Embed Size (px)
Citation preview


Page 2
Start by building the example Wind Lift, then turn it into your own unique design.
For use with TeacherGeek Wind Lift Activity Pack, or Maker Cart. Find documents and activity materials at teachergeek.com.

Below is the list of “ingredients” you’ll need to build one Wind Lift. It includes some extra components to allow you to create your own unique design.
4 - Blocks 4 - Dowels300mm (12″)
1 - Hole Plate
1 - Slide Stop
100mm (3″)
2 - 25mm Screws#10 25mm
(1″)
2 - Nuts#10
1 - Mini Hub Screw
1 - Mini Hub Cover
1 - Mini Hub Base
10 – LargeProject Sticks
1 - Wire Roll
or section
1 - Portion Cup
Multi-CutterSKU 1823-81
ReamerSKU 1823-87
ScrewdriverSKU 1823-90
PliersSKU 1823-86
Tape String 450mm (1.5ft)
Pennies 100 or more to lift
Recycling Materials(for blades)
Page 3

Attach two blocks to the hole plate using a 25mm screw and nut.
Take two dowels. Tap each one into the middle hole of a block.
Push dowels through the blocks on the hole plate as shown.
Cut a 15cm (4”) dowel. Insert the dowel into the block holes in the uprights as shown.
top viewnut
block
25mm screw
bottom view
Quick TipKeep block holes lined up straight.
dowels
block
Page 4

Ream the two holes marked with the symbol.
Cut a 25cm (10″) dowel.
Cut a 6mm (¼″) slide stop section.
Push or tap the mini hub base onto the dowel as shown.
Push the slide stop 5cm (2″) onto the dowel.
Attach the mini hub cover to the base using a mini hub screw.
Page 5
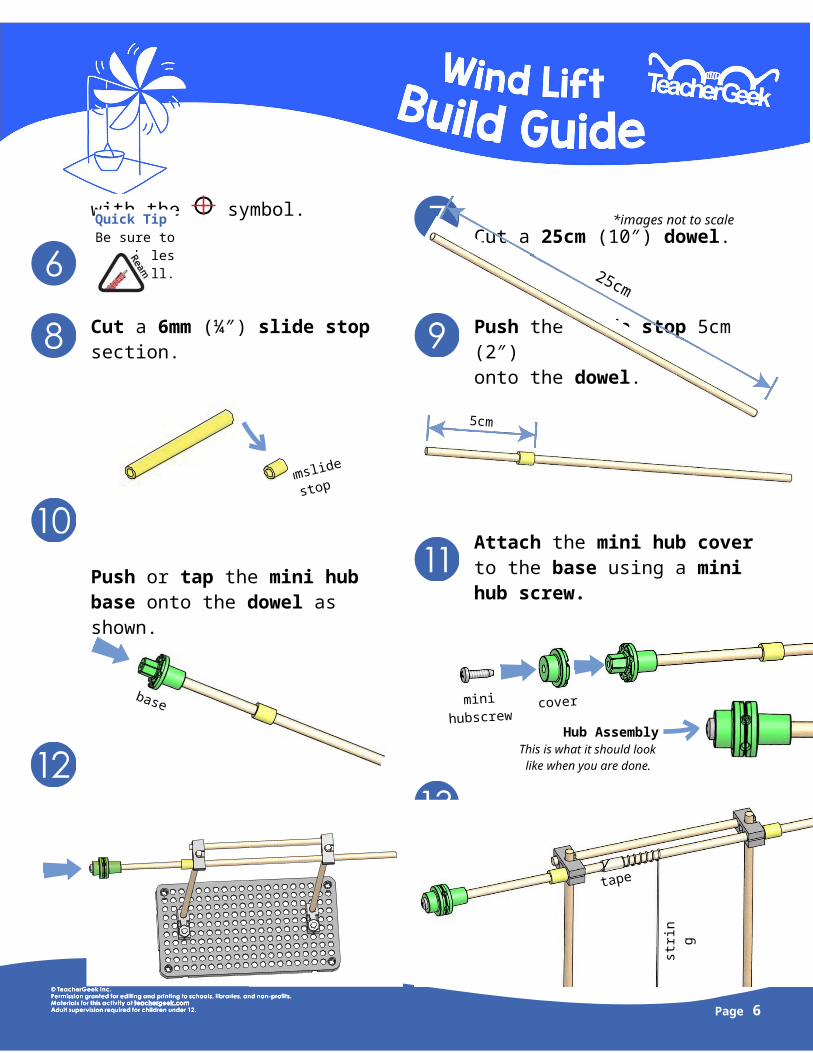
Slide the dowel into the reamed holes of the blocks as shown.
Tape the 45cm (1.5ft) string onto the dowel in the reamed holes.
Make a handle for the portion cup out of wire. Poke two holes with scissors or a screwdriver to tie the wire through.
wire
Page 6

Quick TipAdd more slide stop to keep the dowel from falling out.
Tie the handle to the string.
Now it’s time to make your blades. Make the example blades shown below. Then, in the Engineering Challenges, make them into your own unique design.
Congratulations!You did it. You made the lift mechanism of your design. Experiment and play. Spin the dowel to see how the cup rises and lowers.Next, let’s add blades to use the power of the wind.
Page 7

Cut points off the large bamboo project sticks.
Tape your recycling materials (cardboard, card stock, cereal boxes, etc.) to the skewers as shown below.
b. Place tape half over the edge of the blade.
a. Cut a section of recycling material. This will be one of your blades.
c. Place a stick at the edge of the blade, overhanging to one side.
d. Fold the tape over the stick. Press to secure tape.
Page 8

Loosen the mini hub screw about 1 turn to allow the project sticks to slide in.
First, loosen the mini hub screw by 1 full turns.
Then, carefully slide the sticks into the mini hub’s holes. Angle your blades and re-tighten.
skewer
If you are going to do the optional Wind Lift Lab, now’s the time!
Documents at teachergeek.com/learn
Page 9