Embed Size (px)
Citation preview

http://www.instructables.com/id/LED-Infinity-Mirror-32-LEDs-Selectable-Patterns/
Home Sign Up! Browse Community Submit
All Art Craft Food Games Green Home Kids Life Music Offbeat Outdoors Pets Photo Ride Science Tech
LED Infinity Mirror, 32 LEDs, Selectable Patterns, Quality Frameby ChromationSystems on April 10, 2010
Table of Contents
LED Infinity Mirror, 32 LEDs, Selectable Patterns, Quality Frame . . . . . . . . . . . . . . . . . . . . . . . . . . . . . . . . . . . . . . . . . . . . . . . . . . . . . . . . . . . . . . . . . . . . . . . . . . 1
Intro: LED Infinity Mirror, 32 LEDs, Selectable Patterns, Quality Frame . . . . . . . . . . . . . . . . . . . . . . . . . . . . . . . . . . . . . . . . . . . . . . . . . . . . . . . . . . . . . . . . . . 2
File Downloads . . . . . . . . . . . . . . . . . . . . . . . . . . . . . . . . . . . . . . . . . . . . . . . . . . . . . . . . . . . . . . . . . . . . . . . . . . . . . . . . . . . . . . . . . . . . . . . . . . . . . . . . . . . 3
Step 1: Supplies and Parts . . . . . . . . . . . . . . . . . . . . . . . . . . . . . . . . . . . . . . . . . . . . . . . . . . . . . . . . . . . . . . . . . . . . . . . . . . . . . . . . . . . . . . . . . . . . . . . . . . . 3
Step 2: Frame - Front . . . . . . . . . . . . . . . . . . . . . . . . . . . . . . . . . . . . . . . . . . . . . . . . . . . . . . . . . . . . . . . . . . . . . . . . . . . . . . . . . . . . . . . . . . . . . . . . . . . . . . . 4
Step 3: Inner Wall . . . . . . . . . . . . . . . . . . . . . . . . . . . . . . . . . . . . . . . . . . . . . . . . . . . . . . . . . . . . . . . . . . . . . . . . . . . . . . . . . . . . . . . . . . . . . . . . . . . . . . . . . . 6
Step 4: Inner Walls, LEDs . . . . . . . . . . . . . . . . . . . . . . . . . . . . . . . . . . . . . . . . . . . . . . . . . . . . . . . . . . . . . . . . . . . . . . . . . . . . . . . . . . . . . . . . . . . . . . . . . . . . 8
Step 5: Wire all the LEDs . . . . . . . . . . . . . . . . . . . . . . . . . . . . . . . . . . . . . . . . . . . . . . . . . . . . . . . . . . . . . . . . . . . . . . . . . . . . . . . . . . . . . . . . . . . . . . . . . . . . 9
Step 6: Attach Inner Walls . . . . . . . . . . . . . . . . . . . . . . . . . . . . . . . . . . . . . . . . . . . . . . . . . . . . . . . . . . . . . . . . . . . . . . . . . . . . . . . . . . . . . . . . . . . . . . . . . . . . 12
Step 7: Outer Walls . . . . . . . . . . . . . . . . . . . . . . . . . . . . . . . . . . . . . . . . . . . . . . . . . . . . . . . . . . . . . . . . . . . . . . . . . . . . . . . . . . . . . . . . . . . . . . . . . . . . . . . . . 15
Step 8: Make Connections and Wire Up the Controller . . . . . . . . . . . . . . . . . . . . . . . . . . . . . . . . . . . . . . . . . . . . . . . . . . . . . . . . . . . . . . . . . . . . . . . . . . . . . . . 18
Step 9: Finish Up . . . . . . . . . . . . . . . . . . . . . . . . . . . . . . . . . . . . . . . . . . . . . . . . . . . . . . . . . . . . . . . . . . . . . . . . . . . . . . . . . . . . . . . . . . . . . . . . . . . . . . . . . . 19
Step 10: Optional: Hanging Bracket . . . . . . . . . . . . . . . . . . . . . . . . . . . . . . . . . . . . . . . . . . . . . . . . . . . . . . . . . . . . . . . . . . . . . . . . . . . . . . . . . . . . . . . . . . . . . 20

http://www.instructables.com/id/LED-Infinity-Mirror-32-LEDs-Selectable-Patterns/
Intro: LED Infinity Mirror, 32 LEDs, Selectable Patterns, Quality Frame
This Instructable covers building my available Full 8"x8" 32 LED Infinity Mirror Kit or re-create it with your own materials such as acrylic or hardboard sheet. It also couldbe scaled up or down to suit. Plans are included in the ZIP below.
The Kit contains everything needed to recreate this project. Everything from high-quality glass mirrors, parts to build a durable plastic frame, 32x LEDs( color's are buyerschoice), LED Controller kit, DC Jack, Wall-Wart Power Supply and wire. Just supply some spray paint and a few tools.
With an overall dimension of 12" x 12" x 2.25" and 32x 5mm LEDs with controller.
I can also put together custom kits, if you would like to supply some of your own parts or if you want some of the steps/parts built for you. Just PM me or Contact Me
If you would like to re-create this project with out a kit. There is a diagram in the ZIP below with info on the pieces required to build the frame. Acrylic, Hard-Board, Wood,Styrene, plywood can be used to build the frame.
There are two ways to build this. With or without a controller. This Instructable will cover building with a controller. But there will be notes on what to do if you want analways on version, if you are using all Auto-Fade LEDs then a controller will not need to be used.
I have built of few different Infinity Mirrors, Check out My Gallery
Disclaimer: This project is potentially dangerous. The Author is not responsible in any way for any damages or injury's resulting from its use.
Image Notes1. Shown is with Auto-Change RGB LEDs
Image Notes1. The mirror built for this Instructable

http://www.instructables.com/id/LED-Infinity-Mirror-32-LEDs-Selectable-Patterns/
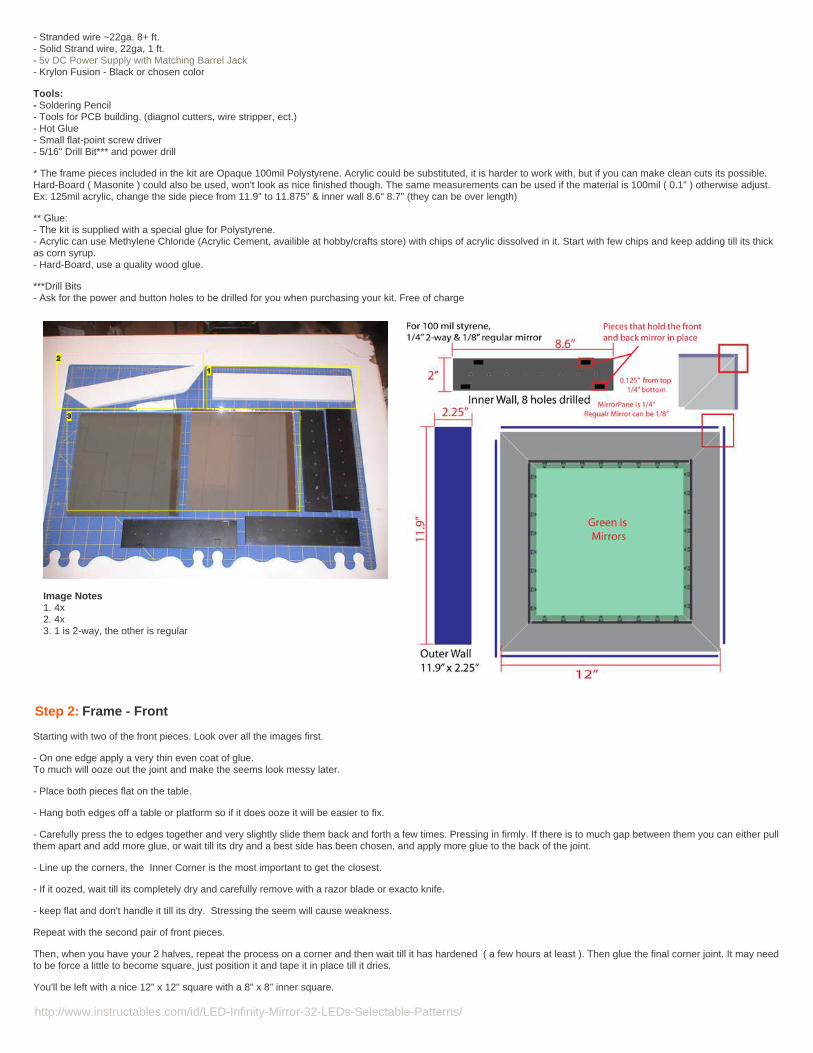
Image Notes1. 4x2. 4x3. 1 is 2-way, the other is regular
File Downloads
ChromationSystems-InfinityMirror.zip (173 KB)[NOTE: When saving, if you see .tmp as the file ext, rename it to 'ChromationSystems-InfinityMirror.zip']
Step 1: Supplies and Parts
Everything is Included in the Full 8"x8" Infinity Mirror Kit
Materials Needed:- 1x 8.5"x8.5" 1/8" Glass or Acrylic Mirror- 1x 8.5"X8.5" Two-Way Mirror, kit includes 1/4" thick MirrorPane( brand name) *Careful the silvered side is easily scratched.- 4x Side Pieces*, measuring 11.9" x 2.25" - 4x Inner Walls*, 8.6" x 2" - 4x Mitered Front Pieces*, 12" x 2", 45deg miters- Pieces to hold the mirrors- Glue**- 32x 5mm LEDs, diffused or water clear. Try Auto-Change LEDs- 8 Channel LED Controller
http://www.instructables.com/id/LED-Infinity-Mirror-32-LEDs-Selectable-Patterns/
- Stranded wire ~22ga. 8+ ft.- Solid Strand wire, 22ga, 1 ft.- 5v DC Power Supply with Matching Barrel Jack- Krylon Fusion - Black or chosen color
Tools:- Soldering Pencil- Tools for PCB building. (diagnol cutters, wire stripper, ect.)- Hot Glue- Small flat-point screw driver- 5/16" Drill Bit*** and power drill
* The frame pieces included in the kit are Opaque 100mil Polystyrene. Acrylic could be substituted, it is harder to work with, but if you can make clean cuts its possible.Hard-Board ( Masonite ) could also be used, won't look as nice finished though. The same measurements can be used if the material is 100mil ( 0.1" ) otherwise adjust.Ex: 125mil acrylic, change the side piece from 11.9" to 11.875" & inner wall 8.6" 8.7" (they can be over length)
** Glue:- The kit is supplied with a special glue for Polystyrene.- Acrylic can use Methylene Chloride (Acrylic Cement, availible at hobby/crafts store) with chips of acrylic dissolved in it. Start with few chips and keep adding till its thickas corn syrup.- Hard-Board, use a quality wood glue.
***Drill Bits- Ask for the power and button holes to be drilled for you when purchasing your kit. Free of charge
Image Notes1. 4x2. 4x3. 1 is 2-way, the other is regular
Step 2: Frame - Front Starting with two of the front pieces. Look over all the images first.
- On one edge apply a very thin even coat of glue.To much will ooze out the joint and make the seems look messy later.
- Place both pieces flat on the table.
- Hang both edges off a table or platform so if it does ooze it will be easier to fix.
- Carefully press the to edges together and very slightly slide them back and forth a few times. Pressing in firmly. If there is to much gap between them you can either pullthem apart and add more glue, or wait till its dry and a best side has been chosen, and apply more glue to the back of the joint.
- Line up the corners, the Inner Corner is the most important to get the closest.
- If it oozed, wait till its completely dry and carefully remove with a razor blade or exacto knife.
- keep flat and don't handle it till its dry. Stressing the seem will cause weakness.
Repeat with the second pair of front pieces.
Then, when you have your 2 halves, repeat the process on a corner and then wait till it has hardened ( a few hours at least ). Then glue the final corner joint. It may needto be force a little to become square, just position it and tape it in place till it dries.
You'll be left with a nice 12" x 12" square with a 8" x 8" inner square.

http://www.instructables.com/id/LED-Infinity-Mirror-32-LEDs-Selectable-Patterns/
Take a look at both sides seems and pick the one you think is best, as it will be facing outward.
Re-glue any seems your not sure about from the back. Just run a bead of glue along it.
Final step for the front of the frame is to give it a coat of paint.
I have found Krylon Fusion is best for Polystyrene,( better than Rustoleum for plastic )I would suggest Krylon Fusion for acrylic as well.And Hardboard can be painted with most anything.
Black is the usual, but any color will do.
Place on a flat surface with the best side facing up. You don't want paint on the back side.Clean off the surface with Isopropyl Alcohol or some other weak solvent. To strong and it will melt the plastic.
Do quick even sprays, don't try to apply to much paint at once. Apply a few to several even layers, letting dry inbetween. Ensure to get the outside and inner edges.
Image Notes1. Final product
Image Notes1. Nice clean seem

http://www.instructables.com/id/LED-Infinity-Mirror-32-LEDs-Selectable-Patterns/
Step 3: Inner Wall
If you have purchased the kit you can skip this step as the inner walls come ready for LEDs and installation.
Drilling for the LEDs:
- Stack up your inner walls(all 4 of them, they are 2"x8.6"), align them evenly and wrap some painters or masking tape around them on each end. To hold them square.
* Acrylic may need to be drilled 1 at a time, use a scrap piece to find out how easy it is for you ti drill
- Print the hole template supplied in the ZIP. Align and tape it to the stack of inner walls.
- With a 1/4" drill bit drill on each of the intersections.
Now for the blocks to hold the mirrors in place.
- Find some scrap material and cut some 1/4" x 1/2" pieces. Size really doesn't matter but smaller is better to avoid noticing them to much when the Infinity mirror is on.One edge should be perfectly straight.
- Take one drilled inner wall and using your mirrors as a guide glue the blocks on like in the image below. Place a mirror on a flat surface and stand the wall up next to itto use a guide for the placement. Remember both the 2-way and normal mirror might not be the same size.
- Check to make sure their placement is correct.
- Repeat with all the inner wall pieces.
Painting:If need be, these could be colored with a black enamel marker( big sharpie ), but painting is easiest. But they should be matte black.
* I use Krylon Fusion Glossy as a base coat(because it adheres well), then use some regular matte black to paint over that and it sticks fine.
The edge that will hold the 2-way mirror in, needs to be kept from getting paint on it or the glue won't hold.
- With some painters or masking tape. Tape down the edges of one side of the inner walls.
- With a razor blade cut off the extra tape so only the edge is covered.

http://www.instructables.com/id/LED-Infinity-Mirror-32-LEDs-Selectable-Patterns/
Now that the front edge is masked off.
- Paint these the same way as the front of the frame. But they must be painted black, matte finish will produce better results.
- Remove the tape from the edge. It should be completely clean, if not, scrap off paint with a razor.
Image Notes1. Front Edge
Image Notes1. 1/4" space for the 2-way mirror

http://www.instructables.com/id/LED-Infinity-Mirror-32-LEDs-Selectable-Patterns/
Image Notes1. Finished
Step 4: Inner Walls, LEDs
Ready your hot glue gun.
- Be Careful not to scratch the paint or the LEDs while working.
- Insert an LED from the painted side through the first hole.
- From the back apply a drop of hot glue in the hole and spin the LED around 1 rotation to evenly apply the glue. Align the LED's flat side towards the front mirror's side.Also, the shortest lead on the LED is the negative lead.
- Continue till all 8 are glued in and all the LED's flat sides (negative) are facing the same direction.
- If you are using multiple colors and are making a pattern ( example: in the images the mirror I am building is Grn-Blu-Grn-Blu-Grn-Blu ect) Ensure that when you placethe LEDs when the walls are put up the pattern will be continue. if one wall starts with Blue it will end with green and the next one starts with blue and ends with greenand so on.
- Repeat for all 4 inner walls
Soldering:
-All of the LEDs Anode's(long leads) are connected in parallel.
- With a needle nose pliers, grab both the LED leads at the base and fold the Anode ( longest lead) over. If it reaches the next LEDs anode, repeat the bending on thatLED and solder. Continue the rest like that.
- If the lead is not long enough to reach the next LEDs anode. Fold a pair of LEDs anodes towards each other, then use some solid strand jumper wire to bridge betweenthe pairs. ( The images below show this as my green LEDs have shorter than normal leads. )
- Repeat till all 4 inner walls have their 8 LED's anodes connected in parallel. ( all hooked together) And the cathodes are not connected to anything.
Image Notes1. Cathode, its shorter2. Anode, its longer, positive lead3. Cathode, its shorter
Image Notes1. Flat side is the Cathode side(Negative)
http://www.instructables.com/id/LED-Infinity-Mirror-32-LEDs-Selectable-Patterns/
Image Notes1. Anodes connected in parallel
Image Notes1. solid strand jumper wire All the Anodes are connected like this
Step 5: Wire all the LEDs
If you are making an Infinity Mirror with no controller.- If you are using auto-change LEDs, each LED will need their own resistor. Cut down the resistor leads and solder one of the resistor leads to a LED's anode and theother lead of the resistor to V+, or the LED's resistor next to it. Then the LED's cathode(short lead) is connected to a LED's cathode next to it. Repeat with all the LEDs
- If you are using a single resistor or Constant current source, connect all the LEDs cathode's together, just like the anodes. All the LEDs must be the same color or havethe same Vdrop. Multiple current supply's could be used for different LEDs current needs. Not recommended.
Good source for calculations is ledz.com/
Wiring an Infinity Mirror with a LED Chase Driver. Purchase a Driver Here
Take a good look at all the photos before starting and things will make more sense.Remember to be careful not to scratch or scuff the LEDs or paint job while working.
First thing is every LED cathode (short/negative lead) needs to have a wire run to where the controller will be. Leave a good 2 - 3" off the edge.
- Starting looking at the first image below shows how to cut dual-strand wire offset so each dual-strand can be run to two LEDs with less waste.
- Take a dual-strand piece of wire and estimate where to cut the wire, like in the image, so you can reach two LED cathodes and have 2-3" of slack to work with whenattaching the wires to the controller.
- Clip the LED's leads shorter.
- Strip and solder the wires. Each to an LED's cathode. see images.
- Repeat with all 8 LEDs on that wall.
Next take your next inner wall, with all the LEDs and cathode(V+) supply ready.

http://www.instructables.com/id/LED-Infinity-Mirror-32-LEDs-Selectable-Patterns/
- Place your inner wall with wires next to your next one. leave a 1/2" space in between. See Image.
- With a piece of solid strand wire, solder it between the 2 inner walls Anode rail.
Now the confusing part. Wiring the second wall to the first.Again look at the images.
- It might help to write the number's onto the backside of the wall to ease in the wiring.
- Simply enough, each LEDs cathode should be connected to the other LED of the same number's cathode. See Diagram. Use the offset cut wire method, like before, tomake your connections.
Now you have one half done and wired. Repeat with the remaining 2 inner walls
- Take a 4" piece of 22 gauge or larger wire and solder it to the LED anode's rail, and do the same with the second half of the inner walls. Both of those wires will connectto the LED+ spot on the controller board or to your current source V+.
Now would be a good time to strip an 1/8" off all the ends, so they will fit into the screw-down terminals.
Image Notes1. cathode2. cathode3. anodes and V+

http://www.instructables.com/id/LED-Infinity-Mirror-32-LEDs-Selectable-Patterns/
Image Notes1. Connects to the Controller/Driver2. LED #13. LED #84. All the LED anodes in parallel
Image Notes1. 1/2" gap
Image Notes1. LED #8 Ends with green2. LED #1 Starts with Blue3. Carries the V+ to all the LED anodes
Image Notes1. LED #12. LED #23. Wire going to the first inner wall, LED# 1 & 2

http://www.instructables.com/id/LED-Infinity-Mirror-32-LEDs-Selectable-Patterns/
Image Notes1. LED #12. LED #23. Wire coming from the second inner wall
Image Notes1. Second inner wall, wires going to the LED of the same number on inner wall 1
Image Notes1. LED #82. LED #13. Wires connecting the first and second inner walls LEDs with eachother
Image Notes1. Inner Wall 1, controller is to the left
Image Notes1. All the LED anodes in parallel2. All the LED anodes in parallel3. wires going to where the controller will be
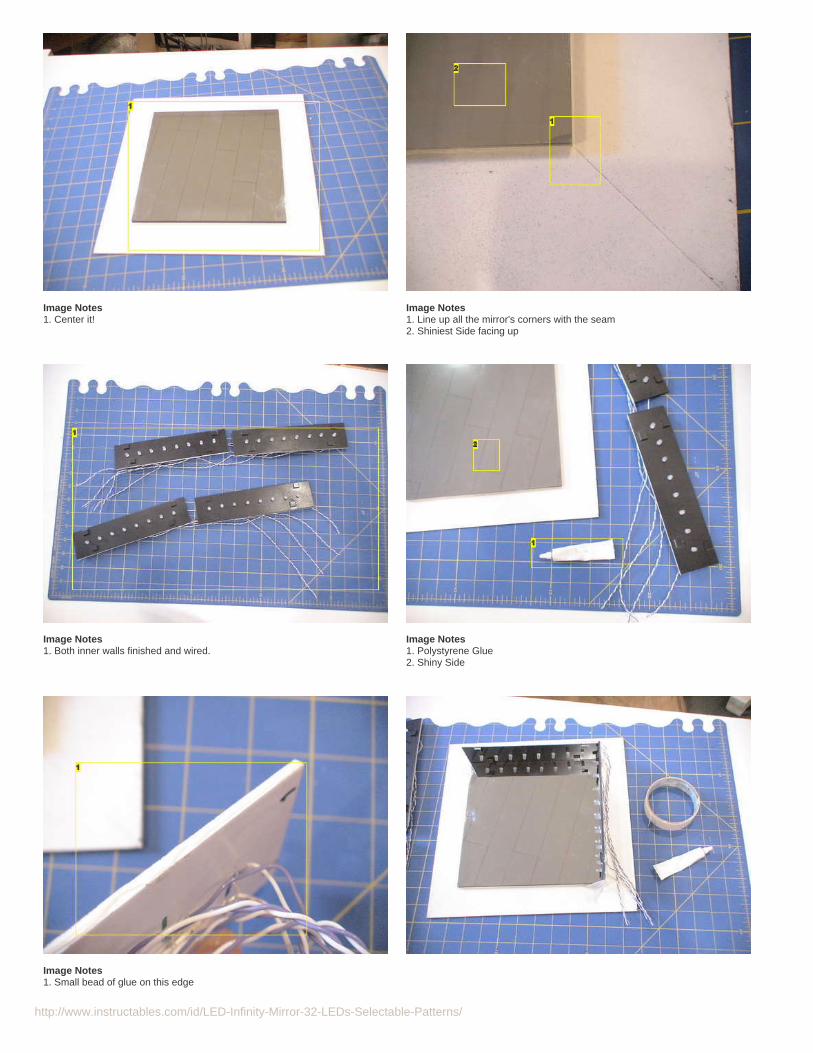
Step 6: Attach Inner Walls
Now that the inner walls are ready to go up. Time start assembly.
First, the front of the frame needs to be masked off. This will help protect it from scratches during assembly and make it easier to paint the outer walls once they are gluedon.
Use some painters or masking tape and some scrap paper to cover the front.Then trim the edges down with a razor knife. Anything hanging over the outer edge will block the paint and leave a mark.
Next get the 2-way mirror out.
- Now would be a good time to clean the mirror with Windex or similar.
- Place the front-frame face down(masked side down)
- Center the 2-way Mirror in the opening with the shiniest side facing upward, should be about 1/4" overlay all the way around. Use the miter seems to help center it. If itsnot perfect just meet the difference half-way. Ensure the shiniest side is facing up, and the dull side will be seen from the front.
http://www.instructables.com/id/LED-Infinity-Mirror-32-LEDs-Selectable-Patterns/
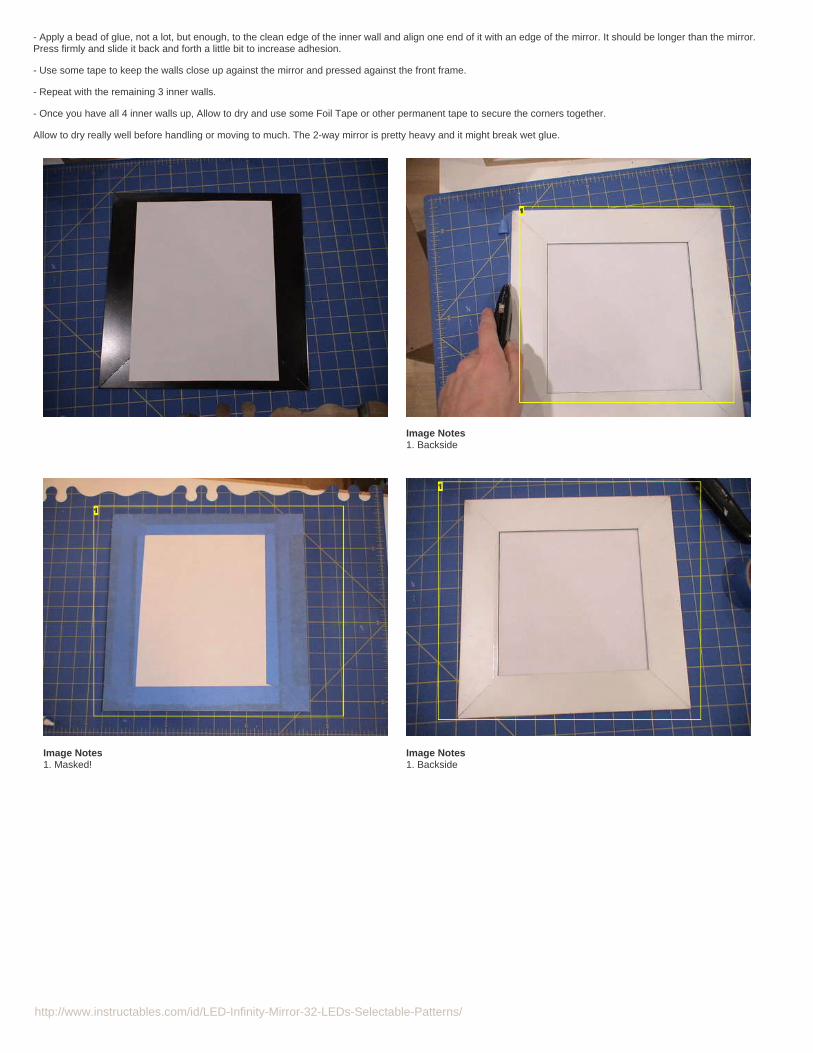
- Apply a bead of glue, not a lot, but enough, to the clean edge of the inner wall and align one end of it with an edge of the mirror. It should be longer than the mirror.Press firmly and slide it back and forth a little bit to increase adhesion.
- Use some tape to keep the walls close up against the mirror and pressed against the front frame.
- Repeat with the remaining 3 inner walls.
- Once you have all 4 inner walls up, Allow to dry and use some Foil Tape or other permanent tape to secure the corners together.
Allow to dry really well before handling or moving to much. The 2-way mirror is pretty heavy and it might break wet glue.
Image Notes1. Backside
Image Notes1. Masked!
Image Notes1. Backside
http://www.instructables.com/id/LED-Infinity-Mirror-32-LEDs-Selectable-Patterns/
Image Notes1. Center it!
Image Notes1. Line up all the mirror's corners with the seam2. Shiniest Side facing up
Image Notes1. Both inner walls finished and wired.
Image Notes1. Polystyrene Glue2. Shiny Side
Image Notes1. Small bead of glue on this edge

http://www.instructables.com/id/LED-Infinity-Mirror-32-LEDs-Selectable-Patterns/
Image Notes1. Temporary tape
Image Notes1. All the corners are like this
Image Notes1. Done
Step 7: Outer Walls
Outer walls are simple enough.Place your frame with attached inner walls face down.
- Apply a thin bead of glue down one of the long sides of an outer wall.
- Carefully align it the long way against the edge of the frame.
- Slide it down, so that its edge is flush with one edge of the front-frame.
- The outer wall should be slightly shorter than the front-frame.
Check how your next outer wall should go up and apply glue to the edge and to the edge that will butt up against the first outer wall.
Finish the rest,
- Wait for glue to dry completely.
Paint It:
- Lay it on a flat surface so the paint cannot get inside, and using quick even coats, spray paint it your color of choice.
- Don't get any paint on the inside or on the wires.
The purchased kit can have its holes drilled by request. No extra cost.I usually drill my holes in the corner. Apply some painters tape to mark on. Estimated 3/4" in from the end.
- Drill with a 5/16" drill bit for DC jack

http://www.instructables.com/id/LED-Infinity-Mirror-32-LEDs-Selectable-Patterns/
Two Button options are included:
For the Board-Mount Push Button: (preferred)- Drill out 5/16" hole and then use a razor blade to make it a little bit bigger(square shaped) to fit in the button later. This button will sit flush on the outside.
For The Panel Mount Button:- The panel mount button requires a 1/4" hole.
Touch up the holes with more paint or a black sharpie.
Image Notes1. Apply Glue
Image Notes1. Every corner is like this.

http://www.instructables.com/id/LED-Infinity-Mirror-32-LEDs-Selectable-Patterns/
Image Notes1. DC Jack2. Board Mount Button, panel mount also available.
Image Notes1. Button2. DC jack3. I ended up moving the tape to a different corner
Image Notes1. squareish, for the board-mount button2. 5/16" for DC jack

http://www.instructables.com/id/LED-Infinity-Mirror-32-LEDs-Selectable-Patterns/
Step 8: Make Connections and Wire Up the Controller
If a controller board is not being used.- And Auto-Change LEDs are being used connect the Power Supples V+ to LED's Anodes and V- to the LED's Cathodes (each LED has its own resistor).
- Single Current Regulator such as a large wattage resistor, connect LED+ to V+ with a large wattage(3w+) resistor, connect all the LED Cathodes to GND/V-
This step requires the 8 Channel LED Driver to be assembled.
Take a look at the wiring diagram and start finding which wires go where. You may want to label them if need be.
The screw-down terminal's are extremely small. I had to use a flat head screw driver from an eyeglass repair kit.
All LED#1's go to Terminal 1 on the PCBAll LED#2 go to Terminal 2 on the PCBAnd so on.
Screw them in tight and watch out for loose strands of wire that could cause a short.
There are 2 wires that are labled LED+ on the driver, each side should have one of those wires soldered to its V+ rail(LED Anodes)
- Mount the panel-mount DC Jack into the 9/16" hole drilled into the outer wall.
- Take the button mounted to the perf-board and with some glue (super, hot, epoxy) apply a drop to the perf-board and place into the prepared hole. Glue it in good.
Image Notes1. Get soldered to LEDs Anodes(V+ rail)

http://www.instructables.com/id/LED-Infinity-Mirror-32-LEDs-Selectable-Patterns/
Step 9: Finish Up
- Carefully place in the 1/8th regular mirror face down from the back, and it should fit perfectly above the 2-way.
- Tape it in with Aluminum Tape(supplied in the kit) or another tape that doesn't curl or stretch (electrical/duct won't work to well)
- Flip the the frame over and remove the masking.
- Finally time to connect the PSU to the DC Jack. It should turn on.
- Test the button make sure it works correctly to change the pattern.
- Once tested, hot glue the driver PCB to the wall.
- With the kit are a few different colors of vinyl dots to be put over the button. Choose one and apply to the center of the button. I am using black
*If the tunnel effect is curving to one direction. You'll have adjust the rear-mirror (regular), just remove it from the frame and raise the side that it is turning towards withsome tape, layer it till its the tunnel effect goes straight back correctly.
Image Notes1. Vinyl Circle to cover the button, kit comes with a few colors.
Image Notes1. Needs to go to LED's Anodes

http://www.instructables.com/id/LED-Infinity-Mirror-32-LEDs-Selectable-Patterns/
Step 10: Optional: Hanging Bracket
Included with the kit is a plastic piece that is for hanging the Infinity Mirror on a wall. It is made to hang the mirror at a 45deg, diamond shaped. Should fit most hook-stylewall hangers.
Before doing this part the mirror needs to be completely finished, tested and adjusted (if the mirror needs it)
Choose which corner to hang it from, usually the cord and button are on the bottom corner. This bracket will glue to the outer walls and to the inner walls.
- Test fit the bracket. And remove any tape that will be under it.
- Scratch off any paint from the edge with a razor blade.
- Apply a bead of glue to the edge of the inner walls where the piece will fit on top of.
- Apply a bead of glue to the mitered edges of the bracket.
- While trying not to drag or move the piece around to much, put it into place.
- Keep pressing it and gently wiggling it to fuse the bracket to the rest of the mirror.
Once its dry, ensure that it is sturdy before hanging it up.
Image Notes1. Scrape off so glue sticks better
Image Notes1. Holes for a hook

http://www.instructables.com/id/LED-Infinity-Mirror-32-LEDs-Selectable-Patterns/
Image Notes1. Glued2. Glued3. Glued