Embed Size (px)
Citation preview

ADRIFT Adventure Development & Runner – Interactive Fiction Toolkit
Version 4.0 Manual
Copyright © Campbell Wild 2003

ADRIFT v4.0 Manual Contents
Campbell Wild Page 1 of 92 25 Oct 2003
Contents
CONTENTS 1
INTRODUCTION 4
HISTORY 5 Background 5 Releases 6 The Future 8
GETTING STARTED 9 Rooms 9
Basic Room Descriptions 9 Alternate Room Descriptions 10 Directions 11 Directions 12
Objects 13 Object Types 13 Descriptions 13 Locations 14 Attributes 15 Advanced features 17
Tasks 18 Task Commands 18 Wildcards 19 Advanced Command Construction 19 Descriptions 20 Restrictions 20 Actions 21 Repeatable & Reversible 22 Hints 23
Events 24 Timings 24 Descriptions 25 Advanced 26
Characters 28 Character Details 28 Movement 29 Conversations 31
Miscellaneous 33 Introduction & Winning 33 Player 34 Options 35 Dependencies 36 Search 37 Browser 37 Passwords 37

ADRIFT v4.0 Manual Contents
Campbell Wild Page 2 of 92 25 Oct 2003
Settings 38 Export text data file 39 Filtering 39
Graphics & Sound 40 Adding Sound 40 Adding a Graphic 41
ADVANCED TECHNIQUES 42 Room Groups 42
Where Room Groups can be used 42 Synonyms 44 Variables 46
Displaying Variables 47 Assigning Variable values 47 Expression Formulae 48 System Variables 49
Formatting Text 50 Supported HTML Tags 50 Nice Big Text Window 50
References 52 What are References 52 How to use them 52 An object example 52 A numeric example 53 Referenced Text 54
Overriding System Commands 55 Language Resources 56
Creating a Language Resource 56 Combining ALR’s with Variables 57
Modules 58 Creating a Module 58 Modifying a Module 59 Importing a Module 59 Module Structure 59
Task Command Functions 64 getdynfromroom 64
THE BATTLE SYSTEM 65 The Player 65 Characters 67 Objects 69 Tasks 71
An Example 71 Status 71
PLAYING ADVENTURES 72 Starting an Adventure 72

ADRIFT v4.0 Manual Contents
Campbell Wild Page 3 of 92 25 Oct 2003
Adventure Commands 73 Example transcript 74
Runner Features 75 Auto Complete 75 Control Panel 75 Verbose 75 Transcript 75 Right-clicking 75 Highscores 76
The Debugger 77 Rooms 77 Objects 77 Tasks 78 Events 78 Characters 78 Variables 79 Player 79
The Map 80 Map Display 80 Zooming the map 81 Navigating the map 81 Printing out the map 81 Display options 81
Display & Media 83 Appearance 83 Media 84 Layout 85
TROUBLESHOOTING 86 Problems 86
Generator or Runner won’t start 86 I keep getting the error message “Cannot draw map – too complex” 86 Component ‘ZlibTool.ocx’ or one of its dependencies not correctly registered 86 Sound cannot be played. Try installing MediaPlayer 87 Out of Memory, Error 7 87 Input Past End of File 87 Generator or Runner crashes 87
ACKNOWLEDGEMENTS 88
APPENDIX 89 Hexadecimal Values 89
Decimal vs. Hexadecimal Numbers 89 Hexadecimal Values in HTML 89 Named Colours 90
Verb List 91
GLOSSARY 92

ADRIFT v4.0 Manual Introduction
Campbell Wild Page 4 of 92 25 Oct 2003
Introduction
ADRIFT is a set of Windows applications for creating and playing text adventures, also known as Interactive Fiction. It comes in two parts; there’s the Generator – the adventure creator, and the Runner – the part which plays the games. ADRIFT Generator has a graphical user interface (GUI) which allows you to create adventures quickly and easily by filling in text boxes, selecting checkboxes, and choosing items from drop down lists. It is unique in that no programming is required, yet it is very powerful allowing the creation of complex adventures. ADRIFT is very simple to understand and learn. ADRIFT Runner is the application, which takes the adventure files created with Generator, and interprets them as an adventure. Runner attempts to recreate the traditional adventure environment as introduced to computers when adventures first came out, but it also improves on this by supplying extra functionality such as a real-time map, optional control panel (to use the mouse instead of keys), general point-n-click, colour customisation, automatic text completion, and a high-score table. More information can be obtained by visiting the ADRIFT web-site at http://www.adrift.org.uk. This manual was last updated 25/10/2003 16:53.

ADRIFT v4.0 Manual History
Campbell Wild Page 5 of 92 25 Oct 2003
History
Background
When I was at school back in about 1989, I was introduced to a text adventure called “Jacaranda Jim” by Graham Cluley. I was fascinated by this game and played it every opportunity I had. Later, when my sister got an Amstrad 6128, I started trying to write my own game using Amstrad Basic. This was, originally enough, called “Jim”. It was extremely basic, and the most advanced thing that could be done was to pick up an object. However nothing could be dropped. Nobody ever played this game. My second attempt, also on the Amstrad, was called “Dan”. This was more advanced with a few puzzles and objects could be dropped. I never completed this game though, but I enjoyed creating it. Round about 1991, I got my own first computer for myself. It was an Amiga 500. One of the first pieces of software I bought for this was AMOS, a programming environment, much like BASIC. I wrote another adventure using AMOS, although the title escapes me. This was quite similar to the style of GC’s game, and much of the same functionality was there – objects could be taken and dropped, referred to as “it”, descriptions changed after certain things had been done, score could be accrued, and the game could be won. I was very proud of this game, and I persuaded several people to play it. I didn’t write any other adventures for a while, until I bought my first PC in 1993. I found myself repeating so much code in the adventures I’d written previously that I thought I’d try my hand at writing a program to facilitate the creation of an adventure much more easily. I called this “Adventure Generator”. It was a command line interface that asked a series of questions, then allowed you to play the game that it output. Although this made it quicker to create a game, it was not a very nice interface, and wasn’t particularly easy. I believe I wrote this in Pascal. The last full adventure I wrote was called “Shipwrecked”, and was written in Pascal. I would have made the game bigger, but I reached some limits of the programming language buffers and couldn’t continue. You can download Shipwrecked from ftp://ftp.adrift.org.uk/adrift/ship.zip. I decided to try to re-write the Adventure Generator, this time making it easy to edit information that had previously been added. Again, I chose Pascal to do this. This was menu driven, and allowed 20 locations, 20 objects and 40 tasks. You can download TAG from ftp://ftp.adrift.org.uk/adrift/tag.zip. I started work on ADRIFT in December 1997 to rewrite a lot of the limitations of TAG 2, and to create it for the Windows environment. Initially, I just called it “Adventure Generator”, but renamed it later. A breakdown of the development of ADRIFT is as follows.

ADRIFT v4.0 Manual History
Campbell Wild Page 6 of 92 25 Oct 2003
Releases
Dec ’97 Started work on “Adventure Generator v3.00” 16th Dec ’98 Released Adventure Generator 3.10 Unknown Released Adventure Generator 3.20 13th May ’99 Released Adventure Generator 3.21 10th Jun ’99 Released Adventure Generator 3.22
This was the first version to support backwards compatibility with previous versions of Adventure Generator. Deleting of objects, tasks and events was also introduced.
13th Jun ’99 Released Adventure Generator 3.23 Up until this point, all TAF files had been plain text – 3.23 was the first version to encrypt the files with password protection.
19th Jul ’99 Released Adventure Generator 3.24 The lists for Rooms, objects etc in the main window were separated into individual windows. The option to hide objects was also introduced. Event sub descriptions also came in this version.
3rd Aug ’99 Released Adventure Generator 3.30 Version 3.30 saw the introduction of characters. Up until this point, objects had to be used instead. Object aliases were introduced, as was an additional room description based on task completion.
28th Nov ’99 Released Adventure Generator 3.31 This was the first version to incorporate a dynamic map, based on the layout created by the user. Basic synonyms were also introduced for common commands.
6th Dec ’99 Released Adventure Generator 3.32 This version had mostly small updates such as printing out the map, and improved tasks.
21st Dec ’99 Released Adventure Generator 3.40 The task dependency viewer was introduced in this version. There were a number of improvements to events and tasks also.
28th Dec ’99 Released Adventure Generator 3.50 First/Second person, wildcards in task commands, unlimited character walks, characters running tasks, toolbar, search facility and hints are amongst the improvements in this version.
7th Feb ’00 Released Adventure Generator 3.60 Splash screen, individual high-score tables, controllable wait, room groups, word clicks, and better room descriptions were improvements in version 3.60. This is the first version which was used by any number of people, and when Adventure Generator started to become known in the Interactive Fiction community.
8th June ’00 Released ADRIFT 3.70 Because of the generic name, and to raise the profile of the program, I decided to rename “Adventure Generator” to “ADRIFT” which is an acronym of Adventure Development & Runner – Interactive Fiction Toolkit. Version 3.70 also had simple TADS output, openable edible readable objects and objects with surfaces, enhanced player, improved tasks and simple ambiguity handling amongst minor changes.

ADRIFT v4.0 Manual History
Campbell Wild Page 7 of 92 25 Oct 2003
3rd Oct ’00 Released ADRIFT 3.80 Version 3.80 was the first version of ADRIFT to be published in a magazine, and became downloadable from many places on the Internet. Most of the improvements in this version were bug fixes and fine tuning to the whole program, making it a lot more reliable. Tasks were improved significantly.
1st Jan ’01 Released ADRIFT 3.90 Version 3.90 was a big improvement over 3.80. It had an improved layout, graphics and sound, a battle system, Language Resource (ALR) files, feature disabling, system variables, undo facility, score overriding, much improved Player, 8 directional compass, room hiding, size and weight for objects, unlimited actions and restrictions per task, more powerful characters, integer variables, improved map, transcript, pausing and many more small changes.
27th May ’01 Released Final release (20) of ADRIFT 3.90 Version 3.90 was continually improved over nearly six months, during which time it became a lot more reliable, and also introduced extra features such as looping sound, dictionary amongst many others.
13th Feb ’02 Released Beta release 0 of ADRIFT 4.00 Version 4.00 again was a big improvement over 3.90. This was the first version to become Shareware – previous versions had been Freeware. The main improvements were the ability to play MP3s, much better TAF file compression, images and sounds embedded into TAF files, tasks setting and unsetting other tasks, text variables, referenced text, lockable objects, adventure browser, graphics in main window, advanced command construction, multiple object and character aliases, initial object descriptions, and/or for task restrictions, unlimited room descriptions, text editing window, faster execution, improved battle system, random character movement, object states, and modules.
9th May ’02 Released ADRIFT 4.00 release 18 Again, as with 3.90, ADRIFT 4.00 is continually being improved with many releases. Currently, improvements are much greater stability, user definable runner layout, and many bug fixes. Release 18 was the first non-beta version.
7th Oct ’03 Released ADRIFT 4.00 release 42 As at writing, this is the latest release of ADRIFT.

ADRIFT v4.0 Manual History
Campbell Wild Page 8 of 92 25 Oct 2003
The Future
I have no intention to stop development of ADRIFT at this stage. My goal is for it to become the most widely used Interactive Fiction development environment. There are still many things which could be improved within the program. Some of the features I hope to add in future versions are: • Character conversation trees • Interchangeable Player and characters • Allowing characters to sit, stand and lie on objects • More powerful tasks, which can control events • User definable map to draw layout I am always open to suggestions for further improvements.

ADRIFT v4.0 Manual Getting Started
Campbell Wild Page 9 of 92 25 Oct 2003
Getting Started
Rooms
Rooms form the basis of your adventure. They are the locations in which you can visit. You can generally move between different rooms using the cardinal directions North, East, South and West, and also Up, Down, In and Out. Some adventures also have off-cardinal directions, i.e. Northeast, Southeast, Southwest and Northwest. These have to be explicitly enabled in the Options screen. To create a room, either select Add > Room from the menus, or click on the icon. This will bring up the Add a room dialog box.
Basic Room Descriptions
The two most important aspects of a room description are the Short description, and the Long description. The Short description is the label that will appear at the bottom of the Runner screen at all times, to show the player where they are. It will also be the description displayed when revisiting a room, unless verbose has been turned on. You can

ADRIFT v4.0 Manual Getting Started
Campbell Wild Page 10 of 92 25 Oct 2003
select to have this displayed in bold before the long room description by checking the relevant box in the display options in Runner. The Long description is the main description that describes the room in detail. Here, you would want to mention everything about the room that does not change each time you visit it. You may want to prevent the room being displayed on the map. Typically, this might be because it is part of a maze or suchlike. To do this, check the Don’t show on map checkbox. If you are creating a room for the first time that is all you should need for now. For more advanced changes to the room description, you may want to alter the description depending on certain events. To do this, you will need Alternate Descriptions. Alternate Room Descriptions
Alternate room descriptions allow you to change what is displayed dependant upon certain circumstances. To add a new alternate description, simply click on the Add button. You can also click on the Description Details tab – if you do this, you will be prompted with a dialog box asking you if you want to add a new description. The Room dialog box then looks like:

ADRIFT v4.0 Manual Getting Started
Campbell Wild Page 11 of 92 25 Oct 2003
You can change the description of a room depending on: • Whether or not tasks have been executed • What state particular objects are in • Whether the Player is or is not holding, wearing, or in the same room as a
particular object Once you have selected the circumstance for the description change, you can enter the description into the relevant box. You can also have it display a different description if the circumstance has not occurred. You can get the main room description to change also. This is useful if you want to create a dark room and don’t want to give away any details about the room. For example, you could create a restriction that a light switch must be in state “On”, have a description in the “else” part of the room being “It is dark.” and have the short description displaying “In a dark room” There are three occasions when you can display the alternate description. These are: • Start room description with this one – This overrides the main room description
completely, displaying only the alternate description. Any other alternate descriptions higher up on the list are completely ignored.
• Start directly after Long Room description – This appends onto the end of the Long Room description. Any other alternate descriptions higher up on the list are completely ignored.
• Append to other descriptions – This appends the room description to any other descriptions higher on the list which are being displayed.
There is also the option to hide objects in the room. Again, this is mainly useful if you are setting the room up as a dark room. Simply check the checkbox.
TIP. If you have lots of rooms with the same Short Description,you can distinguish them in Generator with tags, e.g. “Dark Forest <1>”, “Dark Forest <2>”
ADRIFT v4.0 Manual Getting Started
Campbell Wild Page 12 of 92 25 Oct 2003
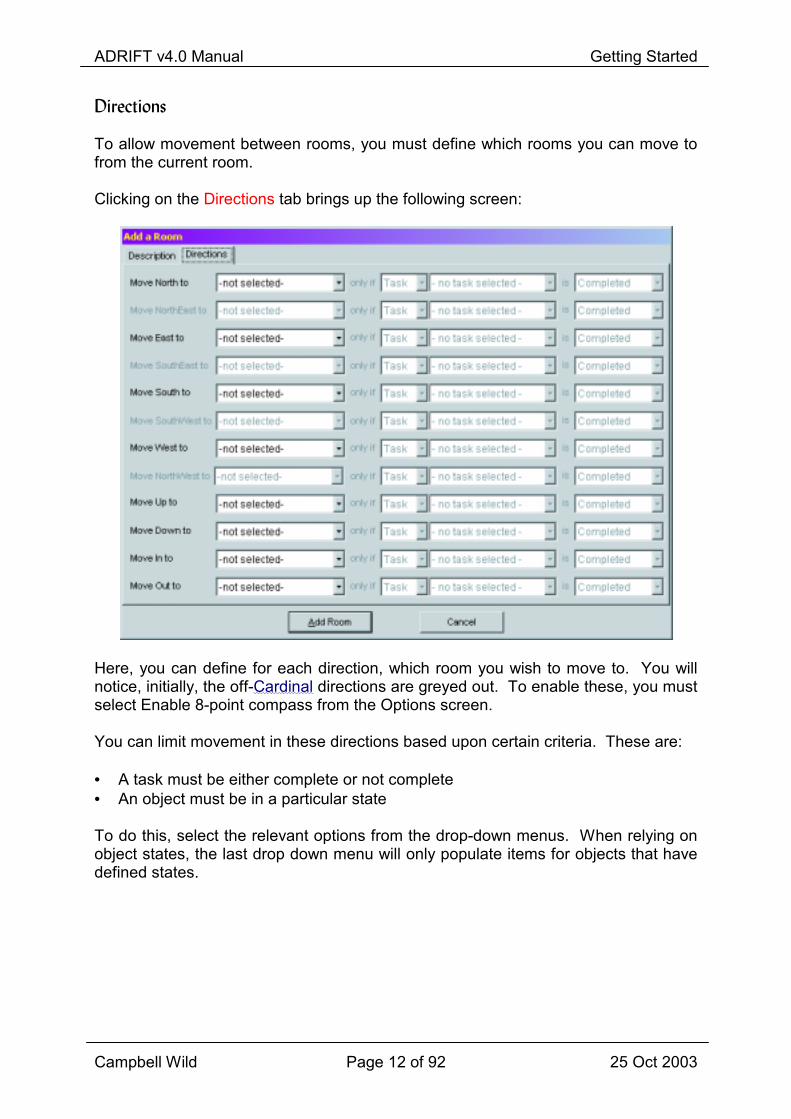
Directions
To allow movement between rooms, you must define which rooms you can move to from the current room. Clicking on the Directions tab brings up the following screen:
Here, you can define for each direction, which room you wish to move to. You will notice, initially, the off-Cardinal directions are greyed out. To enable these, you must select Enable 8-point compass from the Options screen. You can limit movement in these directions based upon certain criteria. These are: • A task must be either complete or not complete • An object must be in a particular state To do this, select the relevant options from the drop-down menus. When relying on object states, the last drop down menu will only populate items for objects that have defined states.

ADRIFT v4.0 Manual Getting Started
Campbell Wild Page 13 of 92 25 Oct 2003
Objects
Objects are the substances within games. They are physical things that can be examined and can be manipulated in many different ways. To add an object, either select Add > Object from the menus, or click on the icon. This will bring up the Add an object dialog box.
Object Types
There are two types of object in ADRIFT; Dynamic objects, and Static objects. The Player can pick up dynamic objects, whereas static objects are fixed in specific rooms. When you view a room all dynamic objects will be listed, in the format "Also here is ...". Descriptions
Every object requires to be given a name. This is how you will refer to the object in the game. You should try to keep this as short as possible with any extra descriptions being put into the object prefix. This means that it will be easier for the

ADRIFT v4.0 Manual Getting Started
Campbell Wild Page 14 of 92 25 Oct 2003
player to refer to the object during the game, as this will have to be typed every time the object is referenced. The prefix should contain any adjectives for the object, and determine whether or not it is singular (i.e. “a large”, “an”, “some purple”). Objects can be given any number of aliases. These are alternative names that can be used in the game to refer to the object. For example, if you wanted to create a red poppy, you would set the prefix to be "a bright red", the object name to be "poppy", and an alias to be "flower". To add multiple aliases, simply type the alias into the box and press Enter. Objects can be given a description. This will be displayed if the player types "examine <object>" in the game. If nothing is entered, it will appear in the game as "You see nothing special about <the object>." If completing a task changes the appearance of the object, then you can select the task from the But if task pull down menu, and enter the new description in the second text box. This description supersedes the first one. Locations
If the object is static, then you have to say in which room(s) the object is present. Usually this will just be a single room, but there may be reasons you would want it to span more than one. This might be a river that was in more than one room, a generic object such as the sky, ground, walls etc, or just a door, which you can view from either side. To choose the rooms, click on the room names in the list on the right hand side. Clicking on All Rooms will highlight all the rooms in the list. Similarly No Rooms will deselect all the rooms. A special case for the static object type is if it is part of a character. Instead of selecting a room for the object, select the location “Part of Character”. This will activate the Character dropdown list. You can then select whether this should be the Player or a specific character. You can now only examine this object when the particular character is in the room. If the object is dynamic, you have to select the initial position for the object from the pull down menu. This can be either Hidden, Held by someone, Inside an object, On an object, a specific room, or Worn by someone if the object is wearable. If you select Held by someone, the Held by who pull down menu becomes active. You should then select whether the Player or another character holds it. Similarly, for Worn by someone. If you select Inside an object, or On an object, the Inside/on object pull down menu becomes active. This will then give a list of all objects that have a surface or are containers.

ADRIFT v4.0 Manual Getting Started
Campbell Wild Page 15 of 92 25 Oct 2003
Attributes
Clicking on the Attributes tab changes the display to show various options about the attributes of the object.
You will be given different options, depending on whether the object is static or dynamic. Object is wearable allows the Player and characters to wear and remove it. You can then restrict tasks depending whether or not the object is being worn. * Object is a container allows you to be able to put other objects inside it. You have to say how many objects it can contain, up to a maximum of 99, and the size of objects it can contain; If you attempt to put objects inside a container object that is full, you will receive a failure message. There is no limit to the depth of object containers; i.e. you could have a coin inside a purse, inside a bag, inside a box etc. Object can be Opened and Closed. This can be used with containers, or just on its own (e.g. a door). Tasks can be restricted depending the status of an object. If the object is also a container, any objects inside it are only listed on examining the object if it is open. You must specify from the dropdown list the state you want the object to start off in. If you define the object as being lockable (see below), then you can also start the object being Locked.

ADRIFT v4.0 Manual Getting Started
Campbell Wild Page 16 of 92 25 Oct 2003
…and is Lockable, with key allows you to lock objects. This option only becomes enabled if you’ve defined the object as being openable. You must select a dynamic object as being a key. You will then be able to lock and unlock the object with that key. If you wanted multiple keys, for example a master key, you would need to do that using tasks. Object starts off in state allows you to create any state for the object. This defaults to On and Off, but by clicking on Define, you can insert, edit or delete the different states available, so for example, you could have Up/Down. These states can be used in task restrictions. If you want the state to be displayed when examining the object in the format “The <object> is <state>.”, then click the Show in description checkbox. Object has a surface allows you to put things onto the object in the game. Objects on other objects won't appear in the room description, so the player has to examine the parent object to see if there are any objects on or in it. There is no limit to the number of objects you can put on a surface object. The player is allowed to sit/stand on the object does just that. This enhances the reality of the adventure, and can be used in task restrictions. The player can lie on the object does the same as above, except for lying. Object is readable means that the player can type "read <object>". If you enter a description in the text box, this will be displayed. If not, the same description is given as when the object is examined. Object is edible means that if the Player "eats" the object in the game, it will disappear. If you want something specific to happen when the object is eaten, you can add a task such as "eat <object>" which would override this option. Object can be used as a weapon defines the object to be something that the Player could potentially use to attack characters with, although the default message will that you miss the character. To enhance this, you’d need to use tasks. * You can define the size and weight of the object from the pull down lists at the bottom of the screen. Each increase in size or weight is 3 times greater than the previous entry; i.e. a Huge object is 81 times the size of a Tiny object. What these sizes actually mean is relative, and determined by you. If an object is put inside a container object and the container is dynamic, the container will increase in weight by the weight of the object put inside it but it won't increase in size. Limits can be put on the Player to limit the size and weight that they can carry. You can edit objects by double clicking on an object, or selecting an object, right clicking, and selecting Edit object. * When the Battle System is enabled, additional options become available in object attributes.

ADRIFT v4.0 Manual Getting Started
Campbell Wild Page 17 of 92 25 Oct 2003
Advanced features
Clicking on the Advanced tab brings up the following display:
By default, all dynamic objects are listed in a room description if they are in that room, and static objects are not listed – you are expected to describe them explicitly in your room description. In the advanced tab, if your object is static, you have the option to select Specifically list object in room descriptions. This lists the object in the form “Also here is …” as though it were a dynamic object. If the object is dynamic, the checkbox becomes Do NOT list object in room descriptions. This prevents the object being listed. The object will still be there; just there will be no notification. You would usually want to use this feature if you were to explicitly write the object into some other description. You can also override the default “Also here is <objectname>” with your own custom message by filling in the box When the object is listed in the room description, display this. This will then be displayed on it’s own after listing any other objects. If you want the custom description of the object to only occur when the Player first comes across the object (i.e. before they take it for the first time), check the Only show above for the object’s initial location box.

ADRIFT v4.0 Manual Getting Started
Campbell Wild Page 18 of 92 25 Oct 2003
Tasks
Tasks allow you to customise your adventures and do things other than the built in functions within ADRIFT. They allow you to specify what the player is expected to type, and carry out certain actions based on this. You can restrict tasks being executed depending on certain criteria. To add a task, either select Add > Task from the menus, or click on the icon. This will bring up the Add a task dialog box.
Task Commands
In the box at the top, What the user must type, you can enter any number of commands. This is what the player must type in the game in order for the task to work. Simply click in the box, and type the command in. If you want to add more than one, press <enter>, and type another command in. To edit an existing command, click the arrow to the right of the box, and select the command you wish to edit. You can then edit the command. You can override any of the system commands with tasks. For example, if you entered "north" as the command, and you were in a room which had an exit to the north, assuming all the restrictions were passed, the task would be executed instead of moving the Player in that direction. This is useful if you want to check something before going north, or you wanted to add a more descriptive message when moving

ADRIFT v4.0 Manual Getting Started
Campbell Wild Page 19 of 92 25 Oct 2003
the Player from one room to another. (See Overriding System Commands for details.) Wildcards
It’s quite difficult to think of all the possible commands a player can type in order to complete a specific task – quite often the player will know what they have to do, just not know the syntax the game needs to be able to run the task. This is commonly known as “guess the verb”. To make it easier to define commands for the user to type, you can put wildcards into the command string. To do this, simply add an asterix "*" where the player can enter any text. For example, if the task was "turn the wheel", you could set the command as "turn *wheel". This would allow the player to type "turn the wheel", "turn wheel", "turn steering wheel" etc. in the game. Basically, it makes it far more flexible, as there's nothing more frustrating knowing what to do, just not know the exact phrase to make it work. It can sometimes work better to define the task as, say, "turn * wheel" - notice the extra space. This guarantees that there will always be a space after the word "turn" and before the word "wheel". In the example earlier, it would have accepted the command "turn swheel". It is also worth noting that by doing this, the command "turn wheel" would match up, but the space would in fact be matched twice. You can also put a wildcard before the command, e.g. “* turn * wheel” so that it would accept something (or nothing – the initial space will be removed if necessary) before the command, so long as it’s separated by a space. You can add commands to refer to any object, character, number or variable by using References. Advanced Command Construction
Quite often, wildcards will allow the task to execute if the player types in a command, but it can sometimes be too vague. For example, the command “get * apple * box” would allow the player to type “get the apple from the box”, “get apple then look in the box”, “get all except the apple from the box” etc. You can see that this could lead to some quite misleading and unintended task executions. To give a different approach from wildcards, you can use advanced command construction. This allows you to define certain required keywords, then have other optional words and allow choices between words. There are three sets of special symbols required for advanced command construction. These are: • Square brackets, i.e. “[“ and “]”. These enclose anything that is required in the
command. • Curly brackets, i.e. “{“ and “}”. These enclose anything that is optional in the
command. • Forward slash, i.e. “/”. This separates any choices within the command.

ADRIFT v4.0 Manual Getting Started
Campbell Wild Page 20 of 92 25 Oct 2003
Symbols are recursive, so for example, you could have an optional section within a required section of the command. An example would clarify this to make it easier to understand. In the example above, you might have a command like: You can see here, from the example commands above, the only one that would succeed is “get the apple from the box” Clicking on the small question mark button to the right of the command box will give a summary of what you can enter as a command. Descriptions
You need to give a reply to a successful command. Enter your message in the box labelled Message upon completion. If the task moves the Player to another room, you would often want to give the description of the new room, so you can select this from the pull down list marked Then show description for room. If you wanted any text to appear after this description, you can enter this in the box marked Additional Message. Usually, you would want to restrict a task to being completed in a particular room or rooms. In the list marked Tasks can be completed in, you can select which rooms these should be. For tasks that can be completed anywhere, you would want to select the whole list, by clicking on All rooms. (Any new rooms added will automatically be added to this selection.) If you don't select any rooms for the task to be completed in, you will be unable to complete the task. As well as being typed in by the player, tasks can also be called from events and tasks. It is best to set the command on these tasks so that the player cannot accidentally type it. If you prefix the command with the hash character (#), then it will be impossible for the player to call the task from Runner, as it strips off any preceding # characters. For example, if you wanted a task that kills off the Player that gets called from an event, you could call the task "# kill player". This would then only be executable by the event or a task. Restrictions
Restrictions are grouped into five sections. These are: Object location You can specify that NO object, ANY object, the Referenced object, or a specific object must or must not be in a specific room, held by the Player or a specific character, worn by the Player or specific character, visible to the Player or specific character, inside a container object, or on a surface object.
[get/take/pick up] {the} [{green} apple from] {the} {large} [box/crate]

ADRIFT v4.0 Manual Getting Started
Campbell Wild Page 21 of 92 25 Oct 2003
State of object For openable objects, you can restrict that the Referenced object or an openable object must be open or closed, or locked for lockable objects. Task state You can restrict that any task must be completed or not. Player & Characters You can specify that the Player, Referenced character, or specific character must or must not be in the same room as the Player, Referenced character or specific character, or that they must or must not be alone. You can also specify that the Player must be standing, sitting or lying on a specific object or the floor, or that the Player or characters are of a specific gender. Variables You can specify that the number the player typed, or a specific variable must be less than, less than or equal to, equal to, greater than or equal to, or greater than a specific value or variable. To access existing variables, click on the down arrow to change the text box into a selectable list. Each restriction is evaluated in turn. The first one that does not hold true will display the message defined in the else display box, and no other restrictions will be checked after this. You can alter the order in which the restrictions are checked by clicking on the up and down arrows. Actions
Actions are divided into seven sections. These are: Move object This allows you to move all held objects, all worn objects, the Referenced object or a specific object to a specific room, to a room group, to inside an object, onto an object, to the same room as the Player or character, or carried or worn by the Player or specific character Move Player or Characters This allows you to move the Player or a specific character to a specific room, room group, or to the same room as a specific character. It also allows you to move the Player’s position to standing, sitting or lying on a specific object. Change object status This enables you to open or close objects. Change variable You can change any variable to an exact value, change it by an exact value, change it to a random value (between two values), change it by a random value (between two values), or set it to the referenced number. There is also the option to change a

ADRIFT v4.0 Manual Getting Started
Camp
variable to a mathematical expression. This is interpreted directly, and can include variables and functions. An example might be something like: See E ChangYou cdecreait is re End gYou cstanda If the Battle Repea
You m If a tathe tas You cait has was "oput a rYou cmove You csame constrthe tasto Not Rever If the messa If the tcomm You ctimes
min(%var1%, 2 - %var2%) * 3bell Wild Page 22 of 92 25 Oct 2003
xpression Formulae for currently supported functions.
e score an change the score by a specific value. If this is negative, the score will se. Positive score increments will only happen the first time a task executes if
peatable or reversible. Negative scores will occur each time.
ame an end the game in one of three states; Wins the game, Doesn't win (Just a rd end to the game), and Kills the Player.
Battle System is enabled, Battle Options becomes available. (See section The System)
table & Reversible
ay want to make tasks repeatable and/or reversible.
sk is repeatable, the player can type the command any number of times, and k will execute as normal.
n also make tasks reversible. This will clear the completed status of a task, if been completed earlier. Examples of wanting to do this could be if the task pen door", then the reverse command would be "close door". You could then estriction on a movement from a room, to only move if "open door" is complete. ould then open and close the door as much as you like, but only be able to through it if it was open.
an have any number of commands for the reverse command, much in the way as the initial command, and wildcards and advanced command
uction can again be used. Note that when you reverse a task, any actions that k performed will not be undone – simply the status of the task will be set back
Completed.
sible tasks share the same restrictions as the forward part of the task.
task is reversible, you can enter in the Message once reversed text box the ge when the task is reversed.
ask is not repeatable then you can amend the default message to display if the and is typed again.
an also make tasks reversible and repeatable. There are probably not many when you would want to do this, but it allows you to execute the task as many

ADRIFT v4.0 Manual Getting Started
Campbell Wild Page 23 of 92 25 Oct 2003
times as you want without having to reverse it. If the task is repeatable and reversible, the Message if task tried again will also be displayed if the player types the command to reverse the task when it has not been completed (or it has been reversed). Hints
If the task is particularly difficult, you may want to supply a hint for the task. There are three parts to a hint. The first is the question. This is to allow the player to know which problem the hint refers to. When the player types "hint" in the game, a list of all the hints is supplied which can be completed in their current location. For example, if there was a slide that the player wanted to climb, but it was too slippery, you could have a question such as "How do I get up the slide?” The subtle hint should be enough to get the player thinking along the right lines. So for the above example, you might want to put "Perhaps you don't have enough grip...” This would hopefully be enough to let the player know that they needed some kind of footwear. The sledgehammer hint should be almost the answer. You don't have to give a sledgehammer hint to a question. In the above example, you may want to say, "Try wearing the climbing boots!"
NB. In the game, if the player uses a subtle hint, they will only score half points for the task. If they use a sledgehammer hint,they will not score at all for completing the task.

ADRIFT v4.0 Manual Getting Started
Campbell Wild Page 24 of 92 25 Oct 2003
Events
Although most of what happens in a game is directly related to what the player does, you may want certain things to happen completely independently of the player. To do this, you will need to create events. To add an event, either select Add > Event from the menus, or click on the icon. This will bring up the Add an event dialog box. Timings
Selecting Event Timings brings up the following window:
You should name the event when you create it. This is not used by anything apart from to reference the event in ADRIFT Generator. There are three options for when you want the event to start. It can either start as soon as the adventure starts, it can start after a certain number of turns, or it can start once a task has been completed. If you want it to start after a certain number of turns, you must say how many turns to wait. The event will start at a random time between the two numbers you specify. If you want it to start after an exact number of turns, then you should set both numbers to be the same. The third option is to have the event start once a specific task has been completed. If for any reason this task is cleared (by a task or another event) then the current event will terminate if still running.

ADRIFT v4.0 Manual Getting Started
Campbell Wild Page 25 of 92 25 Oct 2003
You also need to specify how long the event should last. Again, there are two numbers, and the event will last a random time between these two numbers. If you want it to last an exact number of turns, set both numbers to the same value. There are two more options. You can set the event to restart as soon as it finishes. This really depends on the type of event you are creating. If you have selected for the event to start after a certain number of turns, then you can get the event to restart after this same delay, once it has finished. If neither of these checkboxes are selected, the event will only run once. All events will run, regardless of where the Player currently is, but you may only want the descriptions to display in certain places, e.g. if the event was rain starting and stopping, you would only want the descriptions to apply to outside locations. Descriptions
Selecting the Description tab brings up the following window:
All the descriptions here will only display if you are in one of the rooms selected in the list on the timings page. When the event starts, you will probably want to say something to announce the fact. If the event was rain, you could put in What to display on event start: "It starts to rain." This will always be displayed if you are in the selected room(s). In the box What to display during event if player "looks", this message is appended to the room description. In the above example, you would want to add something such as "It is raining."

ADRIFT v4.0 Manual Getting Started
Campbell Wild Page 26 of 92 25 Oct 2003
You can add up to two extra messages that appear when the event is ending. You specify how many turns from the end of the event the message should appear, and set your message. In the same example, you might want Display this 3 turns from event finish: "The rain eases off slightly.", Display this 1 turns from event finish: "The rain has almost ceased." This will also always display if in the correct room(s). Usually, you will want a message displayed when the event finishes. In this example, it might be something like "The rain stops." Again, this will always display if the Player is in the selected room(s). Advanced
Clicking on the Advanced tab brings up the following window:
You may want to pause and resume an event, for example, if your event was the Player running out of air when they were underwater, you could pause the event if they find an air supply, then resume it when the supply runs out. This can also be used to permanently stop a recurring event if a particular task has been completed, by just setting the paused task only. You may want to move objects about when the event starts of finishes. You can move one object when the event starts and two when it finishes. You also have the added flexibility of being able to move static objects, so if you want a task to move a static object, you can use an event to start as soon as the task is complete, which then moves the object. You may also want to execute another task when the event finishes. This could be for many reasons, but allows you to use the power of tasks spontaneously. An

ADRIFT v4.0 Manual Getting Started
Campbell Wild Page 27 of 92 25 Oct 2003
example could be a gust of wind, which blows the Player from one room to another. The gust of wind could be a random event, but the task the event runs would move the Player or other objects etc. When the task is executed, it executes the exact task selected in the list, even if there are more than one with the same command. This is a change from previous versions where they were executed as though the player typed the command. If the restrictions on the task are not met however, the task will not run. If you want to create a form of IF-THEN-ELSE, you will have to create the task as a “master” task. Get this task to execute a number of other tasks, each sub-task with their own restrictions. Any task that passes the restrictions will execute.
NB. If the event undoes a particular task, and that task startedanother event, the first event will be stopped.

ADRIFT v4.0 Manual Getting Started
Campbell Wild Page 28 of 92 25 Oct 2003
Characters
Characters are independent people or animals within your game. The Player can interact with these characters by having conversations with them, and they can wander around interacting with objects and running tasks. To add a character, either select Add > Character from the menus, or click on the icon. This will bring up the Add a character dialog box. Character Details
The Details tab displays the following window:
You must give each character a name. You can additionally give them a description, which consists of a prefix and an alias. This is another way that the character can be referenced, much in the same way as the alias for objects. Again, as with objects, any number of aliases can be supplied. You can give the character a description, which appears when the player examines the character. You can give a different description depending on whether a certain task has been completed. Just select the task from the pull down menu, and enter the alternative description.

ADRIFT v4.0 Manual Getting Started
Campbell Wild Page 29 of 92 25 Oct 2003
The Gender of the character must be supplied. This would normally be Male or Female, but for monsters and some animals, you might want to specify it as “Unknown”. This means that it could be referred to as “it” in the game, rather than “he” or “she”. You must also specify in which room the character should start off, from the last pull down menu. Movement
The Movement tab displays the following window:
Character movement can easily be created by adding a series of walks. If you want to be notified when a character enters or exits the room that the Player is currently in, check the check box. This will enable the two description boxes at the bottom of the screen. You can modify what it says when the character moves. You would typically put “enters” and “exits” in these boxes so it displays “<Character> enters from the east.”, but you may want to change this for the different ways a character can move, such as “run”, “shuffle”, “trot” etc. Usually you will want to display a message to say if the character is in the current room. You can modify this by changing the relevant message. This message appears when the player types "look", or moves into a room.

ADRIFT v4.0 Manual Getting Started
Campbell Wild Page 30 of 92 25 Oct 2003
Any number of walks can be created. To add a walk, click on the Add walk button. This brings up the following dialog box.
You can select a task to start the walk. As soon as that task executes, the character will begin the defined walk. You create walks by adding a sequence of movements. A movement consists of a destination and a length of time. To create the walk, click on the Add button. This will bring up a dialog box where you can select these. You can move the character to Hidden, Follow Player, a particular room, or to a roomgroup. If the character moves to Follow Player, they will move to the same room as the Player. If the character moves to a roomgroup, they will move to an adjacent room within the roomgroup -–if none are available, they will move to a random room within the group. This is a good way to create a random wandering character. You must also specify how long the character should stay at that location before moving onto the next step of the walk. For a fast moving character, this might just be 1. Continue to build up locations to make a complete walk. If you want the character to endlessly loop in that walk, select the Loop walk when finished checkbox. You probably want to ensure that your start and end rooms match up before doing this, otherwise the character will “jump” from one room to the next. You can run a task if the character comes across another character or the Player, by selecting from the If character comes across character dropdown menu. If this is the Player, and you move into the same room as that character, this will also execute.

ADRIFT v4.0 Manual Getting Started
Campbell Wild Page 31 of 92 25 Oct 2003
You can also run a task if the character comes across a particular object on their walk, by selecting from the If character comes across object dropdown menu. You can update the standard description of the character in a room by adding text to the Description of character in room (look) changes to textbox. This new description will appear any time you view the room the character is in, and supersedes the original text. Finally, you can terminate a walk by selecting a task from the Walk can be terminated if completed task dropdown menu. Conversations
The Character Conversation tab displays the following window:
Conversations are created simply by adding a subject and a reply. You can enter any number of subjects.

ADRIFT v4.0 Manual Getting Started
Campbell Wild Page 32 of 92 25 Oct 2003
Clicking on New subject brings up the following dialog box:
The subject is the word that you want to ask the character about in the game. The player would need to type "ask <character> about <subject>". You can enter any number of words in the Subject(s) box, separated by a comma. So for example, if the subject is "fast car, Porsche", then the character would respond to "fast car" and "Porsche", but not "fast" or "car". You can also add a reply to anything by entering an asterix "*" in the subject box. This means that the character will reply to anything you ask them about, unless you have defined other subjects that correctly match what the player types. You can give two different replies to any subject, depending on whether or not a particular task has been completed. Simply select which task you want the reply to depend on from the pull down list, and enter your replies in the text boxes.

ADRIFT v4.0 Manual Getting Started
Campbell Wild Page 33 of 92 25 Oct 2003
Miscellaneous
Introduction & Winning
To bring up the Introduction and Winning boxes, select Adventure > Introduction & Winning… from the menu. This will bring up a display as follows:
The text in the box Text to show on start-up will be displayed as soon as the adventure is opened in ADRIFT. To start with a completely blank screen instead of having the default adventure title displayed, you may want to add a “<cls>” at the beginning of the introduction. You must select which room to start the adventure in. If this is not selected, it will default to the first room in the rooms list. You may well want the first room description to appear at the end of the introduction. To do this, select the Display first room option. Similar to the introduction, you may want a generic winning message to appear. This will be displayed whenever any winning task is executed.

ADRIFT v4.0 Manual Getting Started
Campbell Wild Page 34 of 92 25 Oct 2003
Player
The Player details window looks as follows:
The Player must have a name. If this is not defined, it will be set to “Anonymous” within the game. (It may or not be important, depending on your game). You can allow the player to choose a name by selecting the Prompt for name checkbox. This will default to whatever is in the Name textbox. Setting the Player’s name will allow you to ‘”examine <Player>” within the game. You can also reference this text within the game using the %player% keyword. You can specify the gender of the Player. Again, if you want the player to choose this, select Prompt. You can then create tasks which have restrictions depending on whether the Player is male or female. The Player can have a description, similar to characters, which can change depending on whether a specific task has been completed. The Player can be in one of three positions; standing, sitting and lying. This can either be on the floor, or on an object that has been defined as allowing sitting etc. You must set limits for what the Player can carry at any one time. If you don’t want this to apply to your adventure, you must set the limits higher than will be required in your game.

ADRIFT v4.0 Manual Getting Started
Campbell Wild Page 35 of 92 25 Oct 2003
You must specify the size limit (object bulk) and the weight limit separately – the Player will only be able to hold the minimum of both of these. You can specify from 0 to 99 and from Tiny to Huge (or Very Light to Very Heavy). Object sizes and weights are relative, and in relation to what you specify for the individual objects. If the Battle System is enabled, extra options become available to the player. Options
There are a number of options you can specify to customise your adventure further. To access these, select Adventure > Options… from the menu, or click on the icon. The options available are: Adventure title This is the title of your adventure. Any HTML tags in here won’t show up in the Runner title bar. Author That’s you! (Or someone else you wish to credit with your work!) How many turns should go by when the player “waits” This is the number of turns which pass whenever the player types “wait”. If this is set at 3 (the default), it means a character could walk three spaces, or an event could run three times. Perspective This affects how most standard responses are phrased. If you select First Person, you may get a response such as “I am unable to do that.” If you selected Second Person, the same response might be “You are unable to do that.” If Third Person was selected, the same response might be “Hamish is unable to do that.” Message when command not understood This is the message displayed when the player input is not understood at all. Set font as If you enable this checkbox, you can specify a font for the adventure to display in when run. This will only take effect if the player doesn’t override it with their own font in Runner, and also that font must be installed on their computer. Show exits from rooms along with room descriptions Pretty much what it says. The exits will be listed after the player views a room. Enable 8-Point compass This activates the off-cardinal directions within the room movement tab.

ADRIFT v4.0 Manual Getting Started
Campbell Wild Page 36 of 92 25 Oct 2003
Enable Battle System This activates the battle system. You should see extra options appear in the Player, Characters and Object dialog boxes. Enable Sound & Graphics This will enable small icons near most pieces of text. You can attach sound and graphics to anywhere you see these. Enable user statusbox This enables a user statusbox. This appears at the bottom of the Runner screen and can contain any text. In order to change this in the middle of an adventure, you would need to use a text variable, or use an ALR-variable combination. A suggestion for this might be %turns%. You can also disable some of the features within the Runner application. These are:
• Score being displayed – useful if score is not relevant in your game • Control Panel – can give away useful information such as objects in the room • Debugger – you probably want to do this when the game is distributed • Map – for the more traditional gaming environment • Auto complete – to prevent giving away extra information • Mouse clicks in Runner - prevents menus appearing when clicking on objects
or right-clicking Dependencies
You can view the dependencies on any task, or on the first winnable task. Clicking on the symbol displays the first winnable task. If that doesn’t exist, the currently highlighted task dependencies will be displayed. This will bring up a dependency tree similar to this:

ADRIFT v4.0 Manual Getting Started
Campbell Wild Page 37 of 92 25 Oct 2003
Search
As adventures get larger, it becomes harder to find parts among the long lists. There is a search facility to enable you to find parts previously defined. To do this, select Help > Search… from the menu, or click on the button. This will search through the list entries and open up each entry as it finds it. You can search matching case or not. Browser
Another way to keep track of adventures as they get larger is to use the Browser window. You can access this by selecting Window > Browser from the menu. This brings up a window that looks like this:
This groups everything by room, i.e. all objects, tasks, events and characters that are specifically relevant to that room will be listed under it. Everything which is not room specific is grouped under the No Specific Room selection. Clicking once on an entry will open it for editing. Passwords
You can password protect an adventure by selecting File > Add Password… from the menu. You will be prompted for a password, then asked to confirm the password. Now every time you open the adventure, you will have to supply the password in order to edit it – opening in Runner will not prompt you for the password unless you are trying to access the debugger.

ADRIFT v4.0 Manual Getting Started
Campbell Wild Page 38 of 92 25 Oct 2003
You can change a password by selecting File > Change Password. You will be asked for you current password. If this is correct, you will then be asked for a new password, then to confirm it. To clear a password, simply change the password to blank. If you open a password protected file which is of an earlier version, you will be prompted whether or not you wish to upgrade the file to the current version of the software. Settings
There are various settings you can make in Generator. Selecting the File > Settings… menu brings up the following window:
The following options are available: Automatically spell check all text This will spell check each window you edit when you close it. Dictionary location This is the location of a text file that Generator uses to spell check the text. This is simply a TXT file containing a list of words. Automatically create backup copies of TAF files This saves the current TAF file as a BAK file before resaving the adventure. This is useful in case you make a mistake in your adventure, or if the file became corrupt for some unforeseen reason.

ADRIFT v4.0 Manual Getting Started
Campbell Wild Page 39 of 92 25 Oct 2003
Embed sound and graphics into TAF files This saves any sound (i.e. WAV, MP3, MIDI) and graphic (i.e. BMP, JPEG) files into the TAF file itself. This makes it much easier to distribute, and keeps them more manageable and neater. It also prevents people from being able to preview the media and potentially cheat with the game. Show Splash screen at start-up This shows the ADRIFT splash screen on start-up. It will also affect the Runner start-up screen. Check file associations at Start-up This will check every time ADRIFT starts that TAF, TAS, AMF and ALR files are correctly associated with ADRIFT, and prompt to ask whether you want to associate them if they’re not. Show Tips at Start-up This will show a random tip every time Generator starts. Conserve Memory over speed This helps to prevent out of memory errors (error 7) which can affect some users of Windows 95, 98 and ME. It may make it slightly slower opening some windows, as they don’t reside in memory, but should be a lot less of a strain on system resources. Check for new releases on Startup This will check the Internet each time ADRIFT starts up to see whether a new release has been made available. If so, it will prompt you whether or not you wish to download it. Selecting Yes will take you to the ADRIFT Downloads homepage. Export text data file
This was an early feature supported by ADRIFT. It simply exports all the text from the adventure, which can then be used to spell check and the like. It does not have much use any more. Filtering
Within the main lists (objects, tasks etc), you can filter the lists. This can make it much easier to find the relevant parts of the adventure you are working on, particularly as your adventure gets larger. To turn on filtering, right click on any list (the only exception being rooms, which cannot be filtered) and select Filter > By Room. What this then does is it only displays items in the particular list if it applies to the current room selected in the rooms list. Every time you click on another item in the room list, all the lists which have filters turned on will refresh with applicable items. To turn off filtering, simply select Filter > Off on the particular list.

ADRIFT v4.0 Manual Getting Started
Campbell Wild Page 40 of 92 25 Oct 2003
Graphics & Sound
Graphics and sound can easily be added to many parts of ADRIFT. To enable these, select Adventure > Options… > Enable Sound in games or Enable Graphics in games. This will then display a number of anchor points around the various screens to attach a sound or graphic to different pieces of text. The anchor points are grey if no sound or graphic is attached. These will change if media is selected. Adding Sound
Clicking on the sound icon brings up the following dialog box:
There are three options for sound: No Sound This is the default, and means no sound is selected for this anchor point. Play Sound Selecting this option allows you to type in a filename of a sound file. You can browse for the file by clicking on the […] button. You can set this sound to loop by selecting the Loop sound continuously checkbox. Stop all currently playing sounds This stops any playing sound. This is convenient if there is a long or looping sound playing currently. Once a sound has been selected, the sound icon changes to display the selected option.

ADRIFT v4.0 Manual Getting Started
Campbell Wild Page 41 of 92 25 Oct 2003
Adding a Graphic
Clicking on the graphic icon brings up the following dialog box:
This allows you to specify a filename. As soon as the file exists, it is previewed within the display window below the filename. Clicking in this window toggles between stretching the graphic to the size of the display, and displaying it normal sized, centrally within the display. Once a graphic has been selected, the graphic icon changes to display the selected option.
TIP. You can preview a selected sound by right-clicking on thesound icon. Clicking a second time will stop the sound.
NB. If a WAV file is selected to play and is non-looping, it will play on top of any looping sound or MIDI file. This allows youto have sound effects occurring whilst having background music.

ADRIFT v4.0 Manual Advanced Techniques
Campbell Wild Page 42 of 92 25 Oct 2003
Advanced Techniques
Room Groups
Room Groups are simply a collection of rooms. They are most commonly used as an area to move objects or characters to when you want them to move to a random room. To add a new room group, click on Adventure > Advanced… and select the Room Groups tab, or click on the button. This should bring up the following dialog box:
Where Room Groups can be used
You can move the Player in a direction from a room to a room group. This will have the effect of moving them to a random room within that group if they go in a particular direction. The room groups will append to the end of the room list in the dropdown lists. In task actions, you can move a dynamic object to a room group. This will randomly move the object to one room of the group. Also in actions, you can move the Player or character to a room group. Again, this will randomly move them to one room of the group.

ADRIFT v4.0 Manual Advanced Techniques
Campbell Wild Page 43 of 92 25 Oct 2003
When creating a character walk, you can add as a step of the walk, for them to move to a room group. The room groups are appended to the end of the room list drop down. This will move the character to an adjacent room within the room group from where they currently are located. If there are no adjacent rooms within the room group, they are moved randomly to one of the room group. This has the effect of allowing characters to roam randomly within a specific area.

ADRIFT v4.0 Manual Advanced Techniques
Campbell Wild Page 44 of 92 25 Oct 2003
Synonyms
Synonyms are alternatives for commands entered in Runner. By adding a synonym for a command, any time you enter your alternative, it will be treated as though it was the original command. For example, if you added a synonym of “put” to be “hang”, then every time you typed “hang” in the game, it would treat it as though you typed “put”. So the command “hang cloak on hook” would execute the system command “put cloak on hook”. To add a new synonym, select Adventure > Advanced… from the menus, and select the Synonyms tab, or click on the button. This will bring up the following dialog box:
Clicking on the Add button brings up the following dialog box, where you can enter the word you want to add an alternative for, and you can enter your new word.

ADRIFT v4.0 Manual Advanced Techniques
Campbell Wild Page 45 of 92 25 Oct 2003
NB. One thing to note – if you have a synonym for a word, then use that word in a task command, the command will not matchbecause the word will have been changed to its synonym. So, for the above example, if you had a task “hang * cloak * hook”,and this was the only command, the task would not execute asit would be trying to match “put * cloak * hook”.

ADRIFT v4.0 Manual Advanced Techniques
Campbell Wild Page 46 of 92 25 Oct 2003
Variables
There are two kinds of variables that ADRIFT can handle; Integers and Text. Integer variables can store values from approx. –2,000,000,000 to 2,000,000,000. Text variables store strings of text which can be obtained from the command line and displayed later in the game. To add a new variable, select Adventure > Advanced… and select the Variables tab, or click on the button. This will bring up the following dialog box:
Clicking on the Add button brings up:
You must give your variable a name by typing into the Variable name box. Click on the Type option to select whether or not the variable is an Integer or a Text variable. The Initial value box will then be right justified for integers, or left justified for text input. Type in the value for your variable, and click OK.

ADRIFT v4.0 Manual Advanced Techniques
Campbell Wild Page 47 of 92 25 Oct 2003
Displaying Variables
To view a variable within Runner, you have to enclose it within percentage signs (%). So for example, if you had a variable “money” which starts off with the value 50, you might put something like “Your wallet is leather. Inside are %money% coins.” This would display “Your wallet is leather. Inside are 50 coins.” Text variables work in exactly the same way, except they display their text value. If you have an integer variable and want the value to appear in text format instead of a number (i.e. “twelve” instead of “12”), then you can append “t_” to the start of the variable name. So for the example above, you’d say “Inside are %t_money% coins.” This will only work for values from 0 to 20. Anything outside this range will display their numeric value. Assigning Variable values
Apart from the initial assignment when you create a variable, you can only set variable values from tasks. In task actions, you have the option to set integer variables to one of the following: • To an exact value – this simply sets the variable to the value specified. • By an exact value – this adds or subtracts the value specified to the value of the
variable. • To random value between – this allows you to specify two integers and the
variable is assigned a value randomly between the two values. • By random value between – this allows you to specify two integers, and the
variable is added to or subtracted by a random value between the two values. • To referenced number – this sets the variable to the referenced number. The
referenced number is set whenever a task command that includes the text “%number%” is executed – the %number% will pattern match on an integer value. (See References for details)
• To expression – this allows you to set a variable to a value using an advanced expression.
You can change text variables to one of the following: • To exact text – this simply sets the variable to the text string specified. • To referenced text – this sets the variable to the referenced text. The referenced
text is set whenever a task command that includes the text “%text%” is pattern matched and executed. (See References for details)
• To expression – this allows you to set the text variable to a string using an advanced expression.

ADRIFT v4.0 Manual Advanced Techniques
Campbell Wild Page 48 of 92 25 Oct 2003
Expression Formulae
Expressions allow you to assign variables values based on other variables, using formulae. Integer variables allow the use of the following formulae:
Formula Description min(x,y) Returns the minimum of value x and y max(x,y) Returns the maximum of value x and y
either(x,y) Randomly returns either x or y rand(x,y) Selects a random value between x and y
abs(x) Returns the absolute value (positive part) of x, i.e. abs(-2) = 2
x mod y Returns the modulus of x and y, i.e. the remainder when x is divided by y. i.e. 11 mod 4 = 3
If(test,x,y)
If "test" evaluates true, returns x, else returns y Where "test" is a=b, a==b, a<b, a<=b, a>b, a>=b, a<>b, a!=b and conditions can be ANDed using "and", "&" or "&&" or ORed using "or", "|", "||"
instr(text, search) Returns the position of <search> within <text> i.e. instr(“hello”,”e”) = 2
len(text) Returns the length of <text> val(text) Converts <text> to a number (or zero if it can't match)
All expressions can be recursive, so that you could have expressions such as: Text variables allow the use of the following formulae:
Formula Description ucase(text) upper(text) Converts <text> to upper case
lcase(text) lower(text) Converts <text> to lower case
pcase(text) proper(text)
Converts <text> to proper case, i.e. a capitalises the first letter of each word, with the rest in lower case
left(text, length) Returns the <length> leftmost characters of <text> right(text, length) Returns the <length> rightmost characters of <text>
mid(text, start, length) returns <length> characters of <text>, starting at <start> str(x) Converts an integer value x to text form
text & text text + text Appends two strings together
money = if(%money%>5 & %money%<10, rand(10,100), min(%money%,5))

ADRIFT v4.0 Manual Advanced Techniques
Campbell Wild Page 49 of 92 25 Oct 2003
System Variables
Certain variable names have been reserved for System variables. These give you access to certain variables within the game. These are as follows: Variable Description author Name of adventure author character Name of the Referenced Character heshe "he" or "she", depending on the Referenced Character himher "him" or "her", depending on the Referenced Character in_<objectname> A list of all objects inside object <objectname> maxscore The maximum score obtainable modified The date the adventure was last modified number Numeric value of the Referenced Number object The name of the Referenced Object, as defined obstate The user-definable state of the Referenced Object obstatus "open", "closed" or "locked" for Referenced Object on_<objectname> A list of all objects on object <objectname> onin_<objectname> A list of all object on or in object <objectname> player The name of the Player score The current score state_<objectname> The user-definable state of object <objectname> status_<objectname> "open", "closed" or "locked" for object <objectname> t_<variable> Value of variable <variable>, spelt out if 0=<=20 t_number Value of Referenced Number, spelt out if 0=<=20 text A string containing the Referenced Text theobject The name of the Referenced Object, tense adjusted time The time the game has been played for in seconds title The title of the Adventure turns The number of turns elapsed for the game version Returns the version of the current Runner executable
You must remember to surround these variable names with percentage (%) symbols when referencing them in text or expressions.

ADRIFT v4.0 Manual Advanced Techniques
Campbell Wild Page 50 of 92 25 Oct 2003
Formatting Text
Supported HTML Tags
The default two-tone text display in Runner can be manipulated in order to display text exactly as you wish. ADRIFT uses HTML style tags in order to format the text. Tag Description <i> </i> Display text in italics <b> </b> Display text in bold <u> </u> Display text using underlined <c> </c> Display text using the secondary colour <font size=[+/-]X> * Change font size to X, or increase/decrease by X
<font colour=”#rrggbb”> *
Sets the font colour. rrggbb is the value for the colour,with each two characters being Hexadecimal Valuesfrom 00 to FF. Alternatively, you can replace this with"red" or "green" etc (See Named Colours)
<font face=”fontname”> * Sets the font to fontname. Please note that if theplayer doesn't have this font installed, it will notdisplay as expected.
</font> Restore font to previous state
<bgcolour=”#rrggbb”> This sets the background to a colour (as specifiedabove). Setting it to “default” will set it back to theplayer’s Runner preference.
<centre> </centre> Centralise text <right> </right> Right justify text <br> Insert a new line
<wait X> Wait for X seconds, where X is between 0.0 and 10.0.This can be to the nearest 10th of a second.
<waitkey> Wait for the player to press a key before resuming. <cls> Clears the screen < Displays the < character > Displays the > character
* All these tags can share the one font tag, i.e. you could have a command: The HTML standards are also supported with American spelling of center and color. Nice Big Text Window
By default, the text windows within ADRIFT are not very good at formatting the text – they don’t display the text as it would appear in Runner unless you have no formatting at all, and many of the windows are quite small so that you may not see your whole text segment. You can bring up a large text box where you can format
<font face=”Arial” colour=blue size=+1>

ADRIFT v4.0 Manual Advanced Techniques
Campbell Wild Page 51 of 92 25 Oct 2003
your writing using standard word-processor facilities. To do this, double-click in any text box. This will bring up a window such as:
This allows you to select bold, italic, underline and secondary colour, left centre and right justify text, change font, spell check, cut, copy, paste and undo, all at the click of a button. Clicking OK will then convert this text into HTML format so it will be displayed the same in Runner. Tags not supported by the NBTW will be displayed as they were in the standard text boxes.

ADRIFT v4.0 Manual Advanced Techniques
Campbell Wild Page 52 of 92 25 Oct 2003
References
What are References
There are certain circumstances where in order to do what you’re trying to do you would need to add potentially hundreds of tasks. More often than not, you can reduce the number of tasks required by using References. References are like wildcards, which return information about what was typed on the command line. References are supported for the following: • Objects • Characters • Numbers • Text How to use them
To use a reference, you have to embed one of the system variables into your task command. This will either be %object% for referenced objects, %character% for referenced characters, or %number% for any referenced number. This must then pattern match on the player’s command to assign the reference. An object example
That probably wasn’t very clear – references are fairly complicated to understand, but once you understand them they are fairly simple to use. Let’s say for example that you want to create a task such that whenever you drop an object in a particular room, it drops down a hole and disappears. You would create a task with the command: This works in the same way as normal task commands, except instead of requiring the player to type “drop %object%”, it will search through all object names to see if they referred to a specific object. The Referenced Object is then set to the object mentioned. So say you have an object called “a large” “ball” and the player types “drop ball”, then Referenced Object is set to “ball”, and the task would be executed (assuming it passes its restrictions). You can use this Referenced Object in the task restrictions and actions in the same way as any other object – instead of requiring a specific object, simply select Referenced Object. So for the example above you would have as a restriction:
drop * %object%

ADRIFT v4.0 Manual Advanced Techniques
Campbell Wild Page 53 of 92 25 Oct 2003
Referenced Object must be held by Player
If this is true, the task will execute. You would then want as an action: Move Referenced Object to Hidden As a message in your text, you can use the system variables %object% or %theobject% for example: This would display: Characters work in much the same way as objects above. You can also use a very similar method for numbers. A numeric example
Let’s say you want to create a dial, which you can set between 1 and 10. You might set up a task such as: As soon as a task command pattern matches against this, for example the player types “turn the dial to 5”, then the Referenced Number is set to the value the player typed in. You can use this in your restrictions, so you could require that Referenced Number must be greater than or equal to 1, AND Referenced Number must be less than or equal to 10. If these restrictions pass, you could set a variable such as %dialvalue% to Referenced Number.
You drop %theobject%. Unfortunately it falls down a large hole anddisappears.
You drop the large ball. Unfortunately it falls down a large hole anddisappears.
turn * dial to %number%
NB. You can only use a single reference of the same type pertask command, so for example you couldn’t have a command“put %object% on %object%”.
If you needed to create tasks such as these, you’d have toreplace one reference for the specific objects.

ADRIFT v4.0 Manual Advanced Techniques
Campbell Wild Page 54 of 92 25 Oct 2003
Referenced Text
Referenced Text works in much the same way as variables. In your task command, you must specify the %text% keyword. This will be pattern matched against the input text, and assigned if it matches. An example command might be something like so: This would match anything typed on the command line beginning with ‘say ‘. If the player typed “say oranges”, then Referenced Text would be assigned to the word ‘oranges’. This can be useful in a number of situations, particularly things like saying passwords, or when being asked questions. You could for example have a character ask where the player is from. You could take this response and assign it to a text variable, then reuse the information later on in the game in a conversation. In addition to this, if %text% is not matched in a task command, Referenced Text always gets assigned with the entire command the player typed. This can be then be used for giving default error responses. For example, in the Message when command not understood (see Options section) you could have the response:
say %text%
I don’t understand what “%text%” means.

ADRIFT v4.0 Manual Advanced Techniques
Campbell Wild Page 55 of 92 25 Oct 2003
Overriding System Commands
The vast majority of all the system commands (i.e. commands that ADRIFT understands without having to explicitly define tasks for, such as getting and dropping objects) can all be overridden with your own tasks. This is necessary to allow you to customise the adventure and do more advanced things. To override the system commands, simply create a task with a command which would normally be understood by the parser One example where this is useful is if you have a fragile object such as a vase. If you type "drop vase", then the default system command moves the object to the current room the Player is in. You may want to make the object break if the Player tries to drop it, so you would define a task such as "drop * vase", then give the reply "You drop the fragile vase, but it smashes on impact with the ground.", then move the object to hidden. The difficulty with overriding the system commands is to cover all possible ways that it can be phrased. In the example above, if that were the only definition in the task and if the player typed "put vase down", the vase would still be moved to the current room instead of the task running. Overriding the standard commands for taking and dropping objects are slightly different from other commands. The reason for this is in case the player types “take all” or “drop all”. You would then want all objects in the room to be taken (or dropped) with the exception of whichever ones you’ve defined tasks for. You would then want the task to run for these. To enable this to work efficiently, you must define the task as simply “get * <object>” (formatted for your particular circumstance), or “drop * <object>”. You don’t have to worry about synonyms for get and drop as ADRIFT will automatically cater for these, but it is essential to use these keywords. If you have defined a task that overrides a system command and the task fails because a restriction is not met, then one of two things will happen: • If you have put a message in the else display part of the restriction, this will be
displayed and the system command will be overridden. • If the else display message is blank, the system command will execute normally.
NB. If a task successfully matches a player command but hasno output text, it will still execute as per normal, but instead ofbypassing the normal response to the command, it will continueto be executed as if not being overridden by the task at all.

ADRIFT v4.0 Manual Advanced Techniques
Cam
Language Resources
ADRIFT supports the facility to create adventures in languages other than English. To do this, there are three things that must be done. These are: • Obtain a wordlist for the language you are writing in, so spell-checking works for
your language. • Create synonyms for all expected English inputs, so that the basic game engine
understands foreign commands. • Use a Language Resource to convert any standard output into a different
language. An ADRIFT Language Resource (ALR) file is basically a list of all words or phrases you want to replace with an alternative. Creating a Language Resource
A language resource file is a plain text file with the extension ALR instead of TXT. To create one, firstly open Notepad (or some similar text editor). The format of an ALR file is very simple – you just add the text you want replaced, put a pipe symbol at the end of the line (that’s a “|” symbol – the one above “\” on most keyboards), then type what you want to replace it with. Within the ALR file, you can add comments. These must start with the character “#”. Anything else on the line will be ignored. Blank lines are also ignored So for example, you might type in: ThisLanengrep If ainfoLanreso
# Comments must start with the hash character Also here is|You can also see You are holding|You are carrying You can only move|Exits arepbell Wild Page 56 of 92 25 Oct 2003
must then be imported into your adventure. To do this, select File > Import > guage Resource from the menu, and resave your adventure. Now every time the ine response contains one of these phrases, it will be substituted with your lacement.
n adventure has had a language resource added to it, you can extract this rmation and create a new Language Resource file by selecting File > Export > guage Resource from the menu. This option will be greyed out if there is no urce to export.

ADRIFT v4.0 Manual Advanced Techniques
Campbell Wild Page 57 of 92 25 Oct 2003
Combining ALR’s with Variables
You can greatly increase the flexibility of descriptions in ADRIFT, using a combination of variables and ALR files, which simulate text variables. (For many cases, you could use standard text variables, but there is more you can do with an ALR-variable than a text variable, for example setting variables randomly). If you have a description that you want changed depending on the state of a particular variable, e.g. you had a dial which had values "Low", "Medium" and "High", you would want to store this state in a variable and simply replace the text in the description. You would do this as follows: Create a variable, say "dial_value" with initial value "1". In the description for the dial, put something like: Then, in the ALR file, add the lines: The extra characters "[DIAL= ]" are used only to prevent the ALR file from inadvertently changing other numbers. What this does when ADRIFT evaluates the description, is it replaces %dial_value% with the current value for that variable. Initially this is the value "1", i.e., the description becomes: The ALR will then replace "[DIAL=1]" with "Low", thus giving the final output:
The dial has a needle, currently pointing to [DIAL=%dial_value%].
# Current position of dial[DIAL=1]|Low [DIAL=2]|Medium [DIAL=3]|High
The dial has a needle, currently pointing to [DIAL=1]
The dial has a needle, currently pointing to Low.

ADRIFT v4.0 Manual Advanced Techniques
Campbell Wild Page 58 of 92 25 Oct 2003
Modules
Modules are essentially segments of adventures, which can be “plugged in” to another adventure. They allow developers to create standard libraries of commonly used objects and functions to reduce the amount of repetition and “recreating the wheel”. Creating a Module
The simplest method of creating a module is to simply export it from an adventure you have created. To do this, select File > Export > Module… from the menu. This will bring up something like the following window:
This lists everything in your adventure in a series of lists. To select items you wish to export to your module, simply click on them in the list – click them again to deselect them. You can select an entire list by clicking on the list title at the top, and you can select the entire adventure by clicking on the Select All button. You have to be careful when exporting a partial adventure, because most items have references to another. For example, you might have a task “light candle” which requires you to be holding a match and a candle. If you exported the task without the objects, it wouldn’t make much sense as a module. To assist with this, you can select the Automatic dependencies checkbox. Now, whenever you select an item from a list, it will automatically select anything else if it is referenced by that item. When you are happy with the items selected, click the OK button to continue. This will prompt you for a filename. Enter the name of the module, and click Save. Your module has now been created.

ADRIFT v4.0 Manual Advanced Techniques
Campbell Wild Page 59 of 92 25 Oct 2003
You can also create a module directly into a text editor, such as Notepad by adding the text and saving the file with the extension AMF. Modifying a Module
Modules are stored in text format to allow manual editing of the files, and to promote easy sharing over text forums. To edit a module, simply double-click on the icon, or right-click on it and select Edit. This should open the file in Notepad. Importing a Module
Importing a module is very simple. Simply select File > Import > Module… from the menu. This will bring up a file browser window to allow you to select the module. Clicking Open will then parse the module. Firstly the syntax is checked. If anything in the module does not match the defined structure (see below) then an error window is displayed showing the parse errors. If there are no parse errors, a window will be displayed if there are any parse warnings. These are generally if there is an item referenced but not present in the module. If this is the case, you are asked whether or not you wish to continue importing the module. Selecting Yes, or if there are no parse warnings will then display the same window as when exporting so that you can preview what the module contains. Clicking OK will then import the module into your adventure. Module Structure
Modules must adhere to a strict syntax in order to be parsed successfully. You can enter comments at any point, as long as the line starts with the character “#”. The parser will ignore anything else on the line. Blank lines will also be ignored. Spaces and carriage returns are ignored when parsing, and all non-quoted tokens are not case sensitive. To embed a quote, i.e. ‘ “ ‘, you must precede it with a backslash, i.e. “\”. E.g. you might have something like “The sign reads \”No Entry\”.” The first non-commented line must contain the ADRIFT version that the module is compatible with. At the moment this will not affect how the module is parsed, but it’s there in case I change the module structure in future versions. It should be in the format Each item within a module must be defined explicitly in the format
Version X.XX Release X
DEFINE <itemtype> “<itemname>”

ADRIFT v4.0 Manual Advanced Techniques
Campbell Wild Page 60 of 92 25 Oct 2003
A complete skeleton for an ADRIFT Room is as follows: An object definition:
DEFINE Room “<room reference>” SHORTDESC = ”<short room description>” LONGDESC = “<long room description>” NOTONMAP = [True / False] ALTDESC IF TASK “<task ref>” IS {Not} Completed
THENSHOW “description” NEWSHORTDESC = “<new short description>” HIDEOBS = [True / False] SHOW [Immediately / After Main / After Any] END ALTDESC NORTH = “<room ref>” {IF OBJECT “<object ref>” IS “<state>”} EAST = “<room ref>” {IF TASK “<task ref>” IS {Not} Completed} SOUTH = “<room ref>” WEST = “<room ref>” UP = “<room ref>” DOWN = “<room ref>” IN = “<room ref>” OUT = “<room ref>” NORTHEAST = “<room ref>” SOUTHEAST = “<room ref>” SOUTHWEST = “<room ref>” NORTHWEST = “<room ref>” END Room
DEFINE Object “<object reference>” PREFIX = “<object prefix>” NAME = “<object name>” ALIASES = “<alias 1>” {,”<alias 2>”…} DESCRIPTION = “<description>” LOCATION = [Hidden / All Rooms / [Inside / On] “<object ref>”
/ ”<room ref>” {,”<room ref>”…}] TYPE = [Static / Dynamic] OPENABLE = [True / False] OPENSTATE = [Open / Closed / Locked] STATES= “<state1>{|<state2>…}” STARTSTATE=”<state>” INITIALDESC = “<initial description>” SURFACE = [True / False] CONTAINER = [True / False] END Object

ADRIFT v4.0 Manual Advanced Techniques
Campbell Wild Page 61 of 92 25 Oct 2003
A task definition: An event definition
DEFINE Task “<task reference>” COMMAND “<command>” {COMMAND …} WHERE = “<room ref>” {, “<room ref>”…} MESSAGE = “<message reply>” RESTRICTION (See Task Restrictions)
ELSESHOW “<message to show on failure>” {[AND / OR] RESTRICTION …} ACTION (See Task Actions) REVERSIBLE = [True / False] REVCOMMAND “<command to reverse task>” {REVCOMMAND …} REVERSETEXT = “<message when task reversed>” REPEATABLE = [True / False]
TRYAGAIN = “<message if tried again>” END Task
DEFINE Event “<event reference>”
NAME = “<event name>” START After Task “<task ref>” LENGTH Between <start no> and <end no> REPEATING = [True / False] WHERE = “<room ref>” STARTTEXT = “<text on event start>” MIDTIME1 = <mid no 1> MIDTEXT1 = “<text 2>” MIDTIME2 = <mid no 2> MIDTEXT2 = “<text 2>” PAUSE IF TASK “<task ref>” IS {Not} Completed ON START MOVE Object “<object ref>” TO “<room ref>” EXECUTE TASK “<task ref>”
END Event

ADRIFT v4.0 Manual Advanced Techniques
Campbell Wild Page 62 of 92 25 Oct 2003
A character definition: The Introduction:
DEFINE Character “<character reference>” NAME = “<character name>” PREFIX = “<character prefix>” ALIASES = “<alias>” {, “<alias 2>”…} LOCATION = “<room ref>” DESCRIPTION = “<description of character>” GENDER = [Male / Female / Unknown] TEXTHERE = “<description if in room>” SHOWMOVE = [True / False] ENTERTEXT = “<text if enters the room>” EXITTEXT = “<text if exits the room>” WALK STARTTASK = “<task ref>” STEP [Follow Player / Hidden / “<room ref>”], <time in room> {STEP …} LOOP = [True / False] END WALK {WALK …} CONVERSATION SUBJECTS = “<subject(s)>” REPLY = “<reply to subject>” TASK = “<task ref>” ELSEREPLY = “<reply if task is complete>” END CONVERSATION {CONVERSATION …} ATTITUDE = {Ally / Neutral / Enemy} STAMINA = X to X STRENGTH = X to X ACCURACY = X to X DEFENCE = X to X AGIILITY = X to X RECOVERY = X SPEED = {Every turn / Most turns / Every second turn / Every third turn / Every four turns} LOWTASK = “<task when stamina drops to below 10%> DIETASK = “<task when character is killed>” END Character
DEFINE Introduction MESSAGE = “<introduction> STARTROOM = “<room ref>” END Introduction

ADRIFT v4.0 Manual Advanced Techniques
Campbell Wild Page 63 of 92 25 Oct 2003
The winning message: And the Player:
DEFINE Winning MESSAGE = “<winning message> END Winning
DEFINE Player NAME = “<name of player>” GENDER = {Male / Female / Prompt} PROMPTFORNAME = {True / False} DESCRIPTION = “<description>” BUTIFTASK “<task>” IS COMPLETE THENSHOW “<description>” INITIALPOSITION = {Standing / Sitting / Lying} {ON “<object ref>”} MAXBULK = <number> {Tiny / Small / Normal / Large / Huge} Objects MAXWEIGHT = <number> {Very Light / Light / Normal / Heavy / Very Heavy} Objects STAMINA = X to X STRENGTH = X to X ACCURACY = X to X DEFENCE = X to X AGIILITY = X to X RECOVERY = X END Player

ADRIFT v4.0 Manual Advanced Techniques
Campbell Wild Page 64 of 92 25 Oct 2003
Task Command Functions
Task Command Functions supply ADRIFT with additional power to do specific things, in which there are no easy ways to do using pull down menus and lists. There is currently only one such function built into ADRIFT, but this may well be expanded in the future as the need arises. Task Command Functions are functions that are written instead of a task command. Instead of the text being pattern matched against what the player types in Runner, the function is run and if all the restrictions are passed, the task will execute. getdynfromroom
Format: # %object% = getdynfromroom(<roomname>) This function assigns the Referenced Object with the first dynamic object found in room <roomname>. Example If you had a room with short description “The Park”, you could create the task command function:
# %object% = getdynfromroom(The Park) This will then assign the Referenced Object to the first dynamic object found in room The Park. Say the Player held an apple and an orange, and dropped both objects. The first time the task runs, the Referenced Object would be assigned to the orange (assuming it was first in the objects list). You would typically have in the restrictions for that task that Referenced Object must be in room The Park. You could then have as an action, to move the Referenced Object to Hidden, with the output: “An old park keeper walks nearby and spears %theobject% with a large prong, and puts it in his bag.”
NB. Unpredictability may occur if you have more than oneroom named the same. In which case, tags within the roomnames may help.
TIP. You can also have other task commands within the sametask, so you could have the first task command being “# Parkkeeper prongs objects” to improve readability

ADRIFT v4.0 Manual The Battle System
Campbell Wild Page 65 of 92 25 Oct 2003
The Battle System
ADRIFT has a built in Battle System. What this allows you to do, is create battles between the various characters in your game and with the Player. By default, the battle system is disabled. To enable it, select Adventure > Options… from the menu, and check the Enable Battle System checkbox. Battles ensue in ADRIFT when two opposing characters meet, or if the Player comes across a character marked as an enemy. Different characters (and the Player) have different strengths and attributes. These can be set within ranges, so that they are random to a certain degree. Weapons and armour can also be picked up to enhance the particular attributes of the characters. You can also make characters flee or do anything when their stamina gets low, and run other tasks when they die. You should notice two things once the Battle System in enabled. Both the Player dialog box, and Character dialog boxes should have an extra tab, namely Battles. Extra functions also become available in object attributes. The Player
The extra tab in the Player dialog box looks like this:

ADRIFT v4.0 Manual The Battle System
Campbell Wild Page 66 of 92 25 Oct 2003
The Player has five attributes; stamina, strength, accuracy, defence and agility. Stamina is the amount of life the Player has. Once stamina reaches zero, the Player is dead. Strength is the physical strength of the Player. This is what is used to harm other characters – the greater the strength, the more damage is done. Strength can be increased by wielding weapons with hit strength greater than zero. You can also have cursed items with a negative strength, which reduces the character strength. Accuracy is how likely the Player is to hit another character. The greater the accuracy, the higher the chance of making contact. Defence is the ability of the Player to withstand physical attack. The greater the defence, the higher the strength must be of the character attacking in order to do the Player damage. The amount of damage received on a successful attack will be the character’s strength, minus the Player’s defence. Agility is the likelihood of the Player to avoid the attack of another character. It is directly opposed to accuracy, such that the chance of an accurate character hitting a Player with high agility might be the same at the chance of a not so accurate character hitting a Player with low agility. All attributes are set on a sliding scale from 0 to 100. Dragging the slider up the scale selects the range. To clear the range, simply drag back down the bar, or click onto the selector. You can also manually set the range to exact values by right-clicking on a slider. This will prompt you for the minimum and maximum values. In the game, the value of each attribute will be a random value in the range selected each time the attribute is required, with the exception of stamina – stamina is assigned randomly in the range whenever the game starts. You can allow the Player to slowly recover from any damage sustained by selecting the Automatic stamina recovery checkbox. This allows you to specify the number of turns to go by for the stamina to go up by one point. This can be in the range 0 to 100. The stamina will then be increased every so many turns up until it reaches the maximum value set in your range.

ADRIFT v4.0 Manual The Battle System
Campbell Wild Page 67 of 92 25 Oct 2003
Characters
Characters have exactly the same options as Player plus a few more. The characters Battles screen looks like this:
In addition to the same options as the Player, you can also specify the attitude of the character, from ally, neutral or enemy. Allies will never attack the Player, but if an enemy appears in the same room as the character, the ally will attack the enemy. Neutral characters will never attack the Player, nor will they attack any enemies. Enemies will attack the Player, plus any allies they come across. To further enhance the normal attributes of characters, you can make super bad enemies. To do this, check the Extra Strong checkbox. This changes the slider scales from being from 0-100 as with the Player, to 0-1000. You must assign a speed for the character to attack at. Potentially you, the player, can attack every turn. This allows you to give the Player an advantage against slower characters but allows you to be equally matched against faster ones.

ADRIFT v4.0 Manual The Battle System
Campbell Wild Page 68 of 92 25 Oct 2003
The options for speed are: • Attack every turn • Attack most turns • Attack every second turn • Attack one in three • Attack one in four If a character comes up against more than one foe at a time, it will randomly pick between the characters (and the Player) to decide which one to attack. In order to make a character flee, or do certain things if it gets low on stamina, you can select a task in the Task to run if stamina low pull down menu. This will execute every time the stamina decreases below 10% of its maximum stamina. The default behaviour for when a character is killed (i.e. its stamina reaches zero) is for the character to disappear, and any objects it was holding are moved to the current room. Typically you would want to create a dead body and have some message notifying the player of the recently deceased. To do this, create a task which moves your body object to the current room with an accompanying message, and select it in the Task to run if killed menu.

ADRIFT v4.0 Manual The Battle System
Campbell Wild Page 69 of 92 25 Oct 2003
Objects
When the battle system is enabled, extra options become available in object attributes like so:
Wearable objects have the option to become armour. If you select the checkbox and is armour with protection value, the textbox for entering the value becomes available. This allows you to specify a value that the armour protects whoever is wearing it. This can be in the range –100 to 100, negative values providing cursed behaviour. The value of the armour is added to the defence value of whoever wears it. If an object is defined as a weapon, extra functionality becomes available. You can specify a hit value, and an accuracy value. Both these can be in the range –100 to 100. The hit value is added to the strength of whoever is wielding it and the accuracy value is added to the accuracy of whoever is wielding it. Each weapon has an attack method. This is the verb that should be used when attacking with it, such as shoot, hit, chop etc.

ADRIFT v4.0 Manual The Battle System
Campbell Wild Page 70 of 92 25 Oct 2003
NB. Only one weapon can be wielded at any one time – the weapons attributes, and only that weapons, are added to the characters attributes. A character will always wield its bestweapon. Armour is different, in that each separate piece ofarmour accumulates the defence value of the wearer.

ADRIFT v4.0 Manual The Battle System
Campbell Wild Page 71 of 92 25 Oct 2003
Tasks
When the Battle System is enabled, extra options become available for task actions. You can: • Change the attitude of a character. • Change the stamina of the Player or characters. • Change the maximum stamina of the Player or characters. • Change the strength of the Player or characters. • Change the maximum strength of the Player or characters • Change the defence value of the Player or characters. • Change the maximum defence value of the Player or characters. • Change the speed of a character. If you increase the stamina, strength or defence value of a Player or character, it will only increase the value up to the maximum for that Player/character. The maximum is where the pointer rests on the sliders within Generator. An Example
Let’s say the Player has been defined with a stamina of 20, but has been hit by an Ogre and currently has stamina of 15. Say you’ve also created an apple which when eaten increases the stamina by 10 points, and a potion which when eaten increases the maximum stamina by 5 points. If the Player ate the apple first, it would only top up the stamina to 20 points, rather than 25, as 20 is the maximum. If before eating the apple, they drank the potion, the maximum would be increased to 25. Eating the apple at this point would then increase the stamina to 25. Status
You can find out the current status of the Player or characters at any time by using the command “status”. The command on it’s own will give you the status of the Player. The command “status <character>” will give you the current status of that particular character. The status command produces a list of the current values of the different aspects of that character such as stamina and strength. It also shows the current weapon being wielded if any.

ADRIFT v4.0 Manual Playing Adventures
Campbell Wild Page 72 of 92 25 Oct 2003
Playing Adventures
Starting an Adventure
There are several ways to start an adventure. • From within Generator, you can select Adventure > Run Adventure from the menu
(or press F5), or click on the button. • From Windows Explorer or the Desktop, you can double click on a TAF file, or
right-click and select Play. (You will need to run Runner initially for it to register the icons)
• From within Runner, select Adventure > Open Adventure from the menu. • From within Runner, select Adventure and click on a recently opened adventure. Once the adventure has opened, you should be able to click into the text box at the bottom of the screen and start issuing commands. Typing “help” will bring up a list of commonly used commands.
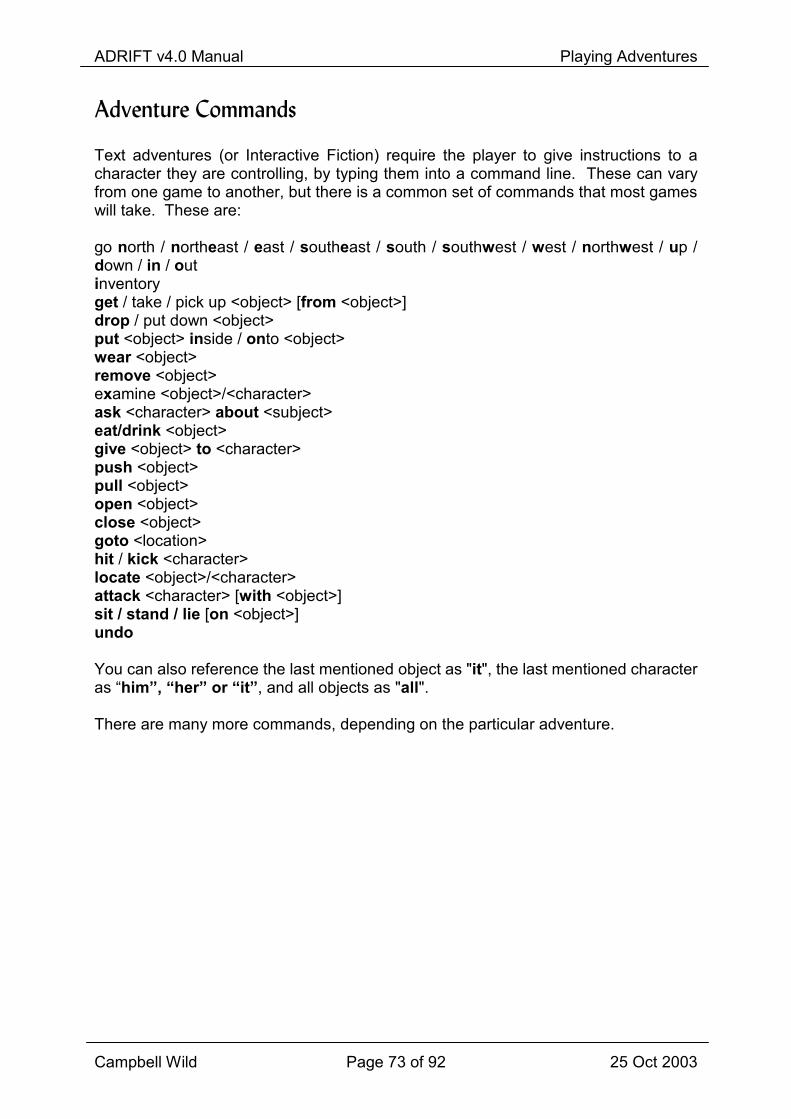
ADRIFT v4.0 Manual Playing Adventures
Campbell Wild Page 73 of 92 25 Oct 2003
Adventure Commands
Text adventures (or Interactive Fiction) require the player to give instructions to a character they are controlling, by typing them into a command line. These can vary from one game to another, but there is a common set of commands that most games will take. These are: go north / northeast / east / southeast / south / southwest / west / northwest / up / down / in / out inventory get / take / pick up <object> [from <object>] drop / put down <object> put <object> inside / onto <object> wear <object> remove <object> examine <object>/<character> ask <character> about <subject> eat/drink <object> give <object> to <character> push <object> pull <object> open <object> close <object> goto <location> hit / kick <character> locate <object>/<character> attack <character> [with <object>] sit / stand / lie [on <object>] undo You can also reference the last mentioned object as "it", the last mentioned character as “him”, “her” or “it”, and all objects as "all". There are many more commands, depending on the particular adventure.

ADRIFT v4.0 Manual Playing Adventures
Campbell Wild Page 74 of 92 25 Oct 2003
Example transcript
You are standing in the kitchen. It is completely bare except for a steel sink and a worktop. � examine sink The steel sink looks rather grubby. There is a single tap in the centre of the sink. � turn tap on You turn the tap, but all that happens is a clunking noise, and a brown goo comes out the tap. � examine it (the tap) The tap appears to be blocked up. There is brown goo coming out the tap. � unblock it (the tap) What would you like to unlock the tap with? � pencil You stick the pencil up inside the tap and fiddle about a bit. A large lump of goo comes out the tap. � turn tap on You turn the tap on. Water gushes out the tap, cleaning away the mess in the sink. � inventory You are holding a pencil. � drop pencil You drop the pencil.

ADRIFT v4.0 Manual Playing Adventures
Campbell Wild Page 75 of 92 25 Oct 2003
Runner Features
Auto Complete
To make typing a bit easier, you can select Options > Auto Complete from the menu. This will attempt to guess what you are typing, making it a lot quicker. Aside from making it quicker for the player to type common commands, it can sometimes make the game a bit too easy by giving away object names. Usually this will only happen if the Player has come across them, but nevertheless, the option exists within Generator to disable this feature. Control Panel
If you select Options > Control Panel from the menus, it will bring up a small control panel with buttons on it. This allows you to navigate the map and do simple object manipulation. Verbose
If you select Options > Verbose from the menus, then every time you enter a room you have already visited the whole room description will be displayed. If it is not selected, only the short room description will be displayed. Transcript
If you want to save some transcript to file, select Adventure > Start Transcript. This will prompt you for a filename to start logging the text from the game. Once you click Save, anything you type, and all the responses will be logged to this file. To stop transcript, select Adventure > Stop Transcript from the same menu. You should now be able to access this file which should contain all text in the game in plain text format. Right-clicking
You can right-click the mouse in the main Runner window for a list of common commands. Clicking on object names will give a different menu specific to that object, and clicking on a direction name will attempt to move the Player in that direction.

ADRIFT v4.0 Manual Playing Adventures
Campbell Wild Page 76 of 92 25 Oct 2003
Highscores
Runner has built in facility to keep track of highscores for particular adventures. To enable this option, select Options > High Scores/Scoring > Enable High Scores from the menu. To view the current highscores for the adventure you are playing, select Options > High Scores/Scoring > View High Score table from the menu. You can clear this at any time by selecting Clear High scores. If you want to be notified explicitly every time the score changes, select Options > High Scores/Scoring > Notify when score changes from the menu. This will display the score change as a reference (in brackets) every time it happens.

ADRIFT v4.0 Manual Playing Adventures
Campbell Wild Page 77 of 92 25 Oct 2003
The Debugger
ADRIFT has a built in debugger, to make it easier to track down things which don’t seem to be working quite right when developing your game. To access it, select Help > Debugger… from the menu. This should bring up a window such as:
The debugger is split up into seven sections. These are: • Rooms • Objects • Tasks • Events • Characters • Variables • Player Each section allows you to either view or amend the information within the adventure. The functionality of each is as follows: Rooms
You can select any room within the game. For each room, you will be shown whether or not the Player has “Seen” this location. If they haven’t seen it, you will not be able to refer to the room or “goto” the location. You can select “Yes” or “No” from the seen menu. Objects
Each object will display its location. If the object is static, this will simply display N/A, as static objects can span more than one location. If the object is dynamic, the location will be displayed – this could be in or on an object, held or worn by a Player, hidden, or simply in a room.

ADRIFT v4.0 Manual Playing Adventures
Campbell Wild Page 78 of 92 25 Oct 2003
By clicking on the pull-down button on the object list, it will allow you to set the location of the object to being in any room within the adventure. You are also notified whether or not the object has been seen. This will affect whether or not you can refer to the object, whether you can pick it up, and in fact do most things regarding its existence. The status of the object will also be displayed – this will be N/A if the object is not openable. For openable objects, you can set this to Open, Closed or Locked. Tasks
The status of all tasks will be displayed. This is either “completed” or “not completed”. You can set this to either status. Any task with a positive score can only be scored once – to keep track of this, tasks are marked as having scored or not. For example, a task that has been reversed or undone will still not score if completed again if it scored initially. You can set or deselect this. In the task debugger, it will also display whether or not it is possible to complete the task given the current conditions. This will be displayed as “Yes” or “No”. Events
The status of an event can be any one of the following five: • Waiting – This means the event is waiting for a timer to reach zero. • Running – The event is currently running. • Awaiting task – The event is waiting for a task to be completed before starting. • Finished – the event has finished and will not restart. • Paused – the event has been paused by a task and can be resumed if the correct
task is executed. Events are probably the hardest part of ADRIFT to track, so the debugger is very useful to track the status as above. The counter is also displayed – this is used for running events (to display how long the event has until it finishes) and for waiting events (to display how long until the event starts). The counter can be overwritten to any value. Characters
The location for the characters is given. You can change the pull down menu to put the character into any room.

ADRIFT v4.0 Manual Playing Adventures
Campbell Wild Page 79 of 92 25 Oct 2003
Each character also has a “seen” flag. This will allow the parser to acknowledge any mention of that character, or pretend that it doesn’t exist. This can be set to “Yes” or “No”. Variables
The current value of each variable is displayed. This can be overwritten to any valid value. Player
The location of the Player is displayed. You can set this to any location by selecting from the pull down menu. The Player also has attributes for how much they can carry in terms of bulk and weight. This is interpreted from the options selected in Generator to numerical values – the current value for objects held and the maximum is displayed. You can overwrite the maximum allowed for held objects.

ADRIFT v4.0 Manual Playing Adventures
Campbell Wild Page 80 of 92 25 Oct 2003
The Map
ADRIFT attempts to dynamically create a map of your surroundings directly from the links between rooms in an adventure. Because of this, it suffers from some problems where rooms don’t link back on their source, or if the map is incorrect or very complex. You can view the map by selecting Options > Show Map, or by pressing F2. Map Display
The map is made up of a series of boxes, one for each room. Links between the rooms are displayed by a line in the corresponding direction. The line will be one of three types: • A thick, complete line represents a two-way connection between the rooms • A thin, complete line represents a one-way connection between the rooms • A dotted line represents a link between the rooms, which is now only possible
since a task was completed or object state satisfied. Directions up, down, in and out are represented by pointing hands and arrows. A typical map display might look something like this:

ADRIFT v4.0 Manual Playing Adventures
Campbell Wild Page 81 of 92 25 Oct 2003
Zooming the map
You can zoom the map in or out by moving the cursor onto the map into a blank area. You should see the cursor change into a magnifying glass shape. Left-clicking the mouse will zoom the map in, whilst right-clicking zooms the map out. You can also change the size of the text within the text boxes quickly and easily in a similar method – wait until the magnifying glass cursor appears, then hold down shift, and right or left click the mouse to zoom the text. Navigating the map
You can navigate around the map by clicking on rooms. This will move the Player to that room using the shortest possible route through rooms previously visited. You can also navigate around the map without moving the Player by clicking on the arrows on the map. If the room the arrow points to has not been visited yet, then this option will not be available. Printing out the map
To print out the map, simply select Map > Print map from the menu. This will print out the map window in the best fit on paper (automatically choosing landscape or portrait) and as large as possible on the paper. NB. This option is only available when viewing the map in windowed mode. Display options
Clicking Map > Options from the Map window, or Options > Map Options… from the main Runner window will bring up the map options dialog box as shown:

ADRIFT v4.0 Manual Playing Adventures
Campbell Wild Page 82 of 92 25 Oct 2003
Here, you can set the colours for the map; the highlight colour, the normal room colour, and the background colour. You can also set the font face and size. You can change the shape of the room boxes by clicking on the left and right arrows. All changes are previewed in the display window. There are two methods of displaying the map. You can either centre the entire map in the display window – this is a nice way to view the map if it all fits in the window but quite often you will wander off the edge and not be able to see where you are. The other method is to focus on the current room – this will always display the current room in the middle of the map, and display the rest of the map around it. The final option is to force the map window to stay on top of the main Runner window – this is useful if you have maximised the Runner window but still wish to see the map.

ADRIFT v4.0 Manual Playing Adventures
Campbell Wild Page 83 of 92 25 Oct 2003
Display & Media
There are numerous options within ADRIFT to customise the display to your liking. To see these options, select Options > Display & Media from the menu. This will bring up a dialog box as follows:
Appearance
You can set three colours here; the typed colour text, the normal replies colour, and the background colour. All changes will be previewed in the small window to the side. By default, the font displayed in Runner will be whatever the person creating the adventure specified – if they didn’t specify anything, this should default to Arial. You can override this font with one of your own – to do this, check the Always use my font checkbox. This will enable the Set font button where you can pick your selection. Other options available are: References in brackets This shows anything referred to such as when using “it” or “him”, or additional information such as score changes in brackets after a command has been given. Room names in descriptions This will display the short roomname in bold before the main description every time the room description is displayed. Prompt for typed commands This simply inserts a “>” symbol before typed commands in the main window to distinguish them from other highlighted parts of the text.

ADRIFT v4.0 Manual Playing Adventures
Campbell Wild Page 84 of 92 25 Oct 2003
Auto pause long text This automatically pauses large amounts of text as they fill the screen, displaying “[More]” and forcing the player to press a key before continuing to display text. Depending on whether font sizes are consistent, sometimes this will skew slightly from the bottom of the screen. Media
Clicking on the Media tab brings up the following display:
Enable sound in games toggles whether or not to play sounds assigned to the adventure. Enable graphics in games toggles whether or not to display graphics assigned to the adventure. If this is enabled, you can specify where you wish graphics to be displayed. The choice is: Display graphics in separate window This will open up a separate window where the graphics can be displayed. This window can be set to stay on top of the main window in the same way as the map. You can also zoom pictures to the size of the window, or size the window to the graphics, or simply display centrally in the window by choosing from the menu in the display window. Display graphics inline with text This will display graphics within the main Runner window along with the text, such that the pictures scroll up alongside the text. Because all pictures must reside in memory using this method, it can soon use up a lot of system resources if displaying a lot of pictures. If this happens, a simple Clear Screen should sort out the problem. If graphics (GFX) has been specified framed within the main Runner window (see Layout section below), then graphics will not be displayed in a separate window as
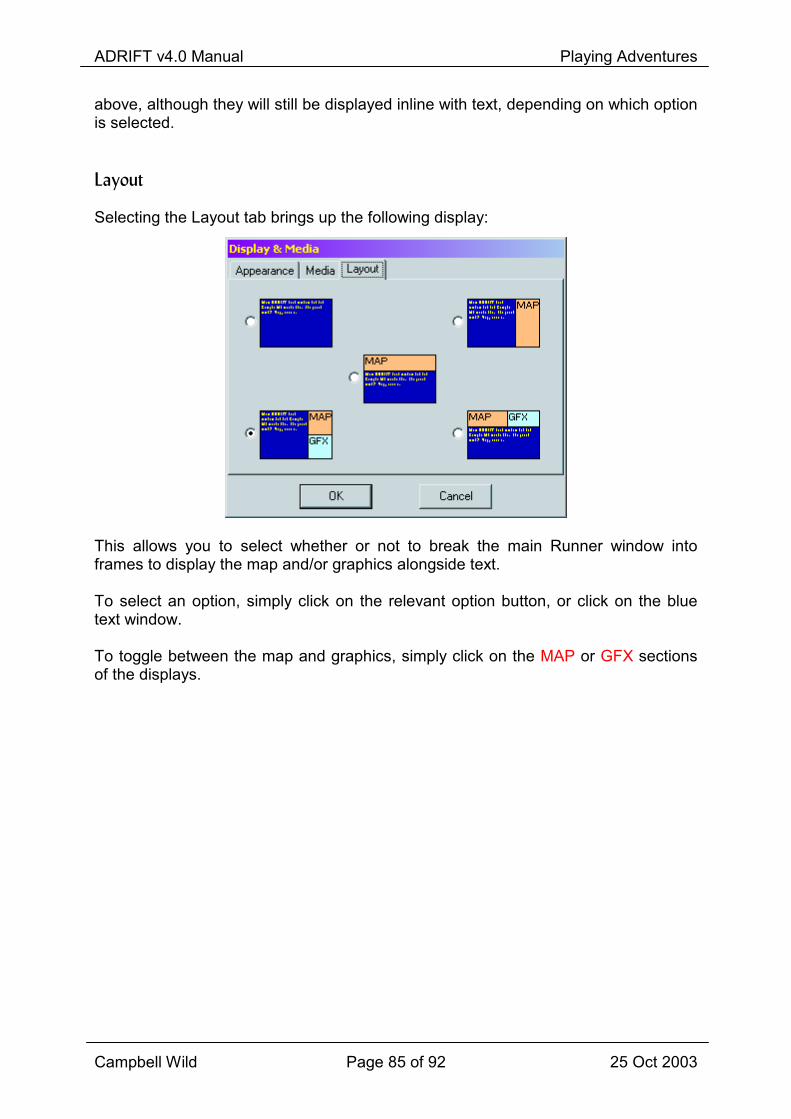
ADRIFT v4.0 Manual Playing Adventures
Campbell Wild Page 85 of 92 25 Oct 2003
above, although they will still be displayed inline with text, depending on which option is selected. Layout
Selecting the Layout tab brings up the following display:
This allows you to select whether or not to break the main Runner window into frames to display the map and/or graphics alongside text. To select an option, simply click on the relevant option button, or click on the blue text window. To toggle between the map and graphics, simply click on the MAP or GFX sections of the displays.

ADRIFT v4.0 Manual Troubleshooting
Campbell Wild Page 86 of 92 25 Oct 2003
Troubleshooting
Problems
• Generator or Runner won’t start • I keep getting the error message “Cannot draw map – too complex” • Component ‘ZlibTool.ocx’ or one of its dependencies not correctly registered • Sound cannot be played. Try installing MediaPlayer • Out of Memory, Error 7 • Input Past End of File • Generator or Runner crashes If your question is not listed here, please send it to me at [email protected], and I will respond as soon as I can. Generator or Runner won’t start
Make sure you have installed version 4.00 with the Setup.exe file – this will install all the required DLL and OCX files needed by ADRIFT. If you have done this and it still won’t start, please email me at [email protected], letting me know what error message you are getting and I will try to sort out the problem. I keep getting the error message “Cannot draw map – too complex”
The map tries to create itself dynamically from the links supplied in the room directions tab. The most common reason this message appears is because there is an error in the connections, i.e. instead of creating a link from Room A to Room B and back from Room B to Room A, the link is from Room A to Room C and Room B to Room A. If you are sure your connections are correct, please send me your Adventure and I will do my best to update the map to handle the more complex layout. Component ‘ZlibTool.ocx’ or one of its dependencies not correctly registered
‘Zlibtool.ocx’ is a file required by ADRIFT to load and save files. If you do not have this on your computer, the chances are you’ve installed the upgrade of ADRIFT instead of the full application. Download ADRIFT40.zip and run setup.exe.

ADRIFT v4.0 Manual Troubleshooting
Campbell Wild Page 87 of 92 25 Oct 2003
Sound cannot be played. Try installing MediaPlayer
To enable ADRIFT to support a wide variety of sounds, such as WAV, MIDI and MP3, it uses a file supplied by Microsoft MediaPlayer, namely Msdxm.ocx. Unfortunately, Microsoft supply different versions of this file depending on which version of Windows you use, therefore I cannot supply the file with ADRIFT as installing the wrong file would render MediaPlayer inoperable. If you are getting this error message and wish to play sound through ADRIFT, you should visit http://www.microsoft.com/mediaplayer/ and download the latest version of MediaPlayer for your version of Windows. Out of Memory, Error 7
This can happen to Windows 95, 98 and ME users. Basically, Windows is running out of resources. Make sure you’ve checked the option in File > Settings… > Conserve Memory. If you’ve already done that and are still getting the error message, try to make sure you don’t have too many other programs running, particularly other Visual Basic programs. If you can narrow the error down to a specific place then please let me know. Input Past End of File
This may occur as a consequence if the operating system is not set to English for non-unicode programs. To do this (in XP - will be similar for others), follow the following steps:
1. In Control Panel and select Date, Time, Language, and Regional Options 2. Select Regional and Language Options 3. Click on the Advanced tab 4. Select English (United Kingdom) - other variants may also work 5. Click OK. You will need to restart your machine
Generator or Runner crashes
This should not happen at all. Please visit http://www.adrift.org.uk/bugs where you will find a list of any outstanding bugs (and enhancements) with ADRIFT. If the problem you have experienced is not on the list, please add it. You can also inform me of the problem at [email protected], although adding it to the list will automatically inform me of the problem. On the list, bugs are prioritised, so I can fix any major ones quickly. It can also keep you informed of the progress of any fixes I make to the software.

ADRIFT v4.0 Manual Acknowledgements
Campbell Wild Page 88 of 92 25 Oct 2003
Acknowledgements
I have had an immense amount of support and input from other people as I’ve been developing ADRIFT. I would like to thank the following people for their bug reports and suggestions; Paul Adams, Koitmäe Arne, Sho Asano, Will Bob, Leo Borisenko, Ryan Bury, Heal Butcher, Tan Chin Hiong, Stephen Clark, Dana Crane, Stewart Crowther, Sawn Curt, Bruce Davis, Arsen Dawn, Buck Dean, Dave Dooley, Liam Erven, Brock Evans, Rickard Falkenäng, Ken Franklin, Frank Gagnon, Rich Galichon, Simon Goldie, David Good, Mike Guidetti, Dan Hartnett, Matthew Hickford, Dave Johnson, Dan Kangas, William Kauffman, Patrick Kelly, Achim Kern, Kinvadren, Ralph Klafert, Rowan Laird, Benjamin Lau, Joshua Lawrence, Cliff Lent, Sam McCall, Steve Miklovic, Bryan Miller, Steve Millerick, Chris Moody, Durgan Nallar, Germ Peñal, Shaun Phurrough, Mark Ratcliffe, Mike Reese, Jon Reid, Ray Richardson, Finn Rosenløv, David Russell, Chris Rutherford, Paul Sanders, Steve Sclafani, Serge Shubkin, Mark Silcox, Kirsty Singleton, Alessio Siniscalchi, David Stafford, Charles Urbach, Mark Van Sciver, Laura Wehmeier, Per Wilhelmsson, Mark Whitmore, Matt Wiltshire I would like to thank the following people for their time and hard work put into creating web pages which support ADRIFT: Ken Franklin - http://kf.adrift.iwarp.com Shaun Phurrough - http://www.thephurroughs.com/projects/atts Andrew Nicholas - http://homepage.ntlworld.com/andrew.nicholas/adrift/ Stewart McAbney – http://www.mileout.org.uk Dana Crane – http://home.gcn.cx/mystery/ Writing never was my strong point, so I’d like to thank my Mum for proof reading this document, and Julie Harrap for her Word skills. Lastly, I’d like to thank Raymond Chramega and Dorothy Mah for their extremely kind generosity. If I’ve left anybody off this page who should be here, or if you’re on here and would rather not be, please let me know.

ADRIFT v4.0 Manual Appendix
Campbell Wild Page 89 of 92 25 Oct 2003
Appendix
Hexadecimal Values
In ADRIFT, colours are specified using hexadecimal numbers. Hexadecimal numbers are numbers that are based on the value of 16 rather than the classical numbers based on the value of 10. Decimal vs. Hexadecimal Numbers In classical numbers you have ten different figures whereas in hexadecimal numbers you have 16 different figures. Below is a table showing how to write the numbers from 1 to 20 in both systems: Decimal 0 1 2 3 4 5 6 7 8 9 10 11 12 13 14 15 16 17 18 19 20
Hexadecimal 0 1 2 3 4 5 6 7 8 9 A B C D E F 10 11 12 13 14
The highest hexadecimal number you can specify using one figure is F equalling 15. With two figures the highest value is FF equalling 255. Hexadecimal Values in HTML
A typical colour-definition in HTML would look like this: The colour is defined in the "#FF8C67". The # simply states that the following numbers are hexadecimal but it is not required. The first two digits are the amount of red. Digits 3 and 4 specify the amount of green. And finally digit 5 and 6 specify the desired amount of blue. Since there are two hexadecimal figures for each colour you can specify 256 gradients of each basic colour. This gives a total of 256 x 256 x 256 = 16,777,216 different combinations.
<font colour=”#FF8C67”>

ADRIFT v4.0 Manual Appendix
Campbell Wild Page 90 of 92 25 Oct 2003
Named Colours
A few colours in ADRIFT can be referred to using names rather than their hex values, in the format: Below is a listing of these colours and their names:
Black Yellow Red Maroon Grey Lime Green Olive Silver Aqua Blue Navy White Magenta Purple Teal
<font colour=Navy>

ADRIFT v4.0 Manual Appendix
Campbell Wild Page 91 of 92 25 Oct 2003
Verb List
ADRIFT will give a default response to most commands. To alter this default response, you would need to override the command with a task, or change the default using an ALR replacement. The verbs that ADRIFT will respond to are: ask, attack, block, break, buy, bye, can, chop, clean, clear,climb, close, cp, cry, cut, dance, date, destroy, dir,directions, down, drink, drop, e, east, eat, enter, empty, ex,exam, examine, exits, feed, feel, fight, find, fix, fly, get,give, go, hit, how, hum, i, inv, inventory, jump, kick, kill,kiss, l, leave, lie, lift, light, listen, ln, locate, lock,look, ls, move, mv, n, ne, no, north, northeast, north-east,northwest, north-west, nw, open, out, panel, past, pick,press, previous, pull, punch, push, put, read, remove, run, s,say, se, sell, shake, shoot, shout, sing, sit, slap, sleep,smash, smell, south, southeast, south-east, southwest, south-west, stab, stand, status, stop, suck, sw, take, talk, thank,throw, time, touch, turn, turns, unblock, undo, unlock, up, w,wait, wash, wear, west, what, when, where, whistle, who, why,x, yes, z Other commands which have functionality within ADRIFT are: !, !!, about, again, author, clr, cls, commands, control,control panel, control-panel, count, end, endgame, g, help,hint, history, info, information, last, num, quit, restore,save, score, version

ADRIFT v4.0 Manual Glossary
Campbell Wild Page 92 of 92 25 Oct 2003
Glossary
Cardinal - The four principal points of the compass, i.e. North, East, South and West. The off-cardinal points are Northeast, Southeast, Southwest and Northwest. Player – This is both the person playing the game in Runner, and also the character the player controls, often referred to in Interactive Fiction, as the Playing Character (PC). In this document, the actual person is referred to as “player” (small p) whereas the character being controlled is referred to as “Player” (capital P). Character – These are other characters in the game, not controlled directly by the player. In Interactive Fiction, they are often referred to as Non-Player Characters (NPCs). Openable – Objects which have the ability to be opened and closed.
Made in Scotland