Embed Size (px)
Citation preview


Fingerpr in t Time At t endance Ser i es
1
Contents
Chapter I Introduction of the Basic Operation of Time Attendance……………3
1.Interface Description of Time Attendance…………………………………………3
2. Power Management in Time Attendance…………………………………3
3. User of Time Attendance………………………………………………………… 4
4. Enroll Method of Time Attendance………………………………………………4
5. User Number and Passwor ……………………………………………………4
6. Working State of Time Attendance……………………………………………4
7. Data Recorded in Time Attendance……………………………………………5
8. Function Setting of Time Attendanc……………………………………………6
8.1 Device setting…………………………………………………………………6
8.2 Record Setting ………………………………………………………… 9
9. Keyboard …………………………………………………………………10
9.1 Keyboard Configuration …………………………………………………… 10
9.2 Keyboard Function ………………………………………………………10
10. Menu………………………………………………… ………………………11
10.1 Menu Division……………………………………… …………………… 11
10.2 Menu Structure ……………………………………… ……………………11
10.3 Prompt Tone and Voice Out ………………………… …………………… 18
Chapter II General Operation of Time Attendance …… ………………… 19
1. Process of the First Operation ………………………… …………………… 19
1.1 Press “MENU” to Enter Management Operating State …………………… 19
1.2 Press “ESC” to Return to General Use State ………… …………………… 19
2. Use Method under Attendance State……………………… ………………… 20
2.1. Fingerprint Attendance ………………………… …………………… 20
2.2. Password Attendance ………………………… ……………………… 21
Chapter III Administrator Operating Method of Time Attendance ………23
1. Operating Procedure under Administrator Operating State ……………… 23
2. User Management……………………………… ……………………… 24
Fingerpr in t Time At tend ance Ser i es
2
2.1 Register User……………………………………………………………………25
2.2 Register Manager……………………………………………………………….32
2.3 Delete User……………………………………………………………………..32
2.4 Inquire In/Out Record…………………………………………………………..33
2.5 Inquire Administrative Record………………………………………………….35
2.6 Delete All Records……………………………………………………………...36
3. Advanced Setting………………………………………………………………...37
3.1 Device Setting…………………………………………………………………..38
3.2 Record Setting…………………………………………………………………..42
4. Information Inquiry………………………………………………………………45
Chapter IV Attachment……………………………………………………………47
1. Notices of Pressing Finger……………………………………………………….47
2. Software Use License Agreement……………………………………………….48
3. Frequently Asked Questions…………………………………………………….50
3.1 Hardware Device……………………………………………………………….50
3.2 Software Part……………………………………………………………………52
Statement Relating to Human Rights and Privacy………………………………54
Quick Installation Guide ……………………………………………………………56
Hardware Part……………………………………………………………………….56
Start and Close Time Attendance…………………………………………………...56
Connect with Computer…………………………………………………………….56
Definition of Communication Interface Signal
Access Control System……………………………………………...
Chapter I Introduction of the Basic
Operation of Time Attendance

Fingerpr in t Time At t endance Ser i es
3
1. Interface Description of Time AttendanceA fingerprint time attendance is equipped with three types of communication
interface: RS232/485 and TCP/IP communication interfaces, as shown in the
following picture:
The positions of communication interface and power connector of time attendance
are as follows:
Communication
Interface
Power Connector
※ TCP/IP communication function is non-standard
function, depending on specific model
2. Power Management in Time Attendance
① Press the power key on the time attendance to start the device
and enter normal working state (attendance state).
② If auto off function is set in the time attendance and no operation
RS232 RS485 Interface TCP/IP

Fingerpr in t Time At tend ance Ser i es
4
is implemented under normal working state (attendance state), it will
close automatically in a set time.
③ Under normal working state (attendance state), pressing the
power key for about 4 seconds and the power of the time attendance will
be cut off (manual shutdown), which is similar to the personal computer.
④ You can turn on or cut off the power of the time attendance by
way of communication in the supervisor computer.
3. User of Time Attendance
Users of the time attendance include administrators and regular
users.
① Regular users can only register attendance in the time attendance,
they can’t carry out the management operation.
② The administrator has the operation rights of the time attendance
management.
The administrator can register and delete the fingerprint and
password of the user, view record data and system information, and set
the functions.
4.Enroll Method of Time Attendance
Enroll method of the time attendance includes: Fingerprint,
password and ID RFID card. Each user can register three fingerprints,
one password and one ID RFID card.
Each of them has its own features, therefore user should carefully
read the instruction manual first and then choose the proper enroll
method suitable to you.

Fingerpr in t Time At t endance Ser i es
5
Note: RFID card function is non-standard function, depending on
specific model.
5. User Number and Password
① User ID number (employee identification number) of the time
attendance is the arbitrary digit from 1 to 65535 and the password is
the arbitrary digit from 1 to 9999. (The machine in ARM7 platform
possesses five-digit user ID and four-digit password.)
②User ID number (employee identification number) of the time
attendance is the arbitrary digit from 1 to 99999999 and the
password is the arbitrary digit from 1 to 99999999. (The machine in
ARM9 platform possesses eight-digit User ID and eight-digit
password.)
6. Working State of Time Attendance
Working state of the time attendance includes: attendance state,
administrator operating state and attendance prohibition state.
①�The attendance state is the operating condition of the time
attendance. After inputting fingerprint or password, it compares
with the stored fingerprint or password to judge whether it is
the registered user and store the record of the attendance time.
If it is the registered user, the ID of the user will be displayed in
the display device.
In addition, the electronic lock control signal and indicator signal
will be provided according to the setting of the time attendance and
the ID and time will be recorded in the internal storage.

Fingerpr in t Time At tend ance Ser i es
6
② Registration of new user, modification of registration data, deletion
of registration data, function setting operation and system information
inquiry can be implemented under the administrator operating state.
a. Only the administrator can implement management operation.
b. The administrator shall be identified through fingerprint or
password to enter the management operating state. (Please refer to the
introduction in “Chapter III Administrator Operating Procedure”)
c. If no administrator is registered in the time attendance, the system
will not identify the administrator and it can be set by any operator.
③Attendance prohibition state is set according to the time attendance by
PC management software.
7. Data Recorded in Time Attendance
★ The time attendance automatically records all information related to the
using condition in the internal storage.
★ Date recorded by the time attendance includes administrative record data
and user record data.
★ Administrative record is the operating record of the related administrator in
the time attendance.
★ User record is the record to verify attendance condition under attendance
state.
The record data is transmitted to the attendance PC management
software through communication interface and saved in database to be
viewed and counted.
Content of record data is as follows:

Fingerpr in t Time At t endance Ser i es
7
Record Type Operation Record Content
Administrative
Record
New register Date, time, machine number, operator number
and ID of the registered object
Delete
registration data
Date, time, machine number, operator number
and ID of the deleted object
Delete all record
data
Date, time, machine number and operator
number
Advanced setting Date, time, machine number and operator
number
Time setting Date, time, machine number and operator
number
Record setting Date, time, machine number and operator
number
User Record User verification Date, time, machine number and the verified
ID
8. Function Setting of Time Attendance
You can flexibly set the time attendance through the friendly user
function setting menu provided by the time attendance according to your
demand.
The setting content is as follows:
8.1 Device Setting
①�Administrator quantity
Setting Content Description
1—10 Set the quantity of the time attendance administrator

Fingerpr in t Time At tend ance Ser i es
8
Factory Setting 5
②Machine number
Setting Content Description
1—2 5 5 The sole number to identify the time attendance during the
networking usage of the time attendance
Factory Setting 1
If the time attendances with same machine number appear during network using, it cannot work in normal condition and the PC management software will be out of order when records attendance data, so please pay more attention to it.
③Baud rate
Setting Content Description
9 6 0 0 Baud rate of communication interface is set to 9600bps
1 9 2 0 0 Baud rate of communication interface is set to 19200bps
3 8 4 0 0 Baud rate of communication interface is set to 38400bps
57600 Baud rate of communication interface is set to 57600bps
115200 Baud rate of communication interface is set to 115200bps
Factory Setting 3 8 4 0 0
The set value shall be consistent with the communication port setting of the PC supervisor computer, otherwise, the communication cannot be realized. ④Display language Setting Content Description
Chinese All contents displayed in the display device is in Chinese

Fingerpr in t Time At t endance Ser i es
9
traditional traditional
Chinese
simplified
All contents displayed in the display device is in Chinese
simplified
English All contents displayed in the display device is in English
Factory Setting Chinese simplified
⑤Time delay of lock
Setting Content Description
Yes Output electronic control signal after successfully
verifying
No Not output electronic control signal after successfully
verifying
Factory Setting Yes, delay for 1s
The lock control signal can be outputted when the time attendance
displays successful comparison information and sets the lock output
signal.
(Note: The lock control signal of the current time attendance
series is used to control green indicator.)
⑥Auto off
Setting Content Description
No The auto off function of the time attendance is invalid
1—2 5 5
If no any operation is implemented in the time attendance,
it will close automatically in a set time. The unit is
“Minute”.
Factory Setting No

Fingerpr in t Time At tend ance Ser i es
10
⑦Time setting
Setting Content Description
Time Setting Set the time of the time attendance
Factory Setting
The time setting of the fingerprint time attendance shall be
consistent with the computer time of installing
management software and it can be set in the management
software.
⑧Voice out
Setting Content Description
No No voice prompt when identifies the fingerprint
Factory Setting Yes
⑨Default setting
Press OK and the system will restore the factory default of each setting. 8.2 Record Setting ① Administrative record warning
When the surplus of the administrative record reaches to the set value,
the time attendance will notify the user that the space of administrative
record storage will be full by means of displaying or prompt tone.
Setting Content Description
No
The time attendance will not warn the administrative record over. If it exceeds, the time attendance will not store the administrative record.

Fingerpr in t Time At t endance Ser i es
11
1—2 5 5
The time attendance notifies the administrative record over according to the set value. If the value is 10, the warning will be sounded from the 990th record. If it exceeds, the time attendance will not store the administrative record.
Factory Setting 100
③User record warning
When the surplus of the in/out record reaches to the set value, the time
attendance will notify the user that the space of in/out record storage will
be full by means of displaying or prompt tone. When the time attendance
sounds a warning, please timely download user record with software!
(The setting method refers to the instruction in Chapter III.)
Setting Content Description
No
The time attendance will not warn the user record over. If it exceeds, the time attendance will not store the user record.
1—1500
The time attendance notifies the user record over according to the set value. If it exceeds, the time attendance will not store the user record.
Factory Setting 1000
③Reverify
Verify the interval of twice identifications of the same user. If the user
checks on work attendance for many times within the set time, the time
attendance will notify the user has signed in and the in/out record will

Fingerpr in t Time At tend ance Ser i es
12
not be stored repeatedly.
Setting Content Description
No The time attendance will not check repeated attendance
1—2 5 5
The time attendance checks the repeated
attendance condition according to the set value
and the unit is “Minute”.
Factory Setting No
IX. Keyboard
9.1 Keyboard Configuration
As shown in the right picture:
1 2 3 ESC
4 5 6 MENU
7 8 9 ▲
⊙ 0 OK ▼
9.2 Keyboard Function

Fingerpr in t Time At t endance Ser i es
13
Keyboard function description is as follows:
X. Menu
The time attendance is equipped with user-friendly menu operation
to flexibly implement menu selection, keyboard input and all kinds of
settings and inquiries adopting five operational keys and the number
keys. In addition, the correctness of the operation is notified by means of
displaying, prompt tone and voice prompt.
10.1 Menu Division
◆The menu is divided into operating menu, setting menu and status
inquiry menu.
◆ Function of the operation menu is to implement user
management.
◆Function of the setting menu is to set the related information of
the time attendance.
◆ Function of status inquiry menu is to inquire the system
ESC Exit when operates the menu
MENU Enter the menu operating state
OK Confirm the current set option (ENTER)
▲ Move up the cursor when operates the menu
▼ Move down the cursor when operates the
menu
0…9 Input numerical value when operates and
selects the menu
⊙ Button of start and close

Fingerpr in t Time At tend ance Ser i es
14
information content of the time attendance.
10.2 Menu Structure
Press MENU to enter the primary menu, including six options. Select the corresponding column with “▲” and “▼” key or enter the menu option through pressing the corresponding number key. For example, Press “MENU” and “3” to enter “Data Download”. 10.21 Register user menu
The option of “Register User” includes “User Registration”,
“Manager Registration”, setting of “Fingerprint Security Level” and
“USB Upload”. Select “Register User” in the primary menu and
press OK to enter the secondary menu.
1.Register user
1.User 2. Manager 3. Security Level 4. USB Upload
Level Selection
Menu
1.Register User
2. Delete User
3. Data Download
4. Time Setting
5. Advanced Setting
6. Information

Fingerpr in t Time At t endance Ser i es
15
Select “User” or “Administrator” in different levels to be
registered and press OK, or press “1” and “2” to enter the third level
menu, including two options as shown in the following picture. New
register is used to register new user and backup register is used to
register backup data of the registered user.
After selecting “1. New register” or “2. Backup register”, the screen
will display the selection of enroll method, as shown in the following
picture. Select the corresponding method and complete according to the
screen tips.
(Remark: The functions of manager registration, user registration and ID
card registration depend on the specific model. Backup Register means
to register the second and third fingerprint or password and RFID card
for the registered user.)
1.User
1.New Register 2. Backup Register
Enroll Method
2. Register Password
1.New Register
1.Register Fingerprint
Enroll Method
3. Register ID Card

Fingerpr in t Time At tend ance Ser i es
16
User setting of “Security Level ”:1:1 verify level, 1:1all
verify levels and 1:N identification accuracy. If the setting
numerical value is higher, the comparison and identification during
using will be more accurate and the requirement of fingerprint and
operating mode of the user will be super high. So non-professionals
do not set to avoid affecting the usage.
Note: The machine in ARM9 platform is equipped with collecting
instrument to automatically regulate the brightness of the fingerprint
reader.
USB upload menu
Partial models with USB interface function can upload the backup
data to the current time attendance through the menu. 10.22 Delete user menu
Select “Delete User” in the primary menu and press OK or
directly press “2” to delete user, as shown in the following picture.
Input the number to be deleted with the number key or the select
key and press OK to delete the information of the corresponding
user. (The machine in ARM9 platform possesses eight-digit user
ID.)
10.23 Data download menu
Select “Data Download” in the primary menu and press OK or
Delete User
ID:00001
ESC ENTER

Fingerpr in t Time At t endance Ser i es
17
directly press “3” to enter data download menu, including four
options.
USB download option includes two functions of downloading
user record and registration data to respectively realize the
download of user record and registration data in the time attendance.
The function depends on the specific model.
RS232 download menu is used to set attendance and computer
communication speed. The communication speed can be set with
the select key.
RS485 download menu is used to start and close the RS485
communication function of the time attendance. Select Yes to start
the RS485 communication function and select No to close.
Ethernet download menu is used to set all parameters of the
Ethernet of the time attendance, including IP address, subnet mask
and gateway. Enter with select key and input according to network
actual environment.
Data Download
USB Download RS232 Download RS485 Download Ethernet Download
Fingerpr in t Time At tend ance Ser i es
18
Note: The communication port, server IP address, server port
and whether automatically upload record to the computer of the
machine TCP can be set to the machine in ARM9 platform
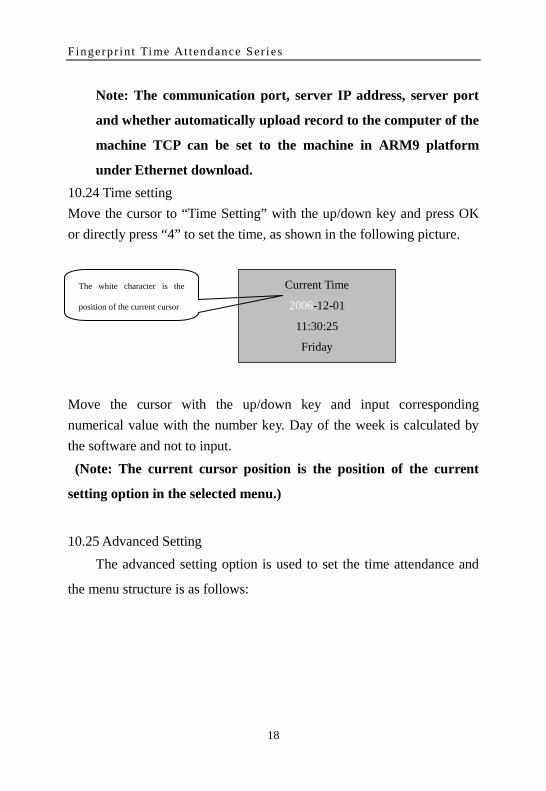
under Ethernet download. 10.24 Time setting Move the cursor to “Time Setting” with the up/down key and press OK or directly press “4” to set the time, as shown in the following picture.
Move the cursor with the up/down key and input corresponding numerical value with the number key. Day of the week is calculated by the software and not to input. (Note: The current cursor position is the position of the current
setting option in the selected menu.)
10.25 Advanced Setting
The advanced setting option is used to set the time attendance and
the menu structure is as follows:
Current Time
2006-12-01
11:30:25
Friday
The white character is the
position of the current cursor

Fingerpr in t Time At t endance Ser i es
19
Machine number: Select “Machine Number” with the up/down
key and press “OK” or directly press “1” to enter. Input the machine
number with the up/down key or the number key. The parameter of the
machine number corresponds with the time attendance machine number
in attendance software and the communication can be realized only both
two is consistent. The option is used when newly or additionally install
device. It is not necessary to set under the environment using one time
attendance and the default value can meet the requirement.
Administrator quantity: It is used to set the quantity of the
manager and the method of entering is same as that of the machine
number. The factory default is 5, showing the device can register 5
managers. The right of regular user can be changed to the right of
manager in the attendance software and the specific operating
Advanced Setting
1.Device Setting
2. Record Setting
1.Machine Number
2. Administrator Quantity
3. Language
4. Voice Out
5. Contrast
8. Default Setting
6. Auto Off
7. Lock Control Output
1.Administrative Record Warning
2. User Record Warning
3. Reverify

Fingerpr in t Time At tend ance Ser i es
20
method refers to the software instruction manual.
Language: It is used to set the language displayed in the screen
and the method of entering is same as that of the machine number.
The time attendance series supports three languages, including
Chinese simplified, Chinese traditional and English. The user can
select according to the demand.
Voice out: It is used to set whether start the voice out function.
The voice category of the time attendance is non-optional and if it
shall be changed, please contact with the dealer or the customer
service department of our company.
Contrast: It is used to display the contrast of the device display
screen. If it is not clear, the numerical value can be regulated.
Auto off: It is used to set whether start the auto off function and
the auto off time of the time attendance. The factory default is
closing and the auto off time means the time delaying to close when
no operation is in the time attendance.
Lock control output: It is used to set whether start the lock control
output function and the holding time of the control signal of the
time attendance. When starting, the holding time of signal shall be
set. The signal is used to drive and verify the indicator in time
attendance series. After passing verification, the bright time of the
green light is the set value and the unit is second. (Note: the option
of the machine in ARM9 platform is the verification mode, that is,
three verification modes of fingerprint + card/ fingerprint +
password, fingerprint /card password.
Default setting: It is used to restore each parameter under

Fingerpr in t Time At t endance Ser i es
21
advanced setting option of the time attendance to the factory
default.
Administrative record warning: It is used to set that the prompt
can be sounded from which administrative record when the
administrative record reaches the storage limit of the time
attendance. All operation implemented by manager will be recorded
as the administrative record.
User record warning: It is used to set that the prompt can be
sounded from which user record when the user record reaches the
storage limit of the time attendance. When the prompt appears,
please timely download the administrative record with software and
delete the data in the time attendance to ensure the storage of new
data.
Reverify: It is used to set the interval of twice fingerprint
identifications and the unit is minute. After setting, the attendance
data within the interval will not be recorded totally and the time
attendance will notify the user has signed in.
The machine in ARM9 platform is equipped with the access control
setting function and the specific setting refers to the detailed introduction
of “Access Control System” in “Quick Install Guide”.
10.26 Information Inquiry
The information inquiry enables user to view the registration, record,
manufacturer and software version of the machine and the menu
structure is as follows:

Fingerpr in t Time At tend ance Ser i es
22
Storage detail: It is used to display all kinds of registration
information of the current user of the time attendance, including
specific information of the user registration quantity, manager
registration quantity, fingerprint registration quantity, password
registration quantity and ID card registration quantity.
Record detail: It is used to display all kinds of current in/out
record of the time attendance, including five contents of user record
quantity, administrative record quantity, viewing user record,
viewing administrative record and deleting all records.
System detail: It is used to display the information of
manufacturing plant, device name and software version of the time
attendance, including six contents of manufacturer, device name,
release date, serial number, engine version and soft version.
If the current set value in the setting menu shall be changed, select
the menu set option. Selecting the menu set option means entering
the setting state, user can select or input the set value with the
up/down key and the number key.
Inputting the value which cannot be set will cause a warning.
If want to set the inputted value, press the key of “OK”, otherwise
press the key of “ESC”.
2. Record Detail 3. System Detail 1.Storage Detail
Information

Fingerpr in t Time At t endance Ser i es
23
Press “ESC” to exit the setting state of the menu option.
10.3 Prompt Tone and Voice Out
Prompt tone: The time attendance notifies the correctness of user
operation by means of displaying and prompt tone.
If the “Voice Out” is opened and the operation is correct, it will be
displayed in the screen and the device will sound “Thanks”.
If the “Voice Out” is opened and the operation is incorrect, it will be
displayed in the screen and the device will sound “Place Again”.
If the “Voice Out” is closed and the operation is correct, it will be
displayed in the screen and the device will sound “Bee-Bee-Bee”.
If the “Voice Out” is closed and the operation is incorrect, it will be
displayed in the screen and the device will sound “Bee-Bee-Bee”.
After two seconds, the prompt tone will be automatically cleared or
press any key to clear and return to the original state.
Chapter II General Operation of Time
Attendance

Fingerpr in t Time At tend ance Ser i es
24
1. Process of the First Operation
Turn on the power of the time attendance to enter attendance state
and it displays:
1.1 Press “MENU” to Enter Management Operating State
There is no registration data when use the product for the first time,
so the administrator identity needs not verification. If there is
administrator identity verification, close the machine and notify the seller
or delete in the management software. Please refer to the software
operating instruction for the deleting method of the management
software. Set date and time
Please refer to the time setting instruction in 10.24 of Chapter III. Function setting
Please refer to 10.25 in Chapter III. Initialization management and user record (It can be ignored since
there is no data when the time attendance is released). Please refer to the instruction of deleting all records in 2.6 of Chapter III.
Register administrator Please refer to the administration registration instruction in 2.2 of
Chapter III.
1.2 Press “ESC” to Return to General Use State
Press “Menu” again to return to management operating state Because the administrator has been registered, the administrator
Welcome! Please Press Finger…….
08 : 00
2006–07–30 Saturday

Fingerpr in t Time At t endance Ser i es
25
identity needs verification. Register regular user
Please refer to 2.1 of Chapter III for detailed instruction of the user registration.
Press “ESC” to enter the general use state
2. Use Method under Attendance State For the use method under the attendance state, the fingerprint
password keeper includes fingerprint attendance and password
attendance and the device with RFID card includes fingerprint
attendance, password attendance and ID card attendance.
2.1 Fingerprint Attendance
Under attendance state, it displays:
For fingerprint registration user, press the registered finger in the
fingerprint window and it displays:
1. After lifting the finger, if it identifies successfully, it displays:
If it identifies successfully and the voice out is “Yes”, it sounds “Thanks”; If the voice out is “No”, it sounds “Bee”; if the unlock is
Welcome! Please Press Finger…….
08︰30
2005–07–30 Staurday
Fp Identify
Lift Finger!
Fp Identify
ID 12345
Identify OK!
Fingerpr in t Time At tend ance Ser i es
26
set, the unlock signal will be outputted.
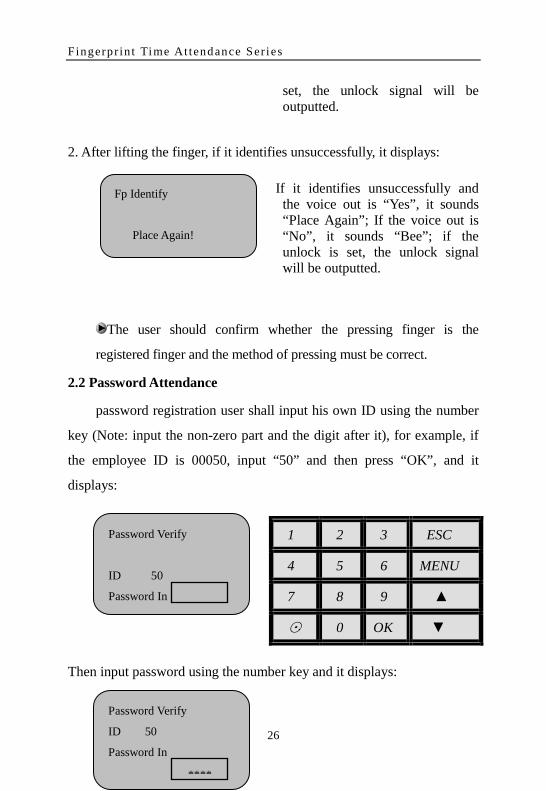
2. After lifting the finger, if it identifies unsuccessfully, it displays:
If it identifies unsuccessfully and the voice out is “Yes”, it sounds “Place Again”; If the voice out is “No”, it sounds “Bee”; if the unlock is set, the unlock signal will be outputted.
The user should confirm whether the pressing finger is the
registered finger and the method of pressing must be correct.
2.2 Password Attendance
password registration user shall input his own ID using the number
key (Note: input the non-zero part and the digit after it), for example, if
the employee ID is 00050, input “50” and then press “OK”, and it
displays:
Then input password using the number key and it displays:
1 2 3 ESC
4 5 6 MENU
7 8 9 ▲
⊙ 0 OK ▼
Fp Identify
Place Again!
Password Verify
ID 50
Password In
Password Verify
ID 50
Password In
****

Fingerpr in t Time At t endance Ser i es
27
Press OK, and it displays:
Successful sign in through the password; if the unlock is set, the
unlock signal will be outputted. If input error ID or password, it displays
“Try Again” and sounds “Place Again” or “Bee”, and then return to the
main attendance interface.
If the time attendance sets reverify time and the fingerprint or password
user signs in for many times within the reverify time under the
attendance state, the time attendance will display “Reverify” and not
store the user record. For example:
Password Verify
ID 50
Verify OK!
Fp Identify
ID 50
Reverify!

Fingerpr in t Time At tend ance Ser i es
28
Chapter III Administrator Operating
Method of Time Attendance Each function can be operated after identifying the administrator
and entering the primary management menu of the time attendance. The
detailed introduction of the specific operating method of the
administrator is as follows.
1. Operating Procedure of Administrator Operating State Press “Menu” under the attendance state

Fingerpr in t Time At t endance Ser i es
29
①If the administrator is unregistered, it displays
Enter the menu interface under the administrator operating state. ②If the administrator is registered, it enters the administrator identify
window and displays:
a.To the administrator of fingerprint registration, press the registered finger in the fingerprint input window. After it identifies successfully, it displays
Enter the menu interface under the administrator operating state.
b.To the administrator of password registration, re-input password after
inputting ID with the number key and pressing “OK”, and then press
“OK” to confirm and display:
Menu
1. Register User
2. Delete User
3. Data Download
Administrator Identify
15︰57
2005–07–30 Saturday
Menu
1. Register User
2. Delete User
3. Data Download

Fingerpr in t Time At tend ance Ser i es
30
Enter the menu interface under the administrator operating state.
There is no registration data when use the product at the first time,
so the administrator identity is not needed to be verified. If there is
administrator identity verification, close it and notify the seller.
③ If the administrator identity cannot be verified, the time
attendance will display “Illegal Operation!” and sounds the prompt tone
and voice prompt. At that time, re-verify the administrator identity.
★ Reading tips: In the following operating procedure
introductions, the Arabic figure of title number like “1” indicates
the primary menu; its subsidiary secondary menu is indicated in the
serial number 1.1; its third level menu is indicated in the serial
number of 1.11; and the classification description of the third level
menu is indicated in the serial number of 1.111.
2. User Management Press Menu under the general mode and it displays: Press Menu under the administrator mode to verify the fingerprint
of the registered administrator and it displays:
Menu
1. Register User
2. Delete User
3. Data Download

Fingerpr in t Time At t endance Ser i es
31
①Press the up/down key or input the digit to move the cursor and
select the registered user, and press OK or directly input “1” to
enter.
②Move the cursor to Delete User with the up/down key and press OK
to display or input “2”
2.1 Register User
The user registration is the most basic operation, so the operator
shall be familiar with it.
①�Under the attendance state it displays
Delete User
ID:000001 ESC ENTER
Menu
1. Register User
2. Delete User
3. Data Download
Press the up/down
key to move or select
with the number key
Level Selection
1. User
2. Manager
3. Security Level
4. USB Upload
Press the corresponding
number key in front of the
menu option to enter.

Fingerpr in t Time At tend ance Ser i es
32
②Press “Menu” under the attendance state and it displays
③With administrator, it displays:
After inputting the administrator fingerprint and verifying, it displays:
④Register user menu displays:
1 2 3 ESC
4 5 6 MENU
7 8 9 ▲
⊙ 0 OK ▼
Welcome! Please Press Finger…
18:26:26 05–07–30 Staturday
Menu
1. Register User
2. Delete User
3. Data Download
Manager Confirm Menu
Login
Menu
1. Register User
2. Delete User
3. Data Download
Fingerpr in t Time At t endance Ser i es
33
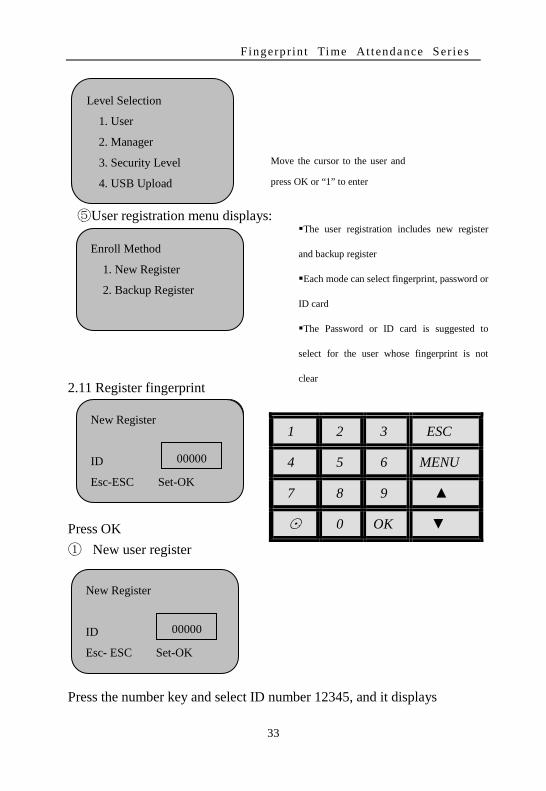
⑤User registration menu displays:
2.11 Register fingerprint
Press OK ①�New user register
Press the number key and select ID number 12345, and it displays
1 2 3 ESC
4 5 6 MENU
7 8 9 ▲
⊙ 0 OK ▼
Level Selection
1. User
2. Manager
3. Security Level
4. USB Upload
Move the cursor to the user and
press OK or “1” to enter
Enroll Method
1. New Register
2. Backup Register
The user registration includes new register
and backup register
Each mode can select fingerprint, password or
ID card
The Password or ID card is suggested to
select for the user whose fingerprint is not
clear
指 纹 注 册 Reggister
Fingerprint
注册号码:00001
ESC ENTER
New Register
ID
Esc-ESC Set-OK
00000
New Register
ID
Esc- ESC Set-OK
00000

Fingerpr in t Time At tend ance Ser i es
34
Press OK to display
After pressing the finger, it displays
After pressing the finger for three times, it displays
If continue to register, press OK,
otherwise, press ESC to return.
The administrator can press the number key to set the user ID in new
register interface.
The ID is the arbitrary number from 1 to 65535; (The machine in ARM9
platform possesses the eight-digit registration number)
The registeration number is the sole ID number to identify the user and it is
equal to the employee number, so the administrator and the user shall
remember it.
Register Fingerprint
ID
ESC ENTER
12345
Place Finger!
First Time
Lift Finger
Register Fingerprint
Continue?
ESC ENTER

Fingerpr in t Time At t endance Ser i es
35
② Backup register
Fingerprint backup register: The administrator can register different
fingerprint, password or ID card for backup to the registered user with
the dame registration number (User ID). The backup register includes 2
fingerprints, 1 password and 1 RFID card and the operating method is
same as that of the new register. 2.12 Register password
Register password is suitable to the user whose fingerprint is not clear to register. Operate to the enroll method option menu and it displays:
Press the up/down key or input the digit to move the cursor to Register
Password and press OK to
display register password
①New user register
1 2 3 ESC
4 5 6 MENU
7 8 9 ▲
⊙ 0 OK ▼
Enroll Object
1. Register Fingerprint
2. Register Password
3. Register ID card
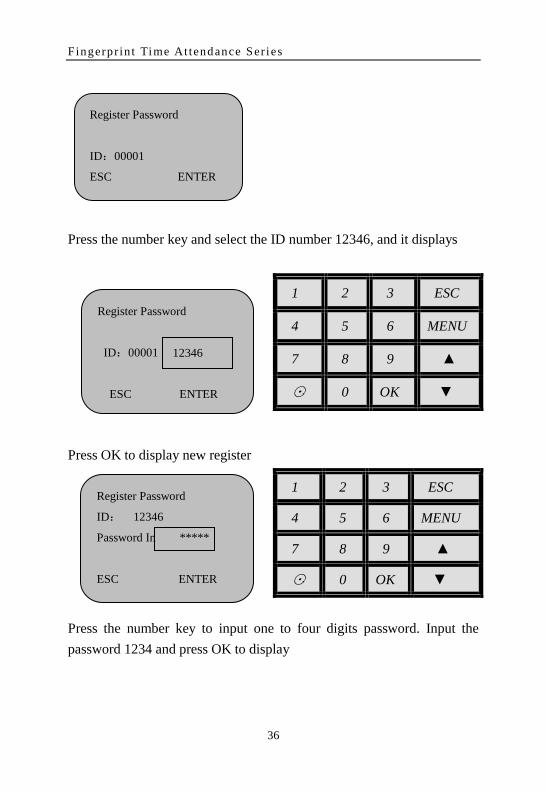
Register Password
ID:00001
ESC ENTER
Fingerpr in t Time At tend ance Ser i es
36
Press the number key and select the ID number 12346, and it displays
Press OK to display new register
Press the number key to input one to four digits password. Input the password 1234 and press OK to display
1 2 3 ESC
4 5 6 MENU
7 8 9 ▲
⊙ 0 OK ▼
1 2 3 ESC
4 5 6 MENU
7 8 9 ▲
⊙ 0 OK ▼
Register Password
ID: 12346
Password In *****
ESC ENTER
Register Password
ID:00001
ESC ENTER
12346
Register Password
ID:00001
ESC ENTER
Fingerpr in t Time At t endance Ser i es
37
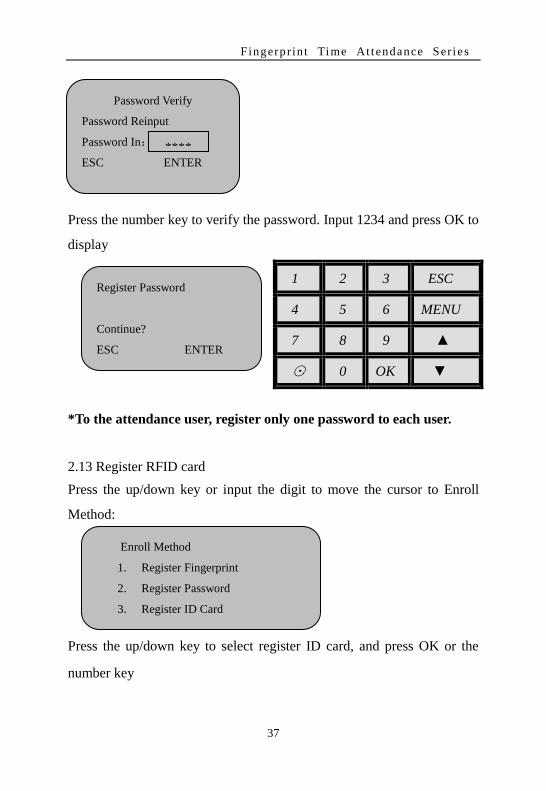
Press the number key to verify the password. Input 1234 and press OK to
display
*To the attendance user, register only one password to each user.
2.13 Register RFID card Press the up/down key or input the digit to move the cursor to Enroll
Method:
Press the up/down key to select register ID card, and press OK or the
number key
1 2 3 ESC
4 5 6 MENU
7 8 9 ▲
⊙ 0 OK ▼
Register Password
Continue?
ESC ENTER
Enroll Method
1. Register Fingerprint
2. Register Password
3. Register ID Card
Password Verify
Password Reinput
Password In:
ESC ENTER ****
Fingerpr in t Time At tend ance Ser i es
38
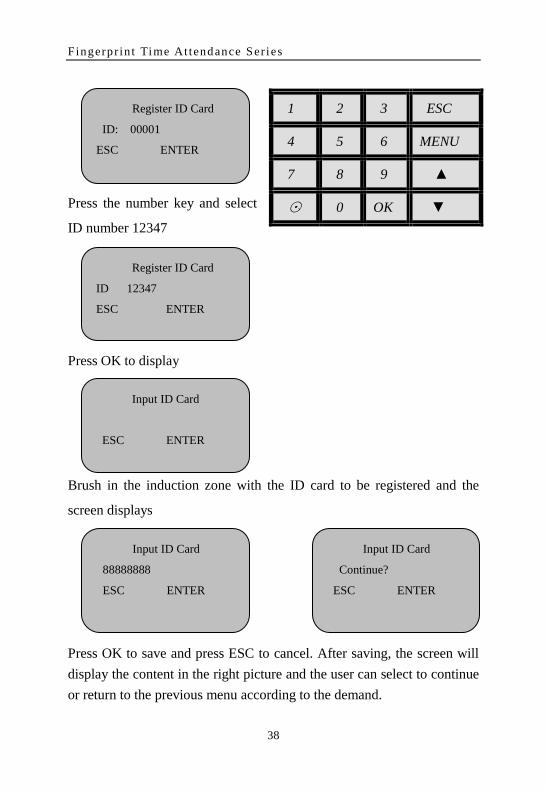
Press the number key and select
ID number 12347
Press OK to display
Brush in the induction zone with the ID card to be registered and the
screen displays
Press OK to save and press ESC to cancel. After saving, the screen will display the content in the right picture and the user can select to continue or return to the previous menu according to the demand.
1 2 3 ESC
4 5 6 MENU
7 8 9 ▲
⊙ 0 OK ▼
Register ID Card
ID: 00001
ESC ENTER
Register ID Card
ID 12347
ESC ENTER
Input ID Card
ESC ENTER
Input ID Card
88888888
ESC ENTER
Input ID Card
Continue?
ESC ENTER

Fingerpr in t Time At t endance Ser i es
39
2.2 Register Manager
Register manager is to authorize to the administrator who implements the management operation and the method is same as that of user registration. Please refer to register user.
Difference: The registered user under the administrator registration menu and the backup registration is the manager.
The manager registered in the machine can be regarded as the regular user for general usage. In addition, it can implement the management operation.
The operating record of the administrator will be recorded on the
time attendance. 2.3 Delete User Operate to the delete user menu
and it displays
Press the up/down key or input the ID of the user to be deleted with the number key and it displays as the following pictures:
1 2 3 ESC
4 5 6 MENU
7 8 9 ▲
⊙ 0 OK ▼
Delete User
ID: 00001-1
ESC ENTER
Delete User
ID: 00001-0
Sure Delete?
ESC ENTER
Delete User
ID: 00001-1
Sure Delete?
ESC ENTER

Fingerpr in t Time At tend ance Ser i es
40
Press OK to delete and press ESC to cancel. If the ID possesses backup
registration, the screen will prompt whether delete the backup data, as shown in the
above right picture. 1. Digit “0” indicates the first registration, “1” indicates
the backup registration 1, and so forth. P indicates register password and C indicates
register ID card.
2.4 Inquire In/Out Record Operate to the information menu and it displays:
Press the up/down key to move to Information Record Detail-View User
Record
If view all user records in the interface, press OK to the menu of view user record and it displays:
Record Detail
1. User Record 0
2. Administrative Record 0
3. View User Record
4. View Administrative Record
5. Delete All Records
Record Detail
1. User Record 0
2. Administrative Record 0
3. View User Record
4. View Administrative Record
5. Delete All Records

Fingerpr in t Time At t endance Ser i es
41
The view user record menu displays
The meaning of the character and the information displayed in the screen
is as follows:
C: Indicates the quantity of in/out records
(For example, C-05431 indicates 5431 records)
N: Indicates the serial number of in/out record
(For example, N- 00001 indicates the first record)
V_F: Indicates the verification of fingerprint
V_P: Indicates the verification of password
12345:Indicated the user ID
01-11-30 17:30 indicates the attendance time of the user
Press “OK” and “▼▲” key to view in/out record
The record displayed firstly is the last record.
Press “▼” to view the first record data.
Press “ESC” to exit.
View User Record C-05431 N-00001
01-11-30 17:30 V_F 12345 ESC ENTER
View User Record
ID
ESC ENTER

Fingerpr in t Time At tend ance Ser i es
42
Repeat other operations and only the in/out record of 12345 user can be
viewed.
If there is no in/out record of 12345 user, press OK to display
It sounds “Bee------“and returns to the interface of viewing in/out record
2.5 Inquire Administrative Record
The operation of viewing administrative record is same as that of viewing in/out record; but the character and the information displayed in the screen is different
◆ If view the in/out record of a user in
the interface, for example, the user of
12345, press the number key to input
12345.
View User Record
ID
ESC ENTER
12345
View User Record
ID 12345
ESC ENTER
View User Record
ID
Empty!
12345

Fingerpr in t Time At t endance Ser i es
43
The meaning of the character and the information displayed in the screen
is as follows:
E_U: Register regular user E_M: Register administrator E_DF: Delete fingerprint registration data E_DP: Delete password registration data D_L: Delete all record data S_T: Time setting S_S: System setting
2.6 Delete All Records Operate to the data management menu and it displays
Press the down key to move the left cursor to Delete All Records and
press OK to enter the menu of deleting all records, and it displays
1 2 3 ESC
4 5 6 MENU
7 8 9 ▲
⊙ 0 OK ▼
View Administrative Record C-00256 N-00001 05-07-30 08:30 E-U
12345 00008 ESC ENTER
Record Detail
1. User Record 0
2. Administrative Record 0
3. View User Record
4. View Administrative Record
5. Delete All Records
删除全部记录

Fingerpr in t Time At tend ance Ser i es
44
The menu of deleting all records displays
Notes of the user and administrator registration:
①Correctly select the user or manager when the menu displays
“level selection”. When inputting an un-existing or registered
ID and the backup registration password is required or the
backup fingerprint of the user is full, the “Time Attendance”
will display “Full Backup Registration” and voices out.
②The “Time Attendance” can automatically provide ID.
a. Use other ID for new register and input new register number
from 1 to 65535 (the inputting number shall be larger than the
number automatically provided by the machine), and then press
“OK”.
b.When inputting error number during inputting ID (the user of the
number has existed when register), the “Time Attendance” will
display “Error ID!” and voices out. At that time, re-input the ID
If the administrator confirms it is wrong to
delete, press ESC to cancel;
The interface displays the data
management menu;
If the administrator confirms it is right to delete,
press OK
Delete All Log
Sure Delete?
ESC ENTER
Delete All Log
Working!
After deleting and sounding “Bee-----”, it
returns to the interface to display the
record detail menu.

Fingerpr in t Time At t endance Ser i es
45
number.
③ When pressing the finger in the input window, if there is excessive
perspiration in the finger or not pressing in the center, is displays
“Place Again!”. Please press following the prompts.
3. Advanced Setting For the detailed setting, please refer to the instruction in “8.
Advanced Function Setting of Time Attendance of Chapter I ”. Here, we
mainly introduce the operating method of the setting.
Press Menu to display under the general mode;
Press Menu under the administrator mode. After verifying the
registered administrator fingerprint, it displays:
Press the up/down key or input the digit to move the cursor to Advanced Setting and press OK to display
Two secondary menus are set under the “Setting” menu and their
function description is as follows:
1 2 3 ESC
4 5 6 MENU
7 8 9 ▲
⊙ 0 OK ▼
Menu
1. Register User
2. Delete User
3. Data Download
4. Time Setting
5. Advanced Setting
6. Information
Advanced Setting
1. Device Setting
2. Record Setting
Fingerpr in t Time At tend ance Ser i es
46
The machine in ARM9 platform is equipped with Access Control Setting function. For the detailed instruction, please refer to the “Access Control Setting” in “Quick Installation Guide”.
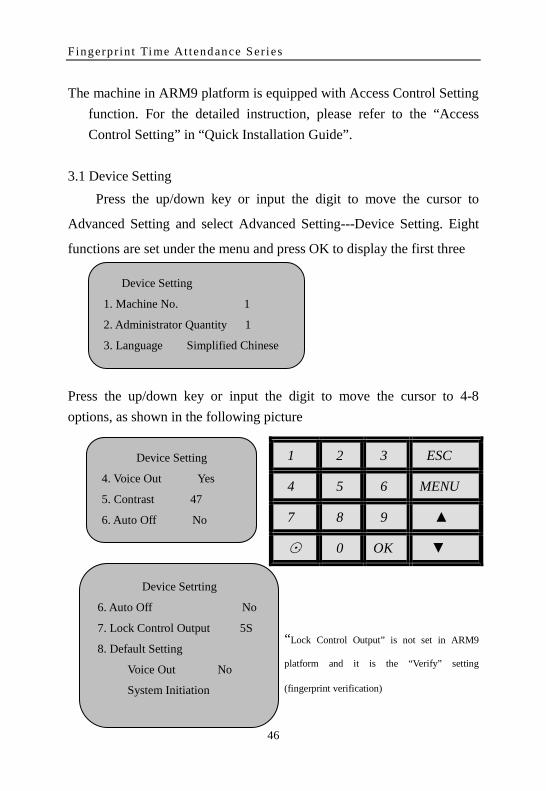
3.1 Device Setting
Press the up/down key or input the digit to move the cursor to
Advanced Setting and select Advanced Setting---Device Setting. Eight
functions are set under the menu and press OK to display the first three
Press the up/down key or input the digit to move the cursor to 4-8 options, as shown in the following picture
“Lock Control Output” is not set in ARM9
platform and it is the “Verify” setting
(fingerprint verification)
1 2 3 ESC
4 5 6 MENU
7 8 9 ▲
⊙ 0 OK ▼
Device Setting
1. Machine No. 1
2. Administrator Quantity 1
3. Language Simplified Chinese
Device Setting
4. Voice Out Yes
5. Contrast 47
6. Auto Off No
Device Setrting
6. Auto Off No
7. Lock Control Output 5S
8. Default Setting
Voice Out No
System Initiation

Fingerpr in t Time At t endance Ser i es
47
3.11 Machine number Press the up/down key or input the digit to move the cursor to Administrator Quantity and press OK to display
Press the up/down key or input the digit to select the machine number
parameter and the range is from 1 to 255. For example, select 3 and press
OK to display
★ In the setting menu, the procedure is universal to save and change the
setting.
★If there is time attendance with the same machine number during network use, it cannot work in normal condition and it will be out of order when reading the administrative attendance record data, so please pay more attention to the setting. The machine number shall be sole in the network. 3.12 Administrator quantity
Press the up/down key or input the digit to move the cursor to Administrator Quantity and press OK to display
Device Setting
1. Machine No. 1
2. Administrator Quantity 1
3. Language Simplified Chinese
Device Setting
1. Machine No. 3
2. Administrator Quantity 1
3. Language Simplified Chinese

Fingerpr in t Time At tend ance Ser i es
48
Press the up/down key or input the digit to Administrator Quantity 3 and press OK to display 3.13 Language Press the up/down key or input the digit to move the cursor to Language
and press OK to display
Move the cursor with the up/down key to select the language and press
OK.
(Note: languages include simplified Chinese, traditional Chinese
and English.)
1 2 3 ESC
4 5 6 MENU
7 8 9 ▲
⊙ 0 OK ▼
Device Setting
1. Machine No. 3
2. Administrator Quantity 1
3. Language Simplified Chinese
Device Setting
1. Machine No. 3
2. Administrator Quantity 3
3. Language Simplified Chinese
Device Setting
1. Machine No. 3
2. Administrator Quantity 3
3. Language Simplified Chinese

Fingerpr in t Time At t endance Ser i es
49
3.14 Voice out Press the up/down key or input the digit to move the cursor to Voice Out
and press OK to display
Press the up/down key to “Yes” or “No” and select to press OK. 3.15 Contrast Press the up/down key or input the digit to move the cursor to Contrast
and press OK to display
Input the numerical value with the number key or the up/down key and
press OK to save. 3.16 Auto off setting The operating procedure is totally same as that of the “Lock Delay” setting. The time unit of auto off is “minute”. 3.17 Lock control output
Device Setting
3. Language Simplified Chinese
4. Voice Out Yes 5. Contrast 47
Device Setting
2. Administrator Quantity 1
3. Language Simplified Chinese
4. Voice Out Yes
Fingerpr in t Time At tend ance Ser i es
50
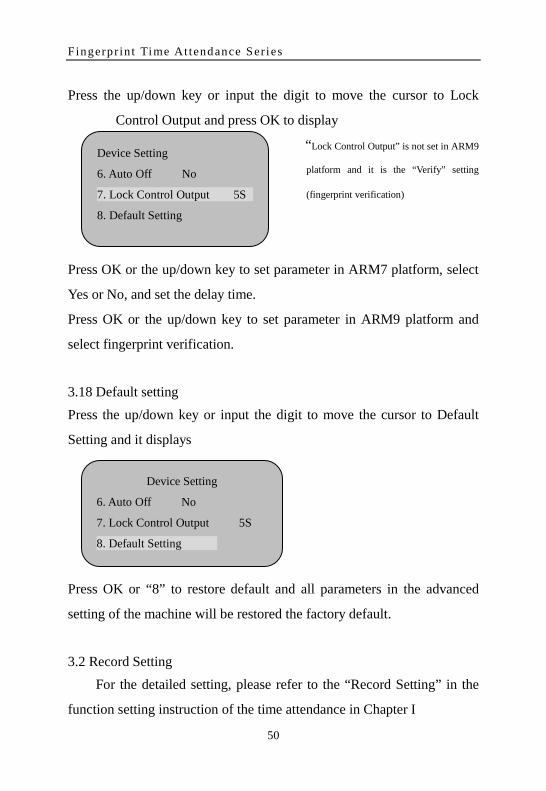
Press the up/down key or input the digit to move the cursor to Lock
Control Output and press OK to display
“Lock Control Output” is not set in ARM9
platform and it is the “Verify” setting
(fingerprint verification)
Press OK or the up/down key to set parameter in ARM7 platform, select
Yes or No, and set the delay time.
Press OK or the up/down key to set parameter in ARM9 platform and
select fingerprint verification.
3.18 Default setting Press the up/down key or input the digit to move the cursor to Default
Setting and it displays
Press OK or “8” to restore default and all parameters in the advanced
setting of the machine will be restored the factory default.
3.2 Record Setting
For the detailed setting, please refer to the “Record Setting” in the
function setting instruction of the time attendance in Chapter I
Device Setting
6. Auto Off No
7. Lock Control Output 5S
8. Default Setting
Device Setting
6. Auto Off No
7. Lock Control Output 5S
8. Default Setting

Fingerpr in t Time At t endance Ser i es
51
In the menu, press the up/down key or input the digit to move the cursor
to Advanced Setting and press OK to display
Press the up/down key or input the digit to move the cursor to Record
Setting and press OK to display
3.21 Administrative record warning Press the up/down key or input the digit to move the cursor to Administrative Record Warning and press OK to display Select 20 with the number key and press OK to display
1 2 3 ESC
4 5 6 MENU
7 8 9 ▲
⊙ 0 OK ▼
Advanced Setting
1.Device Setting
2.Record Setting
Record Setting
1. Administrative Record Warning 100
2. User Record Warning 1000
3. Reverify No
Record Setting
1. Administrative Record Warning 100
2. User Record Warning 1000
3. Reverify No

Fingerpr in t Time At tend ance Ser i es
52
The form of the administrative record warning is same as that of “User Record Warning”. 3.22 User record warning
The operating procedure is totally same as that of the administrative record warning setting. For the function setting, please refer to the “User Record” in the function setting of Chapter I.
Here, we shall explain the form of the user record warning. If the value is 1500 and the in/out record reaches 48500, it will display “Record Over” from the 48501th
record when the user implements attendance verification and it sounds “Thanks!”; when the time attendance record exceeds 49999 and it displays the interface of “Record Over”, the record will not be recorded and the user record is invalid.
The value can be set by the user according to the demand (Any
integer from 1 to 1500) and the time attendance will notify “Record
Record Setting
1. Administrative Record Warning 20
2. User Record Warning 1000
3. Reverify No
Fp Identify
ID:12345
In/out Record Warning!
Fp Identify
ID:12345
Exceed In/out Record
Quantity!

Fingerpr in t Time At t endance Ser i es
53
Over” according to the set value.
Note: The user record of the machine in ARM9 platform is
80,000.
3.23 Reverify
It is used to check whether the user repeatedly checks on work
attendance within the corresponding time and the value is suggested to
set as 5 (minutes).
If the user repeatedly checks on work attendance within the set time,
the time attendance will notify that the user has signed in but not record
the attendance record.
Press the up/down key or input the digit to move the cursor to
Reverify and press OK to display
If the re-verification time shall be set, input data with the number
key like 20 (the unit is “minute”) and press OK to display
Record Setting
1. Administrative Record Warning 20
2. User Record Warning 1000
3. Reverify 20
Record Setting
1. Administrative Record Warning 20
2. User Record Warning 1000
3. Reverify No

Fingerpr in t Time At tend ance Ser i es
54
IV. Information Inquiry
Press Menu to display under the general mode; press Menu under
the administrator mode and it displays after verifying the registered
administrator fingerprint.
Move the cursor to the information option with the up/down key and press OK or directly press “6”, the following picture will appear, including three submenus.
1.Storage detail: It displays the registered information in the time
attendance. Press the up/down key to move the cursor to “Storage
Detail” and press OK or press “1” to enter and view. As shown in the
following picture, press the up/down key or the number key to select
the registration information to be inquired.
Information 1.Storage Detail 2. Record Detail 3. System Detail
Menu 1. Register User 2. Delete User 3. Data Download

Fingerpr in t Time At t endance Ser i es
55
2. Record detail: It displays all kinds of records number of
the time attendance and deletes all records in the machine.
Press the up/down key to move the cursor to “Record
Detail” and press OK or directly press “2”, the screen
displays:
The user can enter the corresponding submenu with the up/down key or
inputting the digit in front of each menu option. For the form of viewing
user record and administrative record, see the above record inquiry.
Storage Detail 1. User Register 100 2. Manager Register 1 3. Fingerprint Register 0
Storage Detail 4. Password Register 1 5. ID Card Register 0
Record Detail 1. User Record 100 2. Administrator Record 1 3. View User Record
Record Detail 4.View Administrative Record 5. Delete All Records

Fingerpr in t Time At tend ance Ser i es
56
Chapter IV Attachment
1. Notices of Pressing Finger Hint: the fingerprint center location shall align to the center of the window.
False Alignment Too Slant
Correct
Slant Too Low

Fingerpr in t Time At t endance Ser i es
57
2. Software Use License Agreement
End User License Agreement License: Our Company authorizes the use rights of the software program to you, but you must promise to our Company that: Do not use, copy, modify, lease or transfer the system or its any part except in accordance with the clauses stipulated in this Agreement. You promise to:
1. Use the system only in one machine; 2. In order to use in the machine, prepare the copy of the system in machine readable format for the purposes of backup and archive management; 3. On the basis of other party accepting the terms and conditions of
this Agreement, transfer the system and the license agreement to that party;
If there is a transfer, all copies of the source file and its accompanying file shall be transferred to other party, or you must destroy the copies that haven’t been transferred.
4.The system can be used in the multi-household environment or the network system only on one of the following bases; The system clearly permits to be used in the multi-household environment or the network system; or Each node and terminal using the system has purchased the Use License. You promise not to:
1. Re-transfer the license of the system;

Fingerpr in t Time At tend ance Ser i es
58
2. Implement reverse engineering, reverse assembly or disassembly to the system; 3. Copy or transfer the whole or part of the system, except
otherwise stipulated expressly in the Agreement. Your license is terminated automatically when you transfer the
whole or part of the system or copies to other party.
Copyright and ownership of the system
The name of the system and all its copies exist together with the company marked in the disk or the system. The system and the file enjoy the copyright and are protected by the national copyright law and the terms of the international agreements. You cannot delete its copyright statement from the system and you promise to copy the copyright statement in the copies (whole or part) of the system. In addition, you agree to prohibit the illegally copy of the system and the file in any way. After-sales warranty:
Our Company guarantees that the software carrier has no defect in material and techniques within 90 days after the date of selling under the normal usage. If it is verified to be defective, our Company’s full responsibility is to return the software carrier, which is also our only compensation for you. If the carrier defect is caused by accident, abuse, use of unauthorized software, or misapplication, the after-sales warranty will be invalid. The returned carrier enjoys the residual warranty period of the original warranty, or thirty-day warranty, whichever is longer.
At own risk:
Except for the above-mentioned warranties, the system doesn’t
enjoy any after-sales warranty in other form.

Fingerpr in t Time At t endance Ser i es
59
Limited liability:
The above-mentioned warranties, whether explicit or implicit, are the whole content of warranty, including the warranties for the merchantability and suitability for the purpose of special application. Whether the Agreement is abided by or not, our Company and its agents and sellers have no responsibility for any profit loss, usability loss, business interruption, or indirect, special, accidental or inevasible damage in any form, or the claim of any other party caused by the use of the system, even if our Company is notified in advance that these things may happen.
License termination If you violate any term and condition of the Agreement, our
Company may terminate the license at any time. When the license is terminated, you must immediately destroy all copies of the system and the file, or return to our Company. Applicable law
Regulations on the Protection of Intellectual Property, Copyright Law, Patent Law, etc.
3. Frequently Asked Questions 3.1 Hardware Device 1. The fingerprint attendance of some users always cannot be verified, how to solve it?

Fingerpr in t Time At tend ance Ser i es
60
Answer: Some employees are hard to implement or cannot implement the fingerprint attendance because of the following situations:
□ Some fingerprint has been smoothened; □ Too many wrinkles are in the hand and it changes frequently; □ Serious desquamation of the finger;
To the user whose fingerprint cannot be identified, delete it and reregister or register another finger. To register the fingerprint for the user like this, select the fingerprint with high quality (little wrinkles, non-scale and clear). The area for the finger touching the fingerprint collecting head shall be larger. After registering, implement the comparison test. We suggest registering several backup fingerprints. In addition, our time attendance provides 1:1 comparison method and password attendance function to set the 1:1 method attendance or password attendance for the employees. 2. What reasons may cause that the communication of the time attendance cannot be realized? Answer: the reason includes:
□ The setting of the communication port is incorrect and the selected communication port is not the actual COM port;
□ The set value of the computer’s communication port baud rate is different with that of the time attendance’s baud rate;
□ The time attendance is not connected to power or not connected with the computer;
□ The time attendance has been connected but not be started; □ The number of the connected terminal machine is incorrect; □ The communication of the data cable and the converter cannot be
realized; □ The COM port of the computer is broken.
3. After the time attendance is connected to the power and started,

Fingerpr in t Time At t endance Ser i es
61
the liquid crystal display is not complete; sometimes it displays a half and sometimes it appears screen mess, what the problem is and how to solve it? Answer: The reason includes: □ the main board is broken; □ the internal characteristics problem of the liquid crystal. Contact with the supplier and return to be repaired. 4.How to eliminate the manager of the time attendance: Answer: Communicate the time attendance with the computer. After realizing the communication successfully, enter the employee information and fingerprint management, select the manager, click to modify the user rights, and eliminate the manager of the time attendance. Enter the menu mode of the time attendance after disconnecting. 5.What reasons cause the sound of beep when implement the
communication connection of the time attendance? Answer: □ if the above phenomenon appears when adopt the RS-232 to communicate, the setting of the computer’s baud rate is different with the time attendance’s baud rate; □ if adopt the RS-485 to communicate, maybe two wires of the converter communication is reversed, or two wires are stuck together; 6.After starting the time attendance, the screen repeatedly displays
“Place Again (Lift Finger)”. What problem it is and how to solve it?
Answer: The reason causing the problem includes: 1.The surface of the collecting head is not clean or possesses scratch
through long-term usage, which gives the false sense to the collecting head that there is finger is pressed in the surface, so it cannot be verified and appear the problem. Under the circumstance, use the adhesive tape to stick the dirt on the surface of the collecting head.

Fingerpr in t Time At tend ance Ser i es
62
2. The wire of the fingerprint collecting head is loosened or completely dropped off.
3.The chip o f the main board is broken. For the second and the third reason, contact with the supplier to apply for maintenance.
7.When operate during the terminal machine management, it is normal to download the fingerprint and password data, but it fails to read the attendance record or it is error in midway, how to solve it?
Answer: It is related to the data cable, or the converter, or the COM port of the computer. Reduce the communication baud rate of the time attendance and the computer, for example, set it as 38400 or 9600 and then read it. 8.The hardware of the attendance system —— the optical fingerprint
collector, which adopts the principle of optical collecting image. When the fingerprint cannot be verified for many times, please check whether there is light source directly irradiates the collector.
3.2 Software 1. How to define the overnight shift? Answer: For example: If start to work at 18:00 p.m. and end at 2:00 early in the next morning. The shift definition is: 18:00-26:00 Explanation: Please add 24 hours based on the ending time of the overnight shift. 2. How to calculate irregular overtime? Answer: For example: If start to work at 8:00 a.m. and end at 12:00 at noon; then re-start to work at 14:00 p.m. and end at 18:00 p.m. Sometimes the employee needs to work overtime according to the factory regulation after work. The irregular overtime starts from 19:00 and it is basically 2 hours. Maybe it is more than 2 hours or less than 2

Fingerpr in t Time At t endance Ser i es
63
hours. Please define according to the following shift: Work hours 1: 08:00 – 12:00 Normal attendance Work hours 2: 14:00 – 18:00 Normal attendance Work hours 3: 19:00 – 21:00 Overtime category (Please select the category of working overtime when choose the shift treatment category). Floatingly tick it. Explanation: It is necessary to tick “Floatable” and the addition of overtime category is in {Calculation Rule}. 3. How to handle the irregular shift? Answer: For example: I have two shifts and the shift definition is as follows: Shift definition1: Work hours 1: 08:00 – 12:00 Work hours 2: 14:00 – 18:00 Shift definition2:
Work hours 1: 09:00 – 13:00 Work hours 2: 15:00 – 19:00
To the irregular shift, please tick automatic shift arrangement and both two shall be ticked Explanation: Please select the department of the employee in the shift when select the department of shift definition.

Fingerpr in t Time At tend ance Ser i es
64
No data of the original record
a. Fail to collect data b. The setting of the entry data is incorrect in the
employee information setting c. The personnel information is introduced and without entry data
If the software has been used, it will prompt “Primary use, please pre-set”
a. Database is in the native machine: Fail to connect to the database, and check SQL b. Database is not in the native machine: Check the database connection of the server
Fail to connect to the device RS232 / RS485
a. The baud rate of the computer is not 38400 b. The hardware communication baud rate of the time attendance is not 38400 c. The software communication baud rate is not 38400 d. Whether the collecting data communication of the software is 38400 e. Whether the corresponding machine number of the collecting data is same f. Whether the connection of the communication wire is correct
TCP / IP Fail to connect to the device TCP / IP
a. Whether the corresponding IP address of the software communication is correct b. Whether the corresponding machine number of the software communication is correct c. Whether the communication password is correct d. Check whether the communication wire is correct
No data of the attendance report
a. Check the employee entry date b. Check whether there is the original record c. Check whether a shift is arranged (or whether it is arranged automatically) d. Check whether the data is processed e. Check whether the “timeworker” attendance method is used

Fingerpr in t Time At t endance Ser i es
65
Statement Relating to Human Rights and Privacy Dear customers, First of all, thank you for the use of the fingerprint identification product designed and produced by us. While continuing to carry out the development and research, we focus on the abidance by the relevant laws relating to human rights and privacy in every country. Our statement is as follows: 1. All of our civil fingerprint identification devices collect only the feature points, not the fingerprint image, thus no privacy is involved. 2. All fingerprint feature points collected by us cannot be restored to the
original fingerprint image, thus no privacy is involved. 3. As the device supplier, we have not any direct or indirect legal
responsibility for the consequences caused by your use of our device. 4. If you have any controversy on the human rights and privacy in using our device, please contact with your employer directly. Our other police fingerprint devices or development tools will provide the function of collecting the original image of the citizen’s fingerprint. Whether or not they infringe your rights, please contact with the government or the end suppliers of the devices. As the device supplier, we have not any legal responsibility. Remark: citizens' personal freedom rights under Chinese laws include the following: 1. Persons are free from illegal arrest, detention, search and infringement; 2. The personal dignity related to personal freedom is free from infringement;

Fingerpr in t Time At tend ance Ser i es
66
3. Citizen's residences are free from infringement; 4. Freedom and privacy of correspondence of citizens are protected by laws. Finally, we reiterate that fingerprint identification as an advanced identification technology will enter the industries of e-commerce, banking, insurance and law in the future. Every year human being is suffering huge loss due to unsafe passwords throughout the world. Under the highly secure environment, the fingerprint identification actually protects your identity.
Quick Installation Guide
Hardware Part
Start and Close Time attendance
1. Connect the time attendance’s
accompanying power adapter with 220V
alternating current;
2. Insert the power plug into the power port of the time attendance
and press the start key on the keyboard, the machine will start;
3. After connecting with the alternating current, directly press the
power button on the fingerprint time attendance to start or close the
system.
Connect with Computer
The time attendance can be connected with the computer through
three methods.
Data Download
2. RS232
3. RS485 Yes

Fingerpr in t Time At t endance Ser i es
67
I.Connect through RS232
1.Set the time attendance as RS232
communication mode, as shown in the
following picture:
Enter the menu system (MENU—3—2--1) and select “Data
Download” and “RS232”. Press the up/down key to set the
communication speed as: 38400;
Note: The default of RS232 communication speed is 38400.
2. Press power key to power off;
3. Insert RS232 connecting wire to the RS232/RS485
communication port of the time attendance;
4. Insert the other end of the RS232 connecting wire to the RS232
interface of the computer;
5. Power on;
II. Connect through RS485
1.Set the time attendance as RS485 communication mode;
Enter the menu system (press MENU-3-3
under the standby mode), select “Data
Download”-“RS485”-“Yes” to start the RS485
connecting function;
Note: RS485 cannot be used together with Ethernet.
2. Press power key to power off;
3. Insert RS485 connecting wire to the RS232/RS485 socket of the
time attendance and connect the other end to the RS232/RS485
Data Download
2. RS232
3. RS485 Yes
Data Download
2. RS232
3. RS485 Yes

Fingerpr in t Time At tend ance Ser i es
68
converter;
4. Connect the RS232/RS485 converter to the RS232 interface of
the computer;
5. Power on.
Note: RS232/RS485 converter and RS485 connecting wire are the
optional parts, excluding in the standard configuration.
III. Connect through RS485 Network
1.Set the time attendance as RS485 communication mode;
Enter the menu system (press MENU-3-3 under the standby mode),
select “Data Download”-“RS485”-“Yes” to start the RS485 connecting
function;
2. Press power key to power off;
3. Insert RS485 connecting wire to the RS232/RS485 socket of the
time attendance and connect the other end to the RS232/RS485 network;
4. Connect the computer to the RS485 network through the
RS232/RS485 converter;
5. Power on.
IV. Connect through Ethernet
1.Set the IP address modifying the time
attendance according to the network;
The default IP address of the time attendance is 192.168.1.224,
which is a legal and available address in many local area networks. If the
network address of your host is 192.168.1.1, it is in a same network
segment with the time attendance, and the host with the address of
192.168.1.224 is not set in the network segment, it is not necessary for
IP Address
192. 168. 1. 224

Fingerpr in t Time At t endance Ser i es
69
you to modify the IP address of the time attendance. Otherwise, modify
the IP address of the time attendance to be legal and available in the
network. In addition, it shall be visited by the computer to be connected.
2. Power off;
3. Insert the network plug in the Ethernet interface of the time
attendance;
Note: When directly connect the time attendance with the computer,
please use crossover cable (Ethernet 10/100Base-T Crossover Cable.
When connect the time attendance to the Ethernet network through
Hub/Switch, please use straight thru cable (Ethernet 10/100Base-T
Straight Thru Cable).
4. Power on.
Note: The Ethernet connecting function is only equipped in the
partial models of the time attendance
5. Definition of Communication Interface Signal
Pin Function
Input
Input
NONC
NONC

Fingerpr in t Time At tend ance Ser i es
70
Access Control Setting
Access Control Setting
1.1.1 Move with the up/down key and select Time Setting, and press OK to display
Select period number (ranging from 1 to 50) with the up/down key or the number key and press OK to display
Access Control Setting 1.Time Setting 2.Lock Register 3.Time Group Set 4.Unlock Group 5.Unlock Timed 6.Lock Type Set
Time Setting Period No. 01 Period No. 02 Period No. 03
1. Period S 00:00-23:59 M 00:00-23:59 T 00:00-23:59 W 00:00-23:59 T 00:00-23:59
Set the daily open time and the attendance time

Fingerpr in t Time At t endance Ser i es
71
1.12 Select Lock Register (ranging from 1 to 99999999) with the up/down key or the number key and press OK to display
The group of the user and the open period can be set.
1.13 Select time group number (ranging from 1 to 5) with the up/down key or the number key. For example, select 1 and press OK to display
Lock Register
ID 12345678
Lock Register 1.Group No 2.Period No 3.Period No 4.Period No
Time Group Set 1.Group 1 01:01:01 2.Group 2 01:01:01 3.Group 3 01:01:01 4.Group 4 01:01:01 5.Group 5 01:01:01 6
01 indicates the first period of time setting Each group can set 3 periods

Fingerpr in t Time At tend ance Ser i es
72
1.34 Select Unlock Group (ranging from group 1 to group 10) with
the up/down key or the number key to set unlock group
1.35 Select Unlock Timed with the up/down key or the number key to set the open time and the range is from 1 to 255 seconds. 1.36 Select Lock Type Set with the up/down key or the number key and the range of the alarm delay is from 1 to 255 seconds. The alarm type includes open type, close type, and unused alarm; The alarm delay can set the closing time of the alarm. If the alarm has not closed within the set time, the machine will alarm. The alarm delay also can be closed and the machine will not alarm.
Unlock Group 1. Group No 2. Group No 3. Group No Access Control Setting 1.Time Setting 2.Lock Register 3.Time Group Set 4.Unlock Group 5.Unlock Timed No 6.Lock Type Set
Range: From 1 to 255 seconds
Access Control Setting 1.Time Setting 2.Lock Register 3.Time Group Set 4.Unlock Group 5.Unlock Timed No 6.Lock Type Set
Lock Type Set 1. Alarm Type No 2. Alarm Delay No