Embed Size (px)
Citation preview


www.JavaEra.com
74
SERVLETS INTRODUCTION
Why there is a need for Server-side programming?
In applets, processing takes place at the client side. So, the burden on client side has increased when the process is more complex. As applets are not permitted to write to the client machine’s local disk, they had to suffer some efficiency problems when it comes to complex situations. Moreover, the need for making the client a ‘thin client’ has become more important to give faster access to the client. Applets are quite slow and all the browsers should support the applets. Keeping this in view a server-side program is developed, it is known as servlets, where there is no complexity on the client side.
World Wide Web
The World Wide Web is a huge collection of interconnected hypertext documents on the Internet. A hypertext document that contains hot links to other documents. There are many thousands of hypertext authors on the Internet, each of them free to connect their documents to anyone else. The Web is based on two standards: HTTP protocol and the HTML language. HTTP stands for HyperText Transfer Protocol and it describes the way that hypertext documents are fetched over the internet. HTML is the abbreviation for hypertext markup language, and it describes how the HTML documents are rendered on to the browsers. Resources on the Web are specified with a Uniform Resource Locator (URL). As it is conceived that the WWW is a pure two-tier client-server application. The user interface is “dumb”, just a presentation written in HTML. For a simple document, hyperlinking this is sufficient. The server is also rather dumb. Its only function is to server out HTML pages. It contains no logic other than this. Dynamic content Very early in the evolution of the WWW developers needed a mechanism to add some ‘smarts’ to the server side. While a web page merely displays static content and lets the user navigate through that content, a web application provides a more interactive experience. A web application can be as simple as a keyword search on a document archive or as complex as an electronic storefront. Web applications are being deployed on the Internet and on corporate Intranets and Extranets, where they have the potential to increase productivity and change the way that companies, large and small, do business. There are so many ways to create web applications some of them are discussed here. Common Gateway Interface The Common Gateway Interface normally refereed to, as CGI was one of the first practical techniques for creating dynamic web content.

www.JavaEra.com
75
You can use URLs within an HTTP message to locate a server program anywhere on the Internet. On the receiving end, the typical web server only knows how to handle HTML documents. When it receives a request for a program, it simply turns around and invokes the resource named in the URL, and tells it to take care of the request. The server passes the method request and its parameters to the back-end program using a protocol called the CGI. You can write your CGI programs in any language that can read standard input and write to standard output including Java. The application executes and returns the results in HTML/HTTP format to the server. The server turns around and returns the results to the client.
Active Server Pages
Active Server Pages (popularly known as ASPs) is a technique developed for generating dynamic web content. With ASP, an HTML page on the web server can contain snippets of embedded code (usually VBScript or Jscript – although it’spossible to use nearly any language). This code is read and executed by the web server before it sends the page to the client. ASP is optimized for generating small portions of dynamic content. Microsoft’s IIS (Internet Information Server) supports ASPs.
1 WHAT 1.1 Definition
"Servlet is a web component, managed by a container, that generates dynamic content."
“Servlets are small, platform independent Java classes compiled to an architecture neutral bytecode that can be loaded dynamically into and run by a web server.”
“Servlets are modules that extend request/response-oriented servers, such as Java-enabled web servers.” “Servlet interacts with web clients through a request-response model (which is based on the behavior of HTTP) implemented by the servlet container.”
1.2 Servlet Container
Here, we must know what is a Servlet Container. A Servlet container, in conjunction with web server -
- provides network services over which request and responses are set - decodes MIME based requests, and - formats MIME based responses.

www.JavaEra.com
76
A Servlet Container can be built into a host web server, or it can be installed as an add-on component to a web server. A servlet container must support HTTP as protocol for requests and responses. The minimum required version of HTTP is 1.0.
1.3 HTTP basics
Before going into the details of Servlets you must have a basic understanding of how the protocol behind the Web, HTTP works.
HTTP is a simple, stateless protocol. A client, such as a web browser, makes a request, the web server responds, and the transaction is done. When the client sends a request, the first thing it specifies is an HTTP command, called a method, that tells the server the type of action it wants performed. This first line of the request also specifies the address of a document (a URL) and the version of the HTTP protocol it is using. For example:
GET /intro.html HTTP/1.0
This request uses the GET method to ask for the document named intro.html, using HTTP version 1.0. After sending the request, the client can send optional header information to tell the server extra information about the request, such as what software the client is running and what content types it understands. This information doesn’t directly pertain to what was requested, but it could be used by the server in generating its response. Here are some sample requests headers:
User-Agent: Mozilla/4.0 (compatible; MSIE 4.0; Wind ows 95) Accept: image/gif, image/jpeg, text/*, */*
After the headers, the client sends a blank line, to indicate the end of the header section. The client can also send data, if appropriate for the method being used, as it is with the POST method that we’ll discuss shortly. If the request doesn’t send any data it ends with an empty line.
After the client sends the request, the server processes it and sends back a response. The first line of the response is a status line that specifies the version of HTTP protocol the server is using, a status code, and a description of the status code. For example,
HTTP/1.0 200 OK
This status line includes a status code of 200, which indicates that the request was successful, hence, the description “OK”. Another common status code is 404, with the description “not found” – as you can guess, this means that the requested document was not found. After the status line, the server sends response headers that tell the client things like what software the server is running and the content type of the server’s response. For example:
Date: Sunday, 14-November-99 03:24:10 GMT Server: JavaWebServer/1.1 MIME-version: 1.0 Content-type: text/html Content-length: 2048 Last-modified: Friday, 12-November-99 08:10:54 GMT
The Server header provides information about the server software, while the Content-type header specifies the MIME type of the data included with the response. The server sends a blank line after the headers, to conclude the header section. If the request was successful, the requested data is then sent as a part of the response. Otherwise, the response may contain human readable data that explains why the server couldn’t fulfill the request.

www.JavaEra.com
77
1.3.1 GET and POST
When a client connects to a server and makes an HTTP request, the request can be of several different types, called ‘methods’. The most frequently used methods are GET and POST. In simple way, we can say that GET method is designed for getting information (a document, a chart, or the results from a database query), while the POST method is designed for posting information (a credit card number, a chart data, or information that is to be stored in a database). GET The GET method gets information from the server by sending a ‘query string’ along with the URL. For example, see the following URL that sends a query string to get some information from the server like results from a database:
http://something.com/servlet/givedata?name=jpcl&pla ce=hyd In general, GET requests are used for sending small amounts of information, so, some servers limit the length of URLs and query strings to about 240 characters.
POST
The POST method uses a different technique to send information to the server because in some cases it may need to send megabytes of information. A POST request passes all its data, of unlimited length, directly over the socket connection as part of its HTTP request body. POST request can be done only once. Some important notes: - For long parameterized requests use POST method - For simple forms that upload information you can even use GET - GET requests should not be used to place an order, update a database etc. (that
should done only once) 2 WHY 2.1 Need for Servlets
A web page merely displays static content and lets the user navigate through that content. But, a web application can provide more interactive experience. Creating dynamic content for a web page or otherwise extending the functionality of a web server effects in creating a web application. A web application can be as simple as a keyword search on a document archive or as complex as a store-front. Before servlets, CGI (Common Gateway Interface) scripts are used to create dynamic web content (web application). But, today servlets are often used to extend web servers, providing a powerful, efficient replacement for CGI scripts.
2.1.1 Differences between CGI scripts and Servlets

www.JavaEra.com
78
Here, we must know how servlets replace CGI scripts? What are the problems or inefficiencies associated with CGI scripts ? How servlets are overcoming those problems? The following are some of the differences between CGI scripts and Servlets -
CGI Scripts Servlets CGI programs run in a separate process Servlets run inside a JVM on the server When a server receives a request that accesses a CGI program, the server must create a new process. Creating a process for every such request requires time and significant server resources, which limits the number of requests a server can handle concurrently. (see Fig.1)
Servlets are all handled by separate threads within the web server process, as they run in a JVM within the web server. So, the server can handle any number of requests concurrently. (see Fig. 2)
CGI program cannot interact with the web server once it begins execution, as it is running in a separate process.
Servlets run within the web server and can interact very closely with the server to do things that are not possible with CGI scripts.
When CGI scripts are written in Perl, it requires that each request start separate Perl interpreter, which takes more time and requires extra resources.
Servlets run on the JVM, so it takes care of running the servlet in a multithreaded way.
For each request made to a CGI program it creates an instance of the program. So, it takes more memory.
Servlets create only one instance and every request to that servlet is processed by creating threads. So, it takes less memory when compared to CGI programs.

www.JavaEra.com
79
For the above reasons, CGI scripts can be replaced by servlets. There are lots of reasons to justify servlets as an alternative to other dynamic web content technologies. (Viz. Fast CGI, mod_perl, PerlEx, Server Extension APIs, Active Server Pages, Server-side JavaScript etc.)
2.2 Advantages of Servlets
Definitely, servlets offer more advantages than any other approach to create dynamic web content. The power of servlets can be attributed to the following:
2.2.1 Portability
As servlets are written in Java, they are highly portable across operating systems. 2.2.2 Power
Servlets can use the power of core Java API like networking, multi-threading, image manipulation, data compression, database connectivity, internationalization, remote method invocation, CORBA connectivity, and object serialization etc. As a servlet author, you can use third-party Java classes, JavaBeans components, and even Enterprise JavaBeans components.
2.2.3 Efficient
Servlet invocation is highly efficient. Once a servlet is loaded, it generally remains in the server's memory as a single object instance. Thereafter, the server invokes the servlet to handle a request using a simple, lightweight method invocation. Concurrent requests are handled by separate threads, so servlet are highly scalable.
2.2.4 Safety
www.JavaEra.com
80
As servlets are written in Java, they inherit the strong type safety of the Java language. Servlets can handle exceptions safely due to Java's exception-handling mechanism.
2.2.5 Elegance
Servlet code is elegant, clean, object oriented, modular, and amazingly simple. The reason for simplicity is the Servlet API, which includes methods and classes to handle routine chores during servlet development. Even advanced operations, like cookie handling and session tracking, are abstracted into convenient classes.
2.2.6 Extensible and Flexible
The Servlet API is designed to be easily extensible. Presently, it includes classes for HTTP servlets and at a later date, it may be extended to include other type of servlets. (Viz. FTP etc.) Servlets are also quite flexible. Servlets can be used in generating a web page, in a server-side include and even in a servlet chain.
3 HOW 3.1 Basic mechanism
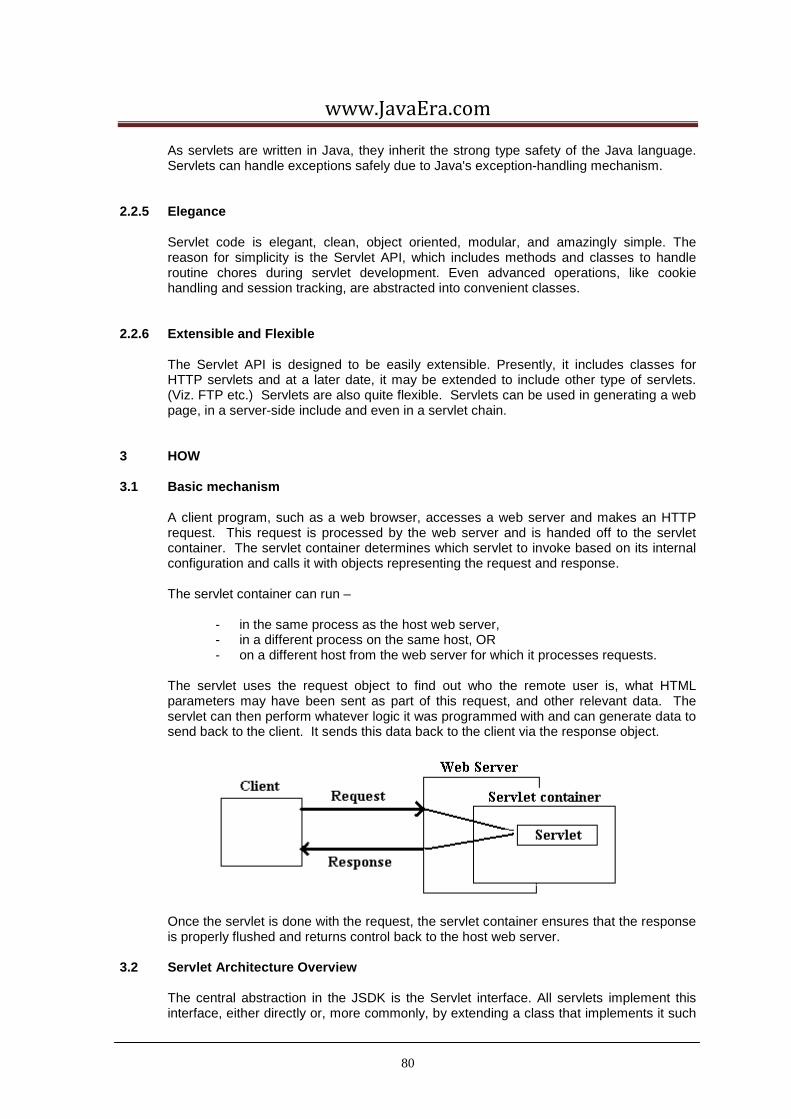
A client program, such as a web browser, accesses a web server and makes an HTTP request. This request is processed by the web server and is handed off to the servlet container. The servlet container determines which servlet to invoke based on its internal configuration and calls it with objects representing the request and response. The servlet container can run –
- in the same process as the host web server, - in a different process on the same host, OR - on a different host from the web server for which it processes requests.
The servlet uses the request object to find out who the remote user is, what HTML parameters may have been sent as part of this request, and other relevant data. The servlet can then perform whatever logic it was programmed with and can generate data to send back to the client. It sends this data back to the client via the response object.
Once the servlet is done with the request, the servlet container ensures that the response is properly flushed and returns control back to the host web server.
3.2 Servlet Architecture Overview The central abstraction in the JSDK is the Servlet interface. All servlets implement this interface, either directly or, more commonly, by extending a class that implements it such

www.JavaEra.com
81
as HttpServlet. The Servlet interface provides for methods that manage the servlet and its communications with clients. Servlet writers provide some or all of these methods when developing a servlet
When a servlet accepts a call from a client it receives two objects: one is a ServletRequest and the other is a ServletResponse. The ServletRequest class encapsulates the communication from the client to the server, while the ServletResponse class encapsulates the communication from the servlet back to the client. The ServletRequest interface allows the servlet access to information such as the names of the parameters passed in by the client, the protocol (scheme) being used by the client, and the names of the remote host that made the request and the server that received it. It also provides the servlet with access to the input stream, ServletInputStream, through which the servlet gets data from clients that are using application protocols such as the HTTP POST and PUT methods. Subclasses of ServletRequest allow the servlet to retrieve more protocol-specific data. For example, HttpServletRequest contains methods for accessing HTTP-specific header information. The ServletResponse interface gives the servlet methods for replying to the client. It allows the servlet to set the content length and mime type of the reply, and provides an output stream, ServletOutputStream, and a Writer through which the servlet can send the reply data. Subclasses of ServletResponse give the servlet more protocol-specific capabilities. For example, HttpServletResponse contains methods that allow the servlet to manipulate HTTP-specific header information. The classes and interfaces described above make up a basic Servlet. HTTP servlets have some additional objects that provide session-tracking capabilities. The servlet writer can use these APIs to maintain state between the servlet and the client that persists across multiple connections during some time period.
3.3 Writing a SimpleServlet
The following example gives you an example of a servlet. /** This example will work both with JSDK2.0 as wel l as Java ** Web Server. */ import javax.servlet.*; import javax.servlet.http.*; import java.io.*; public class SimpleServlet extends GenericServlet {
public void doGet(ServletRequest request, ServletRe sponse response) throws IOException,ServletException {
PrintWriter out ; String title=”Simple Servlet Output”; response.setContentType(”text/html”); out=response.getWriter(); out.println(“<HTML><HEAD><TITLE>”);
out.println(title); out.println(”</TITLE></HEAD><BODY>”); out.println(”<H1>” + title + ”</H1>”); out.println(”<P>This is output from SimpleServlet. ”); out.println(”</BODY></HTML>”); out.close();
} }
SimpleServlet extends the GenericServlet class, which implements the Servlet interface. SimpleServlet overrides the service method in the GenericServlet class. The service
www.JavaEra.com
82
method is called when a client makes a request and results in the simple HTML page being returned to the client. Within the service method,
- An ServletRequest object represents the user’s request. - An ServletResponse object represents the response to the user. - Because text data is returned to the client, the reply is sent using the Writer
object obtained from the ServletResponse object. 3.4 Running Servlets
To run any servlet, you need a Web Server that supports them. Here we will discuss about the use of JavaSoft’s Java Web Server. Not only Java Web Server but also any other servlet-enabled server will work. To run a servlet one must follow the under mentioned sequence of actions: i. Start your Web server, if it is not already running ii. Configure the server to install the servlet (the servlet must be installed in the Web
server) iii. Start your Web browser iv. Direct the browser to the particular URL that refers to the new servlet. Servlets can be invoked in two ways:
- servlets can be called directly by typing their URL into a browser’s location window.
- Servlets’ URLs can be used in HTML tags.
<A HREF=”……”> <FORM ACTION=”……”> <META CONTENT=”……”>
Let’s see the first case where servlet can be called directly by typing URL into the browser’s location window. The URL for a servlet has the following general form, where servlet-name corresponds to the name you have given your servlet.
http://machine-name:port/servlet/servlet-name For example, the above SimpleServlet can be invoked by typing the following URL in browser’s location window.
http://localhost:8080/servlet/SimpleServlet The second option, to invoke a servlet from within an HTML page, just use the servlet URL in the appropriate HTML tag. Tags that take URLs include those that begin anchors, forms, and Meta tags. We will see each tag in detail. Anchor tags:
<A HREF=”http://localhost:8080/servlet/SimpleServlet”>Invoke the SimpleServlet</A> Form tags:
<FORM ACTION=”http://localhost:8080/servlet/SimpleServlet” METHOD=”post”> </FORM>

www.JavaEra.com
83
Meta tags:
<HEAD> <META HTTP-EQUIV=”refresh” CONTENT=4; URL=” http://localhost:8080/servlet/SimpleServlet;” > </HEAD>
3.4.1 Testing Servlets
Once you have written your servlet, but before running the same, you can test it with the utility included in the JSDK2.0 called ‘servletrunner’. To run this utility you might have to specify certain pieces of data called ‘servlet properties’. After the properties are specified, you can run the servletrunner utility, and then invoke the servlet by any means specified above. First let’s look at how we can set the properties of servlets.
3.4.2 Setting Servlet properties
Properties are ‘key-value’ pairs used for configuration, creating and initialization of a servlet. For example in JSDK2.0 we can set the property like the following:
servlet.ss.code=SimpleServlet.class Here the key is ‘servlet.ss.code’ and the value is ‘SimpleServlet’. The servlet name ‘ss’ in this example enables the servlet running utilities to associate properties with the correct servlets. This name ‘ss’ is used when accessing the servlets from other servlets. The JSDK servlet-running utilities have two properties for servlets. They associate the name that you choose for your servlet with: • The class name of the servlet
To associates the servlet class name with the servlet we use servlet. name.code= classname
• Any initialization parameters that the servlet requires
The value of servlet.name.initArgs property holds servlet’s initialization parameters. The syntax of single initialization parameter is –
parameterName = parameterValue
example: servlet.ss.initArgs = mainFile=examples/index.html The servlet properties file could look like this –
servlet.ss.code = SimpleServlet servlet.SimpleServlet.initArgs = mainFile=examples/ index.html

www.JavaEra.com
84
3.4.3 Test-run the Servlet
To test the servlets, first we must run the servletrunner utility that is available along with JSDK2.0. The servletrunner is in jsdk2.0/bin directory. You can run the utility more easily if this directory is on your search path. For example: C:\> set path=c:\jsdk2.0\bin;%path% To know what options are available for running the servletrunner you type at the command prompt the following,
C:\> servletrunner -help Usage: servletrunner [options] Options: -p port the port number to listen on -b backlog the listen backlog -m max maximum number of connection handlers -t timeout connection timeout in milliseconds -d dir servlet directory -r root document root directory -s filename servlet property file name -v verbose output
To see the default values of these options, call servletrunner with –v option. The servletrunner will run with its default values. C:\> servletrunner -v Server settings:
port = 8080 backlog = 50 max handlers = 100 timeout = 5000 servlet dir = ./examples document dir = ./examples servlet propfile = ./examples/servlet.properties
To test the example servlet ‘SimpleServlet’, save the class file in ‘jsdk2.0/examples’ directory and add the properties in the ‘jsdk2.0/examples/servlet.properties’ files. Now, run the servletrunner by saying just, ‘servletrunner’ at the command prompt. After running the servletrunner, open a browser and in the location window of the browser, type the following line:
http://localhost:8080/servlet/SimpleServlet To invoke the servlet, either from browser’s location window or through HTML tags, use the same address given above.
3.5 Life Cycle of a Servlet
Each servlet has the same life cycle: • A server loads and initializes a servlet • The servlet handles zero or more client requests • The server removes/unloads the servlet (some servers do this step only when they shut down)

www.JavaEra.com
85
3.5.1 Initializing a Servlet
When a server loads a servlet, the server runs the servlet’s init() method. Initialization completes before client requests are handled and before the servlet is destroyed. Even though most servlets are run in multi-threaded servers, servlets have no concurrency issues during servlet initialization. The server calls the init() method once, when the server loads the servlet, and will not call the init() method again unless the server is reloading the servlet. The server can not reload a servlet until after the server has destroyed the servlet by running the destroy() method. The default initialization of the HttpServlet class initializes the servlet and logs the initialization. To add initialization specific to your servlet, override the init(ServletConfig) method. When you override the init method, follow these rules: • If an initialization error occurs that renders the servlet incapable of handling client
requests, throw an UnavailableException. An example of this type of error is the inability to establish a required network connection.
• Do not call the System.exit() method • Save the ServletConfig parameter so that the getServletConfig method can return the
value. The simplest way to do this is to have your new init method call super.init(). If a servlet used a database, for example, the init method could try to open a connection and throw the UnavailableException if it was unsuccessful. Here is pseudo-code for what that init method might look like:
public class DataServlet extends HttpServlet { Connection con = null; public void init(ServletConfig config) throws ServletException { super.init(config); // Open a database connection to prepare for r equests try { databaseUrl = getInitParameter("databaseUrl"); // get user and password parameters the same w ay con = DriverManager.getConnection(databaseUrl, user, password); } catch(Exception e) { throw new UnavailableException (this, "Could not open a connection to the dat abase"); } } public void doGet(… … …) { … … … } }
3.5.2 Handling Client requests
This part will be dealt in ‘3.7 Client/Server communication using Servlets ’.
3.5.3 Destroying a Servlet
www.JavaEra.com
86
The destroy() method provided by the HttpServlet class destroys the servlet and logs the destruction. To destroy any resources specific to your servlet, override the destroy() method. The destroy() method should undo any initialization work and synchronize persistent state with the current in-memory state. The following example shows the destroy method that accompanies the pseudo-code init method in the previous example: public class DataServlet extends HttpServlet {
Connection con = null; // the init method // the service method public void destroy() { // Close the connection and allow it to be garbage // collected con.close(); con = null; } }
A server calls the destroy() method after all service calls have been completed, or a server-specific number of seconds have passed, whichever comes first. If your servlet handles any long-running operations, service methods might still be running when the server calls the destroy method. You are responsible for making sure those threads complete.
3.6 The API Overview
There are two packages available for creating servlets: javax.servlet package javax.servlet.http pacakge
3.6.1 javax.servlet package
Here is a brief description of the javax.servlet core interfaces and classes: interface Servlet
The Servlet interface defines standard amethods all servlets must implement. To create a servlet, you typically extend either the GenericServlet class or its more specialized descendent called HttpServlet. A server intializes a servlet by calling its init method. This method pases to a servlet a ServletConfig object; it contains the servlet’s startup configuration and initialization parameters. A server invokes the service method to pass to the servlet requests for service; this method takes a ServletRequest objects for its input and returns a ServletResponse object. Finally, a server can kill a servlet by invoking its destroy method. You can call a servlet’s getServletConfig method to obtain its ServletConfig object. You can invoke the getServletInfo method to obtain a string containing information about the servlet – for example its author, version an copyright.
interface ServletConfig

www.JavaEra.com
87
The ServletConfig interface gives a servlet access to its configuration data. The server passes an object of his type to a servlet when it is first loaded. A service write implementing this interface must write methods for the servlet to use to get its initialization parameters and the context in which it is running. The getInitParameter method returns a string containing the value of the named initialization parameter of the servlet. The getInitParameterNames method returns the names of the servlet’s initialization parameters as an enumeration of strings; It returns an empty enumeration if there are no initialization parameters. The getServletContext method returns a ServletContext object that contains this servlet’s context.
interface ServletContext
The ServletContext interface gives a servlet access to information about its environment; it also allows it to log significant events. Servlet writers must decide what data to log. The interface is implemented by servers and used by servlets. The getAttributed method returns the value of the named attribute of the network service. The getMimeType method returns the mime type of the specified file. The getRealPath method applies alias rules to the specified virtual path and returns the corresponding real path. The getServerInfo method returns the name and version of the server under which this servlet is running. The getServlet method returns the servlet of the specified name. The getServlets method returns an enumeration of Servlet objects on this server. Finally, log lets you write a message to the servlet’s log file.
class GenericServlet
The GenericServlet class implements both the Servlet and ServletConfig interfaces. This class provides both a simple implementation of the life cycle methods init and destroy, as well as the methods in the ServletConfig interface. It also implements the log method as defined by the Servletcontext interface. Servlet writers must override and implement the abstract service method.
interface ServletRequest
The ServletRequest interface is used to access data that is passed from the client to the Servlet; objects that implement this interface are passed as an argument of the service method. The data contained in a ServletRequest object includes parameter names and values, attributes, and a ServletInputStream. The getAttribute method returns the value of a named attribute in the request. The getContentLength method returns the size of the request entity data; if not known it returns –1. The getContentType method returns the Internet Media Type of the request entity data. The getInputStream method returns an object of type ServletInputStream; you use it as an input stream for reading the request body. The getParameter method returns a string containing the value of the specified parameter. The getParameterNames method returns the parameter names for this request as an enumeration of strings. The getParameterValues returns the values of the specified parameter for the request as an array of strings. The getProtocol method returns the protocol andversion of the request. The getRemoteAddr method returns the IP address of the client that sent the request. The getRemoteHost method returns the fully qualified host name of the client that sent the request. The getScheme method returns the scheme of the URL used in this request – for example, http, https, or ftp. The getServerName method returns the host name of the

www.JavaEra.com
88
server that received the request. Finally, the getServerPort method returns the port number on which the request was received.
interface ServletResponse
The ServletResponse interface is used by a servlet to return response data to the client. A ServletResponse object is passed as an argument to the service method. The getOutputStream method returns an output stream that a servlet uses to write the response data. The setContentLength method is used by the servlet to set the content length for this response. The setContentType method is used to set the content type for this response.
class ServletInputStream
The ServletInputStream class provides an input stream that servlets use to read incoming requests and data. This class defines an abstract readLine method. It lets you read an array of bytes at the specified offset. The method reads into an array either the number of characters you request or the number of characters before a new line (\n) is encountered.
class ServletOutputStream
The ServletOutputStream class provides an output stream for writing servlet responses. The overloaded print method lets you write to the stream basic Java types such as booleans, characters, floats, and ints. The println method lets you write these same basic types, followed by a CRLF.
3.6.2 javax.servlet.http package
Here is a brief description of the servlet HTTP interfaces and classes: abstract class HttpServlet
The HttpServlet abstract class extends the GenericServlet with six new HTTP-related methods. You must subclass this abstract class and override at least one method. Typically, you will override doPost to handle HTTP POSTs and doGet to handle HTTP GETs. If you need to manage resources held over the lifetime of a servlet, you would need to override the inherited life cycle methods init and destroy. To support HTTP 1.1 commands – such as OPTIONS, PUT, DELETE, or TRACE – you must override the service method handle these additional HTTP methods directly. Note that only the service method is public; it delegates calls to the other methods defined in this interface. The getLastModified method facilitates the catching of GET requests; it returns the time the requested entity was last modified.
interface HttpServletRequest
The HttpServletRequest interface represents an HTTP servlet request. It provides methods to extract HTTP header information. The getAuthType method returns the authentication scheme of the request. The getDateHeader method returns the value of a date header field. The getHeader method returns the value of a header field. The getHeaderNames method returns an enumeration of strings representing the

www.JavaEra.com
89
header names for this request. The getIntHeader method returns the value of an integer header field. The getMethod returns the HTTP command. The getPathInfo method returns the optional extra path information that follows the servlet’s path in the request. The getPathTranslated method returns the extra path information translated to a real path. The getQueryString method returns the query string part of the servlet URI. The getRemoteUser method returns the name of the user making this request. The getRequestURI method returns the request URI as a URL object. Finally, the getServletPath method returns the part of the request URI that refers to the servlet being invoked.
interface HttpServletResponse
The HttpServletResponse interface represents an HTTP servlet response. It defines helper methods to dynamically generate an HTTP response; it also defines constants for the HTTP return codes. You invoke sendError to return an error response to the client using the specified status code and a default message. You invoke sendRedirect to return a redirect response to the client specifying the new URL. You invoke setDateHeader to add a date field to the response header; you must specify a field name and a date value. You invoke setHeader to add a field to the response header with a given name and integer value. You invoke setStatus to specify the status code and a default message for this response. Finally, the containsHeader method returns true if the response message header has a field with the name you specify.
class HttpUtils
The HttpUtils class provides a useful collection of HTTP utility methods. The getRequestURL method takes as its input an HttpServletRequest; it returns the URL the client used to make the request. The parsePostData takes as its input a ServletInputStream; it then parses it and returns the POST’s form data in a Hashtable of name/value pairs. The parseQueryString method parses a query string and builds a Hashtable of name/value pairs.
3.7 Client/Server communication with Servlets
An HTTP Servlet handles client requests through its service method. The service method supports standard HTTP client requests by dispatching each request to a method (doGet, doPost etc.) designed to handle that request. There are two objects in Servlet API that represents the client’s request, ‘HttpServletRequest’ object, and Servlet’s response ‘HttpServletResponse’ object. These objects are provided to the service method and to the methods (doGet, doPost etc.) that service calls to handle HTTP requests. The service method delegates HTTP requests to the following methods:
• doGet, for handling GET, conditional GET, and HEAD requests • doPost, for handling POST requests • doPut, for handling PUT requests • doDelete, for handling DELETE requests
The HttpServlet's service method also calls the doOptions method when the servlet receives an OPTIONS request, and doTrace when the servlet receives a TRACE request. The default implementation of doOptions automatically determines what HTTP options are supported and returns that information. The default implementation of doTrace

www.JavaEra.com
90
causes a response with a message containing all of the headers sent in the trace request. These methods are not typically overridden. To handle HTTP requests in a servlet, extend the HttpServlet class and override the servlet methods that handle the HTTP requests that your servlet supports. If you want to handle GET requests, you have to override doGet method. If you want to handle POST requests, you have to override doPost method. An example is given below:
import javax.servlet.*; import javax.servlet.http.*; import java.io.*; public class BooksServlet extends HttpServlet { public void doGet(HttpServletRequest request, HttpServletResponse response) throws IOException,ServletException { response.setContentType(“text/html”); PrintWriter out = response.getWriter(); out.println(“<html><head>”);
out.println(“<title>Book Store</title>< /head>”); out.println(“<body>Enter the Book No. you want: “); out.println(“<form action=\”http://localhost:808 0/ servlet/BooksServlet\” method=\”post\”>”); out.println(“<input type=text name=\”bookNo\”>”) ; out.println(“<input type=submit>”); out.println(“</form>”); out.println(“</body></html>”); out.close(); } }
Run the program using servletrunner utility. When you type the address of the servlet in the location bar, you will get the output which may look like this:
1. The servlet extends the HttpServlet class and overrides the doGet method. 2. Within the doGet method, a HTML form, for accessing the book number, is sent to the
client via Writer object’s println method. 3. To respond to the client, the example doGet method uses a Writer from the
HttpServletResponse object to return text data to the client. Before accessing the writer, the example sets the content-type header.
4. At the end of the doGet method, after the response has been sent, the Writer is closed.
In the same way we can write even the doPost method also. First we have to extend the HttpServlet class and override the doPost method. In doPost also we can get the arguments by using getParameter. Set the content-type, get the PrintWriter object, send the information through println method and then at the end close the Writer. An example for doPost method extending the above example is given below:
import javax.servlet.*; import javax.servlet.http.*; import java.io.*; public class BooksServlet extends HttpServlet { public void doGet(HttpServletRequest request, HttpServletResponse response) throws IOException,ServletException { // as in the above example… } public void doPost(HttpServletRequest request, HttpServletResponse response) throws

www.JavaEra.com
91
IOException,ServletException { response.setContentType(“text/html”); PrintWriter out = response.getWriter(); out.println(“<html><head>”);
out.println(“<title>Book Store</title></head>”); String bookno = req.getParameter(“bookNo”); out.println(“<body>You asked for Book No.“+book no); out.println(“</body></html>”); out.close(); } }
After submitting the query with 205 book number you will get the output which may look like this:
3.7.1 Threading issues

www.JavaEra.com
92
HttpServlets are typically capable of serving multiple clients concurrently. If the clients are sharing a common resource, say a database, then you have to create a servlet that handles only one client request at a time. For this you have to implement SingleThreadModel interface in addition to extending the HttpServlet class. SingleThreadModel doesn’t have any methods. So, you need not write any extra methods. Simply implement the SingleThreadModel interface and the server will make sure that your servlet runs only one service method at a time. The code may look like this if you are implementing SingleThreadModel:
public class BookServlet extends HttpServlet implements SingleThreadModel { public void doGet(HttpServletRequest req, HttpServ letResponse res) throw IOException,ServletException {
//implementation } }
Instead of implementing the interface SingleThreadModel, you can even write a ‘synchronized’ block when you are accessing a shared resource.
3.8 Database Connectivity
This part assumes that the reader has basic knowledge of JDBC API, and has worked with connecting to database, executing SQL queries, working with results etc. Most of the web sites on the Internet have some sort of database connectivity. Database-backed web sites are difficult to develop especially Internet applications. Servlets, with their enduring life cycle, and JDBC, are an efficient solution for web developers who want to develop database-backed web sites. We can connect to databases using four different types of JDBC drivers presently available viz., JDBC-ODBC Bridge driver, Native API Pure Java driver, Native Protocol Pure Java driver and Native Protocol Partly Java driver. Servlets, especially Servlets that access a database, finds place in the middle tier. A middle tier (commonly referred to as middleware) is something that helps connect one end point to another and along with the way adds a little something, like business logic. Middleware can improve efficiency by spreading the processing load across several back-end servers. On the Web, middle tiers are often implemented using Servlets. The biggest advantage for Servlets with regard to database connectivity is that the Servlet life cycle allows Servlets to maintain open database connections. In CGI script, the program has to reestablish its connection for every invocation. Whereas, in Servlets we need to establish the connection only once. Another advantage of Servlets over CGI and many other technologies is that JDBC is database-independent. A Servlet written to access a Sybase database can, with a two-line modification or a change in a properties file, begin accessing an Oracle database.
3.8.1 Writing a simple database servlet

www.JavaEra.com
93
The following example shows a very simple database servlet that uses the JDBC-ODBC Bridge driver to perform a simple query, printing the details of all departments listed in a MS Access Database table (in this example DEPT). Please see the example below: /** This database servlet uses JDBC-ODBC Bridge Dri ver */ import java.io.*; import java.sql.*; import javax.servlet.*; import javax.servlet.http.*; public class EmpList extends HttpServlet { Connection con = null; public void init(ServletConfig config) throws ServletException {
super.init(config); try{ Class.forName("sun.jdbc.odbc.JdbcOdbcDriver");
con=DriverManager.getConnection("jdbc:odbc:dep"); }catch(Exception e) { e.printStackTrace(); } } //init method ends
public void doGet(HttpServletRequest req, HttpServletResponse res) throws IOException, ServletException {
Statement stmt = null; ResultSet rs = null;
res.setContentType("text/plain"); PrintWriter out = res.getWriter();
try{ stmt = con.createStatement();
rs = stmt.executeQuery("SELECT * FROM DEPT"); out.println("DEPTNO \t DNAME \t LOC");
while(rs.next()) { out.println(rs.getString(1)+"\t"+ rs.getString(2)+"\t"+rs.getString(3));
} out.close(); }catch(Exception e) { e.printStackTrace();
} } //doGet method ends
public void destroy() { try{ con.close(); }catch(Exception e) { e.printStackTrace(); } }//destroy method ends
}//servlet program ends Before testing the above servlet, we have to do the following steps –
- Create a table in MS Access Database by name DEPT with three fields (deptno, dname, loc) and put some data in that table.
- Create a DSN by name ‘dep’ in ControlPanel/ODBC Data Sources. - Attach the database you have created as source of the DSN.
While writing the above program observe the following points –

www.JavaEra.com
94
- We have made the connection in init() method. So, the connection is made only once for this servlet.
- Every time a request is made to this servlet, it creates a Statement object and accesses the ResultSet by executing the query given.
- It sends the results in a plain text through PrintWriter object’s println method. - At the end, the servlet is unloaded in destroy() method and closes the
Connection object.
One more example given here to connect to the Oracle database using Oracle’s Thin driver. /** This database servlet uses Oracle thin Driver ** running at for example 210.250.251.1 at port No .1521 */ import java.io.*; import java.sql.*; import javax.servlet.*; import javax.servlet.http.*; public class EmpList extends HttpServlet { Connection con = null; public void init(ServletConfig config) throws ServletException {
super.init(config); try{ Class.forName("oracle.jdbc.driver.OracleDriver");
con=DriverManager.getConnection("jdbc:oracle:thin: @210.250.251.1:1521:orcl”,”scott”,”tiger”); }catch(Exception e) { e.printStackTrace(); } } //init method ends
public void doGet(HttpServletRequest req, HttpServletResponse res) throws IOException, ServletException {
Statement stmt = null; ResultSet rs = null;
res.setContentType("text/plain"); PrintWriter out = res.getWriter();
try{ stmt = con.createStatement();
rs = stmt.executeQuery("SELECT * FROM DEPT"); out.println("DEPTNO \t DNAME \t LOC");
while(rs.next()) { out.println(rs.getString(1)+"\t"+ rs.getString(2)+"\t"+rs.getString(3));
} out.close(); }catch(Exception e) { e.printStackTrace();
} } //doGet method ends
public void destroy() { try{ con.close(); }catch(Exception e) { e.printStackTrace(); } }//destroy method ends
}//servlet program ends

www.JavaEra.com
95
The output of the programme, when run in the browser, may look like this:
3.9 Inter-Servlet Communication
There can be three reasons for inter-servlet communication. Those three reasons are –
- Sharing resources among servlets - Servlet reuse - Manipulating other servlets
3.9.1 Sharing resources among servlets
There may be some situations where you need to share some information along with other servlets and need to collaborate with other servlets running on the same server. Information can be shared among servlets by passing the information directly from one servlet to another through method invocations. This approach requires each servlet to know the other servlets with which it is collaborating. Resource sharing among servlets can be done through two different ways:
- through System Properties List - through a Shared Object.
System Properties List This is a simple way to share information among servlets running on the same server. In java.lang.System there is a method called getProperties() which gives access to Java’s system-wide properties list in a java.util.Properties object. The Properties object can hold not only the System properties but also application specific properties. Servlets can use these application specific properties to hold the information they need to share. A servlet can add property to the system properties list by the following method:

www.JavaEra.com
96
System.getProperties().put(“key”,”value”); Another servlet running on the same JVM can later get the value of the property by calling:
String value = System.getProperty(“key ” );
As the java.util.Properties class is extended from Hashtable, we can treat the Properties object as a Hashtable object when storing keys and values and we can add objects to these properties; like –
System.getProperties().put(keyObject,valueObject); An example will make it clear, how to use the Properties object to store the information shared by different servlets. /** this servlet gets the system properties and ** creates a new property with a name and value*/ import javax.servlet.*; import javax.servlet.http.*; import java.io.*; import java.util.*; public class PropServlet extends HttpServlet {
public void doGet(HttpServletRequest req,HttpServletResponse res) throws IOException,ServletException {
try{ System.getProperties().put(“breads.count”, “30”);
}catch(Exception e) {e.printStackTrace();} } } Now, we will see another servlet, which accesses the information by getting the properties list. /** this servlet gets the value of a system propert y ** by giving its key */ import javax.servlet.*; import javax.servlet.http.*; import java.io.*; import java.util.*; public class ListPropServlet extends HttpServlet {
public void doGet(HttpServletRequest req,HttpServletResponse res) throws IOException,ServletException {
try{ PrintWriter out = res.getWriter(); String bc = System.getProperty(“breads.coun t”); out.println(bc); }catch(Exception e) {e.printStackTrace();} } } Shared Object

www.JavaEra.com
97
Shared Object is another concept through which servlets can share information. A shared object can hold the pool of shared information and make it available to each servlet as needed. Though system Properties list is also an example of Shared object, it will not have capability to incorporate business logic. But, a shared object incorporates a fair amount of business logic or rules for manipulating the object’s data. A shared object can enforce data integrity by protecting the actual data by making it available through well-defined methods. It can trigger events to handle certain conditions. This capability isn’t available with the Properties list. An example of shared object will give a clear picture of how we can implement servlet collaboration.
public class CoffeeInventory { private CoffeeInventory() {} private static CoffeeInventory instance = new CoffeeInventory(); public static CoffeeInventory getInstance() { return new CoffeeInventory(); } private int milk = 0; private int sugar =0; public void addMilk(int x) { milk+=x; } public void addSugar(int x) { sugar+=x; } synchronized public boolean coffeeAvailable() { if(milk > 0 && sugar > 0) { milk--; sugar--; return true; } else return false; } }
This CoffeeInventory object maintains an inventory count for milk and sugar. It holds the ingredients with private instance variables. One servlet, which is used to add the ingredients, may use this CoffeeInventory object as in the example given under:
import javax.servlet.*; import javax.servlet.http.*; import java.io.*; public class AddIngredients extends HttpServlet { CoffeeInventory ci = CoffeeInventory.getInstance (); Public void doGet(HttpServletRequest req,
HttpServletResponse res) throws IOException,ServletException {
res.setContentType(“text/html”); PrintWriter out = res.getWriter(); int milk = 10;

www.JavaEra.com
98
int sugar = 20; ci.addMilk(milk); ci.addSugar(sugar); out.println(“<html><body>”); out.println(“<h1>Ingredients Added are as
follows</h1>”); out.println(“<h4>Milk : “+milk+”</h4>”); out.println(“<h4>Sugar : “+sugar+”</h4>”); out.println(“</body></html>”); } }
Test-run the above servlet and you will get the following output in the web-browser: Ingredients added are as follows
Milk : 10 Sugar : 20
Now, some other servlet, for example ‘GetIngredients’, may want to know how many ingredients are available to make the coffee.
import javax.servlet.*; import javax.servlet.http.*; import java.io.*; public class GetIngredients extends HttpServlet { private CoffeeInventory ci = CoffeeInventory.getInstance(); public void doGet(HttpServletRequest req, HttpServletResponse res)throws IOException,ServletException{ res.setContentType(“text/html”); PrintWriter out = res.getWriter(); out.println(“<html><body><b>”); if(ci.coffeeAvailable())
out.println(“Coffee will be served within 2 minutes ”); else out.println(“Sorry ! Coffee not available”); out.println(“</b></body></html>”); } }
If the ingredients are available then the servlet will give a response saying ‘Coffee will be served within 2 minutes’, otherwise if they are not available then it says ‘Sorry! Coffee not available’. To know the effect write and compile all the three programs and follow these steps:
- First, run the AddIngredients servlet. - Next, run the GetIngredients servlet. You will get the response that the
coffee will be served within 2 minutes. - Again run the GetIngredients servlet for three more times. The third time you
run the servlet, you have to get the result that coffee is not available. (Because, we have added milk of 10 points only. So, it has to say no when we are asking for coffee for the fourth time.)

www.JavaEra.com
99
3.9.2 Servlet reuse
Inter-servlet communication allows one servlet to reuse the abilities of another servlet. For this purpose we can call the other servlet running on the same server with the ServletContext’s getServlet() method. But, the problem comes where the called servlet is not yet been loaded into the server. So, the calling servlet has to ask the server to load the called servlet and then access it through getServlet() method. But, servlets cannot control the servlet life cycle, for themselves or for other servlets. But, there is an alternative solution for this problem. A servlet can open an HTTP connection to the server in which it is running, ask for the unloaded servlet, and effectively force the server to load the servlet, and then get the instance of the servlet using getServlet() method. An example is given here under: import javax.servlet.*; import javax.servlet.http.*; import java.io.*; public class GetOtherServlet extends HttpServlet { public void init(ServletConfig config) throws
ServletException {
super.init(config); } public void doGet(HttpServletRequest req,
HttpServletResponse res) throws ServletException,IOException {
ServletContext context = getServletContext(); OtherServlet os =
(OtherServlet) context.getServlet(“OtherServlet”); if(os != null) { os.doGet(req,res); } else { Socket socket = new
Socket(req.getServerName(),req.getServerPort()); socket.setSoTimeout(4000); PrintWriter out =
new PrintWriter(socket.getOutputStream(),true); out.println(“GET /servlet/OtherServlet HTTP/1.0”); out.println(); try{ socket.getInputStream().read(); }catch(InterruptedIOException e) { e.printStackTrace(); }
out.close(); os = context.getServlet(“OtherServlet”); os.doGet(req,res); }
} }
3.9.3 Manipulating other servlets
Manipulating other servlets, loaded on the same server, involves performing some task on one or more of them. A servlet can obtain information about other servlets through the ServletContext object. If your servlet have to call another servlet, you can do it through two ways –

www.JavaEra.com
100
- A servlet can make an HTTP request of another servlet. - A servlet can call another servlet’s public methods directly, if the two servlets
run within the same server.
Making HTTP request A servlet can make an HTTP request of another servlet by opening a connection to a URL. To do this, we must know the name of the servlet that you want to call and the parameters, if any, to be passed to such servlet. Using URL we can access another servlet as explained in the following example: import javax.servlet.*; import javax.servlet.http.*; import java.net.*; import java.io.*; public class Sservlet extends HttpServlet { public void doGet(HttpServletRequest req, HttpServletResponse res) throws IOException,Serv letException { try{ PrintWriter out = res.getWriter(); URL ss = new URL("http://localhost:8080/servlet/Simp leServlet"); BufferedReader in = new BufferedReader( new InputStreamReader( ss.openStream())); String inputLine; while ((inputLine = in.readLine()) != null) out.println(inputLine); }catch(Exception e) {e.printStackTrace();} } } Steps –
- First construct an URL object with the url that is used to call the servlet. - Create a BufferedReader object by passing an InputStreamReader object. - Now, read the response directly from the BufferedReader object and - Send the response to the client using PrintWriter’s println method.
Calling public methods To call another servlet’s public methods directly, we must:
- know the name of the servlet - gain access to that servlet’s Servlet object. - Call the servlet’s public methods.
After knowing the name of the servlet that you want to call, gain access to the Servlet object by using the ServletContext’s getServlet method. Get the ServletContext object from the ServletConfig object stored in the Servlet object. Observe the following example:
public class BooksServlet extends HttpServlet { public void doGet (HttpServletRequest request, HttpServletResponse response)throws ServletException,IOException { ...
DataBase database =(DataBase)getServletConfig()

www.JavaEra.com
101
.getServletContext().getServlet("b ook"); ... } }
After getting the Servlet object, you can call any of the public methods of that servlet. Suppose the DBServlet has a public method called getData(), then we can invoke that method directly on the DBServlet’s object that was returned by the getServlet method of ServletContext’s object. String data = database.getData();
NOTE: You must exercise caution when you call another servlet's methods. If the servlet that you want to call implements the SingleThreadModel interface, your call could violate the called servlet's single threaded nature.
3.10 Applet – Servlet Communication
Sometimes, applets need to communicate with the server. For example, the administration applet that manages the Java Web Server, though executed on the client side, configures the server. To do this, the applet need to communicate with the server constantly. An untrusted applet cannot connect to any other server machine, except to the server from which it was downloaded. Any attempt to connect to another machine results in a SecurityException. So, there is only once option, i.e. connecting to the server from which the applet was downloaded. The applet can connect to the server in several different ways. Before servlets came into picture with the introduction of JDK1.1, the applets used to connect to the server using HTTP and Raw socket connections.
- In HTTP connection, the applet establishes connection to a CGI program on the server and sends a query string or POST data to retrieve response from the CGI program.
- In Raw socket connection, the applet establishes raw socket connection to a non-
HTTP server running on the server machine. The non-HTTP server listens to a particular port and communicates with the applet using any custom protocol.
But, both these approaches have advantages as well as disadvantages. Let’s see them in detail:
HTTP Connection Raw socket Connection Advantages Disadvantages
Easy to write Difficult to write Most firewalls allow HTTP connections. So, it works for applets running behind firewall.
Most firewalls don’t allow raw socket connections. So, it fails for applets running behind firewalls.
It allows Java applet to communicate with a program written in any language. So, the CGI program can be written in any language Perl,C etc.
Both client as well as server programs must be written in Java. (Of course, we can write in C language, but it is easier to write in Java)
An applet can communicate with a secure server using the encrypted HTTPS (HTTP+SSL) protocol.
Here, it may require the development of a custom protocol.
Disadvantages Advantages It is slow, because of request / response More faster, because, a non-HTTP server

www.JavaEra.com
102
paradigm. There is a standard delay in launching and initializing the CGI program for every request.
can be written to handle a request immediately without launching external CGI program.
Only the applet can initiate the communication.
Allows bi-directional, sustained communication.
Generally, it is a standard approach for applets to use HTTP to connect to CGI programs on the server. It’s easy, and it works for all types of browsers, even browsers running behind firewalls. The introduction of Java servlets and object serialization has given new life to these traditional applet-server communication techniques. Java object serialization has simplified the issues involved with formatting responses. If both the applets and servlets are written in Java, then they can exchange Java objects, which provides easy type safety. Two more important features included in JDK1.1 have an impact on applet-server communication: JDBC and RMI. Java applets can use JDBC to communicate with a database on the server. Instead of applet directly connecting to the database, it is better if the applet connects to a servlet that handles the database communication on its behalf. Java RMI API allows an applet to invoke the method of a Java object executing on the server machine, and in some cases, it also allows the object on the server machine to invoke the methods of the applet. Using RMI has some advantages:
- With RMI, there are no requests and responses, just method invocations. - It allows server objects to make callbacks to the methods of the applet. - It can be made to work through firewalls. Though generally RMI transport
layer relies on direct socket connections, when applet executes behind a firewall, socket connections will fail. Then RMI automatically begin operating entirely within the HTTP protocol.
However, there are some disadvantages of using RMI in applet-server communication:
- It is complicated. RMI communication uses Stubs, Skeletons and a Naming registry etc.
- It’s supported in few browsers. (Netscape 4.0) - It can be used only by Java clients.
Which approach to choose for applet-server communication depends on various factors. But, the best solution is to use every solution, with servlets. Servlets make it possible to combine the HTTP, non-HTTP, and RMI applet-server communication techniques, supporting them all with a single servlet. An example will give a clear idea of how an applet can communicate with a servlet. //Applet – ServletApplet.java
import java.applet.*; import java.awt.*; import java.awt.event.*; import java.net.*; import java.io.*; public class ServletApplet extends Applet implement s
ActionListener { TextField t1; Button b1; public void init() {

www.JavaEra.com
103
t1 = new TextField(30); b1 = new Button("receive message from servlet"); add(t1); add(b1); b1.addActionListener(this); } public void actionPerformed(ActionEvent ae) { try{
URL url = new URL("http://localhost:8080/servlet/AppletServlet?op eration =send");
URLConnection con = url.openConnection(); con.setDoInput(true); con.setDoOutput(true); showStatus("sending data"); con.connect(); DataInputStream in= new DataInputStream(new BufferedInputStream
(con.getInputStream())); String response = in.readLine(); t1.setText(response); showStatus("received message"); in.close(); }catch(Exception e) { showStatus(e.getMessage()); } } }
//HTML file – ServletApplet.html
<HTML> <APPLET CODE=ServletApplet WIDTH=400 HEIGHT=150></A PPLET> </HTML>
//Servlet – AppletServlet.java
import java.io.*; import javax.servlet.*; import javax.servlet.http.*; public class AppletServlet extends HttpServlet { public void init(ServletConfig config) throws ServletException { super.init(config); } public void service(HttpServletRequest req,
HttpServletResponse res) throws IOException,ServletException {
String st = req.getParameter("operation");
if(st.equals("send")) { res.setContentType("text/plain"); PrintWriter pw = res.getWriter(); pw.println("This is an example for appletservlet
communication"); pw.close(); } } }

www.JavaEra.com
104
Now, to test the above applet and servlet, run the applet in an appletviewer. You will see the following after running the program. Run the program
Let’s look at an other example that shows an applet contacting a database through a servlet. The applet’s code is shown in DataBaseApplet.java and servlet’s code is shown in DataBaseServlet.java. To contact the database, the servlet uses ‘thin’ driver. It contacts the Oracle database and sends the results to the requesting program in this case an applet.
//Here is the code for the applet that requests a s ervlet. We have to run this applet using appletviewer.
/** <applet code=DataBaseApplet.class width=250 hei ght=150> ** </applet> */ import java.awt.*; import java.applet.*; import java.awt.event.*; import java.net.*; import java.io.*; import java.util.*; public class DataBaseApplet extends Applet implemen ts ActionListener { TextField tf1,tf2,tf3; Button b1,b2; public void init() { setLayout(new GridLayout(4,2)); add(new Label("Department No.")); tf1 = new TextField(20); add(tf1); add(new Label("Department Name")); tf2 = new TextField(20); add(tf2); add(new Label("Location")); tf3 = new TextField(20); add(tf3);

www.JavaEra.com
105
b1 = new Button("List"); add(b1); b2 = new Button("Clear"); add(b2); b1.addActionListener(this); b2.addActionListener(this); } public void actionPerformed(ActionEvent ae) { if(ae.getSource()==b1) { try{
URL url = new URL("http://localhost:8080/servle t/ DataBaseServlet?deptno="+tf1.getText());
URLConnection con = url.openConnection(); con.setDoInput(true); con.setDoOutput(true); con.connect(); DataInputStream in= new DataInputStream (new BufferedInputStream (con.getInputStre am())); String response = in.readLine(); StringTokenizer stkn=new StringTokenizer(respo nse,"-"); while(stkn.hasMoreElements()) { tf1.setText(stkn.nextToken()); tf2.setText(stkn.nextToken()); tf3.setText(stkn.nextToken()); } in.close(); }catch(Exception e) { showStatus(e.getMessage()); } } else if(ae.getSource()==b2) { tf1.setText(""); tf2.setText(""); tf3.setText(""); } } }
//Here is the code for servlet that contacts the Or acle database through thin driver and sends the response.
import java.io.*; import java.sql.*; import javax.servlet.*; import javax.servlet.http.*; public class DataBaseServlet extends HttpServlet { Connection con = null;
public void init(ServletConfig config) throws ServletException {
super.init(config); try{ Class.forName("oracle.jdbc.driver.OracleDriver"); con=DriverManager.getConnection("jdbc:oracle:thin:
@210.250.251.1:1521:orcl","scott","tiger"); }catch(Exception e) {
e.printStackTrace(); } }
public void doGet(HttpServletRequest req, HttpServletResponse res) throws IOException,ServletException {

www.JavaEra.com
106
Statement stmt = null; ResultSet rs = null; res.setContentType("text/plain"); PrintWriter out = res.getWriter(); try{ stmt = con.createStatement(); String deptno = req.getParameter("deptno"); rs = stmt.executeQuery("SELECT * FROM DEPT WHERE
DEPTNO="+deptno); rs.next(); out.println(rs.getString(1)+"-"+rs.getString(2)
+"-"+rs.getString(3)); }catch(Exception e) {
e.printStackTrace(); }
out.close(); }
public void destroy() { try{ con.close();
}catch(Exception e) { e.printStackTrace(); }
} }
After running the example above, the applet will look like this:
3.11 Session Tracking
HTTP is a stateless protocol. It cannot recognize that sequences of requests are all from the same client. To overcome such situation, Session tracking was introduced. Session tracking is a mechanism that servlets use to maintain state about a series of requests from the same user i.e. requests originating from the same browser, across some period of time. There are four different options for tracking a session. They are as follows:
- Hidden form fields - URL Rewriting - HttpSession object - Cookies
3.11.1 Hidden Form Fields
One of the simplest ways to support session tracking is to use hidden form fields. As the name suggests, these fields are hidden (not displayed in the client’s browser) in an HTML form. First they are created by the servlet and sent to the browser, and then the client

www.JavaEra.com
107
sent them back to the server when the form that contains them is submitted. The syntax of HTML hidden form fields is like this: <form action= ’/servlet/GetWelcome’ method=’post’> . . . <input type=hidden name=’name’ value=’xyz’> <input type=hidden name=’session’ value=’123’> . . . </form> For a servlet, which receives the form data, there is no difference between a hidden field and a visible field. The following example will show you how to send hidden form fields to the client for tracking his session. Taking the data of the form is same as what we have done previously. import javax.servlet.*; import javax.servlet.http.*; import java.io.*; public class GetHiddenFields extends HttpServlet { public void doGet(HttpServletRequest req, HttpServletResponse res) throws IOException, ServletException { res.setContentType(“text/html”); PrintWriter out = res.getWriter(); out.println(“<html><body>”); out.println(“<form action=
\” http://localhost:8080/servlet/GetWelcome\ ” method=\”get\”>”);
out.println(“<input type=hidden name=\”name\” value=\”javapoint\”>”); out.println(“<input type=submit value=Get Welc ome>”); out.println(“</form>”); out.println(“</body></html>”); } }
3.11.2 URL Rewriting
Sometimes, when the users are surfing with really old browsers without cookie support, the programmer has to use URL rewriting for tracking the user’s session. URL Rewriting is another way to support anonymous session tracking. With URL rewriting, every local URL the user might click on, is dynamically modified, or rewritten, to include extra information. The extra information can be in the form of extra path information, added parameters, or some custom, server-specific URL change. Note that you cannot use URL rewriting with static HTML pages (all pages must be dynamic), due to the fact that the URL must be encoded for each user to include the session ID. The following servlet will illustrate URL rewriting method of session tracking. import javax.servlet.*; import javax.servlet.http.*; import java.io.*; public class RewritingServlet extends HttpServlet { public void doGet(HttpServletRequest req,

www.JavaEra.com
108
HttpServletResponse res) throws IOException, ServletException {
res.setContentType(“text/html”); PrintWriter out=res.getWriter(); out.println(“<head><title>Rewriting Example</title></head>”); out.println(“<body>”); //Get the current session id, or generate a new on e String sessionid = req.getPathInfo(); if(sessionid == null) { sessionid = generateSessionId(); } out.println(“<form action=\”servlet/ShoppingCart/” +sessionid + “\” method=post>”); out.println(“input type=submit value=\”Add More Items\”>”); out.println(“</form>”); out.println(“</body></html>”); } private static String generateSessionId() { String uid = new java.rmi.server.UID().toString(); return java.net.URLEncoder.encode(uid); } } After running the above servlet in the browser, you may see a button in the browser that was returned by the servlet as part of its response. The output figures may look like the following:
When you press the button may see a string something like the following in the location object: http://localhost:8080/servlet/servlet/ShoppingCart/ 1f0d19%3Adaeb3389ec%3A-8000

www.JavaEra.com
109
3.11.3 Cookies
A Cookie is a keyed piece of data that is created by the server and stored by the client’s browser. Browsers maintain their own list of cookies. When a browser receives a cookie, it saves the cookie and thereafter sends the cookie back to the server each time it accesses a page on that server. Because a cookie’s value can uniquely identify a client, cookies provide a very viable solution for session tracking. For example, let’s assume that a user visits an online store. A cookie can save the user information such as name, address etc. A user need not enter this data each time he/she visits the store. A server can provide one or more cookies to a client. Browser is expected to support twenty cookies per host, of at least four kilobytes each. Multiple cookies can have the same name. For example, a servlet could send two cookies with headers named BookToBuy one could have the value 304qty1, while the other could have a value 301qty3. These cookies would indicate that the user wants to buy one copy of the book with stock number 304, and three copies of the book with stock number 301. Cookies that a client stores for a server are returned by the client to that server and only that server. A server can contain multiple servlets, and because cookies are returned to a server, these multiple servlets running on that server can share cookies. Let’s know how cookies work, by seeing a simple example: The following HTML file will give a text field and submit button and prompts for entering some value for a cookie. When you submit the value, it will invoke a servlet called AddCookieServlet at the server side. The servlet program is given here under: <HTML> <BODY> <FORM NAME="Form1" METHOD="post" ACTION="http://localhost:8080/servlet/AddCookieSer vlet"> <B>Enter the value for a cookie</B> <INPUT TYPE=textbox NAME="data" SIZE=25 VALUE=""> <INPUT TYPE=submit VALUE="submit"> </FORM> </BODY> </HTML> The following servlet program will get the value of parameter called ‘data’ from the above HTML form. And creates the cookie value with that value. Sends it back to the client the value given by the client. That value is written to the client’s machine through the PrintWriter object’s println method. To send a cookie, follow these steps:
- Instantiate a Cookie object - Set any attributes - Send the cookie
import java.io.*; import javax.servlet.*; import javax.servlet.http.*; public class AddCookieServlet extends HttpServlet{ public void doPost(HttpServletRequest req , HttpServletResponse res) throws ServletException,IO Exception {
//get a parameter from the HTTPrequest String data=req.getParameter("data");

www.JavaEra.com
110
// create a cookie Cookie c=new Cookie("MYCookie",data); // add the cookie to the response res.addCookie(c); //write the output to the browser res.setContentType("text/html"); PrintWriter pw=res.getWriter(); pw.println(data); pw.close(); }
} The above servlet, when run, will send a cookie to the browser. So, now the browser is containing a cookie. Now, any servlet running on the same server can get the information about the cookie by following the steps given here under:
- Retrieve all the cookies from the user’s request - Find the cookie or cookies with the name that you are interested in, using
standard programming techniques - Get the value of the cookies that you found
The following servlet will illustrate the procedure to get the cookies’ information from the browser.
import java.io.*; import javax.servlet.*; import javax.servlet.http.*; public class GetCookiesServlet extends HttpServlet { public void doGet(HttpServletRequest req, HttpServletResponse res)throws ServletException,IOE xception {
//Get cookies from header of HTTP Request Cookie[] cookies=req.getCookies();
//Display these cookies res.setContentType("text/html"); PrintWriter pw=res.getWriter(); for(int i=0;i<cookies.length;i++){ String name=cookies[i].getName(); String value=cookies[i].getValue(); pw.println("name="+name+" : value="+value); } pw.close(); }
}
Setting Cookie attributes
The Cookie class provides a number of methods for setting a cookie’s values and attributes. setComment(String purpose)
The cookie’s purpose will be described using this comment. setDomain(String pattern)

www.JavaEra.com
111
The cookie should be presented only to hosts satisfying this domain name pattern. Example: setDomain(“.foo.com”)
setMaxAge(int expiry)
Sets the maximum age of the cookie. The cookie will expire after that many seconds have passed. If a zero value is passed to the cookie then it will be deleted.
setPath(String uri)
The cookie should be presented only with requests beginning with this URL.
setSecurity(boolean flag)
Indicates to the user agent that the cookie should only be sent using a secure protocol.
setValue(String newValue)
Sets the value of the cookie.
setVersion(int v)
Sets the version of the cookie protocol used when this cookie saves itself.
NOTE:
- While creating a cookie, you should not use white spaces and any of these
following characters: [ ] ( ) = , “ / ? @ : ; - Create the cookie before accessing the Writer. (Because cookies are sent to
the client as a header, and headers must be written before accessing the Writer).
3.11.4 HttpSession object
It is not always necessary for a servlet to manage its own sessions using the techniques we have just discussed above. The Servlet API provides several methods and classes specifically designed to handle session tracking on behalf of servlets. In other words, servlets have built-in session tracking. Every user of a site is associated with a javax.servlet.http. HttpSession object that servlets can use to store or retrieve information about the user. You can save any set of arbitrary Java objects in a session object. To track the session, the steps to be followed are as follows:
- Get a session (an HttpSession) for a user. - Store or get data from the HttpSession object. - Invalidate the session (optional)
Obtaining a session

www.JavaEra.com
112
The getSession method of the HttpServletRequest object returns a user’s session. When you call the method with its create argument as true, the implementation creates a session if necessary. To properly maintain the session, you must call getSession before any output is written to the response. The servlet gets the session object by calling the method as follows:
HttpSession HttpServletRequest.GetSession(true); Storing and Getting data from a Session The HttpSession interface provides methods that store and return:
- Standard session properties, such as a session identifier. - Application data, whichi is stored as a name-value pair, where the name is a
String and the value is an object in the Java programming language.
We can store data to a session like the following:
HttpSession session = request.getSession(true); ShoppingCart cart = new ShoppingCart(); session.putValue(session.getId(),cart);
We can retrieve the data from a session like the following:
ShoppingCart cart = (ShoppingCart) session.getValue(session.getId());
Invalidating the Session
To invalidate a session means to remove the HttpSession object and its values from the system. A user’s session can be invalidated manually or, depending on where the servlet is running, automatically. To manually invalidate a session, use the session’s invalidate method. Some applications have a natural point at which to invalidate the session. To invalidate the sessions manually do as following: cart = (ShoppingCart)
session.getValue(session.getId()); //clear shopping cart by invalidating the session session.invalidate(); The following example will give you a clear idea of how to track the session using HttpSession object.
import javax.servlet.*; import javax.servlet.http.*; import java.io.*; import java.util.*; public class HttpSessionServlet extends HttpServlet { public void init(ServletConfig config) throws ServletException { super.init(config); } // process the Http Get request, this method will
// handle the checkout

www.JavaEra.com
113
public void doGet(HttpServletRequest
req,HttpServletResponse res) throws IOException,ServletException {
String[] movies = null; //get a handle to HttpSession object HttpSession session = req.getSession(true); if(session != null) { movies = (String[]) session.getValue("Movies "); } res.setContentType("text/html"); PrintWriter out = res.getWriter(); out.println("<html>"); out.println("<head><title>Session Servlet</title></head>"); out.println("<body>"); out.println("Thank You"); //iterate over the movie array for(int i=0; i<movies.length; i++) { out.println(movies[i]); } out.println("</body>"); out.println("</html>"); out.close(); } //process the Http Post request public void doPost(HttpServletRequest req,HttpServletResponse res) throws IOException,ServletException { // parse the movies selected String movies[] = req.getParameterValues("Movies "); //get a handle to HttpSession object HttpSession session = req.getSession(true); if(session != null) { session.putValue("Movies",movies); } res.setContentType("text/html"); PrintWriter out = res.getWriter(); out.println("<html>"); out.println("<head><title>Session Servlet</title></head>"); out.println("<body>"); out.println("Thank You"); //iterate over the movie array for(int i=0; i<movies.length; i++) { out.println(movies[i]); } //create a form to submit an order out.println("<form action=\"http://localhost:8080/ servlet/HttpSessionServlet\"

www.JavaEra.com
114
method=\"get\">"); out.println("<input type=\"submit\" name=\"add\" value=\"Proceed to checkout\">"); out.println("</form>"); out.println("</body>"); out.println("</html>"); out.close(); } }
4 Java Web Server
WHAT
JavaSoft, being a winner in Java when it comes to server development and server-side programming, developed Java Server Toolkit and Service API. The Java Server Toolkit is a server framework from which other servers can be developed. The Java Server Toolkit is a server framework from which other servers can be developed. One of the servers developed from this framework is the Java Web Server, formerly named Jeeves. The Java Server Toolkit is a framework for building Internet and Intranet servers. It implements the functions that are common to many servers:
• It listens on a port for connection requests. • It accepts connection requests. • It creates threads to handle the requests. • It hands the connections to the threads for processing. • It manages the threads and connections.
Besides providing these basic server functions, the Java Server toolkit makes it easier to integrate the following advanced capabilities into the servers you develop:
• Web-based remote administration • Authentication and access controls • Secure Socket Layer (SSL) • Servlets support • HTTP 1.0 support • Dynamic Web page generation
The Java Server Toolkit provides a framework for developing Java-based server software. This framework was used to develop Java Web Server. Java Web Server is a top-of-the-line, fully HTTP 1.1 compliant Web server (servlet engine).
WHY
There are dozens of servlet engines available for servlet deployment. Java Web Server is one of those engines available. With JSDK2.0 we are getting a servlet engine called ‘servletrunner’ for testing the servlets. But, why not we use the same servlet engine for deploying the servlets and why should we go for Java Web Server ? Because that servlet engine (‘servletrunner’) is bare-bones simple. It implements the Servlet API 2.0 and nothing more. Features like robust session tacking, server-side includes, servlet chaining, and Java Server Pages have been left out because they are technically not part of the Servlet API. For these features, we need to use a full-fledged servlet engine like the Java Web Server or one of its competitors’.

www.JavaEra.com
115
Sun’s Java Web Server is freely available for download at http://www.sun.com/products-n-solutions/edu/java/. There are number of attractive features included in Java Web Server. They are as follows:
• Java servlets can be used to replace CGI programs written in other languages. • Web pages can be dynamically compiled based on server code that is embedded in
HTML files. • User connections with the Web server can be tracked and managed as interactive
sessions. • Secure Sockets Layer and X.509 digital certificates can be used to provide privacy,
integrity, and authentication services. • Templates for the presentation of HTML content are separately managed by the
server. HOW
Because Java Web Server is built using the Java Server framework, it follows its basic execution paradigm. An acceptor listens for incoming connection requests on the TCP ports managed by the server. It hands off accepted connections to connection handlers. The connection handlers receive HTTP requests from Web server clients and load and invoke servlets to process the HTTP requests. The following diagram depicts the working of Java Web server.
When a request for the URL of a servlet is received from a Web browser, Java Web Server invoked the servlet to process the request. Java Web Server provides the servlet with all the information it needs to process the request. It also provides a mechanism for the servlet to send response information back to the Web browser. Servlets can be preloaded by Java Web Server or loaded on the fly, as they are needed. Installing and Running the Java Web Server
Java Web Server is available for download from JavaSoft at http://jserv.javasoft.com/products/java-server/webserver/index.html. Java Web Server for Windows 95 and NT is distributed as a self-extracting executable file. Run

www.JavaEra.com
116
the file and follow the installation instructions to install Java Web Server on your system. Java Web Server comes with extensible documentation that describes its features and shows how they work. To start Java Web Server, open Command prompt, change to Java Web Server’s bin directory, and run httpd, as follows: C:\JavaWebServer1.1\bin>httpd If we install the Java Web Server as a service under Windows NT (NT Service), it is automatically started when we reboot our machine. So, we need not start the httpd service when we have NT Service. Java Web Server provides Web service on port 8080 as default. This lets us to use Java Web Server without having to stop our current Web server (if any). Java Web Server provides an administration applet to administer the server. This server administration runs on port 9090 as default. We can log into this applet to administer the server. Here, we will look at the way a servlet is installed in the server to serve clients.
Deploying and Accessing Servlets
While using Java Web Server, we should put our source code for the servlet in the server_root/servlets directory (where the server_root is the directory where we installed our server eg. ‘D:\JavaWebServer1.1’). So, you have to put the source code in ‘d:\JavaWebServer1.1\servlets’ directory. This is the standard location for servlet class files. Once we have the source code in the right location, we need to compile it. The standard javac compiler can do the job. But be sure that we have javax.servlet and javax.servlet.http packages in our classpath. Now, we have our compiled code in the servlets directory, we need to do nothing but start our server and access the servlet. There are several ways to access a servlet. First one is to access the servlet using a URL with /servlet/ prepended to the servlet’s class name. Then we can enter the URL in our web browser like this: ‘http://server:8080/servlet/SimpleServlet’. Replace the server with the name of the server machine or with localhost if the server is on our local machine. If the servlet were part of a package, it would need to be placed in server_root/servlets/package/name and referred to with the URL ‘http://server:8080/servlet/package.name.SimpleServlet’. The second way to refer to a servlet is by its registered name. The registered name does not have to be the same as its class name, although it can be. Using Java Web Server we can register our servlets via the Java Server Administration Tool, an administration applet that manages the server, usually available at http://server:9090/. Choose to mange the Web Service, go to the Servlets section, and then Add a new servlet. Here you can specify the name of the new servlet and the class associated with that name. If we choose the name simple for our SimpleServlet, we can then access it at the URL ‘http://server:8080/servlet/simple’. Why we are adding a servlet to the server is that it allows the server to remember things about the servlet and give it special treatment. The third way to access a servlet is through a servlet alias. The URL of a servlet alias looks like any other URL. The only difference is that the server has been told that the URL should be handled by a particular servlet. For example, we can choose to have ‘http://server:8080/simple.html’ invoke the SimpleServlet. Using aliases in this way can help hide a site’s use of servlets; it lets a servlet seamlessly replace an

www.JavaEra.com
117
existing page at any given URL. To create a servlet alias, choose to mange the Web Service, go to the Setup section, choose Servlet Aliases, and then Add the alias.
5 Servlet Security The need for security has increased due to immense increase in the Internet’s traffic. Every day more and more people are transferring their credit card numbers or other confidential information over the Internet. If these transfers are not secured, they are exposed to just about any evildoer with a network connection. To get rid of such problems, we can use some common security methods in servlets. One of the key benefits of servlets is tat they inherit the security of the server, without any additional effort on your part. They are protected because they are resources of the server. There are four security models, which are more common. They are – • Roll your own • Basic Authentication • Digest Authentication • Secure Sockets Layer (SSL) We will see each one of them in detail. Roll your own
This first security model will probably the worst method, but at the same time probably safe enough if we are protecting non-vital information. Here we use a basic form to query the user for an ID and password. When we have the request, parse off the ID/password combination and do a lookup to make sure that the user is approved for access. Once the user has approval, we will add his ID to his HttpSession object as proof of his approval for future transactions.
Basic Authentication
Basic Authentication is a challenge/response security model. It is based on the fact that the client must authenticate itself with a user ID/password combination for each resource it wants to access. A protected resource could be a directory, a servlet, or even a specific page. The steps involved in authenticating a client are as follows:
1. The client makes an unauthorized request for a protected resource. 2. The server responds with a challenge to authenticate. 3. The client sends a username/password combination. 4. The server receives the username/password combination and looks in its database
for a match. 5. If the server finds a match, it grants access to the requested resource, else it gives a
message in the form of an error (Unauthorized 401).
We have to use Java Web Server’s Administration tool to protect a resource. We have to perform several tasks to protect a resource. Following are the steps to be followed:
1. Create a new user: To do this, we must go to the Java Web Service Security screen. Select the Users option on the tree control. Then choose defaultRealm from the

www.JavaEra.com
118
Realm list. Then click the Add button and enter a username and password in the resulting Add User dialog box. Click the OK button to add the new user.
2. Add the new user to an access control list (ACL): Access Control Lists allow us to
define a list of users and their permissions; we can apply this list to a resource. To do this, we need to select Access Control Lists from the tree control on the Web Service Security page. Make sure that we set the realm to defaultRealm and select defaultAcl. Now click Add Permission button and select the new user we created. Now click the OK button.
3. Add a new resource: Select the Resources option from the tree control. This will bring up the Resources screen. Make sure the realm is set to defaultRealm and click the Add button. Several options appear on this page. Notice three options for the security scheme: Basic Authentication, Digest Authentication, and SSL. As we are currently dealing with Basic Authentication, select Basic Authentication. Make sure our ACL list is set to defaultAcl and then select the Servlet option. Select a particular servlet, which we want to protect and click the OK button. Now, our servlet is a protected resource.
Digest Authentication
Digest Authentication, like Basic Authentication, is based on the challenge/response model. In fact, digest authentication was created as a direct result of basic authentication’s shortcomings. The main difference between basic and digest authentication is that the digest scheme never sends the user’s password across the network. It instead sends a digest representation of the password. Two steps are involved in creating a digest value. The first is applying a mathematical formula to the ID/password combination. The second is to permute the mathematical calculation with a nonce (a nonce is a server-specific data string that is uniquely generated each time a protected resource is requested). This makes each request more secure because the digest is unique to each request.
Secure Sockets Layer (SSL)
The Secure Sockets Layer (SSL) is an authentication protocol used to send encrypted information over the Internet. It was originally developed by Netscape to transfer secure information between its Web browser and Web server products. Since this time, it has been widely adopted and is now one of the most popular methods for sending encrypted information over the Internet. SSL is implemented as a layer between TCP/IP protocol and the application layer. The following steps are involved in sending secure messages using the SSL protocol:
1. A client makes a request for a resource located on a secure site. 2. The server signs its public key with its private key and sends the public key back to
the client. 3. The client takes the returned public key and makes sure it was signed by the
appropriate owner. 4. The client then verifies that the key was signed by an approved certificate authority. 5. The client then creates a key that is encrypted with the public key of the server and
sends the newly constructed key back to the server. 6. The server optionally compresses the information requested by the client. 7. The server encrypts the message using the key created in step 5.

www.JavaEra.com
119
8. The server then transmits the message to the client. 9. The client receives the message. 10. The message is then decrypted using the same key created in step 5. 11. The message is decompressed if necessary and delivered to the client. 12. All further requests restart at step 6, using the same public key.
The above first five steps make the SSL protocol very secure way to send information across the Internet. The only real drawback of the SSL protocol is the performance degradation taken during the public key encryption and decryption required during these first five steps.