Embed Size (px)
Citation preview

W290LA.indd 58 5/11/21 12:34 PM
COPYRIGHT 2021 by The Taunton Press, Inc. Copying and distribution of this article is not permitted. • Fine Woodworking #290 - JULY/AUG 2021

59J U L Y / A U G U S T 2 0 2 1
This Pembroke table makes the top tier of my all-time favorite pieces. Positioned in our reading room right next to my rocking chair and lamp,
it has given me hours of enjoyment. It has also been a great project to teach, as it offers some techniques that most folks don’t get to use that often—rule and knuckle joints.
The table’s drop leaves are connected to the top with a hinged rule joint. On each side a swing arm with a knuckle joint extends to support the drop-leaf. There are various styles for both these joints, based on re-gional differences, but for this table I am sticking with the joinery from a Connecticut Pembroke table dating to the 18th century, which served as my inspiration.
Creating the knucklesThe meat of the swing arm is the knuckle joint. Stick-ing with precedent, I use a five-knuckle layout, the triple knuckle fixed to the inner apron and the double knuckle cut on the swing arm. I mill the stock at least a few inches longer than necessary to provide options should life happen when I’m not paying attention.
Each knuckle joint starts with two blanks, 3⁄4 in. thick by 45⁄8 in. wide by 14 in. long. Ideally, I’ll cut each pair from a longer board for continuity. But this is not the place to use pretty stock. Function takes precedence and nice, straight grain is the ticket.
Set up a router table with a 3⁄8-in. roundover bit and, for safety, accuracy, and to minimize tearout, use a
Put the Drop in Drop Leaves
Use tried-and-true methods to cut the rule and knuckle joints
B Y S T E V E L A T T A
A KNUCKLE JOINT FOR THE SWING ARM
Five evenly spaced knuckles
V-notches allow for full range of travel.
A roundover and cove combine to create smooth action and a seamless joint.
A RULE JOINT FOR THE DROP LEAVES
3⁄16-in.-dia. steel rod serves as a hinge pin.
The knuckle joint, a variation on the finger joint that serves as a hinge, has rounded knuckles that allow the support arm to swing into place when the leaves are raised, and stow out of the way when they’re lowered.
W290LA.indd 59 5/11/21 12:34 PM
COPYRIGHT 2021 by The Taunton Press, Inc. Copying and distribution of this article is not permitted. • Fine Woodworking #290 - JULY/AUG 2021

F I N E W O O D W O R K I N G60 Photos: Anissa Kapsales; drawings: John Tetreault
fence and a push block. I rout the profile on both ends of each workpiece, using a four-to-get-two approach: I’ll cut knuckles on all four ends and pick the best two when they are fitted together. By “best” I mean both tight and clean.
After sanding the roundover, put a 3⁄4-in.-dia. circle template at the end of the board and trace the circle, locating the center point within it. Then run a 45° line through the center out to the show face. Doing so creates a small triangular area that you’ll remove on the router table with a 90° V-bit. After routing, fair one side of the V-groove to a curve with a chisel and sandpaper.
I made a pair of gauge blocks for lay-ing out the knuckles. Once those lines are scored, excavate between the knuckles on the tablesaw using a carriage jig and a 1⁄2-in. dado set. Mounted to two miter gauges, the carriage both secures the work and provides a positive reference for both sides of each notch. Having notched all the pieces, try all combinations until you get two sets with the tightest fit free of gaps.
Once the knuckle spacing is cut, you have to scoop out extra material at the base of the notches to accommodate the curves as the joined pieces swing. When both pieces fit together completely with a small gap, the excavating is complete. Secure the joints with a few strips of clear, 2-in. packing tape on both sides. The tape will prevent the pieces from sliding when you drill for the 3⁄16-in. pin.
The swing armOn Pembroke tables, the inner rails tenoned into the legs provide the real strength. Swing arms with knuckle joints, mounted to the inner rails, support the leaves when they are raised.
Start the knuckle joint. At the router table with a 3⁄8-in. roundover bit, round over both ends of the knuckle stock. Then use sandpaper backed with packing tape to remove any machine marks.
Lay out the center of the hinge. Using a template, draw a 3⁄4-in.-dia. circle over the end of the board (right). With a combination square set at 3⁄8 in., find the center point by referencing off the end and each face. Because an accurate center point is everything on this joint, take your time finding it. Once located, run a 45° line through the center out to the show face (below right). This creates a small triangular area that you’ll remove on the router table.
1. Draw a 3⁄4-in.-dia. circle.
2. Draw a square line tangent to the circle.
Center point of knuckle
3. Draw 45° lines starting at the corners.
W290LA.indd 60 5/11/21 12:34 PM
COPYRIGHT 2021 by The Taunton Press, Inc. Copying and distribution of this article is not permitted. • Fine Woodworking #290 - JULY/AUG 2021
J u l y / A u g u s t 2 0 2 1 61Photos: Anissa Kapsales; drawings: John Tetreault
Drilling for the pinTo get a true hole, it’s best to drill in from both ends. Make a fence the length of your drill-press table, around 11⁄2 in. thick and 3⁄4 in. wider than the swing arm. One end of the fence must be square and perpen-dicular to the table. Set the fence so the tip of a 3⁄16-in. brad-point bit is centered on the knuckle joint. (To re-duce the likelihood of drift, don’t use a standard twist drill bit.) Make an auxiliary table from 3⁄4-in. MDF that is the length of your fence and about 21⁄2 in. wide. Use a spacer to elevate the auxiliary table 3 in. or so above the main table. Align one end of the auxiliary table to the square end of the fence, and bore a 3⁄16-in. hole through the MDF. Remove the spacer and, keeping the auxiliary table aligned to the end of the fence, clamp it to the main table. Following these steps guarantees the hole is in direct alignment with the bit.
Create a V-notch. At the router table, with a 90° V-bit, run a groove down the length of the barrel. Its point should land exactly where the 45° line intersects the circle.
Transfer the V-groove line. Use a marking gauge resting on the end of the board with the blade just hitting the bottom of the V-groove. Transfer that line to the other side of the knuckle stock.
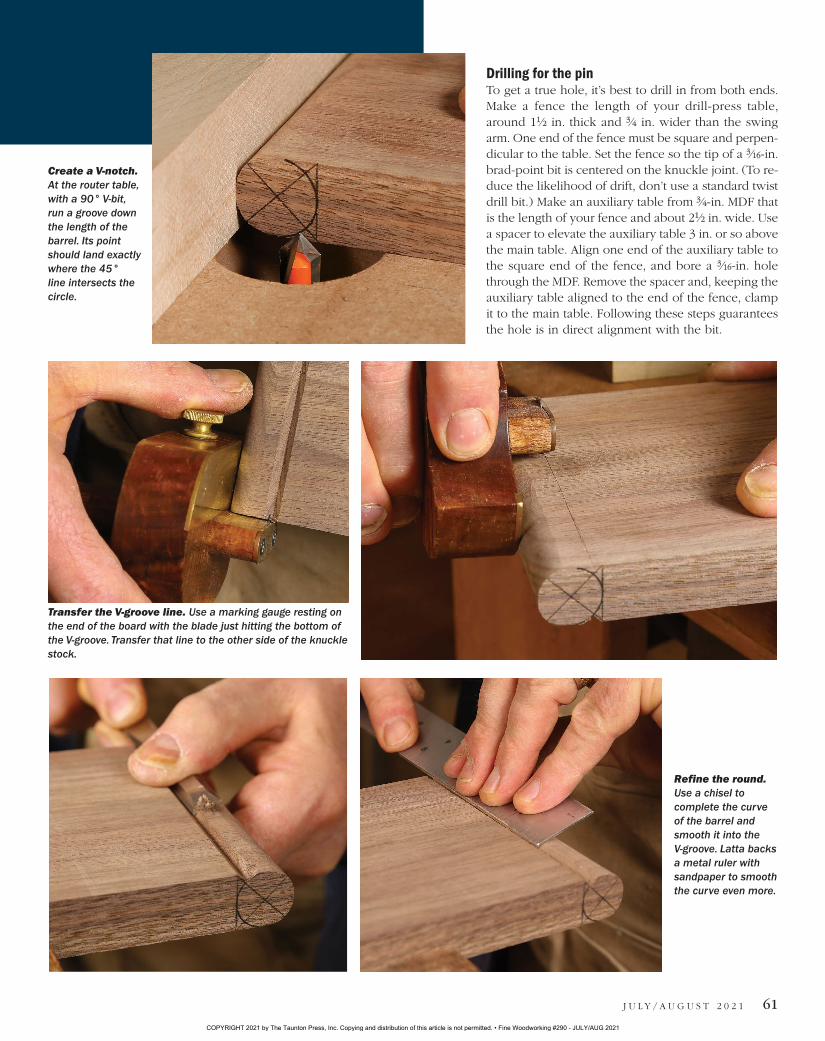
Refine the round. Use a chisel to complete the curve of the barrel and smooth it into the V-groove. Latta backs a metal ruler with sandpaper to smooth the curve even more.
W290LA.indd 61 5/11/21 12:34 PM
COPYRIGHT 2021 by The Taunton Press, Inc. Copying and distribution of this article is not permitted. • Fine Woodworking #290 - JULY/AUG 2021

F I N E W O O D W O R K I N G62
To bore the first half of the hole, line up the center point of the knuckle with the brad point, clamp the stock to the fence, and drill a little more than halfway through the joint. A registration pin will position the workpiece to cut the rest of the hole. Cut a 1-in. length of 3⁄16-in. steel rod and round each end on the grinder. Insert the pin into the hole in the auxiliary table and place the drilled portion of the knuckle joint over the pin. After double checking to make sure the same face is against the fence, clamp the workpiece and bore the second hole. Having cut scores of these, I still get a sense of relief when the bit meets the first hole.
Cut another length of rod to just under the full width of the apron. Gently hammer it in from the bottom to reduce blowout. At this point, the hinge should work nicely with a little bit of sanding.
Making the rule jointTo cut the rule joint on this table’s top, which is 5⁄8 in. thick, I use a 1⁄2-in. cove bit combined with a 1⁄2-in. roundover. Before div-ing into the real thing, mill up a couple of test pieces 5⁄8 in. thick by 6 in. wide by 15 in. long. Believe me, you will recover this investment of time when making the actual joints. Using a router
Swing-arm knuckles
Laying out the knuckles. Latta made two layout blocks to use as marking gauges for the knuckle placements. The thickness of the first block is one fifth of the rail’s width, the second block is twice that. With an X-Acto blade mounted to each block with a few small screws, he lays out all the knuckles referencing off the top and bottom edges. Take the extra step of clearly marking what parts are being taken away and which parts are remaining.
Excavate between the knuckles. Using a carriage to hold the parts, raise the dado head to the midpoint of the V-cut. First make a cut in the middle of the knuckle and then slide left or right, aligning directly to the score marks. The carriage is screwed to two miter gauges.
Undercut the area between the knuckles for clearance.
Clean out the knuckles by hand. On the piece that has only two knuckles, use a carving gouge to create concave shoulders for the top and bottom voids (far right). For the center void, and both voids of the triple knuckle, use a chisel to cut a preliminary notch and then, using the back of the chisel, scrape out the material. The two parts should fit together with a small gap.
W290LA.indd 62 5/14/21 9:11 AM
COPYRIGHT 2021 by The Taunton Press, Inc. Copying and distribution of this article is not permitted. • Fine Woodworking #290 - JULY/AUG 2021

J U L Y / A U G U S T 2 0 2 1 63www.finewoodworking.com
Drill for the pinIt is easier and far more accurate to drill in from both sides with a normal-length bit than trying to use one that is extralong and sure to drift. When drilling from both sides, accuracy depends on having a proper reference point for the second hole.
Setup is the key to success. After squaring his reference fence to the bit, Latta aligns an auxiliary table to the end of the fence and drills a hole in it for a registration pin. To drill that hole he elevates the auxiliary table on a temporary riser. Then he removes the riser and clamps the auxiliary table to the main table, flush again with the end of the fence. He assembles the knuckle joint, tapes it together, and drills the first half of the hole centered in the knuckle.
Flip and drill through. After drilling the first half of the knuckle joint, remove the workpiece, insert a length of steel rod in the registration hole, flip the knuckle board over, and seat the just-drilled hole on the registration pin. Make sure the same face of the board is against the fence, and drill through the knuckle into the first hole. Tap in a pin whose length is just less than the full width of the apron. The hinge should swing smoothly but stiffly.
Flip the stock and center the drilled portion of the hole over the registration pin.
W290LA.indd 63 5/11/21 12:34 PM
COPYRIGHT 2021 by The Taunton Press, Inc. Copying and distribution of this article is not permitted. • Fine Woodworking #290 - JULY/AUG 2021
F I N E W O O D W O R K I N G64
table, run the roundover on one of the boards leaving a 1⁄8-in. fillet. On the other piece, still using a router table, run the cove bit. Sneak up on the fit until there is a gap the thickness of a piece of veneer between the profiles when they are butted together.
Installing hingesHardware is never the place to skimp on quality. I prefer Horton Brasses for my hinges (#510). The place-ment of the hinges is key. With the leaves dropped, the hinges should not be visible and the gap between the top and the leaves should be minimal. Most of the illustrations that show the placement of the hinge barrel do so with a 3⁄4-in. top in mind. That is way too heavy for a table as delicate as this one. For this top, the back of the barrel is tangent with the fillet.
Mount the hinges to the tabletop first. Score the outline of the hinge using an X-Acto knife and a com-
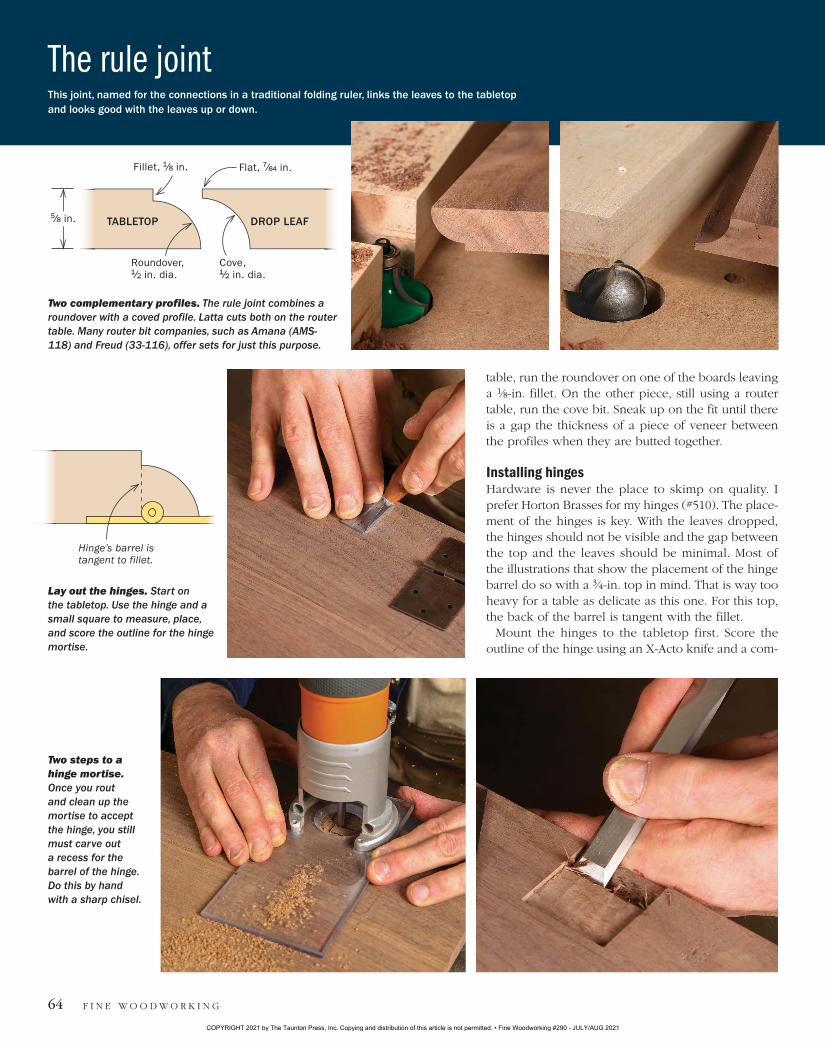
The rule jointThis joint, named for the connections in a traditional folding ruler, links the leaves to the tabletop and looks good with the leaves up or down.
Two complementary profiles. The rule joint combines a roundover with a coved profile. Latta cuts both on the router table. Many router bit companies, such as Amana (AMS-118) and Freud (33-116), offer sets for just this purpose.
Lay out the hinges. Start on the tabletop. Use the hinge and a small square to measure, place, and score the outline for the hinge mortise.
Two steps to a hinge mortise. Once you rout and clean up the mortise to accept the hinge, you still must carve out a recess for the barrel of the hinge. Do this by hand with a sharp chisel.
Roundover, 1⁄2 in. dia.
TABLETOP DROP LEAF
Cove, 1⁄2 in. dia.
Fillet, 1⁄8 in.
5⁄8 in.
Flat, 7⁄64 in.
Hinge’s barrel is tangent to fillet.
W290LA.indd 64 5/11/21 12:35 PM
COPYRIGHT 2021 by The Taunton Press, Inc. Copying and distribution of this article is not permitted. • Fine Woodworking #290 - JULY/AUG 2021

J U L Y / A U G U S T 2 0 2 1 65www.finewoodworking.com
Transfer the hinge placement. With the hinges set in place in the top, set the top and the leaf next to each other (with a commercial veneer between them as a spacer), and clamp them in place. Score the outline of the hinges onto the leaf, and use a trim router to waste out the mortise and a chisel to clean to your line.
Install the hinges. Once the hinge mortises are cut, install all the hinges, and test the fit. If you need to, shimmy a strip of sandpaper backed with packing tape in the joint and slide it back and forth along the length of the joint to tweak the fit.
bination square set to the depth of the hinge. Take the tip of your knife and roll it over the edge to prevent blowout from the router. I use a palm router to exca-vate, and then I clean up the edges with a chisel. Fit the hinge into the mortise and mark where you need to dig a little deeper to accommodate the barrel. Use a chisel for this as well. Be careful not to push too hard and blow through.
With the hinges mounted to the tabletop, butt the drop leaf to it with a piece of veneer between them serving as a spacer. Transfer the hinge layout to the leaf and rout/chisel again. When you think you have a good fit, mount one screw in each side and check the swing. You can adjust the fit if needed by running sandpaper through the joint. Once you are satisfied with the fit, repeat the process on the second leaf. □
Steve Latta teaches cabinetmaking and wood technology at Thaddeus Stevens College in Lancaster, Pa.
To watch Latta create a knuckle joint and rule joint, go to FineWoodworking.com/290.
Online Extra
W290LA.indd 65 5/11/21 12:35 PM
COPYRIGHT 2021 by The Taunton Press, Inc. Copying and distribution of this article is not permitted. • Fine Woodworking #290 - JULY/AUG 2021