Embed Size (px)
Citation preview

2008 Pearson Education, Inc. All rights reserved.
1
44
Introduction to XHTML

2008 Pearson Education, Inc. All rights reserved.
2
OBJECTIVESIn this chapter you will learn: To understand important components of
XHTML documents. To use XHTML to create web pages. To add images to web pages. To create and use hyperlinks to navigate
web pages. To mark up lists of information. To create tables with rows and columns of
data and control table formatting. To create and use forms to get user input. To make web pages accessible to search
engines using <meta> tags.

2008 Pearson Education, Inc. All rights reserved.
3
4.1 Introduction
4.2 Editing XHTML
4.3 First XHTML Example
4.4 W3C XHTML Validation Service
4.5 Headings
4.6 Linking
4.7 Images
4.8 Special Characters and Horizontal Rules
4.9 Lists
4.10 Tables
4.11 Forms
4.12 Internal Linking
4.13 meta Elements
4.14 Wrap-Up
4.15 Web Resources
2008 Pearson Education, Inc. All rights reserved.
4
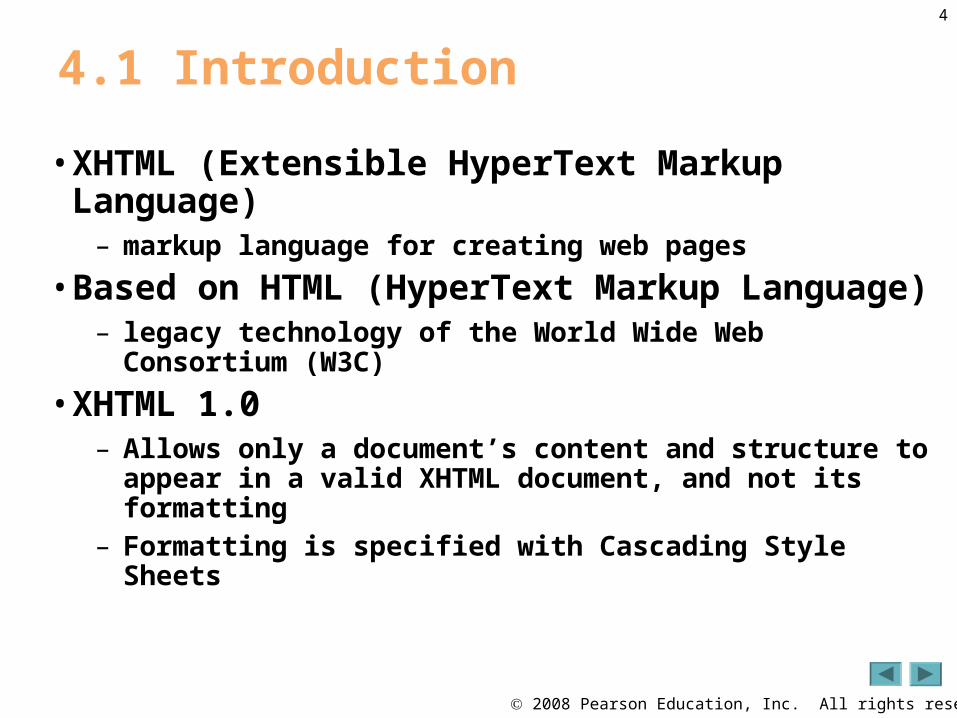
4.1 Introduction
• XHTML (Extensible HyperText Markup Language) – markup language for creating web pages
• Based on HTML (HyperText Markup Language)– legacy technology of the World Wide Web Consortium (W3C)
• XHTML 1.0 – Allows only a document’s content and structure to appear in a
valid XHTML document, and not its formatting– Formatting is specified with Cascading Style Sheets

2008 Pearson Education, Inc. All rights reserved.
5
4.2 Editing XHTML
• A machine that runs a specialized piece of software called a web server stores XHTML documents

2008 Pearson Education, Inc. All rights reserved.
6
Good Programming Practice 4.1
Assign filenames to documents that describe their functionality. This practice can help you identify documents faster. It also helps people who want to link to a page, by giving them an easy-to-remember name. For example, if you are writing an XHTML document that contains product information, you might want to call it products.html.

2008 Pearson Education, Inc. All rights reserved.
7
4.3 First XHTML Example
• In XHTML, text is marked up with elements delimited by tags that are names contained in pairs of angle brackets
– Every XHTML document contains a start <html> tag and an end </html> tag
• Some elements may contain attributes that provide additional information about the element
• Comments in XHTML always begin with <!-- and end with -->. The browser ignores all text inside a comment

2008 Pearson Education, Inc. All rights reserved.
8
4.3 First XHTML Example (Cont.)
• Some important elements of an XHTML document are the html element, the head element and the body element. The html element encloses the head section (represented by the head element) and the body section (represented by the body element).
• The Head element:– generally is not rendered in the display window
– The head section contains information about the XHTML document, such as its title.
– The head section also can contain special document formatting instructions called style sheets and client-side programs called scripts for creating dynamic web pages.

2008 Pearson Education, Inc. All rights reserved.
9
4.3 First XHTML Example (Cont.)
• The title element:– Names a web page
– Usually appears in the colored bar (called the title bar) at the top of the browser window
– Is the text identifying a page when users add your page to their list of Favorites or Bookmarks
• The body element:– Contains the document’s content, which may include text
and tags

2008 Pearson Education, Inc. All rights reserved.
10
4.3 First XHTML Example (Cont.)
• All text placed between the <p> and </p> tags forms one paragraph.

2008 Pearson Education, Inc. All rights reserved.
11
4.3 First XHTML Example (Cont.)
• XHTML documents delimit an element with start and end tags
– A start tag consists of the element name in angle brackets (e.g., <html>)
– An end tag consists of the element name preceded by a forward slash (/) in angle brackets (e.g., </html>)
• Many start tags have attributes that provide additional information about an element
– Each attribute has a name and a value separated by an equals sign (=)

2008 Pearson Education, Inc. All rights reserved.
12
Fig. 4.1 | First XHTML example.
1 <?xml version = "1.0" encoding = "utf-8"?>
2 <!DOCTYPE html PUBLIC "-//W3C//DTD XHTML 1.0 Strict//EN"
3 "http://www.w3.org/TR/xhtml1/DTD/xhtml1-strict.dtd">
4
5 <!-- Fig. 4.1: main.html -->
6 <!-- First XHTML example. -->
7 <html xmlns = "http://www.w3.org/1999/xhtml">
8 <head>
9 <title>Welcome</title>
10 </head>
11
12 <body>
13 <p>Welcome to XHTML!</p>
14 </body>
15 </html>
Creates a head element
Creates a title element, which contains the text Welcome
Creates a p element within the body, which displays welcome text
XHTML comments, not interpreted by the browser

2008 Pearson Education, Inc. All rights reserved.
13
Good Programming Practice 4.2
Place comments throughout your markup. Comments help other programmers understand the markup, assist in debugging and list useful information that you do not want the browser to render. Comments also help you understand your own markup when you revisit a document to modify or update it in the future.
2008 Pearson Education, Inc. All rights reserved.
14
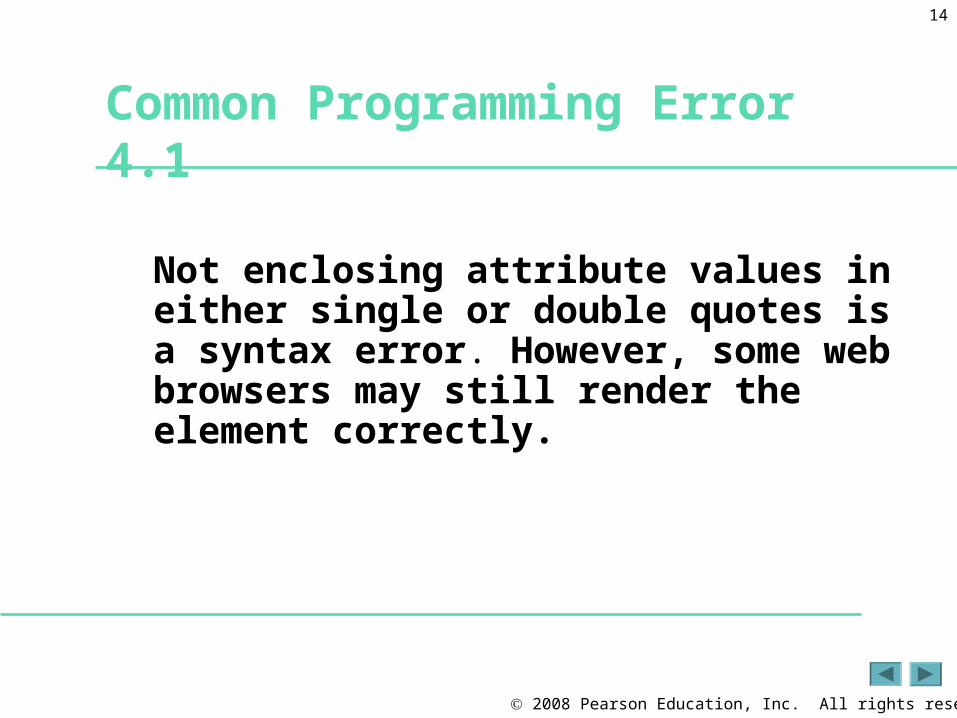
Common Programming Error 4.1
Not enclosing attribute values in either single or double quotes is a syntax error. However, some web browsers may still render the element correctly.

2008 Pearson Education, Inc. All rights reserved.
15
Common Programming Error 4.2
Using uppercase letters in an XHTML element or attribute name is a syntax error. However, some web browsers may still render the element correctly.

2008 Pearson Education, Inc. All rights reserved.
16
Good Programming Practice 4.3
Indenting nested elements emphasizes a document’s structure and promotes readability.

2008 Pearson Education, Inc. All rights reserved.
17
Common Programming Error 4.3
XHTML does not permit tags to overlap—a nested element’s end tag must appear in the document before the enclosing element’s end tag. For example, the nested XHTML tags <head><title>hello</head></title> cause a syntax error, because the enclosing head element’s ending </head> tag appears before the nested title element’s ending </title> tag.

2008 Pearson Education, Inc. All rights reserved.
18
Good Programming Practice 4.4
Use a consistent title-naming convention for all pages on a site. For example, if a site is named “Bailey’s Website,” then the title of the contact page might be “Bailey’s Website - Contact.” This practice can help users better understand the website’s structure.

2008 Pearson Education, Inc. All rights reserved.
19
4.4 W3C XHTML Validation Service
• XHTML documents that are syntactically correct are guaranteed to render properly
• XHTML documents that contain syntax errors may not display properly
• Validation services (e.g., validator.w3.org) ensure that an XHTML document is syntactically correct

2008 Pearson Education, Inc. All rights reserved.
20
Error-Prevention Tip 4.1
Most current browsers attempt to render XHTML documents even if they are invalid. This often leads to unexpected and possibly undesirable results. Use a validation service, such as the W3C MarkUp Validation Service, to confirm that an XHTML document is syntactically correct.
2008 Pearson Education, Inc. All rights reserved.
21
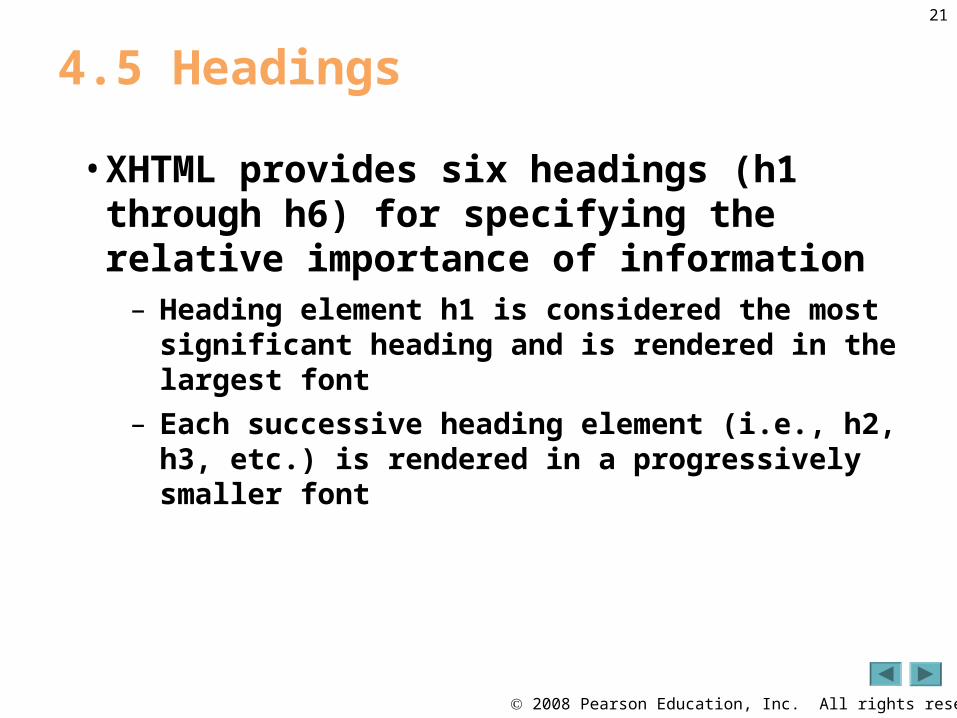
4.5 Headings
• XHTML provides six headings (h1 through h6) for specifying the relative importance of information
– Heading element h1 is considered the most significant heading and is rendered in the largest font
– Each successive heading element (i.e., h2, h3, etc.) is rendered in a progressively smaller font

2008 Pearson Education, Inc. All rights reserved.
22
Portability Tip 4.1
The text size used to display each heading element can vary significantly between browsers. In Chapter 5, we discuss how to control the text size and other text properties.
2008 Pearson Education, Inc. All rights reserved.
23
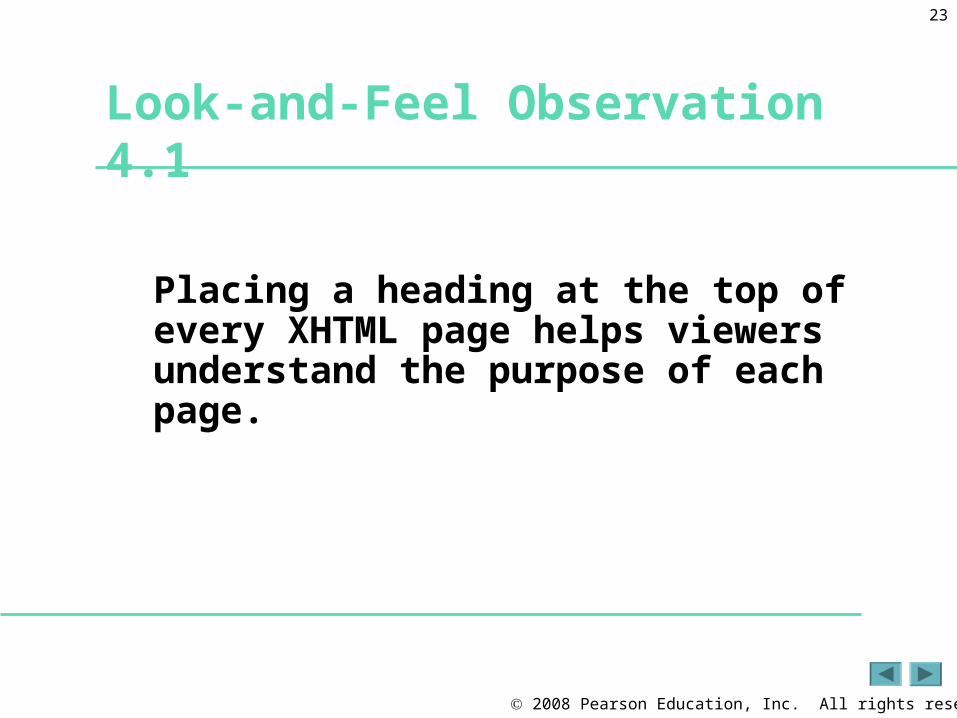
Look-and-Feel Observation 4.1
Placing a heading at the top of every XHTML page helps viewers understand the purpose of each page.

2008 Pearson Education, Inc. All rights reserved.
24
Look-and-Feel Observation 4.2
Use larger headings to emphasize more important sections of a web page.

2008 Pearson Education, Inc. All rights reserved.
25
Fig. 4.2 | Heading elements h1 through h6.
1 <?xml version = "1.0" encoding = "utf-8"?> 2 <!DOCTYPE html PUBLIC "-//W3C//DTD XHTML 1.0 Strict//EN" 3 "http://www.w3.org/TR/xhtml1/DTD/xhtml1-strict.dtd"> 4 5 <!-- Fig. 4.2: heading.html --> 6 <!-- Heading elements h1 through h6. --> 7 <html xmlns = "http://www.w3.org/1999/xhtml"> 8 <head> 9 <title>Headings</title> 10 </head> 11 12 <body> 13 <h1>Level 1 Heading</h1> 14 <h2>Level 2 heading</h2> 15 <h3>Level 3 heading</h3> 16 <h4>Level 4 heading</h4> 17 <h5>Level 5 heading</h5> 18 <h6>Level 6 heading</h6> 19 </body> 20 </html>
Creates six headings, each with decreasing significance
2008 Pearson Education, Inc. All rights reserved.
26
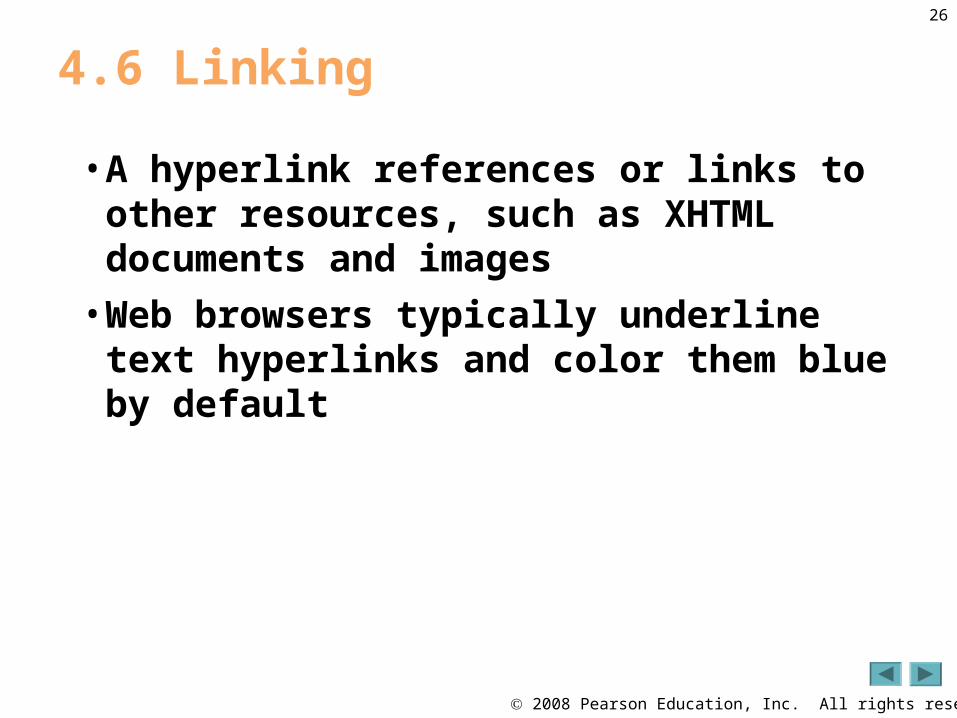
4.6 Linking
• A hyperlink references or links to other resources, such as XHTML documents and images
• Web browsers typically underline text hyperlinks and color them blue by default

2008 Pearson Education, Inc. All rights reserved.
27
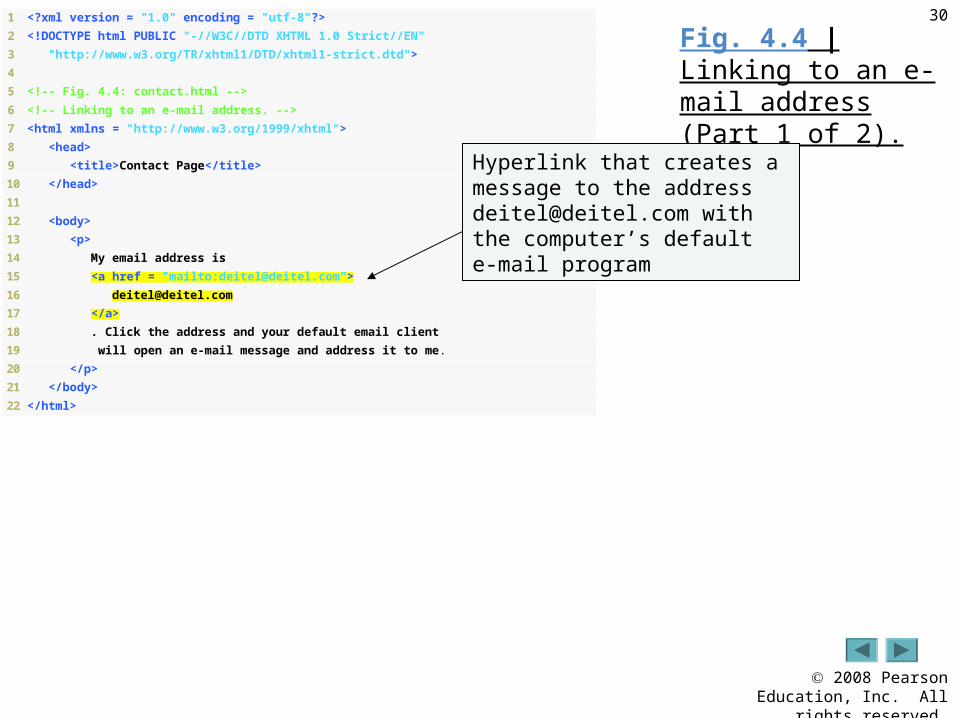
4.6 Linking (Cont.)
• Users can insert links with the a (anchor) element.
– The href attribute specifies the resource (e.g., page, file, e-mail address) being linked
– Anchors can link to an e-mail address using a mailto: URL
• When a user clicks this type of anchored link, most browsers launch the default e-mail program (e.g., Outlook Express) to initiate an e-mail message addressed to the linked address

2008 Pearson Education, Inc. All rights reserved.
28
4.6 Linking (Cont.)
• The strong element typically causes the browser to render text in a bold font

2008 Pearson Education, Inc. All rights reserved.
29
4.3 | Linking to other web pages.
1 <?xml version = "1.0" encoding = "utf-8"?>
2 <!DOCTYPE html PUBLIC "-//W3C//DTD XHTML 1.0 Strict//EN"
3 "http://www.w3.org/TR/xhtml1/DTD/xhtml1-strict.dtd">
4
5 <!-- Fig. 4.3: links.html -->
6 <!-- Linking to other web pages. -->
7 <html xmlns = "http://www.w3.org/1999/xhtml">
8 <head>
9 <title>Links</title>
10 </head>
11
12 <body>
13 <h1>Here are my favorite sites</h1>
14 <p><strong>Click a name to go to that page.</strong></p>
15
16 <!-- Create four text hyperlinks -->
17 <p><a href = "http://www.deitel.com">Deitel</a></p>
18 <p><a href = "http://www.prenhall.com">Prentice Hall</a></p>
19 <p><a href = "http://www.yahoo.com">Yahoo!</a></p>
20 <p><a href = "http://www.usatoday.com">USA Today</a></p>
21 </body>
22 </html>
Creates anchor elements that link to the URL specified in the href attribute
2008 Pearson Education, Inc. All rights reserved.
30
Fig. 4.4 | Linking to an e-mail address (Part 1 of 2).
1 <?xml version = "1.0" encoding = "utf-8"?>
2 <!DOCTYPE html PUBLIC "-//W3C//DTD XHTML 1.0 Strict//EN"
3 "http://www.w3.org/TR/xhtml1/DTD/xhtml1-strict.dtd">
4
5 <!-- Fig. 4.4: contact.html -->
6 <!-- Linking to an e-mail address. -->
7 <html xmlns = "http://www.w3.org/1999/xhtml">
8 <head>
9 <title>Contact Page</title>
10 </head>
11
12 <body>
13 <p>
14 My email address is
15 <a href = "mailto:[email protected]">
17 </a>
18 . Click the address and your default email client
19 will open an e-mail message and address it to me.
20 </p>
21 </body>
22 </html>
Hyperlink that creates a message to the address [email protected] with the computer’s default e-mail program

2008 Pearson Education, Inc. All rights reserved.
31
Fig. 4.4 | Linking to an e-mail address (Part 2 of 2).

2008 Pearson Education, Inc. All rights reserved.
32
4.7 Images
• The img element’s src attribute specifies an image’s location
• Every img element must have an alt attribute, which contains text that is displayed if the client cannot render the image
– The alt attribute makes web pages more accessible to users with disabilities, especially vision impairments
– Width and height are optional attributes• If omitted, the browser uses the image’s actual width and
height
• Images are measured in pixels
2008 Pearson Education, Inc. All rights reserved.
33
Good Programming Practice 4.5
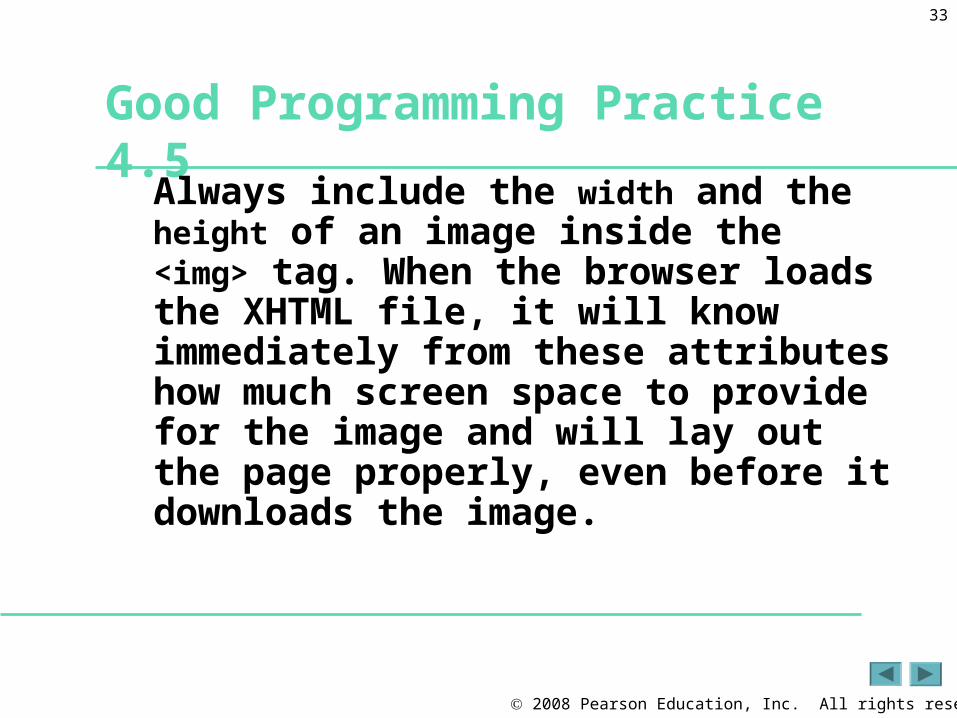
Always include the width and the height of an image inside the <img> tag. When the browser loads the XHTML file, it will know immediately from these attributes how much screen space to provide for the image and will lay out the page properly, even before it downloads the image.

2008 Pearson Education, Inc. All rights reserved.
34
Performance Tip 4.1
Including the width and height attributes in an <img> tag can result in the browser’s loading and rendering pages faster.
2008 Pearson Education, Inc. All rights reserved.
35
Common Programming Error 4.4
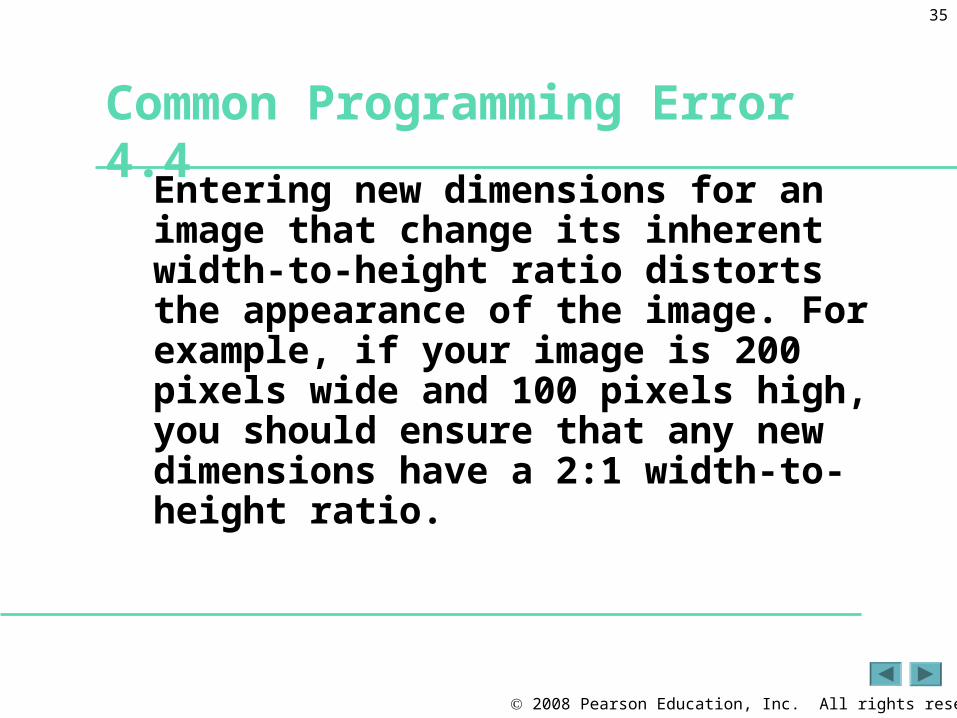
Entering new dimensions for an image that change its inherent width-to-height ratio distorts the appearance of the image. For example, if your image is 200 pixels wide and 100 pixels high, you should ensure that any new dimensions have a 2:1 width-to-height ratio.

2008 Pearson Education, Inc. All rights reserved.
36
4.7 Images (Cont.)
• Some XHTML elements are empty elements that contain only attributes and do not mark up text
• Empty elements (e.g., img) must be terminated, either by using the forward slash character (/) inside the closing right angle bracket or by explicitly writing an end tag

2008 Pearson Education, Inc. All rights reserved.
37
4.5 | Images in XHTML files.
1 <?xml version = "1.0" encoding = "utf-8"?>
2 <!DOCTYPE html PUBLIC "-//W3C//DTD XHTML 1.0 Strict//EN"
3 "http://www.w3.org/TR/xhtml1/DTD/xhtml1-strict.dtd">
4
5 <!-- Fig. 4.5: picture.html -->
6 <!-- Images in XHTML files. -->
7 <html xmlns = "http://www.w3.org/1999/xhtml">
8 <head>
9 <title>Images</title>
10 </head>
11
12 <body>
13 <p>
14 <img src = "cpphtp6.jpg" width = "92" height = "120"
15 alt = "C++ How to Program book cover" />
16 <img src = "jhtp.jpg" width = "92" height = "120"
17 alt = "Java How to Program book cover" />
18 </p>
19 </body>
20 </html>
Specifies the image file’s location
Specifies the image’s width
Specifies the image’s height
Specifies text to display if the image is unavailable
2008 Pearson Education, Inc. All rights reserved.
38
4.7 Images (Cont.)
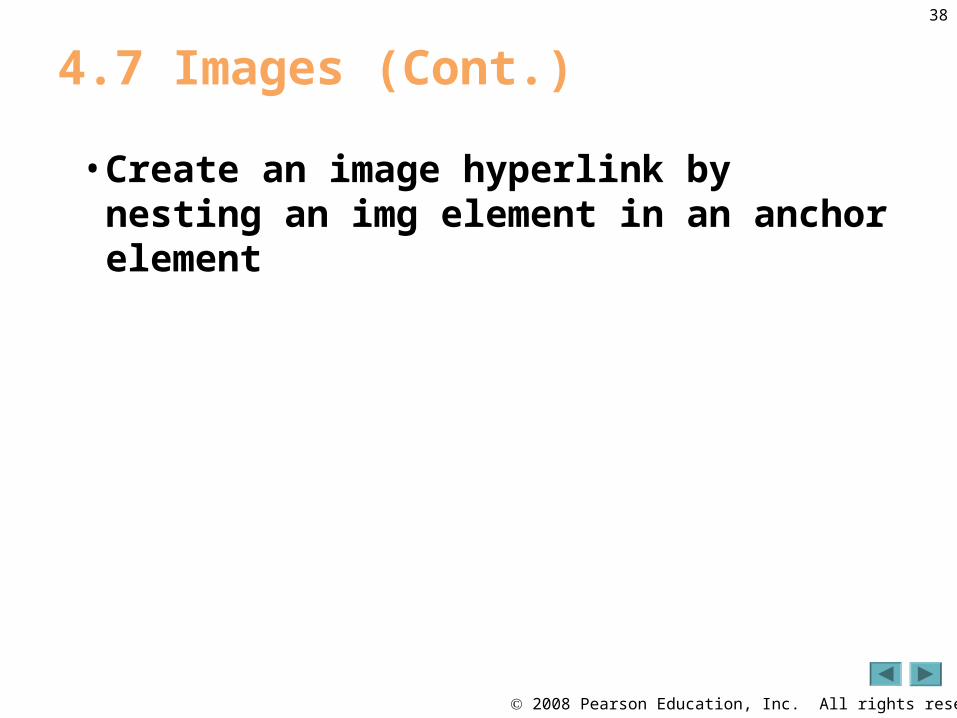
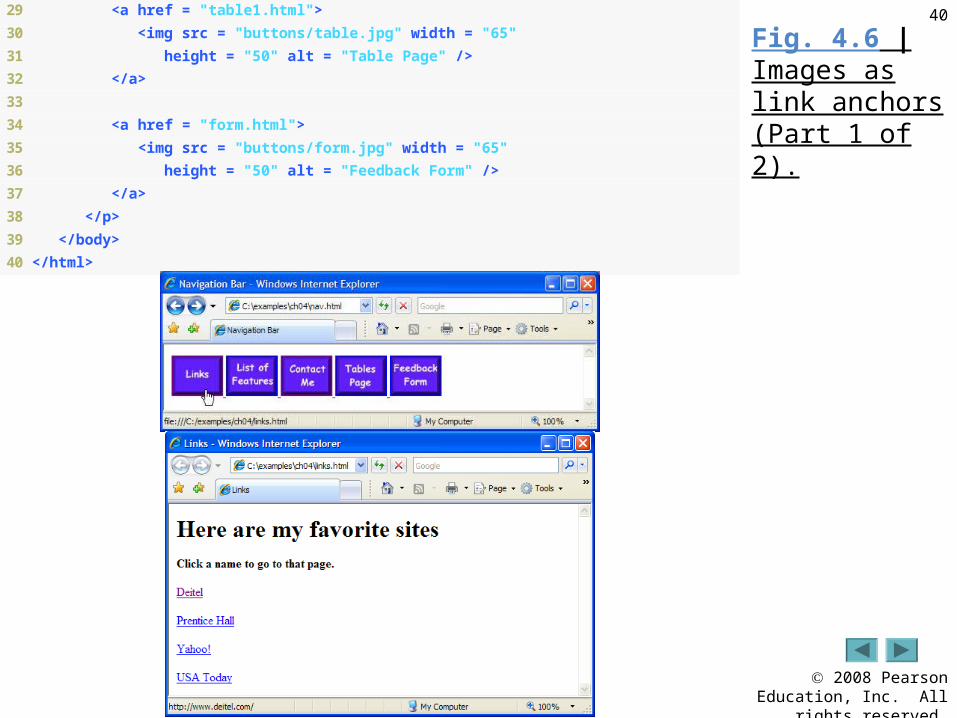
• Create an image hyperlink by nesting an img element in an anchor element
2008 Pearson Education, Inc. All rights reserved.
39
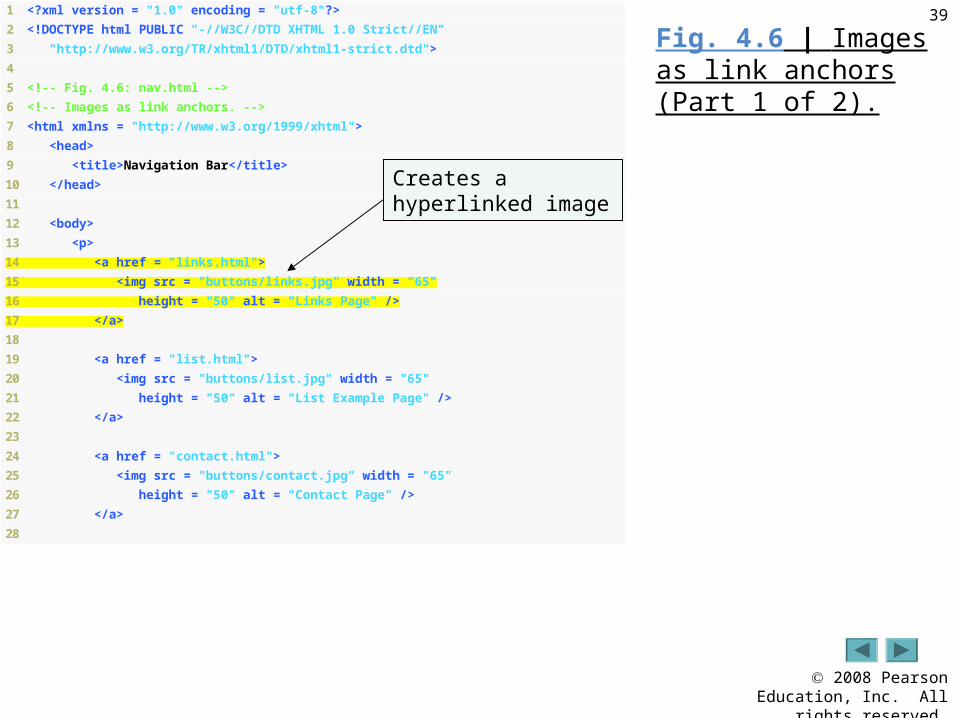
Fig. 4.6 | Images as link anchors (Part 1 of 2).
1 <?xml version = "1.0" encoding = "utf-8"?>
2 <!DOCTYPE html PUBLIC "-//W3C//DTD XHTML 1.0 Strict//EN"
3 "http://www.w3.org/TR/xhtml1/DTD/xhtml1-strict.dtd">
4
5 <!-- Fig. 4.6: nav.html -->
6 <!-- Images as link anchors. -->
7 <html xmlns = "http://www.w3.org/1999/xhtml">
8 <head>
9 <title>Navigation Bar</title>
10 </head>
11
12 <body>
13 <p>
14 <a href = "links.html">
15 <img src = "buttons/links.jpg" width = "65"
16 height = "50" alt = "Links Page" />
17 </a>
18
19 <a href = "list.html">
20 <img src = "buttons/list.jpg" width = "65"
21 height = "50" alt = "List Example Page" />
22 </a>
23
24 <a href = "contact.html">
25 <img src = "buttons/contact.jpg" width = "65"
26 height = "50" alt = "Contact Page" />
27 </a>
28
Creates a hyperlinked image
2008 Pearson Education, Inc. All rights reserved.
40
Fig. 4.6 | Images as link anchors (Part 1 of 2).
29 <a href = "table1.html">
30 <img src = "buttons/table.jpg" width = "65"
31 height = "50" alt = "Table Page" />
32 </a>
33
34 <a href = "form.html">
35 <img src = "buttons/form.jpg" width = "65"
36 height = "50" alt = "Feedback Form" />
37 </a>
38 </p>
39 </body>
40 </html>

2008 Pearson Education, Inc. All rights reserved.
41
4.8 Special Characters and Horizontal Rules
• XHTML provides special characters or entity references (in the form &code;) for representing characters that cannot be rendered otherwise
• The code can be:– Word abbreviations– Numbers
• Decimal• Hexadecimal
• Example: & character represented by:– & – & (decimal)– & (hexadecimal)

2008 Pearson Education, Inc. All rights reserved.
42
4.8 Special Characters and Horizontal Rules (Cont.)
• Most browsers render a horizontal rule, indicated by the <hr /> tag, as a horizontal line
• The hr element also inserts a line break above and below the horizontal line

2008 Pearson Education, Inc. All rights reserved.
43
Fig. 4.7 | Inserting special characters (Part 1 of 2).
1 <?xml version = "1.0" encoding = "utf-8"?>
2 <!DOCTYPE html PUBLIC "-//W3C//DTD XHTML 1.0 Strict//EN"
3 "http://www.w3.org/TR/xhtml1/DTD/xhtml1-strict.dtd">
4
5 <!-- Fig. 4.7: contact2.html -->
6 <!-- Inserting special characters. -->
7 <html xmlns = "http://www.w3.org/1999/xhtml">
8 <head>
9 <title>Contact Page</title>
10 </head>
11
12 <body>
13 <p>
14 Click
15 <a href = "mailto:[email protected]">here</a>
16 to open an email message addressed to
18 </p>
19
20 <hr /> <!-- inserts a horizontal rule -->
21
22 <!-- special characters are entered -->
23 <!-- using the form &code; -->
24 <p>All information on this site is <strong>©
25 Deitel & Associates, Inc. 2007.</strong></p>
26
Inserts a horizontal rule, with a line break before and after
Inserts the special characters © and &

2008 Pearson Education, Inc. All rights reserved.
44
Fig. 4.7 | Inserting special characters (Part 2 of 2).
27 <!-- to strike through text use <del> tags -->
28 <!-- to subscript text use <sub> tags -->
29 <!-- to superscript text use <sup> tags -->
30 <!-- these tags are nested inside other tags -->
31 <p><del>You may download 3.14 x 10<sup>2</sup>
32 characters worth of information from this site.</del>
33 Only <sub>one</sub> download per hour is permitted.</p>
34 <p><em>Note: < ¼ of the information
35 presented here is updated daily.</em></p>
36 </body>
37 </html>
Makes the 2 superscript
Makes the 1 subscript
Creates a strikethrough effect
Emphasizes text Inserts the special symbols < and ¼