Embed Size (px)
Citation preview

X-Ways ForensicsPractitioner’s Guide

Intentionally left as blank
X-Ways ForensicsPractitioner’s Guide
Brett Shavers
Eric Zimmerman
Jimmy Weg, Technical Editor
AMSTERDAM • BOSTON • HEIDELBERG • LONDONNEW YORK • OXFORD • PARIS • SAN DIEGO
SAN FRANCISCO • SINGAPORE • SYDNEY • TOKYO
Syngress is an imprint of Elsevier
Acquiring Editor: Chris KatsaropoulosEditorial Project Manager: Benjamin Rearick
Project Manager: Punithavathy Govindaradjane
Designer: Matthew Limbert
Syngress is an imprint of Elsevier
225 Wyman Street, Waltham, MA 02451, USA
Copyright # 2014 Elsevier Inc. All rights reserved.
No part of this publication may be reproduced or transmitted in any form or by any means, electronic
or mechanical, including photocopying, recording, or any information storage and retrieval system,
without permission in writing from the publisher. Details on how to seek permission, further information
about the Publisher’s permissions policies and our arrangements with organizations such as the
Copyright Clearance Center and the Copyright Licensing Agency, can be found at our website:
www.elsevier.com/permissions.
This book and the individual contributions contained in it are protected under copyright by the Publisher
(other than as may be noted herein).
Notices
Knowledge and best practice in this field are constantly changing. As new research and experience
broaden our understanding, changes in research methods or professional practices, may become necessary.
Practitioners and researchers must always rely on their own experience and knowledge in evaluating
and using any information or methods described herein. In using such information or methods they
should be mindful of their own safety and the safety of others, including parties for whom they have
a professional responsibility.
To the fullest extent of the law, neither the Publisher nor the authors, contributors, or editors, assume
any liability for any injury and/or damage to persons or property as a matter of products liability,
negligence or otherwise, or from any use or operation of any methods, products, instructions, or ideas
contained in the material herein.
Library of Congress Cataloging-in-Publication DataShavers, Brett.
X-Ways Forensics practitioner’s guide / Brett Shavers, Eric Zimmerman.
pages cm
Includes bibliographical references and index.
ISBN 978-0-12-411605-4 (alk. paper)
1. X-Ways Forensics (Computer program) 2. Forensic sciences. 3. Criminal investigations.
I. Zimmerman, Eric, 1974- II. Title.
HV8073.S4228 2014
363.250285’53–dc23
2013022602
British Library Cataloguing-in-Publication Data
A catalogue record for this book is available from the British Library
ISBN: 978-0-12-411605-4
Printed and bound in the United States of America
14 15 16 17 18 10 9 8 7 6 5 4 3 2 1
For information on all Syngress publications, visit our website at store.elsevier.com/Syngress
Contents
Acknowledgments ....................................................................................................xi
About the Authors ................................................................................................. xiii
Foreword ..................................................................................................................xv
Introduction........................................................................................................... xvii
CHAPTER 1 Installation and Configuration of X-Ways Forensics ..................1
Introduction.....................................................................................1
System requirements....................................................................... 1
Installing XWF ............................................................................... 2
Alternative install methods ........................................................ 3
The XWF dongle ............................................................................ 5
Upgrading your dongle............................................................... 7
The XWF user interface ................................................................. 8
Configuring XWF........................................................................... 9
Summary .......................................................................................14
Reference ...................................................................................... 14
CHAPTER 2 Case Management and Imaging............................................. 15Introduction...................................................................................15
Creating a case file ....................................................................... 16
Creating a new case.................................................................. 17
Creating/Adding evidence files .................................................... 21
Creating forensic images with XWF............................................ 22
Live response using XWF........................................................ 27
Using XWF to review medium while imaging ....................... 27
Reverse imaging ........................................................................... 28
Skeleton imaging .......................................................................... 30
Cleansed imaging ......................................................................... 32
CD/DVD ....................................................................................... 33
Physical memory imaging ............................................................ 33
Container files............................................................................... 34
Working with RAID arrays .......................................................... 36
Augmenting with F-Response ...................................................... 39
Shortcuts ....................................................................................... 43
Summary .......................................................................................43
v
CHAPTER 3 Navigating the X-Ways Forensics Interface ............................ 45Introduction...................................................................................45
Case Data directory tree ............................................................... 45
Right click behaviors................................................................ 47
Middle-click behaviors............................................................. 50
Toolbar, tab control, and Directory Browser Options, Filters..... 51
General Options........................................................................ 53
Item listing options................................................................... 57
Directory Browser column and filter options .......................... 57
Directory Browser columns ..................................................... 58
Directory Browser ........................................................................ 60
Column sorting ......................................................................... 60
Column filtering ....................................................................... 60
Directory Browser context menu ............................................. 63
Mode buttons and Details pane.................................................... 73
Legend mode ............................................................................ 73
Volume/Partition mode ............................................................ 73
Disk mode................................................................................. 74
File mode .................................................................................. 74
Preview mode ........................................................................... 74
Details mode............................................................................. 75
Gallery mode ............................................................................ 75
Calendar mode.......................................................................... 76
Directory Browser mode .......................................................... 76
Sync mode ................................................................................ 76
Explore recursively mode ........................................................ 76
Search hit list mode.................................................................. 76
Events mode ............................................................................. 76
Position manager mode ............................................................ 76
Status bar ...................................................................................... 77
Right clicking the status bar .................................................... 77
Left clicking the status bar....................................................... 78
Data Interpreter......................................................................... 79
Main menu.................................................................................... 80
General Options continued........................................................... 80
Volume Snapshot options............................................................. 84
Viewer Programs options continued ............................................ 84
Security Options ........................................................................... 84
Shortcuts ....................................................................................... 86
Summary.......................................................................................86
vi Contents
CHAPTER 4 Refine Volume Snapshot ....................................................... 89Introduction...................................................................................89
Volume snapshot options ............................................................. 90
Starting RVS................................................................................. 93
Take new one and default RVS options .................................. 94
RVS options.................................................................................. 95
File recovery options................................................................ 96
File processing options............................................................. 98
Extract e-mail messages and attachments from. . . ................ 102
Results of an RVS ...................................................................... 105
Shortcuts ..................................................................................... 107
Summary .....................................................................................107
Reference .................................................................................... 108
CHAPTER 5 The XWF Internal Hash Database and the Registry Viewer .... 109
Introduction.................................................................................109
XWF internal hash database and hash sets ................................ 110
Hash categories....................................................................... 110
Computing hash values .......................................................... 112
Creating hash sets................................................................... 113
Duplicate hash values............................................................. 117
The registry through X-Ways Forensics .................................... 118
The XWF Registry Viewer ........................................................ 120
Viewing USB devices ............................................................ 121
Exporting ................................................................................ 123
The XWF Registry Report ......................................................... 124
Shortcuts ..................................................................................... 125
Summary .....................................................................................125
CHAPTER 6 Searching in X-Ways Forensics........................................... 127
Introduction.................................................................................127
Simultaneous Search................................................................... 127
Search terms and code pages ................................................. 128
How to search options............................................................ 129
Where to search options......................................................... 130
Additional search options....................................................... 132
Search methodologies............................................................. 133
Regular expressions .................................................................... 133
Regular expression examples ................................................. 135
GREP and regular expressions in XWF .................................... 137
Indexed search ............................................................................ 138
Other index-related options.................................................... 144
viiContents
Reviewing search hits................................................................. 145
Search Hit List columns......................................................... 146
Interacting with the Search Hit List....................................... 146
Simultaneous search results vs. indexed search results......... 147
Search Hit List options........................................................... 147
þ and � operators.................................................................. 148
Alternate method .................................................................... 148
Proximity between search terms using the Search
Hit List.................................................................................... 149
Text search.................................................................................. 149
Hexadecimal search.................................................................... 151
Shortcuts ..................................................................................... 152
Summary.....................................................................................152
CHAPTER 7 Advanced Use of X-Ways Forensics..................................... 153
Introduction.................................................................................153
Customizing X-Ways Forensics configuration files .................. 153
XWF directory-based configuration files .............................. 154
User profile-based configuration files ................................... 154
File Type Categories.txt ......................................................... 154
File Type Signatures Check Only.txt..................................... 157
File Type Signatures Search.txt ............................................. 157
Maneuvering in hex.................................................................... 157
Data Interpreter....................................................................... 158
Defining blocks of data .......................................................... 160
User search hits ...................................................................... 160
Other options .......................................................................... 161
Sector superimposition ........................................................... 163
Templates................................................................................ 163
Timeline and event analysis ....................................................... 167
Calendar mode........................................................................ 167
Events view ............................................................................ 169
Gathering free and slack space .................................................. 170
RAM analysis ............................................................................. 172
Opening memory from within XWF ..................................... 175
Scripting, X-Tensions API, and external analysis interface...... 176
Scripting.................................................................................. 176
X-Tensions.............................................................................. 177
External analysis interface ..................................................... 177
Shortcuts ..................................................................................... 178
Summary.....................................................................................179
viii Contents
CHAPTER 8 X-Ways Forensics Reporting ............................................... 181Introduction.................................................................................181
Adding items to a report table ................................................... 181
RT associations options.......................................................... 183
Adding a new RT association ................................................ 185
Meanwhile, back in the Directory Browser........................... 187
Sharing RT associations ......................................................... 188
Comments ................................................................................... 189
Report generation ....................................................................... 189
Main report options ................................................................ 191
Audit trail options................................................................... 191
RT options .............................................................................. 191
Report customization.................................................................. 194
Shortcuts ..................................................................................... 195
Summary .....................................................................................195
CHAPTER 9 X-Ways Forensics and Electronic Discovery ......................... 197
Introduction.................................................................................197
Civil litigation............................................................................. 197
Preparing XWF....................................................................... 198
Accessing the data.................................................................. 199
User created files—Existing (active) files ............................. 200
Copying the filtered files ....................................................... 202
Optional method of creating a file list................................... 202
Printing the relevant files ....................................................... 203
XWF container ....................................................................... 204
Redacting files within an image ............................................ 205
Review of relevant data with X-Ways Investigator .................. 206
Bates numbering..................................................................... 207
Attorney review of data.......................................................... 208
Forensic analysis and electronic discovery............................ 208
Log file and reporting ............................................................ 208
Summary .....................................................................................208
Reference .................................................................................... 209
CHAPTER 10 X-Ways Forensics and Criminal Investigations ..................... 211
Introduction.................................................................................211
X-Ways Forensics and criminal investigations.......................... 212
Prepare XWF.......................................................................... 213
Adding evidence items........................................................... 214
Case scenario .......................................................................... 216
Summary .....................................................................................218
Reference .................................................................................... 219
ixContents
APPENDIX A X-Ways Forensics Additional Information ............................. 221
APPENDIX B X-Ways Forensics How to’s ................................................. 229
Index ......................................................................................................................235
x Contents
Acknowledgments
Eric Zimmerman and Jimmy Weg are two forensic examiners that are true X-Ways
Forensics practitioners. I am humbled to have their efforts attributed to this book, as
both Eric and Jimmy are two of the most competent forensic examiners around. After
Eric agreed to coauthor the Practitioner’s Guide to X-Ways, I knew this would be the
go-to guide for all current and new users of X-Ways Forensics. To have JimmyWeg
as the Tech Editor only solidified this book’s credibility. Eric and Jimmy, thank you
for your support in this endeavor.
Stefan Fleischmann of X-Ways Software Technology has been a constant support
of my personal use of X-Ways Forensics since the forensic version was first released.
Little did I know that by asking Stefan in 2004 to teach an X-Ways Forensics class in
Seattle (the first class in the USA) that I would be introduced to the best forensic
utility available, with amazing support, both personal and professional, from Stefan.
Additionally, Stefan’s support of this book has been a tremendous help in ensuring
the information is up to date and accurate.
I also thank Craig Ball for his kind words for the foreword of this book. I first met
Craig Ball in the first X-Ways class and, since then, have followed his witty and intel-
ligent writings on forensics and electronic discovery. Craig has an amazing com-
mand presence and superb knowledge of the law surrounding electronic discovery
and forensics (he is an attorney. . .), but he is also an advocate and longtime user
of X-Ways Forensics.
As for my number one supporter, I thank my wife Chikae, as she not only listened
to my endless jabbering of all things digital forensics at home but has also supported
me in this second book even before I finished writing my first book. When looking at
the success of our children, or even my personal success, I look no further than to my
wife and I know how it is all possible.
Brett Shavers
I would like to start by saying thank you to all of the dedicated men and women in
both law enforcement and private industry that go to work every day and tirelessly
pursue the truth in the realm of digital forensics. While we may at times have dif-
ferent missions, the goal is the same: to tell the story of what happened as it relates
to a computer. It is my belief that X-Ways Forensics can help you tell that story in an
efficient and succinct manner.
I want to extend a special thanks to Brett and Jimmy, my coauthor and tech editor.
I am grateful for being given the opportunity to write this book and work closely with
you over the past few months. Your passion for X-Ways Forensics comes through in
every chapter.
I too want to thank Stefan Fleishmann and all the X-Ways employees for putting
together such a fantastic and capable tool. Your dedication to making the best soft-
ware available has made more impact in the world than you know.
xi
Finally, I would like to thank my wife Michele for supporting me when it came
time to add writing a book to my already crazy schedule. Thank you for being a con-
stant source of encouragement. You are a fantastic wife and mother. Wesley and I are
blessed to have you.
Eric Zimmerman
xii Acknowledgments
About the Authors
Brett Shavers is a former law enforcement officer of a municipal police department
and has been an investigator assigned to state and federal task forces. Besides work-
ing many specialty positions, Brett was the first digital forensics examiner at his
police department, attended over 1000 hours of digital forensic training courses
across the country, collected more than a few certifications along the way, and set
up his department’s first digital forensics lab in a small, cluttered storage closet.
Brett has been an adjunct instructor at the University of Washington’s Digital
Forensics Program, an expert witness and digital forensics consultant, a prolific
speaker at conferences, and a blogger on digital forensics and is an honorary member
of the Computer Technology Investigators Network. Brett has worked cases ranging
from child pornography investigations as a law enforcement investigator to a wide
range of civil litigation cases as a digital forensics expert consultant. This is Brett’s
second book, with Placing the Suspect Behind the Keyboard, being his first.
Brett is also a Former Corporal of Marines.
Eric Zimmerman has been involved with computers in some form or fashion since
the days of the Commodore 64. Initially pursuing a mathematics degree at Youngs-
town State University, Eric moved to Chicago for work in 1997. For the next 9 years,
Eric worked at a third-party logistics company where he was a lead systems admin-
istrator. His duties included programming and systems integration work.
While living in Chicago, Eric received his Bachelor of Science in Computer
Science. In 2007, Eric joined the FBI as a Special Agent and is currently assigned
to the Salt Lake City field office.
xiii

Intentionally left as blank
Foreword
I’ve been waiting for this book for nearly a decade.
As a devoted user of X-Ways Forensics since its introduction, I turn to X-Ways
Forensics more than any other tool in my lab. I’ve watched X-Ways Forensics mature
from a brilliant hex editor to a digital forensics tool of incomparable depth, power,
and flexibility. Yet, after years of daily use, X-Ways Forensics still manages to
amaze and daunt me with its wealth of features and options.
I’m an old-school forensic examiner. I honed my skills in DOS using a hex editor,
so I feel a deep kinship with X-Ways Forensics’ old-school emphasis on the data
notwithstanding its being one of the most advanced digital forensic analysis
platforms on the market. Though it greatly simplifies the forensics workflow, it best
serves those who understand the evidence. X-Ways Forensics is built atop WinHex,
surely the finest hex editor ever written. It’s the tool of choice for the digital forensic
examiner who wants to be close to the evidence and truly, deeply understand how
data live.
The X-Ways Forensics product manual is an invaluable resource, but what’s been
missing is a guide to X-Ways Forensics written from the user’s perspective; ideally, a
volume looking at the many capabilities of the tool through the eyes of experienced
examiners and aiding both novice and veteran users in understanding how to config-
ure the tool and choose wisely among its many options. X-Ways Forensics can do
virtually anything, and its name reflects that tasks need not be accomplished in just
one way, but can often be approached in a multitude of ways, i.e., in “X” ways.
Sometimes, the challenge of having “X” ways to accomplish a task is deciding which
to choose.
This book does a splendid job helping users understand the program’s many
options and make wise choices. Because it’s the work of experienced computer
forensic examiners, it focuses on the basic tasks examiners must accomplish and
the features of greatest practical value. This book introduced me to features of
X-Ways Forensics I’d not noticed before or had forgotten. Far from being a recasting
of the program’s help files, every chapter of this volume contains golden nuggets,
many in the form of tips and tricks to aid your exploration of X-Ways Forensics.
X-Ways Forensics manifests the vision and extraordinary programming acumen
of Stefan Fleischmann, who has nudged, nurtured, and supported the product from its
inception. One marvels at the speed with which Stefan investigates any bug report
and the swiftness with which fixes are instituted and wished-for features appear in
new releases. Where so much software product support today is scripted and imper-
sonal, Stefan’s support is deeply personal. When a new release exhibits an infrequent
glitch—as any complex software will do—that glitch is quickly acknowledged and
corrected. But when the product is unfairly criticized, it is vigorously defended. It is a
tool so deep and rich that many support requests seek features already in the product
or complain that the program can’t do something it’s been able to do for years! When
that happens, Stefan suffers no fools gladly.
xv
Still, an application needs more than just a gifted developer to endure and grow; it
needs a passionate community of experienced and devoted users. This book reflects
the work of some of the strongest contributors to the X-Ways Forensics community.
Brett Shavers brings boundless experience in computer forensics gained as a law
enforcement officer and private practitioner. Brett’s longtime use of X-Ways
Forensics coupled with his experience defending its results in and out of court makes
him an ideal guide to the power and intricacies of the tool. Eric Zimmerman is both a
computer scientist and an FBI Special Agent. Eric has written numerous free tools to
aid the digital forensics community. Together, Brett and Eric bring a first-rate mix of
practical, technical, and investigative skill and experience to their X-Ways Forensics
Practitioner’s Guide.
I recommend you read this book with your copy of X-Ways Forensics running
and data loaded. Try out each of the features described and keep the many shortcuts
shared at the ready.Whether you are exploring X-Ways Forensics for the first time or
you’re an old hand with the program, you will benefit from letting this fine book be
your guide.
Craig Ball
Attorney and Forensic Technologist
Certified Computer Forensic Examiner
xvi Foreword
Introduction
INFORMATION IN THIS CHAPTER
• Introduction
• Organization of this book
• Summary
INTRODUCTION
The need for this book arose because some examiners did not want to try X-Ways
Forensics (XWF) since it looked different from other forensic suites. Some con-
sidered it harder to use or were under the impression that XWF was just a hex editor.
For those who have not tried XWF, the authors hope to enlighten those potential
users of the powerful capabilities of XWF. The authors also hope to explain the inner
workings of XWF so that current users will find it even more helpful in nearly every
analysis.
Much like anyone else, when you find something that works, you stick with it.
Excuses for not trying a different forensic suite may sound reasonable at first, but
in reality, they are not. Just because an examiner attended a course about software
Brand A should not result in only using Brand A, nor should it preclude learning to
use another tool. In addition, holding a certification in Brand B shouldn’t preclude
the use of other tools. It is the underlying forensic skill that has been developed during
one’s studies that should be leveraged across a wide variety of software programs.
Most new tasks are difficult, at least at first. Activities like riding a bicycle, driv-
ing a car, and cooking dinner are examples of difficult tasks that become easier with
effort and time until finally they become second nature. Working with XWF (both
through this book and in casework) is not different from learning any new skill, and
over time, XWF will become as easy to use as riding a bicycle. XWF is remarkably
intuitive, perhaps not seemingly at first, but its straightforward nature actually makes
it easier to master than many other tools.
Intended audienceWe developed this book for every user of XWF including those who have been using
XWF for years as well as those that have yet to take the first step to use XWF in their
examinations. As this book details using a forensic software application using real
life examples, it is intended for users who have an intermediate to advanced level
of understanding about computers, operating systems, and file systems. While var-
ious sections and chapters touch on certain aspects of operating systems, software,
and hardware, they do not contain detailed information on these topics, nor does this
xvii
book contain detailed information on file systems such as FAT, NTFS, HFS, or EXT.
These topics are better described apart from the use of XWF in this book. In other
words, this is not a book on learning how to do forensics. Rather, it is a book on how
to use XWF.
Our hope is to give the reader a solid reference for using XWF in any forensic
examination as either a compliment to current forensic tools or the primary forensic
tool in any examination. We will present real-world case studies so that readers can
see firsthand how capable XWF is as a forensics application. We expect readers of
this book to be demanding of their current tools and assume that they are using their
current tools to the highest potential. With that said, this book will show how to
exploit the capabilities of XWF in order to examine electronic media quickly and
accurately.
Brief history of X-Ways ForensicsBefore delving into an overview of how XWF has improved since its creation, it
would be helpful to have a better understanding of the origins of XWF. In 2002,
Stefan Fleischmann started a software development company while he was a student
at the University of Munster in Germany. Upon graduation, Stefan worked in the
private sector where he specialized in training others in Systems Applications and
Products (SAP). In 2002, Stefan started X-Ways Corporation.
Based on feature requests from users, XWF released the “computer forensics ver-
sion of WinHex” on May 17, 2004. It was not until June 21, 2004, that the first ver-
sion of XWFwas released. The following year, Stefan hosted the first training course
in Seattle, Washington. Since then, XWF has seen many releases that have added
hundreds of new features. To date, XWF has over 35,000 users worldwide ranging
from state, local, and federal law enforcement agencies to Fortune 500 companies
and everything in between.
As the reader will soon see, XWF is a full featured and extremely powerful pro-
gram with hundreds of features and capabilities not found in other forensic programs.
The ingenuity of XWF lies in the multitude of features and capabilities behind a
seemingly simple user interface. To put it in Stefan’s words, with XWF, there is
any number, or “X,” ways of doing things. To view the many updates and added fea-
tures, the reader can find a constantly updated list at http://www.x-ways.net/winhex/
mailings/.
This book’s primary goal is to explain how to best use the capabilities of XWF in
a wide variety of situations. Throughout the following chapters, we take an incre-
mental or building block approach, so the reader can become thoroughly familiar
and competent with each function and feature of the program.
One of the most significant design points of XWF is its ability to allow an exam-
iner to choose only the operations necessary to accomplish a task. In other words,
XWF does not require every single option to be run on every single forensic image
before the review process can begin. In fact, the evidence review process can be ini-
tiated as soon as a piece of media or an image is opened in XWF, either as a preview
or to triage the evidence using some of the more advanced capabilities of XWF.
xviii Introduction
In certain types of cases, an examiner may never need to use the advanced capa-
bilities of XWF at all. Contrast this with other tools that require a lengthy amount of
time to preprocess a case before even conducting a basic review.
A constant theme throughout the book is an emphasis on case workflow. We
describe various methods for workflow that can reduce the time of analysis and result
in a better product, without taking any shortcuts. Whereas some tools may require a
large block of time and machine-intensive preprocessing, we show case flow options
with real life examples to define case preparation, with the granularity based on the
needs of the case. Many of these options exist only with XWF, and, by knowing the
options, you can control the time spent on analysis to reach key objectives in your cases.
Finally, we suggest you check the XWF forums often. Enhancements and updates
can occur literally by the hour, and the forums are the best place to find such
information.
Comparisons to “other” forensic suitesA single, all-encompassing digital forensic suite does not exist, as any given forensic
suite may do a single task better than another forensic suite. In fact, in most cases, a
specifically developed application that does only one task might be the better tool to
use than a suite. An example could be software designed solely for Internet analysis
or parsing certain Windows artifacts.
In addition, one forensic tool simply cannot do everything by itself. The exam-
iners that rely solely upon one tool may be doing a disservice to themselves because
most examinations require a multitude of different software applications for a com-
prehensive examination. Of course, some tools are more comprehensive than others
and provide more value for the price, but these variables fluctuate depending on the
requirements of examiners, usage policy and procedures, and so forth. It is important
not to equate value with price, as they are often at odds.
Keep in mind that you can consider your forensic software and hardware as tools
in a toolbox, each with a specific purpose. Our goal in this book is not to disparage
any forensic application nor place any application in a negative light. In most cases,
you need more than one forensic application to examine a particular case thoroughly,
just as you need more than one hammer and a single pair of pliers in your toolbox.
While reading this book, you may choose to implement XWF into your toolbox,
perhaps as a validation tool initially, but most likely it will become your primary tool
as you gain a better understanding of its capabilities and efficiencies. Either way, you
still need more than one tool to be effective in your job. This book will also show how
the integration of other forensic applications can work well with XWF to fully
exploit capabilities or fill any gaps that might exist in other tools.
ORGANIZATION OF THIS BOOKEach chapter builds upon the preceding chapter, and each chapter stands on its
own for the topics presented in that chapter. With that said, we recommend that
xixIntroduction
you read each chapter in order so that you gain and reinforce a solid foundation and
understanding of XWF.
By the time you read this book, there will have been one or more updates to XWF.
Certain features as outlined in this book may have been changed or improved in addi-
tion to adding new features. Keep in mind that WinHex and XWF have had a steady
growth of updates and improvements. In fact, there is an average of 41 days between
new versions!With this in mind, this guide to using XWF is not out of date as the vast
majority of information contained herein still applies, but to make sure you are aware
of the latest updates, check out the XWF Web site on a regular basis. Rest assured
that there will be an update anywhere between a week and 41 days between each
version or service release.
We are confident that you are holding in your hands the definitive guide to the
most frequently updated and powerful tool in the digital forensics field.
Chapter 1: Installation and configuration of X-Ways ForensicsWe have to start somewhere, so starting with the installation, setup, and configuring
of XWF is a good place to begin. Chapter 1 begins with a broad overview of features
and a brief explanation of the graphical user interface used by XWF. It will conclude
with a walkthrough of the initial configuration steps required to give XWF the basic
information it needs to function.
Chapter 2: Case management and imagingXWF handles just about all types of electronic evidence: hard drives, physical mem-
ory, compact discs, and even remotely acquired evidence. Each of these items rep-
resents that media XWF can forensically image and process. Chapter 2 describes
how to capture electronic evidence with methods that are flexible and efficient,
depending upon the needs of the examiner.
Chapter 3: Navigating the X-Ways Forensics interfaceA key element in using any software is being able to efficiently and effectively nav-
igate through the myriad of buttons and options the program exposes. Chapter 3
shows succinct methods of navigation that will serve well with every use of XWF.
Chapter 4: Refine volume SnapshotVolume Snapshots are unique to XWF and are one of the most powerful features that
exist within the program. A Snapshot is an instrumental feature in XWF and is used
for data carving, indexing data, and preprocessing evidence for analysis. Chapter 4
shows the many choices available when creating and refining a Snapshot of evidence
with examples to maximize your choices based on the needs of that particular case or
item of evidence.
xx Introduction
Chapter 5: The XWF internal hash database and registry viewerChapter 5 explains in detail how to create and import hash data sets to use as hash
comparisons of files. Hash comparisons are one of the most commonly used methods
of identifying known and notable files by their hash value.
A section describing the Registry Viewer is also in Chapter 5. Although this sec-
tion does not teach registry forensics, it does show how to use the XWF Registry
Viewer as part of an analysis of the registry.
Chapter 6: Searching in X-Ways ForensicsSearching for data with XWF is unrivaled. No other forensic utility has the granu-
larity, configurability, accuracy, and speed as does XWF. Chapter 6 shows XWF
users how to effectively search and export hits efficiently and effectively by using
indexed searches, GREP searches, and searches in hex.
Chapter 7: Advanced use of XWFThe advanced use of XWF covers processes of detailed analysis techniques and
uncommon situations. Chapter 7 shows how to maneuver in hex, gather free and
slack spaces, examining physical memory, template editing, and the use of scripts
and the X-Tensions API. With that said, advanced use of XWF does not necessarily
mean that it is any more difficult or essential to the successful use of the program. It
merely means using features and methods that may not be used regularly.
Chapter 8: X-Ways Forensics reportingAn analysis is not completely finished until you generate a report. In Chapter 8, you
will see how to create and customize a report best suited for your examination using
built-in features of XWF as well as adding information from other sources resulting
in a complete and thorough report.
Chapter 9: X-Ways Forensics and electronic discoveryChapter 9 describes a unique use of XWF, in the field of electronic discovery.
Although XWF is a digital forensics application, the same features that make it a
superior forensic application also make it a superior choice in electronic discovery
cases.
Chapter 10: Consent to search and supervision of parolesSituations occur where examiners or first responders are confronted with computer
systems to search, yet may not have enough information to justify a seizure of those
systems. In these instances, such as a consent to search or monitoring a parolee,
XWF enables a high-level triage or preview of electronic media and, when
xxiIntroduction
required, provides extreme granularity in analysis in the field with no reduction in
capabilities. Chapter 10 presents several methods of conducting searches of these
types using XWF.
SUMMARY
We are confident that after you read this book you will dog-ear pages, highlight sen-
tences, write notations in the margins, and place it on the desk right next to a small
stack of your other well-worn and well-used reference books.
With your XWF dongle and this guide, you will have the tools and knowledge to
not only conduct in-depth forensic analysis in the lab and the field but also further
develop into someone who knows his or her job as well as the science behind com-
puter forensics. Beware the forensic examiners who are proficient in XWF as they
most likely know their stuff regardless of the tools they choose to use.
Finally, we believe that after reading this book and spending some time using
XWF, you will ask yourself one question: “Why did I wait so long before trying
out X-Ways?”
xxii Introduction
CHAPTER
Installation andConfiguration of X-WaysForensics
1INFORMATION IN THIS CHAPTER
• Introduction
• Installation
• The XWF dongle
• The XWF user interface
• XWF configuration
• Summary
INTRODUCTION
Before you get started with XWF, there are a few basics to understand about the
installation, user interface, and basic configuration of XWF.We are not fans of using
the term “basic” because, for many of us, we sometimes want to skip the “basics” and
go right into “advanced” work, even when we may not be ready. Nevertheless, there
are a few basic pieces of information that will be helpful to know before you begin
using XWF.
SYSTEM REQUIREMENTSThis chapter begins with one of the most incredible aspects of XWF: its system
requirements. When running on average 64-bit hardware with multiple processors
and 4 GB of RAM, XWF can handle extreme numbers of files and does so in a veryefficient and fast manner. However, XWF will also run on older computers such as a
32-bit machine running Windows XP with just 256 MB of RAM! XWF is not
resource hungry and will use only the resources necessary to get the job done. This
means your workstation remains usable while XWF is working. Contrast this to other
forensic tools that consume all resources on a computer, effectively rendering it unu-
sable for anything else.
So there you have it. XWF is a full-featured forensic software utility that can run
on just about anything. This is an impressive ability and comes into play in situations
where live machines with minimal resources might be the target of an analysis or
1
where an older forensic workstation can be kept in service instead of being discarded.
Plus, XWF can run on a running target machine, either to preview the machine or to
fully analyze it, all while using as little as 100 MB of RAM. Of course, the examiner
must understand that running any program on a live evidence machine must be based
on the circumstances at the time, such as when the machine cannot be turned off.
Finally, XWF’s ability to run from a directory vs. being installed on a computer
means that you have full-blown forensics capabilities with nothing more than a
thumb drive and your XWF dongle!
Throughout this book, there will be tips and guidance to help you squeeze out
every bit of XWF’s power in terms of both speed and processing. Even though
the processing speed is already quick, there are options and techniques to help it
run even faster. Bear in mind that just because XWF runs on older machines, its
forensic capabilities aren’t diminished nor is it less powerful than any other forensic
application. In our experience, the opposite is true.
INSTALLING XWFThere are several ways to install XWF. The first method we will cover is the tradi-
tional setup.exe method. The following steps outline installing XWF in this manner:
1. Download the XWF compressed program file.
Licensed users can download XWF from http://www.x-ways.net. The
download is in the form of a compressed file, generally named xw_ forensics.zip.2. Extract the compressed file and then execute the setup file.
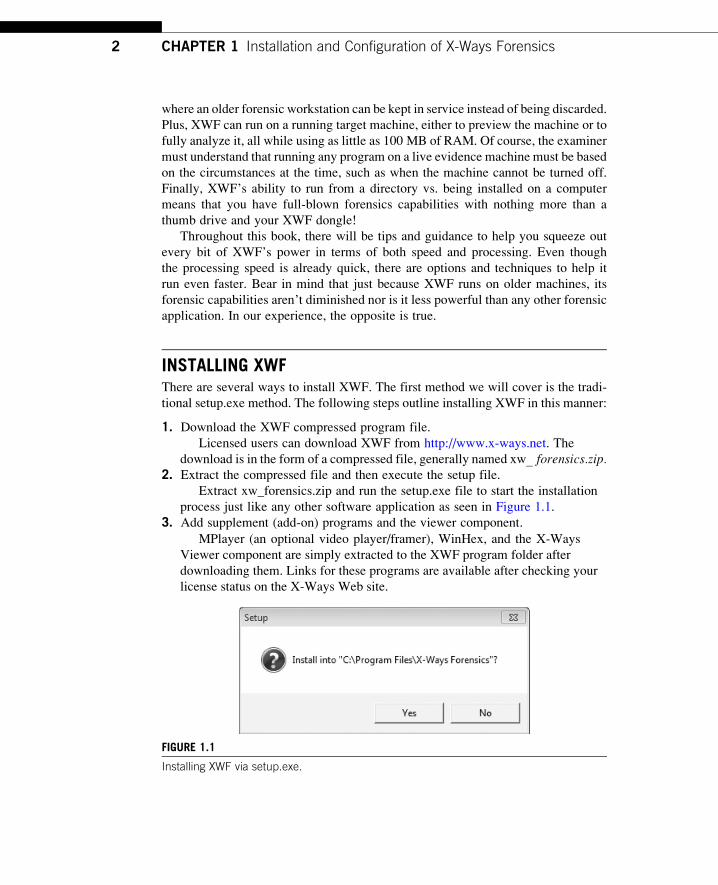
Extract xw_forensics.zip and run the setup.exe file to start the installation
process just like any other software application as seen in Figure 1.1.
3. Add supplement (add-on) programs and the viewer component.
MPlayer (an optional video player/framer), WinHex, and the X-Ways
Viewer component are simply extracted to the XWF program folder after
downloading them. Links for these programs are available after checking your
license status on the X-Ways Web site.
FIGURE 1.1
Installing XWF via setup.exe.
2 CHAPTER 1 Installation and Configuration of X-Ways Forensics
Alternative install methodsThe second method for installing XWF is simply to extract each of the zip files to a
directory and have that directory serve as the installation directory. We recommend
using c:\xwf when installing via this method. By having XWF at the root of your C:\
drive, maintaining, upgrading, and accessing XWF is faster and simpler. In the con-
text of this book, we refer to c:\xwf as the path for XWF. Once xw_forensics.zip is
unzipped, you can run the xwforensics.exe executable without having to do anythingelse. Of course, you should also download and unzip the viewer component,
MPlayer, and any add-ons. Installing via this method does not generate any shortcuts
to the XWF executables, so this will have to be done manually.
Because XWF does not require a traditional installation via setup.exe, you can
unzip xw_forensics.zip to almost anymedia, such as a USB device, and it will operate
from that media. Similarly, XWF requires no uninstaller to remove it from your
system; just delete the directory where it resides. This will come in handy later when
used as portable forensic application. In addition, XWF can run from a compact disc
or a flash drive.
After unzipping XWF, the next step is adding the viewer component add-on.
Adding the viewer component entails unzipping the xw_viewer.zip file to the
XWF folder. XWF expects the viewer files to be in the subdirectory of the program
folder at c:\xwf\viewer (32 bit) or c:\xwf\x64\viewer (64 bit). The viewer component
add-on allows viewing and printing of more than 270 different types of files directly
within XWF. xw_viewer.zip already contains these expected directories, so simply
extracting the contents of xw_viewer.zip to c:\xwf will put things where XWF
expects them to be.
MPlayer (http://www.mplayerhq.hu/) is an optional, but recommended, add-on
for XWF. MPlayer is a free and open source media player and supports a wide range
of media formats. Similar to the viewer component, MPlayer must be extracted to a
folder under c:\xwf. As we saw with the viewer component, the Mplayer archive has
the necessary folders inside it to properly organize things, so extracting the contents
of MPlayer.zip to c:\xwf is all that is required. After extracting MPlayer to c:\xwf,
XWF is also able to extract JPEG pictures from videos files in addition to being able
to play a wide variety of video formats. An alternative to MPlayer is the commercial
product Forensic Framer (http://www.kuiper.de/) from Kuiper Forensics that is free
to law enforcement.
Another available add-on is WinHex. Both XWF and WinHex share the same
base code, and licensed XWF users can use WinHex with the same license. In recent
versions of XWF, the WinHex add-on is included in the XWF zip file and does not
need to be added or installed separately. To start WinHex, run the winhex.exe exe-cutable file in the program folder. The primary difference between XWF and Win-
Hex is that WinHex allows you to alter data, whereas XWF cannot alter any data. It
should be noted that newer versions of XWF already containWinHex in the XWF zip
file and as such, no add-on file is available.
3Installing XWF
XWF TIPS AND TRICKSGetting WinHex in XWF versions 17.1 and laterStaring with version 17.1 of XWF, Winhex.exe is no longer distributed as a separate file. Thereason for this is that there is a significant overlap in the code base between XWF andWinHex.
You can, however, access WinHex’s write capabilities by making a copy of the xwforensics.exe file and renaming itWinHex.exe. If you need a 64-bit version, rename xwforensics64.exe toWinHex64.exe.
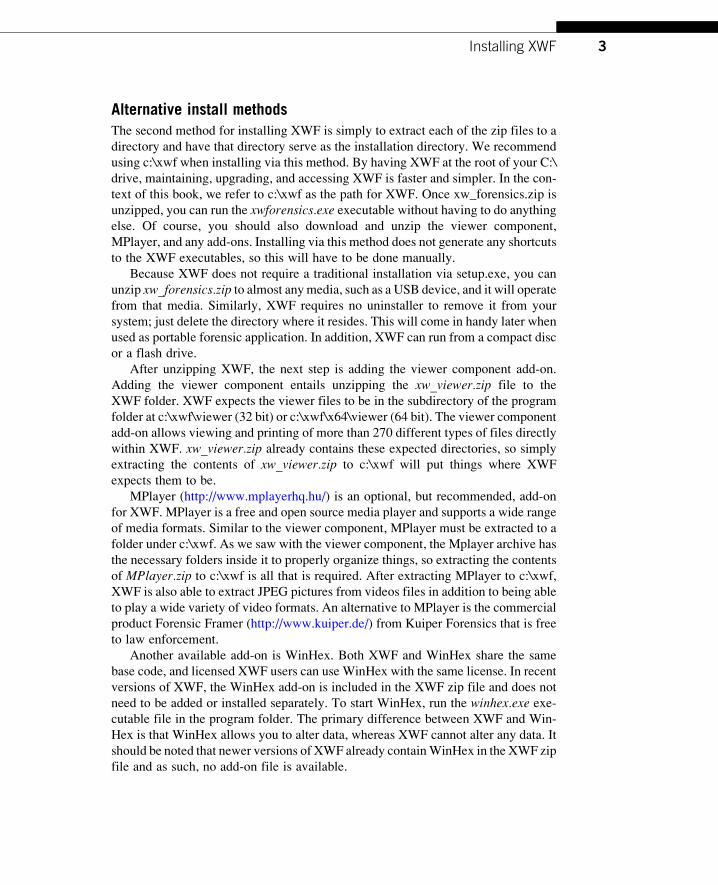
The user interfaces seen in Figure 1.2 shows whether you are running XWF or
WinHex. The programs appear identical to each other, but there are subtle, yet
significantdifferences.Most importantly,XWFinterprets image files, disks, andphysical
RAM in a read-onlymode, whereas WinHex is read-write. Always check the program
you are using before touching your evidence. Those whowish to do so can simply delete
WinHex.exe to remove any chance of inadvertently starting the wrong program.
The last and, in our opinion, best way to install XWF is by using a program we
have written for this book: XWFIM or XWF Installation Manager (created by Eric
Zimmerman). You can download XWFIM from the X-Ways forums. The only
requirement for using XWFIM is the Microsoft .NET 4.0 runtime that should be
installed on almost every Windows machine by default. If you need to install
.NET, it can be downloaded from Microsoft’s Web site.
When XWFIM is first run, it will inform you that it needs the credentials to the
X-WaysWeb site in order to download version information. These credentials can be
found by querying your license status at http://www.x-ways.net/winhex/license.
html. After entering the credentials, XWFIM will download a list of available
XWF and viewer component versions. By default, XWFIM will install the latest
available version of both XWF (to include previews and beta releases) and the viewer
component. The XWFIM interface is shown in Figure 1.3.
Each option in the program is documented via tooltips that are visible when hov-
ering over a particular option. After adjusting the options to suit your needs, simply
click the Install button and XWFIM will download and extract all the necessary
components for you.
In addition to downloading and setting up your XWF directory, XWFIMwill also
generate a file containing the SHA1 hash of every file that was installed. These data
can be used later to verify the integrity of your installation.
We recommend using XWFIM to manage your XWF installation as it not only
combines the best of both previously discussed installation methods but also takes
FIGURE 1.2
Identification of XWF and WinHex.
4 CHAPTER 1 Installation and Configuration of X-Ways Forensics
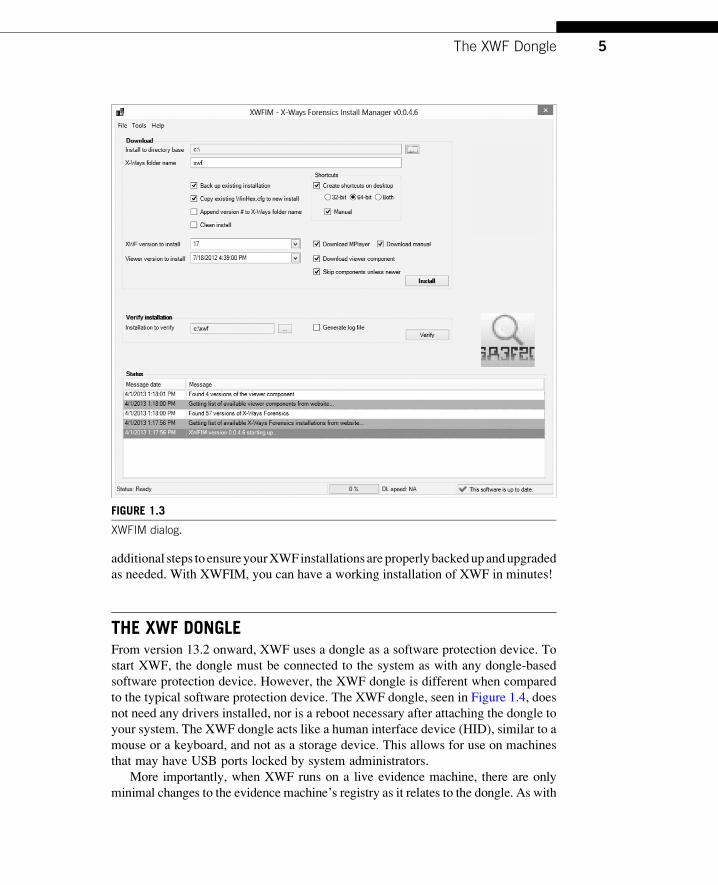
additional steps to ensureyourXWFinstallations are properlybackedupandupgraded
as needed. With XWFIM, you can have a working installation of XWF in minutes!
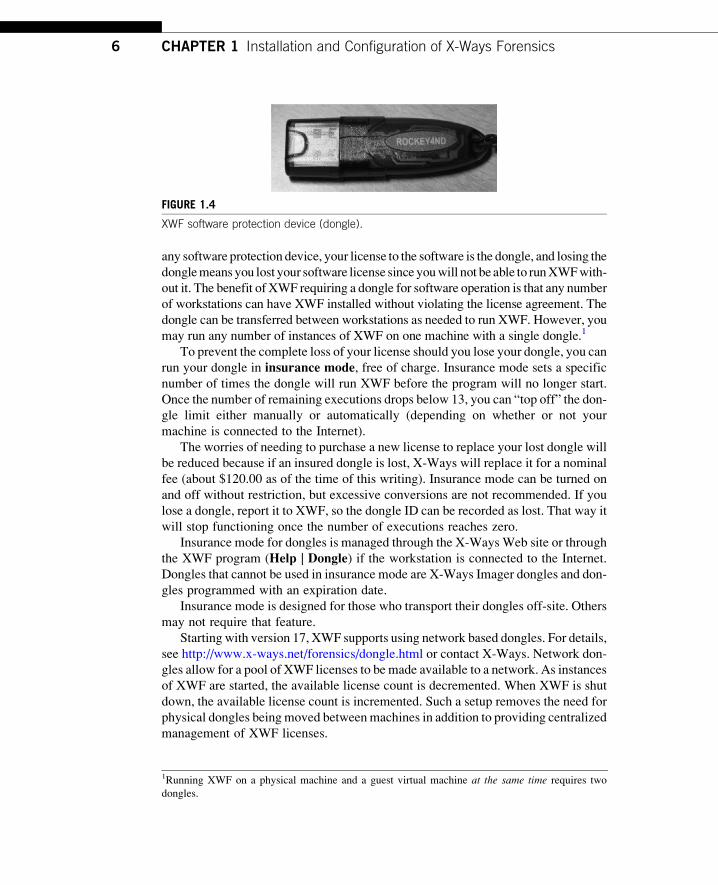
THE XWF DONGLEFrom version 13.2 onward, XWF uses a dongle as a software protection device. To
start XWF, the dongle must be connected to the system as with any dongle-based
software protection device. However, the XWF dongle is different when compared
to the typical software protection device. The XWF dongle, seen in Figure 1.4, does
not need any drivers installed, nor is a reboot necessary after attaching the dongle to
your system. The XWF dongle acts like a human interface device (HID), similar to a
mouse or a keyboard, and not as a storage device. This allows for use on machines
that may have USB ports locked by system administrators.
More importantly, when XWF runs on a live evidence machine, there are only
minimal changes to the evidence machine’s registry as it relates to the dongle. As with
FIGURE 1.3
XWFIM dialog.
5The XWF Dongle
any software protection device, your license to the software is the dongle, and losing the
donglemeans you lost your software license since youwill not be able to runXWFwith-
out it. The benefit of XWF requiring a dongle for software operation is that any number
of workstations can have XWF installed without violating the license agreement. The
dongle can be transferred between workstations as needed to run XWF. However, you
may run any number of instances of XWF on one machine with a single dongle.1
To prevent the complete loss of your license should you lose your dongle, you can
run your dongle in insurance mode, free of charge. Insurance mode sets a specific
number of times the dongle will run XWF before the program will no longer start.
Once the number of remaining executions drops below 13, you can “top off” the don-
gle limit either manually or automatically (depending on whether or not your
machine is connected to the Internet).
The worries of needing to purchase a new license to replace your lost dongle will
be reduced because if an insured dongle is lost, X-Ways will replace it for a nominal
fee (about $120.00 as of the time of this writing). Insurance mode can be turned on
and off without restriction, but excessive conversions are not recommended. If you
lose a dongle, report it to XWF, so the dongle ID can be recorded as lost. That way it
will stop functioning once the number of executions reaches zero.
Insurance mode for dongles is managed through the X-Ways Web site or through
the XWF program (Help | Dongle) if the workstation is connected to the Internet.
Dongles that cannot be used in insurance mode are X-Ways Imager dongles and don-
gles programmed with an expiration date.
Insurance mode is designed for those who transport their dongles off-site. Others
may not require that feature.
Starting with version 17, XWF supports using network based dongles. For details,
see http://www.x-ways.net/forensics/dongle.html or contact X-Ways. Network don-
gles allow for a pool of XWF licenses to be made available to a network. As instances
of XWF are started, the available license count is decremented. When XWF is shut
down, the available license count is incremented. Such a setup removes the need for
physical dongles beingmoved betweenmachines in addition to providing centralized
management of XWF licenses.
FIGURE 1.4
XWF software protection device (dongle).
1Running XWF on a physical machine and a guest virtual machine at the same time requires two
dongles.
6 CHAPTER 1 Installation and Configuration of X-Ways Forensics
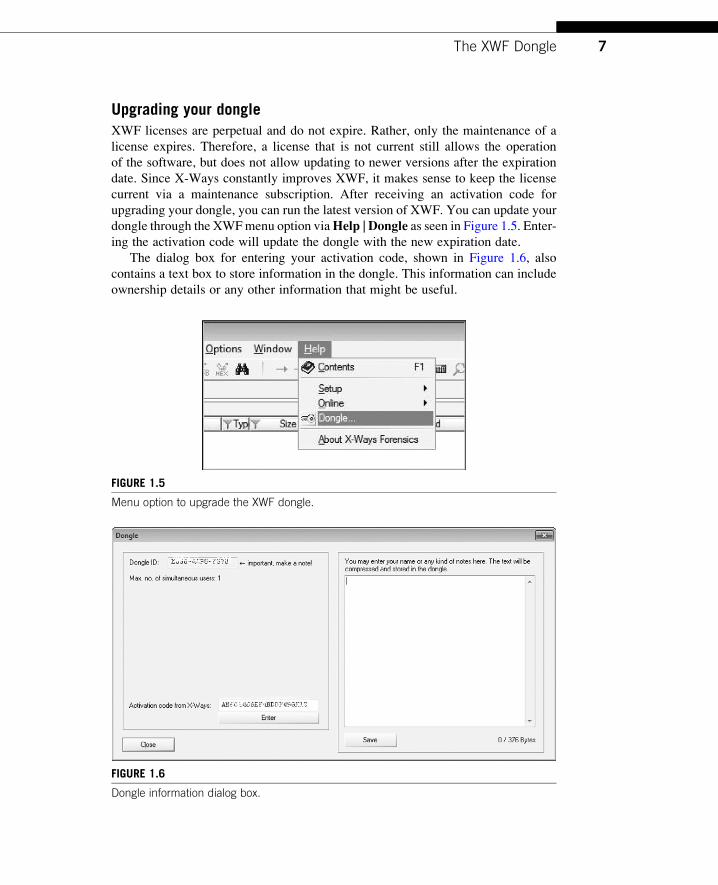
Upgrading your dongleXWF licenses are perpetual and do not expire. Rather, only the maintenance of a
license expires. Therefore, a license that is not current still allows the operation
of the software, but does not allow updating to newer versions after the expiration
date. Since X-Ways constantly improves XWF, it makes sense to keep the license
current via a maintenance subscription. After receiving an activation code for
upgrading your dongle, you can run the latest version of XWF. You can update your
dongle through the XWFmenu option viaHelp | Dongle as seen in Figure 1.5. Enter-ing the activation code will update the dongle with the new expiration date.
The dialog box for entering your activation code, shown in Figure 1.6, also
contains a text box to store information in the dongle. This information can include
ownership details or any other information that might be useful.
FIGURE 1.5
Menu option to upgrade the XWF dongle.
FIGURE 1.6
Dongle information dialog box.
7The XWF Dongle
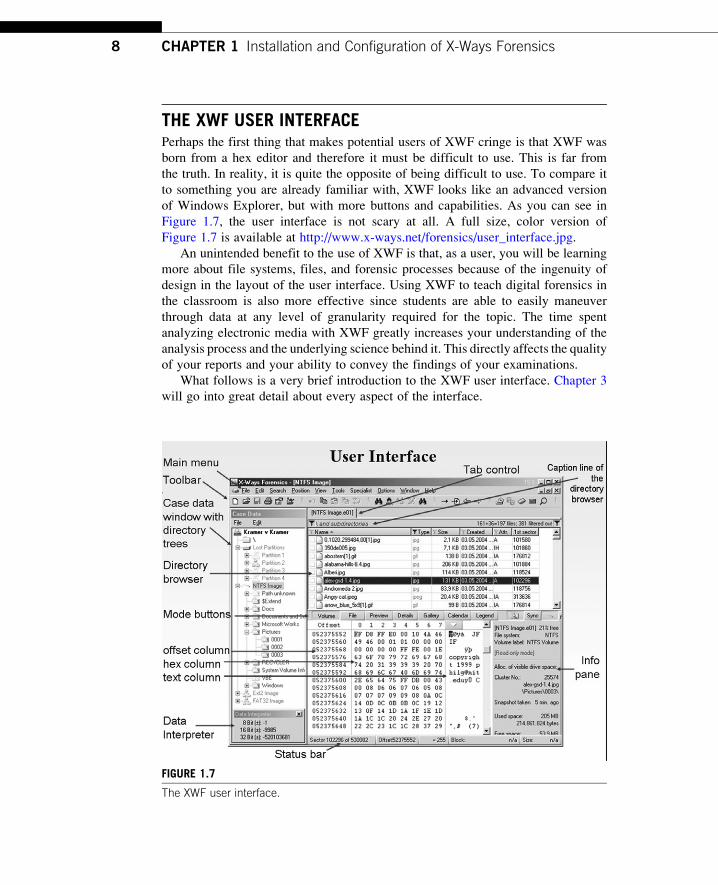
THE XWF USER INTERFACEPerhaps the first thing that makes potential users of XWF cringe is that XWF was
born from a hex editor and therefore it must be difficult to use. This is far from
the truth. In reality, it is quite the opposite of being difficult to use. To compare it
to something you are already familiar with, XWF looks like an advanced version
of Windows Explorer, but with more buttons and capabilities. As you can see in
Figure 1.7, the user interface is not scary at all. A full size, color version of
Figure 1.7 is available at http://www.x-ways.net/forensics/user_interface.jpg.
An unintended benefit to the use of XWF is that, as a user, you will be learning
more about file systems, files, and forensic processes because of the ingenuity of
design in the layout of the user interface. Using XWF to teach digital forensics in
the classroom is also more effective since students are able to easily maneuver
through data at any level of granularity required for the topic. The time spent
analyzing electronic media with XWF greatly increases your understanding of the
analysis process and the underlying science behind it. This directly affects the quality
of your reports and your ability to convey the findings of your examinations.
What follows is a very brief introduction to the XWF user interface. Chapter 3
will go into great detail about every aspect of the interface.
FIGURE 1.7
The XWF user interface.
8 CHAPTER 1 Installation and Configuration of X-Ways Forensics
The most commonly used areas of XWF are the Directory Browser, Case Datawindow (specifically, the directory tree), and offset/hex/text columns via theModebuttons. These three panes of XWF functionmuch likeWindows Explorer, in that the
offset/hex/text column pane (viewer) reflects the file selected in the DirectoryBrowser, which reflects the contents of the selected folder from the Case Data win-dow. In simple terms, choose a directory, highlight a file (or directory), and view the
selected object as it sits on the volume or as it appears by itself.
Nearly all of the surrounding buttons, commands, and menus allow you to data
carve, search, export, and analyze data. As one example, the Mode buttons changethe current view of a file from the hex/text view as shown in Figure 1.7 to a preview
of the file, a timeline calendar of files, or a gallery of images, based completely on the
needs of the examiner. The functions and features will be detailed as we delve into
future chapters.
So rather than detail every mode, feature, option, and function at this point, the
most important sections of the interface are shown in Figure 1.7. Throughout this
book, you will see how each function can be used for specific tasks. While we present
several case studies at the end of the book, we do not explain how to do forensics but
rather how XWF functionality can be brought to bear in those general kinds of cases.
Since any one piece of information in this bookmay not be of enough detail for your
needs, you can obtain additional documentation of XWF from the software manual
(Fleischmann, 2012) available freely from http://www.x-ways.net. While The Practi-tioner’sGuide toX-WaysForensicswas developed to supplement themanual, there is a
major difference in method of presentation. The official software manual details each
featurewithgreat granularity and leaves the user to decidehow to process evidence.Our
book gives suggested steps, recommended options, and proven workflow processes to
get started immediatelywitha forensicanalysisusingXWF.Thecombinationof the two
will set you on the right track to using XWF to its fullest potential.
CONFIGURING XWFOne thing that will become apparent as you use XWFmore and more is that the XWF
team selected the default values through careful deliberation and user suggestions.
While it is our aim to discuss every option in XWF in as much detail as possible,
for most users, simply keeping the default options will suffice in the vast majorityof cases.
With that said, there are a few options we recommend changing depending on
certain circumstances or particular cases. We will point out these options as they
are explained in each of the chapters. Until then, accept the defaults as we progress.
The individual needs of a case and your personal preferences will ultimately deter-
mine the options needed.
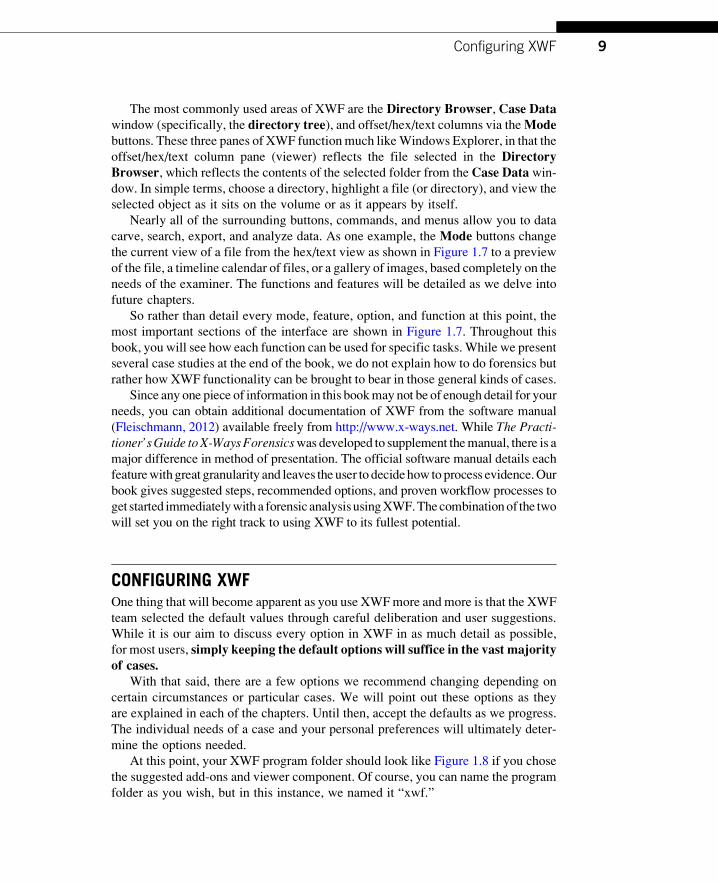
At this point, your XWF program folder should look like Figure 1.8 if you chose
the suggested add-ons and viewer component. Of course, you can name the program
folder as you wish, but in this instance, we named it “xwf.”
9Configuring XWF
Before wrapping up this chapter, there are a few more housekeeping steps that
must be completed. We have already covered the basic XWF directory structure that
we recommend above.
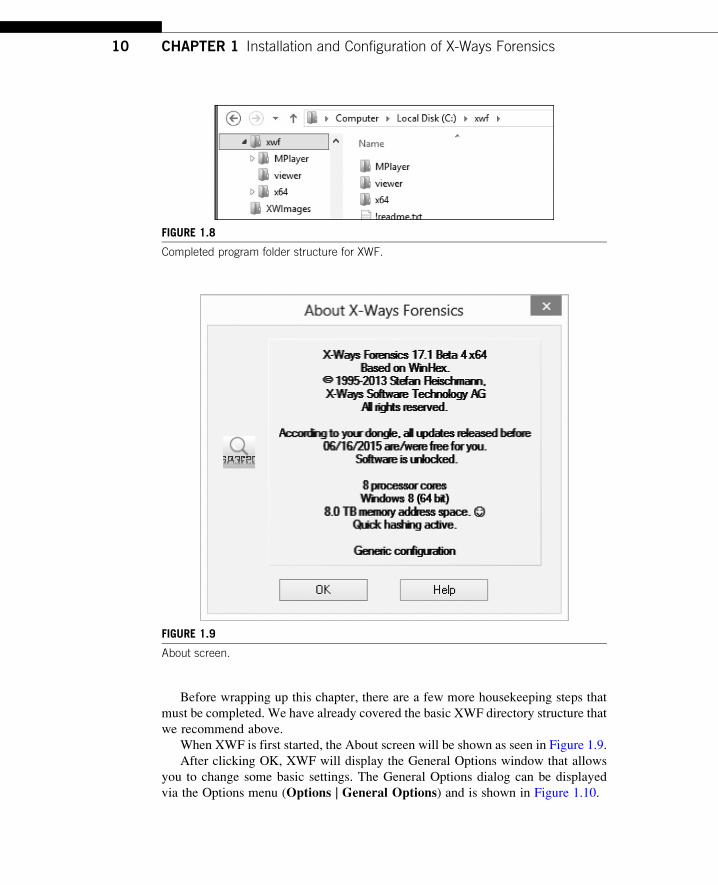
When XWF is first started, the About screen will be shown as seen in Figure 1.9.
After clicking OK, XWF will display the General Options window that allows
you to change some basic settings. The General Options dialog can be displayed
via the Options menu (Options | General Options) and is shown in Figure 1.10.
FIGURE 1.8
Completed program folder structure for XWF.
FIGURE 1.9
About screen.
10 CHAPTER 1 Installation and Configuration of X-Ways Forensics
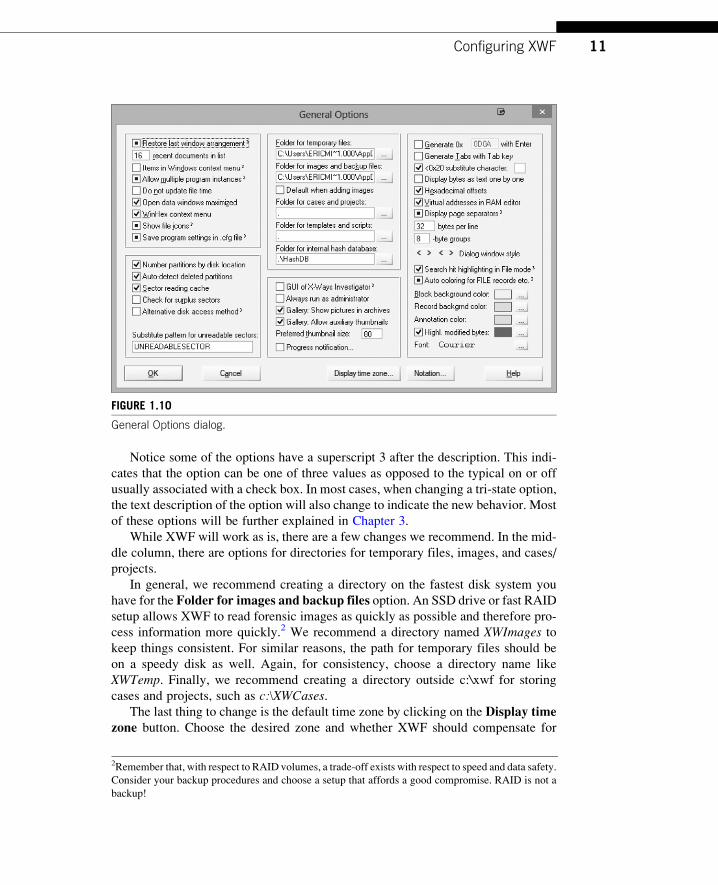
Notice some of the options have a superscript 3 after the description. This indi-
cates that the option can be one of three values as opposed to the typical on or off
usually associated with a check box. In most cases, when changing a tri-state option,
the text description of the option will also change to indicate the new behavior. Most
of these options will be further explained in Chapter 3.
While XWF will work as is, there are a few changes we recommend. In the mid-
dle column, there are options for directories for temporary files, images, and cases/
projects.
In general, we recommend creating a directory on the fastest disk system you
have for the Folder for images and backup files option. An SSD drive or fast RAID
setup allows XWF to read forensic images as quickly as possible and therefore pro-
cess information more quickly.2 We recommend a directory named XWImages tokeep things consistent. For similar reasons, the path for temporary files should be
on a speedy disk as well. Again, for consistency, choose a directory name like
XWTemp. Finally, we recommend creating a directory outside c:\xwf for storing
cases and projects, such as c:\XWCases.The last thing to change is the default time zone by clicking on the Display time
zone button. Choose the desired zone and whether XWF should compensate for
FIGURE 1.10
General Options dialog.
2Remember that, with respect to RAID volumes, a trade-off exists with respect to speed and data safety.
Consider your backup procedures and choose a setup that affords a good compromise. RAID is not a
backup!
11Configuring XWF
daylight savings time automatically. XWF can understand both relative and absolute
paths when setting various options. Notice in some of the options there is a single dot.
This is interpreted by XWF as the “current working directory” or the directory from
which XWF started. XWF also understands that two dots represent the parent direc-
tory from which XWF started from.
As mentioned previously, most of the default options are fine for the time being.
Clicking OK will save the changes and will allow us to configure the last step before
we can start using XWF.
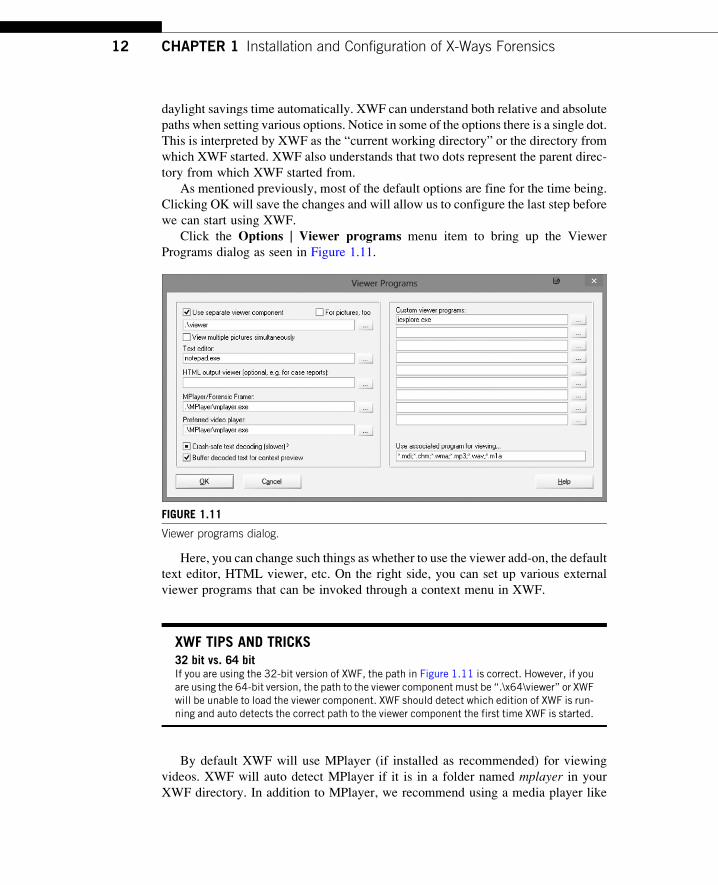
Click the Options | Viewer programs menu item to bring up the Viewer
Programs dialog as seen in Figure 1.11.
Here, you can change such things as whether to use the viewer add-on, the default
text editor, HTML viewer, etc. On the right side, you can set up various external
viewer programs that can be invoked through a context menu in XWF.
XWF TIPS AND TRICKS32 bit vs. 64 bitIf you are using the 32-bit version of XWF, the path in Figure 1.11 is correct. However, if youare using the 64-bit version, the path to the viewer component must be “.\x64\viewer” or XWFwill be unable to load the viewer component. XWF should detect which edition of XWF is run-ning and auto detects the correct path to the viewer component the first time XWF is started.
By default XWF will use MPlayer (if installed as recommended) for viewing
videos. XWF will auto detect MPlayer if it is in a folder named mplayer in your
XWF directory. In addition to MPlayer, we recommend using a media player like
FIGURE 1.11
Viewer programs dialog.
12 CHAPTER 1 Installation and Configuration of X-Ways Forensics
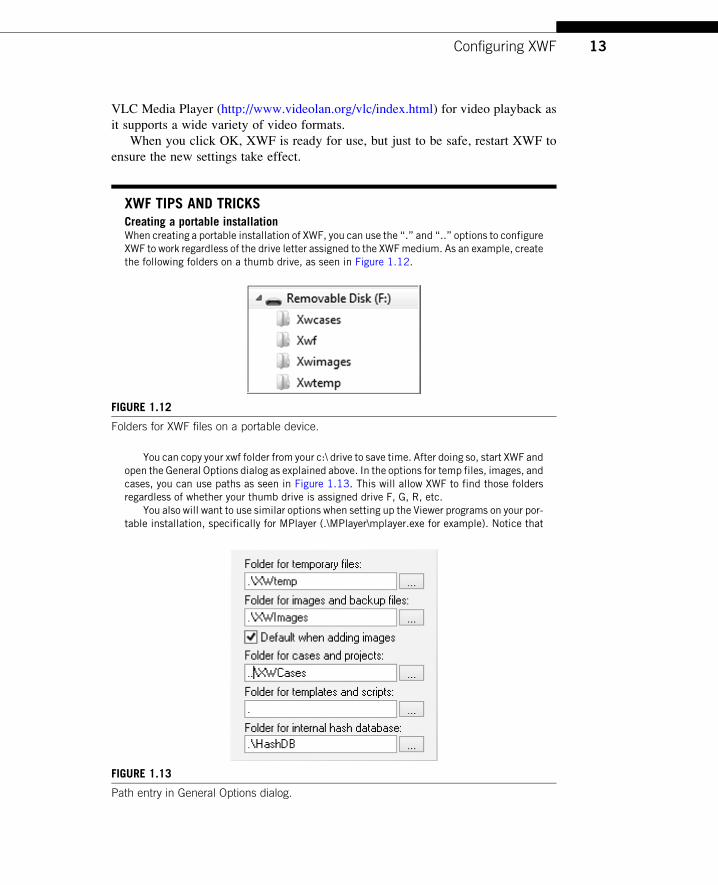
VLC Media Player (http://www.videolan.org/vlc/index.html) for video playback as
it supports a wide variety of video formats.
When you click OK, XWF is ready for use, but just to be safe, restart XWF to
ensure the new settings take effect.
XWF TIPS AND TRICKSCreating a portable installationWhen creating a portable installation of XWF, you can use the “.” and “..” options to configureXWF to work regardless of the drive letter assigned to the XWFmedium. As an example, createthe following folders on a thumb drive, as seen in Figure 1.12.
You can copy your xwf folder from your c:\ drive to save time. After doing so, start XWF andopen the General Options dialog as explained above. In the options for temp files, images, andcases, you can use paths as seen in Figure 1.13. This will allow XWF to find those foldersregardless of whether your thumb drive is assigned drive F, G, R, etc.
You also will want to use similar options when setting up the Viewer programs on your por-table installation, specifically for MPlayer (.\MPlayer\mplayer.exe for example). Notice that
FIGURE 1.12
Folders for XWF files on a portable device.
FIGURE 1.13
Path entry in General Options dialog.
13Configuring XWF
the viewer component uses the single dot notation by default. If you leave an absolute pathanywhere, XWF will not be able to use the programs if the drive letter changes.
Finally, any external viewers can also be set up this way if they exist in folders on yourthumb drive. Just use the correct invocation of “..” to allow XWF to find your external pro-grams. For example, putting something like notepad on your thumb drive and setting the TextEditor option to this program can make your life a lot easier (if notepad.exe is in the root of thethumb drive, the Text Editor path would be ..\notepad.exe).
Finally, when setting up a portable installation, be aware that using the viewer componentcreates files on the system being examined. This does not necessarily compromise a liveexamination, but you should look for and document these changes in your report. By default,XWF creates such files in the Windows profile of the currently logged on user.
SUMMARY
The installation and configuration of XWF are different from other forensic appli-
cations since it is a portable application that doesn’t need an actual installation.
The XWF dongle also has differences in that it does not require drivers and makes
minimal changes to the system. These minor differences extend XWF into a more
flexible and useful tool than you may have realized at first.
XWF is far more than a “forensically sound hex editor.” XWF may be less of a
push-button forensics application than other tools, but that doesn’t mean XWF is
harder to use. There are simply more functions and features available than some
examiners may be accustomed to seeing together along with an amount of granular-
ity for file analysis that is invoked by the XWF user as required. It is because XWF
affords more control to an examiner that he or she can determine the best approach to
an exam and save a great deal of time by making decisions instead of simply letting a
tool decide everything.
ReferenceFleischmann, S., 2012. X-Ways Forensics/WinHexManual. Retrieved January 21, 2013, from
X-Ways Forensics Computer Forensics Integrated Software: http://www.x-ways.net/
winhex/manual.pdf.
14 CHAPTER 1 Installation and Configuration of X-Ways Forensics
CHAPTER
Case Managementand Imaging 2INFORMATION IN THIS CHAPTER
• Introduction
• Creating a case file
• Creating/adding evidence files (forensic images)
• Creating forensic images with XWF
• Reverse imaging
• Skeleton imaging
• Cleansed imaging
• CD/DVD
• Physical memory imaging
• Container files
• Working with RAID arrays
• Augmenting with F-Response
• Shortcuts
• Summary
INTRODUCTION
Every forensic software suite needs a way to manage a related set of forensic images
and XWF is no exception. After creating a new case, we will discuss how to image a
wide variety of physical devices so that they can be added to our case.
Much like other forensic tools, XWF can create forensic images from almost
every type of digital media. What distinguishes XWF is that it uses much more
intelligence when imaging a device. For example, most other tools can compress
an image file but do so blindly by compressing all of the data on a device. In con-
trast, XWF is smart enough to know when data are already compressed, and when
it sees such data, it doesn’t waste time trying to compress that data again. For
example, why waste time trying to compress an AVI video? This results in a much
more efficient imaging process. As we have discussed, the default values in
XWF were chosen very carefully and the values used when imaging are no
exception.
15
In addition to creating forensic images from source devices, XWF can create and
manage container files that allow you to create subsets of data for many purposes.
One example would be to provide a limited and focused set of data to another
examiner with a particular specialty.
As you know, XWF is a Windows-based forensic tool but that does not limit its
capabilities to deal with a wide range of file systems including Ext*, HFS, Reiser,
etc. When used in conjunction with F-Response, XWF can interact with essentially
any system you may encounter including Solaris, FreeBSD, AIX and of course,
Windows.
In Chapter 1, we covered the basics of installing and initially configuring XWF.
After reading this chapter, you will have the knowledge to work with, and add evi-
dence to, an XWF case. Once you have one or more pieces of evidence in a case, the
true power of XWF can be brought to bear on that evidence.
CREATING A CASE FILEXWF allows an examiner to interact with various things such as hard disks, parti-
tions, physical memory, and file systems without creating a case. However, we
strongly recommend that a case be created as this is how many additional features
of XWF are made available including automated logging, global collection and
resolving of SIDs to usernames, and report file generation, to name a few.
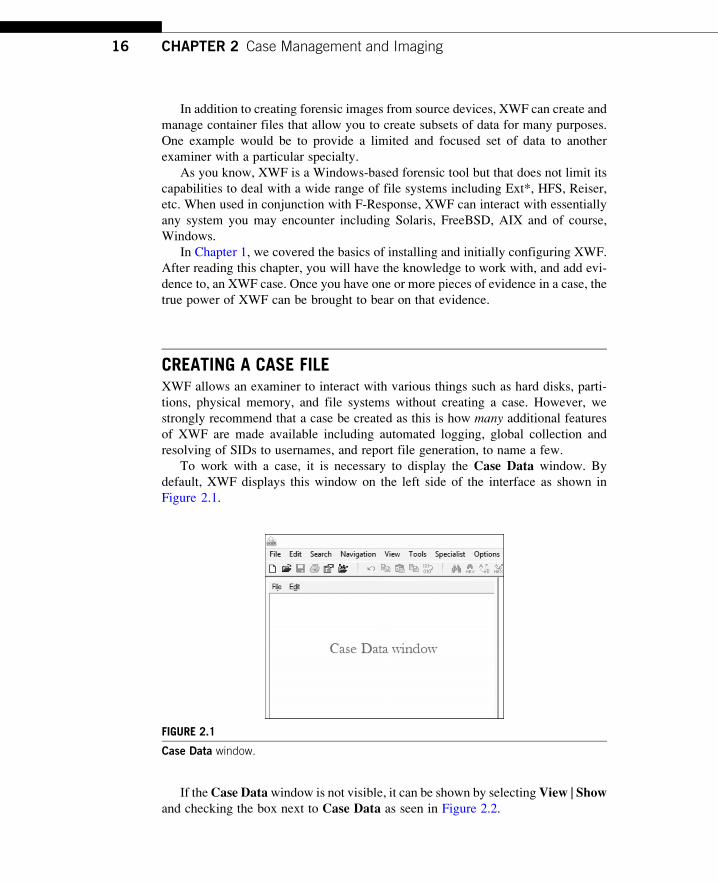
To work with a case, it is necessary to display the Case Data window. By
default, XWF displays this window on the left side of the interface as shown in
Figure 2.1.
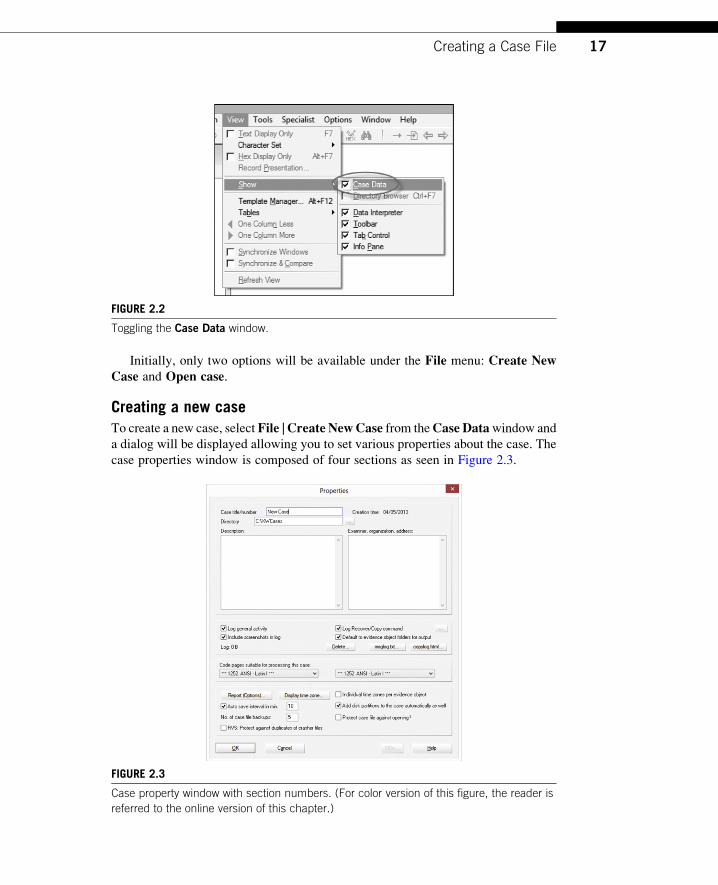
If theCase Datawindow is not visible, it can be shown by selectingView | Showand checking the box next to Case Data as seen in Figure 2.2.
FIGURE 2.1
Case Data window.
16 CHAPTER 2 Case Management and Imaging
Initially, only two options will be available under the File menu: Create NewCase and Open case.
Creating a new caseTo create a new case, select File | Create NewCase from theCase Datawindow and
a dialog will be displayed allowing you to set various properties about the case. The
case properties window is composed of four sections as seen in Figure 2.3.
FIGURE 2.2
Toggling the Case Data window.
FIGURE 2.3
Case property window with section numbers. (For color version of this figure, the reader is
referred to the online version of this chapter.)
17Creating a Case File
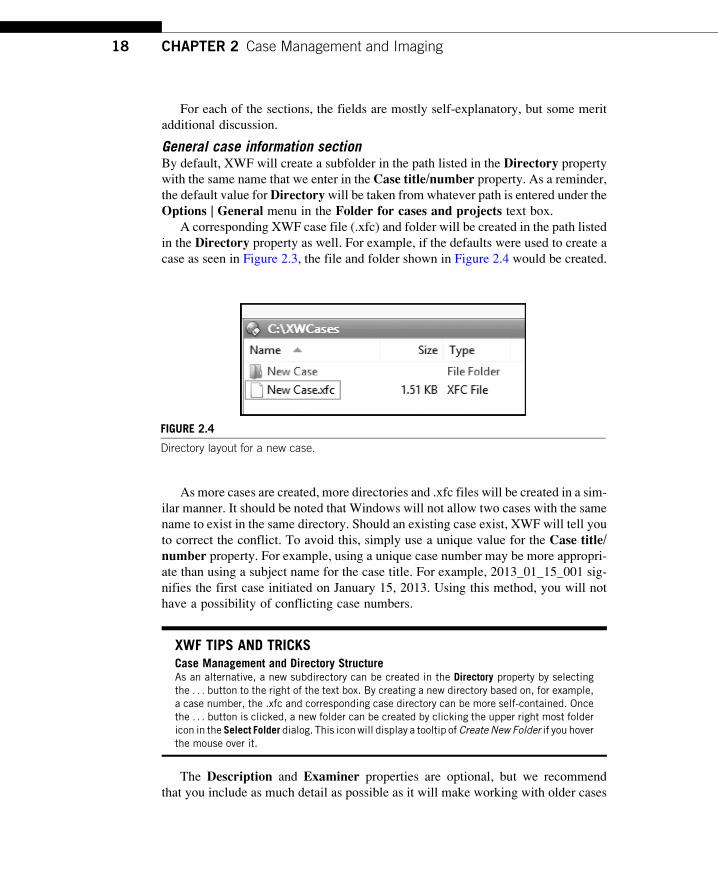
For each of the sections, the fields are mostly self-explanatory, but some merit
additional discussion.
General case information sectionBy default, XWF will create a subfolder in the path listed in the Directory property
with the same name that we enter in the Case title/number property. As a reminder,
the default value forDirectorywill be taken from whatever path is entered under the
Options | General menu in the Folder for cases and projects text box.A corresponding XWF case file (.xfc) and folder will be created in the path listed
in the Directory property as well. For example, if the defaults were used to create a
case as seen in Figure 2.3, the file and folder shown in Figure 2.4 would be created.
As more cases are created, more directories and .xfc files will be created in a sim-
ilar manner. It should be noted that Windows will not allow two cases with the same
name to exist in the same directory. Should an existing case exist, XWF will tell you
to correct the conflict. To avoid this, simply use a unique value for the Case title/number property. For example, using a unique case number may be more appropri-
ate than using a subject name for the case title. For example, 2013_01_15_001 sig-
nifies the first case initiated on January 15, 2013. Using this method, you will not
have a possibility of conflicting case numbers.
XWF TIPS AND TRICKSCase Management and Directory StructureAs an alternative, a new subdirectory can be created in the Directory property by selectingthe . . . button to the right of the text box. By creating a new directory based on, for example,a case number, the .xfc and corresponding case directory can be more self-contained. Oncethe . . . button is clicked, a new folder can be created by clicking the upper right most foldericon in the Select Folder dialog. This iconwill display a tooltip of CreateNew Folder if you hoverthe mouse over it.
The Description and Examiner properties are optional, but we recommend
that you include as much detail as possible as it will make working with older cases
FIGURE 2.4
Directory layout for a new case.
18 CHAPTER 2 Case Management and Imaging

easier because you won’t have to refer to additional notes if they are contained in
the case. Use the Description property to include general case information and
not information related to a particular piece of digital evidence. As images are added
to a case, they will also have a place to enter detailed information about each image.
In sum, fill out each section according to your policies.
Audit trail and activity logging sectionEach of the check boxes in this section controls whether XWFwill automatically add
entries in its audit trail as you use the program. This is a fantastic feature because it
self-documents the exam as you progress. When it comes time to generate a report,
you can optionally include the audit trail information. The button next to the
Log Recover/Copy command checkbox allows you to choose the fields that will
be logged when you recover or copy items from evidence objects. In addition to
enabling or disabling various pieces of the audit trail, you can also view the log
via the corresponding buttons or delete the audit log if you wish. Finally, if In caselog subdir is checked, XWF will create the log file in the _log subdirectory of the
main case directory. If unchecked, the log file will be created in the same directory
the items are recovered to.
If Default to evidence object folders for output is checked, XWF will initially
select the folder that corresponds to the evidence object you are recovering files from
in the Recover/Copy dialog. If unchecked, XWF will remember the last folder used
for recovering files.
For complete details as to what is logged, see the Case Log section of the XWF
manual.
Code pages sectionThe code pages section allows for up to two different code pages to be selected that
will be used when processing certain files (such as e-mail subject lines and file names
inside zip archives) in your case. Depending on the kinds of data in a particular case,
adjust one or both of the code pages accordingly. In most circumstances, it is not
necessary to change the defaults. However, when working with Linux, it may be
helpful to keep the default ANSI code page and then select Unicode UTF-8 for
the second. This will better enable XWF to do such things as convert file names
inside archives and display the subject of e-mail messages properly.
Other options sectionFinally, the last section includes options related to report generation (covered in
Chapter 8), time zone information, auto-save interval, etc. Each will be discussed
below.
TheReport (Options) button brings up a dialog that allows for the customization
of the report files XWF can generate. Since we have nothing in our case to report and
reporting will be covered in detail in Chapter 8, this option will be skipped for now.
The Display time zone button allows for the selection of a time zone to be used
by XWF when interpreting and displaying various date/time values in the program.
19Creating a Case File
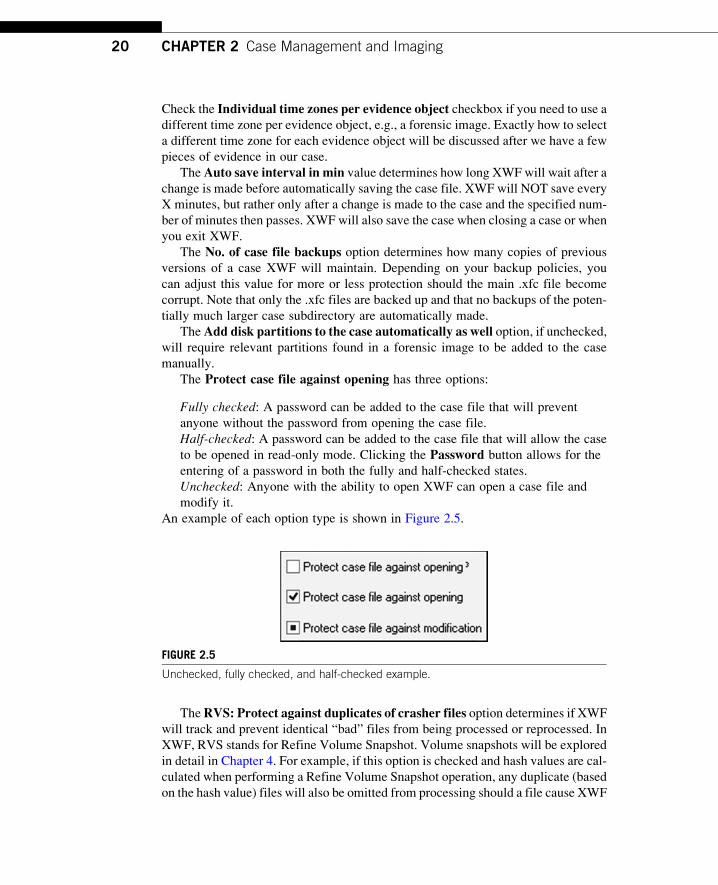
Check the Individual time zones per evidence object checkbox if you need to use adifferent time zone per evidence object, e.g., a forensic image. Exactly how to select
a different time zone for each evidence object will be discussed after we have a few
pieces of evidence in our case.
TheAuto save interval in min value determines how long XWF will wait after a
change is made before automatically saving the case file. XWF will NOT save every
X minutes, but rather only after a change is made to the case and the specified num-
ber of minutes then passes. XWF will also save the case when closing a case or when
you exit XWF.
The No. of case file backups option determines how many copies of previous
versions of a case XWF will maintain. Depending on your backup policies, you
can adjust this value for more or less protection should the main .xfc file become
corrupt. Note that only the .xfc files are backed up and that no backups of the poten-
tially much larger case subdirectory are automatically made.
TheAdd disk partitions to the case automatically as well option, if unchecked,will require relevant partitions found in a forensic image to be added to the case
manually.
The Protect case file against opening has three options:
Fully checked: A password can be added to the case file that will prevent
anyone without the password from opening the case file.
Half-checked: A password can be added to the case file that will allow the case
to be opened in read-only mode. Clicking the Password button allows for the
entering of a password in both the fully and half-checked states.
Unchecked: Anyone with the ability to open XWF can open a case file and
modify it.
An example of each option type is shown in Figure 2.5.
TheRVS: Protect against duplicates of crasher files option determines if XWF
will track and prevent identical “bad” files from being processed or reprocessed. In
XWF, RVS stands for Refine Volume Snapshot. Volume snapshots will be explored
in detail in Chapter 4. For example, if this option is checked and hash values are cal-
culated when performing a Refine Volume Snapshot operation, any duplicate (based
on the hash value) files will also be omitted from processing should a file cause XWF
FIGURE 2.5
Unchecked, fully checked, and half-checked example.
20 CHAPTER 2 Case Management and Imaging
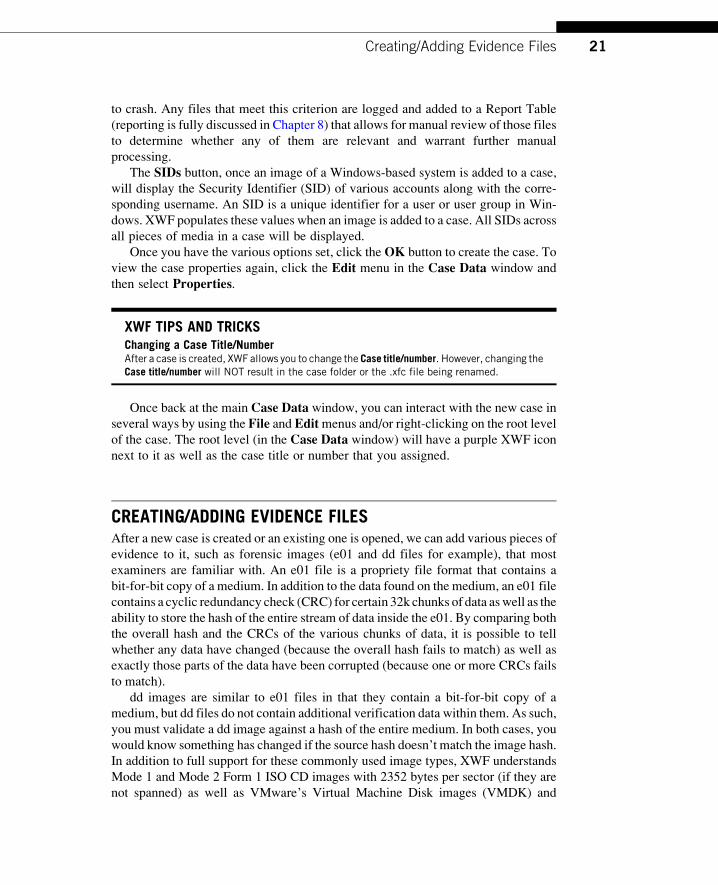
to crash. Any files that meet this criterion are logged and added to a Report Table
(reporting is fully discussed in Chapter 8) that allows for manual review of those files
to determine whether any of them are relevant and warrant further manual
processing.
The SIDs button, once an image of a Windows-based system is added to a case,
will display the Security Identifier (SID) of various accounts along with the corre-
sponding username. An SID is a unique identifier for a user or user group in Win-
dows. XWF populates these values when an image is added to a case. All SIDs across
all pieces of media in a case will be displayed.
Once you have the various options set, click theOK button to create the case. To
view the case properties again, click the Edit menu in the Case Data window and
then select Properties.
XWF TIPS AND TRICKSChanging a Case Title/NumberAfter a case is created, XWF allows you to change the Case title/number. However, changing theCase title/number will NOT result in the case folder or the .xfc file being renamed.
Once back at the main Case Data window, you can interact with the new case in
several ways by using the File and Editmenus and/or right-clicking on the root level
of the case. The root level (in the Case Data window) will have a purple XWF icon
next to it as well as the case title or number that you assigned.
CREATING/ADDING EVIDENCE FILESAfter a new case is created or an existing one is opened, we can add various pieces of
evidence to it, such as forensic images (e01 and dd files for example), that most
examiners are familiar with. An e01 file is a propriety file format that contains a
bit-for-bit copy of a medium. In addition to the data found on the medium, an e01 file
contains a cyclic redundancy check (CRC) for certain 32k chunks of data aswell as the
ability to store the hash of the entire stream of data inside the e01. By comparing both
the overall hash and the CRCs of the various chunks of data, it is possible to tell
whether any data have changed (because the overall hash fails to match) as well as
exactly those parts of the data have been corrupted (because one or more CRCs fails
to match).
dd images are similar to e01 files in that they contain a bit-for-bit copy of a
medium, but dd files do not contain additional verification data within them. As such,
you must validate a dd image against a hash of the entire medium. In both cases, you
would know something has changed if the source hash doesn’t match the image hash.
In addition to full support for these commonly used image types, XWF understands
Mode 1 and Mode 2 Form 1 ISO CD images with 2352 bytes per sector (if they are
not spanned) as well as VMware’s Virtual Machine Disk images (VMDK) and
21Creating/Adding Evidence Files
dynamic Virtual PC VHD images. XWF also allows for individual directories and/or
files to be added to a case. While we haven’t covered container files yet, it is often
better to add individual files and/or directories to a container file rather than directly
to a case. This will be covered in the section on container files below.
One very powerful and unique capability of XWF is the ability to image a hard
disk in reverse. This is useful if there is a damaged section of the hard disk that cannot
be read by other imaging tools or through conventional imaging (beginning to end or
forward imaging). By creating an image in a traditional manner to the point of dam-
age and then continuing the process in reverse starting at the last sector, XWF can
generate a nearly complete image with a small gap that corresponds with the phys-
ically damaged section of the disk.
XWF TIPS AND TRICKSThe File System Matters!When creating reverse images, be sure to save such images to an NTFS formatted partition.FAT32 is not supported.
In addition to forensic images of hard drives, CDROMs, etc., you can add images
of physical memory.
XWF is fully capable of working with a hard drive or other storage device without
taking a forensic image of the device, but we recommend using a forensic copy of a
device as opposed to working with the actual piece of evidence. You can also employ
a write blocker should you want to examine an original device. In some instances,
working on a live system cannot be avoided (when encryption is detected, when
working on a business server that cannot be taken down, working with exotic RAID
setups, etc.). Should you run into such a case, XWF is fully capable of working with a
running system with minimal impact.
CREATING FORENSIC IMAGES WITH XWFThe most common type of imaging you will encounter is the imaging of hard
disks from a “dead box” system. All “dead box” means is that a computer is
powered off as opposed to being powered on with the operating system running,
i.e., a “live box.”
Once you have one or more hard drives, we will need to make them available to
the computer system on which XWF is running. To do this, we will employ a forensic
write blocker that will prevent any changes from being made to the hard drive during
the imaging process. In short, Windows needs to “see” at least a physical device on
the computer regardless of whether it has a drive letter under My Computer.
Once the hard drive is connected to the write blocker, the write blocker is pow-
ered on and Windows detects the drive, we are ready to image the disk.
For most imaging jobs, XWF will be used without creating a case. That is, XWF
will be opened and only used to create a forensic image of one or more pieces of
22 CHAPTER 2 Case Management and Imaging
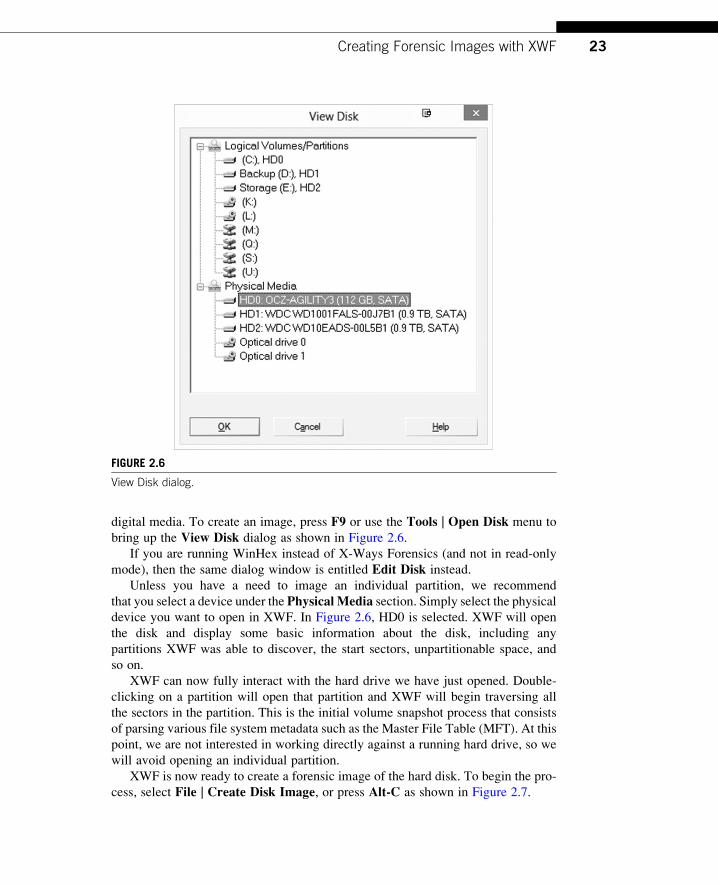
digital media. To create an image, press F9 or use the Tools | Open Disk menu to
bring up the View Disk dialog as shown in Figure 2.6.
If you are running WinHex instead of X-Ways Forensics (and not in read-only
mode), then the same dialog window is entitled Edit Disk instead.
Unless you have a need to image an individual partition, we recommend
that you select a device under the PhysicalMedia section. Simply select the physical
device you want to open in XWF. In Figure 2.6, HD0 is selected. XWF will open
the disk and display some basic information about the disk, including any
partitions XWF was able to discover, the start sectors, unpartitionable space, and
so on.
XWF can now fully interact with the hard drive we have just opened. Double-
clicking on a partition will open that partition and XWF will begin traversing all
the sectors in the partition. This is the initial volume snapshot process that consists
of parsing various file system metadata such as the Master File Table (MFT). At this
point, we are not interested in working directly against a running hard drive, so we
will avoid opening an individual partition.
XWF is now ready to create a forensic image of the hard disk. To begin the pro-
cess, select File | Create Disk Image, or press Alt-C as shown in Figure 2.7.
FIGURE 2.6
View Disk dialog.
23Creating Forensic Images with XWF
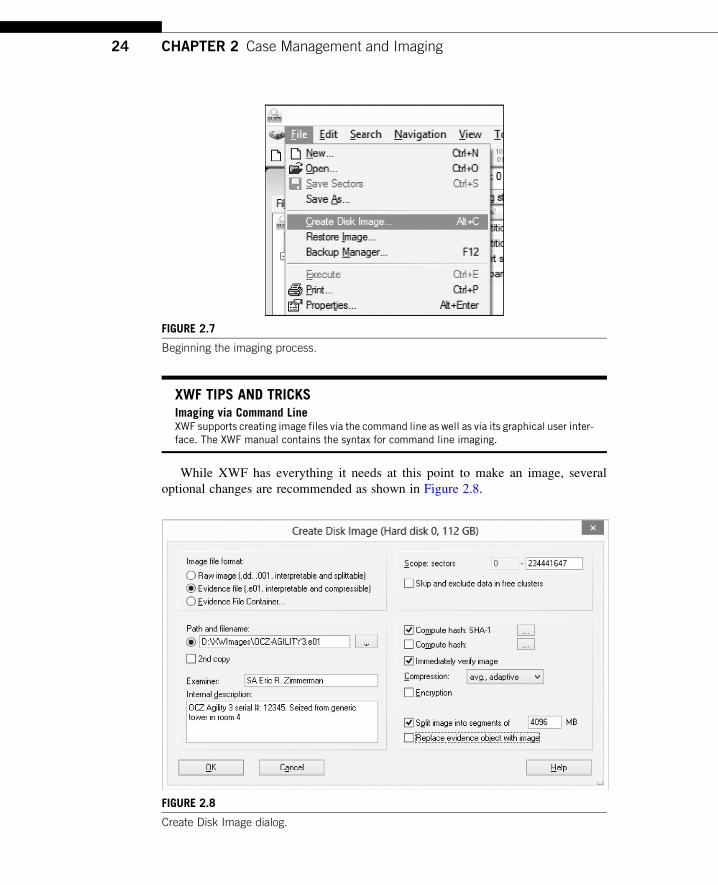
XWF TIPS AND TRICKSImaging via Command LineXWF supports creating image files via the command line as well as via its graphical user inter-face. The XWF manual contains the syntax for command line imaging.
While XWF has everything it needs at this point to make an image, several
optional changes are recommended as shown in Figure 2.8.
FIGURE 2.7
Beginning the imaging process.
FIGURE 2.8
Create Disk Image dialog.
24 CHAPTER 2 Case Management and Imaging
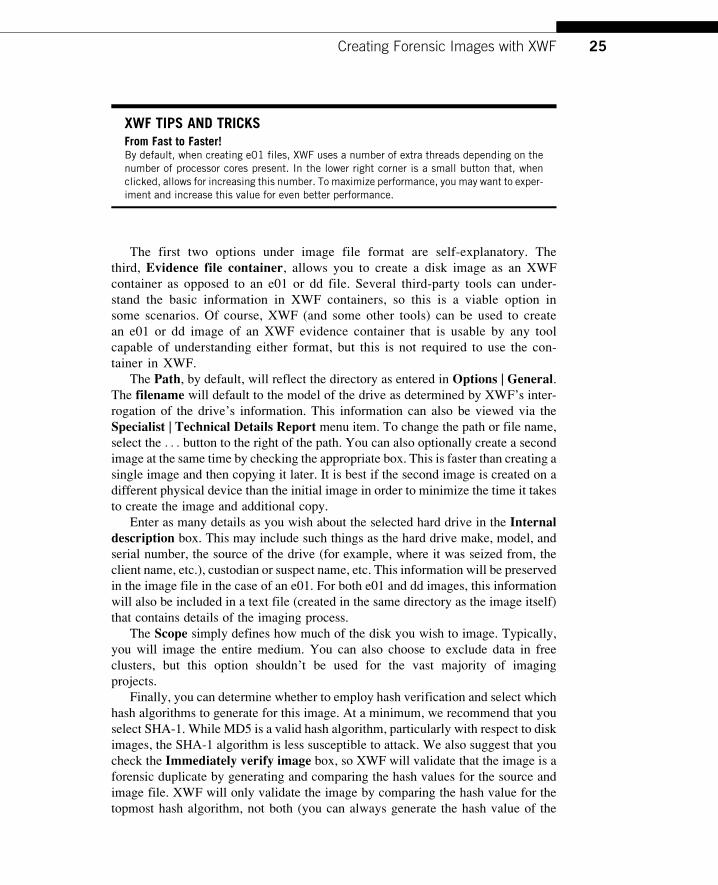
XWF TIPS AND TRICKSFrom Fast to Faster!By default, when creating e01 files, XWF uses a number of extra threads depending on thenumber of processor cores present. In the lower right corner is a small button that, whenclicked, allows for increasing this number. To maximize performance, you may want to exper-iment and increase this value for even better performance.
The first two options under image file format are self-explanatory. The
third, Evidence file container, allows you to create a disk image as an XWF
container as opposed to an e01 or dd file. Several third-party tools can under-
stand the basic information in XWF containers, so this is a viable option in
some scenarios. Of course, XWF (and some other tools) can be used to create
an e01 or dd image of an XWF evidence container that is usable by any tool
capable of understanding either format, but this is not required to use the con-
tainer in XWF.
The Path, by default, will reflect the directory as entered in Options | General.The filename will default to the model of the drive as determined by XWF’s inter-
rogation of the drive’s information. This information can also be viewed via the
Specialist | Technical Details Report menu item. To change the path or file name,
select the . . . button to the right of the path. You can also optionally create a second
image at the same time by checking the appropriate box. This is faster than creating a
single image and then copying it later. It is best if the second image is created on a
different physical device than the initial image in order to minimize the time it takes
to create the image and additional copy.
Enter as many details as you wish about the selected hard drive in the Internaldescription box. This may include such things as the hard drive make, model, and
serial number, the source of the drive (for example, where it was seized from, the
client name, etc.), custodian or suspect name, etc. This information will be preserved
in the image file in the case of an e01. For both e01 and dd images, this information
will also be included in a text file (created in the same directory as the image itself)
that contains details of the imaging process.
The Scope simply defines how much of the disk you wish to image. Typically,
you will image the entire medium. You can also choose to exclude data in free
clusters, but this option shouldn’t be used for the vast majority of imaging
projects.
Finally, you can determine whether to employ hash verification and select which
hash algorithms to generate for this image. At a minimum, we recommend that you
select SHA-1. While MD5 is a valid hash algorithm, particularly with respect to disk
images, the SHA-1 algorithm is less susceptible to attack. We also suggest that you
check the Immediately verify image box, so XWF will validate that the image is a
forensic duplicate by generating and comparing the hash values for the source and
image file. XWF will only validate the image by comparing the hash value for the
topmost hash algorithm, not both (you can always generate the hash value of the
25Creating Forensic Images with XWF

second image and compare it to the primary image’s hashes though). By default,
XWF will split images into 4 GB chunks.
When creating a second image file, XWF will not allow the images to exist on
the same drive letter, so be sure you have at least two destination drives available.
Also, when creating a second image file, XWF will not automatically verify the hash
of the second image.
The Replace evidence object with image option is only available when adding
media directly to a case and then imaging that media (as opposed to usingF9 to selecta device as discussed above). There are several ways to do this to include right-
clicking the case root node and selecting Add Medium or clicking the File menu
in the Case Data window and selecting Add Medium. Regardless of the method
you choose, the Open Disk dialog will be displayed. Replace evidence object withimage is a very handy option that can replace the physical device in the case with animage file once an image is created. Using this option works well for smaller medium
such as thumb drives, etc., but for larger devices, we recommend another technique
that is outlined in another section below.
XWF TIPS AND TRICKSTrue AES Encryption for e01sShould you have a hard drive that contains sensitive information, XWF can fully encrypt thedata in the e01 image using 128- or 256-bit encryption. This is vastly different from simplepassword protection of e01s found in other tools that can easily be bypassed by simply open-ing an e01 and reimaging it. Secure the password for future use as the imagewill not be acces-sible without it.
You can also prevent people from making unencrypted copies (by reimaging an imageafter providing the password) by checking the Prevent unencrypted copies option.
Once you adjust the settings to your liking, click theOK button to start the imag-
ing process. As XWF processes the media, various statistics will be generated and
updated in real time as shown in Figure 2.9.
FIGURE 2.9
Imaging progress.
26 CHAPTER 2 Case Management and Imaging
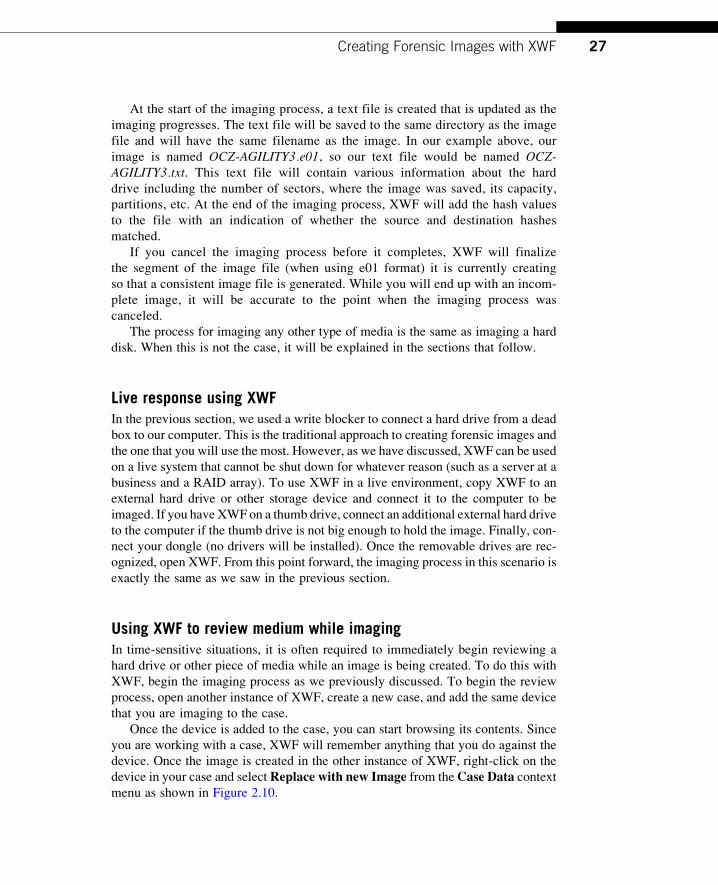
At the start of the imaging process, a text file is created that is updated as the
imaging progresses. The text file will be saved to the same directory as the image
file and will have the same filename as the image. In our example above, our
image is named OCZ-AGILITY3.e01, so our text file would be named OCZ-AGILITY3.txt. This text file will contain various information about the hard
drive including the number of sectors, where the image was saved, its capacity,
partitions, etc. At the end of the imaging process, XWF will add the hash values
to the file with an indication of whether the source and destination hashes
matched.
If you cancel the imaging process before it completes, XWF will finalize
the segment of the image file (when using e01 format) it is currently creating
so that a consistent image file is generated. While you will end up with an incom-
plete image, it will be accurate to the point when the imaging process was
canceled.
The process for imaging any other type of media is the same as imaging a hard
disk. When this is not the case, it will be explained in the sections that follow.
Live response using XWFIn the previous section, we used a write blocker to connect a hard drive from a dead
box to our computer. This is the traditional approach to creating forensic images and
the one that you will use the most. However, as we have discussed, XWF can be used
on a live system that cannot be shut down for whatever reason (such as a server at a
business and a RAID array). To use XWF in a live environment, copy XWF to an
external hard drive or other storage device and connect it to the computer to be
imaged. If you have XWF on a thumb drive, connect an additional external hard drive
to the computer if the thumb drive is not big enough to hold the image. Finally, con-
nect your dongle (no drivers will be installed). Once the removable drives are rec-
ognized, open XWF. From this point forward, the imaging process in this scenario is
exactly the same as we saw in the previous section.
Using XWF to review medium while imagingIn time-sensitive situations, it is often required to immediately begin reviewing a
hard drive or other piece of media while an image is being created. To do this with
XWF, begin the imaging process as we previously discussed. To begin the review
process, open another instance of XWF, create a new case, and add the same device
that you are imaging to the case.
Once the device is added to the case, you can start browsing its contents. Since
you are working with a case, XWF will remember anything that you do against the
device. Once the image is created in the other instance of XWF, right-click on the
device in your case and select Replace with new Image from theCase Data contextmenu as shown in Figure 2.10.
27Creating Forensic Images with XWF
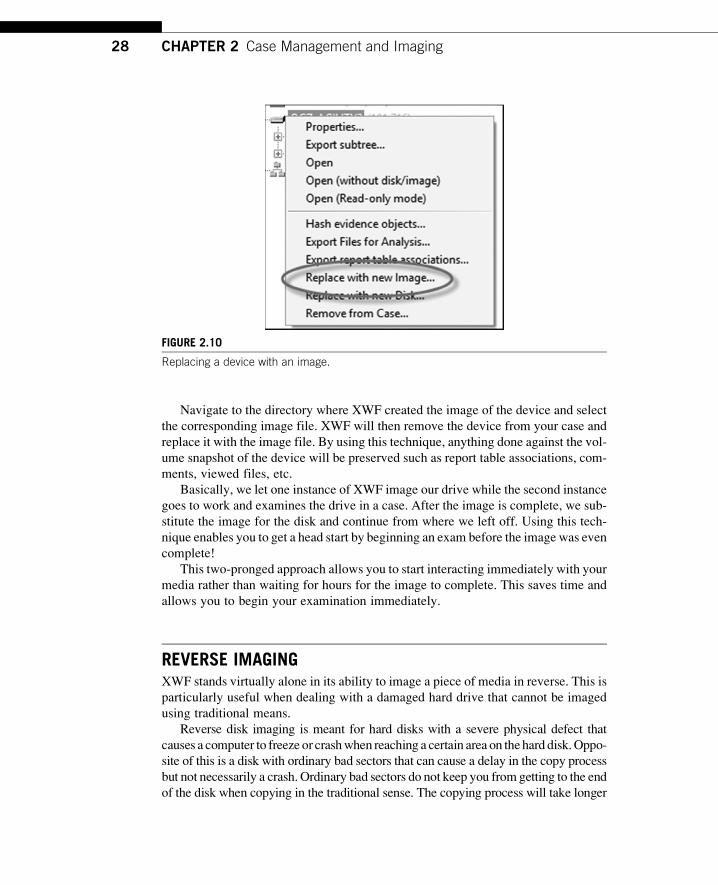
Navigate to the directory where XWF created the image of the device and select
the corresponding image file. XWF will then remove the device from your case and
replace it with the image file. By using this technique, anything done against the vol-
ume snapshot of the device will be preserved such as report table associations, com-
ments, viewed files, etc.
Basically, we let one instance of XWF image our drive while the second instance
goes to work and examines the drive in a case. After the image is complete, we sub-
stitute the image for the disk and continue from where we left off. Using this tech-
nique enables you to get a head start by beginning an exam before the image was even
complete!
This two-pronged approach allows you to start interacting immediately with your
media rather than waiting for hours for the image to complete. This saves time and
allows you to begin your examination immediately.
REVERSE IMAGINGXWF stands virtually alone in its ability to image a piece of media in reverse. This is
particularly useful when dealing with a damaged hard drive that cannot be imaged
using traditional means.
Reverse disk imaging is meant for hard disks with a severe physical defect that
causes a computer to freeze or crashwhen reaching a certain area on thehard disk.Oppo-
site of this is a disk with ordinary bad sectors that can cause a delay in the copy process
but not necessarily a crash. Ordinary bad sectors do not keep you fromgetting to the end
of the disk when copying in the traditional sense. The copying process will take longer
FIGURE 2.10
Replacing a device with an image.
28 CHAPTER 2 Case Management and Imaging
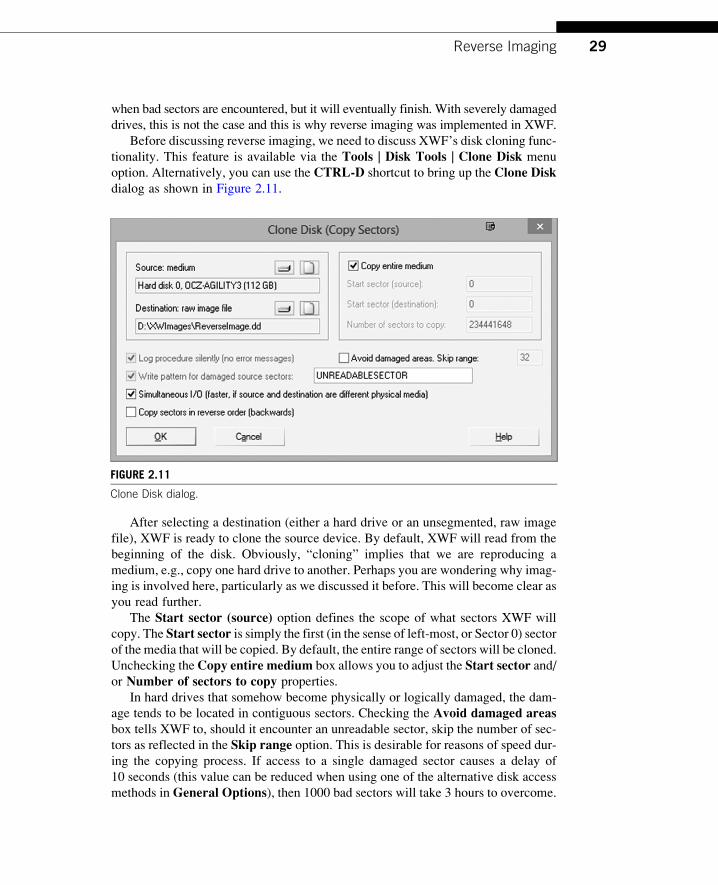
when bad sectors are encountered, but it will eventually finish. With severely damaged
drives, this is not the case and this is why reverse imaging was implemented in XWF.
Before discussing reverse imaging, we need to discuss XWF’s disk cloning func-
tionality. This feature is available via the Tools | Disk Tools | Clone Disk menu
option. Alternatively, you can use the CTRL-D shortcut to bring up the Clone Diskdialog as shown in Figure 2.11.
After selecting a destination (either a hard drive or an unsegmented, raw image
file), XWF is ready to clone the source device. By default, XWF will read from the
beginning of the disk. Obviously, “cloning” implies that we are reproducing a
medium, e.g., copy one hard drive to another. Perhaps you are wondering why imag-
ing is involved here, particularly as we discussed it before. This will become clear as
you read further.
The Start sector (source) option defines the scope of what sectors XWF will
copy. The Start sector is simply the first (in the sense of left-most, or Sector 0) sector
of the media that will be copied. By default, the entire range of sectors will be cloned.
Unchecking theCopy entire medium box allows you to adjust the Start sector and/or Number of sectors to copy properties.
In hard drives that somehow become physically or logically damaged, the dam-
age tends to be located in contiguous sectors. Checking the Avoid damaged areasbox tells XWF to, should it encounter an unreadable sector, skip the number of sec-
tors as reflected in the Skip range option. This is desirable for reasons of speed dur-ing the copying process. If access to a single damaged sector causes a delay of
10 seconds (this value can be reduced when using one of the alternative disk access
methods inGeneral Options), then 1000 bad sectors will take 3 hours to overcome.
FIGURE 2.11
Clone Disk dialog.
29Reverse Imaging
Creating the clone is now as simple as clicking the OK button.
Before we discuss the key options when reverse imaging, it would be helpful to
work with a damaged media example. For instance, when employing theClone Diskoption to clone a disk or to create a single dd image of a 100 GB hard disk, the pro-
cess fails after imaging 60 GB. At this point, you are left with a partial image that is
60 GB in size.
Before XWF, you would have no option to try to acquire the last 40 GB except by
trial and error in guessing where the damage stops, then attempting to create another
image from that point to the end of the drive and finally concatenating the files. How-
ever, XWF has a very elegant and straightforward approach to this problem, the
Copy sectors in reverse order (backwards) option.When Copy sectors in reverse order (backwards) is checked, XWF will take
the following steps to create as complete an image as possible. First, XWF knows
the actual size of the source media (100 GB in our example). XWF also knows the
size of the destination image (60 GB in our example). With that information, XWF
knows it needs to acquire the last 40 GB of data. In the standard forward cloning,
recall how the Start sector option worked in conjunction with the Number of sec-tors to copy option in that XWF would begin at the start sector and copy sectors
through the value of Number of sectors to copy. When Copy sectors in reverseorder (backwards) is checked, XWF uses these two values in a slightly different
way in that XWF will add the value of the Number of sectors to copy option to thevalue of the Start sector option, and that is where XWF starts copying sectors in
reverse order. Your Destination raw image file would be the partial image file that
XWF created initially.
If you choose your existing, partial image as the destination, XWF will ask if you
want to overwrite the existing image. Click Yes at this point so XWF can reuse the
existing image file later. Once you click OK, XWF will ask if you want to Keepexisting file and complete it from the intended rear end. Click Yes to complete
the reverse imaging process.
To summarize, XWF, as usual, is doing the thinking for us. If we start a single
dd image or clone that then fails for any reason, we can start the cloning
process over again without losing our partial image/clone. We need only leave
all of the defaults alone with the exception of enabling the Copy sectors inreverse order (backwards) option. Since XWF knows what size the image
should be and it can see what size the current partial image is, XWF appends
the correct data to the back of the existing image that results in a near complete
image! Magic!
SKELETON IMAGINGAnother unique imaging feature of XWF is the ability to create images based on
NTFS sparse file technology that only contains the exact bits of data (or more pre-
cisely, sectors) you choose to include in the image file.
30 CHAPTER 2 Case Management and Imaging
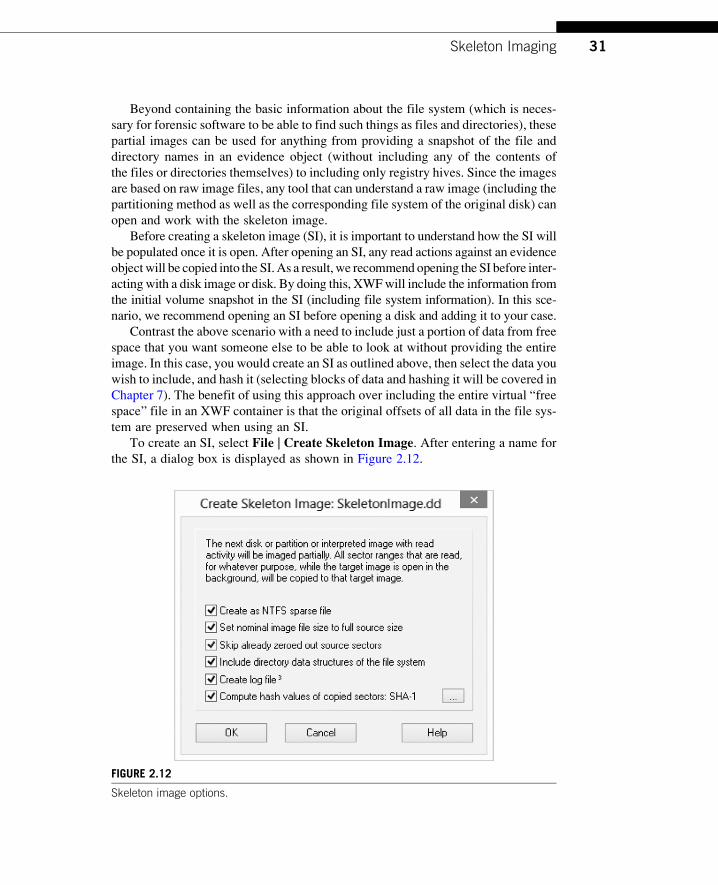
Beyond containing the basic information about the file system (which is neces-
sary for forensic software to be able to find such things as files and directories), these
partial images can be used for anything from providing a snapshot of the file and
directory names in an evidence object (without including any of the contents of
the files or directories themselves) to including only registry hives. Since the images
are based on raw image files, any tool that can understand a raw image (including the
partitioning method as well as the corresponding file system of the original disk) can
open and work with the skeleton image.
Before creating a skeleton image (SI), it is important to understand how the SI will
be populated once it is open. After opening an SI, any read actions against an evidence
objectwill be copied into the SI.As a result, we recommend opening the SI before inter-
actingwith a disk image or disk. By doing this, XWFwill include the information from
the initial volume snapshot in the SI (including file system information). In this sce-
nario, we recommend opening an SI before opening a disk and adding it to your case.
Contrast the above scenario with a need to include just a portion of data from free
space that you want someone else to be able to look at without providing the entire
image. In this case, you would create an SI as outlined above, then select the data you
wish to include, and hash it (selecting blocks of data and hashing it will be covered in
Chapter 7). The benefit of using this approach over including the entire virtual “free
space” file in an XWF container is that the original offsets of all data in the file sys-
tem are preserved when using an SI.
To create an SI, select File | Create Skeleton Image. After entering a name for
the SI, a dialog box is displayed as shown in Figure 2.12.
FIGURE 2.12
Skeleton image options.
31Skeleton Imaging
Most of the options are self-explanatory.
Create log file has three options:
Fully checked: In addition to the log file created as described when half-checked,a secondary log file about the primary log file will be created. This log file is
used to verify the integrity of the primary log file.
Half-checked: A log file will be created containing the hash values of the
sectors that have been added to the SI.
Unchecked: No log file is created.
For example, if we name our SI myskeletonimage.dd and Create log file was
half-checked, a log file named myskeletonimage.log is created that contains all of
the sector ranges copied into the SI as well as the hash value for those sectors.
If fully checked, an additional file, myskeletonimage.log.log will be created after
myskeletonimage.dd is verified that contains the name of the log file, the date and
time of its creation, the size of the log, and hash of myskeletonimage.log.Once an SI is open, the menu option changes to File | State /<Name of SI> and
selecting this option allows for changing the behavior of the SI. The default is Read-ing any sector triggers acquisition, but there are also options to pause acquisition
via the Idle option or closing the SI. When Close is selected, the option to VerifySkeleton Image is available. Depending on your needs, you can use these options
to start and stop the SI process.
The log file created when Create log file is fully or half-checked allows XWF to
verify the integrity of the data contained in the SI, either manually or when the SI is
closed.
We will cover how to add objects to the SI in Chapters 3 and 7.
When copying SI files, it is helpful to use the Tools | File Tools | Copy Sparsecommand as using this command will result in a much faster copy operation since
XWF will preserve the nature of the NTFS sparse file. For example, if the SI was
2 TB in size but only 250 MB of data were copied to the SI, XWF would be able
to copy this file in seconds since it knows how to deal with the sparse file. Contrast
this to using some other means to copy the file which results in all 2 TB of the SI
being copied.
For additional information on skeleton imaging, including both benefits and
caveats, see the XWF manual or help file.
CLEANSED IMAGINGXWF provides yet another imaging option called a Cleansed Image. The cleansedimage is created in the same manner as a standard forensic image except data you
specify can be excluded from the acquisition. As detailed in Chapter 9 for eDiscovery
cases, there are instances where specific data may need redaction due to privacy or
privilege issues and a cleansed image meets this need.
32 CHAPTER 2 Case Management and Imaging
Once the evidence media is added to XWF and the volume snapshot finishes,
simply hide the data you wish to exclude before creating the image (we will cover
how to hide items in Chapter 3). The hidden items will be excluded from acquisi-
tion and the sectors related to hidden items will be zeroed out or optionally water-
marked with a value of your choosing. All other data are acquired as explained in
the imaging section above. Since we have not covered such things as how to browse
directories and hide items, a full discussion of this imaging option will be deferred
until Chapter 9.
CD/DVDWhen a CD or DVD drive is selected, an option to perform Raw CD access is avail-able. This option is unchecked by default. When unchecked, XWF will process any
file systems it sees on the CD/DVD drive in the same way as in the case of a hard
drive. If the raw access option is checked, the contents of the drive will be displayed
in hex without any interpretation of file systems, etc.
PHYSICAL MEMORY IMAGINGXWF by itself contains no way to capture the entirety of physical memory (except
under Windows XP), but it can inspect memory on a per process basis. To do this,
simply select Tools | Open RAM, expand a process, and select one of the sections of
memory to examine. After clicking OK, the contents of the selected process will be
displayed in a hex editor that can then be searched or reviewed as needed. XWF can
access and image physical memory on a remote system when used with F-Response.
This process will be explained in the F-Response section below.
In addition to accessing physical memory via F-Response, XWF can interpret
memory dumps created by a wide variety of tools that can capture physical memory
to a file, such as Helix (http://www.e-fense.com/), Moonsols Windows Memory
toolkit (http://www.moonsols.com/windows-memory-toolkit/), and winpmem
(https://code.google.com/p/volatility/downloads/list).
Once you have a physical memory dump, you can add it to your case via File |Add Memory Dump under the Case Data window or via the same option available
in the context menu of the case root.
Once an image of memory has been added, XWF will traverse the raw memory
similar to how it traversed the file systems on our hard drive. When XWF is finished
with this step, you will be able to browse the contents of memory as shown in
Figure 2.13. The memory layout of many, but not all, different Windows versions
and service packs is supported.
Finally, should you add a disk image that contains a hiberfil.sys file to a case,
XWF will automatically parse the file and add it to the case as shown at the top
of Figure 2.13.
33Physical Memory Imaging
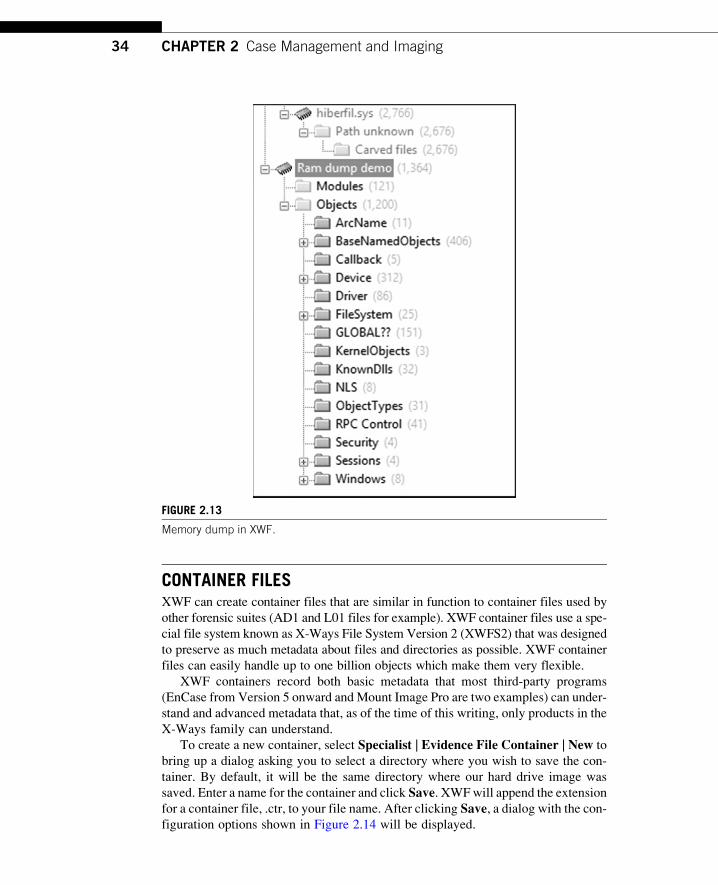
CONTAINER FILESXWF can create container files that are similar in function to container files used by
other forensic suites (AD1 and L01 files for example). XWF container files use a spe-
cial file system known as X-Ways File System Version 2 (XWFS2) that was designed
to preserve as much metadata about files and directories as possible. XWF container
files can easily handle up to one billion objects which make them very flexible.
XWF containers record both basic metadata that most third-party programs
(EnCase from Version 5 onward andMount Image Pro are two examples) can under-
stand and advanced metadata that, as of the time of this writing, only products in the
X-Ways family can understand.
To create a new container, select Specialist | Evidence File Container | New to
bring up a dialog asking you to select a directory where you wish to save the con-
tainer. By default, it will be the same directory where our hard drive image was
saved. Enter a name for the container and click Save. XWFwill append the extension
for a container file, .ctr, to your file name. After clicking Save, a dialog with the con-figuration options shown in Figure 2.14 will be displayed.
FIGURE 2.13
Memory dump in XWF.
34 CHAPTER 2 Case Management and Imaging
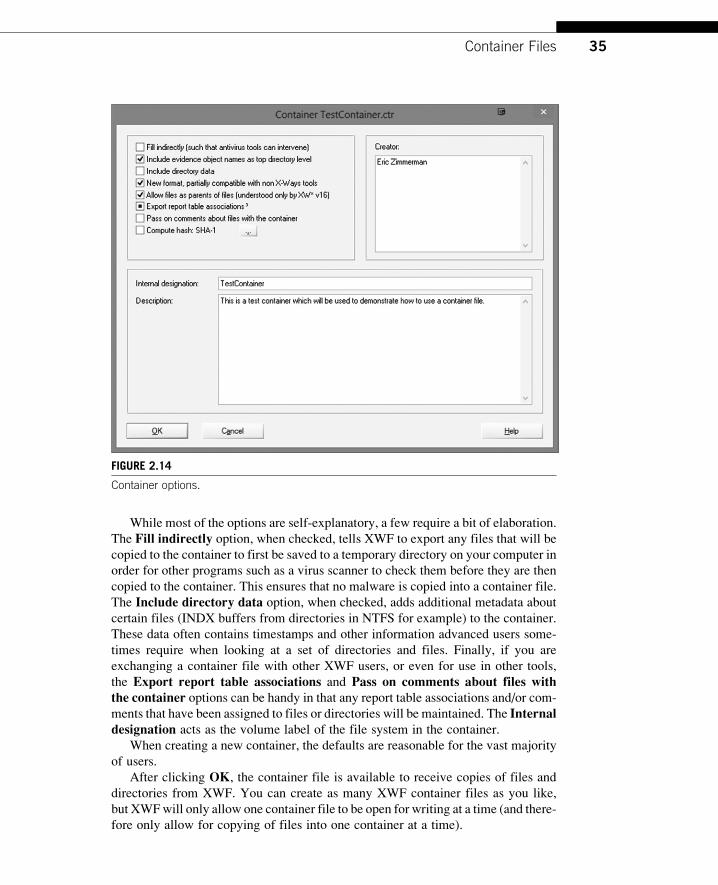
While most of the options are self-explanatory, a few require a bit of elaboration.
The Fill indirectly option, when checked, tells XWF to export any files that will be
copied to the container to first be saved to a temporary directory on your computer in
order for other programs such as a virus scanner to check them before they are then
copied to the container. This ensures that no malware is copied into a container file.
The Include directory data option, when checked, adds additional metadata about
certain files (INDX buffers from directories in NTFS for example) to the container.
These data often contains timestamps and other information advanced users some-
times require when looking at a set of directories and files. Finally, if you are
exchanging a container file with other XWF users, or even for use in other tools,
the Export report table associations and Pass on comments about files withthe container options can be handy in that any report table associations and/or com-
ments that have been assigned to files or directories will be maintained. The Internaldesignation acts as the volume label of the file system in the container.
When creating a new container, the defaults are reasonable for the vast majority
of users.
After clicking OK, the container file is available to receive copies of files and
directories from XWF. You can create as many XWF container files as you like,
but XWFwill only allow one container file to be open for writing at a time (and there-
fore only allow for copying of files into one container at a time).
FIGURE 2.14
Container options.
35Container Files
Since we haven’t covered general navigation in XWF, we will forego the discus-
sion on how to add files to our newly created container until the next chapter. For
now, just assume we have copied some files into our container.
An XWF container can be closed via the Specialist | Evidence File Container |Close menu. When closing a container, XWF will ask you want to finalize the
container. If you elect to do so, XWF will offer to create an e01 disk image of
the container. The options for doing this are identical to the process for creating
a hard disk image that we have previously covered with one exception. If you wish
to prevent any more files from being added to the container file, check the Freezetarget container file system checkbox. Doing so will prevent someone from cre-
ating a dd image of an e01 image of a container file, opening it, and then adding
more files to it. In effect, the container’s file system becomes read-only when it is
frozen.
Finalizing the container is not required and is usually done to compress or encrypt
it when there is a need to share the information in the container with other examiners.
XWF and other tools can view the container file as is in its raw state. If you need to
look at what is inside a container file, add it to your case like you would any other
image once you close the container.
WORKING WITH RAID ARRAYSXWF can internally reconstruct RAID arrays in cases where individual images of the
RAID disks have been acquired or where you have the physical disks that make up an
array. XWF supports RAID level 0, 5, and 6 when reconstructing arrays. In addition
to the images themselves, it is also critically important to know as much as possible
about the RAID controller to which the disks were attached. Information such as the
manufacturer of the controller, stripe size, parity information (backward, forward,
delayed, dynamic, etc.) will be required by XWF to rebuild an array.
XWF TIPS AND TRICKSDon’t Image Individual Disks, Image the Array ItselfIf possible, rather than image many hard disks in a RAID array, image the logical array itself.This can be done by imaging a computer in a live environment or via F-Response (this will becovered in a subsequent section). By imaging the logical array, you won’t need to worry aboutany of the details as outlined in this section.
Before reassembling an array, the images that make up the array must be opened
into XWF. This can be done via the File | Open option. You can designate an image
in the Files of type dropdown box, but if you didn’t, invoke the Specialist | InterpretImage File As Disk option to tell XWF to treat the individual image files as disks.
Once the images are in the case, the process of putting them back in order can be
started by using the Specialist | Reconstruct RAID System option as shown in
Figure 2.15.
36 CHAPTER 2 Case Management and Imaging
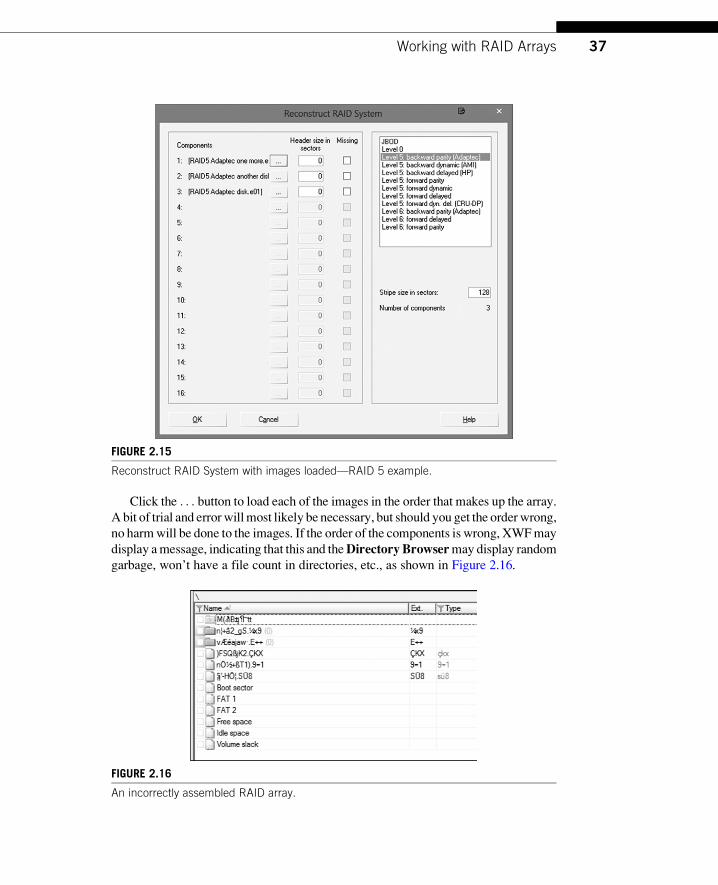
Click the . . . button to load each of the images in the order that makes up the array.
A bit of trial and errorwillmost likely be necessary, but should you get the orderwrong,
no harmwill be done to the images. If the order of the components is wrong, XWFmay
display amessage, indicating that this and theDirectory Browsermay display random
garbage, won’t have a file count in directories, etc., as shown in Figure 2.16.
FIGURE 2.15
Reconstruct RAID System with images loaded—RAID 5 example.
FIGURE 2.16
An incorrectly assembled RAID array.
37Working with RAID Arrays

To correct the situation, close the window that represents the incorrectly recon-
structed RAID (or else after a while these attempts will clutter up the screen), go back
into the Reconstruct RAID System option, and rearrange the disks by clicking
the . . . and loading the images in a different order. You can also try different header
sizes, stripe sizes, or parity patterns. When the images are in the correct order (and
all other parameters are correct as well), opening the partition will display the con-
tents of the file system including the number of files in each directory as seen in
Figure 2.17. At this point, you can properly view JPEG files, Office documents,
etc., that may be stored in the RAID system.
Once correctly assembled, you should add the reassembled array to your case by
right-clicking on the tab of the window that represents the reassembled array and
choosing Add to active case as shown in Figure 2.18. Once the array is added to
the case, it will show up in the Case Data window with a gold icon as opposed
to the usual gray icon. After doing so, XWF will remember the correct component
disks/images and RAID parameters.
In the case of RAID 5 arrays, XWF can reconstruct the array if it is missing one
segment of the array. This is because parity is distributed across each segment of a
RAID 5 array allowing one of its members to be absent. If you only have two of three
FIGURE 2.17
A properly reassembled RAID array.
FIGURE 2.18
Adding the RAID array to a case.
38 CHAPTER 2 Case Management and Imaging
segments, select one of the remaining two segments, add it twice, and check the
Missing box on one of the duplicates and XWF will do the rest.
Finally, you can create a new forensic image of the reassembled, logical array by
using the same options we discussed when imaging media in a previous section.
Once the image is created, it can be added to the case and the individual images
of disks in the array are no longer needed to be open in XWF.
XWF can also handle dynamic disk configurations in much the same way as
above, but rather than choosing a flavor of RAID, you would choose the Just A
Bunch Of Disks (JBOD) option and load each disk as we saw above. Once the
dynamic disk is displayed as a single volume, it can be imaged like any other device.
More advanced capabilities and options are available and are thoroughly
explained in the XWF manual in the Reconstructing RAID Systems section.
AUGMENTING WITH F-RESPONSEIt would be hard to describe F-Response any better than its creators, so here is a quote
from the Web site:
F-Response is an easy to use, vendor neutral, patented software utility that
enables an investigator to conduct live forensics, Data Recovery, and eDiscovery
over an IP network using their tool(s) of choice. F-Response is not another anal-
ysis tool. F-Response is a utility that allows you to make better use of the tools and
training that you already have.
F-Response software uses a patented process to provide read-only access to the
full physical disk(s) of virtually any networked computer, plus the physical memory
(RAM) of most Microsoft Windows® systems. Designed to be completely vendor
neutral, if your analysis software reads a hard drive, it will work with F-Response.1
What does this mean to us, the forensics professional? Basically it means F-Response
can expose physical drives, logical partitions, and memory from just about any oper-
ating system you are likely to encounter as well as things such as e-mail stores (i.e.,
Gmail, Yahoo, or any IMAP mail store), SharePoint databases, exotic raid setups,
cloud storage, etc., as a device on your local machine. For a full list of supported
operating systems and other supported targets, visit the F-Response Web site at
http://www.f-response.com.
F-Response comes in several editions, but the core functionality in all of them is
the same. The higher end editions allow such things as unlimited connections, the
ability to programmatically interact with F-Response, and so on. For many forensic
examiners, F-Response TACTICAL edition is the recommended edition to use.
TACTICAL edition comes in the form of two USB thumb drives: one for the sub-
ject computer and one for the examiner computer. To begin, insert the examiner
thumb drive into your computer and start the software. Before the examiner machine
can find the subject machine, F-Response needs to be started on the subject machine.
1http://www.f-response.com/.
39Augmenting with F-Response
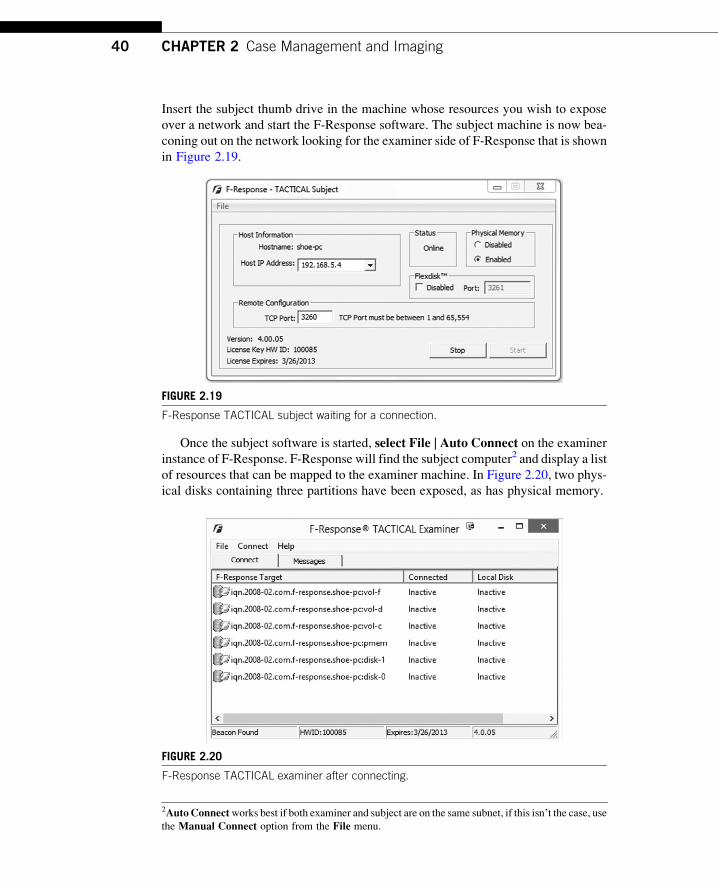
Insert the subject thumb drive in the machine whose resources you wish to expose
over a network and start the F-Response software. The subject machine is now bea-
coning out on the network looking for the examiner side of F-Response that is shown
in Figure 2.19.
Once the subject software is started, select File | Auto Connect on the examiner
instance of F-Response. F-Response will find the subject computer2 and display a list
of resources that can be mapped to the examiner machine. In Figure 2.20, two phys-
ical disks containing three partitions have been exposed, as has physical memory.
FIGURE 2.19
F-Response TACTICAL subject waiting for a connection.
FIGURE 2.20
F-Response TACTICAL examiner after connecting.
2AutoConnectworks best if both examiner and subject are on the same subnet, if this isn’t the case, use
the Manual Connect option from the File menu.
40 CHAPTER 2 Case Management and Imaging
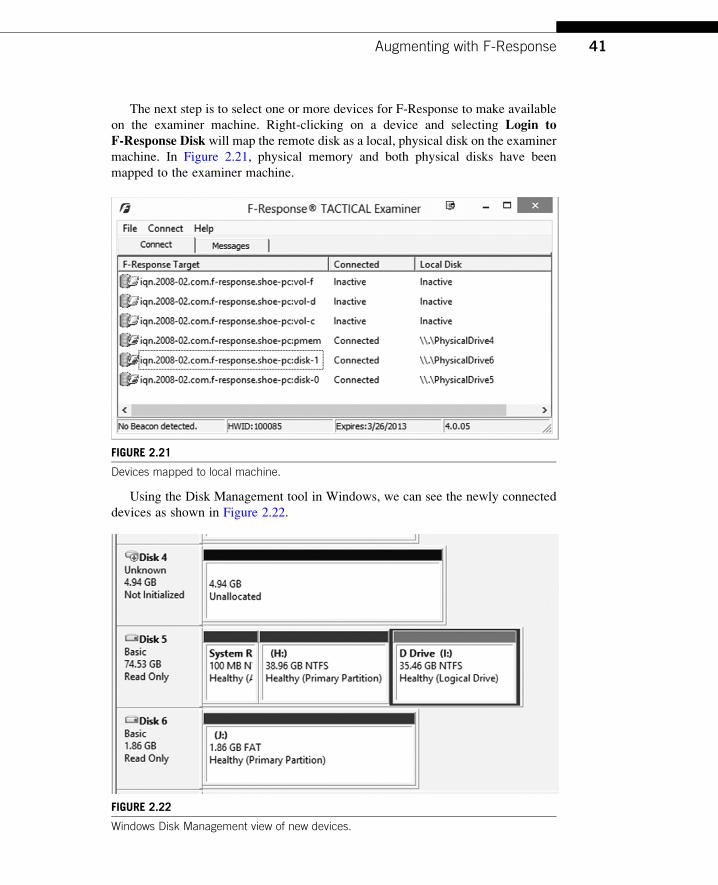
The next step is to select one or more devices for F-Response to make available
on the examiner machine. Right-clicking on a device and selecting Login toF-Response Disk will map the remote disk as a local, physical disk on the examiner
machine. In Figure 2.21, physical memory and both physical disks have been
mapped to the examiner machine.
Using the Disk Management tool in Windows, we can see the newly connected
devices as shown in Figure 2.22.
FIGURE 2.21
Devices mapped to local machine.
FIGURE 2.22
Windows Disk Management view of new devices.
41Augmenting with F-Response
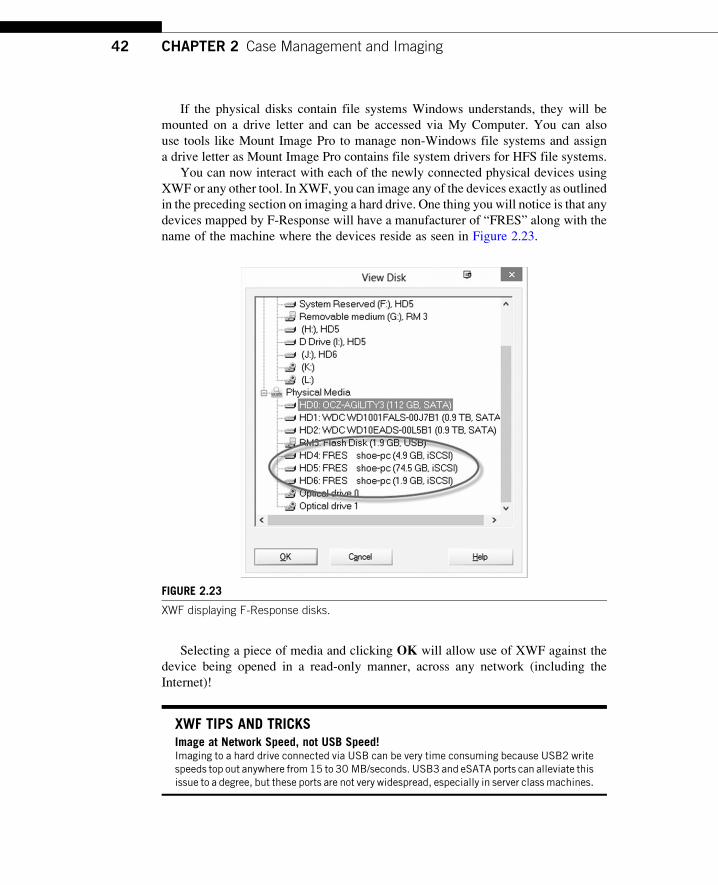
If the physical disks contain file systems Windows understands, they will be
mounted on a drive letter and can be accessed via My Computer. You can also
use tools like Mount Image Pro to manage non-Windows file systems and assign
a drive letter as Mount Image Pro contains file system drivers for HFS file systems.
You can now interact with each of the newly connected physical devices using
XWF or any other tool. In XWF, you can image any of the devices exactly as outlined
in the preceding section on imaging a hard drive. One thing you will notice is that any
devices mapped by F-Response will have a manufacturer of “FRES” along with the
name of the machine where the devices reside as seen in Figure 2.23.
Selecting a piece of media and clicking OK will allow use of XWF against the
device being opened in a read-only manner, across any network (including the
Internet)!
XWF TIPS AND TRICKSImage at Network Speed, not USB Speed!Imaging to a hard drive connected via USB can be very time consuming because USB2 writespeeds top out anywhere from15 to 30 MB/seconds. USB3 and eSATA ports can alleviate thisissue to a degree, but these ports are not very widespread, especially in server class machines.
FIGURE 2.23
XWF displaying F-Response disks.
42 CHAPTER 2 Case Management and Imaging
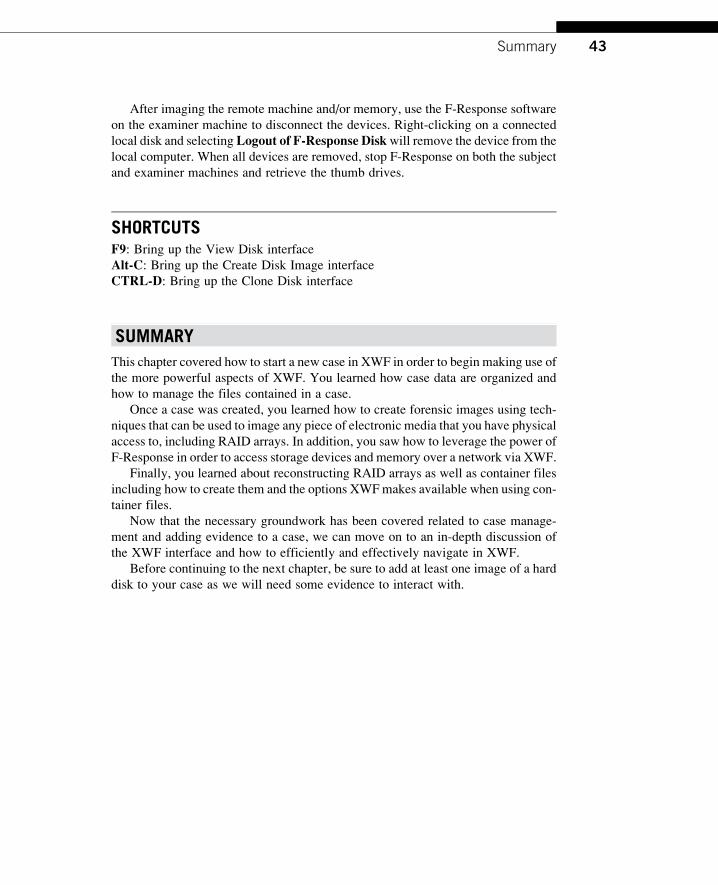
After imaging the remote machine and/or memory, use the F-Response software
on the examiner machine to disconnect the devices. Right-clicking on a connected
local disk and selecting Logout of F-Response Diskwill remove the device from the
local computer. When all devices are removed, stop F-Response on both the subject
and examiner machines and retrieve the thumb drives.
SHORTCUTSF9: Bring up the View Disk interface
Alt-C: Bring up the Create Disk Image interface
CTRL-D: Bring up the Clone Disk interface
SUMMARY
This chapter covered how to start a new case in XWF in order to begin making use of
the more powerful aspects of XWF. You learned how case data are organized and
how to manage the files contained in a case.
Once a case was created, you learned how to create forensic images using tech-
niques that can be used to image any piece of electronic media that you have physical
access to, including RAID arrays. In addition, you saw how to leverage the power of
F-Response in order to access storage devices and memory over a network via XWF.
Finally, you learned about reconstructing RAID arrays as well as container files
including how to create them and the options XWFmakes available when using con-
tainer files.
Now that the necessary groundwork has been covered related to case manage-
ment and adding evidence to a case, we can move on to an in-depth discussion of
the XWF interface and how to efficiently and effectively navigate in XWF.
Before continuing to the next chapter, be sure to add at least one image of a hard
disk to your case as we will need some evidence to interact with.
43Summary

Intentionally left as blank
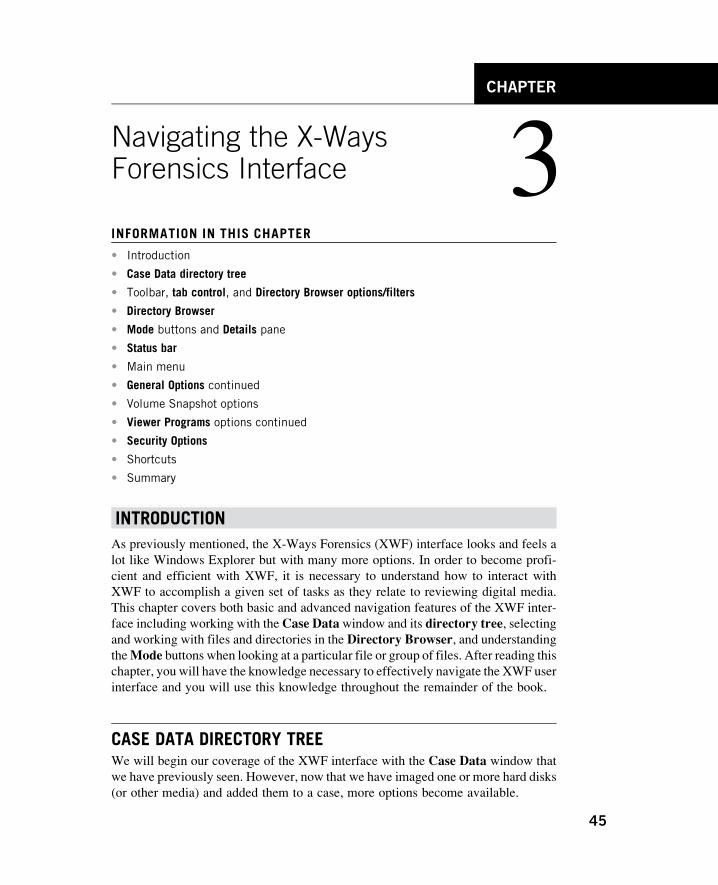
CHAPTER
Navigating the X-WaysForensics Interface 3INFORMATION IN THIS CHAPTER
• Introduction
• Case Data directory tree
• Toolbar, tab control, and Directory Browser options/filters
• Directory Browser
• Mode buttons and Details pane
• Status bar
• Main menu
• General Options continued
• Volume Snapshot options
• Viewer Programs options continued
• Security Options
• Shortcuts
• Summary
INTRODUCTION
As previously mentioned, the X-Ways Forensics (XWF) interface looks and feels a
lot like Windows Explorer but with many more options. In order to become profi-
cient and efficient with XWF, it is necessary to understand how to interact with
XWF to accomplish a given set of tasks as they relate to reviewing digital media.
This chapter covers both basic and advanced navigation features of the XWF inter-
face including working with the Case Datawindow and its directory tree, selectingand working with files and directories in the Directory Browser, and understandingtheMode buttons when looking at a particular file or group of files. After reading thischapter, you will have the knowledge necessary to effectively navigate the XWF user
interface and you will use this knowledge throughout the remainder of the book.
CASE DATA DIRECTORY TREEWe will begin our coverage of the XWF interface with the Case Data window that
we have previously seen. However, now that we have imaged one or more hard disks
(or other media) and added them to a case, more options become available.
45
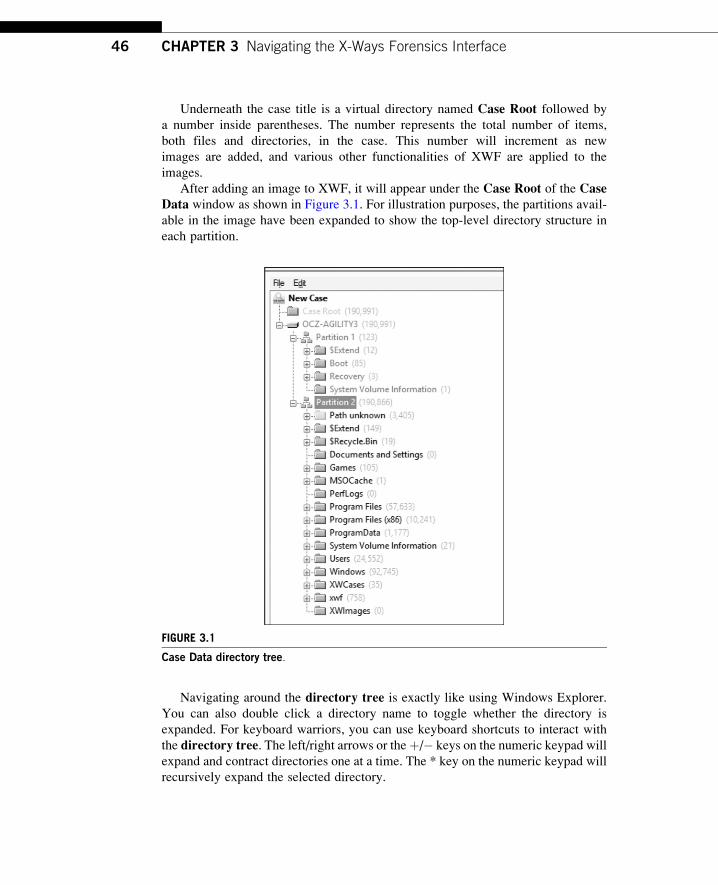
Underneath the case title is a virtual directory named Case Root followed by
a number inside parentheses. The number represents the total number of items,
both files and directories, in the case. This number will increment as new
images are added, and various other functionalities of XWF are applied to the
images.
After adding an image to XWF, it will appear under the Case Root of the CaseData window as shown in Figure 3.1. For illustration purposes, the partitions avail-
able in the image have been expanded to show the top-level directory structure in
each partition.
Navigating around the directory tree is exactly like using Windows Explorer.
You can also double click a directory name to toggle whether the directory is
expanded. For keyboard warriors, you can use keyboard shortcuts to interact with
the directory tree. The left/right arrows or theþ/� keys on the numeric keypad will
expand and contract directories one at a time. The * key on the numeric keypad will
recursively expand the selected directory.
FIGURE 3.1
Case Data directory tree.
46 CHAPTER 3 Navigating the X-Ways Forensics Interface
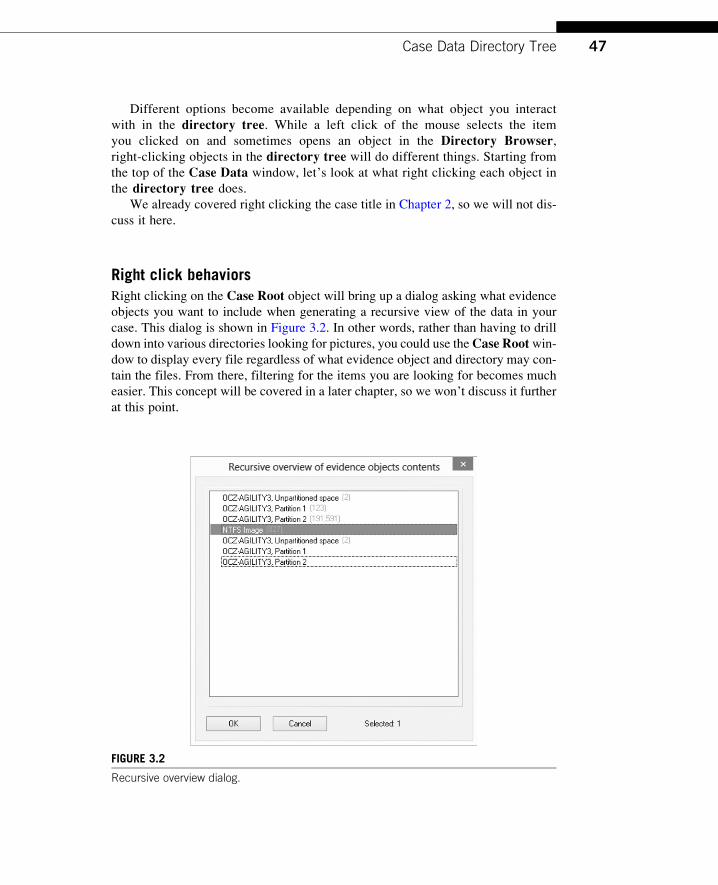
Different options become available depending on what object you interact
with in the directory tree. While a left click of the mouse selects the item
you clicked on and sometimes opens an object in the Directory Browser,right-clicking objects in the directory tree will do different things. Starting from
the top of the Case Data window, let’s look at what right clicking each object in
the directory tree does.
We already covered right clicking the case title in Chapter 2, so we will not dis-
cuss it here.
Right click behaviorsRight clicking on the Case Root object will bring up a dialog asking what evidence
objects you want to include when generating a recursive view of the data in your
case. This dialog is shown in Figure 3.2. In other words, rather than having to drill
down into various directories looking for pictures, you could use theCase Rootwin-dow to display every file regardless of what evidence object and directory may con-
tain the files. From there, filtering for the items you are looking for becomes much
easier. This concept will be covered in a later chapter, so we won’t discuss it further
at this point.
FIGURE 3.2
Recursive overview dialog.
47Case Data Directory Tree
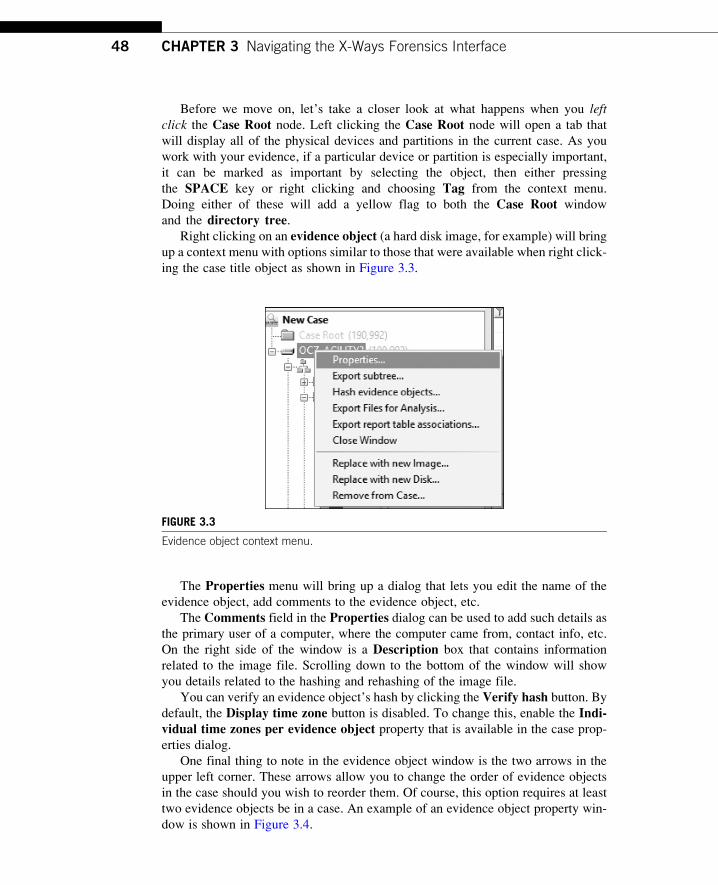
Before we move on, let’s take a closer look at what happens when you leftclick the Case Root node. Left clicking the Case Root node will open a tab that
will display all of the physical devices and partitions in the current case. As you
work with your evidence, if a particular device or partition is especially important,
it can be marked as important by selecting the object, then either pressing
the SPACE key or right clicking and choosing Tag from the context menu.
Doing either of these will add a yellow flag to both the Case Root window
and the directory tree.Right clicking on an evidence object (a hard disk image, for example) will bring
up a context menu with options similar to those that were available when right click-
ing the case title object as shown in Figure 3.3.
The Properties menu will bring up a dialog that lets you edit the name of the
evidence object, add comments to the evidence object, etc.
The Comments field in the Properties dialog can be used to add such details as
the primary user of a computer, where the computer came from, contact info, etc.
On the right side of the window is a Description box that contains information
related to the image file. Scrolling down to the bottom of the window will show
you details related to the hashing and rehashing of the image file.
You can verify an evidence object’s hash by clicking the Verify hash button. By
default, the Display time zone button is disabled. To change this, enable the Indi-vidual time zones per evidence object property that is available in the case prop-
erties dialog.
One final thing to note in the evidence object window is the two arrows in the
upper left corner. These arrows allow you to change the order of evidence objects
in the case should you wish to reorder them. Of course, this option requires at least
two evidence objects be in a case. An example of an evidence object property win-
dow is shown in Figure 3.4.
FIGURE 3.3
Evidence object context menu.
48 CHAPTER 3 Navigating the X-Ways Forensics Interface
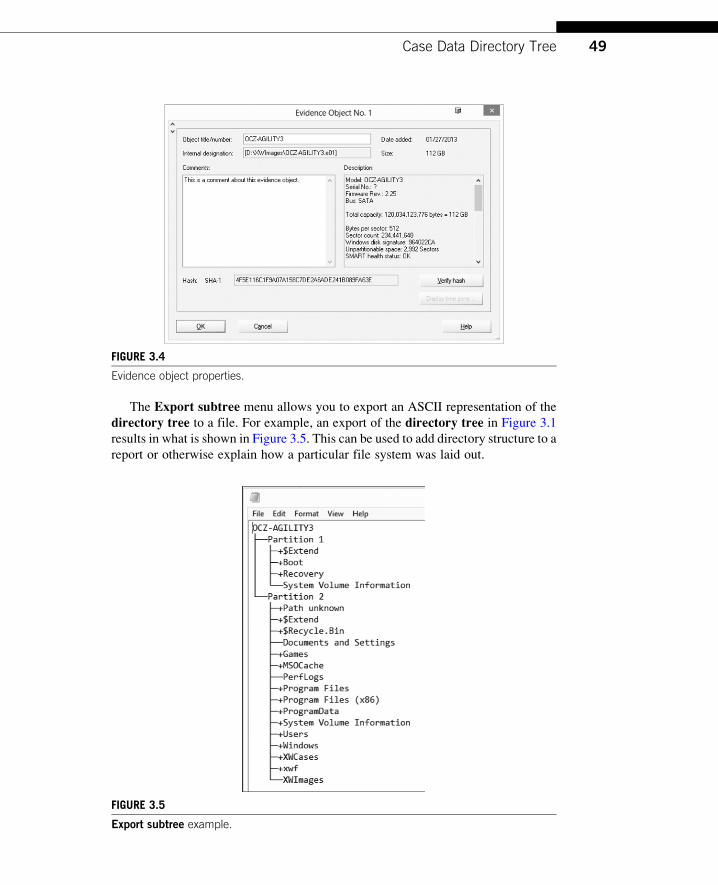
The Export subtree menu allows you to export an ASCII representation of the
directory tree to a file. For example, an export of the directory tree in Figure 3.1
results in what is shown in Figure 3.5. This can be used to add directory structure to a
report or otherwise explain how a particular file system was laid out.
FIGURE 3.4
Evidence object properties.
FIGURE 3.5
Export subtree example.
49Case Data Directory Tree
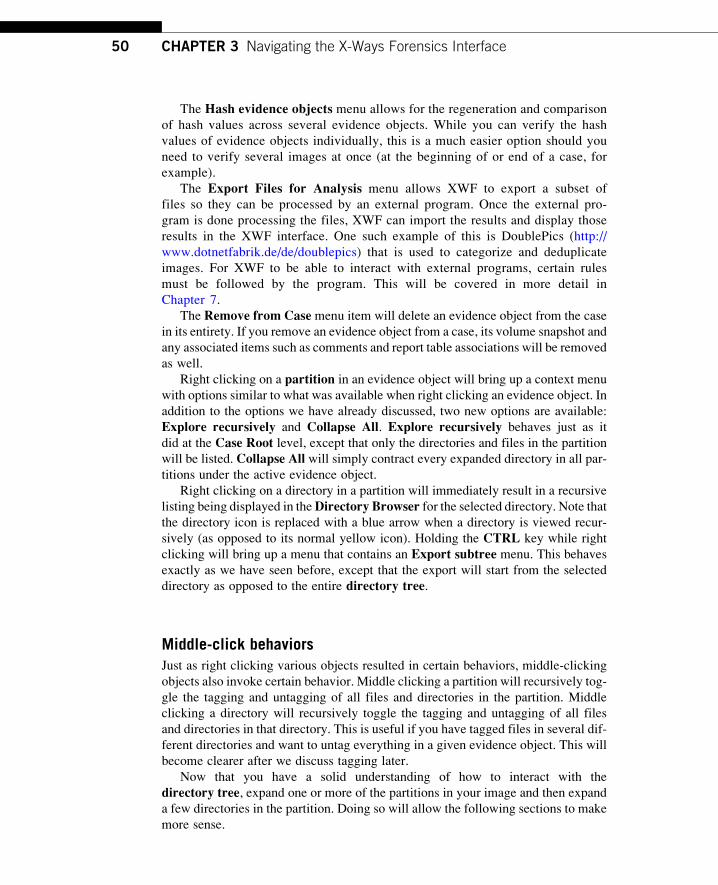
The Hash evidence objects menu allows for the regeneration and comparison
of hash values across several evidence objects. While you can verify the hash
values of evidence objects individually, this is a much easier option should you
need to verify several images at once (at the beginning of or end of a case, for
example).
The Export Files for Analysis menu allows XWF to export a subset of
files so they can be processed by an external program. Once the external pro-
gram is done processing the files, XWF can import the results and display those
results in the XWF interface. One such example of this is DoublePics (http://
www.dotnetfabrik.de/de/doublepics) that is used to categorize and deduplicate
images. For XWF to be able to interact with external programs, certain rules
must be followed by the program. This will be covered in more detail in
Chapter 7.
The Remove from Case menu item will delete an evidence object from the case
in its entirety. If you remove an evidence object from a case, its volume snapshot and
any associated items such as comments and report table associations will be removed
as well.
Right clicking on a partition in an evidence object will bring up a context menu
with options similar to what was available when right clicking an evidence object. In
addition to the options we have already discussed, two new options are available:
Explore recursively and Collapse All. Explore recursively behaves just as it
did at the Case Root level, except that only the directories and files in the partition
will be listed. Collapse All will simply contract every expanded directory in all par-
titions under the active evidence object.
Right clicking on a directory in a partition will immediately result in a recursive
listing being displayed in theDirectory Browser for the selected directory. Note thatthe directory icon is replaced with a blue arrow when a directory is viewed recur-
sively (as opposed to its normal yellow icon). Holding the CTRL key while right
clicking will bring up a menu that contains an Export subtree menu. This behaves
exactly as we have seen before, except that the export will start from the selected
directory as opposed to the entire directory tree.
Middle-click behaviorsJust as right clicking various objects resulted in certain behaviors, middle-clicking
objects also invoke certain behavior. Middle clicking a partition will recursively tog-
gle the tagging and untagging of all files and directories in the partition. Middle
clicking a directory will recursively toggle the tagging and untagging of all files
and directories in that directory. This is useful if you have tagged files in several dif-
ferent directories and want to untag everything in a given evidence object. This will
become clearer after we discuss tagging later.
Now that you have a solid understanding of how to interact with the
directory tree, expand one or more of the partitions in your image and then expand
a few directories in the partition. Doing so will allow the following sections to make
more sense.
50 CHAPTER 3 Navigating the X-Ways Forensics Interface
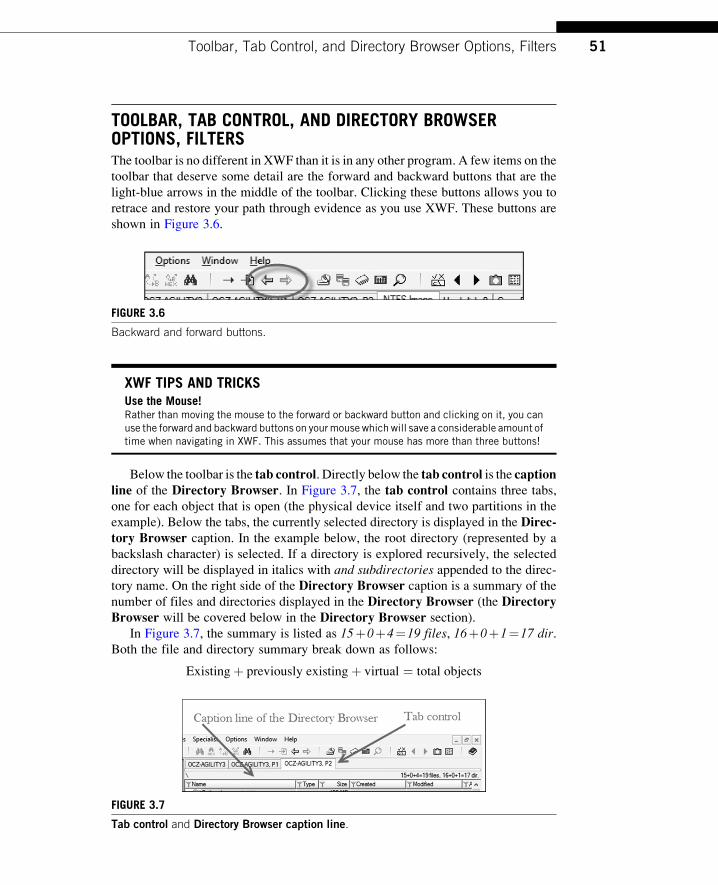
TOOLBAR, TAB CONTROL, AND DIRECTORY BROWSEROPTIONS, FILTERSThe toolbar is no different in XWF than it is in any other program. A few items on the
toolbar that deserve some detail are the forward and backward buttons that are the
light-blue arrows in the middle of the toolbar. Clicking these buttons allows you to
retrace and restore your path through evidence as you use XWF. These buttons are
shown in Figure 3.6.
XWF TIPS AND TRICKSUse the Mouse!Rather than moving the mouse to the forward or backward button and clicking on it, you canuse the forward and backward buttons on yourmouse which will save a considerable amount oftime when navigating in XWF. This assumes that your mouse has more than three buttons!
Below the toolbar is the tab control. Directly below the tab control is the captionline of the Directory Browser. In Figure 3.7, the tab control contains three tabs,
one for each object that is open (the physical device itself and two partitions in the
example). Below the tabs, the currently selected directory is displayed in the Direc-tory Browser caption. In the example below, the root directory (represented by a
backslash character) is selected. If a directory is explored recursively, the selected
directory will be displayed in italics with and subdirectories appended to the direc-
tory name. On the right side of the Directory Browser caption is a summary of the
number of files and directories displayed in the Directory Browser (the DirectoryBrowser will be covered below in the Directory Browser section).
In Figure 3.7, the summary is listed as 15þ0þ4¼19 files, 16þ0þ1¼17 dir.Both the file and directory summary break down as follows:
Existingþ previously existingþ virtual ¼ total objects
FIGURE 3.6
Backward and forward buttons.
FIGURE 3.7
Tab control and Directory Browser caption line.
51Toolbar, Tab Control, and Directory Browser Options, Filters
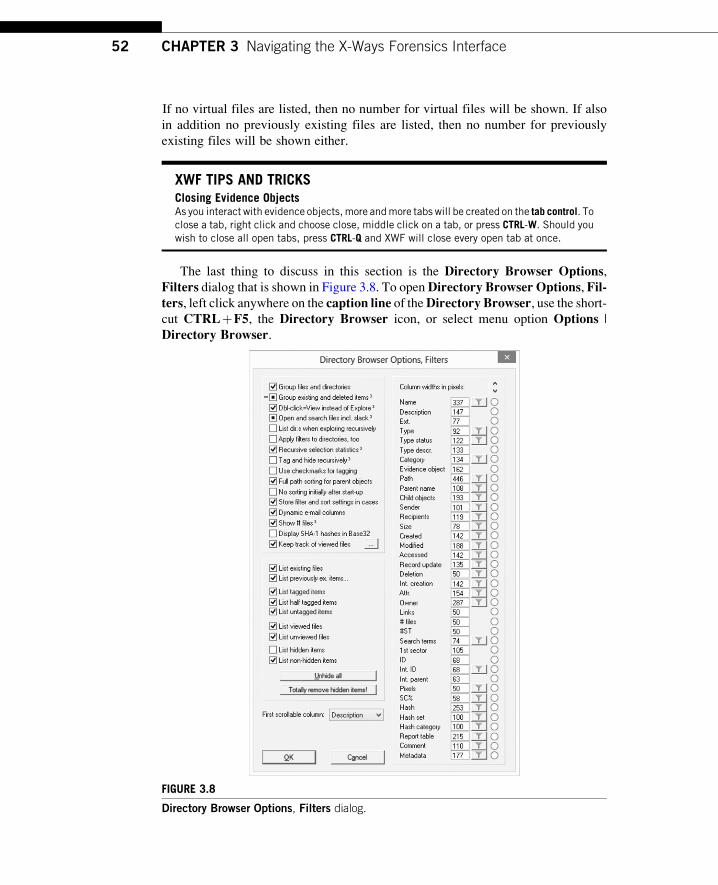
If no virtual files are listed, then no number for virtual files will be shown. If also
in addition no previously existing files are listed, then no number for previously
existing files will be shown either.
XWF TIPS AND TRICKSClosing Evidence ObjectsAs you interact with evidence objects,more andmore tabs will be created on the tab control. Toclose a tab, right click and choose close, middle click on a tab, or press CTRL-W. Should youwish to close all open tabs, press CTRL-Q and XWF will close every open tab at once.
The last thing to discuss in this section is the Directory Browser Options,Filters dialog that is shown in Figure 3.8. To openDirectory Browser Options, Fil-ters, left click anywhere on the caption line of theDirectory Browser, use the short-cut CTRLþF5, the Directory Browser icon, or select menu option Options |
Directory Browser.
FIGURE 3.8
Directory Browser Options, Filters dialog.
52 CHAPTER 3 Navigating the X-Ways Forensics Interface
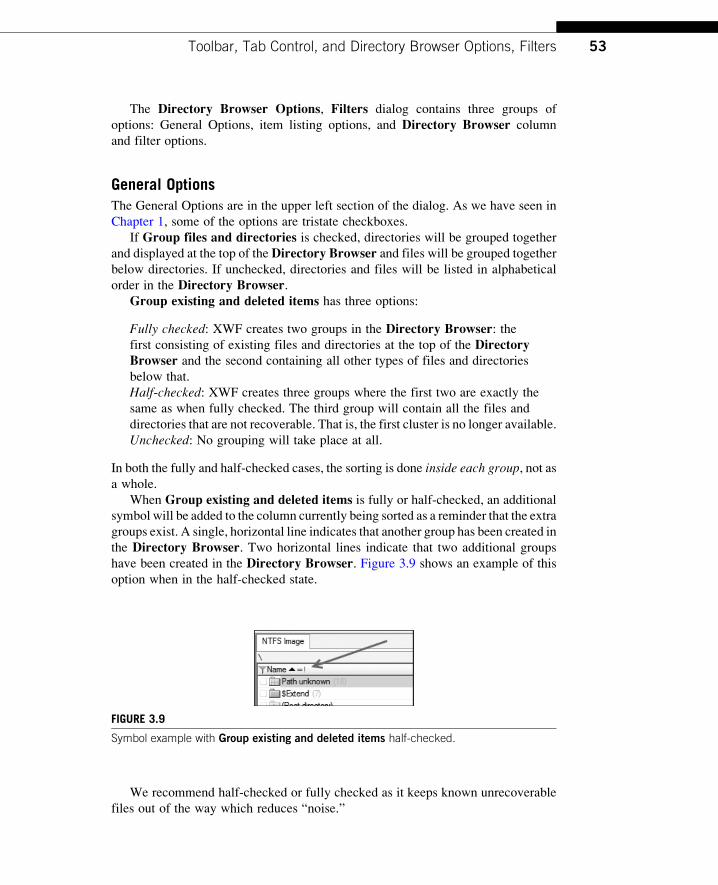
The Directory Browser Options, Filters dialog contains three groups of
options: General Options, item listing options, and Directory Browser column
and filter options.
General OptionsThe General Options are in the upper left section of the dialog. As we have seen in
Chapter 1, some of the options are tristate checkboxes.
If Group files and directories is checked, directories will be grouped together
and displayed at the top of theDirectory Browser and files will be grouped togetherbelow directories. If unchecked, directories and files will be listed in alphabetical
order in the Directory Browser.Group existing and deleted items has three options:
Fully checked: XWF creates two groups in the Directory Browser: thefirst consisting of existing files and directories at the top of the DirectoryBrowser and the second containing all other types of files and directories
below that.
Half-checked: XWF creates three groups where the first two are exactly the
same as when fully checked. The third group will contain all the files and
directories that are not recoverable. That is, the first cluster is no longer available.
Unchecked: No grouping will take place at all.
In both the fully and half-checked cases, the sorting is done inside each group, not asa whole.
When Group existing and deleted items is fully or half-checked, an additional
symbol will be added to the column currently being sorted as a reminder that the extra
groups exist. A single, horizontal line indicates that another group has been created in
the Directory Browser. Two horizontal lines indicate that two additional groups
have been created in the Directory Browser. Figure 3.9 shows an example of this
option when in the half-checked state.
We recommend half-checked or fully checked as it keeps known unrecoverable
files out of the way which reduces “noise.”
FIGURE 3.9
Symbol example with Group existing and deleted items half-checked.
53Toolbar, Tab Control, and Directory Browser Options, Filters
XWF TIPS AND TRICKSPossible Gotcha!Using the Group existing and deleted items option (either fully or half-checked) introducessome caveats you must be aware of. As outlined above, when this option is enabled, XWFcreates additional groups in the Directory Browser that are not present when the option isunchecked. As such, you must check all groups to see whether what you are looking for ispresent. For example, when sorting by the Name column, if you are interested in a file startingwith the letter C, you may expect it to be between the letters B and D at the top of the DirectoryBrowser window. With this option on, you may not see it where you expect it to be and maythink the file is not present at all. In reality, it may very well be present in one of the othergroups that XWF creates as a result of enabling this option. When using this option, be sureto check each group for the presence of the file in which you have an interest.
You can configure XWF to view either a file’s contents or its “children” when
you double click the file. Dbl-click=View instead of Explore has three options:
Fully checked: The file will be viewed when double clicked.
Half-checked: You will be prompted to either view or explore a file when opening
a file with child objects.
Unchecked: The file will be explored when double clicked.
You can always choose either the View or Explore option by right clicking a file inthe Directory Browser as well.
Open and search files incl. slack has three options:
Fully checked: Slack contents will be searched regardless of whether files have
been hidden or marked as irrelevant.
Half-checked: The slack space of files marked as irrelevant by hash comparison
and/or hash database matching as well as files that have been hidden or filtered out
will not be searched. Put another way, the slack of nonhidden or otherwise
nonexcluded files will be searched.Unchecked: File slack is never searched. Additionally, file slack will NOT be
displayed when opening a file via the context menu or when viewing the file
in File mode.
The takeaway from this option is that it allows you the ability to avoid searching “use-
less” objects, e.g., videos, while being able to search their slack areas. This is an excep-
tionally powerful way to maximize search efficiency. There are times when a video
isn’t worth looking at and as such the video itself can be hidden. Using this option
in its fully checked state still allows for its slack space to be searched, and this is impor-
tant because slackmay contain part of a text file, for example. In other words, if you are
looking for a snippet of text, rather than searching through 200 MB of binary data in a
video, search a few kilobytes of that video’s slack space instead.
If this option is half or fully checked, file slack will be shown in green when in
File mode. The recommended setting is fully checked which ensures slack space is
always searched.
54 CHAPTER 3 Navigating the X-Ways Forensics Interface

If List dirs when exploring recursively is checked, a full listing of directory
names will be included when exploring recursively. When unchecked, only files will
be listed when exploring recursively. If you are interested in the directory structure or
timestamps on directories, it is helpful to have them included with files when explor-
ing recursively.
If Apply filters to directories, too is unchecked, directories will always be
shown when filtering on the Name column. If checked, any directories whose name
does not match one of the entered filter criteria will be hidden.
Recursive selection statistics has three options:
Fully checked: All files including child objects are taken into account when
determining how many files and the size of files are calculated.
Half-checked: Child objects of files are not taken into account and only the parentfiles in a given directory are used in the calculation.
Unchecked: Only the items selected in the Directory Browser are taken into
account when calculating statistics.
Tag and hide recursively has three options:
Fully checked: When tagging a directory, all files in the directory will be tagged,
including any child objects of said files. When tagging a file, the file itself
and any child objects will be tagged.
Half-checked: When tagging a directory, only the directory itself is tagged.
When tagging a file, only the parent file itself will be tagged. Additionally, any
child objects contained in a file will inherit the tagged state of its parent when
new child objects are added to the volume snapshot via a Refine Volume
Snapshot (RVS) operation. The RVS operation will be covered in detail in
Chapter 4.
Unchecked: Only the file or directory itself will be tagged.
This option can also be controlled by holding the SHIFT key when tagging. If
SHIFT is pressed when tagging, the opposite of the selected value of this option will
be used. Tagging files will be discussed in more depth in the section on the
“Directory Browser.”If Use checkmarks for tagging is checked, XWF will use a checkmark when
tagging objects as opposed to filling in the box with a blue square.
If Full path sorting for parent objects is checked, any file with child objects
will have their child objects listed directly after the parent file. If unchecked, all
child objects will be grouped together after all parents have been listed for a
given path.
IfNo sorting initially after start-up is checked, XWFwill forget the last sorting
criteria used upon start-up. In other words, columns in the Directory Browser willnot be sorted when XWF is initially loaded which can save time if many objects were
listed in the Directory Browser. Sorting will also be disabled when disabling filterswhen the Directory Browser is in recursive mode with this option checked.
55Toolbar, Tab Control, and Directory Browser Options, Filters
If Store filter and sort settings in cases is checked, XWF will remember the
filter and column sorting criteria on a case-by-case basis. When a case is opened,
XWF will reload the saved settings. When unchecked, XWF uses the same filter
and sorting criteria regardless of which case is open.
If Dynamic email columns is checked, XWF will add and remove e-mail-
specific columns to the Directory Browser. If at least one e-mail message is visible
in theDirectory Browser and that e-mail contains a sender and recipient, the e-mail-
specific columns will be shown. Otherwise, they will be hidden in order to make
more room for other columns. Sender and recipient information is extracted via
an RVS operation.
Show # files has three options:
Fully checked: XWF will calculate the total number of files in a directory or, in
the case of a file, the number of child objects inside the file. This total is then
displayed in both the directory tree and the Directory Browser in the # filescolumn.
Half-checked: The total number of files will not be displayed in the directorytree, but will be displayed in the Directory Browser in the # files column.
Unchecked: The total number of files will only be displayed in the DirectoryBrowser in the # files column.
When either fully and half-checked, the total number of files will be shown in paren-
thesis after the directory or file name.
If Display SHA-1 hashes in Base32 is checked, SHA-1 values will be displayedin Base32 format in the Directory Browser. This is useful if working with peer-to-
peer networks that use SHA-1 Base32 hashes, like Gnutella. If SHA-1 hash values
are 40 characters/bytes in length, they are in Base16 (hex) format. If they are 32 char-
acters/bytes long, they are in Base32 format.
IfKeep track of viewed files is checked, XWFwill track the activities that can be
selected by clicking the . . . button next to this option. If unchecked, XWF will not
track whether files have been viewed. Viewed files will be discussed in more depth in
the section on the “Directory Browser.”The When identifying duplicates based on hash suboption of Keep track of
viewed files has three options:
Fully checked: Files in the same volume are marked as viewed when a duplicate
is viewed (duplicate according to hashing or hard-linked file) or, if a file has
been viewed already and duplicates are found via hash value, the duplicate files
will also be marked as viewed.
Half-checked: Nothing happens to duplicates when viewing files, only when
identifying said duplicates via hash value. Put another way, any duplicates found
via hash value will inherit the view state of the original file.
Unchecked: Files are never marked as viewed at all based on hash duplicates.
When viewed in gallery (pictures only), when checked, will mark pictures as
viewed when they are displayed in the gallery. This is useful when having to
56 CHAPTER 3 Navigating the X-Ways Forensics Interface
review many pictures in that you can uncheck the List viewed items option and
retain a subset of pictures that you haven’t viewed. The When viewed in gallery(pictures only) option is unchecked by default, so be sure to enable this if your
investigation can benefit from it.
Item listing optionsThe item listing options are in the lower left section of the Directory BrowserOptions, Filters dialog. Most are self-explanatory. A unique property of some of
these checkboxes is that checking them will result in another dialog being displayed
that allows for the selection of related items. These will be pointed out below along
with any options that require a bit more explanation.
TheList previously ex. items checkbox, when clicked, will bring up another dia-log that allows you to choose the types of previously existing files to show. If all
items in the secondary dialog are unchecked, List previously ex. items will be
unchecked as well. If one or more of the items in the secondary dialog are checked,
List previously ex. items will be half-checked.
List half tagged items, when checked, will display files and directories who haveat least one child object tagged. In other words, if you had a directorywith four files in it
and tagged two of the files, the parent directory of the tagged fileswould be half tagged.
A directory or file is considered fully tagged when all of its child objects are tagged.
XWF allows you to hide files and/or directories in the Directory Browservia its context menu. Hiding files will be fully explained in the section on the
“Directory Browser.” The last two checkboxes, List hidden items and List non-hidden items, control whether hidden and/or nonhidden items are displayed in
the Directory Browser. Any hidden files can always be viewed again by checking
the List hidden items option. Use the Unhide all button to make all previously hid-
den files visible again. Should you wish to remove hidden files from the volume
snapshot permanently, use the Totally remove hidden items! button. We recom-
mend working with a copy of your case when using this option should you wish
to reverse the process. A copy of a case can be created via the Case Data | File |Save As menu item.
Below the item listing options is the First scrollable column option. By selectinga column here, any columns to the left of the selected column will be pinned to the
left side of the Directory Browser and will not be moved when scrolling to the right
to see other columns. For example, if the column order starts withName followed byDescription and the first scrollable column is Description, the Name column will
remain stationary when scrolling to the right.
Directory Browser column and filter optionsThe Directory Browser column and filter options are on the right side of the dialog.
The left side of the dialog contains the column name (Description, for example).
The middle option allows for entering a number that corresponds to the width of the
57Toolbar, Tab Control, and Directory Browser Options, Filters
column in pixels. A zero indicates that the column will not be shown in theDirectoryBrowser. You can also use the mouse to resize columns in the Directory Browserby clicking the separator between columns and dragging left or right.
Some of the columns will have a gray icon that looks like a funnel. Clicking this
button will bring up a dialog that allows you to enter criteria for that filter. If a filter is
active, the icon will appear as a blue funnel. Clicking an active filter will disable it.
We will cover filters in the section on the “Directory Browser” and will forego a
discussion on filters at this time.
Finally, to the far right of each column name is a radio button. This radio button is
used to rearrange the order of the columns as they are displayed in the DirectoryBrowser. To move a column, click the corresponding radio button. The first time
a radio button is selected, the up and down arrows above all the radio buttons will
flash. This indicates that you can use the up and down arrows to move the selected
column up or down to whatever position in the list you desire. This is the only way to
move columns around. You cannot drag and drop columns to a new position directly
in the Directory Browser. If you wish to reset the columns to their default values,
right click the arrows and confirm the reset action.
Directory Browser columnsWhile most of the columns listed have descriptions that are self-explanatory, a few
require a bit more detail or emphasis.
The Ext. column is the extension of a file name as it exists in the file system,
whereas the Type column is the actual file type (its typical extension or other des-
ignation) based on the results of the file type verification step (file signature) when
RVS is executed.
The Type status column is related to the Ext. and Type options in that the Typestatus column will reflect whether the file type has been confirmed, is irrelevant, not
in the file type list, etc. The Type status column has very powerful filtering options
as it allows you to choose various status categories and the rank of a particular status.
You can eliminate a lot of noise by assigning certain file extensions to lower valued
ranks and then viewing files with a certain rank or higher. This will be covered in
more detail in Chapter 7.
The Child objects column will display a list of comma-separated file names for
any child objects found in the selected file.
TheRecord update column contains the last modified date and time of the file or
directory’s FILE record (on NTFS) or inode (on Linux files systems).
TheDeletion column will reflect, when available, the date and time an object was
deleted. This information is gathered by XWF when looking at various artifacts
related to journaling file systems or when analyzing file systems that store these
timestamps regularly.
The Int. creation (internal creation) column will contain dates and times XWF
extracts from the metadata available in certain kinds of files during the RVS process.
As described in the XWF help file and manual, internal timestamps are usually less
58 CHAPTER 3 Navigating the X-Ways Forensics Interface
volatile and more difficult to manipulate than file system-level timestamps. As such,
they are useful for corroboration.
The Attr. column contains details (such as, but not limited to, Windows attri-
butes) about an object such as its encryption status, if it was found in a volume
shadow copy (VSC), contains an alternate data stream, etc.
The Owner column will display the user name of the owner of an object, if
known. If unknown, the SID of the owner of the object is displayed.
TheLinks column contains a count of the number of hard links that exist for a file
or a directory.
The # files column contains the total number of child objects contained in a file or
a directory. This number corresponds to the number in parenthesis after a file or a
directory name.
The #ST column is the number of search terms that have been found in an object.
The Search terms column is related to #ST in that Search terms will contain a
comma-separated list of all the search terms that were found in a given object.
Searching and reviewing search hits will be covered in depth in Chapter 6.
The ID column is assigned either by the file system or by XWF. It is not guar-
anteed to be unique. In contrast, the Int. ID, or Internal ID, column is a unique value
generated by XWF for each object in a volume snapshot. The higher the Int. ID, themore recently it has been added to the volume snapshot.
The Int. parent column contains the Int. ID value of the parent object.
The Pixels column reflects the size of graphics files in either thousands of pixels
(KP) or megapixels. This column is populated as a by-product of the skin color per-
centage calculation or viewing a picture in either full screen, Preview mode, or the
gallery.
The SC% column, or skin color percentage, reflects the percentage of skin tones
present in a given graphic file. The higher the percentage, the more skin tones are
present in a graphic file. This is useful for cases involving child pornography/child
exploitation material in that sorting by this column allows for quickly locating such
material. Black and white images can also be easily located in a similar manner.
The Hash column will contain the file’s hash value if computed as part of the
RVS process. The Hash set column reflects the internal hash database that a file’s
hash was found in, if any. Should a hash be found in more than one hash set, this
column will reflect all the hash set names that contained the hash. The Hash cate-gory contains the category a particular hash set was assigned to, either irrelevant/
harmless or notable/malicious.
XWF TIPS AND TRICKSHouston, We’ve Got a Problem!If a given hash is in two different hash sets and the categories are different for the hash sets,XWF will detect this and inform you of the inconsistency by adding an entry to the Messageswindow. In addition, as with any file whose hash value is found in the “notable” category, theicon and hash category will also turn red.
59Toolbar, Tab Control, and Directory Browser Options, Filters
The Report table column contains any associated report table categories that
have been created by an examiner. If more than one report table is associated with
a file or a directory, they will be comma separated.
The Comment column contains anything the examiner wishes to annotate about
a given file or directory. A single comment can be applied to multiple files by first
selecting the files to which you wish to apply the same comment.
The Metadata column will contain any internal data that XWF has extracted as
part of the RVS process. This includes such things as EXIF data, Word document
authors, etc.
As you use XWF and become more familiar with these columns and their usage,
you will show and hide different columns depending on the type of case you are
working. In general, it is recommended to keep the number of visible columns as
minimal as possible as opposed to displaying every column and having to scroll
excessively to find the information you need.
DIRECTORY BROWSERThe Directory Browser is perhaps the most used component of the XWF interface.
It is where a listing of files and directories will be displayed as you select folders in
the directory tree. Across the top of theDirectory Browser are column headers that
mirror the columns as configured in theDirectory Browser Options, Filters dialog.As mentioned previously, while you can resize the visible columns using the mouse,
you cannot reorder them by dragging and dropping the columns.
Column sortingClicking on a column will sort by that column. An arrow will indicate whether the
column is sorted in ascending or descending order. XWF allows for sorting on up to
three columns. For example, clicking the Name column will sort the Name column
alphabetically. If you next click the Ext. column, the Ext. column will be sorted
alphabetically, but for each unique extension, the files in the Name column will still
be sorted alphabetically. The Name column will also have two vertical tick marks
added to the right of the sort indicator, indicating that this column is the secondary
sort column. Clicking a third column will result in yet another level of grouping and
sorting and will place the corresponding number of vertical tick marks on the pre-
vious two columns. You can reset any secondary and tertiary sorting by holding
the SHIFT key when clicking a column header.
Column filteringIn many of the column headers, you will see a filter icon just as we saw in the Direc-tory Browser Options, Filters dialog. If a filter is inactive, the icon will be gray. Ifactive, it will be blue. Recall that any time one or more filters are active the captionline of the Directory Browser will contain a blue filter icon to the left of the path.
60 CHAPTER 3 Navigating the X-Ways Forensics Interface
When one or more filters are active, the right side of the caption line of theDirec-tory Browser will change to reflect the number of files that are visible as a result of
the filter as well as the number of files that have been filtered from view. You can
click the blue filter icon to the right of this summary to deactivate all active filters.
To see the options available for a given column’s filter, click the filter icon and a
dialog will be displayed. If you wish to activate a filter without being shown the dia-
log for that filter, hold the SHIFT key while clicking the filter icon. To deactivate the
filter, repeat the process.
Most of the filter options are self-explanatory, but a few have some additional
options that are discussed below.
The Name filter allows for the use of wildcards (up to two if they appear at the
beginning or end of the filter) or substring searches (no wildcards needed). Regular
expressions are supported when substring searches are selected. Filters should be
added one per line.
If you wish to negate an entry, prepend it with a colon. For example, entering
:apple* on one line and *oranges* on another will display all files that do not start
with apple and have the word oranges somewhere in the file name. Negation does notwork for substring matches. This filter dialog is also shared with the Parent nameand Child objects columns. As such, only one of these three columns can be filtered
at any given time.
The Type filter allows for either groups of files by type or individual extensionsto be selected. Rather than browsing the list manually to look for a particular exten-
sion, use the Expand all button to expand all groups and then simply start typing the
extension that you are interested in. You do not need to type the dot as the groups
consist of extensions only.
The Type Status column’s font color will reflect the results of the file type ver-
ification as follows: verified¼black, mismatched¼blue, and everything else¼gray.
The Category filter serves two purposes. Selecting a category filters the files
listed in the Directory Browser to list only those that match the selected category.
You can also simply click the Category filter to get an overview of the number of
files that are listed in the Directory Browser by category without activating the fil-
ter. The configuration file that sets forth categories can be edited as needed and this
will be covered in Chapter 7.
The Path filter works on substring matches, so wildcards are not needed when
entering items.
TheCreated,Modified,Accessed,Record update,Deletion, and Int. creation fil-ters are date based and can be used to filter any of these columns to list files before, after,
or between dates and times. You can also adjust the time zone as needed. These columns
also share a single filter and as such, only one of these columns can be filtered at a time.
In cases where different time zones are being used in different evidence objects, sorting
is done based on the UTC date and time and not the converted date and time value.
The Attr. filter can be used to filter on a wide variety of object attributes. Filter-
ing on this column is very powerful. The values of each of the abbreviations can be
seen on theLegend tab that will be covered belowwhen discussing theMode buttons
61Directory Browser
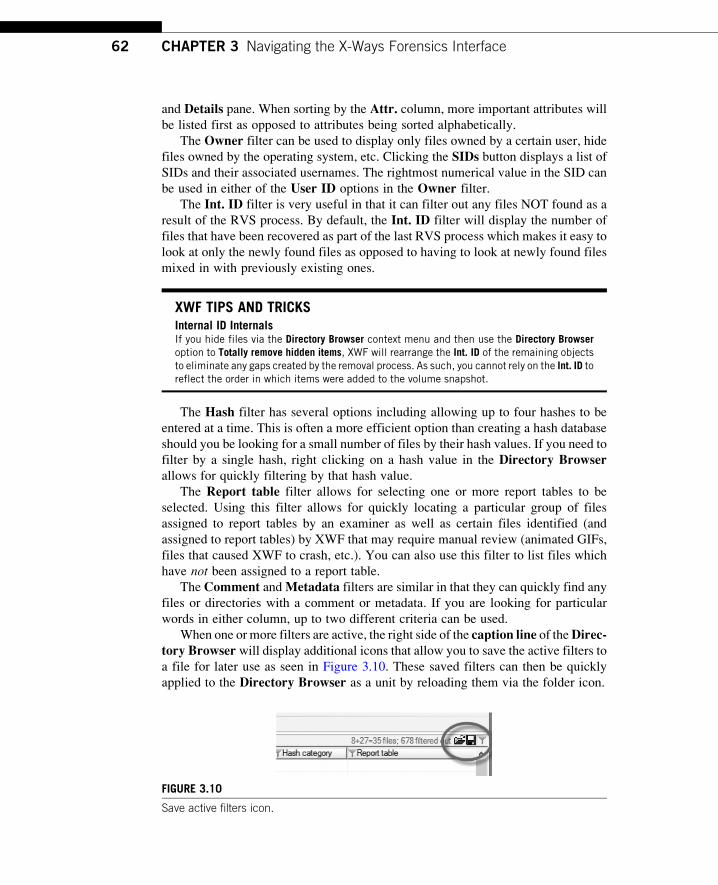
and Details pane. When sorting by the Attr. column, more important attributes will
be listed first as opposed to attributes being sorted alphabetically.
The Owner filter can be used to display only files owned by a certain user, hide
files owned by the operating system, etc. Clicking the SIDs button displays a list of
SIDs and their associated usernames. The rightmost numerical value in the SID can
be used in either of the User ID options in the Owner filter.
The Int. ID filter is very useful in that it can filter out any files NOT found as a
result of the RVS process. By default, the Int. ID filter will display the number of
files that have been recovered as part of the last RVS process which makes it easy to
look at only the newly found files as opposed to having to look at newly found files
mixed in with previously existing ones.
XWF TIPS AND TRICKSInternal ID InternalsIf you hide files via the Directory Browser context menu and then use the Directory Browseroption to Totally remove hidden items, XWF will rearrange the Int. ID of the remaining objectsto eliminate any gaps created by the removal process. As such, you cannot rely on the Int. ID toreflect the order in which items were added to the volume snapshot.
The Hash filter has several options including allowing up to four hashes to be
entered at a time. This is often a more efficient option than creating a hash database
should you be looking for a small number of files by their hash values. If you need to
filter by a single hash, right clicking on a hash value in the Directory Browserallows for quickly filtering by that hash value.
The Report table filter allows for selecting one or more report tables to be
selected. Using this filter allows for quickly locating a particular group of files
assigned to report tables by an examiner as well as certain files identified (and
assigned to report tables) by XWF that may require manual review (animated GIFs,
files that caused XWF to crash, etc.). You can also use this filter to list files which
have not been assigned to a report table.
The Comment andMetadata filters are similar in that they can quickly find any
files or directories with a comment or metadata. If you are looking for particular
words in either column, up to two different criteria can be used.
When one or more filters are active, the right side of the caption line of theDirec-tory Browser will display additional icons that allow you to save the active filters to
a file for later use as seen in Figure 3.10. These saved filters can then be quickly
applied to the Directory Browser as a unit by reloading them via the folder icon.
FIGURE 3.10
Save active filters icon.
62 CHAPTER 3 Navigating the X-Ways Forensics Interface
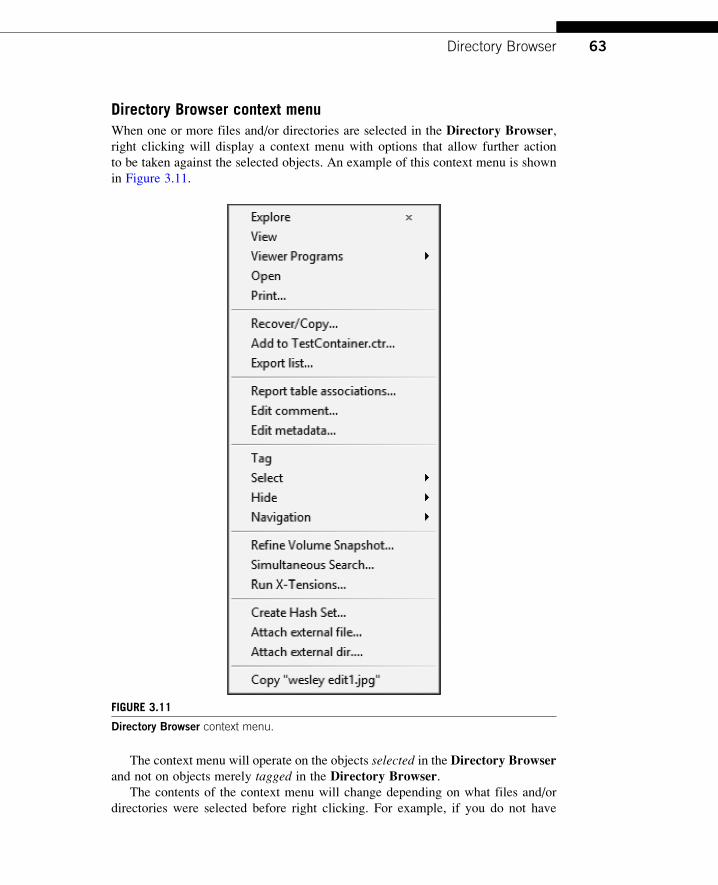
Directory Browser context menuWhen one or more files and/or directories are selected in the Directory Browser,right clicking will display a context menu with options that allow further action
to be taken against the selected objects. An example of this context menu is shown
in Figure 3.11.
The context menu will operate on the objects selected in the Directory Browserand not on objects merely tagged in the Directory Browser.
The contents of the context menu will change depending on what files and/or
directories were selected before right clicking. For example, if you do not have
FIGURE 3.11
Directory Browser context menu.
63Directory Browser
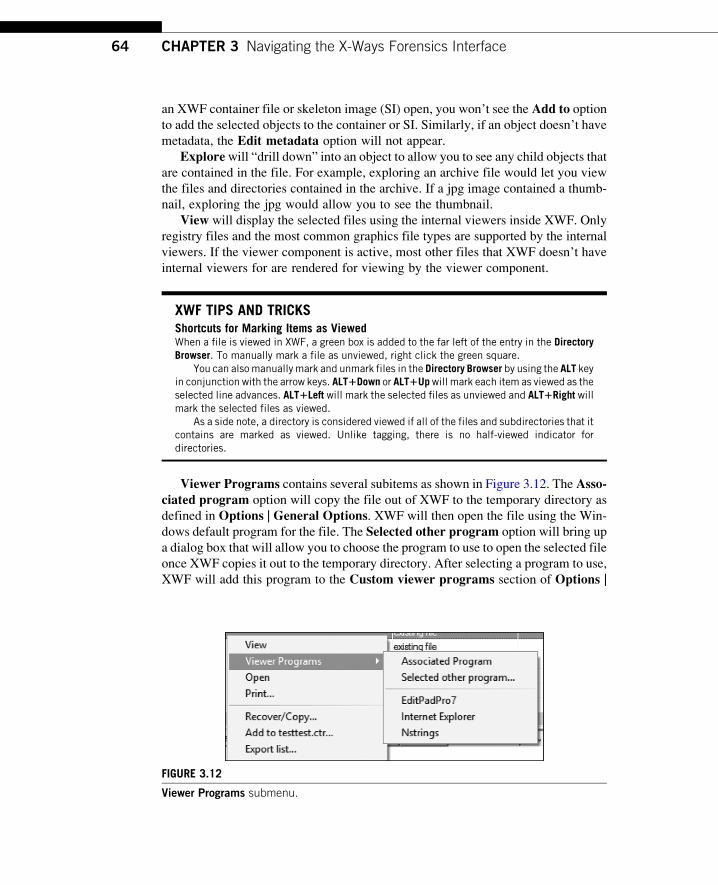
an XWF container file or skeleton image (SI) open, you won’t see the Add to optionto add the selected objects to the container or SI. Similarly, if an object doesn’t have
metadata, the Edit metadata option will not appear.
Explorewill “drill down” into an object to allow you to see any child objects that
are contained in the file. For example, exploring an archive file would let you view
the files and directories contained in the archive. If a jpg image contained a thumb-
nail, exploring the jpg would allow you to see the thumbnail.
View will display the selected files using the internal viewers inside XWF. Only
registry files and the most common graphics file types are supported by the internal
viewers. If the viewer component is active, most other files that XWF doesn’t have
internal viewers for are rendered for viewing by the viewer component.
XWF TIPS AND TRICKSShortcuts for Marking Items as ViewedWhen a file is viewed in XWF, a green box is added to the far left of the entry in the DirectoryBrowser. To manually mark a file as unviewed, right click the green square.
You can alsomanually mark and unmark files in the Directory Browser by using the ALT keyin conjunction with the arrow keys. ALT1Down or ALT1Upwill mark each item as viewed as theselected line advances. ALT1Left will mark the selected files as unviewed and ALT1Right willmark the selected files as viewed.
As a side note, a directory is considered viewed if all of the files and subdirectories that itcontains are marked as viewed. Unlike tagging, there is no half-viewed indicator fordirectories.
Viewer Programs contains several subitems as shown in Figure 3.12. The Asso-ciated program option will copy the file out of XWF to the temporary directory as
defined in Options | General Options. XWF will then open the file using the Win-
dows default program for the file. The Selected other program option will bring up
a dialog box that will allow you to choose the program to use to open the selected file
once XWF copies it out to the temporary directory. After selecting a program to use,
XWF will add this program to the Custom viewer programs section of Options |
FIGURE 3.12
Viewer Programs submenu.
64 CHAPTER 3 Navigating the X-Ways Forensics Interface
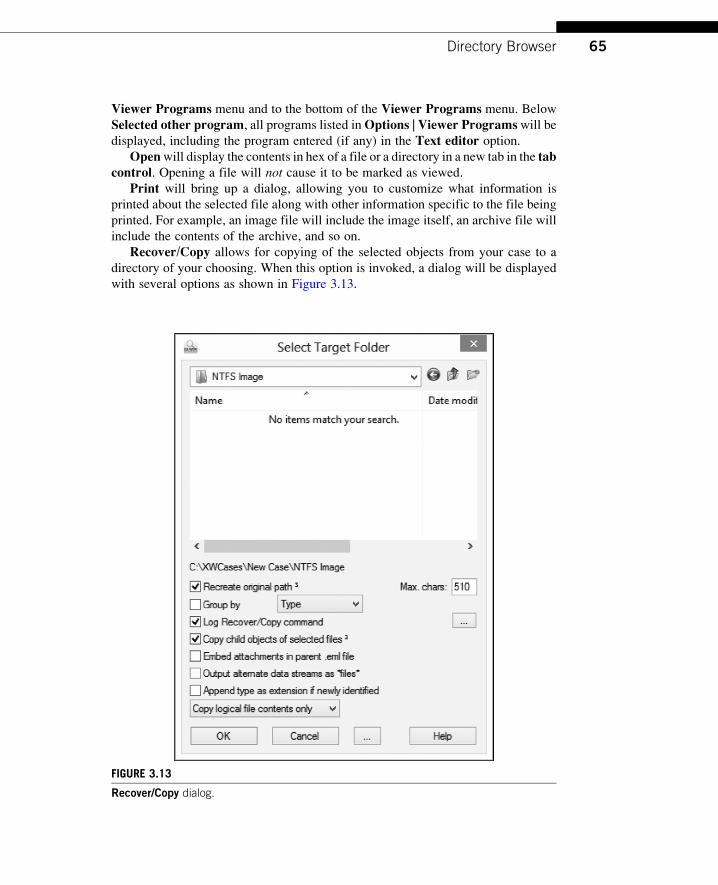
Viewer Programs menu and to the bottom of the Viewer Programs menu. Below
Selected other program, all programs listed inOptions | Viewer Programswill bedisplayed, including the program entered (if any) in the Text editor option.
Openwill display the contents in hex of a file or a directory in a new tab in the tabcontrol. Opening a file will not cause it to be marked as viewed.
Print will bring up a dialog, allowing you to customize what information is
printed about the selected file along with other information specific to the file being
printed. For example, an image file will include the image itself, an archive file will
include the contents of the archive, and so on.
Recover/Copy allows for copying of the selected objects from your case to a
directory of your choosing. When this option is invoked, a dialog will be displayed
with several options as shown in Figure 3.13.
FIGURE 3.13
Recover/Copy dialog.
65Directory Browser
By default, XWF will save recovered files to a subdirectory of the case directory
that corresponds with the name of the evidence object where the files reside
(C:\XWCases\New Case\OCZ-AGILITY3, P2, for example).
Recreate original path has three options:
Fully checked: The full path for each selected object will be recreated inside the
destination directory.
Half-checked: Any directories that have been selected are preserved and
copied, as are any files that have been selected into the destination directory.
The immediate path of the chosen file is copied, as opposed to the path from
the root.
Unchecked: All selected files are copied to the destination directory (directories
are not created at all). When copying objects from the Case Root (whenviewing in recursive mode), an additional top-level directory will be created
to reflect the name of the evidence object that the objects originated from.
If files and/or directories are selected with the same name, XWF will make
the names unique by appending a number to the end of the file so nothing
is overwritten.
When Recreate original path is fully or half-checked, a button is available between
the Cancel and Help buttons that contain settings related to the creation of artificial
directories when objects being exported have one or more child objects.
While XWF supports paths up to a maximum of 510 characters long, Windows
Explorer will not be able to view paths longer than 260 characters, so use the Maxchars. option carefully.
TheGroup by option, when checked, creates subdirectories in output directoriesfor such things as file extension, hash set, and so on. This serves as a timesaver when
you have to categorize the recovered files for some reason.
XWF TIPS AND TRICKSEmbedded Object TimestampsWhen exporting files in XWF, if a file doesn’t have any timestamps (alternate data streams, forexample) of its own, XWFwill use a date and time of January 1, 1601 as ameans to inform youthe file that was recovered did not have its own timestamp. This behavior can be avoided byholding the SHIFT key while clicking the OK button in the Recover/Copy dialog. This may benecessary if any external programs refuse to open files that have such timestamps.
Log Recover/Copy command, when checked, adds the information as selected
in the options dialog accessible via the button to the right of the command to the
Recover/Copy log file. This log is, by default, located in the _log subdirectory of
the active case. To create the log file in the directory where the file(s) are recovered
to, click the button and uncheck In case log subdir. Unchecking this option is usefulif you want to create a record of every Recover/Copy command in the directory
where files were recovered to (as opposed to having all Recover/Copy commands
ending up in one file when the option is checked).
66 CHAPTER 3 Navigating the X-Ways Forensics Interface
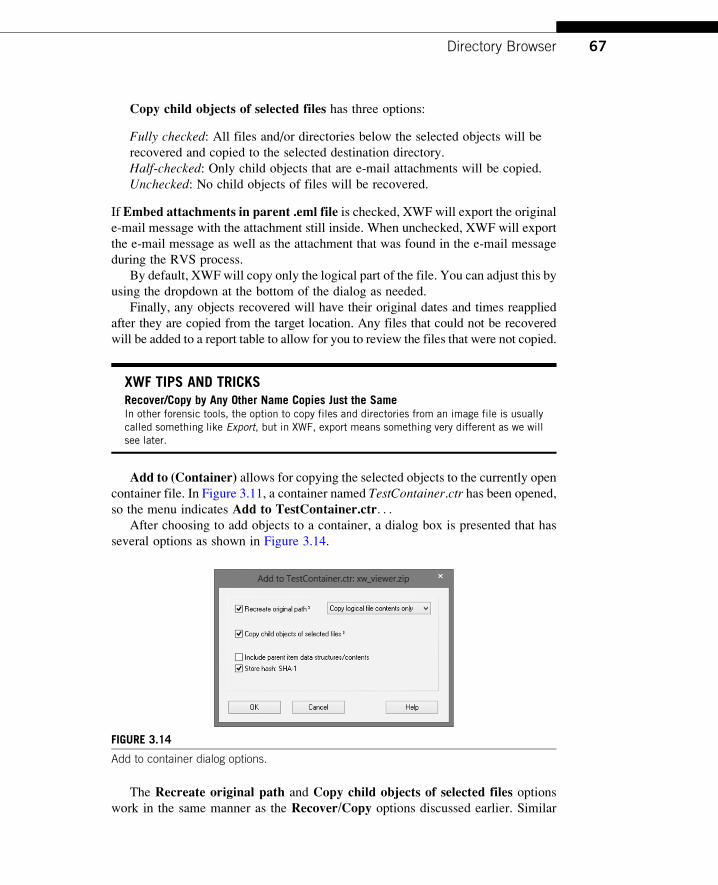
Copy child objects of selected files has three options:
Fully checked: All files and/or directories below the selected objects will be
recovered and copied to the selected destination directory.
Half-checked: Only child objects that are e-mail attachments will be copied.
Unchecked: No child objects of files will be recovered.
If Embed attachments in parent .eml file is checked, XWF will export the original
e-mail message with the attachment still inside. When unchecked, XWF will export
the e-mail message as well as the attachment that was found in the e-mail message
during the RVS process.
By default, XWF will copy only the logical part of the file. You can adjust this by
using the dropdown at the bottom of the dialog as needed.
Finally, any objects recovered will have their original dates and times reapplied
after they are copied from the target location. Any files that could not be recovered
will be added to a report table to allow for you to review the files that were not copied.
XWF TIPS AND TRICKSRecover/Copy by Any Other Name Copies Just the SameIn other forensic tools, the option to copy files and directories from an image file is usuallycalled something like Export, but in XWF, export means something very different as we willsee later.
Add to (Container) allows for copying the selected objects to the currently opencontainer file. In Figure 3.11, a container named TestContainer.ctr has been opened,so the menu indicates Add to TestContainer.ctr. . .
After choosing to add objects to a container, a dialog box is presented that has
several options as shown in Figure 3.14.
The Recreate original path and Copy child objects of selected files optionswork in the same manner as the Recover/Copy options discussed earlier. Similar
FIGURE 3.14
Add to container dialog options.
67Directory Browser
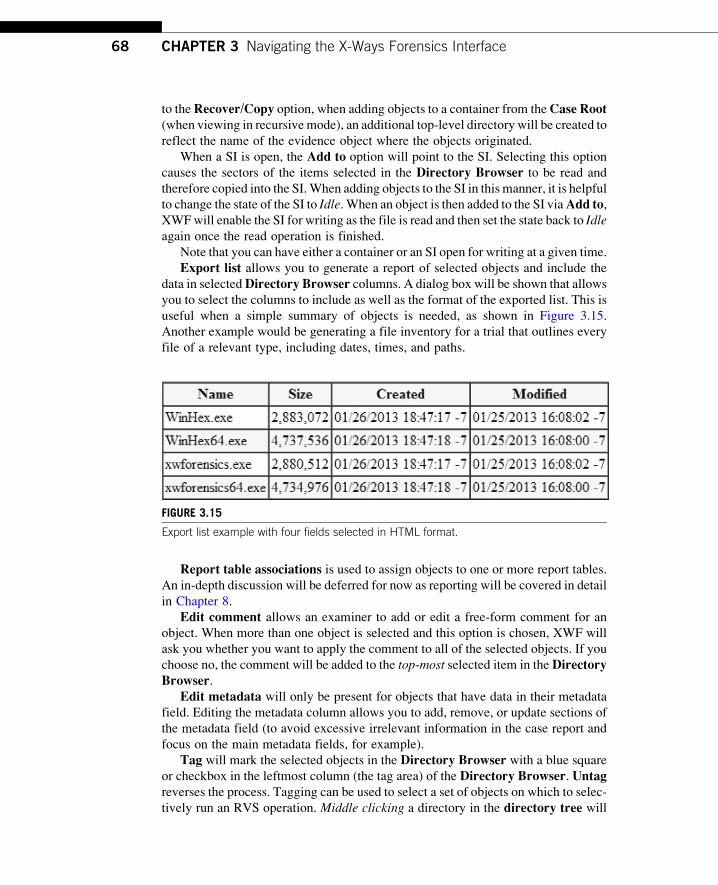
to theRecover/Copy option, when adding objects to a container from theCase Root(when viewing in recursive mode), an additional top-level directory will be created to
reflect the name of the evidence object where the objects originated.
When a SI is open, the Add to option will point to the SI. Selecting this option
causes the sectors of the items selected in the Directory Browser to be read and
therefore copied into the SI.When adding objects to the SI in this manner, it is helpful
to change the state of the SI to Idle. When an object is then added to the SI viaAdd to,XWFwill enable the SI for writing as the file is read and then set the state back to Idleagain once the read operation is finished.
Note that you can have either a container or an SI open for writing at a given time.
Export list allows you to generate a report of selected objects and include the
data in selectedDirectory Browser columns. A dialog box will be shown that allows
you to select the columns to include as well as the format of the exported list. This is
useful when a simple summary of objects is needed, as shown in Figure 3.15.
Another example would be generating a file inventory for a trial that outlines every
file of a relevant type, including dates, times, and paths.
Report table associations is used to assign objects to one or more report tables.
An in-depth discussion will be deferred for now as reporting will be covered in detail
in Chapter 8.
Edit comment allows an examiner to add or edit a free-form comment for an
object. When more than one object is selected and this option is chosen, XWF will
ask you whether you want to apply the comment to all of the selected objects. If you
choose no, the comment will be added to the top-most selected item in the DirectoryBrowser.
Edit metadata will only be present for objects that have data in their metadata
field. Editing the metadata column allows you to add, remove, or update sections of
the metadata field (to avoid excessive irrelevant information in the case report and
focus on the main metadata fields, for example).
Tag will mark the selected objects in the Directory Browser with a blue square
or checkbox in the leftmost column (the tag area) of the Directory Browser. Untagreverses the process. Tagging can be used to select a set of objects on which to selec-
tively run an RVS operation. Middle clicking a directory in the directory tree will
FIGURE 3.15
Export list example with four fields selected in HTML format.
68 CHAPTER 3 Navigating the X-Ways Forensics Interface
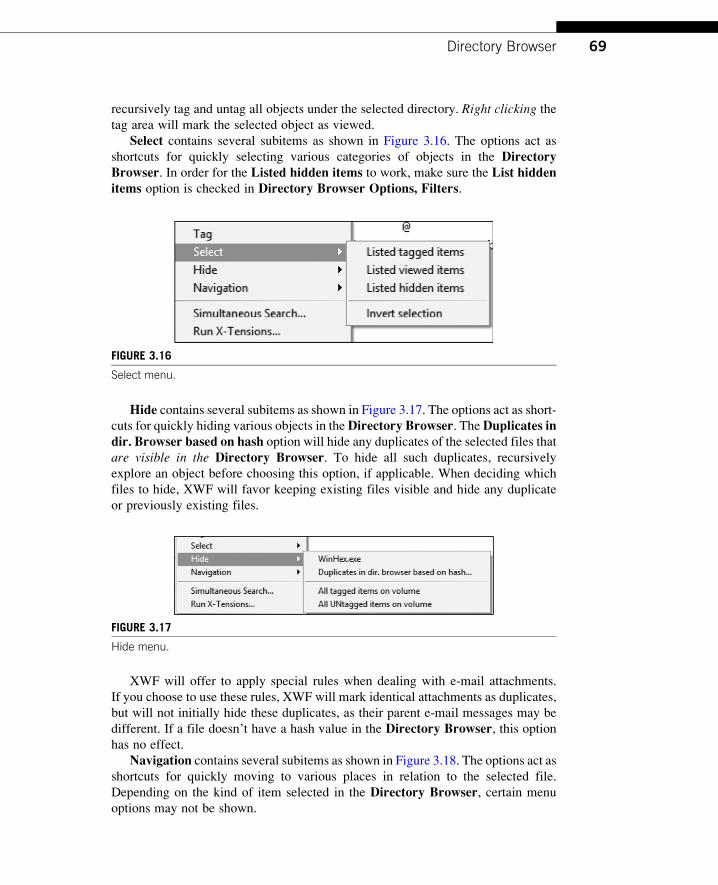
recursively tag and untag all objects under the selected directory. Right clicking the
tag area will mark the selected object as viewed.
Select contains several subitems as shown in Figure 3.16. The options act as
shortcuts for quickly selecting various categories of objects in the DirectoryBrowser. In order for the Listed hidden items to work, make sure the List hiddenitems option is checked in Directory Browser Options, Filters.
Hide contains several subitems as shown in Figure 3.17. The options act as short-
cuts for quickly hiding various objects in theDirectory Browser. TheDuplicates indir. Browser based on hash option will hide any duplicates of the selected files that
are visible in the Directory Browser. To hide all such duplicates, recursively
explore an object before choosing this option, if applicable. When deciding which
files to hide, XWF will favor keeping existing files visible and hide any duplicate
or previously existing files.
XWF will offer to apply special rules when dealing with e-mail attachments.
If you choose to use these rules, XWF will mark identical attachments as duplicates,
but will not initially hide these duplicates, as their parent e-mail messages may be
different. If a file doesn’t have a hash value in the Directory Browser, this optionhas no effect.
Navigation contains several subitems as shown in Figure 3.18. The options act as
shortcuts for quickly moving to various places in relation to the selected file.
Depending on the kind of item selected in the Directory Browser, certain menu
options may not be shown.
FIGURE 3.16
Select menu.
FIGURE 3.17
Hide menu.
69Directory Browser
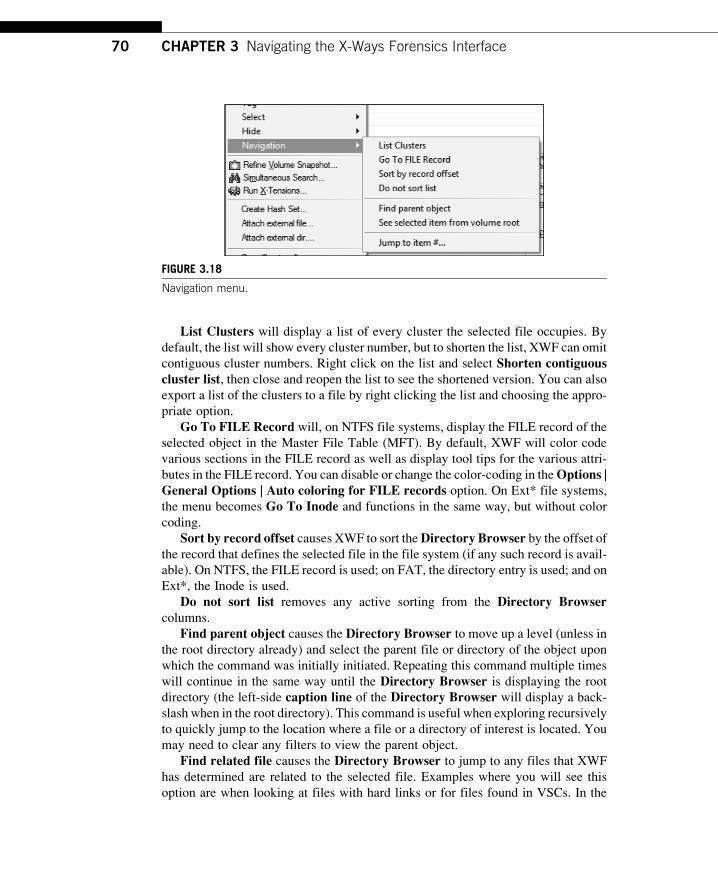
List Clusters will display a list of every cluster the selected file occupies. By
default, the list will show every cluster number, but to shorten the list, XWF can omit
contiguous cluster numbers. Right click on the list and select Shorten contiguouscluster list, then close and reopen the list to see the shortened version. You can alsoexport a list of the clusters to a file by right clicking the list and choosing the appro-
priate option.
Go To FILE Record will, on NTFS file systems, display the FILE record of the
selected object in the Master File Table (MFT). By default, XWF will color code
various sections in the FILE record as well as display tool tips for the various attri-
butes in the FILE record. You can disable or change the color-coding in theOptions |General Options | Auto coloring for FILE records option. On Ext* file systems,
the menu becomes Go To Inode and functions in the same way, but without color
coding.
Sort by record offset causes XWF to sort theDirectory Browser by the offset ofthe record that defines the selected file in the file system (if any such record is avail-
able). On NTFS, the FILE record is used; on FAT, the directory entry is used; and on
Ext*, the Inode is used.
Do not sort list removes any active sorting from the Directory Browsercolumns.
Find parent object causes the Directory Browser to move up a level (unless in
the root directory already) and select the parent file or directory of the object upon
which the command was initially initiated. Repeating this command multiple times
will continue in the same way until the Directory Browser is displaying the root
directory (the left-side caption line of the Directory Browser will display a back-
slash when in the root directory). This command is useful when exploring recursively
to quickly jump to the location where a file or a directory of interest is located. You
may need to clear any filters to view the parent object.
Find related file causes the Directory Browser to jump to any files that XWF
has determined are related to the selected file. Examples where you will see this
option are when looking at files with hard links or for files found in VSCs. In the
FIGURE 3.18
Navigation menu.
70 CHAPTER 3 Navigating the X-Ways Forensics Interface
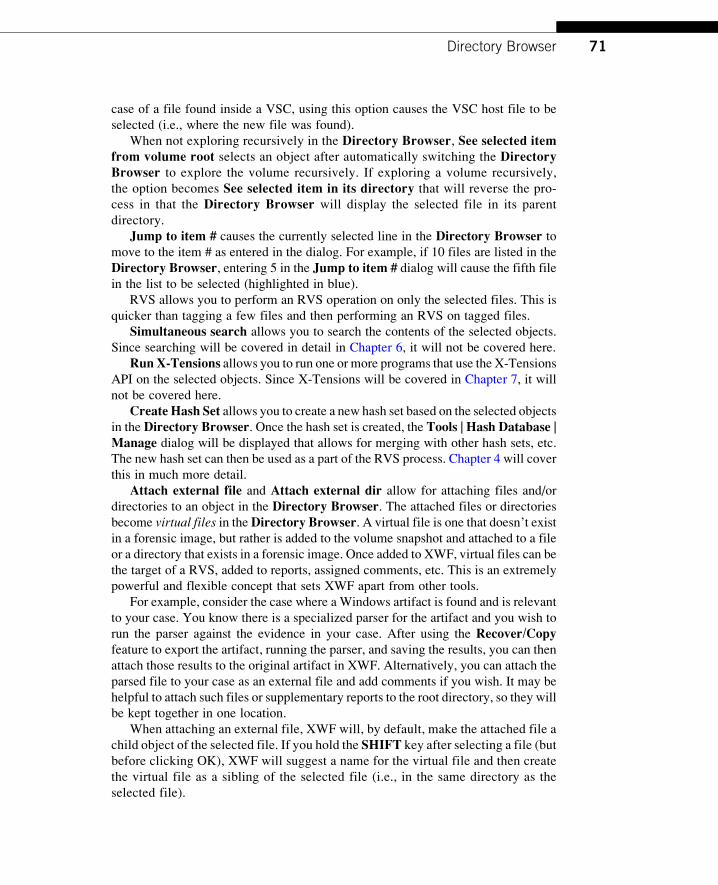
case of a file found inside a VSC, using this option causes the VSC host file to be
selected (i.e., where the new file was found).
When not exploring recursively in the Directory Browser, See selected itemfrom volume root selects an object after automatically switching the DirectoryBrowser to explore the volume recursively. If exploring a volume recursively,
the option becomes See selected item in its directory that will reverse the pro-
cess in that the Directory Browser will display the selected file in its parent
directory.
Jump to item # causes the currently selected line in the Directory Browser tomove to the item # as entered in the dialog. For example, if 10 files are listed in the
Directory Browser, entering 5 in the Jump to item # dialog will cause the fifth filein the list to be selected (highlighted in blue).
RVS allows you to perform an RVS operation on only the selected files. This is
quicker than tagging a few files and then performing an RVS on tagged files.
Simultaneous search allows you to search the contents of the selected objects.
Since searching will be covered in detail in Chapter 6, it will not be covered here.
RunX-Tensions allows you to run one or more programs that use the X-Tensions
API on the selected objects. Since X-Tensions will be covered in Chapter 7, it will
not be covered here.
Create Hash Set allows you to create a new hash set based on the selected objects
in the Directory Browser. Once the hash set is created, the Tools | Hash Database |Manage dialog will be displayed that allows for merging with other hash sets, etc.
The new hash set can then be used as a part of the RVS process. Chapter 4 will cover
this in much more detail.
Attach external file and Attach external dir allow for attaching files and/or
directories to an object in the Directory Browser. The attached files or directories
become virtual files in theDirectory Browser. A virtual file is one that doesn’t exist
in a forensic image, but rather is added to the volume snapshot and attached to a file
or a directory that exists in a forensic image. Once added to XWF, virtual files can be
the target of a RVS, added to reports, assigned comments, etc. This is an extremely
powerful and flexible concept that sets XWF apart from other tools.
For example, consider the case where a Windows artifact is found and is relevant
to your case. You know there is a specialized parser for the artifact and you wish to
run the parser against the evidence in your case. After using the Recover/Copyfeature to export the artifact, running the parser, and saving the results, you can then
attach those results to the original artifact in XWF. Alternatively, you can attach the
parsed file to your case as an external file and add comments if you wish. It may be
helpful to attach such files or supplementary reports to the root directory, so they will
be kept together in one location.
When attaching an external file, XWF will, by default, make the attached file a
child object of the selected file. If you hold the SHIFT key after selecting a file (but
before clicking OK), XWF will suggest a name for the virtual file and then create
the virtual file as a sibling of the selected file (i.e., in the same directory as the
selected file).
71Directory Browser
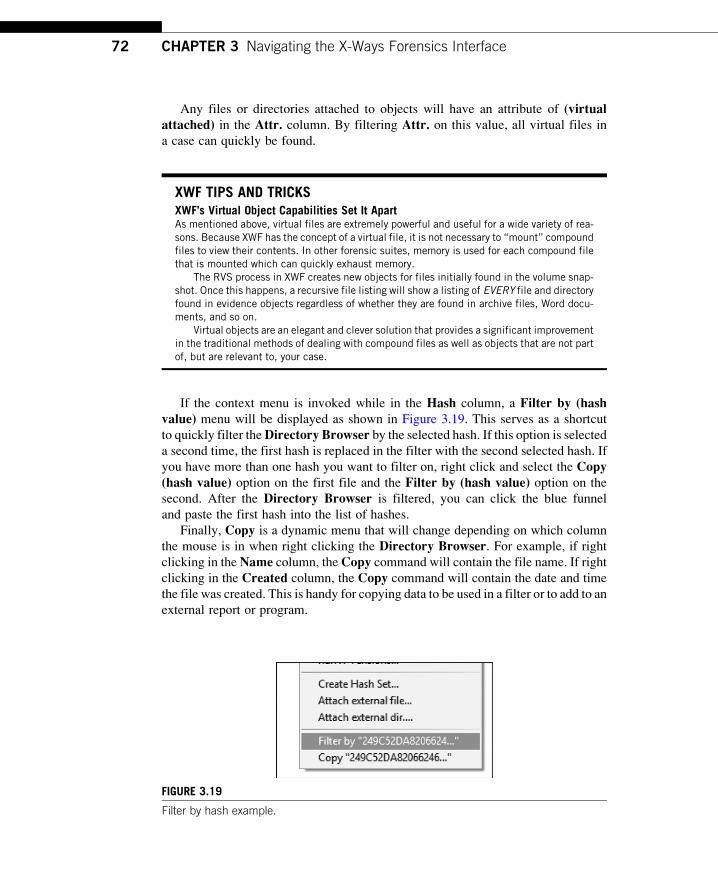
Any files or directories attached to objects will have an attribute of (virtualattached) in the Attr. column. By filtering Attr. on this value, all virtual files in
a case can quickly be found.
XWF TIPS AND TRICKSXWF’s Virtual Object Capabilities Set It ApartAs mentioned above, virtual files are extremely powerful and useful for a wide variety of rea-sons. Because XWF has the concept of a virtual file, it is not necessary to “mount” compoundfiles to view their contents. In other forensic suites, memory is used for each compound filethat is mounted which can quickly exhaust memory.
The RVS process in XWF creates new objects for files initially found in the volume snap-shot. Once this happens, a recursive file listing will show a listing of EVERY file and directoryfound in evidence objects regardless of whether they are found in archive files, Word docu-ments, and so on.
Virtual objects are an elegant and clever solution that provides a significant improvementin the traditional methods of dealing with compound files as well as objects that are not partof, but are relevant to, your case.
If the context menu is invoked while in the Hash column, a Filter by (hashvalue) menu will be displayed as shown in Figure 3.19. This serves as a shortcut
to quickly filter theDirectory Browser by the selected hash. If this option is selecteda second time, the first hash is replaced in the filter with the second selected hash. If
you have more than one hash you want to filter on, right click and select the Copy(hash value) option on the first file and the Filter by (hash value) option on the
second. After the Directory Browser is filtered, you can click the blue funnel
and paste the first hash into the list of hashes.
Finally, Copy is a dynamic menu that will change depending on which column
the mouse is in when right clicking the Directory Browser. For example, if right
clicking in the Name column, the Copy command will contain the file name. If right
clicking in the Created column, the Copy command will contain the date and time
the file was created. This is handy for copying data to be used in a filter or to add to an
external report or program.
FIGURE 3.19
Filter by hash example.
72 CHAPTER 3 Navigating the X-Ways Forensics Interface
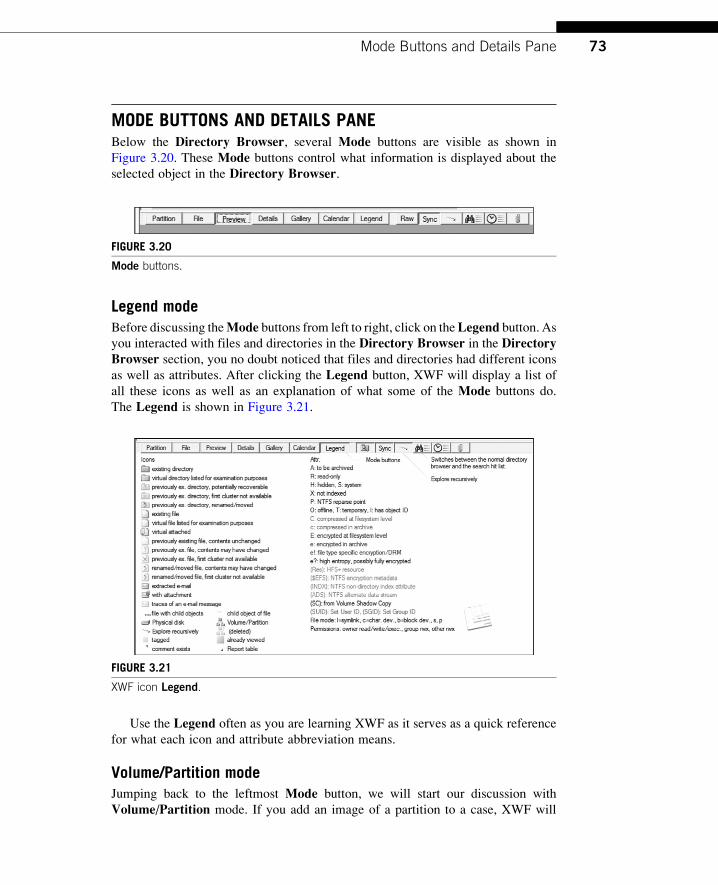
MODE BUTTONS AND DETAILS PANEBelow the Directory Browser, several Mode buttons are visible as shown in
Figure 3.20. These Mode buttons control what information is displayed about the
selected object in the Directory Browser.
Legend modeBefore discussing theMode buttons from left to right, click on theLegend button. Asyou interacted with files and directories in the Directory Browser in the DirectoryBrowser section, you no doubt noticed that files and directories had different icons
as well as attributes. After clicking the Legend button, XWF will display a list of
all these icons as well as an explanation of what some of the Mode buttons do.
The Legend is shown in Figure 3.21.
Use the Legend often as you are learning XWF as it serves as a quick reference
for what each icon and attribute abbreviation means.
Volume/Partition modeJumping back to the leftmost Mode button, we will start our discussion with
Volume/Partition mode. If you add an image of a partition to a case, XWF will
FIGURE 3.20
Mode buttons.
FIGURE 3.21
XWF icon Legend.
73Mode Buttons and Details Pane
use the term Volume in the button. If you add an image of an entire hard drive,
XWF will use the term Partition.When in Volume/Partition mode, the contents of the object selected in the
Directory Browser will be shown in hexadecimal.
The leftmost side of the window contains the offset of the selected file from the
beginning of the partition. Clicking the numbers in the Offset column toggles
between the offsets being displayed in hexadecimal and decimal notation.
Scrolling up or down allows you to see the currently selected object in the context
of the entire partition. As you click different areas of the file, notice that the infor-mation pane on the right side is updated to reflect the current cluster number, phys-
ical and logical sector numbers, etc. Clicking the info pane causes it to scroll in order
to be able to view all the details contained in the info pane. Right clicking the info
pane allows for copying of certain pieces of information to the clipboard.
Right clicking while inVolume/Partitionmode will display a context menu. The
options in this context menu will be discussed in Chapter 7.
Disk modeWhen an evidence object that represents a disk is selected, Diskmode will be active.
This mode works essentially the same asVolume/Partitionmode does, but the items
contained in the Directory Browser are partitions, unpartitionable space, etc.
File modeThe next mode is File mode. File mode works exactly like Volume/Partition mode
with the exception that the hex viewer will only display the contents of a single file.
Slack space is displayed in green unless Specialist | Highlight slack space is
unchecked or Directory Browser Options, Filters | Open and search files incl.slack is unchecked. Additionally, areas at the end of a file that are declared as unin-
itialized by an NTFS or exFAT file system are displayed in red.
Filemode will take any file system-level compression into account when display-
ing the file. The file will also be displayed contiguously regardless of whether the file
is fragmented.
Preview modeIn Preview mode, if XWF has a built-in viewer for the selected file, that viewer will
be used to display a preview of the file. For example, selecting a jpg image will result
in the internal XWF viewer displaying the image unlessOptions | Viewer Programs| For pictures, too is checked.
If XWF does not have a built-in viewer for a particular file type, Preview mode
behaves differently depending on whether the viewer component is active. If the
viewer component is active, it will provide a preview of the selected file if the viewer
component knows how to decode that file.
74 CHAPTER 3 Navigating the X-Ways Forensics Interface
XWF TIPS AND TRICKSTo View or not to ViewThe quickest way to know if you are using an internal viewer vs. the viewer component is toright click the Preview mode pane. If you get a context menu, the viewer component is pro-viding the preview. If no context menu is available, an XWF internal viewer is being used.
Using the viewer component’s context menu allows you to print, copy the selected text tothe clipboard, etc.
If the viewer component doesn’t understand how to decode a file or if the viewer
component is not being used at all, Preview mode will show a partial preview of the
file by displaying the ASCII characters of a portion of the file.
Preview mode is also used to see the internal structures of such things as Win-
dows shortcut (.lnk) files in an easy to read format.
When in Preview mode, an extra button will be displayed that, when clicked,
allows for a noninterpreted view of the file to be seen. Clicking on the Raw button
toggles between the interpreted and noninterpreted view of the selected file. For exam-
ple, this is useful if you want to view HTML code as opposed to a renderedWeb page.
Details modeDetails mode displays the information contained in all of the Directory Browsercolumns regardless of whether they are hidden. Other information, such as a sum-
mary of the object’s permissions and an object’s internal metadata, is also displayed
(regardless of whether it was extracted as part of the RVS process).
Details mode works in conjunction with the viewer component. If the viewer
component isn’t active, Details mode will display raw HTML.
Gallery modeGallery mode will display any files in the Directory Browser that have been deter-mined to be image files of a supported type as thumbnails. For nonimage files, a sum-
mary is displayed that includes the file name and file size. Gallery mode uses XWF
internal viewers to display images. To view an image in a separate window, double
click the thumbnail. Click anywhere in the window to close it.
When the mouse cursor is over the Gallery window, the mouse wheel will scroll
the gallery up or down one page at a time. A page is determined by howmany thumb-
nails are visible in the gallery at once.
In the upper left of each thumbnail is a tag area that can be used to tag files of
interest from the gallery. Right clicking a thumbnail in gallery mode will display
the same context menu as if the file was right clicked in the Directory Browser.It is recommended to filter on the Type column before using gallery view as it
will hide nonpicture files from theDirectory Browserwhich makes reviewingmany
images easier.
75Mode Buttons and Details Pane
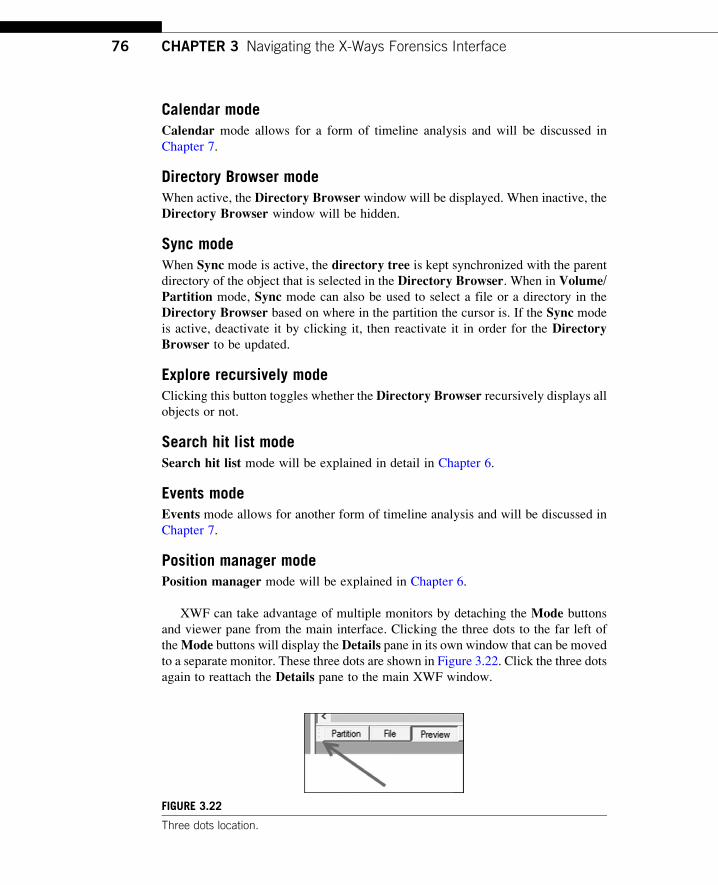
Calendar modeCalendar mode allows for a form of timeline analysis and will be discussed in
Chapter 7.
Directory Browser modeWhen active, the Directory Browser window will be displayed. When inactive, the
Directory Browser window will be hidden.
Sync modeWhen Sync mode is active, the directory tree is kept synchronized with the parent
directory of the object that is selected in the Directory Browser. When in Volume/Partition mode, Sync mode can also be used to select a file or a directory in the
Directory Browser based on where in the partition the cursor is. If the Sync mode
is active, deactivate it by clicking it, then reactivate it in order for the DirectoryBrowser to be updated.
Explore recursively modeClicking this button toggles whether the Directory Browser recursively displays allobjects or not.
Search hit list modeSearch hit list mode will be explained in detail in Chapter 6.
Events modeEvents mode allows for another form of timeline analysis and will be discussed in
Chapter 7.
Position manager modePosition manager mode will be explained in Chapter 6.
XWF can take advantage of multiple monitors by detaching the Mode buttons
and viewer pane from the main interface. Clicking the three dots to the far left of
theMode buttons will display theDetails pane in its own window that can be moved
to a separate monitor. These three dots are shown in Figure 3.22. Click the three dots
again to reattach the Details pane to the main XWF window.
FIGURE 3.22
Three dots location.
76 CHAPTER 3 Navigating the X-Ways Forensics Interface
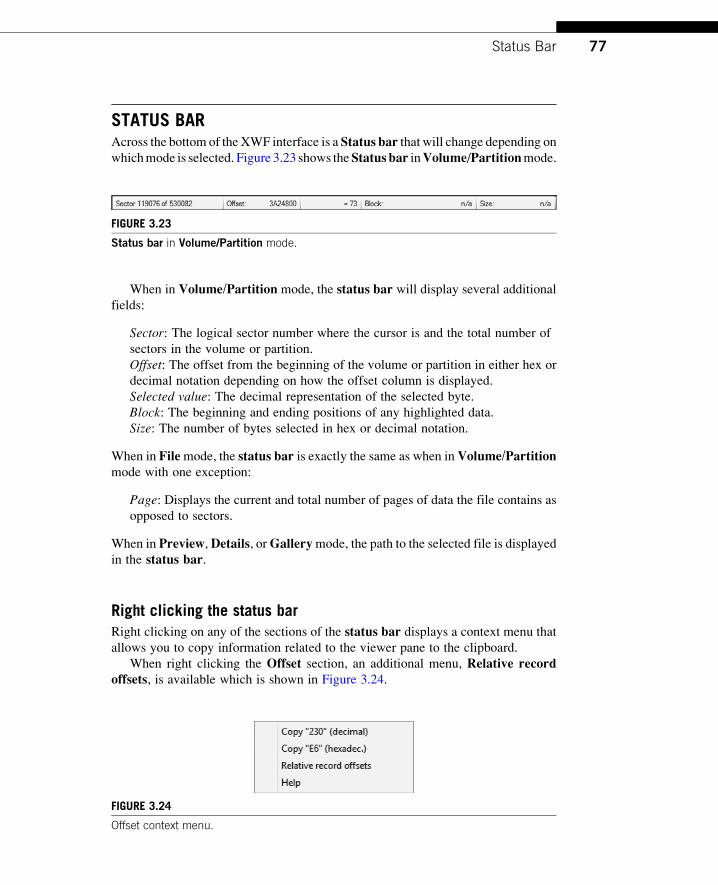
STATUS BARAcross the bottom of theXWF interface is a Status bar that will change depending onwhichmode is selected. Figure 3.23 shows theStatus bar inVolume/Partitionmode.
When in Volume/Partition mode, the status bar will display several additional
fields:
Sector: The logical sector number where the cursor is and the total number of
sectors in the volume or partition.
Offset: The offset from the beginning of the volume or partition in either hex or
decimal notation depending on how the offset column is displayed.
Selected value: The decimal representation of the selected byte.
Block: The beginning and ending positions of any highlighted data.
Size: The number of bytes selected in hex or decimal notation.
When in Filemode, the status bar is exactly the same as when inVolume/Partitionmode with one exception:
Page: Displays the current and total number of pages of data the file contains as
opposed to sectors.
When in Preview,Details, orGallerymode, the path to the selected file is displayed
in the status bar.
Right clicking the status barRight clicking on any of the sections of the status bar displays a context menu that
allows you to copy information related to the viewer pane to the clipboard.
When right clicking the Offset section, an additional menu, Relative recordoffsets, is available which is shown in Figure 3.24.
FIGURE 3.23
Status bar in Volume/Partition mode.
FIGURE 3.24
Offset context menu.
77Status Bar
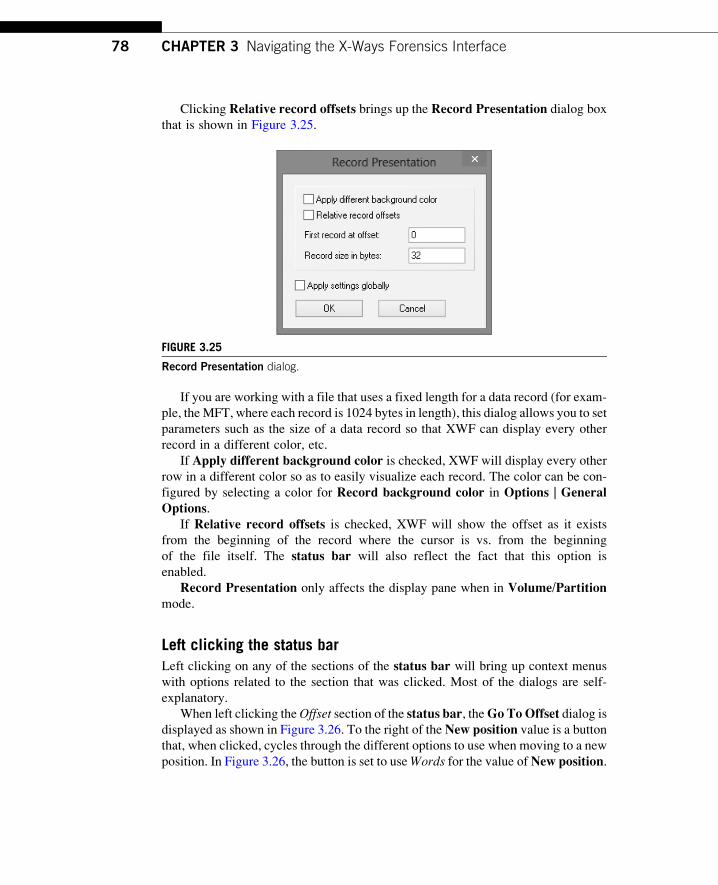
Clicking Relative record offsets brings up the Record Presentation dialog box
that is shown in Figure 3.25.
If you are working with a file that uses a fixed length for a data record (for exam-
ple, theMFT, where each record is 1024 bytes in length), this dialog allows you to set
parameters such as the size of a data record so that XWF can display every other
record in a different color, etc.
If Apply different background color is checked, XWF will display every other
row in a different color so as to easily visualize each record. The color can be con-
figured by selecting a color for Record background color in Options | GeneralOptions.
If Relative record offsets is checked, XWF will show the offset as it exists
from the beginning of the record where the cursor is vs. from the beginning
of the file itself. The status bar will also reflect the fact that this option is
enabled.
Record Presentation only affects the display pane when in Volume/Partitionmode.
Left clicking the status barLeft clicking on any of the sections of the status bar will bring up context menus
with options related to the section that was clicked. Most of the dialogs are self-
explanatory.
When left clicking theOffset section of the status bar, theGo ToOffset dialog isdisplayed as shown in Figure 3.26. To the right of the New position value is a button
that, when clicked, cycles through the different options to use when moving to a new
position. In Figure 3.26, the button is set to useWords for the value ofNew position.
FIGURE 3.25
Record Presentation dialog.
78 CHAPTER 3 Navigating the X-Ways Forensics Interface
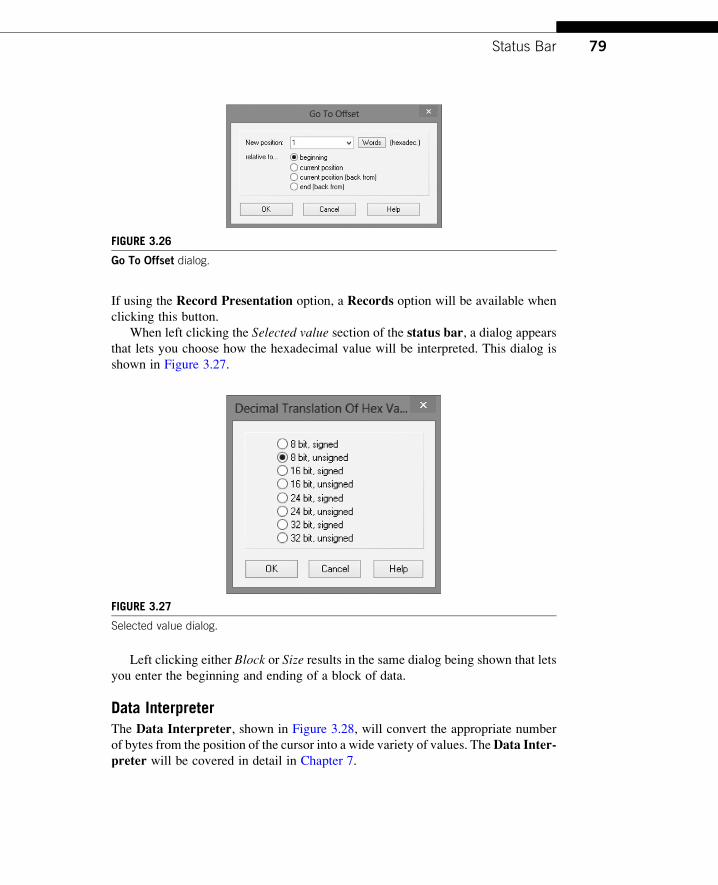
If using the Record Presentation option, a Records option will be available when
clicking this button.
When left clicking the Selected value section of the status bar, a dialog appears
that lets you choose how the hexadecimal value will be interpreted. This dialog is
shown in Figure 3.27.
Left clicking either Block or Size results in the same dialog being shown that lets
you enter the beginning and ending of a block of data.
Data InterpreterThe Data Interpreter, shown in Figure 3.28, will convert the appropriate number
of bytes from the position of the cursor into a wide variety of values. TheData Inter-preter will be covered in detail in Chapter 7.
FIGURE 3.26
Go To Offset dialog.
FIGURE 3.27
Selected value dialog.
79Status Bar
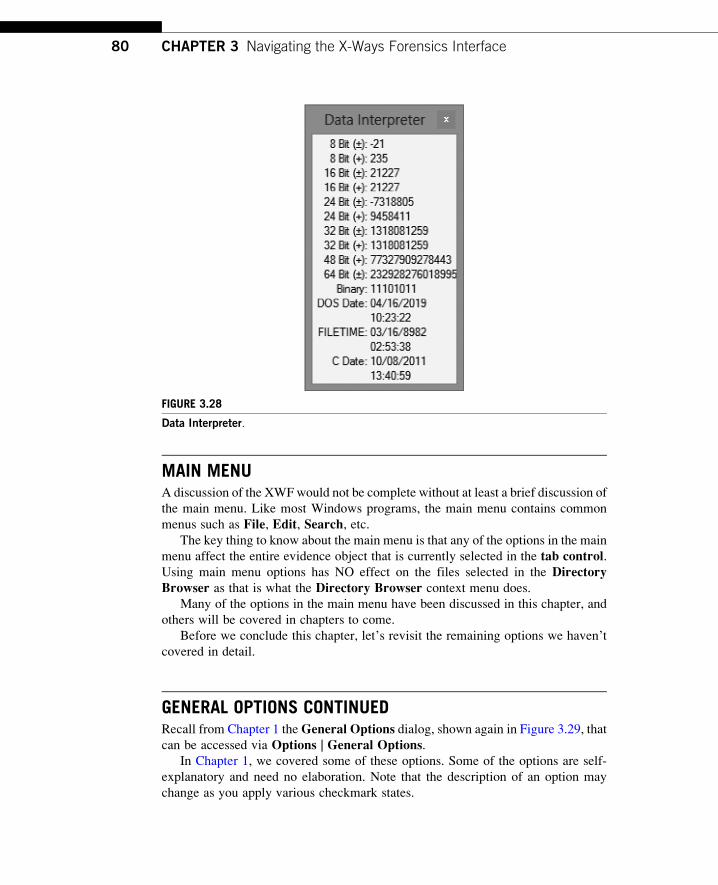
MAIN MENUA discussion of the XWFwould not be complete without at least a brief discussion of
the main menu. Like most Windows programs, the main menu contains common
menus such as File, Edit, Search, etc.The key thing to know about the main menu is that any of the options in the main
menu affect the entire evidence object that is currently selected in the tab control.Using main menu options has NO effect on the files selected in the DirectoryBrowser as that is what the Directory Browser context menu does.
Many of the options in the main menu have been discussed in this chapter, and
others will be covered in chapters to come.
Before we conclude this chapter, let’s revisit the remaining options we haven’t
covered in detail.
GENERAL OPTIONS CONTINUEDRecall from Chapter 1 theGeneral Options dialog, shown again in Figure 3.29, thatcan be accessed via Options | General Options.
In Chapter 1, we covered some of these options. Some of the options are self-
explanatory and need no elaboration. Note that the description of an option may
change as you apply various checkmark states.
FIGURE 3.28
Data Interpreter.
80 CHAPTER 3 Navigating the X-Ways Forensics Interface
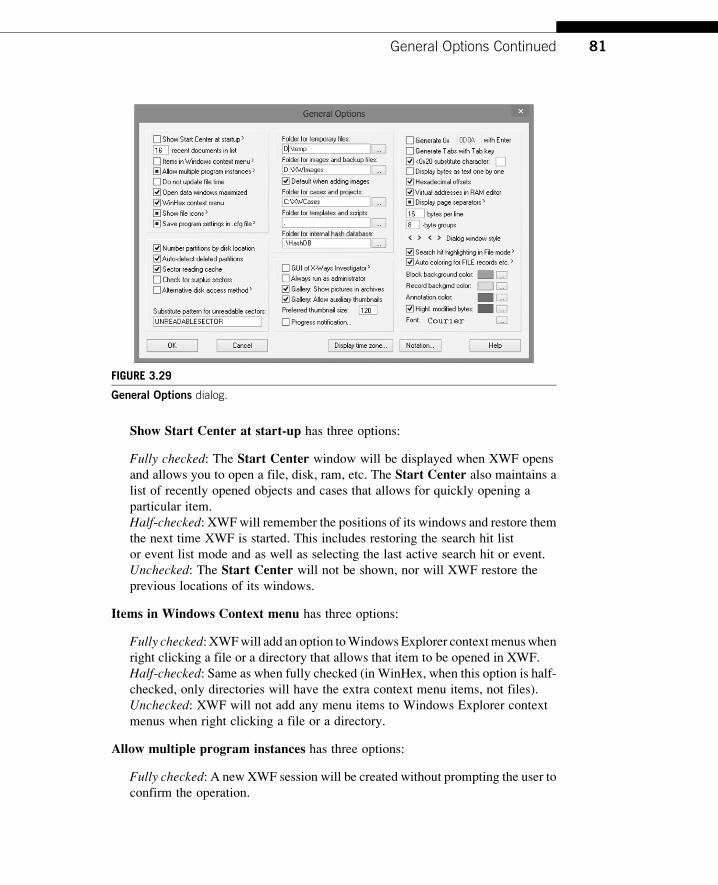
Show Start Center at start-up has three options:
Fully checked: The Start Center window will be displayed when XWF opens
and allows you to open a file, disk, ram, etc. The Start Center also maintains a
list of recently opened objects and cases that allows for quickly opening a
particular item.
Half-checked: XWFwill remember the positions of its windows and restore them
the next time XWF is started. This includes restoring the search hit list
or event list mode and as well as selecting the last active search hit or event.
Unchecked: The Start Center will not be shown, nor will XWF restore the
previous locations of its windows.
Items in Windows Context menu has three options:
Fully checked: XWFwill add an option toWindowsExplorer contextmenuswhen
right clicking a file or a directory that allows that item to be opened in XWF.
Half-checked: Same as when fully checked (in WinHex, when this option is half-
checked, only directories will have the extra context menu items, not files).
Unchecked: XWF will not add any menu items to Windows Explorer context
menus when right clicking a file or a directory.
Allow multiple program instances has three options:
Fully checked: A new XWF session will be created without prompting the user to
confirm the operation.
FIGURE 3.29
General Options dialog.
81General Options Continued
Half-checked: XWF will ask the user to confirm whether to open a new XWF
session.
Unchecked: XWF becomes a single-instance application. Subsequent execution
of XWF results in the already running copy of XWF gaining focus.
If checked, Do not update file time the original timestamps will be preserved when
saving a file after opening via the File | Open menu.
If checked, Open data windows maximized forces windows opened in the tabcontrol to be maximized. The window state can be managed via theWindow menu
at the top of the XWF interface.
If checked,WinHex context menu displays a context menu when right clicking
the Details pane when in Volume/Partition or File mode. The context menu
allows for defining a block, adding a position to the Position Manager, or copyingthe selected values. If unchecked, right clicking results in a block being selected
from offset 0 to the position of the cursor. These options will be covered in
Chapter 7.
Show file icons is not used in XWF. See the user manual for how it is used in
WinHex.
Save program settings in .cfg file has three options:
Fully checked: XWF saves all program options any time a dialog box is
dismissed via the OK button.
Half-checked: XWF saves all program options when XWF exits cleanly.
Unchecked: XWF will never save program options unless holding SHIFT when
exiting.
Alternate disk accessmethodhas three options. It is recommended to leave this option
uncheckedas this is themost efficient accessmethod.When fully orhalf-checked,XWF
allows for entering a “timeout” value that is used when reading data. See the XWF
manual for a full description of these options and when you may need to use them.
GUI of X-Ways Investigator has three options:
Fully checked: XWF uses a simplified user interface that allows for opening of
case files.
Half-checked: XWF uses a simplified user interface and is only capable of
opening XWF container files, not regular images or actual disks.
Unchecked: The full XWF interface will be used.
If checked, Gallery: Allow auxiliary thumbnails forces any embedded thumbnail
images inside larger images to be used when inGallerymode. This can speed up the
gallery when viewing high-resolution images. If stills are extracted from video files,
one of the still frames will be used as a thumbnail for the video.
Checking Progress notification brings up a dialog that allows for the configu-
ration for various types of notification events such as a text file log and an e-mail
message. This is useful for time sensitive but long-running operations in that you
can be notified of progress at the interval specified.
82 CHAPTER 3 Navigating the X-Ways Forensics Interface
TheGenerate Tabs with Tab key is used with WinHex more than with XWF. If
unchecked, pressing TAB moves the focus between the hexadecimal display and the
text display of a file. In XWF, the TAB key changes focus between the directorytree, Directory Browser, and Details pane. When checked, WinHex will insert
a tab character when the TAB key is pressed. In XWF, nothing happens when the
TAB key is pressed.
Display page separators has three options:
Fully checked: XWF will show separators between pages in a file (when a file
opened and has a tab in the tab control) and between sectors when in Volume/Partition or File mode.
Half-checked: XWF will only show separators between sectors.
Unchecked: No separators will be shown.
The arrows to the left of Dialog window style allow for changing of the visual style
XWF uses when drawing certain components of the user interface.
Search hit highlighting in File mode has three options:
Fully checked: XWF will highlight search hits whether or not the search hit list is
visible when in File mode.
Half-checked: XWF will only highlight the search hit when the search hit list
is visible.
Unchecked: XWF will not highlight search hits at all.
Auto coloring for FILE records etc. has three options:
Fully checked: XWF will, for certain files such as NTFS FILE records,
timestamps in registry hives, and shortcut files, color-code different pieces of
data regardless of the file system where such files are found.
Half-checked: FILE record highlighting is not attempted on partitionable disks or
non-NTFS volumes, but only on NTFS volumes/partitions.
Unchecked: No color highlighting will be performed.
Clicking theNotation button allows for setting things such as the format to use when
displaying dates and times, time zone bias, etc.
Checking the Seconds: digits after decimal option will show fractions of a sec-
ond (when timestamps have a high level of resolution). We recommend enabling
both the Seconds and Display time zone bias options.Display file sizes always in bytes has three options:
Fully checked: File sizes will always be displayed in bytes and not rounded at all.Half-checked: Only items listed inside partitions will have their file sizes listed in
bytes, but items outside partitions including individual partitions, start sectors,
unpartitionable space, etc. will use the common notation suffixes such as KB,
MB, and GB.
Unchecked: XWFwill always display file sizes using suffixes ofKB,MB,GB, etc.
83General Options Continued

If you wish to revert all settings to their default values, not just those in the GeneralOptions, use the Help | Setup | Initialize menu item.
VOLUME SNAPSHOT OPTIONSThese options will be discussed in detail in Chapter 4.
VIEWER PROGRAMS OPTIONS CONTINUEDWe also saw most of the Viewer Programs options when we initially configured
XWF in Chapter 1. The remaining options that were not discussed are explained
below.
View multiple pictures simultaneously, when checked, allows for viewing
more than one graphics file in its own window at a time. If unchecked, only one file
will be viewable at a time.
Alternative preview of .eml has three options:
Fully checked: The e-mail headers are displayed in a table for easier viewing.
Half-checked: The e-mail headers (subject, date, sender, etc.) of e-mail files are
excluded in Preview mode (but you can always see the headers in Raw mode).
You can see subject, sender, recipient, and dates already in the DirectoryBrowser, and attachments are listed when exploring the parent .eml file.
Unchecked: The e-mail headers are displayed as they exist in the .eml file without
formatting.
Crash safe text decoding has three options:
Fully checked: Additional background processes will be used when decoding
files via the viewer component. This protects the main XWF process from
crashing should the viewer component encounter a file that causes it to crash.
Half-checked: Same as when fully checked with the exception that e-mail (.eml)
files will not use an additional background process when being decoded.
Unchecked: No background processes will be used when rendering text and as
such, should a file be unable to be decoded, XWF itself may crash.
If Buffer decoded text for context preview is checked, XWF will remember text
extracted from files as a result of certain operations, so searching and indexing will
be more efficient. The extracted text is stored in the volume snapshot.
SECURITY OPTIONSThe last set of XWF options to discuss is Security Options that can be viewed via
Options | Security Options. The Security Options dialog is shown in Figure 3.30.
84 CHAPTER 3 Navigating the X-Ways Forensics Interface

Output messages about exceptions has three options that control how much
detail is output in the messages window:
Fully checked: All messages will be displayed including those that have no
impact on XWF’s stability.
Half-checked: This option strikes a balance between full verbosity and only
reporting significant errors.
Unchecked: Only errors that can significantly affect the stability of XWF will be
displayed.
Regardless of which option is selected, all exceptions will be logged to a file named
error.log in the main XWF directory.
If Verify CRCs in .e01 when reading is checked, XWF will calculate and com-
pare each internal CRC value in the e01 file as the image is read.
XWF will, by default, add entries to the messages window when inefficient com-
pression is detected as it processes image files. If you do notwish to see thesemessages,
uncheck theWarn of inefficient .e01 image layout option. If you do run into an image
that uses inefficient compression, you can use XWF to create a new image and, of
course, XWF will use much more intelligent options when creating the new image.
Finally, the Strict drive letter protection option, when checked, limits XWF
in Recover/Copying files out of XWF. As outlined in the XWF manual and
Help file, when enabled, XWF will limit files being copied to the following locations:
• The drive letter that hosts the active case if one is active
• The drive letter with the directory for temporary files
• The drive letter from which XWF was run
• The drive letter that contains the directory for image files.
Disabling Strict drive letter protection removes any such restrictions on where files
are recovered.
FIGURE 3.30
Security Options.
85Security Options
SHORTCUTSForward and backward mouse buttons: Allows you to quickly jump back to the
previous directory listing in the Directory Browser.Middle click a directory in directory tree: Recursively tags and untags all items
under the selected directory in the directory tree.CTRL1Right click on folder in directory tree: Displays a context menu in the
directory tree with options for exporting of the directory subtree, etc.
Left/right arrows or the 1/2 keys on the numeric keypad: Expand and con-
tract directories one at a time in the directory tree. The * key on the numeric keypad
will recursively expand the selected directory.
CTRL1F5: Opens the Directory Browser Options, Filters dialog.CTRL1Q: Closes all open items in the tab control.CTRL1W: Closes the active item in the tab control.SHIFT1tag file: Reverses the behavior of the Tag and hide recursively option
when tagging files.
SHIFT1click on column name: Removes any secondary and tertiary sorting on
columns in the Directory Browser.SHIFT1click on column filter icon: Activates or deactivates the column filter
without displaying the column filter dialog.
ALT1Left arrow: Marks items as unviewed in the Directory Browser.ALT1Right arrow: Marks items as viewed in the Directory Browser.ALT1Up/Down arrow: Marks item as viewed in the Directory Browser and
moves to the next item.
SUMMARY
This chapter has thoroughly discussed almost every aspect of the XWF user
interface.
We started with how to interact with the directory tree after adding one or more
evidence objects to a case. We saw how to set properties of evidence objects, effi-
ciently expand and contract the directory tree, export a listing of directories, and
view directories recursively.
Next, we covered one of the most used component of XWF, the DirectoryBrowser, in conjunction with the tab control and caption line of the DirectoryBrowser. We discussed every available option in Directory Browser optionsincluding how to add or remove columns from the Directory Browser. We saw
how to sort the Directory Browser, filter on certain columns, and interact with
objects displayed in the Directory Browser.We then looked at the various modes that XWF can display files and directories.
These modes included limiting the display to a single file or directory, previewing a
file with and without the viewer component, and displaying a gallery of files that
allows for quickly reviewing many graphics files.
86 CHAPTER 3 Navigating the X-Ways Forensics Interface
Once we selected a file, we saw how to interact with that file by using the statusbar and its various options when right or left clicking the mouse.
Finally, we discussed the remaining options that were not covered in a previous
chapter, including the remaining General Options, Viewer Options, and SecurityOptions.
Now that you have a thorough understanding of every aspect of the XWF user
interface, we can move on to discuss some of the features that really set XWF apart
from any other forensic program.
87Summary

Intentionally left as blank
CHAPTER
Refine Volume Snapshot 4INFORMATION IN THIS CHAPTER
• Volume snapshot options
• Starting RVS
• RVS options
• Results of an RVS
• Shortcuts
• Summary
INTRODUCTION
The Refine Volume Snapshot (RVS) is perhaps the most important and powerful fea-
ture of X-Ways Forensics (XWF), yet it is also one of the simplest to configure and
use. The value of the RVS cannot be overstated.
Back in Chapter 2, the concept of a volume snapshot (VS) was introduced. A VS
is a database created by XWF that is used to store all of the information related to
items in an evidence object. Each evidence object gets its own VS. As you navigate
the XWF GUI, the VS is queried and the results are displayed in the directory tree,Directory Browser, etc. As XWF interacts with files or other objects in a case for
certain functions, the results are stored in the VS. This includes such things as mark-
ing files as viewed, tagged files, hidden files, etc.
XWF TIPS AND TRICKSThe Rest of the StoryFor more detail on the types of information stored in a VS, refer to the Case Data Storage sec-tion of http://www.x-ways.net/winhex/setup.html.
The VS serves as the starting point for the RVS process. Essentially, the VS con-
tains everything XWF “knows” about evidence objects (as it pertains to files and
directories) in a case. By using RVS, XWF can add even more data to a VS by per-
forming certain actions against evidence objects. This includes such things as finding
embedded thumbnails, exploring archive contents, extracting file metadata, display-
ing the contents of database tables, extracting e-mail, etc.
89
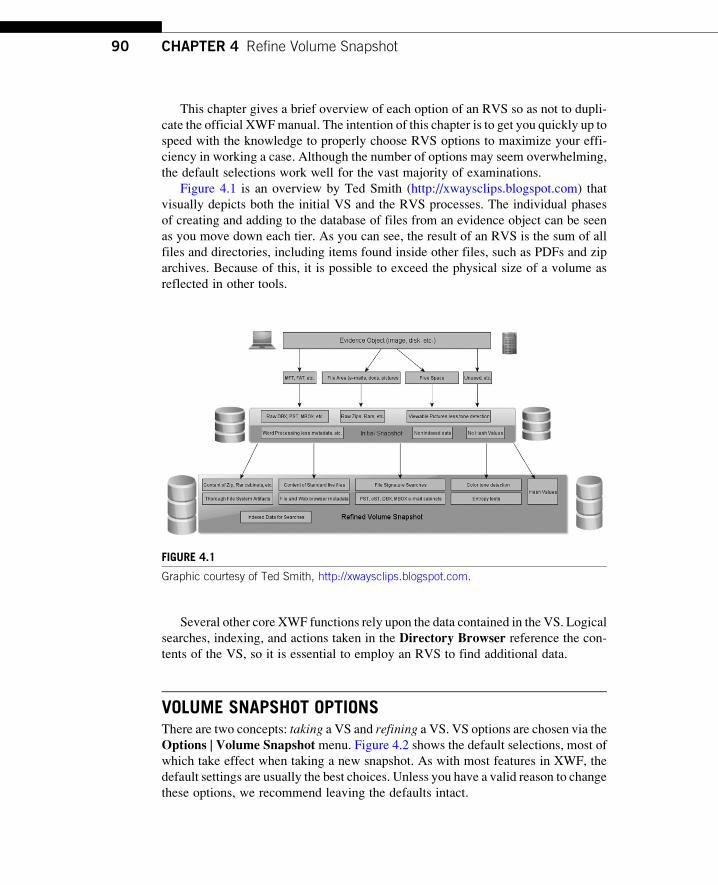
This chapter gives a brief overview of each option of an RVS so as not to dupli-
cate the official XWFmanual. The intention of this chapter is to get you quickly up to
speed with the knowledge to properly choose RVS options to maximize your effi-
ciency in working a case. Although the number of options may seem overwhelming,
the default selections work well for the vast majority of examinations.
Figure 4.1 is an overview by Ted Smith (http://xwaysclips.blogspot.com) that
visually depicts both the initial VS and the RVS processes. The individual phases
of creating and adding to the database of files from an evidence object can be seen
as you move down each tier. As you can see, the result of an RVS is the sum of all
files and directories, including items found inside other files, such as PDFs and zip
archives. Because of this, it is possible to exceed the physical size of a volume as
reflected in other tools.
Several other core XWF functions rely upon the data contained in the VS. Logical
searches, indexing, and actions taken in the Directory Browser reference the con-tents of the VS, so it is essential to employ an RVS to find additional data.
VOLUME SNAPSHOT OPTIONSThere are two concepts: taking a VS and refining a VS. VS options are chosen via the
Options | Volume Snapshot menu. Figure 4.2 shows the default selections, most of
which take effect when taking a new snapshot. As with most features in XWF, the
default settings are usually the best choices. Unless you have a valid reason to change
these options, we recommend leaving the defaults intact.
FIGURE 4.1
Graphic courtesy of Ted Smith, http://xwaysclips.blogspot.com.
90 CHAPTER 4 Refine Volume Snapshot
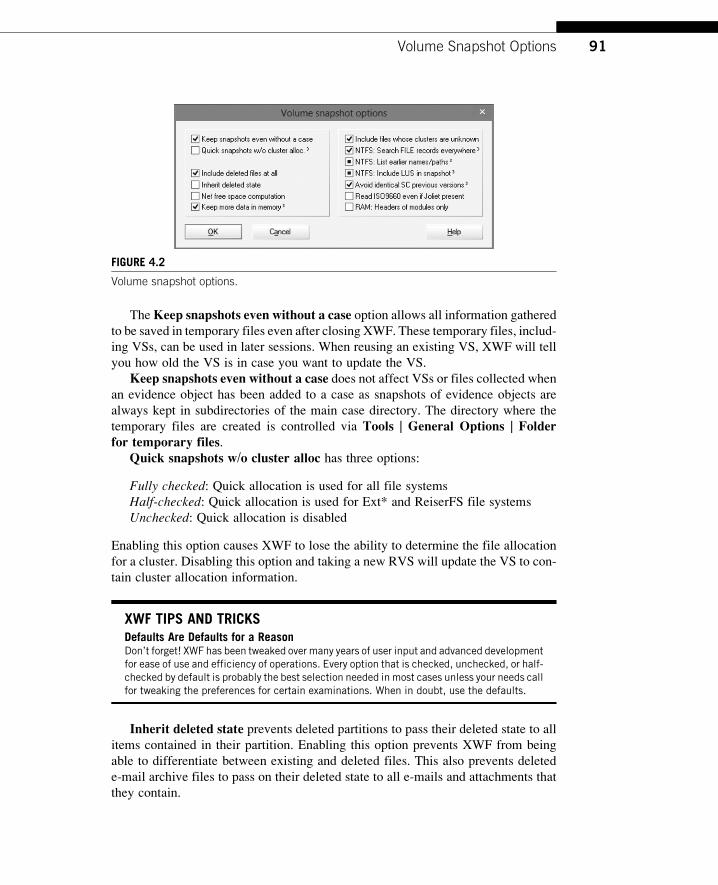
TheKeep snapshots even without a case option allows all information gathered
to be saved in temporary files even after closing XWF. These temporary files, includ-
ing VSs, can be used in later sessions. When reusing an existing VS, XWF will tell
you how old the VS is in case you want to update the VS.
Keep snapshots even without a case does not affect VSs or files collected whenan evidence object has been added to a case as snapshots of evidence objects are
always kept in subdirectories of the main case directory. The directory where the
temporary files are created is controlled via Tools | General Options | Folderfor temporary files.
Quick snapshots w/o cluster alloc has three options:
Fully checked: Quick allocation is used for all file systems
Half-checked: Quick allocation is used for Ext* and ReiserFS file systems
Unchecked: Quick allocation is disabled
Enabling this option causes XWF to lose the ability to determine the file allocation
for a cluster. Disabling this option and taking a new RVS will update the VS to con-
tain cluster allocation information.
XWF TIPS AND TRICKSDefaults Are Defaults for a ReasonDon’t forget! XWF has been tweaked over many years of user input and advanced developmentfor ease of use and efficiency of operations. Every option that is checked, unchecked, or half-checked by default is probably the best selection needed in most cases unless your needs callfor tweaking the preferences for certain examinations. When in doubt, use the defaults.
Inherit deleted state prevents deleted partitions to pass their deleted state to all
items contained in their partition. Enabling this option prevents XWF from being
able to differentiate between existing and deleted files. This also prevents deleted
e-mail archive files to pass on their deleted state to all e-mails and attachments that
they contain.
FIGURE 4.2
Volume snapshot options.
91Volume Snapshot Options
Net free space computation determines what free space XWF will gather into
the Free space virtual file that is found in the root directory of an evidence object.
When this option is enabled, the Free space file will be smaller since the clusters that
are allocated to previously existing files are not included in the computation of free
space. When search results are found in free space, you should only reference the
physical offset in Partition/Volume mode (because that’s where that data actually
live on disk) and not any offset when in File mode.
Keep more data in memory has three options:
Fully checked: Timestamps are kept in memory in addition to everything kept
in memory when half-checked
Half-checked: Additional VS data (start sector number, hard link count, skin
color percentage, etc.) are kept in memory
Unchecked: No additional data are kept in memory
NTFS: Search FILE records everywhere has three options:
Fully checked: Searches in all sectors of the partition
Half-checked: Searches in only volume shadow copy (SC) host files
Unchecked: Disable searching for FILE records
NTFS: List earlier names/paths has three options:
Fully checked: Earlier instances of names/paths are added to the VS
Half-checked: Earlier instances of names/paths are annotated via comments, but
the names and paths themselves are not added to the VS as additional files
Unchecked: Earlier names/paths are not reported at all
NTFS: Include LUS in snapshot has three options:
Fully checked: Include all logged utility streams (LUSs) in the VS
Half-checked: Include only non-$EFS (Encrypting File System) streams
Unchecked: Do not include any LUS information in the VS
A LUS is similar to a data stream but logged in the NTFS log file.
Avoid identical SC previous versions has three options:
Fully checked: Prevents exact duplicates of files from being added to the VS
where duplicates are determined by the contents of files only, not by modification
dates. Up to 128 MB of files are compared
Half-checked: The same as when fully checked with the exception that only
16 MB of data are compared
Unchecked: Duplicate files from volume SCs will be included in the VS
For read errors on a CD/DVDduring a snapshot or during disc imaging, using theReadISO9660 even if Joliet present option gives an additional chance to recover direc-
tories and files if the data structures are located in readable sectors in the ISO9660 area.
TheRAM:Headers of modules only option enables allocation of memory pages
in RAM mode to compute hashes for comparison against known hash sets.
92 CHAPTER 4 Refine Volume Snapshot
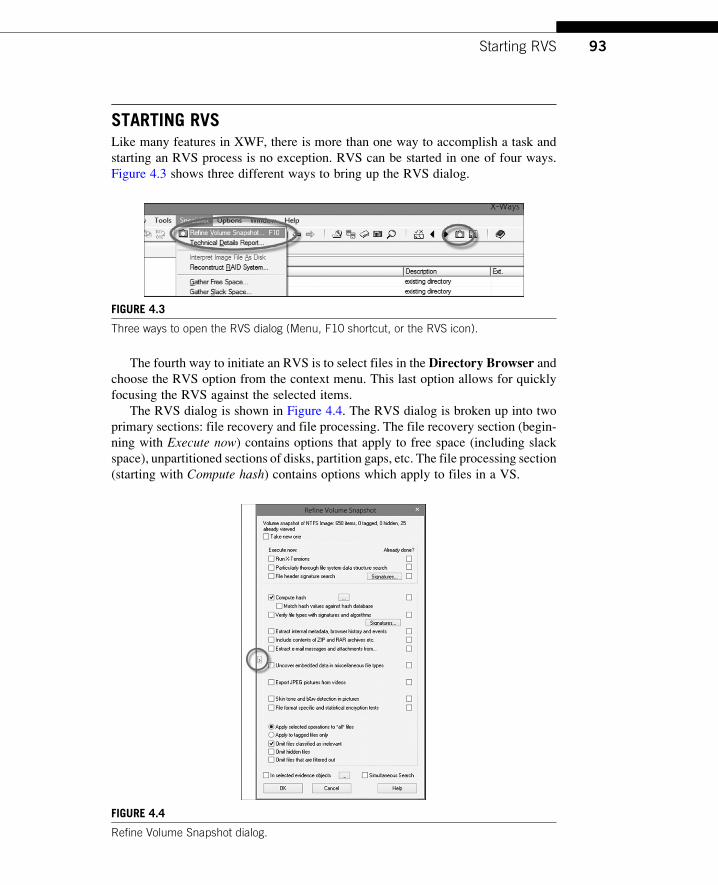
STARTING RVSLike many features in XWF, there is more than one way to accomplish a task and
starting an RVS process is no exception. RVS can be started in one of four ways.
Figure 4.3 shows three different ways to bring up the RVS dialog.
The fourth way to initiate an RVS is to select files in the Directory Browser andchoose the RVS option from the context menu. This last option allows for quickly
focusing the RVS against the selected items.
The RVS dialog is shown in Figure 4.4. The RVS dialog is broken up into two
primary sections: file recovery and file processing. The file recovery section (begin-
ning with Execute now) contains options that apply to free space (including slack
space), unpartitioned sections of disks, partition gaps, etc. The file processing section
(starting with Compute hash) contains options which apply to files in a VS.
FIGURE 4.3
Three ways to open the RVS dialog (Menu, F10 shortcut, or the RVS icon).
FIGURE 4.4
Refine Volume Snapshot dialog.
93Starting RVS

Before explaining the options in these two sections, a few other items merit
discussion.
Take new one and default RVS optionsThe Take new one option is used to force the generation of a new VS. Checking the
box brings up a warning message that asks you to confirm your decision. As shown in
Figure 4.5, taking a newRVSwill cause a loss of all previously gathered, refined data
as well as any comments, report table associations, etc. In short, this option resets the
VS to its original state.
This one selection, if hastily selected, can potentially result in a significant loss of
time as you will have to redo previous refinements unless you restore from backup.
Therefore, as with any XWF warning, make sure you want XWF to do what you are
telling it to do.
XWF TIPS AND TRICKSDo You Really Want an Entirely New Snapshot?If, after an RVS, you find that you should have selected additional options, you can easily runRVS again with only the new options that you need. You do not have to lose your previous RVSresults because the snapshot remembers the processes that were completed (as well as theindividual files those processes affected), so it does not have to process the same data again.
On the center left of the RVS dialog is a small arrow that is circled in Figure 4.4.
When clicked, this small button toggles a number of options as a way to quickly
FIGURE 4.5
Before selecting OK, make sure you want to take a new RVS.
94 CHAPTER 4 Refine Volume Snapshot
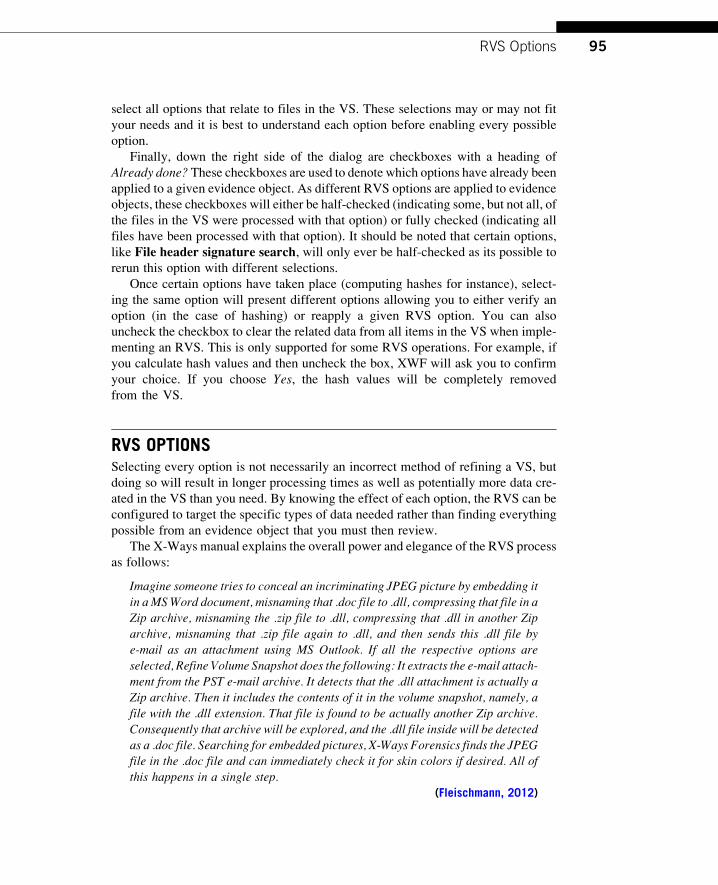
select all options that relate to files in the VS. These selections may or may not fit
your needs and it is best to understand each option before enabling every possible
option.
Finally, down the right side of the dialog are checkboxes with a heading of
Already done? These checkboxes are used to denote which options have already beenapplied to a given evidence object. As different RVS options are applied to evidence
objects, these checkboxes will either be half-checked (indicating some, but not all, of
the files in the VS were processed with that option) or fully checked (indicating all
files have been processed with that option). It should be noted that certain options,
like File header signature search, will only ever be half-checked as its possible to
rerun this option with different selections.
Once certain options have taken place (computing hashes for instance), select-
ing the same option will present different options allowing you to either verify an
option (in the case of hashing) or reapply a given RVS option. You can also
uncheck the checkbox to clear the related data from all items in the VS when imple-
menting an RVS. This is only supported for some RVS operations. For example, if
you calculate hash values and then uncheck the box, XWF will ask you to confirm
your choice. If you choose Yes, the hash values will be completely removed
from the VS.
RVS OPTIONSSelecting every option is not necessarily an incorrect method of refining a VS, but
doing so will result in longer processing times as well as potentially more data cre-
ated in the VS than you need. By knowing the effect of each option, the RVS can be
configured to target the specific types of data needed rather than finding everything
possible from an evidence object that you must then review.
The X-Ways manual explains the overall power and elegance of the RVS process
as follows:
Imagine someone tries to conceal an incriminating JPEG picture by embedding it
in a MSWord document, misnaming that .doc file to .dll, compressing that file in a
Zip archive, misnaming the .zip file to .dll, compressing that .dll in another Zip
archive, misnaming that .zip file again to .dll, and then sends this .dll file by
e-mail as an attachment using MS Outlook. If all the respective options are
selected, Refine Volume Snapshot does the following: It extracts the e-mail attach-
ment from the PST e-mail archive. It detects that the .dll attachment is actually a
Zip archive. Then it includes the contents of it in the volume snapshot, namely, a
file with the .dll extension. That file is found to be actually another Zip archive.
Consequently that archive will be explored, and the .dll file inside will be detected
as a .doc file. Searching for embedded pictures, X-Ways Forensics finds the JPEG
file in the .doc file and can immediately check it for skin colors if desired. All of
this happens in a single step.
(Fleischmann, 2012)
95RVS Options
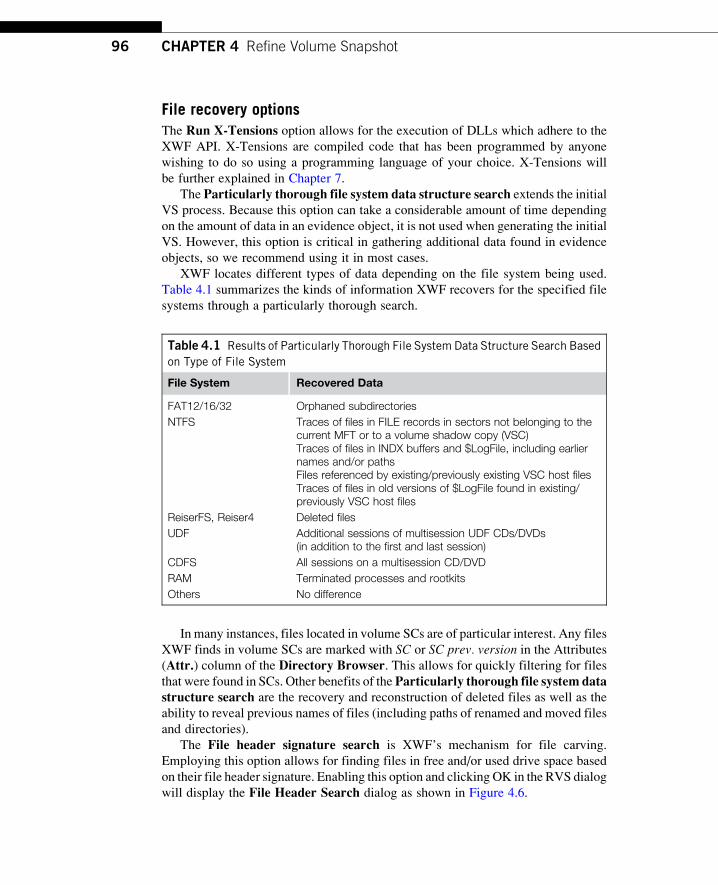
File recovery optionsThe Run X-Tensions option allows for the execution of DLLs which adhere to the
XWF API. X-Tensions are compiled code that has been programmed by anyone
wishing to do so using a programming language of your choice. X-Tensions will
be further explained in Chapter 7.
The Particularly thorough file system data structure search extends the initial
VS process. Because this option can take a considerable amount of time depending
on the amount of data in an evidence object, it is not used when generating the initial
VS. However, this option is critical in gathering additional data found in evidence
objects, so we recommend using it in most cases.
XWF locates different types of data depending on the file system being used.
Table 4.1 summarizes the kinds of information XWF recovers for the specified file
systems through a particularly thorough search.
In many instances, files located in volume SCs are of particular interest. Any files
XWF finds in volume SCs are marked with SC or SC prev. version in the Attributes
(Attr.) column of the Directory Browser. This allows for quickly filtering for files
that were found in SCs. Other benefits of the Particularly thorough file system datastructure search are the recovery and reconstruction of deleted files as well as the
ability to reveal previous names of files (including paths of renamed and moved files
and directories).
The File header signature search is XWF’s mechanism for file carving.
Employing this option allows for finding files in free and/or used drive space based
on their file header signature. Enabling this option and clicking OK in the RVS dialog
will display the File Header Search dialog as shown in Figure 4.6.
Table 4.1 Results of Particularly Thorough File System Data Structure Search Based
on Type of File System
File System Recovered Data
FAT12/16/32 Orphaned subdirectories
NTFS Traces of files in FILE records in sectors not belonging to thecurrent MFT or to a volume shadow copy (VSC)Traces of files in INDX buffers and $LogFile, including earliernames and/or pathsFiles referenced by existing/previously existing VSC host filesTraces of files in old versions of $LogFile found in existing/previously VSC host files
ReiserFS, Reiser4 Deleted files
UDF Additional sessions of multisession UDF CDs/DVDs(in addition to the first and last session)
CDFS All sessions on a multisession CD/DVD
RAM Terminated processes and rootkits
Others No difference
96 CHAPTER 4 Refine Volume Snapshot
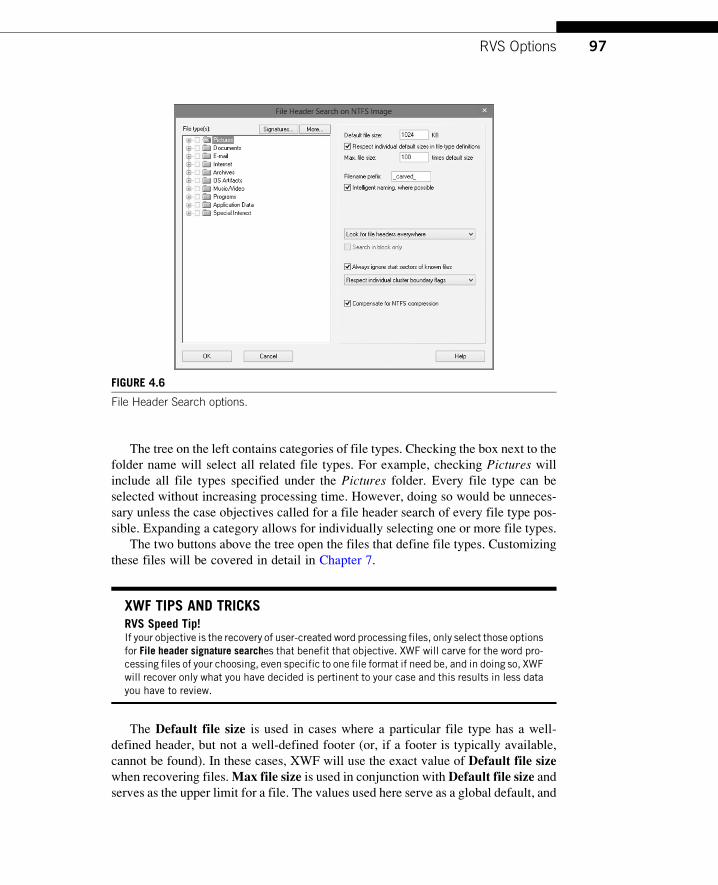
The tree on the left contains categories of file types. Checking the box next to the
folder name will select all related file types. For example, checking Pictures willinclude all file types specified under the Pictures folder. Every file type can be
selected without increasing processing time. However, doing so would be unneces-
sary unless the case objectives called for a file header search of every file type pos-
sible. Expanding a category allows for individually selecting one or more file types.
The two buttons above the tree open the files that define file types. Customizing
these files will be covered in detail in Chapter 7.
XWF TIPS AND TRICKSRVS Speed Tip!If your objective is the recovery of user-created word processing files, only select those optionsfor File header signature searches that benefit that objective. XWF will carve for the word pro-cessing files of your choosing, even specific to one file format if need be, and in doing so, XWFwill recover only what you have decided is pertinent to your case and this results in less datayou have to review.
The Default file size is used in cases where a particular file type has a well-
defined header, but not a well-defined footer (or, if a footer is typically available,
cannot be found). In these cases, XWF will use the exact value of Default file sizewhen recovering files.Max file size is used in conjunction withDefault file size andserves as the upper limit for a file. The values used here serve as a global default, and
FIGURE 4.6
File Header Search options.
97RVS Options

it is recommended to customize a given file’s definition with a more accurate file size
if it is known. This will be covered in more detail in Chapter 7.
For most file types, it is not possible to determine the filename of files recovered
during a file header signature search. Filename prefix provides a means to name
such files as they are recovered. Entering a value for this option gives carved files
a common file prefix. This may make it easier to find such files in the DirectoryBrowser (though they are all collected in a special virtual directory) as well as serveas a visual reminder of the source of these carved files. With Intelligent naming,where possible, XWF creates file names based on metadata in files it has recovered.
For example, EXIF data contained in certain image files will be used when naming
files to include the digital camera model that created the image and, in some cases,
the internal time stamp of the recovered file. This is a powerful option that helps tie
deleted photos back to a given camera or individual.
The default selection for file header search locations is to look for the fileheaders everywhere with the option to change this to either searching headersin free clusters only or in allocated space only. These options allow you to change
the focus of where files are carved from. For example, if you are limited to only
searching active files, change this to in allocated space only. Search in block onlybecomes available after selecting a block of data when in Volume/Partition or Filemode. This serves as another way to limit the scope of a file header signature search.
To prevent duplication of files, any files that are already part of the initial VS are not
carved again.
Always ignore start sectors of known files is a means for XWF to prevent dupli-
cates in that it will not bother to carve files when an existing or previously existing
file already starts in a given sector.
Respect individual cluster boundary flags and the other options available in thedropdown determine how and where XWF searches for file headers. Changing this
option to Search at all sector boundaries results in a more thorough search in that
partitions with different cluster layouts can still be searched since the search will
work on a per sector vs. per cluster basis. Extensive byte-level search is helpful
to find artifacts that are not ordinary files, like memory artifacts or individual records
within certain file formats. The options referencing boundary flags are controlled inthe file type definition files that will be covered in Chapter 7.
Finally, Compensate for NTFS compression often allows the file header signa-
ture search to find NTFS-compressed files, mark them as compressed, and attempt to
decompress them.
As with all RVS options, if XWF crashes during a file header search or if the search
is intentionally canceled before completion, XWF can resume from the point where it
was intentionally interrupted or last saved before a crash (e.g., because of the autosave
interval in the case) as opposed to having to start the RVS process all over again.
File processing optionsBefore discussing the various file processing options, let’s take a look at the different
ways to limit the files that XWF processes in a given RVS operation. Several options
are displayed at the bottom of the processing section as shown in Figure 4.7.
98 CHAPTER 4 Refine Volume Snapshot
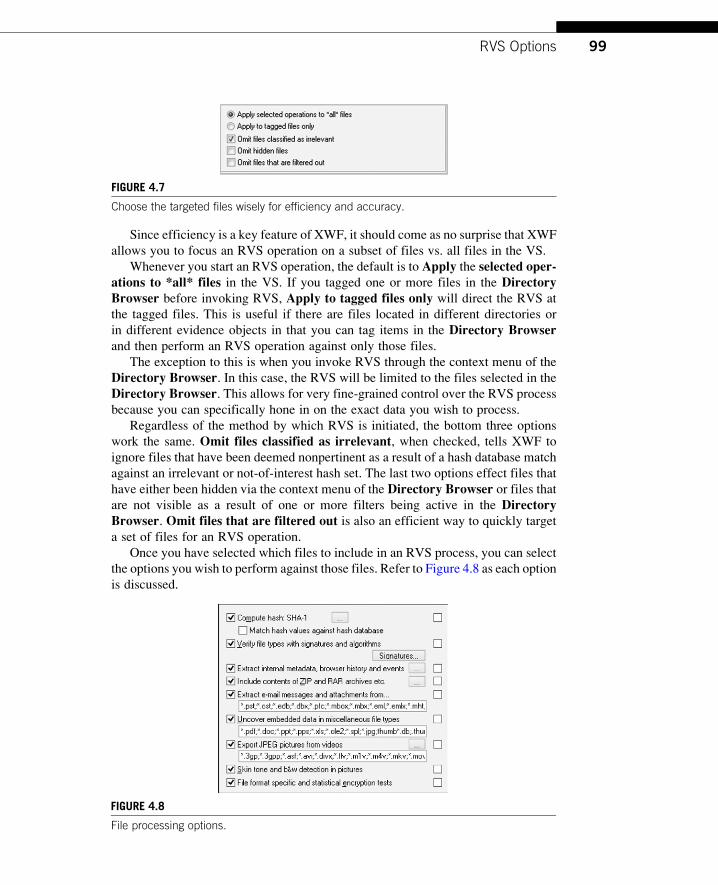
Since efficiency is a key feature of XWF, it should come as no surprise that XWF
allows you to focus an RVS operation on a subset of files vs. all files in the VS.
Whenever you start an RVS operation, the default is to Apply the selected oper-ations to *all* files in the VS. If you tagged one or more files in the DirectoryBrowser before invoking RVS, Apply to tagged files only will direct the RVS at
the tagged files. This is useful if there are files located in different directories or
in different evidence objects in that you can tag items in the Directory Browserand then perform an RVS operation against only those files.
The exception to this is when you invoke RVS through the context menu of the
Directory Browser. In this case, the RVS will be limited to the files selected in the
Directory Browser. This allows for very fine-grained control over the RVS process
because you can specifically hone in on the exact data you wish to process.
Regardless of the method by which RVS is initiated, the bottom three options
work the same. Omit files classified as irrelevant, when checked, tells XWF to
ignore files that have been deemed nonpertinent as a result of a hash database match
against an irrelevant or not-of-interest hash set. The last two options effect files that
have either been hidden via the context menu of the Directory Browser or files thatare not visible as a result of one or more filters being active in the DirectoryBrowser. Omit files that are filtered out is also an efficient way to quickly target
a set of files for an RVS operation.
Once you have selected which files to include in an RVS process, you can select
the options you wish to perform against those files. Refer to Figure 4.8 as each option
is discussed.
FIGURE 4.7
Choose the targeted files wisely for efficiency and accuracy.
FIGURE 4.8
File processing options.
99RVS Options
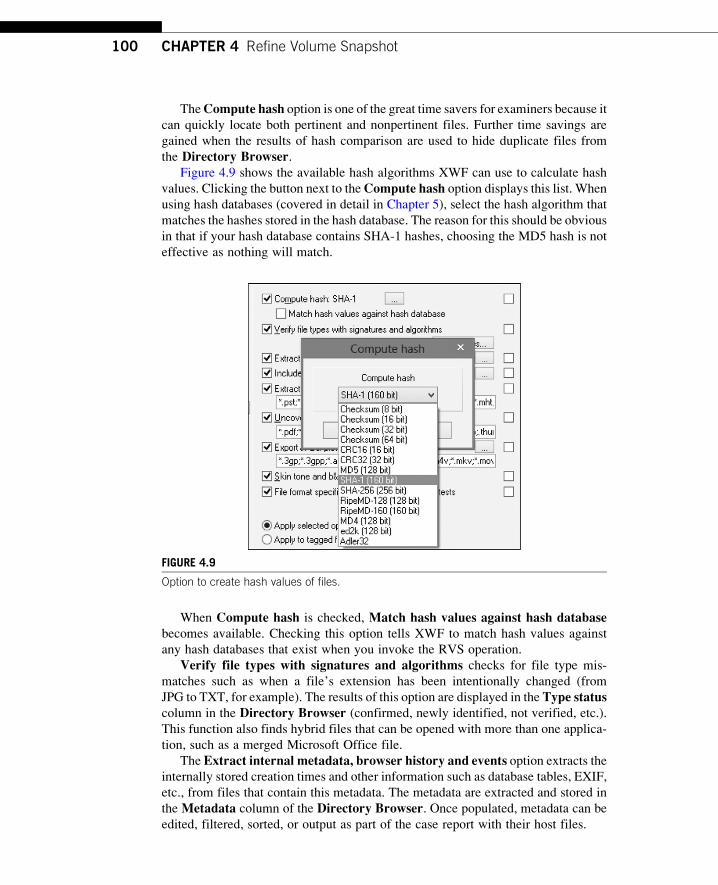
TheCompute hash option is one of the great time savers for examiners because it
can quickly locate both pertinent and nonpertinent files. Further time savings are
gained when the results of hash comparison are used to hide duplicate files from
the Directory Browser.Figure 4.9 shows the available hash algorithms XWF can use to calculate hash
values. Clicking the button next to theCompute hash option displays this list. When
using hash databases (covered in detail in Chapter 5), select the hash algorithm that
matches the hashes stored in the hash database. The reason for this should be obvious
in that if your hash database contains SHA-1 hashes, choosing the MD5 hash is not
effective as nothing will match.
When Compute hash is checked, Match hash values against hash databasebecomes available. Checking this option tells XWF to match hash values against
any hash databases that exist when you invoke the RVS operation.
Verify file types with signatures and algorithms checks for file type mis-
matches such as when a file’s extension has been intentionally changed (from
JPG to TXT, for example). The results of this option are displayed in the Type statuscolumn in the Directory Browser (confirmed, newly identified, not verified, etc.).
This function also finds hybrid files that can be opened with more than one applica-
tion, such as a merged Microsoft Office file.
The Extract internal metadata, browser history and events option extracts theinternally stored creation times and other information such as database tables, EXIF,
etc., from files that contain this metadata. The metadata are extracted and stored in
the Metadata column of the Directory Browser. Once populated, metadata can be
edited, filtered, sorted, or output as part of the case report with their host files.
FIGURE 4.9
Option to create hash values of files.
100 CHAPTER 4 Refine Volume Snapshot

Figure 4.10 shows the suboptions available after clicking the button to the right of
the option. Some of the options are self-explanatory and will not be covered.
File format consistency check can detect corruption in certain types of files. The
results of this check are displayed in theType status columnof theDirectoryBrowser.Any extracted creation timestamps are shown in the Int. Creation column of the
Directory Browser. Typically, the internal creation date is the earliest timestamp
available and is the closest to the original creation date of the file. XWF contains
custom algorithms not found elsewhere that can extract such timestamps with high
reliability.
When processing e-mail messages, the sender and recipient fields are extracted
and shown in the Directory Browser in columns of the same name. These columns
are dynamically displayed in the Directory Browser if Directory BrowserOptions, Filters | Dynamic e-mail columns is checked.
Create previews for browser databases, event logs, and $UsnJrnl:$J unpackssuch things as SQLite databases and other binary storage files into HTML files that
can be included in reports. For a complete list of supported formats, see the XWF
manual section entitled Extract internal metadata.Finally, the last two options enable XWF to create events (which are the basis for
timeline examinations) based on various timestamps, both at the file system and
metadata levels. Events will be covered in Chapter 7.
Include contacts ofZIPandRARarchives, etc. enablesXWF to examine the con-
tents of archived files, such as ZIP files, and create child objects for every item in the
archive files. If an encrypted file is found, it is marked with an e in the DirectoryBrowser Attr. column. There is no limit on the number of archived levels, such as a
ZIP file compressed into another ZIP file, etc., but split/spanned/segmented archives
are not supported. This option is affected by the selected case code pages in that the
FIGURE 4.10
Extract internal metadata options.
101RVS Options

filenames inside archives will not be displayed properly if the code page used by the
archive isnot selected. Inmost cases,usingUTF-8and thedefault codepagewill suffice.
As many modern document files are usually zip archives (such as recent Micro-
soft Office documents), they are processed as archives by XWF. These can be
excluded if you only want to see the documents as a whole without showing embed-
ded data, such as pictures, separately. To select the types of archive files that this
option affects, click the button to the right of the option. As we have seen in other
areas of XWF, the default selection for this option is usually the best choice because
archives, such as .jar files, can add a significant amount of irrelevant child files to the
VS. Unless you have a need to examine the contents of such archives, we recommend
leaving these unchecked.
Extract e-mail messages and attachments from. . .The Extract e-mail messages and attachments from option processes e-mail mes-
sages and attachments from several e-mail archive types including:
Outlook Personal Storage (.pst), Office Storage (.ost), Exchange (.edb), Outlook
Message (.msg), Outlook Template (.oft), Outlook Express (.dbx), Kerio Connect
(store.fdb), AOL PFC files, Mozilla mailbox, generic mailbox (mbox, Unix mail for-
mat), and MHT Web Archive (.mht).
E-mail messages from these archives are extracted as .eml files. The creation date
and time is taken from the timestamp in theDate line in the e-mail message’s header.
The last modification date and time is taken from the timestamp in theDelivery-Dateline in the message header. The Directory Browser also will have two additional
columns populated (Sender and Recipient) for each of the extracted e-mails and
e-mail attachments.
Viewing the contents of an e-mail archive without refining the VS can still be
done by selecting an e-mail archive. However, XWF will suggest you perform an
RVS as shown in Figure 4.11.
Closing this dialog box without taking an RVS will allow viewing the e-mails in
the e-mail store, such as the .pst file seen in Figure 4.12. Changing to Previewmode
renders a view of the e-mail store that contains information about the messages. At
FIGURE 4.11
XWF gives a suggestion to create an RVS when trying to view e-mail.
102 CHAPTER 4 Refine Volume Snapshot
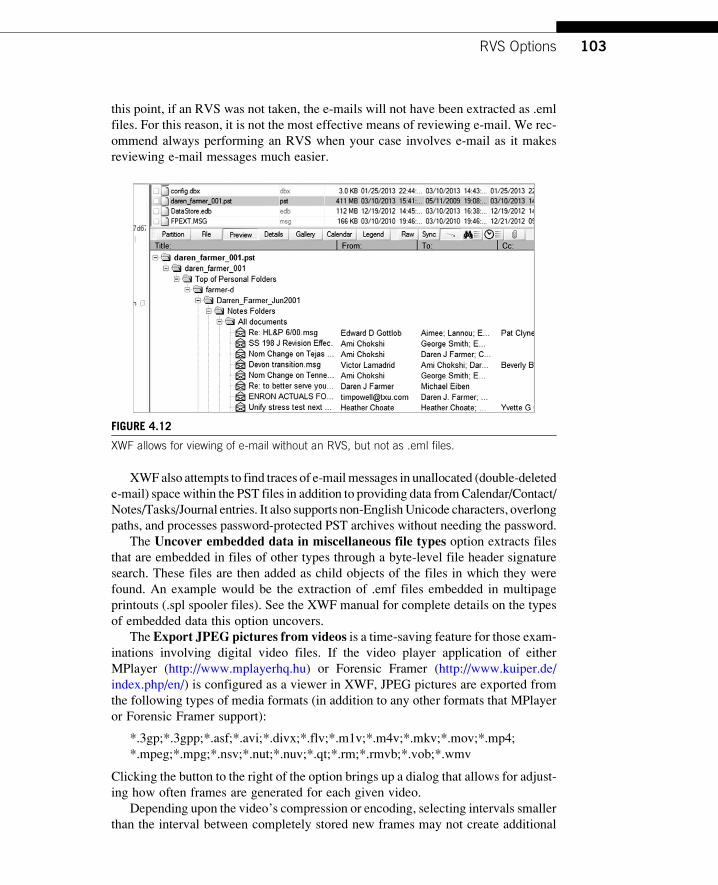
this point, if an RVS was not taken, the e-mails will not have been extracted as .eml
files. For this reason, it is not the most effective means of reviewing e-mail. We rec-
ommend always performing an RVS when your case involves e-mail as it makes
reviewing e-mail messages much easier.
XWF also attempts to find traces of e-mail messages in unallocated (double-deleted
e-mail) spacewithin the PST files in addition to providing data fromCalendar/Contact/
Notes/Tasks/Journal entries. It also supports non-EnglishUnicode characters, overlong
paths, and processes password-protected PST archives without needing the password.
The Uncover embedded data in miscellaneous file types option extracts files
that are embedded in files of other types through a byte-level file header signature
search. These files are then added as child objects of the files in which they were
found. An example would be the extraction of .emf files embedded in multipage
printouts (.spl spooler files). See the XWF manual for complete details on the types
of embedded data this option uncovers.
The Export JPEG pictures from videos is a time-saving feature for those exam-
inations involving digital video files. If the video player application of either
MPlayer (http://www.mplayerhq.hu) or Forensic Framer (http://www.kuiper.de/
index.php/en/) is configured as a viewer in XWF, JPEG pictures are exported from
the following types of media formats (in addition to any other formats that MPlayer
or Forensic Framer support):
*.3gp;*.3gpp;*.asf;*.avi;*.divx;*.flv;*.m1v;*.m4v;*.mkv;*.mov;*.mp4;
*.mpeg;*.mpg;*.nsv;*.nut;*.nuv;*.qt;*.rm;*.rmvb;*.vob;*.wmv
Clicking the button to the right of the option brings up a dialog that allows for adjust-
ing how often frames are generated for each given video.
Depending upon the video’s compression or encoding, selecting intervals smaller
than the interval between completely stored new frames may not create additional
FIGURE 4.12
XWF allows for viewing of e-mail without an RVS, but not as .eml files.
103RVS Options
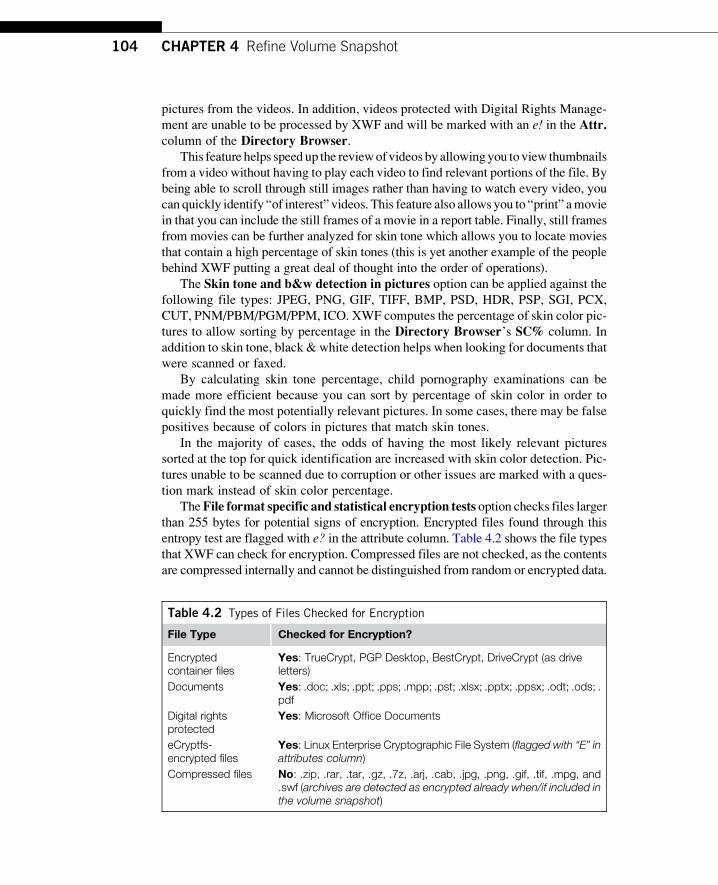
pictures from the videos. In addition, videos protected with Digital Rights Manage-
ment are unable to be processed by XWF and will be marked with an e! in the Attr.column of the Directory Browser.
This feature helps speed up the reviewof videos by allowingyou to view thumbnails
from a video without having to play each video to find relevant portions of the file. By
being able to scroll through still images rather than having to watch every video, you
can quickly identify “of interest” videos. This feature also allows you to “print” amovie
in that you can include the still frames of a movie in a report table. Finally, still frames
from movies can be further analyzed for skin tone which allows you to locate movies
that contain a high percentage of skin tones (this is yet another example of the people
behind XWF putting a great deal of thought into the order of operations).
The Skin tone and b&w detection in pictures option can be applied against thefollowing file types: JPEG, PNG, GIF, TIFF, BMP, PSD, HDR, PSP, SGI, PCX,
CUT, PNM/PBM/PGM/PPM, ICO. XWF computes the percentage of skin color pic-
tures to allow sorting by percentage in the Directory Browser’s SC% column. In
addition to skin tone, black & white detection helps when looking for documents that
were scanned or faxed.
By calculating skin tone percentage, child pornography examinations can be
made more efficient because you can sort by percentage of skin color in order to
quickly find the most potentially relevant pictures. In some cases, there may be false
positives because of colors in pictures that match skin tones.
In the majority of cases, the odds of having the most likely relevant pictures
sorted at the top for quick identification are increased with skin color detection. Pic-
tures unable to be scanned due to corruption or other issues are marked with a ques-
tion mark instead of skin color percentage.
TheFile format specific and statistical encryption tests option checks files largerthan 255 bytes for potential signs of encryption. Encrypted files found through this
entropy test are flagged with e? in the attribute column. Table 4.2 shows the file types
that XWF can check for encryption. Compressed files are not checked, as the contents
are compressed internally and cannot be distinguished from random or encrypted data.
Table 4.2 Types of Files Checked for Encryption
File Type Checked for Encryption?
Encryptedcontainer files
Yes: TrueCrypt, PGP Desktop, BestCrypt, DriveCrypt (as driveletters)
Documents Yes: .doc; .xls; .ppt; .pps; .mpp; .pst; .xlsx; .pptx; .ppsx; .odt; .ods; .pdf
Digital rightsprotected
Yes: Microsoft Office Documents
eCryptfs-encrypted files
Yes: Linux Enterprise Cryptographic File System (flagged with “E” inattributes column)
Compressed files No: .zip, .rar, .tar, .gz, .7z, .arj, .cab, .jpg, .png, .gif, .tif, .mpg, and.swf (archives are detected as encrypted already when/if included inthe volume snapshot)
104 CHAPTER 4 Refine Volume Snapshot
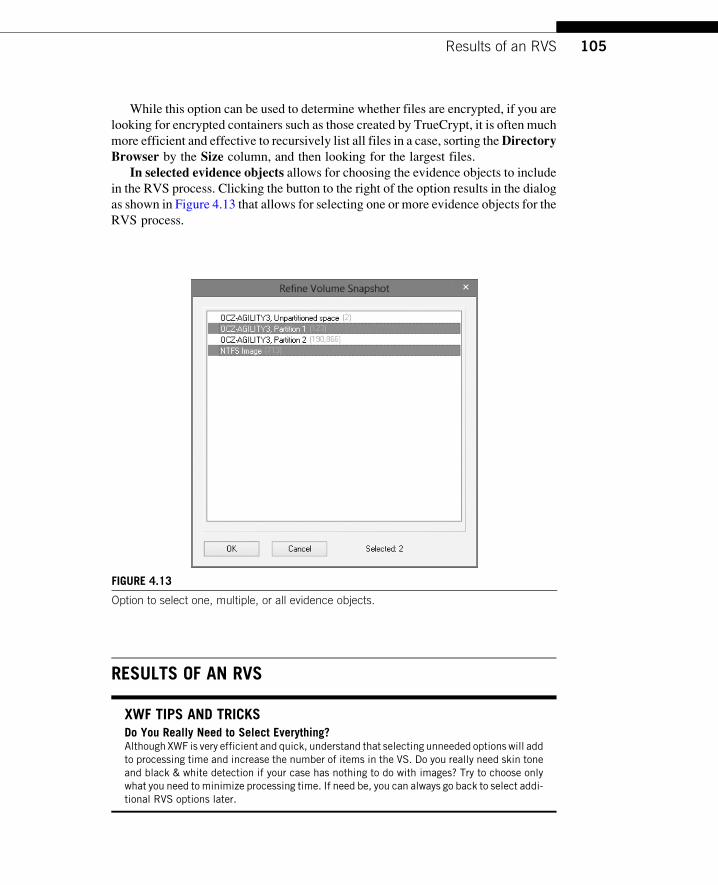
While this option can be used to determine whether files are encrypted, if you are
looking for encrypted containers such as those created by TrueCrypt, it is often much
more efficient and effective to recursively list all files in a case, sorting theDirectoryBrowser by the Size column, and then looking for the largest files.
In selected evidence objects allows for choosing the evidence objects to includein the RVS process. Clicking the button to the right of the option results in the dialog
as shown in Figure 4.13 that allows for selecting one or more evidence objects for the
RVS process.
RESULTS OF AN RVS
XWF TIPS AND TRICKSDo You Really Need to Select Everything?Although XWF is very efficient and quick, understand that selecting unneeded options will addto processing time and increase the number of items in the VS. Do you really need skin toneand black & white detection if your case has nothing to do with images? Try to choose onlywhat you need to minimize processing time. If need be, you can always go back to select addi-tional RVS options later.
FIGURE 4.13
Option to select one, multiple, or all evidence objects.
105Results of an RVS
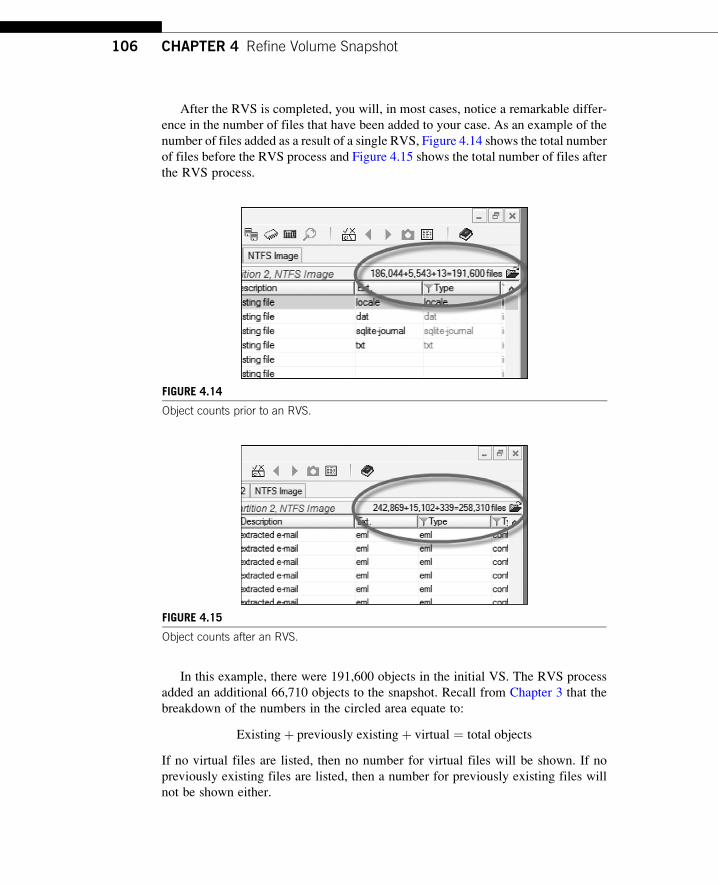
After the RVS is completed, you will, in most cases, notice a remarkable differ-
ence in the number of files that have been added to your case. As an example of the
number of files added as a result of a single RVS, Figure 4.14 shows the total number
of files before the RVS process and Figure 4.15 shows the total number of files after
the RVS process.
In this example, there were 191,600 objects in the initial VS. The RVS process
added an additional 66,710 objects to the snapshot. Recall from Chapter 3 that the
breakdown of the numbers in the circled area equate to:
Existing þ previously existingþ virtual ¼ total objects
If no virtual files are listed, then no number for virtual files will be shown. If no
previously existing files are listed, then a number for previously existing files will
not be shown either.
FIGURE 4.15
Object counts after an RVS.
FIGURE 4.14
Object counts prior to an RVS.
106 CHAPTER 4 Refine Volume Snapshot
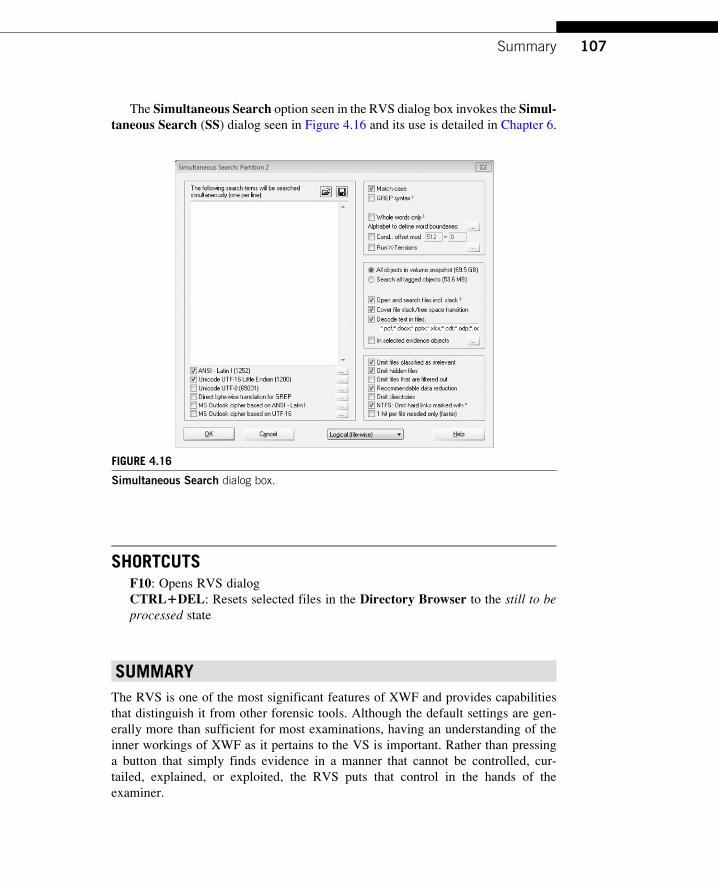
The Simultaneous Search option seen in the RVS dialog box invokes the Simul-taneous Search (SS) dialog seen in Figure 4.16 and its use is detailed in Chapter 6.
SHORTCUTSF10: Opens RVS dialog
CTRL1DEL: Resets selected files in the Directory Browser to the still to beprocessed state
SUMMARY
The RVS is one of the most significant features of XWF and provides capabilities
that distinguish it from other forensic tools. Although the default settings are gen-
erally more than sufficient for most examinations, having an understanding of the
inner workings of XWF as it pertains to the VS is important. Rather than pressing
a button that simply finds evidence in a manner that cannot be controlled, cur-
tailed, explained, or exploited, the RVS puts that control in the hands of the
examiner.
FIGURE 4.16
Simultaneous Search dialog box.
107Summary
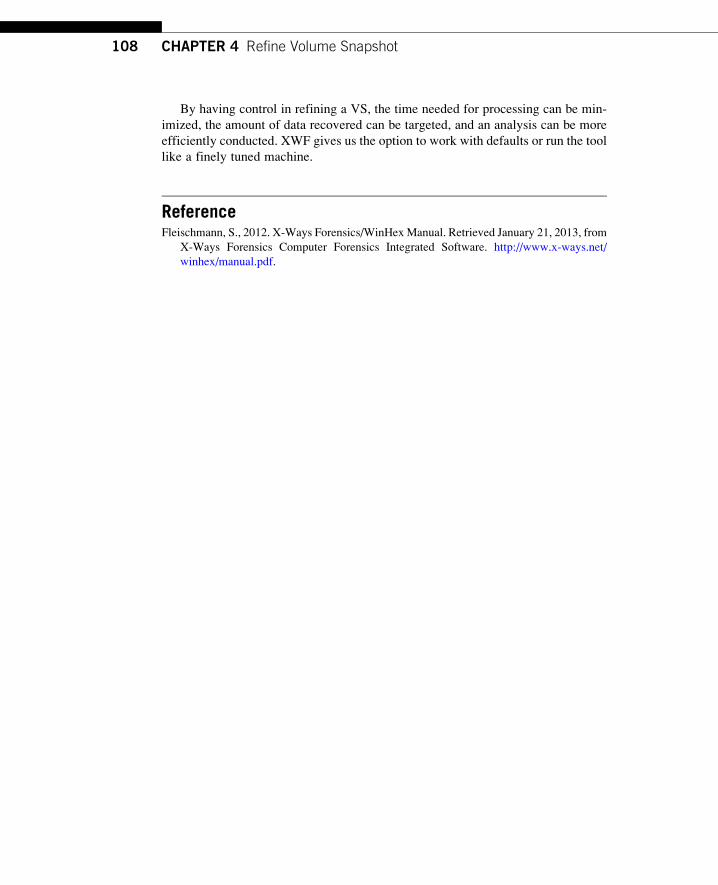
By having control in refining a VS, the time needed for processing can be min-
imized, the amount of data recovered can be targeted, and an analysis can be more
efficiently conducted. XWF gives us the option to work with defaults or run the tool
like a finely tuned machine.
ReferenceFleischmann, S., 2012. X-Ways Forensics/WinHexManual. Retrieved January 21, 2013, from
X-Ways Forensics Computer Forensics Integrated Software. http://www.x-ways.net/
winhex/manual.pdf.
108 CHAPTER 4 Refine Volume Snapshot

CHAPTER
The XWF Internal HashDatabase and the RegistryViewer
5INFORMATION IN THIS CHAPTER
• Introduction
• XWF internal hash database and hash set
• The registry through X-Ways Forensics
• The XWF Registry Viewer
• The XWF Registry Report
• Shortcuts
• Summary
INTRODUCTION
Perhaps the quickest method to find files relevant to your case is through a hash com-
parison of files against one or more preconfigured hash sets. XWF makes it easy to
import existing hash sets or create entirely new hash sets that you can use to conduct
hash comparisons against files in your case. This process can significantly reduce the
amount of data that you must review because you can eliminate irrelevant files
through both filtering and hiding of duplicate files. This allows you to focus on
the important data in a case.
A common use of a hash comparison involves importing a hash set consisting of
known child pornography hash values to compare against hash values of files that
exist in an image of a suspect’s hard drive. Any hash values from the evidence image
files that match any of the child pornography hash values are quickly located and
documented. Another benefit when working with such a hash set is obviating the
need to look at every image and video in a case. You can run similar hash compar-
isons with any set of known hash values run against evidence objects.
Another easy to use, yet comprehensive, tool is the XWF Registry Viewer. The
Windows registry contains a treasure of forensically relevant information, yet it can
be difficult to analyze because of the sheer volume of information present in registry
hives. The XWF Registry Viewer gives you the ability to navigate and collect rel-
evant information quickly and easily. The second part of this chapter focuses on effi-
ciently using the XWF Registry Viewer and its ability to generate comprehensive
reports of registry contents.
109
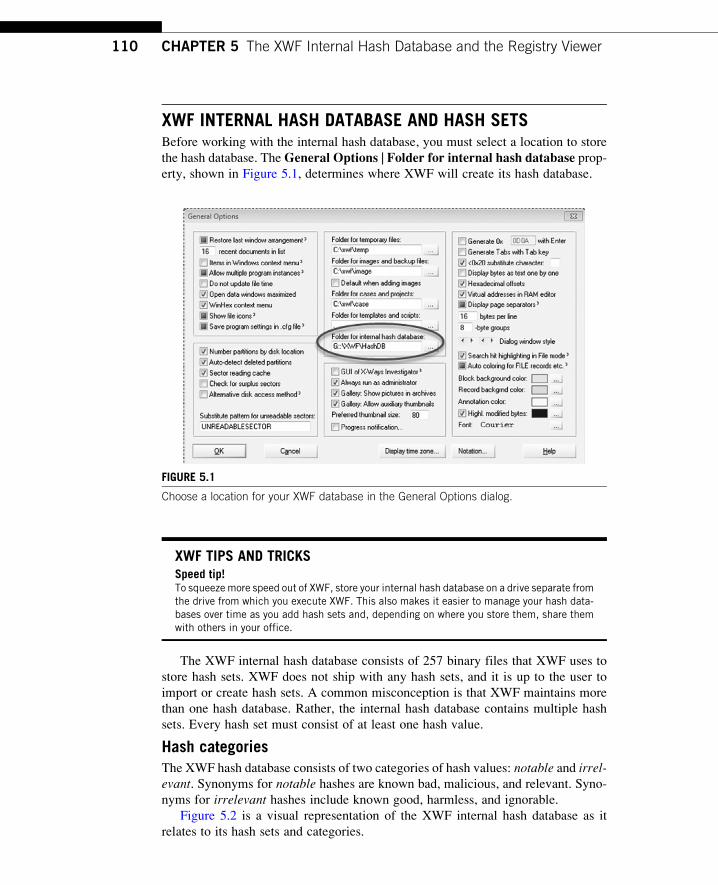
XWF INTERNAL HASH DATABASE AND HASH SETSBefore working with the internal hash database, you must select a location to store
the hash database. TheGeneral Options | Folder for internal hash database prop-erty, shown in Figure 5.1, determines where XWF will create its hash database.
XWF TIPS AND TRICKSSpeed tip!To squeeze more speed out of XWF, store your internal hash database on a drive separate fromthe drive from which you execute XWF. This also makes it easier to manage your hash data-bases over time as you add hash sets and, depending on where you store them, share themwith others in your office.
The XWF internal hash database consists of 257 binary files that XWF uses to
store hash sets. XWF does not ship with any hash sets, and it is up to the user to
import or create hash sets. A common misconception is that XWF maintains more
than one hash database. Rather, the internal hash database contains multiple hash
sets. Every hash set must consist of at least one hash value.
Hash categoriesThe XWF hash database consists of two categories of hash values: notable and irrel-evant. Synonyms for notable hashes are known bad, malicious, and relevant. Syno-
nyms for irrelevant hashes include known good, harmless, and ignorable.
Figure 5.2 is a visual representation of the XWF internal hash database as it
relates to its hash sets and categories.
FIGURE 5.1
Choose a location for your XWF database in the General Options dialog.
110 CHAPTER 5 The XWF Internal Hash Database and the Registry Viewer
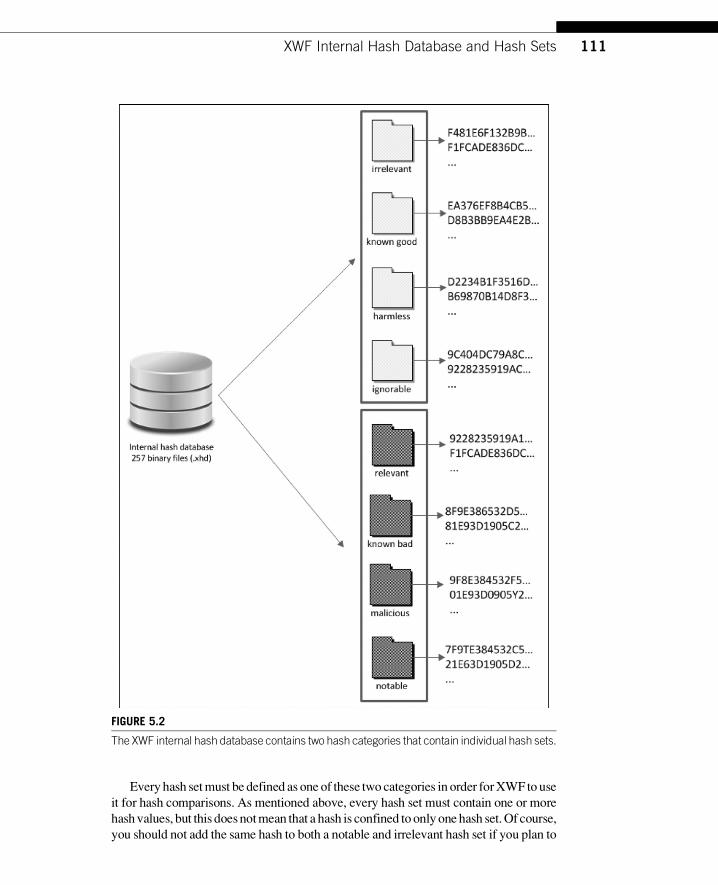
Every hash setmust be defined as one of these two categories in order forXWF to use
it for hash comparisons. As mentioned above, every hash set must contain one or more
hashvalues, but this doesnotmean that a hash is confined to only onehash set.Of course,
you should not add the same hash to both a notable and irrelevant hash set if you plan to
FIGURE 5.2
The XWF internal hash database contains two hash categories that contain individual hash sets.
111XWF Internal Hash Database and Hash Sets
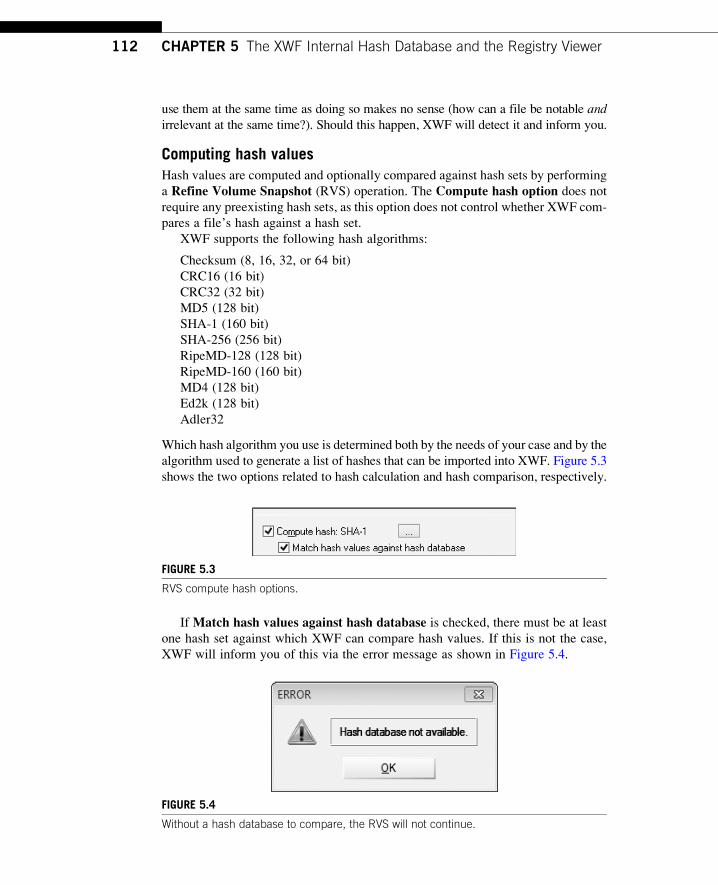
use them at the same time as doing so makes no sense (how can a file be notable andirrelevant at the same time?). Should this happen, XWF will detect it and inform you.
Computing hash valuesHash values are computed and optionally compared against hash sets by performing
a Refine Volume Snapshot (RVS) operation. The Compute hash option does not
require any preexisting hash sets, as this option does not control whether XWF com-
pares a file’s hash against a hash set.
XWF supports the following hash algorithms:
Checksum (8, 16, 32, or 64 bit)
CRC16 (16 bit)
CRC32 (32 bit)
MD5 (128 bit)
SHA-1 (160 bit)
SHA-256 (256 bit)
RipeMD-128 (128 bit)
RipeMD-160 (160 bit)
MD4 (128 bit)
Ed2k (128 bit)
Adler32
Which hash algorithm you use is determined both by the needs of your case and by the
algorithm used to generate a list of hashes that can be imported into XWF. Figure 5.3
shows the two options related to hash calculation and hash comparison, respectively.
If Match hash values against hash database is checked, there must be at least
one hash set against which XWF can compare hash values. If this is not the case,
XWF will inform you of this via the error message as shown in Figure 5.4.
FIGURE 5.3
RVS compute hash options.
FIGURE 5.4
Without a hash database to compare, the RVS will not continue.
112 CHAPTER 5 The XWF Internal Hash Database and the Registry Viewer
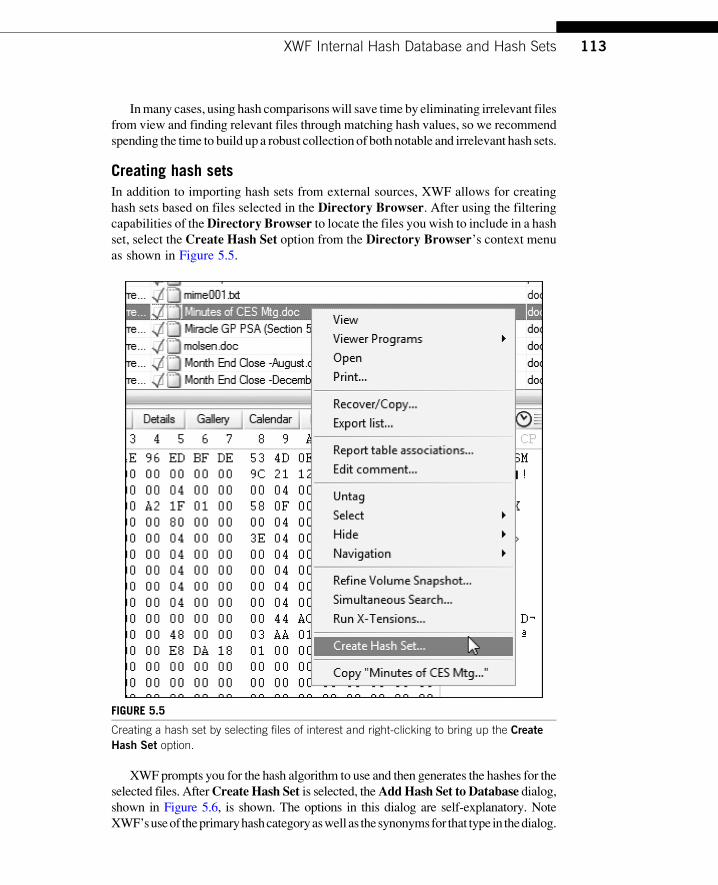
Inmany cases, using hash comparisonswill save time by eliminating irrelevant files
from view and finding relevant files through matching hash values, so we recommend
spending the time to build up a robust collection of both notable and irrelevant hash sets.
Creating hash setsIn addition to importing hash sets from external sources, XWF allows for creating
hash sets based on files selected in the Directory Browser. After using the filteringcapabilities of theDirectory Browser to locate the files you wish to include in a hashset, select the Create Hash Set option from the Directory Browser’s context menu
as shown in Figure 5.5.
XWF prompts you for the hash algorithm to use and then generates the hashes for the
selected files. AfterCreate Hash Set is selected, theAddHash Set to Database dialog,shown in Figure 5.6, is shown. The options in this dialog are self-explanatory. Note
XWF’suseof theprimaryhashcategoryaswellas thesynonymsfor that type in thedialog.
FIGURE 5.5
Creating a hash set by selecting files of interest and right-clicking to bring up the Create
Hash Set option.
113XWF Internal Hash Database and Hash Sets
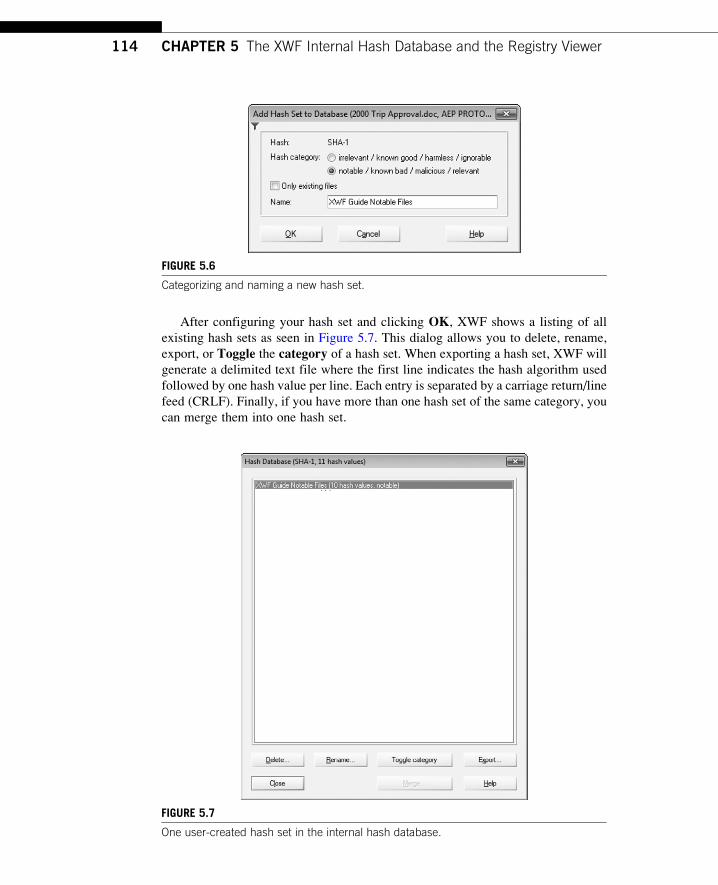
After configuring your hash set and clicking OK, XWF shows a listing of all
existing hash sets as seen in Figure 5.7. This dialog allows you to delete, rename,
export, or Toggle the category of a hash set. When exporting a hash set, XWF will
generate a delimited text file where the first line indicates the hash algorithm used
followed by one hash value per line. Each entry is separated by a carriage return/line
feed (CRLF). Finally, if you have more than one hash set of the same category, you
can merge them into one hash set.
FIGURE 5.6
Categorizing and naming a new hash set.
FIGURE 5.7
One user-created hash set in the internal hash database.
114 CHAPTER 5 The XWF Internal Hash Database and the Registry Viewer
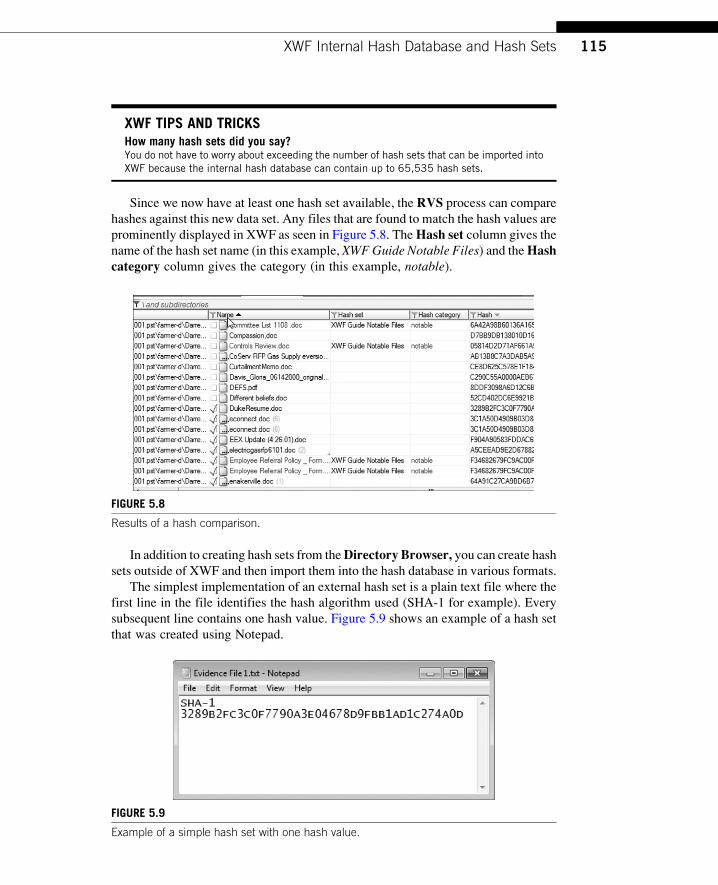
XWF TIPS AND TRICKSHow many hash sets did you say?You do not have to worry about exceeding the number of hash sets that can be imported intoXWF because the internal hash database can contain up to 65,535 hash sets.
Since we now have at least one hash set available, the RVS process can compare
hashes against this new data set. Any files that are found to match the hash values are
prominently displayed in XWF as seen in Figure 5.8. TheHash set column gives the
name of the hash set name (in this example, XWF Guide Notable Files) and theHashcategory column gives the category (in this example, notable).
In addition to creating hash sets from theDirectory Browser, you can create hashsets outside of XWF and then import them into the hash database in various formats.
The simplest implementation of an external hash set is a plain text file where the
first line in the file identifies the hash algorithm used (SHA-1 for example). Every
subsequent line contains one hash value. Figure 5.9 shows an example of a hash set
that was created using Notepad.
FIGURE 5.8
Results of a hash comparison.
FIGURE 5.9
Example of a simple hash set with one hash value.
115XWF Internal Hash Database and Hash Sets
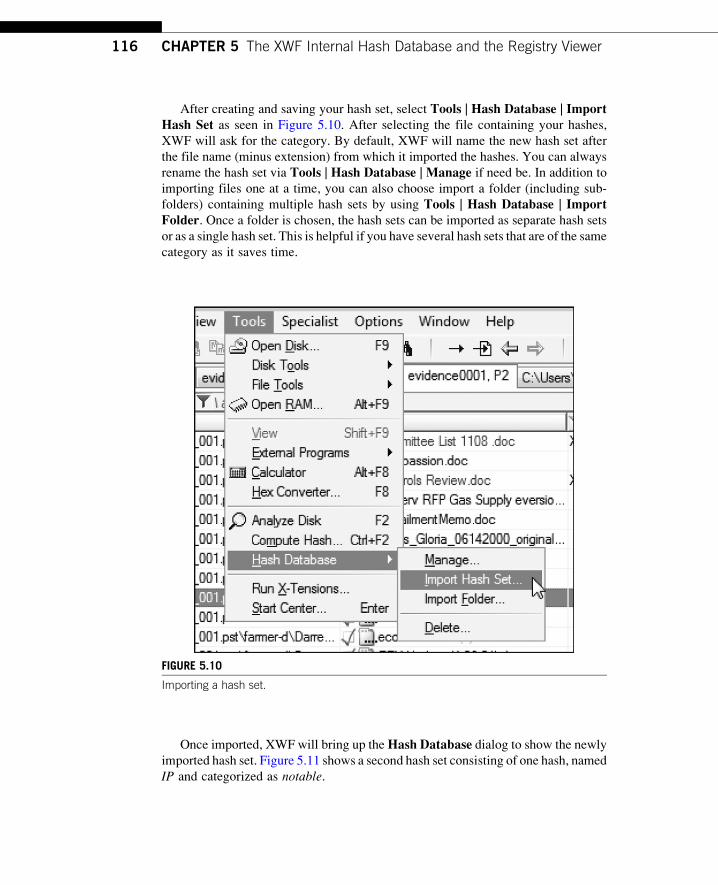
After creating and saving your hash set, select Tools | Hash Database | ImportHash Set as seen in Figure 5.10. After selecting the file containing your hashes,
XWF will ask for the category. By default, XWF will name the new hash set after
the file name (minus extension) from which it imported the hashes. You can always
rename the hash set via Tools | Hash Database | Manage if need be. In addition to
importing files one at a time, you can also choose import a folder (including sub-
folders) containing multiple hash sets by using Tools | Hash Database | ImportFolder. Once a folder is chosen, the hash sets can be imported as separate hash sets
or as a single hash set. This is helpful if you have several hash sets that are of the same
category as it saves time.
Once imported, XWF will bring up theHash Database dialog to show the newly
imported hash set. Figure 5.11 shows a second hash set consisting of one hash, named
IP and categorized as notable.
FIGURE 5.10
Importing a hash set.
116 CHAPTER 5 The XWF Internal Hash Database and the Registry Viewer
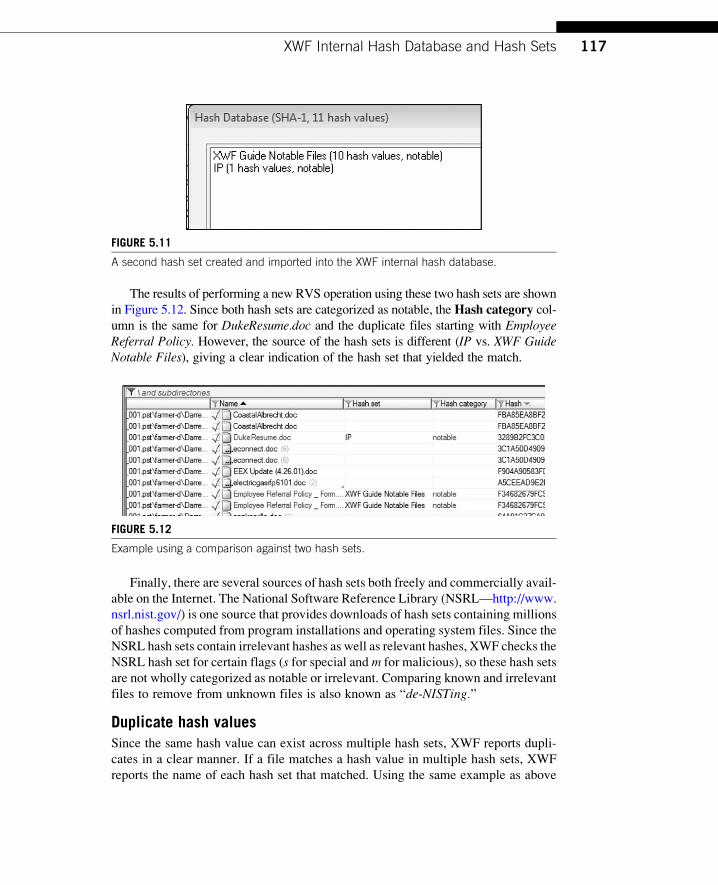
The results of performing a new RVS operation using these two hash sets are shown
in Figure 5.12. Since both hash sets are categorized as notable, theHash category col-umn is the same for DukeResume.doc and the duplicate files starting with EmployeeReferral Policy. However, the source of the hash sets is different (IP vs. XWF GuideNotable Files), giving a clear indication of the hash set that yielded the match.
Finally, there are several sources of hash sets both freely and commercially avail-
able on the Internet. The National Software Reference Library (NSRL—http://www.
nsrl.nist.gov/) is one source that provides downloads of hash sets containing millions
of hashes computed from program installations and operating system files. Since the
NSRL hash sets contain irrelevant hashes as well as relevant hashes, XWF checks the
NSRL hash set for certain flags (s for special and m for malicious), so these hash sets
are not wholly categorized as notable or irrelevant. Comparing known and irrelevant
files to remove from unknown files is also known as “de-NISTing.”
Duplicate hash valuesSince the same hash value can exist across multiple hash sets, XWF reports dupli-
cates in a clear manner. If a file matches a hash value in multiple hash sets, XWF
reports the name of each hash set that matched. Using the same example as above
FIGURE 5.12
Example using a comparison against two hash sets.
FIGURE 5.11
A second hash set created and imported into the XWF internal hash database.
117XWF Internal Hash Database and Hash Sets

and adding a third hash set named IPset2 containing the same hash value as hash set
IP, XWF lists both hash sets as matches for the same file as seen in Figure 5.13.
This should not be confused with duplicate hash values in a single hash set as that
scenario is not possible because XWF checks hash sets for the existence of duplicate
hash values before adding it. In other words, XWF deduplicates hashes as they are
added to hash sets.
THE REGISTRY THROUGH X-WAYS FORENSICSThe following section details using XWF to examine the Windows registry. The reg-
istry is a hierarchical database that stores configuration settings and options for the
Windows operating system in files called hives.Entire books dedicated to the inner workings of the registry are available and such
information will not be repeated here. As registry analysis as a whole requires more
information than can be described in this chapter, we recommend examiners delve
deeper into registry forensics through resources such as Harlan Carvey’s WindowsRegistry Forensics: Advanced Digital Forensic Analysis of the Windows Registry.Resources such as this allow you to understand alternative methods of analysis of
the registry as well as the scope of information stored in the registry.
In Chapter 3, we covered the Directory Browser and its columns including the
ability to filter data contained in one or more columns. Before discussing how to use
XWF to analyze registry hives, it would be helpful to hide everything from view that
isn’t a registry hive. Of course you always can navigate directly to where the hives
are found on disk if you choose, but filtering allows for quickly seeing all available
registry hives across entire evidence objects at the same time.
To begin registry analysis with XWF, click the filter icon for the Type column in
the Directory Browser. Figure 5.14 shows the Type filter dialog that allows you to
hide all files that are not of type Windows Registry. The quickest way to access this
filter is via the funnel icon found in the Type column. Once the filter dialog is open,
you can select one or more registry file types. If you want to find registry files of all
types, filtering via the Category column is quicker than selecting all of the relevant
file types in the Type filter dialog.
FIGURE 5.13
One file (DukeResume.doc) matching two different hash sets (IP and IPset2).
118 CHAPTER 5 The XWF Internal Hash Database and the Registry Viewer
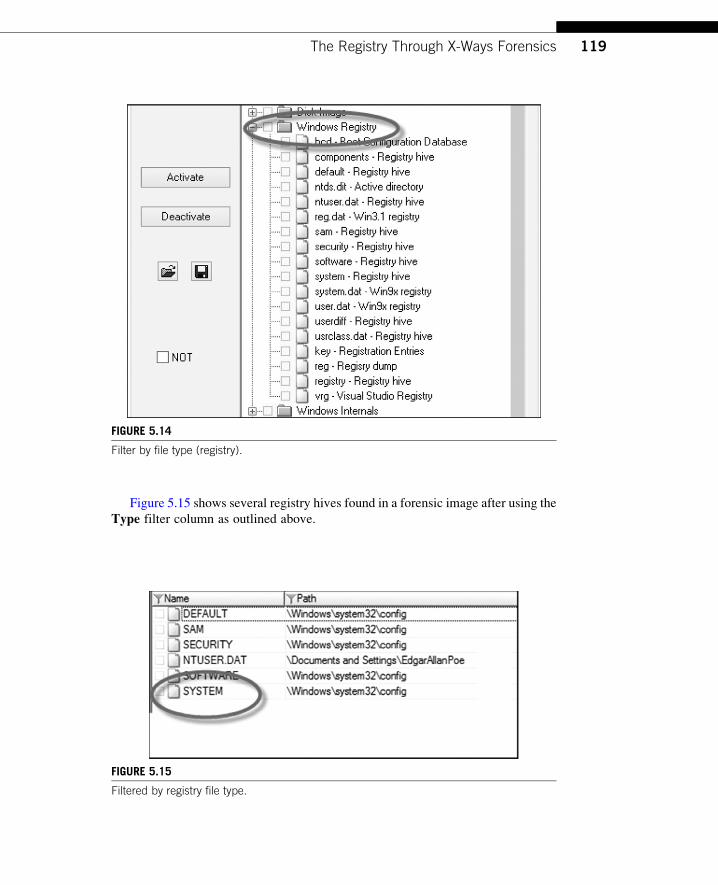
Figure 5.15 shows several registry hives found in a forensic image after using the
Type filter column as outlined above.
FIGURE 5.15
Filtered by registry file type.
FIGURE 5.14
Filter by file type (registry).
119The Registry Through X-Ways Forensics
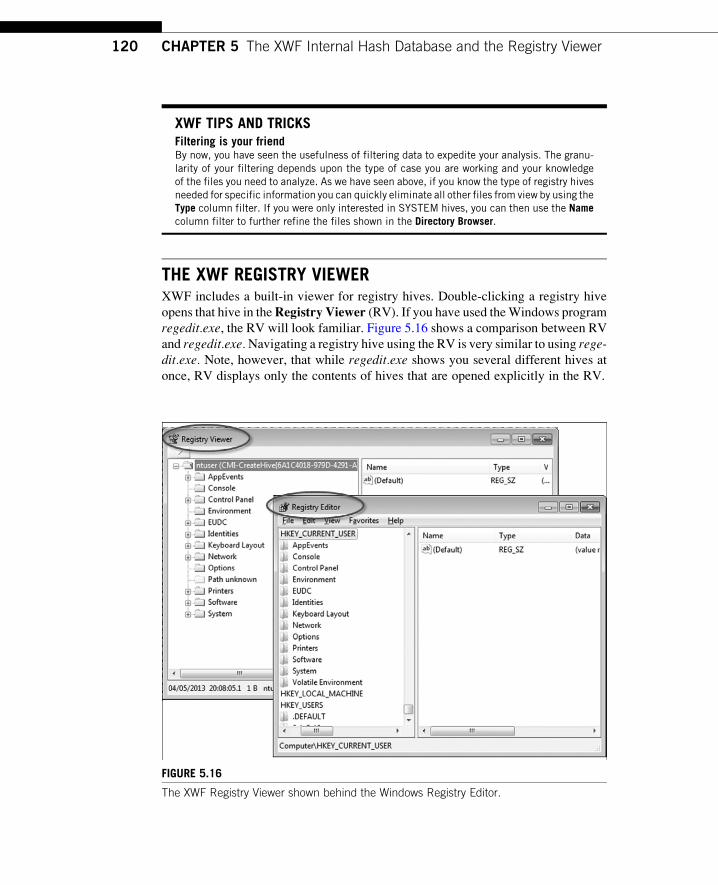
XWF TIPS AND TRICKSFiltering is your friendBy now, you have seen the usefulness of filtering data to expedite your analysis. The granu-larity of your filtering depends upon the type of case you are working and your knowledgeof the files you need to analyze. As we have seen above, if you know the type of registry hivesneeded for specific information you can quickly eliminate all other files from view by using theType column filter. If you were only interested in SYSTEM hives, you can then use the Namecolumn filter to further refine the files shown in the Directory Browser.
THE XWF REGISTRY VIEWERXWF includes a built-in viewer for registry hives. Double-clicking a registry hive
opens that hive in theRegistry Viewer (RV). If you have used theWindows program
regedit.exe, the RV will look familiar. Figure 5.16 shows a comparison between RV
and regedit.exe.Navigating a registry hive using the RV is very similar to using rege-dit.exe. Note, however, that while regedit.exe shows you several different hives at
once, RV displays only the contents of hives that are opened explicitly in the RV.
FIGURE 5.16
The XWF Registry Viewer shown behind the Windows Registry Editor.
120 CHAPTER 5 The XWF Internal Hash Database and the Registry Viewer
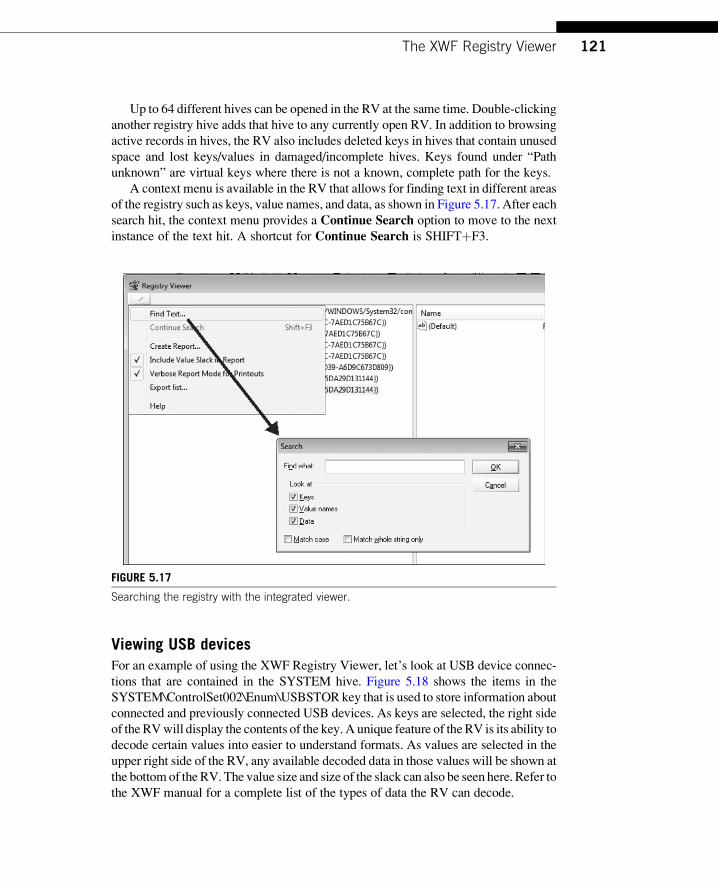
Up to 64 different hives can be opened in the RV at the same time. Double-clicking
another registry hive adds that hive to any currently open RV. In addition to browsing
active records in hives, the RV also includes deleted keys in hives that contain unused
space and lost keys/values in damaged/incomplete hives. Keys found under “Path
unknown” are virtual keys where there is not a known, complete path for the keys.
A context menu is available in the RV that allows for finding text in different areas
of the registry such as keys, value names, and data, as shown in Figure 5.17. After each
search hit, the context menu provides a Continue Search option to move to the next
instance of the text hit. A shortcut for Continue Search is SHIFTþF3.
Viewing USB devicesFor an example of using the XWF Registry Viewer, let’s look at USB device connec-
tions that are contained in the SYSTEM hive. Figure 5.18 shows the items in the
SYSTEM\ControlSet002\Enum\USBSTOR key that is used to store information about
connected and previously connected USB devices. As keys are selected, the right side
of the RVwill display the contents of the key.A unique feature of theRV is its ability to
decode certain values into easier to understand formats. As values are selected in the
upper right side of the RV, any available decoded data in those values will be shown at
the bottomof the RV. The value size and size of the slack can also be seen here. Refer to
the XWF manual for a complete list of the types of data the RV can decode.
FIGURE 5.17
Searching the registry with the integrated viewer.
121The XWF Registry Viewer
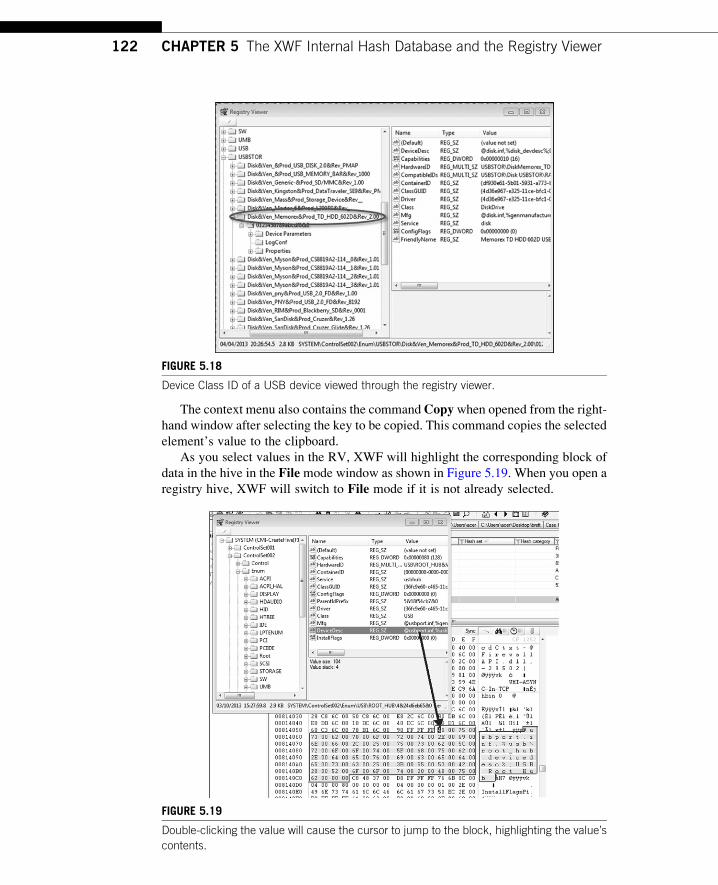
The context menu also contains the commandCopy when opened from the right-
hand window after selecting the key to be copied. This command copies the selected
element’s value to the clipboard.
As you select values in the RV, XWF will highlight the corresponding block of
data in the hive in the File mode window as shown in Figure 5.19. When you open a
registry hive, XWF will switch to File mode if it is not already selected.
FIGURE 5.18
Device Class ID of a USB device viewed through the registry viewer.
FIGURE 5.19
Double-clicking the value will cause the cursor to jump to the block, highlighting the value’s
contents.
122 CHAPTER 5 The XWF Internal Hash Database and the Registry Viewer
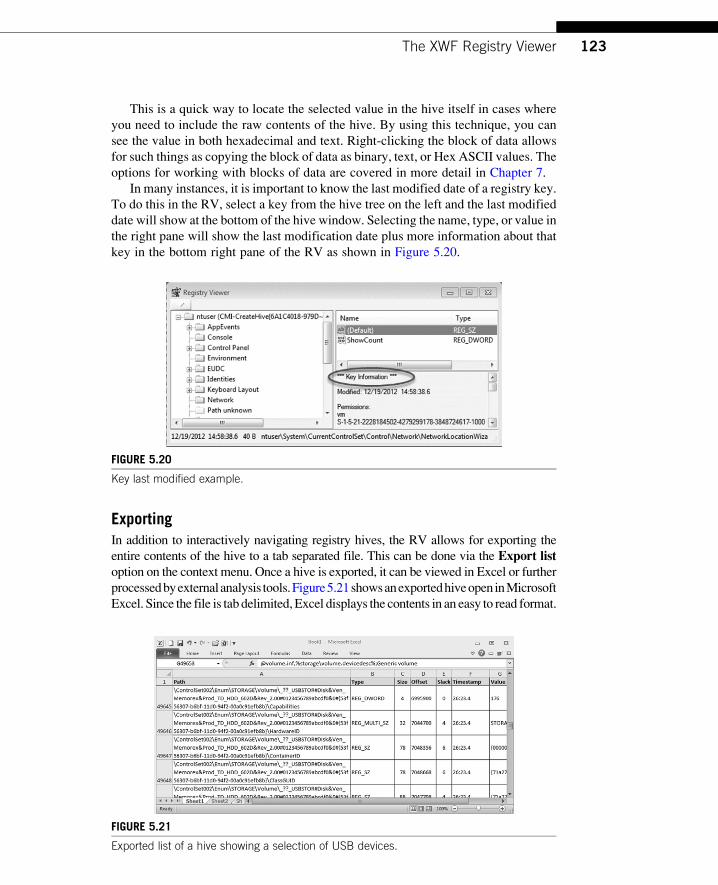
This is a quick way to locate the selected value in the hive itself in cases where
you need to include the raw contents of the hive. By using this technique, you can
see the value in both hexadecimal and text. Right-clicking the block of data allows
for such things as copying the block of data as binary, text, or Hex ASCII values. The
options for working with blocks of data are covered in more detail in Chapter 7.
In many instances, it is important to know the last modified date of a registry key.
To do this in the RV, select a key from the hive tree on the left and the last modified
date will show at the bottom of the hive window. Selecting the name, type, or value in
the right pane will show the last modification date plus more information about that
key in the bottom right pane of the RV as shown in Figure 5.20.
ExportingIn addition to interactively navigating registry hives, the RV allows for exporting the
entire contents of the hive to a tab separated file. This can be done via the Export listoption on the context menu. Once a hive is exported, it can be viewed in Excel or further
processedbyexternalanalysis tools.Figure5.21showsanexportedhiveopeninMicrosoft
Excel. Since the file is tab delimited, Excel displays the contents in an easy to read format.
FIGURE 5.20
Key last modified example.
FIGURE 5.21
Exported list of a hive showing a selection of USB devices.
123The XWF Registry Viewer
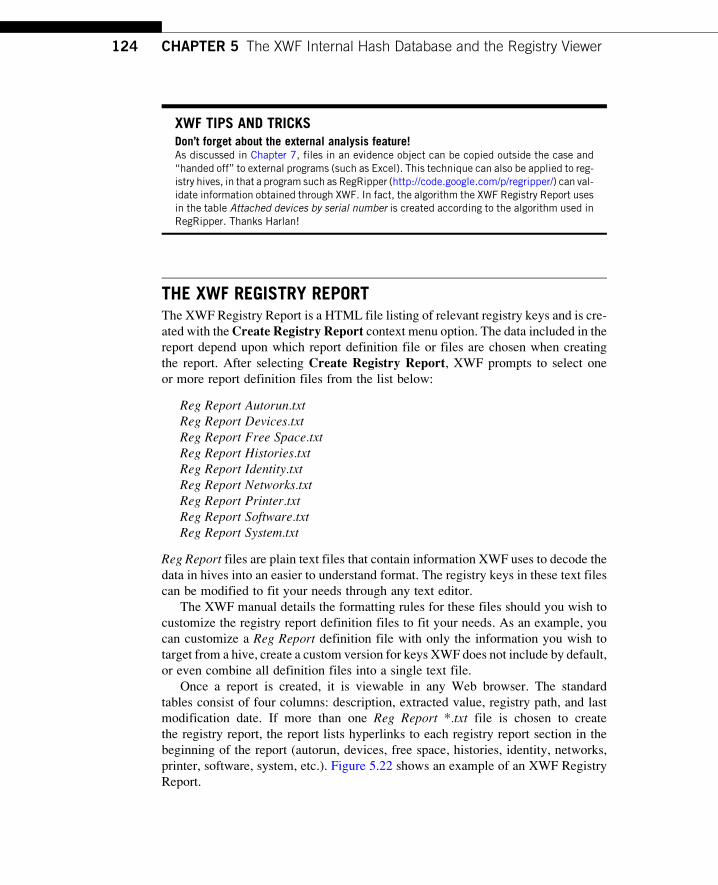
XWF TIPS AND TRICKSDon’t forget about the external analysis feature!As discussed in Chapter 7, files in an evidence object can be copied outside the case and“handed off” to external programs (such as Excel). This technique can also be applied to reg-istry hives, in that a program such as RegRipper (http://code.google.com/p/regripper/) can val-idate information obtained through XWF. In fact, the algorithm the XWF Registry Report usesin the table Attached devices by serial number is created according to the algorithm used inRegRipper. Thanks Harlan!
THE XWF REGISTRY REPORTThe XWF Registry Report is a HTML file listing of relevant registry keys and is cre-
ated with theCreate Registry Report context menu option. The data included in the
report depend upon which report definition file or files are chosen when creating
the report. After selecting Create Registry Report, XWF prompts to select one
or more report definition files from the list below:
Reg Report Autorun.txtReg Report Devices.txtReg Report Free Space.txtReg Report Histories.txtReg Report Identity.txtReg Report Networks.txtReg Report Printer.txtReg Report Software.txtReg Report System.txt
Reg Report files are plain text files that contain information XWF uses to decode the
data in hives into an easier to understand format. The registry keys in these text files
can be modified to fit your needs through any text editor.
The XWF manual details the formatting rules for these files should you wish to
customize the registry report definition files to fit your needs. As an example, you
can customize a Reg Report definition file with only the information you wish to
target from a hive, create a custom version for keys XWF does not include by default,
or even combine all definition files into a single text file.
Once a report is created, it is viewable in any Web browser. The standard
tables consist of four columns: description, extracted value, registry path, and last
modification date. If more than one Reg Report *.txt file is chosen to create
the registry report, the report lists hyperlinks to each registry report section in the
beginning of the report (autorun, devices, free space, histories, identity, networks,
printer, software, system, etc.). Figure 5.22 shows an example of an XWF Registry
Report.
124 CHAPTER 5 The XWF Internal Hash Database and the Registry Viewer
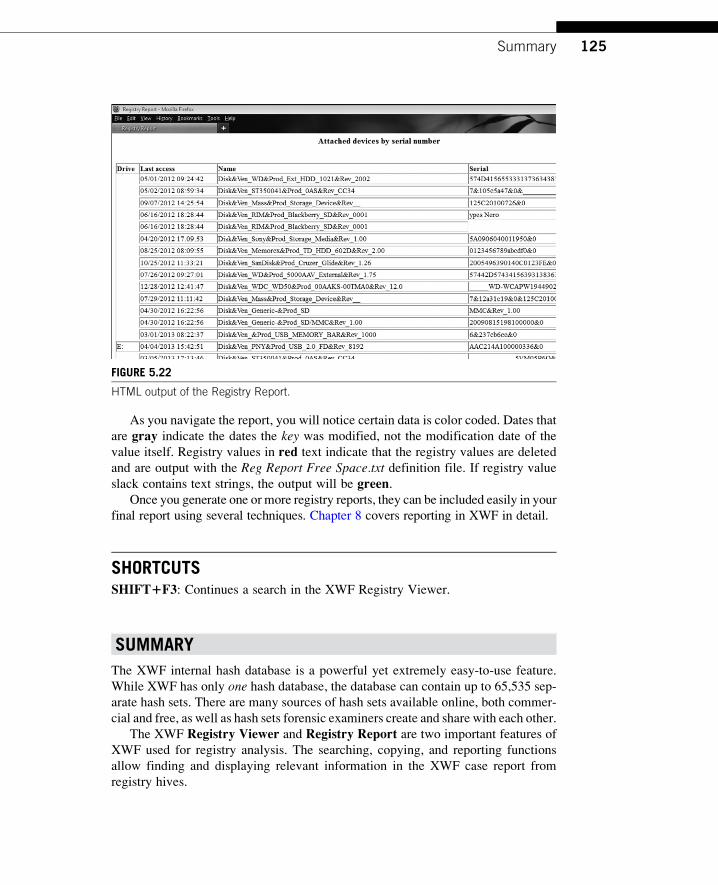
As you navigate the report, you will notice certain data is color coded. Dates that
are gray indicate the dates the key was modified, not the modification date of the
value itself. Registry values in red text indicate that the registry values are deleted
and are output with the Reg Report Free Space.txt definition file. If registry value
slack contains text strings, the output will be green.Once you generate one or more registry reports, they can be included easily in your
final report using several techniques. Chapter 8 covers reporting in XWF in detail.
SHORTCUTSSHIFT1F3: Continues a search in the XWF Registry Viewer.
SUMMARY
The XWF internal hash database is a powerful yet extremely easy-to-use feature.
While XWF has only one hash database, the database can contain up to 65,535 sep-
arate hash sets. There are many sources of hash sets available online, both commer-
cial and free, as well as hash sets forensic examiners create and share with each other.
The XWF Registry Viewer and Registry Report are two important features of
XWF used for registry analysis. The searching, copying, and reporting functions
allow finding and displaying relevant information in the XWF case report from
registry hives.
FIGURE 5.22
HTML output of the Registry Report.
125Summary

Intentionally left as blank
CHAPTER
Searching in X-WaysForensics 6INFORMATION IN THIS CHAPTER
• Introduction
• Simultaneous search
• Regular expressions
• GREP and regular expressions in XWF
• Indexed search
• Reviewing search hits
• Text search
• Hexadecimal search
• Shortcuts
• Summary
INTRODUCTION
Now that you have seen the power and capabilities of theRefineVolumeSnapshotpro-cess, it is time to start drilling down into data beyond usingDirectory Browser filters.
XWF contains several very flexible and capable search features that, when used
individually or in combination with each other, let you quickly and easily find the
information you are looking for. XWF fully supports searching for simple strings,
regular expressions, or any combination of the two, all at the same time.
SearchinginXWFgoesbeyondsimple linearphysical searches in that itprovidesmany
options not found anywhere else, such as searching not only slack space, but in free space
immediately following file slack. In addition, XWF can decode complex files to search
their contentsasopposed to simply searching thecontentsof filesas theyare storedondisk.
Once XWF locates the terms you have searched for, it allows you to review many
different combinations of search hits to separate the relevant search hits from the
irrelevant ones.
SIMULTANEOUS SEARCHThe most commonly used search feature in XWF is Simultaneous Search (SS). SS
can be performed on entire evidence objects, individual files, or anything in between.
SS includes a wide range of options including traditional keyword searches,
127
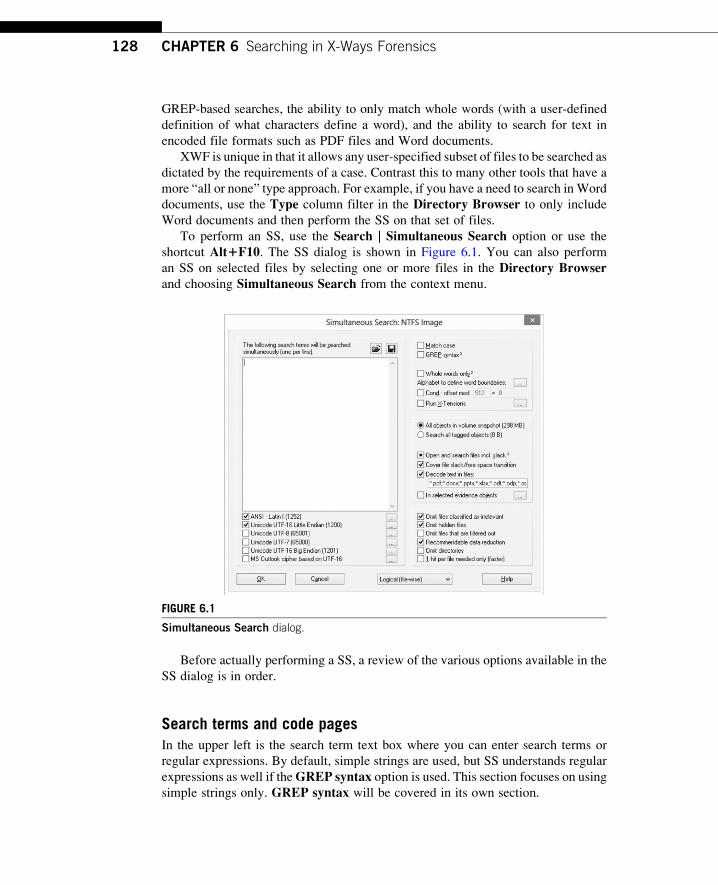
GREP-based searches, the ability to only match whole words (with a user-defined
definition of what characters define a word), and the ability to search for text in
encoded file formats such as PDF files and Word documents.
XWF is unique in that it allows any user-specified subset of files to be searched as
dictated by the requirements of a case. Contrast this to many other tools that have a
more “all or none” type approach. For example, if you have a need to search in Word
documents, use the Type column filter in the Directory Browser to only include
Word documents and then perform the SS on that set of files.
To perform an SS, use the Search | Simultaneous Search option or use the
shortcut Alt1F10. The SS dialog is shown in Figure 6.1. You can also perform
an SS on selected files by selecting one or more files in the Directory Browserand choosing Simultaneous Search from the context menu.
Before actually performing a SS, a review of the various options available in the
SS dialog is in order.
Search terms and code pagesIn the upper left is the search term text box where you can enter search terms or
regular expressions. By default, simple strings are used, but SS understands regular
expressions as well if theGREP syntax option is used. This section focuses on usingsimple strings only. GREP syntax will be covered in its own section.
FIGURE 6.1
Simultaneous Search dialog.
128 CHAPTER 6 Searching in X-Ways Forensics
Above the search term text box are two icons that let you save the terms entered in
the search term text box or open a file containing search terms that will then populate
the list. This makes it easy to have predefined search term lists for drug, child
pornography, white collar, etc., type cases.
Below the search term, text boxes are checkboxes that allow for selecting up to
six different code pages that will be used for the search. As with most settings in
XWF, the default code pages work in the majority of cases.
The right side of the dialog contains three groups of options: how to search, where
to search, and additional search options.
How to search optionsIf Match case is checked, XWF will perform case-sensitive searches. When this
option is enabled, XWF will search on the exact case (upper and lower) of each
search term as it appears in the list. In most cases, this option’s impact on search
speed will be negligible, but we recommend using it only when needed.
The GREP syntax option will be discussed in its own section below.
Whole words only has three options:
Fully checked: Only words meeting the criterion as outlined below, based on
the characters that are included in the Alphabet to define word boundariesoption, will be considered search hits.
Half-checked: Same as fully checked but only for search terms that are indented
with a TAB character. Hence, you can apply the whole word option to some
terms, and not to others.
Unchecked: Words containing any of the terms will be displayed including
words where a search term is a substring of a search hit.
As an example, consider searching for the term range. If Whole words only is
unchecked, XWF will consider the word orange to be a search hit as it contains
the word range. If this option is checked, orange will not be considered a search hit.We recommend half-checking this option as it allows more flexibility in that you
can find both substring and whole word matches at the same time by indenting the
search terms you wish to match as whole words.
A word boundary is a boundary between two consecutive characters where one of
the characters is a word character (as defined in theAlphabet to define word bound-aries option) and one character is not a word character. If both characters are word
characters, there is no possibility the second of the two characters is the start of a new
word, as there was no nonword character between the two (recall the two characters
in question were consecutive).
Likewise, if both consecutive characters are nonword characters, the position
between the two words cannot be the beginning or ending of a word (since they
are, by definition, nonword characters).
129Simultaneous Search
For example, withWhole words only fully or half-checked (and if half-checked,indented with a TAB character), if you were searching for the word flow within the
string her flower, XWFwill initially locate the first four characters in the word flowerand apply some tests to see whether it is a whole word or not as follows:
XWF checks the character to the left of f, which is a SPACE character. XWF
determines that the SPACE character is not a word character. It next checks to
see if f itself is a word character according to the values configured in the Alphabetto define word boundaries option. Since there is a nonword character to the left of
the f and f itself is a word character, XWF now knows there is a word boundary to the
left of f. Since XWF has already identified the word flow as a possible search hit, it
does not need to check every character in the word and moves to the last character, w.Now that XWF is at the w in flow, it again looks to the left and determines whether
there is a word character or not. It then looks to the right of w and again, XWF sees
that e is a word character. Since e is in ourAlphabet to define word boundaries list,XWF now knows that the instance of flow in flower is not a whole word. Therefore,flower will not constitute a hit.
The Condition offset modulo (Cond: offset mod) option allows for looking for
a given string at a given offset. Condition offset modulo, while seemingly intimidating,
significantly reduces thenumberof falsepositives inmanycases for certain types ofdata.
There are two available offsets. The first box isX, and the second isY.X is used to
denote the offset from the beginning of a record, for example, a partition or file. Once
XWFmoves to theX offset of a given object, the search termwill be looked for at offset
Y relative tooffsetX. It is helpful to think ofX as the startingpoint or anchor for a search
andY as how far away from the anchor to actually look for a given search term. When
enteringvalues for bothX andY, usedecimal notation rather thanhexadecimalnotation.
For example, master file table (MFT) FILE records are typically 1024 bytes in
length. With this option disabled, an SS will find the beginning of every record in the
MFT. To find every other FILE record, enable this option and set X¼2048 and Y¼0.
Another example would be a search of the MFT for a common value, such as the
number 8. Searching for 8without this option enabled will result in hundreds of thou-sands of hits on an average MFT file. However, if you are only interested in finding
the instances of 8 that are 20 bytes from the beginning of an MFT record, enable this
option and set X¼1024 and Y¼20. This tells XWF to divide theMFT into 1024-byte
chunks and, for each chunk, look 20 bytes from the beginning of the record for a
value of 8. If found, XWF will mark that instance as a search hit.
RunX-Tensions allows for selecting one ormore plugins that use the X-Tensions
API to be used as a part of the SS. We will cover X-Tensions in Chapter 7.
Where to search optionsThe radio buttons in this section define the scope of the SS as it pertains to which
objects will be included in the SS. Depending on how SS was invoked, either two
or three radio buttons will be visible. If SS is invoked on one or more objects via
the context menu in the Directory Browser, a third option, Search all selectedobjects, will be shown. If not, this option is hidden.
130 CHAPTER 6 Searching in X-Ways Forensics
If All objects in volume snapshot or Search all tagged objects is selected, anadditional option is shown, In selected evidence objects, that allows for selectingwhich evidence objects from the case to include in the search. Individual objects
can be selected by clicking the button to the right of the option. To select more than
one object, press CTRL while clicking an object.
If a single evidence object is selected, the total size of the data to be searched will
be shown in parenthesis at the end of the All objects in volume snapshot option.Similarly, the aggregate size of any tagged items or selected items is reflected after
the appropriate option.
Open and search files incl. slack functions the same way we saw in Chapter 3
when discussing the Directory Browser options. This option can be used in several
ways depending on how you went about selecting files to search. For example, use
the Directory Browser to filter on all .doc files, tag them, and elect to search only
tagged items in the SS dialog. In this scenario, half-checked would be best because,
although nothing is hidden, there may be irrelevant files in your list (unless you ver-
ified file types via Refine Volume Snapshot (RVS) and then filtered for relevant
files only in the Directory Browser). On the other hand, if you hide files in the
Directory Browser, fully checked is the best choice because the file slack of the
hidden files will always be searched. Having “X” ways of doing things can be trickysometimes, but as you find the technique that works best for you, you will know how
to best utilize the features of XWF.
When Open and search files incl. slack is fully or half-checked, the Cover fileslack/free space transition option is shown. If Cover file slack/free space transi-tion is checked, XWF will search into adjacent free space when searching file slack.
For example, a file is created that takes up almost two adjacent clusters. The
string that you are interested in is split across the boundary of these two clusters.
If this file is now edited such that the new file no longer contains the string you
are interested in and the file needs less than one cluster to save its contents, the
remaining part of the first cluster becomes slack space and the entire second cluster
is marked as free space.With this option enabled, XWFwill find the match because it
is not blindly stopping at the cluster boundary but rather looks into the adjacent free
space to see if a search hit exists. This is a unique and powerful option that allows
XWF to find things other tools cannot.
To put it another way, if a larger file is overwritten with a smaller file, data from
the larger file may remain in the slack of the smaller file and spill over into directly
following free space. If the slack space and the free space are only searched sepa-
rately, as in many forensic tools, any word spanning the cluster boundary that
delimits slack and free space cannot be found. XWF does not suffer from this
limitation and, by using this option, such search terms are easily found.
If Decode text in files is checked, SS will use the viewer component
to decode the contents of files whose extensions are listed. XWF will inform
you if the viewer component is not active and give you the opportunity to
enable it. This option can significantly expand the amount of data XWF can
look at while performing the SS as it decodes the contents of the most popular
document types.
131Simultaneous Search
XWF TIPS AND TRICKSViewing Decoded Text Hits in Their Native FormatTo view the decoded text that was extracted from a file when using the Decode text in filesoption, select the file in the normal Directory Browser (as opposed to the Search Hit List)and switch to Preview mode. Clicking the Raw button while in Preview mode results in many“garbage” characters being displayed. However, holding the SHIFT key and clicking the Rawbutton will show the decoded text without the extra characters.
Additional search optionsThe options found here allow for further filtering which objects the SS targets.
Several of the options are self-explanatory.
Omit files classified as irrelevant, when checked, tells XWF to ignore files that
have been deemed nonpertinent as a result of a hash database match against an
irrelevant or not-of-interest hash set. The Open and search files incl. slack option
affects this option, as XWF can search the slack of files deemed irrelevant.
Omit hidden files, when checked, will exclude any files that have been hidden viatheDirectoryBrowser regardlessofwhether theyare shownin theDirectoryBrowser.
The Omit directories option determines if directory records are included in the
search. To clarify, Omit directories option does not exclude files found in selected
directories from being searched. Rather, it excludes the data structures of the file
system that define the directory from being searched (for example, on NTFS file sys-
tems, INDX records).
TheOmit files that are filtered out option is useful because it allows you to usecolumn filters in the Directory Browser to select the files you are interested in
searching. This significantly reduces search time as XWF does not have to search
an entire evidence object.
The Recommendable data reduction, when checked, allows XWF to intelli-
gently omit certain files from a search. This is another example where XWF goes
beyond the norm in terms of efficiency.When this option is enabled, one of the advan-
tages is that XWFwill not duplicate its efforts by searching both a file as a whole and
each child of that file. For example, consider the case where anMBOXmailbox file is
processed by XWF as part of an RVS operation. The RVS operation will result in
child e-mail objects being associated with the MBOX file. When an SS includes
the MBOX and its children, XWF will skip the MBOX as the same information is
already available in the child objects. Archive files such as ZIP and RAR files work
in a similar way after they have been processed as a part of an RVS operation.
XWF TIPS AND TRICKSLess Isn’t Always MoreRecommendable data reduction is just that, a recommendation. There are times when you maynot want to search only child objects of a given file. For example, theremay be cases where notall data is extracted as e-mail messages from an MBOX file. With this option checked, youwould miss any matching search terms found inside the MBOX file that aren’t part of anextracted e-mail. As stated in the XWFmanual, the use of this option is a compromise of sorts.
132 CHAPTER 6 Searching in X-Ways Forensics
If 1 hit per file needed only (faster) is checked, XWF will stop searching a file
when any search term is found in a file. It should be noted that the search term found
and highlighted in the file may not be the most relevant or useful search hit.
For example, if you search for dog and cat, XWFwill not search a file further if it finds
cat before it finds dog in the file. As indicated by this option’s name, enabling this
option results in faster searching but at the expense of not being able to logically com-
bine search term hits, that is, show files with searchterm1, searchterm2, etc. in them.
Search methodologiesThe last option to cover is the methodology XWF will use when performing the
search as it pertains to how data are stored in a given evidence object. This option
is found between the Cancel and Help button at the bottom of the dialog.
Logical (file-wise) is by far the most powerful methodology and is the default
choice. Logical simply means that the search is conducted on the contents of files
regardless of whether the files are fragmented. Additionally, a logical search can
search through decoded text in many file types such as Word and PDF documents
and archive files.
Physical (sector-wise) tells XWF to search on a sector-by-sector basis in Logical
Block Addressing (LBA) order.While this has its uses in certain situations, it is prone
to miss data in many cases. For example, if a file is fragmented and the search term
you are interested in is split across a fragment, it will not be found. A logical search
avoids this issue.
When Physical (sector-wise) is selected, the Where to search options and
Additional search options will not be available. A new set of options is displayed
in place of Additional search options that includes options for the direction of the
search, whether to list search hits, etc.
Unless you have a specific reason for doing otherwise, we recommend always
selecting Logical (file-wise).After you enter one or more search terms and set the various options to your
liking, click the OK button to start the search. To cancel a search, press the ESCkey or click the X in the upper right corner of the search progress window.
REGULAR EXPRESSIONSA regular expression is a specific pattern that provides concise and flexible means to
match (specify and recognize) strings of text, such as particular characters, words, or
patterns of characters.1 It can also be used to search for hex strings that represent
non-ASCII characters.
Regular expressions (regex) come in several flavors or engines. Because of this,
certain rules must be followed in order for a given engine to process a regex pattern.
XWF uses its own engine to parse regular expressions, so its interpretation of regex
patterns is tightly integrated to its internal searching algorithms.
1http://en.wikipedia.org/wiki/Regular_expression.
133Regular Expressions
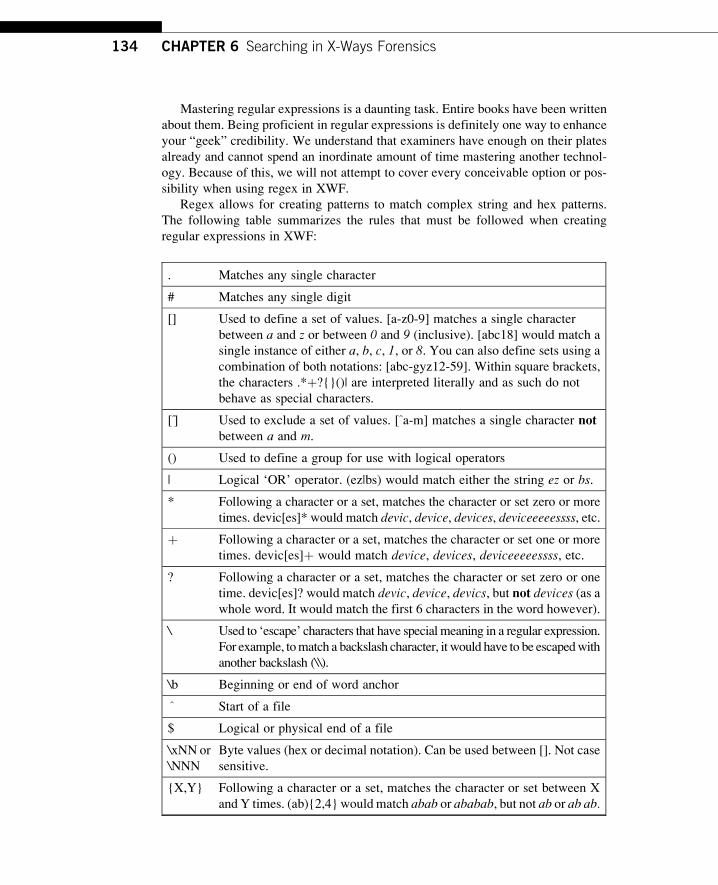
Mastering regular expressions is a daunting task. Entire books have been written
about them. Being proficient in regular expressions is definitely one way to enhance
your “geek” credibility. We understand that examiners have enough on their plates
already and cannot spend an inordinate amount of time mastering another technol-
ogy. Because of this, we will not attempt to cover every conceivable option or pos-
sibility when using regex in XWF.
Regex allows for creating patterns to match complex string and hex patterns.
The following table summarizes the rules that must be followed when creating
regular expressions in XWF:
. Matches any single character
# Matches any single digit
[] Used to define a set of values. [a-z0-9] matches a single character
between a and z or between 0 and 9 (inclusive). [abc18] would match a
single instance of either a, b, c, 1, or 8. You can also define sets using a
combination of both notations: [abc-gyz12-59]. Within square brackets,
the characters .*þ?{}()| are interpreted literally and as such do not
behave as special characters.
[ ] Used to exclude a set of values. [ a-m] matches a single character notbetween a and m.
() Used to define a group for use with logical operators
| Logical ‘OR’ operator. (ez|bs) would match either the string ez or bs.
* Following a character or a set, matches the character or set zero or more
times. devic[es]* would match devic, device, devices, deviceeeeessss, etc.
þ Following a character or a set, matches the character or set one or more
times. devic[es]þ would match device, devices, deviceeeeessss, etc.
? Following a character or a set, matches the character or set zero or one
time. devic[es]? would match devic, device, devics, but not devices (as awhole word. It would match the first 6 characters in the word however).
\ Used to ‘escape’ characters that have special meaning in a regular expression.
For example, tomatch a backslash character, it would have to be escapedwith
another backslash (\\).
\b Beginning or end of word anchor
^ Start of a file
$ Logical or physical end of a file
\xNN or
\NNN
Byte values (hex or decimal notation). Can be used between []. Not case
sensitive.
{X,Y} Following a character or a set, matches the character or set between X
and Y times. (ab){2,4} would match abab or ababab, but not ab or ab ab.
134 CHAPTER 6 Searching in X-Ways Forensics
If you are looking for more information on regex, an excellent resource for all
things regular expressions can be found at http://www.regular-expressions.info/
index.html.
A very good program to help you create and test various regex patterns is
RegexBuddy, found at http://www.regexbuddy.com/. RegexBuddy allows you to
test a regular expression against a set of data, so you can see, in real time, what your
regex matches as you adjust your regex. This is invaluable when learning how to
build both simple and complex regular expressions.
Regular expression examplesWhen creating regular expressions for use in XWF (or anywhere for that matter),
break down the information you are trying to find into smaller chunks. This helps
prevent errors when trying to create a complex regular expression. By composing
regular expressions in this manner, you will also create smaller expressions that
can serve as “ingredients” in future regex “recipes.”
Over the next few paragraphs, we will present several examples of common reg-
ular expressions. First, we will look at the expression as a whole and then, in several
of the examples, deconstruct it into its relevant pieces. This will make the regular
expressions easier to understand and allow you to reuse the building blocks of more
complex regular expressions.
[a-zA-Z0-9\-_\.]+@(gmail\.com|hotmail\.com|yahoo\.com)
Finds e-mail addresses hosted by gmail.com, hotmail.com, or yahoo.com. Because the
set of characters is followed by the plus symbol, the e-mail addressmust contain at least
onecharacter to the [email protected] left sidecancontainany lettersa-z (regardlessofcase),
a dash, an underscore, or a dot. Without the dot, the regex would find foobar@gmail.
com, but not [email protected] (it would however match on [email protected]). This
regexcanbeeasilyadjusted to findall e-mail addressesbyusing apattern similar towhat
we see to the left of @ in place of the three domain names.
[a-zA-Z0-9\-_\.]þ: This part of the regex will match the username piece of the
e-mail address (the information to the left of the @ sign). It will match any character
between a and z (inclusive) regardless of case, the numbers 0-9, the dash, and the
period character. By using a plus sign after the range of characters, we ensure
the username is at least one character in length.
@(gmail\.com|hotmail\.com|yahoo\.com): This part of the regex will first match
the@ sign followed by one of the values in parenthesis. Since the parenthesis defines
a set of OR conditions, there are three possibilities to match against: gmail.com,
hotmail.com, or yahoo.com (case insensitive). As an alternative, this part of the regex
could be simplified to @(gmail|hotmail|yahoo).com since the .com is redundant in
our initial example.
(vacation|holiday)\.jp(g|eg)
Finds files where the file name to the left of the dot is vacation or holiday and the fileextension is either jpg or jpeg. Notice the dot is escaped, so the regex looks for a dot as
135Regular Expressions
opposed to matching any single character. Without the backslash, the regex would
match (in addition to finding fileswith a dot since itwouldmatch any single character)
things such as vacationYjpg or holiday_jpeg. While an SS will find file names (if file
systemdata structures are searched), this regular expressionwould bemore applicable
to be used in the Name filter as it also supports regular expressions.
(vacation|holiday): Matches either vacation or holiday\.: Normally a dot matches any single character, but since we escaped it with a
backslash, this only matches a period.
jp(g|eg): Matches jp followed by either g or eg.
\#[a-f0-9]{6}
Matches six digit hexadecimal numbers. Such numbers are often found in HTML
documents for color codes (e.g., <body bgcolor¼"#FF9900”). In the string above,
this regex would match #FF9900. Without the leading escaped number sign, any
numerical value of at least six numbers would have been matched.
\#: Since the # sign is escaped, this matches the literal character #.
[a-f0-9]: Matches a single character between a-f and 0-9 which are the only valid
characters for hex notation.
{6}: Restricts matches to strings whose length is exactly six.
(http|https|ftp):\/\/[a-zA-Z0-9-./]{5,50}
Matches any URL strings that start with http, https, or ftp. The range thereafter allowsfor letters and numbers, a dash, a dot, and a forward slash. Since we did not include
the question mark, this regex would match URLs up to the beginning of the query
string. The URL must also be between 5 characters and 50 characters long.
\x68\x74\x74\x70\x3A\x2F\x2F
Matches the string https:// but does so by looking at the hexadecimal values in a file
vs. an ASCII string.
X-Account-Key
Looks for the string X-Account-Key at the beginning of a file as opposed to anywherein a given file.
\baccount2\b
Looks for the string account2 as an individual word. Without the leading and trailing
\b, account2 could be a part of any string and it would be considered a hit. Valid wordboundary characters can be configured in the SS dialog via the Alphabet to defineword boundaries button.
The examples above demonstrate several patterns and building blocks that can
be used to create powerful and flexible regex patterns. These patterns greatly
enhance your ability to find specific and relevant hits when searching while elimi-
nating false hits at the same time. Because you will have fewer search hits to review,
you become more efficient.
136 CHAPTER 6 Searching in X-Ways Forensics
GREP AND REGULAR EXPRESSIONS IN XWFTo use GREP expressions in XWF, you must enable theGREP syntax setting in theSS dialog. If you enter a search term in XWF without telling XWF to use GREP,
XWF will look for exact string matches and your results will most likely not be what
you expect. The GREP syntax option, when enabled, tells XWF to use regular
expressions either exclusively or in addition to string searches.
GREP syntax has three options:
Fully checked: All search terms will be treated as regular expressions.
Half-checked: Only search terms prepended with grep: are treated as regular
expressions. This is useful to use both standard and regex searches at the same
time.
Unchecked: All search terms will be treated as simple strings and will be searched
as entered.
If GREP syntax is either fully or half-checked, it replaces the Whole words onlyoption. When fully or half-checked, additional options become available.
Search window determines how many contiguous bytes XWF will look at when
trying to match a regular expression. The default window is 128 bytes. Depending on
the regex pattern used, this would list search hits up to the length of Search windoweven if there were more data that the regex pattern considers a match. In other words,
this prevents overbroad regular expressions from finding matching patterns that are
potentially thousands of lines long.
The value of Search window is also used when using a regular expression to find
two strings within a given distance of one another (a proximity search). Note that this
is not the preferred way to locate two terms that are close to one another. Rather than
adjusting the Search window for terms that are close to one another, the preferred
method is to look for search terms individually and then use the Near function in theSearch Term List. The Search Term List will be explained in its own section
below.
As explained above, the value of Search window determines the range of con-
tiguous bytes XWFwill look at when looking for matches. When used in conjunction
with a proximity search, the potential search hit must fall inside this window.
The regular expressions used for a proximity search are of the pattern:
keyword1.{mindistance,maxdistance}keyword2
keyword2.{mindistance,maxdistance}keyword1
Breaking the regular expression into pieces, we get the following:
keyword1: the first keyword to look for as an exact string match.
.{mindistance,maxdistance}: A period (that matches any character) repeated
betweenmindistance andmaxdistance times. This is the number of characters that
can separate keyword1 and keyword2 and still be considered a search hit.
keyword2: the second keyword to look for as an exact string match.
137GREP and Regular Expressions in XWF
For example, foo.{4,8}bar would find matches where the string foo is at least
four characters away from, but no more than eight characters away from, the
word bar.The total length of the proximity search regular expressions must be less than or
equal to the value of Search window (length of keyword1þmaxdistanceþ length
of keyword2).The second regex works just like the first one did, except that keyword1 and
keyword2 are in opposite positions.
If Allow overlapping hits is checked, XWF will look for search hits if a given
search term is found inside another string that also contains a search term. For
example, if searching for test against the string test testate testy testest, with this
option unchecked, XWF will find four search hits: test, testage, testy, and testest.With this option checked, XWF will find five search hits, the four as outlined above
and an additional one, testest.We recommend leaving this option unchecked as it can
produce many additional search hits in certain cases.
INDEXED SEARCHIn most cases, an SS will be sufficient when looking for search terms. As you have
seen, SS provides a powerful and flexible way to locate search terms in an evidence
object. There are times when indexing can save a considerable amount of time
but it is not necessary, nor do we recommend, creating an index in every case.
XWF is flexible in that it allows you, the user, to make the determination whether
to index or not.
Indexed searching differs from an SS in that, before conducting an
indexed search, XWF must locate and record every word composed of characters
(as selected by the user) that are contained in an evidence object (or subset of an
evidence object).
By creating an index of words, considerable time can be saved if you know you
will have a large number of search terms but do not necessarily know every
search term that you will need at the onset of a case. In situations where you have
a predefined set of keywords for which to search when conducting a particular type
of forensic review, it may be more beneficial to use an SS as opposed to an indexed
search.
XWF supports creating indexes of characters from all languages whose
characters are contained in the Unicode character set, including predefined alphabets
for over 25 languages. It is possible to combine character sets from different
languages if your evidence objects contain more than one language. You can also
create different indexes for different languages (preferable if the languages are not
compatible).
To create an index, use Search | Indexing or press CTRLþALTþI to bring up
the Indexing dialog as shown in Figure 6.2.
138 CHAPTER 6 Searching in X-Ways Forensics
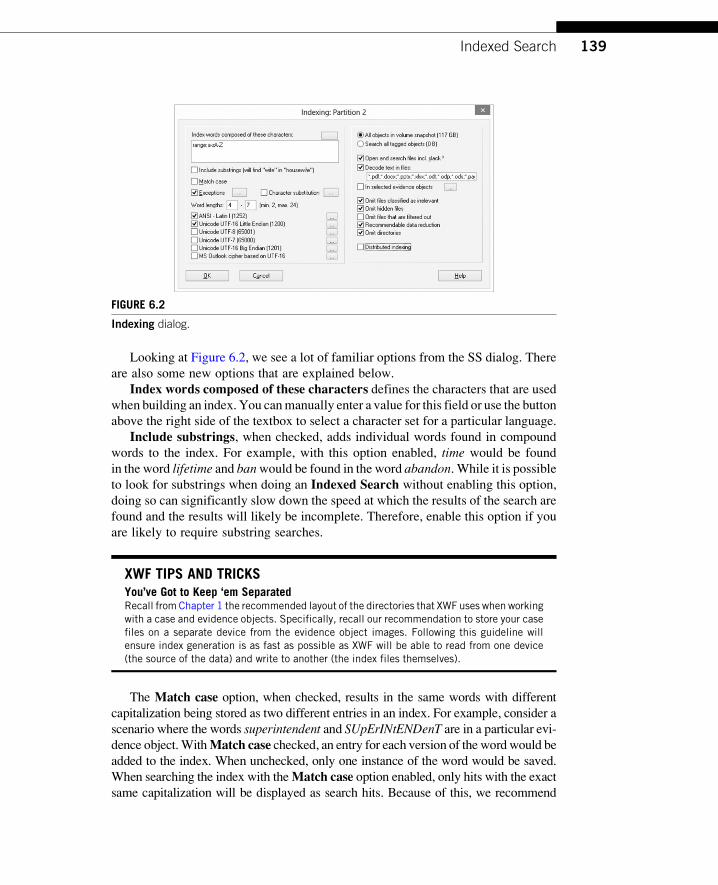
Looking at Figure 6.2, we see a lot of familiar options from the SS dialog. There
are also some new options that are explained below.
Index words composed of these characters defines the characters that are usedwhen building an index. You canmanually enter a value for this field or use the button
above the right side of the textbox to select a character set for a particular language.
Include substrings, when checked, adds individual words found in compound
words to the index. For example, with this option enabled, time would be found
in the word lifetime and banwould be found in the word abandon. While it is possible
to look for substrings when doing an Indexed Search without enabling this option,
doing so can significantly slow down the speed at which the results of the search are
found and the results will likely be incomplete. Therefore, enable this option if you
are likely to require substring searches.
XWF TIPS AND TRICKSYou’ve Got to Keep ‘em SeparatedRecall from Chapter 1 the recommended layout of the directories that XWF uses when workingwith a case and evidence objects. Specifically, recall our recommendation to store your casefiles on a separate device from the evidence object images. Following this guideline willensure index generation is as fast as possible as XWF will be able to read from one device(the source of the data) and write to another (the index files themselves).
The Match case option, when checked, results in the same words with different
capitalization being stored as two different entries in an index. For example, consider a
scenario where the words superintendent and SUpErINtENDenT are in a particular evi-dence object.WithMatch case checked, an entry for each version of the wordwould beadded to the index. When unchecked, only one instance of the word would be saved.
When searching the index with theMatch case option enabled, only hits with the exactsame capitalization will be displayed as search hits. Because of this, we recommend
FIGURE 6.2
Indexing dialog.
139Indexed Search
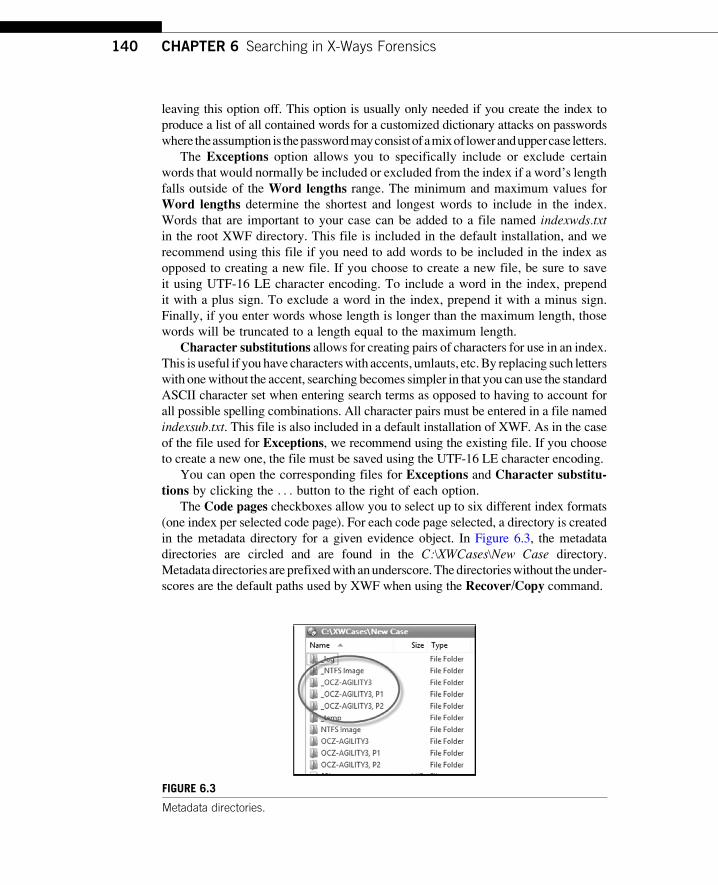
leaving this option off. This option is usually only needed if you create the index to
produce a list of all contained words for a customized dictionary attacks on passwords
where theassumption is thepasswordmayconsistofamixof loweranduppercase letters.
The Exceptions option allows you to specifically include or exclude certain
words that would normally be included or excluded from the index if a word’s length
falls outside of the Word lengths range. The minimum and maximum values for
Word lengths determine the shortest and longest words to include in the index.
Words that are important to your case can be added to a file named indexwds.txtin the root XWF directory. This file is included in the default installation, and we
recommend using this file if you need to add words to be included in the index as
opposed to creating a new file. If you choose to create a new file, be sure to save
it using UTF-16 LE character encoding. To include a word in the index, prepend
it with a plus sign. To exclude a word in the index, prepend it with a minus sign.
Finally, if you enter words whose length is longer than the maximum length, those
words will be truncated to a length equal to the maximum length.
Character substitutions allows for creating pairs of characters for use in an index.This is useful if you have characterswith accents, umlauts, etc.By replacing such letters
with onewithout the accent, searching becomes simpler in that you can use the standard
ASCII character set when entering search terms as opposed to having to account for
all possible spelling combinations. All character pairs must be entered in a file named
indexsub.txt. This file is also included in a default installation of XWF. As in the case
of the file used for Exceptions, we recommend using the existing file. If you choose
to create a new one, the file must be saved using the UTF-16 LE character encoding.
You can open the corresponding files for Exceptions and Character substitu-tions by clicking the . . . button to the right of each option.
The Code pages checkboxes allow you to select up to six different index formats
(one index per selected code page). For each code page selected, a directory is created
in the metadata directory for a given evidence object. In Figure 6.3, the metadata
directories are circled and are found in the C:\XWCases\New Case directory.
Metadata directories are prefixedwith anunderscore. Thedirectorieswithout theunder-
scores are the default paths used by XWF when using the Recover/Copy command.
FIGURE 6.3
Metadata directories.
140 CHAPTER 6 Searching in X-Ways Forensics
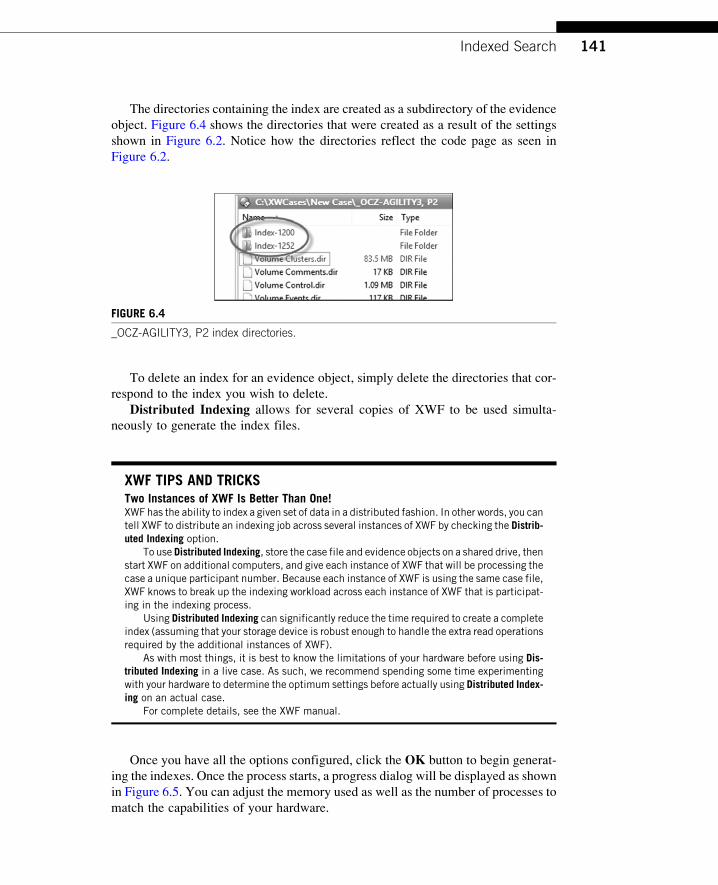
The directories containing the index are created as a subdirectory of the evidence
object. Figure 6.4 shows the directories that were created as a result of the settings
shown in Figure 6.2. Notice how the directories reflect the code page as seen in
Figure 6.2.
To delete an index for an evidence object, simply delete the directories that cor-
respond to the index you wish to delete.
Distributed Indexing allows for several copies of XWF to be used simulta-
neously to generate the index files.
XWF TIPS AND TRICKSTwo Instances of XWF Is Better Than One!XWF has the ability to index a given set of data in a distributed fashion. In other words, you cantell XWF to distribute an indexing job across several instances of XWF by checking the Distrib-uted Indexing option.
To use Distributed Indexing, store the case file and evidence objects on a shared drive, thenstart XWF on additional computers, and give each instance of XWF that will be processing thecase a unique participant number. Because each instance of XWF is using the same case file,XWF knows to break up the indexing workload across each instance of XWF that is participat-ing in the indexing process.
Using Distributed Indexing can significantly reduce the time required to create a completeindex (assuming that your storage device is robust enough to handle the extra read operationsrequired by the additional instances of XWF).
As with most things, it is best to know the limitations of your hardware before using Dis-tributed Indexing in a live case. As such, we recommend spending some time experimentingwith your hardware to determine the optimum settings before actually using Distributed Index-ing on an actual case.
For complete details, see the XWF manual.
Once you have all the options configured, click the OK button to begin generat-
ing the indexes. Once the process starts, a progress dialog will be displayed as shown
in Figure 6.5. You can adjust the memory used as well as the number of processes to
match the capabilities of your hardware.
FIGURE 6.4
_OCZ-AGILITY3, P2 index directories.
141Indexed Search
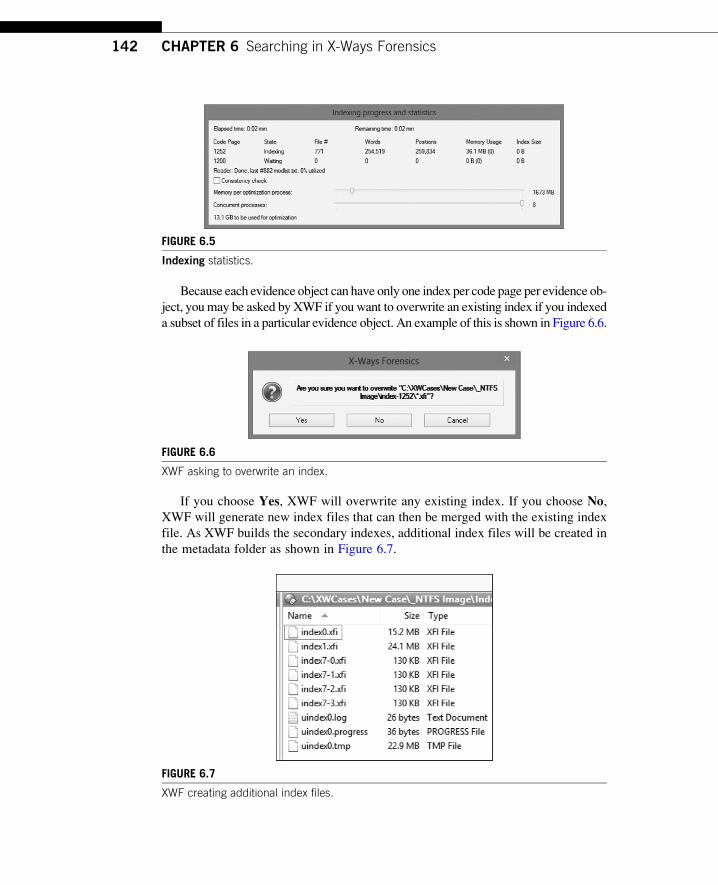
Because each evidence object can have only one index per code page per evidence ob-
ject, youmay be asked by XWF if you want to overwrite an existing index if you indexed
a subset of files in a particular evidence object. An example of this is shown in Figure 6.6.
If you choose Yes, XWF will overwrite any existing index. If you choose No,XWF will generate new index files that can then be merged with the existing index
file. As XWF builds the secondary indexes, additional index files will be created in
the metadata folder as shown in Figure 6.7.
FIGURE 6.5
Indexing statistics.
FIGURE 6.6
XWF asking to overwrite an index.
FIGURE 6.7
XWF creating additional index files.
142 CHAPTER 6 Searching in X-Ways Forensics
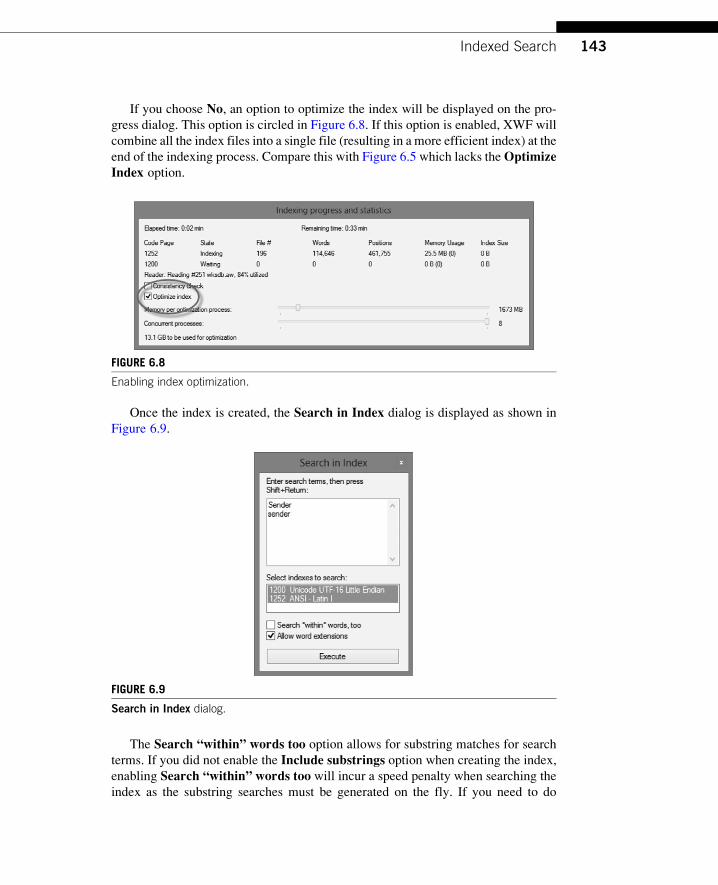
If you choose No, an option to optimize the index will be displayed on the pro-
gress dialog. This option is circled in Figure 6.8. If this option is enabled, XWF will
combine all the index files into a single file (resulting in a more efficient index) at the
end of the indexing process. Compare this with Figure 6.5 which lacks theOptimizeIndex option.
Once the index is created, the Search in Index dialog is displayed as shown in
Figure 6.9.
The Search “within” words too option allows for substring matches for search
terms. If you did not enable the Include substrings option when creating the index,
enabling Search “within” words too will incur a speed penalty when searching the
index as the substring searches must be generated on the fly. If you need to do
FIGURE 6.8
Enabling index optimization.
FIGURE 6.9
Search in Index dialog.
143Indexed Search
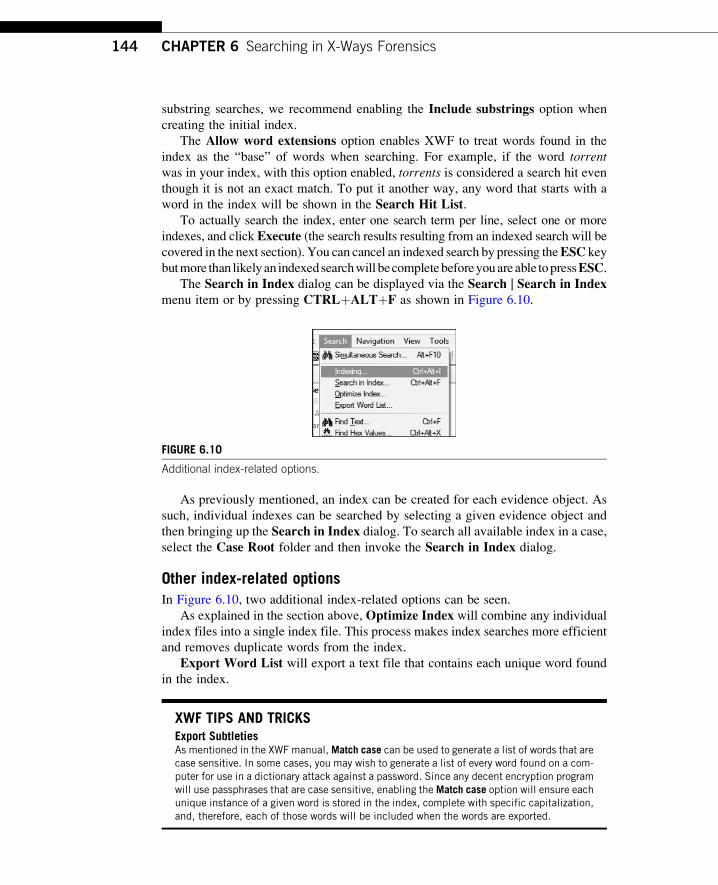
substring searches, we recommend enabling the Include substrings option when
creating the initial index.
The Allow word extensions option enables XWF to treat words found in the
index as the “base” of words when searching. For example, if the word torrentwas in your index, with this option enabled, torrents is considered a search hit even
though it is not an exact match. To put it another way, any word that starts with a
word in the index will be shown in the Search Hit List.To actually search the index, enter one search term per line, select one or more
indexes, and click Execute (the search results resulting from an indexed search will be
covered in the next section). You can cancel an indexed search by pressing theESC key
butmore than likelyan indexedsearchwill becompletebeforeyouareable topressESC.The Search in Index dialog can be displayed via the Search | Search in Index
menu item or by pressing CTRLþALTþF as shown in Figure 6.10.
As previously mentioned, an index can be created for each evidence object. As
such, individual indexes can be searched by selecting a given evidence object and
then bringing up the Search in Index dialog. To search all available index in a case,select the Case Root folder and then invoke the Search in Index dialog.
Other index-related optionsIn Figure 6.10, two additional index-related options can be seen.
As explained in the section above, Optimize Index will combine any individual
index files into a single index file. This process makes index searches more efficient
and removes duplicate words from the index.
Export Word List will export a text file that contains each unique word found
in the index.
XWF TIPS AND TRICKSExport SubtletiesAs mentioned in the XWF manual, Match case can be used to generate a list of words that arecase sensitive. In some cases, you may wish to generate a list of every word found on a com-puter for use in a dictionary attack against a password. Since any decent encryption programwill use passphrases that are case sensitive, enabling the Match case option will ensure eachunique instance of a given word is stored in the index, complete with specific capitalization,and, therefore, each of those words will be included when the words are exported.
FIGURE 6.10
Additional index-related options.
144 CHAPTER 6 Searching in X-Ways Forensics
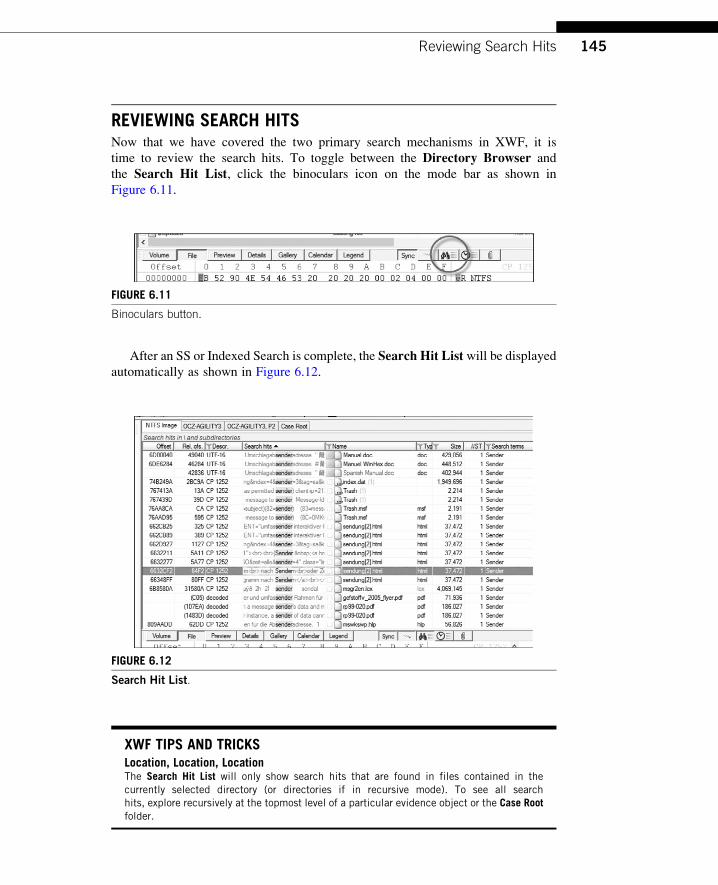
REVIEWING SEARCH HITSNow that we have covered the two primary search mechanisms in XWF, it is
time to review the search hits. To toggle between the Directory Browser and
the Search Hit List, click the binoculars icon on the mode bar as shown in
Figure 6.11.
After an SS or Indexed Search is complete, the Search Hit List will be displayedautomatically as shown in Figure 6.12.
XWF TIPS AND TRICKSLocation, Location, LocationThe Search Hit List will only show search hits that are found in files contained in thecurrently selected directory (or directories if in recursive mode). To see all searchhits, explore recursively at the topmost level of a particular evidence object or the Case Rootfolder.
FIGURE 6.12
Search Hit List.
FIGURE 6.11
Binoculars button.
145Reviewing Search Hits
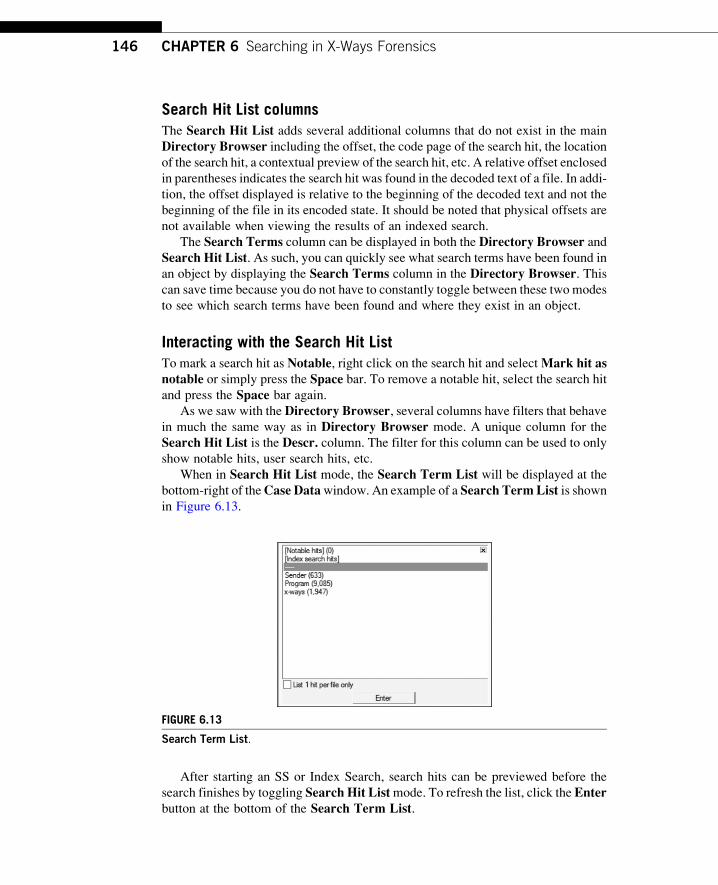
Search Hit List columnsThe Search Hit List adds several additional columns that do not exist in the main
Directory Browser including the offset, the code page of the search hit, the locationof the search hit, a contextual preview of the search hit, etc. A relative offset enclosed
in parentheses indicates the search hit was found in the decoded text of a file. In addi-
tion, the offset displayed is relative to the beginning of the decoded text and not the
beginning of the file in its encoded state. It should be noted that physical offsets are
not available when viewing the results of an indexed search.
The Search Terms column can be displayed in both the Directory Browser andSearch Hit List. As such, you can quickly see what search terms have been found in
an object by displaying the Search Terms column in the Directory Browser. Thiscan save time because you do not have to constantly toggle between these two modes
to see which search terms have been found and where they exist in an object.
Interacting with the Search Hit ListTo mark a search hit as Notable, right click on the search hit and selectMark hit asnotable or simply press the Space bar. To remove a notable hit, select the search hit
and press the Space bar again.As we saw with theDirectory Browser, several columns have filters that behave
in much the same way as in Directory Browser mode. A unique column for the
Search Hit List is the Descr. column. The filter for this column can be used to only
show notable hits, user search hits, etc.
When in Search Hit List mode, the Search Term List will be displayed at the
bottom-right of theCase Datawindow. An example of a Search TermList is shownin Figure 6.13.
After starting an SS or Index Search, search hits can be previewed before the
search finishes by toggling Search Hit Listmode. To refresh the list, click the Enterbutton at the bottom of the Search Term List.
FIGURE 6.13
Search Term List.
146 CHAPTER 6 Searching in X-Ways Forensics
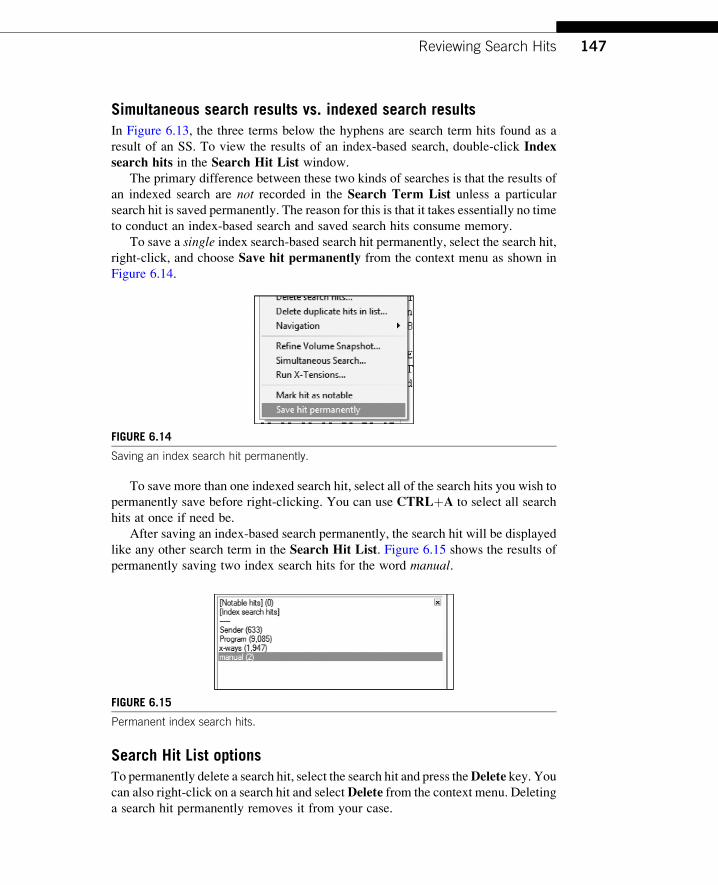
Simultaneous search results vs. indexed search resultsIn Figure 6.13, the three terms below the hyphens are search term hits found as a
result of an SS. To view the results of an index-based search, double-click Indexsearch hits in the Search Hit List window.
The primary difference between these two kinds of searches is that the results of
an indexed search are not recorded in the Search Term List unless a particular
search hit is saved permanently. The reason for this is that it takes essentially no time
to conduct an index-based search and saved search hits consume memory.
To save a single index search-based search hit permanently, select the search hit,
right-click, and choose Save hit permanently from the context menu as shown in
Figure 6.14.
To save more than one indexed search hit, select all of the search hits you wish to
permanently save before right-clicking. You can use CTRLþA to select all search
hits at once if need be.
After saving an index-based search permanently, the search hit will be displayed
like any other search term in the Search Hit List. Figure 6.15 shows the results of
permanently saving two index search hits for the word manual.
Search Hit List optionsTo permanently delete a search hit, select the search hit and press theDelete key. Youcan also right-click on a search hit and selectDelete from the context menu. Deleting
a search hit permanently removes it from your case.
FIGURE 6.14
Saving an index search hit permanently.
FIGURE 6.15
Permanent index search hits.
147Reviewing Search Hits
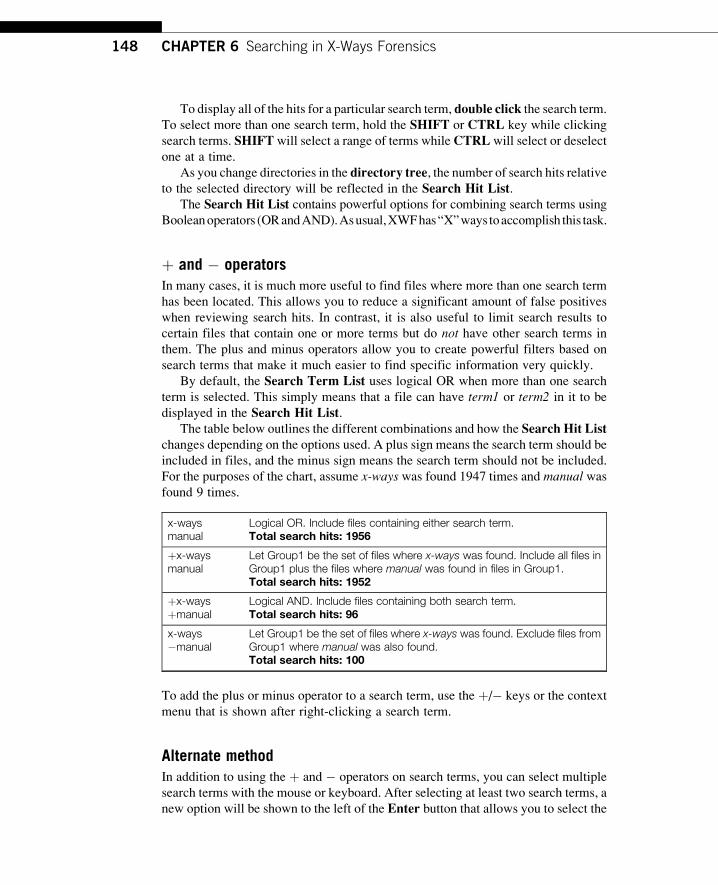
To display all of the hits for a particular search term, double click the search term.
To select more than one search term, hold the SHIFT or CTRL key while clicking
search terms. SHIFT will select a range of terms while CTRL will select or deselect
one at a time.
As you change directories in the directory tree, the number of search hits relative
to the selected directory will be reflected in the Search Hit List.The Search Hit List contains powerful options for combining search terms using
Booleanoperators (ORandAND).Asusual,XWFhas“X”ways toaccomplish this task.
þ and � operatorsIn many cases, it is much more useful to find files where more than one search term
has been located. This allows you to reduce a significant amount of false positives
when reviewing search hits. In contrast, it is also useful to limit search results to
certain files that contain one or more terms but do not have other search terms in
them. The plus and minus operators allow you to create powerful filters based on
search terms that make it much easier to find specific information very quickly.
By default, the Search Term List uses logical OR when more than one search
term is selected. This simply means that a file can have term1 or term2 in it to be
displayed in the Search Hit List.The table below outlines the different combinations and how the Search Hit List
changes depending on the options used. A plus sign means the search term should be
included in files, and the minus sign means the search term should not be included.
For the purposes of the chart, assume x-ways was found 1947 times and manual wasfound 9 times.
x-waysmanual
Logical OR. Include files containing either search term.Total search hits: 1956
þx-waysmanual
Let Group1 be the set of files where x-ways was found. Include all files inGroup1 plus the files where manual was found in files in Group1.Total search hits: 1952
þx-waysþmanual
Logical AND. Include files containing both search term.Total search hits: 96
x-ways�manual
Let Group1 be the set of files where x-ways was found. Exclude files fromGroup1 where manual was also found.Total search hits: 100
To add the plus or minus operator to a search term, use the þ/� keys or the context
menu that is shown after right-clicking a search term.
Alternate methodIn addition to using the þ and � operators on search terms, you can select multiple
search terms with the mouse or keyboard. After selecting at least two search terms, a
new option will be shown to the left of the Enter button that allows you to select the
148 CHAPTER 6 Searching in X-Ways Forensics
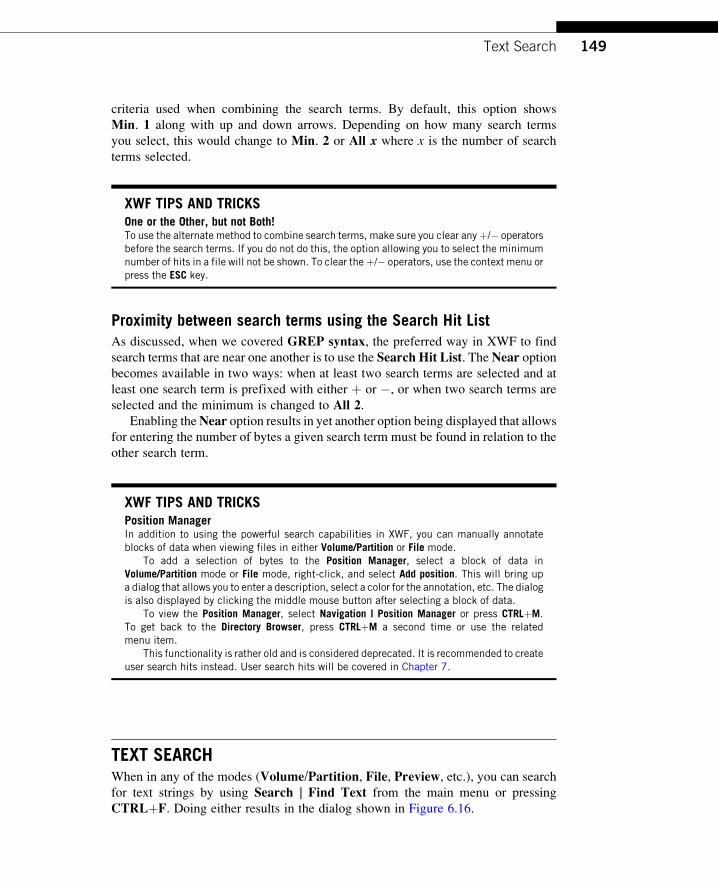
criteria used when combining the search terms. By default, this option shows
Min. 1 along with up and down arrows. Depending on how many search terms
you select, this would change to Min. 2 or All x where x is the number of search
terms selected.
XWF TIPS AND TRICKSOne or the Other, but not Both!To use the alternate method to combine search terms, make sure you clear anyþ/� operatorsbefore the search terms. If you do not do this, the option allowing you to select the minimumnumber of hits in a file will not be shown. To clear theþ/� operators, use the context menu orpress the ESC key.
Proximity between search terms using the Search Hit ListAs discussed, when we covered GREP syntax, the preferred way in XWF to find
search terms that are near one another is to use the Search Hit List. TheNear optionbecomes available in two ways: when at least two search terms are selected and at
least one search term is prefixed with either þ or �, or when two search terms are
selected and the minimum is changed to All 2.Enabling theNear option results in yet another option being displayed that allows
for entering the number of bytes a given search term must be found in relation to the
other search term.
XWF TIPS AND TRICKSPosition ManagerIn addition to using the powerful search capabilities in XWF, you can manually annotateblocks of data when viewing files in either Volume/Partition or File mode.
To add a selection of bytes to the Position Manager, select a block of data inVolume/Partition mode or File mode, right-click, and select Add position. This will bring upa dialog that allows you to enter a description, select a color for the annotation, etc. The dialogis also displayed by clicking the middle mouse button after selecting a block of data.
To view the Position Manager, select Navigation | Position Manager or press CTRLþM.To get back to the Directory Browser, press CTRLþM a second time or use the relatedmenu item.
This functionality is rather old and is considered deprecated. It is recommended to createuser search hits instead. User search hits will be covered in Chapter 7.
TEXT SEARCHWhen in any of the modes (Volume/Partition, File, Preview, etc.), you can search
for text strings by using Search | Find Text from the main menu or pressing
CTRLþF. Doing either results in the dialog shown in Figure 6.16.
149Text Search
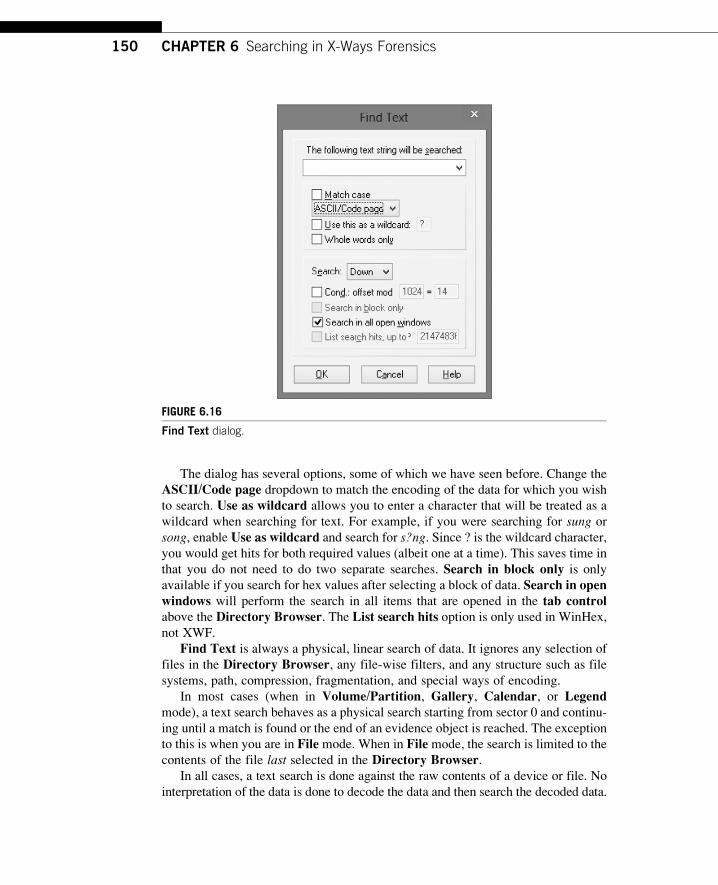
The dialog has several options, some of which we have seen before. Change the
ASCII/Code page dropdown to match the encoding of the data for which you wish
to search. Use as wildcard allows you to enter a character that will be treated as a
wildcard when searching for text. For example, if you were searching for sung or
song, enable Use as wildcard and search for s?ng. Since ? is the wildcard character,you would get hits for both required values (albeit one at a time). This saves time in
that you do not need to do two separate searches. Search in block only is only
available if you search for hex values after selecting a block of data. Search in openwindows will perform the search in all items that are opened in the tab controlabove the Directory Browser. The List search hits option is only used in WinHex,
not XWF.
Find Text is always a physical, linear search of data. It ignores any selection of
files in the Directory Browser, any file-wise filters, and any structure such as file
systems, path, compression, fragmentation, and special ways of encoding.
In most cases (when in Volume/Partition, Gallery, Calendar, or Legendmode), a text search behaves as a physical search starting from sector 0 and continu-
ing until a match is found or the end of an evidence object is reached. The exception
to this is when you are in File mode. When in File mode, the search is limited to the
contents of the file last selected in the Directory Browser.In all cases, a text search is done against the raw contents of a device or file. No
interpretation of the data is done to decode the data and then search the decoded data.
FIGURE 6.16
Find Text dialog.
150 CHAPTER 6 Searching in X-Ways Forensics
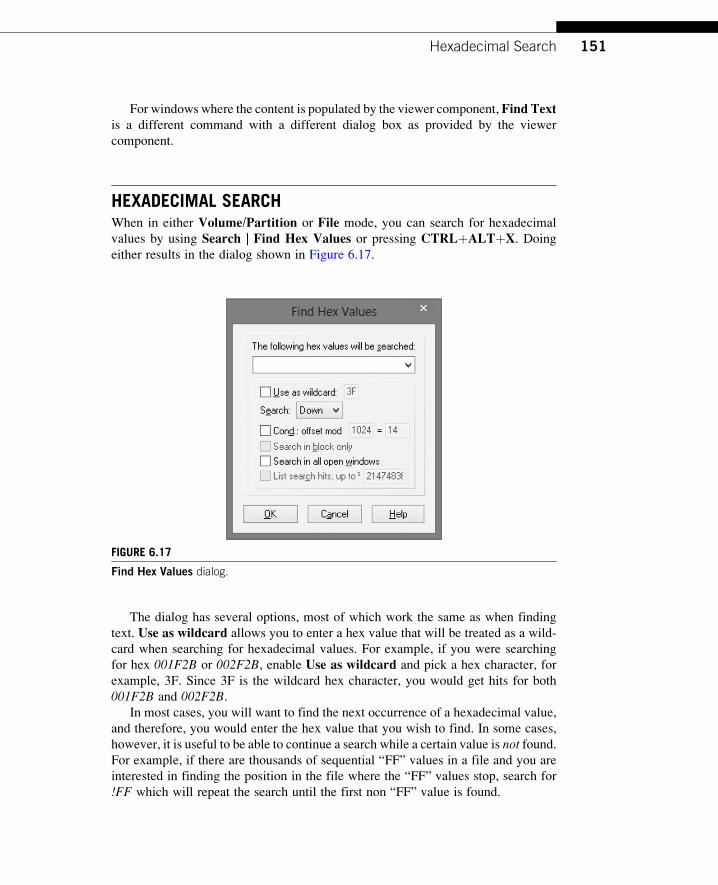
For windows where the content is populated by the viewer component, Find Textis a different command with a different dialog box as provided by the viewer
component.
HEXADECIMAL SEARCHWhen in either Volume/Partition or File mode, you can search for hexadecimal
values by using Search | Find Hex Values or pressing CTRLþALTþX. Doingeither results in the dialog shown in Figure 6.17.
The dialog has several options, most of which work the same as when finding
text. Use as wildcard allows you to enter a hex value that will be treated as a wild-
card when searching for hexadecimal values. For example, if you were searching
for hex 001F2B or 002F2B, enable Use as wildcard and pick a hex character, for
example, 3F. Since 3F is the wildcard hex character, you would get hits for both
001F2B and 002F2B.In most cases, you will want to find the next occurrence of a hexadecimal value,
and therefore, you would enter the hex value that you wish to find. In some cases,
however, it is useful to be able to continue a search while a certain value is not found.For example, if there are thousands of sequential “FF” values in a file and you are
interested in finding the position in the file where the “FF” values stop, search for
!FF which will repeat the search until the first non “FF” value is found.
FIGURE 6.17
Find Hex Values dialog.
151Hexadecimal Search
SHORTCUTSALTþF10: Bring up Simultaneous Search dialog.
CTRLþF: Bring up Find Text Values search dialog.
CTRLþALTþX: Bring up Find Hex Values search dialog.
CTRLþALTþF: Bring up the Search in Index dialog.
CTRLþALTþI: Bring up the Indexing dialog.
CTRLþM: Toggles between the Directory Browser and the Position Manager.
SUMMARY
XWF’s search capabilities are unrivaled and unique among digital forensic tools.
In this chapter, we have covered all of the ways to search for information in XWF
using powerful and flexible options that let you get to the data that is relevant to your
case as quickly as possible.
The primary search mechanism in XWF, the Simultaneous Search, allows youto use both simple strings and regular expressions to quickly and easily find search
terms. Because of its speed, having to index a case in order to perform various
searches is rarely needed.
After covering Simultaneous Search, we covered creating and using an index aswell as various ways to perform both text and hex searches.
With the knowledge you have gained in this chapter, you are equipped with the
skills necessary to find data regardless of where it is in your evidence.
152 CHAPTER 6 Searching in X-Ways Forensics
CHAPTER
Advanced Use of X-WaysForensics 7INFORMATION IN THIS CHAPTER
• Introduction
• Customizing X-Ways Forensics configuration files
• Maneuvering in hex
• Timeline and event analysis
• Gathering free and slack space
• RAM analysis
• Scripting, X-Tensions API, and external analysis interface
• Shortcuts
• Summary
INTRODUCTION
The topics covered in this chapter are advanced not in the sense that they are harder to
use than other areas of X-Ways Forensics (XWF), but rather that they cover areas that
some users may not use regularly. The intention of this chapter is to lay bare some of
the more difficult to understand or esoteric features of XWF in such a way that the
widest possible audience can benefit from them.
XWFcomeswith anextensive collectionof file signatures and types, somany in fact
that youmay never have to add your own. Should you find yourself in a position where
the defaults do not include a signature for your particular requirements, this chapter
details how to add and preserve your customizations.Users are encouraged to send their
customizations to theXWFdevelopers for possible inclusion ina future releaseofXWF.
After covering file customization options, we will discuss several other unique
features of XWF such as various options for interacting with raw data, timeline
analysis, collecting ambient data such as free or slack space, and RAM analysis. This
chapter concludes with a discussion of the different ways to automate XWF through
scripts or the application programming interface (API).
CUSTOMIZING X-WAYS FORENSICS CONFIGURATION FILESXWF comes with several text-based configuration files that let you add to the already
robust number of file types and file signatures provided with the program. These files
are updated regularly by the XWF developers and are included in the XWF zip file.
153

There are two locations where these configuration files can be stored: in the XWF
program directory or in a directory in a user’s profile.
Each of the configuration files discussed below are tab delimited. Using a program
such as Microsoft Excel makes customizing these files much easier as it will create
separate columns for each section of the configuration files. Since the files are plain
text, any text editorwillwork aswell, butwe recommendusing a text editor that allows
for visualizing TAB characters so the file layout remains consistent. UltraEdit (http://
www.ultraedit.com/) and Edit Pad Pro (http://www.editpadpro.com/) are two very
capable text editors that have this capability (among many others).
XWF directory-based configuration filesThis configuration is used by default in a new installation of XWF. Recall in
Chapter 1 that XWF is a portable application and as such does not require a tradi-
tional installation. Directory based means the configuration files live in the same
directory as the XWF executables.
User profile-based configuration filesThis configuration type is used in two scenarios: when a user runs XWF from a direc-
tory where the user does not have write permission or when the behavior is forced. To
force XWF to store its configuration files under the user’s profile, create an empty
file named winhex.user in the XWF directory.
It can be necessary to store this configuration in the user profile tree “necessarily”
if no write permission exist to the program folder or “forced” by the user (if winhex.user is present). The reason why XWF stored its configuration files in the user profile
directory can be seen in the About dialog via Help | About X-Ways Forensics.The default location for XWF to store its configuration files when in user profile
mode is %USERPROFILE%\AppData\Local\X-Ways\<directory from which XWF
was executed>. For example, if you execute C:\xwf\xwforensics64.exe, the com-
plete path to the user profile configurations would be %USERPROFILE%\AppData\Local\X-Ways\xwf.
XWF will automatically create several files in the user profile directory to keep
track of such things as the Name column filter as well as the last used search terms.
It will also create a WinHex.cfg file in the same folder.
When in user profile mode, XWF will load certain configuration files from this
location by default. When this is the case, it will be indicated in each configuration
file’s section below.
File Type Categories.txtThis configuration file is used for several purposes including creating categories of
file types, assigning ranks to file types, and assigning groups to file types. The layout
of the file is straightforward, but for complete details, see the XWF manual.
Assigning ranksRanks range from 0 to 9 with 0 being the default if a file is not given an explicit rank.
Higher ranks denotemore important file types across awider variety of cases. To assign
154 CHAPTER 7 Advanced Use of X-Ways Forensics
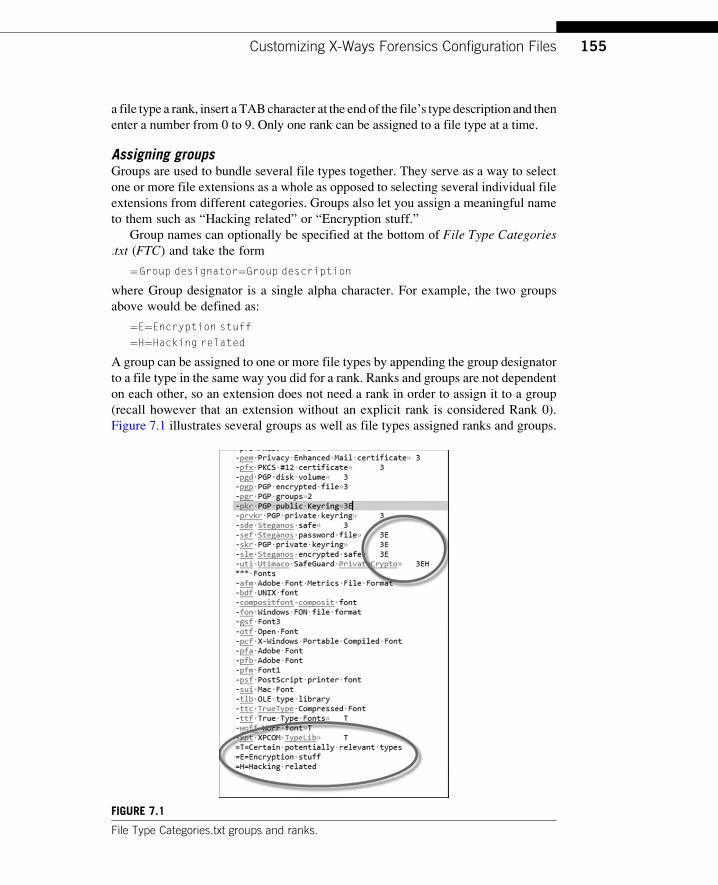
a file type a rank, insert a TABcharacter at the end of the file’s type description and then
enter a number from 0 to 9. Only one rank can be assigned to a file type at a time.
Assigning groupsGroups are used to bundle several file types together. They serve as a way to select
one or more file extensions as a whole as opposed to selecting several individual file
extensions from different categories. Groups also let you assign a meaningful name
to them such as “Hacking related” or “Encryption stuff.”
Group names can optionally be specified at the bottom of File Type Categories.txt (FTC) and take the form
¼Group designator¼Group description
where Group designator is a single alpha character. For example, the two groups
above would be defined as:
¼E¼Encryption stuff
¼H¼Hacking related
A group can be assigned to one or more file types by appending the group designator
to a file type in the same way you did for a rank. Ranks and groups are not dependent
on each other, so an extension does not need a rank in order to assign it to a group
(recall however that an extension without an explicit rank is considered Rank 0).
Figure 7.1 illustrates several groups as well as file types assigned ranks and groups.
FIGURE 7.1
File Type Categories.txt groups and ranks.
155Customizing X-Ways Forensics Configuration Files
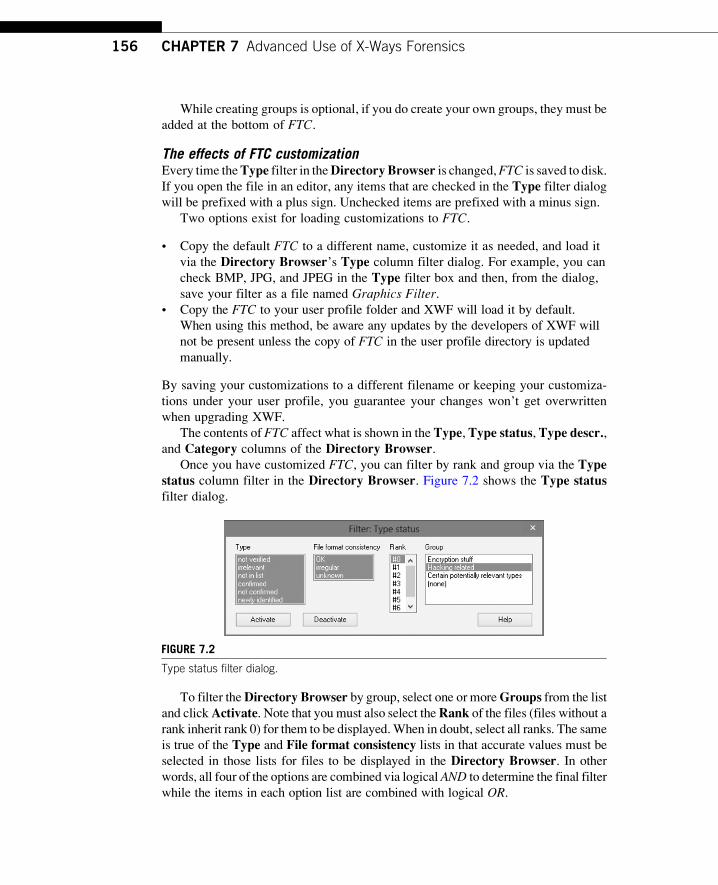
While creating groups is optional, if you do create your own groups, they must be
added at the bottom of FTC.
The effects of FTC customizationEvery time theType filter in theDirectory Browser is changed,FTC is saved to disk.
If you open the file in an editor, any items that are checked in the Type filter dialogwill be prefixed with a plus sign. Unchecked items are prefixed with a minus sign.
Two options exist for loading customizations to FTC.
• Copy the default FTC to a different name, customize it as needed, and load it
via the Directory Browser’s Type column filter dialog. For example, you can
check BMP, JPG, and JPEG in the Type filter box and then, from the dialog,
save your filter as a file named Graphics Filter.• Copy the FTC to your user profile folder and XWF will load it by default.
When using this method, be aware any updates by the developers of XWF will
not be present unless the copy of FTC in the user profile directory is updated
manually.
By saving your customizations to a different filename or keeping your customiza-
tions under your user profile, you guarantee your changes won’t get overwritten
when upgrading XWF.
The contents of FTC affect what is shown in the Type,Type status,Type descr.,and Category columns of the Directory Browser.
Once you have customized FTC, you can filter by rank and group via the Typestatus column filter in the Directory Browser. Figure 7.2 shows the Type statusfilter dialog.
To filter theDirectory Browser by group, select one or moreGroups from the list
and clickActivate. Note that you must also select theRank of the files (files without arank inherit rank 0) for them to be displayed.When in doubt, select all ranks. The same
is true of the Type and File format consistency lists in that accurate values must be
selected in those lists for files to be displayed in the Directory Browser. In other
words, all four of the options are combined via logicalAND to determine the final filter
while the items in each option list are combined with logical OR.
FIGURE 7.2
Type status filter dialog.
156 CHAPTER 7 Advanced Use of X-Ways Forensics
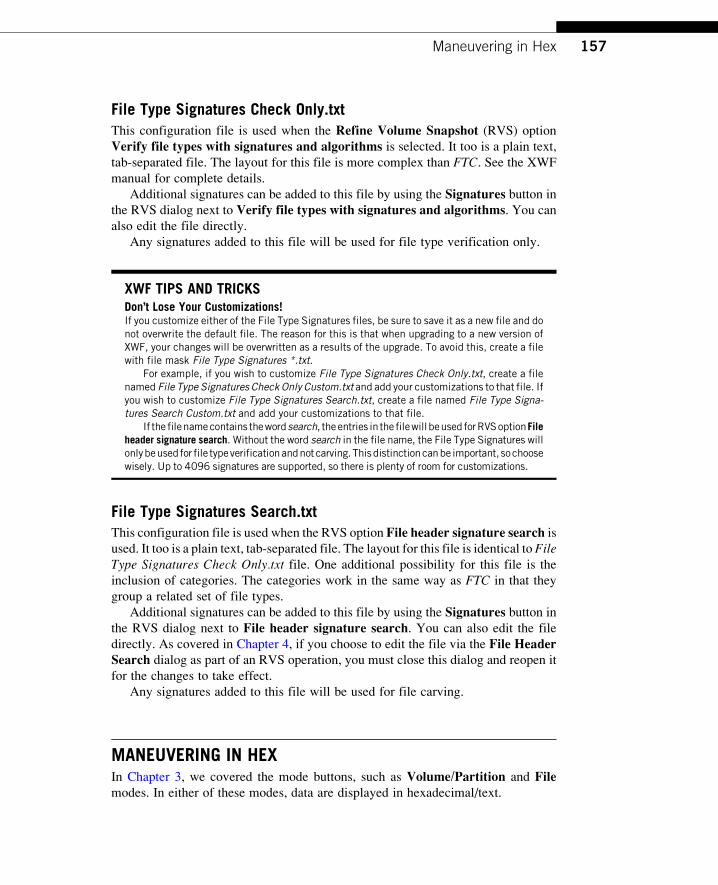
File Type Signatures Check Only.txtThis configuration file is used when the Refine Volume Snapshot (RVS) optionVerify file types with signatures and algorithms is selected. It too is a plain text,
tab-separated file. The layout for this file is more complex than FTC. See the XWF
manual for complete details.
Additional signatures can be added to this file by using the Signatures button inthe RVS dialog next to Verify file types with signatures and algorithms. You can
also edit the file directly.
Any signatures added to this file will be used for file type verification only.
XWF TIPS AND TRICKSDon’t Lose Your Customizations!If you customize either of the File Type Signatures files, be sure to save it as a new file and donot overwrite the default file. The reason for this is that when upgrading to a new version ofXWF, your changes will be overwritten as a results of the upgrade. To avoid this, create a filewith file mask File Type Signatures *.txt.
For example, if you wish to customize File Type Signatures Check Only.txt, create a filenamed File Type Signatures Check Only Custom.txt and add your customizations to that file. Ifyou wish to customize File Type Signatures Search.txt, create a file named File Type Signa-tures Search Custom.txt and add your customizations to that file.
If the filenamecontains thewordsearch, theentries in the filewillbeused forRVSoptionFileheader signature search. Without the word search in the file name, the File Type Signatures willonlybeused for file typeverificationandnot carving.Thisdistinctioncanbe important, sochoosewisely. Up to 4096 signatures are supported, so there is plenty of room for customizations.
File Type Signatures Search.txtThis configuration file is used when the RVS option File header signature search is
used. It too is a plain text, tab-separated file. The layout for this file is identical to FileType Signatures Check Only.txt file. One additional possibility for this file is the
inclusion of categories. The categories work in the same way as FTC in that they
group a related set of file types.
Additional signatures can be added to this file by using the Signatures button inthe RVS dialog next to File header signature search. You can also edit the file
directly. As covered in Chapter 4, if you choose to edit the file via the File HeaderSearch dialog as part of an RVS operation, you must close this dialog and reopen it
for the changes to take effect.
Any signatures added to this file will be used for file carving.
MANEUVERING IN HEXIn Chapter 3, we covered the mode buttons, such as Volume/Partition and Filemodes. In either of these modes, data are displayed in hexadecimal/text.
157Maneuvering in Hex
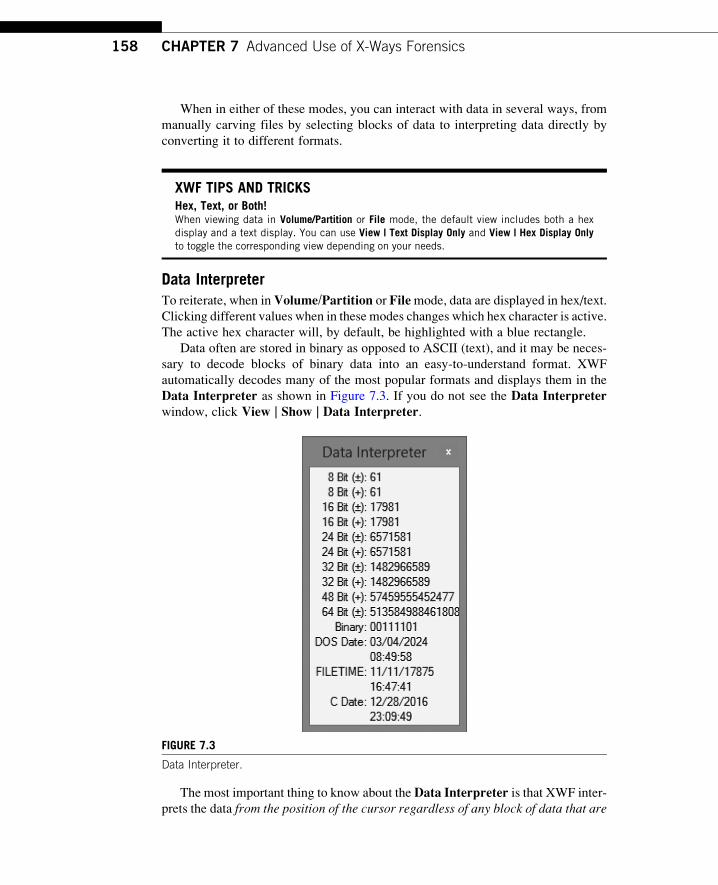
When in either of these modes, you can interact with data in several ways, from
manually carving files by selecting blocks of data to interpreting data directly by
converting it to different formats.
XWF TIPS AND TRICKSHex, Text, or Both!When viewing data in Volume/Partition or File mode, the default view includes both a hexdisplay and a text display. You can use View | Text Display Only and View | Hex Display Onlyto toggle the corresponding view depending on your needs.
Data InterpreterTo reiterate, when inVolume/Partition or Filemode, data are displayed in hex/text.
Clicking different values when in these modes changes which hex character is active.
The active hex character will, by default, be highlighted with a blue rectangle.
Data often are stored in binary as opposed to ASCII (text), and it may be neces-
sary to decode blocks of binary data into an easy-to-understand format. XWF
automatically decodes many of the most popular formats and displays them in the
Data Interpreter as shown in Figure 7.3. If you do not see the Data Interpreterwindow, click View | Show | Data Interpreter.
The most important thing to know about the Data Interpreter is that XWF inter-
prets the data from the position of the cursor regardless of any block of data that are
FIGURE 7.3
Data Interpreter.
158 CHAPTER 7 Advanced Use of X-Ways Forensics
selected. In other words, if you select eight bytes (16 hex characters from left to right)
that make up a timestamp, the data will not be interpreted as a block. Rather, simply
click the first byte/hex character in the timestamp and XWF will do the rest. By
default, the Data Interpreter employs little-endian order, but it can be changed
to big-endian by right clicking within the box (see below).
XWF TIPS AND TRICKS52 65 66 65 72 65 6e 63 65 20 74 61 62 6c 65 73 21Should you need them, several cross-reference tables are available via the View | Tablesmenuincluding decimal to hexadecimal, hex to ASCII, and hex to a user-selected code page. Inaddition to these tables, XWF also includes a hexadecimal converter that can be accessedvia Tools | Hex converter.
To change what is displayed (or the format the data are displayed in) in the DataInterpreter, right click the left side of the window and a context menu will appear.
Selecting Options will bring up a dialog where you can add or remove various for-
mats as shown in Figure 7.4.
If you close the Data Interpreter window while changing options as shown in
Figure 7.4, it can be displayed again by clicking View | Show | Data Interpreter.
FIGURE 7.4
Data Interpreter options.
159Maneuvering in Hex
The Hexadecimal option toggles between three numeric systems:
Fully checked: Hexadecimal
Half-checked: OctalUnchecked: Decimal
Digit grouping, when checked, will add separators when the data are using the dec-imal numeric system (i.e., 6000000 vs. 6,000,000).
Defining blocks of dataBefore you can interact with data beyond a single byte, the data have to be selected
and, as with other areas in XWF, there are several ways to do so.
The simplest way is to use the mouse to select a block of data. To do so, left click
and hold the button down and then drag the mouse to the end of the block to highlight
the data in which you are interested. In XWF terms, this is a “block” of data. Alter-
natively, you can right click and use the relevant block commands from the context
menu: Beginning of block and End of block.Keyboard warriors can set the start of a block with ALTþ1 and the end of the
block with ALTþ2. The ESC key will clear any selected block.
XWF TIPS AND TRICKSBlock Statistics the Easy WayThe Tools | Analyze block command will take a block of data and create a bar graph for allunique hexadecimal values contained in the block of data.
When a skeleton image (SI) (see Chapter 2 for a refresher on how to work with
skeleton images) is open, you can manually add blocks of data to the skeleton image
when in Disk mode. If you wish to only include certain blocks of data in your SI, be
sure to set the SI to Idlemode before navigating to the sectors you want to include in
the SI. This is done via the File | State/<name of SI> dialog. Once you have defined
the block of data you wish to add to the SI, disable Idlemode and then use the Tools |Compute Hash option to generate the hash value of the block. Since XWF has to
read the data in order to calculate its hash, the data will be added to the SI. Depending
on the options used to create or open the SI, the information about the block of data
will be appended to the log file.
User search hitsYou can arbitrarily add data to “search hits” regardless of whether the “hit” was
found by traditional methods. A user search hit can be created on a given block
of data when in Volume/Partition or File mode. To create a user search hit, simply
select a range of bytes, right click, and choose Add to User search hits as shownin Figure 7.5. A dialog will be display allowing you to name the search hit.
160 CHAPTER 7 Advanced Use of X-Ways Forensics
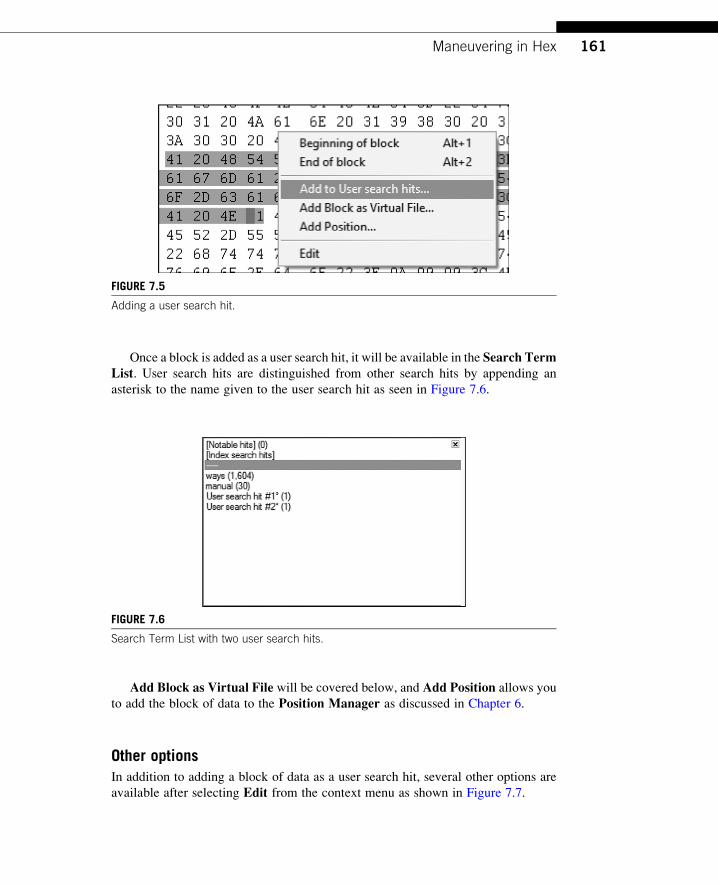
Once a block is added as a user search hit, it will be available in the Search TermList. User search hits are distinguished from other search hits by appending an
asterisk to the name given to the user search hit as seen in Figure 7.6.
Add Block as Virtual File will be covered below, and Add Position allows you
to add the block of data to the Position Manager as discussed in Chapter 6.
Other optionsIn addition to adding a block of data as a user search hit, several other options are
available after selecting Edit from the context menu as shown in Figure 7.7.
FIGURE 7.5
Adding a user search hit.
FIGURE 7.6
Search Term List with two user search hits.
161Maneuvering in Hex
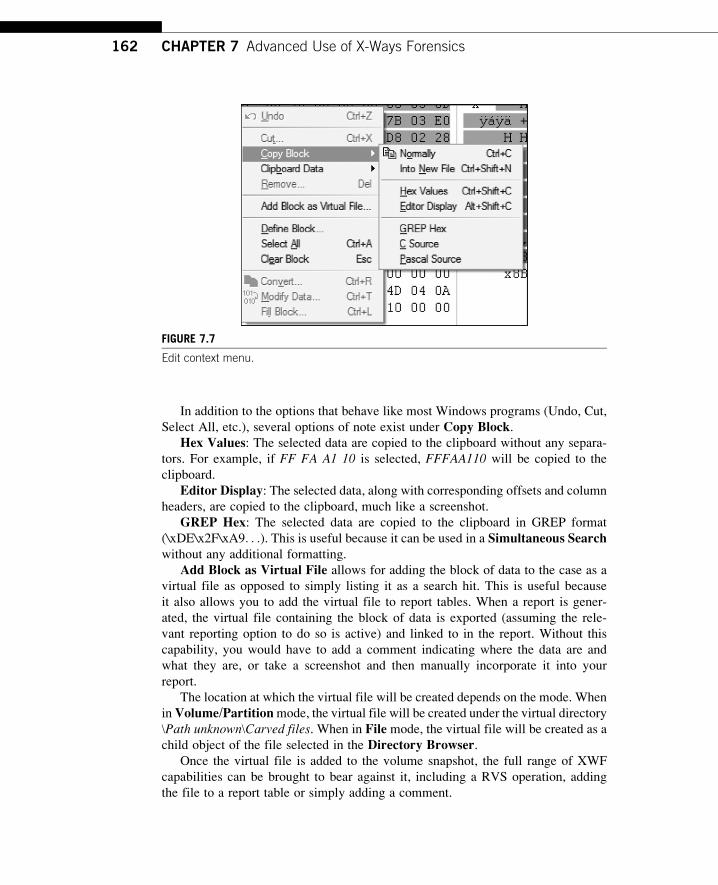
In addition to the options that behave like most Windows programs (Undo, Cut,
Select All, etc.), several options of note exist under Copy Block.Hex Values: The selected data are copied to the clipboard without any separa-
tors. For example, if FF FA A1 10 is selected, FFFAA110 will be copied to the
clipboard.
Editor Display: The selected data, along with corresponding offsets and column
headers, are copied to the clipboard, much like a screenshot.
GREP Hex: The selected data are copied to the clipboard in GREP format
(\xDE\x2F\xA9. . .). This is useful because it can be used in a Simultaneous Searchwithout any additional formatting.
Add Block as Virtual File allows for adding the block of data to the case as a
virtual file as opposed to simply listing it as a search hit. This is useful because
it also allows you to add the virtual file to report tables. When a report is gener-
ated, the virtual file containing the block of data is exported (assuming the rele-
vant reporting option to do so is active) and linked to in the report. Without this
capability, you would have to add a comment indicating where the data are and
what they are, or take a screenshot and then manually incorporate it into your
report.
The location at which the virtual file will be created depends on the mode. When
inVolume/Partitionmode, the virtual file will be created under the virtual directory
\Path unknown\Carved files. When in File mode, the virtual file will be created as a
child object of the file selected in the Directory Browser.Once the virtual file is added to the volume snapshot, the full range of XWF
capabilities can be brought to bear against it, including a RVS operation, adding
the file to a report table or simply adding a comment.
FIGURE 7.7
Edit context menu.
162 CHAPTER 7 Advanced Use of X-Ways Forensics

Sector superimpositionConsider the case where a disk is recovered and certain key sectors are damaged. In
most cases, XWF will still be able to determine the file system and display its con-
tents automatically, but in some cases even XWF will be unable to do so.
By taking a closer look at the data in Volume/Partitionmode, it may be obvious
as to what the problem is, but how can you fix the error without altering your
evidence?
XWF solves this problem with the unique ability to superimpose data on top of
data in an image. In our example above, if the sectors containing the master boot
record (MBR) were damaged and you knew which bits were damaged, you
could select the sectors that comprise the MBR and copy them to a new file outside
of XWF.
After correcting the errors in the newly created file, use the Edit | Superimposesectors menu item and select the corrected file. XWF will then virtually “replace”
the damaged sectors with the sectors in the selected file and the changes will be
reflected in Volume/Partition or File mode. The same menu item removes the
superimposition as well.
Once the superimposition is in place, refresh the view and XWF will use the new
data when interpreting the superimposed sector(s). Depending on the kind of damage
that was repaired, XWF may create an initial volume snapshot. Once XWF finishes
creating the initial volume snapshot, a new image can be created that incorporates
the fixed data permanently. If you choose to create a new forensic image, be sure
to document it accordingly.
Sector superimposition is a powerful option that canmake working with damaged
media a lot easier. As its name implies, sector superimposition only works on com-
plete and not on partial sectors.
TemplatesWhen in Volume/Partitionmode, an extra button (a down arrow) is available to the
right of the hex column headers as shown in Figure 7.8. This button allows you to
FIGURE 7.8
Template button.
163Maneuvering in Hex
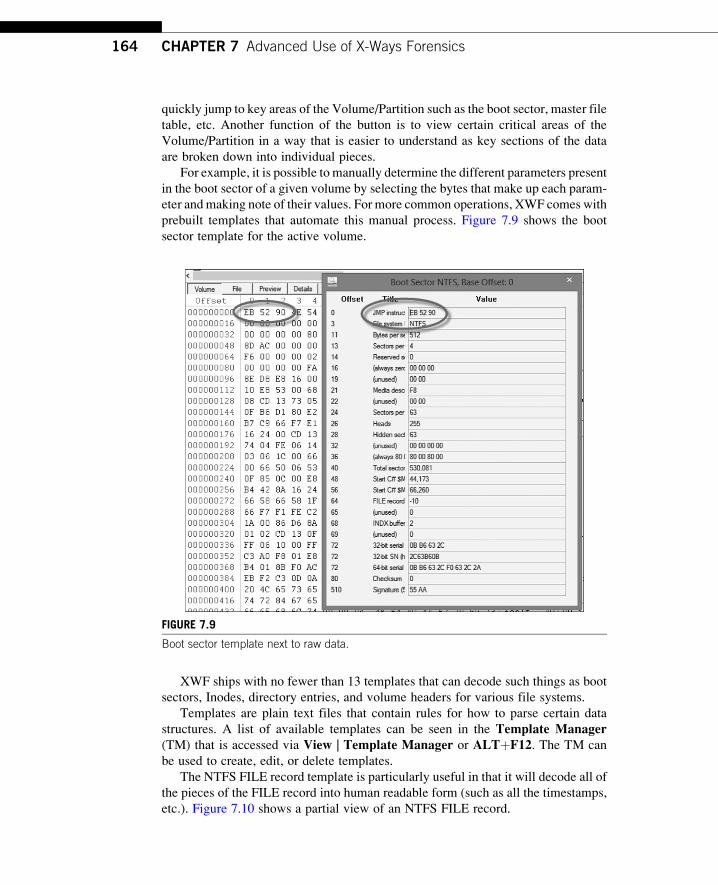
quickly jump to key areas of the Volume/Partition such as the boot sector, master file
table, etc. Another function of the button is to view certain critical areas of the
Volume/Partition in a way that is easier to understand as key sections of the data
are broken down into individual pieces.
For example, it is possible to manually determine the different parameters present
in the boot sector of a given volume by selecting the bytes that make up each param-
eter andmaking note of their values. For more common operations, XWF comes with
prebuilt templates that automate this manual process. Figure 7.9 shows the boot
sector template for the active volume.
XWF ships with no fewer than 13 templates that can decode such things as boot
sectors, Inodes, directory entries, and volume headers for various file systems.
Templates are plain text files that contain rules for how to parse certain data
structures. A list of available templates can be seen in the Template Manager(TM) that is accessed via View | Template Manager or ALTþF12. The TM can
be used to create, edit, or delete templates.
The NTFS FILE record template is particularly useful in that it will decode all of
the pieces of the FILE record into human readable form (such as all the timestamps,
etc.). Figure 7.10 shows a partial view of an NTFS FILE record.
FIGURE 7.9
Boot sector template next to raw data.
164 CHAPTER 7 Advanced Use of X-Ways Forensics
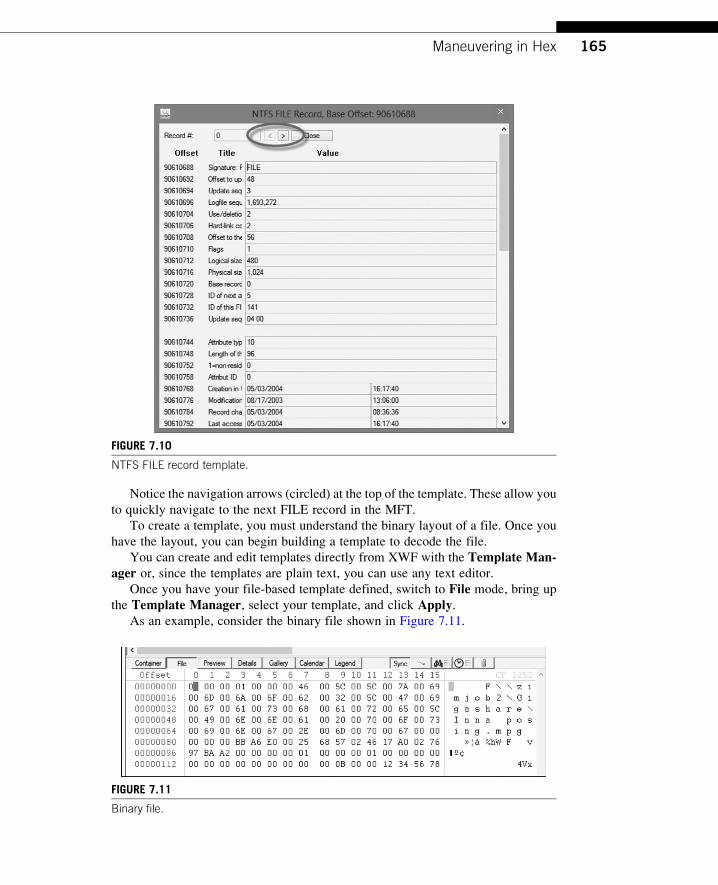
Notice the navigation arrows (circled) at the top of the template. These allow you
to quickly navigate to the next FILE record in the MFT.
To create a template, you must understand the binary layout of a file. Once you
have the layout, you can begin building a template to decode the file.
You can create and edit templates directly from XWF with the Template Man-ager or, since the templates are plain text, you can use any text editor.
Once you have your file-based template defined, switch to File mode, bring up
the Template Manager, select your template, and click Apply.As an example, consider the binary file shown in Figure 7.11.
FIGURE 7.10
NTFS FILE record template.
FIGURE 7.11
Binary file.
165Maneuvering in Hex

This is a Gigatribe .state file and the first three sections of this file are defined as:
• First 4 bytes: Always 00 00 00 01. This is the header
• Next 4 bytes: Length of file name (little-endian)
• Next XX bytes: Filename being downloaded (big-endian Unicode)
Based on this information, we can create a template that looks like this:
template “Gigatribe 3 .state”
description “Demonstrate template for part of a .state file”
fixed_start 0x00
requires 0x00 “00”
requires 0x01 “00”
requires 0x02 “00”
requires 0x03 “01”
begin
hex 4 “Header”
big-endian int32 “Filename length”
big-endian zstring16 “Filename”
end
So what is going on here? The requires entries ensure the template is applied to
files that contain the expected values. In our case, the four requires lines checkfor 0 values in the first three bytes of the file and a value of 1 in the fourth byte.
If the template is applied to a file where these four things are not true, XWF will
display a warning. We grab the first 4 bytes in hexadecimal and name the field
Header. The next 4 bytes (in big-endian) are the Filename length field. Finally,
we tell XWF to look for a big-endian null-terminated Unicode string and this is
the Filename field.
If we apply the template to a .state file, XWF displays the information broken
down as shown in Figure 7.12.
Appendix A in the XWF manual contains the syntax for creating or editing tem-
plates, including all of the data types available.
FIGURE 7.12
.state template example.
166 CHAPTER 7 Advanced Use of X-Ways Forensics
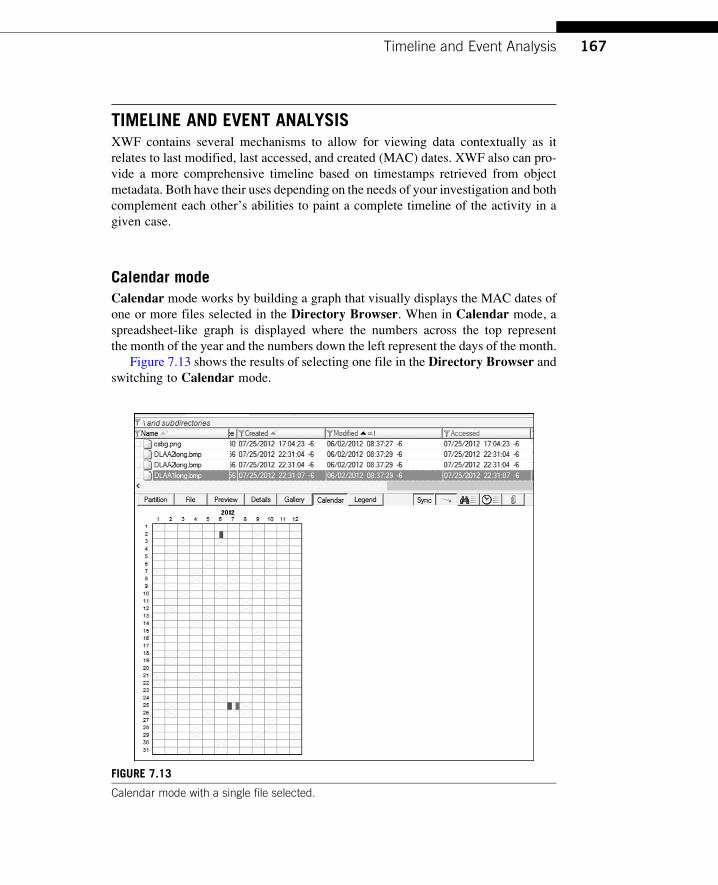
TIMELINE AND EVENT ANALYSISXWF contains several mechanisms to allow for viewing data contextually as it
relates to last modified, last accessed, and created (MAC) dates. XWF also can pro-
vide a more comprehensive timeline based on timestamps retrieved from object
metadata. Both have their uses depending on the needs of your investigation and both
complement each other’s abilities to paint a complete timeline of the activity in a
given case.
Calendar modeCalendar mode works by building a graph that visually displays the MAC dates of
one or more files selected in the Directory Browser. When in Calendar mode, a
spreadsheet-like graph is displayed where the numbers across the top represent
the month of the year and the numbers down the left represent the days of the month.
Figure 7.13 shows the results of selecting one file in the Directory Browser andswitching to Calendar mode.
FIGURE 7.13
Calendar mode with a single file selected.
167Timeline and Event Analysis
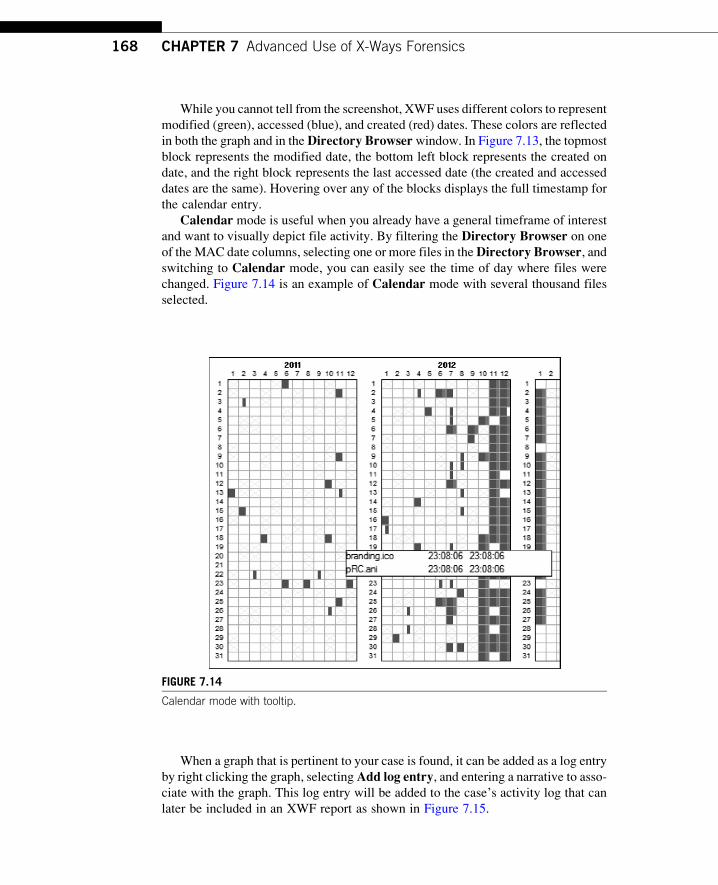
While you cannot tell from the screenshot, XWF uses different colors to represent
modified (green), accessed (blue), and created (red) dates. These colors are reflected
in both the graph and in theDirectory Browserwindow. In Figure 7.13, the topmost
block represents the modified date, the bottom left block represents the created on
date, and the right block represents the last accessed date (the created and accessed
dates are the same). Hovering over any of the blocks displays the full timestamp for
the calendar entry.
Calendar mode is useful when you already have a general timeframe of interest
and want to visually depict file activity. By filtering the Directory Browser on one
of the MAC date columns, selecting one or more files in theDirectory Browser, andswitching to Calendar mode, you can easily see the time of day where files were
changed. Figure 7.14 is an example of Calendar mode with several thousand files
selected.
When a graph that is pertinent to your case is found, it can be added as a log entry
by right clicking the graph, selectingAdd log entry, and entering a narrative to asso-ciate with the graph. This log entry will be added to the case’s activity log that can
later be included in an XWF report as shown in Figure 7.15.
FIGURE 7.14
Calendar mode with tooltip.
168 CHAPTER 7 Advanced Use of X-Ways Forensics
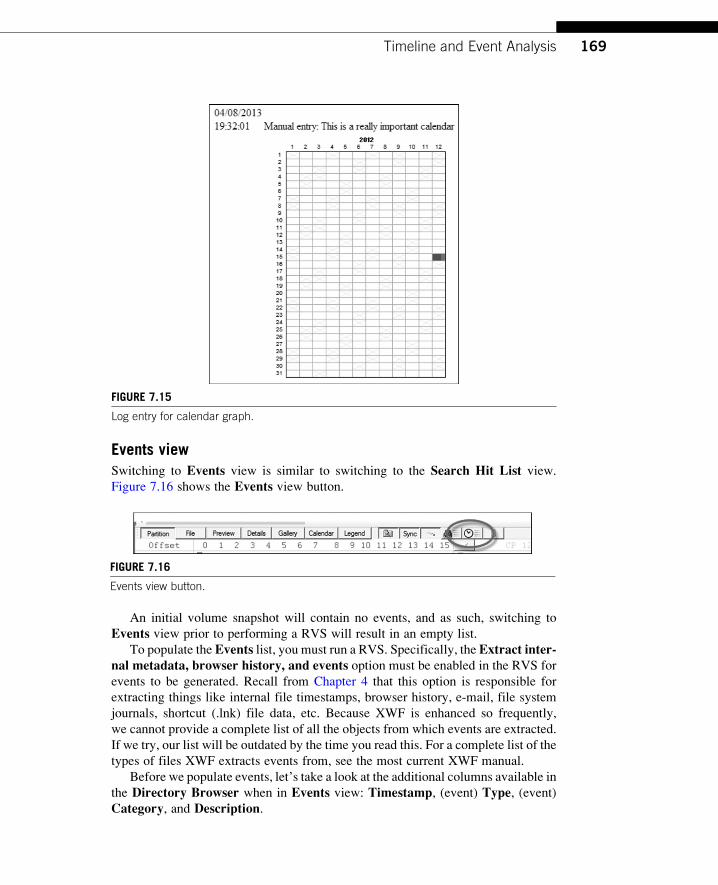
Events viewSwitching to Events view is similar to switching to the Search Hit List view.
Figure 7.16 shows the Events view button.
An initial volume snapshot will contain no events, and as such, switching to
Events view prior to performing a RVS will result in an empty list.
To populate the Events list, you must run a RVS. Specifically, the Extract inter-nal metadata, browser history, and events option must be enabled in the RVS for
events to be generated. Recall from Chapter 4 that this option is responsible for
extracting things like internal file timestamps, browser history, e-mail, file system
journals, shortcut (.lnk) file data, etc. Because XWF is enhanced so frequently,
we cannot provide a complete list of all the objects from which events are extracted.
If we try, our list will be outdated by the time you read this. For a complete list of the
types of files XWF extracts events from, see the most current XWF manual.
Before we populate events, let’s take a look at the additional columns available in
the Directory Browser when in Events view: Timestamp, (event) Type, (event)Category, and Description.
FIGURE 7.15
Log entry for calendar graph.
FIGURE 7.16
Events view button.
169Timeline and Event Analysis
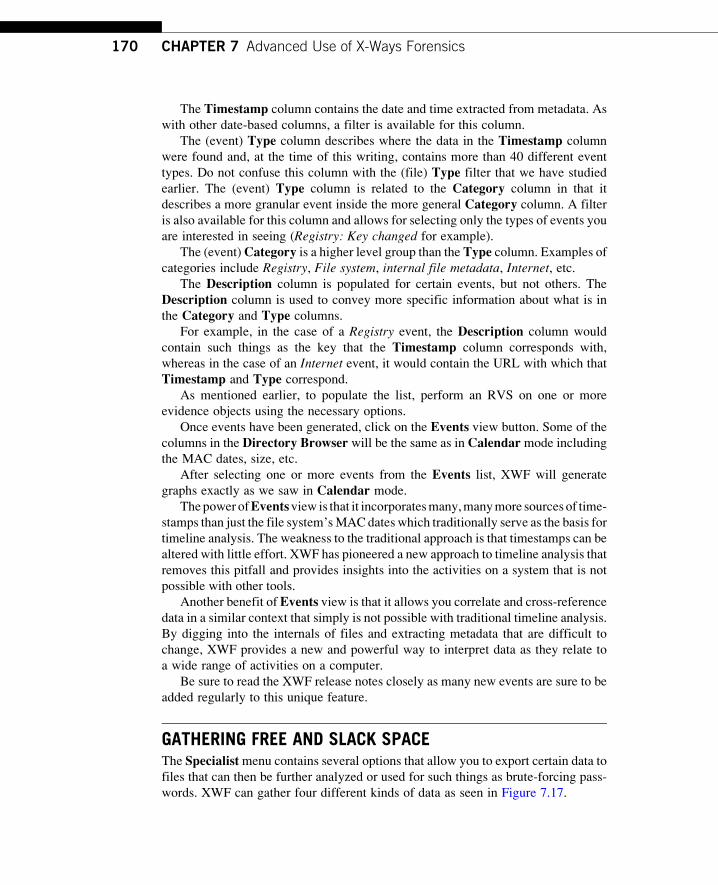
The Timestamp column contains the date and time extracted from metadata. As
with other date-based columns, a filter is available for this column.
The (event) Type column describes where the data in the Timestamp column
were found and, at the time of this writing, contains more than 40 different event
types. Do not confuse this column with the (file) Type filter that we have studied
earlier. The (event) Type column is related to the Category column in that it
describes a more granular event inside the more general Category column. A filter
is also available for this column and allows for selecting only the types of events you
are interested in seeing (Registry: Key changed for example).
The (event)Category is a higher level group than the Type column. Examples of
categories include Registry, File system, internal file metadata, Internet, etc.The Description column is populated for certain events, but not others. The
Description column is used to convey more specific information about what is in
the Category and Type columns.
For example, in the case of a Registry event, the Description column would
contain such things as the key that the Timestamp column corresponds with,
whereas in the case of an Internet event, it would contain the URL with which that
Timestamp and Type correspond.
As mentioned earlier, to populate the list, perform an RVS on one or more
evidence objects using the necessary options.
Once events have been generated, click on the Events view button. Some of the
columns in the Directory Browser will be the same as in Calendar mode including
the MAC dates, size, etc.
After selecting one or more events from the Events list, XWF will generate
graphs exactly as we saw in Calendar mode.
Thepower ofEventsview is that it incorporatesmany,manymore sources of time-
stamps than just the file system’sMAC dates which traditionally serve as the basis for
timeline analysis. The weakness to the traditional approach is that timestamps can be
altered with little effort. XWF has pioneered a new approach to timeline analysis that
removes this pitfall and provides insights into the activities on a system that is not
possible with other tools.
Another benefit of Events view is that it allows you correlate and cross-reference
data in a similar context that simply is not possible with traditional timeline analysis.
By digging into the internals of files and extracting metadata that are difficult to
change, XWF provides a new and powerful way to interpret data as they relate to
a wide range of activities on a computer.
Be sure to read the XWF release notes closely as many new events are sure to be
added regularly to this unique feature.
GATHERING FREE AND SLACK SPACEThe Specialistmenu contains several options that allow you to export certain data to
files that can then be further analyzed or used for such things as brute-forcing pass-
words. XWF can gather four different kinds of data as seen in Figure 7.17.
170 CHAPTER 7 Advanced Use of X-Ways Forensics
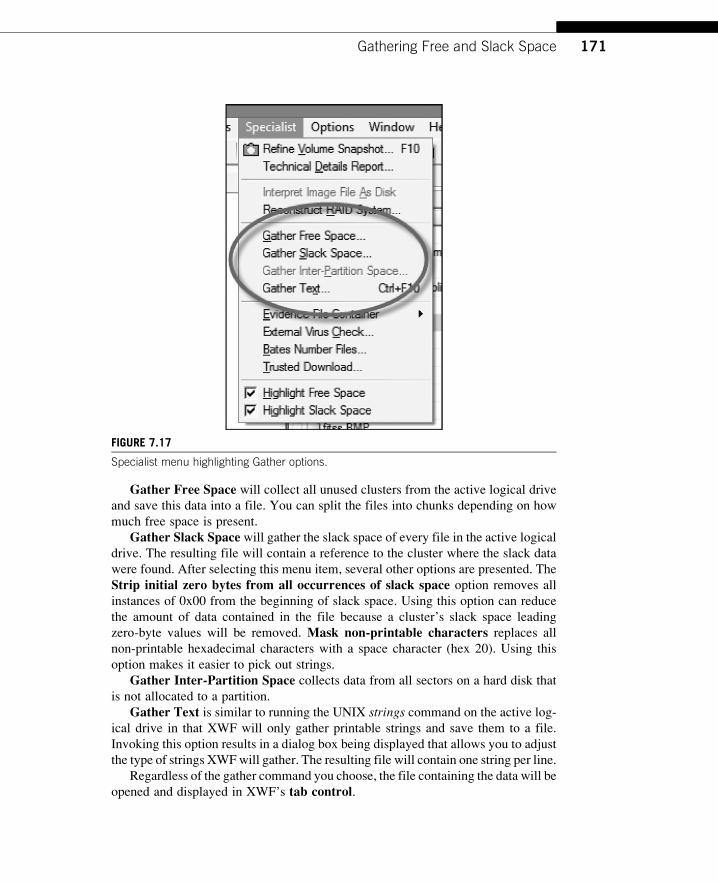
Gather Free Space will collect all unused clusters from the active logical drive
and save this data into a file. You can split the files into chunks depending on how
much free space is present.
Gather Slack Space will gather the slack space of every file in the active logicaldrive. The resulting file will contain a reference to the cluster where the slack data
were found. After selecting this menu item, several other options are presented. The
Strip initial zero bytes from all occurrences of slack space option removes all
instances of 0x00 from the beginning of slack space. Using this option can reduce
the amount of data contained in the file because a cluster’s slack space leading
zero-byte values will be removed. Mask non-printable characters replaces all
non-printable hexadecimal characters with a space character (hex 20). Using this
option makes it easier to pick out strings.
Gather Inter-Partition Space collects data from all sectors on a hard disk that
is not allocated to a partition.
Gather Text is similar to running the UNIX strings command on the active log-
ical drive in that XWF will only gather printable strings and save them to a file.
Invoking this option results in a dialog box being displayed that allows you to adjust
the type of strings XWFwill gather. The resulting file will contain one string per line.
Regardless of the gather command you choose, the file containing the data will be
opened and displayed in XWF’s tab control.
FIGURE 7.17
Specialist menu highlighting Gather options.
171Gathering Free and Slack Space
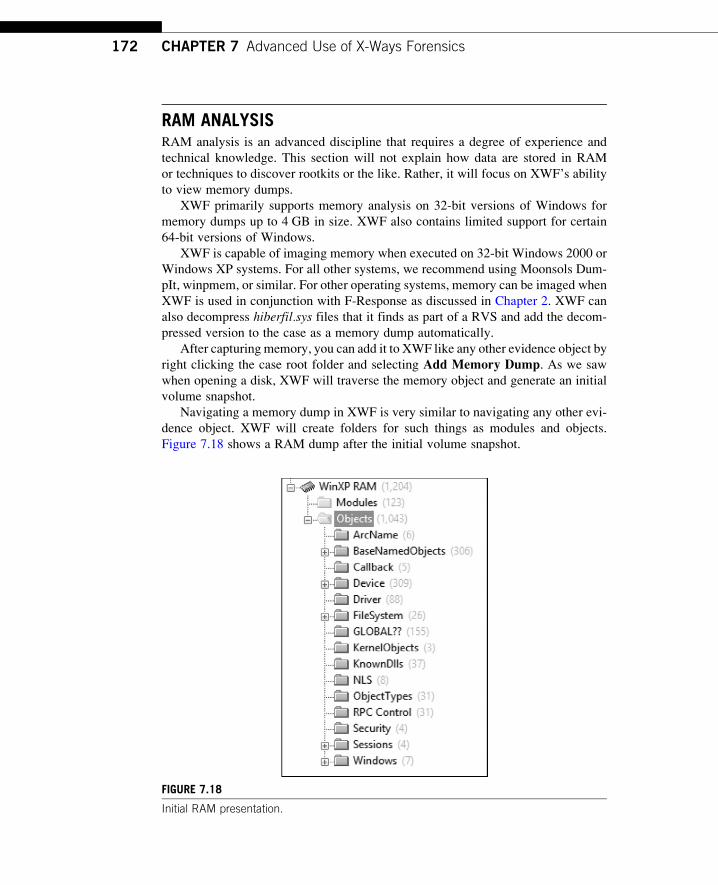
RAM ANALYSISRAM analysis is an advanced discipline that requires a degree of experience and
technical knowledge. This section will not explain how data are stored in RAM
or techniques to discover rootkits or the like. Rather, it will focus on XWF’s ability
to view memory dumps.
XWF primarily supports memory analysis on 32-bit versions of Windows for
memory dumps up to 4 GB in size. XWF also contains limited support for certain
64-bit versions of Windows.
XWF is capable of imaging memory when executed on 32-bit Windows 2000 or
Windows XP systems. For all other systems, we recommend using Moonsols Dum-
pIt, winpmem, or similar. For other operating systems, memory can be imaged when
XWF is used in conjunction with F-Response as discussed in Chapter 2. XWF can
also decompress hiberfil.sys files that it finds as part of a RVS and add the decom-
pressed version to the case as a memory dump automatically.
After capturing memory, you can add it to XWF like any other evidence object by
right clicking the case root folder and selecting Add Memory Dump. As we saw
when opening a disk, XWF will traverse the memory object and generate an initial
volume snapshot.
Navigating a memory dump in XWF is very similar to navigating any other evi-
dence object. XWF will create folders for such things as modules and objects.
Figure 7.18 shows a RAM dump after the initial volume snapshot.
FIGURE 7.18
Initial RAM presentation.
172 CHAPTER 7 Advanced Use of X-Ways Forensics
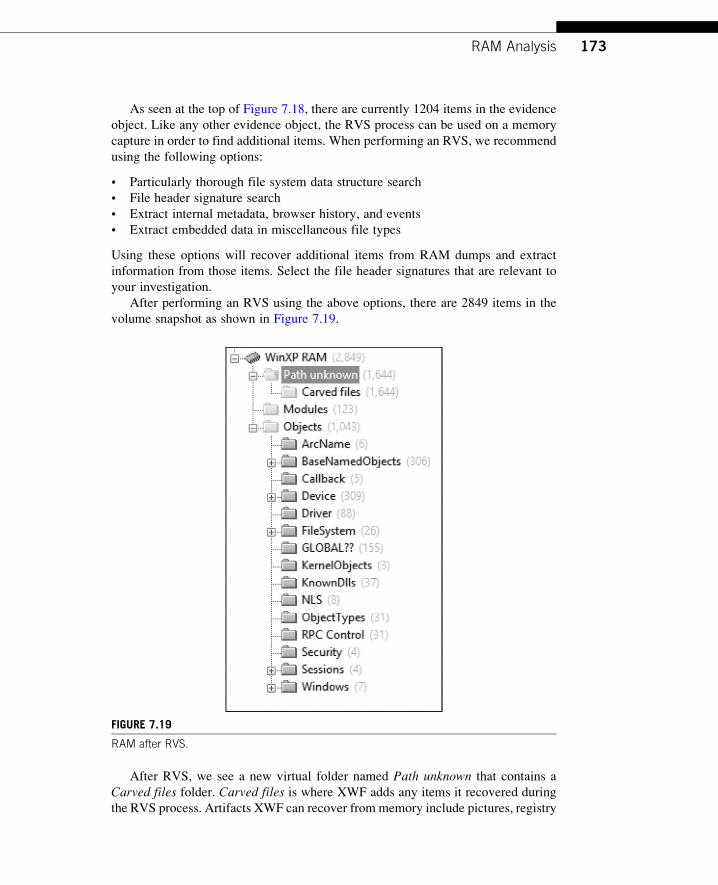
As seen at the top of Figure 7.18, there are currently 1204 items in the evidence
object. Like any other evidence object, the RVS process can be used on a memory
capture in order to find additional items. When performing an RVS, we recommend
using the following options:
• Particularly thorough file system data structure search
• File header signature search
• Extract internal metadata, browser history, and events
• Extract embedded data in miscellaneous file types
Using these options will recover additional items from RAM dumps and extract
information from those items. Select the file header signatures that are relevant to
your investigation.
After performing an RVS using the above options, there are 2849 items in the
volume snapshot as shown in Figure 7.19.
After RVS, we see a new virtual folder named Path unknown that contains a
Carved files folder. Carved files is where XWF adds any items it recovered during
the RVS process. Artifacts XWF can recover from memory include pictures, registry
FIGURE 7.19
RAM after RVS.
173RAM Analysis
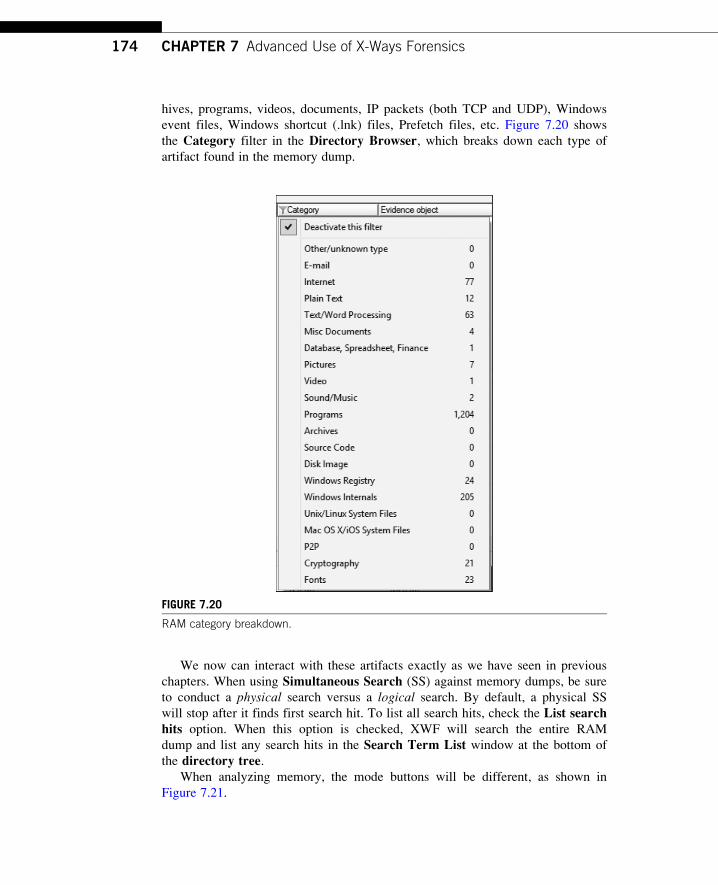
hives, programs, videos, documents, IP packets (both TCP and UDP), Windows
event files, Windows shortcut (.lnk) files, Prefetch files, etc. Figure 7.20 shows
the Category filter in the Directory Browser, which breaks down each type of
artifact found in the memory dump.
We now can interact with these artifacts exactly as we have seen in previous
chapters. When using Simultaneous Search (SS) against memory dumps, be sure
to conduct a physical search versus a logical search. By default, a physical SS
will stop after it finds first search hit. To list all search hits, check the List searchhits option. When this option is checked, XWF will search the entire RAM
dump and list any search hits in the Search Term List window at the bottom of
the directory tree.When analyzing memory, the mode buttons will be different, as shown in
Figure 7.21.
FIGURE 7.20
RAM category breakdown.
174 CHAPTER 7 Advanced Use of X-Ways Forensics
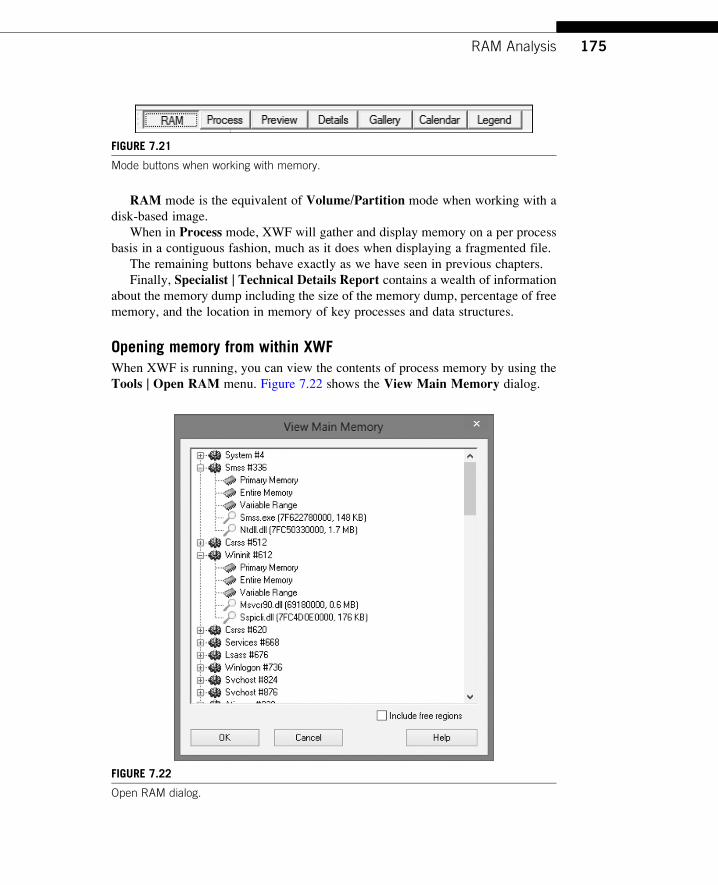
RAM mode is the equivalent of Volume/Partition mode when working with a
disk-based image.
When in Process mode, XWF will gather and display memory on a per process
basis in a contiguous fashion, much as it does when displaying a fragmented file.
The remaining buttons behave exactly as we have seen in previous chapters.
Finally, Specialist | Technical Details Report contains a wealth of information
about the memory dump including the size of the memory dump, percentage of free
memory, and the location in memory of key processes and data structures.
Opening memory from within XWFWhen XWF is running, you can view the contents of process memory by using the
Tools | Open RAM menu. Figure 7.22 shows the View Main Memory dialog.
FIGURE 7.22
Open RAM dialog.
FIGURE 7.21
Mode buttons when working with memory.
175RAM Analysis
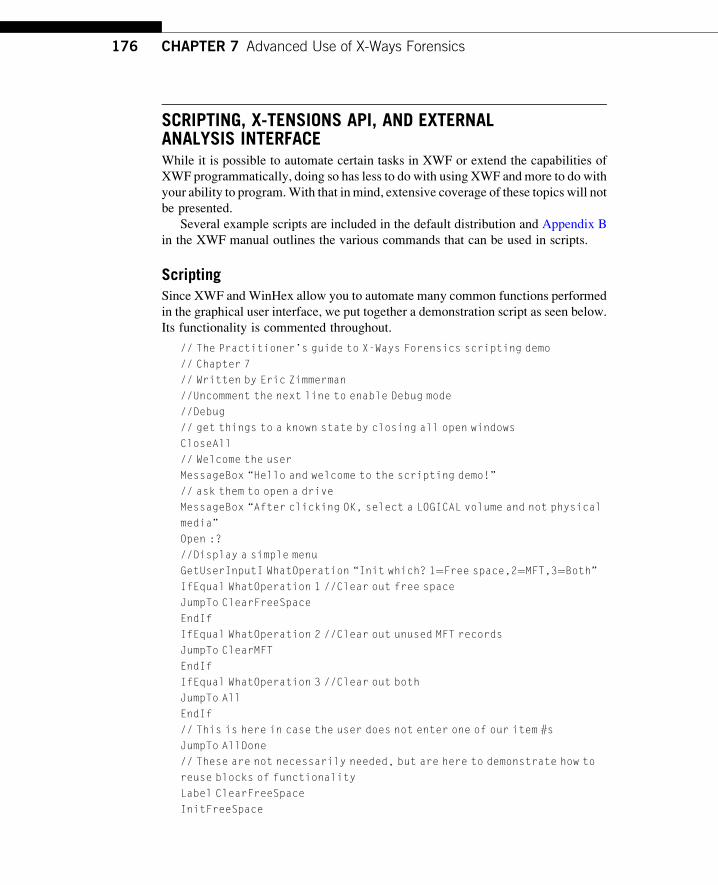
SCRIPTING, X-TENSIONS API, AND EXTERNALANALYSIS INTERFACEWhile it is possible to automate certain tasks in XWF or extend the capabilities of
XWF programmatically, doing so has less to do with using XWF and more to do with
your ability to program.With that in mind, extensive coverage of these topics will not
be presented.
Several example scripts are included in the default distribution and Appendix B
in the XWF manual outlines the various commands that can be used in scripts.
ScriptingSince XWF and WinHex allow you to automate many common functions performed
in the graphical user interface, we put together a demonstration script as seen below.
Its functionality is commented throughout.
// The Practitioner’s guide to X-Ways Forensics scripting demo
// Chapter 7
// Written by Eric Zimmerman
//Uncomment the next line to enable Debug mode
//Debug
// get things to a known state by closing all open windows
CloseAll
// Welcome the user
MessageBox “Hello and welcome to the scripting demo!”
// ask them to open a drive
MessageBox “After clicking OK, select a LOGICAL volume and not physical
media”
Open :?
//Display a simple menu
GetUserInputI WhatOperation “Init which? 1¼Free space,2¼MFT,3¼Both”
IfEqual WhatOperation 1 //Clear out free space
JumpTo ClearFreeSpace
EndIf
IfEqual WhatOperation 2 //Clear out unused MFT records
JumpTo ClearMFT
EndIf
IfEqual WhatOperation 3 //Clear out both
JumpTo All
EndIf
// This is here in case the user does not enter one of our item #s
JumpTo AllDone
// These are not necessarily needed, but are here to demonstrate how to
reuse blocks of functionality
Label ClearFreeSpace
InitFreeSpace
176 CHAPTER 7 Advanced Use of X-Ways Forensics
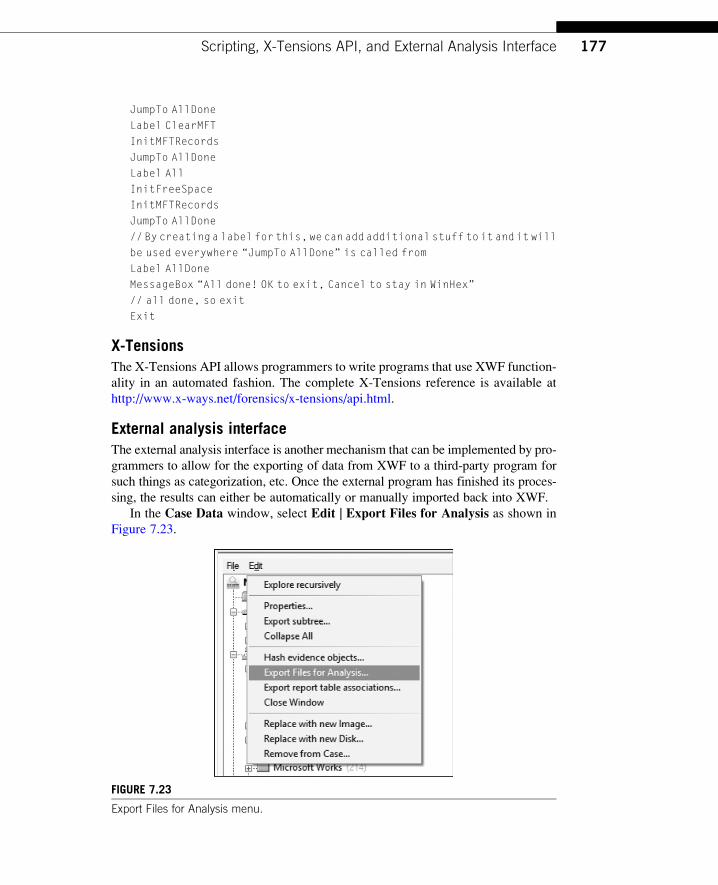
JumpTo AllDone
Label ClearMFT
InitMFTRecords
JumpTo AllDone
Label All
InitFreeSpace
InitMFTRecords
JumpTo AllDone
//Bycreatingalabelforthis,wecanaddadditionalstufftoitanditwill
be used everywhere “JumpTo AllDone” is called from
Label AllDone
MessageBox “All done! OK to exit, Cancel to stay in WinHex”
// all done, so exit
Exit
X-TensionsThe X-Tensions API allows programmers to write programs that use XWF function-
ality in an automated fashion. The complete X-Tensions reference is available at
http://www.x-ways.net/forensics/x-tensions/api.html.
External analysis interfaceThe external analysis interface is another mechanism that can be implemented by pro-
grammers to allow for the exporting of data from XWF to a third-party program for
such things as categorization, etc. Once the external program has finished its proces-
sing, the results can either be automatically or manually imported back into XWF.
In the Case Data window, select Edit | Export Files for Analysis as shown in
Figure 7.23.
FIGURE 7.23
Export Files for Analysis menu.
177Scripting, X-Tensions API, and External Analysis Interface

Aswithusing theRecover/Copy contextmenu in theDirectoryBrowser, an entryis also created in the activity log when exporting files via Export Files for Analysis.
The options in the Export Files for Analysis dialog, shown in Figure 7.24, are
straightforward and are similar to those we have seen in other places. After selecting
OK, XWF exports the files to a subdirectory of the Output folder. The sub-
directory’s name is a unique CRC value that XWF and programs written to use
the IEA will use at various stages of the process. In addition to the files exported
from the case, XWF also creates an additional file named Checksum that contains
additional information used in the IEA process. Once all of the files have been
copied, the external analysis program is automatically executed against the files.
In some cases, external programs can create files that XWF can use to import the
results of this process back into the case. DoublePics (http://www.dotnetfabrik.de/
de/doublepics) is an example of a program that is capable of doing this. In cases
where programs do not have this capability, using Export Files for Analysis is
useful in that it automatically starts the external software. Of course setting up an
external viewer via the Directory Browser’s Viewer Programs context menu
allows for the same thing, but in this case, files are exported to XWF’s temporary
directory (General Options | Folder for temporary files).
SHORTCUTSALTþ1: Set the beginning of a data block
ALTþ2: Set the end of a data block
ESC: Deselects all bytes in a block of data
ALTþF12: Display Template Manager
FIGURE 7.24
Export Files for Analysis.
178 CHAPTER 7 Advanced Use of X-Ways Forensics
SUMMARY
In this chapter, we covered file customization, maneuvering in hex, and timeline
analysis. We also touched on the different ways to automate and extend XWF via
scripting and API.
We began by adding ranks and groups that allowed us to review a set of files that
are pertinent to a particular type of investigation. From there, we moved on to cover
various ways to interact with raw data, including selecting blocks of data and adding
those blocks of data to the volume snapshot as virtual files.
We also saw how the Data Interpreter can be used to convert hexadecimal data
into different human readable formats. In addition to being able to interpret hexadec-
imal values via theData Interpreter, we explored howXWF employs the concept of
templates that allow for automatically parsing and displaying chunks of data in a way
that removes the risk of misinterpreting data since the template will always be
applied to a block of data in a consistent way.
We then moved on to two ways that XWF allows for timeline analysis,Calendarmode and Events view. While both contain common aspects in how they present
data, the data used to generate the timelines come from radically different sources.
We concluded this chapter with a reference to RAM analysis and the various
ways to extend XWF programmatically via scripting or the XWF API.
179Summary

Intentionally left as blank
CHAPTER
X-Ways Forensics Reporting 8INFORMATION IN THIS CHAPTER
• Introduction
• Adding items to a report table
• Comments
• Report generation
• Report customization
• Shortcuts
• Summary
INTRODUCTION
It is critical for examiners to have a means to convey the information they have found
in an easy-to-generate and easy-to-understand format.
XWF’s reporting capabilities center on the use of report tables (RTs) that can be
thought of as bookmarks or categories of sorts. X-Ways Forensics (XWF) allows
examiners to create up to 256 different RTs that can be assigned to one or more items
in a case.
RTs allow examiners to logically organize their findings for review by their cus-
tomers, be it prosecutors, peers, clients, etc. In addition to RTs, you can assign free-
form comments to items to convey any information you desire.
At any point in the review process, XWF can generate a report of not only items
that have been assigned to RTs but also, if enabled, the audit trail of the case.
XWF generates HTML-based reports that contain the contents of each selected
RT in your case. Because the reports are HTML based, they are easy to edit using a
simple text editor or even Microsoft Word.
ADDING ITEMS TO A REPORT TABLEThis chapter assumes you are working with a case that contains at least one evidence
object. Once the case is open, locate some files of interest by whatever means you
wish, such as a filter in the Directory Browser or simply selecting a directory from
the directory tree.
181
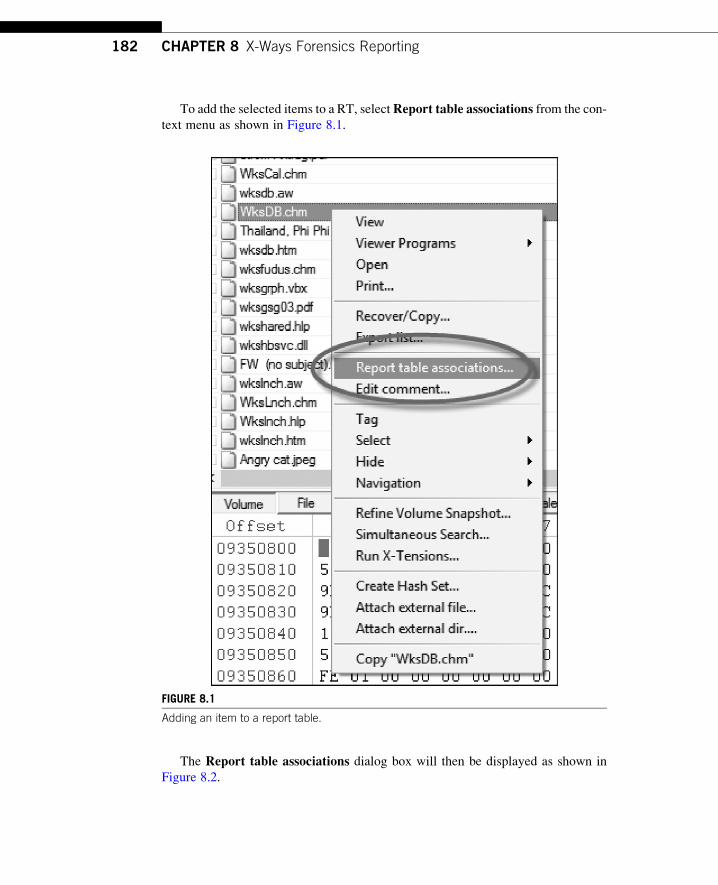
To add the selected items to a RT, selectReport table associations from the con-
text menu as shown in Figure 8.1.
The Report table associations dialog box will then be displayed as shown in
Figure 8.2.
FIGURE 8.1
Adding an item to a report table.
182 CHAPTER 8 X-Ways Forensics Reporting
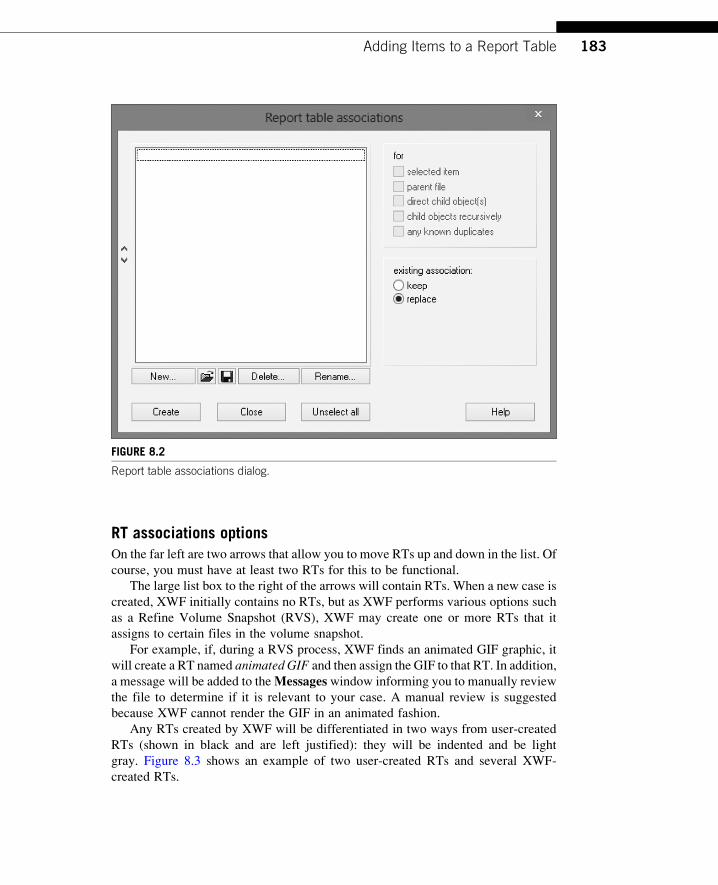
RT associations optionsOn the far left are two arrows that allow you to move RTs up and down in the list. Of
course, you must have at least two RTs for this to be functional.
The large list box to the right of the arrows will contain RTs. When a new case is
created, XWF initially contains no RTs, but as XWF performs various options such
as a Refine Volume Snapshot (RVS), XWF may create one or more RTs that it
assigns to certain files in the volume snapshot.
For example, if, during a RVS process, XWF finds an animated GIF graphic, it
will create a RT named animated GIF and then assign the GIF to that RT. In addition,
a message will be added to theMessages window informing you to manually review
the file to determine if it is relevant to your case. A manual review is suggested
because XWF cannot render the GIF in an animated fashion.
Any RTs created by XWF will be differentiated in two ways from user-created
RTs (shown in black and are left justified): they will be indented and be light
gray. Figure 8.3 shows an example of two user-created RTs and several XWF-
created RTs.
FIGURE 8.2
Report table associations dialog.
183Adding Items to a Report Table
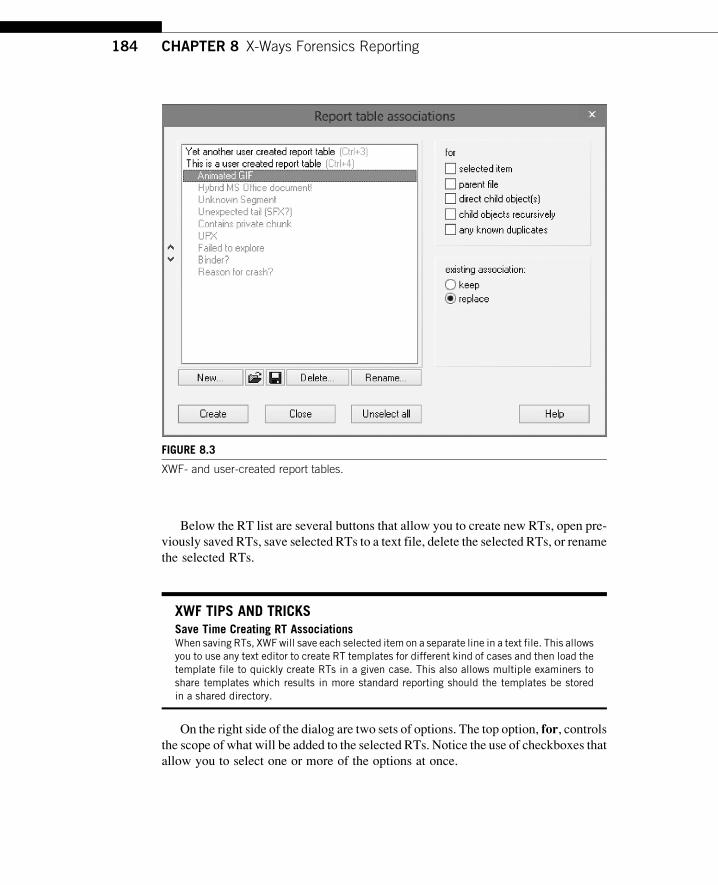
Below the RT list are several buttons that allow you to create new RTs, open pre-
viously saved RTs, save selected RTs to a text file, delete the selected RTs, or rename
the selected RTs.
XWF TIPS AND TRICKSSave Time Creating RT AssociationsWhen saving RTs, XWFwill save each selected item on a separate line in a text file. This allowsyou to use any text editor to create RT templates for different kind of cases and then load thetemplate file to quickly create RTs in a given case. This also allows multiple examiners toshare templates which results in more standard reporting should the templates be storedin a shared directory.
On the right side of the dialog are two sets of options. The top option, for, controlsthe scope of what will be added to the selected RTs. Notice the use of checkboxes that
allow you to select one or more of the options at once.
FIGURE 8.3
XWF- and user-created report tables.
184 CHAPTER 8 X-Ways Forensics Reporting
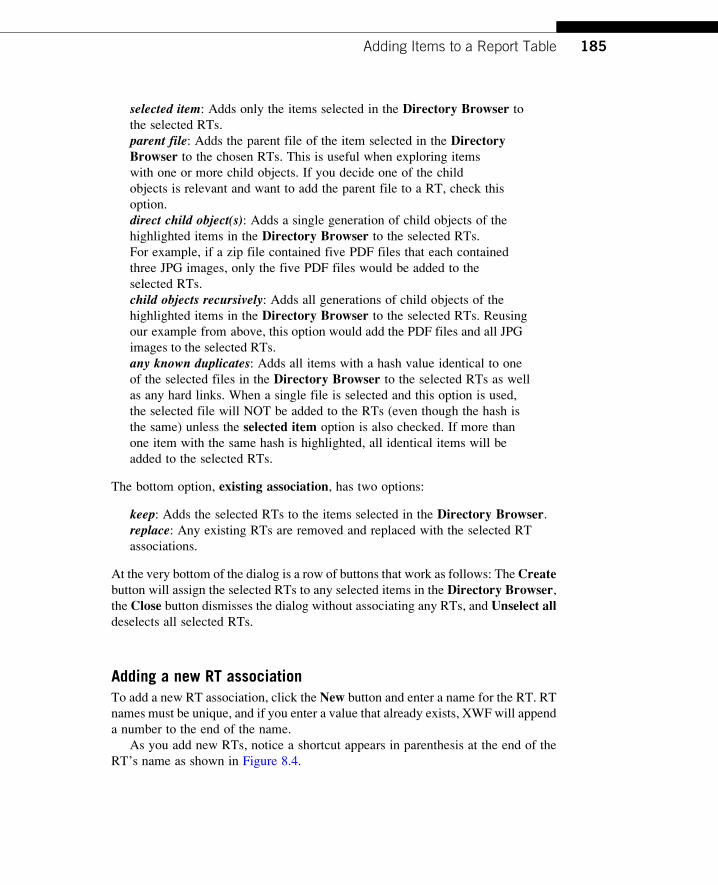
selected item: Adds only the items selected in the Directory Browser tothe selected RTs.
parent file: Adds the parent file of the item selected in the DirectoryBrowser to the chosen RTs. This is useful when exploring items
with one or more child objects. If you decide one of the child
objects is relevant and want to add the parent file to a RT, check this
option.
direct child object(s): Adds a single generation of child objects of the
highlighted items in the Directory Browser to the selected RTs.
For example, if a zip file contained five PDF files that each contained
three JPG images, only the five PDF files would be added to the
selected RTs.
child objects recursively: Adds all generations of child objects of the
highlighted items in the Directory Browser to the selected RTs. Reusing
our example from above, this option would add the PDF files and all JPG
images to the selected RTs.
any known duplicates: Adds all items with a hash value identical to one
of the selected files in the Directory Browser to the selected RTs as well
as any hard links. When a single file is selected and this option is used,
the selected file will NOT be added to the RTs (even though the hash is
the same) unless the selected item option is also checked. If more than
one item with the same hash is highlighted, all identical items will be
added to the selected RTs.
The bottom option, existing association, has two options:
keep: Adds the selected RTs to the items selected in the Directory Browser.replace: Any existing RTs are removed and replaced with the selected RT
associations.
At the very bottom of the dialog is a row of buttons that work as follows: TheCreatebutton will assign the selected RTs to any selected items in the Directory Browser,the Close button dismisses the dialog without associating any RTs, and Unselect alldeselects all selected RTs.
Adding a new RT associationTo add a new RT association, click the New button and enter a name for the RT. RT
names must be unique, and if you enter a value that already exists, XWF will append
a number to the end of the name.
As you add new RTs, notice a shortcut appears in parenthesis at the end of the
RT’s name as shown in Figure 8.4.
185Adding Items to a Report Table
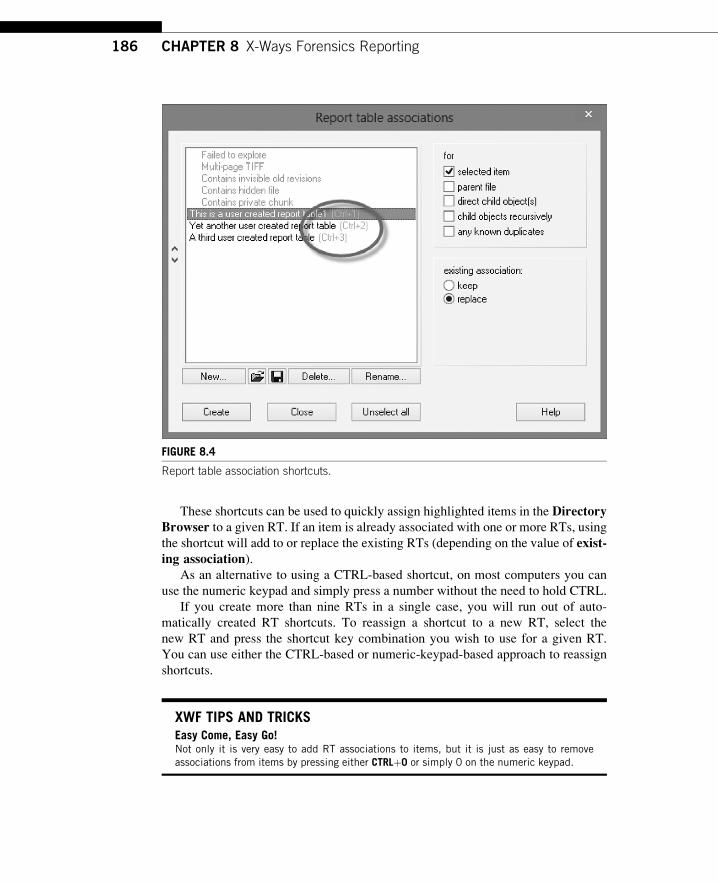
These shortcuts can be used to quickly assign highlighted items in the DirectoryBrowser to a given RT. If an item is already associated with one or more RTs, using
the shortcut will add to or replace the existing RTs (depending on the value of exist-ing association).
As an alternative to using a CTRL-based shortcut, on most computers you can
use the numeric keypad and simply press a number without the need to hold CTRL.
If you create more than nine RTs in a single case, you will run out of auto-
matically created RT shortcuts. To reassign a shortcut to a new RT, select the
new RT and press the shortcut key combination you wish to use for a given RT.
You can use either the CTRL-based or numeric-keypad-based approach to reassign
shortcuts.
XWF TIPS AND TRICKSEasy Come, Easy Go!Not only it is very easy to add RT associations to items, but it is just as easy to removeassociations from items by pressing either CTRLþ0 or simply 0 on the numeric keypad.
FIGURE 8.4
Report table association shortcuts.
186 CHAPTER 8 X-Ways Forensics Reporting
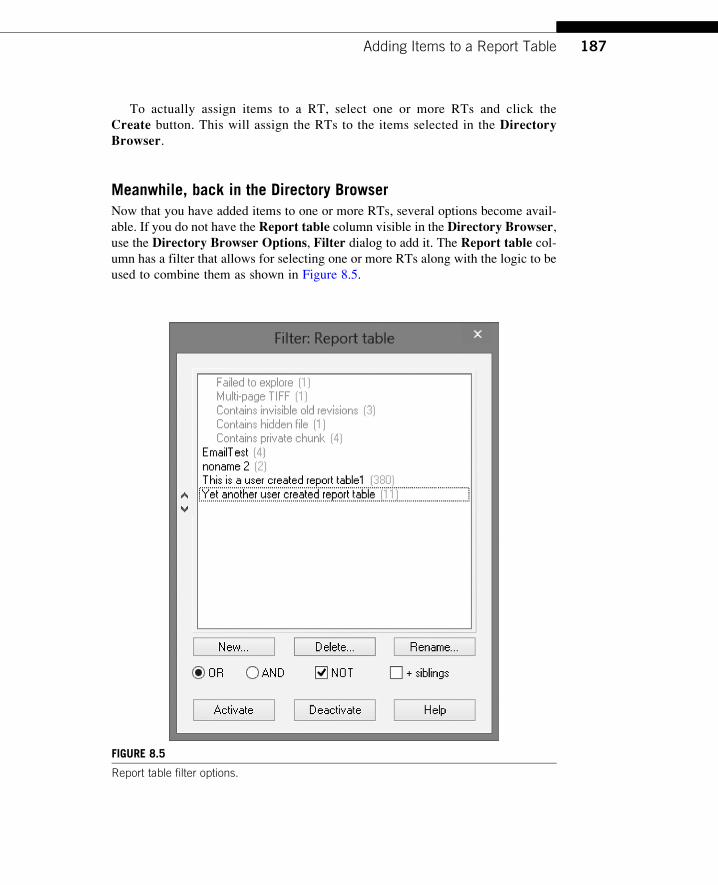
To actually assign items to a RT, select one or more RTs and click the
Create button. This will assign the RTs to the items selected in the DirectoryBrowser.
Meanwhile, back in the Directory BrowserNow that you have added items to one or more RTs, several options become avail-
able. If you do not have the Report table column visible in the Directory Browser,use the Directory Browser Options, Filter dialog to add it. The Report table col-umn has a filter that allows for selecting one or more RTs along with the logic to be
used to combine them as shown in Figure 8.5.
FIGURE 8.5
Report table filter options.
187Adding Items to a Report Table
The þsiblings option, when checked, will filter the items in the DirectoryBrowser to also include any items that exist in the same directory as the items that
are part of the selected RTs. This is useful to quickly find items that may be related to
items already added to RTs to determine whether any additional items should be
added to the RT.
For example, assume you find an item based on a hash value and you have added
it to a RT. You then filter on the Report table column. With þsiblings checked, allitems in the same directory as the item you found via the hash match will be shown in
the Directory Browser. You can then quickly look at these items and, if warranted,
add these additional items to the hashed file’s RT.
Another use for the Report table filter is to limit what is shown in the DirectoryBrowser to a certain RT in order for those files to beRecover/Copy’ed to a directorywithout commingling files from other RTs. This allows for more flexibility when
used in conjunction with the options we have already covered in Chapter 3 in relation
to the Recover/Copy command.
Sharing RT associationsWhen splitting up the workload across multiple examiners (who work with copies of
the same case or receive evidence file containers with selected files from the same
case), there may be a need to share findings (both the RTs and their associated files)
with other examiners. To allow for this, all RT associations can be exported or
imported by using the options available by right clicking the case title as shown
in Figure 8.6.
FIGURE 8.6
Export and import report table association options.
188 CHAPTER 8 X-Ways Forensics Reporting
When exporting RT associations, you will be prompted to select a directory in
which to save the .rtd files. Any existing .rtd files will be deleted, so take care
not to lose any previously exported RT associations. To avoid this, we recommend
exporting RT associations to a unique directory for the case.
When importing RT associations, select the directory containing the .rtd files. XWF
will then import the files and add any files contained in the case to the relevant RTs.
COMMENTSComments serve as a way to add free-form information to one or more items that
cannot be conveyed via some other means in XWF.
To add a comment, highlight one or more items in the Directory Browser, rightclick, and choose Edit Comment from the context menu. If more than one item is
highlighted, XWF will ask whether to apply the comment to all of the highlighted
items. Selecting No will apply the comment to the first item you highlighted, not
the last one. Selecting Yes will apply the comment to all highlighted items.
To remove a comment, select an item with an existing comment, right click, and
again choose Edit Comment from the context menu. Delete anything in the com-
ment window and click OK. XWF will then ask whether you want to remove the
comment. If more than one item with a comment is highlighted, XWF will ask
whether you want to remove the comment from all highlighted items.
REPORT GENERATIONNow that you have added items to various RTs, it is time to generate a report of your
findings. XWF reports contain up to three different sections: main, RT, and the case
activity log/audit trail.
The main report (also referred to as the basic report) includes information about a
case such as when the case was created, the path to the case file, the examiner, etc. It
also contains information about each evidence object including the path to the image
file, the date the itemwas added to the case, the item’s hash value, physical descriptors
such as the number of sectors, total capacity, image hash verification information, etc.
The RT section includes things such as file metadata, thumbnails of pictures,
HTML representation of various artifacts like e-mail messages or shortcut (.lnk)
files, and any other information concerning files that are in your RTs. The files them-
selves can be exported and accessed through links in the XWF report. Reports can be
generated for any combination of RTs at various levels of detail depending on your
requirements. File metadata can optionally be included as well as the information
contained in any or all of the columns available in the Directory Browser.To initiate the report generation process, select File | Create Report from the
Case Data window as shown in Figure 8.7.
189Report Generation
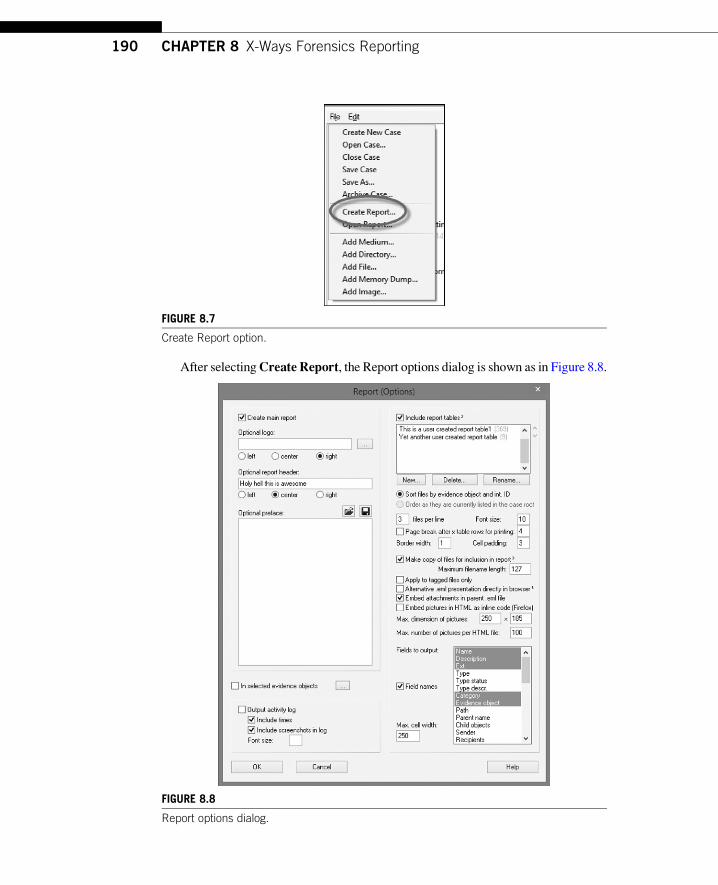
After selectingCreate Report, the Report options dialog is shown as in Figure 8.8.
FIGURE 8.7
Create Report option.
FIGURE 8.8
Report options dialog.
190 CHAPTER 8 X-Ways Forensics Reporting
By default, the selected report sections will be generated across all evidence
objects in a case. You can optionally include only a subset of evidence objects in
a report by first checking In selected evidence objects and then clicking the button
to the right of the option to select one or more evidence objects to include in the
report.
Main report optionsThe main report options are found on the top two thirds of the left side of the dialog
starting with Create main report and ending with Optional preface.If Create main report is checked, XWF will generate and include in the report
information about the case and each evidence object in the case. The main report can
be customized with the remaining options.
Optional logo allows you to choose an image to be included at the very top of the
report. The image will be inserted into the report without resizing the image, so
ensure the selected image is appropriately sized before inserting it in your report.
The contents of Optional report header will be added to the report directly
below the logo (if selected) using the alignment indicated.
The contents of Optional preface will be inserted below the report header (if a
header was entered). You can optionally use HTML in the preface to customize the
look of the information in the preface.
Audit trail optionsBelow the main report options are the options to include the case activity log in the
report. The case activity log is an audit trail in that it includes all the steps you have
taken in XWF related to processing evidence objects.
When Output activity log is checked, XWF adds a new section to the report
titled Log that contains both text and images outlining all activities related to the
operations against evidence objects as performed by a user. If the main report section
is also selected, the audit trail section will be generated after the main report section.
A hyperlink will be added to the top of the report that allows for quickly navigating to
the Log section of the report. This is a handy way to later review the exact steps that
were taken during the course of a review. This option also includes suboptions to
allow for including or excluding timestamps and screenshots in the report.
By default, XWF will want to save the report to the case directory. If you change
the path where the report will be saved and have included the activity log, you will
have to manually copy the _log directory (found in the case directory) to wherever
you saved the report to. If you do not do this, none of the images will show up prop-
erly in the report.
RT optionsThe Include report tables option has three values:
Fully checked: All selected RTs are included in the report.
191Report Generation
Half-checked: Only the total number of items in each of the selected RTs is
included in the report.
Unchecked: No RTs are included in the report.
In the upper right of the list containing RTs are two arrows that can be used to rear-
range the order that the RTs will be added to the report. These arrows and the New,Delete, and Rename buttons work exactly as we saw earlier in the Report tableassociations dialog.
If Sort files by evidence object and Int. ID is selected, the report will be ordered
first by the evidence object where each item in a RT was found and then by the value
in the Int. ID column in the Directory Browser.TheOrder as they are currently listed in the case root option is available if you
first select theCase Root folder in the directory tree and recursively list one or more
evidence objects. Once the recursive listing is generated, you can sort the DirectoryBrowser columns on up to three different columns (refer to Chapter 3 for a refresher
on how this type of sorting works).
XWF TIPS AND TRICKSActive Directory Browser Filters Matter!When using this option, be aware any items that are not visible in the Directory Browserbecause one or more filters are active will NOT be included in the report even if the nonvisibleitems are included in one or more RT associations.
Do not worry about this though as XWF will detect this situation and inform you of thenumber of items that were omitted from the report. If you did not mean to exclude the itemsfrom the report, adjust the active filters and regenerate the report.
The files per line option determines how many columns a given RT will contain.
This option can be adjusted depending on the kinds of files associated with RTs.
Increasing this option (up to a maximum of nine) allows you to make the report more
“dense” in that each row will contain more items.
If Page break after x table rows for printing is checked, XWF will add
explicit page breaks to the generated HTML code. This is useful to prevent RT rows
from being chopped in half when a report is printed. Adjust the number of rows
up or down depending on the type of items in your RTs if you need to print your reports.
The Make copy of files for inclusion in report has three options:
Fully checked: All files in selected RTs will be copied and included in the report.Half-checked: Only pictures in selected RTs will be copied and included
in the report.
Unchecked: No files will be copied and included in the report.
The Maximum filename length option sets the cutoff point for filenames XWF
will use when copying files for inclusion in the report. Any filenames longer
192 CHAPTER 8 X-Ways Forensics Reporting
than the entered value will be truncated for purposes of linking in the report, but the
report itself will reflect the actual filename as it exists in the evidence object.
Certain options below become unavailable depending on the state ofMake copyof files for inclusion in report.
If Apply to tagged files only is checked, XWF will selectively export files for
only those items currently tagged in the Directory Browser. This is useful to only
copy a subset of files in one or more RTs. For example, if you added hundreds of
images of child pornography to your case but only wished to include five images
in your report (so as to not overwhelm the consumer of the report, the jury, etc.),
tag the five images that you want to include in the report and check this option.
All of the metadata about all the files in the RT will be included, but only the tagged
files will have actual images associated.
The Alternative .eml presentation directly in browser has three options:
Fully checked: An HTML version of the e-mail message is generated and
linked to in the report. Any attachments contained in the e-mail message are
listed, but linked only from the main report (if also part of a RT).
Half-checked: XWF will rename plain text e-mail files to .txt and HTML-
formatted e-mails to .html so that they can be viewed directly in the browser. The
text file will be able to be viewed directly in the browser.
Unchecked: The e-mail message is treated like a normal file and clicking on it
in the report allows you to open the .eml file in an external program such as a text
editor or an e-mail client (Thunderbird, for example).
IfEmbed attachments in parent .eml file is checked, XWFwill Base64-encode any
attachments associated with an e-mail message and embed the encoded attachments
inside the e-mail file. When checked, this option disables the Alternate e-mail pre-sentation directly in browser option.
If Embed pictures in HTML as inline code is checked, XWF will Base64-
encode any pictures and embed the encoded data directly in the HTML as opposed
to exporting and linking to a physical picture file. This option can generate massive
HTML files very quickly and, for this reason (and that it only works for Firefox), we
recommend leaving this option unchecked.
Max. dimension of pictures determines the maximum size of thumbnail pictures
in the report. If both values are set to zero, XWF will link to pictures in the main
report and will not display a thumbnail. The link, when clicked, loads the full-size
image. When nonzero values are used, XWF will respect the aspect ratio of pictures
so as to not distort them. This option does not resize the pictures in any way. Rather, it
adds HTML tags to limit the size of the thumbnail pictures in the report.
Max. number of pictures per HTML file determines how many picture files
XWF will include in a single report file before creating a new one. This option pre-
vents huge HTML files from being created that will be slow to load and sluggish to
interact with as links are clicked, etc.
The Fields to output option allows for selecting one or more columns from the
Directory Browser to be included in the report. To select multiple fields, hold CTRL
193Report Generation
and click field names. If Field names are unchecked, the name of the selected fields
will not be prepended to the associated data for that field. Unless you are including
only a few or obvious fields, we recommend keeping Field names checked.
XWF TIPS AND TRICKSSoftwares from Dan MaresDanMares has written several programs that work with XWF reports. Dan’s programs primarilyfocus on processing metadata found by XWF. You can find Dan’s programs at http://www.dmares.com/maresware/tz.htm#X-WAYS.
After adjusting the reporting options to suit your needs, click the OK button to
begin report generation. You will be prompted for a location to save your report to
(the default location is the directory where the rest of the case information is saved).
A progress bar will be displayed and once the report is generated, XWF will offer
to open the report for you. ClickingOK will open the report in your default browser.
If XWF splits the report into multiple report files, the dialog box asking you to open
the report will indicate this as well.
REPORT CUSTOMIZATIONDepending on the options used in the RT options section, XWF may generate more
than one report file. For example, if you have RTs that contain 250 images andMax.number of pictures per HTML file is set to 100, XWF will generate three report
files: Report 1.html, Report 2.html, and Report 3.html.In this example, the top portion of Report 1.html will contain hyperlinks to each
of the RTs contained in all of the report files. However, if any of these hyperlinks
point to RTs that are contained in either Report 2.html or Report 3.html, the links
will not work.
You can correct this in several ways such as using any text editor to manually edit
the HTML code in the report files. You can also use Microsoft Word to edit the files.
By using Word, you can visually adjust the layout of the report if you are not com-
fortable editing HTML directly.
The easiest way to correct this issue is to use XWFRT or X-Ways Forensics
Report Tweaker (created by Eric Zimmerman).
XWFRT allows you to easily adjust the reports generated by XWF. After pointing
XWFRT at the main report file, XWFRT will generate a set of wrapper HTML files
to display the XWF reports in a frame.
XWFRT will then determine which RT associations are in each file and create a
menu on the left side of the main index reflecting this. After this is done, opening the
main index page (as opposed to one of the Report x.html pages) will allow you to
browse all of the XWF report files at once without having to open and close separate
files in your browser.
194 CHAPTER 8 X-Ways Forensics Reporting
XWFRT simplifies adding things like an agency logo, your agency, a list of exter-
nal files, and report narrative to your final report. Because of this, do not use the logo,
report header, or the preface option in XWF when generating your initial report.
You can get XWFRT from the X-Ways Forensics forum or from http://
xwaysforensics.wordpress.com/.
Each report file and subsequent RT associations in each report file will be added
as menus to the left side of the main report index page that XWFRT generates.
XWFRT uses a cascading style sheet (CSS) for all the HTML files it creates. By
editing the CSS, you can easily adjust the entire look and feel of the report.
SHORTCUTSCTRLþ1, . . ., CTRLþ9: Associates highlighted files to the RT with the corre-
sponding shortcut key
CTRLþ0: Removes all RT associations from highlighted files
Numeric pad digits: Same as above, but without the need to use CTRL key
SUMMARY
Reporting in XWF is straightforward and simple. In this chapter, we covered how to
create RTs, associate items to these RTs, and generate a report of our findings.
The reports generated by XWF are universally viewable by anyone with a Web
browser and as such are very portable. XWF includes many options that allow you to
adjust both the layout and contents of your reports. Because XWF reports use HTML,
the reports can be customizable by anyone using various editors.
195Summary

Intentionally left as blank
CHAPTER
X-Ways Forensics andElectronic Discovery 9INFORMATION IN THIS CHAPTER
• Introduction
• Review of relevant data with X-Ways Investigator
• Summary
INTRODUCTION
The case studies chapters put to use the information in this book in a practical way.
As every analysis is different, and every analyst conducts examinations differently,
the suggestions in this chapter are only ideas of a workflow process using XWF.
CIVIL LITIGATIONThe range of civil cases varies just as much as criminal investigations, and although
some rules may be different, there are still rules to follow. At times, a case may be
litigated concurrently in civil and criminal courts, or one case may follow the other.
Although the electronic data involved in both cases may come from the same source,
the processes involved have differences. It is not the intention of this chapter to
describe legal differences, but rather to focus on the practical application of XWF
in these cases.
CASE STUDYScenario: civil litigationPlaintiff and Defendant are involved in civil litigation involving one employee’s workstation.Electronic data are to be collected from the workstation for analysis and review.
This is a broad example of civil litigation and can apply to nearly every case. As
every case is different, particularly in civil cases where additional restrictions affect
the methods and processes involved, this section gives recommendations on handling
varying types of these constraints using XWF.
197
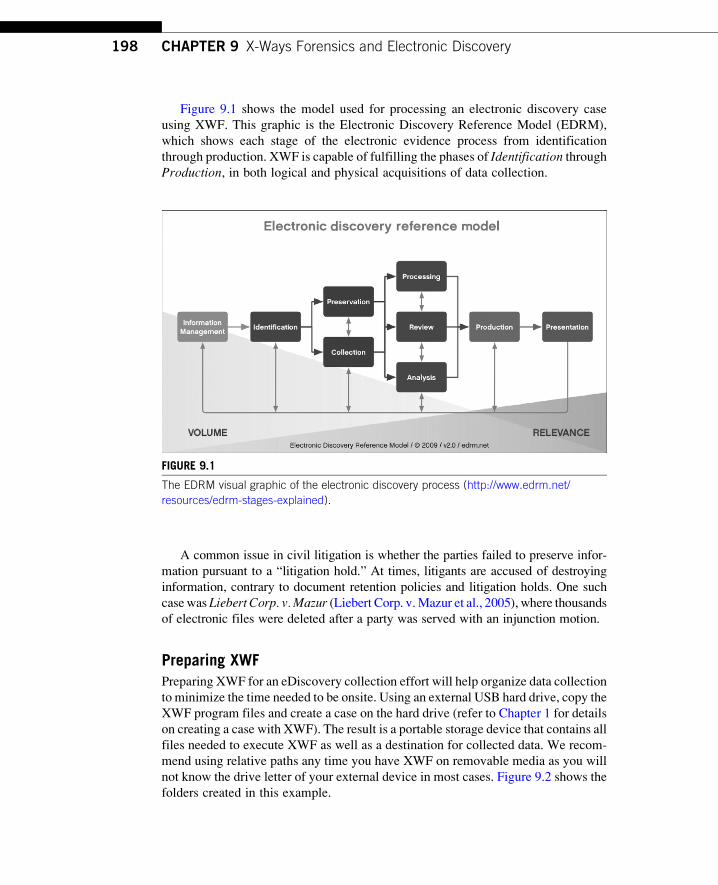
Figure 9.1 shows the model used for processing an electronic discovery case
using XWF. This graphic is the Electronic Discovery Reference Model (EDRM),
which shows each stage of the electronic evidence process from identification
through production. XWF is capable of fulfilling the phases of Identification throughProduction, in both logical and physical acquisitions of data collection.
A common issue in civil litigation is whether the parties failed to preserve infor-
mation pursuant to a “litigation hold.” At times, litigants are accused of destroying
information, contrary to document retention policies and litigation holds. One such
casewas Liebert Corp. v.Mazur (Liebert Corp. v.Mazur et al., 2005), where thousands
of electronic files were deleted after a party was served with an injunction motion.
Preparing XWFPreparing XWF for an eDiscovery collection effort will help organize data collection
to minimize the time needed to be onsite. Using an external USB hard drive, copy the
XWF program files and create a case on the hard drive (refer to Chapter 1 for details
on creating a case with XWF). The result is a portable storage device that contains all
files needed to execute XWF as well as a destination for collected data. We recom-
mend using relative paths any time you have XWF on removable media as you will
not know the drive letter of your external device in most cases. Figure 9.2 shows the
folders created in this example.
FIGURE 9.1
The EDRM visual graphic of the electronic discovery process (http://www.edrm.net/
resources/edrm-stages-explained).
198 CHAPTER 9 X-Ways Forensics and Electronic Discovery
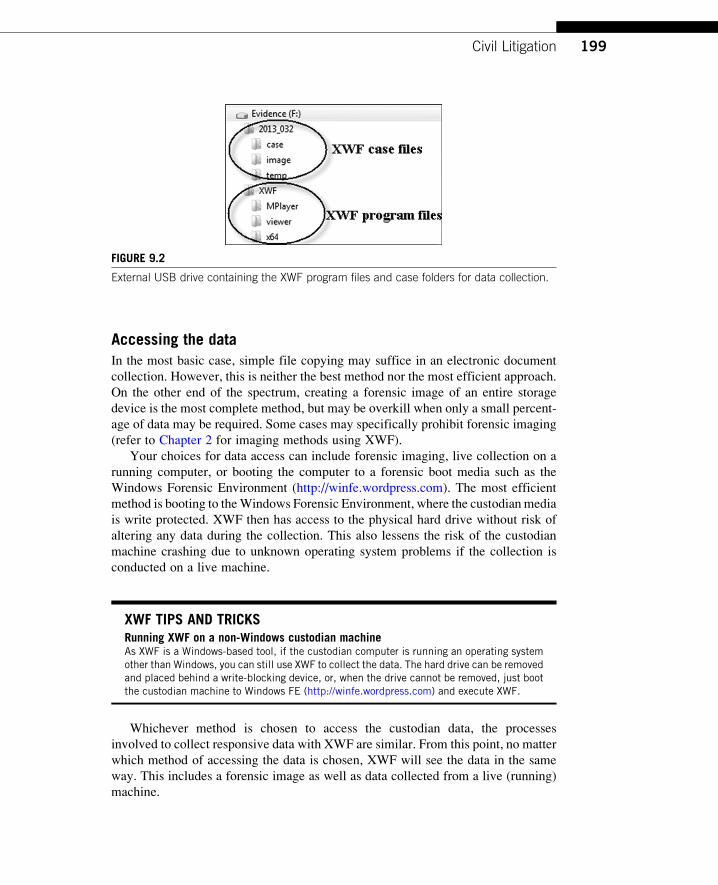
Accessing the dataIn the most basic case, simple file copying may suffice in an electronic document
collection. However, this is neither the best method nor the most efficient approach.
On the other end of the spectrum, creating a forensic image of an entire storage
device is the most complete method, but may be overkill when only a small percent-
age of data may be required. Some cases may specifically prohibit forensic imaging
(refer to Chapter 2 for imaging methods using XWF).
Your choices for data access can include forensic imaging, live collection on a
running computer, or booting the computer to a forensic boot media such as the
Windows Forensic Environment (http://winfe.wordpress.com). The most efficient
method is booting to theWindows Forensic Environment, where the custodian media
is write protected. XWF then has access to the physical hard drive without risk of
altering any data during the collection. This also lessens the risk of the custodian
machine crashing due to unknown operating system problems if the collection is
conducted on a live machine.
XWF TIPS AND TRICKSRunning XWF on a non-Windows custodian machineAs XWF is a Windows-based tool, if the custodian computer is running an operating systemother than Windows, you can still use XWF to collect the data. The hard drive can be removedand placed behind a write-blocking device, or, when the drive cannot be removed, just bootthe custodian machine to Windows FE (http://winfe.wordpress.com) and execute XWF.
Whichever method is chosen to access the custodian data, the processes
involved to collect responsive data with XWF are similar. From this point, no matter
which method of accessing the data is chosen, XWF will see the data in the same
way. This includes a forensic image as well as data collected from a live (running)
machine.
FIGURE 9.2
External USB drive containing the XWF program files and case folders for data collection.
199Civil Litigation

User created files—Existing (active) filesThe most common eDiscovery collection method is collecting only user-created
files, such as word processing documents, spreadsheets, email, and other files typ-
ically created and maintained by a computer user. Previously existing files are not
always a factor for collection in eDiscovery cases. Since only existing files are typ-
ically collected in eDiscovery cases, this may sound like a situation where copying
files to an external hard drive will suffice; however, that would not be efficient, prac-
tical, or as thorough compared to using XWF.
The key feature in XWF that supports this task of collecting electronic data is
through filtering. If you recall from Chapter 3, the Directory Browser Options, Fil-ters (the shortcut is CTRLþF5) gives several dozen options for filtering data. In
Figure 9.3, The Directory Browser Options, Filters shows a way to implement
a Type filter. XWF lists a multitude of predefined and categorized file types. If
the collection goal is the capture of all word processing file types, then every file
type listed can be selected. Conversely, if the data collection requires specific word
processing file types, then only those types can be selected. Depending on the file
types required, you can select additional categories, such as spreadsheets, presenta-
tions, etc.
FIGURE 9.3
Filtering by file type using the Directory Browser Options.
200 CHAPTER 9 X-Ways Forensics and Electronic Discovery
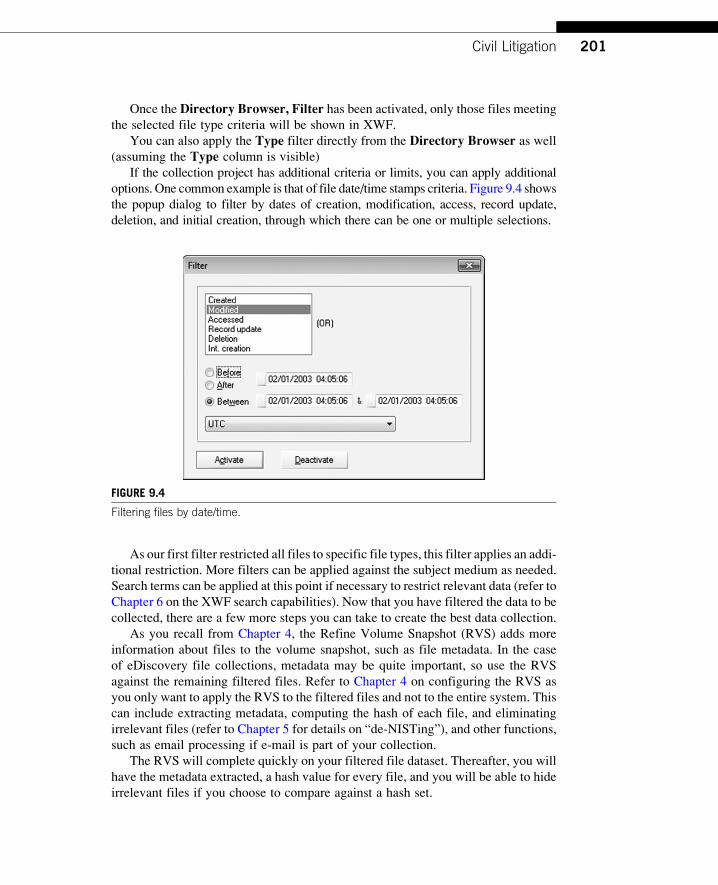
Once the Directory Browser, Filter has been activated, only those files meeting
the selected file type criteria will be shown in XWF.
You can also apply the Type filter directly from the Directory Browser as well(assuming the Type column is visible)
If the collection project has additional criteria or limits, you can apply additional
options. One common example is that of file date/time stamps criteria. Figure 9.4 shows
the popup dialog to filter by dates of creation, modification, access, record update,
deletion, and initial creation, through which there can be one or multiple selections.
As our first filter restricted all files to specific file types, this filter applies an addi-
tional restriction. More filters can be applied against the subject medium as needed.
Search terms can be applied at this point if necessary to restrict relevant data (refer to
Chapter 6 on the XWF search capabilities). Now that you have filtered the data to be
collected, there are a few more steps you can take to create the best data collection.
As you recall from Chapter 4, the Refine Volume Snapshot (RVS) adds more
information about files to the volume snapshot, such as file metadata. In the case
of eDiscovery file collections, metadata may be quite important, so use the RVS
against the remaining filtered files. Refer to Chapter 4 on configuring the RVS as
you only want to apply the RVS to the filtered files and not to the entire system. This
can include extracting metadata, computing the hash of each file, and eliminating
irrelevant files (refer to Chapter 5 for details on “de-NISTing”), and other functions,
such as email processing if e-mail is part of your collection.
The RVS will complete quickly on your filtered file dataset. Thereafter, you will
have the metadata extracted, a hash value for every file, and you will be able to hide
irrelevant files if you choose to compare against a hash set.
FIGURE 9.4
Filtering files by date/time.
201Civil Litigation
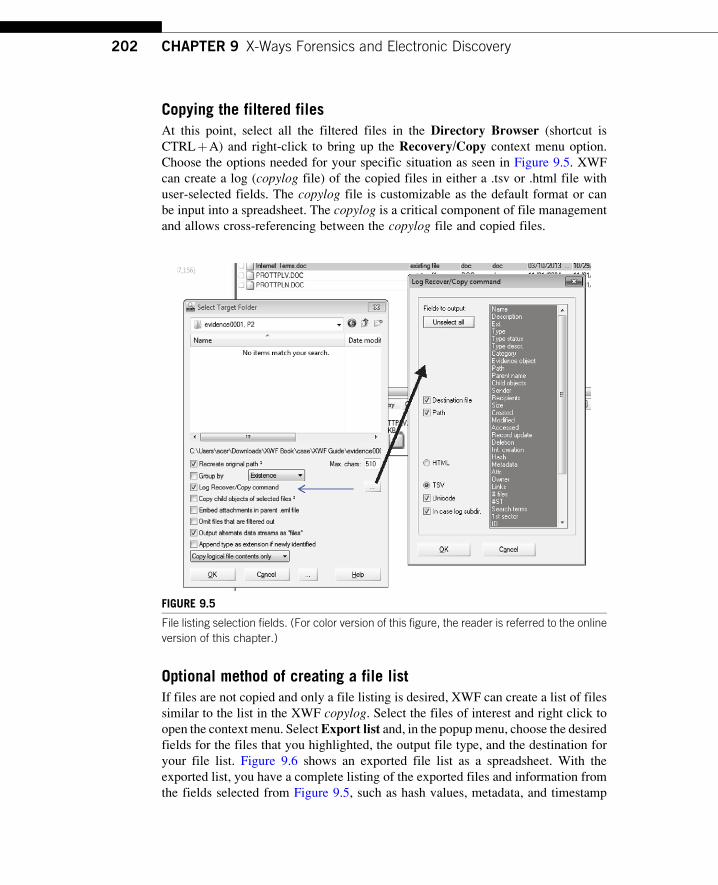
Copying the filtered filesAt this point, select all the filtered files in the Directory Browser (shortcut is
CTRLþA) and right-click to bring up the Recovery/Copy context menu option.
Choose the options needed for your specific situation as seen in Figure 9.5. XWF
can create a log (copylog file) of the copied files in either a .tsv or .html file with
user-selected fields. The copylog file is customizable as the default format or can
be input into a spreadsheet. The copylog is a critical component of file management
and allows cross-referencing between the copylog file and copied files.
Optional method of creating a file listIf files are not copied and only a file listing is desired, XWF can create a list of files
similar to the list in the XWF copylog. Select the files of interest and right click to
open the context menu. SelectExport list and, in the popupmenu, choose the desired
fields for the files that you highlighted, the output file type, and the destination for
your file list. Figure 9.6 shows an exported file list as a spreadsheet. With the
exported list, you have a complete listing of the exported files and information from
the fields selected from Figure 9.5, such as hash values, metadata, and timestamp
FIGURE 9.5
File listing selection fields. (For color version of this figure, the reader is referred to the online
version of this chapter.)
202 CHAPTER 9 X-Ways Forensics and Electronic Discovery
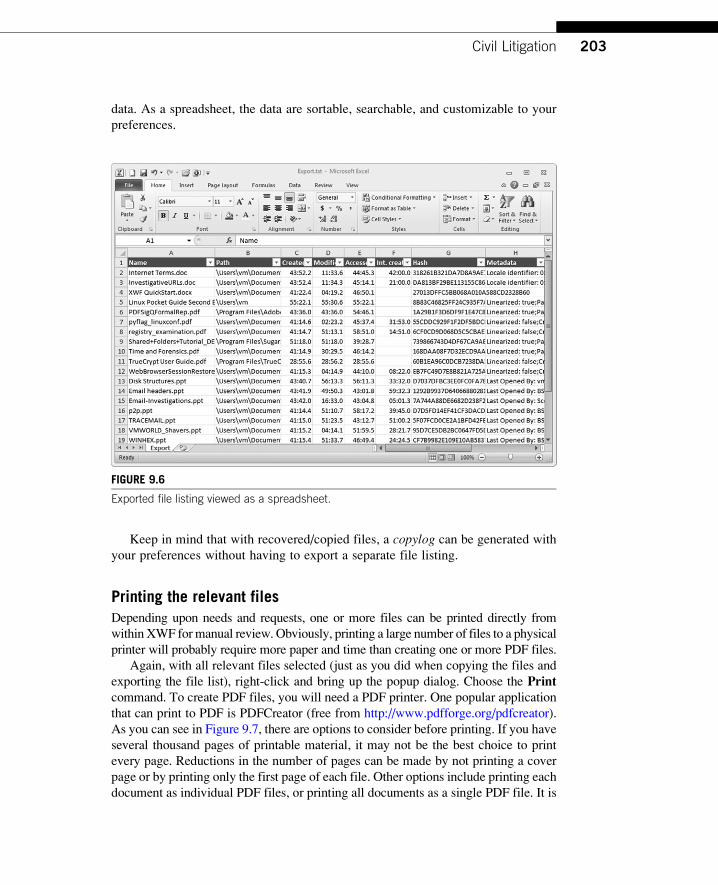
data. As a spreadsheet, the data are sortable, searchable, and customizable to your
preferences.
Keep in mind that with recovered/copied files, a copylog can be generated with
your preferences without having to export a separate file listing.
Printing the relevant filesDepending upon needs and requests, one or more files can be printed directly from
within XWF formanual review. Obviously, printing a large number of files to a physical
printer will probably require more paper and time than creating one or more PDF files.
Again, with all relevant files selected (just as you did when copying the files and
exporting the file list), right-click and bring up the popup dialog. Choose the Printcommand. To create PDF files, you will need a PDF printer. One popular application
that can print to PDF is PDFCreator (free from http://www.pdfforge.org/pdfcreator).
As you can see in Figure 9.7, there are options to consider before printing. If you have
several thousand pages of printable material, it may not be the best choice to print
every page. Reductions in the number of pages can be made by not printing a cover
page or by printing only the first page of each file. Other options include printing each
document as individual PDF files, or printing all documents as a single PDF file. It is
FIGURE 9.6
Exported file listing viewed as a spreadsheet.
203Civil Litigation
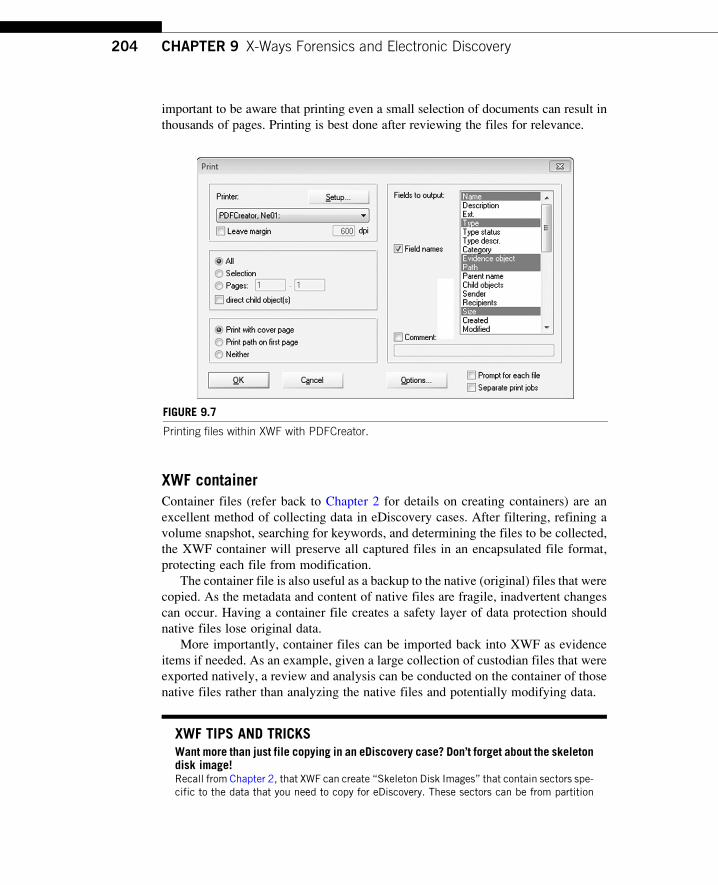
important to be aware that printing even a small selection of documents can result in
thousands of pages. Printing is best done after reviewing the files for relevance.
XWF containerContainer files (refer back to Chapter 2 for details on creating containers) are an
excellent method of collecting data in eDiscovery cases. After filtering, refining a
volume snapshot, searching for keywords, and determining the files to be collected,
the XWF container will preserve all captured files in an encapsulated file format,
protecting each file from modification.
The container file is also useful as a backup to the native (original) files that were
copied. As the metadata and content of native files are fragile, inadvertent changes
can occur. Having a container file creates a safety layer of data protection should
native files lose original data.
More importantly, container files can be imported back into XWF as evidence
items if needed. As an example, given a large collection of custodian files that were
exported natively, a review and analysis can be conducted on the container of those
native files rather than analyzing the native files and potentially modifying data.
XWF TIPS AND TRICKSWant more than just file copying in an eDiscovery case? Don’t forget about the skeletondisk image!Recall from Chapter 2, that XWF can create “Skeleton Disk Images” that contain sectors spe-cific to the data that you need to copy for eDiscovery. These sectors can be from partition
FIGURE 9.7
Printing files within XWF with PDFCreator.
204 CHAPTER 9 X-Ways Forensics and Electronic Discovery
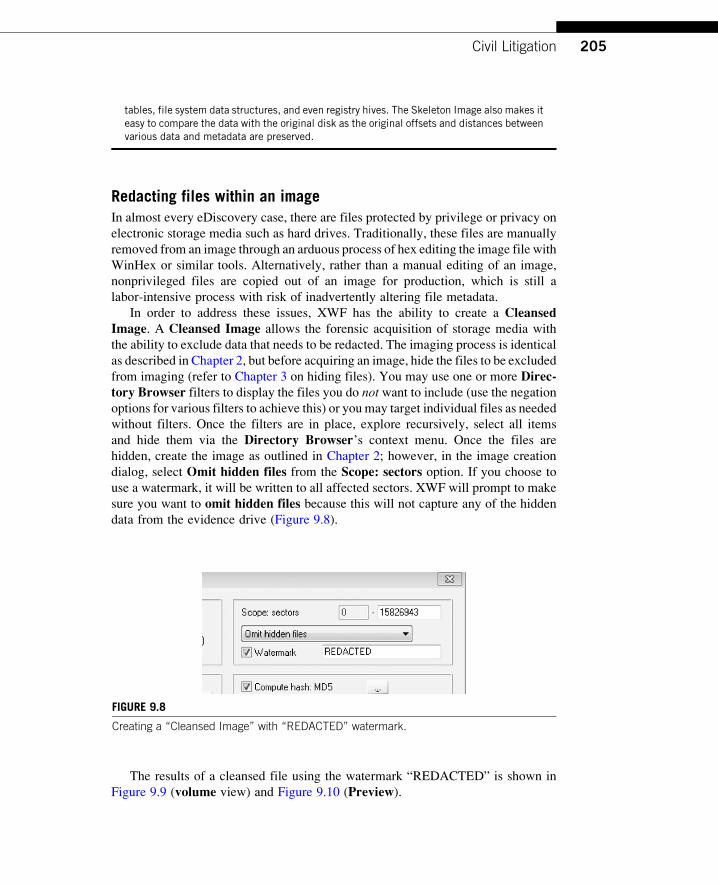
tables, file system data structures, and even registry hives. The Skeleton Image also makes iteasy to compare the data with the original disk as the original offsets and distances betweenvarious data and metadata are preserved.
Redacting files within an imageIn almost every eDiscovery case, there are files protected by privilege or privacy on
electronic storage media such as hard drives. Traditionally, these files are manually
removed from an image through an arduous process of hex editing the image file with
WinHex or similar tools. Alternatively, rather than a manual editing of an image,
nonprivileged files are copied out of an image for production, which is still a
labor-intensive process with risk of inadvertently altering file metadata.
In order to address these issues, XWF has the ability to create a CleansedImage. A Cleansed Image allows the forensic acquisition of storage media with
the ability to exclude data that needs to be redacted. The imaging process is identical
as described in Chapter 2, but before acquiring an image, hide the files to be excluded
from imaging (refer to Chapter 3 on hiding files). You may use one or more Direc-tory Browser filters to display the files you do not want to include (use the negationoptions for various filters to achieve this) or you may target individual files as needed
without filters. Once the filters are in place, explore recursively, select all items
and hide them via the Directory Browser’s context menu. Once the files are
hidden, create the image as outlined in Chapter 2; however, in the image creation
dialog, select Omit hidden files from the Scope: sectors option. If you choose to
use a watermark, it will be written to all affected sectors. XWF will prompt to make
sure you want to omit hidden files because this will not capture any of the hidden
data from the evidence drive (Figure 9.8).
The results of a cleansed file using the watermark “REDACTED” is shown in
Figure 9.9 (volume view) and Figure 9.10 (Preview).
FIGURE 9.8
Creating a “Cleansed Image” with “REDACTED” watermark.
205Civil Litigation
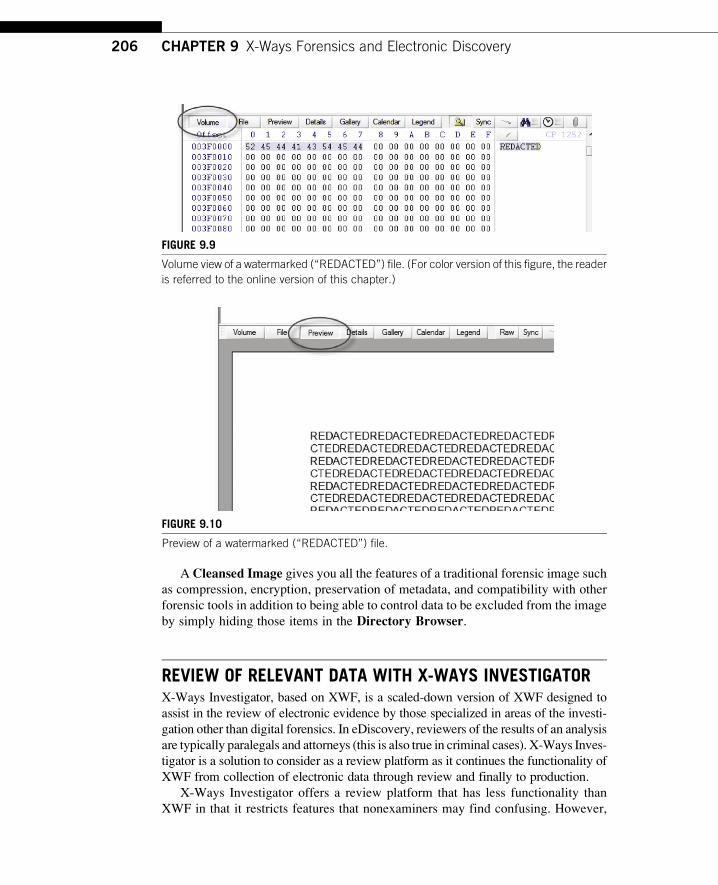
A Cleansed Image gives you all the features of a traditional forensic image such
as compression, encryption, preservation of metadata, and compatibility with other
forensic tools in addition to being able to control data to be excluded from the image
by simply hiding those items in the Directory Browser.
REVIEW OF RELEVANT DATA WITH X-WAYS INVESTIGATORX-Ways Investigator, based on XWF, is a scaled-down version of XWF designed to
assist in the review of electronic evidence by those specialized in areas of the investi-
gation other than digital forensics. In eDiscovery, reviewers of the results of an analysis
are typically paralegals and attorneys (this is also true in criminal cases). X-Ways Inves-
tigator is a solution to consider as a review platform as it continues the functionality of
XWF from collection of electronic data through review and finally to production.
X-Ways Investigator offers a review platform that has less functionality than
XWF in that it restricts features that nonexaminers may find confusing. However,
FIGURE 9.10
Preview of a watermarked (“REDACTED”) file.
FIGURE 9.9
Volume view of a watermarked (“REDACTED”) file. (For color version of this figure, the reader
is referred to the online version of this chapter.)
206 CHAPTER 9 X-Ways Forensics and Electronic Discovery
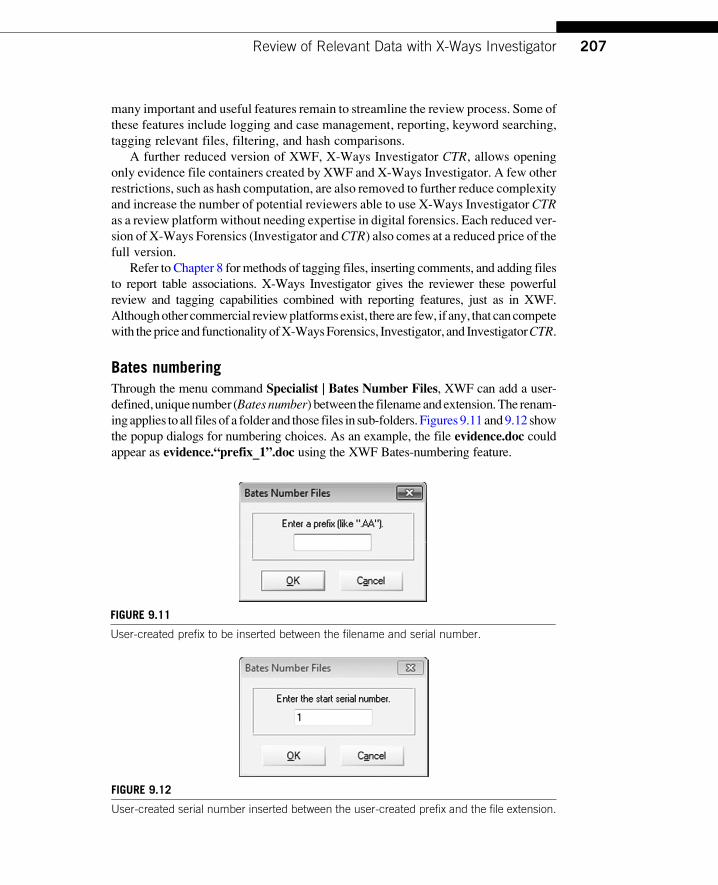
many important and useful features remain to streamline the review process. Some of
these features include logging and case management, reporting, keyword searching,
tagging relevant files, filtering, and hash comparisons.
A further reduced version of XWF, X-Ways Investigator CTR, allows openingonly evidence file containers created by XWF and X-Ways Investigator. A few other
restrictions, such as hash computation, are also removed to further reduce complexity
and increase the number of potential reviewers able to use X-Ways Investigator CTRas a review platformwithout needing expertise in digital forensics. Each reduced ver-
sion of X-Ways Forensics (Investigator andCTR) also comes at a reduced price of the
full version.
Refer to Chapter 8 for methods of tagging files, inserting comments, and adding files
to report table associations. X-Ways Investigator gives the reviewer these powerful
review and tagging capabilities combined with reporting features, just as in XWF.
Althoughother commercial reviewplatformsexist, there are few, if any, that cancompete
with theprice and functionality ofX-WaysForensics, Investigator, and InvestigatorCTR.
Bates numberingThrough the menu command Specialist | Bates Number Files, XWF can add a user-
defined,uniquenumber (Batesnumber) between the filenameandextension.The renam-
ingapplies to all files of a folder and those files in sub-folders. Figures 9.11and9.12 show
the popup dialogs for numbering choices. As an example, the file evidence.doc couldappear as evidence.“prefix_1”.doc using the XWF Bates-numbering feature.
FIGURE 9.11
User-created prefix to be inserted between the filename and serial number.
FIGURE 9.12
User-created serial number inserted between the user-created prefix and the file extension.
207Review of Relevant Data with X-Ways Investigator
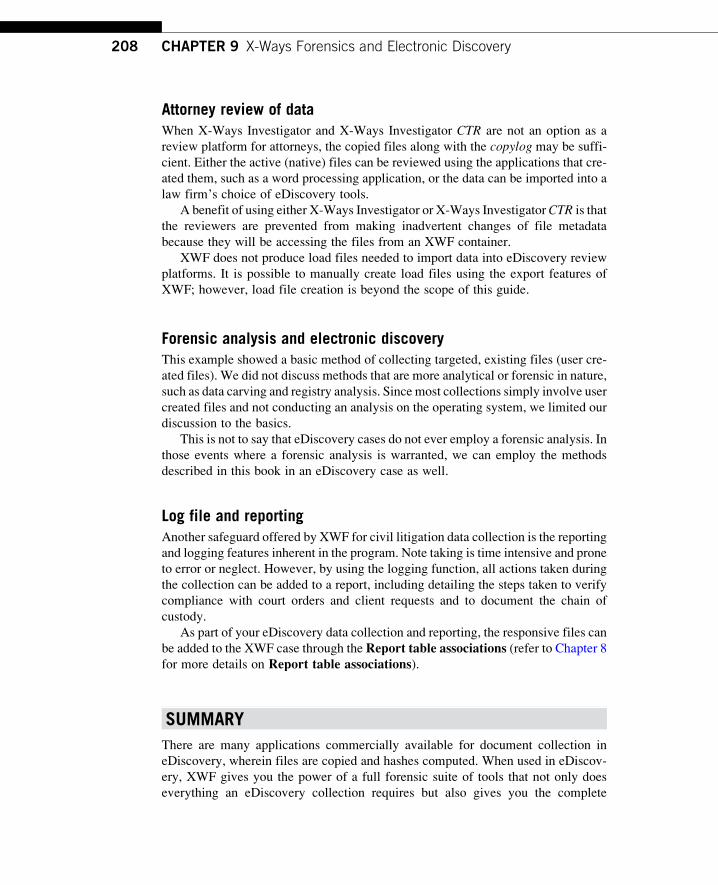
Attorney review of dataWhen X-Ways Investigator and X-Ways Investigator CTR are not an option as a
review platform for attorneys, the copied files along with the copylog may be suffi-
cient. Either the active (native) files can be reviewed using the applications that cre-
ated them, such as a word processing application, or the data can be imported into a
law firm’s choice of eDiscovery tools.
A benefit of using either X-Ways Investigator or X-Ways InvestigatorCTR is that
the reviewers are prevented from making inadvertent changes of file metadata
because they will be accessing the files from an XWF container.
XWF does not produce load files needed to import data into eDiscovery review
platforms. It is possible to manually create load files using the export features of
XWF; however, load file creation is beyond the scope of this guide.
Forensic analysis and electronic discoveryThis example showed a basic method of collecting targeted, existing files (user cre-
ated files). We did not discuss methods that are more analytical or forensic in nature,
such as data carving and registry analysis. Since most collections simply involve user
created files and not conducting an analysis on the operating system, we limited our
discussion to the basics.
This is not to say that eDiscovery cases do not ever employ a forensic analysis. In
those events where a forensic analysis is warranted, we can employ the methods
described in this book in an eDiscovery case as well.
Log file and reportingAnother safeguard offered by XWF for civil litigation data collection is the reporting
and logging features inherent in the program. Note taking is time intensive and prone
to error or neglect. However, by using the logging function, all actions taken during
the collection can be added to a report, including detailing the steps taken to verify
compliance with court orders and client requests and to document the chain of
custody.
As part of your eDiscovery data collection and reporting, the responsive files can
be added to the XWF case through the Report table associations (refer to Chapter 8for more details on Report table associations).
SUMMARY
There are many applications commercially available for document collection in
eDiscovery, wherein files are copied and hashes computed. When used in eDiscov-
ery, XWF gives you the power of a full forensic suite of tools that not only does
everything an eDiscovery collection requires but also gives you the complete
208 CHAPTER 9 X-Ways Forensics and Electronic Discovery
functionality of a forensic tool. From identification to production, XWF delivers
more than just file copying in civil litigation.
ReferenceLiebert Corp. v. Mazur, 357 Ill. App. 3d 265, 283 827 N.E.2d 909, 929 (Ill. App. Ct. 2005).
(Appellate Court of Illinois, First District, Second Division. 2005). Retrieved April 22,
2013, from http://scholar.google.com/scholar_case?case¼16708488608786485277&
q¼LiebertþCorp.þv.þMazur,þ827þN.E.2dþ909&hl¼en&as_sdt¼2,48&as_vis¼1.
209Reference

Intentionally left as blank
CHAPTER
X-Ways Forensics andCriminal Investigations 10INFORMATION IN THIS CHAPTER
• Introduction
• X-Ways Forensics and criminal investigations
• Summary
INTRODUCTION
This chapter aims to cover the use of X-Ways Forensics (XWF) as it relates to crim-
inal investigations: specifically knock and talks, search warrants, and probationary-
type reviews of computers.
This chapter assumes that, prior to any activity, valid legal authority or consent
has been given to officers who will examine any device. In most places, “valid legal
authority” equates to either a search warrant or some kind of parole or supervised
release status. A search warrant is typically authorized by a judge after probable
cause has been adequately demonstrated by some law enforcement entity. Once
signed, the search warrant gives law enforcement the right to search and seize rel-
evant items as specified in the warrant. While there are exceptions to the search war-
rant requirement, this chapter will not address those areas of search and seizure law.
A knock and talk involves the owner of a computer consenting to the search by
voluntarily waiving his or her rights. Knock and talks are usually undertaken when
there is not enough probable cause to justify a search warrant. This waiver gives a
government agency the authority to search property. Each jurisdiction has its own
policies, procedures, and laws pertaining to consent searches, but generally the cit-
izen must voluntarily give up his or her rights of search protections in order for a
consent search to be legally valid.
Since consent searches typically occur on property controlled by the suspect, one
of the most important factors in conducting a search for evidence is time. If there is
reasonable suspicion that a crime has occurred or will occur and the offense involves
a computer, time is of the essence to find that evidence in the event that the suspect
revokes consent. XWF provides speed of searching and preview capabilities that can
help find evidence quickly and easily in those circumstances. If relevant evidence is
found before a subject revokes consent, the computers can be seized and further legal
process obtained to continue the search.
XWF can be used in the context of a search warrant to find additional information
that traditional triage tools are not capable of finding, such as deleted files or more
211
esoteric operating system artifacts. By initially using triage tools to narrow the focus
of the investigation during a search and continuing to examine relevant computers in
more detail with XWF, a clear understanding of the information on the computers
can be used by investigators while on scene during interviews. Unlike a consent
search, time is not as critical when reviewing digital media during the service of
a search warrant as the premises are under the control of law enforcement for the
duration of the search.
Regarding the supervision of parolees, especially those convicted of crimes in-
volving the use of computers, the rules are usually different. Typically, parolees
waive their right to searches while on parole as a condition of their parole. With this
waiver in place, parole officers have the legal authority to enter and search property
including computer systems. However, the terms of the condition of release govern
the scope of the search. Time is not of the essence in these cases as the parolee cannot
revoke consent as he or she would be in violation of the terms of the supervised
release.
In all cases, the ability to quickly and easily search for evidence is still important
as it ensures law enforcement is as minimally intrusive as possible. The following
sections pertain to the scenarios described above, with the only difference being
the ability of someone to revoke the consent to search.
X-WAYS FORENSICS AND CRIMINAL INVESTIGATIONSFor the purposes of this case study, you have legal authority through a search warrant,
consent, or a supervision order to search a computer in the home of a suspect/parolee.
There is either probable cause (in the case of a search warrant) or reasonable suspi-
cion that child pornography exists on one or more computers. The goal is to validate
either probable cause or reasonable suspicion.
If for no other reason but the sake of time and efficiency, searches of computer
systems should not be fishing expeditions but rather should target specific known or
suspected evidence. There is simply too much data on a hard drive to justify spending
time hunting and poking in hopes of finding pertinent data.
A common technique to determine which computers are more important than
others involves triaging computers. The concept of triage is to separate the “wheat
from the chaff” as it relates to digital information pertinent to an investigation. By
triaging computers, you can quickly focus your efforts on relevant computers. For
example, triage tools can quickly determine what files have been opened on a com-
puter, what applications are installed, when applications were last executed, etc. By
using this information, you can quickly hone in on the computers relevant to the
investigation at hand. This technique also lets you eliminate computers that have
nothing to do with your case. In short, triage techniques enable us to be minimally
intrusive to both us (in terms of the amount of digital evidence that we have to
review) and the subjects of the search (in that we are not taking computers that have
no bearing on a particular case).
212 CHAPTER 10 X-Ways Forensics and Criminal Investigations
In all of the scenarios described above, a full forensic examwhile on scene is not a
practical use of time nor is it feasible in most cases. Although plenty of software
applications are available that conduct automated searches of computers for pre-
views, XWF allows for more customization and more granularity when it comes
to searching. Additionally, if evidence is discovered during the search, XWF can
immediately make note of such evidence through report table associations. In addi-
tion, we can create a forensic image of the hard drive being reviewed. As you have
seen in previous chapters, all of the activity taken in XWF can be documented in an
audit trail that allows you to write accurate reports related to the processing of digital
media while on scene.
When a running computer is encountered, the common technique has been to
simply “pull the plug” and process the computer later. With the advance in encryp-
tion technologies, such as TrueCrypt (available at http://www.truecrypt.org), we do
not recommend this approach. Rather, if a suspect’s computer is running, it should be
examined for such things as encryption, running processes, network connections,
etc., as all of this information is volatile and will be lost when power is removed.
Finally, with advances in memory analysis frameworks like volatility (https://
www.volatilesystems.com/default/volatility), we recommend capturing RAM when
a live machine is encountered.
Conversely, if the machine is off when you approach, attempt to boot the system
to a forensically sound media such as the Windows Forensics Environment (WinFE)
and conduct the search in a forensic environment. Another option is to place the hard
drive behind a write blocker and examine it from your laptop.
As previously discussed in the eDiscovery example from Chapter 9, XWF does
not care whether it is running within a suspect’s operating system or your operating
system, such as booting to WinFE or using your laptop.
Prepare XWFWe recommend having XWF available on more than one device. A WinFE CD con-
taining XWF plus an external USB hard drive that also contains XWF gives protec-
tion against one point of failure. With searches conducted onsite, an external USB
hard drive is necessary to create a forensic image or copy evidence files before shut-
ting down the computer system.
Finding evidence as quickly as possible should be a primary goal with onsite
searches. Consent searches can end abruptly if the person retracts his or her consent
and, if evidence has not been found, there may be no authority to seize or search fur-
ther unless other facts are present. Even in the case of parole searches where having
the search ended by the parolee is not a concern, time is a factor when your caseload
demands searching the computers of multiple offenders over a large geographic area.
For these reasons, we recommend preparing XWF before leaving your office. As
seen in Chapter 9, the XWF program files can be copied to an external USB drive and
a case created without having to add evidence. Just be sure to use relative paths when
213X-Ways Forensics and Criminal Investigations
XWF is used on removable storage since you won’t know what drive letter will be
assigned to your device. Once onsite, evidence can be added to the preexisting case.
Once you are in front of the computer you wish to examine, plug in your external
device, insert your dongle, and start XWF. There will be a minimal footprint of the
XWF dongle on the system, but drivers are not installed.
XWF TIPS AND TRICKSDon’t Worry About Modifying System Data!When using XWF on a live system, certain data will change but this is a reasonable compro-mise for this type of search. If you have probable cause to believe that criminal evidence existsbefore conducting a live search, consider creating a forensic image with write protectioninstead of a preview on the live machine. Remember, XWF is not making any changes to fileson the system that were created by a computer user. Windows will, of course, create registryentries when USB devices are attached, but such changes can be explained easily in yourreport.
Adding evidence itemsAdd your evidence through the File | Add Medium menu command. XWF will see
all attached storage devices so add each available object to the case. Since this exam-
ple consists of an onsite preview where the time is generally important, the specific
circumstances of your investigation dictate the type of evidence for which you will
search. For example, in matters relating to child exploitation, you will generally
search for pictures and videos, evidence of peer-to-peer programs, etc. Other crimes
will have different types of relevant artifacts such as crimes involving e-mail or Inter-
net use involving stalking.
For our example, we will focus on an investigation related to the possession of
child pornography. In this scenario, we will be primarily interested in reviewing pic-
tures and videos found on the computer.Wemay also be interested in data carving for
these file types. Remember that data carving takes time but with XWF, you can data
carve with Refine Volume Snapshot (RVS) and conduct a preview at the same time
by starting the RVS in one instance of XWF and previewing the hard drive in another.
Once your evidence items have been added, open the RVS by pressing F10. As
we already know the specific types of files that we are interested in finding, namely
pictures and videos, select only these categories in the File Header Search options.
Other RVS options may be helpful, such as Compute hash andMatch hash valuesagainst hash database, if you have a hash set containing known child pornography
hash values. For each additional selection in the RVS, the time to complete the pro-
cess may increase. We suggest using the RVS for pictures and videos in order to
quickly find evidence that previously existed.
As the RVS is processing, start a new session of XWF. Within the new session of
XWF, Explore recursively on an evidence object and then use the Type filter in theDirectory Browser (Chapter 3 covers filtering in more detail). Next, switch to
214 CHAPTER 10 X-Ways Forensics and Criminal Investigations

Gallery mode and XWF will generate thumbnails of the graphic files found in the
evidence object. Figure 10.1 shows the gallery view of graphics. If, after reviewing
the existing graphics and videos, you have not found evidence, the RVS may be near
completion giving you additional files for review.
Depending on your legal authority (consent or search warrant for example), addi-
tional options become available once evidence is found, e.g., a probable cause arrest,
seizure of digital media, another search warrant, or a violation of parole.
XWF TIPS AND TRICKSDon’t Turn Off the Computer Yet!Prior to exiting XWF and shutting down the computer, ensure that you adequately documentand preserve what you have found by using one or more report table associations and usingRecover/copy to export any evidence that has been found. As encrypted systems becomemorecommon, you may be unable to access it again if the system is shut down and encryption isbeing used. By exporting relevant files and generating a report before shutdown, you ensurethat you at least have the items you found during your initial search.
In the case of United States of America v Jeffery Feldman, the court declined an appli-cation to compel Feldman to turn over his decryption keys. This resulted in being unable toaccess the electronic evidence (Order Denying Application to Compel Decryption, 2013).
FIGURE 10.1
Gallery view of graphic files.
215X-Ways Forensics and Criminal Investigations
Another factor to consider is whether to create an image of the system as it is running(live). For any number of reasons, imaging onsite may be a good option. If you know or evensuspect encryption is being used, it is critical to image the logical partitions before shuttingdown the computer.
As a search progresses, the relevancy of the computer being examined will
increase or decrease depending on the data found. You should use your own judg-
ment to determine how much time to spend reviewing a computer before deciding
whether it is or is not of interest.
If no pictures or videos are found, it may be necessary to examine additional arti-
facts on the computer, such as the registry, shortcut files, installed applications, etc.
The quickest way to hone in on these types of files is to use Directory Browserfilters (the Category filter is particularly useful in this scenario). Once a given type
of artifact is located, use the various features of XWF such as Preview and Detailsmode, the Registry Viewer, etc., to drill down into those files.
Case scenarioTo provide a more concrete use of XWF functionality as it pertains to use in the field,
consider the following scenario.
You are assigned a case where you are investigating the trading of child pornog-
raphy on the Gnutella network. Gnutella is a large peer-to-peer (P2P) network used to
trade files. You have observed a LimeWire client with a specific identifier trading
contraband. The GUID, or globally unique identifier, is what Gnutella uses to
uniquely identify a client on the network. The GUID is also unique to an installation.
In addition to the GUID, you also downloaded several files from the subject. You
have hashed these files to generate their SHA-1 Base32-encoded hash values.
A search warrant has been authorized based on your investigation to date.
After making entry and securing the scene, several computers are located in the
residence. You triage each computer and find one that contains activity that pertains
to the viewing of child pornography. Specifically, you locate within the registry sev-
eral entries in RecentDocs for jpg files. The file names for these recently viewed pic-
tures contain keywords associated with child pornography.
Having eliminated all other computers in the home based on live response infor-
mation, you conduct a search for active pictures on the remaining computer, but none
are located. During the search, you find indications that LimeWire is installed as well
as TrueCrypt.a
Because no active pictures were found during triage, you decide to employ XWF
to look for evidence of deleted files and other artifacts related to your case. After
starting XWF and adding the hard drive to your case, explore recursively and use
the Name column filter in the Directory Browser to look for the files limewire.props, configuration.xml (the configuration file for TrueCrypt), and fileurns.cache
aAn encryption program that can encrypt an entire volume or files within an encrypted container.
216 CHAPTER 10 X-Ways Forensics and Criminal Investigations
(fileurns.cache tracks the files that may be available for downloading for a given
LimeWire client). Each of the files is found on the computer.
After selecting limewire.props in the Directory Browser and switching to Pre-view mode, look for the ClientID key/value pair. ClientID contains the GUID used
by the installed instance of LimeWire. You compare the GUID you have to the
ClientID and note that they match. Right click limewire.props and add it to a new
report table (P2P client for example). At this point, you know this is most likely
the computer you observed earlier on the Gnutella network.
While reviewing other keys in limewire.props, you notice the LAST_FILECHOOSER_DIR key points to the path R:\sort and the key DIRECTORIES_TO_SEARCH_FOR_FILES points to R:\share. When you added the hard drive to
your XWF case, you did not see an R drive. You can add this information as a com-
ment to limewire.props so it can be easily referenced and included in a report later.
Recall that you also found a file named configuration.xml on this computer. To
view the contents of this file, select it in the Directory Browser and make sure you
are in Previewmode. By default, you will not see the contents of the XML document
because the viewer component is rendering it. To see the document in its entirety,
click the Raw button. As with limewire.props, we see several key/value pairs.
In reviewing this file, you find a key named LastSelectedDrive with a value of
R:. TrueCrypt uses this key to reselect the last used drive letter when mounting a
TrueCrypt container.
With the information from limewire.props and configuration.xml, you now know
the subject is storing his contraband inside one or more encrypted containers on
his computer or other device he controls such as a thumb drive. The easiest way
to find these containers is to explore recursively and then sort by the Sizecolumn in the Directory Browser. After doing this, you notice a 3 GB file buried
several directories beneath the Windows directory. You add this file to a report table
as well.
Now that you know encryption is being used to hide child pornography, how can
you determine what is inside the encrypted container? If it was currently mounted,
we can simply image the drive like we would any other partition, but in this case, the
container is not mounted. Recall that you also found fileurns.cache during your ini-
tial search.
As mentioned above, fileurns.cache tracks the files made available for download-
ing by a Gnutella client. This file contains several pieces of information such as the
full file names and hash values of files being shared. Another aspect of fileurns.cacheis that, when LimeWire shuts down, it verifies whether each of the files listed in
fileurns.cache exists in its entirety. If a file listed no longer exists, the entry for that
file is removed from fileurns.cache.After selecting fileurns.cache in the Directory Browser, switch to File mode.
Even though fileurns.cache is a binary file, it contains quite a bit of plain text. In
reviewing this file, you see all of the files being shared on LimeWire are found
in the R:\share directory. You also see all of the SHA-1 values that correspond withthe files that you downloaded. You observe that several of the filenames listed in
217X-Ways Forensics and Criminal Investigations
fileurns.cache correspond with the file names you saw earlier in RecentDocs keys inthe registry. These findings can be annotated in a comment or report table
association.
Based on this information, you now know that the files that are contained inside
the encrypted container as of the last time LimeWire was shut down (at least based
upon the entries in fileurns.cache). You know when LimeWire was last shut down
because the second line of limewire.props provides a timestamp indicating this.
To further peer inside the encryption without knowing the password, you can
use the XWF Registry Viewer to open the user’s NTUSER.dat file, generate a reg-istry report, and look for Shell Bag entries. Among other things, Shell Bags track thefile names found in directories as they are viewed in Windows Explorer. These file
listings persist in the registry even when a directory is deleted or not available (as in
the case with drive R). By looking at the Shell Bags in the registry, you will be ableto see not only a complete listing of folder names but also every file contained in
those folders. In addition to the file name, Shell Bags also track the size of the files.Since you downloaded several files from the subject, you know the file names as
well as the size of those files. You can now look through the entries for both the file
names and the file sizes. By combining the information from Shell Bags with the
information from fileurns.cache, you can determine exactly which files are contained
inside the encrypted container.
Remember to this point we haven’t even conducted a Refine Volume Snapshot
operation that may reveal even more pertinent information about the case.
With this information at hand, you are better prepared for not only the initial
interview with the subject but also for future legal proceedings.
The above example illustrates the power you have at your fingertips in the field
when using XWF. By exploiting computers as much as possible while on scene, you
greatly increase your chances of a successful initial interview. Since we typically
only get one opportunity to interview a subject, it is best to make it count.
SUMMARY
XWF brings powerful triage and full forensics capabilities to the field. As data stor-
age capacities continue to increase, it will become more and more critical to triage
computers in order to determine, as quickly as possible, the computers that are rel-
evant to your case. By leveraging XWF in the field, you will be able to find more
information than traditional techniques allow.
Perhaps the most important benefit of using XWF for these types of searches is
the seamless transition from field triage to a more formal forensic examination in the
lab. When examining evidence objects in the field in XWF, you can add relevant
items to report tables, recover files, etc. In addition, any files reviewed on scene will
be remembered by XWF so you will not duplicate work in reviewing the same files
more than once.
218 CHAPTER 10 X-Ways Forensics and Criminal Investigations
ReferenceOrder Denying Application to Compel Decryption, 13-M-449 (United States District Court
Eastern District of Wisconsin April 19, 2013). Retrieved April 30, 2013, from http://
ia601700.us.archive.org/6/items/gov.uscourts.wied.63043/gov.uscourts.wied.63043.3.0.pdf.
219Reference

Intentionally left as blank
APPENDIX
X-Ways Forensics AdditionalInformation AINFORMATION IN THIS CHAPTER
• Introduction
• Online resources
• Keyboard shortcuts
INTRODUCTION
Over the past several years, there have been more resources created to support
X-Ways Forensics (XWF). This book is one such example. To further the under-
standing and use of XWF, this appendix gives additional references for the reader
to access. As the Internet is constantly changing, youmay need to use a search engine
to find a resource that may have had its URL changed since the printing of this book.
The second part of the appendix is a listing of keyboard shortcuts found through-
out this book as well as others not mentioned. Depending upon your specific use of
XWF, there may be shortcuts that you will use regularly to save time during your
analysis. While you may not use all the keyboard shortcuts, we hope that at least
a few will become favorites.
ONLINE RESOURCESThe number of digital forensics blogs increases regularly, but few are specific to
XWF. Two of the strongest supporters of XWF, insofar as spending lots of their time
maintaining blogs with updated XWF information, are Ted Smith and Jimmy Weg.
For the XWF user, these two blogs should be bookmarked and consulted regularly.
X-Ways forensics video clips—http://xwaysclips.blogspot.com/A fantastic blog dedicated to XWF using a multitude of online videos is Ted Smith’s
blog. Ted creates valuable videos showing specific functionality of XWF. Many of
these videos complement or illustrate the information found in this book. A listing of
the current videos is shown below:
• Adjusting column layout and re-ordering columns in XWF
• Hashing files of live Windows or Linux systems using a GUI
221
• Classifying large volumes of picture files
• Physical or Logical Disk Initialization Using WinHex
• Imaging Backwards and Selective Sector Captures.avi
• Conditional Offset Searches of Sectors
• Pausing and Reviewing the Partial Results of an XWF Simultaneous Search
• Conducting E-Mail Client Analysis Using XWF
• Reporting with XWF
• Retrieving files by file header searching (aka Carving) using XWF
• Navigating an image or disk using LBA sector numbers
• Utilizing the Hash Database Functionality of XWF
• Finding and reading Microsoft Windows Link files (LNK) using XWF
• Indexing a Case Using XWF
• Using XWF to Examine NTFS MFT Entries. . . with auto highlighting!
• Capturing selective files and directories using XWF and Evidence Containers
• Find, filter out, and then exclude known files using NSRL Hash Sets
and XWF
• Finding Large Volumes of Black & White Files from Multiple Forensic
Images
• Refining the Volume Snapshot
• Performing basic disk imaging using the E01 format
• Running multiple instances on the same workstation using the same dongle
• Setting Up Your Environment Using General Options
JustAskWeg—http://justaskweg.com/Jimmy Weg’s blog is another popular digital forensics blog that covers many topics
on forensics with a strong focus on using virtual machines. However, Jimmy is one of
those great examiners that use XWF on a regular basis as his primary tool. Therefore,
his topics on digital forensics problems and obstacles are generally solved using his
favorite tool, XWF.
Third-party softwareTheXWF development team provides superb support. Few companies are as quick to
respond to requests, problems, or questions as X-Ways. No other forensic suite is
updated as regularly as XWF when it comes to new features and improvements.
Third-party developers have begun to share their supporting software, and most
are shared freely. In support of XWF and this book, two software programs have been
developed: XWF InstallationManager (available through the XWF Support forum at
http://www.winhex.com) and XWF Report Tweaker (available at http://
xwaysforensics.wordpress.com/).
Dan Mares has created applications to support XWF as well, namely, his
X-Ways Meta Processing tool (available at http://www.dmares.com/maresware/
html/X-Ways_meta_processing.htm). Dan’s tools process the XWF metadata
222 APPENDIX A X-Ways Forensics Additional Information
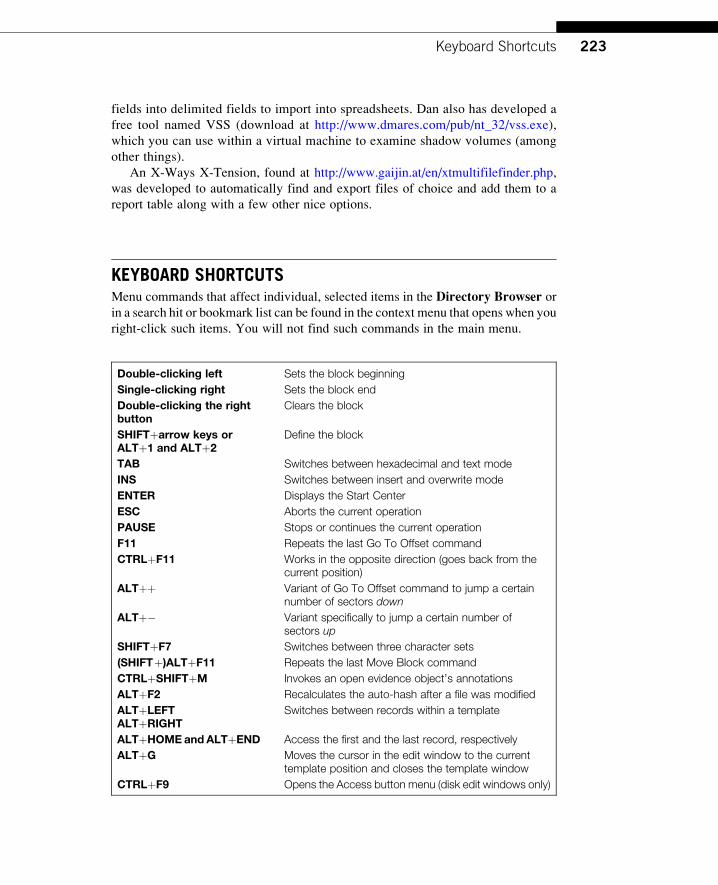
fields into delimited fields to import into spreadsheets. Dan also has developed a
free tool named VSS (download at http://www.dmares.com/pub/nt_32/vss.exe),
which you can use within a virtual machine to examine shadow volumes (among
other things).
An X-Ways X-Tension, found at http://www.gaijin.at/en/xtmultifilefinder.php,
was developed to automatically find and export files of choice and add them to a
report table along with a few other nice options.
KEYBOARD SHORTCUTSMenu commands that affect individual, selected items in the Directory Browser orin a search hit or bookmark list can be found in the context menu that opens when you
right-click such items. You will not find such commands in the main menu.
Double-clicking left Sets the block beginning
Single-clicking right Sets the block end
Double-clicking the rightbutton
Clears the block
SHIFTþarrow keys orALTþ1 and ALTþ2
Define the block
TAB Switches between hexadecimal and text mode
INS Switches between insert and overwrite mode
ENTER Displays the Start Center
ESC Aborts the current operation
PAUSE Stops or continues the current operation
F11 Repeats the last Go To Offset command
CTRLþF11 Works in the opposite direction (goes back from thecurrent position)
ALTþþ Variant of Go To Offset command to jump a certainnumber of sectors down
ALTþ� Variant specifically to jump a certain number ofsectors up
SHIFTþF7 Switches between three character sets
(SHIFTþ)ALTþF11 Repeats the last Move Block command
CTRLþSHIFTþM Invokes an open evidence object’s annotations
ALTþF2 Recalculates the auto-hash after a file was modified
ALTþLEFTALTþRIGHT
Switches between records within a template
ALTþHOMEandALTþEND Access the first and the last record, respectively
ALTþG Moves the cursor in the edit window to the currenttemplate position and closes the template window
CTRLþF9 Opens the Access button menu (disk edit windows only)
223Keyboard Shortcuts
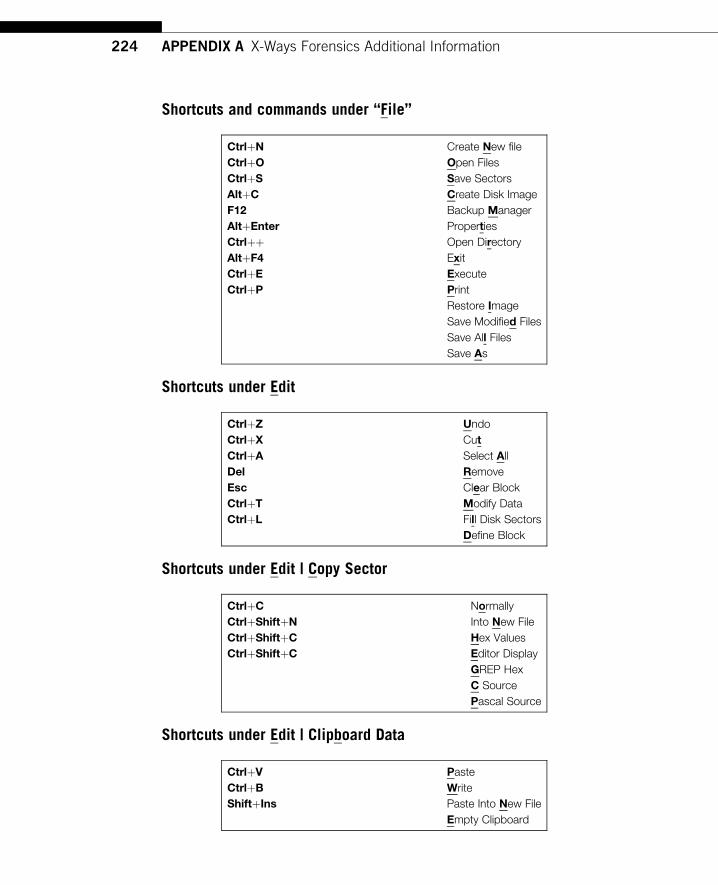
Shortcuts and commands under “File”
CtrlþN Create New file
CtrlþO Open Files
CtrlþS Save Sectors
AltþC Create Disk Image
F12 Backup Manager
AltþEnter Properties
Ctrlþþ Open Directory
AltþF4 Exit
CtrlþE Execute
CtrlþP Print
Restore Image
Save Modified Files
Save All Files
Save As
Shortcuts under Edit
CtrlþZ Undo
CtrlþX Cut
CtrlþA Select All
Del Remove
Esc Clear Block
CtrlþT Modify Data
CtrlþL Fill Disk Sectors
Define Block
Shortcuts under Edit | Copy Sector
CtrlþC Normally
CtrlþShiftþN Into New File
CtrlþShiftþC Hex Values
CtrlþShiftþC Editor Display
GREP Hex
C Source
Pascal Source
Shortcuts under Edit | Clipboard Data
CtrlþV Paste
CtrlþB Write
ShiftþIns Paste Into New File
Empty Clipboard
224 APPENDIX A X-Ways Forensics Additional Information
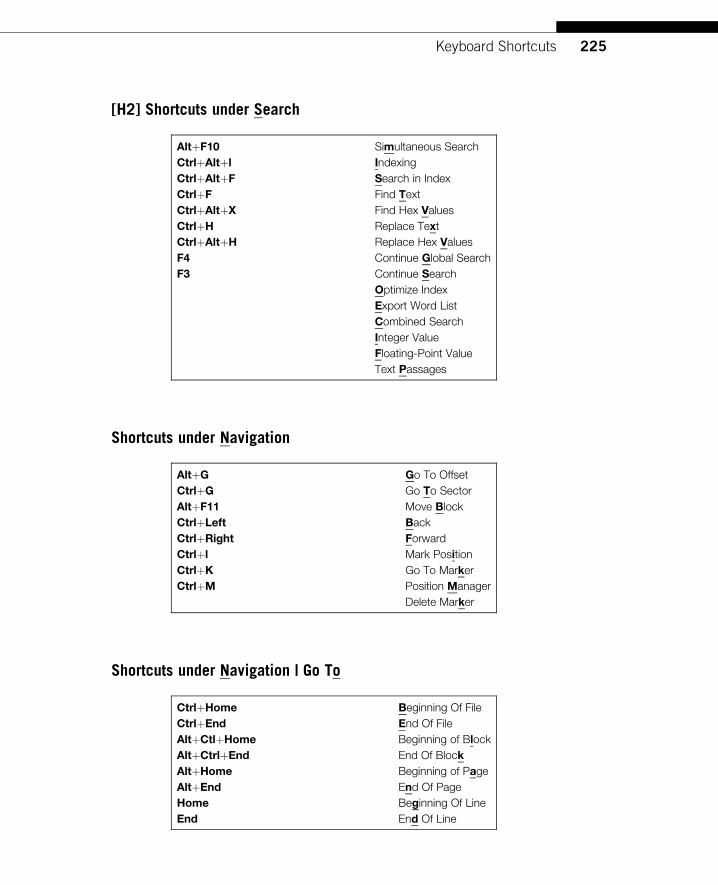
[H2] Shortcuts under Search
AltþF10 Simultaneous Search
CtrlþAltþl Indexing
CtrlþAltþF Search in Index
CtrlþF Find Text
CtrlþAltþX Find Hex Values
CtrlþH Replace Text
CtrlþAltþH Replace Hex Values
F4 Continue Global Search
F3 Continue Search
Optimize Index
Export Word List
Combined Search
Integer Value
Floating-Point Value
Text Passages
Shortcuts under Navigation
AltþG Go To Offset
CtrlþG Go To Sector
AltþF11 Move Block
CtrlþLeft Back
CtrlþRight Forward
Ctrlþl Mark Position
CtrlþK Go To Marker
CtrlþM Position Manager
Delete Marker
Shortcuts under Navigation | Go To
CtrlþHome Beginning Of File
CtrlþEnd End Of File
AltþCtlþHome Beginning of Block
AltþCtrlþEnd End Of Block
AltþHome Beginning of Page
AltþEnd End Of Page
Home Beginning Of Line
End End Of Line
225Keyboard Shortcuts
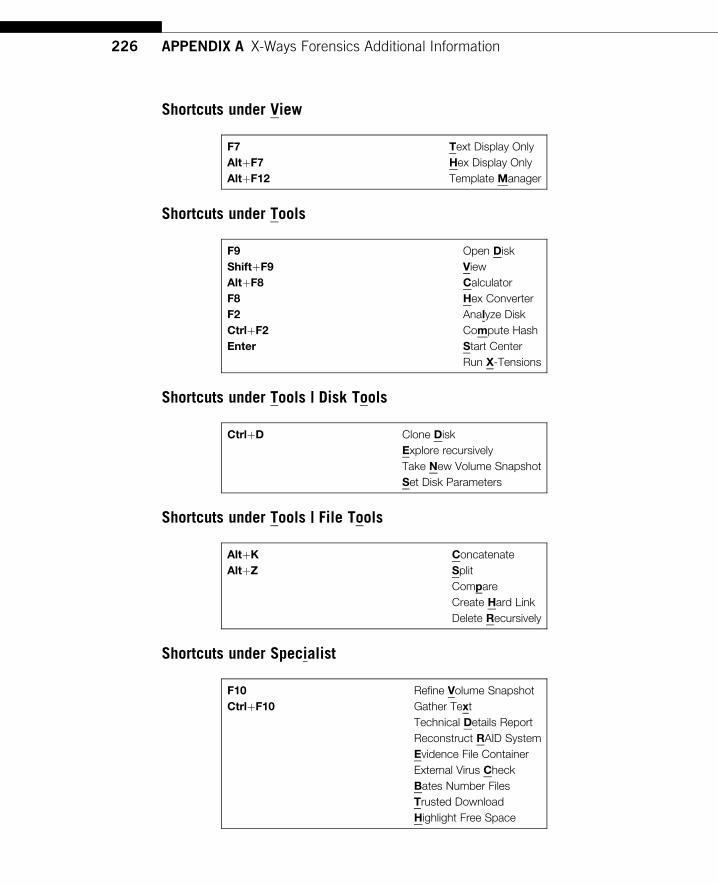
Shortcuts under View
F7 Text Display Only
AltþF7 Hex Display Only
AltþF12 Template Manager
Shortcuts under Tools
F9 Open Disk
ShiftþF9 View
AltþF8 Calculator
F8 Hex Converter
F2 Analyze Disk
CtrlþF2 Compute Hash
Enter Start Center
Run X-Tensions
Shortcuts under Tools | Disk Tools
CtrlþD Clone Disk
Explore recursively
Take New Volume Snapshot
Set Disk Parameters
Shortcuts under Tools | File Tools
AltþK Concatenate
AltþZ Split
Compare
Create Hard Link
Delete Recursively
Shortcuts under Specialist
F10 Refine Volume Snapshot
CtrlþF10 Gather Text
Technical Details Report
Reconstruct RAID System
Evidence File Container
External Virus Check
Bates Number Files
Trusted Download
Highlight Free Space
226 APPENDIX A X-Ways Forensics Additional Information
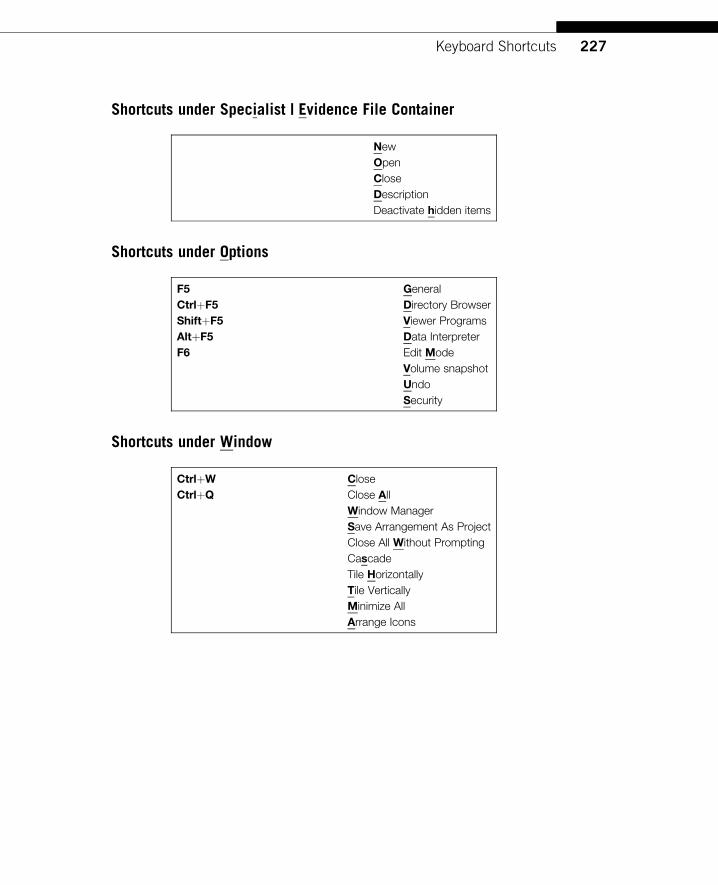
Shortcuts under Specialist | Evidence File Container
New
Open
Close
Description
Deactivate hidden items
Shortcuts under Options
F5 General
CtrlþF5 Directory Browser
ShiftþF5 Viewer Programs
AltþF5 Data Interpreter
F6 Edit Mode
Volume snapshot
Undo
Security
Shortcuts under Window
CtrlþW Close
CtrlþQ Close All
Window Manager
Save Arrangement As Project
Close All Without Prompting
Cascade
Tile Horizontally
Tile Vertically
Minimize All
Arrange Icons
227Keyboard Shortcuts

Intentionally left as blank
APPENDIX
X-Ways Forensics How to’s BINFORMATION IN THIS CHAPTER
• Frequently asked questions and more XWF tips
FREQUENTLY ASKED QUESTIONS AND MORE XWF TIPSThis appendix contains small “how-to’s” or recipes that can be used in X-Ways
Forensics (XWF) to quickly accomplish a task. Although some questions could
be related to other questions, they each stand on its own as one question and one
answer. These “how-tos” refer to information in this book and give more than a
few new methods of using XWF specific to the type of question asked.
How can I find encrypted containers?The easiest way to find encrypted containers in XWF is to view the case recursively,
sort by the Size column, and then look for the largest files in the case. While you can
create small containers that are only a few megabytes in size, these are of limited use.
Using this method, you can quickly find possible encrypted containers in a few
minutes.
Can I search slack space while eliminating logical file contents?This involves two steps. First, use theDirectory Browser filters to only show the file
types you know do not contain your search term (video files, for example). Explorerecursively, select all the files in theDirectory Browser, and then hide them via the
Hide menu item in the Directory Browser’s context menu.
Next, press ALTþF10 to bring up Simultaneous Search and enter your search
terms. Make sure that Open and search files incl. slack is fully checked as this will
ensure that the slack space is checked while omitting the logical contents of all hid-
den files.
Once your search is complete you can unhide the files from step one via the
Directory Browser Options, Filters | Unhide all button.
229
I want to list files so that parent files precede its childobjects. Is this possible?Make sure that Directory Browser Options, Filters | Full path sorting for parentobjects is fully checked and then sort by the Path column.
I need to recursively list two directories at once.What is the easiest way?The easiest way to do this is to use the Path filter. Enter the directories you want to
look at recursively and then explore recursively against the evidence objects that
contain those directories.
You can also add the directories to a container, add the container to your case, and
explore the entire thing recursively.
Another method would be to hide all directories you don’t want to explore, leav-
ing only the directories of interest to recursively view.
How can I export a recursive file listing?In the Case Root node, right-click and select the evidence objects to include in the
listing. If you want to specifically order the items in the list, sort one or more columns
in the Directory Browser. Select all the files in the Directory Browser via
CTRL-A and right-click and choose Export list. Select the fields to include as wellas the format and click OK.
Is it possible to conduct a keyword search on cellphone evidence?XWF is not a cell phone analysis tool; however, XWF can open an image of a cell
phone. Once the image is opened, searches can be run just as with any electronic
media, yet XWF will typically be faster and can search for all phone numbers at once
(some tools may only allow one keyword to be searched at a time).
How can I import Base32-encoded SHA-1 hashes?The process to import Base32-encoded hashes is no different than importing hexa-
decimal encoded SHA-1 or MD5 values. The first line of the file should be SHA-1
and then enter one Base32-encoded hash per line. As XWF imports the hashes, it will
convert them to hexadecimal encoding and then store them. To display the hashes in
Base32 format, checkDirectory Browser Options, Filters | Display SHA-1 hashesin Base32.
230 APPENDIX B X-Ways Forensics How to’s

How can I export a search hit list?Switch to Search Hit List by clicking the appropriate mode button. Select the terms
to export in the Search Term List in the lower left corner. Select Export list fromthe context menu in the Search Term List. You can now copy the search terms with
the number of hits from the Messages window.
I need to export search hits. Where in XWF can I do this?Switch to Search Hit List by clicking the appropriate mode button. Select the search
hits you wish to export, right-click, and selectExport list. Select the Search hits fieldto include the context where the search hit was found.
Can XWF generate a registry report for every hive in a case?Explore recursively across the evidence objects you wish to include in the report. Use
the Category column in the Directory Browser and select Windows Registry fromthe list. Select all of the registry hives by pressing CTRL-A, right-click, and chooseView from the context menu. After all of the hives are loaded, right-click anywhere
on the left side of the Registry Viewer, select Create Report, and finally, choose allof the Reg Report files you want to include. A single HTML file will be produced
containing all of the data from every hive open in the Registry Viewer.
What if I need to reprocess items from an evidence object?How can I do this in XWF?As new versions of XWF are released you may wish to reprocess certain files with the
latest version that contains added functionality for a particular file. Rather than taking a
newvolume snapshot, select the files youwish to reprocess and then pressCTRLþDELto effectively “reset” the selected files. Finally, right-click the selected files and choose
Refine Volume Snapshot from the Directory Browser’s context menu.
How do I verify the hash of an image?Right-click the evidence object in theCase Datawindow and select Properties, thenclick Verify Hash. Once the hash is calculated, it will be appended to the bottom of
the Description property.
How can I find which volume shadow copy a file came from?The Find related file option found in the context menu of the Directory Browsercauses the Directory Browser to jump to any files that XWF has determined are
related to the selected file. Examples where you will see this option are when looking
at files with hard links or for files found in volume shadow copies (VSC). In the case
231Frequently Asked Questions and More XWF Tips
of a file found inside of a VSC, using this option causes the VSC host file to be
selected (i.e., where the new file was found). When working with VSCs you can find
the corresponding snapshot properties file by repeating the process with the VSC file
selected. Rather than using the context menu item, you can also use the
SHIFTþBackspace shortcut to achieve the same thing.
I want to tag every item in an evidence object. How can Ido this and how can I untag if needed?Middle click the Case Root node in the Case Data window.
I can’t find files that I know I tagged! What happened to the files?It is possible that the files are hidden from view. Open the Directory BrowserOptions, Filters (CTRLþF5) to see if you have List tagged items unchecked.
You should also check if you have filtered the files through the Type or other filter-ing criteria in the Directory Browser. You may have also hidden these files, so be
sure to check List hidden items in theDirectory Browser Options, Filters to deter-mine if you hid the files.
There are so many files I see that I know are duplicates, but Ican’t find how to hide them. How can I hide all duplicates?Use the Hide | Duplicates in directory browser based on hash command to hide
the duplicates. Only one file will be shown for each identical hash value.
How can I find and export all e-mail addresses from an image?You can write a GREP expression (or use one from the manual) to search for all
e-mail addresses. After the search has completed, export the search hits.
I just need to copy active files from a custodian’s machineand don’t need a forensic analysis. Do I have to take arefined snapshot?Not at all. If the goal is copying active files, once you add evidence to XWF,
select the files for export. However, taking a refined snapshot of only the files
to be copied will give you more information (metadata) that may be useful in
your case. And of course, consider creating an X-Ways container to preserve
the files first.
232 APPENDIX B X-Ways Forensics How to’s
I want to use XWF as a consent search application. Should I runit from an external device on a live machine or should I use atraditional method like using a physical write blocker?It depends. If the evidence machine is already on, it is probably more reasonable to
execute XWF from an external drive in case encryption is present. If the machine is
off, it is probably more reasonable to protect the drive through a write blocker or a
forensic boot system like Windows FE.
There are some things XWF does not do that I would like it to do.Will XWF update to what my needs are?There is good news and better news. A month hardly goes by before there are several
updates and improvements to XWF. Any of these might be the improvements
you want. If not, at any time you can submit features as a wish list through the
XWF support forum at http://www.winhex.net. All requests are considered and
you never know your request could be one of the best ideas!
There are a lot of features and options available in XWF.Am I expected to know where everything is?You are right; there are many features available in XWF and getting to know most of
them will take time. As you gain experience using XWF, you will start using many
features and functions on a regular basis. For other options you use less frequently
you can refer to this guide, the manual, or the XWF support forum. There are some
functions that you may use constantly in cases and we suggest learning the shortcuts
for those functions. This is a great time saving feature.
I have been using so many filters and hiding files that I don’tremember which files I am hiding or able to view. Can Ijust reset everything?The filtering feature of XWF is extremely powerful and may be overwhelming at
first. If you ever feel lost and don’t know what files have been hidden from view,
simply deactivate all filters and unhide all files. You can start fresh and filter/hide
files again as needed. You can remove all filters at once by clicking the filter icon
in the caption line of the Directory Browser and unhide files in the DirectoryBrowser Options, Filters dialog.
I want to use WinHex and XWF but I want to be sure that I donot edit evidence by mistake. Since the two programs look thesame, how can I tell them apart?Easy. The application title bar (very top left corner of the application) will show the
program’s name.
233Frequently Asked Questions and More XWF Tips

Intentionally left as blank
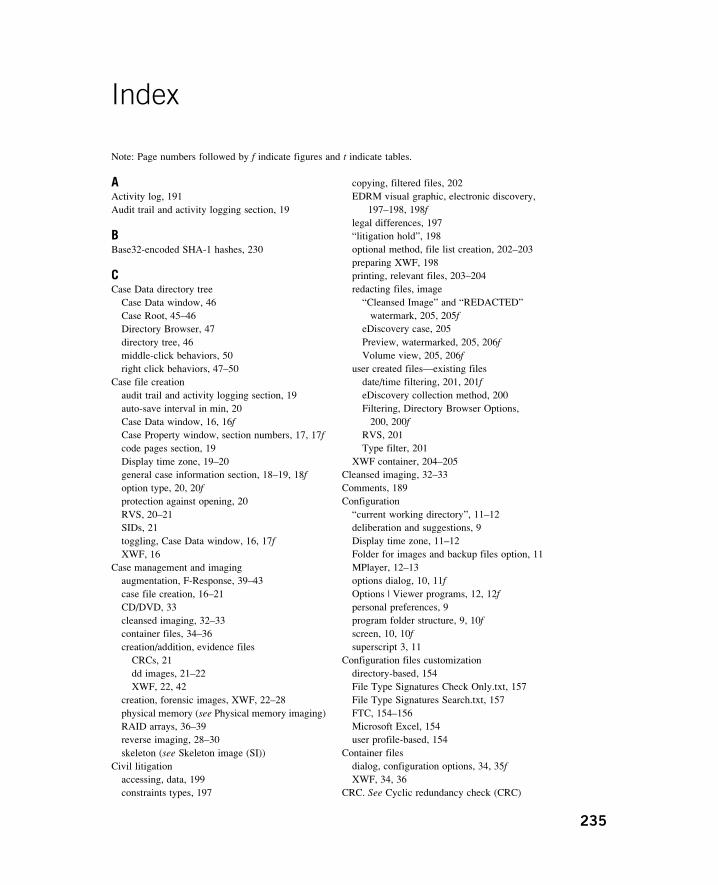
Index
Note: Page numbers followed by f indicate figures and t indicate tables.
AActivity log, 191
Audit trail and activity logging section, 19
BBase32-encoded SHA-1 hashes, 230
CCase Data directory tree
Case Data window, 46
Case Root, 45–46
Directory Browser, 47
directory tree, 46
middle-click behaviors, 50
right click behaviors, 47–50
Case file creation
audit trail and activity logging section, 19
auto-save interval in min, 20
Case Data window, 16, 16f
Case Property window, section numbers, 17, 17f
code pages section, 19
Display time zone, 19–20
general case information section, 18–19, 18f
option type, 20, 20f
protection against opening, 20
RVS, 20–21
SIDs, 21
toggling, Case Data window, 16, 17f
XWF, 16
Case management and imaging
augmentation, F-Response, 39–43
case file creation, 16–21
CD/DVD, 33
cleansed imaging, 32–33
container files, 34–36
creation/addition, evidence files
CRCs, 21
dd images, 21–22
XWF, 22, 42
creation, forensic images, XWF, 22–28
physical memory (see Physical memory imaging)
RAID arrays, 36–39
reverse imaging, 28–30
skeleton (see Skeleton image (SI))
Civil litigation
accessing, data, 199
constraints types, 197
copying, filtered files, 202
EDRM visual graphic, electronic discovery,
197–198, 198f
legal differences, 197
“litigation hold”, 198
optional method, file list creation, 202–203
preparing XWF, 198
printing, relevant files, 203–204
redacting files, image
“Cleansed Image” and “REDACTED”
watermark, 205, 205f
eDiscovery case, 205
Preview, watermarked, 205, 206f
Volume view, 205, 206f
user created files—existing files
date/time filtering, 201, 201f
eDiscovery collection method, 200
Filtering, Directory Browser Options,
200, 200f
RVS, 201
Type filter, 201
XWF container, 204–205
Cleansed imaging, 32–33
Comments, 189
Configuration
“current working directory”, 11–12
deliberation and suggestions, 9
Display time zone, 11–12
Folder for images and backup files option, 11
MPlayer, 12–13
options dialog, 10, 11f
Options | Viewer programs, 12, 12f
personal preferences, 9
program folder structure, 9, 10f
screen, 10, 10f
superscript 3, 11
Configuration files customization
directory-based, 154
File Type Signatures Check Only.txt, 157
File Type Signatures Search.txt, 157
FTC, 154–156
Microsoft Excel, 154
user profile-based, 154
Container files
dialog, configuration options, 34, 35f
XWF, 34, 36
CRC. See Cyclic redundancy check (CRC)
235
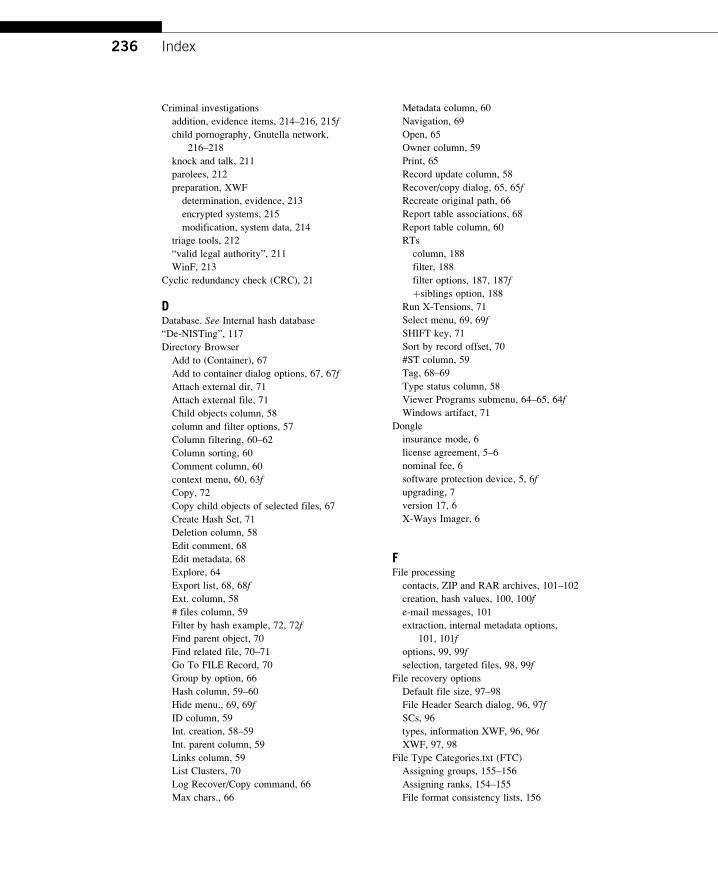
Criminal investigations
addition, evidence items, 214–216, 215f
child pornography, Gnutella network,
216–218
knock and talk, 211
parolees, 212
preparation, XWF
determination, evidence, 213
encrypted systems, 215
modification, system data, 214
triage tools, 212
“valid legal authority”, 211
WinF, 213
Cyclic redundancy check (CRC), 21
DDatabase. See Internal hash database
“De-NISTing”, 117
Directory Browser
Add to (Container), 67
Add to container dialog options, 67, 67f
Attach external dir, 71
Attach external file, 71
Child objects column, 58
column and filter options, 57
Column filtering, 60–62
Column sorting, 60
Comment column, 60
context menu, 60, 63f
Copy, 72
Copy child objects of selected files, 67
Create Hash Set, 71
Deletion column, 58
Edit comment, 68
Edit metadata, 68
Explore, 64
Export list, 68, 68f
Ext. column, 58
# files column, 59
Filter by hash example, 72, 72f
Find parent object, 70
Find related file, 70–71
Go To FILE Record, 70
Group by option, 66
Hash column, 59–60
Hide menu., 69, 69f
ID column, 59
Int. creation, 58–59
Int. parent column, 59
Links column, 59
List Clusters, 70
Log Recover/Copy command, 66
Max chars., 66
Metadata column, 60
Navigation, 69
Open, 65
Owner column, 59
Print, 65
Record update column, 58
Recover/copy dialog, 65, 65f
Recreate original path, 66
Report table associations, 68
Report table column, 60
RTs
column, 188
filter, 188
filter options, 187, 187f
þsiblings option, 188
Run X-Tensions, 71
Select menu, 69, 69f
SHIFT key, 71
Sort by record offset, 70
#ST column, 59
Tag, 68–69
Type status column, 58
Viewer Programs submenu, 64–65, 64f
Windows artifact, 71
Dongle
insurance mode, 6
license agreement, 5–6
nominal fee, 6
software protection device, 5, 6f
upgrading, 7
version 17, 6
X-Ways Imager, 6
FFile processing
contacts, ZIP and RAR archives, 101–102
creation, hash values, 100, 100f
e-mail messages, 101
extraction, internal metadata options,
101, 101f
options, 99, 99f
selection, targeted files, 98, 99f
File recovery options
Default file size, 97–98
File Header Search dialog, 96, 97f
SCs, 96
types, information XWF, 96, 96t
XWF, 97, 98
File Type Categories.txt (FTC)
Assigning groups, 155–156
Assigning ranks, 154–155
File format consistency lists, 156
236 Index
groups and ranks, 155f, 156
Type filter, 156
Type status filter dialog, 156, 156f
Forensic images
AES encryption, e01s, 26
command line imaging, 24
Create Disk Image dialog, 24–25, 24f
“dead box” system, 22
e01 files, 25
imaging process, 23–24, 24f, 26, 26f
live response, 27
replacement, device, 27, 28f
View Disk dialog, 22–23, 23f
F-Response
Disk Management tool, Windows, 41, 41f
display, 42, 42f
physical disks, partitions, 40, 40f
physical memory and disks mapping, examiner
machine, 41, 41f
TACTICAL subject, 39–40, 40f
FTC. See File Type Categories.txt (FTC)
GGeneral options
Allow auxiliary thumbnails, 82
Allow multiple program instances, 81–82
Alternate disk access method, 82
Auto coloring for FILE records, 83
dialog, 80, 81f
Dialog window style, 83
Display file sizes always in bytes, 83–84
Display page separators, 83
Generate Tabs with Tab key, 83
GUI, X-Ways Investigator, 82
Items in Windows Context menu, 81
Notation button, 83
Options | General Options, 80
Save program settings in .cfg file, 82
Show Start Center at start-up options, 81
Global regular expression print (GREP), 137–138
GREP. See Global regular expression
print (GREP)
HHash sets creation
categorization and naming, 113, 114f
importing, 115, 116, 116f, 117f
notepad, 115, 115f
NSRL, 117
outcomes, hash comparison, 115, 115f
selection, files, 113, 113f
user-created, 114–115, 114f
Hexadecimal search, 151, 151f
Hex maneuvering
Add Block as Virtual File, 162
data blocks, 160
data interpreter, 158–160
Edit context menu, 161, 162f
Editor Display, 162
GREP Hex, 162
sector superimposition, 163
templates
binary file, 165, 165f
binary layout, file, 165
binary layout of a file, 165
Boot sector template next to raw data,
164, 164f
NTFS FILE record template, 164, 165f
plain text files, 164
.state file, 166, 166f
TM, 164
Volume/Partition mode, 163–164, 163f
User search hits, 160–161
Volume/Partition mode, 162
Windows programs, 162
Hives, 118
HTML
email messages/shortcut files, 189
as inline code, 193
Max. number of pictures, 193
Report 1.html, Report 2.html and
Report 3.html, 194
IIndexed search
case and evidence objects, 139
Character substitutions, 140
creation
indexes of characters, 138
index files, 142, 142f
index of words, 138
directories, 141, 141f
Exceptions option, 140
export subtleties, 144
Include substrings, 139
indexing dialog, 138, 139f
indexing statistics, 141, 142f
index-related options, 144, 144f
Match case option, 139–140
metadata directories, 140, 140f
optimization, index, 143, 143f
overwrite, index, 142, 142f
Search in Index dialog, 143, 143f, 144, 144f
Installation
credentials, 4
MPlayer, 3
237Index
Installation (Continued)
setup.exe method, 2–3, 2f
steps, 2–3
tooltips, 4
unzipping, 3
USB device, 3
user interfaces, 4
and WinHex, 3–4, 4f
XWFIM dialog, 4, 5f
XWFIM/XWF Installation Manager, 4
zip files extraction, 3
Internal hash database
categorization, 110–112, 111f
computation, hash values, 112–113, 112f
creation, hash sets (see Hash sets creation)
definition, 111–112
duplicate hash values, 117–118, 118f
location selection, General Options dialog,
110, 110f
registry report (see Registry report, XWF)
and RV (see Registry viewer (RV))
squeeze, speed, 110
Windows registry, 118–120
KKeyboard shortcuts
block definition, mouse, 223
under Edit, 224
under Edit | Clipboard Data, 224
under Edit | Copy Sector, 224
under “File”, 224
under Navigation, 225
under Navigation | Go To, 225
under Options, 227
under Search, 225
under Specialist, 226
under Specialist | Evidence File Container,
227
under Tools, 226
under Tools | Disk Tools, 226
under Tools | File Tools, 226
under View, 226
under Window, 227
LLogged utility streams (LUSs), 92
LUSs. See Logged utility streams (LUSs)
MMaster file table (MFT), 130
MFT. See Master file table (MFT)
Mode buttons and details pane
Calendar, 76
details, 75
Directory Browser, 76
disk mode, 74
Events, 76
Explore recursively, 76
file, 74
Gallery mode, 75
Legend, 73
Position manager, 76
preview mode, 74–75
Search hit list, 76
Sync, 76
volume/partition, 73–74
NNational Software Reference Library (NSRL), 117
New Technology File System (NTFS)
LUS, snapshot, 92
names/paths, 92
RAM, 92
search, FILE records, 92
NSRL. See National Software Reference
Library (NSRL)
NTFS. See New Technology File System (NTFS)
PPhysical memory imaging
F-Response, 33
memory dump, XWF, 33, 34f
RRAM analysis
Add Memory Dump, 172
after RVS, 173, 173f
32-bit versions of Windows, 172
Carved files, 173–174
category breakdown, 173–174, 174f
file header signatures, 173
imaging memory, 172
memory dumps, 172
Mode buttons when working with memory.,
174, 175f
modules and objects, 172, 172f
Opening memory from within XWF, 175
Specialist | Technical Details Report, 175
SS, 174
Redundant array of independent disk (RAID)
systems
addition, active case, 38, 38f
incorrection, assembly, 37, 37f
reassembly, 38, 38f
reconstruction, 36, 37f
238 Index
Refine volume snapshot (RVS)
computation, hash options, 112, 112f
configuration file, 157
definition, 89
different ways, open dialog, 93, 93f
Events view, 169
extraction, e-mail messages and attachments
JPEG pictures, videos, 103
miscellaneous file types, 103
selection, evidence objects, 105, 105f
skin tone and b&w detection, pictures, 104
types, XWF, 104, 104t
XWF, 102–103, 102f, 103f
file processing options, 98–102
file recovery and processing, 93, 93f
file recovery options, 96–98
Graphic courtesy, Ted Smith, 90, 90f
memory capture, 173
Object counts, 106, 106f
RAM, 173
Signatures button, 157
Simultaneous Search (SS) dialog box,
107, 107f
Take new one and default options, 94–95, 94f
Verify file types with signatures and
algorithms, 157
VS (see Volume snapshot (VS))
X-Ways manual, power and elegance, 95–96
Regex. See Regular expressions (Regex)
Registry report, XWF
HTML output, 124, 125f
selection, definition files, 124
Registry viewer (RV)
exporting, 123–124, 123f
external analysis, 124
vs. regedit.exe., 120, 120f
search, integrated viewer, 121, 121f
USB devices
Device Class ID, 121, 122f
last modification date and information,
key, 123, 123f
selection, values, 122, 122f
Regular expressions (Regex)
definition, 133–134
e-mail addresses, 135
and GREP, XWF, 137–138
RegexBuddy, 135
rules, creation, 134–135
strings, 136
Reporting
customization, 194–195
easy-to-generate and easy-to-understand
format, 181
report generation
audit trail options, 191
case file, 189
create, 189, 190f
Create main report, 191
File | Create Report, 189
Optional logo, 191
Optional preface, 191
Optional report header, 191
RT options, 191–194
In selected evidence objects, 191
RTs (see Report tables (RTs))
shortcuts, 195
Report tables (RTs)
adding an item, 181–182, 182f
associations options
animated GIF, 183
checkboxes, 184–185
Create button, 185
existing association options, 185
list box, 183
XWF-and user-created, 183, 184f
comments, 189
dialog, associations, 182, 183f
Directory Browser (see Directory Browser, RTs)
generation
Alternative .eml presentation directly in
browser, 193
case root option, 192
Embed attachments in parent .eml file, 193
Embed pictures in HTML as inline code,
193
Fields to output option, 193–194
files per line option, 192
Include report tables option, 191–192
Make copy of files, 192
Max. dimension of pictures, 193
Maximum filename length, 192–193
New, Delete and Rename buttons, 192
OK button, 194
Page break after x table rows for printing,
192
new association, 185–187
sharing associations
export and import options, 188, 188f
.rtd files, 189
Reverse imaging
Clone Disk dialog, 29, 29f
definition, 28–29
XWF, 30
Right click behaviors, Case Root object
Case Root node, 48
Collapse All, 50
239Index
Right click behaviors, Case Root object (Continued)
Comments field, 48
Display time zone, 48
Evidence object context menu., 48, 48f
Evidence object properties., 48, 49f
Explore recursively, 50
Export Files for Analysis menu, 50
Export subtree example., 49, 49f
Hash evidence objects, 50
Properties menu, 48
Recursive overview dialog, 47, 47f
Remove from Case menu item, 50
RTs. See Report tables (RTs)
RV. See Registry viewer (RV)
RVS. See Refine volume snapshot (RVS)
SSC. See Shadow copy (SC)
Search capabilities, XWF
binoculars icon, 145, 145f
bytes selection, Position Manager, 149
combine, search terms, 149
hexadecimal search, 151, 151f
indexed search, 138–144
plus/minus operators, search term, 148
Regex (see Regular expressions (Regex))
Search Hit List
columns, 146
deletion, 147
interaction, 146, 146f
proximity, search terms, 149
selection, multiple search terms, 148–149
SS (see Simultaneous search (SS))
text search, 149–151
Security Identifier (SID), 16, 21
Security options
Output messages about exceptions, 85
Strict drive letter protection option, 85
Verify CRCs in .e01 when reading, 85
Shadow copy (SC), 92, 96
SI. See Skeleton image (SI)
SID. See Security Identifier (SID)
Simultaneous Search (SS)
definition, 127–128
dialog box, 107, 107f, 128, 128f
vs. indexed search outcomes, 147, 147f
logical, 133
options
Alphabet to define word boundaries, 130
Condition offset modulo, 130
MFT, 130
Omit files, 132
Open and search files incl. slack
functions, 131
Recommendable data reduction, 132–133
view, decoded text, 132
Whole words only, 129
word boundary, 129
physical, 133
terms and code pages, 128–129
Skeleton image (SI)
creation, 31, 31f
creation, log file, 32
file system, 31
Slack space
definition, 131
and free space, 131
SS. See Simultaneous Search (SS)
Status bar
data interpreter, 79
left clicking, 78–79
right clicking, 77–78
Volume/Partition mode, 77
System requirements, XWF, 1–2
TTemplate Manager (TM), 164
Text search, 149–151, 150f
Timeline and event analysis
Calendar mode
log entry, calendar graph, 168, 169f
single file selected., 167, 167f
tooltip, 168, 168f
events view
Category, 170
Description column, 170
Registry event, 170
RVS, 169
switching, 169, 169f
Timestamp column, 170
timestamps, 170
traditional timeline analysis, 170
TM. See Template Manager (TM)
Triage tools
definition, 212
XWF, 216–217, 218
UUser interface
buttons and capabilities, 8
digital forensics, 8
Directory Browser and Case Data, 9
Mode buttons, 9
mode, feature, option and function, 8f, 9
240 Index
VViewer programs options
Alternative preview of .eml, 84
Buffer decoded text, 84
Crash safe text decoding, 84
Volume shadow copy (VSC), 59
Volume snapshot (VS)
definition, 89
NTFS (see New Technology File System
(NTFS))
options, 90, 91f
Quick snapshots w/o cluster alloc, options, 91
VS. See Volume snapshot (VS)
VSC. See Volume shadow copy (VSC)
WWindows registry
filter, file type, 118, 119f
filtering data, analysis, 120
registry hives, forensic image, 119–120, 119f
XX-Tensions, 177
X-Ways Forensics (XWF)
available features and options, 233
Base32-encoded SHA-1 hashes, 230
“basics” and “advanced” work, 1
cell phone evidence, 230
child objects, 229–230
civil litigation, 197–206
configuration, 9–14
configuration files customization, 153–157
creation, forensic images (see Forensic
images)
and criminal investigations (see Criminal
investigations)
custodian’s machine, 232
dongle, 5–7
e-mail addresses, 232
encrypted containers, 229
evidence object, 231, 232
external analysis interface, 177–178
file customization options, 153
file signatures and types, 153
filters and hiding files, 233
free and slack space gathering, 170–171
hex maneuvering, 157–166
hidden duplicates, 232
installation, 2–5
interface (see XWF interface)
internal hash database (see Internal hash
database)
Jimmy Weg’s blog, 222
keyboard shortcuts, 223–227
live response, 27
RAM analysis, 172–175
recursive file listing, 230
recursive list, directories, 230
registry report, 231
review medium, imaging, 27–28, 28f
RVS (see Refine Volume Snapshot (RVS))
scripting, 176–177
search (see Search capabilities, XWF)
search application, 233
search hit list, 231
slack space and logical file contents, 229
system requirements, 1–2
tagged files, 232
third-party software, 222–223
timeline and event analysis, 167–170
updation, 233
user interface, 8–9
video clips, 221–222
volume shadow copy, 231–232
and WinHex, 233
X-Tensions, 177
X-Ways Investigator
Attorney review, data, 208
Bates numbering, 207
digital forensics, 206
forensic analysis and electronic discovery,
208
log file and reporting, 208
logging and case management, 206–207
XWF. See X-Ways Forensics (XWF)
XWF interface
apply filters to directories, 55
Case Data directory tree, 45–50
Directory Browser Options, 52–53, 52f
full path sorting for parent object, 55
general options continued, 80–84
group existing and deleted items, 53
group files and directories, 53
item listing options, 57
keep track of viewed files, 56
List dirs when exploring recursively, 55
main menu, 80
mode buttons (see Mode buttons)
No sorting initially after start-up, 55
open and search files incl. slack, 54
Recursive selection statistics, 55
security options, 84–85
SHIFT key, 55
shortcuts, 86
Show # files, 56
status bar (see Status bar)
241Index
XWF interface (Continued)
store filter and sort settings in cases, 56
tab control, 51, 51f
Tab control and Directory Browser caption line,
51–52, 51f
tag and hide recursively, 55
toolbar, 51, 51f
use checkmarks for tagging, 55
viewer programs options, 84
View instead of Explore, 54
volume snapshot options, 84
when viewed in gallery, 56–57
242 Index


