Embed Size (px)
Citation preview
Pega Robotic Automation
USING THE SIEBEL ADAPTER8.0 and later
Start
Notice
© 2019 Pegasystems Inc., Cambridge, MAAll rights reserved.
Trademarks
For Pegasystems Inc. trademarks and registered trademarks, all rights reserved. All other trademarks or service marks are property of their respective holders. For information about the third-party software that is delivered with the product, refer to the third-party license file on your installation media that is specific to your release.
Notices
This publication describes and/or represents products and services of Pegasystems Inc. It may contain trade secrets and proprietary information that are protected by various federal, state, and international laws, and distributed under licenses restricting their use, copying, modification, distribution, or transmittal in any form without prior written authorization of Pegasystems Inc.This publication is current as of the date of publication only. Changes to the publication may be made from time to time at the discretion of Pegasystems Inc. This publication remains the property of Pegasystems Inc. and must be returned to it upon request. This publication does not imply any commitment to offer or deliver the products or services described herein.This publication may include references to Pegasystems Inc. product features that have not been licensed by you or your company. If you have questions about whether a particular capability is included in your installation, please consult your Pegasystems Inc. services consultant.Although Pegasystems Inc. strives for accuracy in its publications, any publication may contain inaccuracies or typographical errors, as well as technical inaccuracies. Pegasystems Inc. shall not be liable for technical or editorial errors or omissions contained herein. Pegasystems Inc. may make improvements and/or changes to the publication at any time without notice.Any references in this publication to non-Pegasystems websites are provided for convenience only and do not serve as an endorsement of these websites. The materials at these websites are not part of the material for Pegasystems products, and use of those websites is at your own risk.Information concerning non-Pegasystems products was obtained from the suppliers of those products, their publications, or other publicly available sources. Address questions about non-Pegasystems products to the suppliers of those products.This publication may contain examples used in daily business operations that include the names of people, companies, products, and other third-party publications. Such examples are fictitious and any similarity to the names or other data used by an actual business enterprise or individual is coincidental.This document is the property of:Pegasystems Inc.One Rogers StreetCambridge, MA 02142-1209USAPhone: (617) 374-9600Fax: (617) 374-9620www.pega.com
Updated: December 9, 2019
Feedback
If you have suggestions or comments for how we can improve our materials, send an email [email protected].

iii
CONTENTS
v Preface
v Requirementsv Downloading the practice filesv Setting up Internet Explorer to use Siebel
vi Conventions
1 Using the Siebel Adapter
2 Overview
2 Identifying web application pages and controls2 Siebel application pages3 Siebel application controls - ElementID match rule
5 Exercise 1: Sample project – Data transfer
5 Automating the login process
6 Getting data from a Siebel list
9 Initiating a process
12 Exercise 2: Navigation controls
14 Automating navigation16 Completing the Automate Navigation solution
18 Exercise 3: Working with pop-up dialog boxes
22 Testing the automation22 Automation notes

iv
Pega Robotic Automation: Using the Siebel Adapter v
PrefacePega Robot Studio projects can be used to integrate with Siebel and automate Siebel user actions. This guide provides details on integrating Siebel with Robot Studio projects and includes step-by-step instructions for creating sample Robot Studio Siebel projects.
RequirementsThis tutorial module assumes you have successfully completed the Pega Robotic Automation Architect Essentials training and are familiar with the Siebel application. These exercises require your system to be set up with Robot Studio.
Downloading the practice files
In addition, you must download the practice files you will use in the following exercises. You can download these practice files from this website:
Pega Robotic Automation - Using the Seibel Adapter.zip
Once downloaded, unzip the Using the Siebel Adapter.zip file into your OpenSpan/Projects directory. This will create the following files in the /Projects directory:
• Siebel Test.ossln• Siebel Test.ossuo
Setting up Internet Explorer to use Siebel
You must set up Siebel as a trusted site in Internet Explorer. You can do this via the Internet Options in Internet Explorer. Be sure to set the Trusted Sites security setting to Low. Setting this to Low allows ActiveX controls to run in Internet Explorer. This is required for the exercises in this guide.
Note Finished solutions are available from the same download location. You can use these as a reference for checking your work after completing the exercises.
Note On some systems the pop-up blocker must be set to allow pop-ups for the Siebel site. The settings required for Internet Explorer may vary depending on your Siebel installation.

| Preface
Pega Robotic Automation: Using the Siebel Adapter vi
ConventionsThe following typographical conventions are used in this document:.
Convention DescriptionItalics Italics is used to emphasize important terms and phrases.
Blue, bold characters
Text you are supposed to enter is displayed in blue, boldface characters.
Bold Buttons, options, or selections you should click or choose while performing the steps outlined in this document.
Pega Robotic Automation: Using the Siebel Adapter 1
USING THE SIEBEL ADAPTER
You can integrate Pega Robot Studio projects with Siebel and use them to automate Siebel user actions. This document provides information on integrating Siebel with Robot Studio projects and includes step-by-step instructions for creating sample Siebel projects.
This document includes the following topics and exercises.
• Overview• Exercise 1: Sample project – Data transfer• Exercise 2: Navigation controls• Exercise 3: Working with pop-up dialog boxes

Using the Siebel Adapter | Overview
Pega Robotic Automation: Using the Siebel Adapter 2
OverviewPega Robot Studio supports these Siebel versions:
• 6.3 (limited)• 7.7• 7.7 (Wow64)• 7.8• 7.8 (Wow64)• 8.0• 8.0 (Wow64)• 8.1.11 (Open IU)
Robot Studio’s web adapter is used to integrate Siebel into Robot Studio projects. Keep in mind that these methods are not implemented for Siebel 7.5:
• GetHeading• GetHeadings• GetColumnFromHeading
Identifying web application pages and controls
Siebel application pages
The structure of the Siebel application uses multiple frames which house the active webpages. During navigation of the application, the frames are hidden and then come into focus as needed by the application. The same page may exist on multiple, different frames.
When you interrogate the application, use the Create Global Web Page option to make sure the pages are matched without the frames. This way, no matter which frame currently shows the page, the page is matched.
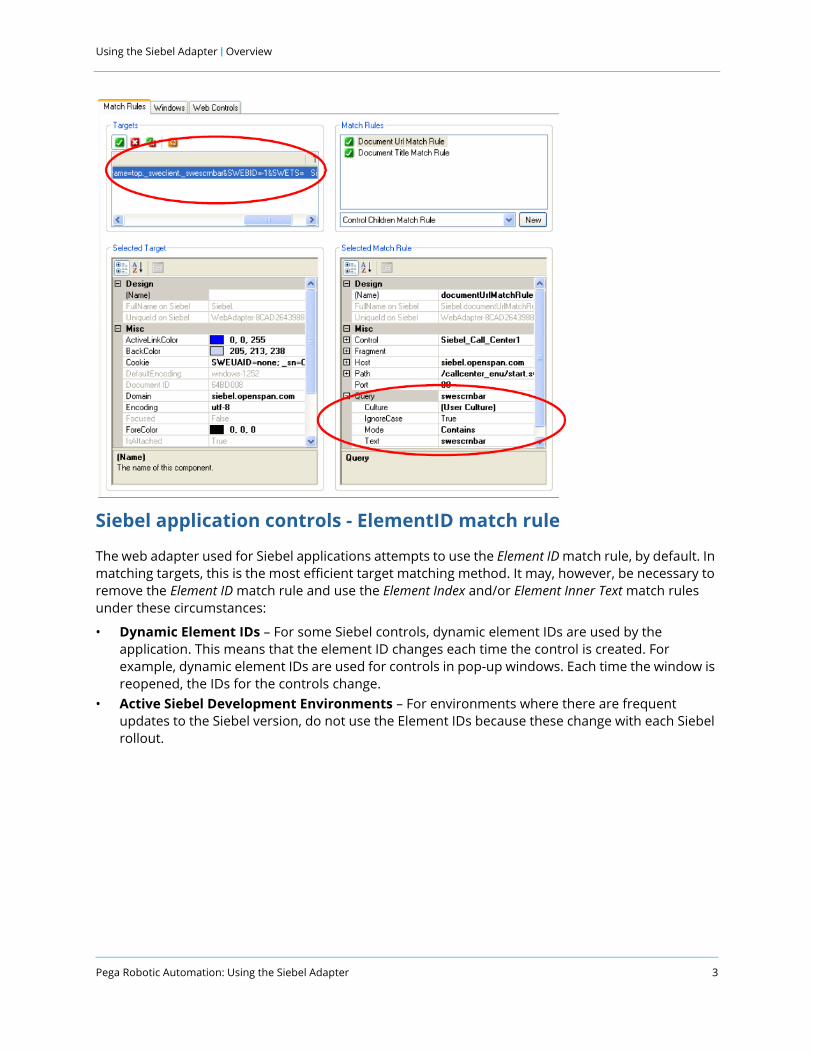
When you identify (using interrogation) a new webpage, be sure to modify the Document URL match rule and use a query string that is unique to identify that form. Here is an example.
Note For more information on Siebel properties, methods, and events see the Help topic: Siebel Control – Properties, Methods, and Events.
Pega Robotic Automation: Using the Siebel Adapter 3
Using the Siebel Adapter | Overview
Siebel application controls - ElementID match rule
The web adapter used for Siebel applications attempts to use the Element ID match rule, by default. In matching targets, this is the most efficient target matching method. It may, however, be necessary to remove the Element ID match rule and use the Element Index and/or Element Inner Text match rules under these circumstances:
• Dynamic Element IDs – For some Siebel controls, dynamic element IDs are used by the application. This means that the element ID changes each time the control is created. For example, dynamic element IDs are used for controls in pop-up windows. Each time the window is reopened, the IDs for the controls change.
• Active Siebel Development Environments – For environments where there are frequent updates to the Siebel version, do not use the Element IDs because these change with each Siebel rollout.

Using the Siebel Adapter | Overview
Pega Robotic Automation: Using the Siebel Adapter 4
When Interrogating a Siebel target and the Element ID match rule is used, make sure the ID is static by navigating away from the control and then navigating back to it. If the control is still matched, the ID has not changed and you can use the Element ID match rule.
If, however, the Element ID match rule shows that the control is no longer matched, change the match rules for the target. Use these steps to update match rules when this happens.
1. Set the UseElementId property for the control to False or select the Disable Use ElementID for this control option, as shown here:
2. Delete the Element ID match rule.
3. Add the Element Index match rule.
4. Set the Use Element ID property to False.
5. Add the Element Inner Text match rule.
6. Set the Use Element ID property to False.

Pega Robotic Automation: Using the Siebel Adapter 5
Using the Siebel Adapter | Exercise 1: Sample project – Data transfer
Exercise 1: Sample project – Data transferThis exercise shows how to automate Siebel through Robot Studio to:
• Login a user• Get data from a list• Initiate a process (make an appointment)
Automating the login processThis automation sets up an automatic login to the Siebel training site used for this exercise.
1. Create a new solution and assign this name to it:
Siebel Test
2. Add a web application Item (web adapter) and assign this name to it:
Siebel
3. Change the StartPage property to the login page for your Siebel system. Here is an example.
http://siebel.openspan.com/callcenter_enu/start.swe
4. Start the Interrogator and interrogate the User Name and Password fields.
5. Next, interrogate the Login button.
6. Stop the interrogation and save the solution.
7. Add a new automation and assign this name to it:
Login
Using the Siebel Adapter | Exercise 1: Sample project – Data transfer
Pega Robotic Automation: Using the Siebel Adapter 6
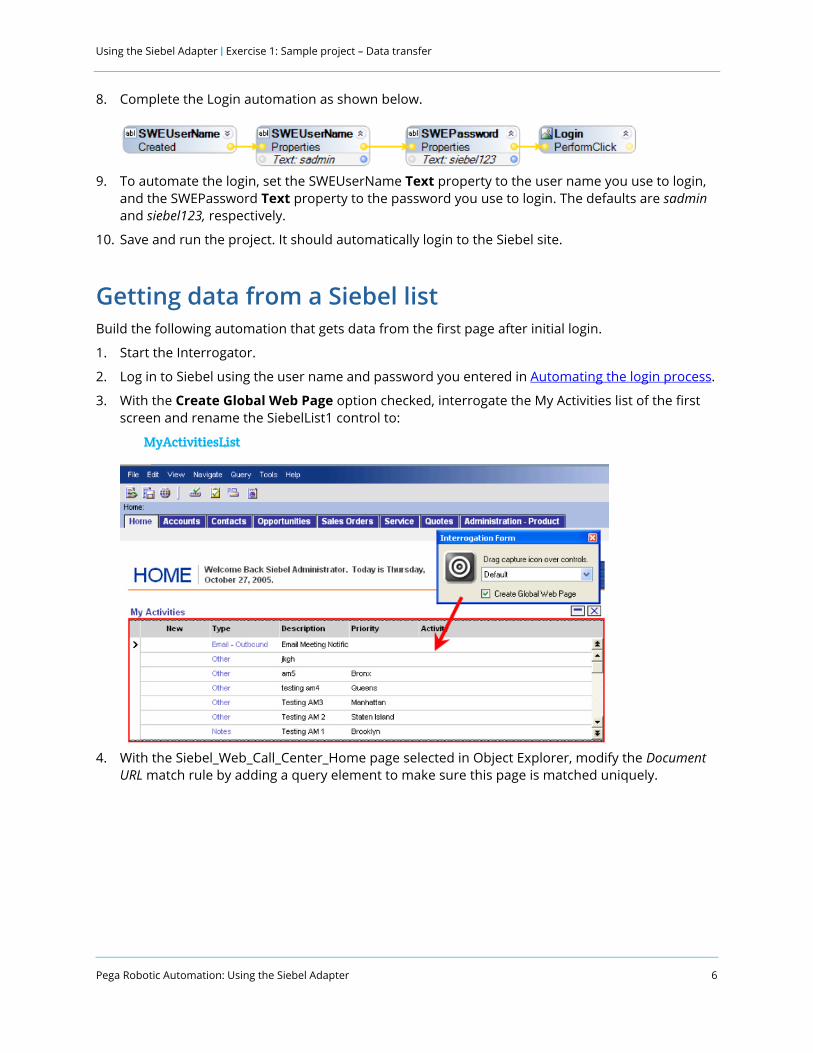
8. Complete the Login automation as shown below.
9. To automate the login, set the SWEUserName Text property to the user name you use to login, and the SWEPassword Text property to the password you use to login. The defaults are sadmin and siebel123, respectively.
10. Save and run the project. It should automatically login to the Siebel site.
Getting data from a Siebel listBuild the following automation that gets data from the first page after initial login.
1. Start the Interrogator.
2. Log in to Siebel using the user name and password you entered in Automating the login process.
3. With the Create Global Web Page option checked, interrogate the My Activities list of the first screen and rename the SiebelList1 control to:
MyActivitiesList
4. With the Siebel_Web_Call_Center_Home page selected in Object Explorer, modify the Document URL match rule by adding a query element to make sure this page is matched uniquely.
Pega Robotic Automation: Using the Siebel Adapter 7
Using the Siebel Adapter | Exercise 1: Sample project – Data transfer
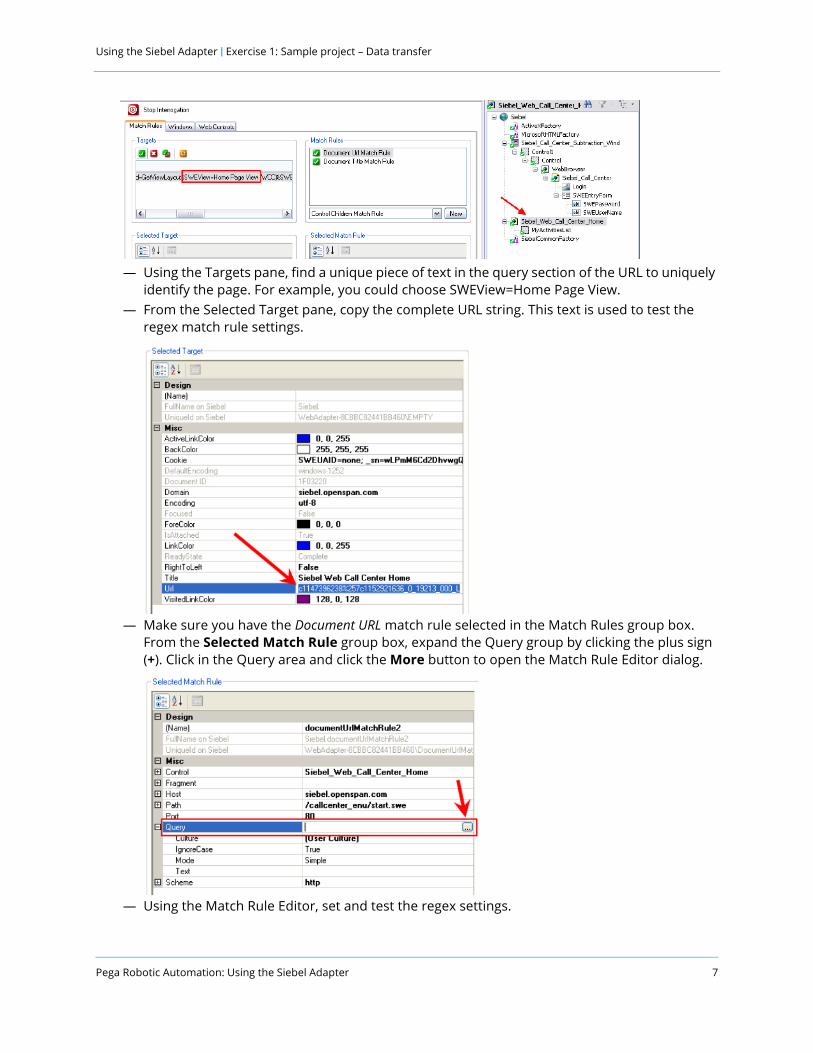
— Using the Targets pane, find a unique piece of text in the query section of the URL to uniquely identify the page. For example, you could choose SWEView=Home Page View.
— From the Selected Target pane, copy the complete URL string. This text is used to test the regex match rule settings.
— Make sure you have the Document URL match rule selected in the Match Rules group box. From the Selected Match Rule group box, expand the Query group by clicking the plus sign (+). Click in the Query area and click the More button to open the Match Rule Editor dialog.
— Using the Match Rule Editor, set and test the regex settings.

Using the Siebel Adapter | Exercise 1: Sample project – Data transfer
Pega Robotic Automation: Using the Siebel Adapter 8
5. Notice that the test is matched correctly. Click OK on the Match Rule Editor to accept your changes.
6. Stop the interrogation and create a Windows form as shown in this example.
7. Label the items as shown in the Object Explorer image from the previous step.
8. Create a new automation and assign this name to it:
DataMove
This automation retrieves the information in the second, third, and a fourth column for a given row in the Siebel list and outputs the values to text boxes on the Windows form. To retrieve data from these columns, the Column parameter on the SiebelList Siebel.GetCellValue method is set to 2, 3, and 4 respectively as shown in the following automation image.
9. Complete the DataMove automation as shown here:
In this field EnterTest Input field Paste the URL you copied in the previous step.
Text Field SWEView=Home%20Page%20View%20Mode Contains

Pega Robotic Automation: Using the Siebel Adapter 9
Using the Siebel Adapter | Exercise 1: Sample project – Data transfer
10. Save and run the project.
11. Once the login automation is complete and the Home page appears, enter a row number into the Get Data field on the Design Form window. Click the Get Data button. Here is an example of the active Design Form window.
12. Stop the project.
Initiating a processThese steps create an automation which adds an appointment to the calendar shown on the first page of the Siebel system.
1. Create a new automation and assign this name to it:
MakeAppointment
2. With the Create Global Web Page option checked, start the Interrogator. Then log into Siebel.
3. Interrogate the New button in the Calendar area. You should now have a New link element in Object Explorer under MyActivitiesList.

Using the Siebel Adapter | Exercise 1: Sample project – Data transfer
Pega Robotic Automation: Using the Siebel Adapter 10
4. Click the New button to move to the Calendar Detail tab. Interrogate the Description field and the Save This One button.
5. Modify the Document URL match rule for the Calendar_Detail page to make sure the page is uniquely matched. Modify the query string of the Document URL match rule.
6. Stop the interrogation.
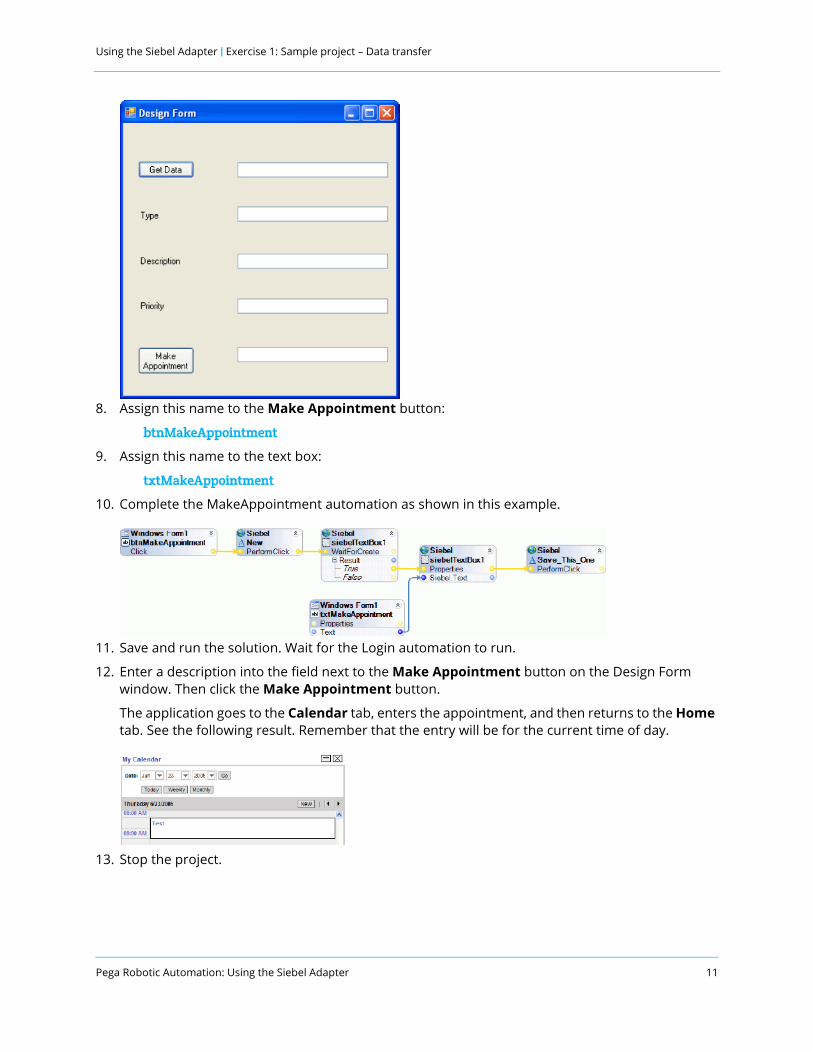
7. Modify the Design Form window to include a Make Appointment button and another text box.
Pega Robotic Automation: Using the Siebel Adapter 11
Using the Siebel Adapter | Exercise 1: Sample project – Data transfer
8. Assign this name to the Make Appointment button:
btnMakeAppointment
9. Assign this name to the text box:
txtMakeAppointment
10. Complete the MakeAppointment automation as shown in this example.
11. Save and run the solution. Wait for the Login automation to run.
12. Enter a description into the field next to the Make Appointment button on the Design Form window. Then click the Make Appointment button.
The application goes to the Calendar tab, enters the appointment, and then returns to the Home tab. See the following result. Remember that the entry will be for the current time of day.
13. Stop the project.
Using the Siebel Adapter | Exercise 2: Navigation controls
Pega Robotic Automation: Using the Siebel Adapter 12
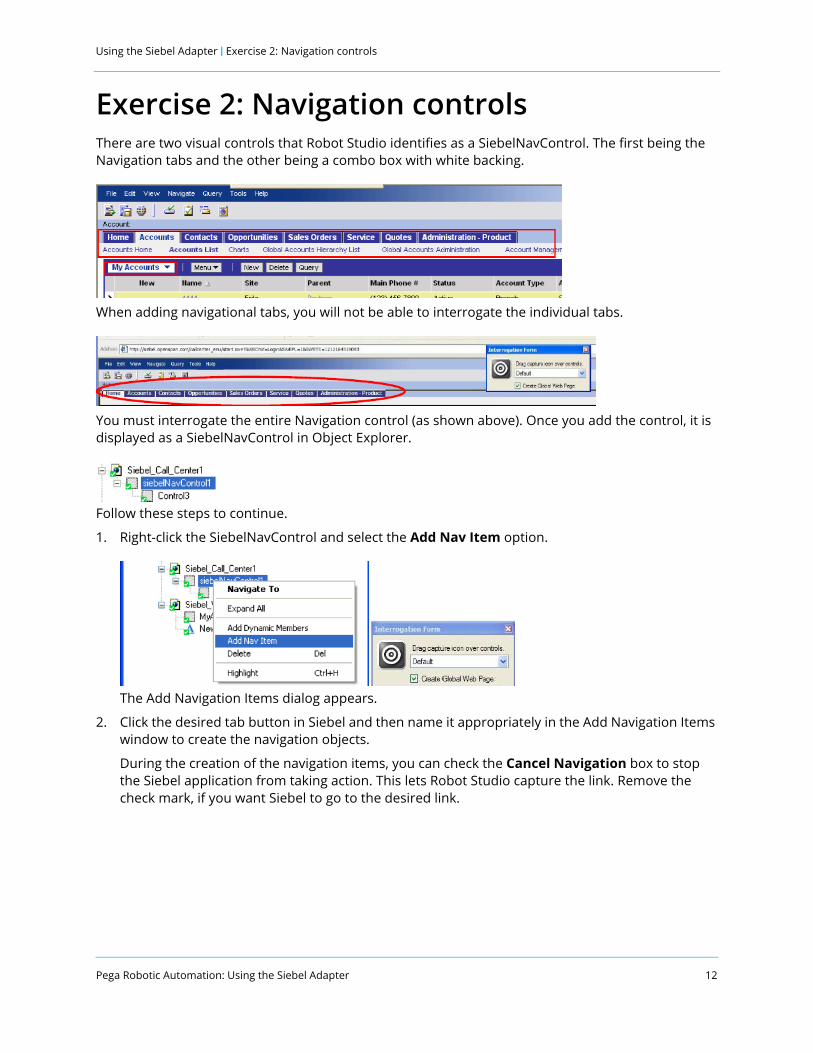
Exercise 2: Navigation controlsThere are two visual controls that Robot Studio identifies as a SiebelNavControl. The first being the Navigation tabs and the other being a combo box with white backing.
When adding navigational tabs, you will not be able to interrogate the individual tabs.
You must interrogate the entire Navigation control (as shown above). Once you add the control, it is displayed as a SiebelNavControl in Object Explorer.
Follow these steps to continue.
1. Right-click the SiebelNavControl and select the Add Nav Item option.
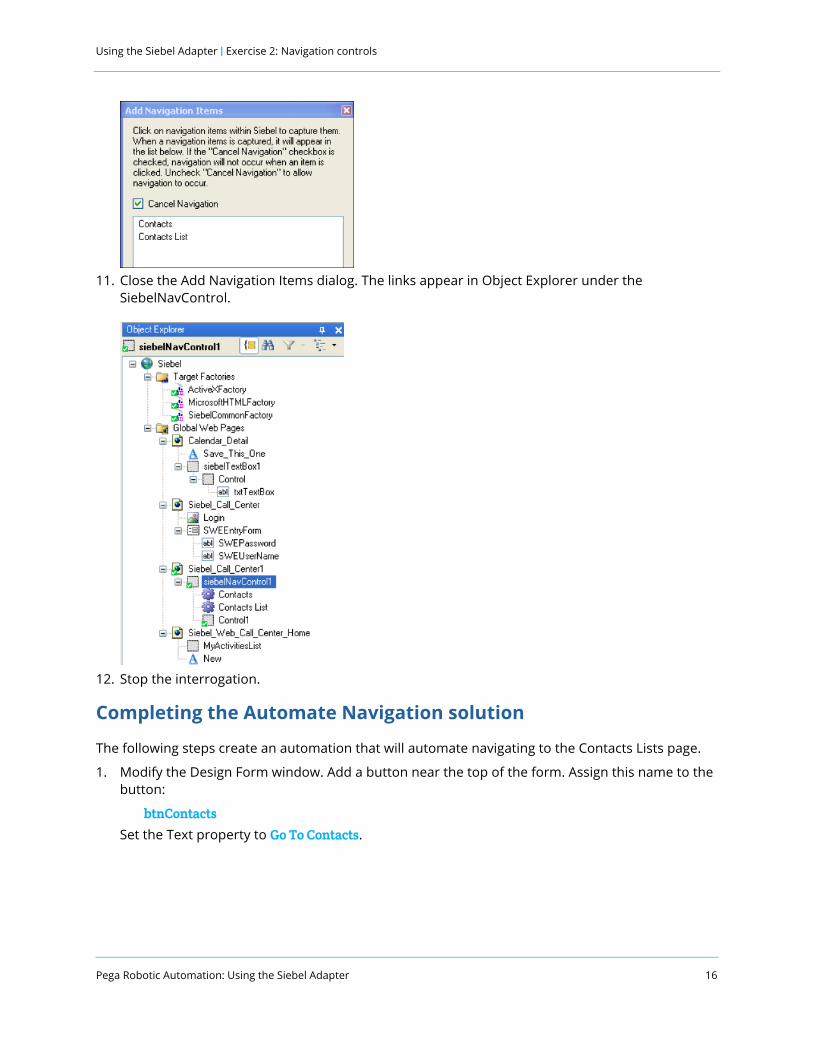
The Add Navigation Items dialog appears.
2. Click the desired tab button in Siebel and then name it appropriately in the Add Navigation Items window to create the navigation objects.
During the creation of the navigation items, you can check the Cancel Navigation box to stop the Siebel application from taking action. This lets Robot Studio capture the link. Remove the check mark, if you want Siebel to go to the desired link.
Pega Robotic Automation: Using the Siebel Adapter 13
Using the Siebel Adapter | Exercise 2: Navigation controls
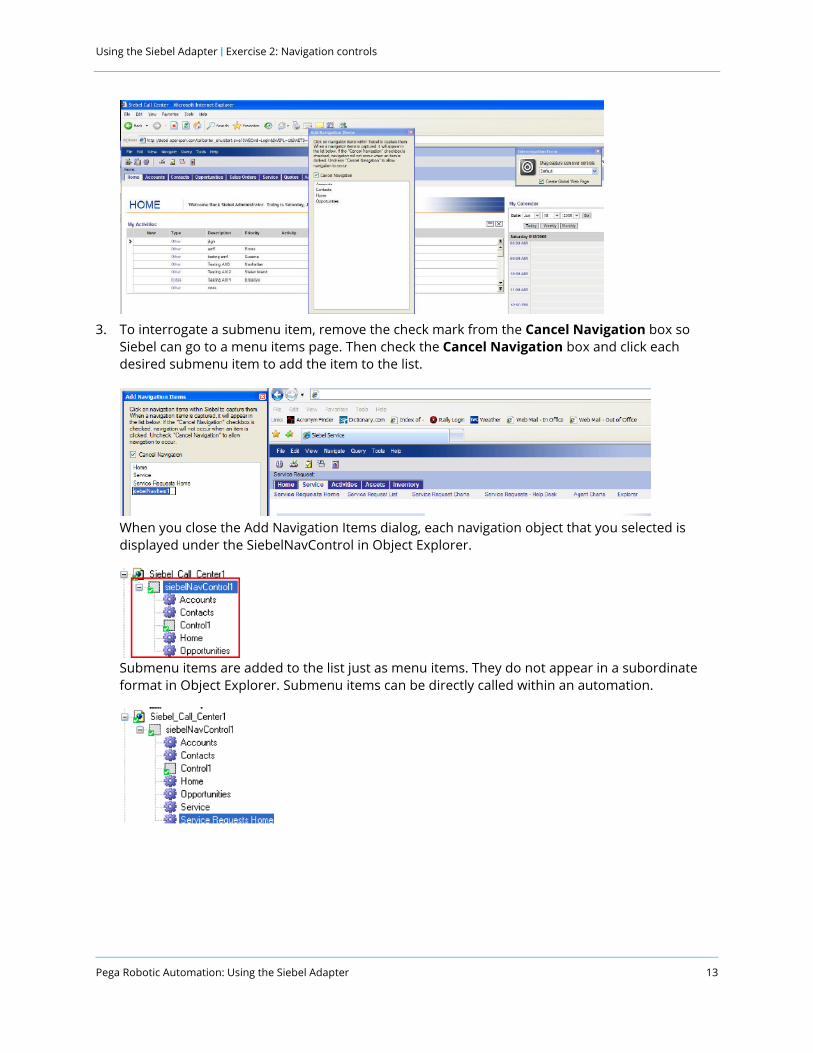
3. To interrogate a submenu item, remove the check mark from the Cancel Navigation box so Siebel can go to a menu items page. Then check the Cancel Navigation box and click each desired submenu item to add the item to the list.
When you close the Add Navigation Items dialog, each navigation object that you selected is displayed under the SiebelNavControl in Object Explorer.
Submenu items are added to the list just as menu items. They do not appear in a subordinate format in Object Explorer. Submenu items can be directly called within an automation.
Using the Siebel Adapter | Exercise 2: Navigation controls
Pega Robotic Automation: Using the Siebel Adapter 14
Automating navigationFollow these steps to create a project which automatically goes to the Contact List page. Start by returning to the Siebel Test solution you completed earlier.
1. Start the interrogation of the Siebel application. Log into the application to open the Home page.
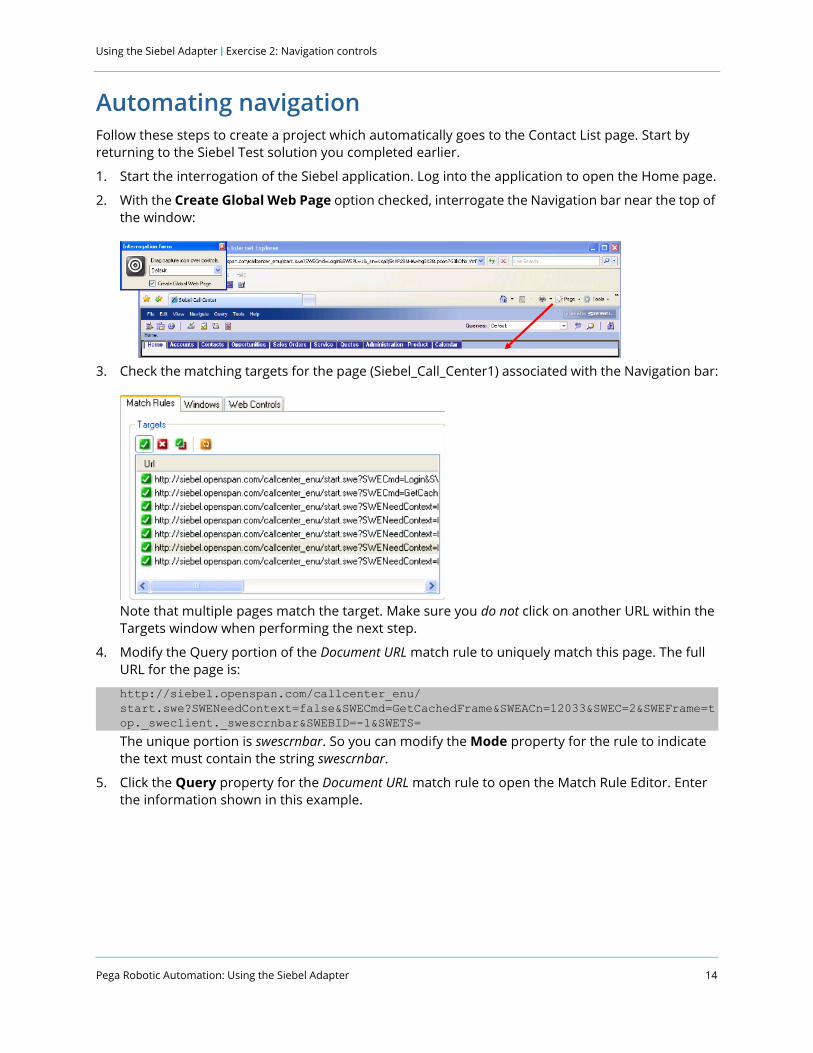
2. With the Create Global Web Page option checked, interrogate the Navigation bar near the top of the window:
3. Check the matching targets for the page (Siebel_Call_Center1) associated with the Navigation bar:
Note that multiple pages match the target. Make sure you do not click on another URL within the Targets window when performing the next step.
4. Modify the Query portion of the Document URL match rule to uniquely match this page. The full URL for the page is:
http://siebel.openspan.com/callcenter_enu/start.swe?SWENeedContext=false&SWECmd=GetCachedFrame&SWEACn=12033&SWEC=2&SWEFrame=top._sweclient._swescrnbar&SWEBID=-1&SWETS=The unique portion is swescrnbar. So you can modify the Mode property for the rule to indicate the text must contain the string swescrnbar.
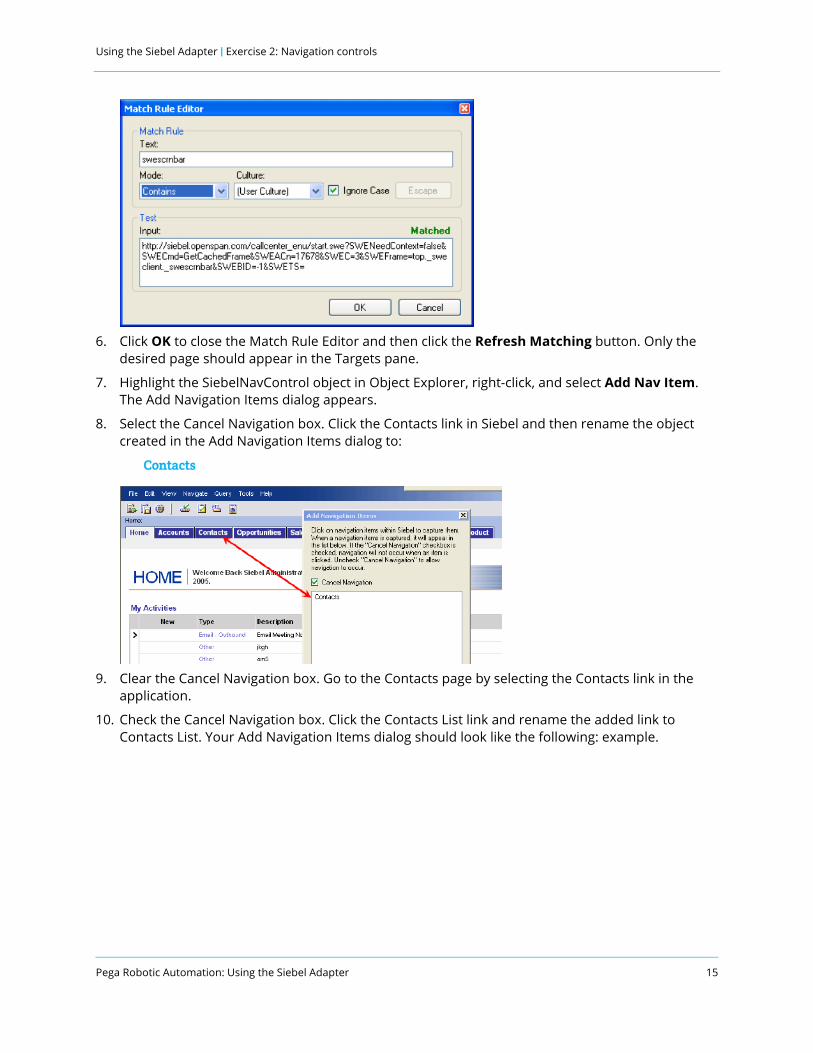
5. Click the Query property for the Document URL match rule to open the Match Rule Editor. Enter the information shown in this example.
Pega Robotic Automation: Using the Siebel Adapter 15
Using the Siebel Adapter | Exercise 2: Navigation controls
6. Click OK to close the Match Rule Editor and then click the Refresh Matching button. Only the desired page should appear in the Targets pane.
7. Highlight the SiebelNavControl object in Object Explorer, right-click, and select Add Nav Item. The Add Navigation Items dialog appears.
8. Select the Cancel Navigation box. Click the Contacts link in Siebel and then rename the object created in the Add Navigation Items dialog to:
Contacts
9. Clear the Cancel Navigation box. Go to the Contacts page by selecting the Contacts link in the application.
10. Check the Cancel Navigation box. Click the Contacts List link and rename the added link to Contacts List. Your Add Navigation Items dialog should look like the following: example.
Using the Siebel Adapter | Exercise 2: Navigation controls
Pega Robotic Automation: Using the Siebel Adapter 16
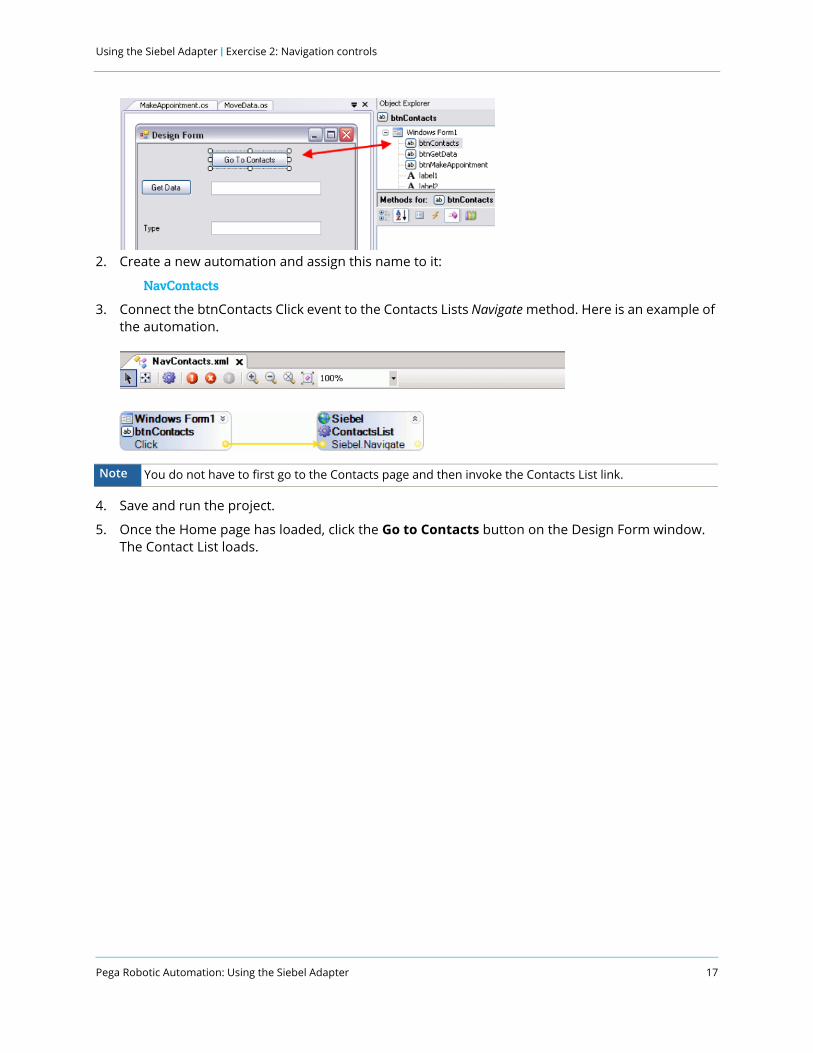
11. Close the Add Navigation Items dialog. The links appear in Object Explorer under the SiebelNavControl.
12. Stop the interrogation.
Completing the Automate Navigation solution
The following steps create an automation that will automate navigating to the Contacts Lists page.
1. Modify the Design Form window. Add a button near the top of the form. Assign this name to the button:
btnContacts
Set the Text property to Go To Contacts.
Pega Robotic Automation: Using the Siebel Adapter 17
Using the Siebel Adapter | Exercise 2: Navigation controls
2. Create a new automation and assign this name to it:
NavContacts
3. Connect the btnContacts Click event to the Contacts Lists Navigate method. Here is an example of the automation.
4. Save and run the project.
5. Once the Home page has loaded, click the Go to Contacts button on the Design Form window. The Contact List loads.
Note You do not have to first go to the Contacts page and then invoke the Contacts List link.
Using the Siebel Adapter | Exercise 3: Working with pop-up dialog boxes
Pega Robotic Automation: Using the Siebel Adapter 18
Exercise 3: Working with pop-up dialog boxesSiebel contains pop-up dialogs accessible from multivalue and SiebelList controls. This exercise demonstrates working with a pop-up dialog.
This exercise pushes data from the Windows form used in the previous exercise to the Contacts page in Siebel to create a new contact. Part of the process is assigning an account manager for the contact. This is done by selecting the name of the account manager from a list box populated with data found in a SiebelList control of a popup dialog. This data is later automatically chosen via a pop-up dialog which is accessed by a multivalue control.
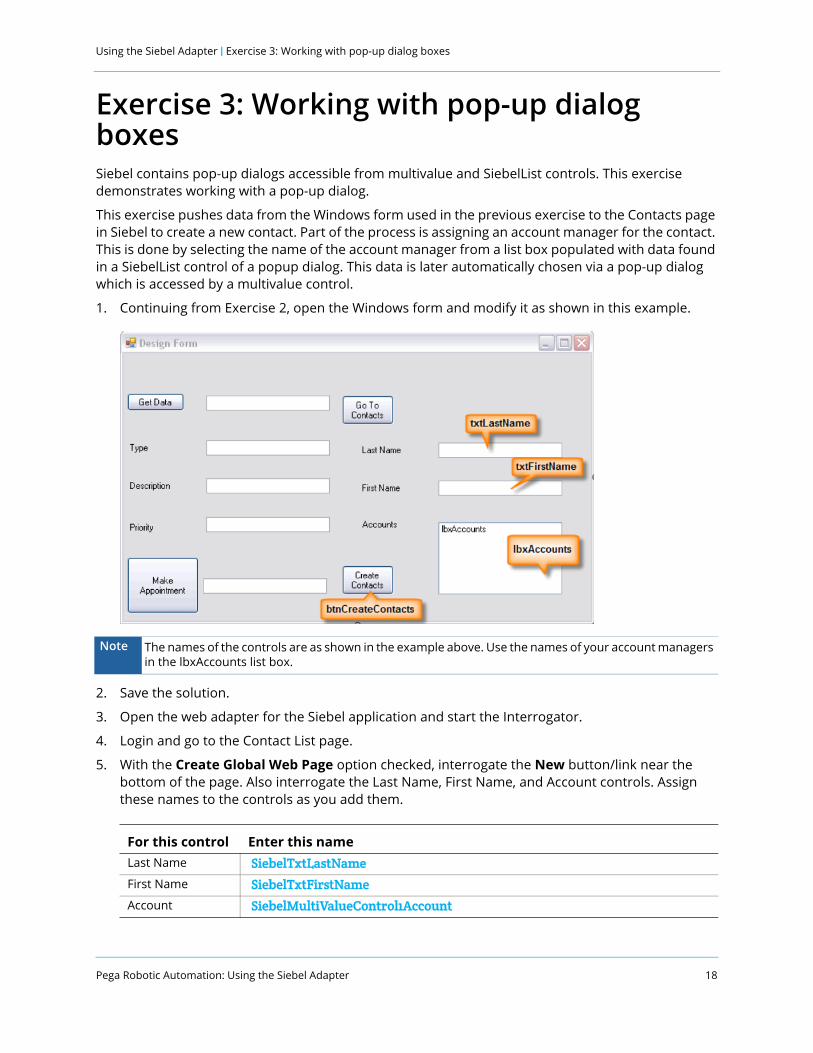
1. Continuing from Exercise 2, open the Windows form and modify it as shown in this example.
2. Save the solution.
3. Open the web adapter for the Siebel application and start the Interrogator.
4. Login and go to the Contact List page.
5. With the Create Global Web Page option checked, interrogate the New button/link near the bottom of the page. Also interrogate the Last Name, First Name, and Account controls. Assign these names to the controls as you add them.
Note The names of the controls are as shown in the example above. Use the names of your account managers in the lbxAccounts list box.
For this control Enter this nameLast Name SiebelTxtLastNameFirst Name SiebelTxtFirstNameAccount SiebelMultiValueControl1Account

Pega Robotic Automation: Using the Siebel Adapter 19
Using the Siebel Adapter | Exercise 3: Working with pop-up dialog boxes
6. Click the pop-up button in the Account control to open the Accounts page. Interrogate the Available list, Add, and OK button/links. Rename SiebelList to:
SiebelListAccount
Leave the other control names as is.
7. In Object Explorer, highlight the Accounts page. Note that multiple pages are matched in the Targets pane. To correct this situation, modify the Match Document URL match rule. The URL for the page that needs to be matched is the one that does not contain the string ShowPopup in the Query section. Your Match Rule Editor should look like the following: example.
Note All Siebel-specific controls are identified in Object Explorer with the prefix Siebel. When interrogating a text box for example, Object Explorer shows three controls are added, as shown here:
SiebelTextBox1Control1txtTextBox1The only control that should be used within an automation is the Siebel Component.
Using the Siebel Adapter | Exercise 3: Working with pop-up dialog boxes
Pega Robotic Automation: Using the Siebel Adapter 20
8. Click OK to save the Match Rule Editor entries and then click the Refresh Matching button. Only this page should match.
http://siebel.openspan.com/callcenter_enu/start.swe?SWECmd=GetCachedFrame&SWEC=10&SWEFrame=top._sweclient._swecontent._sweview._swetmp&SWESP=1
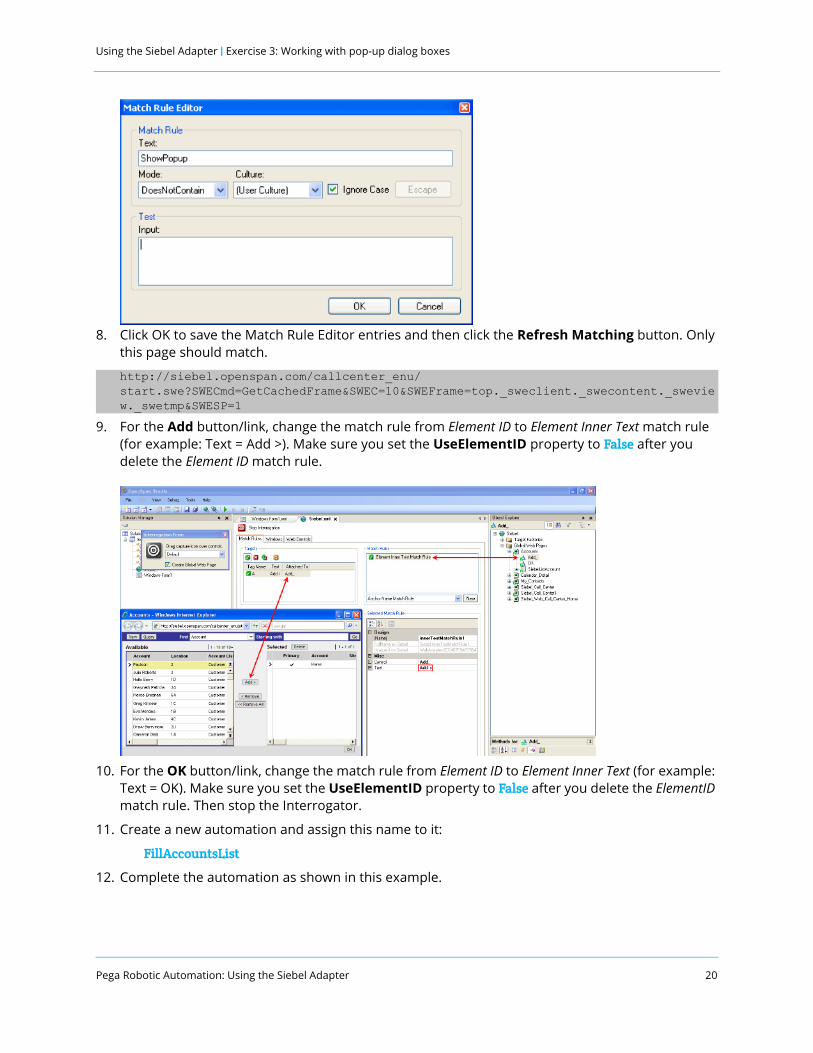
9. For the Add button/link, change the match rule from Element ID to Element Inner Text match rule (for example: Text = Add >). Make sure you set the UseElementID property to False after you delete the Element ID match rule.
10. For the OK button/link, change the match rule from Element ID to Element Inner Text (for example: Text = OK). Make sure you set the UseElementID property to False after you delete the ElementID match rule. Then stop the Interrogator.
11. Create a new automation and assign this name to it:
FillAccountsList
12. Complete the automation as shown in this example.

Pega Robotic Automation: Using the Siebel Adapter 21
Using the Siebel Adapter | Exercise 3: Working with pop-up dialog boxes
13. Open the automation you created in Exercise 2: Navigation controls called NavContacts.
14. Modify the NavContacts automation as shown here:
This modification will cause the Accounts list box to be filled with account manager names when the Go To Contacts button is clicked.
15. Create a new automation and assign this name to it:
CreateContact
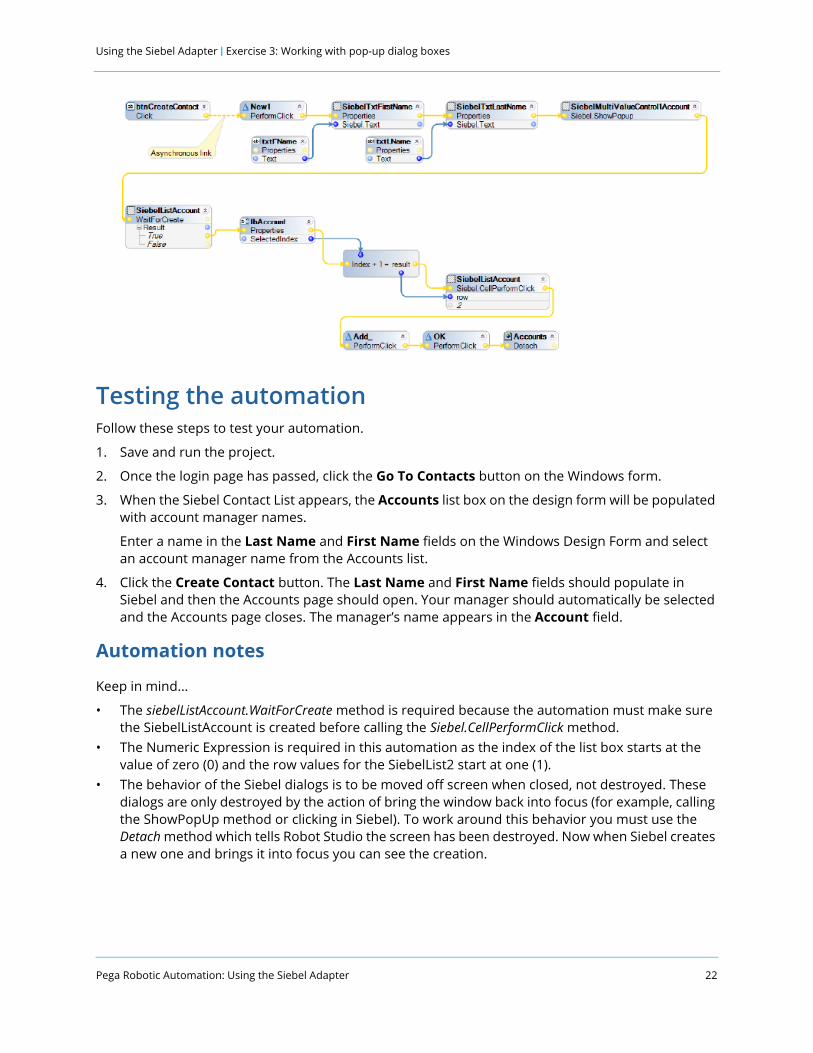
16. Complete the automation as shown in this example.
Using the Siebel Adapter | Exercise 3: Working with pop-up dialog boxes
Pega Robotic Automation: Using the Siebel Adapter 22
Testing the automationFollow these steps to test your automation.
1. Save and run the project.
2. Once the login page has passed, click the Go To Contacts button on the Windows form.
3. When the Siebel Contact List appears, the Accounts list box on the design form will be populated with account manager names.
Enter a name in the Last Name and First Name fields on the Windows Design Form and select an account manager name from the Accounts list.
4. Click the Create Contact button. The Last Name and First Name fields should populate in Siebel and then the Accounts page should open. Your manager should automatically be selected and the Accounts page closes. The manager’s name appears in the Account field.
Automation notes
Keep in mind...
• The siebelListAccount.WaitForCreate method is required because the automation must make sure the SiebelListAccount is created before calling the Siebel.CellPerformClick method.
• The Numeric Expression is required in this automation as the index of the list box starts at the value of zero (0) and the row values for the SiebelList2 start at one (1).
• The behavior of the Siebel dialogs is to be moved off screen when closed, not destroyed. These dialogs are only destroyed by the action of bring the window back into focus (for example, calling the ShowPopUp method or clicking in Siebel). To work around this behavior you must use the Detach method which tells Robot Studio the screen has been destroyed. Now when Siebel creates a new one and brings it into focus you can see the creation.


