Embed Size (px)
Citation preview
Real-Media Painting Software
User Manual
v. 1.5.5
2
Introduction
Welcome to Rebelle!
Rebelle is a one-of-a-kind paint application that lets you create realistic wet and dry media
artwork, complete with stunning real-world dynamic simulation of fluid flow, color blending,
wet diffusion, and drying.
We designed Rebelle for CG artists as well as for traditional painters who want to explore
and broaden their artistic repertoire, using the latest groundbreaking digital painting
technology.
In this manual you’ll find general information covering all necessary details you need to
know for a hassle-free use of this software. We’ve prepared for you explanations of its
features, useful hints and some technical background of Rebelle.
Thank you for purchasing Rebelle, I hope you have a great time painting!
Peter Blaškovič
Creator of Rebelle
3
Table of Contents
Introduction ................................................................................................................................ 2
Getting Started ........................................................................................................................... 5
Installing and Registering Rebelle .......................................................................................... 5
Rebelle Interface ........................................................................................................................ 7
Tools Panel .............................................................................................................................. 9
Watercolor Tool Properties .............................................................................................. 10
Acrylic Tool Properties ...................................................................................................... 11
Pastel Tool Properties ....................................................................................................... 12
Pencil Tool Properties ....................................................................................................... 13
Ink Pen Tool Properties ..................................................................................................... 13
Marker Tool Properties ..................................................................................................... 13
Airbrush Tool Properties ................................................................................................... 14
Eraser Tool Properties ....................................................................................................... 14
Blend Tool Properties ........................................................................................................ 15
Smudge Tool Properties .................................................................................................... 15
Water Tool Properties ....................................................................................................... 16
Dry Tool Properties ........................................................................................................... 16
Blow Tool Properties ......................................................................................................... 16
Pick Color Tool Properties ................................................................................................. 17
Navigator Panel .................................................................................................................... 19
Tilt Panel ............................................................................................................................... 20
Color Panel ............................................................................................................................ 21
Color Set Panel ...................................................................................................................... 22
Layers Panel .......................................................................................................................... 24
The Menu Bar ........................................................................................................................... 26
File Menu .............................................................................................................................. 26
Edit Menu ............................................................................................................................. 27
Layer Menu ........................................................................................................................... 28
View Menu ............................................................................................................................ 28
Window Menu ...................................................................................................................... 28
4
Help Menu ............................................................................................................................ 29
Preferences............................................................................................................................... 30
Starting Painting ....................................................................................................................... 31
Workflow options ................................................................................................................. 31
Working with Water ............................................................................................................. 31
Tracing Option ...................................................................................................................... 33
Multi-touch Support ............................................................................................................. 33
Art Canvases ......................................................................................................................... 34
Creating, Opening and Saving Paintings................................................................................... 35
Creating a New Painting ....................................................................................................... 35
Opening a Painting................................................................................................................ 35
Saving a Painting ................................................................................................................... 35
Closing an Application .......................................................................................................... 36
Publish a Painting to Gallery .................................................................................................... 37
Creating a Gallery account.................................................................................................... 37
Publish artwork from Rebelle to Gallery .............................................................................. 37
Edit your profile and artworks in Gallery ............................................................................. 37
Keyboard Shortcuts .................................................................................................................. 38
Copyright & Credits .................................................................................................................. 40
Rebelle End-User Software License Agreement....................................................................... 41
5
Getting Started
Installing and Registering Rebelle
Download & Install
After purchasing Rebelle from our website, you receive an email with a download link and
registration details.
Mac OS X Users
Download a .dmg file from the link provided in a registration email. Locate the Rebelle
installer file named "Rebelle.dmg”. Double-click on the installer to complete the installation.
Windows Users
Download an .exe file for 32 or 64 bit system from the link provided in a registration email.
Locate the Rebelle installer file named "Rebelle.exe”. Double-click on the .exe installer to
complete the installation.
Registration
Fill in your registration details provided in your registration email. Please check if you are
connected to the internet, the internet connection is required for activation to check the
registration details.
TIP: We recommend to copy & paste your Registration Key and ID in order to avoid
misspelling numbers with letters and vice versa.
Application Launch
You’ll see an Intro Tutorial during first launch of an application, or after every updating to
the newer version. This tutorial will guide you through the most essential Rebelle tools. You
can run an Intro Tutorial from a Menu -> Help anytime.
6
System Requirements
Minimum: Intel i3 or equivalent AMD, 4GB RAM, 100MB harddisk space, Open GL graphics
card with 1GB RAM, Windows XP, Vista, or OS X 10.7 - on this configuration watercolor
simulation may work slower, faster processor and more memory is better.
Recommended: Intel i7 or equivalent AMD, 16GB RAM, 100MB harddisk space, Open GL
graphics card with 2GB RAM, Windows 7, 8 or OS X 10.9, 10.10, 10.11, Wacom tablet.
Getting Support for Rebelle
If you need help using Rebelle, please refer to the included manual first. We tried to make it
easy to read and full of information you may need to know.
You are welcome to send us an email at [email protected] if you have any
question, technical issue with Rebelle, or you would like just to greet us.
Before asking questions please read FAQ in support section on the website
rebelle.escapemotions.com first. If the answer is not there, please add your computer
configuration to your email (Windows / Mac OS, 32 / 64bit OS, processor, graphics card,
memory). This will help us provide answers much faster.
Community
Let’s keep in touch on our social channels - click on any icon and visit our pages on Facebook,
Twitter, Pinterest, Google+, Tumblr, YouTube, DeviantArt and Behance.
7
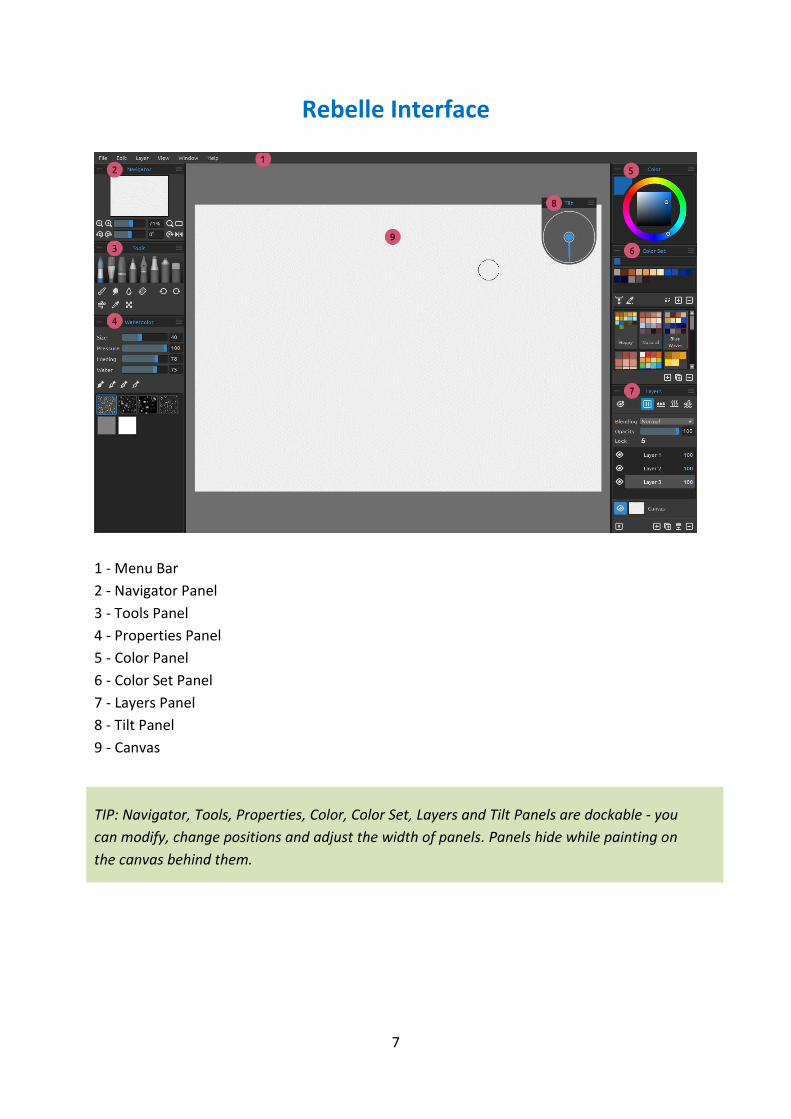
Rebelle Interface
1 - Menu Bar
2 - Navigator Panel
3 - Tools Panel
4 - Properties Panel
5 - Color Panel
6 - Color Set Panel
7 - Layers Panel
8 - Tilt Panel
9 - Canvas
TIP: Navigator, Tools, Properties, Color, Color Set, Layers and Tilt Panels are dockable - you
can modify, change positions and adjust the width of panels. Panels hide while painting on
the canvas behind them.
8
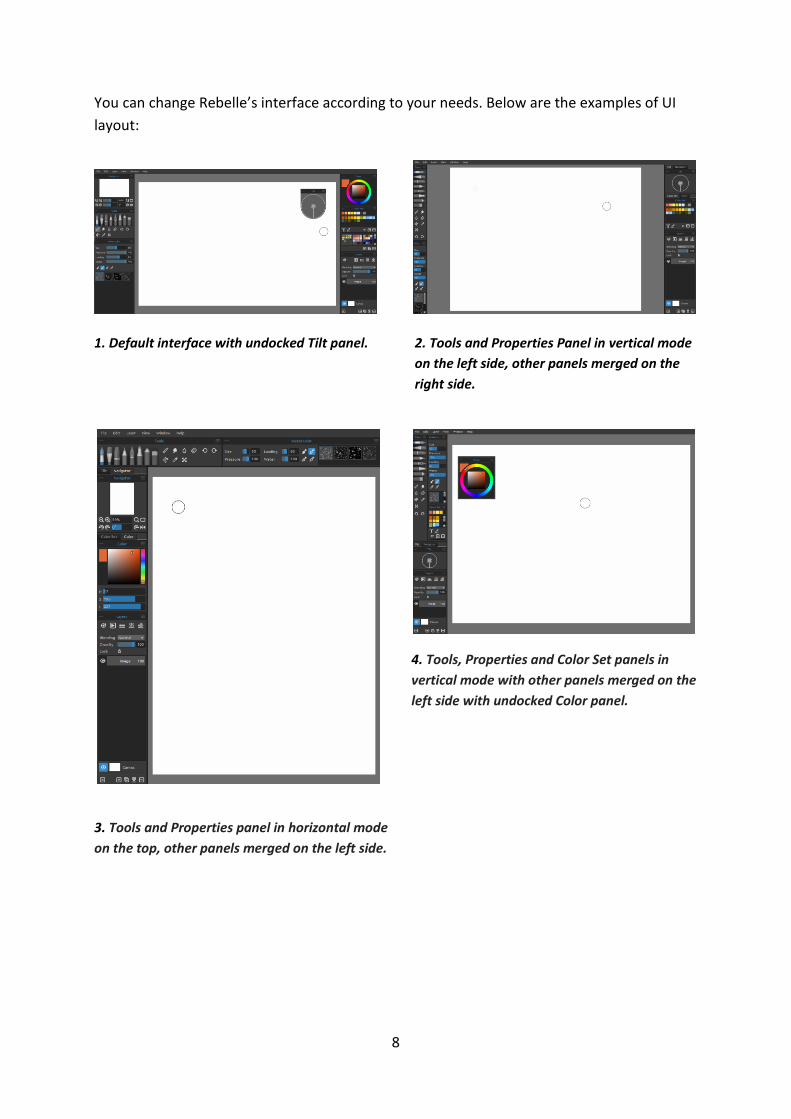
You can change Rebelle’s interface according to your needs. Below are the examples of UI
layout:
1. Default interface with undocked Tilt panel. 2. Tools and Properties Panel in vertical mode
on the left side, other panels merged on the
right side.
4. Tools, Properties and Color Set panels in
vertical mode with other panels merged on the
left side with undocked Color panel.
3. Tools and Properties panel in horizontal mode
on the top, other panels merged on the left side.
9
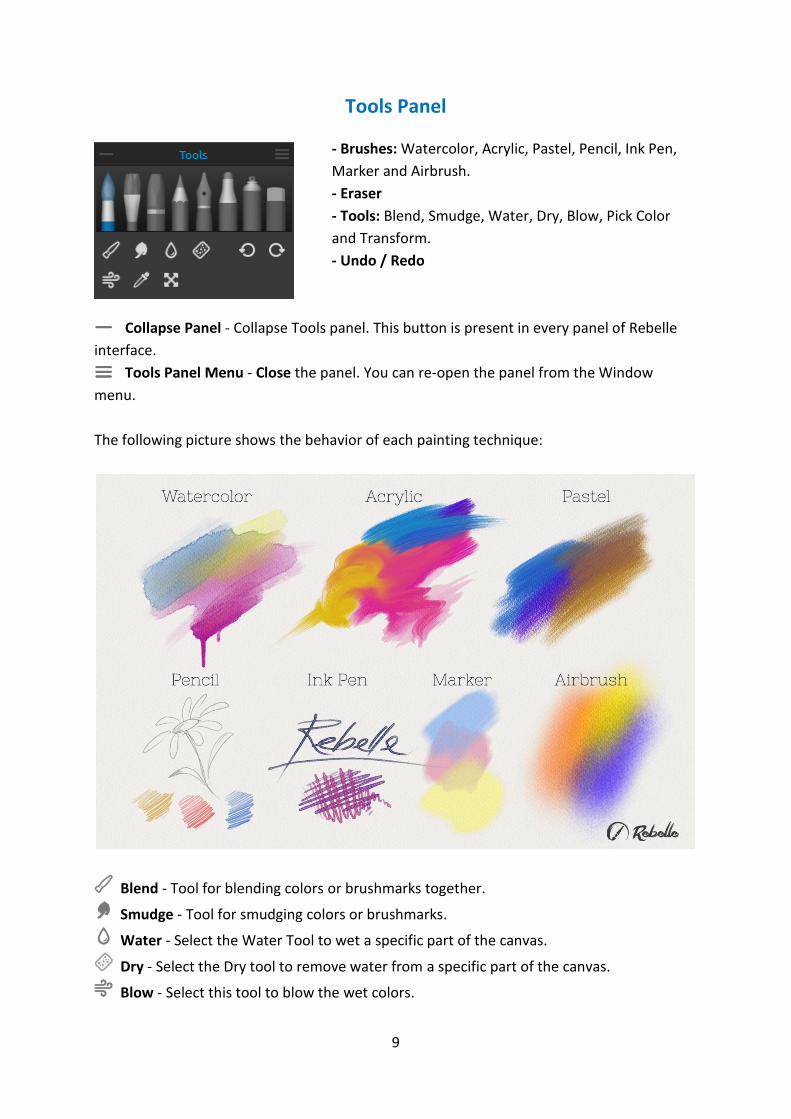
Tools Panel
- Brushes: Watercolor, Acrylic, Pastel, Pencil, Ink Pen,
Marker and Airbrush.
- Eraser
- Tools: Blend, Smudge, Water, Dry, Blow, Pick Color
and Transform.
- Undo / Redo
Collapse Panel - Collapse Tools panel. This button is present in every panel of Rebelle
interface.
Tools Panel Menu - Close the panel. You can re-open the panel from the Window
menu.
The following picture shows the behavior of each painting technique:
Blend - Tool for blending colors or brushmarks together.
Smudge - Tool for smudging colors or brushmarks.
Water - Select the Water Tool to wet a specific part of the canvas.
Dry - Select the Dry tool to remove water from a specific part of the canvas.
Blow - Select this tool to blow the wet colors.
10
Pick Color - Select the Pick Color Tool to choose a color from your canvas.
Transform - Move, resize, scale, rotate or flip selected layer.
Undo - Undo the last painting operation you performed.
Redo - Redo the last operation you undid.
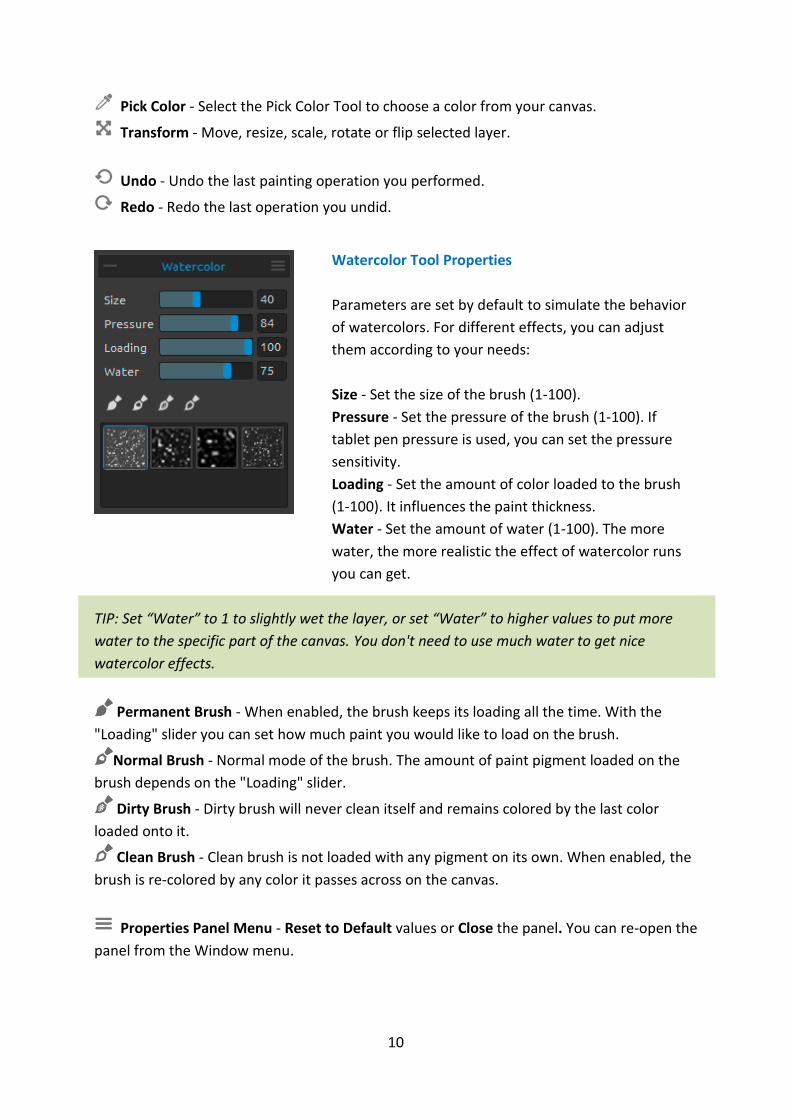
Watercolor Tool Properties
Parameters are set by default to simulate the behavior
of watercolors. For different effects, you can adjust
them according to your needs:
Size - Set the size of the brush (1-100).
Pressure - Set the pressure of the brush (1-100). If
tablet pen pressure is used, you can set the pressure
sensitivity.
Loading - Set the amount of color loaded to the brush
(1-100). It influences the paint thickness.
Water - Set the amount of water (1-100). The more
water, the more realistic the effect of watercolor runs
you can get.
TIP: Set “Water” to 1 to slightly wet the layer, or set “Water” to higher values to put more
water to the specific part of the canvas. You don't need to use much water to get nice
watercolor effects.
Permanent Brush - When enabled, the brush keeps its loading all the time. With the
"Loading" slider you can set how much paint you would like to load on the brush.
Normal Brush - Normal mode of the brush. The amount of paint pigment loaded on the
brush depends on the "Loading" slider.
Dirty Brush - Dirty brush will never clean itself and remains colored by the last color
loaded onto it.
Clean Brush - Clean brush is not loaded with any pigment on its own. When enabled, the
brush is re-colored by any color it passes across on the canvas.
Properties Panel Menu - Reset to Default values or Close the panel. You can re-open the
panel from the Window menu.
11
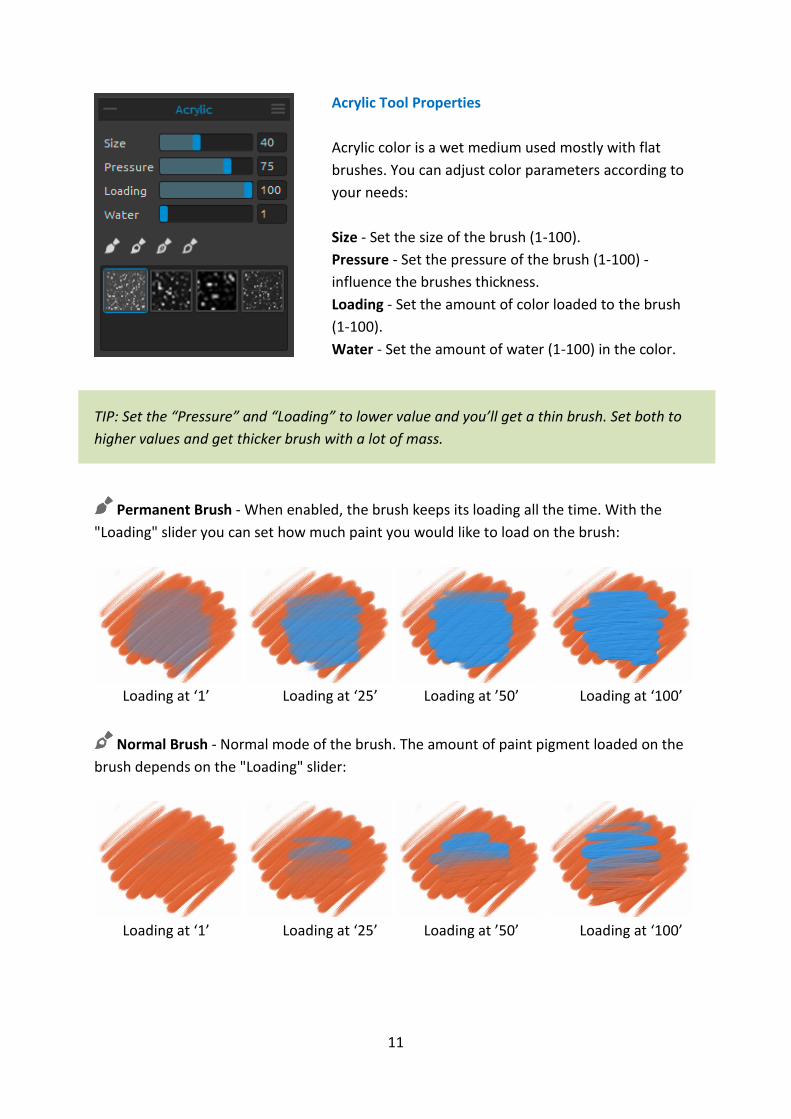
Acrylic Tool Properties
Acrylic color is a wet medium used mostly with flat
brushes. You can adjust color parameters according to
your needs:
Size - Set the size of the brush (1-100).
Pressure - Set the pressure of the brush (1-100) -
influence the brushes thickness.
Loading - Set the amount of color loaded to the brush
(1-100).
Water - Set the amount of water (1-100) in the color.
TIP: Set the “Pressure” and “Loading” to lower value and you’ll get a thin brush. Set both to
higher values and get thicker brush with a lot of mass.
Permanent Brush - When enabled, the brush keeps its loading all the time. With the
"Loading" slider you can set how much paint you would like to load on the brush:
Loading at ‘1’ Loading at ‘25’ Loading at ’50’ Loading at ‘100’
Normal Brush - Normal mode of the brush. The amount of paint pigment loaded on the
brush depends on the "Loading" slider:
Loading at ‘1’ Loading at ‘25’ Loading at ’50’ Loading at ‘100’
12
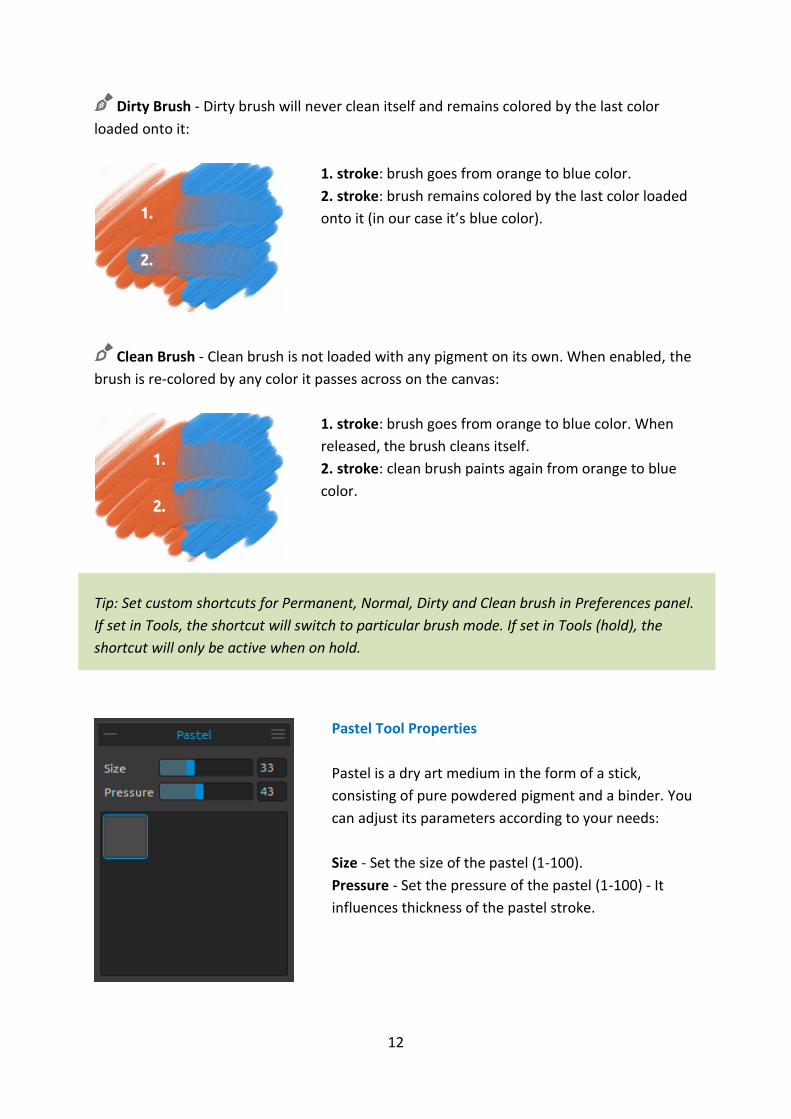
Dirty Brush - Dirty brush will never clean itself and remains colored by the last color
loaded onto it:
1. stroke: brush goes from orange to blue color.
2. stroke: brush remains colored by the last color loaded
onto it (in our case it’s blue color).
Clean Brush - Clean brush is not loaded with any pigment on its own. When enabled, the
brush is re-colored by any color it passes across on the canvas:
1. stroke: brush goes from orange to blue color. When
released, the brush cleans itself.
2. stroke: clean brush paints again from orange to blue
color.
Tip: Set custom shortcuts for Permanent, Normal, Dirty and Clean brush in Preferences panel.
If set in Tools, the shortcut will switch to particular brush mode. If set in Tools (hold), the
shortcut will only be active when on hold.
Pastel Tool Properties
Pastel is a dry art medium in the form of a stick,
consisting of pure powdered pigment and a binder. You
can adjust its parameters according to your needs:
Size - Set the size of the pastel (1-100).
Pressure - Set the pressure of the pastel (1-100) - It
influences thickness of the pastel stroke.
13
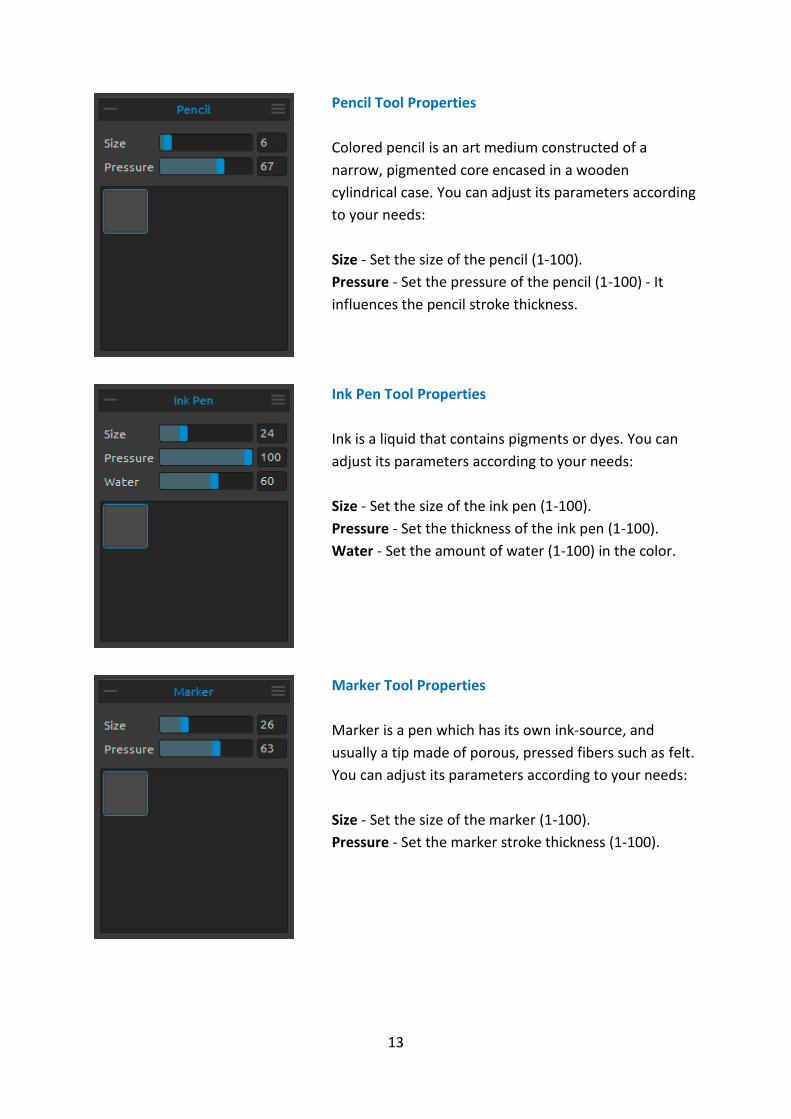
Pencil Tool Properties
Colored pencil is an art medium constructed of a
narrow, pigmented core encased in a wooden
cylindrical case. You can adjust its parameters according
to your needs:
Size - Set the size of the pencil (1-100).
Pressure - Set the pressure of the pencil (1-100) - It
influences the pencil stroke thickness.
Ink Pen Tool Properties
Ink is a liquid that contains pigments or dyes. You can
adjust its parameters according to your needs:
Size - Set the size of the ink pen (1-100).
Pressure - Set the thickness of the ink pen (1-100).
Water - Set the amount of water (1-100) in the color.
Marker Tool Properties
Marker is a pen which has its own ink-source, and
usually a tip made of porous, pressed fibers such as felt.
You can adjust its parameters according to your needs:
Size - Set the size of the marker (1-100).
Pressure - Set the marker stroke thickness (1-100).
14
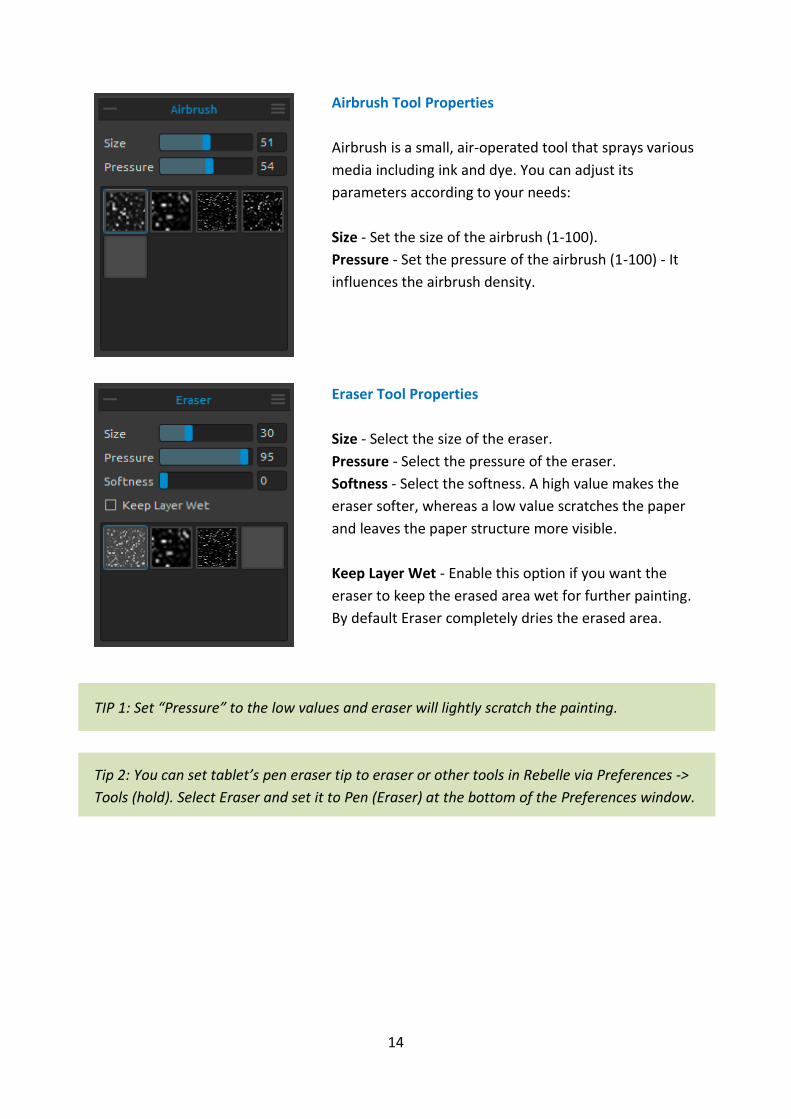
Airbrush Tool Properties
Airbrush is a small, air-operated tool that sprays various
media including ink and dye. You can adjust its
parameters according to your needs:
Size - Set the size of the airbrush (1-100).
Pressure - Set the pressure of the airbrush (1-100) - It
influences the airbrush density.
Eraser Tool Properties
Size - Select the size of the eraser.
Pressure - Select the pressure of the eraser.
Softness - Select the softness. A high value makes the
eraser softer, whereas a low value scratches the paper
and leaves the paper structure more visible.
Keep Layer Wet - Enable this option if you want the
eraser to keep the erased area wet for further painting.
By default Eraser completely dries the erased area.
TIP 1: Set “Pressure” to the low values and eraser will lightly scratch the painting.
Tip 2: You can set tablet’s pen eraser tip to eraser or other tools in Rebelle via Preferences ->
Tools (hold). Select Eraser and set it to Pen (Eraser) at the bottom of the Preferences window.
15
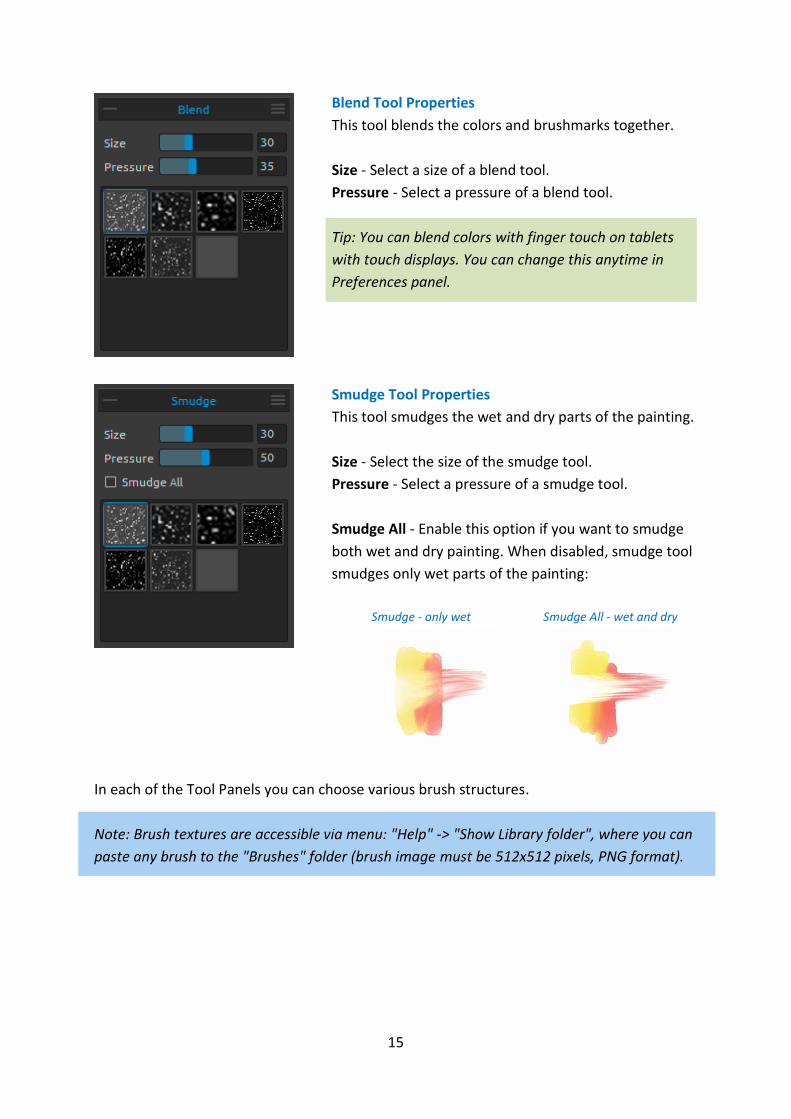
Blend Tool Properties
This tool blends the colors and brushmarks together.
Size - Select a size of a blend tool.
Pressure - Select a pressure of a blend tool.
Tip: You can blend colors with finger touch on tablets
with touch displays. You can change this anytime in
Preferences panel.
Smudge Tool Properties
This tool smudges the wet and dry parts of the painting.
Size - Select the size of the smudge tool.
Pressure - Select a pressure of a smudge tool.
Smudge All - Enable this option if you want to smudge
both wet and dry painting. When disabled, smudge tool
smudges only wet parts of the painting:
Smudge - only wet Smudge All - wet and dry
In each of the Tool Panels you can choose various brush structures.
Note: Brush textures are accessible via menu: "Help" -> "Show Library folder", where you can
paste any brush to the "Brushes" folder (brush image must be 512x512 pixels, PNG format).
16
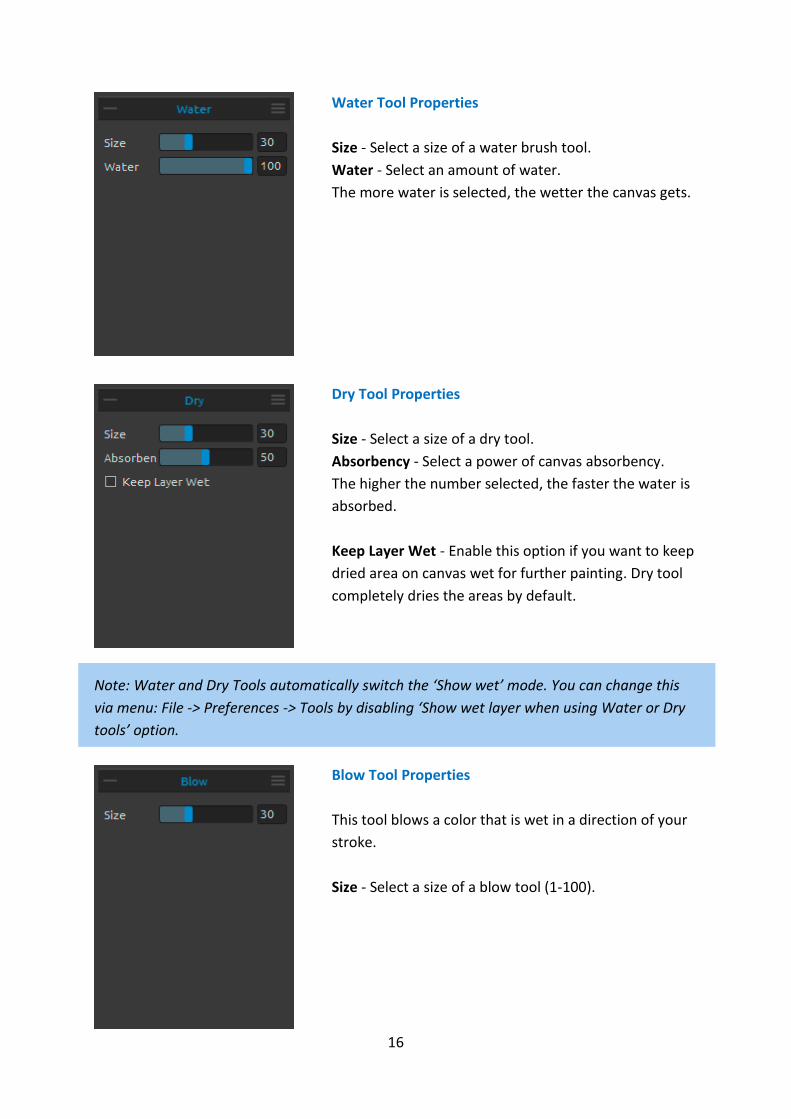
Water Tool Properties
Size - Select a size of a water brush tool.
Water - Select an amount of water.
The more water is selected, the wetter the canvas gets.
Dry Tool Properties
Size - Select a size of a dry tool.
Absorbency - Select a power of canvas absorbency.
The higher the number selected, the faster the water is
absorbed.
Keep Layer Wet - Enable this option if you want to keep
dried area on canvas wet for further painting. Dry tool
completely dries the areas by default.
Note: Water and Dry Tools automatically switch the ‘Show wet’ mode. You can change this
via menu: File -> Preferences -> Tools by disabling ‘Show wet layer when using Water or Dry
tools’ option.
Blow Tool Properties
This tool blows a color that is wet in a direction of your
stroke.
Size - Select a size of a blow tool (1-100).
17
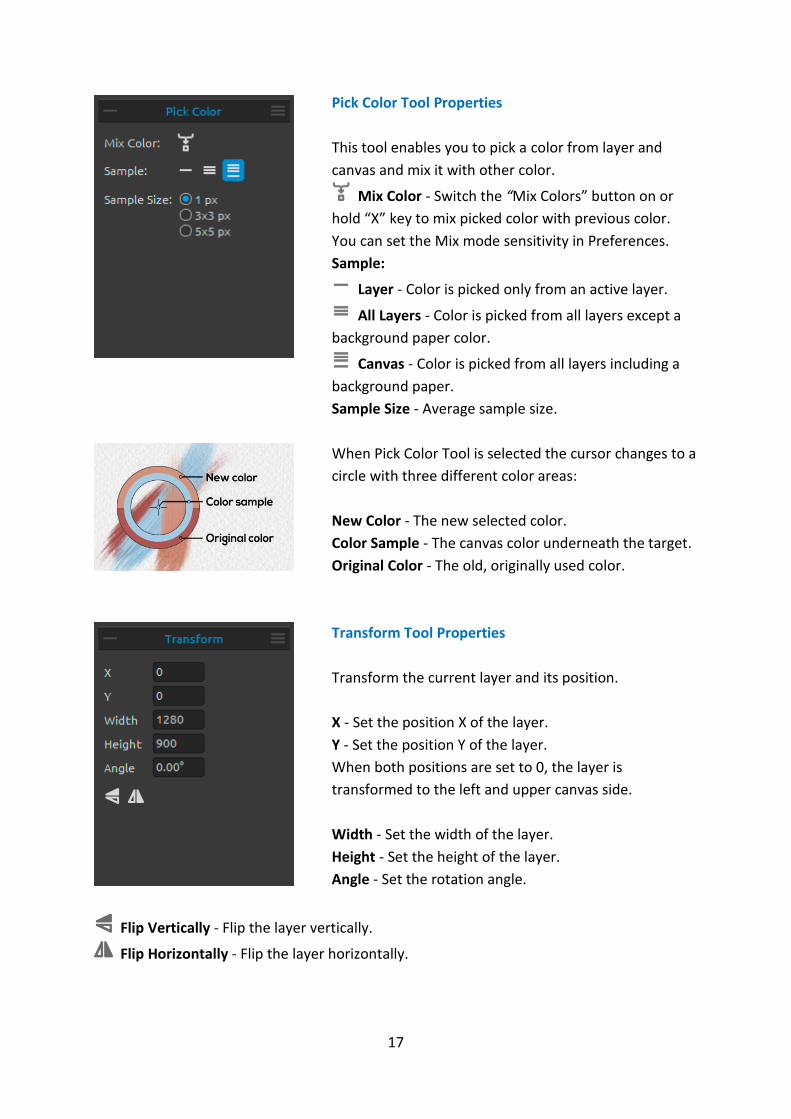
Pick Color Tool Properties
This tool enables you to pick a color from layer and
canvas and mix it with other color.
Mix Color - Switch the “Mix Colors” button on or
hold “X” key to mix picked color with previous color.
You can set the Mix mode sensitivity in Preferences.
Sample:
Layer - Color is picked only from an active layer.
All Layers - Color is picked from all layers except a
background paper color.
Canvas - Color is picked from all layers including a
background paper.
Sample Size - Average sample size.
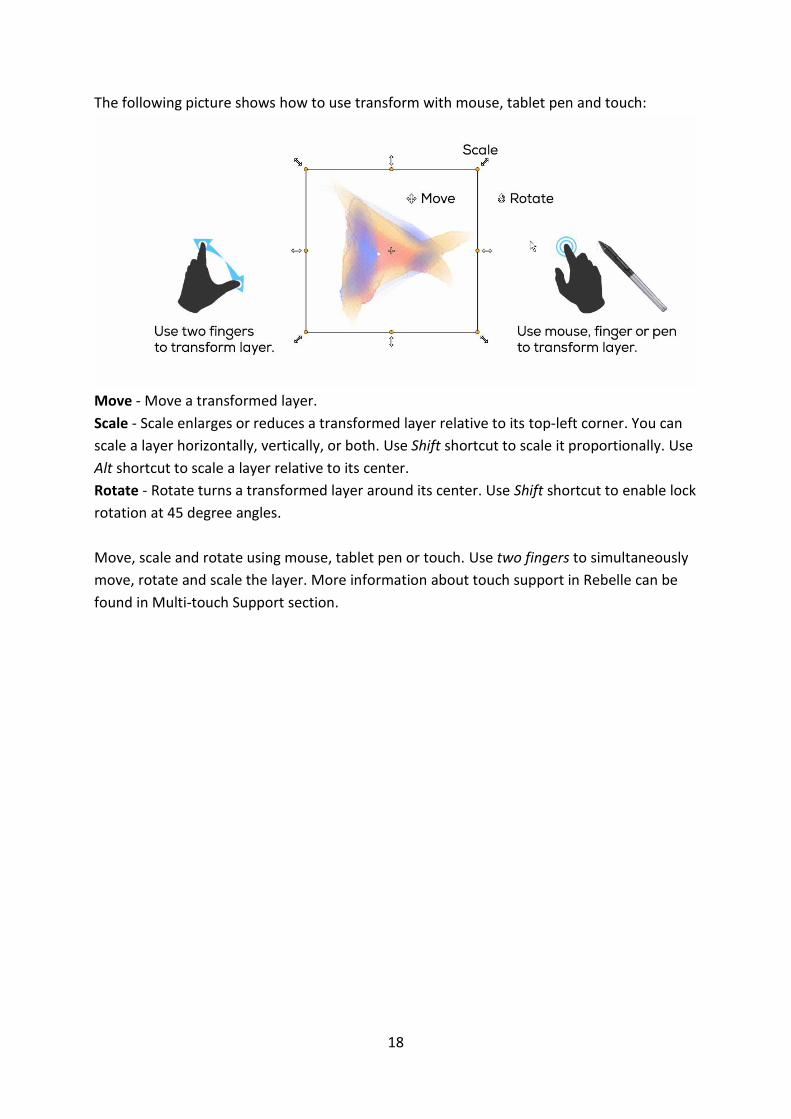
When Pick Color Tool is selected the cursor changes to a
circle with three different color areas:
New Color - The new selected color.
Color Sample - The canvas color underneath the target.
Original Color - The old, originally used color.
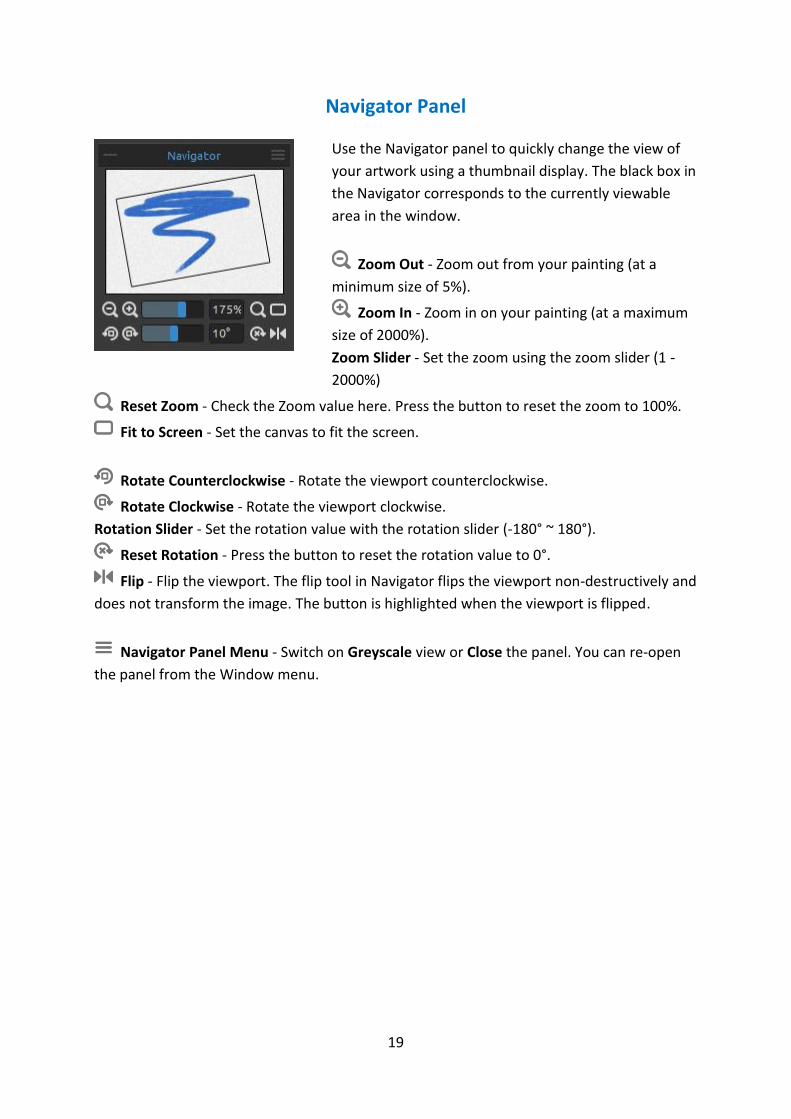
Transform Tool Properties
Transform the current layer and its position.
X - Set the position X of the layer.
Y - Set the position Y of the layer.
When both positions are set to 0, the layer is
transformed to the left and upper canvas side.
Width - Set the width of the layer.
Height - Set the height of the layer.
Angle - Set the rotation angle.
Flip Vertically - Flip the layer vertically.
Flip Horizontally - Flip the layer horizontally.
18
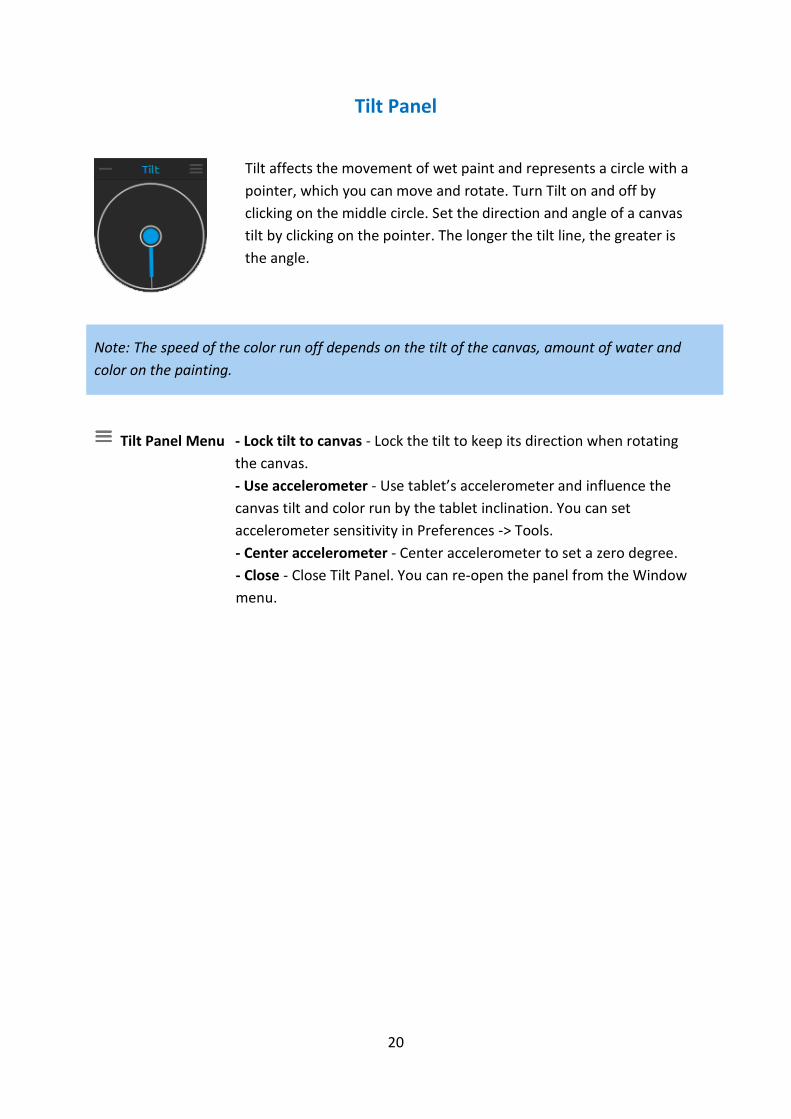
The following picture shows how to use transform with mouse, tablet pen and touch:
Move - Move a transformed layer.
Scale - Scale enlarges or reduces a transformed layer relative to its top-left corner. You can
scale a layer horizontally, vertically, or both. Use Shift shortcut to scale it proportionally. Use
Alt shortcut to scale a layer relative to its center.
Rotate - Rotate turns a transformed layer around its center. Use Shift shortcut to enable lock
rotation at 45 degree angles.
Move, scale and rotate using mouse, tablet pen or touch. Use two fingers to simultaneously
move, rotate and scale the layer. More information about touch support in Rebelle can be
found in Multi-touch Support section.
19
Navigator Panel
Use the Navigator panel to quickly change the view of
your artwork using a thumbnail display. The black box in
the Navigator corresponds to the currently viewable
area in the window.
Zoom Out - Zoom out from your painting (at a
minimum size of 5%).
Zoom In - Zoom in on your painting (at a maximum
size of 2000%).
Zoom Slider - Set the zoom using the zoom slider (1 -
2000%)
Reset Zoom - Check the Zoom value here. Press the button to reset the zoom to 100%.
Fit to Screen - Set the canvas to fit the screen.
Rotate Counterclockwise - Rotate the viewport counterclockwise.
Rotate Clockwise - Rotate the viewport clockwise.
Rotation Slider - Set the rotation value with the rotation slider (-180° ~ 180°).
Reset Rotation - Press the button to reset the rotation value to 0°.
Flip - Flip the viewport. The flip tool in Navigator flips the viewport non-destructively and
does not transform the image. The button is highlighted when the viewport is flipped.
Navigator Panel Menu - Switch on Greyscale view or Close the panel. You can re-open
the panel from the Window menu.
20
Tilt Panel
Tilt affects the movement of wet paint and represents a circle with a
pointer, which you can move and rotate. Turn Tilt on and off by
clicking on the middle circle. Set the direction and angle of a canvas
tilt by clicking on the pointer. The longer the tilt line, the greater is
the angle.
Note: The speed of the color run off depends on the tilt of the canvas, amount of water and
color on the painting.
Tilt Panel Menu - Lock tilt to canvas - Lock the tilt to keep its direction when rotating
the canvas.
- Use accelerometer - Use tablet’s accelerometer and influence the
canvas tilt and color run by the tablet inclination. You can set
accelerometer sensitivity in Preferences -> Tools.
- Center accelerometer - Center accelerometer to set a zero degree.
- Close - Close Tilt Panel. You can re-open the panel from the Window
menu.
21
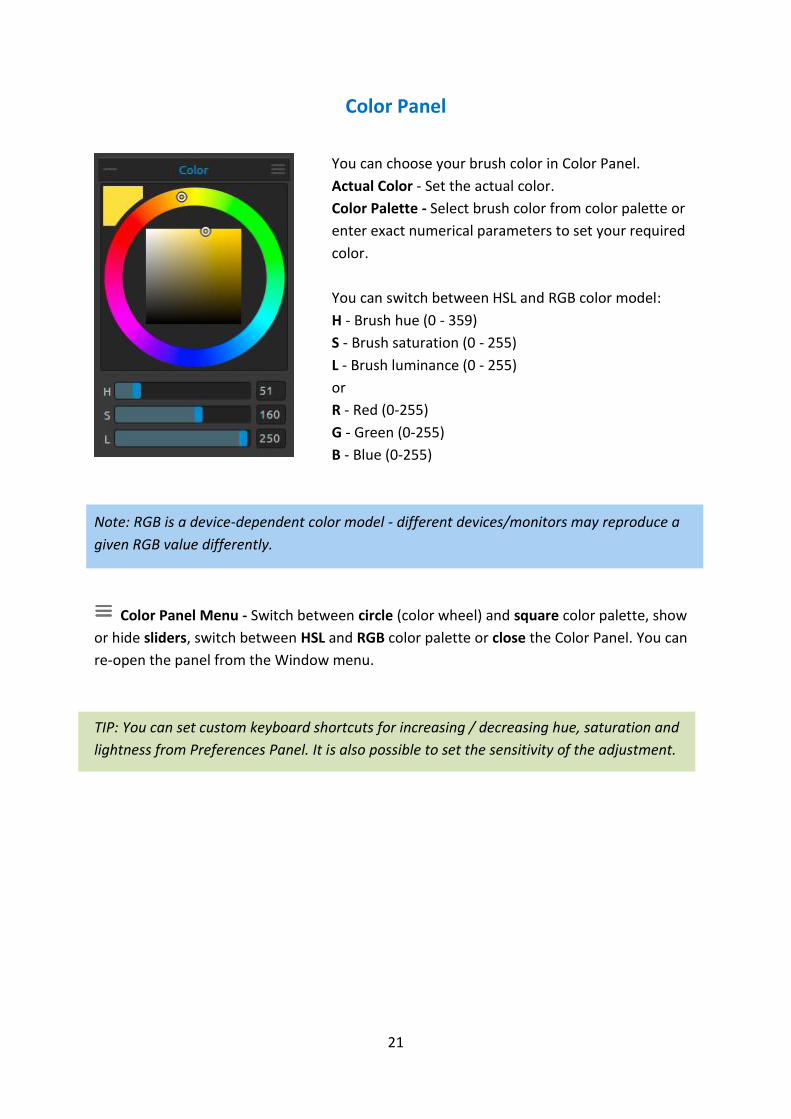
Color Panel
You can choose your brush color in Color Panel.
Actual Color - Set the actual color.
Color Palette - Select brush color from color palette or
enter exact numerical parameters to set your required
color.
You can switch between HSL and RGB color model:
H - Brush hue (0 - 359)
S - Brush saturation (0 - 255)
L - Brush luminance (0 - 255)
or
R - Red (0-255)
G - Green (0-255)
B - Blue (0-255)
Note: RGB is a device-dependent color model - different devices/monitors may reproduce a
given RGB value differently.
Color Panel Menu - Switch between circle (color wheel) and square color palette, show
or hide sliders, switch between HSL and RGB color palette or close the Color Panel. You can
re-open the panel from the Window menu.
TIP: You can set custom keyboard shortcuts for increasing / decreasing hue, saturation and
lightness from Preferences Panel. It is also possible to set the sensitivity of the adjustment.
22
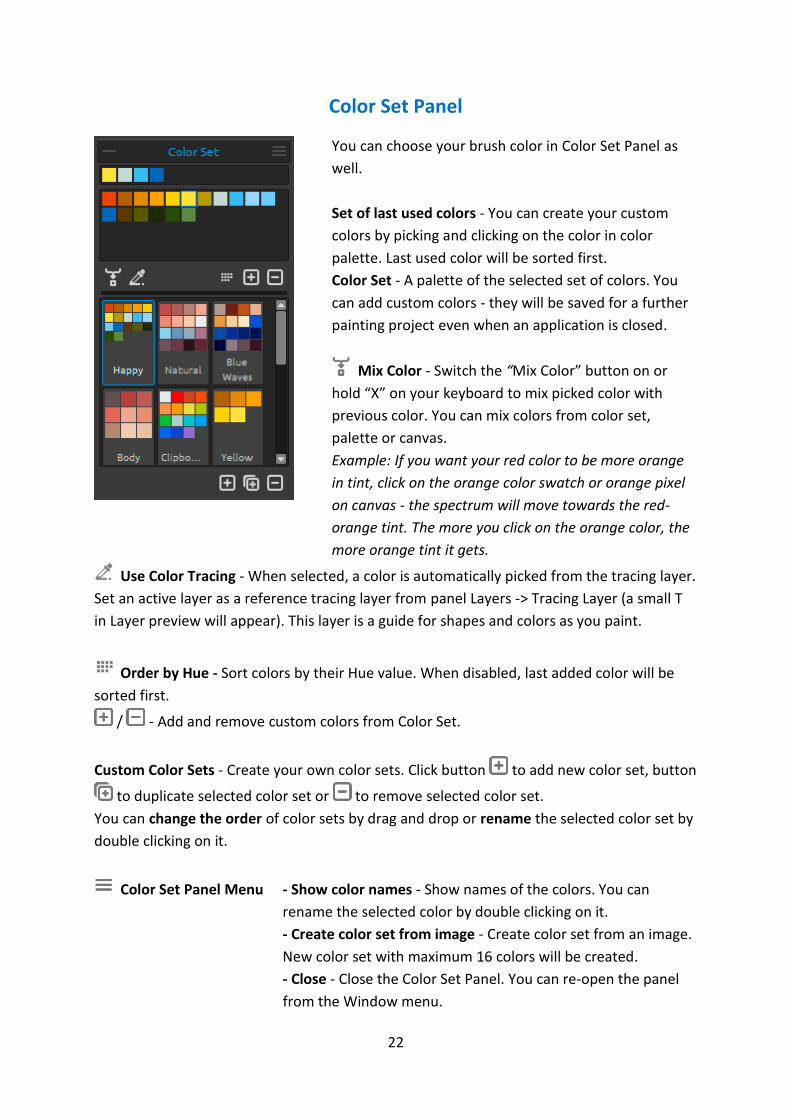
Color Set Panel
You can choose your brush color in Color Set Panel as
well.
Set of last used colors - You can create your custom
colors by picking and clicking on the color in color
palette. Last used color will be sorted first.
Color Set - A palette of the selected set of colors. You
can add custom colors - they will be saved for a further
painting project even when an application is closed.
Mix Color - Switch the “Mix Color” button on or
hold “X” on your keyboard to mix picked color with
previous color. You can mix colors from color set,
palette or canvas.
Example: If you want your red color to be more orange
in tint, click on the orange color swatch or orange pixel
on canvas - the spectrum will move towards the red-
orange tint. The more you click on the orange color, the
more orange tint it gets.
Use Color Tracing - When selected, a color is automatically picked from the tracing layer.
Set an active layer as a reference tracing layer from panel Layers -> Tracing Layer (a small T
in Layer preview will appear). This layer is a guide for shapes and colors as you paint.
Order by Hue - Sort colors by their Hue value. When disabled, last added color will be
sorted first.
/ - Add and remove custom colors from Color Set.
Custom Color Sets - Create your own color sets. Click button to add new color set, button
to duplicate selected color set or to remove selected color set.
You can change the order of color sets by drag and drop or rename the selected color set by
double clicking on it.
Color Set Panel Menu - Show color names - Show names of the colors. You can
rename the selected color by double clicking on it.
- Create color set from image - Create color set from an image.
New color set with maximum 16 colors will be created.
- Close - Close the Color Set Panel. You can re-open the panel
from the Window menu.
23
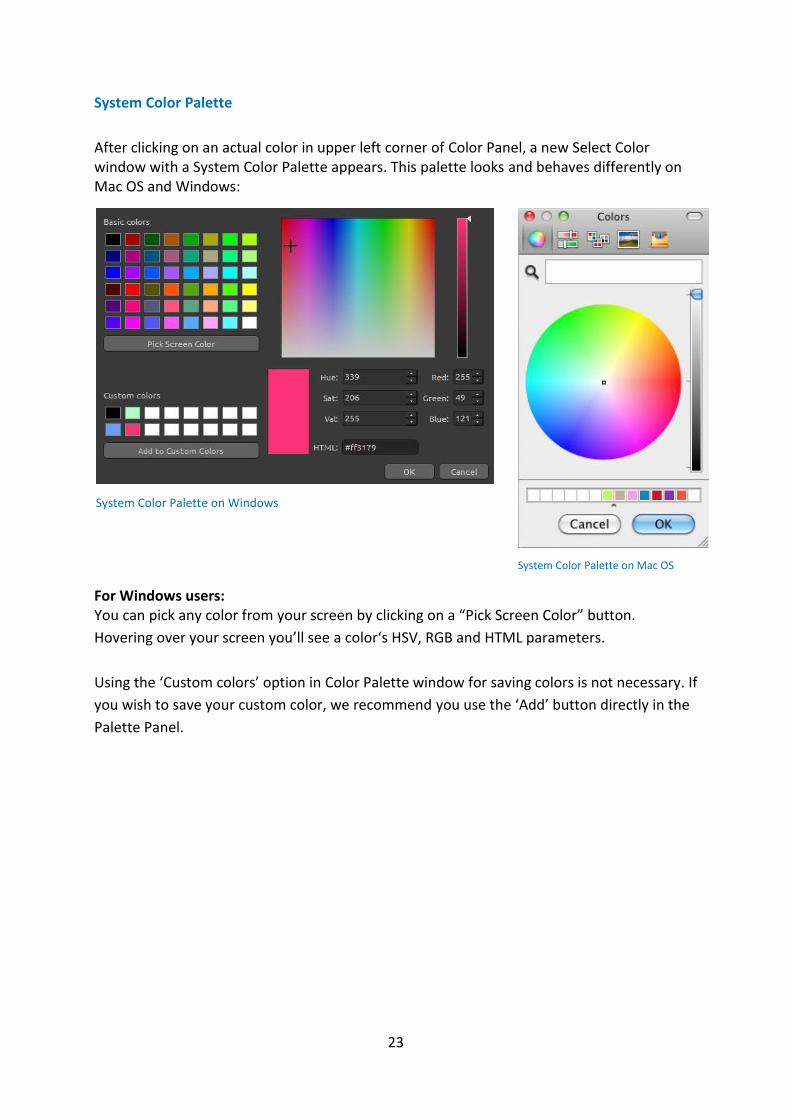
System Color Palette
After clicking on an actual color in upper left corner of Color Panel, a new Select Color window with a System Color Palette appears. This palette looks and behaves differently on Mac OS and Windows:
For Windows users: You can pick any color from your screen by clicking on a “Pick Screen Color” button.
Hovering over your screen you’ll see a color‘s HSV, RGB and HTML parameters.
Using the ‘Custom colors’ option in Color Palette window for saving colors is not necessary. If
you wish to save your custom color, we recommend you use the ‘Add’ button directly in the
Palette Panel.
System Color Palette on Windows
System Color Palette on Mac OS
24
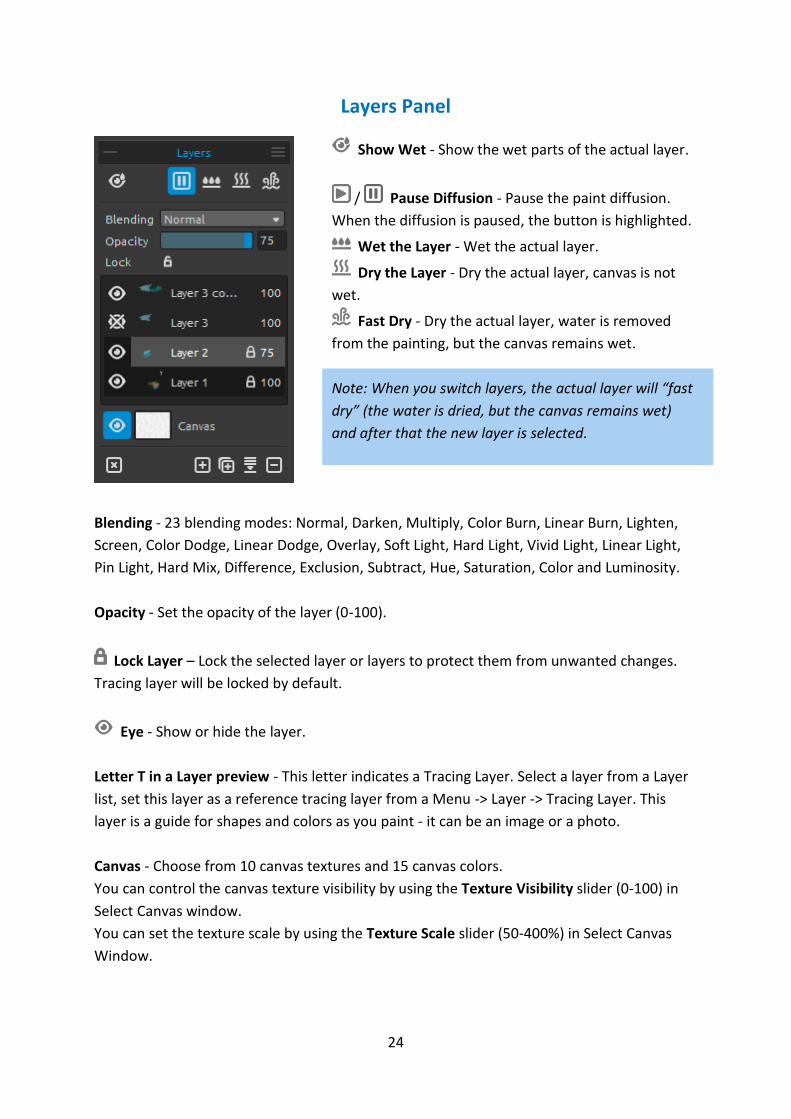
Layers Panel
Show Wet - Show the wet parts of the actual layer.
/ Pause Diffusion - Pause the paint diffusion.
When the diffusion is paused, the button is highlighted.
Wet the Layer - Wet the actual layer.
Dry the Layer - Dry the actual layer, canvas is not
wet.
Fast Dry - Dry the actual layer, water is removed
from the painting, but the canvas remains wet.
Note: When you switch layers, the actual layer will “fast
dry” (the water is dried, but the canvas remains wet)
and after that the new layer is selected.
Blending - 23 blending modes: Normal, Darken, Multiply, Color Burn, Linear Burn, Lighten,
Screen, Color Dodge, Linear Dodge, Overlay, Soft Light, Hard Light, Vivid Light, Linear Light,
Pin Light, Hard Mix, Difference, Exclusion, Subtract, Hue, Saturation, Color and Luminosity.
Opacity - Set the opacity of the layer (0-100).
Lock Layer – Lock the selected layer or layers to protect them from unwanted changes.
Tracing layer will be locked by default.
Eye - Show or hide the layer.
Letter T in a Layer preview - This letter indicates a Tracing Layer. Select a layer from a Layer
list, set this layer as a reference tracing layer from a Menu -> Layer -> Tracing Layer. This
layer is a guide for shapes and colors as you paint - it can be an image or a photo.
Canvas - Choose from 10 canvas textures and 15 canvas colors.
You can control the canvas texture visibility by using the Texture Visibility slider (0-100) in
Select Canvas window.
You can set the texture scale by using the Texture Scale slider (50-400%) in Select Canvas
Window.
25
TIP: Click on the eye next to a canvas preview icon to show or hide canvas texture. When
the canvas texture is hidden, you can save your artwork with transparent background.
Find more information about canvas textures in the Art Canvases section.
Clear Layer - Clear layer content (shortcut Del).
New Layer - Add the new layer.
Duplicate Layer - Duplicate one or more selected layers.
Merge Layers - Merge more layers into a single layer. If only one layer is selected, it will
be automatically merged with the layer underneath it.
Remove Layer - Delete one or more selected layers.
TIP: Drag the selected layer above any of these buttons to execute their functions on that
layer.
You can rename a selected layer by double-clicking on it in the Layers list.
You can move the layers by drag & dropping to sort them into the desired order.
Layers Panel Menu - Select a Tracing layer or Close the panel. You can re-open the panel
from the Window menu.
26
The Menu Bar
File - Contains items related to loading, saving, exporting and publishing your paintings.
Edit - Contains items related to editing the painting process and the canvas.
Layer - Contains items related to the layers.
View - Contains items related to the viewport.
Window - Contains items related to the user interface.
Help - Contains items that let you get help on the application, or look for updates on
website.
File Menu
The File Menu contains items related to your painting. They work as follows:
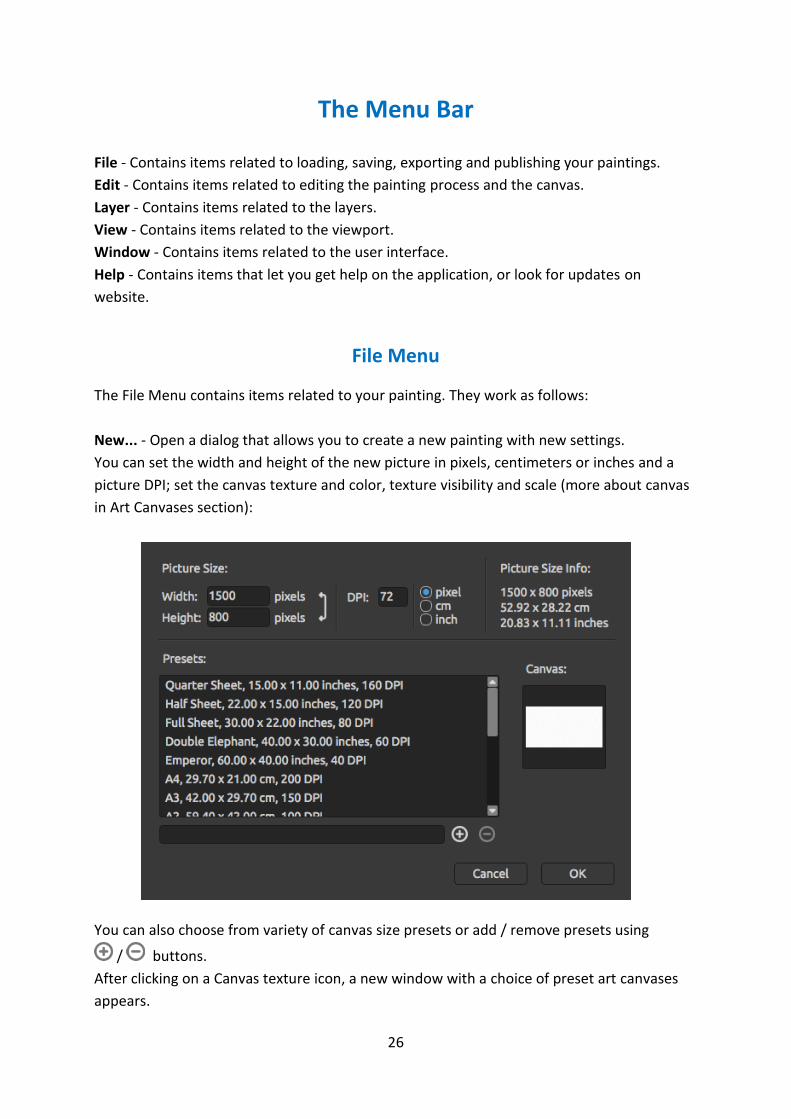
New... - Open a dialog that allows you to create a new painting with new settings.
You can set the width and height of the new picture in pixels, centimeters or inches and a
picture DPI; set the canvas texture and color, texture visibility and scale (more about canvas
in Art Canvases section):
You can also choose from variety of canvas size presets or add / remove presets using
/ buttons.
After clicking on a Canvas texture icon, a new window with a choice of preset art canvases
appears.
27
According to the DPI you set, picture size information will be automatically calculated both in
centimeters and inches.
Note: Please be aware that setting bigger resolutions for your artwork may slow down your
computer; especially if you use a lot of water when painting.
Open... - Open a file dialog that allows you to load a painting from disk.
Open Recent - Open one of the last saved artwork.
Save - Save your painting. If you have not saved it before, you are prompted to enter a
name.
Save As… - Save a copy of your current painting as a new one in .reb, .png, .jpg, .bmp and .tif
file formats.
Iterative Save - Save sequentially numbered versions of an artwork. The first time Iterative
Save is used, "_1" is appended to the file name. Each subsequent time the number
increments by 1 and a new sequentially numbered file is created.
Import… - Import any image file in .png, .jpg, .bmp and .tif format as a new layer.
Publish… - Publish your painting to Rebelle Gallery. Enter the name of the painting;
optionally write a description and tags.
Publish preferences… - A sub-menu is containing Gallery preferences.
Preferences… - Set General, Tools, Palette and Keyboard Preferences. You can find more
information in Preferences section later on in the manual.
Quit - Close the application. (Only on Windows).
TIP: You can also Drag and Drop a picture from any application, file manager or internet
browser directly to Rebelle if the application allows it.
For more information on creating, loading and saving your paintings, see the Creating,
Opening and Saving Paintings section later on in the manual.
Edit Menu
Undo - Undo the last painting operation you performed. Number of undo-steps depends on
your computer memory. Maximum number of undo steps is set to 30.
Redo - Redo the last operation you undid.
28
Layer Menu
New Layer - Add new layer.
Duplicate Layer - Duplicate one or more selected layers.
Merge Layers - Merge layers into one layer.
Remove Layer - Remove one or more selected layers.
Show Layer - Show or hide an individual layer.
Tracing Layer - Set an active layer as a reference tracing
layer (a small T in Layer preview will appear). This layer
is a guide for shapes and colors as you paint - it can be an image or photo. You can set a
Tracing layer also from the Layers panel menu.
Use Color Tracing - When selected, a color is automatically picked from the tracing layer.
Transform Layer - Move and resize selected layer.
Clear Layer - Clear the layer.
View Menu
Zoom In - Zoom in on your artwork (at maximum size of 2000%).
Zoom Out - Zoom out from your artwork (at a minimum size of 5%).
Zoom 100% - Check up a zoom value. Press the button to reset the zoom to 100%.
Fit to Screen - Set the canvas to fit the screen.
Greyscale - View the canvas in greyscale mode.
Show Cursor - Show or hide the cursor.
Stay on Top - Application will stay always on a top of other applications.
Enter Fullscreen - Switch the application window to full screen mode. (Press Esc to quit).
Window Menu
Tools - Show or hide the Tools Panel.
Properties - Show or hide the Properties Panel.
Color - Show or hide the Color Panel.
Color Set - Show or hide the Color Set Panel.
Tilt - Show or hide the Tilt Panel.
Navigator - Show or hide the Navigator Panel.
29
Layers - Show or hide the Layers Panel.
Show Panels - Show or hide panels to get more space for painting.
Reset to Default - Reset user interface to default.
Help Menu
Help - Open this Users’ Manual document.
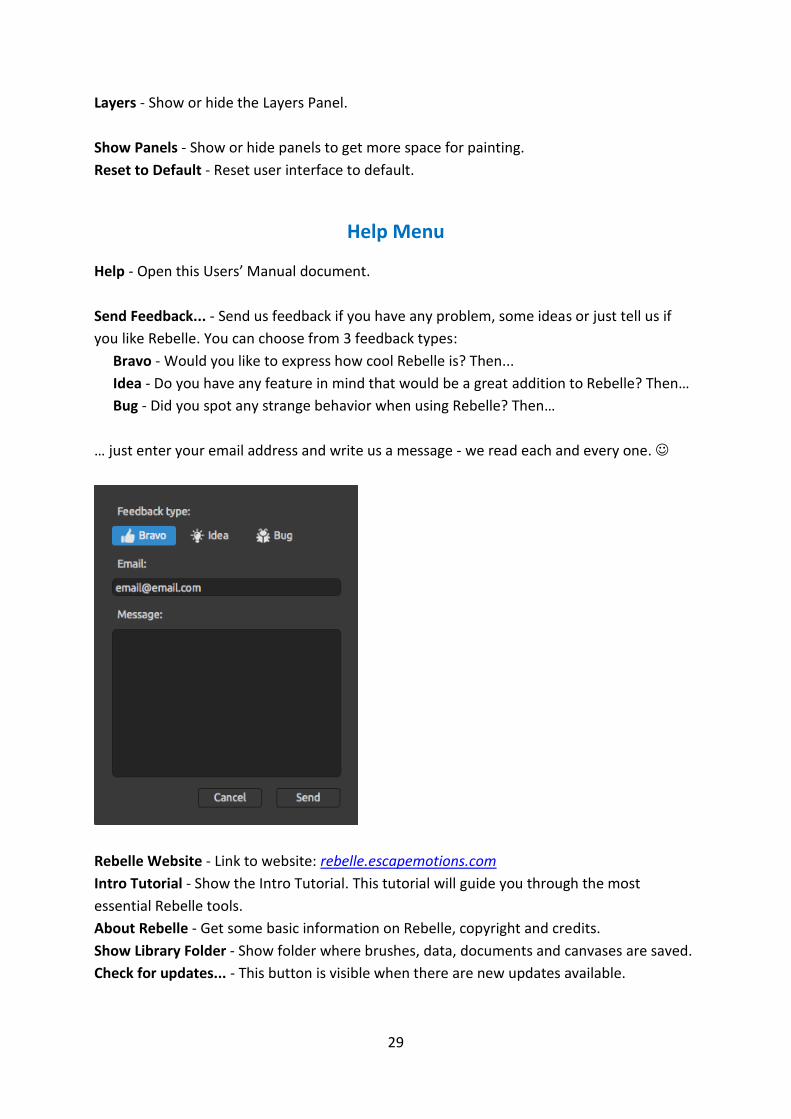
Send Feedback... - Send us feedback if you have any problem, some ideas or just tell us if
you like Rebelle. You can choose from 3 feedback types:
Bravo - Would you like to express how cool Rebelle is? Then...
Idea - Do you have any feature in mind that would be a great addition to Rebelle? Then…
Bug - Did you spot any strange behavior when using Rebelle? Then…
… just enter your email address and write us a message - we read each and every one.
Rebelle Website - Link to website: rebelle.escapemotions.com
Intro Tutorial - Show the Intro Tutorial. This tutorial will guide you through the most
essential Rebelle tools.
About Rebelle - Get some basic information on Rebelle, copyright and credits.
Show Library Folder - Show folder where brushes, data, documents and canvases are saved.
Check for updates... - This button is visible when there are new updates available.
30
Preferences
Set General, Tools, Palette and Keyboard preferences form application menu.
- General - Startup Screen - Show “New Artwork” dialog at application startup - Check
this option if you want the New Artwork dialog to open every time you launch
the application.
- Tablet Options - Choose whether your tablet should use mouse or pen
position and Wacom device (WinTab) or Microsoft Ink device. Please restart
Rebelle to apply changes.
- Enable / disable multitouch gestures in Rebelle.
- Interface - Set the scale to resize the interface (70-200%).
- Canvas - Zoom at cursor - Check this option if you want to zoom at the
cursor, not at the canvas center.
- Jpeg Compression - Set the quality of jpeg file (0-100).
- Edit Box Sensitivity - Set the sensitivity of spinbox editing for Mouse or
Tablet (1-100).
- Language - Select the user interface language. Choose whether the
languages should update automatically or not.
- Tools - Brushes - Select the last paintbrush when color is picked from palette -
Check this option if you want the last used paintbrush to be automatically
selected after picking a color from color panel.
- Show wet layer when using Water or Dry tool - Check this option if
you want the Water and Dry tools automatically activate Show wet mode.
- Lazy Mouse - Set the strength of the lazy mouse (0-10). The higher number
on lazy mouse strength slider, the smoother lines you can draw.
- Accelerometer - Set the sensitivity of the accelerometer (1-10).
- Palette - Tracing Color Sample Size - Choose the average sample size of color tracing
(1 pixel, 3x3 pixels, 5x5 pixels).
- Mix Color - Set the sensitivity of Mix Color. The sensitivity influences the
number of steps between two mixed colors. When sensitivity is low, fewer
steps (clicks) are required to reach the second mix color. When sensitivity is
high, it takes more clicks to reach the second mixed color.
- Adjust color with keyboard shortcut - Set the sensitivity for color adjustment.
The sensitivity influences the distance between two colors. When sensitivity is
high, the distance between two colors on color palette will be smaller.
- Keyboard - Set custom keyboard shortcuts. Click Reset to reset the selected shortcut.
Click Reset All to reset all shortcuts.
Click OK to confirm the changes you made in Preferences or Cancel if you decide not to.
31
Starting Painting
Workflow options
Start a new painting with a blank canvas
1. Click File -> New… and a new window appears.
2. Set the width, height of the image, canvas texture, color and the image DPI.
3. Choose the brush color from the Color or Color Set Panel.
4. Choose the tool, set brush size and other parameters from the Properties Panel and
start painting.
Start with a photo or a reference picture
1. Click File -> Open… and choose your reference picture.
2. Click Add Layer from Layers Panel to create a new layer on the top of the reference
layer.
3. Choose the brush color from the Color or Color Set Panel.
4. Choose the tool, set brush size and other parameters from the Properties Panel and
start painting.
You can import a sketch previously scanned or drawn in a 3rd party software in .png, .jpg,
.bmp and .tif format by clicking on Menu -> File -> Import....
You can also Drag and Drop a picture from any application or internet browser directly to
Rebelle as a new layer.
Working with Water
When painting with a wet medium (watercolor, acrylic and ink pen) you can set the amount
of water to be used. With more water, the color will spread faster on the layer and wet
colors are mixed.
Not only colors can be wet, with a ‘Wet the Layer’ button (in Layers Panel) you can wet
the whole layer. How the painting is blended and dried depends on the water and the
wetness of the canvas underneath it.
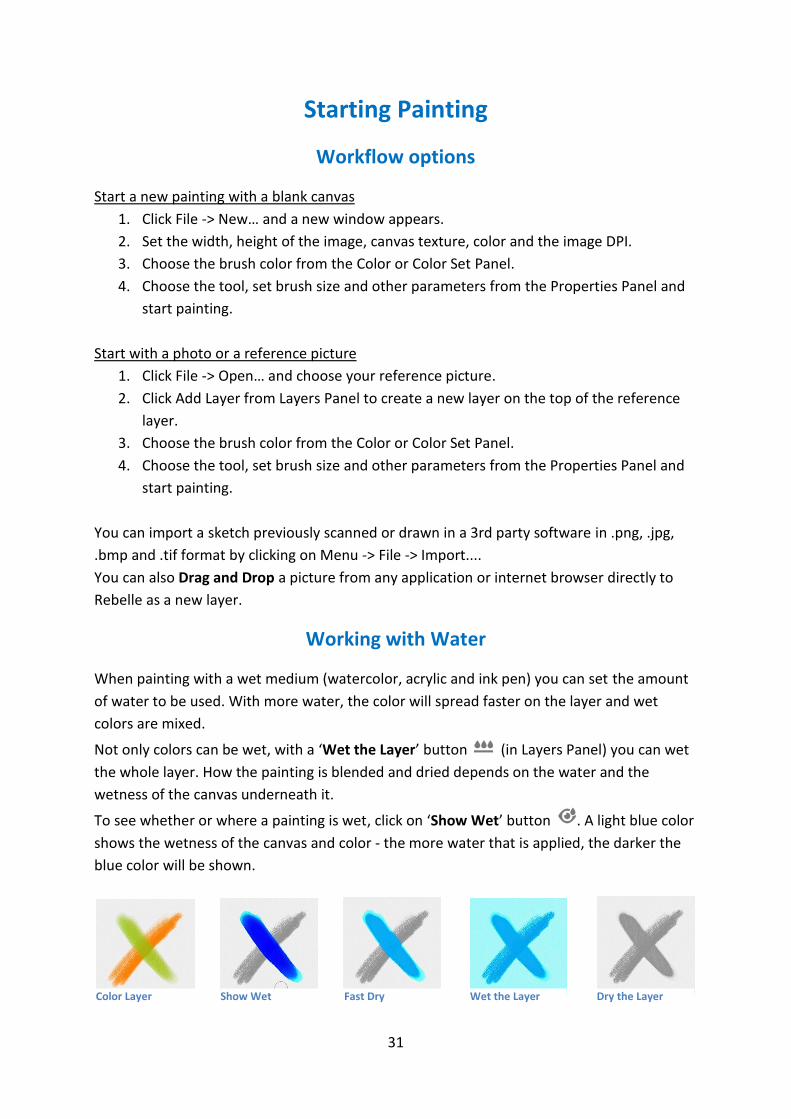
To see whether or where a painting is wet, click on ‘Show Wet’ button . A light blue color
shows the wetness of the canvas and color - the more water that is applied, the darker the
blue color will be shown.
Color Layer Show Wet Fast Dry Dry the Layer Wet the Layer
32
To speed up your painting process we implemented 2 functions:
‘Dry the layer’ button completely dries the active layer with all its contents - painting,
canvas and water applied.
You can use a ‘Fast Dry’ button when you want water to be removed from your active
layer but you want to keep the canvas wet.
TIP: Pause the fluid simulation anytime during painting by clicking Pause Diffusion button in
Layers panel: / . When diffusion is paused, the button is highlighted.
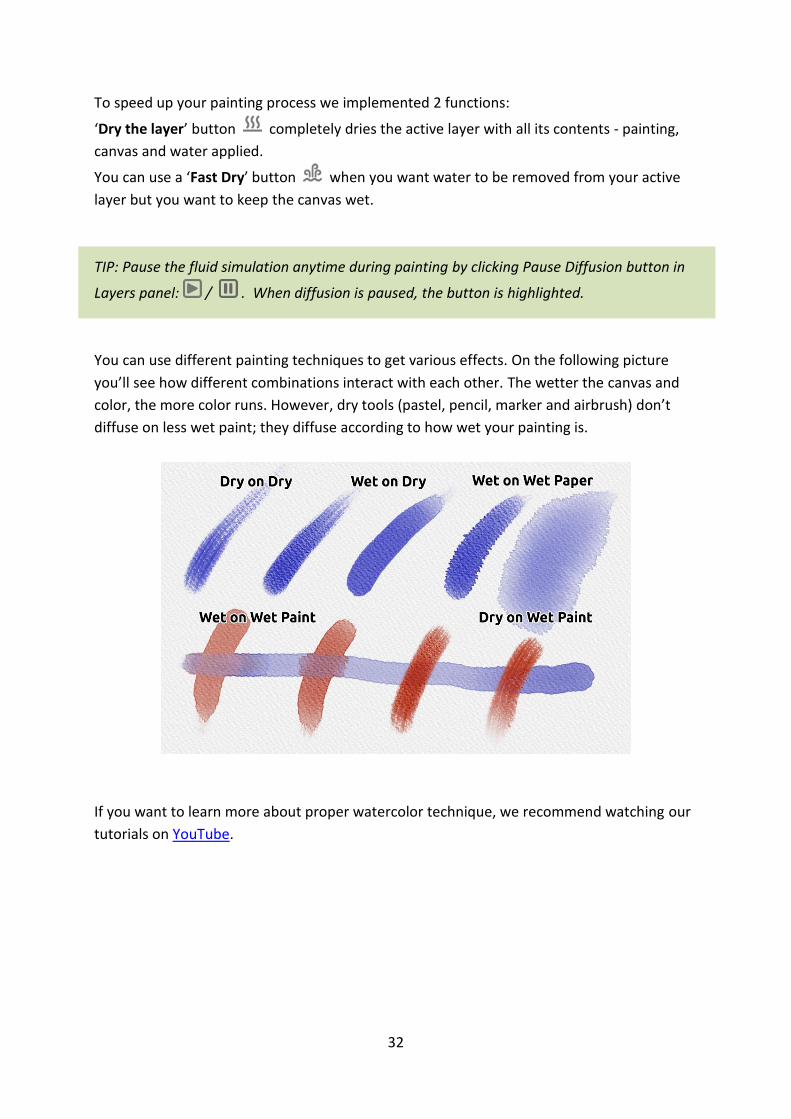
You can use different painting techniques to get various effects. On the following picture
you’ll see how different combinations interact with each other. The wetter the canvas and
color, the more color runs. However, dry tools (pastel, pencil, marker and airbrush) don’t
diffuse on less wet paint; they diffuse according to how wet your painting is.
If you want to learn more about proper watercolor technique, we recommend watching our
tutorials on YouTube.
33
Tracing Option
Rebelle enables you to create paintings by tracing colors from a selected image. You can
Drag and Drop picture directly from any source - folder, browser or website and it opens as a
new layer. Using a tracing option allows you to recreate existing images in your own way.
When using color tracing, the color is applied for each stroke. It means that each brush
stroke picks the color pigment from the first "click" and uses it until you do another click.
Rebelle does not trace all colors from a reference tracing layer during a single stroke.
How to trace an existing or imported image:
1. Click on Menu -> File -> Import... to open the Import dialog box. A picture is imported
as a new layer. You can also drag & drop image directly from any folder or a browser.
2. Select this layer and click on Menu -> Layer -> Tracing Layer. A layer is set as a
reference tracing layer (a small T in layer preview will appear). This layer is a guide for
shapes and colors as you paint. You can set a Tracing layer also from the Layers panel
menu.
3. Add a new layer and click on Menu -> Layer -> Use Color Tracing or click a button
"Use Color Tracing" from Palette Panel.
4. Now you are ready to trace colors from your reference image into an active layer.
If color tracing isn't selected you can paint with other colors. Deselect tracing layer from
Menu -> Layer -> Tracing Layer.
Tracing layer is locked by default to protect it from unwanted changes. You can unlock the
layer by clicking the “lock” button.
Multi-touch Support
Multi-touch support is available for both Windows and Mac OS and provides enhanced
support for tablets with touch and multi-touch displays. You can pan, rotate and zoom the
viewport or individual layers. This provides a seamless and responsive way of positioning and
navigating the canvas.
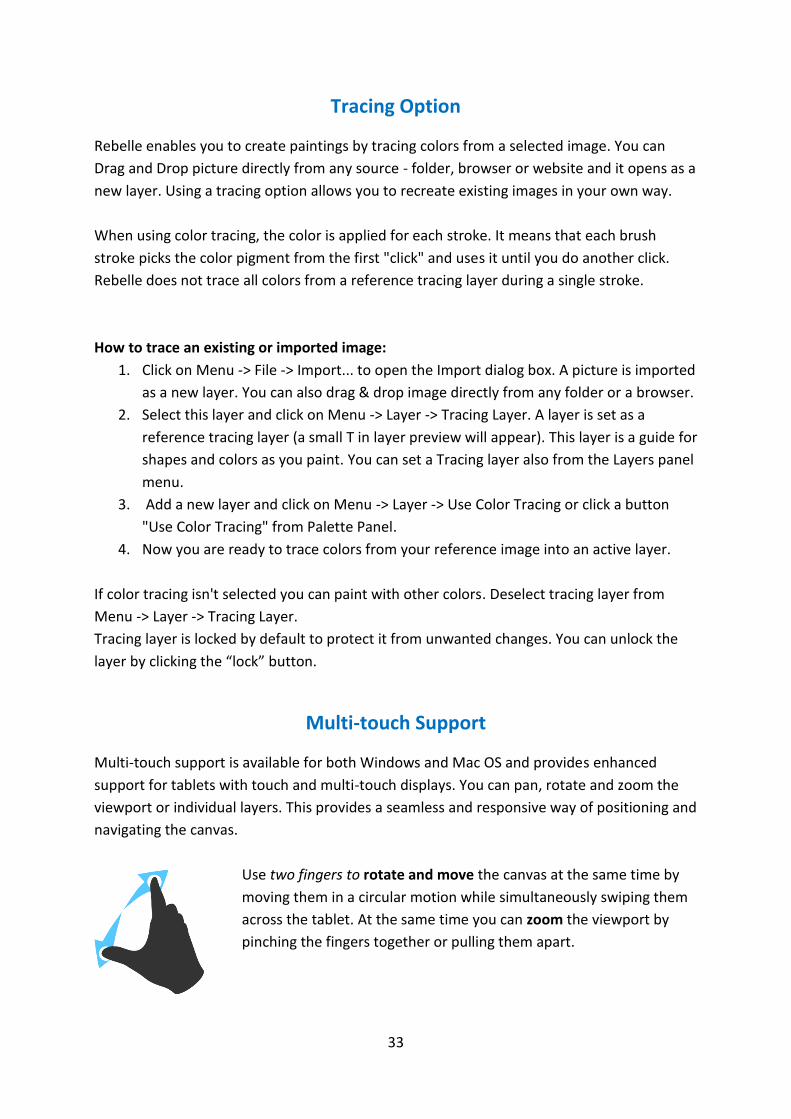
Use two fingers to rotate and move the canvas at the same time by
moving them in a circular motion while simultaneously swiping them
across the tablet. At the same time you can zoom the viewport by
pinching the fingers together or pulling them apart.
34
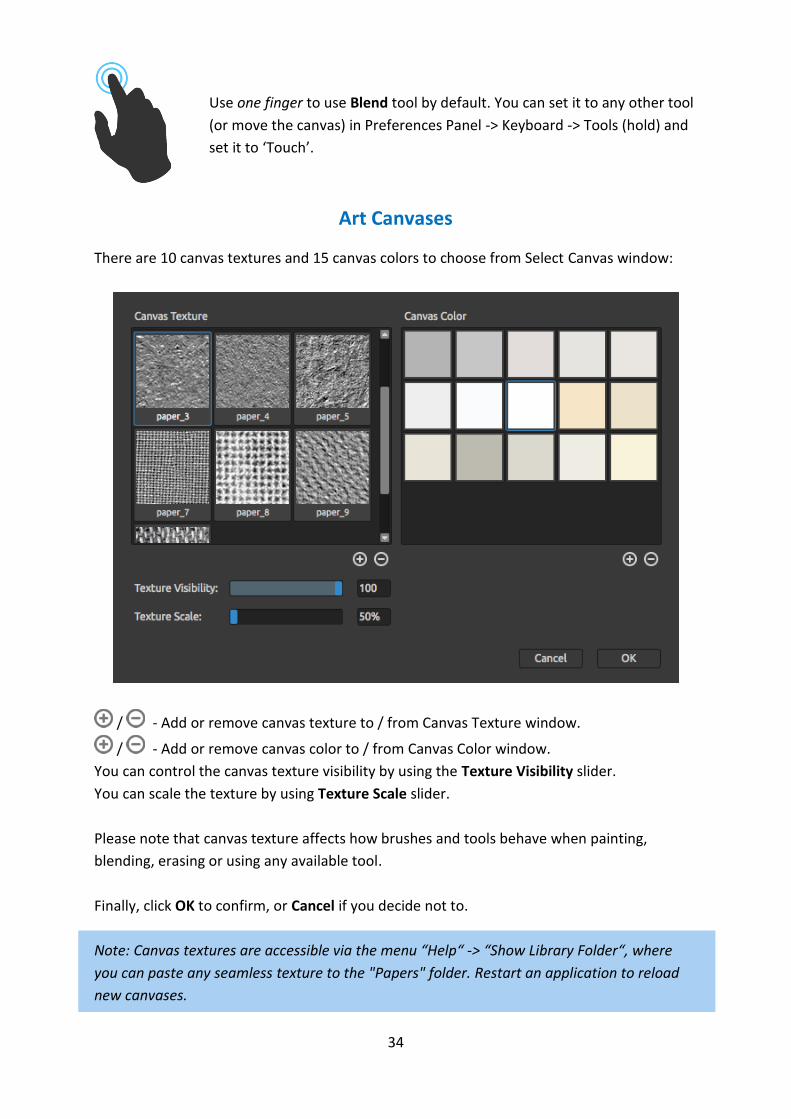
Use one finger to use Blend tool by default. You can set it to any other tool
(or move the canvas) in Preferences Panel -> Keyboard -> Tools (hold) and
set it to ‘Touch’.
Art Canvases
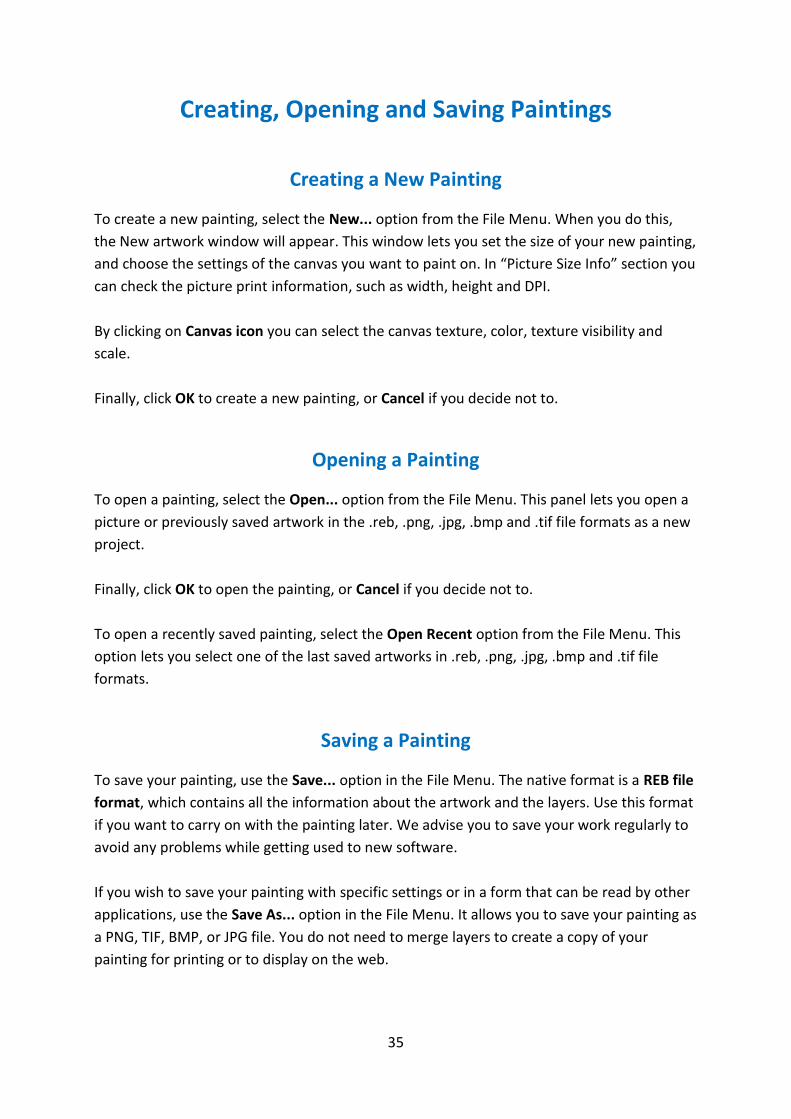
There are 10 canvas textures and 15 canvas colors to choose from Select Canvas window:
/ - Add or remove canvas texture to / from Canvas Texture window.
/ - Add or remove canvas color to / from Canvas Color window.
You can control the canvas texture visibility by using the Texture Visibility slider.
You can scale the texture by using Texture Scale slider.
Please note that canvas texture affects how brushes and tools behave when painting,
blending, erasing or using any available tool.
Finally, click OK to confirm, or Cancel if you decide not to.
Note: Canvas textures are accessible via the menu “Help“ -> “Show Library Folder“, where
you can paste any seamless texture to the "Papers" folder. Restart an application to reload
new canvases.
35
Creating, Opening and Saving Paintings
Creating a New Painting
To create a new painting, select the New... option from the File Menu. When you do this,
the New artwork window will appear. This window lets you set the size of your new painting,
and choose the settings of the canvas you want to paint on. In “Picture Size Info” section you
can check the picture print information, such as width, height and DPI.
By clicking on Canvas icon you can select the canvas texture, color, texture visibility and
scale.
Finally, click OK to create a new painting, or Cancel if you decide not to.
Opening a Painting
To open a painting, select the Open... option from the File Menu. This panel lets you open a
picture or previously saved artwork in the .reb, .png, .jpg, .bmp and .tif file formats as a new
project.
Finally, click OK to open the painting, or Cancel if you decide not to.
To open a recently saved painting, select the Open Recent option from the File Menu. This
option lets you select one of the last saved artworks in .reb, .png, .jpg, .bmp and .tif file
formats.
Saving a Painting
To save your painting, use the Save... option in the File Menu. The native format is a REB file
format, which contains all the information about the artwork and the layers. Use this format
if you want to carry on with the painting later. We advise you to save your work regularly to
avoid any problems while getting used to new software.
If you wish to save your painting with specific settings or in a form that can be read by other
applications, use the Save As... option in the File Menu. It allows you to save your painting as
a PNG, TIF, BMP, or JPG file. You do not need to merge layers to create a copy of your
painting for printing or to display on the web.
36
Note: Please be aware that only REB file contains all the artwork information. PNG, TIF and
BMP file save only color and transparency information. Transparency is not saved in JPG
format.
Finally, click OK to save the painting or Cancel if you decide not to.
Iterative Save - Save sequentially numbered versions of an artwork. The first time Iterative
Save is used, "_1" is appended to the file name. Each subsequent time the number
increments by 1 and a new sequentially numbered file is created.
Closing an Application
If you want to close an application, you can choose from the following options depending on
your operating system:
Windows user
- click on File Menu -> Quit, or
- press a Close button in the upper right
corner of an application, or
- use a shortcut Ctrl+W or Alt+F4
Mac OS user
- click on Rebelle Menu -> Quit, or
- press a Quit button in the upper left
corner of an application, or
- use a shortcut Cmd-Q on Mac OS
Note: Please don’t forget to save your artwork before closing an application.
37
Publish a Painting to Gallery
Creating a Gallery account
To publish your artworks, firstly you have to create an account. To create an account you
have two options:
From application:
Create your Gallery account from Rebelle’s menu File -> Publish Preferences. Set Your name,
Email ("Your ID") and Password to gallery and optionally a link to your Website.
From website:
On the Gallery website press login -> Create Account and enter “Your ID” (registration
email). We will send you a Password, which you can change later on.
Note: You can find "Your ID" in Rebelle’s menu Help -> About Rebelle. If "Your ID" does not
exist, enter your active email.
Publish artwork from Rebelle to Gallery
To publish your painting, use the Publish... option in the File Menu. Enter the Artwork Name,
a picture Description and Tags. Click Publish button. Your picture will be published on the
Gallery website (www.escapemotions.com/gallery) where you can edit pictures later on.
Edit your profile and artworks in Gallery
If you have already created an account, go to Gallery website, press login and enter "Your
ID" and Password.
In Edit Pictures section you can edit your artworks name, description, tags and other
settings.
In My Profile section you can change your Password.
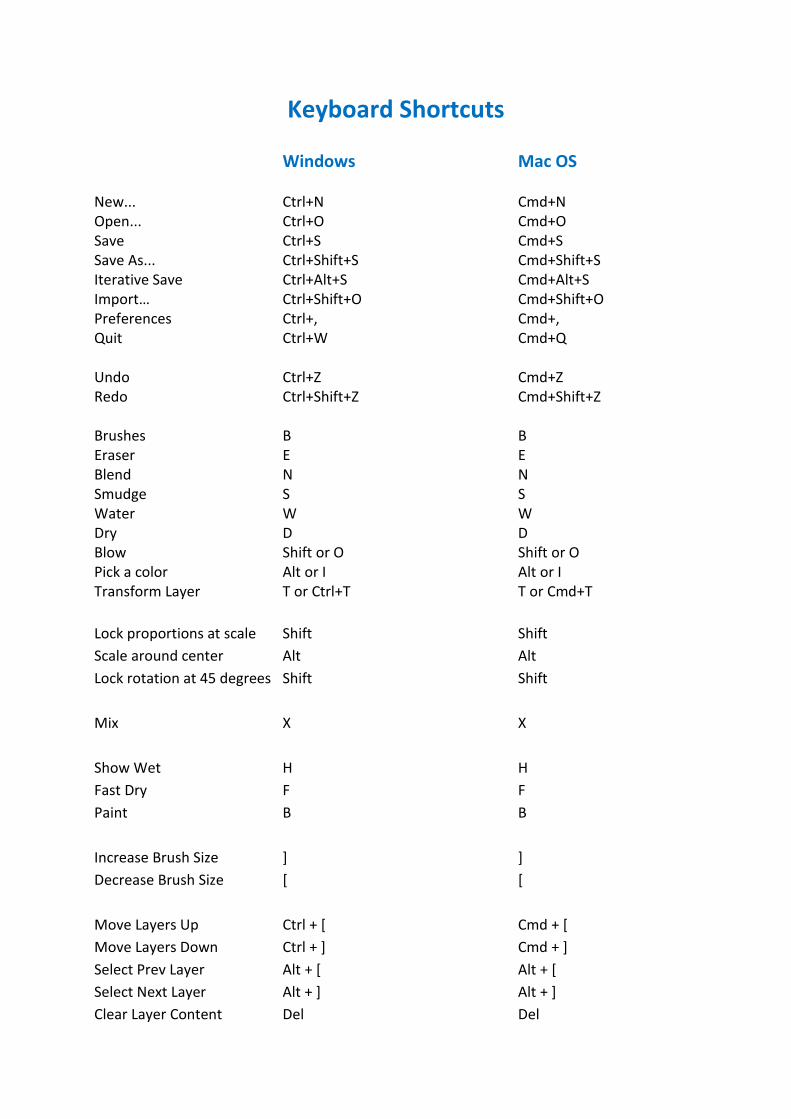
Keyboard Shortcuts
Windows Mac OS New... Ctrl+N Cmd+N Open... Ctrl+O Cmd+O Save Ctrl+S Cmd+S Save As... Ctrl+Shift+S Cmd+Shift+S Iterative Save Ctrl+Alt+S Cmd+Alt+S Import… Ctrl+Shift+O Cmd+Shift+O Preferences Ctrl+, Cmd+, Quit Ctrl+W Cmd+Q Undo Ctrl+Z Cmd+Z Redo Ctrl+Shift+Z Cmd+Shift+Z Brushes B B Eraser E E Blend N N Smudge S S Water W W Dry D D Blow Shift or O Shift or O Pick a color Alt or I Alt or I Transform Layer T or Ctrl+T T or Cmd+T
Lock proportions at scale Shift Shift
Scale around center Alt Alt
Lock rotation at 45 degrees Shift Shift
Mix X X
Show Wet H H
Fast Dry F F
Paint B B
Increase Brush Size ] ]
Decrease Brush Size [ [
Move Layers Up Ctrl + [ Cmd + [
Move Layers Down Ctrl + ] Cmd + ]
Select Prev Layer Alt + [ Alt + [
Select Next Layer Alt + ] Alt + ]
Clear Layer Content Del Del
39
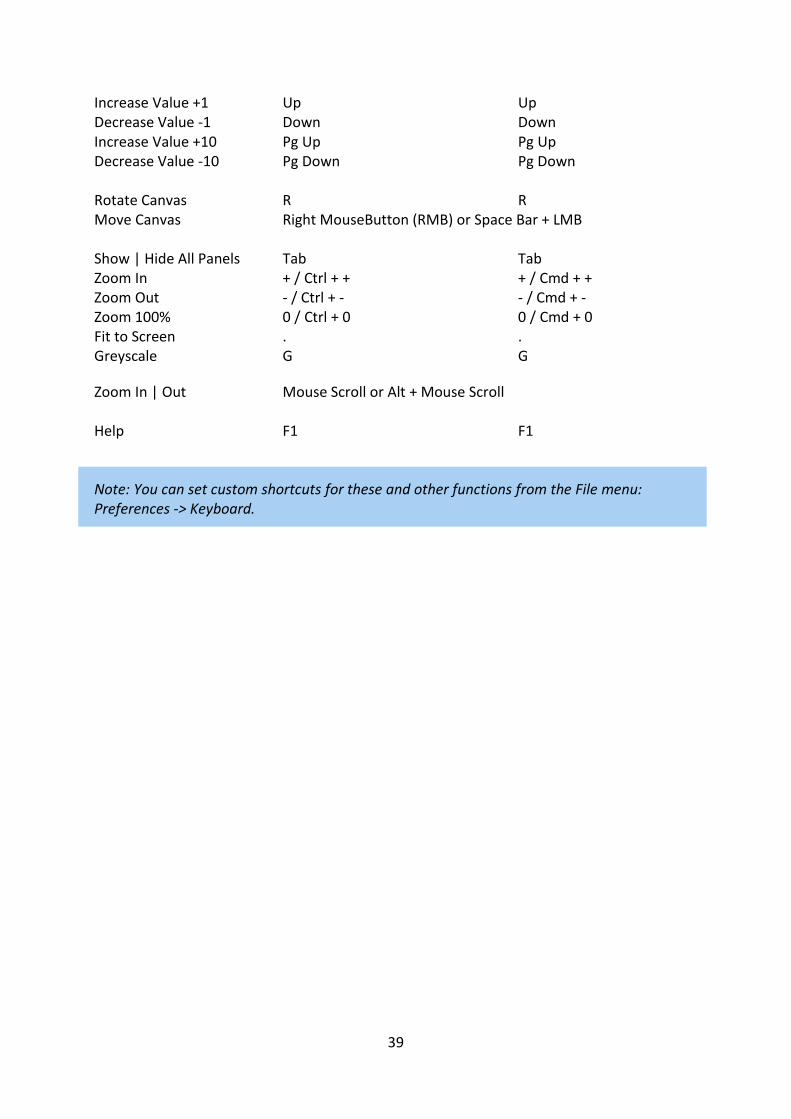
Increase Value +1 Up Up Decrease Value -1 Down Down Increase Value +10 Pg Up Pg Up Decrease Value -10 Pg Down Pg Down Rotate Canvas R R Move Canvas Right MouseButton (RMB) or Space Bar + LMB Show | Hide All Panels Tab Tab Zoom In + / Ctrl + + + / Cmd + + Zoom Out - / Ctrl + - - / Cmd + - Zoom 100% 0 / Ctrl + 0 0 / Cmd + 0 Fit to Screen . . Greyscale G G
Zoom In | Out Mouse Scroll or Alt + Mouse Scroll Help F1 F1 Note: You can set custom shortcuts for these and other functions from the File menu: Preferences -> Keyboard.
40
Copyright & Credits Rebelle © 2016 Escape Motions, s.r.o.
Escape Motions Team: Peter Blaškovič, Michal Fapšo, Ľuboš Tóth, Miroslav Sedlák, Anton Poživenec, Veronika Klimeková, Andrea Vachová, Jaroslav Kaša
Special Thanks to: Everyone who contributed with ideas, suggestions, or helped to finalize Rebelle, especially to Keith Alford, Nigel Brewster, Harvey Bunda, Kris Cooper, Jeanne Corbeil, Sylvia van Dervis, Rana Dias, Matúš Fedorko, Daniel Innes, Vladimir J., Umin Kang, Jim Kanter, Iulia Khestanova, Suawek Kolakowski, John LaBrie, Tomáš Lancz, Francis McKeon, Michelle Parsley, Rastislav Piovarči, Corey Pollack, Elke Schnabel, Kristin Schuricht, Martina Sesterhenn, Tim Shelbourne, Gina Startup, Martin Surovček, Maťo Tondáš, Gregorii Trombo, Oliver Wetter and Blaze Wu. User Interface Icons: "Batch" by Adam Whitcroft
Used Libraries: This application has been developed with the following libraries: Qt 5.4, LGPL license - http://qt-project.org/downloads/ QuaZIP, LGPL license - http://sourceforge.net/projects/quazip/ CryptoPP, Boost Software license - http://www.cryptopp.com/ ImageMagick, Apache license - http://www.imagemagick.org/ AntiGrain Geometry 2.4, LGPL license - http://agg.sourceforge.net/antigrain.com/index.html MB WebSockets, LGPL license - https://qt.gitorious.org/qtplayground/mbwebsockets Thanks to God for all creative ideas.
41
Rebelle End-User Software License Agreement Copyright 2015-2016 Escape Motions, s.r.o. All Rights Reserved. This license is a legal agreement between you and Escape Motions for the use of Rebelle software (the "Software"). By downloading, installing, copying, or otherwise using the Software, you acknowledge that you have read terms and conditions of this license, understand them, and agree to be bound by them. If you do not agree with these terms and conditions, Escape Motions is unwilling to license the Software to you, and you are not authorized and may not use the Software. Permitted Use Users of the Rebelle may use the Software for commercial, or for-profit activities as well as for personal, non-commercial, or non-profit activities. The Software may be installed on a computer that is for multiple users but it may not be installed on more than one computer regardless of whether those computers are operated simultaneously or not. You may install the Software on multiple computers provided that not more than one of those computers is in use simultaneously and that those computers are solely for your own personal use. You may not remove the copyrights notices from the Software. You may make one (1) copy of the Software for back-up or archival purposes. Restrictions This is a SINGLE COPY SOFTWARE LICENSE. The Software is copyrighted and protected by law and international treaty. This is a license, not a transfer of title, and unless you have been granted prior, written consent from Escape Motions you may not: a, Reproduce, distribute, or transfer the Software, or portions thereof, to any third party. b, Sell, rent, lease, assign, or sublet the Software or portions thereof. c, Grant rights to any other person. d, Modify, decompile, reverse engineer, disassemble, or create derivative works based on the Software or the documentation in whole or in part. e, Use the Software in violation of any international law or regulation. You must not intentionally or unintentionally make the Software available on any web server, ftp server, file sharing network, shared directory, or other location where any other person can acquire a copy of the Software. You are responsible for keeping the Software safe from being copied by others.
42
Display of Copyright Notices All copyright and proprietary notices and logos within the Software files must remain intact. Indemnity You agree to indemnify and hold harmless Escape Motions for any third-party claims, actions or suits, as well as any related expenses, liabilities, damages, settlements or fees arising from your use or misuse of the Software, or a violation of any terms of this license. The Software may contain technical inaccuracies or typographical errors, so changes and/or updates may be affected without notice. Escape Motions may also make improvements and/or other changes to the Software at any time without notice. Disclaimer Of Warranty THE SOFTWARE IS PROVIDED \"AS IS\", WITHOUT WARRANTY OF ANY KIND, EXPRESSED OR IMPLIED, AS TO THE SOFTWARE OR ITS OPERATION, INCLUDING, BUT NOT LIMITED TO, WARRANTIES OF QUALITY, PERFORMANCE, NON-INFRINGEMENT, MERCHANTABILITY, OR FITNESS FOR A PARTICULAR PURPOSE. FURTHER, ESCAPE MOTIONS DOES NOT WARRANT THAT THE SOFTWARE OR ANY RELATED SERVICE WILL ALWAYS BE AVAILABLE. Limitations Of Liability YOU ASSUME ALL RISK ASSOCIATED WITH THE INSTALLATION AND USE OF THE SOFTWARE. IN NO EVENT SHALL THE AUTHORS OR COPYRIGHT HOLDERS OF THE SOFTWARE BE LIABLE FOR CLAIMS, DAMAGES OR OTHER LIABILITY ARISING FROM, OUT OF, OR IN CONNECTION WITH THE SOFTWARE. LICENSE HOLDERS ARE SOLELY RESPONSIBLE FOR DETERMINING THE APPROPRIATENESS OF USE AND ASSUME ALL RISKS ASSOCIATED WITH ITS USE, INCLUDING BUT NOT LIMITED TO THE RISKS OF PROGRAM ERRORS, DAMAGE TO EQUIPMENT, ANY LOST PROFITS, BUSINESS INTERRUPTION, LOSS OF DATA OR SOFTWARE PROGRAMS, OR UNAVAILABILITY OR INTERRUPTION OF OPERATIONS.


