Embed Size (px)
Citation preview

ManualManuel de l’utilisateurManual de usuario
Ref. 18377 - 18378 -18379 - 18380 US Ref. 50113 - 50114 - 50115 - 50116
Read through this manual before useLisez ce manuel avant utilisationLea este manual antes de utilizar
STEYR AUG A3 XS COMMANDO

2 STEYR AUG A3 XS COMMANDO
Steyr AUG A3 XS COMMANDO
Congratulations with your new Steyr AUG A3 XS COMMANDO Airsoft gun. Read through this manual before use.Félicitations pour votre nouveau Steyr AUG A3 XS COMMANDO Lisez ce manuel avant utili-sation.Enhorabuena por su nuevo Steyr AUG A3 XS COMMANDO un arma de Airsoft. Lea este manual antes de utilizar.
Not a toy. Adult supervision required. Misuse or careless use may cause serious injury or death. Always wear eye-protec-
tion when using this product. Read and follow instructions carefully before use. This product is a high-powered Airsoft gun, recommended for adult use (18 years and up).
Ceci n’est pas un jouet, et doit être placé sous le contrôle d’un adulte. Une mauvaise utilisation risque de provoquer des blessures sérieuses ou la mort. Utilisez toujours des lunettes de protection. Lisez et suivez les instructions avant utilisation.Ce produit est interdit aux moins de 18 ans.
No es un juguete. Es necesario con-tar con la supervisión de un adulto. El uso incorrecto o descuidado puede ocasionar lesiones graves o la muerte. Emplee protección ocular siempre que use el arma. Lea cuidadosamente y siga las instrucciones antes del uso. Debido a la gran potencia del arma de Airsoft, se recomienda que la utilicen mayores de 18 años.
Butt plateTalon de crosseAlmohadilla del culatín
Port coverCache de la fenêtre d’éjectionCubierta
Mount base Rail de montageBase montura
TriggerDétenteGatillo
Magazine release buttonLevier de déverrouillage du chargeurBotón de liberación del cargador
MagazineChargeurCargador
Sling swivelAttache-sangleSwivel para correa
SafetyCran de sûretéSeguro
STEYR AUG A3 XS COMMANDO 3
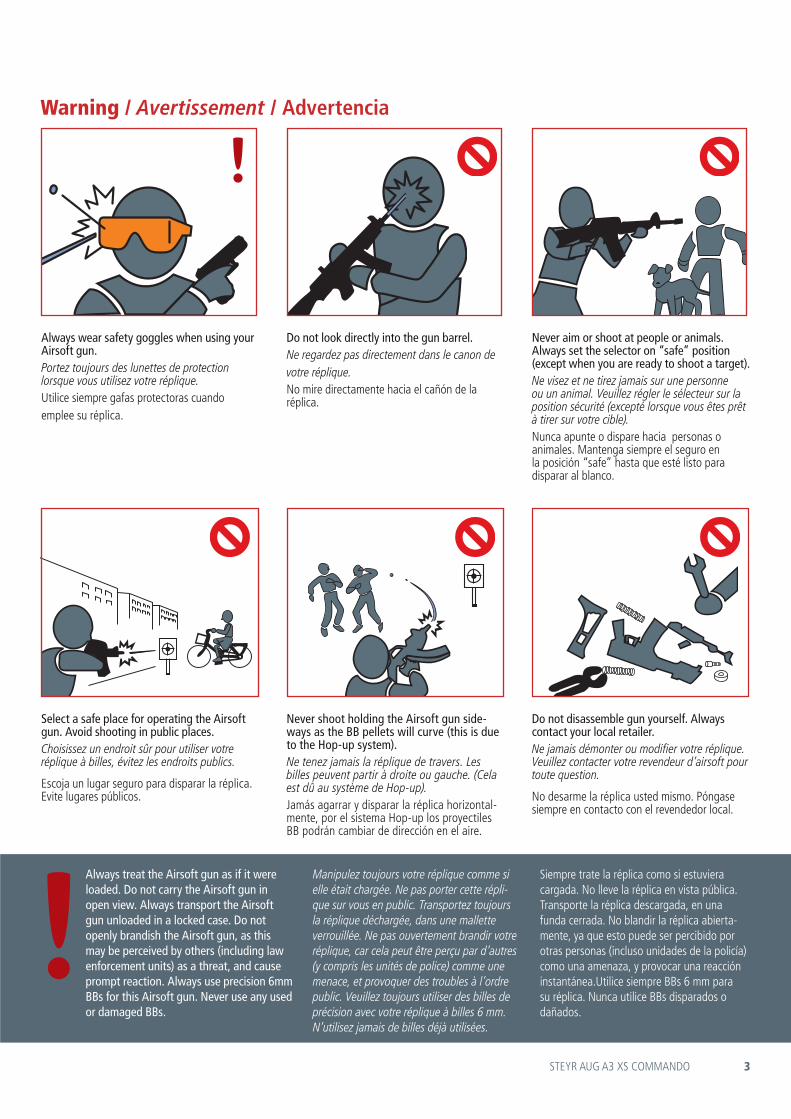
Warning / Avertissement / Advertencia
Never shoot holding the Airsoft gun side-ways as the BB pellets will curve (this is due to the Hop-up system).Ne tenez jamais la réplique de travers. Les billes peuvent partir à droite ou gauche. (Cela est dû au système de Hop-up).Jamás agarrar y disparar la réplica horizontal-mente, por el sistema Hop-up los proyectiles BB podrán cambiar de dirección en el aire.
Do not look directly into the gun barrel.Ne regardez pas directement dans le canon de votre réplique.No mire directamente hacia el cañón de la réplica.
Always wear safety goggles when using your Airsoft gun.Portez toujours des lunettes de protection lorsque vous utilisez votre réplique.Utilice siempre gafas protectoras cuando emplee su réplica.
Never aim or shoot at people or animals. Always set the selector on “safe” position (except when you are ready to shoot a target).Ne visez et ne tirez jamais sur une personne ou un animal. Veuillez régler le sélecteur sur la position sécurité (excepté lorsque vous êtes prêt à tirer sur votre cible).Nunca apunte o dispare hacia personas o animales. Mantenga siempre el seguro en la posición “safe” hasta que esté listo para disparar al blanco.
Select a safe place for operating the Airsoft gun. Avoid shooting in public places.Choisissez un endroit sûr pour utiliser votre réplique à billes, évitez les endroits publics.
Escoja un lugar seguro para disparar la réplica. Evite lugares públicos.
Do not disassemble gun yourself. Always contact your local retailer.Ne jamais démonter ou modifier votre réplique. Veuillez contacter votre revendeur d’airsoft pour toute question.
No desarme la réplica usted mismo. Póngase siempre en contacto con el revendedor local.
Always treat the Airsoft gun as if it were loaded. Do not carry the Airsoft gun in open view. Always transport the Airsoft gun unloaded in a locked case. Do not openly brandish the Airsoft gun, as this may be perceived by others (including law enforcement units) as a threat, and cause prompt reaction. Always use precision 6mm BBs for this Airsoft gun. Never use any used or damaged BBs.
Manipulez toujours votre réplique comme si elle était chargée. Ne pas porter cette répli-que sur vous en public. Transportez toujours la réplique déchargée, dans une mallette verrouillée. Ne pas ouvertement brandir votre réplique, car cela peut être perçu par d’autres (y compris les unités de police) comme une menace, et provoquer des troubles à l’ordre public. Veuillez toujours utiliser des billes de précision avec votre réplique à billes 6 mm. N’utilisez jamais de billes déjà utilisées.
Siempre trate la réplica como si estuviera cargada. No lleve la réplica en vista pública. Transporte la réplica descargada, en una funda cerrada. No blandir la réplica abierta-mente, ya que esto puede ser percibido por otras personas (incluso unidades de la policía) como una amenaza, y provocar una reacción instantánea.Utilice siempre BBs 6 mm para su réplica. Nunca utilice BBs disparados o dañados.
4 STEYR AUG A3 XS COMMANDO
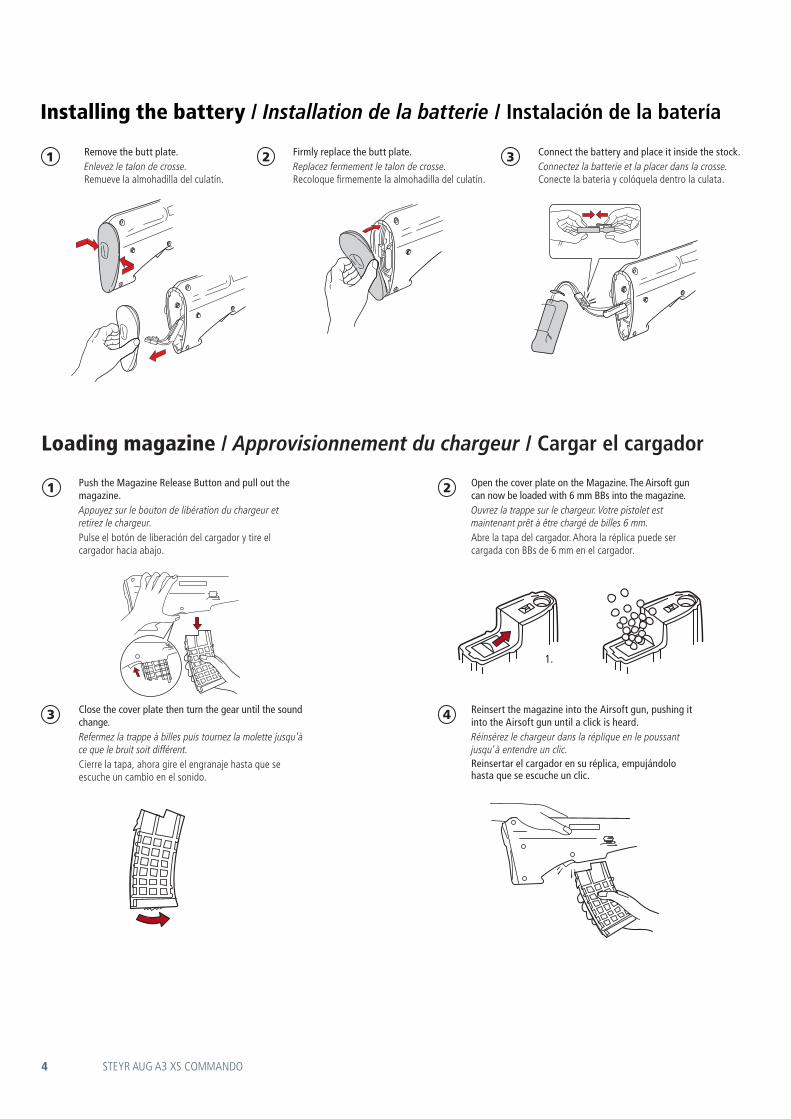
Installing the battery / Installation de la batterie / Instalación de la batería
Loading magazine / Approvisionnement du chargeur / Cargar el cargador
Close the cover plate then turn the gear until the sound change.Refermez la trappe à billes puis tournez la molette jusqu’à ce que le bruit soit différent.Cierre la tapa, ahora gire el engranaje hasta que se escuche un cambio en el sonido.
Reinsert the magazine into the Airsoft gun, pushing it into the Airsoft gun until a click is heard. Réinsérez le chargeur dans la réplique en le poussant jusqu’à entendre un clic.Reinsertar el cargador en su réplica, empujándolo hasta que se escuche un clic.
Push the Magazine Release Button and pull out the magazine.Appuyez sur le bouton de libération du chargeur et retirez le chargeur.Pulse el botón de liberación del cargador y tire el cargador hacia abajo.
Open the cover plate on the Magazine. The Airsoft gun can now be loaded with 6 mm BBs into the magazine. Ouvrez la trappe sur le chargeur. Votre pistolet est maintenant prêt à être chargé de billes 6 mm.Abre la tapa del cargador. Ahora la réplica puede ser cargada con BBs de 6 mm en el cargador.
1.
Firmly replace the butt plate. Replacez fermement le talon de crosse.Recoloque firmemente la almohadilla del culatín.
Remove the butt plate.Enlevez le talon de crosse.Remueve la almohadilla del culatín.
Connect the battery and place it inside the stock.Connectez la batterie et la placer dans la crosse.Conecte la batería y colóquela dentro la culata.
3 4
21
1 2 3
STEYR AUG A3 XS COMMANDO 5
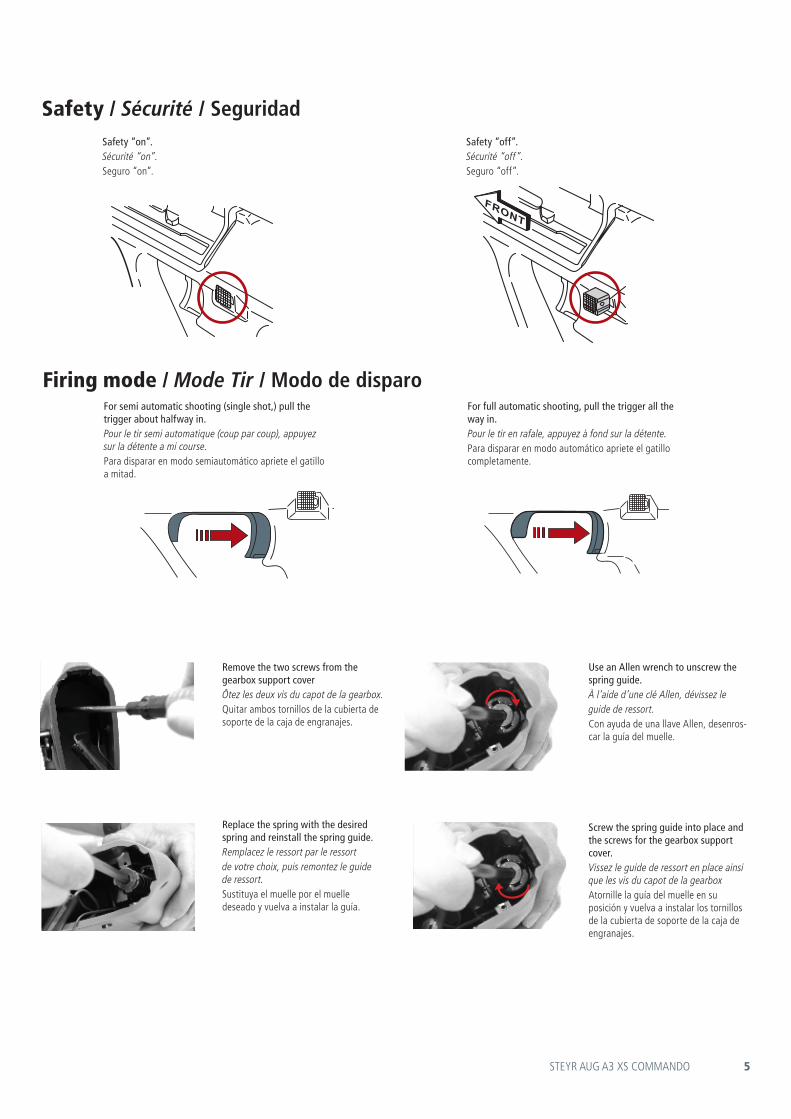
Safety / Sécurité / SeguridadSafety “on”.Sécurité “on”.Seguro “on”.
Safety “off”.Sécurité “off”.Seguro “off”.
For semi automatic shooting (single shot,) pull the trigger about halfway in.Pour le tir semi automatique (coup par coup), appuyez sur la détente a mi course.Para disparar en modo semiautomático apriete el gatillo a mitad.
For full automatic shooting, pull the trigger all the way in.Pour le tir en rafale, appuyez à fond sur la détente.Para disparar en modo automático apriete el gatillo completamente.
Firing mode / Mode Tir / Modo de disparo
Always keep the airsoft gun in "SAFE" position until you are ready to shoot.The safety is located on the top of the pistol grip of the stock, behind the trigger. The safety is a two position push through “cross-bolt” type that locks the trigger. When the safety is protruding all the way from the right side of the gun and a white dot is visible, it is in the “safe” position and the trigger is locked in place.When the safety is protruding all the way from the left side of the gun and a red dot is visible, it is in the “fire” position and the trigger can be moved.
Inserting: Take the magazine at its lower half – little finger lies under-neath the magazine bottom- and slide it into the magazine well, until it audibly engages . Check the engagement again by pulling on the magazine.
Removing: Grab the magazine with your hand so, that the thumb can press the magazine catch to release the magazine
To fire your gun when a cartridge is loaded in the chamber, move the safety all the way left into the “fire” position and pull the trigger. To fire another shot, release the trigger and then pull it again. When the last round has been fired, the bolt carrier will remain locked open in the rearward position.The trigger mechanism is designed for semiautomatic or full automatic fire, just controlled by the trigger. Semi Auto - Pull the trigger 4mmFull Auto - Pull the trigger to 7mm
Taking off the barrel-housing group: With the right hand grasp the pistol grip, rest the weapon with the butt plate on your right hip. Place left hand on the front position of the receiver and press slightly against hip to release pressure of the housing lock.
Now place right hand underneath the butt so, that you are able to pull out the housing lock until to the stop.
Point the gun down and pull out completely the barrel housing group from the butt.
Barrel removal by holding the rifle in the right hand by its pistol grip, rest the butt plate of the rifle against the hip. Retract the cocking slide knob and secure it in the rearward position. Grasp the barrel grip with the left hand and use the left thumb to press the barrel locking latch down. Rotate the barrel clockwise to disengage it from the receiver assembly and then pull it outwards to remove it
Hold the stock with your left hand and pull the butt plate off of the stock with your right hand
Pull out the gun connector and connect to the battery
Install the battery pack, wire and connector completely inside the stock
Install the butt plate
Remove the screw from the gear box support cover.
Easy power up - V2 HYBRID gear box equipped with unique design quick change spring mechanism. End user can power up the gun without disassembly the gear box.
Retract the cocking slide knob and secure it in the rearward position.
Lock it in the rear position by turning it clockwise and allowing it to rest on the indentation on the receiver
Adjust the hop up system by turning it counter clockwise to increase and clockwise to decrease
Remove the two screws from the gearbox support coverÔtez les deux vis du capot de la gearbox.Quitar ambos tornillos de la cubierta de soporte de la caja de engranajes.
Replace the spring with the desired spring and reinstall the spring guide.Remplacez le ressort par le ressortde votre choix, puis remontez le guide de ressort.Sustituya el muelle por el muelle deseado y vuelva a instalar la guía.
Use an Allen wrench to unscrew the spring guide.À l’aide d’une clé Allen, dévissez leguide de ressort.Con ayuda de una llave Allen, desenros-car la guía del muelle.
Screw the spring guide into place and the screws for the gearbox support cover.Vissez le guide de ressort en place ainsi que les vis du capot de la gearboxAtornille la guía del muelle en su posición y vuelva a instalar los tornillos de la cubierta de soporte de la caja de engranajes.

6 STEYR AUG A3 XS COMMANDO
Gradually turn the adjustment dial towards “Hop” and fire a round or two to see the effect. Continue to adjust until the BBs fly straight/horizontally. Perfect hop-up is applied when the BBs fly straight.
Progressivement tourner la molette vers la position « Hop » et tirez un ou deux coups pour vérifier l’effet. Continuez le réglage jusqu’à ce que la bille vole droite et horizontale. L’ajustement optimum du Hop up est atteint quand la bille vole parfaitement droite.
Gire el dial de hop-up poco a poco hacia ‘Hop’, dispare una vez o dos veces para ver el efecto. Siga ajustando hasta que los BBs sigan una línea recta en el aire, eso es la posición perfecta.
Hop-up adjustment / Réglage du Hop-up / Ajuste del Hop-up
By applying a back-spin to the BBs when firing, the trajectory of the BBs can be altered in order to obtain better flight and precision of the BBs – referred to as the Hop-up system. There are two types of Hop-up systems; the fixed and the adjustable. The adjustable Hop-up system allows for fine-tuning the trajectory of the BBs.
En appliquant un effet rétro aux billes pendant le tir, leur trajectoire peut être modifiée dans le but d’obtenir une meilleure portée et précision. Il y a deux types de système Hop-up ; le fixe et le modifiable. Le réglage du système Hop-up permet d’affiner la trajectoire des billes.
Si se aplica una rotación hacia atrás a los BBs cuando se dispara la réplica, la trayectoria de los BBs pueden ser alterados para obtener un mejor disparo y precisión de los BBs, conocido como el sistema Hop-up; existe el sistema fijo y ajustable. El sistema de ajuste del Hop-up permite afinar la trayectoria de BBs.
Excessive hop-up applied. Trop de hop-up.
Demasiado hop-up.
No hop-up applied. Pas de hop-up.
Sin hop-up..
Perfect Hop-up position.Position du hop-up parfaite.
Posición perfecta de hop-up.
Después haber aplicado el aceite la función del Hop-up puede resultar inestable durante unas 200-300 rondas. Se debe aplicar aceite de nuevo después haber disparado unas 10.000 rondas.
• Turning the Hop-up dial excessively can cause the BBs to clog the Airsoft gun and damage the piston and gears. Reset the adjustment dial to normal and readjust the Hop-up.
Tourner de façon excessive le réglage du Hop-up peut provoquer le blocage de votre réplique et risque d’endommager le piston et les pignons. Positionnez alors de nouveau le Hop-up en position normale et réajustez le Hop-up.
Girando el dial de Hop-up excesivamente puede causar que los BBs bloquean y estropean el pistón y los engranajes. Restablecer el ajuste a su posición normal y volver a ajustar el Hop-up.
• The Hop-up function can be unstable the first 200-300 rounds after applying oil. Oil should be applied for ca. every 10.000 rds. fired.
La fonctionnalité du Hop-up peut être instable les premiers 200 – 300 coups après avoir appliqué de l’huile. L’huile doit être appliquée environ tous les 10.000 coups.
Technical information / Informations techniques / Información técnica
Length Weight Caliber Magazine Material Energy VelocityLänge Gewicht Kaliber Magazin Material Leistung GeschwindigkeitLongueur Poids Calibre Capacité du chargeur Matière Énergie VélocitéLongitud Peso Calibre Capacidad del cargador Material Energía Velocidad
615 mm 3400 g 6 mm 300 Nylon/Metal 1.4 Joule 120 ms / 395 fps

STEYR AUG A3 XS COMMANDO 7
Accessories / Accessoires / Accesorios
Magazine / Chargeur / Cargador
6 mm BBs / Billes de 6 mm / BBs de 6 mm
CURSED BB series
Magazine, 330rd
Magazine, 110rd
Magazine, 45rd
Ref. 16537
Ref. 17974
Ref. 17975
Ref. 14198
Ref. 18233
Ref. 14787
Ref. 18231
BLASTER®, 3000 pcs. (0.25g)
CURSED, 3600 pcs. (0.28g)
BLASTER®, 3000 pcs. (0.20g)
CURSED, 5000 pcs. (0.20g)
BLASTER®, 6000 pcs. (0.25g)
BLASTER®, 6000 pcs. (0.20g)
CURSED, 4000 pcs. (0.25g)
Ref. 14199
Ref. 14788
Ref. 18232
US Only 6 mm BBs, bag / Billes de 6 mm, sac / BBs de 6 mm, saco
Battery / Batterie / Batería
Dot sight, Ø30mm / Dot sight, Ø30mm / Mira de punto, Ø30mm
Ref. 50007
Ref. 15087
Ref. 17206
Ref. 17357
BLASTER®, 3000 pcs. (0.20g) (USA ONLY)
Battery, 8,4v 1400mAh, mini-U, NiMH
Battery, 7,4V 1300 mAh, LI-PO, sticks
Dot sight, red / Dot sight, rouge / Mira de punto, rojo
Ref. 50008BLASTER®, 3000 pcs. (0.25g) (USA ONLY)
AIR SOFT GUN Décret Nº 99-240 du 24 mars 1999 Réglementant la vente en France. Objet ayant l’apparence d’une arme à feu. «DISTRIBUTION INTERDITE AUX MINEURS». «ATTENTION NE JAMAIS DIRIGER LE TIR VERS UNE PERSONNE».Le port de lunettes de protection est obligatoire. Avant tout usage, lire attentivement la notice incluse dans la boite. Compte tenu du réalisme de ces modèles factices, il est rappelé que la loi interdit le port de tout objet susceptible de constituer une arme dangereuse pour la sécurité publique.
Suojaudu aina soujalaseilla tai maskilla. Käytä vain korkealaatuisia kuulia. Takuu El korvaa huonolaatuisten kuulien aiheuttamaa rikkoontumista. Ei alle 18-vuotiaille. Tämä ase ei ole lelu. Lue huolto – ja käyttöohjeet ennen käyttöä.
Skydda dig alltid med skyddsglas eller skyddsmask. Använd endast högklassiga kulor. Garantin ersätter inte skador som uppkommit då kulor av dålig kvalitet användts. Inte för personer under 18 år. Detta vapen är inte en leksak. Läs service- och bruksanvisning före använding.
ActionSportGames A/SBjergvangen 1DK-3060 EspergaerdeDenmark
Phone: +45 8928 1888Fax: +45 4919 3160www.actionsportgames.com 18
377_
0089
_091
5


![[XS HMMMMMM XS H/LIONESS] - vending machines](https://img.dokumen.tips/doc/110x75/6326f0e3cedd78c2b50d5531/xs-hmmmmmm-xs-hlioness-vending-machines.jpg)


