Embed Size (px)
Citation preview
Sterling Connect:Direct1.0
Enterprise Deployment Guide
IBM
Last updated: 17 November 2015

Note
Before using this information and the product it supports, read the information in “Notices” on page49.
This edition applies to Version 5 Release 3 of IBM® Connect:Direct and to all subsequent releases and modifications untilotherwise indicated in new editions.© Copyright International Business Machines Corporation 2013.US Government Users Restricted Rights – Use, duplication or disclosure restricted by GSA ADP Schedule Contract withIBM Corp.
Contents
Chapter 1. Managed File Transfer enterprise deployment solution...........................1
Chapter 2. Enterprise deployment overview........................................................... 5Requirements for enterprise deployment...................................................................................................5
Chapter 3. Steps for planning an enterprise deployment......................................... 7Identify the target systems..........................................................................................................................7Create deployment groups for enterprise deployment.............................................................................. 8Security overview.........................................................................................................................................8Create an installation package for each group............................................................................................9Test each package........................................................................................................................................9Deploy each group package.........................................................................................................................9
Chapter 4. Use the Connect:Direct silent installation for enterprise deployment.... 11Connect:Direct for UNIX silent installation...............................................................................................11
Sterling Connect:Direct for UNIX silent installation options file and command-line parameters.....12cdinstall_a script operation................................................................................................................. 20Basic installation and configuration.....................................................................................................21Installing Connect:Direct for UNIX...................................................................................................... 21Upgrading or applying a fix pack to Connect:Direct for UNIX............................................................. 21Uninstalling Connect:Direct for UNIX.................................................................................................. 22Complete installation and configuration............................................................................................. 22Installing Connect:Direct for UNIX with optional files........................................................................ 22Upgrading or applying a fix pack to Connect:Direct for UNIX with optional files...............................23Configuring and monitoring Connect:Direct for UNIX with Control Center........................................ 23
Connect:Direct for Microsoft Windows silent installation........................................................................ 23Sterling Connect:Direct for Microsoft Windows deployment options.................................................24Installation executable silent operation..............................................................................................25Installing Connect:Direct for Microsoft Windows................................................................................25Upgrading Connect:Direct for Microsoft Windows.............................................................................. 26Applying a fix pack to Connect:Direct for Microsoft Windows............................................................ 26Uninstalling Connect:Direct for Microsoft Windows............................................................................26Configuring and monitoring Connect:Direct for Microsoft Windows with Control Center..................27
Chapter 5. Tivoli Endpoint Manager overview....................................................... 29Getting Started with the CreateTEMTasks utility...................................................................................... 29CTTU data file.............................................................................................................................................30CTTU properties file...................................................................................................................................30CTTU tasks file........................................................................................................................................... 30
Connect:Direct for UNIX tasks file....................................................................................................... 31Connect:Direct for Microsoft Windows tasks file................................................................................ 32
Sample tasks file........................................................................................................................................34Running the CTTU...................................................................................................................................... 34Running the TEM tasks.............................................................................................................................. 35
Chapter 6. Connect:Direct for UNIX deployment messages.................................. 39
Chapter 7. Configure new nodes in Control Center................................................ 45Importing certificates................................................................................................................................ 45
iii

Creating server node entries..................................................................................................................... 45
Chapter 8. Troubleshooting.................................................................................. 47
Notices................................................................................................................49Trademarks................................................................................................................................................ 50Terms and conditions for product documentation................................................................................... 51
iv

Chapter 1. Managed File Transfer enterprisedeployment solution
Deploying a Managed File Transfer (MFT) solution across your organization is a major step that you cantake toward a comprehensive data movement strategy. The IBM® enterprise deployment solution helpsyour organization adopt a customer-centric MFT architecture to realize the full potential of an MFTsolution.
© Copyright IBM Corp. 2013 1

Connect:DirectAutomate the deployment of Connect:Direct® for UNIX and Connect:Direct for Microsoft Windows acrossyour enterprise with the IBM Connect:Direct installation. Automated deployment of Connect:Direct,coupled with the configuration and monitoring capabilities of Control Center, enables the followingbenefits:
• Reduced total cost of ownership• Improved operational efficiencies• Improved governance and auditability over the data that is being moved
Connect:Direct is point-to-point (peer-to-peer) file-based integration middleware that is meant for24x365 unattended operation, which provides assured delivery, high-volume, and secure data exchangewithin and between enterprises. It is optimized for high performance and throughput. It also moves filesthat contain any type of data (text, EDI, binary, digital content, image) across multiple hardware types andoperating systems, disparate file systems, and disparate media. It is used by many industries throughoutthe world to move large volumes of data and for connecting to remote offices.
2 Sterling Connect:Direct: Enterprise Deployment Guide

Control CenterAfter you deploy Connect:Direct across your enterprise, use Control Center to configure and monitor yourConnect:Direct nodes from a central location.
Control Center is a centralized monitoring and management system. It gives operations personnel thecapability to continuously monitor business activities across the enterprise for the following server types:
• Connect:Direct• Connect:Direct File Agent• IBM Connect:Enterprise®
• IBM B2B Integrator• IBM File Gateway
Chapter 1. Managed File Transfer enterprise deployment solution 3

• IBM Connect:Express• IBM QuickFile• Many FTP servers
In addition, you can manage the configurations and licenses of Connect:Direct servers.
Tivoli Endpoint ManagerIBM Tivoli® Endpoint Manager delivers an easy-to-manage, quick-to-deploy solution that provides unified,real-time visibility to install, upgrade, patch, and uninstall applications, such as Connect:Direct, across allendpoints from a single console. It offers the following capabilities:
• Single intelligent agent for continuous endpoint self-assessment and policy enforcement• Real-time visibility and control from a single management console• Manage hundreds of thousands of endpoints regardless of location, connection type, or status.
Endpoints include network-attached servers and desktops, Internet-connected notebooks, mobiledevices, and specialized equipment such as point-of-sale (POS) devices, ATMs, and self-service kiosks.
• Support heterogeneous hardware and operating systems: Microsoft® Windows®, UNIX®, Linux® and Macoperating systems
4 Sterling Connect:Direct: Enterprise Deployment Guide

Chapter 2. Enterprise deployment overviewAs the number of Connect:Direct for UNIX and Connect:Direct for Microsoft Windows installationsincreases, so does the time and effort that is needed for new installations and upgrades. Especially whenadministrators perform these operations one installation at a time.
Silent installations on individual systemsYou can use an installation script for Connect:Direct for UNIX to silently and automatically install theproduct. The silent installation for Connect:Direct for Microsoft Windows supports enterprise deployment.
Automated installations on multiple systemsInstead of performing silent installations one system at a time, you can automate deployment on multiplesystems with a single installation package. Use these installation solutions with existing softwaredeployment systems, such as the Tivoli Endpoint Manager.
Then, you can use IBM Control Center for post-installation configuration and monitoring tasks. Although itis possible to combine installation and configuration in a single step, in this document the installation andconfiguration are treated as separate steps. During installation, perform the minimum configuration that isrequired to allow Control Center to establish a secure connection with Connect:Direct. Then, use ControlCenter for production configuration and subsequent configuration updates.
Another tool that you can use for post-installation and ongoing configuration management ofConnect:Direct servers is the Control Center API (CCAPI). Use the CCAPI, a Java program, toprogrammatically create and maintain Connect:Direct server objects for large-scale efficiency.
These objects include:
• Functional authorities• Initialization parameters• Netmap nodes• Netmap modes• Netmap communication paths• Connect:Direct Secure Plus nodes• Connect:Direct Secure Plus key certificates• Connect:Direct Secure Plus trusted certificates• Connect:Direct Secure Plus cipher suites• User proxies
Requirements for enterprise deploymentTo automate the Connect:Direct deployment, your environment must meet the following requirements:
• A software deployment tool, such as IBM Tivoli Endpoint Manager, to create a deployment package anddistribute it to the target systems
• A test environment to test a deployment before you deploy to your production environment• Control Center to perform post-installation configuration (optional)
© Copyright IBM Corp. 2013 5

6 Sterling Connect:Direct: Enterprise Deployment Guide
Chapter 3. Steps for planning an enterprisedeployment
To ensure a successful enterprise deployment, you can create and follow a detailed deployment plan.
To plan for an enterprise deployment, follow these steps:
1. Identify the attributes of systems where you plan to install Connect:Direct. Attributes can includeoperating system type and the attributes of the Connect:Direct servers, such as users and netmaps.
2. Define one or more groups of systems with common attributes.3. Create a deployment package for each group of systems.4. Incorporate site-specific security considerations.5. Deploy and verify the installation package for each group on a test system with identical deployment
attributes.6. Deploy and verify each group deployment package on all systems in the group.
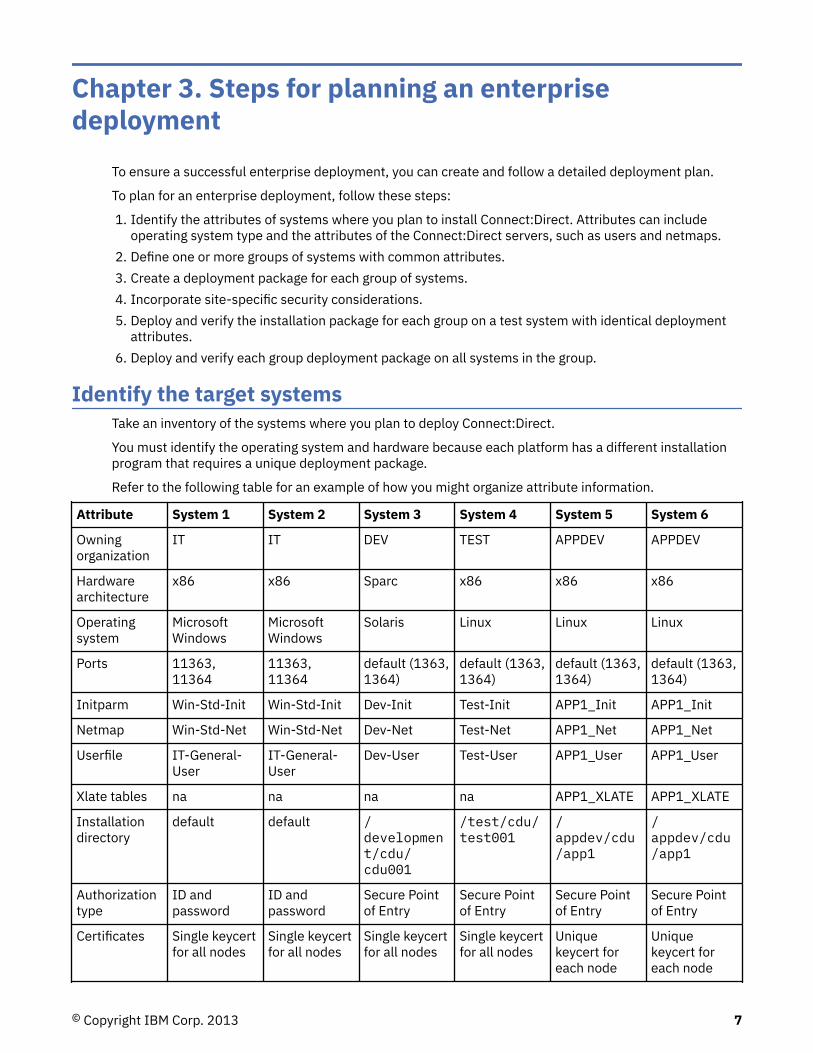
Identify the target systemsTake an inventory of the systems where you plan to deploy Connect:Direct.
You must identify the operating system and hardware because each platform has a different installationprogram that requires a unique deployment package.
Refer to the following table for an example of how you might organize attribute information.
Attribute System 1 System 2 System 3 System 4 System 5 System 6
Owningorganization
IT IT DEV TEST APPDEV APPDEV
Hardwarearchitecture
x86 x86 Sparc x86 x86 x86
Operatingsystem
MicrosoftWindows
MicrosoftWindows
Solaris Linux Linux Linux
Ports 11363,11364
11363,11364
default (1363,1364)
default (1363,1364)
default (1363,1364)
default (1363,1364)
Initparm Win-Std-Init Win-Std-Init Dev-Init Test-Init APP1_Init APP1_Init
Netmap Win-Std-Net Win-Std-Net Dev-Net Test-Net APP1_Net APP1_Net
Userfile IT-General-User
IT-General-User
Dev-User Test-User APP1_User APP1_User
Xlate tables na na na na APP1_XLATE APP1_XLATE
Installationdirectory
default default /development/cdu/cdu001
/test/cdu/test001
/appdev/cdu/app1
/appdev/cdu/app1
Authorizationtype
ID andpassword
ID andpassword
Secure Pointof Entry
Secure Pointof Entry
Secure Pointof Entry
Secure Pointof Entry
Certificates Single keycertfor all nodes
Single keycertfor all nodes
Single keycertfor all nodes
Single keycertfor all nodes
Uniquekeycert foreach node
Uniquekeycert foreach node
© Copyright IBM Corp. 2013 7
Attribute System 1 System 2 System 3 System 4 System 5 System 6
Connect:Directadministratoruser ID
cdadmin cdadmin cdadmin cdadmin cdadmin cdadmin
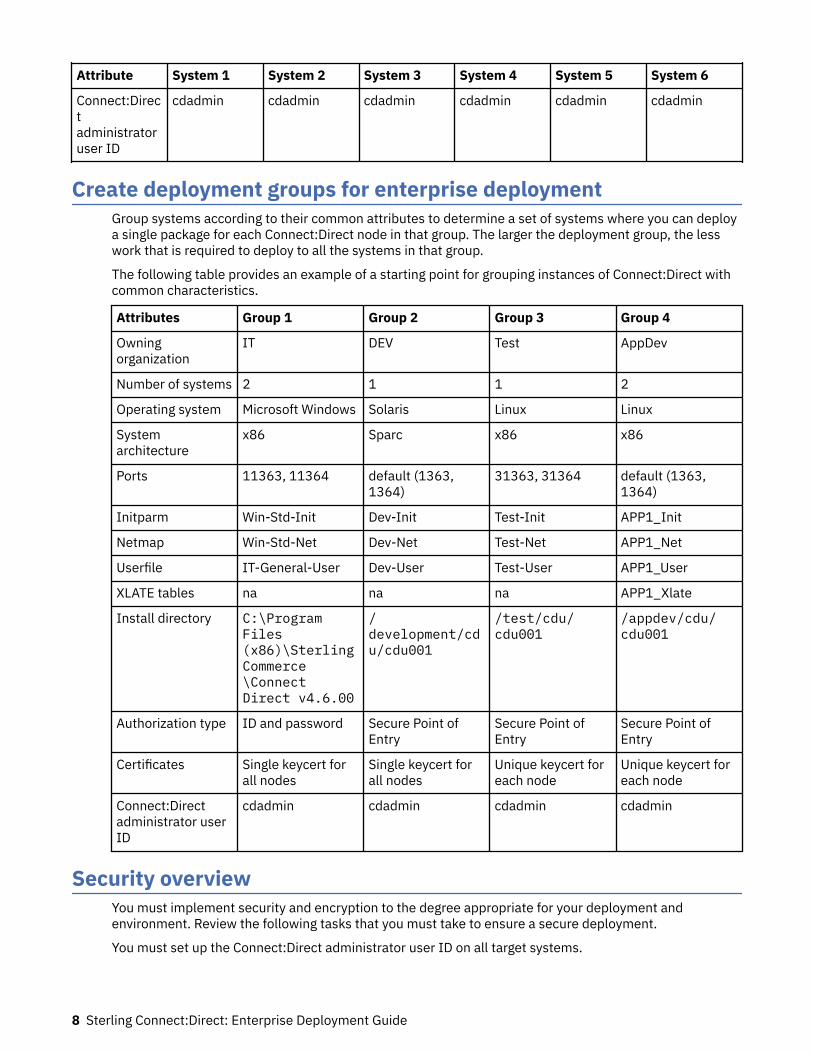
Create deployment groups for enterprise deploymentGroup systems according to their common attributes to determine a set of systems where you can deploya single package for each Connect:Direct node in that group. The larger the deployment group, the lesswork that is required to deploy to all the systems in that group.
The following table provides an example of a starting point for grouping instances of Connect:Direct withcommon characteristics.
Attributes Group 1 Group 2 Group 3 Group 4
Owningorganization
IT DEV Test AppDev
Number of systems 2 1 1 2
Operating system Microsoft Windows Solaris Linux Linux
Systemarchitecture
x86 Sparc x86 x86
Ports 11363, 11364 default (1363,1364)
31363, 31364 default (1363,1364)
Initparm Win-Std-Init Dev-Init Test-Init APP1_Init
Netmap Win-Std-Net Dev-Net Test-Net APP1_Net
Userfile IT-General-User Dev-User Test-User APP1_User
XLATE tables na na na APP1_Xlate
Install directory C:\ProgramFiles(x86)\SterlingCommerce\ConnectDirect v4.6.00
/development/cdu/cdu001
/test/cdu/cdu001
/appdev/cdu/cdu001
Authorization type ID and password Secure Point ofEntry
Secure Point ofEntry
Secure Point ofEntry
Certificates Single keycert forall nodes
Single keycert forall nodes
Unique keycert foreach node
Unique keycert foreach node
Connect:Directadministrator userID
cdadmin cdadmin cdadmin cdadmin
Security overviewYou must implement security and encryption to the degree appropriate for your deployment andenvironment. Review the following tasks that you must take to ensure a secure deployment.
You must set up the Connect:Direct administrator user ID on all target systems.
8 Sterling Connect:Direct: Enterprise Deployment Guide
In order for Control Center to establish a secure connection with the Connect:Direct nodes after they areinstalled, install the nodes with a keycert. You must also configure the Secure+ .Client record to use thekeycert. If you establish a secure connection from a client, you can safely complete more securityconfiguration tasks. These configuration tasks include adding users and updating keycerts, with theConnect:Direct API. For more information, see the IBM Sterling Control Center Getting Started Guide.
For ease of deployment, use a single keycert for all the nodes in a group during deployment. A singlekeycert facilitates a secure connection so that you can use Control Center to apply production keycerts tothe deployed nodes. For more information, see the IBM Sterling Control Center Configuration ManagementGuide.
CAUTION: Encrypt the keycert passphrase to keep it protected. Decrypt the keycert passphraseimmediately before you install a Connect:Direct node.
Tip: If you use Tivoli Endpoint Manager for deployment, the passphrase is encrypted for you.
Create an installation package for each groupNo matter which deployment tool you use, you must provide it with the files that make up aConnect:Direct silent installation.
For Connect:Direct for UNIX, the cdinstall_a, cdinstall, and cpio archive files are required. If youdo more than a basic installation, you might also need the options file, Connect:Direct Secure Plusconfiguration command file, other keycerts, initparm.cfg file, netmap.cfg file, and userfile.cfgfile. For more information, see “ Connect:Direct for UNIX silent installation” on page 11.
For Connect:Direct for Microsoft Windows, you must include the installation executable. The optionscd_srv.ini file, keycert file, initparm.cfg file, netmap.cfg file, and userfile.cfg file areoptional. For more information, see “Connect:Direct for Microsoft Windows silent installation” on page23.
Test each packageChoose a test system for installing the newly created installation package. It must have the sameattributes as the systems in the group for which the package was created.
Each deployment tool has its own error report mechanism. However, you can use the return code from theConnect:Direct silent installation and the installation log to assist with troubleshooting.
Deploy each group packageAfter you successfully test the deployment package, you can deploy it to a group of production or testsystems.
Connect:Direct for UNIX does some minimal deployment validation. For additional validation, you can useControl Center to access each Connect:Direct node by using a secure connection to do the followingtasks:
• Verify that each deployed Connect:Direct node is up and running and connectable by Control Center• Validate the initial configuration of each Connect:Direct node
For more information, see the IBM Sterling Control Center System Administration Guide.
Chapter 3. Steps for planning an enterprise deployment 9

10 Sterling Connect:Direct: Enterprise Deployment Guide
Chapter 4. Use the Connect:Direct silent installationfor enterprise deployment
The following sections provide step-by-step instructions for command-line deployment of Connect:Directfor UNIX and Connect:Direct for Microsoft Windows by starting their silent installations.
Connect:Direct for UNIX silent installationThe following installation and configuration files are required for a silent installation of Connect:Direct forUNIX:
• cdinstall_a script• cdinstall script• cpio file (installation archive)• key certificate• Options file (unless you specify all parameters on the command line)
On the command line, you can specify parameters, such as the parameters in the following list:
• key certificate passphrase• Connect:Direct server port• Connect:Direct client port• Connect:Direct administrator user ID
Refer to “Sterling Connect:Direct for UNIX silent installation options file and command-line parameters”on page 12 for a description of the options file and command-line parameters. The options file andcommand-line parameters are important when you do not use Control Center for configuration tasks or anenterprise deployment tool.
Attention: Command-line parameters override the settings in the options file.
The cdinstall_a script provides the essential installation and configuration capabilities for deployingConnect:Direct for UNIX. This script uses the cdinstall and cdcust scripts.
The cdinstall_a script reads the options file, command-line arguments, or both for the necessaryarguments that are needed for execution. This information includes the deployment command to run:install, upgrade, or uninstall, the installation directory for Connect:Direct, the platform-specific cpio file,and other information.
Refer to “cdinstall_a script operation” on page 20 for a detailed description of how cdinstall_aoperates. This information is essential if you do not use Control Center for configuration tasks or anenterprise deployment tool.
Restriction: Different UNIX and Linux operating systems have different command-line length limitations.An effective method for silent installations is to use an options file to specify your parameters instead ofthe command line.
The following installation and configuration files are optional for a silent installation of Connect:Direct forUNIX:
• Connect:Direct Secure Plus configuration command file (permits extended configuration ofConnect:Direct Secure Plus)
• initparm.cfg• netmap.cfg• userfile.cfg
© Copyright IBM Corp. 2013 11
• Xlate tables (the file extension must be .sxlt)
Note: The silent install requires the original pre-compiled .sxlt files to import. Re-naming an existing .xltfile to .sxlt does not work because the silent install does the compile process during the install.
• More key certificate files to use with the Connect:Direct Secure Plus configuration command line (thefile extension must be .pem, .cer, or .crt)
Refer to the IBM Connect:Direct for UNIX Administration Guide for more information about .cfg files andxlate tables.
Refer to the IBM Connect:Direct Secure Plus for UNIX Administration Guide for more information about theConnect:Direct Secure Plus configuration command file and key certificate files.
Sterling Connect:Direct for UNIX silent installation options file andcommand-line parameters
The options file contains shell script variables. cdinstall_a “source includes” the options file into itsexecution environment so that the variables are available. However, it will do so only after it runs asecurity check that UNIX or Linux commands are not specified as values for the parameter variables or asindividual commands. This guards against a code injection attack.
This point is important because cdinstall_a is started under the root account. Therefore, theadministrator can run arbitrary commands without cdinstall_a. However, other users or applicationswithout root privileges can initiate an automated installation. These users or applications might specifyUNIX or Linux commands in the options file, which would be processed under root. This situation createsa security issue.
The following table lists and describes these variables. If you do not specify the full path of the files in theinstallation package, then the path defaults to the directory where cdinstall_a was started. Forexample, the path name for the cpio file defaults to the package directory where cdinstall_a islocated if you do not explicitly specify a path.
Variable nameCommand-linearguments Default value Description
cdai_installCmd=<install | upgrade| uninstall>
--installCmd None. Requiredparameter.
Specifies the typeof processing touse.
cdai_cpioFile=<cpio file name> --cpioFile cdunix The installationcpio name.
If it is in a differentdirectory than thepackage directory,the full path mustbe specified.
cdai_installDir=<target installationdirectory>
--installDir None. Requiredparameter.
Where to installSterlingConnect:Direct. Theadministrator canchoose anyaccessible location,but the full pathmust be specified
12 Sterling Connect:Direct: Enterprise Deployment Guide
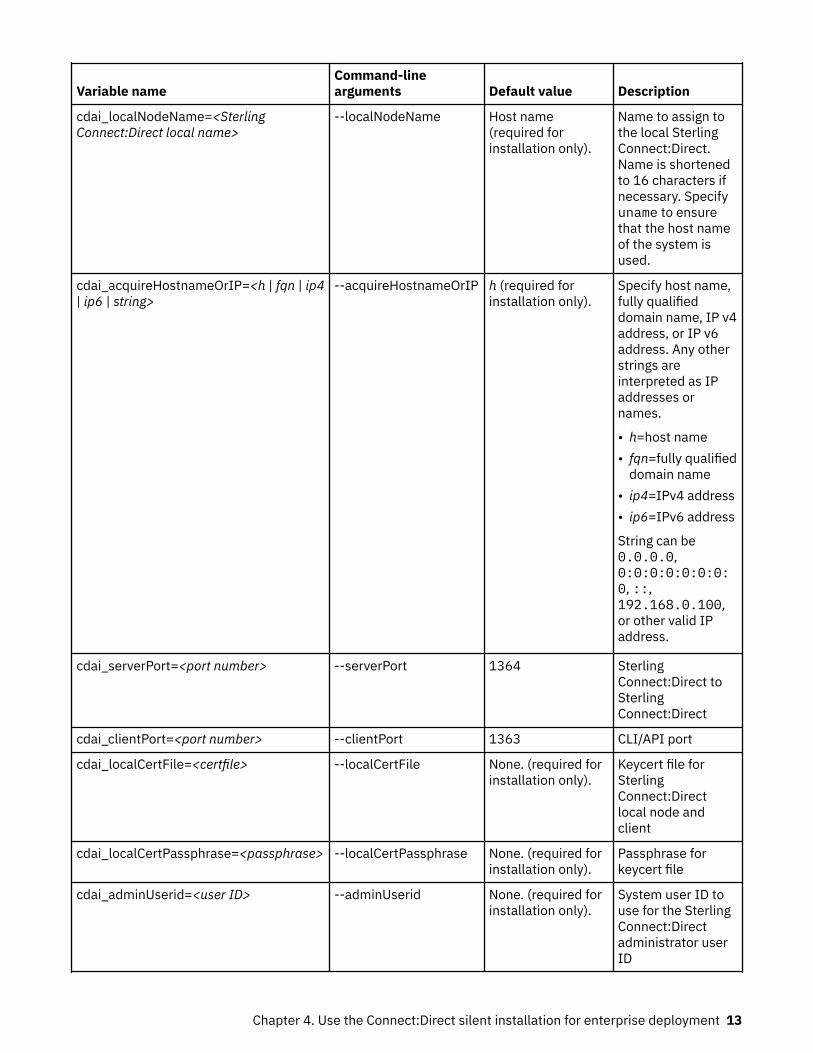
Variable nameCommand-linearguments Default value Description
cdai_localNodeName=<SterlingConnect:Direct local name>
--localNodeName Host name(required forinstallation only).
Name to assign tothe local SterlingConnect:Direct.Name is shortenedto 16 characters ifnecessary. Specifyuname to ensurethat the host nameof the system isused.
cdai_acquireHostnameOrIP=<h | fqn | ip4| ip6 | string>
--acquireHostnameOrIP h (required forinstallation only).
Specify host name,fully qualifieddomain name, IP v4address, or IP v6address. Any otherstrings areinterpreted as IPaddresses ornames.
• h=host name• fqn=fully qualified
domain name• ip4=IPv4 address• ip6=IPv6 address
String can be0.0.0.0,0:0:0:0:0:0:0:0, ::,192.168.0.100,or other valid IPaddress.
cdai_serverPort=<port number> --serverPort 1364 SterlingConnect:Direct toSterlingConnect:Direct
cdai_clientPort=<port number> --clientPort 1363 CLI/API port
cdai_localCertFile=<certfile> --localCertFile None. (required forinstallation only).
Keycert file forSterlingConnect:Directlocal node andclient
cdai_localCertPassphrase=<passphrase> --localCertPassphrase None. (required forinstallation only).
Passphrase forkeycert file
cdai_adminUserid=<user ID> --adminUserid None. (required forinstallation only).
System user ID touse for the SterlingConnect:Directadministrator userID
Chapter 4. Use the Connect:Direct silent installation for enterprise deployment 13
Variable nameCommand-linearguments Default value Description
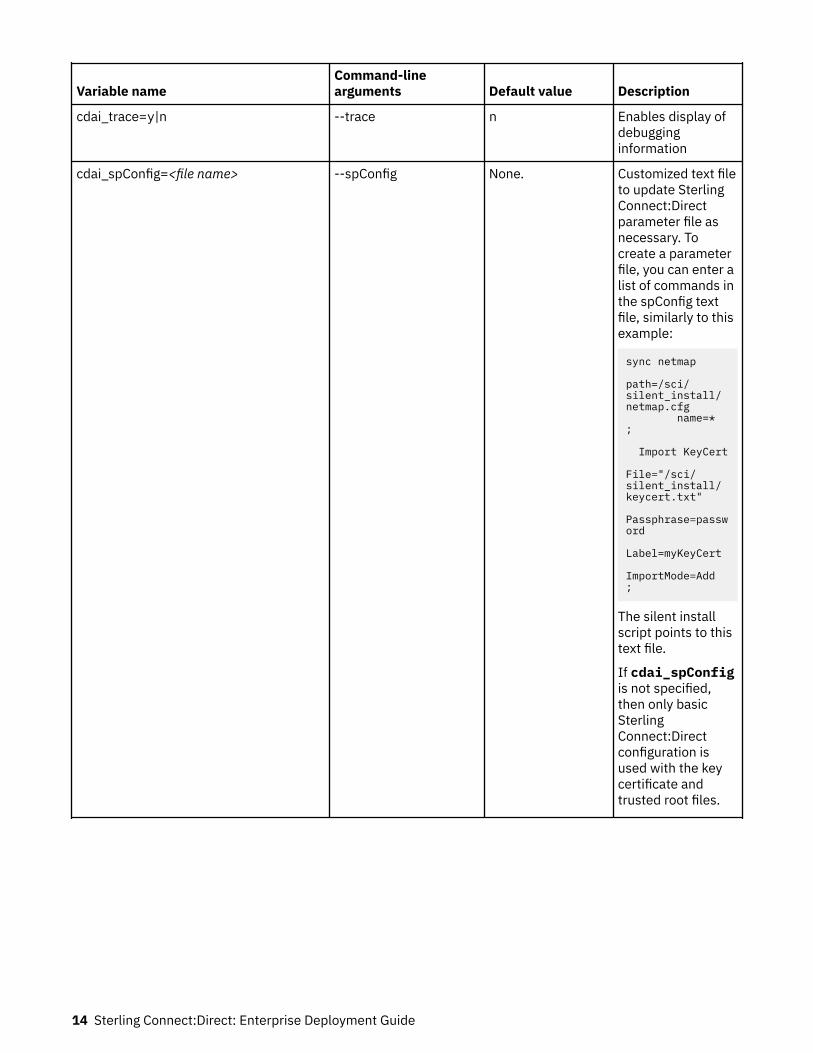
cdai_trace=y|n --trace n Enables display ofdebugginginformation
cdai_spConfig=<file name> --spConfig None. Customized text fileto update SterlingConnect:Directparameter file asnecessary. Tocreate a parameterfile, you can enter alist of commands inthe spConfig textfile, similarly to thisexample:
sync netmap path=/sci/silent_install/netmap.cfg name=*;
Import KeyCert File="/sci/silent_install/keycert.txt" Passphrase=password Label=myKeyCert ImportMode=Add;
The silent installscript points to thistext file.
If cdai_spConfigis not specified,then only basicSterlingConnect:Directconfiguration isused with the keycertificate andtrusted root files.
14 Sterling Connect:Direct: Enterprise Deployment Guide
Variable nameCommand-linearguments Default value Description
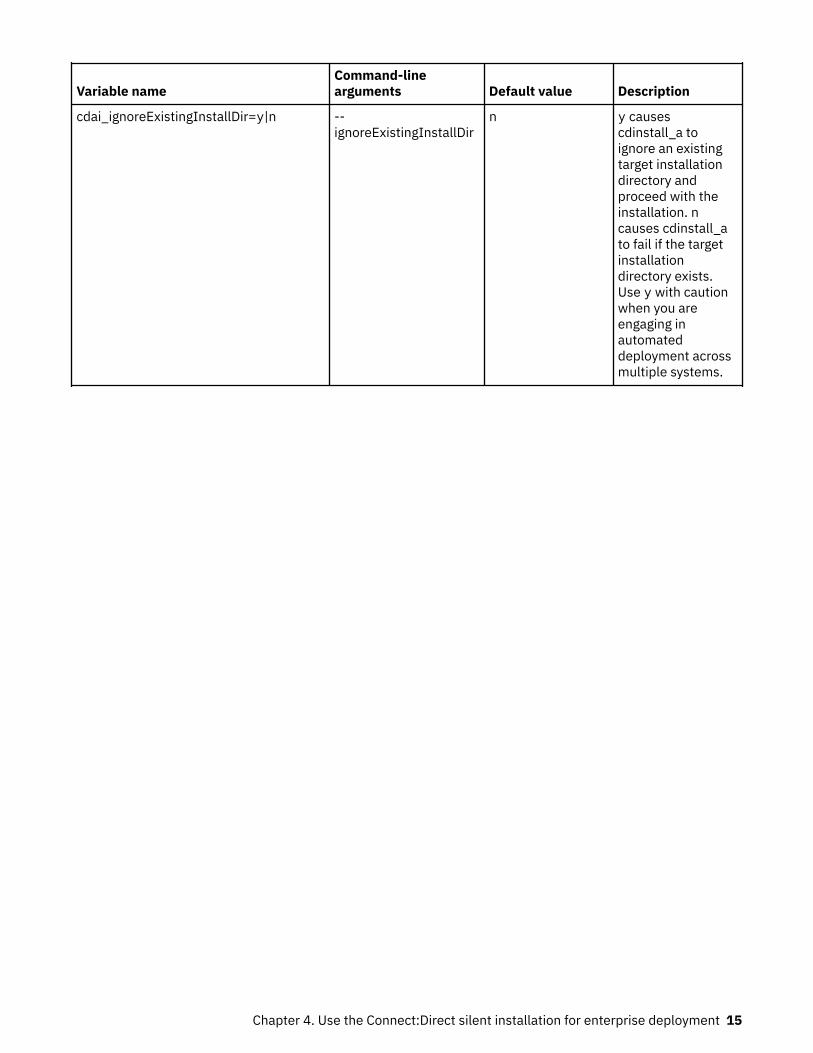
cdai_ignoreExistingInstallDir=y|n --ignoreExistingInstallDir
n y causescdinstall_a toignore an existingtarget installationdirectory andproceed with theinstallation. ncauses cdinstall_ato fail if the targetinstallationdirectory exists.Use y with cautionwhen you areengaging inautomateddeployment acrossmultiple systems.
Chapter 4. Use the Connect:Direct silent installation for enterprise deployment 15
Variable nameCommand-linearguments Default value Description
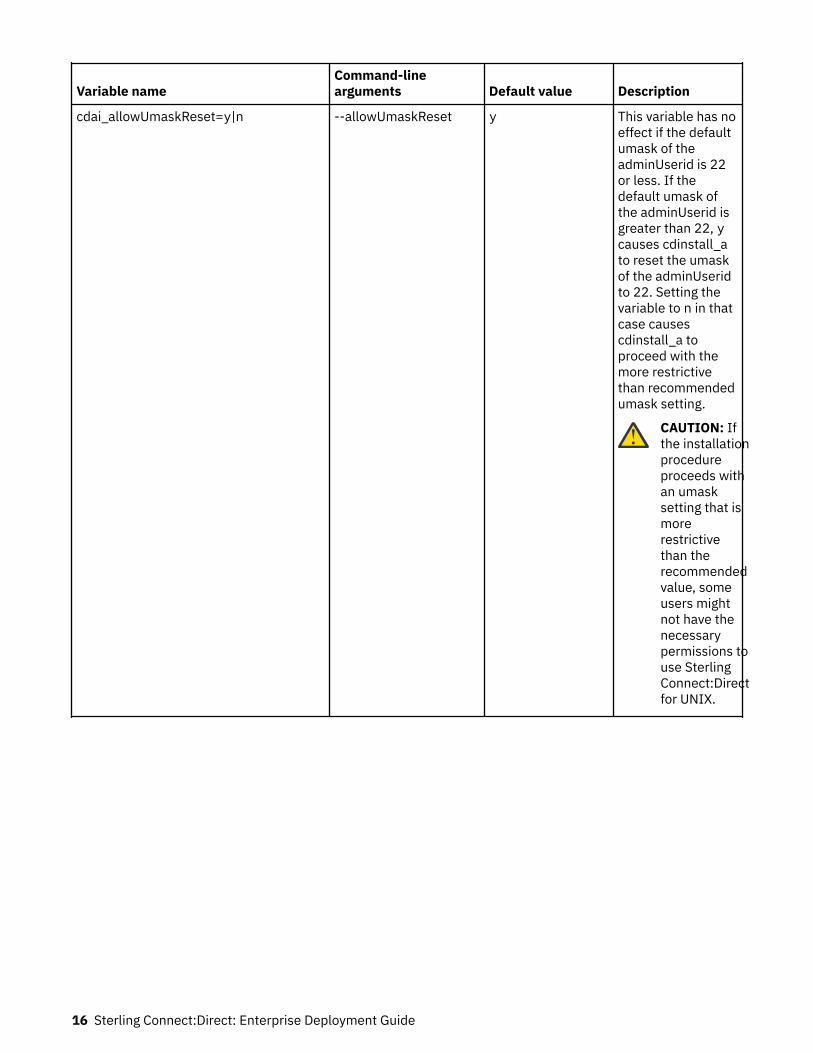
cdai_allowUmaskReset=y|n --allowUmaskReset y This variable has noeffect if the defaultumask of theadminUserid is 22or less. If thedefault umask ofthe adminUserid isgreater than 22, ycauses cdinstall_ato reset the umaskof the adminUseridto 22. Setting thevariable to n in thatcase causescdinstall_a toproceed with themore restrictivethan recommendedumask setting.
CAUTION: Ifthe installationprocedureproceeds withan umasksetting that ismorerestrictivethan therecommendedvalue, someusers mightnot have thenecessarypermissions touse SterlingConnect:Directfor UNIX.
16 Sterling Connect:Direct: Enterprise Deployment Guide

Variable nameCommand-linearguments Default value Description
cdai_verifyUpgrade=y|n --verifyUpgrade y An upgradecommand fails ifpre-existingconfiguration filesdon't pass theconfiguration checkor if the sample.cdprocess fails tocompletesuccessfully. Thishappens even whenthe configurationerrors or sample.cdoperation failure isconsideredtolerable. Thisvariable allowsusers to choosewhether to verify anupgrade or not.
Chapter 4. Use the Connect:Direct silent installation for enterprise deployment 17
Variable nameCommand-linearguments Default value Description
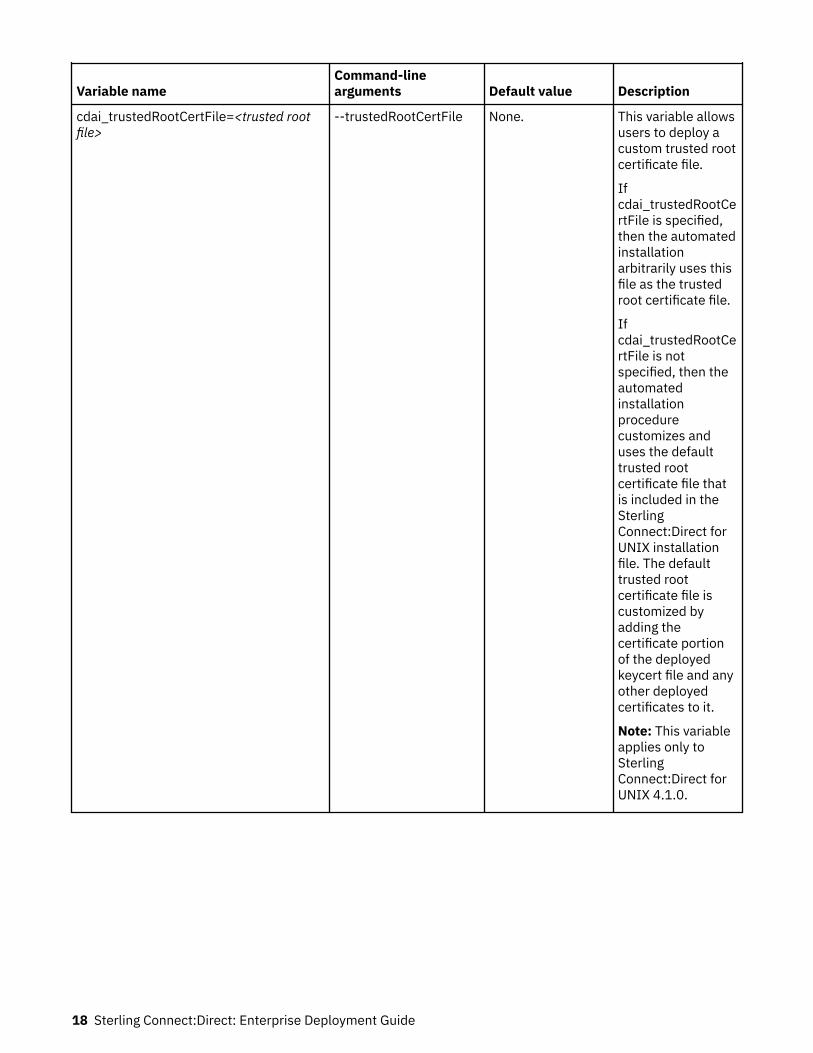
cdai_trustedRootCertFile=<trusted rootfile>
--trustedRootCertFile None. This variable allowsusers to deploy acustom trusted rootcertificate file.
Ifcdai_trustedRootCertFile is specified,then the automatedinstallationarbitrarily uses thisfile as the trustedroot certificate file.
Ifcdai_trustedRootCertFile is notspecified, then theautomatedinstallationprocedurecustomizes anduses the defaulttrusted rootcertificate file thatis included in theSterlingConnect:Direct forUNIX installationfile. The defaulttrusted rootcertificate file iscustomized byadding thecertificate portionof the deployedkeycert file and anyother deployedcertificates to it.
Note: This variableapplies only toSterlingConnect:Direct forUNIX 4.1.0.
18 Sterling Connect:Direct: Enterprise Deployment Guide
Variable nameCommand-linearguments Default value Description
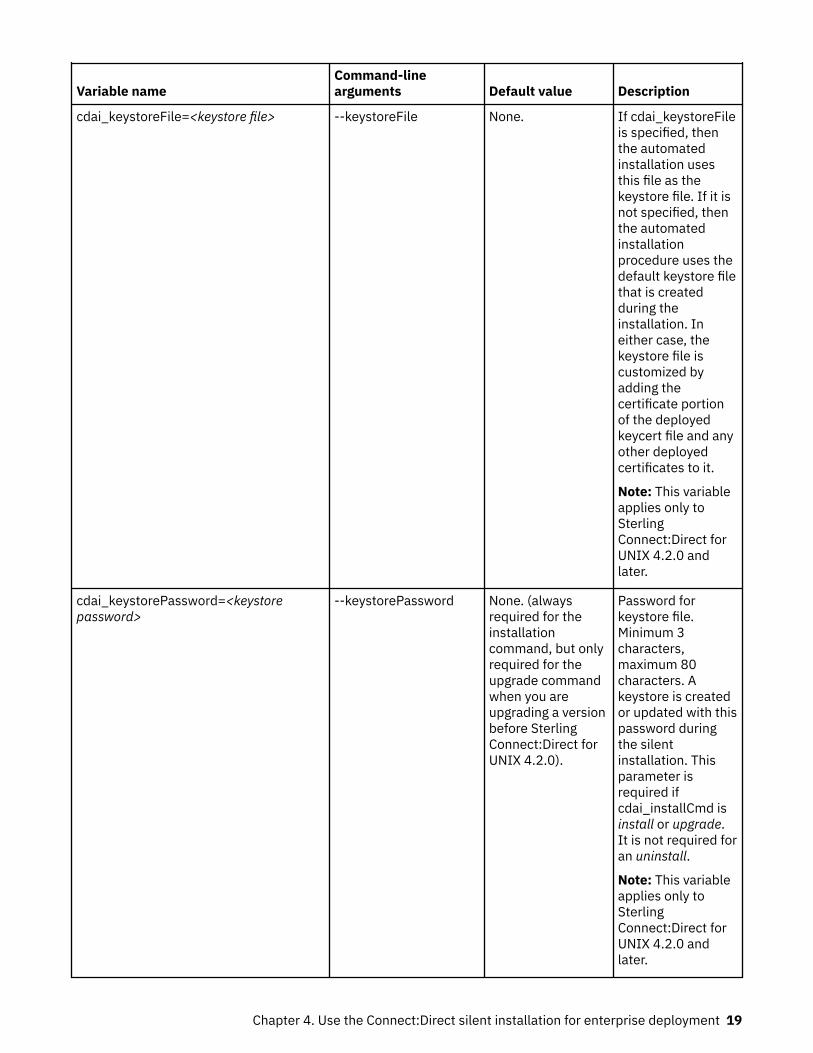
cdai_keystoreFile=<keystore file> --keystoreFile None. If cdai_keystoreFileis specified, thenthe automatedinstallation usesthis file as thekeystore file. If it isnot specified, thenthe automatedinstallationprocedure uses thedefault keystore filethat is createdduring theinstallation. Ineither case, thekeystore file iscustomized byadding thecertificate portionof the deployedkeycert file and anyother deployedcertificates to it.
Note: This variableapplies only toSterlingConnect:Direct forUNIX 4.2.0 andlater.
cdai_keystorePassword=<keystorepassword>
--keystorePassword None. (alwaysrequired for theinstallationcommand, but onlyrequired for theupgrade commandwhen you areupgrading a versionbefore SterlingConnect:Direct forUNIX 4.2.0).
Password forkeystore file.Minimum 3characters,maximum 80characters. Akeystore is createdor updated with thispassword duringthe silentinstallation. Thisparameter isrequired ifcdai_installCmd isinstall or upgrade.It is not required foran uninstall.
Note: This variableapplies only toSterlingConnect:Direct forUNIX 4.2.0 andlater.
Chapter 4. Use the Connect:Direct silent installation for enterprise deployment 19
Variable nameCommand-linearguments Default value Description
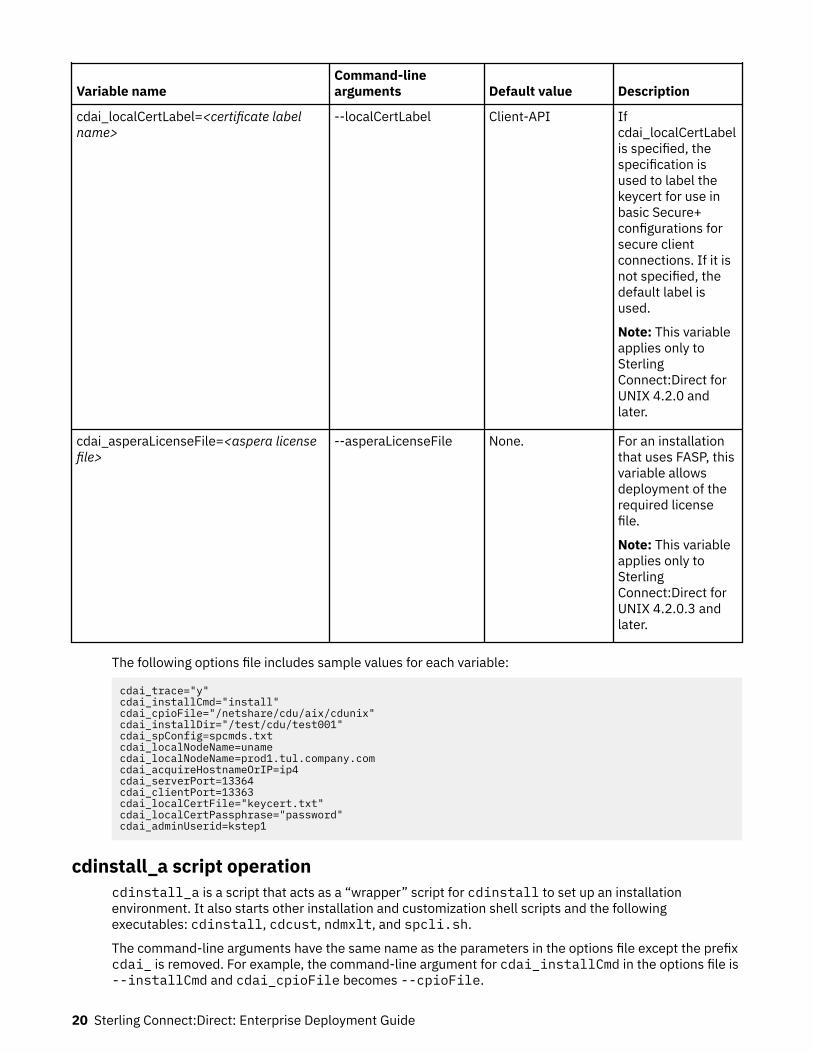
cdai_localCertLabel=<certificate labelname>
--localCertLabel Client-API Ifcdai_localCertLabelis specified, thespecification isused to label thekeycert for use inbasic Secure+configurations forsecure clientconnections. If it isnot specified, thedefault label isused.
Note: This variableapplies only toSterlingConnect:Direct forUNIX 4.2.0 andlater.
cdai_asperaLicenseFile=<aspera licensefile>
--asperaLicenseFile None. For an installationthat uses FASP, thisvariable allowsdeployment of therequired licensefile.
Note: This variableapplies only toSterlingConnect:Direct forUNIX 4.2.0.3 andlater.
The following options file includes sample values for each variable:
cdai_trace="y"cdai_installCmd="install"cdai_cpioFile="/netshare/cdu/aix/cdunix"cdai_installDir="/test/cdu/test001"cdai_spConfig=spcmds.txtcdai_localNodeName=unamecdai_localNodeName=prod1.tul.company.comcdai_acquireHostnameOrIP=ip4cdai_serverPort=13364cdai_clientPort=13363cdai_localCertFile="keycert.txt"cdai_localCertPassphrase="password"cdai_adminUserid=kstep1
cdinstall_a script operationcdinstall_a is a script that acts as a “wrapper” script for cdinstall to set up an installationenvironment. It also starts other installation and customization shell scripts and the followingexecutables: cdinstall, cdcust, ndmxlt, and spcli.sh.
The command-line arguments have the same name as the parameters in the options file except the prefixcdai_ is removed. For example, the command-line argument for cdai_installCmd in the options file is--installCmd and cdai_cpioFile becomes --cpioFile.
20 Sterling Connect:Direct: Enterprise Deployment Guide
If you specify both an options file and command-line arguments, then the command-line argumentsoverride the corresponding values in the options file.
Restriction: Different UNIX and Linux operating systems have different command-line length limitations.The best practice for silent installations is to use an options file to specify your parameters instead of thecommand line.
To start cdinstall_a with an options file, use the following syntax:
$ cdinstall_a –f <options file>
To start cdinstall_a with command-line arguments, refer the following example:
$ cdinstall_a –-installCmd upgrade –-cpioFile <file name> --installDir <CDU install dir>
Basic installation and configurationA basic installation includes only the basic installation steps with the required deployment andinstallation files.
Important: Log on as root before you start the cdinstall_a script. If the root password is unavailable,but root authority can be properly acquired per your company's security policies via a utility like sudo,then acquire root authority via the utility and then execute cdinstall_a script.
Installing Connect:Direct for UNIXComplete the following procedure to perform a basic installation of Connect:Direct for UNIX:
Procedure1. Create the options file to install Connect:Direct for UNIX.2. Log in to the target system as root.
Note: If the root password is unavailable, but root authority can be properly acquired per yourcompany's security policies via a utility like sudo, then acquire root authority via the utility and thenexecute cdinstall_a script.
3. Make a deployment directory on the target system to stage the installation files.4. Copy cdinstall_a, cdinstall, the cpio file, keycert file, and the options file to the deployment
directory. You can put the cpio file on a network file system instead of the deployment directory.5. Run cdinstall_a.6. Review the log file in the deployment directory (cdaiLog.txt).
Upgrading or applying a fix pack to Connect:Direct for UNIXComplete the following procedure to perform a basic upgrade or fix pack application of Connect:Direct forUNIX:
Procedure1. Copy and modify the installation options file for the upgrade.2. Log in to the target system as root.3. Copy cdinstall_a, cdinstall, the cpio file, and the options file to the deployment directory. You
can copy the cpio file to a network file system instead of the deployment directory.4. Run cdinstall_a.5. Review the log file in the deployment directory (cdaiLog.txt).
Chapter 4. Use the Connect:Direct silent installation for enterprise deployment 21
Uninstalling Connect:Direct for UNIXComplete the following procedure to uninstall Connect:Direct for UNIX:
Procedure1. Copy and modify the installation options file and copy cdinstall_a to the deployment directory.2. Log in to the target system as root.3. Run cdinstall_a.4. Review the log file in the deployment directory (cdaiLog.txt).5. If cdinstall_a fails:
a) Stop Connect:Direct with the command-line interface (or issue kill -9 <cdpmgr pid>).b) Under the root ID, issue rm -rf <Sterling Connect:Direct install directory>.
6. Remove the deployment directory and contents.
Complete installation and configurationThe complete, script-only installation and configuration include the basic installation steps. Optionally,you can add any combination of more keycerts, Connect:Direct configuration files, the Connect:DirectSecure Plus configuration command file, and Xlate tables.
After installation, you can use Control Center to do more configuration of your Connect:Direct nodes. Thisconfiguration includes updating netmaps with other newly installed nodes and applying productionkeycerts to the deployed nodes.
Installing Connect:Direct for UNIX with optional filesComplete the following procedure for a complete, script-only installation of Connect:Direct for UNIX:
Procedure1. Create the options file to install Connect:Direct.2. Create one of more of the following optional files:
• More keycert files• Connect:Direct initparm.cfg, netmap.cfg, or userfile.cfg files. You can use one or more of
these files.
Note: If the silent installation options file includes port numbers different from the port numbersthat are specified in the optional .cfg files, the silent installation overrides the options fileparameters and uses the parameters from the optional .cfg files.
• Connect:Direct Secure Plus configuration command file• Xlate tables
3. Log in to the target server.4. Create a deployment directory.5. Copy the cdinstall_a, cdinstall, keycert file, cpio file, options file, and other files to the
deployment directory. You can put the cpio file on a network file system instead of the deploymentdirectory.
6. Run cdinstall_a.7. Review the log file in the deployment directory (cdaiLog.txt).
22 Sterling Connect:Direct: Enterprise Deployment Guide
Upgrading or applying a fix pack to Connect:Direct for UNIX with optionalfiles
Complete the following procedure to perform a complete, script-only upgrade, or fix pack application ofConnect:Direct for UNIX:
Procedure1. Copy and modify the installation options file.2. Log in to the target server as root.3. Copy cdinstall_a, cdinstall, the cpio file, and the options file to the deployment directory. You
can copy the cpio file to a network file system instead of the deployment directory.4. Run cdinstall_a.5. Review the log file in the deployment directory (cdaiLog.txt).
Configuring and monitoring Connect:Direct for UNIX with Control CenterAfter you deploy Connect:Direct for UNIX by any of the previous methods, use Control Center to quicklycomplete more configuration and to monitor the new Connect:Direct nodes. Control Center provides fullfunctionality for configuring, monitoring, and analyzing your Connect:Direct servers.
About this taskComplete the following procedure to configure and monitor Connect:Direct nodes with Control Center.
Procedure1. Configure secure connections from Control Center to the new Connect:Direct nodes with unique
keycerts for each node. For more information, see the IBM Sterling Control Center SystemAdministration Guide.
2. Perform post-deployment configuration on these nodes.
• Add new Connect:Direct nodes to the netmaps of the existing nodes.• Add Connect:Direct nodes to the netmaps of new nodes.• Update the functional authorities on each node.• Update the user proxies on each node.
For more information, see the IBM Sterling Control Center Configuration Management Guide.
Connect:Direct for Microsoft Windows silent installationThe installation file for a silent installation of Connect:Direct for Microsoft Windows is an executable(.exe).
On the command line for the installation executable, you can specify parameters, such as the parametersin the following list:
• Database password• keycert passphrase• Connect:Direct server port• Connect:Direct client port• Connect:Direct administrator user ID
For more information about the installation executable, see “Installation executable silent operation” onpage 25.
Chapter 4. Use the Connect:Direct silent installation for enterprise deployment 23
The Connect:Direct server supports the use of an INI file, which can specify the value of installationproperties. If you plan to use the cd_srvr.ini file to manage a silent installation, change theparameters of the INI file that is provided with Connect:Direct for Microsoft Windows to specify site-specific information.
You can use the Connect:Direct for Microsoft Windows Configuration Utility (CdConfig.exe) to extractand validate configuration information from an existing master node.
• To extract netmap configuration, run the following command:
CDConfig.exe /q /mC:\Configurations\MyNetmap.cfg
• To extract user configuration, run the following command:
CDConfig.exe /q /uC:\Configurations\MyUserAuth.cfg
• To extract initialization parameters, run the following command:
CDConfig.exe /q /pC:\Configurations\MyInitparms.cfg
Attention: If a parameter is defined in both the cd_srvr.ini file and on the command line, theparameter in the cd_srvr.ini file overrides the command-line parameter.
Important: Some parameters must be defined at the command line, such as ADDLOCAL, REMOVE, andINSTALLDIR.
Refer to “Sterling Connect:Direct for Microsoft Windows deployment options” on page 24 for moreinformation about installation parameters that can be specified in the cd_srvr.ini file or on thecommand line. This is important when you do not use Control Center for configuration tasks or anenterprise deployment tool.
After installation, you can use Control Center to complete the configuration of your Connect:Direct nodes.
Sterling Connect:Direct for Microsoft Windows deployment optionsThe installation parameters can be specified in the cd_srvr.ini file or on the command line, click hereto view the details of these parameters.
Restriction: Values in the cd_srvr.ini file are case-sensitive. Use the appropriate case when you editthe file.
Attention: Parameters that are specified on the command line do not override parameters incd_srvr.ini. Parameters in cd_srvr.ini override parameters that are specified on thecommand line. It is a safe practice to specify parameters either in cd_srvr.ini or the commandline but not both.
The following cd_srvr.ini file includes sample values for each parameter:
[Server]CD_SETUP_TYPE=defaultCD_NODENAME=CD.WINDOWSCD_HOST_IP=0.0.0.0CD_HOST_PORT=1364CD_API_IP=0.0.0.0CD_API_PORT=1363CD_EVENTLOG_FLAG=1CD_NOTIFY_TYPE=NT BROADCASTCD_USERAUTH_FILE=C:\Configurations\MyUserAuth.cfgCD_NETMAP_FILE=C:\Configurations\MyNetmap.cfgCD_INITPARMS_FILE=C:\Configurations\MyInitparms.cfgCD_POSTGRESQL_PORT=23610CD_POSTGRESQL_USERID=postgresCD_POSTGRESQL_PWD=postgrespasswdCD_SVC_ACCOUNT=.\cdsvcuserCD_SVC_ACCOUNT_PWD=syspasswdCD_NETMAP_CHECK=YCD_CLIENT_KEYCERT_FILE=c:\certs\clientKeycert.pemCD_CLIENT_KEYCERT_PWD=passwdCD_CLIENT_CIPHERSUITES=(TLS_RSA_WITH_AES_256_CBC_SHA,
24 Sterling Connect:Direct: Enterprise Deployment Guide

TLS_RSA_WITH_AES_128_CBC_SHA)CD_ADMIN_USERID=cdadmin
Installation executable silent operationThere are four types of operations: Install, upgrade, apply fix pack, and uninstall.
The following example illustrates how to use the installation executable file for a new installation:
<Drive:\path>Setup.exe /s /v"ADDLOCAL=ALL REMOVE=Symbols CD_SRVR_INI_FILE=\"C:\MyFiles\cd_srvr.ini\" /qn /l*vx \"C:\cdinstall.log\""
Tip: You can specify the CD_SOLIDDB_PWD in the cd_srvr.ini file.
The following example illustrates how to use the installation executable for an upgrade installation(CD_SETUP_TYPE=Upgrade):
<Drive:\path>Setup.exe /s /v"ADDLOCAL=ALL REMOVE=Symbols CD_SRVR_INI_FILE=\"C:\MyFiles\cd_srvr.ini\" /qn /l*vx \"C:cdupgrade.log\""
Tip: You can specify the CD_SOLIDDB_PWD and CD_SETUP_TYPE in the cd_srvr.ini file.
The following example illustrates how to use the installation executable for a fix pack installation(SEPATCH_ONLY_FLAG=1):
<Drive:\path><Fix Pack executable> /v"SEPATCH_ONLY_FLAG=1 /qn /l*vx C:\temp\fpinstall.log" /s
The following example illustrates how to use the installation executable to uninstall (/x) Connect:Directfor Microsoft Windows.
Important: The uninstall works only with the same version of the installer executable as the instance thatis being uninstalled.
<Drive:\path><setup.exe> /v"/qn /l*vx C:\temp\uninstall.log" /s /xOR<Drive:\path>< Fix Pack executable > /v"/qn /l*vx C:\temp\uninstall.log" /s /x
Installing Connect:Direct for Microsoft WindowsComplete the following procedure to perform a basic installation of Connect:Direct for Microsoft Windows:
Procedure1. If needed, edit the cd_srvr.ini file with a text editor.2. Log in to the target server as a Microsoft Windows administrator.3. Create a deployment directory on the target system to stage the installation files.4. Copy the installation executable file, keycert file, and cd_srvr.ini file (if needed) to the
deployment directory. You can optionally put the installation executable file on a network share.5. For Connect:Direct for Microsoft Windows version 4.6.0.2 or later, run the installation executable with
the following syntax:
<Installation executable name> /v"ADDLOCAL=ALL REMOVE=SNMP,Symbols CD_SRVR_INI_FILE=\”C:\My Files\cd_srvr.ini\” CD_SOLIDDB_PWD=<password> /qn /l*v C:\Windows\temp\cdinstall.log\" /w /s
Restriction: If you want to use the cd_srvr.ini file, add it to the command.6. Review the log file (C:\Windows\temp\cdinstall.log).
Chapter 4. Use the Connect:Direct silent installation for enterprise deployment 25
Upgrading Connect:Direct for Microsoft WindowsComplete the following procedure to perform a basic upgrade of Connect:Direct for Microsoft Windows:
Procedure1. If needed, copy the cd_srvr.ini file for the upgrade.2. Log in to the target server.3. Copy the installation executable file and cd_srvr.ini file (if needed) to the deployment directory.
You can optionally put the installation executable file on a network share.4. For Connect:Direct for Microsoft Windows version 4.6, run the installation executable with the
following syntax:
<Installation executable name> /v"ADDLOCAL=ALL REMOVE=SNMP,Symbols CD_SETUP_TYPE=Upgrade CD_SRVR_INI_FILE=\”C:\My Files\cd_srvr.ini\” CD_SOLIDDB_PWD=<password> /qn /l*v C:\Windows\temp\cdinstall.log\" /w /s
Restriction: If you want to use the cd_srvr.ini file, add it to the command.5. Review the log file (C:\Windows\temp\cdinstall.log).
Applying a fix pack to Connect:Direct for Microsoft WindowsComplete the following procedure to apply a fix pack application of Connect:Direct for Microsoft Windows:
Procedure1. Log in to the target server.2. Copy the fix pack executable to the deployment directory
You can optionally make the fix pack executable file available on a network share.3. For Connect:Direct for Microsoft Windows version 4.6, run the fix pack executable with the following
syntax:
<Fix pack executable name> /v"SEPATCH_ONLY_FLAG=1 /qn /l*v C:\Windows\temp\cdinstall.log\" /w /s
4. Review the log file (C:\Windows\temp\cdinstall.log).
Uninstalling Connect:Direct for Microsoft WindowsComplete the following procedure to uninstall Connect:Direct for Microsoft Windows:
Procedure1. Copy the installation executable file to the deployment directory or a network share.2. Log in to the target system.3. For Connect:Direct for Microsoft Windows version 4.6, run the installation executable file with the
following syntax:
<Installation executable name> /v"/qn /lv* C:\cduninstall.log" /s /x
4. Review the log file.5. Remove the deployment directory and contents.
26 Sterling Connect:Direct: Enterprise Deployment Guide
Configuring and monitoring Connect:Direct for Microsoft Windows withControl Center
After you deploy Connect:Direct for Microsoft Windows by any of the previous methods, use ControlCenter to quickly complete configuration and to monitor the new Connect:Direct nodes. Control Centerprovides full functionality for configuring, monitoring, and analyzing your Connect:Direct servers.
About this taskComplete the following procedure to configure and monitor Connect:Direct nodes with Control Center.
Procedure1. Configure secure connections from Control Center to the new Connect:Direct nodes. For more
information, see IBM Sterling Control Center System Administration Guide.2. Perform post-deployment configuration on these nodes.
• Add new Connect:Direct nodes to the netmaps of the existing nodes.• Add Connect:Direct nodes to the netmaps of new nodes.• Update the functional authorities on each node.• Update the user proxies on each node.
For more information, see IBM Sterling Control Center Configuration Management Guide.
Chapter 4. Use the Connect:Direct silent installation for enterprise deployment 27

28 Sterling Connect:Direct: Enterprise Deployment Guide

Chapter 5. Tivoli Endpoint Manager overviewYou can use IBM Tivoli Endpoint Manager (TEM) to deploy Connect:Direct across computers in yourenterprise. You can also use TEM to upgrade and uninstall Connect:Direct.
RequirementsIf you want to use TEM to deploy, upgrade, and uninstall Connect:Direct, you must install the followingsoftware:
• IBM Tivoli Endpoint Manager Server and Console, version 9.0 or later.• IBM Tivoli Endpoint Manager agent, version 9.0 or later, must be installed on every computer on which
you want to install, upgrade, or uninstall Connect:Direct.• CreateTEMTasks utility
Getting Started with the CreateTEMTasks utilityThe CreateTEMTasks utility (CTTU) creates TEM tasks that are used by a TEM console operator to deploy,upgrade, and uninstall Connect:Direct for UNIX and Connect:Direct for Microsoft Windows across theenterprise. The CTTU also provides a TEM task to start the Connect:Direct for Microsoft Windows service.
Before you beginThe CTTU is a Java based application and requires Java Runtime Environment (JRE), version 1.6 or later.
About this taskThe CTTU must use a secure connection to the TEM server. Before you can run the CTTU, you must addthe TEM server public certificate to the JKS truststore used by the CTTU. You can add the certificate byusing the following procedure on Microsoft Windows:
Procedure1. Make a copy of the cacerts truststore file for the JRE. The truststore file is usually in the <installdirectory>/jre/lib/security directory of your JRE.
2. Put your copy of the cacerts truststore file in a directory that contains no other files.3. Download a copy of the TEM server public certificate. If you use a Firefox browser, use the following
procedure:a) Type the URL of the TEM server in the following format: https://<TEM serveraddress>:<TEM port>.A "This Connection is Untrusted" message is displayed.
Attention: 52311 is the default port the TEM server listens on for connections. If your TEMserver is configured to listen on a different port, use that value.
b) Click Add Exception....The "Add Security Exception" window opens.
c) Click View...d) Click the Details tab.e) Click Export....f) Save the certificate.
Tip: Alternately, you can use OpenSSL to obtain a copy of the TEM server public certificate. Issue thecommand: s_client -showcerts -connect <server>:52311, where <server> must bereplaced with the TEM server address. Copy the certificate from the console.
© Copyright IBM Corp. 2013 29
4. Open a Command Prompt.5. Use the Java keytool utility to add the certificate to your copy of the cacerts file with the following
command:
keytool -import -alias tem -keystore <file pathname to cacerts copy> -file <file pathname to TEM server public certificate> -trustcacerts
6. When prompted, enter the password for the truststore file. The default value is changeit.
CTTU data fileThe CTTU utilizes two data files:
• A properties file containing connection information for the TEM server. This file usually does not changefor different tasks.
• A tasks file containing one line of information, in CSV form, for each TEM task.
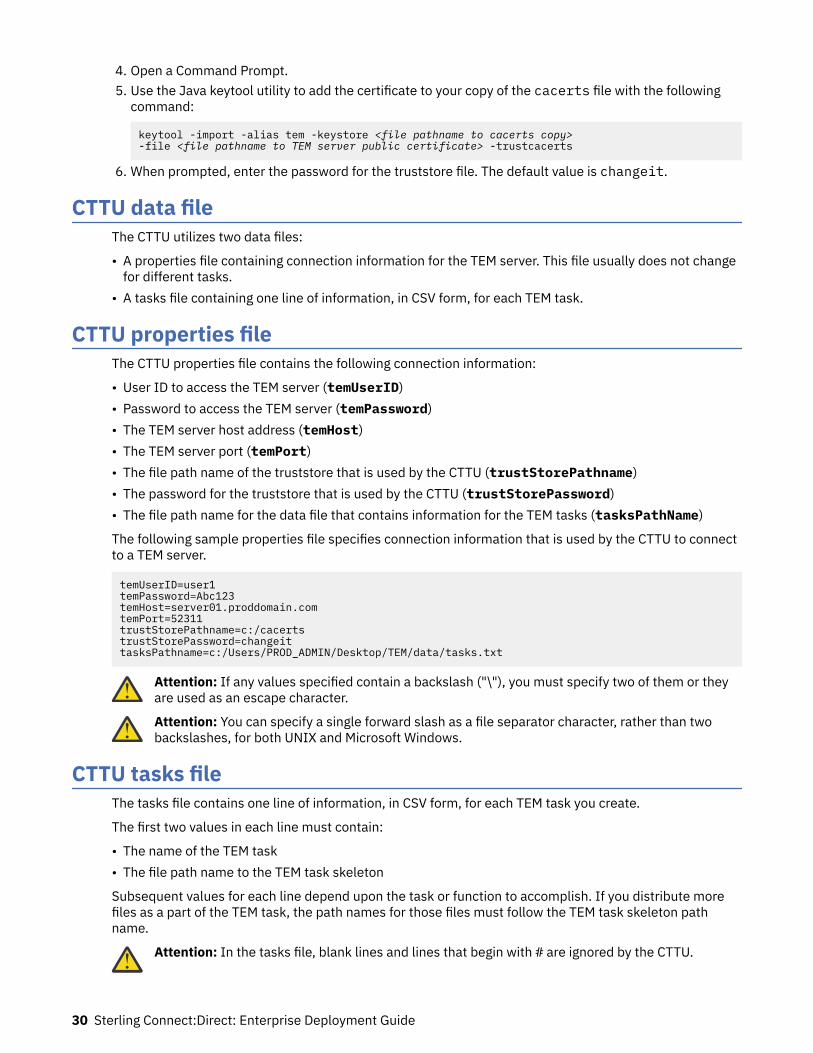
CTTU properties fileThe CTTU properties file contains the following connection information:
• User ID to access the TEM server (temUserID)• Password to access the TEM server (temPassword)• The TEM server host address (temHost)• The TEM server port (temPort)• The file path name of the truststore that is used by the CTTU (trustStorePathname)• The password for the truststore that is used by the CTTU (trustStorePassword)• The file path name for the data file that contains information for the TEM tasks (tasksPathName)
The following sample properties file specifies connection information that is used by the CTTU to connectto a TEM server.
temUserID=user1temPassword=Abc123temHost=server01.proddomain.comtemPort=52311trustStorePathname=c:/cacertstrustStorePassword=changeittasksPathname=c:/Users/PROD_ADMIN/Desktop/TEM/data/tasks.txt
Attention: If any values specified contain a backslash ("\"), you must specify two of them or theyare used as an escape character.
Attention: You can specify a single forward slash as a file separator character, rather than twobackslashes, for both UNIX and Microsoft Windows.
CTTU tasks fileThe tasks file contains one line of information, in CSV form, for each TEM task you create.
The first two values in each line must contain:
• The name of the TEM task• The file path name to the TEM task skeleton
Subsequent values for each line depend upon the task or function to accomplish. If you distribute morefiles as a part of the TEM task, the path names for those files must follow the TEM task skeleton pathname.
Attention: In the tasks file, blank lines and lines that begin with # are ignored by the CTTU.
30 Sterling Connect:Direct: Enterprise Deployment Guide
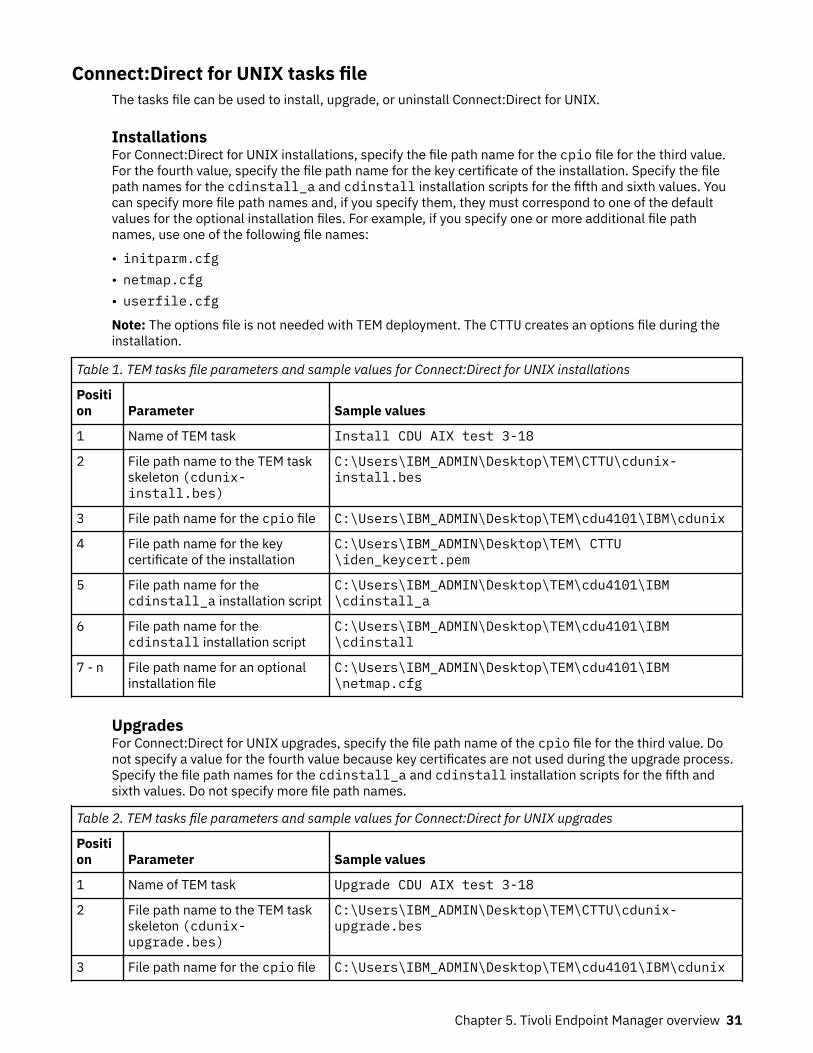
Connect:Direct for UNIX tasks fileThe tasks file can be used to install, upgrade, or uninstall Connect:Direct for UNIX.
InstallationsFor Connect:Direct for UNIX installations, specify the file path name for the cpio file for the third value.For the fourth value, specify the file path name for the key certificate of the installation. Specify the filepath names for the cdinstall_a and cdinstall installation scripts for the fifth and sixth values. Youcan specify more file path names and, if you specify them, they must correspond to one of the defaultvalues for the optional installation files. For example, if you specify one or more additional file pathnames, use one of the following file names:
• initparm.cfg• netmap.cfg• userfile.cfg
Note: The options file is not needed with TEM deployment. The CTTU creates an options file during theinstallation.
Table 1. TEM tasks file parameters and sample values for Connect:Direct for UNIX installations
Position Parameter Sample values
1 Name of TEM task Install CDU AIX test 3-18
2 File path name to the TEM taskskeleton (cdunix-install.bes)
C:\Users\IBM_ADMIN\Desktop\TEM\CTTU\cdunix-install.bes
3 File path name for the cpio file C:\Users\IBM_ADMIN\Desktop\TEM\cdu4101\IBM\cdunix
4 File path name for the keycertificate of the installation
C:\Users\IBM_ADMIN\Desktop\TEM\ CTTU\iden_keycert.pem
5 File path name for thecdinstall_a installation script
C:\Users\IBM_ADMIN\Desktop\TEM\cdu4101\IBM\cdinstall_a
6 File path name for thecdinstall installation script
C:\Users\IBM_ADMIN\Desktop\TEM\cdu4101\IBM\cdinstall
7 - n File path name for an optionalinstallation file
C:\Users\IBM_ADMIN\Desktop\TEM\cdu4101\IBM\netmap.cfg
UpgradesFor Connect:Direct for UNIX upgrades, specify the file path name of the cpio file for the third value. Donot specify a value for the fourth value because key certificates are not used during the upgrade process.Specify the file path names for the cdinstall_a and cdinstall installation scripts for the fifth andsixth values. Do not specify more file path names.
Table 2. TEM tasks file parameters and sample values for Connect:Direct for UNIX upgrades
Position Parameter Sample values
1 Name of TEM task Upgrade CDU AIX test 3-18
2 File path name to the TEM taskskeleton (cdunix-upgrade.bes)
C:\Users\IBM_ADMIN\Desktop\TEM\CTTU\cdunix-upgrade.bes
3 File path name for the cpio file C:\Users\IBM_ADMIN\Desktop\TEM\cdu4101\IBM\cdunix
Chapter 5. Tivoli Endpoint Manager overview 31
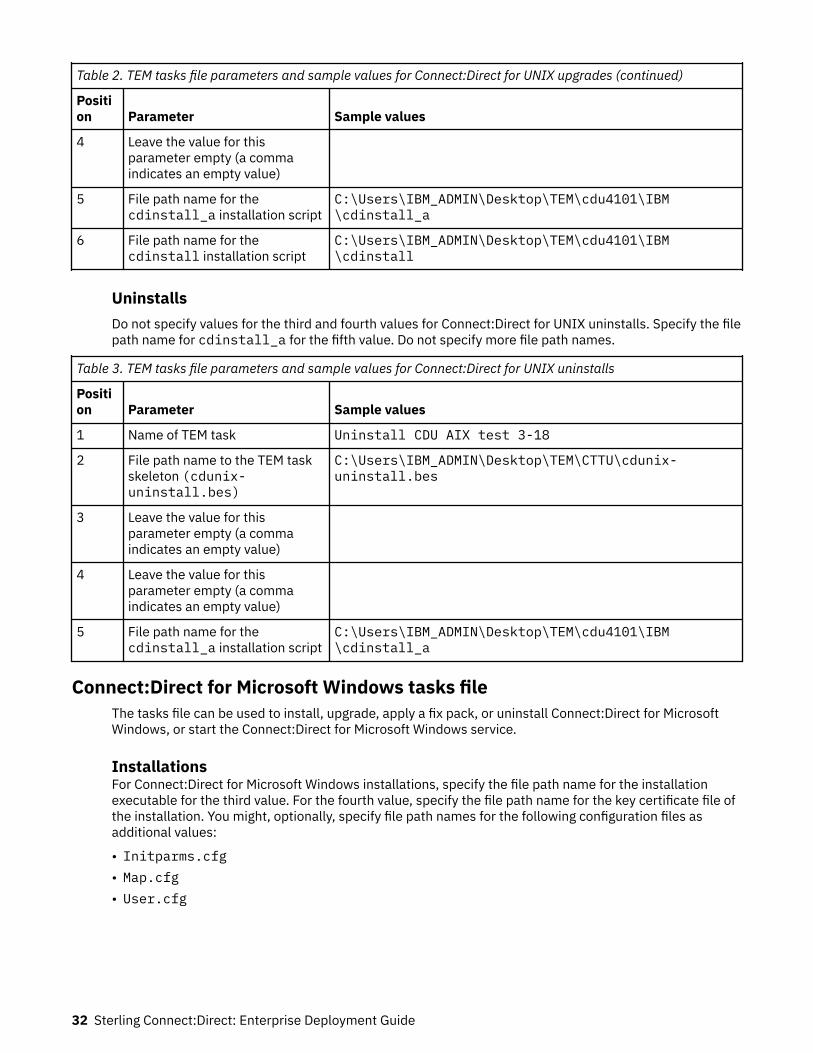
Table 2. TEM tasks file parameters and sample values for Connect:Direct for UNIX upgrades (continued)
Position Parameter Sample values
4 Leave the value for thisparameter empty (a commaindicates an empty value)
5 File path name for thecdinstall_a installation script
C:\Users\IBM_ADMIN\Desktop\TEM\cdu4101\IBM\cdinstall_a
6 File path name for thecdinstall installation script
C:\Users\IBM_ADMIN\Desktop\TEM\cdu4101\IBM\cdinstall
UninstallsDo not specify values for the third and fourth values for Connect:Direct for UNIX uninstalls. Specify the filepath name for cdinstall_a for the fifth value. Do not specify more file path names.
Table 3. TEM tasks file parameters and sample values for Connect:Direct for UNIX uninstalls
Position Parameter Sample values
1 Name of TEM task Uninstall CDU AIX test 3-18
2 File path name to the TEM taskskeleton (cdunix-uninstall.bes)
C:\Users\IBM_ADMIN\Desktop\TEM\CTTU\cdunix-uninstall.bes
3 Leave the value for thisparameter empty (a commaindicates an empty value)
4 Leave the value for thisparameter empty (a commaindicates an empty value)
5 File path name for thecdinstall_a installation script
C:\Users\IBM_ADMIN\Desktop\TEM\cdu4101\IBM\cdinstall_a
Connect:Direct for Microsoft Windows tasks fileThe tasks file can be used to install, upgrade, apply a fix pack, or uninstall Connect:Direct for MicrosoftWindows, or start the Connect:Direct for Microsoft Windows service.
InstallationsFor Connect:Direct for Microsoft Windows installations, specify the file path name for the installationexecutable for the third value. For the fourth value, specify the file path name for the key certificate file ofthe installation. You might, optionally, specify file path names for the following configuration files asadditional values:
• Initparms.cfg• Map.cfg• User.cfg
32 Sterling Connect:Direct: Enterprise Deployment Guide

Table 4. TEM tasks file parameters and sample values for Connect:Direct for Microsoft Windows installations
Position Parameter Sample values
1 Name of TEM task Install CDW test 3-18
2 File path name to the TEM taskskeleton (cdwindows-install.bes)
C:\Users\IBM_ADMIN\Desktop\TEM\CTTU\cdwindows-install.bes
3 File path name for theinstallation executable
C :\Users\IBM_ADMIN\Desktop\TEM\Windows\4.6.0.3-SterlingConnectDirectforMicrosoftWindows-x86-fp0003.exe
4 File path name for the keycertificate of the installation
C:\Users\IBM_ADMIN\Desktop\TEM\CTTU\iden_keycert.pem
5 - 7 File path name for optionalconfiguration files
C:\Users\IBM_ADMIN\Desktop\TEM\CTTU\user.cfg
UpgradesFor Connect:Direct for Microsoft Windows upgrades, specify the file path name for the installationexecutable for the third value. Do not specify additional file path names.
Table 5. TEM tasks file parameters and sample values for Connect:Direct for Microsoft Windows upgrades
Position Parameter Sample values
1 Name of TEM task Upgrade CDW test 3-18
2 File path name to the TEM taskskeleton (cdwindows-upgrade.bes)
C:\Users\IBM_ADMIN\Desktop\TEM\CTTU\cdwindows-upgrade.bes
3 File path name for theinstallation executable
C:\Users\IBM_ADMIN\Desktop\TEM\Windows\4.6.0.3-SterlingConnectDirectforMicrosoftWindows-x86-fp0003.exe
Fix packsFor Connect:Direct for Microsoft Windows fix pack applications, specify the file path name for theinstallation executable for the third value. Do not specify additional file path names.
Table 6. TEM tasks file parameters and sample values for Connect:Direct for Microsoft Windows fix packs
Position Parameter Sample values
1 Name of TEM task Fixpack CDW test 3-18
2 File path name to the TEM taskskeleton (cdwindows-fixpack_application.bes)
C:\Users\IBM_ADMIN\Desktop\TEM\CTTU\cdwindows-fixpack_application.bes
3 File path name for theinstallation executable
C:\Users\IBM_ADMIN\Desktop\TEM\Windows\4.6.0.3-SterlingConnectDirectforMicrosoftWindows-x86-fp0003.exe
UninstallsFor Connect:Direct for Microsoft Windows uninstalls, do not specify any additional values.
Chapter 5. Tivoli Endpoint Manager overview 33
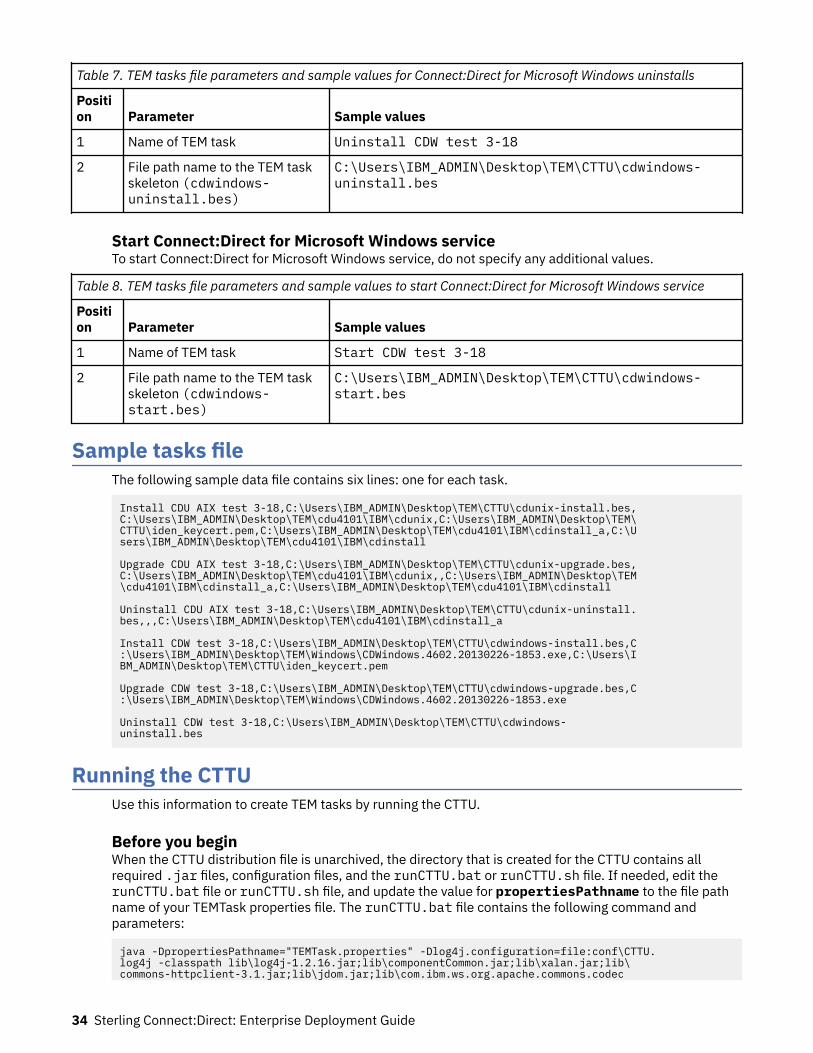
Table 7. TEM tasks file parameters and sample values for Connect:Direct for Microsoft Windows uninstalls
Position Parameter Sample values
1 Name of TEM task Uninstall CDW test 3-18
2 File path name to the TEM taskskeleton (cdwindows-uninstall.bes)
C:\Users\IBM_ADMIN\Desktop\TEM\CTTU\cdwindows-uninstall.bes
Start Connect:Direct for Microsoft Windows serviceTo start Connect:Direct for Microsoft Windows service, do not specify any additional values.
Table 8. TEM tasks file parameters and sample values to start Connect:Direct for Microsoft Windows service
Position Parameter Sample values
1 Name of TEM task Start CDW test 3-18
2 File path name to the TEM taskskeleton (cdwindows-start.bes)
C:\Users\IBM_ADMIN\Desktop\TEM\CTTU\cdwindows-start.bes
Sample tasks fileThe following sample data file contains six lines: one for each task.
Install CDU AIX test 3-18,C:\Users\IBM_ADMIN\Desktop\TEM\CTTU\cdunix-install.bes,C:\Users\IBM_ADMIN\Desktop\TEM\cdu4101\IBM\cdunix,C:\Users\IBM_ADMIN\Desktop\TEM\CTTU\iden_keycert.pem,C:\Users\IBM_ADMIN\Desktop\TEM\cdu4101\IBM\cdinstall_a,C:\Users\IBM_ADMIN\Desktop\TEM\cdu4101\IBM\cdinstall
Upgrade CDU AIX test 3-18,C:\Users\IBM_ADMIN\Desktop\TEM\CTTU\cdunix-upgrade.bes,C:\Users\IBM_ADMIN\Desktop\TEM\cdu4101\IBM\cdunix,,C:\Users\IBM_ADMIN\Desktop\TEM\cdu4101\IBM\cdinstall_a,C:\Users\IBM_ADMIN\Desktop\TEM\cdu4101\IBM\cdinstall
Uninstall CDU AIX test 3-18,C:\Users\IBM_ADMIN\Desktop\TEM\CTTU\cdunix-uninstall.bes,,,C:\Users\IBM_ADMIN\Desktop\TEM\cdu4101\IBM\cdinstall_a
Install CDW test 3-18,C:\Users\IBM_ADMIN\Desktop\TEM\CTTU\cdwindows-install.bes,C:\Users\IBM_ADMIN\Desktop\TEM\Windows\CDWindows.4602.20130226-1853.exe,C:\Users\IBM_ADMIN\Desktop\TEM\CTTU\iden_keycert.pem
Upgrade CDW test 3-18,C:\Users\IBM_ADMIN\Desktop\TEM\CTTU\cdwindows-upgrade.bes,C:\Users\IBM_ADMIN\Desktop\TEM\Windows\CDWindows.4602.20130226-1853.exe
Uninstall CDW test 3-18,C:\Users\IBM_ADMIN\Desktop\TEM\CTTU\cdwindows-uninstall.bes
Running the CTTUUse this information to create TEM tasks by running the CTTU.
Before you beginWhen the CTTU distribution file is unarchived, the directory that is created for the CTTU contains allrequired .jar files, configuration files, and the runCTTU.bat or runCTTU.sh file. If needed, edit therunCTTU.bat file or runCTTU.sh file, and update the value for propertiesPathname to the file pathname of your TEMTask properties file. The runCTTU.bat file contains the following command andparameters:
java -DpropertiesPathname="TEMTask.properties" -Dlog4j.configuration=file:conf\CTTU.log4j -classpath lib\log4j-1.2.16.jar;lib\componentCommon.jar;lib\xalan.jar;lib\commons-httpclient-3.1.jar;lib\jdom.jar;lib\com.ibm.ws.org.apache.commons.codec
34 Sterling Connect:Direct: Enterprise Deployment Guide
.1.4_1.0.0.jar;lib\commons-logging.jar;lib\SCCenter.jar;. com.sterlingcommerce.scc.tem.CreateTEMTasks
About this taskTo run the CTTU, use the following procedure:
Procedure1. Open a Command Prompt2. Go to the directory where the runCTTU.bat or runCTTU.sh file is located3. Type runCTTU (Microsoft Windows) or runCTTU.sh (UNIX/Linux) and press Enter
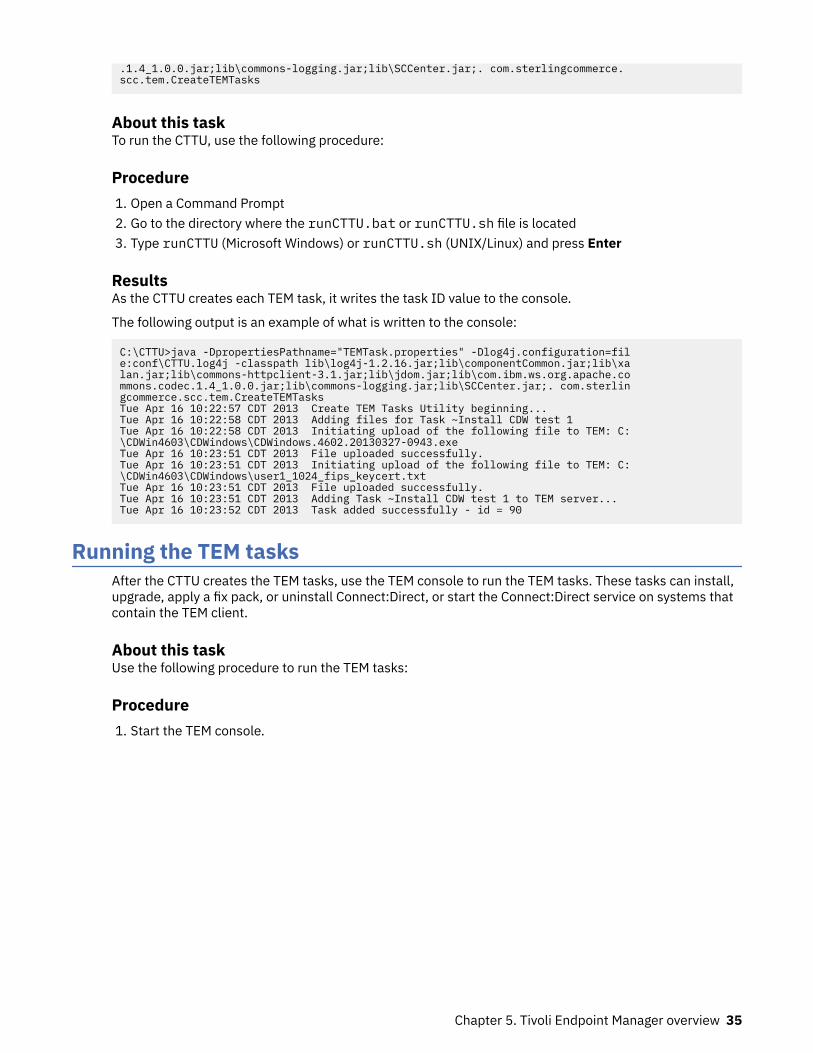
ResultsAs the CTTU creates each TEM task, it writes the task ID value to the console.
The following output is an example of what is written to the console:
C:\CTTU>java -DpropertiesPathname="TEMTask.properties" -Dlog4j.configuration=file:conf\CTTU.log4j -classpath lib\log4j-1.2.16.jar;lib\componentCommon.jar;lib\xalan.jar;lib\commons-httpclient-3.1.jar;lib\jdom.jar;lib\com.ibm.ws.org.apache.commons.codec.1.4_1.0.0.jar;lib\commons-logging.jar;lib\SCCenter.jar;. com.sterlingcommerce.scc.tem.CreateTEMTasksTue Apr 16 10:22:57 CDT 2013 Create TEM Tasks Utility beginning...Tue Apr 16 10:22:58 CDT 2013 Adding files for Task ~Install CDW test 1Tue Apr 16 10:22:58 CDT 2013 Initiating upload of the following file to TEM: C:\CDWin4603\CDWindows\CDWindows.4602.20130327-0943.exeTue Apr 16 10:23:51 CDT 2013 File uploaded successfully.Tue Apr 16 10:23:51 CDT 2013 Initiating upload of the following file to TEM: C:\CDWin4603\CDWindows\user1_1024_fips_keycert.txtTue Apr 16 10:23:51 CDT 2013 File uploaded successfully.Tue Apr 16 10:23:51 CDT 2013 Adding Task ~Install CDW test 1 to TEM server...Tue Apr 16 10:23:52 CDT 2013 Task added successfully - id = 90
Running the TEM tasksAfter the CTTU creates the TEM tasks, use the TEM console to run the TEM tasks. These tasks can install,upgrade, apply a fix pack, or uninstall Connect:Direct, or start the Connect:Direct service on systems thatcontain the TEM client.
About this taskUse the following procedure to run the TEM tasks:
Procedure1. Start the TEM console.
Chapter 5. Tivoli Endpoint Manager overview 35
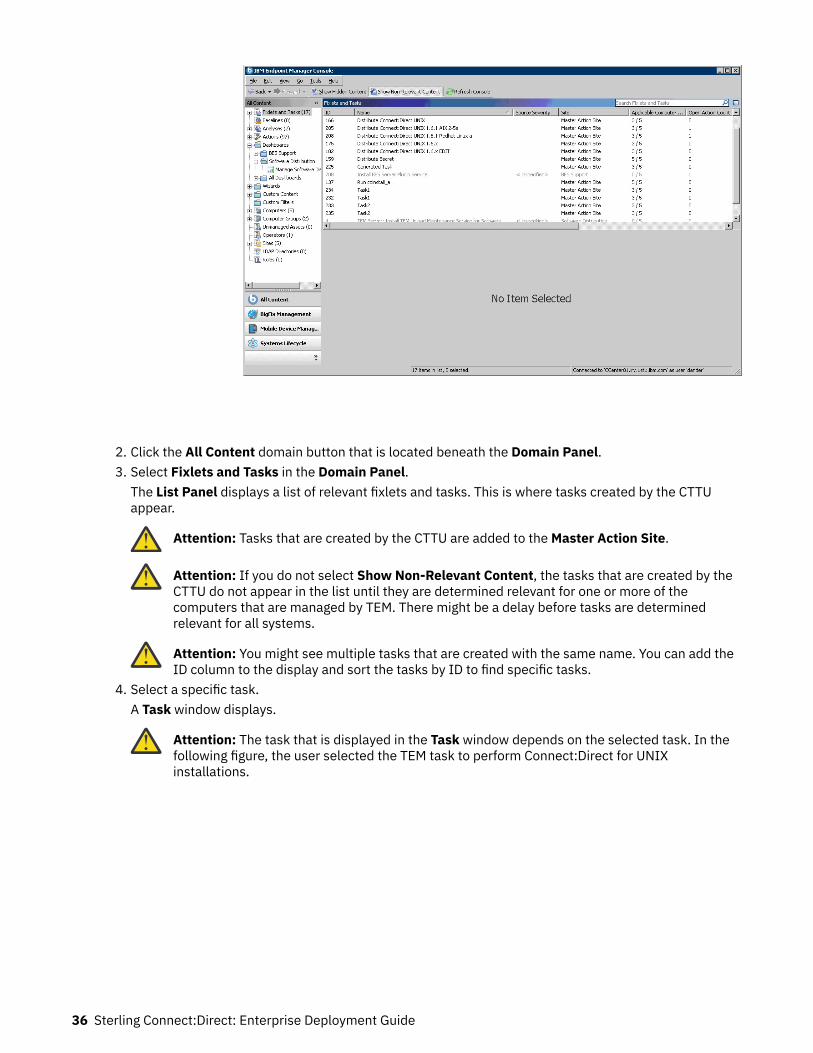
2. Click the All Content domain button that is located beneath the Domain Panel.3. Select Fixlets and Tasks in the Domain Panel.
The List Panel displays a list of relevant fixlets and tasks. This is where tasks created by the CTTUappear.
Attention: Tasks that are created by the CTTU are added to the Master Action Site.
Attention: If you do not select Show Non-Relevant Content, the tasks that are created by theCTTU do not appear in the list until they are determined relevant for one or more of thecomputers that are managed by TEM. There might be a delay before tasks are determinedrelevant for all systems.
Attention: You might see multiple tasks that are created with the same name. You can add theID column to the display and sort the tasks by ID to find specific tasks.
4. Select a specific task.A Task window displays.
Attention: The task that is displayed in the Task window depends on the selected task. In thefollowing figure, the user selected the TEM task to perform Connect:Direct for UNIXinstallations.
36 Sterling Connect:Direct: Enterprise Deployment Guide
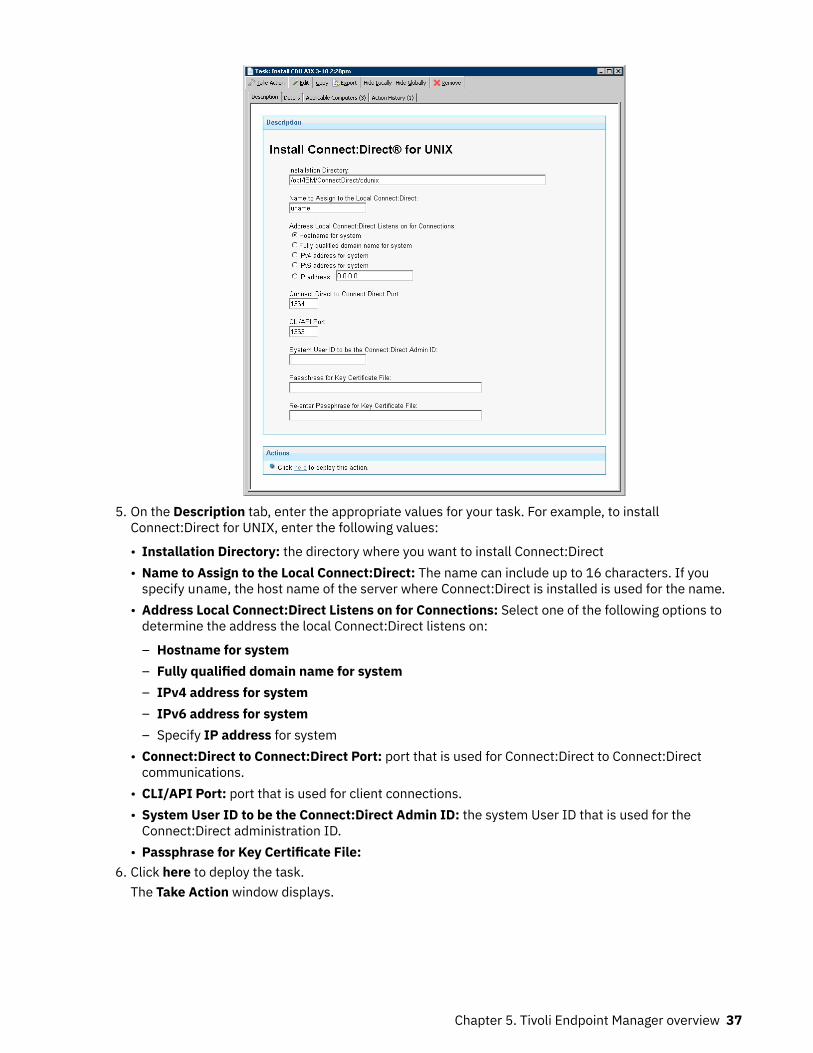
5. On the Description tab, enter the appropriate values for your task. For example, to installConnect:Direct for UNIX, enter the following values:
• Installation Directory: the directory where you want to install Connect:Direct• Name to Assign to the Local Connect:Direct: The name can include up to 16 characters. If you
specify uname, the host name of the server where Connect:Direct is installed is used for the name.• Address Local Connect:Direct Listens on for Connections: Select one of the following options to
determine the address the local Connect:Direct listens on:
– Hostname for system– Fully qualified domain name for system– IPv4 address for system– IPv6 address for system– Specify IP address for system
• Connect:Direct to Connect:Direct Port: port that is used for Connect:Direct to Connect:Directcommunications.
• CLI/API Port: port that is used for client connections.• System User ID to be the Connect:Direct Admin ID: the system User ID that is used for the
Connect:Direct administration ID.• Passphrase for Key Certificate File:
6. Click here to deploy the task.The Take Action window displays.
Chapter 5. Tivoli Endpoint Manager overview 37
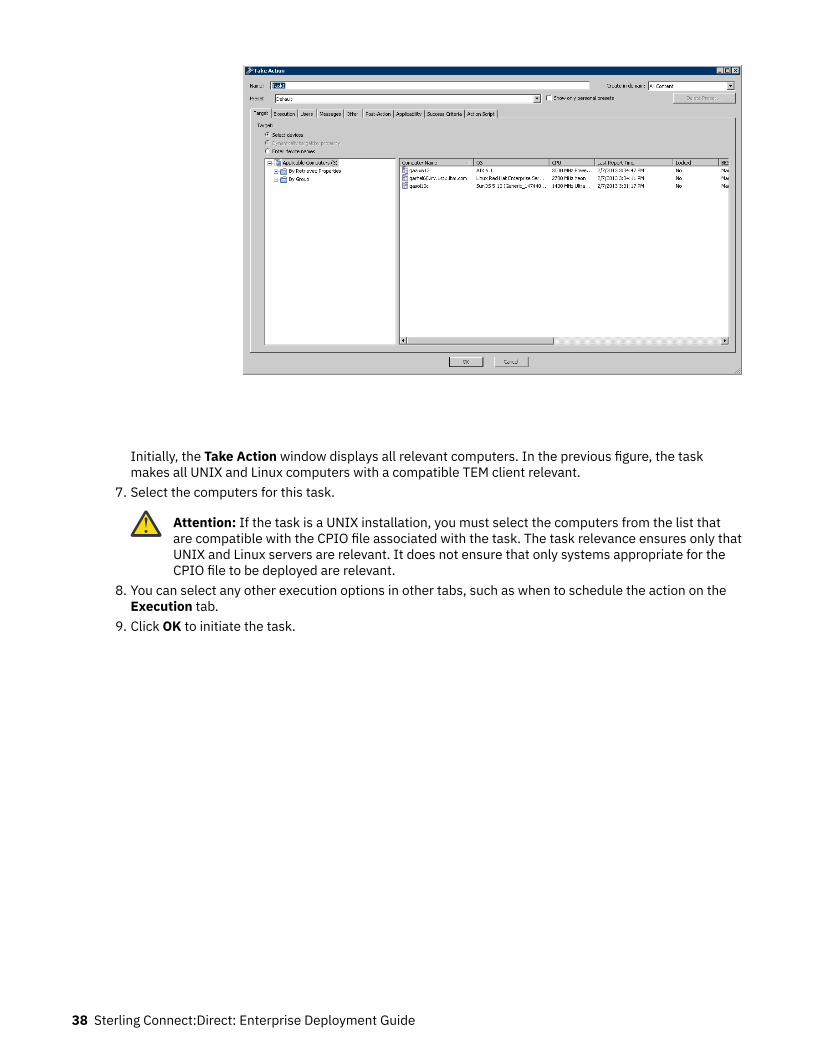
Initially, the Take Action window displays all relevant computers. In the previous figure, the taskmakes all UNIX and Linux computers with a compatible TEM client relevant.
7. Select the computers for this task.
Attention: If the task is a UNIX installation, you must select the computers from the list thatare compatible with the CPIO file associated with the task. The task relevance ensures only thatUNIX and Linux servers are relevant. It does not ensure that only systems appropriate for theCPIO file to be deployed are relevant.
8. You can select any other execution options in other tabs, such as when to schedule the action on theExecution tab.
9. Click OK to initiate the task.
38 Sterling Connect:Direct: Enterprise Deployment Guide
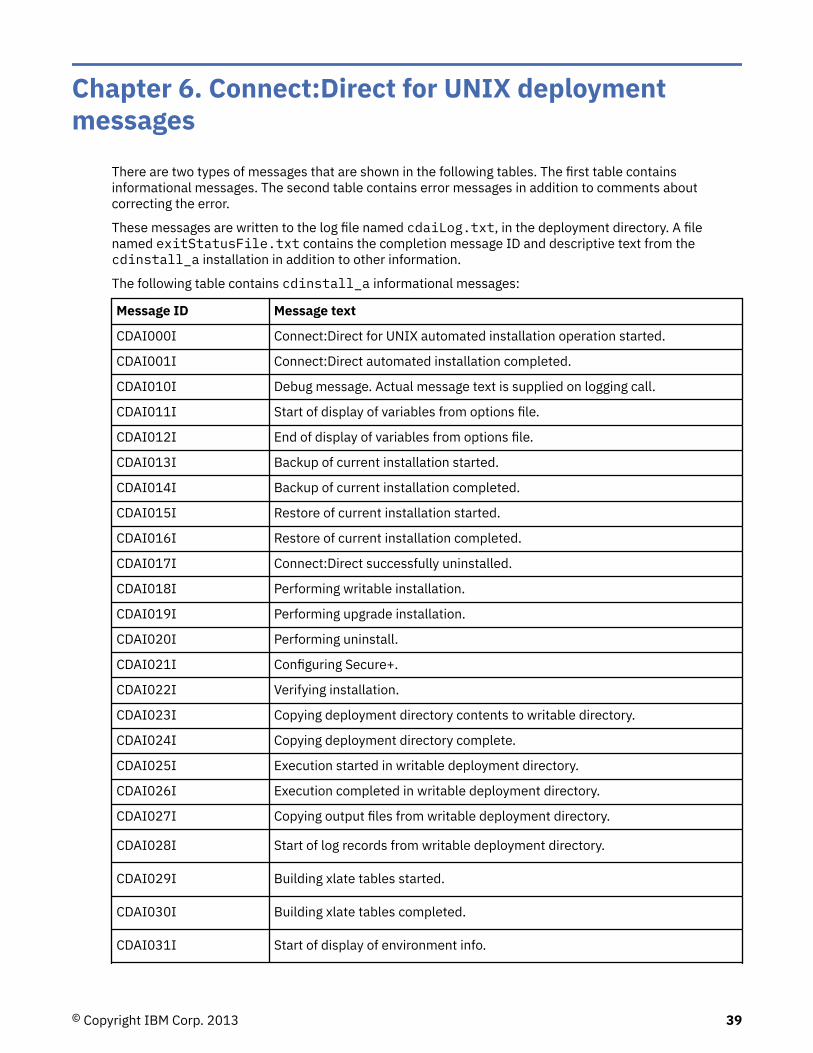
Chapter 6. Connect:Direct for UNIX deploymentmessages
There are two types of messages that are shown in the following tables. The first table containsinformational messages. The second table contains error messages in addition to comments aboutcorrecting the error.
These messages are written to the log file named cdaiLog.txt, in the deployment directory. A filenamed exitStatusFile.txt contains the completion message ID and descriptive text from thecdinstall_a installation in addition to other information.
The following table contains cdinstall_a informational messages:
Message ID Message text
CDAI000I Connect:Direct for UNIX automated installation operation started.
CDAI001I Connect:Direct automated installation completed.
CDAI010I Debug message. Actual message text is supplied on logging call.
CDAI011I Start of display of variables from options file.
CDAI012I End of display of variables from options file.
CDAI013I Backup of current installation started.
CDAI014I Backup of current installation completed.
CDAI015I Restore of current installation started.
CDAI016I Restore of current installation completed.
CDAI017I Connect:Direct successfully uninstalled.
CDAI018I Performing writable installation.
CDAI019I Performing upgrade installation.
CDAI020I Performing uninstall.
CDAI021I Configuring Secure+.
CDAI022I Verifying installation.
CDAI023I Copying deployment directory contents to writable directory.
CDAI024I Copying deployment directory complete.
CDAI025I Execution started in writable deployment directory.
CDAI026I Execution completed in writable deployment directory.
CDAI027I Copying output files from writable deployment directory.
CDAI028I Start of log records from writable deployment directory.
CDAI029I Building xlate tables started.
CDAI030I Building xlate tables completed.
CDAI031I Start of display of environment info.
© Copyright IBM Corp. 2013 39
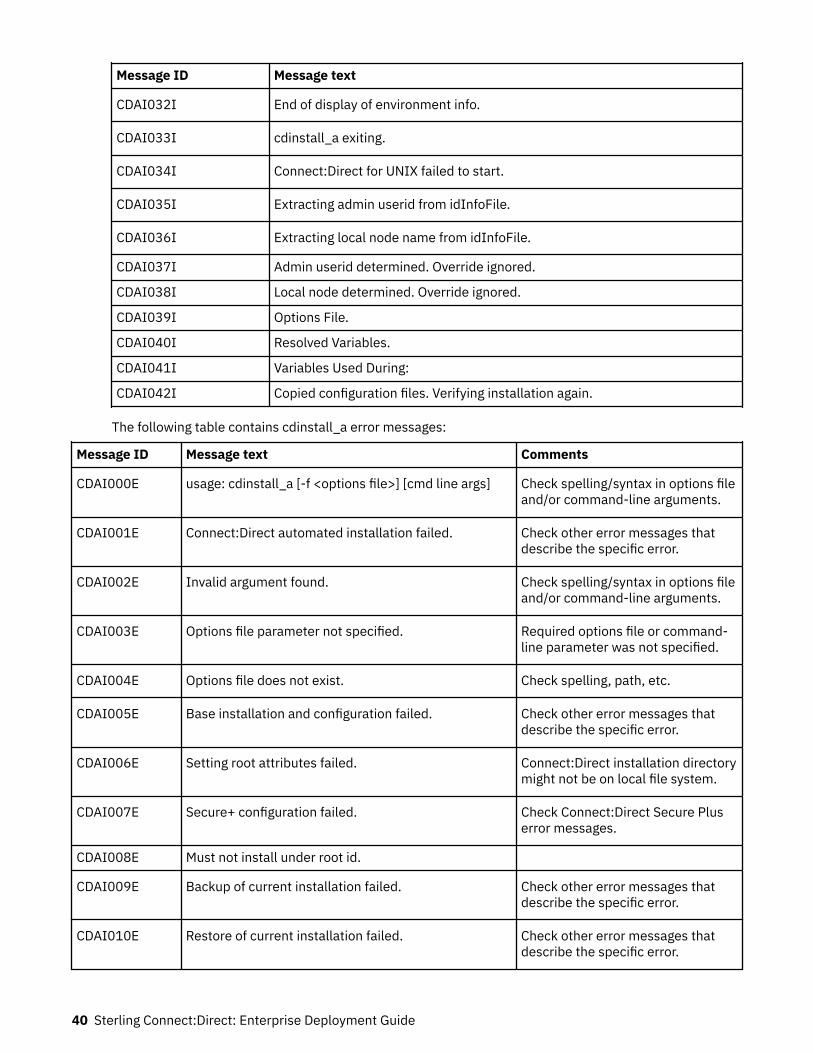
Message ID Message text
CDAI032I End of display of environment info.
CDAI033I cdinstall_a exiting.
CDAI034I Connect:Direct for UNIX failed to start.
CDAI035I Extracting admin userid from idInfoFile.
CDAI036I Extracting local node name from idInfoFile.
CDAI037I Admin userid determined. Override ignored.
CDAI038I Local node determined. Override ignored.
CDAI039I Options File.
CDAI040I Resolved Variables.
CDAI041I Variables Used During:
CDAI042I Copied configuration files. Verifying installation again.
The following table contains cdinstall_a error messages:
Message ID Message text Comments
CDAI000E usage: cdinstall_a [-f <options file>] [cmd line args] Check spelling/syntax in options fileand/or command-line arguments.
CDAI001E Connect:Direct automated installation failed. Check other error messages thatdescribe the specific error.
CDAI002E Invalid argument found. Check spelling/syntax in options fileand/or command-line arguments.
CDAI003E Options file parameter not specified. Required options file or command-line parameter was not specified.
CDAI004E Options file does not exist. Check spelling, path, etc.
CDAI005E Base installation and configuration failed. Check other error messages thatdescribe the specific error.
CDAI006E Setting root attributes failed. Connect:Direct installation directorymight not be on local file system.
CDAI007E Secure+ configuration failed. Check Connect:Direct Secure Pluserror messages.
CDAI008E Must not install under root id.
CDAI009E Backup of current installation failed. Check other error messages thatdescribe the specific error.
CDAI010E Restore of current installation failed. Check other error messages thatdescribe the specific error.
40 Sterling Connect:Direct: Enterprise Deployment Guide
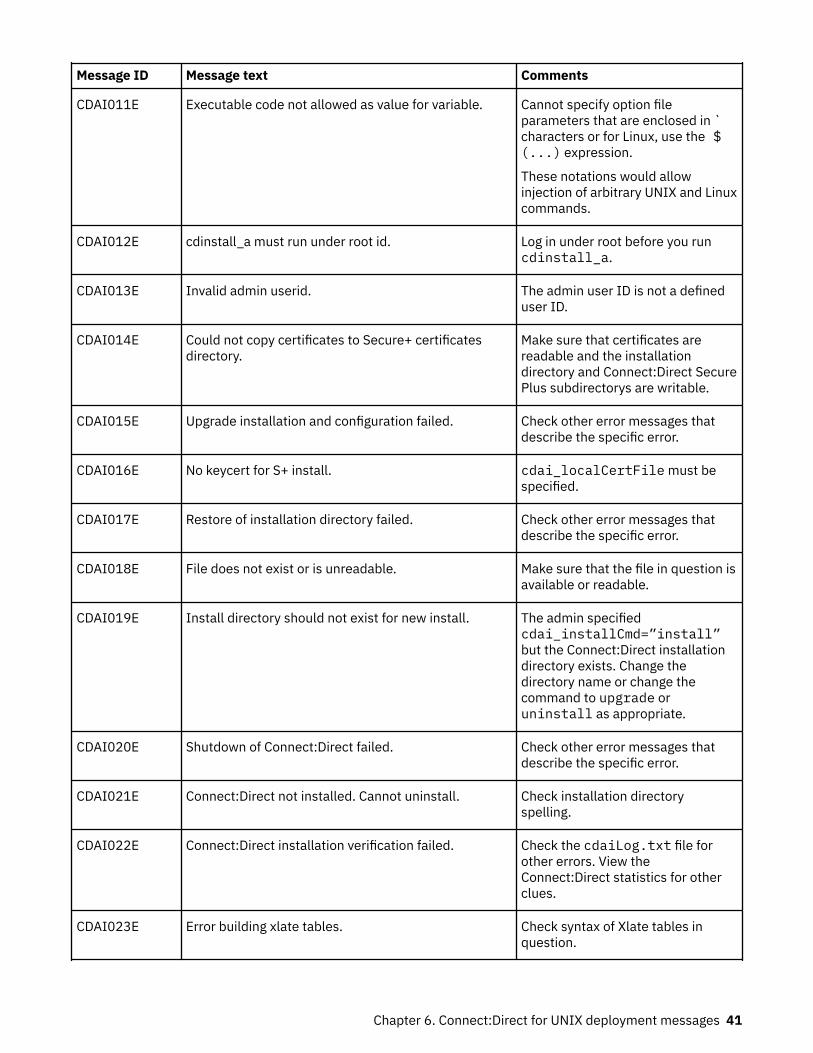
Message ID Message text Comments
CDAI011E Executable code not allowed as value for variable. Cannot specify option fileparameters that are enclosed in `characters or for Linux, use the $(...) expression.
These notations would allowinjection of arbitrary UNIX and Linuxcommands.
CDAI012E cdinstall_a must run under root id. Log in under root before you runcdinstall_a.
CDAI013E Invalid admin userid. The admin user ID is not a defineduser ID.
CDAI014E Could not copy certificates to Secure+ certificatesdirectory.
Make sure that certificates arereadable and the installationdirectory and Connect:Direct SecurePlus subdirectorys are writable.
CDAI015E Upgrade installation and configuration failed. Check other error messages thatdescribe the specific error.
CDAI016E No keycert for S+ install. cdai_localCertFile must bespecified.
CDAI017E Restore of installation directory failed. Check other error messages thatdescribe the specific error.
CDAI018E File does not exist or is unreadable. Make sure that the file in question isavailable or readable.
CDAI019E Install directory should not exist for new install. The admin specifiedcdai_installCmd=”install”but the Connect:Direct installationdirectory exists. Change thedirectory name or change thecommand to upgrade oruninstall as appropriate.
CDAI020E Shutdown of Connect:Direct failed. Check other error messages thatdescribe the specific error.
CDAI021E Connect:Direct not installed. Cannot uninstall. Check installation directoryspelling.
CDAI022E Connect:Direct installation verification failed. Check the cdaiLog.txt file forother errors. View theConnect:Direct statistics for otherclues.
CDAI023E Error building xlate tables. Check syntax of Xlate tables inquestion.
Chapter 6. Connect:Direct for UNIX deployment messages 41

Message ID Message text Comments
CDAI024E Copying log/output files to work subdirectory failed. Verify permissions are correct.
CDAI025E cdinstall_a exiting with error. Check other error messages thatdescribe the specific error.
CDAI026E Deletion of C:D installation directory failed. Check permissions on directory.
CDAI027E Invalid parameter in options file or on command line. Correct the spelling and/or syntax.
CDAI028E Install cmd specified but C:D already installed. Change command to upgrade oruninstall if either is the intendedaction.
CDAI029E Upgrade cmd specified but C:D is not installed. Change cdai_installCmd toinstall and rerun.
CDAI030E Uninstall cmd specified but C:D is not installed. Nothing left to do.
CDAI031E IAcquiring net info failed. ip4|6: link addressesdefined?
Correct spelling/syntax errors incdai_acquireHostnameOrIPparameter value.
CDAI032E Passphrase missing for keycert. Specifycdai_localCertPassphrase.
CDAI033E No cmd line arguments specified. Specify an options file or theminimum required individualcommand-line arguments that areneeded for the command that isbeing run.
CDAI034E Connect:Direct for UNIX failed to start. Check other log errors. ViewConnect:Direct statistics records.
CDAI035E mkdir failed for directory: Check spelling.
CDAI036E Invalid exit code returned. cmd= Report
CDAI037E idInfoFile.txt missing. setting cdadmin to dir owner id. Can occur if you are upgrading aConnect:Direct installation that isnot originally installed with theautomated installation mechanism.
CDAI038E No cdadmin userid in id file. Trying alternate settings. Can occur if you are upgrading aConnect:Direct installation that isnot originally installed with theautomated installation mechanism.
CDAI039E No local node name. Trying alternate settings. Can occur if you are upgrading aConnect:Direct installation that isnot originally installed with theautomated installation mechanism.
42 Sterling Connect:Direct: Enterprise Deployment Guide
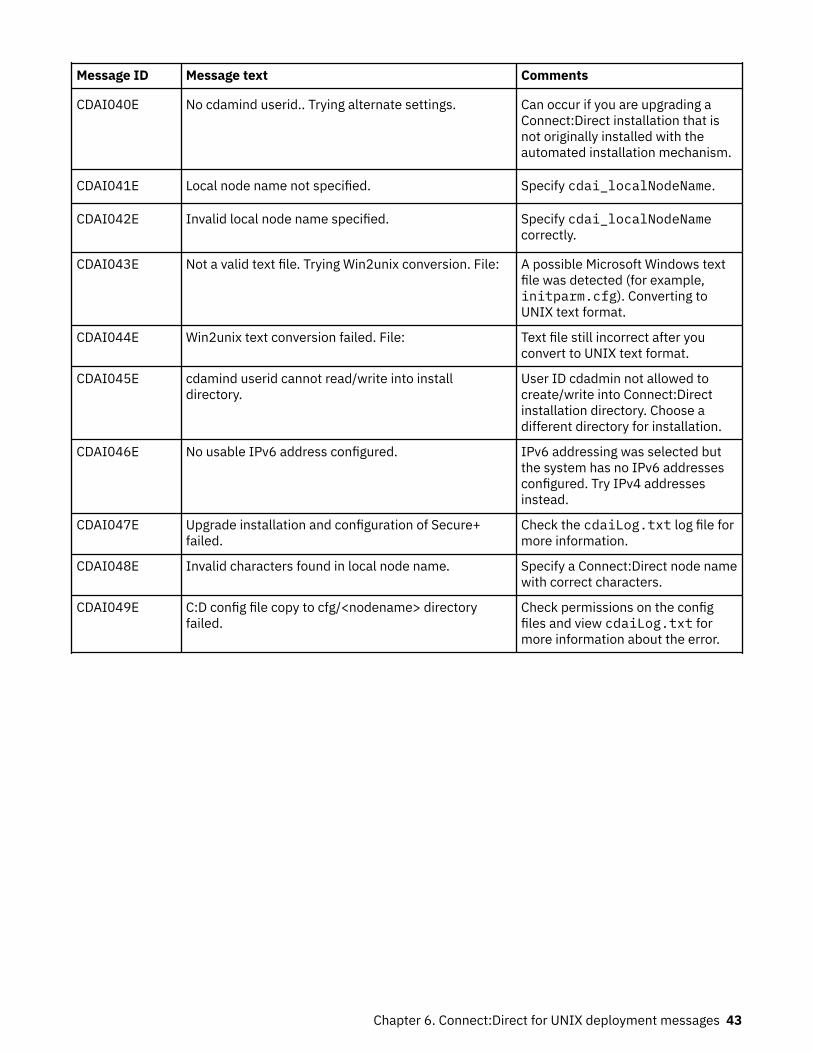
Message ID Message text Comments
CDAI040E No cdamind userid.. Trying alternate settings. Can occur if you are upgrading aConnect:Direct installation that isnot originally installed with theautomated installation mechanism.
CDAI041E Local node name not specified. Specify cdai_localNodeName.
CDAI042E Invalid local node name specified. Specify cdai_localNodeNamecorrectly.
CDAI043E Not a valid text file. Trying Win2unix conversion. File: A possible Microsoft Windows textfile was detected (for example,initparm.cfg). Converting toUNIX text format.
CDAI044E Win2unix text conversion failed. File: Text file still incorrect after youconvert to UNIX text format.
CDAI045E cdamind userid cannot read/write into installdirectory.
User ID cdadmin not allowed tocreate/write into Connect:Directinstallation directory. Choose adifferent directory for installation.
CDAI046E No usable IPv6 address configured. IPv6 addressing was selected butthe system has no IPv6 addressesconfigured. Try IPv4 addressesinstead.
CDAI047E Upgrade installation and configuration of Secure+failed.
Check the cdaiLog.txt log file formore information.
CDAI048E Invalid characters found in local node name. Specify a Connect:Direct node namewith correct characters.
CDAI049E C:D config file copy to cfg/<nodename> directoryfailed.
Check permissions on the configfiles and view cdaiLog.txt formore information about the error.
Chapter 6. Connect:Direct for UNIX deployment messages 43

44 Sterling Connect:Direct: Enterprise Deployment Guide
Chapter 7. Configure new nodes in Control CenterAfter you deploy your Connect:Direct servers, you can use Control Center to complete more configurationtasks and to monitor those servers.
There are two tasks you must complete so that Control Center can securely communicate withConnect:Direct servers.
1. Import root certificates from each Connect:Direct server into the Control Center truststore file.2. Create new Control Center node entries with connection information for each Connect:Direct node.
Importing certificatesComplete the following procedure to import root certificates from a Connect:Direct server into the ControlCenter truststore:
Procedure1. Locate the existing Control Center truststore or create a new one.
Note: If you create a truststore, use the configCC.bat or shell script to configure Control Center touse it.
2. Create a truststore file that contains CA information in JKS format on the Control Center engine.3. If a truststore file in JKS format is not available, use the default truststore file (cacerts) in the<Sterling Control Center installation directory>/jre/lib/security directory. Thistruststore file contains authentication information for most CAs.
4. Import the root certificate of the Connect:Direct server into the truststore on the Control Centerengine. Use the Import to Trust Store feature of IBM Certificate Wizard.
5. Configure the Control Center engine for a secure connection.
For more information about creating a truststore, see the Configure a Secure Connection section of theIBM Sterling Control Center Getting Started Guide.
Creating server node entriesComplete the following procedure to create Connect:Direct node entries:
Procedure1. Start the Control Center console.2. Select Manage > Add Server. The Add Server wizard displays.3. Type the server name or alias and an optional description.4. Click Next.5. Select the server type Connect:Direct with TCP/IP API.6. Complete the requested information on the Connection page of the Add Server wizard for
Connect:Direct servers.7. Optionally, add this server to a server group by selecting a group name in Groups and moving it to
Selected Groups by clicking >.
© Copyright IBM Corp. 2013 45

46 Sterling Connect:Direct: Enterprise Deployment Guide
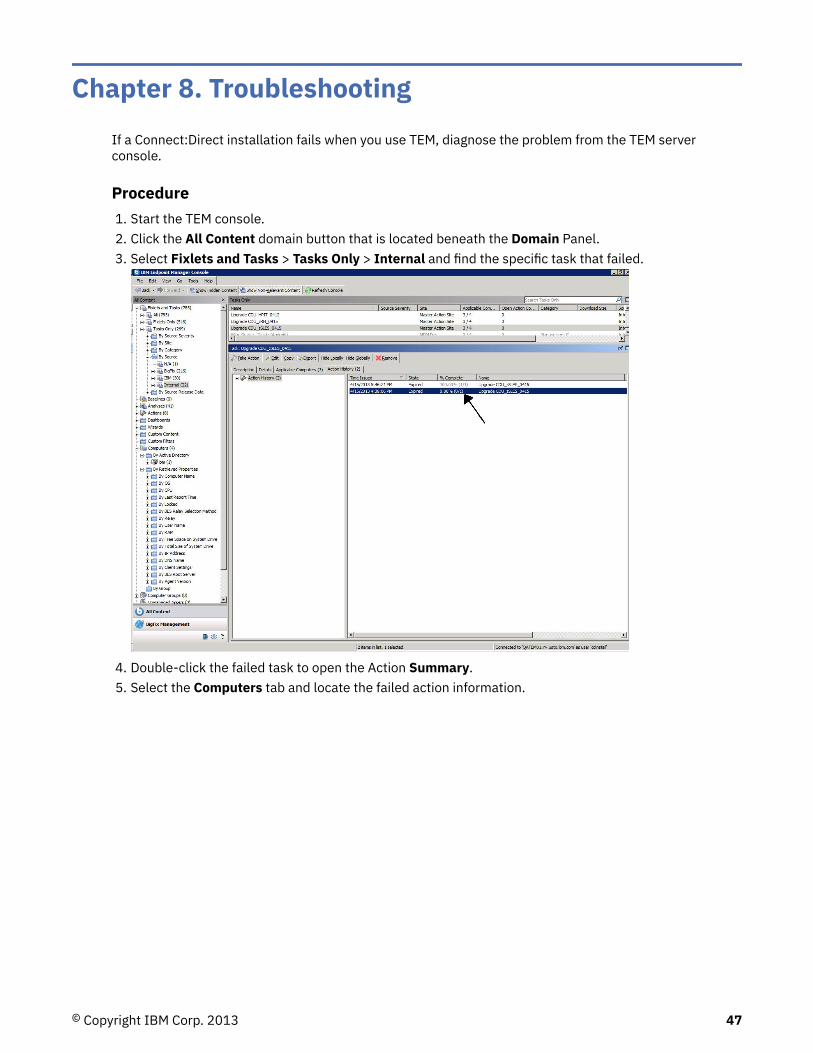
Chapter 8. TroubleshootingIf a Connect:Direct installation fails when you use TEM, diagnose the problem from the TEM serverconsole.
Procedure1. Start the TEM console.2. Click the All Content domain button that is located beneath the Domain Panel.3. Select Fixlets and Tasks > Tasks Only > Internal and find the specific task that failed.
4. Double-click the failed task to open the Action Summary.5. Select the Computers tab and locate the failed action information.
© Copyright IBM Corp. 2013 47
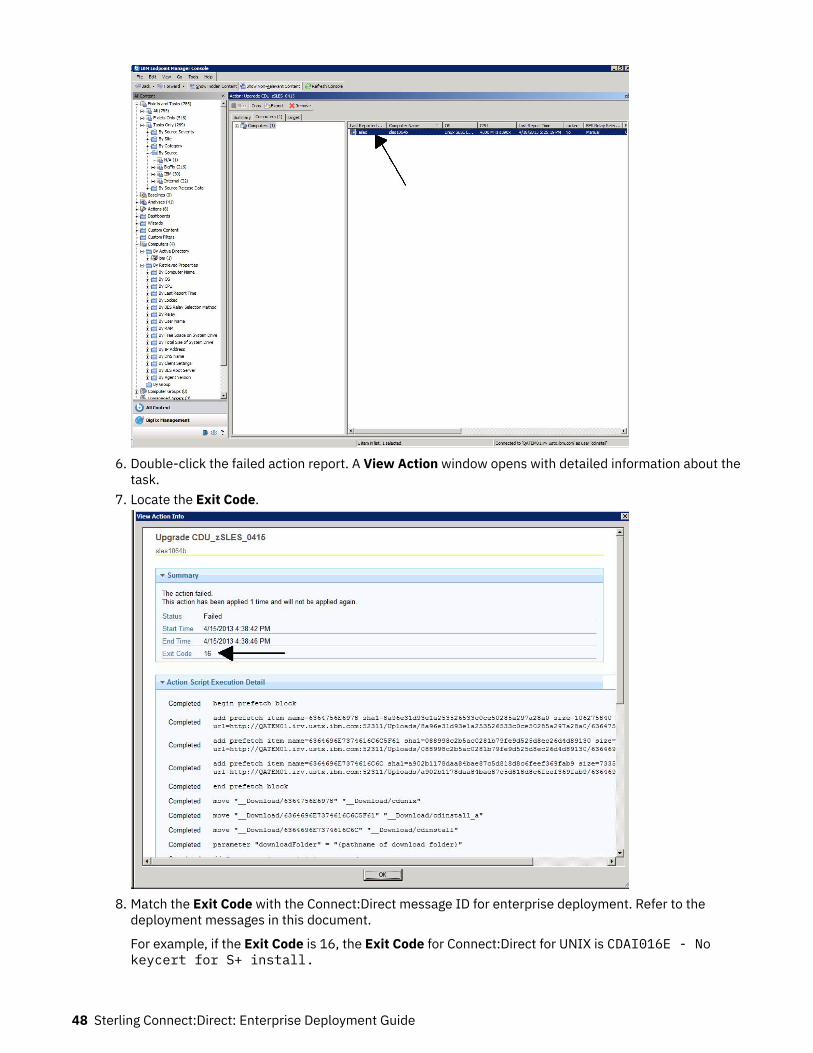
6. Double-click the failed action report. A View Action window opens with detailed information about thetask.
7. Locate the Exit Code.
8. Match the Exit Code with the Connect:Direct message ID for enterprise deployment. Refer to thedeployment messages in this document.
For example, if the Exit Code is 16, the Exit Code for Connect:Direct for UNIX is CDAI016E - Nokeycert for S+ install.
48 Sterling Connect:Direct: Enterprise Deployment Guide

Notices
This information was developed for products and services offered in the US. This material might beavailable from IBM in other languages. However, you may be required to own a copy of the product orproduct version in that language in order to access it.
IBM may not offer the products, services, or features discussed in this document in other countries.Consult your local IBM representative for information on the products and services currently available inyour area. Any reference to an IBM product, program, or service is not intended to state or imply that onlythat IBM product, program, or service may be used. Any functionally equivalent product, program, orservice that does not infringe any IBM intellectual property right may be used instead. However, it is theuser's responsibility to evaluate and verify the operation of any non-IBM product, program, or service.
IBM may have patents or pending patent applications covering subject matter described in thisdocument. The furnishing of this document does not grant you any license to these patents. You can sendlicense inquiries, in writing, to:
IBM Director of LicensingIBM CorporationNorth Castle Drive, MD-NC119Armonk, NY 10504-1785US
For license inquiries regarding double-byte character set (DBCS) information, contact the IBM IntellectualProperty Department in your country or send inquiries, in writing, to:
Intellectual Property LicensingLegal and Intellectual Property LawIBM Japan Ltd.19-21, Nihonbashi-Hakozakicho, Chuo-kuTokyo 103-8510, Japan
INTERNATIONAL BUSINESS MACHINES CORPORATION PROVIDES THIS PUBLICATION "AS IS"WITHOUT WARRANTY OF ANY KIND, EITHER EXPRESS OR IMPLIED, INCLUDING, BUT NOT LIMITED TO,THE IMPLIED WARRANTIES OF NON-INFRINGEMENT, MERCHANTABILITY OR FITNESS FOR APARTICULAR PURPOSE. Some jurisdictions do not allow disclaimer of express or implied warranties incertain transactions, therefore, this statement may not apply to you.
This information could include technical inaccuracies or typographical errors. Changes are periodicallymade to the information herein; these changes will be incorporated in new editions of the publication.IBM may make improvements and/or changes in the product(s) and/or the program(s) described in thispublication at any time without notice.
Any references in this information to non-IBM websites are provided for convenience only and do not inany manner serve as an endorsement of those websites. The materials at those websites are not part ofthe materials for this IBM product and use of those websites is at your own risk.
IBM may use or distribute any of the information you provide in any way it believes appropriate withoutincurring any obligation to you.
Licensees of this program who wish to have information about it for the purpose of enabling: (i) theexchange of information between independently created programs and other programs (including thisone) and (ii) the mutual use of the information which has been exchanged, should contact:
IBM Director of LicensingIBM CorporationNorth Castle Drive, MD-NC119Armonk, NY 10504-1785US
© Copyright IBM Corp. 2013 49

Such information may be available, subject to appropriate terms and conditions, including in some cases,payment of a fee.
The licensed program described in this document and all licensed material available for it are provided byIBM under terms of the IBM Customer Agreement, IBM International Program License Agreement or anyequivalent agreement between us.
The performance data and client examples cited are presented for illustrative purposes only. Actualperformance results may vary depending on specific configurations and operating conditions.
Information concerning non-IBM products was obtained from the suppliers of those products, theirpublished announcements or other publicly available sources. IBM has not tested those products andcannot confirm the accuracy of performance, compatibility or any other claims related to non-IBMproducts. Questions on the capabilities of non-IBM products should be addressed to the suppliers ofthose products.
Statements regarding IBM's future direction or intent are subject to change or withdrawal without notice,and represent goals and objectives only.
All IBM prices shown are IBM's suggested retail prices, are current and are subject to change withoutnotice. Dealer prices may vary.
This information is for planning purposes only. The information herein is subject to change before theproducts described become available.
This information contains examples of data and reports used in daily business operations. To illustratethem as completely as possible, the examples include the names of individuals, companies, brands, andproducts. All of these names are fictitious and any similarity to actual people or business enterprises isentirely coincidental.
COPYRIGHT LICENSE:
This information contains sample application programs in source language, which illustrate programmingtechniques on various operating platforms. You may copy, modify, and distribute these sample programsin any form without payment to IBM, for the purposes of developing, using, marketing or distributingapplication programs conforming to the application programming interface for the operating platform forwhich the sample programs are written. These examples have not been thoroughly tested under allconditions. IBM, therefore, cannot guarantee or imply reliability, serviceability, or function of theseprograms. The sample programs are provided "AS IS", without warranty of any kind. IBM shall not beliable for any damages arising out of your use of the sample programs.
Each copy or any portion of these sample programs or any derivative work must include a copyright noticeas shown in the next column.
© 2015. Portions of this code are derived from IBM Corp. Sample Programs. © Copyright IBM Corp. 2015.
TrademarksIBM, the IBM logo, and ibm.com are trademarks or registered trademarks of International BusinessMachines Corp., registered in many jurisdictions worldwide. Other product and service names might betrademarks of IBM or other companies. A current list of IBM trademarks is available on the web at"Copyright and trademark information" at www.ibm.com/legal/copytrade.shtml.
Adobe, the Adobe logo, PostScript, and the PostScript logo are either registered trademarks ortrademarks of Adobe Systems Incorporated in the United States, and/or other countries.
IT Infrastructure Library is a registered trademark of the Central Computer and TelecommunicationsAgency which is now part of the Office of Government Commerce.
Intel, Intel logo, Intel Inside, Intel Inside logo, Intel Centrino, Intel Centrino logo, Celeron, Intel Xeon,Intel SpeedStep, Itanium, and Pentium are trademarks or registered trademarks of Intel Corporation orits subsidiaries in the United States and other countries.
50 Notices
Linux® is a registered trademark of Linus Torvalds in the United States, other countries, or both.
Microsoft, Windows, Windows NT, and the Windows logo are trademarks of Microsoft Corporation in theUnited States, other countries, or both.
ITIL is a registered trademark, and a registered community trademark of the Office of GovernmentCommerce, and is registered in the U.S. Patent and Trademark Office.
UNIX is a registered trademark of The Open Group in the United States and other countries.
Java™ and all Java-based trademarks and logos are trademarks or registered trademarks of Oracle and/orits affiliates.
Cell Broadband Engine is a trademark of Sony Computer Entertainment, Inc. in the United States, othercountries, or both and is used under license therefrom.
Linear Tape-Open, LTO, the LTO Logo, Ultrium and the Ultrium Logo are trademarks of HP, IBM Corp. andQuantum in the U.S. and other countries.
Connect Control Center®, Connect:Direct®, Connect:Enterprise, Gentran®, Gentran®:Basic®,Gentran:Control®, Gentran:Director®, Gentran:Plus®, Gentran:Realtime®, Gentran:Server®,Gentran:Viewpoint®, Commerce™, Information Broker®, and Integrator® are trademarks, Inc., an IBMCompany.
Other company, product, and service names may be trademarks or service marks of others.
Terms and conditions for product documentationPermissions for the use of these publications are granted subject to the following terms and conditions.
ApplicabilityThese terms and conditions are in addition to any terms of use for the IBM website.
Personal useYou may reproduce these publications for your personal, noncommercial use provided that all proprietarynotices are preserved. You may not distribute, display or make derivative work of these publications, orany portion thereof, without the express consent of IBM.
Commercial useYou may reproduce, distribute and display these publications solely within your enterprise provided thatall proprietary notices are preserved. You may not make derivative works of these publications, orreproduce, distribute or display these publications or any portion thereof outside your enterprise, withoutthe express consent of IBM.
RightsExcept as expressly granted in this permission, no other permissions, licenses or rights are granted, eitherexpress or implied, to the publications or any information, data, software or other intellectual propertycontained therein.
IBM reserves the right to withdraw the permissions granted herein whenever, in its discretion, the use ofthe publications is detrimental to its interest or, as determined by IBM, the above instructions are notbeing properly followed.
You may not download, export or re-export this information except in full compliance with all applicablelaws and regulations, including all United States export laws and regulations.
IBM MAKES NO GUARANTEE ABOUT THE CONTENT OF THESE PUBLICATIONS. THE PUBLICATIONS AREPROVIDED "AS-IS" AND WITHOUT WARRANTY OF ANY KIND, EITHER EXPRESSED OR IMPLIED,
Notices 51

INCLUDING BUT NOT LIMITED TO IMPLIED WARRANTIES OF MERCHANTABILITY, NON-INFRINGEMENT,AND FITNESS FOR A PARTICULAR PURPOSE.
52 Sterling Connect:Direct: Enterprise Deployment Guide

IBM®
Part Number:Product Number: 5725-C99
Last updated: 17 November 2015
(1P) P
/N: