Embed Size (px)
Citation preview


w w w . sol i dpl a n t3 d . c om
Introduction
Welcome to the real Plant Design System on SolidWorks, the most famous program platform used for machine part design. We call this program “SolidPlant”. It is created to fulfill what SolidWorks does not currently have any add-in to fully work in plant design. Thus, SolidWorks users who need Plant Design System will get the most efficient program through various and well-prepared tools. Moreover, SolidPlant is an add-in which can work on the standard SolidWorks package. So this can help you save costs on the program.
SolidPlant truly understands SolidWorks users’ need for Plant Design System. SolidWorks alone cannot answer this need, even though it already has Piping Module. SolidPlant has provided various appropriate tools for working on the plant design application starting from Piping Specification Class preparation, Steel Structure Modeler creation, Equipment Model creation, and Pipe Routing Model creation. From all these information, users can get bills of materials for using in material assessment and order, as well as automatic generation Piping Isometric Drawing for using in Fabrication Drawing Piping. Additionally, users can also get General Arrangement Drawing or GA in order to be used in piping installation at the plant site.
Thus, SolidPlant can be called the best product for SolidWorks users who are seeking for a real Plant Design Software without the need to use additional software. SolidPlant has everything including full ranges of efficient features and tools with precision for quality works that will follow.
As for the actual working on the Plant Design System, in order for users to see all the steps, we will start from importing P&ID data to be used in the system. And then this information will be used in creating Equipment Model and Steel Structure Model, as well as Piping Model. Users will have chances to thoroughly use various available tools and features.
1

w w w . sol i dpl a n t3 d . c om
Introduction 1
Chapter 1 SolidPlant User Interface 2 Chapter 1-1 SolidPlant User Interface 2 Chapter 1-2 How to start program 2 Chapter 1-3 Ribbons System in SolidPlant 3 Chapter 1-4 SolidPlant Ribbon 4 Chapter 1-5 Structure Ribbon 4 Chapter 1-6 Equipment Ribbon 4 Chapter 1-7 Routing Ribbon 4 Chapter 1-8 Component Ribbon 5 Chapter 1-9 Drawing Ribbon 5 Chapter 1-10 SolidPlant Project Manager 5 Chapter 1-11 Control View Model 7 Chapter 1-12 Walk Through Model 8
Chapter 2 How to create project data with SolidPlant Project Manager 10 Chapter 2-1 Manage a Project System and Model Layout Setup 10 Chapter 2-2 How to create project data with SolidPlant Project Manager 10 Chapter 2-3 How to change settings on project properties 12 Chapter 2-4 Insert plant layout for reference models 13 Chapter 2-5 Backup & restore project system 15
Chapter 3 Create the Piping Specification Class by SpecCreator 17 Chapter 3-1 Create the Piping Specification Class by SpecCreator 17 Chapter 3-2 Introduction concept to making the pipe spec 17 Chapter 3-3 How to create new spec & open spec 17 Chapter 3-4 How to generate components 19 Chapter 3-5 Pipe Table 21 Chapter 3-6 Fittings Table 24 Chapter 3-7 Misc Table 31 Chapter 3-8 Flanges Table 36 Chapter 3-9 Valves Table 38 Chapter 3-10 Fastener Table 48 Chapter 3-11 Olet Table 51 Chapter 3-12 How to define a chart to display the status for branch fittings using Branch Editor 53 Chapter 3-13 How to add new record database in Catalog Editor 53 Chapter 3-14 Print check for report 59
Chapter 4 Project Initial Data Setup 61 Chapter 4-1 Project Initial Data Setup 61 Chapter 4-2 Introduction to concept of P&ID data import 62 Chapter 4-3 To import P&ID data into SolidPlant project system by TAG Manager 64 Chapter 4-4 Process Line List 64 Chapter 4-5 Equipment List 67 Chapter 4-6 Valve List 69 Chapter 4-7 Instrument Index Chapter 4-8 Nozzle List 71 Chapter 4-9 Input specified data directly 72
74

w w w . sol i dpl a n t3 d . c om
Chapter 5 Create Steel Structures
Chapter 5-1 Create Steel Structures Chapter 5-2 How to use Structure 3D Grid Chapter 5-3 How to place Structure Member on 3D grid Chapter 5-4 How to place model platforms Chapter 5-5 Stair Chapter 5-6 Ladder Chapter 5-7 Handrail Chapter 5-8 Floor Plate Chapter 5-9 Take part list report
Chapter 6 Create Equipment Model
Chapter 6-1 Create Equipment Model Chapter 6-2 Create Equipment model from standard library Chapter 6-3 Pump Chapter 6-4 Create the Horizontal Pump P-103A Chapter 6-5 Create the Horizontal Vessel D-102 Chapter 6-6 Heat Exchanger Chapter 6-7 Create the Breech Lock Exchanger E-102A Chapter 6-8 How to place user defined Nozzle on Equipment Chapter 6-9 At the Pump P-103A Chapter 6-10 Insert nozzles position on Suction and Discharge Chapter 6-11 At the Vessel D-102 Chapter 6-12 Insert nozzles position on vessel Chapter 6-13 At the Breech Lock Exchanger E-102A Chapter 6-14 Insert nozzles position on exchanger Chapter 6-15 To place equipment model into Main Assembly SolidPlant system Chapter 6-16 Insert pump P-103A into plant layout Chapter 6-17 Allocate equipment by using Move and Rotate Equipment features Chapter 6-18 Add more equipment by Linear Equipment feature Chapter 6-19 Make a copy of new pump P-103B Chapter 6-20 How to import SolidWorks’s model to SolidPlant project Chapter 6-21 Import the Tower T-102 Chapter 6-22 Design the nozzle positions on equipment Chapter 6-23 Insert the tower to the located point on plant layout in main SolidPlant system
Chapter 7 Route Piping
Chapter 7-1 Route Piping Chapter 7-2 How to define a New Pipe Model Chapter 7-3 Create the tag of pipe routing from imported P&ID data Chapter 7-4 Create the tag by manual input Chapter 7-5 SolidPlant pipe routing methods as below Chapter 7-6 Manual Route Chapter 7-7 Make pipe routing on space Chapter 7-8 Place pipe routing on the pipe rack Chapter 7-9 Move pipe by Elevation Move Pipe feature Chapter 7-10 Adjust pipe spacing by Elevation Move Pipe feature Chapter 7-11 Make pipe routing connect between equipments Chapter 7-12 Make pipe routing short piece from the suction’s nozzle P-103A Chapter 7-13 Place the Eccentric Reducer 8’’X6’’ on the line Chapter 7-14 Continue to make pipe connect to Vessel’s nozzle D-102 Chapter 7-15 Define pipe cut length between the Eccentric Reducer and
Weldneck Flange by Assign Length feature
76 76 76 79 86 86 88 89 90 93
94 94 94 94 95 96 97 97 98 98 98
100 100 103 104 107 107 108 109 109 110 111 113 115 116 116 116 116 118 118 119 119 119 121 122 124 124 125 126 127

w w w . sol i dpl a n t3 d . c om
Chapter 7-16 Make the same routing for another pump Chapter 7-17 Smart-Fitting Chapter 7-18 Make pipe to connect fittings Chapter 7-19 Manual Route and Smart-Fitting Chapter 7-20 Make pipe routing for 003, 004, and 008 Chapter 7-21 Auto-Route Chapter 7-22 Make partial pipe routing for 010 Chapter 7-23 Automatic Pipe routing by Auto-Route
Chapter 8 Insert Piping Components
Chapter 8-1 Insert Piping Components Chapter 8-2 Insert the Pipe Support Chapter 8-3 Insert Valve Component Chapter 8-4 Insert Reducer Component Chapter 8-5 Case study of how to insert kinds of branching on main pipe routing :
Stub-In, Straight Tee, Reducing Tee and Sockolet Chapter 8-6 Re-Design the pipe routing and equipment at Heat Exchanger
Chapter 9 Review and Manipulate Features
Chapter 9-1 Review and Manipulate Features Chapter 9-2 Component Property Chapter 9-3 Measure Route Chapter 9-4 Assign Length Chapter 9-5 Rotate Component Chapter 9-6 Rebuild Component Chapter 9-7 Regen Pipe Chapter 9-8 Delete Component Chapter 9-9 Delete Route
Chapter 10 Pipe Routing Advance Features
Chapter 10-1 Pipe Routing Advance Features Chapter 10-2 Change Size Feature Chapter 10-3 Jog Route Feature Chapter 10-4 Split Pipe Feature
Chapter 11 Generate Piping Isometric Drawing
Chapter 11-1 Generate Piping Isometric Drawing Chapter 11-2 Generate Fabrication Piping Isometric Drawing Chapter 11-3 Select pipe routing by tag number Chapter 11-4 Select on specify components by manual Chapter 11-5 How to change settings the SmartPlant I-Configure
Chapter 12 Create General Arrangement Drawings
Chapter 12-1 Create General Arrangement Drawings Chapter 12-2 Insert view on drawing Chapter 12-3 Take dimensions and annotation data on drawing
Chapter 13 Create Bill of Material
Chapter 13-1 Create Bill of Material Chapter 13-2 Generate Bill of Material on drawing Chapter 13-3 Export the Material List Report to Excel files
127 129 129 131 131 142 143 144 146 146 146 148 150 152 155 161 161 161 162 162 163 164 164 165 166 166 166 166 168 170 172 172 172 172 173 175 176 176 177 180 182 182 182 183

w w w . sol i dpl a n t3 d . c om
Chapter 1 SolidPlant User Interface
Chapter 1-1 SolidPlant User Interface
In this chapter, we will learn basics about SolidPlant User Interface. First, we will learn how to start SolidPlant
program. Then we will learn about Ribbon System in SolidPlant, which will be classified according to application groups and types of works. Next, we will learn about SolidPlant Project Manager, which is used for all project management tasks including copy, backup, restore, as well as data control in the system. Then, we will learn about Control View Model, which is about how to use tools or features to look at various views of our models. Because there are usually many components in the plant we build, we need to learn the basics. And after we already have models, we can walk-through our model by using Walk-Through Model feature in order to see how our models look. If we want to present the piping, equipment and structure placement that we have designed, we can walk through and make a video record for our presentation.
Chapter 1-2 How to start program
In this step, we will learn how to start the SolidPlant program. In the case we will use the shortcut on the desktop
after the software have already installed, it is named SolidPlant Addin – this one. But if we want to use the SolidWorks program, select SolidWorks 2012. Next, if we want to use SpecCreator—this one, it is for creating pipe specification, which will be explained in the next chapter.
Shortcut to start SolidPlant and Spec Creator on desktop
After we have started SolidPlant using the shortcut, we can see that we have opened SolidWorks together with SolidPlant. Please notice SolidPlant Project Manager on the right panel.
SolidPlant Project Manager pane tab is tool manage project system
The present status is standby which is ready for opening the required project. Here we can open the project by using the cursor to open it at the task of SolidPlant Project Manager.
SolidPlant Project Manager Click to display this task pane tab.
2

w w w . sol i dpl a n t3 d . c om
1
Then if we want to see the project that we have opened, we can click to see it at the Active Project.
List history project name used to opened
As another way, we can also open projects using the Open Project toolbar. And at this point, when we click at the
command, the dialog of Browse for folder will appear. Then we can point to our project in the folder and click to open it. Here we will try opening from our opened project.
1. Click, Open button. 2. Browse to select project.
2
Now our project model has already been opened. We can notice on the left that there are Main Assembly of equipment, piping, and structure. These are parts that keep the model information.
Now active project is opening
Main assembly 3D model is consist of Equipment, Piping and Structure
Next, look above, and we will see SolidWorks Ribbons that we regularly works on. But here there is also the added SolidPlant Ribbons which are SolidPlant, Structure, Equipment, Routing, Component, and Drawing. Next we will look at the details for each Ribbon.
Chapter 1-3 Ribbons System in SolidPlant
Next, look at the above, and we will see SolidWorks Ribbons that we regularly work on. But here there is also the
added SolidPlant Ribbons which are SolidPlant, Structure, Equipment, Routing, Component, and Drawing. Next we will look at the details for each Ribbon.
3

w w w . sol i dpl a n t3 d . c om
Chapter 1-4 SolidPlant Ribbon
Let’s learn about the first Ribbon, which is SolidPlant. Basically, the commands in SolidPlant Ribbon comprises commands on managing our newly created projects, or opening projects we have created and saved, as well as saving, backing up, and restoring projects. It also includes commands for calling the saved specifications to change, or newly creating them. Additionally, we have Tag Manager tool for importing P&ID data, and Tag Finder for searching models from tag data we have. And we also have Insert Layout tool for the case we want to insert Plot Plan or layout of our plant as 2D reference for allocating equipment or Structure Model. We also have tools for creating reports, and showing property of the project in Project Property. Additionally, we have commands related to handling or moving equipment which are Move, and Rotate. And for the output and to look model pictures in different viewpoints appropriate for plant works, there are outputs appropriate for this type of work. Next, there are tools for using Turn Table to rotate models and to rotate views using unique tools of SolidPlant.
Chapter 1-5 Structure Ribbon
Now we will learn about Structure Ribbon. It comprises important components starting from creating Structure 3D Grid as reference for locating columns and beams. Additionally, beams that we use will conform to standards that SolidWorks users can choose from various standards. Moreover, SolidPlant has prepared a feature called Model Platform frequently used in plant works, such as Stair, Ladder, Handrail, and others, which make models able to be more easily created as well as easy to change and correct. In addition, we can make a report using Assign Member feature in order to take materials as well.
Chapter 1-6 Equipment Ribbon
Next, Equipment Ribbon comprises important features which include creating equipments from the standard library of SolidPlant, or converting from SolidWorks equipments to import them into our SolidPlant projects. Additionally, we have feature for determining nozzle position on equipments to make a starting point for piping work. Next we also have tools to facilitate putting necessary accessories on equipments, which include Equipment Support. Or in the case that equipments are quantitatively made, we can use the copy command both linearly and circularly, as well as available tools for movement and rotation.
Chapter 1-7 Routing Ribbon
Now we will learn about Routing Ribbon. This Ribbon is about making all pipe routes, which comprises groups of various types of pipe routing. The first example is Manual Route, which is a point-to-point routing. Auto Route is related to determining the start and end points of nozzles, and then the software will generate all possible piping paths for SolidWorks users to choose from. Or for Smart Route, it can smartly get data from line list that we have imported, and then generate pipe routes for us, as well as insert equipment such as valves and control valves on route lines. Additionally, we have prepared commands for creating and changing our pipe routes, which include deleting, assigning short piece of pipes, reducing size, and changing spec. We also have additional feature or Advance Feature for piping work, which includes moving pipe directly for this type of work. For example, if we want a specific distance from center to center, we can specify it using this feature. Or in the case of making expansion loop or which is called Jog Route, or in the case of dividing pipes in stock lengthwise, or putting pipe support, these are in this feature as well.
4

w w w . sol i dpl a n t3 d . c om
Chapter 1-8 Component Ribbon
Next we will look at Component Ribbon in SolidPlant. We will see that there are various components including many types of pipe fittings, and flanges for valves. We can utilize these additional equipment, but first we must originally have data created in pipe spec. So we can retrieve data for using with appropriate models in each component types.
Chapter 1-9 Drawing Ribbon
The last Ribbon in SolidPlant is called Drawing Ribbon. This Ribbon includes features and commands for use after the model has already been created. The first is Gen PCF, which we can take PCF file in order to create Piping Isometric Drawing. And we can make drawing, and take dimension on drawing in GA or General Arrangement Drawing for installation at plant site. Additionally, we can take Bill of Materials , and annotation that we want to show the drawing. We can instantly get this information for use.
Chapter 1-10 SolidPlant Project Manager
Next we will look at the task panel that is called SolidPlant Project Manager. The task panel on the right is the main
panel for working on our SolidPlant project. We will see the basic information of the project we are working on. Here we will notice the project name, the unit used in the project.
Click the task pane tab for active SolidPlant Project Manager
Additionally, SolidPlant Manager also has a command to facilitate the creation of new projects or New Project command. And to open the project, we can instantly browse in the folder. Moreover, we can also copy the saved project for use in the new project. Or if we want to save and back up for each working day, we have Save Project feature for this purpose as well. And we have Restore Project function to retrieve the saved project for future use. In addition, we also have Close Project command to close the project, and Project Property command to show status of settings in the project.
Copy project... button
Open project... button Close project... button
New project... button Project Property... button
Save project... button Restore project... button
5

w w w . sol i dpl a n t3 d . c om
Additionally, below we will see Document List topic. In the Document List,
we will see nodes of items indicating various data. For example, in Pipe Routing, we can expand the node to see its data, which has colors indicating data status. For example, the color Black tells us that the model and database have already had the joined data. The color Red tells us that there is only data in the tag, but not yet in the model. Or as for the color Blue (which we do not have now), if the color Blue is shown, this means that we have both data and model but we have not brought that model into the Main Assembly of the project.
Please notice that data of each item will be separately grouped. For example, as for Equipment, the data will be shown in various tags. If we want to know where this tag is located, we can only double-click at the tag name. It will go to the location of the equipment for us.
Double-click on the tag number for review and location of model
Next, below we can see GA Drawing, Isometric Drawing, and Document. These show status. And when there are data documents, they will be listed under these topics.
Node contents to keep documents of the project, then it is available to expand for checking
6

w w w . sol i dpl a n t3 d . c om
Next, let’s look at the important feature under SolidPlant Project Manager, which is called SolidPlant Piping
Routing, and click into it.
Click the task pane tab for active SolidPlant Pipe Routing
This is important for defining Line Name or Line Number which will be used for pipe routing in our model. As for the line shown in the Active Route box, we will see the values of many line numbers that have been used in the system. Or we can also create the new one. Or we can delete it from our model. At this point, please notice that we are selecting Line 001. We can set the name of Pipe Spec that will be used in this line. We can also set the pipe size as desired. In the same way, we can set Insulation to have thickness as required. And we can also retrieve and use the data we have set for our previous equipments. Or as for the case of pipe routing that we want to disable the routing or display in order to correctly sketch before and then generate later, we can disable them at this point.
As seen below, we have many types of Snaps for pipe routing to select from. These Snaps are in fact Snaps in SolidWorks. Additionally, as below, we also have options of Slope feature. This is important for pipe routing in slope. We can set it as proportion, for example, 1:100 or 1:50. When we want to use it, just click this button. It will then route the pipe in slope for us without the need for us to calculate the length or degree before.
Below shows status for us to know where we are – at which spec, what size, which equipment we have - that may be chosen for use. This shows the data in a specific spec and size.
Chapter 1-11 Control View Model
Next is the topic of Control View Model, which is about looking models in various viewpoints. First we have to know the basic. Please notice the lower left corner. We will see the axis that is called Triad, and notice that its Z-axis is in vertical. This is common in plant design system. However, this is different from the part design in SolidWorks, in which Y-axis is commonly in vertical.
Please note that its Z-axis is in vertical
7

w w w . sol i dpl a n t3 d . c om
Now please look at model viewing. We can use SolidWorks feature called Orientation to create views from
different viewpoints, which we have previously used for our convenience. For example, if we want to see at this point, we can instantly do it. Or we can use model viewing tools. For example, if we want to see the top view, we also have features in SolidPlant Ribbon. Or Iso view that we specifically set for SolidPlant.
User can view model with any Isomatric Views.
Moreover, we also have Rotate feature to rotate models by only placing the triad onto the model for reference. And then go to Rotate View feature, which we can gradually click to rotate model view as required. We can see that our Control View feature is easy to use. We can try adjusting views according to our works in order to easily change or update our model.
Click “ Rotate View” for Rotating around model
Chapter 1-12 Walk Through Model
Next we will learn about the feature of Walk Through Model. When we have already made a model, we can walk through the plant that we have created to check or review our model as well as to record it as a video.
Now we will learn what we need to set when working. First, please go to Tools menu, then open the status of
Large Assembly Mode.
Click to turn on status for big Assembly Mode
8

w w w . sol i dpl a n t3 d . c om
And then go to View --> Lights and Cameras, and select Add Walk-through.
Click to start “ walk-through ” feature
After that, click into the box of Viewport Settings, then choose at the vertical pole axis and flip it up. And now click Start Walk-Through.
4
1. Click active Direction.
2. Select the rdge if beam.
3. Tiek check-box for vertical up.
4. Click start the feature. 1 3 2
There will be a dialog showing Introduction and guideline for using keyboards and mouse in the Walk-Through, then click OK.
Click to “ OK ” for walk-through Instructions.
After that we will see that there is a Box Panel appearing at the bottom. This is for us to handle or walk-through into the plant. Basically we can set, increase, or decrease speed. Then we can click button to walk-through. Additionally, we can also record and save it as a video by clicking Record button, then walk-through as usual. When finished, if we want to playback the video, we can click Play here.
Control speed level Control pan view
the button to control for walk- throgh
Keep record video funetion
the button to move for vertical up and down
Zoom in-out
9

w w w . sol i dpl a n t3 d . c om
And when we are ready to generate a video file, we can click at the Generate Video
button. We can also save or compress the file as required.
User can save as video record for presentation.
Chapter 2 How to create project data with SolidPlant Project Manager
Chapter 2-1 Manage a Project System and Model Layout Setup
In this chapter, we will learn about SolidPlant project management. This includes how to create a project, and how to insert model layout into the project. First we will learn about how to create a project using tool called SolidPlant Project Manager. Next we will learn about the system settings, and conditions related to settings before we start writing the model. Then we will insert Plan Layout to be a reference for our model, including Equipment Model and Structure Model in our Plant Layout.
Chapter 2-2 How to create project data with SolidPlant Project Manager
Now we will look at the first topic, which is about how to create a project in SolidPlant. First, go to the SolidPlant
Project Manager task panel, and click here.
Click “ SolidPlant Project Manager ”
Then look at the Toolbar of SolidPlant Project Manager which is called New Project, and click here
Click “ New Project ”
10

w w w . sol i dpl a n t3 d . c om
Next will be how to input data for our Project Name, in which we will try inputting the name of the project. Next is Project Description, in which we can input the information.
Enter more information Project.
Click Browse folder to keep Project Database.
In the directory we can point at the folder in which we want to keep our project. There is also a button for us to browse for the keeping location. We can keep the data of our project separately at the desired local folder. The default local folder is at drive c:\, which is c:\SolidPlant Projects\ that we will now use.
This is default folder Project of SolidPlant.
Next, below is Project Unit. Please notice that there are 3 modes to select from, which are Imperial, Metric, and
Mix-Metric. The meaning of Imperial is that Outsize Diameter of pipes we use will be read in inches, and the pipe-length summation is in feet and inches. On the other hand, if we use Metric, OD of pipes will be in millimeters, and the pipe-length summation is in millimeters and meters. As for the third type: Mix-Metric, OD of pipes will be in inches, and the pipe-length summation is in millimeters. Here we will choose 2 Mix-Metric, then click Create button below.
1 1. Click ‘‘ Create ’’ button. 2. Tiek the Unit.
Please notice that when the project has been already created, there will be the project name under the Active Project, which is named SolidPlant Project. Now we are ready. As for the created project, please notice on the left that there are 3 defaulted Main Assemblies, which are Equipment, Piping, and Structure.
The created Project is active current.
11

w w w . sol i dpl a n t3 d . c om
Chapter 2-3 How to change settings on project properties Next, we will learn how to set the settings for the project we are working on. First, click to activate the SolidPlant
Project Manager task panel. Then go to a command in toolbar called Project Property.
1 1. Click ‘‘ SolidPlant Project Manager ’’ is active.
2. Next, click ‘‘ Project Property ’’ 2 feature.
After clicking it, the Project Property dialog will appear, and there are tabs for various property settings. The first one is General tab, which we can see the project name and the path folder in which the project is kept. Here please notice that when we click on the path, it will open the folder where our project is located without the need to look for it from outside. Now please close this. Next is the display of Project Unit that we have selected from the last chapter. And below is Project Property, which we can directly input the details into it. For example, we can instantly input the project number here.
Enter the Value of Project Number, 001.
Next, let’s look at the second tab, which is Piping Specification. Please notice that when we click it, the path linked to the pipe spec used in the project will appear. We will see a default called Demo. As from this, we can add or delete spec to which we want to link in the project. If we want to add spec, click on this button and select the spec we want to use in the project. Please notice the file extension mdb.
This is add to link Pipe spec button.
This is delete to unlink Pipe spec button.
Next, please look at the third tab, which is Model Setup. This tab is for Snap settings frequently used in the project for model making. These Snaps are in fact the Snaps that have already been in SolidWorks, but we have brought them into SolidPlant to be able to more easily set them. Next, below is Shaded Quality, which we can set shade and wireframe for display quality. However, this depends on the hardware performance of each computer. If we set for high quality, it will consume the computer performance.
12

w w w . sol i dpl a n t3 d . c om
2
Next, let’s look at the last tab, which is Component Color. Component Color is the colors of components. If we look
from the Component picklist, we will see that they are separately grouped as Equipment, Pipe Routing, or Valve, for example. And we can assign different colors for each of them. For example, if we are now active at Pipe Routing, we can see in the topic ‘‘Assign color by’’ that the default is now set to Service. We will see each service name and its color. Here we can change options.
This is drop-down list for component types.
For example, if we choose the option of Nominal Diameter, this means the pipe color will change in accordance with its size.
This is options to assign color of Pipe component.
However, our default is set to be Service. For instance, Line Steam color can be set as required, such as steam as red, or line as blue. Color setting can be easily done by just choosing the name and then double-clicking at the color, and now we can select the color here. Well, all we have learned in this part are the details of how to change default system settings of the project used in our model.
User can double - click on any service or Nominal Diameter for specify by yourself.
Chapter 2-4 Insert plant layout for reference models
The next step is about inserting our plant layout, which can also be called Plot Plan. As for the Plot Plan, we can import the file from AutoCAD 2D which have layout for equipments and structures as reference for locating our equipments and steel structure. Now we are ready to try the insert. First, activate the SolidPlant Ribbon, then go to 1 Insert Layout command, and click.
1. Click ‘‘ SolidPlant ribbor is active.
2. Next, click ‘‘ Insert Layout ’’ feature.
13

w w w . sol i dpl a n t3 d . c om
After clicking the dialog of Insert 2D Layout will appear. We then can input the name for our layout, which will be
shown in Feature Manager on the left. Here we will use the name ‘‘solidplant layout’’. Next, the second box is for Elevation, and its default is zero. However, in fact we can set its value as required. In the case that our plant is at a higher level, we can set its level at this point. Here we will set it to be zero, and then click OK.
Enter the name Plant layout.
Next is the dialog to browse for 2D CAD files. At this point, please notice the format of file types. Let’s change from Dxf to Dwg. Then we will go to the folder on desktop in Dataset Training, in which we will see the file named SP Plant Layout that will be imported to use here, and then click Open button.
1. Change format file type to .Dwg.
2. Go to the Dataset training folder. 3
3. Select ‘‘ SP Plan-Layout.dwg’’ file. 1 4. Click ‘‘ Open ’’ button. 2
4
Then the dialog for importing files (which can be dxf or dwg import) will appear. And certainly in this case, we will
use 2D Sketch. Then click next once.
Make Sure to tick ‘‘ 2D sketch ’’ mode. Click ‘‘ Next ’’ button.
And the preview of our Plot Plan drawing will appear. At this point, change the unit from inches to millimeters, then click next once more.
1 1. Change unit to ‘‘ Millimeters ’’.
2. Click ‘‘ Next ’’ button.
2
14

w w w . sol i dpl a n t3 d . c om
And click finish button. There will be a dialog for enabling Explode Blocks option
Click ‘‘ Finish ’’ button.
Then click Yes. Now we have already inserted the Plot Plan.
Click ‘‘ Yes ’’ button to Explode Blocks.
We can zoom to check equipment positions including positions of vessels, pumps, steel structures, and tanks.
Chapter 2-5 Backup & restore project system
Next we will back up the project we are working on. The backup is useful because we can save the latest working status for each period. When we want the information for any period, we can get its status for use at any time. Well, now we will learn how to back up our working project. First, we will go to the SolidPlant Ribbon and click to activate it. Then go to the Save Project command and click it.
1. Click ‘‘ SolidPlant ’’ ribbor is active. 2 1
2. Next, click ‘‘ Save Project ’’ feature.
The Backup Project dialog will now pop up, and we can input a name for the project that we want to back up. We will use the name 1-First Project Backup. When finished, click Create button.
Enter the name to Backup Project. 15

w w w . sol i dpl a n t3 d . c om
The dialog saying ‘‘Backup done’’ will appear, then we click OK.
Click ‘‘ OK ’’ button.
If we want to restore our backed-up project, we can do it by going to SolidPlant Ribbon called Restore Project, and click it.
1. Click ‘‘ SolidPlant ’’ ribbor is active.
2. Next, click ‘‘ Restore Project ’’ feature.
As from the Restore Project dialog, we can see the project which we have backed up in the system, and can use mouse to select it. Or if we do not want it now, we can delete it as well. Now supposing that we want to restore this project back, we can select the project and click Restore.
1. Select the name of backup project restore. 2
2. Next, click ‘‘ Restore ’’ button. 1
And then Yes to confirm. After that the project will be closed.
Click ‘‘ Yes ’’ button.
Now click here for drop-down list to appear, and then choose the project name again. And now we have already got our backed up project back.
16

w w w . sol i dpl a n t3 d . c om
Chapter 3 Create the Piping Specification Class by SpecCreator
Chapter 3-1 Create the Piping Specification Class by SpecCreator
This chapter is about how to create the piping specification
class using SpecCreator. As for the concept of piping spec creation, we will begin with designing various systems in the process. For instance, systems of the process that we have in a plant such as processes of steam line, low-pressure Line, high-pressure line, chemical line, water line, Instrument air line, and services. Each line is different in details, for example, in design temperature, design pressure, operating temperature, operating pressure, as well as material grades used and specified in the pipe spec. So it is necessary to consider making the piping specification in accordance with the systems that we will design in pipe 3D routing.
Chapter 3-2 Introduction concept to making the pipe spec Now we will learn the concept of how to make the piping spec. I will begin with the concept of the SolidPlant
Program. SolidPlant has catalogs referring to standards, and brands from various manufacturers, for us to select from. For example, the catalog of ANSI/ASME standards, which are presently worldwide standards for piping works, JIS and DIN standards, and brands from various manufacturers such as Crane, Ladish, Fisher. All these are ready for us to use in our work. As we already have the catalogs, this is the starting point that we can link them to use in our spec for each class as I have said earlier about system grouping into various systems such as steam, water line, and air line.
Imperial Unit’s Catalogs. Imperial Unit’s Catalogs. Imperial Unit’s Catalogs.
Chapter 3-3 How to create new spec & open spec
In this chapter, we will learn how to create a spec. As we are at SolidPlant interface, we will learn how to call SpecCreator, how to use it, and how to open and make change to the file we have previously used. Now, we will go to SolidPlant Ribbon by clicking at SolidPlant here.
17

w w w . sol i dpl a n t3 d . c om
And we can see a SpecCreator command, then click to open it. After that the window called SolidPlant Specification Creator or shortly SpecCreator will open.
Now please notice that the program is standing by ready for us to work on it. So if we want to open the old file, we can go to the Open Spec and click it.
Click ‘‘ Open Space ’’ button.
Then the folder containing our spec will be opened. Please notice that the file extension of our to-be-created spec file is mdb. But for now, let’s cancel it first.
Please note this is file format ( *.mdb ) of the pipe spec
Click ‘‘ Cancel ’’ button.
After that, if we want to make a new spec file, we can click the New Spec button.
Click ‘‘ New Space ’’ button.
Then the dialog of New Piping Spec will appear. In the dialog, there are 3 modes of spec units for us to choose from, related to the project we create. The First is Imperial. In this unit mode, the pipe’s Outsize Diamenter size is in inches and the pipe length summation is in feet and inches. The second is Metric. In this unit mode, the pipe’s Outsize Diamenter size is in millimeters and the pipe length summation is in meters and millimeters. The third is Mix-Metric. In this unit mode, 1 the pipe’s Outsize Diamenter size is in inches and the pipe length summation is in meters and millimeters. If we want to make a new spec, please choose Mix-Metric to be the same as the project we have currently created. Then click OK.
1. Select ‘‘ Mix-Metric ’’ Unit Mode. 2. Next, click ‘‘ OK ’’ button. 2
18

w w w . sol i dpl a n t3 d . c om
And now we can input a name for our spec, for example, here we will name it D1T, then save it. Please notice at
the folder that in fact we can save it in the same location of our project.
1. Select ‘‘ Mix-Metric ’’ Unit Mode.
2. Next, click ‘‘ OK ’’ button. 1 2
Next is how to add a catalog which we have to link and use our pipe spec. As said earlier, we have catalogs of standards such as ANSI/ASME, JIS, DIN, and others, which we can instantly add them here. That is how to create it, but we will learn its details later. So please cancel it for now.
Click ‘‘ Cancel ’’ button.
Chapter 3-4 How to generate components In this chapter, we will learn how to generate various types of components, which here we will call them tables,
such as pipe table, fitting table, flange table, valve table, fastener table, olet table, and others. But before we make tables, we will learn how to link catalogs to be used in our pipe spec. Please notice that now we have already created our spec name called D1T, but we have not linked catalogs in here. Let’s see how to link catalogs by clicking at the Add Catalog button.
Click ‘‘ Add Catalog ’’ button.
Then the dialog of Catalog will appear, but now there is nothing in the catalog list. Here we can get it by just clicking Add button to instantly add a catalog.
Click ‘‘ Add ’’ button.
19

w w w . sol i dpl a n t3 d . c om
Now let’s try it, and the folder where the program is installed will be opened into the folder called Mix-Metric in
Catalog folder. Please see that our SolidPlant have prepared a lot of catalogs that we can link and use at anytime while we are changing this spec class. As an example, please select ANSI-ASME.
Select ‘‘ ANSI-ASME ’’ Catalog file.
We can select to link more than one catalog files by press and hold control button then click on the catalogs that we want. Now we will select only one file, ANSI-ASME. Please notice that after linking, the file name with its path of the catalog will appear. Then click OK.
1. Display the catalog file to link with the pipe spec. 2
1 2. Click ‘‘ OK ’’ button.
Immediately, the dialog about New Table will pop up. As said earlier that we want to make which table or component first, we can click the list to see various spec tables. We will choose the first table, which is pipe. Then click OK.
2
1. Select ‘‘ PIPE ’’ table.
2. Next, click ‘‘ OK ’’ button.
1
Now we are in standby, ready for the pipe table.
The first ‘‘ PIPE ’’ table in pipe spec.
20

w w w . sol i dpl a n t3 d . c om
Chapter 3-5 Pipe Table
Now we are already active at pipe table. But before we input detailed information in our pipe spec, first we will look at the details of this pipe class. We will open the pdf file of the spec class called D1T. This is an example class of pipe spec design. We will see details of the pipe class: class name and systems it is related. For example, this spec is named D1T, which is related to the service of Superheated Steam as well as its details. Below we will see tables of various components. Now we will begin with the pipe table. Considering its details, we will see the details for each pipe range. For example, as for the ½ to 1 ½ pipe, the material grade will be A106GR.B, which is carbon steel class. There are details in each row specifying the required information. For example, this is the pipe according to Schedule 80, with refer code according to ASME B36.10M. Now we will see how to input this information into our SpecCreator. As from here, we will set the range to ½ to 1 ½ inches, and Schedule 80.
This is the pipe range data of specification sheet.
And now we will switch to our SpecCreator. If we look at the field columns of the pipe table, the fields currently used will be shown, such as Min Main Size, Max Main Size, Schedule, Class Name, Material Grade, ITEM_CODE, and Description. Now we will start to set it by clicking at the picklist of Min Main Size, and select 1/2 inches. Then select 1+1/2 at Max Main Size. At Schedule row, choose 80. And for the class name, which is the component type, we will use pipe.
After all the first row are set, we will see how it looks by clicking at the Preview checkbox here. Then look below.
Turn on ‘‘ Preview ’’ status.
These are records or rows showing information in the database, which will range from 1/2 to 1 1/2 as we have set above. If we look at the details in each field column, we can see that they are in accordance with the filter we have set. For instance, Catalog appears as we set, and Schedule as 80. Then scroll to see in the right to see more details, such as WEIGHT_DRY or weight in kilogram/meter, and some other details.
Now we will input some more details about the name of this pipe component. The name we will input in the Description column is important and will appear when we use it in our model, and make an order for equipments, as well as when we estimate costs. Now please input ‘‘PIPE SCH.80 SMLS PE A106GR.B’’ in the table to describe the pipe that is schedule 80 (SCH.80), seamless (SMLS), plain end (PE), with material grade of A106GR.B. Then press enter. Now look at the preview below, and the description as we input will appear. This simply 1 means that we have to input information from every row into the description column.
1. Enter the description of pipe.
2. All pipe sizes will be defind the description by Automatically
2 21

w w w . sol i dpl a n t3 d . c om
Moreover, our SolidPlant has prepared the way to input data that is specific to each record type. This is useful for
the case that the organization uses a special code to specify component type when making an order and buying equipments. We can input that code, for example, in the ITEM_CODE that we have designed for this, we can input any code as desired.
User can input special codes with any conponants.
Additionally, we can choose to open or close statuses of the unused records as well. As an example, look at the 1+1/4 pipe and this record is rarely used, so we can close or disable it for now. We can easily do this by clicking at the front of the record, and it will be instantly closed. And this record will not be used in our pipe spec table.
User can disabla to specify any records.
Next, if we look at the details in the pdf file, there is also the range of 2 to 16 inches, with the same Schedule 80 but the bevel pipe end or BE.
This is pipe’s data to must assign in pipe table.
Now back to the previous window. We will close preview for now.
Turn off ‘‘ Preview ’’ status.
Then click at the plus-sign button in Row Control section in order to add a row.
1. This is the newrow after added row.
2. Click once ‘‘ + ’’ button.
2 1
22

w w w . sol i dpl a n t3 d . c om
Then we can set the row starting from Min Main Size of 2 to Max Main Size of 16 inches, Schedule 80, Class Name
is PIPE as previous. When finished, please click Preview checkbox to check if our records are correct.
Enter the valve ofpipe range by pick-list in each fielts.
Every time we get the rows of the required records, we must always input details in the description by typing--like this. Or we can copy it from the above row by selecting, then right-clicking and pressing Control C to copy then Control V like this.
1
1. Select all wording and then copy them by Pressing Control C. 2
2. Delete the existing wording and then paste them by Pressing Control V.
And then change some details here from PE to BE. Click the mouse here, and notice that the description will now appear.
2 1. Change some wording PE to BE.
1 2. The valve of Deseripton column
will update by autometieally.
This is the first table, which is PIPE table. Each time when we finish one table, we should generate spec once by clicking Gen Spec here. The program will then generate the spec for us, then click OK
1
1. Click ‘‘ Gen Spec ’’ button.
2 2. Next to click ‘‘ OK ’’ button.
23

w w w . sol i dpl a n t3 d . c om
Chapter 3-6 Fittings Table
Next, we will add Fittings table. And before that, let’s look at the spec sheet of this pipe spec class. The fittings table will comprise Elbow, Straight Tee, Reducer, and Pipe Cap. Please notice that rows for filter setting looks similar to those for pipes. Now let’s look at the first row, which is for 1/2 to 1 1/2 pipes. The material is A105, and the connection is SW, which is Socket Weld. Wall thickness is CL.3000 class. And the standard reference code is ANSI B16.11. The next row is for a larger pipe, which is 2 to 16 inches. Its material grade is this number, and the connection is BW, which is Butt Weld. And its reference code is ASME B16.9.
This is fitting’s data to must assignin Fitting table.
Now we will switch back to SpecCreator. And go to the Add New Table command, and click it.
Click ‘‘ Add New Table ’’ button.
The dialog will appear for us to choose the required table, and certainly we will select Fitting, and then click OK. The Fitting table will appear.
1. Next to ‘‘ OK ’’ button. 2
2. Pick - list to choose FITTING table.
1
We will start setting now. As for the Min Main Size, we will begin with 1/2 inches, and Max Size of 1+1/2 inches. And notice that for the small size, we will use Rating to control, which we will use at 3000 lbs. As for the end condition, we will use SWF, which is Socket Weld Female. Now we will begin select component in Class Name, which we will use ELBOW_LR_90 for elbow, long radius, 90 degrees. Next, we can choose material grade to be A105.
Enter the valve of Elbow data by pick - list in each fields.
24

w w w . sol i dpl a n t3 d . c om
And now let’s preview it by clicking the Preview checkbox, and the records will be shown. We can see that it will
refer to values we have set in filter, such as size of 1/2 to 1+1/2, class rating of 3000 lbs, end condition of SWF.
Turn on ‘‘ Preview ’’ status.
Then please uncheck the Preview box. And now add a row by clicking at plus-sign button here
2 1. Click once ‘‘ + ’’ button.
2. Turn off ‘‘ Preview ’’ status. 1
Then we will set the new row.
The is the new nowafter added now.
Then starting from Min Size of 2 inches to Max Size of 16 inches. As for the larger size, we will use schedule, which is 80. End condition will be BW for Butt Weld. And Class Name will be ELBOW_LR_90. Material grade will be A234. When finished, preview it, and the records will be shown below. In all cases, please do not forget here that in the description field, we have to input all the details after we have already set the row. We will do this later.
1. Enter the value of Elbow data 2 by pick - list in each fields. 1
2. Next to turn on ‘‘ Preview ’’ status.
25

w w w . sol i dpl a n t3 d . c om
2
Next, let’s look at Tee. Please notice that we have set the Class Name as Elbow 90 degrees. Now click to select at
the range 1/2 to 1+1/2 inches, then right-click on the row, and choose Duplicate. The row will be copied.
1 1. Click in front of the Elbow’s
row at range 1/2 to 1+1/2 .
2. Next to at the same position, 2 themn pressing right - click to Select ‘‘ Duplicate ’’ command.
Now we can change the type of component from ELBOW_LR_90 to TEE.
Change type companant from ELBOW to TEE.
Then preview it to see that the socket weld tee is shown here.
Turn on ‘‘ Preview ’’ status.
In the same way, if we want to copy the row of 2 to 16 inches, right-click on the front of the row and choose Duplicate.
1. Click in front of the Elbow’s 1 row at range 2 to 16 .
2. Next to at the same position,
then pressing right - click to Select ‘‘ Duplicate ’’ command.
26

w w w . sol i dpl a n t3 d . c om
Then go to the field column of Class Name, and change from elbow to tee. We have to check every time when
we change the filter value in order to see if our components completely appear.
1. Chang type companent from ELBOW to TEE . 2
2. Next to turn on 1 ‘‘ Preview ’’ status.
Next, let’s look at the Reducer component. Please note that now we have Elbow and Tee, and the next will be Reducer. In the same way, click at the row of 1/2 to 1+1/2 inches to duplicate it. And then we need to change the Class Name to Concentric Reducer, but we do not have it here.
1
1. Click at the in front of TEE row at range 1/2 to 1+1/2 .
2. Click once‘‘ Duplicate Row ’’ button.
2 3 3. Pick - list to checking concentrie
Reducer is not available.
So we have to search for the component that we want to add, which is Concentric Reducer. Now we will learn how to add catalog. Please go to the Add Catalog command, and click search.
1
1. Click ‘‘ Add Catalog ’’ button . 2
2. Next to click ‘‘ Search ’’ button.
The Search Catalog will pop up, then please select Class Name filter in the Column------Scroll down to find Class Name and select. In Value, select Concentric Reducer (REDUCER_CON). When finished, click Add Constraint to make it active, then click Search button.
1 1. Select ‘‘ CLASS NAME ’’ in column filter .
2. Next choose ‘‘ REDUCER CON ’’ in valve 2 of the type.
3. Click ‘‘ Add Constrain ’’ button.
3 4. Firal, click ‘‘ Search ’’ button.
4 27

w w w . sol i dpl a n t3 d . c om
Now SpecCreator has searched and found the catalogs which contain Concentric Reducer. We will try using one of them, such as Bonney Forge, then click Add Selected.
1. Tick to check - box ‘‘ BONNEY FORGE ’’ catalog file.
1 2. Click ‘‘ Add Selected ’’ button.
2
The catalog will be linked into this spec class. Then click OK.
Click ‘‘ OK ’’ button.
Now please look at the list of Class Name field column, and now we can see Concentric Reducer in the list, so choose it.
Pick - list to select ‘‘ REDUCER CON ’’ in Class Name column.
And then preview it to see that the records has appeared.
Turn on ‘‘ Preview ’’ status.
In the same way, we can duplicate the row of 2 to 16 inches.
1. Click in front of the TEE’s 1 row at range 2 to 16 .
2. Next to at the same position, 2 then pressing right - click to Select ‘‘ Duplicate ’’ command.
28

w w w . sol i dpl a n t3 d . c om
And change the Class Name to Concentric Reducer.
Change type component frome TEE to REDUCER_CON.
When done, preview it like this.
Turn on ‘‘ Preview ’’ status.
Next we will add the Reducing Tee. Now please select the row for Tee whose size is 1/2 to 1+1/2 inches, and duplicate it in the same way.
1. Click in front of the TEE’s 1 row at range 2 to 16 .
2. Next to at the same position, 2 then pressing right - click to Select ‘‘ Duplicate ’’ command.
Then look at the Class Name, and we will find that there is no Reducing Tee here.
29

w w w . sol i dpl a n t3 d . c om
As before, we will add catalog containing small-sized Reducing Tee component. We can do this by clicking at Add Catalog, then click Add.
1
1. Click ‘‘ Add Catalog ’’ button .
2. Next to click ‘‘ Add ’’ button. 2
We will choose NON-STANDARD, and click Open then OK. 1
1. Select ‘‘ NON - STANDARD ’’ catalog file .
2. Click ‘‘ Open ’’ button.
2
Now please click on any field, then use mouse to select Class Name. We will see TEE_RED_BRANCH, which means Reducing Tee is already here, so choose it.
Pick - list to Select ‘‘ TEE_RED_BRANCH ’’ in Class Name column.
When done, preview it to see its records.
Turn on ‘‘ Preview ’’ status.
30

w w w . sol i dpl a n t3 d . c om
Now uncheck the Preview box. And as done before, select the Tee row of 2 to 16 inches, and duplicate it.
1. Turn off ‘‘ Preview ’’ status. 2
2. Click in front of the TEE’s row at range 2 to 16 .
3. Next to at the same position, 3 then pressing right - click to 1 Select ‘‘ Duplicate ’’ command.
And change the Class Name to Reducing Tee.
At the new row in Class Name column to choose ‘‘ TEE_RED_BRANCH.
Then preview it to see information in the records.
Turn on ‘‘ Preview ’’ status.
As for the Cap component, we will have to add another table, which will be in Miscellaneous.
Chapter 3-7 Misc Table Now we will learn how to add Pipe Cap component. Before doing that, let’s look in the spec sheet. This is the cap
that we will add. There are 2 rows, which are for 1/2 to 1 1/2 inch range and 2 to 16 inch range. Other components that will be added are Screwed Cap, Full Coupling, and Half Coupling. The table that we will add is called Misc table, or Miscellaneous.
This is pipe cap data to create in MISC table.
31

w w w . sol i dpl a n t3 d . c om
Now go back to Spec Creator, and click Add New Table button. Then choose Misc table, and click OK.
1. Click ‘‘ Add New Table ’’ button . 1
2. Pich - list to select ‘‘ MISC ’’ table.
2
Now we are ready to set it. In the same way, we will set Min Main Size to be 1/2 inches, Max Main Size 1+1/2 inches, Class Rating 3000 lbs, and End Condition to be Socket Weld or SWF. As for the Class Name, notice that in the list for Class Name, there are components as said above starting from PCAP or Pipe Cap.
Enter the valve of pipe cap data by pick - list in each fields.
Then preview it, and we will see that there are 2 records for each size. If we look at the field column of Catalog File, we will see that there are 2 catalogs linked to use here.
Turn on ‘‘ Preview ’’ status.
Now we will add a field column in order to control the way to use data from each catalog. Please go to Column Editor, and click it.
Click ‘‘ Class Edittor... ’’ button.
32

w w w . sol i dpl a n t3 d . c om
Then, in the Available Classes on the left, select Field, and then find CatalogFile then click >> button to add it into the right box. Then click OK.
1 1. Choose ‘‘ catalogfile ’’ field column . 2 2. Click ‘‘ >> ’’ button to adding field column. 3
3. Finally, click ‘‘ OK ’’ button.
Now please notice above that we have already added Catalog File column, so we can control its value. We will control it from Bonney Forge.
Pick - list to choose‘‘ BONNEY FORGE ’’ catalog file in ‘‘ catalogfile ’’ column.
Then preview it once more, and we can see that it will now get the value only from the Bonney Forge catalog file.
Turn on ‘‘ Preview ’’ status.
Now uncheck the Preview, and add a row in the same way.
Turn off ‘‘ Preview ’’ status.
33

w w w . sol i dpl a n t3 d . c om
And now set the row to be for 2 to 16 inches, Schedule 80, End Condition to be Butt Weld or BW, Class Name to be PCAP as previous.
1. Click ‘‘ + ’’ button to adding a new row.
2. Enter the valve of pipe cap data by pick - list in each fields. 1
2
Then preview it, and notice that it will link the ANSI-ASME catalog file for the size of 2 to 16 inches. Then uncheck the Preview.
Turn on ‘‘ Preview ’’ status.
Now we will add the next component. Please duplicate the row of 1/2 to 1+1/2 inches.
1. Turn off ‘‘ Preview ’’ status. 2
2. Click in front of the Pipe cap’s row at range 1/2 to 1+1/2 .
3 3. Next to at the same position,
then pressing right - click to 1 Select ‘‘ Duplicate ’’ command.
The component that we will add now is Full Coupling, or simply called Coupling.
Change component type from PCAP to COUPLING.
34

w w w . sol i dpl a n t3 d . c om
Then preview it, and we will see its records.
Turn on ‘‘ Preview ’’ status.
Next, duplicate the Coupling row that we have just added.
1. Turn off ‘‘ Preview ’’ status.
2 2. Click in front of the Coupling’s
row at range 1/2 to 1+1/2 .
3 3. Next to at the same position,
then pressing right - click to 1 Select ‘‘ Duplicate ’’ command.
Then select Half Coupling for Class Name.
Change component type from Coupling to HALF_COUPLING .
Then preview it to see the records for Half Coupling.
Turn on ‘‘ Preview ’’ status.
35

w w w . sol i dpl a n t3 d . c om
Next is Screwed Cap. Please select and duplicate the first PCAP row.
1. Turn off ‘‘ Preview ’’ status. 2
2. Click in front of the Pipe cap’s row at range 1/2 to 1+1/2 . 3
3. Next to at the same position, 1 then pressing right - click to Select ‘‘ Duplicate ’’ command.
Then change the type of end condition from SWF to SCF or Screwed Cap.
Change the end type from SWF to SCF .
Then preview it to see that its type has become Screwed Cap as we want. That is the end condition will be SCF. And that was how to add Miscellaneous or Misc table.
Turn on ‘‘ Preview ’’ status.
Chapter 3-8 Flanges Table Next, we will add Flange table. First we will look in the spec sheet to see the size ranges and types of this
component. Now look at Flange. As for the range of 1/2 to 1 1/2 inches, its rating is 600 lbs. It is Socket Weld (SW ), and its face is Raised Face (RF). Another row is for the range 2 to 16 inches. Its type is WN, which is Weld Neck Flange. And please see that there is a row for the same size of 1/2 to 1 1/2 inches, but its type is Long Weld Neck (LWN). This is a special part, specially made for Weld Neck Flange.
This is flange data to create in FLANGE table.
36

w w w . sol i dpl a n t3 d . c om
Now we will go to Spec Creator to add Weld Neck Flange table. Please go the Add New Table button, and click it.
2
1. Turn off ‘‘ Preview ’’ status.
2. Click ‘‘ Add New Table ’’ button. 1
Then the dialog will appear for us to choose Flange table, then click OK.
1. Next to click ‘‘ OK ’’ button. 2
2. Pick - list to choose ‘‘ FLANGE ’’ table.
1
After that we will set its data according to the data we see in the spec sheet. We will start from setting Main Size, which is from 1/2 to 1+1/2 inches, and Rating to be 600 lbs, Facing to be Raised Face (RF), Class Name to be Socket Weld Flange (FLANGE_SW ), and Material Grade to be A105.
Enter the valve of Socket Weld Flange data by Pick - list in each fields.
Then preview it to see that after we have set the filter, we will get the records ranging from 1/2 to 1 1/2 inches for this Socket Weld Flange.
Turn on ‘‘ Preview ’’ status.
37

w w w . sol i dpl a n t3 d . c om
Next, we will set the next row by starting from clicking plus-sign button to add a new row.
1. Turn once ‘‘ + ’’ button to adding a new row. 2
2. Click ‘‘ Add New Table ’’ button.
1
Then we will set the Main Size to be from 2 to 16 inches, Rating to be 600 lbs as previous, Facing also to be RF or
Raised Face as previous, Class Name or Component Type to be Weld Neck Flange or FLANGE_WNK, and Material Grade to be the same, which is A105.
Enter the value of Weld Neck Flange data by Pick - list in each fields.
Then preview it to see the records ranging from 2 to 16 inches, and check their data.
Turn on ‘‘ Preview ’’ status.
Next will be Long Weld Neck Flange. As said before, Long Weld Neck Flange is a special part that we will add later in the customized part of catalog.
And we will add another one, which is Blind Flange. Here we will duplicate from the row of 2 to 16 inches by
selecting the row and click duplicate row here.
2 1. Turn off ‘‘ Preview ’’ status.
2. Click in front of Weld Neck Flange’s
row at range 2 to 16 . 3
3. Click ‘‘ Duplicate Row ’’ button. 1
38

w w w . sol i dpl a n t3 d . c om
Then change Min Main Size to 1/2 inches, and change Class Name to Blind Flange (BLD).
Change Corponent type from FLANGE_WNK to FLANGE_BLD.
Then preview it to see the records for 1/2 to 16 inches for Blind Flange. And these are how to set Flange table.
Turn on ‘‘ Preview ’’ status.
Chapter 3-9 Valves Table Next we will add Valve table. First we will look at the valve group that we will add. Starting from Gate Valve, there
are 3 rows that we have to set in the filter. The first row is for the size of 1/2 to 1 1/2 inches. This is 800-lb Class, and has Socket Weld End. The second row is for the size of 1/2 to 1 1/2 inches. This is 600-lb Class, and has Raised Face End. The third row is for the size of 2 to 16 inches. This is 600-lb Class, and has Raised Face End too.
This is Pipe Valve data to create in valve table.
Now we will switch back to the Spec Creator. First, as a basic step, we will add catalog for valve. Please go to Add Catalog, and click it.
2
1. Turn off ‘‘ Preview ’’ status.
2. Click ‘‘ Add Catalog ’’ button. 1
39

w w w . sol i dpl a n t3 d . c om
Then click the Add button here.
Click ‘‘ Add... ’’ button.
And then choose the catalog file for valve------this one, and click Open, then OK.
1 1. Choose‘‘ VALVE ’’ catalog file .
2. Next to Click ‘‘ Open ’’ button.
2
Now we are ready to add Valve table. Click Add New Table button, then choose the table named Valve, and click OK.
1. Pick - list to select ‘‘ VALVE ’’ table .
2 2. Click ‘‘ OK ’’ button.
1
We will start to set the row for Gate Valve. We will set Main Size to be from 1/2 to 1 1/2 inches, Rating to be 800 lbs, End Condition to be SWF, and Class Name to be Gate Valve.
Enter the valve of valve data at range 1/2 to 1+1/2 Pick - list in each fields .
Then preview it. We will get records for Gate Valve in the Class Rating of 800 lbs.
Turn on ‘‘ Preview ’’ status.
40

w w w . sol i dpl a n t3 d . c om
3
Next, as for the second row, it is also Gate Valve. We can select the first row and duplicate it. … Take the preview out first.
1. Turn off ‘‘ Preview ’’ status.
2. Click in front of Cate Valve’s 2 row at range 1/2 to 1+1/2 .
3. Next to at the same position,
then pressing right - click to Select ‘‘ Duplicate ’’ command.
1
In the second, duplicated row, we will disable the status End Condition to be blank for now.
Remove the value in End Cond field column is black.
And choose 600 lbs for Class Rating. And for Facing, select RF.
1. Change the valve pressure rating from 800LB to 600LB.
2. Next to Pick - list to choose the
facing type is RF. 1 2
Then preview it. Please notice that it shows 3 records for each size. So we have to control it to show only one record for each size. Here we will see the difference in the field column called Catalog. We will see that, in fact, as from the spec sheet that we have looked, this one refers to ASME B16.10 code, which is this one. Now we will add field column called Catalog. In the same way, please click at Column Editor button.
2 1. Turn on ‘‘ Preview ’’ status.
2. Click ‘‘ Column Editor ’’ button.
1

w w w . sol i dpl a n t3 d . c om
Then scroll down to find Catalog, and click this button to add, and then click OK.
1 1
2
2
1. Change ‘‘ CATALOG ’’ field column.
2. Next to click ‘‘ >> ’’ button to adding field column.
1. This is ‘‘ CATALOG ’’ field column that will available.
2. Click ‘‘ OK ’’ button.
Now go to Catalog filter, and select ASME/ANSI B16.10. When finished.
Pick - list to select ‘‘ ASME/ANSI B16.10 ’’ in ‘‘ CATALOG ’’ field column.
Then preview it to see that we have got one record for each size.
Turn on ‘‘ Preview ’’ status.
However, as for the size of 1+1/2 inches, please notice that there is still more than one record for each size. So we have to find the difference. We might look at the short description column, and we can see that there is a difference between names, which are ‘‘SHORT_DESC’’ gate valve, and ‘‘conduit gate valve’’. For both of these, if we scroll to the typical field COMP_LEN, please see that comp length is the length of this valve, which, in reality, we may have to open it with the typical of the valve we are using in order to see how close they are, or choose which one we will use. Set the filter using that one.
42

w w w . sol i dpl a n t3 d . c om
Here we will use the conduit one. That means we will add the column called SHORT_DESC. Please go to Column
Editor, and click it.
Click ‘‘ Column Editor... ’’ button.
Then scroll to select SHORT_DESC, and click this button to add it, and click OK.
1. Choose‘‘ SHORT DESC ’’ field column. 1
2. Next to click ‘‘ >> ’’ button to adding field column.
2
1. This is ‘‘ SHORT DESC ’’ field column that will available.
2. Click ‘‘ OK ’’ button. 1
2
Now we can set filter, and we will use Conduit Gate Valve.
Pick - list to select ‘‘ CONDUIT GATE VALVE ’’.
Then preview again. And now we get one record for each size. Close the preview for now.
Turn on ‘‘ Preview ’’ status.
43

w w w . sol i dpl a n t3 d . c om
Next we will add the row for the size range of 2 to 16 inches. As previous, Class Rating is set to be 600 lbs. Facing
is RF. Class Name is Gate Valve.
1. In the new row then enter the valve of Gate Value at rang 2 to 16.
1 2. Turn on ‘‘ Preview ’’ status. 2
And for the catalog, we will use ASME/ANSI B16.10 too. So please set them accordingly. Then preview again.
Pick - list to choose ‘‘ ASME/ANSI B16.10 ’’.
Then preliminarily preview it, and please notice that there is more than one record for each size. Now look at the name in the field column of Short Desc, and we will use the Conduit one as in here, and we can see that it now shows one records for each size.
Pick - list to choose ‘‘ CONDUIT GATE VALVE ’’.
Next we will look at Globe Valve. We will see that there are also 3 rows. The first one is for the size of 1/2 to 1 /12 inches. This is 800-lb Class, and has Socket Weld End. The second one is also for the size of 1/2 to 1 /12 inches. But this is 600-lb Class, and has RF End. And the third one is for the size of 2 to 4 inches, 600-lb Class, and RF End.
This is Globe Valve data to create in valve table.
Now please look at Spec Creator. We will add a row. Please see that we now have Gate Valve rows. So we can duplicate from the row of the size 1/2 to 1 1/2 inches by selecting the row and then click Duplicate Row button.
1. Click in front of Cate Valve’s
row at range 1/2 to 1+1/2 . 1 2. Next to click‘‘ Duplicate Row ’’
button.
2 44

w w w . sol i dpl a n t3 d . c om
Then change the Class Name to Globe Valve. And do not forget to preview it to see if it correctly shows the right
value for the sizes ranging from 1/2 to 1 1/2 inches.
1. Enter the Value of Valve data at range 1/2 to 1+1/2 by Pick - list in ench fields . 1
2. Next to turn on ‘‘ Preview ’’ status. 2
Next is the second range, which is from 1/2 to 1 1/2 inches with 600 lbs Rating and RF End. Here select the second row of Gate Valve, and duplicate the row.
1. Turn off ‘‘ Preview ’’ status. 2
2. Click in front of Cate Valve’s row at range 1/2 to 1+1/2 .
3 3. Next to click ‘‘ Duplicate Row ’’
button. 1
At this point, we may disable the status of the filter that we have set for Gate Valve.
Remove the valve is blank both ‘‘ CATALOG ’’ and ‘‘ SHORT_DESC ‘‘ field column.
Then go to Class Name, and choose Globe for it. And then preview it to see how the result is. We can see that the records for Globe Valve will be shown.
1. Change component type from ‘‘ VALVE_GETE ’’ to ‘‘ VALVE_GLOBE ’’.
1 2. Next to click ‘‘ Preview ’’ status.
2
Please notice that there is more than record for each size. We can look in the details to see why. For instance, look in the field column of Weight Dry, and we will find different values. On the other hand, in the column of Comp_Len, some values are the same. Here we can disable the unwanted records and values. For example, in the front of Item Code, we can click to instantly disable them in order to have only one record for each size.
Next, we will duplicate the row of 2 to 16 inches Gate Valve by selecting the row then click Duplicate Row button.
1. Turn off ‘‘ Preview ’’ status. 2
2. Click in front of the Cate Valve’s row at range 2 to 16 .
3 3. Next to click ‘‘ Duplicate Row ’’
button. 1
45

w w w . sol i dpl a n t3 d . c om
After that, please disable the current values of Gate Valve in the Catalog and Short Desc columns. If we do not
disable them, we will not see the right values of Globe Valve because they will not be shown. Now choose Globe Valve for the Class Name. The range of Globe Valve is from 2 to 4 inches, so change the Max size to 4. Then preview it, and we will see that there is more than one record for each size.
1. Remove the valve is blank both
‘‘ CATALOG ’’ and ‘‘ SHORT_DESC ’’ field column.
2. Change component type from
VALVE_GATE to VALVE_GLOBE. 1 2 3
3. Turn on ‘‘ Preview ’’ status.
We can see in the Catalog Column that in fact this Globe Valve use B16.10 code, so we will use the almost-similar code of B16.34. Now go to Catalog column in the table above, and select ASME/ANSI B16.34. When finished, preview it again. Now there is one record for each size.
Pick - list to choose ‘‘ ASME/ANSI B16.34 ’’.
Next, we will look at Check Valve table. For Check Valve, there are 2 rows that we have to set. The first one is for the size of 1/2 to 1 1/2 inches, 800 lbs, and Socket Weld. The other row is for the size of 2 to 16 inches, 600 lbs, and RF.
This is the Check Valve data to create in valve table.
Now we will return to Spec Creator. Please add a row.
1. Turn off ‘‘ Preview ’’ status.
2. Click once ‘‘ + ’’ button to 2 adding the new row .
1
46

w w w . sol i dpl a n t3 d . c om
Then set the size to be from 1/2 to 1 1/2 inches, Rating to be 800 lbs, End Condition to be SWF, and Class Name
to be Check Valve. When finished, preview it, and we will a record for each size. Notice in the catalog that we use VELAN, so we can set the Catalog column in the table above to be VELAN.
1. Enter the Valve of Check Value data at range 1/2 to 1+1/2 by Pick - list in ench fields .
1 2. Next to turn on ‘‘ Preview ’’ status. 2
Next, for the second row, we will set the size to be 2 to 16 inches, Class Rating to be 600 lbs, Facing to be RF, and Class Name to be Check Valve. Then preview it, and we will see that there are many records for each size. Notice in the catalog, and we may also see the details in each one.
1 2
1. Click once ‘‘ + ’’ button toadding the new row.
2. Next to enter the Value of Check Valve data
range 2 to 6 by Pick - list in each fields. .
In fact, for the range of 2 to 16 inches, we will use the Swing type. We will use 2 filters using 2 field columns, which are Short Description and Catalog to control values. Now, return to the row of our filter. For the Catalog, we will use ASME/ANSI B16.10.
Pick - list to choose ‘‘ ASME/ANSI B16.10 ’’.
And for the Short Desc, we will use Swing Check Valve.
Pick - list to choose ‘‘ SWING CHECK VALVE ’’.
47

w w w . sol i dpl a n t3 d . c om
Then click at the front to preview it. We will see that now it shows only one record for each size. And now we
already have all types of Valves.
Turn on ‘‘ Preview ’’ status.
Chapter 3-10 Fastener Table Next, we will add Fastener, which comprises Stud Bolt and Gasket. First, please look in our spec sheet. For Gasket,
we will use the size range from 1/2 to 16 inches. Material used is spiral wound. Class Rating is 600 lbs. It is RF. Thickness of the gasket is 4.5. For Stud Bolt, we will also use the size range from 1/2 to 16 inches. Material used is as in here. Class Rating is 600 lbs.
This is the Fastener data to create in Fastener table.
Now we will switch back to Spec Creator. We will add a table using the Add New Table button. Then select Fastener, and click OK.
1
1. Click ‘‘ Add New Table ’’ button.
2. Pick - list to choose ‘‘ FASTENER ’’ table . 3
3. Next to click ‘‘ OK ’’ button
2
The first row that we will set is Stud Bolt. We will start by setting the size to be from 1/2 to 16 inches, Class Rating to be 600 lbs, Facing to be RF, and Class Name to be Bolt. Then preliminarily preview it, and we will see that there are many records for each size.
1. Enter the Valve of the bolt data at range 1/2 to 16 by Pick - list in ench fields . 1
2. Turn on ‘‘ Preview ’’ status.
2
48

w w w . sol i dpl a n t3 d . c om
If we consider their difference, we will see that they are from different catalog files. And the catalog in which are referred are also different. Here we will add the catalog referring to ASTM A307. Now, we will add new column by going to Column Editor------this one, and click it.
Click ‘‘ Column Editor... ’’ button.
Then scroll down to select Catalog, and click >> button to add it, and click OK.
Choose ‘‘ CATALOG ’’ field column.
1. Click ‘‘ >> ’’ button to adding field column. 1
2. This is ‘‘ CATALOG ’’ field column that will available.
3. Next to click ‘‘ OK ’’ button. 2 3
After that, we will control data retrieval using ASTM A307. And then preview again to see that now it retrieves only one record for each size.
1. Pick - list to choose ‘‘ ASTM A307 ’’. 2 2. Next to turn on ‘‘ Preview ’’ status. 1
Then disable the preview. Next, select this row, and duplicate it by clicking Duplicate Row button.
1 1. Click in front of the Bolt data
range 1/2 to 16.
2. Next to click ‘‘ Duplicate Row ’’ 2 button.
49

w w w . sol i dpl a n t3 d . c om
As for now, we will delete the value of the Catalog column. And in the field column of Class Name, we will change
it to Gasket. Then preview it, and we will see that there are many records for each size as well.
1. Remove the valve is blank both ‘‘ CATALOG ’’.
2. Change component type from 3 BOLT to GASKET.
2 1 3. Next to Turn on ‘‘ Preview ’’ status.
Why? As said before, Gasket has thickness too. If we want to consider the thickness, go to the field column called Comp Length------this one. Now we will refer to it to find the record in this filter by using the value of 4.445 in the Comp_Len column.
Please note the valve of thickness that will have both 3.175 and 4.445.
Now we will go to Column Editor again, and click here. Then scroll down to select Comp Length, and click >> button to add it.
1
1. Click‘‘ Column Editor ’’ button.
2. Choose‘‘ COMP LEN ’’ field column.
2
1. Click ‘‘ >> ’’ button to adding field column.
1 2. This is ‘‘ COMP LEN ’’ field column
that will available. 2
3. Next to click ‘‘ OK ’’ button.
3
50

w w w . sol i dpl a n t3 d . c om
Next we will choose the value for record in Comp_Len by using 4.445. Then preview again, and we will see that now only one record is shown for each size by using the thickness of 4.445 as criteria. And that was how to set Fastener table.
1. Pick - list to choose ‘‘ 4.445 ’’. 2 1
2. Turn on ‘‘ Preview ’’ status.
Chapter 3-11 Olet Table Next, we will learn how to add Olet table. Olet components frequently used are Sockolet, and Weldolet, which
we will add in the table. First, please go to Add New Table button, and click it. Select Olet., then click OK.
1 1. Click‘‘ Add Catalog ’’ button.
2. Pick - list to select ‘‘ OLET ’’ table.
3. Final click ‘‘ OK ’’ button. 3
2
Now we will add the field column necessary for Olet, which is Branch. Go to Column Editor, find Branch Size, and click >> button to add it. We will see that there are 2 Branch Sizes, which are Min Branch Size and Max Branch Size. Then click OK.
1
1. Click‘‘ Column Editor ’’ button.
2. Choose‘‘ BRAN SIZE ’’ field column.
2
1. Click ‘‘ >> ’’ button to adding field column.
1 2. This is ‘‘ BRAN SIZE ’’ field column 2
that will available.
3. Next to click ‘‘ OK ’’ button.
3

w w w . sol i dpl a n t3 d . c om
Now we are ready to set it. First, we will add Sockolet. We will set Main Size to be from 2 to 16 inches, Rating
to be 3000 lbs, Class Name to be Sockolet, Min Branch Size to be 1/2 inches, and Max Branch Size to be 1+1/2 inches. Then preview it to see data for Sockolet. Scroll down to see on the left that the Main size is ranged from 2 to 16 inches, and the Branch Size is from 1/2 to 1 1/2 inches. Now disable the preview.
2 1. Enter the Valve of the Olet data 1
at range 2 to 16 by Pick - list in ench fields .
2. Turn on ‘‘ Preview ’’ status.
After that please select the row, and then click Duplicate Row to duplicate it.
1. Click in front of the sockolet’s row at range 2 to 16.
1 2. Next to click ‘‘ Duplicate Row ’’
button. 2
The next component is Weldolet. It is slightly different from Sockolet. We will not use Rating for Weldolet, but will use Schedule to control filter instead. Now please disable the status of Rating, and go to click Column Editor.
1. Remove the valve of
Pressure Rating is blank.
2. Next to click ‘‘ Column Editor ’’ 2 button.
1
We will add Schedule field, and click OK.
1. Add ‘‘ SCHEDULE ’’ field column is available.
2. Click ‘‘ OK ’’ button. 1
2
And then we will set the Class Name to be Weldolet, Schedule to be STD or Standard, then preview it. We will see that Main Size has appeared. And this is what we get for Weldolet.
1. Pick - list to choose ‘‘ STD ’’. 2 2. Turn on ‘‘ Previiew ’’ status. 1
52

w w w . sol i dpl a n t3 d . c om
Chapter 3-12 How to define a chart to display the status for branch fittings using Branch Editor Next, we will learn about Branch Editor. It is on the lower left. Please click it.
Click ‘‘ Branch Editor ’’ tab is active.
After that we will see a chart. The vertical part of it shows Main Size, and the horizontal part shows Branch Size. The chart shows the status of how the Main and Branch connect together. There are many types of connections. As from the right, there are codes for each type. For example, T for Straight Tee, TR for Reducing Tee, S for Stub-In, SOL for SocketOlet, and WOL for WeldOlet. We can see that now there are some codes in the chart. Please note that the codes shown here are from what we have set for fittings and components. It will get these data, and show them to us. So we can instantly use these data. However, for some branches, we may set more conditions for them. For instance, for the Main pipe of 4 inches to the Branch of 2 1/2 inches, we can see that TR or Reducing Tee is used. We can specify more codes. For example, we may connect to the branch using either Reducing Tee or Stud-In. This way, we can click Apply to table. Please see that for the Main Size of 4 inches reducing to 2 1/2 inches, the chart will show 2 codes to choose from. So this is useful for piping designers when creating models.
2
1. Click on the cell of Main Size 6x4. 1
2. Pick - list to choose ‘‘ s ’’ is the stab-in. 3
3. Next to click ‘‘ Apply to table ’’ button.
Chapter 3-13 How to add new record database in Catalog Editor Next is how to add a new record into our catalog. This is like adding a special part of component into our catalog
in order to use it in our spec later. For example, please look at the component called Long Boss. We will see that it uses the size of 1/2 to 1 1/2 inches, and Schedule 80. Next we will set our data according to this condition.
This is the Long Boss data to create in MISC table.
53

w w w . sol i dpl a n t3 d . c om
Please return to Spec Creator. Long Boss is in the Misc table.
Click the ‘‘ MISC ’’ tab is active.
Now, go to Class Editor, and click it. Please notice on the right that there is a component called Boss in this table. Then close the dialog.
1. Click ‘‘ Class Editoe ’’ button.
2. Please make sure that the BOSS 2 has deen selected. 1
3. Click ‘‘ Close ’’ button. 3
Now I will add a new row. Please notice that we cannot see the component called Boss in the list of Class Name field. The reason is that the catalog we use does not have this component.
So please go to Add Catalog button, and click it. We can see that now we have linked 4 catalogs. Then we will search for the component called Boss by clicking at Search button.
1
1. Click ‘‘ Add Catalog ’’ button.
2. Next to click ‘‘ Search ’’ button.
2
Then go to Column and select Class Name. Then in Value, type the word ‘‘Boss’’ to find it. When found, choose it,
and click Add Constraint in order to make it active, then click Search.
1. Pick - list to choose ‘‘ CLASS_NAME ’’. 1
2. Pick - list to select ‘‘ BOSS ’’. 2
3. Next to click ‘‘ Add Constrain ’’ button.
4. Fanal, click ‘‘ Search ’’ button. 3 4
54

w w w . sol i dpl a n t3 d . c om
Now Spec Creator has searched for the catalogs having Boss components, and found them. There are 3 catalogs,
which are JIS, Penn Forged, and Stainless Steel. Here we will use Penn Forged. Check in the front to select it, then click Add Selected button.
1
1. Tick the chech-box of PENN FORGED catalog. 2
2. Next to click ‘‘ Add Selected ’’.
Now it will be linked into the Catalog List. Click OK.
1. Please note that ‘‘ PENN FORGED ’’ catalog file has been linked. 1
2. Click ‘‘ OK ’’ button.
2
Next, click at the Class Name field column, and now we can see the component called Boss then select it.
Pick - list to choose ‘‘ BOSS ’’
After that we will set the size range to be from 1/2 to 1 1/2 inches. Then preview it, and we will see that there are many records for each size. If we look at their difference, we can see that they are different in terms of Class Ratings, which are both 3000 lbs and 6000lbs. Another difference is the End Conditions. One End can be either Screw or Socket Weld. The other End is only Butt Weld.
1 1. Pick - list to set the range of
BOSS at 1/2 to 1+1/2 .
2. Turn on ‘‘ Preview ’’ status. 2
55

w w w . sol i dpl a n t3 d . c om
If we look in our spec sheet, we will see that our Boss refers to Schedule 80. So here we may have to customize the
Penn Forged catalog to refer to Schedule.
The BOSS data will use the Sehedule 80.
Return to Spec Creator. Take the preview out, then go to Catalog Editor on the lower left and click it. After that, click open and select at Penn Forged catalog file, and click Open.
2 1. Click ‘‘ Catalog Editor ’’ tab is active.
2. then click ‘‘ Open ’’ button 3
3. Next to choose ‘‘ PENN FORGED ’’ catalog file. 1
4. Final, click ‘‘ Open ’’ button.
4
And go to a box called Table, and choose Misc. We will see various components in Misc table. We will see that there are a lot of records, and this is not convenient when selecting or working. Thus, our Spec Creator has Build Filter to be able to easily screen data we want to search. Now click at Build Filter.
Pick - list to select ‘‘ MISC ’’ table.
And the dialog Filter will appear. The left will be the fields that we can select and set. Certainly the first field that we will use is Class Name, so select it. Next, go below at Data Filter to choose Equal, and select the one we will use, which is Boss. After that scroll down to select Main Size. For the Data Filter of this one, we will choose Between, and choose the size from 1/2 to 1 1/2 inches. Then click >>> button in the middle to add it. Next, scroll down to select Rating. And go to Data Filter, choose Equal and then 3000 lbs. At this point, we can save the data we have set by clicking Save Filter button.
1 1. This is the Column’s name to
setup for control data record.
2 2. Click ‘‘ Save Filter ’’ button.
56

w w w . sol i dpl a n t3 d . c om
2
We can name our filter according to the conditions it relates, which is boss. Then click OK. And click Apply in this dialog.
1
2
1. Enter the name to save for this setup.
2. Next to click ‘‘ OK ’’ button .
Final, click ‘‘ OK ’’ button .
After that, go to Filter, and click to see the list. Now the name ‘‘boss’’ has appeared, so select it. Spec Creator will
screen and show only the data that we want.
Pick - list to choose ‘‘ Boss ’’
Here we can choose the records we want to modify in this catalog. The suggestion is that we should not change any default, but copy it instead. How to select or copy it is common, by pressing Shift to select the whole range, or pressing Control to select some rows we want. Now we want all the rows from the most upper to the lowest, so press Shift and select to the lowest. The rows will be highlighted. Then put cursor on here, and right-click on the mouse, and choose Copy.
1 1. Select all record by pressing shift to
choose the whole range..
2. Then pressing right - click to copy for the records selected.
When finished, then right-click on the mouse again. Please notice that it will highlight the newly pasted rows. Now we can modify data to be our own.
Then right - click to Paste for the new range records.
For example, we want to change it to be our own catalog. We will input the name of catalog to be our own. First double-click in the box, and type the name ‘‘SOLIDPLANT’’. Then press Shift and choose from SOLIDPLANT to the lowest PENN FORGED. Press and hold Control, then release it and press enter. They will change from PENN FORGED to SOLIDPLANT.
Change the name from PENN FORGED to SOLIDPLANT.
57

w w w . sol i dpl a n t3 d . c om
After that, scroll to the right. We will change 3000 lbs Rating in the same way. Press Shift and select the last one.
Then press Control, and delete the data, then press enter. The data will be deleted.
Remove the value of Pressure Rating is blank.
Next, scroll right to field column called Schedule. Input the data in the same way. Select here by pressing Shift, and click at the first one then double-click it to input ‘‘80’’, and then press enter. These are how to change details.
Enter the valve of ‘‘ SCHEDULE ’’ is 80.
When finished, click at the Save button on the upper left. Now it is already saved. Click OK.
1. Click ‘‘ Save ’’ button. 1
2. Final, then click ‘‘ OK ’’.
2
Next click Spec Editor on the left below. And click at Class Name, and select Boss. We will set the size range to be from 1/2 to 1 1/2 inches, and Schedule to be 80. Please notice that Schedule now appears. Then preview it to see that the Boss data is linked to use here.
1. Click ‘‘ Spec Editor ’’ tab is active.
2. Next to pick - list to choose ‘‘ 80 ’’. 2
3. Final, then turn on ‘‘ Preview ’’ status. 3
1
58

w w w . sol i dpl a n t3 d . c om
Chapter 3-14 Print check for report After we have finished creating components in the tables, in order to check that everything we have set is correct,
we have a feature to be used in verifying it. This feature is called Print Preview. Look on the left to find the Print Preview button, and click it. Instantly.
Click ‘‘ Print Preview ’’ button.
Then the SelectHeader dialog will appear for us to set the template we want. First, the left will be all the data in our database. And the right will be the fields we choose to show in the report. We can set it to have the required format. For example, set it to be ‘‘new1’’.
Enter the name format for Item Configuration.
Please notice that we already have fields in the left. As an example, if we want to get a field in the left, such as Short Desc, to be in the template, just double-click it. It will then appear in the right. However, if we do not want Short Desc in the right, double-click it and it will be gone. Or for the Piece Mark, we can also double-click it out.
2
1. This is the field colimn databass is available.
2. This is Field column that
will appear in template 1 for Print Preview.
Then save this template ‘‘new1’’ by using Save Configuration. And then click OK.
1. Click ‘‘ Save Configuration ’’ button.
2. Final, then click ‘‘ OK ’’
button. 2
1
59

w w w . sol i dpl a n t3 d . c om
Suddenly, the Print Preview dialog will pop up to show us that there are field columns called No., Main Size, and
Description as we have set. At this point, we can preview by clicking Print Preview button on the right.
Click ‘‘ Print Preview ’’ button.
Then expand it. We will see the preview before printing. We can print it by using Print command on the left, or we can set pages as needed using Page Settings, or we can zoom using Zoom command on the right. This is how to preview to see its format. We will see that the format may not look nice now. So click here to close it, and return to set it again.
2 1. This is print funetion system . 1
2. Click ‘‘ Close ’’ button the Print
Preview Templats.
We can set it to automatically fit the paper by checking the Auto Fit box. We may also adjust the field widths to look better. Then print preview again. Now change zoom scale to get larger view. We can see that the format is as what we have set. Then close the preview. We can change colors to highlight words. To do this, click the row we want, and select the range by clicking Shift. Now go to Add color button, and double-click at the color next to it, then select the color we want and click OK. And click Add color. We can see that the color is now changed to red.
If we want to input properties for this spec class, click Properties button, and input the data as we want. For example, Company is SolidPlant, and Project Name is SolidPlant Training.
3
1. Click ‘‘ Properties ’’ button.
1 2. Enter the valve of project Properties.
3. Final, then click ‘‘ Print Preview ’’ button.
2 60

w w w . sol i dpl a n t3 d . c om
Now preview it again by clicking at Print Preview button. Then expand and zoom it. We will get detailed data for this spec class as we have input, as well as the color highlight as we have set. This is very useful for checking the spec we have created.
Chapter 4 Project Initial Data Setup
Chapter 4-1 Project Initial Data Setup In the next chapter, we will learn how to set up initial data for a project. It is about general principles of plant
design. In fact, we will start from the concept of frontend. This begins from designing in the systems and processes of plant to see that what are necessary to be used in the systems of our plant.
In this part, plant design will begin with diagram drawing. This may start from the equipment layout diagram.
After equipment layout is done, the process flow will be roughly determined. The frontend design, which does not have much detail, is, at this point, called PFD, or Process Flow Diagram. However, after the next design level, there may be more details. For instance, in our process line, we might include valves, control valves, and instruments.
In this part, our SolidPlant does not have tools to manage. However, we can get the data that already are P&ID into our system. We have tools to facilitate the data import for users. Next, we will learn in details how to import data into the system.
61

w w w . sol i dpl a n t3 d . c om
Chapter 4-2 Introduction to concept of P&ID data import
Next, we will look at an example of P&ID Drawing to see how it looks in the form of Process & instrument Diagram, as well as the related data import. The picture we are seeing now is called P&ID Drawing, which shows process details. First, we will see that there are equipments such as tank, pumps, two heat exchangers, and one tower, to be used in this training. There are process lines starting from above. The upper lines are the process lines of pipe that crosses the Pipe Rack. Out from those lines, there are also pipes going out to connect equipments. The details, such as size, spec, service, and tag number, will be specified. In the process, there are also details about equipments and instruments being used, which are necessary in 3D design. And this is Process & instrument Diagram. But if we want it in the format of data as seen from this drawing, I will show it to you.
After we have designed and created P&ID Drawing using software, various data can be reported from it. We will
see which data they are. Please notice that they are exported in the form of Excel file. Look at the data we need to use in the worksheets. The first one I will introduce is Line List. Look at the first column, which is Tag. In the tag, there are all the details including size, spec, service, and tag number. It will show details and Line Number. Please see that it shows details about lines. As from the details, it shows where and which equipment this line starts from and to. All the details will be shown. Please scroll to see details on the right. There are details about size, service, and pipe spec name.
Click ‘‘ Line List ’’ worksheets.
Next, the second worksheet we use is called Equipment List. This will show details about Tags of equipments. The details include full name of equipments and tags.
Click ‘‘ Equipment List ’’ worksheets.
Next is Valve list. This shows list of valves in details. As from the details, it shows type and size of valve, as well as on which line number each valve is located. All related details will be shown.
Click ‘‘ Valve List ’’ worksheets.
62

w w w . sol i dpl a n t3 d . c om
Next, look at Instrument list. These are tags of instruments used in the drawing. We can take these data for use as well.
Click ‘‘ Instrument List ’’ worksheets.
Next, as for the Nozzle List, we can also take its data for use.
Click ‘‘ Nozzle List ’’ worksheets.
And it is the same for Control Valve List.
Click ‘‘ Control Valve List ’’ worksheets.
Basically, we can get the data from Excel into the system. In the next topic, we will learn how to do this.
63

w w w . sol i dpl a n t3 d . c om
Chapter 4-3 To import P&ID data into SolidPlant project system by TAG Manager Next, we will learn how to import P&ID data into SolidPlant project by using tool called Tag Manager. As for Tag
Manager, we can select it from the feature in Ribbon. First, click at SolidPlant Ribbon, and we will see a feature called Tag Manager. We can select it here.
2 1. Click ‘‘ SolidPlant ’’ ribbon.
1 2. Click ‘‘ Tag Manager ’’ feature.
Or by the other way, we can click at SolidPlant Project Manager here. After that we will see Tag Manager toolbar under the Document List section, and we can use it.
Select ‘‘ Tag Manager ’’ button.
Chapter 4-4 Process Line List Next, we will start to import the first data, which is Process Line List. Before doing that, please check data under
the Document List. Look at Pipe Routing, and please see that there is no any data in it now. Now please select Tag Manager. The Tag Manager dialog will appear. The command that we will use from this toolbar is called Import Tag. But before importing tag, please check the to-be-inserted component type that we want to see its data here, to determine which one it will be imported into. Certainly, the first one is Pipe Routing. Then click to select Import Tag.
1. Picklist to choose the component type 2 as ‘‘ pipe Routing ’’.
2. Next, click ‘‘ Import Tag ‘‘.
1
64

w w w . sol i dpl a n t3 d . c om
2
After that, a dialog will appear for us to choose file which we want to import. The file extension is xls, which is an
Excel file. Please go to Dataset folder.
Choose folder ‘‘ Dataset Training ’’.
We will see an Excel file that is the report of P&ID data. We can preview this file here by selecting at the filename. And we will see the preview of various worksheets, such as Valve List, Nozzle List, Line List, Instrument List, Control Valve List, and Equipment List. First, look at the Line List. There are details as we can see here, such as Tag, Line Number, and From-To. From-To specifies source and destination of the process for us to know which equipments each line connects to.
1. Choose ‘‘ P&ID Reports.xls .
2. Click ‘‘ Open ‘‘ button . 1
2
Now click Open. The dialog will pop up to confirm our tag import from Excel. And certainly, we will choose Pipe Routing as Component Type. Then choose Line List for Excel Worksheet. Click OK.
1 1. Choose ‘‘ Line List ’’ Excel Worksheet.
2. Click ‘‘ OK ’’ botton.
65

w w w . sol i dpl a n t3 d . c om
Dialog will suddenly pop up. We have to map data for each field in the project. … Here are fields of data in the project, which are Tag, Description, Service, Spec, Main Size, Insulation Thickness, From Equipment, and we can scroll to see more, To Equipment, Material, Schedule, and Rating. The second row is for fields from worksheets that will be mapped. We will try doing it. Here I will choose Line Number for Tag, Tag for Description, Service, Spec, Size, Insulation Thickness, From, To, Material, and Schedule.
1. Choose ‘‘ Line number ’’.
2. Choose ‘‘ Tag ’’ .
3. Choose ‘‘ Service ’’ .
4. Choose ‘‘ Spec ’’ .
5. Choose ‘‘ Size ’’ .
6. Choose ‘‘ Insulation Thickness ’’ .
1 2 3 4 5 6
These are what we can select and set. Here we can add more fields by clicking at Edit Column on the lower right.
1. Choose ‘‘ From ’’.
2. Choose ‘‘ To ’’ . 1 2
3. Click ‘‘ Edit column ’’ button.
3
The dialog of Column Editor will appear, and we can input data that we want to add. For example, if we want to input Drawing, we can type ‘‘DWG_Name’’ here. The column names cannot have space, so we will use underscore when space is needed. When finished, click OK.
1. Click and Write ‘‘ DWG_Name ’’.
2. Click ‘‘ OK ’’ button. 1 2
66

w w w . sol i dpl a n t3 d . c om
Now we have just created a new column, and then we can map data. As for this point, please check and click OK.
1. Choose ‘‘ DWG_Name ’’. 1
2. Click ‘‘ OK ’’ button.
2
After that it will return to the dialog of Tag Manager. We will see line numbers, and other data we have imported in here. When done, click Close button.
Click ‘‘ Close ’’ button.
And we can see that now we have tags of line numbers here. If these data are not updated, we can click Refresh Tag to update them. Then put mouse over each of them to expand and see its data. We will see data in group item of Pipe Routing.
Click ‘‘ Refresh Tag ’’ button.
Chapter 4-5 Equipment List Next is the topic of P&ID data import for Equipment List. Please look at the right panel, and we will see now there
are no data in group item of Equipment. We will import it. In the same way, select Tag Manager and click it.
Choose ‘‘ Tag Manager ’’ feature.
67

w w w . sol i dpl a n t3 d . c om
Then expand the popped-up dialog of Tag Manager. As from Component Type picklist, change it to Equipment.
Please notice that now there is no data of Equipment. Then click at Import Tag toolbar.
1. Picklist to choose the 2 component type as ‘‘ Equipment ’’.
2. Next, Click ‘‘ Import Tag ’’. 1
And go to the folders of Desktop and then Dataset Training. Select the Excel file, and look on the right to see inside the worksheet of Equipment List. These are data tag of equipments, which we will import. Now click Open button.
1. Choose file name ‘‘ P&ID Reports.xls ’’.
2. Click ’’ Open ‘‘ button. 1
2
In the dialog, choose Component Type to be Equipment, and change Excel Worksheet to be Equipment List. Then click OK.
1. Choose Component Type ‘‘ Equipment ’’. 1
2. Choose Excel Worksheet to ’’ Equitpment List ‘‘. 2
Now we will map between system fields and worksheet fields. Here we will choose Tag for Tag field, Description for Description field, and Type, Insulation, and Location to be specified if any. And that would be enough, so click OK.
1. Choose ‘‘ Tag ’’.
2. Choose ‘‘ Description ’’ . 3
3. Click ‘‘ OK ’’ button. 1 2
68

w w w . sol i dpl a n t3 d . c om
We can see that it has already imported Tags of Equipments into the system. Then click Close button.
Click ‘‘ Close ’’ button.
Please check in the group item of Equipment, and we can see that tags are already imported. At this point, if tags are not updated, we can click Refresh Tag button to update them.
Click ‘‘ Refresh ’’ button.
Chapter 4-6 Valve List Next, we will learn how to import P&ID data for Valve List.
This is the ‘‘ valve ’’ item data.
Now go to Tag Manager, and click it. Slightly expand the dialog. Then go to Component Type picklist, and change to Valve.
1. Click ‘‘ Tag Manager ’’ feature. 2
2. Picklist to choose the
Component Type ‘‘ Valve ’’ 1
69
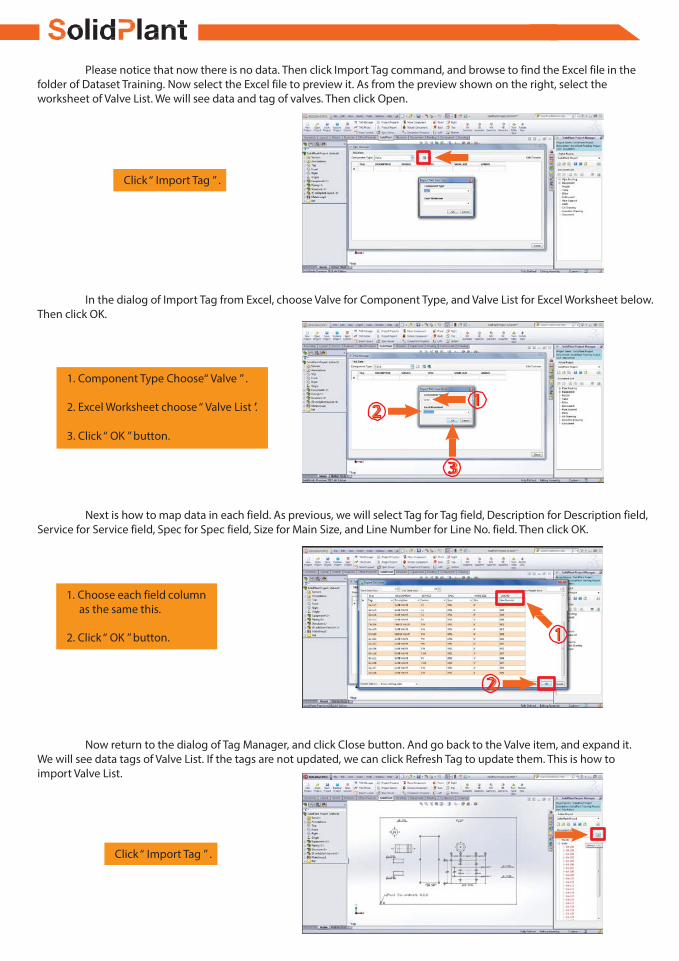
w w w . sol i dpl a n t3 d . c om
Please notice that now there is no data. Then click Import Tag command, and browse to find the Excel file in the folder of Dataset Training. Now select the Excel file to preview it. As from the preview shown on the right, select the worksheet of Valve List. We will see data and tag of valves. Then click Open.
Click ‘‘ Import Tag ’’ .
In the dialog of Import Tag from Excel, choose Valve for Component Type, and Valve List for Excel Worksheet below. Then click OK.
1. Component Type Choose‘‘ Valve ’’ .
2. Excel Worksheet choose ‘‘ Valve List ’’. 2 1
3. Click ‘‘ OK ’’ button.
3
Next is how to map data in each field. As previous, we will select Tag for Tag field, Description for Description field, Service for Service field, Spec for Spec field, Size for Main Size, and Line Number for Line No. field. Then click OK.
1. Choose each field column as the same this.
2. Click ‘‘ OK ’’ button. 1
2
Now return to the dialog of Tag Manager, and click Close button. And go back to the Valve item, and expand it. We will see data tags of Valve List. If the tags are not updated, we can click Refresh Tag to update them. This is how to import Valve List.
Click ‘‘ Import Tag ’’ .
70

w w w . sol i dpl a n t3 d . c om
Chapter 4-7 Instrument Index Next we will learn how to import data of Instrument List. To do that, click Tag Manager command here.
Click ‘‘ Tag Manager ’’ feature .
Then change Component Type to be Instrument. Notice that now there is no data. Then click Import Tag button.
1. Click ‘‘ Import Tag ’’.
2. Select Component Type 2 to ‘‘ Instrument ’’.
1
In the dialog, browse for the Excel file in the Dataset Training folder, and select the file. Its preview will be shown. Now select the worksheet of Instrument List to check its data. Then click open.
1. Select Excel file in Dataset Training folder .
2. Click ‘‘ Instrument List ’’
worksheet to Preview.
3. Click ‘‘ Open ’’ button.
1
2 3
This dialog is to confirm data mapping between Component Type and Excel Worksheet. And certainly, here we will choose Instrument List for Excel Worksheet. Then click OK.
1. Component Type choose 1 ‘‘ Instrument ’’ .
2. Excel worksheet choose
‘‘ Instrument List ’’ . 2 3. Click ‘‘ OK ’’ button.
3
71

w w w . sol i dpl a n t3 d . c om
Now we will map the fields above. We will select Tag for Tag field, Description for Description field, Type to be specified if any, Service for Service field, and Spec for Spec field. Scroll or expand the dialog to see more. And select Size for Main Size filed, and Line Number for Line No. field. When done, click OK.
1. Choose each fild columns as the same this.
2. Click ‘‘ OK ’’ button. 1
2
We can now see the data in the table. And then click Close.
Click ‘‘ Close ’’ button.
Please notice that now we can see data tag of Instrument. If the tags are not updated, we can click Refresh Tag to update them, and we will see the most updated ones. And this is how to import Instrument List.
Click ‘‘ Refresh Tag ’’ feature.
Chapter 4-8 Nozzle List Next, we will import the data of Nozzle List. Please notice that now there is no data in the Nozzle item. We will
click at Tag Manager.
1. This is the ‘‘ Nozzle ’’ item data. 1
2. Click ‘‘ Tag Manager ’’ feature.
2
72

w w w . sol i dpl a n t3 d . c om
After that, change the Component Type to Nozzle. Now there is no data in the table. Then click at Import Tag.
1. Select Component Type to ‘‘ Nozzle ’’.
2 2. Click ‘‘ Import Tag ’’. 1
And browse in Desktop folder and then Dataset Training to select the Excel file called P&ID Reports. The preview of the file will be shown on the right. Click Nozzle List worksheet to see its data. Then click Open below.
1. Browse ‘‘ P&ID Reports.xls ’’ in ‘‘ Dataset Training ’’.
2. Click ‘‘ Nozzle List ’’
worksheet to Preview. 1 3. Click ‘‘ OK ’’ button. 3
2
This dialog is to confirm data mapping. Certainly, the Component Type is Nozzle. And we will choose Nozzle List for Excel Worksheet. Then click OK.
1. Component Type Choose ‘‘ Nozzle ’’.
1 2. Excel worksheet
choose ‘‘ Nozzle List ’’.
3. Click ‘‘ OK ’’ button. 2 3
After that we will map fields. We will select Tag for Tag field, Service for Service field, Spec for Spec field, Size for Main Size field, Equipment Tag for Equipment field, and Line Number for Line No. field. Then click OK.
1. Choose each field column as the same this.
2. Click ‘‘ OK ’’ button.
2 1
73

w w w . sol i dpl a n t3 d . c om
We then get the Nozzle data in to the table. Then click Close.
Click ‘‘ Close ’’ button.
Chapter 4-9 Input specified data directly In the next topic, as for the case that
we do not have P&ID data, we can manually input data from users. Let’s see how to do it. First, we will check Pipe Routing, and add a line into it. Please go to Tag Manager, and click it.
Click ‘‘ Tag Manager ’’ feature.
Notice that there are current data for Pipe Routing. Now, look at this toolbar called Create Tag. We can add more tags for every 2 Component Type. As for Pipe Routing, click at Create Tag.
1. Picklist to choose 1
‘‘ Pipe Routing ’’.
2. Click ‘‘ Create Tag ’’.
Suddenly, the dialog of Create Tag will appear for Group of Pipe Routing. We can input new data in it, such as L1001 for Tag. We can also input data for Description, for example Process water. As for Service, we can select from the list and instantly input data that we want. As for Spec, we can choose from the names of pipe spec that we have. And we can choose the size we want, such as 6 inches. As for ‘‘Color by’’ below, we can set color according to criteria we want. For example, if we want to set color according to service, select Service here and the color will change according to service type. And if we set color according to Nominal Diameter, each size will have its own color. If Custom is selected here, the color will be as it has been set by users. For example, when users design 3D pipe routing, the color blue may be used for all water systems, and the color red may be used for high-pressure systems. And the color can be change by clicking at Color Preview here. For instance, to change to color yellow, click at the color yellow, then click OK. The color will change accordingly. When done, click Create button, and then click Close on this dialog.
1 1. Enter each data as the sam this. 2. Picklist to choose ‘‘ custom ’’
the color component .
3. Double-click to define the color . 2 3 5
4. Click ‘‘ Create ’’ button . 5. Finally, Click ‘‘ Close ’’ button . 4
74

w w w . sol i dpl a n t3 d . c om
Now we can see below that there is a new line number of L1001 as well as data that we have manually set.
1 1. This is the new line number
of Pipe Routing. 2
2. Click ‘‘ Close ’’ button.
In the same way, as for Equipment, choose Equipment for Component Type. And click at Create Tag. Then input tag as 2 required, such as P-201.
1. Picklist to choose Component Type
‘‘ Equipment ’’. 1
2. Click ‘‘ Create Tag ’’.
And specify the name of equipment in Description, such as Pump for training. Then click Create button, and click Close. Now we 1 can see that we have already got the new pump.
1. Enter each data field as the same this.
2. Click ‘‘ Create ’’ button. 3
3. Finally , click ‘‘ Close ’’ button.
2
75
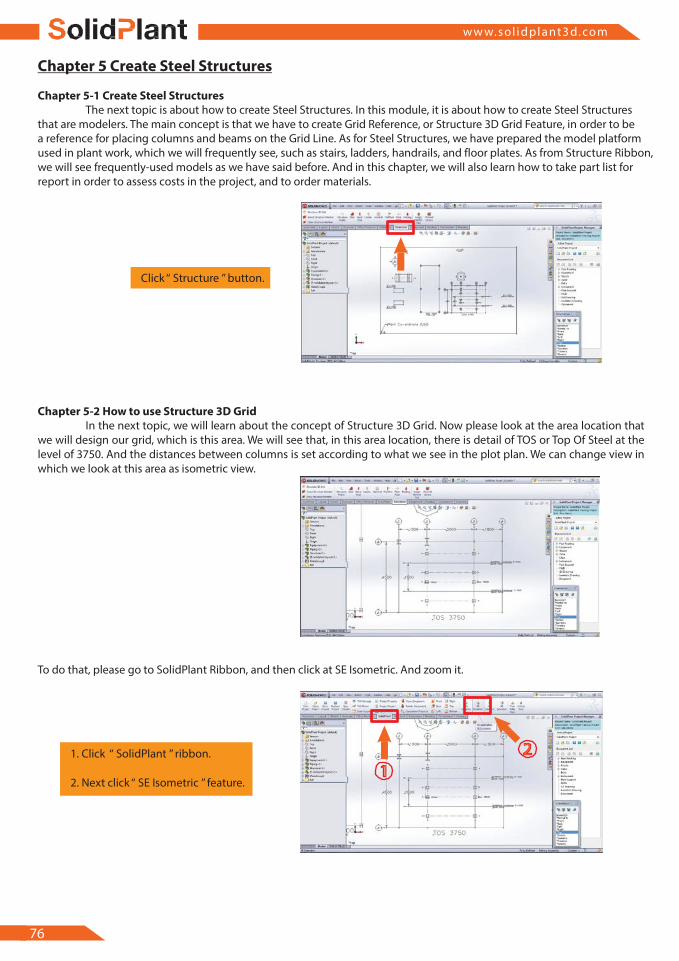
w w w . sol i dpl a n t3 d . c om
Chapter 5 Create Steel Structures
Chapter 5-1 Create Steel Structures
The next topic is about how to create Steel Structures. In this module, it is about how to create Steel Structures that are modelers. The main concept is that we have to create Grid Reference, or Structure 3D Grid Feature, in order to be a reference for placing columns and beams on the Grid Line. As for Steel Structures, we have prepared the model platform used in plant work, which we will frequently see, such as stairs, ladders, handrails, and floor plates. As from Structure Ribbon, we will see frequently-used models as we have said before. And in this chapter, we will also learn how to take part list for report in order to assess costs in the project, and to order materials.
Click ‘‘ Structure ’’ button.
Chapter 5-2 How to use Structure 3D Grid In the next topic, we will learn about the concept of Structure 3D Grid. Now please look at the area location that
we will design our grid, which is this area. We will see that, in this area location, there is detail of TOS or Top Of Steel at the level of 3750. And the distances between columns is set according to what we see in the plot plan. We can change view in which we look at this area as isometric view.
To do that, please go to SolidPlant Ribbon, and then click at SE Isometric. And zoom it.
1. Click ‘‘ SolidPlant ’’ ribbon. 2 1
2. Next click ‘‘ SE Isometric ’’ feature.
76

w w w . sol i dpl a n t3 d . c om
2
The concept of this is that we have to open the mode of Edit Main Assembly in Structure first. Please click at
Feature Manager of Structure, and choose Edit Assembly.
Edit Assembly ‘‘ Structure ’’ .
We will see details inside. Then go to Structure Ribbon in order to call the feature of Structure 3D Grid. Open it by clicking here.
1. Click ‘‘ Structure ’’ ribbon. 2 2. Next , click ‘‘ Structure 3D Grid ’’ 1
feature.
We can expand the panel to see more. In details, we will start to make it obtain positions. I will use this point as a reference by clicking at the point on the plot plan. Then click at the button of ‘‘Get selected point’’.
1. Click the point at the end of the sketch line.
2. Next , click ‘‘ Get selected point ’’
button.
1
We can see that the preview of 3D grid has appeared. After that, we will input values, such as number of rows and offset of X-axis, which we will try using 1800. Notice that it will adjust the preview distance for us. Or we can change for different number. Please notice that each number has the same distance. However, in the plot plan, distances between columns are different. The distance from the first to second columns is 1800, from the second to third is 3000, and from the third to fourth is 1800. As of now, we will input the 2 same distance values. And now we will change the 3D grid again. We will try inputting distance value of Y-axis. As from the plot plan and the triad, the Y-axis is in this direction. Then input 4500 for the Offset of Y. It will adjust the preview in Y direction. As of now, we will accept these values, so click OK.
1. Input 3D Grid frome detail. 1
2. Next , click ‘‘ OK ’’ button.
77

w w w . sol i dpl a n t3 d . c om
After that, we will go to Structure, and then Grid Frame, and then 3DGridFeature. As from that select and click at Edit Sketch.
1. Choose ‘‘ 3D GridFeature ’’ .
2. Next select ‘‘ Edit sketch ’’. 2
1
And this is how the sketch looks. We will change the distances according to our plot plan. We can do this by selecting this sketch line. After the selection, the first thing that we have to do is as the followings. As seen in Relations box on the left, there is a relation called Patterned11. Every time that we come in here, we must delete it by selecting it and then delete.
Select ‘‘ Patterned11 ’’ and delete it.
in order to cancel this relation. After that we will create a new relation by clicking at the line. And then press and hold Control button, then click at the second line. And add relation to be Colinear. It will move to the same line.
1. Choose the first line.
2. Next, select second line. 1 2
3. Finally , click ‘‘ Collinear ’’ of Add Relations. 3
In the same way, I want to change this grid line to be on this line of the plot plan. We can also do that by adding relation to be Colinear. It will appear as required.
1. Choose the first line. 2
2. Next, select second line.
3. Finally , click ‘‘ Collinear ’’ 3 1 of Add Relations.
78

w w w . sol i dpl a n t3 d . c om
When we add all necessary relations, we will see that all distances are congruent to Y axis. Then get out of Sketch by clicking here.
Click here to Exit from sketch.
After that, we will input data for levels. We can do that by editing the grid frame again. Go to Structure Ribbon, and then click at 3D grid. And click the button of Structure 3D Grid.
2
1. Click ‘‘ Structure ’’ ribbon .
2. Next , click ‘‘ Structure 3D Grid ’’ 1 feature.
Notice that it will open the grid parameters having values as we have set. Now we will input values for floor levels. That means we will input the number of Z, and increase it to 3. The number of distance values that we want to input now, as counted from the first floor -- 1-2-3, will be 3. As seen from the values of Z, Zero is for the lowest floor. We will change the second value to 2750, and third value to 3750. Now we can get grid distance values as required. When finished, click OK to go out of this feature. This is how to create 3D grid. 2
1. Enter the Value : 3. 1
2. Enter the Value : 0,2750,3750.
3. Finally , click ‘‘ OK ’’. 3
Chapter 5-3 How to place Structure Member on 3D grid Next, after we already have the 3D grid, we will input shape column on our 3D grid. As the concept of how to do
this, Weldment feature will be applied. First go to Structure, and then click Edit Assembly.
1. Choose ‘‘ Structure ’’ Assembly . 2
2. Select Edit Assembly.
1
79

w w w . sol i dpl a n t3 d . c om
3
After that, select Grid Frame, which will be a reference for placing columns. And then click at Insert Structure
Member. On the left, please notice that Structural Member window will appear.
1. Select ‘‘ Grid Frame ’’ . 2
2. Click ‘‘ Insert Structure Member ’’ feature .
1
As from Standard list, we have various standards to choose from, such as ANSI, Australian, British, Canadian, Japanese, and others. Here we will select ANSI Inch Standard, and then click Type. We will use Type of W Section in placing columns. And as for Size, please scroll down to choose W8x40. After that, click at this grid column, and also this one. When done, click OK. Now the columns appear.
1. Enter the steel shape detail.
2. Choose the Grid Colimn.
3. Finally , click ‘‘ OK ’’.
Pt4
1 Pt3
Pt1
2 Pt2
Next, we will place beams. Click at the feature of Draw Structure Member.
Click ‘‘ Draw Structure Member ’’ feature .
The concept of beam placing is to make a point-to-point sketch, starting from this point and drawing to this point.
Click the point at the end of the line .
Pt2
Pt1
80

w w w . sol i dpl a n t3 d . c om
Then click S button, and select Line as previous.
1
1. Push S button on keyboard .
2. Choose the ‘‘ Line ’’ button. 2
And start from this point to this point. Then go out of Sketch.
1. Sketch line point to point .
2. Click ‘‘ OK ’’ button.
1
2 Pt1
Pt2
Suddenly, the dialog of Structure Database will pop up. Please see on the left that there are various standards. As previous, select ANSI Inch Standard. As for Member Group, scroll down to select W Section. As for Member Size, we will use a smaller size, which is W8x24. And then click OK.
1. Choose ‘‘ ANSI Inch Standard ‘‘.
3 2. Next choos ’’ W section ‘‘.
3. Next ,choose ’’ W8x24 ‘‘ 1
4. Finally , click ’’ OK ‘‘ button. 2 4
Now we have already got beams. Please notice that beams are currently placed by center. We can change the position of beam placing. To do that, please expand the assembly of Grid Frame-1. Then select Structural Member of Weldment, and click Edit Feature.
1. Choose Edit Feature.
2. Select ‘‘ Stuctural Member2 ’’. 2
1
81

w w w . sol i dpl a n t3 d . c om
Please see on the left, and scroll down. As from Alignment Settings, we can rotate it, but its alignment is now
correct, so we do not need to rotate it. We want to change position or locate profile as said before. As we want to place Top Of Steel (TOS) at the top surface of the shape, click at Locate Profile button.
2 1. Click Mid-Point of shape.
2. Click ‘‘ Locate Profile ’’ button.
1
Then click at the head or center of the shape here. Please notice that the positions of both shapes will be moved down. Then click OK. Now we already have beams and columns.
Finally, click ‘‘ OK ’’ buttonof finish.
Next, we will copy these beams and columns to the other positions of columns in each range. To copy them, first we will make a sketch to determine the reference points for our placement. Now select Top view here, and open Sketch by clicking it.
Select Top View and Open Sketch.
Then we will make points. To do that, click at Point here. Then make the first point, the second, the third, and the fourth, like these. And we will make the line for copy according to these points. When finished, go out of Sketch.
1. Click ‘‘ Point ‘‘ sketch fuature.
2. Next ,make the point at the end of line.
3. Finally , exit frome sketch.
Pt1
2
1 Pt2
Pt3
3
Pt4
82

w w w . sol i dpl a n t3 d . c om
Next, select Features------this one. And then go to Pattern, and select Sketch Driven Pattern.
Click ‘‘ Sketch Driver Pattern ’’ feature under pull-down pattern feature.
Please see that it is now at Sketch. In the part of Reference point, click at Selected point. Then click at this point here.
1. Click ‘‘ Selected Point ’’ option. 1
2. Next, click this point of sketch.
2
After that, select Bodies to Patter, which is this one. Then click at parts that we want to copy. Please see that the preview will be shown. Then click OK. And we have already copied them.
3 4 1. In ‘‘ Bodies to Pattern option, then
shoose steel shapes as Sequence 2 5
of numbers. 1 6
2. Finally click ’’ OK ‘‘ button to finish. 1 2
After that, we will place the remaining beams in the weldment. Now go out of Grid Frame.
Click ‘‘ Exit ’’ from Grid Frame.
83

w w w . sol i dpl a n t3 d . c om
And then edit our main assembly in Structure again. And select Grid Frame as we have done before. Then go to the feature of Draw Structure Member.
3
1. Edit ‘‘ Structure ’’ Assembly. 1
2. Choose ‘‘ Grid Frame ’’ Sub Assembly. 2
3. Next ,click ‘‘ Draw Structure Member ’’ feature.
We will make all the needed sketch lines for beams. There are 4 of them. This is the first line, and this is the second as from this point to this point.
1. The first line.
2. The second line.
Pt3
Pt1 1
2 Pt4
Pt2
Then we make the third, and fourth one. When finished, get out of Sketch.
1. Make the line sketch by sequence of numbers.
2. Next, click exit from sketch.
1. The third line.
2. The fourth line.
1 Pt1 1
Pt3
2
2
Pt2 Pt4
On this dialog, choose the same as before, which is ANSI Inch Standard. The shape we use is W Section. Size is W8x24. When done, click OK.
1. Choose ‘‘ ANSI Inch Standard ‘‘.
2. Next, choose ’’ W ‘‘ Section.
3. Next, select ‘‘ W8x24 ‘‘. 1 3
4. Finally, click ’’ OK ‘‘ button. 2 4
84

w w w . sol i dpl a n t3 d . c om
Please see that now we have already had beams, but their rotation and position are still not correct.
Placing default of the
beam is not practical.
Go to this weldment, which we have just made. And click Edit Feature.
1. Select ‘‘ Structral Member4 ‘‘.
2. Next, click ’’ Edit Feature ‘‘. 2
1
First, we will rotate it by typing 90 degree.
Enter the Value : 90.
Then we have to change position to be at Top Of Steel (TOS) by clicking at Locate Profile. And select at the top here. Then click OK.
1. Click ‘‘ Locate Profile ’’ button. 2
2. Next, click mid-point of shape.
1 3 3. Finally, click ‘‘ OK ’’ button to finish.
85

w w w . sol i dpl a n t3 d . c om
Please see that now we have already got the model.
All of the beams have already been changed position.
2
Chapter 5-4 How to place model platforms Next, we will place model platforms used in plant works. Our SolidPlant has prepared various types of platforms
for us to choose from. These are, as seen from Structure Ribbon, Stair, Ladder, Handrail, Platform on equipments, Floor Plate, and Footing. These platforms facilitate users to be able to work more easily, because each platform we have made has its own special features. Each has template form in order for us to conveniently input size and distance. This will help users to be able to quickly make models.
Chapter 5-5 Stair Next, we will place a model platform that we often see in plant works. The first one that we will start from is Stair.
First, please select the main assembly of Structure, and click at Edit Assembly to edit it.
1. Choose ‘‘ Structure ’’. 2
2. Next, click ‘‘ Edit Assembly ’’.
1
When finished, expand the assembly, and select Grid Frame --- this one --- to appear as a reference for our placement. After that, select Stair in Structure Ribbon.
1. Select ‘‘ Grid Frame-1 ’’ under structure main assembly.
2. Next, click ‘‘ Stair ’’ feature.
1
86

w w w . sol i dpl a n t3 d . c om
The concept is that we draw a sketch line for the width of our stair. The concept is that we draw a sketch line for the width of our stair.
1. Click the line sketch. 1
2. Draw the line sketch as sequecne point of numbers.
Pt1
2 Pt2
We will zoom to the head of the column. Then draw a line, and specify its dimension to be 1200. And get out of Sketch.
1. Enter the value of 2 Dimension : 1200.
2. Next, click ‘‘ Exit Sketch ’’
button. 1
The dialog of Stair template will pop up, and at the same time, the model preview will be shown. We will begin to set the part of Start Platform.Here we want it to be 90 degrees to the left. Then verify heights. And click Apply.
3
1. Piclist to choose ‘‘ 90 Degree Left ’’.
2. Enter the value of height. 1
3. Next, click ‘‘ Apply ’’ button. 2
Please notice that it has turned to the direction as shown. Verify that everything is correct, then click Close. And go out of the assembly of Stair.
Click ‘‘ Close ’’ button to finish.
87

w w w . sol i dpl a n t3 d . c om
Chapter 5-6 Ladder
Next, we will place the next model platform, which is Ladder. We will change viewpoint to the other side by clicking at SolidPlant Ribbon, and select NE Isometric view. We will place a ladder at this position.
1. Choose ‘‘ SolidPlant ’’ ribbon.
2. Click ‘‘ NE Isometric ’’. 1 2
Now, select the main assembly of Structure, then click Edit Assembly.
1. Choose ‘‘ Structure Assembly ’’. 2
2. Click ‘‘ Edit Assembly ’’.
1
After that, select Grid Frame, and go to Structure Ribbon. Click the feature of Ladder.
2
1. Select ‘‘ Grid Frame-1 ’’.
2. Next, click ‘‘ Ladder ’’ feature under ‘‘ Strueture ’’ ribbon.
1
In the same way, draw a sketch line at the edge, and specify dimension to be 800. We can also move it. After that, go out of Sketch.
1. Click the line sketch.
2. Draw the line sketch as sequecne
point of numbers.
3. Enter the value of Dimension : 800.
4. Finally, click ’’ OK ‘‘ to exit from sketch.
1
4 2
Pt1
Pt2
3
88

w w w . sol i dpl a n t3 d . c om
Suddenly, the dialog of Ladder Dimension will appear. Verify heights. We can change these values as we want, and click Apply to check. If everything is correct, click Apply and then close the dialog.
2 3
1. Enter the value of height : 3750.
2. Next, click ‘‘ Apply ’’ button. 1
3. Finally, click ‘‘ Close ’’ button.
Now we have already got Stair and Ladder.
Click to exit from ‘‘ Ladder Assembly ’’.
Chapter 5-7 Handrail Next, we will place the model platform called Handrail. First, select at the main assembly of Structure to edit it.
Then, select Grid Frame to be a reference for Handrail placing.
1. Click ‘‘ Edit Assembly ’’. 2
2. Select ‘‘ Structure ’’.
1
Next, go to Structure Ribbon, and click at the Handrail feature.
1. Click ‘‘ Handrail ’’ feature under ‘‘ Structure ’’ ribbon.
1 2. Select ‘‘ Grid Frame ’’.
2
89

w w w . sol i dpl a n t3 d . c om
3
The concept of Handrail placing is making a boundary for it using sketch lines. Now we will begin at this point
to be the start point, and draw to this point, then continue to this point. After that, press Escape and S. And make a new sketch line from this point to this point, and continue to this point. When done, get out of Sketch.
1. Draw the line sketch as sequecne of numbers.
2. Next, click exit from sketch.
1 Pt1
Pt2
Pt6
2 Pt3
Pt5
Pt4
The program will call the template for us to set dimension values. If we verify that everything is correct, then click Apply, and close the dialog. Now we have already got Handrail. Please go out of the main assembly of Handrail.
1
2 1. Click ‘‘ Apply ’’ button .
2. Next, click ‘‘ Close ’’ button to finish.
3. Finally, click ‘‘ Exit ’’ from assembly.
Chapter 5-8 Floor Plate Next, we will place Floor Plate. In reality, the plates regularly used are Checker Plate, and Grating, which we can
place them. Now, click on Grid Frame, and select Edit Part.
2 1. Choose ‘‘ Grid Frame-1.
2. Next, click ’’ Edit Assembly ‘‘.
1
90

w w w . sol i dpl a n t3 d . c om
After that, select at the surface of the shape of beam. And then go to Structure Ribbon in order to choose the
feature of Floor Plate.
2
1. Select at the surface of the shape of beam.
2. Click ‘‘ Floor Plate ’’ feature
under ‘‘ Structure ’’ ribbon.
1
The concept is to make a boundary for it. Here please press S, and now we will make a rectangle boundary.
Press ‘‘ S ’’ and click on the ‘‘ Corner Rectangle ’’.
And then click at this point, and expand the boundary to the opposite point, which is this point. When done, get out of Sketch.
1. Click the first point. 3
2. Click the second point. 1
3. Finally , click to exit from sketch.
2
On the left, please input thickness to be 20, and click Flip Out to change the placement direction. The plate will be flipped. Then click OK.
3
1. Enter the value : 20. 1
2. Turn on ‘‘ Filp Cut ’’ option.
3. Finally , click ‘‘ OK ’’ button. 2
91

w w w . sol i dpl a n t3 d . c om
Now, we have already got the plate, and we can go out of the Assembly.
Click to exit ‘‘ Edit Assembly ’’ button.
Chapter 5-9 Take part list report Next is the topic about how to take part list report for our Structure Model. At this point, we can take beams and
columns. Now, we will learn how to do that. First, we will open the assembly which is our model. That is to select Grid Frame, then right-click and select Open Part.
1. Choose ‘‘ Grid Frame-1 ‘‘. 2
2. Next, click ’’ Open Part ‘‘ button.
1
After that, select Cut list, then right-click and select Update.
1. Choose ‘‘ Cutlist(xx) ‘‘. 1
2. Next, click ’’ Update ‘‘.
2
When finished, go to Structure Ribbon, and call a feature named Assign Member Tag.
1. Click ‘‘ Assign Memder Tag ’’ feature under ‘‘ Structure ’’ ribbon.
92

w w w . sol i dpl a n t3 d . c om
Suddenly, a dialog will appear to show data. There are some important data that we will use, such as to-be-painted
area, or surface area, mass, and center of mass. And as seen below, we can also rename shapes. For example, for W8x40, which is a column, we can input CO in order to use when generating the part list. For W8x24, which is a beam, we will input BE for it. When finished, click Apply.
1. Enter the value : CO.
2. Enter the value : BE. 1
3. Next, click ‘‘ Apply ’’ button.
2 3
Instantly, a dialog will appear. Please notice the names of Structural Member, which are shown as name and order of part list. The numbers are run for all parts. As from below, total length of each type of shape is also shown. The whole length of each shape type will appear here. Moreover, we can export data as an Excel file.To do that,click Export to Excel.
Click ‘‘ Export to Excel ’’ button.
Then input the file name as ‘‘partlist’’, and save it.
1. Enter the name of Excel file : Partlist.
2. Finally, click ‘‘ Save ’’ button. 1
2
Excel will be instantly called, and the report of data seen before will be shown here. There is also summation of total length for each shape.
93

w w w . sol i dpl a n t3 d . c om
Chapter 6 Create Equipment Model
Chapter 6-1 Create Equipment Model
Next, we will learn how to create Equipment Model. In fact, as for Equipment Model, SolidWorks can currently work well for creating types of parts and models. However, In SolidPlant, we have Equipment module to facilitate users in doing that more easily. For example, our SolidPlant has standard library of equipments, which has groups of equipments such as various types of pumps, vessels, and exchangers, for us to select from. The advantage of having standard library is that we can input data and values such as distances. This is because in our standard library of equipments, there are templates in which users can input data and details more easily. Moreover, this helps users to be able to easily go back to change or correct data.
Additionally, the necessary thing for equipment creation is Nozzle. Nozzle placement means considering the open position of equipment, which is an important point used as a reference in pipe routing from Nozzle to Nozzle. In addition, if users already have a part that is Equipment in SolidWorks, they can import that part model into the SolidPlant project.
The above details will be separated into topics, which we will subsequently learn.
Chapter 6-2 Create Equipment model from standard library Now we will learn about the standard library of Equipment to see what SolidPlant has prepared for us. Please go
to Equipment Ribbon, and click to open Create Equipment. We will see that in the dialog of Create Equipment, there are groups of various types of Equipments. The first one is Cyclone.
2 1
1. Click ‘‘ Equipment ’’ ribbon. 3
2. Click ‘‘ Create Equipment ’’ feature.
3. Click in Crop Down list to choose the Equipment template lists for review.
Next, there are also various types of Exchangers, Pumps,Tanks, and Vessels. All these are what we can immediately use. As for the standard library, the advantage is that after we have chosen equipment, the program will allow us to input its related data such as distance. The template dialog will appear for us to easily input the required data. Accuracy and speed of working will increase. And that is the standard library of Equipment.
Chapter 6-3 Pump The first Equipment we will learn how to use is Pump. In SolidPlant, we have prepared various types of Pumps,
which piping designers can use. The concept of SolidPlant is that we already have the library of pump standards, which we can use together with template in controlling sizes and setting distances, to be appropriate for our work.
94

w w w . sol i dpl a n t3 d . c om
Chapter 6-4 Create the Horizontal Pump P-103A
In the next topic, we will learn how to use the first equipment library, which is Pump. We can see data related to Pump in the Document List from the data tag that we have imported. If we look at the Plot Plan by zooming into it, the first position that we will place the pump is P-103A. As from the Document List, under the item of Equipment, we will see that this tag is shown in the color red. The color red tells us that we have already had tag data in the system, but have not had the data in the model and the main assembly of the layout. So we will start to create it now. First, please select the main assembly of Equipment, and then click at Edit Assembly. Expand the main assembly to see that as of now, there is no equipment assembly in it.
1. Review a tag in the Equipment list the
Equipment list is shoe color red it’s ready information into the system but isn’t in the model.
2. Review in Plot plan area it’s have 2 1 Equipment No. same in document list. 3
3. Click Equipment then select edit
assembly it’s no equipment in assembly.
Then go to Create Equipment and click it. The dialog of Create Equipments will appear, and we will select Pump.
We will see that there are many types of pumps. Now select TAG tab on the right,and then choose P-103A from the TAG picklist. Please notice that it will get the related data for us. When done, click Create button below.
1 1. Click ‘‘ Create Equipment ’’ feature.
2. Picle list to select ‘‘ Pump ’’ type. 2 4
3. Select ‘‘ Horizontal Pump ’’.
4. Then picle list to select ‘‘ TAG No. P-103A ’’. 3 5
5. Click ‘‘ Create ’’ button.
The program will immediately open the dialog of the Pump together with the model assembly of the specified pump.In this step, we will see the dialog for inputting values in the template for various parameters. So we can input the values now. The first one, A, is 1870. The second, B, is 715. And we will set C to be 300, D to be 250, E to be 650, F to be 300, G to be 650, H to be 300, I to be 800, J to be 680, K to be 150, L to be 1620, M to be 100, and N to be 150. When finished, click Apply. Notice that the model will change according to the values we have input. Now click Close.
1 1. Input the value of parameter.
3 2. ‘‘ Apply ’’ and ‘‘ Close ’’ button .
3. Close model window.
2
95

w w w . sol i dpl a n t3 d . c om
4
For the Nozzle, we will place it in the design later. As of now, we will only create and prepare the equipment model.
At this point, please close it. After that, go to the Document List on the right, and click Refresh Tag button. AS of now, we can see that the Tag of P-103A has changed to color blue. This tells us that now we have already had
the model, but have not inserted it into the main assembly.
Click ‘‘ Refresh a Tag ’’ for update a tag No. P-103A will change to blue color. ( *color blue it’s mean ready a model
create but not have in the main layout assembly )
The next equipment that we will create is Vessel. SolidPlant has various types of Vessels in the standard library to select from, such as horizontal, vertical, and tower. Piping designers can use these equipment models. The advantage of these equipment models in SolidPlant is that these equipments will link with templates, which we can input distance settings appropriate for plant works.
Chapter 6-5 Create the Horizontal Vessel D-102 Now, we will look at the next equipment in the standard library.
Please click at Create Equipment feature. And then in the Equipment picklist, choose Vessel. After that select Horizontal Vessel then click on the TAG tab. Look in the picklist of TAG, and we will see tag data that we have in the system. Select D-102, which is of Vessel type. And then click Create. The template dialog as well as model will appear.
1
1. Click ‘‘ Create Equipment ’’ feature.
2 2. Picle list to select ‘‘ Vessel ’’ type.
3. Select ‘‘ Horizontal Vessel ’’.
4. In a tag tap select tag No.D-102. 3
5 5. Click ‘‘ Create ’’ button.
At this point, we can input the details including Left Head and Right Head. Now we will input details starting from its length B to be 3000, diameter A to be 1500, height C to be 2100, leg size G to be 300, D to be the same as diameter, which is 1500, and saddle distances E and F to be 600. When finished, click Apply button. Notice that now we will get the new Vessel base. Click Close button.After that, close it, and we will design Nozzle position later.
1. Input the value of parameters on template dialog.
2. Click ‘‘ Apply ’’ and ‘‘ Close’’ button.
3. Close model window.
96

w w w . sol i dpl a n t3 d . c om
2
Now please look on the right, in the item of Equipment under Document List, and click Refresh. We will see that
now the color of D-102 tag has changed to blue. This tells us that now we have already had the model, but have not inserted it into the layout of plot plan.
Click ‘‘ Refresh a Tag ’’ for update a tag No. D-102 will change to blue color.
Chapter 6-6 Heat Exchanger The next equipment that we will create is Heat Exchanger. SolidPlant has prepared various types of Heat
Exchangers. The model will tie to template to be appropriate for value and dimension setting. Piping designers can readily change parameters of Heat Exchangers. This is convenient when we use it.
Chapter 6-7 Create the Breech Lock Exchanger E-102A Next, we will create Heat Exchanger as called E-102A in the equipment. Please notice that its color indicates that
we have not had its model as of now. Go to Equipment Ribbon, and select the feature of Create Equipment.From the picklist, select Exchanger, and choose Beech Lock Exchanger which is the first one. And then click on the TAG tab and select E-102A from the picklist. We can see that its data is shown here. Click Create button below.
1 1. Click ‘‘ Create Equipment ’’ feature.
2. Picle list to select ‘‘ Exchanger ’’ type. 4
3. Select ‘‘ Breech Lock Exchanger ’’.
4. Then pick list select tag No.E-102A. 3
5. Click ‘‘ Create ’’ button. 5
After that, we will input parameter values, which are 3900 for A, 600 for B and C, 2850 for D, 600 for E, 1050 for F, 150 for G, 225 for H, 567 for I, 900 for J, and 117 for K and L. After that, click Apply button,and look to check it. Now we already get it, so click Close button below. And then close this.
1. Input the value of parameters on 1 template dialog.
3 2. Click ‘‘ Apply ’’ and ‘‘ Close ’’ button. 2
3. Close model window.
97

w w w . sol i dpl a n t3 d . c om
Click Refresh under Document List. Now we can see that the color of Tag of Exchanger is now blue.
Click ‘‘ Refresh a Tag ’’ for update a tag No. E-102A will change to blue color.
Chapter 6-8 How to place user defined Nozzle on Equipment In the next topic, we will learn how to create Nozzle positions. This is very important as a starting point of pipe
works or pipe routing. If we define a wrong position of Nozzle, our pipe routing will also be wrong both in terms of size and pipe spec.
Chapter 6-9 At the Pump P-103A In the next topic, before we begin our practice, we will learn about Nozzle. Nozzle is indeed very important,
because it is the starting point of piping works. In other words, it is the anchor point. The first equipment on which we will place the Nozzle is Pump. In the Pump Model, there are 2 types of Nozzles that we will use here, which are Suction and Discharge Nozzles. We can get the data of these Nozzles from the pipe spec that we have already created. Thus, the data of Nozzles that we use in our design will be certainly accurate. This is because before we can design Nozzles, first we have to create pipe spec of Nozzles for placing them on the model. So Nozzle is very important.
Chapter 6-10 Insert nozzles position on Suction and Discharge After we have already got the model, we will learn how to place Nozzles. The first equipment that we will insert
Nozzles is Pump. Now please open the Pump model called P-103A under Document List by double-click it. And the model will be opened. After that, go to Feature Manager on the left, then choose the tag name and right-click it, and select Set All To Resolved.
1. Double click a ‘‘ TAG No. P-103A ’’ 2 in the equipment list.
3 2. At ‘‘ Feature manager ’’ right click 1
on P-103A.
3. Then select ‘‘ Set All to Resolved ’’.
98

w w w . sol i dpl a n t3 d . c om
Then, go to Equipment Ribbon. Please notice that we already have Nozzles here. If we want to change the
properties of the Nozzles, we can use the feature called Create Nozzle, which can be used for both creating new Nozzles and changing existing Nozzles. Now click it, and we will see the panel called Nozzle Component on the left. The panel is composed of 2 tabs, which are Type and Positions. As we are active at the Type tab, please see below, and we will see data of the Nozzles of this Pump. Now select the N1 tag, and we can see the spec name for this Nozzle, and then select SP01 for it. For the size, we will use 8 inches for this Suction Nozzle. For End Type, which is the connection type, we will use FL, which is flange. We will see the record for this Nozzle that it is a 600-lb Nozzle.
1
1. Click ‘‘ Equipment ’’ ribbon.
3 2. Click ‘‘ Create Nozzle feature. 2 3. Input the Value of Nozzle parameters
for the ’’ Suction Side ‘‘ of pump by pick list ’’ TAG P-103A-N1 ‘‘.
After that, we will look at the second Nozzle. Choose N2 from the Tag picklist. For the spec, we will certainly use SP01. For its size, we will use 6 inches. For End Type, we will use FL. Then select at the record.
Now we have already got the model and determined its data. Next, we will look at the Positions tab. In fact, we
have already determined from the template typical for the lengths of these two Nozzles. Now we can click OK.
2 1. Input the Value of Nozzle parameters
for the ’’ Discharge Side ‘‘ of pump by pick list ’’ TAG P-103A-N2 ‘‘.
1 2. Click ‘‘ OK ’’ button.
After that we will close it and confirm our saving by clicking at Save All button.
2 1
1. Close model window.
2. Click ‘‘ Save All ’’ button.
99

w w w . sol i dpl a n t3 d . c om
Chapter 6-11 At the Vessel D-102
Next, we will insert Nozzles on another equipment, which is Vessel. As from what we have previously prepared, we do not have Nozzles. But we can place Nozzles on the positions we want. For example, we can place them on the radius of the tank, or on the axis of heads, or on the customized slope. These Nozzles can be preliminarily prepared in the pipe spec, and we can get the Nozzle data from this for using in the model.
Chapter 6-12 Insert nozzles position on vessel Next, we will learn how to create Nozzles on vessels. First, please go to the tag of D-102, and double-click it to
open the Vessel Model. After that, select the tag on the left, then right-click and select the feature of ‘‘Set All to Resolved’’ in order for it to show all the feature managers.
1. Double click a ‘‘ TAG No. D-102 ’’ 2 in the equipment list.
1 2. At ‘‘ Feature manager ’’ right click
on D-102. 3 3. Then select ‘‘ Set All to Resolved ’’.
Now, we are ready to call the command or feature of Create Nozzle. First, click at Equipment Ribbon, and select Create Nozzle. On the left, there will be the panel of Nozzle Component. We will click at this button in order to automatically create tags. Please notice that the program will automatically create tags. The tag numbers will be run in order.
The first Nozzle N1 is the one with the size of 8 inches. For its database or spec, we will use SP01. For Size, of course,
we will use 8 inches. For End Type, select FL. And we will see the record. After that, click New Nozzle button.
1
1. At equipment ribbon click 2 ‘‘ Create Nozzle ’’ feature.
2. Click ‘‘ New Nozzle ’’ Button. 3
3. Click ‘‘ New Nozzle ’’ button.
It will go to Position tab. Please look at parameters in the bottom, and notice that it uses Co-ordinate default. We have to change this by selecting Radian from the picklist, because Nozzle that we want to insert will be on the surface of the tank. Please see that there is a preview according to the typical of this Nozzle type. After that, click at the surface- reserving box, and then click at any position on the body of the tank.
1. Piclist to select ‘‘ Radian ’’.
1 2. ‘‘ Select Sorface ’’ field.
3. Click on Vessel Body.
3 2
100

w w w . sol i dpl a n t3 d . c om
Then we will begin to input values of degrees and distances. This one is for the placing angle of this Nozzle, which
we will input 90 degrees. And distance from the edge of the tank is 1800 mm. And the length of this Nozzle is 200 mm. When done, click Apply button. Now we have already got the first Nozzle.
Input the value parameters then click ‘‘ Apply ’’ button.
After that, go back to Type tab, and click at the tag button to create tag again. Please see that now the tag is changed to Nozzle N2. For the spec, choose SP01 as previous. For the size of the second one, we will use 6 inches. And for End Type, we choose FL. When finished, select the record under Select Nozzle. And click New Nozzle button again for the second Nozzle.
1. Click ‘‘ Type ’’ tad.
2. Click ‘‘ New Nozzle ’’. 1
3. Input the value of ‘‘ Nozzle ’’ 2
parameters. 3
4. Click ‘‘ New Nozzle ‘‘ button.
4
In the Position tab, change parameters to Radian. And as previous, click at the surface-reserving box, and then click at any position on the body of the tank.
1. Plick list to select ‘‘ Radian ’’. 1
2. Select ‘‘ Surface ’’ field.
3. Click on vassel body. 3 2
After that we will input the angle parameter, which is 90 degrees. The distance from the edge of the tank is 1300 mm. And the length of the Nozzle is 200 mm. Then click Apply button. And now we got it.
Input the value of parameters then click ‘‘ Apply ’’ button.
101

w w w . sol i dpl a n t3 d . c om
For the third Nozzle, in the same way, click at the Type tab. And click the button next to Tag to create the third
Nozzle tag. For the spec, use SP01 as before. For size, we will use 4 inches. For End Type, use FL. We will see the record of 300-lb Nozzle. And click New Nozzle button.
1. Click ‘‘ Type ’’ tad.
1 2. Click ‘‘ New Nozzle ’’. 2 3. Input the value of ‘‘ Nozzle ’’ 3
parameters.
4. Click ‘‘ New Nozzle ‘‘ button.
4
Then go to the Position tab, and change parameter to Radian. And then click in the box to reserve the surface that we will place.
1. Plick list to select ‘‘ Radian ’’. 1
2. Select ‘‘ Surface ’’ field.
3. Click on vassel body. 3 2
After that, click at the tank. And input parameters to be 90 degrees for angle, 200 mm for distance, and 200 mm Nozzle length. When done, click Apply button.
Input the value of parameters then click ‘‘ Apply ’’ button.
Now go back to the Type tab again. Click the tag button to create the fourth tag. We will set its pipe spec to be SP01, size to be 6 inches, and End Type to be FL. We will see the record of 300-lb Nozzle for it. Then click New Nozzle button.
1. Click ‘‘ Type ’’ tad.
2. Click ‘‘ New Nozzle ’’. 1
3. Input the value of ‘‘ Nozzle ’’ 2
parameters. 3 4. Click ‘‘ New Nozzle ‘‘ button.
4 102

w w w . sol i dpl a n t3 d . c om
Now go to the Position tab, and change parameter to Radian. In the same way, click to reserve the surface, and
then click at the body of the tank.
1. Plick list to select ‘‘ Radian ’’. 1
2. Select ‘‘ Surface ’’ field.
3. Click on vassel body. 3 2
Next, We will input angle value to be 270 degrees, which means that it is located below. And we will set distance to be 200 mm, and Nozzle length to be 150 mm. When finished, click Apply to check it.
Input the value of parameters then click ‘‘ Apply ’’ button.
Please notice that this Nozzle is located under the tank. After that, click OK to get out, and then close it. Upon closing, it will ask about saving, so we will answer by choosing Save All. Now we have already got nozzles on this tank.
1
1. Click model window.
2. Click ‘‘ Save All ’’ button.
2
Chapter 6-13 At the Breech Lock Exchanger E-102A In the next topic, we will learn how to insert Nozzle position on Heat Exchanger. Initially, we have already had
Heat Exchanger from the model that we have prepared. In practice, we will design Nozzle positions on Heat Exchanger according to the guideline from piping engineers. And we can properly design positions and sizes.
103

w w w . sol i dpl a n t3 d . c om
Chapter 6-14 Insert nozzles position on exchanger
Next, we will learn how to insert Nozzle on Heat Exchanger. First, select the tag of E-102A from the model that we already have, and double-click to open it. After that, select at the tag name on the left of feature manager, and right-click and then select the feature called ‘‘Set All to Resolved’’ to make it show features.
1. Double click a ‘‘ TAG No.P-102A ’’ in the equipment list. 2
3 2. At ‘‘ Feature manager ’’ right 1
click on P-103A.
3. Then select ‘‘ Set All to Resolved ’’.
Now, we will see the model of Heat Exchanger. Next, how to insert Nozzle is by selecting Create Nozzle. We will see the panel of Nozzle Component on the left. Click at the button for new Nozzle tag. For the first Nozzle, we will use the size of 4 inches. For Database, which is pipe spec, choose SP01. For Size, choose 4 inches. For End Type, choose FL. And the record will be 300-lb Nozzle. Now click New Nozzle button.
2 1. Click ‘‘ Equipment ’’ ribbon. 1
2. Click ‘‘ Creeate Nozzle ’’ feature.
3 3. Select ‘‘ TAG E-102A-N1 ’’ from dropdown list. 4
4. Input the value of Nozzle Parameters.
5. Click ‘‘ New Nozzle ’’ button 5
Next, in the tab of Position, please change parameter to Radian, because we want to insert Nozzle on the radius of the tank. Then click at the box to reserve the surface that we will use, and click at the tank body.
1. Plick list to select ‘‘ Radian ’’. 1 3
2. Select ‘‘ Surface ’’ field.
3. Click on vassel body.
2
104

w w w . sol i dpl a n t3 d . c om
After that, we will input parameters. The first one is angle, which we will use 90 degrees. Next, distance from the
reference point is 572 mm. And the Nozzle length that we will use is 150 mm. When done, click Apply button. Now we have already got the first Nozzle.
Input the value of parameters then click ‘‘ Apply ’’ button.
Please go back to select the tab of Type again, and click the button to create new Nozzle tag for the second Nozzle. We will set spec to be SP01, Size to be 4 inches, and End type to be FL. And the record will be 300-lb Nozzle. Then click New Nozzle button.
1. Click ‘‘ Type ’’ tad.
2. Click ‘‘ New Nozzle ’’. 1 2
3. Input the value of ‘‘ Nozzle ’’ parameters. 3
4. Click ‘‘ New Nozzle ‘‘ button.
4
And for the position, please change parameter to Radian. After that, click to reserve the surface, and then click at the exchanger.
1. Plick list to select ‘‘ Radian ’’. 1 2. Select ‘‘ Surface ’’ field. 3
3. Click on vassel body.
Click ‘‘2Apply ’’ button.
We will input angle parameter to be 90 degrees, distance to be zero -- which is exactly at the datum point, and the Nozzle length to be 150 mm. When done, click Apply.
Input the value of parameters then click ‘‘ Apply ’’ button.
105

w w w . sol i dpl a n t3 d . c om
Next, we will insert the third Nozzle. Click at the Type tab, and click to create new Nozzle tag, which is the third
one. We will set pipe spec to be SP01, Size to be 4 inches, and End Type to be FL. The record will be 300-lb Nozzle. After that, click New Nozzle.
1. Click ‘‘ Type ’’ tad.
2. Click ‘‘ New Nozzle ’’. 1 2
3. Input the value of ‘‘ Nozzle ’’ parameters. 3
4. Click ‘‘ New Nozzle ‘‘ button.
4
In the Position tab, please change parameter to Radian. And as previous, click to reserve and click at the surface
of the exchanger again.
1. Plick list to select ‘‘ Radian ’’. 1 2. Select ‘‘ Surface ’’ field. 3
3. Click on vassel body.
2
And then we will input angle parameter to be 270 degrees, distance from the datum or reference point to be zero, and the Nozzle length to be 150 mm. Then click Apply.
Input the value of parameters then click ‘‘ Apply ’’ button.
To create the fourth Nozzle, please click at the Type tab again, and click to create the new Nozzle tag, which is the fourth one. We will set spec to be SP01, Size to be 4 inches, and End Type to be FL. Then select the record, and click New Nozzle button.
1. Click ‘‘ Type ’’ tad.
2. Click ‘‘ New Nozzle ’’. 1 2
3. Input the value of ‘‘ Nozzle ’’ parameters. 3
4. Click ‘‘ New Nozzle ‘‘ button.
4
106

w w w . sol i dpl a n t3 d . c om
In the Position tab, please change parameter to be Radian. And click to reserve in this box, then click at the surface
that we will insert the Nozzle.
1. Plick list to select ‘‘ Radian ’’. 1 3
2. Select ‘‘ Surface ’’ field.
3. Click on vassel body.
2
We will input the angle to be 270 degrees, distance from reference point to be 3875 mm, and the Nozzle length to be 150 mm. When done, click Apply. Please notice that the Nozzle will be underneath.
When we got all the required Nozzles, click OK.
Input the value of parameters then click ‘‘ Apply ’’ button.
After that, close the Exchanger, and select Save All button to confirm saving. When finished, please select E-102A, and notice that the preview is already updated.
1
1. Click model window.
2. Click ‘‘ Save All ’’ button.
2
Chapter 6-15 To place equipment model into Main Assembly SolidPlant system The next topic is about how to place the models that we have already had such as pump, vessel, and exchanger,
which we have already prepared models and nozzle positions, on our plot plan layout. Next, we will learn how.
Chapter 6-16 Insert pump P-103A into plant layout After we have models of various equipments that we have already prepared together with Nozzles, the next
procedures will involve putting equipment models into plot plan or plant layout. In our plant layout, we can see that, on 3D drawing shown here, there are positions for pump, vessel, and heat exchanger as well. The first position that we will place equipment is for pump. Conceptually, when we have inserted pump into model assembly, we can use SolidPlant functions to instantly move or rotate it according to the piping designer’s requirements.
107

w w w . sol i dpl a n t3 d . c om
Chapter 6-17 Allocate equipment by using Move and Rotate Equipment features
Next, we will insert the first pump model that we have already got on the required position in the plot plan, together with using the Move and Rotate features. First, select the name of Equipment main assembly, and click Edit Assembly.
1. At the feature manager 1 click ‘‘ Equipment ’’.
2. Click ‘‘ Edit Assembly ’’.
2
Then please expand it to see that as of now there is not any tag. After that, click at the tag of P-103A, and select the position that we want it to be a reference for placing the pump. This can be any point on here, supposing that at this point. When done, please click at the command called ‘‘Insert component to model’’.
1. Click ‘‘ TAG P-103A ’’ in document list.
2. Click any point on sketch foundation 3
P-103A. 1
3. Click ‘‘ Insert Component to model ’’.
2
If we zoom to see closely, we will see that it will place the lower edge on the point that we have located. Now, we will use the Move feature. Go to Equipment Ribbon, and click at Move Equipment. After that, go to ‘‘Select point to move’’ and click it to reserve. For example, I want to catch the point for placing------supposing that it is this point, then click it. After that, click to reserve at the box of ‘‘Select destination point’’, and then click at this point. Then click Apply button.
1. Click ‘‘ Equipment ’’ ribbon. 2 3
2. Click ‘‘ Move Equipment ’’ feature.
1 3. In ‘‘ Move methode pick list to select 4
Move to Entity ‘‘. 7
4. Click at ’’ Select point to move ‘‘ field. 6
5. Click at first point in plot plan P-103A. 8 5
6. Click at ‘‘ Select Destination point ’’ field.
7. Click Second point in plot plan P-103A.
8. Click ‘‘ Apply ’’ button.
108

w w w . sol i dpl a n t3 d . c om
2
The pump will be moved accordingly. Please notice that, within the Move feature, there is also another feature
called Rotate. So we can simultaneously use the Rotate feature. We can see that the Rotate method used now is ‘‘Rotate Along Edge’’. We will select axis to be a reference by clicking to reserve at the box of ‘‘Selected edge to rotate’’, and then click at the reference axis. And input the angle to be 90 degrees. When done, click Apply button. Now we have already got the pump on the correct position on plot plan. This is called allocating equipment. After that, click OK --- this one.
After we have inserted equipment on the plot plan, we can see that the tag name of the inserted equipment has
changed to the color black. This tells us that database, tag, and model have been used in the model or already inserted into the plot plan.
1. At Rotate method pick list to select 6
‘‘ Rotate Along Edge ’’. 1
2. Click at ‘‘ Selected edge to rotate ’’ field.
3. Click edge to be reference axis. 2 3
4. Input value parameters in ‘‘ Angle ’’ field. 4
5. Click ‘‘ Apply ’’ button. 5
6. Click ‘‘ OK ’’.
Chapter 6-18 Add more equipment by Linear Equipment feature The next topic is about how to copy equipment. In some cases, we may have equipment that we want to copy.
We can linearly or circularly copy the equipment we have. Next we will learn how to use these features.
Chapter 6-19 Make a copy of new pump P-103B Next, we will learn about the feature of Linear Equipment. In this case, please look at the pump P-103A, which
we will linearly copy to place on the position of layout plot plan in the tag named P-103B. Now, select Equipment main assembly, and click Edit Assembly.
1. Select ‘‘ Equipment ’’ main assembly .
2. Click ‘‘ Edit Assembly ’’.
1

w w w . sol i dpl a n t3 d . c om
After that, please go to Equipment Ribbon, and click at the feature of Linear Equipment. After selecting this feature, look at the panel on the left. For Direction 1, we will zoom at the position of the pump, and click on the edge. Next, we will input the required distance, which is 2400 mm in this case. And next will be the number of the copies, which we can choose. Now, we will skip it to see below at ‘‘Components to Pattern’’. Then click to reserve in the box, and then select at the pump. We will see the preview of the new pump according to distance value that we have set. Now we have already got one preview. After that, click OK to go out.
9 1. Click ‘‘ Equipment ’’ ribbon. 3 2
1 2. Click ‘‘ Linear Equipment ’’ feature. 8
3. Click in ‘‘ Pattern Direction‘‘ field. 5
4. Click on the edge to set direction. 6 7 4
5. Input the required distance in a ‘‘ Spacing ’’ field.
6. Input the number of copies in
‘‘ Number of instant ’’ field.
7. Click in ‘‘ Components to Patterm ’’ field.
8. Click ‘‘ Pump P-103A ’’.
9. Click ‘‘ OK ’’ .
Suddenly, the dialog of Match TAG will pop up. This dialog allows us to input the new tag number for the newly copied equipment. We can instantly input the new tag for it. In this case, we will click and change the tag to P-103B. When done, click in the box of Description, and we can see that the box has instantly got data of the equipment. Then click OK. After that, look on the left, and now we can see the assembly of the pump named P-103B here, together with its model.
1. In a ‘‘ TAG ’’ field click and change the tag to P-103B. 1
2. Click ‘‘ OK ’’ button.
2
Chapter 6-20 How to import SolidWorks’s model to SolidPlant project In the next topic, we will learn how to import models created in SolidWorks to be used in the project of SolidPlant.
Another possible way regarding the imported model from SolidWorks is that it is not necessary for the model to be created in SolidWorks. But we can also create it from some other CAD programs, and then change the file to be a neutral file, such as ACIS file and IGES file -- which are central files that SolidWorks can accept. When we have a file of those types, we can import it into SolidWorks, and then save it as a part or assembly of SolidWorks. After that, we can import those models into the project of SolidPlant.
110

w w w . sol i dpl a n t3 d . c om
Chapter 6-21 Import the Tower T-102
Next, we will learn how to import a neutral file which is CAD file into SolidWorks. First, click Open, and in the Open dialog, change the format of files to be the types that we can accept, which include IGES and ACIS. In this case, we will use ACIS, so select it.
1
1. Click ‘‘ Open ’’. 3
2. Pick list to select ‘‘ Change file of type ’’.
3. Select type ‘‘ ACIS ’’.
2
then OK. Then go to the folder of Dataset Training, and we will see the file that is named T-102. To open it, click Open, and
1 1. Select file ‘‘ T-102.SAT ’’.
2. Click ‘‘ Open ’’ and then
click ‘‘ OK ’’ button. 2
Now, zoom all, and we can see that we have already got the model of Tower. After that, we will look at various viewpoints. Select SolidPlant, and we may change the viewpoint to be Isometric, or top view, for example. When finished, save the file by clicking Save button.
1. Click ‘‘ SolidPlant ’’ button. 3
2. Try to change verious ‘‘ Viewpoint ’’ 2 ( for final select ‘‘ ISOMETRIC ’’ view ). 1
3. Click ‘‘ Save ’’.
close it. We will save it as Part type, and name it T-102. We will save it in the folder of Dataset Training. Now click Save, and
1. Save it as ‘‘ Part ’’ type and name it ‘‘ T-102 ’’.
1 2. Click ‘‘ Save ’’ button. 2
111

w w w . sol i dpl a n t3 d . c om
Next, please go back to our SolidPlant, and create a new file by clicking at New. Then select at the assembly template, which is this one, and open it.
1
1. Click ‘‘ New File ’’. 3
2. Select ‘‘ Assembly ’’ file.
3. Click ‘‘ OK ’’ button. 2
At the panel on the left, click Browse, and then select the file that we have saved a moment ago. This is the SolidPlant part file which is named T-102. Then click Open.After that, click OK here.
1. Click ‘‘ Browse ’’ in ‘‘ Begin Assembly ’’ panel. 1
2. Select file ‘‘ T-102.SCDPRT ’’.
3. Click ‘‘ Open ’’ button.
4. Click ‘‘ OK ’’. 4 2 3
Next, we will change its viewpoint by selecting at SolidPlant, and select the view we want. We may change the view to Isometric, for example.
1. Select ‘‘ SolidPlant ’’ ribbon.
1 2 2. Click ‘‘ SW Isometric ’’ view.
112

w w w . sol i dpl a n t3 d . c om
After that, we will select Equipment Ribbon, and we will start to use the feature called Convert Equipment to
change file format. First, please notice the name of the file that it is now Assembly file, and it has not yet changed to our model name. Now, click at the button of Convert Equipment. Then the dialog of Create TAG will appear. We will look at TAG, which we want to name. This list includes data in SolidPlant system, which we have previously imported. We will scroll down to T-102, and select it. We can see that it is Tower, which is Equipment. Then click Apply button below to confirm, and then click OK. Now, please notice at the name, and we can see that it has already changed from Assembly to the assembly file named T-102. Now we can save it.
1. Select ‘‘ Equipment ’’ ribbon. 6 1
2. Click ‘‘ Convert Equipment ’’. 3 3. Pick list to select ‘‘ TAG T-102 ’’. 2
4. Click ‘‘ Apply ’’ button.
5. Click ‘‘ OK ’’ button. 5
6. Click ‘‘ Save ’’ button. 4
Chapter 6-22 Design the nozzle positions on equipment Next, we will design the nozzle positions on equipment. First, please go to SolidPlant Ribbon, and change the
viewpoint to SE Isometric. And then zoom it to be able to closely see nozzle positions.
1. Select ‘‘ SolidPlant ’’ ribbon.
2. Click ‘‘ SE Isometric ’’ view. 1 2
Now, we will determine the points on the nozzle positions. Whenever we want to do piping, we can instantly refer to those points. SolidPlant will receive position values and nozzle data, such as size and spec, according to the data we have set.
Now, go to Equipment Ribbon, which we will use for creating nozzle data. And then click at the feature of Create
Nozzle. Then look at the panel of Nozzle Component on the left, and click at the button to create the first Nozzle N1. We will firstly start from the right, which is this one --- N1. After that, look at Database, or the pipe spec, which we will use the name SP01. For Size, select 4 inches. For End Type, choose FL. And the record will be 300-lb Nozzle. This is the case for the model that we have imported from CAD files or central files of equipment. Now, select the checkbox of User Nozzle, and click New Nozzle.
1. Select ‘‘ Equipment ’’ ribbon. 2 2. Click ‘‘ Create Nozzle ’’ feature. 1
3. Click ‘‘ New Nozzle ’’. 3
4. Input the value of parameters. 4 5
5. Click box ‘‘ User Nozzle ’’.
6. Click ‘‘ New Nozzle ’’ button. 6 113

w w w . sol i dpl a n t3 d . c om
In the next step, it will go to Position tab. The parameter is Co-ordinate. Select at the box below to reserve position.
After that, select at the center position of the Nozzle, which means selecting at the edge line.
1. Click ‘‘ Position ’’ tab.
2. Pick list to select ‘‘ Cordinate ’’. 1
3. Select at the ‘‘ Box ’’ below to reserve position. 2
4 4. Select at the edge line of nozzle.
3
created. When done, go to View Menu, and open Points. We can see that now the position of the nozzle point has been
1
1. Click menu ‘‘ view ’’.
2. Drop down to select ‘‘ Point ’’ 2
Next, select the Type tab again, and click the button to create the new nozzle tag for the second nozzle N2. As before, spec is SP01. For size, select 4 inches. For End Type, choose FL. And the record is 300-lb nozzle. Also select the checkbox of User Nozzle, and then click New Nozzle button.
1. Click ‘‘ Type ’’ tab.
1
2. Click ‘‘ New Nozzle ’’. 2
3. Input the value of parameters. 3
4. Click box ‘‘ User Nozzle ’’. 4
5. Click ‘‘ New Nozzle ’’ button. 5
After that, go to Position tab, and click at the box to reserve position. Select at the edge of the second nozzle. Now we already got the position of the second nozzle.
1. Click ‘‘ Position ’’ tab.
2. Pick list to select ‘‘ Cordinate ’’.
1 3. Select at the ‘‘ Box ’’ below to
reserve position. 2
4. Select at the edge line of nozzle. 4
3
114

w w w . sol i dpl a n t3 d . c om
Next, we will do the same for the third nozzle. Now, click at the Type tab, and click at the button to create the third
nozzle tag. As previous, select SP01 for spec. For size, select 4 inches. For End Type, choose FL. The record is 300-lb nozzle. And please make sure that UserNozzle checkbox is selected. When done, click New Nozzle button.
1. Click ‘‘ Type ’’ tab. 1
2. Click ‘‘ New Nozzle ’’. 2
3. Input the value of parameters. 3
4. Click box ‘‘ User Nozzle ’’. 4
5. Click ‘‘ New Nozzle ’’ button. 5
At the Position tab, click at the box to reserve, and then select at the edge of the nozzle. Now, we have got all three nozzles. Then click OK button. Please notice on the left that there are 3 nozzles shown in order.
1. Click ‘‘ Position ’’ tab.
2. Pick list to select ‘‘ Cordinate ’’. 1 4
3. Select at the ‘‘ Box ’’ below to reserve position. 2
4. Select at the edge line of nozzle.
3
Chapter 6-23 Insert the tower to the located point on plant layout in main SolidPlant system In the next step, we will insert the equipment model of tower that we have converted into SolidPlant. Please
notice that the color of T-102 tag is now blue. This tells us that now we have already got the model, but have not inserted it in the plot plan in our main assembly. First, select Equipment main assembly, and click Edit Assembly.
1. Select ‘‘ Equipment ’’. 2
2. Click ‘‘ Edit Assembly ’’.
1
115

w w w . sol i dpl a n t3 d . c om
After that, select the position that we will place the model, and click at this point to reserve the place. Next, go to
T-102 tag, and select it. Please also notice the picture of our tower model. Then click at ‘‘Insert component to model’’, and we will see that the Tower is now already imported. If its positions or directions are not correct, we can instantly use Move or Rotate commands of the equipment to change it.
3
1. Select the position in plot plan.
2. Select T-102 in ‘‘ Document ’’ list.
3. Click ‘‘ Insert Compunent ’’ to model.
1 2
Chapter 7 Route Piping
Chapter 7-1 Route Piping In the next chapter, we will learn about pipe routing. We can see in our model that now we have already got
various equipments, steel structures, and together with pipe racks on the layout. Thus, the next step belongs to piping designers to design pipe routes from nozzles and equipments according to the process in Process &Instrument Diagram that we have received data into the system for accuracy in the process in our plant. The pipe routes design, which concerns how we place them, on which directions they will go, and distances from various parts, depends on designers who must have related knowledge and skills. For example, parallel piping that concerns distance from center to center between pipes, or conditions determining, which piping designers have to know basic information in order to accurately design our pipe routing.
SolidPlant has various tools to facilitate modeling of pipe works. There are many methods to do it. The first
method, which is frequently used, is Manual Route. This method is in the manner of point-to-point along each segment of pipe, or for the case that we know the start and end points. Start and end points are the nozzle positions, which we can specify and then SolidPlant will find directions or routes by using the feature called Auto Route.
For all of these, we will learn how to use them in the next lessons.
Chapter 7-2 How to define a New Pipe Model In the first topic of pipe routing, what we have to basically prepare before running any route lines is to create tag
line model to be basic reference for calling each particular line in the model of pipe routing. We will need to create tag line model for only in the first time, and then we can instantly use it in the next times.
Chapter 7-3 Create the tag of pipe routing from imported P&ID data Now, please click at the task of SolidPlant Pipe Routing, which is this one. After that, look on the right at list of
Active Route, and we can see that as of now there is no tags of any lines. Conceptually, for pipe routing of SolidPlant, before we can do any pipe routing, we have to set tag number for pipe line number.
116

w w w . sol i dpl a n t3 d . c om
Now, we will learn how to set tag. Before we create tag, please consider Process &Instrument Diagram. We will
create tag number in accordance with this P&I Diagram. We will firstly create tags for the lines located on pipe racks. Now we will zoom at this position to see the tag numbers of lines that we will create. There are tags of lines called 026, 021, 023, 022, 024, and 025. That is there are 6 lines altogether, which we have to prepare data for.
Now, return to our SolidPlant, and select ‘‘New pipe model’’ and click it to create tag. The dialog of Create TAG will appear. Click at the list of Tag, and we will see the databases that we have in the system. These databases are line list that we have initially imported. We will first select the line 026. From the line we choose, it will get related data from the system to show here. For example, the data of Description, Service, Spec, and Size, which we can automatically get here. As of now, please look at the box of Color By. We can see that now the colors will change corresponding to Service. Now, select at Custom. After that, double-click at Color Preview, and the dialog of Color will pop up for us to choose colors we want. As for the service of CWS, we will use the color yellow, so select yellow and click OK. After that click Apply button, and then OK. Please check to see that line 026 that we have just created is now active.
We will do the same for all the remaining lines. Click at the New pipe model button, and select the next line
number, which is 021. And then change color by going to Color by and choose Custom. After that, click at Color Preview. The color that we will use for this service, which is RW, is green, so select green and click OK. Then click Apply and OK to confirm.
Now, click at New Pipe Model again, and go to TAG picklist to select 023. And then go to Color by and choose
Custom. After that, double-click at Color Preview. The color that we will use for this service, which is RV, is light blue, so select light blue and click OK. Then click Apply and OK to confirm.
Please click at New Pipe Model again, and choose line 022 from TAG picklist. And then go to Color by and choose
Custom. Then double-click at Color Preview. The service here is BFW, which we will use the color dark blue, so select dark blue and click OK. Then click Apply and OK.
Next, click at New pipe model again, and select line 024 form TAG picklist. After that, choose Custom at Color by,
and then double-click at Color Preview. The service here is CWR, which we will use the color purple, so select it and click OK. Then click Apply and OK.
Now, we will do it for the last line. Click at New pipe model, and select line 025 from TAG. After that, choose
Custom at Color by, and double-click at Color Preview. Please notice that the service is RV, which we will use light blue, so select light blue and click OK. Then click Apply and OK.
117

w w w . sol i dpl a n t3 d . c om
Now, we will verify that we have all 6 tag line numbers ready for using in models on pipe racks.
1. Select ‘‘ New pipe model ’’.
2 2. Go to ‘‘ TAG ’’ Then pick list
‘‘ TAG No.026 ’’. 1
3. At ‘‘ Color By ’’ pick list to select ‘‘ Custom ’’ then select color.
3 4. Click ‘‘ Apply ’’ button. 4 5. Do the same all remain line tag No. 021-025
Chapter 7-4 Create the tag by manual input In the next topic, we will explore the case that we want to create tag line numbers of pipelines on new models
additional to what we have initially imported. Now we will learn how to do it. Go to SolidPlant Pipe Routing, and look at the picklist of Active Route. These are the lines that we previously have. Next, we will create the new ones. In the same way, click at the button of New pipe model, and go to TAG box on the Create TAG dialog. We can instantly type the name of line number as we want, for example, LINE_001. We can also input the name in description as we want, such as ‘‘NEW LINE PIPE’’. We can select the required service as well. For spec, select SP01. And for Main Size, we can specify the size we want to use in this line. In the same way, we can also set ‘‘Color by’’. For example, we will select Custom, and determine color in the Color Preview. When finished, click Create button. Please notice on the right, in the Active Route, that we now have the new line number by manually inputting it.
1. Select ‘‘ New pipe model ’’.
2. Go to ‘‘ TAG ’’ Then type ‘‘ Line_001 ’’ in ‘‘ TAG field. 3 2 4
3. In ’’ Description field ‘‘ type ’’ NEW LINE PIPE ‘‘ for another field follow like a data in picture. 1
4. For Specifacation picklist to select SP01, then select 6 Inch at Main Size, for Color By select "Custom" 5
5. Click ‘‘ Create ’’ button.
Chapter 7-5 SolidPlant pipe routing methods as below Next, we will learn how to do pipe routing in our SolidPlant. We will start from the first method, which is called
Manual Route. The concept of Manual Route is that we can draw pipe segment in a point-to-point manner. That is we can draw a sketch lines as required, or according to paths. When finished, it will generate and get pipes together with fittings, and put them on paths that we have drawn in our sketch.
The second method is called Smart Fitting. In some cases, we want to create branches separating from main pipe.
For instant, for line header, we may tap branch and draw pipes to separate from it. At the separating point, they will use a component called Straight Tee, or sometimes Straight Tee with Reducer, or drill in a horse-riding manner or Stud-In.
The third method is called Auto Route. For Auto Route, in the case that we have 2 equipments with nozzles on
them, we can design position from one nozzle at the start point to another nozzle of the destination equipment. Then the program will simulate route paths for us. We can choose direction on our route or path. After that, it will generate pipes together with fittings on our center line path.
We will learn how to use these 3 methods in the next topics.
118

w w w . sol i dpl a n t3 d . c om
Chapter 7-6 Manual Route
Now, we will learn the first pipe routing method, which is called Manual Route. Manual Route uses the existing concept of SolidWorks, which is drawing a sketch in a point-to-point manner. SolidPlant has brought this benefit to be used, because pipe routing needs to know directions and distances. Thus, pipe routing may have various characteristics. In general pipe routing, it will be routed in the horizontal plane. In some cases, it may need to be routed in some ways other than in the horizontal plane, such as swing on the plane, or swing with offset. For these, we can use this concept to design corresponding to our required directions. Initially, we can draw a sketch line of the system. The line that is helpful in drawing, which have been drawn and its properties have been determined, may be construction line, such as in the offset of the system. To be appropriate for piping design, piping designers can control and specify distances as desired.
Chapter 7-7 Make pipe routing on space Next, we will learn how to make pipe routing on a wide space. This topic, in fact, is about pipe routing on space of
our area. When finished, we will move pipes up onto the level of pipe racks. We can see the pipe racks here in this area. We will place them on the top of steel at the level of 4200.
Chapter 7-8 Place pipe routing on the pipe rack Next, we will begin to place pipes on space. Before we do that, we will manage how the output is shown. As of now, the area that we will work on is at this pipe rack. Other areas will not be concerned. So in order to reduce working load, we will hide models by selecting main assembly and clicking at Hide Component.
1. Select ‘‘ Equipment ’’. 2
2. Click ‘‘ Hide Components ’’.
1
Next, please expand the main assembly of Structure. We will close the structure models in other areas. We will select only our pipe rack to make it active. First, select them all in the main assembly, and then deselect Grid Frame, which is our pipe rack. After that, we will hide the selected ones by clicking at Hide Components.
Now, only the pipe rack model is shown. After that, select at the task of SolidPlant Pipe Routing.
1. Expand the main assembly
of Structure. 1
2. Select then all in the main assembly and then deselect ‘‘ Grid Frame ’’. 3
3. Click ‘‘ Hide Component ’’. 2
119

w w w . sol i dpl a n t3 d . c om
To make active the routes that we want to work with. For the active routes that we want to currently open, select
025 from the picklist of Active Route. This is the first line that we will use. Please notice that upon choosing line 025, the Piping Preference will set values for spec and size as well as show components below. These components are the currently active components in the spec SP01 and the size of 4 inches, for example, valves, fittings, pipes, which we can immediately see.
Now, look at the top, and we can see that now we are active at line 025. After that, please select Routing Ribbon,
and choose the feature of Manual Route.
1. Select tasle of ‘‘ SolidPlant Pipe Routing ’’. 3 1
2. In ‘‘ Active Route ’’ pick list to select ‘‘ 025 ’’. 4
3. Select ‘‘ Routing ’’ ribbon. 2
4. Choose the feature of ‘‘ Manual Route ’’
After clicking Manual Route, the 3D Sketch model will be opened. Then we will go to top view by selecting SolidPlant Ribbon and click at Top. We will place it on the area of pipe rack, so we will start at this point. Now we have determined the start point. We can see that our SolidPlant has prepared a function for drawing pipe on the plane. Please look at the axis, which is now active at X and Y. If we move cursor vertically, arrowhead and output will be locked on Y axis. If we move cursor horizontally, it will be locked on X axis. We can change the active axis by pressing Tab button anytime while we are sketching.
Now, we will zoom out and pan it by pressing Control and holding it to move the picture, and then pressing Scroll
button. After that, click at this point, and then press Escape. The program will start creating a pipe as we can see here.
1. Select ‘‘ SolidPlant ’’ ribbon.
2. Click ‘‘ TOP ’’ view. 2
3. 3 to 4 Sketching to point. 1
4. 3 to 4 and then press ‘‘ Escape ’’ 3
* 4
Next, if we want to look at its Isometric View, go to SolidPlant Ribbon and select Isometric. We will see that the pipe is placed in the horizontal plane.Next, we will draw another line. As of now, please go out of Sketch.
1. Select ‘‘ SolidPlant ’’ ribbon. 3
2. Select ‘‘ SW Isometric. 2 1
3. Exist from sketch.
120

w w w . sol i dpl a n t3 d . c om
And select line 024 from the picklist of Active Route. After that, select Top to get top view, and zoom to closely see the area. The next pipe line will be placed on the right of line 025. Now, select Routing Ribbon, and then click at the feature of Manual Route again. It will open 3D Sketch. Trying to lock in Y axis, we will draw it by zooming and panning down to get the vertical line, and press Escape. Now, we have got one more pipe line. Then go out of the Sketch.
We will look at Isometric view. Go to SolidPlant Ribbon, and choose SW Isometric. We will see pipes in the
horizontal plane below.
1. Select tasle of ‘‘ SolidPlant Pipe Routing ’’. 3 7
2. In ‘‘ Active Route ’’ pick list to select ‘‘ 024 ’’. 4
3. Select ‘‘ Routing ’’ ribbon. 5 2 1
4. Choose the feature of ‘‘ Manual Route ’’ 6
5. 5 to 6 Sketching to point.
6. 5 to 6 and then press ‘‘ Escape ’’.
7. Exit from Sketch.
Chapter 7-9 Move pipe by Elevation Move Pipe feature We will see that now we have two pipes. They are line 025, which is blue, and line 024, which is purple. They are
placed in the horizontal plane of the floor in the area of pipe rack. How can we move them to place on the Top of Steel of level 4200? The pipe rack on the level of 4200 is the middle line. And we want to bring the bottoms of pipes to place on that level. We will learn how to do it.
First, we have to make active at the line that we want to work with, and this is what we have to do every time when
working. Now, zoom at the area of pipes, and click this one to be active. Then look above to see if it is active, and we can see that now it is active at the main assembly of line 025. After that, go to Routing Ribbon. The feature that we will use is Elevation Move Pipe, which is this one, so click it. Upon clicking it, a panel will appear on the left.
1. Click center of pipe. 3
2. Click ‘‘ Routing ’’ ribbon.
3. Select ‘‘ Elevation move pipe ’’ feature. 1 2
4. Select ‘‘ Pipe Reference. 4
5. Select center lint of pipe. 5
121

w w w . sol i dpl a n t3 d . c om
For Pipe Reference, please select at the center line of the pipe. And then in the Node Reference, the cross-section
of this pipe will instantly appear. After that, look at Target Reference, which is the position that we want to place the pipe. So click in the Target Reference box to reserve, and then select at the surface of this shape member. Please notice at Node Reference that the cross-section of the pipe has changed to have 3 points on it. The upper point is the top of pipe. The middle is the center of pipe. And below is the bottom of pipe. Now, look below in the field called Distance, we will see that it will make a distance active for us. First, we will choose a reference point. Go to Node Reference, and click at the bottom of pipe. Please notice that the distance value has changed depending on the pipe size. After that, click in the distance box to reserve and input the offset value to be zero. When done, click Apply button. Please examine the pipe, and rotate to see that the bottom of the pipe is exactly placed on the level. Then click OK to go out. Now we have already got one line.
1. Click ‘‘ Taget Reference ’’ field.
2. Select at position ‘‘ Top of beam ’’ 3 6 for reference pipe elevation. 1 2
3. Select ‘‘ Node Reference ’’. 4
4. For ‘‘ Distance ’’ input the offset valve to be ‘‘ Zero ’’
5 5. Click ‘‘ Apply ’’ button.
6. Click ‘‘ OK ’’.
In the same way, we will do this with the pipe below as well. We will double-click at the sketch of the pipe line to make it active, and the active line will now be the line 024. After that, go to the feature of Elevation Move Pipe again. And select at the center line of the pipe, and then click to reserve at Target Reference. Then select at the surface of beam. When finished, change the reference point to the bottom of the pipe. And input the offset distance to be zero at the bottom of the pipe, and then click OK. Now we have already got 2 pipe lines on the Top of Steel level of 4200 as reference to the bottom of the pipe. As of now, please go out of the Sketch.
Do it same way for pipe line .024 ( Repeat step Fig 7-11 ).
Chapter 7-10 Adjust pipe spacing by Elevation Move Pipe feature After we have already moved the pipes, and placed the bottoms of the pipes on the level of 4200. Next, we will
adjust the pipes to be farther from the column. We will learn how to adjust pipe spacing from center to center. First, go to SE Isometric view, which is this one, and zoom at the head of the column. Now, look at the first pipe
line, which is line 025. We will set the distance from the side of this pipe to the surface of this column to be equal to typical spacing. Next, for the other pipe line or line 024, which is the purple line, we will set the spacing of this line in a center-to-center manner.
122

w w w . sol i dpl a n t3 d . c om
Before we adjust spacing, please look at the Typical Stud Standard of Pipe Spacing Chart. Please notice that this
one is for welded piping, not for flange. If we zoom in to see closely, we can see that this is the typical chart that shows spacing. As for the first one referring to the cross-section of pipe, the spacing from the side of pipe to the wall is the value according to standard. And there is also a variable of center-to-center spacing as values in the chart below. The first example that we will do is line 025. The pipe size of this line is 4 inches. Its spacing from beam will be as in this row, which is the value of Dim ‘‘B’’ in the chart. So the spacing what we will use is 130 mm. And the center-to-center spacing between 4-inch pipe and 6-inch pipe is 200 mm. as from the chart.
Typical Stud Standard of Pipe Spacing Chart.
Now, please return to our SolidPlant. Double-click at the center line of the pipe line 025 to make it active. And then go to Routing Ribbon, and call the feature of Elevation Move Pipe. After that, click at the center line, and its cross-section in Node Reference will appear like this. Then click to reserve at Target Reference, and zoom to closely see the pipe. We want it to be far from the surface edge of this column. The viewing concept is to look at the axis. For this case, we will have to set the distance of X axis. And when we look through in the direction of Y axis, we can determine that the reference point is on the left of the pipe, so click at the point on the left. Then we will set the spacing to be 130 as the value that we have seen in the typical table. When done, click Apply. And we will get it. Then click OK, and go out of Sketch.
1. Double-click at the line 025 to make it activate. 3
2. Click ‘‘ Routing ’’ ribbon. 6 9 5
3. Select feature ’’ Elevation Move Pipe ‘‘. 2 1
4. Select the center line of pipe. 7
5. Click to resevs at ’’ Target Reference ‘‘. 8 6. Click at Surface of column for make ’’ Target 4
Reference.
7. In ‘‘ Distance ’’ at ‘‘ X axis ’’ input value 130 for make spacing pipe between column.
8. Click ‘‘ Apply ’’ button.
9. Click ‘‘ OK ’’ button.
123

w w w . sol i dpl a n t3 d . c om
In the same way, we will set center-to-center spacing between the 4-inch pipe and 6-inch pipe to be 200 as we
have seen in the typical table. Now, double-click at the line 024 to make it active. After that, call the feature of Elevation Move Pipe, and click at the center line of the pipe. Then click to reserve at Target Reference, and select at the center line of the pipe line 025. After that, scroll down the left panel to input the distance values. The spacing that we want to set is in the direction of X axis, and we will input the value of 200 for it. When done, click Apply button. Now, we have already got the required center-to-center spacing. After that, click OK, and go out of the Sketch.
1. Double-click at the line 024 to make it activate. 3
2. Click ‘‘ Routing ’’ ribbon. 6 9 5
3. Select feature ’’ Elevation Move Pipe ‘‘. 2 1
4. Select the center line of pipe 024.
5. Click to resevs at ’’ Target Reference ‘‘. 7
6. Click at Surface of column for make ’’ Target 8 4 Reference.
7. In ‘‘ Distance ’’ at ‘‘ X axis ’’ input value 130
for make spacing pipe between column.
8. Click ‘‘ Apply ’’ button.
9. Click ‘‘ OK ’’ button.
Chapter 7-11 Make pipe routing connect between equipments Next is also manual pipe routing as previous. However, this is the manual pipe routing between equipments from
one nozzle of equipment to another nozzle of other equipment. Next, we will learn how to do it.
Chapter 7-12 Make pipe routing short piece from the suction’s nozzle P-103A Next, we will learn how to manually do pipe routing from equipment to equipment, which is from this pump to
this vessel. We will look at its area position. First, please rotate and zoom at the position by pressing Scroll button at the edge of the column. And then rotate it like this.
Rotate and zoom at the position by press Scroll button at the adge of the colmn and then rotate it like this.
124

w w w . sol i dpl a n t3 d . c om
2
After that, zoom in, and rotate it a little bit. Then click at SolidPlant Pipe Routing, and then click at the button of
New pipe model to create new route. We will get line 001 to be the current line that we are working on.
1. Click at SolidPlant Pipe Routing.
3 2. Click at button of New pipe model.
3.At a dialog box TAG Property pick 1
drop down list in ‘‘ TAG ’’ field to select
‘‘ TAG 001 ’’. 4 2
4. Click ‘‘ Apply ’’ button.
Here, the face of the pump is flange of 8-inch size. Please see that the current value is now 6 inches, so we will change it to 8 inches. After that, select at the Routing Ribbon, and choose Manual Route. We will connect from the flange, so first we will open ‘‘Snap to center’’. And then snap here and draw the Sketch along X axis for a short distance, and then click and press Escape button. Now we have already got the short piece of pipe.
1. At ‘‘ SolidPlant Pipe Routing ’’ go to 1
Pipe Size Pick list to Select Pipe Size 8. 3
2. Click ‘‘ Routing ’’ ribbon. 5
3. Select ‘‘ Manual Route ’’. 4
4. Select ‘‘ Snap to Canter ’’.
5. Draw the sketch along X axis for a short distance and then click ‘‘ Escape ’’ button.
Chapter 7-13 Place the Eccentric Reducer 8’’X6’’ on the line Next, click at the point at the end of the pipe. After that, go to Component Ribbon, and select Eccentric Reducer.
Instantly, the dialog of records of Eccentric Reducer will appear. We will use 8x6, which is the first one. And then click Create.
1. Click ‘‘ Component ’’ ribbon. 2 1
2. Select ‘‘ Eccentric Reducer ’’. 3
3. In dialog of records use ‘‘ Main Size 8, Run Size 6’’.
4. Click ‘‘ Create ’’ button. 4
125

w w w . sol i dpl a n t3 d . c om
3
Now we have got Eccentric Reducer, but its placement is not correct, so we have to rotate it. Please select at the
Eccentric Reducer. After that, go to Routing Ribbon. We will rotate by using the feature of Rotate Component. The dialog of Rotate Component will pop up. In the dialog, change the angle to 180, and click Rotate. We will get the reducer with the straight side turning up. Then close the dialog.
1. Select at the ‘‘ Eccentric Reducer ’’.
2 2. Click ‘‘ Routing ’’ ribbon.
4 3. Select ‘‘ Rotate Component ’’. 6
4. Chang the angle to 180.
5 5. Click ‘‘ Rotate ’’ button.
6. Click ‘‘ Close ’’ button of ‘‘ Rotate Companent ’’ 1
Chapter 7-14 Continue to make pipe connect to Vessel’s nozzle D-102 Next, we will draw a pipe connecting from the reducer. First, we will change the pipe size to be 6 inches. After that,
call Sketch by typing S, and select Line.
1. At ‘‘ Pipe Size ’’ pick drop down
list to select pipe size 8. 2
2. Call sketch by typing ‘‘ S ’’ and select ‘‘ Line ’’. 1
Catch and snap at the end of reducer at this point, and draw along axis like this.
Catch and snap at the end of renducer at point and draw along axis.
126

w w w . sol i dpl a n t3 d . c om
And this, and then press Tab to make it connect to the flange above. We will use Snap and the control of Z axis, so
click at them, and catch here. When done, click Escape. Now, we have already got the pipe between pump and vessel.
1. Press ‘‘ TAP ’’ to malee it connect to flange above.
1 2. Select along Z axis.
2 3. Press ‘‘ Escape ’’.
Chapter 7-15 Define pipe cut length between the Eccentric Reducer and Weldneck Flange by Assign Length feature Next, please notice at this pipe or what we call short piece. We can set the length of this short piece. And we can
also determine the length of every pipe. For instance, if we want to set the short piece of pipe, we can specify it. To do this, first, make this sketch active, and select at this line. After that, go to Routing Ribbon, and use the feature of Assign Length. There will be a dialog for us to input pipe length. We can input zero or the value we want. Here we will input zero, supposing that no length. Then click OK. Please notice that the short piece will instantly get shorter and closer to the flange.
1. Make this sketch active and select this line. 3
2 2. Click ‘‘ Routing ’’ ribbon.
3. Select feture of ‘‘ Assign Lenght ’’. 4
4. In put value ‘‘ Zero ’’ in ‘‘ Pipe Length 1 ’’ dialog, then click ‘‘ OK ’’.
Chapter 7-16 Make the same routing for another pump Next, we will do pipe routing for the suction side of the second pump. The steps will be the same. First, double-click
to make active the route that we already have, because we will use the same sketch of the same line. After that, look at pipe size, and change it to 8 inches corresponding to its nozzle size. And then go to the feature of Manual Route. Then open ‘‘Snap to center’’. Snap here and draw the pipe for a short distance, and then press Escape.
1. Look at pipe size and chang it to 8 inches. 2
2. Select ‘‘ Manual Route ’’ feature.
3. Select ‘‘ Snap to center ’’. 1
4. Snap to center of nozzle and draw the pipe 3 for a short distance, and then press ‘‘ Escape ’’.
4
127

w w w . sol i dpl a n t3 d . c om
After that, click at the point, and go to Component Ribbon and select Eccentric Reducer. Click at the record of
8-inch Main Size and 6-inch Run Size. When done, click Create.
1. click at the point. 3
2. Select ‘‘ Component ’’ ribbon.
3. Select ‘‘ Eccentric Reducer ‘‘. 2 4
4. Click at the record of 8-inch ’’ Main Size ‘‘ and 6-inch ’’ Run Size ‘‘
5. Click ’’ Create ‘‘ button. 1 5
Then select at the Eccentric Reducer. After that, go to Routing Ribbon, and select the feature of Rotate Component to rotate the reducer. Change angle in the dialog to be 180 degrees, and click Rotate, then close it.
1. Select ‘‘ Eccentric Reducer. 3
2. Select ‘‘ Routing ’’ ribbon.
2 3. Select ‘‘ Rotate Component ‘‘ feature.
4. Change angle in the dialog to be 180 4
degrees, and click ’’ Rotate ‘‘. then close it. 1
Next, we will make pipe connecting from the reducer. Select 6 inches from the list of Pipe Size. Type S to open the Sketch, and choose Line.
Type ‘‘ S ’’ to open the sketch and choose ‘‘ Line ’’.
And draw along X axis for a short distance, then press Escape. Now, for the short piece, we will set it to be the same as the previous one. Click at this sketch line, and select Assign Length feature. The length value is now already zero, so click OK.
1. And draw along X axis for a short distance,
then press ‘‘ Escape ’’.
2. Click at this sketch line.
3. Select ‘‘ Assign Length ‘‘ feature.
4. Input value ’’ Zero ‘‘ in ’’ Pipe Length ‘‘ dialog, then click ’’ OK ‘‘ .
128

w w w . sol i dpl a n t3 d . c om
Chapter 7-17 Smart-Fitting
Next, the concept of Smart-Fitting is for connecting equipments in branches. For example, for separation of header lines, it will automatically add straight tee. Or for connection of angles between pipes, it will automatically add Straight Tee fittings. According to this picture, we will route the pipe through an elbow and connect to the line of this elbow. And it will automatically change this elbow to be Straight Tee. This helps piping designers to be convenient and it is not necessary to change fittings for branches anymore.
Chapter 7-18 Make pipe to connect fittings Next, we will route the pipe from this point to connect to this elbow. This connection is as a branch. Our SolidPlant will change this elbow according to the concept of Smart-Fitting, which means to change it to be Straight Tee. Now, please make active at the pipe line to be a current line. After that, type S, and choose Line.
1. Make active at the pipe line to be a current line.
2. Type ‘‘ S ’’ and choose ‘‘ Line ’’.
1 2
Draw and turn it along Y axis. We will also use Relation of ‘‘Along Y axis’’ to help in approaching the required position.
1. Draw and turn it along Y axis. 2
2. Select relation of along Y axis ‘‘.
1
And then click at the center of the elbow, which is this one. When finished, click Escape. We can see that the elbow has automatically changed to be Straight Tee.
1. Click at the center of the elbow.
2. Click ‘‘ Escape ’’.
1 2
129

w w w . sol i dpl a n t3 d . c om
Next, we will do pipe routing out of this elbow, in order to make this pipe to be the header line. This means that
when the pipe is connected out of this elbow, it will instantly become Straight Tee for us. Now, please type S, and then select Line.
Type ‘‘ S ’’ and then select ‘‘ Line ’’.
We will connect out of the center of the elbow, and draw a line along Y axis, then press Escape.
Draw a line along Y axis, then press ‘‘ Escape ’’.
And we will now get the pipe line. Next, we will put on the flange at the end of this pipe. Click at the point, and select Component Ribbon, and choose Flange.
3
1. Click at the point. 2
2. Select ‘‘ Component ’’ ribbon.
3. Choose ‘‘ Flanfe ’’.
1
Now, we will set the length of this pipe to be 200, or we can call it short piece of 200. Select at this center line. Then go to Routing Ribbon, and choose Assign Length. Input 200 for the length of this part of pipe, and click OK. This part of pipe will be shortened accordingly. When done, go out of the Sketch.
1. Select at this center line. 3
2. Go to ‘‘ Routing ’’ ribbon. 5 2
3. Choose ‘‘ Assign Lingth ’’ feature.
4. Input value 200 in ‘‘ Pipe Lenght ’’ dialog box, then click ‘‘ OK ’’. 1
4 5. Click go out of the sketch.
130

w w w . sol i dpl a n t3 d . c om
Chapter 7-19 Manual Route and Smart-Fitting
In the next topic, we will practice pipe routing by using the concept of Manual Route together with Smart-Fitting.
Chapter 7-20 Make pipe routing for 003, 004, and 008 Next, we will create branch lines that are located on pipe lines on the pipe rack. Now, please zoom to this position,
and notice the dark blue pipe line, which is line 022. We will make this line active by double-clicking at its center line. After that, draw a branch line by using Manual Route. We will initially draw a branch line. Press Tab button to get Z axis to show horizontal axis, and click it, then press Escape. Now, we will get a Straight Tee from it. When finished, go out of the Sketch.
1. Double-click at this center line.
2. Select ‘‘ Manual Route ’’ feature. 2
3. Press ‘‘ Tab ’’ button to get ‘‘ Z axis ’’ 3 and draw a branch line along Z axis, then finish press ‘‘ Escape ’’.
1
We will do the same for line 024, which is the purple one. Double-click at it. In the same way, select at the feature of Manual Route, and then click at the sketch line of the pipe. After that, lock the axis, and we will draw a line along Z axis, then click and press Escape. Now we have already got it.
1. Double-click at this center line.
2. Select ‘‘ Manual Route ’’ feature. 2
3. Press ‘‘ Tab ’’ button to get ‘‘ Z axis ’’ and draw a branch line along Z axis, 3 then finish press ‘‘ Escape ’’.
1
After that, we will adjust distances and spacing. When we design, we need to set spacing between pipes, and distance between pipe and beam. We will start from line 022, which is the dark blue one. Now, please go out of the Sketch. Then make the line active by double-clicking at it. After that, go to Routing Ribbon, and select the feature of Elevation Move Pipe.
1. Double-click at this center line. 3
2. Click ‘‘ Routing ’’ ribbon. 2
3. Select ‘‘ Elevation Move Pipe ’’ feature. 1
131

w w w . sol i dpl a n t3 d . c om
4
And click at this pipe line, and then click at the face of 5-inch beam. We will see the distance value of Y axis, as
reference to a specified point of the pipe’s cross-section. Here, we will use the center to be a reference point. And we will set the distance to be -300, and click Apply. When done, rotate and see it. And then click OK to go out, and got out of the Sketch.
1. Click at this pipe line. 5
2. Click at the face of 5-inch beam. 2
3. Set distance value of Y axis to be (-300) 3 1
4. Click ‘‘ Apply ’’ button.
5. Click ‘‘ OK ’’. 4
Next, go to the purple line. Double-click at the pipe, and go to the feature of Elevation Move Pipe, and then click at the center line of the pipe. Certainly, we will also set it to be far from the center of the other line, which is line 022. So click at line 022 as well. It will show the cross-sections of both pipe lines. Certainly, we will use a center-to-center distance along Y axis. So we will select at the box of Y axis, and input the value to be -500. When done, click Apply and then click OK. Now we have already got the required spacing.
1. Double-click at the pipe.
2. Select feature ‘‘ Elevation Move Pipe ’’. 3 6
3. Click at the center of the pipe. 2 4. At ‘‘ Distance ’’ along Y axis in put the
value to be (-500) 1
5. Click ‘‘ Apply ’’ button.
6. Click ‘‘ OK ’’. 5
Next, we will shorten these two pipes that connect the Straight Tee, because the pipe that will connect these main
pipes must be another line. Now, double-click at the dark blue line, and go to the feature of Assign Length. Then input zero for the pipe length value, and click OK. The pipe will be shortened to be equal to the Straight Tee. Now, go out of the Sketch.
1 1. Double-click at center of the pipe line. 2
2. Select ‘‘ Assign Lenght ’’ feature. 3
3. In ‘‘ Pipe Lenght ’’ dialog input the value to be ‘‘ Zero ’’, then click ‘‘ OK ’’.
132

w w w . sol i dpl a n t3 d . c om
1
Next, double-click at the second pipe line, which is the purple one. Select at the pipe, and select the feature of
Assign Length. Input zero for the length value, and click OK. After that, go out of the Sketch.
1. Double-click at center of the pipe line.
2. Select ‘‘ Assign Lenght ’’ feature. 2
3. In ‘‘ Pipe Lenght ’’ dialog input the value to be ‘‘ Zero ’’, then click ‘‘ OK ’’.
3 1
Now, we will look at the position that we will do pipe routing. Go to SolidPlant Pipe Routing, and click New pipe
model button. In the dialog of Create TAG, select line 003. It will show details of the line, such as spec, size, and others. For ‘‘Color by’’, change from Service to Custom. Then double-click at Color Preview, and change the color to dark blue, and then click OK. When done, click Apply, and then OK.
1. Select ‘‘ SolidPlant Routing ‘‘. 1 2. Click ’’ New pipe model ‘‘ button. 3
3. Pick list at a ’’ TAG ‘‘ to select ’’003 ‘‘. 4 4. Color by select ’’ Custom ‘‘.
5. Color preview double-click and change 5 2 color to dark blue, then click ’’ OK ‘‘.
6 6. Click ‘‘ Apply ’’ button and then ‘‘ OK ’’.
After that, select the Manual Route feature. We will start from this Straight Tee, and draw up. Press Tab button to lock the axis to be vertical, which is along Z axis that is yellow. Next, press Tab, and then draw along X axis and click. Next, in the horizontal plane of XY, the line that we will draw next is neither along X nor Y axis, but it is slanting and makes angle, which later we will set to be 45 degrees. After that, click the checkbox of Disable Routing Mode, because we will input dimension on this sketch line.
1. Select ‘‘ Manaul Route ‘‘ feature. 3 2. Click at center of ‘‘ Straight Tee ‘‘ and
draw up alowg Z axis.
3. Press ‘‘ Tab ‘‘ and then draw along X axis and click.
4. Draw about 45 degrees. 2 4
5. Click check box of ’’ Disable Routing ‘‘ Mode. 5
133

w w w . sol i dpl a n t3 d . c om
Right-click on the mouse, and choose Select.
Right-click on the mouse, and choose Select.
Next, we will input dimension by selecting Smart Dimension.
Select ‘‘ Smart Dimansion ’’.
And then click at this line and this line, and input angle value to be 45 degrees, and click OK.
Click line and input angle value to be 45 degrees and click ‘‘ OK ’’.
It will change the angle for us accordingly. After that, deselect the checkbox of Disable Routing Mode.
Deselect the check box of ‘‘ Disable Routing ’’ Mode.
134

w w w . sol i dpl a n t3 d . c om
We will see that it will start to generate. Please notice that the red relation has appeared, because normally the
Manual Route pipe routing method will always maintain the axis in a perpendicular manner. Now, click at the sketch center line. Then, under Existing Relation on the left panel, select Collinear, then right-click at the mouse and select Delete. The relation will disappear.
2 1. Click at the sketch center line.
2. Select ‘‘ Collinear ’’.
3. Right-click at the mouse and
select ‘‘ Delete ’’. 3 1
Next, we will continue to route the line from here to connect to nozzle. Again, select Manual Route, and click at this point. We want to go down along Z axis, so we will use Center Snap tool and Z axis relation. And then click at this nozzle point.
1. Select ‘‘ Manaul Route ‘‘ feature.
2 2. Click at this point. 1 4 3. Select ‘‘ Center Snap ‘‘ tool.
4. Select Z axis relation. 5 3 5. Click at this nozzle point.
We can see that sometimes a part of pipe is gone, so click at the line, and select Rebuild Component to generate it back.
2 1. Click at the line.
2. Select ‘‘ Rebuild Component ’’.
1
And for the length of this part, we can set it as required, by clicking at the line and select Assign Length, and then input the length value as we want. For here, we will set it to be 200, and click OK. Now, we have already got the route line.
1. Click at the line.
2. Select ‘‘ Assign Lenght ’’ feature. 1 2
3. Input value in ‘‘ Pipe Length ’’ dialog box to be ‘‘ 200 ’’ then click ‘‘ OK ’’
3
135

w w w . sol i dpl a n t3 d . c om
Next will be another line, which is line 004. First, we will create a new pipe by clicking at New pipe model. For TAG,
select 004. We will change color in accordance with the main pipe, so choose Custom at Color By. And then, click at Color Preview. We will use the color purple, so select it and then click OK. Then click Apply, and OK.
1. Select ‘‘ SolidPlant Routing ‘‘. 1 2. Click ’’ New pipe model ‘‘ button. 3
3. Pick list at a ’’ TAG ‘‘ to select ’’004 ‘‘. 4 4. Color by select ’’ Custom ‘‘.
5. Color preview double-click and change 5 2 color to dark blue, then click ’’ OK ‘‘.
6 6. Click ‘‘ Apply ’’ button and then ‘‘ OK ’’.
After that, go to Manual Route, and click it. Now, click at this Straight Tee. Press Tab and Lock the axis to be along Z axis. Then change the plane to be on X axis, and draw the slanting line in the plane. And now, please select the option of Disable Routing Mode.
1. Select ‘‘ Manaul Route ‘‘ feature.
2. Click at center of ‘‘ Straight Tee ‘‘ and
draw up alowg Z axis.
3. Press ‘‘ Tab ‘‘ and then draw along X axis and click.
4. Draw about 45 degrees.
5. Click check box of ’’ Disable Routing ‘‘ Mode.
1 4 5
2
3
Right-click at the mouse and choose Select.
Right-click on the mouse, and choose Select.
And then select at this line, press Control, and click at the other line. We want them to be parallel to each other, so click at Parallel button under Add Relations. When done, deselect the option of Disable Routing Mode.
1. Click at the center of this line. 2 4
2. Press control and click at other line.
3. Click at ‘‘ Parallel ’’ button under Add Relations.
1 4. Diselect the option of ‘‘ Disable Routing Mode ’’. 3
136

w w w . sol i dpl a n t3 d . c om
4
We can see that there are red relations. Click at the center of the purple pipe. Look in the right panel, we will see
that Collinear is red. Select at it, right-click on the mouse, and select Delete. The relation will disappear.
2 1. Click at the center of the pipe line.
2. Select ‘‘ Collinear ’’ and right-click
on the mouse. 1 3. select ‘‘ Delete ’’. 3
Next, we will continue to draw our sketch line, which is the pipe connecting this end point and this nozzle. Again, select Manual Route, and click at the end point of the pipe. After that, open Snap to Center and control relation along Z axis to help in approaching the required position. Then press Escape.
1. Select ‘‘ Manaul Route ‘‘ feature. 2 1
2. Click at the end point of the pipe.
3. Select Snap to open center.
4. Select relation along Z axis. 5 3
5. Click at the center point of vessel nozzle.
Now, we have got the required pipe route. Looking from the side, we can see that the levels of both pipes are not the same. We can move the center line of the purple pipe up to be in the same level at the blue line. Select the center line or sketch line of the purple line, and select the feature Elevation Move Pipe, and then click at the center line of the purple line. After that, select at the center line of the blue pipe.
4
1. Select the center line of this pipe.
2. Select feature ‘‘ Elevation Move Pipe ’’. 2
3. Select that line again.
4. Select other line. 1 3
137

w w w . sol i dpl a n t3 d . c om
Next, consider distance on Z axis, which we can see the difference value. Input zero for it, and click Apply. Please
see that now the center lines of both pipes are already on the same level. Then click OK. Now we have already got 2 pipe lines, which are line 003 and 004. Go out of the Sketch.
1. Input value ‘‘ Zero ’’ at distance on Z axis. 3
2. Click ‘‘ Apply ’’ button.
3. Click ‘‘ OK ’’ then go out of the sketch. 2
1
The pipe that we will generate next is line 008. It is the line that goes out of this tank to connect into the main line, which is this blue line, on pipe rack. First, go to SolidPlant Pipe Routing, and click at the button of New pipe model. And select 008 for TAG. Please notice that the size of this line is 4 inches. For Color By, we will use Custom, and we will change its color corresponding to system. Double-click at Color Preview, and choose blue, then click OK. After that click Apply and OK.
1. Select ‘‘ SolidPlant Routing ‘‘. 1 2. Click ’’ New pipe model ‘‘ button. 3
3. Pick list at a ’’ TAG ‘‘ to select ’’008 ‘‘. 4 4. Color by select ’’ Custom ‘‘.
5. Color preview double-click and change 5 2 color to dark blue, then click ’’ OK ‘‘.
6 6. Click ‘‘ Apply ’’ button and then ‘‘ OK ’’.
Next, we will look at the front view. Go to SolidPlant Ribbon, and select Front. We will see distances in the plane.
1. Select ‘‘ SolidPlant ‘‘ ribbon. 2
2. Click ’’ Front ‘‘ view. 1
138

w w w . sol i dpl a n t3 d . c om
4
After that, go to Routing Ribbon, and select Manual Route. Open Snap to Center, and then catch the nozzle, and
draw a line up according to our required sketch. When finished, press Escape, and wait for it to generate.
1. Select ‘‘ Routing ’’ ribbon.
2. Select ‘‘ Manual Rouye ’’ feature. 2 1
3. Click ‘‘ Snap to center ’’. 5
4. Click the nozzle point. 3
5. Draw a line up according to our required sketch when finished press ‘‘ Escape ’’.
4
After that, if we want to draw a line in a Smart-Fitting manner, noticing this elbow and also this elbow, we can continue to draw a sketch line from them. So open Sketch, and draw a line out of the elbow. We will make it go along X axis, so please open the relation of Along X axis. When done, press Escape. It then will generate the pipe accordingly.
1. Draw a line out of the elbow. 3 2. Click the relation of Along X axis.
3. Draw to conect other point of elbow.
2 1
We can adjust and pull it up if we want to change distances in our design as required. After that, go out of the Sketch.
2 1. Pull it up if we want to change distances. 1 2. Go out of the Sketch.
Next, we will look at the main pipe. We need to have a Straight Tee connecting from it. And then we will have to rotate it to be in the angle of 45 degrees. Now, double-click to make it active at this line, which is line 025. Click on the line. Then go to select the checkbox of Disable Routing Mode to have this status on. The first line will be drawn along Z axis. Then press Escape, and click to select the line to be a reference axis, which is to select the Option of ‘‘For Construction’’.
1. Double-click to make it active at this line.
1 2. Type ‘‘ S ’’ then select ‘‘ Center line ’’.
3. Select the checkbox of ‘‘ Disable Routing Mode ’’
to have this status on. 3
4. Drawn along Z axis.
5. Press ‘‘ Escape ’’. 2

w w w . sol i dpl a n t3 d . c om
When done, select Line to sketch again. Click at this point. Draw a line on the ZX plane. And set dimension to be
an angle of 45 degrees. Choose this line and also this line, and input the angle value of 45 degrees. Now we have got it. Next, click to release Disable Routing Mode. And now we have already got a slanting Straight Tee of 45 degrees, which will connect to this pipe.
1. Type ‘‘ S ’’ select line then Draw a line on the ZX plane.
2. Type ‘‘ S ’’ select ‘‘ Smart Dimansion ’’ 1 then click the line and input the angle 3 value of 45 degrees.
3. Click to release ‘‘ Disable Routing Mode ’’.
2
Next, we have to move this Straight Tee to be in the same line of the center line of this pipe. As of now, we are already active at this Straight Tee pipe, and we will click on its pipe line. Then select Elevation Move Pipe, and click at the center of this pipe. When done, select the other pipe.
1. Click at center of pipe. 2
2. Select feature ‘‘ Elevation Move Pipe ’’. 1
3. Click at center of pipe again. 3
4. Select other line.
4
Certainly, we will use the common center for both lines. Scroll down to see the distance difference along Y axis.
And surely, the common center for both lines means the distance difference is zero. So input zero, and click Apply. The Straight Tee will be moved to be at the common center. Then click OK to go out.
1. At ‘‘ Distance ’’ along Y axis input value 3 to be ‘‘ Zero ’’.
2. Click ‘‘ Apply ’’ button.
3. Click ‘‘ OK ’’. 2
1

w w w . sol i dpl a n t3 d . c om
2
After that, we will shorten this pipe, because the pipe line must be the branch line that connects to the Straight
Tee. Select at this pipe, and click Assign Length, and input zero. The pipe will be shorten to fit the Straight Tee.
1. Click at center of pipe. 2
2. Click ‘‘ Assign Lenght ’’ feature. 3
3. Input value in ‘‘ Pipe Length ’’ dialog box to be ‘‘ Zero ’’ then click ‘‘ OK ’’.
1
After that, select Manual Route. Open the option of Disable Routing Mode. Then click at the pipe end to catch it, and change the plane to ZX. And then draw to a line to the opening side of the Straight Tee.
1. Click ‘‘ Manual Route ’’ feature. 1 3
2. Click for check box ‘‘ Disable Routing Mode ’’.
2 3. Draw the line from end point of pipe to end
point of ‘‘ Straight Tee.
When done, set dimension to be the angle of 45 degrees. After that, deselect Disable Routing Mode. It will generate a 45-degree elbow together with pipe.
1. Set dimension to be the angle of 45 degrees.
2. Click for check box ‘‘ Disable Routing Mode ’’. 2
1
Please notice that there is a red relation. Click at the center line of the pipe, and select at Collinear12 to delete it
1. Click at the center line of the pipe. 3 2. Select at ‘‘ Collinear12 ’’.
3. Right click then select ‘‘ Delete All ’’
1
141

w w w . sol i dpl a n t3 d . c om
Now, we have already got the line that connects to the main line with 45-degree Straight Tee. If we want to take
this pipe out, which means that there is no short piece, we can select at its center line and click Assign Length. Input zero for the length value, and click OK. We can see that the elbow has not turned up.
1. Click at center of pipe. 2 2. Click ‘‘ Assign Lenght ’’ feature. 1
3 3. Input value in ‘‘ Pipe Length ’’ dialog box
to be ‘‘ Zero ’’ then click ‘‘ OK ’’.
Click at this point, and click Rebuild. It will regenerate the 45-degree elbow for us.
2 1. Click at this. point
2. Click ‘‘ Rebuild Component ’’ feature.
1
Now we have already got this line.
Chapter 7-21 Auto-Route Next, we will learn another method of pipe routing, which is called Auto Route. Auto Route is the pipe routing
method that SolidPlant is the one who designs or generates paths from starting point to destination. Piping designers can choose directions for various positions and placements of each point. This will facilitate and accelerate the generation of our pipe routes. In practice, after we have finished our design, Auto Route will generate the required pipes. After we have used this feature, our pipes and routings could be further managed by handling or changing the placing positions and directions to be more appropriate. When piping designers have used this feature, some lines may collide. However, we do not need to worry about it. Because our pipe routing is flexible, we can change directions or adjust various distance values. We will learn about it in details later.
142
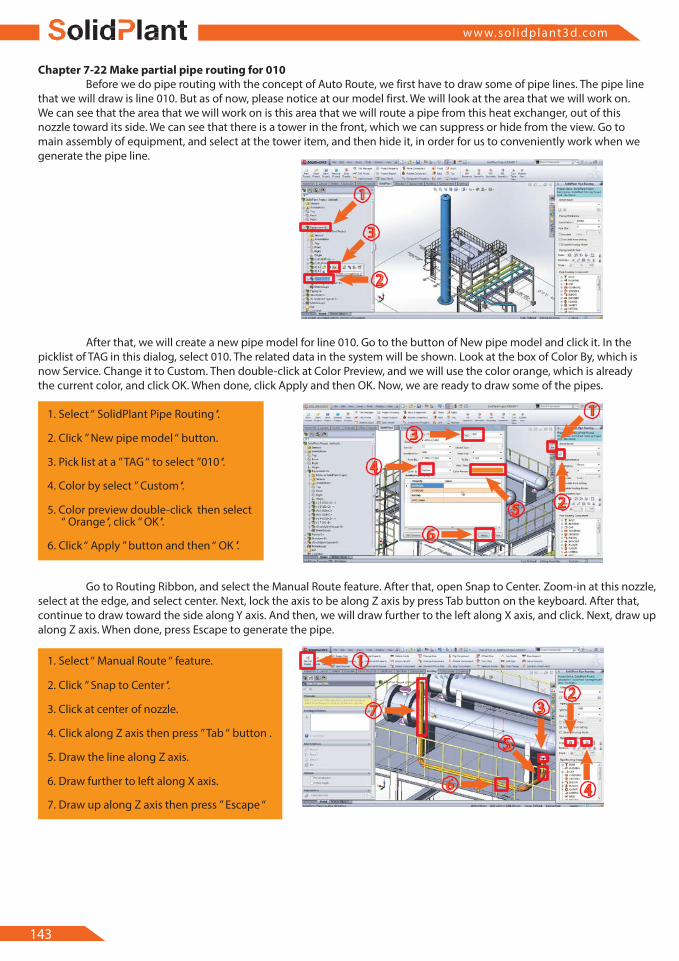
w w w . sol i dpl a n t3 d . c om
Chapter 7-22 Make partial pipe routing for 010
Before we do pipe routing with the concept of Auto Route, we first have to draw some of pipe lines. The pipe line that we will draw is line 010. But as of now, please notice at our model first. We will look at the area that we will work on. We can see that the area that we will work on is this area that we will route a pipe from this heat exchanger, out of this nozzle toward its side. We can see that there is a tower in the front, which we can suppress or hide from the view. Go to main assembly of equipment, and select at the tower item, and then hide it, in order for us to conveniently work when we generate the pipe line.
1
3
2
After that, we will create a new pipe model for line 010. Go to the button of New pipe model and click it. In the picklist of TAG in this dialog, select 010. The related data in the system will be shown. Look at the box of Color By, which is now Service. Change it to Custom. Then double-click at Color Preview, and we will use the color orange, which is already the current color, and click OK. When done, click Apply and then OK. Now, we are ready to draw some of the pipes.
1. Select ‘‘ SolidPlant Pipe Routing ‘‘. 1 2. Click ’’ New pipe model ‘‘ button. 3
3. Pick list at a ’’ TAG ‘‘ to select ’’010 ‘‘. 4 4. Color by select ’’ Custom ‘‘.
5. Color preview double-click then select 5 2 ‘‘ Orange ‘‘, click ’’ OK ‘‘.
6 6. Click ‘‘ Apply ’’ button and then ‘‘ OK ’’.
Go to Routing Ribbon, and select the Manual Route feature. After that, open Snap to Center. Zoom-in at this nozzle, select at the edge, and select center. Next, lock the axis to be along Z axis by press Tab button on the keyboard. After that, continue to draw toward the side along Y axis. And then, we will draw further to the left along X axis, and click. Next, draw up along Z axis. When done, press Escape to generate the pipe.
1. Select ‘‘ Manual Route ‘‘ feature. 1
2. Click ’’ Snap to Center ‘‘. 2
3. Click at center of nozzle. 7 3 4. Click along Z axis then press ’’ Tab ‘‘ button .
5 5. Draw the line along Z axis.
6. Draw further to left along X axis. 6 4 7. Draw up along Z axis then press ’’ Escape ‘‘
143

w w w . sol i dpl a n t3 d . c om
2
Now, we have got the route. We will draw more lines, so select Manual Route. Then click at the center line of the
sketch, and draw up. Please notice that it will later add Straight Tee for us according to the concept of Smart-Fitting. Now, press Tab button to make it vertical along Z axis. And then change drawing direction to be along X axis. Now, we have already got our initial route.
1. Select ‘‘ Manual Route ‘‘ feature. 1
2. Select center line of the sketch, Press ’’ Tad ‘‘ to make it vertical along Z axis and draw up.
3 3. Press ’’ Tab ‘‘ to along X axis and draw to next
other center line.
Chapter 7-23 Automatic Pipe routing by Auto-Route In the next topic, we are ready to do pipe routing by using Auto Route method. Initially, we will open tower
equipment, because the pipe line that we will build will have to connect to the nozzle on the tower. Go the left, at the main assembly of equipment, we can see that the equipment T-102 is hidden, so we will open it. Now we can see the tower equipment.
1. Click at T-102. 2
2. Select ‘‘ Show Components ’’.
1
After that, zoom at the initial route that we have previously prepared. Double-click at this line to make it active. Look at this pipe, which we have to shorten its length. We will connect the to-be drawn line from this Straight Tee by using Auto Route. Now, select this pipe line, and then go to Routing Ribbon. Select the feature of Assign Length, and certainly, we will input zero for the pipe length. We can see that now the pipe has been shortened.
3 2
1. Double-click at this line to make it active.
2. Select this pipe line. 1
3. Input value in ‘‘ Pipe Length ’’ dialog box
to be ‘‘ Zero ’’ then click ‘‘ OK ’’.
4
144

w w w . sol i dpl a n t3 d . c om
After that, go to the feature of Auto Route in Routing Ribbon, and select it. After we have selected Auto Route,
as seen on the left, it allows us to choose items that we want to connect. For the starting point, zoom-in at this Straight Tee. The way to mark the starting point is to select at the edge of it. Please notice the direction of arrowhead of the pipe line or path.
1. Select ‘‘ Routing ’’ ribbon 2
2. Click ‘‘ Auto Route ’’ feature 1 3. Select ‘‘ the edge ’’
3
After that, zoom-in at this tower, and we will connect to this nozzle. Click at the edge of the nozzle. Please see that now the path has started to be generated. If we carefully notice it, we will see that the purple path has shown an arrowhead or direction.
Click at the edge of the nozzle.
So piping designers can change the direction as required. The way to do it is as follows. First, zoom-in at the arrowhead. Supposing that I want to change the direction of this one, so click it. Please see that it will change the path for us.
Click it for change the path.
Additionally, if we click at this vertical line, we can move it as well. Directions and distances will be adjusted accordingly.
click this vertical line, for move the line.
145

w w w . sol i dpl a n t3 d . c om
At this point, we are ready, and we will let it generate by clicking OK to go out.3 Now, the pipe has already been
generated. Zoom-in to closely see it. There is a pipe line going out of the branch line of the Straight Tee. Then zoom and pan upper, we can see that the pipe is routed to connect to the nozzle of the tower as well.
Click ‘‘ OK ’’ to go out.
Chapter 8 Insert Piping Components
Chapter 8-1 Insert Piping Components In this chapter, we will learn how to insert piping components on route lines that we have drawn. These components
include valves, control valves, and others. This chapter also includes the guideline of how to insert pipe supports in order for piping designers to appropriately work with it.
Chapter 8-2 Insert the Pipe Support In the next topic, we will learn how to insert pipe supports. Our SolidPlant have prepared the standard library of
pipe supports for us to choose from. There are various types of pipe supports, such as base support, pipe shoe, guide, and U-bolt. Next, we will learn how to do it.0
Now, at the route model, please look at this line header. We will insert pipe support on this line. First, make sure
that we are currently active at SolidPlant Pipe Routing. After that, we will double-click at the line that we will insert pipe support, to make it active. Double-click at its center line. The n go to the feature called Pipe Support in Routing Ribbon, and click it. After that, look on the left, the panel of Pipe Support Manager will appear. The first type seen here is Guide Type. Look in the list to see all available types. This is pipe shoe. And this is U-Bolt. Next, we will try them.
Now, we will insert the first one. Please select pipe shoe, which is this one. After that, click in the box of Pipe, and then click on the surface of this pipe. We can see that the pipe shoe will be placed here.
1. Click ‘‘ SolidPlant Pipe Routing ‘‘. 4
2. Double-click at this center line. 1 3. Click at ‘‘ Routing ‘‘ ribbon. 5
3 4. Select ’’ Pipe Support ‘‘ feature.
5. At ’’ Select Support ‘‘ pick list to 6 select ’’ SHO-B.SLPPRT ‘‘.
7 6. Click in the box of pipe. 2
7. Click on the surface of pipe.
146

w w w . sol i dpl a n t3 d . c om
Click in the box of Distance Reference to specify a reference point by clicking at it. And then set OffSet Length
value to be 600, and click on the screen. Please notice that the pipe shoe will be flipped to the other side. However, we do not have to worry about this. Just select Flip checkbox, and it will flip back. We can also change the distance, such as change to 700, and then click on the screen. It will be moved accordingly.
1. Click in the box of ‘‘ Distance Referrence ’’.
1 2. Click at point of straight tee.
3. Set off set length value to be 700, then
click on screen.
4. Checle box at ‘‘ Flip ’’ for opposite side of pipe support.
4 3
2
Below, we can change to other standard to correspond to our pipe support type. Importantly, we can also set tag to specify the number of the pipe support. Normally, the input tag number will refer to typical data of that particular pipe support. When we install the pipe support at the site, we will have the typical drawing for using in installation. And we can input the name of this pipe support as well. Now, we are ready, so close the panel. And we have already got the first pipe shoe.
1. Pick list to ‘‘ Select Standard ’’ JIS. 3
2. Type ‘‘ SUP-001 ’’ for create a ‘‘ TAG ’’.
3. Click ‘‘ Close ’’. 1
2
Next, we will insert more pipe support. Again, go to the feature of Pipe Support, and click it. Then select the type of U-Bolt like this one. And click to reserve at the box of Pipe, and click to select at the pipe surface. We can see that it will insert the U-Bolt to the pipe for us. We can input the length value to adjust the length as required. For example, we can input the length value to be 500, and click at the screen. Then it will change the length for us. We can also flip it to the other direction, by selecting Flip option, and it will flip for us. And if we deselect Flip, it will flip back to the previous direction.
1
1. Select feature of ‘‘ Pipe Support ’’.
2. Pict list to ‘‘ Select Support.
3. Click to reserve at the box of pipe. 2
4. Click to select at the pipe surface.
5. Inputthe length value to be 500, 4 then click on screen.
3 5
147

w w w . sol i dpl a n t3 d . c om
After that, we will look at Distance Reference. Supposing that we want it to be away from this support point, which
we have previously inserted, we can input the distance from that point as required. For example, we can input 600, and it will change the distance for us. Here, it also flip to the other direction, so we will select Flip checkbox to flip back. Now, we will get the new pipe support at the distance of 600 away from the first one. One important thing is that when we scroll down, we will see Select Standard. For U-Bolts, we can select from various standards, such as JIS, DIN, BS, and ISO. Even though it will choose the size of U-Bolt to fit the size of pipe, we can change the size by ourselves as well. Sometimes, we might want a margin for it. For example, we can set it to be 8 inches. And then it will change the size to be bigger for us. Now, please go back to select 6 inches as previous. Next, below at TAG, we can input the tag number as in the typical drawing of the pipe support. Now, we can close it. And this is how to insert pipe support.
1. Click to reserve at the box of ‘‘ Distance Reference ’’. 1
2. Click at point of straight tee.
3 3. Input the value to be 600, then
click on screen. 2
Chapter 8-3 Insert Valve Component In the next topic, we will learn how to insert valve component to our route line in order to complete our pipe
system. Now, we will go to the position to which we will insert valve, and zoom-in at it. This red line is the line that we will insert valve. First, double-click at the red line to make it active by selecting at its center line. After that, go to the task of SolidPlant Pipe Routing. Here, please turn off the status of ‘‘Use data from setting’’, because if we do not turn it off, it will use default values that was previously used. For example, if we have used gate valve, with this option turn on, it will always retrieve gate valve of the same size for us. In fact, there may be more than one record for the same size. So turning off this status will force us to be able to choose other records as well.
Now, we will learn how to insert valve. Please zoom-in to closely see it. Click at the position that we want to insert
valve. For instance, if we want to insert valve at this point, click it to get the position. After that, go to Component Ribbon, and select Valve.
6 1. Double-click at this center line. 5 2. Select task of ‘‘SolidPlant Pipe Routing ’’. 4 2
3. Turn off the status of ‘‘ Use data from setting ’’.
4. Click at this point.
1 5. Select ‘‘ Component ’’ ribbon.
3 6. Click ‘‘ Valve ’’ feature.
148

w w w . sol i dpl a n t3 d . c om
Then a dialog will appear for us to choose tag. The tags that we have seen here are the tags which we have initially
imported from P&ID data at the beginning. Select GA-101. When we insert, we can choose the position that we want to insert. Normally, we will use Center Point. Below, we can choose to show valve operator, such as Hand Wheel, in the output by select the checkbox of ‘‘Add valve operator’’. When done, click OK.
1. Pick list to select ‘‘ TAG ’’ GA-101. 2
2. Pick list to select type of valve, 1
select ‘‘ GATE VALVE ’’.
3. ‘‘ Insertion Point ’’ select ’’ Center Point ‘‘ . 3
4. Check box to ’’ Add valve Operater ‘‘. 4 5
5. Click ’’ OK ‘‘ button.
The next dialog shows records from the pipe spec that we have created. This allows us to choose the required record. Here we will choose gate valve. We can see that for the size of 6 inches, there are both gate and check valves. Now we will choose gate valve, and click Create button. And now we have already got a gate valve.
1. Select ‘‘ CONDUIT GATE VALVE, 600LB. RF ’’.
2. Click ‘‘ Create ’’ button.
1 2
Next, for another one, please click at the middle of the center line. Then go to Component Ribbon, and click select Valve. And now we have already got the second valve.
1. Select at center line of pipe. 2
2. Click ‘‘ Valve ’’ feature.
1
149

w w w . sol i dpl a n t3 d . c om
1
We can zoom-in to closely see it. If we want to move the valves to be closer to the three-ways, we can also do that
by using the feature of Assign Length. First, click at this center line, and go to Routing Ribbon, then click Assign Length. Certainly, we will input zero for the length value. And then click OK. We then see that the valve is now exactly next to the three-way.
3 1. Click at this center line. 1 2. Select ‘‘ Routing ’’ ribbon. 2
3. Click ‘‘ Assign Length ’’ feature.
4. Input valve of ‘‘ Pipelenght ’’ zero, then click ‘‘ OK ’’ button. 4
For another one, please see that there is a small gap. Click at the center line, and select the feature of Assign Length. Surely, we will set its length to be zero, and then click OK. It then will move to be exactly next to the three-way. These are examples of how to insert valves. Then go out of the Sketch.
1. Click at this center line. 3
2. Select ‘‘ Routing ’’ ribbon. 2
3. Click ‘‘ Assign Length ’’ feature.
4. Input valve of ‘‘ Pipelenght ’’ zero, then click ‘‘ OK ’’ button. 4
Chapter 8-4 Insert Reducer Component Next, we will learn how to insert reducers on our pipe. As of now, we are at the top view. We will go to the
NE Isometric view by selecting at NE Isometric in SolidPlant Ribbon.
selecting at ‘‘ NE Isometric in SolidPlant ’’ ribbon
After that, zoom-in at the orange line. This orange line is the control loop station of heat exchanger. We have to insert a control valve in this area. But we have the condition that the control valve which we have to insert must be reduced to a smaller size. Previously, the main pipe of this line is of 4-inch size, but we have to reduce it to 3 inches in the middle area of this pipe. This means that we have to reduce the pipe size.
150

w w w . sol i dpl a n t3 d . c om
First, double-click at the center line to make it active. After that, please right-click at the mouse, and point to the
line, and then select Split Entities to break the line.
1 1. Double-click at the center line,
then right-click at the mouse.
2. Select ‘‘ Split Entities ’’.
2
Next, click at the required positions to be the first point and the second point. Initially, we will click to define the position, but we will not set the distance at this moment. After that, press Escape button to break the pipe. Please notice that now it has already divided the pipe into 3 parts - one, two, and three. Zoom to closely see it. Here we can select the middle part by clicking at its center line. After that, go to Routing Ribbon to select the feature of Change Size by clicking it.
4
1. Select ‘‘ Routing ’’ ribbon.
2. Click at first point. 1
3. Click at second point.
4. Click ‘‘ Chang Size ’’ feature. 3
2
After clicking it, the appearing dialog will show the current value of nominal size, which is 4 inches. Select 3 inches from the picklist to decrease the pipe size. Then click Apply button. When finished, it will generate for us. Please wait for a moment. We will see that it will decrease the pipe size, and also insert reducers at both ends for us. Then press Escape button.
1. Select 3 Inch from the pick list. 1
2. Then click ‘‘ Apply ’’ button.
2
151

w w w . sol i dpl a n t3 d . c om
Now, please see that the lengths of pipes before and after reducers are not the same. We can use the feature of
Assign Length to set it. Easily, click at the center line of this pipe, and click Assign Length. And we can input the length value as required, such as 200. Then click OK, and wait for it to change. We will see that the pipe will be shortened to the length of 200. In the same way, for another pipe, we will assign its length value to be 200 as well. Then click OK. It will then shorten both pipes to be the same length of 200.
2
1. Click at the center of this pipe line. 1
2. Click ‘‘ Assign Length ’’ feature.
3. Input the Length value to be 200, 3 then click ‘‘ OK ’’ button.
4. Do it same way for another pipe. 4
Chapter 8-5 Case study of how to insert kinds of branching on main pipe routing : Stub-In, Straight Tee, Reducing Tee and Sockolet
Next, we will learn how to insert line branches that can be found in pipe works. As an example, the first type is called Stub-In. Stub-In is drilling down into the main pipe, and then welding around it. The second type is a general type that inserts three-ways into the main pipe to make branching. Another type is called reducing tee. This type also makes branching by using tees, but the branch side will get smaller than the main pipe. So we call it reducing tee. The last type uses olet components. There are various types of Olets, such as Weldolet and Sockolet. As an example, next we will try Sockolet.
As of now, we are at the top view. Please go to the view of NE Isometric by clicking at NE Isometric. After that,
zoom-in at the lower part of tower, and we will see a nozzle.
1. Select 3 ‘‘ SolidPlant ’’ ribbon.
2. Clicking at NE Isometric, then 1 2 zoom-in at the lower part of tower
152

w w w . sol i dpl a n t3 d . c om
Then we will make active at the line by selecting Line 001 from the picklist of Active Route. After we have selected
it, please notice that the line 001 uses spec SP01, and is 6 inches in size. Here we will change the size to be 10 inches. After that, please go to Routing Ribbon in order to draw pipe by selecting the feature of Manual Route. And then select Snap to center, and click at the edge of the nozzle. Snap at the center and draw it out horizontally along Y axis. When done, click to finish it, and press Escape to generate a 10-inch pipe. Now, we have already got the 10-inch pipe.
1. Select ‘‘ SolidPlant Pipe Routing ’’.
2. Pick list to select ‘‘ Line_001 ’’.
3. Change pipe size to be 10 Inch.
4. Select ‘‘ Routing ’’ ribbon.
5
4 2 7 8 1 3
5. Click ‘‘ Manual Route ’’ feature. 6 6. Select ‘‘ Snap to center ’’. 9
7. click at the edge of the nozzle.
8. Snap at the center and draw it.
9. Click to finish it, and press Escape.
Next, we will learn about the first type, which is Stub-In. Here, for the stub-in that we will make branches, we will reduce its size to be 6 inches. After that, go to Component Ribbon, and select the feature of Stub-In by clicking at it. The concept of stud-in is like how to draw a pipe by using point-to-point sketch feature. Now, click at the center of the main line, and draw a new pipe line. When done, press Escape. Now, we have got a stub-in branch of 6-inch size. Please notice that this kind of branch is made by drilling into the main pipe.
1. Pick list to select pipe size 6 inch. 3
2. Select ‘‘ Component ’’ ribbon. 2
3. Click feature of ‘‘ Stub-In ’’ . 4 1
4. Click at the center line of main line ,
and draw a new pipe line, when done press ‘‘ Escape ’’.
Next, we will make a line branch by using three-way, or straight tee, or tee. Now, we can see that the size of the main pipe is 10 inches. So we will change the value of pipe size to be 10 inches. After that, go to the component. Like a normal drawing of a pipe line, we will go to Routing Ribbon, and then select Manual Route. Click at the center line of the main line, draw a line out, and then click it. When done, press Escape. Now we have already got the straight tee.
1. Change the value of ‘‘ Pipe Size ’’ to be 10 inch.
3 2. Select ‘‘ Routing ’’ ribbon. 2
1 3. Click ‘‘ Manual Route ’’ feature . 4 4. Click at the center of pipe line.
5. Draw a line out and click it, when
done press ‘‘ Escape ’’ 5
153

w w w . sol i dpl a n t3 d . c om
Next, we will insert reducing tee. Go to the picklist of pipe size, and change the size from 10 inches to 6 inches.
After that, go to Routing Ribbon, and select Manual Route to draw a line again. Draw along X axis, and do the same. Now, we have already got the reducing tee.
2 1. Pick list to select pipe size 6 inch.
2. Select ‘‘ Routing ’’ ribbon. 3 4 1 3. Click ‘‘ Manual Route ’’ feature .
4. Click at the center of pipe line, then
draw along X axis. 5 5. Click it when done, then press ‘‘ Escape ’’
Next, we will insert a branch with the component called Olet. For Olet, we will change its size to be smaller. We can do this by selecting the required size. However, we must have the record in the pipe spec that we have previously created in order for the components to be retrieved and placed for us. Here, we will select the size of 1 1/2 inches. After that, go to Component Ribbon, and we can see the component called Olet, then click to select it. We will work with it in the same way as when we work with a line branch. Click at the center line of the main line, and draw a line, then press Escape. When done, zoom-in to see closely.
1. Pick list to select pipe size 1+1/2 inch.
2. Select ‘‘ Component ’’ ribbon.
3. Click ‘‘ Olet ’’ feature .
4. Click at the center of pipe line, then
draw along X axis.
5. Click it when done, then press ‘‘ Escape ’’
3 2 4 1
5
Can you see it? Now we have already got 1 1/2 ---inch Sockolet.
These are how to insert various types of line branches including stub-in, straight tee, reducing tee, and Sockolet. Now, go out of the Sketch.
1. So we have all ready got 1+1/2 inch Sockolet.
2. Now, go out of the Sketch.
164

w w w . sol i dpl a n t3 d . c om
Chapter 8-6 Re-Design the pipe routing and equipment at Heat Exchanger
Next, we will consider the case of pipe routing design when there are some situations concerning equipment or component placement. For example, there are not enough valves, or equipment adjustment or update is needed at the site. If our model has been up when it needs change, how can we change it?
Now, please zoom-in at the front of the first heat exchanger. We will insert valve under the nozzle of the heat
exchanger. Double-click the center line here. After that, we will insert valve. Click to pick the point at the end of the line in order to insert valve at this point. When finished, go to Component Ribbon. Before doing anything else, make active at SolidPlant Pipe Routing. Turn off the status of ‘‘Use data from setting’’ to reset the selection of equipments to update with the records of equipment that we will used. As we have already been at Component Ribbon, click to select Valve.
6 1. Double-click at this center line.
2. Click at this end point 3 5
3. Select ‘‘SolidPlant Pipe Routing ’’.
4. Turn off the status of ‘‘ Use data from setting ’’. 2 4
5. Select ‘‘ Component ’’ ribbon. 1
6. Click ‘‘ Valve ’’ feature.
After that, choose the required valve from the list. At this position, we will use the tag of GA-109, which is Gate Valve. And then click OK.
1
2
1. Pick list to select ‘‘ TAG GA-109 ’’.
2. Click ‘‘ OK ’’ button.
After that, select the record of conduit gate valve 600 lbs, and then click Create.
1. Select the record.
2. Click ‘‘ Create ’’ button.
1 2
155

w w w . sol i dpl a n t3 d . c om
3
We can see that now the valve has already been inserted. We can also see that there is not enough space for it in
this area. We may try adjusting it. For example, for its length, click at its side, and go to Routing Ribbon, then select Assign Length. Input zero for the length, and click OK.
1. Click at this center line.
2. Select ‘‘ Routing ’’ ribbon. 2 3 3. Click ‘‘ Assign Length ’’ feature.
4. Input valve of to be ‘‘ Zero ’’, in
‘‘ Pipe Lenght ’’then click ‘‘ OK ’’ button. 4
1
Please notice that the pipe will move down, and a part of the pipe will be under the floor. As for this situation, we have to redesign our model. What we can do as of now is that we have to modify the saddle base, or adjust the floor, or drill it. But for this case, we will change the saddle base to be higher.
1. Good of the Sketch, then go to 1 ‘‘ SolidPlant Project Manager ’’.
2. Expand the node of ‘‘ Equipment ’’.
3. Select E-102A, then right click and 2 select Open Component.
Next, we will redesign the component. Select Equipment Ribbon, and click Edit Equipment feature.
1. Select ‘‘ Equipment ’’ ribbon. 2 1
2. Click ‘‘ Edit Equipment ’’ feature.
Suddenly, the dialog of equipment template for this exchanger will pop up. Please look at the height of saddle, which is parameter F. The value of F is currently 1050, and we will change it to be 1300. When done, click Apply, and then Close. Please notice that its legs now get higher. Then click to close it.
Change value of ‘‘ F ’’ to be 1300, click ‘‘ Apply ’’ then click ‘‘ Close ’’ button.
156

w w w . sol i dpl a n t3 d . c om
Return to our model. We can see that the heat exchanger now gets taller, and the pipes have adjusted their lengths
accordingly. Here, we can notice that the valve has fallen out. This is not a problem, because we can fix it. Make it active by double-clicking at its center line, and make relation it back again. By use mate here at this point, it is fixed, so we will take it out.
2
1. Click at this point valve.
2. Select ‘‘ Existing Relations ’’. 1
3. Then right click and ‘‘ Delete ’’.
3
And then we will mate the edge and the point. Select at the point and click at the edge. Select Concentric to make them use a common center. Then click OK.
2
1. Select the end point of valve.
2. Click at the edge. 1 3. Add Relations ‘‘ Concentric ’’.
3
After that, select at the surface and then click at the point, and choose the relation of On Plane. When done, click OK. The valve will be moved up to attach to the nozzle.
1. Select at the surface. 2 1
2. Click at the point of valve.
3. Click ‘‘ On Plane ’’ to Add Relation. 3
Next, certainly, the pipe is still sunken under the floor. We will move the pipe line up by adjusting the length of this short-piece. Select at its center line, and click at Assign Length, and then set it to be zero. Now we can see that the pipe line will move up.
1. Click at this center line.
2. Select ‘‘ Routing ’’ ribbon. 3 2
3. Click ‘‘ Assign Length ’’ feature. 4
4. Input valve of ‘‘ Pipe Lenght ’’ to be ‘‘ Zero ’’, then click ‘‘ OK ’’ button. 1
157

w w w . sol i dpl a n t3 d . c om
Next, go to the upper part. For several nozzles on the upper part, please notice that in fact there are many valves
that must be connected to these nozzles. And the current distances are surely not enough for them. So we will move these pipe lines up. There are all 3 of them, which are one, two, and three. For now, please go out of the Sketch. Starting from the middle one, double-click at its center line, which is line 005, and select the feature of Elevation Move Pipe. And then select at the center line again to see its cross-section as on the left.
3 1. Go out of the Sketch, then double-click
at this center line
2. Select ‘‘ Routing ’’ ribbon. 2 1
3. Click ‘‘ Elevation Move Pipe ’’ feature. 4
4. Select at the center line again .
Next, for Target Reference, choose the same pipe, and look at Z distance value, which we will increase the value to be 400. When finished, click Apply button. The pipe will then move up. We may also move the lower pipe accordingly. Please notice that this short-piece is still short, so we can adjust it in the same way. Click OK here.
1. Choose the same pipe for ‘‘ Target Reference ’’. 4
2. Input valve to be 400 at Z Distance.
3. Click ‘‘ Apply ’’ button. 1 2
4. Click ‘‘ OK ’’.
3
Now, select Elevation Move Pipe to move it. For Target Reference,
1. Click ‘‘ Elevation Move Pipe ’’ feature. 1 2. Click at this center line.
2
Use this pipe, and set the Z distance value to be 400. And then click Apply button. And now, we will get it. We will do the same for all pipes.
1. Click at center of pipe line for
‘‘ Target Reference ’’. 4 2. Input valve to be 400 at ‘‘ Z ’’ Distance.
3. Click ‘‘ Apply ’’ button.
4. Click ‘‘ OK ’’, then go out from the sketch. 2 1
3
158

w w w . sol i dpl a n t3 d . c om
For the next line, please look at the yellow line. For now, go out of the Sketch. Double-click at the center line of the
yellow line, and select the feature of Elevation Move Pipe, and then select the center line again.
3
1. Double-click at this center line
2. Select ‘‘ Routing ’’ ribbon. 2 3. Click ‘‘ Elevation Move Pipe ’’ feature. 4
4. Select at the center line again . 1
For Target Reference, we will use this pipe. The common distance that we will use is Z distance, which will be set to be zero from the reference. It will then move up to the same level. Then click OK, and go out of the Sketch.
1. Select at this pipe for ‘‘ Target Reference ’’. 4 2. Input valve to be ‘‘ Zero ’’ at ‘‘ Z Distance ’’.
3. Click ‘‘ Apply ’’ button. 1 4. Click ‘‘ OK ’’, then go out from the sketch.
2
3
We will do the same with the next line, which is this line. First, make active at the line by double-clicking at the center line. Then select the feature of Elevation Move Pipe, and click at the center line again.
1. Double-click at this center line 2
2. Click ‘‘ Elevation Move Pipe ’’ feature.
3. Select at this center line again . 3
1
For Target Reference, choose the middle green line. And set the Z difference to be zero. Then click Apply button.
1. Select at this pipe for ‘‘ Target Reference ’’. 4
2. Input valve to be ‘‘ Zero ’’ for ‘‘ Z Distance ’’. 1
3. Click ‘‘ Apply ’’ button. 2 4. Click ‘‘ OK ’’, then go out from the sketch.
3
159

w w w . sol i dpl a n t3 d . c om
In the same way, for this pipe line, we can select the feature of Elevation Move Pipe, and select at the pipe, and
then use the middle pipe as the Target Reference. And certainly, we will set the center-to-center distance of Z to be zero. Now, we can see that the pipe has already moved up. Then click OK, and go out of the Sketch. The remaining thing to do is to insert valves.
Normally, we can adjust or update our pipe design as needed, as previously described.
3
1. Double-click at this center line
2. Select ‘‘ Routing ’’ ribbon. 2
3. Click ‘‘ Elevation Move Pipe ’’ feature. 4 1 4. Select at the center line again .
1. Select at this pipe for ‘‘ Target Reference ’’. 4 2. Input valve to be ‘‘ Zero ’’ for ‘‘ Z Distance ’’. 1
3. Click ‘‘ Apply ’’ button. 2 4. Click ‘‘ OK ’’, then go out from the sketch.
3
160

w w w . sol i dpl a n t3 d . c om
Chapter 9 Review and Manipulate Features
Chapter 9-1 Review and Manipulate Features
In this chapter, we will use features that help us see the data of route lines that we have drawn, including valves, pipes, and fittings. For everything that we have drawn with SolidPlant, we can go to check or review their data. This includes changing or adjusting routes created from our model, such as determining lengths of short pieces, rotating equipments, as well as various types of deleting. All that we can find in pipe routing adjustment. Pipe routing always needs adjustment and change, so this chapter will concern all these features.
Chapter 9-2 Component Property Next, we will learn how to verify component data. This is very important, because piping designers sometimes
need to check details of components. For example, the component we have placed is on which line, and how its data is in details. The feature that will be introduced now is called Component Property. The way to use it is easy. We do not need to go to edit it in the main assembly of each line. Please zoom-in at our model. As an example, if we want to see the details of this pipe, just click at it, and go to the feature of Component Property in Routing Ribbon, then click it.
1. Select ‘‘ Routing ‘‘ ribbon. 3 1
2. Zoom in at model, then select at this pipe.
3. Click ’’ Component Property ‘‘ feature. 2
Suddenly, the dialog will appear to show the component details of this pipe. It will show all the details, which we can scroll down to see various details.
The dialog will appear to show the component detail of pipe
We can also change to another component, such as this elbow. Click at the elbow, and then click Refresh button in the dialog. The details in the dialog will be changed accordingly. It will change to elbow as we can see in the data here.
1. Select ‘‘ Routing ‘‘ ribbon.
2. Zoom in at model, then select at this pipe.
3. Click ’’ Component Property ‘‘ feature. 1 2
161

w w w . sol i dpl a n t3 d . c om
Also, as for flange, we can click at the flange, and click Refresh in the same way. The dialog will show details of the
flange for us. This is an advantage of this feature that will help us to more clearly see detailed data of components.
1. Click at the flang.
2. Click ‘‘ Refresh ’’ button in dialog box.
2 1
Chapter 9-3 Measure Route Next, we will learn to use the feature that measure distances between pipes. Sometimes, piping designers need to
measure distances to check and verify pipe routing at various points.
We will look at this case. As of now, we are at top view of the pipe rack, which we can see pipes. Click at a pipe to select it, and press and hold Control button, and then click at another pipe that we want to check. After that, go to the feature of Measure Route in Routing Ribbon, and click at it. Suddenly, the dialog showing the measuring details will appear. We will look at the first one, center-to-center, whose value is now 700 mm. There are details of the diameters of both pipes as well. There are also values of the distance differences of the inner and outer edges, which are Min and Max values that are shown for us.
1. Change model view to top view then select first pipe.
2. Select Second pipe. 3 4
3. Select ‘‘ Routing ’’ ribbon. 2 4.Click ‘‘ Measure Route ’’ feature.
1
Chapter 9-4 Assign Length Next, we will learn how to change pipe length, which is for a short pipe that we want to specify length on the
component. In pipe design, sometimes we may need to have pipe length margin for the maintenance work. For instance, it may be a pipe in front of valve.
Now, we will learn how to set the pipe length of short-piece. Please zoom-in at the position of tower. We can see
this short pipe or short-piece, and we will check its current length. Go to Evaluate Ribbon, and select Measure command to check the length. After that, select at the edge to the edge, and we will know the current length of the short-piece. As seen here, its length is approximately 200 mm. Supposing that we want decrease the length to 150 mm., this means that after the length decrease, the pipes will move all through the whole route lines that are connected. Now, we 2 will learn how to do it.
1. Zoom-in at the position of tower, 1 then select ‘‘ Evaluate ’’ ribbon.
2. Select ‘‘ Measure ’’ feature.
3. Click at this center line. 3
162

w w w . sol i dpl a n t3 d . c om
First, click to make active at this line, and then click to select at the sketch center line which we want reduce its
length. After that, go to Routing Ribbon, and select Assign Length feature. Upon selecting it, we will input the pipe length to be 150, and click OK. Now we can see that the pipe gets shorter. We will measure it again. Go out of the Sketch.
1. Double-click at this center line.
2. Select ‘‘ Routing ’’ ribbon.
3. Click ‘‘ Assign Length ’’ feature.
4. Input valve of ‘‘ Pipe Lenght ’’ to be 150, then click ‘‘ OK ’’ button.
3 2 1
4
Then select Measure feature. Zoom-in and select at both edges of the pipe. We can see that the length has now reduced to 150 mm.
2
1. Select ‘‘ Evatuate ’’ ribbon. 1 2. Click ‘‘ Measure ’’ feature.
3. Click this center line.
3
Chapter 9-5 Rotate Component Next, we will learn about the feature that is related to rotating component. This component is the one called
operator, which we can rotate it. We can see that now we are in front of the pump where a valve is located. Please notice that at the valve, there is a Hand Wheel, which we can rotate. Rotating the Hand Wheel is easy. Just click to select at the Hand Wheel operator. After that, go to Routing Ribbon, and then click at the feature of Rotate Component. The dialog of Rotate Component will appear for us to choose the rotating angle. We can select the angle in degrees that we want to rotate each time. For instance, if we want it to rotate 90 degrees each time, select 90 and click Rotate. We can continue clicking Rotate button, and for each click, it will rotate 90 degrees as the angle we have selected. This is an easy way to rotate it. When finished, close it.
1. Click to select at the hand wheel operator. 2 3
2. Select ‘‘ Routing ’’ ribbon.
3. Click ‘‘ Rotate Component ’’ feature.
4. Pic list to select 90, then click ‘‘ Rotate ’’ button. 1
4
163

w w w . sol i dpl a n t3 d . c om
ction of the route.
1 3
Chapter 9-6 Rebuild Component
Next, we will draw additional route at the nozzle on the base of the tower. At Active Route, select line 001. And then change its size to be appropriate for this nozzle, which is 10 inches. After that, go to Routing Ribbon, and click at Manual Route. Then turn on Snap to center, and catch at this nozzle. Draw a line out of it a little bit, and then turn to the right along X axis. And then press Tab, and draw up along Z axis. When finished, press Escape button. And now we have got the route.
1. Select ‘‘ SolidPlant Pipe Routing ‘‘.
2. Pick list to select ’’ Line_001 ‘‘ in
’’ Active Route ‘‘. 5 2 4
3. Pick list to select ‘‘ Pipe Size 10 Inch ‘‘.
4. Select ’’ Routing ‘‘ button. 6 5. Click at ’’Manual Route ‘‘ feature.
6. Turn on Snap to center. 7
7. Start draw from point of this nozzle. then draw the pipe line, when finished, press Escape button.
After that, we will consider the case of using Rebuild Component feature. As an example, click at the center of this
elbow, and then left-click and hold while drawing a line toward the other side. When done, click at an empty space on the screen, and wait for it to generate the pipe. We can see that the elbow has not turned accordingly. In this case, we will use the feature called Rebuild Component. To do this, we certainly have to be active at the sketch of this route line. Click at the center of this elbow, and then click at the feature of Rebuild Component. We can see that it has updated the model by correctly turning the elbow according to the dire
1. Click at the center of this elbow, and then
left-click and hold while drawing a line toward the other side. 4
3 2. Click at the center of this elbow.
3. Select ’’ Routing ‘‘ button.
4. Click ’’ Rebuild Component ‘‘ feature.
2 1
Chapter 9-7 Regen Pipe Next, for the case that the pipe was incompletely generated, or over-generated, we can use the feature called
Regen Pipe to regenerate it. Basically, click at the center line of the pipe, and then click at Regen Pipe. It will regenerate the incomplete or over-generated pipe to be a complete one.
1. Click at this center line. 3 2. Select ‘‘ Routing ’’ ribbon. 2
3. Click ‘‘ Regen Pipe ’’ feature.
1
164

w w w . sol i dpl a n t3 d . c om
Chapter 9-8 Delete Component
Next, we will draw an additional line. That is we will draw a sketch line connecting to the center of this elbow. And draw along X axis to the right. Please notice that it will automatically change the elbow to the three-way for us.
Draw a sketch line by type ‘‘ S ’’ then select ‘‘ LINE ’’ and then start slectch from this point.
Now, we will try a feature called Delete Component. For example, if we do not want this three-way, we will click at the center of it, or if we do not want this elbow, we will click at the center of it in the same way. To delete which component, we will click at that component.As an example, we will click at the center of three-way. But the condition for doing this is that we first have to be active in that sketch. Then click at Delete Component in Routing Ribbon. We can see that now the three-way has already been deleted.
1. Click at this point. 3 2 2. Select ‘‘ Routing ’’ ribbon.
3. Click ‘‘ Delete Component ’’ feature. 1
If we want to get it back, we can do it by clicking at this point, which is its branch point. Then go to Component Ribbon, and select Tee by clicking it. It will retrieve the data from the spec of three-way to insert at this point. In the same way, in front of the nozzle, this pipe connection is not correct. So click at its point, and go to Component Ribbon, and then select Flange by clicking at it. We can see that it will insert flange for us.
1. Click at this point. 3 5
2. Select ‘‘ Component ’’ ribbon. 2 3. Click ‘‘ Tee ’’ feature. 4
4. Click at this point. 1
5. Click ‘‘ Flang ’’ feature
165

w w w . sol i dpl a n t3 d . c om
Chapter 9-9 Delete Route
In the same way, if we want to delete the whole route lines including branch and main lines, we can do it as well. To do that, first we have to go out of the Sketch, but are still active at the line. Then go to Routing Ribbon, and select at the center line, which can be any line but only one line. After that, click at Delete Route button. It will then delete the whole route lines in this area. It is not necessary for us to waste time in deleting each line at a time. This helps us work faster.
1. Go out from the Sketch, then select ‘‘ Routing ’’ ribbon
3 2. Select at center of this line. 1 3. Click ‘‘ Delete Route ’’ feature.
2
Chapter 10 Pipe Routing Advance Features
Chapter 10-1 Pipe Routing Advance Features In the next chapter, we will learn about advanced features of piping work. We have advanced applications which
are added to complete our pipe generating system.
The first feature that we will learn is Change Size feature. In many times of pipe route drawing, we may have to change pipe size from the original main size to another size, depending on what we choose to do with our piping. This will help us to work faster without the need to draw new route lines. Thus, piping designers will be more convenient by using this feature.
Next is the feature called Jog feature. The Jog feature is like loop making, or expansion loop for a long line routing
in order to reduce pressure. However, this feature may also be used for designing to avoid columns and some other things. We can apply and use this feature in many cases.
Next is the feature called Split Pipe. Split Pipe is used for dividing a very long pipe. The system that needs this
feature is likely to be the system of pipe line work. Pipe line work is a very long transport pipe system, which may be many kilometers long. Sometimes, pipe routing in SolidPlant may be only one pipe line that runs long and straight out. In reality, for pipes that we will cut, the lengths of pipes sold in the market are standard. For example, for each size, pipes are sold in 6-meter length. This Split Pipe feature will allow us to input stock length of the pipe in order to automatically divide it according to the stock length on the pipe line. It is not necessary to split each part of pipe, so this feature helps piping designers work more flexibly.
Chapter 10-2 Change Size Feature Next, we will learn about the first feature, which is Change Size feature. We will try reducing the size of the main
pipe. Before doing that, we will look at the working area that we will be active at, and work for that route. Please look at the discharge side of the route. We will start to decrease the size of this pipe from here to the heat exchanger. Please zoom and pan to see it. We will see that the pipe shown here is originally 6 inches, and next we will reduce it to 4 inches.
166

w w w . sol i dpl a n t3 d . c om
3
Please notice that selecting the required route line could be difficult. So we will use the technique of SolidWorks.
That is we will hide other models in order for us to work more conveniently. Select at line 002 under the main assembly of piping, then right-click and select Invert Selection.
1. Select at line 002 under the main 2 assembly of piping.
2. right-click and select ‘‘Invert Selection’’.
1
We can see that it will choose all other non-relevant lines. After that, point at the highlighted items here and right-click at Hide Components. Now, we can see the model more clearly, and can work with it more conveniently.
2
1. Point at the highlighted items here and right-click.
2. Click ‘‘Hide component’’.
1
Now, we will start to change its size. First, click at the center line to make active at this line. After that, select the part that we want to reduce the size by clicking at its center line. When done, press and hold Control button, and then click at the center line of the whole part of the pipe that we want to decrease the size. After that, go to Change Size feature in Routing Ribbon. We can see that the current size is 6 inches, and we will change it to be 4 inches. When finished, press Apply button. And wait for it to generate accordingly. Now, the new pipe size has been generated. Zoom-in to see closely. Please notice that at the branch here, it has become a reducing tee. This, in any case, depends on records in the pipe spec, and it will retrieve the related component to place here. Now, zoom-in at the position of the pipe end, which connects to heat exchanger. Its size has decreased now. Then go out of the Sketch.
1. At the center line to make active at this line.
2. Select the part that we want to reduce the
size by clicking at its center line. When done, press and hold Control button, and then click 4 at the center line of the whole part of the pipe that we want to decrease the size. 1
3.Select ‘‘Routing ‘‘ribbon. 2 6
4.Click’’Change Size’’ feature
5.Pick list to select 4 Inch, then click Apply button. 5
6.Go out of the Sketch
167

w w w . sol i dpl a n t3 d . c om
After that, we will open all the models again. That is to select at the item 002, right-click and select Invert Selection.
1. Select at the item 002 2
2. then right-click and select ‘‘Invert Selection’’
1
And then select itself, which is line 002 again. After that, select Show Components, and we will get all the models back.
This is the feature that is very helpful in facilitating our work, because pipe routing may need size adjustment all the time. So this feature is designed to be one of our advanced features.
1. Select line 002.
2. Select ‘‘Show Components’’. 2
1
Chapter 10-3 Jog Route Feature Next, we will learn about another advanced feature called Jog Feature. Jog Feature is used for making routes that
are U-shaped, and can also be applied for expansion loops, depending on piping designers. Now, we will create Jog Route on our route line.
Now, please go to isometric view, and zoom to look at the purple line. We will make it U-shaped in order to avoid
obstruction and place it on the upper pipe rack. And the bottom of the pipe has to be at this level. To do that, double-click to make active at this line, which is line 024.
1. Select ‘‘SolidPlant’’ ribbon.
2. Click isometric view, and zoom 1 2 to look at the purple line.
3. Double click at this center line.
3
168

w w w . sol i dpl a n t3 d . c om
After that, click to be active at SolidPlant Pipe Routing, and we can see that the current active route is line 024.
And then go to Routing Ribbon, and click at Jog Route feature.
2
1. Select ‘‘Routing’’ ribbon. 1
2. Click ‘‘Jog Route’’ feature.
After that, click at the center line of the currently active pipe. We can see that upon clicking it, lining of a rectangle shape has appeared. We can press Tab to specify the plane for loop drawing. We can adjust it like this, and then click to place it. When done, press Escape to generate.
Draw the rectangle shape like a picture, when done, press Escape to generate.
We can see that now it has made the u-shaped loop. Now, we will look at its side view. Go to SolidPlant Ribbon, and select Left for left view. Then zoom-in to see the pipe closely. Please notice that there is overlapping and interfering between the pipe and the pipe rack. Here, we will use a feature to elevate the pipe up to our required level.
1. Select ‘‘SolidPlant’’ribbon. 1 2 2. Click ‘‘Left’’ view feature, then
zoom-in to see the pipe closely.
169

w w w . sol i dpl a n t3 d . c om
So go to Routing Ribbon and select the feature of Elevation Move Pipe. Please see on the left that the panel of this
feature has appeared. Now it has already been clicked to reserve at Pipe Reference, so we can click at the center line of the pipe, and we can see its cross-section shown in Node Reference. After that, click at the Top of Steel of the pipe rack to be our Target Reference. Next, change the placing position to be bottom of the pipe. Please notice the difference of Z distances here, and change it to be zero, and then click Apply.
Select Routing ribbon.
Cliclk feature of ‘‘Elevation Move Pipe’’.
Click to reserve at ‘‘Pipe Reference’’.
Click at this center line.
Click to reserve at ‘‘Target Reference’’.
Click at the Top of Steel of the pipe rack.
At ‘‘Distance’’ of ‘‘Z ‘‘ input value to be Zero.
Click ‘‘Apply’’ button.
3 1 2
6 5 4 7
8
We can see that the pipe has been moved up, and now the bottom of the pipe is exactly on the surface level of the beam shape of the pipe rack. When finished, go out of the Sketch.
We can see that the pipe has been moved up, when finished, go out of the Sketch.
Chapter 10-4 Split Pipe Feature Next, we will learn how to use another interesting advanced feature called Split Pipe feature. As said before about
Split Pipe, we can divide pipe in accordance with stock length of the pipe we have. As previously said, we will use this feature for very long pipe lines, which may be many kilometers long. This is helpful for piping designers to reduce their workload.
First, we will hide non-relevant components. Go the Feature Manager on the left, and select line 002, and then
right-click and choose Invert Selection.
1. Go the Feature Manager on the left, and select line 002.
2. Then right-click and choose 2 ‘‘ Invert Selection ’’.
1
170

w w w . sol i dpl a n t3 d . c om
Then point cursor over the highlighted items, right-click and select Hide Components.
1. Point cursor over the highlighted items, then right-click.
2. Select ‘‘ Hide Components ’’.
2
1
Now, we can see only the line that we want to work with. Next, we will split this line. Double-click to make the route active. Open SolidPlant Pipe Routing, and check the data to see that it is line 002 and its size is 6 inches. To split it, select at the center line of this line. After that, go to the feature called Split Pipe in Routing Ribbon. After clicking at the feature, The pipe length dialog will appear for us to input the required length. Here we will input 6000 for the pipe length. In fact, it is not necessary to be 6000, but now we will use 6000. Then click OK.
3 1. Double-click to make the route active.
2. Select ‘‘Routing’’ribbon 5 2
3. Click ‘‘Split Pipe’’feature. 1
4. Input value ‘‘Standard Pipe Length’’ to be 6000, then click ‘‘OK’’ button.
5. Go out of the sketch. 4
Now, please zoom-in on our pipe line to closely see it, and we can see that there are breaking points on the line corresponding to the length value that we have input. There are all 2 points. Now, we have already divide the line using Split Pipe feature, so we can go out of the Sketch. If we want to open all other models again, select the item of line 002, right-click and select Invert Selection.
1. Select at the item 002
2. Then right-click and select 2 ‘‘Invert Selection’’
1
Then point at the highlighted items, and right-click and select Show Components. Now, we have already got all the models back.
1. Point at the highlighted items, and right-click
2. Click ‘‘Show Components’’. 2
1
171

w w w . sol i dpl a n t3 d . c om
4 5
Chapter 11 Generate Piping Isometric Drawing
Chapter 11-1 Generate Piping Isometric Drawing
In this chapter, we will learn how to generate piping isometric drawing. For plant design, the main elements are 3D piping models. At this point, after we have already designed piping or what we call piping arrangement among equipments. In our SolidPlant software, there is a feature used for generating the 3D pipe routing to a part of drawing. This drawing is very useful, because it contains details of equipments and components, distances, and Bill of Material. These details will be used for shop drawing, which will be used for ordering to make and purchase various equipments. The details are very important. Equipment lists in the models and types of routes in the models determine how the drawing will look like. We will see in details about it later.
Now, I will explain more about piping isometric drawing. To create a piping isometric drawing, we will use plug-in
software called IsoGen together with our SolidPlant. IsoGen is famous software for this type of work, and it is used for general plant design work worldwide. Thus, we can be sure of its accuracy. As for its details, we will learn how to set various options necessary to be used in IsoGen. As for the format of drawing that we will use, we can select from various styles, such as check, system, and final styles, which we will take equipment list. Users can choose from these styles as appropriate for each work.
Chapter 11-2 Generate Fabrication Piping Isometric Drawing After we have already got 3D pipe routing by using SolidPlant to create it, this step is to generate piping isometric drawing with IsoGen. The software has provided 2 methods to do this. The first method is by selecting line numbers that SolidPlant has prepared. That is we can select the line number of the line that we want to generate its drawing. This is convenient for users when they want to generate the whole line for further use. The second method is the case when piping designers want to generate the drawing of a particular part of route line, not to generate the whole line. This is used for the case when we want to verify the correctness and completeness of our required route line equipments at this specific point. It can generate only the required part. SolidPlant can facilitate our work by providing related tools.
Chapter 11-3 Select pipe routing by tag number Next, we will learn the first method for generating piping isometric drawing by selecting from the list of line numbers of all the pipe lines in the project. First, go to Drawing Ribbon in our SolidPlant. The feature that we will use is called Gen PCF, so click at it. The dialog of IsoGen will pop up. Please see under the topic of Generate Item that there is a list of pipe line numbers or all pipe routings in our project. We will choose one from this. First, I will zoom at this position. We will generate the drawing of this route line for the whole line. This is line 001, so we will select Piping-1/001 from the list in the dialog. After that, look at Drawing Style below. This is the format or style of the drawing that IsoGen will generate. There are various styles to select from. The popular one that we will use is Final-Cut-List, so select it. The next step is to click at the button of Generate Drawing. Then the program will start to generate it and give an output as a file. The generated drawing file will be automatically saved in our project.
1. Select ‘‘Drawing’’ribbon. 1 2. Click ‘‘Gen PCF’’ feature. 2
3. Select Piping-1/001 from the
list in the dialog. 3 4. Pick list to select ‘‘Final-Cut-List’’,
at Drawing Style .
5. Click at the button of Generate Drawing.
After the generation is finished, there will be a dialog to notify us together with the showing of the output drawing in the item called Isometric Drawing under the Document List as seen here. Now, the drawing has already been generated. We can see the dialog showing status for us to know if there is any error. Then click OK. After that the drawing will be automatically opened for us. Now, SolidWorks has already generated the drawing. Click OK, and then it is time to check the drawing.
172

w w w . sol i dpl a n t3 d . c om
This is piping isometric drawing, which it has automatically generate for us without the need to manually draw it
by hand. We can use this to make an order for piping fabrication in the factory. We can use zoom function to see it more closely. This is the drawing of SolidWorks, and it has already been in SolidWorks. It shows various fittings, equipments, and distances in the drawing for us. Now we will look at the Material List table, and we can see the orders and types of equipments. The first one that is clearly seen is for pipe. It shows the details and description of the 6-inch pipe, and the needed quantity as length in meter. Various types of fittings, such as flanges, gaskets, stud bolts, and valves are also shown in details.
Next, please look below, which we can see the topic called Cutting List. This is the list of each part of pipes that we
have to cut. The list specifies items of 1, 2, 3, 4 and 5 in sequence, which we can see in the drawing. The items are shown in parentheses. For example, number 1 in parentheses is for pipe no.1, and number 2 for pipe no.2, etc, which are needed to be cut. It will automatically take these data for us.
project. This is the first method for generating piping isometric drawing by selecting from the list of line numbers in the
Click ‘‘OK’’ button.
Chapter 11-4 Select on specify components by manual We will learn the second method for generating piping isometric drawing. As for this second method, we will
choose only some of equipments on our route line that we want to generate. We can select the required part by using an easy concept of clicking to select around the required equipments on the route line and then use the command of Gen PCF. Or we can also call the command before and then select later. It depends on users to choose which way to do it.
Now, we will explore the case that we want to call the feature or the command before selecting the required part
of route line. Go to Drawing Ribbon in SolidPlant, and then click at the feature of Gen PCF. After that, the dialog of IsoGen will pop up. At the checkbox called Selected Items on the upper right, click to select it to make the case for selecting only some of equipments on the route line that we want to generate, not for the whole line. Please notice that the list of all pipe line numbers in the project will disappear.
1. Select ‘‘Drawing’’ribbon. 2 2. Click ‘‘Gen PCF’’ feature. 1 3. Check box at ‘‘Select item 3
173

w w w . sol i dpl a n t3 d . c om
Move the dialog to uncover the required line, and then zoom at the line. Supposing that I want to cover only pipe,
elbow, and valve, click the mouse to make an area to cover them.
Click the mouse to make an area to cover them.
After that, on the dialog of IsoGen, there is a new list of equipments appearing in the dialog. Select the drawing style of Final-Cut-List from the pick-list of Drawing Style. When done, click Generate Drawing. The program will start to generate the drawing for us.
1. Pick list to select ‘‘Final-Cut-List’’, at Drawing Style .
2. Click at the button of Generate
Drawing.
1 2
Now, the drawing has already been generated for us, and it also shows the status of no errors with the status code of zero. Click OK. When done, the program will open the generated drawing of only the part of the route line that we have selected. Please zoom-in at the drawing to see more closely. Please notice on the route line that we have got valve, flange, pipe, elbow, and one more pipe. There are no other parts that we have not selected. And we can also see the material list to check the correctness. Below is the cutting list as well.
This is the second method for generating piping isometric drawing by manually selecting and specifying on the
route line model.
Click ‘‘OK’’ button.
174

w w w . sol i dpl a n t3 d . c om
Chapter 11-5 How to change settings the SmartPlant I-Configure
In the next topic, we will learn about settings and options used in IsoGen. The interface of this IsoGen is called SmartPlant I-Configure. Using these options, we can set various formats. We will look at the available formats later.
First, go to Drawing and call the feature of Gen PCF. After that dialog of IsoGen has appeared, please look at
Drawing Style below. We can see the list of various formats of drawing style. For each drawing style format in the list, we can set its details as required. To do this, next to the list, please notice the button with 3 points on it. We can click on this button to call SmartPlant I-Configure.
1. Select ‘‘Drawing’’ribbon. 2
2. Click ‘‘Gen PCF’’ feature. 1 3. Click button with tree point.
3
Now, SmartPlant I-Configure has appeared. Please look at the upper left of the screen, and there is a path specifying where the project config that we are opening is located, and in which project it is. And under this item, we can see various formats or styles of drawing that we can use, such as Check, Final-Basic, Final-Cut-List, Final-Erection, Final-Fab, Final-Weld-Box, Overview, Spool, and System.
Now, click at Final-Cut-List, and look below to see that it is now active at Final-Cut-List. We can try with another
style to see that when we click at which style, it will be active at that style. Then, go back to Final-Cut-List style. Under this style, expand drawing item to see the details of options that are currently set. For example, when clicking at Output Format, we can see that it also specifies the output file format used for generate, which is DWG. And various options are also shown on the right in many items together with their values as we have set. Next is Drawing Size, or the size of the paper frame of the isometric drawing that we will generate.
Next, we will set one of the options, which is North Direction. Select it, and notice that the default is now set to be
‘‘Top Left’’. We can see that when we click at this option, it will be instantly active at the record of this option. And when we double-click at its value, there will be 4 choices available to be selected as the value for this option. However, now the default is set at Top Left. We can change the direction option that we will use to generate the drawing. Now, we will try selecting Top Right. After that, click Save to save the value that we have set. Then click OK at the dialog to confirm our saving. Next, we will verify the change of the North Direction value to see if it is really changed be Top Right. As for our working step here, we have entered into SmartPlant I-Configure, so we have to go back by going to File menu and then click Exit.
1. Click at Final-Cut-List.
2. Select ‘‘North Direction’’.
3. Pick list to select ‘‘Top Right’’.
4. Click ‘‘Save’’button.
5. Click ‘‘Close’’button.
4
1 3 5
2
175

w w w . sol i dpl a n t3 d . c om
After that, scroll down in the dialog and select line 001. Then change Drawing Style to be Final-Cut-List as we have
set before. When done, click at Generate Drawing button. Now, the drawing has been generated, so click OK. And then click OK again.
1. Select line 001.
2. Pick list to select ‘‘Final-Cut list’’.
3. Click at Generate Drawing button.
Now, the drawing has been generated, 1 so click OK. And then click OK again.
3
2
Now, please look at the direction on the upper left of the drawing, and we can see that the north direction has changed to Top-Right as we have set. Consider the direction of the drawing of pipe routing, and we can see that it has changed. We can compare it to the previous one. Select the final-cut-list drawing that we have previously generated, which is this one. This is the previous one of which the north direction is Top-Left. And as for the Top-Right, it is like this. Users can change these options as well as other options.
This is how to set options for SmartPlant I-Configure.
Click ‘‘Final-Cut-List-001-DWG-1’’.
Chapter 12 Create General Arrangement Drawings
Chapter 12-1 Create General Arrangement Drawings In the next topic, we will learn how to create drawings for site installation, which is called General Arrangement
Drawings. Technicians will have to use the plan drawn from all the models for site installation. In the plan, various views, such as front, side, section, and elevation views, will be shown for using in piping installation at site. Parts of good drawings will make parts of the best plan.
In fact, for drawing, we will basically use the technique of SolidWorks, such as view creating and view cutting,
because SolidWorks is already very good for drawing. SolidPlant will add some details that SolidWorks has not had yet. We will have details additional to dimensions which we have already done from SolidWorks. If we look at Drawing Ribbon that we can see now, above we will see features for showing BOM tables, line numbers, tags, coordinates, top of pipe, center of pipe, bottom of pipe, and pipe length. We can show all of these above-mentioned data. Next, we will learn how to use these features for our work.
176

w w w . sol i dpl a n t3 d . c om
Chapter 12-2 Insert view on drawing
Next, we will learn how to make production drawing for installation views in the part of General Arrangement Drawing. First, go to Drawing Ribbon, and select the feature called New Drawing. The dialog of New SolidWorks Document will pop up. Choose drawing, and then click OK.
1. Select ‘‘Drawing’’ ribbon. 2 2. Click ‘‘New Drawing’’ feature. 1
3. Choose drawing. 3
4. Click OK button. 4
When done, click cancel to go out.
Click ‘‘Cancael’’.
We will begin by changing the paper frame to be appropriate for our drawing. Point the cursor on the screen, and right-click at the mouse, and then select Edit Sheet Format.
Right-click at the mouse, and then select Edit Sheet Format
After that, right-click again, and select Properties.
Right-click and select Properties.
177

w w w . sol i dpl a n t3 d . c om
The dialog of Sheet Properties will appear. We will use A1 (ISO) for the paper size. And for the scale, we will change
it to 1:50 for the view that we will create. When done, click OK, and then OK again.
2 1. Select paper size A1 ISO. 1
2. Change the scale to be 1:50.
3. Click ‘‘OK’’button.
3
And for the next dialog of Sheet Format/Size, we will select A1 for the size, and click OK.
1. Select paper size A1 ISO. 1
2. Click ‘‘OK’’ button.
2
After that, go out of the Edit. Next, we will set some values for dimension style settings. Open Options.
2 1. Click ‘‘Go Out’’.
2. Pick list to select ‘‘Option’’. 1
And select the tab of Document Properties, and then select Annotations. Click at Font, and set the height of the font to be 18, and click OK.
1 4 1. Select the tab of Document Properties.
2. Select Annotations. 2 3. Set the height of the font to be 18.
4. Click ‘‘OK’’ button.
3
178

w w w . sol i dpl a n t3 d . c om
Next, we will set dimension, so select Dimension. Under Text, select Font, and select the same size of 18 for the
font height, and then click OK.
4 1. Select the ‘‘Dimension’’. 2
2. Click ‘‘Font…. ’’
3. Set the height of the font to be 18. 1
4. Click ‘‘OK’’ button.
3
Next, under the part of Primary Precision, we will take dimension as integers. After that, for arrows, go to Arrows, and select ‘‘Scale with dimension height’’. For arrowhead style, we will use the solid arrowhead. For Annotation view layout, we will select it as well. Below, for the dimension that will be shown when taking dimension, deselect the option of ‘‘Add parentheses by default’’.
1 2
1. Pick list to select ‘‘None’’.
2. Check box ‘‘Scale with Dimension height.
3. Pick list to select ‘‘Solid Arrow’’. 3
4. Uncheck box ‘‘Add parentheses by default‘‘.
4
After that, go to Detailing. For the view of drawing that we will use, we want it to be in colors, so we have to select the option of ‘‘Use model color for HLR/HLV in drawings’’. When finished, click OK.
1. Select ‘‘Detailing’’.
2. Check box for ‘‘Use model color for HLR/HLV in drawings’’. When finished, click OK.button
1 2
179

w w w . sol i dpl a n t3 d . c om
Now, we are ready to insert views. We will select them from the view palette on the right. Click to open View
Palette, and then click at the picklist to see the name of the project that we are currently working on. Select it. After that, it will preview all the views that are currently used in our system. If we have created various views, we will see them here, and can take them from here. To do that, we can instantly drag the required views onto our drawing. For example, we can drag the top view like this. Now, we have already got the view on our drawing in colors. And this is how to insert views onto our drawing.
1. Click to open View Palette. 2
2. Pick list to select Project.
1 3. Select view. 4
3 4. Drag view to drawing.
Chapter 12-3 Take dimensions and annotation data on drawing After we have already got the view on our drawing, next we will take dimensions by using the technique from
SolidWorks. Additionally, we will also take annotation data, such as line numbers, levels, and coordinates, which we need to use the features of SolidPlant.
Now, we will learn how to take dimensions. Go to Annotation Ribbon, and select Smart Dimension. Then zoom-in
and click at the center line of both pumps, and pull out to place like this. In the same way, do the same for other components.
2
1. Select ‘‘Annotation’’ ribbon.
2. Click ‘‘Smart Dimension’’ feature. 1
3. Zoom to this area, then add dimension by center to center between pump and vessel.
3
Next, horizontally, we will also take dimensions of the pipes on the pipe rack. Now, click at Smart Dimension. After that, we will select the reference line of the column, and the center line of the blue pipe. Then select the line of the column and the center of the purple pipe. Next, select the center of the column and the center of the dark blue pipe. After that, we will do the same for pipes on the right. Click at the center of the column and the center of the yellow pipe, then the center of the column and the center of the green pipe, and then the center of the column and the center of the blue pipe. Each user may have his/her own technique in taking dimensions. Users can specify dimensions by using the technique of SolidWorks.
2
1. Click ‘‘Smart Dimension’’ feature.
2. Zoom to this area, then add 1 dimension by center to center between pipe and structure
180

w w w . sol i dpl a n t3 d . c om
2
3
Next, we will learn how to take annotation data for pipe lines. Go to Drawing Ribbon, and then go to the features
that we want to show. Certainly, when we create production drawing for this kind of work, we usually show the line numbers of the pipes for technicians who do installation at site to know which pipes and their details. To do that, zoom-in at our pipes, and click at the surface or edge of the pipe. After that, select Line Number feature, and then drag the appearing details to the required position. We can also set how these details are shown by using SolidWorks. For example, we can use a leader line and specify its style and other details, such as its arrowhead style, or we can also use the non-arrowhead style, or others.
For the next line, also click at the surface or edge of the pipe, and then click at the feature of Line Number again.
After that, drag the appearing details to the required place. We can do the same for all the lines before adjusting how these details are to be shown later. When done, click at the details of each line, and set how the details are to be shown as we want, such as to show a straight line as leader line.
1. Click ‘‘Drawing’’ribbon.
2. Zoom into this area, then
click to select the pipe.
3. Click ‘‘Line No.’’ feature.
4. Drop annotation Pipe line number to drawing area.
3 2 1
4
Next, for drawing, another thing that we have to show is the level of placement. To specify the placement level, we have the features of TOP or top of pipe, COP or center of pipe, and BOP or bottom of pipe. TOP specifies the distance and coordinate of the pipe by referring to the top of the pipe, while COP refers to the center of the pipe, and BOP refers to the bottom of the pipe. To do that, select the surface or edge of the required pipe. After that, click at TOP, and then we can instantly adjust how the appearing details is to be shown, and can drag it to the required place.
1. Click to select the pipe.
2. Click ‘‘TOP’’ feature. 2 3. Drop annotation ‘‘ Top of pipe ‘‘ 1 3
to drawing area.
Next, for the second one, we will try COP with it. And next, try BOP with the third pipe. The details will be shown for us. Please notice that the bottom of the pipe is at the level of 4200.
1. Click to select the pipe. 5
2. Click ‘‘COP’’ feature. 1 3. Drop annotation ‘‘ Center of pipe ‘‘ 4
to drawing area.
4. Click to select other pipe. 6 5. Click ‘‘BOP’’feature.
6. Drop annotation ‘‘ Bottom of pipe ‘‘
to drawing area.
181

w w w . sol i dpl a n t3 d . c om
These are how to take dimensions and necessary annotations. Another interesting thing is that we can also take
tags of equipments. To do that, select at the surface of the equipment and then click at TAG. It will retrieve the tag number to place on the drawing for us. And for pumps, we can just click at the body of the pump and then click at TAG. And we will get it in the same way.
These are overview of how to take dimensions and annotations used in our drawing.
1. Zoom into this area, then click to select vessel. 2
1 2. Click ‘‘TAG’’feature.
3. Drop annotation ‘‘ Equipment TAG‘‘ 3 to drawing area.
Chapter 13 Create Bill of Material
Chapter 13-1 Create Bill of Material Next, we will learn how to create Bill of Material. After we have already got models and production drawing which
is General Arrangement Drawing or GA Drawing, the software can also take materials that will be used and then show them in tables. This facilitates our work. How to take materials can be divided into 2 types. For the first type, the table will be shown on the drawing. Usually for this kind of work, for GA, we will require only the drawing. However, if we want to cross-check with the materials of pipe lines, we can also show this data as well. For the second type, the data will be exported in the form of Excel files to be used for cost estimation. For example, in the exported Excel file, certainly there are details of pipes, valves, and various fittings, but additionally there is also a thing called joint. For the number of joints that we will take, we can use an Excel formula with that number to calculate the number of welding, or what we call DB (Diameter Bore), for each size of joints to estimate costs including wage and material costs. This is how to create Bill of Material.
Chapter 13-2 Generate Bill of Material on drawing Next, we will learn how to generate a table of Bill of Material on our drawing. Now, we have already got the
drawing together with views. And we are now ready. To generate Bill of Material, firstly click to select at the view. After that, go to Drawing Ribbon, and select BOM feature.
1. Click to select at the view. 3 2
2. Select ‘‘Drawing’’ribbon. 1
3. Click ‘‘BOP’’feature.
182

w w w . sol i dpl a n t3 d . c om
Next, the dialog will appear. Look on the left to see existing pipe line numbers that are in the models, which are
shown in order of number. In front of each line, there is a checkbox for choosing whether to show that line or not on our drawing. We can see in the details that there are various data, such as material details of various components, which are sorted in the order of line numbers, such as 001, 002, and others. We can also scroll down to see various data. Here we can turn off a line from being shown. For instance, if we want only line 001 to be shown, we can deselect all other lines except line 001. Now, in the preview, we will see only the data of line 001. After that, click Close button on the lower right.
1
1. Check box for line no.001
2. Click ‘‘Close’’button.
2
We can see that now it has shown the table of BOM on the drawing for us. We can drag to move the table to the required place. Please zoom-in to see the data, which we can verify. We can use Solid Works to set or adjust various format values, such as font, and column width, to be appropriate as required. This is the first type of creating Bill of Material.
Click inside the table and try to adjust position of it. When finished click at drawing area.
Chapter 13-3 Export the Material List Report to Excel files. Next, we will learn the second way to generate Bill of Material. That is to export it as an outside file, which is an
Excel file. First, click at our view that we want to generate Bill of Material for. After that, go to Drawing Ribbon, and select the feature called BOM.
2
1. Click to select view.
2. Select ‘‘Drawing’’ ribbon. 3 1
3. Click ‘‘BOM’’ feature.
183

w w w . sol i dpl a n t3 d . c om
Then we can export it as a file by selecting to turn on the status in front of all the lines that we want to export.
At this point, to export it, we can instantly click ‘‘To Excel’’ button on the lower right.
Click ‘‘To Excel’’ button.
After that, the dialog will appear for us to save the file as Excel. Go to the Document folder of our SoidPlant Projects in drive C, and then input the name of the Excel file as desired. I will input ‘‘bom’’ for it. And then click Save.
1. At ‘‘File name’’ is ‘‘BOM’’.
2.Click ‘‘Save’’button.
1 2
After it finishes saving, the file will be opened for us to instantly see the data inside. Here we can add more details about unit prices. And for joints, we can see and know the number of joints existing in this line, so we can use Excel formula with it to calculate the total number of DB and to roughly estimate costs. This is how to export the Bill of Material as an Excel file.
Review the data.
184


