Embed Size (px)
Citation preview
SMART Bridgit® 4.5Windows operating systemsInstallation and system administrator's guide
Trademark noticeSMART Bridgit, SMART Board, SMART Meeting Pro, SMART Notebook, smarttech, the SMART logo and all SMART taglines are trademarks or registered trademarks ofSMART Technologies ULC in the U.S. and/or other countries. Microsoft, Windows, Windows Server, Windows Vista, DirectShow, Internet Explorer andMicrosoft Outlookare either a registered trademark or trademarks of Microsoft Corporation in the U.S. and/or other countries. Mac, iSight, andQuickTime are registered trademarks of Apple,Inc. Intel is a registered trademark of Intel Corporation or its subsidiaries in the U.S. and other countries. All other third-party product and company names may betrademarks of their respective owners.
Copyright notice© 2012 SMART Technologies ULC. All rights reserved. No part of this publicationmay be reproduced, transmitted, transcribed, stored in a retrieval system or translatedinto any language in any form by any means without the prior written consent of SMART Technologies ULC. Information in this manual is subject to change without noticeand does not represent a commitment on the part of SMART.One or more of the following patents: US7757001.Other patents pending.February 2012
ContentsIntroducing SMART Bridgit conferencing software 1
Software components 1Global Server Network (GSN) option 4SMART Scheduler 4SMART Scheduler Outlook add-in 4
Installing SMART Bridgit software 5Preparing for installation 6SMART Bridgit server requirements 6Server security 9Client security 9Installing SMART Bridgit server software 16
Configuring the server software 23Setting passwords 23Changing SMART Bridgit server setup options 26Settingmeeting options 26
Managing a Global Server Network (GSN) 31About the Global Server Network (GSN) 31SMART Bridgit Servers in a GSN 31SMART Bridgit clients in a GSN 34
Administering the server software 37About SMART Bridgit Administration Tools 37Viewing status information 38Managing servers andmeetings 40Controlling SMART Bridgit conferencing software services 41Customizing the SMART Bridgit server's web page 42Downloading the SMART Bridgit client 43
Using SMART Scheduler 45Introduction 45SMART Scheduler requirements 45Installing SMART Scheduler server software 46Configuring SMART Scheduler Server 48Upgrading SMART Scheduler Server 48Installing the SMART Scheduler Outlook add-in from a command line 49Removing the SMART Scheduler Outlook add-in 51
i
Bandwidth and scalability 53Bandwidth requirements 54Examples of bandwidth requirements 54Scaling SMART Bridgit 55
Appendix A: Troubleshooting 57Using the SMART Bridgit troubleshooting tool 58Monitoring ameeting's performance - presenter 63Monitoring ameeting's performance – participant 64Minimizing network latency 66Troubleshooting SMART Bridgit server connections 68Troubleshooting administration tool connections 73Troubleshooting SMART Scheduler 75
Index 77
CON T EN T S
ii
Introducing SMART Bridgitconferencing softwareSoftware components 1
SMART Bridgit Server software (Windows only) 1SMART Bridgit Administration Tools 2
SMART Bridgit client software 2Features and highlights 2
Global Server Network (GSN) option 4SMART Scheduler 4SMART Scheduler Outlook add-in 4
SMART Bridgit® conferencing software is a cost effective client/server application that lets youeasily schedulemeetings to connect, share and collaborate between SMART Board interactivewhiteboards, interactive displays and local and remote participants anytime, anywhere.SMART Bridgit conferencing software supports private local and wide area network (LAN andWAN)installations as well as public deployment scenarios that use a fully qualified domain name via theInternet.
For detailed information about using the SMART Bridgit client software, refer to its online Help.
Software componentsOnce you install and configure SMART Bridgit Server software, computers that meet theminimumrequirements can connect to your server, download the SMART Bridgit client software and create orjoin meetings.
SMART Bridgit Server software (Windows only)SMART Bridgit Server passes data between clients and authenticates client connections usingoptionally implemented passwords.
Chapter 1
1
SMART Bridgit Administration ToolsSMART Bridgit Server software also includes an Administration Tools application. You can useSMART Bridgit Administration Tools to configure servers and view their statuses, manage yourSMART Bridgit conferencing software licenses and change password, sharing and remote controlsettings. You can also use the tools to set up amessage of the day and configure chat and videosettings.
When you install SMART Bridgit Server software, a shortcut to SMART Bridgit Administration Tools
appears on your desktop.
SMARTBridgit client softwareSMART Bridgit client software transmits meeting data to and from the SMART Bridgit Server anddisplays it to themeeting participants.
Features and highlightsl Sharemultiple displays with local and remote participants
l Share applications running on your SMART Board interactive whiteboard or computer desktopwith meeting participants
l Host live demos, presentations, training events, webinars and ad hoc collaborative sessions
l Share and work onmeeting notes simultaneously with remote participants
l Help colleagues and customers navigate Internet and intranet sites
l Request permission to remotely control a meeting participant’s computer
l View off-site meeting participants using webcams
l Speak with, and listen to, meeting participants using VoIP technology
CHA PT ER 1
Introducing SMART Bridgit conferencing software
2
SMART Bridgit conferencing software and SMART Meeting Pro™ software
SMART Bridgit conferencing software is integrated with SMART Meeting Pro software andSMART Product Drivers to provide screen sharing and simultaneous viewing of multiple shareddisplays, VoIP and webcam functionality. SMART Bridgit works best with SMART Meeting Pro 3.0and SMART Meeting Pro Premium version 2.1 and 2.2. For detailed information on this functionality,refer to SMART Meeting Pro documentation.
SMART Bridgit conferencing software and SMART Notebook™ collaborative learningsoftware
SMART Bridgit conferencing software is integrated with SMART Notebook software andSMART Product Drivers to provide instant conferencing capabilities. SMART Bridgit works best withSMART Notebook versions 10.8 and 11 and SMART Product Drivers versions 10.8 and 11. Fordetailed information on this functionality, refer to SMART Notebook software documentation.
CHA PT ER 1
Introducing SMART Bridgit conferencing software
3
Global Server Network (GSN) optionThe SMART Bridgit Global Server Network (GSN) is a network of SMART Bridgit servers at differentgeographical locations. TheGSN optimizes bandwidth and reduces latency by detecting the fastestserver in eachGSN and then automatically connecting the client to that server, regardless of theserver they initially connected to.
For example, if there are five clients in North America and five clients in Europe all connecting to thesamemeeting, and the GSN consists of one server on each continent, each client automaticallyconnects to the nearest, fastest server. This results in only one high latency overseas connection,instead of five overseas connections. A GSN works just as well for different buildings in the samecity, or even different networks in the same building.
SMART SchedulerSMART Scheduler allows you to createmeetings in Microsoft® Outlook® that will automaticallystart on a specified SMART Bridgit Server. SMART Scheduler monitors theMicrosoft Exchangeserver for upcoming SMART Bridgit meetings and starts themeeting on the SMART Bridgit Server atthe appropriate time.
SMART Scheduler Outlook add-inTo use SMART Scheduler, install the SMART Scheduler Outlook add-in on your client computers.This add-in consists of a toolbar that appears in the standardmeeting request window inMicrosoftOutlook.
You can create ameeting in Outlook that uses SMART Bridgit conferencing software by selecting theThis is a SMART Bridgit Meeting check box in themeeting creation dialog box. Both themeetingcreator and the attendees will see a booking in their Outlook calendar that contains a link to theSMART Bridgit meeting.
CHA PT ER 1
Introducing SMART Bridgit conferencing software
4
Installing SMART BridgitsoftwarePreparing for installation 6SMART Bridgit server requirements 6
Software licensing 7Managing software licenses purchased prior to February 22, 2012 7Managing SMART Bridgit software licenses purchased after February 22, 2012 7
Access requirements 7Network administration experience 7Access to servers and infrastructure components on your network 7Administrator rights 9
About SMART Bridgit security 9Server security 9Client security 9
Domain names 10Registered domain name 10IPv4/IPv6 addresses 10
SMART Bridgit and firewalls 11Configuring firewalls 11Configuring proxy servers 12
SMART Bridgit client system requirements 13SMART Scheduler requirements 15
Minimum computer requirements 15Installing SMART Bridgit server software 16
Introduction 16Installing the server software 16Upgrading SMART Bridgit server software 20Licensing SMART Bridgit server software 20Activating using the SMART activation server 20Activating your licensemanually 21Removing server or user licenses 22
Chapter 2
5
This chapter contains information you will need to prepare for installation as well as procedures thatwill lead you through the installation process of SMART Bridgit software and its options.
Preparing for installationSMART Bridgit conferencing software is scalable, so system requirements vary. Themaximumnumber of users that a server can support is constrained by both the server hardware and the networkbandwidth available to that server. The exact number of users supported varies depending on theavailable bandwidth and the use of Voice over Internet Protocol (VoIP) audio and webcamfunctionality. Allowingmore than the recommended number of simultaneous users may negativelyimpact performance. To support more users, configuremultiple servers to operate as aGlobal ServerNetwork (GSN).
N NOTES
l To determine the amount of bandwidth you need, seeBandwidth requirements on page 54.
l Your system performs best if you use a high performance server or a dedicated server withno other applications installed.
SMART Bridgit server requirementsEach server must meet the followingminimum requirements:
l 2.0 GHz or faster processor
l 2GB of RAM
l Windows Server® 2003 R2 or 2008 R2 operating system
l 100Mbps network interface card (NIC) that supports the TCP/IP
N NOTES
l 1Gbps NIC recommended.
l Increased hardware capabilities improve overall meeting performance.
l A single-processor server with a 100Mb network interface can support from 200 to 300concurrent users. To support more users, addmultiple processor cores to the server andallocatemore network bandwidth. Exceeding the recommended number of users can affectperformance.
CHA PT ER 2
Installing SMART Bridgit software
6
Software licensingDuring the 60-day free evaluation period. After the evaluation version expires, users can no longerconduct meetings on the server andmust purchase and activate a software license.
Managing software licenses purchased prior to February 22, 2012If you purchased a SMART Bridgit software prior to February 22, 2012, you got a server license withits own product key. Youmay have also purchased a concurrent user license with a set entitlementthat varies depending on the user license SKU you purchased. The concurrent user license SKUsavailable included: BDC-05, BDC-10, BDC-25, BDC-50, and BDC-MAX. The SKU camewith oneproduct key for use with all of its concurrent user licenses.
If you’re upgrading to SMART Bridgit 4.5 software server, you don't need a new server license. Youalsomaintain the same number of concurrent user licenses you have when you originally purchased.With the purchase of a promotional BDC-MAX SKU available for limited time only, you can upgradeyour concurrent user license entitlement to 500. For information on upgrade options, contact yourauthorized SMART reseller (smarttech.com/where).
Managing SMART Bridgit software licenses purchased after February 22, 2012To continue using the software after the free trial period, you need to purchase a license before theevaluation period expires.
When you purchase a license a SMART Bridgit software license after February 22, 2012, you’repurchasing a server license with entitlement of up to 500 concurrent users and you receive oneproduct key.
Access requirementsBefore you can successfully install and use a SMART Bridgit server software, youmust correctlyconfigure your network environment. SMART Bridgit server software doesn't automatically do this.Therefore, you need access to various components of your network infrastructure before you canconfigure your network environment appropriately.
Network administration experience
I I MPORTANT
SMART Bridgit server software functions in a complex network environment. Do not attempt toinstall or configure the SMART Bridgit server software unless you’re an experienced networkadministrator with a full understanding of how your network functions.
Access to servers and infrastructure components on your networkDifferent network configurations use different types of access.
CHA PT ER 2
Installing SMART Bridgit software
7
Private local area network (LAN) use
If your SMART Bridgit server will be used only in a private LAN, you need access to the followingcomponents of your LAN infrastructure:
l An administrator login account with installation rights for the server computer you’ll installSMART Bridgit server software on.
l Physical or remote login access, and an administrator login account with configuration rights,for your network’s DHCP and DNS servers.
l You could also need physical or remote login access to, and an administrator login accountwith configuration rights for, your network’s domain server which controls the software firewallconfigurations for all of your network's client computers. This is dependent on your localnetwork’s domain policies.
Use by different networks connected to a wide area network (WAN)
If your SMART Bridgit server will be used by different networks connected to aWAN, you’ll needaccess to the following components of your LAN orWAN infrastructure:
l Physical or remote login access to, and an administrator login account with configuration rightsfor, the routers, WAN firewalls, and proxy servers between different segments of yourWAN.
l Physical or remote login access to, and an administrator login account with configuration rightsfor, all DNS servers in each segment of yourWAN.
Use by clients with an Internet connection
If your SMART Bridgit server will be accessible to clients via the Internet, you need access to thefollowing components:
l Physical or remote login access to, and an administrator login account with configuration rightsfor, the routers, firewalls and proxy servers between your network and the Internet.
l Login access with configuration rights to the Internet registrar which controls your company'spublic Internet DNS records.
Use of SMART Scheduler
If you want to use the SMART Bridgit Outlook add-in and SMART Scheduler integration withMicrosoft Exchange, you need physical or remote login access to, and an administrator login accountwith configuration rights for, your company's domain server. This server is used to create useraccounts for use on your Microsoft Exchange server.
CHA PT ER 2
Installing SMART Bridgit software
8

Administrator rightsAfter you install and configure SMART Bridgit server software, youmay want to administer the serverto check information such as performance logs and use records. To do this, your administrator needsphysical or remote login access and a user login account on the SMART Bridgit server computer.
About SMART Bridgit security
Server securitySMART Bridgit conferencing software complies with Secure Sockets Layer (SSL) 3.0 to encrypt datatransmitted using a TCP connection. It uses OpenSSL to generate a self-signed SSL certificate usedfor data encryption. Each time the server starts, it generates a new 1024-bit SSL certificate andnegotiates a new 256-bit encryption key with each client. However, if a client is unable to negotiate aset of encryption keys with the server, no connection is established.
SMART Bridgit conferencing software also uses Secure Real-time Transport Protocol (SRTP) toencrypt audio traffic transmitted using a UDP connection. These encryptions prevent third partiesfrom intercepting data transmitted between client and server.
The cipher suite negotiated between aWindows operating system server and client is an AES256-SHA cipher suite, including RSA encrypted key exchange, digest authentication and 256-bit SSLdata encryption. SMART Bridgit conferencing software for Mac OS X operating system software alsoimplements 256-bit SSL encryption.
Client securitySystem administrators andmeeting creators can set four types of passwords to enhance SMARTBridgit software security. These passwords aren't mandatory.
I I MPORTANT
If you assign a server access password, SMART recommends that you also assign ameetingcreation password
CHA PT ER 2
Installing SMART Bridgit software
9
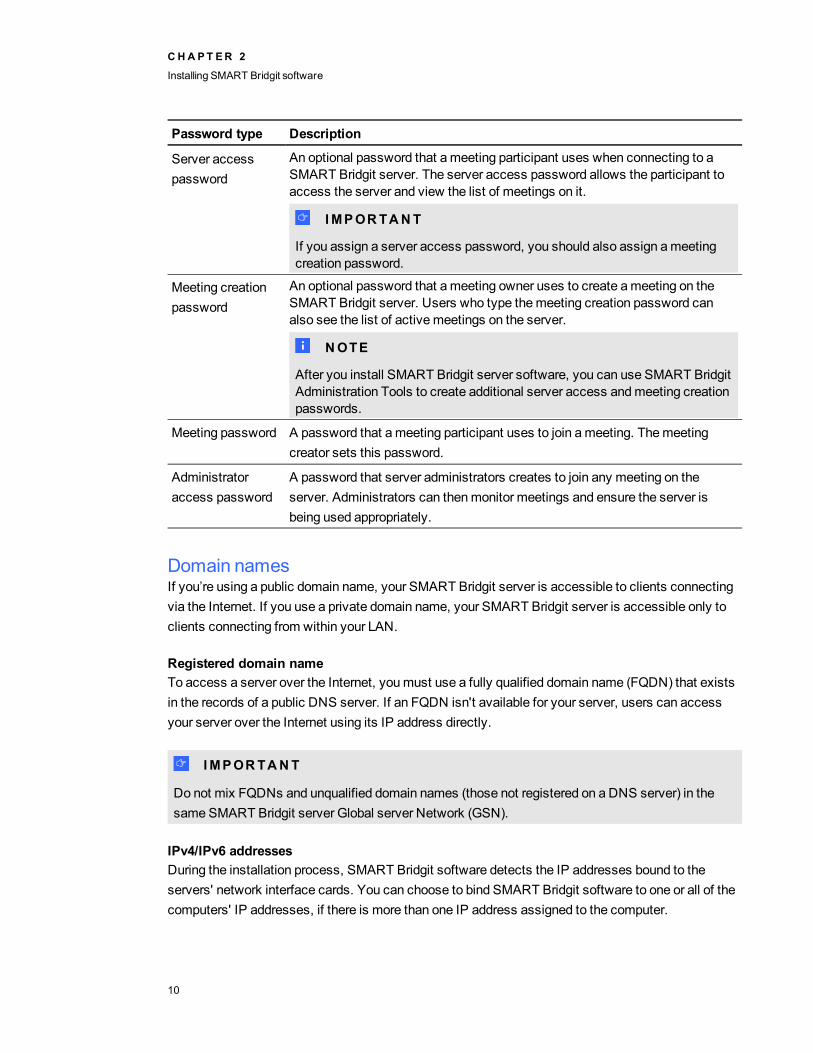
Password type Description
Server accesspassword
An optional password that ameeting participant uses when connecting to aSMART Bridgit server. The server access password allows the participant toaccess the server and view the list of meetings on it.
I I MPORTANT
If you assign a server access password, you should also assign ameetingcreation password.
Meeting creationpassword
An optional password that ameeting owner uses to create ameeting on theSMART Bridgit server. Users who type themeeting creation password canalso see the list of activemeetings on the server.
N NOTE
After you install SMART Bridgit server software, you can use SMART BridgitAdministration Tools to create additional server access andmeeting creationpasswords.
Meeting password A password that ameeting participant uses to join ameeting. Themeetingcreator sets this password.
Administratoraccess password
A password that server administrators creates to join any meeting on theserver. Administrators can thenmonitor meetings and ensure the server isbeing used appropriately.
Domain namesIf you’re using a public domain name, your SMART Bridgit server is accessible to clients connectingvia the Internet. If you use a private domain name, your SMART Bridgit server is accessible only toclients connecting from within your LAN.
Registered domain nameTo access a server over the Internet, youmust use a fully qualified domain name (FQDN) that existsin the records of a public DNS server. If an FQDN isn't available for your server, users can accessyour server over the Internet using its IP address directly.
I I MPORTANT
Do not mix FQDNs and unqualified domain names (those not registered on a DNS server) in thesame SMART Bridgit server Global server Network (GSN).
IPv4/IPv6 addressesDuring the installation process, SMART Bridgit software detects the IP addresses bound to theservers' network interface cards. You can choose to bind SMART Bridgit software to one or all of thecomputers' IP addresses, if there is more than one IP address assigned to the computer.
CHA PT ER 2
Installing SMART Bridgit software
10
g To check if your public domain name resolves to an IP address
1. Select Start > Run on the computer where you'll install the SMART Bridgit server software.
2. Type cmd, and then press ENTER.
A Command Prompt dialog boxappears.
3. Use the ipconfig command to determine the server’s IP address.
4. Use either the nslookup command or the ping command against the domain name for theSMART Bridgit server to determine the IP address that the network’s DNS returns.
5. Compare this IP address to the SMART Bridgit server’s IP address from step 3.
If the IP addresses are the same, the network’s DNS is configured correctly.
N NOTES
l Your domain namemust resolve to a valid IP address for you to be able to use it to configureyour SMART Bridgit server.
l The ping can fail for reasons unrelated to the public domain name and still resolve to acomputer name or IP address.
SMART Bridgit and firewallsSMART Bridgit software automatically detects and employs themost secure and efficient methodsavailable to connect clients and tomaintain optimal meeting performance. However, SMARTrecommends installing your SMART Bridgit server behind a firewall to prevent unauthorized access.
The firewall must open port 80 for HTTP traffic coming into the server and going out to the client.
N NOTE
SMART doesn't recommend deploying SMART Bridgit servers with only HTTP connectivity.
Configuring firewallsYou can install your SMART Bridgit server software behind a software firewall, proxy server,hardware firewall or router. For optimal performance, enable both primary and secondary TCP portsand a range of UDP ports for Voice over Internet Protocol (VoIP) audio on the server.
l Firewalls for the server should allow inbound communication to the server on all specifiedports.
CHA PT ER 2
Installing SMART Bridgit software
11

l Firewalls for the client should allow outbound communication from the client on all specifiedports.
For best performance, allow inbound TCP and UDP traffic to the server on the default ports specifiedin the following table.
Defaultports
Type/protocol Use
80 TCP/HTTP l Initial connection to the SMART Bridgit server todisplay the web page from which the users downloadthe SMART Bridgit client.
l Initial connection to the SMART Bridgit server fromthe SMART Bridgit client when looking for meetingsto join or when creating new meetings.
l Fallback communicationmethod for all otherSMART Bridgit functions when other ports areunavailable (lower performance than other ports).
80 TCP/SMART Bridgit l Primary port for data, screen viewing and webcamtraffic for SMART Bridgit meetings.
l If this port is limited to only HTTP, SMART Bridgitconferencing software attempts to use thesecondary port (9933) for this traffic.
l If this port is blocked or unavailable, SMART Bridgitconferencing software uses the HTTP on the primaryport, which can affect performance.
9933 TCP/SMART Bridgit Secondary port for data, screen viewing and webcam trafficfor SMART Bridgit meetings.
9901 to9920
UDP/SMART Bridgit l Primary port range for VoIP audio traffic forSMART Bridgit meetings.
l If these ports are blocked or unavailable,SMART Bridgit conferencing software falls to TCP orHTTP on the primary or secondary port, which cannegatively affect performance.
Configuring proxy serversYou can configure your SMART Bridgit server software to work with any proxy server that adheres tothe RFC 2068 HTTP standard. If you install your SMART Bridgit server software behind a proxyserver, youmust create access policy rules for inbound and outbound traffic on that proxy server. Youcan further enhance your network security by enabling authentication, such as basic, digest or NTLAN Manager (NTLM) authentication.
CHA PT ER 2
Installing SMART Bridgit software
12
N NOTE
Although proxy servers protect internal networks from intruders, they unavoidably introducenetwork latency.
If you incorporate a proxy server, configure eachmeeting participant’s Internet browser to allowaccess to the SMART Bridgit server.
SMART Bridgit client system requirementsSMART Bridgit software allows meeting participants to interact and collaborate directly with eachother. In order for you to share audio and video with other meeting participants, your computer mustmeet the followingminimum requirements.
Supported Windows operating systems
Supported Windows® operating systems
l Windows XP SP3
l Windows 7
Supported Mac operating system software
l Mac OS X 10.6
l Mac OS X 10.7
Without VoIP audio or webcam video
Windows
l 2.0 GHz processor
l 1GB of RAM
l Broadband Internet connection
Mac
l 2.0 GHz Intel® processor
l 1GB of RAM
l Broadband Internet connection
CHA PT ER 2
Installing SMART Bridgit software
13
With VoIP audio and webcam video
Windows
l 2.0 GHz processor
l 2GB RAM
l Broadband Internet connection
Mac
l 2.0 GHz Intel processor
l 2GB of RAM
l Broadband Internet connection
Webcam requirements
Windows
Mac
l Internal webcam or iSight camera
l QuickTime application program
Audio requirements
l Sound card
l Speakers or headphones
l Microphone
Internet browser requirements
The following list of Internet browsers support SMART Bridgit conferencing software:
Windows
l Internet Explorer® 7.0, 8.0 or 9.0
l Opera™ 11.0
l Firefox® 3.0, 3.5 or 4.0
Mac
Safari 3.0
CHA PT ER 2
Installing SMART Bridgit software
14
N NOTE
You can download or update SMART software downloads from smarttech.com/downloads.
SMARTScheduler requirements
Minimum computer requirementsSMART Scheduler server requirements
l 2.0 GHz processor
l 1GB of RAM
l Windows Server 2003 R2 or 2008 R2 operating system
l 10Mbps network interface card that supports the TCP/IP
l Network connection to your Microsoft Exchange Server
l CDO 1.2.1 (Microsoft Collaboration Data Objects), version 6.5.8165.0 or later. You can alsodownload this software during the server installation.
Microsoft Exchange Server
Microsoft Exchange Server 2003, 2007 or 2010.
SMART Scheduler Outlook add-in
l 2.0 GHz processor
l 1GB of RAM
l Outlook 2003 SP3, 2007 SP2 or 2010.
l Network connection to your Microsoft Exchange Server
l Youmust have SMART Bridgit server installed and running on either a separate computer(recommended) or, if required, on the same computer where you'll install SMART Schedulerserver.
CHA PT ER 2
Installing SMART Bridgit software
15
Installing SMART Bridgit server software
IntroductionWhen installing SMART Bridgit server software, consider the following points:
l If you install SMART Bridgit server software on a dedicated server with one network interfacecard (NIC), select All (default) to bind SMART Bridgit conferencing software to all IPaddresses. If your network uses network address translation (NAT), use port forwarding toredirect external requests to the NIC.
l If the server is multi-homed (has multiple NICs), select the internal IP address to bindSMART Bridgit conferencing software to the internal NIC. Use port forwarding to redirectexternal requests to the external NIC.
l If you install SMART Bridgit server software on a server running other web server applications(for instance, Microsoft IIS or any other web server application using Port 80), you canconfigure SMART Bridgit software by:
o Using IP specific binding. Each server binds to a specific IP address. You can addmultiple IP addresses to a single NIC onWindows servers by selectingControl Panel> Network Connections > Internet Protocol (TCP/IP).
o Customizing the default primary server port. In this case, multiple applications can bindto the same IP address but on different ports. This setup requires users to specify theport when connecting SMART Bridgit client (for example server.company.com:88).
Installing the server software
g To install SMART Bridgit server software
1. Go to smarttech.com/downloads.
2. Download SMART Bridgit software and run theConferenceServicesSetup.exe file.
TheSMART Bridgit - InstallShieldWizard opens and displays the start-up screen.
3. Click Next.
The License Agreement page appears.
CHA PT ER 2
Installing SMART Bridgit software
16
4. Read the agreement. If you accept, click I accept, and then click Next.
N NOTE
If you want to keep a hard copy of the agreement for your records, click Print.
TheDestination Folder dialog box appears.
5. Click Next to use the default destination folder.
OR
Click Change to select a new location for SMART Bridgit conferencing software, and thenbrowse to the desired folder and click OK.
6. Click Next.
TheServer Address Configuration page appears.
7. Configure your server by selecting one of the following options:
IPv4 address andIPv6 address
The installation software detects all IP addresses assigned to theserver. To use all the addresses, select All in the IPv4 address orIPv6 address box.
N NOTES
o If you select all addresses, SMART Bridgit conferencingsoftware clients can use any IP address assigned to theserver computer to contact the SMART Bridgit server. Torestrict the IP addresses through which your server isreachable, select a specific IP address.
o If the IP address fields are unavailable, SMART Bridgitconferencing software has automatically detected that youdon’t havemore than one IP address to choose from.
Public domain name Each SMART Bridgit server requires a fully qualified domain name(for example, conference.company.com:88 orserver.company.com:88) or a host name (for LAN access only).
I I MPORTANT
If you use the computer’s network host name as the domain name,the server is accessible only from within the LAN. Internet users donot have access to the server. Do not mix fully qualified domainnames and computer host names within the same SMART BridgitGSN.
8. Click Next.
TheServer Port Configuration page appears.
CHA PT ER 2
Installing SMART Bridgit software
17
9. Configure the ports using the following options:
Primary TCP port By default, SMART Bridgit conferencing software uses port 80 as itsprimary port. If your server is running another application that usesport 80, youmust assign SMART Bridgit conferencing software to anunoccupied port. Configure your firewall to allow incoming andoutgoing TCP traffic on your chosen port.
Enable secondaryTCP port
By default, SMART Bridgit conferencing software uses port 9933. Ifyou want to use a different port, make sure it doesn't conflict with anyother applications running on the server computer.
N NOTE
If your server is running another application that uses either of theseports, youmust assign SMART Bridgit software’s primary andsecondary ports to unoccupied ports. Configure your firewall toallow incoming and outgoing TCP traffic on the chosen ports.
Enable UDP ports(audio optimization)
Whenever possible, SMART Bridgit conferencing software uses UDPfor audio transmission to avoid the additional overhead of TCP in atiming-sensitive situation. SMART strongly recommends that youenable UDP tominimize audio lag in SMART Bridgit meetings. Youmust open a range of UDP ports (9901 to 9920) on your firewall to usethis feature.
N NOTES
o If you configure SMART Bridgit server software to use a TCPport that isn’t the default, users must specify the port whenconnecting to the server. For example, to connect to aSMART Bridgit server on port 8080, users must typeserver.company.com: 8080.
o A UDP port supports up to 10 participants with optimalperformance. By default, SMART Bridgit conferencingsoftware opens 20 UDP ports to allow approximately 200concurrent participants. Openmore ports to accommodatemore participants.
o If your network uses a firewall, youmust configure it to allowincoming TCP and UDP traffic on these ports.
10. Click Next.
TheServer Password Security page appears.
CHA PT ER 2
Installing SMART Bridgit software
18
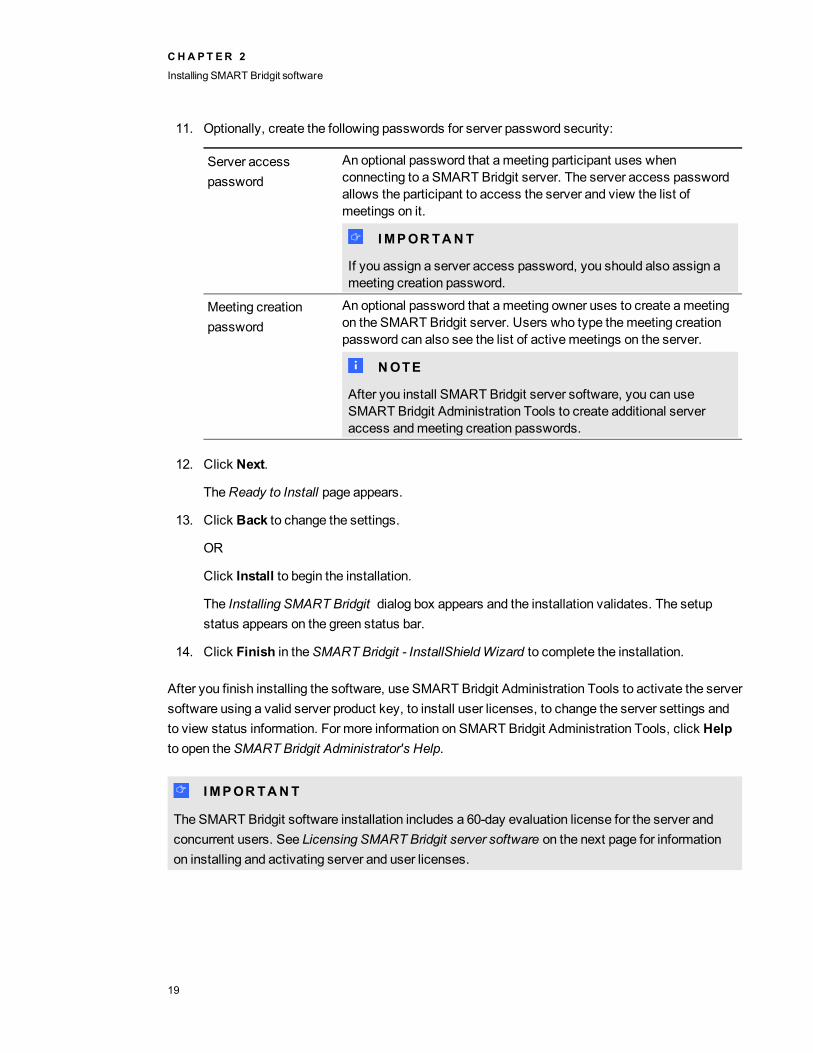
11. Optionally, create the following passwords for server password security:
Server accesspassword
An optional password that ameeting participant uses whenconnecting to a SMART Bridgit server. The server access passwordallows the participant to access the server and view the list ofmeetings on it.
I I MPORTANT
If you assign a server access password, you should also assign ameeting creation password.
Meeting creationpassword
An optional password that ameeting owner uses to create ameetingon the SMART Bridgit server. Users who type themeeting creationpassword can also see the list of activemeetings on the server.
N NOTE
After you install SMART Bridgit server software, you can useSMART Bridgit Administration Tools to create additional serveraccess andmeeting creation passwords.
12. Click Next.
TheReady to Install page appears.
13. Click Back to change the settings.
OR
Click Install to begin the installation.
The Installing SMART Bridgit dialog box appears and the installation validates. The setupstatus appears on the green status bar.
14. Click Finish in theSMART Bridgit - InstallShieldWizard to complete the installation.
After you finish installing the software, use SMART Bridgit Administration Tools to activate the serversoftware using a valid server product key, to install user licenses, to change the server settings andto view status information. For more information on SMART Bridgit Administration Tools, click Helpto open theSMART Bridgit Administrator's Help.
I I MPORTANT
The SMART Bridgit software installation includes a 60-day evaluation license for the server andconcurrent users. See Licensing SMART Bridgit server software on the next page for informationon installing and activating server and user licenses.
CHA PT ER 2
Installing SMART Bridgit software
19
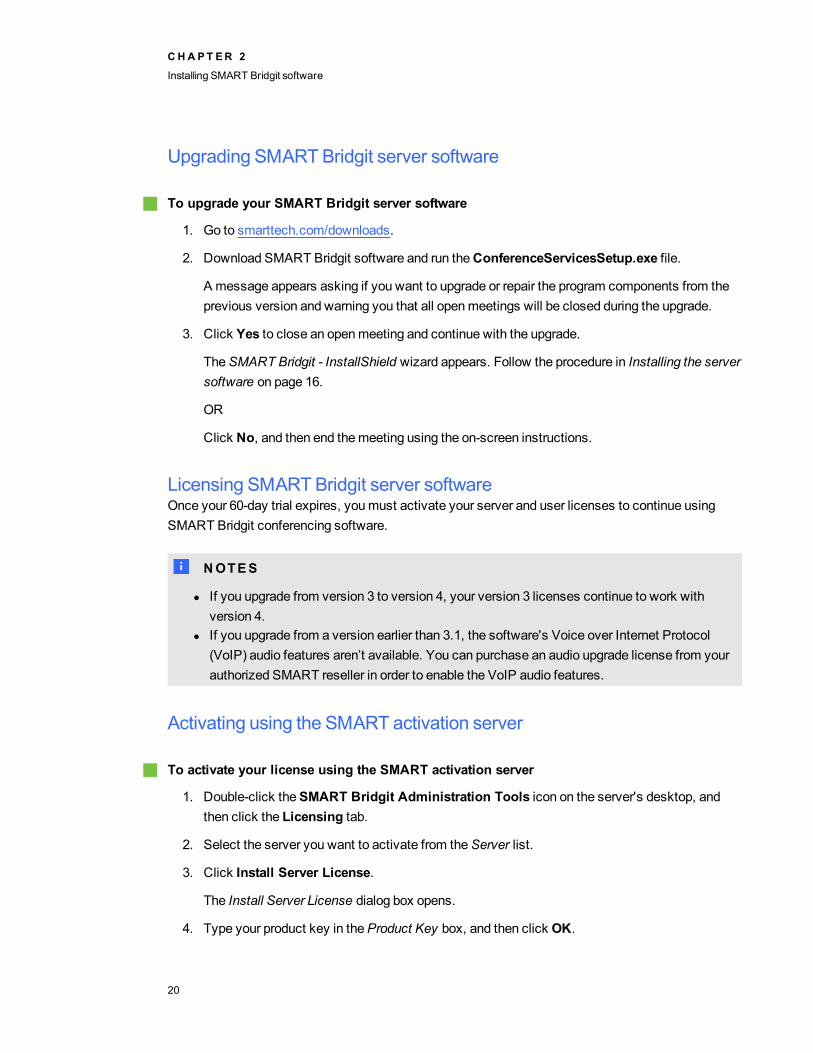
Upgrading SMART Bridgit server software
g To upgrade your SMART Bridgit server software
1. Go to smarttech.com/downloads.
2. Download SMART Bridgit software and run theConferenceServicesSetup.exe file.
A message appears asking if you want to upgrade or repair the program components from theprevious version and warning you that all openmeetings will be closed during the upgrade.
3. Click Yes to close an openmeeting and continue with the upgrade.
TheSMART Bridgit - InstallShield wizard appears. Follow the procedure in Installing the serversoftware on page 16.
OR
Click No, and then end themeeting using the on-screen instructions.
Licensing SMART Bridgit server softwareOnce your 60-day trial expires, youmust activate your server and user licenses to continue usingSMART Bridgit conferencing software.
N NOTES
l If you upgrade from version 3 to version 4, your version 3 licenses continue to work withversion 4.
l If you upgrade from a version earlier than 3.1, the software's Voice over Internet Protocol(VoIP) audio features aren’t available. You can purchase an audio upgrade license from yourauthorized SMART reseller in order to enable the VoIP audio features.
Activating using the SMART activation server
g To activate your license using the SMART activation server
1. Double-click theSMART Bridgit Administration Tools icon on the server's desktop, andthen click the Licensing tab.
2. Select the server you want to activate from theServer list.
3. Click Install Server License.
The Install Server License dialog box opens.
4. Type your product key in theProduct Key box, and then click OK.
CHA PT ER 2
Installing SMART Bridgit software
20
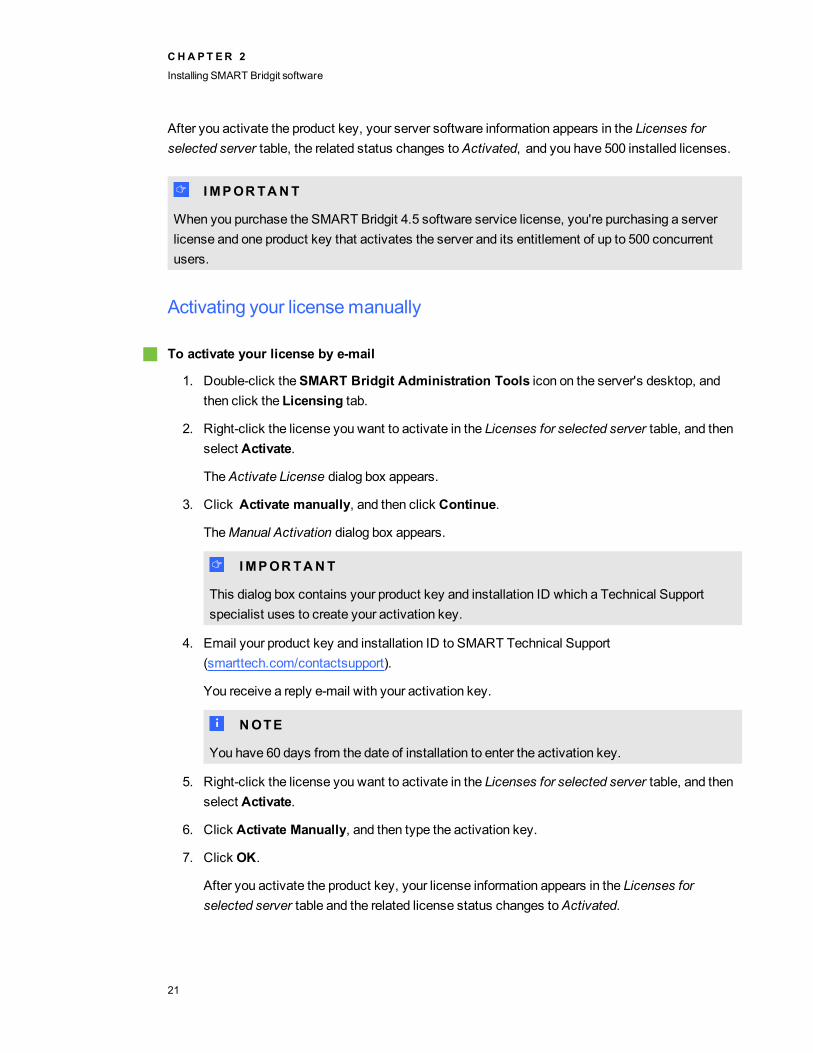
After you activate the product key, your server software information appears in the Licenses forselected server table, the related status changes toActivated, and you have 500 installed licenses.
I I MPORTANT
When you purchase the SMART Bridgit 4.5 software service license, you're purchasing a serverlicense and one product key that activates the server and its entitlement of up to 500 concurrentusers.
Activating your licensemanually
g To activate your license by e-mail
1. Double-click theSMART Bridgit Administration Tools icon on the server's desktop, andthen click the Licensing tab.
2. Right-click the license you want to activate in the Licenses for selected server table, and thenselect Activate.
TheActivate License dialog box appears.
3. Click Activate manually, and then click Continue.
TheManual Activation dialog box appears.
I I MPORTANT
This dialog box contains your product key and installation ID which a Technical Supportspecialist uses to create your activation key.
4. Email your product key and installation ID to SMART Technical Support(smarttech.com/contactsupport).
You receive a reply e-mail with your activation key.
N NOTE
You have 60 days from the date of installation to enter the activation key.
5. Right-click the license you want to activate in the Licenses for selected server table, and thenselect Activate.
6. Click Activate Manually, and then type the activation key.
7. Click OK.
After you activate the product key, your license information appears in the Licenses forselected server table and the related license status changes toActivated.
CHA PT ER 2
Installing SMART Bridgit software
21
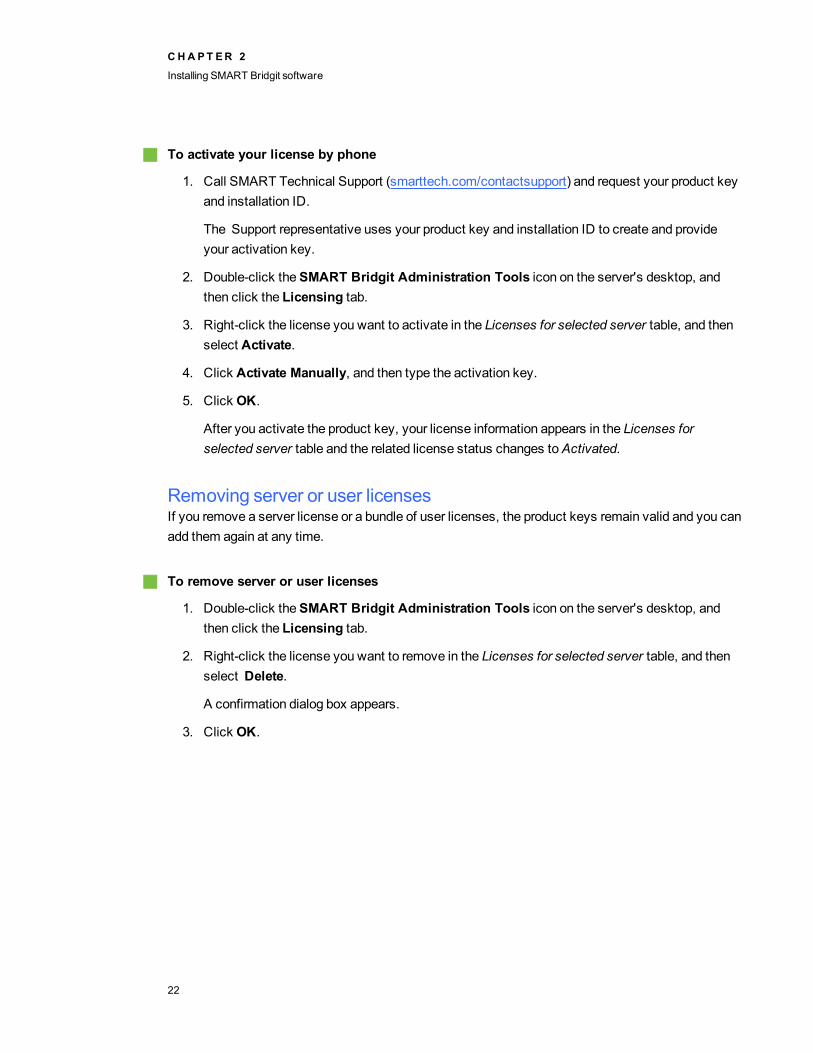
g To activate your license by phone
1. Call SMART Technical Support (smarttech.com/contactsupport) and request your product keyand installation ID.
The Support representative uses your product key and installation ID to create and provideyour activation key.
2. Double-click theSMART Bridgit Administration Tools icon on the server's desktop, andthen click the Licensing tab.
3. Right-click the license you want to activate in the Licenses for selected server table, and thenselect Activate.
4. Click Activate Manually, and then type the activation key.
5. Click OK.
After you activate the product key, your license information appears in the Licenses forselected server table and the related license status changes toActivated.
Removing server or user licensesIf you remove a server license or a bundle of user licenses, the product keys remain valid and you canadd them again at any time.
g To remove server or user licenses
1. Double-click theSMART Bridgit Administration Tools icon on the server's desktop, andthen click the Licensing tab.
2. Right-click the license you want to remove in the Licenses for selected server table, and thenselect Delete.
A confirmation dialog box appears.
3. Click OK.
CHA PT ER 2
Installing SMART Bridgit software
22
Configuring the server softwareSetting passwords 23
Changing the server access password 23Changing themeeting creation password 24Changing the administrator access password 25Assigning an API password 25
Changing SMART Bridgit server setup options 26Settingmeeting options 26
Disabling remote control 27Disabling webcams 27Disabling text chat 27Disabling the Raise Hand feature 28Disabling the Knock feature 28Adding amessage of the day 29Configuringmeeting audio settings 29
Third-party audio 30
You can use SMART Bridgit Administration Tools on any SMART Bridgit server to assign clientaccess and server access passwords, to create amessage of the day, and to enable remote control.If you’re using aGSN, these settings automatically update on all your SMART Bridgit Servers.
Setting passwordsYou can assign, change or removemany of the passwords users and administrators use withSMART Bridgit.
Changing the server access passwordServer access passwords are optional. Assign a server access password if you want users to haveto type a password before they can view the list of activemeetings on a server. You can assign asmany server access passwords as necessary.
I I MPORTANT
If you assign a server access password, you should also assign ameeting creation password.
Chapter 3
23
g To change server access passwords
1. Double-click theSMART Bridgit Administration Tools icon on the server's desktop, andthen click theSecurity tab.
2. Select Server access password in theClient access passwords area.
3. Type the passwords you want to use. Use a semicolon to separatemultiple passwords (forexample, apple;banana;pear).
N NOTES
o To revoke a password, remove it from the list.
o If the server access password andmeeting creation password are identical, you'reprompted for only the server access password.
4. Click Apply.
N NOTES
o Remember to give the passwords to everyone who's authorized to view the list ofactivemeetings.
o Participants who receive an e-mail invitation to join ameeting can click the link in theinvitation to bypass the server access password. However, the participant can joinonly themeeting they're invited to. The participant can't view the list of other activemeetings on the server.
Changing themeeting creation passwordMeeting creation passwords are optional. Assign ameeting creation password if you want users tohave to type a password before they can create ameeting. You can assign as many passwords asnecessary.
I I MPORTANT
If you assign a server access password, youmust also assign ameeting creation password.
g To change meeting creation passwords
1. Double-click theSMART Bridgit Administration Tools icon on the server's desktop, andthen click theSecurity tab.
2. SelectMeeting creation password in theClient access passwords area.
CHA PT ER 3
Configuring the server software
24
3. Type the passwords you want to use. Use a semicolon to separatemultiple passwords (forexample, apple;banana;pear).
N NOTES
o To revoke a password, remove it from the list.
o If the server access password andmeeting creation password are identical, you'reprompted for only the server access password.
4. Click Apply.
N NOTE
Remember to give the passwords to everyone who's authorized to createmeetings.
Changing the administrator access passwordAdministrators can access andmonitor any meeting on the SMART Bridgit Server using anadministrator access password.
g To assign an administrator access password
1. Double-click theSMART Bridgit Administration Tools icon on the server's desktop, andthen click theSecurity tab.
2. Select Admin access password in theClient access passwords area.
3. Type the passwords you want to assign.
4. Click Apply.
N NOTES
o You can assign only one administrator access password.
o The administrator appears as Administrator in a SMART Bridgit meeting's participantlist but doesn't have any special capabilities in themeeting.
o If you create ameeting that uses the same password as the administrator's, nomeetingmembers appear as Administrator in the participant list.
Assigning an API passwordOnly original equipment manufacturers (OEMs) using the SMART Bridgit application programminginterface (API) use this authorization password.
CHA PT ER 3
Configuring the server software
25
g To assign an API authorization password
1. Double-click theSMART Bridgit Administration Tools icon on the server's desktop, andthen click theSecurity tab.
2. Select API authorization password in theServer access passwords area.
3. Type the password you want to assign.
4. Click Apply.
N NOTES
o You can assign only one API authorization password.
o To revoke the password, clear theAPI authorization password check box.
o Remember to give the password to third-party users whose systems are integratedwith SMART Bridgit software.
Changing SMART Bridgit server setup optionsAdministrators can change server setup information including the registered domain name andprimary and secondary port numbers.
g To change the server setup options
1. Double-click theSMART Bridgit Administration Tools shortcut on the server's desktop,and then click theSetup tab.
2. Modify the options as required.
For information on the options, see SMART Bridgit 4.5 Installation and system administrator'sguide (smarttech.com/kb/170180)
Configuration changes on this page don't take effect until you restart both the SMART BridgitMaster Service and the Conference Service inWindows Services Manager (seeControllingSMART Bridgit conferencing software services on page 41).
Setting meeting optionsYou can configure, enable and disable several features of SMART Bridgit that are available tomeeting participants.
CHA PT ER 3
Configuring the server software
26
Disabling remote controlTo prevent presenters from sharing control of their computers with other participants, disable theremote control setting in SMART Bridgit Administration Tools.
g To disable remote control
1. Double-click theSMART Bridgit Administration Tools shortcut on the server's desktop,and then click theOptions tab.
2. Clear theEnable Remote Control check box.
N NOTES
o Remote control is available in activemeetings until they end.
o Remote control is disabled in new meetings and the option doesn't appear to meetingparticipants.
Disabling webcamsTo prevent participants from sharing video, disable the webcam setting in SMART BridgitAdministration Tools.
g To disable webcams in SMART Bridgit meetings
1. Double-click theSMART Bridgit Administration Tools shortcut on the server's desktop,and then click theOptions tab.
2. Clear theEnable Webcams check box.
N NOTES
o Webcams are available in activemeetings until they end.
o Webcams are disabled in new meetings and the option doesn't appear to meetingparticipants.
Disabling text chatTo prevent participants from sharing chat messages, disable the text chat setting in SMART BridgitAdministration Tools.
CHA PT ER 3
Configuring the server software
27
g To disable text chat in SMART Bridgit meetings
1. Double-click theSMART Bridgit Administration Tools shortcut on the server's desktop,and then click theOptions tab.
2. Clear theEnable Chat check box.
N NOTES
o Text chat is available in activemeetings until they end.
o Text chat is disabled in new meetings and the option doesn't appear to meetingparticipants.
Disabling the Raise Hand featureTo prevent participants from interrupting themeeting with the Raise Hand feature, disable the featurein SMART Bridgit Administration Tools.
g To disable the raise hand feature in SMART Bridgit meetings
1. Double-click theSMART Bridgit Administration Tools shortcut on the server's desktop,and then click theOptions tab.
2. Clear theEnable Raise Hand check box.
N NOTES
o The Raise Hand feature is available in activemeetings until they end.
o The Raise Hand feature is disabled in new meetings and the option doesn't appear tomeeting participants.
Disabling the Knock featureTo prevent participants from knocking and entering ameeting without a password, disable the Knockfeature in SMART Bridgit Administration Tools.
g To disable the knock feature in SMART Bridgit meetings
1. Double-click theSMART Bridgit Administration Tools shortcut on the server's desktop,and then click theOptions tab.
CHA PT ER 3
Configuring the server software
28
2. Clear theEnable Knock check box.
N NOTES
o The Knock feature is available in activemeetings until they end.
o The Knock feature is disabled in new meetings and theKnock to Join button doesn'tappear to participants trying to join themeeting.
Adding amessage of the daySelect this option to create amessage users see when they open SMART Bridgit client.
g To add a message of the day
1. Double-click theSMART Bridgit Administration Tools shortcut on the server's desktop,and then click theOptions tab.
2. Select the display frequency in theMessage of the day area.
3. Type themessage in theMessage of the Day text box (maximum 256 characters).
4. Click Apply.
Configuringmeeting audio settingsBy default, SMART Bridgit software's audio is enabled, allowingmeeting participants to speak toeach other duringmeetings.
Up to four participants in ameeting can speak concurrently using SMART Bridgit's Voice overInternet Protocol (VoIP) feature. SMART Bridgit's VoIP implementation incorporates Secure Real-time Transport Protocol (SRTP) communication on UDP ports, processing audio data as a steadystream with minimal lag time.
Whenmore than four people are in ameeting, participants can open and close their microphones togive others the opportunity to speak.
g To disable meeting audio
1. Double-click theSMART Bridgit Administration Tools shortcut on the server's desktop,and then click theAudio tab.
CHA PT ER 3
Configuring the server software
29
2. Clear theEnable Audio check box.
N NOTES
o Meeting audio is available in activemeetings until they end.
o Meeting audio is disabled in new meetings.
g To select a default audio optimization when using VoIP
1. Double-click theSMART Bridgit Administration Tools shortcut on the server's desktop,and then click theAudio tab.
2. Select Use VoIP Audio, and then select one of the following:
o Optimize for high audio quality provides the best quality meeting audio. It alsoconsumes themost bandwidth.
o Optimize for low bandwidth uses less bandwidth but doesn’t provide optimal audioquality.
Third-party audioIf you're using a third-party voice bridge instead of VoIP, you can provide the telephone number andmeeting code to participants so they can join themeeting.
g To notify participants of a third-party voice bridge
1. Double-click theSMART Bridgit Administration Tools shortcut on the server's desktop,and then click theAudio tab.
2. Select Use a third-party Voice Bridge or audio-conferencing provider.
CHA PT ER 3
Configuring the server software
30
Managing a Global ServerNetwork (GSN)
About the Global Server Network (GSN)A SMART Bridgit GSN is a network of SMART Bridgit servers in different geographical locations. AGSN optimizes bandwidth and reduces latency for enterprise SMART Bridgit deployment.
You don't have to install the GSN separately. Install the SMART Bridgit server software and useSMART Bridgit Administration Tools to configure the GSN options. See Installing the server softwareon page 16 for installation information.
SMART Bridgit Servers in a GSNYou install each server in a GSN as an independent SMART Bridgit Server. Once included in a GSN,each independent server becomes a node in the network with independent server capabilities.
Requirements and prerequisitesThe requirements for a GSN Server are the same as a standard SMART Bridgit Server. SeePreparing for installation on page 6 for details.
Setting up a local GSN serverWhen you install SMART Bridgit server software, a shortcut to SMART Bridgit Administration Toolsappears on your desktop.
N NOTES
l Changes made on theOptions, Audio andSecurity tabs in SMART Bridgit AdministrationTools on one server in a GSN automatically apply to all servers in that GSN.
l Your server name should describe your local server in plain language.
l The server password is used by other servers in the GSN to add your server. This passwordis mandatory.
Chapter 4
31
g To set up your local GSN server
1. Double-click theSMART Bridgit Administration Tools shortcut on the server's desktop,and then click theServers tab.
2. Type a name for your server in theDescription box in theServer setup information area.
3. Type a password for the server in theServer password box.
4. Click Apply.
N NOTE
TheApply button is enabled when you enter a server password.
Adding a remote server to the GSN
g To add a remote SMART Bridgit server to the GSN
1. Double-click theSMART Bridgit Administration Tools shortcut on the server's desktop,and then click theServers tab.
2. Click Add.
TheAdd Server dialog box appears.
3. Type the server address, server port andGSN password for the server you want to add, andthen click OK.
N NOTES
o All three boxes must be filled in before theOK button is available.
o If you try to subscribe to your own server, an error message appears.
o If there's noGSN but you have two servers and want to form aGSN with them, youcan use either server to add the other.
o If there are two or more servers in a GSN, you can’t add your server to that GSN. Anexistingmembermust add your server.
Once you add the server, theServer list displayed on every member server of the GSN updates withthe new server information. If meetings are running that include these servers, theConference Serverlist on theMeetings tab also updates.
CHA PT ER 4
Managing aGlobalServer Network (GSN)
32
Removing a local server from aGSN
g To remove a SMART Bridgit server from a GSN
1. Double-click theSMART Bridgit Administration Tools shortcut on the server's desktop.
2. Click theServers tab.
3. Select the local server you want to remove in theServer list.
4. Click Remove Local, and then click OK to confirm.
N NOTES
o The server is removed from every user’s Server list.
o If clients are connected tomeetings at the time of the server removal, they remain ontheMeetings list of the server computer hosting them.
Removing a server from aGSN
g To remove a SMART Bridgit server from a GSN
1. Double-click theSMART Bridgit Administration Tools shortcut on the server's desktop,and then click theServers tab.
2. Select the server you want to remove in theServer list.
3. Click Remove, and then click OK to confirm.
N NOTES
o The server is removed from every user’s Server list.
o If clients are connected tomeetings when the server is removed, they remain on theMeetings list of the server computer hosting them.
ChangingGSN server information
g To change GSN server information
1. Double-click theSMART Bridgit Administration Tools shortcut on the server's desktop,and then click theServers tab.
2. Type new information in theDescription box or theServer password box.
CHA PT ER 4
Managing aGlobalServer Network (GSN)
33
3. Click Apply.
The new information is pushed to all other servers in the GSN.
Ending aGSNmeeting
g To end a meeting on the local GSN server
1. Double-click theSMART Bridgit Administration Tools shortcut on the server's desktop,and then click theMeetings tab.
2. Select ameeting in the list.
3. Click End meeting.
N NOTE
You can endmeetings that exist on your local server only. If themeeting is created on aremote server, theEnd Meeting button is unavailable.
SMART Bridgit clients in a GSNSMART Bridgit clients in a GSN detect and connect to the GSN server with the fastest connectionspeed. Once this selection and connection is complete, the GSN optimizes the bandwidth for thenetwork.
Connecting to a GSN server
Connecting to a server in a GSNConnecting to GSN servers is similar to connecting to a single SMART Bridgit server. Themaindifference is that the SMART GSN client automatically detects the fastest server in the GSN andconnects you to it, regardless of the server address you enter.
g To connect to the GSN
1. In your internet browser, go to your SMART Bridgit server.
2. Click theDownload Software link, and then run the client software.
CHA PT ER 4
Managing aGlobalServer Network (GSN)
34
Selecting or viewing server information
g To select or view a GSN server
1. Double-click theSMART Bridgit icon on your desktop.
TheSMART Bridgit Software dialog box appears.
2. Click the server icon in the bottom-left corner of the SMART Bridgit Software dialog box, ifyou want to connect to a different server.
TheServer Information dialog box appears.
N NOTES
o Starting server is the name or address you typed into your browser.
o Fastest server is the name or address of the fastest server in the GSN.
3. Type the name of the new server or select a server from the drop-down list.
4. Click Connect.
Disabling thePick fastest server option
N NOTE
For best results, SMART recommends always using thePick fastest server option.
g To disable the Pick fastest server option
1. Double-click theSMART Bridgit icon on the server's desktop.
TheSMART Bridgit Software dialog box appears.
2. Click the small SMART Bridgit icon in the upper-left corner.
3. Select About SMART Bridgit.
TheAbout SMART Bridgit Software dialog box appears.
4. Click the Technical Support tab, and then click the Troubleshooting tab.
5. Clear thePick fastest server check box in theConnection area.
The next time you connect to a GSN, you connect to the server you designate, regardless ofconnection speed and network traffic.
CHA PT ER 4
Managing aGlobalServer Network (GSN)
35

Administering the serversoftwareAbout SMART Bridgit Administration Tools 37Viewing status information 38
Viewing activemeetings 38Broadcastingmessages to participants 38Viewing status information 39Viewing and saving usage reports 39
Setting log purge frequency 40Managing servers andmeetings 40
Placing a server on hold 40Ending ameeting 41
Controlling SMART Bridgit conferencing software services 41Customizing the SMART Bridgit server's web page 42Downloading the SMART Bridgit client 43
About SMART Bridgit Administration ToolsSMART Bridgit server software includes an administration tools application which you can use toconfigure servers and view their statuses, manage your SMART Bridgit software licenses andchange password, sharing and remote control settings. You can also use the administration tools toset up amessage of the day and configure chat and video settings.
When you install SMART Bridgit server software, a shortcut to SMART Bridgit Administration Toolsappears on the server's desktop.
I I MPORTANT
Before you start SMART Bridgit Administration Tools, youmight need to temporarily disable theother services listening on the same port as SMART Bridgit services. When you finish configuringSMART Bridgit server software, restart the services you disabled.
Chapter 5
37

Viewing status informationYou can use SMART Bridgit Administration Tools to view status information for SMART BridgitServer software, including activemeetings, licenses and server usage.
Viewing activemeetings
g To view active meetings
3. Double-click theSMART Bridgit Administration Tools shortcut on the server's desktop, and thenclick theMeetings tab.
A table of activemeetings appears. The table includes the following information:
l When themeeting was created
l Themeeting’s name
l Who created themeeting
l The number of participants
l TheGSN server hosting themeeting
Broadcastingmessages to participants
g To broadcast a message to all meeting participants
1. Double-click theSMART Bridgit Administration Tools shortcut on the server's desktop,and then click theMeetings tab.
2. Select themeeting to which you want to broadcast amessage, and then click Send Message.
3. Type themessage you want to broadcast in theMessage box.
4. Click OK.
Your message appears on eachmeeting participant's screen.
CHA PT ER 5
Administering the server software
38
Viewing status information
g To view status information
3. Double-click theSMART Bridgit Administration Tools shortcut on the server's desktop, and thenclick theServers tab.
A table of active servers appears. The table includes the following information:
l Server IP address or domain name
l A description of the server
l The port being used for the server
l The number of activemeetings
l The server’s status, which can include the following:
o Alive - the server is active and users can connect.
o Offline - the server is offline or the local server is unable to contact it
o On hold - an administrator placed the server on hold
Viewing and saving usage reports
g To view server usage reports
1. Double-click theSMART Bridgit Administration Tools shortcut on the server's desktop,and then click theReport tab.
A server usage report for the current week appears.
2. Use theReport start date andReport end date calendars to select report dates, and thenclick Refresh.
A report appears for the period you select.
g To save a server usage report as a text file
1. Double-click theSMART Bridgit Administration Tools shortcut on the server's desktop,and then click theReport tab.
A server usage report for the current week appears.
CHA PT ER 5
Administering the server software
39

2. In the server usage report, select the entries you want to save.
OR
Ensure no entries are selected if you want to save the entire report.
3. Click Save Report.
If no entries are selected, aSave As dialog box appears. Skip step 5.
OR
If entries are selected, aSave All Items dialog box appears. Proceed to step 5.
4. Click Save All Entries orSave Selection.
A Save As dialog box appears.
5. Enter a file name and destination, and then click Save.
Setting log purge frequencyYou can control how long the log stores information about server usage. The default value is 30 days,whichmeans log entries older than 30 days are automatically deleted from the log. You can use anysetting between 1 and 120 days.
g To set log purge frequency
1. Double-click theSMART Bridgit Administration Tools shortcut on the server's desktop,and then click theReport tab.
2. Enter the number of days you want the log to store information for in the Logs purged after box.
3. Click Apply.
Managing servers and meetingsYou can change the connection status of servers and endmeetings using SMART BridgitAdministration Tools.
Placing a server on holdWhen you place a server on hold, it doesn't allow users to connect, but it doesn't end activemeetings.
Place a server on hold when you want to perform maintenance on the server. This allows activeparticipants to finish their meetings, and allows you tomaintain the server when they’re finished.
CHA PT ER 5
Administering the server software
40
g To place a server on hold or reactivate it
1. Double-click theSMART Bridgit Administration Tools shortcut on the server's desktop,and then click theServers tab.
2. Select the server in theServer list that you want to place on hold or to reactivate.
3. Click On Hold, and then click OK when asked to confirm.
The server status changes toOnHold.
OR
Click Re-activate.
The server status changes toAlive.
Ending ameeting
g To end a meeting
1. Double-click theSMART Bridgit Administration Tools shortcut on the server's desktop.
2. Click theMeetings tab.
3. Select themeeting you want to end, and then click End Meeting.
4. If you want to broadcast amessage tomeeting participants as themeeting ends, type it in theMessage box.
5. Click OK.
A notification dialog box and your message appears on eachmeeting participant's screen, andthemeeting ends.
Controlling SMART Bridgit conferencing softwareservicesYou can use theMicrosoft Windows Services administration console to control SMART Bridgitconferencing software services without restarting the computer.
I I MPORTANT
If you stop the services from theWindows Services administration console, all meetings currentlyrunning end without warning the users.
CHA PT ER 5
Administering the server software
41
g To control SMART Bridgit conferencing software services
1. Open theWindows Services administration console (Control Panel > Administrative Tools> Services).
2. Double-click SMART Bridgit Master Service.
TheSMART Bridgit Master Service Properties dialog box appears.
3. Click Start, Stop, Pause, Restart orResume in theGeneral tab to control the service.
4. Click OK.
5. Double-click SMART Bridgit Meeting Service.
TheSMART Bridgit Meeting Service Properties dialog box appears.
6. Click theGeneral tab.
7. Click Start, Stop, Pause, Restart orResume to control the service.
8. Click OK.
Customizing the SMART Bridgit server's webpageAfter you configure the SMART Bridgit Servers, users can download the SMART Bridgit client byvisiting the server's address in an internet browser.
g To customize the SMART Bridgit server's web page
1. Create a web page file calledCustomPage.htm.
2. Customize the web page.
It should contain links to download the SMART Bridgit client for bothWindows operatingsystems andMac OS X operating system software. You can also include the SMARTScheduler Outlook add-in installer.
The paths for these files are:
Windows http://yourbridgitserverurl/Bridgit.exe
Mac OS X http://yourbridgitserverurl/Bridgit.zip
SMART Scheduler OutlookAdd-in
http://yourbridgitserverurl/BridgitSchedulerOutlookAddinSetup.msi
where yourbridgitserverurl is the URL of your SMART Bridgit server.
CHA PT ER 5
Administering the server software
42

3. Save the web page file in the server’s application directory.
N NOTES
o The default directory location is C:\Program Files\SMART Technologies\SMARTBridgit.
o For enhanced security, SMART Bridgit Server makes CustomPage.htm availableonly to a internet browser. If your custom page includes images or other files, thoseimages and files must be hosted on a different server and referenced with absolutelinks in the custom page.
Downloading the SMART Bridgit client
g To download the SMART Bridgit client
1. In your internet browser, go to your SMART Bridgit server.
2. Click theDownload Software link, and then run the client software.
CHA PT ER 5
Administering the server software
43

Using SMART SchedulerIntroduction 45SMART Scheduler requirements 45
Minimum computer requirements 45Installing SMART Scheduler server software 46
Installing the software 46Configuring SMART Scheduler Server 48Upgrading SMART Scheduler Server 48Installing the SMART Scheduler Outlook add-in from a command line 49Removing the SMART Scheduler Outlook add-in 51
IntroductionIf you're using aWindows operating system, the SMART Scheduler option integrates theSMART Bridgit server with Microsoft Exchange Server andMicrosoft Outlook Clients. This enablesyou to schedule single or recurringmeetings that use SMART Bridgit software.
SMART Scheduler requirements
Minimum computer requirementsSMART Scheduler server requirements
l 2.0 GHz processor
l 1GB of RAM
l Windows Server 2003 R2 or 2008 R2 operating system
l 10Mbps network interface card that supports the TCP/IP
l Network connection to your Microsoft Exchange Server
l CDO 1.2.1 (Microsoft Collaboration Data Objects), version 6.5.8165.0 or later. You can alsodownload this software during the server installation.
Chapter 6
45
Microsoft Exchange Server
Microsoft Exchange Server 2003, 2007 or 2010.
SMART Scheduler Outlook add-in
l 2.0 GHz processor
l 1GB of RAM
l Outlook 2003 SP3, 2007 SP2 or 2010.
l Network connection to your Microsoft Exchange Server
l Youmust have SMART Bridgit server installed and running on either a separate computer(recommended) or, if required, on the same computer where you'll install SMART Schedulerserver.
Installing SMART Scheduler server softwareThe SMART Scheduler Server software installation file is included with your SMART Bridgit serversoftware.
g To locate the SMART Scheduler Server software installation file
On the computer where you're installing the software, browse to your SMART Bridgit Server by typing
http://<yourserver.com>/SMARTSchedulerServerSetup.exe
in the address bar, where <yourserver.com> is the URL of your SMART Bridgit Server.
OR
On your SMART Bridgit server, go to
C:\Program Files\SMART Technologies\SMART Bridgit\SMARTSchedulerInstallers
and then copy theSMARTSchedulerServerSetup.exe file to the computer you’re installing it on.
Installing the softwareThe ports that theMicrosoft Exchange Server or Exchange client use depend upon the versionsinstalled. The network administrator can restrict the Exchange Server's range of allowed TCP ports orcanmap static TCP ports. Refer to theMicrosoft Exchange Server andOutlook clients section in thisarticle http://support.microsoft.com/kb/832017.
CHA PT ER 6
Using SMART Scheduler
46
g To install SMART Scheduler Server software
1. Double-click theSMARTSchedulerServerSetup.exe installation file.
TheSMART Scheduler Server – InstallShieldWizard welcome screen appears.
N NOTE
The installer won’t run on a computer with Microsoft Outlook.
2. Click Next to continue.
If you don’t haveMicrosoft Collaboration Data Object (CDO) installed on your computer, theCDO Installation Required dialog box appears. Go to the To install Microsoft CDO procedurebelow.
If CDO is installed theSoftware License Agreement appears.
3. Read the agreement. If you accept is, click I accept, and then click Next.
N NOTE
If you want to keep a hard copy of the agreement for your records, click Print.
TheDestination Folder dialog box appears.
4. Click Next to install to the default folder, or click Change to specify another folder location.
5. Click Install.
If the installation is successful, the InstallShieldWizard Completed dialog box appears.
6. Click Configure to set up themailbox.
TheSMART Scheduler Server Configuration dialog box appears.
7. Type your SMART Scheduler mailbox credentials andWindows authentication information inthe appropriate boxes, and then click OK.
The setup application installs the SMART Scheduler Server which runs as a service. Theapplication then verifies that the specifiedWindows user account has access to theMicrosoftExchangemailbox and that themailbox is functioning correctly. Any errors are reported to you.
g To install Microsoft CDO
1. Select Download CDO Installer, and then click Finish.
2. Run the downloaded software.
TheChoose Directory for Extracted Files dialog box appears.
CHA PT ER 6
Using SMART Scheduler
47
3. Click OK to accept the default location, or type a new location.
The CDO Installation file downloads to the specified location.
4. Browse to where you saved the file and double-click theExchangeMapiCdo.msi file.
5. To install SMART Scheduler Server software, return to step 3 in Installing SMART Schedulerserver software on page 46.
Configuring SMART Scheduler ServerAfter you install SMART Scheduler server software, you can change the server name and passwordsettings.
g To change the SMART Scheduler server settings
1. Browse to where you installed SMART Scheduler server and double-click theSMARTSchedulerServerConfig.exe file.
TheSMART Scheduler Server Configuration dialog box opens.
2. Change your SMART Scheduler mailbox credentials orWindows authentication information asrequired.
3. Click OK to save the changes.
I I MPORTANT
l If you change the name of your SMART Scheduler mailbox, none of themeetings scheduledusing the oldmailbox namewill run.
l After changing the name of themailbox on the server, youmust also change the name of themailbox in the SMART Scheduler Outlook add-in. For instructions, see To change theSMART Scheduler settings for all new meetings in yourSMART Bridgit 4.5 user's guide(smarttech.com/kb/170181) or SMART Bridgit Help.
Upgrading SMART Scheduler Server
g To upgrade your SMART Scheduler Server software
1. Upgrade your SMART Bridgit Server.
SeeUpgrading SMART Bridgit server software on page 20.
2. OpenWindows Control Panel's Install or Remove Programs tool.
CHA PT ER 6
Using SMART Scheduler
48
3. Remove the installed SMART Scheduler Outlook add-in software.
4. RemoveMicrosoft Messaging, API and Collaboration Data Objects (CDO).
N NOTE
The current versions of these components are installed during the upgrade procedure.
5. Install the SMART Scheduler server software.
See Installing SMART Scheduler server software on page 46 for instructions.
Installing the SMART Scheduler Outlook add-infrom a command line
g To install the add-in from a command line
1. Open a Command Prompt window, then type cmd in theOpen box, and then click OK.
The cmd.exe dialog box appears.
2. Type cd followed by a space, and then type the path to the directory that contains the installer.
3. Execute the installer with any appropriate msi-related parameters.
N NOTE
For a list of msi-related parameters, type msiexec /? and press ENTER.
CHA PT ER 6
Using SMART Scheduler
49
4. Specify configuration options for the installer.
SERVERNAME The address of the SMART Bridgit Server on which your SMARTScheduler meetings will run.
USEPASSWORD Whether your SMART Scheduler meetings are password protected (0 or1).
MAILBOX The SMART Scheduler e-mail address
N NOTE
TheMicrosoft Exchange Server administrator creates this address andthemailbox on theMicrosoft Exchange Server at the same time.
USERTF specifies whether your e-mail messages use rich text formatting (1) orplain text formatting (0).
EXAMPLE
msiexec.exe /i
"C:\<SourceFileLocation>\SMARTSchedulerOutlookAddinSetup.msi" /qn
SERVERNAME=<yourserver.com> USEPASSWORD=1 USERTF=1
MAILBOX="<Scheduler Mailbox>"
where <SourceFileLocation> is the path to the .msi file, <yourserver.com> is the URL ofyour SMART Bridgit Server, and <Scheduler Mailbox> is the SMART Scheduler emailaddress.
N NOTE
If you have a space in your mailbox name, youmust use double quotations marks before andafter the name. If there is no space, quotationmarks are not required.
5. Press ENTER.
The SMART Scheduler Outlook add-in installs.
g To upgrade the add-in from a command line
Follow the steps in the To install the add-in from a command line procedure above, and then closeand restart Outlook.
N NOTE
You can leaveOutlook running during the upgrade, but youmust restart it for the changes to takeeffect.
CHA PT ER 6
Using SMART Scheduler
50

Removing the SMART Scheduler Outlook add-inI I MPORTANT
Do not remove files for other SMART software products you want to continue to use. If you areunsure, contact SMART Technical Support for more information.
Before you can perform the default removal procedure, youmust obtain the product code for yourversion of SMART Scheduler Outlook add-in. You can find your product code in the following table.
SMART Scheduler Outlook add-in product codes
Software version Product code
4.0.500.0 {916243FB-5A56-4CF1-B75B-6F4236977C12}
4.1.169.0 (Current) {EF2064B4-D050-4A45-B28A-F8BA573AB0B5}
N NOTE
Include the braces when entering a product code value.
g To remove the add-in from the uninstaller
1. OpenWindows Control Panel's Install or Remove Programs tool.
2. Remove the installed SMART Scheduler Outlook add-in software.
g To remove the add-in from a command line
1. Open a Command Prompt window, then type cmd in theOpen box, and then click OK.
The cmd.exe dialog box appears.
2. Type the following command (including quotationmarks), and then press ENTER:
msiexec.exe /x"path to .msi\SMARTSchedulerOutlookAddinSetup.msi" /q
OR
Type the following command, and then press ENTER:
msiexec.exe /x{ProductCode} /q
CHA PT ER 6
Using SMART Scheduler
51

Bandwidth and scalabilityBandwidth requirements 54Examples of bandwidth requirements 54Scaling SMART Bridgit 55
Chapter 6
53
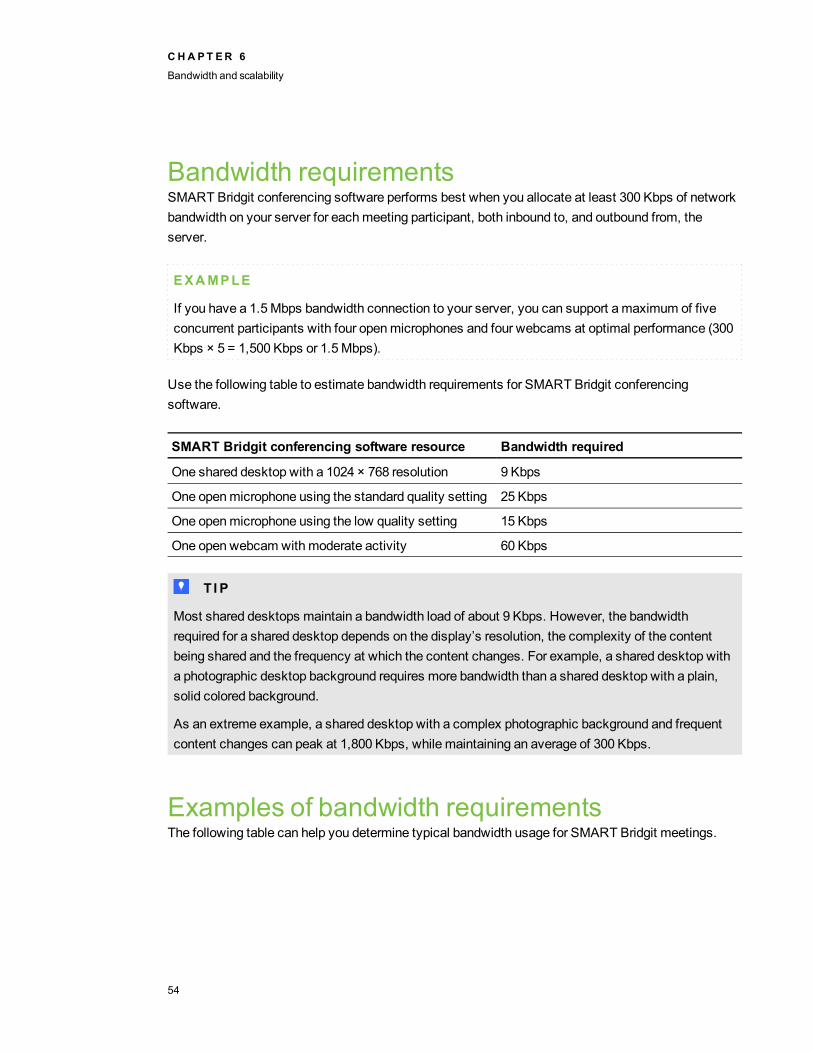
Bandwidth requirementsSMART Bridgit conferencing software performs best when you allocate at least 300 Kbps of networkbandwidth on your server for eachmeeting participant, both inbound to, and outbound from, theserver.
EXAMPLE
If you have a 1.5Mbps bandwidth connection to your server, you can support a maximum of fiveconcurrent participants with four openmicrophones and four webcams at optimal performance (300Kbps × 5 = 1,500 Kbps or 1.5Mbps).
Use the following table to estimate bandwidth requirements for SMART Bridgit conferencingsoftware.
SMART Bridgit conferencing software resource Bandwidth required
One shared desktop with a 1024 × 768 resolution 9 Kbps
One openmicrophone using the standard quality setting 25 Kbps
One openmicrophone using the low quality setting 15 Kbps
One open webcam with moderate activity 60 Kbps
T T I P
Most shared desktops maintain a bandwidth load of about 9 Kbps. However, the bandwidthrequired for a shared desktop depends on the display’s resolution, the complexity of the contentbeing shared and the frequency at which the content changes. For example, a shared desktop witha photographic desktop background requires more bandwidth than a shared desktop with a plain,solid colored background.
As an extreme example, a shared desktop with a complex photographic background and frequentcontent changes can peak at 1,800 Kbps, while maintaining an average of 300 Kbps.
Examples of bandwidth requirementsThe following table can help you determine typical bandwidth usage for SMART Bridgit meetings.
CHA PT ER 6
Bandwidth and scalability
54

SMART Bridgit resource Bandwidth required
One shared desktop with a resolution of 1024 ×768
9 Kbps
Four openmicrophones using the standard qualitysetting
25 Kbps × 4 = 100 Kbps
Four open webcams with moderate activity 60 Kbps × 4 = 240 Kbps
Totals:Bandwidth required for each participantBandwidth required for all 4 participants
9 + 100 Kbps + 240 Kbps = 349 Kbps349 Kbps × 4 participants = 1,396 Kbps or1.396Mbps
Scaling SMART BridgitSMART Bridgit software is scalable. A SMART Bridgit Server softwaremaintains its availability,reliability and performance when the number of meeting participants increases on the server.
# SMART Bridgit software resources Totalcomputers
NIC speed Max. clientconnections
Outbound from Server Server
1 l One shared desktop with aresolution of 1024 × 768
l Four openmicrophonesusing the standard qualitysetting
l Four open webcams withmoderate activity
349Mbps 4 1Gbps 1,000
2 l One shared desktop with aresolution of 1024 × 768
l Four openmicrophonesusing the standard qualitysetting
109Mbps 4 1Gbps 1,000
3 l One shared desktop with aresolution of 1024 × 768
l Four open webcams withmoderate activity
249Mbps 4 1Gbps 1,000
4 l One shared desktop with aresolution of 1024 × 768
9Mbps 2 7.2Mbps 800
CHA PT ER 6
Bandwidth and scalability
55

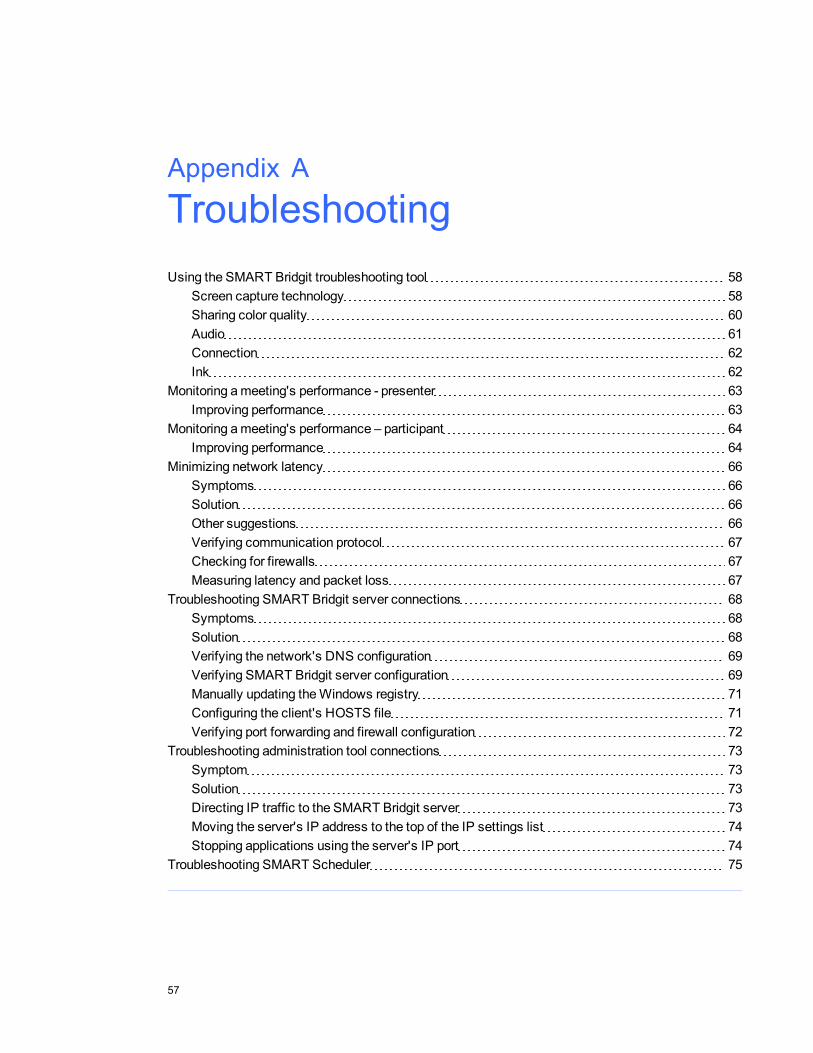
Appendix A: TroubleshootingUsing the SMART Bridgit troubleshooting tool 58
Screen capture technology 58Sharing color quality 60Audio 61Connection 62Ink 62
Monitoring ameeting's performance - presenter 63Improving performance 63
Monitoring ameeting's performance – participant 64Improving performance 64
Minimizing network latency 66Symptoms 66Solution 66Other suggestions 66Verifying communication protocol 67Checking for firewalls 67Measuring latency and packet loss 67
Troubleshooting SMART Bridgit server connections 68Symptoms 68Solution 68Verifying the network's DNS configuration 69Verifying SMART Bridgit server configuration 69Manually updating theWindows registry 71Configuring the client's HOSTS file 71Verifying port forwarding and firewall configuration 72
Troubleshooting administration tool connections 73Symptom 73Solution 73Directing IP traffic to the SMART Bridgit server 73Moving the server's IP address to the top of the IP settings list 74Stopping applications using the server's IP port 74
Troubleshooting SMART Scheduler 75
Appendix A
57
This section includes troubleshooting topics and information on how to get technical support. It alsoshows how you can use the SMART Bridgit software troubleshooting tool to optimize your systemconfiguration and resolve problems.
Using the SMART Bridgit troubleshooting toolSMART Bridgit software has a troubleshooting tool that you can use to determine the cause of issuesyou could have.
g To open the troubleshooting tool
1. Open SMART Bridgit client software and create a test meeting.
The SMART Bridgit lobby screen appears.
2. SelectMenu > About SMART Bridgit.
TheAbout SMART Bridgit Software dialog box appears.
3. Select Technical Support > Troubleshooting.
The Troubleshooting dialog box appears.
The features of the Troubleshooting dialog box are described in the following sections:
l Screen capture technology below
l Sharing color quality on page 60
l Audio on page 61
l Connection on page 62
l Ink on page 62
Formore assistance, contact SMART Technical Support (smarttech.com/contactsupport).
Screen capture technologyThis section provides an overview of the various technologies that SMART Bridgit software useswhen you share your desktop during ameeting.
A PPEN D I X A
Troubleshooting
58
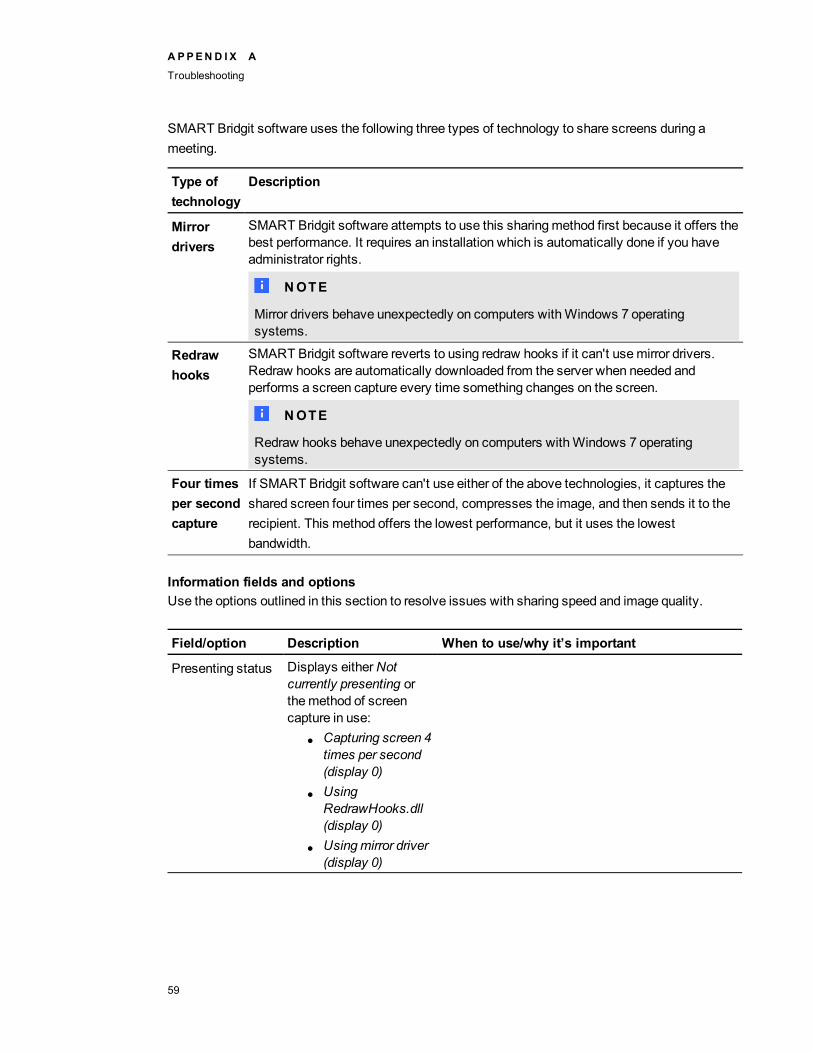
SMART Bridgit software uses the following three types of technology to share screens during ameeting.
Type oftechnology
Description
Mirrordrivers
SMART Bridgit software attempts to use this sharingmethod first because it offers thebest performance. It requires an installation which is automatically done if you haveadministrator rights.
N NOTE
Mirror drivers behave unexpectedly on computers withWindows 7 operatingsystems.
Redrawhooks
SMART Bridgit software reverts to using redraw hooks if it can't usemirror drivers.Redraw hooks are automatically downloaded from the server when needed andperforms a screen capture every time something changes on the screen.
N NOTE
Redraw hooks behave unexpectedly on computers withWindows 7 operatingsystems.
Four timesper secondcapture
If SMART Bridgit software can't use either of the above technologies, it captures theshared screen four times per second, compresses the image, and then sends it to therecipient. This method offers the lowest performance, but it uses the lowestbandwidth.
Information fields and optionsUse the options outlined in this section to resolve issues with sharing speed and image quality.
Field/option Description When to use/why it’s important
Presenting status Displays eitherNotcurrently presenting orthemethod of screencapture in use:
l Capturing screen 4times per second(display 0)
l UsingRedrawHooks.dll(display 0)
l Usingmirror driver(display 0)
A PPEN D I X A
Troubleshooting
59
Field/option Description When to use/why it’s important
Hardwareaccelerationstatus
Indicates whetherhardware acceleration ison or off.
If you use a low-end video card in your system andyou disable hardware acceleration, you increase theperformance of your computer.
Mirror driveravailability
l available – themirror driver isinstalled
l unavailable – themirror driver isn'tinstalled
l disable by OS –your computer hasWindows 7, whichcauses themirrordriver to behaveunexpectedly.
When videomirroring is active, each time thesystem draws to the primary video device at alocation inside themirrored area, a copy of the drawoperation is executed on themirrored video devicein real time.
Enable redrawhooks
Select to share usingredraw hooks.
N NOTE
Redraw hooks behaveunexpectedly withWindows 7 operatingsystem.
If your pointer is flickering, youmight want to tryclearing this option.
Enablemirrordriver
Select to share usingmirror driver.
If your shared applications aren't being capturedcorrectly, youmight want to try clearing this option.Otherwise, leave this option enabled.
Sharing color qualityUse the following options to adjust the quality of shared color images and video.
Field Description When to use/why it’s important
Share in full color l Select to share in thehighest color depth available(usually 24 or 32 bits perpixel).
l Clear to share in 256 colormode.
Clearing this option causes bandwidthusage to drop, but it increases the load onthe presenter's computer. The imagequality of the shared screen is reduced.
Optimize desktopfor sharing
Slows down the frequency ofscreen captures and removes yourdesktop background to decreasethe amount of bandwidth used.
This option is cleared by default. You canselect it to improve sharing whenbandwidth is limited.
A PPEN D I X A
Troubleshooting
60
AudioUse the following options to adjust your audio settings.
Option Description When to use/why it’s important
Enable echocancellation
Enables echocancellation forVoIP audio
Disable this option only if the computer's power is verylimited, because it takes slightly more processing power tohave this enabled.Some hardware devices contain echo cancellation thatSMART Bridgit’s software-based echo cancellation caninterfere with.Disable this option if you are having problems with echocancellation.
Enable AGC Enablesautomatic gaincontrol (AGC)
AGC adjusts the volume of your microphone to areasonable level in case you have your volume set too high.Disable this option if you prefer full control over the volume.
A PPEN D I X A
Troubleshooting
61
ConnectionThis section provides server connection status details, as well as information on ports and proxyconnections.
Field Description When to use/why it’s important
Starting server Displays the server namethat you typed when youconnected SMART Bridgitsoftware to the server.
l Status only
l To change which server is in use, double-
click theSMART Bridgit client iconon your desktop or in the Dock, and then
click the server icon .Fastest server l Displays the server in
the Global ServerNetwork (GSN) thatyou're connected to.
l SMART Bridgitsoftware selected thisserver due to its speedof connection
l Status only
l SMART Bridgit software detects thisserver automatically.
TCP port Displays the port yoursystem is using for screensharing, video conferencingand chat.
Status only
UDP port The port used for VoIP audio Status only
Proxy connection Fallback communicationprotocol when TCP/UDP isrestricted.
Status only
Pick fastest server Select to enable theautomatic selection of thefastest server.
If you clear this option, SMART Bridgitsoftware connects to the server you specified,regardless of whether there is a faster serveravailable in the sameGSN.
InkClear this check box to disable SMART Bridgit’s remote and local ink ability. This is useful if youwant to write on a SMART Board interactive whiteboard instead of using SMART Bridgit software’sink capability.
A PPEN D I X A
Troubleshooting
62
Monitoring a meeting's performance - presenterWhen you present in ameeting, an hourglass could appear on theShow/Hide Partipant Listbutton while SMART Bridgit software sends updates to the other participants. The hourglassdisappears once all the participants can see your desktop.
If the hourglass remains, one or more participants are lagging behind themeeting.
g To view the meeting performance for each participant
Click theShow/Hide Partipant List button .
The participant list appears. The delay interval (in seconds) appears to the right of the name of theparticipant who's lagging. The chat icon is also covered by an hourglass.
If participants continue to lag behind themeeting, you can take steps to improve themeeting'sperformance.
Improving performanceIf you're presenting ameeting and you find that some participants are seeing events on your desktopseveral seconds after they happen, you can try a number of things:
l Use a solid-color desktop background rather than a complex wallpaper.
l Disable animations or fades in list boxes, windows, menus, ToolTips and so on.
l Stop sharing your webcam.
l Optimize your desktop for sharing. SelectMenu > About SMART Bridgit > TechnicalSupport > Troubleshooting, and then select Optimize desktop for sharing and click OK.
l Reduce the screen resolution in your operating system's display settings or share only aportion of the desktop.
N NOTES
o The procedure for reducing the desktop resolution varies between versions of Windowsoperating system. However, the option is always available inControl Panel > Display >Settings.
A PPEN D I X A
Troubleshooting
63
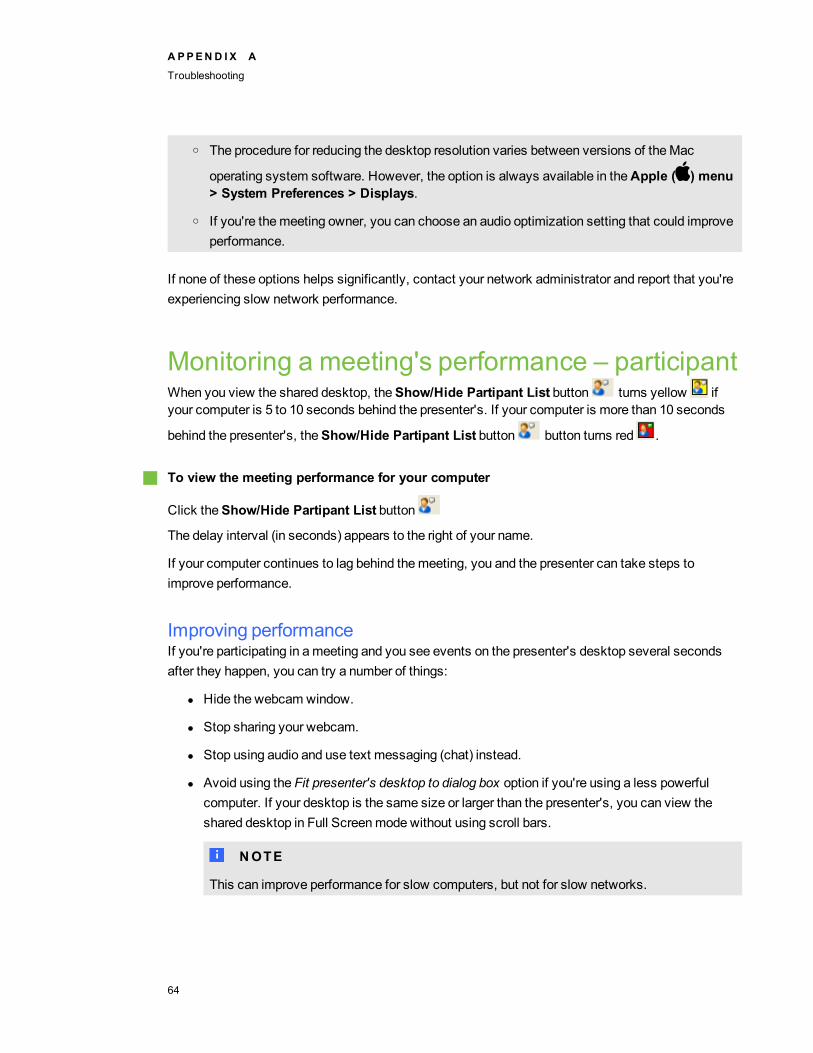
o The procedure for reducing the desktop resolution varies between versions of theMac
operating system software. However, the option is always available in theApple ( ) menu> System Preferences > Displays.
o If you're themeeting owner, you can choose an audio optimization setting that could improveperformance.
If none of these options helps significantly, contact your network administrator and report that you'reexperiencing slow network performance.
Monitoring a meeting's performance – participantWhen you view the shared desktop, theShow/Hide Partipant List button turns yellow ifyour computer is 5 to 10 seconds behind the presenter's. If your computer is more than 10 seconds
behind the presenter's, theShow/Hide Partipant List button button turns red .
g To view the meeting performance for your computer
Click theShow/Hide Partipant List button
The delay interval (in seconds) appears to the right of your name.
If your computer continues to lag behind themeeting, you and the presenter can take steps toimprove performance.
Improving performanceIf you're participating in ameeting and you see events on the presenter's desktop several secondsafter they happen, you can try a number of things:
l Hide the webcam window.
l Stop sharing your webcam.
l Stop using audio and use text messaging (chat) instead.
l Avoid using the Fit presenter's desktop to dialog box option if you're using a less powerfulcomputer. If your desktop is the same size or larger than the presenter's, you can view theshared desktop in Full Screenmode without using scroll bars.
N NOTE
This can improve performance for slow computers, but not for slow networks.
A PPEN D I X A
Troubleshooting
64
l Reduce the level of Windows hardware acceleration. Select Control Panel > Display >Settings > Advanced. Click the Troubleshoot tab and drag the level of Hardwareacceleration towardNone. Test SMART Bridgit software's performance and reduce thehardware accelerationmore if necessary.
N NOTE
This can improve performance for slow computers, but not for slow networks.
If none of these options helps significantly, contact your network administrator and report that you'reexperiencing slow network performance.
A PPEN D I X A
Troubleshooting
65
Minimizing network latencyThis topic details steps you can take if your client’s program is slow or unresponsive during ameeting. Latency, the time lag between sending amessage to a remote computer and receiving aresponse, can cause noticeable performance issues in SMART Bridgit software.
Symptomsl Connecting to the SMART Bridgit Server takes a long time.
l The screen updates slowly when you view a shared desktop.
l SMART Bridgit software doesn’t respond to your mouse or keyboard when you use remotecontrol.
SolutionTry the following to troubleshoot network latency issues:
l Verify that you're using TCP and UDP network protocols. SeeVerifying communicationprotocol on the next page.
l Check if you're connecting through a proxy server. SeeSMART Bridgit and firewalls on page11.
l Check your network bandwidth. SeeExamples of bandwidth requirements on page 54.
l Measure latency and packet loss rate. SeeMeasuring latency and packet loss on the nextpage.
Other suggestionsBecause you have limited control over the network outside of your LAN, you have limited control overnetwork latency issues. However, youmight be able to improve the connection between your LANand your Internet Service Provider (ISP).
You can try these options:
l Read the specifications of your server and client computer Ethernet card throughput rates.Also, check your network device rates. If they're low, upgrade the hardware.
l Verify that your Internet transmit and receive speeds match the speed guaranteed by your ISP.
A PPEN D I X A
Troubleshooting
66
Verifying communication protocolSMART Bridgit software uses three types of network protocols:
l TCP for data and video
l UDP for VoIP audio
l HTTP if a client is unable to connect to the server using TCP
Communications using TCP and UDP have lower network delays than those using HTTP protocol,and using them helps to prevent latency issues.
Use SMART Bridgit software’s troubleshooting tool to determine the network protocol you’re using.SeeUsing the SMART Bridgit troubleshooting tool on page 58.
Ensure that values appear in the TCP Port andUDP Port fields. If these fields haveN/A in them, or iftheProxy Connection option is selected, contact your administrator to open the TCP and UDP portsto connect to SMART Bridgit server. SeeAdministering the server software on page 37. SeeSMART Bridgit and firewalls on page 11 for information about configuring firewalls and proxy servers.
Checking for firewalls
g To determine if the client is behind a firewall
1. On the client computer, open the SMART Bridgit troubleshooting tool. SeeUsing theSMART Bridgit troubleshooting tool on page 58.
TheConnection area displays the ports and protocols the client computer is using tocommunicate with the server. If a client is communicating through a proxy server or if theclient’s UDP and secondary TCP ports are blocked by a firewall, theProxy Connection checkbox is selected.
2. Contact your administrator to open the TCP and UDP ports to connect to SMART Bridgitserver
Measuring latency and packet lossPacket loss occurs when one or more packets of data traveling across a computer network fail toreach their destination. Packet loss rates depend on factors including bandwidth, communicationpath reliability and router buffer size. When packets are lost, latency increases as the networkdevices try to recover the information.
A PPEN D I X A
Troubleshooting
67
Microsoft Windows operating systems include the PathPing tool to measure packet loss rate andlatency. PathPing sends packets to each router on the path to a destination for an interval, and then itcomputes results based on the packets returned from each hop. Since PathPing shows how muchpacket loss is seen for any router or link, you can determine which routers or links are causingnetwork problems. For more information on using PathPing to determine network latency and packetloss, see theMicrosoft website.
Troubleshooting SMART Bridgit serverconnectionsThis section help you resolve connection issues that are caused by your SMART Bridgit serversoftware or your network environment.
SMART Bridgit server connection issues can result from an incorrect domain name server (DNS)configuration for routing to the SMART Bridgit server or from the server computer's domain and IPaddress and port forwarding settings on the network servers, routers or firewalls.
Symptomsl When a SMART Bridgit client connects to a SMART Bridgit server that’s running on the same
computer, a The <servername.com> server is not available. Try again later or select anotherserver error message appears.
This error message can also appear when a client's software causes the issue.
When you're unable to connect to SMART Bridgit software server and SMART Bridgit clientsoftware is causing the issue, see smarttech.com/kb/099567.
l An error message appears when you connect to a SMART Bridgit server from an Internetbrowser.
SolutionVerify that you're using the latest version of SMART Bridgit Server software. SeeUpgradingSMART Bridgit server software on page 20. If the software upgrade doesn’t resolve the issue, trythese procedures:
l Verifying the network's DNS configuration on the next page
l Verifying SMART Bridgit server configuration on the next page
l Manually updating theWindows registry on page 71
A PPEN D I X A
Troubleshooting
68
l Configuring the client's HOSTS file on page 71
l Verifying port forwarding and firewall configuration on page 72
Verifying the network's DNS configurationVerify that the network’s DNS is configured correctly so the IP address resolved by the network’sDNS is the same as the SMART Bridgit Server’s IP address.
g To verify that the DNS is configured correctly
1. Open a Command Prompt window on the SMART Bridgit server, type ipconfig and then pressENTER.
The server's network configuration information appears, including its IP address.
2. Type nslookup <ServerDomainName> and then press ENTER.
OR
Type ping <ServerDomainName> using the domain name for the SMART Bridgit Server, andthen press ENTER.
The IP address that the network’s DNS resolves to appears.
3. Compare the IP addresses.
N NOTES
l If the IP addresses are the same, the network’s DNS is configured correctly. SeeTroubleshooting SMART Bridgit server connections on the previous page.
l If the IP addresses are different, the network’s DNS isn’t configured correctly.
OR
The SMART Bridgit server is located on a LAN or virtual LAN but the domain name resolvesto a router on a different LAN, and your network’s router doesn’t allow loop-backcommunication. SeeConfiguring the client's HOSTS file on page 71 to add the domain nameto theWindows HOSTS file.
Verifying SMARTBridgit server configurationVerify the domain name or IP address, and then configure the SMART Bridgit server software.
g To verify the domain name or IP address
1. Double-click theSMART Bridgit Administration Tools shortcut on the server's desktop,and then click theSetup tab.
A PPEN D I X A
Troubleshooting
69
Formore information, seeConfiguring the server software on page 23.
N NOTE
If theSMART Bridgit Software Administration Tools window doesn’t appear, seeManuallyupdating theWindows registry on the next page to enter the domain name or IP addressmanually in theWindows registry.
2. Compare the domain name or IP address in theRegistered Domain Name box to the domainname or IP address you compared inVerifying the network's DNS configuration on theprevious page.
3. If the domain names or IP addresses are the same but clients are still unable to connect to theserver, seeVerifying the network's DNS configuration on the previous page to verify the portforwarding and firewall configurations.
If the domain names or IP addresses are different, type your SMART Bridgit Server’s domainname or IP address in theRegistered Domain Name box, and then click Apply.
TheRestart Services dialog box appears.
4. Click Close Administrative Tools.
TheSMART Bridgit Software Administration Tools dialog box closes.
5. Select Start > Control Panel > Administrative Tools > Services.
TheServices dialog box appears.
6. Right-click SMART Bridgit Master Service, and then select Restart.
TheSMART Bridgit Master Service restarts.
N NOTE
Other SMART Bridgit clients disconnect from the SMART Bridgit server when you completethis procedure.
7. Right-click SMART Bridgit Conference Service, and then select Restart.
TheSMART Bridgit Conference Service starts.
N NOTES
If clients are still unable to connect to the server, seeVerifying the network's DNSconfiguration on the previous page to verify the port forwarding and firewall configurations.
A PPEN D I X A
Troubleshooting
70
Manually updating theWindows registry
C CAUT ION
Use caution when you open theWindows registry editor. If you incorrectly modify theWindowsregistry, you can damage your computer’s operating system. Back up your registry beforeperforming the following procedure.
g To enter the domain name or IP address in the Windows registry
1. Start theWindows registry editor and browse toHKEY_LOCAL_MACHINE\SOFTWARE\SMART Technologies Inc.\Bridgit Data-conferencingSoftware\3.0.
2. Type your SMART Bridgit server’s domain name or IP address in theMasterServerDomainName boxes.
3. Exit theWindows registry editor.
4. Select Start > Control Panel > Administrative Tools > Services.
TheServices dialog box appears.
5. Right-click SMART Bridgit Master Service, and then select Restart.
TheSMART Bridgit Master Service restarts.
N NOTE
Other clients disconnect from the SMART Bridgit server when you complete this procedure.
6. Right-click SMART Bridgit Conference Service, and then select Restart.
TheSMART Bridgit Conference Service restarts.
If clients are still unable to connect to the server, see Verifying port forwarding and firewallconfiguration on the next page to verify the port forwarding and firewall configurations.
If the domain name resolves to your router’s public IP address, and your router doesn’t allow loop-back communication, seeConfiguring the client's HOSTS file below to add the domain name to theWindows HOSTS file.
Configuring the client's HOSTS fileIf the domain name resolves to your router’s public IP address, and your router doesn’t allow loop-back communication, follow this procedure to add the domain name to theWindows HOSTS file.
A PPEN D I X A
Troubleshooting
71
g To add the domain name to the Windows HOSTS file
1. Go toC:\Windows\system32\drivers\etc on the SMART Bridgit client computer, and thenopen theHOSTS file.
2. Add an entry so that the domain name you’re using to connect to the SMART Bridgit serverresolves to the server’s IP address.
This procedure is effective for SMART Bridgit clients on this computer only. Other clients canuse a direct IP address or the IP address resolved from the domain name by your network’sDNS server.
3. See Troubleshooting SMART Bridgit server connections on page 68 to configure theSMART Bridgit server software.
Verifying port forwarding and firewall configurationIf clients are still unable to connect to the server, verify that port forwarding on the network routers isconfigured to give clients access to the server, and that firewalls protecting the SMART Bridgit serverallow clients to access the server. SeeVerifying communication protocol on page 67 andCheckingfor firewalls on page 67.
If the problems persist, the SMART Bridgit client (not the server) could be the cause. SeeUnable toconnect to Bridgit software server (client side) smarttech.com/kb/099567.
A PPEN D I X A
Troubleshooting
72
Troubleshooting administration tool connections
SymptomWhen you install SMART Bridgit software with IP binding, SMART Bridgit Administration Toolsdoesn’t connect to the SMART Bridgit server.
SolutionUse one of the following procedures to connect SMART Bridgit Administration Tools to the SMARTBridgit server:
l Directing IP traffic to the SMART Bridgit server below (recommended solution)
l Moving the server's IP address to the top of the IP settings list on the next page
l Stopping applications using the server's IP port on the next page
Directing IP traffic to the SMARTBridgit server
g To direct IP traffic to the IP address bound to the SMART Bridgit server
1. Open a Command Prompt window, type hostname, and then press ENTER.
Note the computer name that appears.
2. If you don’t know the IP address that was entered when the server was installed, open SMARTBridgit Administration Tools, and then select theSetup tab. For more information, seeVerifying SMART Bridgit server configuration.
Note the server's IP address in the IPv4 Address drop-down list.
3. Go toC:\WINDOWS\system32\drivers\etc\, and then open theHOSTS file.
4. Type your IP address and host name on a new line at the bottom of the file.
EXAMPLE
192.168.0.8 bridgitserver.
5. Save theHOSTS file.
You can now open SMART Bridgit Administration Tools and configure the SMART Bridgitserver software. SeeConfiguring the server software on page 23.
A PPEN D I X A
Troubleshooting
73
I I MPORTANT
Because other applications can use the hostname, you should remove the line you added in step 4after you configure the SMART Bridgit Server. You can remove the line or comment it out (byinserting a “#” character at the beginning of the line).
Moving the server's IP address to the top of the IP settings list
g To move the server's IP address to the top of the IP settings list
1. If you don’t know the IP address that was entered when the server was installed, open SMARTBridgit Administration Tools, and then select theSetup tab.
Note the server's IP address in the IPv4 Address drop-down list.
2. Select Start > Control Panel> Network Connections.
3. Right-click the network device that SMART Bridgit software is bound to, and then selectProperties.
4. Click Internet Protocol (TCP/IP) in the This connection uses the following items list.
5. Click Properties.
6. Select theGeneral tab, and then click Advanced.
The Advanced TCP/IP Settings dialog box appears.
7. Click the IP Settings tab.
8. Remove all the IP addresses above the SMART Bridgit server's address.
9. Replace the addresses below the server's address.
10. Restart the server.
Stopping applications using the server's IP port
T T I P
Perform this procedure when it won't affect other users.
A PPEN D I X A
Troubleshooting
74
g To make SMART Bridgit software's primary port available
1. Stop applications that use SMART Bridgit software’s primary port.
2. Open SMART Bridgit Administration Tools and configure SMART Bridgit software. For moreinformation, see Verifying SMART Bridgit server configuration.
3. Close SMART Bridgit Administration Tools.
4. Start the applications that you stopped in step 1.
Troubleshooting SMART SchedulerAfter the you install and configure SMART Scheduler, it runs silently as aWindows service. It doesn'thave a user interface when running, and it doesn't create a log file by default. Follow these steps togather more information when troubleshooting.
g To display a SMART Scheduler server log
1. Open aCommand Promptwindow, and then browse to theSMART Scheduler Server folder.
The default folder is C:\Program Files\SMART Technologies\SMART Scheduler Server.
2. Type net stop "SMART Scheduler Server", and then press ENTER.
The SMART Scheduler server service stops.
3. TypeSMARTSchedulerServer.exe, and then press ENTER.
The SMART Scheduler server service starts. A series of text lines appear.
4. Look for and record any error information in the log that can help you identify a problem.
5. Press CTRL+C.
The server stops and the command prompt returns.
6. Type net start "SMART Scheduler Server", and then press ENTER.
The SMART Scheduler server service starts.
g To create a server log file
1. Open aCommand Promptwindow, and then browse to theSMART Scheduler Server folder.
The default folder is C:\Program Files\SMART Technologies\SMART Scheduler Server.
2. Type net stop "SMART Scheduler Server", and then press ENTER.
The SMART Scheduler ServerWindows service stops.
A PPEN D I X A
Troubleshooting
75
3. TypeSMARTSchedulerServer.exe>>log.txt, and then press ENTER.
The SMART Scheduler Server service starts. The log information re-directs to the log.txt file.
4. Wait a few minutes, and then press CTRL+C.
The server stops and the command prompt returns.
5. Type net start "SMART Scheduler Server", and then press ENTER.
The SMART Scheduler server service starts.
6. Locate the log.txt file, and then open it in a text editor.
A PPEN D I X A
Troubleshooting
76
Aaccess requirements 7activatingmanually 21using the SMART activation server 20
administering the server software 37administrationserver software 37
audio settings 29, 61
Bbandwidth and scalability 53bandwidth requirements 54examples 55
broadcastingmessages 38
Cchecking for firewalls 67color quality 60configuring firewalls 11configuring proxy servers 12configuring the server software 23connection 62customizing the server's web page 42
Ddisabling remote control 27disabling text chat 27disabling webcams 27domain names 10
Eending ameeting 41
Ffirewallschecking for 67configuring 11
GGlobal Server Network 4GSN 4adding a remote server 32changing server information 33connecting to a server 34ending ameeting 34removing a server 33setting up a local server 31
HHosts fileconfiguring 71
Iink 62Installing SMART Bridgit software 5IP addressmove to the top of the IP Settings list 74
IP trafficdirecting to the SMART Bridgit Server 73
Index
77
Llicensesremoving server or user licenses 22
licensing SMART Bridgit Server software 20
Mmessage of the day 29minimizing network latency 66monitor meeting performance - participant64monitor meeting performance - presenter 63
PpasswordAPI 25changing the administrator accesspasword
25
changing the conference creationpassword
24
changing the server access password 23setting 23
pick fastest server option, disabling 35proxy serversconfiguring 12
RRemoving server or user licenses 22
Sscreen capture technology 58server security 9server setup options 26settingmeeting options 26Setting passwords 23SMART Bridgit clientdownloading 43
SMART Bridgit Server softwareInstalling 16
SMART Scheduler 4Outlook add-in 4prerequisites 15, 45removing Outlook add-in 51using 45
SMART Scheduler Serverinstalling 46upgrading 48
SMARTBridgit Server softwareupgrading 20
software components 1software licensing 7system requirementsclient 13server 6
TtroubleshootingAdministration Tool connections 73SMART Bridgit Server connections 68SMART Scheduler 75
troubleshooting tool 58
Uupdating theWindows registry 71upgrading server software 20
Vverify communication protocol 67verify network's DNS configuration 69verify port forwarding and firewallconfiguration
72
verify SMART Bridgit Serverconfiguration
69
viewing activemeetings 38viewing and saving usage reports 39viewing status information 38-39
I N D EX
78


