Embed Size (px)
Citation preview
JULIA RIEDE
THIRD EDITION
SHAWLDESIGN
IN PLAIN ENGLISH
PART 2
ADVANCEDSHAWL SHAPES

Sign up for the author’s mailing list and get a free copy
of her newest knitting pattern!
Click here to get started: www.knitting.today
Copyright © 2012-2017 Dr. Julia Riede
All rights reserved
Third edition, March 2017

ABOUT THE AUTHOR
Twitter: @jriedeknits
Instagram: @jriedeknits
Facebook:
facebook.com/JriedeKnittingToday
Julia (jriede on Ravelry) is a knitwear designer and
nuclear physicist. Her website and blog can be
found on www.knitting.today.
PREFACECreating patterns was always more interesting than fol-
lowing instructions for me. But of course I did not start
knitting shawls by designing my own but by selecting
appealing pat- terns and followed their instructions word
by word.
As a physicist, I soon was tempted to find out the under-lying magic of shawl construction. How do the design-
ers of all those beautiful shawls choose which patterns
to use? How do they calculate the number of stitches
to cast on, how can they know which patterns work for
which shawl and which do not - and why? I was hooked.
Soon after I just started away, chose an appealing chart
and cast on my first do-it-yourself triangle shawl. Need-
less to say it ended in a disaster: The charts did not add
up properly, I always ended up with additional stitches at
the sides. I must have missed something!
After consulting some graph paper and a pen, I figured out that there are some simple mathematical rules and
recipes to apply to each shape. If followed, everybody
can create shawl patterns that work.
4 SHAWL DESIGN IN PLAIN ENGLISH
You can create shawl patterns, too!
I wrote this book with only one thing in mind: to help you achieve this goal.
I hope this book helps you getting started on shawl de-
sign, and I am looking forward to your beautiful shawl
knitting patterns!
Happy knitting!
Julia
CONTENTSPREFACE 3
INTRODUCTION 7
CIRCULAR SHAWLS 11THE ANATOMY OF A CIRCULAR SHAWL 12CIRCLE SEGMENT SHAWLS 14ANNULAR SHAWLS 15ANNULAR SEGMENT SHAWLS 16
CRESCENT SHAWLS 19SHORT ROW CRESCENTS 20CRESCENTS WORKED SIDEWAYS 22WINGED CRESCENTS 23INCREASE CRESCENTS 24
FAROESE SHAWLS 27THE ANATOMY OF A FAROESE SHAWL 28TRADITIONAL FAROESE SHAWLS 28RAGLAN SHAPED FAROESE SHAWLS 30VORTEX FAROESE SHAWLS 31
6 SHAWL DESIGN IN PLAIN ENGLISH
PATTERN TEMPLATES 35TEMPLATES FOR CIRCULAR SHAWLS 36TEMPLATES FOR CRESCENT SHAWLS 40TEMPLATES FOR FAROESE SHAWLS 43
EXAMPLE PATTERNS 51
HUG ME 53
ELISABETH 61
PRISCILLA 69
PHOEBE 75
AEGEAN SEA 81
RAGLAN FAROESE 97
REDWING 107
SHAWL SHAPE INDEX 121
CHAPTER I
INTRODUCTION
8 SHAWL DESIGN IN PLAIN ENGLISH
The first edition of Shawl Design in Plain English was
published in 2012. Back then, no comprehensive collec-
tion of shawl shapes and their construction principles
was available. If you wanted to knit a certain shawl shape
you had to figure it out all by yourself.
Not all shapes popular today were included in the first edition. Vortex shawls, polygons, stars and swirl shawls
were not yet existent, for instance. The second edition
(2015) introduced these shapes and many more. The book became so voluminous it had to be divided into
three parts.
The third edition - this one - contains updated pattern
templates, new shawl shapes and many new illustra-
tions. The chapters on crescent and vortex shawls have
been rewritten completely, including new construction
methods for both.
Shawl Design in Plain English consists of three parts,
compiling instructions and pattern templates for all shawl
shapes you can possibly think of.
Part one (Basic Shawl Shapes) includes chapters on yarn and needle selection, swatches as well as instructions on
how to outline, plan and calculate your shawl designs.

9INTRODUCTION
The following shawl shapes and design related topics
are covered in this book series:
Part I: Basic Shawl Shapes• How to Start
• Calculations
• Squares
• Rectangles
• Triangles
Part II: Advanced Shawl Shapes• Circles
• Half-circles
• Annulars
• Circle segments
• Crescents
• Faroese
Part III: Fancy Shawl Shapes• Rhomboids
• Trapezoids
• Polygons• Star shapes
• S-shapes
• Vortex (cornucopia) shawls
and many more.

10 SHAWL DESIGN IN PLAIN ENGLISH
Chapters 2-4 cover advanced shawl shapes: circular, an-
nular, crescent and Faroese shawls. Different construc-
tion methods for each shape are provided.
Whenever you need a recipe or pattern template for a
specific shape and construction method, Chapter 5 is the place to go. For all shawl shapes described in this book,
templates are provided there in order of appearance.
After listing pattern templates this book contiues with 7
complete, self-contained example patterns.
Questions? Feel free to ask!In case you have any questions that are not answered in
this book (or the other volumes of this series), the best
place to ask is my Facebook group. Feel free to join and
ask all your question there, anytime!
You can find our group here:
facebook.com/JriedeKnittingToday
Let’s start designing shawls together!
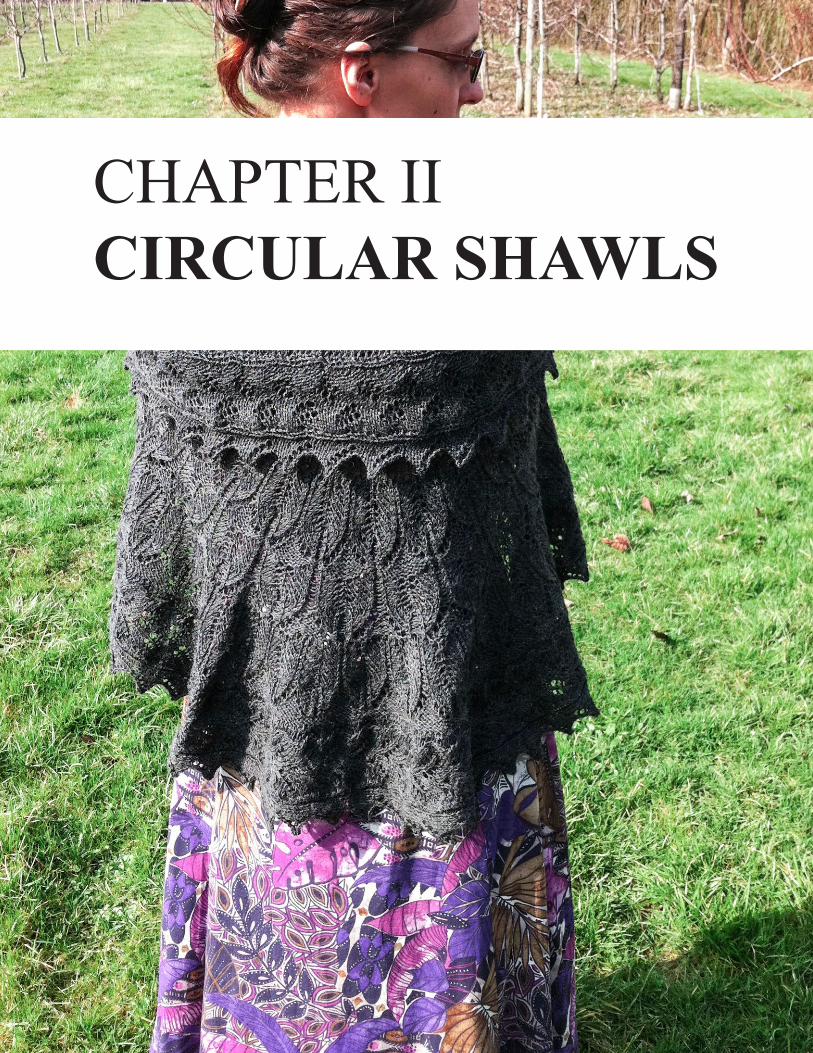
CHAPTER II
CIRCULAR SHAWLS
12 SHAWL DESIGN IN PLAIN ENGLISH
The Anatomy of a Circular Shawl SHAWL SHAPE INDEX: CIRCLE
Circular shawls are best worked from the center out-
wards.
Remember your school math? There is a number called
Pi. The geometry of the circle unveils when looking at the mysterious relationship of the circumference of a circle
to its radius (which is equal to Pi).
Elizabeth Zimmerman brought it to the point in her book
The Knitter’s Almanac1:
“A circle will double its circumference in infinitely them-
selves- doubling distances, or, in knitters’ terms, the dis-
tance between the increase-rounds, in which you double
the number of stitches, goes 3, 6, 12, 24 and so on.”
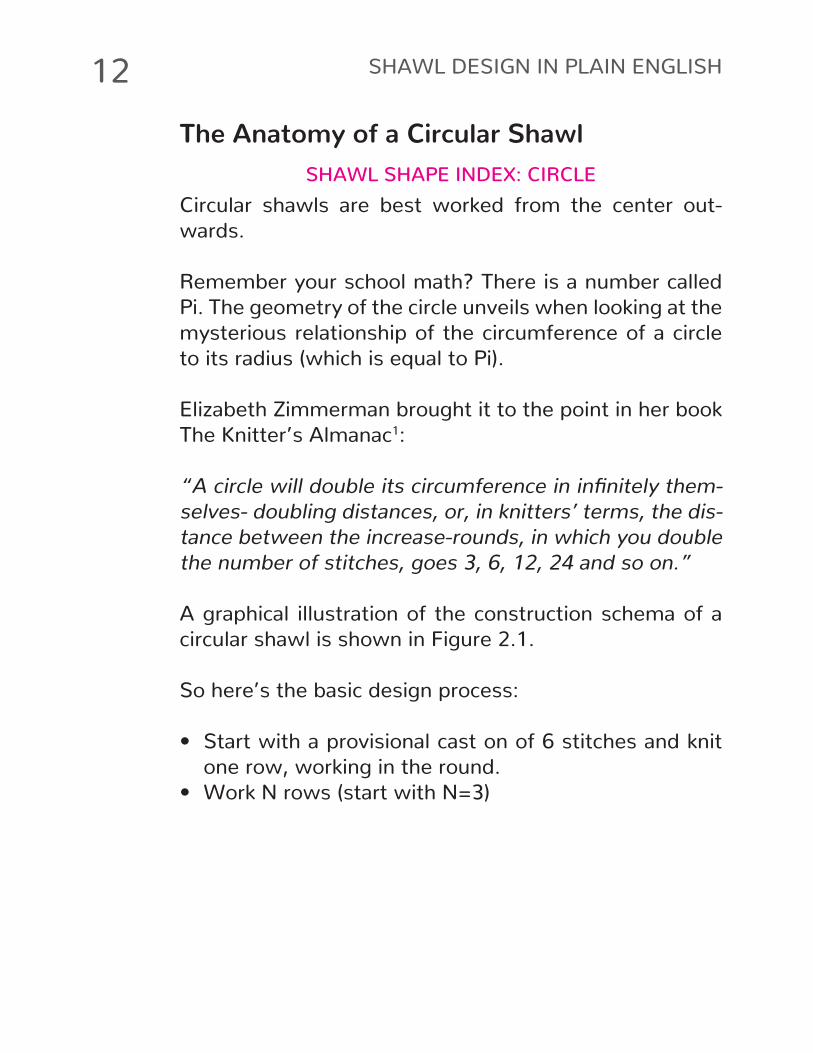
A graphical illustration of the construction schema of a
circular shawl is shown in Figure 2.1.
So here’s the basic design process:
• Start with a provisional cast on of 6 stitches and knit one row, working in the round.
• Work N rows (start with N=3)
13CIRCULAR SHAWLS
• Work increase row (double stitch count)
• Work 2*N rows• Work increase round (double stitch count)
• Work 4*N rounds• Work increase round (double stitch count)
• Work 8*N rounds• ...
When working the increase round you might want to re-
place the yarn overs with a kfb or m1 stitch if you do not
Figure 2.1: The construction of a circular shawl with edging.
The main body is shown in white, the edging in gray. Arrows
indicate knitting direction.
14 SHAWL DESIGN IN PLAIN ENGLISH
want an eyelet effect.
An example for a circular shawl is the pattern Hug Me
included in this book.
A pattern template can be found in Chapter 5.
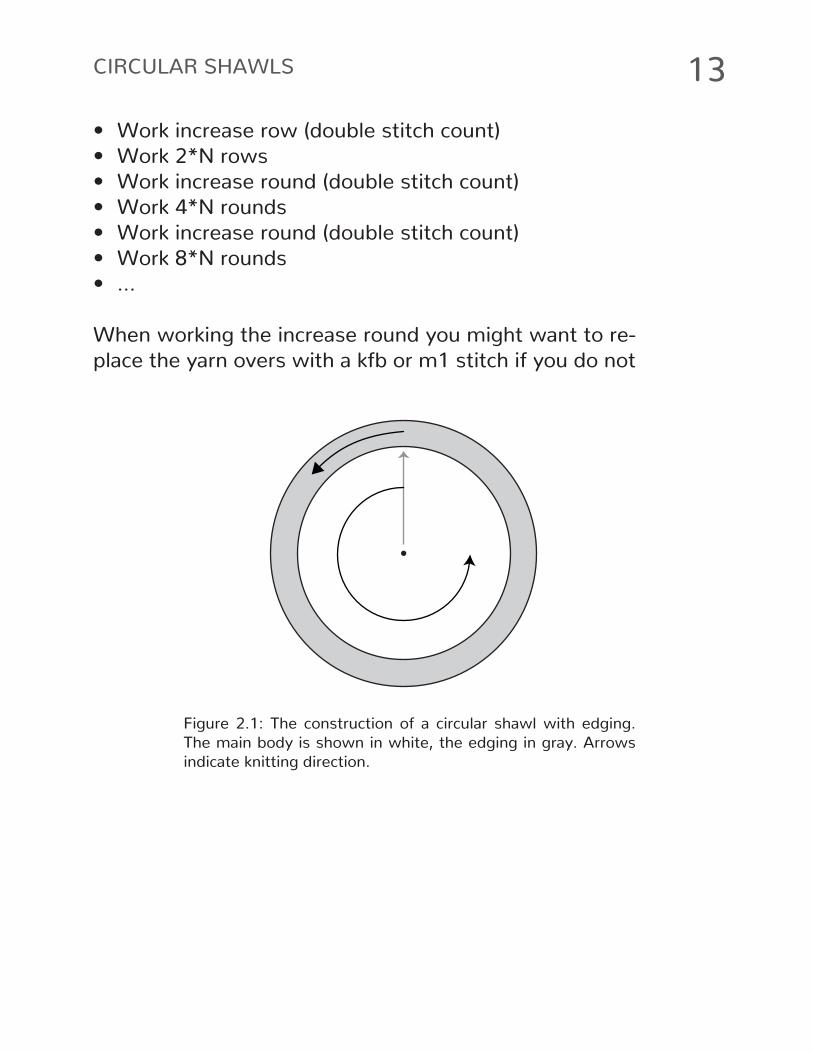
Circle Segment ShawlsSHAWL SHAPE INDEX: CIRCLE-SEG
Circle segments are worked like circular shawls, but back
and forth instead of in the round.
Figure 2.2: The construction of a circle segment shawl with
edging. The main body is shown in white, the edging in gray.
Arrows indicate knitting direction.
15CIRCULAR SHAWLS
Less stitches are cast on than for a normal circular shawl,
based on the proportion of the segment to be knitted.
For example, if you are knitting 1/6 of a circle, then you would cast on 1/6 of the stitches. A schematic is shown in Figure 2.2).
A pattern template for a circle segment shawl is provided
in Chapter 5.
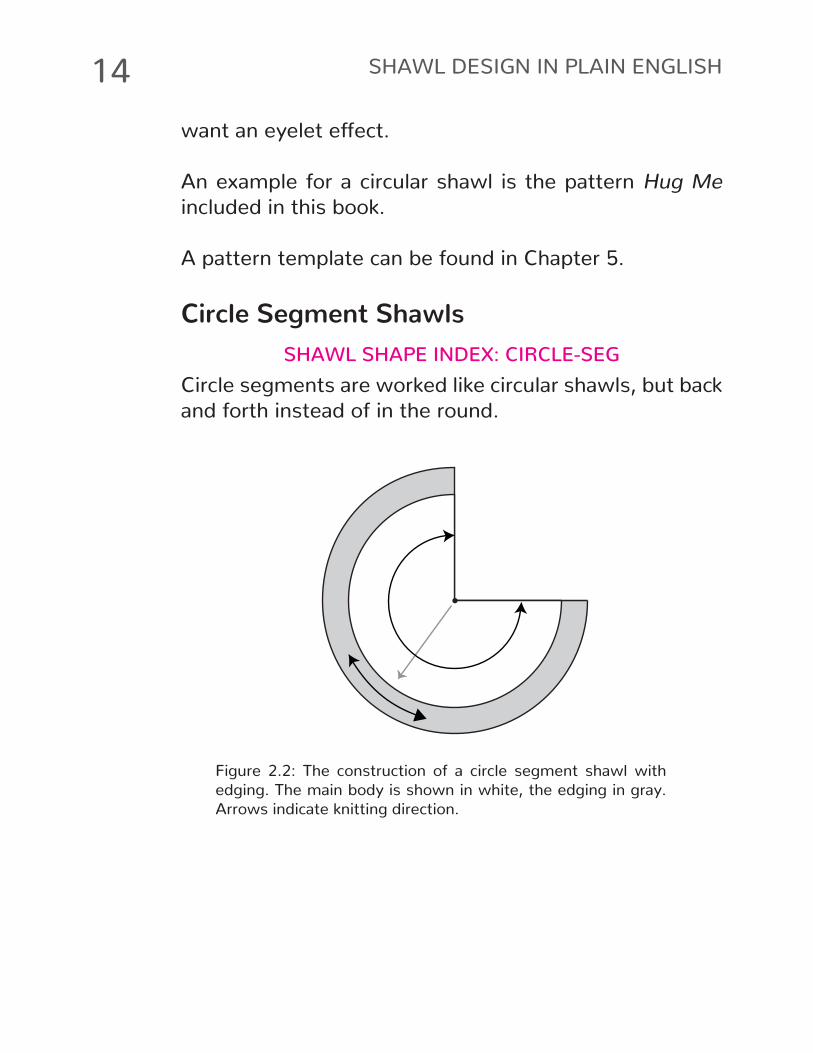
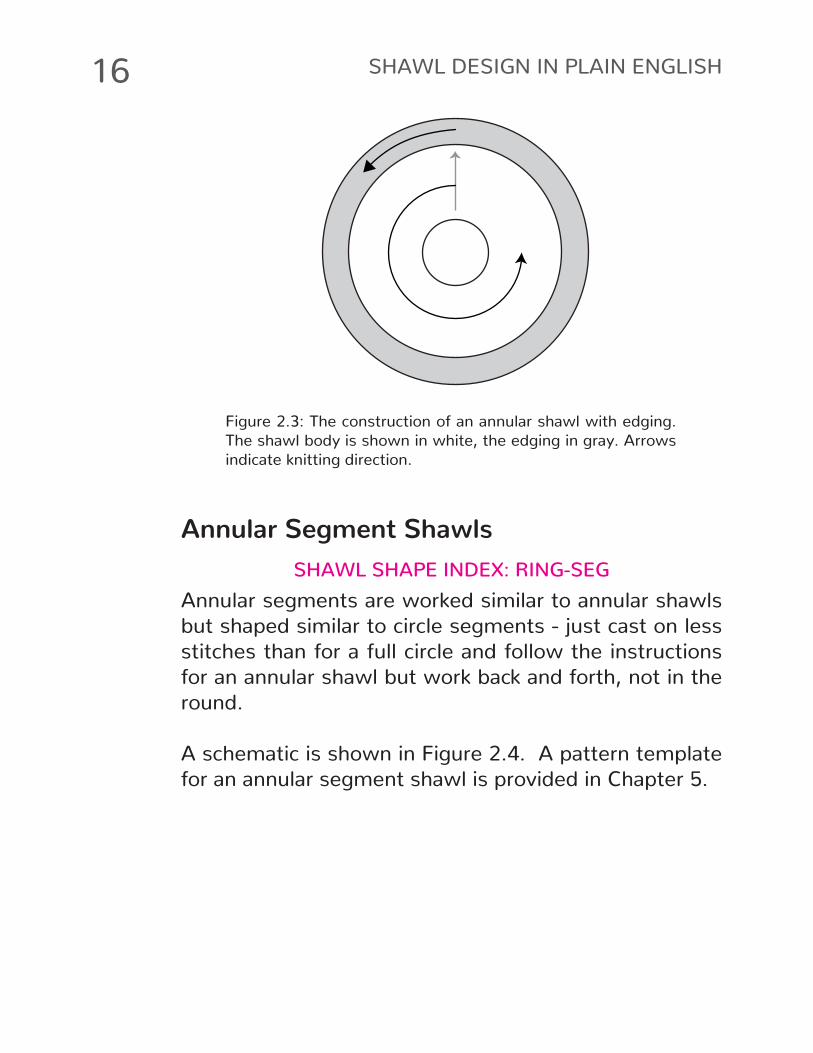
Annular ShawlsSHAWL SHAPE INDEX: RING
Annular shawls are circular shawls with holes in the cen-
ter - rings, basically. They are worked in the round, the
same as circular shawls are.
They are constructed by casting on more stitches than
for a circular shawl, following the increase instructions of
circular shawls from the number of stitches cast on, thus
creating a hole in the middle of the shawl body.
A schematic is shown in Figure 2.3.
A pattern template for a circle segment shawl is provided
in Chapter 5.
16 SHAWL DESIGN IN PLAIN ENGLISH
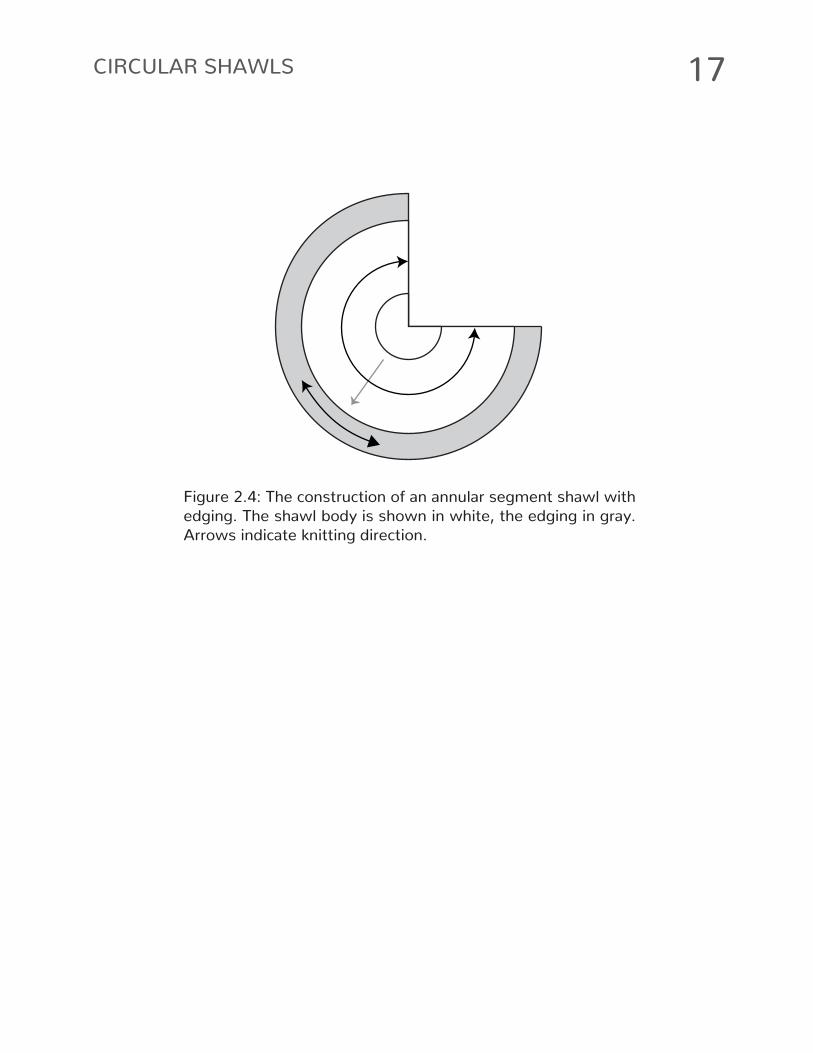
Annular Segment Shawls SHAWL SHAPE INDEX: RING-SEG
Annular segments are worked similar to annular shawls
but shaped similar to circle segments - just cast on less
stitches than for a full circle and follow the instructions
for an annular shawl but work back and forth, not in the
round.
A schematic is shown in Figure 2.4. A pattern template
for an annular segment shawl is provided in Chapter 5.
Figure 2.3: The construction of an annular shawl with edging. The shawl body is shown in white, the edging in gray. Arrows
indicate knitting direction.
17CIRCULAR SHAWLS
Figure 2.4: The construction of an annular segment shawl with
edging. The shawl body is shown in white, the edging in gray.
Arrows indicate knitting direction.
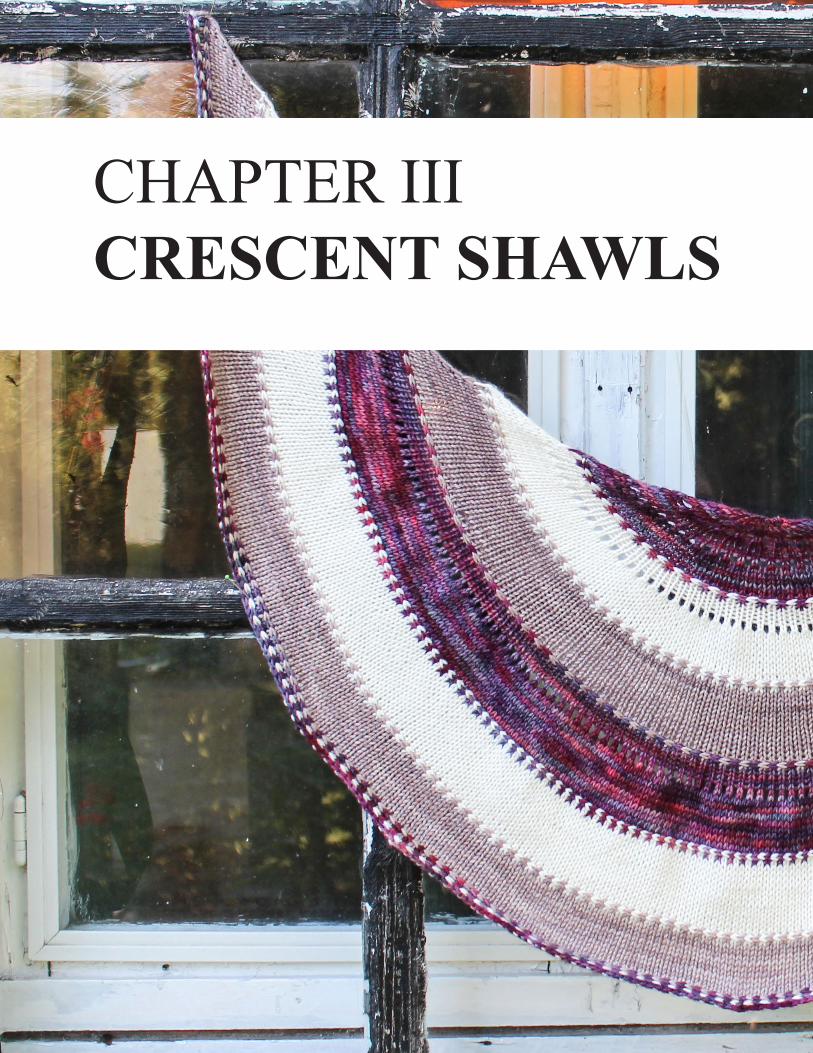
CHAPTER III
CRESCENT SHAWLS
20 SHAWL DESIGN IN PLAIN ENGLISH
Crescent shapes can be achieved in various ways, and
each one has its advantages and disadvantages. Choos-
ing the right construction is usually a decision based on
design features, and the techniques you prefer to use.
Not everybody likes knitting short rows, for instance. Others might find the selvedge created by shaping with increases not very appealing - or the total opposite.
For shaping crescent shawls, you have the following op-
tions for construction:
• Short row shaping,
• Shaping by increases,
• Working them sideways (similar to trapezoids) and
blocking into a crescent shape, and
• Working a half circle shawl with additional increases
on the sides, similar to winged triangle shawls.
Short Row Crescents SHAWL SHAPE INDEX: CRESCENT
Implementing short rows into the shawls main panel
forms crescents. The problem with short row shaping is
that lace charts and short rows do not work well togeth-
er, so usually the main panel of crescents is worked us-
ing garter or stockinette stitch.
21CRESCENT SHAWLS
One you made yourself familiar with how short row cres-
cent shawls are shaped, implementing stitch patterns
into crescent shawls worked this way is possible.
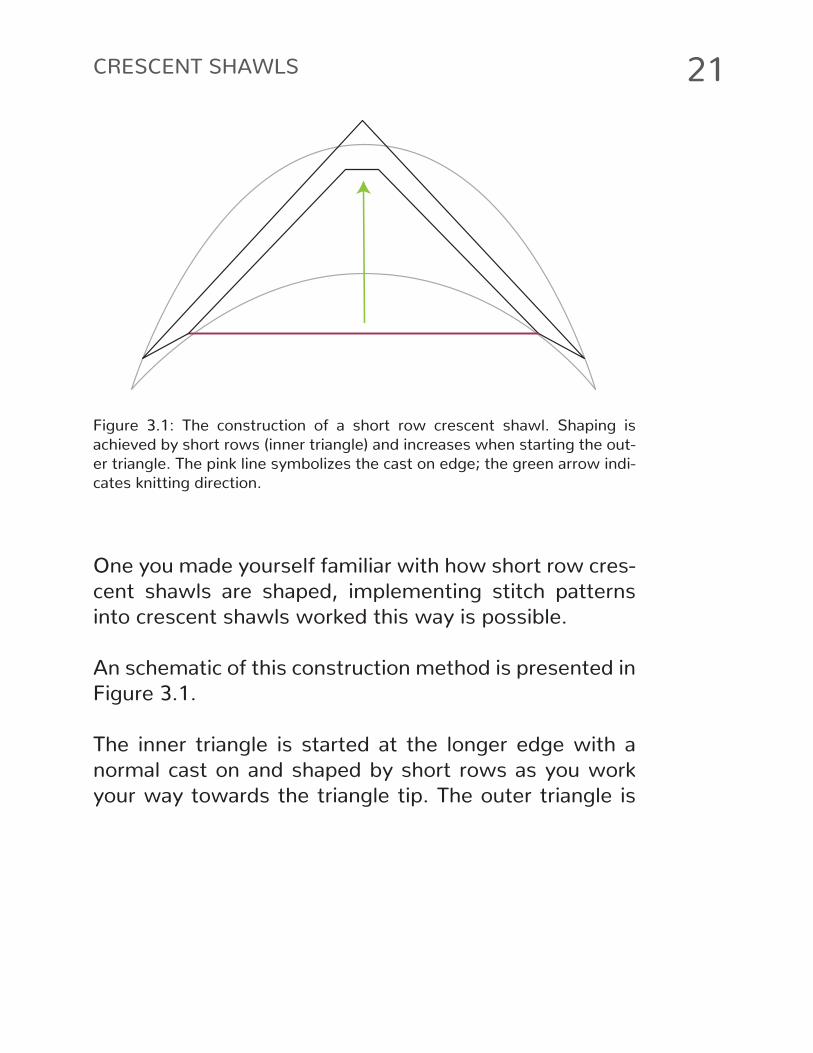
An schematic of this construction method is presented in
Figure 3.1.
The inner triangle is started at the longer edge with a
normal cast on and shaped by short rows as you work
your way towards the triangle tip. The outer triangle is
Figure 3.1: The construction of a short row crescent shawl. Shaping is achieved by short rows (inner triangle) and increases when starting the out-
er triangle. The pink line symbolizes the cast on edge; the green arrow indi-
cates knitting direction.
22 SHAWL DESIGN IN PLAIN ENGLISH
started with the live stitches from the inner one and in-
creased to form a crescent shape.
An example for a crescent shawl shaped using short rows
is the pattern Priscilla. A pattern template can be found
in Chapter 5.
Crescents Worked Sideways SHAWL SHAPE INDEX: TRAPEZ, CRESCENT
Crescent shawls worked sideways are trapezoids in fact
- a combination of a rectangle together with two trian-
gles at the beginning and the end of the shawl.
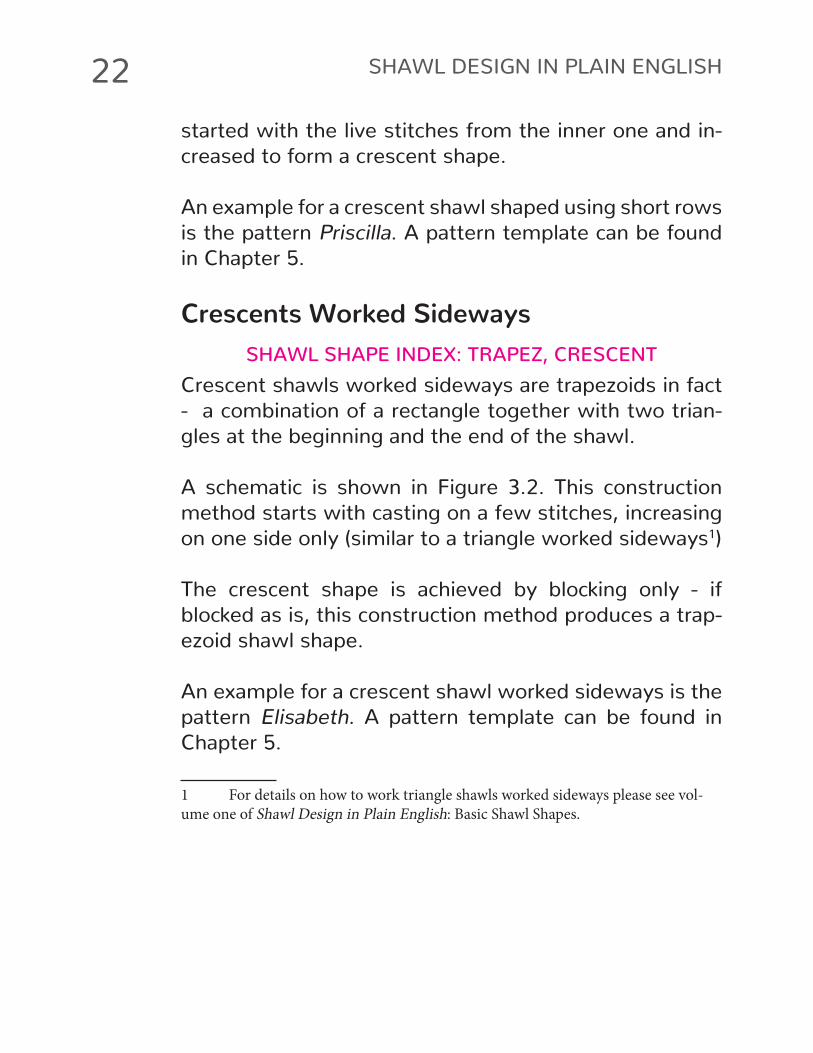
A schematic is shown in Figure 3.2. This construction method starts with casting on a few stitches, increasing
on one side only (similar to a triangle worked sideways1)
The crescent shape is achieved by blocking only - if
blocked as is, this construction method produces a trap-
ezoid shawl shape.
An example for a crescent shawl worked sideways is the
pattern Elisabeth. A pattern template can be found in
Chapter 5.
1 For details on how to work triangle shawls worked sideways please see vol-ume one of Shawl Design in Plain English: Basic Shawl Shapes.
23CRESCENT SHAWLS
Winged CrescentsSHAWL SHAPE INDEX: CRESCENT
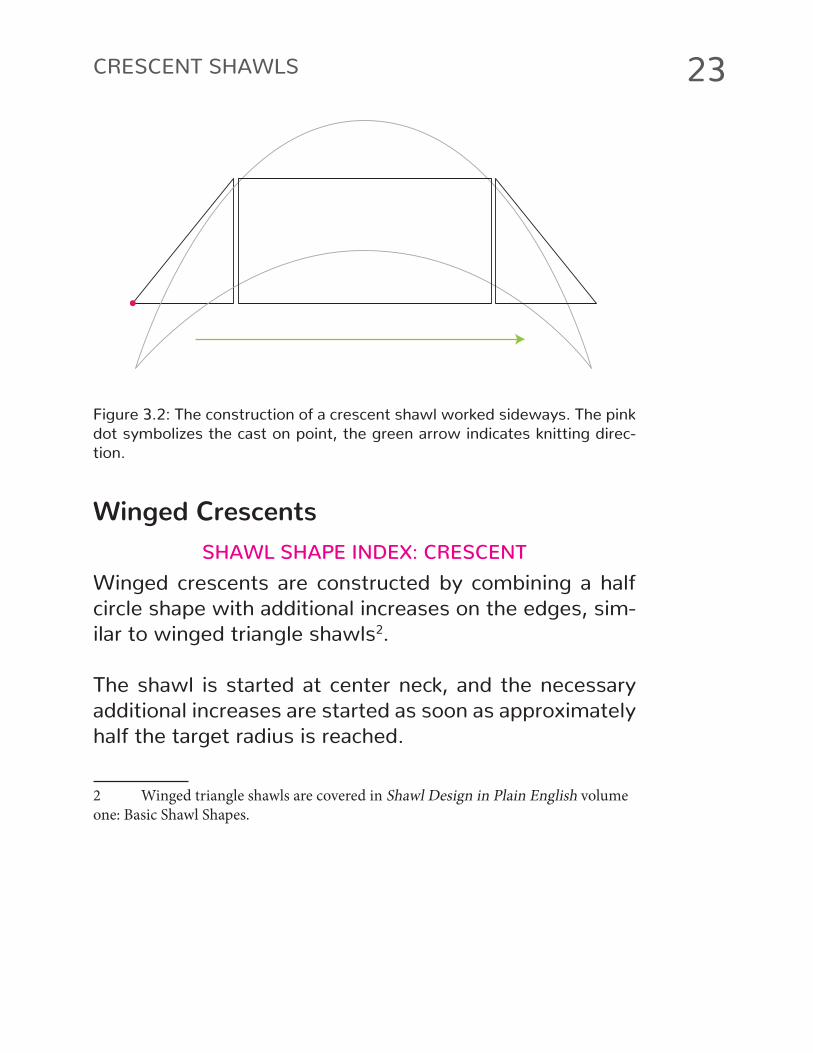
Winged crescents are constructed by combining a half
circle shape with additional increases on the edges, sim-
ilar to winged triangle shawls2.
The shawl is started at center neck, and the necessary
additional increases are started as soon as approximately
half the target radius is reached.
2 Winged triangle shawls are covered in Shawl Design in Plain English volume one: Basic Shawl Shapes.
Figure 3.2: The construction of a crescent shawl worked sideways. The pink dot symbolizes the cast on point, the green arrow indicates knitting direc-
tion.
24 SHAWL DESIGN IN PLAIN ENGLISH
The final crescent shape is achieved by blocking. An illus-
tration is shown in Figure 3.3.
An example for a winged crescent shawl is the pattern
Phoebe. A pattern template can be found in Chapter 5.
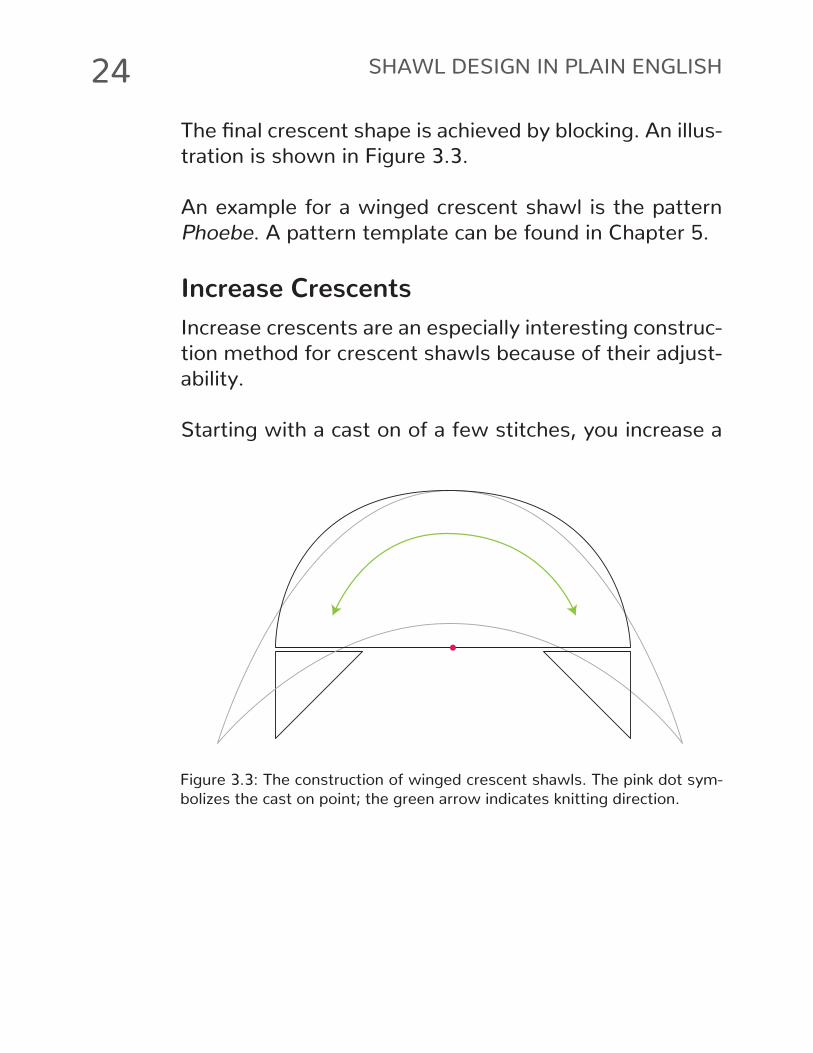
Increase CrescentsIncrease crescents are an especially interesting construc-
tion method for crescent shawls because of their adjust-
ability.
Starting with a cast on of a few stitches, you increase a
Figure 3.3: The construction of winged crescent shawls. The pink dot sym-
bolizes the cast on point; the green arrow indicates knitting direction.
25CRESCENT SHAWLS
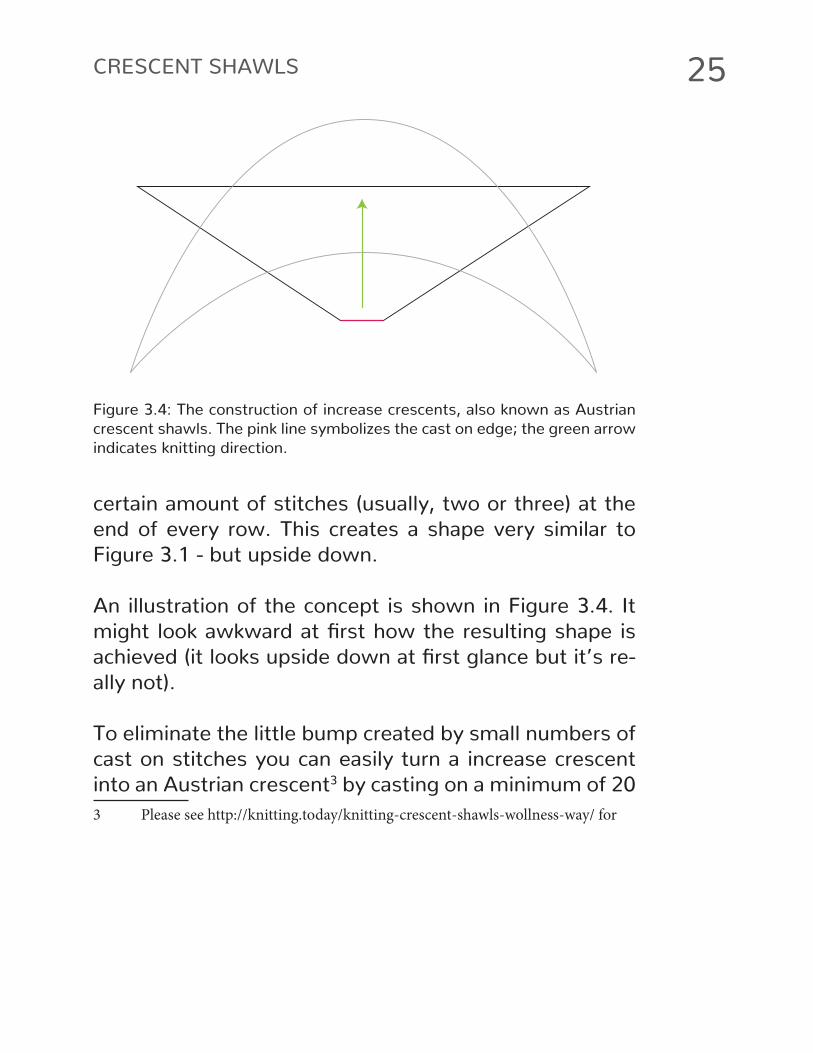
Figure 3.4: The construction of increase crescents, also known as Austrian crescent shawls. The pink line symbolizes the cast on edge; the green arrow
indicates knitting direction.
certain amount of stitches (usually, two or three) at the
end of every row. This creates a shape very similar to
Figure 3.1 - but upside down.
An illustration of the concept is shown in Figure 3.4. It might look awkward at first how the resulting shape is achieved (it looks upside down at first glance but it’s re-
ally not).
To eliminate the little bump created by small numbers of
cast on stitches you can easily turn a increase crescent
into an Austrian crescent3 by casting on a minimum of 20
3 Please see http://knitting.today/knitting-crescent-shawls-wollness-way/ for

26 SHAWL DESIGN IN PLAIN ENGLISH
stitches.
A pattern template can be found in Chapter 5.
details on Austrian crescent shawls and their origin.
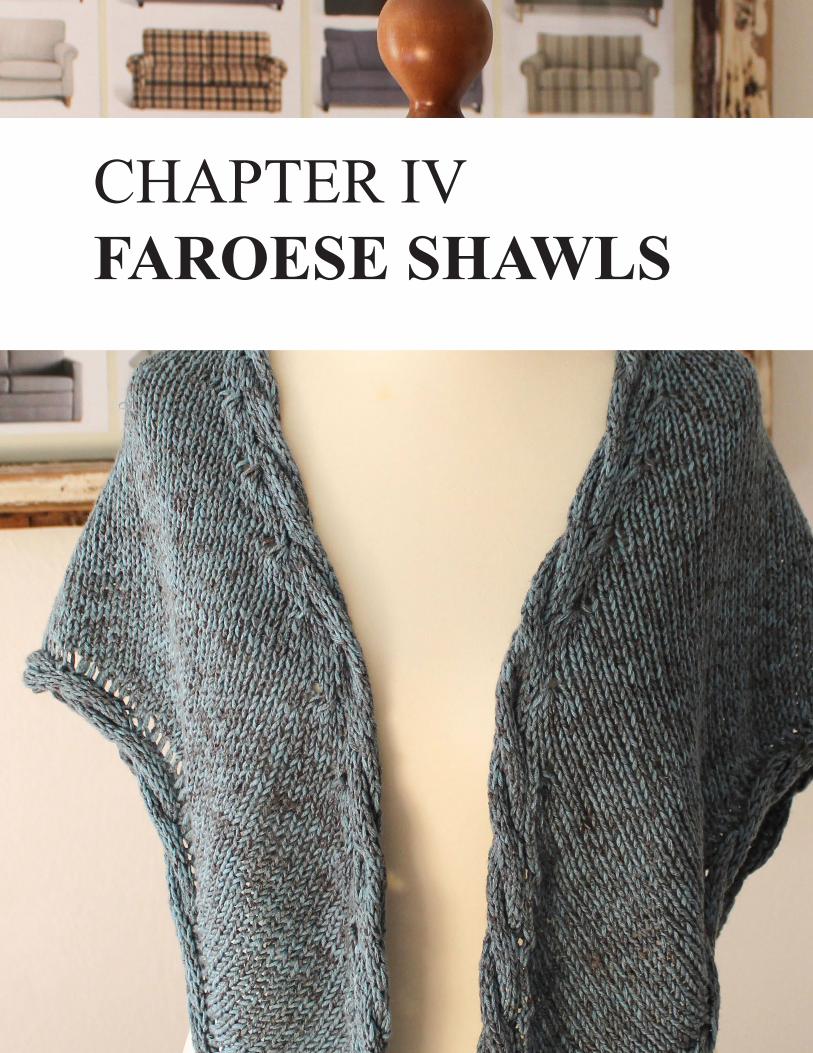
CHAPTER IV
FAROESE SHAWLS
The Anatomy of a Faroese Shawl Faroese shawls are my all-time favorite. They look like
wings and their shape makes it easy to tie them behind
your back, providing extra warmth during cold winter
days.
Traditionally, they were worked in thicker yarns and often
lined, turning them into a piece of everyday clothing.
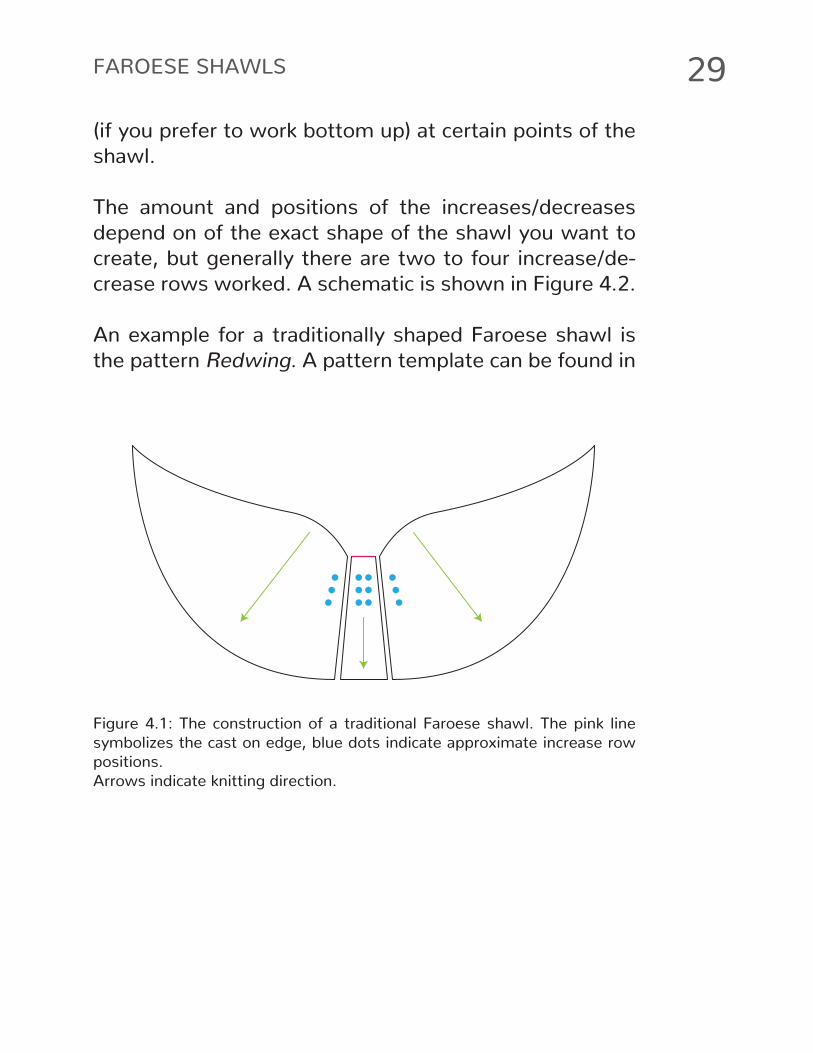
Figure 4.1 shows a sketch of the shape of a Faroese
shawl.
Faroese shawls can be constructed in three different ways: by working them top-down and working increases
the traditional Faroese way, by working them bottom-up
and working decreases the traditional Faroese way, or by
working them top-down and working raglan increases.
A comprehensive book on Faroese shawls is Føroysk Bin-
din- garmynstur by Marilyn Van Keppel1.
Traditional Faroese shawls SHAWL SHAPE INDEX: FAROESE
Traditional Faroese shawls are constructed similar to tri-
angle shawls with center panels, but with additional in-
creases (if you decide to work top down) or decreases
1 Van Keppel, Marilyn: Føroysk Bindingarmynstur, Schoolhouse Press, 1997.
29FAROESE SHAWLS
(if you prefer to work bottom up) at certain points of the
shawl.
The amount and positions of the increases/decreases
depend on of the exact shape of the shawl you want to
create, but generally there are two to four increase/de-
crease rows worked. A schematic is shown in Figure 4.2.
An example for a traditionally shaped Faroese shawl is
the pattern Redwing. A pattern template can be found in
Figure 4.1: The construction of a traditional Faroese shawl. The pink line
symbolizes the cast on edge, blue dots indicate approximate increase row
positions.
Arrows indicate knitting direction.
30 SHAWL DESIGN IN PLAIN ENGLISH
Chapter 5.
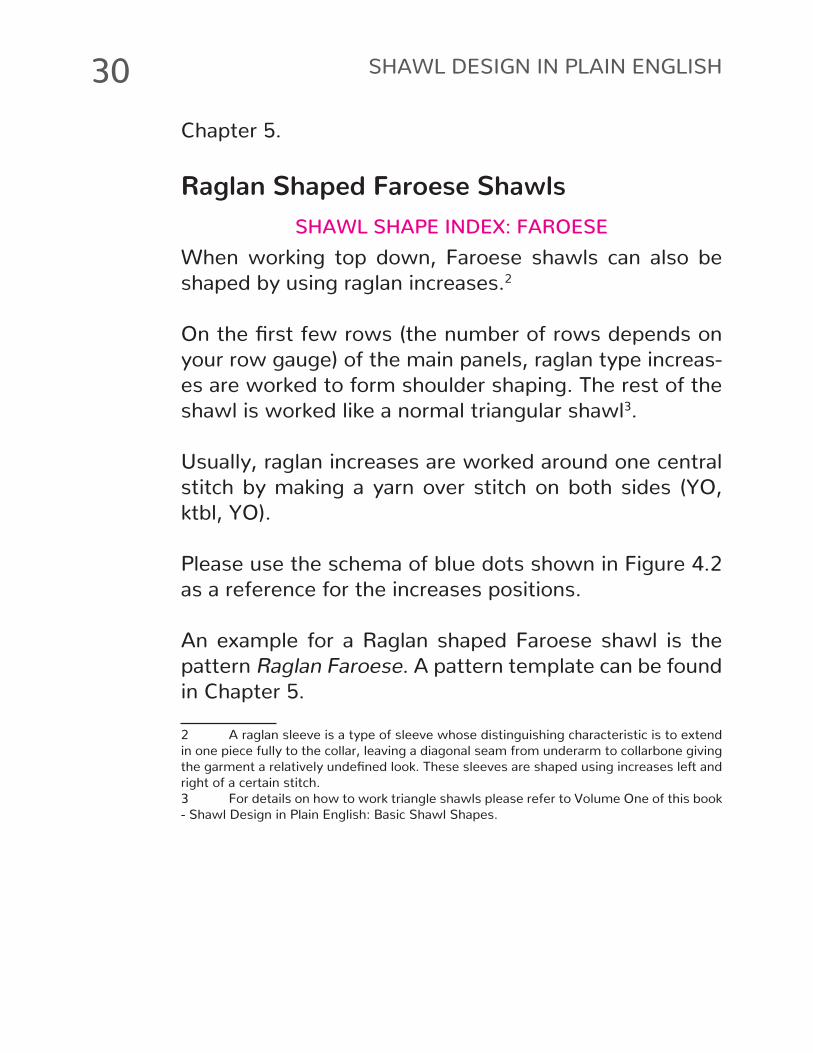
Raglan Shaped Faroese ShawlsSHAWL SHAPE INDEX: FAROESE
When working top down, Faroese shawls can also be
shaped by using raglan increases.2
On the first few rows (the number of rows depends on your row gauge) of the main panels, raglan type increas-
es are worked to form shoulder shaping. The rest of the
shawl is worked like a normal triangular shawl3.
Usually, raglan increases are worked around one central stitch by making a yarn over stitch on both sides (YO, ktbl, YO).
Please use the schema of blue dots shown in Figure 4.2 as a reference for the increases positions.
An example for a Raglan shaped Faroese shawl is the
pattern Raglan Faroese. A pattern template can be found
in Chapter 5.
2 A raglan sleeve is a type of sleeve whose distinguishing characteristic is to extend
in one piece fully to the collar, leaving a diagonal seam from underarm to collarbone giving
the garment a relatively undefined look. These sleeves are shaped using increases left and right of a certain stitch.
3 For details on how to work triangle shawls please refer to Volume One of this book - Shawl Design in Plain English: Basic Shawl Shapes.
31FAROESE SHAWLS
Vortex Faroese ShawlsSHAWL SHAPE INDEX: FAROESE
Honestly, I discovered this completely new construction method for a Faroese shawl by accident.
I was editing illustrations for crescent shawls with cen-ter panels on a flight from Thessaloniki to Berlin when my husband, sitting next to me, made a comment on how much the two halves left and right looked like vor-tex (cornucopia) shawls.
Figure 4.2: The construction of a Raglan Faroese shawl. The pink line sym-
bolizes the cast on edge, blue dots indicate increase approximate row posi-
tions. Arrows indicate knitting direction.
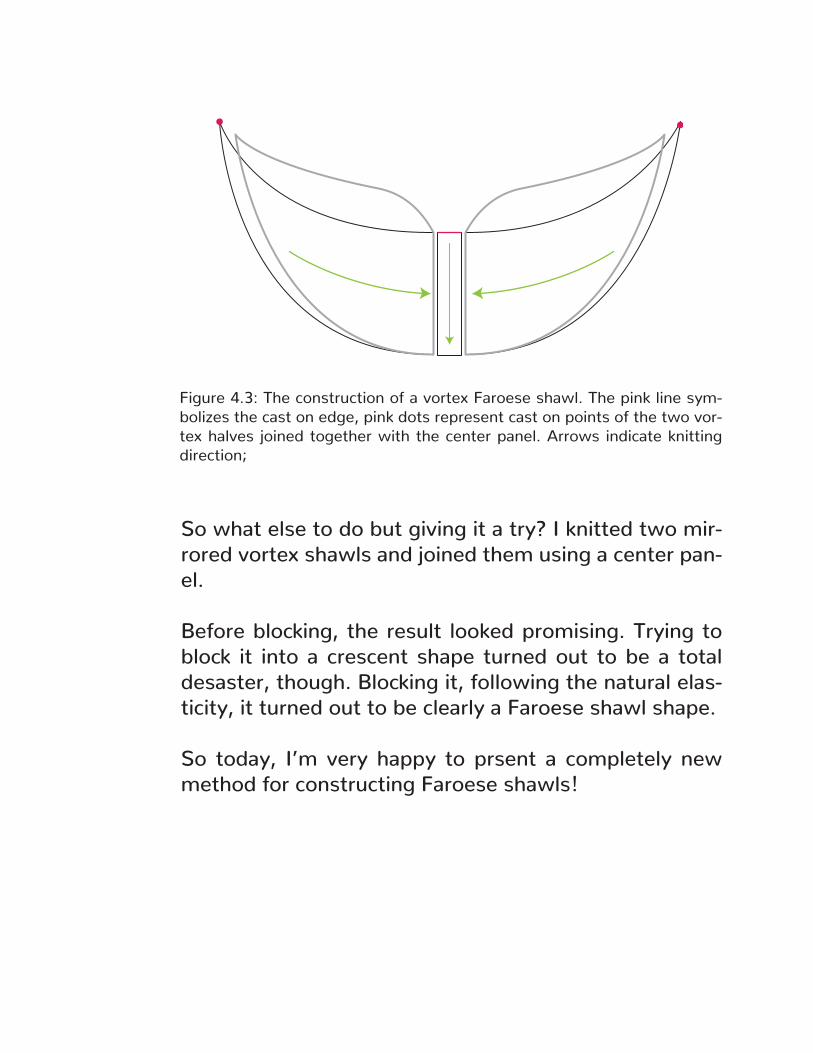
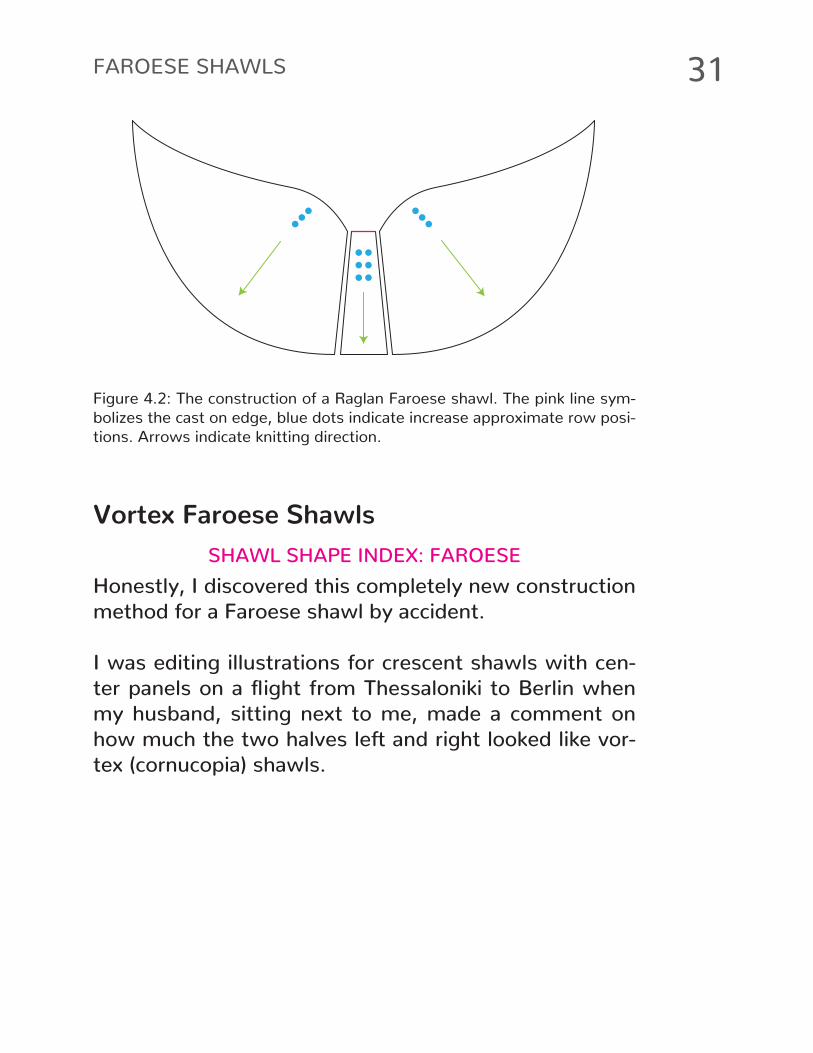
So what else to do but giving it a try? I knitted two mir-rored vortex shawls and joined them using a center pan-el.
Before blocking, the result looked promising. Trying to block it into a crescent shape turned out to be a total desaster, though. Blocking it, following the natural elas-ticity, it turned out to be clearly a Faroese shawl shape.
So today, I’m very happy to prsent a completely new method for constructing Faroese shawls!
Figure 4.3: The construction of a vortex Faroese shawl. The pink line sym-
bolizes the cast on edge, pink dots represent cast on points of the two vor-
tex halves joined together with the center panel. Arrows indicate knitting
direction;
The outline is as follows:• Knit a vortex (cornucopia) shawl.• Knit the mirror image of this vortex shawl.• Join the two halves with a center panel.• Block smoothly nto Faroese shape.
The main difference between traditionally and raglan shaped Faroese shawls is the knitting direction. Keep this in mind when implementing stitch patterns into this shawl shape!
An example pattern for this shawl shape is Aegean Sea.
A pattern template can be found in Chapter 5.
CHAPTER VII
PATTERN TEMPLATES
36 SHAWL DESIGN IN PLAIN ENGLISH
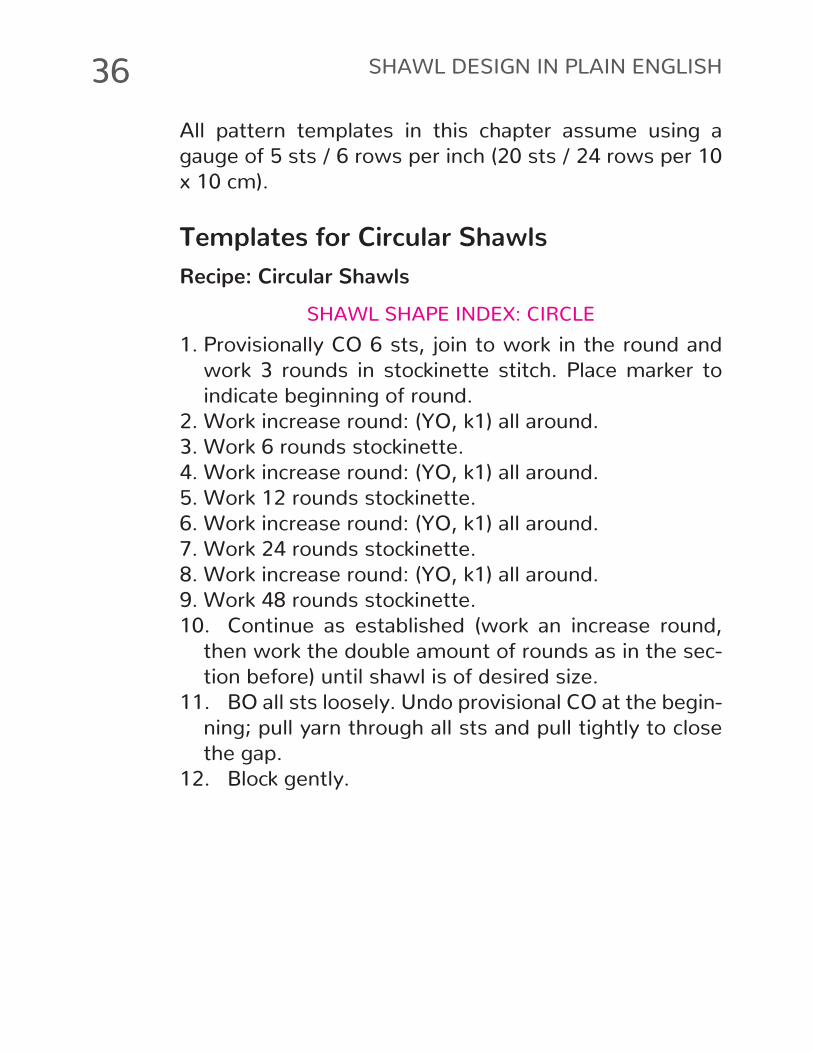
All pattern templates in this chapter assume using a
gauge of 5 sts / 6 rows per inch (20 sts / 24 rows per 10 x 10 cm).
Templates for Circular ShawlsRecipe: Circular Shawls
SHAWL SHAPE INDEX: CIRCLE1. Provisionally CO 6 sts, join to work in the round and
work 3 rounds in stockinette stitch. Place marker to indicate beginning of round.
2. Work increase round: (YO, k1) all around.3. Work 6 rounds stockinette.4. Work increase round: (YO, k1) all around.5. Work 12 rounds stockinette.
6. Work increase round: (YO, k1) all around.7. Work 24 rounds stockinette.
8. Work increase round: (YO, k1) all around.9. Work 48 rounds stockinette.10. Continue as established (work an increase round,
then work the double amount of rounds as in the sec-
tion before) until shawl is of desired size.
11. BO all sts loosely. Undo provisional CO at the begin-
ning; pull yarn through all sts and pull tightly to close
the gap.
12. Block gently.
37PATTERN TEMPLATES
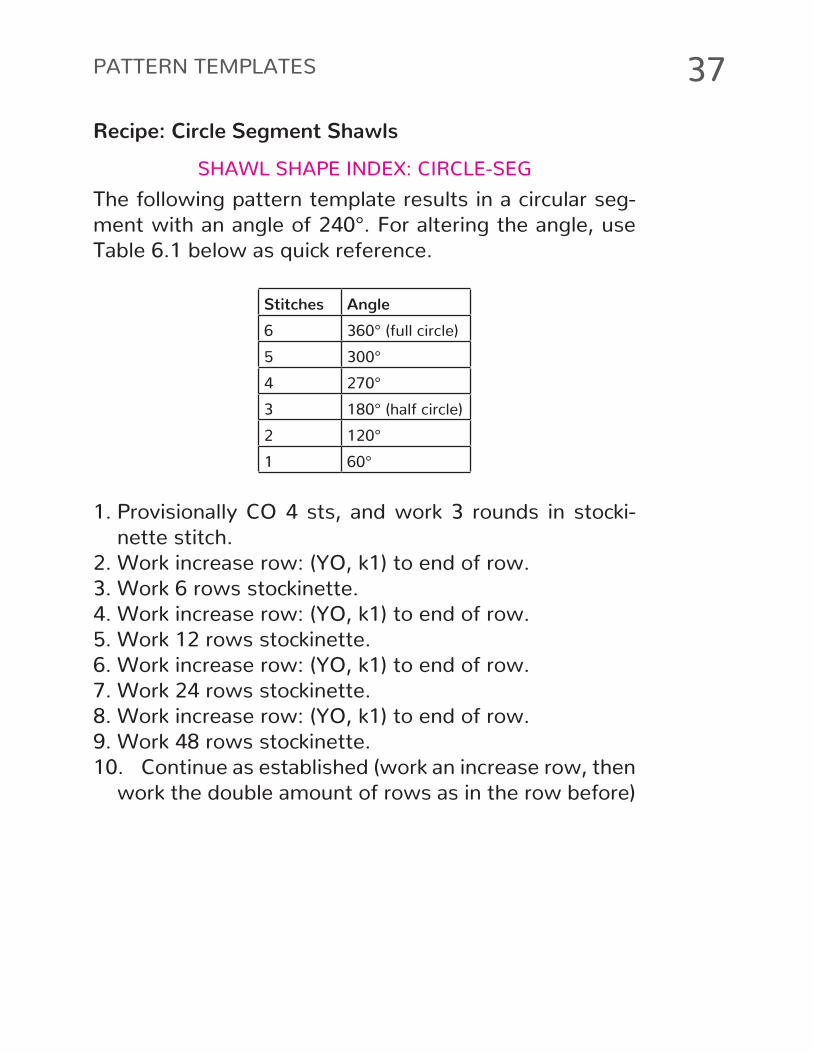
Recipe: Circle Segment ShawlsSHAWL SHAPE INDEX: CIRCLE-SEG
The following pattern template results in a circular seg-
ment with an angle of 240°. For altering the angle, use
Table 6.1 below as quick reference.
Stitches Angle6 360° (full circle)5 300°4 270°
3 180° (half circle)2 120°
1 60°
1. Provisionally CO 4 sts, and work 3 rounds in stocki-nette stitch.
2. Work increase row: (YO, k1) to end of row.3. Work 6 rows stockinette.4. Work increase row: (YO, k1) to end of row.5. Work 12 rows stockinette.
6. Work increase row: (YO, k1) to end of row.7. Work 24 rows stockinette.
8. Work increase row: (YO, k1) to end of row.9. Work 48 rows stockinette.10. Continue as established (work an increase row, then
work the double amount of rows as in the row before)
38 SHAWL DESIGN IN PLAIN ENGLISH
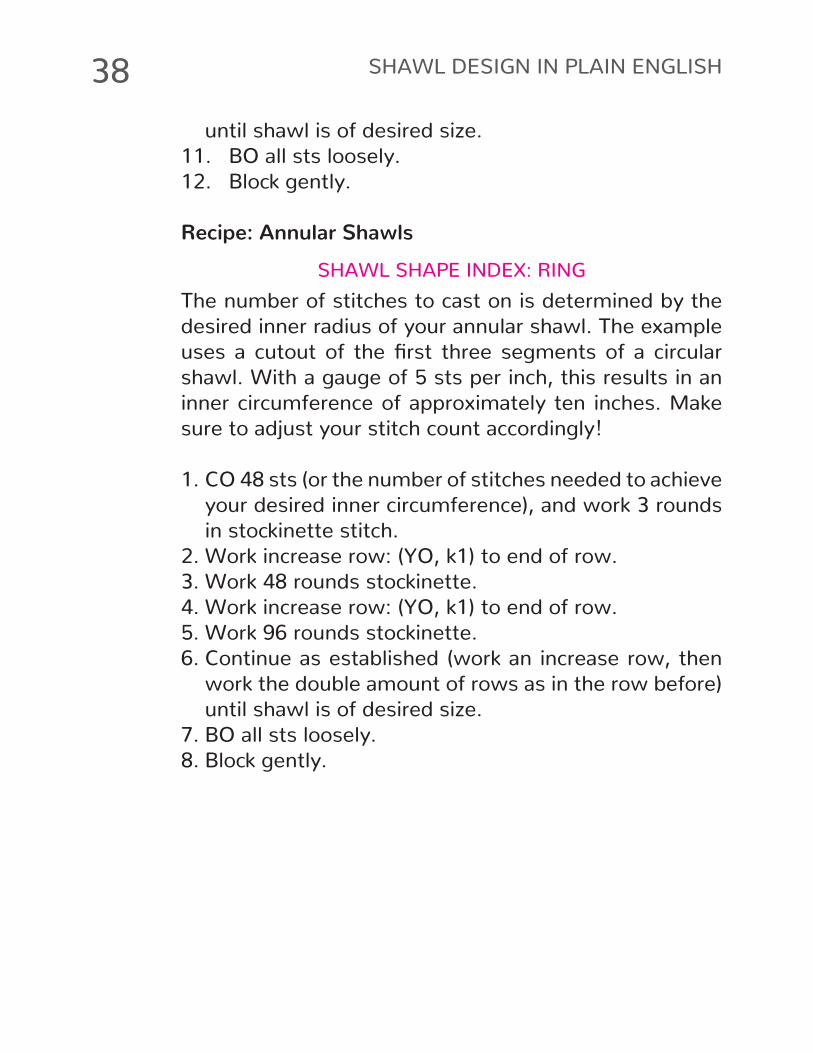
until shawl is of desired size.
11. BO all sts loosely.12. Block gently.
Recipe: Annular ShawlsSHAWL SHAPE INDEX: RING
The number of stitches to cast on is determined by the
desired inner radius of your annular shawl. The example
uses a cutout of the first three segments of a circular shawl. With a gauge of 5 sts per inch, this results in an inner circumference of approximately ten inches. Make
sure to adjust your stitch count accordingly!
1. CO 48 sts (or the number of stitches needed to achieve your desired inner circumference), and work 3 rounds in stockinette stitch.
2. Work increase row: (YO, k1) to end of row.3. Work 48 rounds stockinette.4. Work increase row: (YO, k1) to end of row.5. Work 96 rounds stockinette.6. Continue as established (work an increase row, then
work the double amount of rows as in the row before)
until shawl is of desired size.
7. BO all sts loosely.8. Block gently.
39PATTERN TEMPLATES
Recipe: Annular Segment ShawlsSHAWL SHAPE INDEX: RING-SEG
The number of stitches to cast on is determined by the
desired inner radius and the desired angle of your annu-
lar segment shawl.
The example uses a cutout of the first three segments of a circular shawl. With a gauge of 5 sts per inch, this results in an inner circumference of approximately ten
inches. An example angle of 180° is used.
Make sure to adjust your stitch count accordingly! The
formula used is (round your result to whole numbers):
48 sts * ANGLE/360°
1. CO 48 sts (or the number of stitches needed to achieve your desired inner circumference and angle as de-
scribed above) and work 3 rounds in stockinette stitch.2. Work increase row: (YO, k1) to end of row.3. Work 48 rounds stockinette.4. Work increase row: (YO, k1) to end of row.5. Work 96 rounds stockinette.6. Continue as established (work an increase row, then
work the double amount of rows as in the row before)
until shawl is of desired size.
7. BO all sts loosely.
40 SHAWL DESIGN IN PLAIN ENGLISH
8. Block gently.
Templates for Crescent ShawlsRecipe: Short Row Crescents
SHAWL SHAPE INDEX: CRESCENT1. Work a swatch in the desired needles and yarn to de-
termine your working gauge.
2. Calculate how many stitches you will need to reach
the desired width at the lower hem of the shawl and
cast on this number of stitches.
3. Work about 16 rows in pattern for the lower hem - for example, work any lace border.
4. Decrease about one third of your CO sts evenly over the next 4 rows. Count your stitches (=A) at the last row.
5. Calculate B = (A-10)/2+10 and round to whole num-
bers.
6. (RS) sl1, knit B sts, turn work.
7. (WS) p10, turn work.
8. (RS) k9, ssk, k3, turn work.9. (WS) p12, p2tog, p3, turn work.10. (RS) k to 1 st before last turning point, ssk, k3, turn
work.
11. (WS) p to 1 st before last turning point, p2tog, p3, turn work.
12. Repeat the last two rows until less than three sts
41PATTERN TEMPLATES
remain unworked at each edge.
13. K to last 2 sts, k2tog, turn work.
14. P to last 2 sts, p2tog, turn work.15. Repeat the last two rows if you had 2 sts left un-
worked at each edge; otherwise you are done.
16. Bind off all sts loosely.
Recipe: Crescents Worked SidewaysThe pattern template for crescent shawls worked side-
ways is similar to trapezoid shawls.
SHAWL SHAPE INDEX: TRAPEZ, CRESCENT1. CO 3 sts and purl one row.2. Work increase row: sl1, YO, k to end of row.3. Next row: knit.4. Repeat the last two rows until shawl is of desired
width. Measure the heigth of you shawl now (=A).5. Next row: knit.6. Repeat the last row until shawl is of desired length
minus A.
7. Work decrease row: sl1, k to last 3 sts, k2tog, k1.8. Next row: knit.9. Repeat the last two rows until 3 sts are left, then bind
off all sts.
42 SHAWL DESIGN IN PLAIN ENGLISH
Recipe: Winged CrescentsSHAWL SHAPE INDEX: CRESCENT
1. Provisionally CO 3 sts, and work 3 rows in stockinette stitch.
2. Work increase row: (YO, k1) to end of row.3. Work 6 rows stockinette.4. Work increase row: (YO, k1) to end of row.5. Work 12 rows stockinette.
6. Work increase row: (YO, k1) to end of row.7. Next Row: k1, YO, k to last st, YO, k1.8. Next Row: purl.9. Repeat the last two rows 11 times more.
10. Work increase row: (YO, k1) to end of row.11. Next Row: k1, YO, k to last st, YO, k1.12. Next Row: purl.13. Repeat the last two rows 23 times more.14. Work 48 rows stockinette.15. Continue as established (work an increase row, then
work the double amount of rows as in the row before
with one YO at each end of RS rows) including addi-tional increases on each side until shawl is of desired
size.
16. BO all sts loosely.17. Block gently.
43PATTERN TEMPLATES
Recipe: Increase CrescentsSHAWL SHAPE INDEX: CRESCENT
1. CO 20 sts and knit one row.2. Next Row: Knit all sts, then cast on 2 stitches using a
backward loop cast on.
3. Repeat the last row until shawl is of desired size.
4. Bind off all stitches loosely and block gently.
Templates for Faroese ShawlsNote: This section also contains a recipe for a triangle shawl for the sake of completeness. Triangle shawls with
center panels are used as basis for Faroese shawls.
Recipe: Traditional Faroese ShawlsSHAWL SHAPE INDEX: FAROESE
5. When knitting a traditional Faroese Shawl, follow the
recipe for a triangular shawl with center panels as list-
ed below.
6. At the same time, work the following additional in-
creases:
7. At the center panel, work 3 increases every 16 rows (stop increasing when your center panel is abut 40 sts
wide).
8. At the side panels, work additional increases as fol-
lows:
44 SHAWL DESIGN IN PLAIN ENGLISH
9. At row 41, increase every 3rd stitch by working YO, k1 instead of k1.
10. At row 81, increase every 7th stitch by working11. YO, k1 instead of k1.12. At row 120, increase every 9th stitch by working
13. YO, k1 instead of k1.
Recipe: Raglan Shaped Faroese ShawlsSHAWL SHAPE INDEX: FAROESE
1. Define A, the number of sts in the center panel pattern and B, the number of sts in your small border pattern.
2. Using any provisional cast on method, cast on B + 1 sts using waste yarn.
3. Work 2*A + 10 rows of your small border pattern with one selvedge stitch. At the last row, put a marker be-
tween the small border sts and the selvedge stitch.
4. Next row: work next row of small border, slm, k1, pick up and knit 3 sts, pm, pick up and knit A-1 sts, pm, pick up and knit 3 sts, pm, undo provisional CO at the beginning of the small border band and work next row
of small border pattern. Turn work.
5. Next row (RS): Work small border, slm, YO, k1, YO, pm, k1, pm, YO, k1, YO, slm, work center panel, slm, YO, k1, YO, pm, k1, pm, YO, k1, YO, slm, work next row of small border.
6. Next row (WS): Work next row of small border, k to center panel (slipping markers as you knit), slm, work
45PATTERN TEMPLATES
center panel, slm, p to last marker, slm, work next row of small
border.
7. Next row (RS): Work next row of small border, slm, YO, k to next marker, YO, slm, k1, slm, YO, k to next marker, YO, slm, k1, slm, k to next marker, YO, slm, work center panel, slm, YO, k to next marker, YO, slm, k1, slm, YO, k to next marker, YO, slm, k1, slm, k to next marker, YO, slm, work next row of small border.
8. Next row (WS): Work small border, p to center panel (slipping markers as you knit), slm, work center panel, slm, p to last mark-
er, slm, work next row of small border.
9. Repeat the last two rows until shawl is long enough to cover
your shoulders, then remove the markers in your raglan shaping
in the next row you are working.
10. Next row (RS): Work next row of small border, slm, YO, work in pattern to next marker, YO, slm, work center panel, slm, YO, work in pattern to next marker, YO, slm, work next row of small border.
11. Next row (WS): Work small border, work in pattern to center panel (slipping markers as you knit), slm, work center panel,
slm, work in pattern to last marker, slm, and work next row of
small border.
12. Repeat the last two rows until shawl is of desired size.
13. Work edging.
14. BO all sts loosely and block gently.
46 SHAWL DESIGN IN PLAIN ENGLISH
Recipe: Vortex Faroese ShawlsFirst half:
1. CO 5 stitches and knit one row.2. Next Row (RS): K1, YO, k to end of row.3. Next Row (WS): K1, k to last stitch, YO, k1.4. Next Row (RS): K1, YO, k to end of row.5. Next Row (WS): K1, k to last stitch, YO, k1.6. Next Row (RS): K1, YO, k to end of row.7. Next Row (WS): K1, k4tog1, k to last stitch, YO, k1.8. Repeat the last six rows until shawl is half of desired
width. Cut yarn and put stitches on waste yarn.
Second half:
1. CO 5 stitches and knit one row.2. Next Row (RS): K to last stitch, YO, k1.3. Next Row (WS): K1, YO, k to end of row.4. Next Row (RS): K to last stitch, YO, k1.5. Next Row (WS): K1, YO, k to end of row.6. Next Row (RS): K to last stitch, YO, k1.7. Next Row (WS): K1, YO, k to last 5 stitches, k4tog, k18. Repeat the last six rows until shawl is half of desired
width. Do not break yarn.
Center panel:
The center panel is started with a band using a few live
stitches from the second half. The band is worked until it
1 k4tog: knit 4 stitches together.
47PATTERN TEMPLATES
is long enough to pick up enough stitches forn the center
panel along the longer edge of the band. In this example,
the center panel is 10 stitches wide.
This center panel is only an example, you can use any
stitch count for your own. As a guideline of how many
rows to work to have enough space to pick up stitches:
work two rows per stitch you want to pick up.
1. Next Row (RS): Using the live stitches and yarn from the second half, k5.
2. Next Row (WS): K5.3. Next Row (RS): K5.4. Next Row (WS): K5.5. Repeat the last two rows 8 times more. (Repeat more
often to create a wider center panel.)
6. Align the first and second half of the shawl (both right side up, live stitches facing each other). Put stitches from first half on second needle.
7. Next Row (RS): K5 (knit the aligned first five stitches from both halves together to attach the band to the
first five stitches of the first half), pick up and knit 10 stitches along longer edge of band,turn.
8. Next Row (WS): Knit all stitches.9. Next Row (RS): Knit to last stitch, k2tog tbl2 using one
center panel stitch and the next stitch from the second
2 tbl: through back loop.
48 SHAWL DESIGN IN PLAIN ENGLISH
half.
10. Next Row (WS): Knit to last stitch, k2tog tbl using one center panel stitch and the next stitch from the
first half.11. Repeat the last two rows until all stitches from the
two halves have been attached to the center panel.
12. Bind off all stitches. 13. Weave in ends and block gently.
Recipe: Triangle Shawls With Center PanelsSHAWL SHAPE INDEX: TRIANGLE-1
1. Decide how many stitches your center panel will be (
= N). The template uses a 5 stitch garter stitch border on the longer (upper) side of the triangle, therefore we
have to cast on 6 (5 + 1 selvedge st) stitches.2. CO 5 sts with smaller needle and work 2 times N rows
in seed stitch, slipping the very first st of each row (wyb on RS rows, wyf on WS rows) to to ensure a
clean edge for pick up later).
3. Panel setup row (RS): Sl1 wyb, work 5 sts in garter stitch, pm, k1, pm, pick up and knit N sts along edge, pm, pick up and knit 1 stitch, pm, pick up and knit 5 sts along the cast on edge.
4. Panel setup row (WS): Sl1 wyf, work 3 sts in seed stitch, slm, p1, slm, p to next marker, slm, p1, slm,
work in seed stitch to end.
5. Next row (RS): Sl1 wyb, work 3 sts in seed stitch, slm,
49PATTERN TEMPLATES
YO, k to next marker, YO, slm, work N sts in center panel pattern, slm, YO, k to next marker, YO, slm, work in seed stitch to end.
6. Next row (WS): Sl1 wyf, work 3 sts in seed stitch, slm, p to next marker, slm, work N sts in center panel pat-tern, slm, p to next marker, slm, work in seed stitch to
end.
7. Repeat the last two rows until shawl is of desired size,
then work a few rows of garter stitch (or any other
edging of your choice), then bind off all sts loosely. Weave in ends and block gently.
CHAPTER VIII
EXAMPLE PATTERNS
HUG ME
54 SHAWL DESIGN IN PLAIN ENGLISH
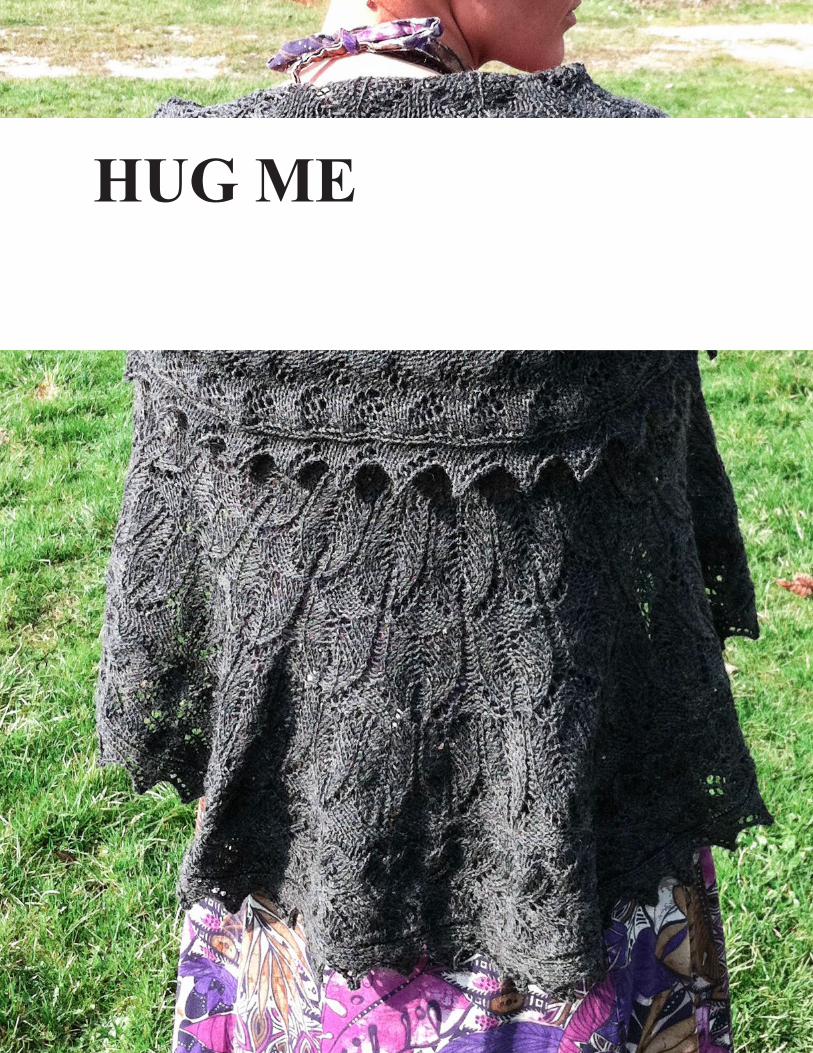
FINISHED MEASUREMENTS40 in (100 cm) diameter after blocking
YARNFour Seasons Gruendl Sockenwolle [230 yards (210 me-
ters) per 50 grams (1.76 ounces)], 6 skeins
NEEDLES & NOTIONSSize US 2 1/2 (3.0 mm) circular needles, 80 cm or lon-
ger; tapestry needle, stitch markers
GAUGE20 stitches / 30 rows equals 4 x 4 in (10 x 10 cm) in stockinette stitch after blocking
DIFFICULTY*****
NOTESA circular shawl worked from center outwards.
Using solid or semi-solid colors of yarn show off the stitch patterns best.
55EXAMPLE PATTERNS: HUG ME
SETUPUsing any provisional cast on method, cast on 9 sts using waste yarn and work one round in stockinette stitch.
Place marker to indicate beginning of round.
Work Increase Round: *YO, k1* all around. (18 sts)Work 3 rounds stockinette.
Work Increase Round: *YO, k1*, repeat from * to * to end of rnd. (36 sts) Work 6 rounds stockinette.
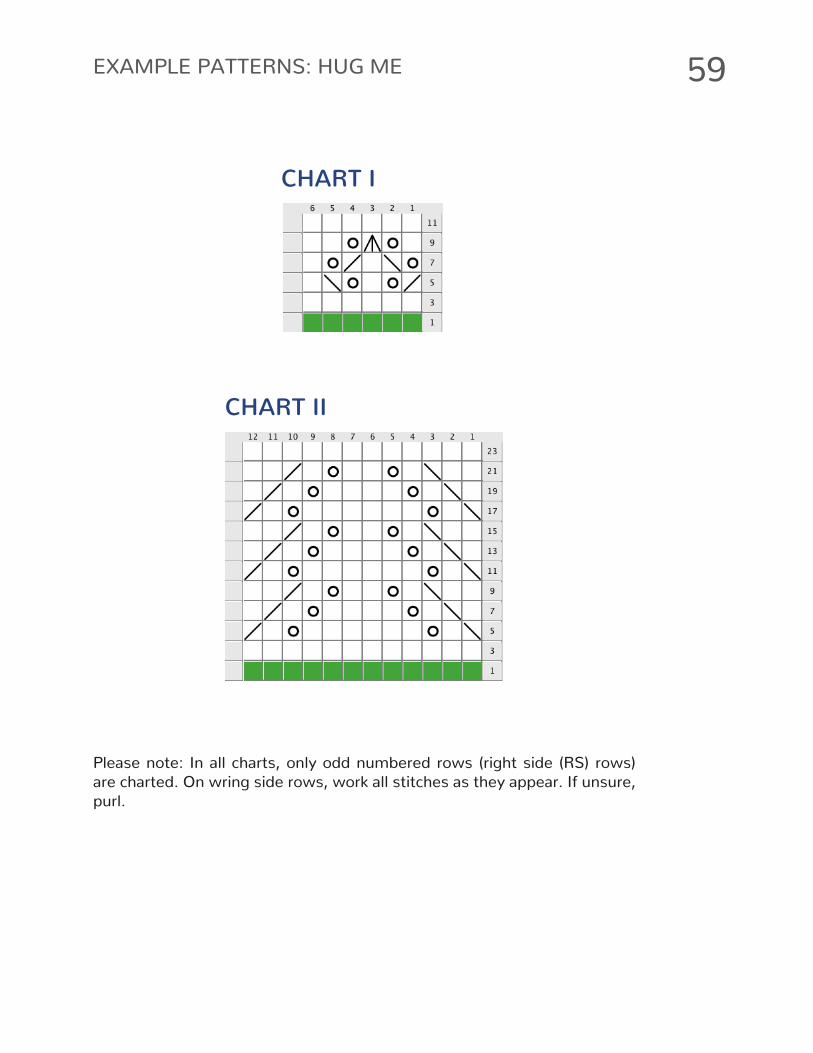
FIRST SECTIONWork Increase Round: *YO, k1*, repeat from * to * to end of rnd (first row of Chart I). (72 sts) Work rounds 2-12 of Chart I.
SECOND SECTIONWork Increase Round: *YO, k1*, repeat from * to * to end of rnd (first row of Chart II) . (144 sts)Work rounds 2-24 of Chart II.
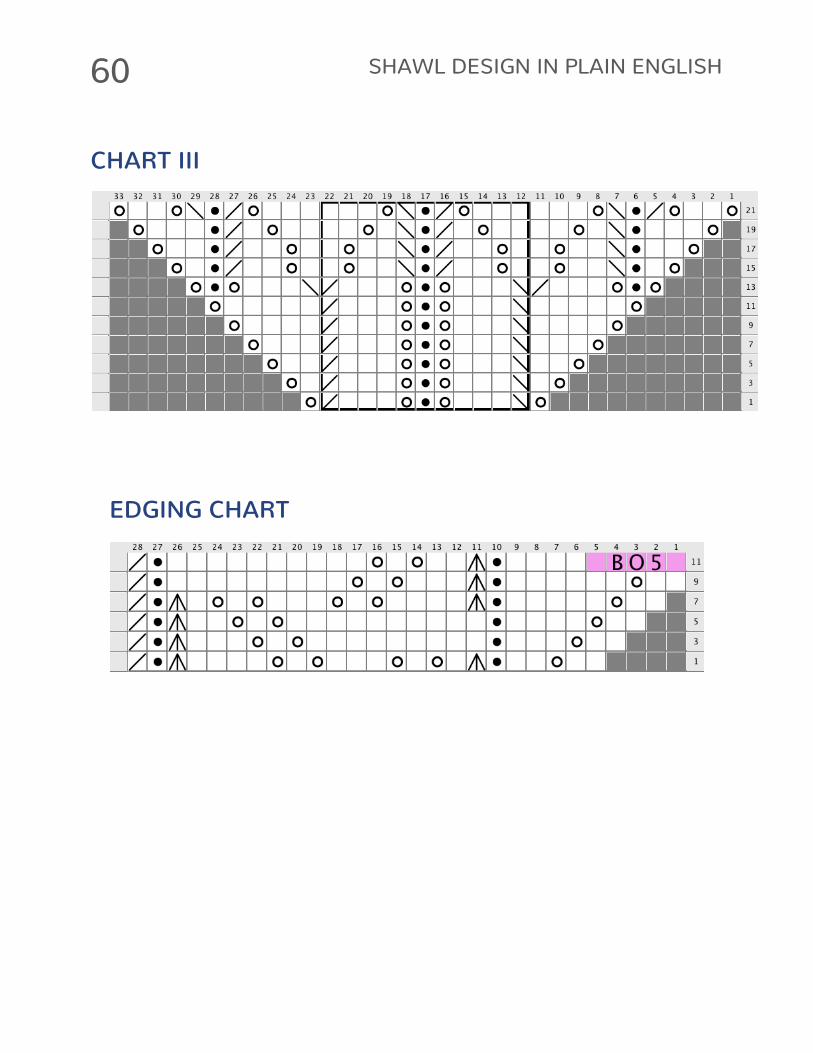
THIRD SECTIONWork Increase Round: *YO, k1*, repeat from * to * to end of rnd (first row of Chart III). (288 sts)Work rounds 2-48 of Chart III.
56 SHAWL DESIGN IN PLAIN ENGLISH
FOURTH SECTIONWork Increase Round: *YO, k1*, repeat from * to * to end of rnd (first row of Chart III). (576 sts)Work rounds 2-26 of Chart III.
EDGINGUsing the backwards loop method, CO 23 sts.
Work rows 1-12 of the edging chart all around and attach
the loose sts of the shawl body by working each inner-
most sts when facing the RS together with the inner-
most st of the edging by working a k2tog. This attaches
the edging to the shawl body.
FINISHINGWeave in ends and block gently.
57EXAMPLE PATTERNS: HUG ME
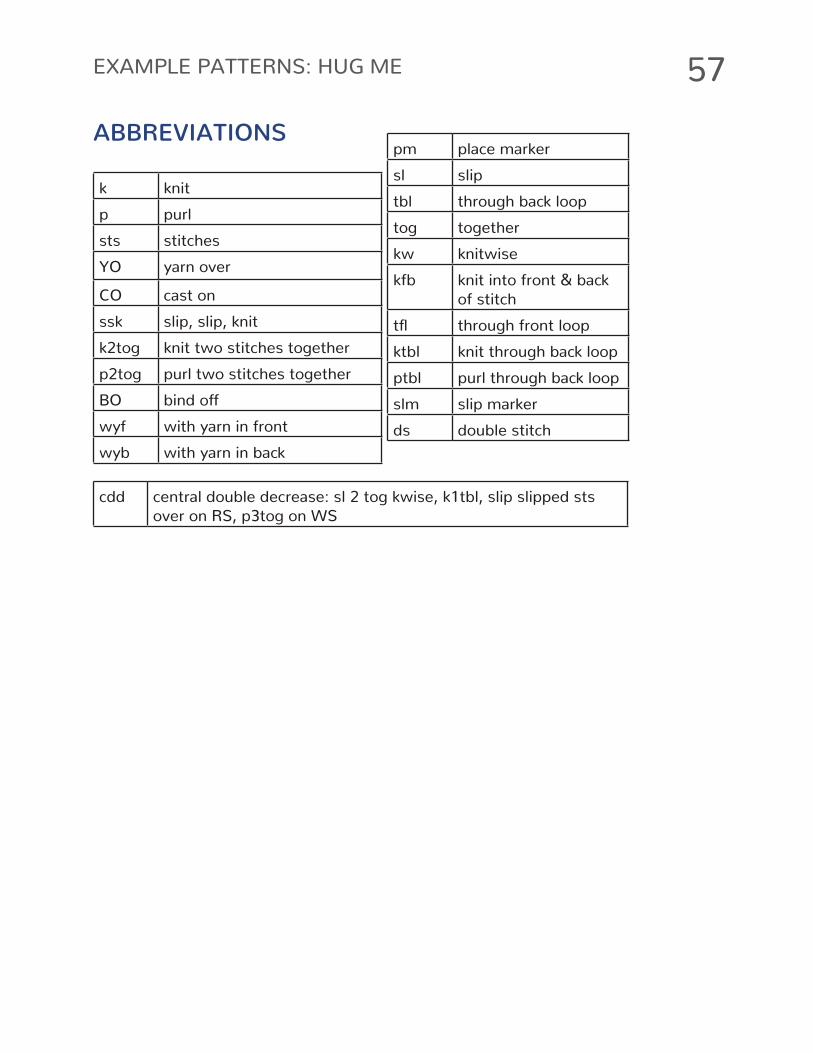
ABBREVIATIONS
k knit
p purl
sts stitches
YO yarn over
CO cast on
ssk slip, slip, knit
k2tog knit two stitches together
p2tog purl two stitches together
BO bind offwyf with yarn in front
wyb with yarn in back
pm place marker
sl slip
tbl through back loop
tog together
kw knitwise
kfb knit into front & back
of stitch
tfl through front loop
ktbl knit through back loop
ptbl purl through back loop
slm slip marker
ds double stitch
cdd central double decrease: sl 2 tog kwise, k1tbl, slip slipped sts
over on RS, p3tog on WS
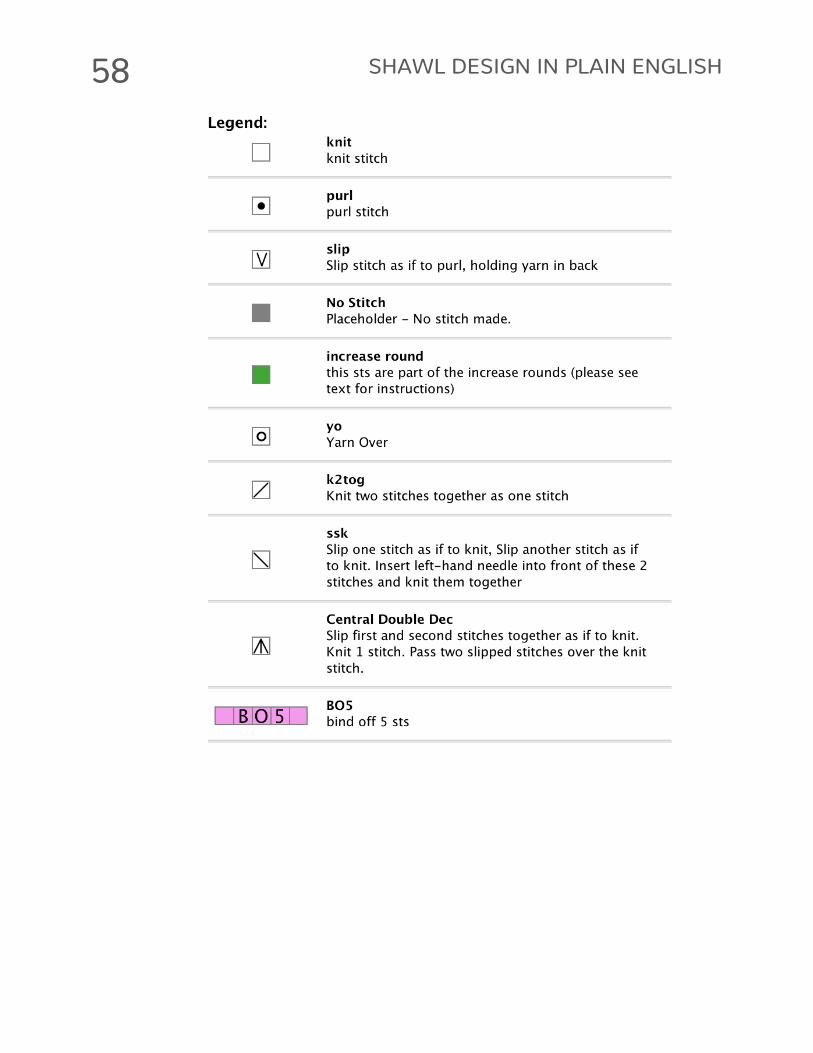
58 SHAWL DESIGN IN PLAIN ENGLISH
59EXAMPLE PATTERNS: HUG ME
CHART I
CHART II
Please note: In all charts, only odd numbered rows (right side (RS) rows) are charted. On wring side rows, work all stitches as they appear. If unsure, purl.
60 SHAWL DESIGN IN PLAIN ENGLISH
CHART III
EDGING CHART
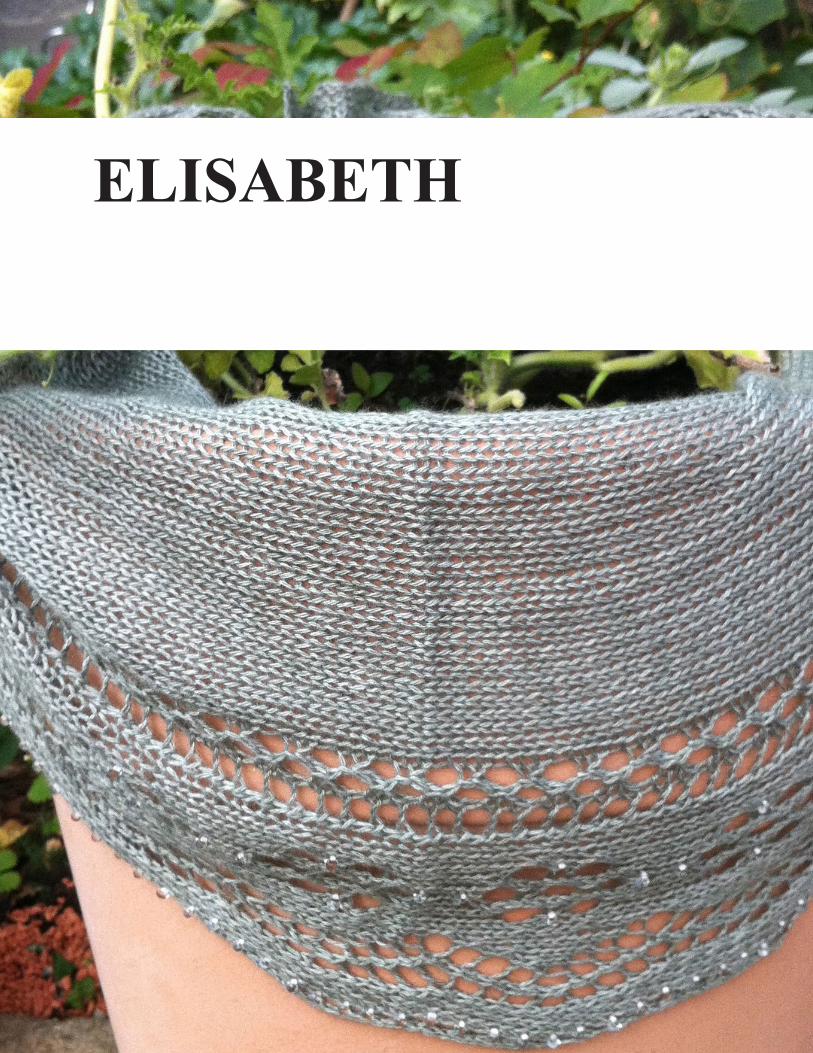
ELISABETH
62 SHAWL DESIGN IN PLAIN ENGLISH
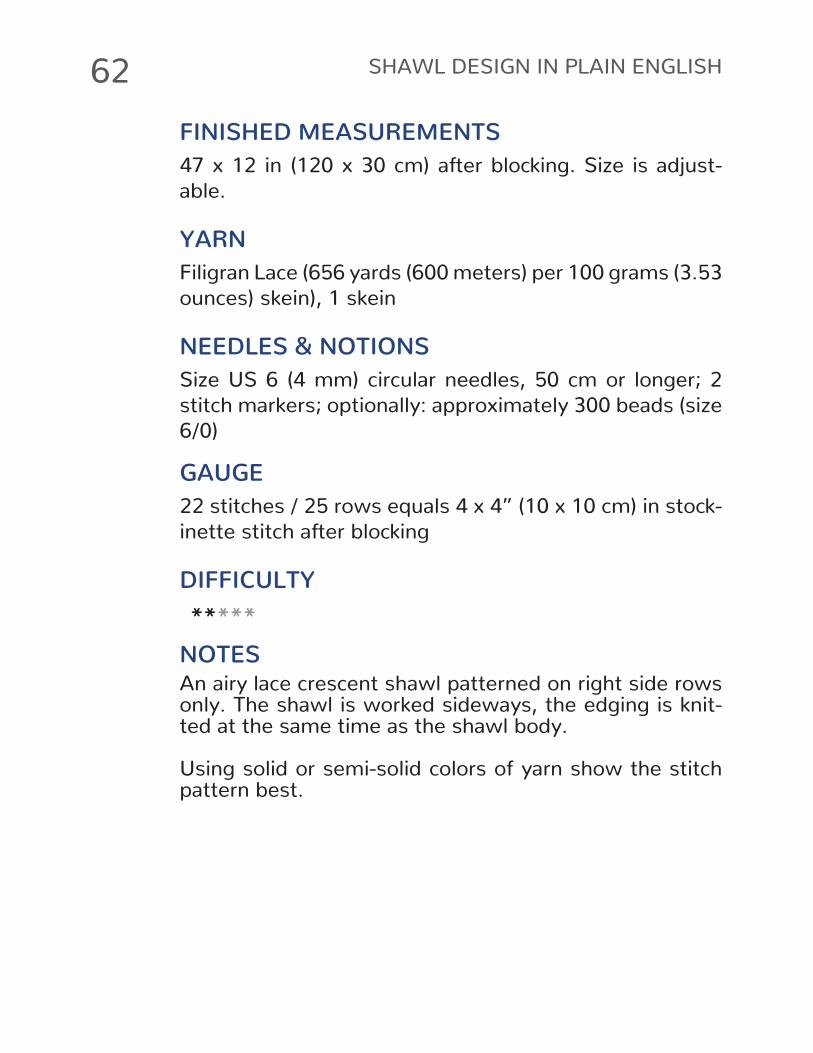
FINISHED MEASUREMENTS47 x 12 in (120 x 30 cm) after blocking. Size is adjust- able.
YARNFiligran Lace (656 yards (600 meters) per 100 grams (3.53 ounces) skein), 1 skein
NEEDLES & NOTIONSSize US 6 (4 mm) circular needles, 50 cm or longer; 2 stitch markers; optionally: approximately 300 beads (size 6/0)
GAUGE22 stitches / 25 rows equals 4 x 4’’ (10 x 10 cm) in stock-
inette stitch after blocking
DIFFICULTY*****
NOTESAn airy lace crescent shawl patterned on right side rows
only. The shawl is worked sideways, the edging is knit-
ted at the same time as the shawl body.
Using solid or semi-solid colors of yarn show the stitch pattern best.

63EXAMPLE PATTERNS: ELISABETH
SETUPCO on 26 sts and work 4 rows in garter stitch (2 ridges).
Next Row (RS): Sl1, work first row of Border Chart.Next Row (WS): Work next row of border chart, p1.
INCREASE SECTIONIncrease Row 1 (RS): sl1, m1, pm, work next row of bor-
der chart.
Increase Row 2 (WS): work next row of border chart, slm,
p to end of row.
Increase Row 3 (RS): sl1, k to next marker, m1, slm, work next row of border chart.
Increase Row 4 (WS): work next row of border chart, slm,
p to next marker, slm, p1.
Repeat increase rows 3-4 until shawl measures about 30 cm in width, ending with row 16 of the border chart. (Ap-
proximately 6 repeats of the Border Chart)
CENTER SECTIONCenter Row 1 (RS): Sl1, k to next marker, slm, work next
row of border chart.
Center Row 2 (WS): Work next row of border chart, slm,
p to end of row.
Repeat center rows 1-2 until you have completed 8 re-
peats of the Border Chart in the center section (approxi-
mately 14 repeats total depending on the amount of re-
peats in the increase section).
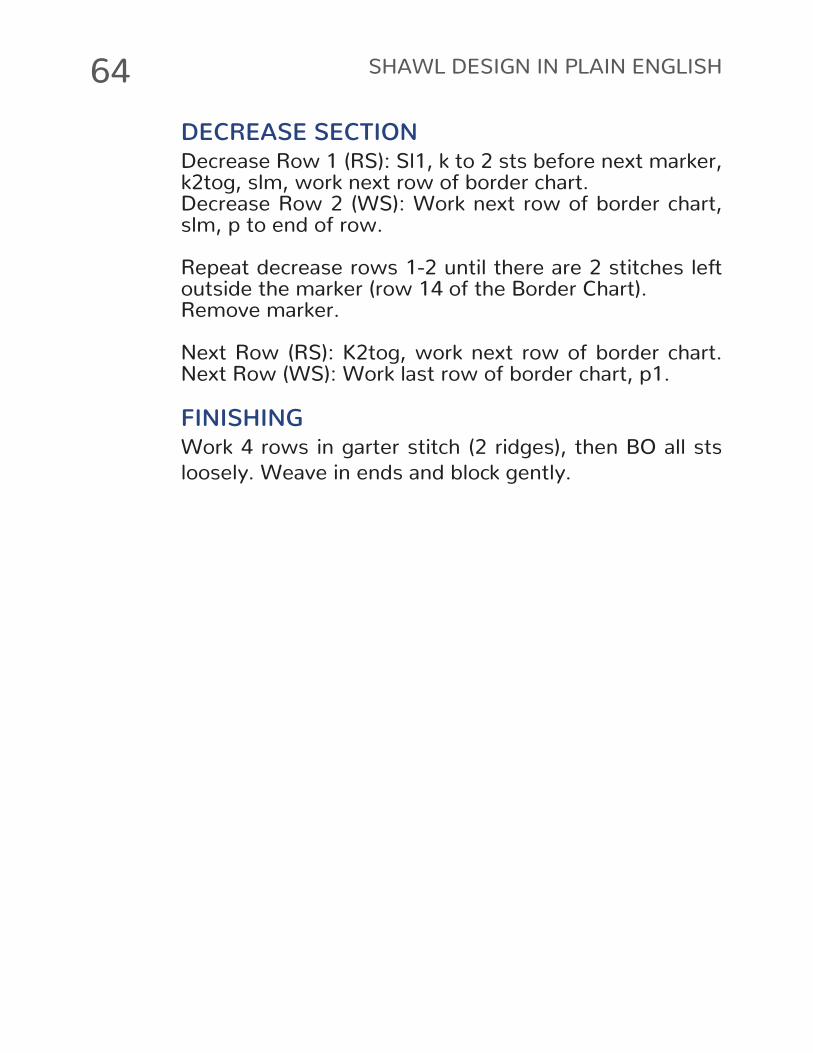
64 SHAWL DESIGN IN PLAIN ENGLISH
DECREASE SECTIONDecrease Row 1 (RS): Sl1, k to 2 sts before next marker,
k2tog, slm, work next row of border chart.
Decrease Row 2 (WS): Work next row of border chart,
slm, p to end of row.
Repeat decrease rows 1-2 until there are 2 stitches left
outside the marker (row 14 of the Border Chart).
Remove marker.
Next Row (RS): K2tog, work next row of border chart. Next Row (WS): Work last row of border chart, p1.
FINISHINGWork 4 rows in garter stitch (2 ridges), then BO all sts loosely. Weave in ends and block gently.

65EXAMPLE PATTERNS: ELISABETH
ABBREVIATIONS
k knit
p purl
sts stitches
YO yarn over
CO cast on
ssk slip, slip, knit
k2tog knit two stitches together
p2tog purl two stitches together
BO bind offwyf with yarn in front
wyb with yarn in back
cdd central double decrease
sl slip
tbl through back loop
tog together
kw knitwise
kfb knit into front & back of
stitch
tfl through front loop
ktbl knit through back loop
ptbl purl through back loop
slm slip marker
pm place marker

66 SHAWL DESIGN IN PLAIN ENGLISH
67EXAMPLE PATTERNS: ELISABETH
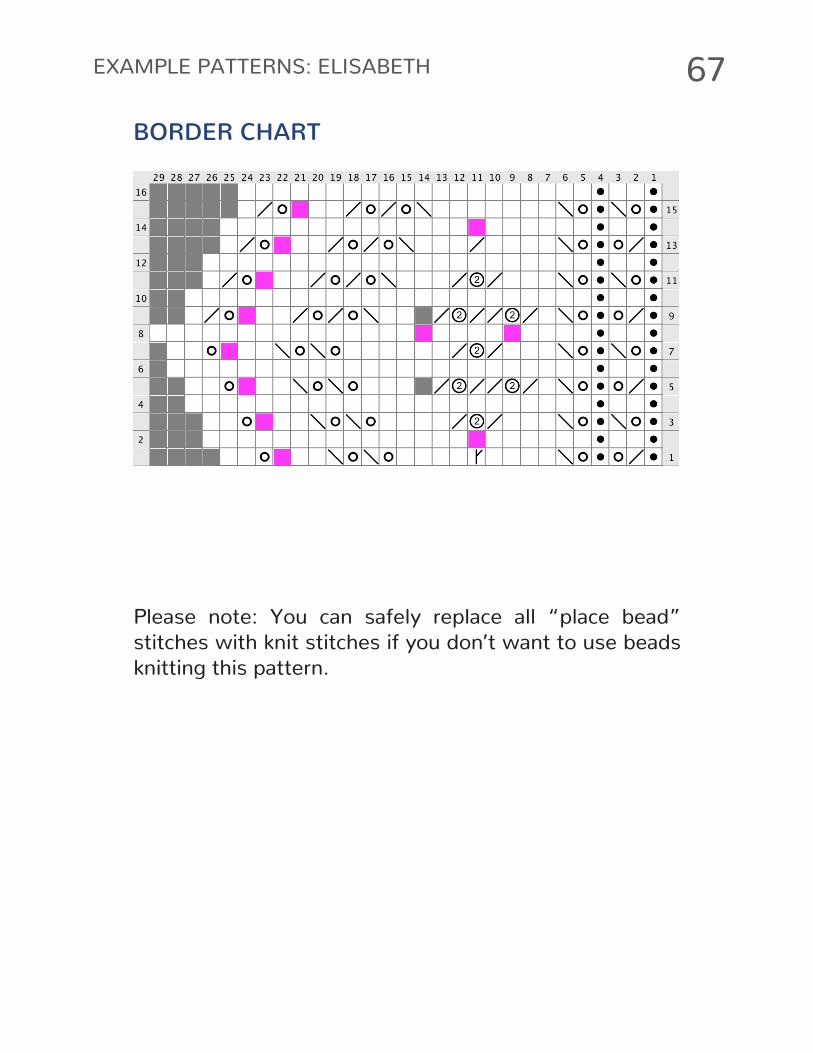
BORDER CHART
Please note: You can safely replace all “place bead” stitches with knit stitches if you don’t want to use beads
knitting this pattern.

PRISCILLA
70 SHAWL DESIGN IN PLAIN ENGLISH
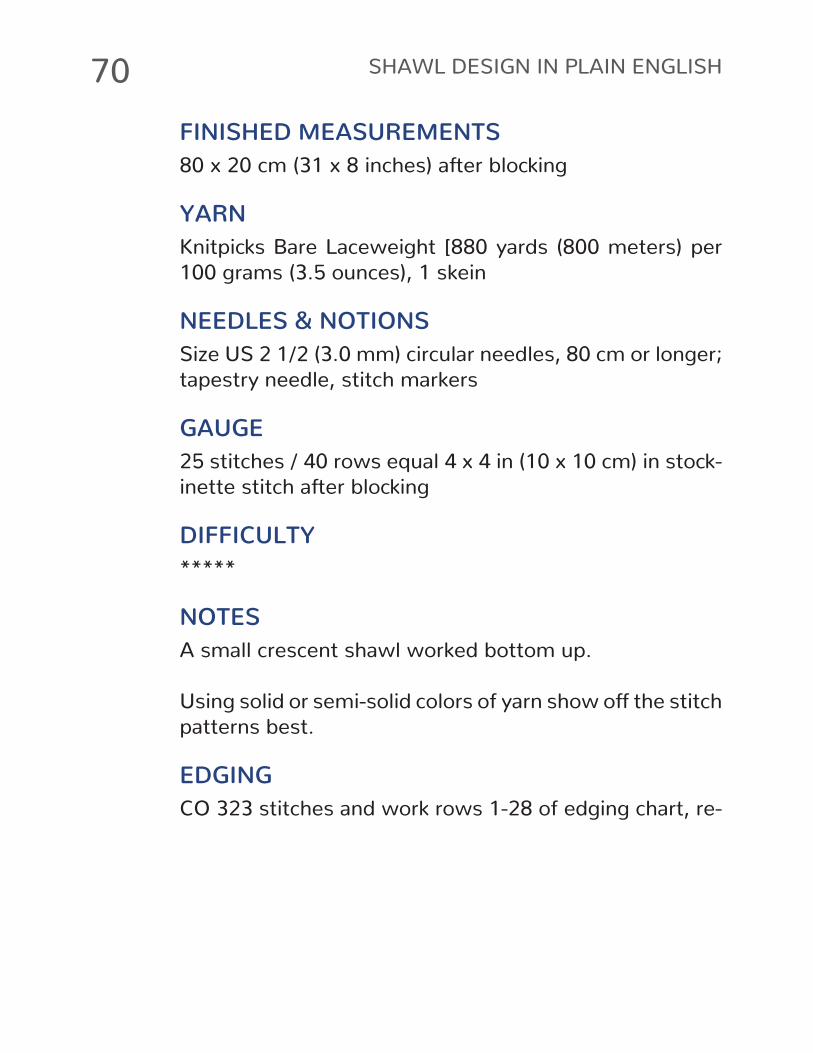
FINISHED MEASUREMENTS80 x 20 cm (31 x 8 inches) after blocking
YARNKnitpicks Bare Laceweight [880 yards (800 meters) per 100 grams (3.5 ounces), 1 skein
NEEDLES & NOTIONSSize US 2 1/2 (3.0 mm) circular needles, 80 cm or longer; tapestry needle, stitch markers
GAUGE25 stitches / 40 rows equal 4 x 4 in (10 x 10 cm) in stock-
inette stitch after blocking
DIFFICULTY*****
NOTESA small crescent shawl worked bottom up.
Using solid or semi-solid colors of yarn show off the stitch patterns best.
EDGINGCO 323 stitches and work rows 1-28 of edging chart, re-
71EXAMPLE PATTERNS: PRISCILLA
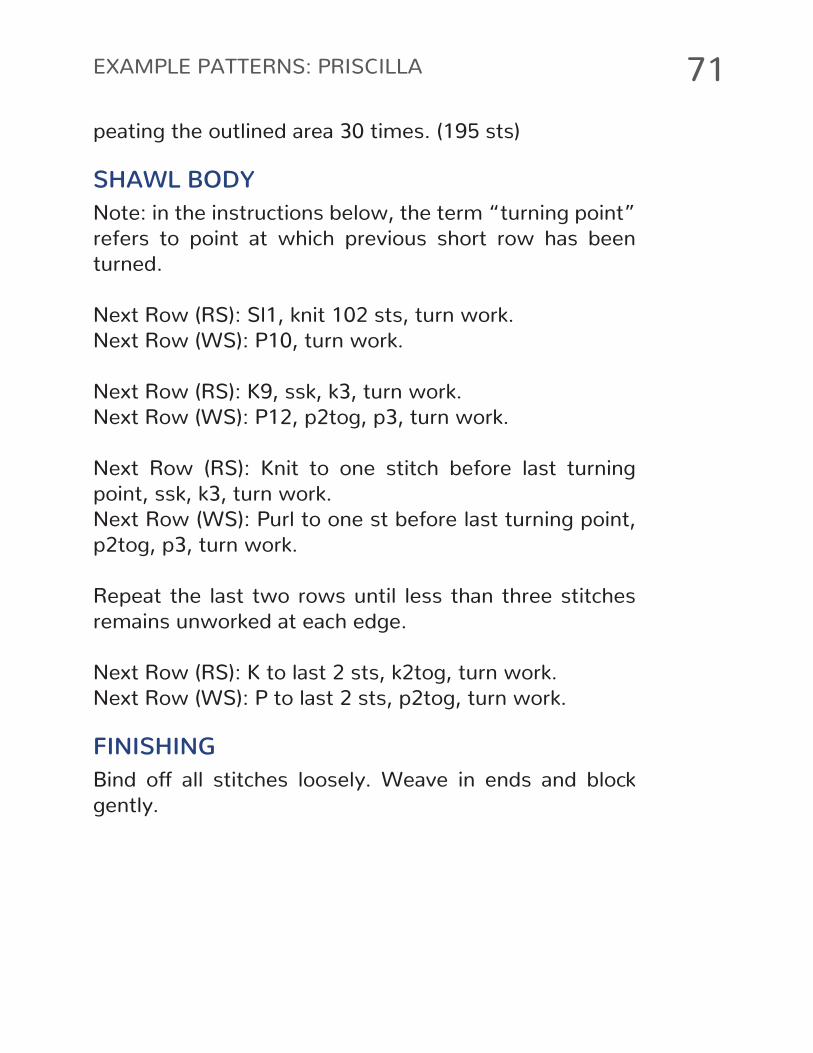
peating the outlined area 30 times. (195 sts)
SHAWL BODYNote: in the instructions below, the term “turning point” refers to point at which previous short row has been
turned.
Next Row (RS): Sl1, knit 102 sts, turn work. Next Row (WS): P10, turn work.
Next Row (RS): K9, ssk, k3, turn work. Next Row (WS): P12, p2tog, p3, turn work.
Next Row (RS): Knit to one stitch before last turning point, ssk, k3, turn work. Next Row (WS): Purl to one st before last turning point, p2tog, p3, turn work.
Repeat the last two rows until less than three stitches
remains unworked at each edge.
Next Row (RS): K to last 2 sts, k2tog, turn work. Next Row (WS): P to last 2 sts, p2tog, turn work.
FINISHINGBind off all stitches loosely. Weave in ends and block gently.
72 SHAWL DESIGN IN PLAIN ENGLISH
ABBREVIATIONS
k knit
p purl
sts stitches
YO yarn over
CO cast on
ssk slip, slip, knit
k2tog knit two stitches together
p2tog purl two stitches together
BO bind offwyf with yarn in front
wyb with yarn in back
cdd central double de-
crease
sl slip
tbl through back loop
tog together
kw knitwise
kfb knit into front & back
of stitch
tfl through front loop
ktbl knit through back loop
ptbl purl through back loop
slm slip marker
pm place marker

73EXAMPLE PATTERNS: PRISCILLA
Please note: only odd numbered rows (right side (RS) rows) are charted. On wring side rows, work all stitches as they appear. If unsure, purl.
EDGING CHART
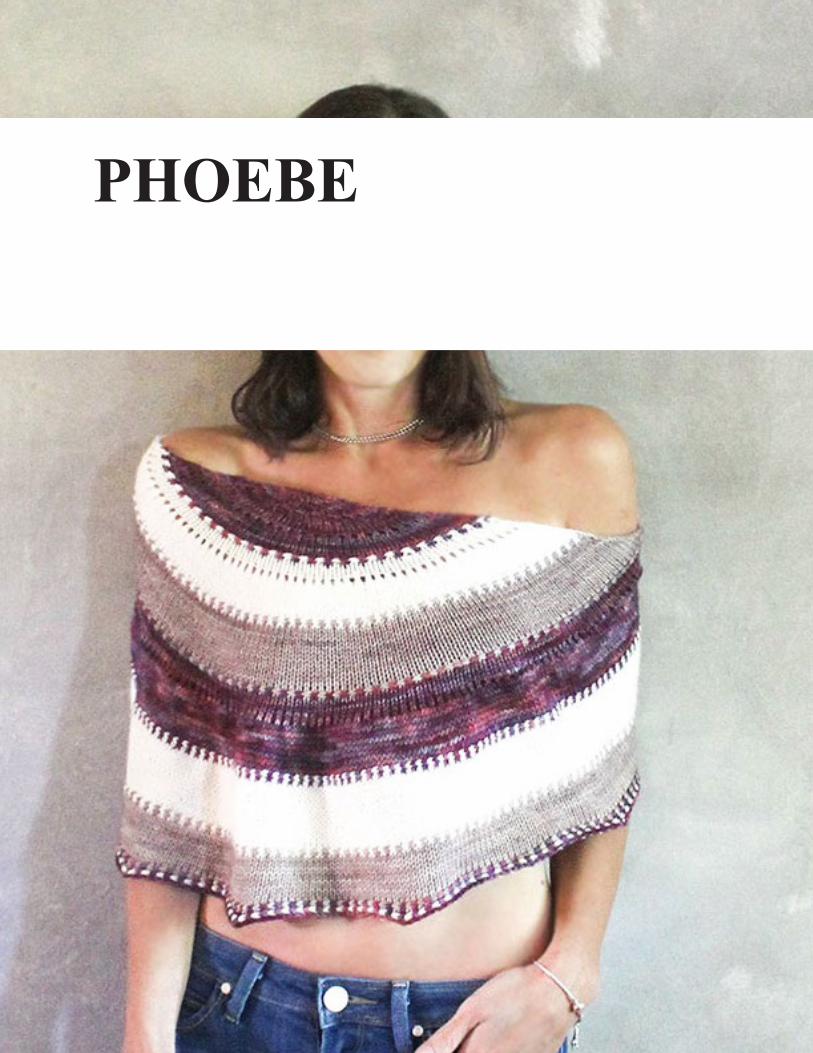
PHOEBE
76 SHAWL DESIGN IN PLAIN ENGLISH
FINISHED MEASUREMENTS31 x 16 in (80 x 40 cm) after blocking
YARNMalabrigo Yarn Arroyo (335 yds (306 m) in 3.53 ounc-
es (100g) in the colors Purpuras (MC), Natural (CC1) and Sand Bank (CC2), 0.5 skeins each
NEEDLES & NOTIONSSize US 6 (4 mm) circular needles, 80 cm or longer; Tap-
estry needle
GAUGE20 stitches / 28 rows equal 4 x 4 in (10 x 10 cm) in stock-
inette stitch after blocking
DIFFICULTY*****
NOTESPhoebe is a winged crescent shawl worked top down without using short rows.
In this pattern, a two color Vikkel braid is used, creating
a line of horizontally aligned knit stitches.
77EXAMPLE PATTERNS: PHOEBE
HOW TO WORK VIKKEL BRAIDSColor A: color of the section after the Vikkel braid.
Color B: color of the section before the Vikkel braid.
Using A, work a m1 stitch into the B strand right before the first stitch of the row.
Slip the newly made A stitch to the left hand needle.
Using B, knit into the 2nd stitch from behind the first stitch. Do not slip the worked-into stitch off the needle (you can’t, anyway, without pulling off the first stitch). Next, knit into the first stitch with the A yarn. Drop both of the just worked into stitches off the left hand needle.
You now have a B stitch, which you just made, on your
right hand needle. Slip that stitch to the left hand nee-
dle. Knit with A into the second stitch (note it’s also an
A stitch) from behind the first stitch. Knit with B into the first stitch. Drop both of the just worked into stitches off the left hand needle.
Repeat the last two steps until you have worked all the
stitches of the row.
SETUPUsing MC, CO 6 sts using MC and purl one row.
78 SHAWL DESIGN IN PLAIN ENGLISH
Next Row: Sl1, knit to last stitch, ktbl.Next Row: Sl1 wyf, p to end.
FIRST SECTIONNext Row: Sl1, (YO, k1) to last st, YO, ktbl.Next Row: Sl1 wyf, p to end.Next Row: Sl1, knit to last stitch, ktbl.Next Row: Sl1 wyf, p to end.
Repeat the last two rows once more.
SECOND SECTIONNext Row: Sl1, (YO, k1) to last st, YO, ktbl.Next Row: Sl1 wyf, p to end.Next Row: Sl1, knit to last stitch, ktbl.Next Row: Sl1 wyf, p to end.Repeat the last two rows 4 times more.
THIRD SECTIONNext Row: Sl1, (YO, k1) to last st, YO, ktbl.Next Row: Sl1 wyf, p to end.Next Row: Sl1, knit to last stitch, ktbl.Next Row: Sl1 wyf, p to end.
Repeat the last two rows 7 times more.
Change to CC1 and work a Vikkel braid row, then repeat
the last two rows before the braid another two times.
79EXAMPLE PATTERNS: PHOEBE
FOURTH SECTIONNext Row: Sl1, (YO, k1) to last st, YO, ktbl.Next Row: Sl1 wyf, p to end.Next Row: Sl1, YO, knit to last stitch, YO, ktbl.Next Row: Sl1 wyf, p to end.
Repeat the last two rows 4 times more, then change to
CC2 and work a Vikkel braid row. After the braid, work an-
other 7 repeats of the last two rows before the braid.
Change to MC and work a Vikkel braid row, then work an-
other 2 repeats of the last two rows before the braid.
FIFTH SECTIONNext Row: Sl1, (YO, k1) to last st, YO, ktbl.Next Row: Sl1 wyf, p to end.Next Row: Sl1, YO, knit to last stitch, YO, ktbl.Next Row: Sl1 wyf, p to end.
Repeat the last two rows 4 times more.
Change to CC1 and work a Vikkel braid row.
Next Row: Sl1, YO, knit to last stitch, YO, ktbl.Next Row: Sl1 wyf, p to end.
Repeat the last two rows 7 more times.
80 SHAWL DESIGN IN PLAIN ENGLISH
Change to CC2 and work a Vikkel braid row.
Next Row: Sl1, YO, knit to last stitch, YO, ktbl.Next Row: Sl1 wyf, p to end.
Repeat the last two rows 7 more times.
Change to MC and work a Vikkel braid row.
Next Row: Sl1, YO, knit to last stitch, YO, ktbl.Next Row: Sl1 wyf, p to end.
Change to CC1 and work a Vikkel braid row.
Bind off all sts loosely.
FINISHINGWeave in ends and block gently.
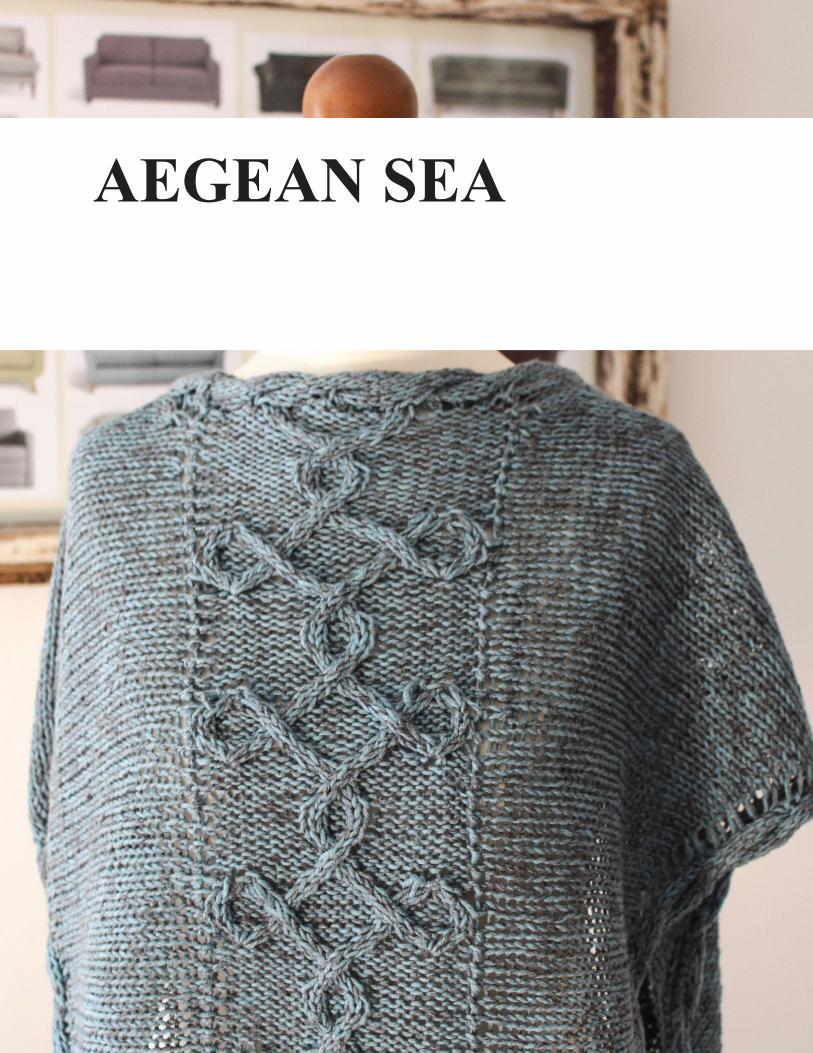
AEGEAN SEA
82 SHAWL DESIGN IN PLAIN ENGLISH
FINISHED MEASUREMENTS63 x 47 in (160 x 120 cm) after blocking
YARNLana Grossa Linea Pura Organico Print/Spray [98 yards (90 meters) per 50 grams (1.76 ounces)], color: #406; 5 skeins
NEEDLES & NOTIONSSize US 6 (4.0 mm) circular needles (2x), 80 cm or lon-
ger; tapestry needle, stitch markers
GAUGE14 stitches / 18 rows equal 4 x 4 in (10 x 10 cm) in stockinette stitch after blocking
DIFFICULTY*****
NOTESThe idea to construct a Faroese shawl using a vortex
shape as basis was born during a flight from Thessaloniki (Greece) to Berlin, Germany.
I purchased the yarn for the sample shawl shown in the
pictures straight after we got off the plane in a small yarn shop in Kreuzberg and cast on an hour later, on our way
83EXAMPLE PATTERNS: AEGEAN SEA
home by car. Of course I had to choose blue yarn to re-
flect the color of the Aegean Sea we had left only hours earlier.
This shawl is constructed by knitting a vortex (cornuco-
pia) shawl and its mirror image. The two pieces are joined
during knitting the center panel. It features cables along
the border, and a cabled center panel.
FIRST HALF.SETUPProvisionally CO 10 sts and purl one row.
Setup Row 1 (RS): Work first row of border chart, p1, ktbl.
Setup Row 2 (WS): Sl1 wyf, k1, work next row of border
chart.
Setup Row 3 (RS): Work next row of border chart, p1, ktbl.
Setup Row 4 (WS): Sl1 wyf, k1, work next row of border
chart.
Repeat the last two rows 8 times more.
Next Row (RS): Work next row of border chart, p1, pm, k1, pm, pick up and knit 18 stitches along longer edge, pm, undo provisional cast on and k1, pm, p1, k8.
84 SHAWL DESIGN IN PLAIN ENGLISH
Next Row (WS): P8, k1, slm, p1, slm, k18, slm, p1, slm, k1, work next row of border chart.
SHAWL BODYNext Row (RS): Work next row of border chart, p1, slm, YO, k to next marker, slm, p1, work row 7 of border chart.Next Row (WS): Work next row of border chart, k1, slm, p to next marker, YO, slm, k1, work next row of border chart.
Next Row (RS): Work next row of border chart, p1, slm, YO, k to next marker, slm, p1, work next row of border chart.
Next Row (WS): Work next row of border chart, k1, slm, p to next marker, YO, slm, k1, work next row of border chart.
Next Row (RS): Work next row of border chart, p1, slm, YO, k to next marker, slm, p1, work next row of border chart.
Next Row (WS): Work next row of border chart, k1, slm, p4tog, to next marker, YO, slm, k1, work next row of border chart.
Next Row (RS): Work next row of border chart, p1, slm, YO, k to next marker, slm, p1, work next row of border chart.

85EXAMPLE PATTERNS: AEGEAN SEA
Next Row (WS): Work next row of border chart, k1, slm, p to next marker, YO, slm, k1, work next row of border chart.
Next Row (RS): Work next row of border chart, p1, slm, YO, k to next marker, slm, p1, work next row of border chart.
Next Row (WS): Work next row of border chart, k1, slm, p to next marker, YO, slm, k1, work next row of border chart.
Next Row (RS): Work next row of border chart, p1, slm, YO, k to next marker, slm, p1, work next row of border chart.
Next Row (WS): Work next row of border chart, k1, slm, p4tog, to next marker, YO, slm, k1, work next row of border chart.
Repeat the last six rows 17 times more.
Cut yarn.
SECOND HALF.SETUPUse the second needle for the second half of the shawl.
Setup Row 1 (RS): Work first row of border chart, p1,
86 SHAWL DESIGN IN PLAIN ENGLISH
ktbl.
Setup Row 2 (WS): Sl1 wyf, k1, work next row of border
chart.
Setup Row 3 (RS): Work next row of border chart, p1, ktbl.
Setup Row 4 (WS): Sl1 wyf, k1, work next row of border
chart.
Repeat the last two rows 8 times more.
Next Row (RS): Work next row of border chart, p1, pm, k1, pm, pick up and knit 18 stitches along longer edge, pm, undo provisional cast on and k1, pm, p1, k8.Next Row (WS): P8, k1, slm, p1, slm, k18, slm, p1, slm, k1, work next row of border chart.
SHAWL BODYNext Row (RS): Work next row of border chart, p1, slm, k to next marker, YO, slm, p1, work row 7 of border chart.Next Row (WS): Work next row of border chart, k1, slm, YO, p to next marker, slm, k1, work next row of border chart.
Next Row (RS): Work next row of border chart, p1, slm, k to next marker, YO, slm, p1, work next row of border chart.
Next Row (WS): Work next row of border chart, k1, slm,
87EXAMPLE PATTERNS: AEGEAN SEA
YO, p to next marker, slm, k1, work next row of border chart.
Next Row (RS): Work next row of border chart, p1, slm, k to next marker, YO, slm, p1, work next row of border chart.
Next Row (WS): Work next row of border chart, k1, slm, YO, p to 4 stitches before next marker, p4tog, slm, k1, work next row of border chart.
Next Row (RS): Work next row of border chart, p1, slm, k to next marker, YO, slm, p1, work next row of border chart.
Next Row (WS): Work next row of border chart, k1, slm, YO, p to next marker, slm, k1, work next row of border chart.
Next Row (RS): Work next row of border chart, p1, slm, k to next marker, YO, slm, p1, work next row of border chart.
Next Row (WS): Work next row of border chart, k1, slm, YO, p to next marker, slm, k1, work next row of border chart.
Next Row (RS): Work next row of border chart, p1, slm, k to next marker, YO, slm, p1, work next row of border chart.

88 SHAWL DESIGN IN PLAIN ENGLISH
Next Row (WS): Work next row of border chart, k1, slm, YO, p to 4 stitches before next marker, p4tog, slm, k1, work next row of border chart.
Repeat the last six rows 17 times more.
DON’T CUT YARN.
Write down the number of the last border chart row just
worked.
CENTER PANELThe center panel is started with a band using the border
stitches from the second half. The band is worked until it
is long enough to pick up enough stitches forn the center
panel along the longer edge of the band (in our case, 24
stitches).
Next Row (RS): Using the live stitches and yarn from the second half, work next row of border chart (look at the
notes you just took), p1.
Next Row (WS): P1, Work next row of border chart.
Repeat the last two rows 30 times more.
Align the first and second half of the shawl (both right
89EXAMPLE PATTERNS: AEGEAN SEA
side up, live stitches facing each other with space in be-
tween for the center panel).
Make sure your cables align neatly. Ideally, your next
border chart row would be identical to the number of the
last row of the border chart of the first half.
Next Row (RS): K8 from both halves (knit the aligned first eight border chart stitches from both halves together to
attach the band to the corresponding eigth border stitch-
es of the first half), pick up and knit 24 stitches along longer edge of band,turn.
Next Row (WS): Work row 2 of center chart.
Next Row (RS): Work first row of center chart, p2tog us-
ing one center panel stitch and the next (aligned) stitch
from the second half.
Next Row (WS): Work row 2 of center chart, k2tog tbl using one center panel stitch and the next stitch from the
first half.
Next Row (RS): Work next row of center chart, p2tog us-
ing one center panel stitch and the next (aligned) stitch
from the second half.
Next Row (WS): Work next row of center chart, k2tog tbl using one center panel stitch and the next stitch from the
first half.
90 SHAWL DESIGN IN PLAIN ENGLISH
Repeat the last two rows until all stitches (except one
on each side) from the two halves have been attached to
the center panel.
The section outlined in black in the center chart is repeat-
ed four times.
After reaching the end of the center chart, repeat the last
row of the center chart until all shawl body stitches have
been attached to the center panel.
Make sure you do not attach the border stitches you
come to at the end of attaching the center panel! The
small border at the other end is worked sideways, too.
Put the remaining last nine stitches from the first half (one body stitch, eight border chart stitches) onto live
needle and continue to work from there. (These nine
stitches are called edging stitches from now on.)
Next Row (RS): Work next row of border chart, p2tog using one stitch from the edging and the next (nearest)
center panel stitch.
Next Row (WS): K1, work next row of border chart.
Repeat the last two rows until all center panel stitches
have been attached to the edging.

91EXAMPLE PATTERNS: AEGEAN SEA
FINISHINGGraft together the remaining stitches.
Weave in ends and block gently.
92 SHAWL DESIGN IN PLAIN ENGLISH
93EXAMPLE PATTERNS: AEGEAN SEA
94 SHAWL DESIGN IN PLAIN ENGLISH
ABBREVIATIONS
k knit
p purl
sts stitches
YO yarn over
CO cast on
ssk slip, slip, knit
k2tog knit two stitches together
p2tog purl two stitches together
BO bind offwyf with yarn in front
wyb with yarn in back
cdd central double decrease
sl slip
tbl through back loop
tog together
kw knitwise
kfb knit into front & back of
stitch
tfl through front loop
ktbl knit through back loop
ptbl purl through back loop
slm slip marker
pm place marker
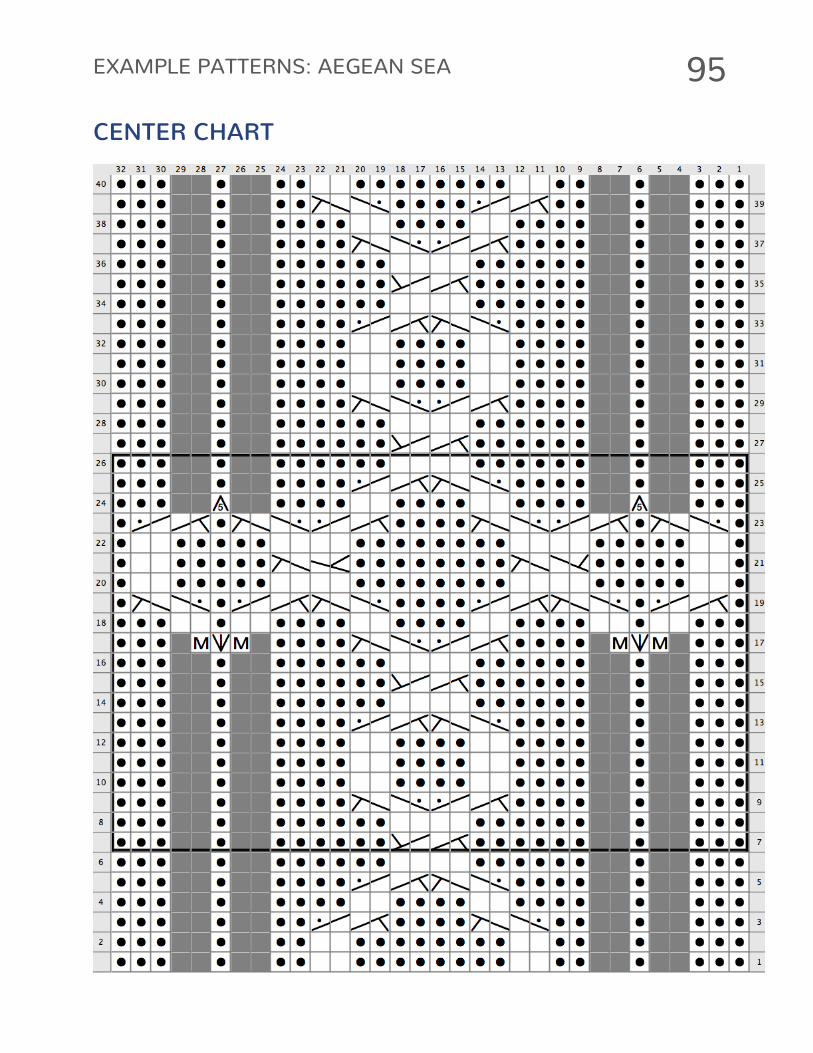
95EXAMPLE PATTERNS: AEGEAN SEA
CENTER CHART
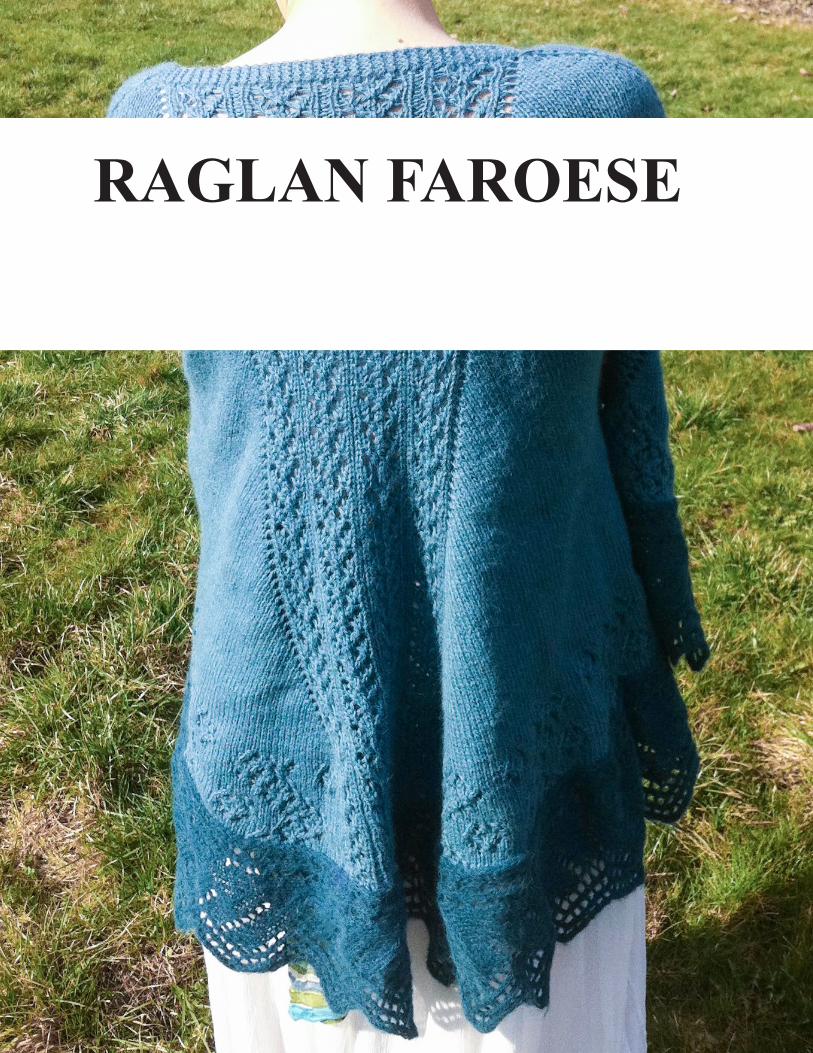
RAGLAN FAROESE
98 SHAWL DESIGN IN PLAIN ENGLISH
FINISHED MEASUREMENTS110 x 63 in (280 x 160 cm) after blocking
YARNSMC Select Highland Alpaca Fino, approx.1200 m
NEEDLES & NOTIONSSize US 2 1/2 (3.0 mm) circular needles, 80 cm or lon-
ger; Tapestry needle; stitch markers
GAUGE25 stitches / 38 rows equal 4 x 4 in (10 x 10 cm) in stockinette stitch after blocking
DIFFICULTY*****
NOTESA large Faroese shawl worked top down with raglan in-
creases.
Using solid or semi-solid colors of yarn show off the stitch patterns best.
SETUPUsing any provisional cast on method, cast on 5 stitch-
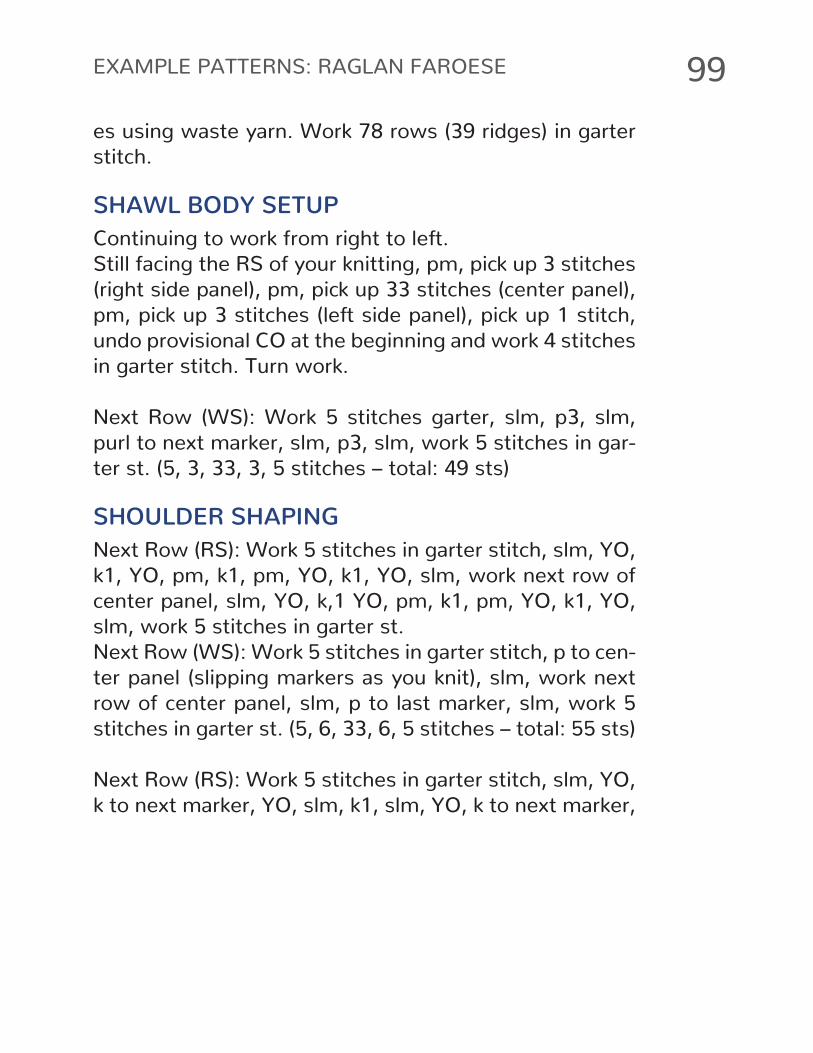
99EXAMPLE PATTERNS: RAGLAN FAROESE
es using waste yarn. Work 78 rows (39 ridges) in garter stitch.
SHAWL BODY SETUPContinuing to work from right to left.
Still facing the RS of your knitting, pm, pick up 3 stitches (right side panel), pm, pick up 33 stitches (center panel), pm, pick up 3 stitches (left side panel), pick up 1 stitch, undo provisional CO at the beginning and work 4 stitches in garter stitch. Turn work.
Next Row (WS): Work 5 stitches garter, slm, p3, slm, purl to next marker, slm, p3, slm, work 5 stitches in gar-ter st. (5, 3, 33, 3, 5 stitches – total: 49 sts)
SHOULDER SHAPINGNext Row (RS): Work 5 stitches in garter stitch, slm, YO, k1, YO, pm, k1, pm, YO, k1, YO, slm, work next row of center panel, slm, YO, k,1 YO, pm, k1, pm, YO, k1, YO, slm, work 5 stitches in garter st.Next Row (WS): Work 5 stitches in garter stitch, p to cen-
ter panel (slipping markers as you knit), slm, work next
row of center panel, slm, p to last marker, slm, work 5 stitches in garter st. (5, 6, 33, 6, 5 stitches – total: 55 sts)
Next Row (RS): Work 5 stitches in garter stitch, slm, YO, k to next marker, YO, slm, k1, slm, YO, k to next marker,
100 SHAWL DESIGN IN PLAIN ENGLISH
YO, slm, k1, slm, YO, k to next marker, YO, slm, work next row of center panel, slm, YO, k to next marker, YO, slm, k1, slm, YO, k to next marker, YO, slm, k1, slm, YO, k to next marker, YO, slm, work 5 stitches in garter st.Next Row (WS): Work 5 stitches in garter stitch, p to center panel (slipping markers as you knit), slm, work
next row of center panel, slm, p to last marker, slm, work
5 stitches in garter st.
Continue as established until shawl is long enough to
cover your shoulders and remove the markers in your
raglan shaping (the markers in the middle of the side
panels) in the last shoulder shaping row you are working.
SHAWL BODYNext Row (RS): Work 5 stitches garter stitch, YO, k to next marker, YO, slm, work next row of center panel, slm, k to next marker, slm, work 5 stitches garter.Next Row (WS): Work 5 stitches garter stitch, purl to center panel, slm, work next row of center panel, slm, p
to last marker, slm, work 5 stitches in garter stitch.
Repeat the last two rows until your shawl measures
about 22 in (55 cm) measured from cast on edge.
LACE BORDERNext Row (RS): K5, work first row of Bottom Lace Panel,
101EXAMPLE PATTERNS: RAGLAN FAROESE
slm, work next row of center panel, slm, work first row of Bottom Lace Panel, slm, k5.Next Row (WS): K5, purl to center panel, slm, work next row of center panel, slm, p to last marker, slm, k5.
Next Row (RS): K5, work next row of Bottom Lace Panel, slm, work next row of center panel, slm, work next row
of Bottom Lace Panel, slm, k5.Next Row (WS): K5, purl to center panel, slm, work next row of center panel, slm, p to last marker, slm, k5.
Repeat the last two rows until you have completed all 26 rows of the Bottom Lace Panel chart.
EDGINGWith RS facing and at the position of the working yarn,
cast on 18 stitches using the backward loop method.
Work rows 1-24 of the right side of the edging chart until
you reach the center of the shawl and attach the loose
stitches of the shawl body by working each innermost
stitches when facing the RS together with the innermost
stitch of the edging by working a k2tog. This attaches the
edging to the shawl body.
When you have reached the center of your shawl, put
the edging stitches on waste yarn and repeat working
102 SHAWL DESIGN IN PLAIN ENGLISH
the left side of the edging chart for the other side of the
shawl.
When you have reached the center, graft together the
stitches from your live needle and the stitches from the
waste yarn.
FINISHINGWeave in ends and block gently.
103EXAMPLE PATTERNS: RAGLAN FAROESE
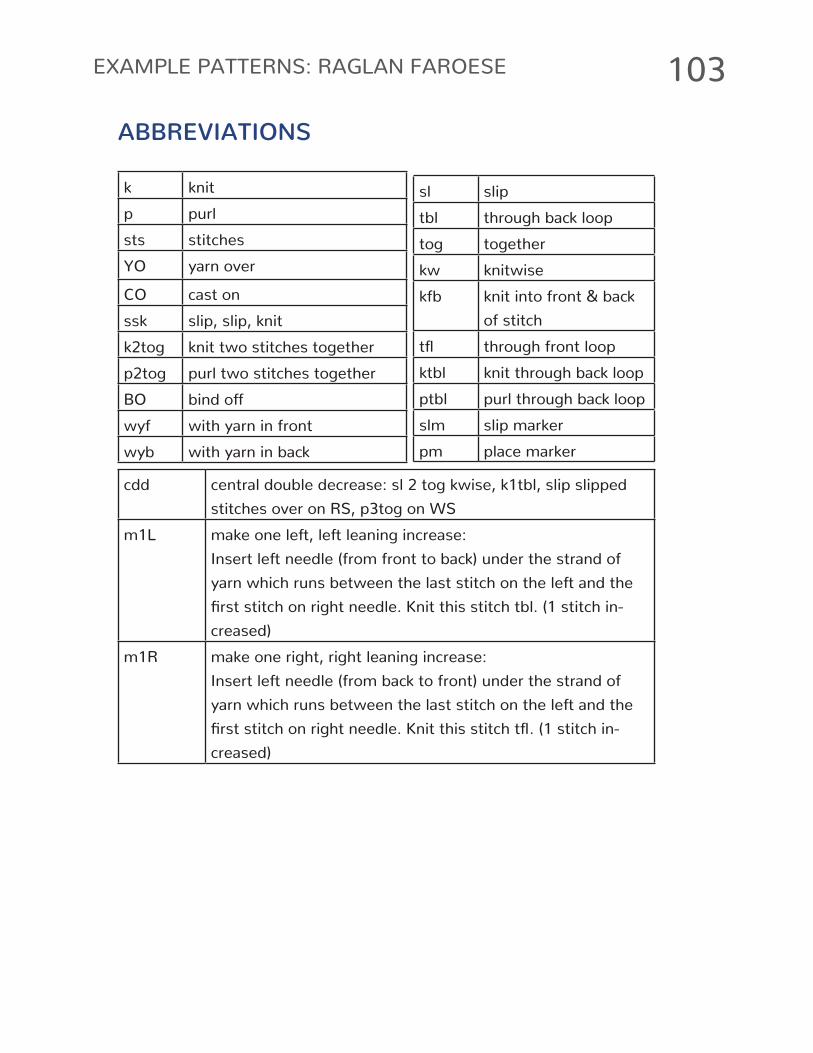
ABBREVIATIONS
k knit
p purl
sts stitches
YO yarn over
CO cast on
ssk slip, slip, knit
k2tog knit two stitches together
p2tog purl two stitches together
BO bind offwyf with yarn in front
wyb with yarn in back
sl slip
tbl through back loop
tog together
kw knitwise
kfb knit into front & back
of stitch
tfl through front loop
ktbl knit through back loop
ptbl purl through back loop
slm slip marker
pm place marker
cdd central double decrease: sl 2 tog kwise, k1tbl, slip slipped
stitches over on RS, p3tog on WSm1L make one left, left leaning increase:
Insert left needle (from front to back) under the strand of
yarn which runs between the last stitch on the left and the
first stitch on right needle. Knit this stitch tbl. (1 stitch in-
creased)
m1R make one right, right leaning increase:
Insert left needle (from back to front) under the strand of
yarn which runs between the last stitch on the left and the
first stitch on right needle. Knit this stitch tfl. (1 stitch in-
creased)
104 SHAWL DESIGN IN PLAIN ENGLISH
105EXAMPLE PATTERNS: RAGLAN FAROESE
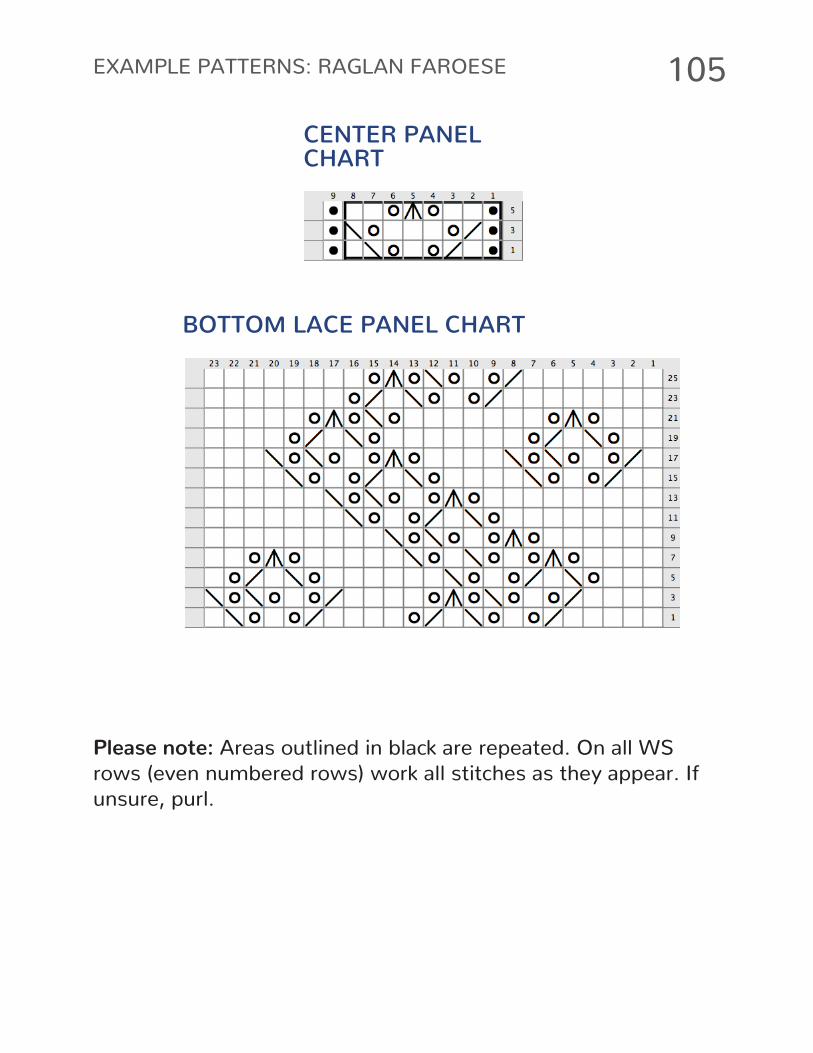
BOTTOM LACE PANEL CHART
CENTER PANEL CHART
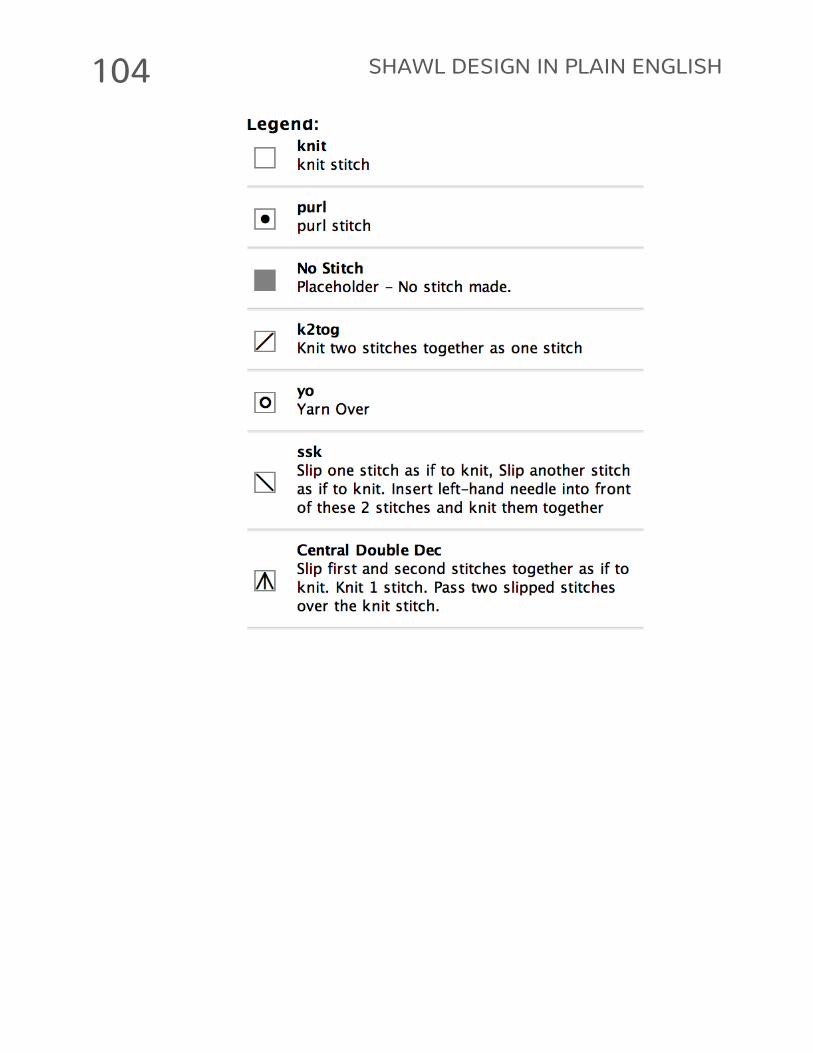
Please note: Areas outlined in black are repeated. On all WS rows (even numbered rows) work all stitches as they appear. If
unsure, purl.
106 SHAWL DESIGN IN PLAIN ENGLISH
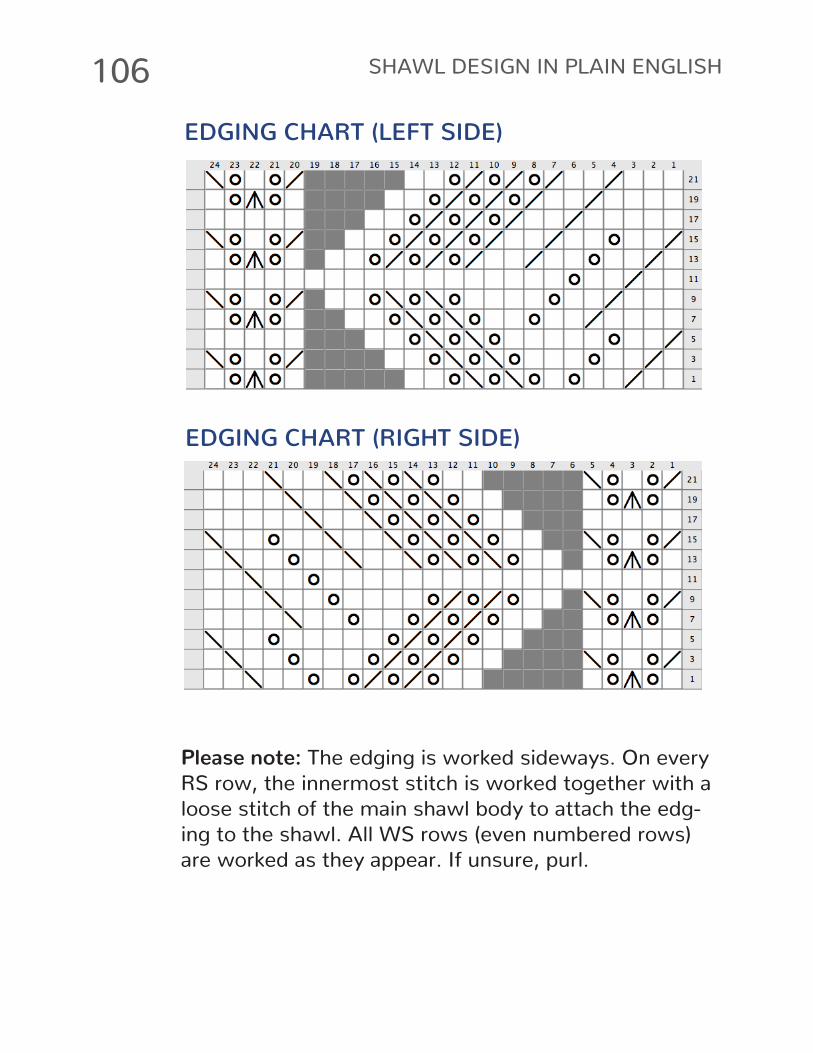
EDGING CHART (LEFT SIDE)
EDGING CHART (RIGHT SIDE)
Please note: The edging is worked sideways. On every RS row, the innermost stitch is worked together with a
loose stitch of the main shawl body to attach the edg-
ing to the shawl. All WS rows (even numbered rows)
are worked as they appear. If unsure, purl.
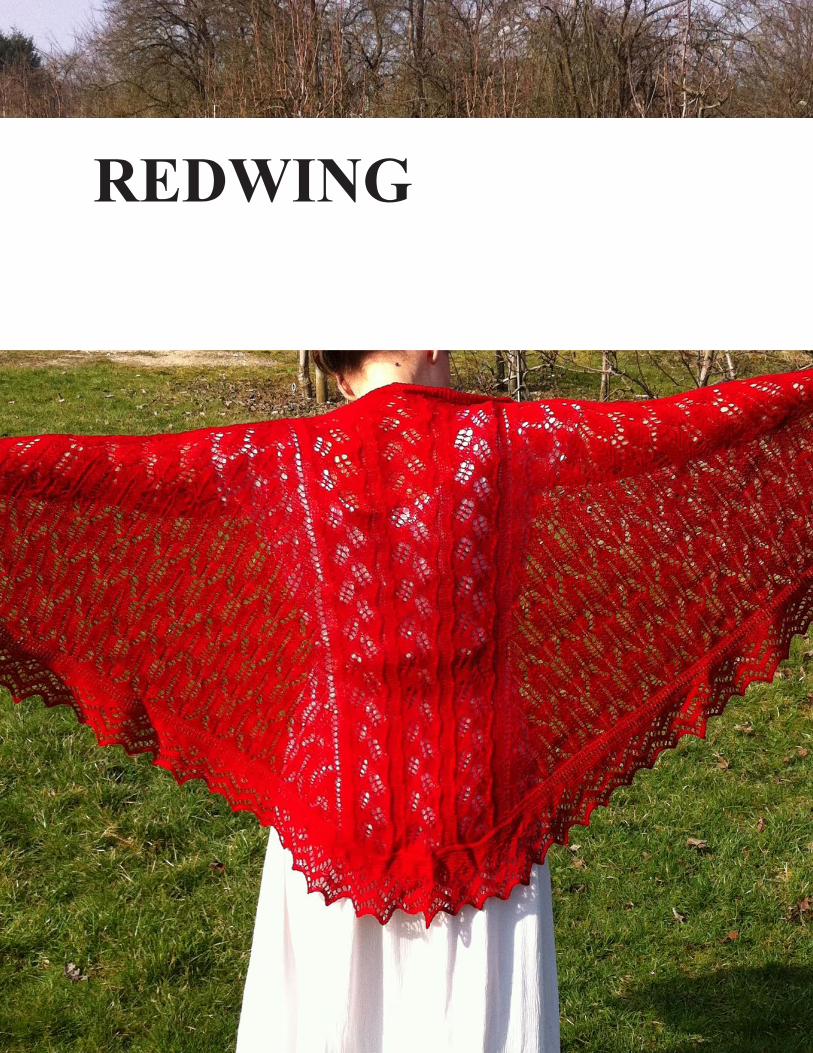
REDWING
108 SHAWL DESIGN IN PLAIN ENGLISH
FINISHED MEASUREMENTS80 x 40 in (200 x 100 cm) after blocking
YARNWollmeise Lace-Garn [100% Merino, 1740 yards (1591 meters) per 300 grams (10.58 ounces)], 1 skein
NEEDLES & NOTIONSSize US 4 / 3.5 mm circular needles, 80 cm or longer; Tapestry needle; stitch markers
GAUGE21 stitches / 29 rows equal 4 x 4 in (10 x 10 cm) in
stockinette stitch after blocking
DIFFICULTY*****
NOTESRedwing is a Faroese shawl with traditional shaping fea-
turing leaves and gothic window lace stitch patterns. It is
started at center neck and worked top down.
The edging is worked sideways after the shawl body has
been finished.
109EXAMPLE PATTERNS: REDWING
SETUPUsing any provisional cast on method, cast on 5 sts using waste yarn using smaller needle.
Next Row: sl1 wyb, k3, ktbl. Next row: sl1 wyf, k3, ktbl.
Repeat the last two rows 54 times more (112 rows of garter stitch).
MAIN PANEL SETUPWith RS facing, sl1 wyf, k3, pm, pick up and knit 55 sts along straight edge of the garter st band, pm, undo pro-
visional cast on and knit 4 sts from the provisional cast
on. Turn work.
Next Row: sl1 wyf, k3, slm, p1, pm, k2, (p16, k2) 3 times, pm, p1, slm, k3, ktbl. Turn work. (4+56+4 = 64 sts)
SHAWL BODY, PART IPlease note: additional to the increases (yarn overs) worked on both sides of the side panels every other row
(one next to the center panel and one next to the garter
stitch band, total 4 increases on every other row), addi-
tional increase rows are worked in rows 41, 81 and 120.
In the side panel charts these additional increases are
110 SHAWL DESIGN IN PLAIN ENGLISH
included, but not in the center panel charts!
The increases in the center panels are worked by increas-
ing the number of purl sts between the repeats; more
detailed instructions are given below.
Row 1 (RS): Sl1 wyb, k3, slm, work first row of side pan-
el chart, slm, work first row of center panel, slm, work first row of side panel chart, slm, k3, ktbl.Row 2 (WS): Sl1 wyf, k3, slm, purl to next marker, slm, work next row of center panel, slm, purl to next marker,
slm, k3, ktbl.
Row 3 (RS): Sl1 wyb, k3, slm, work next row of side pan-
el chart, slm, work next row of center panel, slm, work
first row of side panel chart slm, k3, ktbl.Row 4 (WS): Sl1 wyb, k3, slm, purl to next marker, slm, work next row of center panel, slm, purl to next marker,
slm, k3, ktbl.
Continue in established pattern until you have finished row 38 of the side panel chart.
The next row is an additional increase row for both the
side panels and the center panel:
Next Row (RS): Sl1 wyb, k3, slm, work row 39 of side
111EXAMPLE PATTERNS: REDWING
panel chart, slm, *p1, YO, p1, cdd, k1, YO, k1, YO, k3, YO, k1, YO, k4, cdd*, repeat from * to * 3 times, p1, YO, p1, slm, work row 39 of side panel chart, slm, k3, ktbl.
Next Row (WS): Sl1 wyb, k3, slm, purl to next marker, slm, k3, *p16, k3*, repeat from * to * 3 times, slm, purl to next marker, slm, k3, ktbl. (4+49+60+49+4 = 166 sts)
SHAWL BODY, PART IIRow 41 (RS): Sl1 wyb, k3, slm, work first row of Fir Cone (repeating outlined section three times), slm, work next
row of center panel (use Chart II from now on), slm, work
first row of Fir Cone (repeating outlined section three times), slm, k3, ktbl.Row 42 (WS): Sl1 wyf, k3, slm, purl to next marker, slm, work next row of center panel, slm, purl to next marker,
slm, k3, ktbl.
Row 43 (RS): Sl1 wyb, k3, slm, work next row of Fir Cone pattern, slm, work next row of center panel, slm, work
work next row of Fir Cone pattern, slm, k3, ktbl.Row 44 (WS): Sl1 wyb, k3, slm, purl to next marker, slm, work next row of center panel, slm, purl to next marker,
slm, k3, ktbl.
Continue in established pattern until you have finished two full repeats of the Fir Cone pattern. (4+91+60+91+4
112 SHAWL DESIGN IN PLAIN ENGLISH
= 250 sts)
The next row is an additional increase row for both the
side panels and the center panel:
Row 81 (RS): Sl1 wyb, k3, slm, k5, (YO, k8) to 5 sts be-
fore marker, YO, k5, slm, *p1, YO, p1, cdd, k1, YO, k1, YO, k3, YO, k1, YO, k4, cdd*, repeat from * to * 3 times, p1, YO, p1, slm, k5, (YO, k8) to 5 sts before marker, YO, k5, slm, k3, ktbl.
Row 82 (WS): Sl1 wyb, k3, slm, purl to next marker, slm, k4, *p16, k4*, repeat from * to * 3 times, slm, purl to next marker, slm, k3, ktbl. (4+101+64+101+4 = 274 sts)
SHAWL BODY, PART IIIRow 83 (RS): Sl1 wyb, k3, slm, work first row of Feather pattern (repeating outlined section six times), slm, work
first row of center panel, slm, work first row of Feather pattern (repeating outlined section six times), slm, k3, ktbl.
Row 84 (WS): Sl1 wyf, k3, slm, work next row of Feather pattern, slm, work next row of center panel, slm, work
next row of Feather pattern, slm, k3, ktbl.
Row 85 (RS): Sl1 wyb, k3, slm, work next row of Feather pattern, slm, work next row of center panel, slm, work
113EXAMPLE PATTERNS: REDWING
next row of Feather pattern, slm, k3, ktbl.Row 86 (WS): Sl1 wyb, k3, slm, work next row of Feather pattern, slm, work next row of center panel, slm, work
next row of Feather pattern, slm, k3, ktbl.
Continue in established pattern until you have finished two full repeats of the Feather pattern. (4+189+68+189+4 = 362 sts)
The next row is an additional increase row the center
panel only:
Row 121 (RS): Sl1 wyb, k3, slm, work next row of Feath-
er pattern, slm, *p2, YO, p1, cdd, k1, YO, k1, YO, k3, YO, k1, YO, k4, cdd*, repeat from * to * 3 times, p1, YO, p2, slm, work next row of Feather pattern, slm, k3, ktbl.Row 122 (WS): Sl1 wyb, k3, slm, work next row of Feath-
er pattern, slm, k4, *p16, k4*, repeat from * to * 3 times, slm, work next row of Feather pattern, slm, k3, ktbl. (4+106+68+106+4 = 288 sts)
Continue in established pattern, working the Feather pat-
tern for the side panels and the Center Panel Chart III for the center panel until you have finished 4 total repeats of the Feather pattern. (4+191+68+191+4 = 458 sts
114 SHAWL DESIGN IN PLAIN ENGLISH
EDGINGWith right side of shawl facing, CO 13 sts and work the edging chart towards the other end of the shawl.
The first three rows are setup rows (edging setup chart) and just worked once, they are not part of the repeat
(edging chart). The ssk stitches at the innermost side of
all odd rows are all worked with one stitch of the edging
and one stitch from the remaining shawl stitches (the
edging is knitted on).
FINISHINGBind off all stitches loosely. Weave in ends and block gently.
115EXAMPLE PATTERNS: REDWING
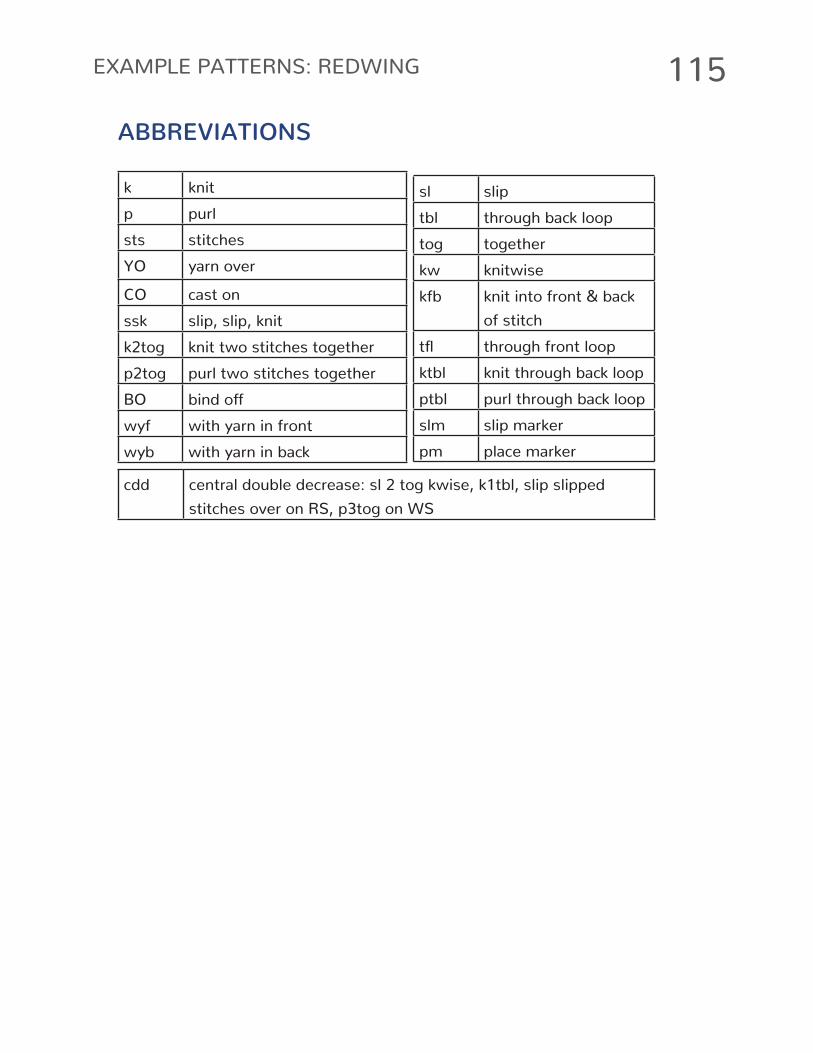
ABBREVIATIONS
k knit
p purl
sts stitches
YO yarn over
CO cast on
ssk slip, slip, knit
k2tog knit two stitches together
p2tog purl two stitches together
BO bind offwyf with yarn in front
wyb with yarn in back
sl slip
tbl through back loop
tog together
kw knitwise
kfb knit into front & back
of stitch
tfl through front loop
ktbl knit through back loop
ptbl purl through back loop
slm slip marker
pm place marker
cdd central double decrease: sl 2 tog kwise, k1tbl, slip slipped
stitches over on RS, p3tog on WS
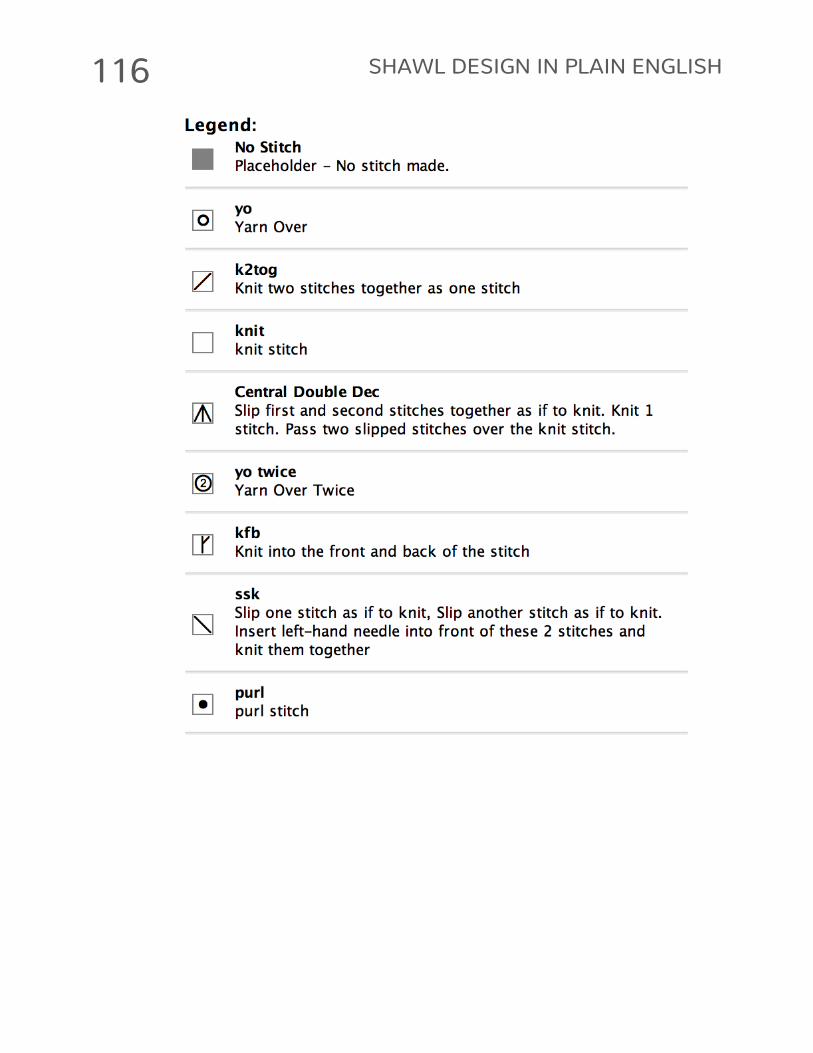
116 SHAWL DESIGN IN PLAIN ENGLISH
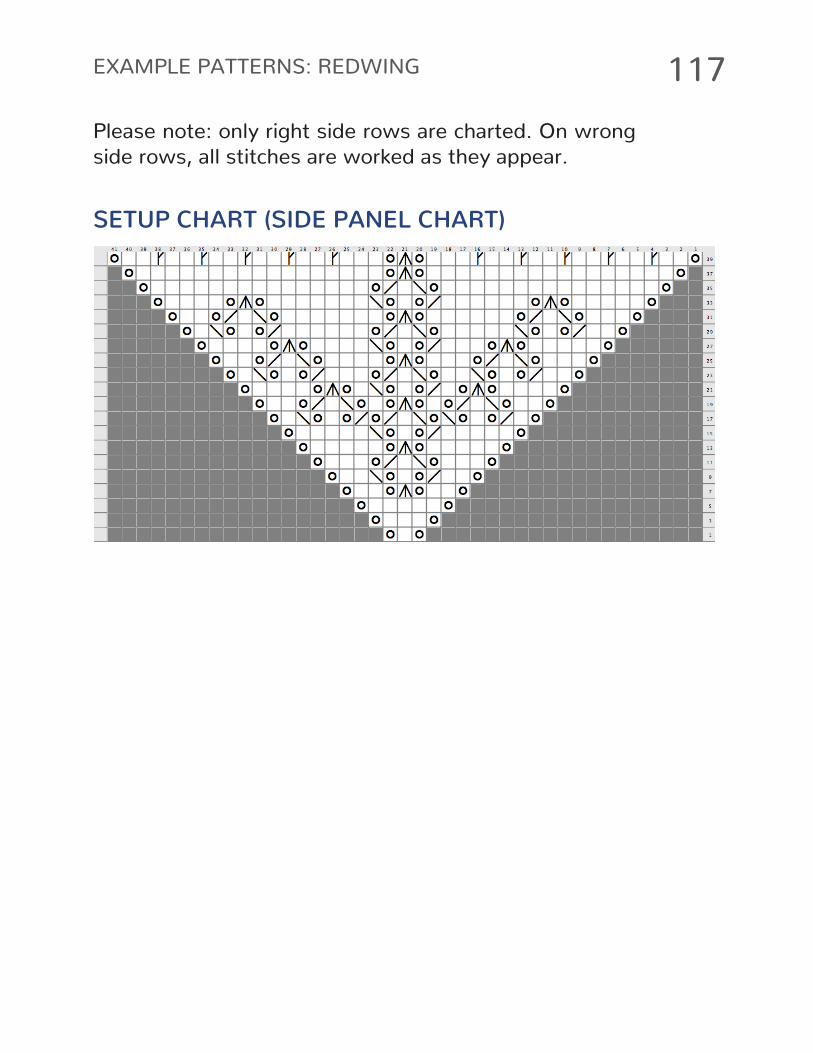
117EXAMPLE PATTERNS: REDWING
SETUP CHART (SIDE PANEL CHART)
Please note: only right side rows are charted. On wrong side rows, all stitches are worked as they appear.
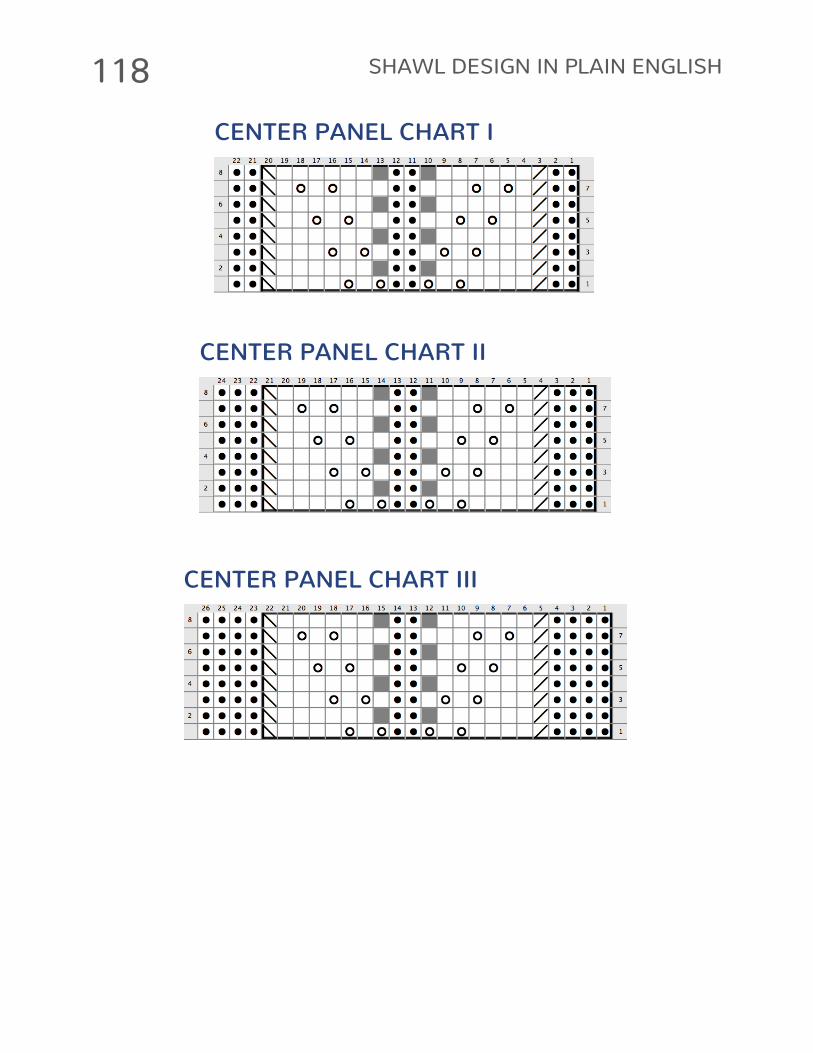
118 SHAWL DESIGN IN PLAIN ENGLISH
CENTER PANEL CHART I
CENTER PANEL CHART II
CENTER PANEL CHART III
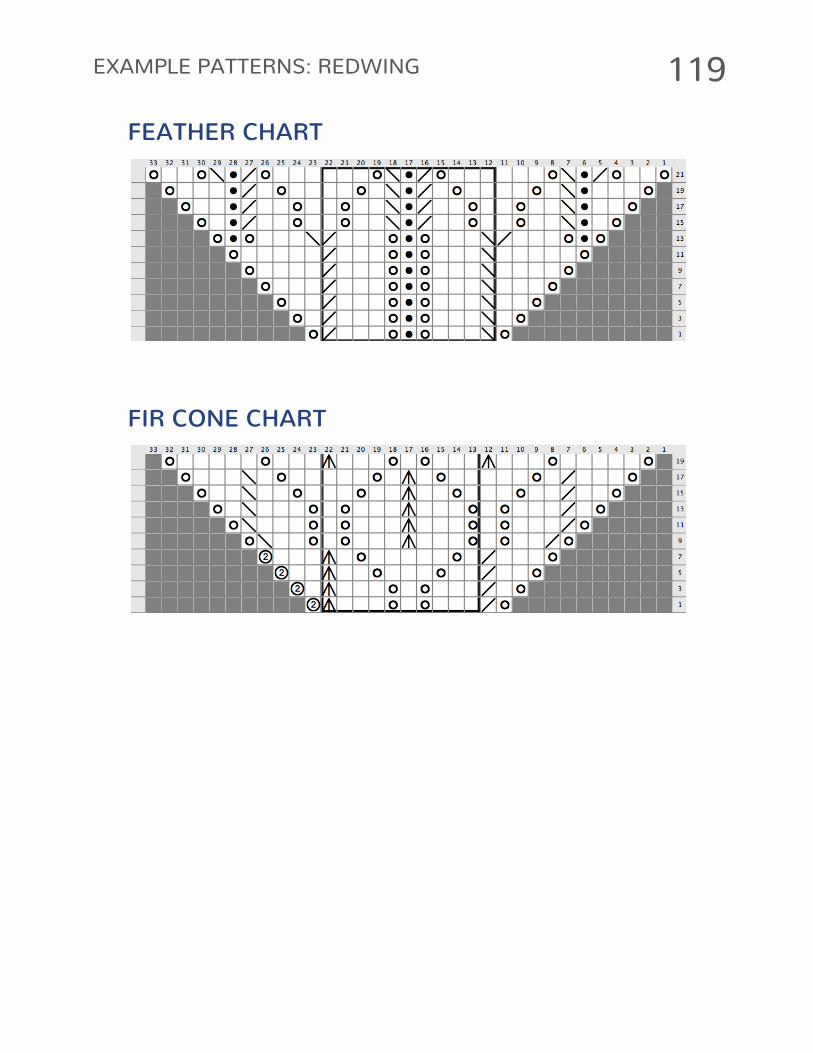
119EXAMPLE PATTERNS: REDWING
FEATHER CHART
FIR CONE CHART
120 SHAWL DESIGN IN PLAIN ENGLISH
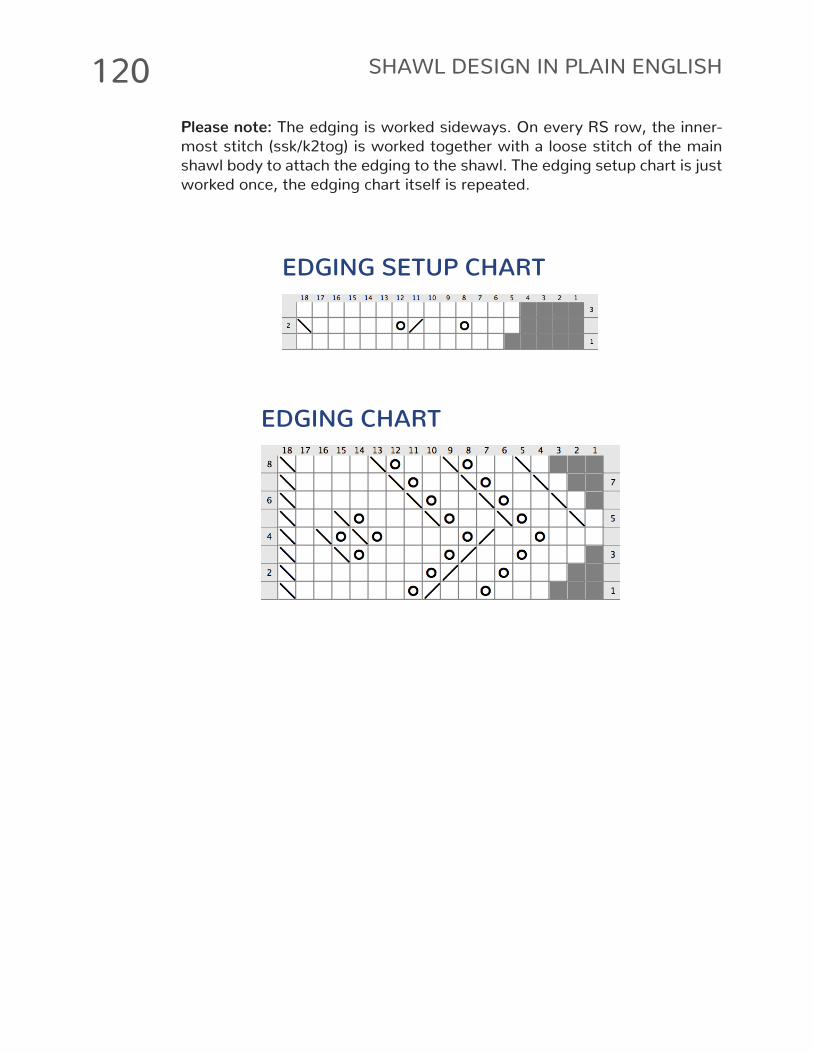
Please note: The edging is worked sideways. On every RS row, the inner-most stitch (ssk/k2tog) is worked together with a loose stitch of the main
shawl body to attach the edging to the shawl. The edging setup chart is just
worked once, the edging chart itself is repeated.
EDGING SETUP CHART
EDGING CHART
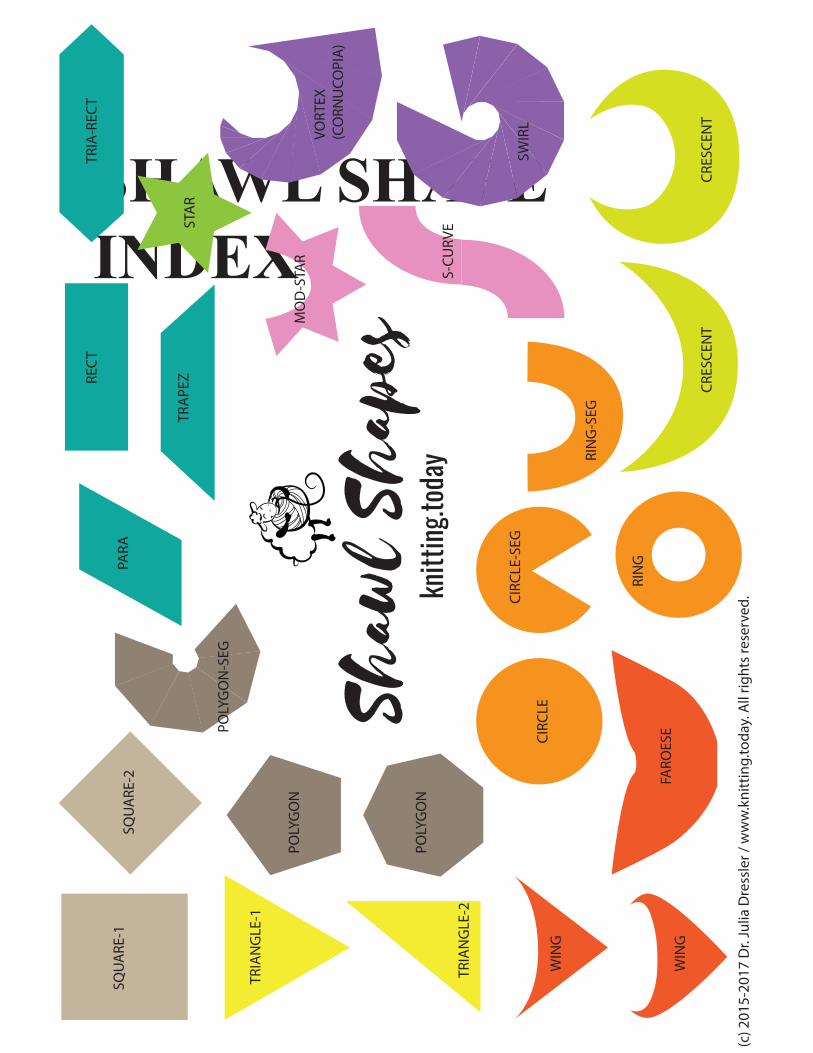
SHAWL SHAPE INDEX
(c) 2
015-
2017
Dr.
Julia
Dre
ssle
r / w
ww
.kni
ttin
g.to
day.
All
right
s res
erve
d.
Shaw
l Sha
pes
knitt
ing.to
day
SQUA
RE-1
SQUA
RE-2
TRIA
NG
LE-1
TRIA
NG
LE-2
POLY
GO
N
PARA
RECT
TRAP
EZ
TRIA
-REC
T
POLY
GO
N
CIRC
LE
FARO
ESE
RIN
G
RIN
G-S
EG
CRES
CEN
TCR
ESCE
NT
STAR
MO
D-S
TAR
POLY
GO
N-S
EG
WIN
G
WIN
G
SWIR
L
VORT
EX(C
ORN
UCO
PIA)
CIRC
LE-S
EG
S-CU
RVE