Embed Size (px)
Citation preview
SAP Point of Sale 2.0SAP Transactionware GM10.0
Technical Reference Guide
2
Technical Reference GuideDocumentation version 10.0
PN: 072002/SAPTWRGM100TCHRG
October 16, 2008
Copyright© Copyright 2007 SAP AG. All rights reserved.
SAP Library document classification: PUBLIC
No part of this publication may be reproduced or transmitted in any form or for any purpose without the expresspermission of SAP AG. The information contained herein may be changed without prior notice.
Some software products marketed by SAP AG and its distributors contain proprietary software components ofother software vendors.
Microsoft, Windows, Outlook, and PowerPoint are registered trademarks of Microsoft Corporation.
IBM, DB2, DB2 Universal Database, OS/2, Parallel Sysplex, MVS/ESA, AIX, S/390, AS/400, OS/390, OS/400,iSeries, pSeries, xSeries, zSeries, z/OS, AFP, Intelligent Miner, WebSphere, Netfinity, Tivoli, and Informix aretrademarks or registered trademarks of IBM Corporation in the United States and/or other countries.
Oracle is a registered trademark of Oracle Corporation.
UNIX, X/Open, OSF/1, and Motif are registered trademarks of the Open Group.
Citrix, ICA, Program Neighborhood, MetaFrame, WinFrame, VideoFrame, and MultiWin are trademarks orregistered trademarks of Citrix Systems, Inc.
HTML, XML, XHTML, and W3C are trademarks or registered trademarks of W3C®, World Wide WebConsortium, Massachusetts Institute of Technology.
Java is a registered trademark of Sun Microsystems, Inc.
JavaScript is a registered trademark of Sun Microsystems, Inc., used under license for technology invented andimplemented by Netscape.
MaxDB is a trademark of MySQL AB, Sweden.
SAP, R/3, mySAP, mySAP.com, xApps, xApp, SAP NetWeaver, and other SAP products and services mentionedherein as well as their respective logos are trademarks or registered trademarks of SAP AG in Germany and inseveral other countries all over the world. SAP POS, POS Xpress, Store Manager, and Configurator are allregistered trademarks of SAP. All other product and service names mentioned are the trademarks of theirrespective companies. Data contained in this document serves information purposes only. National productspecifications may vary.
These materials are subject to change without notice. These materials are provided by SAP AG and its affiliatedcompanies ("SAP Group") for informational purposes only, without representation or warranty of any kind, andSAP Group shall not be liable for errors or omissions with respect to the materials. The only warranties for SAPGroup products and services are those that are set forth in the express warranty statements accompanying suchproducts and services, if any. Nothing herein should be construed as constituting an additional warranty.
SAP - Important DisclaimersSAP Library document classification: PUBLIC
This document is for informational purposes only. Its content is subject to change without notice, and SAP doesnot warrant that it is error-free. SAP MAKES NO WARRANTIES, EXPRESS OR IMPLIED, OR OFMERCHANTABILITY, OR FITNESS FOR A PARTICULAR PURPOSE.
Coding samplesAny software coding and/or code lines / strings ("Code") included in this documentation are only examples andare not intended to be used in a productive system environment. The Code is only intended better explain andvisualize the syntax and phrasing rules of certain coding. SAP does not warrant the correctness and completeness
3
of the Code given herein, and SAP shall not be liable for errors or damages caused by the usage of the Code,except if such damages were caused by SAP intentionally or grossly negligent.
Internet hyperlinksThe SAP documentation may contain hyperlinks to the Internet. These hyperlinks are intended to serve as a hintwhere to find supplementary documentation. SAP does not warrant the availability and correctness of suchsupplementary documentation or the ability to serve for a particular purpose. SAP shall not be liable for anydamages caused by the use of such documentation unless such damages have been caused by SAP's grossnegligence or willful misconduct.
AccessibilityThe information contained in the SAP Library documentation represents SAP's current view of accessibilitycriteria as of the date of publication; it is in no way intended to be a binding guideline on how to ensureaccessibility of software products. SAP specifically disclaims any liability with respect to this document and nocontractual obligations or commitments are formed either directly or indirectly by this document. This documentis for internal use only and may not be circulated or distributed outside your organization without SAP's priorwritten authorization.

4
1
CTable of Contents
Chapter 1 IntroductionUsing the Technical Reference Guide ................................................................ 11
Chapter 2 About the Rdata, Sdata, and Parameter SubdirectoriesAbout the RDATA and SDATA directories ..................................................... 13
RDATA ........................................................................................................... 13SDATA ........................................................................................................... 13DATA Files .................................................................................................... 13Extensions for data files ............................................................................... 14Bringing it all together .................................................................................. 15
RDATA and SDATA directories for the Store Manager ................................ 20PARM directory files .............................................................................................23
Binary files ...................................................................................................... 23Database files ................................................................................................. 24ASCII files ...................................................................................................... 24ASCII update files ......................................................................................... 24ASCII transaction files .................................................................................. 24Binary transaction files .................................................................................. 24
PARM file listing ................................................................................... 25
Chapter 3 TLOG Data Capture FormatsTGM security library .............................................................................................31
Supporting multiple encryption keys .......................................................... 32How it works .......................................................................................... 32
TLOG data record types ...................................................................................... 32Transaction types ................................................................................................... 33
Record type I: Merchandise sale ................................................................. 37Record type I2: Merchandise sale (part 2) ................................................. 38Record type I3: Merchandise sale (part 3) ................................................. 40Record type I4: Merchandise sale (part 4) ................................................. 40Record type I5: Merchandise sale (part 5) ................................................. 40Record type I6: Merchandise sale (part 4) ................................................. 40Record type FS: Fuel sale record ................................................................. 42Record type F2: Fuel sale record (part 2) .................................................. 42Record type N: Non-merchandise sale ...................................................... 43Record type N3: Non-merchandise record (part 2) ................................. 45Record type NA: Encrypted non-merchandise sale record .................... 45Record type N2: Non-merchandise sale record with extended fields ... 47Record type NB: Encrypted non-merchandise sale record with extended fields 49Record type PF: Profile prompt response record .................................... 51Record type PE: Encrypted profile prompt response record .................51
2
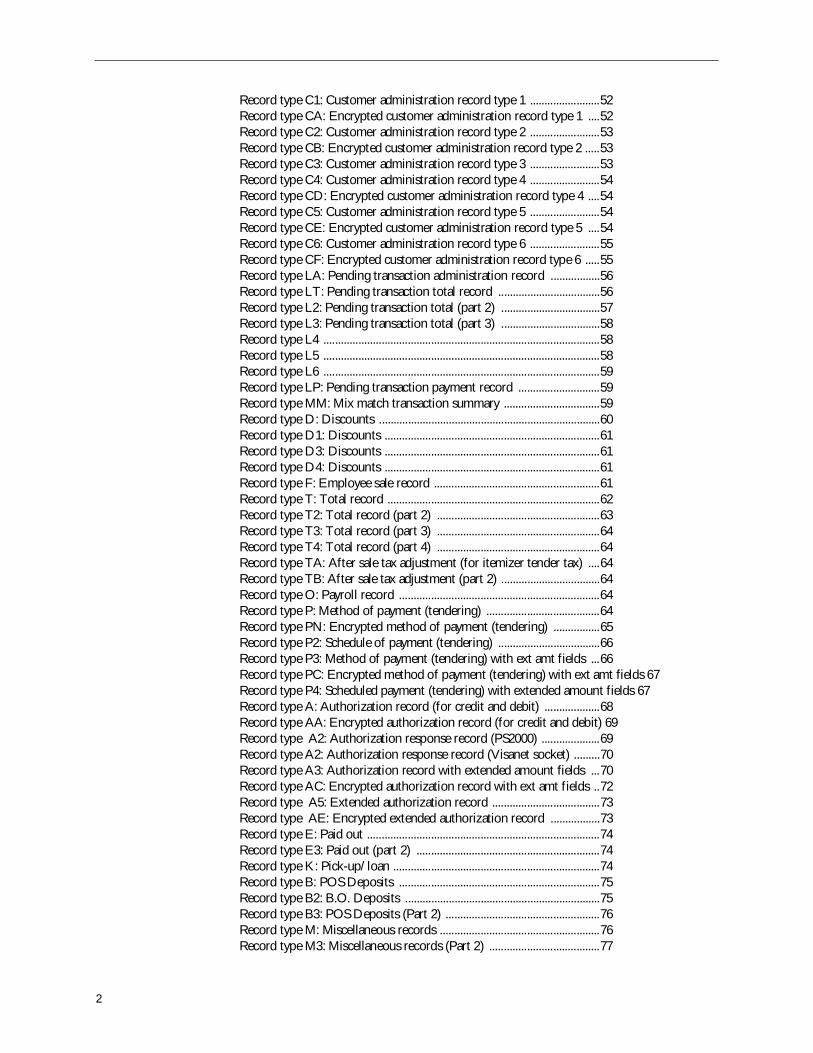
Record type C1: Customer administration record type 1 ........................52Record type CA: Encrypted customer administration record type 1 ....52Record type C2: Customer administration record type 2 ........................53Record type CB: Encrypted customer administration record type 2 .....53Record type C3: Customer administration record type 3 ........................53Record type C4: Customer administration record type 4 ........................54Record type CD: Encrypted customer administration record type 4 ....54Record type C5: Customer administration record type 5 ........................54Record type CE: Encrypted customer administration record type 5 ....54Record type C6: Customer administration record type 6 ........................55Record type CF: Encrypted customer administration record type 6 .....55Record type LA: Pending transaction administration record .................56Record type LT: Pending transaction total record ...................................56Record type L2: Pending transaction total (part 2) ..................................57Record type L3: Pending transaction total (part 3) ..................................58Record type L4 ...............................................................................................58Record type L5 ...............................................................................................58Record type L6 ...............................................................................................59Record type LP: Pending transaction payment record ............................59Record type MM: Mix match transaction summary .................................59Record type D: Discounts ............................................................................60Record type D1: Discounts ..........................................................................61Record type D3: Discounts ..........................................................................61Record type D4: Discounts ..........................................................................61Record type F: Employee sale record .........................................................61Record type T: Total record .........................................................................62Record type T2: Total record (part 2) ........................................................63Record type T3: Total record (part 3) ........................................................64Record type T4: Total record (part 4) ........................................................64Record type TA: After sale tax adjustment (for itemizer tender tax) ....64Record type TB: After sale tax adjustment (part 2) ..................................64Record type O: Payroll record .....................................................................64Record type P: Method of payment (tendering) .......................................64Record type PN: Encrypted method of payment (tendering) ................65Record type P2: Schedule of payment (tendering) ...................................66Record type P3: Method of payment (tendering) with ext amt fields ...66Record type PC: Encrypted method of payment (tendering) with ext amt fields 67Record type P4: Scheduled payment (tendering) with extended amount fields 67Record type A: Authorization record (for credit and debit) ...................68Record type AA: Encrypted authorization record (for credit and debit) 69Record type A2: Authorization response record (PS2000) ....................69Record type A2: Authorization response record (Visanet socket) .........70Record type A3: Authorization record with extended amount fields ...70Record type AC: Encrypted authorization record with ext amt fields ..72Record type A5: Extended authorization record .....................................73Record type AE: Encrypted extended authorization record .................73Record type E: Paid out ................................................................................74Record type E3: Paid out (part 2) ...............................................................74Record type K: Pick-up/loan .......................................................................74Record type B: POS Deposits .....................................................................75Record type B2: B.O. Deposits ...................................................................75Record type B3: POS Deposits (Part 2) .....................................................76Record type M: Miscellaneous records .......................................................76Record type M3: Miscellaneous records (Part 2) ......................................77
3
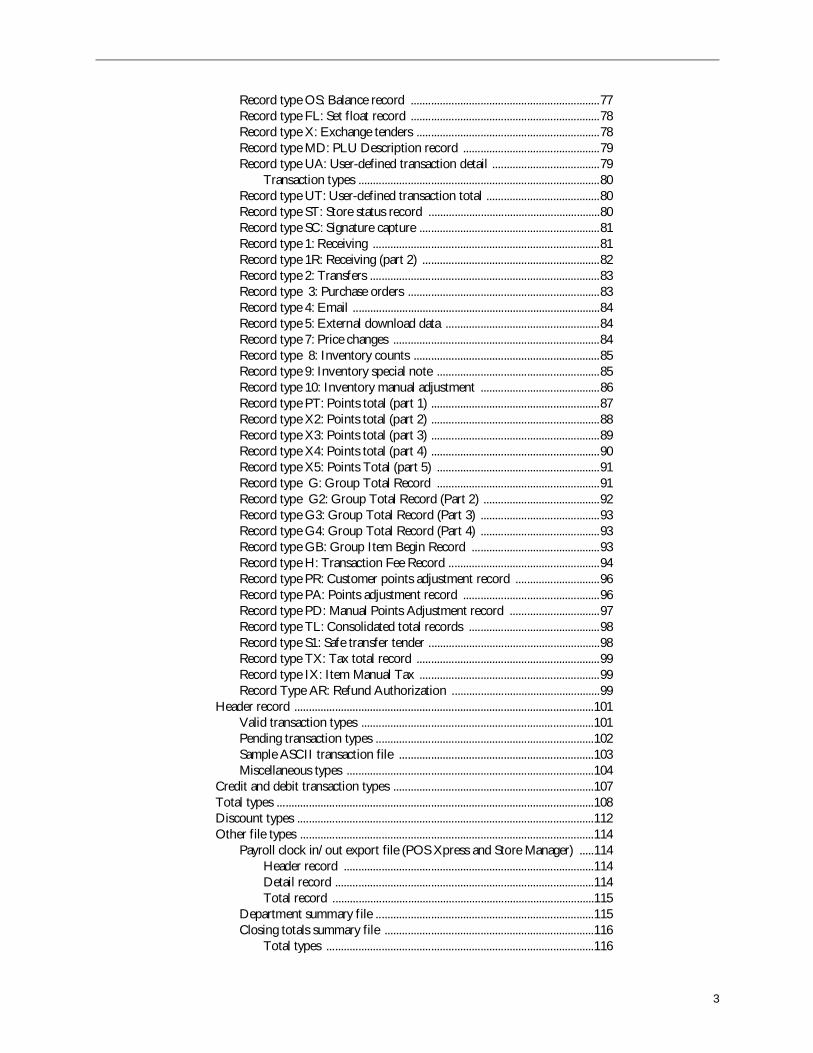
Record type OS: Balance record .................................................................77Record type FL: Set float record .................................................................78Record type X: Exchange tenders ...............................................................78Record type MD: PLU Description record ...............................................79Record type UA: User-defined transaction detail .....................................79
Transaction types ...................................................................................80Record type UT: User-defined transaction total .......................................80Record type ST: Store status record ...........................................................80Record type SC: Signature capture ..............................................................81Record type 1: Receiving ..............................................................................81Record type 1R: Receiving (part 2) .............................................................82Record type 2: Transfers ...............................................................................83Record type 3: Purchase orders ..................................................................83Record type 4: Email .....................................................................................84Record type 5: External download data .....................................................84Record type 7: Price changes .......................................................................84Record type 8: Inventory counts ................................................................85Record type 9: Inventory special note ........................................................85Record type 10: Inventory manual adjustment .........................................86Record type PT: Points total (part 1) ..........................................................87Record type X2: Points total (part 2) ..........................................................88Record type X3: Points total (part 3) ..........................................................89Record type X4: Points total (part 4) ..........................................................90Record type X5: Points Total (part 5) ........................................................91Record type G: Group Total Record ........................................................91Record type G2: Group Total Record (Part 2) ........................................92Record type G3: Group Total Record (Part 3) .........................................93Record type G4: Group Total Record (Part 4) .........................................93Record type GB: Group Item Begin Record ............................................93Record type H: Transaction Fee Record ....................................................94Record type PR: Customer points adjustment record .............................96Record type PA: Points adjustment record ...............................................96Record type PD: Manual Points Adjustment record ...............................97Record type TL: Consolidated total records .............................................98Record type S1: Safe transfer tender ...........................................................98Record type TX: Tax total record ...............................................................99Record type IX: Item Manual Tax ..............................................................99Record Type AR: Refund Authorization ...................................................99
Header record .......................................................................................................101Valid transaction types ................................................................................101Pending transaction types ...........................................................................102Sample ASCII transaction file ...................................................................103Miscellaneous types .....................................................................................104
Credit and debit transaction types .....................................................................107Total types .............................................................................................................108Discount types ......................................................................................................112Other file types .....................................................................................................114
Payroll clock in/out export file (POS Xpress and Store Manager) .....114Header record ......................................................................................114Detail record .........................................................................................114Total record ..........................................................................................115
Department summary file ...........................................................................115Closing totals summary file ........................................................................116
Total types ............................................................................................116
4
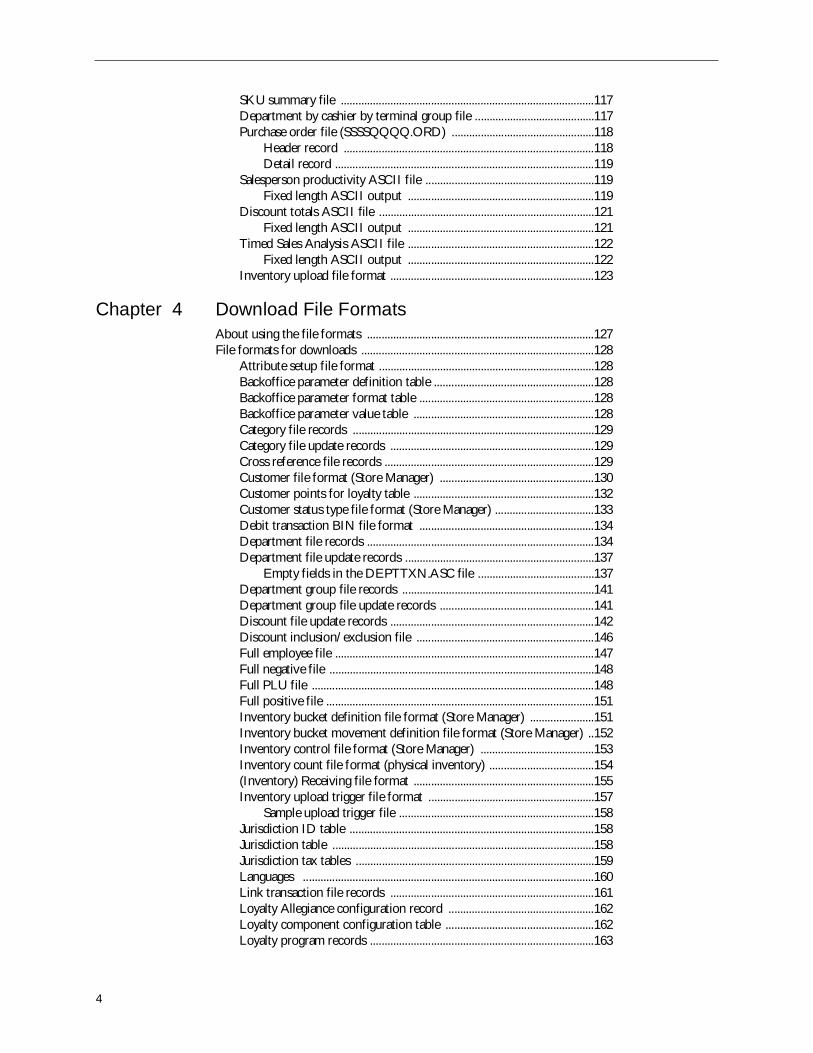
SKU summary file .......................................................................................117Department by cashier by terminal group file .........................................117Purchase order file (SSSSQQQQ.ORD) .................................................118
Header record ......................................................................................118Detail record .........................................................................................119
Salesperson productivity ASCII file ..........................................................119Fixed length ASCII output ................................................................119
Discount totals ASCII file ..........................................................................121Fixed length ASCII output ................................................................121
Timed Sales Analysis ASCII file ................................................................122Fixed length ASCII output ................................................................122
Inventory upload file format ......................................................................123
Chapter 4 Download File FormatsAbout using the file formats ..............................................................................127File formats for downloads ................................................................................128
Attribute setup file format ..........................................................................128Backoffice parameter definition table .......................................................128Backoffice parameter format table ............................................................128Backoffice parameter value table ..............................................................128Category file records ...................................................................................129Category file update records ......................................................................129Cross reference file records ........................................................................129Customer file format (Store Manager) .....................................................130Customer points for loyalty table ..............................................................132Customer status type file format (Store Manager) ..................................133Debit transaction BIN file format ............................................................134Department file records ..............................................................................134Department file update records .................................................................137
Empty fields in the DEPTTXN.ASC file ........................................137Department group file records ..................................................................141Department group file update records .....................................................141Discount file update records ......................................................................142Discount inclusion/exclusion file .............................................................146Full employee file .........................................................................................147Full negative file ...........................................................................................148Full PLU file .................................................................................................148Full positive file ............................................................................................151Inventory bucket definition file format (Store Manager) ......................151Inventory bucket movement definition file format (Store Manager) ..152Inventory control file format (Store Manager) .......................................153Inventory count file format (physical inventory) ....................................154(Inventory) Receiving file format ..............................................................155Inventory upload trigger file format .........................................................157
Sample upload trigger file ...................................................................158Jurisdiction ID table ....................................................................................158Jurisdiction table ..........................................................................................158Jurisdiction tax tables ..................................................................................159Languages ....................................................................................................160Link transaction file records ......................................................................161Loyalty Allegiance configuration record ..................................................162Loyalty component configuration table ...................................................162Loyalty program records .............................................................................163
5
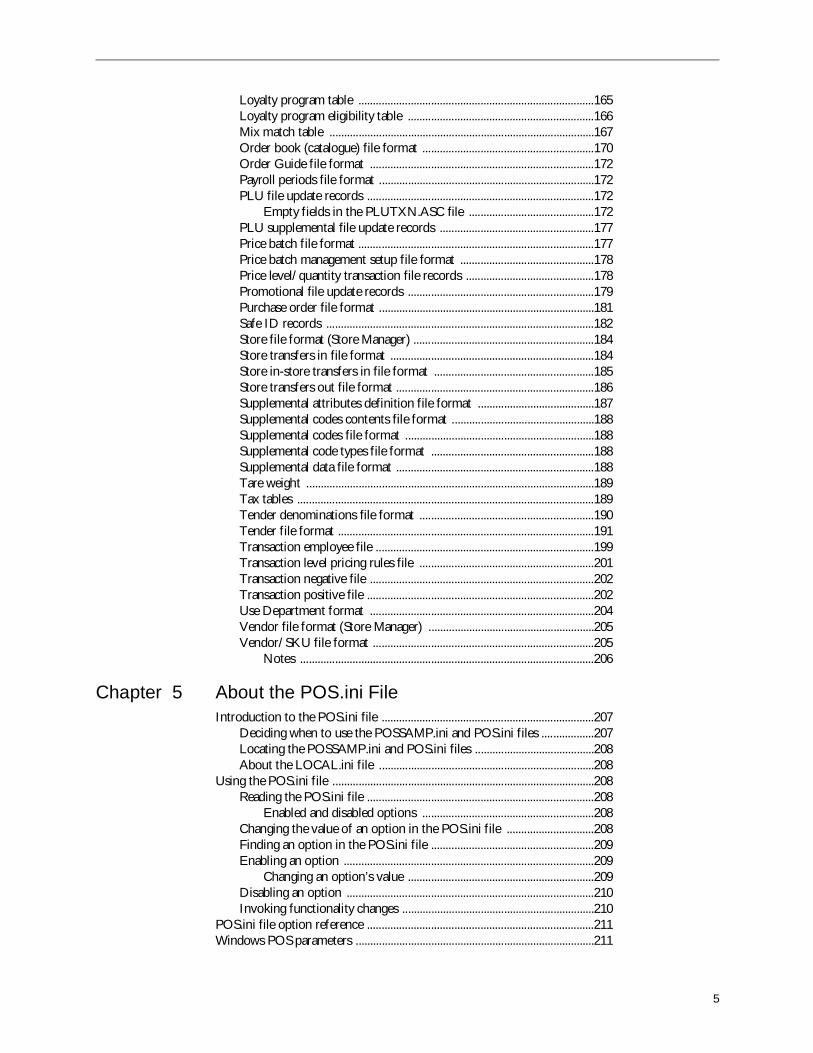
Loyalty program table .................................................................................165Loyalty program eligibility table ................................................................166Mix match table ...........................................................................................167Order book (catalogue) file format ...........................................................170Order Guide file format .............................................................................172Payroll periods file format ..........................................................................172PLU file update records ..............................................................................172
Empty fields in the PLUTXN.ASC file ...........................................172PLU supplemental file update records .....................................................177Price batch file format .................................................................................177Price batch management setup file format ..............................................178Price level/quantity transaction file records ............................................178Promotional file update records ................................................................179Purchase order file format ..........................................................................181Safe ID records ............................................................................................182Store file format (Store Manager) ..............................................................184Store transfers in file format ......................................................................184Store in-store transfers in file format .......................................................185Store transfers out file format ....................................................................186Supplemental attributes definition file format ........................................187Supplemental codes contents file format .................................................188Supplemental codes file format .................................................................188Supplemental code types file format ........................................................188Supplemental data file format ....................................................................188Tare weight ...................................................................................................189Tax tables ......................................................................................................189Tender denominations file format ............................................................190Tender file format ........................................................................................191Transaction employee file ...........................................................................199Transaction level pricing rules file ............................................................201Transaction negative file .............................................................................202Transaction positive file ..............................................................................202Use Department format .............................................................................204Vendor file format (Store Manager) .........................................................205Vendor/SKU file format ............................................................................205
Notes .....................................................................................................206
Chapter 5 About the POS.ini FileIntroduction to the POS.ini file .........................................................................207
Deciding when to use the POSSAMP.ini and POS.ini files ..................207Locating the POSSAMP.ini and POS.ini files .........................................208About the LOCAL.ini file ..........................................................................208
Using the POS.ini file ..........................................................................................208Reading the POS.ini file ..............................................................................208
Enabled and disabled options ...........................................................208Changing the value of an option in the POS.ini file ..............................208Finding an option in the POS.ini file ........................................................209Enabling an option ......................................................................................209
Changing an option’s value ................................................................209Disabling an option .....................................................................................210Invoking functionality changes ..................................................................210
POS.ini file option reference ..............................................................................211Windows POS parameters ..................................................................................211
6
POS specific parameters .....................................................................................216End of Day-related parameters ..........................................................................275
End of day trigger file parameters .............................................................275End of day non-required .rd files configuration .....................................275
Register-related parameters ................................................................................276Configurable warning/beep tones during item entry .............................276Configurable screensaver for POS ............................................................277Configurable screensaver for Back Office and ISP ................................278Parameters for department menu descriptions .......................................279
Barcode parameters .............................................................................................280Parameters for UPC NSC 2 (embedded weight/price) bar codes .......280
Sample NSC 2 bar code ......................................................................281Additional parameters for UPC NSC5 (coupon) bar codes .................282Parameters for translating bar codes ........................................................283
Bar code types ......................................................................................284SKU-related parameters ......................................................................................285
Parameters for second definition of SKU Min/Max/CDV entries ....285Printing-related parameters ................................................................................285
Printing parameters for gift receipts .........................................................285Remote printing specific parameters ........................................................288Printing parameters .....................................................................................290
Thresholdprofile layout files ..............................................................291Notes regarding invoice printing using these parameters .............291Sample configuration and output of a layout1.txt file ...................295
Tender-related parameters ..................................................................................295Parameters for international currency ......................................................295
Default characteristics .........................................................................295Peripheral equipment parameters ......................................................................298
Parameters for MICR reader ......................................................................298Parameters for NCR 7800 consumer price verifier ................................300NDC2 specific parameters .........................................................................302Parameters to integrate an internal scale ..................................................307
Authorization-related parameters ......................................................................308Credit card identification parameters .......................................................308
Standard cards ......................................................................................309INon-standard card parameters ........................................................310
EFT-related parameters ..............................................................................310Gift card-related parameters ......................................................................313Blackhawk-related parameters ...................................................................313State identities for check authorization ....................................................314State Identities for Different State Abbreviations ..................................316Province Identities for Canadian Provinces ...........................................318Credit authorization specific parameters ..................................................318Nabanco specific parameters for record formats ...................................318State identities for TeleCheck Full Risk Management authorization ..319Parameters For Tender Retail credit configuration ................................321AAFES Credit Card Authorization Specific Parameters. ......................325
AAFES credit authorization response message prompt ...............325AAFES Credit Card Prompts ....................................................................326AAFES general customer and DDP response prompt .........................326Specific parameters for the CIBC prompter ...........................................326NCIS/Velocity PLUS check authorization .............................................326Parameters for smart card support ...........................................................327NCR EPS credit parameters ......................................................................334
7
Online credit diagnostic parameters .........................................................334Integrated debit parameters .......................................................................335AJB FiPay Specific Parameters ..................................................................337Parameters for ValueLink ...........................................................................337Centralized returns authorization parameters .........................................339
Recall Entire Transaction parameters ..............................................340Server-related parameters ...................................................................................342
POS server specific parameters .................................................................342Server command file specification ............................................................352Unix server specific parameters .................................................................353
Back office-related parameters ...........................................................................353Back office specific parameters .................................................................353Parameters for advanced Back Office testing .........................................358Customer database parameters ..................................................................358Customer database 2 parameters ...............................................................362
Communication-related parameters ..................................................................364Communication specific parameters ........................................................364Transnet specific parameters .....................................................................364
Simplified Transnet configuration ....................................................365CHAINNUMBER ..............................................................................365HOSTREQPROF ...............................................................................365
Database-related parameters ..............................................................................367ASCII TLog specific parameters ...............................................................367STS specific parameters for record formats ............................................369Specific parameters of Harmonic Systems for record formats ............371
Transaction-related parameters ..........................................................................373Mix Match parameters ................................................................................373Suspend/resume parameters ......................................................................373Non-taxable item print character parameters ..........................................376Discount related parameters ......................................................................377
Glossary .................................................................................................................380
Chapter 6 Manager Code Reference
Chapter 7 About the Xpress Server and Backup ServerAbout the Xpress server .....................................................................................397
Working with the Xpress server ................................................................398Working with the Xpress server Main tab .......................................400Editing the Xpress server Properties settings .................................402Monitoring Xpress server tasks .........................................................404Using the Xpress server debug function ..........................................405
About the backup server .....................................................................................406Setting up a backup server ..........................................................................406Backup server functionality ........................................................................406
Chapter 8 Operating the Databases and UtilitiesDatabase encryption ............................................................................................413Viewing and validating databases ......................................................................413
Viewing the databases .................................................................................414Validating the databases ..............................................................................414Backing up a database .................................................................................415Erasing the databases ..................................................................................415
8
Activating a database from a backup ........................................................416Unloading a database ..................................................................................416Reloading a database ...................................................................................417Reloading a table ..........................................................................................417Examining the SQL/Sybase Database Server startup ...........................418Starting the server from DOS ....................................................................418Tmxpurge Utility ..........................................................................................419
Purge parameters .................................................................................420About the purge database ..................................................................422Purged data storage .............................................................................424View purged data .................................................................................425Delete purged data ..............................................................................425Purge schedule .....................................................................................425Determining hard drive space on MSSQL ......................................426
Using the non-database utilities .........................................................................427Understanding how utilities deal with encryption processes ................427
Keyindex command line utility for re-encrypting data ..................428CVTLOG Utility ..........................................................................................430
Additional flags ....................................................................................430Transaction type 'tt' values .................................................................430
CVTOTALS Utility .....................................................................................432PARMDUMP Utility ...................................................................................432Database encryption utility .........................................................................434
Status files .............................................................................................434Troubleshooting end of day data problems .............................................435
Rebuilding the TLOG and journal ...................................................435Rebuilding the \sdata directory .........................................................435End of day journal naming issues .....................................................436
Chapter 9 Database ToolsConnecting to the database ................................................................................437
Understanding the DBTools main window .............................................439Backing up a database .........................................................................................440
About the database transaction logs .........................................................440Specifying the destination of backup files ...............................................441About the Expert options ..........................................................................441
Exporting data ......................................................................................................441Destination and output format ..................................................................442Tables to be exported ..................................................................................442
Importing data ......................................................................................................444Loading the data ..................................................................................447
Viewing data .........................................................................................................449Retrieving the data ...............................................................................450Creating a query ...................................................................................451
Moving a database ...............................................................................................454Upgrade database .................................................................................................454
Starting the upgrade process ..............................................................456Database sizing .....................................................................................................457Resetting a store ...................................................................................................458Viewing table information ..................................................................................460
Chapter 10 Translation & Language Support
9
Translating literal files in POS and Store Manager .........................................461POS Xpress for Windows ..........................................................................461Store Manager ..............................................................................................462
Supporting multiple languages and translation ................................................463Where the store language is set .................................................................463
Working with the *.ini files ................................................................464Setting a preferred language for an employee .........................................465
Allowing an employee to choose a language at signon ..................466Allowing an employee to switch languages on-the-fly ...................466
Translating configuration descriptions in the Configurator ..................466Offline translation file support ..................................................................466Using the translation utilities ......................................................................468Implementing multiple languages .............................................................469How to create translation files for the POS application ........................471About mkascii.exe ........................................................................................472
Parameters required for mkascii.exe .................................................472Output of the mkascii.exe utility .......................................................472
Using the DB Export/Import Database utility ......................................473Online mode .........................................................................................473Command Line Mode .........................................................................474Examples ..............................................................................................474

10
11
1Introduction
Using the Technical Reference GuideThe Technical Reference guide provides reference information for various file formats and utilitiesrelated to the product suite.
Note: This information is intended primarily for advanced technical and head office personnel.
The Reference guide covers the following topics:
About the Rdata, Sdata, and PARM Directories: Information about the Rdata, Sdata, andPARM (parameter) directories, and the files and information contained therein (see Chapter 2,“About the RDATA and SDATA directories” on page 13)
Transaction Log Data Capture Formats: Information about the Transaction Log (TLOG), andthe format of the data provided therein (see Chapter 3, “TLOG data record types” on page 32)
Data Download File Formats: Format information for data downloaded from head office intothe system (see Chapter 4, “File formats for downloads” on page 128)
Transaction Log XML Formats: Format information for transaction log data as converted toXML (see Chapter 5, “XML transaction log” on page 205)
About the POS.ini file: Information about the POS initialization file, used to maintain someaspects of the POS Xpress and Store Manager applications (see Chapter 5, “Introduction to thePOS.ini file” on page 207)
Manager Code list: Manager Codes available in the POS Xpress system, together with adescription of their functions (see Chapter 6, “Manager Code Reference” on page 381)
About the Software Development Kit: Information about the SDK for developers (seeChapter 7, “SDK Reference” on page 395).
About the Xpress Server and Backup Server: Information about the functions of the POSXpress Server, and about setting up a backup server (see Chapter 7, “About the Xpress Server andBackup Server” on page 397)
Using the Database Utilities: Information and instructions for managing your databases andusing the related database utility programs. See Chapter 8, “Operating the Databases and Utilities”on page 413.
Using the Database Tools: Information about the functions of the DBTools applications (seeChapter 9, “Database Tools” on page 437)
Translating for Use in Other Languages: Information about how to set up your system to runin other languages. See Chapter 10, “Translation & Language Support” on page 461.
Introduction
12
Note: To optimize your view of the SAP POS screens in the following applications, it is recommendedthat you increase the standard screen dimension of your monitor to 1280 X 1024. You can do thisthrough the Control Panel > Display > Settings of your pc.
Configurator
Store Manager
Electronic Journal Viewer
Database Tools
Database Purge
Translation Export (txtxlt.exe)
13
2About the Rdata, Sdata, andParameter Subdirectories
This section describes the RDATA, SDATA, and Parameter (PARM) subdirectories as they apply todata movement within the system.
About the RDATA and SDATA directoriesThis section discusses the RDATA and SDATA directories, how they interact, and the files theycontain. RDATA and SDATA are two subdirectories in the POS directory.
RDATARDATA is an abbreviation of ‘Register Data’. RDATA is where all actions performed on the POSterminal are recorded. The previous day data terminal specific is also stored here for previous day POSgenerated reporting. Only POS terminals should have anything stored here, however Back Office doeskeep some temporary files in RDATA. Terminal specific daily, weekly, and period-to-date data is kepthere.
SDATASDATA is an abbreviation of ‘Store Data’. This is where all consolidated daily ,weekly and period todate data is kept. Only the Database Server or Backup Server should have anything stored here.
DATA FilesThe file name denotes time frame and how the data is totaled in any data file. The format of thefilenames in RDATA and SDATA is as follows:
LD: Register local daily files (functionally the same as RD)
RD: Register daily files.
RP: Register previous day files
SC: Store consolidation files
SD: Store current day files
SM: Store monthly/fiscal period files
SP: Store previous day files
SW: Store weekly files
For example:
About the Rdata, Sdata, and Parameter Subdirectories
14
ld.txn is the register daily transaction log file
sp.smv is the consolidated previous day SKU movement file
Register or Local files are found in RDATA on any POS terminal while Store files are found only onthe database server or backup server.
Data by drawer and shift are kept in these files:
xxdwr.eee
xxshftn.eee
Where:
xx represents the first two characters discussed previously.
n represents the shift number
eee represents the extension
For example:
lddwr.tot is the current day totals file by drawer.
rpshft2.tot is the previous day totals file for that register for shift number 2
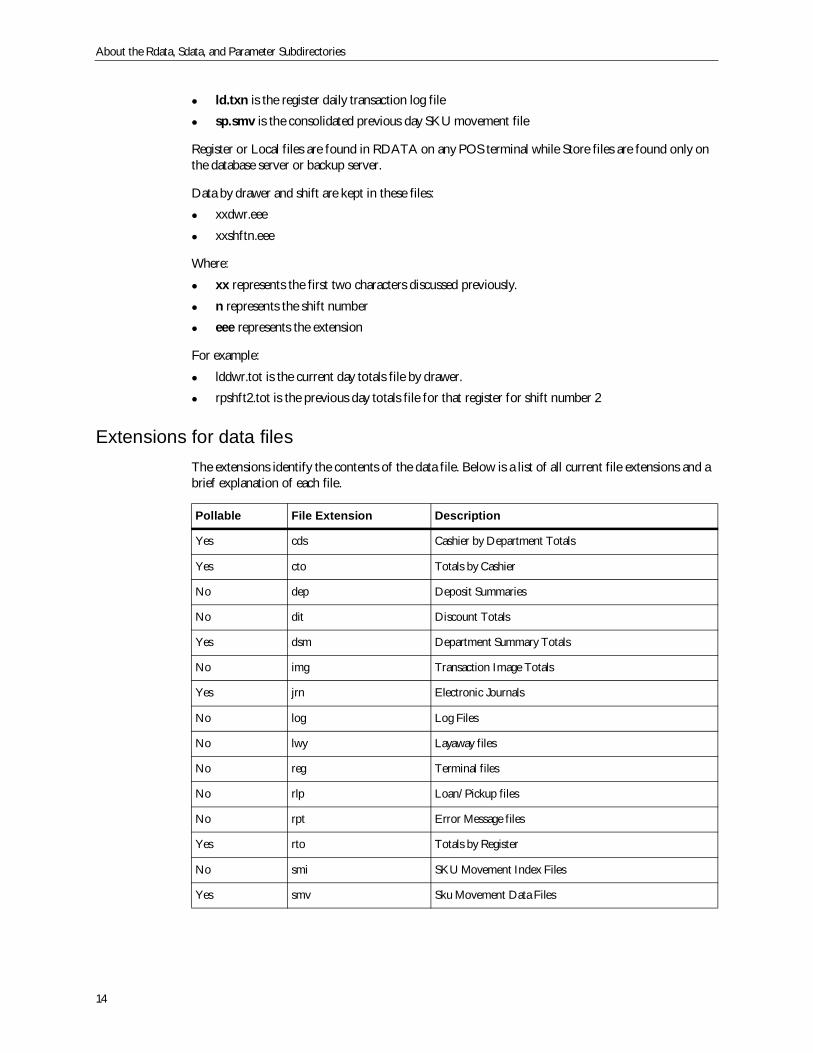
Extensions for data filesThe extensions identify the contents of the data file. Below is a list of all current file extensions and abrief explanation of each file.
Pollable File Extension Description
Yes cds Cashier by Department Totals
Yes cto Totals by Cashier
No dep Deposit Summaries
No dit Discount Totals
Yes dsm Department Summary Totals
No img Transaction Image Totals
Yes jrn Electronic Journals
No log Log Files
No lwy Layaway files
No reg Terminal files
No rlp Loan/Pickup files
No rpt Error Message files
Yes rto Totals by Register
No smi SKU Movement Index Files
Yes smv Sku Movement Data Files
About the RDATA and SDATA directories
15
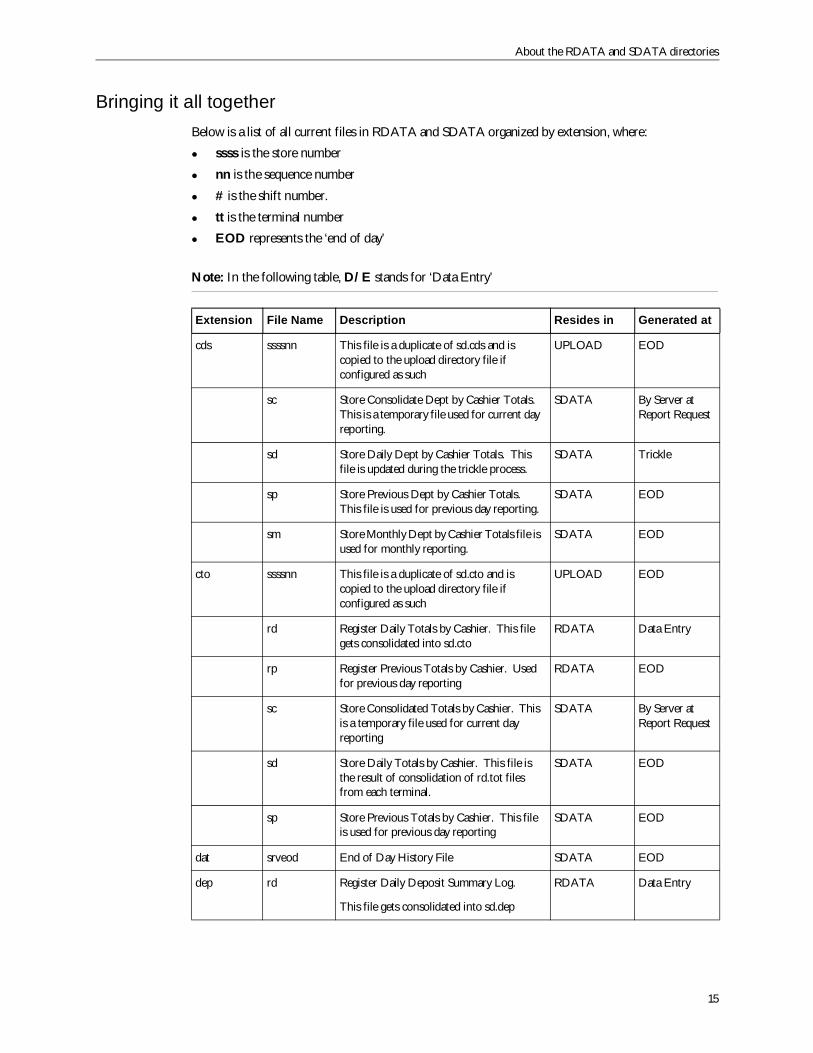
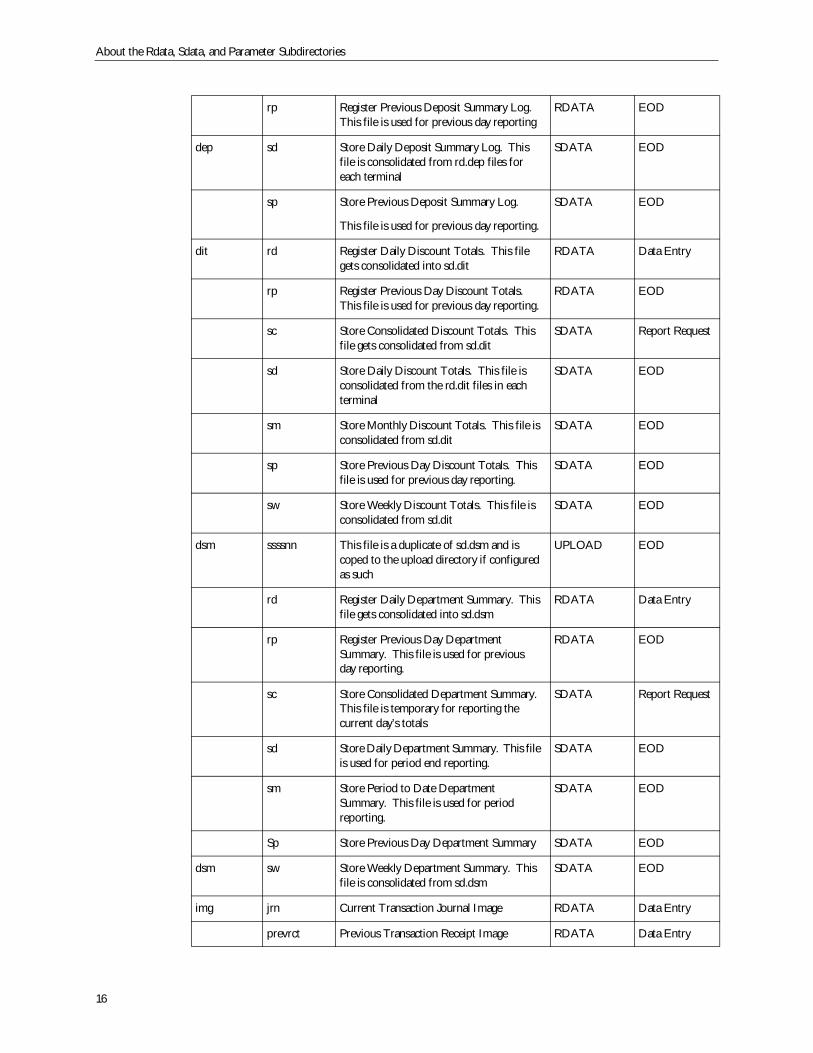
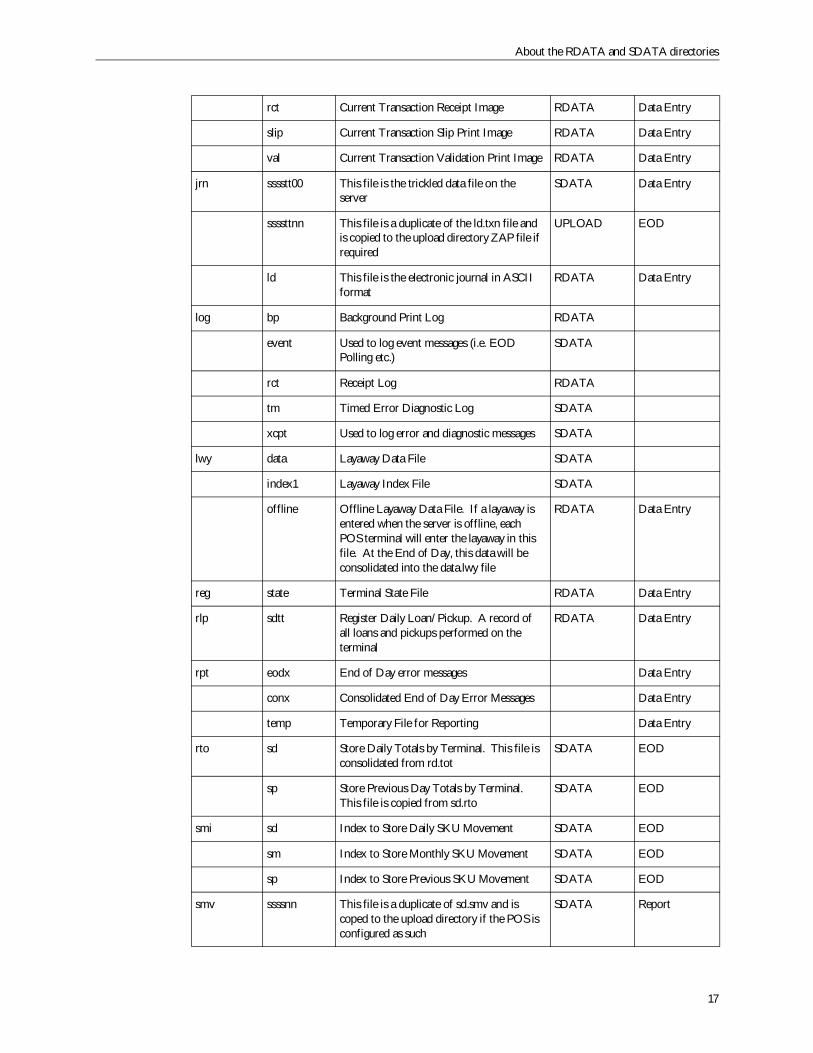
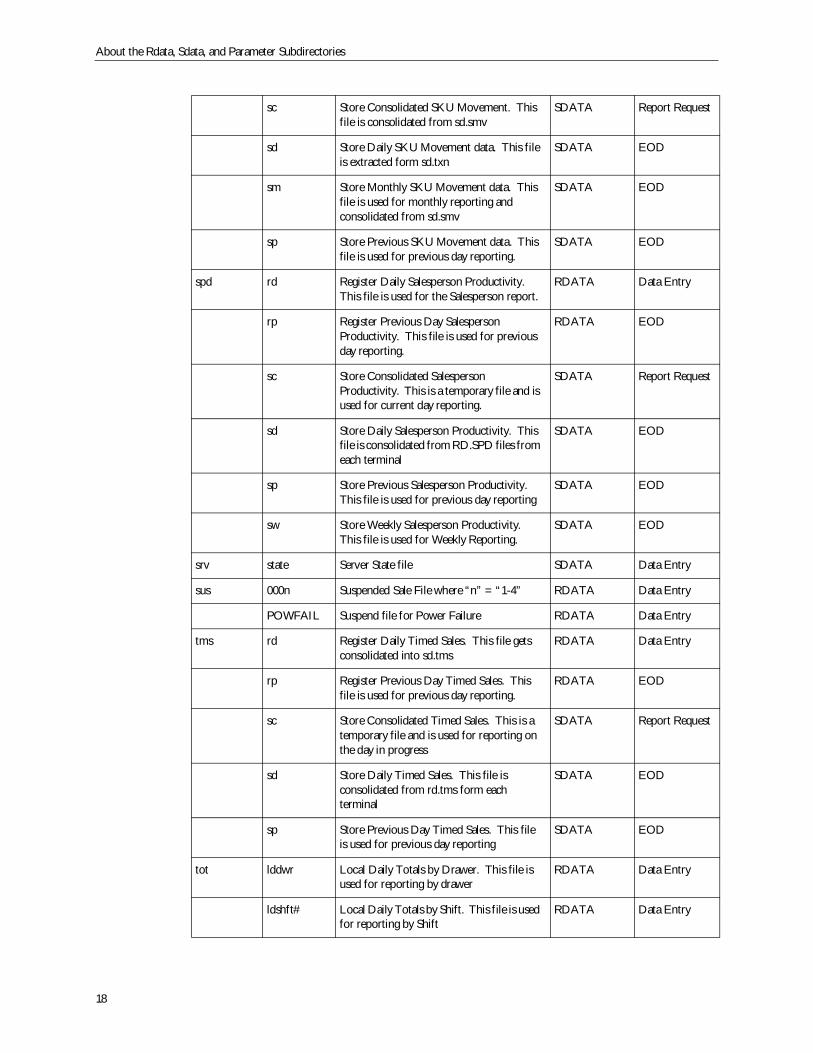
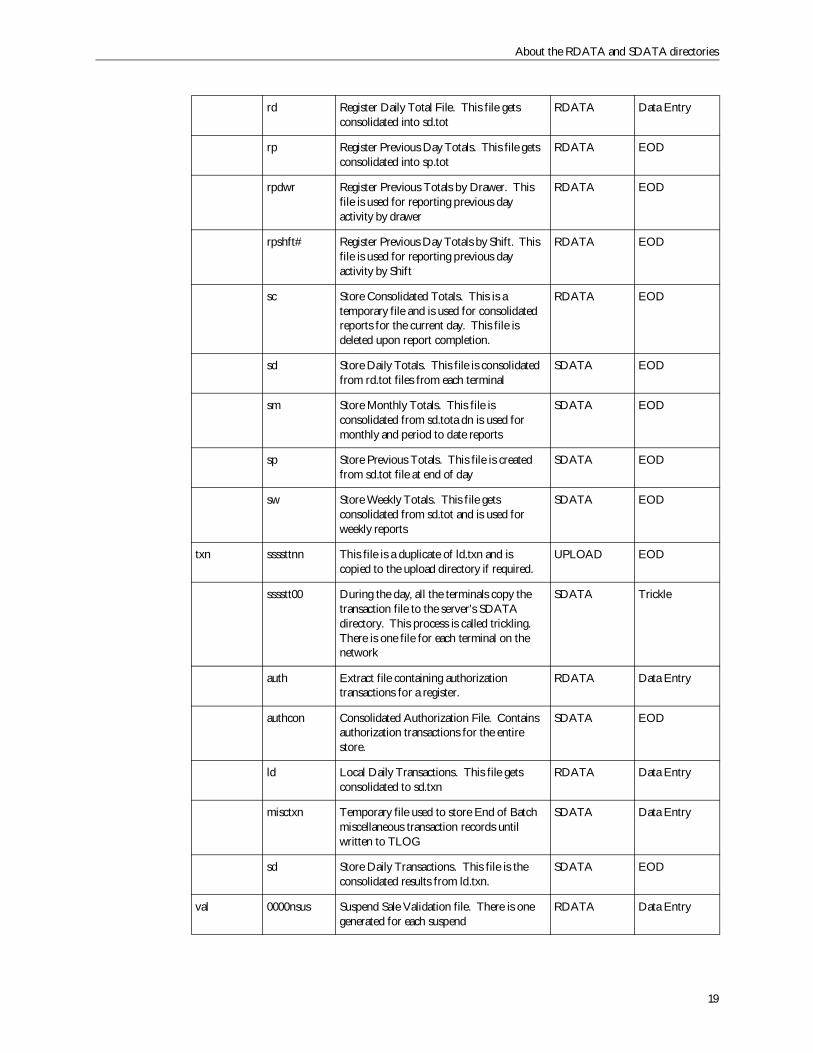
Bringing it all togetherBelow is a list of all current files in RDATA and SDATA organized by extension, where:
ssss is the store number
nn is the sequence number
# is the shift number.
tt is the terminal number
EOD represents the ‘end of day’
Note: In the following table, D/E stands for ‘Data Entry’
Extension File Name Description Resides in Generated at
cds ssssnn This file is a duplicate of sd.cds and iscopied to the upload directory file ifconfigured as such
UPLOAD EOD
sc Store Consolidate Dept by Cashier Totals.This is a temporary file used for current dayreporting.
SDATA By Server atReport Request
sd Store Daily Dept by Cashier Totals. Thisfile is updated during the trickle process.
SDATA Trickle
sp Store Previous Dept by Cashier Totals.This file is used for previous day reporting.
SDATA EOD
sm Store Monthly Dept by Cashier Totals file isused for monthly reporting.
SDATA EOD
cto ssssnn This file is a duplicate of sd.cto and iscopied to the upload directory file ifconfigured as such
UPLOAD EOD
rd Register Daily Totals by Cashier. This filegets consolidated into sd.cto
RDATA Data Entry
rp Register Previous Totals by Cashier. Usedfor previous day reporting
RDATA EOD
sc Store Consolidated Totals by Cashier. Thisis a temporary file used for current dayreporting
SDATA By Server atReport Request
sd Store Daily Totals by Cashier. This file isthe result of consolidation of rd.tot filesfrom each terminal.
SDATA EOD
sp Store Previous Totals by Cashier. This fileis used for previous day reporting
SDATA EOD
dat srveod End of Day History File SDATA EOD
dep rd Register Daily Deposit Summary Log.
This file gets consolidated into sd.dep
RDATA Data Entry
About the Rdata, Sdata, and Parameter Subdirectories
16
rp Register Previous Deposit Summary Log.This file is used for previous day reporting
RDATA EOD
dep sd Store Daily Deposit Summary Log. Thisfile is consolidated from rd.dep files foreach terminal
SDATA EOD
sp Store Previous Deposit Summary Log.
This file is used for previous day reporting.
SDATA EOD
dit rd Register Daily Discount Totals. This filegets consolidated into sd.dit
RDATA Data Entry
rp Register Previous Day Discount Totals.This file is used for previous day reporting.
RDATA EOD
sc Store Consolidated Discount Totals. Thisfile gets consolidated from sd.dit
SDATA Report Request
sd Store Daily Discount Totals. This file isconsolidated from the rd.dit files in eachterminal
SDATA EOD
sm Store Monthly Discount Totals. This file isconsolidated from sd.dit
SDATA EOD
sp Store Previous Day Discount Totals. Thisfile is used for previous day reporting.
SDATA EOD
sw Store Weekly Discount Totals. This file isconsolidated from sd.dit
SDATA EOD
dsm ssssnn This file is a duplicate of sd.dsm and iscoped to the upload directory if configuredas such
UPLOAD EOD
rd Register Daily Department Summary. Thisfile gets consolidated into sd.dsm
RDATA Data Entry
rp Register Previous Day DepartmentSummary. This file is used for previousday reporting.
RDATA EOD
sc Store Consolidated Department Summary.This file is temporary for reporting thecurrent day’s totals
SDATA Report Request
sd Store Daily Department Summary. This fileis used for period end reporting.
SDATA EOD
sm Store Period to Date DepartmentSummary. This file is used for periodreporting.
SDATA EOD
Sp Store Previous Day Department Summary SDATA EOD
dsm sw Store Weekly Department Summary. Thisfile is consolidated from sd.dsm
SDATA EOD
img jrn Current Transaction Journal Image RDATA Data Entry
prevrct Previous Transaction Receipt Image RDATA Data Entry
About the RDATA and SDATA directories
17
rct Current Transaction Receipt Image RDATA Data Entry
slip Current Transaction Slip Print Image RDATA Data Entry
val Current Transaction Validation Print Image RDATA Data Entry
jrn sssstt00 This file is the trickled data file on theserver
SDATA Data Entry
ssssttnn This file is a duplicate of the ld.txn file andis copied to the upload directory ZAP file ifrequired
UPLOAD EOD
ld This file is the electronic journal in ASCIIformat
RDATA Data Entry
log bp Background Print Log RDATA
event Used to log event messages (i.e. EODPolling etc.)
SDATA
rct Receipt Log RDATA
tm Timed Error Diagnostic Log SDATA
xcpt Used to log error and diagnostic messages SDATA
lwy data Layaway Data File SDATA
index1 Layaway Index File SDATA
offline Offline Layaway Data File. If a layaway isentered when the server is offline, eachPOS terminal will enter the layaway in thisfile. At the End of Day, this data will beconsolidated into the data.lwy file
RDATA Data Entry
reg state Terminal State File RDATA Data Entry
rlp sdtt Register Daily Loan/Pickup. A record ofall loans and pickups performed on theterminal
RDATA Data Entry
rpt eodx End of Day error messages Data Entry
conx Consolidated End of Day Error Messages Data Entry
temp Temporary File for Reporting Data Entry
rto sd Store Daily Totals by Terminal. This file isconsolidated from rd.tot
SDATA EOD
sp Store Previous Day Totals by Terminal.This file is copied from sd.rto
SDATA EOD
smi sd Index to Store Daily SKU Movement SDATA EOD
sm Index to Store Monthly SKU Movement SDATA EOD
sp Index to Store Previous SKU Movement SDATA EOD
smv ssssnn This file is a duplicate of sd.smv and iscoped to the upload directory if the POS isconfigured as such
SDATA Report
About the Rdata, Sdata, and Parameter Subdirectories
18
sc Store Consolidated SKU Movement. Thisfile is consolidated from sd.smv
SDATA Report Request
sd Store Daily SKU Movement data. This fileis extracted form sd.txn
SDATA EOD
sm Store Monthly SKU Movement data. Thisfile is used for monthly reporting andconsolidated from sd.smv
SDATA EOD
sp Store Previous SKU Movement data. Thisfile is used for previous day reporting.
SDATA EOD
spd rd Register Daily Salesperson Productivity.This file is used for the Salesperson report.
RDATA Data Entry
rp Register Previous Day SalespersonProductivity. This file is used for previousday reporting.
RDATA EOD
sc Store Consolidated SalespersonProductivity. This is a temporary file and isused for current day reporting.
SDATA Report Request
sd Store Daily Salesperson Productivity. Thisfile is consolidated from RD.SPD files fromeach terminal
SDATA EOD
sp Store Previous Salesperson Productivity.This file is used for previous day reporting
SDATA EOD
sw Store Weekly Salesperson Productivity.This file is used for Weekly Reporting.
SDATA EOD
srv state Server State file SDATA Data Entry
sus 000n Suspended Sale File where “n” = “1-4” RDATA Data Entry
POWFAIL Suspend file for Power Failure RDATA Data Entry
tms rd Register Daily Timed Sales. This file getsconsolidated into sd.tms
RDATA Data Entry
rp Register Previous Day Timed Sales. Thisfile is used for previous day reporting.
RDATA EOD
sc Store Consolidated Timed Sales. This is atemporary file and is used for reporting onthe day in progress
SDATA Report Request
sd Store Daily Timed Sales. This file isconsolidated from rd.tms form eachterminal
SDATA EOD
sp Store Previous Day Timed Sales. This fileis used for previous day reporting
SDATA EOD
tot lddwr Local Daily Totals by Drawer. This file isused for reporting by drawer
RDATA Data Entry
ldshft# Local Daily Totals by Shift. This file is usedfor reporting by Shift
RDATA Data Entry
About the RDATA and SDATA directories
19
rd Register Daily Total File. This file getsconsolidated into sd.tot
RDATA Data Entry
rp Register Previous Day Totals. This file getsconsolidated into sp.tot
RDATA EOD
rpdwr Register Previous Totals by Drawer. Thisfile is used for reporting previous dayactivity by drawer
RDATA EOD
rpshft# Register Previous Day Totals by Shift. Thisfile is used for reporting previous dayactivity by Shift
RDATA EOD
sc Store Consolidated Totals. This is atemporary file and is used for consolidatedreports for the current day. This file isdeleted upon report completion.
RDATA EOD
sd Store Daily Totals. This file is consolidatedfrom rd.tot files from each terminal
SDATA EOD
sm Store Monthly Totals. This file isconsolidated from sd.tota dn is used formonthly and period to date reports
SDATA EOD
sp Store Previous Totals. This file is createdfrom sd.tot file at end of day
SDATA EOD
sw Store Weekly Totals. This file getsconsolidated from sd.tot and is used forweekly reports
SDATA EOD
txn ssssttnn This file is a duplicate of ld.txn and iscopied to the upload directory if required.
UPLOAD EOD
sssstt00 During the day, all the terminals copy thetransaction file to the server’s SDATAdirectory. This process is called trickling.There is one file for each terminal on thenetwork
SDATA Trickle
auth Extract file containing authorizationtransactions for a register.
RDATA Data Entry
authcon Consolidated Authorization File. Containsauthorization transactions for the entirestore.
SDATA EOD
ld Local Daily Transactions. This file getsconsolidated to sd.txn
RDATA Data Entry
misctxn Temporary file used to store End of Batchmiscellaneous transaction records untilwritten to TLOG
SDATA Data Entry
sd Store Daily Transactions. This file is theconsolidated results from ld.txn.
SDATA EOD
val 0000nsus Suspend Sale Validation file. There is onegenerated for each suspend
RDATA Data Entry
About the Rdata, Sdata, and Parameter Subdirectories
20
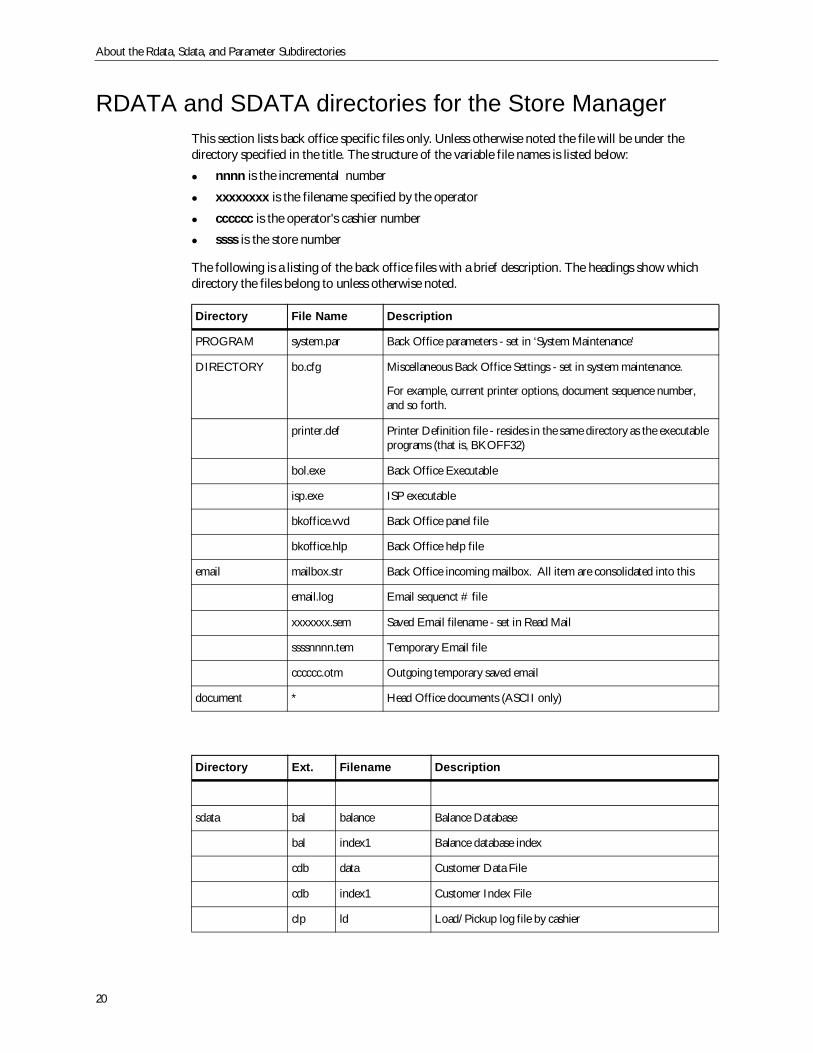
RDATA and SDATA directories for the Store ManagerThis section lists back office specific files only. Unless otherwise noted the file will be under thedirectory specified in the title. The structure of the variable file names is listed below:
nnnn is the incremental number
xxxxxxxx is the filename specified by the operator
cccccc is the operator's cashier number
ssss is the store number
The following is a listing of the back office files with a brief description. The headings show whichdirectory the files belong to unless otherwise noted.
Directory File Name Description
PROGRAM system.par Back Office parameters - set in ‘System Maintenance’
DIRECTORY bo.cfg Miscellaneous Back Office Settings - set in system maintenance.
For example, current printer options, document sequence number,and so forth.
printer.def Printer Definition file - resides in the same directory as the executableprograms (that is, BKOFF32)
bol.exe Back Office Executable
isp.exe ISP executable
bkoffice.vvd Back Office panel file
bkoffice.hlp Back Office help file
email mailbox.str Back Office incoming mailbox. All item are consolidated into this
email.log Email sequenct # file
xxxxxxx.sem Saved Email filename - set in Read Mail
ssssnnnn.tem Temporary Email file
cccccc.otm Outgoing temporary saved email
document * Head Office documents (ASCII only)
Directory Ext. Filename Description
sdata bal balance Balance Database
bal index1 Balance database index
cdb data Customer Data File
cdb index1 Customer Index File
clp ld Load/Pickup log file by cashier
RDATA and SDATA directories for the Store Manager
21
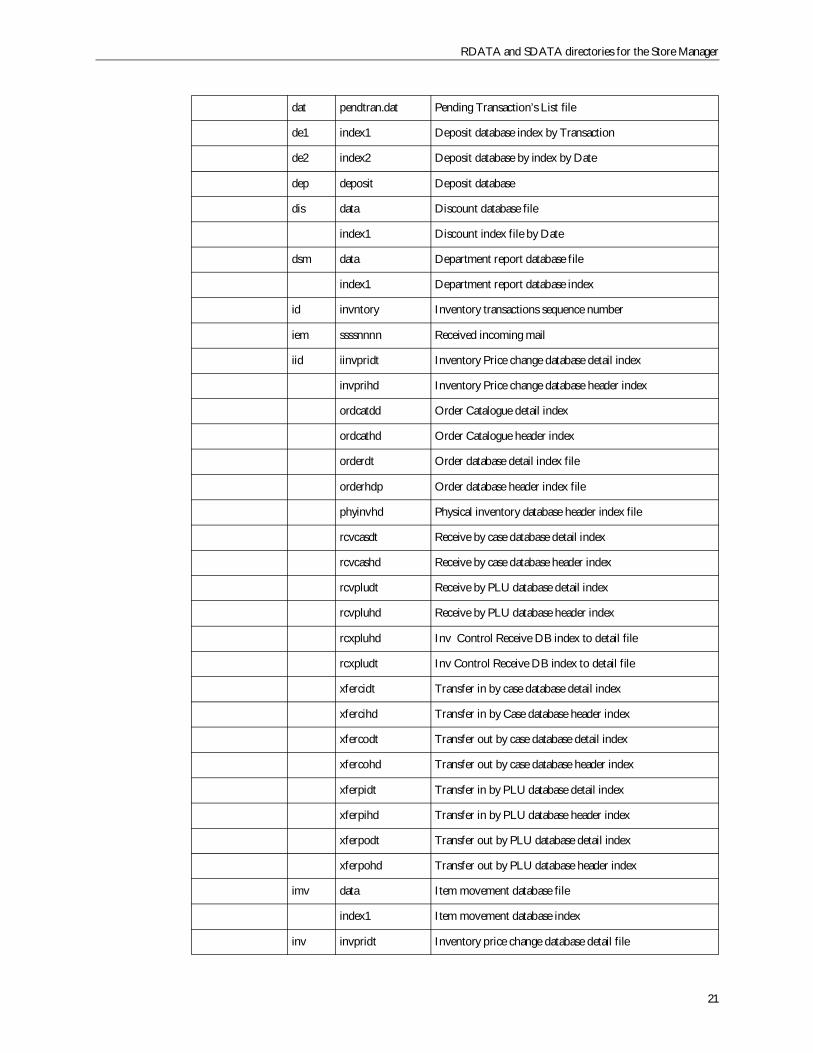
dat pendtran.dat Pending Transaction’s List file
de1 index1 Deposit database index by Transaction
de2 index2 Deposit database by index by Date
dep deposit Deposit database
dis data Discount database file
index1 Discount index file by Date
dsm data Department report database file
index1 Department report database index
id invntory Inventory transactions sequence number
iem ssssnnnn Received incoming mail
iid iinvpridt Inventory Price change database detail index
invprihd Inventory Price change database header index
ordcatdd Order Catalogue detail index
ordcathd Order Catalogue header index
orderdt Order database detail index file
orderhdp Order database header index file
phyinvhd Physical inventory database header index file
rcvcasdt Receive by case database detail index
rcvcashd Receive by case database header index
rcvpludt Receive by PLU database detail index
rcvpluhd Receive by PLU database header index
rcxpluhd Inv Control Receive DB index to detail file
rcxpludt Inv Control Receive DB index to detail file
xfercidt Transfer in by case database detail index
xfercihd Transfer in by Case database header index
xfercodt Transfer out by case database detail index
xfercohd Transfer out by case database header index
xferpidt Transfer in by PLU database detail index
xferpihd Transfer in by PLU database header index
xferpodt Transfer out by PLU database detail index
xferpohd Transfer out by PLU database header index
imv data Item movement database file
index1 Item movement database index
inv invpridt Inventory price change database detail file
About the Rdata, Sdata, and Parameter Subdirectories
22
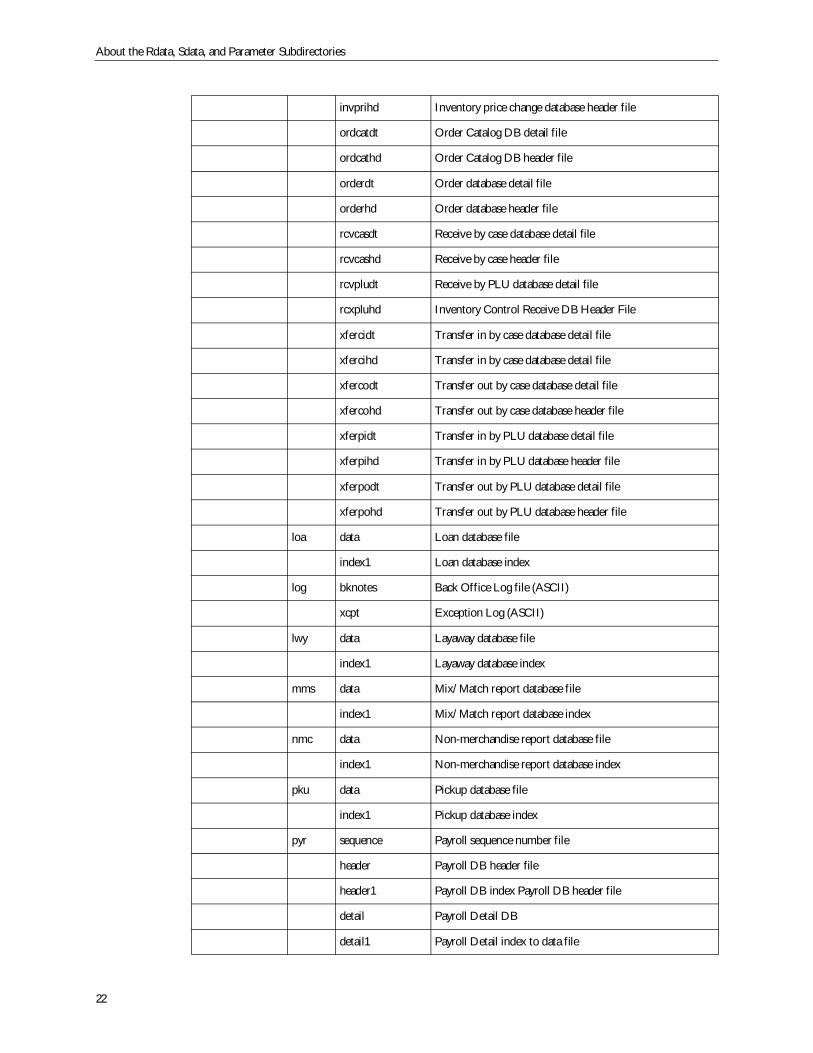
invprihd Inventory price change database header file
ordcatdt Order Catalog DB detail file
ordcathd Order Catalog DB header file
orderdt Order database detail file
orderhd Order database header file
rcvcasdt Receive by case database detail file
rcvcashd Receive by case header file
rcvpludt Receive by PLU database detail file
rcxpluhd Inventory Control Receive DB Header File
xfercidt Transfer in by case database detail file
xfercihd Transfer in by case database detail file
xfercodt Transfer out by case database detail file
xfercohd Transfer out by case database header file
xferpidt Transfer in by PLU database detail file
xferpihd Transfer in by PLU database header file
xferpodt Transfer out by PLU database detail file
xferpohd Transfer out by PLU database header file
loa data Loan database file
index1 Loan database index
log bknotes Back Office Log file (ASCII)
xcpt Exception Log (ASCII)
lwy data Layaway database file
index1 Layaway database index
mms data Mix/Match report database file
index1 Mix/Match report database index
nmc data Non-merchandise report database file
index1 Non-merchandise report database index
pku data Pickup database file
index1 Pickup database index
pyr sequence Payroll sequence number file
header Payroll DB header file
header1 Payroll DB index Payroll DB header file
detail Payroll Detail DB
detail1 Payroll Detail index to data file
PARM directory files
23
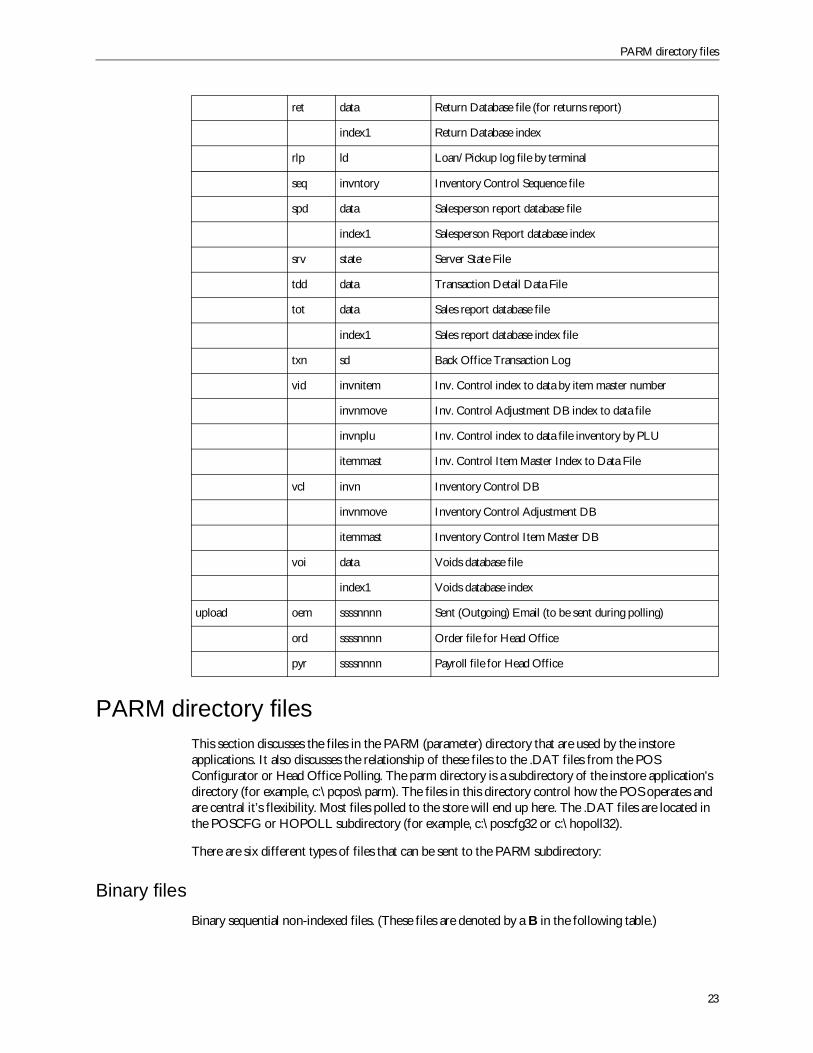
PARM directory filesThis section discusses the files in the PARM (parameter) directory that are used by the instoreapplications. It also discusses the relationship of these files to the .DAT files from the POSConfigurator or Head Office Polling. The parm directory is a subdirectory of the instore application'sdirectory (for example, c:\pcpos\parm). The files in this directory control how the POS operates andare central it’s flexibility. Most files polled to the store will end up here. The .DAT files are located inthe POSCFG or HOPOLL subdirectory (for example, c:\poscfg32 or c:\hopoll32).
There are six different types of files that can be sent to the PARM subdirectory:
Binary filesBinary sequential non-indexed files. (These files are denoted by a B in the following table.)
ret data Return Database file (for returns report)
index1 Return Database index
rlp ld Loan/Pickup log file by terminal
seq invntory Inventory Control Sequence file
spd data Salesperson report database file
index1 Salesperson Report database index
srv state Server State File
tdd data Transaction Detail Data File
tot data Sales report database file
index1 Sales report database index file
txn sd Back Office Transaction Log
vid invnitem Inv. Control index to data by item master number
invnmove Inv. Control Adjustment DB index to data file
invnplu Inv. Control index to data file inventory by PLU
itemmast Inv. Control Item Master Index to Data File
vcl invn Inventory Control DB
invnmove Inventory Control Adjustment DB
itemmast Inventory Control Item Master DB
voi data Voids database file
index1 Voids database index
upload oem ssssnnnn Sent (Outgoing) Email (to be sent during polling)
ord ssssnnnn Order file for Head Office
pyr ssssnnnn Payroll file for Head Office
About the Rdata, Sdata, and Parameter Subdirectories
24
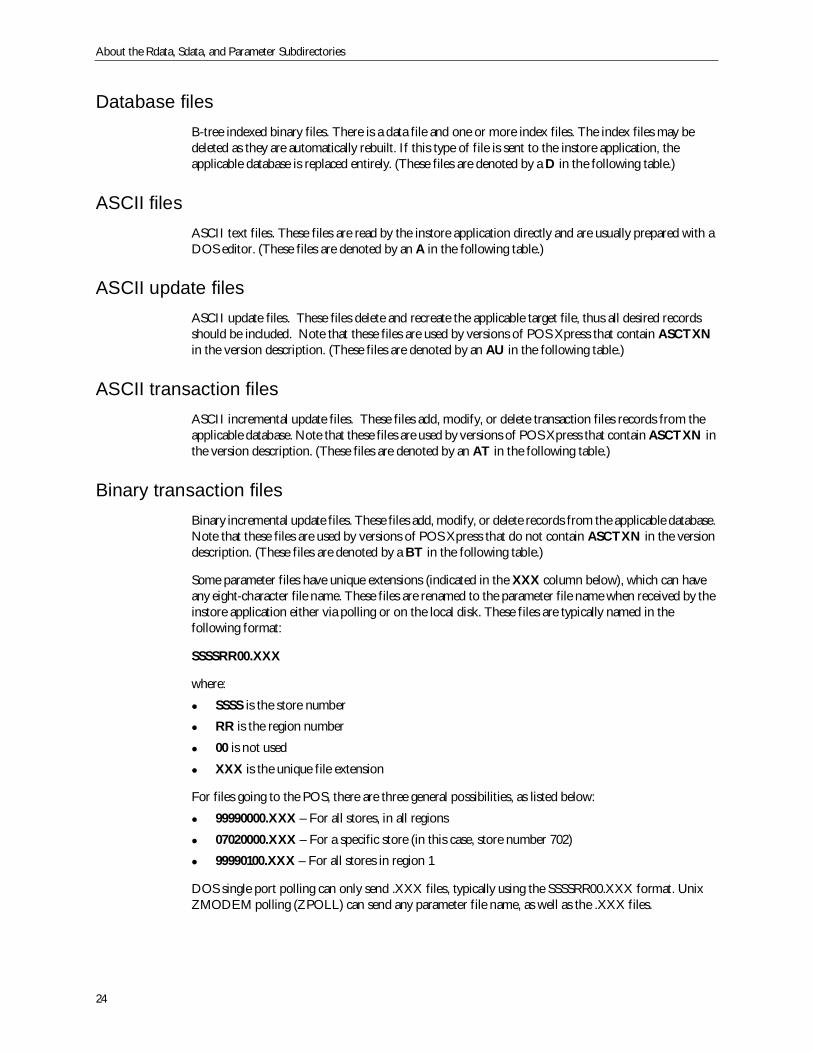
Database filesB-tree indexed binary files. There is a data file and one or more index files. The index files may bedeleted as they are automatically rebuilt. If this type of file is sent to the instore application, theapplicable database is replaced entirely. (These files are denoted by a D in the following table.)
ASCII filesASCII text files. These files are read by the instore application directly and are usually prepared with aDOS editor. (These files are denoted by an A in the following table.)
ASCII update filesASCII update files. These files delete and recreate the applicable target file, thus all desired recordsshould be included. Note that these files are used by versions of POS Xpress that contain ASCTXNin the version description. (These files are denoted by an AU in the following table.)
ASCII transaction filesASCII incremental update files. These files add, modify, or delete transaction files records from theapplicable database. Note that these files are used by versions of POS Xpress that contain ASCTXN inthe version description. (These files are denoted by an AT in the following table.)
Binary transaction filesBinary incremental update files. These files add, modify, or delete records from the applicable database.Note that these files are used by versions of POS Xpress that do not contain ASCTXN in the versiondescription. (These files are denoted by a BT in the following table.)
Some parameter files have unique extensions (indicated in the XXX column below), which can haveany eight-character file name. These files are renamed to the parameter file name when received by theinstore application either via polling or on the local disk. These files are typically named in thefollowing format:
SSSSRR00.XXX
where:
SSSS is the store number
RR is the region number
00 is not used
XXX is the unique file extension
For files going to the POS, there are three general possibilities, as listed below:
99990000.XXX – For all stores, in all regions
07020000.XXX – For a specific store (in this case, store number 702)
99990100.XXX – For all stores in region 1
DOS single port polling can only send .XXX files, typically using the SSSSRR00.XXX format. UnixZMODEM polling (ZPOLL) can send any parameter file name, as well as the .XXX files.
PARM directory files
25
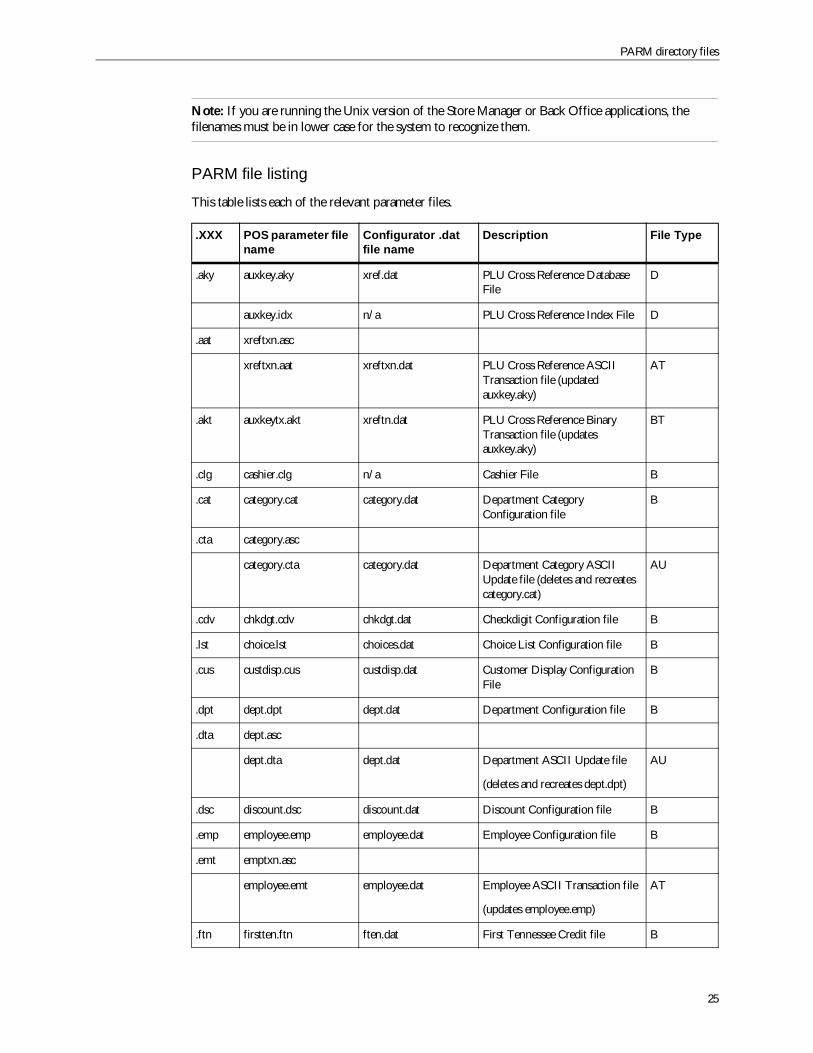
Note: If you are running the Unix version of the Store Manager or Back Office applications, thefilenames must be in lower case for the system to recognize them.
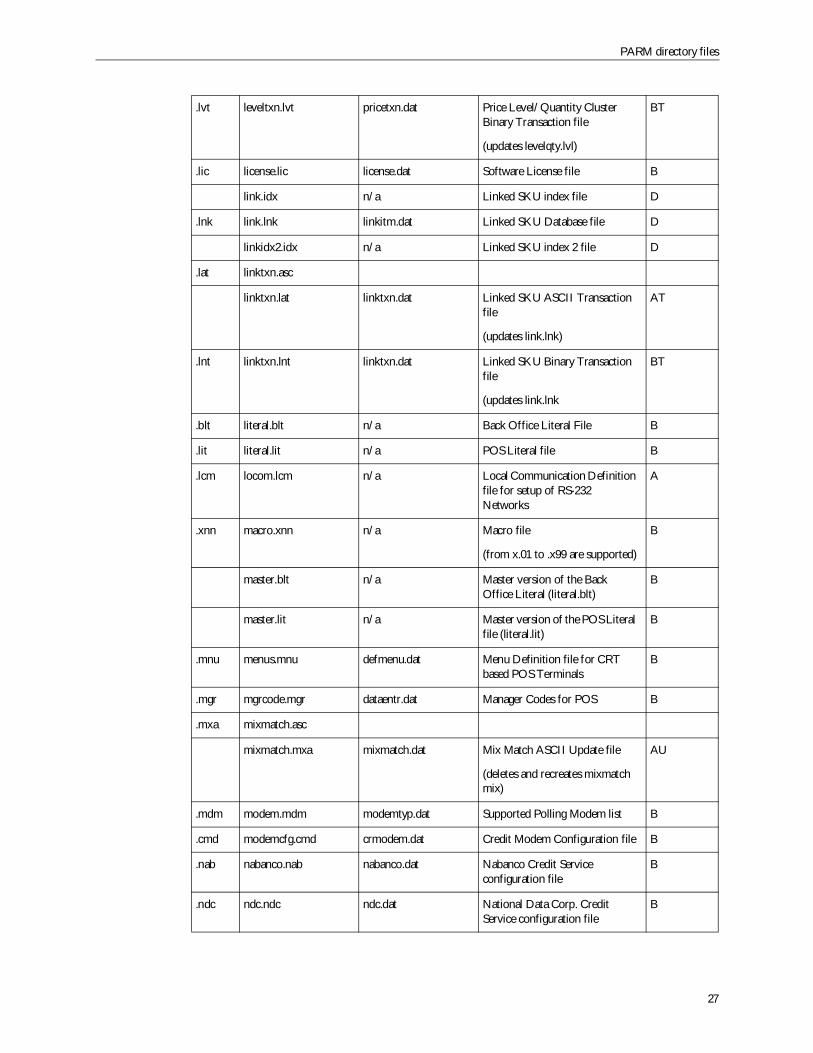
PARM file listing
This table lists each of the relevant parameter files.
.XXX POS parameter filename
Configurator .datfile name
Description File Type
.aky auxkey.aky xref.dat PLU Cross Reference DatabaseFile
D
auxkey.idx n/a PLU Cross Reference Index File D
.aat xreftxn.asc
xreftxn.aat xreftxn.dat PLU Cross Reference ASCIITransaction file (updatedauxkey.aky)
AT
.akt auxkeytx.akt xreftn.dat PLU Cross Reference BinaryTransaction file (updatesauxkey.aky)
BT
.clg cashier.clg n/a Cashier File B
.cat category.cat category.dat Department CategoryConfiguration file
B
.cta category.asc
category.cta category.dat Department Category ASCIIUpdate file (deletes and recreatescategory.cat)
AU
.cdv chkdgt.cdv chkdgt.dat Checkdigit Configuration file B
.lst choice.lst choices.dat Choice List Configuration file B
.cus custdisp.cus custdisp.dat Customer Display ConfigurationFile
B
.dpt dept.dpt dept.dat Department Configuration file B
.dta dept.asc
dept.dta dept.dat Department ASCII Update file
(deletes and recreates dept.dpt)
AU
.dsc discount.dsc discount.dat Discount Configuration file B
.emp employee.emp employee.dat Employee Configuration file B
.emt emptxn.asc
employee.emt employee.dat Employee ASCII Transaction file
(updates employee.emp)
AT
.ftn firstten.ftn ften.dat First Tennessee Credit file B
About the Rdata, Sdata, and Parameter Subdirectories
26
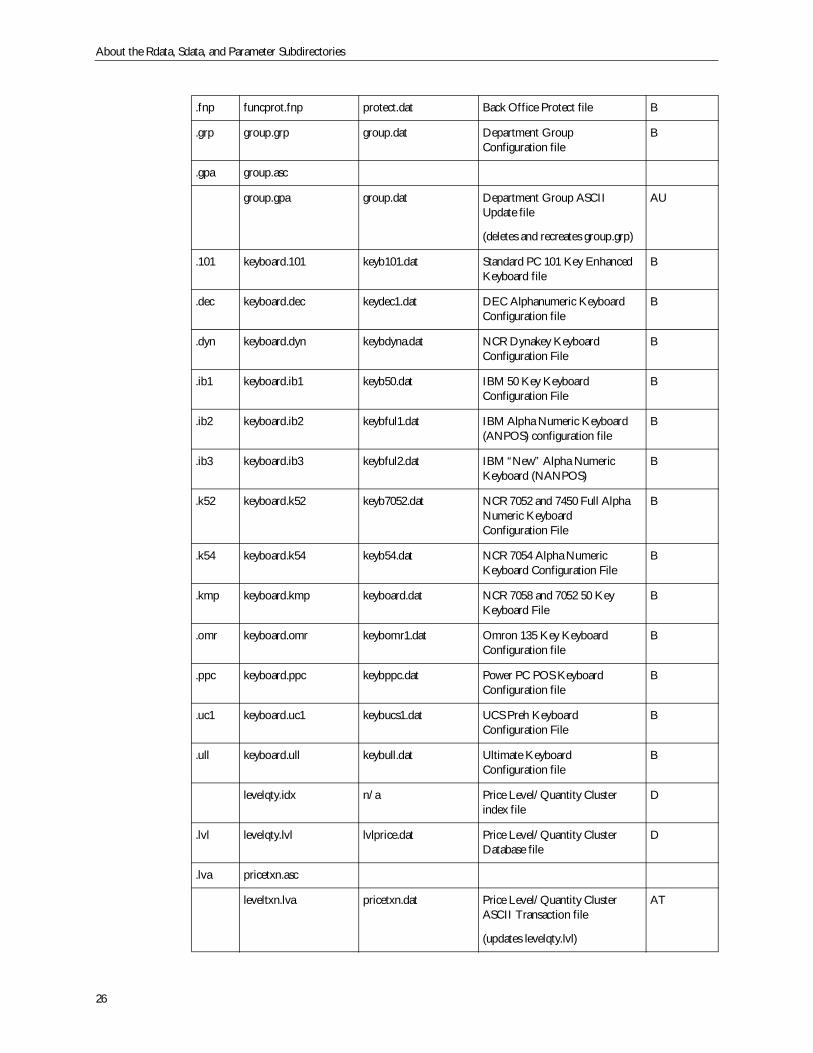
.fnp funcprot.fnp protect.dat Back Office Protect file B
.grp group.grp group.dat Department GroupConfiguration file
B
.gpa group.asc
group.gpa group.dat Department Group ASCIIUpdate file
(deletes and recreates group.grp)
AU
.101 keyboard.101 keyb101.dat Standard PC 101 Key EnhancedKeyboard file
B
.dec keyboard.dec keydec1.dat DEC Alphanumeric KeyboardConfiguration file
B
.dyn keyboard.dyn keybdyna.dat NCR Dynakey KeyboardConfiguration File
B
.ib1 keyboard.ib1 keyb50.dat IBM 50 Key KeyboardConfiguration File
B
.ib2 keyboard.ib2 keybful1.dat IBM Alpha Numeric Keyboard(ANPOS) configuration file
B
.ib3 keyboard.ib3 keybful2.dat IBM “New” Alpha NumericKeyboard (NANPOS)
B
.k52 keyboard.k52 keyb7052.dat NCR 7052 and 7450 Full AlphaNumeric KeyboardConfiguration File
B
.k54 keyboard.k54 keyb54.dat NCR 7054 Alpha NumericKeyboard Configuration File
B
.kmp keyboard.kmp keyboard.dat NCR 7058 and 7052 50 KeyKeyboard File
B
.omr keyboard.omr keybomr1.dat Omron 135 Key KeyboardConfiguration file
B
.ppc keyboard.ppc keybppc.dat Power PC POS KeyboardConfiguration file
B
.uc1 keyboard.uc1 keybucs1.dat UCS Preh KeyboardConfiguration File
B
.ull keyboard.ull keybull.dat Ultimate KeyboardConfiguration file
B
levelqty.idx n/a Price Level/Quantity Clusterindex file
D
.lvl levelqty.lvl lvlprice.dat Price Level/Quantity ClusterDatabase file
D
.lva pricetxn.asc
leveltxn.lva pricetxn.dat Price Level/Quantity ClusterASCII Transaction file
(updates levelqty.lvl)
AT
PARM directory files
27
.lvt leveltxn.lvt pricetxn.dat Price Level/Quantity ClusterBinary Transaction file
(updates levelqty.lvl)
BT
.lic license.lic license.dat Software License file B
link.idx n/a Linked SKU index file D
.lnk link.lnk linkitm.dat Linked SKU Database file D
linkidx2.idx n/a Linked SKU index 2 file D
.lat linktxn.asc
linktxn.lat linktxn.dat Linked SKU ASCII Transactionfile
(updates link.lnk)
AT
.lnt linktxn.lnt linktxn.dat Linked SKU Binary Transactionfile
(updates link.lnk
BT
.blt literal.blt n/a Back Office Literal File B
.lit literal.lit n/a POS Literal file B
.lcm locom.lcm n/a Local Communication Definitionfile for setup of RS-232Networks
A
.xnn macro.xnn n/a Macro file
(from x.01 to .x99 are supported)
B
master.blt n/a Master version of the BackOffice Literal (literal.blt)
B
master.lit n/a Master version of the POS Literalfile (literal.lit)
B
.mnu menus.mnu defmenu.dat Menu Definition file for CRTbased POS Terminals
B
.mgr mgrcode.mgr dataentr.dat Manager Codes for POS B
.mxa mixmatch.asc
mixmatch.mxa mixmatch.dat Mix Match ASCII Update file
(deletes and recreates mixmatchmix)
AU
.mdm modem.mdm modemtyp.dat Supported Polling Modem list B
.cmd modemcfg.cmd crmodem.dat Credit Modem Configuration file B
.nab nabanco.nab nabanco.dat Nabanco Credit Serviceconfiguration file
B
.ndc ndc.ndc ndc.dat National Data Corp. CreditService configuration file
B
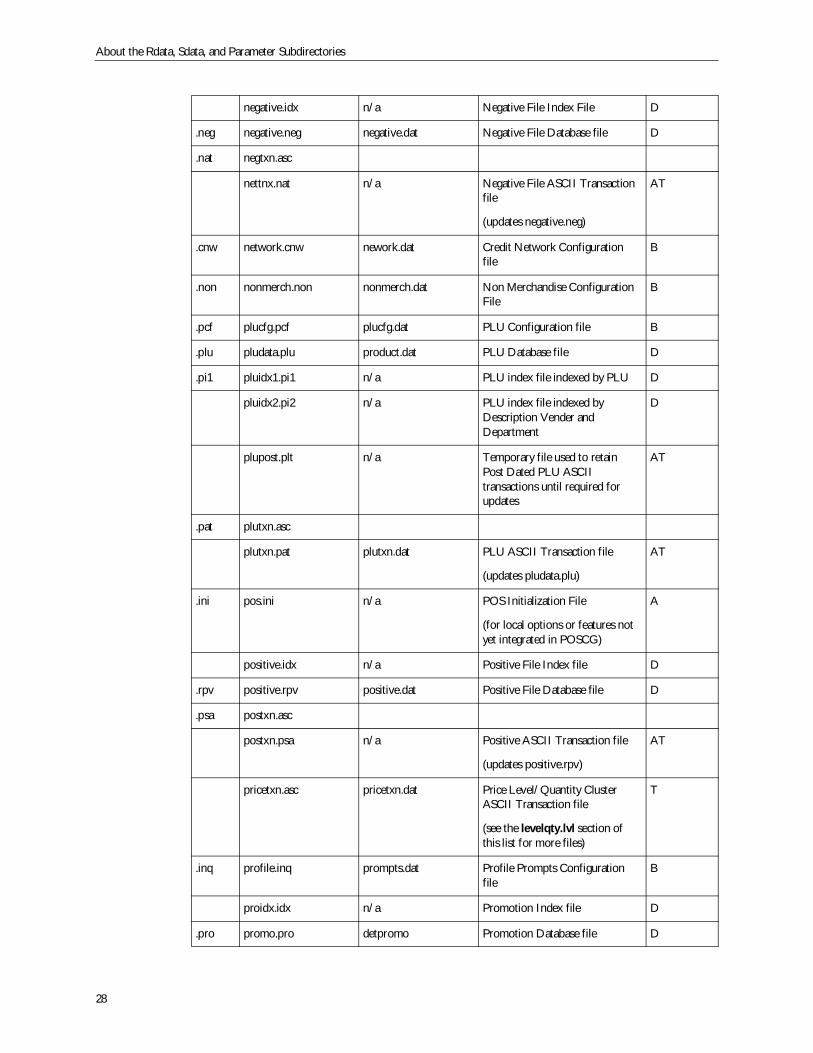
About the Rdata, Sdata, and Parameter Subdirectories
28
negative.idx n/a Negative File Index File D
.neg negative.neg negative.dat Negative File Database file D
.nat negtxn.asc
nettnx.nat n/a Negative File ASCII Transactionfile
(updates negative.neg)
AT
.cnw network.cnw nework.dat Credit Network Configurationfile
B
.non nonmerch.non nonmerch.dat Non Merchandise ConfigurationFile
B
.pcf plucfg.pcf plucfg.dat PLU Configuration file B
.plu pludata.plu product.dat PLU Database file D
.pi1 pluidx1.pi1 n/a PLU index file indexed by PLU D
pluidx2.pi2 n/a PLU index file indexed byDescription Vender andDepartment
D
plupost.plt n/a Temporary file used to retainPost Dated PLU ASCIItransactions until required forupdates
AT
.pat plutxn.asc
plutxn.pat plutxn.dat PLU ASCII Transaction file
(updates pludata.plu)
AT
.ini pos.ini n/a POS Initialization File
(for local options or features notyet integrated in POSCG)
A
positive.idx n/a Positive File Index file D
.rpv positive.rpv positive.dat Positive File Database file D
.psa postxn.asc
postxn.psa n/a Positive ASCII Transaction file
(updates positive.rpv)
AT
pricetxn.asc pricetxn.dat Price Level/Quantity ClusterASCII Transaction file
(see the levelqty.lvl section ofthis list for more files)
T
.inq profile.inq prompts.dat Profile Prompts Configurationfile
B
proidx.idx n/a Promotion Index file D
.pro promo.pro detpromo Promotion Database file D
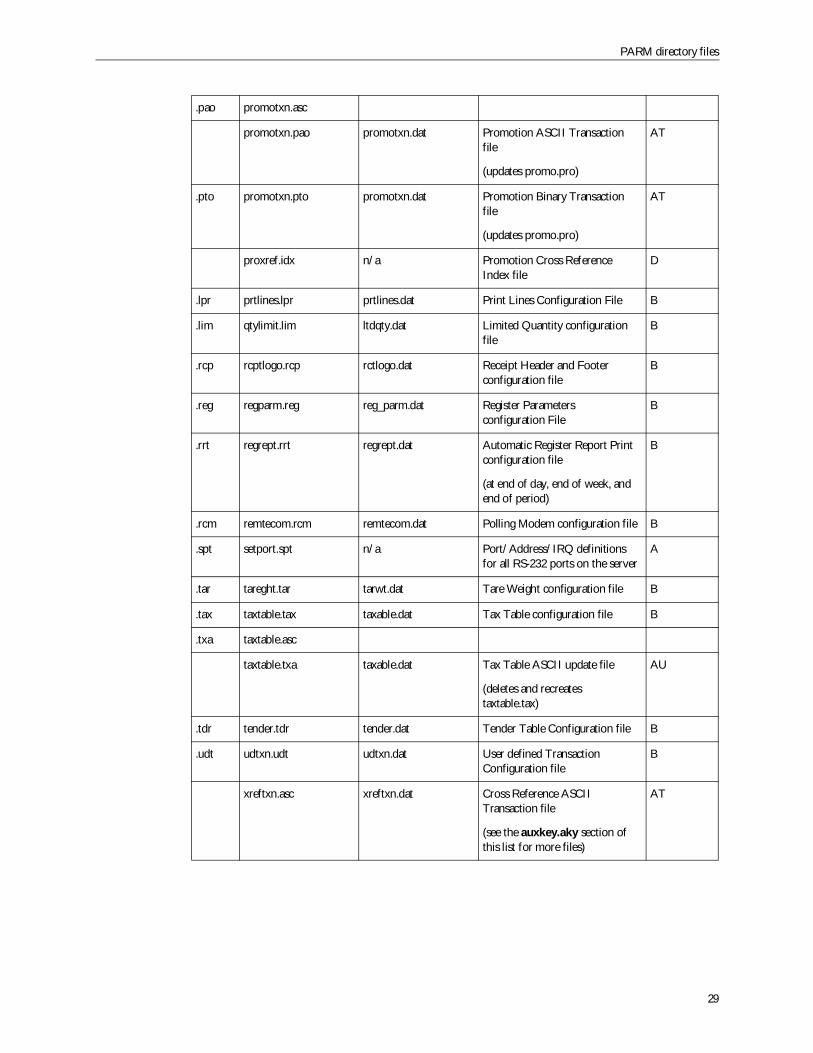
PARM directory files
29
.pao promotxn.asc
promotxn.pao promotxn.dat Promotion ASCII Transactionfile
(updates promo.pro)
AT
.pto promotxn.pto promotxn.dat Promotion Binary Transactionfile
(updates promo.pro)
AT
proxref.idx n/a Promotion Cross ReferenceIndex file
D
.lpr prtlines.lpr prtlines.dat Print Lines Configuration File B
.lim qtylimit.lim ltdqty.dat Limited Quantity configurationfile
B
.rcp rcptlogo.rcp rctlogo.dat Receipt Header and Footerconfiguration file
B
.reg regparm.reg reg_parm.dat Register Parametersconfiguration File
B
.rrt regrept.rrt regrept.dat Automatic Register Report Printconfiguration file
(at end of day, end of week, andend of period)
B
.rcm remtecom.rcm remtecom.dat Polling Modem configuration file B
.spt setport.spt n/a Port/Address/IRQ definitionsfor all RS-232 ports on the server
A
.tar tareght.tar tarwt.dat Tare Weight configuration file B
.tax taxtable.tax taxable.dat Tax Table configuration file B
.txa taxtable.asc
taxtable.txa taxable.dat Tax Table ASCII update file
(deletes and recreatestaxtable.tax)
AU
.tdr tender.tdr tender.dat Tender Table Configuration file B
.udt udtxn.udt udtxn.dat User defined TransactionConfiguration file
B
xreftxn.asc xreftxn.dat Cross Reference ASCIITransaction file
(see the auxkey.aky section ofthis list for more files)
AT

About the Rdata, Sdata, and Parameter Subdirectories
30
31
3TLOG Data Capture Formats
This section contains a comprehensive listing of the transaction log (TLOG) data capture recordformats, file types, and additional information type formats.
TGM security libraryTo comply with recent privacy legislation which outlines a new policy for the electronic managementof personal information, encrypted versions of any records which capture and transmit a customer’spersonal information have been developed. In most cases, specific fields containing personalinformation were extended to handle the increased field size required for encryption. In all cases,non-encrypted versions of the record formats are still available for users who are not bound by thislegislation or who cannot modify their transaction record formats in tandem with this release.
The following is a list of encryption-related TLOG record formats in TGM:
Customer record formats:
A new record type, CA – Customer administration record type 1 with encryption, hasbeen added (see “Record type CA: Encrypted customer administration record type 1” onpage 52 for details). This is the encrypted version of record type C1.
A new record type, CB – Customer administration record type 2 with encryption, hasbeen added (see “Record type CB: Encrypted customer administration record type 2” onpage 53 for details). This is the encrypted version of record type C2.
A new record type, CD – Customer administration record type 4 with encryption, hasbeen added (see “Record type CD: Encrypted customer administration record type 4” onpage 54 for details). This is the encrypted version of record type C4.
A new record type, CE – Customer administration record type 5 with encryption, hasbeen added (see “Record type CE: Encrypted customer administration record type 5” onpage 54 for details). This is the encrypted version of record type C5.
A new record type, CF – Customer administration record type 6 with encryption, hasbeen added (see “Record type CF: Encrypted customer administration record type 6” onpage 55for details). This is the encrypted version of record type C6.
Profile prompt response record format:
A new record type, PE – Profile prompt response record with encryption, has been added(see “Record type PE: Encrypted profile prompt response record” on page 51 for details).This is the encrypted version of record type PF.
Authorization record formats:
A new record type, AA – Authorization record (for credit and debit) with encryption, hasbeen added (see “Record type AA: Encrypted authorization record (for credit and debit)” onpage 69 for details). This is the encrypted version of record type A.
TLOG Data Capture Formats
32
A new record type, AC – Authorization record (for credit and debit) with extendedamount fields with encryption, has been added (see “Record type AC: Encryptedauthorization record with ext amt fields” on page 72 for details). This is the encrypted versionof record type A3.
Tender record formats:
A new record type, PN – Method of payment (tendering) with encryption, has beenadded (see “Record type PN: Encrypted method of payment (tendering)” on page 65 fordetails). This is the encrypted version of record type P.
A new record type, PC – Method of payment (tendering) with extended amount fieldswith encryption, has been added (see “Record type PC: Encrypted method of payment(tendering) with ext amt fields” on page 67 for details). This is the encrypted version of recordtype P3.
Non-merchandise records:
A new record type, NA - Non-merchandise sale record with encryption, has been added(see “Record type NA: Encrypted non-merchandise sale record” on page 45 for details). Thisis the encrypted version of record type N.
A new record type, NB - Non-merchandise sale record with extended fields withencryption, has been added (see “Record type NB: Encrypted non-merchandise sale recordwith extended fields” on page 49 for details). This is the encrypted version of record type N2.
Supporting multiple encryption keysYour system can safeguard information such as customer names and credit card numbers throughprocesses which encrypt or mask sensitive data as it is transmitted from the POS client to the serverand beyond, or while it is stored in TLogs, journals or databases. You can define specific parameterswhich control aspects of these processes such as which encryption key to activate when several keysare defined, or which portion of data in a string of data should be masked.
TGM supports the use of multiple encryption keys through a behind-the-scenes security module. Thismodule maintains a library of secret keys and allows the active secret encryption key to be changed atany time.
How it works
This multiple keys design is based on the assumption that there is only one key per transaction and thatit cannot be changed during the transaction. The key index used to encrypt the Tlog record should bestored in the same Tlog record. The key index ID is stored in the header of the Tlog record and is usedto encrypt and decrypt the Tlog record. If the key index field is empty, the last recent key will be usedto encrypt and decrypt the Tlog record. A value of -1 in the key index field indicates that no encryptionor decryption is needed.
When an active secret key changes, a miscellaneous Tlog record is created and serves as an indicator tothird party applications processing Tlog data. If customer data is encrypted, the record types CA, CB,CD, CE, and CF are generated. See “TGM security library” on page 31 for details.
TLOG data record typesThe CVTLOG utility is used to create the ASCII version of the TLOG from the *.txn files. TheseASCII files (both TXN and TOTALS) can be created directly on the fly by using the appropriate flagsin the POS.ini file.

Transaction types
33
POS data records can have fixed or variable record lengths and are terminated by carriage return/linefeed. The first 48 bytes are the same on all records. This is referred to as the header record. All numericfields are left zero-filled and all alpha and alpha/numeric fields are right blank-filled. The record lengthif using fixed records is 148 bytes.
Transaction typesType Description
A Authorization Record
AA Authorization Record with encryption
AC Authorization Record with extended amount fields with encryption
A2 Authorization Record (Part 2)
A3 Authorization Record with extended amount fields
A4 Authorization Record (Part 2) with extended amount fields
A5 Authorization Record (Part 3)
AE Authorization Record with extended amount fields with encryption
AR Refund Authorization Record
B POS Deposit Tender Record
B2 BO Deposit Tender Record
B3 POS Deposit Tender Record with extended amount fields
B4 BO Deposit Tender Record with extended amount fields
CA Customer Admin Record Type 1 with encryption
CB Customer Admin Record Type 2 with encryption
CD Long Customer Administration Record (Part 2) with encryption
CE Long Customer Administration Record (Part 3) with encryption
CF Long Customer Administration Record (Part 4) with encryption
C1 Customer Admin Record Type 1
C2 Customer Admin Record Type 2
C3 Long Customer Administration Record (Part 1)
C4 Long Customer Administration Record (Part 2)
C5 Long Customer Administration Record (Part 3)
C6 Long Customer Administration Record (Part 4)
D Discount Record
D1 Discount Record with Transaction Discount Pro-rated
D3 Discount Record with extended amount fields
D4 Discount Record with Transaction Discouhnt Pro-rated with extended amount fields
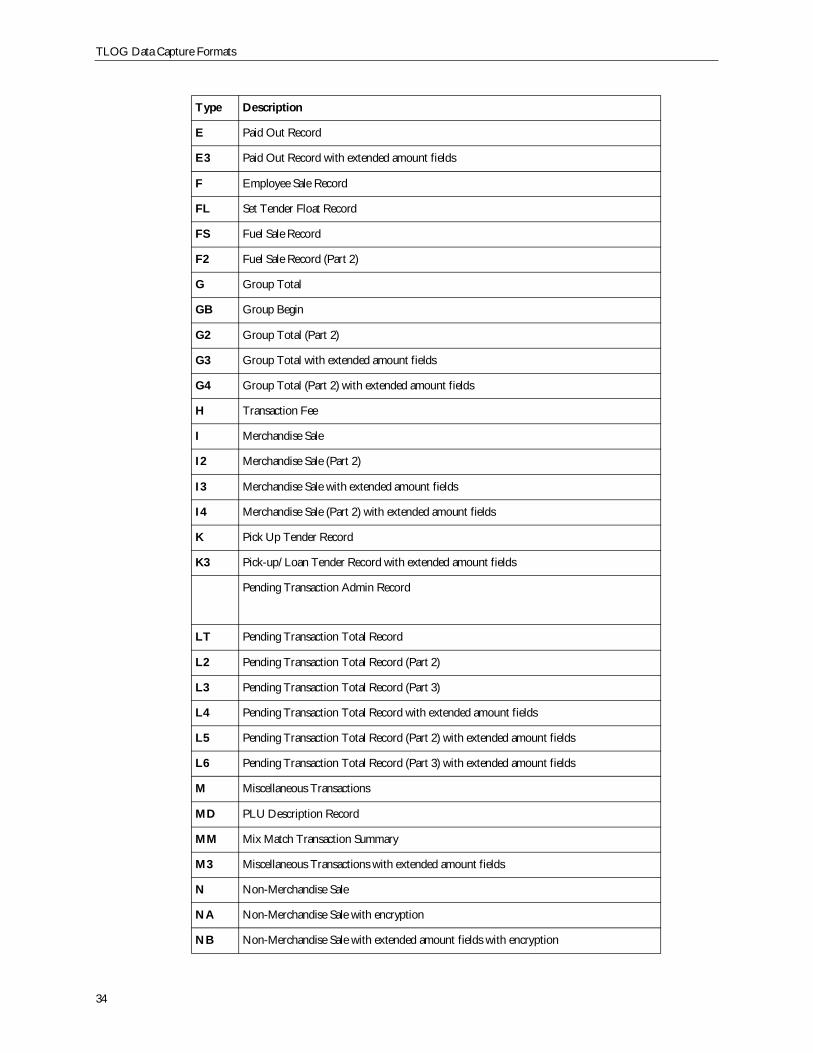
TLOG Data Capture Formats
34
E Paid Out Record
E3 Paid Out Record with extended amount fields
F Employee Sale Record
FL Set Tender Float Record
FS Fuel Sale Record
F2 Fuel Sale Record (Part 2)
G Group Total
GB Group Begin
G2 Group Total (Part 2)
G3 Group Total with extended amount fields
G4 Group Total (Part 2) with extended amount fields
H Transaction Fee
I Merchandise Sale
I2 Merchandise Sale (Part 2)
I3 Merchandise Sale with extended amount fields
I4 Merchandise Sale (Part 2) with extended amount fields
K Pick Up Tender Record
K3 Pick-up/Loan Tender Record with extended amount fields
Pending Transaction Admin Record
LT Pending Transaction Total Record
L2 Pending Transaction Total Record (Part 2)
L3 Pending Transaction Total Record (Part 3)
L4 Pending Transaction Total Record with extended amount fields
L5 Pending Transaction Total Record (Part 2) with extended amount fields
L6 Pending Transaction Total Record (Part 3) with extended amount fields
M Miscellaneous Transactions
MD PLU Description Record
MM Mix Match Transaction Summary
M3 Miscellaneous Transactions with extended amount fields
N Non-Merchandise Sale
NA Non-Merchandise Sale with encryption
NB Non-Merchandise Sale with extended amount fields with encryption
Type Description
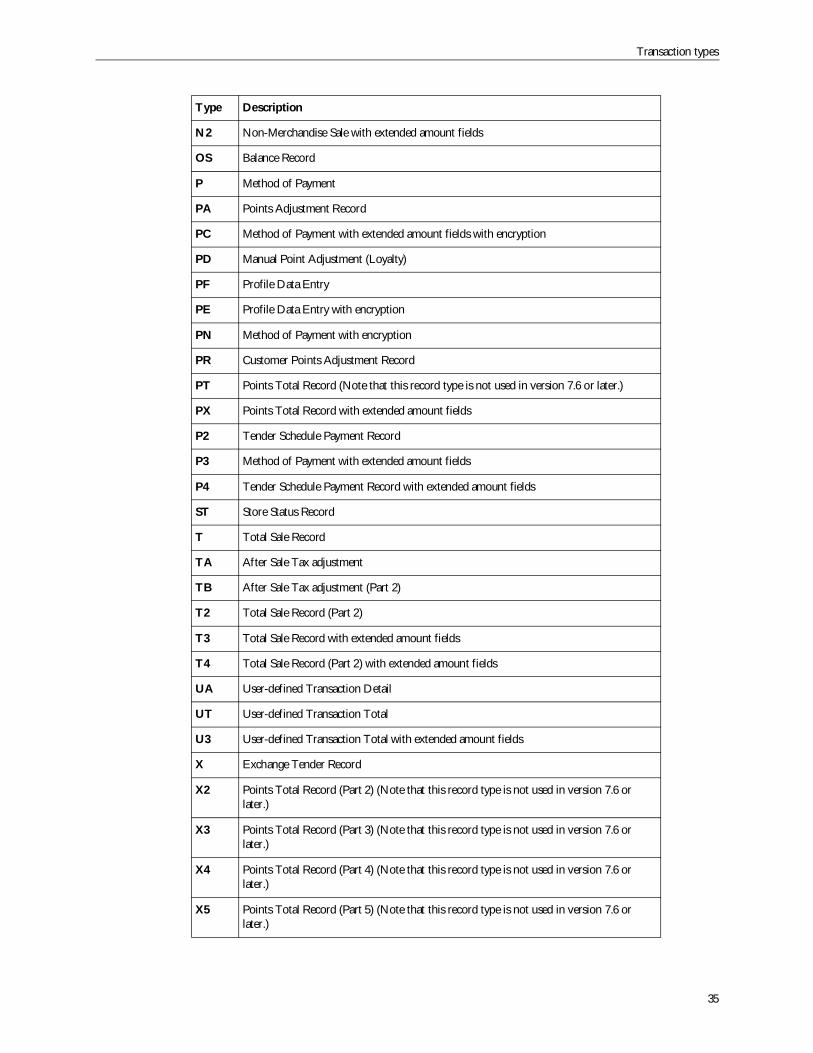
Transaction types
35
N2 Non-Merchandise Sale with extended amount fields
OS Balance Record
P Method of Payment
PA Points Adjustment Record
PC Method of Payment with extended amount fields with encryption
PD Manual Point Adjustment (Loyalty)
PF Profile Data Entry
PE Profile Data Entry with encryption
PN Method of Payment with encryption
PR Customer Points Adjustment Record
PT Points Total Record (Note that this record type is not used in version 7.6 or later.)
PX Points Total Record with extended amount fields
P2 Tender Schedule Payment Record
P3 Method of Payment with extended amount fields
P4 Tender Schedule Payment Record with extended amount fields
ST Store Status Record
T Total Sale Record
TA After Sale Tax adjustment
TB After Sale Tax adjustment (Part 2)
T2 Total Sale Record (Part 2)
T3 Total Sale Record with extended amount fields
T4 Total Sale Record (Part 2) with extended amount fields
UA User-defined Transaction Detail
UT User-defined Transaction Total
U3 User-defined Transaction Total with extended amount fields
X Exchange Tender Record
X2 Points Total Record (Part 2) (Note that this record type is not used in version 7.6 orlater.)
X3 Points Total Record (Part 3) (Note that this record type is not used in version 7.6 orlater.)
X4 Points Total Record (Part 4) (Note that this record type is not used in version 7.6 orlater.)
X5 Points Total Record (Part 5) (Note that this record type is not used in version 7.6 orlater.)
Type Description

TLOG Data Capture Formats
36
0 Payroll Record
1 Receiving Records
1R Receiving Record (Part2)
2 Transfer Records
3 Purchase Order Header Records
4 Email Records
5 External Download Data
7 Price Change Records
8 Inventory Counts
9 Inventory Special Notes
10 Manual Inventory Adjustments
Type Description
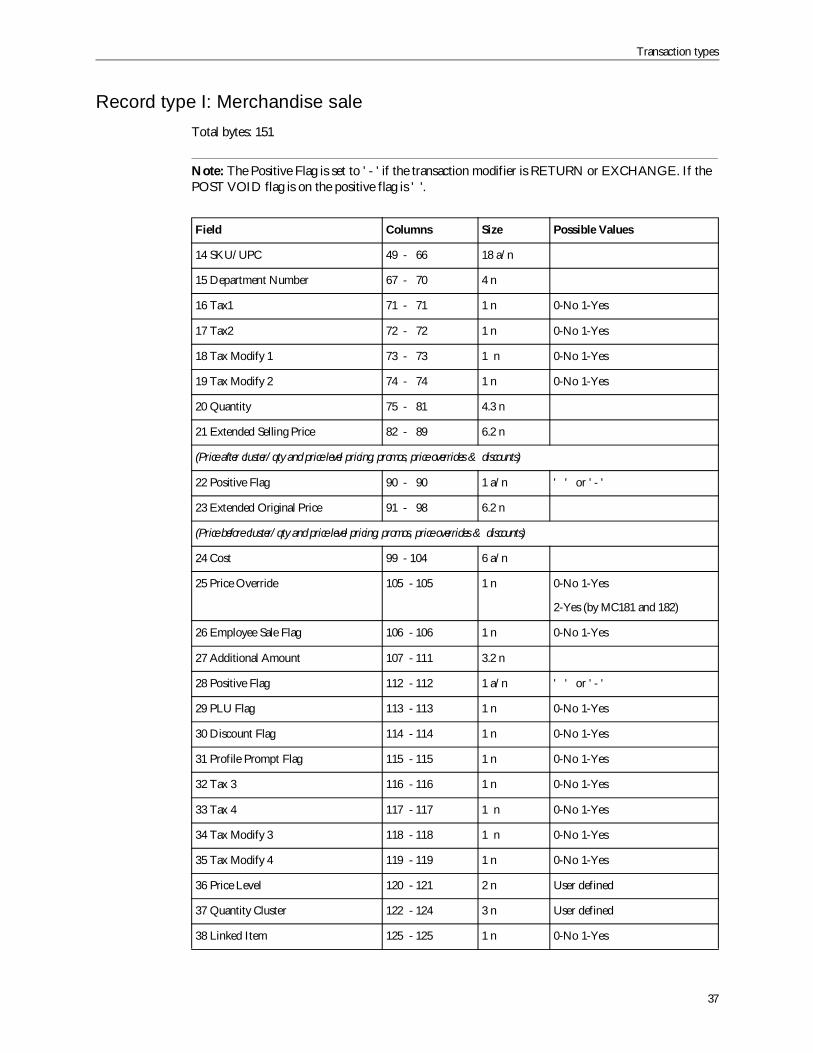
Transaction types
37
Record type I: Merchandise saleTotal bytes: 151
Note: The Positive Flag is set to ' - ' if the transaction modifier is RETURN or EXCHANGE. If thePOST VOID flag is on the positive flag is ' '.
Field Columns Size Possible Values
14 SKU/UPC 49 - 66 18 a/n
15 Department Number 67 - 70 4 n
16 Tax1 71 - 71 1 n 0-No 1-Yes
17 Tax2 72 - 72 1 n 0-No 1-Yes
18 Tax Modify 1 73 - 73 1 n 0-No 1-Yes
19 Tax Modify 2 74 - 74 1 n 0-No 1-Yes
20 Quantity 75 - 81 4.3 n
21 Extended Selling Price 82 - 89 6.2 n
(Price after cluster/qty and price level pricing, promos, price overrides & discounts)
22 Positive Flag 90 - 90 1 a/n ' ' or ' - '
23 Extended Original Price 91 - 98 6.2 n
(Price before cluster/qty and price level pricing, promos, price overrides & discounts)
24 Cost 99 - 104 6 a/n
25 Price Override 105 - 105 1 n 0-No 1-Yes
2-Yes (by MC181 and 182)
26 Employee Sale Flag 106 - 106 1 n 0-No 1-Yes
27 Additional Amount 107 - 111 3.2 n
28 Positive Flag 112 - 112 1 a/n ' ' or ' - '
29 PLU Flag 113 - 113 1 n 0-No 1-Yes
30 Discount Flag 114 - 114 1 n 0-No 1-Yes
31 Profile Prompt Flag 115 - 115 1 n 0-No 1-Yes
32 Tax 3 116 - 116 1 n 0-No 1-Yes
33 Tax 4 117 - 117 1 n 0-No 1-Yes
34 Tax Modify 3 118 - 118 1 n 0-No 1-Yes
35 Tax Modify 4 119 - 119 1 n 0-No 1-Yes
36 Price Level 120 - 121 2 n User defined
37 Quantity Cluster 122 - 124 3 n User defined
38 Linked Item 125 - 125 1 n 0-No 1-Yes
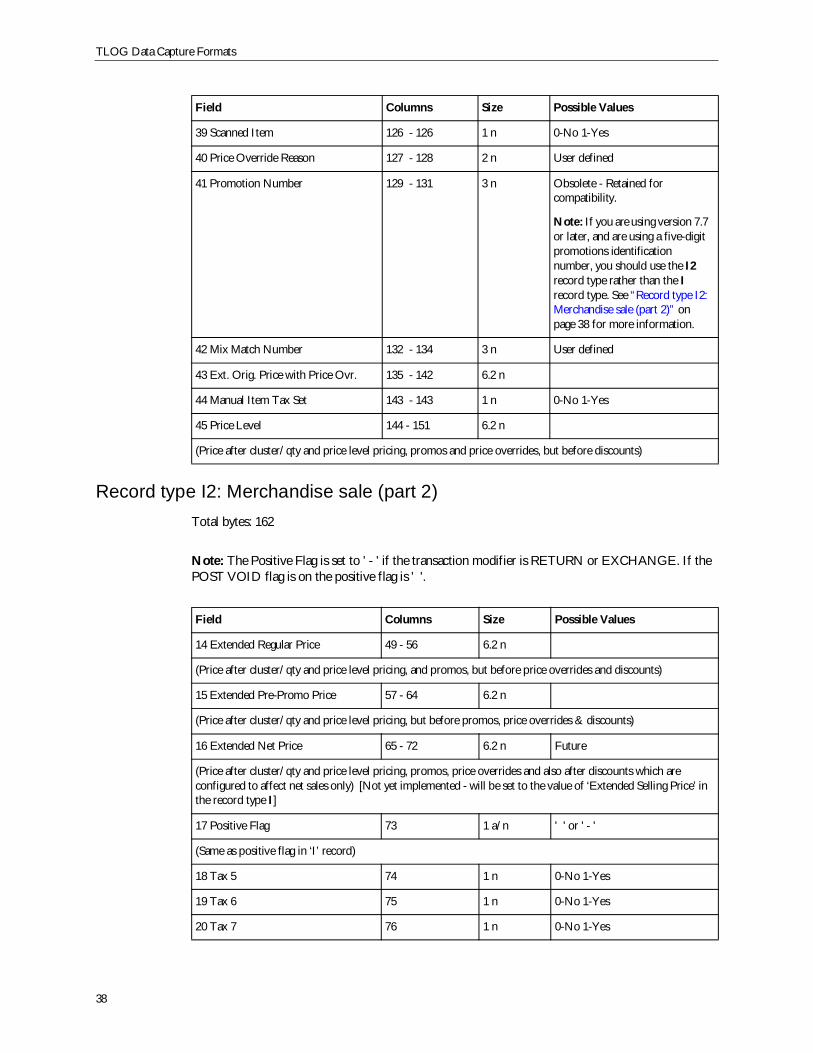
TLOG Data Capture Formats
38
Record type I2: Merchandise sale (part 2)Total bytes: 162
Note: The Positive Flag is set to ' - ' if the transaction modifier is RETURN or EXCHANGE. If thePOST VOID flag is on the positive flag is ' '.
39 Scanned Item 126 - 126 1 n 0-No 1-Yes
40 Price Override Reason 127 - 128 2 n User defined
41 Promotion Number 129 - 131 3 n Obsolete - Retained forcompatibility.
Note: If you are using version 7.7or later, and are using a five-digitpromotions identificationnumber, you should use the I2record type rather than the Irecord type. See “Record type I2:Merchandise sale (part 2)” onpage 38 for more information.
42 Mix Match Number 132 - 134 3 n User defined
43 Ext. Orig. Price with Price Ovr. 135 - 142 6.2 n
44 Manual Item Tax Set 143 - 143 1 n 0-No 1-Yes
45 Price Level 144 - 151 6.2 n
(Price after cluster/qty and price level pricing, promos and price overrides, but before discounts)
Field Columns Size Possible Values
14 Extended Regular Price 49 - 56 6.2 n
(Price after cluster/qty and price level pricing, and promos, but before price overrides and discounts)
15 Extended Pre-Promo Price 57 - 64 6.2 n
(Price after cluster/qty and price level pricing, but before promos, price overrides & discounts)
16 Extended Net Price 65 - 72 6.2 n Future
(Price after cluster/qty and price level pricing, promos, price overrides and also after discounts which areconfigured to affect net sales only) [Not yet implemented - will be set to the value of ‘Extended Selling Price’ inthe record type I]
17 Positive Flag 73 1 a/n ' ' or ' - '
(Same as positive flag in ‘I’ record)
18 Tax 5 74 1 n 0-No 1-Yes
19 Tax 6 75 1 n 0-No 1-Yes
20 Tax 7 76 1 n 0-No 1-Yes
Field Columns Size Possible Values
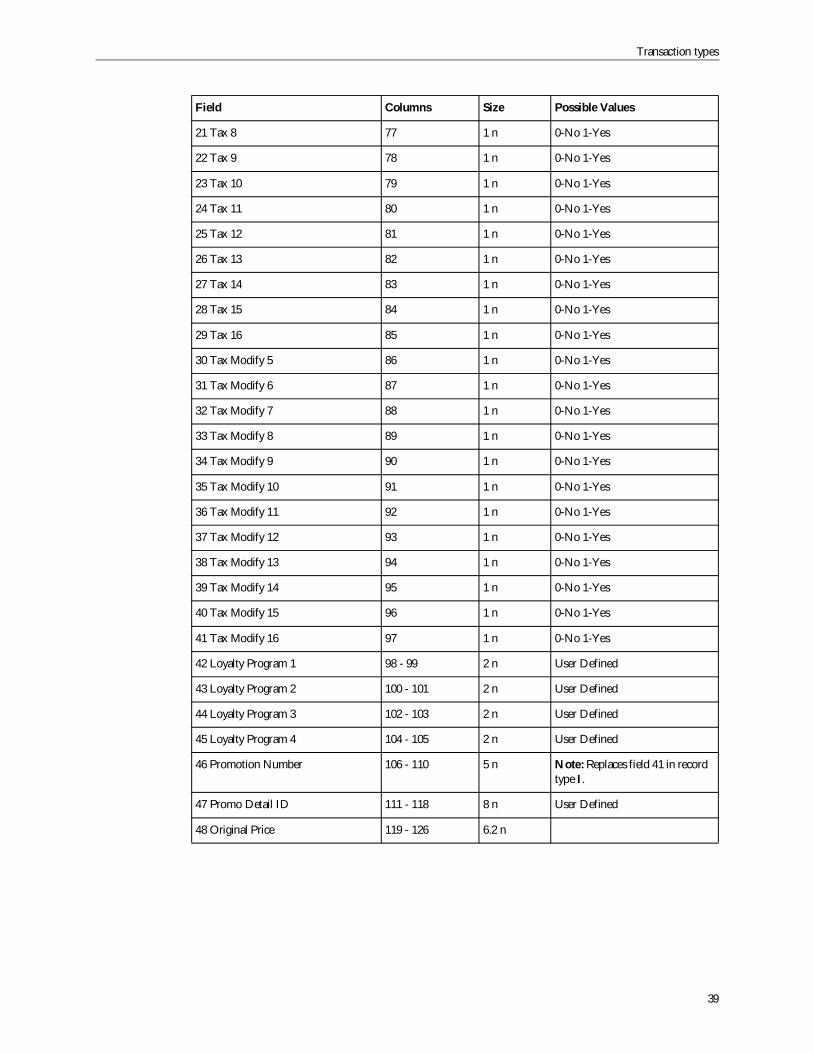
Transaction types
39
21 Tax 8 77 1 n 0-No 1-Yes
22 Tax 9 78 1 n 0-No 1-Yes
23 Tax 10 79 1 n 0-No 1-Yes
24 Tax 11 80 1 n 0-No 1-Yes
25 Tax 12 81 1 n 0-No 1-Yes
26 Tax 13 82 1 n 0-No 1-Yes
27 Tax 14 83 1 n 0-No 1-Yes
28 Tax 15 84 1 n 0-No 1-Yes
29 Tax 16 85 1 n 0-No 1-Yes
30 Tax Modify 5 86 1 n 0-No 1-Yes
31 Tax Modify 6 87 1 n 0-No 1-Yes
32 Tax Modify 7 88 1 n 0-No 1-Yes
33 Tax Modify 8 89 1 n 0-No 1-Yes
34 Tax Modify 9 90 1 n 0-No 1-Yes
35 Tax Modify 10 91 1 n 0-No 1-Yes
36 Tax Modify 11 92 1 n 0-No 1-Yes
37 Tax Modify 12 93 1 n 0-No 1-Yes
38 Tax Modify 13 94 1 n 0-No 1-Yes
39 Tax Modify 14 95 1 n 0-No 1-Yes
40 Tax Modify 15 96 1 n 0-No 1-Yes
41 Tax Modify 16 97 1 n 0-No 1-Yes
42 Loyalty Program 1 98 - 99 2 n User Defined
43 Loyalty Program 2 100 - 101 2 n User Defined
44 Loyalty Program 3 102 - 103 2 n User Defined
45 Loyalty Program 4 104 - 105 2 n User Defined
46 Promotion Number 106 - 110 5 n Note: Replaces field 41 in recordtype I.
47 Promo Detail ID 111 - 118 8 n User Defined
48 Original Price 119 - 126 6.2 n
Field Columns Size Possible Values
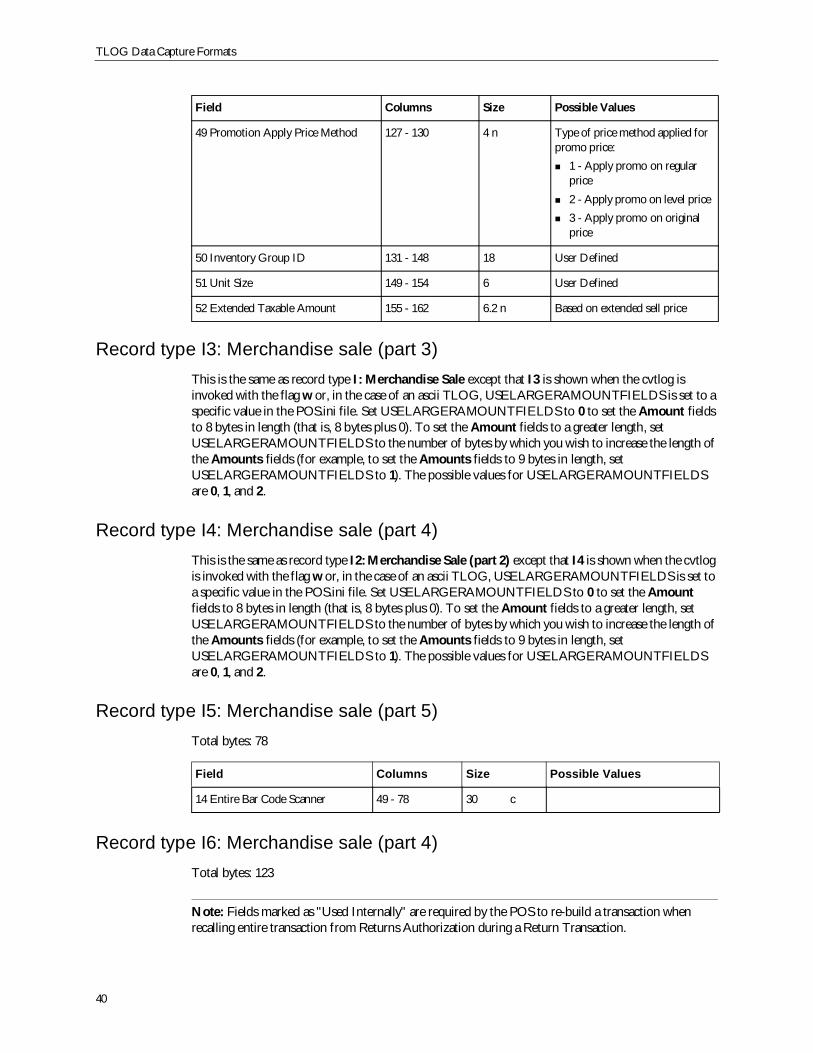
TLOG Data Capture Formats
40
Record type I3: Merchandise sale (part 3)This is the same as record type I: Merchandise Sale except that I3 is shown when the cvtlog isinvoked with the flag w or, in the case of an ascii TLOG, USELARGERAMOUNTFIELDS is set to aspecific value in the POS.ini file. Set USELARGERAMOUNTFIELDS to 0 to set the Amount fieldsto 8 bytes in length (that is, 8 bytes plus 0). To set the Amount fields to a greater length, setUSELARGERAMOUNTFIELDS to the number of bytes by which you wish to increase the length ofthe Amounts fields (for example, to set the Amounts fields to 9 bytes in length, setUSELARGERAMOUNTFIELDS to 1). The possible values for USELARGERAMOUNTFIELDSare 0, 1, and 2.
Record type I4: Merchandise sale (part 4)This is the same as record type I2: Merchandise Sale (part 2) except that I4 is shown when the cvtlogis invoked with the flag w or, in the case of an ascii TLOG, USELARGERAMOUNTFIELDS is set toa specific value in the POS.ini file. Set USELARGERAMOUNTFIELDS to 0 to set the Amountfields to 8 bytes in length (that is, 8 bytes plus 0). To set the Amount fields to a greater length, setUSELARGERAMOUNTFIELDS to the number of bytes by which you wish to increase the length ofthe Amounts fields (for example, to set the Amounts fields to 9 bytes in length, setUSELARGERAMOUNTFIELDS to 1). The possible values for USELARGERAMOUNTFIELDSare 0, 1, and 2.
Record type I5: Merchandise sale (part 5)Total bytes: 78
Record type I6: Merchandise sale (part 4)Total bytes: 123
Note: Fields marked as "Used Internally" are required by the POS to re-build a transaction whenrecalling entire transaction from Returns Authorization during a Return Transaction.
49 Promotion Apply Price Method 127 - 130 4 n Type of price method applied forpromo price:
1 - Apply promo on regularprice2 - Apply promo on level price3 - Apply promo on originalprice
50 Inventory Group ID 131 - 148 18 User Defined
51 Unit Size 149 - 154 6 User Defined
52 Extended Taxable Amount 155 - 162 6.2 n Based on extended sell price
Field Columns Size Possible Values
14 Entire Bar Code Scanner 49 - 78 30 c
Field Columns Size Possible Values
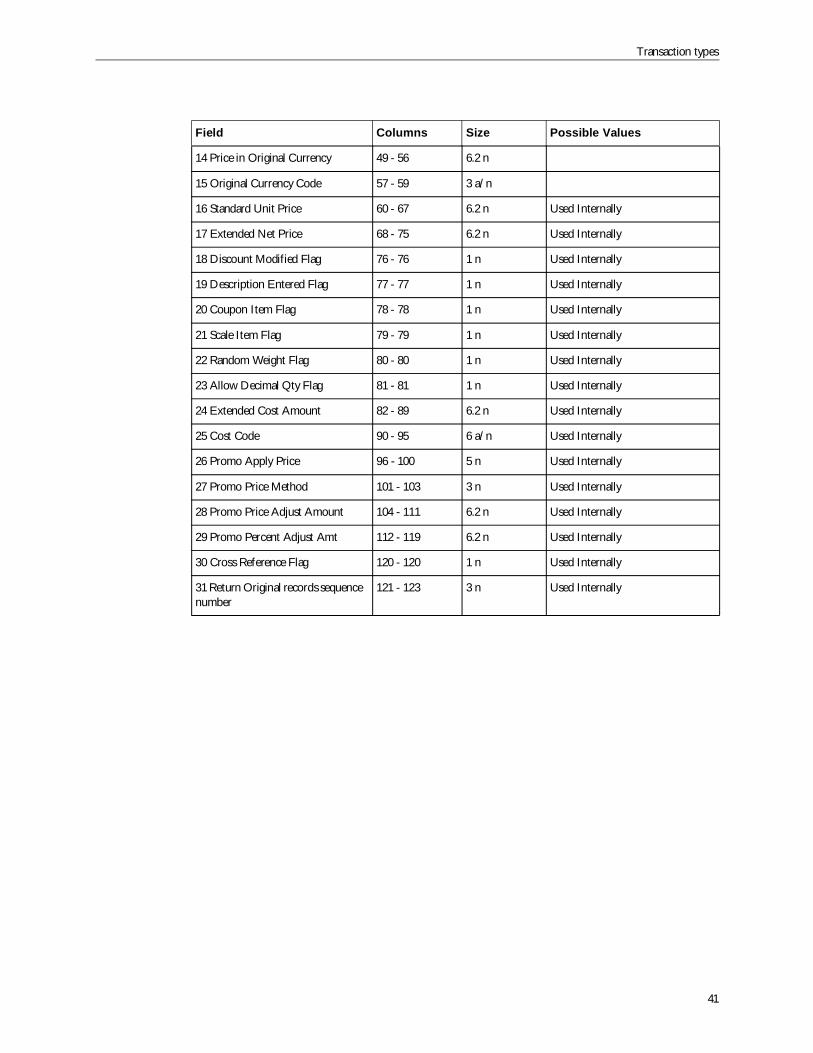
Transaction types
41
Field Columns Size Possible Values
14 Price in Original Currency 49 - 56 6.2 n
15 Original Currency Code 57 - 59 3 a/n
16 Standard Unit Price 60 - 67 6.2 n Used Internally
17 Extended Net Price 68 - 75 6.2 n Used Internally
18 Discount Modified Flag 76 - 76 1 n Used Internally
19 Description Entered Flag 77 - 77 1 n Used Internally
20 Coupon Item Flag 78 - 78 1 n Used Internally
21 Scale Item Flag 79 - 79 1 n Used Internally
22 Random Weight Flag 80 - 80 1 n Used Internally
23 Allow Decimal Qty Flag 81 - 81 1 n Used Internally
24 Extended Cost Amount 82 - 89 6.2 n Used Internally
25 Cost Code 90 - 95 6 a/n Used Internally
26 Promo Apply Price 96 - 100 5 n Used Internally
27 Promo Price Method 101 - 103 3 n Used Internally
28 Promo Price Adjust Amount 104 - 111 6.2 n Used Internally
29 Promo Percent Adjust Amt 112 - 119 6.2 n Used Internally
30 Cross Reference Flag 120 - 120 1 n Used Internally
31 Return Original records sequencenumber
121 - 123 3 n Used Internally
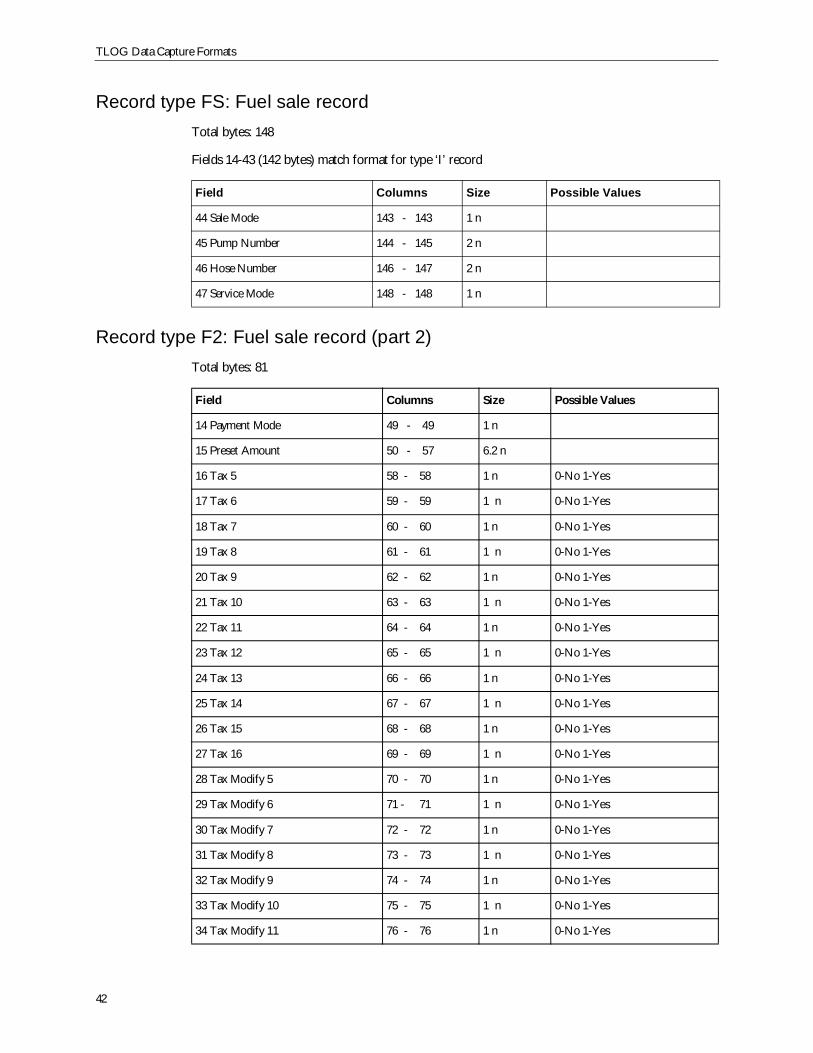
TLOG Data Capture Formats
42
Record type FS: Fuel sale recordTotal bytes: 148
Fields 14-43 (142 bytes) match format for type ‘I’ record
Record type F2: Fuel sale record (part 2)Total bytes: 81
Field Columns Size Possible Values
44 Sale Mode 143 - 143 1 n
45 Pump Number 144 - 145 2 n
46 Hose Number 146 - 147 2 n
47 Service Mode 148 - 148 1 n
Field Columns Size Possible Values
14 Payment Mode 49 - 49 1 n
15 Preset Amount 50 - 57 6.2 n
16 Tax 5 58 - 58 1 n 0-No 1-Yes
17 Tax 6 59 - 59 1 n 0-No 1-Yes
18 Tax 7 60 - 60 1 n 0-No 1-Yes
19 Tax 8 61 - 61 1 n 0-No 1-Yes
20 Tax 9 62 - 62 1 n 0-No 1-Yes
21 Tax 10 63 - 63 1 n 0-No 1-Yes
22 Tax 11 64 - 64 1 n 0-No 1-Yes
23 Tax 12 65 - 65 1 n 0-No 1-Yes
24 Tax 13 66 - 66 1 n 0-No 1-Yes
25 Tax 14 67 - 67 1 n 0-No 1-Yes
26 Tax 15 68 - 68 1 n 0-No 1-Yes
27 Tax 16 69 - 69 1 n 0-No 1-Yes
28 Tax Modify 5 70 - 70 1 n 0-No 1-Yes
29 Tax Modify 6 71 - 71 1 n 0-No 1-Yes
30 Tax Modify 7 72 - 72 1 n 0-No 1-Yes
31 Tax Modify 8 73 - 73 1 n 0-No 1-Yes
32 Tax Modify 9 74 - 74 1 n 0-No 1-Yes
33 Tax Modify 10 75 - 75 1 n 0-No 1-Yes
34 Tax Modify 11 76 - 76 1 n 0-No 1-Yes
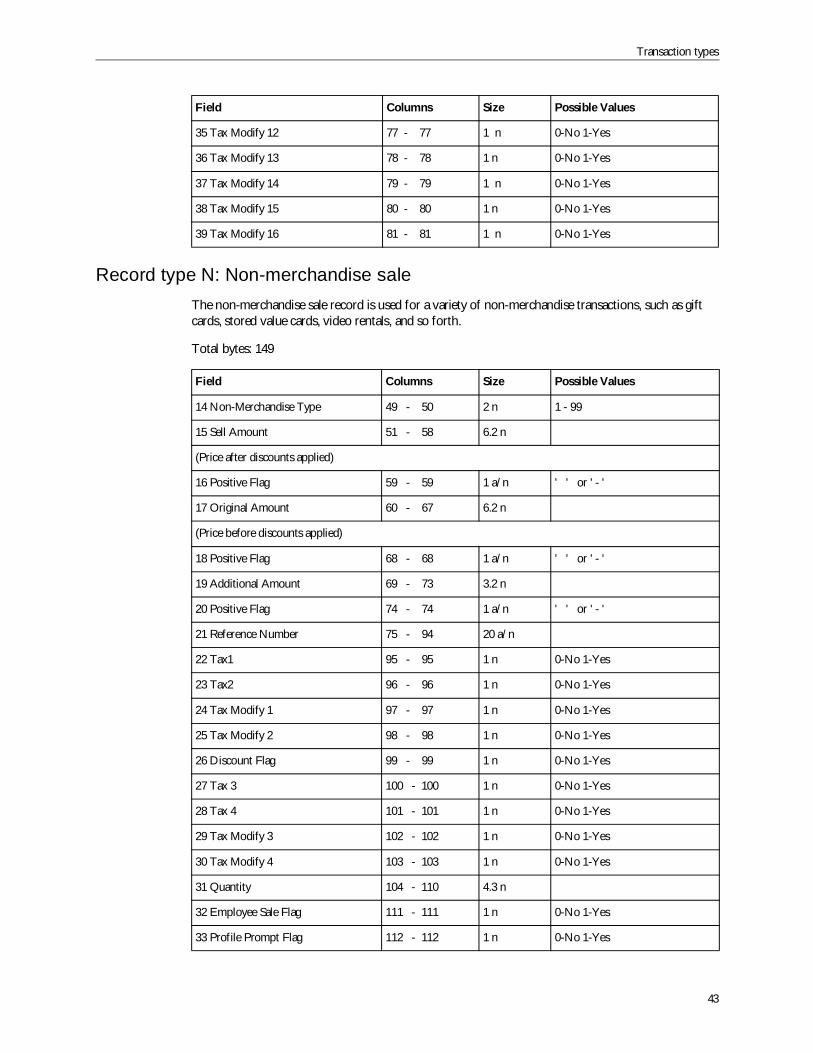
Transaction types
43
Record type N: Non-merchandise saleThe non-merchandise sale record is used for a variety of non-merchandise transactions, such as giftcards, stored value cards, video rentals, and so forth.
Total bytes: 149
35 Tax Modify 12 77 - 77 1 n 0-No 1-Yes
36 Tax Modify 13 78 - 78 1 n 0-No 1-Yes
37 Tax Modify 14 79 - 79 1 n 0-No 1-Yes
38 Tax Modify 15 80 - 80 1 n 0-No 1-Yes
39 Tax Modify 16 81 - 81 1 n 0-No 1-Yes
Field Columns Size Possible Values
14 Non-Merchandise Type 49 - 50 2 n 1 - 99
15 Sell Amount 51 - 58 6.2 n
(Price after discounts applied)
16 Positive Flag 59 - 59 1 a/n ' ' or ' - '
17 Original Amount 60 - 67 6.2 n
(Price before discounts applied)
18 Positive Flag 68 - 68 1 a/n ' ' or ' - '
19 Additional Amount 69 - 73 3.2 n
20 Positive Flag 74 - 74 1 a/n ' ' or ' - '
21 Reference Number 75 - 94 20 a/n
22 Tax1 95 - 95 1 n 0-No 1-Yes
23 Tax2 96 - 96 1 n 0-No 1-Yes
24 Tax Modify 1 97 - 97 1 n 0-No 1-Yes
25 Tax Modify 2 98 - 98 1 n 0-No 1-Yes
26 Discount Flag 99 - 99 1 n 0-No 1-Yes
27 Tax 3 100 - 100 1 n 0-No 1-Yes
28 Tax 4 101 - 101 1 n 0-No 1-Yes
29 Tax Modify 3 102 - 102 1 n 0-No 1-Yes
30 Tax Modify 4 103 - 103 1 n 0-No 1-Yes
31 Quantity 104 - 110 4.3 n
32 Employee Sale Flag 111 - 111 1 n 0-No 1-Yes
33 Profile Prompt Flag 112 - 112 1 n 0-No 1-Yes
Field Columns Size Possible Values
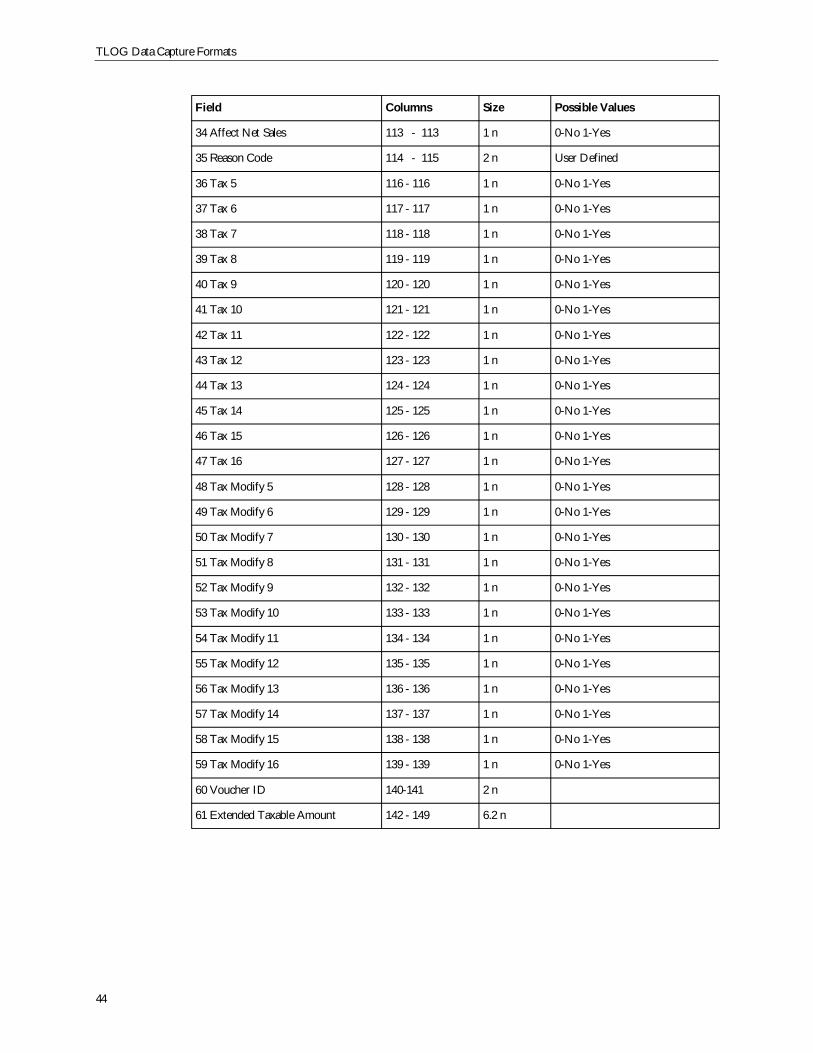
TLOG Data Capture Formats
44
34 Affect Net Sales 113 - 113 1 n 0-No 1-Yes
35 Reason Code 114 - 115 2 n User Defined
36 Tax 5 116 - 116 1 n 0-No 1-Yes
37 Tax 6 117 - 117 1 n 0-No 1-Yes
38 Tax 7 118 - 118 1 n 0-No 1-Yes
39 Tax 8 119 - 119 1 n 0-No 1-Yes
40 Tax 9 120 - 120 1 n 0-No 1-Yes
41 Tax 10 121 - 121 1 n 0-No 1-Yes
42 Tax 11 122 - 122 1 n 0-No 1-Yes
43 Tax 12 123 - 123 1 n 0-No 1-Yes
44 Tax 13 124 - 124 1 n 0-No 1-Yes
45 Tax 14 125 - 125 1 n 0-No 1-Yes
46 Tax 15 126 - 126 1 n 0-No 1-Yes
47 Tax 16 127 - 127 1 n 0-No 1-Yes
48 Tax Modify 5 128 - 128 1 n 0-No 1-Yes
49 Tax Modify 6 129 - 129 1 n 0-No 1-Yes
50 Tax Modify 7 130 - 130 1 n 0-No 1-Yes
51 Tax Modify 8 131 - 131 1 n 0-No 1-Yes
52 Tax Modify 9 132 - 132 1 n 0-No 1-Yes
53 Tax Modify 10 133 - 133 1 n 0-No 1-Yes
54 Tax Modify 11 134 - 134 1 n 0-No 1-Yes
55 Tax Modify 12 135 - 135 1 n 0-No 1-Yes
56 Tax Modify 13 136 - 136 1 n 0-No 1-Yes
57 Tax Modify 14 137 - 137 1 n 0-No 1-Yes
58 Tax Modify 15 138 - 138 1 n 0-No 1-Yes
59 Tax Modify 16 139 - 139 1 n 0-No 1-Yes
60 Voucher ID 140-141 2 n
61 Extended Taxable Amount 142 - 149 6.2 n
Field Columns Size Possible Values
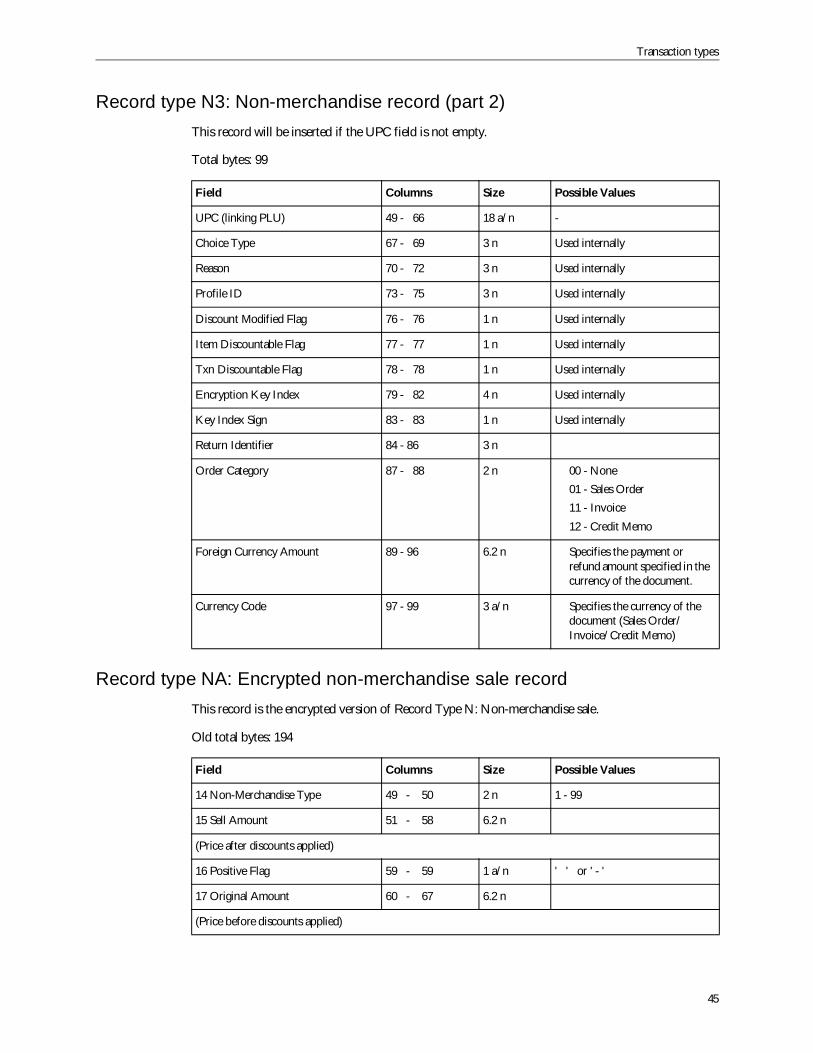
Transaction types
45
Record type N3: Non-merchandise record (part 2)This record will be inserted if the UPC field is not empty.
Total bytes: 99
Record type NA: Encrypted non-merchandise sale recordThis record is the encrypted version of Record Type N: Non-merchandise sale.
Old total bytes: 194
Field Columns Size Possible Values
UPC (linking PLU) 49 - 66 18 a/n -
Choice Type 67 - 69 3 n Used internally
Reason 70 - 72 3 n Used internally
Profile ID 73 - 75 3 n Used internally
Discount Modified Flag 76 - 76 1 n Used internally
Item Discountable Flag 77 - 77 1 n Used internally
Txn Discountable Flag 78 - 78 1 n Used internally
Encryption Key Index 79 - 82 4 n Used internally
Key Index Sign 83 - 83 1 n Used internally
Return Identifier 84 - 86 3 n
Order Category 87 - 88 2 n 00 - None01 - Sales Order11 - Invoice12 - Credit Memo
Foreign Currency Amount 89 - 96 6.2 n Specifies the payment orrefund amount specified in thecurrency of the document.
Currency Code 97 - 99 3 a/n Specifies the currency of thedocument (Sales Order/Invoice/Credit Memo)
Field Columns Size Possible Values
14 Non-Merchandise Type 49 - 50 2 n 1 - 99
15 Sell Amount 51 - 58 6.2 n
(Price after discounts applied)
16 Positive Flag 59 - 59 1 a/n ' ' or ' - '
17 Original Amount 60 - 67 6.2 n
(Price before discounts applied)
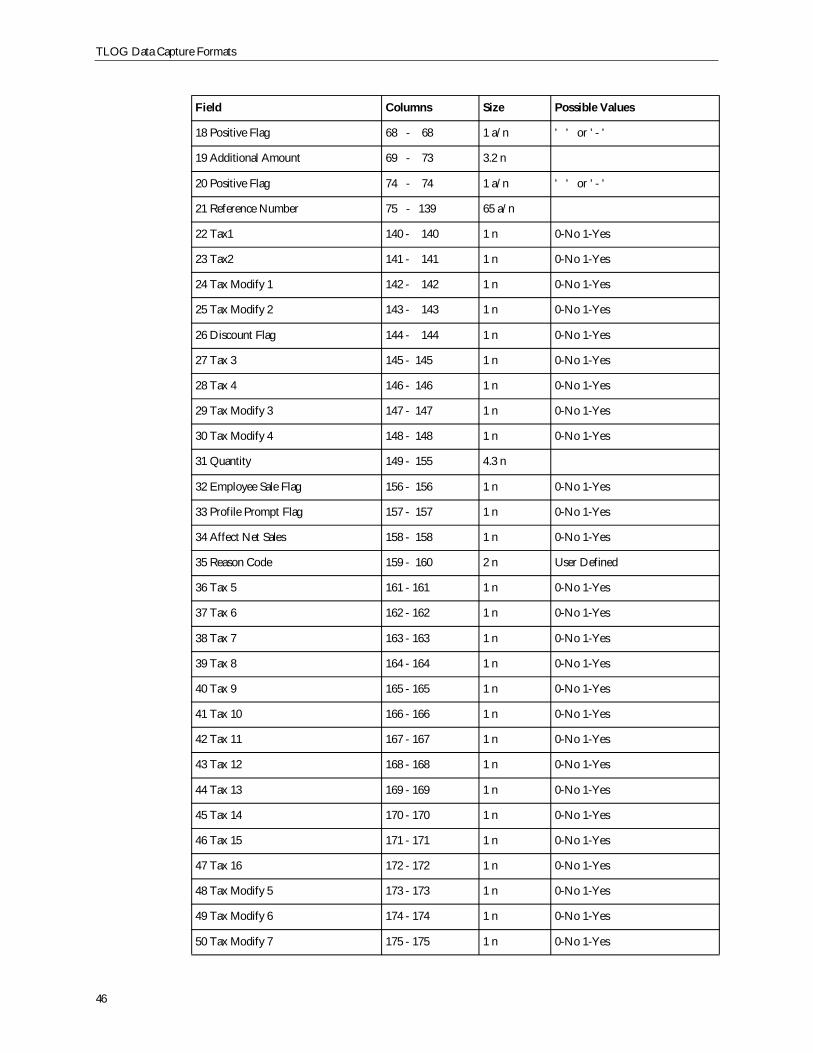
TLOG Data Capture Formats
46
18 Positive Flag 68 - 68 1 a/n ' ' or ' - '
19 Additional Amount 69 - 73 3.2 n
20 Positive Flag 74 - 74 1 a/n ' ' or ' - '
21 Reference Number 75 - 139 65 a/n
22 Tax1 140 - 140 1 n 0-No 1-Yes
23 Tax2 141 - 141 1 n 0-No 1-Yes
24 Tax Modify 1 142 - 142 1 n 0-No 1-Yes
25 Tax Modify 2 143 - 143 1 n 0-No 1-Yes
26 Discount Flag 144 - 144 1 n 0-No 1-Yes
27 Tax 3 145 - 145 1 n 0-No 1-Yes
28 Tax 4 146 - 146 1 n 0-No 1-Yes
29 Tax Modify 3 147 - 147 1 n 0-No 1-Yes
30 Tax Modify 4 148 - 148 1 n 0-No 1-Yes
31 Quantity 149 - 155 4.3 n
32 Employee Sale Flag 156 - 156 1 n 0-No 1-Yes
33 Profile Prompt Flag 157 - 157 1 n 0-No 1-Yes
34 Affect Net Sales 158 - 158 1 n 0-No 1-Yes
35 Reason Code 159 - 160 2 n User Defined
36 Tax 5 161 - 161 1 n 0-No 1-Yes
37 Tax 6 162 - 162 1 n 0-No 1-Yes
38 Tax 7 163 - 163 1 n 0-No 1-Yes
39 Tax 8 164 - 164 1 n 0-No 1-Yes
40 Tax 9 165 - 165 1 n 0-No 1-Yes
41 Tax 10 166 - 166 1 n 0-No 1-Yes
42 Tax 11 167 - 167 1 n 0-No 1-Yes
43 Tax 12 168 - 168 1 n 0-No 1-Yes
44 Tax 13 169 - 169 1 n 0-No 1-Yes
45 Tax 14 170 - 170 1 n 0-No 1-Yes
46 Tax 15 171 - 171 1 n 0-No 1-Yes
47 Tax 16 172 - 172 1 n 0-No 1-Yes
48 Tax Modify 5 173 - 173 1 n 0-No 1-Yes
49 Tax Modify 6 174 - 174 1 n 0-No 1-Yes
50 Tax Modify 7 175 - 175 1 n 0-No 1-Yes
Field Columns Size Possible Values
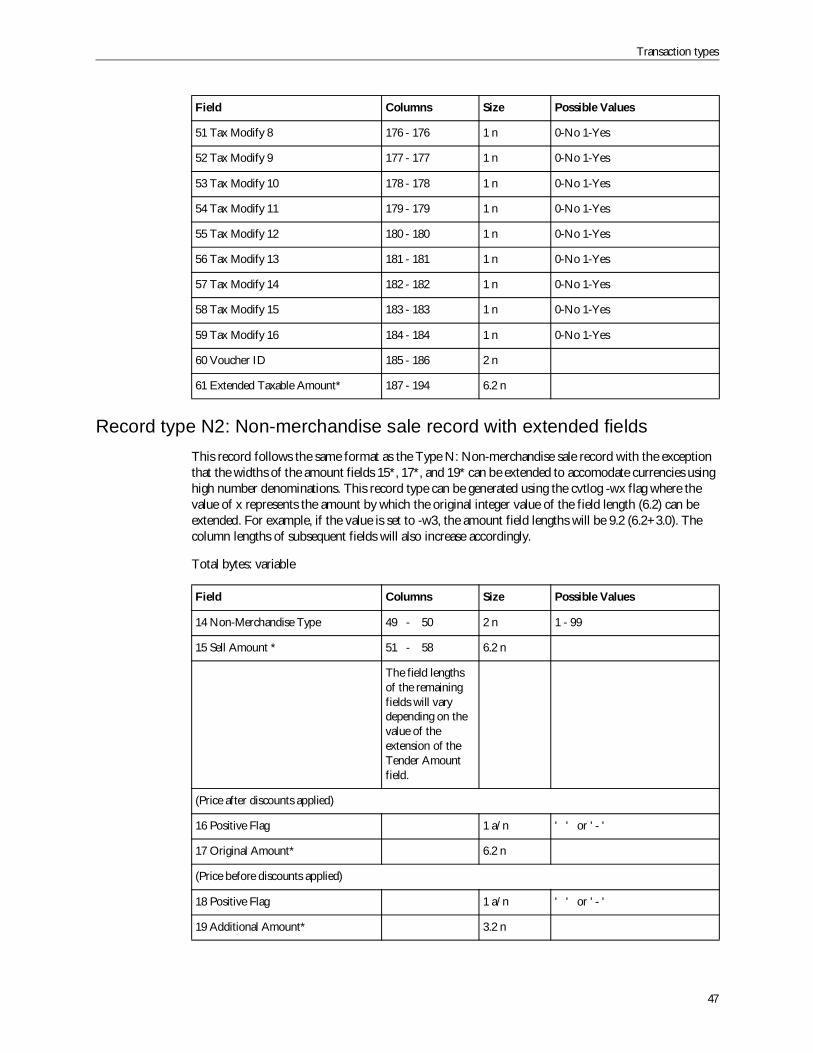
Transaction types
47
Record type N2: Non-merchandise sale record with extended fieldsThis record follows the same format as the Type N: Non-merchandise sale record with the exceptionthat the widths of the amount fields 15*, 17*, and 19* can be extended to accomodate currencies usinghigh number denominations. This record type can be generated using the cvtlog -wx flag where thevalue of x represents the amount by which the original integer value of the field length (6.2) can beextended. For example, if the value is set to -w3, the amount field lengths will be 9.2 (6.2+3.0). Thecolumn lengths of subsequent fields will also increase accordingly.
Total bytes: variable
51 Tax Modify 8 176 - 176 1 n 0-No 1-Yes
52 Tax Modify 9 177 - 177 1 n 0-No 1-Yes
53 Tax Modify 10 178 - 178 1 n 0-No 1-Yes
54 Tax Modify 11 179 - 179 1 n 0-No 1-Yes
55 Tax Modify 12 180 - 180 1 n 0-No 1-Yes
56 Tax Modify 13 181 - 181 1 n 0-No 1-Yes
57 Tax Modify 14 182 - 182 1 n 0-No 1-Yes
58 Tax Modify 15 183 - 183 1 n 0-No 1-Yes
59 Tax Modify 16 184 - 184 1 n 0-No 1-Yes
60 Voucher ID 185 - 186 2 n
61 Extended Taxable Amount* 187 - 194 6.2 n
Field Columns Size Possible Values
14 Non-Merchandise Type 49 - 50 2 n 1 - 99
15 Sell Amount * 51 - 58 6.2 n
The field lengthsof the remainingfields will varydepending on thevalue of theextension of theTender Amountfield.
(Price after discounts applied)
16 Positive Flag 1 a/n ' ' or ' - '
17 Original Amount* 6.2 n
(Price before discounts applied)
18 Positive Flag 1 a/n ' ' or ' - '
19 Additional Amount* 3.2 n
Field Columns Size Possible Values
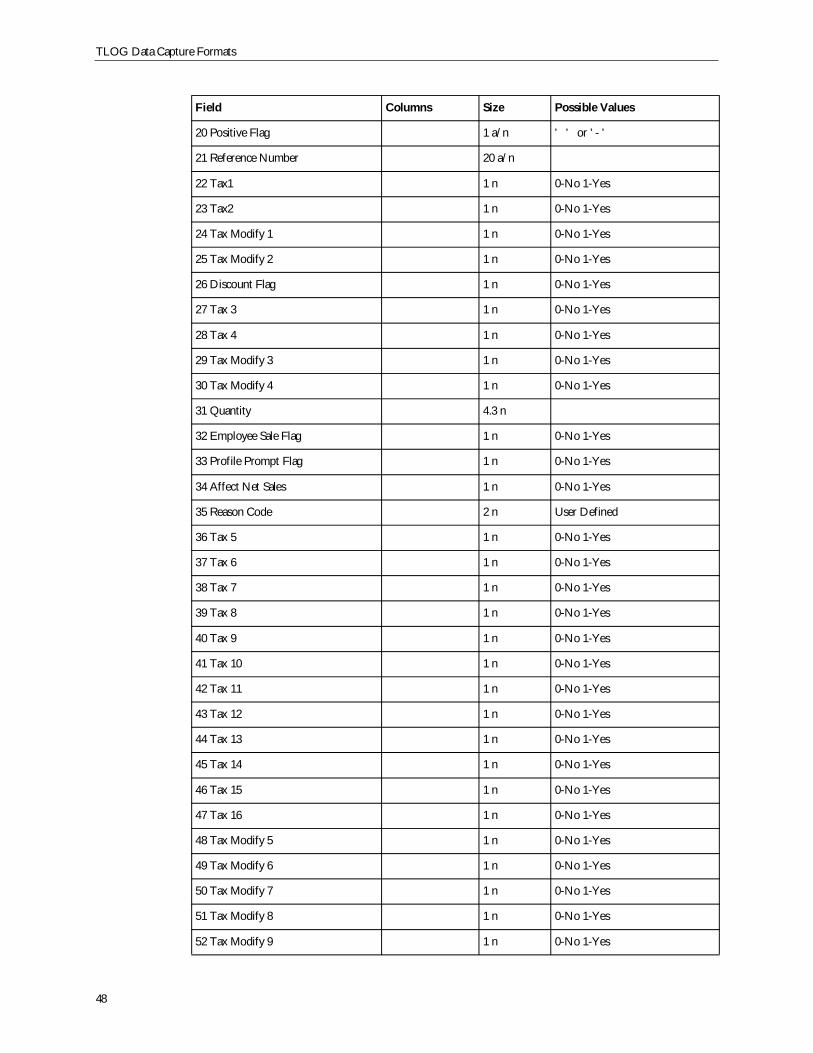
TLOG Data Capture Formats
48
20 Positive Flag 1 a/n ' ' or ' - '
21 Reference Number 20 a/n
22 Tax1 1 n 0-No 1-Yes
23 Tax2 1 n 0-No 1-Yes
24 Tax Modify 1 1 n 0-No 1-Yes
25 Tax Modify 2 1 n 0-No 1-Yes
26 Discount Flag 1 n 0-No 1-Yes
27 Tax 3 1 n 0-No 1-Yes
28 Tax 4 1 n 0-No 1-Yes
29 Tax Modify 3 1 n 0-No 1-Yes
30 Tax Modify 4 1 n 0-No 1-Yes
31 Quantity 4.3 n
32 Employee Sale Flag 1 n 0-No 1-Yes
33 Profile Prompt Flag 1 n 0-No 1-Yes
34 Affect Net Sales 1 n 0-No 1-Yes
35 Reason Code 2 n User Defined
36 Tax 5 1 n 0-No 1-Yes
37 Tax 6 1 n 0-No 1-Yes
38 Tax 7 1 n 0-No 1-Yes
39 Tax 8 1 n 0-No 1-Yes
40 Tax 9 1 n 0-No 1-Yes
41 Tax 10 1 n 0-No 1-Yes
42 Tax 11 1 n 0-No 1-Yes
43 Tax 12 1 n 0-No 1-Yes
44 Tax 13 1 n 0-No 1-Yes
45 Tax 14 1 n 0-No 1-Yes
46 Tax 15 1 n 0-No 1-Yes
47 Tax 16 1 n 0-No 1-Yes
48 Tax Modify 5 1 n 0-No 1-Yes
49 Tax Modify 6 1 n 0-No 1-Yes
50 Tax Modify 7 1 n 0-No 1-Yes
51 Tax Modify 8 1 n 0-No 1-Yes
52 Tax Modify 9 1 n 0-No 1-Yes
Field Columns Size Possible Values
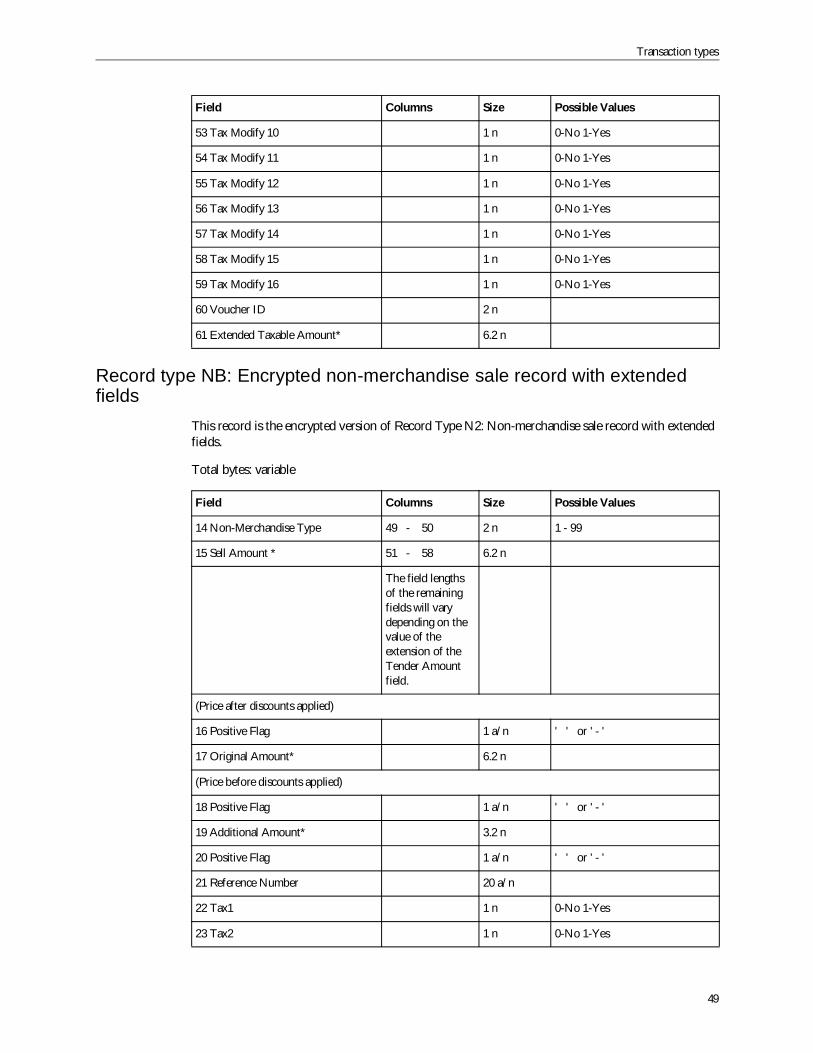
Transaction types
49
Record type NB: Encrypted non-merchandise sale record with extendedfields
This record is the encrypted version of Record Type N2: Non-merchandise sale record with extendedfields.
Total bytes: variable
53 Tax Modify 10 1 n 0-No 1-Yes
54 Tax Modify 11 1 n 0-No 1-Yes
55 Tax Modify 12 1 n 0-No 1-Yes
56 Tax Modify 13 1 n 0-No 1-Yes
57 Tax Modify 14 1 n 0-No 1-Yes
58 Tax Modify 15 1 n 0-No 1-Yes
59 Tax Modify 16 1 n 0-No 1-Yes
60 Voucher ID 2 n
61 Extended Taxable Amount* 6.2 n
Field Columns Size Possible Values
14 Non-Merchandise Type 49 - 50 2 n 1 - 99
15 Sell Amount * 51 - 58 6.2 n
The field lengthsof the remainingfields will varydepending on thevalue of theextension of theTender Amountfield.
(Price after discounts applied)
16 Positive Flag 1 a/n ' ' or ' - '
17 Original Amount* 6.2 n
(Price before discounts applied)
18 Positive Flag 1 a/n ' ' or ' - '
19 Additional Amount* 3.2 n
20 Positive Flag 1 a/n ' ' or ' - '
21 Reference Number 20 a/n
22 Tax1 1 n 0-No 1-Yes
23 Tax2 1 n 0-No 1-Yes
Field Columns Size Possible Values
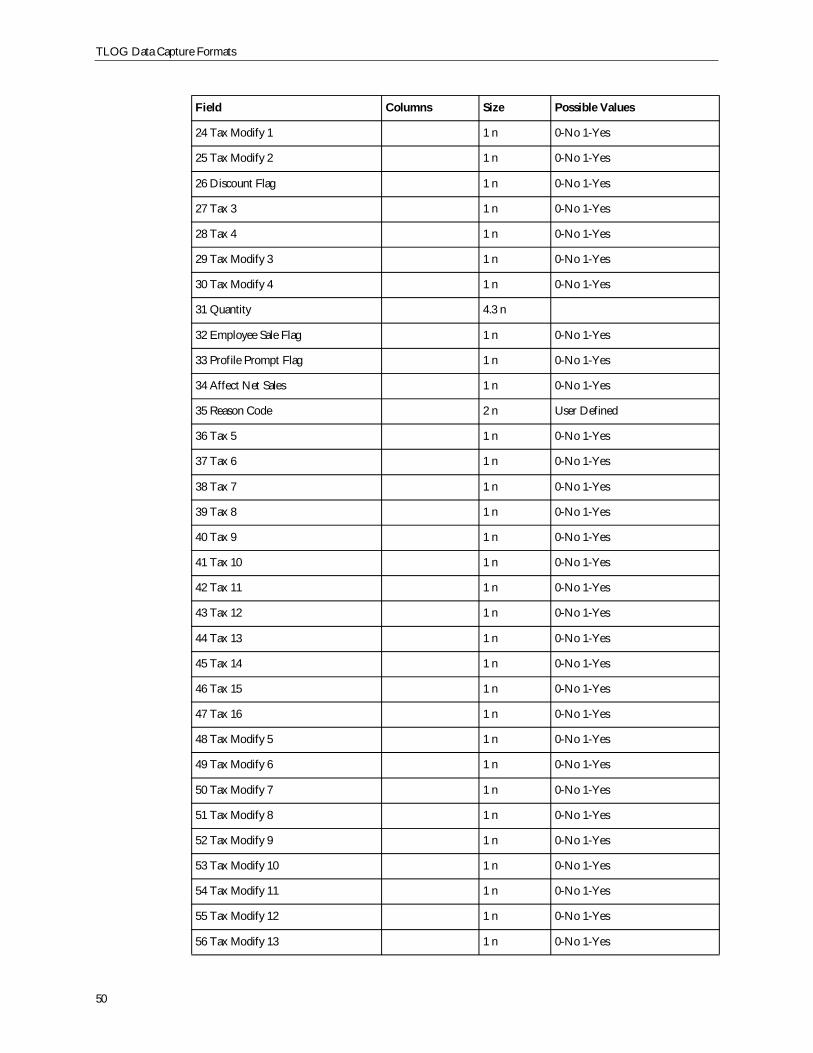
TLOG Data Capture Formats
50
24 Tax Modify 1 1 n 0-No 1-Yes
25 Tax Modify 2 1 n 0-No 1-Yes
26 Discount Flag 1 n 0-No 1-Yes
27 Tax 3 1 n 0-No 1-Yes
28 Tax 4 1 n 0-No 1-Yes
29 Tax Modify 3 1 n 0-No 1-Yes
30 Tax Modify 4 1 n 0-No 1-Yes
31 Quantity 4.3 n
32 Employee Sale Flag 1 n 0-No 1-Yes
33 Profile Prompt Flag 1 n 0-No 1-Yes
34 Affect Net Sales 1 n 0-No 1-Yes
35 Reason Code 2 n User Defined
36 Tax 5 1 n 0-No 1-Yes
37 Tax 6 1 n 0-No 1-Yes
38 Tax 7 1 n 0-No 1-Yes
39 Tax 8 1 n 0-No 1-Yes
40 Tax 9 1 n 0-No 1-Yes
41 Tax 10 1 n 0-No 1-Yes
42 Tax 11 1 n 0-No 1-Yes
43 Tax 12 1 n 0-No 1-Yes
44 Tax 13 1 n 0-No 1-Yes
45 Tax 14 1 n 0-No 1-Yes
46 Tax 15 1 n 0-No 1-Yes
47 Tax 16 1 n 0-No 1-Yes
48 Tax Modify 5 1 n 0-No 1-Yes
49 Tax Modify 6 1 n 0-No 1-Yes
50 Tax Modify 7 1 n 0-No 1-Yes
51 Tax Modify 8 1 n 0-No 1-Yes
52 Tax Modify 9 1 n 0-No 1-Yes
53 Tax Modify 10 1 n 0-No 1-Yes
54 Tax Modify 11 1 n 0-No 1-Yes
55 Tax Modify 12 1 n 0-No 1-Yes
56 Tax Modify 13 1 n 0-No 1-Yes
Field Columns Size Possible Values
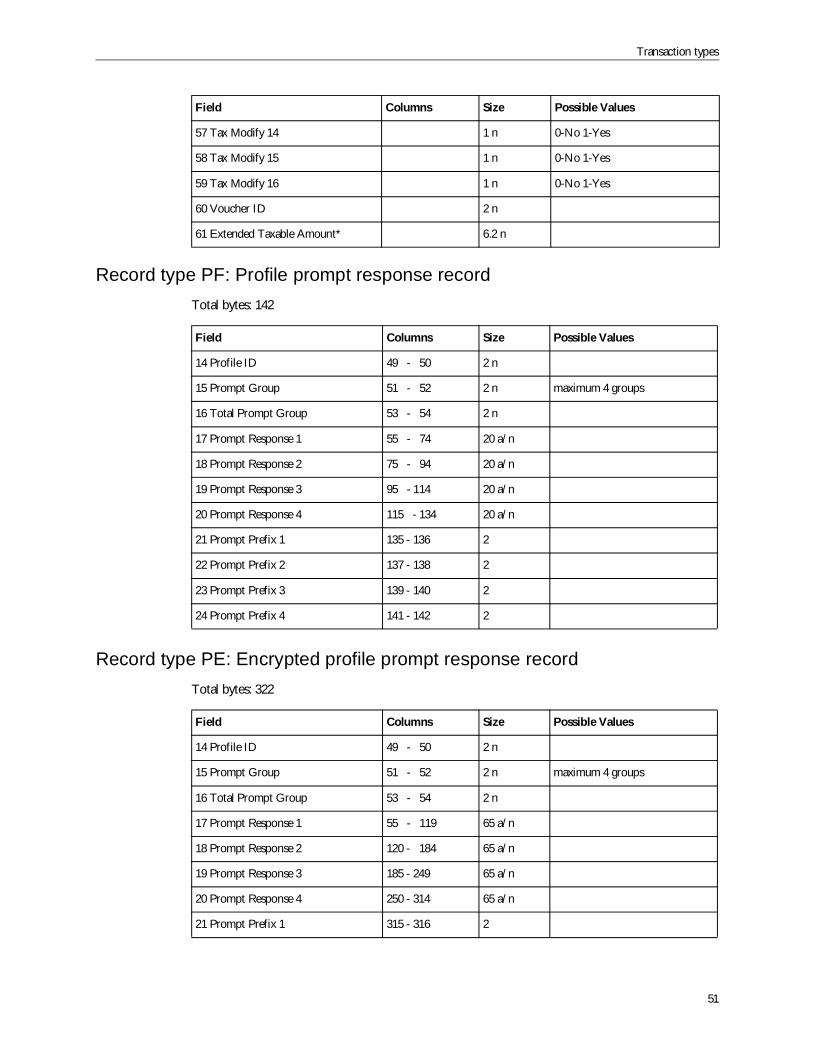
Transaction types
51
Record type PF: Profile prompt response recordTotal bytes: 142
Record type PE: Encrypted profile prompt response recordTotal bytes: 322
57 Tax Modify 14 1 n 0-No 1-Yes
58 Tax Modify 15 1 n 0-No 1-Yes
59 Tax Modify 16 1 n 0-No 1-Yes
60 Voucher ID 2 n
61 Extended Taxable Amount* 6.2 n
Field Columns Size Possible Values
14 Profile ID 49 - 50 2 n
15 Prompt Group 51 - 52 2 n maximum 4 groups
16 Total Prompt Group 53 - 54 2 n
17 Prompt Response 1 55 - 74 20 a/n
18 Prompt Response 2 75 - 94 20 a/n
19 Prompt Response 3 95 - 114 20 a/n
20 Prompt Response 4 115 - 134 20 a/n
21 Prompt Prefix 1 135 - 136 2
22 Prompt Prefix 2 137 - 138 2
23 Prompt Prefix 3 139 - 140 2
24 Prompt Prefix 4 141 - 142 2
Field Columns Size Possible Values
14 Profile ID 49 - 50 2 n
15 Prompt Group 51 - 52 2 n maximum 4 groups
16 Total Prompt Group 53 - 54 2 n
17 Prompt Response 1 55 - 119 65 a/n
18 Prompt Response 2 120 - 184 65 a/n
19 Prompt Response 3 185 - 249 65 a/n
20 Prompt Response 4 250 - 314 65 a/n
21 Prompt Prefix 1 315 - 316 2
Field Columns Size Possible Values
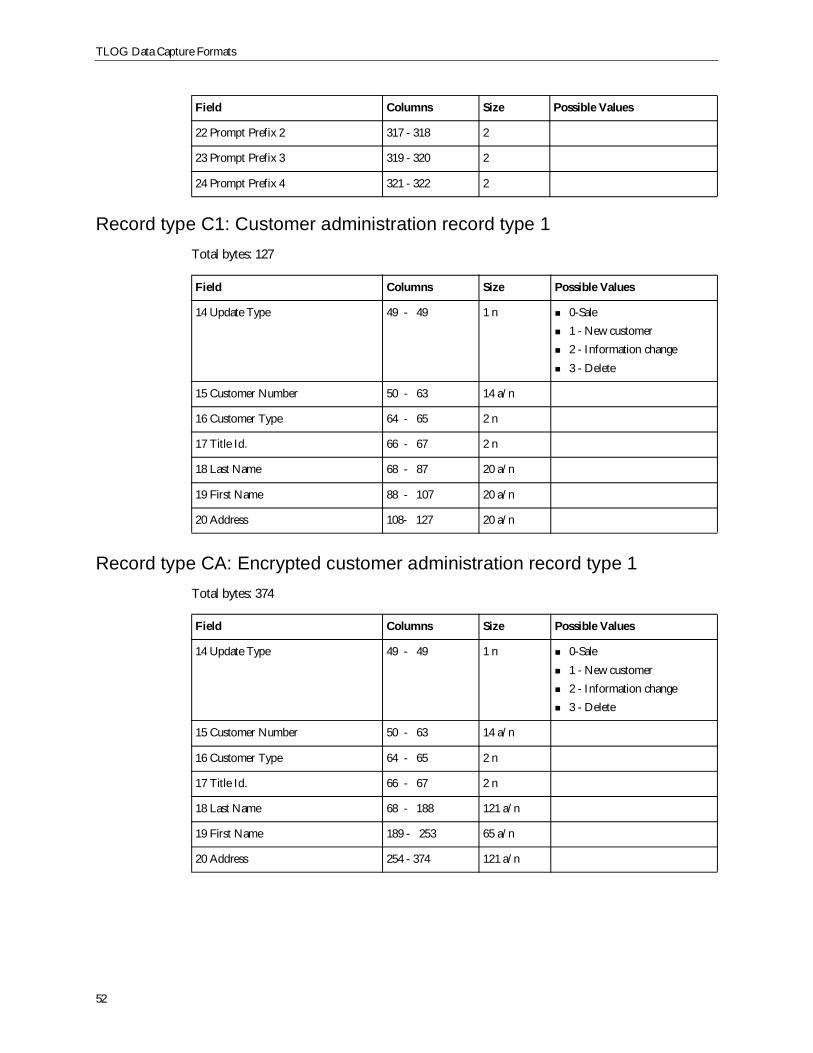
TLOG Data Capture Formats
52
Record type C1: Customer administration record type 1Total bytes: 127
Record type CA: Encrypted customer administration record type 1Total bytes: 374
22 Prompt Prefix 2 317 - 318 2
23 Prompt Prefix 3 319 - 320 2
24 Prompt Prefix 4 321 - 322 2
Field Columns Size Possible Values
14 Update Type 49 - 49 1 n 0-Sale1 - New customer2 - Information change3 - Delete
15 Customer Number 50 - 63 14 a/n
16 Customer Type 64 - 65 2 n
17 Title Id. 66 - 67 2 n
18 Last Name 68 - 87 20 a/n
19 First Name 88 - 107 20 a/n
20 Address 108- 127 20 a/n
Field Columns Size Possible Values
14 Update Type 49 - 49 1 n 0-Sale1 - New customer2 - Information change3 - Delete
15 Customer Number 50 - 63 14 a/n
16 Customer Type 64 - 65 2 n
17 Title Id. 66 - 67 2 n
18 Last Name 68 - 188 121 a/n
19 First Name 189 - 253 65 a/n
20 Address 254 - 374 121 a/n
Field Columns Size Possible Values
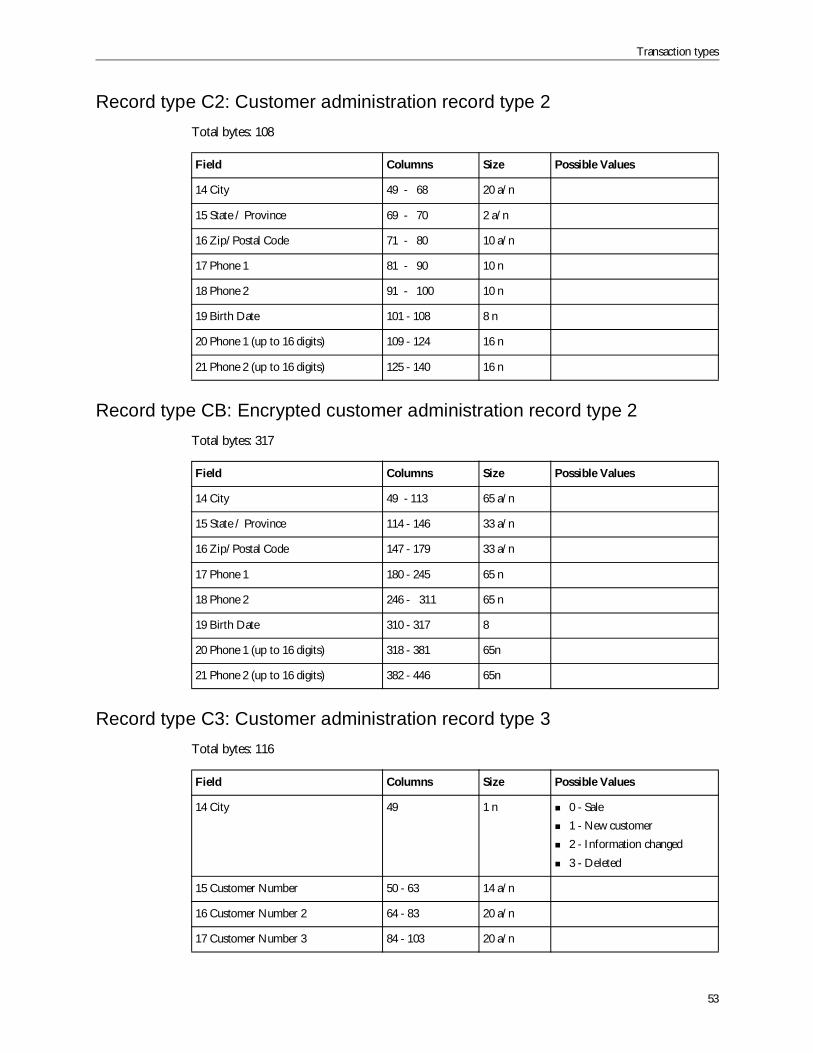
Transaction types
53
Record type C2: Customer administration record type 2Total bytes: 108
Record type CB: Encrypted customer administration record type 2Total bytes: 317
Record type C3: Customer administration record type 3Total bytes: 116
Field Columns Size Possible Values
14 City 49 - 68 20 a/n
15 State / Province 69 - 70 2 a/n
16 Zip/Postal Code 71 - 80 10 a/n
17 Phone 1 81 - 90 10 n
18 Phone 2 91 - 100 10 n
19 Birth Date 101 - 108 8 n
20 Phone 1 (up to 16 digits) 109 - 124 16 n
21 Phone 2 (up to 16 digits) 125 - 140 16 n
Field Columns Size Possible Values
14 City 49 - 113 65 a/n
15 State / Province 114 - 146 33 a/n
16 Zip/Postal Code 147 - 179 33 a/n
17 Phone 1 180 - 245 65 n
18 Phone 2 246 - 311 65 n
19 Birth Date 310 - 317 8
20 Phone 1 (up to 16 digits) 318 - 381 65n
21 Phone 2 (up to 16 digits) 382 - 446 65n
Field Columns Size Possible Values
14 City 49 1 n 0 - Sale1 - New customer2 - Information changed3 - Deleted
15 Customer Number 50 - 63 14 a/n
16 Customer Number 2 64 - 83 20 a/n
17 Customer Number 3 84 - 103 20 a/n
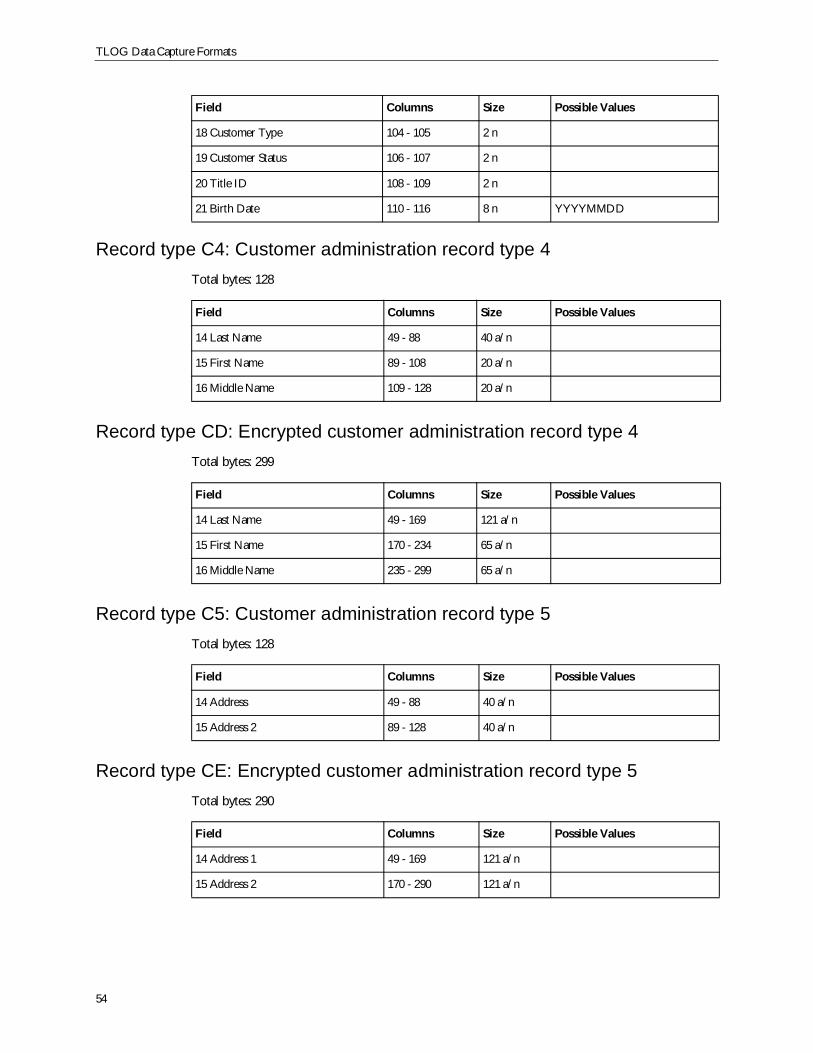
TLOG Data Capture Formats
54
Record type C4: Customer administration record type 4Total bytes: 128
Record type CD: Encrypted customer administration record type 4Total bytes: 299
Record type C5: Customer administration record type 5Total bytes: 128
Record type CE: Encrypted customer administration record type 5Total bytes: 290
18 Customer Type 104 - 105 2 n
19 Customer Status 106 - 107 2 n
20 Title ID 108 - 109 2 n
21 Birth Date 110 - 116 8 n YYYYMMDD
Field Columns Size Possible Values
14 Last Name 49 - 88 40 a/n
15 First Name 89 - 108 20 a/n
16 Middle Name 109 - 128 20 a/n
Field Columns Size Possible Values
14 Last Name 49 - 169 121 a/n
15 First Name 170 - 234 65 a/n
16 Middle Name 235 - 299 65 a/n
Field Columns Size Possible Values
14 Address 49 - 88 40 a/n
15 Address 2 89 - 128 40 a/n
Field Columns Size Possible Values
14 Address 1 49 - 169 121 a/n
15 Address 2 170 - 290 121 a/n
Field Columns Size Possible Values
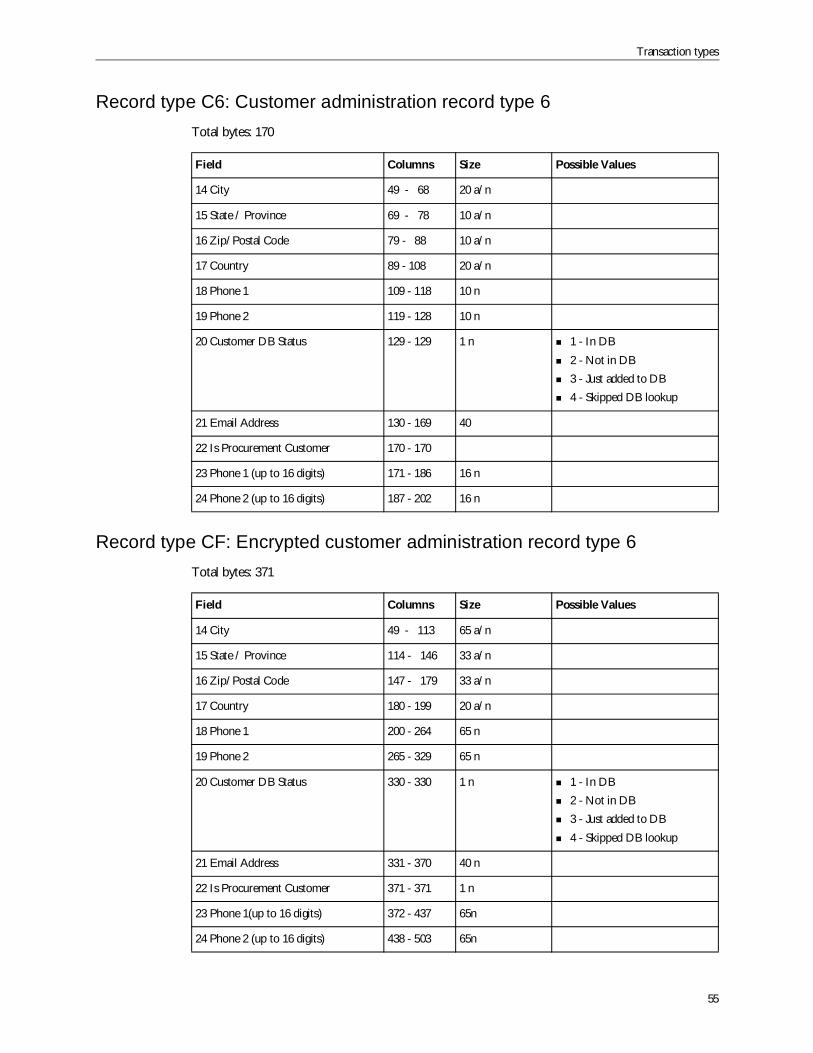
Transaction types
55
Record type C6: Customer administration record type 6Total bytes: 170
Record type CF: Encrypted customer administration record type 6Total bytes: 371
Field Columns Size Possible Values
14 City 49 - 68 20 a/n
15 State / Province 69 - 78 10 a/n
16 Zip/Postal Code 79 - 88 10 a/n
17 Country 89 - 108 20 a/n
18 Phone 1 109 - 118 10 n
19 Phone 2 119 - 128 10 n
20 Customer DB Status 129 - 129 1 n 1 - In DB2 - Not in DB3 - Just added to DB4 - Skipped DB lookup
21 Email Address 130 - 169 40
22 Is Procurement Customer 170 - 170
23 Phone 1 (up to 16 digits) 171 - 186 16 n
24 Phone 2 (up to 16 digits) 187 - 202 16 n
Field Columns Size Possible Values
14 City 49 - 113 65 a/n
15 State / Province 114 - 146 33 a/n
16 Zip/Postal Code 147 - 179 33 a/n
17 Country 180 - 199 20 a/n
18 Phone 1 200 - 264 65 n
19 Phone 2 265 - 329 65 n
20 Customer DB Status 330 - 330 1 n 1 - In DB2 - Not in DB3 - Just added to DB4 - Skipped DB lookup
21 Email Address 331 - 370 40 n
22 Is Procurement Customer 371 - 371 1 n
23 Phone 1(up to 16 digits) 372 - 437 65n
24 Phone 2 (up to 16 digits) 438 - 503 65n
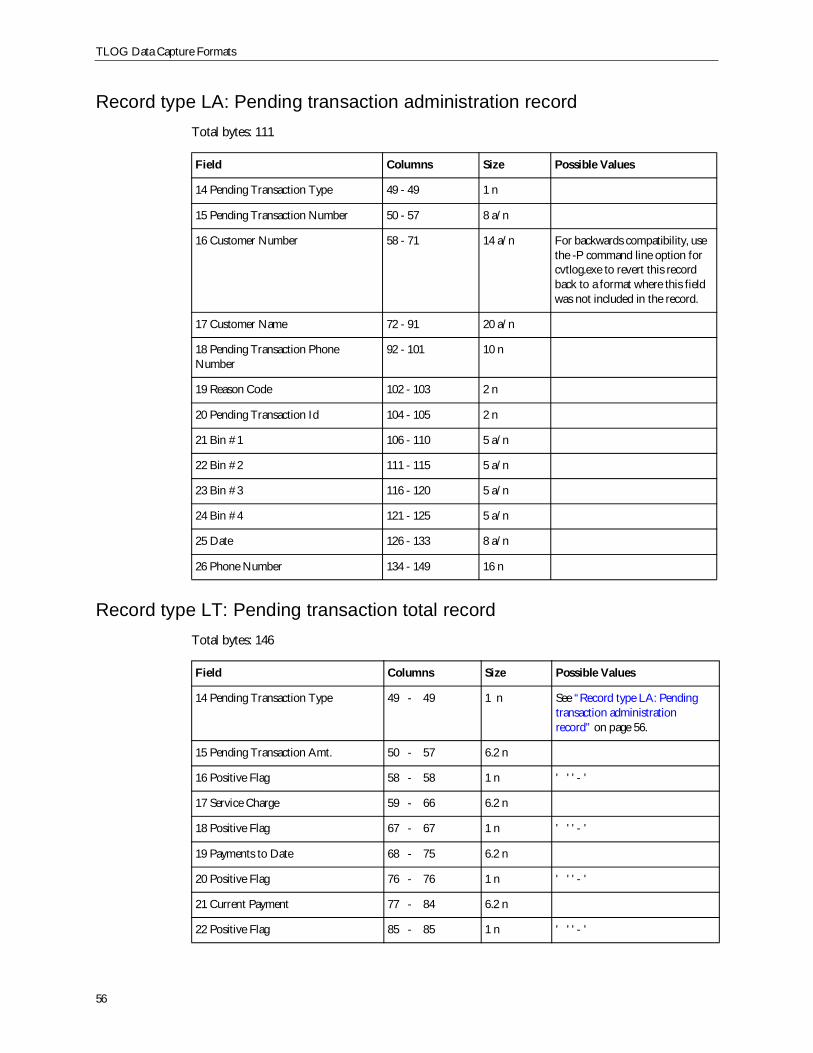
TLOG Data Capture Formats
56
Record type LA: Pending transaction administration recordTotal bytes: 111
Record type LT: Pending transaction total recordTotal bytes: 146
Field Columns Size Possible Values
14 Pending Transaction Type 49 - 49 1 n
15 Pending Transaction Number 50 - 57 8 a/n
16 Customer Number 58 - 71 14 a/n For backwards compatibility, usethe -P command line option forcvtlog.exe to revert this recordback to a format where this fieldwas not included in the record.
17 Customer Name 72 - 91 20 a/n
18 Pending Transaction PhoneNumber
92 - 101 10 n
19 Reason Code 102 - 103 2 n
20 Pending Transaction Id 104 - 105 2 n
21 Bin #1 106 - 110 5 a/n
22 Bin #2 111 - 115 5 a/n
23 Bin #3 116 - 120 5 a/n
24 Bin #4 121 - 125 5 a/n
25 Date 126 - 133 8 a/n
26 Phone Number 134 - 149 16 n
Field Columns Size Possible Values
14 Pending Transaction Type 49 - 49 1 n See “Record type LA: Pendingtransaction administrationrecord” on page 56.
15 Pending Transaction Amt. 50 - 57 6.2 n
16 Positive Flag 58 - 58 1 n ' ' ' - '
17 Service Charge 59 - 66 6.2 n
18 Positive Flag 67 - 67 1 n ' ' ' - '
19 Payments to Date 68 - 75 6.2 n
20 Positive Flag 76 - 76 1 n ' ' ' - '
21 Current Payment 77 - 84 6.2 n
22 Positive Flag 85 - 85 1 n ' ' ' - '
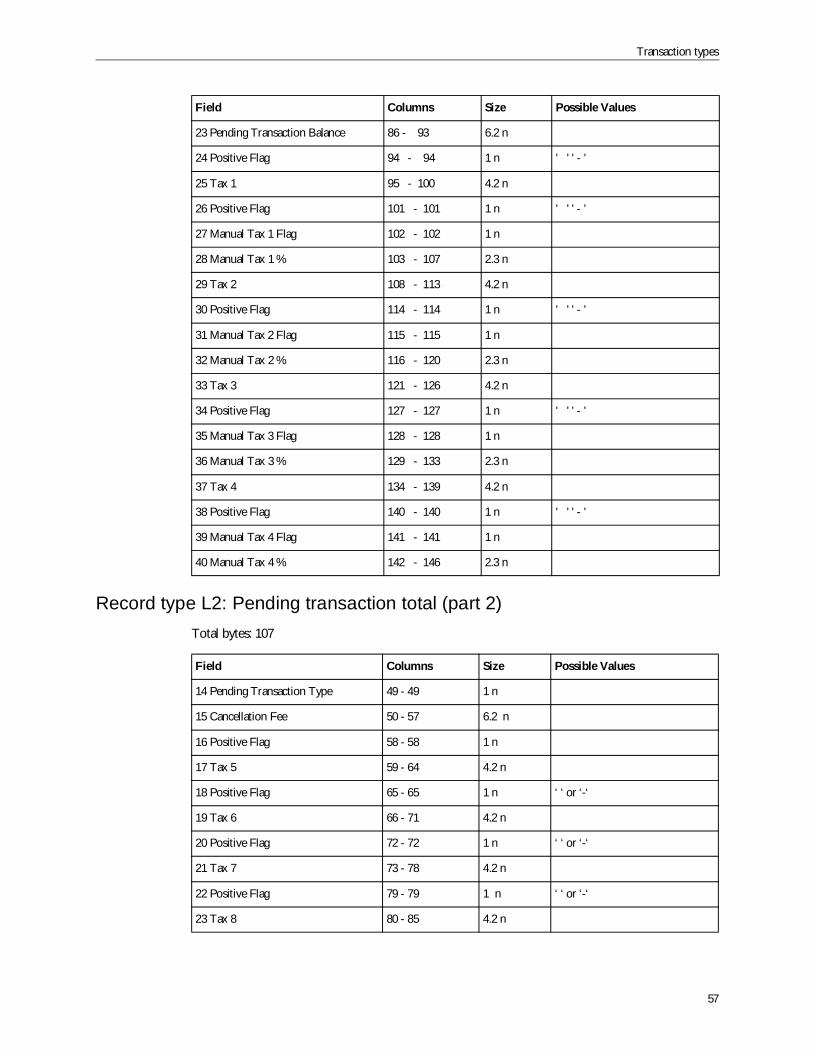
Transaction types
57
Record type L2: Pending transaction total (part 2)Total bytes: 107
23 Pending Transaction Balance 86 - 93 6.2 n
24 Positive Flag 94 - 94 1 n ' ' ' - '
25 Tax 1 95 - 100 4.2 n
26 Positive Flag 101 - 101 1 n ' ' ' - '
27 Manual Tax 1 Flag 102 - 102 1 n
28 Manual Tax 1 % 103 - 107 2.3 n
29 Tax 2 108 - 113 4.2 n
30 Positive Flag 114 - 114 1 n ' ' ' - '
31 Manual Tax 2 Flag 115 - 115 1 n
32 Manual Tax 2 % 116 - 120 2.3 n
33 Tax 3 121 - 126 4.2 n
34 Positive Flag 127 - 127 1 n ' ' ' - '
35 Manual Tax 3 Flag 128 - 128 1 n
36 Manual Tax 3 % 129 - 133 2.3 n
37 Tax 4 134 - 139 4.2 n
38 Positive Flag 140 - 140 1 n ' ' ' - '
39 Manual Tax 4 Flag 141 - 141 1 n
40 Manual Tax 4 % 142 - 146 2.3 n
Field Columns Size Possible Values
14 Pending Transaction Type 49 - 49 1 n
15 Cancellation Fee 50 - 57 6.2 n
16 Positive Flag 58 - 58 1 n
17 Tax 5 59 - 64 4.2 n
18 Positive Flag 65 - 65 1 n ‘ ‘ or ‘-‘
19 Tax 6 66 - 71 4.2 n
20 Positive Flag 72 - 72 1 n ‘ ‘ or ‘-‘
21 Tax 7 73 - 78 4.2 n
22 Positive Flag 79 - 79 1 n ‘ ‘ or ‘-‘
23 Tax 8 80 - 85 4.2 n
Field Columns Size Possible Values

TLOG Data Capture Formats
58
Record type L3: Pending transaction total (part 3)Total bytes: 83
Record type L4This record type functions the same as record type LT (see “Record type LT: Pending transaction totalrecord” on page 56), except that it is shown when the cvtlog file is invoked with the flag W, or (in thecase of the ascii TLOG) USELARGERAMOUNTFIELDS is set to Y in the POS.ini file.
Record type L5This record type functions the same as record type L2 (see “Record type L2: Pending transaction total(part 2)” on page 57), except that it is shown when the cvtlog file is invoked with the flag W, or (in thecase of the ascii TLOG) USELARGERAMOUNTFIELDS is set to Y in the POS.ini file.
24 Positive Flag 86 - 86 1 n ‘ ‘ or ‘-‘
25 Tax 9 87 - 92 4.2 n
26 Positive Flag 93 - 93 1 n ‘ ‘ or ‘-‘
27 Tax 10 94 - 99 4.2 n
28 Positive Flag 100 - 100 1 n ‘ ‘ or ‘-‘
29 Tax 11 101 - 106 4.2 n
30 Positive Flag 107 - 107 1 n ‘ ‘ or ‘-‘
Field Columns Size Possible Values
14 Tax 12 49 - 54 4.2 n
15 Positive Flag 55 1 n ‘ ‘ or ‘-‘
16 Tax 13 56 - 61 4.2 n
17 Positive Flag 62 1 n ‘ ‘ or ‘-‘
18 Tax 14 63 - 68 4.2 n
19 Positive Flag 69 1 n ‘ ‘ or ‘-‘
20 Tax 15 70 - 75 4.2 n
21 Positive Flag 76 1 n ‘ ‘ or ‘-‘
22 Tax 16 77 - 82 4.2 n
23 Positive Flag 83 1 n ‘ ‘ or ‘-‘
Field Columns Size Possible Values
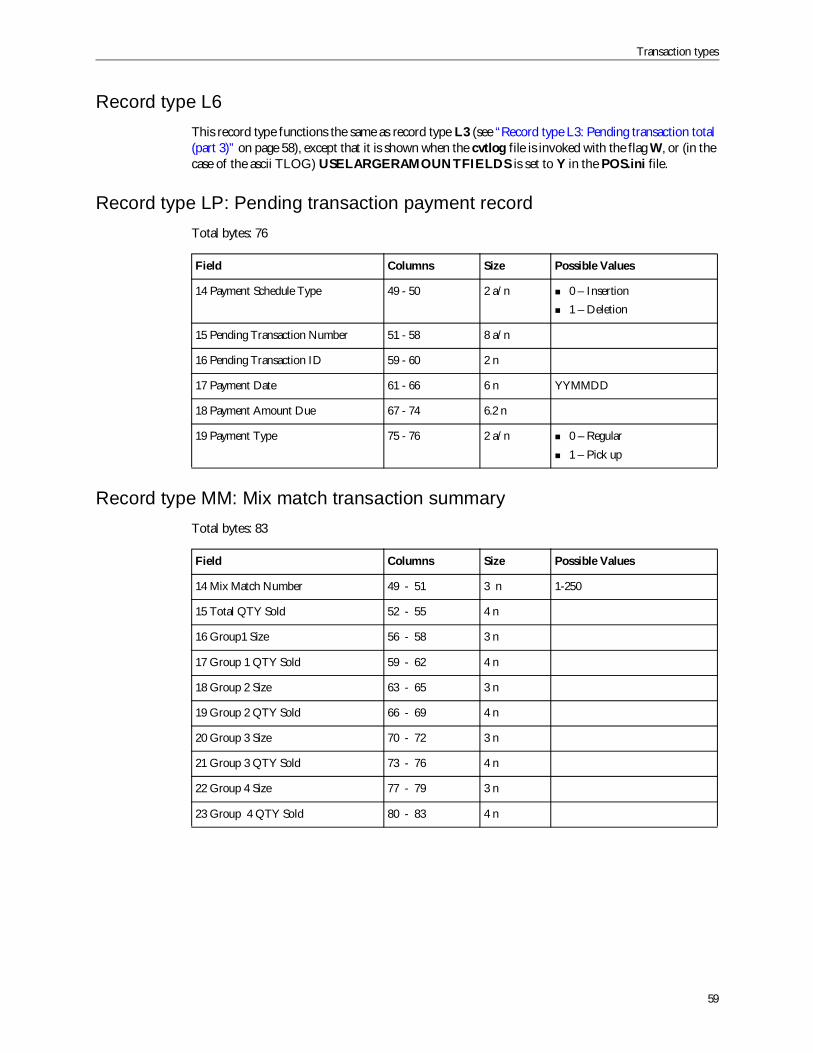
Transaction types
59
Record type L6This record type functions the same as record type L3 (see “Record type L3: Pending transaction total(part 3)” on page 58), except that it is shown when the cvtlog file is invoked with the flag W, or (in thecase of the ascii TLOG) USELARGERAMOUNTFIELDS is set to Y in the POS.ini file.
Record type LP: Pending transaction payment recordTotal bytes: 76
Record type MM: Mix match transaction summaryTotal bytes: 83
Field Columns Size Possible Values
14 Payment Schedule Type 49 - 50 2 a/n 0 – Insertion1 – Deletion
15 Pending Transaction Number 51 - 58 8 a/n
16 Pending Transaction ID 59 - 60 2 n
17 Payment Date 61 - 66 6 n YYMMDD
18 Payment Amount Due 67 - 74 6.2 n
19 Payment Type 75 - 76 2 a/n 0 – Regular1 – Pick up
Field Columns Size Possible Values
14 Mix Match Number 49 - 51 3 n 1-250
15 Total QTY Sold 52 - 55 4 n
16 Group1 Size 56 - 58 3 n
17 Group 1 QTY Sold 59 - 62 4 n
18 Group 2 Size 63 - 65 3 n
19 Group 2 QTY Sold 66 - 69 4 n
20 Group 3 Size 70 - 72 3 n
21 Group 3 QTY Sold 73 - 76 4 n
22 Group 4 Size 77 - 79 3 n
23 Group 4 QTY Sold 80 - 83 4 n

TLOG Data Capture Formats
60
Record type D: DiscountsOld total bytes: 105; Total bytes: 133
Field Columns Size Possible Values
14 Discount Type 49 - 50 2 n See “Discount types” onpage 112.
15 Reason 51 - 52 2 n User Defined
16 Discount Percentage 53 - 58 3.3 n
17 Extended Discount Amt 59 - 65 5.2 n
18 Positive Flag 66 - 66 1 a/n ' ' ' - '
19 Reference number 67 - 86 20 a/n User defined
20 Original Price 87 - 94 6.2 n
21 Positive Flag 95 - 95 1 a/n ' ' ' - '
22 Discount ID 96 - 97 2 n
23 Tax Table 1 98 - 98 1 n 0-No 1-Yes
24 Tax Table 2 99 - 99 1 n 0-No 1-Yes
25 Tax Table 3 100 - 100 1 n 0-No 1-Yes
26 Tax Table 4 101 - 101 1 n 0-No 1-Yes
27 Auto Preset Discount 102 - 102 1 n 0-No 1-Yes
28 Affect Net Sales 103 - 103 1 n 0-No 1-Yes
29 Profile Prompt Flag 104 - 104 1 n 0-No 1-Yes
30 Scanned Reference Num 105 - 105 1 n 0-No 1 - Yes
31 Tax 5 106 - 106 1 n 0-No 1-Yes
32 Tax 6 107 - 107 1 n 0-No 1-Yes
33 Tax 7 108 - 108 1 n 0-No 1-Yes
34 Tax 8 109 - 109 1 n 0-No 1-Yes
35 Tax 9 110 - 110 1 n 0-No 1-Yes
36 Tax 10 111 - 111 1 n 0-No 1-Yes
37 Tax 11 112 - 112 1 n 0-No 1-Yes
38 Tax 12 113 - 113 1 n 0-No 1-Yes
39 Tax 13 114 - 114 1 n 0-No 1-Yes
40 Tax 14 115 - 115 1 n 0-No 1-Yes
41 Tax 15 116 - 116 1 n 0-No 1-Yes
42 Tax 16 117 - 117 1 n 0-No 1-Yes
43 Promo Amount 118 - 123 4.2 n
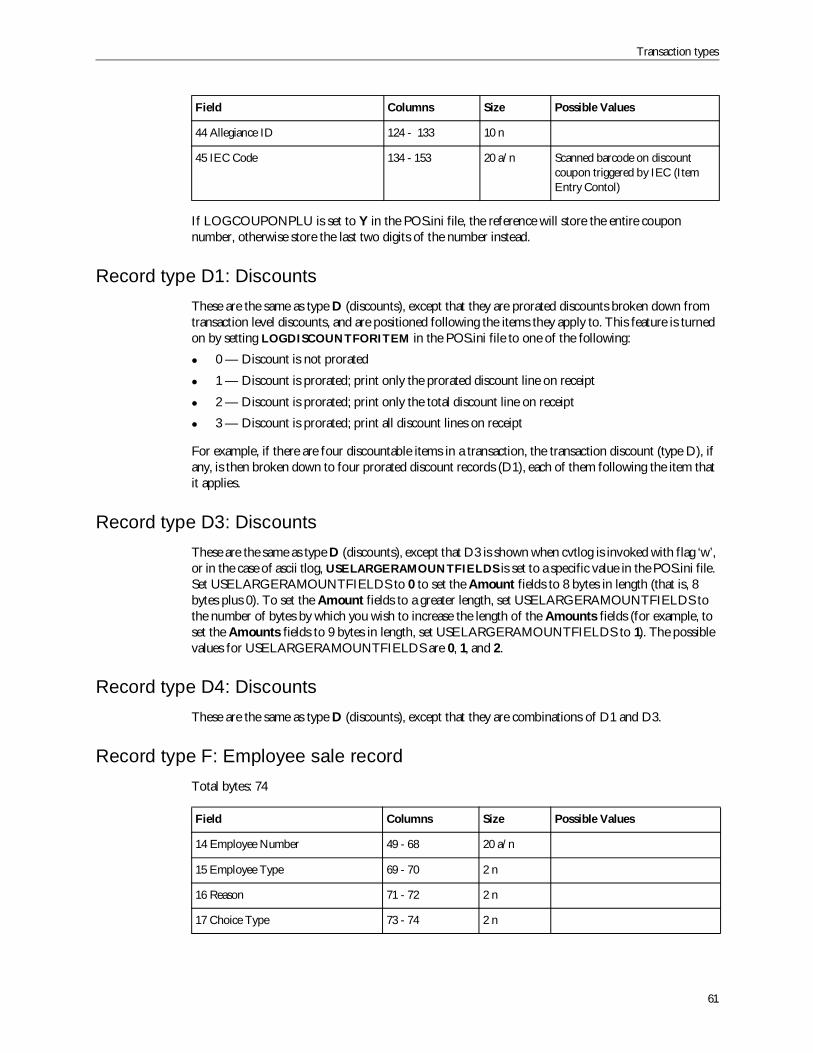
Transaction types
61
If LOGCOUPONPLU is set to Y in the POS.ini file, the reference will store the entire couponnumber, otherwise store the last two digits of the number instead.
Record type D1: DiscountsThese are the same as type D (discounts), except that they are prorated discounts broken down fromtransaction level discounts, and are positioned following the items they apply to. This feature is turnedon by setting LOGDISCOUNTFORITEM in the POS.ini file to one of the following:
0 — Discount is not prorated
1 — Discount is prorated; print only the prorated discount line on receipt
2 — Discount is prorated; print only the total discount line on receipt
3 — Discount is prorated; print all discount lines on receipt
For example, if there are four discountable items in a transaction, the transaction discount (type D), ifany, is then broken down to four prorated discount records (D1), each of them following the item thatit applies.
Record type D3: DiscountsThese are the same as type D (discounts), except that D3 is shown when cvtlog is invoked with flag ‘w’,or in the case of ascii tlog, USELARGERAMOUNTFIELDS is set to a specific value in the POS.ini file.Set USELARGERAMOUNTFIELDS to 0 to set the Amount fields to 8 bytes in length (that is, 8bytes plus 0). To set the Amount fields to a greater length, set USELARGERAMOUNTFIELDS tothe number of bytes by which you wish to increase the length of the Amounts fields (for example, toset the Amounts fields to 9 bytes in length, set USELARGERAMOUNTFIELDS to 1). The possiblevalues for USELARGERAMOUNTFIELDS are 0, 1, and 2.
Record type D4: DiscountsThese are the same as type D (discounts), except that they are combinations of D1 and D3.
Record type F: Employee sale recordTotal bytes: 74
44 Allegiance ID 124 - 133 10 n
45 IEC Code 134 - 153 20 a/n Scanned barcode on discountcoupon triggered by IEC (ItemEntry Contol)
Field Columns Size Possible Values
14 Employee Number 49 - 68 20 a/n
15 Employee Type 69 - 70 2 n
16 Reason 71 - 72 2 n
17 Choice Type 73 - 74 2 n
Field Columns Size Possible Values
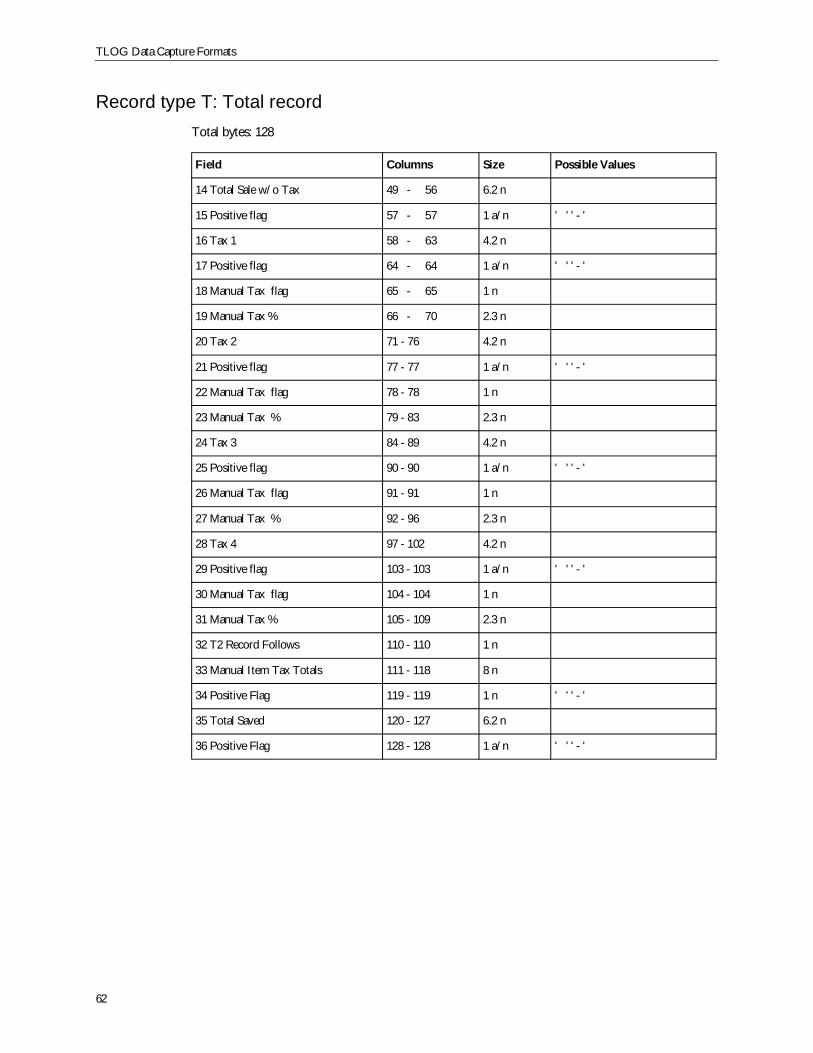
TLOG Data Capture Formats
62
Record type T: Total recordTotal bytes: 128
Field Columns Size Possible Values
14 Total Sale w/o Tax 49 - 56 6.2 n
15 Positive flag 57 - 57 1 a/n ' ' ' - '
16 Tax 1 58 - 63 4.2 n
17 Positive flag 64 - 64 1 a/n ' ' ' - '
18 Manual Tax flag 65 - 65 1 n
19 Manual Tax % 66 - 70 2.3 n
20 Tax 2 71 - 76 4.2 n
21 Positive flag 77 - 77 1 a/n ' ' ' - '
22 Manual Tax flag 78 - 78 1 n
23 Manual Tax % 79 - 83 2.3 n
24 Tax 3 84 - 89 4.2 n
25 Positive flag 90 - 90 1 a/n ' ' ' - '
26 Manual Tax flag 91 - 91 1 n
27 Manual Tax % 92 - 96 2.3 n
28 Tax 4 97 - 102 4.2 n
29 Positive flag 103 - 103 1 a/n ' ' ' - '
30 Manual Tax flag 104 - 104 1 n
31 Manual Tax % 105 - 109 2.3 n
32 T2 Record Follows 110 - 110 1 n
33 Manual Item Tax Totals 111 - 118 8 n
34 Positive Flag 119 - 119 1 n ' ' ' - '
35 Total Saved 120 - 127 6.2 n
36 Positive Flag 128 - 128 1 a/n ' ' ' - '
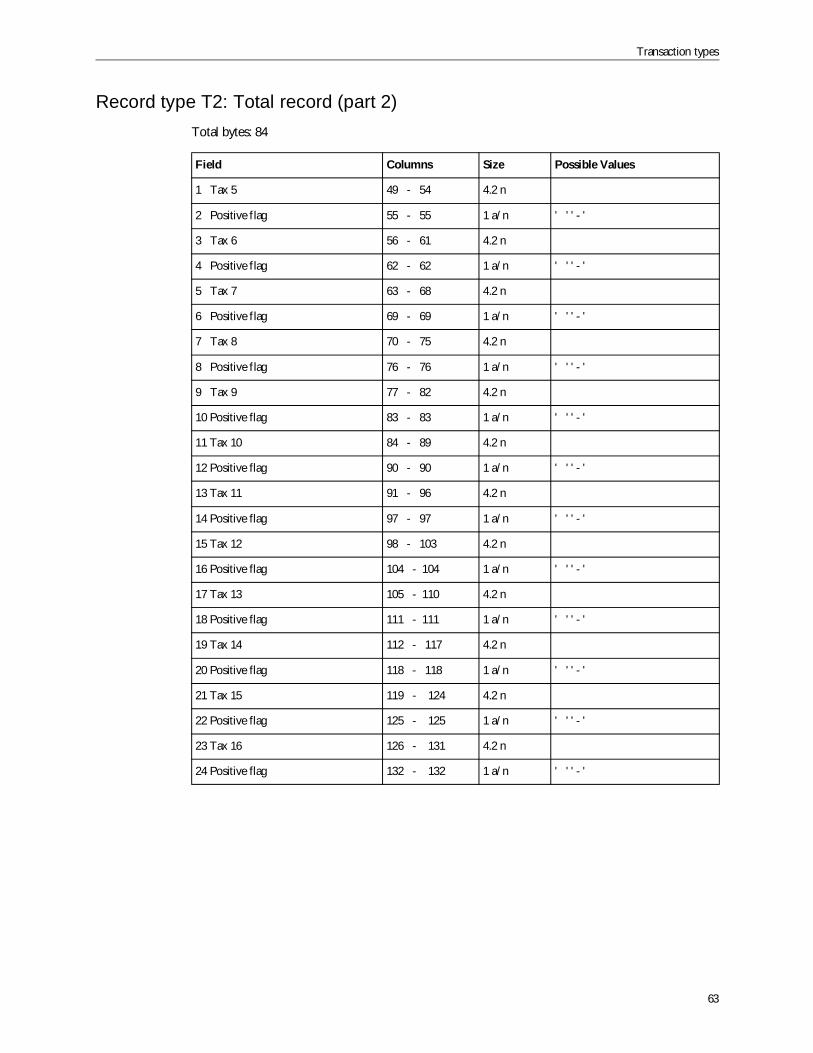
Transaction types
63
Record type T2: Total record (part 2)Total bytes: 84
Field Columns Size Possible Values
1 Tax 5 49 - 54 4.2 n
2 Positive flag 55 - 55 1 a/n ' ' ' - '
3 Tax 6 56 - 61 4.2 n
4 Positive flag 62 - 62 1 a/n ' ' ' - '
5 Tax 7 63 - 68 4.2 n
6 Positive flag 69 - 69 1 a/n ' ' ' - '
7 Tax 8 70 - 75 4.2 n
8 Positive flag 76 - 76 1 a/n ' ' ' - '
9 Tax 9 77 - 82 4.2 n
10 Positive flag 83 - 83 1 a/n ' ' ' - '
11 Tax 10 84 - 89 4.2 n
12 Positive flag 90 - 90 1 a/n ' ' ' - '
13 Tax 11 91 - 96 4.2 n
14 Positive flag 97 - 97 1 a/n ' ' ' - '
15 Tax 12 98 - 103 4.2 n
16 Positive flag 104 - 104 1 a/n ' ' ' - '
17 Tax 13 105 - 110 4.2 n
18 Positive flag 111 - 111 1 a/n ' ' ' - '
19 Tax 14 112 - 117 4.2 n
20 Positive flag 118 - 118 1 a/n ' ' ' - '
21 Tax 15 119 - 124 4.2 n
22 Positive flag 125 - 125 1 a/n ' ' ' - '
23 Tax 16 126 - 131 4.2 n
24 Positive flag 132 - 132 1 a/n ' ' ' - '
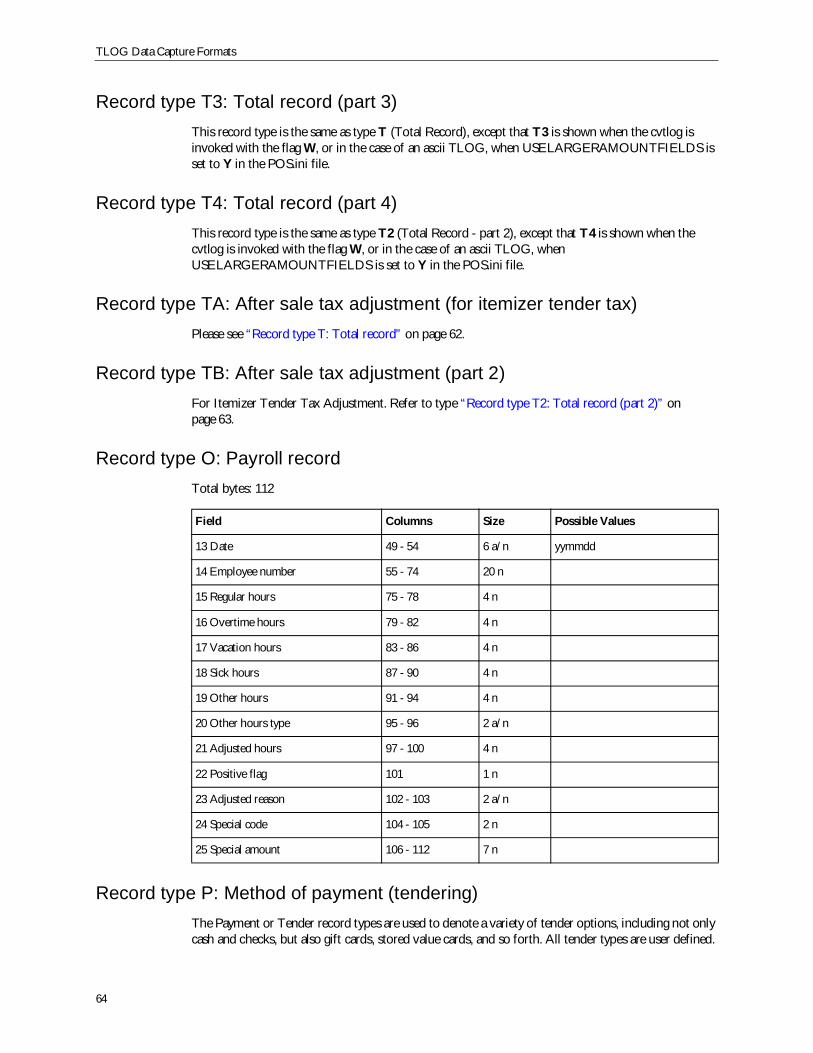
TLOG Data Capture Formats
64
Record type T3: Total record (part 3)This record type is the same as type T (Total Record), except that T3 is shown when the cvtlog isinvoked with the flag W, or in the case of an ascii TLOG, when USELARGERAMOUNTFIELDS isset to Y in the POS.ini file.
Record type T4: Total record (part 4)This record type is the same as type T2 (Total Record - part 2), except that T4 is shown when thecvtlog is invoked with the flag W, or in the case of an ascii TLOG, whenUSELARGERAMOUNTFIELDS is set to Y in the POS.ini file.
Record type TA: After sale tax adjustment (for itemizer tender tax)Please see “Record type T: Total record” on page 62.
Record type TB: After sale tax adjustment (part 2)For Itemizer Tender Tax Adjustment. Refer to type “Record type T2: Total record (part 2)” onpage 63.
Record type O: Payroll recordTotal bytes: 112
Record type P: Method of payment (tendering)The Payment or Tender record types are used to denote a variety of tender options, including not onlycash and checks, but also gift cards, stored value cards, and so forth. All tender types are user defined.
Field Columns Size Possible Values
13 Date 49 - 54 6 a/n yymmdd
14 Employee number 55 - 74 20 n
15 Regular hours 75 - 78 4 n
16 Overtime hours 79 - 82 4 n
17 Vacation hours 83 - 86 4 n
18 Sick hours 87 - 90 4 n
19 Other hours 91 - 94 4 n
20 Other hours type 95 - 96 2 a/n
21 Adjusted hours 97 - 100 4 n
22 Positive flag 101 1 n
23 Adjusted reason 102 - 103 2 a/n
24 Special code 104 - 105 2 n
25 Special amount 106 - 112 7 n
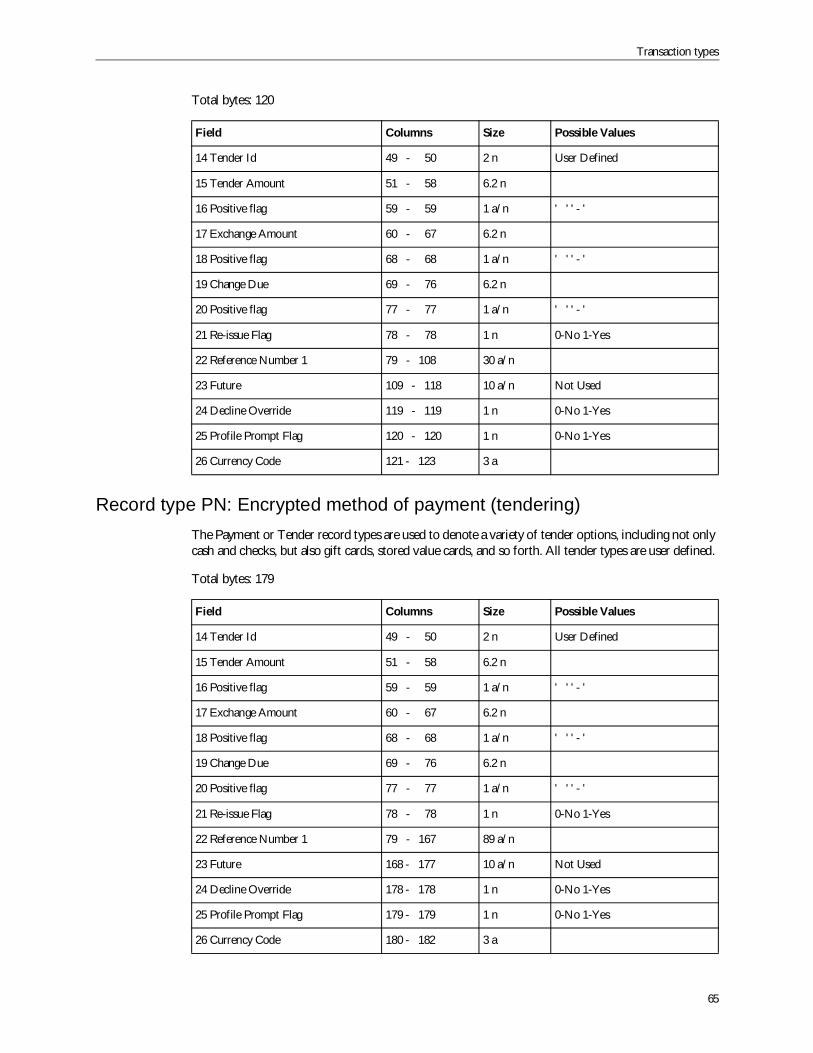
Transaction types
65
Total bytes: 120
Record type PN: Encrypted method of payment (tendering)The Payment or Tender record types are used to denote a variety of tender options, including not onlycash and checks, but also gift cards, stored value cards, and so forth. All tender types are user defined.
Total bytes: 179
Field Columns Size Possible Values
14 Tender Id 49 - 50 2 n User Defined
15 Tender Amount 51 - 58 6.2 n
16 Positive flag 59 - 59 1 a/n ' ' ' - '
17 Exchange Amount 60 - 67 6.2 n
18 Positive flag 68 - 68 1 a/n ' ' ' - '
19 Change Due 69 - 76 6.2 n
20 Positive flag 77 - 77 1 a/n ' ' ' - '
21 Re-issue Flag 78 - 78 1 n 0-No 1-Yes
22 Reference Number 1 79 - 108 30 a/n
23 Future 109 - 118 10 a/n Not Used
24 Decline Override 119 - 119 1 n 0-No 1-Yes
25 Profile Prompt Flag 120 - 120 1 n 0-No 1-Yes
26 Currency Code 121 - 123 3 a
Field Columns Size Possible Values
14 Tender Id 49 - 50 2 n User Defined
15 Tender Amount 51 - 58 6.2 n
16 Positive flag 59 - 59 1 a/n ' ' ' - '
17 Exchange Amount 60 - 67 6.2 n
18 Positive flag 68 - 68 1 a/n ' ' ' - '
19 Change Due 69 - 76 6.2 n
20 Positive flag 77 - 77 1 a/n ' ' ' - '
21 Re-issue Flag 78 - 78 1 n 0-No 1-Yes
22 Reference Number 1 79 - 167 89 a/n
23 Future 168 - 177 10 a/n Not Used
24 Decline Override 178 - 178 1 n 0-No 1-Yes
25 Profile Prompt Flag 179 - 179 1 n 0-No 1-Yes
26 Currency Code 180 - 182 3 a
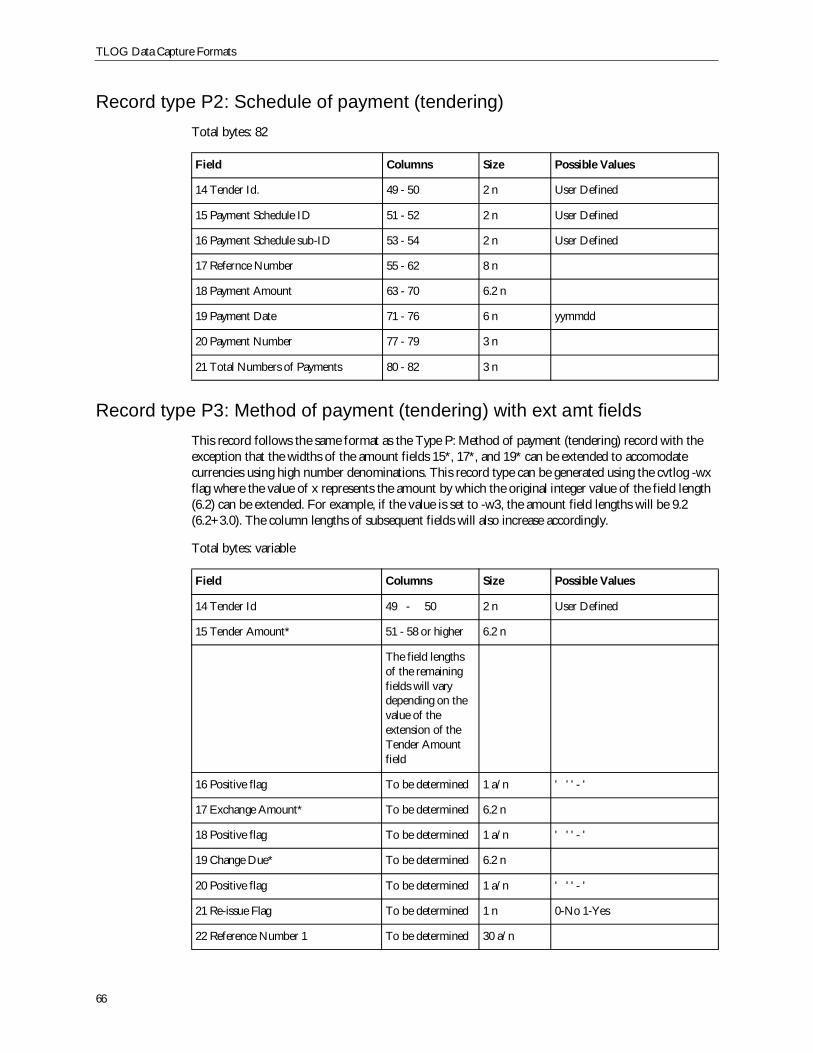
TLOG Data Capture Formats
66
Record type P2: Schedule of payment (tendering)Total bytes: 82
Record type P3: Method of payment (tendering) with ext amt fieldsThis record follows the same format as the Type P: Method of payment (tendering) record with theexception that the widths of the amount fields 15*, 17*, and 19* can be extended to accomodatecurrencies using high number denominations. This record type can be generated using the cvtlog -wxflag where the value of x represents the amount by which the original integer value of the field length(6.2) can be extended. For example, if the value is set to -w3, the amount field lengths will be 9.2(6.2+3.0). The column lengths of subsequent fields will also increase accordingly.
Total bytes: variable
Field Columns Size Possible Values
14 Tender Id. 49 - 50 2 n User Defined
15 Payment Schedule ID 51 - 52 2 n User Defined
16 Payment Schedule sub-ID 53 - 54 2 n User Defined
17 Refernce Number 55 - 62 8 n
18 Payment Amount 63 - 70 6.2 n
19 Payment Date 71 - 76 6 n yymmdd
20 Payment Number 77 - 79 3 n
21 Total Numbers of Payments 80 - 82 3 n
Field Columns Size Possible Values
14 Tender Id 49 - 50 2 n User Defined
15 Tender Amount* 51 - 58 or higher 6.2 n
The field lengthsof the remainingfields will varydepending on thevalue of theextension of theTender Amountfield
16 Positive flag To be determined 1 a/n ' ' ' - '
17 Exchange Amount* To be determined 6.2 n
18 Positive flag To be determined 1 a/n ' ' ' - '
19 Change Due* To be determined 6.2 n
20 Positive flag To be determined 1 a/n ' ' ' - '
21 Re-issue Flag To be determined 1 n 0-No 1-Yes
22 Reference Number 1 To be determined 30 a/n
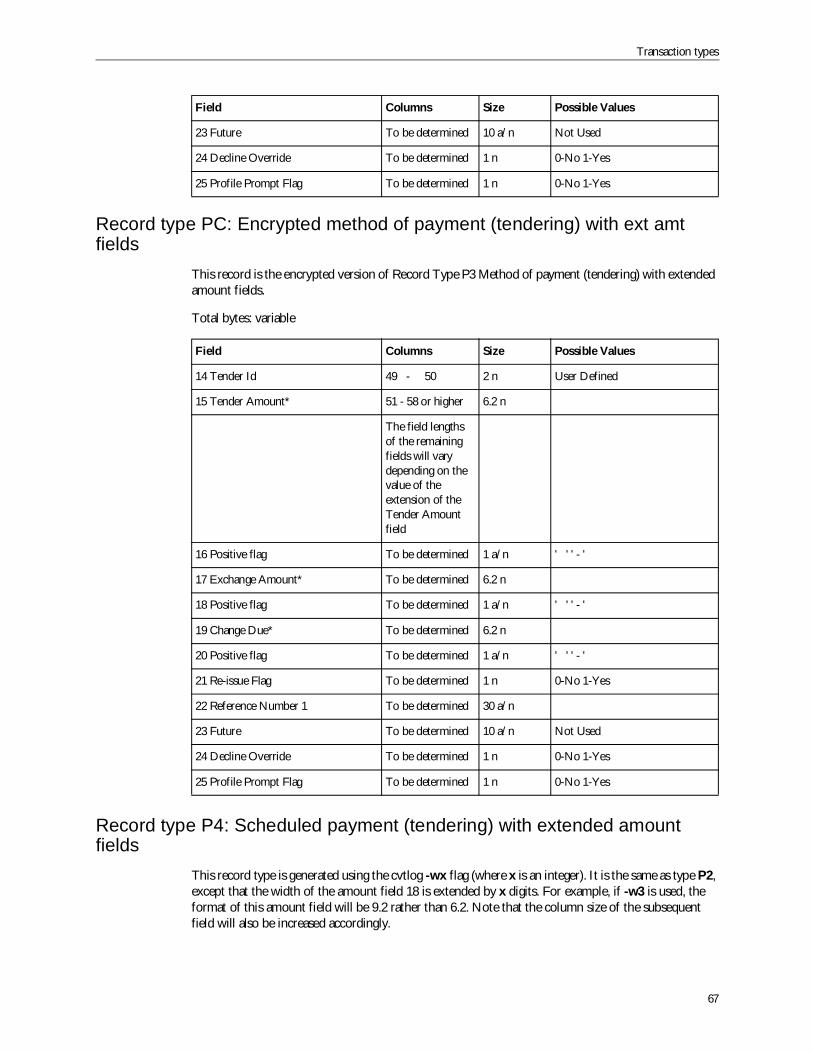
Transaction types
67
Record type PC: Encrypted method of payment (tendering) with ext amtfields
This record is the encrypted version of Record Type P3 Method of payment (tendering) with extendedamount fields.
Total bytes: variable
Record type P4: Scheduled payment (tendering) with extended amountfields
This record type is generated using the cvtlog -wx flag (where x is an integer). It is the same as type P2,except that the width of the amount field 18 is extended by x digits. For example, if -w3 is used, theformat of this amount field will be 9.2 rather than 6.2. Note that the column size of the subsequentfield will also be increased accordingly.
23 Future To be determined 10 a/n Not Used
24 Decline Override To be determined 1 n 0-No 1-Yes
25 Profile Prompt Flag To be determined 1 n 0-No 1-Yes
Field Columns Size Possible Values
14 Tender Id 49 - 50 2 n User Defined
15 Tender Amount* 51 - 58 or higher 6.2 n
The field lengthsof the remainingfields will varydepending on thevalue of theextension of theTender Amountfield
16 Positive flag To be determined 1 a/n ' ' ' - '
17 Exchange Amount* To be determined 6.2 n
18 Positive flag To be determined 1 a/n ' ' ' - '
19 Change Due* To be determined 6.2 n
20 Positive flag To be determined 1 a/n ' ' ' - '
21 Re-issue Flag To be determined 1 n 0-No 1-Yes
22 Reference Number 1 To be determined 30 a/n
23 Future To be determined 10 a/n Not Used
24 Decline Override To be determined 1 n 0-No 1-Yes
25 Profile Prompt Flag To be determined 1 n 0-No 1-Yes
Field Columns Size Possible Values
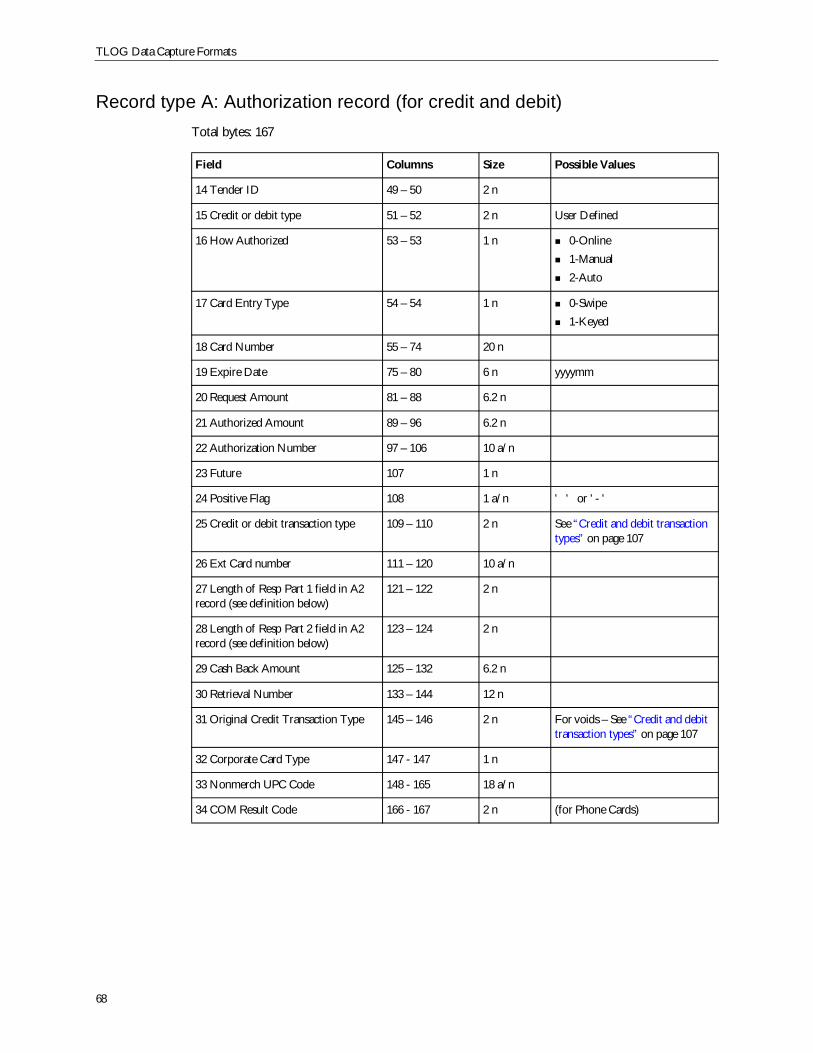
TLOG Data Capture Formats
68
Record type A: Authorization record (for credit and debit)Total bytes: 167
Field Columns Size Possible Values
14 Tender ID 49 – 50 2 n
15 Credit or debit type 51 – 52 2 n User Defined
16 How Authorized 53 – 53 1 n 0-Online1-Manual2-Auto
17 Card Entry Type 54 – 54 1 n 0-Swipe1-Keyed
18 Card Number 55 – 74 20 n
19 Expire Date 75 – 80 6 n yyyymm
20 Request Amount 81 – 88 6.2 n
21 Authorized Amount 89 – 96 6.2 n
22 Authorization Number 97 – 106 10 a/n
23 Future 107 1 n
24 Positive Flag 108 1 a/n ' ' or ' - '
25 Credit or debit transaction type 109 – 110 2 n See “Credit and debit transactiontypes” on page 107
26 Ext Card number 111 – 120 10 a/n
27 Length of Resp Part 1 field in A2record (see definition below)
121 – 122 2 n
28 Length of Resp Part 2 field in A2record (see definition below)
123 – 124 2 n
29 Cash Back Amount 125 – 132 6.2 n
30 Retrieval Number 133 – 144 12 n
31 Original Credit Transaction Type 145 – 146 2 n For voids – See “Credit and debittransaction types” on page 107
32 Corporate Card Type 147 - 147 1 n
33 Nonmerch UPC Code 148 - 165 18 a/n
34 COM Result Code 166 - 167 2 n (for Phone Cards)
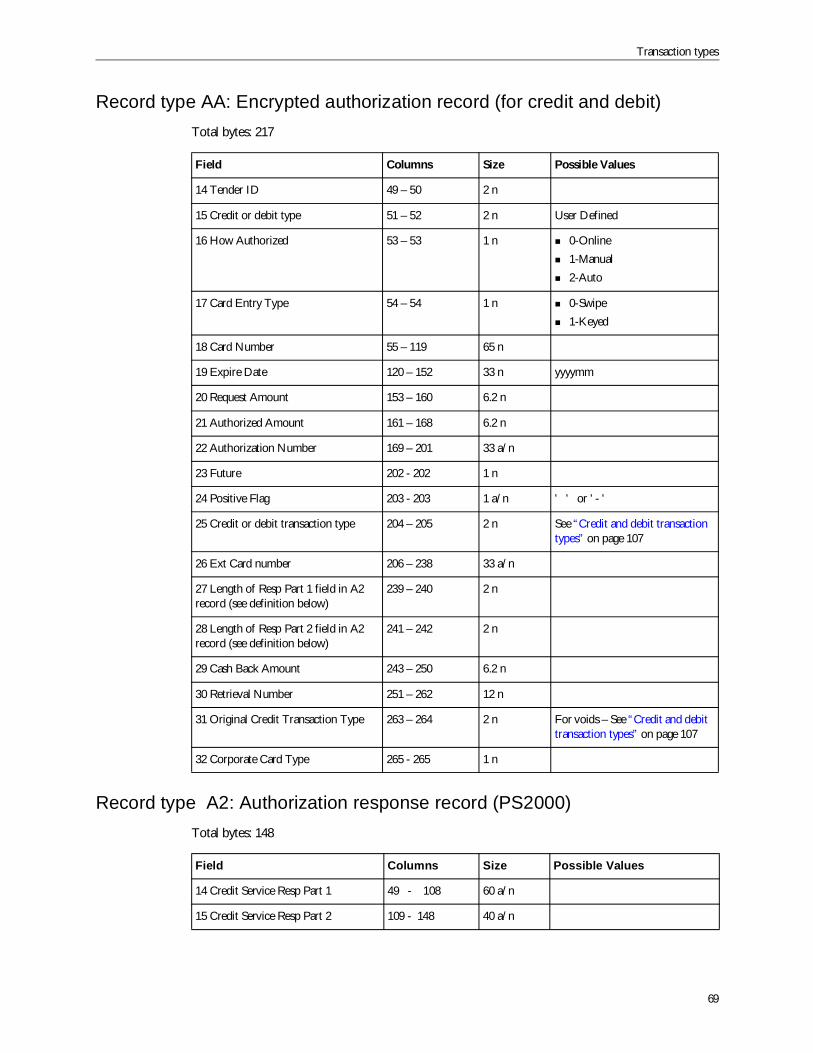
Transaction types
69
Record type AA: Encrypted authorization record (for credit and debit)Total bytes: 217
Record type A2: Authorization response record (PS2000)Total bytes: 148
Field Columns Size Possible Values
14 Tender ID 49 – 50 2 n
15 Credit or debit type 51 – 52 2 n User Defined
16 How Authorized 53 – 53 1 n 0-Online1-Manual2-Auto
17 Card Entry Type 54 – 54 1 n 0-Swipe1-Keyed
18 Card Number 55 – 119 65 n
19 Expire Date 120 – 152 33 n yyyymm
20 Request Amount 153 – 160 6.2 n
21 Authorized Amount 161 – 168 6.2 n
22 Authorization Number 169 – 201 33 a/n
23 Future 202 - 202 1 n
24 Positive Flag 203 - 203 1 a/n ' ' or ' - '
25 Credit or debit transaction type 204 – 205 2 n See “Credit and debit transactiontypes” on page 107
26 Ext Card number 206 – 238 33 a/n
27 Length of Resp Part 1 field in A2record (see definition below)
239 – 240 2 n
28 Length of Resp Part 2 field in A2record (see definition below)
241 – 242 2 n
29 Cash Back Amount 243 – 250 6.2 n
30 Retrieval Number 251 – 262 12 n
31 Original Credit Transaction Type 263 – 264 2 n For voids – See “Credit and debittransaction types” on page 107
32 Corporate Card Type 265 - 265 1 n
Field Columns Size Possible Values
14 Credit Service Resp Part 1 49 - 108 60 a/n
15 Credit Service Resp Part 2 109 - 148 40 a/n
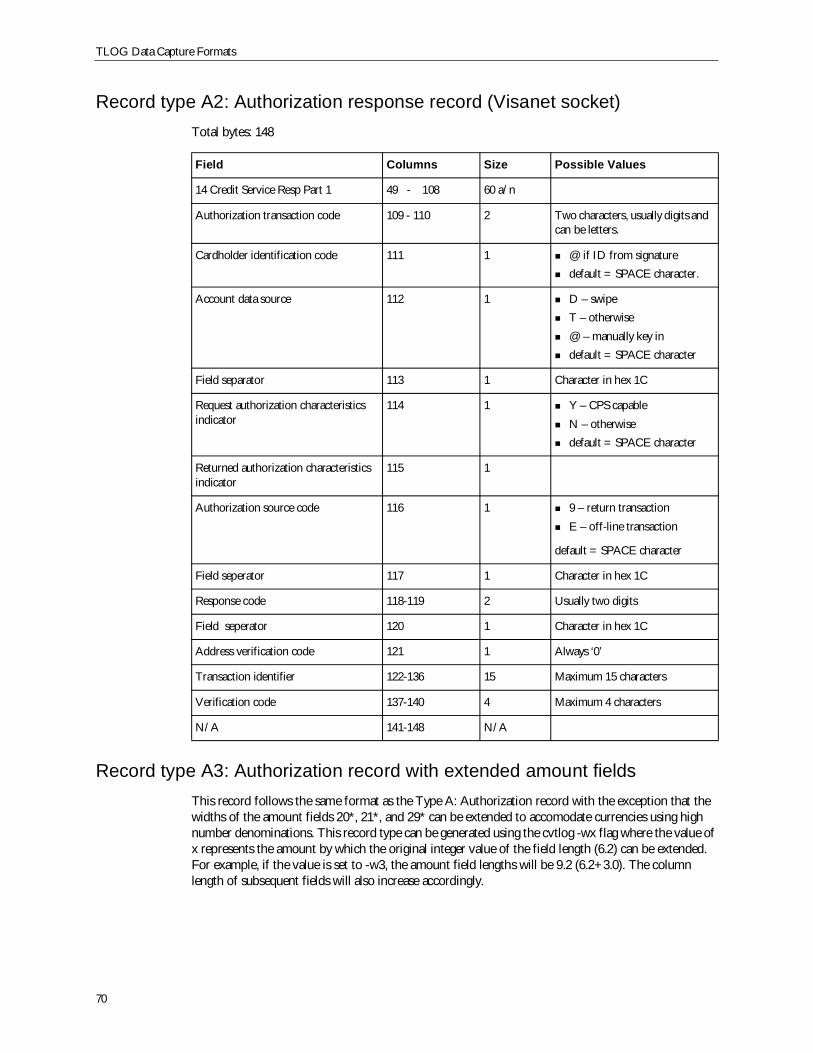
TLOG Data Capture Formats
70
Record type A2: Authorization response record (Visanet socket)Total bytes: 148
Record type A3: Authorization record with extended amount fieldsThis record follows the same format as the Type A: Authorization record with the exception that thewidths of the amount fields 20*, 21*, and 29* can be extended to accomodate currencies using highnumber denominations. This record type can be generated using the cvtlog -wx flag where the value ofx represents the amount by which the original integer value of the field length (6.2) can be extended.For example, if the value is set to -w3, the amount field lengths will be 9.2 (6.2+3.0). The columnlength of subsequent fields will also increase accordingly.
Field Columns Size Possible Values
14 Credit Service Resp Part 1 49 - 108 60 a/n
Authorization transaction code 109 - 110 2 Two characters, usually digits andcan be letters.
Cardholder identification code 111 1 @ if ID from signaturedefault = SPACE character.
Account data source 112 1 D – swipeT – otherwise@ – manually key indefault = SPACE character
Field separator 113 1 Character in hex 1C
Request authorization characteristicsindicator
114 1 Y – CPS capableN – otherwisedefault = SPACE character
Returned authorization characteristicsindicator
115 1
Authorization source code 116 1 9 – return transactionE – off-line transaction
default = SPACE character
Field seperator 117 1 Character in hex 1C
Response code 118-119 2 Usually two digits
Field seperator 120 1 Character in hex 1C
Address verification code 121 1 Always ‘0’
Transaction identifier 122-136 15 Maximum 15 characters
Verification code 137-140 4 Maximum 4 characters
N/A 141-148 N/A
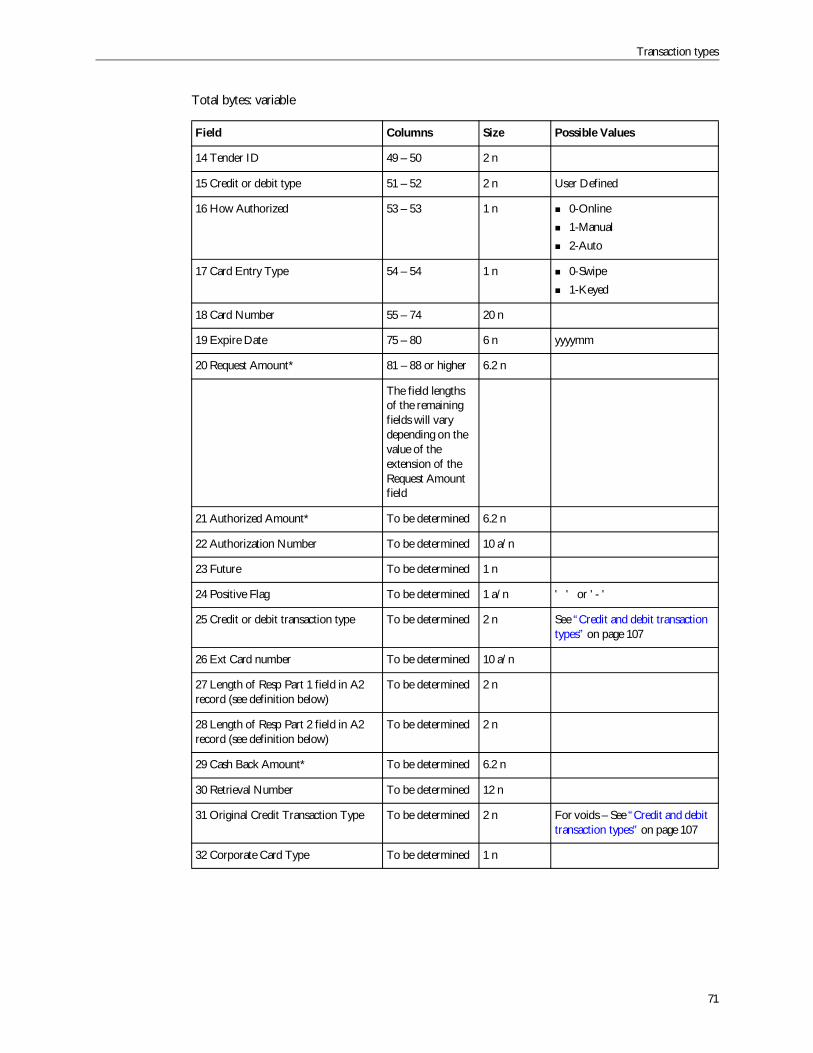
Transaction types
71
Total bytes: variable
Field Columns Size Possible Values
14 Tender ID 49 – 50 2 n
15 Credit or debit type 51 – 52 2 n User Defined
16 How Authorized 53 – 53 1 n 0-Online1-Manual2-Auto
17 Card Entry Type 54 – 54 1 n 0-Swipe1-Keyed
18 Card Number 55 – 74 20 n
19 Expire Date 75 – 80 6 n yyyymm
20 Request Amount* 81 – 88 or higher 6.2 n
The field lengthsof the remainingfields will varydepending on thevalue of theextension of theRequest Amountfield
21 Authorized Amount* To be determined 6.2 n
22 Authorization Number To be determined 10 a/n
23 Future To be determined 1 n
24 Positive Flag To be determined 1 a/n ' ' or ' - '
25 Credit or debit transaction type To be determined 2 n See “Credit and debit transactiontypes” on page 107
26 Ext Card number To be determined 10 a/n
27 Length of Resp Part 1 field in A2record (see definition below)
To be determined 2 n
28 Length of Resp Part 2 field in A2record (see definition below)
To be determined 2 n
29 Cash Back Amount* To be determined 6.2 n
30 Retrieval Number To be determined 12 n
31 Original Credit Transaction Type To be determined 2 n For voids – See “Credit and debittransaction types” on page 107
32 Corporate Card Type To be determined 1 n
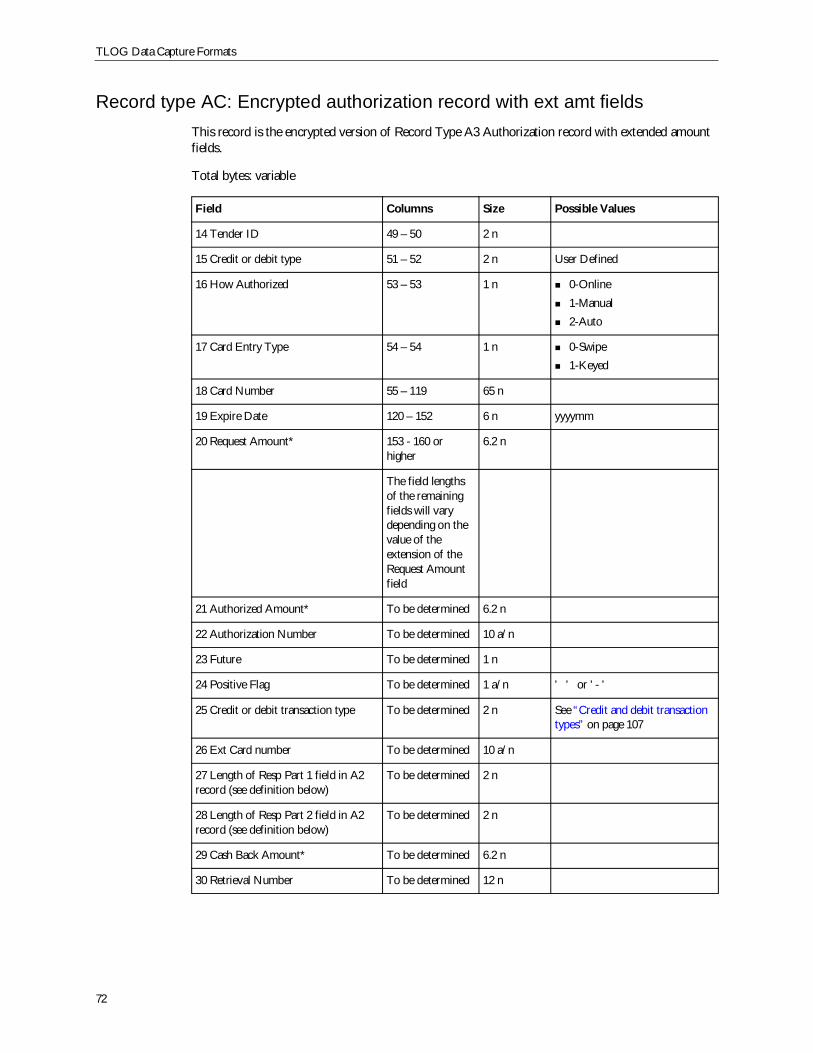
TLOG Data Capture Formats
72
Record type AC: Encrypted authorization record with ext amt fieldsThis record is the encrypted version of Record Type A3 Authorization record with extended amountfields.
Total bytes: variable
Field Columns Size Possible Values
14 Tender ID 49 – 50 2 n
15 Credit or debit type 51 – 52 2 n User Defined
16 How Authorized 53 – 53 1 n 0-Online1-Manual2-Auto
17 Card Entry Type 54 – 54 1 n 0-Swipe1-Keyed
18 Card Number 55 – 119 65 n
19 Expire Date 120 – 152 6 n yyyymm
20 Request Amount* 153 - 160 orhigher
6.2 n
The field lengthsof the remainingfields will varydepending on thevalue of theextension of theRequest Amountfield
21 Authorized Amount* To be determined 6.2 n
22 Authorization Number To be determined 10 a/n
23 Future To be determined 1 n
24 Positive Flag To be determined 1 a/n ' ' or ' - '
25 Credit or debit transaction type To be determined 2 n See “Credit and debit transactiontypes” on page 107
26 Ext Card number To be determined 10 a/n
27 Length of Resp Part 1 field in A2record (see definition below)
To be determined 2 n
28 Length of Resp Part 2 field in A2record (see definition below)
To be determined 2 n
29 Cash Back Amount* To be determined 6.2 n
30 Retrieval Number To be determined 12 n
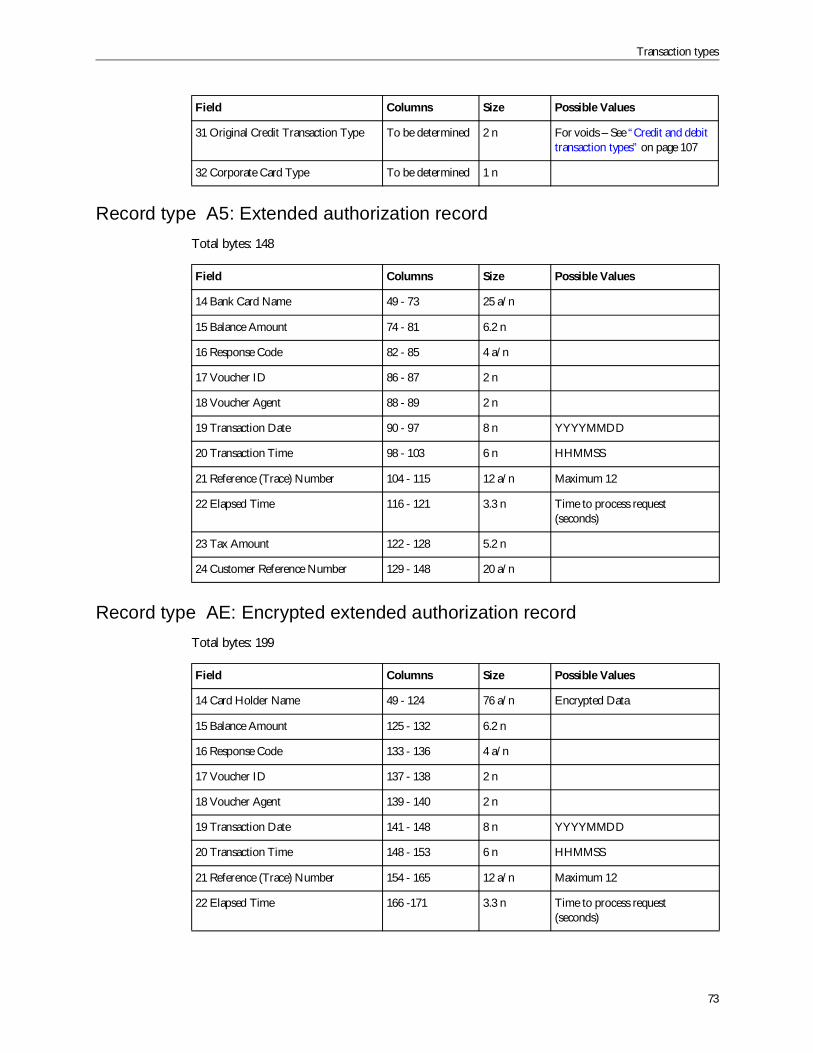
Transaction types
73
Record type A5: Extended authorization recordTotal bytes: 148
Record type AE: Encrypted extended authorization recordTotal bytes: 199
31 Original Credit Transaction Type To be determined 2 n For voids – See “Credit and debittransaction types” on page 107
32 Corporate Card Type To be determined 1 n
Field Columns Size Possible Values
14 Bank Card Name 49 - 73 25 a/n
15 Balance Amount 74 - 81 6.2 n
16 Response Code 82 - 85 4 a/n
17 Voucher ID 86 - 87 2 n
18 Voucher Agent 88 - 89 2 n
19 Transaction Date 90 - 97 8 n YYYYMMDD
20 Transaction Time 98 - 103 6 n HHMMSS
21 Reference (Trace) Number 104 - 115 12 a/n Maximum 12
22 Elapsed Time 116 - 121 3.3 n Time to process request(seconds)
23 Tax Amount 122 - 128 5.2 n
24 Customer Reference Number 129 - 148 20 a/n
Field Columns Size Possible Values
14 Card Holder Name 49 - 124 76 a/n Encrypted Data
15 Balance Amount 125 - 132 6.2 n
16 Response Code 133 - 136 4 a/n
17 Voucher ID 137 - 138 2 n
18 Voucher Agent 139 - 140 2 n
19 Transaction Date 141 - 148 8 n YYYYMMDD
20 Transaction Time 148 - 153 6 n HHMMSS
21 Reference (Trace) Number 154 - 165 12 a/n Maximum 12
22 Elapsed Time 166 -171 3.3 n Time to process request(seconds)
Field Columns Size Possible Values
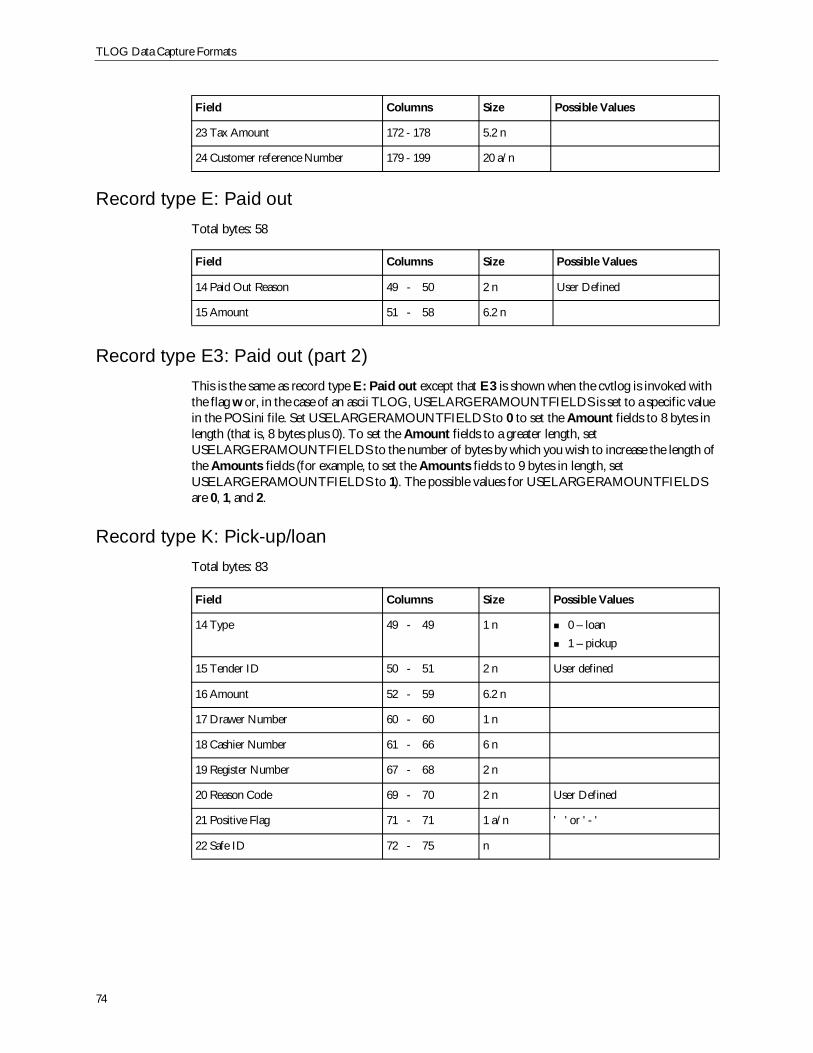
TLOG Data Capture Formats
74
Record type E: Paid outTotal bytes: 58
Record type E3: Paid out (part 2)This is the same as record type E: Paid out except that E3 is shown when the cvtlog is invoked withthe flag w or, in the case of an ascii TLOG, USELARGERAMOUNTFIELDS is set to a specific valuein the POS.ini file. Set USELARGERAMOUNTFIELDS to 0 to set the Amount fields to 8 bytes inlength (that is, 8 bytes plus 0). To set the Amount fields to a greater length, setUSELARGERAMOUNTFIELDS to the number of bytes by which you wish to increase the length ofthe Amounts fields (for example, to set the Amounts fields to 9 bytes in length, setUSELARGERAMOUNTFIELDS to 1). The possible values for USELARGERAMOUNTFIELDSare 0, 1, and 2.
Record type K: Pick-up/loanTotal bytes: 83
23 Tax Amount 172 - 178 5.2 n
24 Customer reference Number 179 - 199 20 a/n
Field Columns Size Possible Values
14 Paid Out Reason 49 - 50 2 n User Defined
15 Amount 51 - 58 6.2 n
Field Columns Size Possible Values
14 Type 49 - 49 1 n 0 – loan1 – pickup
15 Tender ID 50 - 51 2 n User defined
16 Amount 52 - 59 6.2 n
17 Drawer Number 60 - 60 1 n
18 Cashier Number 61 - 66 6 n
19 Register Number 67 - 68 2 n
20 Reason Code 69 - 70 2 n User Defined
21 Positive Flag 71 - 71 1 a/n ' ' or ' - '
22 Safe ID 72 - 75 n
Field Columns Size Possible Values
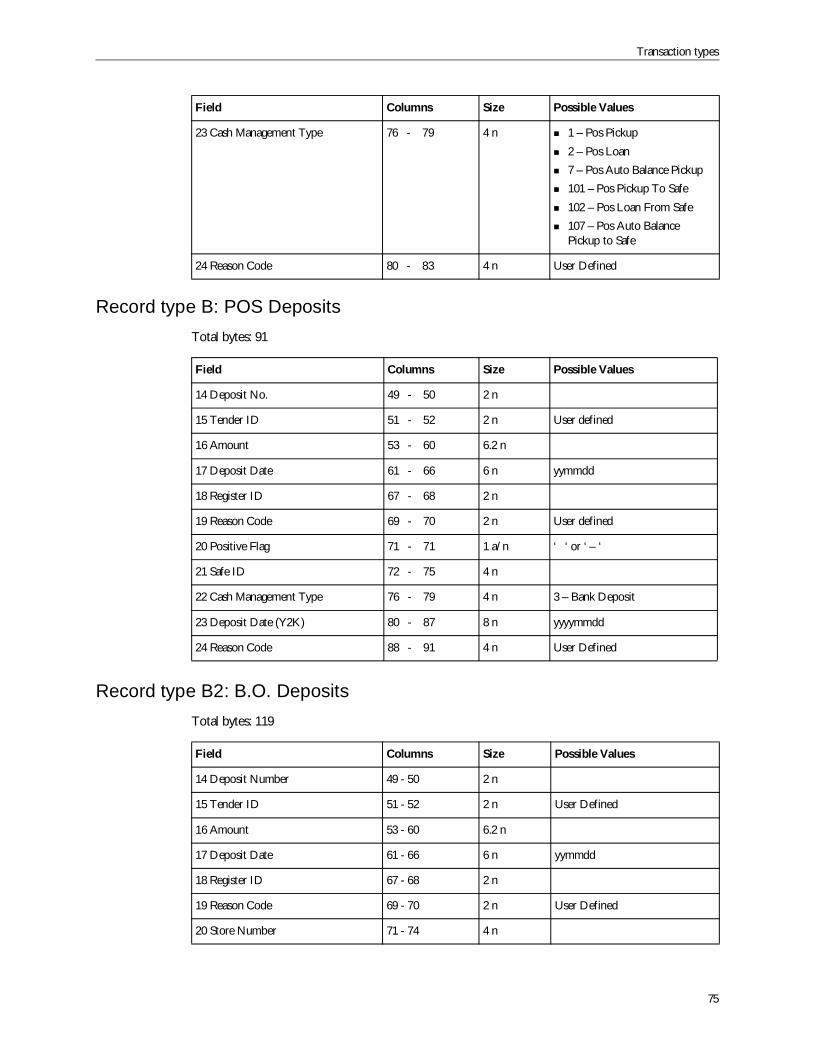
Transaction types
75
Record type B: POS DepositsTotal bytes: 91
Record type B2: B.O. DepositsTotal bytes: 119
23 Cash Management Type 76 - 79 4 n 1 – Pos Pickup2 – Pos Loan7 – Pos Auto Balance Pickup101 – Pos Pickup To Safe102 – Pos Loan From Safe107 – Pos Auto BalancePickup to Safe
24 Reason Code 80 - 83 4 n User Defined
Field Columns Size Possible Values
14 Deposit No. 49 - 50 2 n
15 Tender ID 51 - 52 2 n User defined
16 Amount 53 - 60 6.2 n
17 Deposit Date 61 - 66 6 n yymmdd
18 Register ID 67 - 68 2 n
19 Reason Code 69 - 70 2 n User defined
20 Positive Flag 71 - 71 1 a/n ‘ ‘ or ‘ – ‘
21 Safe ID 72 - 75 4 n
22 Cash Management Type 76 - 79 4 n 3 – Bank Deposit
23 Deposit Date (Y2K) 80 - 87 8 n yyyymmdd
24 Reason Code 88 - 91 4 n User Defined
Field Columns Size Possible Values
14 Deposit Number 49 - 50 2 n
15 Tender ID 51 - 52 2 n User Defined
16 Amount 53 - 60 6.2 n
17 Deposit Date 61 - 66 6 n yymmdd
18 Register ID 67 - 68 2 n
19 Reason Code 69 - 70 2 n User Defined
20 Store Number 71 - 74 4 n
Field Columns Size Possible Values

TLOG Data Capture Formats
76
Record type B3: POS Deposits (Part 2)This is the same as record type B: POS Deposits except that B3 is shown when the cvtlog is invokedwith the flag w or, in the case of an ascii TLOG, USELARGERAMOUNTFIELDS is set to a specificvalue in the POS.ini file. Set USELARGERAMOUNTFIELDS to 0 to set the Amount fields to 8bytes in length (that is, 8 bytes plus 0). To set the Amount fields to a greater length, setUSELARGERAMOUNTFIELDS to the number of bytes by which you wish to increase the length ofthe Amounts fields (for example, to set the Amounts fields to 9 bytes in length, setUSELARGERAMOUNTFIELDS to 1). The possible values for USELARGERAMOUNTFIELDSare 0, 1, and 2.
Record type M: Miscellaneous recordsTotal bytes: 111
21 Positive Flag 75 - 75 1 a/n ‘ ‘ or ‘ – ‘
22 Safe ID 76 - 79 4 n
23 Cash Management Type 80 - 83 4 n 103 – Bank Deposit To Safe104 – Bank Deposit FromSafe
24 Deposit Date (Y2K) 84 - 91 8 n yyyymmdd
25 Verified By 92 - 97 6 n
26 Collection Date 98 - 105 8 n Yyyymmdd(VABC version 8.0.1)
27 Bag Number 106 - 115 10 a/n Bag number(VABC version 8.0.1)
28 Reason Code 116 - 119 4 n User Defined
Field Columns Size Possible Values
14 Miscellaneous Type 49 - 50 2 n
15 Reference Number 51 - 70 20 a/n User defined
(Can be used to store the lastbusiness date, as regards missingdays in the system. The format isDD-MM-YY.)
16 Amount 71 - 78 6.2 n Opening Balance for Mgr 246Closing Balance for Mgr 249
17 Positive Flag 79 - 79 1 a/n ‘ ‘ ‘ – ‘
18 Drawer Number 80 - 80 1 n
19 Transaction Mode 81 - 81 1 n 0-Off1-On
20 Cashier/Manager Number 82 - 87 6 n
Field Columns Size Possible Values
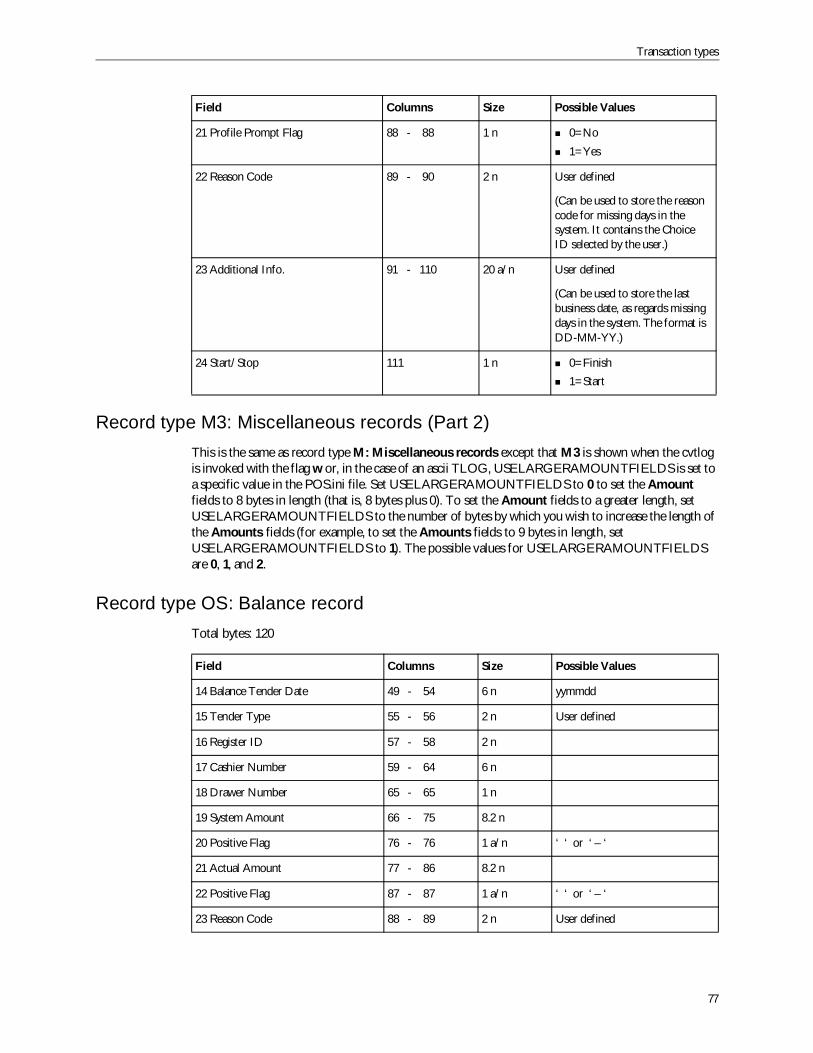
Transaction types
77
Record type M3: Miscellaneous records (Part 2)This is the same as record type M: Miscellaneous records except that M3 is shown when the cvtlogis invoked with the flag w or, in the case of an ascii TLOG, USELARGERAMOUNTFIELDS is set toa specific value in the POS.ini file. Set USELARGERAMOUNTFIELDS to 0 to set the Amountfields to 8 bytes in length (that is, 8 bytes plus 0). To set the Amount fields to a greater length, setUSELARGERAMOUNTFIELDS to the number of bytes by which you wish to increase the length ofthe Amounts fields (for example, to set the Amounts fields to 9 bytes in length, setUSELARGERAMOUNTFIELDS to 1). The possible values for USELARGERAMOUNTFIELDSare 0, 1, and 2.
Record type OS: Balance recordTotal bytes: 120
21 Profile Prompt Flag 88 - 88 1 n 0=No1=Yes
22 Reason Code 89 - 90 2 n User defined
(Can be used to store the reasoncode for missing days in thesystem. It contains the ChoiceID selected by the user.)
23 Additional Info. 91 - 110 20 a/n User defined
(Can be used to store the lastbusiness date, as regards missingdays in the system. The format isDD-MM-YY.)
24 Start/Stop 111 1 n 0=Finish1=Start
Field Columns Size Possible Values
14 Balance Tender Date 49 - 54 6 n yymmdd
15 Tender Type 55 - 56 2 n User defined
16 Register ID 57 - 58 2 n
17 Cashier Number 59 - 64 6 n
18 Drawer Number 65 - 65 1 n
19 System Amount 66 - 75 8.2 n
20 Positive Flag 76 - 76 1 a/n ‘ ‘ or ‘ – ‘
21 Actual Amount 77 - 86 8.2 n
22 Positive Flag 87 - 87 1 a/n ‘ ‘ or ‘ – ‘
23 Reason Code 88 - 89 2 n User defined
Field Columns Size Possible Values
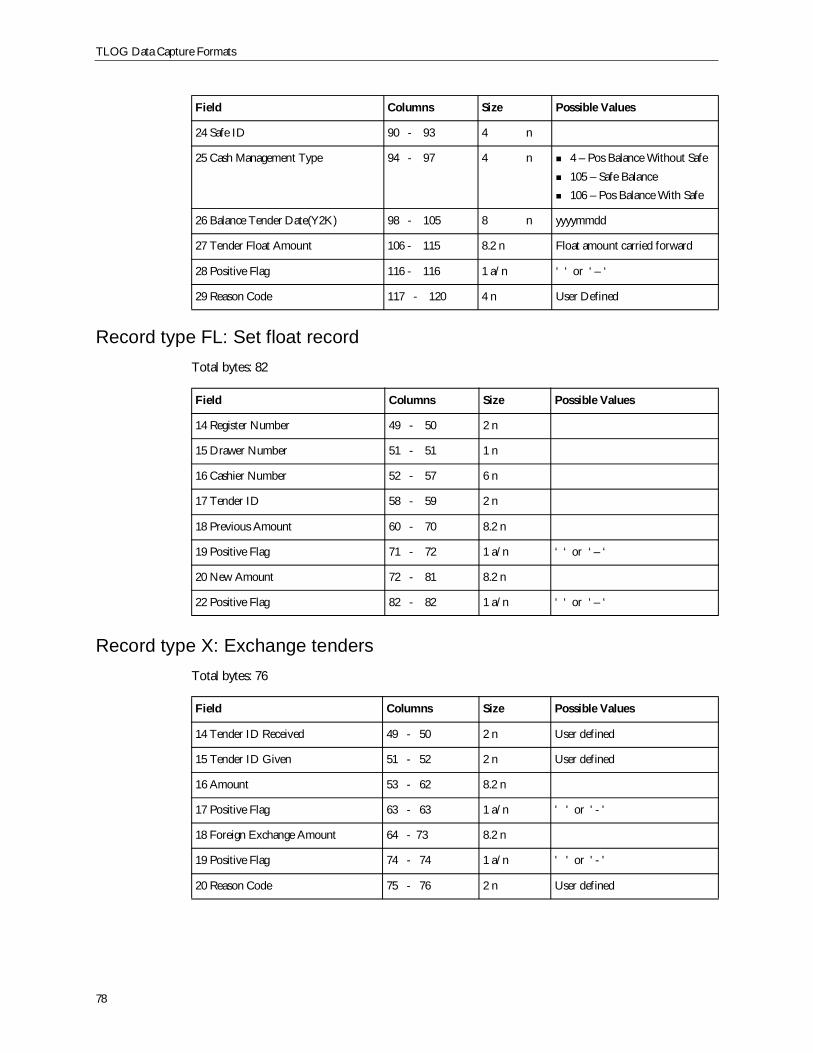
TLOG Data Capture Formats
78
Record type FL: Set float recordTotal bytes: 82
Record type X: Exchange tendersTotal bytes: 76
24 Safe ID 90 - 93 4 n
25 Cash Management Type 94 - 97 4 n 4 – Pos Balance Without Safe105 – Safe Balance106 – Pos Balance With Safe
26 Balance Tender Date(Y2K) 98 - 105 8 n yyyymmdd
27 Tender Float Amount 106 - 115 8.2 n Float amount carried forward
28 Positive Flag 116 - 116 1 a/n ‘ ‘ or ‘ – ‘
29 Reason Code 117 - 120 4 n User Defined
Field Columns Size Possible Values
14 Register Number 49 - 50 2 n
15 Drawer Number 51 - 51 1 n
16 Cashier Number 52 - 57 6 n
17 Tender ID 58 - 59 2 n
18 Previous Amount 60 - 70 8.2 n
19 Positive Flag 71 - 72 1 a/n ‘ ‘ or ‘ – ‘
20 New Amount 72 - 81 8.2 n
22 Positive Flag 82 - 82 1 a/n ‘ ‘ or ‘ – ‘
Field Columns Size Possible Values
14 Tender ID Received 49 - 50 2 n User defined
15 Tender ID Given 51 - 52 2 n User defined
16 Amount 53 - 62 8.2 n
17 Positive Flag 63 - 63 1 a/n ' ' or ' - '
18 Foreign Exchange Amount 64 - 73 8.2 n
19 Positive Flag 74 - 74 1 a/n ' ' or ' - '
20 Reason Code 75 - 76 2 n User defined
Field Columns Size Possible Values
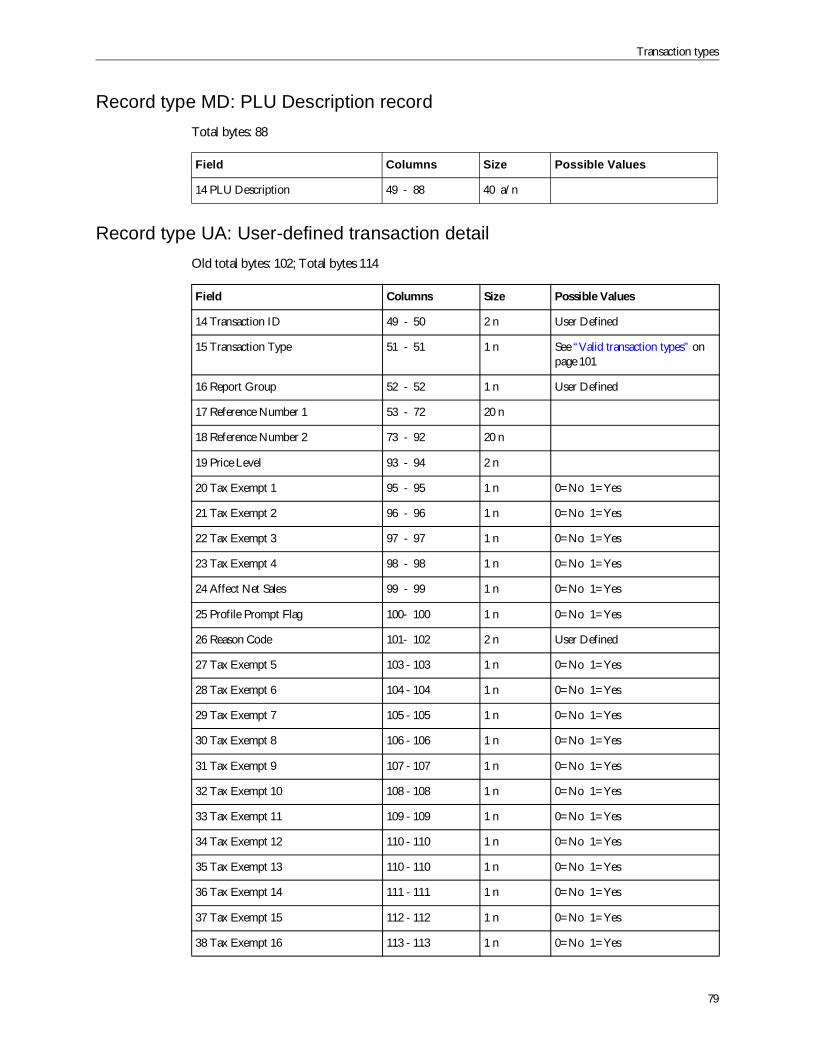
Transaction types
79
Record type MD: PLU Description recordTotal bytes: 88
Record type UA: User-defined transaction detailOld total bytes: 102; Total bytes 114
Field Columns Size Possible Values
14 PLU Description 49 - 88 40 a/n
Field Columns Size Possible Values
14 Transaction ID 49 - 50 2 n User Defined
15 Transaction Type 51 - 51 1 n See “Valid transaction types” onpage 101
16 Report Group 52 - 52 1 n User Defined
17 Reference Number 1 53 - 72 20 n
18 Reference Number 2 73 - 92 20 n
19 Price Level 93 - 94 2 n
20 Tax Exempt 1 95 - 95 1 n 0=No 1=Yes
21 Tax Exempt 2 96 - 96 1 n 0=No 1=Yes
22 Tax Exempt 3 97 - 97 1 n 0=No 1=Yes
23 Tax Exempt 4 98 - 98 1 n 0=No 1=Yes
24 Affect Net Sales 99 - 99 1 n 0=No 1=Yes
25 Profile Prompt Flag 100- 100 1 n 0=No 1=Yes
26 Reason Code 101- 102 2 n User Defined
27 Tax Exempt 5 103 - 103 1 n 0=No 1=Yes
28 Tax Exempt 6 104 - 104 1 n 0=No 1=Yes
29 Tax Exempt 7 105 - 105 1 n 0=No 1=Yes
30 Tax Exempt 8 106 - 106 1 n 0=No 1=Yes
31 Tax Exempt 9 107 - 107 1 n 0=No 1=Yes
32 Tax Exempt 10 108 - 108 1 n 0=No 1=Yes
33 Tax Exempt 11 109 - 109 1 n 0=No 1=Yes
34 Tax Exempt 12 110 - 110 1 n 0=No 1=Yes
35 Tax Exempt 13 110 - 110 1 n 0=No 1=Yes
36 Tax Exempt 14 111 - 111 1 n 0=No 1=Yes
37 Tax Exempt 15 112 - 112 1 n 0=No 1=Yes
38 Tax Exempt 16 113 - 113 1 n 0=No 1=Yes
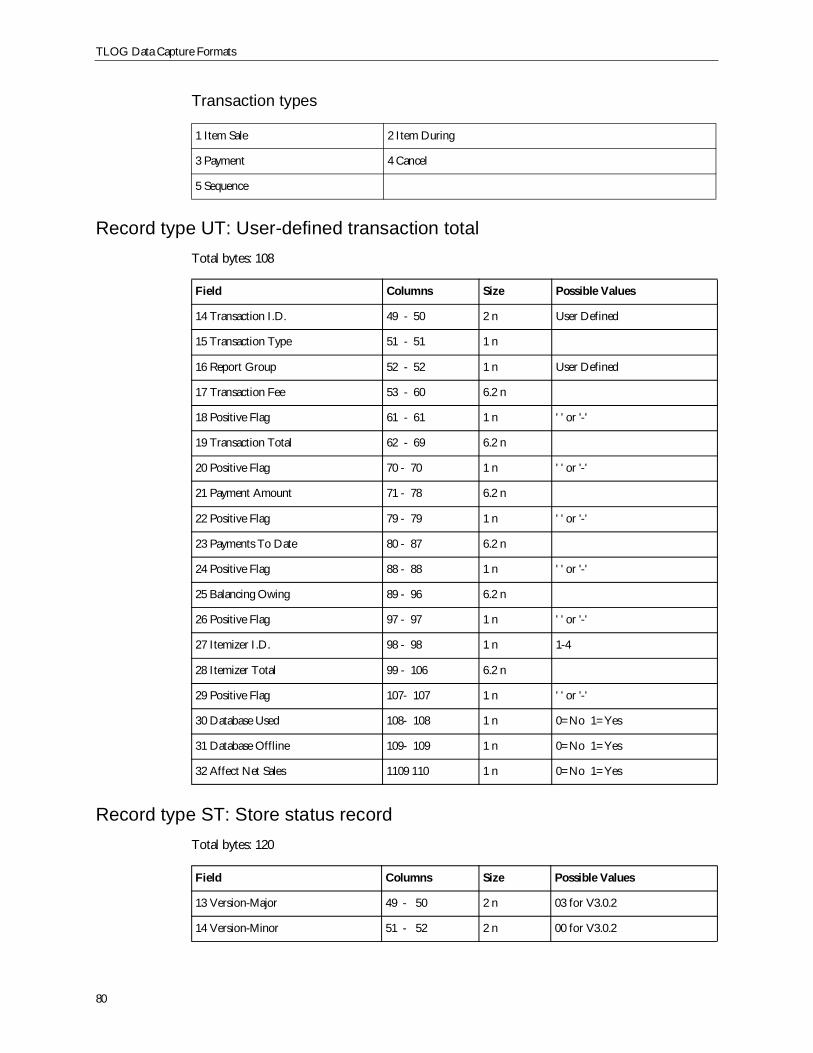
TLOG Data Capture Formats
80
Transaction types
Record type UT: User-defined transaction totalTotal bytes: 108
Record type ST: Store status recordTotal bytes: 120
1 Item Sale 2 Item During
3 Payment 4 Cancel
5 Sequence
Field Columns Size Possible Values
14 Transaction I.D. 49 - 50 2 n User Defined
15 Transaction Type 51 - 51 1 n
16 Report Group 52 - 52 1 n User Defined
17 Transaction Fee 53 - 60 6.2 n
18 Positive Flag 61 - 61 1 n ' ' or '-'
19 Transaction Total 62 - 69 6.2 n
20 Positive Flag 70 - 70 1 n ' ' or '-'
21 Payment Amount 71 - 78 6.2 n
22 Positive Flag 79 - 79 1 n ' ' or '-'
23 Payments To Date 80 - 87 6.2 n
24 Positive Flag 88 - 88 1 n ' ' or '-'
25 Balancing Owing 89 - 96 6.2 n
26 Positive Flag 97 - 97 1 n ' ' or '-'
27 Itemizer I.D. 98 - 98 1 n 1-4
28 Itemizer Total 99 - 106 6.2 n
29 Positive Flag 107- 107 1 n ' ' or '-'
30 Database Used 108- 108 1 n 0=No 1=Yes
31 Database Offline 109- 109 1 n 0=No 1=Yes
32 Affect Net Sales 1109 110 1 n 0=No 1=Yes
Field Columns Size Possible Values
13 Version-Major 49 - 50 2 n 03 for V3.0.2
14 Version-Minor 51 - 52 2 n 00 for V3.0.2
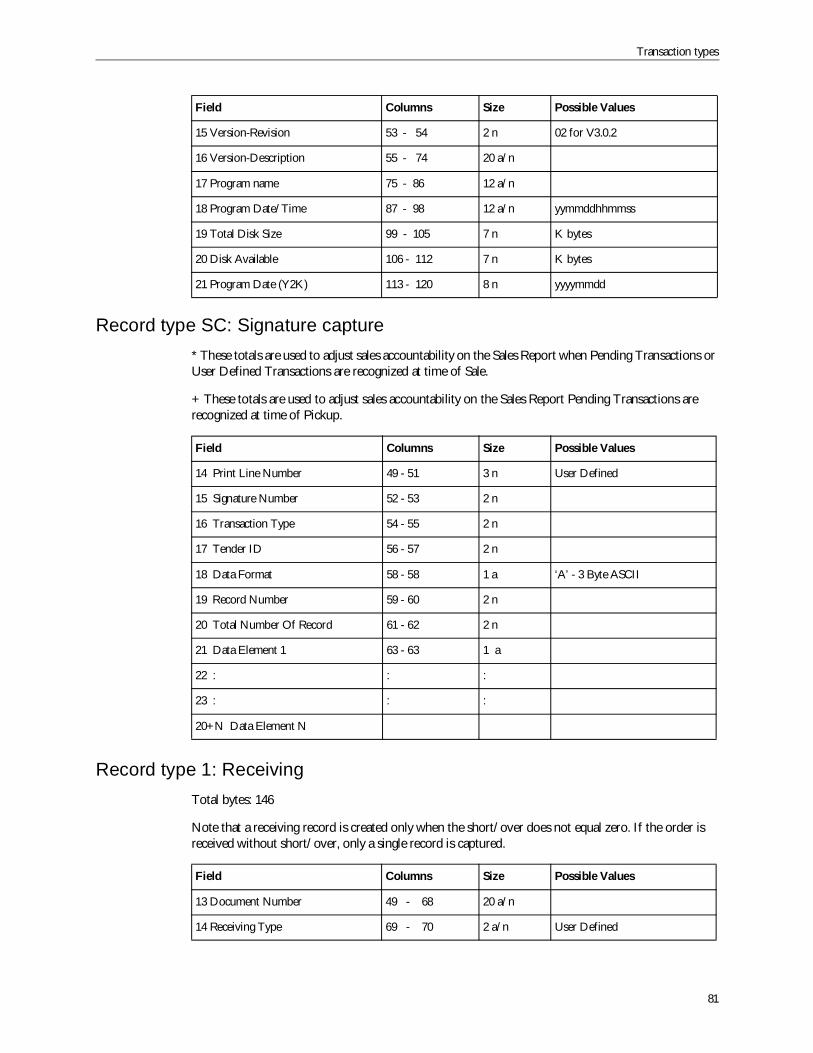
Transaction types
81
Record type SC: Signature capture* These totals are used to adjust sales accountability on the Sales Report when Pending Transactions orUser Defined Transactions are recognized at time of Sale.
+ These totals are used to adjust sales accountability on the Sales Report Pending Transactions arerecognized at time of Pickup.
Record type 1: ReceivingTotal bytes: 146
Note that a receiving record is created only when the short/over does not equal zero. If the order isreceived without short/over, only a single record is captured.
15 Version-Revision 53 - 54 2 n 02 for V3.0.2
16 Version-Description 55 - 74 20 a/n
17 Program name 75 - 86 12 a/n
18 Program Date/Time 87 - 98 12 a/n yymmddhhmmss
19 Total Disk Size 99 - 105 7 n K bytes
20 Disk Available 106 - 112 7 n K bytes
21 Program Date (Y2K) 113 - 120 8 n yyyymmdd
Field Columns Size Possible Values
14 Print Line Number 49 - 51 3 n User Defined
15 Signature Number 52 - 53 2 n
16 Transaction Type 54 - 55 2 n
17 Tender ID 56 - 57 2 n
18 Data Format 58 - 58 1 a ‘A’ - 3 Byte ASCII
19 Record Number 59 - 60 2 n
20 Total Number Of Record 61 - 62 2 n
21 Data Element 1 63 - 63 1 a
22 : : :
23 : : :
20+N Data Element N
Field Columns Size Possible Values
13 Document Number 49 - 68 20 a/n
14 Receiving Type 69 - 70 2 a/n User Defined
Field Columns Size Possible Values
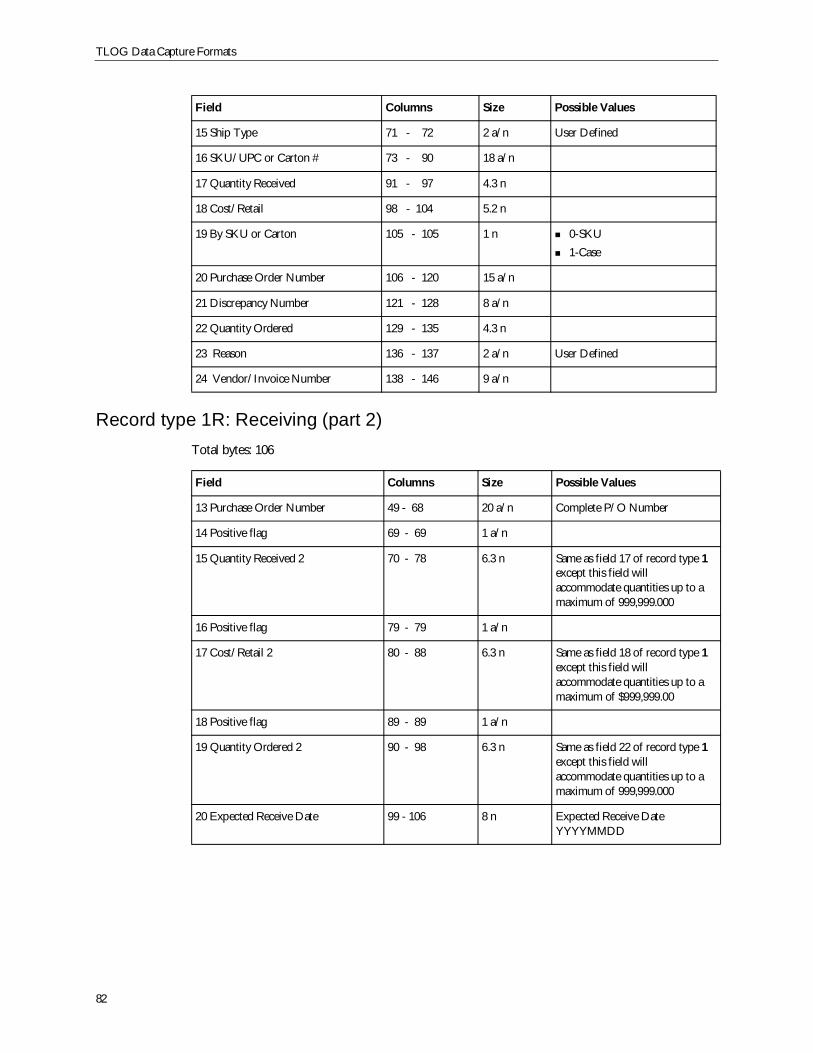
TLOG Data Capture Formats
82
Record type 1R: Receiving (part 2)Total bytes: 106
15 Ship Type 71 - 72 2 a/n User Defined
16 SKU/UPC or Carton # 73 - 90 18 a/n
17 Quantity Received 91 - 97 4.3 n
18 Cost/Retail 98 - 104 5.2 n
19 By SKU or Carton 105 - 105 1 n 0-SKU1-Case
20 Purchase Order Number 106 - 120 15 a/n
21 Discrepancy Number 121 - 128 8 a/n
22 Quantity Ordered 129 - 135 4.3 n
23 Reason 136 - 137 2 a/n User Defined
24 Vendor/Invoice Number 138 - 146 9 a/n
Field Columns Size Possible Values
13 Purchase Order Number 49 - 68 20 a/n Complete P/O Number
14 Positive flag 69 - 69 1 a/n
15 Quantity Received 2 70 - 78 6.3 n Same as field 17 of record type 1except this field willaccommodate quantities up to amaximum of 999,999.000
16 Positive flag 79 - 79 1 a/n
17 Cost/Retail 2 80 - 88 6.3 n Same as field 18 of record type 1except this field willaccommodate quantities up to amaximum of $999,999.00
18 Positive flag 89 - 89 1 a/n
19 Quantity Ordered 2 90 - 98 6.3 n Same as field 22 of record type 1except this field willaccommodate quantities up to amaximum of 999,999.000
20 Expected Receive Date 99 - 106 8 n Expected Receive DateYYYYMMDD
Field Columns Size Possible Values
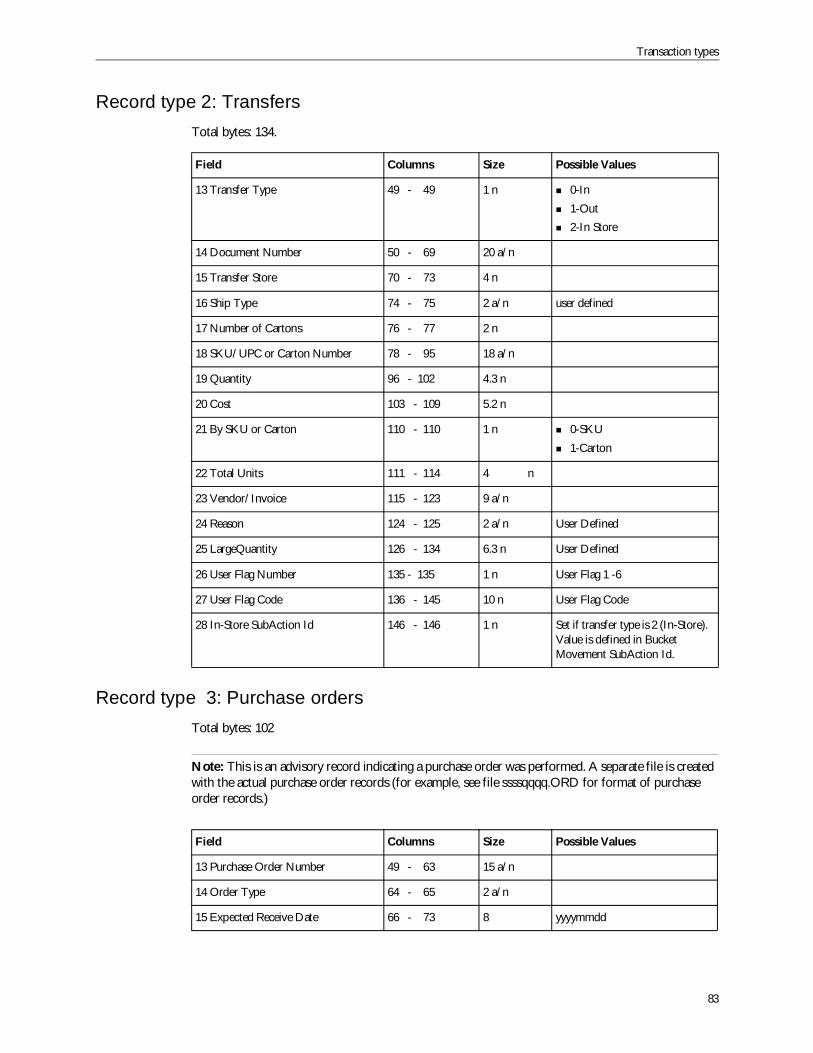
Transaction types
83
Record type 2: TransfersTotal bytes: 134.
Record type 3: Purchase ordersTotal bytes: 102
Note: This is an advisory record indicating a purchase order was performed. A separate file is createdwith the actual purchase order records (for example, see file ssssqqqq.ORD for format of purchaseorder records.)
Field Columns Size Possible Values
13 Transfer Type 49 - 49 1 n 0-In1-Out2-In Store
14 Document Number 50 - 69 20 a/n
15 Transfer Store 70 - 73 4 n
16 Ship Type 74 - 75 2 a/n user defined
17 Number of Cartons 76 - 77 2 n
18 SKU/UPC or Carton Number 78 - 95 18 a/n
19 Quantity 96 - 102 4.3 n
20 Cost 103 - 109 5.2 n
21 By SKU or Carton 110 - 110 1 n 0-SKU1-Carton
22 Total Units 111 - 114 4 n
23 Vendor/Invoice 115 - 123 9 a/n
24 Reason 124 - 125 2 a/n User Defined
25 LargeQuantity 126 - 134 6.3 n User Defined
26 User Flag Number 135 - 135 1 n User Flag 1 -6
27 User Flag Code 136 - 145 10 n User Flag Code
28 In-Store SubAction Id 146 - 146 1 n Set if transfer type is 2 (In-Store).Value is defined in BucketMovement SubAction Id.
Field Columns Size Possible Values
13 Purchase Order Number 49 - 63 15 a/n
14 Order Type 64 - 65 2 a/n
15 Expected Receive Date 66 - 73 8 yyyymmdd
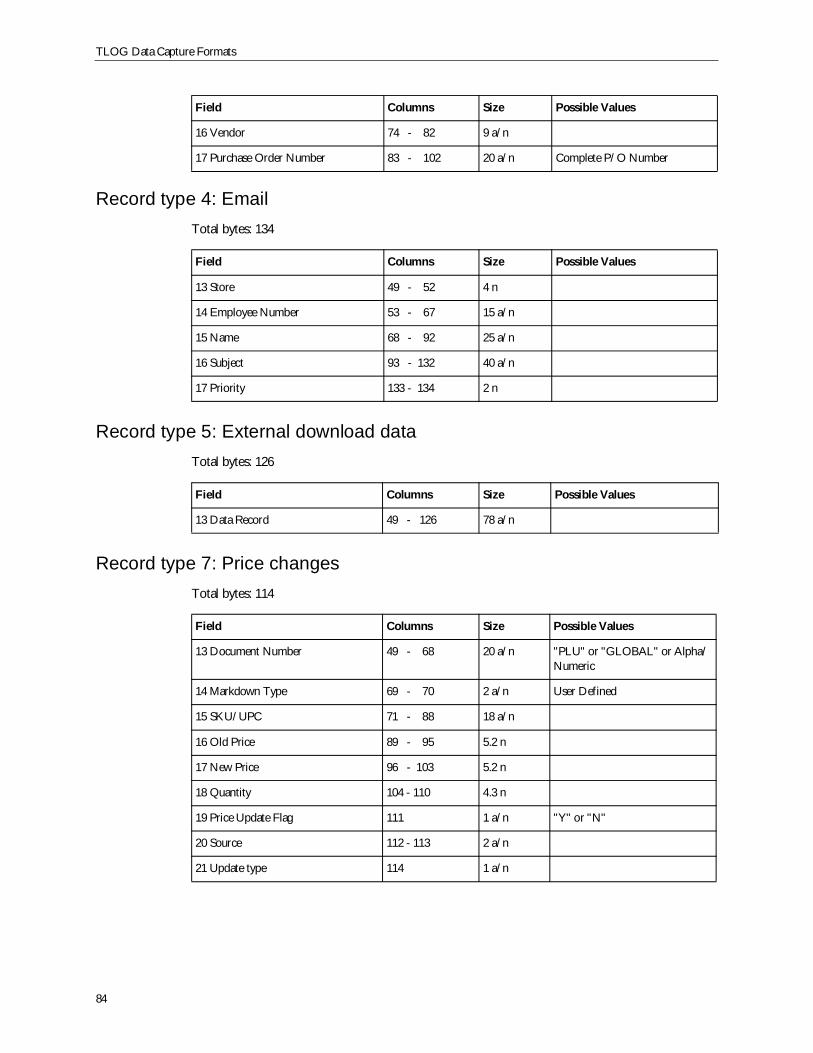
TLOG Data Capture Formats
84
Record type 4: EmailTotal bytes: 134
Record type 5: External download dataTotal bytes: 126
Record type 7: Price changesTotal bytes: 114
16 Vendor 74 - 82 9 a/n
17 Purchase Order Number 83 - 102 20 a/n Complete P/O Number
Field Columns Size Possible Values
13 Store 49 - 52 4 n
14 Employee Number 53 - 67 15 a/n
15 Name 68 - 92 25 a/n
16 Subject 93 - 132 40 a/n
17 Priority 133 - 134 2 n
Field Columns Size Possible Values
13 Data Record 49 - 126 78 a/n
Field Columns Size Possible Values
13 Document Number 49 - 68 20 a/n "PLU" or "GLOBAL" or Alpha/Numeric
14 Markdown Type 69 - 70 2 a/n User Defined
15 SKU/UPC 71 - 88 18 a/n
16 Old Price 89 - 95 5.2 n
17 New Price 96 - 103 5.2 n
18 Quantity 104 - 110 4.3 n
19 Price Update Flag 111 1 a/n "Y" or "N"
20 Source 112 - 113 2 a/n
21 Update type 114 1 a/n
Field Columns Size Possible Values
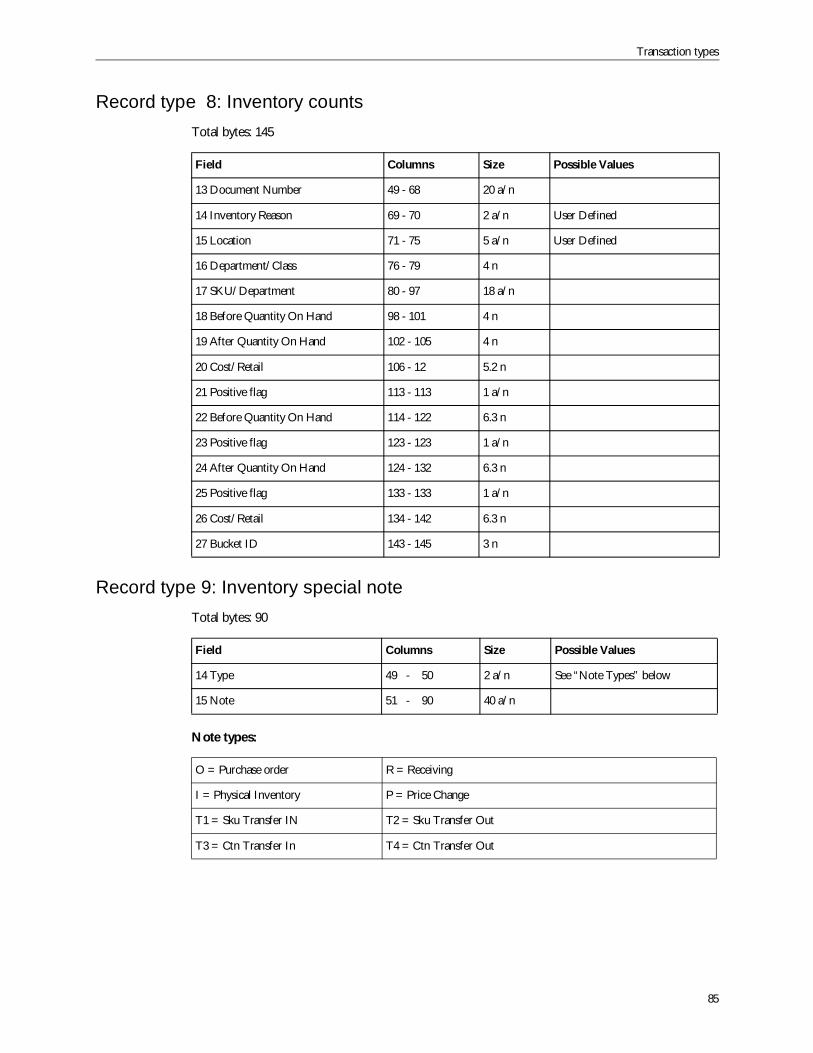
Transaction types
85
Record type 8: Inventory countsTotal bytes: 145
Record type 9: Inventory special noteTotal bytes: 90
Note types:
Field Columns Size Possible Values
13 Document Number 49 - 68 20 a/n
14 Inventory Reason 69 - 70 2 a/n User Defined
15 Location 71 - 75 5 a/n User Defined
16 Department/Class 76 - 79 4 n
17 SKU/Department 80 - 97 18 a/n
18 Before Quantity On Hand 98 - 101 4 n
19 After Quantity On Hand 102 - 105 4 n
20 Cost/Retail 106 - 12 5.2 n
21 Positive flag 113 - 113 1 a/n
22 Before Quantity On Hand 114 - 122 6.3 n
23 Positive flag 123 - 123 1 a/n
24 After Quantity On Hand 124 - 132 6.3 n
25 Positive flag 133 - 133 1 a/n
26 Cost/Retail 134 - 142 6.3 n
27 Bucket ID 143 - 145 3 n
Field Columns Size Possible Values
14 Type 49 - 50 2 a/n See “Note Types” below
15 Note 51 - 90 40 a/n
O = Purchase order R = Receiving
I = Physical Inventory P = Price Change
T1 = Sku Transfer IN T2 = Sku Transfer Out
T3 = Ctn Transfer In T4 = Ctn Transfer Out
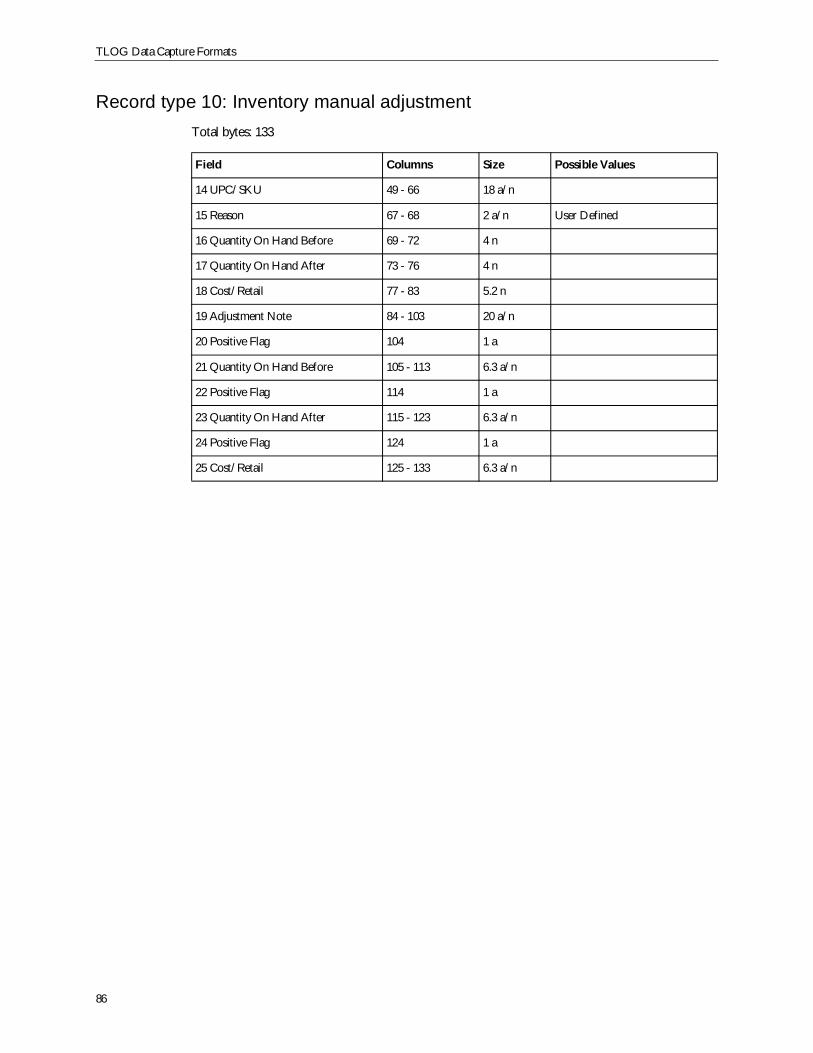
TLOG Data Capture Formats
86
Record type 10: Inventory manual adjustmentTotal bytes: 133
Field Columns Size Possible Values
14 UPC/SKU 49 - 66 18 a/n
15 Reason 67 - 68 2 a/n User Defined
16 Quantity On Hand Before 69 - 72 4 n
17 Quantity On Hand After 73 - 76 4 n
18 Cost/Retail 77 - 83 5.2 n
19 Adjustment Note 84 - 103 20 a/n
20 Positive Flag 104 1 a
21 Quantity On Hand Before 105 - 113 6.3 a/n
22 Positive Flag 114 1 a
23 Quantity On Hand After 115 - 123 6.3 a/n
24 Positive Flag 124 1 a
25 Cost/Retail 125 - 133 6.3 a/n

Transaction types
87
Record type PT: Points total (part 1)
Note: This record type is not used in version 7.6 or later.
Total bytes: 147
Field Columns Size Possible Values
14 Eligible Amount 49 - 56 6.2 n
15 Positive Flag 57 - 57 1 n ‘ ‘ or ‘-‘
16 Loyalty Program ID 58 - 59 2 n
17 Eligible Amount 60 - 67 6.2 n
18 Positive Flag 68 - 68 1 n ‘ ‘ or ‘-‘
19 Loyalty Program ID 69 - 70 2 n
20 Eligible Amount 71 - 78 6.2 n
21 Positive Flag 79 - 79 1 n ‘ ‘ or ‘-‘
22 Loyalty Program ID 80 - 81 2 n
23 Eligible Amount 82 - 89 6.2 n
24 Positive Flag 90 - 90 1 n ‘ ‘ or ‘-‘
25 Loyalty Program ID 91 - 92 2 n
26 Eligible Amount 93 – 100 6.2 n
27 Positive Flag 101 – 101 1 n ‘ ‘ or ‘-‘
28 Loyalty Program ID 102 – 103 2 n
29 Eligible Amount 104 – 111 6.2 n
30 Positive Flag 112 – 112 1 n ‘ ‘ or ‘-‘
31 Loyalty Program ID 113 – 114 2 n
32 Eligible Amount 115 – 122 6.2 n
33 Positive Flag 123 – 123 1 n ‘ ‘ or ‘-‘
34 Loyalty Program ID 124 – 125 2 n
35 Eligible Amount 126 – 133 6.2 n
36 Positive Flag 134 – 134 1 n ‘ ‘ or ‘-‘
37 Loyalty Program ID 135 – 136 2 n
38 Eligible Amount 137 – 144 6.2 n
39 Positive Flag 145 – 145 1 n ‘ ‘ or ‘-‘
40 Loyalty Program ID 146 – 147 2 n
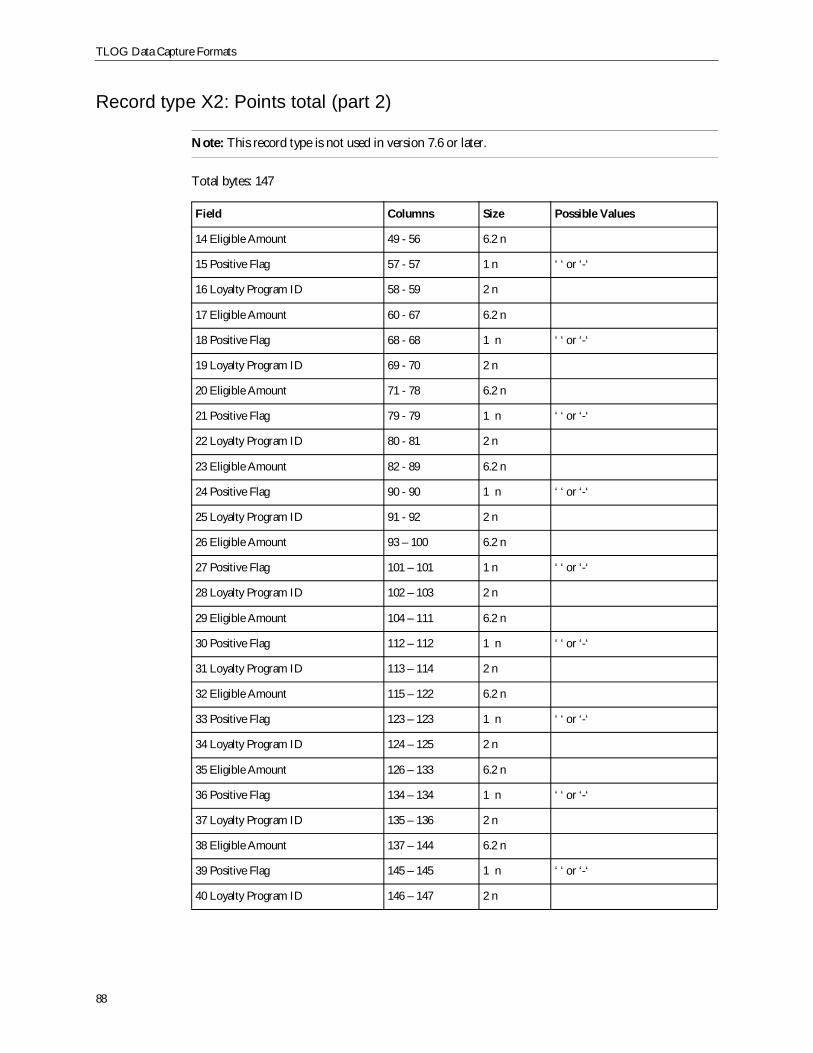
TLOG Data Capture Formats
88
Record type X2: Points total (part 2)
Note: This record type is not used in version 7.6 or later.
Total bytes: 147
Field Columns Size Possible Values
14 Eligible Amount 49 - 56 6.2 n
15 Positive Flag 57 - 57 1 n ‘ ‘ or ‘-‘
16 Loyalty Program ID 58 - 59 2 n
17 Eligible Amount 60 - 67 6.2 n
18 Positive Flag 68 - 68 1 n ‘ ‘ or ‘-‘
19 Loyalty Program ID 69 - 70 2 n
20 Eligible Amount 71 - 78 6.2 n
21 Positive Flag 79 - 79 1 n ‘ ‘ or ‘-‘
22 Loyalty Program ID 80 - 81 2 n
23 Eligible Amount 82 - 89 6.2 n
24 Positive Flag 90 - 90 1 n ‘ ‘ or ‘-‘
25 Loyalty Program ID 91 - 92 2 n
26 Eligible Amount 93 – 100 6.2 n
27 Positive Flag 101 – 101 1 n ‘ ‘ or ‘-‘
28 Loyalty Program ID 102 – 103 2 n
29 Eligible Amount 104 – 111 6.2 n
30 Positive Flag 112 – 112 1 n ‘ ‘ or ‘-‘
31 Loyalty Program ID 113 – 114 2 n
32 Eligible Amount 115 – 122 6.2 n
33 Positive Flag 123 – 123 1 n ‘ ‘ or ‘-‘
34 Loyalty Program ID 124 – 125 2 n
35 Eligible Amount 126 – 133 6.2 n
36 Positive Flag 134 – 134 1 n ‘ ‘ or ‘-‘
37 Loyalty Program ID 135 – 136 2 n
38 Eligible Amount 137 – 144 6.2 n
39 Positive Flag 145 – 145 1 n ‘ ‘ or ‘-‘
40 Loyalty Program ID 146 – 147 2 n
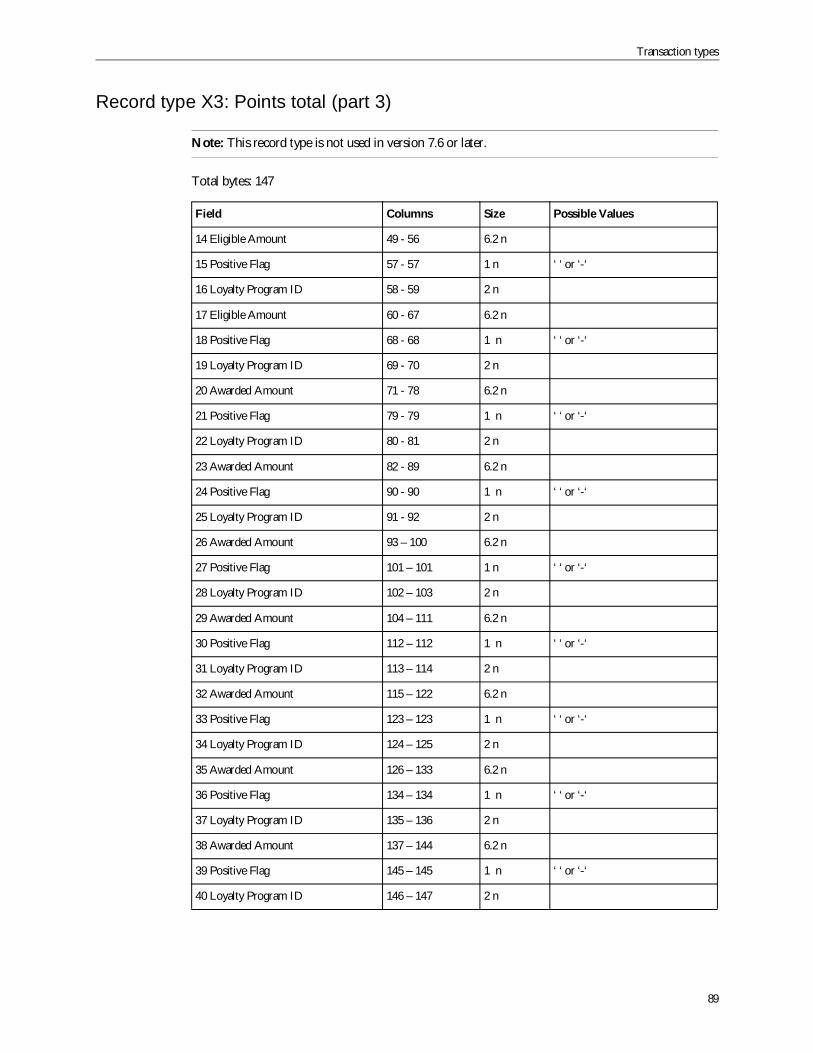
Transaction types
89
Record type X3: Points total (part 3)
Note: This record type is not used in version 7.6 or later.
Total bytes: 147
Field Columns Size Possible Values
14 Eligible Amount 49 - 56 6.2 n
15 Positive Flag 57 - 57 1 n ‘ ‘ or ‘-‘
16 Loyalty Program ID 58 - 59 2 n
17 Eligible Amount 60 - 67 6.2 n
18 Positive Flag 68 - 68 1 n ‘ ‘ or ‘-‘
19 Loyalty Program ID 69 - 70 2 n
20 Awarded Amount 71 - 78 6.2 n
21 Positive Flag 79 - 79 1 n ‘ ‘ or ‘-‘
22 Loyalty Program ID 80 - 81 2 n
23 Awarded Amount 82 - 89 6.2 n
24 Positive Flag 90 - 90 1 n ‘ ‘ or ‘-‘
25 Loyalty Program ID 91 - 92 2 n
26 Awarded Amount 93 – 100 6.2 n
27 Positive Flag 101 – 101 1 n ‘ ‘ or ‘-‘
28 Loyalty Program ID 102 – 103 2 n
29 Awarded Amount 104 – 111 6.2 n
30 Positive Flag 112 – 112 1 n ‘ ‘ or ‘-‘
31 Loyalty Program ID 113 – 114 2 n
32 Awarded Amount 115 – 122 6.2 n
33 Positive Flag 123 – 123 1 n ‘ ‘ or ‘-‘
34 Loyalty Program ID 124 – 125 2 n
35 Awarded Amount 126 – 133 6.2 n
36 Positive Flag 134 – 134 1 n ‘ ‘ or ‘-‘
37 Loyalty Program ID 135 – 136 2 n
38 Awarded Amount 137 – 144 6.2 n
39 Positive Flag 145 – 145 1 n ‘ ‘ or ‘-‘
40 Loyalty Program ID 146 – 147 2 n
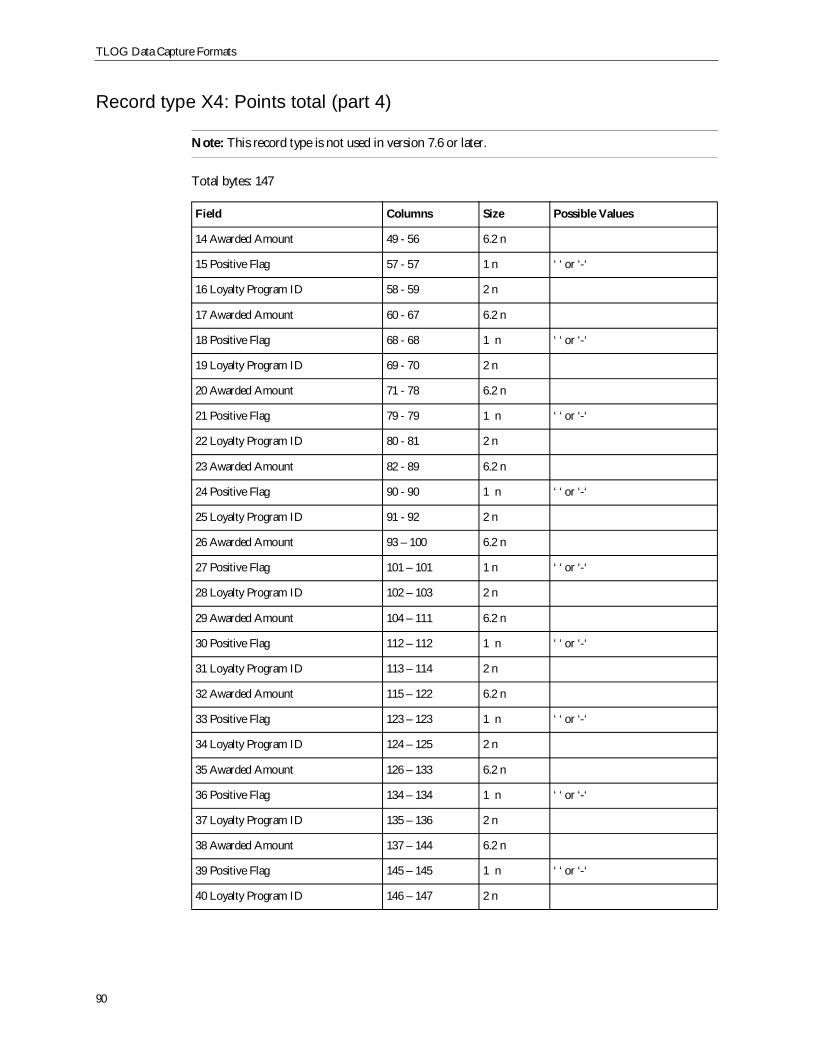
TLOG Data Capture Formats
90
Record type X4: Points total (part 4)
Note: This record type is not used in version 7.6 or later.
Total bytes: 147
Field Columns Size Possible Values
14 Awarded Amount 49 - 56 6.2 n
15 Positive Flag 57 - 57 1 n ‘ ‘ or ‘-‘
16 Loyalty Program ID 58 - 59 2 n
17 Awarded Amount 60 - 67 6.2 n
18 Positive Flag 68 - 68 1 n ‘ ‘ or ‘-‘
19 Loyalty Program ID 69 - 70 2 n
20 Awarded Amount 71 - 78 6.2 n
21 Positive Flag 79 - 79 1 n ‘ ‘ or ‘-‘
22 Loyalty Program ID 80 - 81 2 n
23 Awarded Amount 82 - 89 6.2 n
24 Positive Flag 90 - 90 1 n ‘ ‘ or ‘-‘
25 Loyalty Program ID 91 - 92 2 n
26 Awarded Amount 93 – 100 6.2 n
27 Positive Flag 101 – 101 1 n ‘ ‘ or ‘-‘
28 Loyalty Program ID 102 – 103 2 n
29 Awarded Amount 104 – 111 6.2 n
30 Positive Flag 112 – 112 1 n ‘ ‘ or ‘-‘
31 Loyalty Program ID 113 – 114 2 n
32 Awarded Amount 115 – 122 6.2 n
33 Positive Flag 123 – 123 1 n ‘ ‘ or ‘-‘
34 Loyalty Program ID 124 – 125 2 n
35 Awarded Amount 126 – 133 6.2 n
36 Positive Flag 134 – 134 1 n ‘ ‘ or ‘-‘
37 Loyalty Program ID 135 – 136 2 n
38 Awarded Amount 137 – 144 6.2 n
39 Positive Flag 145 – 145 1 n ‘ ‘ or ‘-‘
40 Loyalty Program ID 146 – 147 2 n
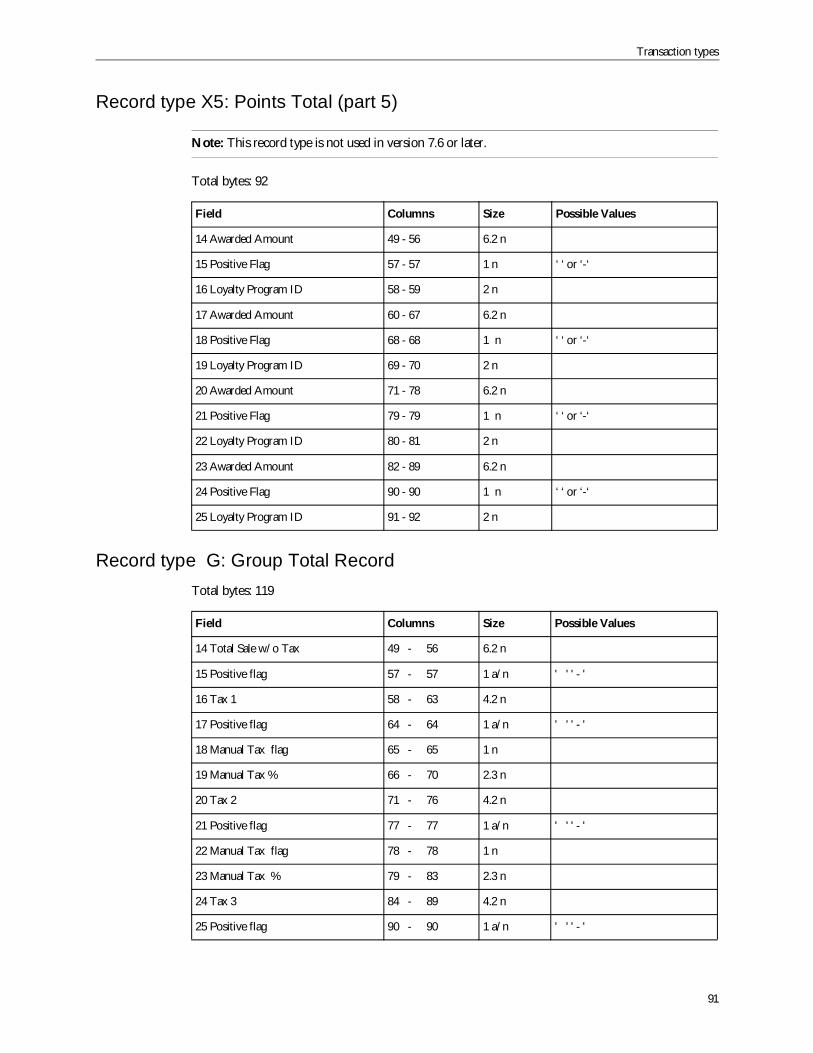
Transaction types
91
Record type X5: Points Total (part 5)
Note: This record type is not used in version 7.6 or later.
Total bytes: 92
Record type G: Group Total RecordTotal bytes: 119
Field Columns Size Possible Values
14 Awarded Amount 49 - 56 6.2 n
15 Positive Flag 57 - 57 1 n ‘ ‘ or ‘-‘
16 Loyalty Program ID 58 - 59 2 n
17 Awarded Amount 60 - 67 6.2 n
18 Positive Flag 68 - 68 1 n ‘ ‘ or ‘-‘
19 Loyalty Program ID 69 - 70 2 n
20 Awarded Amount 71 - 78 6.2 n
21 Positive Flag 79 - 79 1 n ‘ ‘ or ‘-‘
22 Loyalty Program ID 80 - 81 2 n
23 Awarded Amount 82 - 89 6.2 n
24 Positive Flag 90 - 90 1 n ‘ ‘ or ‘-‘
25 Loyalty Program ID 91 - 92 2 n
Field Columns Size Possible Values
14 Total Sale w/o Tax 49 - 56 6.2 n
15 Positive flag 57 - 57 1 a/n ' ' ' - '
16 Tax 1 58 - 63 4.2 n
17 Positive flag 64 - 64 1 a/n ' ' ' - '
18 Manual Tax flag 65 - 65 1 n
19 Manual Tax % 66 - 70 2.3 n
20 Tax 2 71 - 76 4.2 n
21 Positive flag 77 - 77 1 a/n ' ' ' - '
22 Manual Tax flag 78 - 78 1 n
23 Manual Tax % 79 - 83 2.3 n
24 Tax 3 84 - 89 4.2 n
25 Positive flag 90 - 90 1 a/n ' ' ' - '
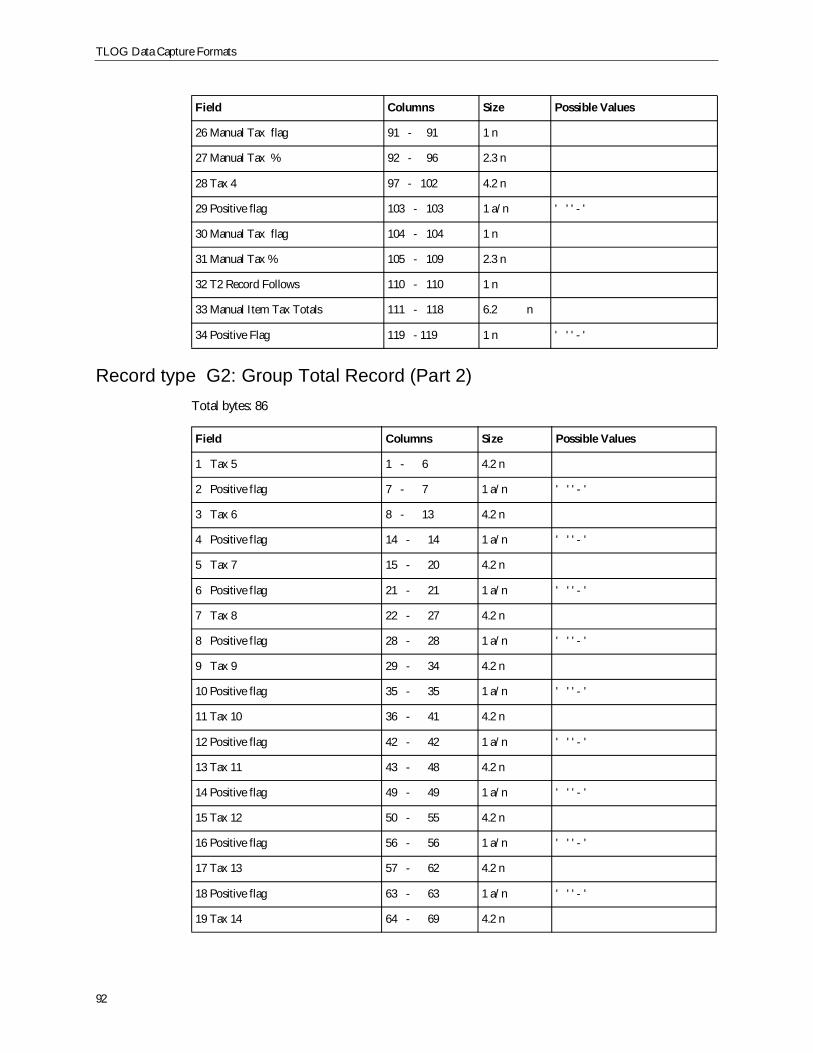
TLOG Data Capture Formats
92
Record type G2: Group Total Record (Part 2)Total bytes: 86
26 Manual Tax flag 91 - 91 1 n
27 Manual Tax % 92 - 96 2.3 n
28 Tax 4 97 - 102 4.2 n
29 Positive flag 103 - 103 1 a/n ' ' ' - '
30 Manual Tax flag 104 - 104 1 n
31 Manual Tax % 105 - 109 2.3 n
32 T2 Record Follows 110 - 110 1 n
33 Manual Item Tax Totals 111 - 118 6.2 n
34 Positive Flag 119 - 119 1 n ' ' ' - '
Field Columns Size Possible Values
1 Tax 5 1 - 6 4.2 n
2 Positive flag 7 - 7 1 a/n ' ' ' - '
3 Tax 6 8 - 13 4.2 n
4 Positive flag 14 - 14 1 a/n ' ' ' - '
5 Tax 7 15 - 20 4.2 n
6 Positive flag 21 - 21 1 a/n ' ' ' - '
7 Tax 8 22 - 27 4.2 n
8 Positive flag 28 - 28 1 a/n ' ' ' - '
9 Tax 9 29 - 34 4.2 n
10 Positive flag 35 - 35 1 a/n ' ' ' - '
11 Tax 10 36 - 41 4.2 n
12 Positive flag 42 - 42 1 a/n ' ' ' - '
13 Tax 11 43 - 48 4.2 n
14 Positive flag 49 - 49 1 a/n ' ' ' - '
15 Tax 12 50 - 55 4.2 n
16 Positive flag 56 - 56 1 a/n ' ' ' - '
17 Tax 13 57 - 62 4.2 n
18 Positive flag 63 - 63 1 a/n ' ' ' - '
19 Tax 14 64 - 69 4.2 n
Field Columns Size Possible Values
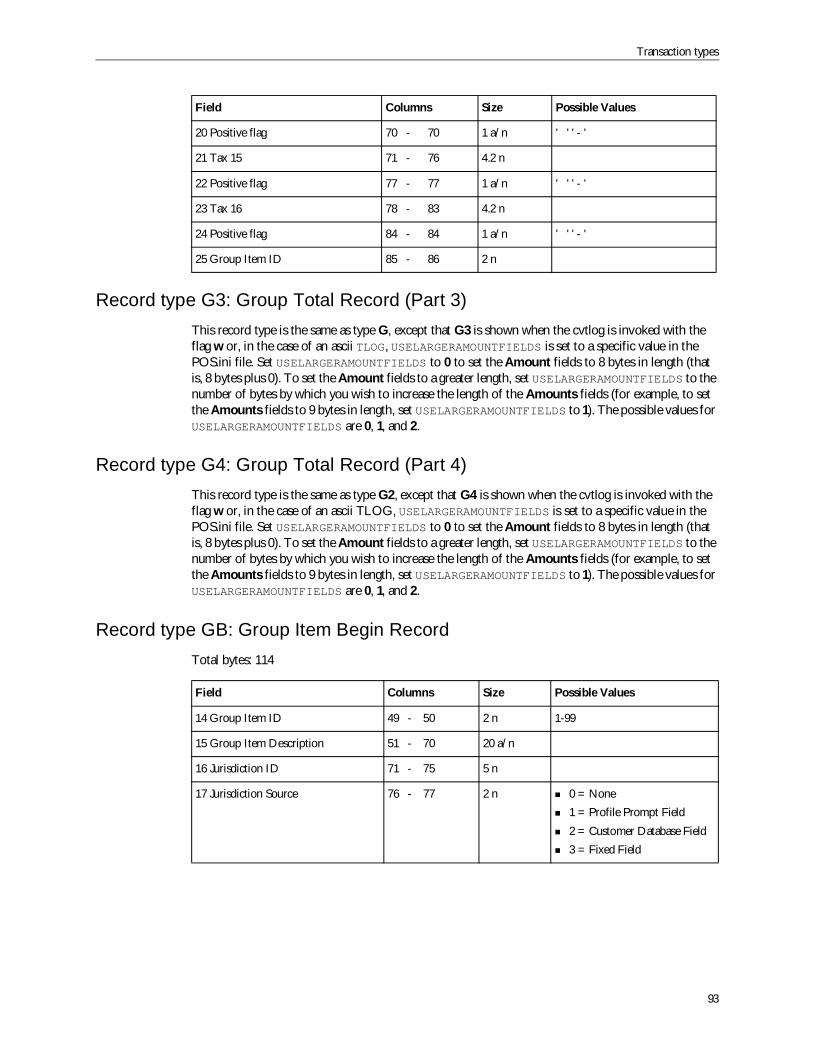
Transaction types
93
Record type G3: Group Total Record (Part 3)This record type is the same as type G, except that G3 is shown when the cvtlog is invoked with theflag w or, in the case of an ascii TLOG, USELARGERAMOUNTFIELDS is set to a specific value in thePOS.ini file. Set USELARGERAMOUNTFIELDS to 0 to set the Amount fields to 8 bytes in length (thatis, 8 bytes plus 0). To set the Amount fields to a greater length, set USELARGERAMOUNTFIELDS to thenumber of bytes by which you wish to increase the length of the Amounts fields (for example, to setthe Amounts fields to 9 bytes in length, set USELARGERAMOUNTFIELDS to 1). The possible values forUSELARGERAMOUNTFIELDS are 0, 1, and 2.
Record type G4: Group Total Record (Part 4)This record type is the same as type G2, except that G4 is shown when the cvtlog is invoked with theflag w or, in the case of an ascii TLOG, USELARGERAMOUNTFIELDS is set to a specific value in thePOS.ini file. Set USELARGERAMOUNTFIELDS to 0 to set the Amount fields to 8 bytes in length (thatis, 8 bytes plus 0). To set the Amount fields to a greater length, set USELARGERAMOUNTFIELDS to thenumber of bytes by which you wish to increase the length of the Amounts fields (for example, to setthe Amounts fields to 9 bytes in length, set USELARGERAMOUNTFIELDS to 1). The possible values forUSELARGERAMOUNTFIELDS are 0, 1, and 2.
Record type GB: Group Item Begin RecordTotal bytes: 114
20 Positive flag 70 - 70 1 a/n ' ' ' - '
21 Tax 15 71 - 76 4.2 n
22 Positive flag 77 - 77 1 a/n ' ' ' - '
23 Tax 16 78 - 83 4.2 n
24 Positive flag 84 - 84 1 a/n ' ' ' - '
25 Group Item ID 85 - 86 2 n
Field Columns Size Possible Values
14 Group Item ID 49 - 50 2 n 1-99
15 Group Item Description 51 - 70 20 a/n
16 Jurisdiction ID 71 - 75 5 n
17 Jurisdiction Source 76 - 77 2 n 0 = None1 = Profile Prompt Field2 = Customer Database Field3 = Fixed Field
Field Columns Size Possible Values
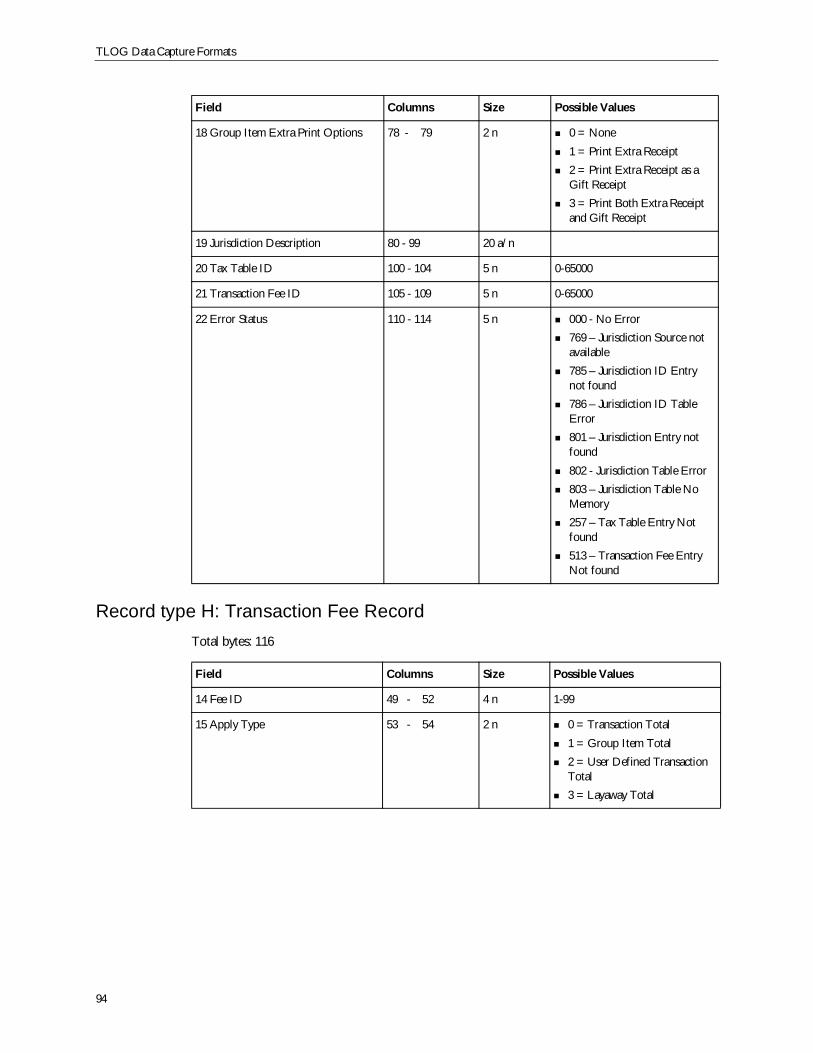
TLOG Data Capture Formats
94
Record type H: Transaction Fee RecordTotal bytes: 116
18 Group Item Extra Print Options 78 - 79 2 n 0 = None1 = Print Extra Receipt2 = Print Extra Receipt as aGift Receipt3 = Print Both Extra Receiptand Gift Receipt
19 Jurisdiction Description 80 - 99 20 a/n
20 Tax Table ID 100 - 104 5 n 0-65000
21 Transaction Fee ID 105 - 109 5 n 0-65000
22 Error Status 110 - 114 5 n 000 - No Error769 – Jurisdiction Source notavailable785 – Jurisdiction ID Entrynot found786 – Jurisdiction ID TableError801 – Jurisdiction Entry notfound802 - Jurisdiction Table Error803 – Jurisdiction Table NoMemory257 – Tax Table Entry Notfound513 – Transaction Fee EntryNot found
Field Columns Size Possible Values
14 Fee ID 49 - 52 4 n 1-99
15 Apply Type 53 - 54 2 n 0 = Transaction Total1 = Group Item Total2 = User Defined TransactionTotal3 = Layaway Total
Field Columns Size Possible Values
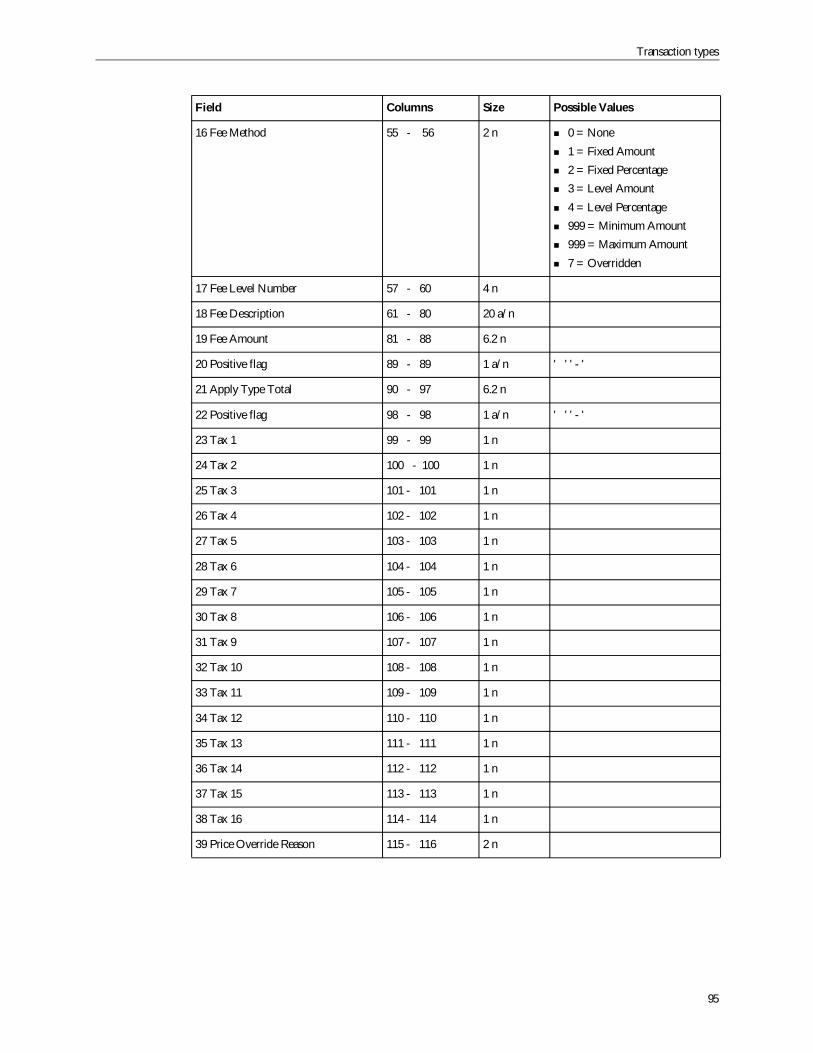
Transaction types
95
16 Fee Method 55 - 56 2 n 0 = None1 = Fixed Amount2 = Fixed Percentage3 = Level Amount4 = Level Percentage999 = Minimum Amount999 = Maximum Amount7 = Overridden
17 Fee Level Number 57 - 60 4 n
18 Fee Description 61 - 80 20 a/n
19 Fee Amount 81 - 88 6.2 n
20 Positive flag 89 - 89 1 a/n ' ' ' - '
21 Apply Type Total 90 - 97 6.2 n
22 Positive flag 98 - 98 1 a/n ' ' ' - '
23 Tax 1 99 - 99 1 n
24 Tax 2 100 - 100 1 n
25 Tax 3 101 - 101 1 n
26 Tax 4 102 - 102 1 n
27 Tax 5 103 - 103 1 n
28 Tax 6 104 - 104 1 n
29 Tax 7 105 - 105 1 n
30 Tax 8 106 - 106 1 n
31 Tax 9 107 - 107 1 n
32 Tax 10 108 - 108 1 n
33 Tax 11 109 - 109 1 n
34 Tax 12 110 - 110 1 n
35 Tax 13 111 - 111 1 n
36 Tax 14 112 - 112 1 n
37 Tax 15 113 - 113 1 n
38 Tax 16 114 - 114 1 n
39 Price Override Reason 115 - 116 2 n
Field Columns Size Possible Values
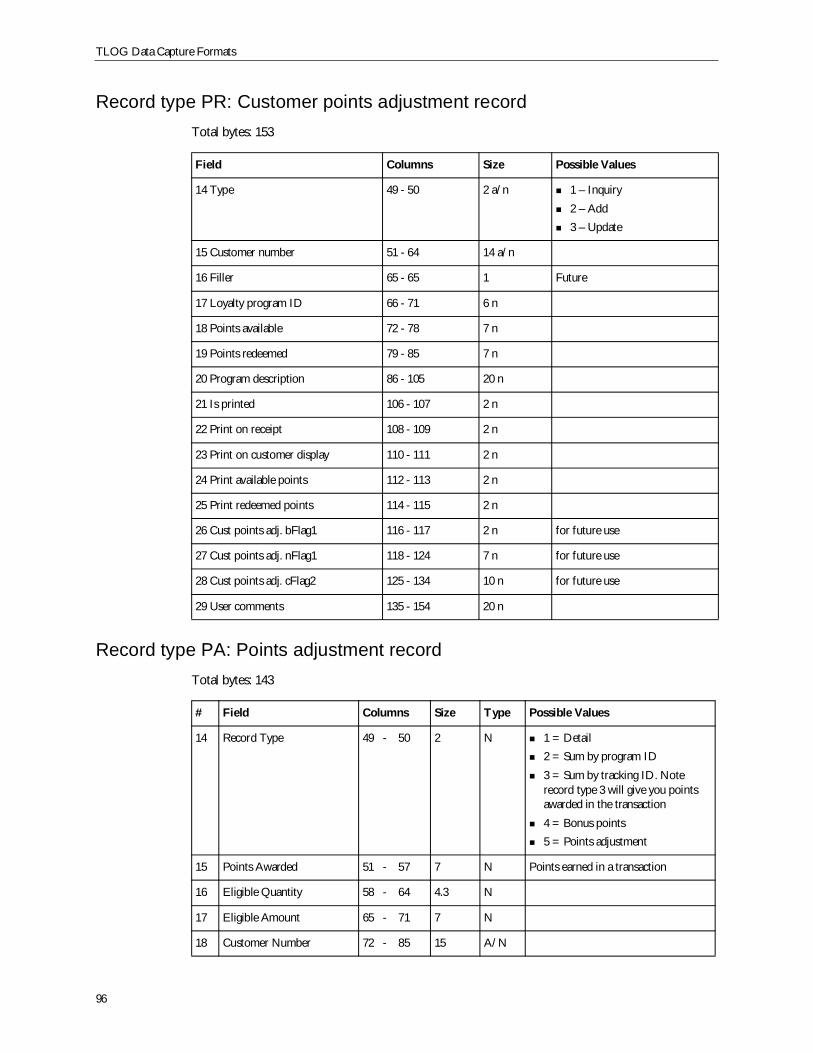
TLOG Data Capture Formats
96
Record type PR: Customer points adjustment recordTotal bytes: 153
Record type PA: Points adjustment recordTotal bytes: 143
Field Columns Size Possible Values
14 Type 49 - 50 2 a/n 1 – Inquiry2 – Add3 – Update
15 Customer number 51 - 64 14 a/n
16 Filler 65 - 65 1 Future
17 Loyalty program ID 66 - 71 6 n
18 Points available 72 - 78 7 n
19 Points redeemed 79 - 85 7 n
20 Program description 86 - 105 20 n
21 Is printed 106 - 107 2 n
22 Print on receipt 108 - 109 2 n
23 Print on customer display 110 - 111 2 n
24 Print available points 112 - 113 2 n
25 Print redeemed points 114 - 115 2 n
26 Cust points adj. bFlag1 116 - 117 2 n for future use
27 Cust points adj. nFlag1 118 - 124 7 n for future use
28 Cust points adj. cFlag2 125 - 134 10 n for future use
29 User comments 135 - 154 20 n
# Field Columns Size Type Possible Values
14 Record Type 49 - 50 2 N 1 = Detail2 = Sum by program ID3 = Sum by tracking ID. Noterecord type 3 will give you pointsawarded in the transaction4 = Bonus points5 = Points adjustment
15 Points Awarded 51 - 57 7 N Points earned in a transaction
16 Eligible Quantity 58 - 64 4.3 N
17 Eligible Amount 65 - 71 7 N
18 Customer Number 72 - 85 15 A/N
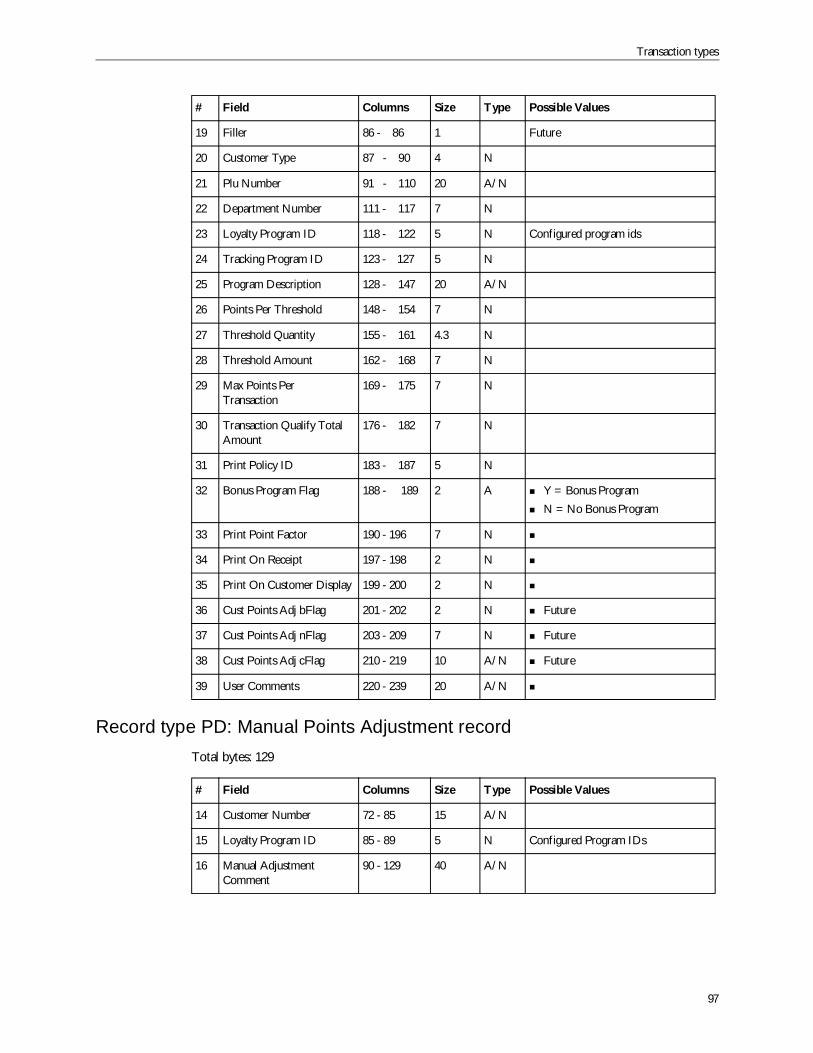
Transaction types
97
Record type PD: Manual Points Adjustment recordTotal bytes: 129
19 Filler 86 - 86 1 Future
20 Customer Type 87 - 90 4 N
21 Plu Number 91 - 110 20 A/N
22 Department Number 111 - 117 7 N
23 Loyalty Program ID 118 - 122 5 N Configured program ids
24 Tracking Program ID 123 - 127 5 N
25 Program Description 128 - 147 20 A/N
26 Points Per Threshold 148 - 154 7 N
27 Threshold Quantity 155 - 161 4.3 N
28 Threshold Amount 162 - 168 7 N
29 Max Points PerTransaction
169 - 175 7 N
30 Transaction Qualify TotalAmount
176 - 182 7 N
31 Print Policy ID 183 - 187 5 N
32 Bonus Program Flag 188 - 189 2 A Y = Bonus ProgramN = No Bonus Program
33 Print Point Factor 190 - 196 7 N
34 Print On Receipt 197 - 198 2 N
35 Print On Customer Display 199 - 200 2 N
36 Cust Points Adj bFlag 201 - 202 2 N Future
37 Cust Points Adj nFlag 203 - 209 7 N Future
38 Cust Points Adj cFlag 210 - 219 10 A/N Future
39 User Comments 220 - 239 20 A/N
# Field Columns Size Type Possible Values
14 Customer Number 72 - 85 15 A/N
15 Loyalty Program ID 85 - 89 5 N Configured Program IDs
16 Manual AdjustmentComment
90 - 129 40 A/N
# Field Columns Size Type Possible Values
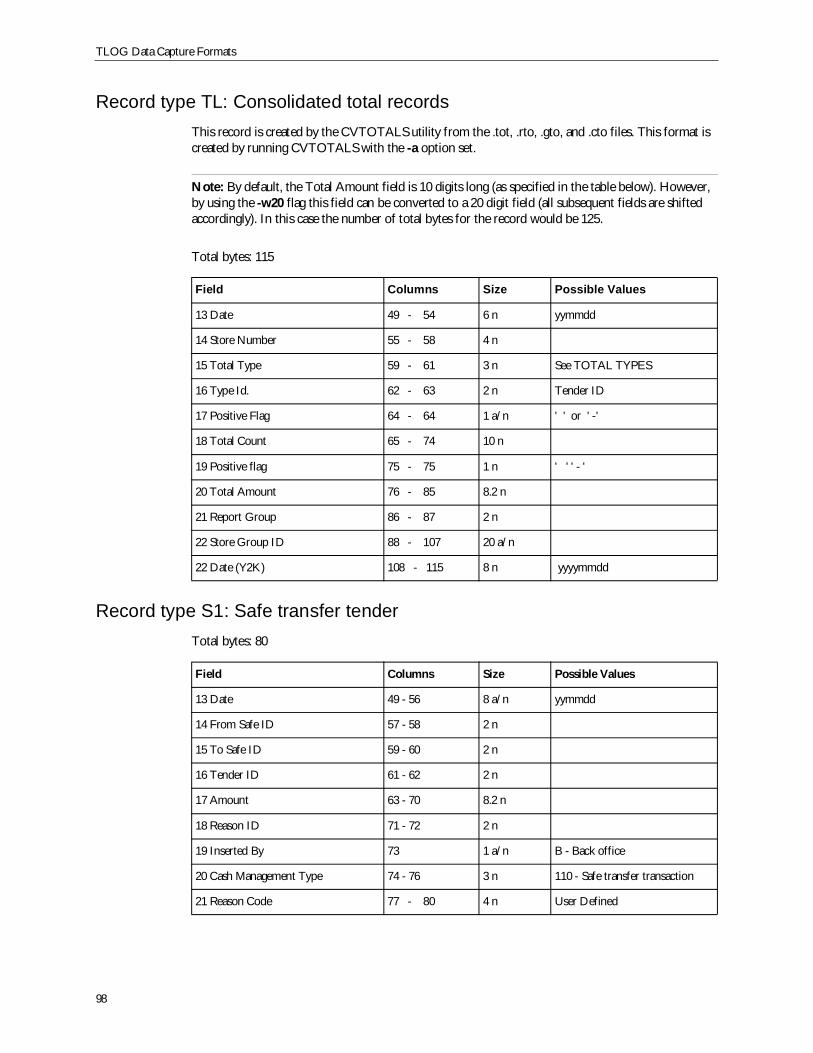
TLOG Data Capture Formats
98
Record type TL: Consolidated total recordsThis record is created by the CVTOTALS utility from the .tot, .rto, .gto, and .cto files. This format iscreated by running CVTOTALS with the -a option set.
Note: By default, the Total Amount field is 10 digits long (as specified in the table below). However,by using the -w20 flag this field can be converted to a 20 digit field (all subsequent fields are shiftedaccordingly). In this case the number of total bytes for the record would be 125.
Total bytes: 115
Record type S1: Safe transfer tenderTotal bytes: 80
Field Columns Size Possible Values
13 Date 49 - 54 6 n yymmdd
14 Store Number 55 - 58 4 n
15 Total Type 59 - 61 3 n See TOTAL TYPES
16 Type Id. 62 - 63 2 n Tender ID
17 Positive Flag 64 - 64 1 a/n ' ' or ' -'
18 Total Count 65 - 74 10 n
19 Positive flag 75 - 75 1 n ' ' ' - '
20 Total Amount 76 - 85 8.2 n
21 Report Group 86 - 87 2 n
22 Store Group ID 88 - 107 20 a/n
22 Date (Y2K) 108 - 115 8 n yyyymmdd
Field Columns Size Possible Values
13 Date 49 - 56 8 a/n yymmdd
14 From Safe ID 57 - 58 2 n
15 To Safe ID 59 - 60 2 n
16 Tender ID 61 - 62 2 n
17 Amount 63 - 70 8.2 n
18 Reason ID 71 - 72 2 n
19 Inserted By 73 1 a/n B - Back office
20 Cash Management Type 74 - 76 3 n 110 - Safe transfer transaction
21 Reason Code 77 - 80 4 n User Defined
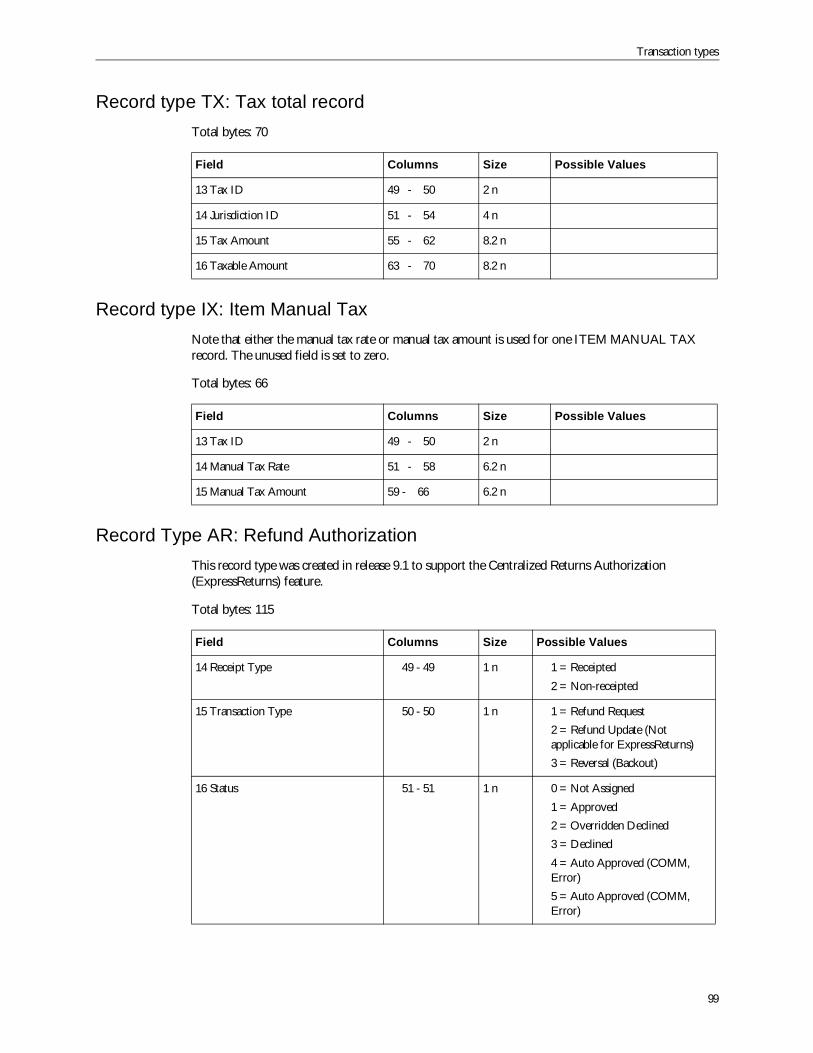
Transaction types
99
Record type TX: Tax total recordTotal bytes: 70
Record type IX: Item Manual TaxNote that either the manual tax rate or manual tax amount is used for one ITEM MANUAL TAXrecord. The unused field is set to zero.
Total bytes: 66
Record Type AR: Refund AuthorizationThis record type was created in release 9.1 to support the Centralized Returns Authorization(ExpressReturns) feature.
Total bytes: 115
Field Columns Size Possible Values
13 Tax ID 49 - 50 2 n
14 Jurisdiction ID 51 - 54 4 n
15 Tax Amount 55 - 62 8.2 n
16 Taxable Amount 63 - 70 8.2 n
Field Columns Size Possible Values
13 Tax ID 49 - 50 2 n
14 Manual Tax Rate 51 - 58 6.2 n
15 Manual Tax Amount 59 - 66 6.2 n
Field Columns Size Possible Values
14 Receipt Type 49 - 49 1 n 1 = Receipted2 = Non-receipted
15 Transaction Type 50 - 50 1 n 1 = Refund Request2 = Refund Update (Notapplicable for ExpressReturns)3 = Reversal (Backout)
16 Status 51 - 51 1 n 0 = Not Assigned1 = Approved2 = Overridden Declined3 = Declined4 = Auto Approved (COMM,Error)5 = Auto Approved (COMM,Error)
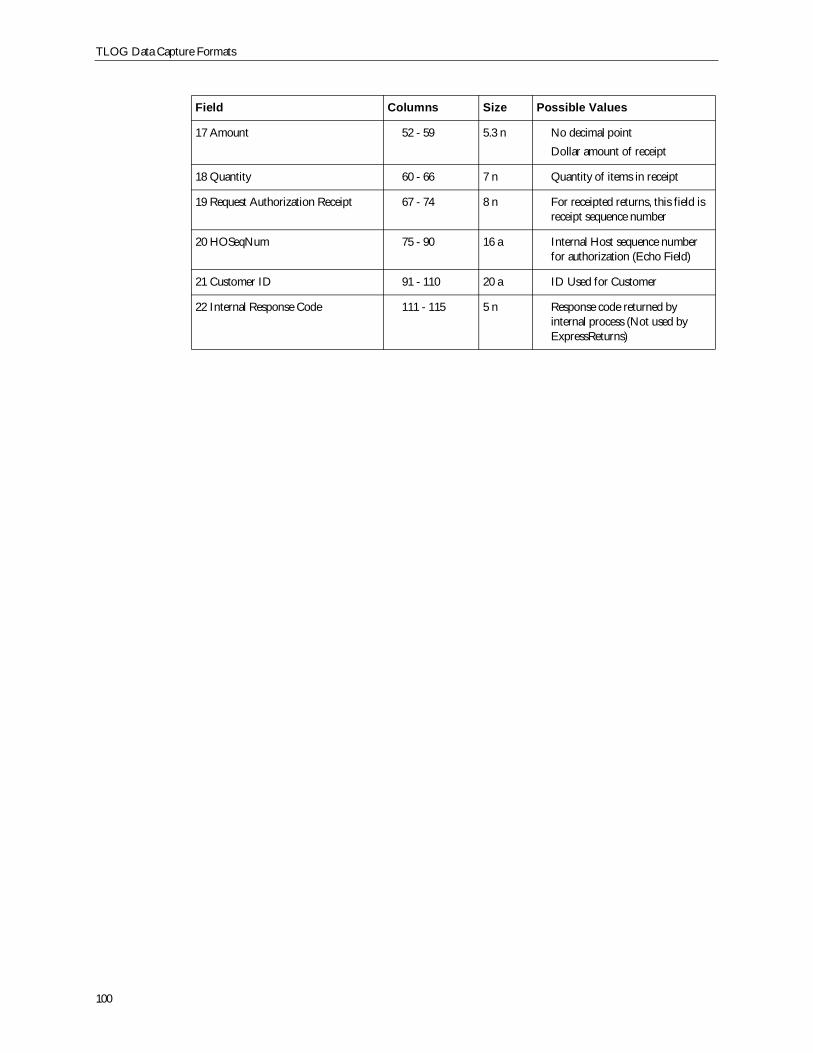
TLOG Data Capture Formats
100
17 Amount 52 - 59 5.3 n No decimal pointDollar amount of receipt
18 Quantity 60 - 66 7 n Quantity of items in receipt
19 Request Authorization Receipt 67 - 74 8 n For receipted returns, this field isreceipt sequence number
20 HOSeqNum 75 - 90 16 a Internal Host sequence numberfor authorization (Echo Field)
21 Customer ID 91 - 110 20 a ID Used for Customer
22 Internal Response Code 111 - 115 5 n Response code returned byinternal process (Not used byExpressReturns)
Field Columns Size Possible Values
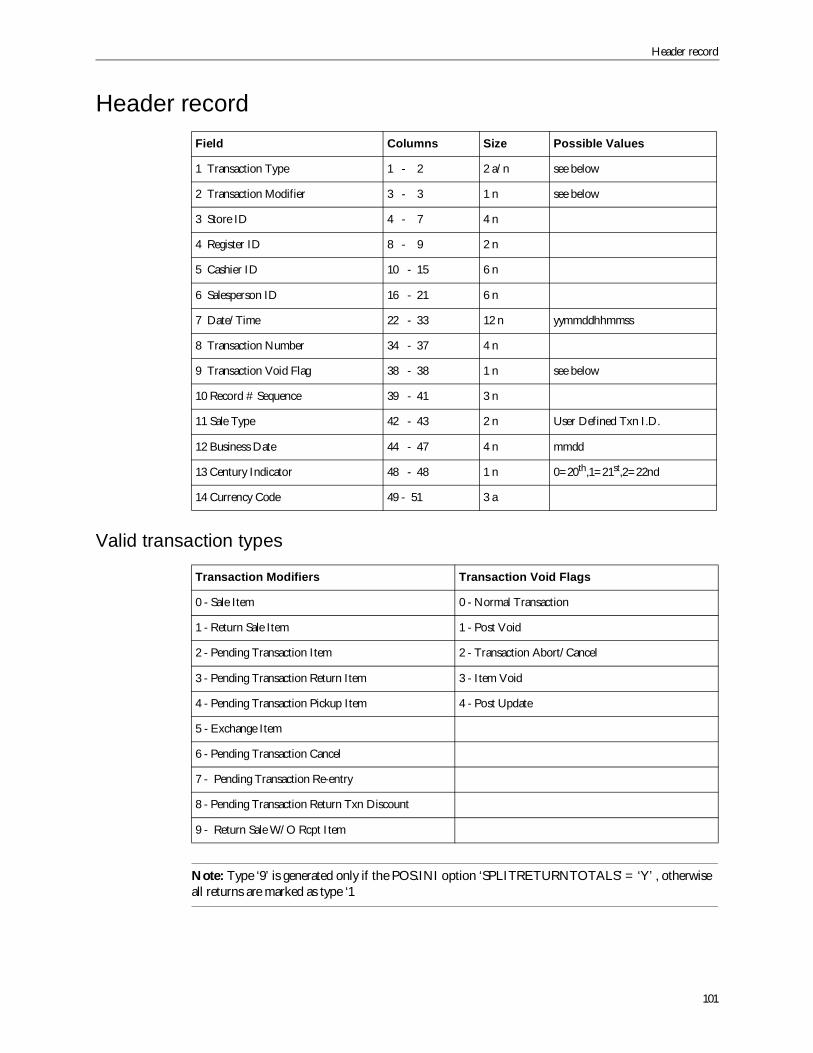
Header record
101
Header record
Valid transaction types
Note: Type ‘9’ is generated only if the POS.INI option ‘SPLITRETURNTOTALS’ = ‘Y’ , otherwiseall returns are marked as type ‘1
Field Columns Size Possible Values
1 Transaction Type 1 - 2 2 a/n see below
2 Transaction Modifier 3 - 3 1 n see below
3 Store ID 4 - 7 4 n
4 Register ID 8 - 9 2 n
5 Cashier ID 10 - 15 6 n
6 Salesperson ID 16 - 21 6 n
7 Date/Time 22 - 33 12 n yymmddhhmmss
8 Transaction Number 34 - 37 4 n
9 Transaction Void Flag 38 - 38 1 n see below
10 Record # Sequence 39 - 41 3 n
11 Sale Type 42 - 43 2 n User Defined Txn I.D.
12 Business Date 44 - 47 4 n mmdd
13 Century Indicator 48 - 48 1 n 0=20th,1=21st,2=22nd
14 Currency Code 49 - 51 3 a
Transaction Modifiers Transaction Void Flags
0 - Sale Item 0 - Normal Transaction
1 - Return Sale Item 1 - Post Void
2 - Pending Transaction Item 2 - Transaction Abort/Cancel
3 - Pending Transaction Return Item 3 - Item Void
4 - Pending Transaction Pickup Item 4 - Post Update
5 - Exchange Item
6 - Pending Transaction Cancel
7 - Pending Transaction Re-entry
8 - Pending Transaction Return Txn Discount
9 - Return Sale W/O Rcpt Item
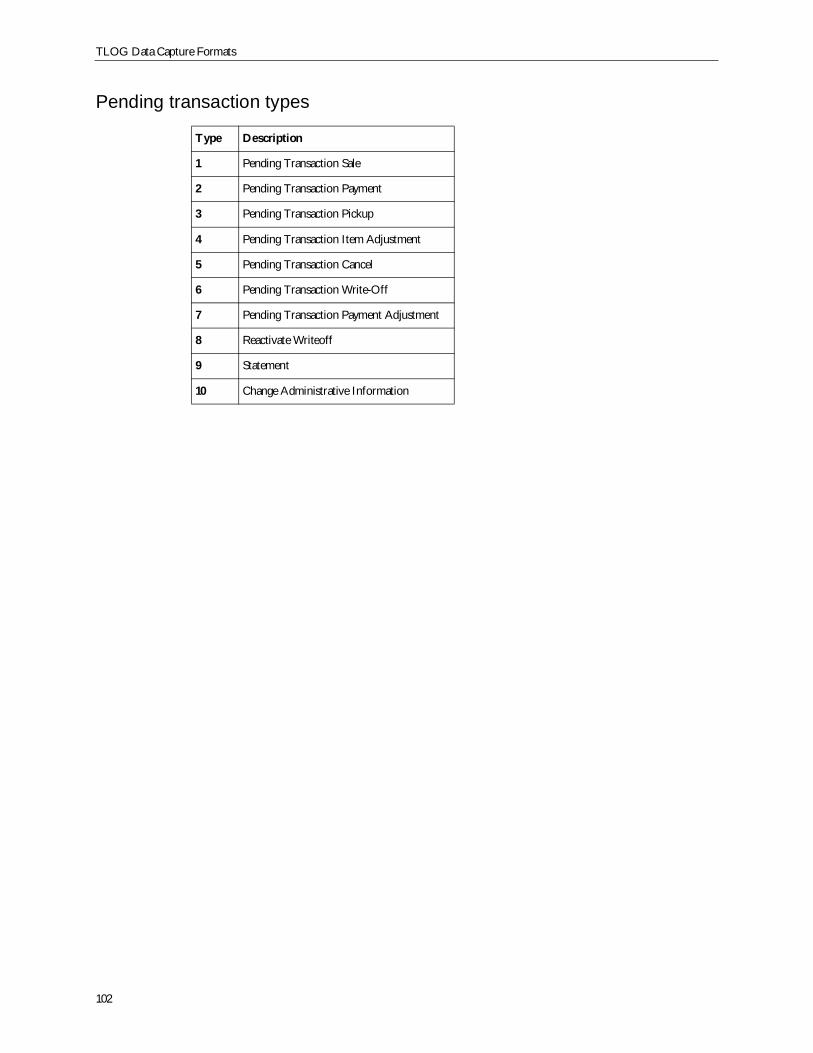
TLOG Data Capture Formats
102
Pending transaction types
Type Description
1 Pending Transaction Sale
2 Pending Transaction Payment
3 Pending Transaction Pickup
4 Pending Transaction Item Adjustment
5 Pending Transaction Cancel
6 Pending Transaction Write-Off
7 Pending Transaction Payment Adjustment
8 Reactivate Writeoff
9 Statement
10 Change Administrative Information
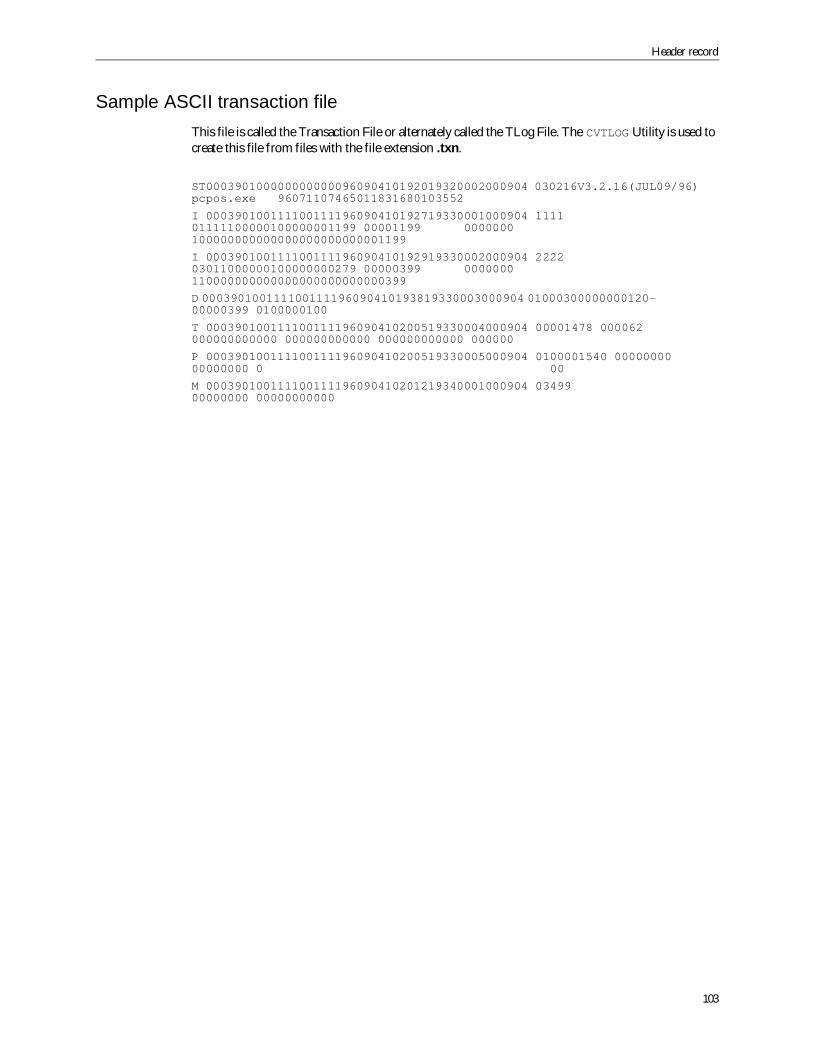
Header record
103
Sample ASCII transaction fileThis file is called the Transaction File or alternately called the TLog File. The CVTLOG Utility is used tocreate this file from files with the file extension .txn.
ST000390100000000000096090410192019320002000904 030216V3.2.16(JUL09/96)pcpos.exe 96071107465011831680103552
I 000390100111100111196090410192719330001000904 111101111100000100000001199 00001199 0000000100000000000000000000000001199
I 000390100111100111196090410192919330002000904 222203011000000100000000279 00000399 0000000110000000000000000000000000399
D 000390100111100111196090410193819330003000904 01000300000000120-00000399 0100000100
T 000390100111100111196090410200519330004000904 00001478 000062000000000000 000000000000 000000000000 000000
P 000390100111100111196090410200519330005000904 0100001540 0000000000000000 0 00
M 000390100111100111196090410201219340001000904 0349900000000 00000000000
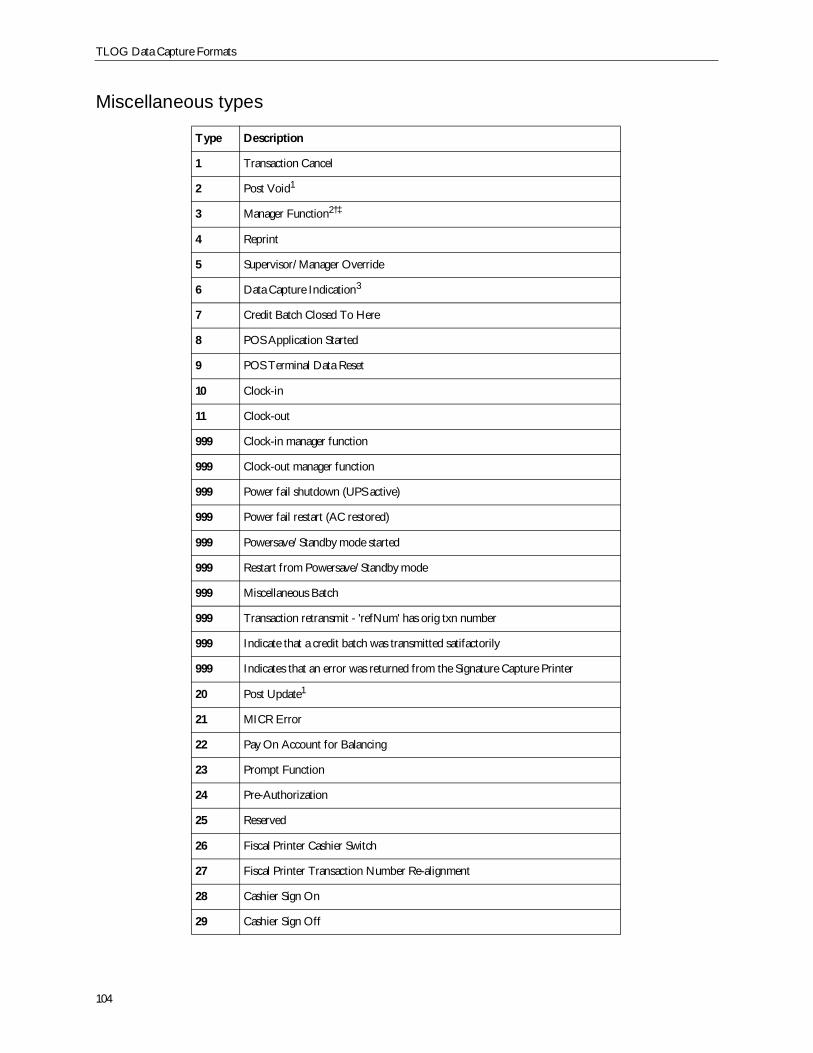
TLOG Data Capture Formats
104
Miscellaneous types
Type Description
1 Transaction Cancel
2 Post Void1
3 Manager Function2†‡
4 Reprint
5 Supervisor/Manager Override
6 Data Capture Indication3
7 Credit Batch Closed To Here
8 POS Application Started
9 POS Terminal Data Reset
10 Clock-in
11 Clock-out
999 Clock-in manager function
999 Clock-out manager function
999 Power fail shutdown (UPS active)
999 Power fail restart (AC restored)
999 Powersave/Standby mode started
999 Restart from Powersave/Standby mode
999 Miscellaneous Batch
999 Transaction retransmit - 'refNum' has orig txn number
999 Indicate that a credit batch was transmitted satifactorily
999 Indicates that an error was returned from the Signature Capture Printer
20 Post Update1
21 MICR Error
22 Pay On Account for Balancing
23 Prompt Function
24 Pre-Authorization
25 Reserved
26 Fiscal Printer Cashier Switch
27 Fiscal Printer Transaction Number Re-alignment
28 Cashier Sign On
29 Cashier Sign Off
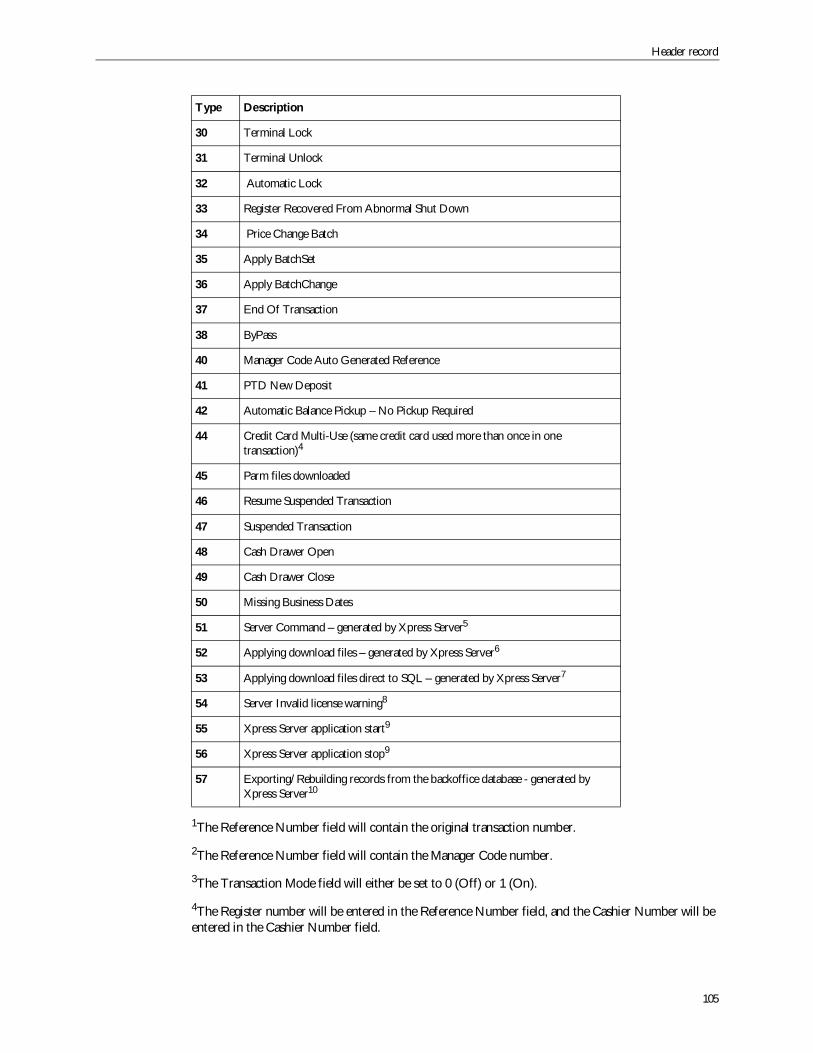
Header record
105
1The Reference Number field will contain the original transaction number.
2The Reference Number field will contain the Manager Code number.
3The Transaction Mode field will either be set to 0 (Off) or 1 (On).
4The Register number will be entered in the Reference Number field, and the Cashier Number will beentered in the Cashier Number field.
30 Terminal Lock
31 Terminal Unlock
32 Automatic Lock
33 Register Recovered From Abnormal Shut Down
34 Price Change Batch
35 Apply BatchSet
36 Apply BatchChange
37 End Of Transaction
38 ByPass
40 Manager Code Auto Generated Reference
41 PTD New Deposit
42 Automatic Balance Pickup – No Pickup Required
44 Credit Card Multi-Use (same credit card used more than once in onetransaction)4
45 Parm files downloaded
46 Resume Suspended Transaction
47 Suspended Transaction
48 Cash Drawer Open
49 Cash Drawer Close
50 Missing Business Dates
51 Server Command – generated by Xpress Server5
52 Applying download files – generated by Xpress Server6
53 Applying download files direct to SQL – generated by Xpress Server7
54 Server Invalid license warning8
55 Xpress Server application start9
56 Xpress Server application stop9
57 Exporting/Rebuilding records from the backoffice database - generated byXpress Server10
Type Description
TLOG Data Capture Formats
106
5When stopped (that is, the StartStop field is set to 0), the Reason field will contain 0 (no error) or 1(with error), and the Additional Info field will contain the error log file name if error.
6The Additional field will contain the applied file name. When stopped (that is, the StartStop field is setto 0), the Amount field will contain the count of records applied.
7 The Additional Info field will contain the applied file name. When stopped (that is, the StartStop fieldis set to 0), the Amount field will contain the count of records applied, and the Cashier Number fieldwill contain the count of records failed.
8The Reason field will contain 0 (Demo License) or 1 (Temp License). The Additional Info field willcontain the system tag.
9The Additional Information field will contain the software version number.
10The Additional field will contain the exported/rebuilt file name. When stopped, that is when theStartStop field is 0, the Amount field will contain the count of records exported. If the Amount field is0 and the StartStop field is 0, then the export/rebuild was cancelled.
†For Manager Codes 400 (Re-key Mode) and 402 (Training Mode), the Transaction Mode field will beset to either 0 (Off) or 1 (On).
‡For Manager Code 244 (Open Store), the Additional Information field will contain the Store GroupID as defined by the STOREGRPID parameter in the LOCAL.INI file.
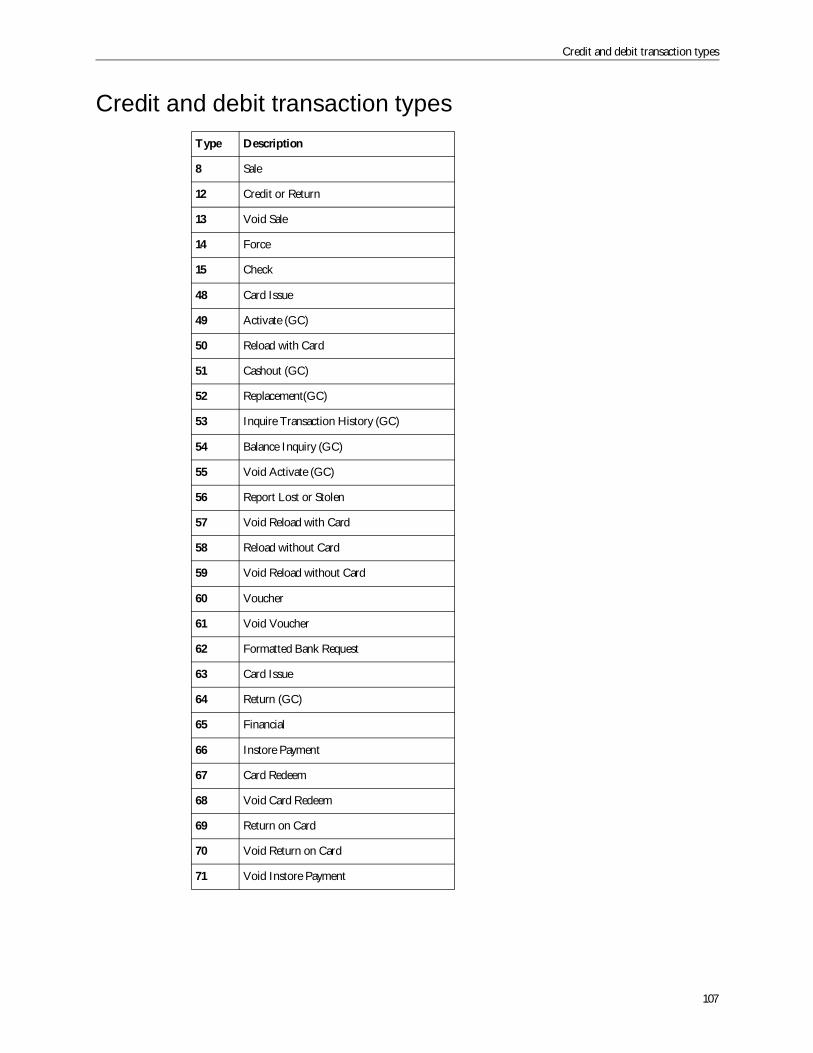
Credit and debit transaction types
107
Credit and debit transaction typesType Description
8 Sale
12 Credit or Return
13 Void Sale
14 Force
15 Check
48 Card Issue
49 Activate (GC)
50 Reload with Card
51 Cashout (GC)
52 Replacement(GC)
53 Inquire Transaction History (GC)
54 Balance Inquiry (GC)
55 Void Activate (GC)
56 Report Lost or Stolen
57 Void Reload with Card
58 Reload without Card
59 Void Reload without Card
60 Voucher
61 Void Voucher
62 Formatted Bank Request
63 Card Issue
64 Return (GC)
65 Financial
66 Instore Payment
67 Card Redeem
68 Void Card Redeem
69 Return on Card
70 Void Return on Card
71 Void Instore Payment
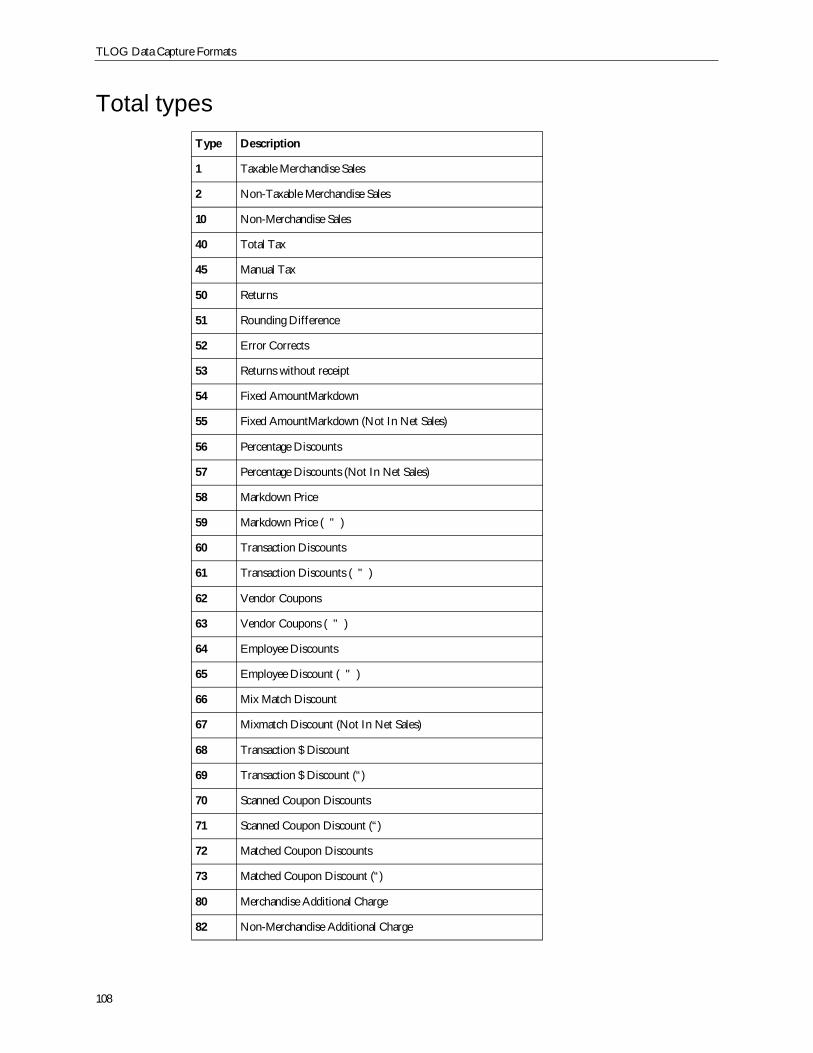
TLOG Data Capture Formats
108
Total typesType Description
1 Taxable Merchandise Sales
2 Non-Taxable Merchandise Sales
10 Non-Merchandise Sales
40 Total Tax
45 Manual Tax
50 Returns
51 Rounding Difference
52 Error Corrects
53 Returns without receipt
54 Fixed AmountMarkdown
55 Fixed AmountMarkdown (Not In Net Sales)
56 Percentage Discounts
57 Percentage Discounts (Not In Net Sales)
58 Markdown Price
59 Markdown Price ( " )
60 Transaction Discounts
61 Transaction Discounts ( " )
62 Vendor Coupons
63 Vendor Coupons ( " )
64 Employee Discounts
65 Employee Discount ( " )
66 Mix Match Discount
67 Mixmatch Discount (Not In Net Sales)
68 Transaction $ Discount
69 Transaction $ Discount (“)
70 Scanned Coupon Discounts
71 Scanned Coupon Discount (“)
72 Matched Coupon Discounts
73 Matched Coupon Discount (“)
80 Merchandise Additional Charge
82 Non-Merchandise Additional Charge
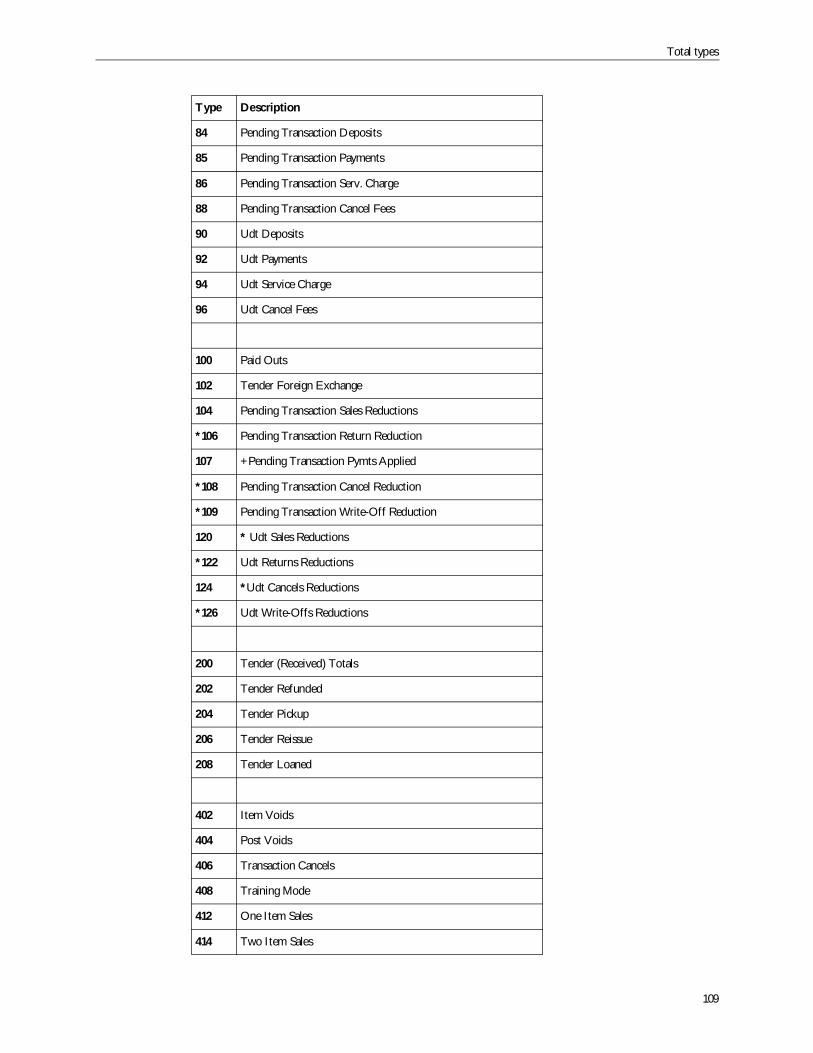
Total types
109
84 Pending Transaction Deposits
85 Pending Transaction Payments
86 Pending Transaction Serv. Charge
88 Pending Transaction Cancel Fees
90 Udt Deposits
92 Udt Payments
94 Udt Service Charge
96 Udt Cancel Fees
100 Paid Outs
102 Tender Foreign Exchange
104 Pending Transaction Sales Reductions
*106 Pending Transaction Return Reduction
107 +Pending Transaction Pymts Applied
*108 Pending Transaction Cancel Reduction
*109 Pending Transaction Write-Off Reduction
120 * Udt Sales Reductions
*122 Udt Returns Reductions
124 *Udt Cancels Reductions
*126 Udt Write-Offs Reductions
200 Tender (Received) Totals
202 Tender Refunded
204 Tender Pickup
206 Tender Reissue
208 Tender Loaned
402 Item Voids
404 Post Voids
406 Transaction Cancels
408 Training Mode
412 One Item Sales
414 Two Item Sales
Type Description

TLOG Data Capture Formats
110
416 More Than Two Items Sales
418 Suspends Count
420 Resume Count
422 Reprint Count
424 No Sales
426 Offline Txn Count
428 Uncaptured Txn Count
430 Rekey Txn Count
432 Scanned Items
434 Keyed Items
436 PLU Not On File
438 Price Overrides
440 Signed On Time (in seconds)
442 Idle Time (in seconds)
444 Item Entry Time (Sec.)
446 Total Time Open (Sec.)
448 Active Time
500 Pending Transaction Sales
512 Pending Transaction Pickups
514 Pending Transaction Cancels
516 Pending Transaction Payment Refunds
518 Pending Transaction Returns
520 Pending Transaction Write-Offs
522 Pending Transaction Pymt Forfeit
900 Net Merchandise Sales
902 Net Non-Merchandise Sales
904 Net Employee Sales
908 Total Customers
910 Promo Savings
920 Loyalty Sales
921 Loyalty Rewards (Points)
Type Description
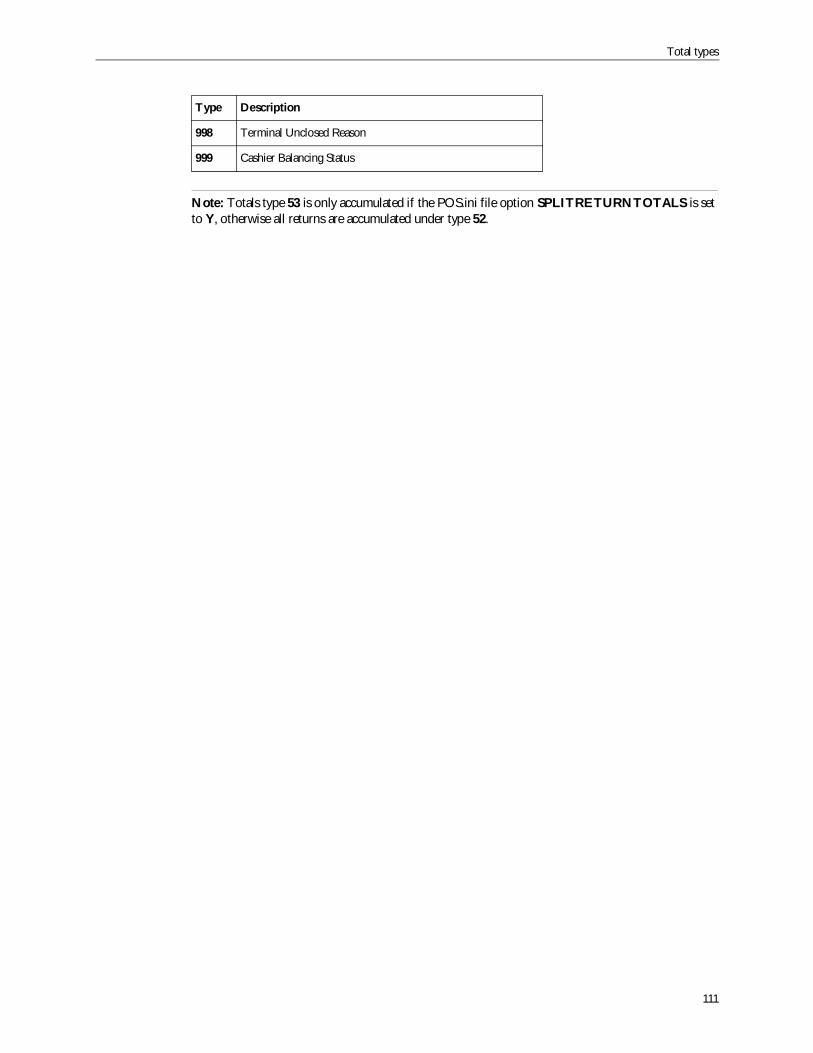
Total types
111
Note: Totals type 53 is only accumulated if the POS.ini file option SPLITRETURNTOTALS is setto Y, otherwise all returns are accumulated under type 52.
998 Terminal Unclosed Reason
999 Cashier Balancing Status
Type Description
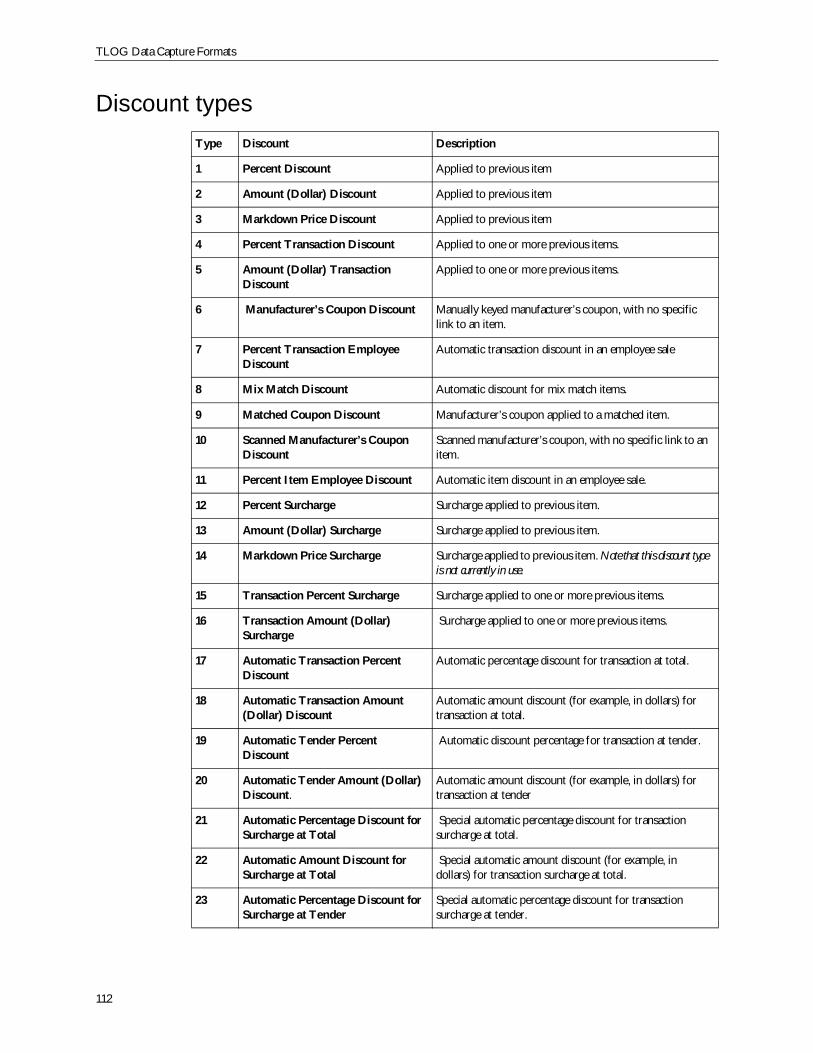
TLOG Data Capture Formats
112
Discount typesType Discount Description
1 Percent Discount Applied to previous item
2 Amount (Dollar) Discount Applied to previous item
3 Markdown Price Discount Applied to previous item
4 Percent Transaction Discount Applied to one or more previous items.
5 Amount (Dollar) TransactionDiscount
Applied to one or more previous items.
6 Manufacturer’s Coupon Discount Manually keyed manufacturer’s coupon, with no specificlink to an item.
7 Percent Transaction EmployeeDiscount
Automatic transaction discount in an employee sale
8 Mix Match Discount Automatic discount for mix match items.
9 Matched Coupon Discount Manufacturer’s coupon applied to a matched item.
10 Scanned Manufacturer’s CouponDiscount
Scanned manufacturer’s coupon, with no specific link to anitem.
11 Percent Item Employee Discount Automatic item discount in an employee sale.
12 Percent Surcharge Surcharge applied to previous item.
13 Amount (Dollar) Surcharge Surcharge applied to previous item.
14 Markdown Price Surcharge Surcharge applied to previous item. Note that this discount typeis not currently in use.
15 Transaction Percent Surcharge Surcharge applied to one or more previous items.
16 Transaction Amount (Dollar)Surcharge
Surcharge applied to one or more previous items.
17 Automatic Transaction PercentDiscount
Automatic percentage discount for transaction at total.
18 Automatic Transaction Amount(Dollar) Discount
Automatic amount discount (for example, in dollars) fortransaction at total.
19 Automatic Tender PercentDiscount
Automatic discount percentage for transaction at tender.
20 Automatic Tender Amount (Dollar)Discount.
Automatic amount discount (for example, in dollars) fortransaction at tender
21 Automatic Percentage Discount forSurcharge at Total
Special automatic percentage discount for transactionsurcharge at total.
22 Automatic Amount Discount forSurcharge at Total
Special automatic amount discount (for example, indollars) for transaction surcharge at total.
23 Automatic Percentage Discount forSurcharge at Tender
Special automatic percentage discount for transactionsurcharge at tender.
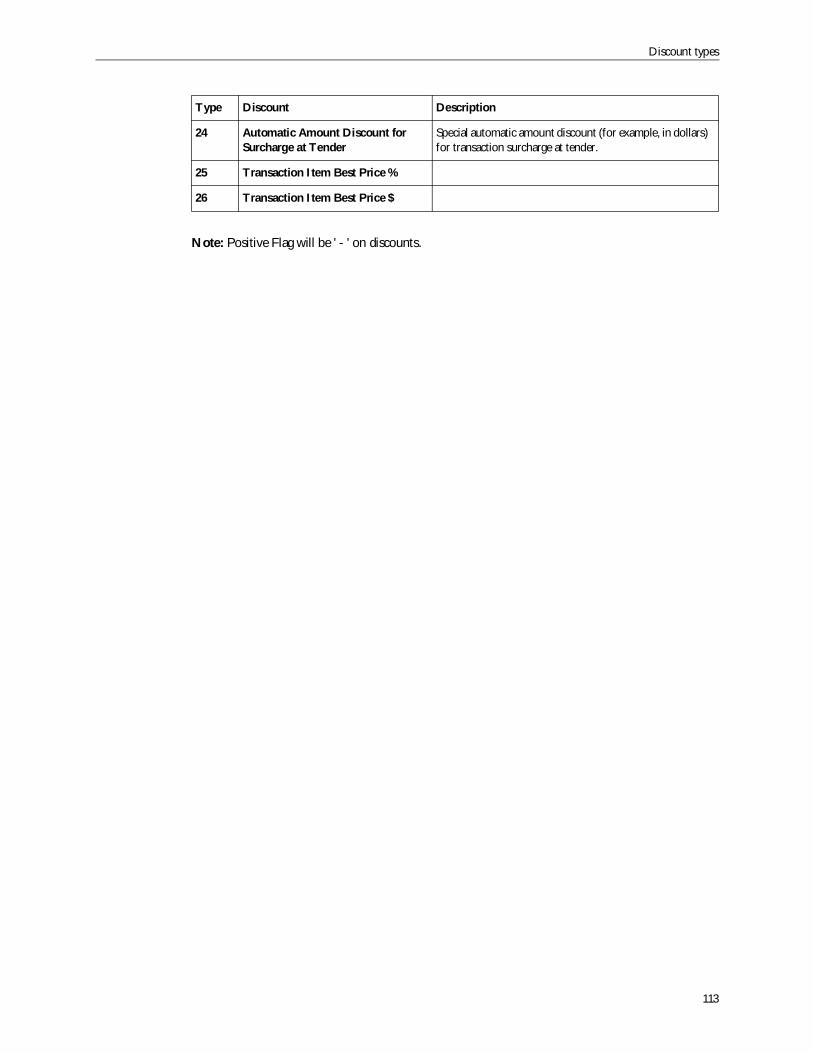
Discount types
113
Note: Positive Flag will be ' - ' on discounts.
24 Automatic Amount Discount forSurcharge at Tender
Special automatic amount discount (for example, in dollars)for transaction surcharge at tender.
25 Transaction Item Best Price %
26 Transaction Item Best Price $
Type Discount Description
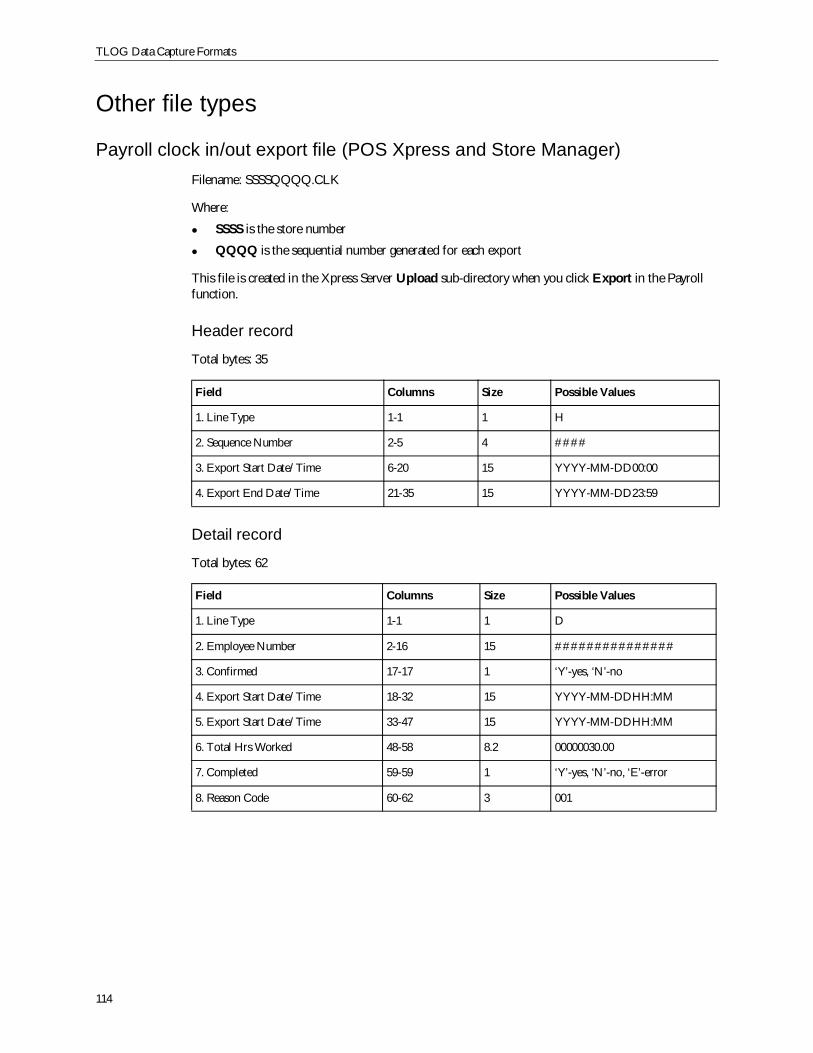
TLOG Data Capture Formats
114
Other file types
Payroll clock in/out export file (POS Xpress and Store Manager)Filename: SSSSQQQQ.CLK
Where:
SSSS is the store number
QQQQ is the sequential number generated for each export
This file is created in the Xpress Server Upload sub-directory when you click Export in the Payrollfunction.
Header record
Total bytes: 35
Detail record
Total bytes: 62
Field Columns Size Possible Values
1. Line Type 1-1 1 H
2. Sequence Number 2-5 4 ####
3. Export Start Date/Time 6-20 15 YYYY-MM-DD00:00
4. Export End Date/Time 21-35 15 YYYY-MM-DD23:59
Field Columns Size Possible Values
1. Line Type 1-1 1 D
2. Employee Number 2-16 15 ###############
3. Confirmed 17-17 1 ‘Y’-yes, ‘N’-no
4. Export Start Date/Time 18-32 15 YYYY-MM-DDHH:MM
5. Export Start Date/Time 33-47 15 YYYY-MM-DDHH:MM
6. Total Hrs Worked 48-58 8.2 00000030.00
7. Completed 59-59 1 ‘Y’-yes, ‘N’-no, ‘E’-error
8. Reason Code 60-62 3 001
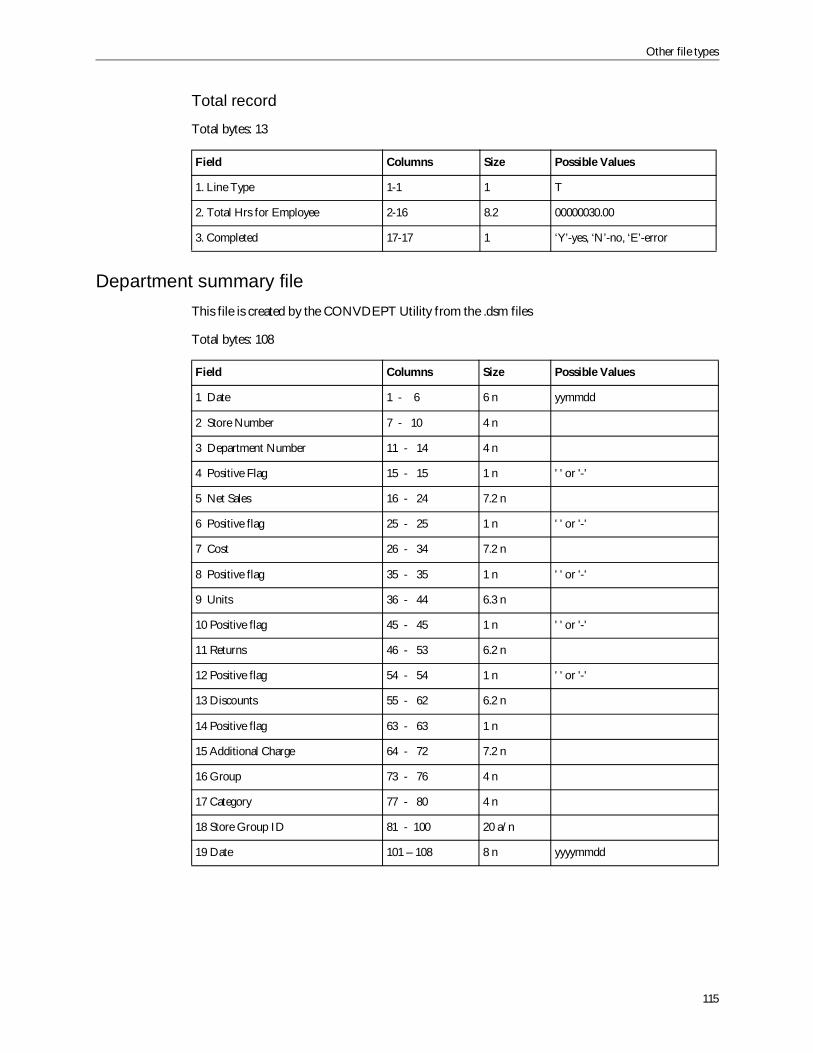
Other file types
115
Total record
Total bytes: 13
Department summary fileThis file is created by the CONVDEPT Utility from the .dsm files
Total bytes: 108
Field Columns Size Possible Values
1. Line Type 1-1 1 T
2. Total Hrs for Employee 2-16 8.2 00000030.00
3. Completed 17-17 1 ‘Y’-yes, ‘N’-no, ‘E’-error
Field Columns Size Possible Values
1 Date 1 - 6 6 n yymmdd
2 Store Number 7 - 10 4 n
3 Department Number 11 - 14 4 n
4 Positive Flag 15 - 15 1 n ' ' or '-'
5 Net Sales 16 - 24 7.2 n
6 Positive flag 25 - 25 1 n ' ' or '-'
7 Cost 26 - 34 7.2 n
8 Positive flag 35 - 35 1 n ' ' or '-'
9 Units 36 - 44 6.3 n
10 Positive flag 45 - 45 1 n ' ' or '-'
11 Returns 46 - 53 6.2 n
12 Positive flag 54 - 54 1 n ' ' or '-'
13 Discounts 55 - 62 6.2 n
14 Positive flag 63 - 63 1 n
15 Additional Charge 64 - 72 7.2 n
16 Group 73 - 76 4 n
17 Category 77 - 80 4 n
18 Store Group ID 81 - 100 20 a/n
19 Date 101 – 108 8 n yyyymmdd
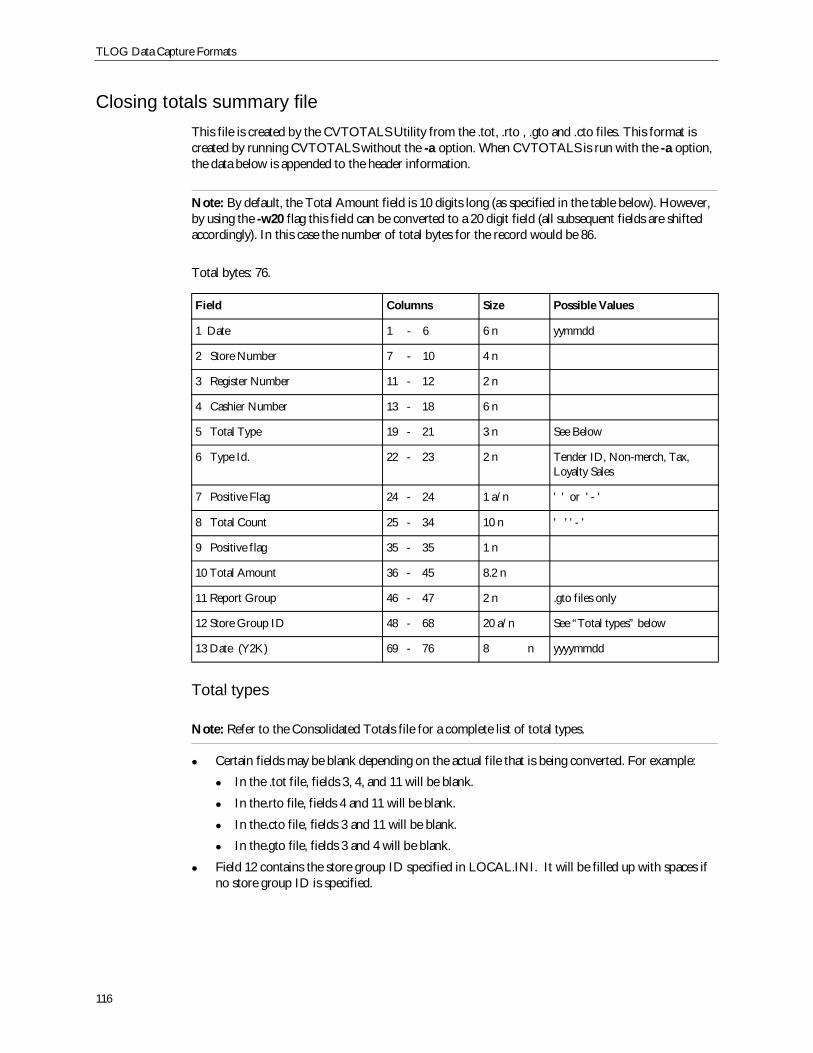
TLOG Data Capture Formats
116
Closing totals summary fileThis file is created by the CVTOTALS Utility from the .tot, .rto , .gto and .cto files. This format iscreated by running CVTOTALS without the -a option. When CVTOTALS is run with the -a option,the data below is appended to the header information.
Note: By default, the Total Amount field is 10 digits long (as specified in the table below). However,by using the -w20 flag this field can be converted to a 20 digit field (all subsequent fields are shiftedaccordingly). In this case the number of total bytes for the record would be 86.
Total bytes: 76.
Total types
Note: Refer to the Consolidated Totals file for a complete list of total types.
Certain fields may be blank depending on the actual file that is being converted. For example:
In the .tot file, fields 3, 4, and 11 will be blank.
In the.rto file, fields 4 and 11 will be blank.
In the.cto file, fields 3 and 11 will be blank.
In the.gto file, fields 3 and 4 will be blank.
Field 12 contains the store group ID specified in LOCAL.INI. It will be filled up with spaces ifno store group ID is specified.
Field Columns Size Possible Values
1 Date 1 - 6 6 n yymmdd
2 Store Number 7 - 10 4 n
3 Register Number 11 - 12 2 n
4 Cashier Number 13 - 18 6 n
5 Total Type 19 - 21 3 n See Below
6 Type Id. 22 - 23 2 n Tender ID, Non-merch, Tax,Loyalty Sales
7 Positive Flag 24 - 24 1 a/n ' ' or ' - '
8 Total Count 25 - 34 10 n ' ' ' - '
9 Positive flag 35 - 35 1 n
10 Total Amount 36 - 45 8.2 n
11 Report Group 46 - 47 2 n .gto files only
12 Store Group ID 48 - 68 20 a/n See “Total types” below
13 Date (Y2K) 69 - 76 8 n yyyymmdd
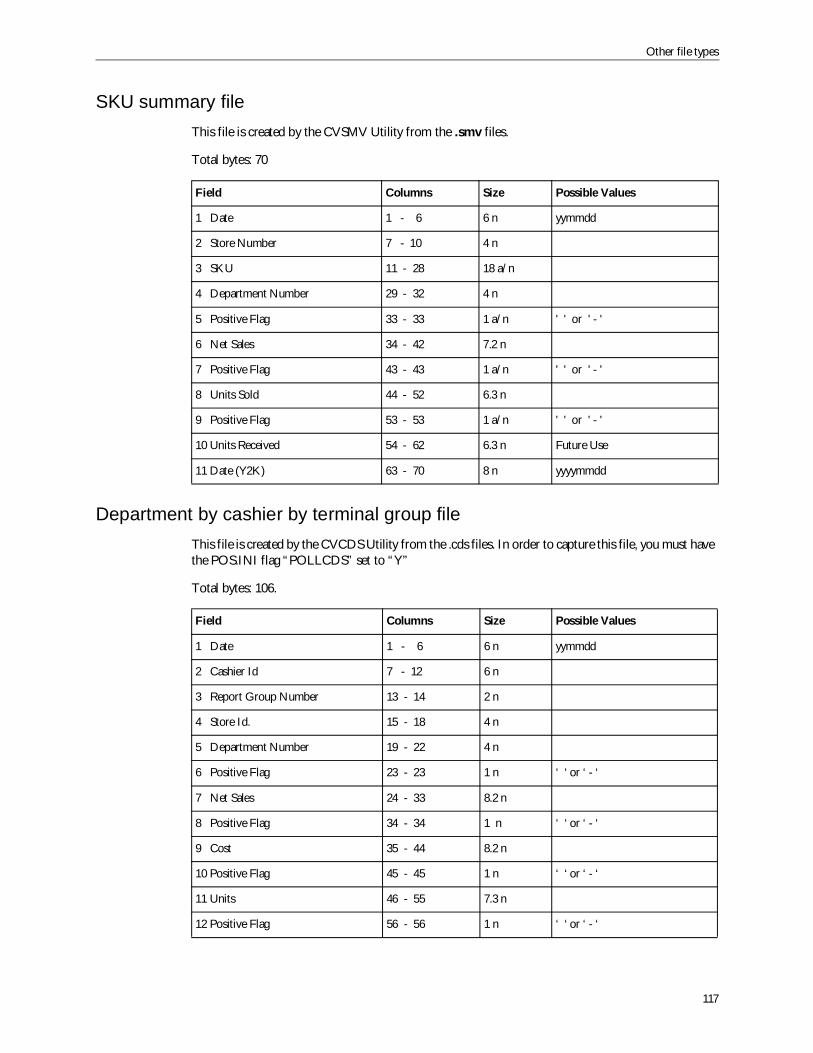
Other file types
117
SKU summary fileThis file is created by the CVSMV Utility from the .smv files.
Total bytes: 70
Department by cashier by terminal group fileThis file is created by the CVCDS Utility from the .cds files. In order to capture this file, you must havethe POS.INI flag “POLLCDS” set to “Y”
Total bytes: 106.
Field Columns Size Possible Values
1 Date 1 - 6 6 n yymmdd
2 Store Number 7 - 10 4 n
3 SKU 11 - 28 18 a/n
4 Department Number 29 - 32 4 n
5 Positive Flag 33 - 33 1 a/n ' ' or ' - '
6 Net Sales 34 - 42 7.2 n
7 Positive Flag 43 - 43 1 a/n ' ' or ' - '
8 Units Sold 44 - 52 6.3 n
9 Positive Flag 53 - 53 1 a/n ' ' or ' - '
10 Units Received 54 - 62 6.3 n Future Use
11 Date (Y2K) 63 - 70 8 n yyyymmdd
Field Columns Size Possible Values
1 Date 1 - 6 6 n yymmdd
2 Cashier Id 7 - 12 6 n
3 Report Group Number 13 - 14 2 n
4 Store Id. 15 - 18 4 n
5 Department Number 19 - 22 4 n
6 Positive Flag 23 - 23 1 n ‘ ‘ or ‘ - ‘
7 Net Sales 24 - 33 8.2 n
8 Positive Flag 34 - 34 1 n ‘ ‘ or ‘ - ‘
9 Cost 35 - 44 8.2 n
10 Positive Flag 45 - 45 1 n ‘ ‘ or ‘ - ‘
11 Units 46 - 55 7.3 n
12 Positive Flag 56 - 56 1 n ‘ ‘ or ‘ - ‘
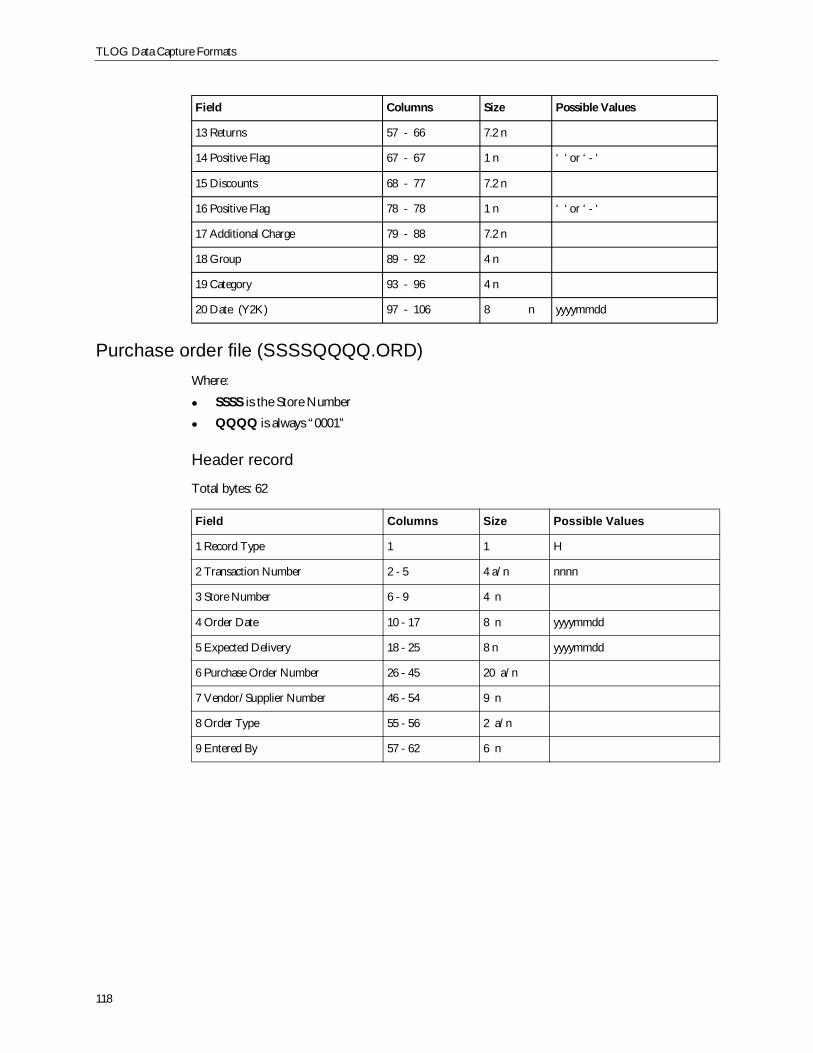
TLOG Data Capture Formats
118
Purchase order file (SSSSQQQQ.ORD)Where:
SSSS is the Store Number
QQQQ is always “0001”
Header record
Total bytes: 62
13 Returns 57 - 66 7.2 n
14 Positive Flag 67 - 67 1 n ‘ ‘ or ‘ - ‘
15 Discounts 68 - 77 7.2 n
16 Positive Flag 78 - 78 1 n ‘ ‘ or ‘ - ‘
17 Additional Charge 79 - 88 7.2 n
18 Group 89 - 92 4 n
19 Category 93 - 96 4 n
20 Date (Y2K) 97 - 106 8 n yyyymmdd
Field Columns Size Possible Values
1 Record Type 1 1 H
2 Transaction Number 2 - 5 4 a/n nnnn
3 Store Number 6 - 9 4 n
4 Order Date 10 - 17 8 n yyyymmdd
5 Expected Delivery 18 - 25 8 n yyyymmdd
6 Purchase Order Number 26 - 45 20 a/n
7 Vendor/Supplier Number 46 - 54 9 n
8 Order Type 55 - 56 2 a/n
9 Entered By 57 - 62 6 n
Field Columns Size Possible Values
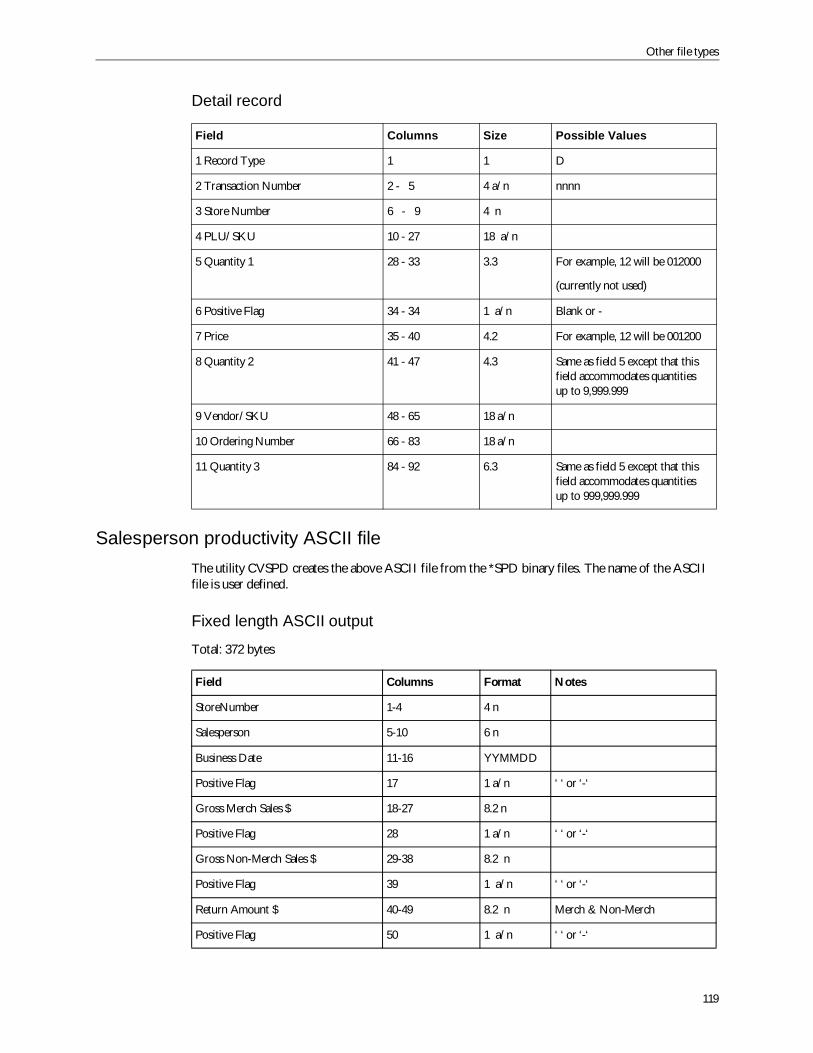
Other file types
119
Detail record
Salesperson productivity ASCII fileThe utility CVSPD creates the above ASCII file from the *SPD binary files. The name of the ASCIIfile is user defined.
Fixed length ASCII output
Total: 372 bytes
Field Columns Size Possible Values
1 Record Type 1 1 D
2 Transaction Number 2 - 5 4 a/n nnnn
3 Store Number 6 - 9 4 n
4 PLU/SKU 10 - 27 18 a/n
5 Quantity 1 28 - 33 3.3 For example, 12 will be 012000
(currently not used)
6 Positive Flag 34 - 34 1 a/n Blank or -
7 Price 35 - 40 4.2 For example, 12 will be 001200
8 Quantity 2 41 - 47 4.3 Same as field 5 except that thisfield accommodates quantitiesup to 9,999.999
9 Vendor/SKU 48 - 65 18 a/n
10 Ordering Number 66 - 83 18 a/n
11 Quantity 3 84 - 92 6.3 Same as field 5 except that thisfield accommodates quantitiesup to 999,999.999
Field Columns Format Notes
StoreNumber 1-4 4 n
Salesperson 5-10 6 n
Business Date 11-16 YYMMDD
Positive Flag 17 1 a/n ‘ ‘ or ‘-‘
Gross Merch Sales $ 18-27 8.2 n
Positive Flag 28 1 a/n ‘ ‘ or ‘-‘
Gross Non-Merch Sales $ 29-38 8.2 n
Positive Flag 39 1 a/n ‘ ‘ or ‘-‘
Return Amount $ 40-49 8.2 n Merch & Non-Merch
Positive Flag 50 1 a/n ‘ ‘ or ‘-‘
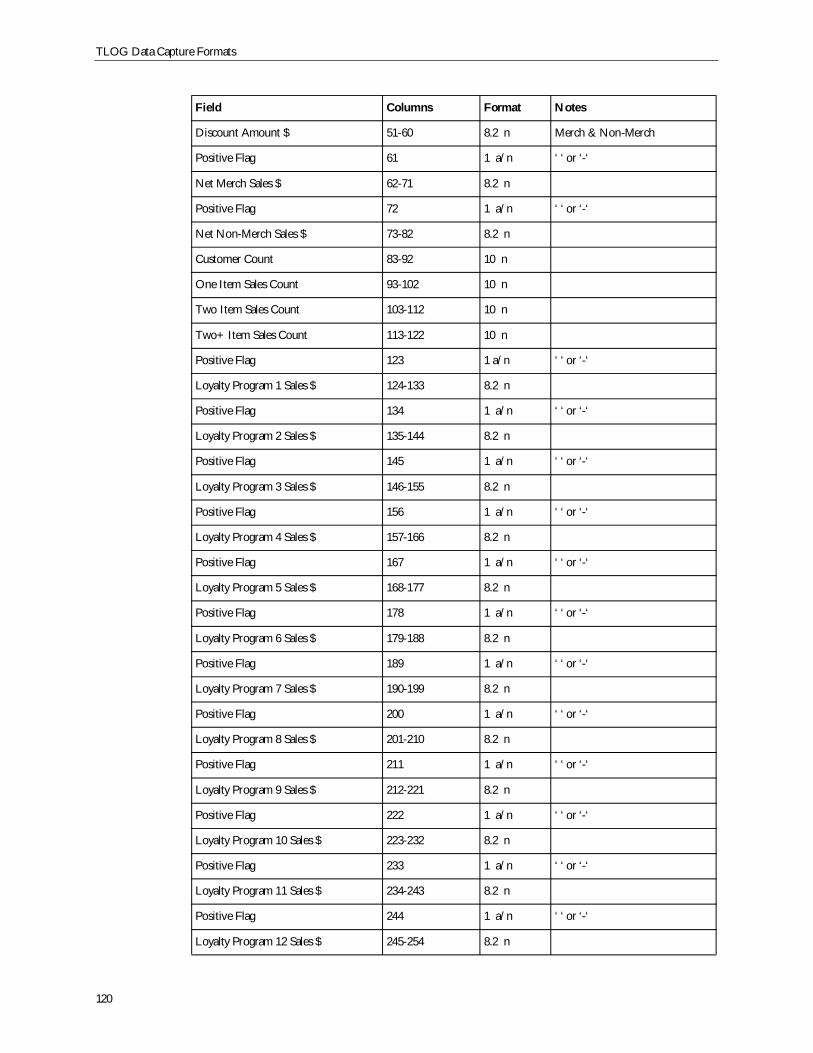
TLOG Data Capture Formats
120
Discount Amount $ 51-60 8.2 n Merch & Non-Merch
Positive Flag 61 1 a/n ‘ ‘ or ‘-‘
Net Merch Sales $ 62-71 8.2 n
Positive Flag 72 1 a/n ‘ ‘ or ‘-‘
Net Non-Merch Sales $ 73-82 8.2 n
Customer Count 83-92 10 n
One Item Sales Count 93-102 10 n
Two Item Sales Count 103-112 10 n
Two+ Item Sales Count 113-122 10 n
Positive Flag 123 1 a/n ‘ ‘ or ‘-‘
Loyalty Program 1 Sales $ 124-133 8.2 n
Positive Flag 134 1 a/n ‘ ‘ or ‘-‘
Loyalty Program 2 Sales $ 135-144 8.2 n
Positive Flag 145 1 a/n ‘ ‘ or ‘-‘
Loyalty Program 3 Sales $ 146-155 8.2 n
Positive Flag 156 1 a/n ‘ ‘ or ‘-‘
Loyalty Program 4 Sales $ 157-166 8.2 n
Positive Flag 167 1 a/n ‘ ‘ or ‘-‘
Loyalty Program 5 Sales $ 168-177 8.2 n
Positive Flag 178 1 a/n ‘ ‘ or ‘-‘
Loyalty Program 6 Sales $ 179-188 8.2 n
Positive Flag 189 1 a/n ‘ ‘ or ‘-‘
Loyalty Program 7 Sales $ 190-199 8.2 n
Positive Flag 200 1 a/n ‘ ‘ or ‘-‘
Loyalty Program 8 Sales $ 201-210 8.2 n
Positive Flag 211 1 a/n ‘ ‘ or ‘-‘
Loyalty Program 9 Sales $ 212-221 8.2 n
Positive Flag 222 1 a/n ‘ ‘ or ‘-‘
Loyalty Program 10 Sales $ 223-232 8.2 n
Positive Flag 233 1 a/n ‘ ‘ or ‘-‘
Loyalty Program 11 Sales $ 234-243 8.2 n
Positive Flag 244 1 a/n ‘ ‘ or ‘-‘
Loyalty Program 12 Sales $ 245-254 8.2 n
Field Columns Format Notes
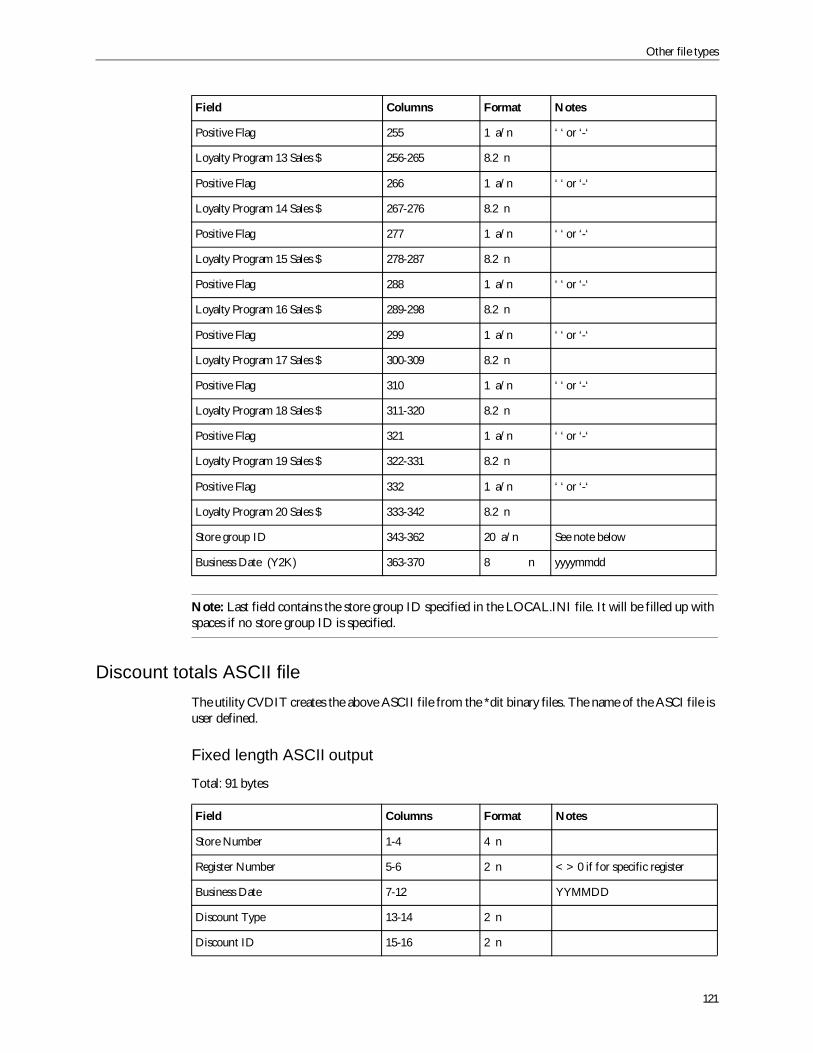
Other file types
121
Note: Last field contains the store group ID specified in the LOCAL.INI file. It will be filled up withspaces if no store group ID is specified.
Discount totals ASCII fileThe utility CVDIT creates the above ASCII file from the *dit binary files. The name of the ASCI file isuser defined.
Fixed length ASCII output
Total: 91 bytes
Positive Flag 255 1 a/n ‘ ‘ or ‘-‘
Loyalty Program 13 Sales $ 256-265 8.2 n
Positive Flag 266 1 a/n ‘ ‘ or ‘-‘
Loyalty Program 14 Sales $ 267-276 8.2 n
Positive Flag 277 1 a/n ‘ ‘ or ‘-‘
Loyalty Program 15 Sales $ 278-287 8.2 n
Positive Flag 288 1 a/n ‘ ‘ or ‘-‘
Loyalty Program 16 Sales $ 289-298 8.2 n
Positive Flag 299 1 a/n ‘ ‘ or ‘-‘
Loyalty Program 17 Sales $ 300-309 8.2 n
Positive Flag 310 1 a/n ‘ ‘ or ‘-‘
Loyalty Program 18 Sales $ 311-320 8.2 n
Positive Flag 321 1 a/n ‘ ‘ or ‘-‘
Loyalty Program 19 Sales $ 322-331 8.2 n
Positive Flag 332 1 a/n ‘ ‘ or ‘-‘
Loyalty Program 20 Sales $ 333-342 8.2 n
Store group ID 343-362 20 a/n See note below
Business Date (Y2K) 363-370 8 n yyyymmdd
Field Columns Format Notes
Store Number 1-4 4 n
Register Number 5-6 2 n < > 0 if for specific register
Business Date 7-12 YYMMDD
Discount Type 13-14 2 n
Discount ID 15-16 2 n
Field Columns Format Notes
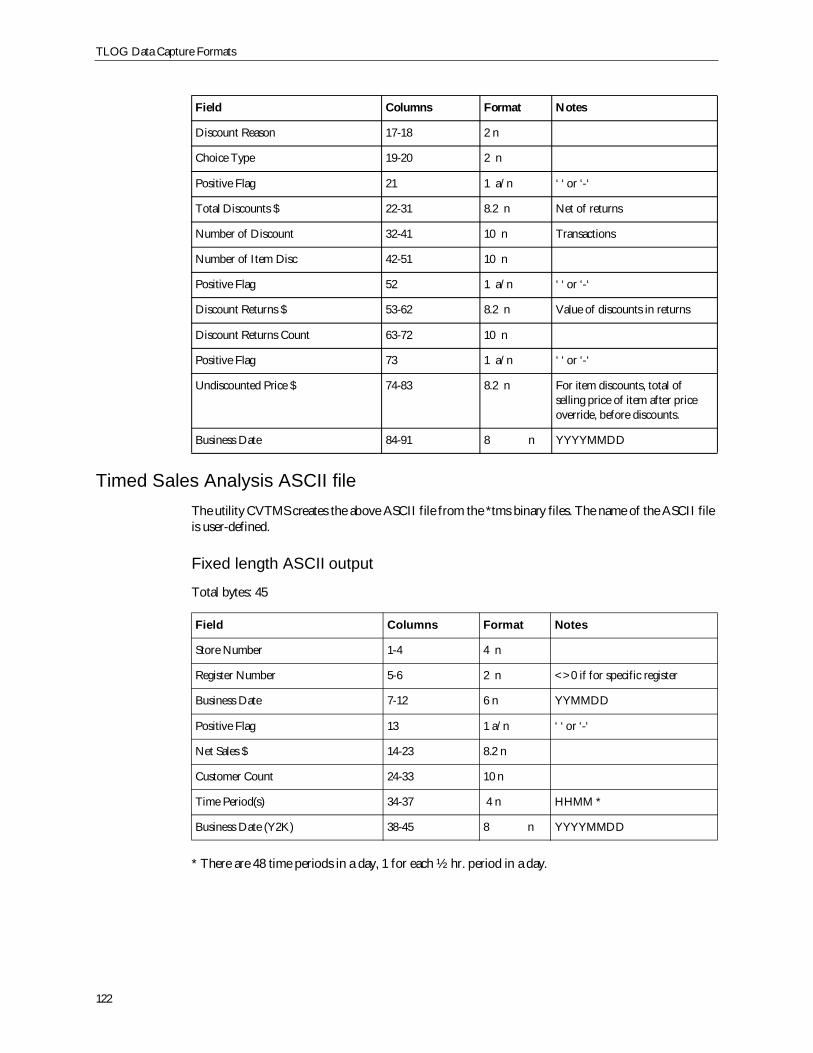
TLOG Data Capture Formats
122
Timed Sales Analysis ASCII fileThe utility CVTMS creates the above ASCII file from the *tms binary files. The name of the ASCII fileis user-defined.
Fixed length ASCII output
Total bytes: 45
* There are 48 time periods in a day, 1 for each ½ hr. period in a day.
Discount Reason 17-18 2 n
Choice Type 19-20 2 n
Positive Flag 21 1 a/n ‘ ‘ or ‘-‘
Total Discounts $ 22-31 8.2 n Net of returns
Number of Discount 32-41 10 n Transactions
Number of Item Disc 42-51 10 n
Positive Flag 52 1 a/n ‘ ‘ or ‘-‘
Discount Returns $ 53-62 8.2 n Value of discounts in returns
Discount Returns Count 63-72 10 n
Positive Flag 73 1 a/n ‘ ‘ or ‘-‘
Undiscounted Price $ 74-83 8.2 n For item discounts, total ofselling price of item after priceoverride, before discounts.
Business Date 84-91 8 n YYYYMMDD
Field Columns Format Notes
Store Number 1-4 4 n
Register Number 5-6 2 n <>0 if for specific register
Business Date 7-12 6 n YYMMDD
Positive Flag 13 1 a/n ‘ ‘ or ‘-‘
Net Sales $ 14-23 8.2 n
Customer Count 24-33 10 n
Time Period(s) 34-37 4 n HHMM *
Business Date (Y2K) 38-45 8 n YYYYMMDD
Field Columns Format Notes
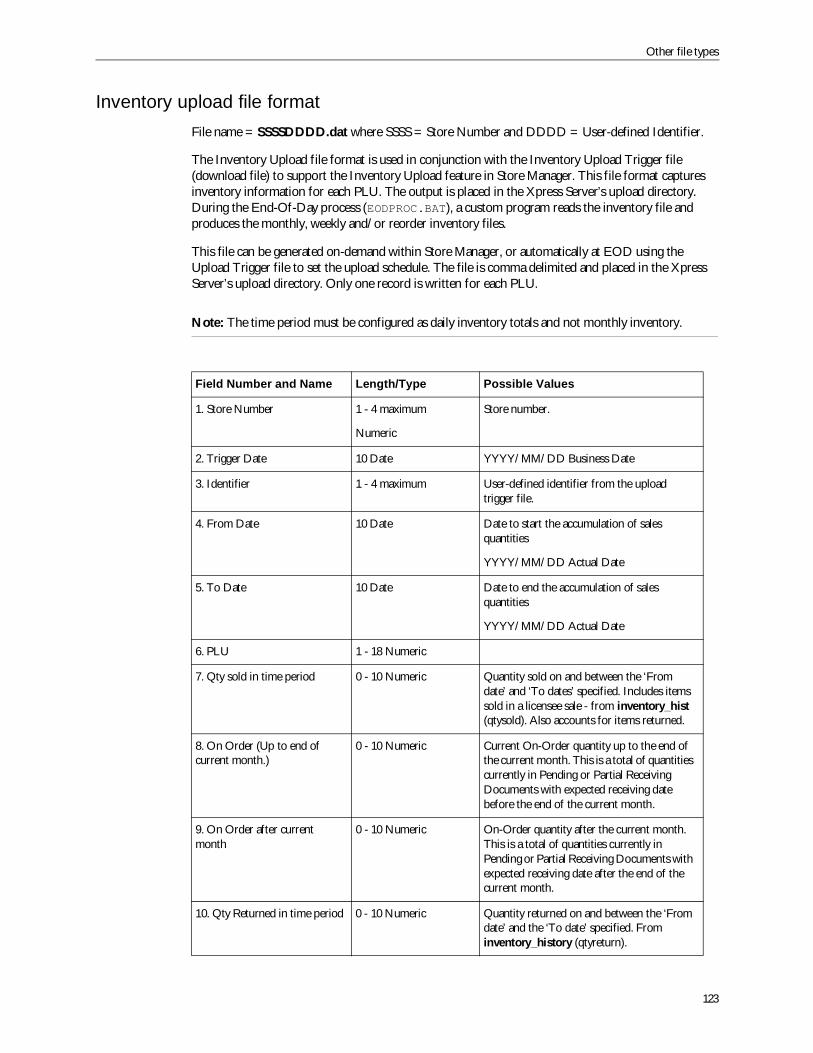
Other file types
123
Inventory upload file formatFile name = SSSSDDDD.dat where SSSS = Store Number and DDDD = User-defined Identifier.
The Inventory Upload file format is used in conjunction with the Inventory Upload Trigger file(download file) to support the Inventory Upload feature in Store Manager. This file format capturesinventory information for each PLU. The output is placed in the Xpress Server’s upload directory.During the End-Of-Day process (EODPROC.BAT), a custom program reads the inventory file andproduces the monthly, weekly and/or reorder inventory files.
This file can be generated on-demand within Store Manager, or automatically at EOD using theUpload Trigger file to set the upload schedule. The file is comma delimited and placed in the XpressServer’s upload directory. Only one record is written for each PLU.
Note: The time period must be configured as daily inventory totals and not monthly inventory.
Field Number and Name Length/Type Possible Values
1. Store Number 1 - 4 maximum
Numeric
Store number.
2. Trigger Date 10 Date YYYY/MM/DD Business Date
3. Identifier 1 - 4 maximum User-defined identifier from the uploadtrigger file.
4. From Date 10 Date Date to start the accumulation of salesquantities
YYYY/MM/DD Actual Date
5. To Date 10 Date Date to end the accumulation of salesquantities
YYYY/MM/DD Actual Date
6. PLU 1 - 18 Numeric
7. Qty sold in time period 0 - 10 Numeric Quantity sold on and between the ‘Fromdate’ and ‘To dates’ specified. Includes itemssold in a licensee sale - from inventory_hist(qtysold). Also accounts for items returned.
8. On Order (Up to end ofcurrent month.)
0 - 10 Numeric Current On-Order quantity up to the end ofthe current month. This is a total of quantitiescurrently in Pending or Partial ReceivingDocuments with expected receiving datebefore the end of the current month.
9. On Order after currentmonth
0 - 10 Numeric On-Order quantity after the current month.This is a total of quantities currently inPending or Partial Receiving Documents withexpected receiving date after the end of thecurrent month.
10. Qty Returned in time period 0 - 10 Numeric Quantity returned on and between the ‘Fromdate’ and the ‘To date’ specified. Frominventory_history (qtyreturn).
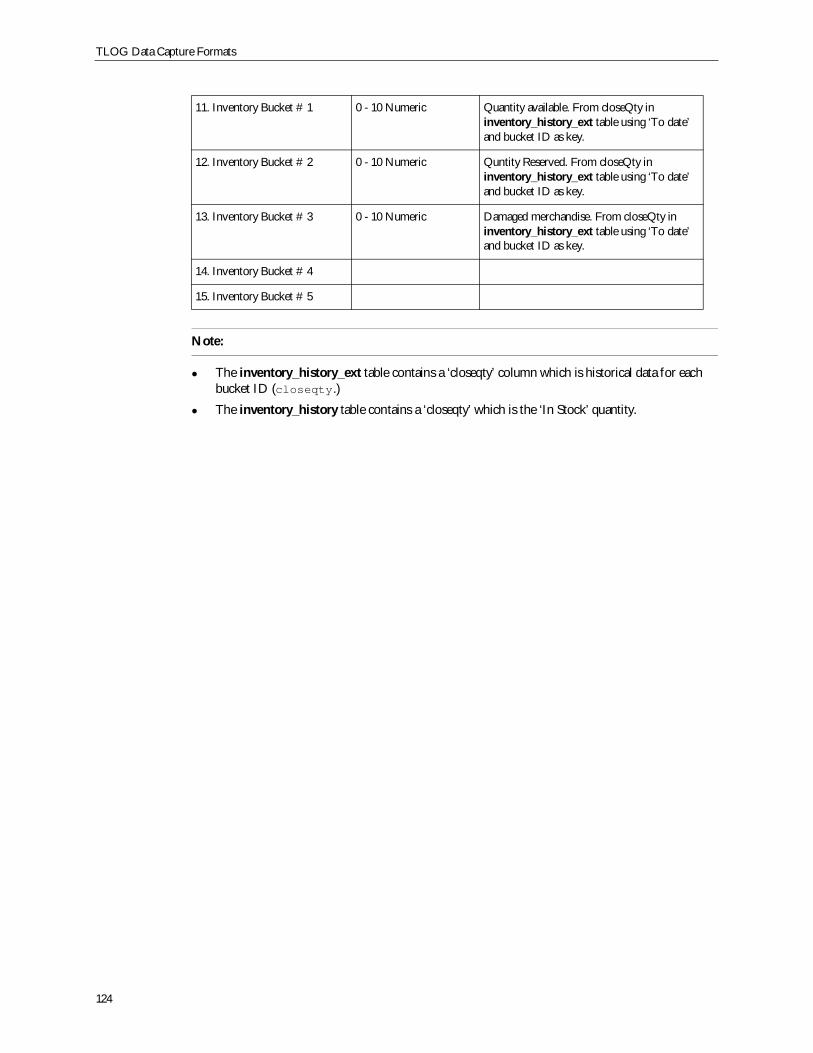
TLOG Data Capture Formats
124
Note:
The inventory_history_ext table contains a ‘closeqty’ column which is historical data for eachbucket ID (closeqty.)
The inventory_history table contains a ‘closeqty’ which is the ‘In Stock’ quantity.
11. Inventory Bucket # 1 0 - 10 Numeric Quantity available. From closeQty ininventory_history_ext table using ‘To date’and bucket ID as key.
12. Inventory Bucket # 2 0 - 10 Numeric Quntity Reserved. From closeQty ininventory_history_ext table using ‘To date’and bucket ID as key.
13. Inventory Bucket # 3 0 - 10 Numeric Damaged merchandise. From closeQty ininventory_history_ext table using ‘To date’and bucket ID as key.
14. Inventory Bucket # 4
15. Inventory Bucket # 5

Other file types
125

TLOG Data Capture Formats
126
127
4Download File Formats
About using the file formatsFiles downloaded from head office must conform to the file layouts contained in this section. Pleasenote that all fields are separated by a comma and each record is terminated with a carriage return/linefeed.
Note: An asterisk ( * ) indicates fields that are required, and a dollar sign ( $ ) indicates future fields.
If the Update Type is set to 99 in any transaction type files, this feature deletes the corresponding file atthe POS and builds a new file. Update types 1 and Add can be used interchangeably, as can updatetypes 2 and Modify. In the case of an update type 2, if the record does not exist then it is added to thedatabase. In the case of an update type 1, if the record already exists then it is modified.
WARNING! If the Update Type is set to 99 in the PLUTXN.ASC file, the system deletes the PLUfile, and the following related files as well: Linkrecord, plu_cross-ref, and LevelCluster.
Files enclosed within square brackets (that is “[ ]”) can be processed as ASCII files at the POS. As aresult, the ASCII to Binary conversion utilities do not have to be run.
Note: Files displayed with a 1 indicates that these file formats are fixed record length and are notcomma delimited.
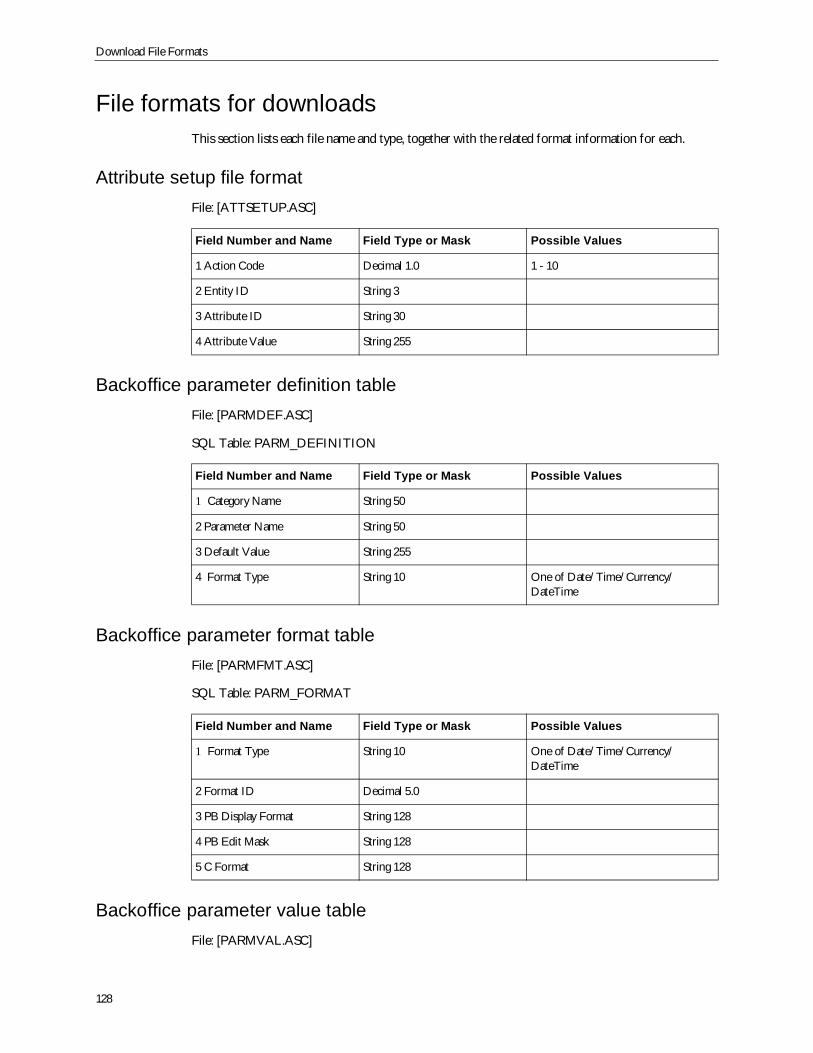
Download File Formats
128
File formats for downloadsThis section lists each file name and type, together with the related format information for each.
Attribute setup file formatFile: [ATTSETUP.ASC]
Backoffice parameter definition tableFile: [PARMDEF.ASC]
SQL Table: PARM_DEFINITION
Backoffice parameter format tableFile: [PARMFMT.ASC]
SQL Table: PARM_FORMAT
Backoffice parameter value tableFile: [PARMVAL.ASC]
Field Number and Name Field Type or Mask Possible Values
1 Action Code Decimal 1.0 1 - 10
2 Entity ID String 3
3 Attribute ID String 30
4 Attribute Value String 255
Field Number and Name Field Type or Mask Possible Values
1 Category Name String 50
2 Parameter Name String 50
3 Default Value String 255
4 Format Type String 10 One of Date/Time/Currency/DateTime
Field Number and Name Field Type or Mask Possible Values
1 Format Type String 10 One of Date/Time/Currency/DateTime
2 Format ID Decimal 5.0
3 PB Display Format String 128
4 PB Edit Mask String 128
5 C Format String 128
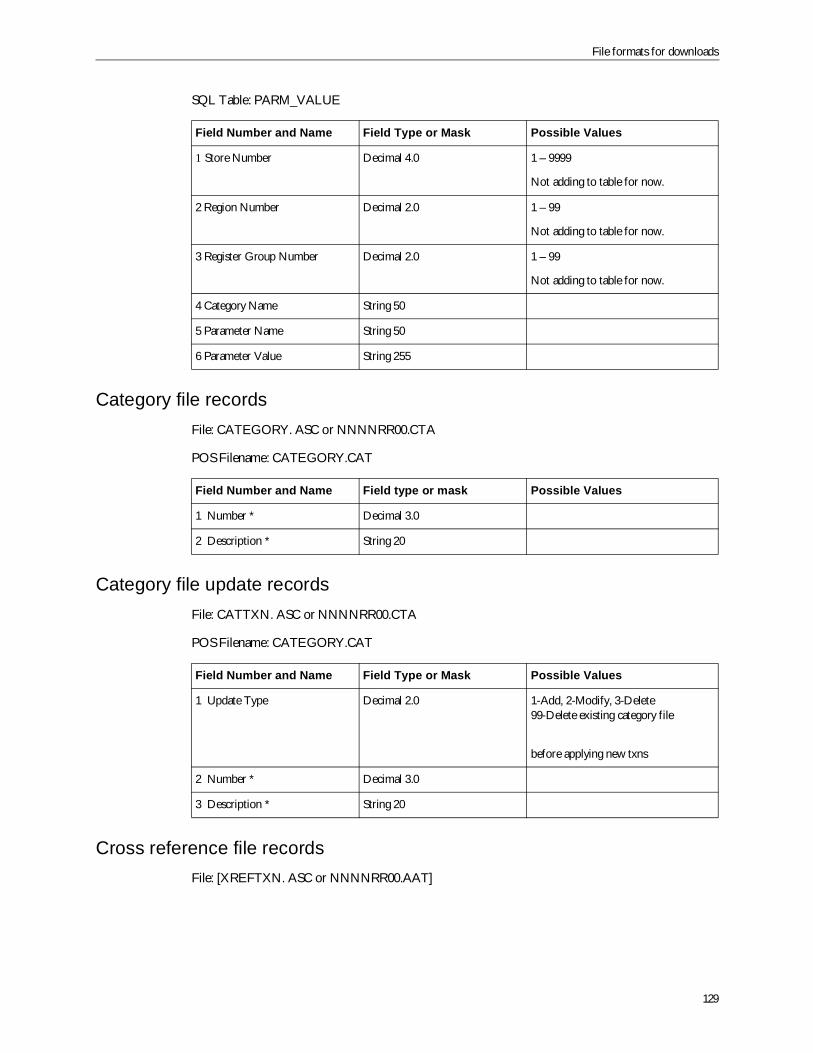
File formats for downloads
129
SQL Table: PARM_VALUE
Category file recordsFile: CATEGORY. ASC or NNNNRR00.CTA
POS Filename: CATEGORY.CAT
Category file update recordsFile: CATTXN. ASC or NNNNRR00.CTA
POS Filename: CATEGORY.CAT
Cross reference file recordsFile: [XREFTXN. ASC or NNNNRR00.AAT]
Field Number and Name Field Type or Mask Possible Values
1 Store Number Decimal 4.0 1 – 9999
Not adding to table for now.
2 Region Number Decimal 2.0 1 – 99
Not adding to table for now.
3 Register Group Number Decimal 2.0 1 – 99
Not adding to table for now.
4 Category Name String 50
5 Parameter Name String 50
6 Parameter Value String 255
Field Number and Name Field type or mask Possible Values
1 Number * Decimal 3.0
2 Description * String 20
Field Number and Name Field Type or Mask Possible Values
1 Update Type Decimal 2.0 1-Add, 2-Modify, 3-Delete99-Delete existing category file
before applying new txns
2 Number * Decimal 3.0
3 Description * String 20
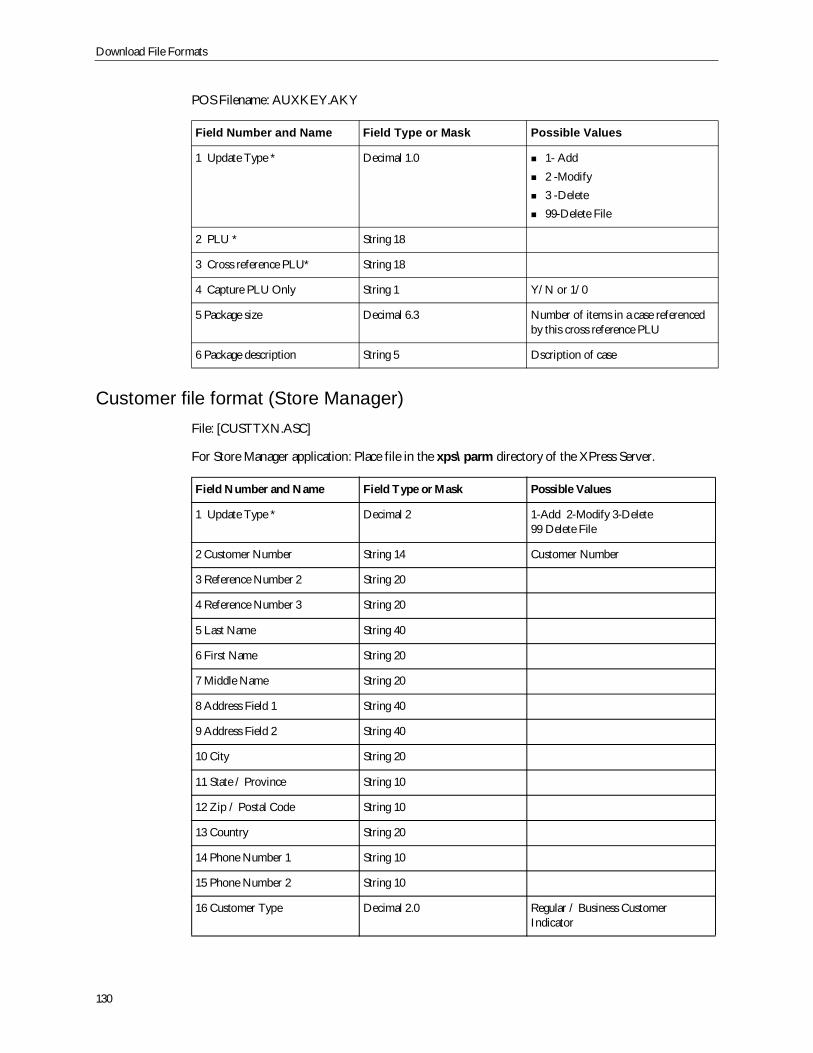
Download File Formats
130
POS Filename: AUXKEY.AKY
Customer file format (Store Manager)File: [CUSTTXN.ASC]
For Store Manager application: Place file in the xps\parm directory of the XPress Server.
Field Number and Name Field Type or Mask Possible Values
1 Update Type * Decimal 1.0 1- Add2 -Modify3 -Delete99-Delete File
2 PLU * String 18
3 Cross reference PLU* String 18
4 Capture PLU Only String 1 Y/N or 1/0
5 Package size Decimal 6.3 Number of items in a case referencedby this cross reference PLU
6 Package description String 5 Dscription of case
Field Number and Name Field Type or Mask Possible Values
1 Update Type * Decimal 2 1-Add 2-Modify 3-Delete99 Delete File
2 Customer Number String 14 Customer Number
3 Reference Number 2 String 20
4 Reference Number 3 String 20
5 Last Name String 40
6 First Name String 20
7 Middle Name String 20
8 Address Field 1 String 40
9 Address Field 2 String 40
10 City String 20
11 State / Province String 10
12 Zip / Postal Code String 10
13 Country String 20
14 Phone Number 1 String 10
15 Phone Number 2 String 10
16 Customer Type Decimal 2.0 Regular / Business CustomerIndicator
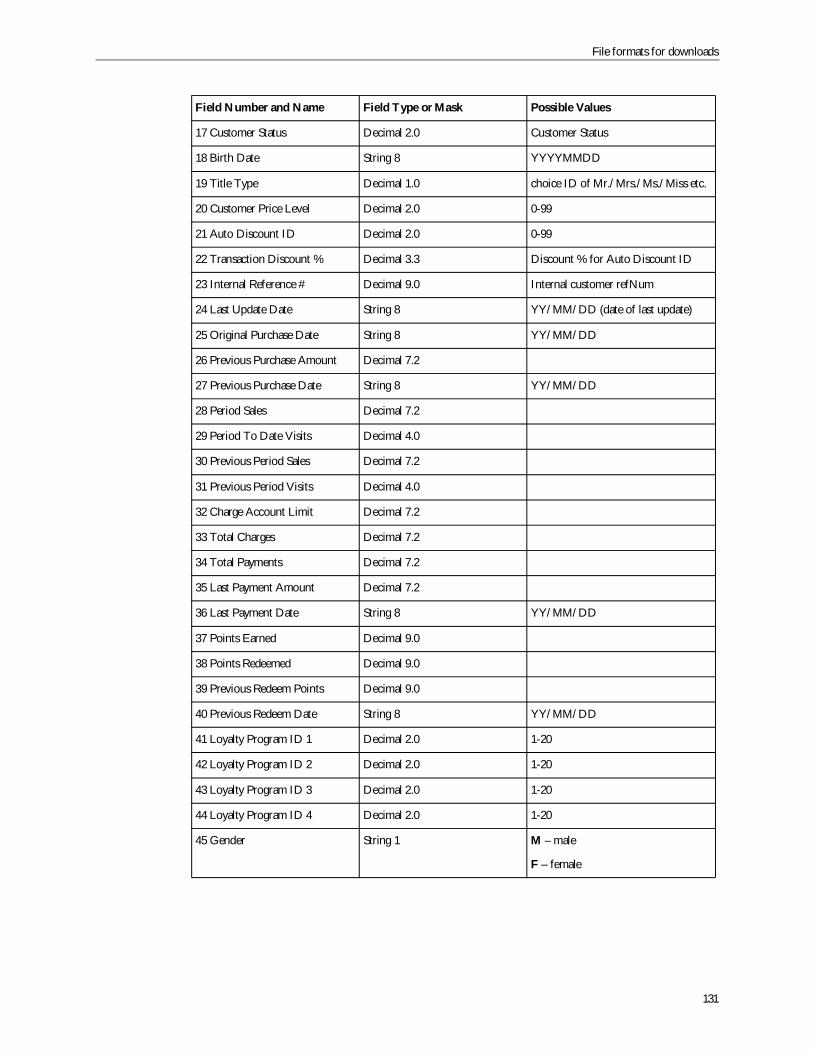
File formats for downloads
131
17 Customer Status Decimal 2.0 Customer Status
18 Birth Date String 8 YYYYMMDD
19 Title Type Decimal 1.0 choice ID of Mr./Mrs./Ms./Miss etc.
20 Customer Price Level Decimal 2.0 0-99
21 Auto Discount ID Decimal 2.0 0-99
22 Transaction Discount % Decimal 3.3 Discount % for Auto Discount ID
23 Internal Reference # Decimal 9.0 Internal customer refNum
24 Last Update Date String 8 YY/MM/DD (date of last update)
25 Original Purchase Date String 8 YY/MM/DD
26 Previous Purchase Amount Decimal 7.2
27 Previous Purchase Date String 8 YY/MM/DD
28 Period Sales Decimal 7.2
29 Period To Date Visits Decimal 4.0
30 Previous Period Sales Decimal 7.2
31 Previous Period Visits Decimal 4.0
32 Charge Account Limit Decimal 7.2
33 Total Charges Decimal 7.2
34 Total Payments Decimal 7.2
35 Last Payment Amount Decimal 7.2
36 Last Payment Date String 8 YY/MM/DD
37 Points Earned Decimal 9.0
38 Points Redeemed Decimal 9.0
39 Previous Redeem Points Decimal 9.0
40 Previous Redeem Date String 8 YY/MM/DD
41 Loyalty Program ID 1 Decimal 2.0 1-20
42 Loyalty Program ID 2 Decimal 2.0 1-20
43 Loyalty Program ID 3 Decimal 2.0 1-20
44 Loyalty Program ID 4 Decimal 2.0 1-20
45 Gender String 1 M – male
F – female
Field Number and Name Field Type or Mask Possible Values
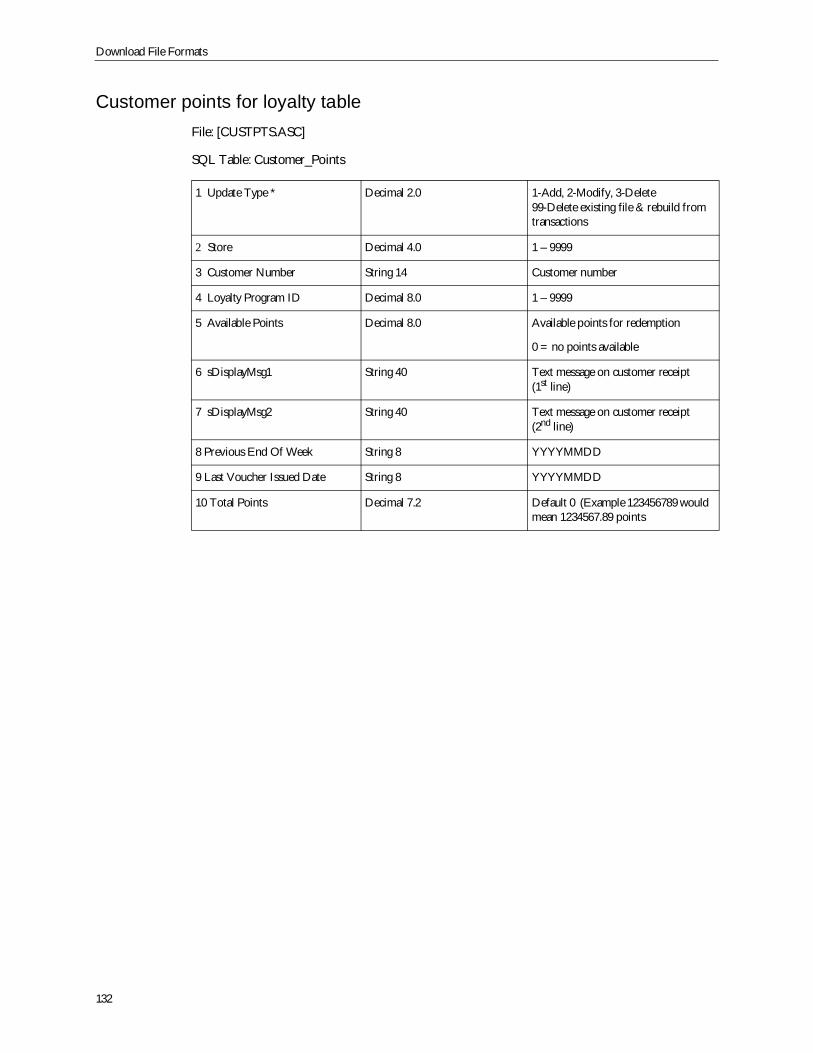
Download File Formats
132
Customer points for loyalty tableFile: [CUSTPTS.ASC]
SQL Table: Customer_Points
1 Update Type * Decimal 2.0 1-Add, 2-Modify, 3-Delete99-Delete existing file & rebuild fromtransactions
2 Store Decimal 4.0 1 – 9999
3 Customer Number String 14 Customer number
4 Loyalty Program ID Decimal 8.0 1 – 9999
5 Available Points Decimal 8.0 Available points for redemption
0 = no points available
6 sDisplayMsg1 String 40 Text message on customer receipt(1st line)
7 sDisplayMsg2 String 40 Text message on customer receipt(2nd line)
8 Previous End Of Week String 8 YYYYMMDD
9 Last Voucher Issued Date String 8 YYYYMMDD
10 Total Points Decimal 7.2 Default 0 (Example 123456789 wouldmean 1234567.89 points
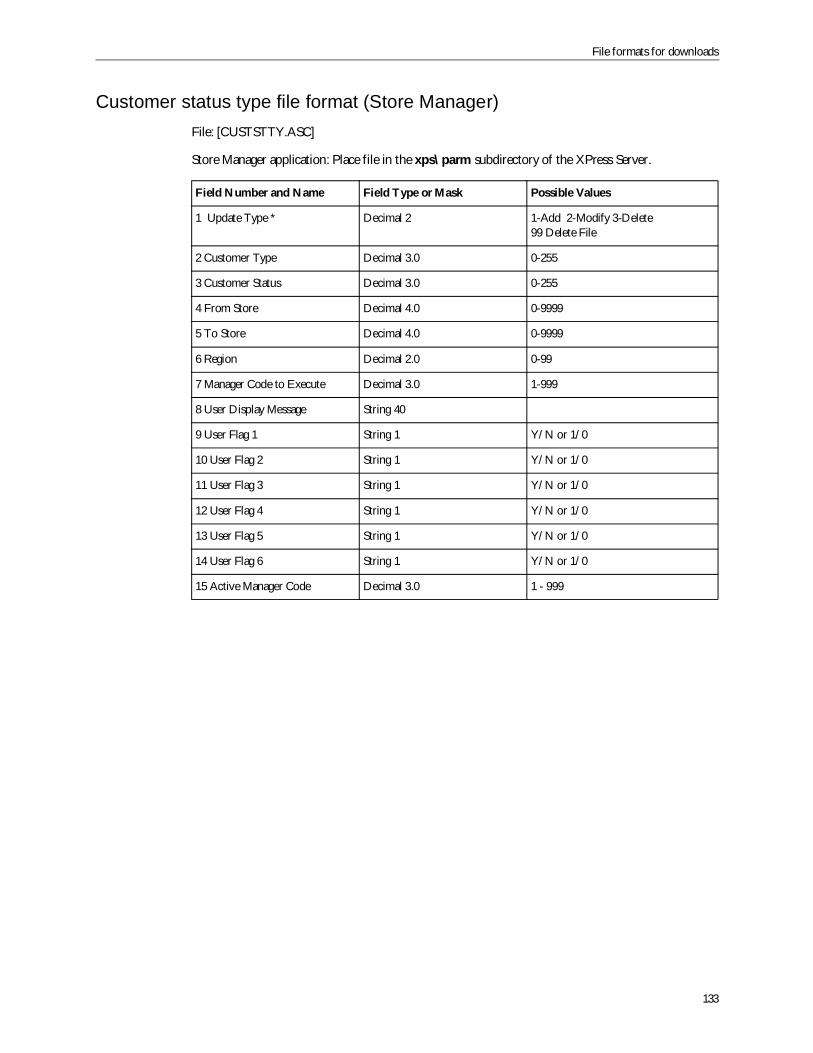
File formats for downloads
133
Customer status type file format (Store Manager)File: [CUSTSTTY.ASC]
Store Manager application: Place file in the xps\parm subdirectory of the XPress Server.
Field Number and Name Field Type or Mask Possible Values
1 Update Type * Decimal 2 1-Add 2-Modify 3-Delete99 Delete File
2 Customer Type Decimal 3.0 0-255
3 Customer Status Decimal 3.0 0-255
4 From Store Decimal 4.0 0-9999
5 To Store Decimal 4.0 0-9999
6 Region Decimal 2.0 0-99
7 Manager Code to Execute Decimal 3.0 1-999
8 User Display Message String 40
9 User Flag 1 String 1 Y/N or 1/0
10 User Flag 2 String 1 Y/N or 1/0
11 User Flag 3 String 1 Y/N or 1/0
12 User Flag 4 String 1 Y/N or 1/0
13 User Flag 5 String 1 Y/N or 1/0
14 User Flag 6 String 1 Y/N or 1/0
15 Active Manager Code Decimal 3.0 1 - 999
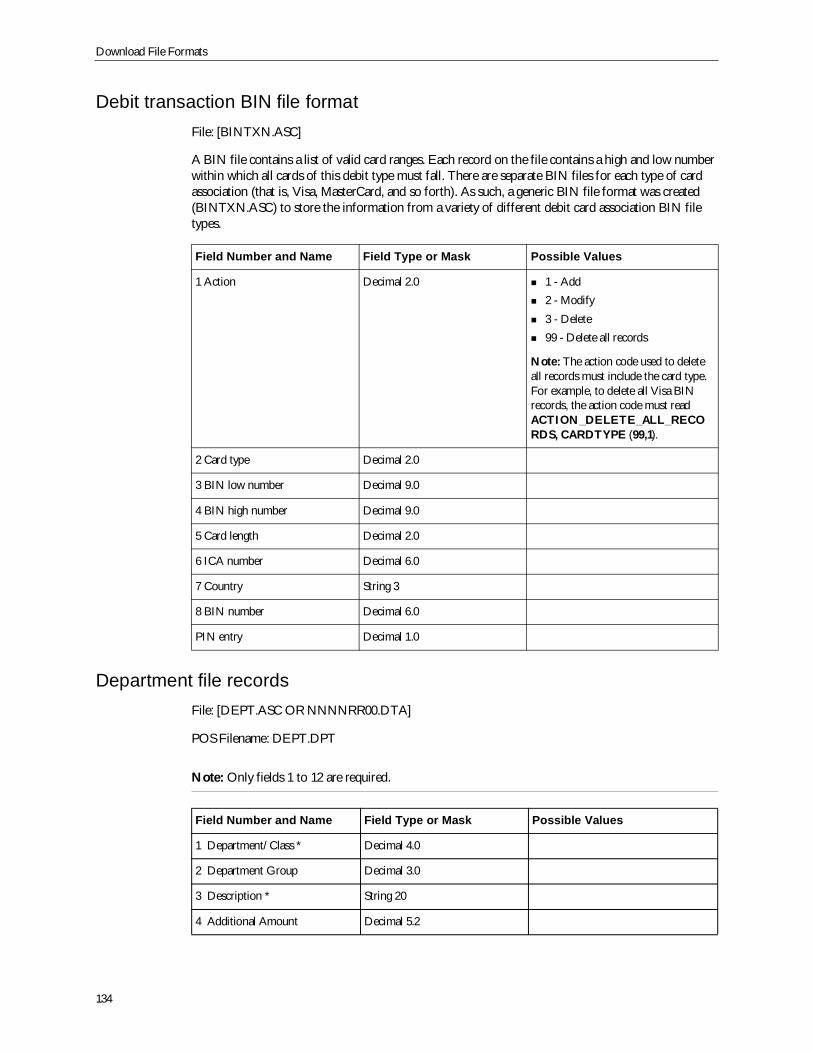
Download File Formats
134
Debit transaction BIN file formatFile: [BINTXN.ASC]
A BIN file contains a list of valid card ranges. Each record on the file contains a high and low numberwithin which all cards of this debit type must fall. There are separate BIN files for each type of cardassociation (that is, Visa, MasterCard, and so forth). As such, a generic BIN file format was created(BINTXN.ASC) to store the information from a variety of different debit card association BIN filetypes.
Department file recordsFile: [DEPT.ASC OR NNNNRR00.DTA]
POS Filename: DEPT.DPT
Note: Only fields 1 to 12 are required.
Field Number and Name Field Type or Mask Possible Values
1 Action Decimal 2.0 1 - Add2 - Modify3 - Delete99 - Delete all records
Note: The action code used to deleteall records must include the card type.For example, to delete all Visa BINrecords, the action code must readACTION_DELETE_ALL_RECORDS, CARDTYPE (99,1).
2 Card type Decimal 2.0
3 BIN low number Decimal 9.0
4 BIN high number Decimal 9.0
5 Card length Decimal 2.0
6 ICA number Decimal 6.0
7 Country String 3
8 BIN number Decimal 6.0
PIN entry Decimal 1.0
Field Number and Name Field Type or Mask Possible Values
1 Department/Class * Decimal 4.0
2 Department Group Decimal 3.0
3 Description * String 20
4 Additional Amount Decimal 5.2
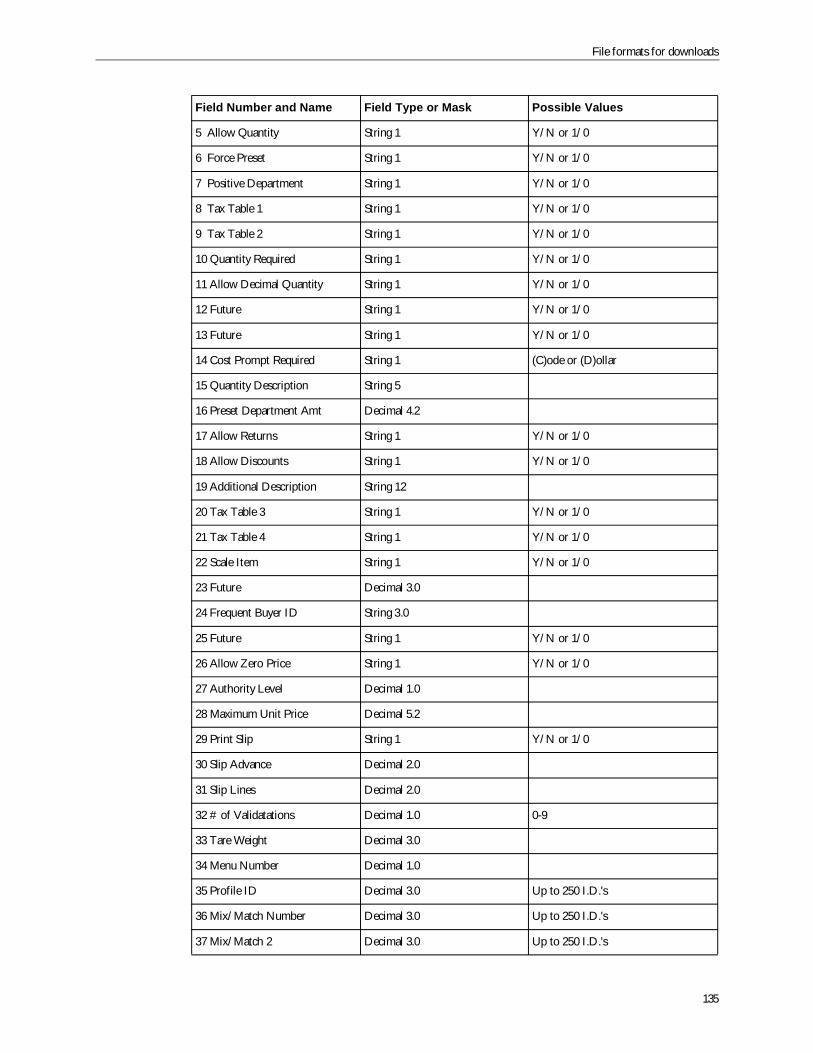
File formats for downloads
135
5 Allow Quantity String 1 Y/N or 1/0
6 Force Preset String 1 Y/N or 1/0
7 Positive Department String 1 Y/N or 1/0
8 Tax Table 1 String 1 Y/N or 1/0
9 Tax Table 2 String 1 Y/N or 1/0
10 Quantity Required String 1 Y/N or 1/0
11 Allow Decimal Quantity String 1 Y/N or 1/0
12 Future String 1 Y/N or 1/0
13 Future String 1 Y/N or 1/0
14 Cost Prompt Required String 1 (C)ode or (D)ollar
15 Quantity Description String 5
16 Preset Department Amt Decimal 4.2
17 Allow Returns String 1 Y/N or 1/0
18 Allow Discounts String 1 Y/N or 1/0
19 Additional Description String 12
20 Tax Table 3 String 1 Y/N or 1/0
21 Tax Table 4 String 1 Y/N or 1/0
22 Scale Item String 1 Y/N or 1/0
23 Future Decimal 3.0
24 Frequent Buyer ID String 3.0
25 Future String 1 Y/N or 1/0
26 Allow Zero Price String 1 Y/N or 1/0
27 Authority Level Decimal 1.0
28 Maximum Unit Price Decimal 5.2
29 Print Slip String 1 Y/N or 1/0
30 Slip Advance Decimal 2.0
31 Slip Lines Decimal 2.0
32 # of Validatations Decimal 1.0 0-9
33 Tare Weight Decimal 3.0
34 Menu Number Decimal 1.0
35 Profile ID Decimal 3.0 Up to 250 I.D.'s
36 Mix/Match Number Decimal 3.0 Up to 250 I.D.'s
37 Mix/Match 2 Decimal 3.0 Up to 250 I.D.'s
Field Number and Name Field Type or Mask Possible Values
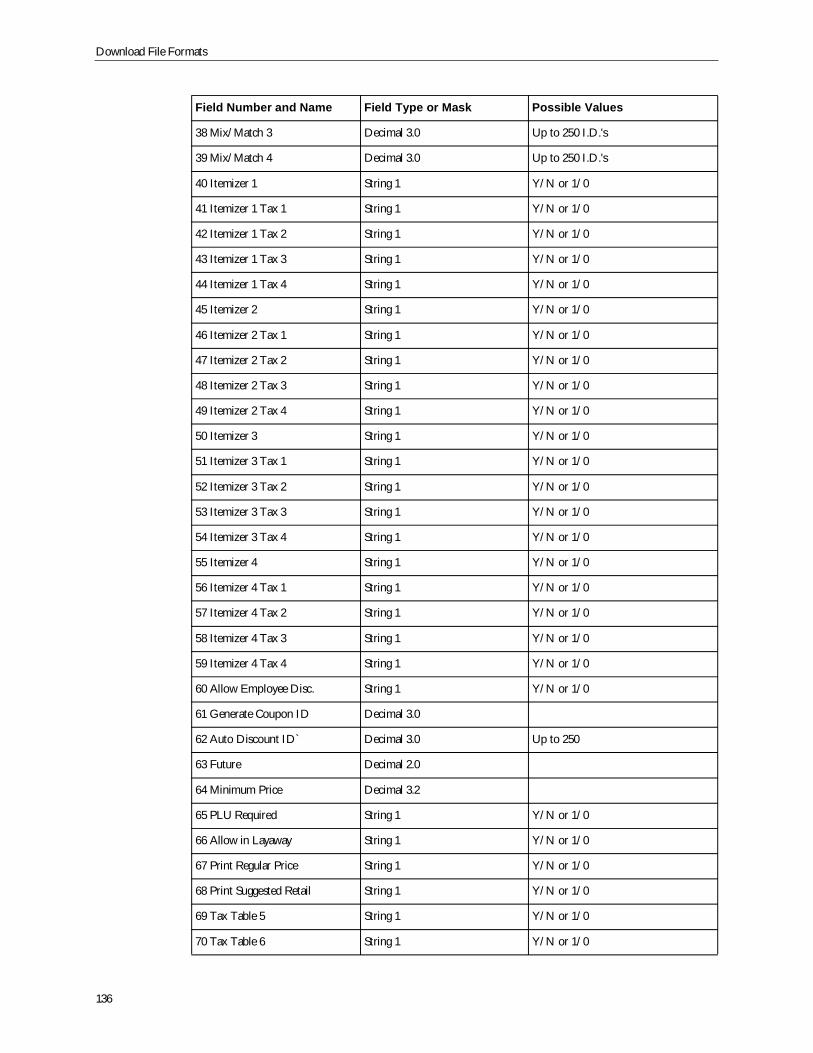
Download File Formats
136
38 Mix/Match 3 Decimal 3.0 Up to 250 I.D.'s
39 Mix/Match 4 Decimal 3.0 Up to 250 I.D.'s
40 Itemizer 1 String 1 Y/N or 1/0
41 Itemizer 1 Tax 1 String 1 Y/N or 1/0
42 Itemizer 1 Tax 2 String 1 Y/N or 1/0
43 Itemizer 1 Tax 3 String 1 Y/N or 1/0
44 Itemizer 1 Tax 4 String 1 Y/N or 1/0
45 Itemizer 2 String 1 Y/N or 1/0
46 Itemizer 2 Tax 1 String 1 Y/N or 1/0
47 Itemizer 2 Tax 2 String 1 Y/N or 1/0
48 Itemizer 2 Tax 3 String 1 Y/N or 1/0
49 Itemizer 2 Tax 4 String 1 Y/N or 1/0
50 Itemizer 3 String 1 Y/N or 1/0
51 Itemizer 3 Tax 1 String 1 Y/N or 1/0
52 Itemizer 3 Tax 2 String 1 Y/N or 1/0
53 Itemizer 3 Tax 3 String 1 Y/N or 1/0
54 Itemizer 3 Tax 4 String 1 Y/N or 1/0
55 Itemizer 4 String 1 Y/N or 1/0
56 Itemizer 4 Tax 1 String 1 Y/N or 1/0
57 Itemizer 4 Tax 2 String 1 Y/N or 1/0
58 Itemizer 4 Tax 3 String 1 Y/N or 1/0
59 Itemizer 4 Tax 4 String 1 Y/N or 1/0
60 Allow Employee Disc. String 1 Y/N or 1/0
61 Generate Coupon ID Decimal 3.0
62 Auto Discount ID` Decimal 3.0 Up to 250
63 Future Decimal 2.0
64 Minimum Price Decimal 3.2
65 PLU Required String 1 Y/N or 1/0
66 Allow in Layaway String 1 Y/N or 1/0
67 Print Regular Price String 1 Y/N or 1/0
68 Print Suggested Retail String 1 Y/N or 1/0
69 Tax Table 5 String 1 Y/N or 1/0
70 Tax Table 6 String 1 Y/N or 1/0
Field Number and Name Field Type or Mask Possible Values
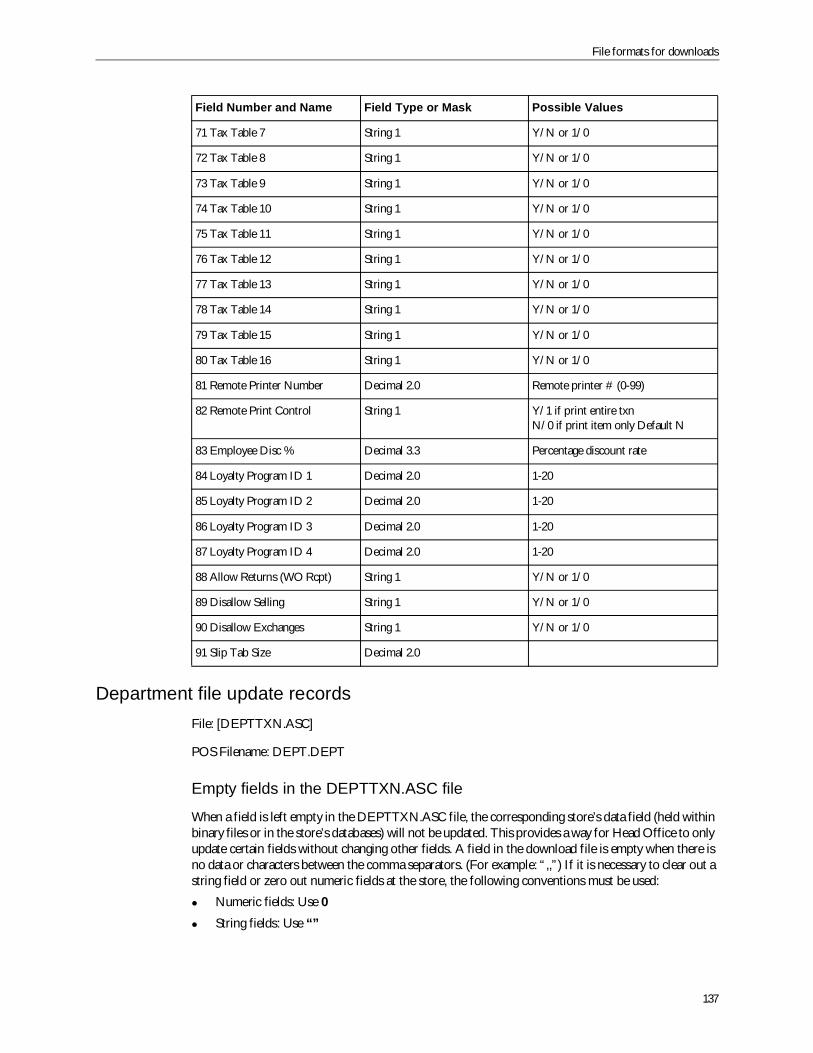
File formats for downloads
137
Department file update recordsFile: [DEPTTXN.ASC]
POS Filename: DEPT.DEPT
Empty fields in the DEPTTXN.ASC file
When a field is left empty in the DEPTTXN.ASC file, the corresponding store’s data field (held withinbinary files or in the store’s databases) will not be updated. This provides a way for Head Office to onlyupdate certain fields without changing other fields. A field in the download file is empty when there isno data or characters between the comma separators. (For example: “,,”) If it is necessary to clear out astring field or zero out numeric fields at the store, the following conventions must be used:
Numeric fields: Use 0
String fields: Use “”
71 Tax Table 7 String 1 Y/N or 1/0
72 Tax Table 8 String 1 Y/N or 1/0
73 Tax Table 9 String 1 Y/N or 1/0
74 Tax Table 10 String 1 Y/N or 1/0
75 Tax Table 11 String 1 Y/N or 1/0
76 Tax Table 12 String 1 Y/N or 1/0
77 Tax Table 13 String 1 Y/N or 1/0
78 Tax Table 14 String 1 Y/N or 1/0
79 Tax Table 15 String 1 Y/N or 1/0
80 Tax Table 16 String 1 Y/N or 1/0
81 Remote Printer Number Decimal 2.0 Remote printer # (0-99)
82 Remote Print Control String 1 Y/1 if print entire txnN/0 if print item only Default N
83 Employee Disc % Decimal 3.3 Percentage discount rate
84 Loyalty Program ID 1 Decimal 2.0 1-20
85 Loyalty Program ID 2 Decimal 2.0 1-20
86 Loyalty Program ID 3 Decimal 2.0 1-20
87 Loyalty Program ID 4 Decimal 2.0 1-20
88 Allow Returns (WO Rcpt) String 1 Y/N or 1/0
89 Disallow Selling String 1 Y/N or 1/0
90 Disallow Exchanges String 1 Y/N or 1/0
91 Slip Tab Size Decimal 2.0
Field Number and Name Field Type or Mask Possible Values
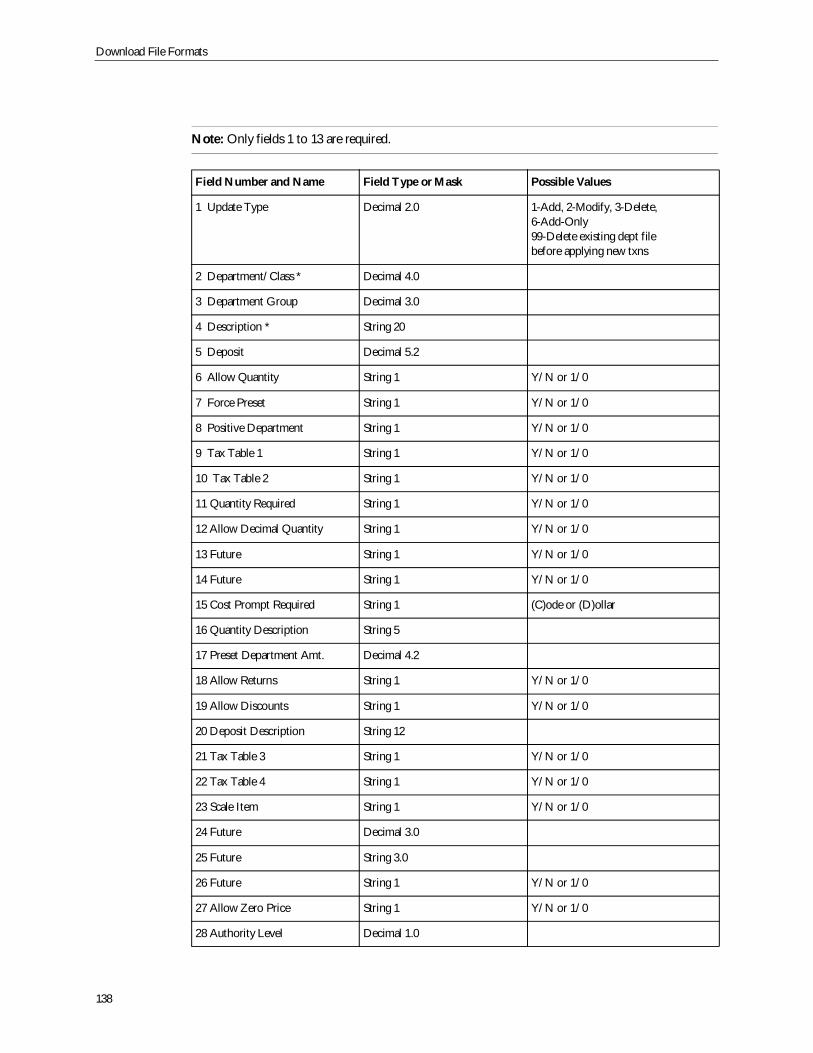
Download File Formats
138
Note: Only fields 1 to 13 are required.
Field Number and Name Field Type or Mask Possible Values
1 Update Type Decimal 2.0 1-Add, 2-Modify, 3-Delete,6-Add-Only99-Delete existing dept filebefore applying new txns
2 Department/Class * Decimal 4.0
3 Department Group Decimal 3.0
4 Description * String 20
5 Deposit Decimal 5.2
6 Allow Quantity String 1 Y/N or 1/0
7 Force Preset String 1 Y/N or 1/0
8 Positive Department String 1 Y/N or 1/0
9 Tax Table 1 String 1 Y/N or 1/0
10 Tax Table 2 String 1 Y/N or 1/0
11 Quantity Required String 1 Y/N or 1/0
12 Allow Decimal Quantity String 1 Y/N or 1/0
13 Future String 1 Y/N or 1/0
14 Future String 1 Y/N or 1/0
15 Cost Prompt Required String 1 (C)ode or (D)ollar
16 Quantity Description String 5
17 Preset Department Amt. Decimal 4.2
18 Allow Returns String 1 Y/N or 1/0
19 Allow Discounts String 1 Y/N or 1/0
20 Deposit Description String 12
21 Tax Table 3 String 1 Y/N or 1/0
22 Tax Table 4 String 1 Y/N or 1/0
23 Scale Item String 1 Y/N or 1/0
24 Future Decimal 3.0
25 Future String 3.0
26 Future String 1 Y/N or 1/0
27 Allow Zero Price String 1 Y/N or 1/0
28 Authority Level Decimal 1.0
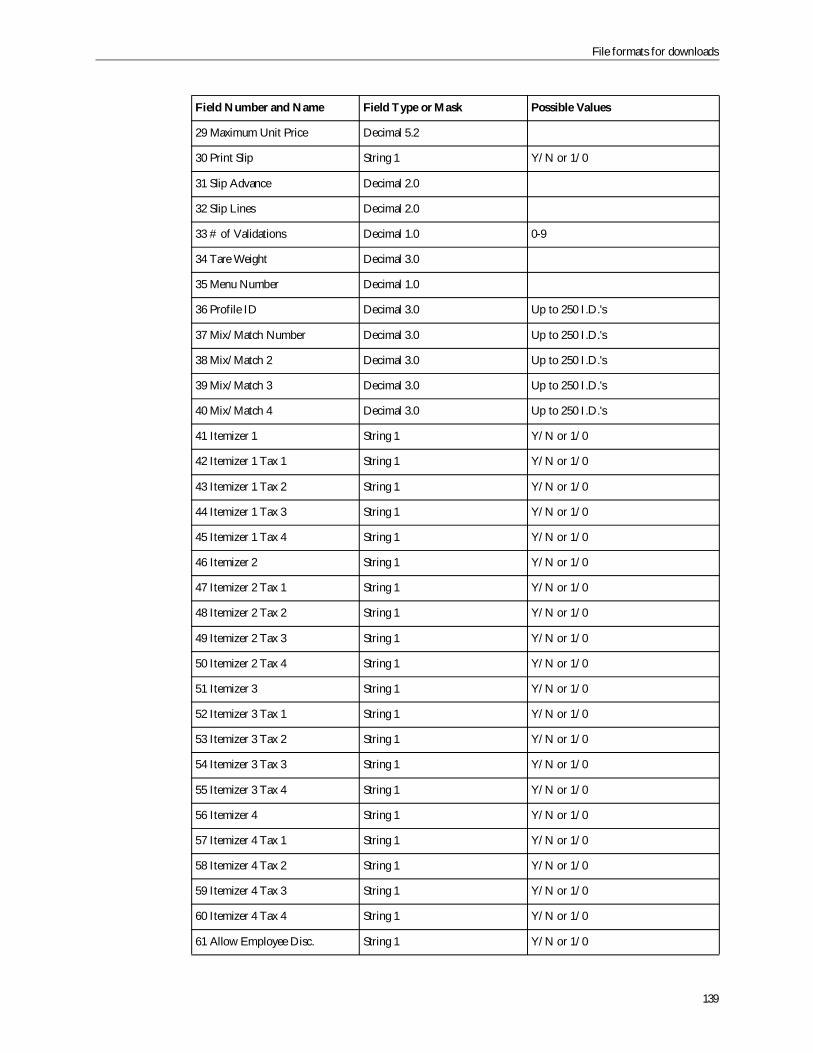
File formats for downloads
139
29 Maximum Unit Price Decimal 5.2
30 Print Slip String 1 Y/N or 1/0
31 Slip Advance Decimal 2.0
32 Slip Lines Decimal 2.0
33 # of Validations Decimal 1.0 0-9
34 Tare Weight Decimal 3.0
35 Menu Number Decimal 1.0
36 Profile ID Decimal 3.0 Up to 250 I.D.'s
37 Mix/Match Number Decimal 3.0 Up to 250 I.D.'s
38 Mix/Match 2 Decimal 3.0 Up to 250 I.D.'s
39 Mix/Match 3 Decimal 3.0 Up to 250 I.D.'s
40 Mix/Match 4 Decimal 3.0 Up to 250 I.D.'s
41 Itemizer 1 String 1 Y/N or 1/0
42 Itemizer 1 Tax 1 String 1 Y/N or 1/0
43 Itemizer 1 Tax 2 String 1 Y/N or 1/0
44 Itemizer 1 Tax 3 String 1 Y/N or 1/0
45 Itemizer 1 Tax 4 String 1 Y/N or 1/0
46 Itemizer 2 String 1 Y/N or 1/0
47 Itemizer 2 Tax 1 String 1 Y/N or 1/0
48 Itemizer 2 Tax 2 String 1 Y/N or 1/0
49 Itemizer 2 Tax 3 String 1 Y/N or 1/0
50 Itemizer 2 Tax 4 String 1 Y/N or 1/0
51 Itemizer 3 String 1 Y/N or 1/0
52 Itemizer 3 Tax 1 String 1 Y/N or 1/0
53 Itemizer 3 Tax 2 String 1 Y/N or 1/0
54 Itemizer 3 Tax 3 String 1 Y/N or 1/0
55 Itemizer 3 Tax 4 String 1 Y/N or 1/0
56 Itemizer 4 String 1 Y/N or 1/0
57 Itemizer 4 Tax 1 String 1 Y/N or 1/0
58 Itemizer 4 Tax 2 String 1 Y/N or 1/0
59 Itemizer 4 Tax 3 String 1 Y/N or 1/0
60 Itemizer 4 Tax 4 String 1 Y/N or 1/0
61 Allow Employee Disc. String 1 Y/N or 1/0
Field Number and Name Field Type or Mask Possible Values
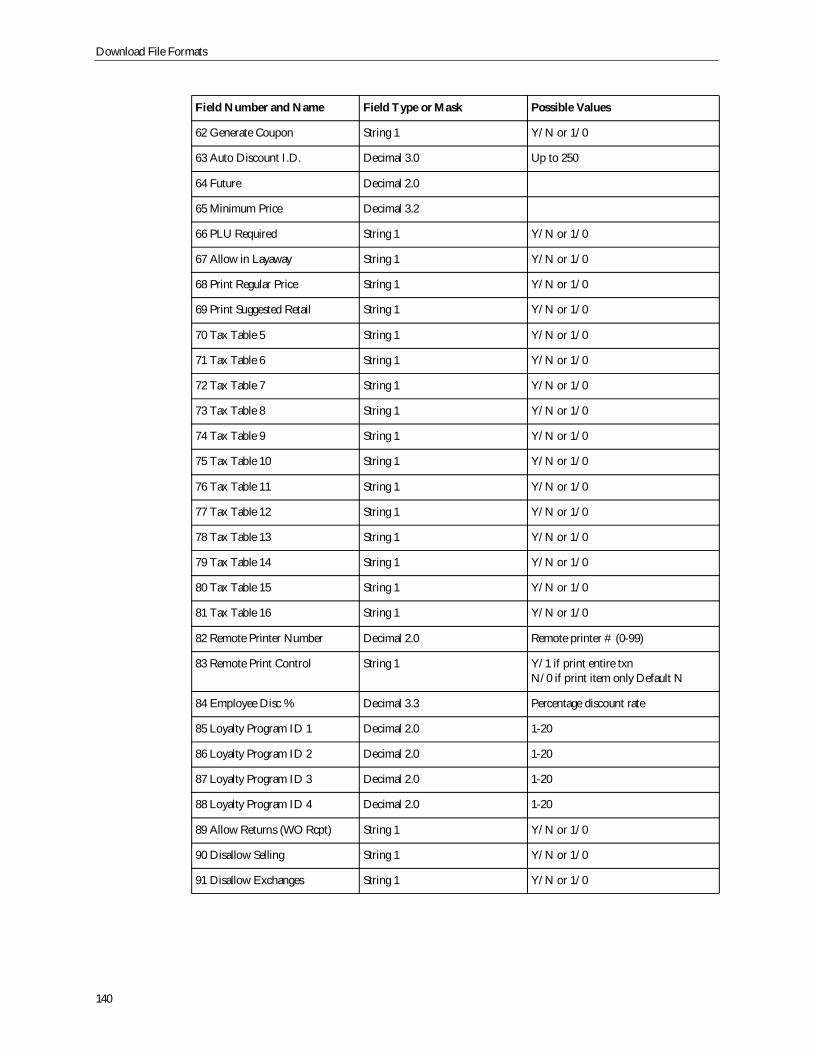
Download File Formats
140
62 Generate Coupon String 1 Y/N or 1/0
63 Auto Discount I.D. Decimal 3.0 Up to 250
64 Future Decimal 2.0
65 Minimum Price Decimal 3.2
66 PLU Required String 1 Y/N or 1/0
67 Allow in Layaway String 1 Y/N or 1/0
68 Print Regular Price String 1 Y/N or 1/0
69 Print Suggested Retail String 1 Y/N or 1/0
70 Tax Table 5 String 1 Y/N or 1/0
71 Tax Table 6 String 1 Y/N or 1/0
72 Tax Table 7 String 1 Y/N or 1/0
73 Tax Table 8 String 1 Y/N or 1/0
74 Tax Table 9 String 1 Y/N or 1/0
75 Tax Table 10 String 1 Y/N or 1/0
76 Tax Table 11 String 1 Y/N or 1/0
77 Tax Table 12 String 1 Y/N or 1/0
78 Tax Table 13 String 1 Y/N or 1/0
79 Tax Table 14 String 1 Y/N or 1/0
80 Tax Table 15 String 1 Y/N or 1/0
81 Tax Table 16 String 1 Y/N or 1/0
82 Remote Printer Number Decimal 2.0 Remote printer # (0-99)
83 Remote Print Control String 1 Y/1 if print entire txnN/0 if print item only Default N
84 Employee Disc % Decimal 3.3 Percentage discount rate
85 Loyalty Program ID 1 Decimal 2.0 1-20
86 Loyalty Program ID 2 Decimal 2.0 1-20
87 Loyalty Program ID 3 Decimal 2.0 1-20
88 Loyalty Program ID 4 Decimal 2.0 1-20
89 Allow Returns (WO Rcpt) String 1 Y/N or 1/0
90 Disallow Selling String 1 Y/N or 1/0
91 Disallow Exchanges String 1 Y/N or 1/0
Field Number and Name Field Type or Mask Possible Values
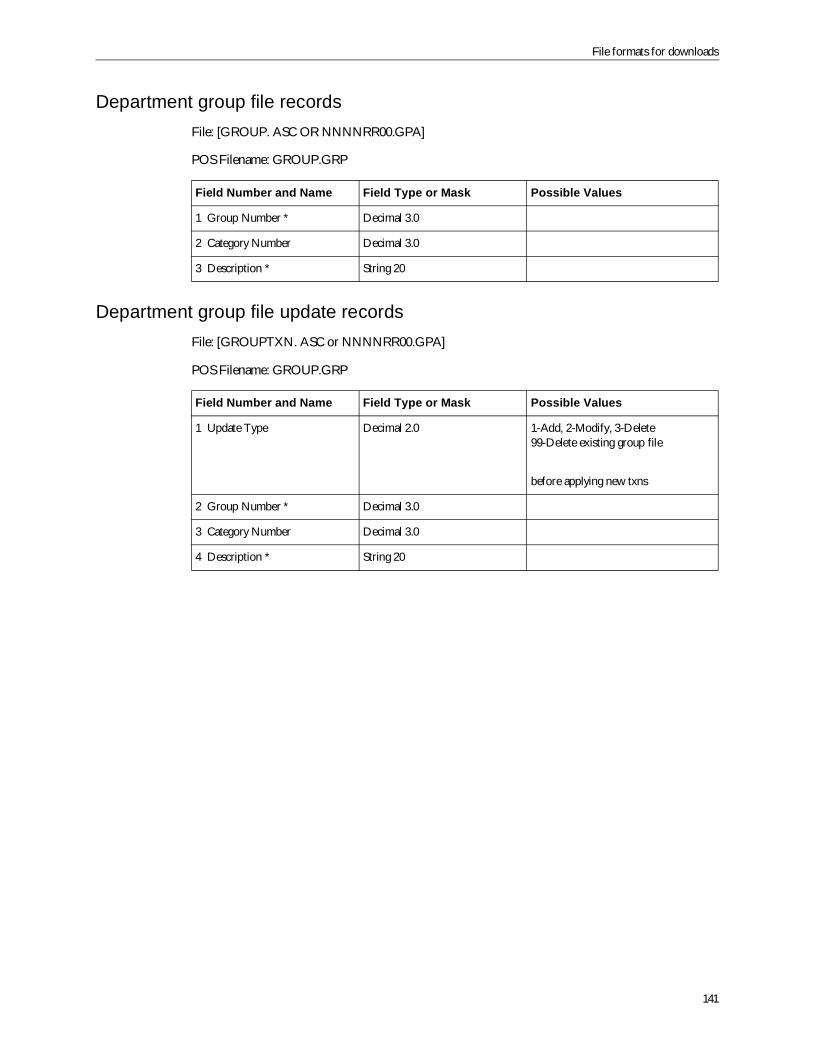
File formats for downloads
141
Department group file recordsFile: [GROUP. ASC OR NNNNRR00.GPA]
POS Filename: GROUP.GRP
Department group file update recordsFile: [GROUPTXN. ASC or NNNNRR00.GPA]
POS Filename: GROUP.GRP
Field Number and Name Field Type or Mask Possible Values
1 Group Number * Decimal 3.0
2 Category Number Decimal 3.0
3 Description * String 20
Field Number and Name Field Type or Mask Possible Values
1 Update Type Decimal 2.0 1-Add, 2-Modify, 3-Delete99-Delete existing group file
before applying new txns
2 Group Number * Decimal 3.0
3 Category Number Decimal 3.0
4 Description * String 20
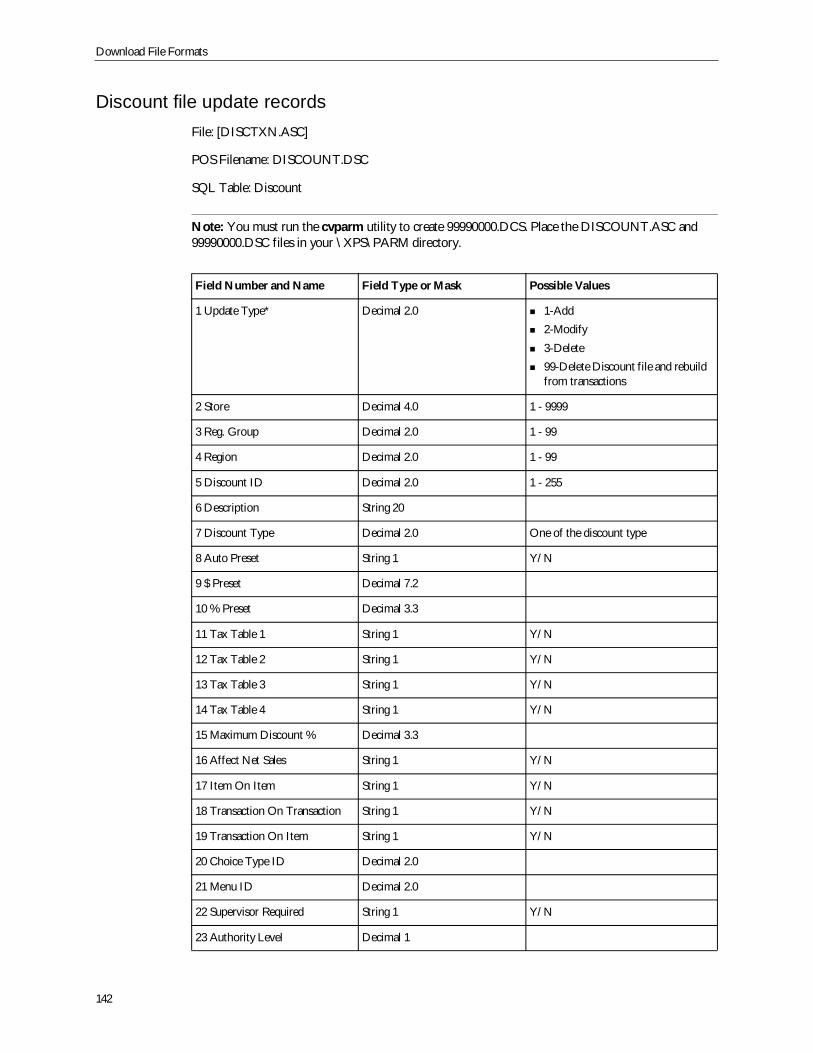
Download File Formats
142
Discount file update recordsFile: [DISCTXN.ASC]
POS Filename: DISCOUNT.DSC
SQL Table: Discount
Note: You must run the cvparm utility to create 99990000.DCS. Place the DISCOUNT.ASC and99990000.DSC files in your \XPS\PARM directory.
Field Number and Name Field Type or Mask Possible Values
1 Update Type* Decimal 2.0 1-Add2-Modify3-Delete99-Delete Discount file and rebuildfrom transactions
2 Store Decimal 4.0 1 - 9999
3 Reg. Group Decimal 2.0 1 - 99
4 Region Decimal 2.0 1 - 99
5 Discount ID Decimal 2.0 1 - 255
6 Description String 20
7 Discount Type Decimal 2.0 One of the discount type
8 Auto Preset String 1 Y/N
9 $ Preset Decimal 7.2
10 % Preset Decimal 3.3
11 Tax Table 1 String 1 Y/N
12 Tax Table 2 String 1 Y/N
13 Tax Table 3 String 1 Y/N
14 Tax Table 4 String 1 Y/N
15 Maximum Discount % Decimal 3.3
16 Affect Net Sales String 1 Y/N
17 Item On Item String 1 Y/N
18 Transaction On Transaction String 1 Y/N
19 Transaction On Item String 1 Y/N
20 Choice Type ID Decimal 2.0
21 Menu ID Decimal 2.0
22 Supervisor Required String 1 Y/N
23 Authority Level Decimal 1
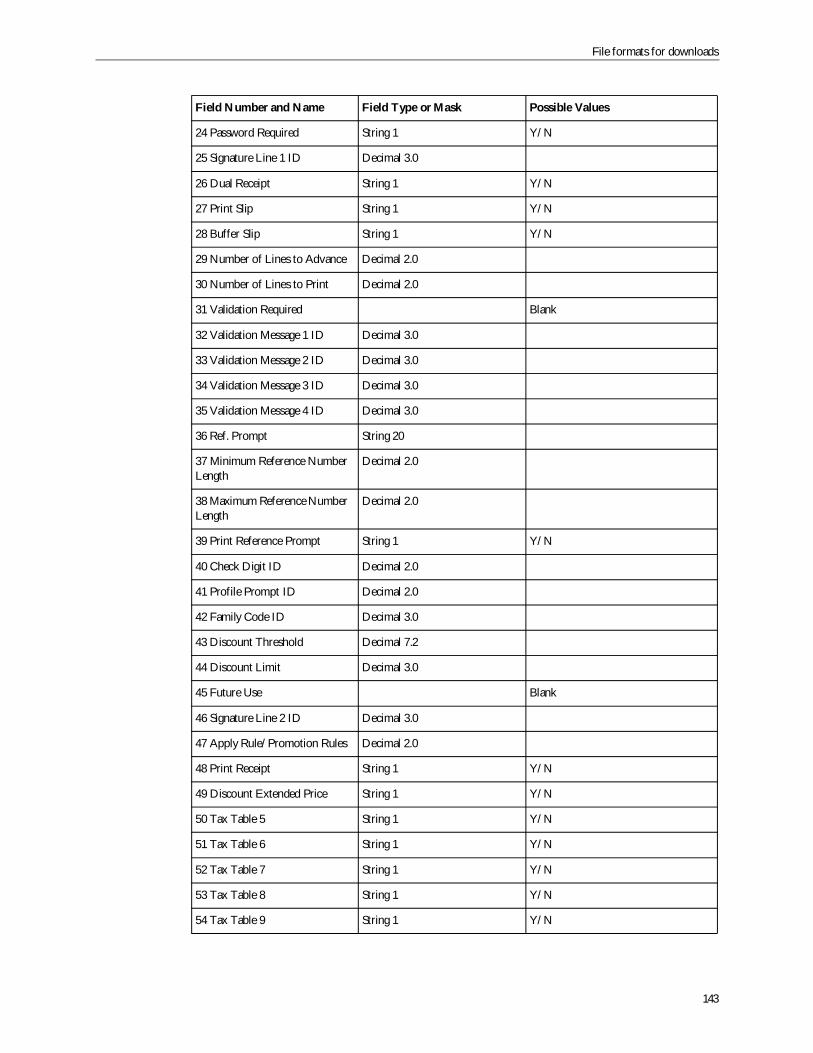
File formats for downloads
143
24 Password Required String 1 Y/N
25 Signature Line 1 ID Decimal 3.0
26 Dual Receipt String 1 Y/N
27 Print Slip String 1 Y/N
28 Buffer Slip String 1 Y/N
29 Number of Lines to Advance Decimal 2.0
30 Number of Lines to Print Decimal 2.0
31 Validation Required Blank
32 Validation Message 1 ID Decimal 3.0
33 Validation Message 2 ID Decimal 3.0
34 Validation Message 3 ID Decimal 3.0
35 Validation Message 4 ID Decimal 3.0
36 Ref. Prompt String 20
37 Minimum Reference NumberLength
Decimal 2.0
38 Maximum Reference NumberLength
Decimal 2.0
39 Print Reference Prompt String 1 Y/N
40 Check Digit ID Decimal 2.0
41 Profile Prompt ID Decimal 2.0
42 Family Code ID Decimal 3.0
43 Discount Threshold Decimal 7.2
44 Discount Limit Decimal 3.0
45 Future Use Blank
46 Signature Line 2 ID Decimal 3.0
47 Apply Rule/Promotion Rules Decimal 2.0
48 Print Receipt String 1 Y/N
49 Discount Extended Price String 1 Y/N
50 Tax Table 5 String 1 Y/N
51 Tax Table 6 String 1 Y/N
52 Tax Table 7 String 1 Y/N
53 Tax Table 8 String 1 Y/N
54 Tax Table 9 String 1 Y/N
Field Number and Name Field Type or Mask Possible Values
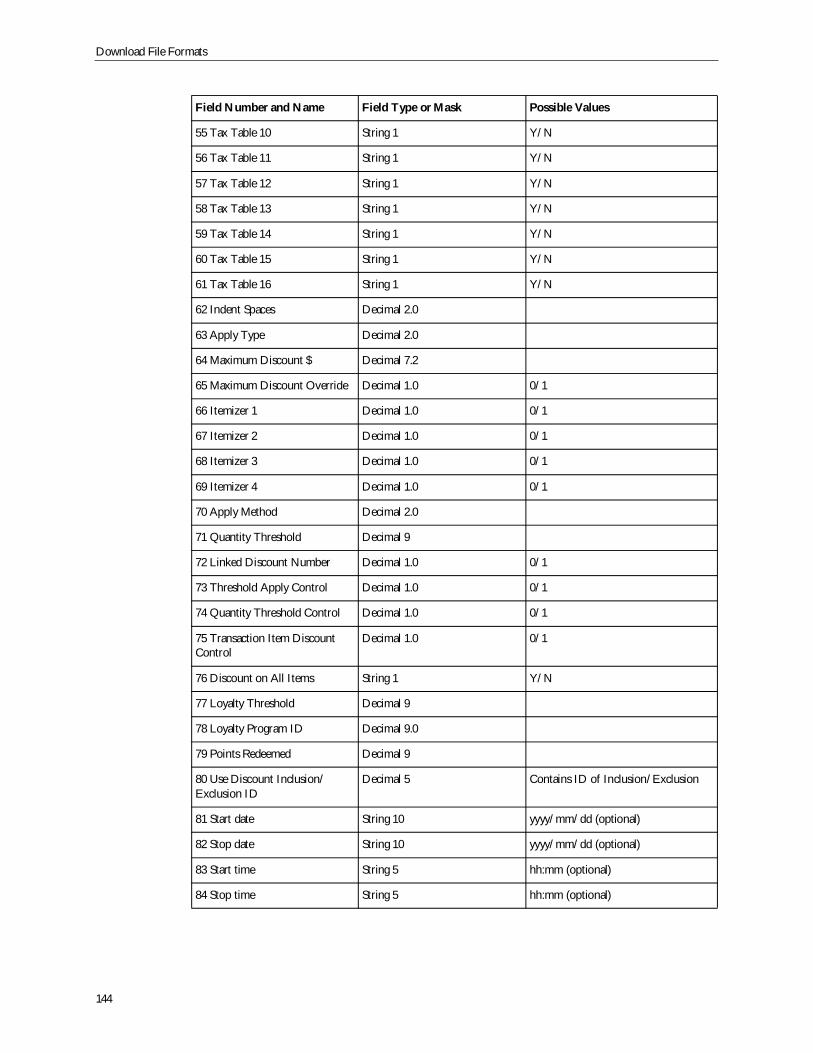
Download File Formats
144
55 Tax Table 10 String 1 Y/N
56 Tax Table 11 String 1 Y/N
57 Tax Table 12 String 1 Y/N
58 Tax Table 13 String 1 Y/N
59 Tax Table 14 String 1 Y/N
60 Tax Table 15 String 1 Y/N
61 Tax Table 16 String 1 Y/N
62 Indent Spaces Decimal 2.0
63 Apply Type Decimal 2.0
64 Maximum Discount $ Decimal 7.2
65 Maximum Discount Override Decimal 1.0 0/1
66 Itemizer 1 Decimal 1.0 0/1
67 Itemizer 2 Decimal 1.0 0/1
68 Itemizer 3 Decimal 1.0 0/1
69 Itemizer 4 Decimal 1.0 0/1
70 Apply Method Decimal 2.0
71 Quantity Threshold Decimal 9
72 Linked Discount Number Decimal 1.0 0/1
73 Threshold Apply Control Decimal 1.0 0/1
74 Quantity Threshold Control Decimal 1.0 0/1
75 Transaction Item DiscountControl
Decimal 1.0 0/1
76 Discount on All Items String 1 Y/N
77 Loyalty Threshold Decimal 9
78 Loyalty Program ID Decimal 9.0
79 Points Redeemed Decimal 9
80 Use Discount Inclusion/Exclusion ID
Decimal 5 Contains ID of Inclusion/Exclusion
81 Start date String 10 yyyy/mm/dd (optional)
82 Stop date String 10 yyyy/mm/dd (optional)
83 Start time String 5 hh:mm (optional)
84 Stop time String 5 hh:mm (optional)
Field Number and Name Field Type or Mask Possible Values

File formats for downloads
145
85 Link control Decimal 1.0 0 – None1 – Stop link when one discountapplies2 – Apply all discounts in link
86 On items with transactiondiscount
String 1 Y/N
Note: When this option is set to Y, thetransaction discount applies to all ofthe items in the transaction. When it isset to N, the transaction discountapplies only to those items not alreadyhaving a transaction discount.
The default value is Y.
87 Prompt at the Beginning ofTXN
String 1 Y/N
88 Print Description String 1 Y/N
89 Item Best Price Decimal 2.0 1-Retail, 2-Original, 3-SuggestedRetail, 4-Promotion, 5-Level
90 Affect Base Price String 1 Y/N or 0/1
91 Allow Price Override String 1 Y/N or 0/1
92 Points Redemption Min Decimal 5.2
93 Point Dollar Value Decimal 4.2
94 point Dollar Value Decimal 9
95 Birth Date Days Decimal 3 Issue discount if current day is plus orminus this number of days
96 Pricing Target ID 0 – All1 – Pricing Target Type 12 – Pricing Target Type 2...99 – None
97 Free Membership Renewal
98 Redeem All Available Points
99 Lang ID Decimal 2.0 Lanuage ID
Used to differentiate languages forfield 6 - Discount description. Whenmultiple languages are defined, adescription of the discount is requiredfor each defined language
100 Language File/DirectoryName
String 9 Sub-directory name for parm file
Field Number and Name Field Type or Mask Possible Values
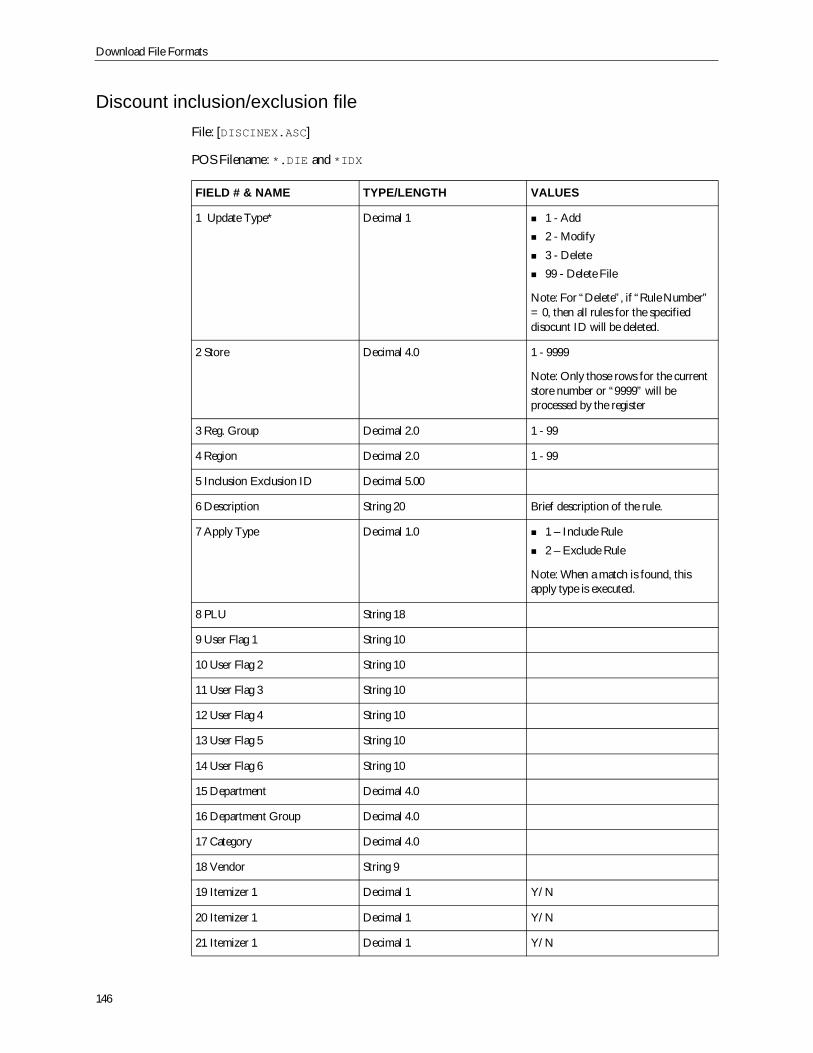
Download File Formats
146
Discount inclusion/exclusion fileFile: [DISCINEX.ASC]
POS Filename: *.DIE and *IDX
FIELD # & NAME TYPE/LENGTH VALUES
1 Update Type* Decimal 1 1 - Add2 - Modify3 - Delete99 - Delete File
Note: For “Delete”, if “Rule Number”= 0, then all rules for the specifieddisocunt ID will be deleted.
2 Store Decimal 4.0 1 - 9999
Note: Only those rows for the currentstore number or “9999” will beprocessed by the register
3 Reg. Group Decimal 2.0 1 - 99
4 Region Decimal 2.0 1 - 99
5 Inclusion Exclusion ID Decimal 5.00
6 Description String 20 Brief description of the rule.
7 Apply Type Decimal 1.0 1 – Include Rule2 – Exclude Rule
Note: When a match is found, thisapply type is executed.
8 PLU String 18
9 User Flag 1 String 10
10 User Flag 2 String 10
11 User Flag 3 String 10
12 User Flag 4 String 10
13 User Flag 5 String 10
14 User Flag 6 String 10
15 Department Decimal 4.0
16 Department Group Decimal 4.0
17 Category Decimal 4.0
18 Vendor String 9
19 Itemizer 1 Decimal 1 Y/N
20 Itemizer 1 Decimal 1 Y/N
21 Itemizer 1 Decimal 1 Y/N
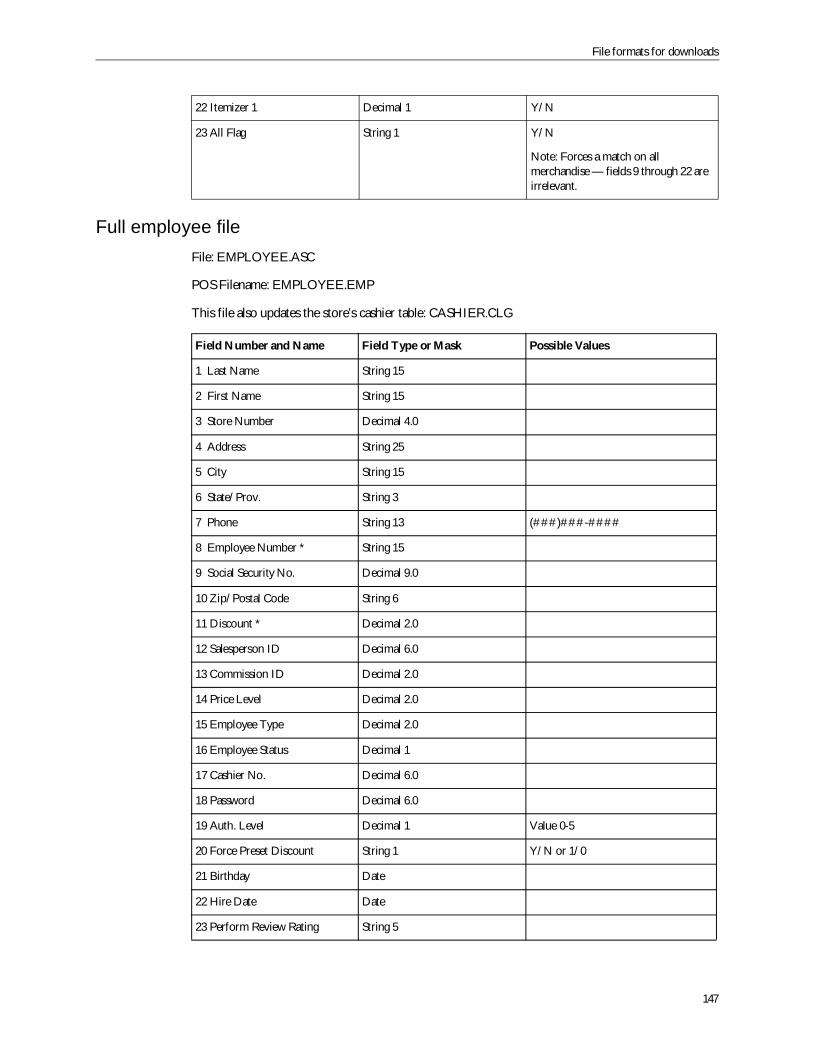
File formats for downloads
147
Full employee fileFile: EMPLOYEE.ASC
POS Filename: EMPLOYEE.EMP
This file also updates the store’s cashier table: CASHIER.CLG
22 Itemizer 1 Decimal 1 Y/N
23 All Flag String 1 Y/N
Note: Forces a match on allmerchandise — fields 9 through 22 areirrelevant.
Field Number and Name Field Type or Mask Possible Values
1 Last Name String 15
2 First Name String 15
3 Store Number Decimal 4.0
4 Address String 25
5 City String 15
6 State/Prov. String 3
7 Phone String 13 (###)###-####
8 Employee Number * String 15
9 Social Security No. Decimal 9.0
10 Zip/Postal Code String 6
11 Discount * Decimal 2.0
12 Salesperson ID Decimal 6.0
13 Commission ID Decimal 2.0
14 Price Level Decimal 2.0
15 Employee Type Decimal 2.0
16 Employee Status Decimal 1
17 Cashier No. Decimal 6.0
18 Password Decimal 6.0
19 Auth. Level Decimal 1 Value 0-5
20 Force Preset Discount String 1 Y/N or 1/0
21 Birthday Date
22 Hire Date Date
23 Perform Review Rating String 5
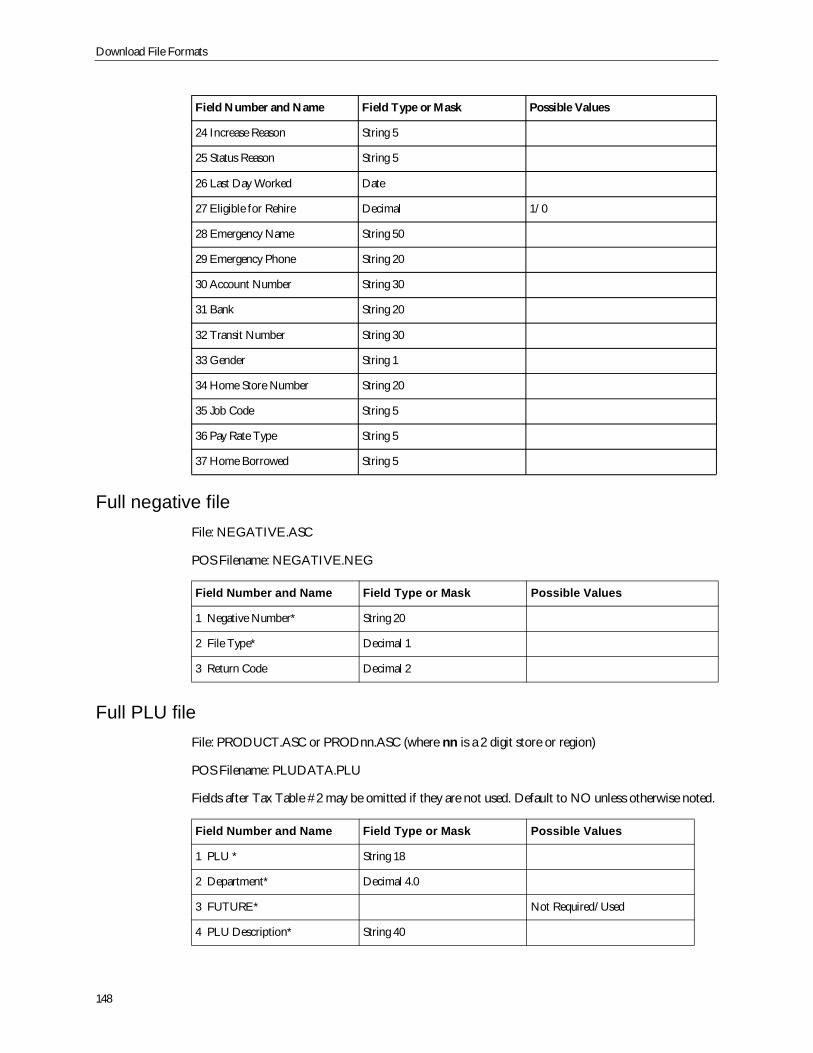
Download File Formats
148
Full negative fileFile: NEGATIVE.ASC
POS Filename: NEGATIVE.NEG
Full PLU fileFile: PRODUCT.ASC or PRODnn.ASC (where nn is a 2 digit store or region)
POS Filename: PLUDATA.PLU
Fields after Tax Table #2 may be omitted if they are not used. Default to NO unless otherwise noted.
24 Increase Reason String 5
25 Status Reason String 5
26 Last Day Worked Date
27 Eligible for Rehire Decimal 1/0
28 Emergency Name String 50
29 Emergency Phone String 20
30 Account Number String 30
31 Bank String 20
32 Transit Number String 30
33 Gender String 1
34 Home Store Number String 20
35 Job Code String 5
36 Pay Rate Type String 5
37 Home Borrowed String 5
Field Number and Name Field Type or Mask Possible Values
1 Negative Number* String 20
2 File Type* Decimal 1
3 Return Code Decimal 2
Field Number and Name Field Type or Mask Possible Values
1 PLU * String 18
2 Department* Decimal 4.0
3 FUTURE* Not Required/Used
4 PLU Description* String 40
Field Number and Name Field Type or Mask Possible Values
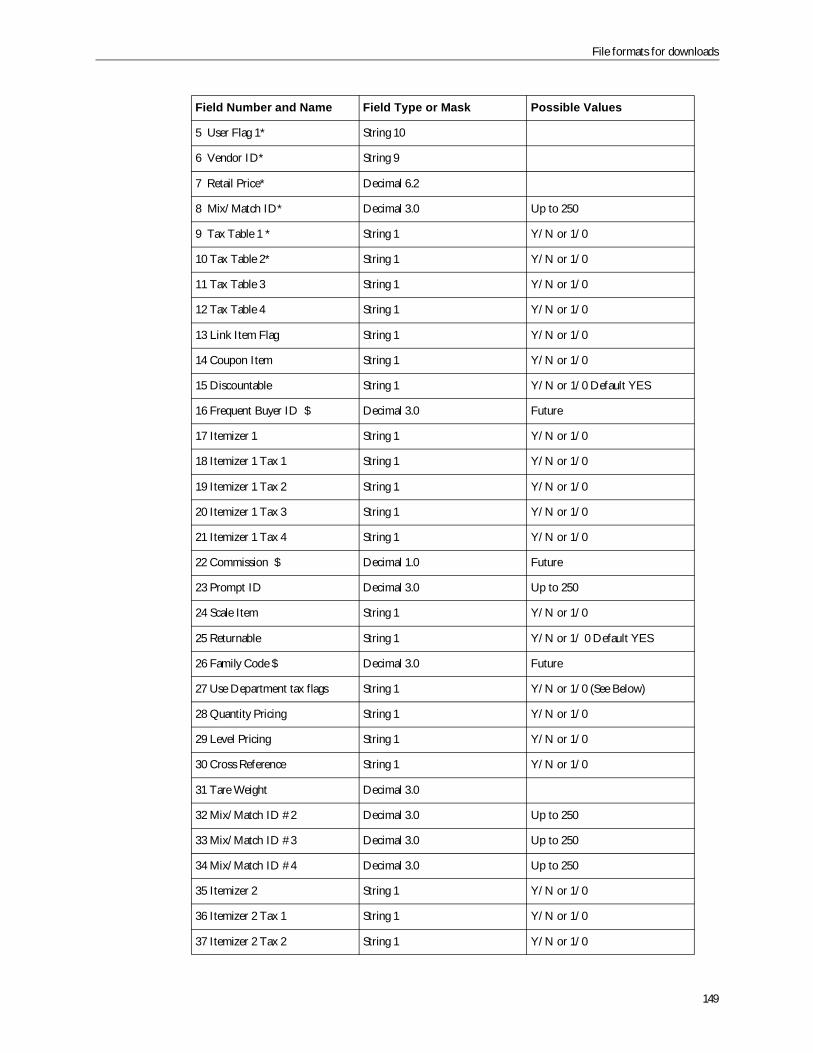
File formats for downloads
149
5 User Flag 1* String 10
6 Vendor ID* String 9
7 Retail Price* Decimal 6.2
8 Mix/Match ID* Decimal 3.0 Up to 250
9 Tax Table 1 * String 1 Y/N or 1/0
10 Tax Table 2* String 1 Y/N or 1/0
11 Tax Table 3 String 1 Y/N or 1/0
12 Tax Table 4 String 1 Y/N or 1/0
13 Link Item Flag String 1 Y/N or 1/0
14 Coupon Item String 1 Y/N or 1/0
15 Discountable String 1 Y/N or 1/0 Default YES
16 Frequent Buyer ID $ Decimal 3.0 Future
17 Itemizer 1 String 1 Y/N or 1/0
18 Itemizer 1 Tax 1 String 1 Y/N or 1/0
19 Itemizer 1 Tax 2 String 1 Y/N or 1/0
20 Itemizer 1 Tax 3 String 1 Y/N or 1/0
21 Itemizer 1 Tax 4 String 1 Y/N or 1/0
22 Commission $ Decimal 1.0 Future
23 Prompt ID Decimal 3.0 Up to 250
24 Scale Item String 1 Y/N or 1/0
25 Returnable String 1 Y/N or 1/ 0 Default YES
26 Family Code $ Decimal 3.0 Future
27 Use Department tax flags String 1 Y/N or 1/0 (See Below)
28 Quantity Pricing String 1 Y/N or 1/0
29 Level Pricing String 1 Y/N or 1/0
30 Cross Reference String 1 Y/N or 1/0
31 Tare Weight Decimal 3.0
32 Mix/Match ID #2 Decimal 3.0 Up to 250
33 Mix/Match ID #3 Decimal 3.0 Up to 250
34 Mix/Match ID #4 Decimal 3.0 Up to 250
35 Itemizer 2 String 1 Y/N or 1/0
36 Itemizer 2 Tax 1 String 1 Y/N or 1/0
37 Itemizer 2 Tax 2 String 1 Y/N or 1/0
Field Number and Name Field Type or Mask Possible Values
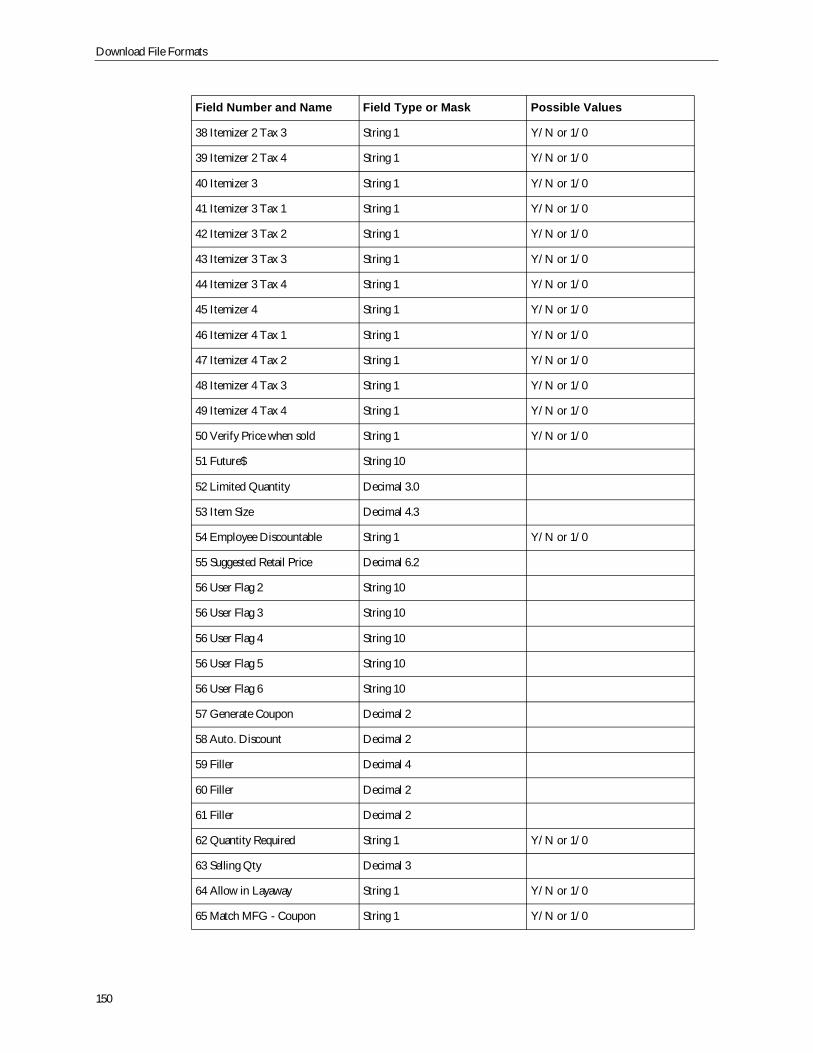
Download File Formats
150
38 Itemizer 2 Tax 3 String 1 Y/N or 1/0
39 Itemizer 2 Tax 4 String 1 Y/N or 1/0
40 Itemizer 3 String 1 Y/N or 1/0
41 Itemizer 3 Tax 1 String 1 Y/N or 1/0
42 Itemizer 3 Tax 2 String 1 Y/N or 1/0
43 Itemizer 3 Tax 3 String 1 Y/N or 1/0
44 Itemizer 3 Tax 4 String 1 Y/N or 1/0
45 Itemizer 4 String 1 Y/N or 1/0
46 Itemizer 4 Tax 1 String 1 Y/N or 1/0
47 Itemizer 4 Tax 2 String 1 Y/N or 1/0
48 Itemizer 4 Tax 3 String 1 Y/N or 1/0
49 Itemizer 4 Tax 4 String 1 Y/N or 1/0
50 Verify Price when sold String 1 Y/N or 1/0
51 Future$ String 10
52 Limited Quantity Decimal 3.0
53 Item Size Decimal 4.3
54 Employee Discountable String 1 Y/N or 1/0
55 Suggested Retail Price Decimal 6.2
56 User Flag 2 String 10
56 User Flag 3 String 10
56 User Flag 4 String 10
56 User Flag 5 String 10
56 User Flag 6 String 10
57 Generate Coupon Decimal 2
58 Auto. Discount Decimal 2
59 Filler Decimal 4
60 Filler Decimal 2
61 Filler Decimal 2
62 Quantity Required String 1 Y/N or 1/0
63 Selling Qty Decimal 3
64 Allow in Layaway String 1 Y/N or 1/0
65 Match MFG - Coupon String 1 Y/N or 1/0
Field Number and Name Field Type or Mask Possible Values
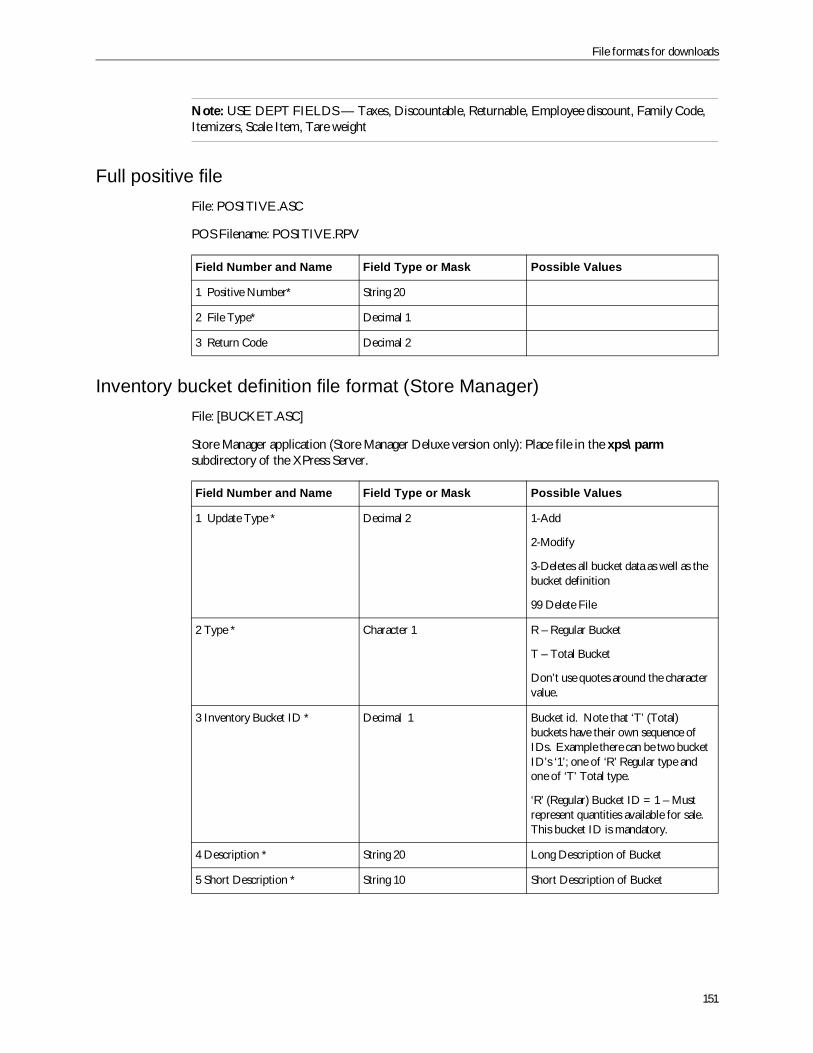
File formats for downloads
151
Note: USE DEPT FIELDS — Taxes, Discountable, Returnable, Employee discount, Family Code,Itemizers, Scale Item, Tare weight
Full positive fileFile: POSITIVE.ASC
POS Filename: POSITIVE.RPV
Inventory bucket definition file format (Store Manager)File: [BUCKET.ASC]
Store Manager application (Store Manager Deluxe version only): Place file in the xps\parmsubdirectory of the XPress Server.
Field Number and Name Field Type or Mask Possible Values
1 Positive Number* String 20
2 File Type* Decimal 1
3 Return Code Decimal 2
Field Number and Name Field Type or Mask Possible Values
1 Update Type * Decimal 2 1-Add
2-Modify
3-Deletes all bucket data as well as thebucket definition
99 Delete File
2 Type * Character 1 R – Regular Bucket
T – Total Bucket
Don’t use quotes around the charactervalue.
3 Inventory Bucket ID * Decimal 1 Bucket id. Note that ‘T’ (Total)buckets have their own sequence ofIDs. Example there can be two bucketID’s ‘1’; one of ‘R’ Regular type andone of ‘T’ Total type.
‘R’ (Regular) Bucket ID = 1 – Mustrepresent quantities available for sale.This bucket ID is mandatory.
4 Description * String 20 Long Description of Bucket
5 Short Description * String 10 Short Description of Bucket

Download File Formats
152
Inventory bucket movement definition file format (Store Manager)File: [BUCKETMV.ASC]
The rows defined in this format determine the movement of stock from a specific bucket to anotherspecific bucket for each action type and PTD type defined.
Note: The entire “INVENTORY BUCKET MOVEMENT DEFINITION” must be download.
6 Is Accumulative * String 1 Y/N
Y – Maintain accumulator for thebucket.
N – No accumulator is kept. Thisbucket is used for choice lists only.
7 Keep History * String Y/N
Y – Keep history records for thisbucket.
N – Do not keep history records forthis bucket
8 Total Bucket ID * Decimal 1 Accumulate to this total bucket ID.Must be a valid ‘Total’ type bucket ID
9 POS Information Position inPrice Inquiry Function *
Decimal 1 Numeric indicating the position thatthis information is to be displayedwhen “Price Inquiry” is run at thePOS (ex, 1st, 2nd, 3rd, 4th, 5th or 6th). Avalue of zero indicates that the counterwill not be displayed at the POS
10 Count Type * Character 1 Indicates the ‘count’ type of thebucket.
C – the bucket can be counted
A – the bucket cannot be counted butits quantity may be adjusted
N – the bucket cannot be counted noradjusted
Don’t use quotes around the charactervalue.
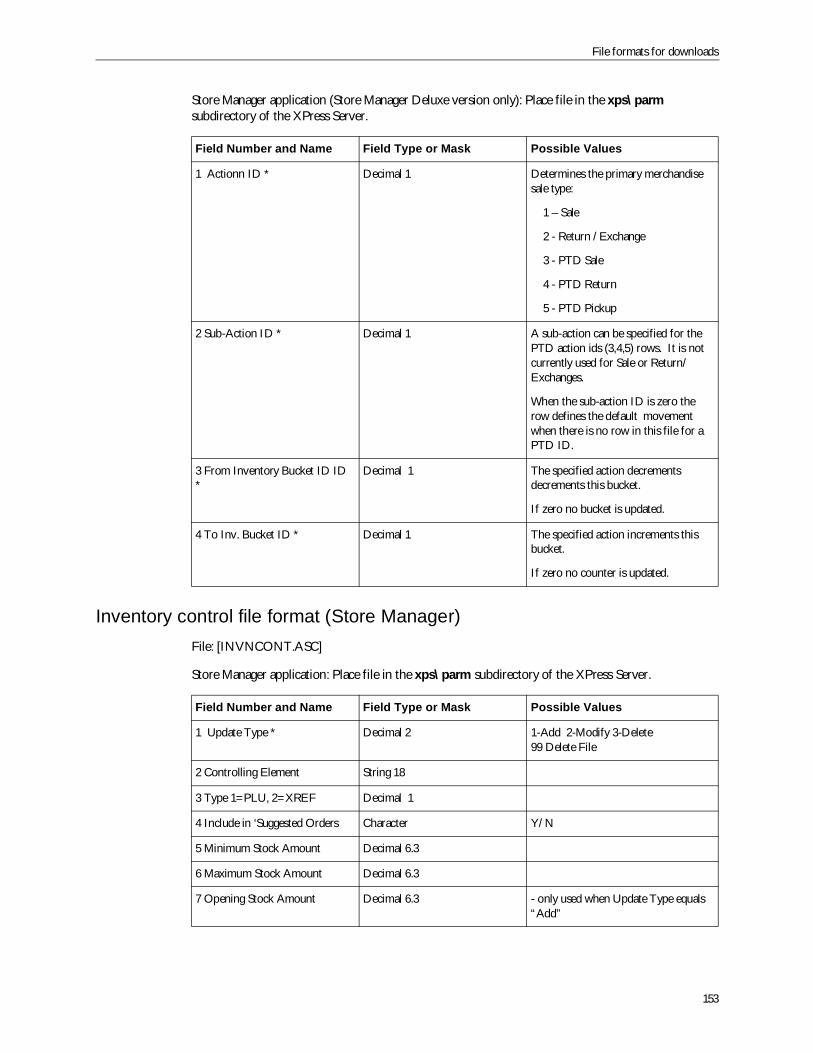
File formats for downloads
153
Store Manager application (Store Manager Deluxe version only): Place file in the xps\parmsubdirectory of the XPress Server.
Inventory control file format (Store Manager)File: [INVNCONT.ASC]
Store Manager application: Place file in the xps\parm subdirectory of the XPress Server.
Field Number and Name Field Type or Mask Possible Values
1 Actionn ID * Decimal 1 Determines the primary merchandisesale type:
1 – Sale
2 - Return /Exchange
3 - PTD Sale
4 - PTD Return
5 - PTD Pickup
2 Sub-Action ID * Decimal 1 A sub-action can be specified for thePTD action ids (3,4,5) rows. It is notcurrently used for Sale or Return/Exchanges.
When the sub-action ID is zero therow defines the default movementwhen there is no row in this file for aPTD ID.
3 From Inventory Bucket ID ID*
Decimal 1 The specified action decrementsdecrements this bucket.
If zero no bucket is updated.
4 To Inv. Bucket ID * Decimal 1 The specified action increments thisbucket.
If zero no counter is updated.
Field Number and Name Field Type or Mask Possible Values
1 Update Type * Decimal 2 1-Add 2-Modify 3-Delete99 Delete File
2 Controlling Element String 18
3 Type 1=PLU, 2=XREF Decimal 1
4 Include in ‘Suggested Orders Character Y/N
5 Minimum Stock Amount Decimal 6.3
6 Maximum Stock Amount Decimal 6.3
7 Opening Stock Amount Decimal 6.3 - only used when Update Type equals“Add”
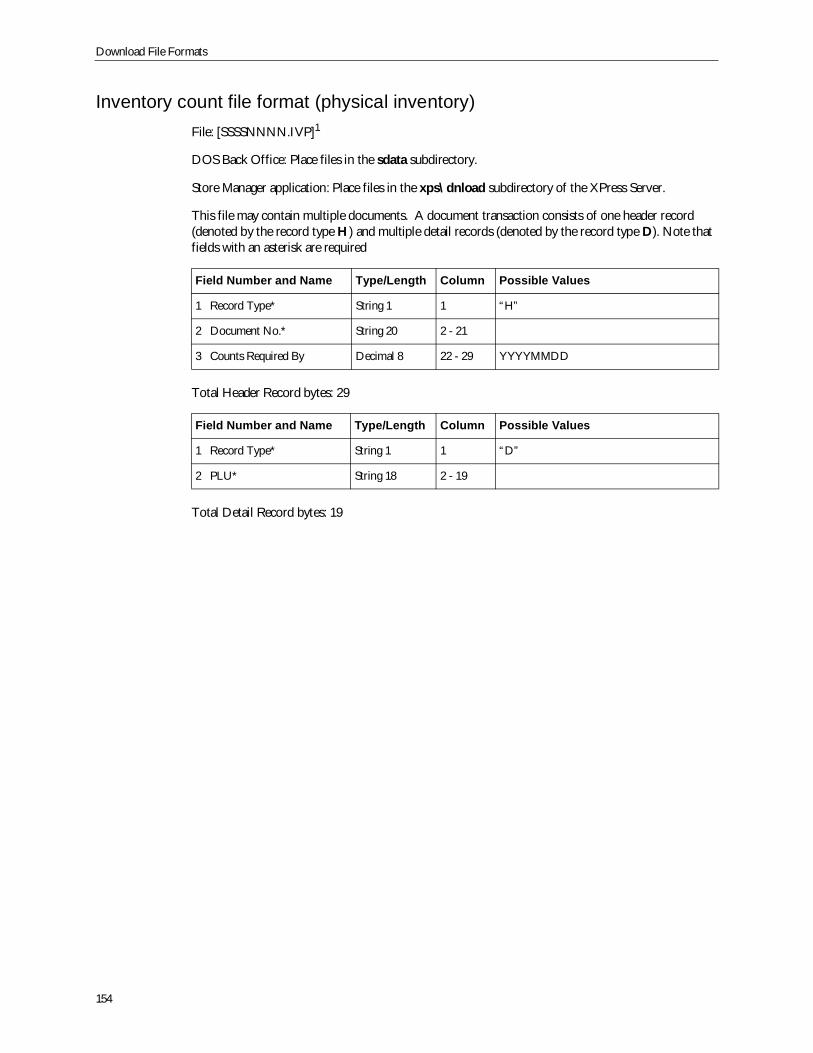
Download File Formats
154
Inventory count file format (physical inventory)File: [SSSSNNNN.IVP]1
DOS Back Office: Place files in the sdata subdirectory.
Store Manager application: Place files in the xps\dnload subdirectory of the XPress Server.
This file may contain multiple documents. A document transaction consists of one header record(denoted by the record type H) and multiple detail records (denoted by the record type D). Note thatfields with an asterisk are required
Total Header Record bytes: 29
Total Detail Record bytes: 19
Field Number and Name Type/Length Column Possible Values
1 Record Type* String 1 1 “H”
2 Document No.* String 20 2 - 21
3 Counts Required By Decimal 8 22 - 29 YYYYMMDD
Field Number and Name Type/Length Column Possible Values
1 Record Type* String 1 1 “D”
2 PLU* String 18 2 - 19
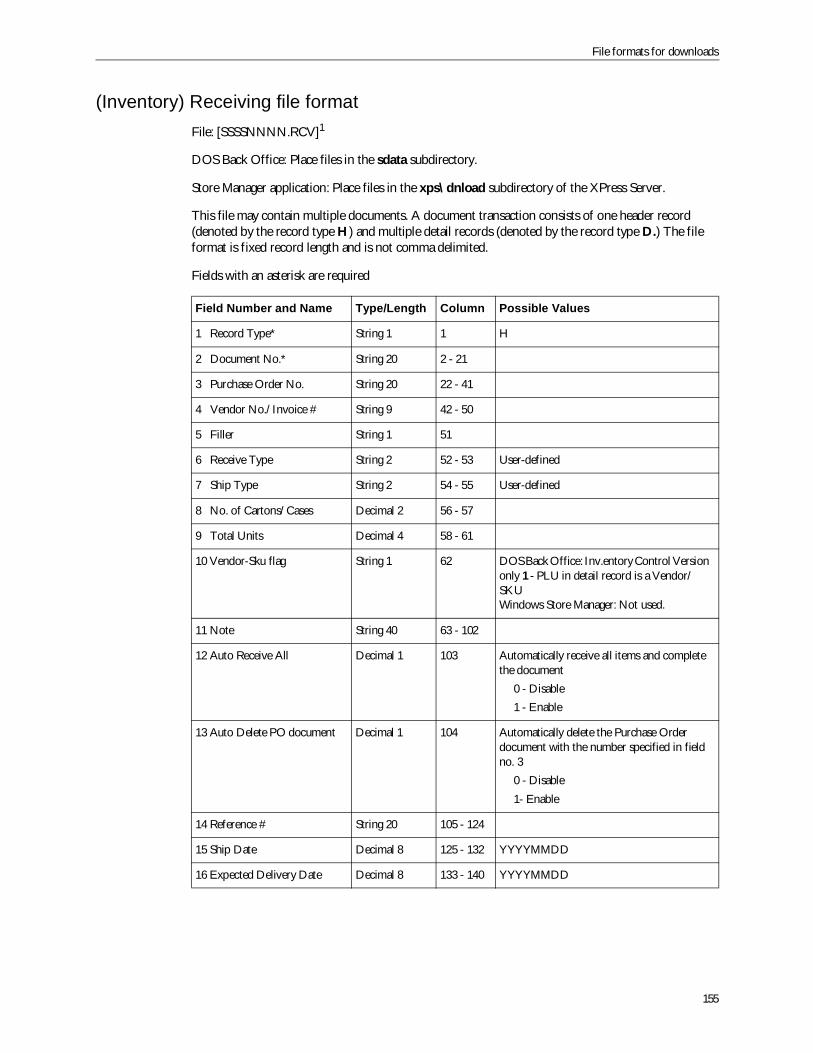
File formats for downloads
155
(Inventory) Receiving file formatFile: [SSSSNNNN.RCV]1
DOS Back Office: Place files in the sdata subdirectory.
Store Manager application: Place files in the xps\dnload subdirectory of the XPress Server.
This file may contain multiple documents. A document transaction consists of one header record(denoted by the record type H) and multiple detail records (denoted by the record type D.) The fileformat is fixed record length and is not comma delimited.
Fields with an asterisk are required
Field Number and Name Type/Length Column Possible Values
1 Record Type* String 1 1 H
2 Document No.* String 20 2 - 21
3 Purchase Order No. String 20 22 - 41
4 Vendor No./Invoice # String 9 42 - 50
5 Filler String 1 51
6 Receive Type String 2 52 - 53 User-defined
7 Ship Type String 2 54 - 55 User-defined
8 No. of Cartons/Cases Decimal 2 56 - 57
9 Total Units Decimal 4 58 - 61
10 Vendor-Sku flag String 1 62 DOS Back Office: Inv.entory Control Versiononly 1 - PLU in detail record is a Vendor/SKUWindows Store Manager: Not used.
11 Note String 40 63 - 102
12 Auto Receive All Decimal 1 103 Automatically receive all items and completethe document
0 - Disable1 - Enable
13 Auto Delete PO document Decimal 1 104 Automatically delete the Purchase Orderdocument with the number specified in fieldno. 3
0 - Disable1- Enable
14 Reference # String 20 105 - 124
15 Ship Date Decimal 8 125 - 132 YYYYMMDD
16 Expected Delivery Date Decimal 8 133 - 140 YYYYMMDD

Download File Formats
156
Total Header Record bytes: 140
Total Detail Record Bytes: 55
Field Number and Name Type/Length Column Possible Values
1 Record Type* String 1 1 D
2 PLU* String 18 2 - 19
3 Quantity 1* Decimal 3.3 20 - 25
4 Pkg Size Decimal 4 26 - 29 Windows Store Manager: Notused
5 Filler String 2 30 - 31
6 Cost Decimal 4.2 32 - 37 DOS: Used in InventoryControl Version only.Mandatory in Inv.entoryControl version.
Windows Store Manager: Notused.
7 Quantity 2 Decimal 6.3 38 - 46 Same as field 3 except thisfield will accommodatequantities up to a maximumof 999,999.000
8 Actual Quantity Decimal 6.3 47 - 55 Actual quantity received
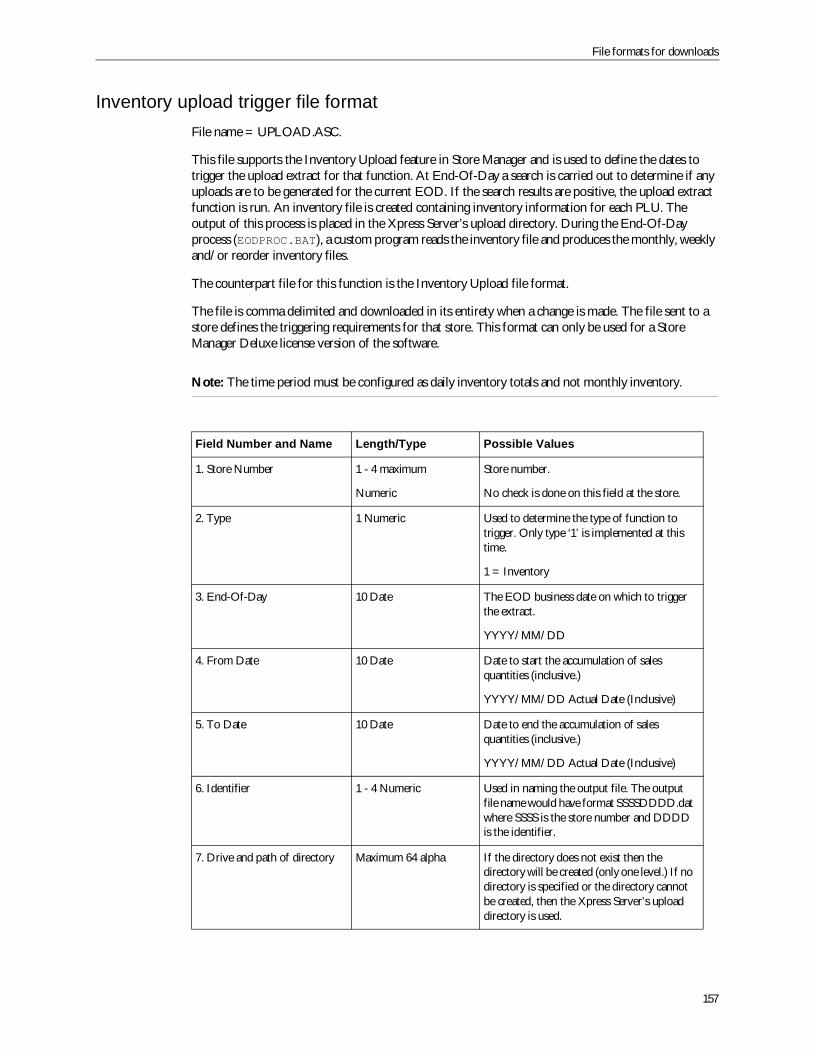
File formats for downloads
157
Inventory upload trigger file formatFile name = UPLOAD.ASC.
This file supports the Inventory Upload feature in Store Manager and is used to define the dates totrigger the upload extract for that function. At End-Of-Day a search is carried out to determine if anyuploads are to be generated for the current EOD. If the search results are positive, the upload extractfunction is run. An inventory file is created containing inventory information for each PLU. Theoutput of this process is placed in the Xpress Server’s upload directory. During the End-Of-Dayprocess (EODPROC.BAT), a custom program reads the inventory file and produces the monthly, weeklyand/or reorder inventory files.
The counterpart file for this function is the Inventory Upload file format.
The file is comma delimited and downloaded in its entirety when a change is made. The file sent to astore defines the triggering requirements for that store. This format can only be used for a StoreManager Deluxe license version of the software.
Note: The time period must be configured as daily inventory totals and not monthly inventory.
Field Number and Name Length/Type Possible Values
1. Store Number 1 - 4 maximum
Numeric
Store number.
No check is done on this field at the store.
2. Type 1 Numeric Used to determine the type of function totrigger. Only type ‘1’ is implemented at thistime.
1 = Inventory
3. End-Of-Day 10 Date The EOD business date on which to triggerthe extract.
YYYY/MM/DD
4. From Date 10 Date Date to start the accumulation of salesquantities (inclusive.)
YYYY/MM/DD Actual Date (Inclusive)
5. To Date 10 Date Date to end the accumulation of salesquantities (inclusive.)
YYYY/MM/DD Actual Date (Inclusive)
6. Identifier 1 - 4 Numeric Used in naming the output file. The outputfile name would have format SSSSDDDD.datwhere SSSS is the store number and DDDDis the identifier.
7. Drive and path of directory Maximum 64 alpha If the directory does not exist then thedirectory will be created (only one level.) If nodirectory is specified or the directory cannotbe created, then the Xpress Server’s uploaddirectory is used.
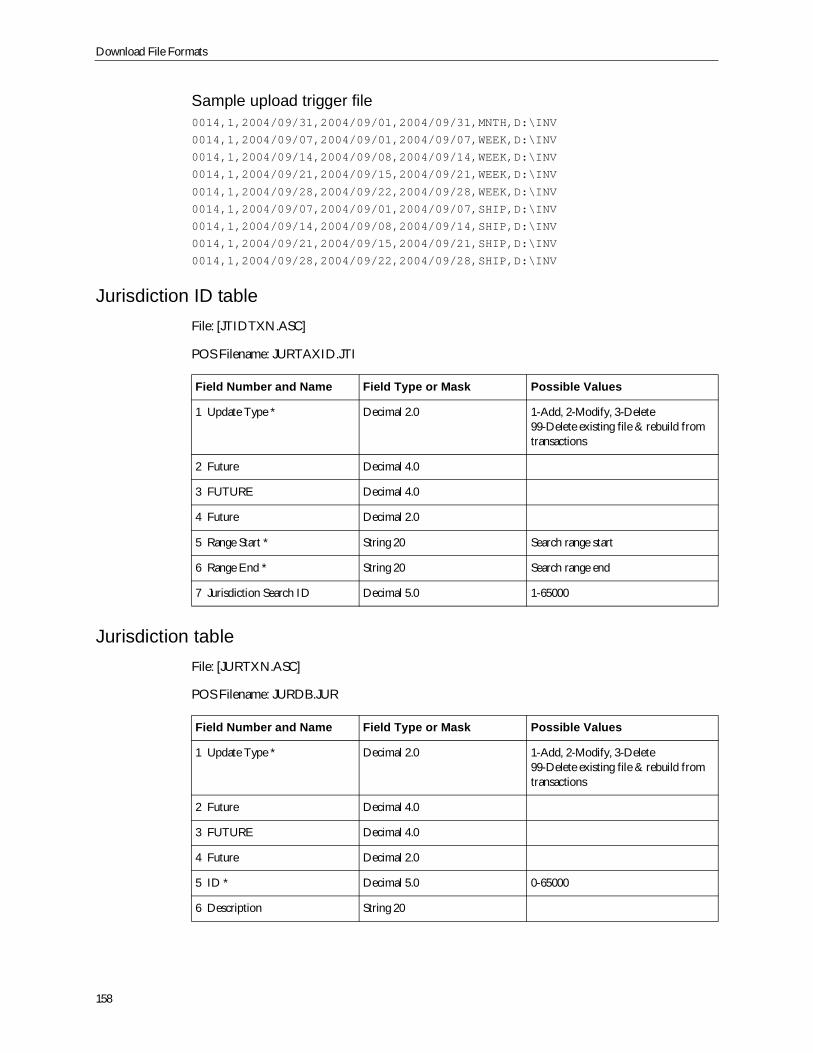
Download File Formats
158
Sample upload trigger file0014,1,2004/09/31,2004/09/01,2004/09/31,MNTH,D:\INV
0014,1,2004/09/07,2004/09/01,2004/09/07,WEEK,D:\INV
0014,1,2004/09/14,2004/09/08,2004/09/14,WEEK,D:\INV
0014,1,2004/09/21,2004/09/15,2004/09/21,WEEK,D:\INV
0014,1,2004/09/28,2004/09/22,2004/09/28,WEEK,D:\INV
0014,1,2004/09/07,2004/09/01,2004/09/07,SHIP,D:\INV
0014,1,2004/09/14,2004/09/08,2004/09/14,SHIP,D:\INV
0014,1,2004/09/21,2004/09/15,2004/09/21,SHIP,D:\INV
0014,1,2004/09/28,2004/09/22,2004/09/28,SHIP,D:\INV
Jurisdiction ID tableFile: [JTIDTXN.ASC]
POS Filename: JURTAXID.JTI
Jurisdiction tableFile: [JURTXN.ASC]
POS Filename: JURDB.JUR
Field Number and Name Field Type or Mask Possible Values
1 Update Type * Decimal 2.0 1-Add, 2-Modify, 3-Delete99-Delete existing file & rebuild fromtransactions
2 Future Decimal 4.0
3 FUTURE Decimal 4.0
4 Future Decimal 2.0
5 Range Start * String 20 Search range start
6 Range End * String 20 Search range end
7 Jurisdiction Search ID Decimal 5.0 1-65000
Field Number and Name Field Type or Mask Possible Values
1 Update Type * Decimal 2.0 1-Add, 2-Modify, 3-Delete99-Delete existing file & rebuild fromtransactions
2 Future Decimal 4.0
3 FUTURE Decimal 4.0
4 Future Decimal 2.0
5 ID * Decimal 5.0 0-65000
6 Description String 20
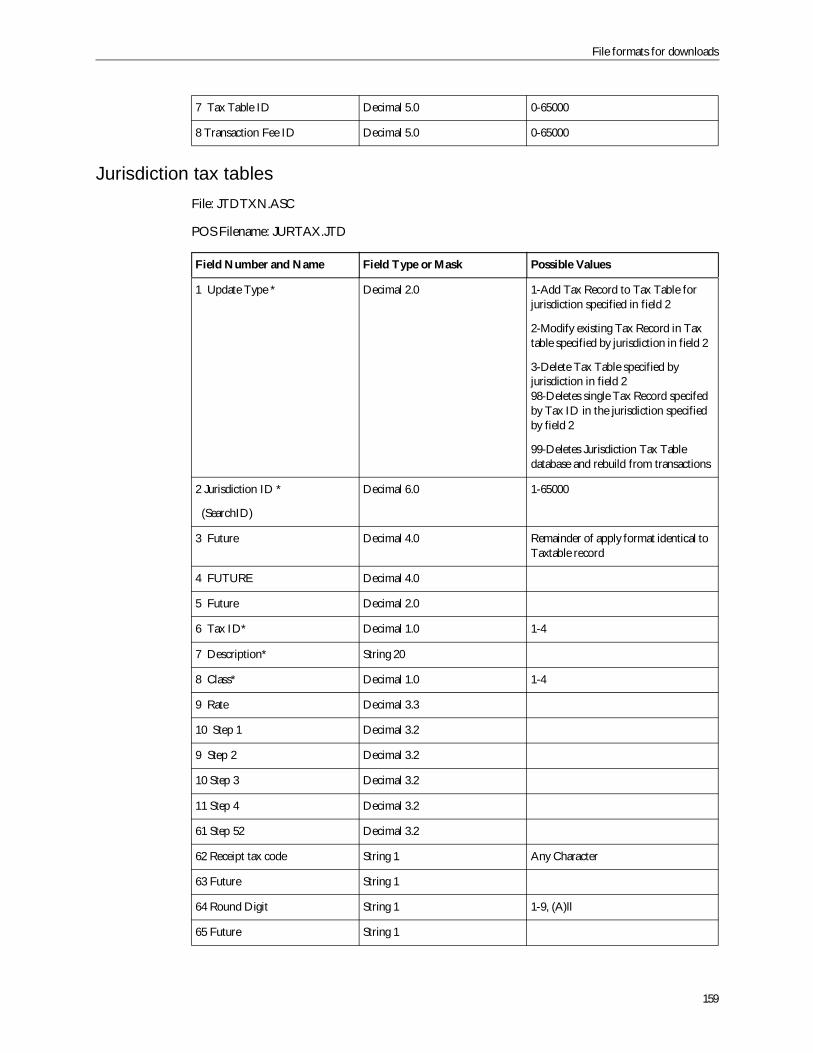
File formats for downloads
159
Jurisdiction tax tablesFile: JTDTXN.ASC
POS Filename: JURTAX.JTD
7 Tax Table ID Decimal 5.0 0-65000
8 Transaction Fee ID Decimal 5.0 0-65000
Field Number and Name Field Type or Mask Possible Values
1 Update Type * Decimal 2.0 1-Add Tax Record to Tax Table forjurisdiction specified in field 2
2-Modify existing Tax Record in Taxtable specified by jurisdiction in field 2
3-Delete Tax Table specified byjurisdiction in field 298-Deletes single Tax Record specifedby Tax ID in the jurisdiction specifiedby field 2
99-Deletes Jurisdiction Tax Tabledatabase and rebuild from transactions
2 Jurisdiction ID *
(SearchID)
Decimal 6.0 1-65000
3 Future Decimal 4.0 Remainder of apply format identical toTaxtable record
4 FUTURE Decimal 4.0
5 Future Decimal 2.0
6 Tax ID* Decimal 1.0 1-4
7 Description* String 20
8 Class* Decimal 1.0 1-4
9 Rate Decimal 3.3
10 Step 1 Decimal 3.2
9 Step 2 Decimal 3.2
10 Step 3 Decimal 3.2
11 Step 4 Decimal 3.2
61 Step 52 Decimal 3.2
62 Receipt tax code String 1 Any Character
63 Future String 1
64 Round Digit String 1 1-9, (A)ll
65 Future String 1
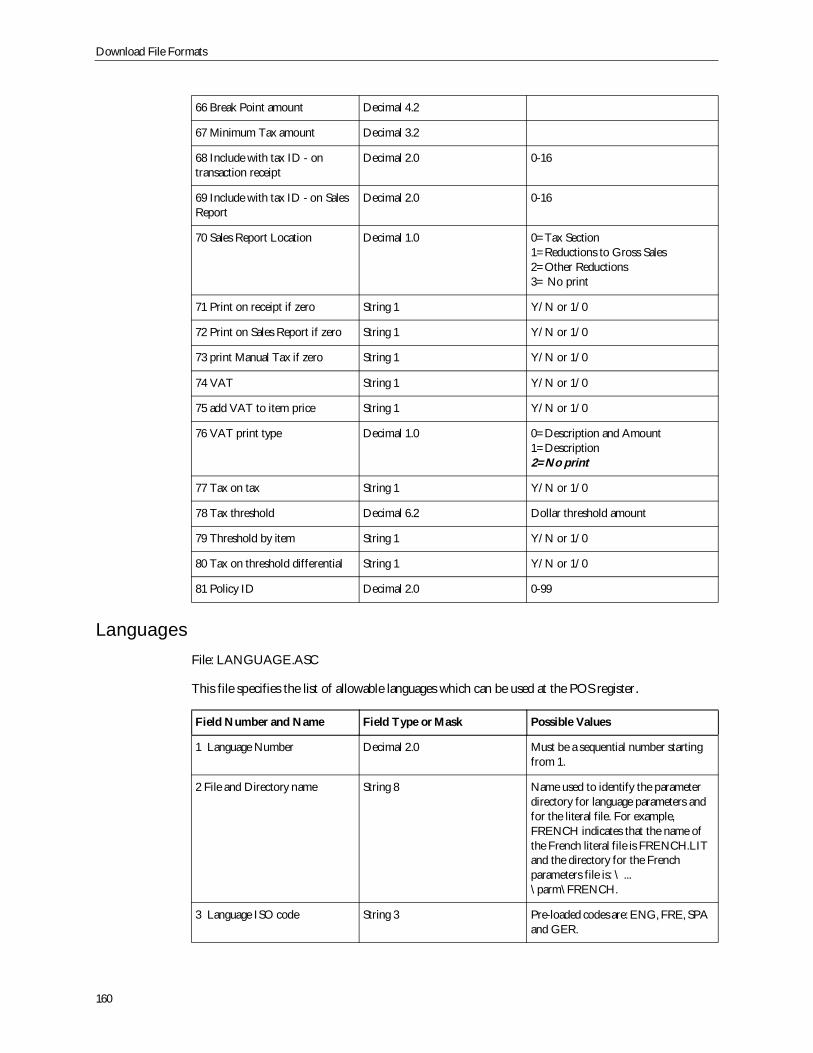
Download File Formats
160
LanguagesFile: LANGUAGE.ASC
This file specifies the list of allowable languages which can be used at the POS register.
66 Break Point amount Decimal 4.2
67 Minimum Tax amount Decimal 3.2
68 Include with tax ID - ontransaction receipt
Decimal 2.0 0-16
69 Include with tax ID - on SalesReport
Decimal 2.0 0-16
70 Sales Report Location Decimal 1.0 0=Tax Section1=Reductions to Gross Sales2=Other Reductions3= No print
71 Print on receipt if zero String 1 Y/N or 1/0
72 Print on Sales Report if zero String 1 Y/N or 1/0
73 print Manual Tax if zero String 1 Y/N or 1/0
74 VAT String 1 Y/N or 1/0
75 add VAT to item price String 1 Y/N or 1/0
76 VAT print type Decimal 1.0 0=Description and Amount1=Description2=No print
77 Tax on tax String 1 Y/N or 1/0
78 Tax threshold Decimal 6.2 Dollar threshold amount
79 Threshold by item String 1 Y/N or 1/0
80 Tax on threshold differential String 1 Y/N or 1/0
81 Policy ID Decimal 2.0 0-99
Field Number and Name Field Type or Mask Possible Values
1 Language Number Decimal 2.0 Must be a sequential number startingfrom 1.
2 File and Directory name String 8 Name used to identify the parameterdirectory for language parameters andfor the literal file. For example,FRENCH indicates that the name ofthe French literal file is FRENCH.LITand the directory for the Frenchparameters file is: \ ...\parm\FRENCH.
3 Language ISO code String 3 Pre-loaded codes are: ENG, FRE, SPAand GER.
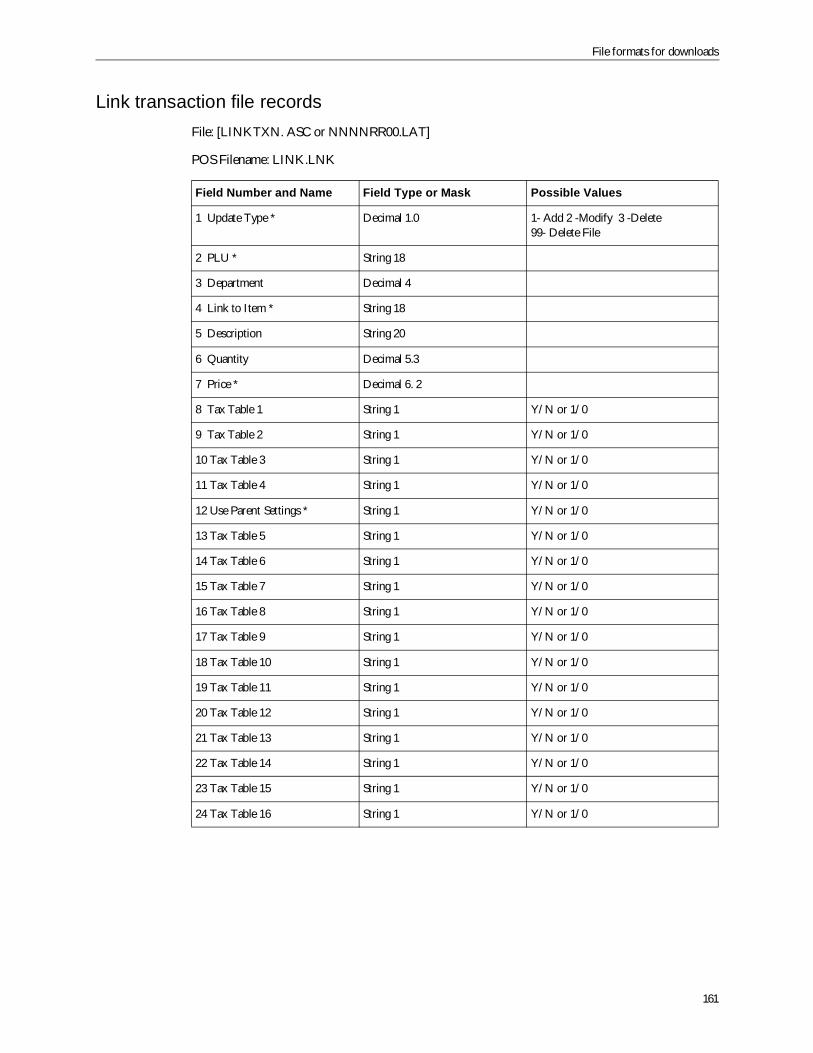
File formats for downloads
161
Link transaction file recordsFile: [LINKTXN. ASC or NNNNRR00.LAT]
POS Filename: LINK.LNK
Field Number and Name Field Type or Mask Possible Values
1 Update Type * Decimal 1.0 1- Add 2 -Modify 3 -Delete99- Delete File
2 PLU * String 18
3 Department Decimal 4
4 Link to Item * String 18
5 Description String 20
6 Quantity Decimal 5.3
7 Price * Decimal 6. 2
8 Tax Table 1 String 1 Y/N or 1/0
9 Tax Table 2 String 1 Y/N or 1/0
10 Tax Table 3 String 1 Y/N or 1/0
11 Tax Table 4 String 1 Y/N or 1/0
12 Use Parent Settings * String 1 Y/N or 1/0
13 Tax Table 5 String 1 Y/N or 1/0
14 Tax Table 6 String 1 Y/N or 1/0
15 Tax Table 7 String 1 Y/N or 1/0
16 Tax Table 8 String 1 Y/N or 1/0
17 Tax Table 9 String 1 Y/N or 1/0
18 Tax Table 10 String 1 Y/N or 1/0
19 Tax Table 11 String 1 Y/N or 1/0
20 Tax Table 12 String 1 Y/N or 1/0
21 Tax Table 13 String 1 Y/N or 1/0
22 Tax Table 14 String 1 Y/N or 1/0
23 Tax Table 15 String 1 Y/N or 1/0
24 Tax Table 16 String 1 Y/N or 1/0
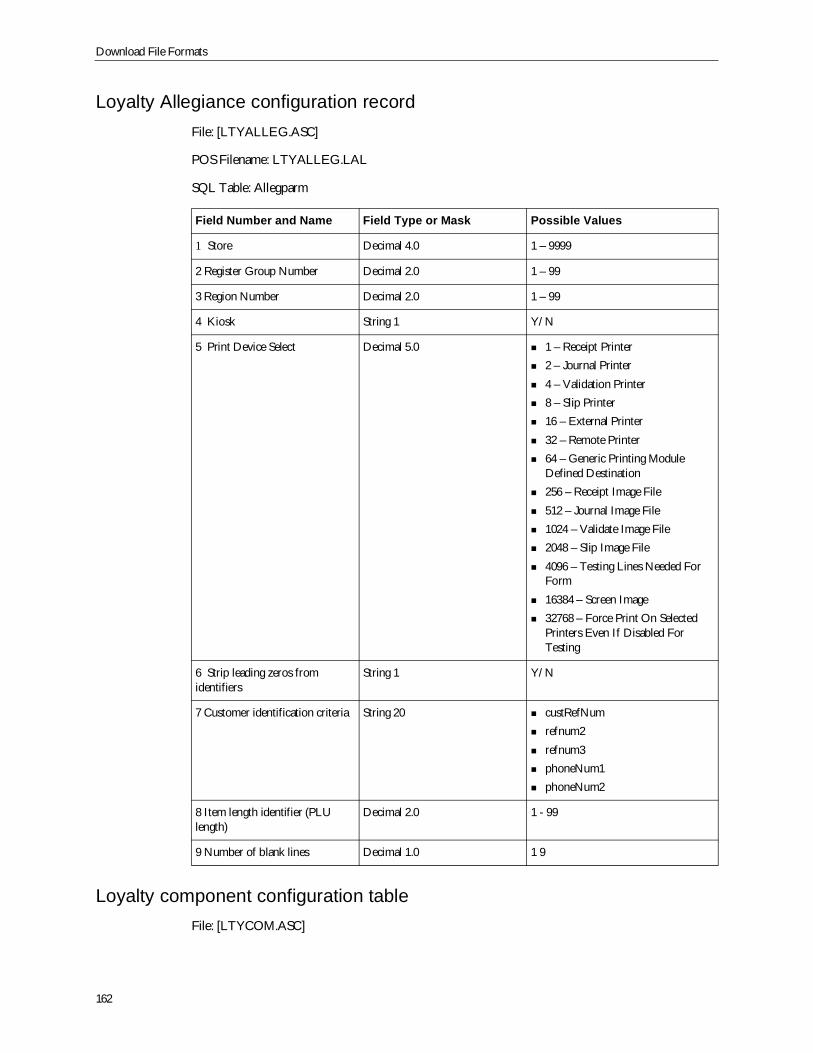
Download File Formats
162
Loyalty Allegiance configuration recordFile: [LTYALLEG.ASC]
POS Filename: LTYALLEG.LAL
SQL Table: Allegparm
Loyalty component configuration tableFile: [LTYCOM.ASC]
Field Number and Name Field Type or Mask Possible Values
1 Store Decimal 4.0 1 – 9999
2 Register Group Number Decimal 2.0 1 – 99
3 Region Number Decimal 2.0 1 – 99
4 Kiosk String 1 Y/N
5 Print Device Select Decimal 5.0 1 – Receipt Printer2 – Journal Printer4 – Validation Printer8 – Slip Printer16 – External Printer32 – Remote Printer64 – Generic Printing ModuleDefined Destination256 – Receipt Image File512 – Journal Image File1024 – Validate Image File2048 – Slip Image File4096 – Testing Lines Needed ForForm16384 – Screen Image32768 – Force Print On SelectedPrinters Even If Disabled ForTesting
6 Strip leading zeros fromidentifiers
String 1 Y/N
7 Customer identification criteria String 20 custRefNumrefnum2refnum3phoneNum1phoneNum2
8 Item length identifier (PLUlength)
Decimal 2.0 1 - 99
9 Number of blank lines Decimal 1.0 1 9
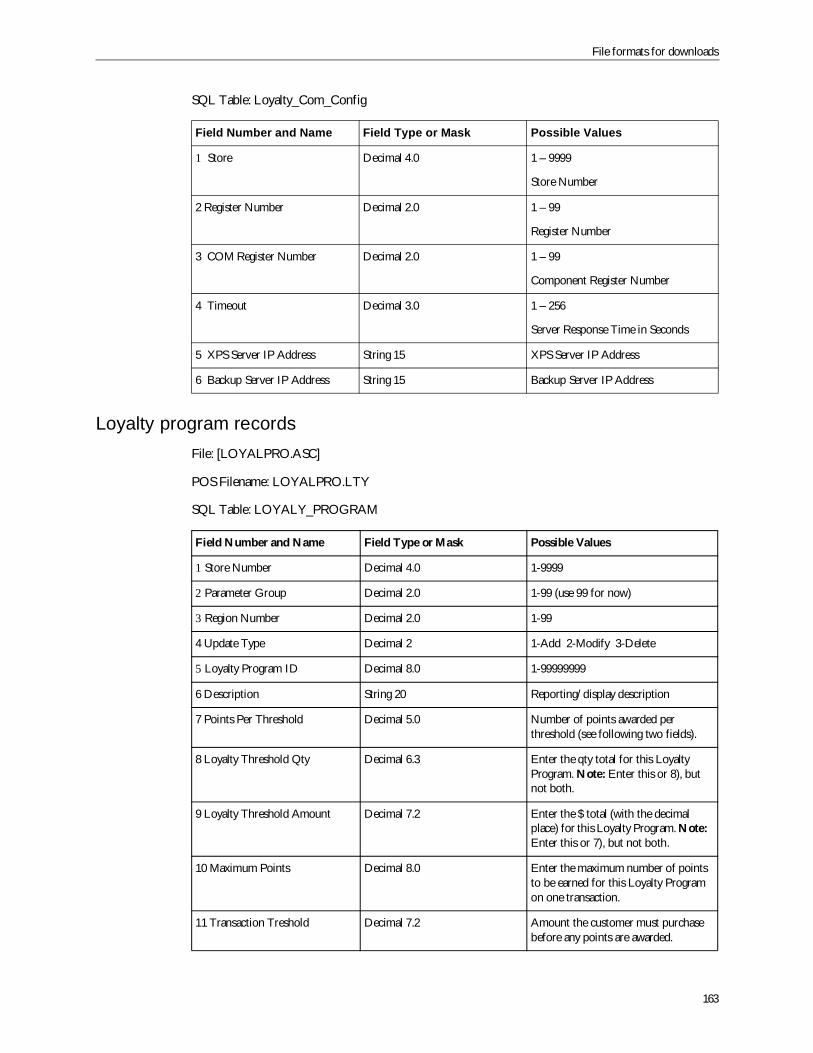
File formats for downloads
163
SQL Table: Loyalty_Com_Config
Loyalty program recordsFile: [LOYALPRO.ASC]
POS Filename: LOYALPRO.LTY
SQL Table: LOYALY_PROGRAM
Field Number and Name Field Type or Mask Possible Values
1 Store Decimal 4.0 1 – 9999
Store Number
2 Register Number Decimal 2.0 1 – 99
Register Number
3 COM Register Number Decimal 2.0 1 – 99
Component Register Number
4 Timeout Decimal 3.0 1 – 256
Server Response Time in Seconds
5 XPS Server IP Address String 15 XPS Server IP Address
6 Backup Server IP Address String 15 Backup Server IP Address
Field Number and Name Field Type or Mask Possible Values
1 Store Number Decimal 4.0 1-9999
2 Parameter Group Decimal 2.0 1-99 (use 99 for now)
3 Region Number Decimal 2.0 1-99
4 Update Type Decimal 2 1-Add 2-Modify 3-Delete
5 Loyalty Program ID Decimal 8.0 1-99999999
6 Description String 20 Reporting/display description
7 Points Per Threshold Decimal 5.0 Number of points awarded perthreshold (see following two fields).
8 Loyalty Threshold Qty Decimal 6.3 Enter the qty total for this LoyaltyProgram. Note: Enter this or 8), butnot both.
9 Loyalty Threshold Amount Decimal 7.2 Enter the $ total (with the decimalplace) for this Loyalty Program. Note:Enter this or 7), but not both.
10 Maximum Points Decimal 8.0 Enter the maximum number of pointsto be earned for this Loyalty Programon one transaction.
11 Transaction Treshold Decimal 7.2 Amount the customer must purchasebefore any points are awarded.
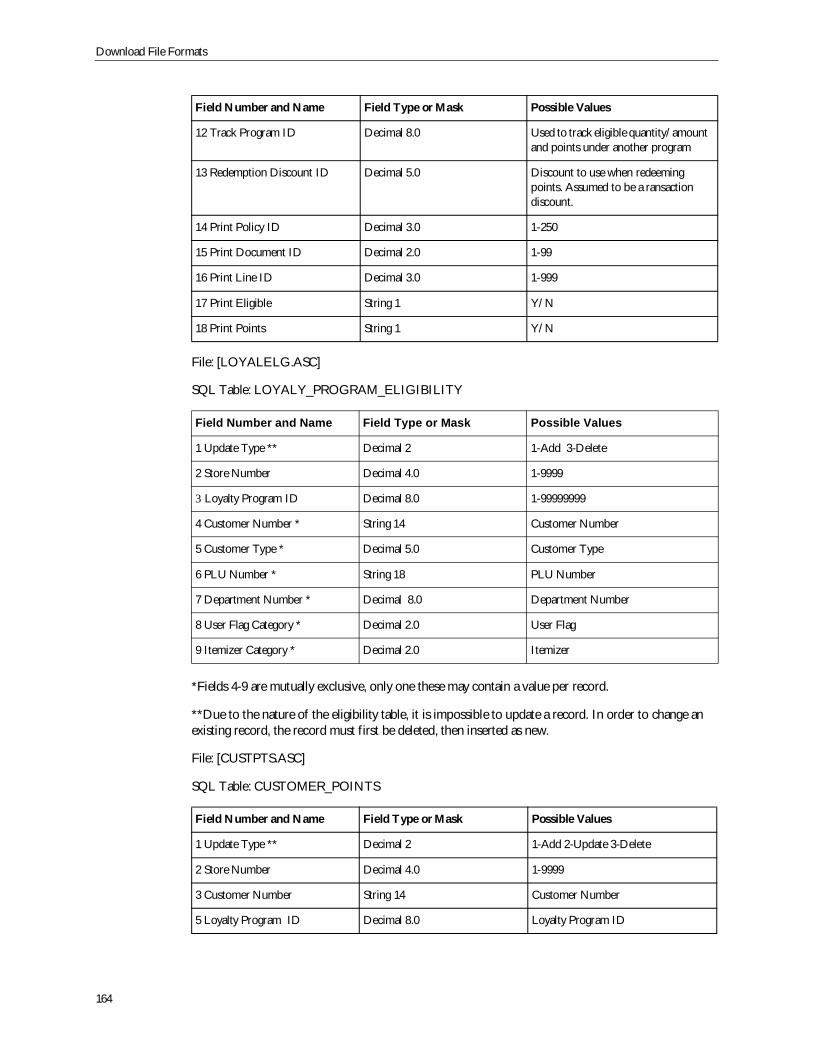
Download File Formats
164
File: [LOYALELG.ASC]
SQL Table: LOYALY_PROGRAM_ELIGIBILITY
*Fields 4-9 are mutually exclusive, only one these may contain a value per record.
**Due to the nature of the eligibility table, it is impossible to update a record. In order to change anexisting record, the record must first be deleted, then inserted as new.
File: [CUSTPTS.ASC]
SQL Table: CUSTOMER_POINTS
12 Track Program ID Decimal 8.0 Used to track eligible quantity/amountand points under another program
13 Redemption Discount ID Decimal 5.0 Discount to use when redeemingpoints. Assumed to be a ransactiondiscount.
14 Print Policy ID Decimal 3.0 1-250
15 Print Document ID Decimal 2.0 1-99
16 Print Line ID Decimal 3.0 1-999
17 Print Eligible String 1 Y/N
18 Print Points String 1 Y/N
Field Number and Name Field Type or Mask Possible Values
1 Update Type ** Decimal 2 1-Add 3-Delete
2 Store Number Decimal 4.0 1-9999
3 Loyalty Program ID Decimal 8.0 1-99999999
4 Customer Number * String 14 Customer Number
5 Customer Type * Decimal 5.0 Customer Type
6 PLU Number * String 18 PLU Number
7 Department Number * Decimal 8.0 Department Number
8 User Flag Category * Decimal 2.0 User Flag
9 Itemizer Category * Decimal 2.0 Itemizer
Field Number and Name Field Type or Mask Possible Values
1 Update Type ** Decimal 2 1-Add 2-Update 3-Delete
2 Store Number Decimal 4.0 1-9999
3 Customer Number String 14 Customer Number
5 Loyalty Program ID Decimal 8.0 Loyalty Program ID
Field Number and Name Field Type or Mask Possible Values
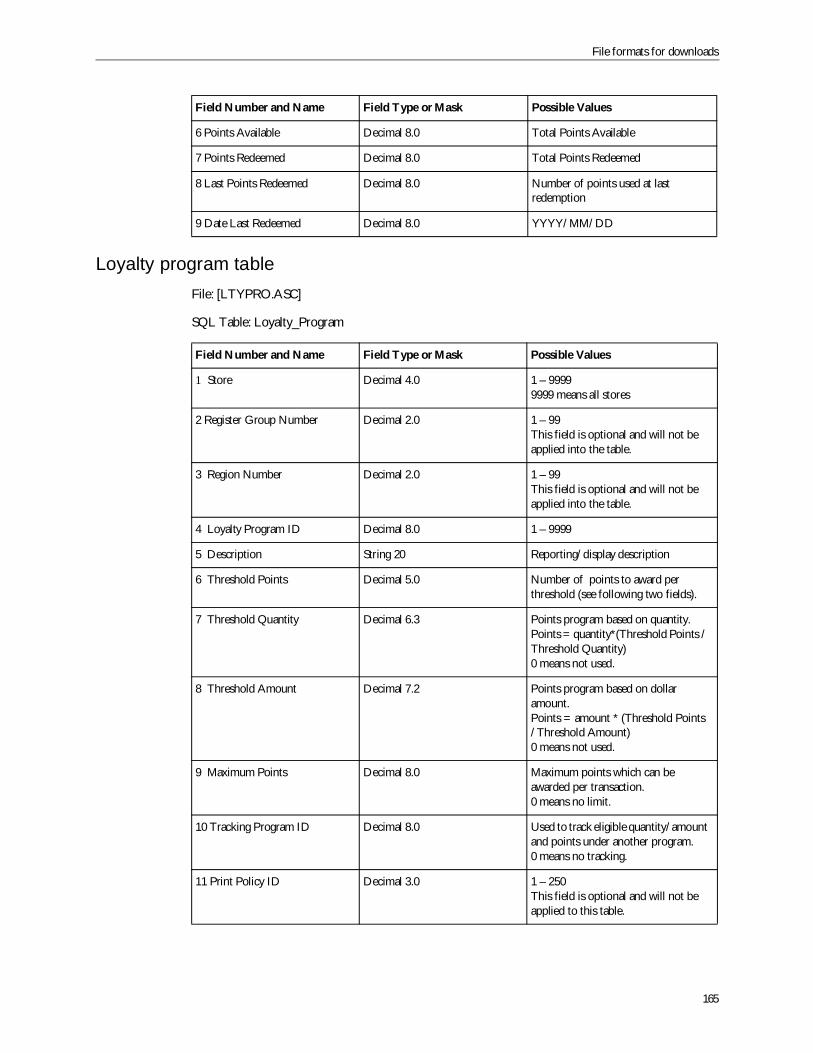
File formats for downloads
165
Loyalty program tableFile: [LTYPRO.ASC]
SQL Table: Loyalty_Program
6 Points Available Decimal 8.0 Total Points Available
7 Points Redeemed Decimal 8.0 Total Points Redeemed
8 Last Points Redeemed Decimal 8.0 Number of points used at lastredemption
9 Date Last Redeemed Decimal 8.0 YYYY/MM/DD
Field Number and Name Field Type or Mask Possible Values
1 Store Decimal 4.0 1 – 99999999 means all stores
2 Register Group Number Decimal 2.0 1 – 99This field is optional and will not beapplied into the table.
3 Region Number Decimal 2.0 1 – 99This field is optional and will not beapplied into the table.
4 Loyalty Program ID Decimal 8.0 1 – 9999
5 Description String 20 Reporting/display description
6 Threshold Points Decimal 5.0 Number of points to award perthreshold (see following two fields).
7 Threshold Quantity Decimal 6.3 Points program based on quantity.Points = quantity*(Threshold Points /Threshold Quantity)0 means not used.
8 Threshold Amount Decimal 7.2 Points program based on dollaramount.Points = amount * (Threshold Points/Threshold Amount)0 means not used.
9 Maximum Points Decimal 8.0 Maximum points which can beawarded per transaction.0 means no limit.
10 Tracking Program ID Decimal 8.0 Used to track eligible quantity/amountand points under another program.0 means no tracking.
11 Print Policy ID Decimal 3.0 1 – 250This field is optional and will not beapplied to this table.
Field Number and Name Field Type or Mask Possible Values
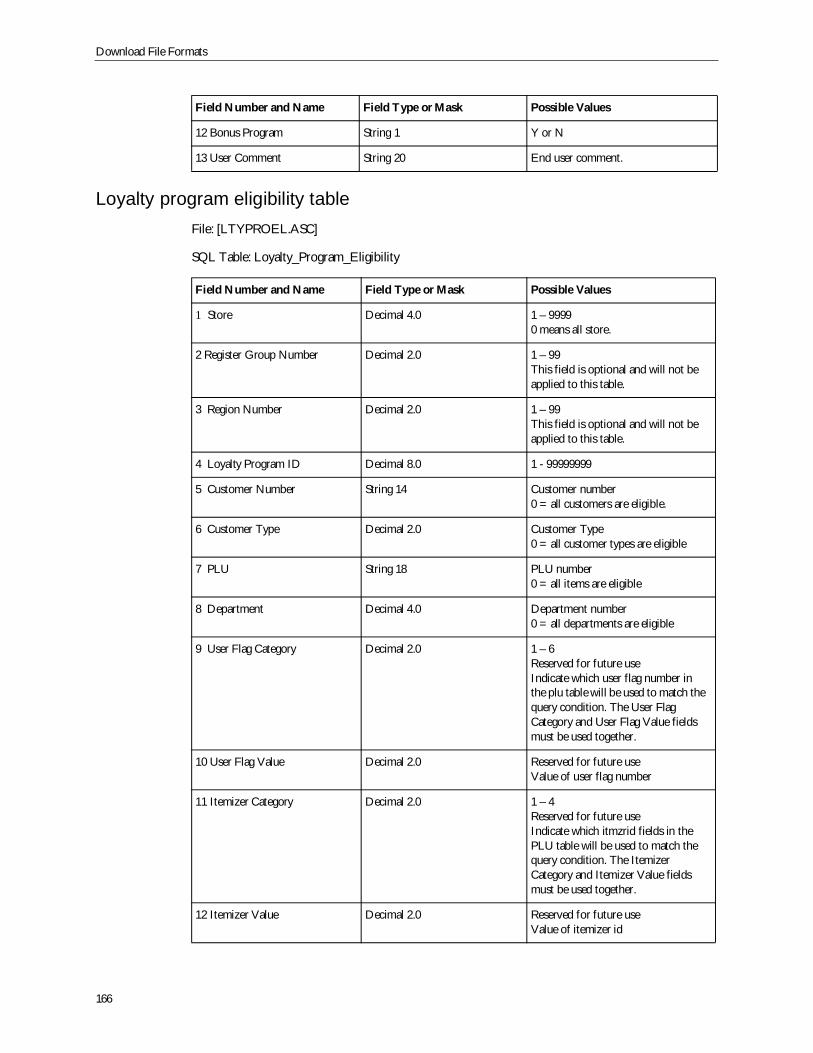
Download File Formats
166
Loyalty program eligibility tableFile: [LTYPROEL.ASC]
SQL Table: Loyalty_Program_Eligibility
12 Bonus Program String 1 Y or N
13 User Comment String 20 End user comment.
Field Number and Name Field Type or Mask Possible Values
1 Store Decimal 4.0 1 – 99990 means all store.
2 Register Group Number Decimal 2.0 1 – 99This field is optional and will not beapplied to this table.
3 Region Number Decimal 2.0 1 – 99This field is optional and will not beapplied to this table.
4 Loyalty Program ID Decimal 8.0 1 - 99999999
5 Customer Number String 14 Customer number0 = all customers are eligible.
6 Customer Type Decimal 2.0 Customer Type0 = all customer types are eligible
7 PLU String 18 PLU number0 = all items are eligible
8 Department Decimal 4.0 Department number0 = all departments are eligible
9 User Flag Category Decimal 2.0 1 – 6Reserved for future useIndicate which user flag number inthe plu table will be used to match thequery condition. The User FlagCategory and User Flag Value fieldsmust be used together.
10 User Flag Value Decimal 2.0 Reserved for future useValue of user flag number
11 Itemizer Category Decimal 2.0 1 – 4Reserved for future useIndicate which itmzrid fields in thePLU table will be used to match thequery condition. The ItemizerCategory and Itemizer Value fieldsmust be used together.
12 Itemizer Value Decimal 2.0 Reserved for future useValue of itemizer id
Field Number and Name Field Type or Mask Possible Values
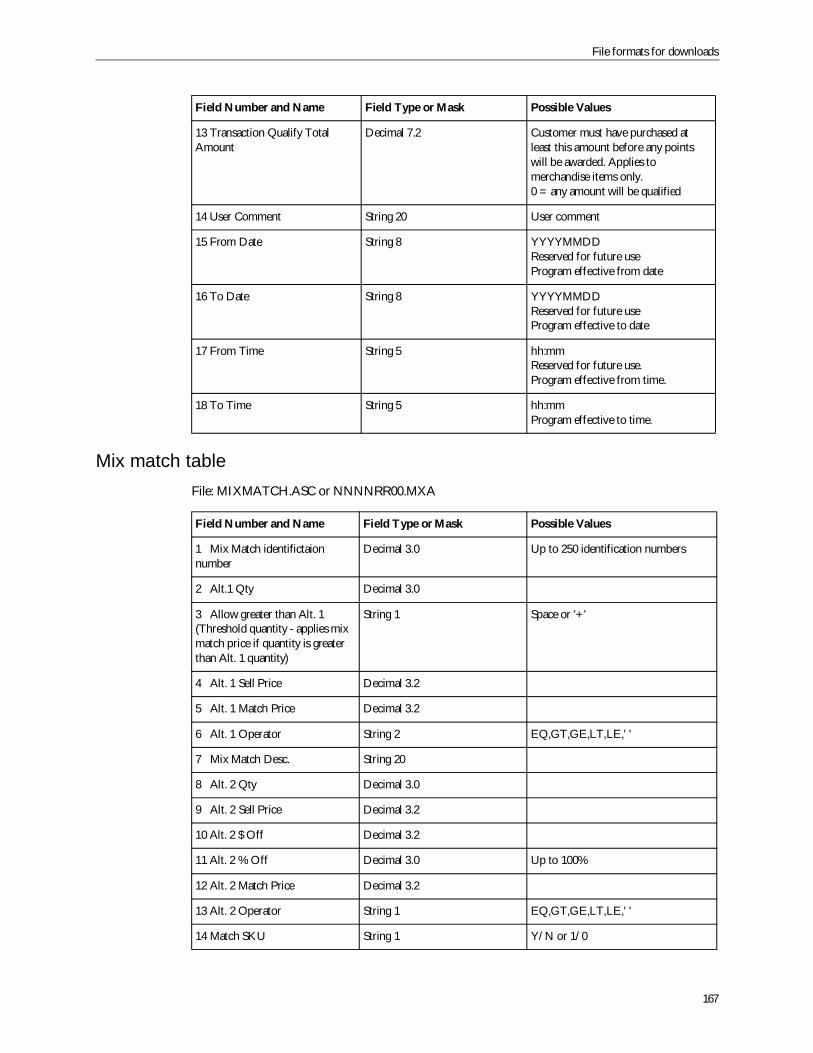
File formats for downloads
167
Mix match tableFile: MIXMATCH.ASC or NNNNRR00.MXA
13 Transaction Qualify TotalAmount
Decimal 7.2 Customer must have purchased atleast this amount before any pointswill be awarded. Applies tomerchandise items only.0 = any amount will be qualified
14 User Comment String 20 User comment
15 From Date String 8 YYYYMMDDReserved for future useProgram effective from date
16 To Date String 8 YYYYMMDDReserved for future useProgram effective to date
17 From Time String 5 hh:mmReserved for future use.Program effective from time.
18 To Time String 5 hh:mmProgram effective to time.
Field Number and Name Field Type or Mask Possible Values
1 Mix Match identifictaionnumber
Decimal 3.0 Up to 250 identification numbers
2 Alt.1 Qty Decimal 3.0
3 Allow greater than Alt. 1(Threshold quantity - applies mixmatch price if quantity is greaterthan Alt. 1 quantity)
String 1 Space or '+'
4 Alt. 1 Sell Price Decimal 3.2
5 Alt. 1 Match Price Decimal 3.2
6 Alt. 1 Operator String 2 EQ,GT,GE,LT,LE,' '
7 Mix Match Desc. String 20
8 Alt. 2 Qty Decimal 3.0
9 Alt. 2 Sell Price Decimal 3.2
10 Alt. 2 $ Off Decimal 3.2
11 Alt. 2 % Off Decimal 3.0 Up to 100%
12 Alt. 2 Match Price Decimal 3.2
13 Alt. 2 Operator String 1 EQ,GT,GE,LT,LE,' '
14 Match SKU String 1 Y/N or 1/0
Field Number and Name Field Type or Mask Possible Values
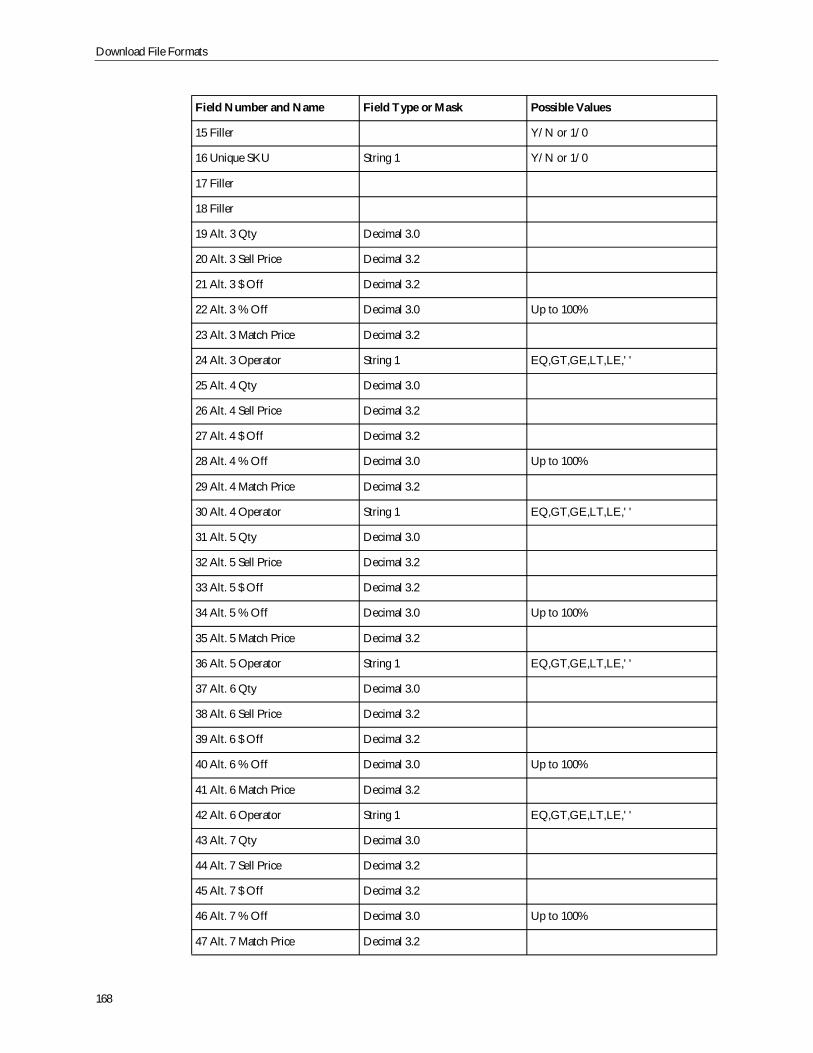
Download File Formats
168
15 Filler Y/N or 1/0
16 Unique SKU String 1 Y/N or 1/0
17 Filler
18 Filler
19 Alt. 3 Qty Decimal 3.0
20 Alt. 3 Sell Price Decimal 3.2
21 Alt. 3 $ Off Decimal 3.2
22 Alt. 3 % Off Decimal 3.0 Up to 100%
23 Alt. 3 Match Price Decimal 3.2
24 Alt. 3 Operator String 1 EQ,GT,GE,LT,LE,' '
25 Alt. 4 Qty Decimal 3.0
26 Alt. 4 Sell Price Decimal 3.2
27 Alt. 4 $ Off Decimal 3.2
28 Alt. 4 % Off Decimal 3.0 Up to 100%
29 Alt. 4 Match Price Decimal 3.2
30 Alt. 4 Operator String 1 EQ,GT,GE,LT,LE,' '
31 Alt. 5 Qty Decimal 3.0
32 Alt. 5 Sell Price Decimal 3.2
33 Alt. 5 $ Off Decimal 3.2
34 Alt. 5 % Off Decimal 3.0 Up to 100%
35 Alt. 5 Match Price Decimal 3.2
36 Alt. 5 Operator String 1 EQ,GT,GE,LT,LE,' '
37 Alt. 6 Qty Decimal 3.0
38 Alt. 6 Sell Price Decimal 3.2
39 Alt. 6 $ Off Decimal 3.2
40 Alt. 6 % Off Decimal 3.0 Up to 100%
41 Alt. 6 Match Price Decimal 3.2
42 Alt. 6 Operator String 1 EQ,GT,GE,LT,LE,' '
43 Alt. 7 Qty Decimal 3.0
44 Alt. 7 Sell Price Decimal 3.2
45 Alt. 7 $ Off Decimal 3.2
46 Alt. 7 % Off Decimal 3.0 Up to 100%
47 Alt. 7 Match Price Decimal 3.2
Field Number and Name Field Type or Mask Possible Values
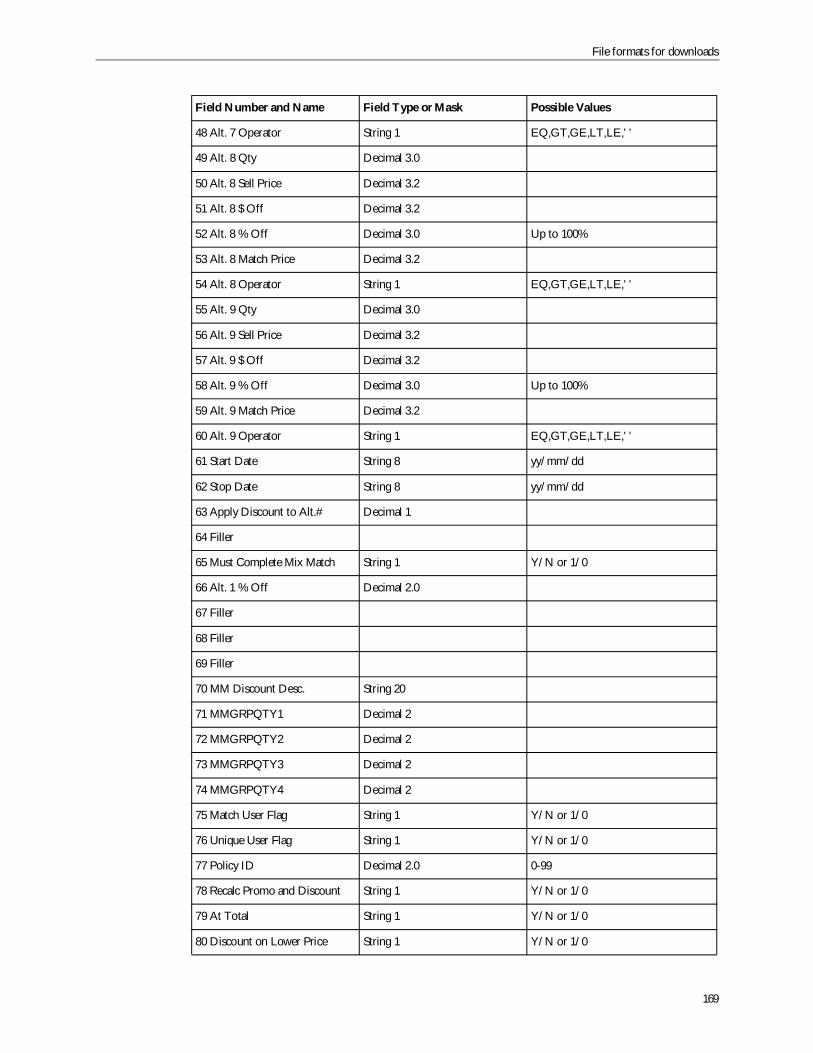
File formats for downloads
169
48 Alt. 7 Operator String 1 EQ,GT,GE,LT,LE,' '
49 Alt. 8 Qty Decimal 3.0
50 Alt. 8 Sell Price Decimal 3.2
51 Alt. 8 $ Off Decimal 3.2
52 Alt. 8 % Off Decimal 3.0 Up to 100%
53 Alt. 8 Match Price Decimal 3.2
54 Alt. 8 Operator String 1 EQ,GT,GE,LT,LE,' '
55 Alt. 9 Qty Decimal 3.0
56 Alt. 9 Sell Price Decimal 3.2
57 Alt. 9 $ Off Decimal 3.2
58 Alt. 9 % Off Decimal 3.0 Up to 100%
59 Alt. 9 Match Price Decimal 3.2
60 Alt. 9 Operator String 1 EQ,GT,GE,LT,LE,' '
61 Start Date String 8 yy/mm/dd
62 Stop Date String 8 yy/mm/dd
63 Apply Discount to Alt.# Decimal 1
64 Filler
65 Must Complete Mix Match String 1 Y/N or 1/0
66 Alt. 1 % Off Decimal 2.0
67 Filler
68 Filler
69 Filler
70 MM Discount Desc. String 20
71 MMGRPQTY1 Decimal 2
72 MMGRPQTY2 Decimal 2
73 MMGRPQTY3 Decimal 2
74 MMGRPQTY4 Decimal 2
75 Match User Flag String 1 Y/N or 1/0
76 Unique User Flag String 1 Y/N or 1/0
77 Policy ID Decimal 2.0 0-99
78 Recalc Promo and Discount String 1 Y/N or 1/0
79 At Total String 1 Y/N or 1/0
80 Discount on Lower Price String 1 Y/N or 1/0
Field Number and Name Field Type or Mask Possible Values
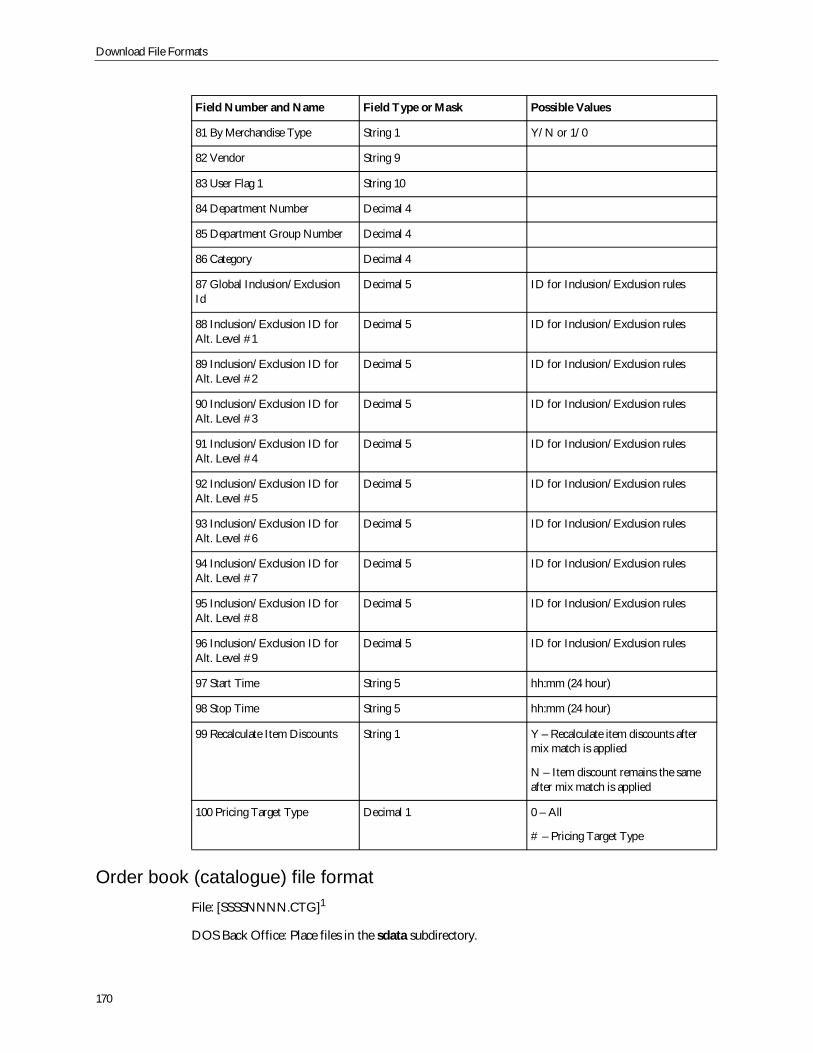
Download File Formats
170
Order book (catalogue) file formatFile: [SSSSNNNN.CTG]1
DOS Back Office: Place files in the sdata subdirectory.
81 By Merchandise Type String 1 Y/N or 1/0
82 Vendor String 9
83 User Flag 1 String 10
84 Department Number Decimal 4
85 Department Group Number Decimal 4
86 Category Decimal 4
87 Global Inclusion/ExclusionId
Decimal 5 ID for Inclusion/Exclusion rules
88 Inclusion/Exclusion ID forAlt. Level #1
Decimal 5 ID for Inclusion/Exclusion rules
89 Inclusion/Exclusion ID forAlt. Level #2
Decimal 5 ID for Inclusion/Exclusion rules
90 Inclusion/Exclusion ID forAlt. Level #3
Decimal 5 ID for Inclusion/Exclusion rules
91 Inclusion/Exclusion ID forAlt. Level #4
Decimal 5 ID for Inclusion/Exclusion rules
92 Inclusion/Exclusion ID forAlt. Level #5
Decimal 5 ID for Inclusion/Exclusion rules
93 Inclusion/Exclusion ID forAlt. Level #6
Decimal 5 ID for Inclusion/Exclusion rules
94 Inclusion/Exclusion ID forAlt. Level #7
Decimal 5 ID for Inclusion/Exclusion rules
95 Inclusion/Exclusion ID forAlt. Level #8
Decimal 5 ID for Inclusion/Exclusion rules
96 Inclusion/Exclusion ID forAlt. Level #9
Decimal 5 ID for Inclusion/Exclusion rules
97 Start Time String 5 hh:mm (24 hour)
98 Stop Time String 5 hh:mm (24 hour)
99 Recalculate Item Discounts String 1 Y – Recalculate item discounts aftermix match is applied
N – Item discount remains the sameafter mix match is applied
100 Pricing Target Type Decimal 1 0 – All
# – Pricing Target Type
Field Number and Name Field Type or Mask Possible Values
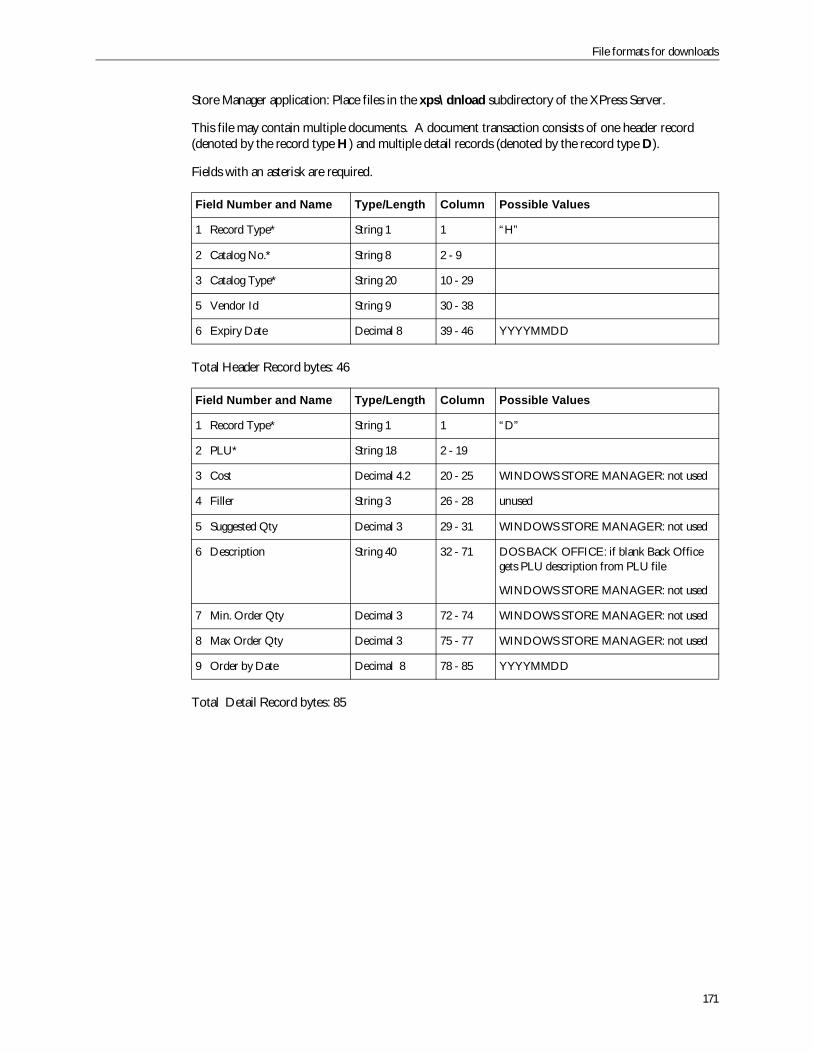
File formats for downloads
171
Store Manager application: Place files in the xps\dnload subdirectory of the XPress Server.
This file may contain multiple documents. A document transaction consists of one header record(denoted by the record type H) and multiple detail records (denoted by the record type D).
Fields with an asterisk are required.
Total Header Record bytes: 46
Total Detail Record bytes: 85
Field Number and Name Type/Length Column Possible Values
1 Record Type* String 1 1 “H”
2 Catalog No.* String 8 2 - 9
3 Catalog Type* String 20 10 - 29
5 Vendor Id String 9 30 - 38
6 Expiry Date Decimal 8 39 - 46 YYYYMMDD
Field Number and Name Type/Length Column Possible Values
1 Record Type* String 1 1 “D”
2 PLU* String 18 2 - 19
3 Cost Decimal 4.2 20 - 25 WINDOWS STORE MANAGER: not used
4 Filler String 3 26 - 28 unused
5 Suggested Qty Decimal 3 29 - 31 WINDOWS STORE MANAGER: not used
6 Description String 40 32 - 71 DOS BACK OFFICE: if blank Back Officegets PLU description from PLU file
WINDOWS STORE MANAGER: not used
7 Min. Order Qty Decimal 3 72 - 74 WINDOWS STORE MANAGER: not used
8 Max Order Qty Decimal 3 75 - 77 WINDOWS STORE MANAGER: not used
9 Order by Date Decimal 8 78 - 85 YYYYMMDD
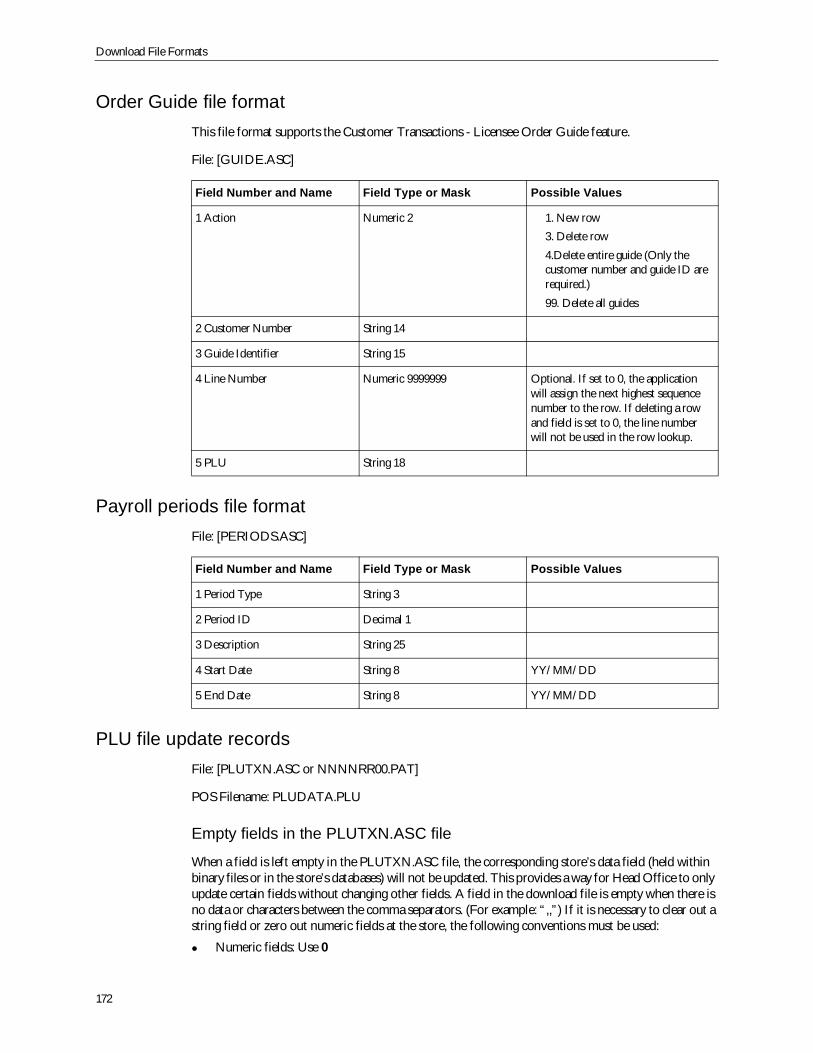
Download File Formats
172
Order Guide file formatThis file format supports the Customer Transactions - Licensee Order Guide feature.
File: [GUIDE.ASC]
Payroll periods file formatFile: [PERIODS.ASC]
PLU file update recordsFile: [PLUTXN.ASC or NNNNRR00.PAT]
POS Filename: PLUDATA.PLU
Empty fields in the PLUTXN.ASC file
When a field is left empty in the PLUTXN.ASC file, the corresponding store’s data field (held withinbinary files or in the store’s databases) will not be updated. This provides a way for Head Office to onlyupdate certain fields without changing other fields. A field in the download file is empty when there isno data or characters between the comma separators. (For example: “,,”) If it is necessary to clear out astring field or zero out numeric fields at the store, the following conventions must be used:
Numeric fields: Use 0
Field Number and Name Field Type or Mask Possible Values
1 Action Numeric 2 1. New row3. Delete row4.Delete entire guide (Only thecustomer number and guide ID arerequired.)99. Delete all guides
2 Customer Number String 14
3 Guide Identifier String 15
4 Line Number Numeric 9999999 Optional. If set to 0, the applicationwill assign the next highest sequencenumber to the row. If deleting a rowand field is set to 0, the line numberwill not be used in the row lookup.
5 PLU String 18
Field Number and Name Field Type or Mask Possible Values
1 Period Type String 3
2 Period ID Decimal 1
3 Description String 25
4 Start Date String 8 YY/MM/DD
5 End Date String 8 YY/MM/DD
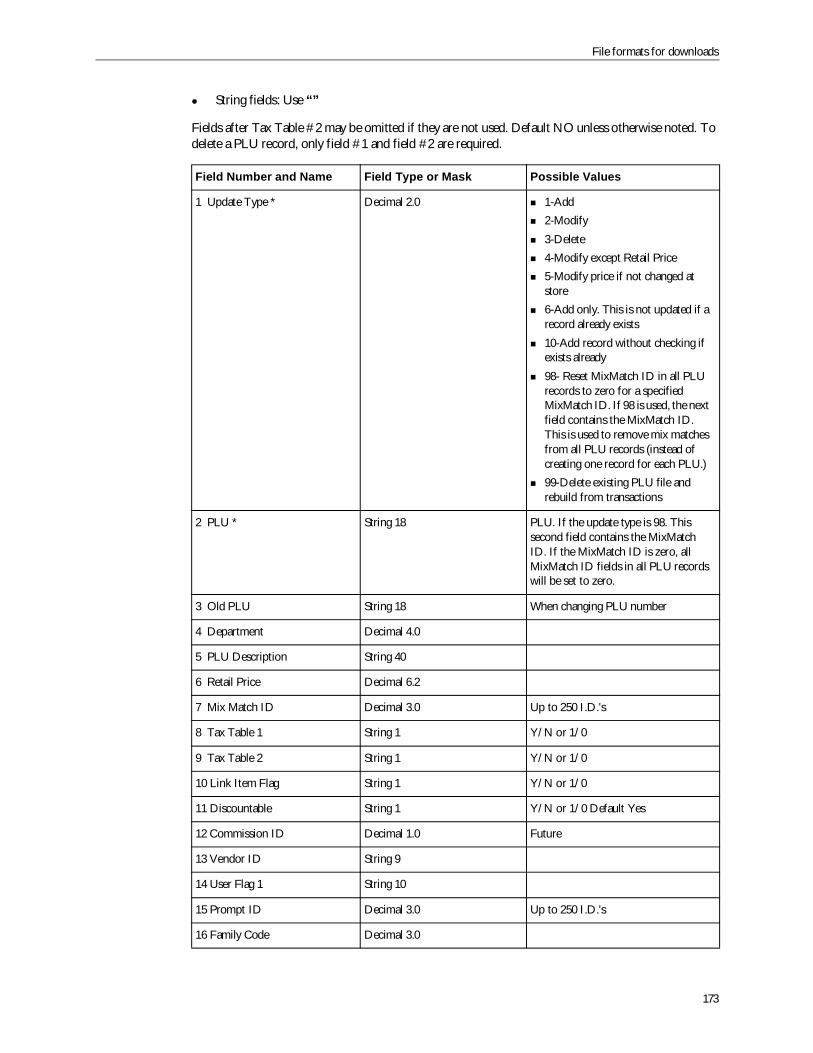
File formats for downloads
173
String fields: Use “”
Fields after Tax Table #2 may be omitted if they are not used. Default NO unless otherwise noted. Todelete a PLU record, only field #1 and field #2 are required.
Field Number and Name Field Type or Mask Possible Values
1 Update Type * Decimal 2.0 1-Add2-Modify3-Delete4-Modify except Retail Price5-Modify price if not changed atstore6-Add only. This is not updated if arecord already exists10-Add record without checking ifexists already98- Reset MixMatch ID in all PLUrecords to zero for a specifiedMixMatch ID. If 98 is used, the nextfield contains the MixMatch ID.This is used to remove mix matchesfrom all PLU records (instead ofcreating one record for each PLU.)99-Delete existing PLU file andrebuild from transactions
2 PLU * String 18 PLU. If the update type is 98. Thissecond field contains the MixMatchID. If the MixMatch ID is zero, allMixMatch ID fields in all PLU recordswill be set to zero.
3 Old PLU String 18 When changing PLU number
4 Department Decimal 4.0
5 PLU Description String 40
6 Retail Price Decimal 6.2
7 Mix Match ID Decimal 3.0 Up to 250 I.D.'s
8 Tax Table 1 String 1 Y/N or 1/0
9 Tax Table 2 String 1 Y/N or 1/0
10 Link Item Flag String 1 Y/N or 1/0
11 Discountable String 1 Y/N or 1/0 Default Yes
12 Commission ID Decimal 1.0 Future
13 Vendor ID String 9
14 User Flag 1 String 10
15 Prompt ID Decimal 3.0 Up to 250 I.D.'s
16 Family Code Decimal 3.0
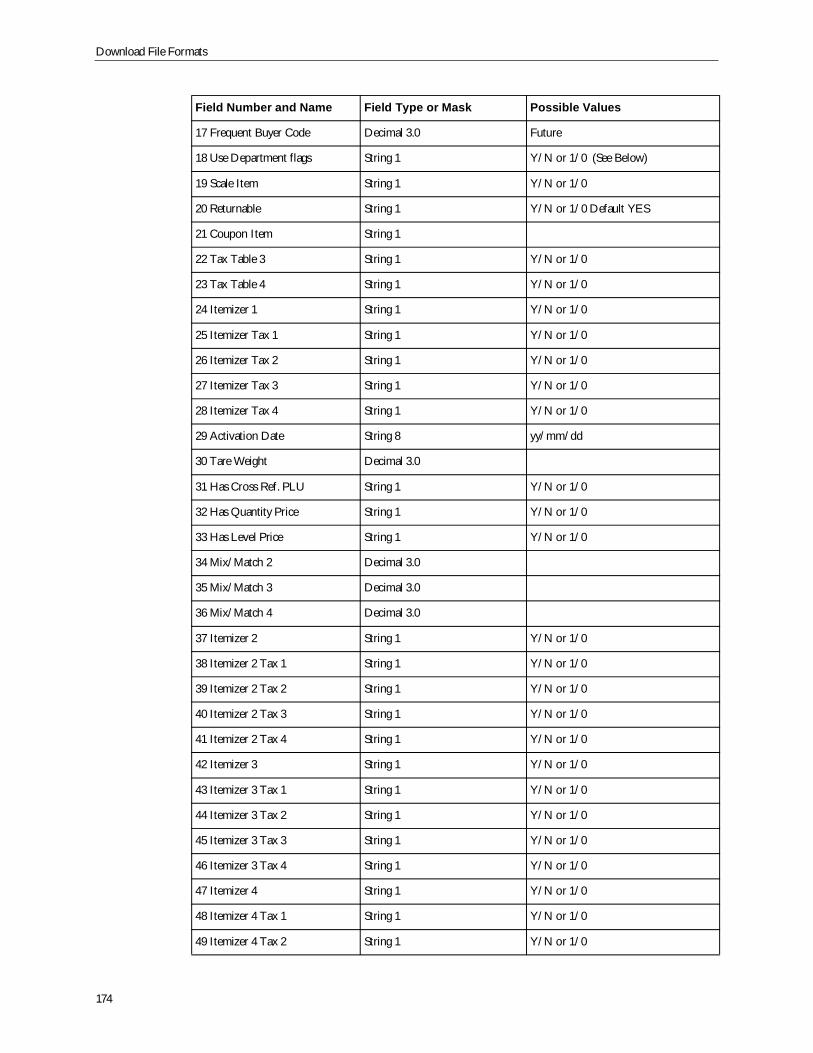
Download File Formats
174
17 Frequent Buyer Code Decimal 3.0 Future
18 Use Department flags String 1 Y/N or 1/0 (See Below)
19 Scale Item String 1 Y/N or 1/0
20 Returnable String 1 Y/N or 1/0 Default YES
21 Coupon Item String 1
22 Tax Table 3 String 1 Y/N or 1/0
23 Tax Table 4 String 1 Y/N or 1/0
24 Itemizer 1 String 1 Y/N or 1/0
25 Itemizer Tax 1 String 1 Y/N or 1/0
26 Itemizer Tax 2 String 1 Y/N or 1/0
27 Itemizer Tax 3 String 1 Y/N or 1/0
28 Itemizer Tax 4 String 1 Y/N or 1/0
29 Activation Date String 8 yy/mm/dd
30 Tare Weight Decimal 3.0
31 Has Cross Ref. PLU String 1 Y/N or 1/0
32 Has Quantity Price String 1 Y/N or 1/0
33 Has Level Price String 1 Y/N or 1/0
34 Mix/Match 2 Decimal 3.0
35 Mix/Match 3 Decimal 3.0
36 Mix/Match 4 Decimal 3.0
37 Itemizer 2 String 1 Y/N or 1/0
38 Itemizer 2 Tax 1 String 1 Y/N or 1/0
39 Itemizer 2 Tax 2 String 1 Y/N or 1/0
40 Itemizer 2 Tax 3 String 1 Y/N or 1/0
41 Itemizer 2 Tax 4 String 1 Y/N or 1/0
42 Itemizer 3 String 1 Y/N or 1/0
43 Itemizer 3 Tax 1 String 1 Y/N or 1/0
44 Itemizer 3 Tax 2 String 1 Y/N or 1/0
45 Itemizer 3 Tax 3 String 1 Y/N or 1/0
46 Itemizer 3 Tax 4 String 1 Y/N or 1/0
47 Itemizer 4 String 1 Y/N or 1/0
48 Itemizer 4 Tax 1 String 1 Y/N or 1/0
49 Itemizer 4 Tax 2 String 1 Y/N or 1/0
Field Number and Name Field Type or Mask Possible Values
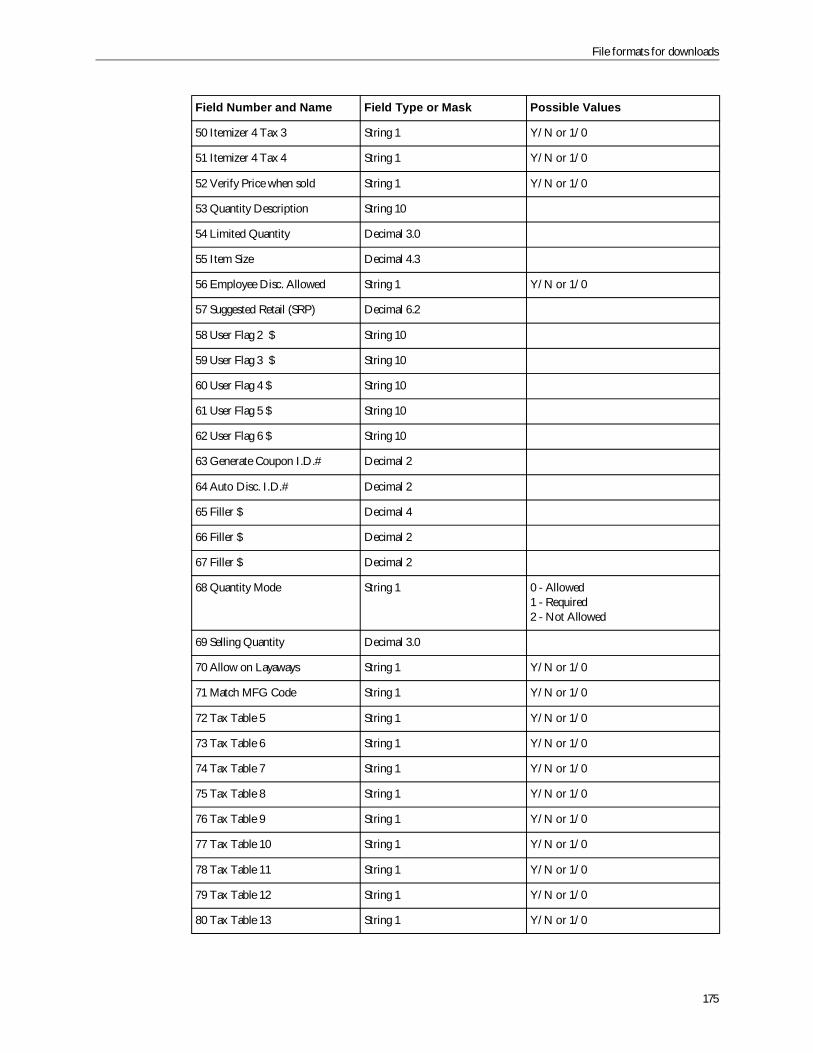
File formats for downloads
175
50 Itemizer 4 Tax 3 String 1 Y/N or 1/0
51 Itemizer 4 Tax 4 String 1 Y/N or 1/0
52 Verify Price when sold String 1 Y/N or 1/0
53 Quantity Description String 10
54 Limited Quantity Decimal 3.0
55 Item Size Decimal 4.3
56 Employee Disc. Allowed String 1 Y/N or 1/0
57 Suggested Retail (SRP) Decimal 6.2
58 User Flag 2 $ String 10
59 User Flag 3 $ String 10
60 User Flag 4 $ String 10
61 User Flag 5 $ String 10
62 User Flag 6 $ String 10
63 Generate Coupon I.D.# Decimal 2
64 Auto Disc. I.D.# Decimal 2
65 Filler $ Decimal 4
66 Filler $ Decimal 2
67 Filler $ Decimal 2
68 Quantity Mode String 1 0 - Allowed1 - Required2 - Not Allowed
69 Selling Quantity Decimal 3.0
70 Allow on Layaways String 1 Y/N or 1/0
71 Match MFG Code String 1 Y/N or 1/0
72 Tax Table 5 String 1 Y/N or 1/0
73 Tax Table 6 String 1 Y/N or 1/0
74 Tax Table 7 String 1 Y/N or 1/0
75 Tax Table 8 String 1 Y/N or 1/0
76 Tax Table 9 String 1 Y/N or 1/0
77 Tax Table 10 String 1 Y/N or 1/0
78 Tax Table 11 String 1 Y/N or 1/0
79 Tax Table 12 String 1 Y/N or 1/0
80 Tax Table 13 String 1 Y/N or 1/0
Field Number and Name Field Type or Mask Possible Values
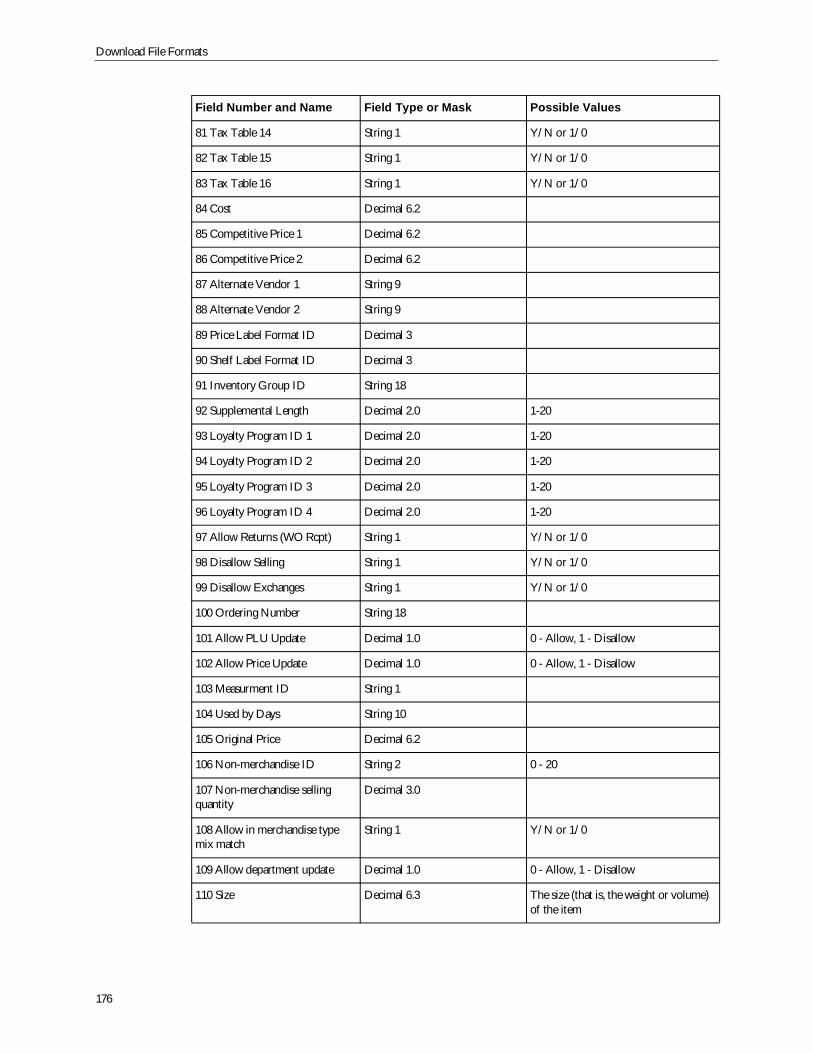
Download File Formats
176
81 Tax Table 14 String 1 Y/N or 1/0
82 Tax Table 15 String 1 Y/N or 1/0
83 Tax Table 16 String 1 Y/N or 1/0
84 Cost Decimal 6.2
85 Competitive Price 1 Decimal 6.2
86 Competitive Price 2 Decimal 6.2
87 Alternate Vendor 1 String 9
88 Alternate Vendor 2 String 9
89 Price Label Format ID Decimal 3
90 Shelf Label Format ID Decimal 3
91 Inventory Group ID String 18
92 Supplemental Length Decimal 2.0 1-20
93 Loyalty Program ID 1 Decimal 2.0 1-20
94 Loyalty Program ID 2 Decimal 2.0 1-20
95 Loyalty Program ID 3 Decimal 2.0 1-20
96 Loyalty Program ID 4 Decimal 2.0 1-20
97 Allow Returns (WO Rcpt) String 1 Y/N or 1/0
98 Disallow Selling String 1 Y/N or 1/0
99 Disallow Exchanges String 1 Y/N or 1/0
100 Ordering Number String 18
101 Allow PLU Update Decimal 1.0 0 - Allow, 1 - Disallow
102 Allow Price Update Decimal 1.0 0 - Allow, 1 - Disallow
103 Measurment ID String 1
104 Used by Days String 10
105 Original Price Decimal 6.2
106 Non-merchandise ID String 2 0 - 20
107 Non-merchandise sellingquantity
Decimal 3.0
108 Allow in merchandise typemix match
String 1 Y/N or 1/0
109 Allow department update Decimal 1.0 0 - Allow, 1 - Disallow
110 Size Decimal 6.3 The size (that is, the weight or volume)of the item
Field Number and Name Field Type or Mask Possible Values

File formats for downloads
177
Note: Records in the PLU transaction file which are not yet effective are stored in the filePLUPOST.PLU for reprocessing when the next transaction update is performed, after polling or ifmanager code 909 is performed.
PLU supplemental file update recordsFile: [PLUTXN2.ASC]
POS Filename: PLUDATA.PLU
SQL Table: PLU_Supplemental
Price batch file formatFile: [BATCHCHG.ASC] (two record types)
111 Size type String 4 Indicates the type of format of “Size”used for this item. For example, ML orGM
112 Inventory controlled String 1 Y/N or 1/0Y – item is inventory controlledN – item is not inventory controlled
Field Number and Name Field Type or Mask Possible Values
1 Update Type * Decimal 2.0 1-Add, 2-Modify, 3-Delete99-Delete existing PLU file & rebuildfrom transactions
2 PLU * String 18
3 Old PLU String 18 When changing PLU number
4 PLU Secondary Description String 80
Field Number and Name Field Type or Mask Possible Values
1 Action Code Decimal 1.0 1 - Add
2 - Modify
3 - Delete
2 Batch ID String 18
3 Record Type String 1 H
4 Entity Type String 3 PLU
5 Effective Date String 8 yyyy/mm/dd
6 Effective Time String 5 hh:mm
Field Number and Name Field Type or Mask Possible Values
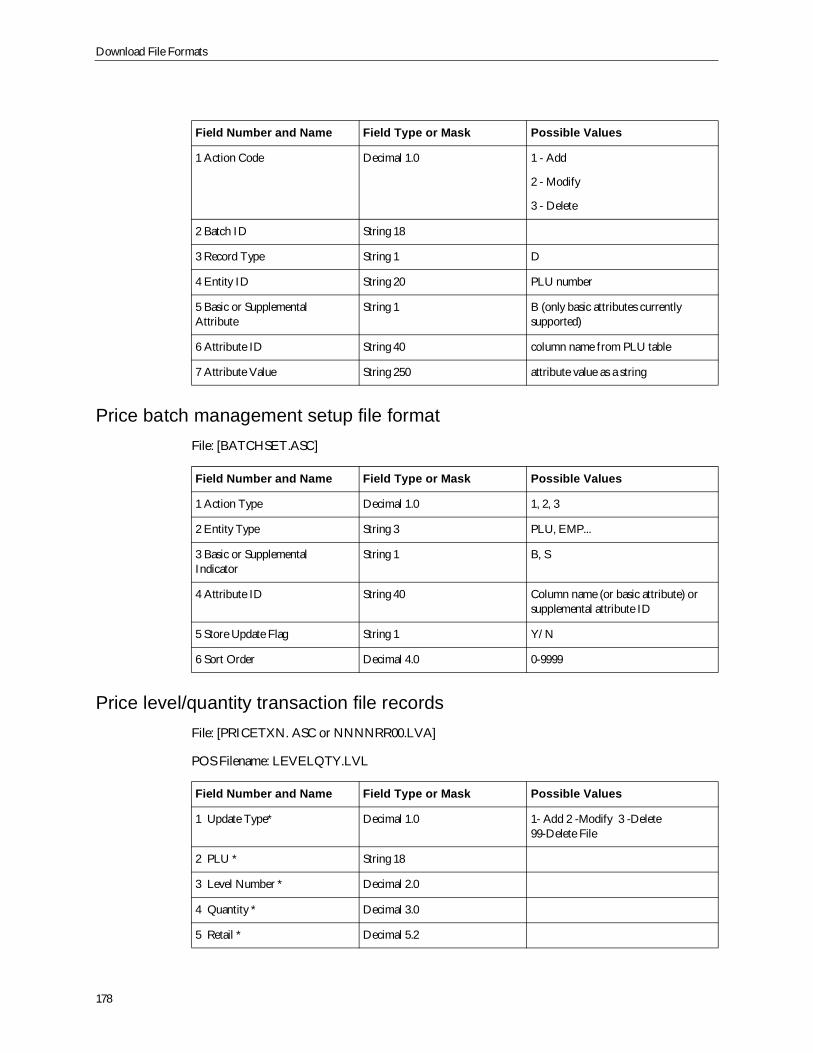
Download File Formats
178
Price batch management setup file formatFile: [BATCHSET.ASC]
Price level/quantity transaction file recordsFile: [PRICETXN. ASC or NNNNRR00.LVA]
POS Filename: LEVELQTY.LVL
Field Number and Name Field Type or Mask Possible Values
1 Action Code Decimal 1.0 1 - Add
2 - Modify
3 - Delete
2 Batch ID String 18
3 Record Type String 1 D
4 Entity ID String 20 PLU number
5 Basic or SupplementalAttribute
String 1 B (only basic attributes currentlysupported)
6 Attribute ID String 40 column name from PLU table
7 Attribute Value String 250 attribute value as a string
Field Number and Name Field Type or Mask Possible Values
1 Action Type Decimal 1.0 1, 2, 3
2 Entity Type String 3 PLU, EMP...
3 Basic or SupplementalIndicator
String 1 B, S
4 Attribute ID String 40 Column name (or basic attribute) orsupplemental attribute ID
5 Store Update Flag String 1 Y/N
6 Sort Order Decimal 4.0 0-9999
Field Number and Name Field Type or Mask Possible Values
1 Update Type* Decimal 1.0 1- Add 2 -Modify 3 -Delete99-Delete File
2 PLU * String 18
3 Level Number * Decimal 2.0
4 Quantity * Decimal 3.0
5 Retail * Decimal 5.2

File formats for downloads
179
Promotional file update recordsFile: [PROMOTXN.ASC or NNNNRR00.PAO]
POS Filename: PROMO.PRO
6 Tax Table 1 String 1 Y/N or 1/0
7 Tax Table 2 String 1 Y/N or 1/0
8 Tax Table 3 String 1 Y/N or 1/0
9 Tax Table 4 String 1 Y/N or 1/0
10 Description String 15
11 Tax Table 5 String 1 Y/N or 1/0
12 Tax Table 6 String 1 Y/N or 1/0
13 Tax Table 7 String 1 Y/N or 1/0
14 Tax Table 8 String 1 Y/N or 1/0
15 Tax Table 9 String 1 Y/N or 1/0
16 Tax Table 10 String 1 Y/N or 1/0
17 Tax Table 11 String 1 Y/N or 1/0
18 Tax Table 12 String 1 Y/N or 1/0
19 Tax Table 13 String 1 Y/N or 1/0
20 Tax Table 14 String 1 Y/N or 1/0
21 Tax Table 15 String 1 Y/N or 1/0
22 Tax Table 16 String 1 Y/N or 1/0
23 Effective Date String 10 YYYY/MM/DD - Date price is tobecome effective
Field Number and Name Field Type or Mask Possible Values
1 Update Type * Decimal 1.0 1-Add2-Modify3-Delete99-Delete Promo file and rebuildfrom transactions
2 Start Date * String 8 yy/mm/dd
3 Stop Date * String 8 yy/mm/dd
4 Start Time String 5 hh:mm
5 Stop Time String 5 hh:mm
6 PLU String 18
7 Filler String 18
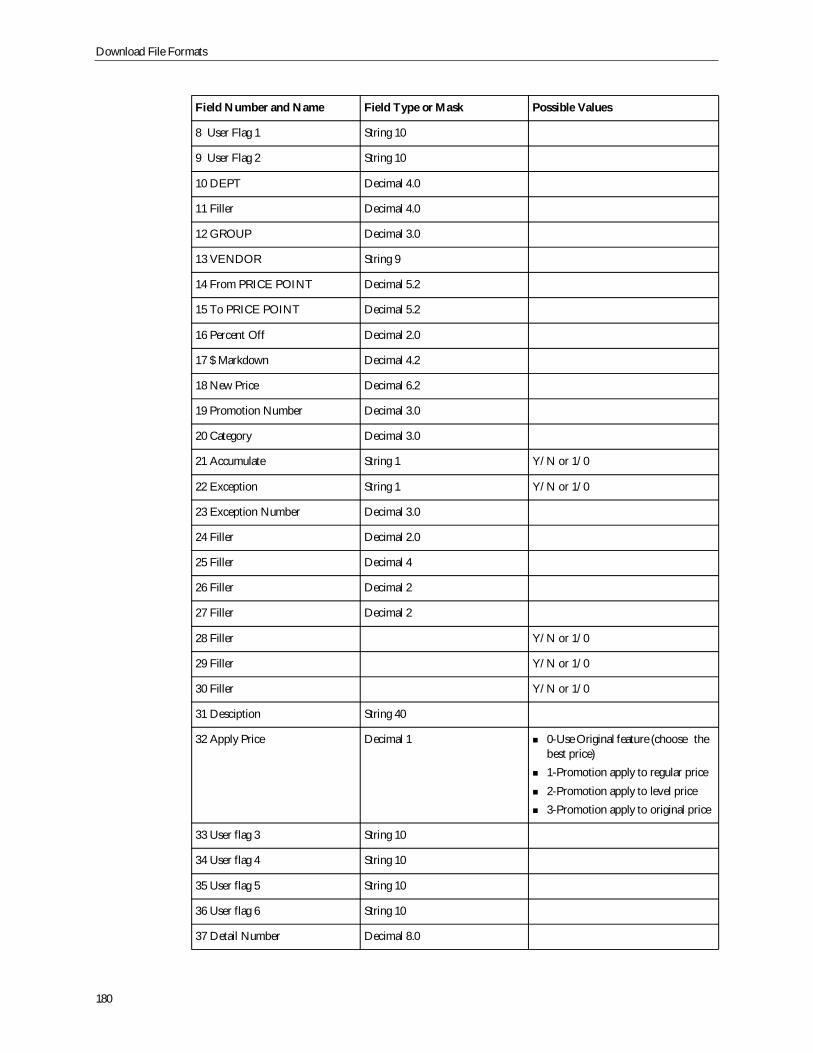
Download File Formats
180
8 User Flag 1 String 10
9 User Flag 2 String 10
10 DEPT Decimal 4.0
11 Filler Decimal 4.0
12 GROUP Decimal 3.0
13 VENDOR String 9
14 From PRICE POINT Decimal 5.2
15 To PRICE POINT Decimal 5.2
16 Percent Off Decimal 2.0
17 $ Markdown Decimal 4.2
18 New Price Decimal 6.2
19 Promotion Number Decimal 3.0
20 Category Decimal 3.0
21 Accumulate String 1 Y/N or 1/0
22 Exception String 1 Y/N or 1/0
23 Exception Number Decimal 3.0
24 Filler Decimal 2.0
25 Filler Decimal 4
26 Filler Decimal 2
27 Filler Decimal 2
28 Filler Y/N or 1/0
29 Filler Y/N or 1/0
30 Filler Y/N or 1/0
31 Desciption String 40
32 Apply Price Decimal 1 0-Use Original feature (choose thebest price)1-Promotion apply to regular price2-Promotion apply to level price3-Promotion apply to original price
33 User flag 3 String 10
34 User flag 4 String 10
35 User flag 5 String 10
36 User flag 6 String 10
37 Detail Number Decimal 8.0
Field Number and Name Field Type or Mask Possible Values
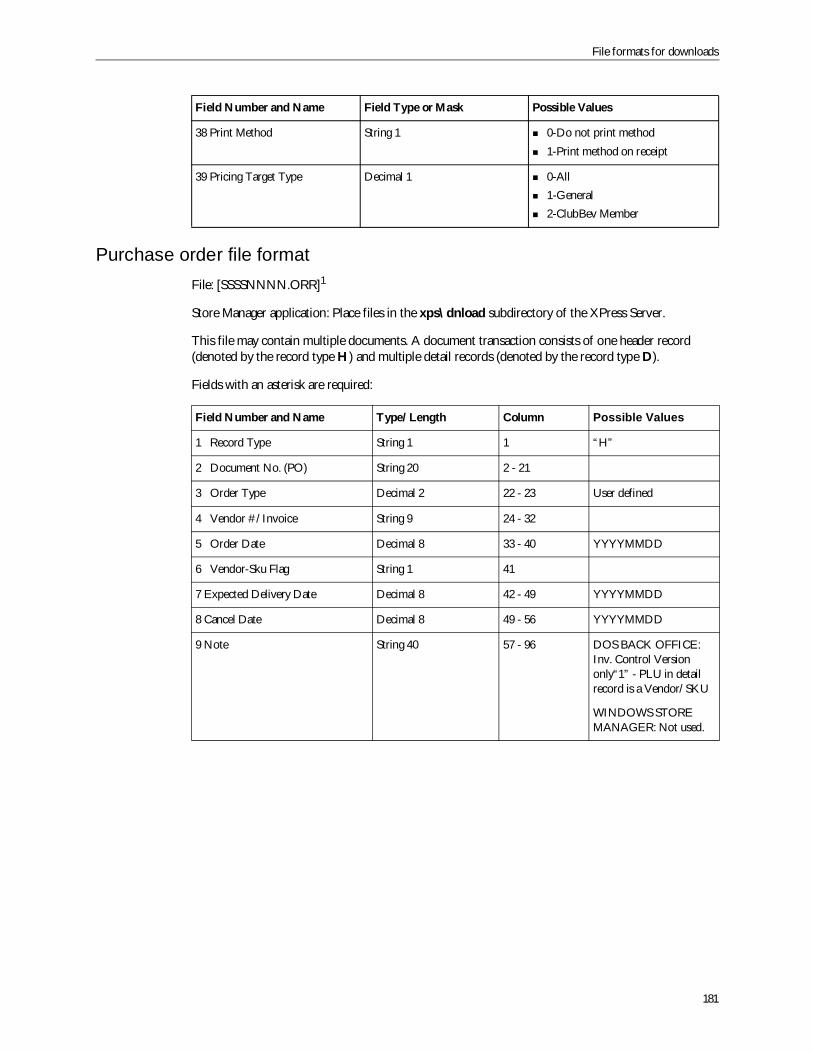
File formats for downloads
181
Purchase order file formatFile: [SSSSNNNN.ORR]1
Store Manager application: Place files in the xps\dnload subdirectory of the XPress Server.
This file may contain multiple documents. A document transaction consists of one header record(denoted by the record type H) and multiple detail records (denoted by the record type D).
Fields with an asterisk are required:
38 Print Method String 1 0-Do not print method1-Print method on receipt
39 Pricing Target Type Decimal 1 0-All1-General2-ClubBev Member
Field Number and Name Type/Length Column Possible Values
1 Record Type String 1 1 “H”
2 Document No. (PO) String 20 2 - 21
3 Order Type Decimal 2 22 - 23 User defined
4 Vendor #/Invoice String 9 24 - 32
5 Order Date Decimal 8 33 - 40 YYYYMMDD
6 Vendor-Sku Flag String 1 41
7 Expected Delivery Date Decimal 8 42 - 49 YYYYMMDD
8 Cancel Date Decimal 8 49 - 56 YYYYMMDD
9 Note String 40 57 - 96 DOS BACK OFFICE:Inv. Control Versiononly“1” - PLU in detailrecord is a Vendor/SKU
WINDOWS STOREMANAGER: Not used.
Field Number and Name Field Type or Mask Possible Values
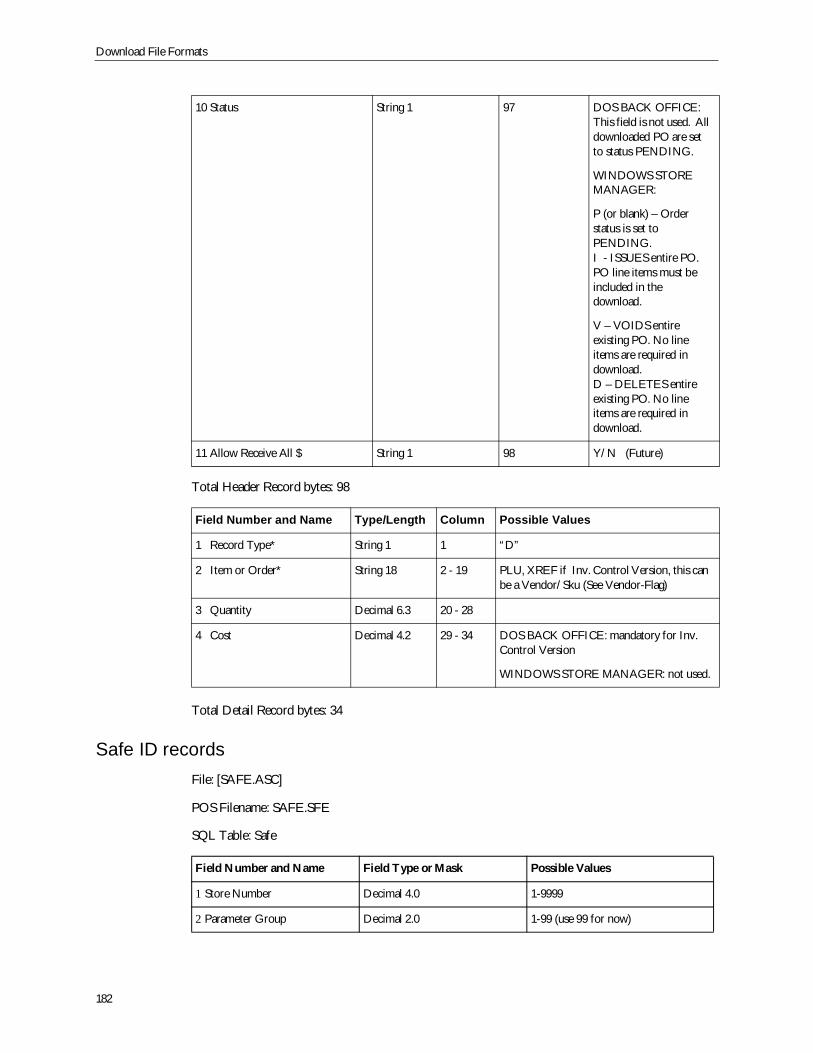
Download File Formats
182
Total Header Record bytes: 98
Total Detail Record bytes: 34
Safe ID recordsFile: [SAFE.ASC]
POS Filename: SAFE.SFE
SQL Table: Safe
10 Status String 1 97 DOS BACK OFFICE:This field is not used. Alldownloaded PO are setto status PENDING.
WINDOWS STOREMANAGER:
P (or blank) – Orderstatus is set toPENDING.I - ISSUES entire PO.PO line items must beincluded in thedownload.
V – VOIDS entireexisting PO. No lineitems are required indownload.D – DELETES entireexisting PO. No lineitems are required indownload.
11 Allow Receive All $ String 1 98 Y/N (Future)
Field Number and Name Type/Length Column Possible Values
1 Record Type* String 1 1 “D”
2 Item or Order* String 18 2 - 19 PLU, XREF if Inv. Control Version, this canbe a Vendor/Sku (See Vendor-Flag)
3 Quantity Decimal 6.3 20 - 28
4 Cost Decimal 4.2 29 - 34 DOS BACK OFFICE: mandatory for Inv.Control Version
WINDOWS STORE MANAGER: not used.
Field Number and Name Field Type or Mask Possible Values
1 Store Number Decimal 4.0 1-9999
2 Parameter Group Decimal 2.0 1-99 (use 99 for now)
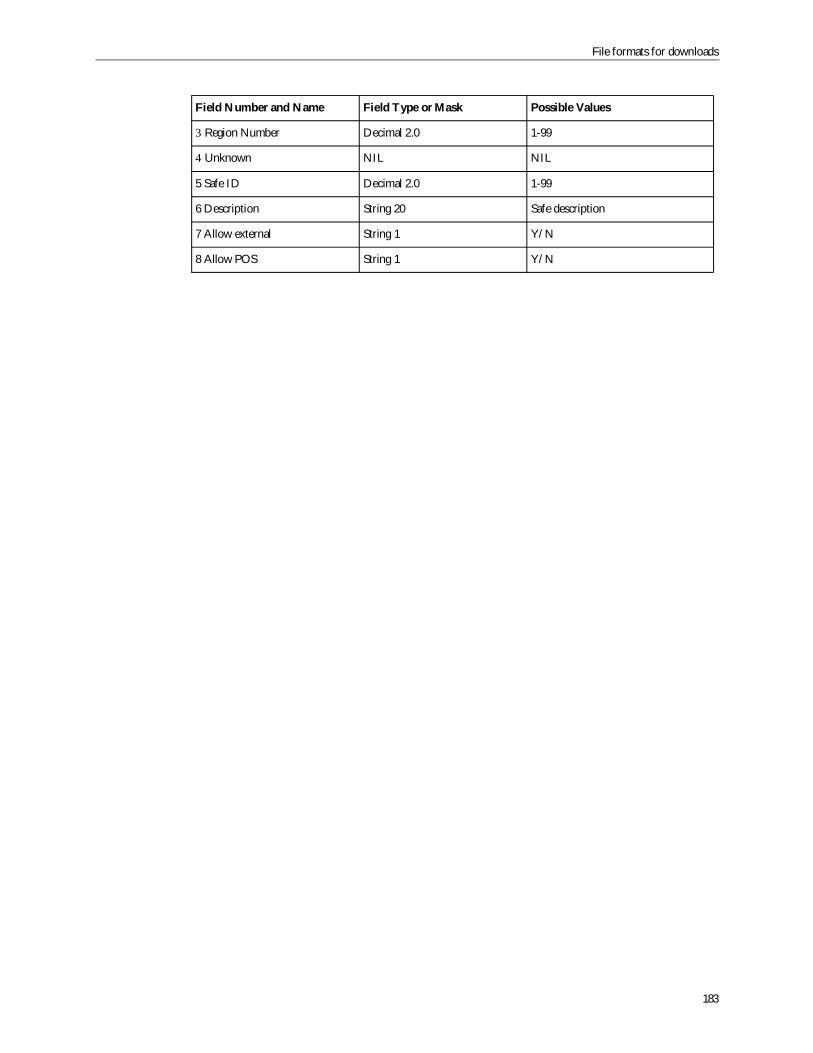
File formats for downloads
183
3 Region Number Decimal 2.0 1-99
4 Unknown NIL NIL
5 Safe ID Decimal 2.0 1-99
6 Description String 20 Safe description
7 Allow external String 1 Y/N
8 Allow POS String 1 Y/N
Field Number and Name Field Type or Mask Possible Values
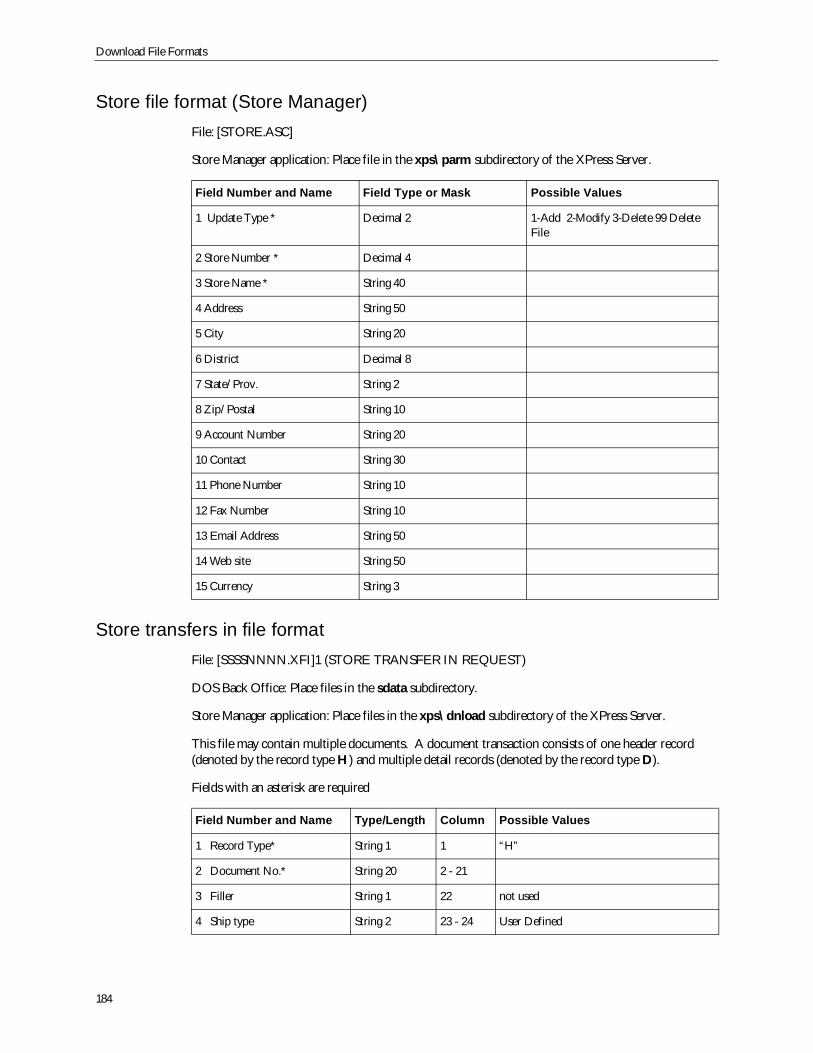
Download File Formats
184
Store file format (Store Manager)File: [STORE.ASC]
Store Manager application: Place file in the xps\parm subdirectory of the XPress Server.
Store transfers in file formatFile: [SSSSNNNN.XFI]1 (STORE TRANSFER IN REQUEST)
DOS Back Office: Place files in the sdata subdirectory.
Store Manager application: Place files in the xps\dnload subdirectory of the XPress Server.
This file may contain multiple documents. A document transaction consists of one header record(denoted by the record type H) and multiple detail records (denoted by the record type D).
Fields with an asterisk are required
Field Number and Name Field Type or Mask Possible Values
1 Update Type * Decimal 2 1-Add 2-Modify 3-Delete 99 DeleteFile
2 Store Number * Decimal 4
3 Store Name * String 40
4 Address String 50
5 City String 20
6 District Decimal 8
7 State/Prov. String 2
8 Zip/Postal String 10
9 Account Number String 20
10 Contact String 30
11 Phone Number String 10
12 Fax Number String 10
13 Email Address String 50
14 Web site String 50
15 Currency String 3
Field Number and Name Type/Length Column Possible Values
1 Record Type* String 1 1 “H”
2 Document No.* String 20 2 - 21
3 Filler String 1 22 not used
4 Ship type String 2 23 - 24 User Defined
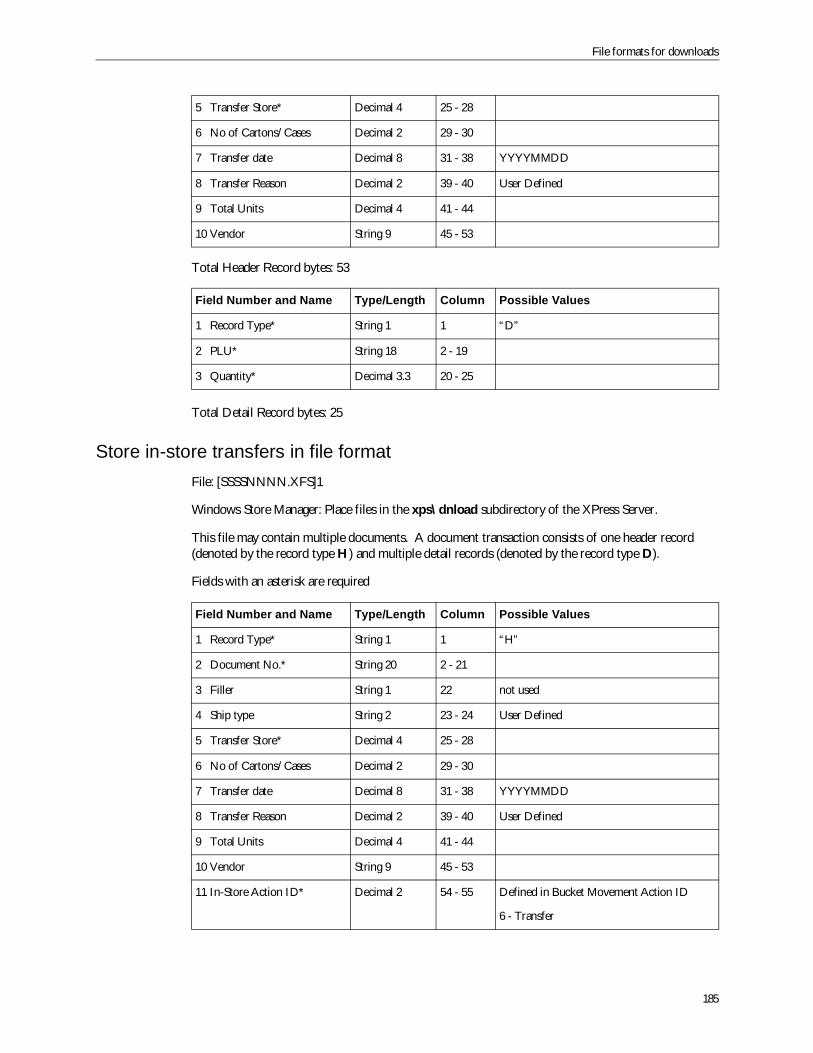
File formats for downloads
185
Total Header Record bytes: 53
Total Detail Record bytes: 25
Store in-store transfers in file formatFile: [SSSSNNNN.XFS]1
Windows Store Manager: Place files in the xps\dnload subdirectory of the XPress Server.
This file may contain multiple documents. A document transaction consists of one header record(denoted by the record type H) and multiple detail records (denoted by the record type D).
Fields with an asterisk are required
5 Transfer Store* Decimal 4 25 - 28
6 No of Cartons/Cases Decimal 2 29 - 30
7 Transfer date Decimal 8 31 - 38 YYYYMMDD
8 Transfer Reason Decimal 2 39 - 40 User Defined
9 Total Units Decimal 4 41 - 44
10 Vendor String 9 45 - 53
Field Number and Name Type/Length Column Possible Values
1 Record Type* String 1 1 “D”
2 PLU* String 18 2 - 19
3 Quantity* Decimal 3.3 20 - 25
Field Number and Name Type/Length Column Possible Values
1 Record Type* String 1 1 “H”
2 Document No.* String 20 2 - 21
3 Filler String 1 22 not used
4 Ship type String 2 23 - 24 User Defined
5 Transfer Store* Decimal 4 25 - 28
6 No of Cartons/Cases Decimal 2 29 - 30
7 Transfer date Decimal 8 31 - 38 YYYYMMDD
8 Transfer Reason Decimal 2 39 - 40 User Defined
9 Total Units Decimal 4 41 - 44
10 Vendor String 9 45 - 53
11 In-Store Action ID* Decimal 2 54 - 55 Defined in Bucket Movement Action ID
6 - Transfer
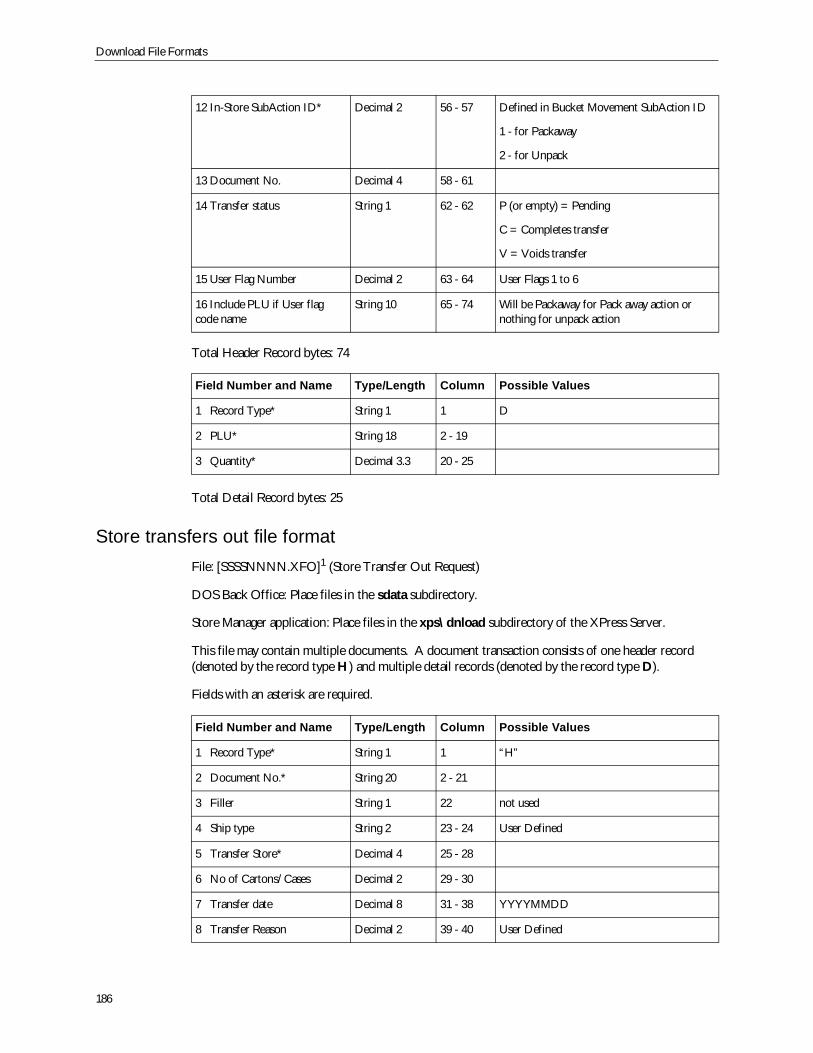
Download File Formats
186
Total Header Record bytes: 74
Total Detail Record bytes: 25
Store transfers out file formatFile: [SSSSNNNN.XFO]1 (Store Transfer Out Request)
DOS Back Office: Place files in the sdata subdirectory.
Store Manager application: Place files in the xps\dnload subdirectory of the XPress Server.
This file may contain multiple documents. A document transaction consists of one header record(denoted by the record type H) and multiple detail records (denoted by the record type D).
Fields with an asterisk are required.
12 In-Store SubAction ID* Decimal 2 56 - 57 Defined in Bucket Movement SubAction ID
1 - for Packaway
2 - for Unpack
13 Document No. Decimal 4 58 - 61
14 Transfer status String 1 62 - 62 P (or empty) = Pending
C = Completes transfer
V = Voids transfer
15 User Flag Number Decimal 2 63 - 64 User Flags 1 to 6
16 Include PLU if User flagcode name
String 10 65 - 74 Will be Packaway for Pack away action ornothing for unpack action
Field Number and Name Type/Length Column Possible Values
1 Record Type* String 1 1 D
2 PLU* String 18 2 - 19
3 Quantity* Decimal 3.3 20 - 25
Field Number and Name Type/Length Column Possible Values
1 Record Type* String 1 1 “H”
2 Document No.* String 20 2 - 21
3 Filler String 1 22 not used
4 Ship type String 2 23 - 24 User Defined
5 Transfer Store* Decimal 4 25 - 28
6 No of Cartons/Cases Decimal 2 29 - 30
7 Transfer date Decimal 8 31 - 38 YYYYMMDD
8 Transfer Reason Decimal 2 39 - 40 User Defined
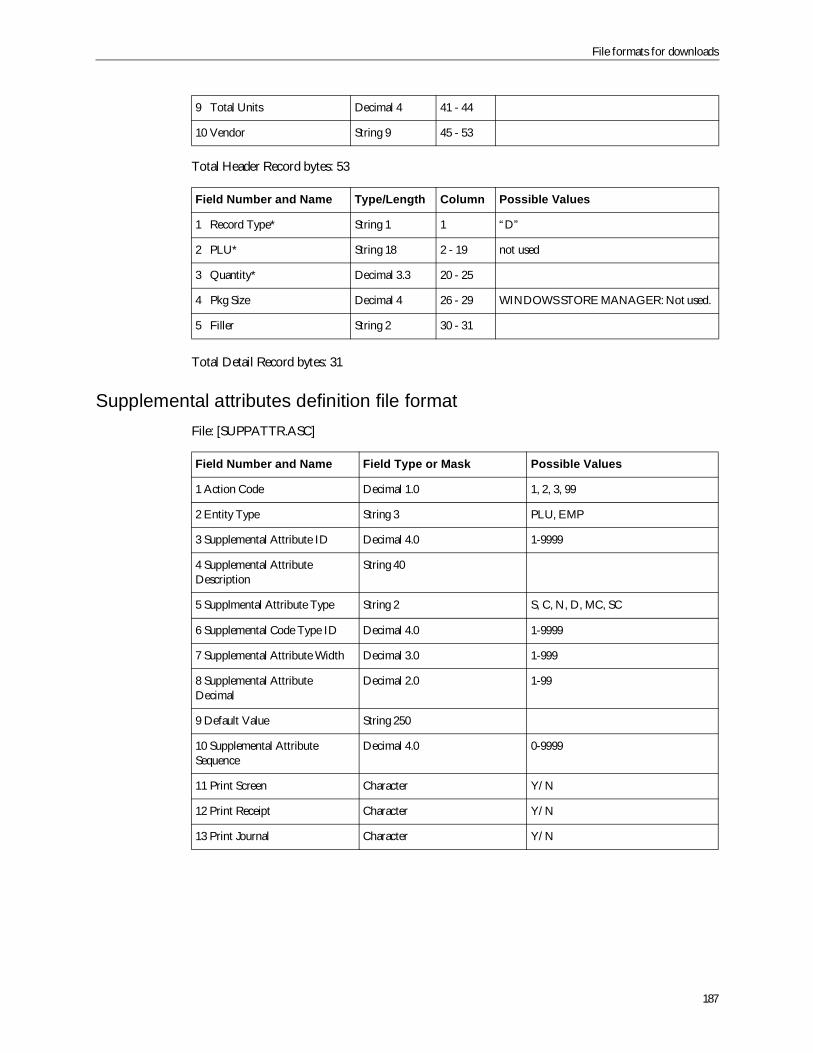
File formats for downloads
187
Total Header Record bytes: 53
Total Detail Record bytes: 31
Supplemental attributes definition file formatFile: [SUPPATTR.ASC]
9 Total Units Decimal 4 41 - 44
10 Vendor String 9 45 - 53
Field Number and Name Type/Length Column Possible Values
1 Record Type* String 1 1 “D”
2 PLU* String 18 2 - 19 not used
3 Quantity* Decimal 3.3 20 - 25
4 Pkg Size Decimal 4 26 - 29 WINDOWS STORE MANAGER: Not used.
5 Filler String 2 30 - 31
Field Number and Name Field Type or Mask Possible Values
1 Action Code Decimal 1.0 1, 2, 3, 99
2 Entity Type String 3 PLU, EMP
3 Supplemental Attribute ID Decimal 4.0 1-9999
4 Supplemental AttributeDescription
String 40
5 Supplmental Attribute Type String 2 S, C, N, D, MC, SC
6 Supplemental Code Type ID Decimal 4.0 1-9999
7 Supplemental Attribute Width Decimal 3.0 1-999
8 Supplemental AttributeDecimal
Decimal 2.0 1-99
9 Default Value String 250
10 Supplemental AttributeSequence
Decimal 4.0 0-9999
11 Print Screen Character Y/N
12 Print Receipt Character Y/N
13 Print Journal Character Y/N
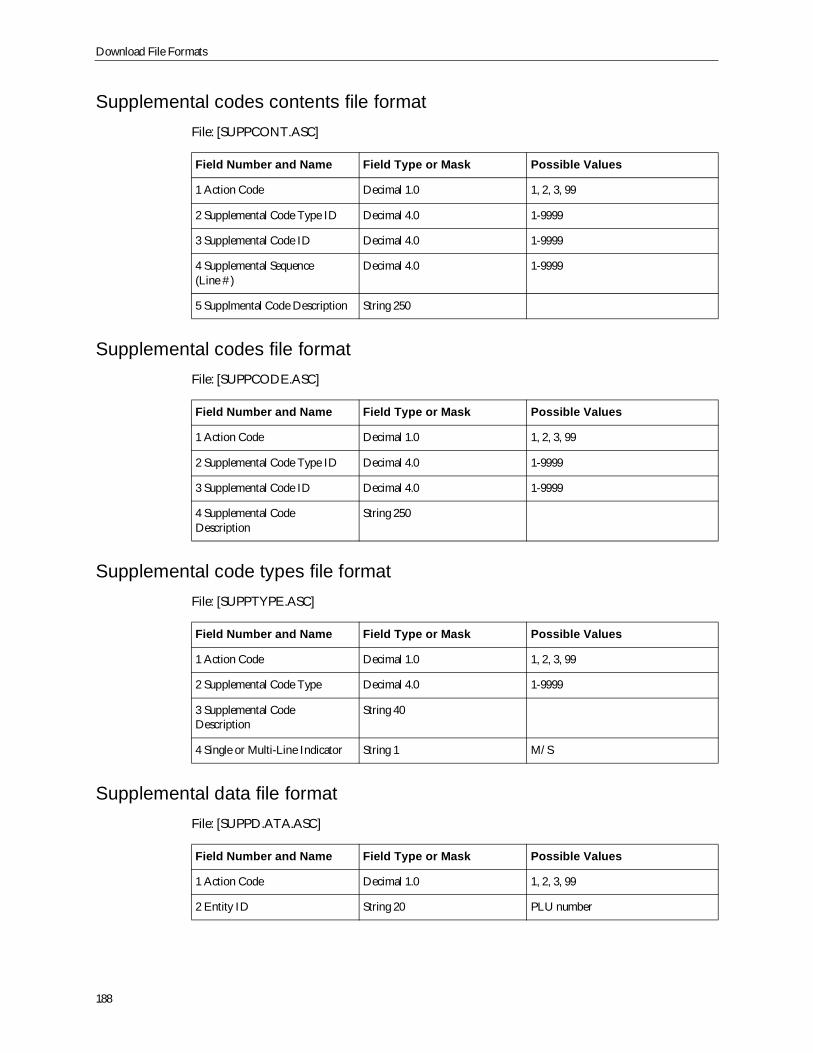
Download File Formats
188
Supplemental codes contents file formatFile: [SUPPCONT.ASC]
Supplemental codes file formatFile: [SUPPCODE.ASC]
Supplemental code types file formatFile: [SUPPTYPE.ASC]
Supplemental data file formatFile: [SUPPD.ATA.ASC]
Field Number and Name Field Type or Mask Possible Values
1 Action Code Decimal 1.0 1, 2, 3, 99
2 Supplemental Code Type ID Decimal 4.0 1-9999
3 Supplemental Code ID Decimal 4.0 1-9999
4 Supplemental Sequence(Line #)
Decimal 4.0 1-9999
5 Supplmental Code Description String 250
Field Number and Name Field Type or Mask Possible Values
1 Action Code Decimal 1.0 1, 2, 3, 99
2 Supplemental Code Type ID Decimal 4.0 1-9999
3 Supplemental Code ID Decimal 4.0 1-9999
4 Supplemental CodeDescription
String 250
Field Number and Name Field Type or Mask Possible Values
1 Action Code Decimal 1.0 1, 2, 3, 99
2 Supplemental Code Type Decimal 4.0 1-9999
3 Supplemental CodeDescription
String 40
4 Single or Multi-Line Indicator String 1 M/S
Field Number and Name Field Type or Mask Possible Values
1 Action Code Decimal 1.0 1, 2, 3, 99
2 Entity ID String 20 PLU number
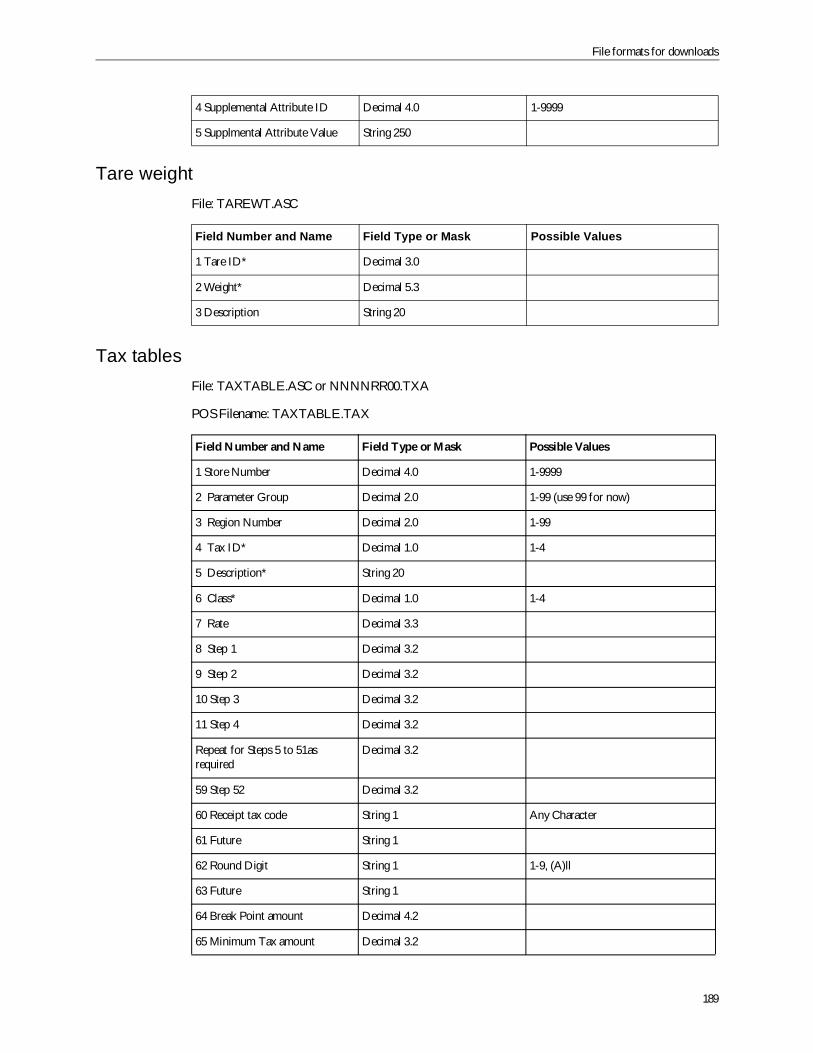
File formats for downloads
189
Tare weightFile: TAREWT.ASC
Tax tablesFile: TAXTABLE.ASC or NNNNRR00.TXA
POS Filename: TAXTABLE.TAX
4 Supplemental Attribute ID Decimal 4.0 1-9999
5 Supplmental Attribute Value String 250
Field Number and Name Field Type or Mask Possible Values
1 Tare ID* Decimal 3.0
2 Weight* Decimal 5.3
3 Description String 20
Field Number and Name Field Type or Mask Possible Values
1 Store Number Decimal 4.0 1-9999
2 Parameter Group Decimal 2.0 1-99 (use 99 for now)
3 Region Number Decimal 2.0 1-99
4 Tax ID* Decimal 1.0 1-4
5 Description* String 20
6 Class* Decimal 1.0 1-4
7 Rate Decimal 3.3
8 Step 1 Decimal 3.2
9 Step 2 Decimal 3.2
10 Step 3 Decimal 3.2
11 Step 4 Decimal 3.2
Repeat for Steps 5 to 51asrequired
Decimal 3.2
59 Step 52 Decimal 3.2
60 Receipt tax code String 1 Any Character
61 Future String 1
62 Round Digit String 1 1-9, (A)ll
63 Future String 1
64 Break Point amount Decimal 4.2
65 Minimum Tax amount Decimal 3.2
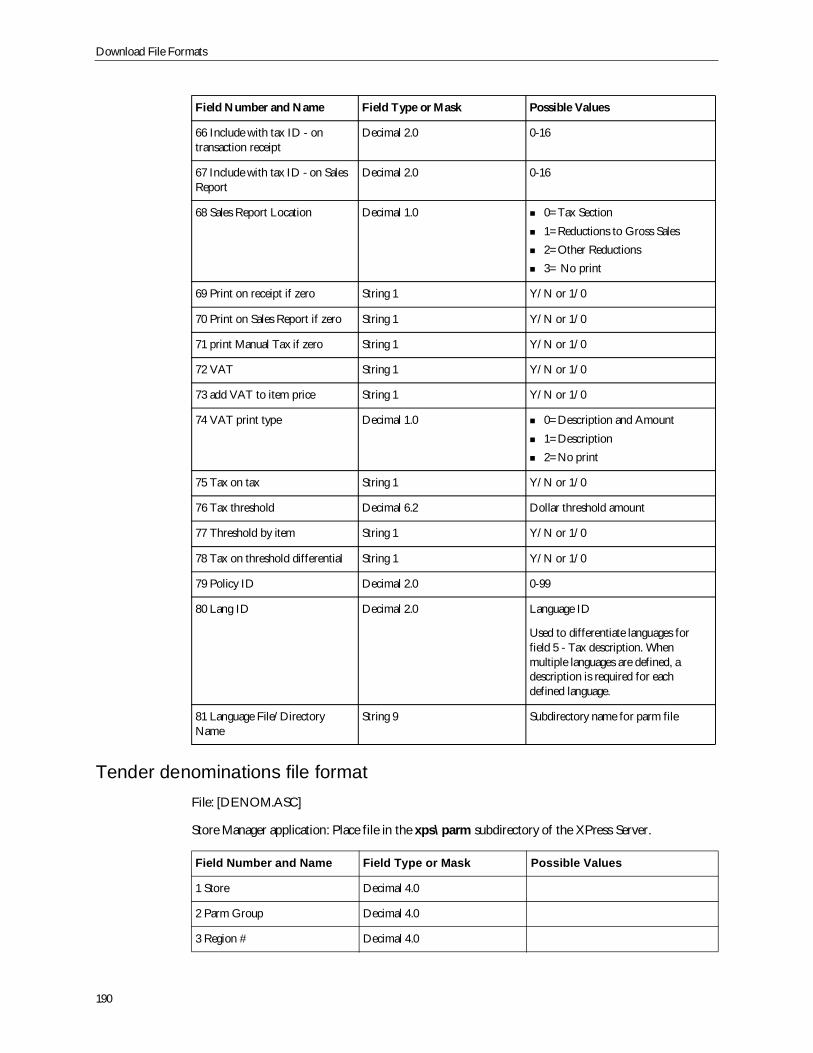
Download File Formats
190
Tender denominations file formatFile: [DENOM.ASC]
Store Manager application: Place file in the xps\parm subdirectory of the XPress Server.
66 Include with tax ID - ontransaction receipt
Decimal 2.0 0-16
67 Include with tax ID - on SalesReport
Decimal 2.0 0-16
68 Sales Report Location Decimal 1.0 0=Tax Section1=Reductions to Gross Sales2=Other Reductions3= No print
69 Print on receipt if zero String 1 Y/N or 1/0
70 Print on Sales Report if zero String 1 Y/N or 1/0
71 print Manual Tax if zero String 1 Y/N or 1/0
72 VAT String 1 Y/N or 1/0
73 add VAT to item price String 1 Y/N or 1/0
74 VAT print type Decimal 1.0 0=Description and Amount1=Description2=No print
75 Tax on tax String 1 Y/N or 1/0
76 Tax threshold Decimal 6.2 Dollar threshold amount
77 Threshold by item String 1 Y/N or 1/0
78 Tax on threshold differential String 1 Y/N or 1/0
79 Policy ID Decimal 2.0 0-99
80 Lang ID Decimal 2.0 Language ID
Used to differentiate languages forfield 5 - Tax description. Whenmultiple languages are defined, adescription is required for eachdefined language.
81 Language File/DirectoryName
String 9 Subdirectory name for parm file
Field Number and Name Field Type or Mask Possible Values
1 Store Decimal 4.0
2 Parm Group Decimal 4.0
3 Region # Decimal 4.0
Field Number and Name Field Type or Mask Possible Values
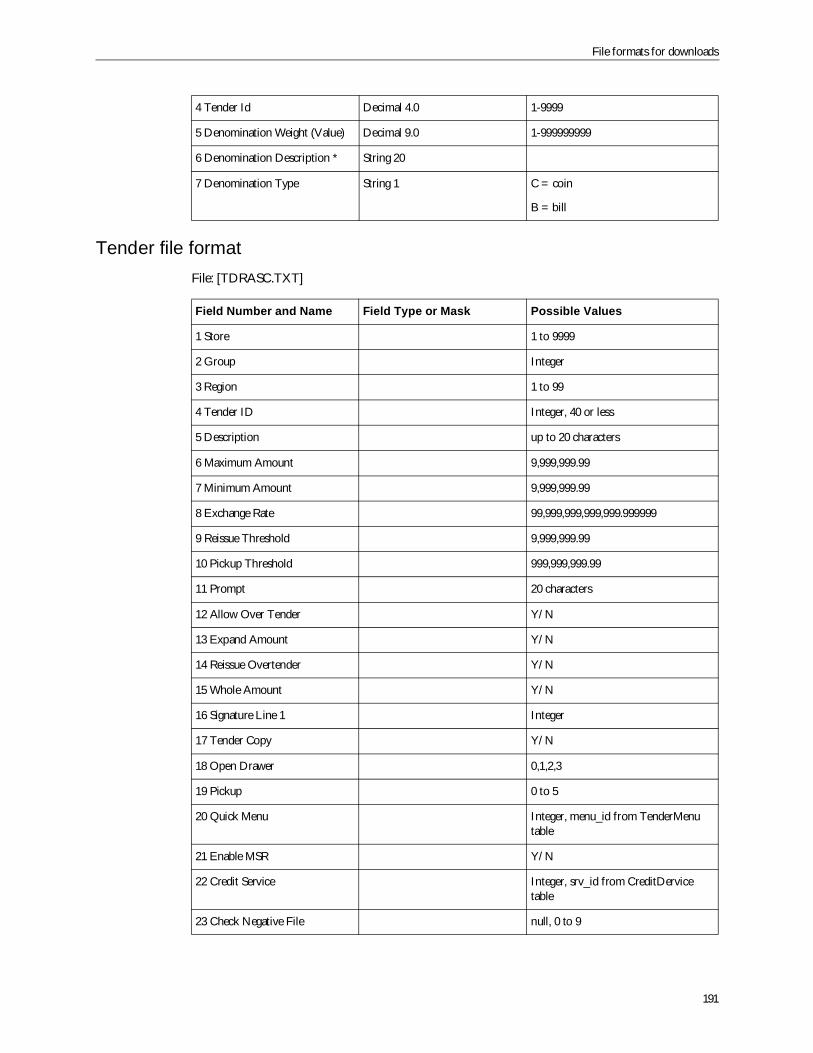
File formats for downloads
191
Tender file formatFile: [TDRASC.TXT]
4 Tender Id Decimal 4.0 1-9999
5 Denomination Weight (Value) Decimal 9.0 1-999999999
6 Denomination Description * String 20
7 Denomination Type String 1 C = coin
B = bill
Field Number and Name Field Type or Mask Possible Values
1 Store 1 to 9999
2 Group Integer
3 Region 1 to 99
4 Tender ID Integer, 40 or less
5 Description up to 20 characters
6 Maximum Amount 9,999,999.99
7 Minimum Amount 9,999,999.99
8 Exchange Rate 99,999,999,999,999.999999
9 Reissue Threshold 9,999,999.99
10 Pickup Threshold 999,999,999.99
11 Prompt 20 characters
12 Allow Over Tender Y/N
13 Expand Amount Y/N
14 Reissue Overtender Y/N
15 Whole Amount Y/N
16 Signature Line 1 Integer
17 Tender Copy Y/N
18 Open Drawer 0,1,2,3
19 Pickup 0 to 5
20 Quick Menu Integer, menu_id from TenderMenutable
21 Enable MSR Y/N
22 Credit Service Integer, srv_id from CreditDervicetable
23 Check Negative File null, 0 to 9
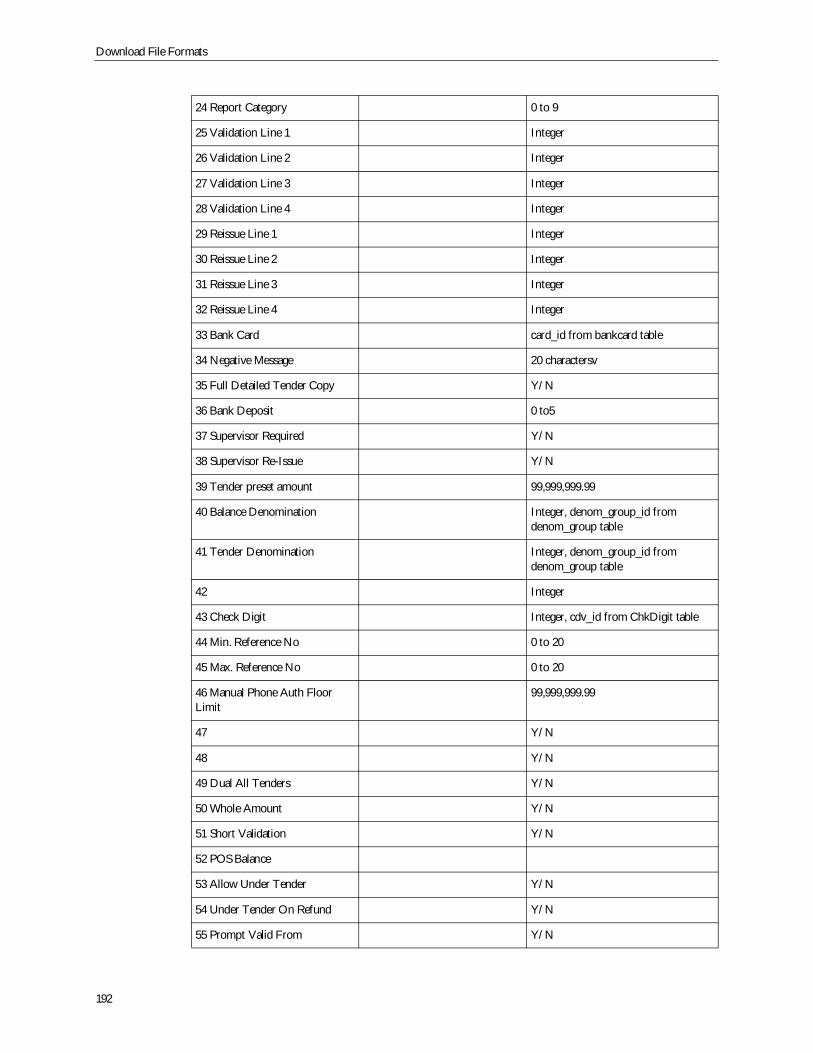
Download File Formats
192
24 Report Category 0 to 9
25 Validation Line 1 Integer
26 Validation Line 2 Integer
27 Validation Line 3 Integer
28 Validation Line 4 Integer
29 Reissue Line 1 Integer
30 Reissue Line 2 Integer
31 Reissue Line 3 Integer
32 Reissue Line 4 Integer
33 Bank Card card_id from bankcard table
34 Negative Message 20 charactersv
35 Full Detailed Tender Copy Y/N
36 Bank Deposit 0 to5
37 Supervisor Required Y/N
38 Supervisor Re-Issue Y/N
39 Tender preset amount 99,999,999.99
40 Balance Denomination Integer, denom_group_id fromdenom_group table
41 Tender Denomination Integer, denom_group_id fromdenom_group table
42 Integer
43 Check Digit Integer, cdv_id from ChkDigit table
44 Min. Reference No 0 to 20
45 Max. Reference No 0 to 20
46 Manual Phone Auth FloorLimit
99,999,999.99
47 Y/N
48 Y/N
49 Dual All Tenders Y/N
50 Whole Amount Y/N
51 Short Validation Y/N
52 POS Balance
53 Allow Under Tender Y/N
54 Under Tender On Refund Y/N
55 Prompt Valid From Y/N

File formats for downloads
193
56 Prompt Expiry Y/N
57 If Split Tender, Open Drawer 0,1,2,3
58 Print Bank Card / ReferenceNo
Y/N
59 Integer
60 Refund Only Y/N
61 15 characters
62 Expand Tender Description Y/N
63 Tender Exchange CheckBoxes 40 characters
64 Integer
65 Message to be displayed ifreference number is rejected by apositive/negative file check
20 characters
66 Allow Positive Update Y/N
67 Y/N
68 Authority Level 0 to 5
69 Itemizer ID 0 to 4
70 Integer
71 Loan 0 to 5
72 Profile Prompt Integer, prompt_id fromProfilePrompt table
73 99,999,999.99
74 To print or not to printreference number prompt
Y/N
75 Print Slip Y/N
76 No Of Lines To Advance Integer
77 No Of Lines To Print Integer
78 Check Positive File null, 0 to 9
79 Auto Generate Reference Integer, autoref_id from autoref table
80 Policy Integer
81 Integer
82 Signature Line 2 Integer
83 Print Receipt Y/N
84 % of Purchase 0 to 100
85 Enable MICR Y/N
86 Allow Cheque Writing Y/N
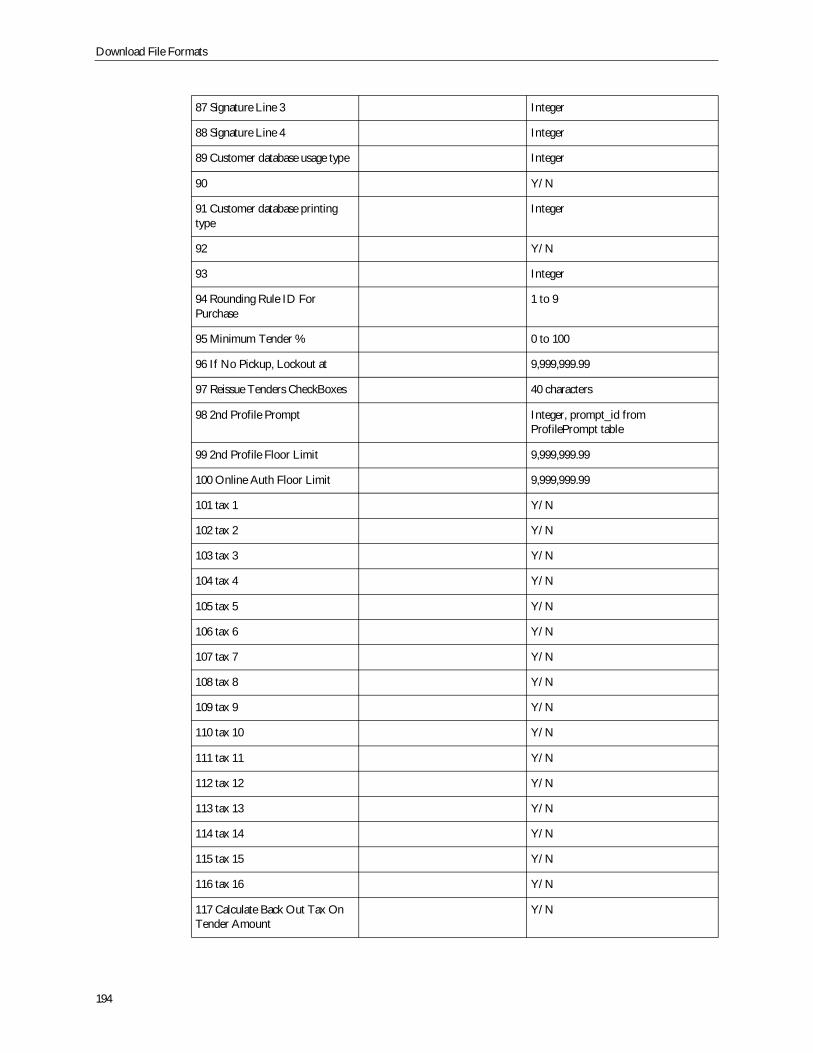
Download File Formats
194
87 Signature Line 3 Integer
88 Signature Line 4 Integer
89 Customer database usage type Integer
90 Y/N
91 Customer database printingtype
Integer
92 Y/N
93 Integer
94 Rounding Rule ID ForPurchase
1 to 9
95 Minimum Tender % 0 to 100
96 If No Pickup, Lockout at 9,999,999.99
97 Reissue Tenders CheckBoxes 40 characters
98 2nd Profile Prompt Integer, prompt_id fromProfilePrompt table
99 2nd Profile Floor Limit 9,999,999.99
100 Online Auth Floor Limit 9,999,999.99
101 tax 1 Y/N
102 tax 2 Y/N
103 tax 3 Y/N
104 tax 4 Y/N
105 tax 5 Y/N
106 tax 6 Y/N
107 tax 7 Y/N
108 tax 8 Y/N
109 tax 9 Y/N
110 tax 10 Y/N
111 tax 11 Y/N
112 tax 12 Y/N
113 tax 13 Y/N
114 tax 14 Y/N
115 tax 15 Y/N
116 tax 16 Y/N
117 Calculate Back Out Tax OnTender Amount
Y/N
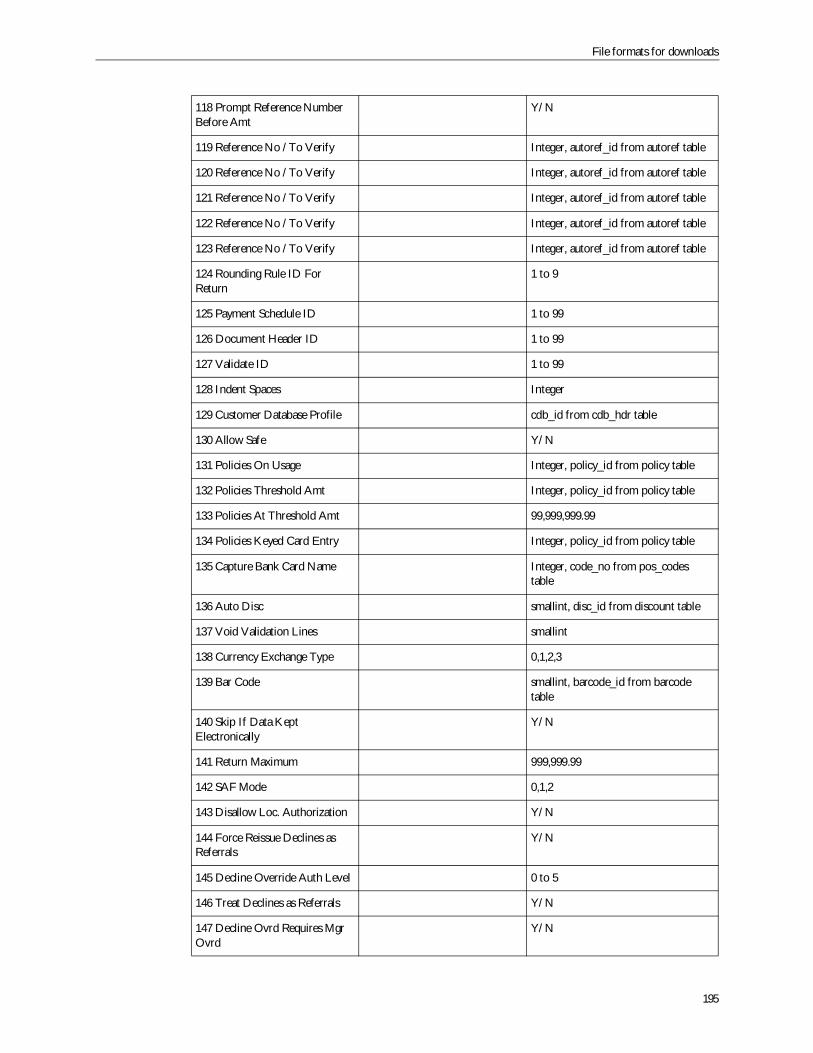
File formats for downloads
195
118 Prompt Reference NumberBefore Amt
Y/N
119 Reference No /To Verify Integer, autoref_id from autoref table
120 Reference No /To Verify Integer, autoref_id from autoref table
121 Reference No /To Verify Integer, autoref_id from autoref table
122 Reference No /To Verify Integer, autoref_id from autoref table
123 Reference No /To Verify Integer, autoref_id from autoref table
124 Rounding Rule ID ForReturn
1 to 9
125 Payment Schedule ID 1 to 99
126 Document Header ID 1 to 99
127 Validate ID 1 to 99
128 Indent Spaces Integer
129 Customer Database Profile cdb_id from cdb_hdr table
130 Allow Safe Y/N
131 Policies On Usage Integer, policy_id from policy table
132 Policies Threshold Amt Integer, policy_id from policy table
133 Policies At Threshold Amt 99,999,999.99
134 Policies Keyed Card Entry Integer, policy_id from policy table
135 Capture Bank Card Name Integer, code_no from pos_codestable
136 Auto Disc smallint, disc_id from discount table
137 Void Validation Lines smallint
138 Currency Exchange Type 0,1,2,3
139 Bar Code smallint, barcode_id from barcodetable
140 Skip If Data KeptElectronically
Y/N
141 Return Maximum 999,999.99
142 SAF Mode 0,1,2
143 Disallow Loc. Authorization Y/N
144 Force Reissue Declines asReferrals
Y/N
145 Decline Override Auth Level 0 to 5
146 Treat Declines as Referrals Y/N
147 Decline Ovrd Requires MgrOvrd
Y/N
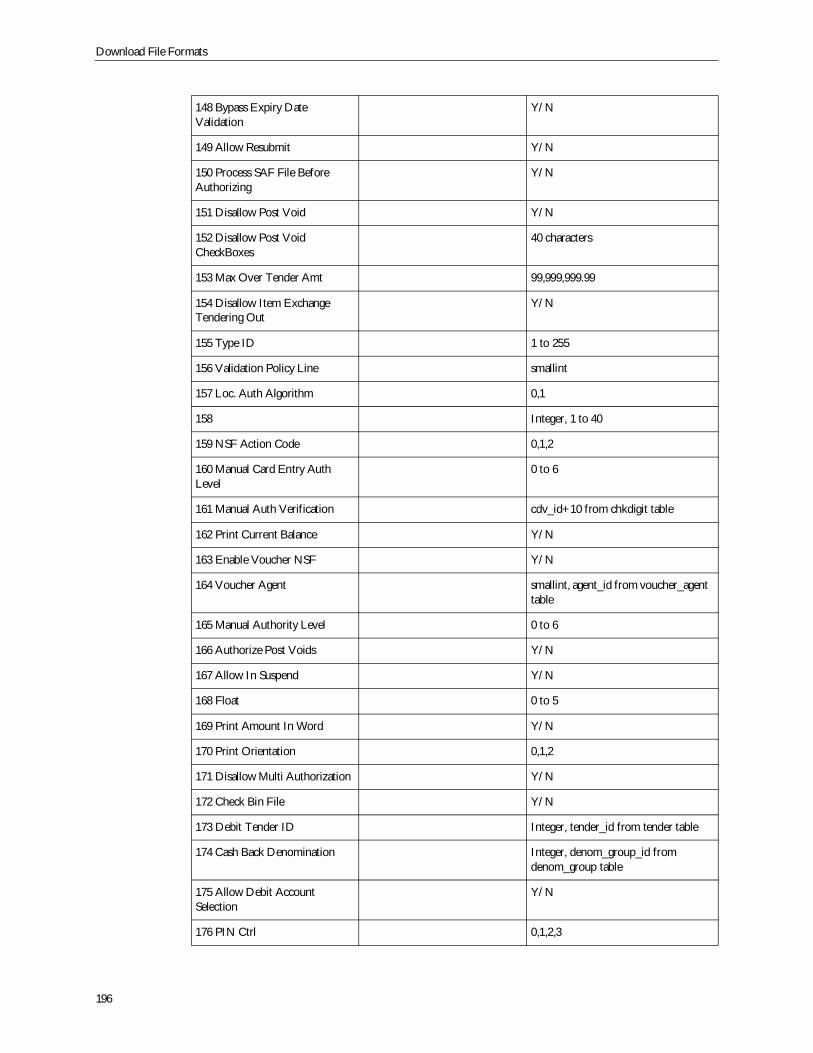
Download File Formats
196
148 Bypass Expiry DateValidation
Y/N
149 Allow Resubmit Y/N
150 Process SAF File BeforeAuthorizing
Y/N
151 Disallow Post Void Y/N
152 Disallow Post VoidCheckBoxes
40 characters
153 Max Over Tender Amt 99,999,999.99
154 Disallow Item ExchangeTendering Out
Y/N
155 Type ID 1 to 255
156 Validation Policy Line smallint
157 Loc. Auth Algorithm 0,1
158 Integer, 1 to 40
159 NSF Action Code 0,1,2
160 Manual Card Entry AuthLevel
0 to 6
161 Manual Auth Verification cdv_id+10 from chkdigit table
162 Print Current Balance Y/N
163 Enable Voucher NSF Y/N
164 Voucher Agent smallint, agent_id from voucher_agenttable
165 Manual Authority Level 0 to 6
166 Authorize Post Voids Y/N
167 Allow In Suspend Y/N
168 Float 0 to 5
169 Print Amount In Word Y/N
170 Print Orientation 0,1,2
171 Disallow Multi Authorization Y/N
172 Check Bin File Y/N
173 Debit Tender ID Integer, tender_id from tender table
174 Cash Back Denomination Integer, denom_group_id fromdenom_group table
175 Allow Debit AccountSelection
Y/N
176 PIN Ctrl 0,1,2,3
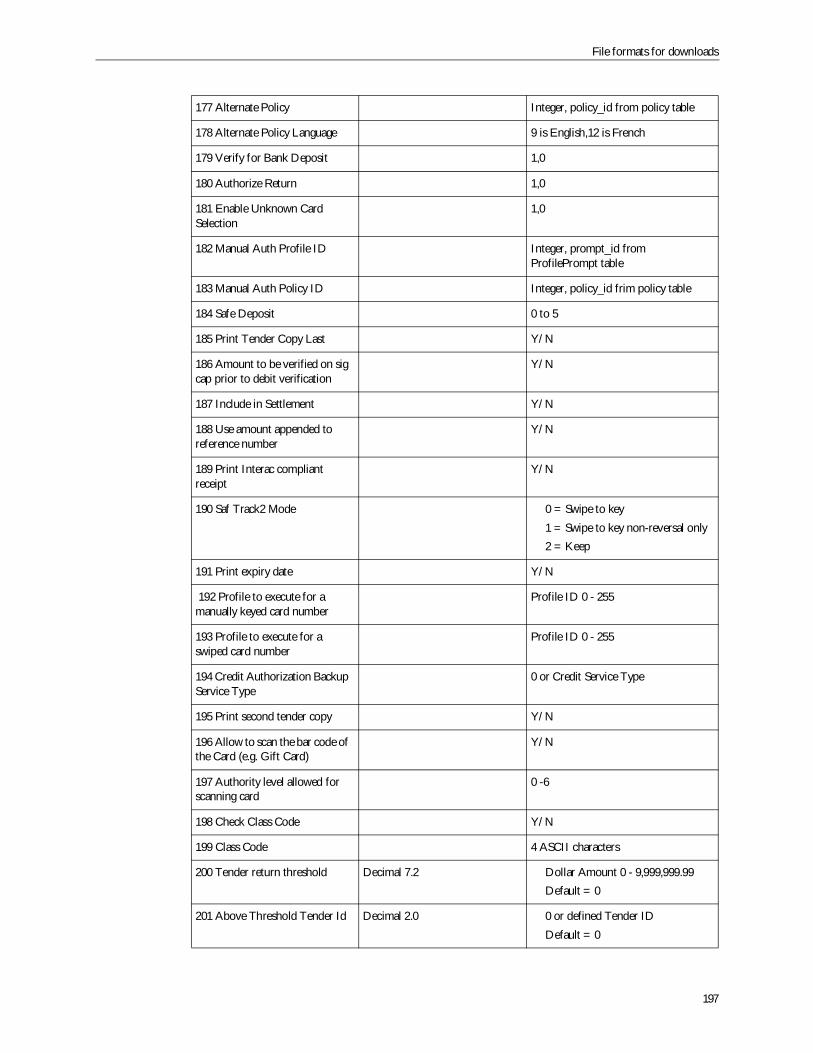
File formats for downloads
197
177 Alternate Policy Integer, policy_id from policy table
178 Alternate Policy Language 9 is English,12 is French
179 Verify for Bank Deposit 1,0
180 Authorize Return 1,0
181 Enable Unknown CardSelection
1,0
182 Manual Auth Profile ID Integer, prompt_id fromProfilePrompt table
183 Manual Auth Policy ID Integer, policy_id frim policy table
184 Safe Deposit 0 to 5
185 Print Tender Copy Last Y/N
186 Amount to be verified on sigcap prior to debit verification
Y/N
187 Include in Settlement Y/N
188 Use amount appended toreference number
Y/N
189 Print Interac compliantreceipt
Y/N
190 Saf Track2 Mode 0 = Swipe to key1 = Swipe to key non-reversal only2 = Keep
191 Print expiry date Y/N
192 Profile to execute for amanually keyed card number
Profile ID 0 - 255
193 Profile to execute for aswiped card number
Profile ID 0 - 255
194 Credit Authorization BackupService Type
0 or Credit Service Type
195 Print second tender copy Y/N
196 Allow to scan the bar code ofthe Card (e.g. Gift Card)
Y/N
197 Authority level allowed forscanning card
0 -6
198 Check Class Code Y/N
199 Class Code 4 ASCII characters
200 Tender return threshold Decimal 7.2 Dollar Amount 0 - 9,999,999.99Default = 0
201 Above Threshold Tender Id Decimal 2.0 0 or defined Tender IDDefault = 0
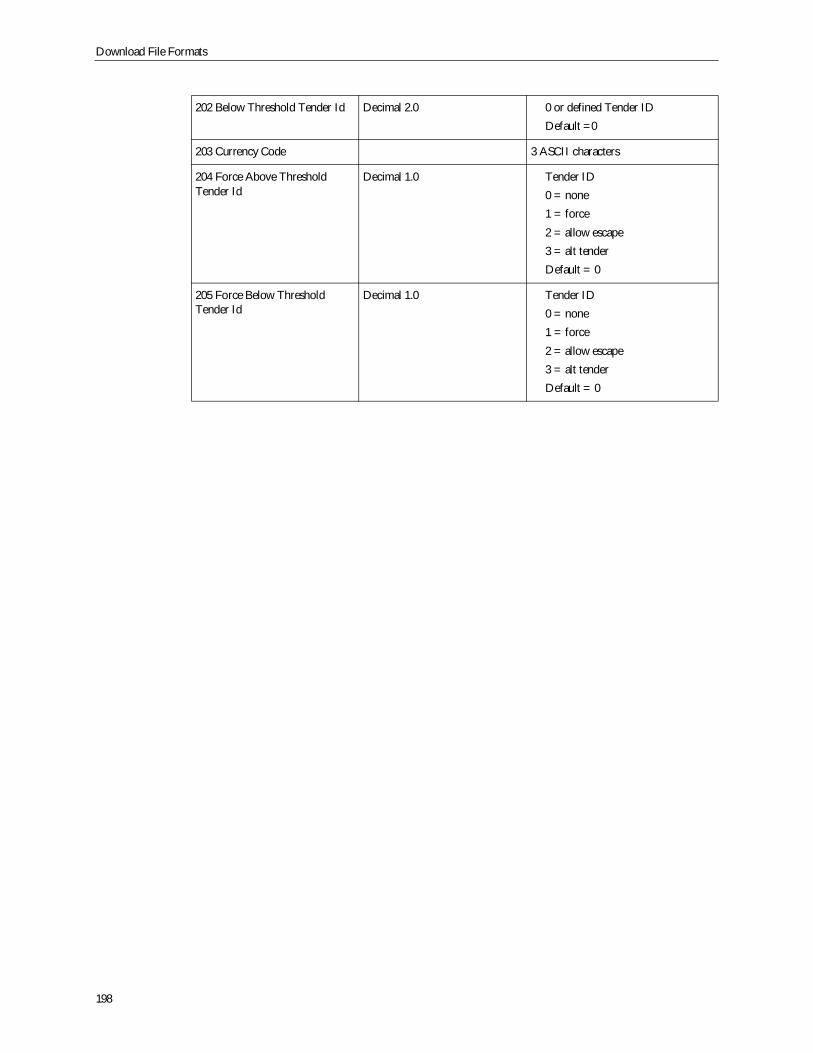
Download File Formats
198
202 Below Threshold Tender Id Decimal 2.0 0 or defined Tender IDDefault =0
203 Currency Code 3 ASCII characters
204 Force Above ThresholdTender Id
Decimal 1.0 Tender ID0 = none1 = force2 = allow escape3 = alt tenderDefault = 0
205 Force Below ThresholdTender Id
Decimal 1.0 Tender ID0 = none1 = force2 = allow escape3 = alt tenderDefault = 0
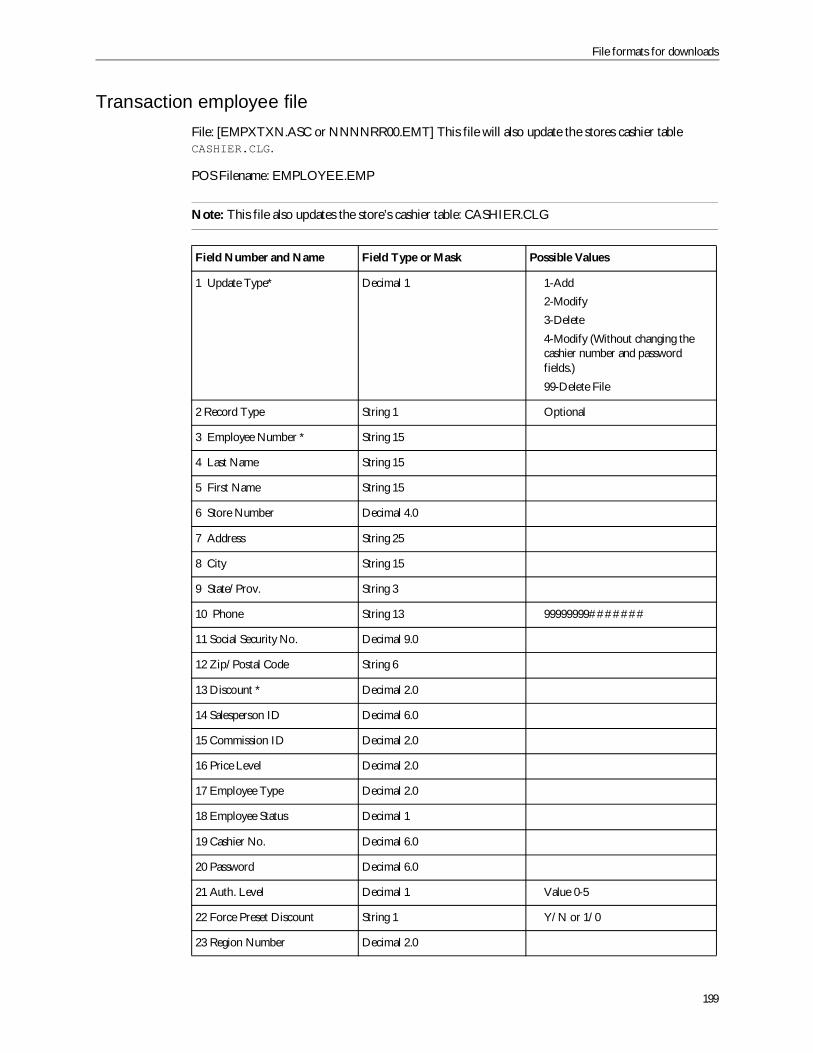
File formats for downloads
199
Transaction employee fileFile: [EMPXTXN.ASC or NNNNRR00.EMT] This file will also update the stores cashier tableCASHIER.CLG.
POS Filename: EMPLOYEE.EMP
Note: This file also updates the store’s cashier table: CASHIER.CLG
Field Number and Name Field Type or Mask Possible Values
1 Update Type* Decimal 1 1-Add2-Modify3-Delete4-Modify (Without changing thecashier number and passwordfields.)99-Delete File
2 Record Type String 1 Optional
3 Employee Number * String 15
4 Last Name String 15
5 First Name String 15
6 Store Number Decimal 4.0
7 Address String 25
8 City String 15
9 State/Prov. String 3
10 Phone String 13 99999999#######
11 Social Security No. Decimal 9.0
12 Zip/Postal Code String 6
13 Discount * Decimal 2.0
14 Salesperson ID Decimal 6.0
15 Commission ID Decimal 2.0
16 Price Level Decimal 2.0
17 Employee Type Decimal 2.0
18 Employee Status Decimal 1
19 Cashier No. Decimal 6.0
20 Password Decimal 6.0
21 Auth. Level Decimal 1 Value 0-5
22 Force Preset Discount String 1 Y/N or 1/0
23 Region Number Decimal 2.0

Download File Formats
200
24 Employee Short Name String 12
25 Scheduling Mode Decimal 1.0 1/0
26 Salary Decimal 6.2
27 Hourly Pay Rate Decimal 6.2
28 Employee Profile ID Decimal 2.0
29 Upgrade Password String 15
30 Birthday String 8 mm/dd/yy or mm/dd/yyyy
31 Hire Date String 8 mm/dd/yy or mm/dd/yyyy
32 Perform Rating String 5
33 Increase Reason String 5
34 Status Reason Decimal 5.0
35 Last Day Worked String 8 mm/dd/yy or mm/dd/yyyy
36 Eligible for Rehire Decimal 1.0 1/0
37 Emergency Name String 50
38 Emergency Phone String 10
39 Account Number String 30
40 Bank String 20
41 Transit Number String 5
42 Gender String 1 M/F
43 Home Store Number String 5
44 Job Code String 5
45 Pay Rate Type String 5
46 Home Borrowed String 5 1= Home2= Borrowed
47 Unused
48 Unused
49 Unused
50 Unused
51 Unused
52 Language ID Decimal 2.0 Language ID of the employee
53 Allow Alternate Language String 1 Y/N
Field Number and Name Field Type or Mask Possible Values
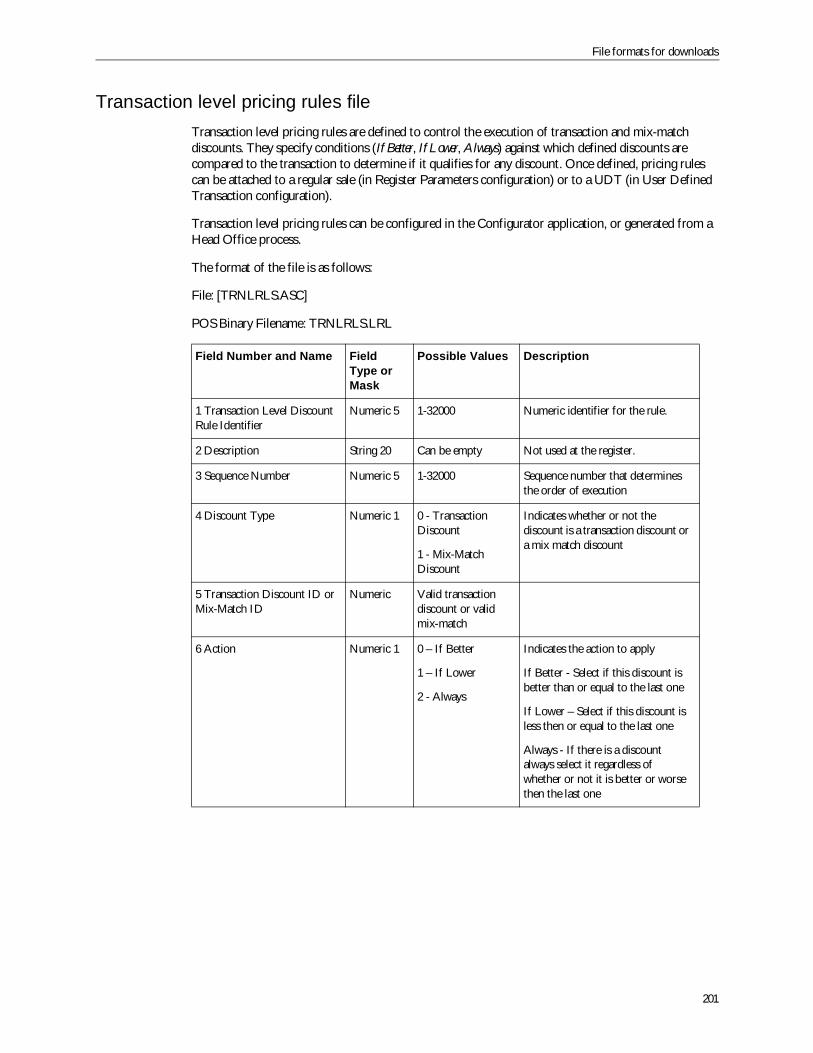
File formats for downloads
201
Transaction level pricing rules fileTransaction level pricing rules are defined to control the execution of transaction and mix-matchdiscounts. They specify conditions (If Better, If Lower, Always) against which defined discounts arecompared to the transaction to determine if it qualifies for any discount. Once defined, pricing rulescan be attached to a regular sale (in Register Parameters configuration) or to a UDT (in User DefinedTransaction configuration).
Transaction level pricing rules can be configured in the Configurator application, or generated from aHead Office process.
The format of the file is as follows:
File: [TRNLRLS.ASC]
POS Binary Filename: TRNLRLS.LRL
Field Number and Name FieldType orMask
Possible Values Description
1 Transaction Level DiscountRule Identifier
Numeric 5 1-32000 Numeric identifier for the rule.
2 Description String 20 Can be empty Not used at the register.
3 Sequence Number Numeric 5 1-32000 Sequence number that determinesthe order of execution
4 Discount Type Numeric 1 0 - TransactionDiscount
1 - Mix-MatchDiscount
Indicates whether or not thediscount is a transaction discount ora mix match discount
5 Transaction Discount ID orMix-Match ID
Numeric Valid transactiondiscount or validmix-match
6 Action Numeric 1 0 – If Better
1 – If Lower
2 - Always
Indicates the action to apply
If Better - Select if this discount isbetter than or equal to the last one
If Lower – Select if this discount isless then or equal to the last one
Always - If there is a discountalways select it regardless ofwhether or not it is better or worsethen the last one
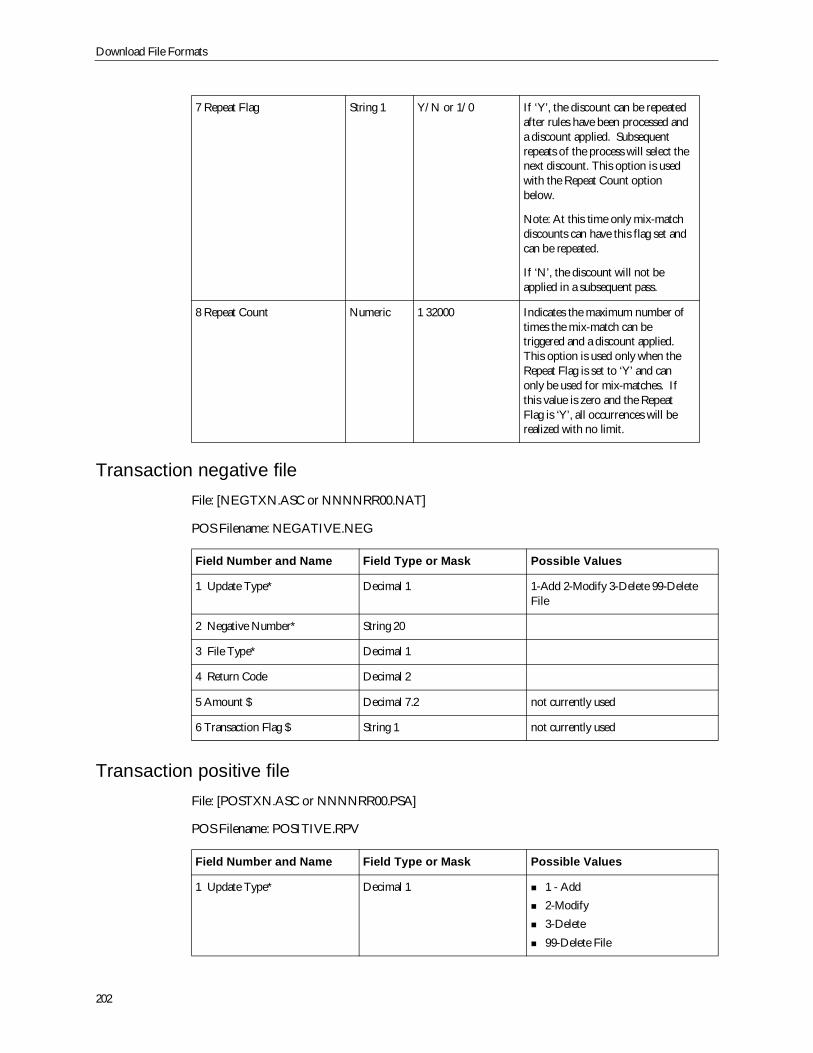
Download File Formats
202
Transaction negative fileFile: [NEGTXN.ASC or NNNNRR00.NAT]
POS Filename: NEGATIVE.NEG
Transaction positive fileFile: [POSTXN.ASC or NNNNRR00.PSA]
POS Filename: POSITIVE.RPV
7 Repeat Flag String 1 Y/N or 1/0 If ‘Y’, the discount can be repeatedafter rules have been processed anda discount applied. Subsequentrepeats of the process will select thenext discount. This option is usedwith the Repeat Count optionbelow.
Note: At this time only mix-matchdiscounts can have this flag set andcan be repeated.
If ‘N’, the discount will not beapplied in a subsequent pass.
8 Repeat Count Numeric 1 32000 Indicates the maximum number oftimes the mix-match can betriggered and a discount applied.This option is used only when theRepeat Flag is set to ‘Y’ and canonly be used for mix-matches. Ifthis value is zero and the RepeatFlag is ‘Y’, all occurrences will berealized with no limit.
Field Number and Name Field Type or Mask Possible Values
1 Update Type* Decimal 1 1-Add 2-Modify 3-Delete 99-DeleteFile
2 Negative Number* String 20
3 File Type* Decimal 1
4 Return Code Decimal 2
5 Amount $ Decimal 7.2 not currently used
6 Transaction Flag $ String 1 not currently used
Field Number and Name Field Type or Mask Possible Values
1 Update Type* Decimal 1 1 - Add2-Modify3-Delete99-Delete File

File formats for downloads
203
2 Positive Number* String 20
3 File Type* Decimal 1
4 Return Code Decimal 2
5 Amount $ Decimal 7.2 not currently used
6 Transaction Flag $ String 1 not currently used
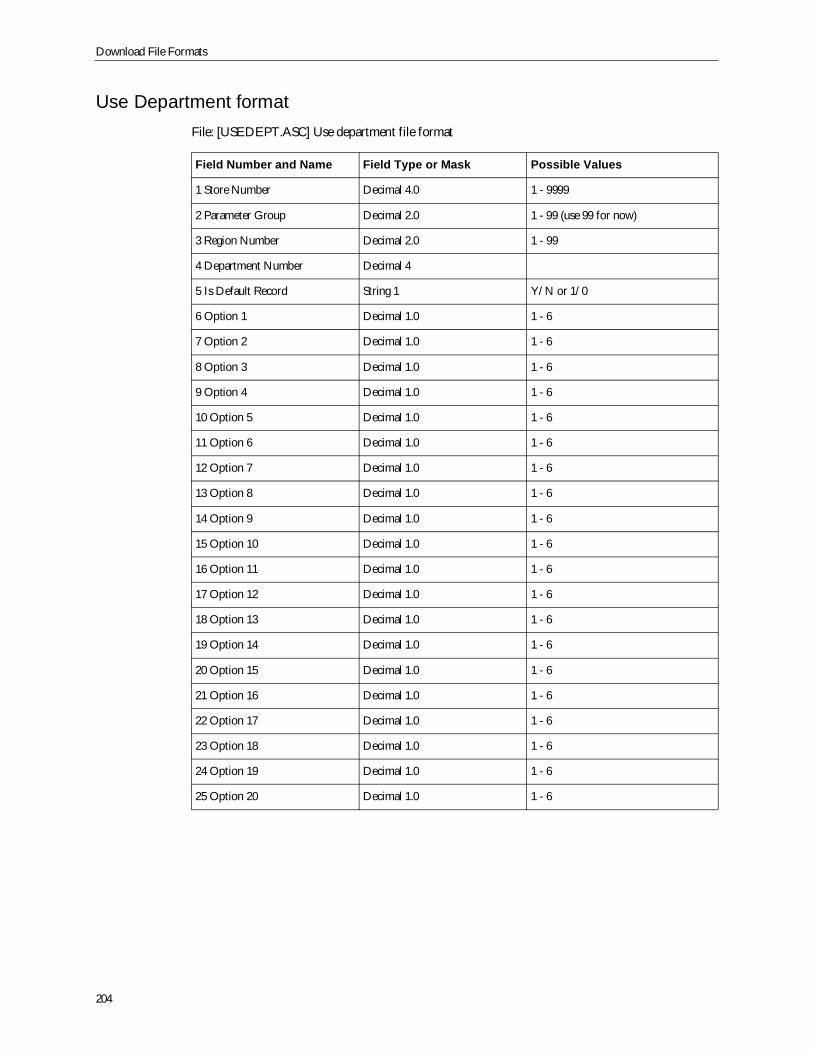
Download File Formats
204
Use Department formatFile: [USEDEPT.ASC] Use department file format
Field Number and Name Field Type or Mask Possible Values
1 Store Number Decimal 4.0 1 - 9999
2 Parameter Group Decimal 2.0 1 - 99 (use 99 for now)
3 Region Number Decimal 2.0 1 - 99
4 Department Number Decimal 4
5 Is Default Record String 1 Y/N or 1/0
6 Option 1 Decimal 1.0 1 - 6
7 Option 2 Decimal 1.0 1 - 6
8 Option 3 Decimal 1.0 1 - 6
9 Option 4 Decimal 1.0 1 - 6
10 Option 5 Decimal 1.0 1 - 6
11 Option 6 Decimal 1.0 1 - 6
12 Option 7 Decimal 1.0 1 - 6
13 Option 8 Decimal 1.0 1 - 6
14 Option 9 Decimal 1.0 1 - 6
15 Option 10 Decimal 1.0 1 - 6
16 Option 11 Decimal 1.0 1 - 6
17 Option 12 Decimal 1.0 1 - 6
18 Option 13 Decimal 1.0 1 - 6
19 Option 14 Decimal 1.0 1 - 6
20 Option 15 Decimal 1.0 1 - 6
21 Option 16 Decimal 1.0 1 - 6
22 Option 17 Decimal 1.0 1 - 6
23 Option 18 Decimal 1.0 1 - 6
24 Option 19 Decimal 1.0 1 - 6
25 Option 20 Decimal 1.0 1 - 6
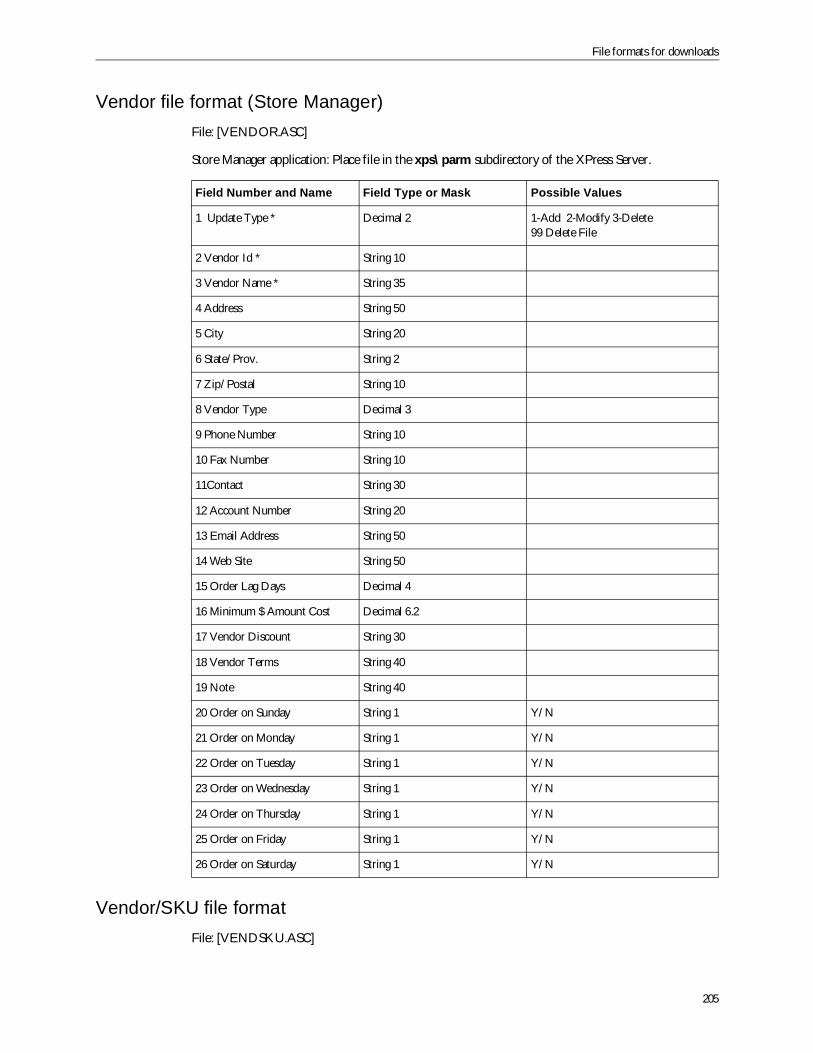
File formats for downloads
205
Vendor file format (Store Manager)File: [VENDOR.ASC]
Store Manager application: Place file in the xps\parm subdirectory of the XPress Server.
Vendor/SKU file formatFile: [VENDSKU.ASC]
Field Number and Name Field Type or Mask Possible Values
1 Update Type * Decimal 2 1-Add 2-Modify 3-Delete99 Delete File
2 Vendor Id * String 10
3 Vendor Name * String 35
4 Address String 50
5 City String 20
6 State/Prov. String 2
7 Zip/Postal String 10
8 Vendor Type Decimal 3
9 Phone Number String 10
10 Fax Number String 10
11Contact String 30
12 Account Number String 20
13 Email Address String 50
14 Web Site String 50
15 Order Lag Days Decimal 4
16 Minimum $ Amount Cost Decimal 6.2
17 Vendor Discount String 30
18 Vendor Terms String 40
19 Note String 40
20 Order on Sunday String 1 Y/N
21 Order on Monday String 1 Y/N
22 Order on Tuesday String 1 Y/N
23 Order on Wednesday String 1 Y/N
24 Order on Thursday String 1 Y/N
25 Order on Friday String 1 Y/N
26 Order on Saturday String 1 Y/N
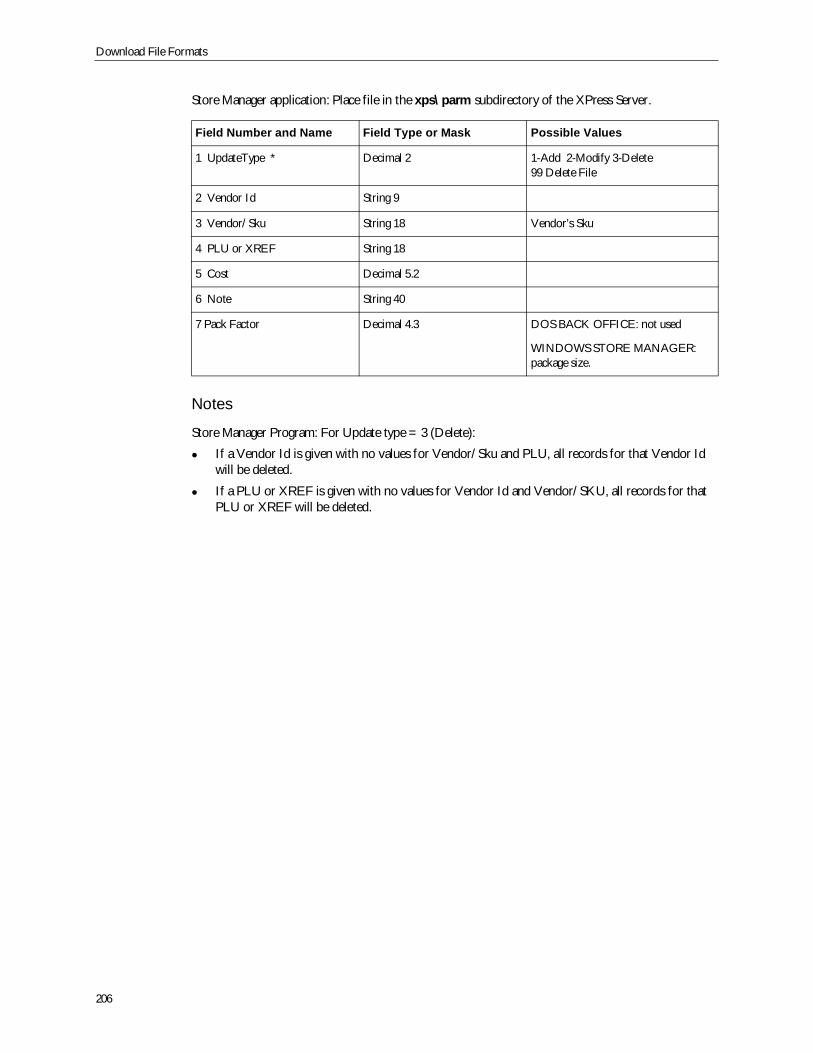
Download File Formats
206
Store Manager application: Place file in the xps\parm subdirectory of the XPress Server.
Notes
Store Manager Program: For Update type = 3 (Delete):
If a Vendor Id is given with no values for Vendor/Sku and PLU, all records for that Vendor Idwill be deleted.
If a PLU or XREF is given with no values for Vendor Id and Vendor/SKU, all records for thatPLU or XREF will be deleted.
Field Number and Name Field Type or Mask Possible Values
1 UpdateType * Decimal 2 1-Add 2-Modify 3-Delete99 Delete File
2 Vendor Id String 9
3 Vendor/Sku String 18 Vendor’s Sku
4 PLU or XREF String 18
5 Cost Decimal 5.2
6 Note String 40
7 Pack Factor Decimal 4.3 DOS BACK OFFICE: not used
WINDOWS STORE MANAGER:package size.
207
5About the POS.ini File
This section provides general information about the POS.ini file. It covers the following topics:
“Introduction to the POS.ini file” on page 207
“Using the POS.ini file” on page 208
“POS.ini file option reference” on page 211
“About the LOCAL.ini file” on page 208
“Glossary” on page 380
Introduction to the POS.ini fileThe POS.ini file’s function is similar to that of the Configurator software application; it gives you a wayto change the functionality of the POS Xpress and the Store Manager applications. Each of the optionsin the POS.ini file controls a function in the other related applications. Therefore, when you change aPOS.ini file option’s value, you change another application’s functionality.
You must first create the POS.ini file. To create the POS.ini file, copy the entire POSSAMP.ini file, saveit as “POS.ini”, and then make any required changes to the new POS.ini file. The POSSAMP.ini file isthe master file of options that can be used in the POS.ini to change functionality in the otherapplications. Although the POSSAMP.ini file contains all the master options, it is through the POS.inifile that functionality is changed. The options in the POSSAMP.ini file should never be changed. Youshould copy the options you need from the POSSAMP.ini file and paste them in the POS.ini file or asa backup file only.
Note: To reduce the size of the POS.ini file, you can delete any options that you are not using. Later, ifyou decide to use an option you deleted, you can simply put the option back in by copying it from thePOSSAMP.ini file.
Deciding when to use the POSSAMP.ini and POS.ini filesEach option in the POSSAMP.ini file has a default value assigned to it. When an option is copied intothe POS.ini file, default functionality will be applied to other applications.
You only need to change an option’s value if you no longer want the default functionality to be applied.This manual contains the default values for each option that can be used in the POS.ini file, and validalternative values that you can enter.
Note: Do not edit the POSSAMP.ini file. Copy the options you need into the POS.ini file. ThePOSSAMP.ini file is a sample file only and does not affect the functionality of the other applications.
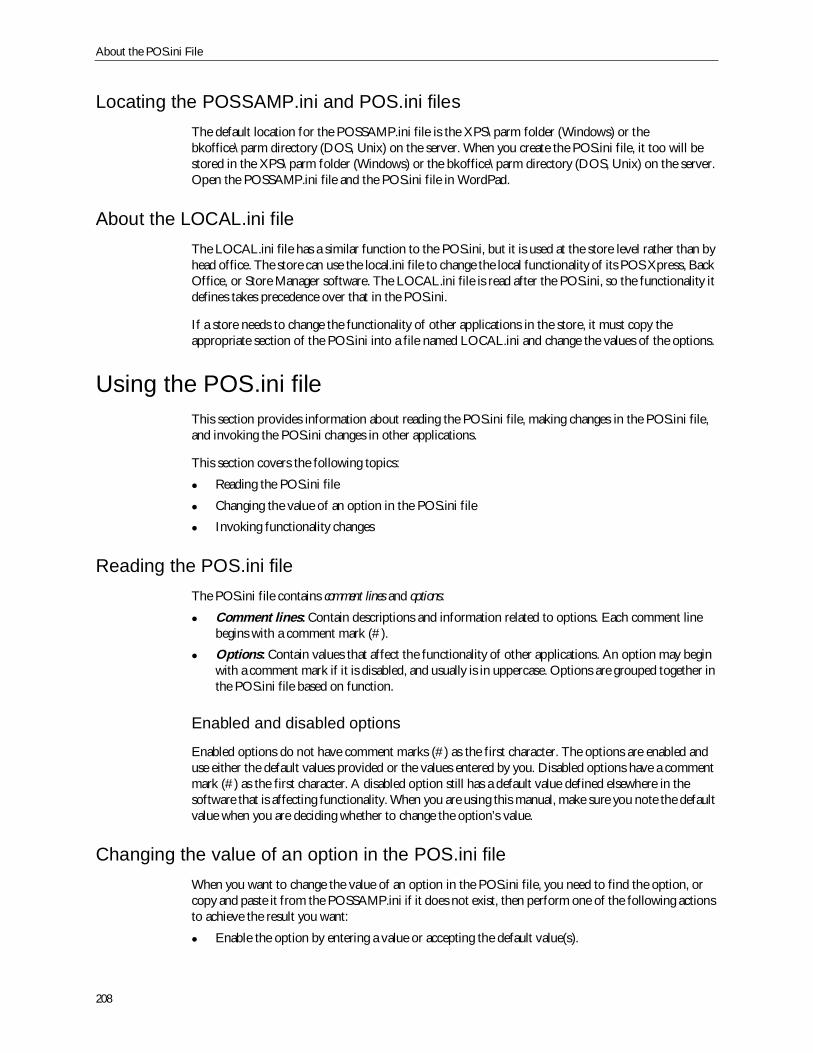
About the POS.ini File
208
Locating the POSSAMP.ini and POS.ini filesThe default location for the POSSAMP.ini file is the XPS\parm folder (Windows) or thebkoffice\parm directory (DOS, Unix) on the server. When you create the POS.ini file, it too will bestored in the XPS\parm folder (Windows) or the bkoffice\parm directory (DOS, Unix) on the server.Open the POSSAMP.ini file and the POS.ini file in WordPad.
About the LOCAL.ini fileThe LOCAL.ini file has a similar function to the POS.ini, but it is used at the store level rather than byhead office. The store can use the local.ini file to change the local functionality of its POS Xpress, BackOffice, or Store Manager software. The LOCAL.ini file is read after the POS.ini, so the functionality itdefines takes precedence over that in the POS.ini.
If a store needs to change the functionality of other applications in the store, it must copy theappropriate section of the POS.ini into a file named LOCAL.ini and change the values of the options.
Using the POS.ini fileThis section provides information about reading the POS.ini file, making changes in the POS.ini file,and invoking the POS.ini changes in other applications.
This section covers the following topics:
Reading the POS.ini file
Changing the value of an option in the POS.ini file
Invoking functionality changes
Reading the POS.ini fileThe POS.ini file contains comment lines and options:
Comment lines: Contain descriptions and information related to options. Each comment linebegins with a comment mark (#).
Options: Contain values that affect the functionality of other applications. An option may beginwith a comment mark if it is disabled, and usually is in uppercase. Options are grouped together inthe POS.ini file based on function.
Enabled and disabled options
Enabled options do not have comment marks (#) as the first character. The options are enabled anduse either the default values provided or the values entered by you. Disabled options have a commentmark (#) as the first character. A disabled option still has a default value defined elsewhere in thesoftware that is affecting functionality. When you are using this manual, make sure you note the defaultvalue when you are deciding whether to change the option’s value.
Changing the value of an option in the POS.ini fileWhen you want to change the value of an option in the POS.ini file, you need to find the option, orcopy and paste it from the POSSAMP.ini if it does not exist, then perform one of the following actionsto achieve the result you want:
Enable the option by entering a value or accepting the default value(s).
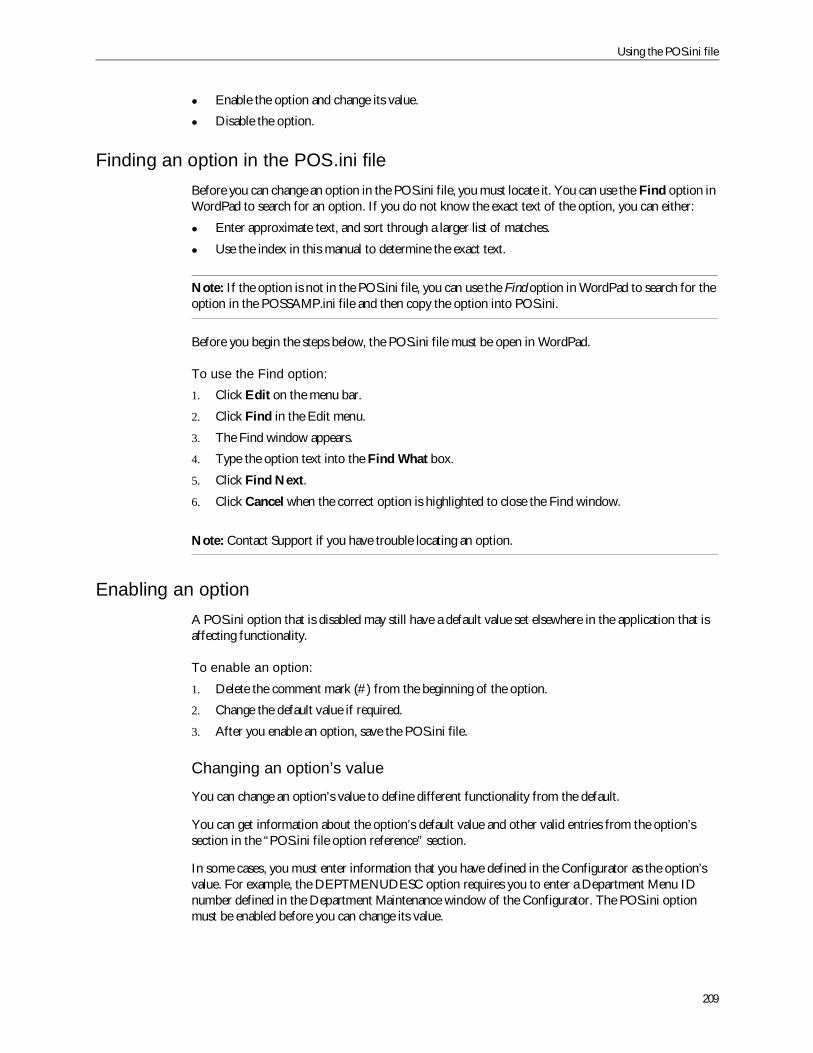
Using the POS.ini file
209
Enable the option and change its value.
Disable the option.
Finding an option in the POS.ini fileBefore you can change an option in the POS.ini file, you must locate it. You can use the Find option inWordPad to search for an option. If you do not know the exact text of the option, you can either:
Enter approximate text, and sort through a larger list of matches.
Use the index in this manual to determine the exact text.
Note: If the option is not in the POS.ini file, you can use the Find option in WordPad to search for theoption in the POSSAMP.ini file and then copy the option into POS.ini.
Before you begin the steps below, the POS.ini file must be open in WordPad.
To use the Find option:1. Click Edit on the menu bar.
2. Click Find in the Edit menu.
3. The Find window appears.
4. Type the option text into the Find What box.
5. Click Find Next.
6. Click Cancel when the correct option is highlighted to close the Find window.
Note: Contact Support if you have trouble locating an option.
Enabling an optionA POS.ini option that is disabled may still have a default value set elsewhere in the application that isaffecting functionality.
To enable an option:1. Delete the comment mark (#) from the beginning of the option.
2. Change the default value if required.
3. After you enable an option, save the POS.ini file.
Changing an option’s value
You can change an option’s value to define different functionality from the default.
You can get information about the option’s default value and other valid entries from the option’ssection in the “POS.ini file option reference” section.
In some cases, you must enter information that you have defined in the Configurator as the option’svalue. For example, the DEPTMENUDESC option requires you to enter a Department Menu IDnumber defined in the Department Maintenance window of the Configurator. The POS.ini optionmust be enabled before you can change its value.
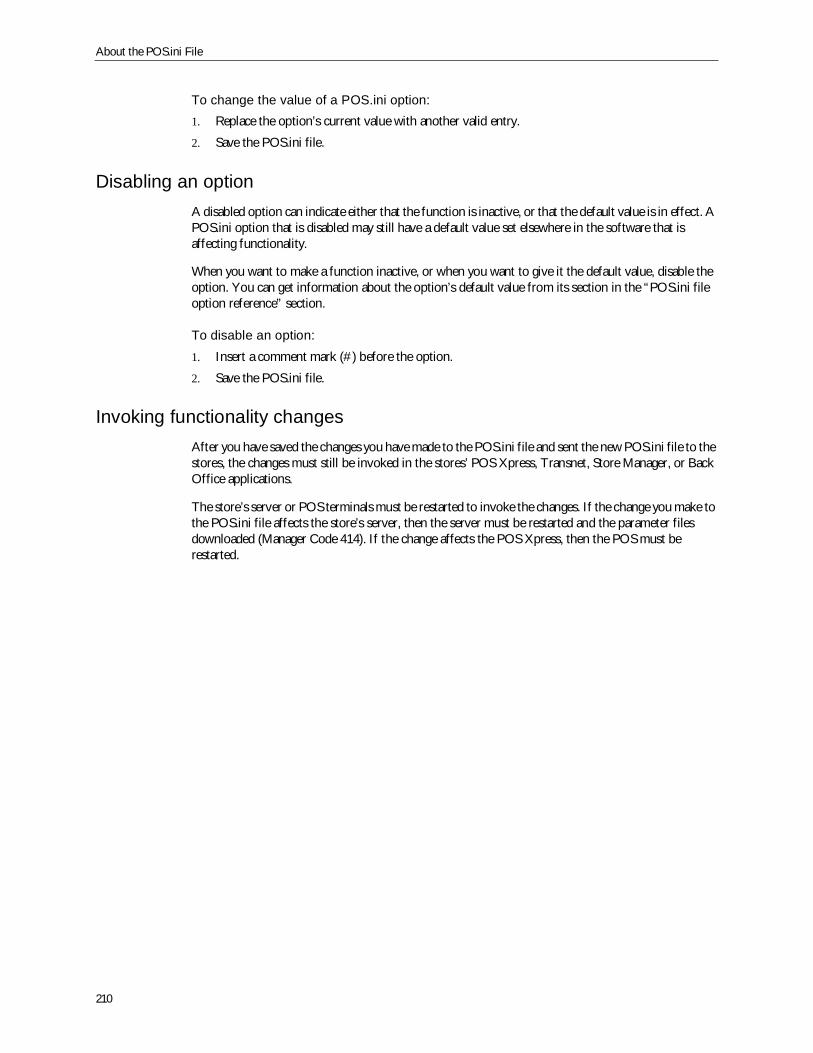
About the POS.ini File
210
To change the value of a POS.ini option:1. Replace the option’s current value with another valid entry.
2. Save the POS.ini file.
Disabling an optionA disabled option can indicate either that the function is inactive, or that the default value is in effect. APOS.ini option that is disabled may still have a default value set elsewhere in the software that isaffecting functionality.
When you want to make a function inactive, or when you want to give it the default value, disable theoption. You can get information about the option’s default value from its section in the “POS.ini fileoption reference” section.
To disable an option:1. Insert a comment mark (#) before the option.
2. Save the POS.ini file.
Invoking functionality changesAfter you have saved the changes you have made to the POS.ini file and sent the new POS.ini file to thestores, the changes must still be invoked in the stores’ POS Xpress, Transnet, Store Manager, or BackOffice applications.
The store’s server or POS terminals must be restarted to invoke the changes. If the change you make tothe POS.ini file affects the store’s server, then the server must be restarted and the parameter filesdownloaded (Manager Code 414). If the change affects the POS Xpress, then the POS must berestarted.
POS.ini file option reference
211
POS.ini file option referenceThis section contains information about each of the options in the POS.ini file including a description,values you can enter into the option, and the option’s default value.
Windows POS parametersThe options in this section of the POS.ini file control the POS Xpress application’s behavior. Thefollowing list is alphabetical.
Note: This section must be at the beginning of the POS.ini file (first 64K of the file) to ensure fullfunctionality in the Windows POS parameters because it controls some of the major behavior of thePOS.
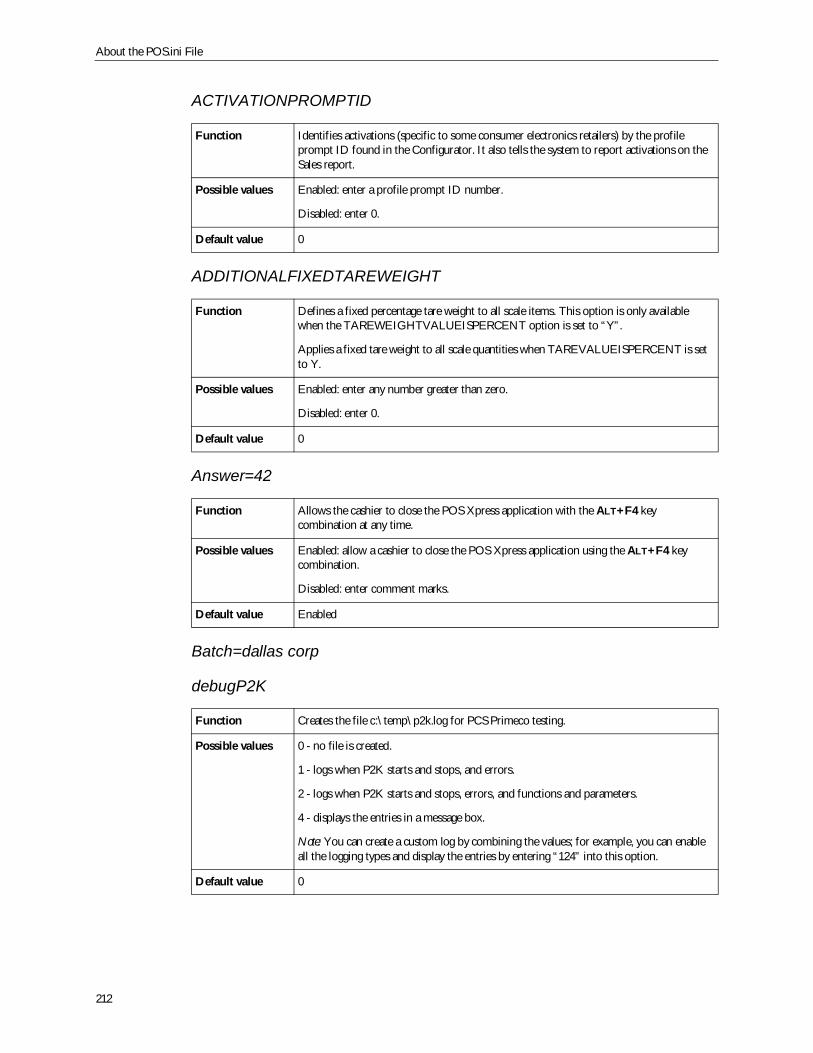
About the POS.ini File
212
ACTIVATIONPROMPTID
ADDITIONALFIXEDTAREWEIGHT
Answer=42
Batch=dallas corp
debugP2K
Function Identifies activations (specific to some consumer electronics retailers) by the profileprompt ID found in the Configurator. It also tells the system to report activations on theSales report.
Possible values Enabled: enter a profile prompt ID number.
Disabled: enter 0.
Default value 0
Function Defines a fixed percentage tare weight to all scale items. This option is only availablewhen the TAREWEIGHTVALUEISPERCENT option is set to “Y”.
Applies a fixed tare weight to all scale quantities when TAREVALUEISPERCENT is setto Y.
Possible values Enabled: enter any number greater than zero.
Disabled: enter 0.
Default value 0
Function Allows the cashier to close the POS Xpress application with the ALT+F4 keycombination at any time.
Possible values Enabled: allow a cashier to close the POS Xpress application using the ALT+F4 keycombination.
Disabled: enter comment marks.
Default value Enabled
Function Creates the file c:\temp\p2k.log for PCS Primeco testing.
Possible values 0 - no file is created.
1 - logs when P2K starts and stops, and errors.
2 - logs when P2K starts and stops, errors, and functions and parameters.
4 - displays the entries in a message box.
Note: You can create a custom log by combining the values; for example, you can enableall the logging types and display the entries by entering “124” into this option.
Default value 0
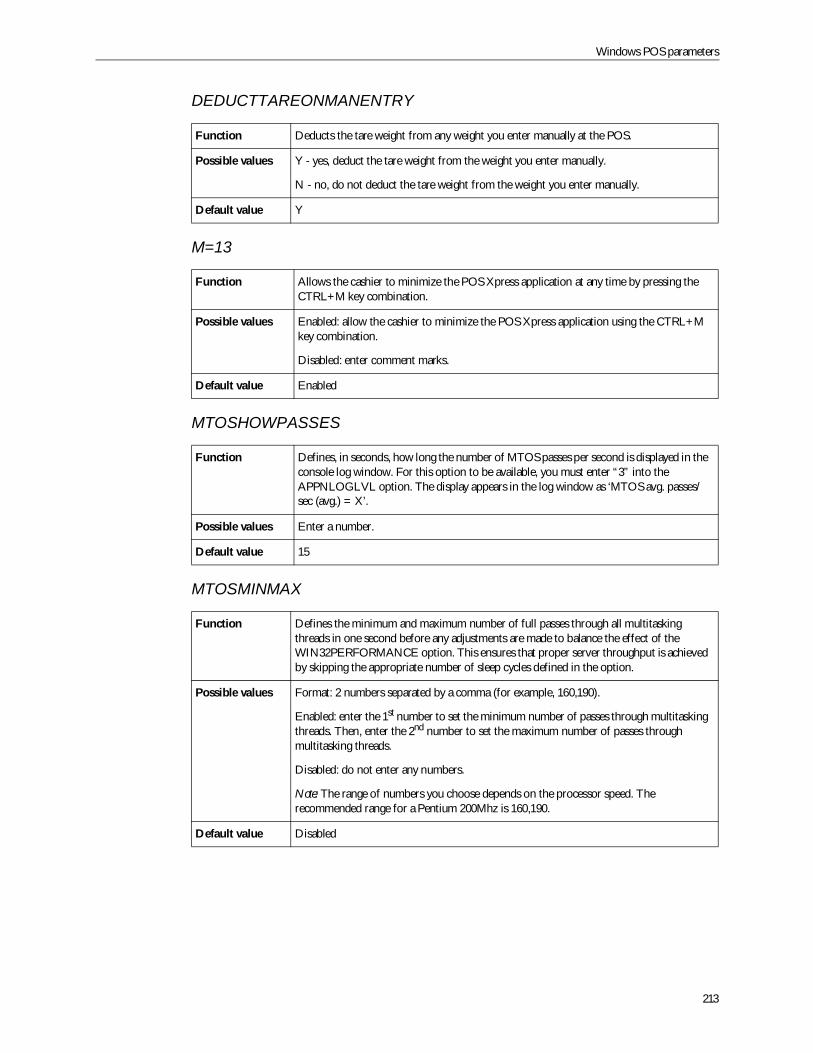
Windows POS parameters
213
DEDUCTTAREONMANENTRY
M=13
MTOSHOWPASSES
MTOSMINMAX
Function Deducts the tare weight from any weight you enter manually at the POS.
Possible values Y - yes, deduct the tare weight from the weight you enter manually.
N - no, do not deduct the tare weight from the weight you enter manually.
Default value Y
Function Allows the cashier to minimize the POS Xpress application at any time by pressing theCTRL+M key combination.
Possible values Enabled: allow the cashier to minimize the POS Xpress application using the CTRL+Mkey combination.
Disabled: enter comment marks.
Default value Enabled
Function Defines, in seconds, how long the number of MTOS passes per second is displayed in theconsole log window. For this option to be available, you must enter “3” into theAPPNLOGLVL option. The display appears in the log window as ‘MTOS avg. passes/sec (avg.) = X’.
Possible values Enter a number.
Default value 15
Function Defines the minimum and maximum number of full passes through all multitaskingthreads in one second before any adjustments are made to balance the effect of theWIN32PERFORMANCE option. This ensures that proper server throughput is achievedby skipping the appropriate number of sleep cycles defined in the option.
Possible values Format: 2 numbers separated by a comma (for example, 160,190).
Enabled: enter the 1st number to set the minimum number of passes through multitaskingthreads. Then, enter the 2nd number to set the maximum number of passes throughmultitasking threads.
Disabled: do not enter any numbers.
Note: The range of numbers you choose depends on the processor speed. Therecommended range for a Pentium 200Mhz is 160,190.
Default value Disabled
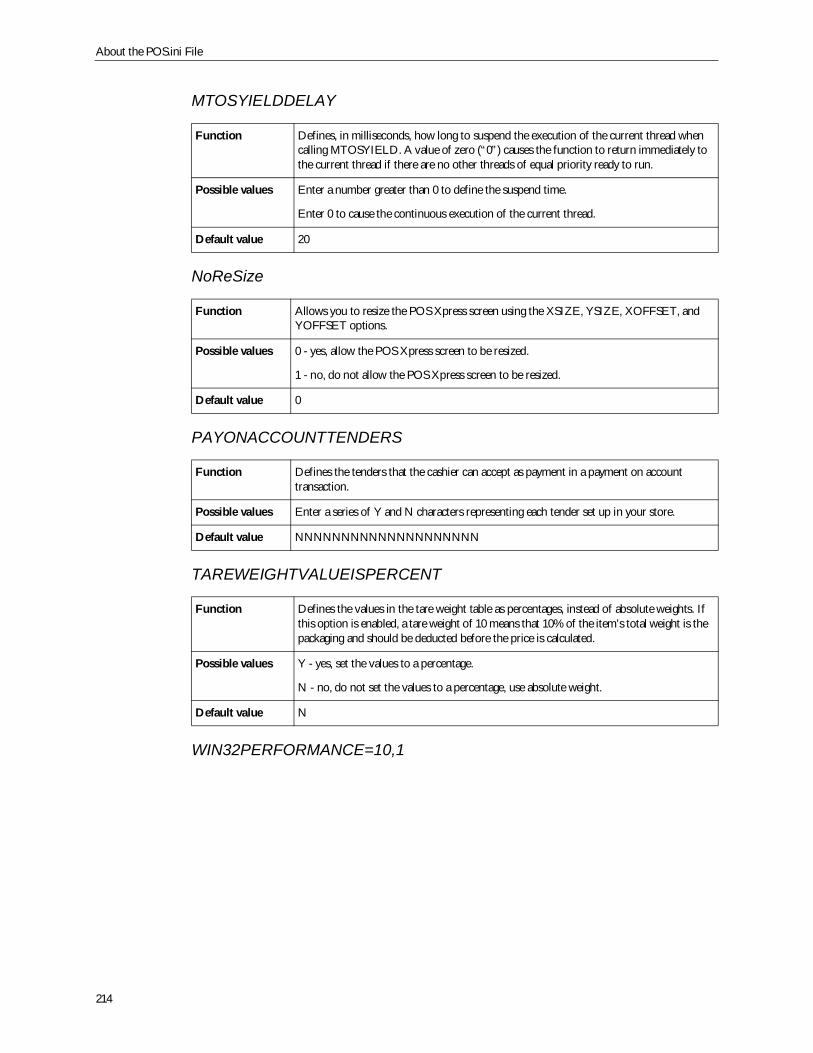
About the POS.ini File
214
MTOSYIELDDELAY
NoReSize
PAYONACCOUNTTENDERS
TAREWEIGHTVALUEISPERCENT
WIN32PERFORMANCE=10,1
Function Defines, in milliseconds, how long to suspend the execution of the current thread whencalling MTOSYIELD. A value of zero (“0”) causes the function to return immediately tothe current thread if there are no other threads of equal priority ready to run.
Possible values Enter a number greater than 0 to define the suspend time.
Enter 0 to cause the continuous execution of the current thread.
Default value 20
Function Allows you to resize the POS Xpress screen using the XSIZE, YSIZE, XOFFSET, andYOFFSET options.
Possible values 0 - yes, allow the POS Xpress screen to be resized.
1 - no, do not allow the POS Xpress screen to be resized.
Default value 0
Function Defines the tenders that the cashier can accept as payment in a payment on accounttransaction.
Possible values Enter a series of Y and N characters representing each tender set up in your store.
Default value NNNNNNNNNNNNNNNNNNNN
Function Defines the values in the tare weight table as percentages, instead of absolute weights. Ifthis option is enabled, a tare weight of 10 means that 10% of the item’s total weight is thepackaging and should be deducted before the price is calculated.
Possible values Y - yes, set the values to a percentage.
N - no, do not set the values to a percentage, use absolute weight.
Default value N
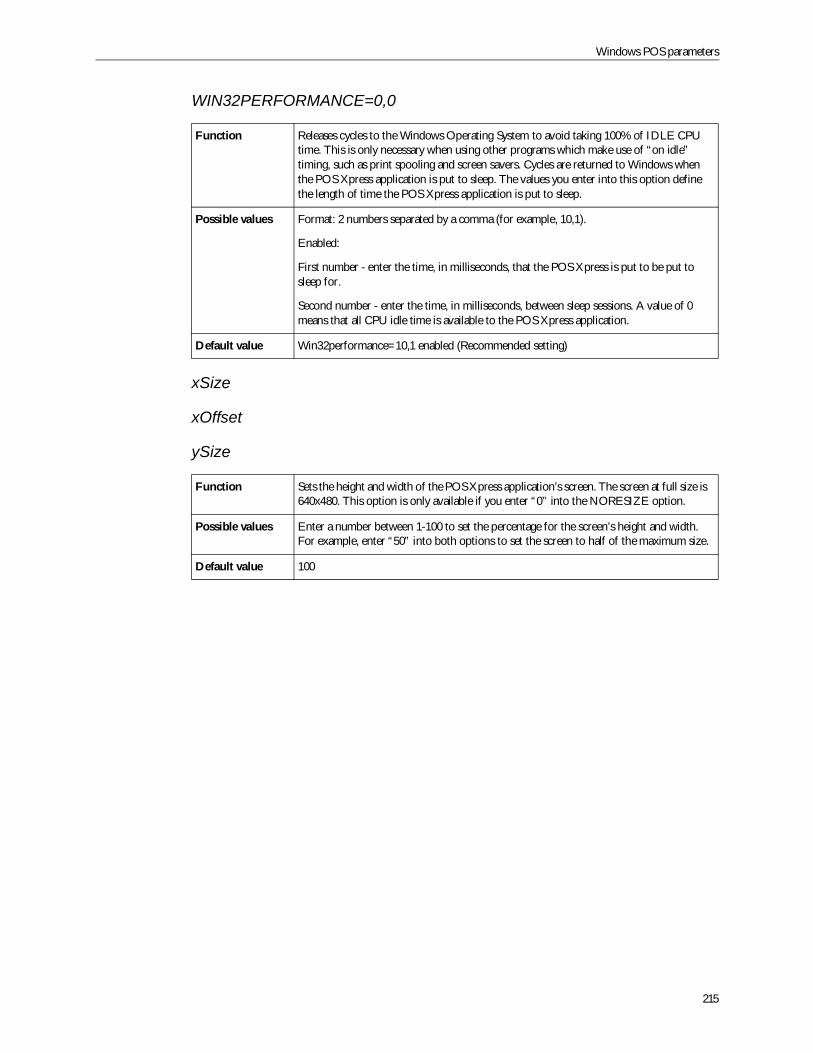
Windows POS parameters
215
WIN32PERFORMANCE=0,0
xSize
xOffset
ySize
Function Releases cycles to the Windows Operating System to avoid taking 100% of IDLE CPUtime. This is only necessary when using other programs which make use of “on idle”timing, such as print spooling and screen savers. Cycles are returned to Windows whenthe POS Xpress application is put to sleep. The values you enter into this option definethe length of time the POS Xpress application is put to sleep.
Possible values Format: 2 numbers separated by a comma (for example, 10,1).
Enabled:
First number - enter the time, in milliseconds, that the POS Xpress is put to be put tosleep for.
Second number - enter the time, in milliseconds, between sleep sessions. A value of 0means that all CPU idle time is available to the POS Xpress application.
Default value Win32performance=10,1 enabled (Recommended setting)
Function Sets the height and width of the POS Xpress application’s screen. The screen at full size is640x480. This option is only available if you enter “0” into the NORESIZE option.
Possible values Enter a number between 1-100 to set the percentage for the screen’s height and width.For example, enter “50” into both options to set the screen to half of the maximum size.
Default value 100
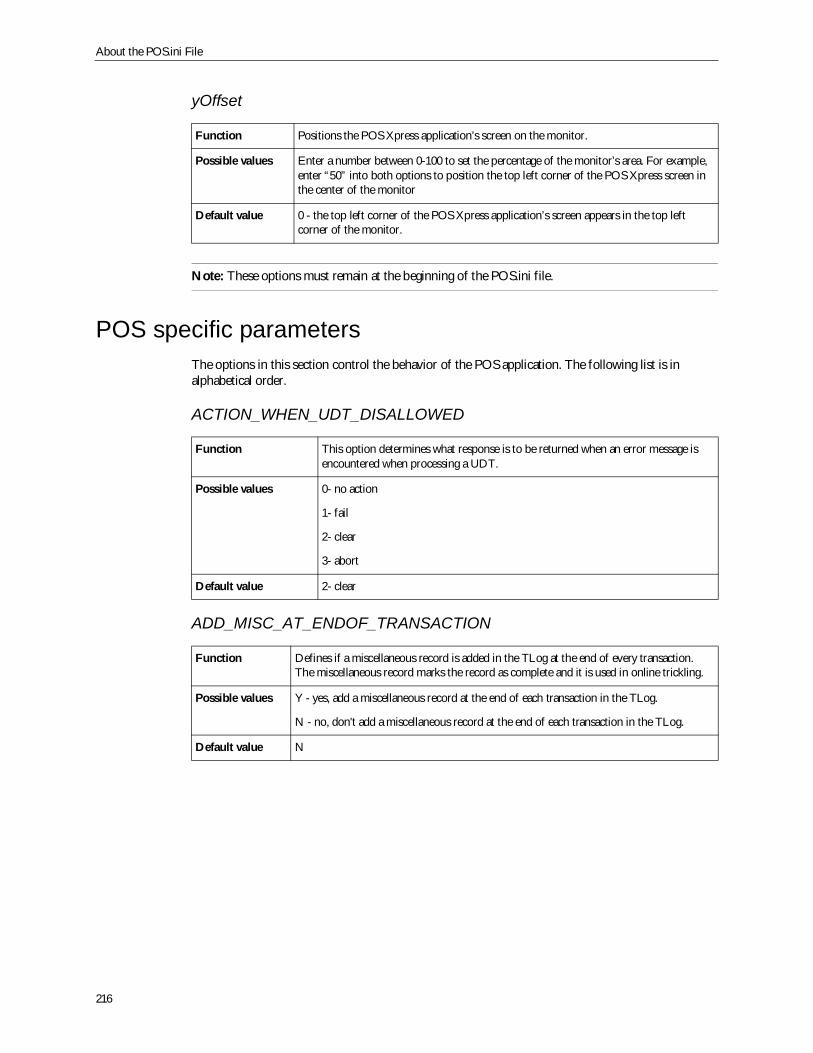
About the POS.ini File
216
yOffset
Note: These options must remain at the beginning of the POS.ini file.
POS specific parametersThe options in this section control the behavior of the POS application. The following list is inalphabetical order.
ACTION_WHEN_UDT_DISALLOWED
ADD_MISC_AT_ENDOF_TRANSACTION
Function Positions the POS Xpress application’s screen on the monitor.
Possible values Enter a number between 0-100 to set the percentage of the monitor’s area. For example,enter “50” into both options to position the top left corner of the POS Xpress screen inthe center of the monitor
Default value 0 - the top left corner of the POS Xpress application’s screen appears in the top leftcorner of the monitor.
Function This option determines what response is to be returned when an error message isencountered when processing a UDT.
Possible values 0- no action
1- fail
2- clear
3- abort
Default value 2- clear
Function Defines if a miscellaneous record is added in the TLog at the end of every transaction.The miscellaneous record marks the record as complete and it is used in online trickling.
Possible values Y - yes, add a miscellaneous record at the end of each transaction in the TLog.
N - no, don't add a miscellaneous record at the end of each transaction in the TLog.
Default value N
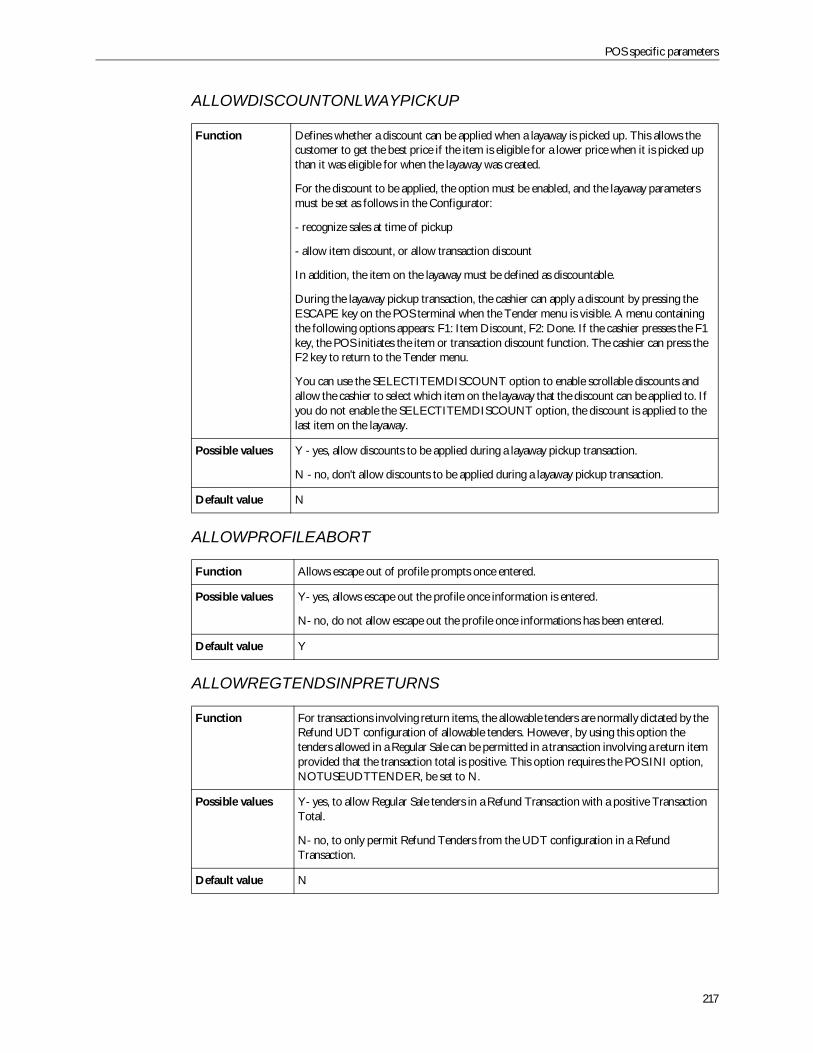
POS specific parameters
217
ALLOWDISCOUNTONLWAYPICKUP
ALLOWPROFILEABORT
ALLOWREGTENDSINPRETURNS
Function Defines whether a discount can be applied when a layaway is picked up. This allows thecustomer to get the best price if the item is eligible for a lower price when it is picked upthan it was eligible for when the layaway was created.
For the discount to be applied, the option must be enabled, and the layaway parametersmust be set as follows in the Configurator:
- recognize sales at time of pickup
- allow item discount, or allow transaction discount
In addition, the item on the layaway must be defined as discountable.
During the layaway pickup transaction, the cashier can apply a discount by pressing theESCAPE key on the POS terminal when the Tender menu is visible. A menu containingthe following options appears: F1: Item Discount, F2: Done. If the cashier presses the F1key, the POS initiates the item or transaction discount function. The cashier can press theF2 key to return to the Tender menu.
You can use the SELECTITEMDISCOUNT option to enable scrollable discounts andallow the cashier to select which item on the layaway that the discount can be applied to. Ifyou do not enable the SELECTITEMDISCOUNT option, the discount is applied to thelast item on the layaway.
Possible values Y - yes, allow discounts to be applied during a layaway pickup transaction.
N - no, don't allow discounts to be applied during a layaway pickup transaction.
Default value N
Function Allows escape out of profile prompts once entered.
Possible values Y- yes, allows escape out the profile once information is entered.
N- no, do not allow escape out the profile once informations has been entered.
Default value Y
Function For transactions involving return items, the allowable tenders are normally dictated by theRefund UDT configuration of allowable tenders. However, by using this option thetenders allowed in a Regular Sale can be permitted in a transaction involving a return itemprovided that the transaction total is positive. This option requires the POS.INI option,NOTUSEUDTTENDER, be set to N.
Possible values Y- yes, to allow Regular Sale tenders in a Refund Transaction with a positive TransactionTotal.
N- no, to only permit Refund Tenders from the UDT configuration in a RefundTransaction.
Default value N
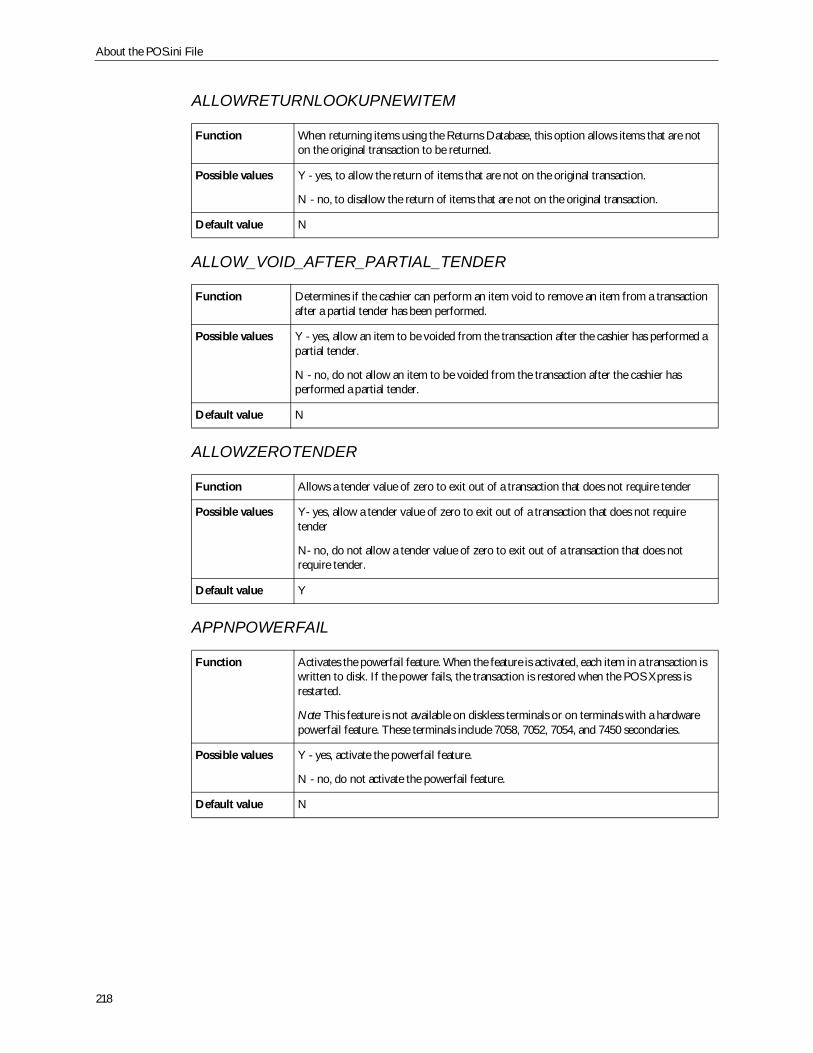
About the POS.ini File
218
ALLOWRETURNLOOKUPNEWITEM
ALLOW_VOID_AFTER_PARTIAL_TENDER
ALLOWZEROTENDER
APPNPOWERFAIL
Function When returning items using the Returns Database, this option allows items that are noton the original transaction to be returned.
Possible values Y - yes, to allow the return of items that are not on the original transaction.
N - no, to disallow the return of items that are not on the original transaction.
Default value N
Function Determines if the cashier can perform an item void to remove an item from a transactionafter a partial tender has been performed.
Possible values Y - yes, allow an item to be voided from the transaction after the cashier has performed apartial tender.
N - no, do not allow an item to be voided from the transaction after the cashier hasperformed a partial tender.
Default value N
Function Allows a tender value of zero to exit out of a transaction that does not require tender
Possible values Y- yes, allow a tender value of zero to exit out of a transaction that does not requiretender
N- no, do not allow a tender value of zero to exit out of a transaction that does notrequire tender.
Default value Y
Function Activates the powerfail feature. When the feature is activated, each item in a transaction iswritten to disk. If the power fails, the transaction is restored when the POS Xpress isrestarted.
Note: This feature is not available on diskless terminals or on terminals with a hardwarepowerfail feature. These terminals include 7058, 7052, 7054, and 7450 secondaries.
Possible values Y - yes, activate the powerfail feature.
N - no, do not activate the powerfail feature.
Default value N
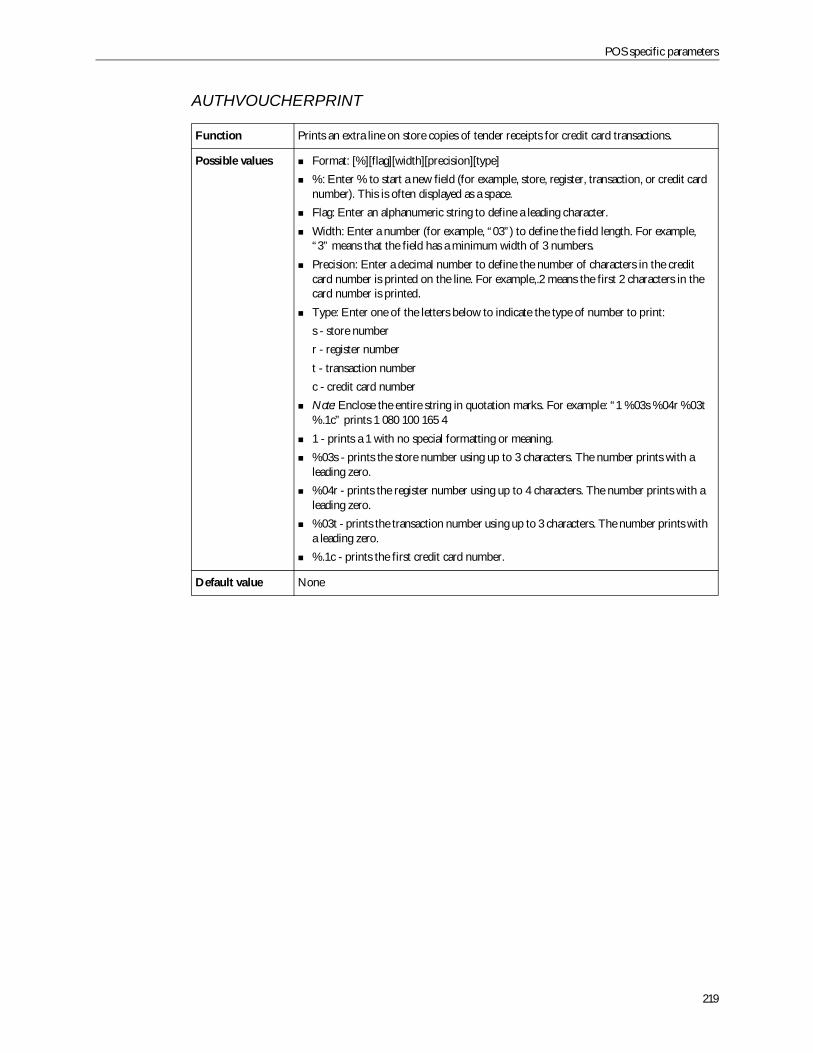
POS specific parameters
219
AUTHVOUCHERPRINT
Function Prints an extra line on store copies of tender receipts for credit card transactions.
Possible values Format: [%][flag][width][precision][type]%: Enter % to start a new field (for example, store, register, transaction, or credit cardnumber). This is often displayed as a space.Flag: Enter an alphanumeric string to define a leading character.Width: Enter a number (for example, “03”) to define the field length. For example,“3” means that the field has a minimum width of 3 numbers.Precision: Enter a decimal number to define the number of characters in the creditcard number is printed on the line. For example,.2 means the first 2 characters in thecard number is printed.Type: Enter one of the letters below to indicate the type of number to print:s - store numberr - register numbert - transaction numberc - credit card numberNote: Enclose the entire string in quotation marks. For example: “1 %03s %04r %03t%.1c” prints 1 080 100 165 41 - prints a 1 with no special formatting or meaning.%03s - prints the store number using up to 3 characters. The number prints with aleading zero.%04r - prints the register number using up to 4 characters. The number prints with aleading zero.%03t - prints the transaction number using up to 3 characters. The number prints witha leading zero.%.1c - prints the first credit card number.
Default value None
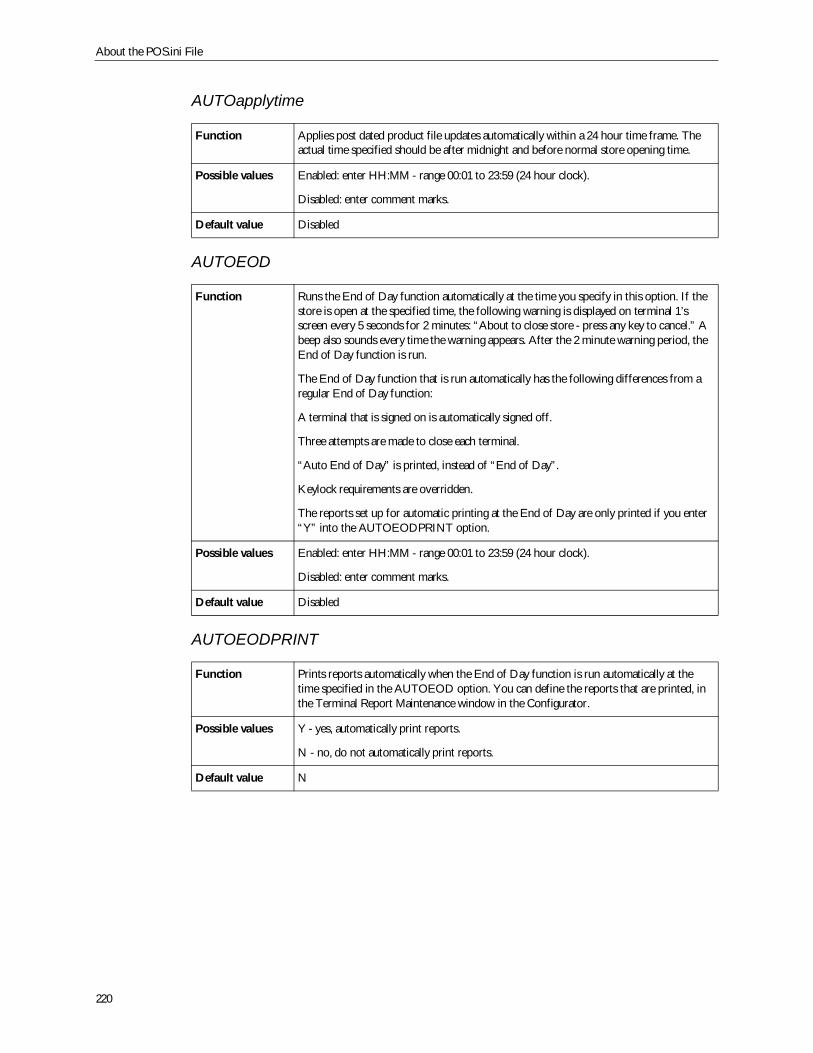
About the POS.ini File
220
AUTOapplytime
AUTOEOD
AUTOEODPRINT
Function Applies post dated product file updates automatically within a 24 hour time frame. Theactual time specified should be after midnight and before normal store opening time.
Possible values Enabled: enter HH:MM - range 00:01 to 23:59 (24 hour clock).
Disabled: enter comment marks.
Default value Disabled
Function Runs the End of Day function automatically at the time you specify in this option. If thestore is open at the specified time, the following warning is displayed on terminal 1’sscreen every 5 seconds for 2 minutes: “About to close store - press any key to cancel.” Abeep also sounds every time the warning appears. After the 2 minute warning period, theEnd of Day function is run.
The End of Day function that is run automatically has the following differences from aregular End of Day function:
A terminal that is signed on is automatically signed off.
Three attempts are made to close each terminal.
“Auto End of Day” is printed, instead of “End of Day”.
Keylock requirements are overridden.
The reports set up for automatic printing at the End of Day are only printed if you enter“Y” into the AUTOEODPRINT option.
Possible values Enabled: enter HH:MM - range 00:01 to 23:59 (24 hour clock).
Disabled: enter comment marks.
Default value Disabled
Function Prints reports automatically when the End of Day function is run automatically at thetime specified in the AUTOEOD option. You can define the reports that are printed, inthe Terminal Report Maintenance window in the Configurator.
Possible values Y - yes, automatically print reports.
N - no, do not automatically print reports.
Default value N
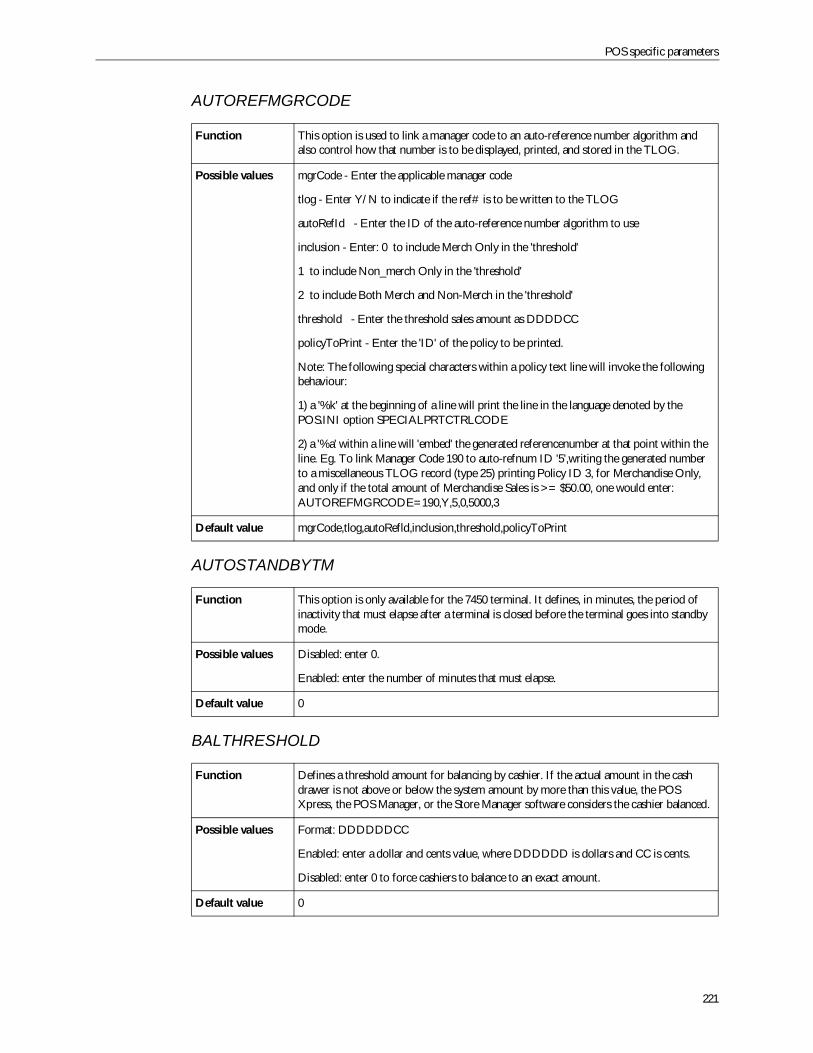
POS specific parameters
221
AUTOREFMGRCODE
AUTOSTANDBYTM
BALTHRESHOLD
Function This option is used to link a manager code to an auto-reference number algorithm andalso control how that number is to be displayed, printed, and stored in the TLOG.
Possible values mgrCode - Enter the applicable manager code
tlog - Enter Y/N to indicate if the ref# is to be written to the TLOG
autoRefId - Enter the ID of the auto-reference number algorithm to use
inclusion - Enter: 0 to include Merch Only in the 'threshold'
1 to include Non_merch Only in the 'threshold'
2 to include Both Merch and Non-Merch in the 'threshold'
threshold - Enter the threshold sales amount as DDDDCC
policyToPrint - Enter the 'ID' of the policy to be printed.
Note: The following special characters within a policy text line will invoke the followingbehaviour:
1) a '%k' at the beginning of a line will print the line in the language denoted by thePOS.INI option SPECIALPRTCTRLCODE
2) a '%a' within a line will 'embed' the generated referencenumber at that point within theline. Eg. To link Manager Code 190 to auto-refnum ID '5',writing the generated numberto a miscellaneous TLOG record (type 25) printing Policy ID 3, for Merchandise Only,and only if the total amount of Merchandise Sales is >= $50.00, one would enter:AUTOREFMGRCODE=190,Y,5,0,5000,3
Default value mgrCode,tlog,autoRefld,inclusion,threshold,policyToPrint
Function This option is only available for the 7450 terminal. It defines, in minutes, the period ofinactivity that must elapse after a terminal is closed before the terminal goes into standbymode.
Possible values Disabled: enter 0.
Enabled: enter the number of minutes that must elapse.
Default value 0
Function Defines a threshold amount for balancing by cashier. If the actual amount in the cashdrawer is not above or below the system amount by more than this value, the POSXpress, the POS Manager, or the Store Manager software considers the cashier balanced.
Possible values Format: DDDDDDCC
Enabled: enter a dollar and cents value, where DDDDDD is dollars and CC is cents.
Disabled: enter 0 to force cashiers to balance to an exact amount.
Default value 0
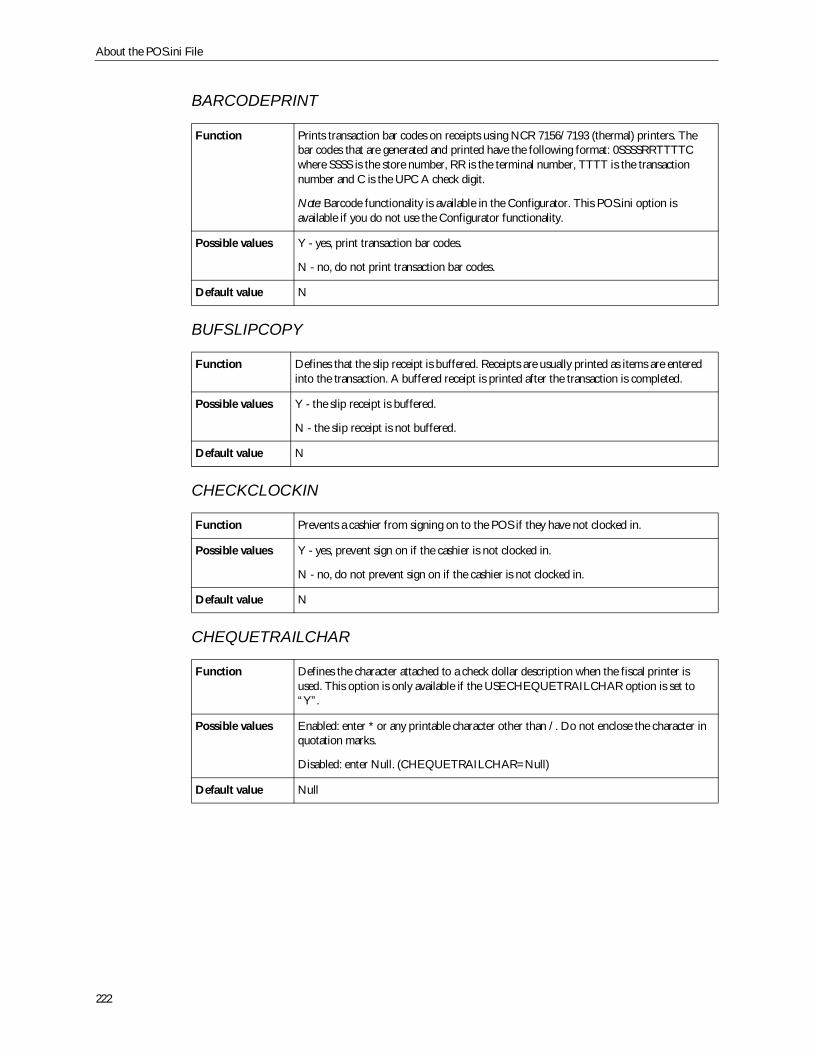
About the POS.ini File
222
BARCODEPRINT
BUFSLIPCOPY
CHECKCLOCKIN
CHEQUETRAILCHAR
Function Prints transaction bar codes on receipts using NCR 7156/7193 (thermal) printers. Thebar codes that are generated and printed have the following format: 0SSSSRRTTTTCwhere SSSS is the store number, RR is the terminal number, TTTT is the transactionnumber and C is the UPC A check digit.
Note: Barcode functionality is available in the Configurator. This POS.ini option isavailable if you do not use the Configurator functionality.
Possible values Y - yes, print transaction bar codes.
N - no, do not print transaction bar codes.
Default value N
Function Defines that the slip receipt is buffered. Receipts are usually printed as items are enteredinto the transaction. A buffered receipt is printed after the transaction is completed.
Possible values Y - the slip receipt is buffered.
N - the slip receipt is not buffered.
Default value N
Function Prevents a cashier from signing on to the POS if they have not clocked in.
Possible values Y - yes, prevent sign on if the cashier is not clocked in.
N - no, do not prevent sign on if the cashier is not clocked in.
Default value N
Function Defines the character attached to a check dollar description when the fiscal printer isused. This option is only available if the USECHEQUETRAILCHAR option is set to“Y”.
Possible values Enabled: enter * or any printable character other than /. Do not enclose the character inquotation marks.
Disabled: enter Null. (CHEQUETRAILCHAR=Null)
Default value Null
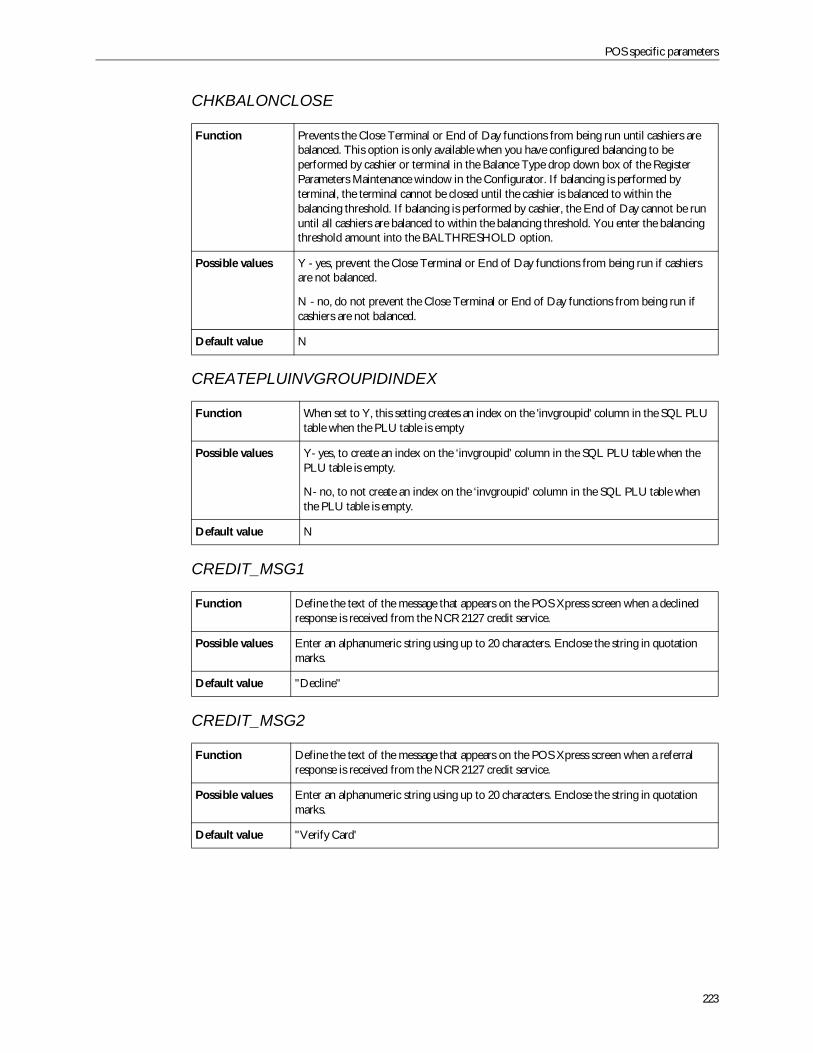
POS specific parameters
223
CHKBALONCLOSE
CREATEPLUINVGROUPIDINDEX
CREDIT_MSG1
CREDIT_MSG2
Function Prevents the Close Terminal or End of Day functions from being run until cashiers arebalanced. This option is only available when you have configured balancing to beperformed by cashier or terminal in the Balance Type drop down box of the RegisterParameters Maintenance window in the Configurator. If balancing is performed byterminal, the terminal cannot be closed until the cashier is balanced to within thebalancing threshold. If balancing is performed by cashier, the End of Day cannot be rununtil all cashiers are balanced to within the balancing threshold. You enter the balancingthreshold amount into the BALTHRESHOLD option.
Possible values Y - yes, prevent the Close Terminal or End of Day functions from being run if cashiersare not balanced.
N - no, do not prevent the Close Terminal or End of Day functions from being run ifcashiers are not balanced.
Default value N
Function When set to Y, this setting creates an index on the 'invgroupid' column in the SQL PLUtable when the PLU table is empty
Possible values Y- yes, to create an index on the ‘invgroupid’ column in the SQL PLU table when thePLU table is empty.
N- no, to not create an index on the ‘invgroupid’ column in the SQL PLU table whenthe PLU table is empty.
Default value N
Function Define the text of the message that appears on the POS Xpress screen when a declinedresponse is received from the NCR 2127 credit service.
Possible values Enter an alphanumeric string using up to 20 characters. Enclose the string in quotationmarks.
Default value "Decline"
Function Define the text of the message that appears on the POS Xpress screen when a referralresponse is received from the NCR 2127 credit service.
Possible values Enter an alphanumeric string using up to 20 characters. Enclose the string in quotationmarks.
Default value "Verify Card'
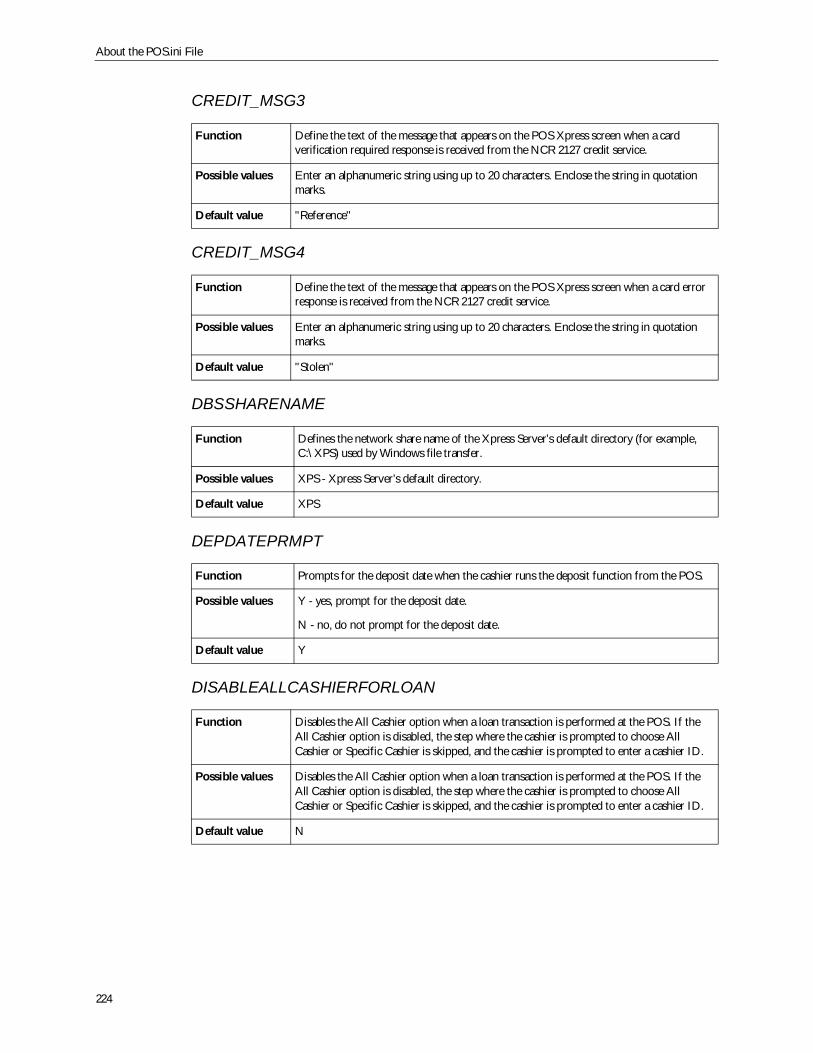
About the POS.ini File
224
CREDIT_MSG3
CREDIT_MSG4
DBSSHARENAME
DEPDATEPRMPT
DISABLEALLCASHIERFORLOAN
Function Define the text of the message that appears on the POS Xpress screen when a cardverification required response is received from the NCR 2127 credit service.
Possible values Enter an alphanumeric string using up to 20 characters. Enclose the string in quotationmarks.
Default value "Reference"
Function Define the text of the message that appears on the POS Xpress screen when a card errorresponse is received from the NCR 2127 credit service.
Possible values Enter an alphanumeric string using up to 20 characters. Enclose the string in quotationmarks.
Default value "Stolen"
Function Defines the network share name of the Xpress Server’s default directory (for example,C:\XPS) used by Windows file transfer.
Possible values XPS - Xpress Server’s default directory.
Default value XPS
Function Prompts for the deposit date when the cashier runs the deposit function from the POS.
Possible values Y - yes, prompt for the deposit date.
N - no, do not prompt for the deposit date.
Default value Y
Function Disables the All Cashier option when a loan transaction is performed at the POS. If theAll Cashier option is disabled, the step where the cashier is prompted to choose AllCashier or Specific Cashier is skipped, and the cashier is prompted to enter a cashier ID.
Possible values Disables the All Cashier option when a loan transaction is performed at the POS. If theAll Cashier option is disabled, the step where the cashier is prompted to choose AllCashier or Specific Cashier is skipped, and the cashier is prompted to enter a cashier ID.
Default value N
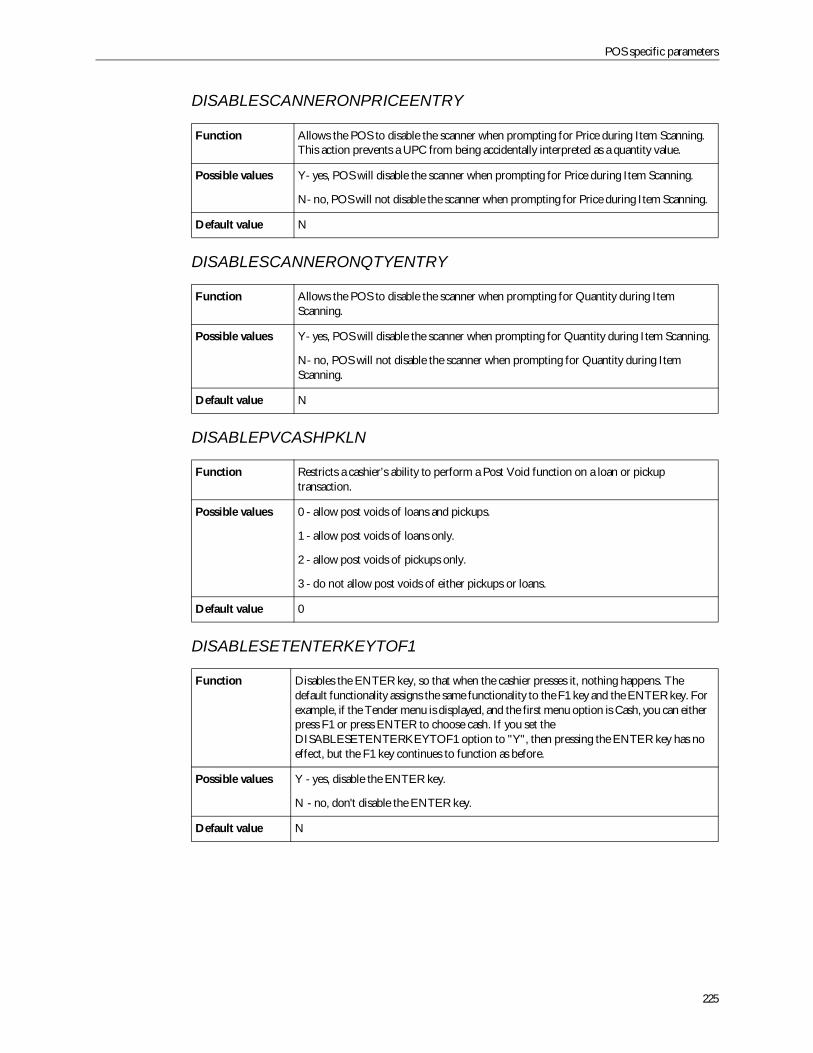
POS specific parameters
225
DISABLESCANNERONPRICEENTRY
DISABLESCANNERONQTYENTRY
DISABLEPVCASHPKLN
DISABLESETENTERKEYTOF1
Function Allows the POS to disable the scanner when prompting for Price during Item Scanning.This action prevents a UPC from being accidentally interpreted as a quantity value.
Possible values Y- yes, POS will disable the scanner when prompting for Price during Item Scanning.
N- no, POS will not disable the scanner when prompting for Price during Item Scanning.
Default value N
Function Allows the POS to disable the scanner when prompting for Quantity during ItemScanning.
Possible values Y- yes, POS will disable the scanner when prompting for Quantity during Item Scanning.
N- no, POS will not disable the scanner when prompting for Quantity during ItemScanning.
Default value N
Function Restricts a cashier’s ability to perform a Post Void function on a loan or pickuptransaction.
Possible values 0 - allow post voids of loans and pickups.
1 - allow post voids of loans only.
2 - allow post voids of pickups only.
3 - do not allow post voids of either pickups or loans.
Default value 0
Function Disables the ENTER key, so that when the cashier presses it, nothing happens. Thedefault functionality assigns the same functionality to the F1 key and the ENTER key. Forexample, if the Tender menu is displayed, and the first menu option is Cash, you can eitherpress F1 or press ENTER to choose cash. If you set theDISABLESETENTERKEYTOF1 option to "Y", then pressing the ENTER key has noeffect, but the F1 key continues to function as before.
Possible values Y - yes, disable the ENTER key.
N - no, don't disable the ENTER key.
Default value N
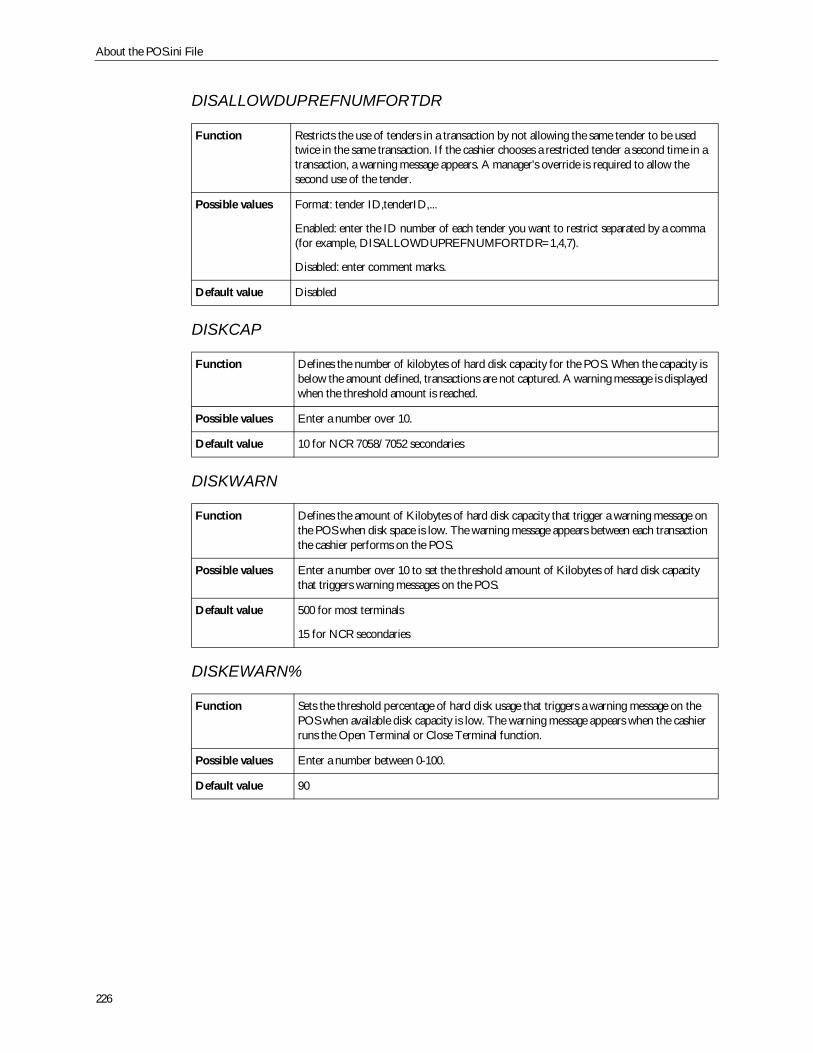
About the POS.ini File
226
DISALLOWDUPREFNUMFORTDR
DISKCAP
DISKWARN
DISKEWARN%
Function Restricts the use of tenders in a transaction by not allowing the same tender to be usedtwice in the same transaction. If the cashier chooses a restricted tender a second time in atransaction, a warning message appears. A manager's override is required to allow thesecond use of the tender.
Possible values Format: tender ID,tenderID,...
Enabled: enter the ID number of each tender you want to restrict separated by a comma(for example, DISALLOWDUPREFNUMFORTDR=1,4,7).
Disabled: enter comment marks.
Default value Disabled
Function Defines the number of kilobytes of hard disk capacity for the POS. When the capacity isbelow the amount defined, transactions are not captured. A warning message is displayedwhen the threshold amount is reached.
Possible values Enter a number over 10.
Default value 10 for NCR 7058/7052 secondaries
Function Defines the amount of Kilobytes of hard disk capacity that trigger a warning message onthe POS when disk space is low. The warning message appears between each transactionthe cashier performs on the POS.
Possible values Enter a number over 10 to set the threshold amount of Kilobytes of hard disk capacitythat triggers warning messages on the POS.
Default value 500 for most terminals
15 for NCR secondaries
Function Sets the threshold percentage of hard disk usage that triggers a warning message on thePOS when available disk capacity is low. The warning message appears when the cashierruns the Open Terminal or Close Terminal function.
Possible values Enter a number between 0-100.
Default value 90
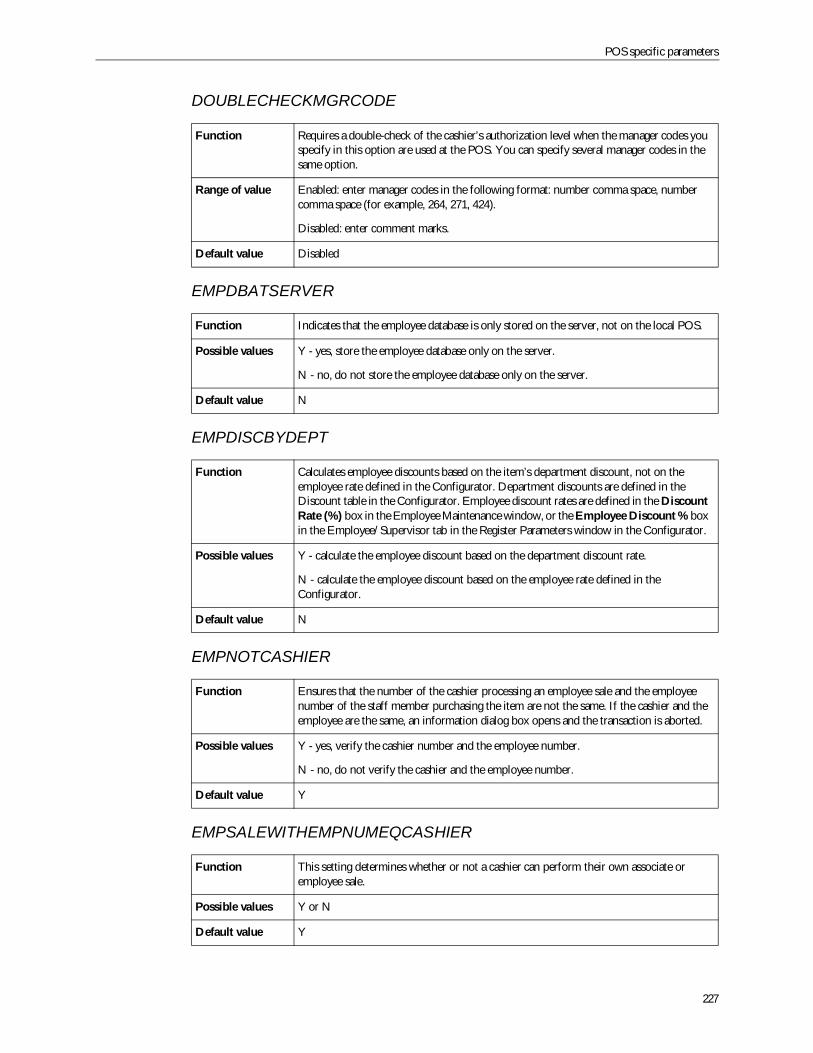
POS specific parameters
227
DOUBLECHECKMGRCODE
EMPDBATSERVER
EMPDISCBYDEPT
EMPNOTCASHIER
EMPSALEWITHEMPNUMEQCASHIER
Function Requires a double-check of the cashier’s authorization level when the manager codes youspecify in this option are used at the POS. You can specify several manager codes in thesame option.
Range of value Enabled: enter manager codes in the following format: number comma space, numbercomma space (for example, 264, 271, 424).
Disabled: enter comment marks.
Default value Disabled
Function Indicates that the employee database is only stored on the server, not on the local POS.
Possible values Y - yes, store the employee database only on the server.
N - no, do not store the employee database only on the server.
Default value N
Function Calculates employee discounts based on the item’s department discount, not on theemployee rate defined in the Configurator. Department discounts are defined in theDiscount table in the Configurator. Employee discount rates are defined in the DiscountRate (%) box in the Employee Maintenance window, or the Employee Discount % boxin the Employee/Supervisor tab in the Register Parameters window in the Configurator.
Possible values Y - calculate the employee discount based on the department discount rate.
N - calculate the employee discount based on the employee rate defined in theConfigurator.
Default value N
Function Ensures that the number of the cashier processing an employee sale and the employeenumber of the staff member purchasing the item are not the same. If the cashier and theemployee are the same, an information dialog box opens and the transaction is aborted.
Possible values Y - yes, verify the cashier number and the employee number.
N - no, do not verify the cashier and the employee number.
Default value Y
Function This setting determines whether or not a cashier can perform their own associate oremployee sale.
Possible values Y or N
Default value Y
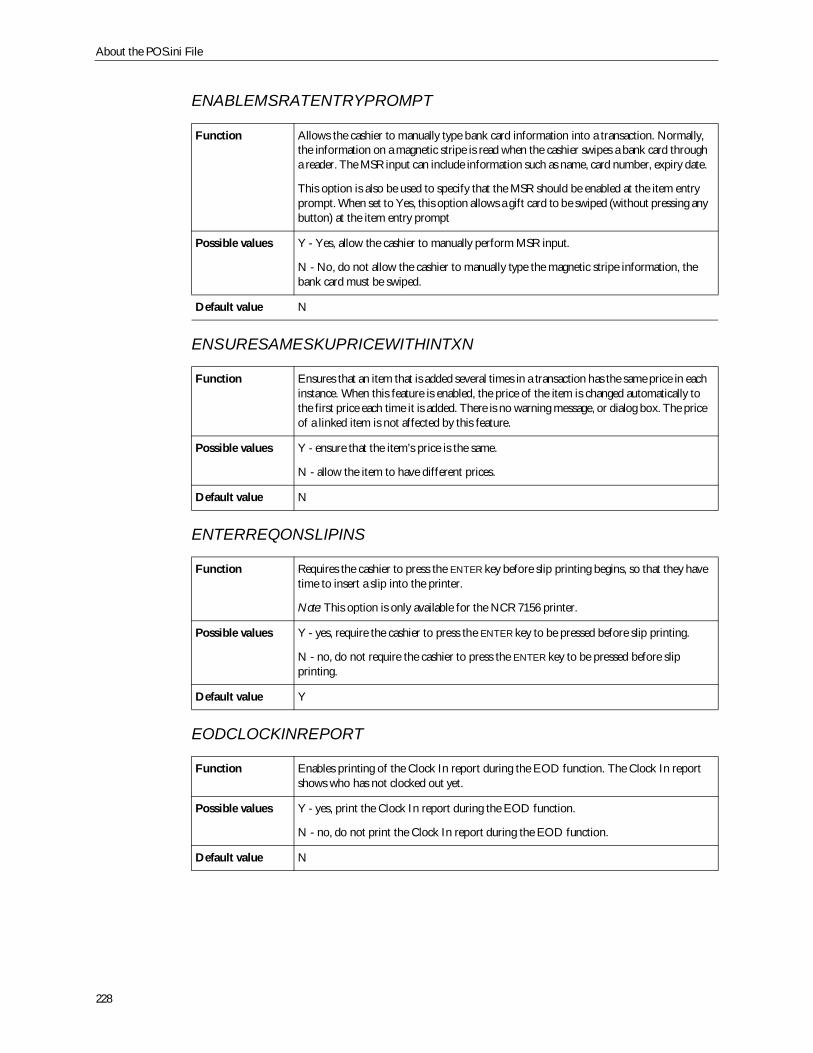
About the POS.ini File
228
ENABLEMSRATENTRYPROMPT
ENSURESAMESKUPRICEWITHINTXN
ENTERREQONSLIPINS
EODCLOCKINREPORT
Function Allows the cashier to manually type bank card information into a transaction. Normally,the information on a magnetic stripe is read when the cashier swipes a bank card througha reader. The MSR input can include information such as name, card number, expiry date.
This option is also be used to specify that the MSR should be enabled at the item entryprompt. When set to Yes, this option allows a gift card to be swiped (without pressing anybutton) at the item entry prompt
Possible values Y - Yes, allow the cashier to manually perform MSR input.
N - No, do not allow the cashier to manually type the magnetic stripe information, thebank card must be swiped.
Default value N
Function Ensures that an item that is added several times in a transaction has the same price in eachinstance. When this feature is enabled, the price of the item is changed automatically tothe first price each time it is added. There is no warning message, or dialog box. The priceof a linked item is not affected by this feature.
Possible values Y - ensure that the item’s price is the same.
N - allow the item to have different prices.
Default value N
Function Requires the cashier to press the ENTER key before slip printing begins, so that they havetime to insert a slip into the printer.
Note: This option is only available for the NCR 7156 printer.
Possible values Y - yes, require the cashier to press the ENTER key to be pressed before slip printing.
N - no, do not require the cashier to press the ENTER key to be pressed before slipprinting.
Default value Y
Function Enables printing of the Clock In report during the EOD function. The Clock In reportshows who has not clocked out yet.
Possible values Y - yes, print the Clock In report during the EOD function.
N - no, do not print the Clock In report during the EOD function.
Default value N

POS specific parameters
229
EODCLRCLOCKIN
EODEMPLOYEEUPLOAD
EXCLUDEDISCOUNTFROMJM
EODVERIFYCLOCKIN
EXCLUDEMERCHFROMJRN
Function Clears employees’ clock in status to be automatically from the employee database at theend of the day.
Possible values Y - yes, clear employees’ clock in status at the end of the day.
N - no, do not clear employees’ clock in status at the end of the day.
Default value N
Function Determines if an EMPTXN.loc file is automatically created at the end of day containingthe ASCII definition for all the employees that the store manager modified or added. Thisfile is sent to the upload directory.
Possible values Y - yes, automatically export local employee information to the upload directory.
N - no, do not automatically export local employee information to the upload directory.
Default value N
Function Determines if discount entries are printed to the journal. This option can be use in storesthat have a high volumes of items and want a smaller journal, such as grocery stores.
Possible values Y - exclude discount entries from the journal.
N - print discount entries to the journal.
Default value N
Function Enables the EOD function to be aborted when an employee has not clocked out.
Possible values Y - yes, abort the EOD function to allow employees to clock out before completing theEOD.
N- no, do not abort the EOD function when employees have not clocked out.
Default value N
Function Determines if merchandise entries are printed to the journal. This option can be used instores that have high volumes of items and want a smaller journal, such as grocery stores.
Possible values Y - exclude merchant entries from the journal.
N - print merchandise entries to the journal.
Default value N
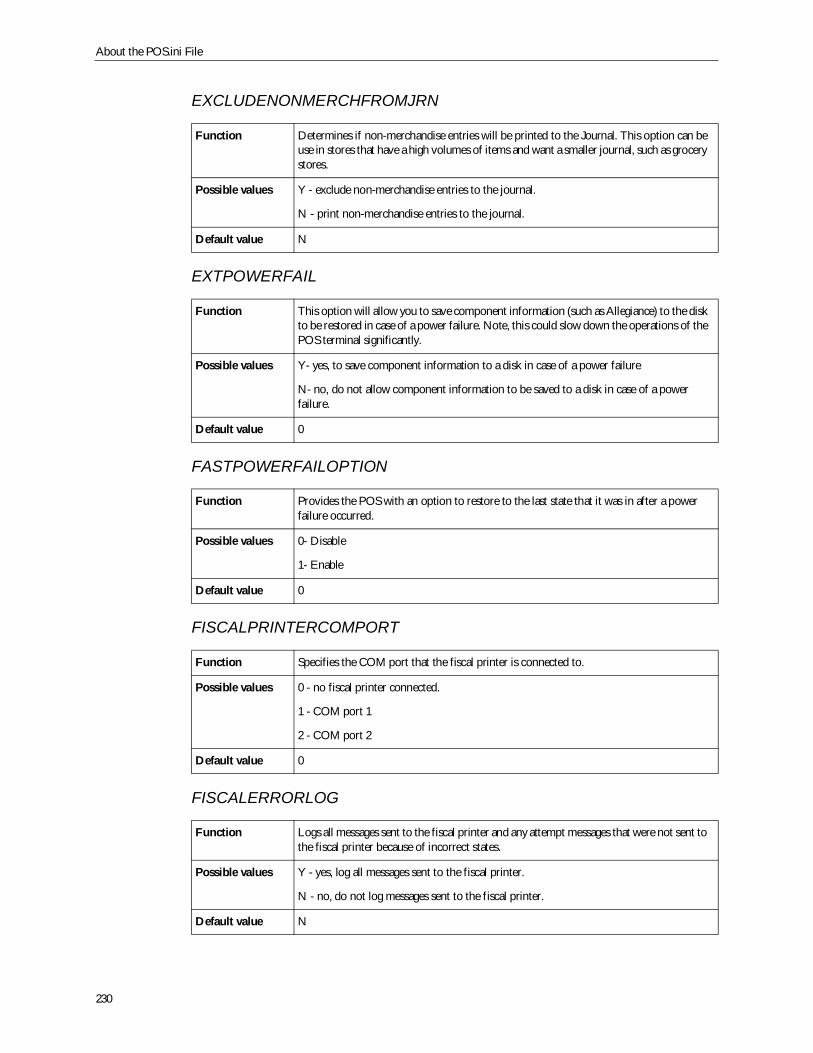
About the POS.ini File
230
EXCLUDENONMERCHFROMJRN
EXTPOWERFAIL
FASTPOWERFAILOPTION
FISCALPRINTERCOMPORT
FISCALERRORLOG
Function Determines if non-merchandise entries will be printed to the Journal. This option can beuse in stores that have a high volumes of items and want a smaller journal, such as grocerystores.
Possible values Y - exclude non-merchandise entries to the journal.
N - print non-merchandise entries to the journal.
Default value N
Function This option will allow you to save component information (such as Allegiance) to the diskto be restored in case of a power failure. Note, this could slow down the operations of thePOS terminal significantly.
Possible values Y- yes, to save component information to a disk in case of a power failure
N- no, do not allow component information to be saved to a disk in case of a powerfailure.
Default value 0
Function Provides the POS with an option to restore to the last state that it was in after a powerfailure occurred.
Possible values 0- Disable
1- Enable
Default value 0
Function Specifies the COM port that the fiscal printer is connected to.
Possible values 0 - no fiscal printer connected.
1 - COM port 1
2 - COM port 2
Default value 0
Function Logs all messages sent to the fiscal printer and any attempt messages that were not sent tothe fiscal printer because of incorrect states.
Possible values Y - yes, log all messages sent to the fiscal printer.
N - no, do not log messages sent to the fiscal printer.
Default value N
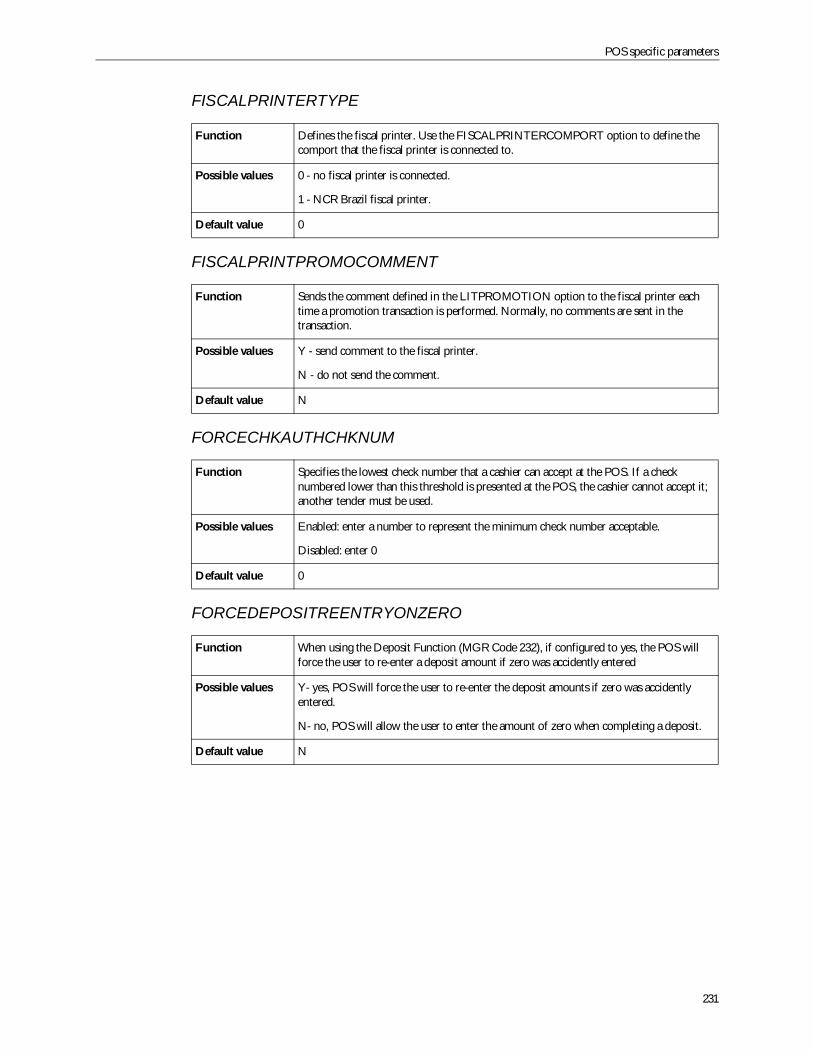
POS specific parameters
231
FISCALPRINTERTYPE
FISCALPRINTPROMOCOMMENT
FORCECHKAUTHCHKNUM
FORCEDEPOSITREENTRYONZERO
Function Defines the fiscal printer. Use the FISCALPRINTERCOMPORT option to define thecomport that the fiscal printer is connected to.
Possible values 0 - no fiscal printer is connected.
1 - NCR Brazil fiscal printer.
Default value 0
Function Sends the comment defined in the LITPROMOTION option to the fiscal printer eachtime a promotion transaction is performed. Normally, no comments are sent in thetransaction.
Possible values Y - send comment to the fiscal printer.
N - do not send the comment.
Default value N
Function Specifies the lowest check number that a cashier can accept at the POS. If a checknumbered lower than this threshold is presented at the POS, the cashier cannot accept it;another tender must be used.
Possible values Enabled: enter a number to represent the minimum check number acceptable.
Disabled: enter 0
Default value 0
Function When using the Deposit Function (MGR Code 232), if configured to yes, the POS willforce the user to re-enter a deposit amount if zero was accidently entered
Possible values Y- yes, POS will force the user to re-enter the deposit amounts if zero was accidentlyentered.
N- no, POS will allow the user to enter the amount of zero when completing a deposit.
Default value N
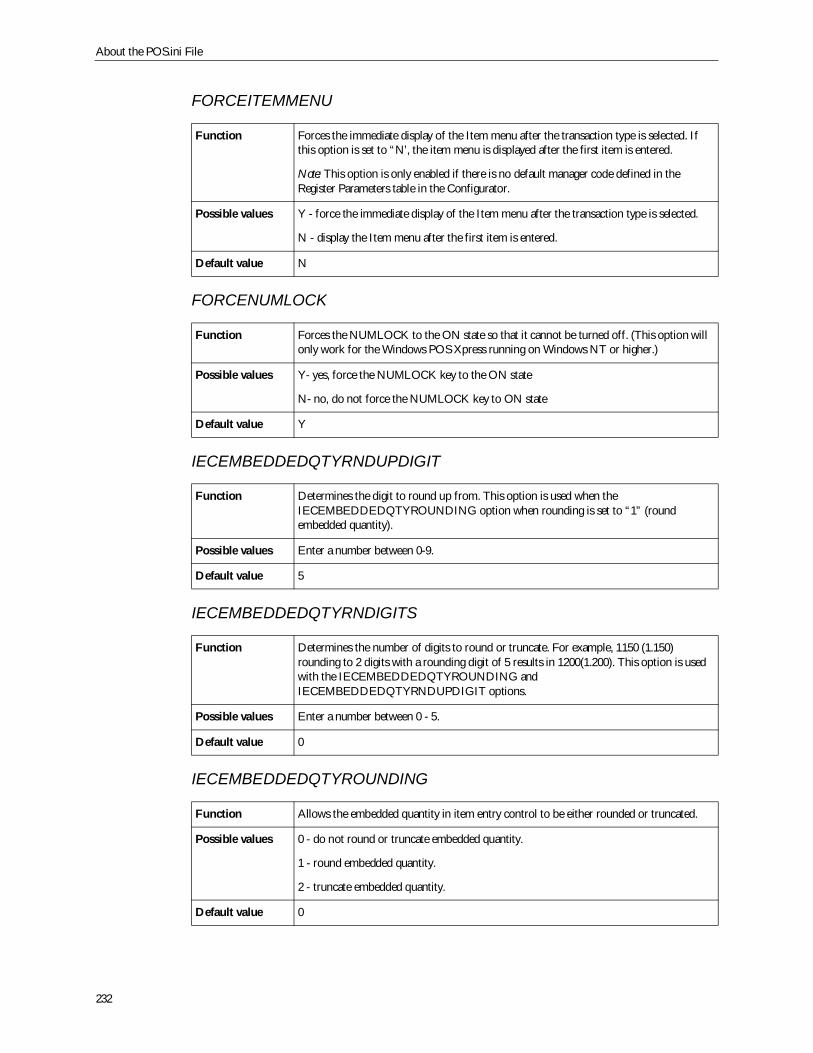
About the POS.ini File
232
FORCEITEMMENU
FORCENUMLOCK
IECEMBEDDEDQTYRNDUPDIGIT
IECEMBEDDEDQTYRNDIGITS
IECEMBEDDEDQTYROUNDING
Function Forces the immediate display of the Item menu after the transaction type is selected. Ifthis option is set to “N’, the item menu is displayed after the first item is entered.
Note: This option is only enabled if there is no default manager code defined in theRegister Parameters table in the Configurator.
Possible values Y - force the immediate display of the Item menu after the transaction type is selected.
N - display the Item menu after the first item is entered.
Default value N
Function Forces the NUMLOCK to the ON state so that it cannot be turned off. (This option willonly work for the Windows POS Xpress running on Windows NT or higher.)
Possible values Y- yes, force the NUMLOCK key to the ON state
N- no, do not force the NUMLOCK key to ON state
Default value Y
Function Determines the digit to round up from. This option is used when theIECEMBEDDEDQTYROUNDING option when rounding is set to “1” (roundembedded quantity).
Possible values Enter a number between 0-9.
Default value 5
Function Determines the number of digits to round or truncate. For example, 1150 (1.150)rounding to 2 digits with a rounding digit of 5 results in 1200(1.200). This option is usedwith the IECEMBEDDEDQTYROUNDING andIECEMBEDDEDQTYRNDUPDIGIT options.
Possible values Enter a number between 0 - 5.
Default value 0
Function Allows the embedded quantity in item entry control to be either rounded or truncated.
Possible values 0 - do not round or truncate embedded quantity.
1 - round embedded quantity.
2 - truncate embedded quantity.
Default value 0
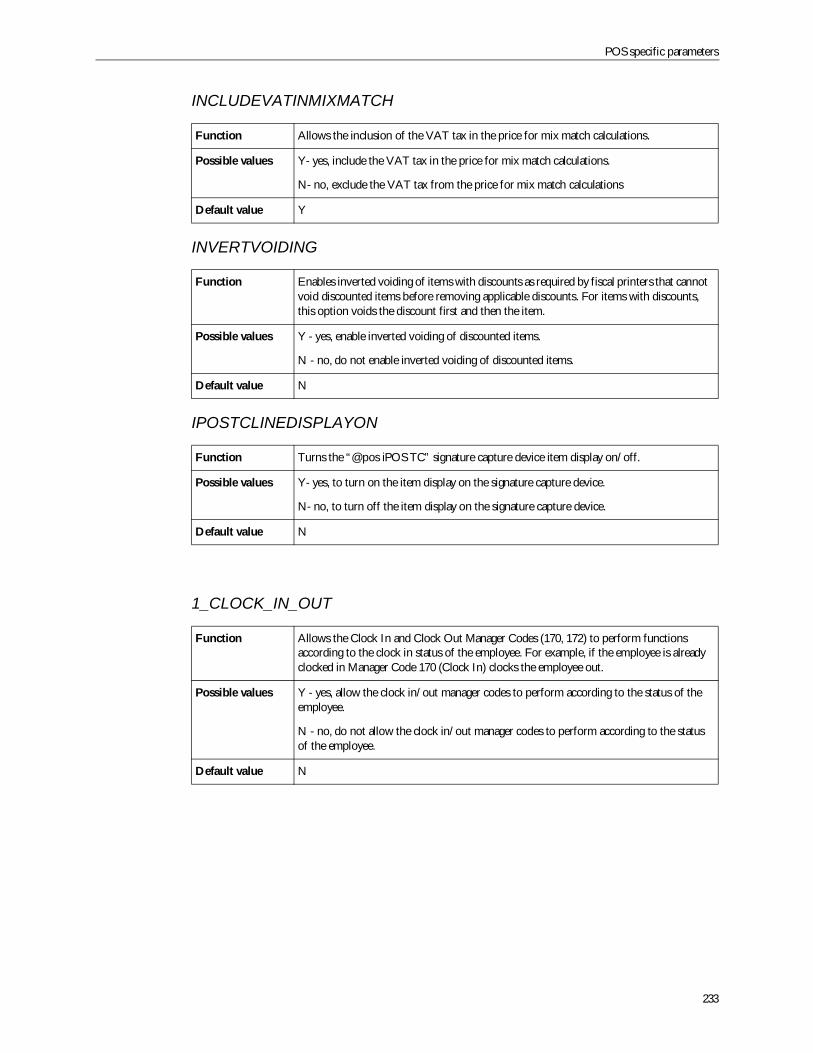
POS specific parameters
233
INCLUDEVATINMIXMATCH
INVERTVOIDING
IPOSTCLINEDISPLAYON
1_CLOCK_IN_OUT
Function Allows the inclusion of the VAT tax in the price for mix match calculations.
Possible values Y- yes, include the VAT tax in the price for mix match calculations.
N- no, exclude the VAT tax from the price for mix match calculations
Default value Y
Function Enables inverted voiding of items with discounts as required by fiscal printers that cannotvoid discounted items before removing applicable discounts. For items with discounts,this option voids the discount first and then the item.
Possible values Y - yes, enable inverted voiding of discounted items.
N - no, do not enable inverted voiding of discounted items.
Default value N
Function Turns the “@pos iPOS TC” signature capture device item display on/off.
Possible values Y- yes, to turn on the item display on the signature capture device.
N- no, to turn off the item display on the signature capture device.
Default value N
Function Allows the Clock In and Clock Out Manager Codes (170, 172) to perform functionsaccording to the clock in status of the employee. For example, if the employee is alreadyclocked in Manager Code 170 (Clock In) clocks the employee out.
Possible values Y - yes, allow the clock in/out manager codes to perform according to the status of theemployee.
N - no, do not allow the clock in/out manager codes to perform according to the statusof the employee.
Default value N
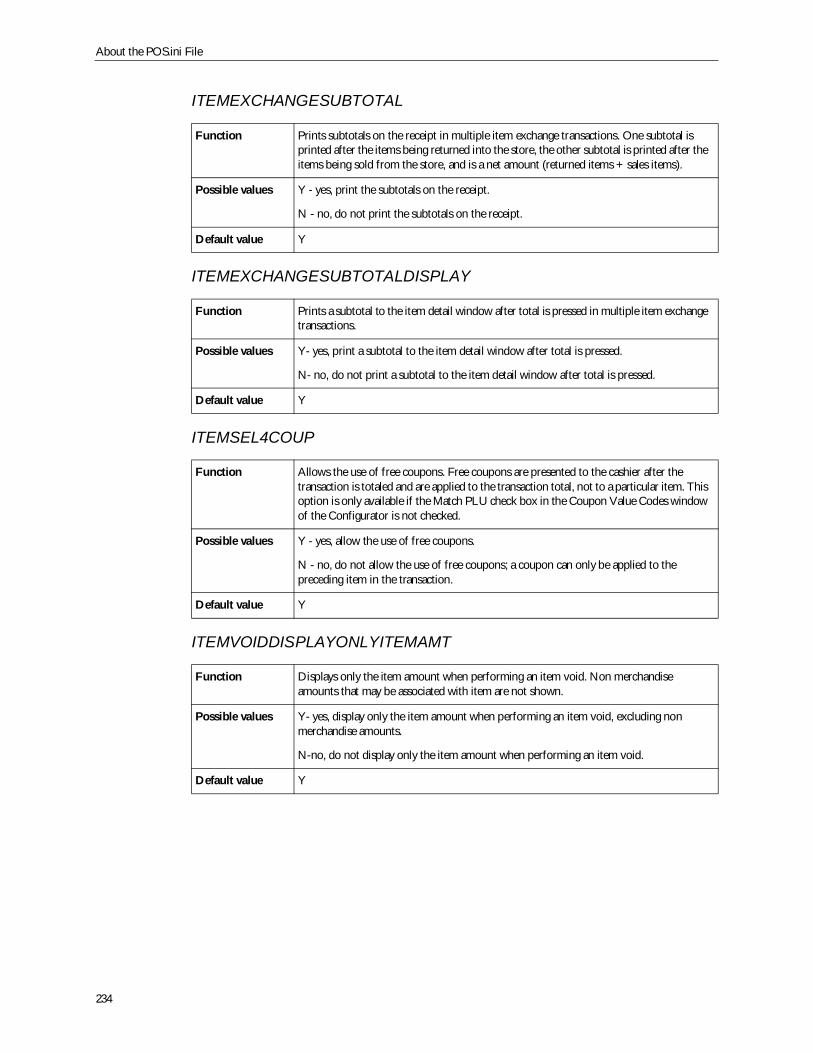
About the POS.ini File
234
ITEMEXCHANGESUBTOTAL
ITEMEXCHANGESUBTOTALDISPLAY
ITEMSEL4COUP
ITEMVOIDDISPLAYONLYITEMAMT
Function Prints subtotals on the receipt in multiple item exchange transactions. One subtotal isprinted after the items being returned into the store, the other subtotal is printed after theitems being sold from the store, and is a net amount (returned items + sales items).
Possible values Y - yes, print the subtotals on the receipt.
N - no, do not print the subtotals on the receipt.
Default value Y
Function Prints a subtotal to the item detail window after total is pressed in multiple item exchangetransactions.
Possible values Y- yes, print a subtotal to the item detail window after total is pressed.
N- no, do not print a subtotal to the item detail window after total is pressed.
Default value Y
Function Allows the use of free coupons. Free coupons are presented to the cashier after thetransaction is totaled and are applied to the transaction total, not to a particular item. Thisoption is only available if the Match PLU check box in the Coupon Value Codes windowof the Configurator is not checked.
Possible values Y - yes, allow the use of free coupons.
N - no, do not allow the use of free coupons; a coupon can only be applied to thepreceding item in the transaction.
Default value Y
Function Displays only the item amount when performing an item void. Non merchandiseamounts that may be associated with item are not shown.
Possible values Y- yes, display only the item amount when performing an item void, excluding nonmerchandise amounts.
N-no, do not display only the item amount when performing an item void.
Default value Y
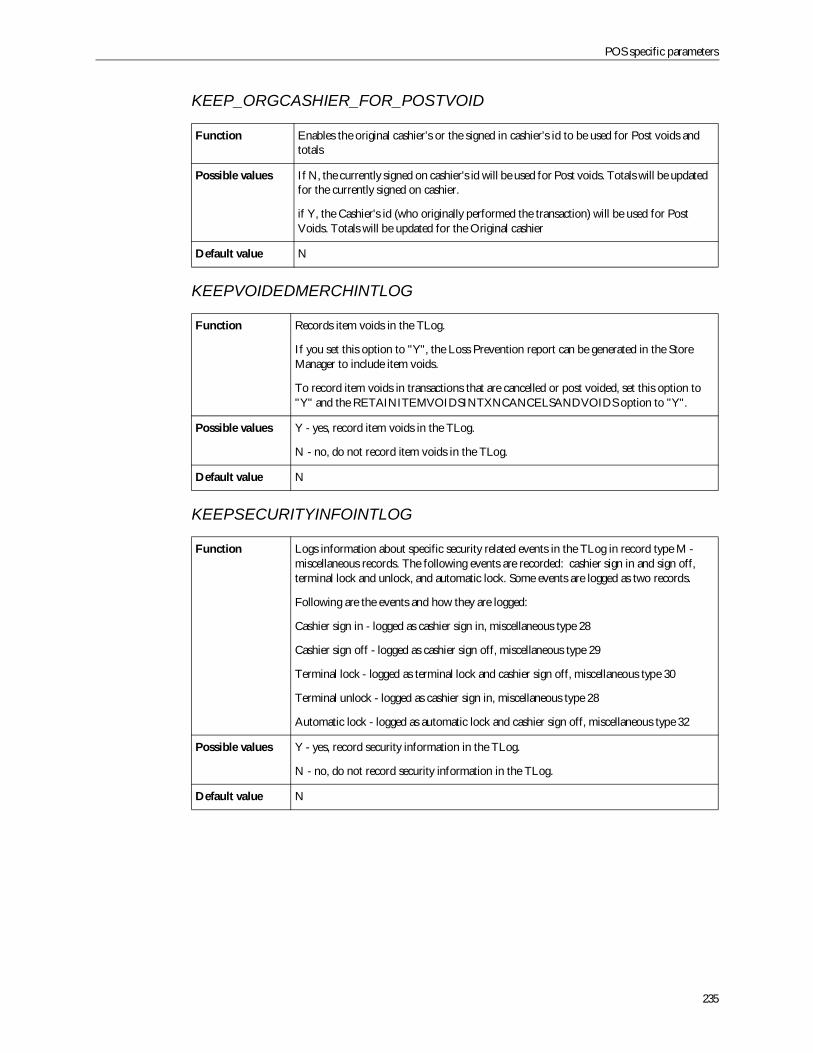
POS specific parameters
235
KEEP_ORGCASHIER_FOR_POSTVOID
KEEPVOIDEDMERCHINTLOG
KEEPSECURITYINFOINTLOG
Function Enables the original cashier’s or the signed in cashier’s id to be used for Post voids andtotals
Possible values If N, the currently signed on cashier's id will be used for Post voids. Totals will be updatedfor the currently signed on cashier.
if Y, the Cashier's id (who originally performed the transaction) will be used for PostVoids. Totals will be updated for the Original cashier
Default value N
Function Records item voids in the TLog.
If you set this option to "Y", the Loss Prevention report can be generated in the StoreManager to include item voids.
To record item voids in transactions that are cancelled or post voided, set this option to"Y" and the RETAINITEMVOIDSINTXNCANCELSANDVOIDS option to "Y".
Possible values Y - yes, record item voids in the TLog.
N - no, do not record item voids in the TLog.
Default value N
Function Logs information about specific security related events in the TLog in record type M -miscellaneous records. The following events are recorded: cashier sign in and sign off,terminal lock and unlock, and automatic lock. Some events are logged as two records.
Following are the events and how they are logged:
Cashier sign in - logged as cashier sign in, miscellaneous type 28
Cashier sign off - logged as cashier sign off, miscellaneous type 29
Terminal lock - logged as terminal lock and cashier sign off, miscellaneous type 30
Terminal unlock - logged as cashier sign in, miscellaneous type 28
Automatic lock - logged as automatic lock and cashier sign off, miscellaneous type 32
Possible values Y - yes, record security information in the TLog.
N - no, do not record security information in the TLog.
Default value N
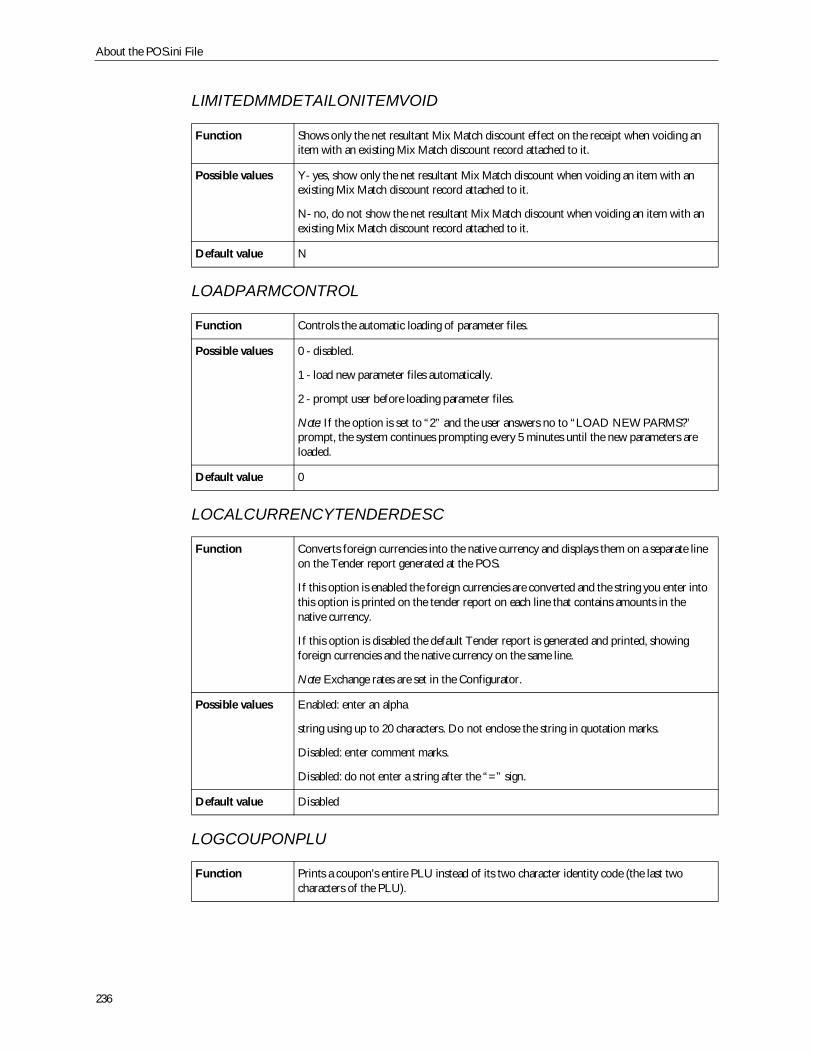
About the POS.ini File
236
LIMITEDMMDETAILONITEMVOID
LOADPARMCONTROL
LOCALCURRENCYTENDERDESC
LOGCOUPONPLU
Function Shows only the net resultant Mix Match discount effect on the receipt when voiding anitem with an existing Mix Match discount record attached to it.
Possible values Y- yes, show only the net resultant Mix Match discount when voiding an item with anexisting Mix Match discount record attached to it.
N- no, do not show the net resultant Mix Match discount when voiding an item with anexisting Mix Match discount record attached to it.
Default value N
Function Controls the automatic loading of parameter files.
Possible values 0 - disabled.
1 - load new parameter files automatically.
2 - prompt user before loading parameter files.
Note: If the option is set to “2” and the user answers no to “LOAD NEW PARMS?”prompt, the system continues prompting every 5 minutes until the new parameters areloaded.
Default value 0
Function Converts foreign currencies into the native currency and displays them on a separate lineon the Tender report generated at the POS.
If this option is enabled the foreign currencies are converted and the string you enter intothis option is printed on the tender report on each line that contains amounts in thenative currency.
If this option is disabled the default Tender report is generated and printed, showingforeign currencies and the native currency on the same line.
Note: Exchange rates are set in the Configurator.
Possible values Enabled: enter an alpha
string using up to 20 characters. Do not enclose the string in quotation marks.
Disabled: enter comment marks.
Disabled: do not enter a string after the “=” sign.
Default value Disabled
Function Prints a coupon’s entire PLU instead of its two character identity code (the last twocharacters of the PLU).
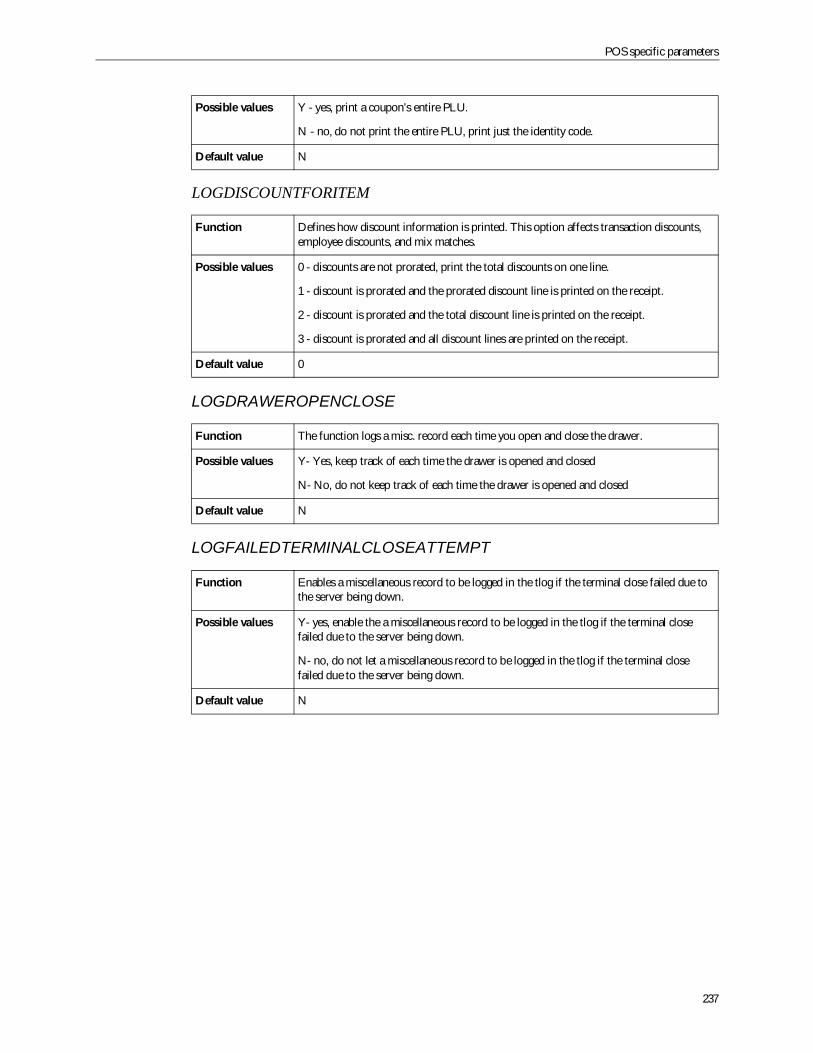
POS specific parameters
237
LOGDISCOUNTFORITEM
LOGDRAWEROPENCLOSE
LOGFAILEDTERMINALCLOSEATTEMPT
Possible values Y - yes, print a coupon’s entire PLU.
N - no, do not print the entire PLU, print just the identity code.
Default value N
Function Defines how discount information is printed. This option affects transaction discounts,employee discounts, and mix matches.
Possible values 0 - discounts are not prorated, print the total discounts on one line.
1 - discount is prorated and the prorated discount line is printed on the receipt.
2 - discount is prorated and the total discount line is printed on the receipt.
3 - discount is prorated and all discount lines are printed on the receipt.
Default value 0
Function The function logs a misc. record each time you open and close the drawer.
Possible values Y- Yes, keep track of each time the drawer is opened and closed
N- No, do not keep track of each time the drawer is opened and closed
Default value N
Function Enables a miscellaneous record to be logged in the tlog if the terminal close failed due tothe server being down.
Possible values Y- yes, enable the a miscellaneous record to be logged in the tlog if the terminal closefailed due to the server being down.
N- no, do not let a miscellaneous record to be logged in the tlog if the terminal closefailed due to the server being down.
Default value N
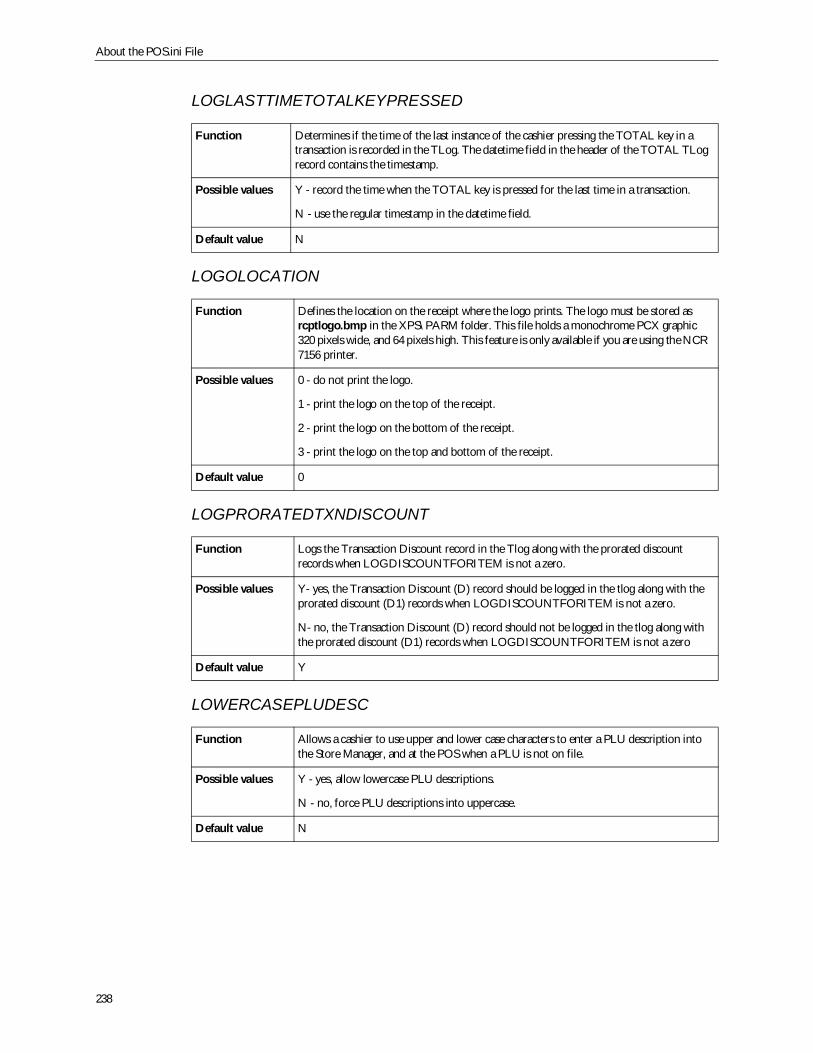
About the POS.ini File
238
LOGLASTTIMETOTALKEYPRESSED
LOGOLOCATION
LOGPRORATEDTXNDISCOUNT
LOWERCASEPLUDESC
Function Determines if the time of the last instance of the cashier pressing the TOTAL key in atransaction is recorded in the TLog. The datetime field in the header of the TOTAL TLogrecord contains the timestamp.
Possible values Y - record the time when the TOTAL key is pressed for the last time in a transaction.
N - use the regular timestamp in the datetime field.
Default value N
Function Defines the location on the receipt where the logo prints. The logo must be stored asrcptlogo.bmp in the XPS\PARM folder. This file holds a monochrome PCX graphic320 pixels wide, and 64 pixels high. This feature is only available if you are using the NCR7156 printer.
Possible values 0 - do not print the logo.
1 - print the logo on the top of the receipt.
2 - print the logo on the bottom of the receipt.
3 - print the logo on the top and bottom of the receipt.
Default value 0
Function Logs the Transaction Discount record in the Tlog along with the prorated discountrecords when LOGDISCOUNTFORITEM is not a zero.
Possible values Y- yes, the Transaction Discount (D) record should be logged in the tlog along with theprorated discount (D1) records when LOGDISCOUNTFORITEM is not a zero.
N- no, the Transaction Discount (D) record should not be logged in the tlog along withthe prorated discount (D1) records when LOGDISCOUNTFORITEM is not a zero
Default value Y
Function Allows a cashier to use upper and lower case characters to enter a PLU description intothe Store Manager, and at the POS when a PLU is not on file.
Possible values Y - yes, allow lowercase PLU descriptions.
N - no, force PLU descriptions into uppercase.
Default value N
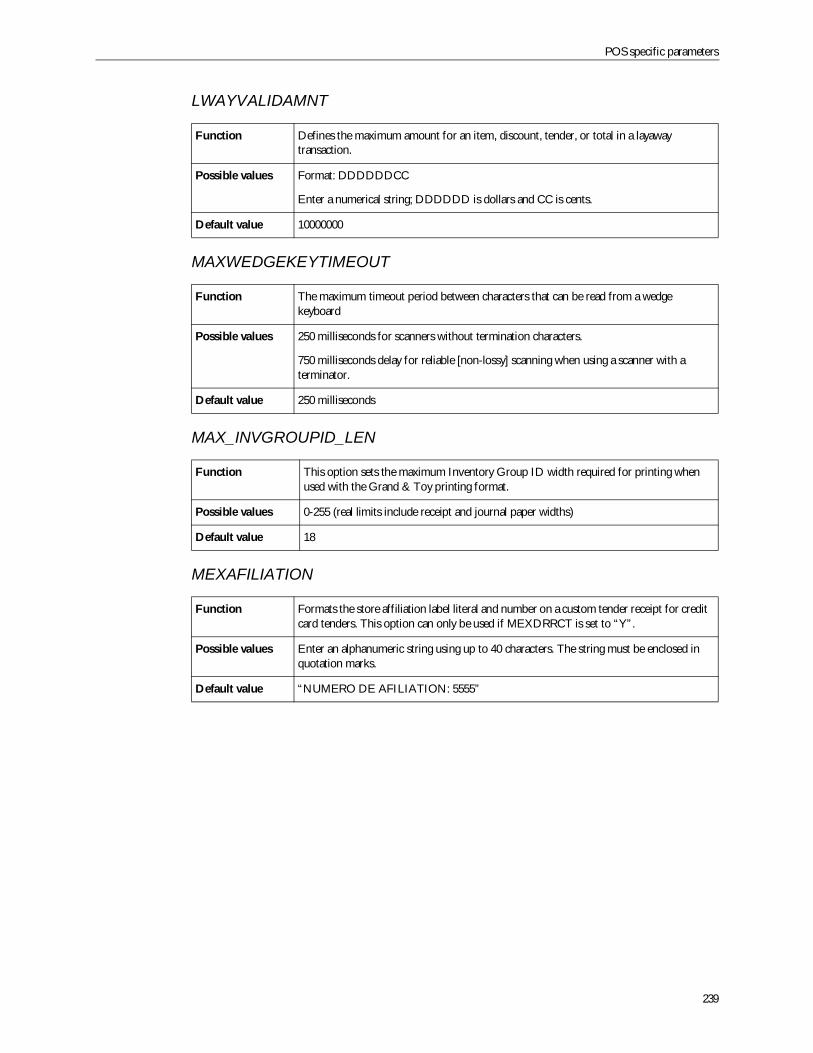
POS specific parameters
239
LWAYVALIDAMNT
MAXWEDGEKEYTIMEOUT
MAX_INVGROUPID_LEN
MEXAFILIATION
Function Defines the maximum amount for an item, discount, tender, or total in a layawaytransaction.
Possible values Format: DDDDDDCC
Enter a numerical string; DDDDDD is dollars and CC is cents.
Default value 10000000
Function The maximum timeout period between characters that can be read from a wedgekeyboard
Possible values 250 milliseconds for scanners without termination characters.
750 milliseconds delay for reliable [non-lossy] scanning when using a scanner with aterminator.
Default value 250 milliseconds
Function This option sets the maximum Inventory Group ID width required for printing whenused with the Grand & Toy printing format.
Possible values 0-255 (real limits include receipt and journal paper widths)
Default value 18
Function Formats the store affiliation label literal and number on a custom tender receipt for creditcard tenders. This option can only be used if MEXDRRCT is set to “Y”.
Possible values Enter an alphanumeric string using up to 40 characters. The string must be enclosed inquotation marks.
Default value “NUMERO DE AFILIATION: 5555”
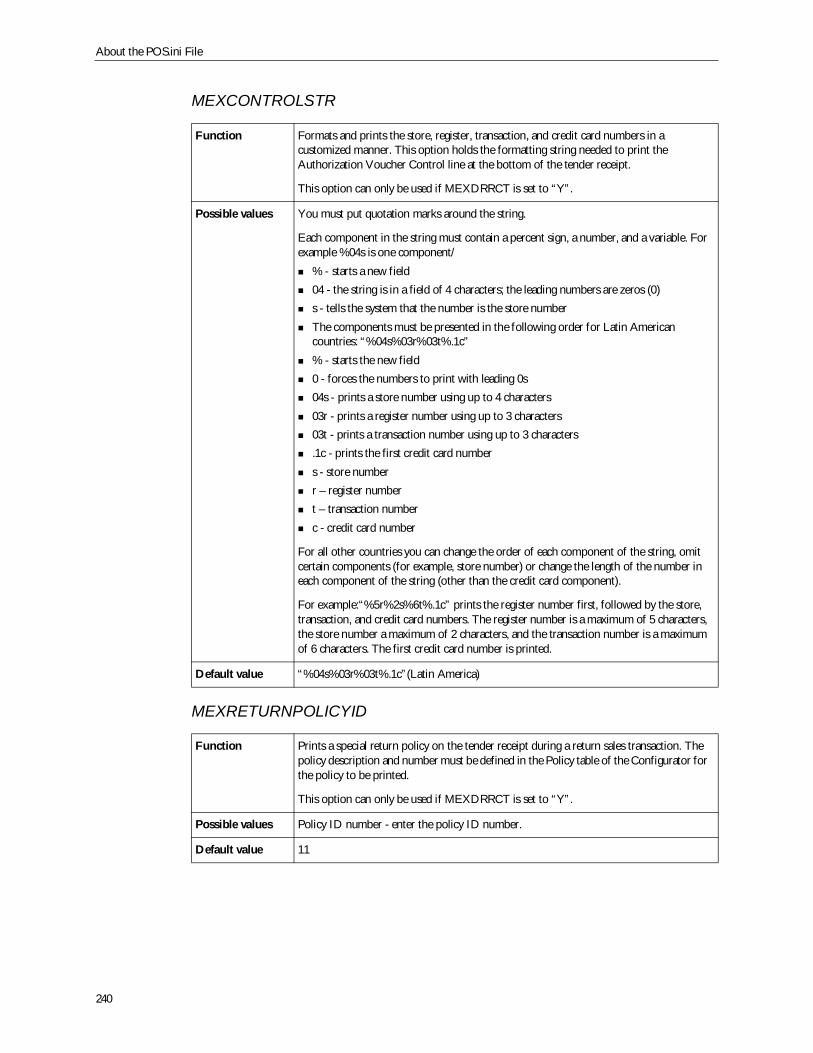
About the POS.ini File
240
MEXCONTROLSTR
MEXRETURNPOLICYID
Function Formats and prints the store, register, transaction, and credit card numbers in acustomized manner. This option holds the formatting string needed to print theAuthorization Voucher Control line at the bottom of the tender receipt.
This option can only be used if MEXDRRCT is set to “Y”.
Possible values You must put quotation marks around the string.
Each component in the string must contain a percent sign, a number, and a variable. Forexample %04s is one component/
% - starts a new field04 - the string is in a field of 4 characters; the leading numbers are zeros (0)s - tells the system that the number is the store numberThe components must be presented in the following order for Latin Americancountries: “%04s%03r%03t%.1c”% - starts the new field0 - forces the numbers to print with leading 0s04s - prints a store number using up to 4 characters03r - prints a register number using up to 3 characters03t - prints a transaction number using up to 3 characters.1c - prints the first credit card numbers - store numberr – register numbert – transaction numberc - credit card number
For all other countries you can change the order of each component of the string, omitcertain components (for example, store number) or change the length of the number ineach component of the string (other than the credit card component).
For example:“%5r%2s%6t%.1c” prints the register number first, followed by the store,transaction, and credit card numbers. The register number is a maximum of 5 characters,the store number a maximum of 2 characters, and the transaction number is a maximumof 6 characters. The first credit card number is printed.
Default value “%04s%03r%03t%.1c”(Latin America)
Function Prints a special return policy on the tender receipt during a return sales transaction. Thepolicy description and number must be defined in the Policy table of the Configurator forthe policy to be printed.
This option can only be used if MEXDRRCT is set to “Y”.
Possible values Policy ID number - enter the policy ID number.
Default value 11
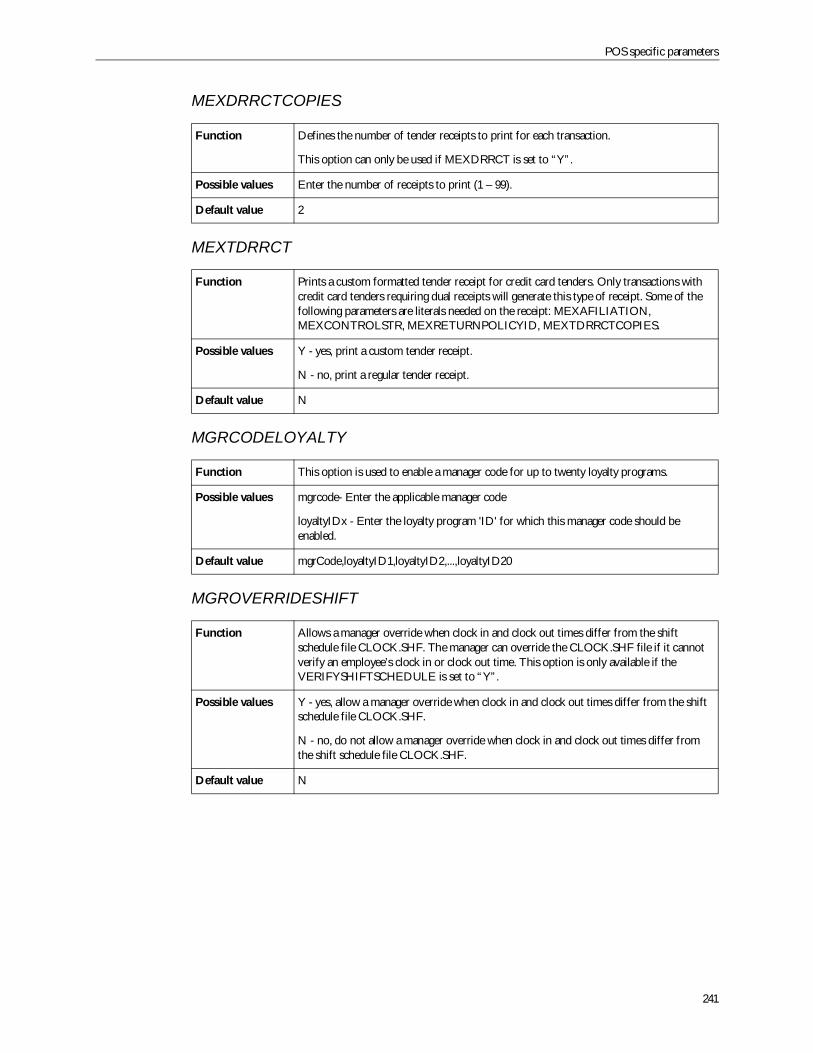
POS specific parameters
241
MEXDRRCTCOPIES
MEXTDRRCT
MGRCODELOYALTY
MGROVERRIDESHIFT
Function Defines the number of tender receipts to print for each transaction.
This option can only be used if MEXDRRCT is set to “Y”.
Possible values Enter the number of receipts to print (1 – 99).
Default value 2
Function Prints a custom formatted tender receipt for credit card tenders. Only transactions withcredit card tenders requiring dual receipts will generate this type of receipt. Some of thefollowing parameters are literals needed on the receipt: MEXAFILIATION,MEXCONTROLSTR, MEXRETURNPOLICYID, MEXTDRRCTCOPIES.
Possible values Y - yes, print a custom tender receipt.
N - no, print a regular tender receipt.
Default value N
Function This option is used to enable a manager code for up to twenty loyalty programs.
Possible values mgrcode- Enter the applicable manager code
loyaltyIDx - Enter the loyalty program 'ID' for which this manager code should beenabled.
Default value mgrCode,loyaltyID1,loyaltyID2,...,loyaltyID20
Function Allows a manager override when clock in and clock out times differ from the shiftschedule file CLOCK.SHF. The manager can override the CLOCK.SHF file if it cannotverify an employee’s clock in or clock out time. This option is only available if theVERIFYSHIFTSCHEDULE is set to “Y”.
Possible values Y - yes, allow a manager override when clock in and clock out times differ from the shiftschedule file CLOCK.SHF.
N - no, do not allow a manager override when clock in and clock out times differ fromthe shift schedule file CLOCK.SHF.
Default value N
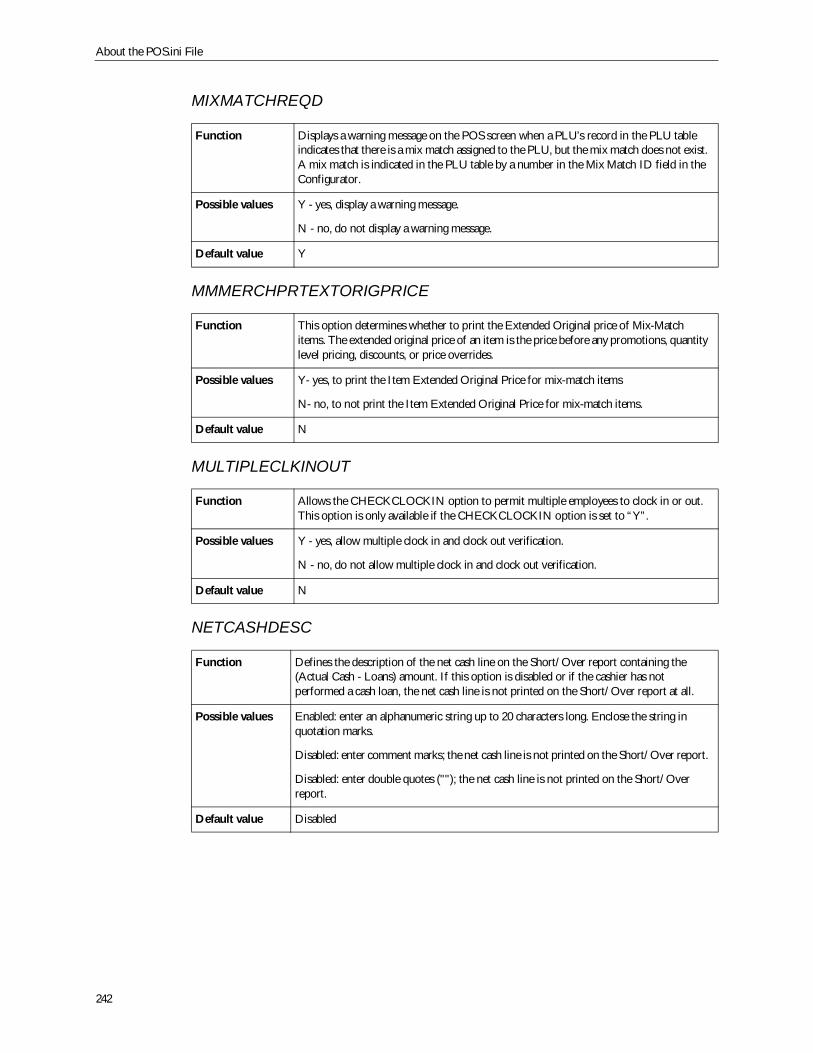
About the POS.ini File
242
MIXMATCHREQD
MMMERCHPRTEXTORIGPRICE
MULTIPLECLKINOUT
NETCASHDESC
Function Displays a warning message on the POS screen when a PLU’s record in the PLU tableindicates that there is a mix match assigned to the PLU, but the mix match does not exist.A mix match is indicated in the PLU table by a number in the Mix Match ID field in theConfigurator.
Possible values Y - yes, display a warning message.
N - no, do not display a warning message.
Default value Y
Function This option determines whether to print the Extended Original price of Mix-Matchitems. The extended original price of an item is the price before any promotions, quantitylevel pricing, discounts, or price overrides.
Possible values Y- yes, to print the Item Extended Original Price for mix-match items
N- no, to not print the Item Extended Original Price for mix-match items.
Default value N
Function Allows the CHECKCLOCKIN option to permit multiple employees to clock in or out.This option is only available if the CHECKCLOCKIN option is set to “Y”.
Possible values Y - yes, allow multiple clock in and clock out verification.
N - no, do not allow multiple clock in and clock out verification.
Default value N
Function Defines the description of the net cash line on the Short/Over report containing the(Actual Cash - Loans) amount. If this option is disabled or if the cashier has notperformed a cash loan, the net cash line is not printed on the Short/Over report at all.
Possible values Enabled: enter an alphanumeric string up to 20 characters long. Enclose the string inquotation marks.
Disabled: enter comment marks; the net cash line is not printed on the Short/Over report.
Disabled: enter double quotes (""); the net cash line is not printed on the Short/Overreport.
Default value Disabled
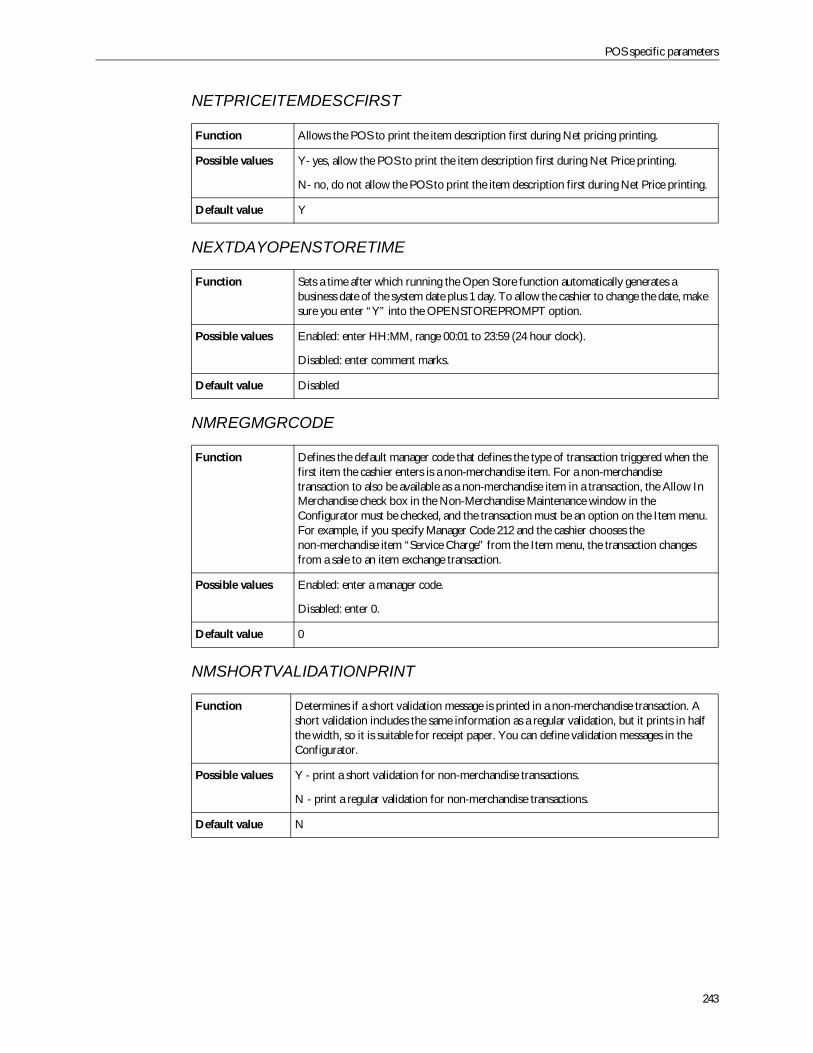
POS specific parameters
243
NETPRICEITEMDESCFIRST
NEXTDAYOPENSTORETIME
NMREGMGRCODE
NMSHORTVALIDATIONPRINT
Function Allows the POS to print the item description first during Net pricing printing.
Possible values Y- yes, allow the POS to print the item description first during Net Price printing.
N- no, do not allow the POS to print the item description first during Net Price printing.
Default value Y
Function Sets a time after which running the Open Store function automatically generates abusiness date of the system date plus 1 day. To allow the cashier to change the date, makesure you enter “Y” into the OPENSTOREPROMPT option.
Possible values Enabled: enter HH:MM, range 00:01 to 23:59 (24 hour clock).
Disabled: enter comment marks.
Default value Disabled
Function Defines the default manager code that defines the type of transaction triggered when thefirst item the cashier enters is a non-merchandise item. For a non-merchandisetransaction to also be available as a non-merchandise item in a transaction, the Allow InMerchandise check box in the Non-Merchandise Maintenance window in theConfigurator must be checked, and the transaction must be an option on the Item menu.For example, if you specify Manager Code 212 and the cashier chooses thenon-merchandise item “Service Charge” from the Item menu, the transaction changesfrom a sale to an item exchange transaction.
Possible values Enabled: enter a manager code.
Disabled: enter 0.
Default value 0
Function Determines if a short validation message is printed in a non-merchandise transaction. Ashort validation includes the same information as a regular validation, but it prints in halfthe width, so it is suitable for receipt paper. You can define validation messages in theConfigurator.
Possible values Y - print a short validation for non-merchandise transactions.
N - print a regular validation for non-merchandise transactions.
Default value N
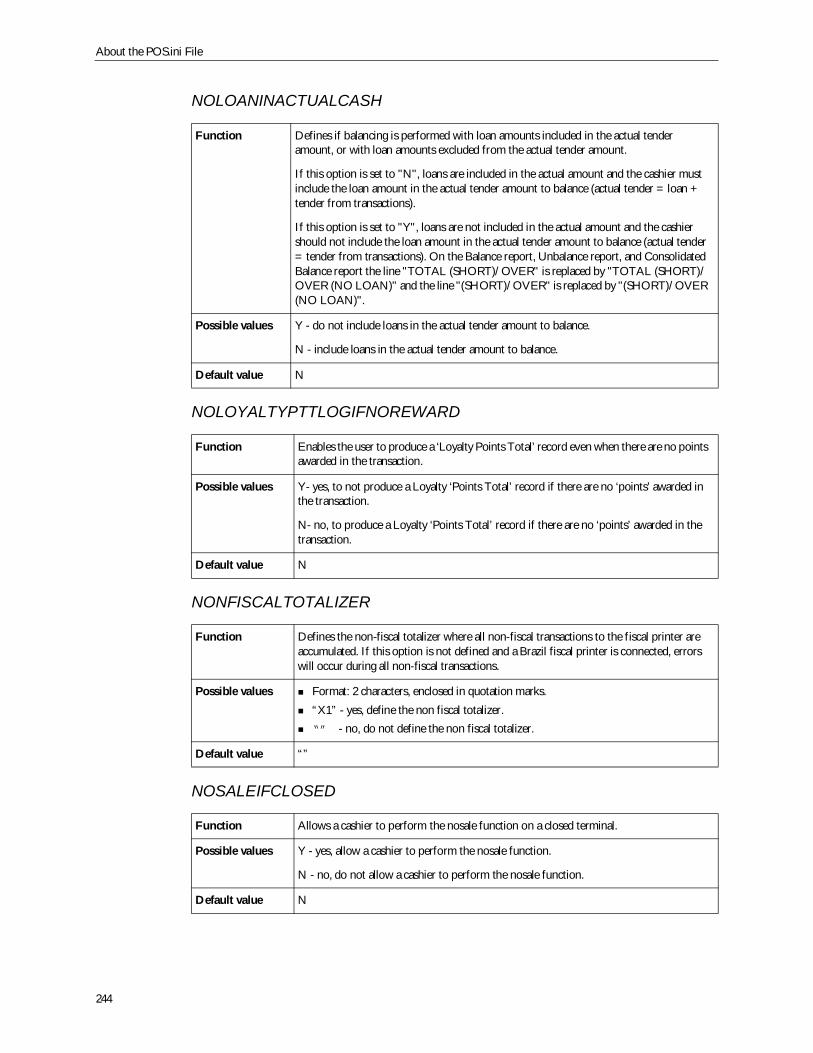
About the POS.ini File
244
NOLOANINACTUALCASH
NOLOYALTYPTTLOGIFNOREWARD
NONFISCALTOTALIZER
NOSALEIFCLOSED
Function Defines if balancing is performed with loan amounts included in the actual tenderamount, or with loan amounts excluded from the actual tender amount.
If this option is set to "N", loans are included in the actual amount and the cashier mustinclude the loan amount in the actual tender amount to balance (actual tender = loan +tender from transactions).
If this option is set to "Y", loans are not included in the actual amount and the cashiershould not include the loan amount in the actual tender amount to balance (actual tender= tender from transactions). On the Balance report, Unbalance report, and ConsolidatedBalance report the line "TOTAL (SHORT)/OVER" is replaced by "TOTAL (SHORT)/OVER (NO LOAN)" and the line "(SHORT)/OVER" is replaced by "(SHORT)/OVER(NO LOAN)".
Possible values Y - do not include loans in the actual tender amount to balance.
N - include loans in the actual tender amount to balance.
Default value N
Function Enables the user to produce a ‘Loyalty Points Total’ record even when there are no pointsawarded in the transaction.
Possible values Y- yes, to not produce a Loyalty ‘Points Total’ record if there are no ‘points’ awarded inthe transaction.
N- no, to produce a Loyalty ‘Points Total’ record if there are no ‘points’ awarded in thetransaction.
Default value N
Function Defines the non-fiscal totalizer where all non-fiscal transactions to the fiscal printer areaccumulated. If this option is not defined and a Brazil fiscal printer is connected, errorswill occur during all non-fiscal transactions.
Possible values Format: 2 characters, enclosed in quotation marks.“X1” - yes, define the non fiscal totalizer.“” - no, do not define the non fiscal totalizer.
Default value “”
Function Allows a cashier to perform the nosale function on a closed terminal.
Possible values Y - yes, allow a cashier to perform the nosale function.
N - no, do not allow a cashier to perform the nosale function.
Default value N
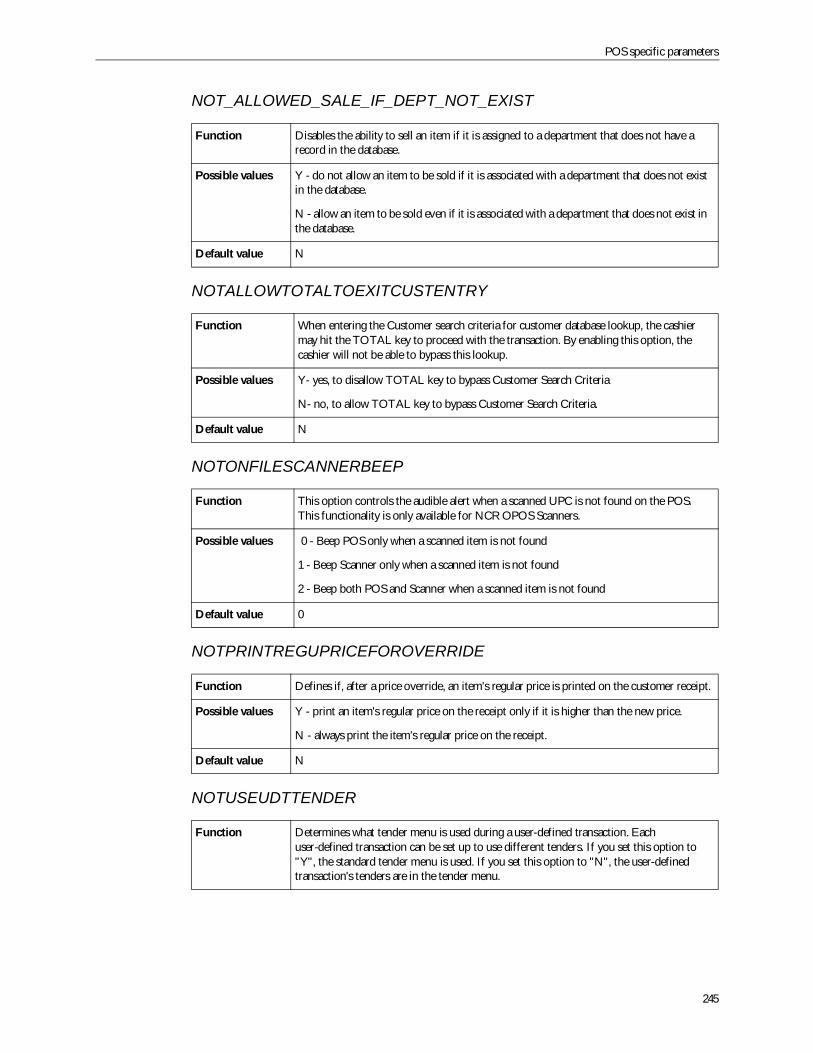
POS specific parameters
245
NOT_ALLOWED_SALE_IF_DEPT_NOT_EXIST
NOTALLOWTOTALTOEXITCUSTENTRY
NOTONFILESCANNERBEEP
NOTPRINTREGUPRICEFOROVERRIDE
NOTUSEUDTTENDER
Function Disables the ability to sell an item if it is assigned to a department that does not have arecord in the database.
Possible values Y - do not allow an item to be sold if it is associated with a department that does not existin the database.
N - allow an item to be sold even if it is associated with a department that does not exist inthe database.
Default value N
Function When entering the Customer search criteria for customer database lookup, the cashiermay hit the TOTAL key to proceed with the transaction. By enabling this option, thecashier will not be able to bypass this lookup.
Possible values Y- yes, to disallow TOTAL key to bypass Customer Search Criteria
N- no, to allow TOTAL key to bypass Customer Search Criteria.
Default value N
Function This option controls the audible alert when a scanned UPC is not found on the POS.This functionality is only available for NCR OPOS Scanners.
Possible values 0 - Beep POS only when a scanned item is not found
1 - Beep Scanner only when a scanned item is not found
2 - Beep both POS and Scanner when a scanned item is not found
Default value 0
Function Defines if, after a price override, an item's regular price is printed on the customer receipt.
Possible values Y - print an item's regular price on the receipt only if it is higher than the new price.
N - always print the item's regular price on the receipt.
Default value N
Function Determines what tender menu is used during a user-defined transaction. Eachuser-defined transaction can be set up to use different tenders. If you set this option to"Y", the standard tender menu is used. If you set this option to "N", the user-definedtransaction's tenders are in the tender menu.
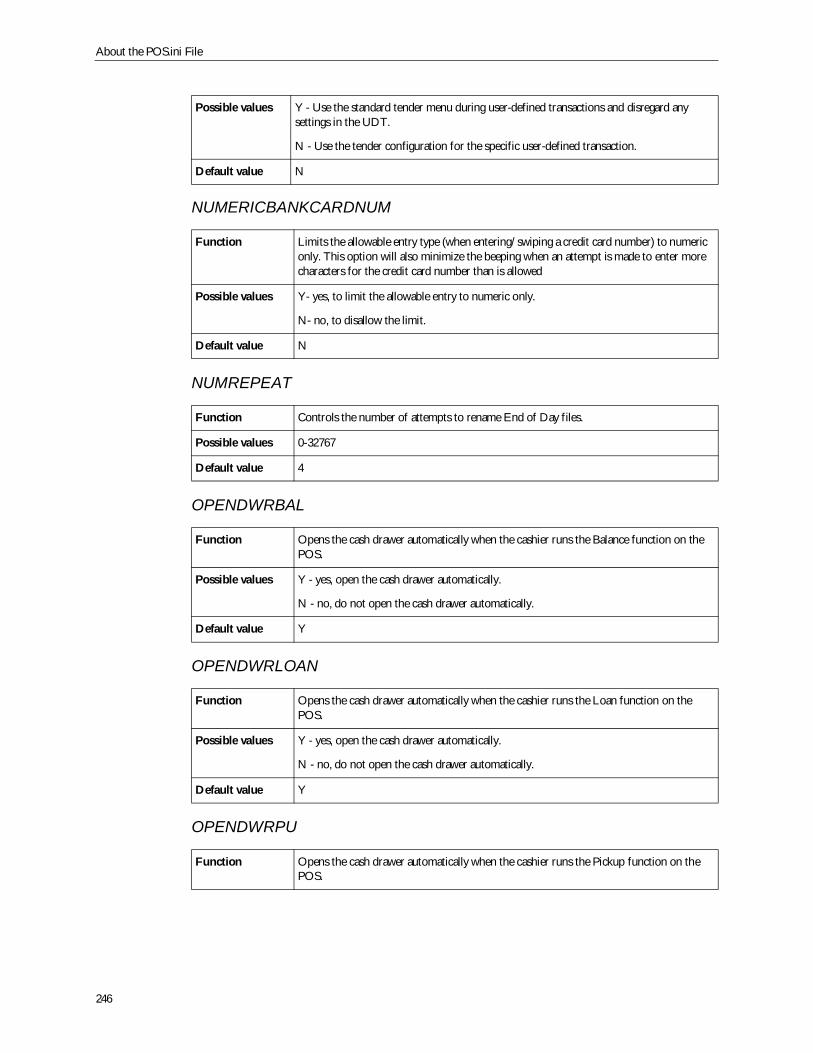
About the POS.ini File
246
NUMERICBANKCARDNUM
NUMREPEAT
OPENDWRBAL
OPENDWRLOAN
OPENDWRPU
Possible values Y - Use the standard tender menu during user-defined transactions and disregard anysettings in the UDT.
N - Use the tender configuration for the specific user-defined transaction.
Default value N
Function Limits the allowable entry type (when entering/swiping a credit card number) to numericonly. This option will also minimize the beeping when an attempt is made to enter morecharacters for the credit card number than is allowed
Possible values Y- yes, to limit the allowable entry to numeric only.
N- no, to disallow the limit.
Default value N
Function Controls the number of attempts to rename End of Day files.
Possible values 0-32767
Default value 4
Function Opens the cash drawer automatically when the cashier runs the Balance function on thePOS.
Possible values Y - yes, open the cash drawer automatically.
N - no, do not open the cash drawer automatically.
Default value Y
Function Opens the cash drawer automatically when the cashier runs the Loan function on thePOS.
Possible values Y - yes, open the cash drawer automatically.
N - no, do not open the cash drawer automatically.
Default value Y
Function Opens the cash drawer automatically when the cashier runs the Pickup function on thePOS.

POS specific parameters
247
Possible values Y - yes, open the cash drawer automatically.
N - no, do not open the cash drawer automatically.
Default value Y
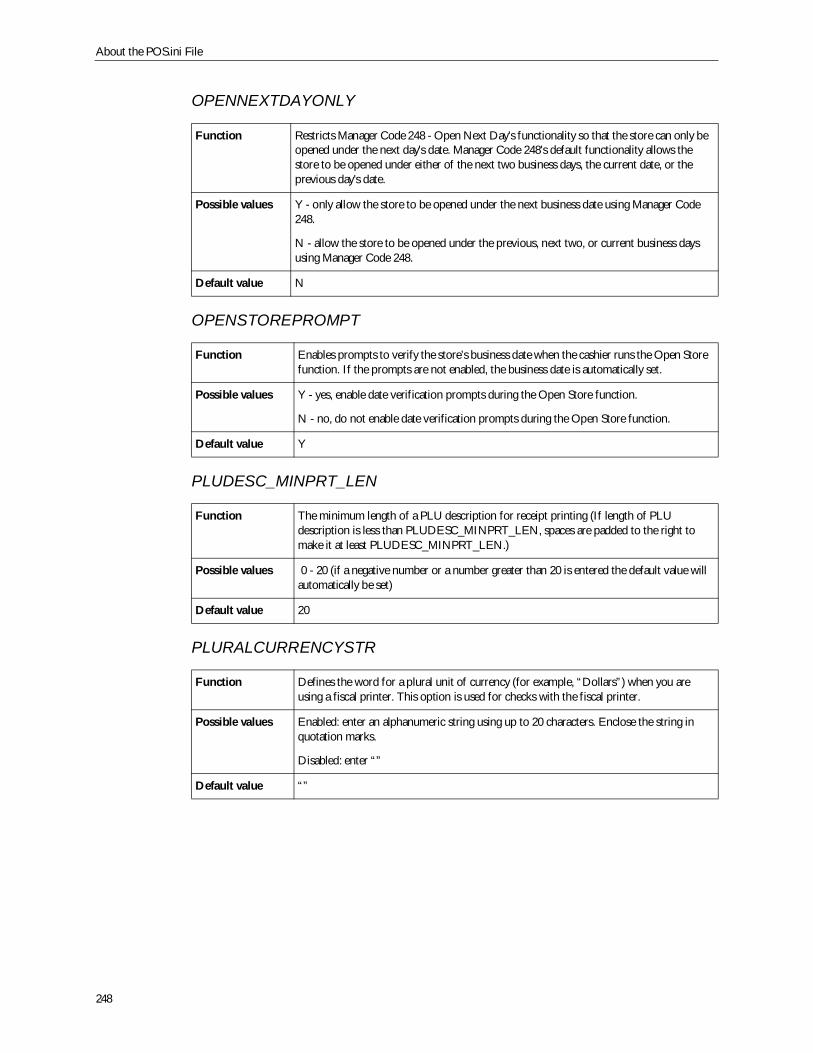
About the POS.ini File
248
OPENNEXTDAYONLY
OPENSTOREPROMPT
PLUDESC_MINPRT_LEN
PLURALCURRENCYSTR
Function Restricts Manager Code 248 - Open Next Day's functionality so that the store can only beopened under the next day's date. Manager Code 248's default functionality allows thestore to be opened under either of the next two business days, the current date, or theprevious day's date.
Possible values Y - only allow the store to be opened under the next business date using Manager Code248.
N - allow the store to be opened under the previous, next two, or current business daysusing Manager Code 248.
Default value N
Function Enables prompts to verify the store’s business date when the cashier runs the Open Storefunction. If the prompts are not enabled, the business date is automatically set.
Possible values Y - yes, enable date verification prompts during the Open Store function.
N - no, do not enable date verification prompts during the Open Store function.
Default value Y
Function The minimum length of a PLU description for receipt printing (If length of PLUdescription is less than PLUDESC_MINPRT_LEN, spaces are padded to the right tomake it at least PLUDESC_MINPRT_LEN.)
Possible values 0 - 20 (if a negative number or a number greater than 20 is entered the default value willautomatically be set)
Default value 20
Function Defines the word for a plural unit of currency (for example, “Dollars”) when you areusing a fiscal printer. This option is used for checks with the fiscal printer.
Possible values Enabled: enter an alphanumeric string using up to 20 characters. Enclose the string inquotation marks.
Disabled: enter “”
Default value “”
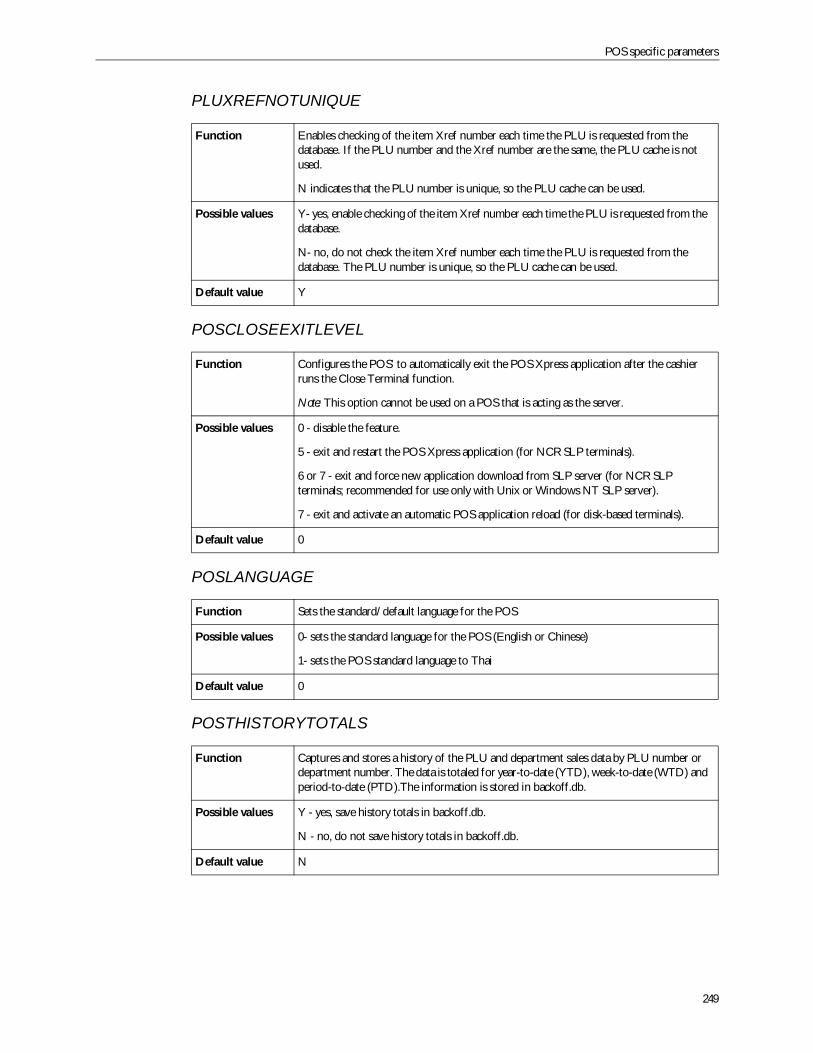
POS specific parameters
249
PLUXREFNOTUNIQUE
POSCLOSEEXITLEVEL
POSLANGUAGE
POSTHISTORYTOTALS
Function Enables checking of the item Xref number each time the PLU is requested from thedatabase. If the PLU number and the Xref number are the same, the PLU cache is notused.
N indicates that the PLU number is unique, so the PLU cache can be used.
Possible values Y- yes, enable checking of the item Xref number each time the PLU is requested from thedatabase.
N- no, do not check the item Xref number each time the PLU is requested from thedatabase. The PLU number is unique, so the PLU cache can be used.
Default value Y
Function Configures the POS’ to automatically exit the POS Xpress application after the cashierruns the Close Terminal function.
Note: This option cannot be used on a POS that is acting as the server.
Possible values 0 - disable the feature.
5 - exit and restart the POS Xpress application (for NCR SLP terminals).
6 or 7 - exit and force new application download from SLP server (for NCR SLPterminals; recommended for use only with Unix or Windows NT SLP server).
7 - exit and activate an automatic POS application reload (for disk-based terminals).
Default value 0
Function Sets the standard/default language for the POS
Possible values 0- sets the standard language for the POS (English or Chinese)
1- sets the POS standard language to Thai
Default value 0
Function Captures and stores a history of the PLU and department sales data by PLU number ordepartment number. The data is totaled for year-to-date (YTD), week-to-date (WTD) andperiod-to-date (PTD).The information is stored in backoff.db.
Possible values Y - yes, save history totals in backoff.db.
N - no, do not save history totals in backoff.db.
Default value N
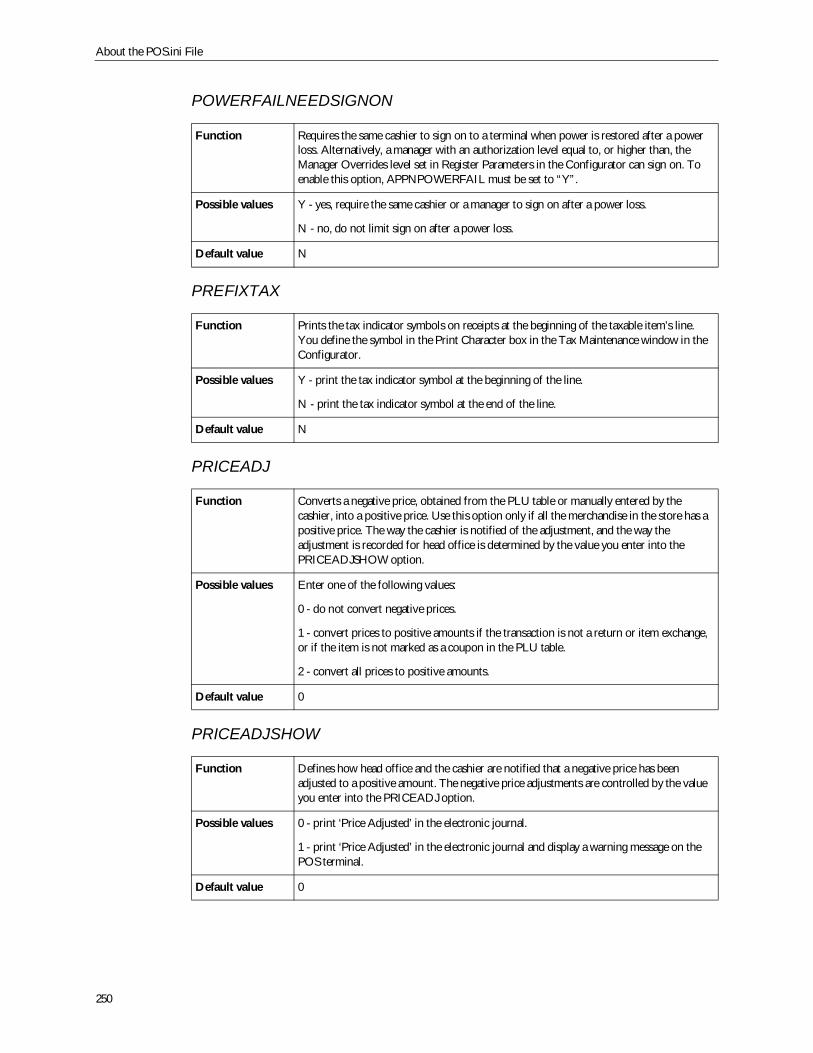
About the POS.ini File
250
POWERFAILNEEDSIGNON
PREFIXTAX
PRICEADJ
PRICEADJSHOW
Function Requires the same cashier to sign on to a terminal when power is restored after a powerloss. Alternatively, a manager with an authorization level equal to, or higher than, theManager Overrides level set in Register Parameters in the Configurator can sign on. Toenable this option, APPNPOWERFAIL must be set to “Y”.
Possible values Y - yes, require the same cashier or a manager to sign on after a power loss.
N - no, do not limit sign on after a power loss.
Default value N
Function Prints the tax indicator symbols on receipts at the beginning of the taxable item’s line.You define the symbol in the Print Character box in the Tax Maintenance window in theConfigurator.
Possible values Y - print the tax indicator symbol at the beginning of the line.
N - print the tax indicator symbol at the end of the line.
Default value N
Function Converts a negative price, obtained from the PLU table or manually entered by thecashier, into a positive price. Use this option only if all the merchandise in the store has apositive price. The way the cashier is notified of the adjustment, and the way theadjustment is recorded for head office is determined by the value you enter into thePRICEADJSHOW option.
Possible values Enter one of the following values:
0 - do not convert negative prices.
1 - convert prices to positive amounts if the transaction is not a return or item exchange,or if the item is not marked as a coupon in the PLU table.
2 - convert all prices to positive amounts.
Default value 0
Function Defines how head office and the cashier are notified that a negative price has beenadjusted to a positive amount. The negative price adjustments are controlled by the valueyou enter into the PRICEADJ option.
Possible values 0 - print ‘Price Adjusted’ in the electronic journal.
1 - print ‘Price Adjusted’ in the electronic journal and display a warning message on thePOS terminal.
Default value 0
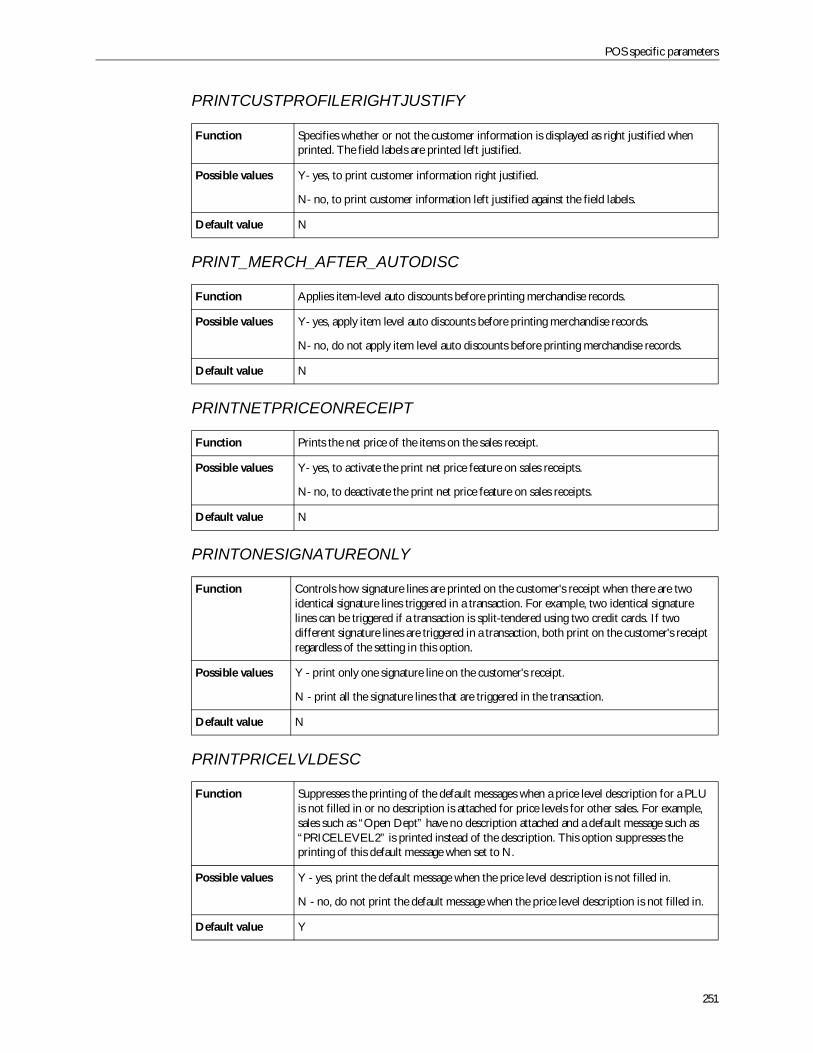
POS specific parameters
251
PRINTCUSTPROFILERIGHTJUSTIFY
PRINT_MERCH_AFTER_AUTODISC
PRINTNETPRICEONRECEIPT
PRINTONESIGNATUREONLY
PRINTPRICELVLDESC
Function Specifies whether or not the customer information is displayed as right justified whenprinted. The field labels are printed left justified.
Possible values Y- yes, to print customer information right justified.
N- no, to print customer information left justified against the field labels.
Default value N
Function Applies item-level auto discounts before printing merchandise records.
Possible values Y- yes, apply item level auto discounts before printing merchandise records.
N- no, do not apply item level auto discounts before printing merchandise records.
Default value N
Function Prints the net price of the items on the sales receipt.
Possible values Y- yes, to activate the print net price feature on sales receipts.
N- no, to deactivate the print net price feature on sales receipts.
Default value N
Function Controls how signature lines are printed on the customer's receipt when there are twoidentical signature lines triggered in a transaction. For example, two identical signaturelines can be triggered if a transaction is split-tendered using two credit cards. If twodifferent signature lines are triggered in a transaction, both print on the customer's receiptregardless of the setting in this option.
Possible values Y - print only one signature line on the customer's receipt.
N - print all the signature lines that are triggered in the transaction.
Default value N
Function Suppresses the printing of the default messages when a price level description for a PLUis not filled in or no description is attached for price levels for other sales. For example,sales such as “Open Dept” have no description attached and a default message such as“PRICELEVEL2” is printed instead of the description. This option suppresses theprinting of this default message when set to N.
Possible values Y - yes, print the default message when the price level description is not filled in.
N - no, do not print the default message when the price level description is not filled in.
Default value Y
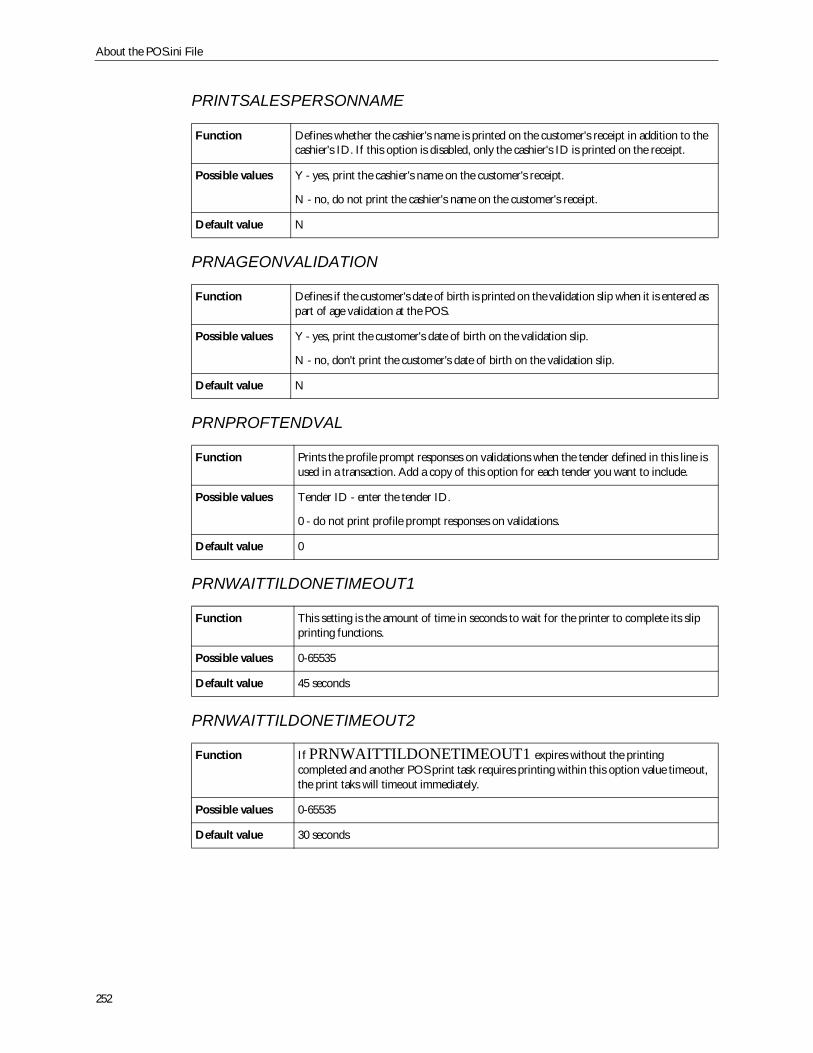
About the POS.ini File
252
PRINTSALESPERSONNAME
PRNAGEONVALIDATION
PRNPROFTENDVAL
PRNWAITTILDONETIMEOUT1
PRNWAITTILDONETIMEOUT2
Function Defines whether the cashier's name is printed on the customer's receipt in addition to thecashier's ID. If this option is disabled, only the cashier's ID is printed on the receipt.
Possible values Y - yes, print the cashier's name on the customer's receipt.
N - no, do not print the cashier's name on the customer's receipt.
Default value N
Function Defines if the customer's date of birth is printed on the validation slip when it is entered aspart of age validation at the POS.
Possible values Y - yes, print the customer's date of birth on the validation slip.
N - no, don't print the customer's date of birth on the validation slip.
Default value N
Function Prints the profile prompt responses on validations when the tender defined in this line isused in a transaction. Add a copy of this option for each tender you want to include.
Possible values Tender ID - enter the tender ID.
0 - do not print profile prompt responses on validations.
Default value 0
Function This setting is the amount of time in seconds to wait for the printer to complete its slipprinting functions.
Possible values 0-65535
Default value 45 seconds
Function If PRNWAITTILDONETIMEOUT1 expires without the printingcompleted and another POS print task requires printing within this option value timeout,the print taks will timeout immediately.
Possible values 0-65535
Default value 30 seconds
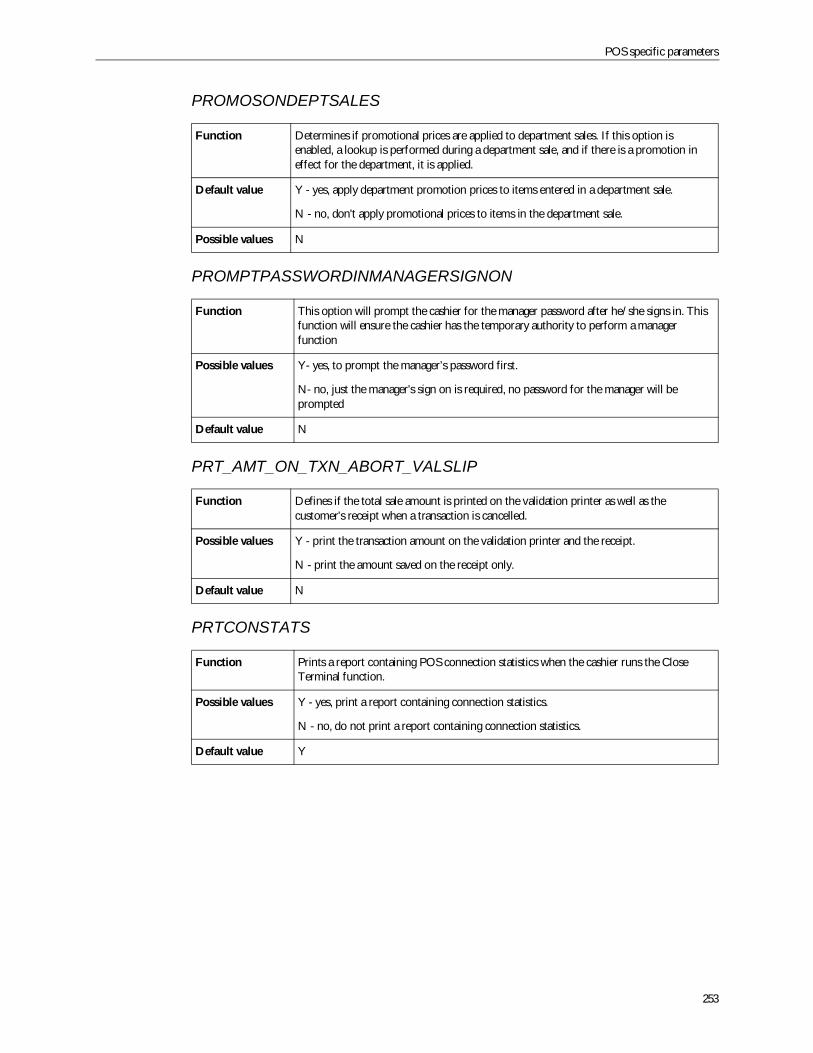
POS specific parameters
253
PROMOSONDEPTSALES
PROMPTPASSWORDINMANAGERSIGNON
PRT_AMT_ON_TXN_ABORT_VALSLIP
PRTCONSTATS
Function Determines if promotional prices are applied to department sales. If this option isenabled, a lookup is performed during a department sale, and if there is a promotion ineffect for the department, it is applied.
Default value Y - yes, apply department promotion prices to items entered in a department sale.
N - no, don't apply promotional prices to items in the department sale.
Possible values N
Function This option will prompt the cashier for the manager password after he/she signs in. Thisfunction will ensure the cashier has the temporary authority to perform a managerfunction
Possible values Y- yes, to prompt the manager’s password first.
N- no, just the manager's sign on is required, no password for the manager will beprompted
Default value N
Function Defines if the total sale amount is printed on the validation printer as well as thecustomer's receipt when a transaction is cancelled.
Possible values Y - print the transaction amount on the validation printer and the receipt.
N - print the amount saved on the receipt only.
Default value N
Function Prints a report containing POS connection statistics when the cashier runs the CloseTerminal function.
Possible values Y - yes, print a report containing connection statistics.
N - no, do not print a report containing connection statistics.
Default value Y
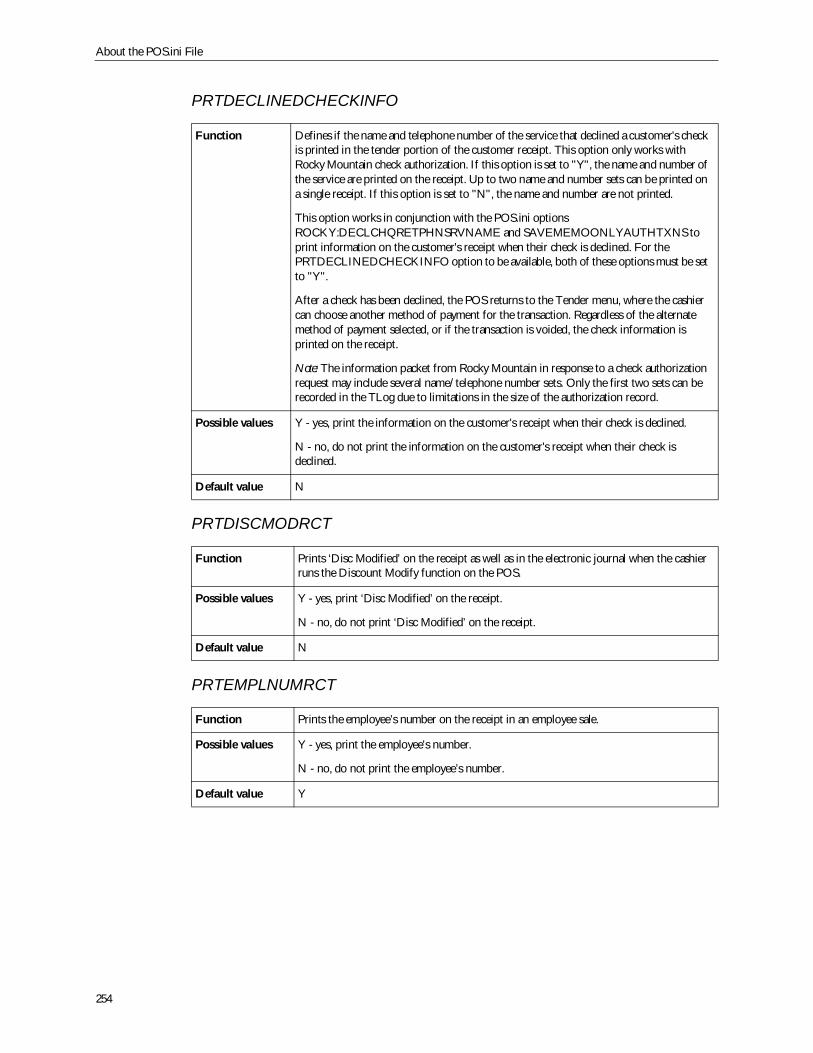
About the POS.ini File
254
PRTDECLINEDCHECKINFO
PRTDISCMODRCT
PRTEMPLNUMRCT
Function Defines if the name and telephone number of the service that declined a customer's checkis printed in the tender portion of the customer receipt. This option only works withRocky Mountain check authorization. If this option is set to "Y", the name and number ofthe service are printed on the receipt. Up to two name and number sets can be printed ona single receipt. If this option is set to "N", the name and number are not printed.
This option works in conjunction with the POS.ini optionsROCKY:DECLCHQRETPHNSRVNAME and SAVEMEMOONLYAUTHTXNS toprint information on the customer's receipt when their check is declined. For thePRTDECLINEDCHECKINFO option to be available, both of these options must be setto "Y".
After a check has been declined, the POS returns to the Tender menu, where the cashiercan choose another method of payment for the transaction. Regardless of the alternatemethod of payment selected, or if the transaction is voided, the check information isprinted on the receipt.
Note: The information packet from Rocky Mountain in response to a check authorizationrequest may include several name/telephone number sets. Only the first two sets can berecorded in the TLog due to limitations in the size of the authorization record.
Possible values Y - yes, print the information on the customer's receipt when their check is declined.
N - no, do not print the information on the customer's receipt when their check isdeclined.
Default value N
Function Prints ‘Disc Modified’ on the receipt as well as in the electronic journal when the cashierruns the Discount Modify function on the POS.
Possible values Y - yes, print ‘Disc Modified’ on the receipt.
N - no, do not print ‘Disc Modified’ on the receipt.
Default value N
Function Prints the employee’s number on the receipt in an employee sale.
Possible values Y - yes, print the employee’s number.
N - no, do not print the employee’s number.
Default value Y
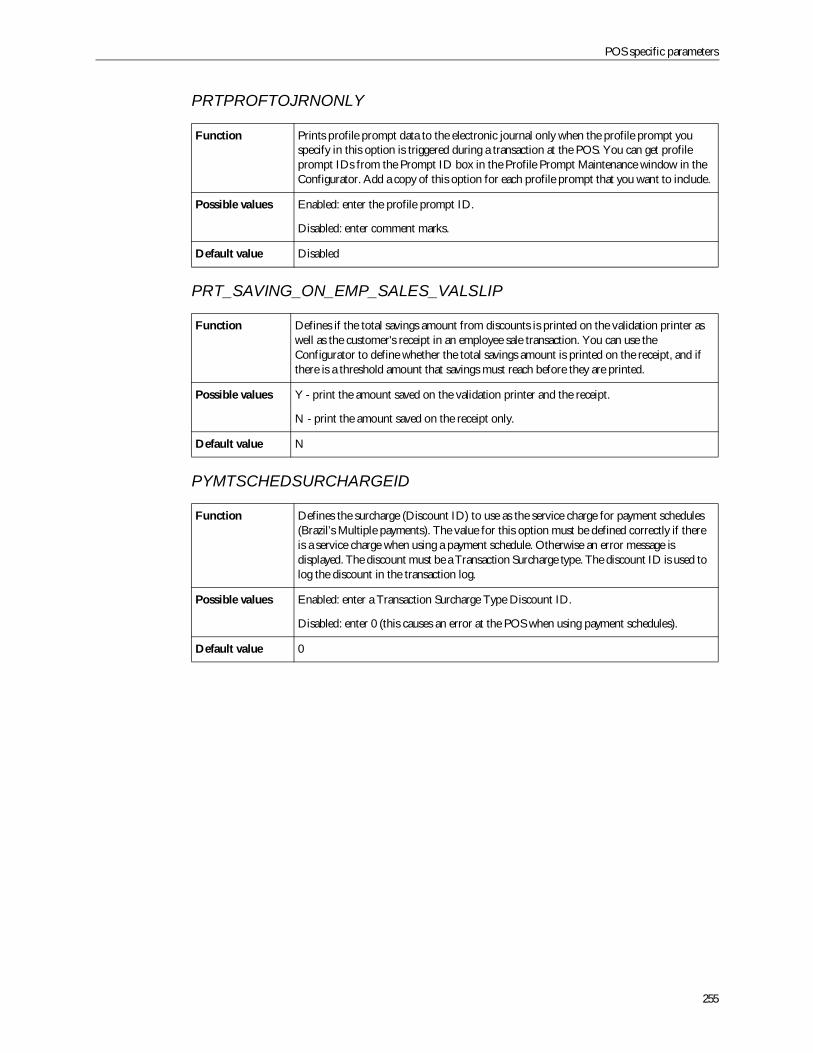
POS specific parameters
255
PRTPROFTOJRNONLY
PRT_SAVING_ON_EMP_SALES_VALSLIP
PYMTSCHEDSURCHARGEID
Function Prints profile prompt data to the electronic journal only when the profile prompt youspecify in this option is triggered during a transaction at the POS. You can get profileprompt IDs from the Prompt ID box in the Profile Prompt Maintenance window in theConfigurator. Add a copy of this option for each profile prompt that you want to include.
Possible values Enabled: enter the profile prompt ID.
Disabled: enter comment marks.
Default value Disabled
Function Defines if the total savings amount from discounts is printed on the validation printer aswell as the customer's receipt in an employee sale transaction. You can use theConfigurator to define whether the total savings amount is printed on the receipt, and ifthere is a threshold amount that savings must reach before they are printed.
Possible values Y - print the amount saved on the validation printer and the receipt.
N - print the amount saved on the receipt only.
Default value N
Function Defines the surcharge (Discount ID) to use as the service charge for payment schedules(Brazil’s Multiple payments). The value for this option must be defined correctly if thereis a service charge when using a payment schedule. Otherwise an error message isdisplayed. The discount must be a Transaction Surcharge type. The discount ID is used tolog the discount in the transaction log.
Possible values Enabled: enter a Transaction Surcharge Type Discount ID.
Disabled: enter 0 (this causes an error at the POS when using payment schedules).
Default value 0
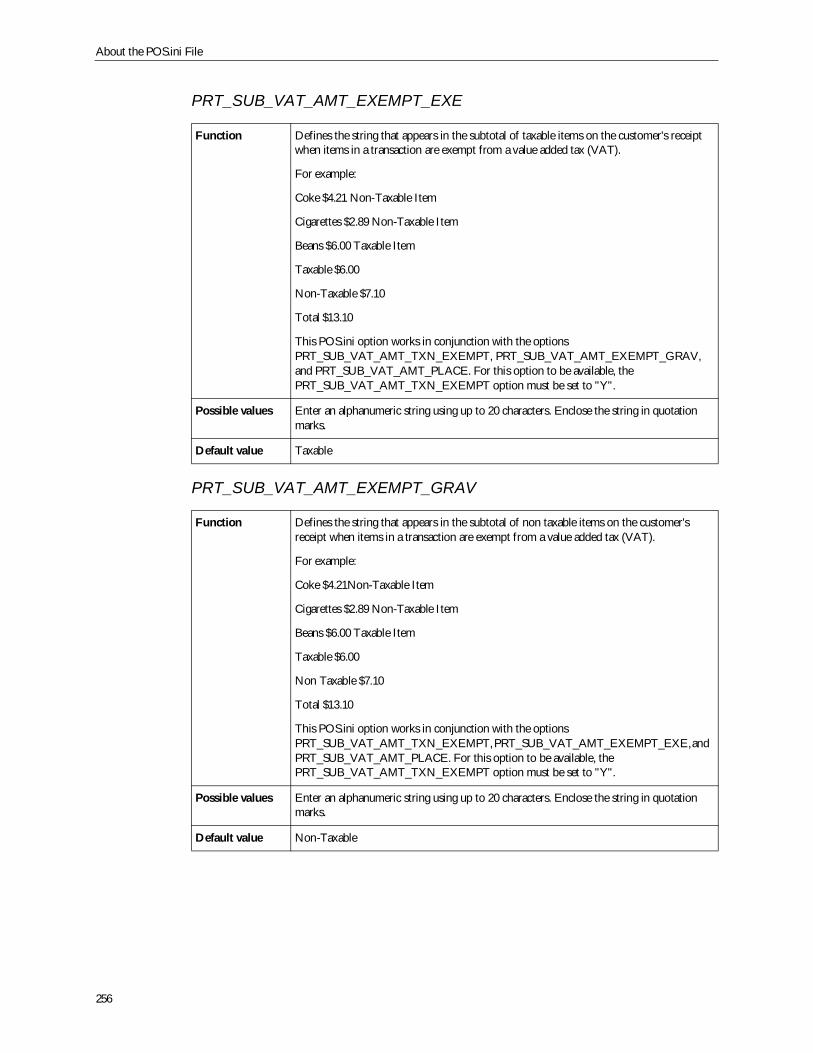
About the POS.ini File
256
PRT_SUB_VAT_AMT_EXEMPT_EXE
PRT_SUB_VAT_AMT_EXEMPT_GRAV
Function Defines the string that appears in the subtotal of taxable items on the customer's receiptwhen items in a transaction are exempt from a value added tax (VAT).
For example:
Coke $4.21 Non-Taxable Item
Cigarettes $2.89 Non-Taxable Item
Beans $6.00 Taxable Item
Taxable $6.00
Non-Taxable $7.10
Total $13.10
This POS.ini option works in conjunction with the optionsPRT_SUB_VAT_AMT_TXN_EXEMPT, PRT_SUB_VAT_AMT_EXEMPT_GRAV,and PRT_SUB_VAT_AMT_PLACE. For this option to be available, thePRT_SUB_VAT_AMT_TXN_EXEMPT option must be set to "Y".
Possible values Enter an alphanumeric string using up to 20 characters. Enclose the string in quotationmarks.
Default value Taxable
Function Defines the string that appears in the subtotal of non taxable items on the customer'sreceipt when items in a transaction are exempt from a value added tax (VAT).
For example:
Coke $4.21Non-Taxable Item
Cigarettes $2.89 Non-Taxable Item
Beans $6.00 Taxable Item
Taxable $6.00
Non Taxable $7.10
Total $13.10
This POS.ini option works in conjunction with the optionsPRT_SUB_VAT_AMT_TXN_EXEMPT, PRT_SUB_VAT_AMT_EXEMPT_EXE, andPRT_SUB_VAT_AMT_PLACE. For this option to be available, thePRT_SUB_VAT_AMT_TXN_EXEMPT option must be set to "Y".
Possible values Enter an alphanumeric string using up to 20 characters. Enclose the string in quotationmarks.
Default value Non-Taxable
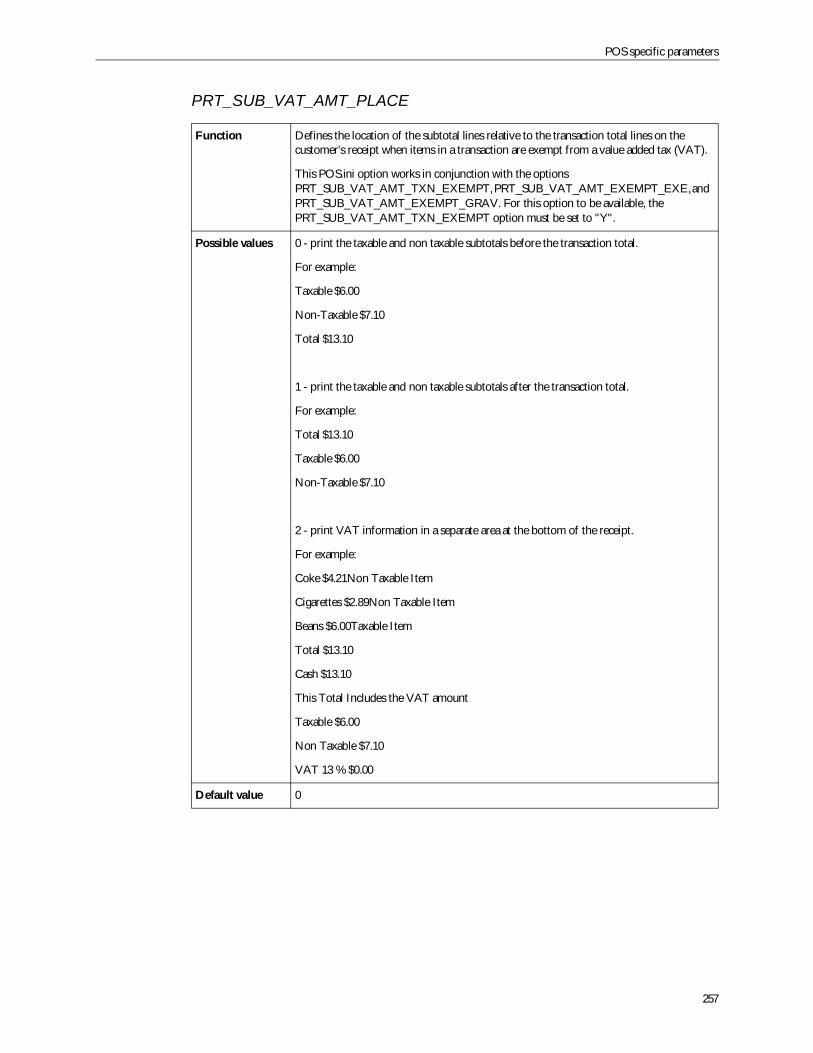
POS specific parameters
257
PRT_SUB_VAT_AMT_PLACE
Function Defines the location of the subtotal lines relative to the transaction total lines on thecustomer's receipt when items in a transaction are exempt from a value added tax (VAT).
This POS.ini option works in conjunction with the optionsPRT_SUB_VAT_AMT_TXN_EXEMPT, PRT_SUB_VAT_AMT_EXEMPT_EXE, andPRT_SUB_VAT_AMT_EXEMPT_GRAV. For this option to be available, thePRT_SUB_VAT_AMT_TXN_EXEMPT option must be set to "Y".
Possible values 0 - print the taxable and non taxable subtotals before the transaction total.
For example:
Taxable $6.00
Non-Taxable $7.10
Total $13.10
1 - print the taxable and non taxable subtotals after the transaction total.
For example:
Total $13.10
Taxable $6.00
Non-Taxable $7.10
2 - print VAT information in a separate area at the bottom of the receipt.
For example:
Coke $4.21Non Taxable Item
Cigarettes $2.89Non Taxable Item
Beans $6.00Taxable Item
Total $13.10
Cash $13.10
This Total Includes the VAT amount
Taxable $6.00
Non Taxable $7.10
VAT 13 % $0.00
Default value 0
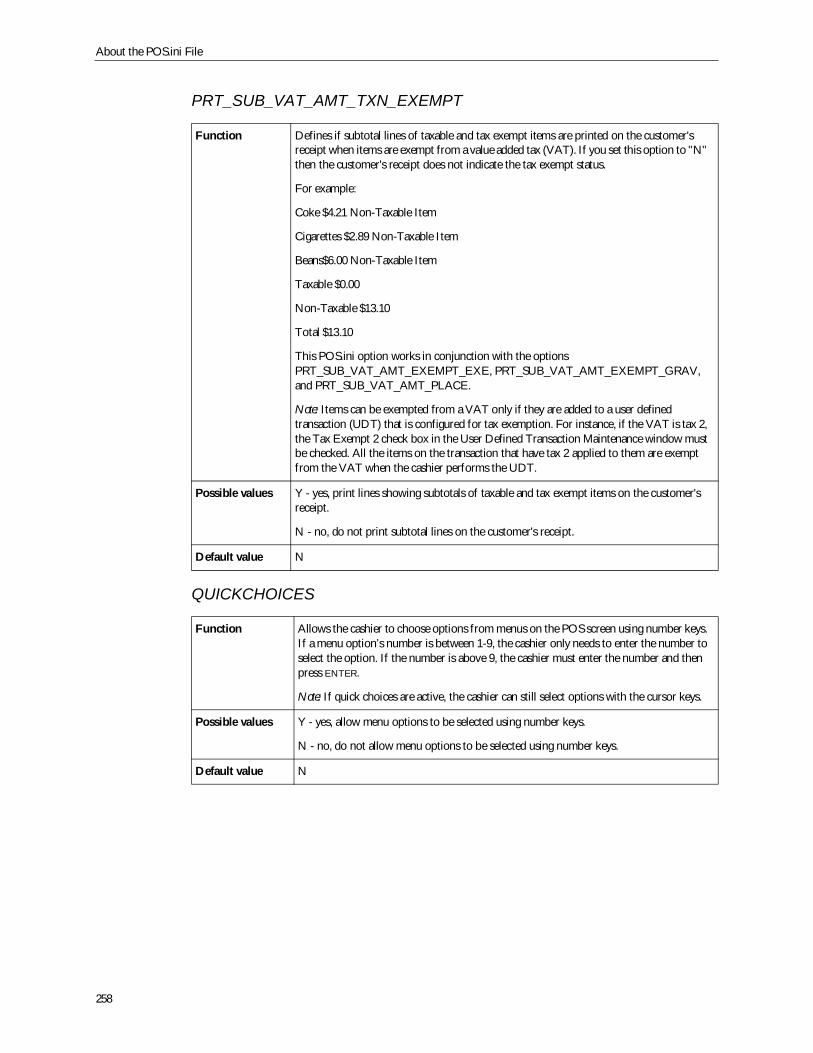
About the POS.ini File
258
PRT_SUB_VAT_AMT_TXN_EXEMPT
QUICKCHOICES
Function Defines if subtotal lines of taxable and tax exempt items are printed on the customer'sreceipt when items are exempt from a value added tax (VAT). If you set this option to "N"then the customer's receipt does not indicate the tax exempt status.
For example:
Coke $4.21 Non-Taxable Item
Cigarettes $2.89 Non-Taxable Item
Beans$6.00 Non-Taxable Item
Taxable $0.00
Non-Taxable $13.10
Total $13.10
This POS.ini option works in conjunction with the optionsPRT_SUB_VAT_AMT_EXEMPT_EXE, PRT_SUB_VAT_AMT_EXEMPT_GRAV,and PRT_SUB_VAT_AMT_PLACE.
Note: Items can be exempted from a VAT only if they are added to a user definedtransaction (UDT) that is configured for tax exemption. For instance, if the VAT is tax 2,the Tax Exempt 2 check box in the User Defined Transaction Maintenance window mustbe checked. All the items on the transaction that have tax 2 applied to them are exemptfrom the VAT when the cashier performs the UDT.
Possible values Y - yes, print lines showing subtotals of taxable and tax exempt items on the customer'sreceipt.
N - no, do not print subtotal lines on the customer's receipt.
Default value N
Function Allows the cashier to choose options from menus on the POS screen using number keys.If a menu option’s number is between 1-9, the cashier only needs to enter the number toselect the option. If the number is above 9, the cashier must enter the number and thenpress ENTER.
Note: If quick choices are active, the cashier can still select options with the cursor keys.
Possible values Y - yes, allow menu options to be selected using number keys.
N - no, do not allow menu options to be selected using number keys.
Default value N
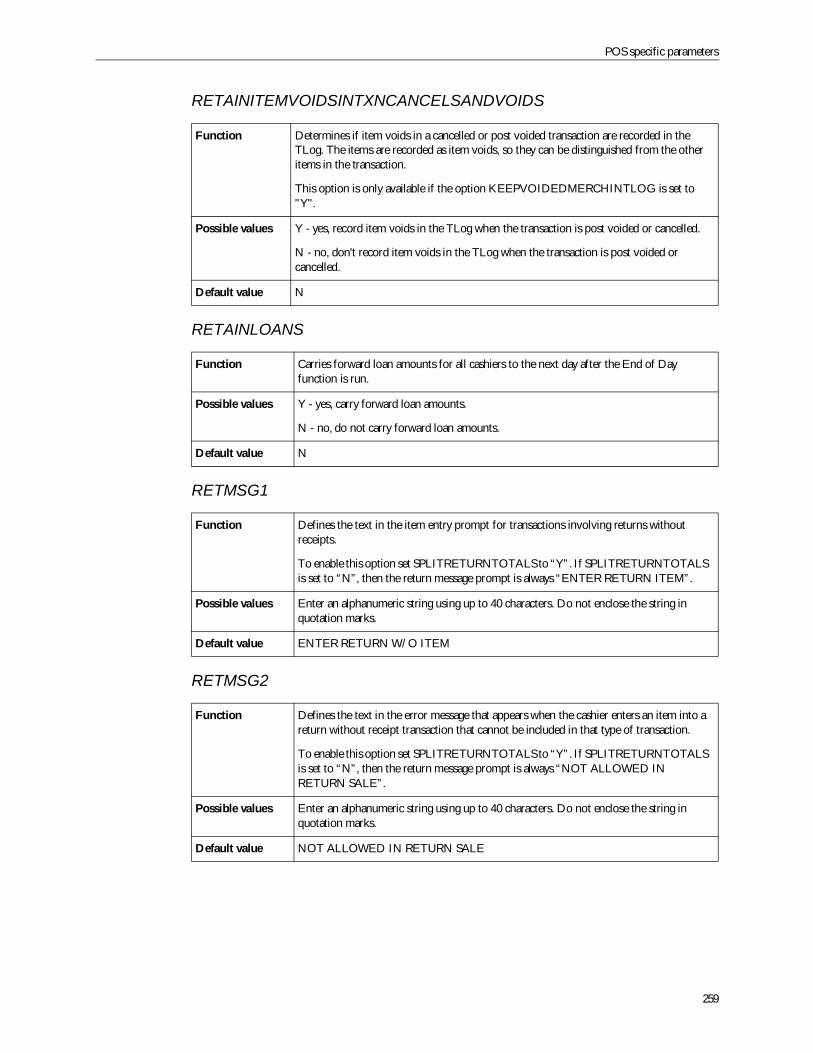
POS specific parameters
259
RETAINITEMVOIDSINTXNCANCELSANDVOIDS
RETAINLOANS
RETMSG1
RETMSG2
Function Determines if item voids in a cancelled or post voided transaction are recorded in theTLog. The items are recorded as item voids, so they can be distinguished from the otheritems in the transaction.
This option is only available if the option KEEPVOIDEDMERCHINTLOG is set to"Y".
Possible values Y - yes, record item voids in the TLog when the transaction is post voided or cancelled.
N - no, don't record item voids in the TLog when the transaction is post voided orcancelled.
Default value N
Function Carries forward loan amounts for all cashiers to the next day after the End of Dayfunction is run.
Possible values Y - yes, carry forward loan amounts.
N - no, do not carry forward loan amounts.
Default value N
Function Defines the text in the item entry prompt for transactions involving returns withoutreceipts.
To enable this option set SPLITRETURNTOTALS to “Y”. If SPLITRETURNTOTALSis set to “N”, then the return message prompt is always “ENTER RETURN ITEM”.
Possible values Enter an alphanumeric string using up to 40 characters. Do not enclose the string inquotation marks.
Default value ENTER RETURN W/O ITEM
Function Defines the text in the error message that appears when the cashier enters an item into areturn without receipt transaction that cannot be included in that type of transaction.
To enable this option set SPLITRETURNTOTALS to “Y”. If SPLITRETURNTOTALSis set to “N”, then the return message prompt is always “NOT ALLOWED INRETURN SALE”.
Possible values Enter an alphanumeric string using up to 40 characters. Do not enclose the string inquotation marks.
Default value NOT ALLOWED IN RETURN SALE
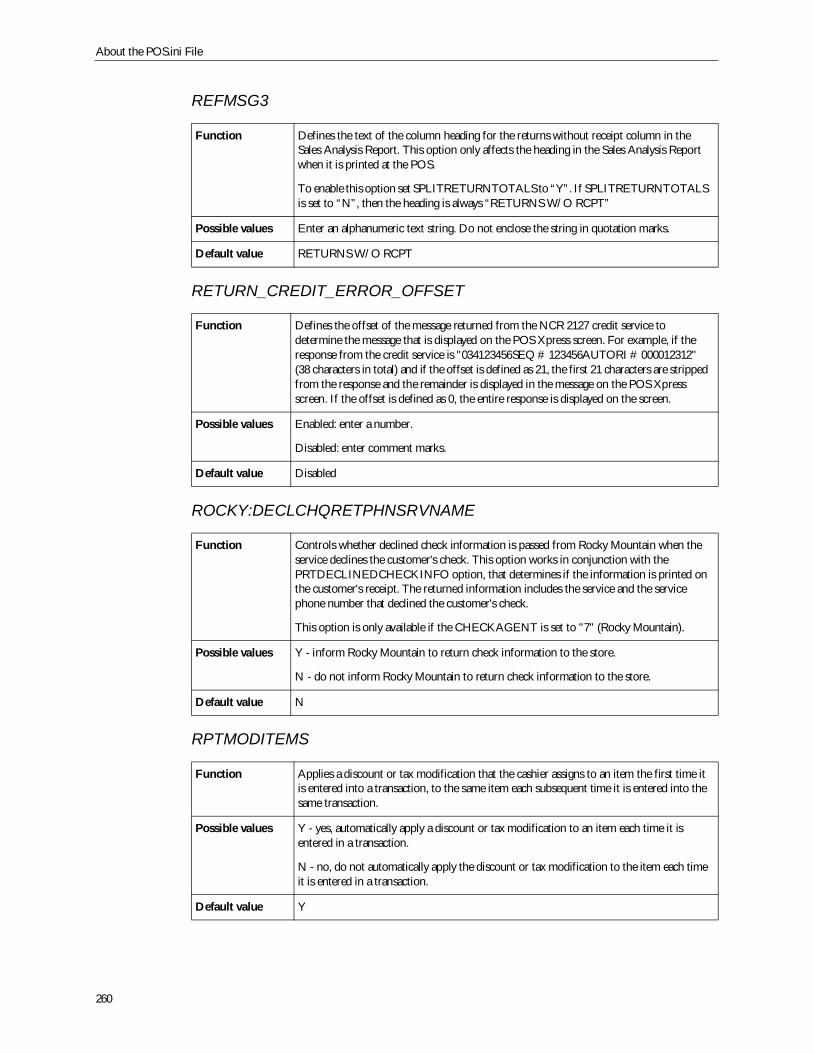
About the POS.ini File
260
REFMSG3
RETURN_CREDIT_ERROR_OFFSET
ROCKY:DECLCHQRETPHNSRVNAME
RPTMODITEMS
Function Defines the text of the column heading for the returns without receipt column in theSales Analysis Report. This option only affects the heading in the Sales Analysis Reportwhen it is printed at the POS.
To enable this option set SPLITRETURNTOTALS to “Y”. If SPLITRETURNTOTALSis set to “N”, then the heading is always “RETURNS W/O RCPT”
Possible values Enter an alphanumeric text string. Do not enclose the string in quotation marks.
Default value RETURNS W/O RCPT
Function Defines the offset of the message returned from the NCR 2127 credit service todetermine the message that is displayed on the POS Xpress screen. For example, if theresponse from the credit service is "034123456SEQ # 123456AUTORI # 000012312"(38 characters in total) and if the offset is defined as 21, the first 21 characters are strippedfrom the response and the remainder is displayed in the message on the POS Xpressscreen. If the offset is defined as 0, the entire response is displayed on the screen.
Possible values Enabled: enter a number.
Disabled: enter comment marks.
Default value Disabled
Function Controls whether declined check information is passed from Rocky Mountain when theservice declines the customer's check. This option works in conjunction with thePRTDECLINEDCHECKINFO option, that determines if the information is printed onthe customer's receipt. The returned information includes the service and the servicephone number that declined the customer's check.
This option is only available if the CHECKAGENT is set to "7" (Rocky Mountain).
Possible values Y - inform Rocky Mountain to return check information to the store.
N - do not inform Rocky Mountain to return check information to the store.
Default value N
Function Applies a discount or tax modification that the cashier assigns to an item the first time itis entered into a transaction, to the same item each subsequent time it is entered into thesame transaction.
Possible values Y - yes, automatically apply a discount or tax modification to an item each time it isentered in a transaction.
N - no, do not automatically apply the discount or tax modification to the item each timeit is entered in a transaction.
Default value Y
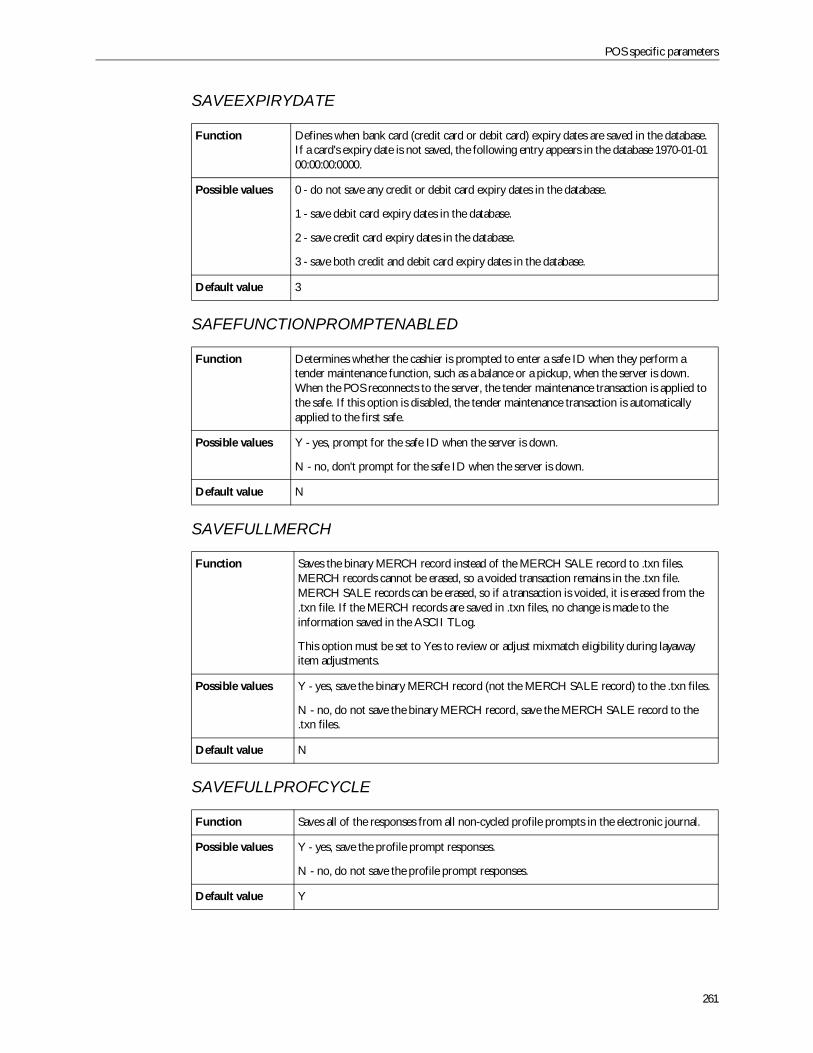
POS specific parameters
261
SAVEEXPIRYDATE
SAFEFUNCTIONPROMPTENABLED
SAVEFULLMERCH
SAVEFULLPROFCYCLE
Function Defines when bank card (credit card or debit card) expiry dates are saved in the database.If a card's expiry date is not saved, the following entry appears in the database 1970-01-0100:00:00:0000.
Possible values 0 - do not save any credit or debit card expiry dates in the database.
1 - save debit card expiry dates in the database.
2 - save credit card expiry dates in the database.
3 - save both credit and debit card expiry dates in the database.
Default value 3
Function Determines whether the cashier is prompted to enter a safe ID when they perform atender maintenance function, such as a balance or a pickup, when the server is down.When the POS reconnects to the server, the tender maintenance transaction is applied tothe safe. If this option is disabled, the tender maintenance transaction is automaticallyapplied to the first safe.
Possible values Y - yes, prompt for the safe ID when the server is down.
N - no, don't prompt for the safe ID when the server is down.
Default value N
Function Saves the binary MERCH record instead of the MERCH SALE record to .txn files.MERCH records cannot be erased, so a voided transaction remains in the .txn file.MERCH SALE records can be erased, so if a transaction is voided, it is erased from the.txn file. If the MERCH records are saved in .txn files, no change is made to theinformation saved in the ASCII TLog.
This option must be set to Yes to review or adjust mixmatch eligibility during layawayitem adjustments.
Possible values Y - yes, save the binary MERCH record (not the MERCH SALE record) to the .txn files.
N - no, do not save the binary MERCH record, save the MERCH SALE record to the.txn files.
Default value N
Function Saves all of the responses from all non-cycled profile prompts in the electronic journal.
Possible values Y - yes, save the profile prompt responses.
N - no, do not save the profile prompt responses.
Default value Y
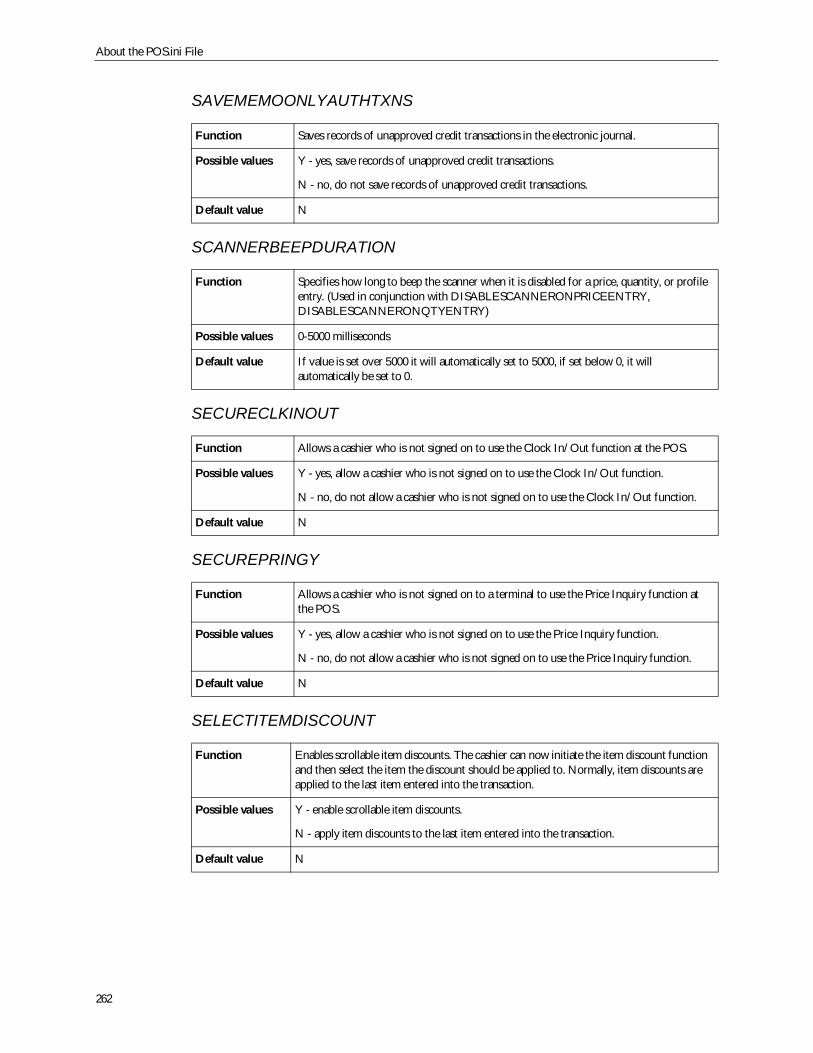
About the POS.ini File
262
SAVEMEMOONLYAUTHTXNS
SCANNERBEEPDURATION
SECURECLKINOUT
SECUREPRINGY
SELECTITEMDISCOUNT
Function Saves records of unapproved credit transactions in the electronic journal.
Possible values Y - yes, save records of unapproved credit transactions.
N - no, do not save records of unapproved credit transactions.
Default value N
Function Specifies how long to beep the scanner when it is disabled for a price, quantity, or profileentry. (Used in conjunction with DISABLESCANNERONPRICEENTRY,DISABLESCANNERONQTYENTRY)
Possible values 0-5000 milliseconds
Default value If value is set over 5000 it will automatically set to 5000, if set below 0, it willautomatically be set to 0.
Function Allows a cashier who is not signed on to use the Clock In/Out function at the POS.
Possible values Y - yes, allow a cashier who is not signed on to use the Clock In/Out function.
N - no, do not allow a cashier who is not signed on to use the Clock In/Out function.
Default value N
Function Allows a cashier who is not signed on to a terminal to use the Price Inquiry function atthe POS.
Possible values Y - yes, allow a cashier who is not signed on to use the Price Inquiry function.
N - no, do not allow a cashier who is not signed on to use the Price Inquiry function.
Default value N
Function Enables scrollable item discounts. The cashier can now initiate the item discount functionand then select the item the discount should be applied to. Normally, item discounts areapplied to the last item entered into the transaction.
Possible values Y - enable scrollable item discounts.
N - apply item discounts to the last item entered into the transaction.
Default value N
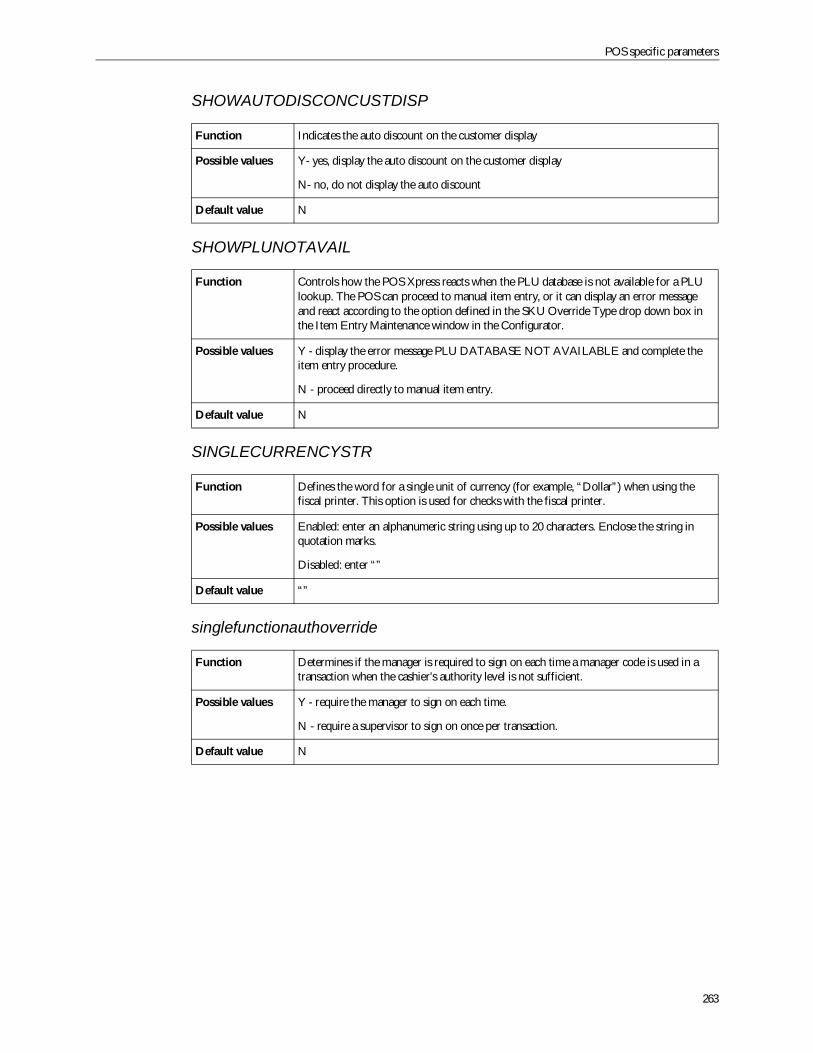
POS specific parameters
263
SHOWAUTODISCONCUSTDISP
SHOWPLUNOTAVAIL
SINGLECURRENCYSTR
singlefunctionauthoverride
Function Indicates the auto discount on the customer display
Possible values Y- yes, display the auto discount on the customer display
N- no, do not display the auto discount
Default value N
Function Controls how the POS Xpress reacts when the PLU database is not available for a PLUlookup. The POS can proceed to manual item entry, or it can display an error messageand react according to the option defined in the SKU Override Type drop down box inthe Item Entry Maintenance window in the Configurator.
Possible values Y - display the error message PLU DATABASE NOT AVAILABLE and complete theitem entry procedure.
N - proceed directly to manual item entry.
Default value N
Function Defines the word for a single unit of currency (for example, “Dollar”) when using thefiscal printer. This option is used for checks with the fiscal printer.
Possible values Enabled: enter an alphanumeric string using up to 20 characters. Enclose the string inquotation marks.
Disabled: enter “”
Default value “”
Function Determines if the manager is required to sign on each time a manager code is used in atransaction when the cashier’s authority level is not sufficient.
Possible values Y - require the manager to sign on each time.
N - require a supervisor to sign on once per transaction.
Default value N
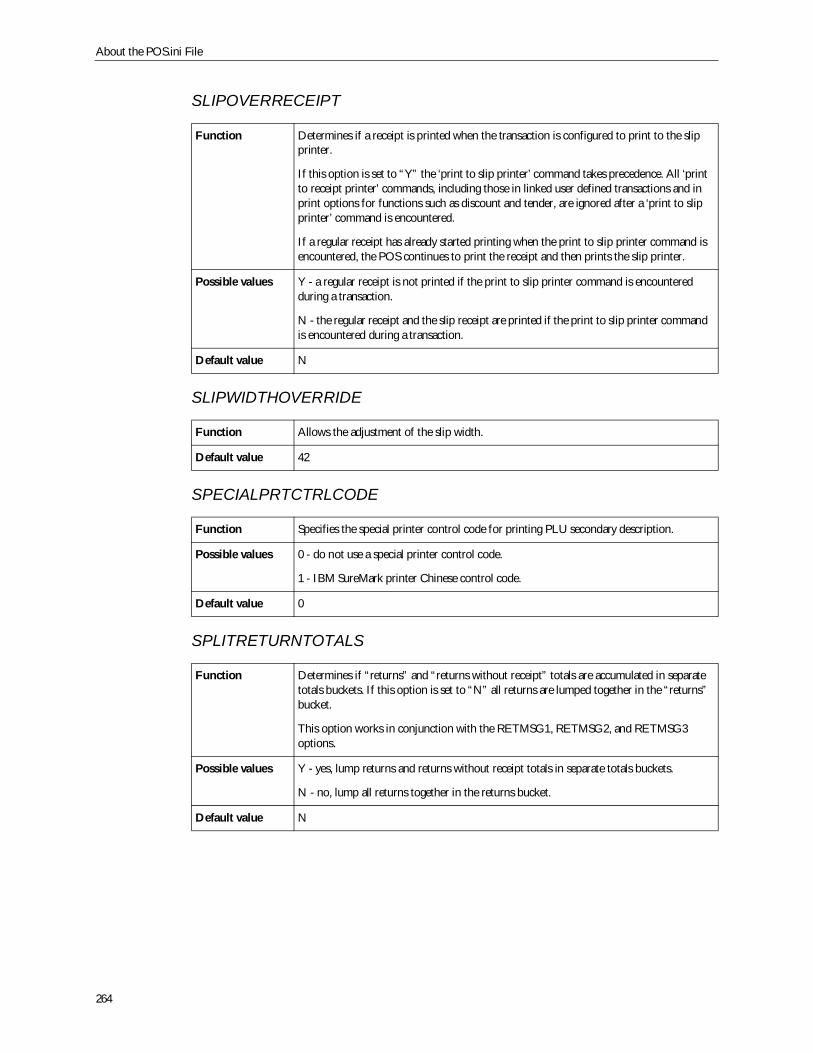
About the POS.ini File
264
SLIPOVERRECEIPT
SLIPWIDTHOVERRIDE
SPECIALPRTCTRLCODE
SPLITRETURNTOTALS
Function Determines if a receipt is printed when the transaction is configured to print to the slipprinter.
If this option is set to “Y” the ‘print to slip printer’ command takes precedence. All ‘printto receipt printer’ commands, including those in linked user defined transactions and inprint options for functions such as discount and tender, are ignored after a ‘print to slipprinter’ command is encountered.
If a regular receipt has already started printing when the print to slip printer command isencountered, the POS continues to print the receipt and then prints the slip printer.
Possible values Y - a regular receipt is not printed if the print to slip printer command is encounteredduring a transaction.
N - the regular receipt and the slip receipt are printed if the print to slip printer commandis encountered during a transaction.
Default value N
Function Allows the adjustment of the slip width.
Default value 42
Function Specifies the special printer control code for printing PLU secondary description.
Possible values 0 - do not use a special printer control code.
1 - IBM SureMark printer Chinese control code.
Default value 0
Function Determines if “returns” and “returns without receipt” totals are accumulated in separatetotals buckets. If this option is set to “N” all returns are lumped together in the “returns”bucket.
This option works in conjunction with the RETMSG1, RETMSG2, and RETMSG3options.
Possible values Y - yes, lump returns and returns without receipt totals in separate totals buckets.
N - no, lump all returns together in the returns bucket.
Default value N
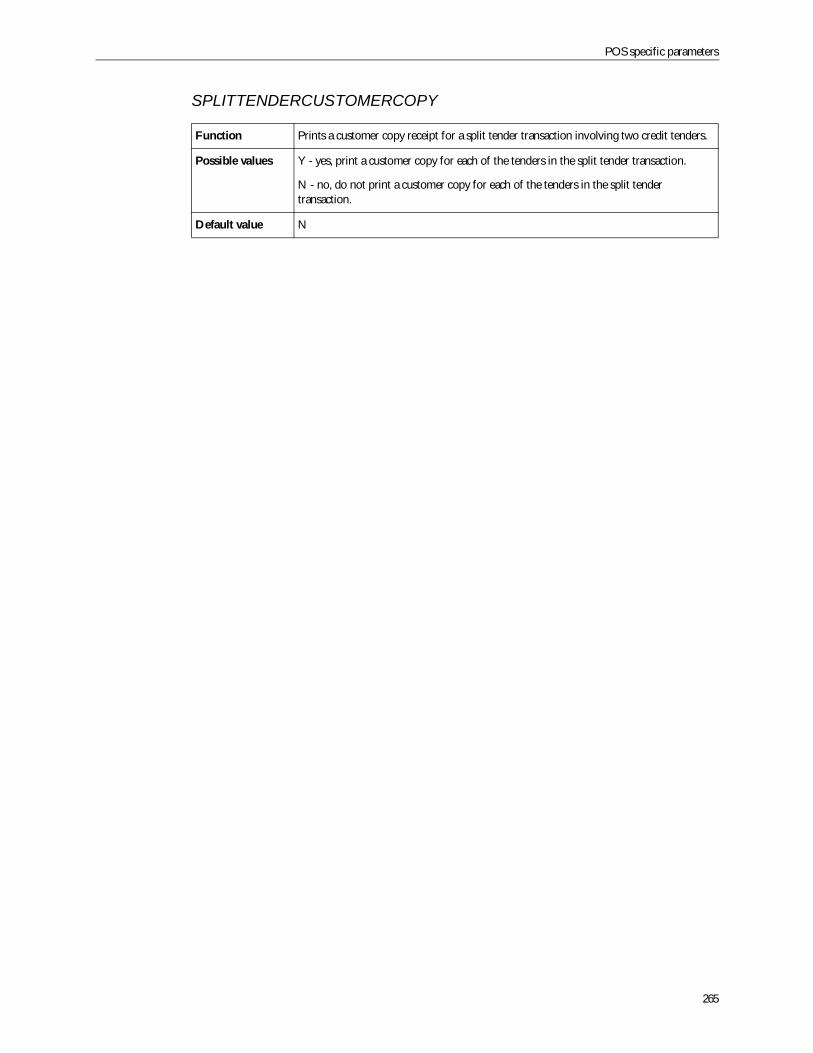
POS specific parameters
265
SPLITTENDERCUSTOMERCOPY
Function Prints a customer copy receipt for a split tender transaction involving two credit tenders.
Possible values Y - yes, print a customer copy for each of the tenders in the split tender transaction.
N - no, do not print a customer copy for each of the tenders in the split tendertransaction.
Default value N
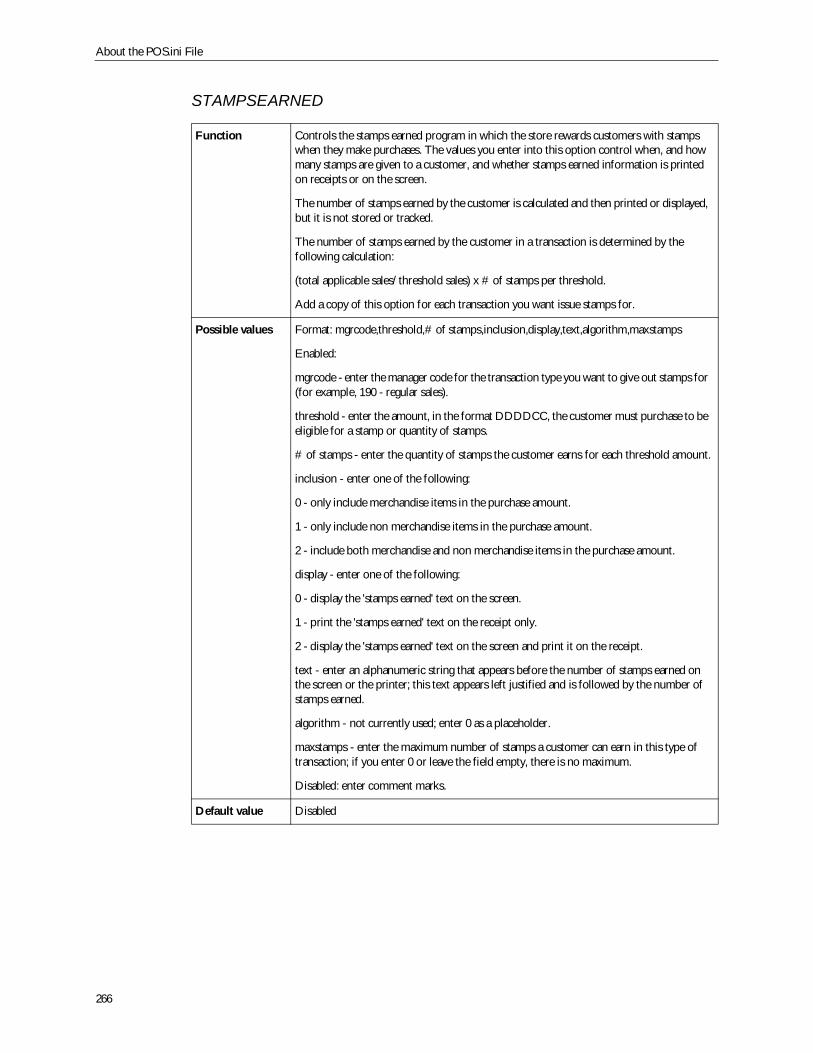
About the POS.ini File
266
STAMPSEARNED
Function Controls the stamps earned program in which the store rewards customers with stampswhen they make purchases. The values you enter into this option control when, and howmany stamps are given to a customer, and whether stamps earned information is printedon receipts or on the screen.
The number of stamps earned by the customer is calculated and then printed or displayed,but it is not stored or tracked.
The number of stamps earned by the customer in a transaction is determined by thefollowing calculation:
(total applicable sales/threshold sales) x # of stamps per threshold.
Add a copy of this option for each transaction you want issue stamps for.
Possible values Format: mgrcode,threshold,# of stamps,inclusion,display,text,algorithm,maxstamps
Enabled:
mgrcode - enter the manager code for the transaction type you want to give out stamps for(for example, 190 - regular sales).
threshold - enter the amount, in the format DDDDCC, the customer must purchase to beeligible for a stamp or quantity of stamps.
# of stamps - enter the quantity of stamps the customer earns for each threshold amount.
inclusion - enter one of the following:
0 - only include merchandise items in the purchase amount.
1 - only include non merchandise items in the purchase amount.
2 - include both merchandise and non merchandise items in the purchase amount.
display - enter one of the following:
0 - display the 'stamps earned' text on the screen.
1 - print the 'stamps earned' text on the receipt only.
2 - display the 'stamps earned' text on the screen and print it on the receipt.
text - enter an alphanumeric string that appears before the number of stamps earned onthe screen or the printer; this text appears left justified and is followed by the number ofstamps earned.
algorithm - not currently used; enter 0 as a placeholder.
maxstamps - enter the maximum number of stamps a customer can earn in this type oftransaction; if you enter 0 or leave the field empty, there is no maximum.
Disabled: enter comment marks.
Default value Disabled
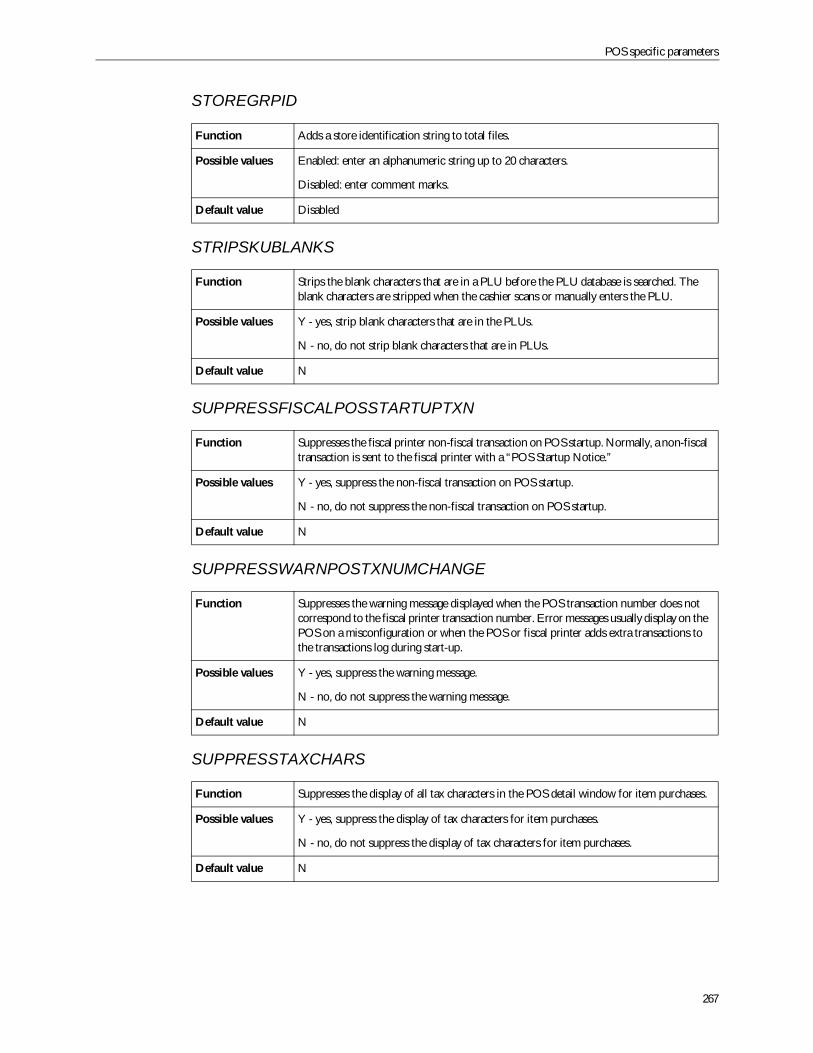
POS specific parameters
267
STOREGRPID
STRIPSKUBLANKS
SUPPRESSFISCALPOSSTARTUPTXN
SUPPRESSWARNPOSTXNUMCHANGE
SUPPRESSTAXCHARS
Function Adds a store identification string to total files.
Possible values Enabled: enter an alphanumeric string up to 20 characters.
Disabled: enter comment marks.
Default value Disabled
Function Strips the blank characters that are in a PLU before the PLU database is searched. Theblank characters are stripped when the cashier scans or manually enters the PLU.
Possible values Y - yes, strip blank characters that are in the PLUs.
N - no, do not strip blank characters that are in PLUs.
Default value N
Function Suppresses the fiscal printer non-fiscal transaction on POS startup. Normally, a non-fiscaltransaction is sent to the fiscal printer with a “POS Startup Notice.”
Possible values Y - yes, suppress the non-fiscal transaction on POS startup.
N - no, do not suppress the non-fiscal transaction on POS startup.
Default value N
Function Suppresses the warning message displayed when the POS transaction number does notcorrespond to the fiscal printer transaction number. Error messages usually display on thePOS on a misconfiguration or when the POS or fiscal printer adds extra transactions tothe transactions log during start-up.
Possible values Y - yes, suppress the warning message.
N - no, do not suppress the warning message.
Default value N
Function Suppresses the display of all tax characters in the POS detail window for item purchases.
Possible values Y - yes, suppress the display of tax characters for item purchases.
N - no, do not suppress the display of tax characters for item purchases.
Default value N
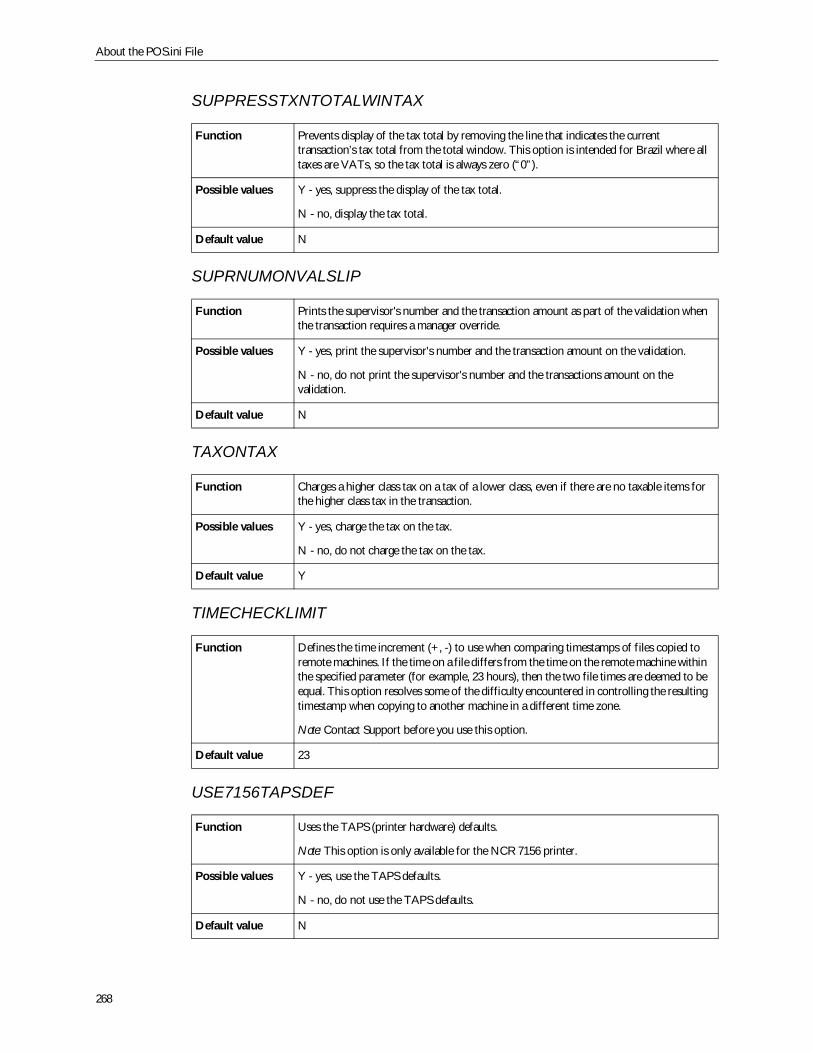
About the POS.ini File
268
SUPPRESSTXNTOTALWINTAX
SUPRNUMONVALSLIP
TAXONTAX
TIMECHECKLIMIT
USE7156TAPSDEF
Function Prevents display of the tax total by removing the line that indicates the currenttransaction’s tax total from the total window. This option is intended for Brazil where alltaxes are VATs, so the tax total is always zero (“0”).
Possible values Y - yes, suppress the display of the tax total.
N - no, display the tax total.
Default value N
Function Prints the supervisor's number and the transaction amount as part of the validation whenthe transaction requires a manager override.
Possible values Y - yes, print the supervisor's number and the transaction amount on the validation.
N - no, do not print the supervisor's number and the transactions amount on thevalidation.
Default value N
Function Charges a higher class tax on a tax of a lower class, even if there are no taxable items forthe higher class tax in the transaction.
Possible values Y - yes, charge the tax on the tax.
N - no, do not charge the tax on the tax.
Default value Y
Function Defines the time increment (+, -) to use when comparing timestamps of files copied toremote machines. If the time on a file differs from the time on the remote machine withinthe specified parameter (for example, 23 hours), then the two file times are deemed to beequal. This option resolves some of the difficulty encountered in controlling the resultingtimestamp when copying to another machine in a different time zone.
Note: Contact Support before you use this option.
Default value 23
Function Uses the TAPS (printer hardware) defaults.
Note: This option is only available for the NCR 7156 printer.
Possible values Y - yes, use the TAPS defaults.
N - no, do not use the TAPS defaults.
Default value N
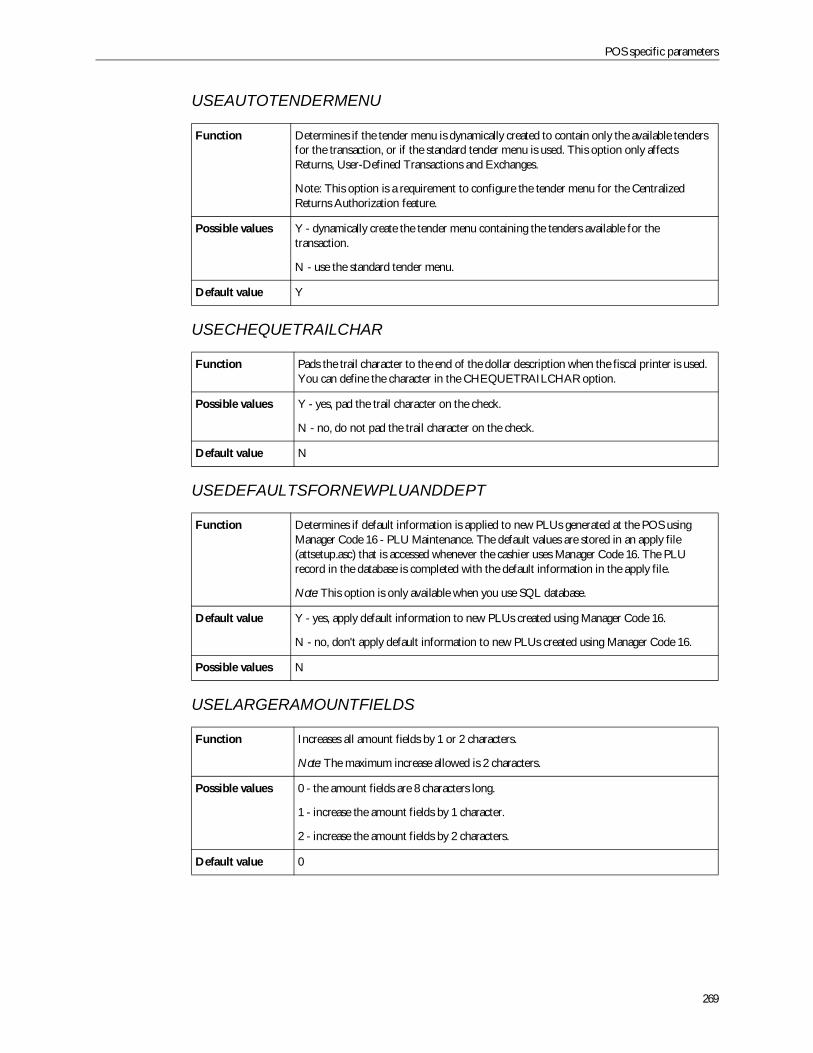
POS specific parameters
269
USEAUTOTENDERMENU
USECHEQUETRAILCHAR
USEDEFAULTSFORNEWPLUANDDEPT
USELARGERAMOUNTFIELDS
Function Determines if the tender menu is dynamically created to contain only the available tendersfor the transaction, or if the standard tender menu is used. This option only affectsReturns, User-Defined Transactions and Exchanges.
Note: This option is a requirement to configure the tender menu for the CentralizedReturns Authorization feature.
Possible values Y - dynamically create the tender menu containing the tenders available for thetransaction.
N - use the standard tender menu.
Default value Y
Function Pads the trail character to the end of the dollar description when the fiscal printer is used.You can define the character in the CHEQUETRAILCHAR option.
Possible values Y - yes, pad the trail character on the check.
N - no, do not pad the trail character on the check.
Default value N
Function Determines if default information is applied to new PLUs generated at the POS usingManager Code 16 - PLU Maintenance. The default values are stored in an apply file(attsetup.asc) that is accessed whenever the cashier uses Manager Code 16. The PLUrecord in the database is completed with the default information in the apply file.
Note: This option is only available when you use SQL database.
Default value Y - yes, apply default information to new PLUs created using Manager Code 16.
N - no, don't apply default information to new PLUs created using Manager Code 16.
Possible values N
Function Increases all amount fields by 1 or 2 characters.
Note: The maximum increase allowed is 2 characters.
Possible values 0 - the amount fields are 8 characters long.
1 - increase the amount fields by 1 character.
2 - increase the amount fields by 2 characters.
Default value 0
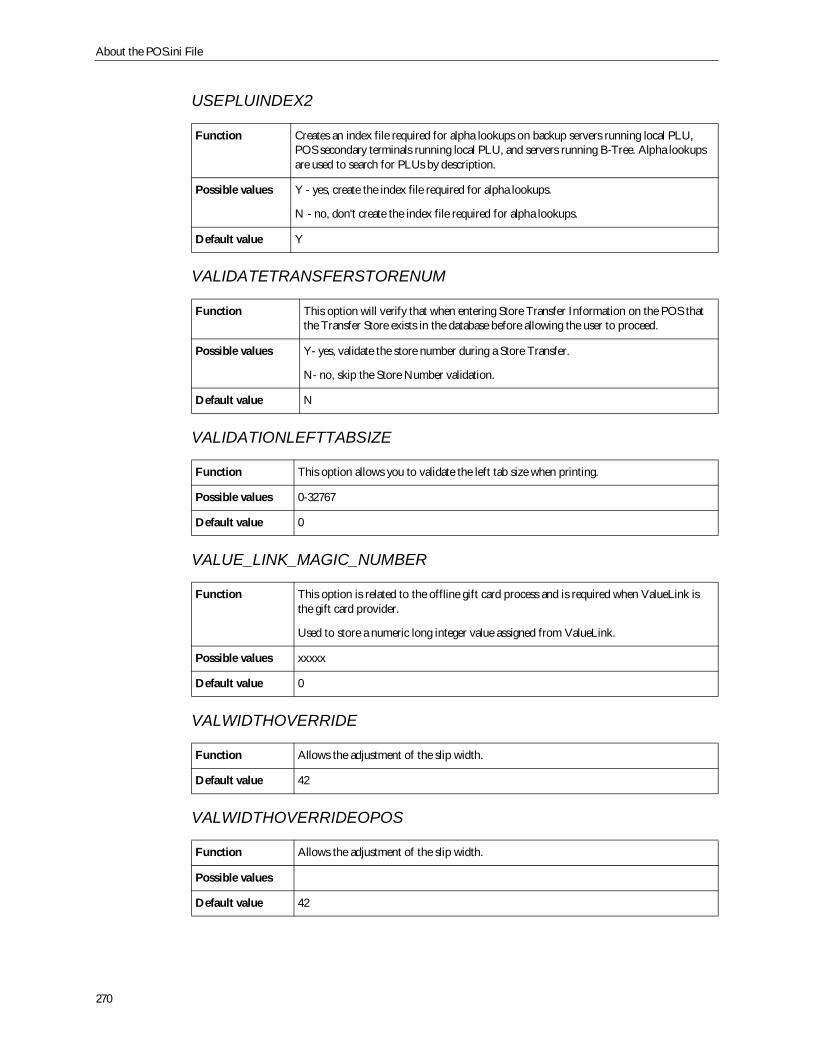
About the POS.ini File
270
USEPLUINDEX2
VALIDATETRANSFERSTORENUM
VALIDATIONLEFTTABSIZE
VALUE_LINK_MAGIC_NUMBER
VALWIDTHOVERRIDE
VALWIDTHOVERRIDEOPOS
Function Creates an index file required for alpha lookups on backup servers running local PLU,POS secondary terminals running local PLU, and servers running B-Tree. Alpha lookupsare used to search for PLUs by description.
Possible values Y - yes, create the index file required for alpha lookups.
N - no, don't create the index file required for alpha lookups.
Default value Y
Function This option will verify that when entering Store Transfer Information on the POS thatthe Transfer Store exists in the database before allowing the user to proceed.
Possible values Y- yes, validate the store number during a Store Transfer.
N- no, skip the Store Number validation.
Default value N
Function This option allows you to validate the left tab size when printing.
Possible values 0-32767
Default value 0
Function This option is related to the offline gift card process and is required when ValueLink isthe gift card provider.
Used to store a numeric long integer value assigned from ValueLink.
Possible values xxxxx
Default value 0
Function Allows the adjustment of the slip width.
Default value 42
Function Allows the adjustment of the slip width.
Possible values
Default value 42
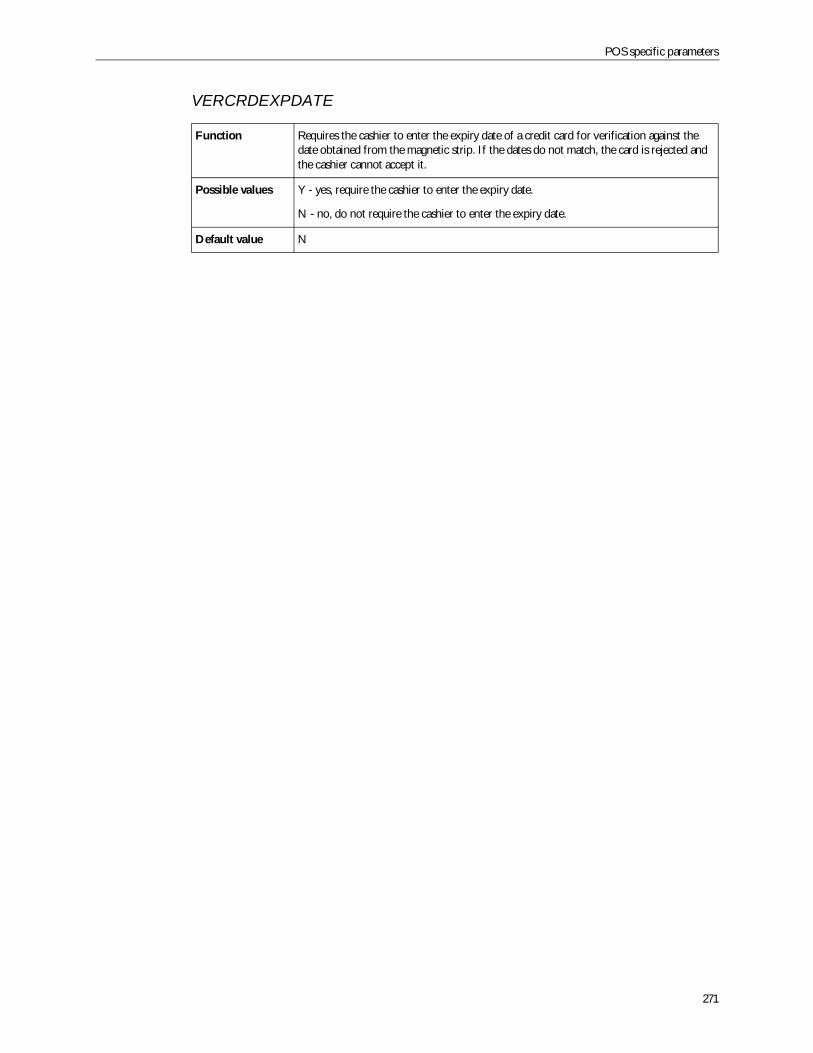
POS specific parameters
271
VERCRDEXPDATE
Function Requires the cashier to enter the expiry date of a credit card for verification against thedate obtained from the magnetic strip. If the dates do not match, the card is rejected andthe cashier cannot accept it.
Possible values Y - yes, require the cashier to enter the expiry date.
N - no, do not require the cashier to enter the expiry date.
Default value N
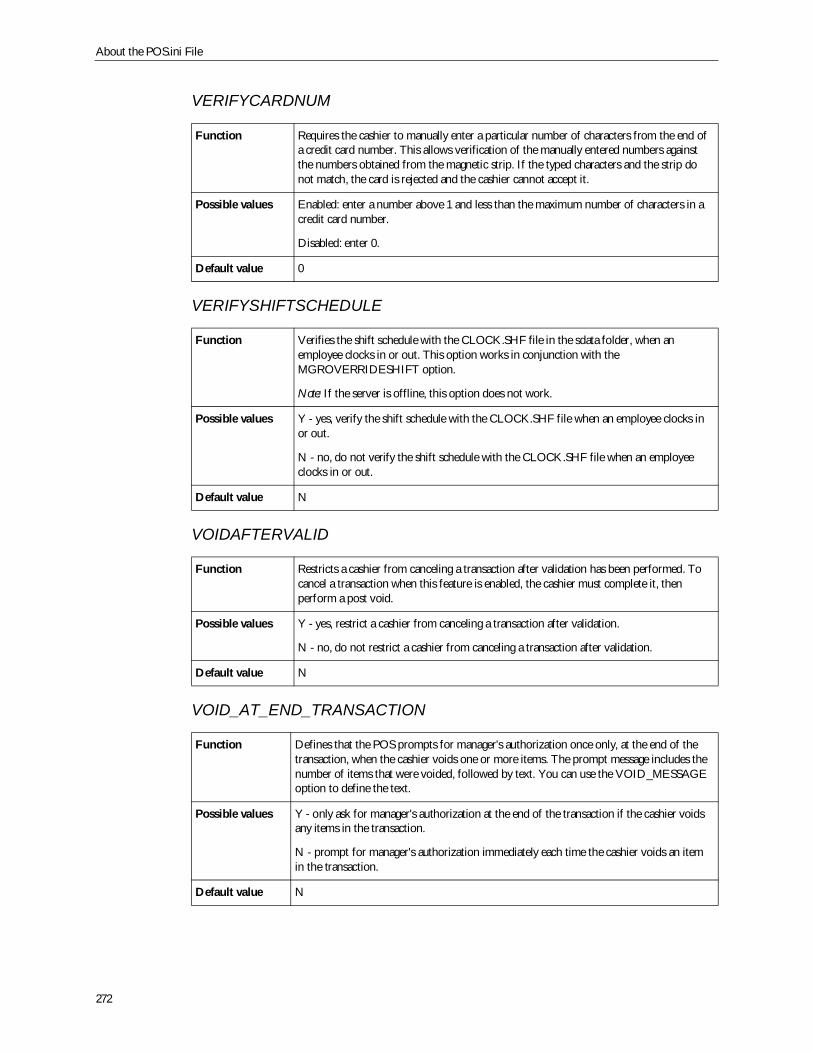
About the POS.ini File
272
VERIFYCARDNUM
VERIFYSHIFTSCHEDULE
VOIDAFTERVALID
VOID_AT_END_TRANSACTION
Function Requires the cashier to manually enter a particular number of characters from the end ofa credit card number. This allows verification of the manually entered numbers againstthe numbers obtained from the magnetic strip. If the typed characters and the strip donot match, the card is rejected and the cashier cannot accept it.
Possible values Enabled: enter a number above 1 and less than the maximum number of characters in acredit card number.
Disabled: enter 0.
Default value 0
Function Verifies the shift schedule with the CLOCK.SHF file in the sdata folder, when anemployee clocks in or out. This option works in conjunction with theMGROVERRIDESHIFT option.
Note: If the server is offline, this option does not work.
Possible values Y - yes, verify the shift schedule with the CLOCK.SHF file when an employee clocks inor out.
N - no, do not verify the shift schedule with the CLOCK.SHF file when an employeeclocks in or out.
Default value N
Function Restricts a cashier from canceling a transaction after validation has been performed. Tocancel a transaction when this feature is enabled, the cashier must complete it, thenperform a post void.
Possible values Y - yes, restrict a cashier from canceling a transaction after validation.
N - no, do not restrict a cashier from canceling a transaction after validation.
Default value N
Function Defines that the POS prompts for manager's authorization once only, at the end of thetransaction, when the cashier voids one or more items. The prompt message includes thenumber of items that were voided, followed by text. You can use the VOID_MESSAGEoption to define the text.
Possible values Y - only ask for manager's authorization at the end of the transaction if the cashier voidsany items in the transaction.
N - prompt for manager's authorization immediately each time the cashier voids an itemin the transaction.
Default value N
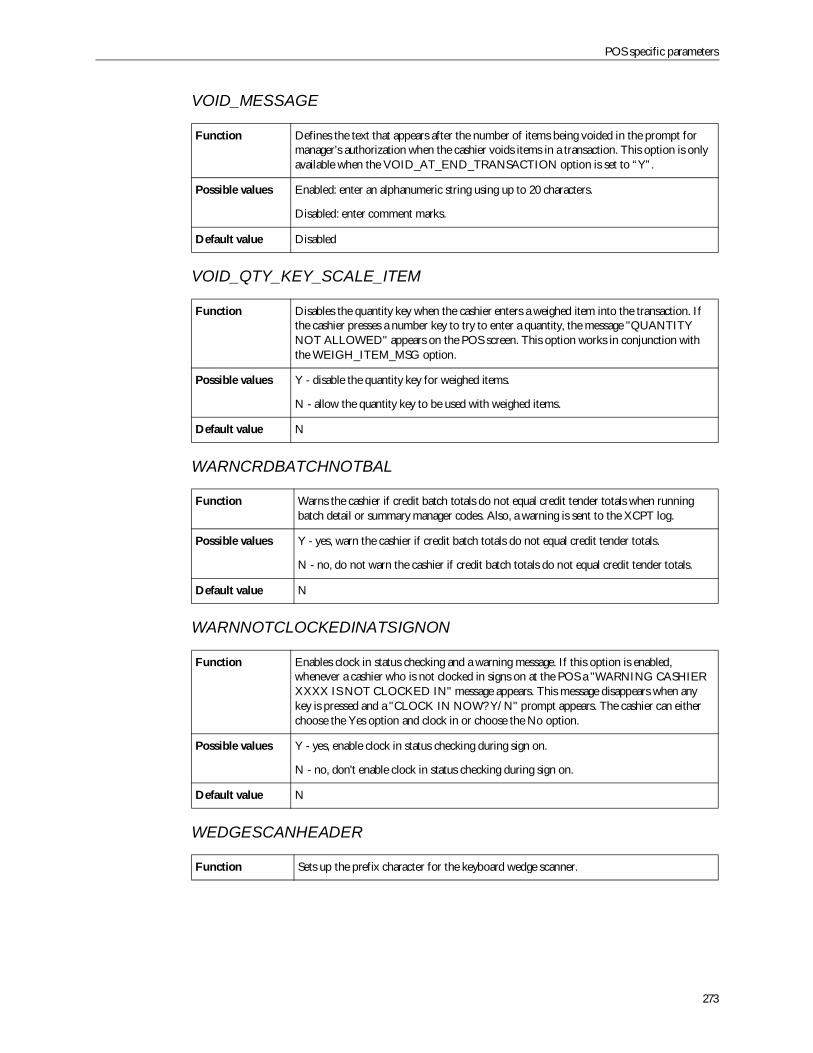
POS specific parameters
273
VOID_MESSAGE
VOID_QTY_KEY_SCALE_ITEM
WARNCRDBATCHNOTBAL
WARNNOTCLOCKEDINATSIGNON
WEDGESCANHEADER
Function Defines the text that appears after the number of items being voided in the prompt formanager’s authorization when the cashier voids items in a transaction. This option is onlyavailable when the VOID_AT_END_TRANSACTION option is set to “Y”.
Possible values Enabled: enter an alphanumeric string using up to 20 characters.
Disabled: enter comment marks.
Default value Disabled
Function Disables the quantity key when the cashier enters a weighed item into the transaction. Ifthe cashier presses a number key to try to enter a quantity, the message "QUANTITYNOT ALLOWED" appears on the POS screen. This option works in conjunction withthe WEIGH_ITEM_MSG option.
Possible values Y - disable the quantity key for weighed items.
N - allow the quantity key to be used with weighed items.
Default value N
Function Warns the cashier if credit batch totals do not equal credit tender totals when runningbatch detail or summary manager codes. Also, a warning is sent to the XCPT log.
Possible values Y - yes, warn the cashier if credit batch totals do not equal credit tender totals.
N - no, do not warn the cashier if credit batch totals do not equal credit tender totals.
Default value N
Function Enables clock in status checking and a warning message. If this option is enabled,whenever a cashier who is not clocked in signs on at the POS a "WARNING CASHIERXXXX IS NOT CLOCKED IN" message appears. This message disappears when anykey is pressed and a "CLOCK IN NOW? Y/N" prompt appears. The cashier can eitherchoose the Yes option and clock in or choose the No option.
Possible values Y - yes, enable clock in status checking during sign on.
N - no, don't enable clock in status checking during sign on.
Default value N
Function Sets up the prefix character for the keyboard wedge scanner.
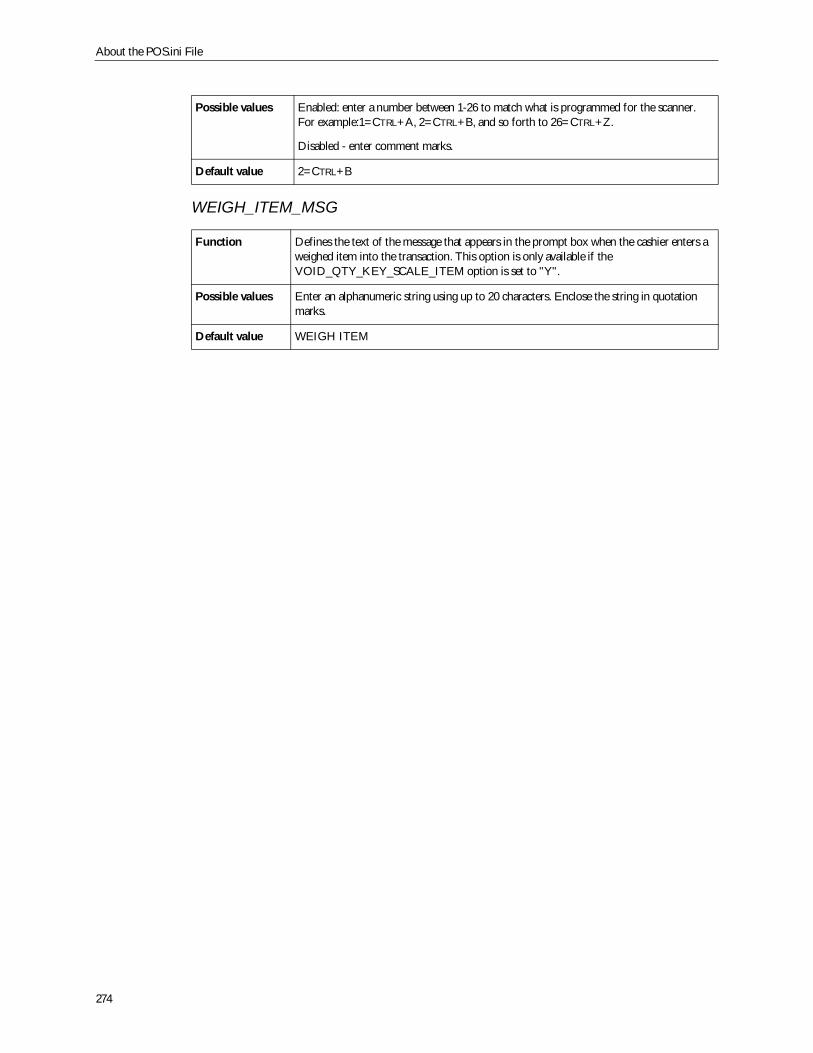
About the POS.ini File
274
WEIGH_ITEM_MSG
Possible values Enabled: enter a number between 1-26 to match what is programmed for the scanner.For example:1=CTRL+A, 2=CTRL+B, and so forth to 26=CTRL+Z.
Disabled - enter comment marks.
Default value 2=CTRL+B
Function Defines the text of the message that appears in the prompt box when the cashier enters aweighed item into the transaction. This option is only available if theVOID_QTY_KEY_SCALE_ITEM option is set to "Y".
Possible values Enter an alphanumeric string using up to 20 characters. Enclose the string in quotationmarks.
Default value WEIGH ITEM
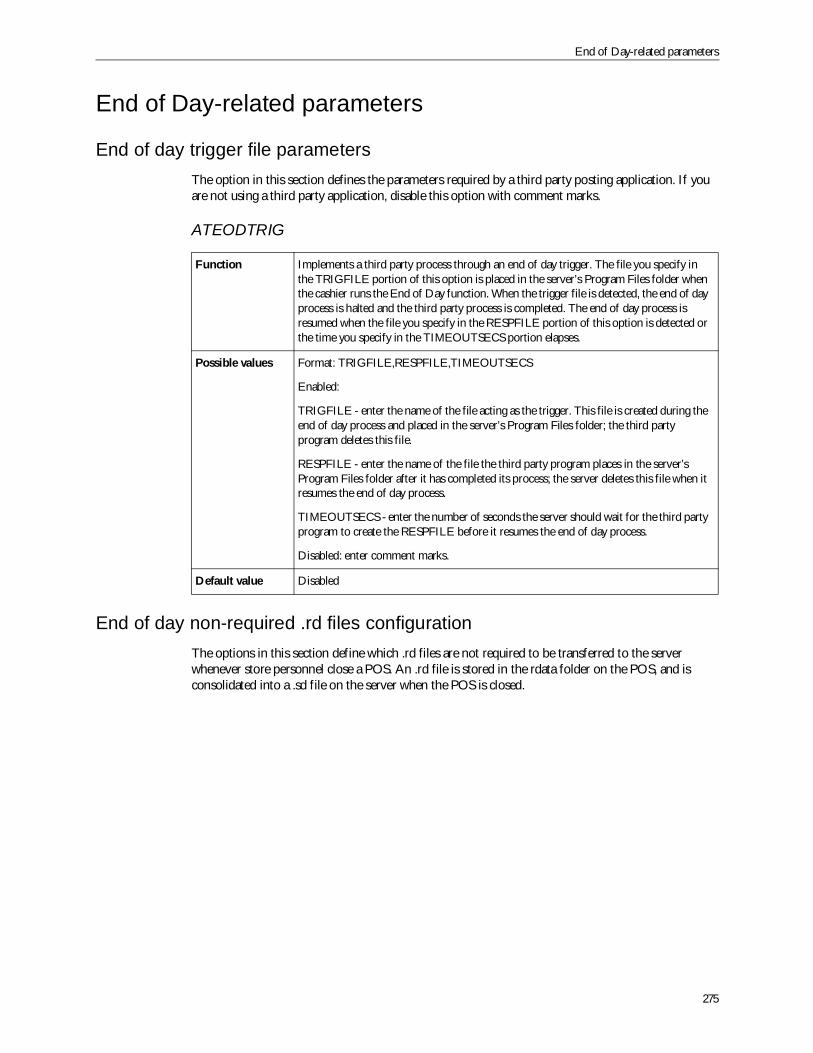
End of Day-related parameters
275
End of Day-related parameters
End of day trigger file parametersThe option in this section defines the parameters required by a third party posting application. If youare not using a third party application, disable this option with comment marks.
ATEODTRIG
End of day non-required .rd files configurationThe options in this section define which .rd files are not required to be transferred to the serverwhenever store personnel close a POS. An .rd file is stored in the rdata folder on the POS, and isconsolidated into a .sd file on the server when the POS is closed.
Function Implements a third party process through an end of day trigger. The file you specify inthe TRIGFILE portion of this option is placed in the server’s Program Files folder whenthe cashier runs the End of Day function. When the trigger file is detected, the end of dayprocess is halted and the third party process is completed. The end of day process isresumed when the file you specify in the RESPFILE portion of this option is detected orthe time you specify in the TIMEOUTSECS portion elapses.
Possible values Format: TRIGFILE,RESPFILE,TIMEOUTSECS
Enabled:
TRIGFILE - enter the name of the file acting as the trigger. This file is created during theend of day process and placed in the server’s Program Files folder; the third partyprogram deletes this file.
RESPFILE - enter the name of the file the third party program places in the server’sProgram Files folder after it has completed its process; the server deletes this file when itresumes the end of day process.
TIMEOUTSECS - enter the number of seconds the server should wait for the third partyprogram to create the RESPFILE before it resumes the end of day process.
Disabled: enter comment marks.
Default value Disabled
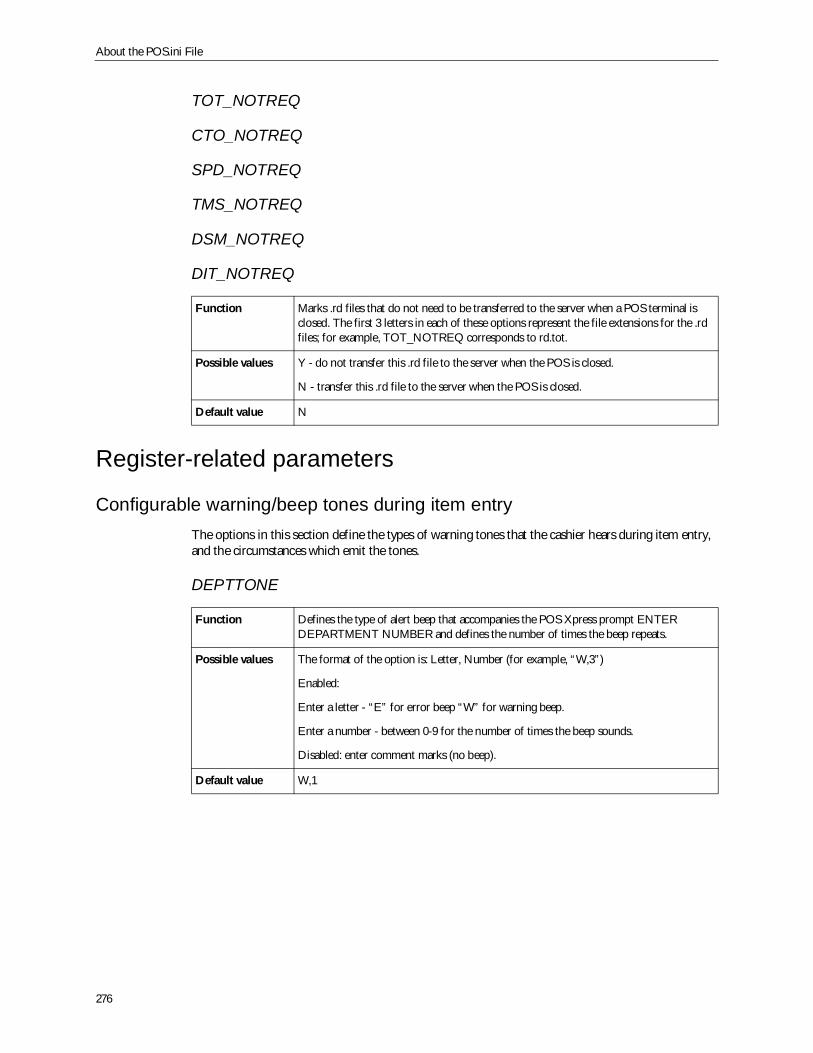
About the POS.ini File
276
TOT_NOTREQ
CTO_NOTREQ
SPD_NOTREQ
TMS_NOTREQ
DSM_NOTREQ
DIT_NOTREQ
Register-related parameters
Configurable warning/beep tones during item entryThe options in this section define the types of warning tones that the cashier hears during item entry,and the circumstances which emit the tones.
DEPTTONE
Function Marks .rd files that do not need to be transferred to the server when a POS terminal isclosed. The first 3 letters in each of these options represent the file extensions for the .rdfiles; for example, TOT_NOTREQ corresponds to rd.tot.
Possible values Y - do not transfer this .rd file to the server when the POS is closed.
N - transfer this .rd file to the server when the POS is closed.
Default value N
Function Defines the type of alert beep that accompanies the POS Xpress prompt ENTERDEPARTMENT NUMBER and defines the number of times the beep repeats.
Possible values The format of the option is: Letter, Number (for example, “W,3”)
Enabled:
Enter a letter - “E” for error beep “W” for warning beep.
Enter a number - between 0-9 for the number of times the beep sounds.
Disabled: enter comment marks (no beep).
Default value W,1

Register-related parameters
277
NOTONFILETONE
PRICETONE
SUPPTONE
Configurable screensaver for POSThe options in this section are for setting up the DOS POS screensaver.
The following options do not apply to the 7052 and 7450 Dynakey CRT POS platforms. If you areusing one of these platforms, disable these options with comment marks.
Function Defines the type of alert beep that accompanies the POS Xpress message PLU NOT ONFILE and the number of times the beep repeats.
Possible values The format of the option is: Letter, Number (for example, “W,3”)
Enabled:
Enter a letter - “E” for error beep or “W” for warning beep.
Enter a number - between 0-9 for the number of times the beep sounds.
Disabled: enter comment marks (no beep).
Default value Disabled with comment marks
Function Defines the type of alert beep that accompanies the POS Xpress prompt ENTER PRICEand defines the number of times the beep repeats.
Possible values The format of the option is: Letter, Number (for example, “W,3”)
Enter a letter - “E” for error beep or “W” for warning beep.
Enter a number - between 0-9 for the number of times the beep sounds.
Disabled: enter comment marks (no beep).
Default value Disabled with comment marks
Function Defines the type of beep that accompanies the POS Xpress prompt ENTERSUPPLEMENTAL CODE and defines the number of times the beep repeats.
Possible values The format of the option is: Letter, Number (for example, “W,3”)
Enabled:
Enter a letter - “E” for error beep or “W” for warning beep.
Enter a number - between 0-9 for the number of times the beep sounds.
Disabled: enter comment marks (no beep).
Default value W,1
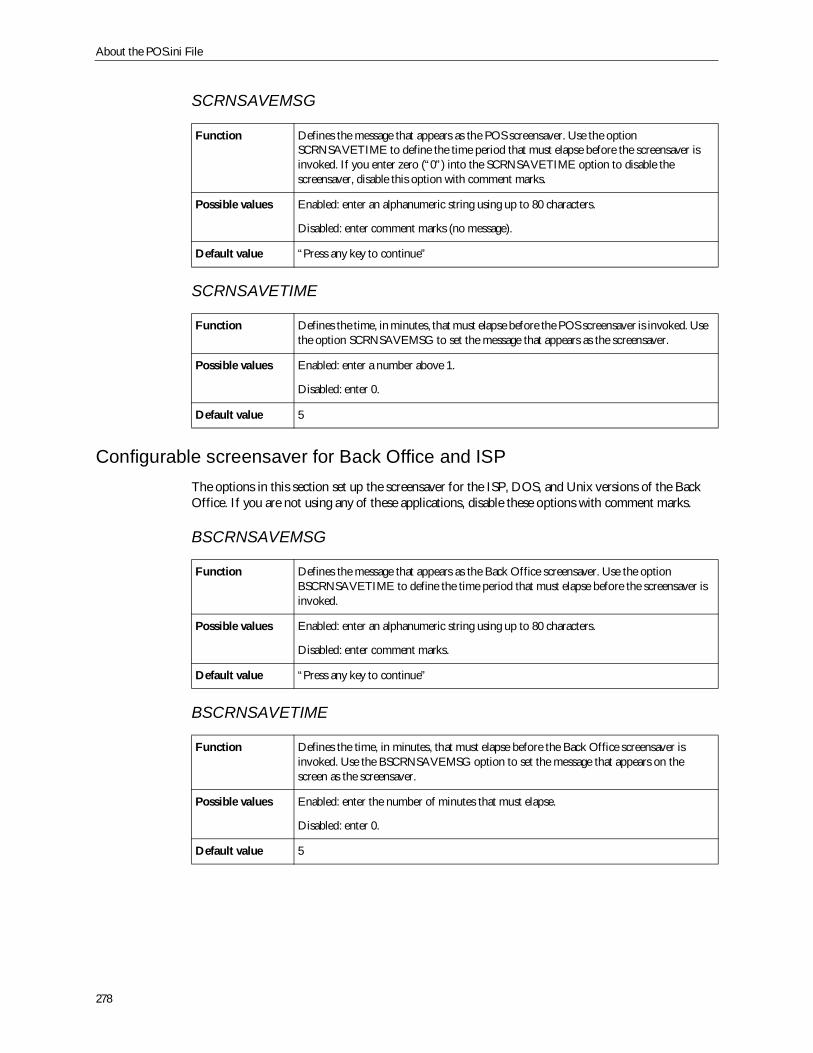
About the POS.ini File
278
SCRNSAVEMSG
SCRNSAVETIME
Configurable screensaver for Back Office and ISPThe options in this section set up the screensaver for the ISP, DOS, and Unix versions of the BackOffice. If you are not using any of these applications, disable these options with comment marks.
BSCRNSAVEMSG
BSCRNSAVETIME
Function Defines the message that appears as the POS screensaver. Use the optionSCRNSAVETIME to define the time period that must elapse before the screensaver isinvoked. If you enter zero (“0”) into the SCRNSAVETIME option to disable thescreensaver, disable this option with comment marks.
Possible values Enabled: enter an alphanumeric string using up to 80 characters.
Disabled: enter comment marks (no message).
Default value “Press any key to continue”
Function Defines the time, in minutes, that must elapse before the POS screensaver is invoked. Usethe option SCRNSAVEMSG to set the message that appears as the screensaver.
Possible values Enabled: enter a number above 1.
Disabled: enter 0.
Default value 5
Function Defines the message that appears as the Back Office screensaver. Use the optionBSCRNSAVETIME to define the time period that must elapse before the screensaver isinvoked.
Possible values Enabled: enter an alphanumeric string using up to 80 characters.
Disabled: enter comment marks.
Default value “Press any key to continue”
Function Defines the time, in minutes, that must elapse before the Back Office screensaver isinvoked. Use the BSCRNSAVEMSG option to set the message that appears on thescreen as the screensaver.
Possible values Enabled: enter the number of minutes that must elapse.
Disabled: enter 0.
Default value 5
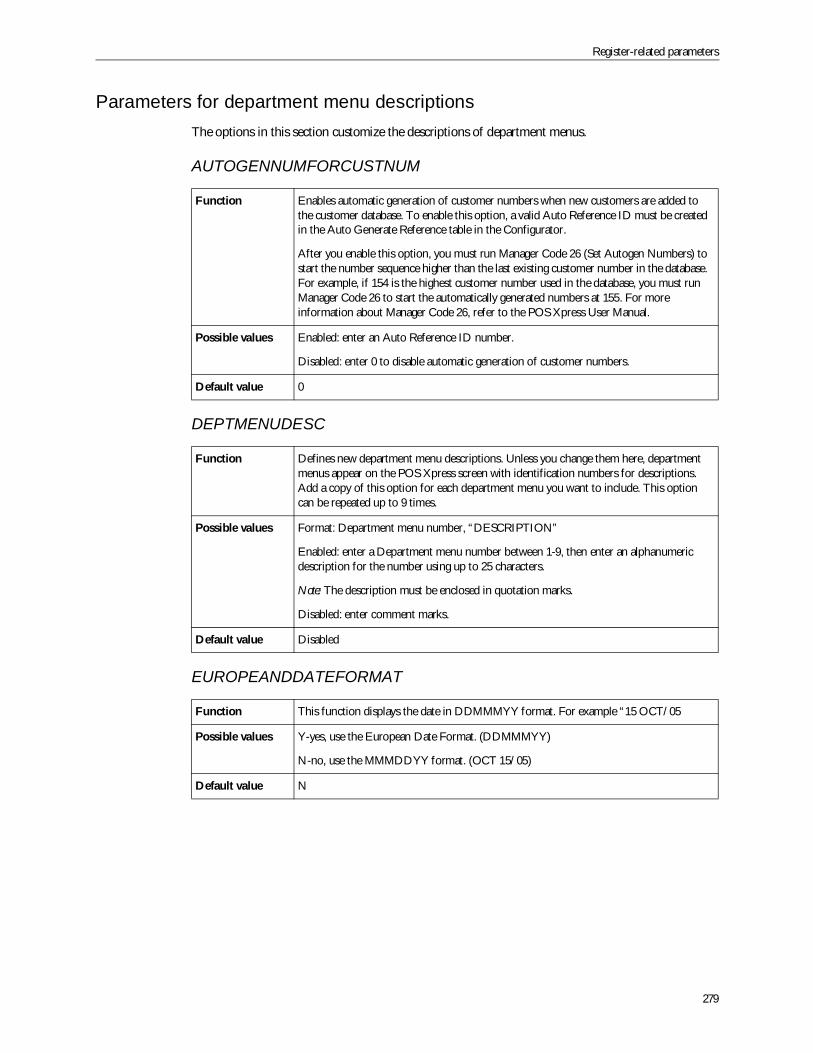
Register-related parameters
279
Parameters for department menu descriptionsThe options in this section customize the descriptions of department menus.
AUTOGENNUMFORCUSTNUM
DEPTMENUDESC
EUROPEANDDATEFORMAT
Function Enables automatic generation of customer numbers when new customers are added tothe customer database. To enable this option, a valid Auto Reference ID must be createdin the Auto Generate Reference table in the Configurator.
After you enable this option, you must run Manager Code 26 (Set Autogen Numbers) tostart the number sequence higher than the last existing customer number in the database.For example, if 154 is the highest customer number used in the database, you must runManager Code 26 to start the automatically generated numbers at 155. For moreinformation about Manager Code 26, refer to the POS Xpress User Manual.
Possible values Enabled: enter an Auto Reference ID number.
Disabled: enter 0 to disable automatic generation of customer numbers.
Default value 0
Function Defines new department menu descriptions. Unless you change them here, departmentmenus appear on the POS Xpress screen with identification numbers for descriptions.Add a copy of this option for each department menu you want to include. This optioncan be repeated up to 9 times.
Possible values Format: Department menu number, “DESCRIPTION”
Enabled: enter a Department menu number between 1-9, then enter an alphanumericdescription for the number using up to 25 characters.
Note: The description must be enclosed in quotation marks.
Disabled: enter comment marks.
Default value Disabled
Function This function displays the date in DDMMMYY format. For example “15 OCT/05
Possible values Y-yes, use the European Date Format. (DDMMMYY)
N-no, use the MMMDDYY format. (OCT 15/05)
Default value N
About the POS.ini File
280
ISR_ALLOW_NEW_APPEND_MENU
MPOSFIRSTMENUHIGHLIGHT
Barcode parameters
Parameters for UPC NSC 2 (embedded weight/price) bar codesThe options in this section define the NSC 2 bar codes that are used for variable weight items. Youenter values into these options to define the number of characters in the article number and price, andto indicate whether a price check digit is present in the NSC 2 bar codes you are using.
Before you change the states or values of any of the options in this section, you must activate the NSC2 bar code entry by clicking the ENABLE NSC 2 check box in the Register Parameters Maintenancewindow in the Configurator. If you do not want to use NSC 2 bar codes, disable all of the options inthis particular section with comment marks.
You can use the SUPPORTEAN13 option to activate support of EAN 13 labels. EAN 13 labels followinternational bar code standards that require each 13 character label to begin with a 0 and use a checkdigit.
Function When performing In-Stock Research Inventory using Manager Code 297, this optiondetermines whether to display NEW and APPEND menu buttons.
Possible values Y- yes, have the new menu options added to the In-Stock Research Manager Code.
N- no, disable this option.
Default value N
Function This option determines the first menu option to highlight on the first MPOS menu. Thisfeature then allows the MPOS to be configured to default (most used menu option)
Possible values 0-255, where 0 is the first Menu option
Default value 0- First Menu option.
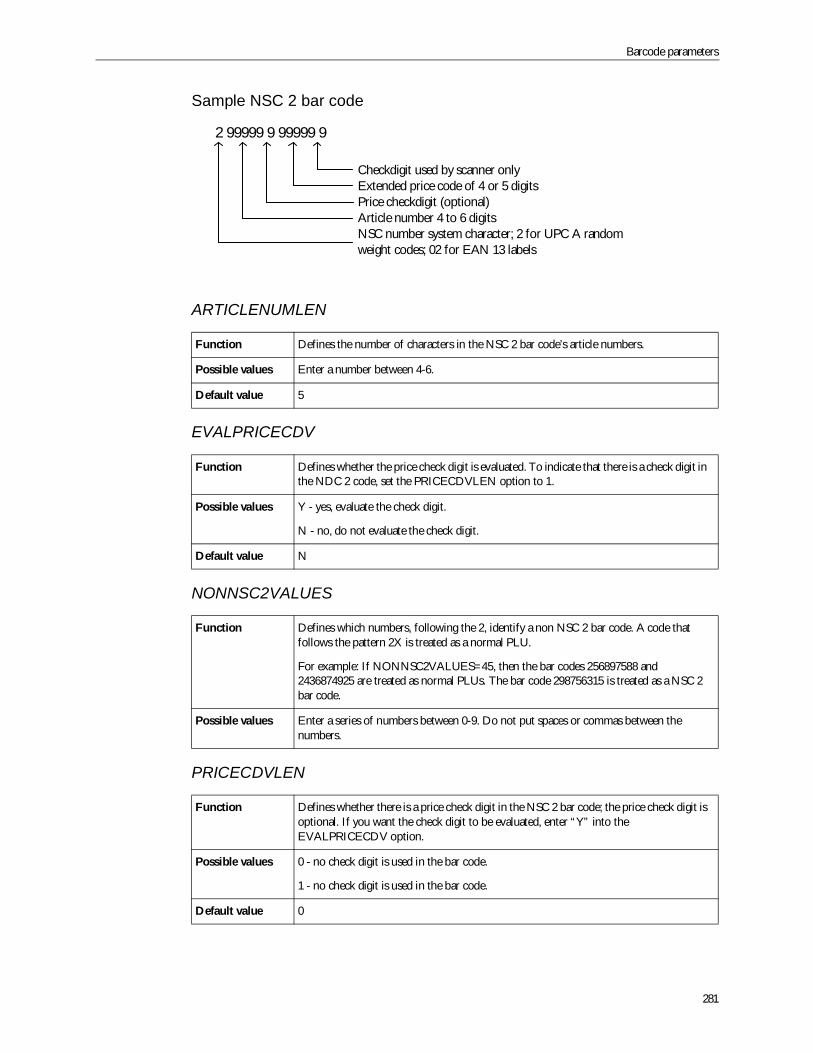
Barcode parameters
281
Sample NSC 2 bar code
ARTICLENUMLEN
EVALPRICECDV
NONNSC2VALUES
PRICECDVLEN
Function Defines the number of characters in the NSC 2 bar code’s article numbers.
Possible values Enter a number between 4-6.
Default value 5
Function Defines whether the price check digit is evaluated. To indicate that there is a check digit inthe NDC 2 code, set the PRICECDVLEN option to 1.
Possible values Y - yes, evaluate the check digit.
N - no, do not evaluate the check digit.
Default value N
Function Defines which numbers, following the 2, identify a non NSC 2 bar code. A code thatfollows the pattern 2X is treated as a normal PLU.
For example: If NONNSC2VALUES=45, then the bar codes 256897588 and2436874925 are treated as normal PLUs. The bar code 298756315 is treated as a NSC 2bar code.
Possible values Enter a series of numbers between 0-9. Do not put spaces or commas between thenumbers.
Function Defines whether there is a price check digit in the NSC 2 bar code; the price check digit isoptional. If you want the check digit to be evaluated, enter “Y” into theEVALPRICECDV option.
Possible values 0 - no check digit is used in the bar code.
1 - no check digit is used in the bar code.
Default value 0
2 99999 9 99999 9
Checkdigit used by scanner onlyExtended price code of 4 or 5 digitsPrice checkdigit (optional)Article number 4 to 6 digitsNSC number system character; 2 for UPC A randomweight codes; 02 for EAN 13 labels
About the POS.ini File
282
PRICELEN
SUPPORTEAN13
NSC2TLOGWEIGHT
Additional parameters for UPC NSC5 (coupon) bar codesThe options in this section define the minimum and maximum length of the NSC 5 coupon bar codes.NSC 5 coupons have bar codes that can be used to enter the NSC 5 coupons in a transaction. You haveto manually enter the amounts of other types of coupons.
NSC 5 coupon bar codes can be entered or scanned at the POS if you click the Enable UPC NSC 5check box in the Register Parameters Maintenance window in the Configurator.
Function Defines the number of characters in the NSC 2 bar code’s price.
Possible values Enter a number between 4-5.
Default value 5
Function Defines whether EAN13 bar codes can be entered at the POS.
Possible values Y - yes, allow EAN13 bar codes to be entered at the POS.
N - no, do not allow EAN13 bar codes to be entered at the POS.
Default value N
Function Records the weight of a random weight item as the item's quantity in the TLog. Forexample, if an item weighs 456 grams, the quantity is recorded as 456. If this option is setto "N", the item's quantity is always recorded as 1 in the TLog.
Possible values Y - a random weight's quantity is recorded as the item's weight in the TLog.
N - a random weight's quantity is recorded as 1 in the TLog.
Default value N
Barcode parameters
283
BARCODEMASK
BARCODEMASKLEN
MAXNSC5LEN
MINNSC5LEN
Parameters for translating bar codesThe option in this section allows the POS to read bar codes. You must set up all the bar codes youwant the POS to accept. There are no standard types set up for you.
Function Defines the NSC5 barcode format. Each of the four elements in the barcode are identifiedby a number, and you can arrange the elements in any order, by entering theircorresponding numbers in this option.
This option works in conjunction with the BARCODEMASKLEN option.
Possible values Format: number,number,number,number
Enter the following numbers, in any order:
1 - manufacturer ID
2 - product family
3 - coupon ID code
4 - check digit
Default value 1,2,3,4
Function Defines the length of each of the four elements in an NSC5 barcode. This option works inconjunction with the BARCODEMASK option. The format of this option must exactlymatch the format of the BARCODEMASK option. For example, if theBARCODEMASK option defines that the elements are in the following order: productfamily, coupon ID code, check digit, manufacturer ID then you must define the lengths inthe same order in this option.
Possible values Format: number,number,number,number
Enter four numbers each between 1-9, separated by a comma.
Default value 5,3,2,1
Function Defines the maximum number of characters in UPC NSC5 coupon bar codes.
Possible values Enter a number between 11-13.
Default value 13
Function Defines the minimum number of characters in a UPC NSC 5 coupon’s bar code.
Possible values Enter a number between 11-13.
Default value 11
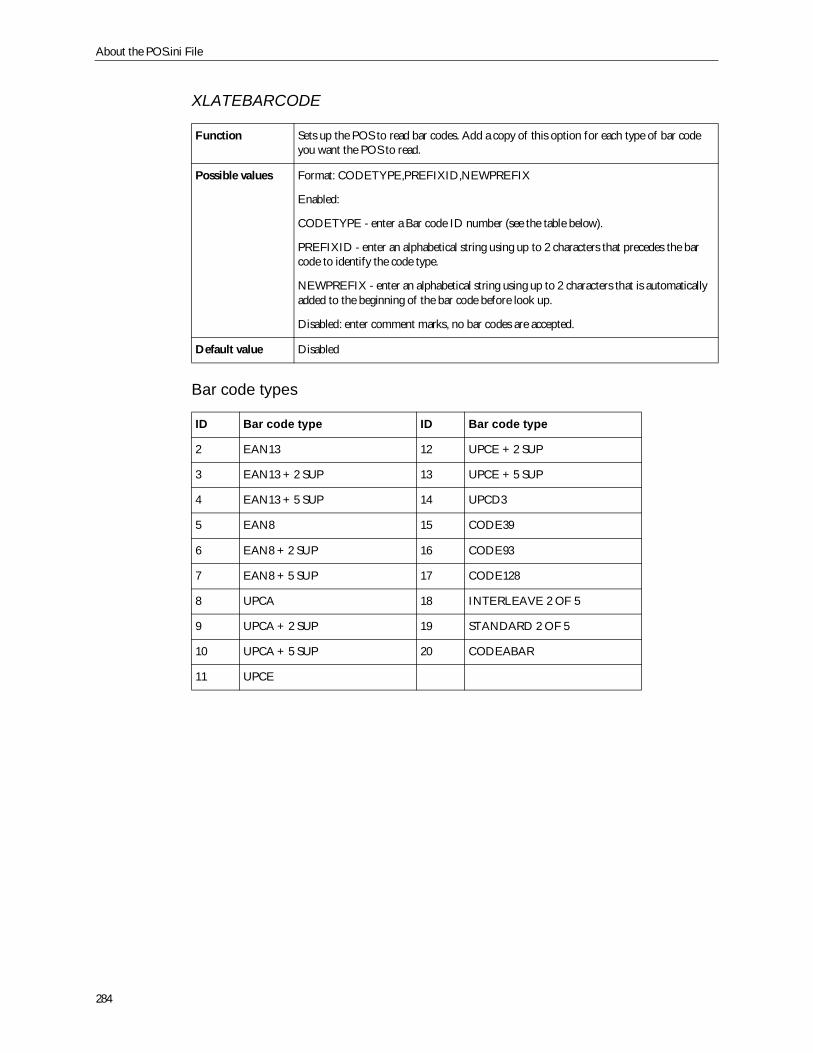
About the POS.ini File
284
XLATEBARCODE
Bar code types
Function Sets up the POS to read bar codes. Add a copy of this option for each type of bar codeyou want the POS to read.
Possible values Format: CODETYPE,PREFIXID,NEWPREFIX
Enabled:
CODETYPE - enter a Bar code ID number (see the table below).
PREFIXID - enter an alphabetical string using up to 2 characters that precedes the barcode to identify the code type.
NEWPREFIX - enter an alphabetical string using up to 2 characters that is automaticallyadded to the beginning of the bar code before look up.
Disabled: enter comment marks, no bar codes are accepted.
Default value Disabled
ID Bar code type ID Bar code type
2 EAN13 12 UPCE + 2 SUP
3 EAN13 + 2 SUP 13 UPCE + 5 SUP
4 EAN13 + 5 SUP 14 UPCD3
5 EAN8 15 CODE39
6 EAN8 + 2 SUP 16 CODE93
7 EAN8 + 5 SUP 17 CODE128
8 UPCA 18 INTERLEAVE 2 OF 5
9 UPCA + 2 SUP 19 STANDARD 2 OF 5
10 UPCA + 5 SUP 20 CODEABAR
11 UPCE
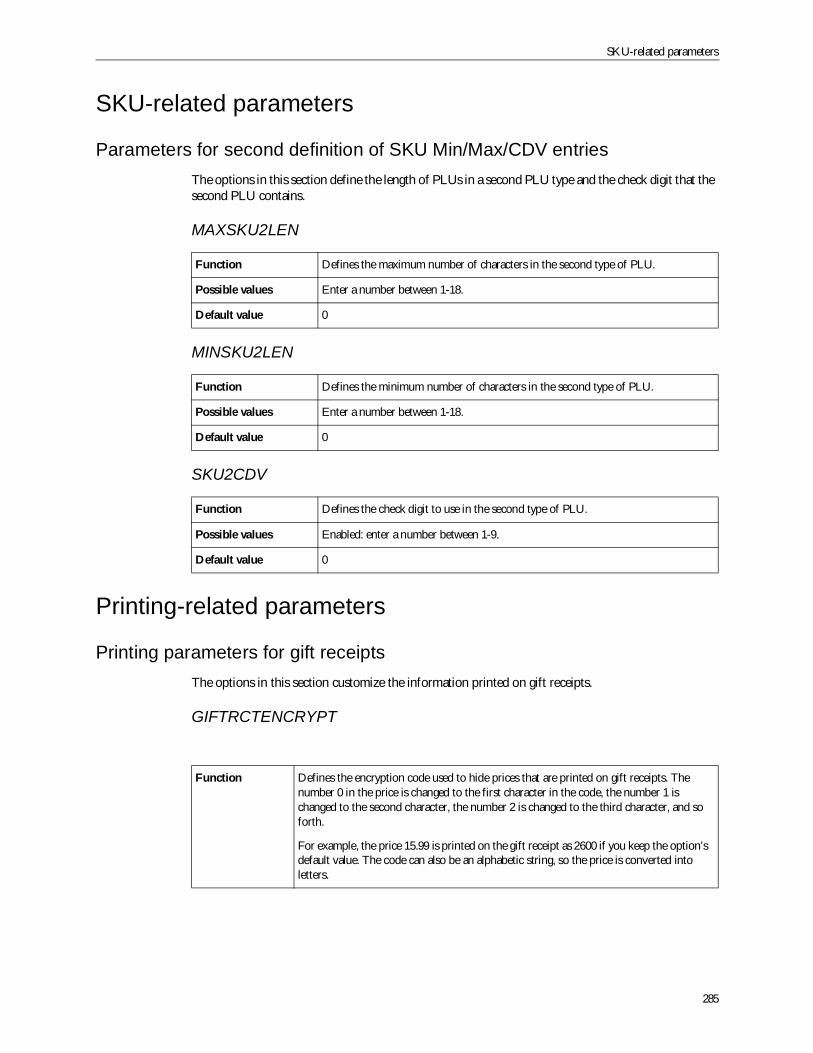
SKU-related parameters
285
SKU-related parameters
Parameters for second definition of SKU Min/Max/CDV entriesThe options in this section define the length of PLUs in a second PLU type and the check digit that thesecond PLU contains.
MAXSKU2LEN
MINSKU2LEN
SKU2CDV
Printing-related parameters
Printing parameters for gift receiptsThe options in this section customize the information printed on gift receipts.
GIFTRCTENCRYPT
Function Defines the maximum number of characters in the second type of PLU.
Possible values Enter a number between 1-18.
Default value 0
Function Defines the minimum number of characters in the second type of PLU.
Possible values Enter a number between 1-18.
Default value 0
Function Defines the check digit to use in the second type of PLU.
Possible values Enabled: enter a number between 1-9.
Default value 0
Function Defines the encryption code used to hide prices that are printed on gift receipts. Thenumber 0 in the price is changed to the first character in the code, the number 1 ischanged to the second character, the number 2 is changed to the third character, and soforth.
For example, the price 15.99 is printed on the gift receipt as 2600 if you keep the option’sdefault value. The code can also be an alphabetic string, so the price is converted intoletters.
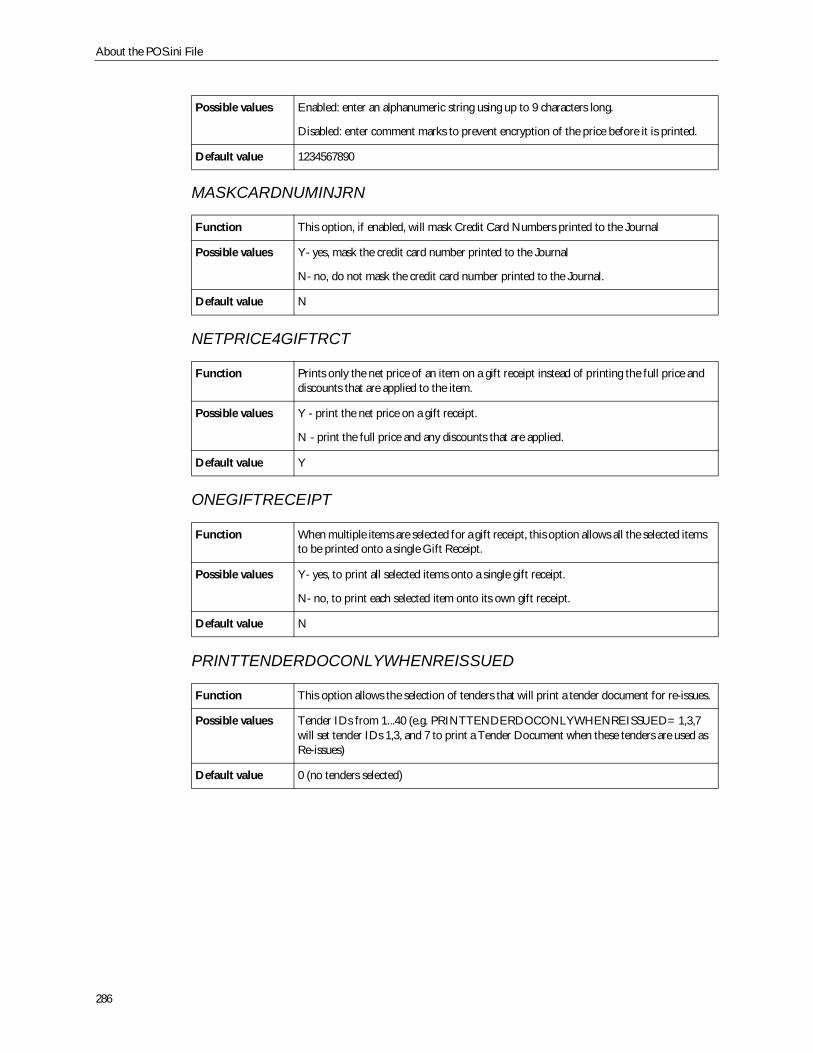
About the POS.ini File
286
MASKCARDNUMINJRN
NETPRICE4GIFTRCT
ONEGIFTRECEIPT
PRINTTENDERDOCONLYWHENREISSUED
Possible values Enabled: enter an alphanumeric string using up to 9 characters long.
Disabled: enter comment marks to prevent encryption of the price before it is printed.
Default value 1234567890
Function This option, if enabled, will mask Credit Card Numbers printed to the Journal
Possible values Y- yes, mask the credit card number printed to the Journal
N- no, do not mask the credit card number printed to the Journal.
Default value N
Function Prints only the net price of an item on a gift receipt instead of printing the full price anddiscounts that are applied to the item.
Possible values Y - print the net price on a gift receipt.
N - print the full price and any discounts that are applied.
Default value Y
Function When multiple items are selected for a gift receipt, this option allows all the selected itemsto be printed onto a single Gift Receipt.
Possible values Y- yes, to print all selected items onto a single gift receipt.
N- no, to print each selected item onto its own gift receipt.
Default value N
Function This option allows the selection of tenders that will print a tender document for re-issues.
Possible values Tender IDs from 1...40 (e.g. PRINTTENDERDOCONLYWHENREISSUED= 1,3,7will set tender IDs 1,3, and 7 to print a Tender Document when these tenders are used asRe-issues)
Default value 0 (no tenders selected)
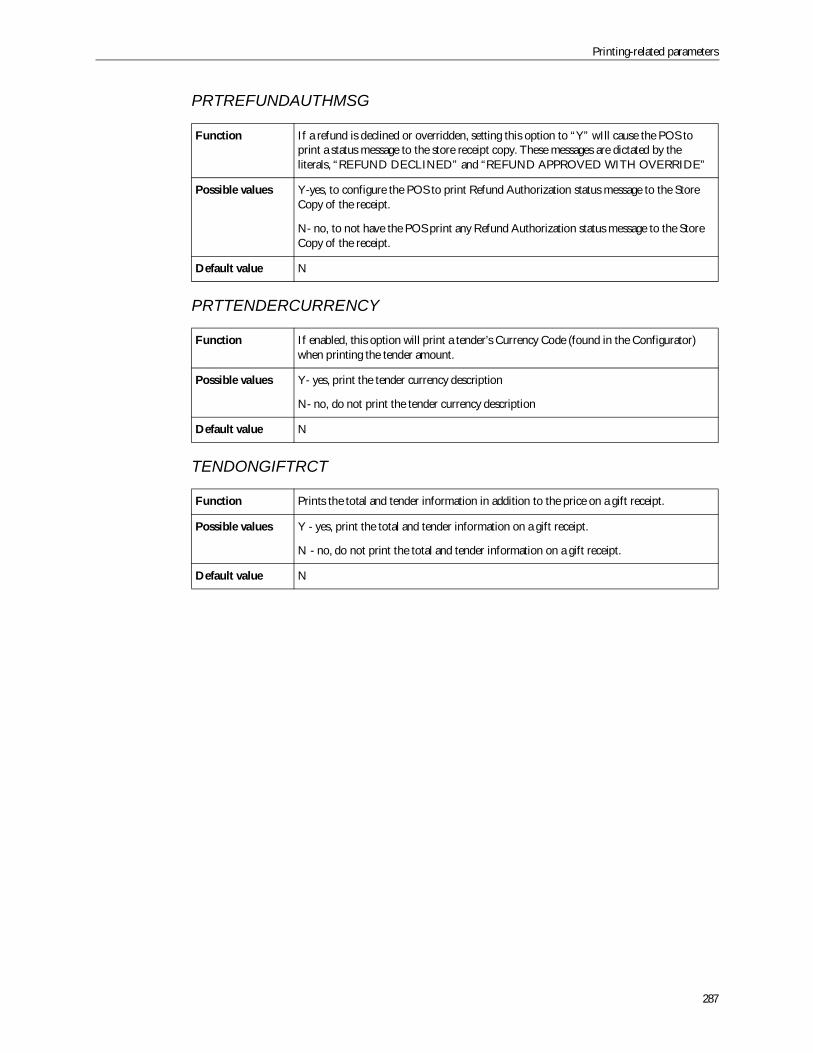
Printing-related parameters
287
PRTREFUNDAUTHMSG
PRTTENDERCURRENCY
TENDONGIFTRCT
Function If a refund is declined or overridden, setting this option to “Y” wIll cause the POS toprint a status message to the store receipt copy. These messages are dictated by theliterals, “REFUND DECLINED” and “REFUND APPROVED WITH OVERRIDE”
Possible values Y-yes, to configure the POS to print Refund Authorization status message to the StoreCopy of the receipt.
N- no, to not have the POS print any Refund Authorization status message to the StoreCopy of the receipt.
Default value N
Function If enabled, this option will print a tender’s Currency Code (found in the Configurator)when printing the tender amount.
Possible values Y- yes, print the tender currency description
N- no, do not print the tender currency description
Default value N
Function Prints the total and tender information in addition to the price on a gift receipt.
Possible values Y - yes, print the total and tender information on a gift receipt.
N - no, do not print the total and tender information on a gift receipt.
Default value N
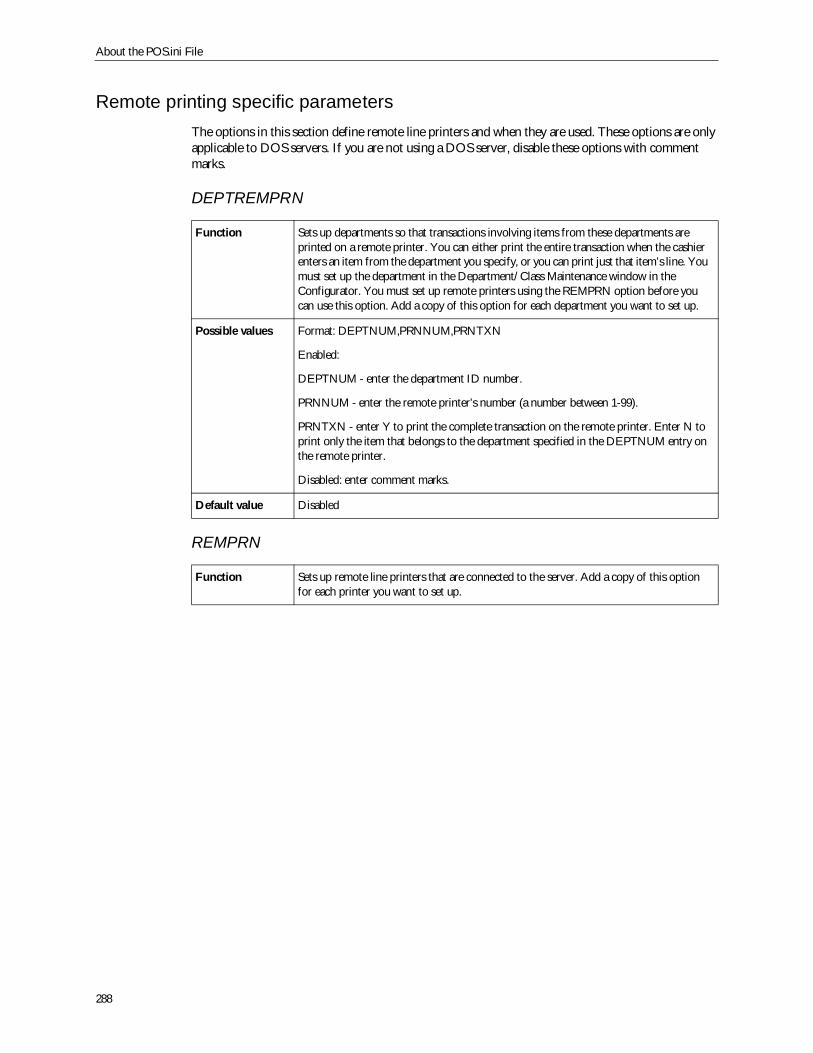
About the POS.ini File
288
Remote printing specific parametersThe options in this section define remote line printers and when they are used. These options are onlyapplicable to DOS servers. If you are not using a DOS server, disable these options with commentmarks.
DEPTREMPRN
REMPRN
Function Sets up departments so that transactions involving items from these departments areprinted on a remote printer. You can either print the entire transaction when the cashierenters an item from the department you specify, or you can print just that item’s line. Youmust set up the department in the Department/Class Maintenance window in theConfigurator. You must set up remote printers using the REMPRN option before youcan use this option. Add a copy of this option for each department you want to set up.
Possible values Format: DEPTNUM,PRNNUM,PRNTXN
Enabled:
DEPTNUM - enter the department ID number.
PRNNUM - enter the remote printer’s number (a number between 1-99).
PRNTXN - enter Y to print the complete transaction on the remote printer. Enter N toprint only the item that belongs to the department specified in the DEPTNUM entry onthe remote printer.
Disabled: enter comment marks.
Default value Disabled
Function Sets up remote line printers that are connected to the server. Add a copy of this optionfor each printer you want to set up.
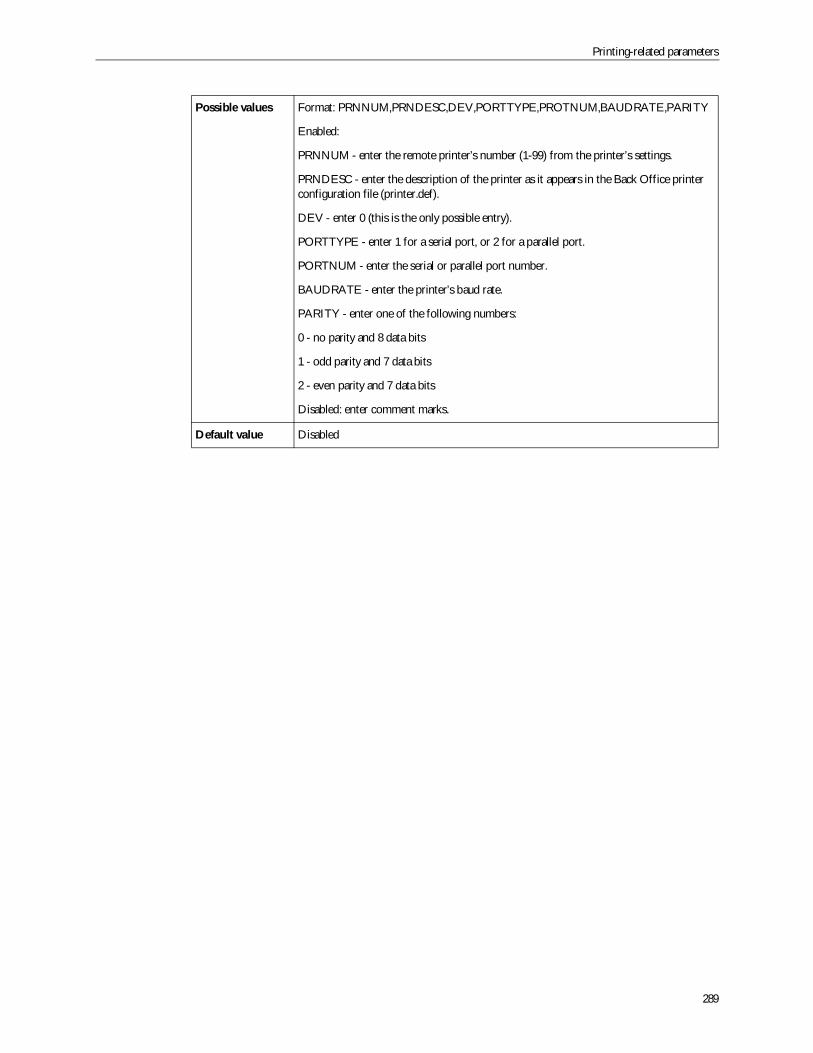
Printing-related parameters
289
Possible values Format: PRNNUM,PRNDESC,DEV,PORTTYPE,PROTNUM,BAUDRATE,PARITY
Enabled:
PRNNUM - enter the remote printer’s number (1-99) from the printer’s settings.
PRNDESC - enter the description of the printer as it appears in the Back Office printerconfiguration file (printer.def).
DEV - enter 0 (this is the only possible entry).
PORTTYPE - enter 1 for a serial port, or 2 for a parallel port.
PORTNUM - enter the serial or parallel port number.
BAUDRATE - enter the printer’s baud rate.
PARITY - enter one of the following numbers:
0 - no parity and 8 data bits
1 - odd parity and 7 data bits
2 - even parity and 7 data bits
Disabled: enter comment marks.
Default value Disabled

About the POS.ini File
290
Printing parametersYou can configure the POS to print a document such as an invoice or an order pick-up summary on aremote, network or laser printer using 8 1/2 x 11 paper. Once defined, this function can be launched atthe POS through Manager Code 429. To configure the POS to handle remote printing, you will need todo the following:
In the POS.ini configure the THRESHOLDPROFILE parameter according to specificationsprovided below.
Using one of the defined layout files (layout1 or layout2), create a layout file to specify theinformation to be printed and how it should be printed.
In the Configurator, configure an auto-reference definition to produce a 10-digit referencenumber for each printed document.
THRESHOLDPROFILE
This parameter supports the transportation permit printing function but is also used to configure anytype of POS-triggered document printing such as an invoice on a network or remote printer. Toactivate the remote printing function, the THRESHOLDPROFILE parameter must be defined in thePOS.ini as follows. A description of each field is provided in the table below.
THRESHOLDPROFILE= 11,2,1,3000.45,1,0,0,190
You can also define more than one instance of the THRESHOLDPROFILE for varying scenarios. Inthe following example, the parameter shows a different value for field 2, which defines the Inclusion/Exclusion definition. Remote printing is therefore defined for two distinct Inclusion/Exclusionscenarios.
THRESHOLDPROFILE= 11,2,1,1000.34,0,2,1,598,599THRESHOLDPROFILE= 11,3,1,1000.34,0,2,1,598,599
The following table provides a definition of each field in the THRESHOLDPROFILE parameter.
Field Field description andfunction
Possible values
field 1 Profile ID 0 - No Profile ID1 - Profile ID value
field 2 Inclusion/Exclusion rules ID 0 - No Inclusion/Exclusion rule1 - Value assigned to ruledefinition
field 3 Accumulation Mode 1 - Calculate total size2 - Calculate total items3 - Calculate total Sale value
field 4 Threshold Amount 0 - No Threshold Amount1 - Value of Threshold Amount
field 5 Profile prompt printing location 0 - Do not print1 - Print on POS receipt printer2 - Print on remote networkprinter
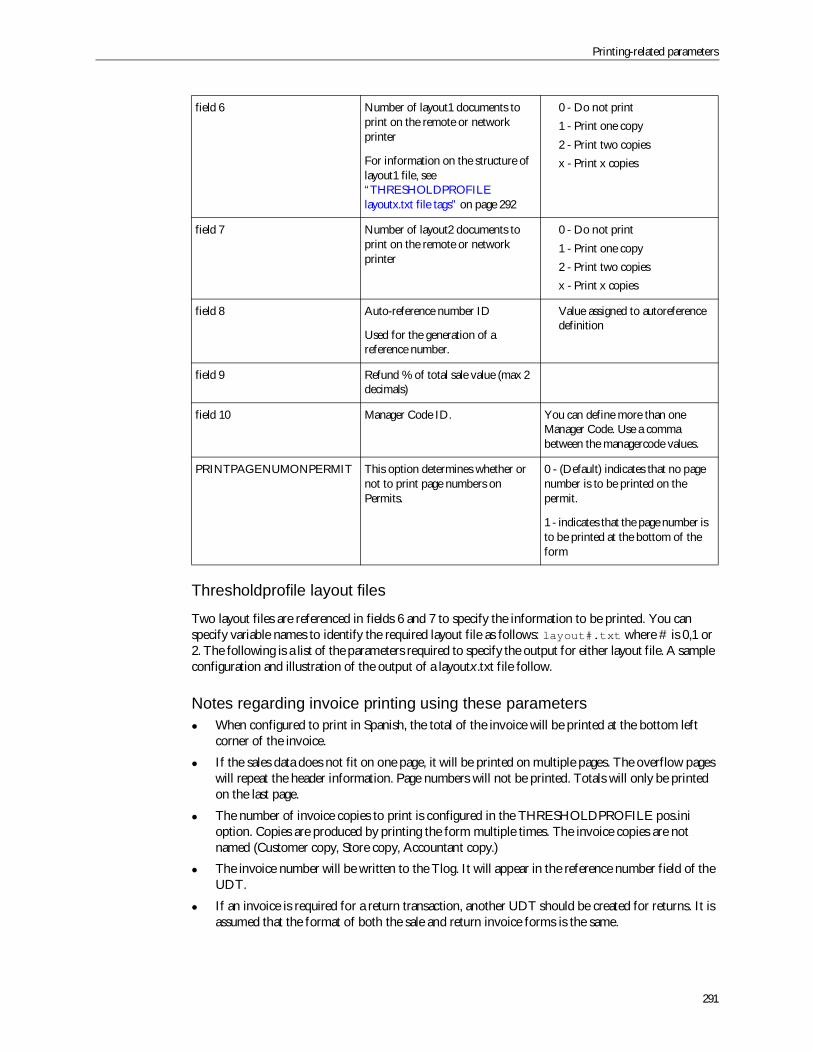
Printing-related parameters
291
Thresholdprofile layout files
Two layout files are referenced in fields 6 and 7 to specify the information to be printed. You canspecify variable names to identify the required layout file as follows: layout#.txt where # is 0,1 or2. The following is a list of the parameters required to specify the output for either layout file. A sampleconfiguration and illustration of the output of a layoutx.txt file follow.
Notes regarding invoice printing using these parametersWhen configured to print in Spanish, the total of the invoice will be printed at the bottom leftcorner of the invoice.
If the sales data does not fit on one page, it will be printed on multiple pages. The overflow pageswill repeat the header information. Page numbers will not be printed. Totals will only be printedon the last page.
The number of invoice copies to print is configured in the THRESHOLDPROFILE pos.inioption. Copies are produced by printing the form multiple times. The invoice copies are notnamed (Customer copy, Store copy, Accountant copy.)
The invoice number will be written to the Tlog. It will appear in the reference number field of theUDT.
If an invoice is required for a return transaction, another UDT should be created for returns. It isassumed that the format of both the sale and return invoice forms is the same.
field 6 Number of layout1 documents toprint on the remote or networkprinter
For information on the structure oflayout1 file, see“THRESHOLDPROFILElayoutx.txt file tags” on page 292
0 - Do not print1 - Print one copy2 - Print two copiesx - Print x copies
field 7 Number of layout2 documents toprint on the remote or networkprinter
0 - Do not print1 - Print one copy2 - Print two copiesx - Print x copies
field 8 Auto-reference number ID
Used for the generation of areference number.
Value assigned to autoreferencedefinition
field 9 Refund % of total sale value (max 2decimals)
field 10 Manager Code ID. You can define more than oneManager Code. Use a commabetween the managercode values.
PRINTPAGENUMONPERMIT This option determines whether ornot to print page numbers onPermits.
0 - (Default) indicates that no pagenumber is to be printed on thepermit.
1 - indicates that the page number isto be printed at the bottom of theform
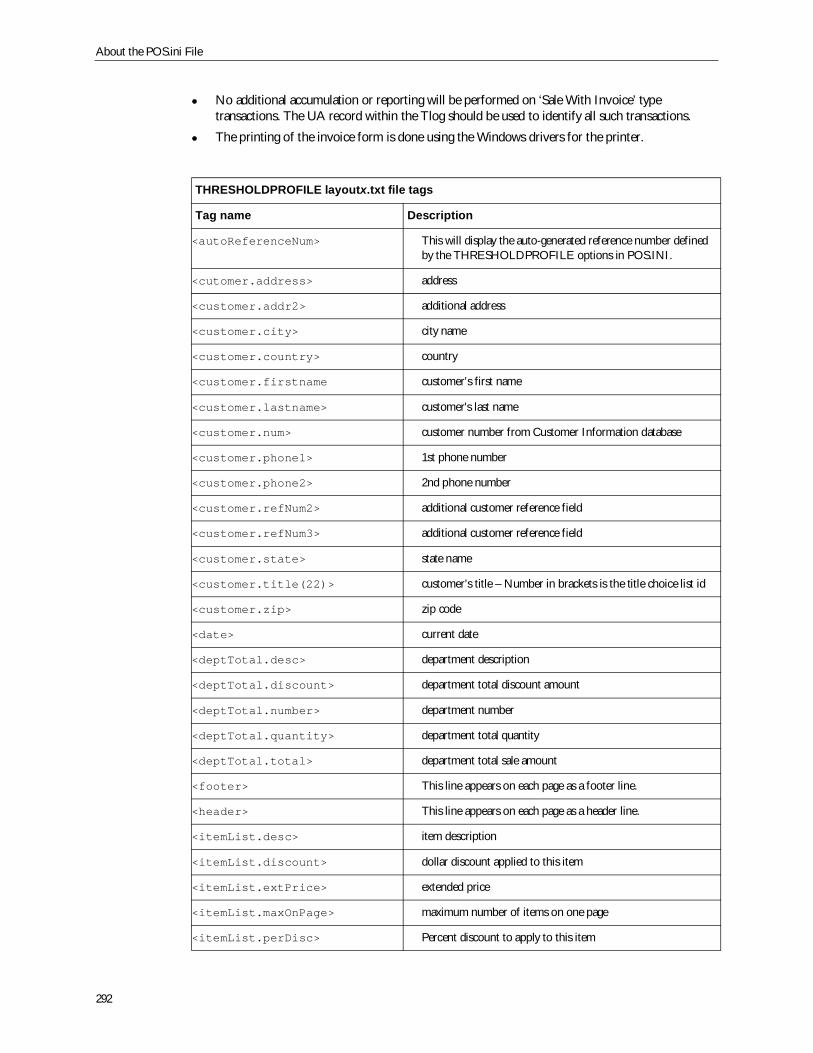
About the POS.ini File
292
No additional accumulation or reporting will be performed on ‘Sale With Invoice’ typetransactions. The UA record within the Tlog should be used to identify all such transactions.
The printing of the invoice form is done using the Windows drivers for the printer.
THRESHOLDPROFILE layoutx.txt file tags
Tag name Description
<autoReferenceNum> This will display the auto-generated reference number definedby the THRESHOLDPROFILE options in POS.INI.
<cutomer.address> address
<customer.addr2> additional address
<customer.city> city name
<customer.country> country
<customer.firstname customer’s first name
<customer.lastname> customer's last name
<customer.num> customer number from Customer Information database
<customer.phone1> 1st phone number
<customer.phone2> 2nd phone number
<customer.refNum2> additional customer reference field
<customer.refNum3> additional customer reference field
<customer.state> state name
<customer.title(22)> customer’s title – Number in brackets is the title choice list id
<customer.zip> zip code
<date> current date
<deptTotal.desc> department description
<deptTotal.discount> department total discount amount
<deptTotal.number> department number
<deptTotal.quantity> department total quantity
<deptTotal.total> department total sale amount
<footer> This line appears on each page as a footer line.
<header> This line appears on each page as a header line.
<itemList.desc> item description
<itemList.discount> dollar discount applied to this item
<itemList.extPrice> extended price
<itemList.maxOnPage> maximum number of items on one page
<itemList.perDisc> Percent discount to apply to this item

Printing-related parameters
293
<itemList.quantity> count of same item
<itemList.sku> SKU number
<itemList.unitPrice> unit price for item
<itemList.unitSize> volume size of one item
<itemList.sizeType> unit measurement
<linePosition=##> fixed line that the data must appear on
<profilePrompt.response[x]> data captured in profile prompt. X is prompt line number
<refundAmount> total amount to refundThis is the value of <totalSale> times the refund percentdefined by the THRESHOLDPROFILE options in POS.INI
<tab=n> Space holder for variables defined after this tag.Used for formatting and alignment. N is a numeric value thatspecifies how many characters the next variable value shoulddisplay. It will append spaces if the number of characters of thevariable value is less than n, or will truncate to n characters if itis greater than n. You can redefine the tab value, n, as manytimes as you want.
<store.account> account number of store
<store.address> address of store
<store.contact> contact of store
<store.city> city of store
<store.district> district of store
<store.email> email of store
<store.fax> fax number of store
<store.name> name of store
<store.phone> phone number of store
<store.stateprov> state/province of store
<store.web> website of store
<store.zippostal> zip/postal code of store
<time> current time
<totalCount> total item count
<totalSale> total sale (price) value
<txn.date> date of transaction record
<txn.day> Transaction day
<txn.discount> Total transaction discount
<txn.month> Transaction month. Maximum three characters.
<txn.pendingNum> pending number used as order number

About the POS.ini File
294
<txn.storeNum> store number from transaction record
<txn.subtotal> Transaction total before taxes
<txn.year> Transaction year
<vatAmount> total amount of vat taxes
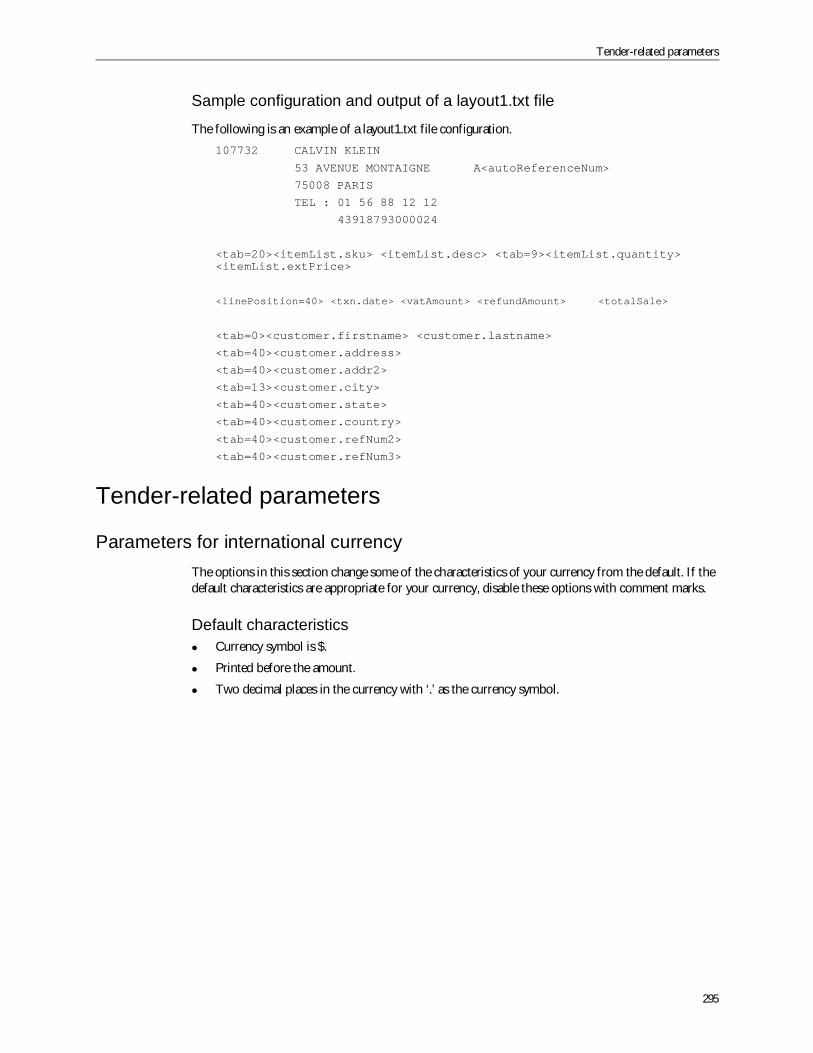
Tender-related parameters
295
Sample configuration and output of a layout1.txt file
The following is an example of a layout1.txt file configuration.107732 CALVIN KLEIN
53 AVENUE MONTAIGNE A<autoReferenceNum>
75008 PARIS
TEL : 01 56 88 12 12
43918793000024
<tab=20><itemList.sku> <itemList.desc> <tab=9><itemList.quantity><itemList.extPrice>
<linePosition=40> <txn.date> <vatAmount> <refundAmount> <totalSale>
<tab=0><customer.firstname> <customer.lastname>
<tab=40><customer.address>
<tab=40><customer.addr2>
<tab=13><customer.city>
<tab=40><customer.state>
<tab=40><customer.country>
<tab=40><customer.refNum2>
<tab=40><customer.refNum3>
Tender-related parameters
Parameters for international currencyThe options in this section change some of the characteristics of your currency from the default. If thedefault characteristics are appropriate for your currency, disable these options with comment marks.
Default characteristicsCurrency symbol is $.
Printed before the amount.
Two decimal places in the currency with ‘.’ as the currency symbol.
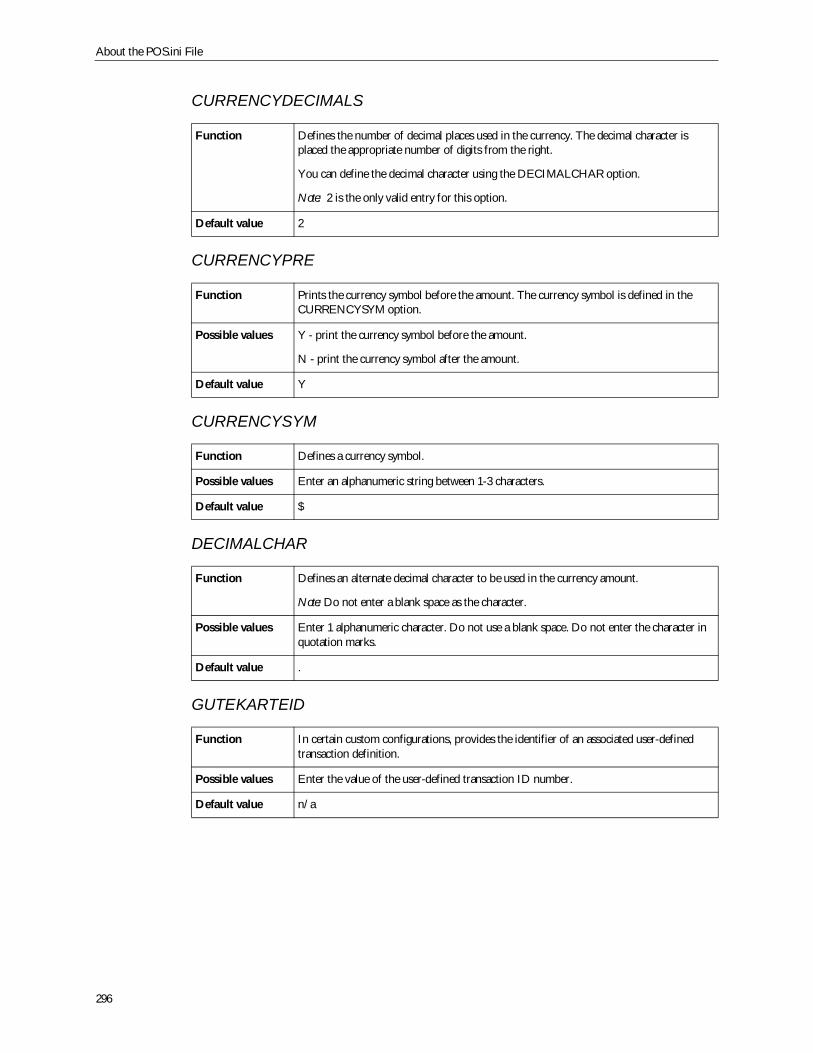
About the POS.ini File
296
CURRENCYDECIMALS
CURRENCYPRE
CURRENCYSYM
DECIMALCHAR
GUTEKARTEID
Function Defines the number of decimal places used in the currency. The decimal character isplaced the appropriate number of digits from the right.
You can define the decimal character using the DECIMALCHAR option.
Note: 2 is the only valid entry for this option.
Default value 2
Function Prints the currency symbol before the amount. The currency symbol is defined in theCURRENCYSYM option.
Possible values Y - print the currency symbol before the amount.
N - print the currency symbol after the amount.
Default value Y
Function Defines a currency symbol.
Possible values Enter an alphanumeric string between 1-3 characters.
Default value $
Function Defines an alternate decimal character to be used in the currency amount.
Note: Do not enter a blank space as the character.
Possible values Enter 1 alphanumeric character. Do not use a blank space. Do not enter the character inquotation marks.
Default value .
Function In certain custom configurations, provides the identifier of an associated user-definedtransaction definition.
Possible values Enter the value of the user-defined transaction ID number.
Default value n/a

Tender-related parameters
297
PROMPTFORINVOICEINSERT
PROMPTID
Function If there are any documents (layaway sale reprint, permits etc.) that are to be sent to thenetwork printer, this option if set to “Y” will prompt the user to “INSERT FORM ININVOICE PRINTER” before the printing occurs.
Possible values Y- yes, to prompt the user before printing to the network printer
N- no, to not prompt the user before printing to the network printer.
Default value N
Function In certain custom configurations, provides the identifier of an associated profile promptdefinition.
Possible values Enter the value of the profile prompt ID number.
Default value n/a
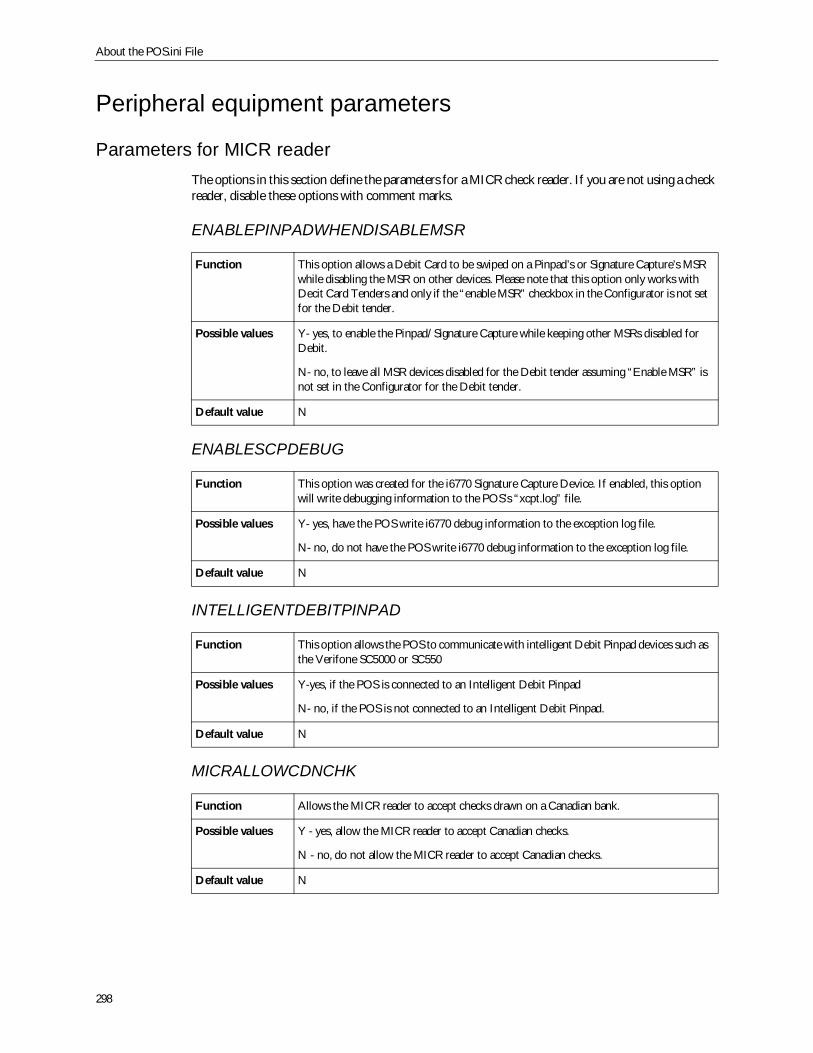
About the POS.ini File
298
Peripheral equipment parameters
Parameters for MICR readerThe options in this section define the parameters for a MICR check reader. If you are not using a checkreader, disable these options with comment marks.
ENABLEPINPADWHENDISABLEMSR
ENABLESCPDEBUG
INTELLIGENTDEBITPINPAD
MICRALLOWCDNCHK
Function This option allows a Debit Card to be swiped on a Pinpad’s or Signature Capture’s MSRwhile disabling the MSR on other devices. Please note that this option only works withDecit Card Tenders and only if the “enable MSR” checkbox in the Configurator is not setfor the Debit tender.
Possible values Y- yes, to enable the Pinpad/Signature Capture while keeping other MSRs disabled forDebit.
N- no, to leave all MSR devices disabled for the Debit tender assuming “Enable MSR” isnot set in the Configurator for the Debit tender.
Default value N
Function This option was created for the i6770 Signature Capture Device. If enabled, this optionwill write debugging information to the POS’s “xcpt.log” file.
Possible values Y- yes, have the POS write i6770 debug information to the exception log file.
N- no, do not have the POS write i6770 debug information to the exception log file.
Default value N
Function This option allows the POS to communicate with intelligent Debit Pinpad devices such asthe Verifone SC5000 or SC550
Possible values Y-yes, if the POS is connected to an Intelligent Debit Pinpad
N- no, if the POS is not connected to an Intelligent Debit Pinpad.
Default value N
Function Allows the MICR reader to accept checks drawn on a Canadian bank.
Possible values Y - yes, allow the MICR reader to accept Canadian checks.
N - no, do not allow the MICR reader to accept Canadian checks.
Default value N
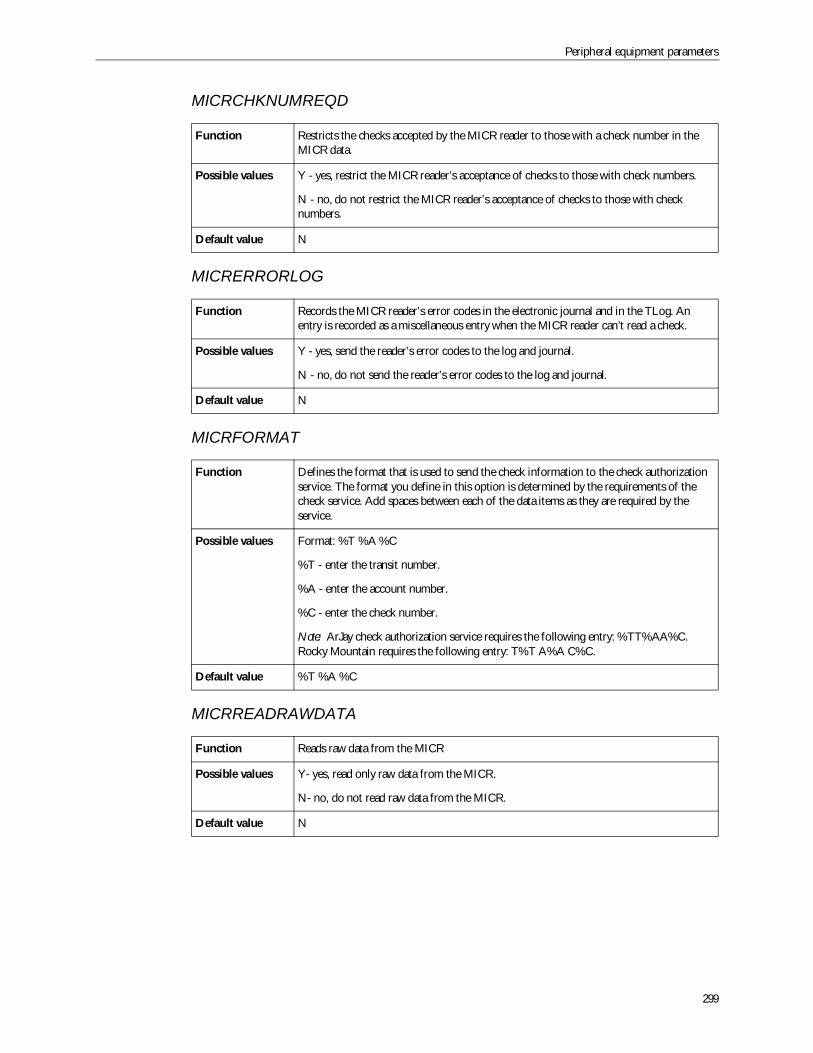
Peripheral equipment parameters
299
MICRCHKNUMREQD
MICRERRORLOG
MICRFORMAT
MICRREADRAWDATA
Function Restricts the checks accepted by the MICR reader to those with a check number in theMICR data.
Possible values Y - yes, restrict the MICR reader’s acceptance of checks to those with check numbers.
N - no, do not restrict the MICR reader’s acceptance of checks to those with checknumbers.
Default value N
Function Records the MICR reader’s error codes in the electronic journal and in the TLog. Anentry is recorded as a miscellaneous entry when the MICR reader can’t read a check.
Possible values Y - yes, send the reader’s error codes to the log and journal.
N - no, do not send the reader’s error codes to the log and journal.
Default value N
Function Defines the format that is used to send the check information to the check authorizationservice. The format you define in this option is determined by the requirements of thecheck service. Add spaces between each of the data items as they are required by theservice.
Possible values Format: %T %A %C
%T - enter the transit number.
%A - enter the account number.
%C - enter the check number.
Note: ArJay check authorization service requires the following entry: %TT%AA%C.Rocky Mountain requires the following entry: T%T A%A C%C.
Default value %T %A %C
Function Reads raw data from the MICR
Possible values Y- yes, read only raw data from the MICR.
N- no, do not read raw data from the MICR.
Default value N
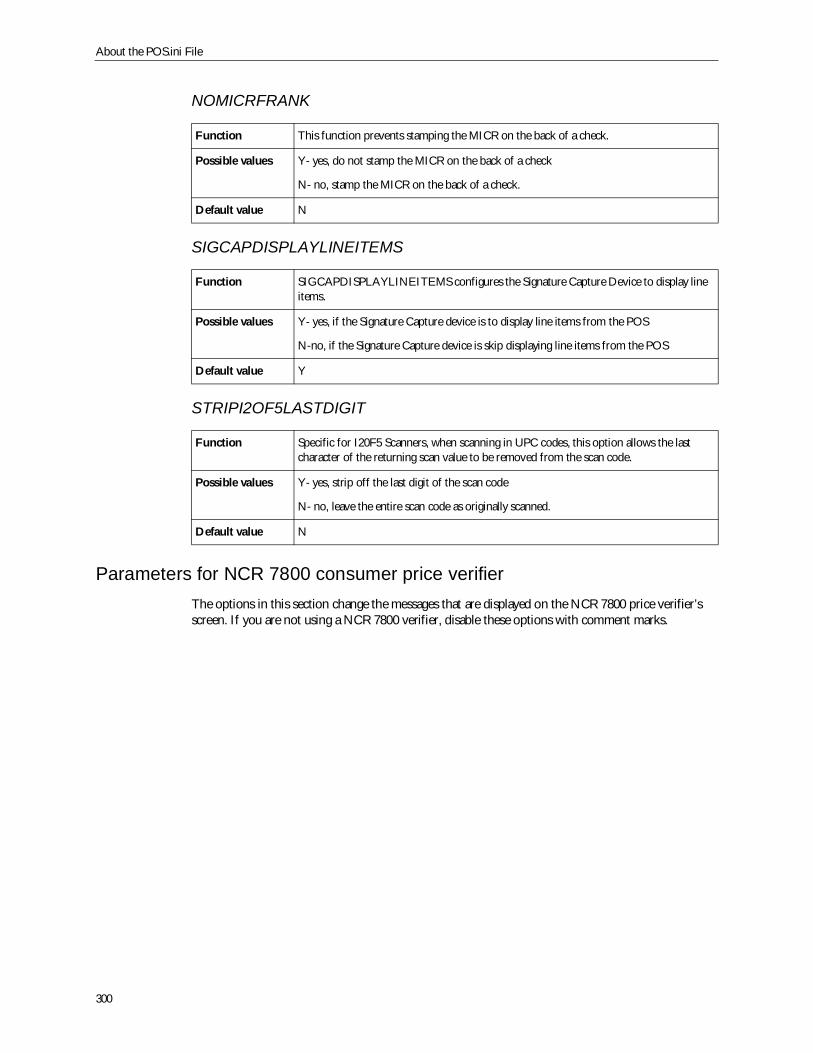
About the POS.ini File
300
NOMICRFRANK
SIGCAPDISPLAYLINEITEMS
STRIPI2OF5LASTDIGIT
Parameters for NCR 7800 consumer price verifierThe options in this section change the messages that are displayed on the NCR 7800 price verifier’sscreen. If you are not using a NCR 7800 verifier, disable these options with comment marks.
Function This function prevents stamping the MICR on the back of a check.
Possible values Y- yes, do not stamp the MICR on the back of a check
N- no, stamp the MICR on the back of a check.
Default value N
Function SIGCAPDISPLAYLINEITEMS configures the Signature Capture Device to display lineitems.
Possible values Y- yes, if the Signature Capture device is to display line items from the POS
N-no, if the Signature Capture device is skip displaying line items from the POS
Default value Y
Function Specific for I20F5 Scanners, when scanning in UPC codes, this option allows the lastcharacter of the returning scan value to be removed from the scan code.
Possible values Y- yes, strip off the last digit of the scan code
N- no, leave the entire scan code as originally scanned.
Default value N
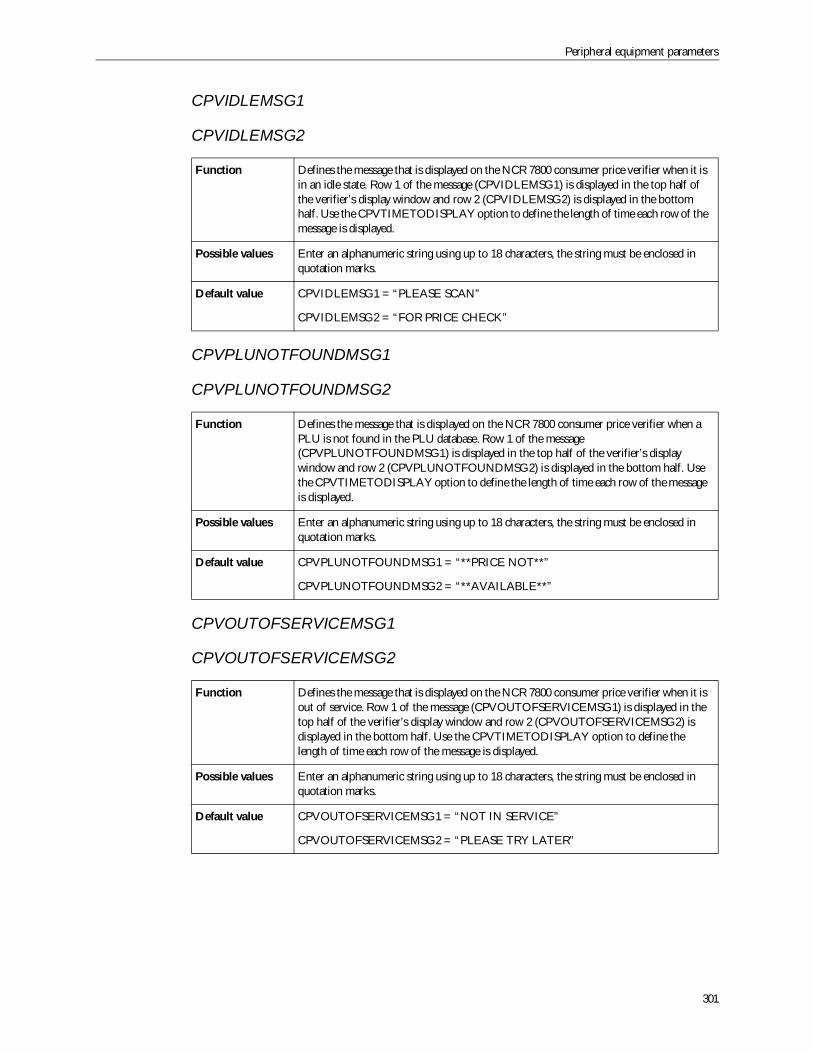
Peripheral equipment parameters
301
CPVIDLEMSG1
CPVIDLEMSG2
CPVPLUNOTFOUNDMSG1
CPVPLUNOTFOUNDMSG2
CPVOUTOFSERVICEMSG1
CPVOUTOFSERVICEMSG2
Function Defines the message that is displayed on the NCR 7800 consumer price verifier when it isin an idle state. Row 1 of the message (CPVIDLEMSG1) is displayed in the top half ofthe verifier’s display window and row 2 (CPVIDLEMSG2) is displayed in the bottomhalf. Use the CPVTIMETODISPLAY option to define the length of time each row of themessage is displayed.
Possible values Enter an alphanumeric string using up to 18 characters, the string must be enclosed inquotation marks.
Default value CPVIDLEMSG1 = “PLEASE SCAN”
CPVIDLEMSG2 = “FOR PRICE CHECK”
Function Defines the message that is displayed on the NCR 7800 consumer price verifier when aPLU is not found in the PLU database. Row 1 of the message(CPVPLUNOTFOUNDMSG1) is displayed in the top half of the verifier’s displaywindow and row 2 (CPVPLUNOTFOUNDMSG2) is displayed in the bottom half. Usethe CPVTIMETODISPLAY option to define the length of time each row of the messageis displayed.
Possible values Enter an alphanumeric string using up to 18 characters, the string must be enclosed inquotation marks.
Default value CPVPLUNOTFOUNDMSG1 = “**PRICE NOT**”
CPVPLUNOTFOUNDMSG2 = “**AVAILABLE**”
Function Defines the message that is displayed on the NCR 7800 consumer price verifier when it isout of service. Row 1 of the message (CPVOUTOFSERVICEMSG1) is displayed in thetop half of the verifier’s display window and row 2 (CPVOUTOFSERVICEMSG2) isdisplayed in the bottom half. Use the CPVTIMETODISPLAY option to define thelength of time each row of the message is displayed.
Possible values Enter an alphanumeric string using up to 18 characters, the string must be enclosed inquotation marks.
Default value CPVOUTOFSERVICEMSG1 = “NOT IN SERVICE”
CPVOUTOFSERVICEMSG2 = “PLEASE TRY LATER”
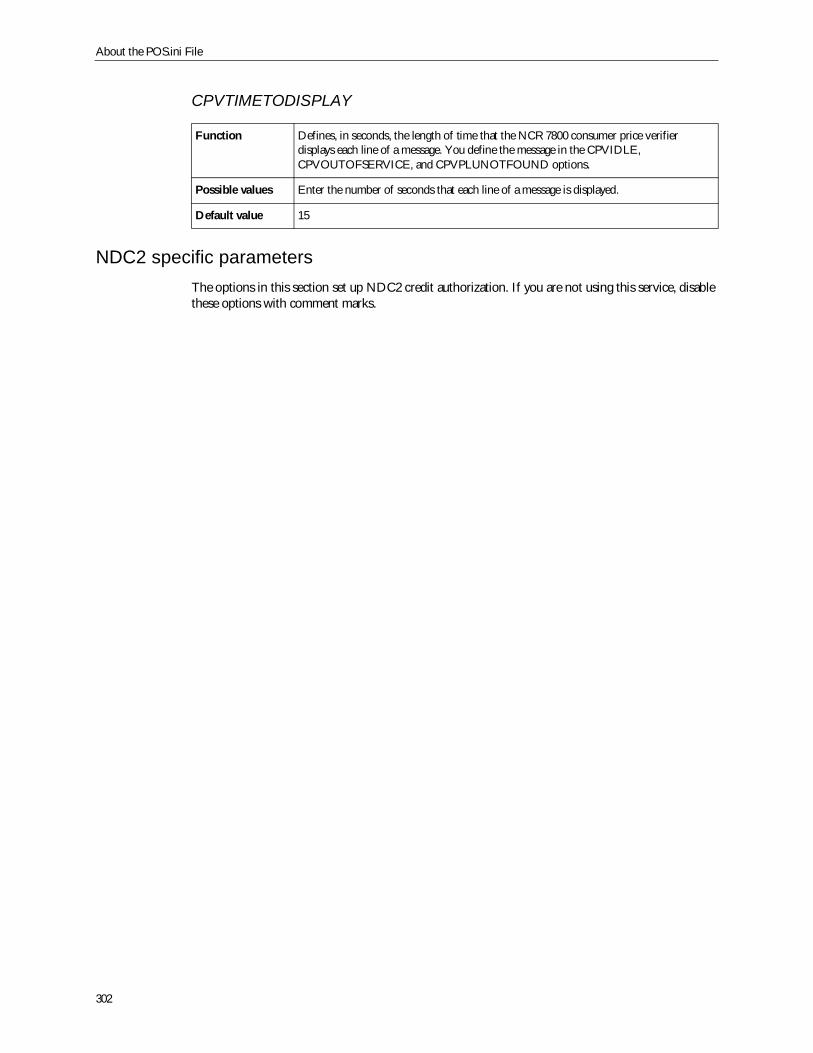
About the POS.ini File
302
CPVTIMETODISPLAY
NDC2 specific parametersThe options in this section set up NDC2 credit authorization. If you are not using this service, disablethese options with comment marks.
Function Defines, in seconds, the length of time that the NCR 7800 consumer price verifierdisplays each line of a message. You define the message in the CPVIDLE,CPVOUTOFSERVICE, and CPVPLUNOTFOUND options.
Possible values Enter the number of seconds that each line of a message is displayed.
Default value 15
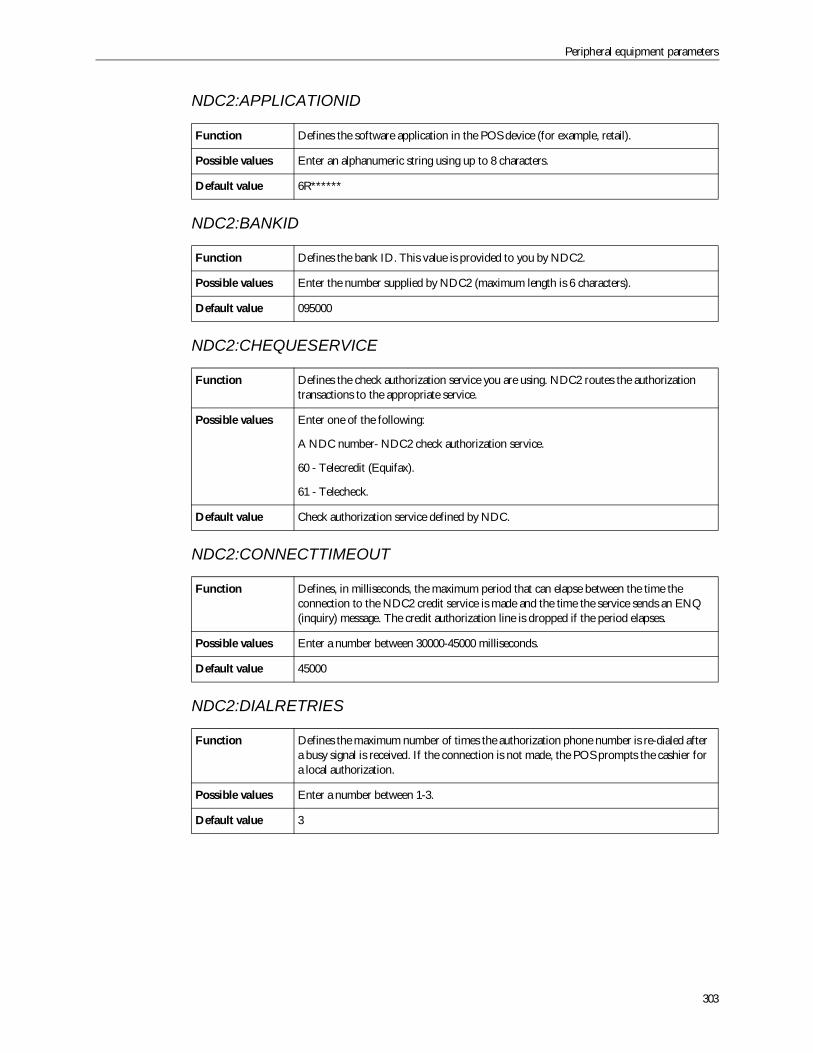
Peripheral equipment parameters
303
NDC2:APPLICATIONID
NDC2:BANKID
NDC2:CHEQUESERVICE
NDC2:CONNECTTIMEOUT
NDC2:DIALRETRIES
Function Defines the software application in the POS device (for example, retail).
Possible values Enter an alphanumeric string using up to 8 characters.
Default value 6R******
Function Defines the bank ID. This value is provided to you by NDC2.
Possible values Enter the number supplied by NDC2 (maximum length is 6 characters).
Default value 095000
Function Defines the check authorization service you are using. NDC2 routes the authorizationtransactions to the appropriate service.
Possible values Enter one of the following:
A NDC number- NDC2 check authorization service.
60 - Telecredit (Equifax).
61 - Telecheck.
Default value Check authorization service defined by NDC.
Function Defines, in milliseconds, the maximum period that can elapse between the time theconnection to the NDC2 credit service is made and the time the service sends an ENQ(inquiry) message. The credit authorization line is dropped if the period elapses.
Possible values Enter a number between 30000-45000 milliseconds.
Default value 45000
Function Defines the maximum number of times the authorization phone number is re-dialed aftera busy signal is received. If the connection is not made, the POS prompts the cashier fora local authorization.
Possible values Enter a number between 1-3.
Default value 3
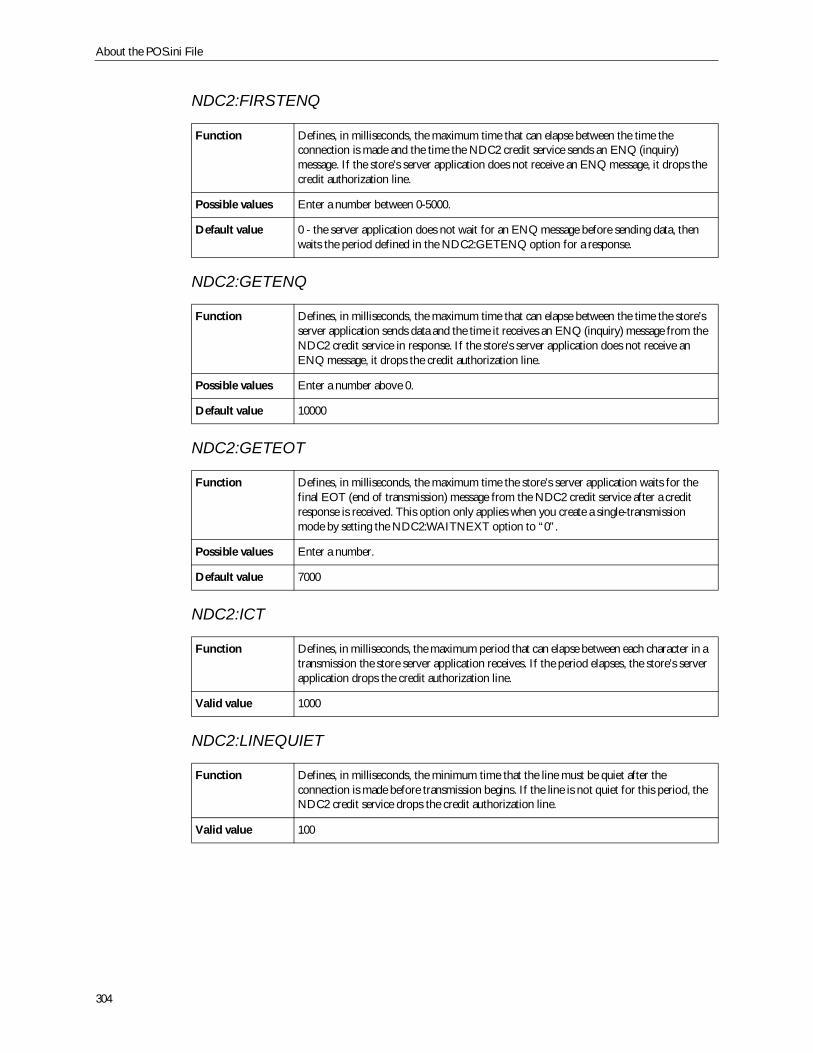
About the POS.ini File
304
NDC2:FIRSTENQ
NDC2:GETENQ
NDC2:GETEOT
NDC2:ICT
NDC2:LINEQUIET
Function Defines, in milliseconds, the maximum time that can elapse between the time theconnection is made and the time the NDC2 credit service sends an ENQ (inquiry)message. If the store’s server application does not receive an ENQ message, it drops thecredit authorization line.
Possible values Enter a number between 0-5000.
Default value 0 - the server application does not wait for an ENQ message before sending data, thenwaits the period defined in the NDC2:GETENQ option for a response.
Function Defines, in milliseconds, the maximum time that can elapse between the time the store’sserver application sends data and the time it receives an ENQ (inquiry) message from theNDC2 credit service in response. If the store’s server application does not receive anENQ message, it drops the credit authorization line.
Possible values Enter a number above 0.
Default value 10000
Function Defines, in milliseconds, the maximum time the store’s server application waits for thefinal EOT (end of transmission) message from the NDC2 credit service after a creditresponse is received. This option only applies when you create a single-transmissionmode by setting the NDC2:WAITNEXT option to “0”.
Possible values Enter a number.
Default value 7000
Function Defines, in milliseconds, the maximum period that can elapse between each character in atransmission the store server application receives. If the period elapses, the store’s serverapplication drops the credit authorization line.
Valid value 1000
Function Defines, in milliseconds, the minimum time that the line must be quiet after theconnection is made before transmission begins. If the line is not quiet for this period, theNDC2 credit service drops the credit authorization line.
Valid value 100
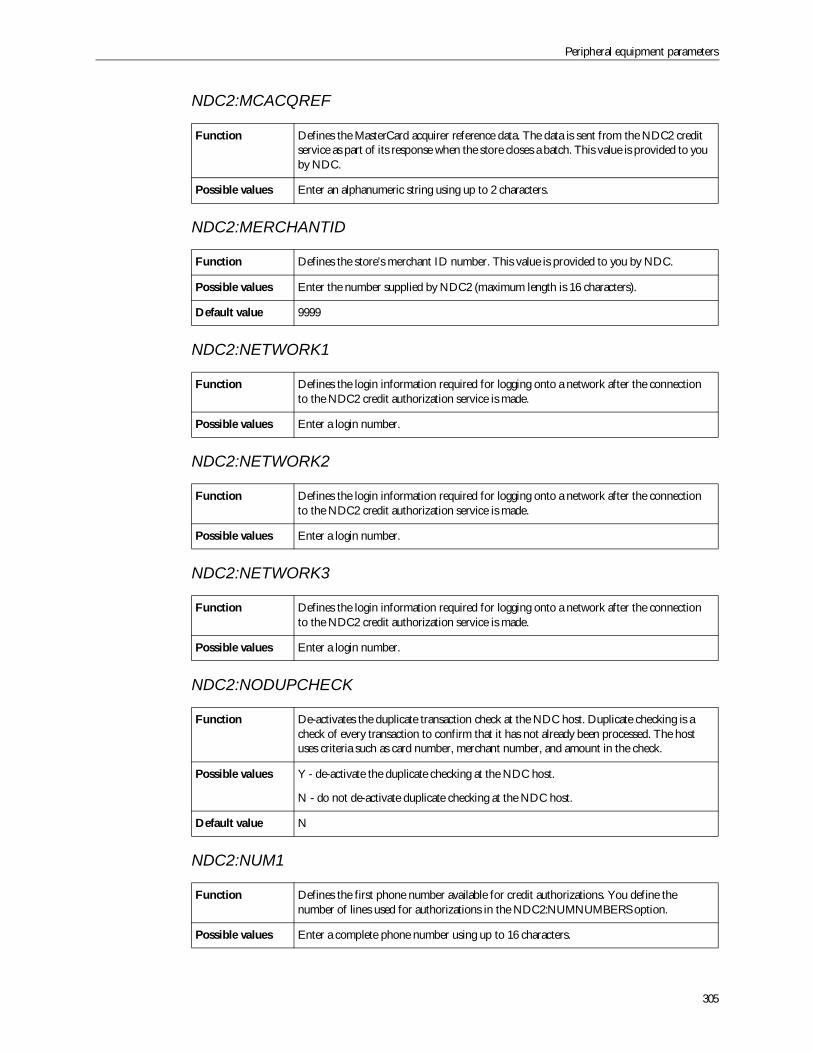
Peripheral equipment parameters
305
NDC2:MCACQREF
NDC2:MERCHANTID
NDC2:NETWORK1
NDC2:NETWORK2
NDC2:NETWORK3
NDC2:NODUPCHECK
NDC2:NUM1
Function Defines the MasterCard acquirer reference data. The data is sent from the NDC2 creditservice as part of its response when the store closes a batch. This value is provided to youby NDC.
Possible values Enter an alphanumeric string using up to 2 characters.
Function Defines the store’s merchant ID number. This value is provided to you by NDC.
Possible values Enter the number supplied by NDC2 (maximum length is 16 characters).
Default value 9999
Function Defines the login information required for logging onto a network after the connectionto the NDC2 credit authorization service is made.
Possible values Enter a login number.
Function Defines the login information required for logging onto a network after the connectionto the NDC2 credit authorization service is made.
Possible values Enter a login number.
Function Defines the login information required for logging onto a network after the connectionto the NDC2 credit authorization service is made.
Possible values Enter a login number.
Function De-activates the duplicate transaction check at the NDC host. Duplicate checking is acheck of every transaction to confirm that it has not already been processed. The hostuses criteria such as card number, merchant number, and amount in the check.
Possible values Y - de-activate the duplicate checking at the NDC host.
N - do not de-activate duplicate checking at the NDC host.
Default value N
Function Defines the first phone number available for credit authorizations. You define thenumber of lines used for authorizations in the NDC2:NUMNUMBERS option.
Possible values Enter a complete phone number using up to 16 characters.
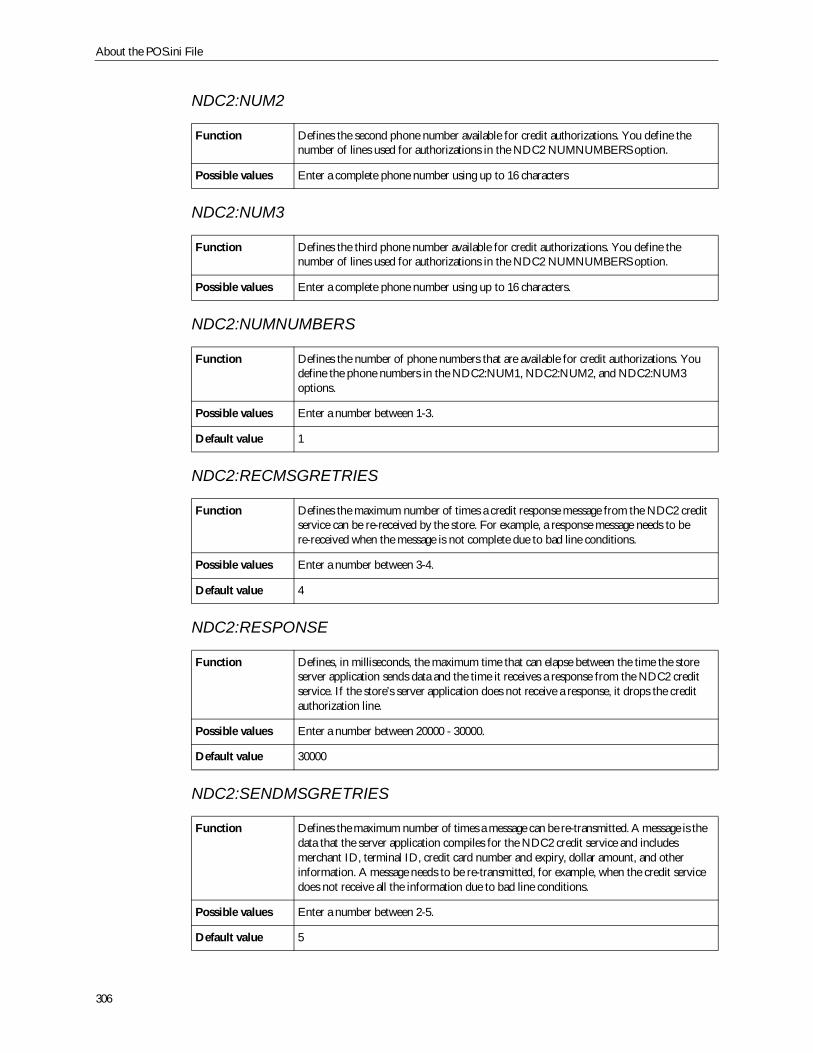
About the POS.ini File
306
NDC2:NUM2
NDC2:NUM3
NDC2:NUMNUMBERS
NDC2:RECMSGRETRIES
NDC2:RESPONSE
NDC2:SENDMSGRETRIES
Function Defines the second phone number available for credit authorizations. You define thenumber of lines used for authorizations in the NDC2 NUMNUMBERS option.
Possible values Enter a complete phone number using up to 16 characters
Function Defines the third phone number available for credit authorizations. You define thenumber of lines used for authorizations in the NDC2 NUMNUMBERS option.
Possible values Enter a complete phone number using up to 16 characters.
Function Defines the number of phone numbers that are available for credit authorizations. Youdefine the phone numbers in the NDC2:NUM1, NDC2:NUM2, and NDC2:NUM3options.
Possible values Enter a number between 1-3.
Default value 1
Function Defines the maximum number of times a credit response message from the NDC2 creditservice can be re-received by the store. For example, a response message needs to bere-received when the message is not complete due to bad line conditions.
Possible values Enter a number between 3-4.
Default value 4
Function Defines, in milliseconds, the maximum time that can elapse between the time the storeserver application sends data and the time it receives a response from the NDC2 creditservice. If the store’s server application does not receive a response, it drops the creditauthorization line.
Possible values Enter a number between 20000 - 30000.
Default value 30000
Function Defines the maximum number of times a message can be re-transmitted. A message is thedata that the server application compiles for the NDC2 credit service and includesmerchant ID, terminal ID, credit card number and expiry, dollar amount, and otherinformation. A message needs to be re-transmitted, for example, when the credit servicedoes not receive all the information due to bad line conditions.
Possible values Enter a number between 2-5.
Default value 5
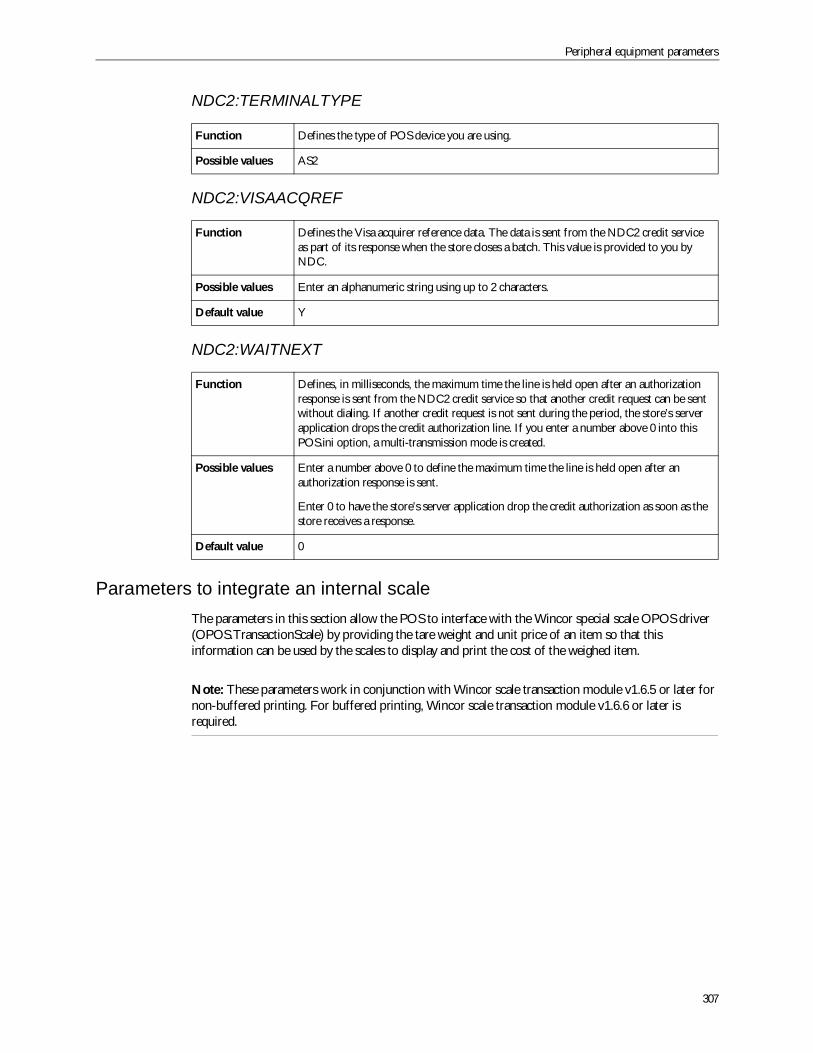
Peripheral equipment parameters
307
NDC2:TERMINALTYPE
NDC2:VISAACQREF
NDC2:WAITNEXT
Parameters to integrate an internal scaleThe parameters in this section allow the POS to interface with the Wincor special scale OPOS driver(OPOS.TransactionScale) by providing the tare weight and unit price of an item so that thisinformation can be used by the scales to display and print the cost of the weighed item.
Note: These parameters work in conjunction with Wincor scale transaction module v1.6.5 or later fornon-buffered printing. For buffered printing, Wincor scale transaction module v1.6.6 or later isrequired.
Function Defines the type of POS device you are using.
Possible values AS2
Function Defines the Visa acquirer reference data. The data is sent from the NDC2 credit serviceas part of its response when the store closes a batch. This value is provided to you byNDC.
Possible values Enter an alphanumeric string using up to 2 characters.
Default value Y
Function Defines, in milliseconds, the maximum time the line is held open after an authorizationresponse is sent from the NDC2 credit service so that another credit request can be sentwithout dialing. If another credit request is not sent during the period, the store’s serverapplication drops the credit authorization line. If you enter a number above 0 into thisPOS.ini option, a multi-transmission mode is created.
Possible values Enter a number above 0 to define the maximum time the line is held open after anauthorization response is sent.
Enter 0 to have the store’s server application drop the credit authorization as soon as thestore receives a response.
Default value 0
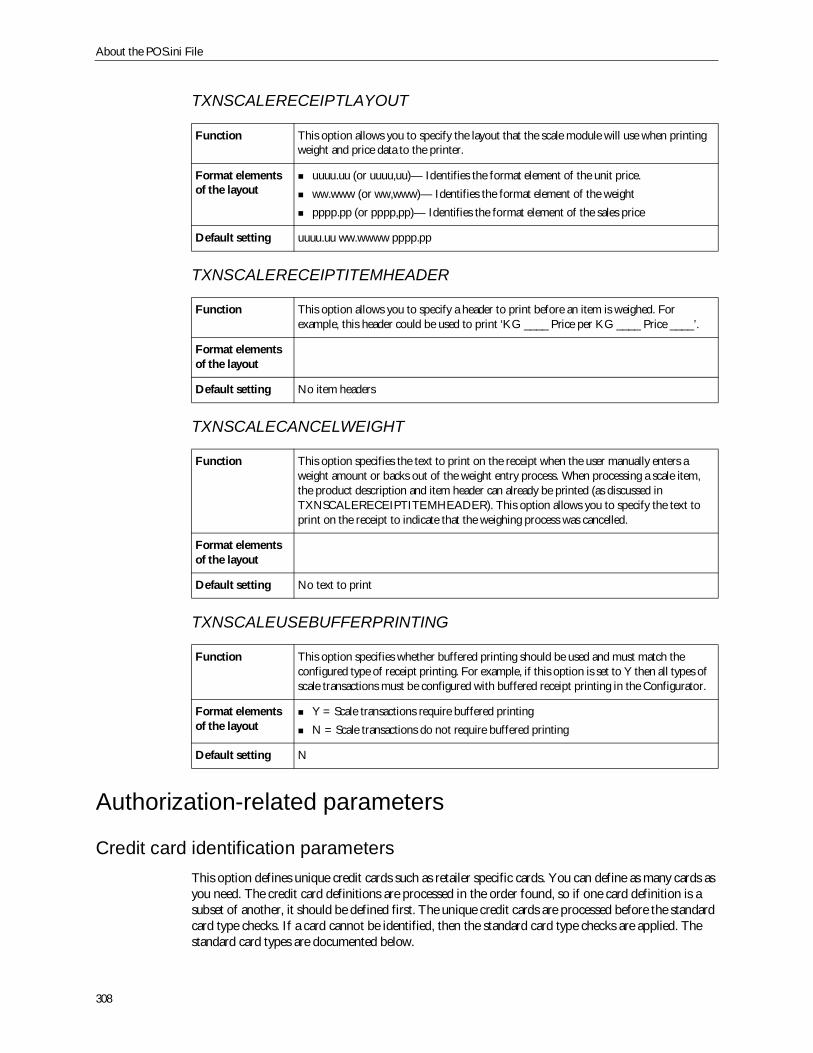
About the POS.ini File
308
TXNSCALERECEIPTLAYOUT
TXNSCALERECEIPTITEMHEADER
TXNSCALECANCELWEIGHT
TXNSCALEUSEBUFFERPRINTING
Authorization-related parameters
Credit card identification parametersThis option defines unique credit cards such as retailer specific cards. You can define as many cards asyou need. The credit card definitions are processed in the order found, so if one card definition is asubset of another, it should be defined first. The unique credit cards are processed before the standardcard type checks. If a card cannot be identified, then the standard card type checks are applied. Thestandard card types are documented below.
Function This option allows you to specify the layout that the scale module will use when printingweight and price data to the printer.
Format elementsof the layout
uuuu.uu (or uuuu,uu)— Identifies the format element of the unit price.ww.www (or ww,www)— Identifies the format element of the weightpppp.pp (or pppp,pp)— Identifies the format element of the sales price
Default setting uuuu.uu ww.wwww pppp.pp
Function This option allows you to specify a header to print before an item is weighed. Forexample, this header could be used to print ‘KG ____ Price per KG ____ Price ____’.
Format elementsof the layout
Default setting No item headers
Function This option specifies the text to print on the receipt when the user manually enters aweight amount or backs out of the weight entry process. When processing a scale item,the product description and item header can already be printed (as discussed inTXNSCALERECEIPTITEMHEADER). This option allows you to specify the text toprint on the receipt to indicate that the weighing process was cancelled.
Format elementsof the layout
Default setting No text to print
Function This option specifies whether buffered printing should be used and must match theconfigured type of receipt printing. For example, if this option is set to Y then all types ofscale transactions must be configured with buffered receipt printing in the Configurator.
Format elementsof the layout
Y = Scale transactions require buffered printingN = Scale transactions do not require buffered printing
Default setting N
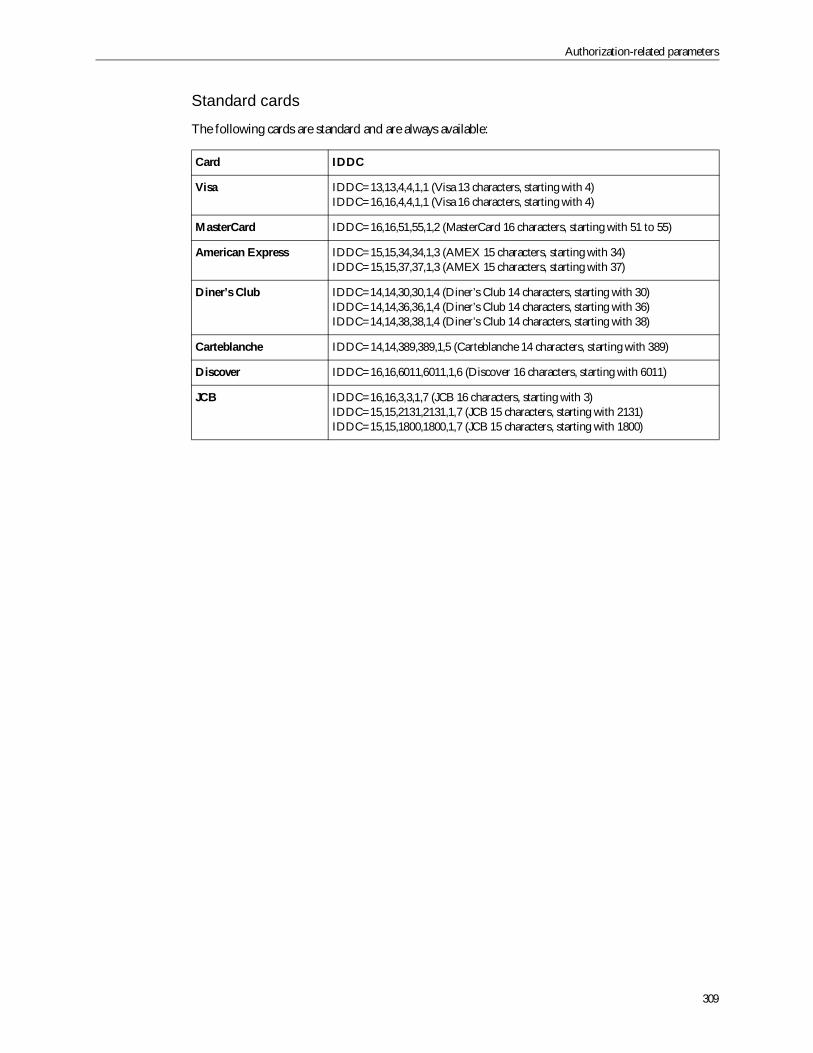
Authorization-related parameters
309
Standard cards
The following cards are standard and are always available:
Card IDDC
Visa IDDC=13,13,4,4,1,1 (Visa 13 characters, starting with 4)IDDC=16,16,4,4,1,1 (Visa 16 characters, starting with 4)
MasterCard IDDC=16,16,51,55,1,2 (MasterCard 16 characters, starting with 51 to 55)
American Express IDDC=15,15,34,34,1,3 (AMEX 15 characters, starting with 34)IDDC=15,15,37,37,1,3 (AMEX 15 characters, starting with 37)
Diner’s Club IDDC=14,14,30,30,1,4 (Diner’s Club 14 characters, starting with 30)IDDC=14,14,36,36,1,4 (Diner’s Club 14 characters, starting with 36)IDDC=14,14,38,38,1,4 (Diner’s Club 14 characters, starting with 38)
Carteblanche IDDC=14,14,389,389,1,5 (Carteblanche 14 characters, starting with 389)
Discover IDDC=16,16,6011,6011,1,6 (Discover 16 characters, starting with 6011)
JCB IDDC=16,16,3,3,1,7 (JCB 16 characters, starting with 3)IDDC=15,15,2131,2131,1,7 (JCB 15 characters, starting with 2131)IDDC=15,15,1800,1800,1,7 (JCB 15 characters, starting with 1800)
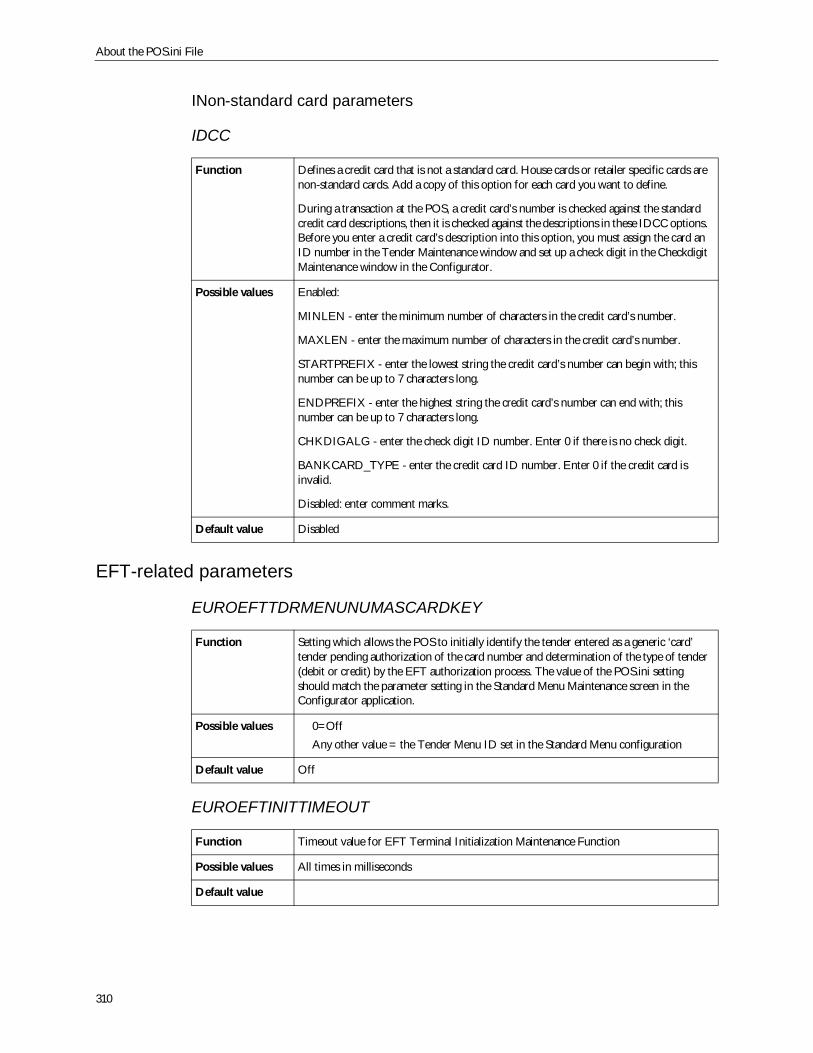
About the POS.ini File
310
INon-standard card parameters
IDCC
EFT-related parameters
EUROEFTTDRMENUNUMASCARDKEY
EUROEFTINITTIMEOUT
Function Defines a credit card that is not a standard card. House cards or retailer specific cards arenon-standard cards. Add a copy of this option for each card you want to define.
During a transaction at the POS, a credit card’s number is checked against the standardcredit card descriptions, then it is checked against the descriptions in these IDCC options.Before you enter a credit card’s description into this option, you must assign the card anID number in the Tender Maintenance window and set up a check digit in the CheckdigitMaintenance window in the Configurator.
Possible values Enabled:
MINLEN - enter the minimum number of characters in the credit card’s number.
MAXLEN - enter the maximum number of characters in the credit card’s number.
STARTPREFIX - enter the lowest string the credit card’s number can begin with; thisnumber can be up to 7 characters long.
ENDPREFIX - enter the highest string the credit card’s number can end with; thisnumber can be up to 7 characters long.
CHKDIGALG - enter the check digit ID number. Enter 0 if there is no check digit.
BANKCARD_TYPE - enter the credit card ID number. Enter 0 if the credit card isinvalid.
Disabled: enter comment marks.
Default value Disabled
Function Setting which allows the POS to initially identify the tender entered as a generic ‘card’tender pending authorization of the card number and determination of the type of tender(debit or credit) by the EFT authorization process. The value of the POS.ini settingshould match the parameter setting in the Standard Menu Maintenance screen in theConfigurator application.
Possible values 0=OffAny other value = the Tender Menu ID set in the Standard Menu configuration
Default value Off
Function Timeout value for EFT Terminal Initialization Maintenance Function
Possible values All times in milliseconds
Default value
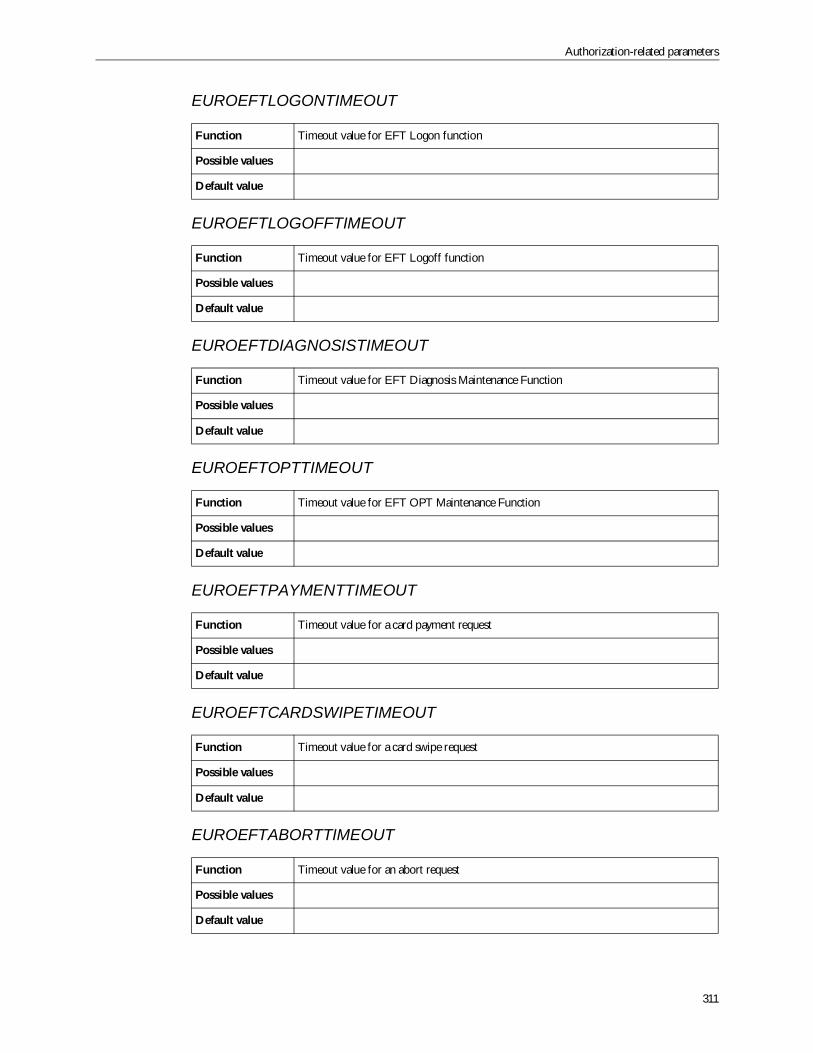
Authorization-related parameters
311
EUROEFTLOGONTIMEOUT
EUROEFTLOGOFFTIMEOUT
EUROEFTDIAGNOSISTIMEOUT
EUROEFTOPTTIMEOUT
EUROEFTPAYMENTTIMEOUT
EUROEFTCARDSWIPETIMEOUT
EUROEFTABORTTIMEOUT
Function Timeout value for EFT Logon function
Possible values
Default value
Function Timeout value for EFT Logoff function
Possible values
Default value
Function Timeout value for EFT Diagnosis Maintenance Function
Possible values
Default value
Function Timeout value for EFT OPT Maintenance Function
Possible values
Default value
Function Timeout value for a card payment request
Possible values
Default value
Function Timeout value for a card swipe request
Possible values
Default value
Function Timeout value for an abort request
Possible values
Default value
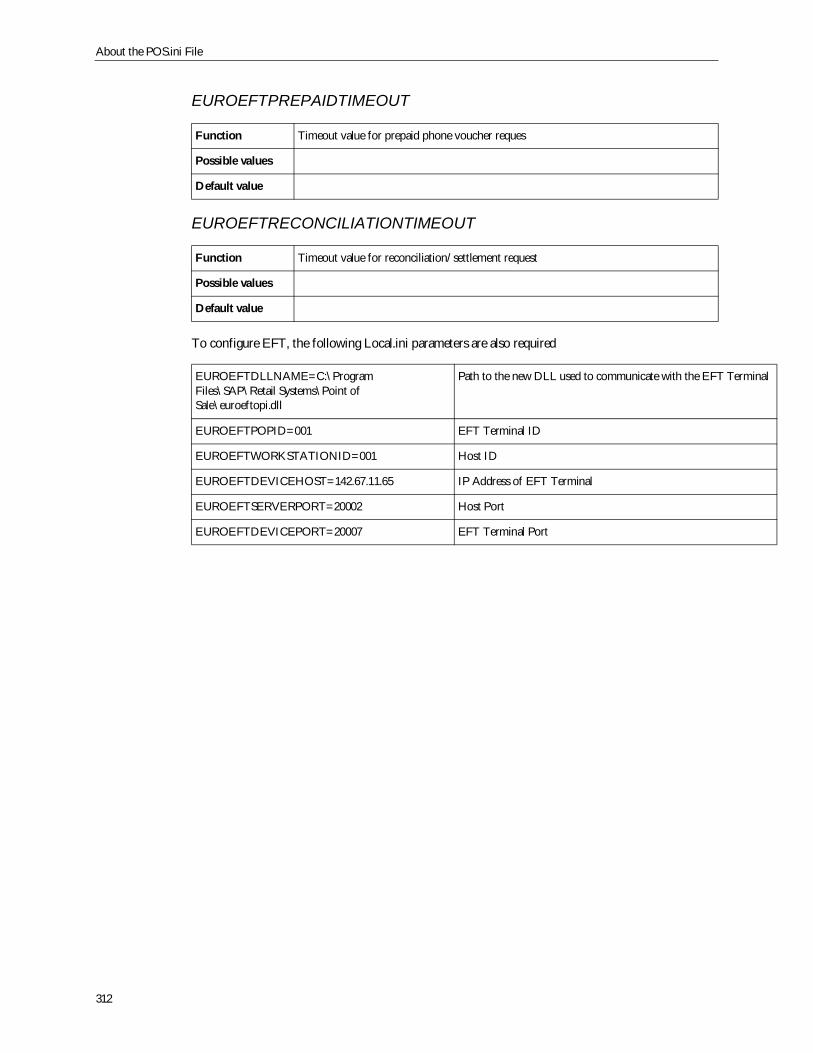
About the POS.ini File
312
EUROEFTPREPAIDTIMEOUT
EUROEFTRECONCILIATIONTIMEOUT
To configure EFT, the following Local.ini parameters are also required
Function Timeout value for prepaid phone voucher reques
Possible values
Default value
Function Timeout value for reconciliation/settlement request
Possible values
Default value
EUROEFTDLLNAME=C:\ProgramFiles\SAP\Retail Systems\Point ofSale\euroeftopi.dll
Path to the new DLL used to communicate with the EFT Terminal
EUROEFTPOPID=001 EFT Terminal ID
EUROEFTWORKSTATIONID=001 Host ID
EUROEFTDEVICEHOST=142.67.11.65 IP Address of EFT Terminal
EUROEFTSERVERPORT=20002 Host Port
EUROEFTDEVICEPORT=20007 EFT Terminal Port
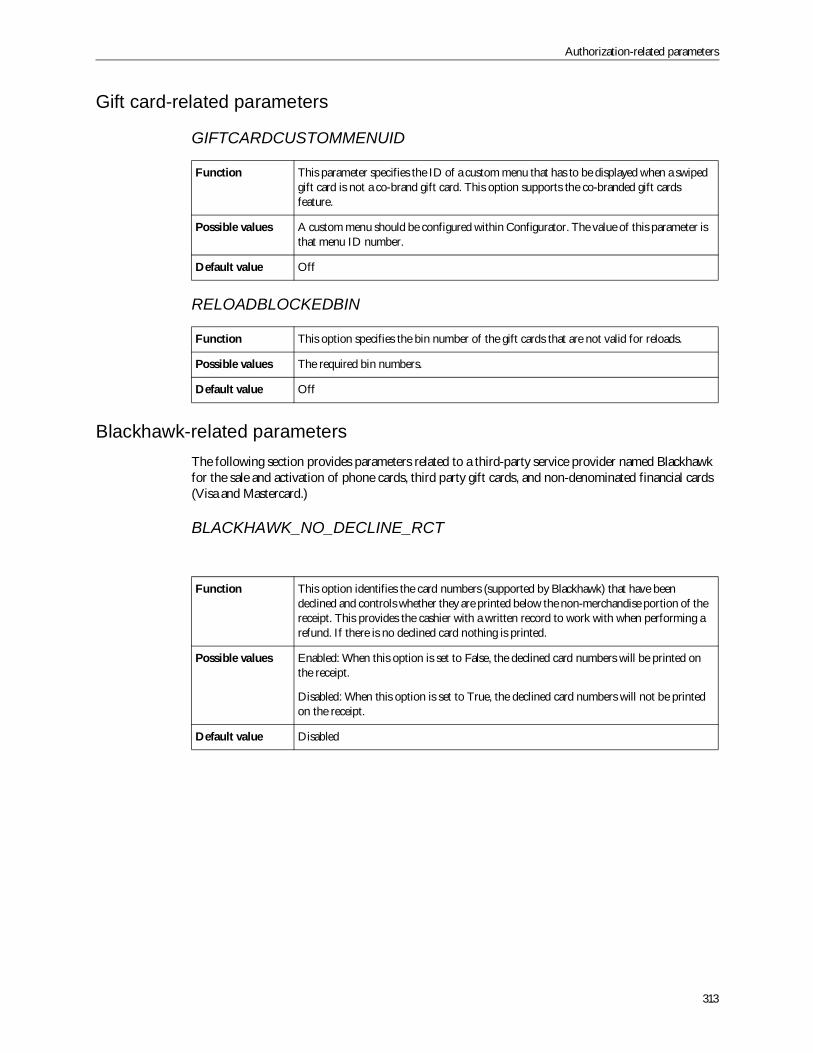
Authorization-related parameters
313
Gift card-related parameters
GIFTCARDCUSTOMMENUID
RELOADBLOCKEDBIN
Blackhawk-related parametersThe following section provides parameters related to a third-party service provider named Blackhawkfor the sale and activation of phone cards, third party gift cards, and non-denominated financial cards(Visa and Mastercard.)
BLACKHAWK_NO_DECLINE_RCT
Function This parameter specifies the ID of a custom menu that has to be displayed when a swipedgift card is not a co-brand gift card. This option supports the co-branded gift cardsfeature.
Possible values A custom menu should be configured within Configurator. The value of this parameter isthat menu ID number.
Default value Off
Function This option specifies the bin number of the gift cards that are not valid for reloads.
Possible values The required bin numbers.
Default value Off
Function This option identifies the card numbers (supported by Blackhawk) that have beendeclined and controls whether they are printed below the non-merchandise portion of thereceipt. This provides the cashier with a written record to work with when performing arefund. If there is no declined card nothing is printed.
Possible values Enabled: When this option is set to False, the declined card numbers will be printed onthe receipt.
Disabled: When this option is set to True, the declined card numbers will not be printedon the receipt.
Default value Disabled
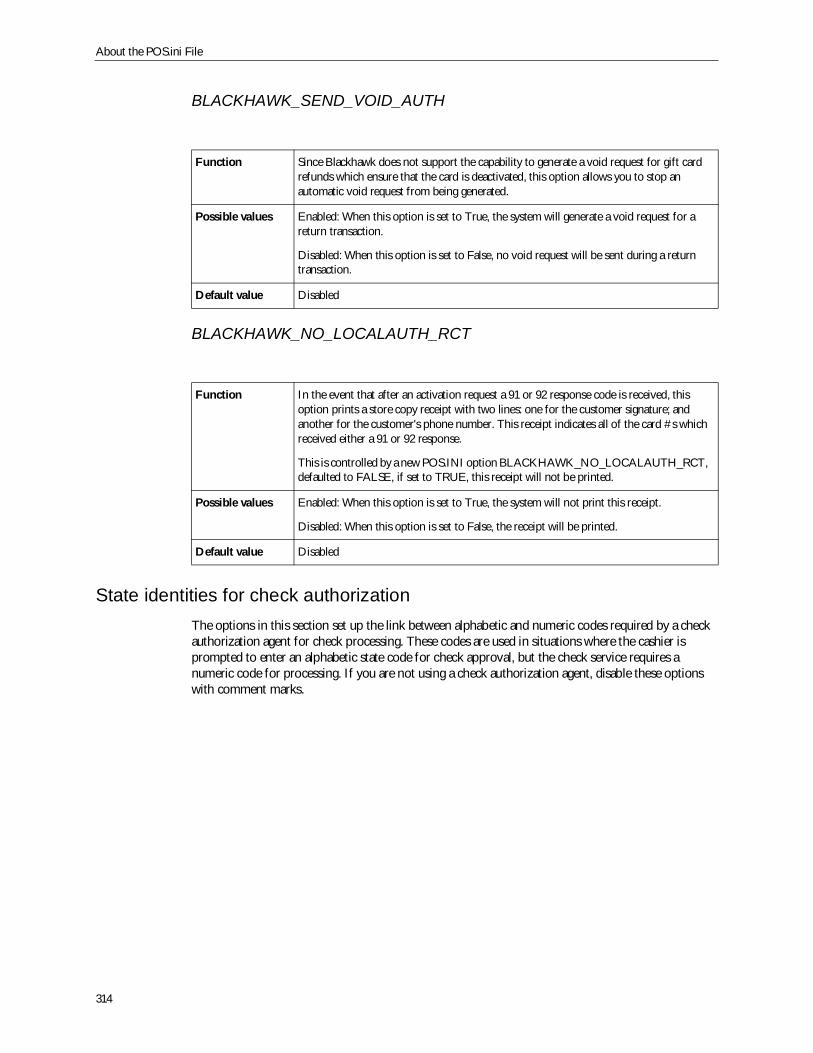
About the POS.ini File
314
BLACKHAWK_SEND_VOID_AUTH
BLACKHAWK_NO_LOCALAUTH_RCT
State identities for check authorizationThe options in this section set up the link between alphabetic and numeric codes required by a checkauthorization agent for check processing. These codes are used in situations where the cashier isprompted to enter an alphabetic state code for check approval, but the check service requires anumeric code for processing. If you are not using a check authorization agent, disable these optionswith comment marks.
Function Since Blackhawk does not support the capability to generate a void request for gift cardrefunds which ensure that the card is deactivated, this option allows you to stop anautomatic void request from being generated.
Possible values Enabled: When this option is set to True, the system will generate a void request for areturn transaction.
Disabled: When this option is set to False, no void request will be sent during a returntransaction.
Default value Disabled
Function In the event that after an activation request a 91 or 92 response code is received, thisoption prints a store copy receipt with two lines: one for the customer signature; andanother for the customer's phone number. This receipt indicates all of the card #s whichreceived either a 91 or 92 response.
This is controlled by a new POS.INI option BLACKHAWK_NO_LOCALAUTH_RCT,defaulted to FALSE, if set to TRUE, this receipt will not be printed.
Possible values Enabled: When this option is set to True, the system will not print this receipt.
Disabled: When this option is set to False, the receipt will be printed.
Default value Disabled

Authorization-related parameters
315
CHECKAGENT
STATEID
Function Defines the check authorization agent you are using. You must define the state code andthe corresponding numeric code that the agent requires using the STATEID option.
Note: This option is repeated in the State Identities for TeleCheck Full Risk ManagementCheck Authorization section of the POS.ini. You only need to enter a value into one ofthe options.
Possible values Enter one of the following values:
1 - Equifax West
2 - Equifax East (TeleCredit)
3 - ETC
4 - TeleCheck
6 - ArJay
7 - Rocky Mountain Retail Systems
Function Defines the numeric identity codes that correspond to the state and provinceabbreviations that the cashier enters when a check is offered for tender. Add a copy ofthis option for each state and province you want to include. You must get the numericcodes from the authorization agent; they are different for each agent.
Note: This option is repeated in the State Identities for TeleCheck Full Risk ManagementCheck Authorization section of the POS.ini. You only need to enter a value into one ofthe options.
Possible values Format: 2 letters, 2 numbers (for example, AB=00)
Enabled:
State abbreviation - enter a 2 character alphanumeric string to identify the State orProvince.
State ID’s - enter the number defined by the check authorization service.
Disabled: enter 00 for State and Province ID and 0 for check authorization service (forexample, 00=0)
Default value 00=0
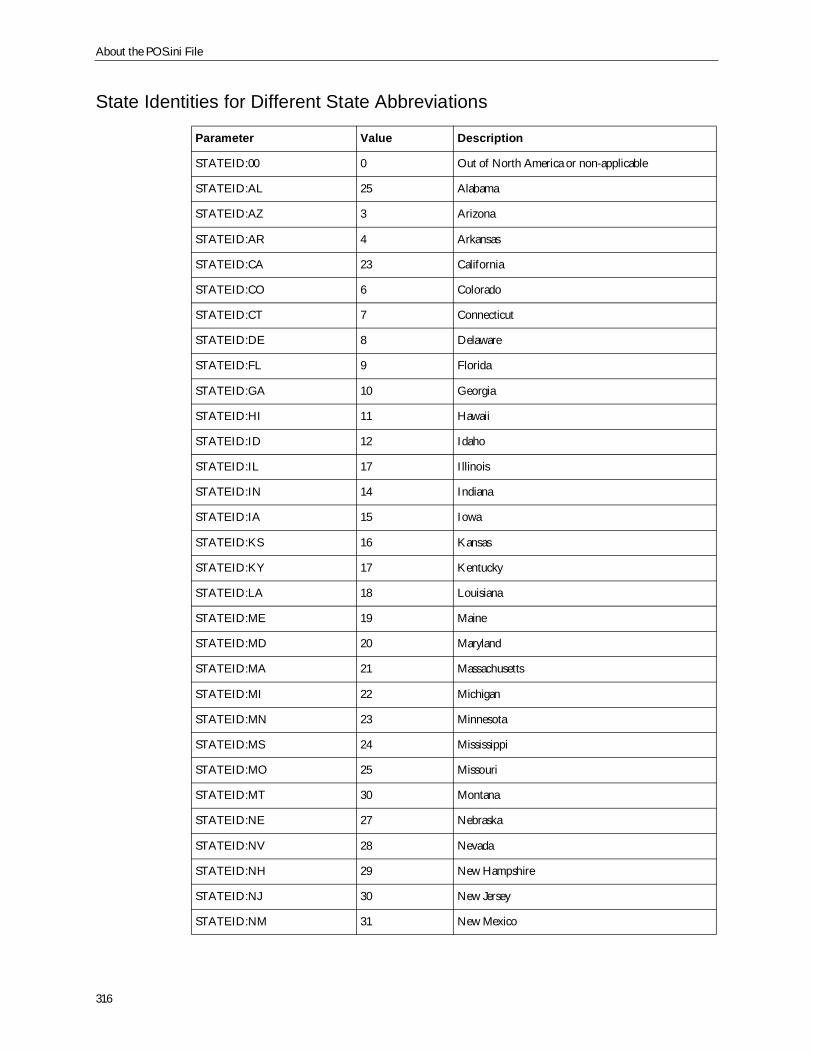
About the POS.ini File
316
State Identities for Different State Abbreviations
Parameter Value Description
STATEID:00 0 Out of North America or non-applicable
STATEID:AL 25 Alabama
STATEID:AZ 3 Arizona
STATEID:AR 4 Arkansas
STATEID:CA 23 California
STATEID:CO 6 Colorado
STATEID:CT 7 Connecticut
STATEID:DE 8 Delaware
STATEID:FL 9 Florida
STATEID:GA 10 Georgia
STATEID:HI 11 Hawaii
STATEID:ID 12 Idaho
STATEID:IL 17 Illinois
STATEID:IN 14 Indiana
STATEID:IA 15 Iowa
STATEID:KS 16 Kansas
STATEID:KY 17 Kentucky
STATEID:LA 18 Louisiana
STATEID:ME 19 Maine
STATEID:MD 20 Maryland
STATEID:MA 21 Massachusetts
STATEID:MI 22 Michigan
STATEID:MN 23 Minnesota
STATEID:MS 24 Mississippi
STATEID:MO 25 Missouri
STATEID:MT 30 Montana
STATEID:NE 27 Nebraska
STATEID:NV 28 Nevada
STATEID:NH 29 New Hampshire
STATEID:NJ 30 New Jersey
STATEID:NM 31 New Mexico
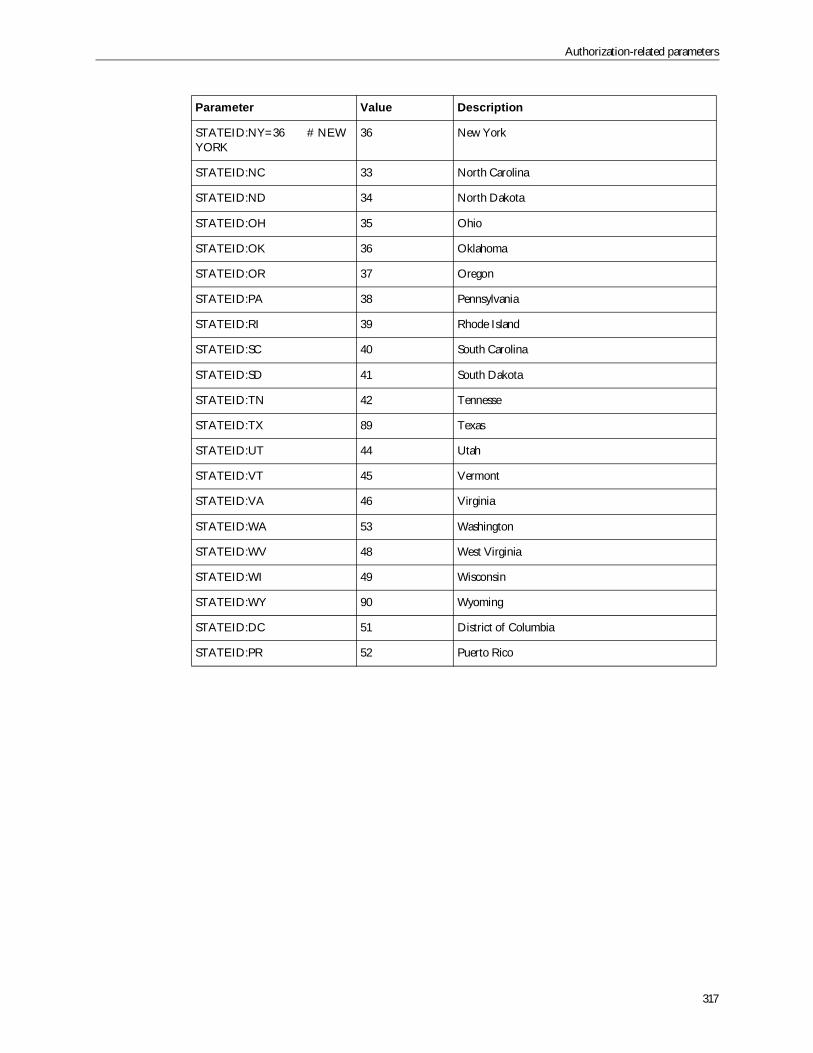
Authorization-related parameters
317
STATEID:NY=36 # NEWYORK
36 New York
STATEID:NC 33 North Carolina
STATEID:ND 34 North Dakota
STATEID:OH 35 Ohio
STATEID:OK 36 Oklahoma
STATEID:OR 37 Oregon
STATEID:PA 38 Pennsylvania
STATEID:RI 39 Rhode Island
STATEID:SC 40 South Carolina
STATEID:SD 41 South Dakota
STATEID:TN 42 Tennesse
STATEID:TX 89 Texas
STATEID:UT 44 Utah
STATEID:VT 45 Vermont
STATEID:VA 46 Virginia
STATEID:WA 53 Washington
STATEID:WV 48 West Virginia
STATEID:WI 49 Wisconsin
STATEID:WY 90 Wyoming
STATEID:DC 51 District of Columbia
STATEID:PR 52 Puerto Rico
Parameter Value Description
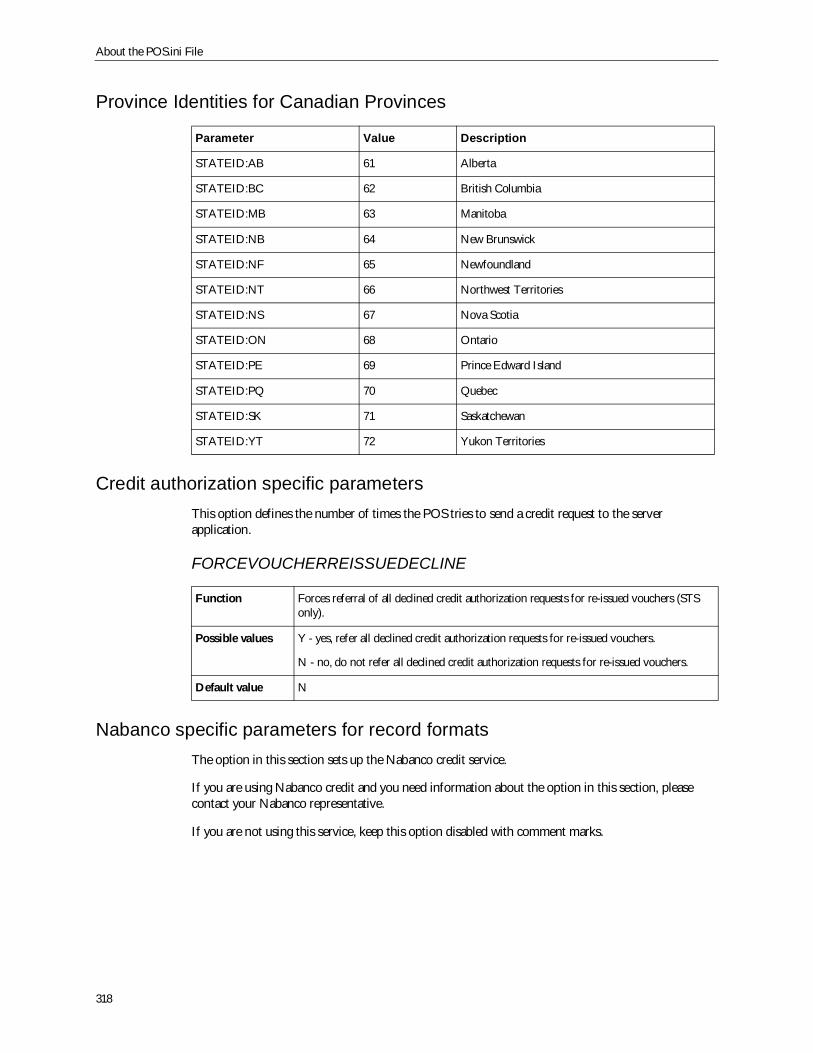
About the POS.ini File
318
Province Identities for Canadian Provinces
Credit authorization specific parametersThis option defines the number of times the POS tries to send a credit request to the serverapplication.
FORCEVOUCHERREISSUEDECLINE
Nabanco specific parameters for record formatsThe option in this section sets up the Nabanco credit service.
If you are using Nabanco credit and you need information about the option in this section, pleasecontact your Nabanco representative.
If you are not using this service, keep this option disabled with comment marks.
Parameter Value Description
STATEID:AB 61 Alberta
STATEID:BC 62 British Columbia
STATEID:MB 63 Manitoba
STATEID:NB 64 New Brunswick
STATEID:NF 65 Newfoundland
STATEID:NT 66 Northwest Territories
STATEID:NS 67 Nova Scotia
STATEID:ON 68 Ontario
STATEID:PE 69 Prince Edward Island
STATEID:PQ 70 Quebec
STATEID:SK 71 Saskatchewan
STATEID:YT 72 Yukon Territories
Function Forces referral of all declined credit authorization requests for re-issued vouchers (STSonly).
Possible values Y - yes, refer all declined credit authorization requests for re-issued vouchers.
N - no, do not refer all declined credit authorization requests for re-issued vouchers.
Default value N
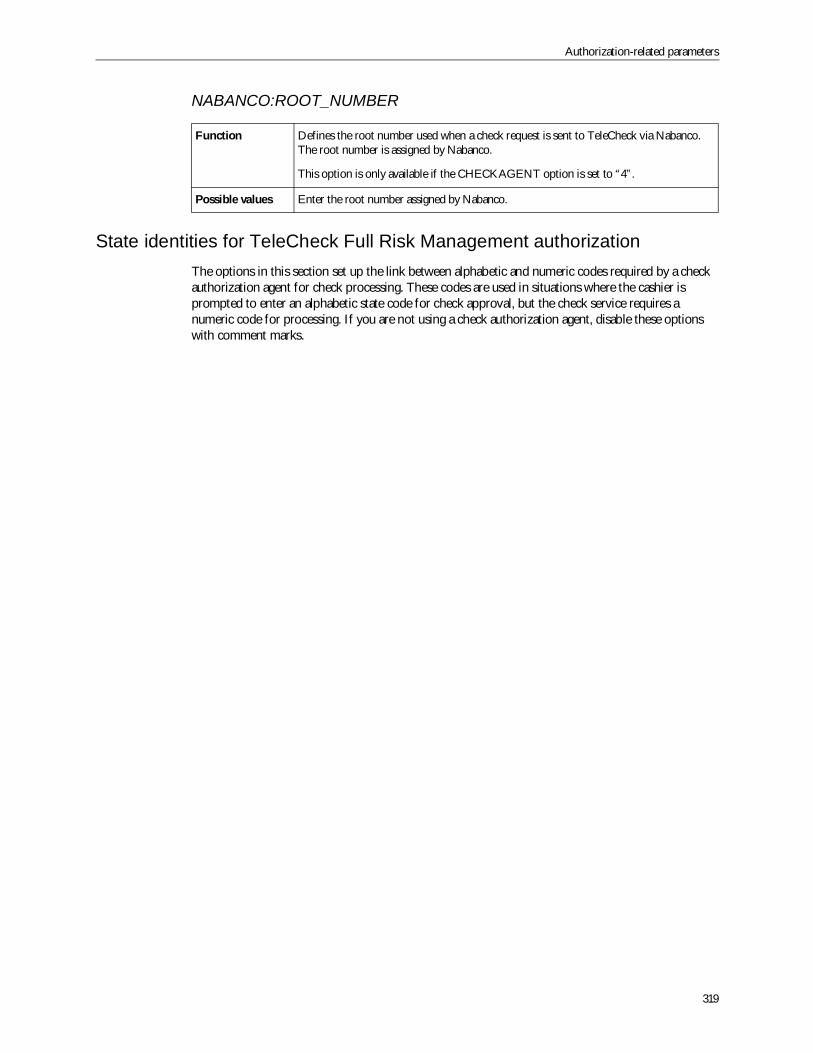
Authorization-related parameters
319
NABANCO:ROOT_NUMBER
State identities for TeleCheck Full Risk Management authorizationThe options in this section set up the link between alphabetic and numeric codes required by a checkauthorization agent for check processing. These codes are used in situations where the cashier isprompted to enter an alphabetic state code for check approval, but the check service requires anumeric code for processing. If you are not using a check authorization agent, disable these optionswith comment marks.
Function Defines the root number used when a check request is sent to TeleCheck via Nabanco.The root number is assigned by Nabanco.
This option is only available if the CHECKAGENT option is set to “4”.
Possible values Enter the root number assigned by Nabanco.
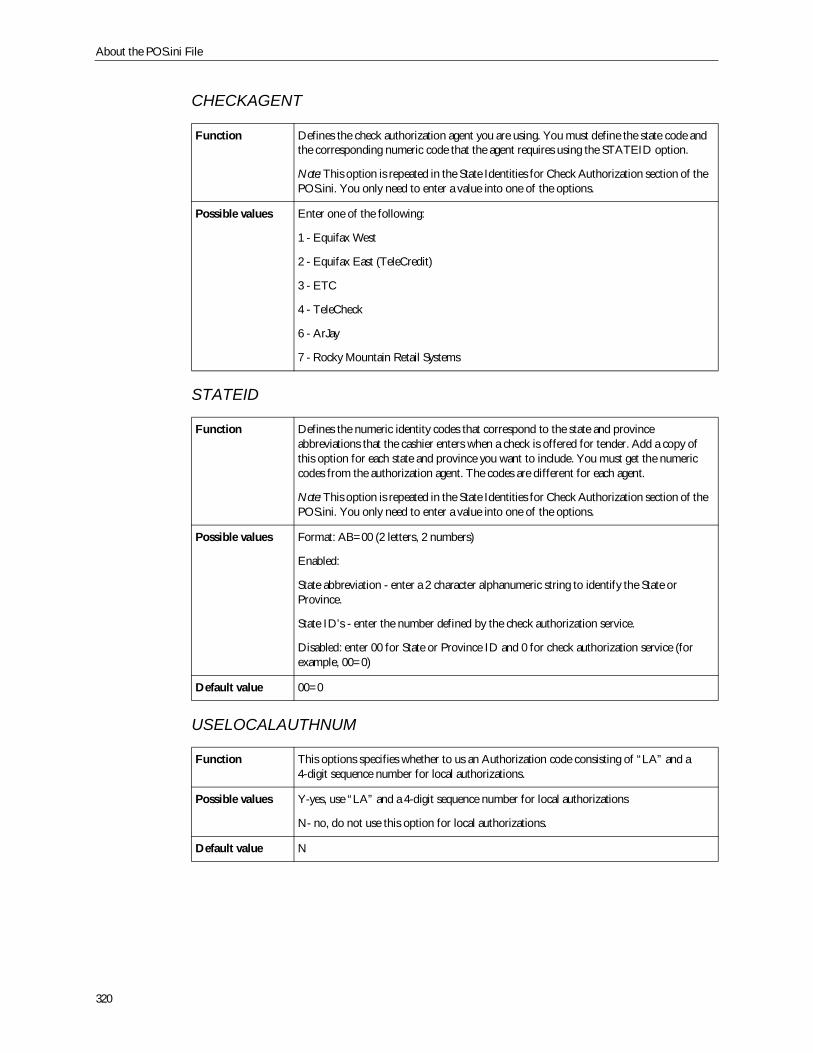
About the POS.ini File
320
CHECKAGENT
STATEID
USELOCALAUTHNUM
Function Defines the check authorization agent you are using. You must define the state code andthe corresponding numeric code that the agent requires using the STATEID option.
Note: This option is repeated in the State Identities for Check Authorization section of thePOS.ini. You only need to enter a value into one of the options.
Possible values Enter one of the following:
1 - Equifax West
2 - Equifax East (TeleCredit)
3 - ETC
4 - TeleCheck
6 - ArJay
7 - Rocky Mountain Retail Systems
Function Defines the numeric identity codes that correspond to the state and provinceabbreviations that the cashier enters when a check is offered for tender. Add a copy ofthis option for each state and province you want to include. You must get the numericcodes from the authorization agent. The codes are different for each agent.
Note: This option is repeated in the State Identities for Check Authorization section of thePOS.ini. You only need to enter a value into one of the options.
Possible values Format: AB=00 (2 letters, 2 numbers)
Enabled:
State abbreviation - enter a 2 character alphanumeric string to identify the State orProvince.
State ID’s - enter the number defined by the check authorization service.
Disabled: enter 00 for State or Province ID and 0 for check authorization service (forexample, 00=0)
Default value 00=0
Function This options specifies whether to us an Authorization code consisting of “LA” and a4-digit sequence number for local authorizations.
Possible values Y-yes, use “LA” and a 4-digit sequence number for local authorizations
N- no, do not use this option for local authorizations.
Default value N
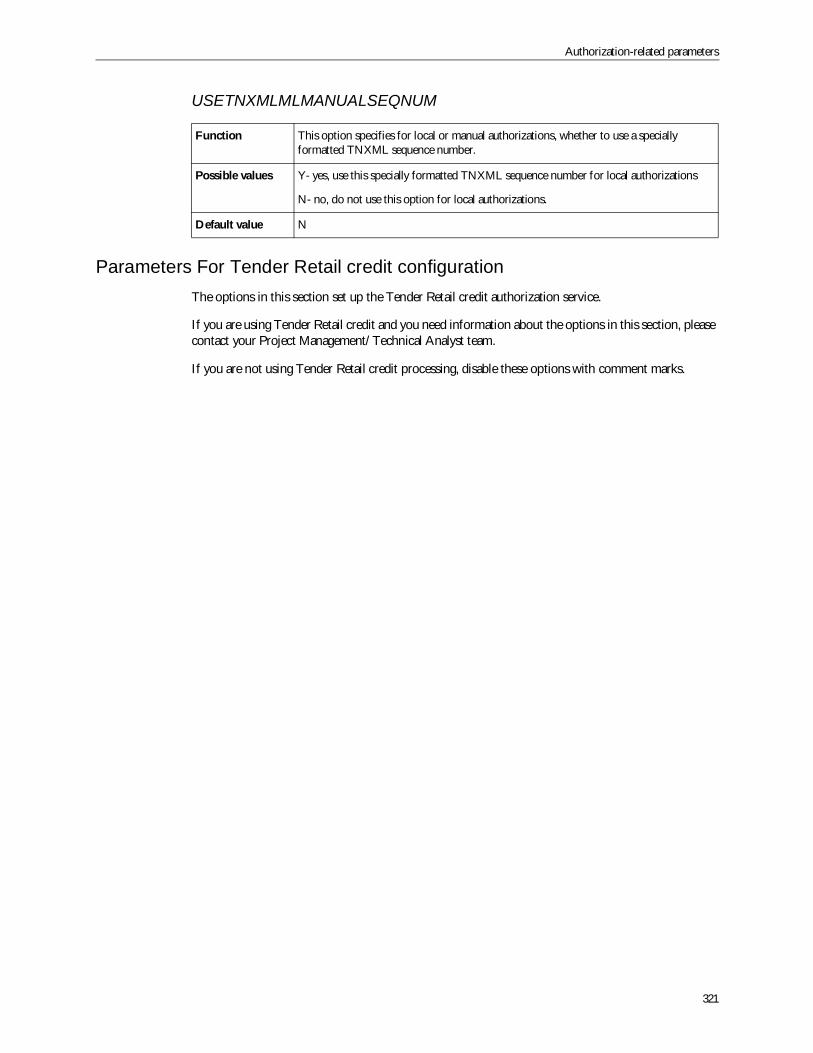
Authorization-related parameters
321
USETNXMLMLMANUALSEQNUM
Parameters For Tender Retail credit configurationThe options in this section set up the Tender Retail credit authorization service.
If you are using Tender Retail credit and you need information about the options in this section, pleasecontact your Project Management/Technical Analyst team.
If you are not using Tender Retail credit processing, disable these options with comment marks.
Function This option specifies for local or manual authorizations, whether to use a speciallyformatted TNXML sequence number.
Possible values Y- yes, use this specially formatted TNXML sequence number for local authorizations
N- no, do not use this option for local authorizations.
Default value N
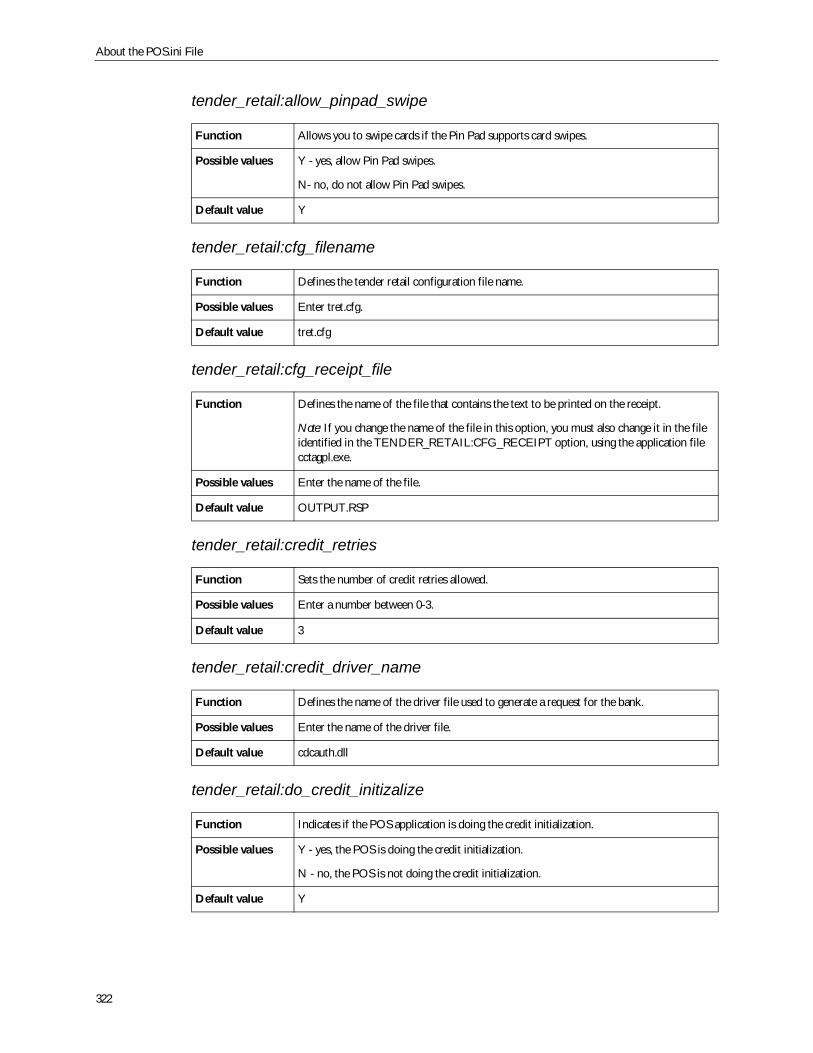
About the POS.ini File
322
tender_retail:allow_pinpad_swipe
tender_retail:cfg_filename
tender_retail:cfg_receipt_file
tender_retail:credit_retries
tender_retail:credit_driver_name
tender_retail:do_credit_initizalize
Function Allows you to swipe cards if the Pin Pad supports card swipes.
Possible values Y - yes, allow Pin Pad swipes.
N- no, do not allow Pin Pad swipes.
Default value Y
Function Defines the tender retail configuration file name.
Possible values Enter tret.cfg.
Default value tret.cfg
Function Defines the name of the file that contains the text to be printed on the receipt.
Note: If you change the name of the file in this option, you must also change it in the fileidentified in the TENDER_RETAIL:CFG_RECEIPT option, using the application filecctagpl.exe.
Possible values Enter the name of the file.
Default value OUTPUT.RSP
Function Sets the number of credit retries allowed.
Possible values Enter a number between 0-3.
Default value 3
Function Defines the name of the driver file used to generate a request for the bank.
Possible values Enter the name of the driver file.
Default value cdcauth.dll
Function Indicates if the POS application is doing the credit initialization.
Possible values Y - yes, the POS is doing the credit initialization.
N - no, the POS is not doing the credit initialization.
Default value Y
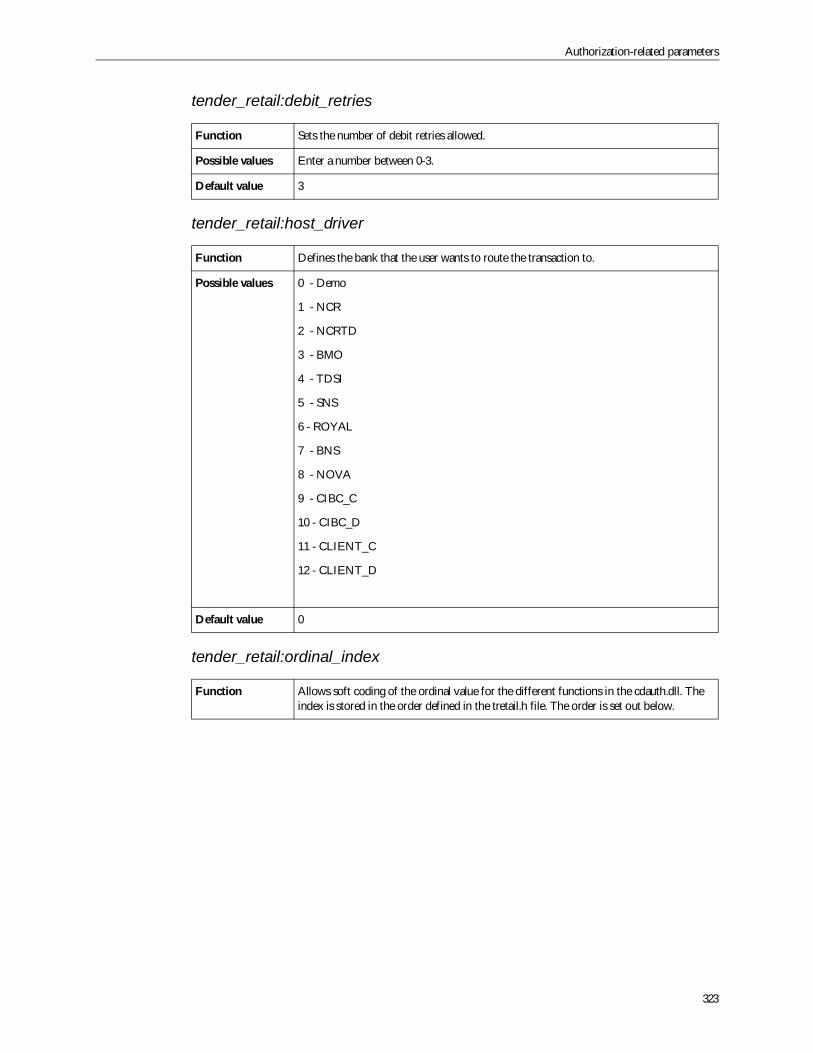
Authorization-related parameters
323
tender_retail:debit_retries
tender_retail:host_driver
tender_retail:ordinal_index
Function Sets the number of debit retries allowed.
Possible values Enter a number between 0-3.
Default value 3
Function Defines the bank that the user wants to route the transaction to.
Possible values 0 - Demo
1 - NCR
2 - NCRTD
3 - BMO
4 - TDSI
5 - SNS
6 - ROYAL
7 - BNS
8 - NOVA
9 - CIBC_C
10 - CIBC_D
11 - CLIENT_C
12 - CLIENT_D
Default value 0
Function Allows soft coding of the ordinal value for the different functions in the cdauth.dll. Theindex is stored in the order defined in the tretail.h file. The order is set out below.
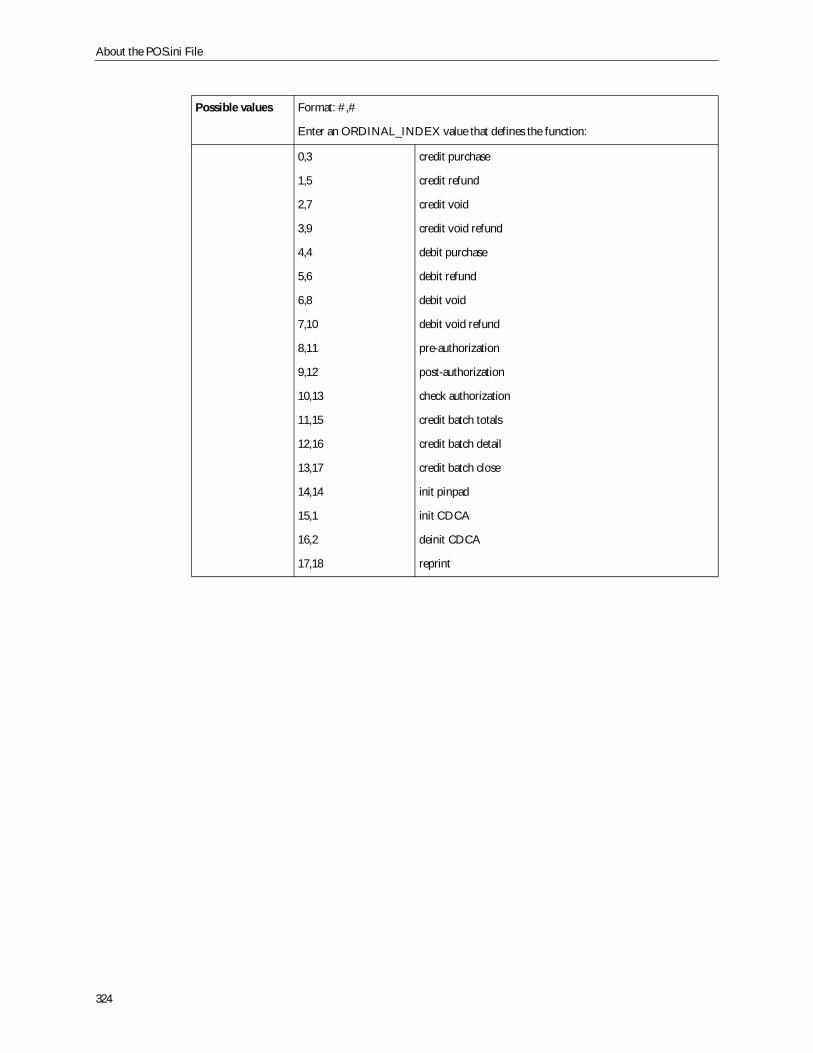
About the POS.ini File
324
Possible values Format: #,#
Enter an ORDINAL_INDEX value that defines the function:
0,3
1,5
2,7
3,9
4,4
5,6
6,8
7,10
8,11
9,12
10,13
11,15
12,16
13,17
14,14
15,1
16,2
17,18
credit purchase
credit refund
credit void
credit void refund
debit purchase
debit refund
debit void
debit void refund
pre-authorization
post-authorization
check authorization
credit batch totals
credit batch detail
credit batch close
init pinpad
init CDCA
deinit CDCA
reprint

Authorization-related parameters
325
tender_retail:supported_cards
AAFES Credit Card Authorization Specific Parameters.This facility allows for end user runtime customization of the status action and display message thatresults from an AAFES credit authorization request/response. The response status action (i.e.approval, declined, referral) and the response text can be specified for any AAFES credit responsemessage. Also, if the response status is designated as a REFERRAL, additional security options mustbe specified (see below).
AAFES credit authorization response message prompt
Format->KeyPadCode, StatCode, ResponseStatus, PromptMessage (e.g.)='A','B',APPROVED,[TRANSACTION APPROVED] Put space ' ' for any unknown/non-applicableKeyPadCode or StatCode ResponseStatus can be: APPROVED, REFERRAL or DECLINED.
The combination of the KeyPadCode (see Note), StatCode (see Note) and ResponseStatus (see Note)are specified by AAFES to conform to their credit requirements. The corresponding displayableresponse messages that are to be shown on the POS terminal are specified in the last field inside thesquare brackets.
If ResponseStatus is set to REFERRAL, 3 extra fields must be inserted right after the response statusfield. The first field is the minimum authority level needed to perform a manual override, the second is
Function Allows for mapping of the Tender Retail index to the Stores’ internal card type numbers.Add a copy of this option for each card type you want to map.
Possible values Format: bankcard type, Tender Retail Index No.
Standard Bank Card Types:
1 - Visa
2 - MasterCard
3 - American Express
4 - Dinner
5 - Carteblanche
6 - Discover
7 - JCB
8 - JAL
9 - Private Label
10 - Private Label2
11 - Private Label3
12 - Private Label4
13 - Debit Card
14 - Insignia Card
15 - Insignia Card
Tender Retail Index No.:
0
1
2
-1
-1
5
7
-1
-1
-1
-1
-1
4
6
3
Note: -1 means that the card is not supported.
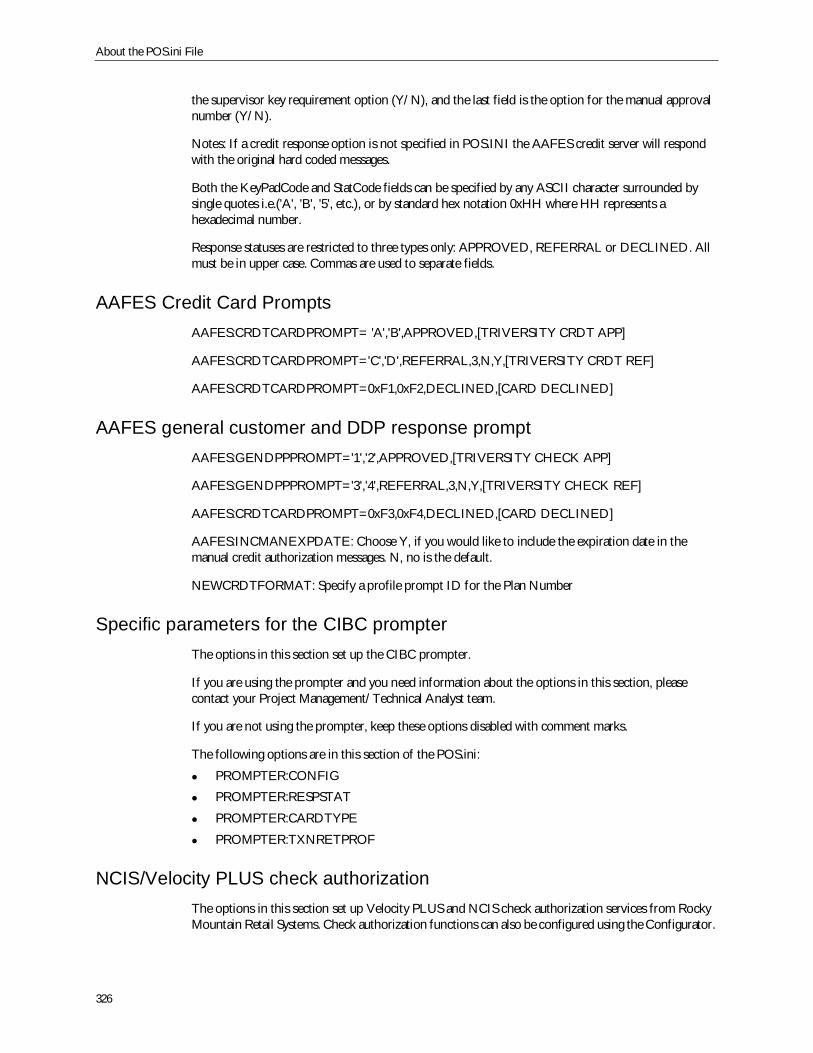
About the POS.ini File
326
the supervisor key requirement option (Y/N), and the last field is the option for the manual approvalnumber (Y/N).
Notes: If a credit response option is not specified in POS.INI the AAFES credit server will respondwith the original hard coded messages.
Both the KeyPadCode and StatCode fields can be specified by any ASCII character surrounded bysingle quotes i.e.('A', 'B', '5', etc.), or by standard hex notation 0xHH where HH represents ahexadecimal number.
Response statuses are restricted to three types only: APPROVED, REFERRAL or DECLINED. Allmust be in upper case. Commas are used to separate fields.
AAFES Credit Card PromptsAAFES:CRDTCARDPROMPT= 'A','B',APPROVED,[TRIVERSITY CRDT APP]
AAFES:CRDTCARDPROMPT='C','D',REFERRAL,3,N,Y,[TRIVERSITY CRDT REF]
AAFES:CRDTCARDPROMPT=0xF1,0xF2,DECLINED,[CARD DECLINED]
AAFES general customer and DDP response promptAAFES:GENDPPPROMPT='1','2',APPROVED,[TRIVERSITY CHECK APP]
AAFES:GENDPPPROMPT='3','4',REFERRAL,3,N,Y,[TRIVERSITY CHECK REF]
AAFES:CRDTCARDPROMPT=0xF3,0xF4,DECLINED,[CARD DECLINED]
AAFES:INCMANEXPDATE: Choose Y, if you would like to include the expiration date in themanual credit authorization messages. N, no is the default.
NEWCRDTFORMAT: Specify a profile prompt ID for the Plan Number
Specific parameters for the CIBC prompterThe options in this section set up the CIBC prompter.
If you are using the prompter and you need information about the options in this section, pleasecontact your Project Management/Technical Analyst team.
If you are not using the prompter, keep these options disabled with comment marks.
The following options are in this section of the POS.ini:
PROMPTER:CONFIG
PROMPTER:RESPSTAT
PROMPTER:CARDTYPE
PROMPTER:TXNRETPROF
NCIS/Velocity PLUS check authorizationThe options in this section set up Velocity PLUS and NCIS check authorization services from RockyMountain Retail Systems. Check authorization functions can also be configured using the Configurator.
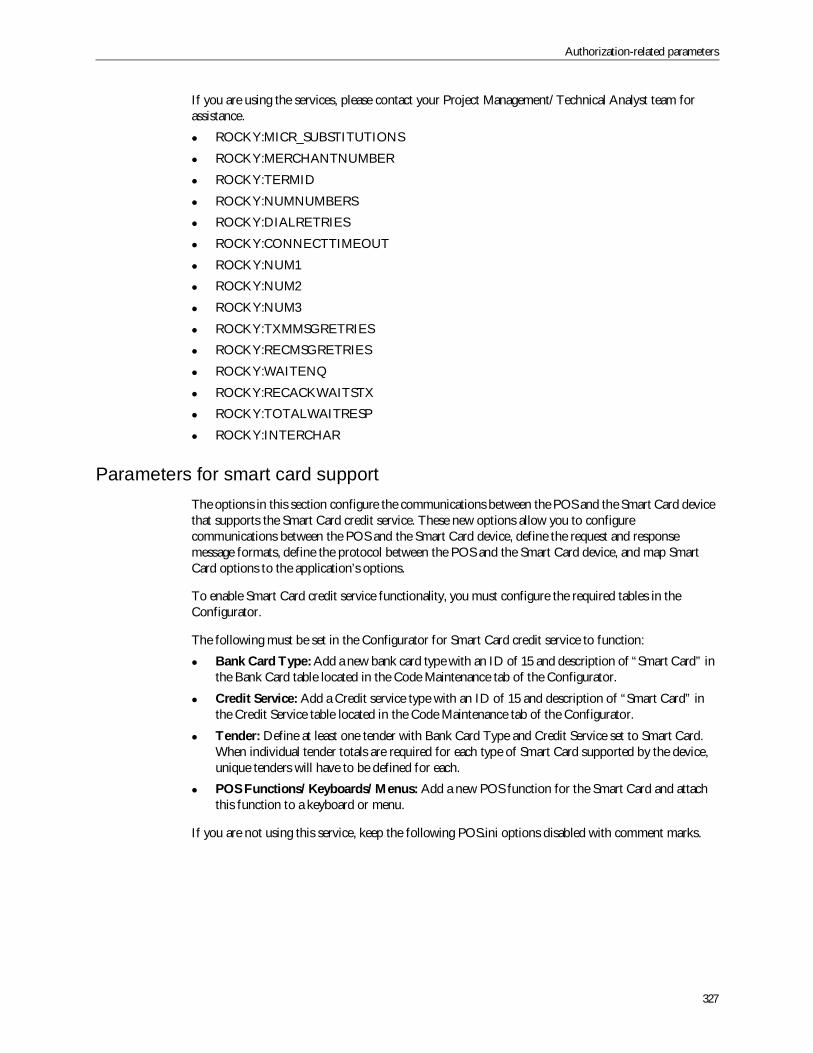
Authorization-related parameters
327
If you are using the services, please contact your Project Management/Technical Analyst team forassistance.
ROCKY:MICR_SUBSTITUTIONS
ROCKY:MERCHANTNUMBER
ROCKY:TERMID
ROCKY:NUMNUMBERS
ROCKY:DIALRETRIES
ROCKY:CONNECTTIMEOUT
ROCKY:NUM1
ROCKY:NUM2
ROCKY:NUM3
ROCKY:TXMMSGRETRIES
ROCKY:RECMSGRETRIES
ROCKY:WAITENQ
ROCKY:RECACKWAITSTX
ROCKY:TOTALWAITRESP
ROCKY:INTERCHAR
Parameters for smart card supportThe options in this section configure the communications between the POS and the Smart Card devicethat supports the Smart Card credit service. These new options allow you to configurecommunications between the POS and the Smart Card device, define the request and responsemessage formats, define the protocol between the POS and the Smart Card device, and map SmartCard options to the application’s options.
To enable Smart Card credit service functionality, you must configure the required tables in theConfigurator.
The following must be set in the Configurator for Smart Card credit service to function:
Bank Card Type: Add a new bank card type with an ID of 15 and description of “Smart Card” inthe Bank Card table located in the Code Maintenance tab of the Configurator.
Credit Service: Add a Credit service type with an ID of 15 and description of “Smart Card” inthe Credit Service table located in the Code Maintenance tab of the Configurator.
Tender: Define at least one tender with Bank Card Type and Credit Service set to Smart Card.When individual tender totals are required for each type of Smart Card supported by the device,unique tenders will have to be defined for each.
POS Functions/Keyboards/Menus: Add a new POS function for the Smart Card and attachthis function to a keyboard or menu.
If you are not using this service, keep the following POS.ini options disabled with comment marks.
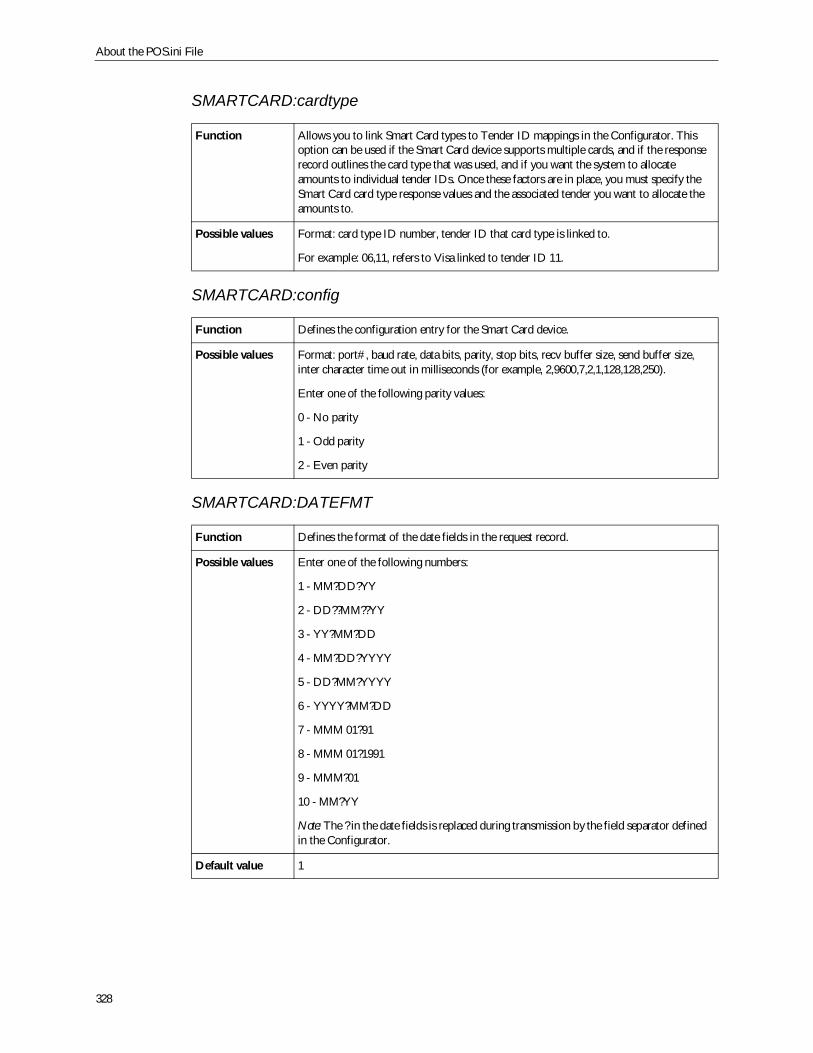
About the POS.ini File
328
SMARTCARD:cardtype
SMARTCARD:config
SMARTCARD:DATEFMT
Function Allows you to link Smart Card types to Tender ID mappings in the Configurator. Thisoption can be used if the Smart Card device supports multiple cards, and if the responserecord outlines the card type that was used, and if you want the system to allocateamounts to individual tender IDs. Once these factors are in place, you must specify theSmart Card card type response values and the associated tender you want to allocate theamounts to.
Possible values Format: card type ID number, tender ID that card type is linked to.
For example: 06,11, refers to Visa linked to tender ID 11.
Function Defines the configuration entry for the Smart Card device.
Possible values Format: port#, baud rate, data bits, parity, stop bits, recv buffer size, send buffer size,inter character time out in milliseconds (for example, 2,9600,7,2,1,128,128,250).
Enter one of the following parity values:
0 - No parity
1 - Odd parity
2 - Even parity
Function Defines the format of the date fields in the request record.
Possible values Enter one of the following numbers:
1 - MM?DD?YY
2 - DD??MM??YY
3 - YY?MM?DD
4 - MM?DD?YYYY
5 - DD?MM?YYYY
6 - YYYY?MM?DD
7 - MMM 01?91
8 - MMM 01?1991
9 - MMM?01
10 - MM?YY
Note: The ? in the date fields is replaced during transmission by the field separator definedin the Configurator.
Default value 1
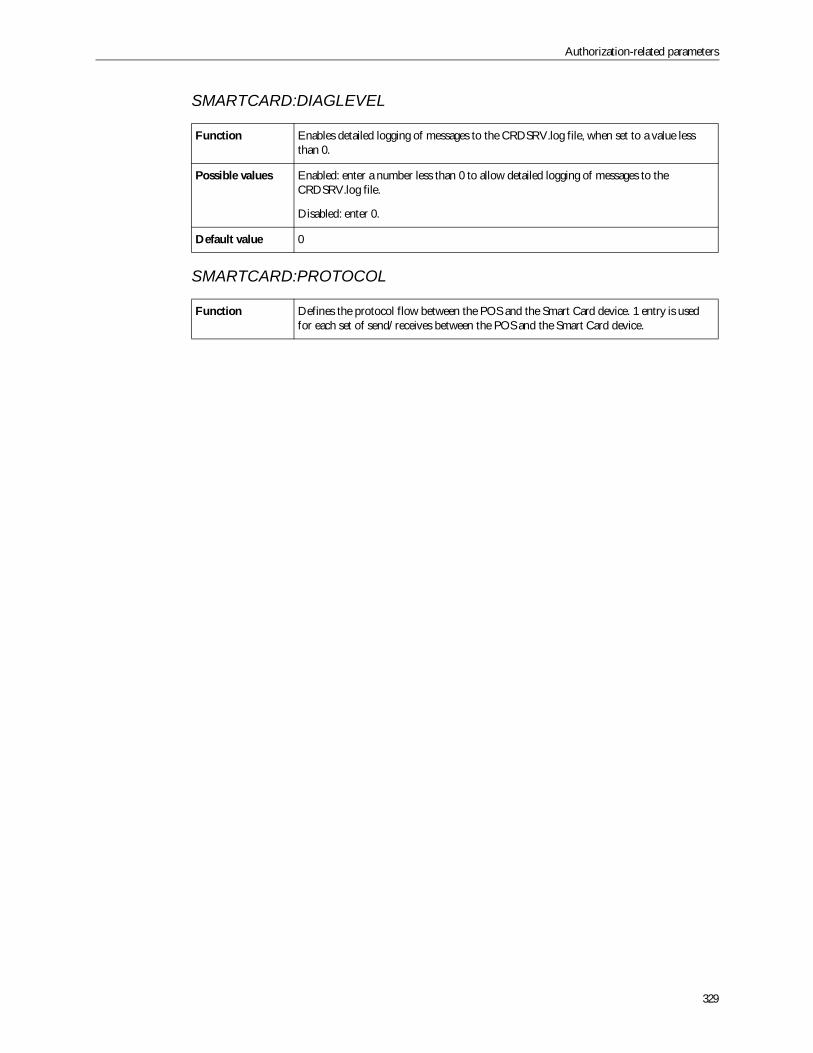
Authorization-related parameters
329
SMARTCARD:DIAGLEVEL
SMARTCARD:PROTOCOL
Function Enables detailed logging of messages to the CRDSRV.log file, when set to a value lessthan 0.
Possible values Enabled: enter a number less than 0 to allow detailed logging of messages to theCRDSRV.log file.
Disabled: enter 0.
Default value 0
Function Defines the protocol flow between the POS and the Smart Card device. 1 entry is usedfor each set of send/receives between the POS and the Smart Card device.
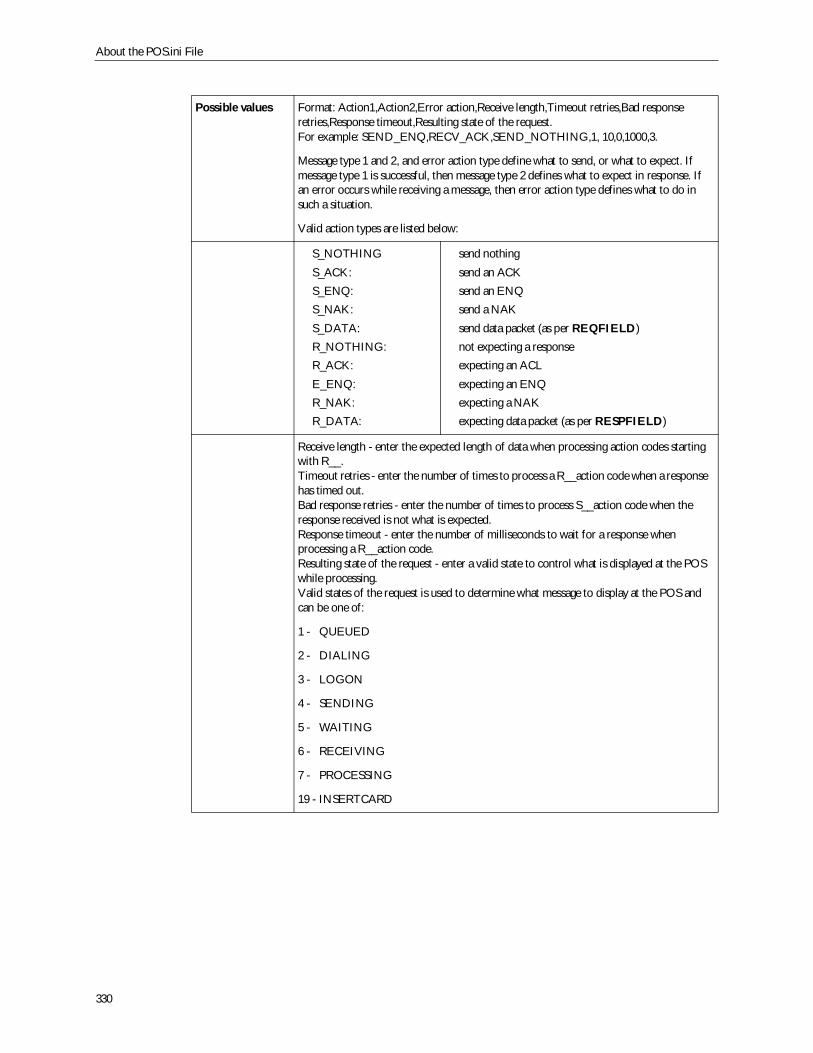
About the POS.ini File
330
Possible values Format: Action1,Action2,Error action,Receive length,Timeout retries,Bad responseretries,Response timeout,Resulting state of the request.For example: SEND_ENQ,RECV_ACK,SEND_NOTHING,1, 10,0,1000,3.
Message type 1 and 2, and error action type define what to send, or what to expect. Ifmessage type 1 is successful, then message type 2 defines what to expect in response. Ifan error occurs while receiving a message, then error action type defines what to do insuch a situation.
Valid action types are listed below:
S_NOTHINGS_ACK:S_ENQ:S_NAK:S_DATA:R_NOTHING:R_ACK:E_ENQ:R_NAK:R_DATA:
send nothingsend an ACKsend an ENQsend a NAKsend data packet (as per REQFIELD)not expecting a responseexpecting an ACLexpecting an ENQexpecting a NAKexpecting data packet (as per RESPFIELD)
Receive length - enter the expected length of data when processing action codes startingwith R__.Timeout retries - enter the number of times to process a R__action code when a responsehas timed out.Bad response retries - enter the number of times to process S__action code when theresponse received is not what is expected.Response timeout - enter the number of milliseconds to wait for a response whenprocessing a R__action code.Resulting state of the request - enter a valid state to control what is displayed at the POSwhile processing.Valid states of the request is used to determine what message to display at the POS andcan be one of:
1 - QUEUED
2 - DIALING
3 - LOGON
4 - SENDING
5 - WAITING
6 - RECEIVING
7 - PROCESSING
19 - INSERTCARD
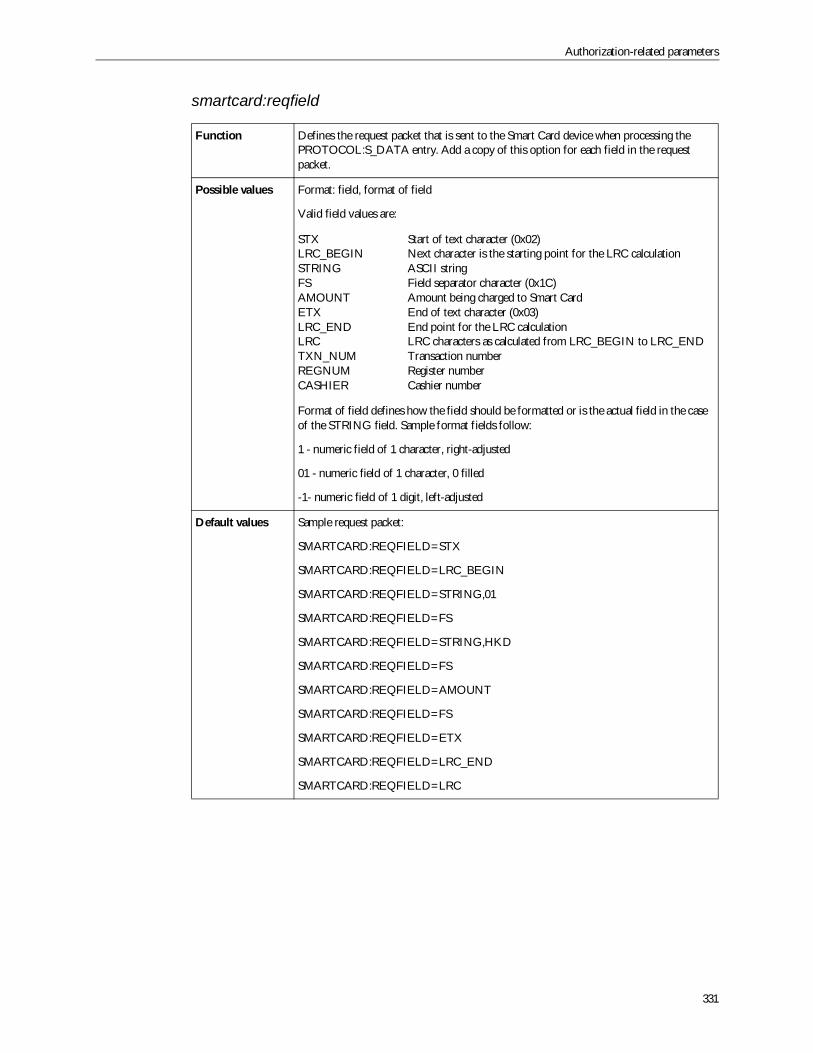
Authorization-related parameters
331
smartcard:reqfield
Function Defines the request packet that is sent to the Smart Card device when processing thePROTOCOL:S_DATA entry. Add a copy of this option for each field in the requestpacket.
Possible values Format: field, format of field
Valid field values are:
STXLRC_BEGINSTRINGFSAMOUNTETXLRC_ENDLRCTXN_NUMREGNUMCASHIER
Start of text character (0x02)Next character is the starting point for the LRC calculationASCII stringField separator character (0x1C)Amount being charged to Smart CardEnd of text character (0x03)End point for the LRC calculationLRC characters as calculated from LRC_BEGIN to LRC_ENDTransaction numberRegister numberCashier number
Format of field defines how the field should be formatted or is the actual field in the caseof the STRING field. Sample format fields follow:
1 - numeric field of 1 character, right-adjusted
01 - numeric field of 1 character, 0 filled
-1- numeric field of 1 digit, left-adjusted
Default values Sample request packet:
SMARTCARD:REQFIELD=STX
SMARTCARD:REQFIELD=LRC_BEGIN
SMARTCARD:REQFIELD=STRING,01
SMARTCARD:REQFIELD=FS
SMARTCARD:REQFIELD=STRING,HKD
SMARTCARD:REQFIELD=FS
SMARTCARD:REQFIELD=AMOUNT
SMARTCARD:REQFIELD=FS
SMARTCARD:REQFIELD=ETX
SMARTCARD:REQFIELD=LRC_END
SMARTCARD:REQFIELD=LRC
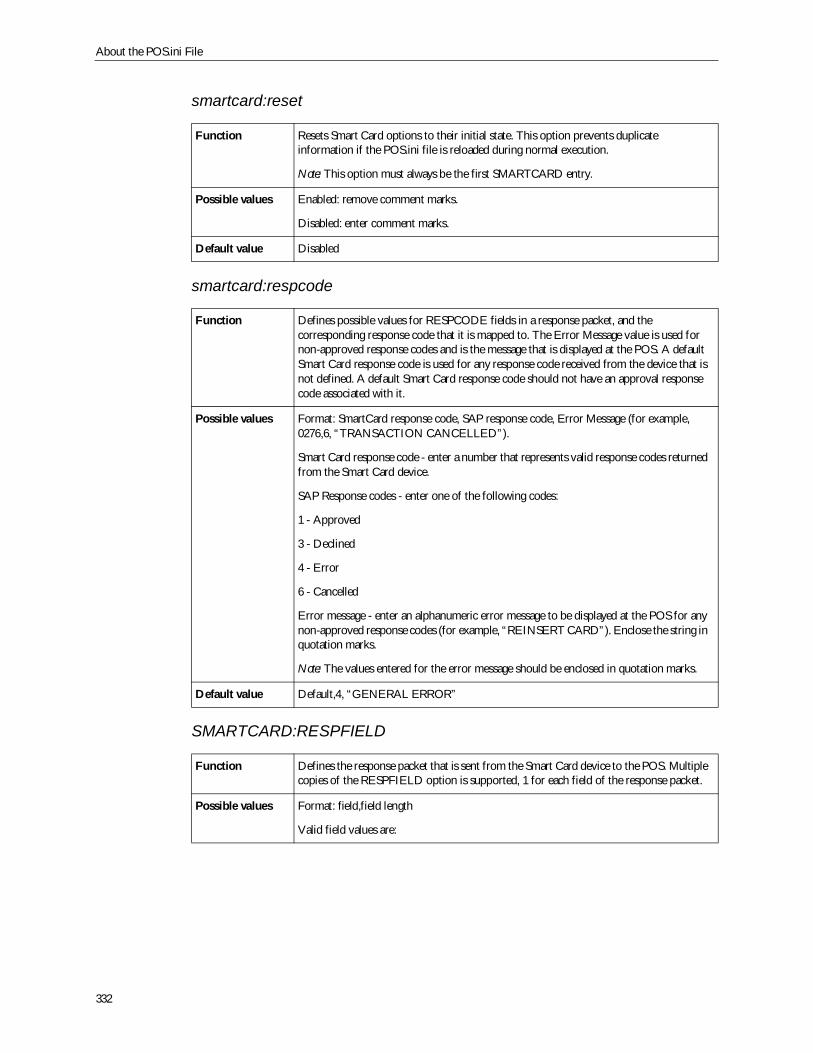
About the POS.ini File
332
smartcard:reset
smartcard:respcode
SMARTCARD:RESPFIELD
Function Resets Smart Card options to their initial state. This option prevents duplicateinformation if the POS.ini file is reloaded during normal execution.
Note: This option must always be the first SMARTCARD entry.
Possible values Enabled: remove comment marks.
Disabled: enter comment marks.
Default value Disabled
Function Defines possible values for RESPCODE fields in a response packet, and thecorresponding response code that it is mapped to. The Error Message value is used fornon-approved response codes and is the message that is displayed at the POS. A defaultSmart Card response code is used for any response code received from the device that isnot defined. A default Smart Card response code should not have an approval responsecode associated with it.
Possible values Format: SmartCard response code, SAP response code, Error Message (for example,0276,6, “TRANSACTION CANCELLED”).
Smart Card response code - enter a number that represents valid response codes returnedfrom the Smart Card device.
SAP Response codes - enter one of the following codes:
1 - Approved
3 - Declined
4 - Error
6 - Cancelled
Error message - enter an alphanumeric error message to be displayed at the POS for anynon-approved response codes (for example, “REINSERT CARD”). Enclose the string inquotation marks.
Note: The values entered for the error message should be enclosed in quotation marks.
Default value Default,4, “GENERAL ERROR”
Function Defines the response packet that is sent from the Smart Card device to the POS. Multiplecopies of the RESPFIELD option is supported, 1 for each field of the response packet.
Possible values Format: field,field length
Valid field values are:
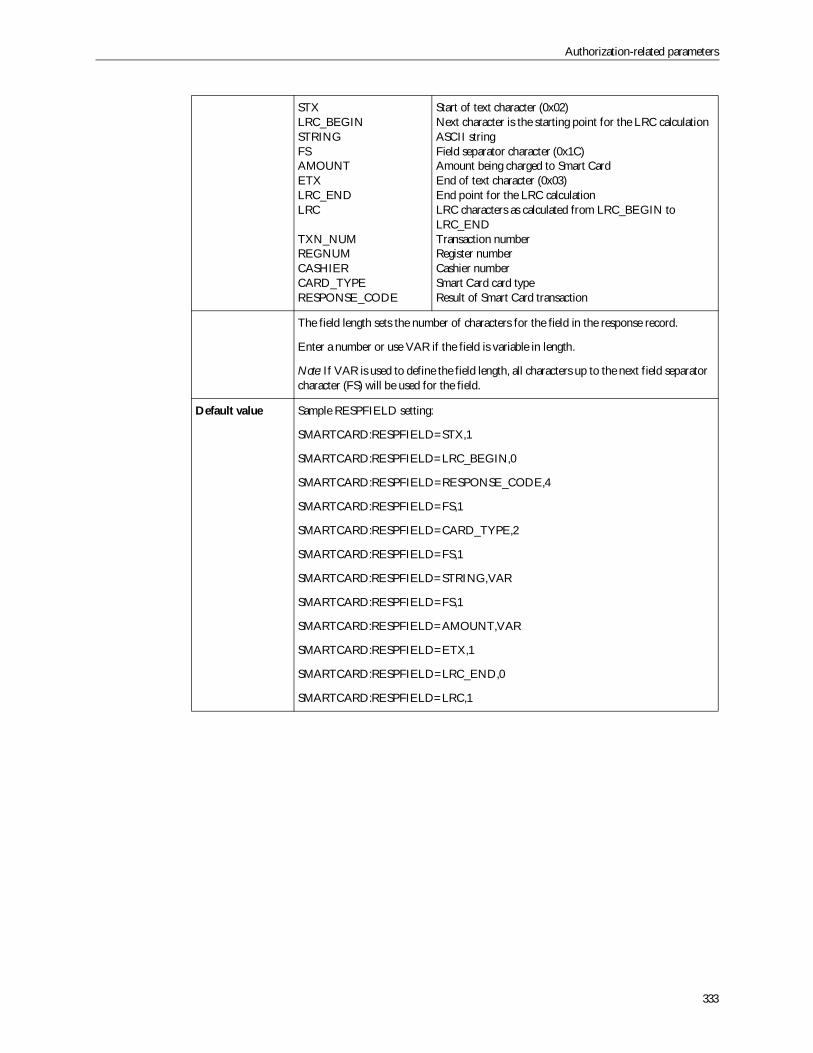
Authorization-related parameters
333
STXLRC_BEGINSTRINGFSAMOUNTETXLRC_ENDLRC
TXN_NUMREGNUMCASHIERCARD_TYPERESPONSE_CODE
Start of text character (0x02)Next character is the starting point for the LRC calculationASCII stringField separator character (0x1C)Amount being charged to Smart CardEnd of text character (0x03)End point for the LRC calculationLRC characters as calculated from LRC_BEGIN toLRC_ENDTransaction numberRegister numberCashier numberSmart Card card typeResult of Smart Card transaction
The field length sets the number of characters for the field in the response record.
Enter a number or use VAR if the field is variable in length.
Note: If VAR is used to define the field length, all characters up to the next field separatorcharacter (FS) will be used for the field.
Default value Sample RESPFIELD setting:
SMARTCARD:RESPFIELD=STX,1
SMARTCARD:RESPFIELD=LRC_BEGIN,0
SMARTCARD:RESPFIELD=RESPONSE_CODE,4
SMARTCARD:RESPFIELD=FS,1
SMARTCARD:RESPFIELD=CARD_TYPE,2
SMARTCARD:RESPFIELD=FS,1
SMARTCARD:RESPFIELD=STRING,VAR
SMARTCARD:RESPFIELD=FS,1
SMARTCARD:RESPFIELD=AMOUNT,VAR
SMARTCARD:RESPFIELD=ETX,1
SMARTCARD:RESPFIELD=LRC_END,0
SMARTCARD:RESPFIELD=LRC,1
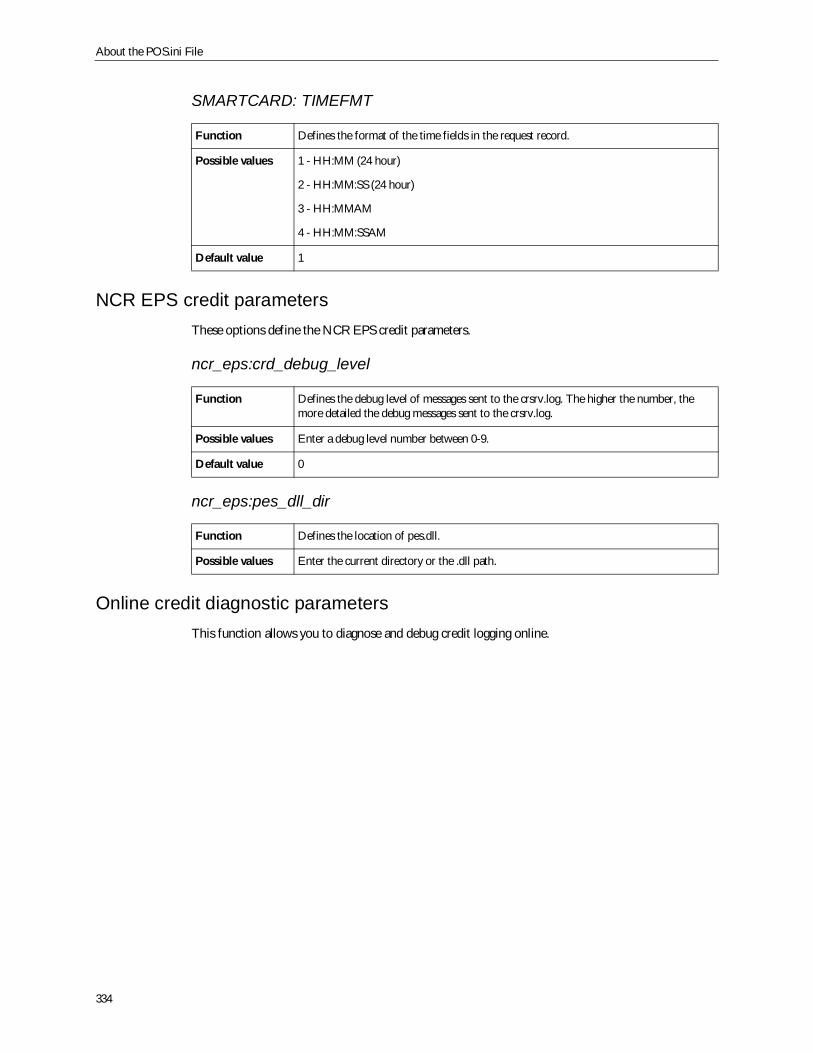
About the POS.ini File
334
SMARTCARD: TIMEFMT
NCR EPS credit parametersThese options define the NCR EPS credit parameters.
ncr_eps:crd_debug_level
ncr_eps:pes_dll_dir
Online credit diagnostic parametersThis function allows you to diagnose and debug credit logging online.
Function Defines the format of the time fields in the request record.
Possible values 1 - HH:MM (24 hour)
2 - HH:MM:SS (24 hour)
3 - HH:MMAM
4 - HH:MM:SSAM
Default value 1
Function Defines the debug level of messages sent to the crsrv.log. The higher the number, themore detailed the debug messages sent to the crsrv.log.
Possible values Enter a debug level number between 0-9.
Default value 0
Function Defines the location of pes.dll.
Possible values Enter the current directory or the .dll path.
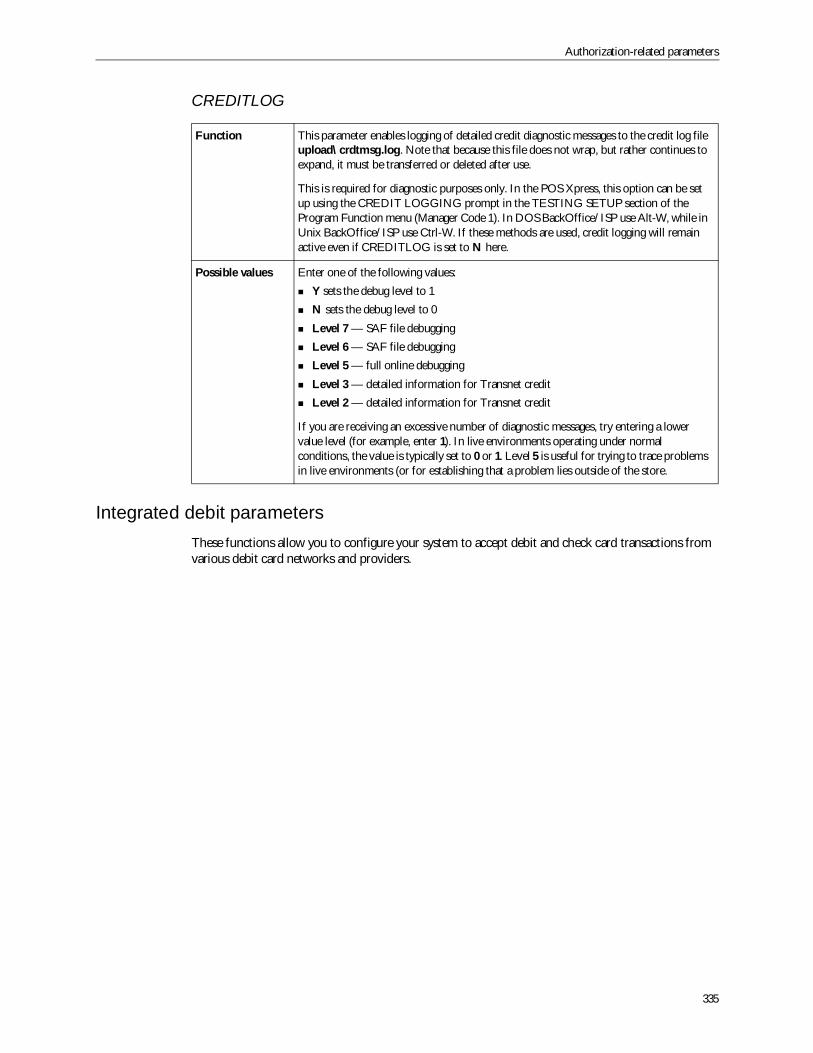
Authorization-related parameters
335
CREDITLOG
Integrated debit parametersThese functions allow you to configure your system to accept debit and check card transactions fromvarious debit card networks and providers.
Function This parameter enables logging of detailed credit diagnostic messages to the credit log fileupload\crdtmsg.log. Note that because this file does not wrap, but rather continues toexpand, it must be transferred or deleted after use.
This is required for diagnostic purposes only. In the POS Xpress, this option can be setup using the CREDIT LOGGING prompt in the TESTING SETUP section of theProgram Function menu (Manager Code 1). In DOS BackOffice/ISP use Alt-W, while inUnix BackOffice/ISP use Ctrl-W. If these methods are used, credit logging will remainactive even if CREDITLOG is set to N here.
Possible values Enter one of the following values:Y sets the debug level to 1N sets the debug level to 0Level 7 — SAF file debuggingLevel 6 — SAF file debuggingLevel 5 — full online debuggingLevel 3 — detailed information for Transnet creditLevel 2 — detailed information for Transnet credit
If you are receiving an excessive number of diagnostic messages, try entering a lowervalue level (for example, enter 1). In live environments operating under normalconditions, the value is typically set to 0 or 1. Level 5 is useful for trying to trace problemsin live environments (or for establishing that a problem lies outside of the store.
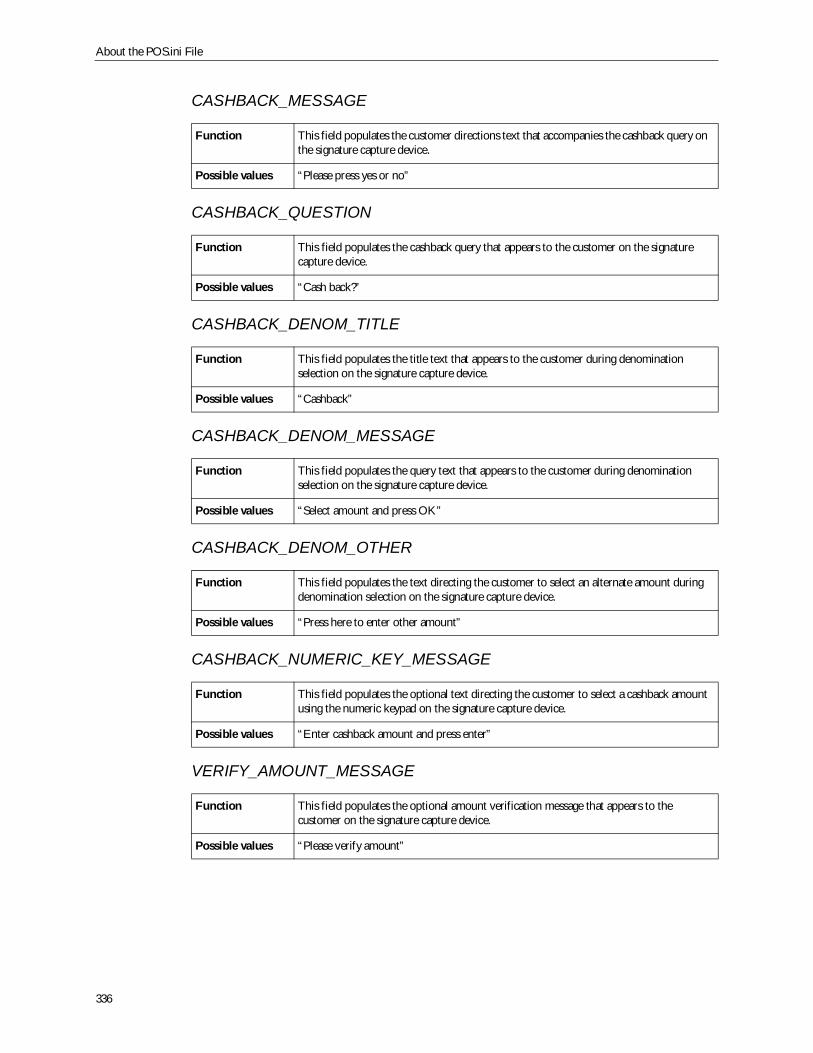
About the POS.ini File
336
CASHBACK_MESSAGE
CASHBACK_QUESTION
CASHBACK_DENOM_TITLE
CASHBACK_DENOM_MESSAGE
CASHBACK_DENOM_OTHER
CASHBACK_NUMERIC_KEY_MESSAGE
VERIFY_AMOUNT_MESSAGE
Function This field populates the customer directions text that accompanies the cashback query onthe signature capture device.
Possible values “Please press yes or no”
Function This field populates the cashback query that appears to the customer on the signaturecapture device.
Possible values “Cash back?”
Function This field populates the title text that appears to the customer during denominationselection on the signature capture device.
Possible values “Cashback”
Function This field populates the query text that appears to the customer during denominationselection on the signature capture device.
Possible values “Select amount and press OK”
Function This field populates the text directing the customer to select an alternate amount duringdenomination selection on the signature capture device.
Possible values “Press here to enter other amount”
Function This field populates the optional text directing the customer to select a cashback amountusing the numeric keypad on the signature capture device.
Possible values “Enter cashback amount and press enter”
Function This field populates the optional amount verification message that appears to thecustomer on the signature capture device.
Possible values “Please verify amount”
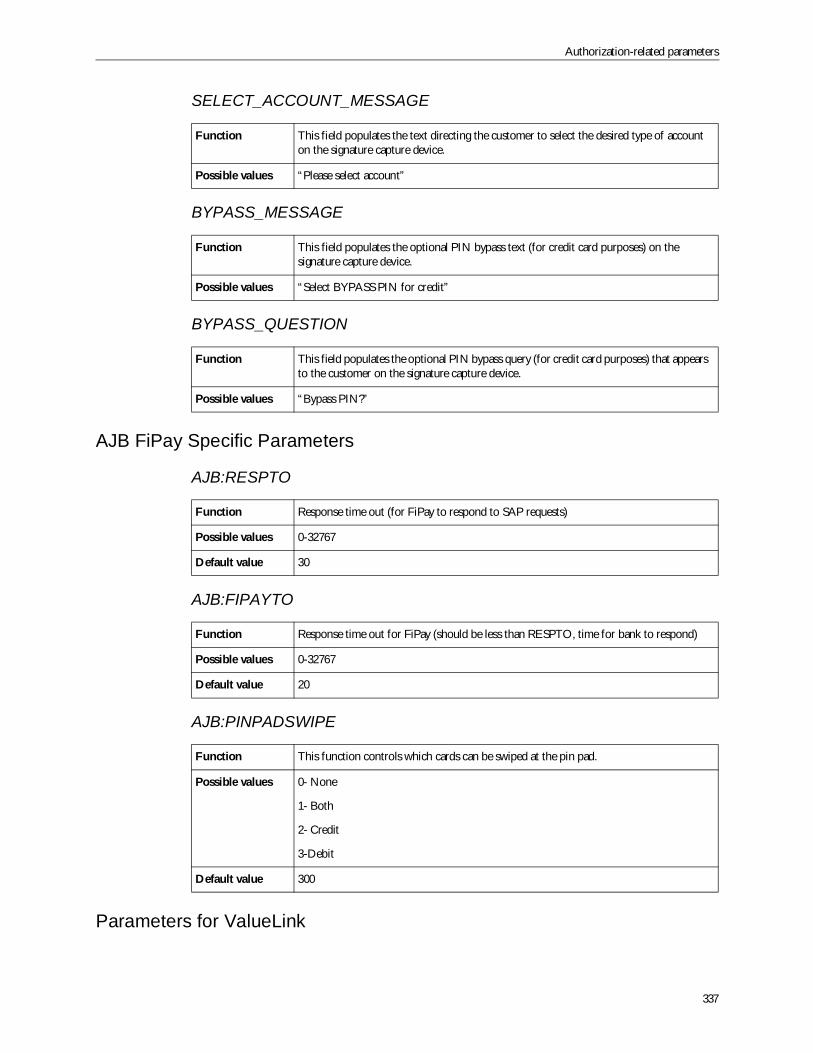
Authorization-related parameters
337
SELECT_ACCOUNT_MESSAGE
BYPASS_MESSAGE
BYPASS_QUESTION
AJB FiPay Specific Parameters
AJB:RESPTO
AJB:FIPAYTO
AJB:PINPADSWIPE
Parameters for ValueLink
Function This field populates the text directing the customer to select the desired type of accounton the signature capture device.
Possible values “Please select account”
Function This field populates the optional PIN bypass text (for credit card purposes) on thesignature capture device.
Possible values “Select BYPASS PIN for credit”
Function This field populates the optional PIN bypass query (for credit card purposes) that appearsto the customer on the signature capture device.
Possible values “Bypass PIN?”
Function Response time out (for FiPay to respond to SAP requests)
Possible values 0-32767
Default value 30
Function Response time out for FiPay (should be less than RESPTO, time for bank to respond)
Possible values 0-32767
Default value 20
Function This function controls which cards can be swiped at the pin pad.
Possible values 0- None
1- Both
2- Credit
3-Debit
Default value 300
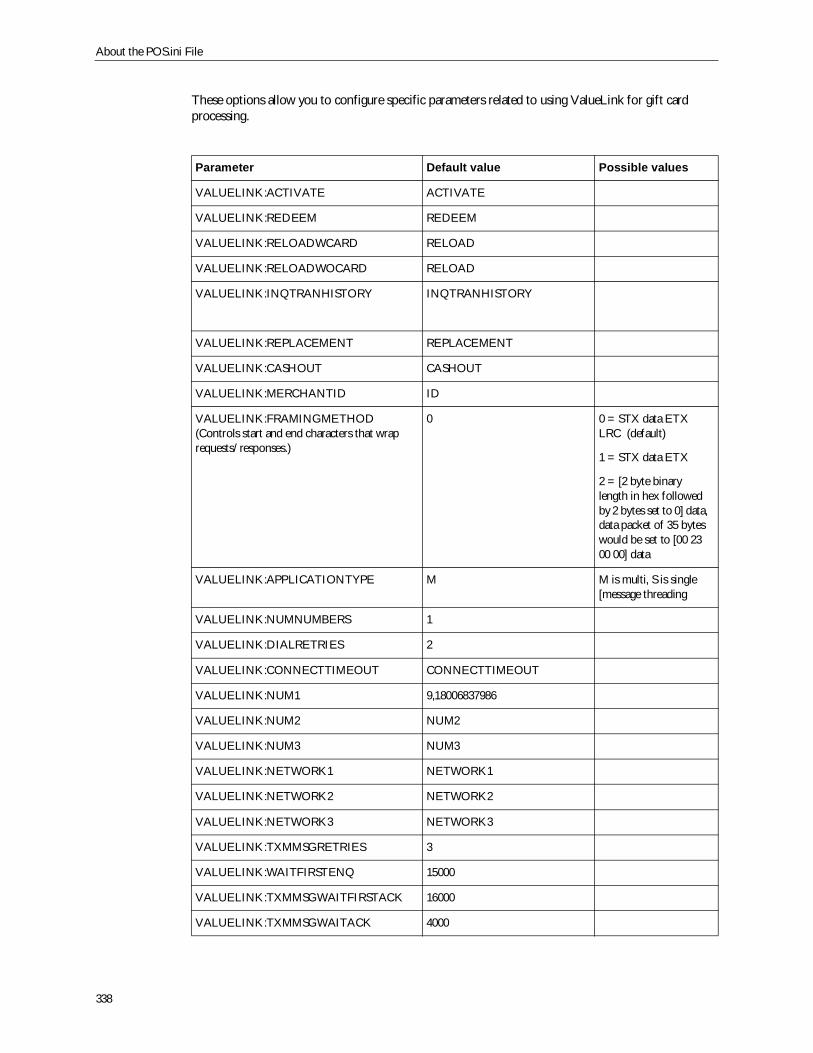
About the POS.ini File
338
These options allow you to configure specific parameters related to using ValueLink for gift cardprocessing.
Parameter Default value Possible values
VALUELINK:ACTIVATE ACTIVATE
VALUELINK:REDEEM REDEEM
VALUELINK:RELOADWCARD RELOAD
VALUELINK:RELOADWOCARD RELOAD
VALUELINK:INQTRANHISTORY INQTRANHISTORY
VALUELINK:REPLACEMENT REPLACEMENT
VALUELINK:CASHOUT CASHOUT
VALUELINK:MERCHANTID ID
VALUELINK:FRAMINGMETHOD(Controls start and end characters that wraprequests/responses.)
0 0 = STX data ETXLRC (default)
1 = STX data ETX
2 = [2 byte binarylength in hex followedby 2 bytes set to 0] data,data packet of 35 byteswould be set to [00 2300 00] data
VALUELINK:APPLICATIONTYPE M M is multi, S is single[message threading
VALUELINK:NUMNUMBERS 1
VALUELINK:DIALRETRIES 2
VALUELINK:CONNECTTIMEOUT CONNECTTIMEOUT
VALUELINK:NUM1 9,18006837986
VALUELINK:NUM2 NUM2
VALUELINK:NUM3 NUM3
VALUELINK:NETWORK1 NETWORK1
VALUELINK:NETWORK2 NETWORK2
VALUELINK:NETWORK3 NETWORK3
VALUELINK:TXMMSGRETRIES 3
VALUELINK:WAITFIRSTENQ 15000
VALUELINK:TXMMSGWAITFIRSTACK 16000
VALUELINK:TXMMSGWAITACK 4000

Authorization-related parameters
339
Centralized returns authorization parametersThese options were created to support the Centralized Returns Authorization database(ExpressReturns) component. Note that in addition to setting the following two parameters to supportthis feature, you must also ensure that the value of the USEAUTOTENDERMENU parameter is setto Y. For more information on this parameter, see “USEAUTOTENDERMENU” on page 269.
VALUELINK:TXMACKWAITENQ 15000
VALUELINK:TXMACKWAITEOT 4000
VALUELINK:TXMNAKWAITSTX 10000
VALUELINK:RECACKWAITRESP 15000
VALUELINK:RECACKWAITRESP 15000
VALUELINK:RECACKTOTALWAITRESP 30000
VALUELINK:INTERCHAR 4000
VALUELINK:RECSYNWAITRESP 10000
VALUELINK:RECSYNDELAY 120000
VALUELINK:PROMPTFIELDS PROMPTFIELDS
Parameter Default value Possible values
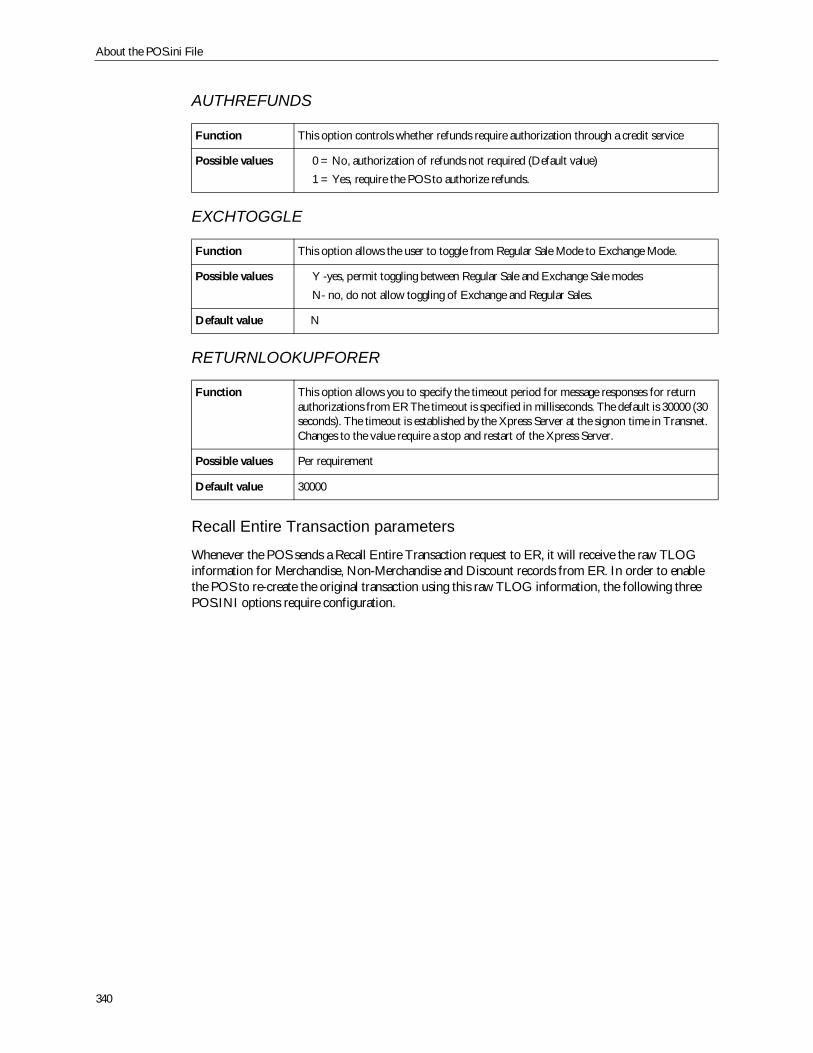
About the POS.ini File
340
AUTHREFUNDS
EXCHTOGGLE
RETURNLOOKUPFORER
Recall Entire Transaction parameters
Whenever the POS sends a Recall Entire Transaction request to ER, it will receive the raw TLOGinformation for Merchandise, Non-Merchandise and Discount records from ER. In order to enablethe POS to re-create the original transaction using this raw TLOG information, the following threePOS.INI options require configuration.
Function This option controls whether refunds require authorization through a credit service
Possible values 0 = No, authorization of refunds not required (Default value)1 = Yes, require the POS to authorize refunds.
Function This option allows the user to toggle from Regular Sale Mode to Exchange Mode.
Possible values Y -yes, permit toggling between Regular Sale and Exchange Sale modesN- no, do not allow toggling of Exchange and Regular Sales.
Default value N
Function This option allows you to specify the timeout period for message responses for returnauthorizations from ER The timeout is specified in milliseconds. The default is 30000 (30seconds). The timeout is established by the Xpress Server at the signon time in Transnet.Changes to the value require a stop and restart of the Xpress Server.
Possible values Per requirement
Default value 30000
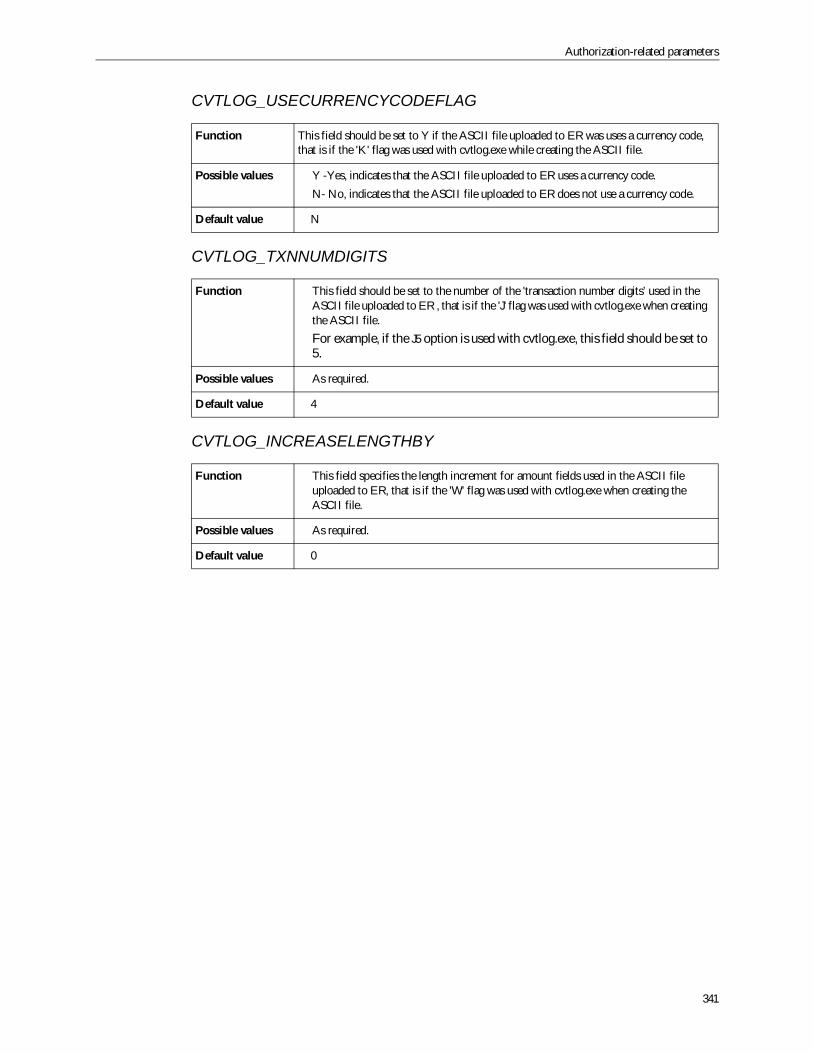
Authorization-related parameters
341
CVTLOG_USECURRENCYCODEFLAG
CVTLOG_TXNNUMDIGITS
CVTLOG_INCREASELENGTHBY
Function This field should be set to Y if the ASCII file uploaded to ER was uses a currency code,that is if the 'K' flag was used with cvtlog.exe while creating the ASCII file.
Possible values Y -Yes, indicates that the ASCII file uploaded to ER uses a currency code.N- No, indicates that the ASCII file uploaded to ER does not use a currency code.
Default value N
Function This field should be set to the number of the 'transaction number digits’ used in theASCII file uploaded to ER , that is if the 'J' flag was used with cvtlog.exe when creatingthe ASCII file.For example, if the J5 option is used with cvtlog.exe, this field should be set to5.
Possible values As required.
Default value 4
Function This field specifies the length increment for amount fields used in the ASCII fileuploaded to ER, that is if the 'W' flag was used with cvtlog.exe when creating theASCII file.
Possible values As required.
Default value 0
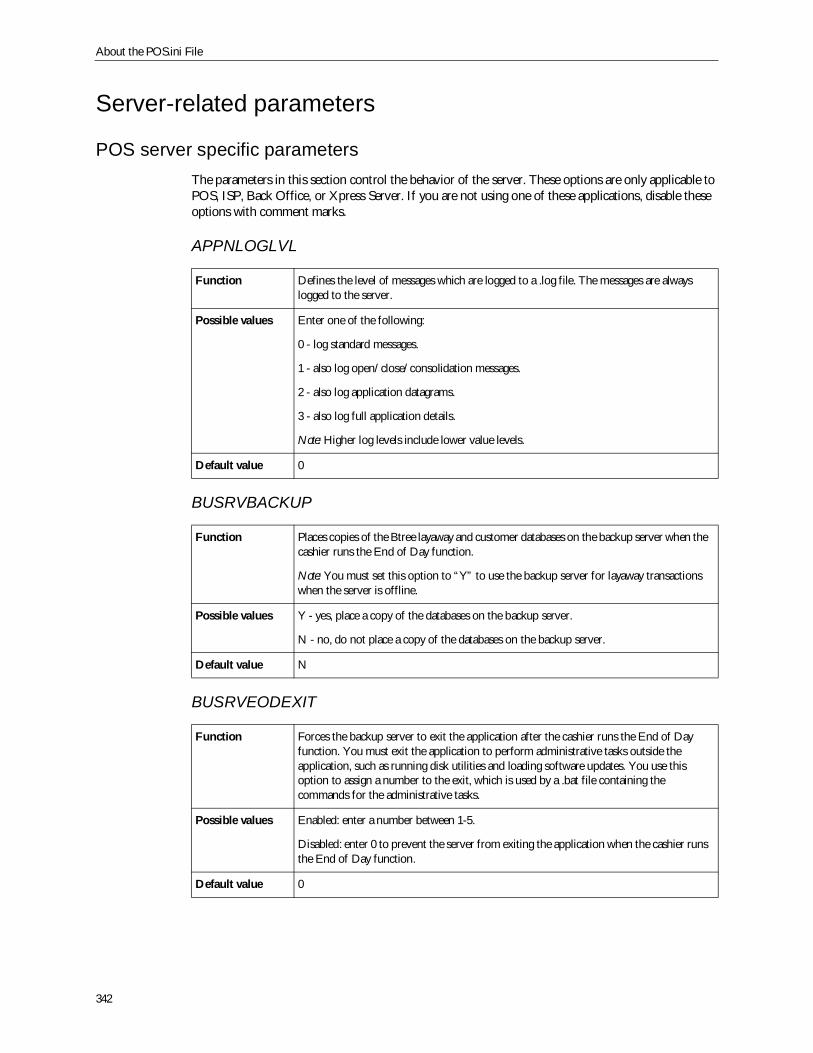
About the POS.ini File
342
Server-related parameters
POS server specific parametersThe parameters in this section control the behavior of the server. These options are only applicable toPOS, ISP, Back Office, or Xpress Server. If you are not using one of these applications, disable theseoptions with comment marks.
APPNLOGLVL
BUSRVBACKUP
BUSRVEODEXIT
Function Defines the level of messages which are logged to a .log file. The messages are alwayslogged to the server.
Possible values Enter one of the following:
0 - log standard messages.
1 - also log open/close/consolidation messages.
2 - also log application datagrams.
3 - also log full application details.
Note: Higher log levels include lower value levels.
Default value 0
Function Places copies of the Btree layaway and customer databases on the backup server when thecashier runs the End of Day function.
Note: You must set this option to “Y” to use the backup server for layaway transactionswhen the server is offline.
Possible values Y - yes, place a copy of the databases on the backup server.
N - no, do not place a copy of the databases on the backup server.
Default value N
Function Forces the backup server to exit the application after the cashier runs the End of Dayfunction. You must exit the application to perform administrative tasks outside theapplication, such as running disk utilities and loading software updates. You use thisoption to assign a number to the exit, which is used by a .bat file containing thecommands for the administrative tasks.
Possible values Enabled: enter a number between 1-5.
Disabled: enter 0 to prevent the server from exiting the application when the cashier runsthe End of Day function.
Default value 0
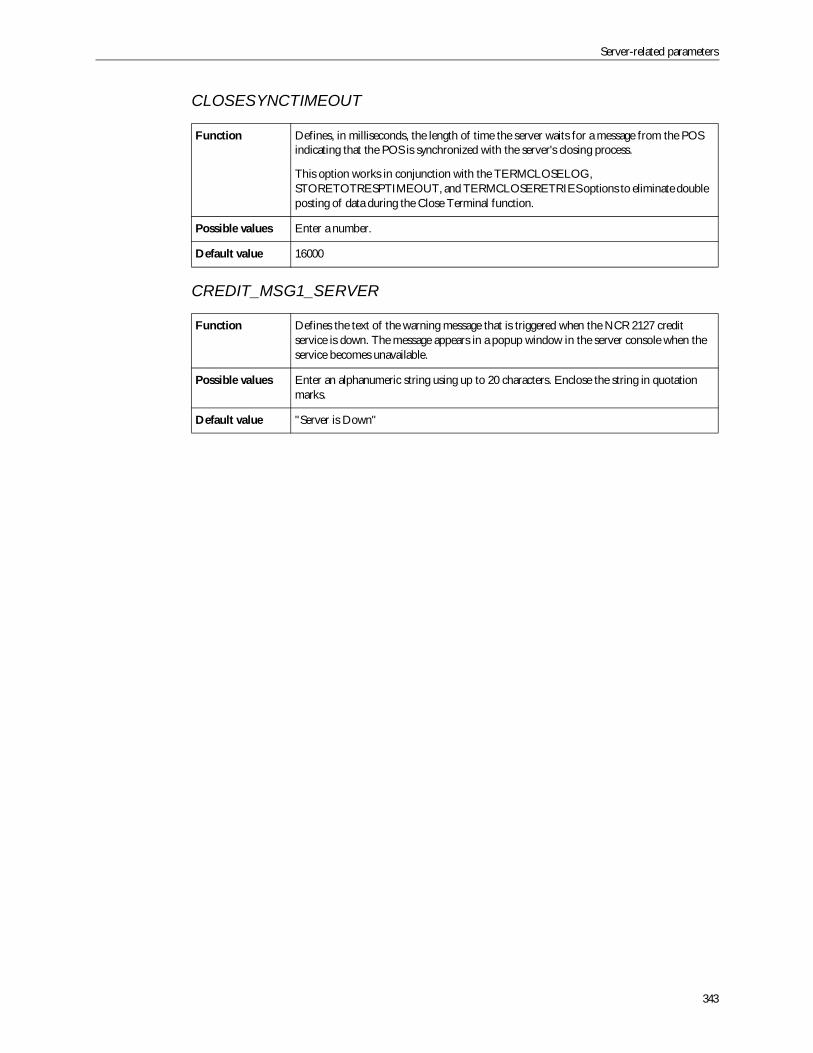
Server-related parameters
343
CLOSESYNCTIMEOUT
CREDIT_MSG1_SERVER
Function Defines, in milliseconds, the length of time the server waits for a message from the POSindicating that the POS is synchronized with the server's closing process.
This option works in conjunction with the TERMCLOSELOG,STORETOTRESPTIMEOUT, and TERMCLOSERETRIES options to eliminate doubleposting of data during the Close Terminal function.
Possible values Enter a number.
Default value 16000
Function Defines the text of the warning message that is triggered when the NCR 2127 creditservice is down. The message appears in a popup window in the server console when theservice becomes unavailable.
Possible values Enter an alphanumeric string using up to 20 characters. Enclose the string in quotationmarks.
Default value "Server is Down"
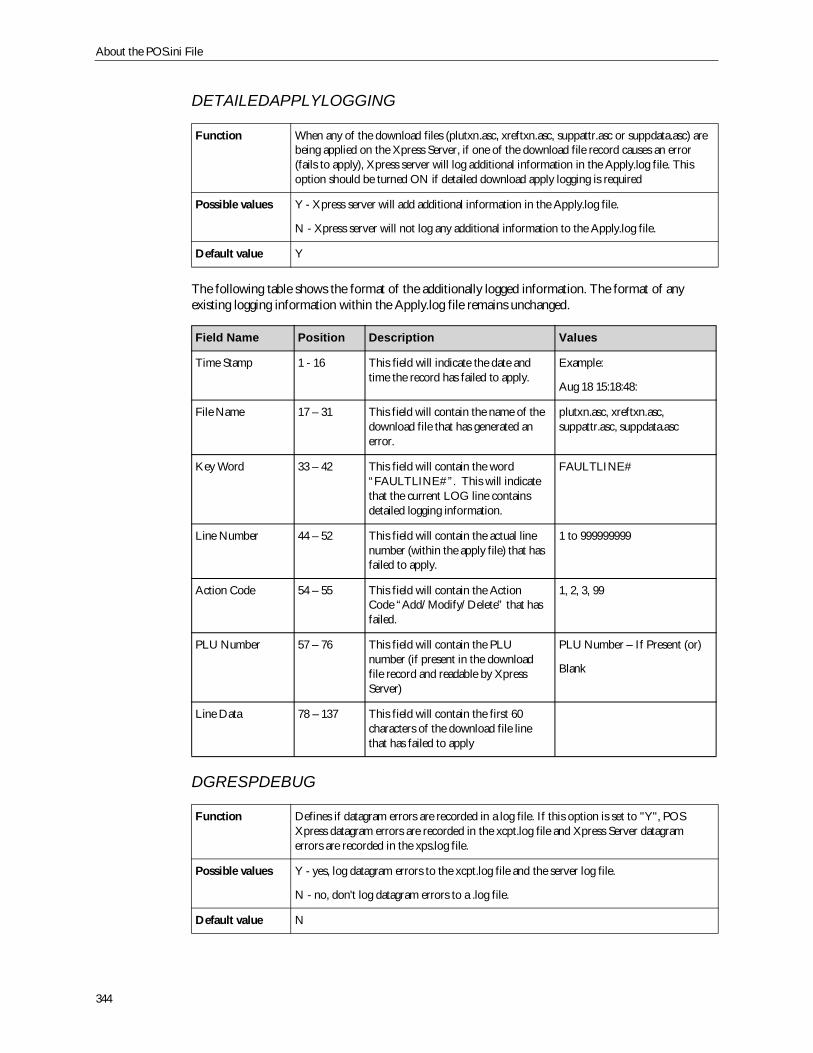
About the POS.ini File
344
DETAILEDAPPLYLOGGING
The following table shows the format of the additionally logged information. The format of anyexisting logging information within the Apply.log file remains unchanged.
DGRESPDEBUG
Function When any of the download files (plutxn.asc, xreftxn.asc, suppattr.asc or suppdata.asc) arebeing applied on the Xpress Server, if one of the download file record causes an error(fails to apply), Xpress server will log additional information in the Apply.log file. Thisoption should be turned ON if detailed download apply logging is required
Possible values Y - Xpress server will add additional information in the Apply.log file.
N - Xpress server will not log any additional information to the Apply.log file.
Default value Y
Field Name Position Description Values
Time Stamp 1 - 16 This field will indicate the date andtime the record has failed to apply.
Example:
Aug 18 15:18:48:
File Name 17 – 31 This field will contain the name of thedownload file that has generated anerror.
plutxn.asc, xreftxn.asc,suppattr.asc, suppdata.asc
Key Word 33 – 42 This field will contain the word“FAULTLINE#”. This will indicatethat the current LOG line containsdetailed logging information.
FAULTLINE#
Line Number 44 – 52 This field will contain the actual linenumber (within the apply file) that hasfailed to apply.
1 to 999999999
Action Code 54 – 55 This field will contain the ActionCode “Add/Modify/Delete” that hasfailed.
1, 2, 3, 99
PLU Number 57 – 76 This field will contain the PLUnumber (if present in the downloadfile record and readable by XpressServer)
PLU Number – If Present (or)
Blank
Line Data 78 – 137 This field will contain the first 60characters of the download file linethat has failed to apply
Function Defines if datagram errors are recorded in a log file. If this option is set to "Y", POSXpress datagram errors are recorded in the xcpt.log file and Xpress Server datagramerrors are recorded in the xps.log file.
Possible values Y - yes, log datagram errors to the xcpt.log file and the server log file.
N - no, don't log datagram errors to a .log file.
Default value N
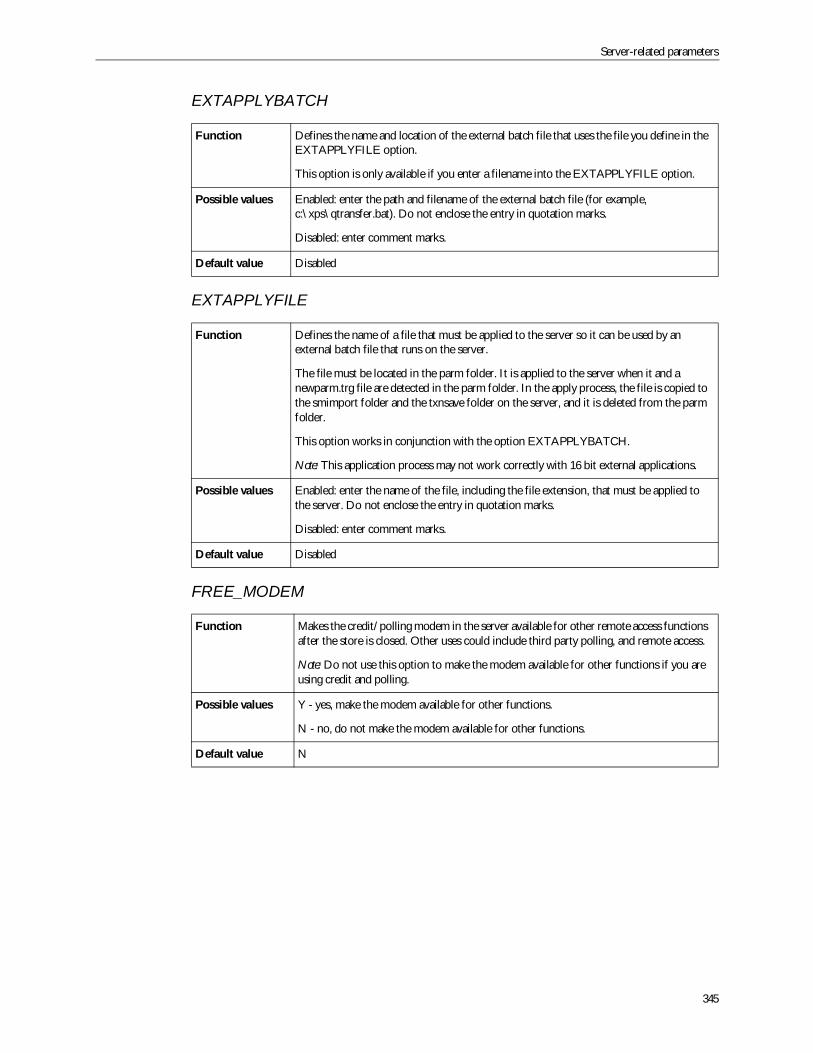
Server-related parameters
345
EXTAPPLYBATCH
EXTAPPLYFILE
FREE_MODEM
Function Defines the name and location of the external batch file that uses the file you define in theEXTAPPLYFILE option.
This option is only available if you enter a filename into the EXTAPPLYFILE option.
Possible values Enabled: enter the path and filename of the external batch file (for example,c:\xps\qtransfer.bat). Do not enclose the entry in quotation marks.
Disabled: enter comment marks.
Default value Disabled
Function Defines the name of a file that must be applied to the server so it can be used by anexternal batch file that runs on the server.
The file must be located in the parm folder. It is applied to the server when it and anewparm.trg file are detected in the parm folder. In the apply process, the file is copied tothe smimport folder and the txnsave folder on the server, and it is deleted from the parmfolder.
This option works in conjunction with the option EXTAPPLYBATCH.
Note: This application process may not work correctly with 16 bit external applications.
Possible values Enabled: enter the name of the file, including the file extension, that must be applied tothe server. Do not enclose the entry in quotation marks.
Disabled: enter comment marks.
Default value Disabled
Function Makes the credit/polling modem in the server available for other remote access functionsafter the store is closed. Other uses could include third party polling, and remote access.
Note: Do not use this option to make the modem available for other functions if you areusing credit and polling.
Possible values Y - yes, make the modem available for other functions.
N - no, do not make the modem available for other functions.
Default value N
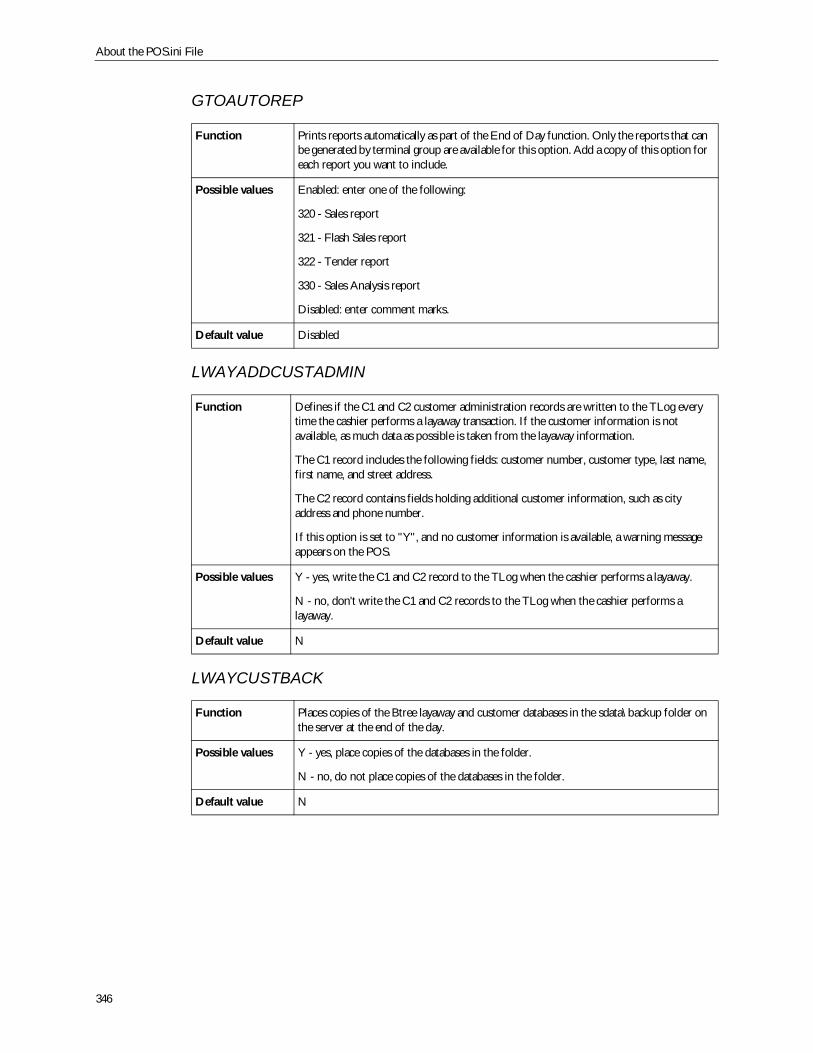
About the POS.ini File
346
GTOAUTOREP
LWAYADDCUSTADMIN
LWAYCUSTBACK
Function Prints reports automatically as part of the End of Day function. Only the reports that canbe generated by terminal group are available for this option. Add a copy of this option foreach report you want to include.
Possible values Enabled: enter one of the following:
320 - Sales report
321 - Flash Sales report
322 - Tender report
330 - Sales Analysis report
Disabled: enter comment marks.
Default value Disabled
Function Defines if the C1 and C2 customer administration records are written to the TLog everytime the cashier performs a layaway transaction. If the customer information is notavailable, as much data as possible is taken from the layaway information.
The C1 record includes the following fields: customer number, customer type, last name,first name, and street address.
The C2 record contains fields holding additional customer information, such as cityaddress and phone number.
If this option is set to "Y", and no customer information is available, a warning messageappears on the POS.
Possible values Y - yes, write the C1 and C2 record to the TLog when the cashier performs a layaway.
N - no, don't write the C1 and C2 records to the TLog when the cashier performs alayaway.
Default value N
Function Places copies of the Btree layaway and customer databases in the sdata\backup folder onthe server at the end of the day.
Possible values Y - yes, place copies of the databases in the folder.
N - no, do not place copies of the databases in the folder.
Default value N
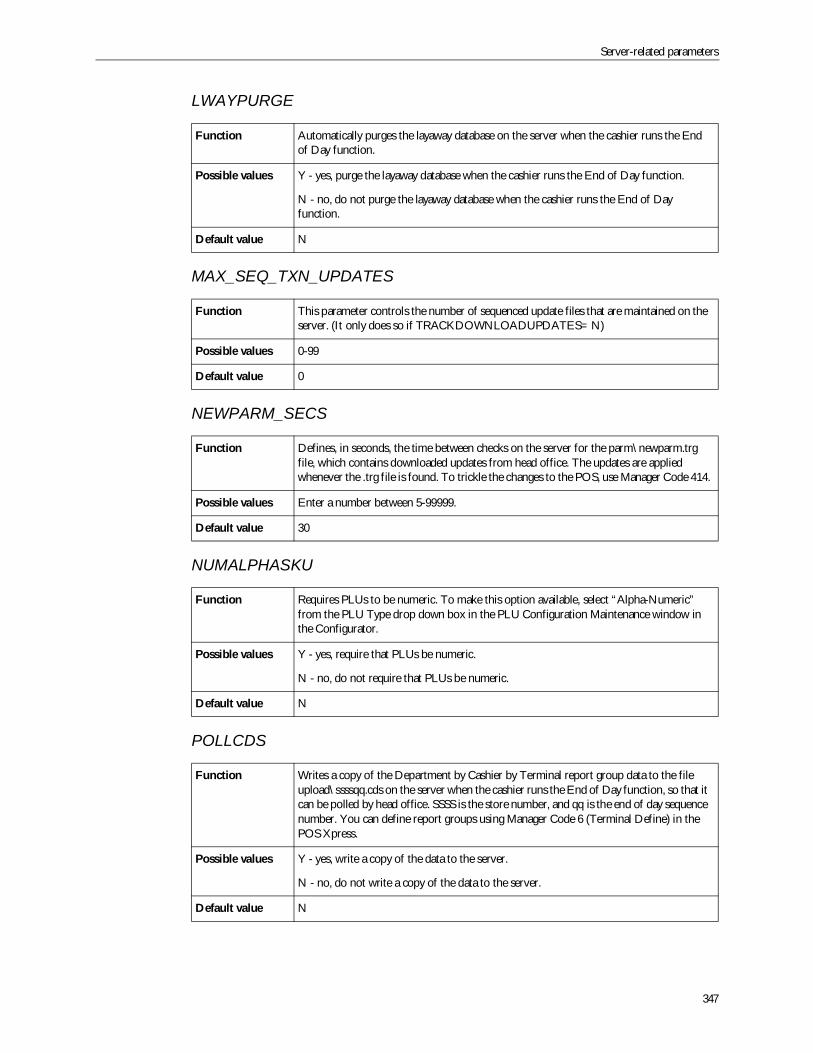
Server-related parameters
347
LWAYPURGE
MAX_SEQ_TXN_UPDATES
NEWPARM_SECS
NUMALPHASKU
POLLCDS
Function Automatically purges the layaway database on the server when the cashier runs the Endof Day function.
Possible values Y - yes, purge the layaway database when the cashier runs the End of Day function.
N - no, do not purge the layaway database when the cashier runs the End of Dayfunction.
Default value N
Function This parameter controls the number of sequenced update files that are maintained on theserver. (It only does so if TRACKDOWNLOADUPDATES= N)
Possible values 0-99
Default value 0
Function Defines, in seconds, the time between checks on the server for the parm\newparm.trgfile, which contains downloaded updates from head office. The updates are appliedwhenever the .trg file is found. To trickle the changes to the POS, use Manager Code 414.
Possible values Enter a number between 5-99999.
Default value 30
Function Requires PLUs to be numeric. To make this option available, select “Alpha-Numeric”from the PLU Type drop down box in the PLU Configuration Maintenance window inthe Configurator.
Possible values Y - yes, require that PLUs be numeric.
N - no, do not require that PLUs be numeric.
Default value N
Function Writes a copy of the Department by Cashier by Terminal report group data to the fileupload\ssssqq.cds on the server when the cashier runs the End of Day function, so that itcan be polled by head office. SSSS is the store number, and qq is the end of day sequencenumber. You can define report groups using Manager Code 6 (Terminal Define) in thePOS Xpress.
Possible values Y - yes, write a copy of the data to the server.
N - no, do not write a copy of the data to the server.
Default value N
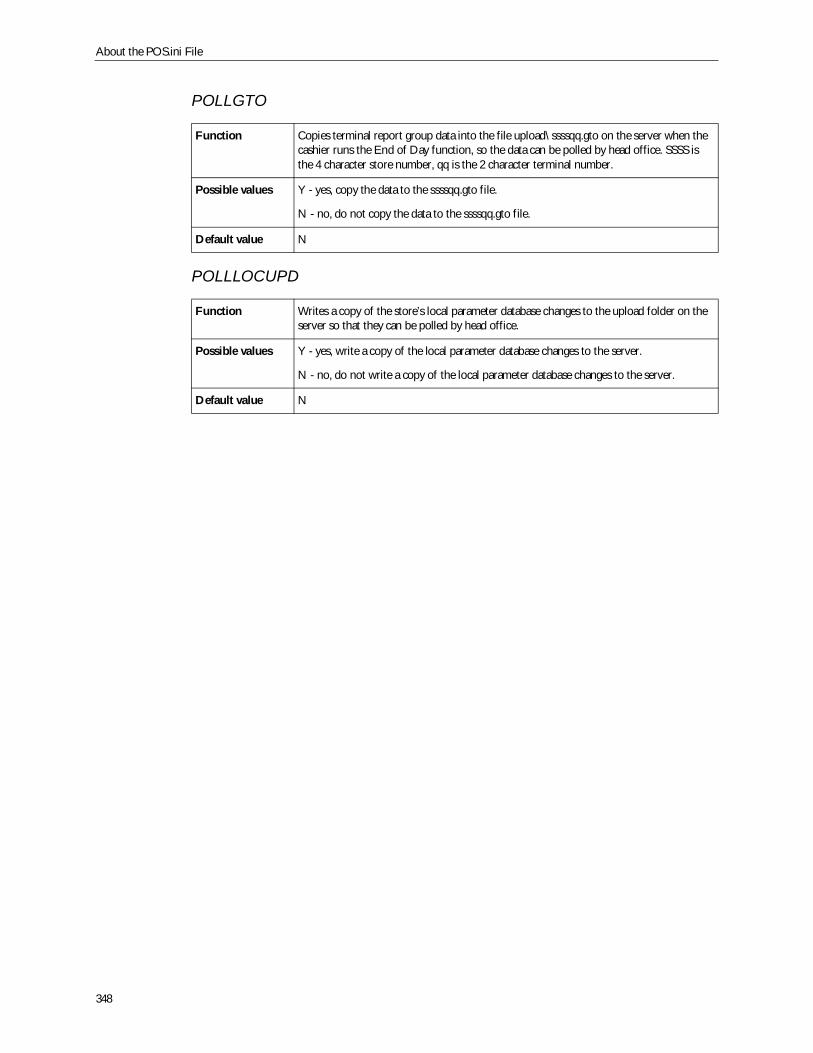
About the POS.ini File
348
POLLGTO
POLLLOCUPD
Function Copies terminal report group data into the file upload\ssssqq.gto on the server when thecashier runs the End of Day function, so the data can be polled by head office. SSSS isthe 4 character store number, qq is the 2 character terminal number.
Possible values Y - yes, copy the data to the ssssqq.gto file.
N - no, do not copy the data to the ssssqq.gto file.
Default value N
Function Writes a copy of the store’s local parameter database changes to the upload folder on theserver so that they can be polled by head office.
Possible values Y - yes, write a copy of the local parameter database changes to the server.
N - no, do not write a copy of the local parameter database changes to the server.
Default value N
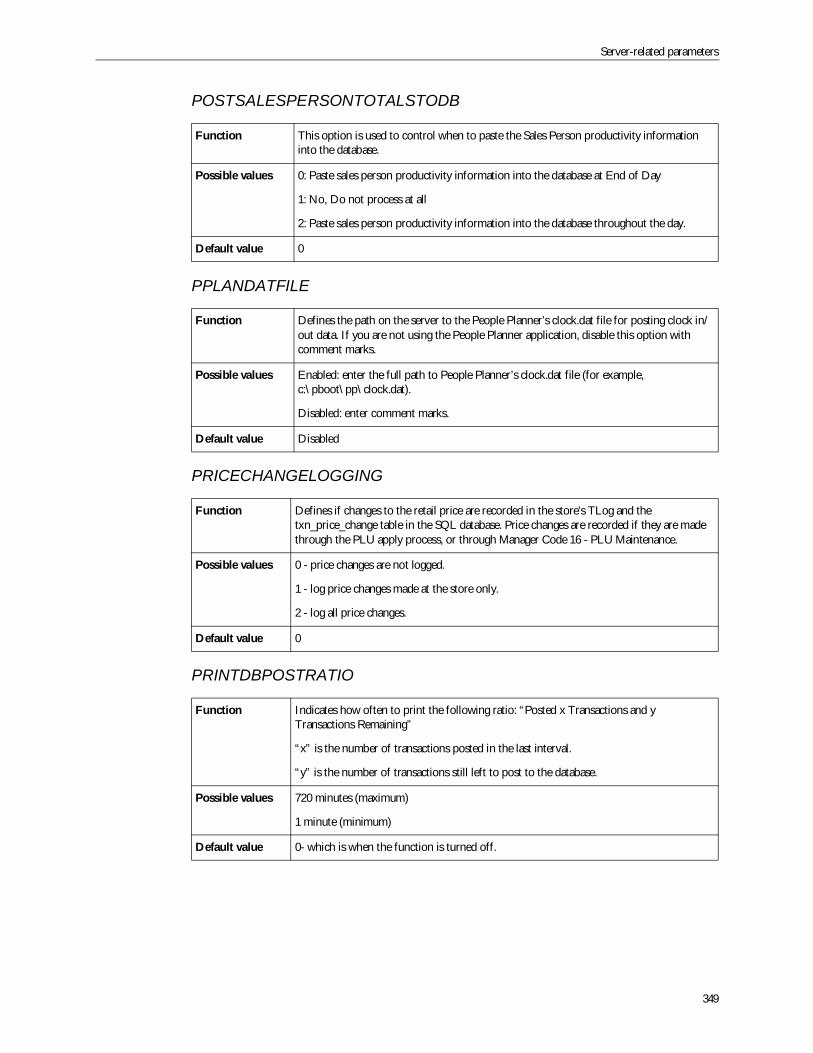
Server-related parameters
349
POSTSALESPERSONTOTALSTODB
PPLANDATFILE
PRICECHANGELOGGING
PRINTDBPOSTRATIO
Function This option is used to control when to paste the Sales Person productivity informationinto the database.
Possible values 0: Paste sales person productivity information into the database at End of Day
1: No, Do not process at all
2: Paste sales person productivity information into the database throughout the day.
Default value 0
Function Defines the path on the server to the People Planner’s clock.dat file for posting clock in/out data. If you are not using the People Planner application, disable this option withcomment marks.
Possible values Enabled: enter the full path to People Planner’s clock.dat file (for example,c:\pboot\pp\clock.dat).
Disabled: enter comment marks.
Default value Disabled
Function Defines if changes to the retail price are recorded in the store's TLog and thetxn_price_change table in the SQL database. Price changes are recorded if they are madethrough the PLU apply process, or through Manager Code 16 - PLU Maintenance.
Possible values 0 - price changes are not logged.
1 - log price changes made at the store only.
2 - log all price changes.
Default value 0
Function Indicates how often to print the following ratio: “Posted x Transactions and yTransactions Remaining”
“x” is the number of transactions posted in the last interval.
“y” is the number of transactions still left to post to the database.
Possible values 720 minutes (maximum)
1 minute (minimum)
Default value 0- which is when the function is turned off.
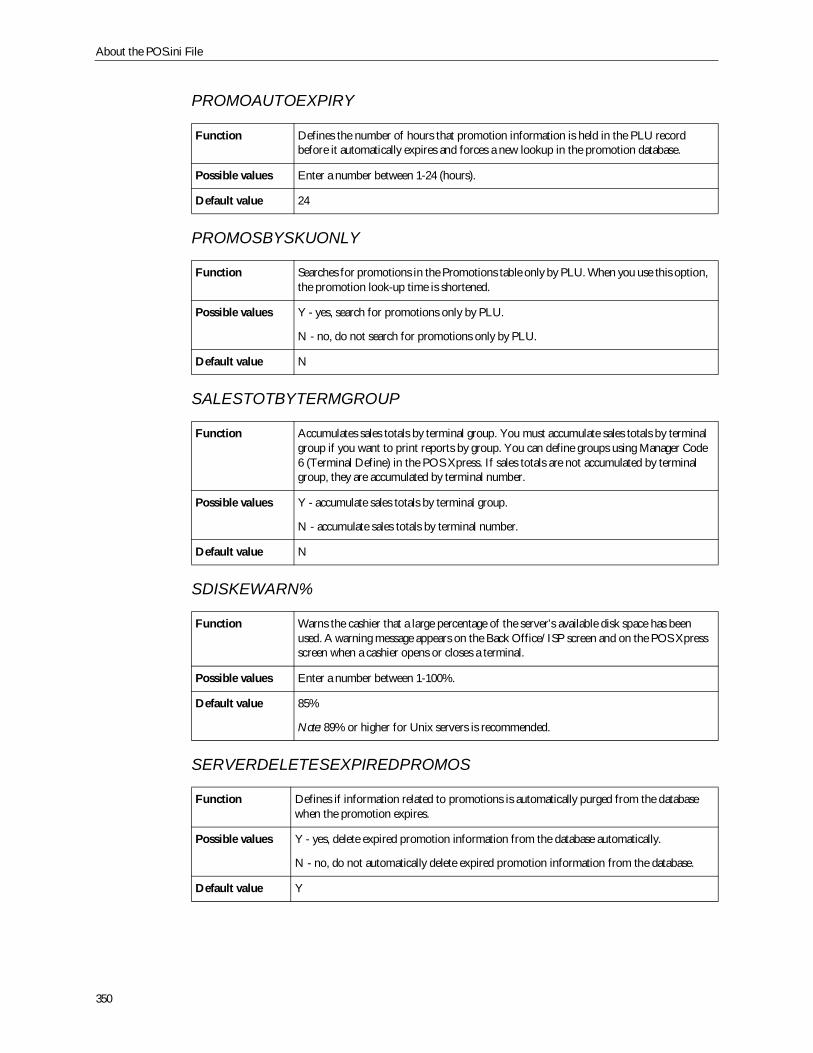
About the POS.ini File
350
PROMOAUTOEXPIRY
PROMOSBYSKUONLY
SALESTOTBYTERMGROUP
SDISKEWARN%
SERVERDELETESEXPIREDPROMOS
Function Defines the number of hours that promotion information is held in the PLU recordbefore it automatically expires and forces a new lookup in the promotion database.
Possible values Enter a number between 1-24 (hours).
Default value 24
Function Searches for promotions in the Promotions table only by PLU. When you use this option,the promotion look-up time is shortened.
Possible values Y - yes, search for promotions only by PLU.
N - no, do not search for promotions only by PLU.
Default value N
Function Accumulates sales totals by terminal group. You must accumulate sales totals by terminalgroup if you want to print reports by group. You can define groups using Manager Code6 (Terminal Define) in the POS Xpress. If sales totals are not accumulated by terminalgroup, they are accumulated by terminal number.
Possible values Y - accumulate sales totals by terminal group.
N - accumulate sales totals by terminal number.
Default value N
Function Warns the cashier that a large percentage of the server’s available disk space has beenused. A warning message appears on the Back Office/ISP screen and on the POS Xpressscreen when a cashier opens or closes a terminal.
Possible values Enter a number between 1-100%.
Default value 85%
Note: 89% or higher for Unix servers is recommended.
Function Defines if information related to promotions is automatically purged from the databasewhen the promotion expires.
Possible values Y - yes, delete expired promotion information from the database automatically.
N - no, do not automatically delete expired promotion information from the database.
Default value Y
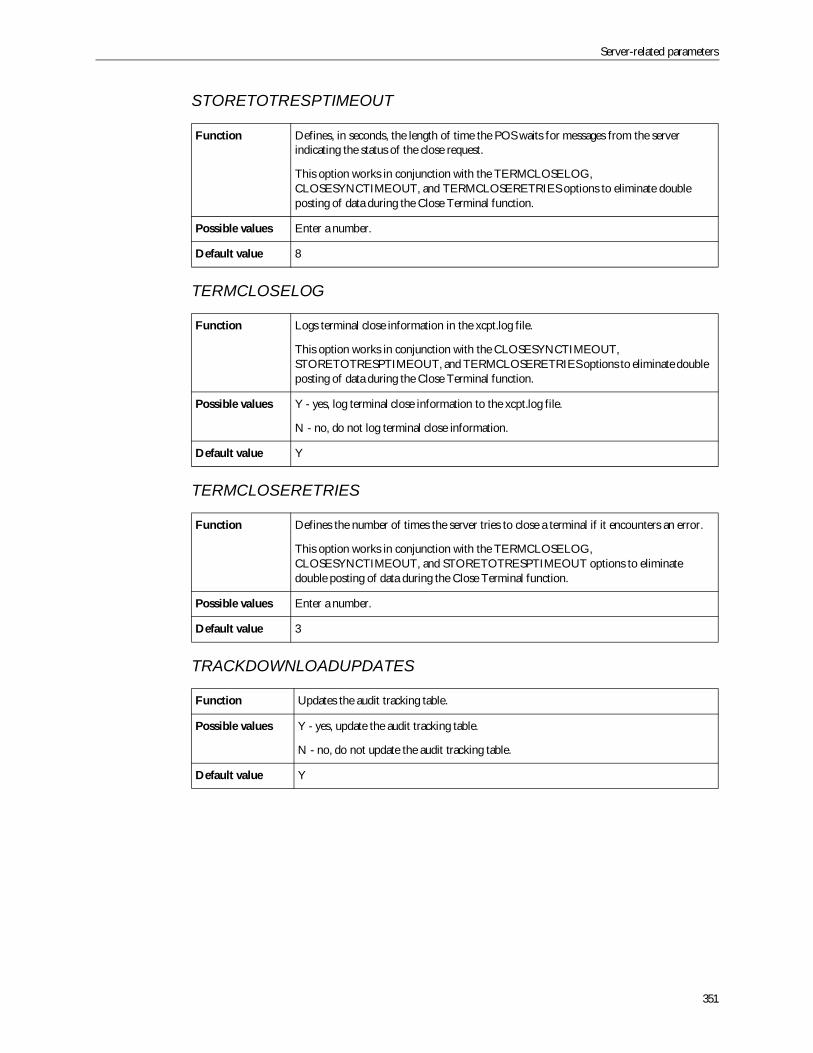
Server-related parameters
351
STORETOTRESPTIMEOUT
TERMCLOSELOG
TERMCLOSERETRIES
TRACKDOWNLOADUPDATES
Function Defines, in seconds, the length of time the POS waits for messages from the serverindicating the status of the close request.
This option works in conjunction with the TERMCLOSELOG,CLOSESYNCTIMEOUT, and TERMCLOSERETRIES options to eliminate doubleposting of data during the Close Terminal function.
Possible values Enter a number.
Default value 8
Function Logs terminal close information in the xcpt.log file.
This option works in conjunction with the CLOSESYNCTIMEOUT,STORETOTRESPTIMEOUT, and TERMCLOSERETRIES options to eliminate doubleposting of data during the Close Terminal function.
Possible values Y - yes, log terminal close information to the xcpt.log file.
N - no, do not log terminal close information.
Default value Y
Function Defines the number of times the server tries to close a terminal if it encounters an error.
This option works in conjunction with the TERMCLOSELOG,CLOSESYNCTIMEOUT, and STORETOTRESPTIMEOUT options to eliminatedouble posting of data during the Close Terminal function.
Possible values Enter a number.
Default value 3
Function Updates the audit tracking table.
Possible values Y - yes, update the audit tracking table.
N - no, do not update the audit tracking table.
Default value Y
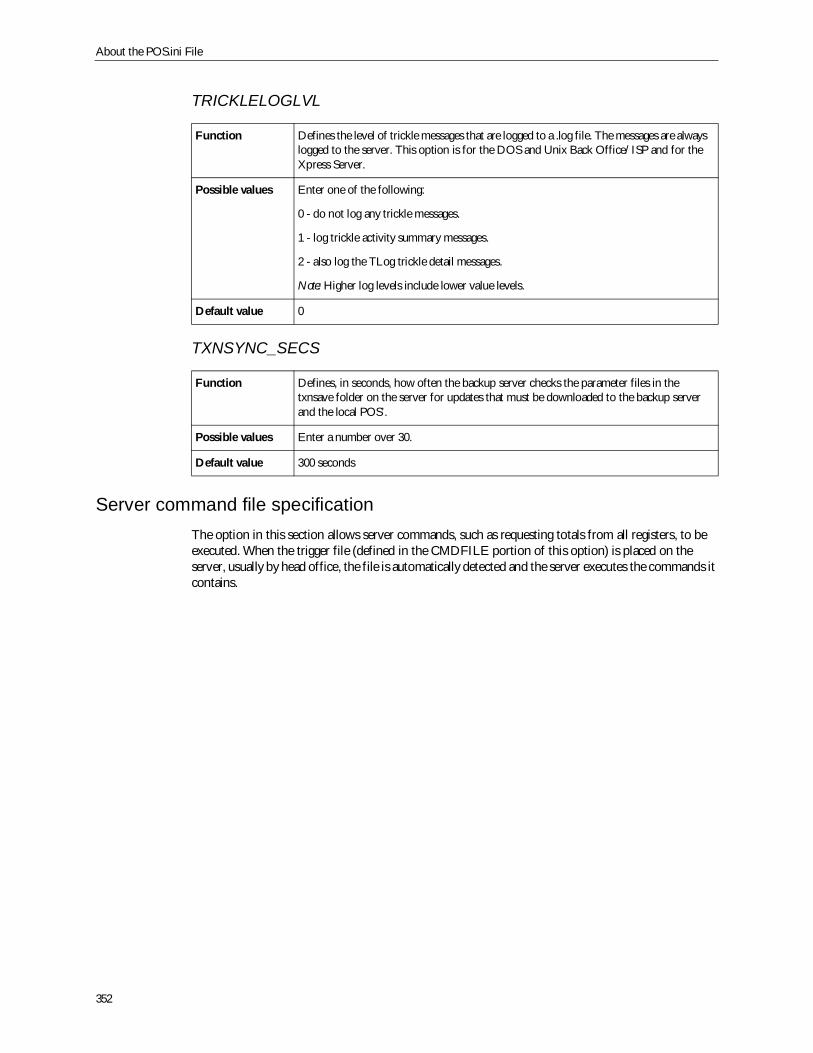
About the POS.ini File
352
TRICKLELOGLVL
TXNSYNC_SECS
Server command file specificationThe option in this section allows server commands, such as requesting totals from all registers, to beexecuted. When the trigger file (defined in the CMDFILE portion of this option) is placed on theserver, usually by head office, the file is automatically detected and the server executes the commands itcontains.
Function Defines the level of trickle messages that are logged to a .log file. The messages are alwayslogged to the server. This option is for the DOS and Unix Back Office/ISP and for theXpress Server.
Possible values Enter one of the following:
0 - do not log any trickle messages.
1 - log trickle activity summary messages.
2 - also log the TLog trickle detail messages.
Note: Higher log levels include lower value levels.
Default value 0
Function Defines, in seconds, how often the backup server checks the parameter files in thetxnsave folder on the server for updates that must be downloaded to the backup serverand the local POS’.
Possible values Enter a number over 30.
Default value 300 seconds
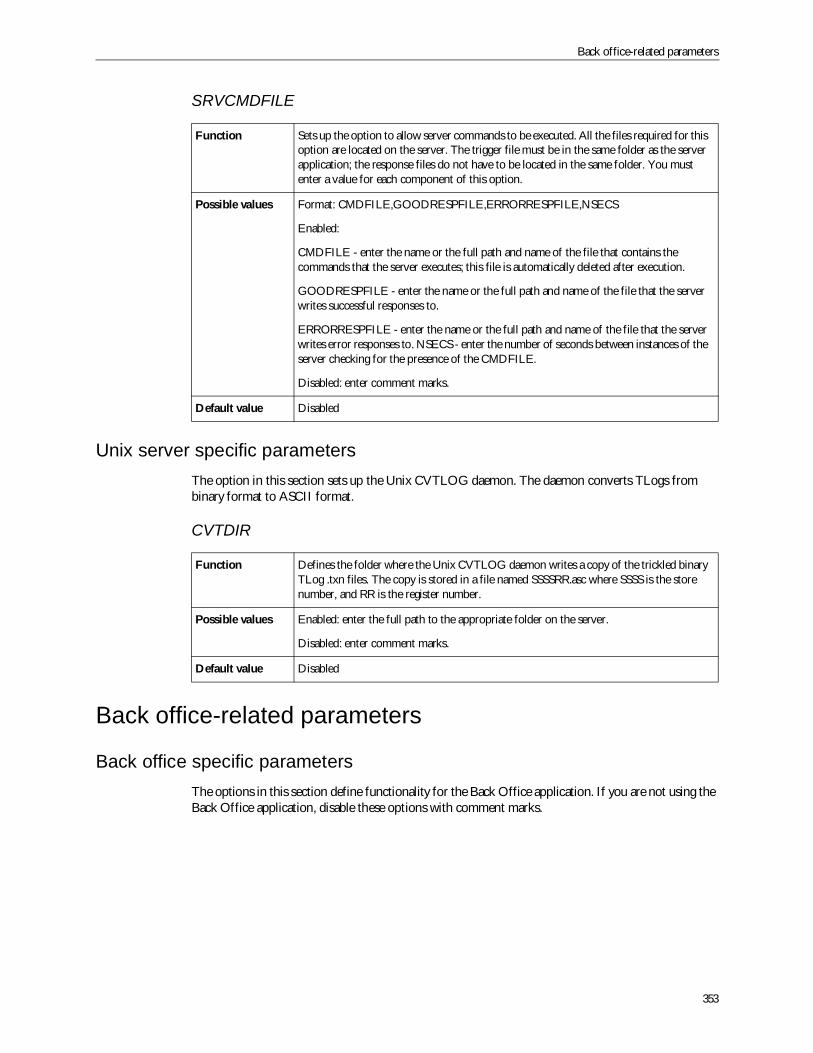
Back office-related parameters
353
SRVCMDFILE
Unix server specific parametersThe option in this section sets up the Unix CVTLOG daemon. The daemon converts TLogs frombinary format to ASCII format.
CVTDIR
Back office-related parameters
Back office specific parametersThe options in this section define functionality for the Back Office application. If you are not using theBack Office application, disable these options with comment marks.
Function Sets up the option to allow server commands to be executed. All the files required for thisoption are located on the server. The trigger file must be in the same folder as the serverapplication; the response files do not have to be located in the same folder. You mustenter a value for each component of this option.
Possible values Format: CMDFILE,GOODRESPFILE,ERRORRESPFILE,NSECS
Enabled:
CMDFILE - enter the name or the full path and name of the file that contains thecommands that the server executes; this file is automatically deleted after execution.
GOODRESPFILE - enter the name or the full path and name of the file that the serverwrites successful responses to.
ERRORRESPFILE - enter the name or the full path and name of the file that the serverwrites error responses to. NSECS - enter the number of seconds between instances of theserver checking for the presence of the CMDFILE.
Disabled: enter comment marks.
Default value Disabled
Function Defines the folder where the Unix CVTLOG daemon writes a copy of the trickled binaryTLog .txn files. The copy is stored in a file named SSSSRR.asc where SSSS is the storenumber, and RR is the register number.
Possible values Enabled: enter the full path to the appropriate folder on the server.
Disabled: enter comment marks.
Default value Disabled
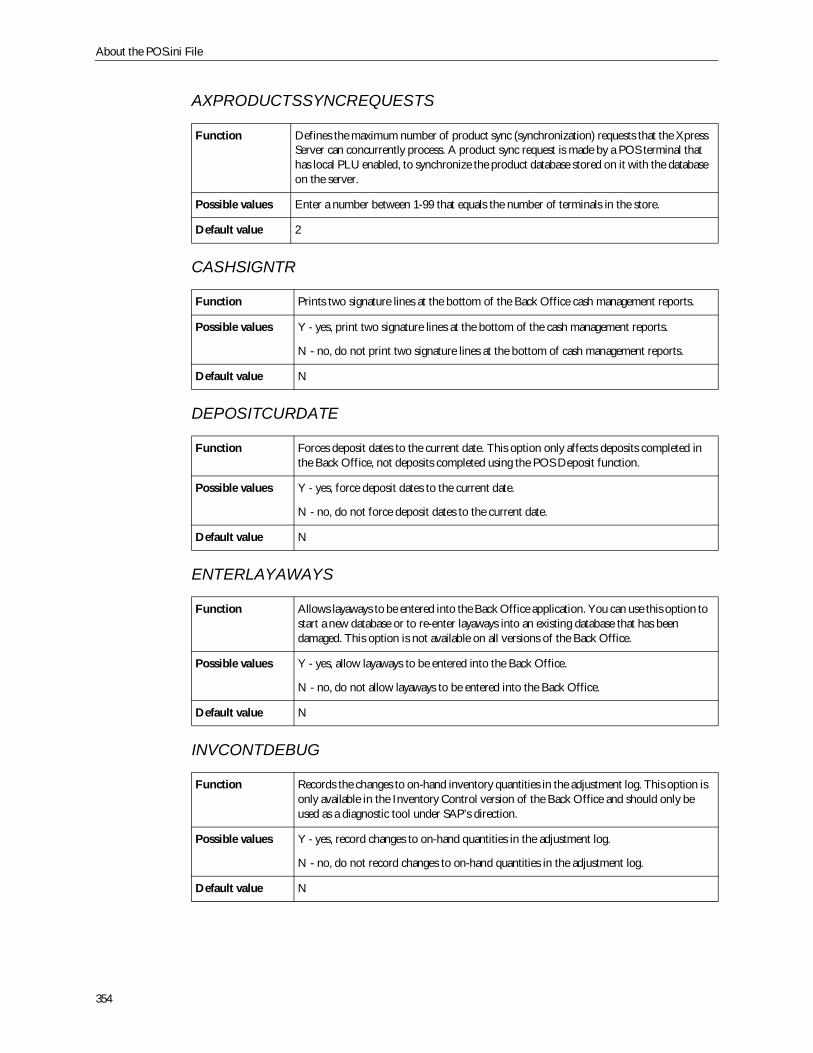
About the POS.ini File
354
AXPRODUCTSSYNCREQUESTS
CASHSIGNTR
DEPOSITCURDATE
ENTERLAYAWAYS
INVCONTDEBUG
Function Defines the maximum number of product sync (synchronization) requests that the XpressServer can concurrently process. A product sync request is made by a POS terminal thathas local PLU enabled, to synchronize the product database stored on it with the databaseon the server.
Possible values Enter a number between 1-99 that equals the number of terminals in the store.
Default value 2
Function Prints two signature lines at the bottom of the Back Office cash management reports.
Possible values Y - yes, print two signature lines at the bottom of the cash management reports.
N - no, do not print two signature lines at the bottom of cash management reports.
Default value N
Function Forces deposit dates to the current date. This option only affects deposits completed inthe Back Office, not deposits completed using the POS Deposit function.
Possible values Y - yes, force deposit dates to the current date.
N - no, do not force deposit dates to the current date.
Default value N
Function Allows layaways to be entered into the Back Office application. You can use this option tostart a new database or to re-enter layaways into an existing database that has beendamaged. This option is not available on all versions of the Back Office.
Possible values Y - yes, allow layaways to be entered into the Back Office.
N - no, do not allow layaways to be entered into the Back Office.
Default value N
Function Records the changes to on-hand inventory quantities in the adjustment log. This option isonly available in the Inventory Control version of the Back Office and should only beused as a diagnostic tool under SAP’s direction.
Possible values Y - yes, record changes to on-hand quantities in the adjustment log.
N - no, do not record changes to on-hand quantities in the adjustment log.
Default value N
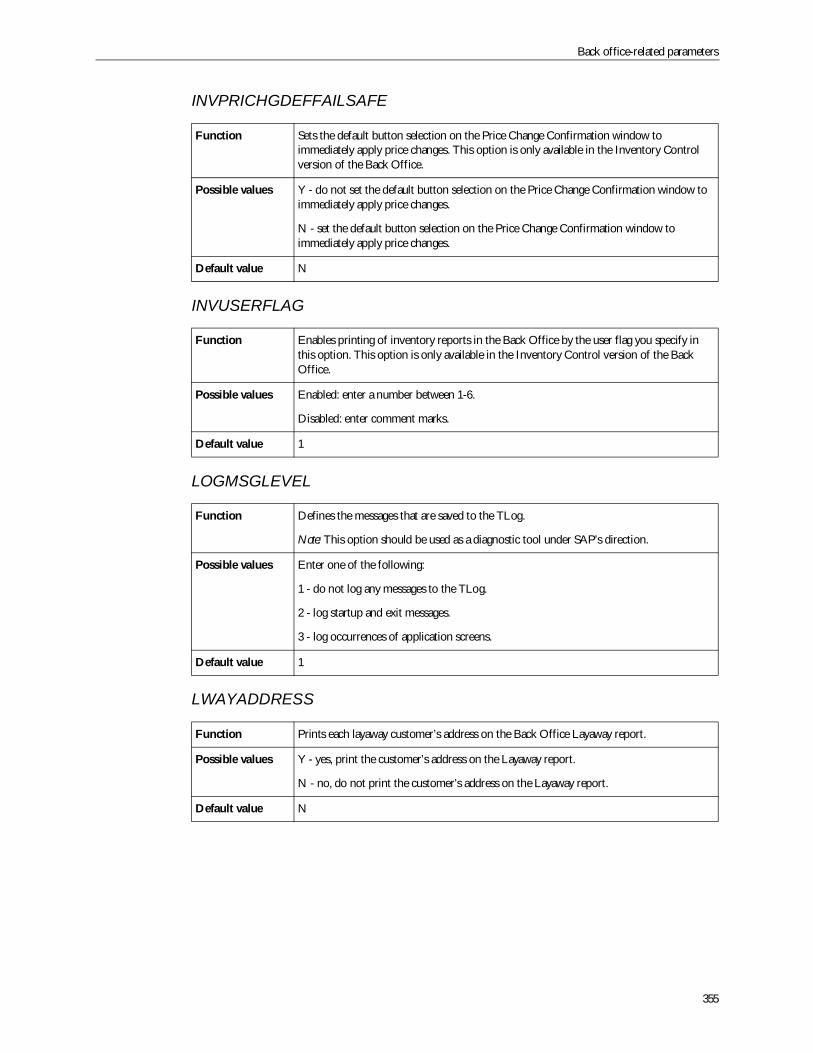
Back office-related parameters
355
INVPRICHGDEFFAILSAFE
INVUSERFLAG
LOGMSGLEVEL
LWAYADDRESS
Function Sets the default button selection on the Price Change Confirmation window toimmediately apply price changes. This option is only available in the Inventory Controlversion of the Back Office.
Possible values Y - do not set the default button selection on the Price Change Confirmation window toimmediately apply price changes.
N - set the default button selection on the Price Change Confirmation window toimmediately apply price changes.
Default value N
Function Enables printing of inventory reports in the Back Office by the user flag you specify inthis option. This option is only available in the Inventory Control version of the BackOffice.
Possible values Enabled: enter a number between 1-6.
Disabled: enter comment marks.
Default value 1
Function Defines the messages that are saved to the TLog.
Note: This option should be used as a diagnostic tool under SAP’s direction.
Possible values Enter one of the following:
1 - do not log any messages to the TLog.
2 - log startup and exit messages.
3 - log occurrences of application screens.
Default value 1
Function Prints each layaway customer’s address on the Back Office Layaway report.
Possible values Y - yes, print the customer’s address on the Layaway report.
N - no, do not print the customer’s address on the Layaway report.
Default value N

About the POS.ini File
356
MAXPRODUCTSYNCREQUESTS
ORDERBYVENDOR
PAYROLLHOURS99
RECEIVEBYVENDOR
SCANNERPORT
Function This function sets the maximum number of product sync requests the Xpress server canconcurrently process.
Possible values 0-99
Default value 2
Function Uses vendor’s SKU to identify items in the .ord file lines that are created by the orderingfunction. This option is only available in the Inventory Control version of the Back officeand it is only available if you set the VENDOR/SKU option to “Y”.
Possible values Y - yes, use vendor’s SKU in the .ord files.
N - no, do not use vendor’s SKU in the .ord files.
Default value N
Function Allows a number greater than 24 to be entered into the Hours 1 and Hours 2 fields ofthe Back Office’s Payroll Weekly Entry window.
Possible values Y - yes, allow a number greater than 24 to be entered into the payroll hours field.
N - no, do not allow a number greater than 24 to be entered into the payroll hours fields.
Default value N
Function Uses vendor’s SKU in the TLog reporting of the receiving function. This option is onlyavailable in the Inventory Control version of the Back Office and it is only available if youset the VENDOR/SKU option to “Y”.
Possible values Y - yes, report by vendor’s SKU.
N - no, do not report by vendor’s SKU.
Default value N
Function Specifies the port number for the serial scanner.
Possible values Format: Port parameters are fixed at 9600, odd parity, 7 data bits.
Enabled: enter a number.
Disabled: enter comment marks.
Default value Disabled
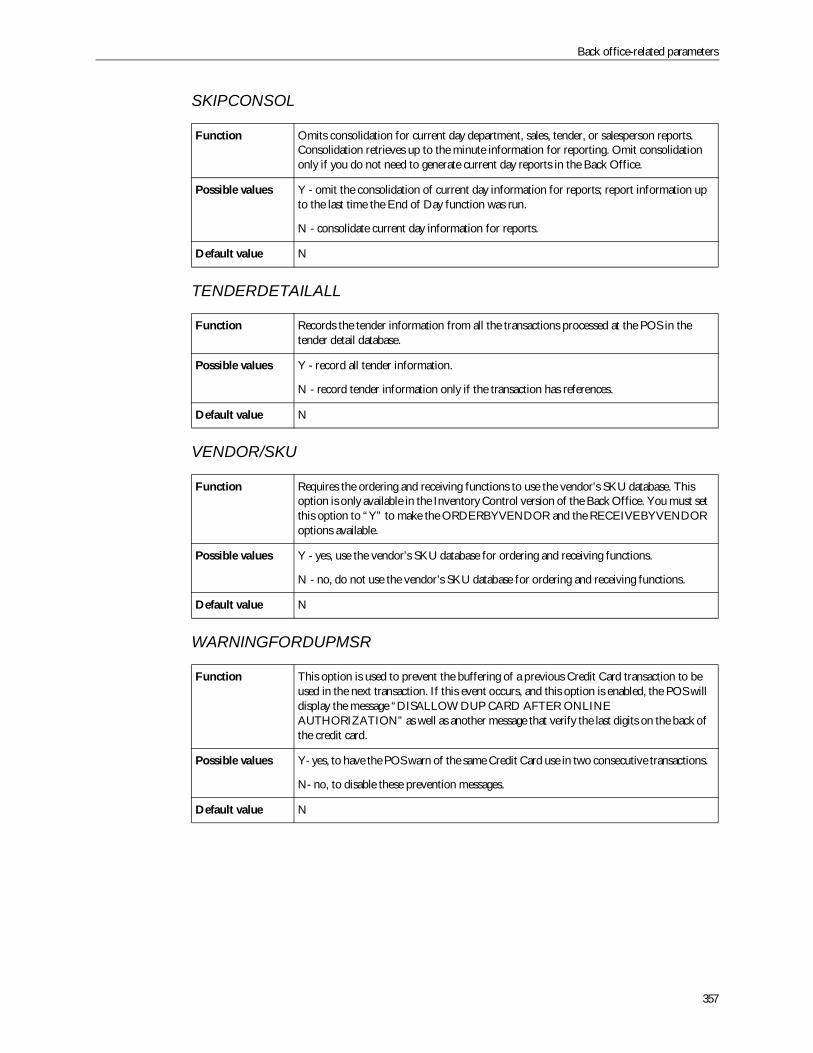
Back office-related parameters
357
SKIPCONSOL
TENDERDETAILALL
VENDOR/SKU
WARNINGFORDUPMSR
Function Omits consolidation for current day department, sales, tender, or salesperson reports.Consolidation retrieves up to the minute information for reporting. Omit consolidationonly if you do not need to generate current day reports in the Back Office.
Possible values Y - omit the consolidation of current day information for reports; report information upto the last time the End of Day function was run.
N - consolidate current day information for reports.
Default value N
Function Records the tender information from all the transactions processed at the POS in thetender detail database.
Possible values Y - record all tender information.
N - record tender information only if the transaction has references.
Default value N
Function Requires the ordering and receiving functions to use the vendor’s SKU database. Thisoption is only available in the Inventory Control version of the Back Office. You must setthis option to “Y” to make the ORDERBYVENDOR and the RECEIVEBYVENDORoptions available.
Possible values Y - yes, use the vendor’s SKU database for ordering and receiving functions.
N - no, do not use the vendor’s SKU database for ordering and receiving functions.
Default value N
Function This option is used to prevent the buffering of a previous Credit Card transaction to beused in the next transaction. If this event occurs, and this option is enabled, the POS willdisplay the message “DISALLOW DUP CARD AFTER ONLINEAUTHORIZATION” as well as another message that verify the last digits on the back ofthe credit card.
Possible values Y- yes, to have the POS warn of the same Credit Card use in two consecutive transactions.
N- no, to disable these prevention messages.
Default value N
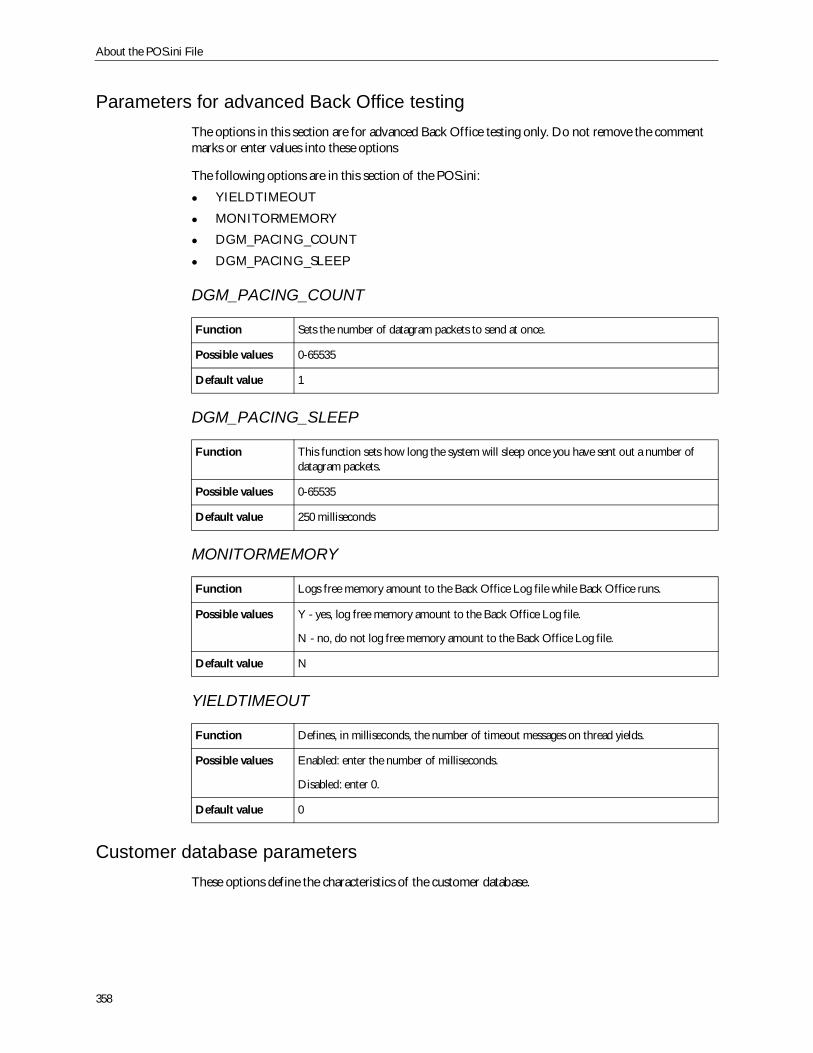
About the POS.ini File
358
Parameters for advanced Back Office testingThe options in this section are for advanced Back Office testing only. Do not remove the commentmarks or enter values into these options
The following options are in this section of the POS.ini:
YIELDTIMEOUT
MONITORMEMORY
DGM_PACING_COUNT
DGM_PACING_SLEEP
DGM_PACING_COUNT
DGM_PACING_SLEEP
MONITORMEMORY
YIELDTIMEOUT
Customer database parametersThese options define the characteristics of the customer database.
Function Sets the number of datagram packets to send at once.
Possible values 0-65535
Default value 1
Function This function sets how long the system will sleep once you have sent out a number ofdatagram packets.
Possible values 0-65535
Default value 250 milliseconds
Function Logs free memory amount to the Back Office Log file while Back Office runs.
Possible values Y - yes, log free memory amount to the Back Office Log file.
N - no, do not log free memory amount to the Back Office Log file.
Default value N
Function Defines, in milliseconds, the number of timeout messages on thread yields.
Possible values Enabled: enter the number of milliseconds.
Disabled: enter 0.
Default value 0
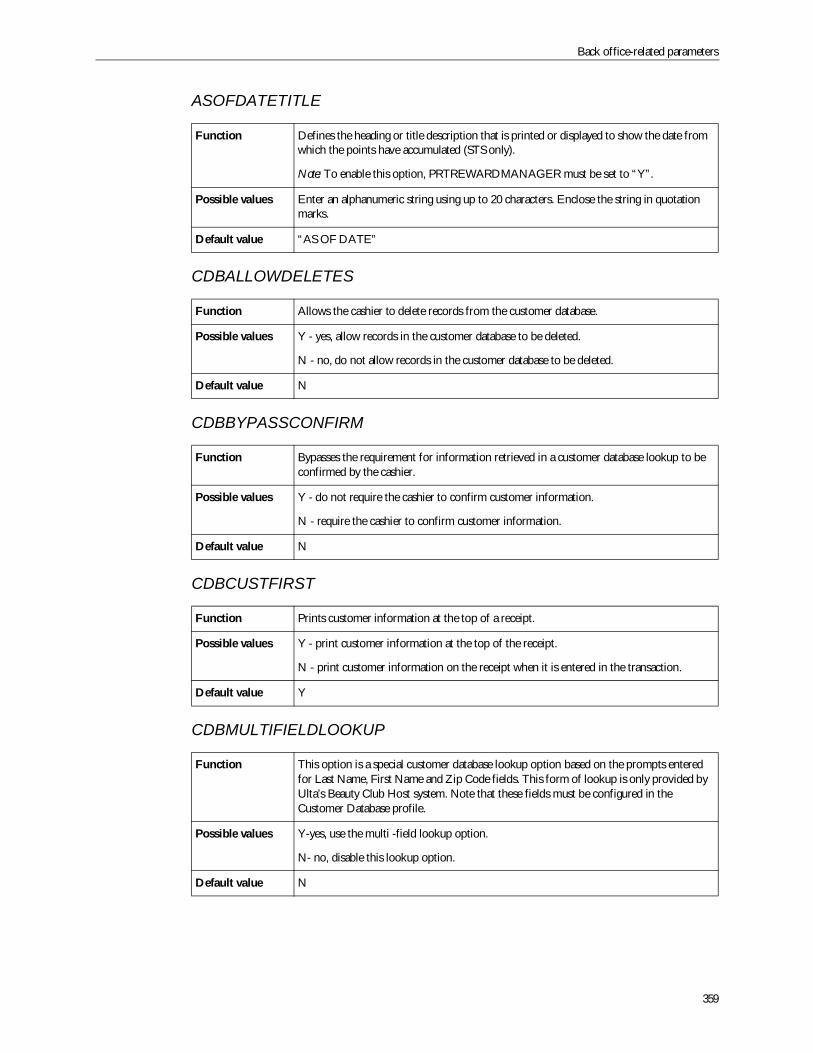
Back office-related parameters
359
ASOFDATETITLE
CDBALLOWDELETES
CDBBYPASSCONFIRM
CDBCUSTFIRST
CDBMULTIFIELDLOOKUP
Function Defines the heading or title description that is printed or displayed to show the date fromwhich the points have accumulated (STS only).
Note: To enable this option, PRTREWARDMANAGER must be set to “Y”.
Possible values Enter an alphanumeric string using up to 20 characters. Enclose the string in quotationmarks.
Default value “AS OF DATE”
Function Allows the cashier to delete records from the customer database.
Possible values Y - yes, allow records in the customer database to be deleted.
N - no, do not allow records in the customer database to be deleted.
Default value N
Function Bypasses the requirement for information retrieved in a customer database lookup to beconfirmed by the cashier.
Possible values Y - do not require the cashier to confirm customer information.
N - require the cashier to confirm customer information.
Default value N
Function Prints customer information at the top of a receipt.
Possible values Y - print customer information at the top of the receipt.
N - print customer information on the receipt when it is entered in the transaction.
Default value Y
Function This option is a special customer database lookup option based on the prompts enteredfor Last Name, First Name and Zip Code fields. This form of lookup is only provided byUlta’s Beauty Club Host system. Note that these fields must be configured in theCustomer Database profile.
Possible values Y-yes, use the multi -field lookup option.
N- no, disable this lookup option.
Default value N
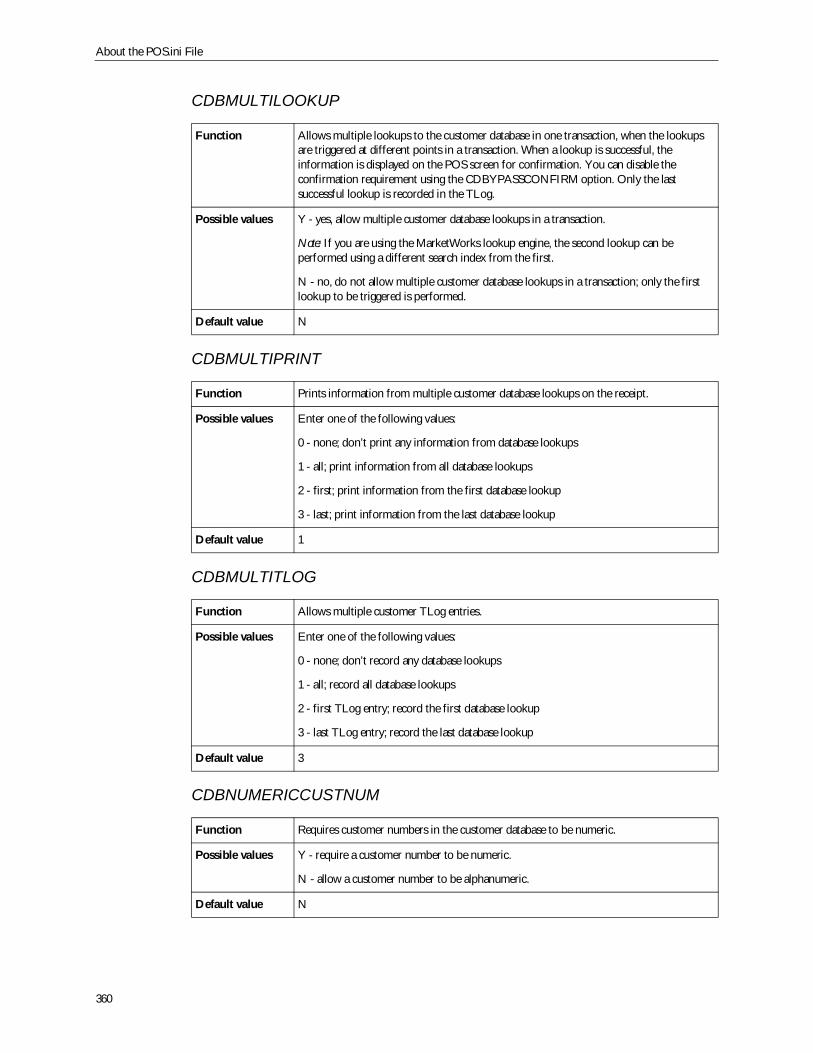
About the POS.ini File
360
CDBMULTILOOKUP
CDBMULTIPRINT
CDBMULTITLOG
CDBNUMERICCUSTNUM
Function Allows multiple lookups to the customer database in one transaction, when the lookupsare triggered at different points in a transaction. When a lookup is successful, theinformation is displayed on the POS screen for confirmation. You can disable theconfirmation requirement using the CDBYPASSCONFIRM option. Only the lastsuccessful lookup is recorded in the TLog.
Possible values Y - yes, allow multiple customer database lookups in a transaction.
Note: If you are using the MarketWorks lookup engine, the second lookup can beperformed using a different search index from the first.
N - no, do not allow multiple customer database lookups in a transaction; only the firstlookup to be triggered is performed.
Default value N
Function Prints information from multiple customer database lookups on the receipt.
Possible values Enter one of the following values:
0 - none; don’t print any information from database lookups
1 - all; print information from all database lookups
2 - first; print information from the first database lookup
3 - last; print information from the last database lookup
Default value 1
Function Allows multiple customer TLog entries.
Possible values Enter one of the following values:
0 - none; don’t record any database lookups
1 - all; record all database lookups
2 - first TLog entry; record the first database lookup
3 - last TLog entry; record the last database lookup
Default value 3
Function Requires customer numbers in the customer database to be numeric.
Possible values Y - require a customer number to be numeric.
N - allow a customer number to be alphanumeric.
Default value N
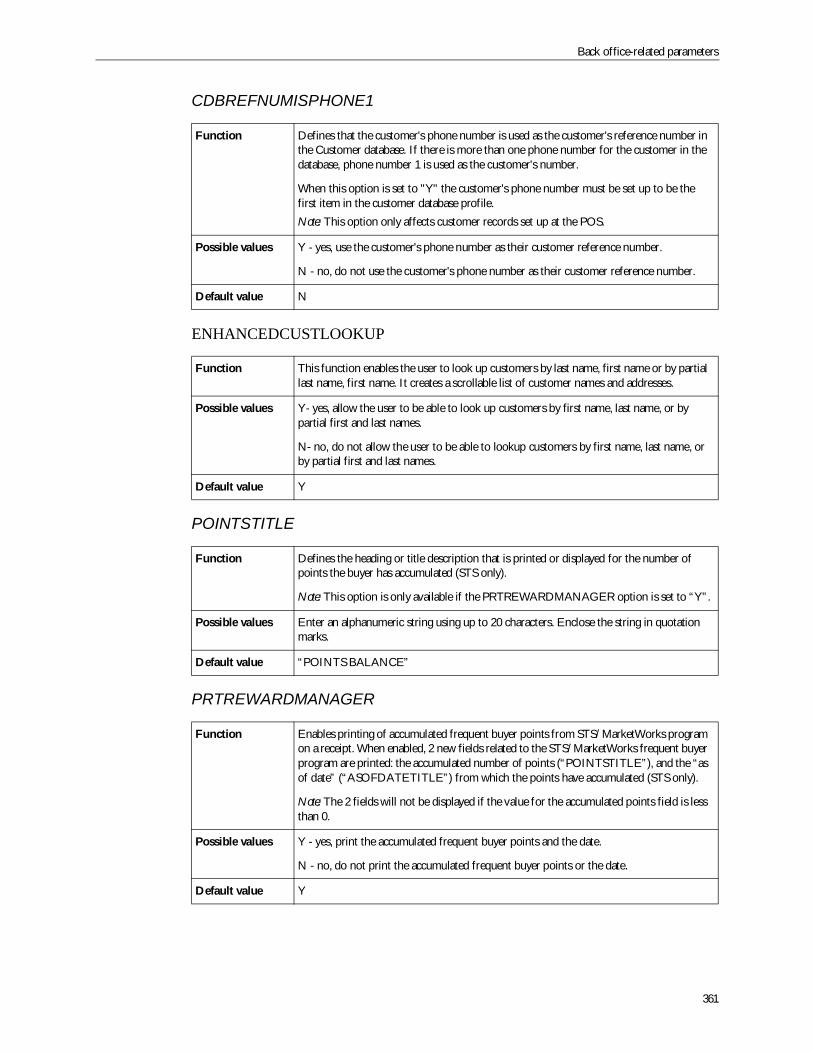
Back office-related parameters
361
CDBREFNUMISPHONE1
ENHANCEDCUSTLOOKUP
POINTSTITLE
PRTREWARDMANAGER
Function Defines that the customer's phone number is used as the customer's reference number inthe Customer database. If there is more than one phone number for the customer in thedatabase, phone number 1 is used as the customer's number.
When this option is set to "Y" the customer's phone number must be set up to be thefirst item in the customer database profile.Note: This option only affects customer records set up at the POS.
Possible values Y - yes, use the customer's phone number as their customer reference number.
N - no, do not use the customer's phone number as their customer reference number.
Default value N
Function This function enables the user to look up customers by last name, first name or by partiallast name, first name. It creates a scrollable list of customer names and addresses.
Possible values Y- yes, allow the user to be able to look up customers by first name, last name, or bypartial first and last names.
N- no, do not allow the user to be able to lookup customers by first name, last name, orby partial first and last names.
Default value Y
Function Defines the heading or title description that is printed or displayed for the number ofpoints the buyer has accumulated (STS only).
Note: This option is only available if the PRTREWARDMANAGER option is set to “Y”.
Possible values Enter an alphanumeric string using up to 20 characters. Enclose the string in quotationmarks.
Default value “POINTS BALANCE”
Function Enables printing of accumulated frequent buyer points from STS/MarketWorks programon a receipt. When enabled, 2 new fields related to the STS/MarketWorks frequent buyerprogram are printed: the accumulated number of points (“POINTSTITLE”), and the “asof date” (“ASOFDATETITLE”) from which the points have accumulated (STS only).
Note: The 2 fields will not be displayed if the value for the accumulated points field is lessthan 0.
Possible values Y - yes, print the accumulated frequent buyer points and the date.
N - no, do not print the accumulated frequent buyer points or the date.
Default value Y
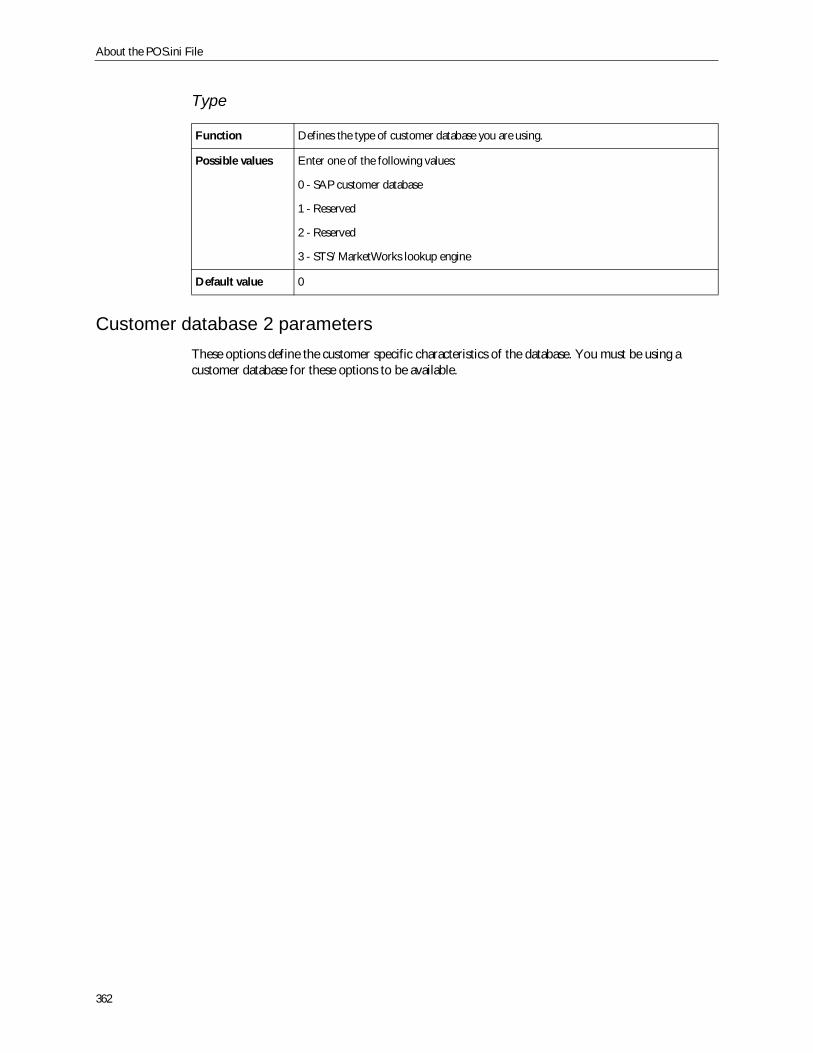
About the POS.ini File
362
Type
Customer database 2 parametersThese options define the customer specific characteristics of the database. You must be using acustomer database for these options to be available.
Function Defines the type of customer database you are using.
Possible values Enter one of the following values:
0 - SAP customer database
1 - Reserved
2 - Reserved
3 - STS/MarketWorks lookup engine
Default value 0
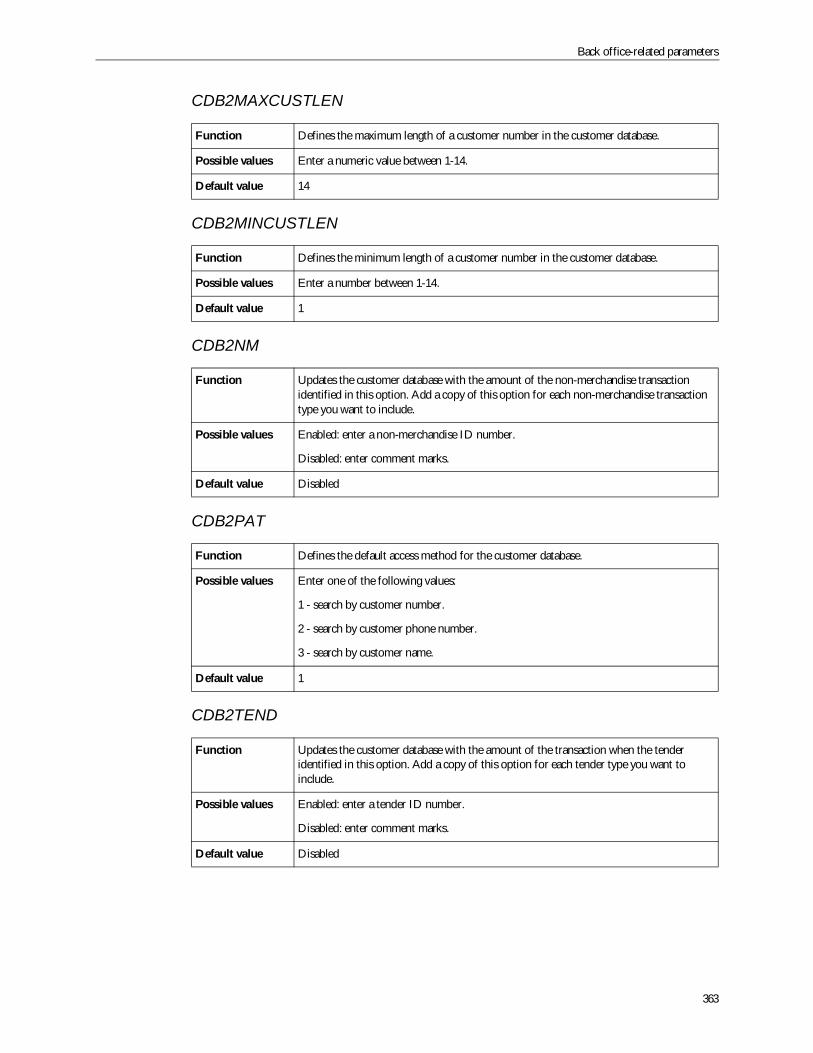
Back office-related parameters
363
CDB2MAXCUSTLEN
CDB2MINCUSTLEN
CDB2NM
CDB2PAT
CDB2TEND
Function Defines the maximum length of a customer number in the customer database.
Possible values Enter a numeric value between 1-14.
Default value 14
Function Defines the minimum length of a customer number in the customer database.
Possible values Enter a number between 1-14.
Default value 1
Function Updates the customer database with the amount of the non-merchandise transactionidentified in this option. Add a copy of this option for each non-merchandise transactiontype you want to include.
Possible values Enabled: enter a non-merchandise ID number.
Disabled: enter comment marks.
Default value Disabled
Function Defines the default access method for the customer database.
Possible values Enter one of the following values:
1 - search by customer number.
2 - search by customer phone number.
3 - search by customer name.
Default value 1
Function Updates the customer database with the amount of the transaction when the tenderidentified in this option. Add a copy of this option for each tender type you want toinclude.
Possible values Enabled: enter a tender ID number.
Disabled: enter comment marks.
Default value Disabled
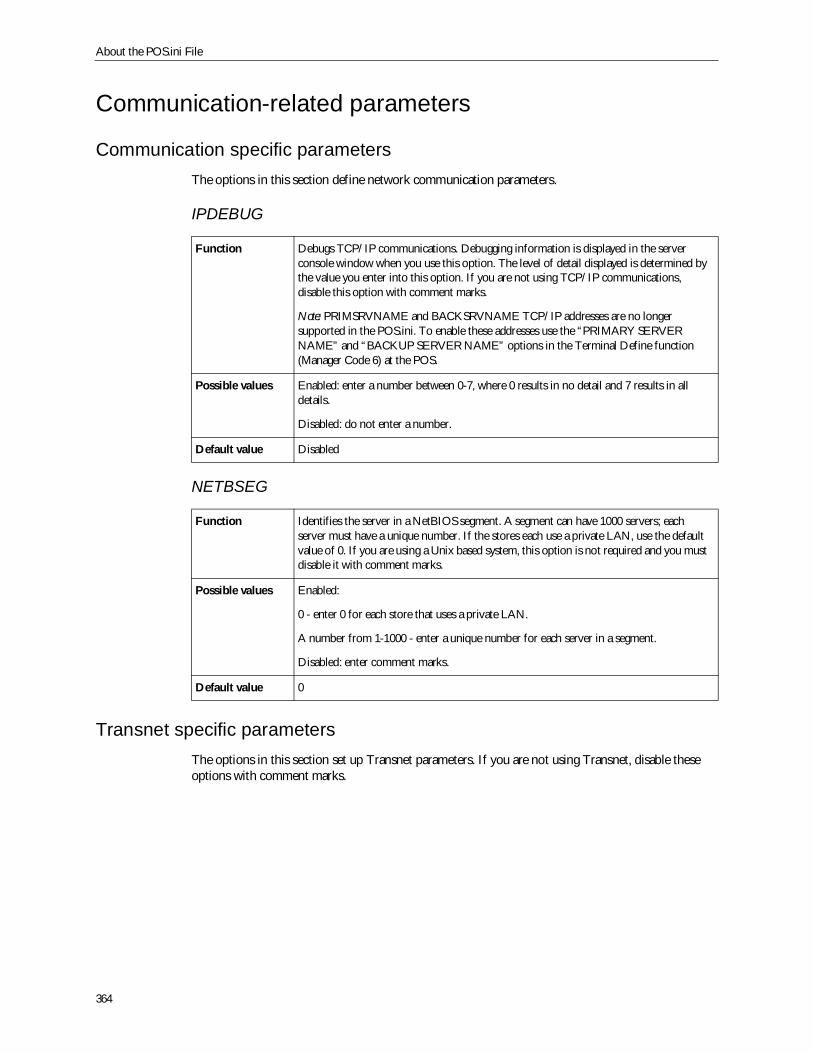
About the POS.ini File
364
Communication-related parameters
Communication specific parametersThe options in this section define network communication parameters.
IPDEBUG
NETBSEG
Transnet specific parametersThe options in this section set up Transnet parameters. If you are not using Transnet, disable theseoptions with comment marks.
Function Debugs TCP/IP communications. Debugging information is displayed in the serverconsole window when you use this option. The level of detail displayed is determined bythe value you enter into this option. If you are not using TCP/IP communications,disable this option with comment marks.
Note: PRIMSRVNAME and BACKSRVNAME TCP/IP addresses are no longersupported in the POS.ini. To enable these addresses use the “PRIMARY SERVERNAME” and “BACKUP SERVER NAME” options in the Terminal Define function(Manager Code 6) at the POS.
Possible values Enabled: enter a number between 0-7, where 0 results in no detail and 7 results in alldetails.
Disabled: do not enter a number.
Default value Disabled
Function Identifies the server in a NetBIOS segment. A segment can have 1000 servers; eachserver must have a unique number. If the stores each use a private LAN, use the defaultvalue of 0. If you are using a Unix based system, this option is not required and you mustdisable it with comment marks.
Possible values Enabled:
0 - enter 0 for each store that uses a private LAN.
A number from 1-1000 - enter a unique number for each server in a segment.
Disabled: enter comment marks.
Default value 0
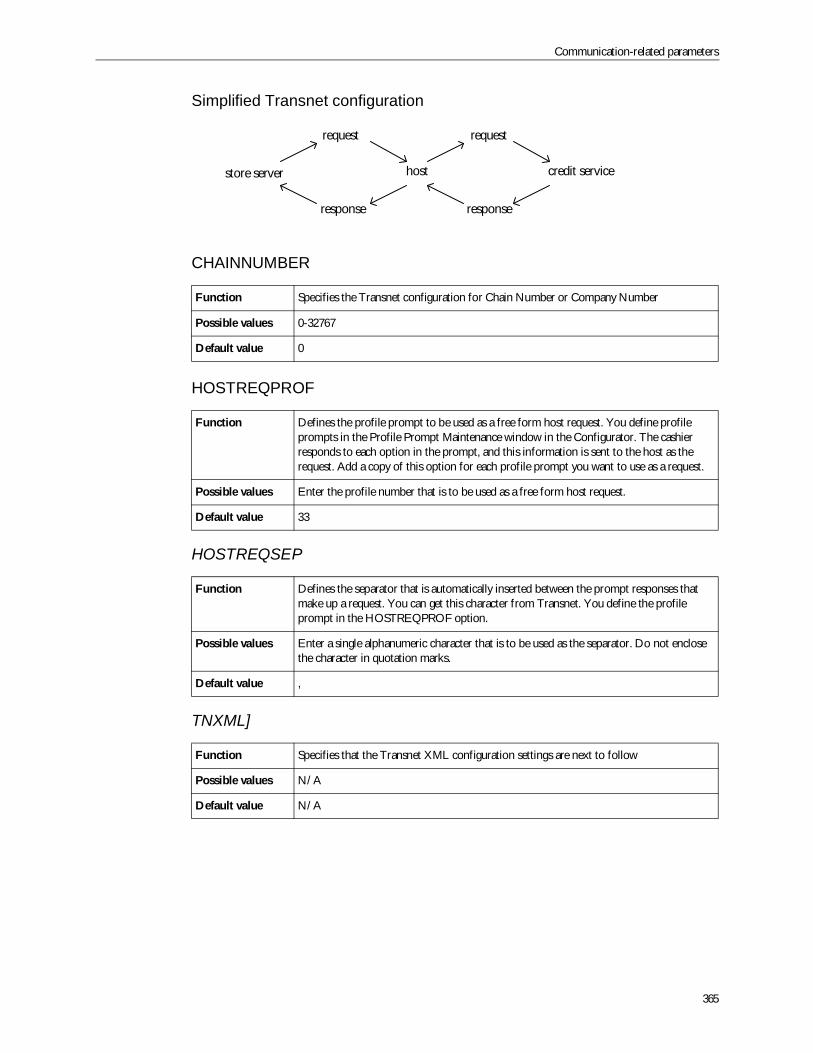
Communication-related parameters
365
Simplified Transnet configuration
CHAINNUMBER
HOSTREQPROF
HOSTREQSEP
TNXML]
Function Specifies the Transnet configuration for Chain Number or Company Number
Possible values 0-32767
Default value 0
Function Defines the profile prompt to be used as a free form host request. You define profileprompts in the Profile Prompt Maintenance window in the Configurator. The cashierresponds to each option in the prompt, and this information is sent to the host as therequest. Add a copy of this option for each profile prompt you want to use as a request.
Possible values Enter the profile number that is to be used as a free form host request.
Default value 33
Function Defines the separator that is automatically inserted between the prompt responses thatmake up a request. You can get this character from Transnet. You define the profileprompt in the HOSTREQPROF option.
Possible values Enter a single alphanumeric character that is to be used as the separator. Do not enclosethe character in quotation marks.
Default value ,
Function Specifies that the Transnet XML configuration settings are next to follow
Possible values N/A
Default value N/A
store server
request
response
host
request
response
credit service
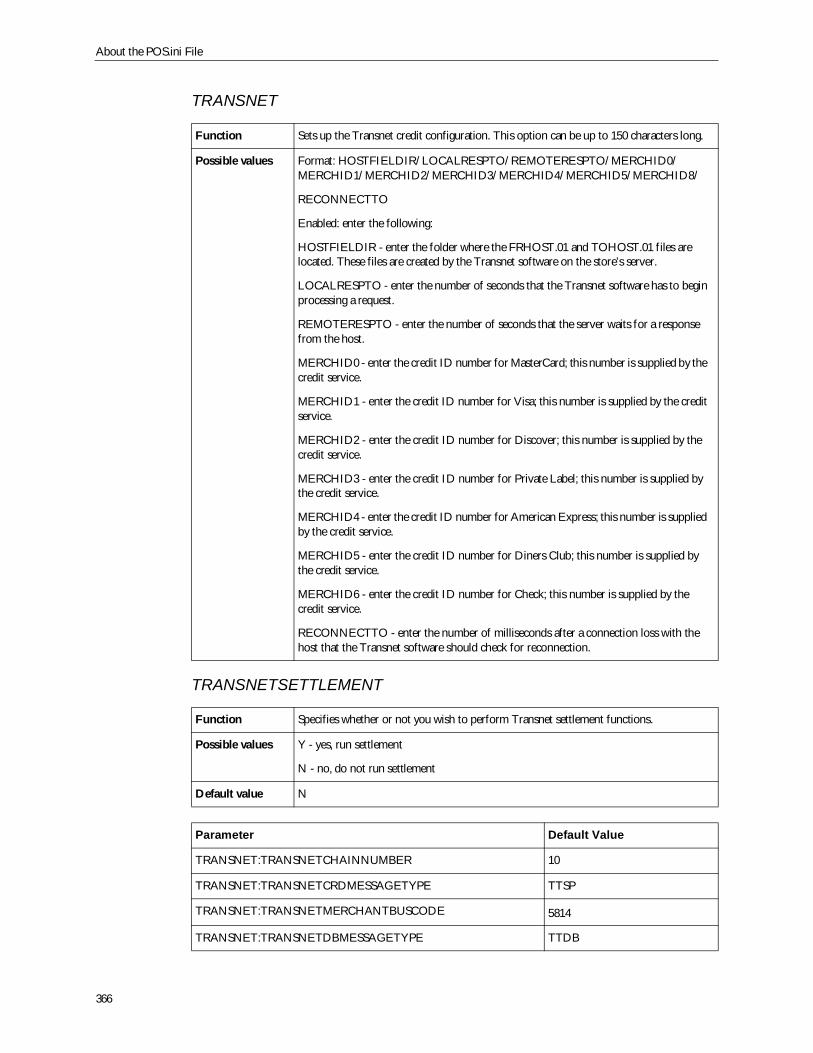
About the POS.ini File
366
TRANSNET
TRANSNETSETTLEMENT
Function Sets up the Transnet credit configuration. This option can be up to 150 characters long.
Possible values Format: HOSTFIELDIR/LOCALRESPTO/REMOTERESPTO/MERCHID0/MERCHID1/MERCHID2/MERCHID3/MERCHID4/MERCHID5/MERCHID8/
RECONNECTTO
Enabled: enter the following:
HOSTFIELDIR - enter the folder where the FRHOST.01 and TOHOST.01 files arelocated. These files are created by the Transnet software on the store’s server.
LOCALRESPTO - enter the number of seconds that the Transnet software has to beginprocessing a request.
REMOTERESPTO - enter the number of seconds that the server waits for a responsefrom the host.
MERCHID0 - enter the credit ID number for MasterCard; this number is supplied by thecredit service.
MERCHID1 - enter the credit ID number for Visa; this number is supplied by the creditservice.
MERCHID2 - enter the credit ID number for Discover; this number is supplied by thecredit service.
MERCHID3 - enter the credit ID number for Private Label; this number is supplied bythe credit service.
MERCHID4 - enter the credit ID number for American Express; this number is suppliedby the credit service.
MERCHID5 - enter the credit ID number for Diners Club; this number is supplied bythe credit service.
MERCHID6 - enter the credit ID number for Check; this number is supplied by thecredit service.
RECONNECTTO - enter the number of milliseconds after a connection loss with thehost that the Transnet software should check for reconnection.
Function Specifies whether or not you wish to perform Transnet settlement functions.
Possible values Y - yes, run settlement
N - no, do not run settlement
Default value N
Parameter Default Value
TRANSNET:TRANSNETCHAINNUMBER 10
TRANSNET:TRANSNETCRDMESSAGETYPE TTSP
TRANSNET:TRANSNETMERCHANTBUSCODE 5814
TRANSNET:TRANSNETDBMESSAGETYPE TTDB
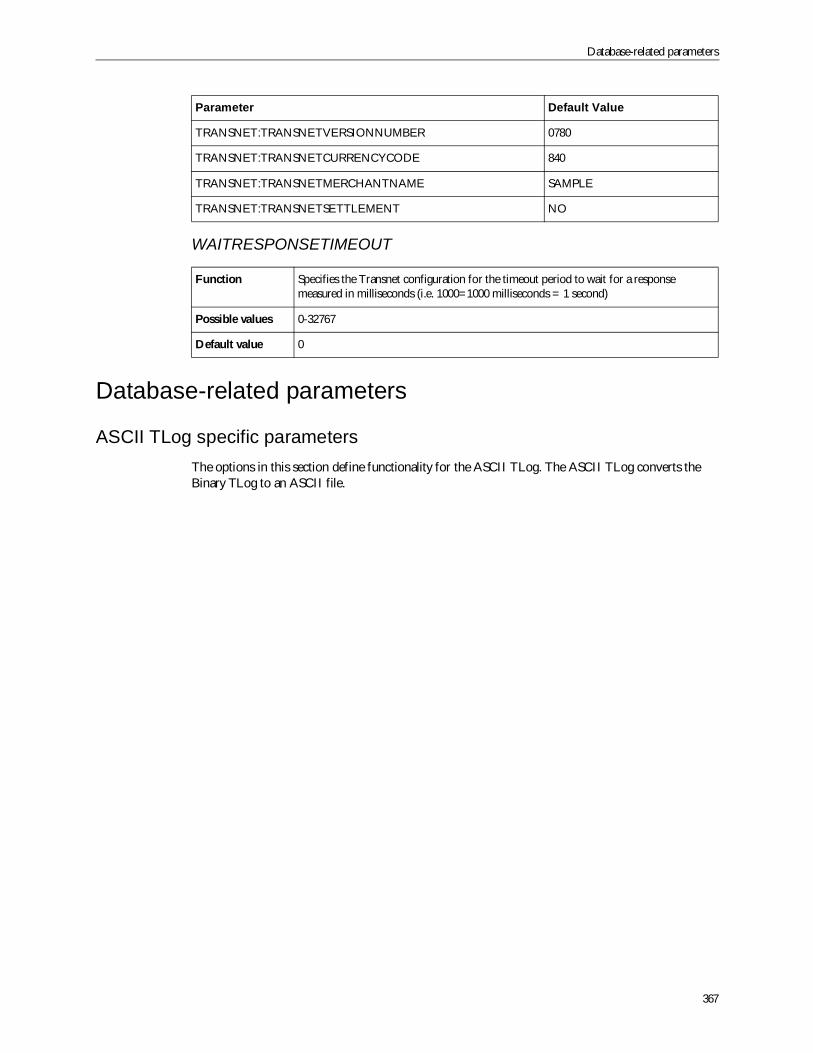
Database-related parameters
367
WAITRESPONSETIMEOUT
Database-related parameters
ASCII TLog specific parametersThe options in this section define functionality for the ASCII TLog. The ASCII TLog converts theBinary TLog to an ASCII file.
TRANSNET:TRANSNETVERSIONNUMBER 0780
TRANSNET:TRANSNETCURRENCYCODE 840
TRANSNET:TRANSNETMERCHANTNAME SAMPLE
TRANSNET:TRANSNETSETTLEMENT NO
Function Specifies the Transnet configuration for the timeout period to wait for a responsemeasured in milliseconds (i.e. 1000=1000 milliseconds = 1 second)
Possible values 0-32767
Default value 0
Parameter Default Value
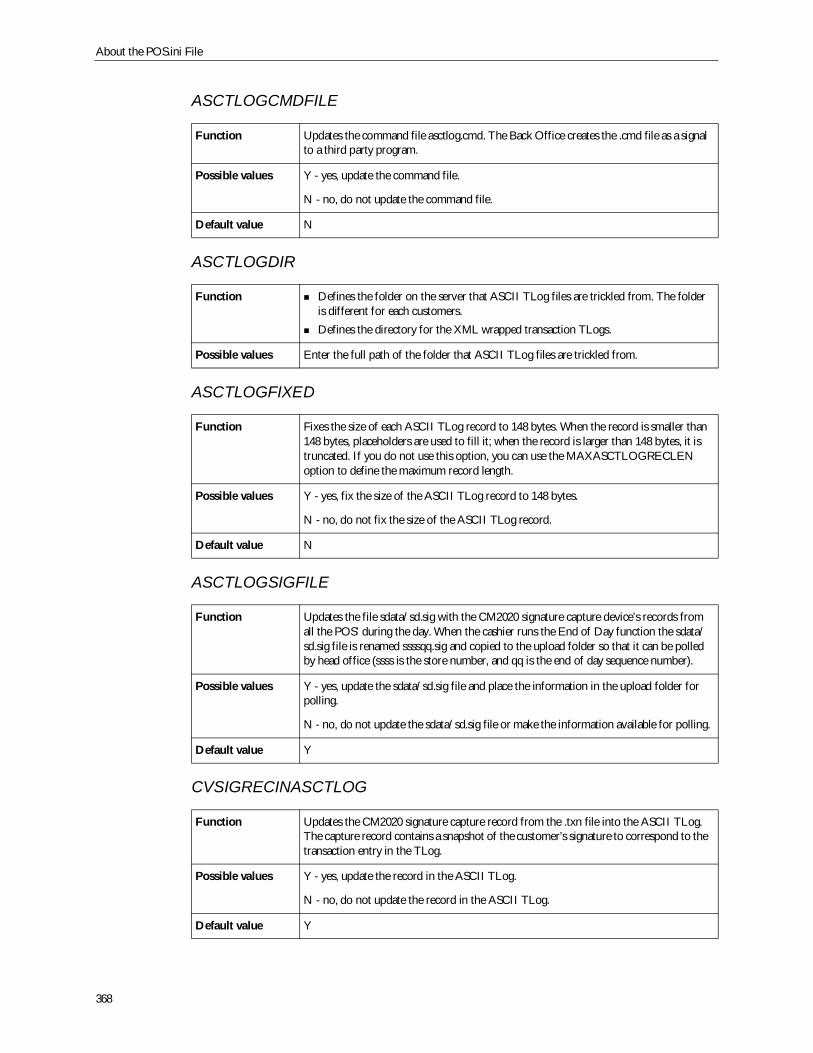
About the POS.ini File
368
ASCTLOGCMDFILE
ASCTLOGDIR
ASCTLOGFIXED
ASCTLOGSIGFILE
CVSIGRECINASCTLOG
Function Updates the command file asctlog.cmd. The Back Office creates the .cmd file as a signalto a third party program.
Possible values Y - yes, update the command file.
N - no, do not update the command file.
Default value N
Function Defines the folder on the server that ASCII TLog files are trickled from. The folderis different for each customers.Defines the directory for the XML wrapped transaction TLogs.
Possible values Enter the full path of the folder that ASCII TLog files are trickled from.
Function Fixes the size of each ASCII TLog record to 148 bytes. When the record is smaller than148 bytes, placeholders are used to fill it; when the record is larger than 148 bytes, it istruncated. If you do not use this option, you can use the MAXASCTLOGRECLENoption to define the maximum record length.
Possible values Y - yes, fix the size of the ASCII TLog record to 148 bytes.
N - no, do not fix the size of the ASCII TLog record.
Default value N
Function Updates the file sdata/sd.sig with the CM2020 signature capture device’s records fromall the POS’ during the day. When the cashier runs the End of Day function the sdata/sd.sig file is renamed ssssqq.sig and copied to the upload folder so that it can be polledby head office (ssss is the store number, and qq is the end of day sequence number).
Possible values Y - yes, update the sdata/sd.sig file and place the information in the upload folder forpolling.
N - no, do not update the sdata/sd.sig file or make the information available for polling.
Default value Y
Function Updates the CM2020 signature capture record from the .txn file into the ASCII TLog.The capture record contains a snapshot of the customer’s signature to correspond to thetransaction entry in the TLog.
Possible values Y - yes, update the record in the ASCII TLog.
N - no, do not update the record in the ASCII TLog.
Default value Y
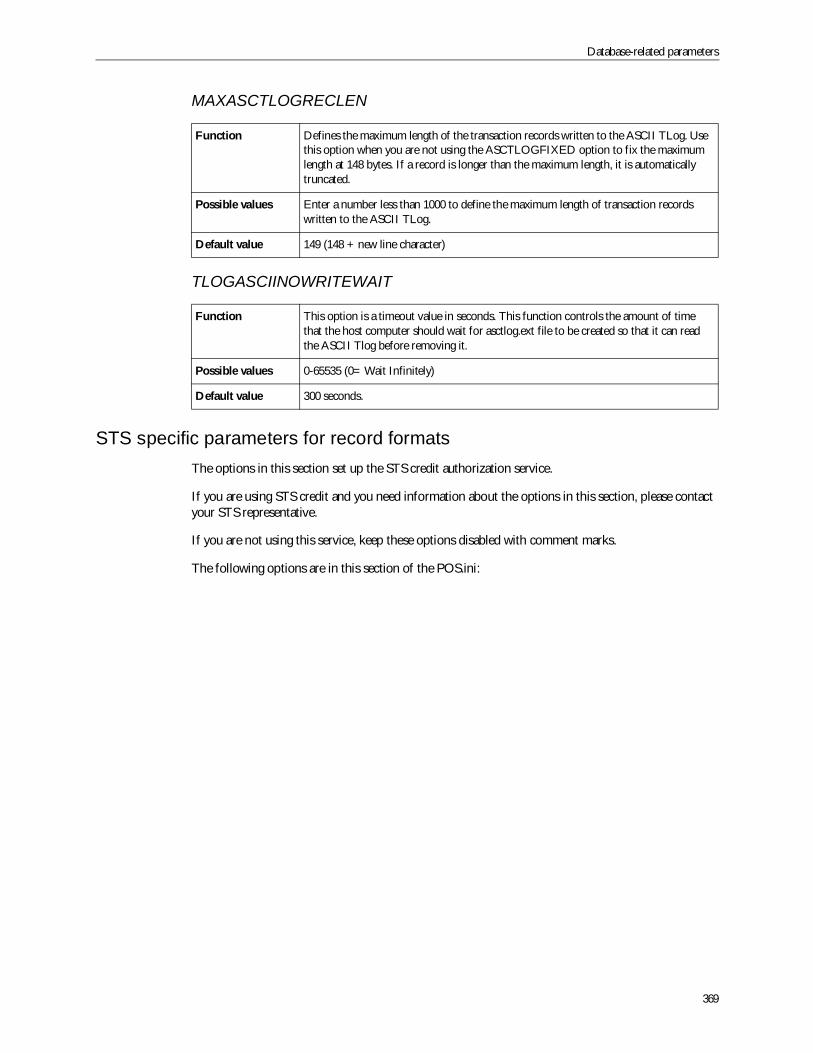
Database-related parameters
369
MAXASCTLOGRECLEN
TLOGASCIINOWRITEWAIT
STS specific parameters for record formatsThe options in this section set up the STS credit authorization service.
If you are using STS credit and you need information about the options in this section, please contactyour STS representative.
If you are not using this service, keep these options disabled with comment marks.
The following options are in this section of the POS.ini:
Function Defines the maximum length of the transaction records written to the ASCII TLog. Usethis option when you are not using the ASCTLOGFIXED option to fix the maximumlength at 148 bytes. If a record is longer than the maximum length, it is automaticallytruncated.
Possible values Enter a number less than 1000 to define the maximum length of transaction recordswritten to the ASCII TLog.
Default value 149 (148 + new line character)
Function This option is a timeout value in seconds. This function controls the amount of timethat the host computer should wait for asctlog.ext file to be created so that it can readthe ASCII Tlog before removing it.
Possible values 0-65535 (0= Wait Infinitely)
Default value 300 seconds.
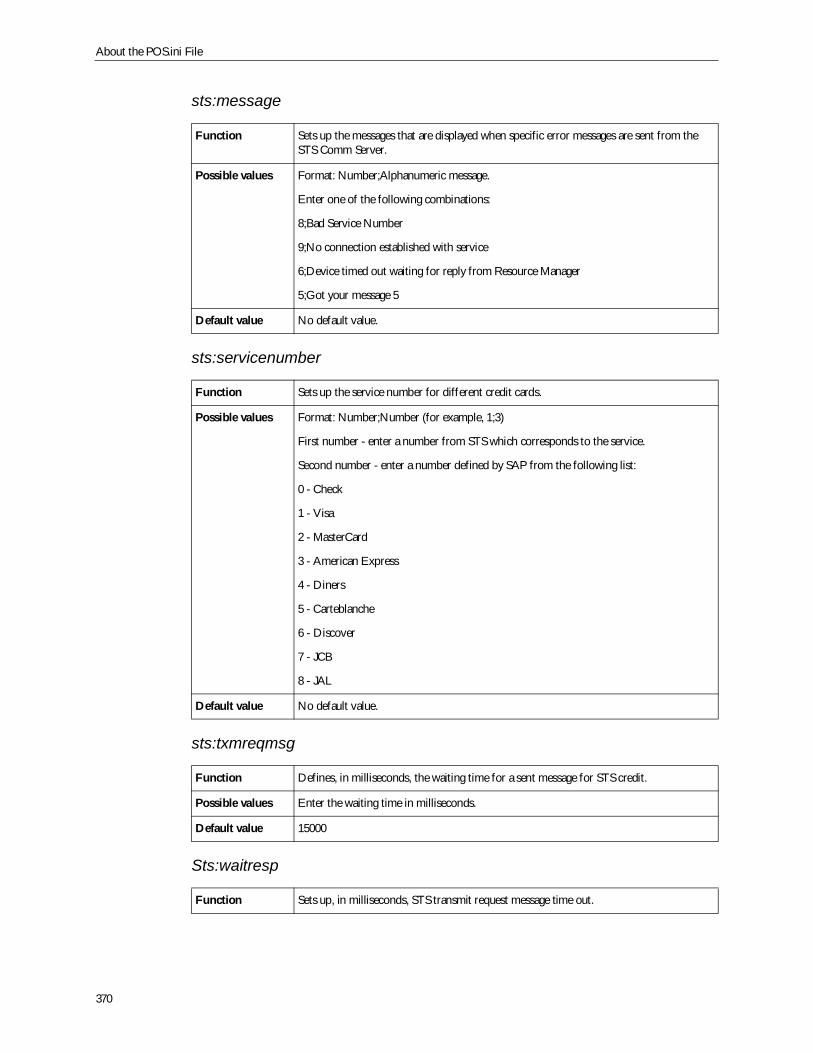
About the POS.ini File
370
sts:message
sts:servicenumber
sts:txmreqmsg
Sts:waitresp
Function Sets up the messages that are displayed when specific error messages are sent from theSTS Comm Server.
Possible values Format: Number;Alphanumeric message.
Enter one of the following combinations:
8;Bad Service Number
9;No connection established with service
6;Device timed out waiting for reply from Resource Manager
5;Got your message 5
Default value No default value.
Function Sets up the service number for different credit cards.
Possible values Format: Number;Number (for example, 1;3)
First number - enter a number from STS which corresponds to the service.
Second number - enter a number defined by SAP from the following list:
0 - Check
1 - Visa
2 - MasterCard
3 - American Express
4 - Diners
5 - Carteblanche
6 - Discover
7 - JCB
8 - JAL
Default value No default value.
Function Defines, in milliseconds, the waiting time for a sent message for STS credit.
Possible values Enter the waiting time in milliseconds.
Default value 15000
Function Sets up, in milliseconds, STS transmit request message time out.
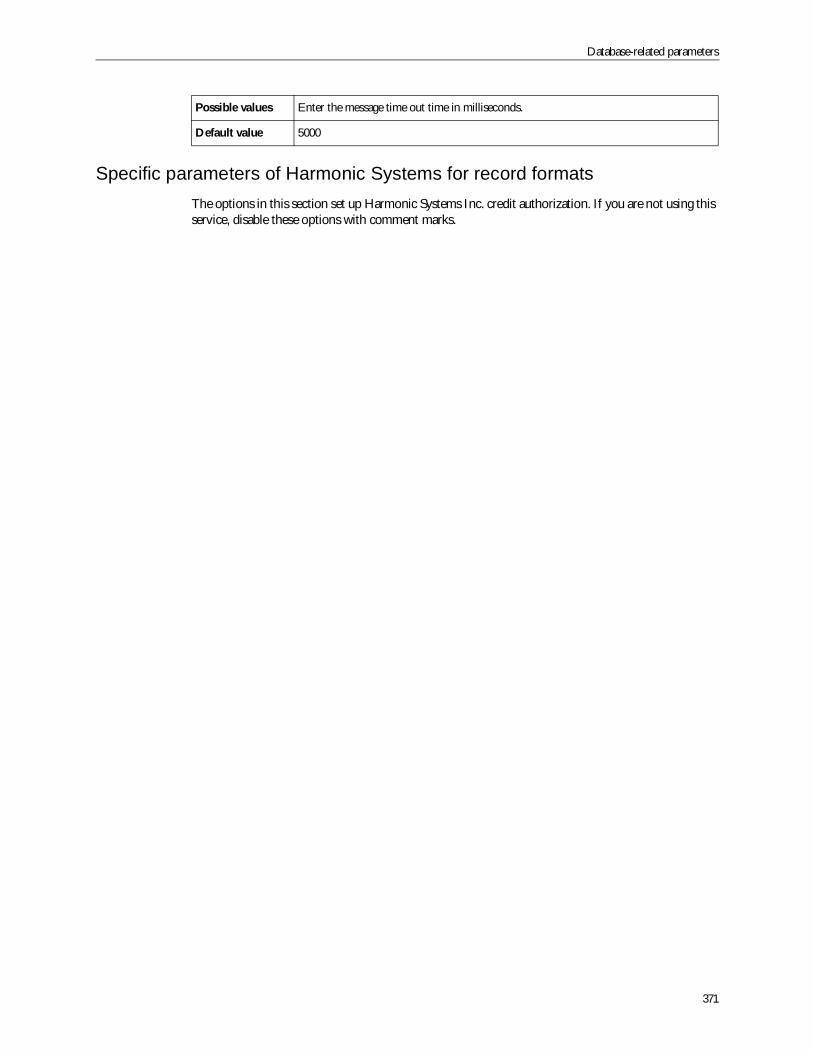
Database-related parameters
371
Specific parameters of Harmonic Systems for record formatsThe options in this section set up Harmonic Systems Inc. credit authorization. If you are not using thisservice, disable these options with comment marks.
Possible values Enter the message time out time in milliseconds.
Default value 5000
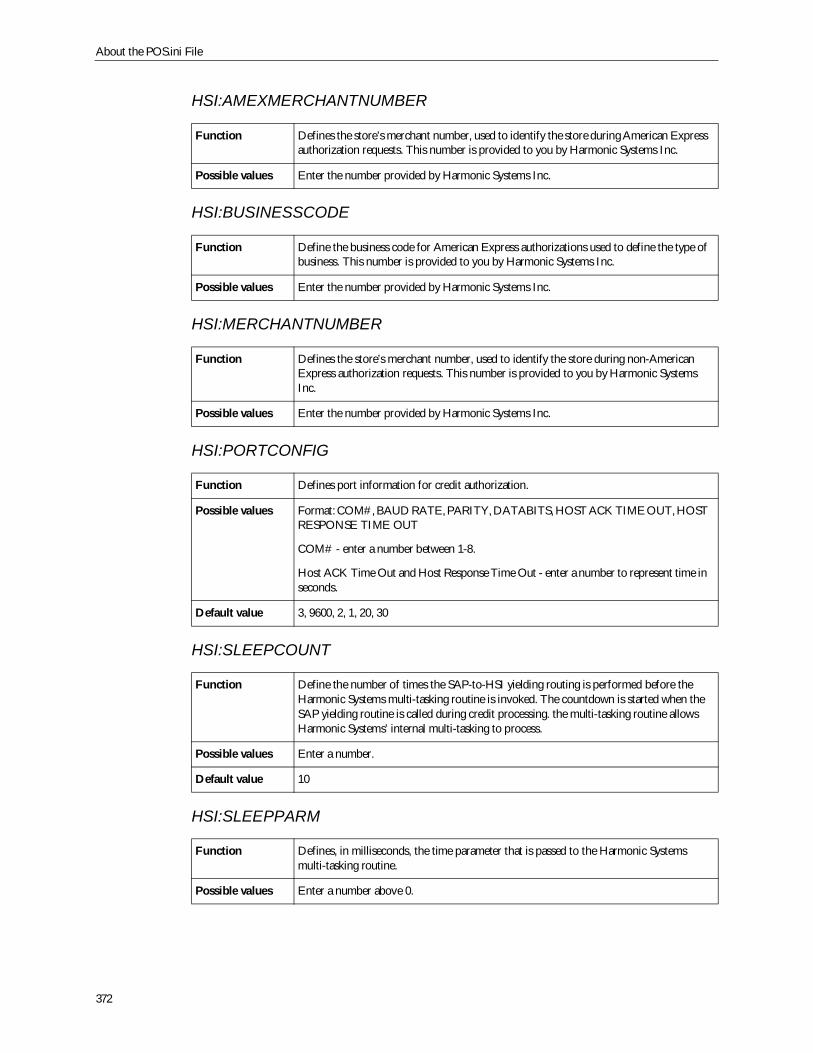
About the POS.ini File
372
HSI:AMEXMERCHANTNUMBER
HSI:BUSINESSCODE
HSI:MERCHANTNUMBER
HSI:PORTCONFIG
HSI:SLEEPCOUNT
HSI:SLEEPPARM
Function Defines the store’s merchant number, used to identify the store during American Expressauthorization requests. This number is provided to you by Harmonic Systems Inc.
Possible values Enter the number provided by Harmonic Systems Inc.
Function Define the business code for American Express authorizations used to define the type ofbusiness. This number is provided to you by Harmonic Systems Inc.
Possible values Enter the number provided by Harmonic Systems Inc.
Function Defines the store’s merchant number, used to identify the store during non-AmericanExpress authorization requests. This number is provided to you by Harmonic SystemsInc.
Possible values Enter the number provided by Harmonic Systems Inc.
Function Defines port information for credit authorization.
Possible values Format: COM#, BAUD RATE, PARITY, DATABITS, HOST ACK TIME OUT, HOSTRESPONSE TIME OUT
COM# - enter a number between 1-8.
Host ACK Time Out and Host Response Time Out - enter a number to represent time inseconds.
Default value 3, 9600, 2, 1, 20, 30
Function Define the number of times the SAP-to-HSI yielding routing is performed before theHarmonic Systems multi-tasking routine is invoked. The countdown is started when theSAP yielding routine is called during credit processing. the multi-tasking routine allowsHarmonic Systems’ internal multi-tasking to process.
Possible values Enter a number.
Default value 10
Function Defines, in milliseconds, the time parameter that is passed to the Harmonic Systemsmulti-tasking routine.
Possible values Enter a number above 0.
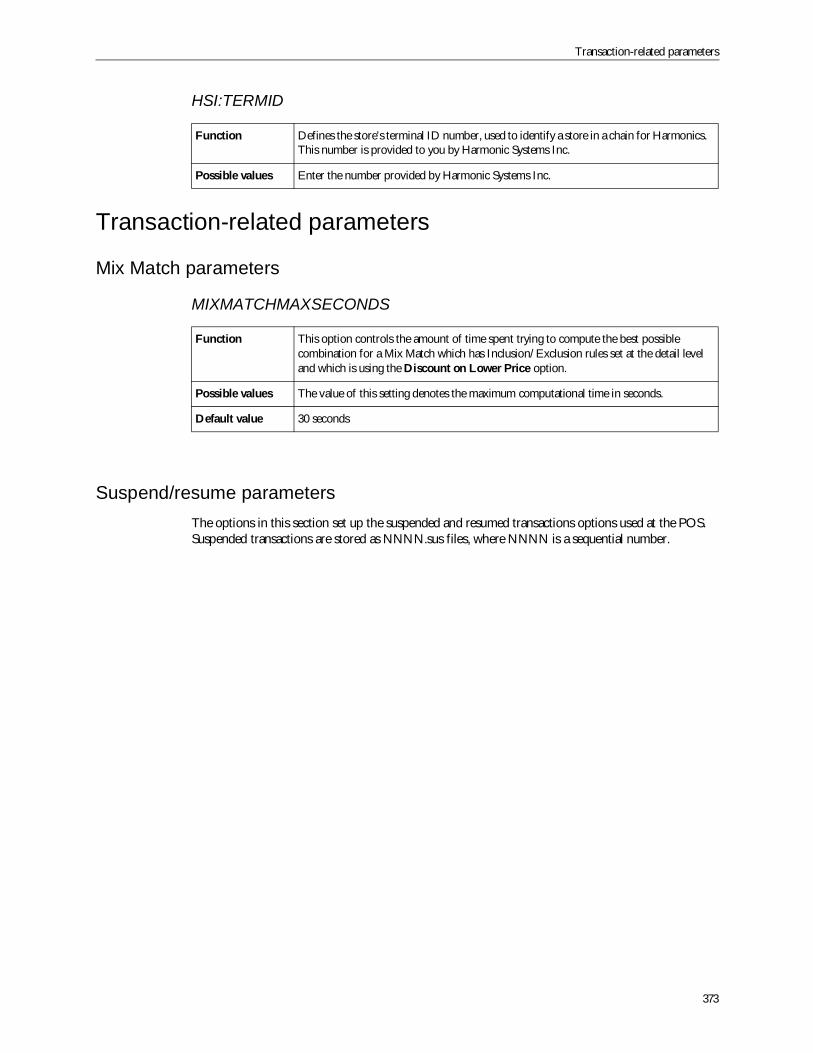
Transaction-related parameters
373
HSI:TERMID
Transaction-related parameters
Mix Match parameters
MIXMATCHMAXSECONDS
Suspend/resume parametersThe options in this section set up the suspended and resumed transactions options used at the POS.Suspended transactions are stored as NNNN.sus files, where NNNN is a sequential number.
Function Defines the store’s terminal ID number, used to identify a store in a chain for Harmonics.This number is provided to you by Harmonic Systems Inc.
Possible values Enter the number provided by Harmonic Systems Inc.
Function This option controls the amount of time spent trying to compute the best possiblecombination for a Mix Match which has Inclusion/Exclusion rules set at the detail leveland which is using the Discount on Lower Price option.
Possible values The value of this setting denotes the maximum computational time in seconds.
Default value 30 seconds
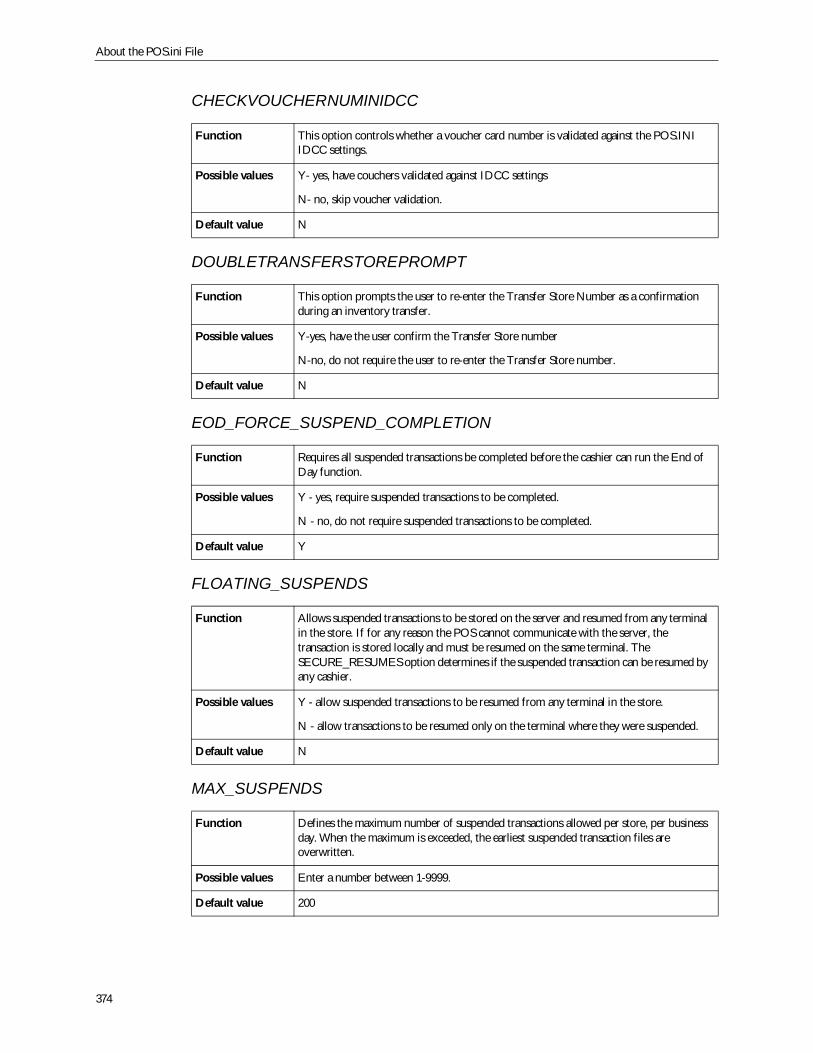
About the POS.ini File
374
CHECKVOUCHERNUMINIDCC
DOUBLETRANSFERSTOREPROMPT
EOD_FORCE_SUSPEND_COMPLETION
FLOATING_SUSPENDS
MAX_SUSPENDS
Function This option controls whether a voucher card number is validated against the POS.INIIDCC settings.
Possible values Y- yes, have couchers validated against IDCC settings
N- no, skip voucher validation.
Default value N
Function This option prompts the user to re-enter the Transfer Store Number as a confirmationduring an inventory transfer.
Possible values Y-yes, have the user confirm the Transfer Store number
N-no, do not require the user to re-enter the Transfer Store number.
Default value N
Function Requires all suspended transactions be completed before the cashier can run the End ofDay function.
Possible values Y - yes, require suspended transactions to be completed.
N - no, do not require suspended transactions to be completed.
Default value Y
Function Allows suspended transactions to be stored on the server and resumed from any terminalin the store. If for any reason the POS cannot communicate with the server, thetransaction is stored locally and must be resumed on the same terminal. TheSECURE_RESUMES option determines if the suspended transaction can be resumed byany cashier.
Possible values Y - allow suspended transactions to be resumed from any terminal in the store.
N - allow transactions to be resumed only on the terminal where they were suspended.
Default value N
Function Defines the maximum number of suspended transactions allowed per store, per businessday. When the maximum is exceeded, the earliest suspended transaction files areoverwritten.
Possible values Enter a number between 1-9999.
Default value 200
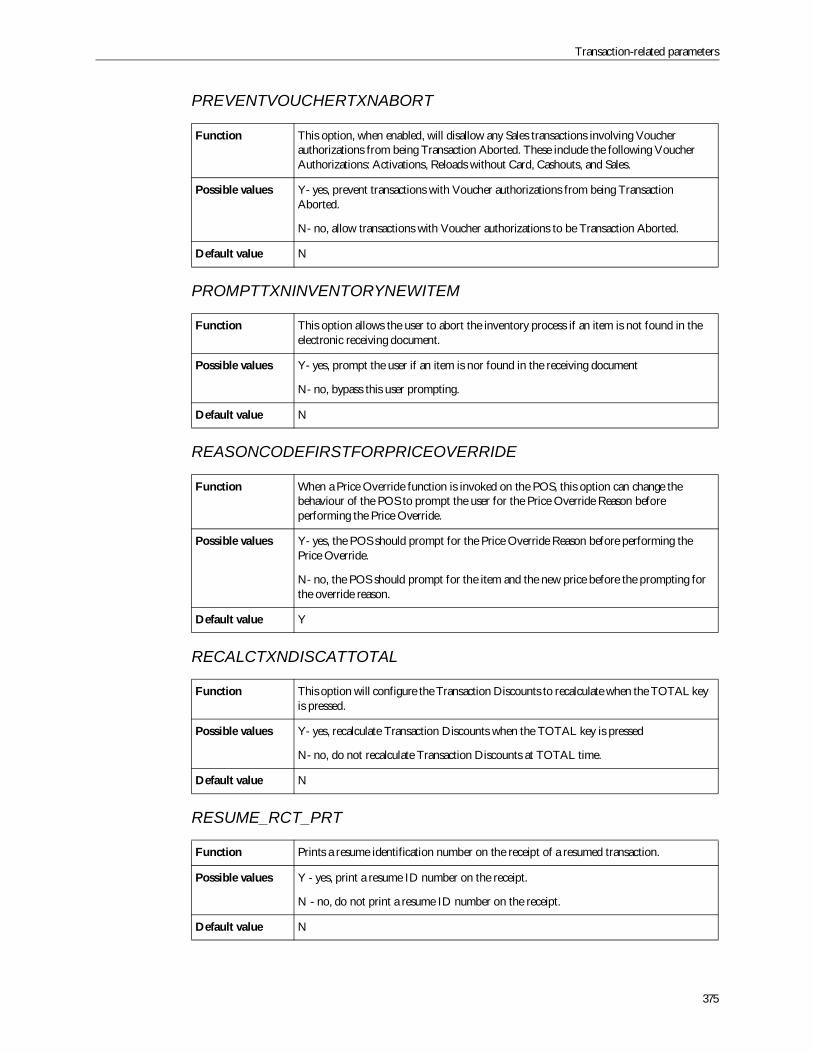
Transaction-related parameters
375
PREVENTVOUCHERTXNABORT
PROMPTTXNINVENTORYNEWITEM
REASONCODEFIRSTFORPRICEOVERRIDE
RECALCTXNDISCATTOTAL
RESUME_RCT_PRT
Function This option, when enabled, will disallow any Sales transactions involving Voucherauthorizations from being Transaction Aborted. These include the following VoucherAuthorizations: Activations, Reloads without Card, Cashouts, and Sales.
Possible values Y- yes, prevent transactions with Voucher authorizations from being TransactionAborted.
N- no, allow transactions with Voucher authorizations to be Transaction Aborted.
Default value N
Function This option allows the user to abort the inventory process if an item is not found in theelectronic receiving document.
Possible values Y- yes, prompt the user if an item is nor found in the receiving document
N- no, bypass this user prompting.
Default value N
Function When a Price Override function is invoked on the POS, this option can change thebehaviour of the POS to prompt the user for the Price Override Reason beforeperforming the Price Override.
Possible values Y- yes, the POS should prompt for the Price Override Reason before performing thePrice Override.
N- no, the POS should prompt for the item and the new price before the prompting forthe override reason.
Default value Y
Function This option will configure the Transaction Discounts to recalculate when the TOTAL keyis pressed.
Possible values Y- yes, recalculate Transaction Discounts when the TOTAL key is pressed
N- no, do not recalculate Transaction Discounts at TOTAL time.
Default value N
Function Prints a resume identification number on the receipt of a resumed transaction.
Possible values Y - yes, print a resume ID number on the receipt.
N - no, do not print a resume ID number on the receipt.
Default value N
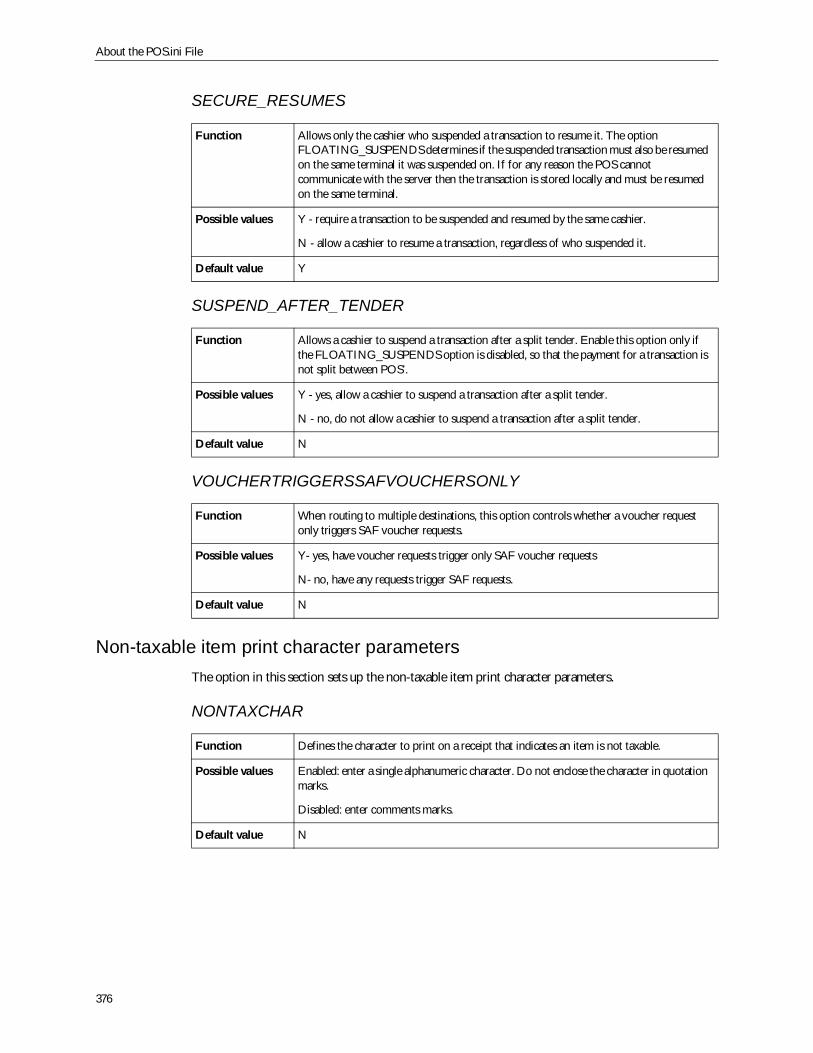
About the POS.ini File
376
SECURE_RESUMES
SUSPEND_AFTER_TENDER
VOUCHERTRIGGERSSAFVOUCHERSONLY
Non-taxable item print character parametersThe option in this section sets up the non-taxable item print character parameters.
NONTAXCHAR
Function Allows only the cashier who suspended a transaction to resume it. The optionFLOATING_SUSPENDS determines if the suspended transaction must also be resumedon the same terminal it was suspended on. If for any reason the POS cannotcommunicate with the server then the transaction is stored locally and must be resumedon the same terminal.
Possible values Y - require a transaction to be suspended and resumed by the same cashier.
N - allow a cashier to resume a transaction, regardless of who suspended it.
Default value Y
Function Allows a cashier to suspend a transaction after a split tender. Enable this option only ifthe FLOATING_SUSPENDS option is disabled, so that the payment for a transaction isnot split between POS’.
Possible values Y - yes, allow a cashier to suspend a transaction after a split tender.
N - no, do not allow a cashier to suspend a transaction after a split tender.
Default value N
Function When routing to multiple destinations, this option controls whether a voucher requestonly triggers SAF voucher requests.
Possible values Y- yes, have voucher requests trigger only SAF voucher requests
N- no, have any requests trigger SAF requests.
Default value N
Function Defines the character to print on a receipt that indicates an item is not taxable.
Possible values Enabled: enter a single alphanumeric character. Do not enclose the character in quotationmarks.
Disabled: enter comments marks.
Default value N
Transaction-related parameters
377
Discount related parametersThe options in this section define how discounts are applied when both an auto discount and a POSdiscount are applied to a transaction. Auto discounts include PLU, department and employeediscounts. For example, an item can have an automatic 20% discount triggered by the item’sdepartment record, and the cashier enters a 30% POS discount. The options in this section definewhether one or both discounts are applied.
Multiple POS discounts can be applied to the same item, however, the comparison is only conductedon the auto discount (PLU, department, or employee) and the first POS discount.
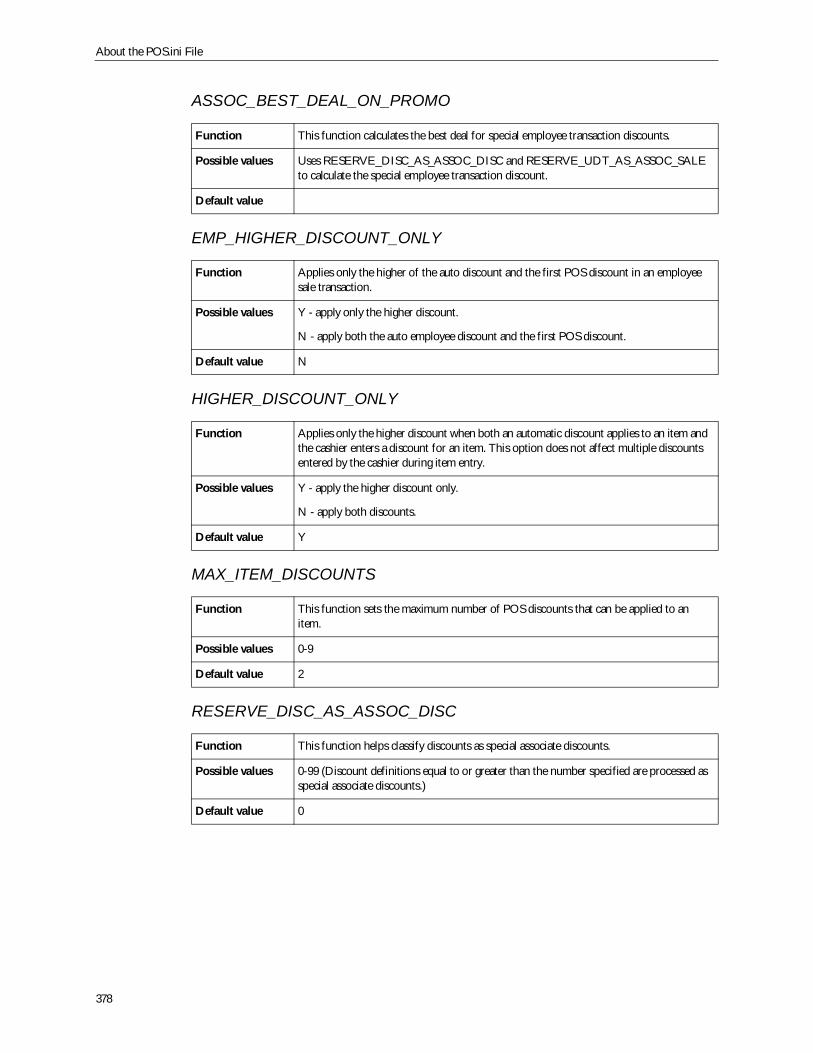
About the POS.ini File
378
ASSOC_BEST_DEAL_ON_PROMO
EMP_HIGHER_DISCOUNT_ONLY
HIGHER_DISCOUNT_ONLY
MAX_ITEM_DISCOUNTS
RESERVE_DISC_AS_ASSOC_DISC
Function This function calculates the best deal for special employee transaction discounts.
Possible values Uses RESERVE_DISC_AS_ASSOC_DISC and RESERVE_UDT_AS_ASSOC_SALEto calculate the special employee transaction discount.
Default value
Function Applies only the higher of the auto discount and the first POS discount in an employeesale transaction.
Possible values Y - apply only the higher discount.
N - apply both the auto employee discount and the first POS discount.
Default value N
Function Applies only the higher discount when both an automatic discount applies to an item andthe cashier enters a discount for an item. This option does not affect multiple discountsentered by the cashier during item entry.
Possible values Y - apply the higher discount only.
N - apply both discounts.
Default value Y
Function This function sets the maximum number of POS discounts that can be applied to anitem.
Possible values 0-9
Default value 2
Function This function helps classify discounts as special associate discounts.
Possible values 0-99 (Discount definitions equal to or greater than the number specified are processed asspecial associate discounts.)
Default value 0

Transaction-related parameters
379
RESERVE_UDT_AS_ASSOC_SALE
Function This function helps classify sales as special associate sales.
Possible values 0-255 (UDT’s equal to or greater than the number specified are processed as specialassociate sales.)
Default value 0 (disables feature)
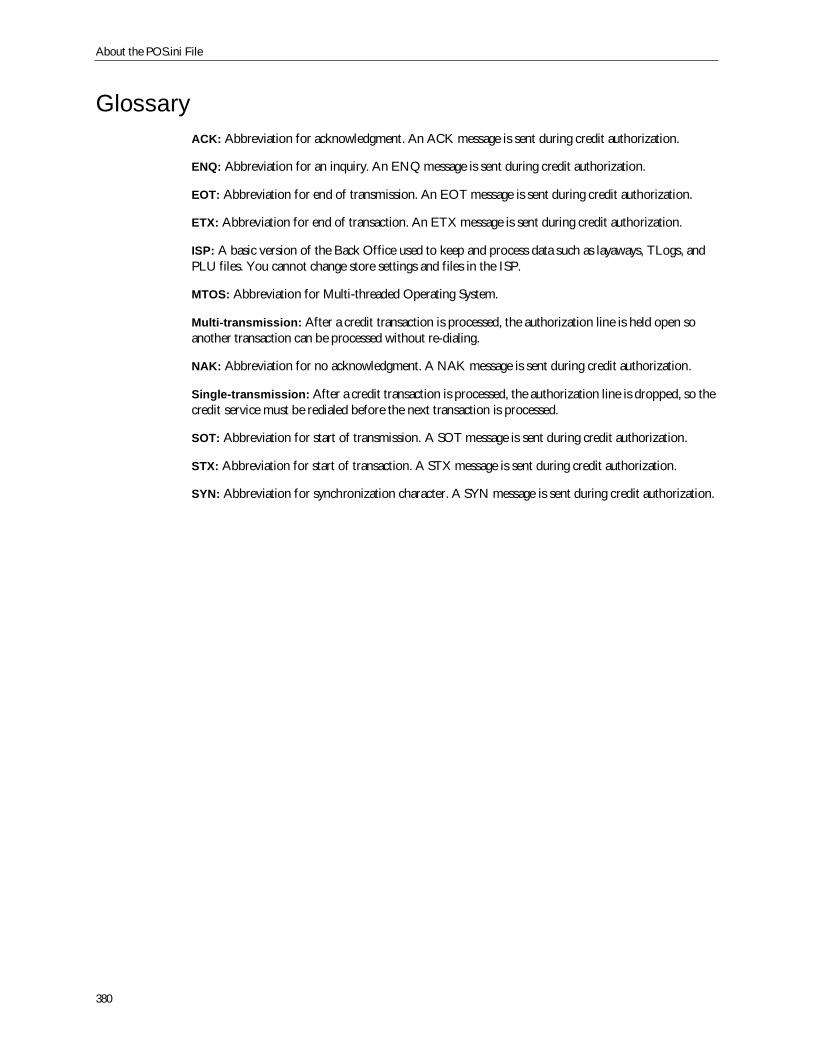
About the POS.ini File
380
GlossaryACK: Abbreviation for acknowledgment. An ACK message is sent during credit authorization.
ENQ: Abbreviation for an inquiry. An ENQ message is sent during credit authorization.
EOT: Abbreviation for end of transmission. An EOT message is sent during credit authorization.
ETX: Abbreviation for end of transaction. An ETX message is sent during credit authorization.
ISP: A basic version of the Back Office used to keep and process data such as layaways, TLogs, andPLU files. You cannot change store settings and files in the ISP.
MTOS: Abbreviation for Multi-threaded Operating System.
Multi-transmission: After a credit transaction is processed, the authorization line is held open soanother transaction can be processed without re-dialing.
NAK: Abbreviation for no acknowledgment. A NAK message is sent during credit authorization.
Single-transmission: After a credit transaction is processed, the authorization line is dropped, so thecredit service must be redialed before the next transaction is processed.
SOT: Abbreviation for start of transmission. A SOT message is sent during credit authorization.
STX: Abbreviation for start of transaction. A STX message is sent during credit authorization.
SYN: Abbreviation for synchronization character. A SYN message is sent during credit authorization.
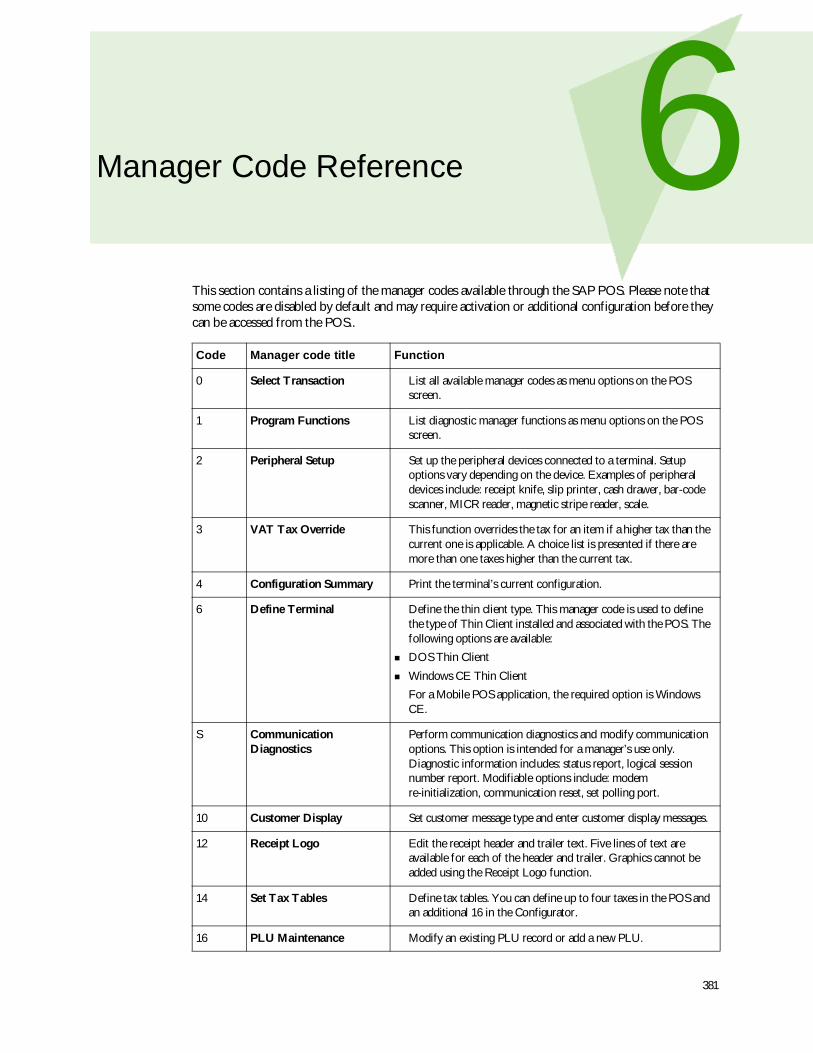
381
6Manager Code Reference
This section contains a listing of the manager codes available through the SAP POS. Please note thatsome codes are disabled by default and may require activation or additional configuration before theycan be accessed from the POS..
Code Manager code title Function
0 Select Transaction List all available manager codes as menu options on the POSscreen.
1 Program Functions List diagnostic manager functions as menu options on the POSscreen.
2 Peripheral Setup Set up the peripheral devices connected to a terminal. Setupoptions vary depending on the device. Examples of peripheraldevices include: receipt knife, slip printer, cash drawer, bar-codescanner, MICR reader, magnetic stripe reader, scale.
3 VAT Tax Override This function overrides the tax for an item if a higher tax than thecurrent one is applicable. A choice list is presented if there aremore than one taxes higher than the current tax.
4 Configuration Summary Print the terminal’s current configuration.
6 Define Terminal Define the thin client type. This manager code is used to definethe type of Thin Client installed and associated with the POS. Thefollowing options are available:DOS Thin ClientWindows CE Thin ClientFor a Mobile POS application, the required option is WindowsCE.
S CommunicationDiagnostics
Perform communication diagnostics and modify communicationoptions. This option is intended for a manager’s use only.Diagnostic information includes: status report, logical sessionnumber report. Modifiable options include: modemre-initialization, communication reset, set polling port.
10 Customer Display Set customer message type and enter customer display messages.
12 Receipt Logo Edit the receipt header and trailer text. Five lines of text areavailable for each of the header and trailer. Graphics cannot beadded using the Receipt Logo function.
14 Set Tax Tables Define tax tables. You can define up to four taxes in the POS andan additional 16 in the Configurator.
16 PLU Maintenance Modify an existing PLU record or add a new PLU.
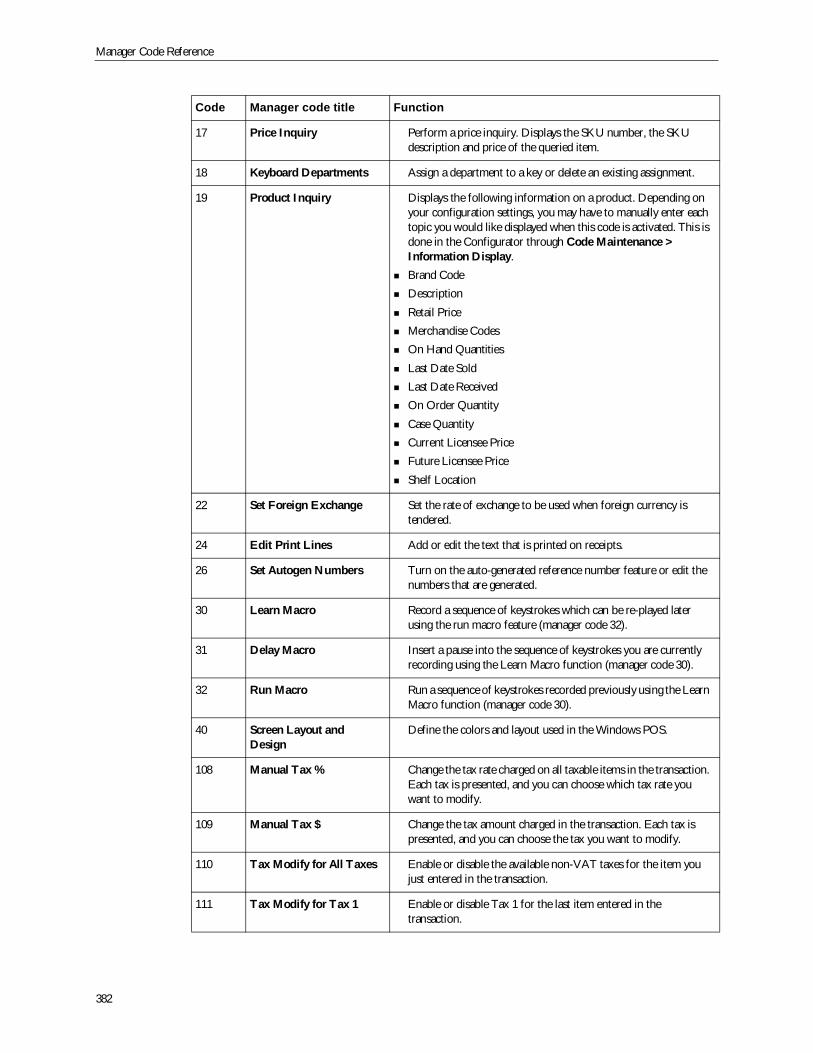
Manager Code Reference
382
17 Price Inquiry Perform a price inquiry. Displays the SKU number, the SKUdescription and price of the queried item.
18 Keyboard Departments Assign a department to a key or delete an existing assignment.
19 Product Inquiry Displays the following information on a product. Depending onyour configuration settings, you may have to manually enter eachtopic you would like displayed when this code is activated. This isdone in the Configurator through Code Maintenance >Information Display.Brand CodeDescriptionRetail PriceMerchandise CodesOn Hand QuantitiesLast Date SoldLast Date ReceivedOn Order QuantityCase QuantityCurrent Licensee PriceFuture Licensee PriceShelf Location
22 Set Foreign Exchange Set the rate of exchange to be used when foreign currency istendered.
24 Edit Print Lines Add or edit the text that is printed on receipts.
26 Set Autogen Numbers Turn on the auto-generated reference number feature or edit thenumbers that are generated.
30 Learn Macro Record a sequence of keystrokes which can be re-played laterusing the run macro feature (manager code 32).
31 Delay Macro Insert a pause into the sequence of keystrokes you are currentlyrecording using the Learn Macro function (manager code 30).
32 Run Macro Run a sequence of keystrokes recorded previously using the LearnMacro function (manager code 30).
40 Screen Layout andDesign
Define the colors and layout used in the Windows POS.
108 Manual Tax % Change the tax rate charged on all taxable items in the transaction.Each tax is presented, and you can choose which tax rate youwant to modify.
109 Manual Tax $ Change the tax amount charged in the transaction. Each tax ispresented, and you can choose the tax you want to modify.
110 Tax Modify for All Taxes Enable or disable the available non-VAT taxes for the item youjust entered in the transaction.
111 Tax Modify for Tax 1 Enable or disable Tax 1 for the last item entered in thetransaction.
Code Manager code title Function

383
112 Tax Modify for Tax 2 Enable or disable Tax 2 for the last item entered in thetransaction.
113 Tax Modify for Tax 3 Enable or disable Tax 3 for the last item entered in thetransaction.
114 Tax Modify for Tax 4 Enable or disable Tax 4 for the last item entered in thetransaction.
115 Tax Modify for Tax 5 Enable or disable Tax 5 for the last item entered in thetransaction.
116 Tax Modify for Tax 6 Enable or disable Tax 6 for the last item entered in thetransaction.
117 Tax Modify for Tax 7 Enable or disable Tax 7 for the last item entered in thetransaction.
118 Tax Modify for Tax 8 Enable or disable Tax 8 for the last item entered in thetransaction.
119 Tax Modify for Tax 9 Enable or disable Tax 9 for the last item entered in thetransaction.
120 Tax Modify for Tax 10 Enable or disable Tax 10 for the last item entered in thetransaction.
121 Tax Modify for Tax 11 Enable or disable Tax 11 for the last item entered in thetransaction.
122 Tax Modify for Tax 12 Enable or disable Tax 12 for the last item entered in thetransaction.
123 Tax Modify for Tax 13 Enable or disable Tax 13 for the last item entered in thetransaction.
124 Tax Modify for Tax 14 Enable or disable Tax 14 for the last item entered in thetransaction.
125 Tax Modify for Tax 15 Enable or disable Tax 15 for the last item entered in thetransaction.
126 Tax Modify for Tax 16 Enable or disable Tax 16 for the last item entered in thetransaction.
127 Manual Item Tax Change the tax rate or tax amount charged on a single item in thetransaction.
156 Customer CardReplacement
Performs the customer card replacement function.When the POS detects an expired customer card, this functionprompts the cashier to enter old card information, and thencaptures replacement card information.
160 View Electronic Journal Review transactions that are stored in the electronic journal.
162 Gift Receipt Print a gift receipt with an encoded price.
168 View Current Transaction Allows you to scroll up to view items entered in the currenttransaction before the transaction is completed.
Code Manager code title Function
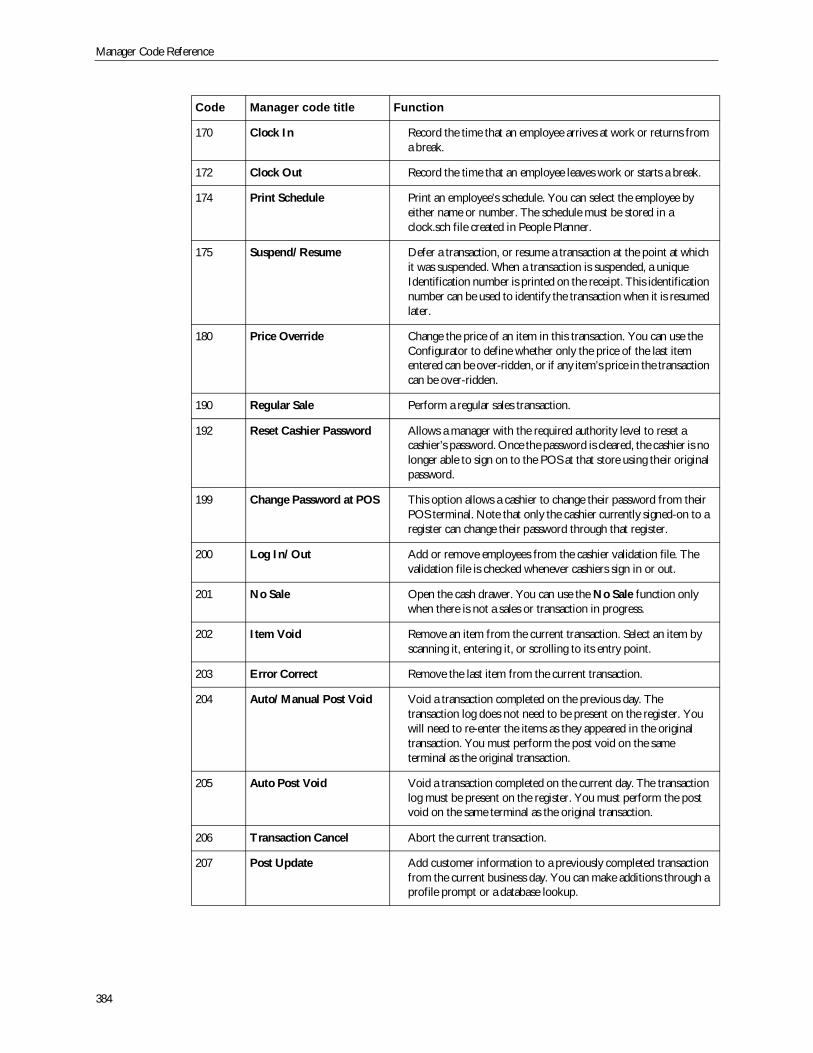
Manager Code Reference
384
170 Clock In Record the time that an employee arrives at work or returns froma break.
172 Clock Out Record the time that an employee leaves work or starts a break.
174 Print Schedule Print an employee’s schedule. You can select the employee byeither name or number. The schedule must be stored in aclock.sch file created in People Planner.
175 Suspend/Resume Defer a transaction, or resume a transaction at the point at whichit was suspended. When a transaction is suspended, a uniqueIdentification number is printed on the receipt. This identificationnumber can be used to identify the transaction when it is resumedlater.
180 Price Override Change the price of an item in this transaction. You can use theConfigurator to define whether only the price of the last itementered can be over-ridden, or if any item’s price in the transactioncan be over-ridden.
190 Regular Sale Perform a regular sales transaction.
192 Reset Cashier Password Allows a manager with the required authority level to reset acashier’s password. Once the password is cleared, the cashier is nolonger able to sign on to the POS at that store using their originalpassword.
199 Change Password at POS This option allows a cashier to change their password from theirPOS terminal. Note that only the cashier currently signed-on to aregister can change their password through that register.
200 Log In/Out Add or remove employees from the cashier validation file. Thevalidation file is checked whenever cashiers sign in or out.
201 No Sale Open the cash drawer. You can use the No Sale function onlywhen there is not a sales or transaction in progress.
202 Item Void Remove an item from the current transaction. Select an item byscanning it, entering it, or scrolling to its entry point.
203 Error Correct Remove the last item from the current transaction.
204 Auto/Manual Post Void Void a transaction completed on the previous day. Thetransaction log does not need to be present on the register. Youwill need to re-enter the items as they appeared in the originaltransaction. You must perform the post void on the sameterminal as the original transaction.
205 Auto Post Void Void a transaction completed on the current day. The transactionlog must be present on the register. You must perform the postvoid on the same terminal as the original transaction.
206 Transaction Cancel Abort the current transaction.
207 Post Update Add customer information to a previously completed transactionfrom the current business day. You can make additions through aprofile prompt or a database lookup.
Code Manager code title Function
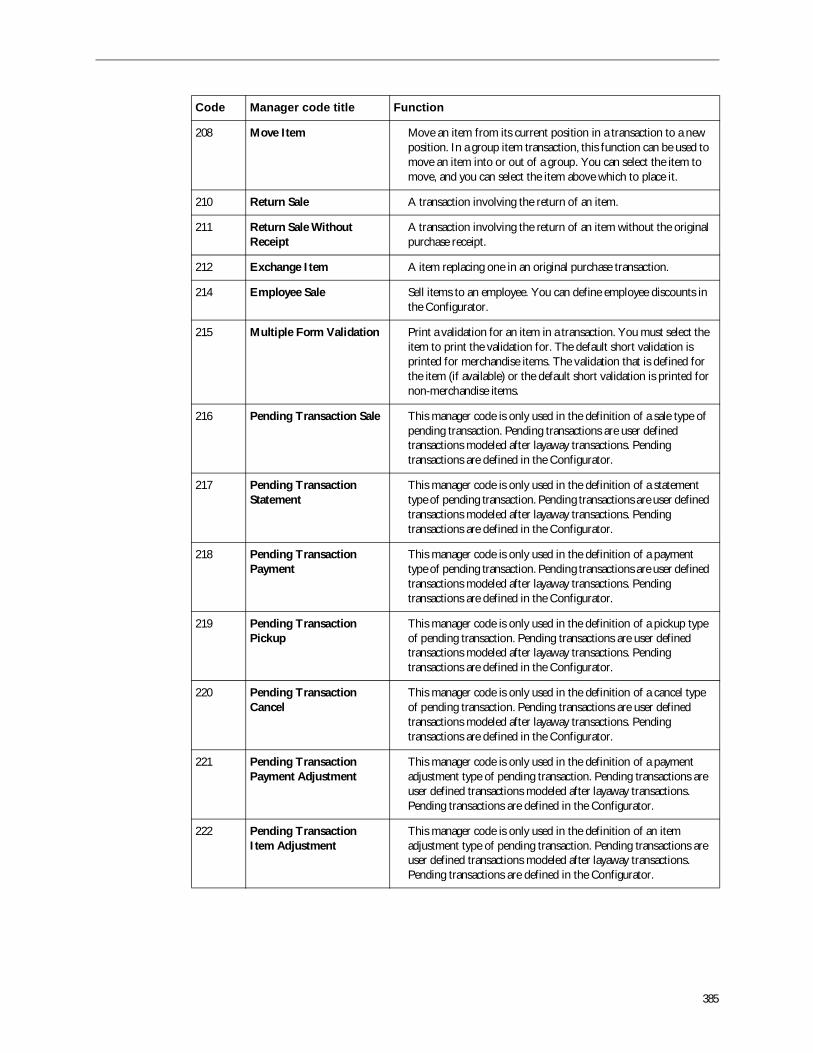
385
208 Move Item Move an item from its current position in a transaction to a newposition. In a group item transaction, this function can be used tomove an item into or out of a group. You can select the item tomove, and you can select the item above which to place it.
210 Return Sale A transaction involving the return of an item.
211 Return Sale WithoutReceipt
A transaction involving the return of an item without the originalpurchase receipt.
212 Exchange Item A item replacing one in an original purchase transaction.
214 Employee Sale Sell items to an employee. You can define employee discounts inthe Configurator.
215 Multiple Form Validation Print a validation for an item in a transaction. You must select theitem to print the validation for. The default short validation isprinted for merchandise items. The validation that is defined forthe item (if available) or the default short validation is printed fornon-merchandise items.
216 Pending Transaction Sale This manager code is only used in the definition of a sale type ofpending transaction. Pending transactions are user definedtransactions modeled after layaway transactions. Pendingtransactions are defined in the Configurator.
217 Pending TransactionStatement
This manager code is only used in the definition of a statementtype of pending transaction. Pending transactions are user definedtransactions modeled after layaway transactions. Pendingtransactions are defined in the Configurator.
218 Pending TransactionPayment
This manager code is only used in the definition of a paymenttype of pending transaction. Pending transactions are user definedtransactions modeled after layaway transactions. Pendingtransactions are defined in the Configurator.
219 Pending TransactionPickup
This manager code is only used in the definition of a pickup typeof pending transaction. Pending transactions are user definedtransactions modeled after layaway transactions. Pendingtransactions are defined in the Configurator.
220 Pending TransactionCancel
This manager code is only used in the definition of a cancel typeof pending transaction. Pending transactions are user definedtransactions modeled after layaway transactions. Pendingtransactions are defined in the Configurator.
221 Pending TransactionPayment Adjustment
This manager code is only used in the definition of a paymentadjustment type of pending transaction. Pending transactions areuser defined transactions modeled after layaway transactions.Pending transactions are defined in the Configurator.
222 Pending TransactionItem Adjustment
This manager code is only used in the definition of an itemadjustment type of pending transaction. Pending transactions areuser defined transactions modeled after layaway transactions.Pending transactions are defined in the Configurator.
Code Manager code title Function
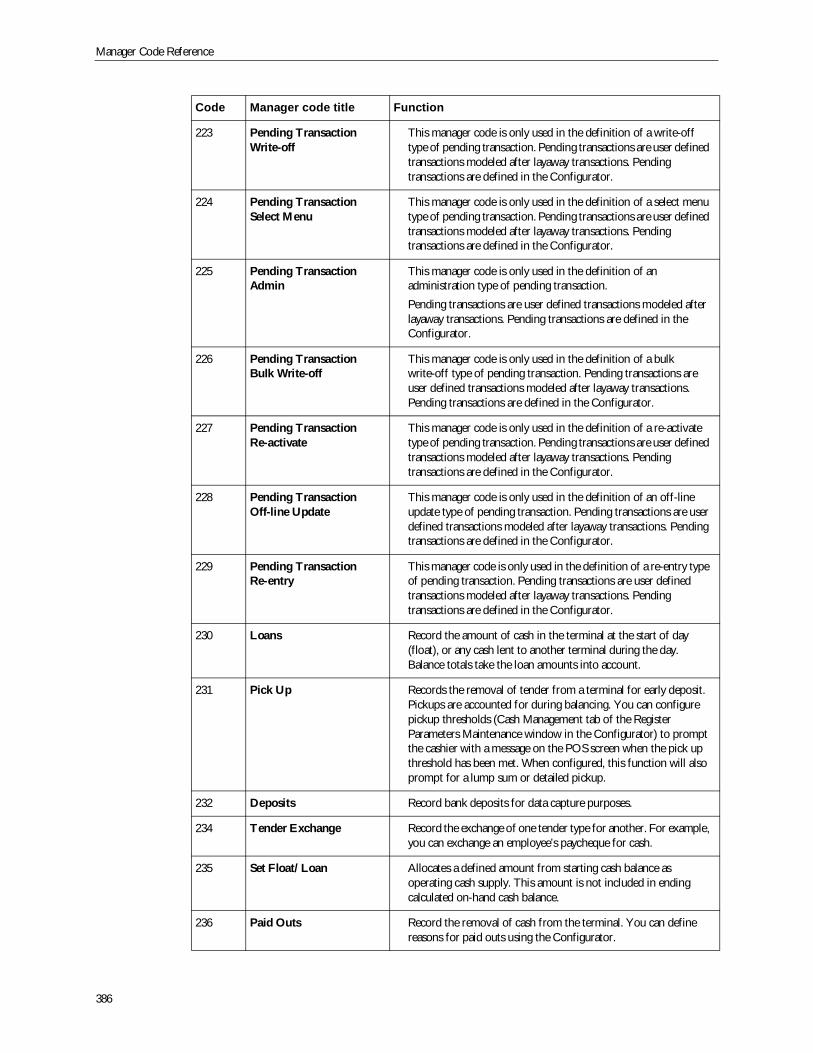
Manager Code Reference
386
223 Pending TransactionWrite-off
This manager code is only used in the definition of a write-offtype of pending transaction. Pending transactions are user definedtransactions modeled after layaway transactions. Pendingtransactions are defined in the Configurator.
224 Pending TransactionSelect Menu
This manager code is only used in the definition of a select menutype of pending transaction. Pending transactions are user definedtransactions modeled after layaway transactions. Pendingtransactions are defined in the Configurator.
225 Pending TransactionAdmin
This manager code is only used in the definition of anadministration type of pending transaction.Pending transactions are user defined transactions modeled afterlayaway transactions. Pending transactions are defined in theConfigurator.
226 Pending TransactionBulk Write-off
This manager code is only used in the definition of a bulkwrite-off type of pending transaction. Pending transactions areuser defined transactions modeled after layaway transactions.Pending transactions are defined in the Configurator.
227 Pending TransactionRe-activate
This manager code is only used in the definition of a re-activatetype of pending transaction. Pending transactions are user definedtransactions modeled after layaway transactions. Pendingtransactions are defined in the Configurator.
228 Pending TransactionOff-line Update
This manager code is only used in the definition of an off-lineupdate type of pending transaction. Pending transactions are userdefined transactions modeled after layaway transactions. Pendingtransactions are defined in the Configurator.
229 Pending TransactionRe-entry
This manager code is only used in the definition of a re-entry typeof pending transaction. Pending transactions are user definedtransactions modeled after layaway transactions. Pendingtransactions are defined in the Configurator.
230 Loans Record the amount of cash in the terminal at the start of day(float), or any cash lent to another terminal during the day.Balance totals take the loan amounts into account.
231 Pick Up Records the removal of tender from a terminal for early deposit.Pickups are accounted for during balancing. You can configurepickup thresholds (Cash Management tab of the RegisterParameters Maintenance window in the Configurator) to promptthe cashier with a message on the POS screen when the pick upthreshold has been met. When configured, this function will alsoprompt for a lump sum or detailed pickup.
232 Deposits Record bank deposits for data capture purposes.
234 Tender Exchange Record the exchange of one tender type for another. For example,you can exchange an employee’s paycheque for cash.
235 Set Float/Loan Allocates a defined amount from starting cash balance asoperating cash supply. This amount is not included in endingcalculated on-hand cash balance.
236 Paid Outs Record the removal of cash from the terminal. You can definereasons for paid outs using the Configurator.
Code Manager code title Function
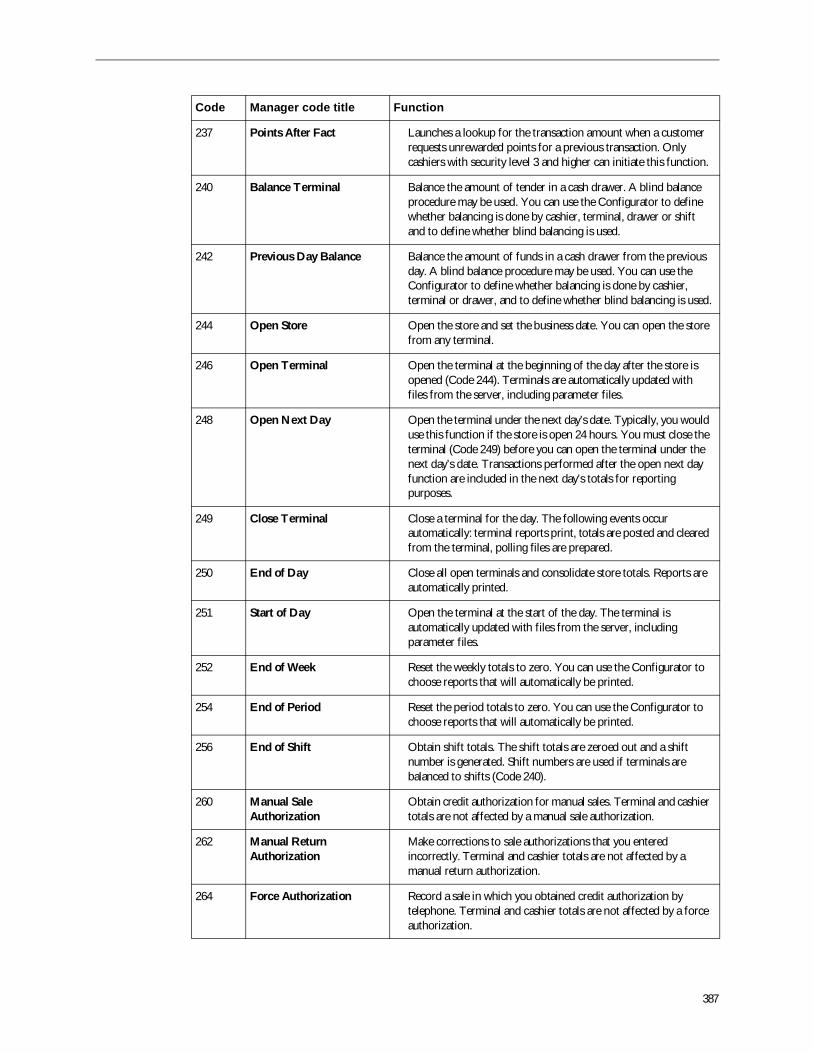
387
237 Points After Fact Launches a lookup for the transaction amount when a customerrequests unrewarded points for a previous transaction. Onlycashiers with security level 3 and higher can initiate this function.
240 Balance Terminal Balance the amount of tender in a cash drawer. A blind balanceprocedure may be used. You can use the Configurator to definewhether balancing is done by cashier, terminal, drawer or shiftand to define whether blind balancing is used.
242 Previous Day Balance Balance the amount of funds in a cash drawer from the previousday. A blind balance procedure may be used. You can use theConfigurator to define whether balancing is done by cashier,terminal or drawer, and to define whether blind balancing is used.
244 Open Store Open the store and set the business date. You can open the storefrom any terminal.
246 Open Terminal Open the terminal at the beginning of the day after the store isopened (Code 244). Terminals are automatically updated withfiles from the server, including parameter files.
248 Open Next Day Open the terminal under the next day’s date. Typically, you woulduse this function if the store is open 24 hours. You must close theterminal (Code 249) before you can open the terminal under thenext day’s date. Transactions performed after the open next dayfunction are included in the next day’s totals for reportingpurposes.
249 Close Terminal Close a terminal for the day. The following events occurautomatically: terminal reports print, totals are posted and clearedfrom the terminal, polling files are prepared.
250 End of Day Close all open terminals and consolidate store totals. Reports areautomatically printed.
251 Start of Day Open the terminal at the start of the day. The terminal isautomatically updated with files from the server, includingparameter files.
252 End of Week Reset the weekly totals to zero. You can use the Configurator tochoose reports that will automatically be printed.
254 End of Period Reset the period totals to zero. You can use the Configurator tochoose reports that will automatically be printed.
256 End of Shift Obtain shift totals. The shift totals are zeroed out and a shiftnumber is generated. Shift numbers are used if terminals arebalanced to shifts (Code 240).
260 Manual SaleAuthorization
Obtain credit authorization for manual sales. Terminal and cashiertotals are not affected by a manual sale authorization.
262 Manual ReturnAuthorization
Make corrections to sale authorizations that you enteredincorrectly. Terminal and cashier totals are not affected by amanual return authorization.
264 Force Authorization Record a sale in which you obtained credit authorization bytelephone. Terminal and cashier totals are not affected by a forceauthorization.
Code Manager code title Function
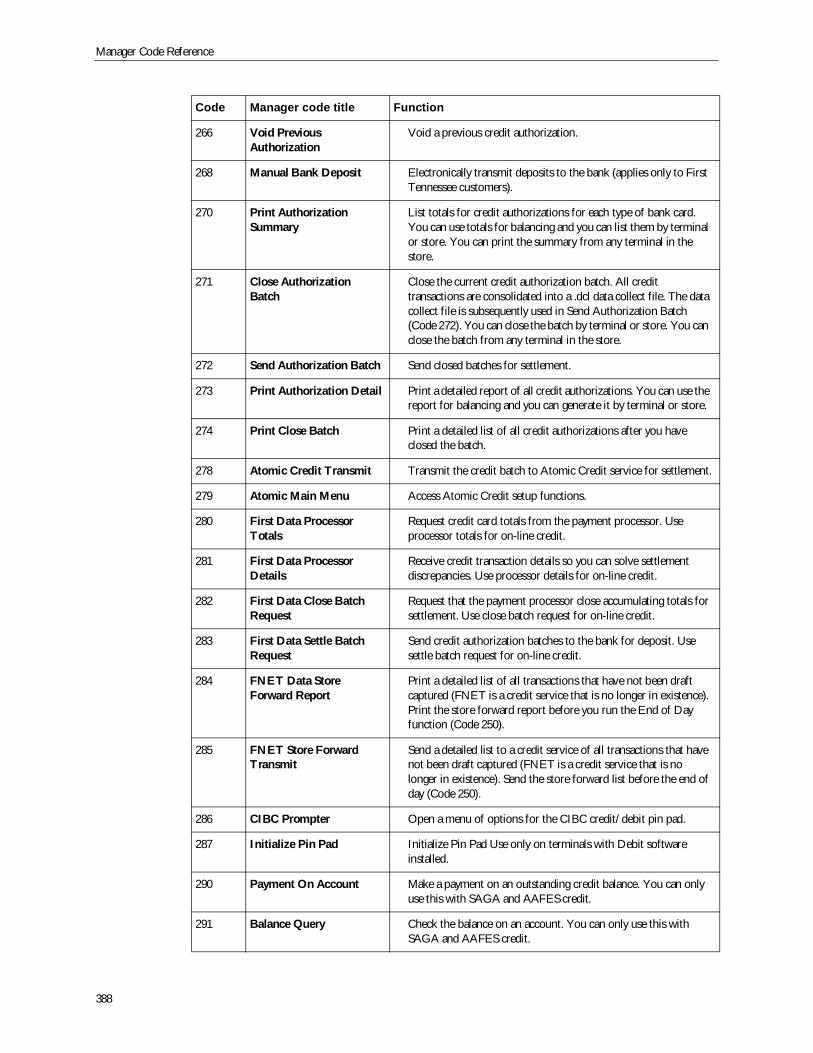
Manager Code Reference
388
266 Void PreviousAuthorization
Void a previous credit authorization.
268 Manual Bank Deposit Electronically transmit deposits to the bank (applies only to FirstTennessee customers).
270 Print AuthorizationSummary
List totals for credit authorizations for each type of bank card.You can use totals for balancing and you can list them by terminalor store. You can print the summary from any terminal in thestore.
271 Close AuthorizationBatch
Close the current credit authorization batch. All credittransactions are consolidated into a .dcl data collect file. The datacollect file is subsequently used in Send Authorization Batch(Code 272). You can close the batch by terminal or store. You canclose the batch from any terminal in the store.
272 Send Authorization Batch Send closed batches for settlement.
273 Print Authorization Detail Print a detailed report of all credit authorizations. You can use thereport for balancing and you can generate it by terminal or store.
274 Print Close Batch Print a detailed list of all credit authorizations after you haveclosed the batch.
278 Atomic Credit Transmit Transmit the credit batch to Atomic Credit service for settlement.
279 Atomic Main Menu Access Atomic Credit setup functions.
280 First Data ProcessorTotals
Request credit card totals from the payment processor. Useprocessor totals for on-line credit.
281 First Data ProcessorDetails
Receive credit transaction details so you can solve settlementdiscrepancies. Use processor details for on-line credit.
282 First Data Close BatchRequest
Request that the payment processor close accumulating totals forsettlement. Use close batch request for on-line credit.
283 First Data Settle BatchRequest
Send credit authorization batches to the bank for deposit. Usesettle batch request for on-line credit.
284 FNET Data StoreForward Report
Print a detailed list of all transactions that have not been draftcaptured (FNET is a credit service that is no longer in existence).Print the store forward report before you run the End of Dayfunction (Code 250).
285 FNET Store ForwardTransmit
Send a detailed list to a credit service of all transactions that havenot been draft captured (FNET is a credit service that is nolonger in existence). Send the store forward list before the end ofday (Code 250).
286 CIBC Prompter Open a menu of options for the CIBC credit/debit pin pad.
287 Initialize Pin Pad Initialize Pin Pad Use only on terminals with Debit softwareinstalled.
290 Payment On Account Make a payment on an outstanding credit balance. You can onlyuse this with SAGA and AAFES credit.
291 Balance Query Check the balance on an account. You can only use this withSAGA and AAFES credit.
Code Manager code title Function
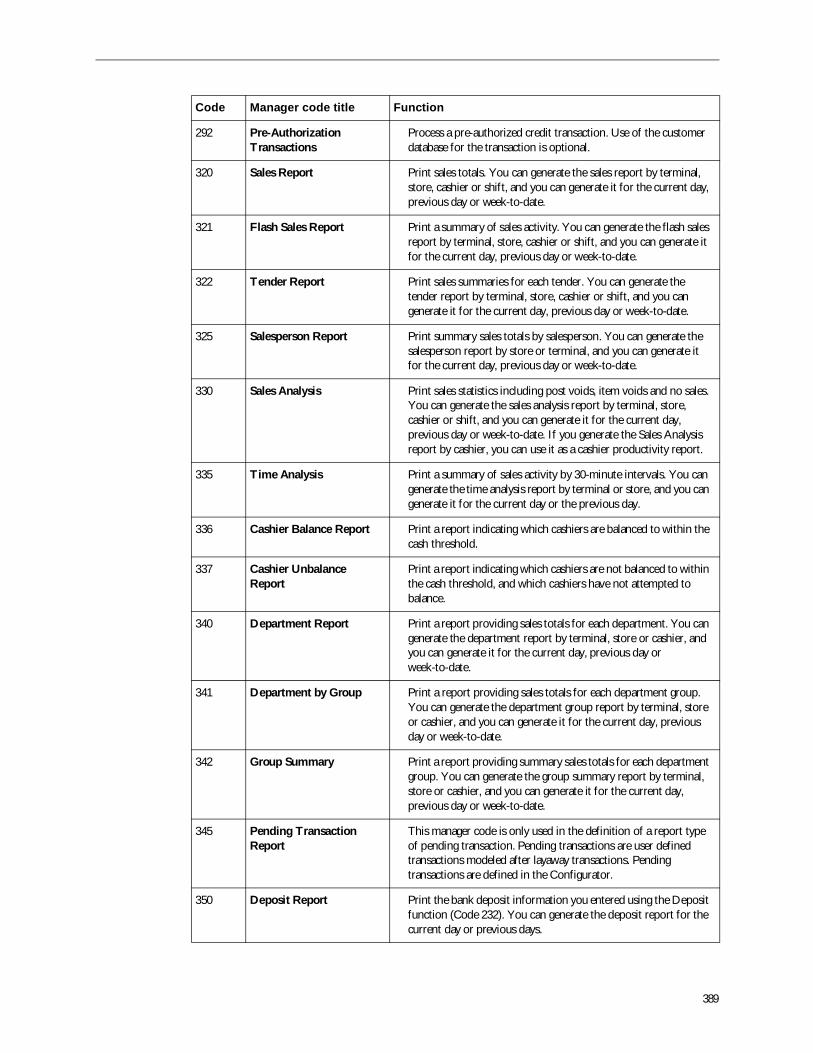
389
292 Pre-AuthorizationTransactions
Process a pre-authorized credit transaction. Use of the customerdatabase for the transaction is optional.
320 Sales Report Print sales totals. You can generate the sales report by terminal,store, cashier or shift, and you can generate it for the current day,previous day or week-to-date.
321 Flash Sales Report Print a summary of sales activity. You can generate the flash salesreport by terminal, store, cashier or shift, and you can generate itfor the current day, previous day or week-to-date.
322 Tender Report Print sales summaries for each tender. You can generate thetender report by terminal, store, cashier or shift, and you cangenerate it for the current day, previous day or week-to-date.
325 Salesperson Report Print summary sales totals by salesperson. You can generate thesalesperson report by store or terminal, and you can generate itfor the current day, previous day or week-to-date.
330 Sales Analysis Print sales statistics including post voids, item voids and no sales.You can generate the sales analysis report by terminal, store,cashier or shift, and you can generate it for the current day,previous day or week-to-date. If you generate the Sales Analysisreport by cashier, you can use it as a cashier productivity report.
335 Time Analysis Print a summary of sales activity by 30-minute intervals. You cangenerate the time analysis report by terminal or store, and you cangenerate it for the current day or the previous day.
336 Cashier Balance Report Print a report indicating which cashiers are balanced to within thecash threshold.
337 Cashier UnbalanceReport
Print a report indicating which cashiers are not balanced to withinthe cash threshold, and which cashiers have not attempted tobalance.
340 Department Report Print a report providing sales totals for each department. You cangenerate the department report by terminal, store or cashier, andyou can generate it for the current day, previous day orweek-to-date.
341 Department by Group Print a report providing sales totals for each department group.You can generate the department group report by terminal, storeor cashier, and you can generate it for the current day, previousday or week-to-date.
342 Group Summary Print a report providing summary sales totals for each departmentgroup. You can generate the group summary report by terminal,store or cashier, and you can generate it for the current day,previous day or week-to-date.
345 Pending TransactionReport
This manager code is only used in the definition of a report typeof pending transaction. Pending transactions are user definedtransactions modeled after layaway transactions. Pendingtransactions are defined in the Configurator.
350 Deposit Report Print the bank deposit information you entered using the Depositfunction (Code 232). You can generate the deposit report for thecurrent day or previous days.
Code Manager code title Function
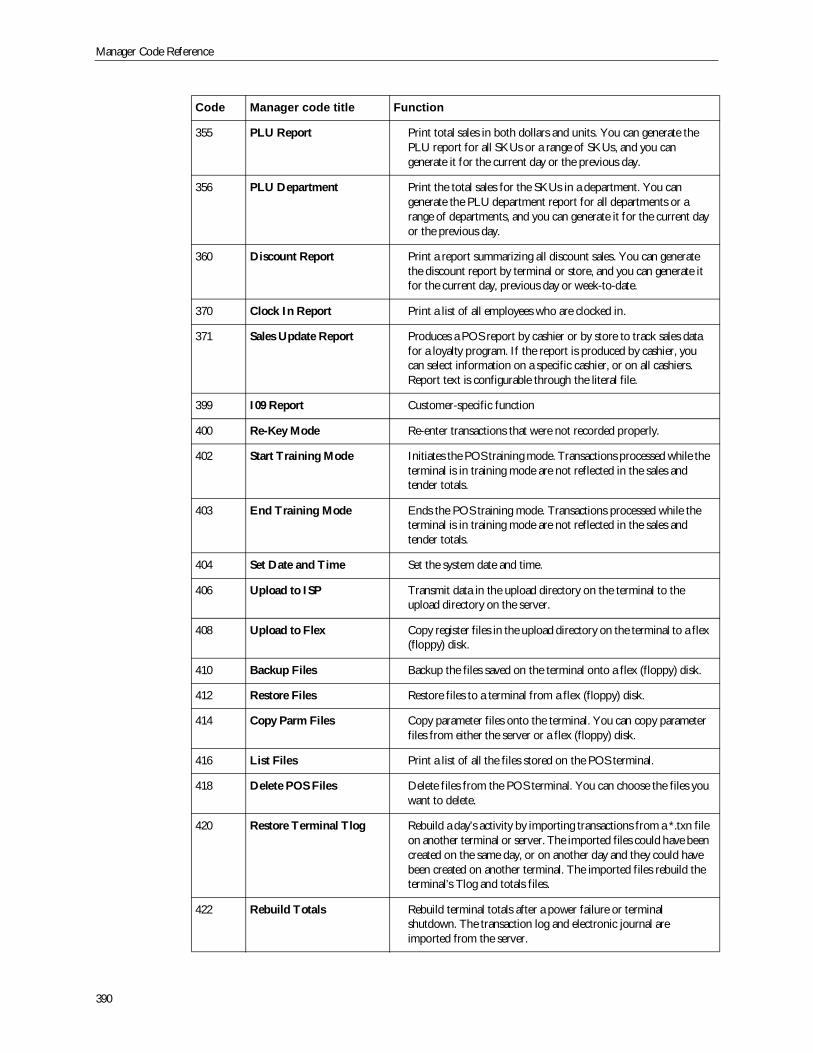
Manager Code Reference
390
355 PLU Report Print total sales in both dollars and units. You can generate thePLU report for all SKUs or a range of SKUs, and you cangenerate it for the current day or the previous day.
356 PLU Department Print the total sales for the SKUs in a department. You cangenerate the PLU department report for all departments or arange of departments, and you can generate it for the current dayor the previous day.
360 Discount Report Print a report summarizing all discount sales. You can generatethe discount report by terminal or store, and you can generate itfor the current day, previous day or week-to-date.
370 Clock In Report Print a list of all employees who are clocked in.
371 Sales Update Report Produces a POS report by cashier or by store to track sales datafor a loyalty program. If the report is produced by cashier, youcan select information on a specific cashier, or on all cashiers.Report text is configurable through the literal file.
399 I09 Report Customer-specific function
400 Re-Key Mode Re-enter transactions that were not recorded properly.
402 Start Training Mode Initiates the POS training mode. Transactions processed while theterminal is in training mode are not reflected in the sales andtender totals.
403 End Training Mode Ends the POS training mode. Transactions processed while theterminal is in training mode are not reflected in the sales andtender totals.
404 Set Date and Time Set the system date and time.
406 Upload to ISP Transmit data in the upload directory on the terminal to theupload directory on the server.
408 Upload to Flex Copy register files in the upload directory on the terminal to a flex(floppy) disk.
410 Backup Files Backup the files saved on the terminal onto a flex (floppy) disk.
412 Restore Files Restore files to a terminal from a flex (floppy) disk.
414 Copy Parm Files Copy parameter files onto the terminal. You can copy parameterfiles from either the server or a flex (floppy) disk.
416 List Files Print a list of all the files stored on the POS terminal.
418 Delete POS Files Delete files from the POS terminal. You can choose the files youwant to delete.
420 Restore Terminal Tlog Rebuild a day’s activity by importing transactions from a *.txn fileon another terminal or server. The imported files could have beencreated on the same day, or on another day and they could havebeen created on another terminal. The imported files rebuild theterminal’s Tlog and totals files.
422 Rebuild Totals Rebuild terminal totals after a power failure or terminalshutdown. The transaction log and electronic journal areimported from the server.
Code Manager code title Function
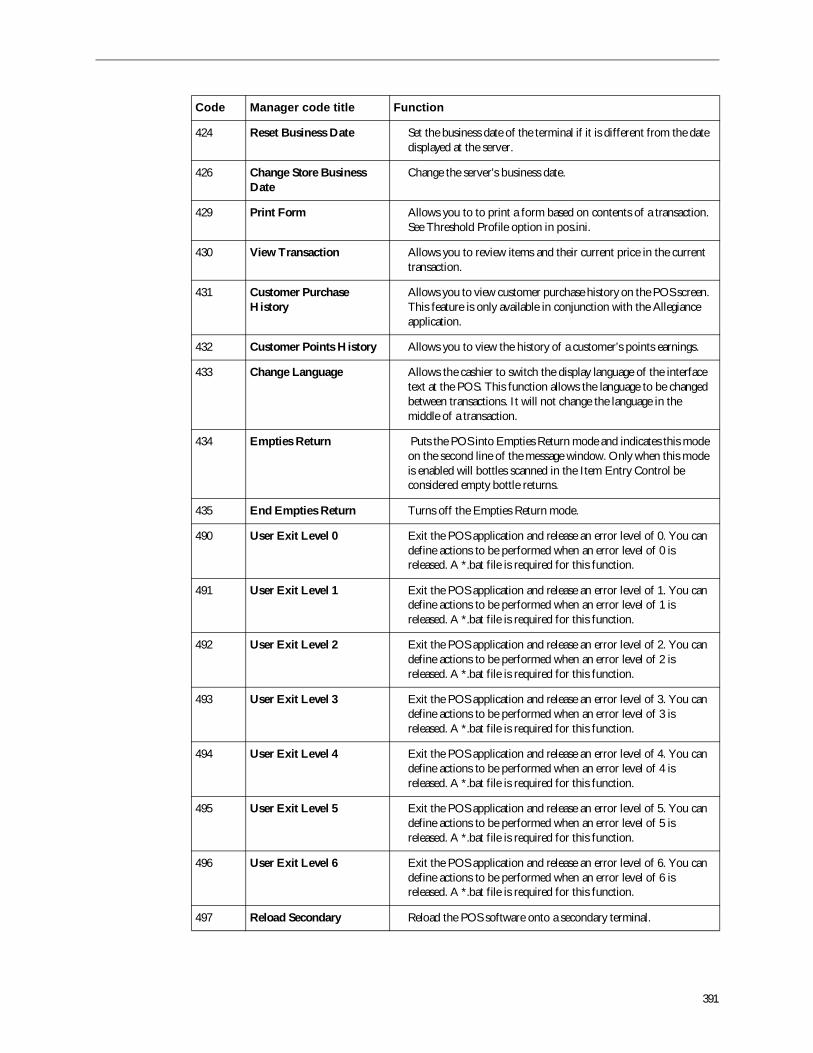
391
424 Reset Business Date Set the business date of the terminal if it is different from the datedisplayed at the server.
426 Change Store BusinessDate
Change the server’s business date.
429 Print Form Allows you to to print a form based on contents of a transaction.See Threshold Profile option in pos.ini.
430 View Transaction Allows you to review items and their current price in the currenttransaction.
431 Customer PurchaseHistory
Allows you to view customer purchase history on the POS screen.This feature is only available in conjunction with the Allegianceapplication.
432 Customer Points History Allows you to view the history of a customer’s points earnings.
433 Change Language Allows the cashier to switch the display language of the interfacetext at the POS. This function allows the language to be changedbetween transactions. It will not change the language in themiddle of a transaction.
434 Empties Return Puts the POS into Empties Return mode and indicates this modeon the second line of the message window. Only when this modeis enabled will bottles scanned in the Item Entry Control beconsidered empty bottle returns.
435 End Empties Return Turns off the Empties Return mode.
490 User Exit Level 0 Exit the POS application and release an error level of 0. You candefine actions to be performed when an error level of 0 isreleased. A *.bat file is required for this function.
491 User Exit Level 1 Exit the POS application and release an error level of 1. You candefine actions to be performed when an error level of 1 isreleased. A *.bat file is required for this function.
492 User Exit Level 2 Exit the POS application and release an error level of 2. You candefine actions to be performed when an error level of 2 isreleased. A *.bat file is required for this function.
493 User Exit Level 3 Exit the POS application and release an error level of 3. You candefine actions to be performed when an error level of 3 isreleased. A *.bat file is required for this function.
494 User Exit Level 4 Exit the POS application and release an error level of 4. You candefine actions to be performed when an error level of 4 isreleased. A *.bat file is required for this function.
495 User Exit Level 5 Exit the POS application and release an error level of 5. You candefine actions to be performed when an error level of 5 isreleased. A *.bat file is required for this function.
496 User Exit Level 6 Exit the POS application and release an error level of 6. You candefine actions to be performed when an error level of 6 isreleased. A *.bat file is required for this function.
497 Reload Secondary Reload the POS software onto a secondary terminal.
Code Manager code title Function
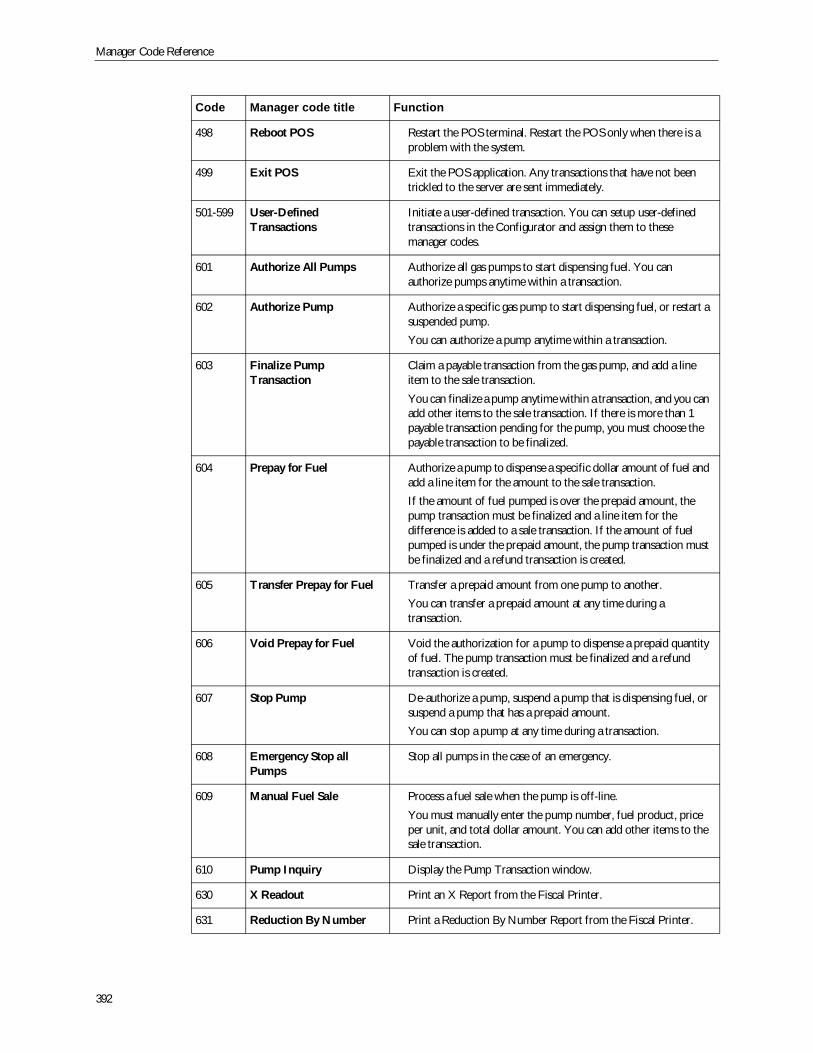
Manager Code Reference
392
498 Reboot POS Restart the POS terminal. Restart the POS only when there is aproblem with the system.
499 Exit POS Exit the POS application. Any transactions that have not beentrickled to the server are sent immediately.
501-599 User-DefinedTransactions
Initiate a user-defined transaction. You can setup user-definedtransactions in the Configurator and assign them to thesemanager codes.
601 Authorize All Pumps Authorize all gas pumps to start dispensing fuel. You canauthorize pumps anytime within a transaction.
602 Authorize Pump Authorize a specific gas pump to start dispensing fuel, or restart asuspended pump.You can authorize a pump anytime within a transaction.
603 Finalize PumpTransaction
Claim a payable transaction from the gas pump, and add a lineitem to the sale transaction.You can finalize a pump anytime within a transaction, and you canadd other items to the sale transaction. If there is more than 1payable transaction pending for the pump, you must choose thepayable transaction to be finalized.
604 Prepay for Fuel Authorize a pump to dispense a specific dollar amount of fuel andadd a line item for the amount to the sale transaction.If the amount of fuel pumped is over the prepaid amount, thepump transaction must be finalized and a line item for thedifference is added to a sale transaction. If the amount of fuelpumped is under the prepaid amount, the pump transaction mustbe finalized and a refund transaction is created.
605 Transfer Prepay for Fuel Transfer a prepaid amount from one pump to another.You can transfer a prepaid amount at any time during atransaction.
606 Void Prepay for Fuel Void the authorization for a pump to dispense a prepaid quantityof fuel. The pump transaction must be finalized and a refundtransaction is created.
607 Stop Pump De-authorize a pump, suspend a pump that is dispensing fuel, orsuspend a pump that has a prepaid amount.You can stop a pump at any time during a transaction.
608 Emergency Stop allPumps
Stop all pumps in the case of an emergency.
609 Manual Fuel Sale Process a fuel sale when the pump is off-line.You must manually enter the pump number, fuel product, priceper unit, and total dollar amount. You can add other items to thesale transaction.
610 Pump Inquiry Display the Pump Transaction window.
630 X Readout Print an X Report from the Fiscal Printer.
631 Reduction By Number Print a Reduction By Number Report from the Fiscal Printer.
Code Manager code title Function
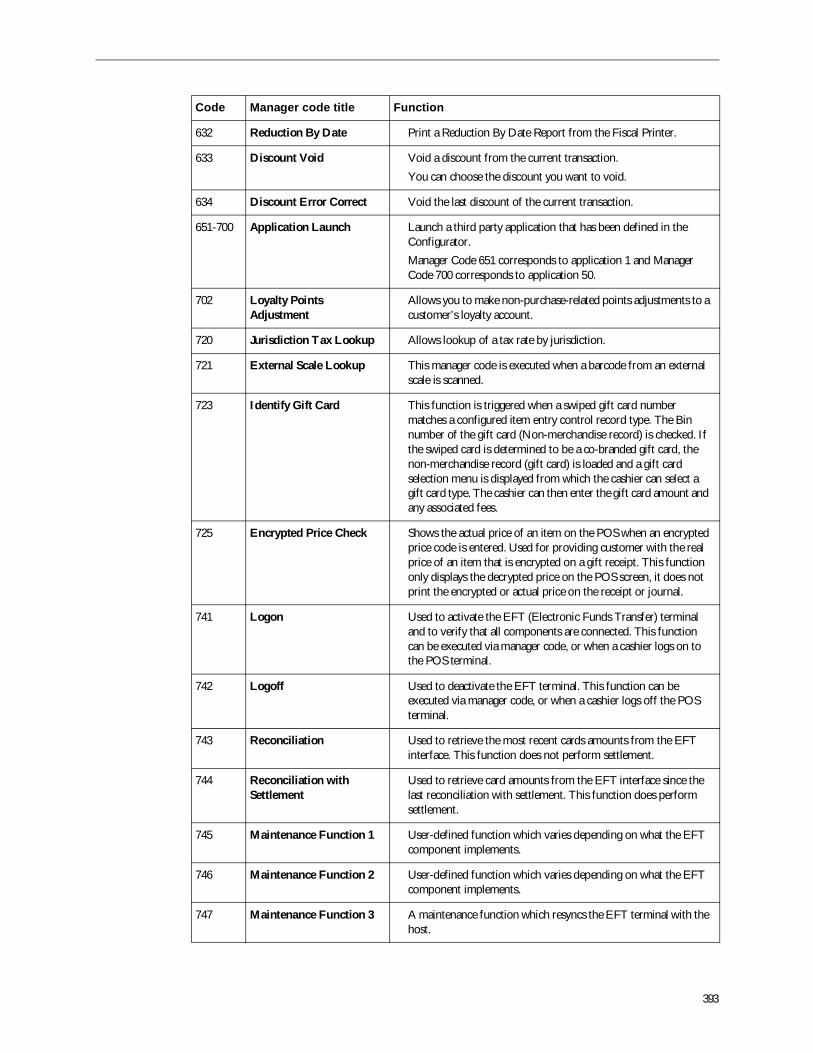
393
632 Reduction By Date Print a Reduction By Date Report from the Fiscal Printer.
633 Discount Void Void a discount from the current transaction.You can choose the discount you want to void.
634 Discount Error Correct Void the last discount of the current transaction.
651-700 Application Launch Launch a third party application that has been defined in theConfigurator.Manager Code 651 corresponds to application 1 and ManagerCode 700 corresponds to application 50.
702 Loyalty PointsAdjustment
Allows you to make non-purchase-related points adjustments to acustomer’s loyalty account.
720 Jurisdiction Tax Lookup Allows lookup of a tax rate by jurisdiction.
721 External Scale Lookup This manager code is executed when a barcode from an externalscale is scanned.
723 Identify Gift Card This function is triggered when a swiped gift card numbermatches a configured item entry control record type. The Binnumber of the gift card (Non-merchandise record) is checked. Ifthe swiped card is determined to be a co-branded gift card, thenon-merchandise record (gift card) is loaded and a gift cardselection menu is displayed from which the cashier can select agift card type. The cashier can then enter the gift card amount andany associated fees.
725 Encrypted Price Check Shows the actual price of an item on the POS when an encryptedprice code is entered. Used for providing customer with the realprice of an item that is encrypted on a gift receipt. This functiononly displays the decrypted price on the POS screen, it does notprint the encrypted or actual price on the receipt or journal.
741 Logon Used to activate the EFT (Electronic Funds Transfer) terminaland to verify that all components are connected. This functioncan be executed via manager code, or when a cashier logs on tothe POS terminal.
742 Logoff Used to deactivate the EFT terminal. This function can beexecuted via manager code, or when a cashier logs off the POSterminal.
743 Reconciliation Used to retrieve the most recent cards amounts from the EFTinterface. This function does not perform settlement.
744 Reconciliation withSettlement
Used to retrieve card amounts from the EFT interface since thelast reconciliation with settlement. This function does performsettlement.
745 Maintenance Function 1 User-defined function which varies depending on what the EFTcomponent implements.
746 Maintenance Function 2 User-defined function which varies depending on what the EFTcomponent implements.
747 Maintenance Function 3 A maintenance function which resyncs the EFT terminal with thehost.
Code Manager code title Function
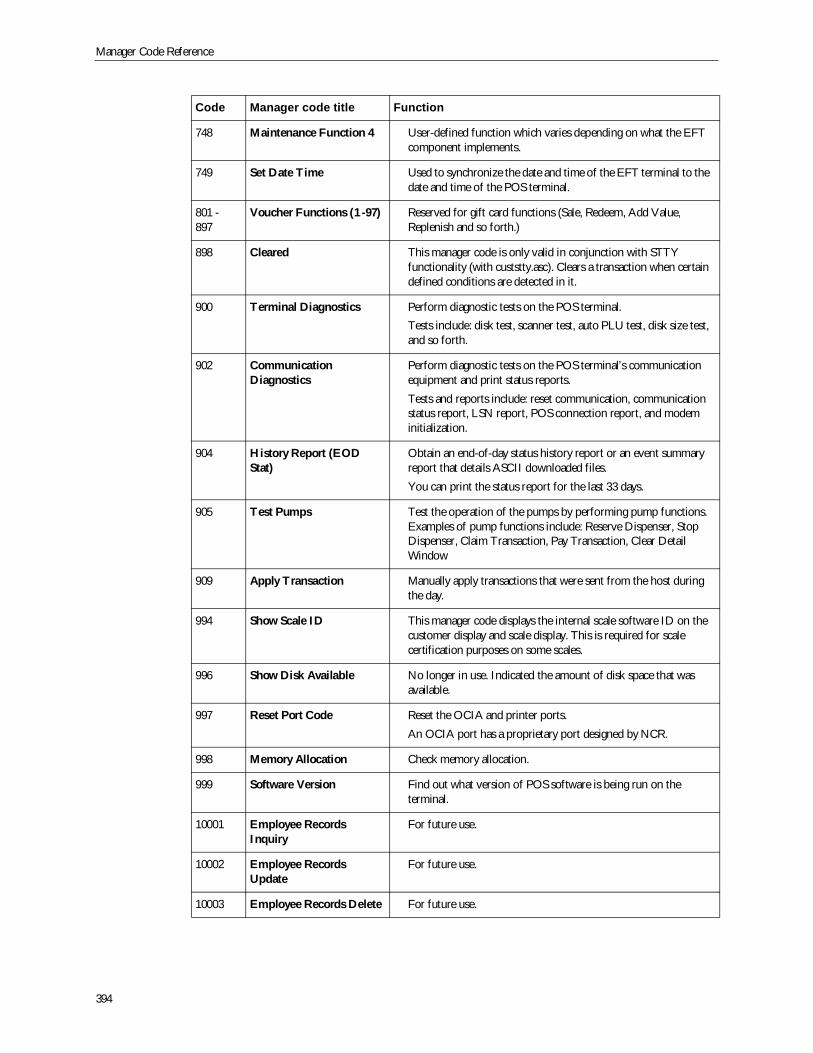
Manager Code Reference
394
748 Maintenance Function 4 User-defined function which varies depending on what the EFTcomponent implements.
749 Set Date Time Used to synchronize the date and time of the EFT terminal to thedate and time of the POS terminal.
801 -897
Voucher Functions (1 -97) Reserved for gift card functions (Sale, Redeem, Add Value,Replenish and so forth.)
898 Cleared This manager code is only valid in conjunction with STTYfunctionality (with custstty.asc). Clears a transaction when certaindefined conditions are detected in it.
900 Terminal Diagnostics Perform diagnostic tests on the POS terminal.Tests include: disk test, scanner test, auto PLU test, disk size test,and so forth.
902 CommunicationDiagnostics
Perform diagnostic tests on the POS terminal’s communicationequipment and print status reports.Tests and reports include: reset communication, communicationstatus report, LSN report, POS connection report, and modeminitialization.
904 History Report (EODStat)
Obtain an end-of-day status history report or an event summaryreport that details ASCII downloaded files.You can print the status report for the last 33 days.
905 Test Pumps Test the operation of the pumps by performing pump functions.Examples of pump functions include: Reserve Dispenser, StopDispenser, Claim Transaction, Pay Transaction, Clear DetailWindow
909 Apply Transaction Manually apply transactions that were sent from the host duringthe day.
994 Show Scale ID This manager code displays the internal scale software ID on thecustomer display and scale display. This is required for scalecertification purposes on some scales.
996 Show Disk Available No longer in use. Indicated the amount of disk space that wasavailable.
997 Reset Port Code Reset the OCIA and printer ports.An OCIA port has a proprietary port designed by NCR.
998 Memory Allocation Check memory allocation.
999 Software Version Find out what version of POS software is being run on theterminal.
10001 Employee RecordsInquiry
For future use.
10002 Employee RecordsUpdate
For future use.
10003 Employee Records Delete For future use.
Code Manager code title Function
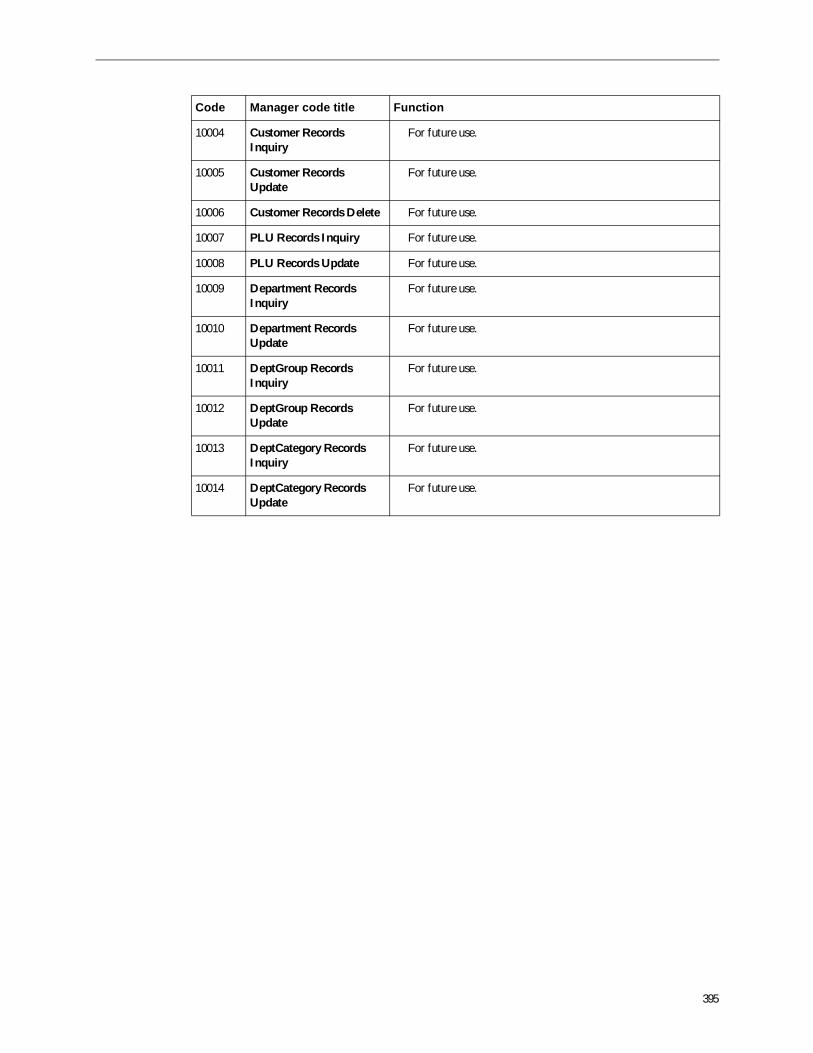
395
10004 Customer RecordsInquiry
For future use.
10005 Customer RecordsUpdate
For future use.
10006 Customer Records Delete For future use.
10007 PLU Records Inquiry For future use.
10008 PLU Records Update For future use.
10009 Department RecordsInquiry
For future use.
10010 Department RecordsUpdate
For future use.
10011 DeptGroup RecordsInquiry
For future use.
10012 DeptGroup RecordsUpdate
For future use.
10013 DeptCategory RecordsInquiry
For future use.
10014 DeptCategory RecordsUpdate
For future use.
Code Manager code title Function

Manager Code Reference
396
397
7About the Xpress Server andBackup Server
This section describes the Xpress server and backup server functionalities. Topics include:
About the Xpress server ( see “About the Xpress server” on page 397)
Working with the Xpress server ( see “Working with the Xpress server” on page 398)
About the backup server ( see “About the backup server” on page 406)
Setting up a backup server ( see “Setting up a backup server” on page 406)
Backup server functionality ( see “Backup server functionality” on page 406)
About the Xpress serverThe POS Xpress server is a store level server application that typically resides in the back office of aretail store (although in small stores it can reside on a POS terminal). The Xpress server’s functionsinclude:
Trickling of transaction log and journal data
Database access
Credit authorization
Consolidated reporting
End of day reporting
Processing of download file formats
Automatic data backup and recovery
Data redundancy
You may choose to run a single Xpress server in each store, or to also run a backup server at eachlocation to provide an extra layer of redundancy should the primary server fail (see “About the backupserver” on page 406 for more information).
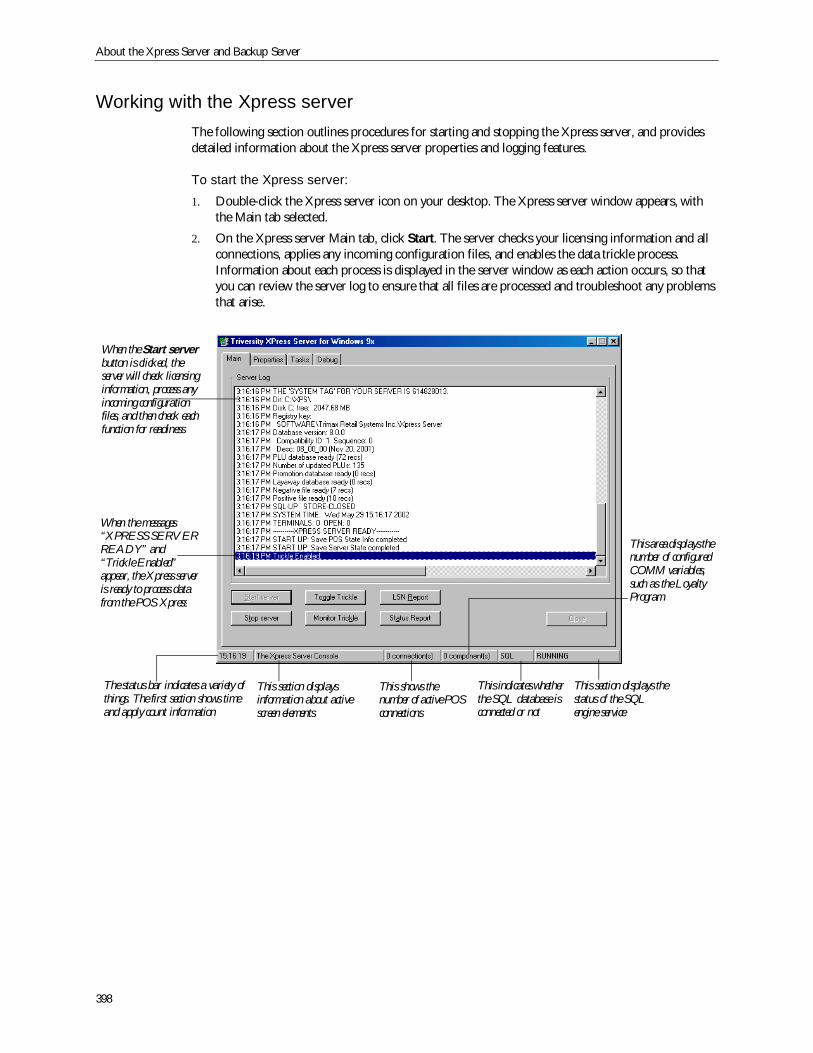
About the Xpress Server and Backup Server
398
Working with the Xpress serverThe following section outlines procedures for starting and stopping the Xpress server, and providesdetailed information about the Xpress server properties and logging features.
To start the Xpress server:1. Double-click the Xpress server icon on your desktop. The Xpress server window appears, with
the Main tab selected.
2. On the Xpress server Main tab, click Start. The server checks your licensing information and allconnections, applies any incoming configuration files, and enables the data trickle process.Information about each process is displayed in the server window as each action occurs, so thatyou can review the server log to ensure that all files are processed and troubleshoot any problemsthat arise.
When the Start serverbutton is clicked, theserver will check licensinginformation, process anyincoming configurationfiles, and then check eachfunction for readiness
When the messages“XPRESS SERVERREADY” and“Trickle Enabled”appear, the Xpress serveris ready to process datafrom the POS Xpress
The status bar indicates a variety ofthings. The first section shows timeand apply count information
This section displaysinformation about activescreen elements
This shows thenumber of active POSconnections
This section displays thestatus of the SQLengine service
This area displays thenumber of configuredCOMM variables,such as the LoyaltyProgram
This indicates whetherthe SQL database isconnected or not
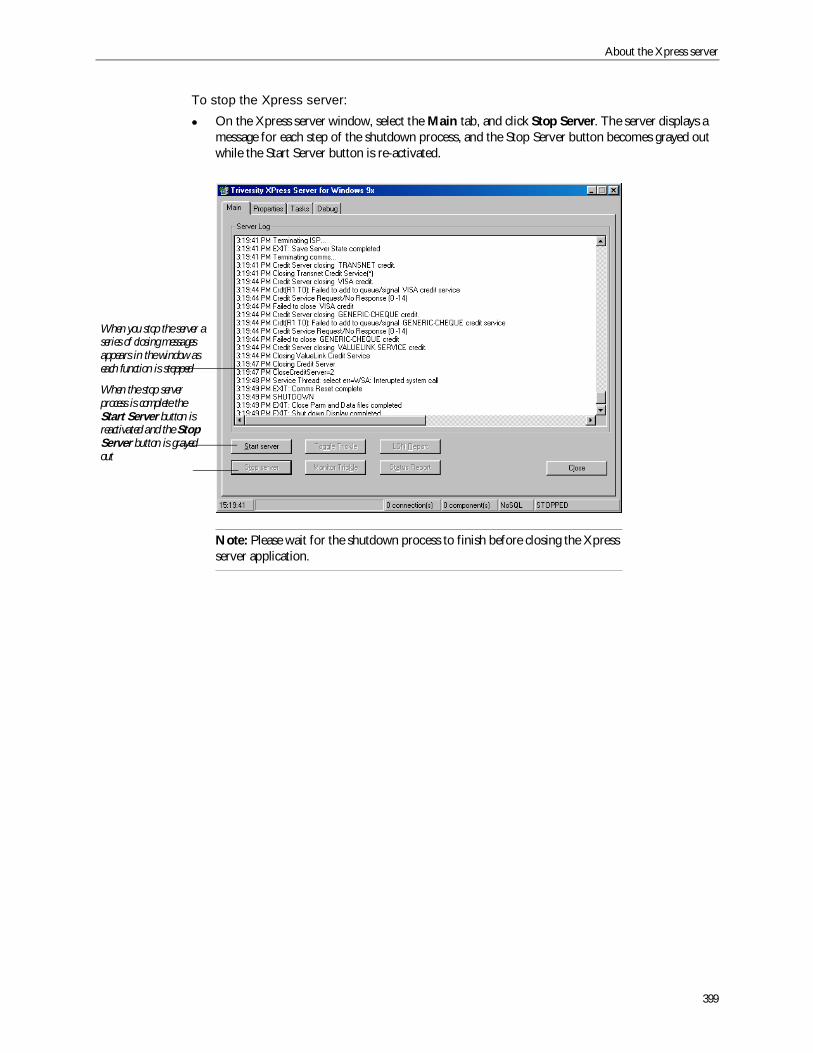
About the Xpress server
399
To stop the Xpress server:On the Xpress server window, select the Main tab, and click Stop Server. The server displays amessage for each step of the shutdown process, and the Stop Server button becomes grayed outwhile the Start Server button is re-activated.
Note: Please wait for the shutdown process to finish before closing the Xpressserver application.
When you stop the server aseries of closing messagesappears in the window aseach function is stopped
When the stop serverprocess is complete theStart Server button isreactivated and the StopServer button is grayedout
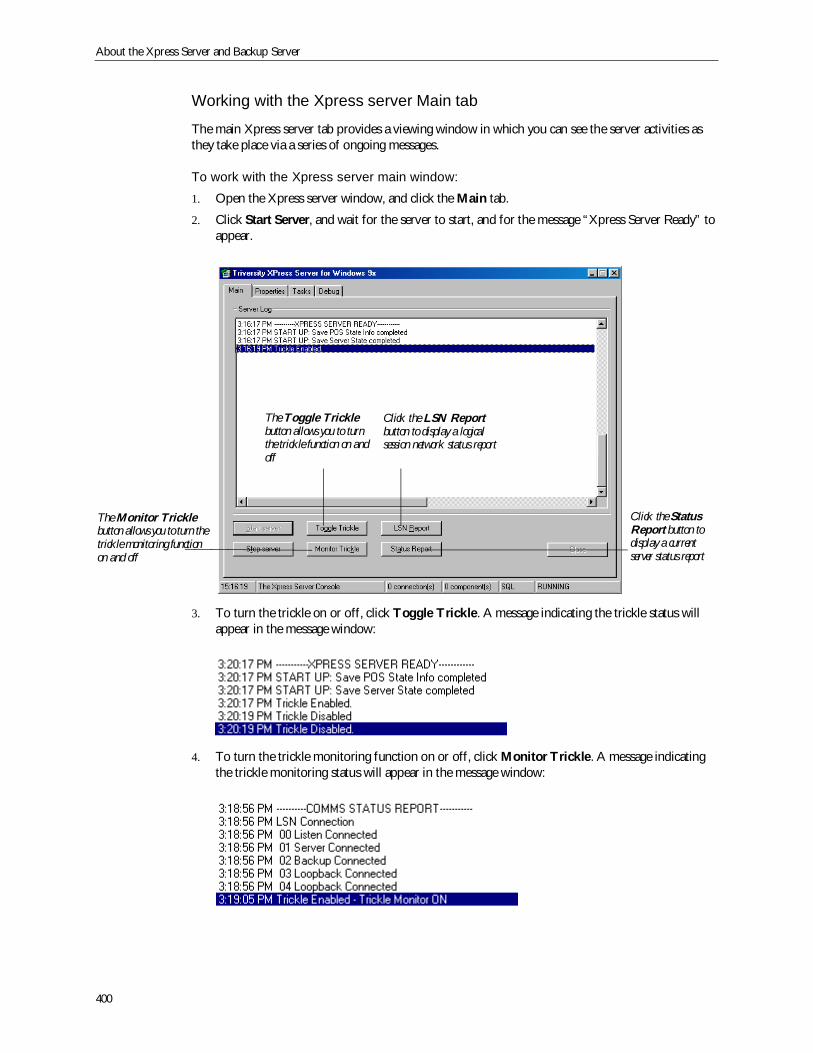
About the Xpress Server and Backup Server
400
Working with the Xpress server Main tab
The main Xpress server tab provides a viewing window in which you can see the server activities asthey take place via a series of ongoing messages.
To work with the Xpress server main window:1. Open the Xpress server window, and click the Main tab.
2. Click Start Server, and wait for the server to start, and for the message “Xpress Server Ready” toappear.
3. To turn the trickle on or off, click Toggle Trickle. A message indicating the trickle status willappear in the message window:
4. To turn the trickle monitoring function on or off, click Monitor Trickle. A message indicatingthe trickle monitoring status will appear in the message window:
The Toggle Tricklebutton allows you to turnthe trickle function on andoff
Click the LSN Reportbutton to display a logicalsession network status report
The Monitor Tricklebutton allows you to turn thetrickle monitoring functionon and off
Click the StatusReport button todisplay a currentserver status report
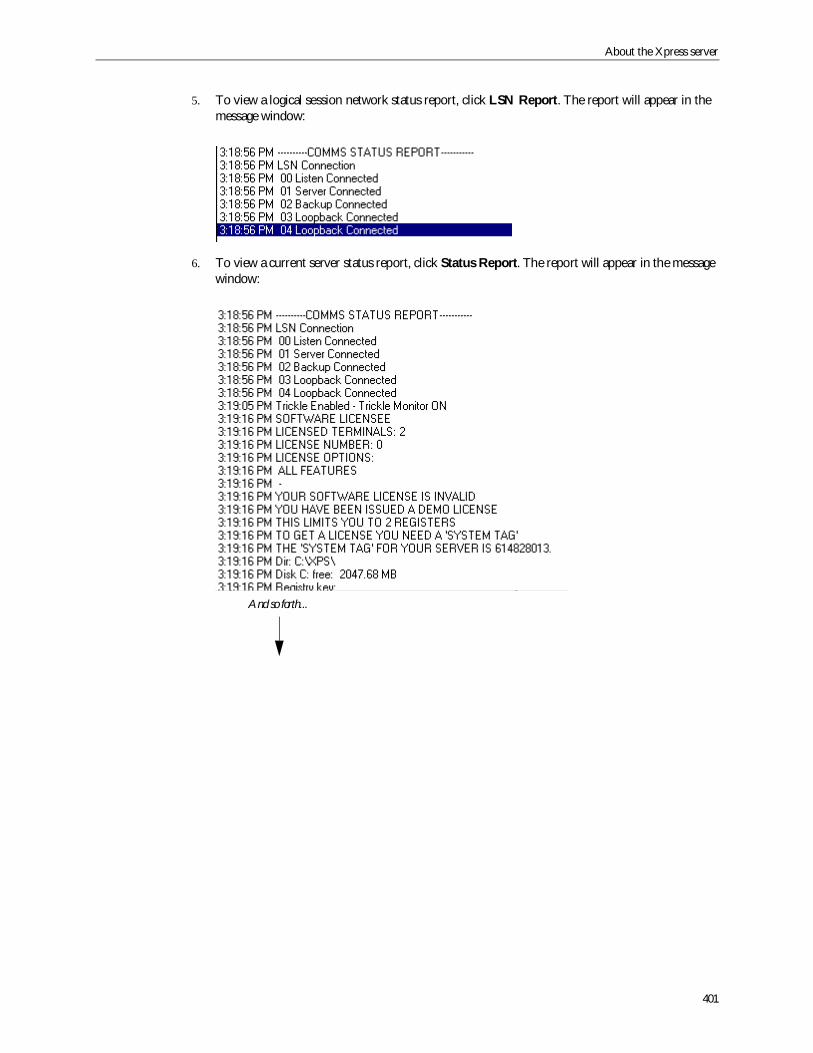
About the Xpress server
401
5. To view a logical session network status report, click LSN Report. The report will appear in themessage window:
6. To view a current server status report, click Status Report. The report will appear in the messagewindow:
And so forth...
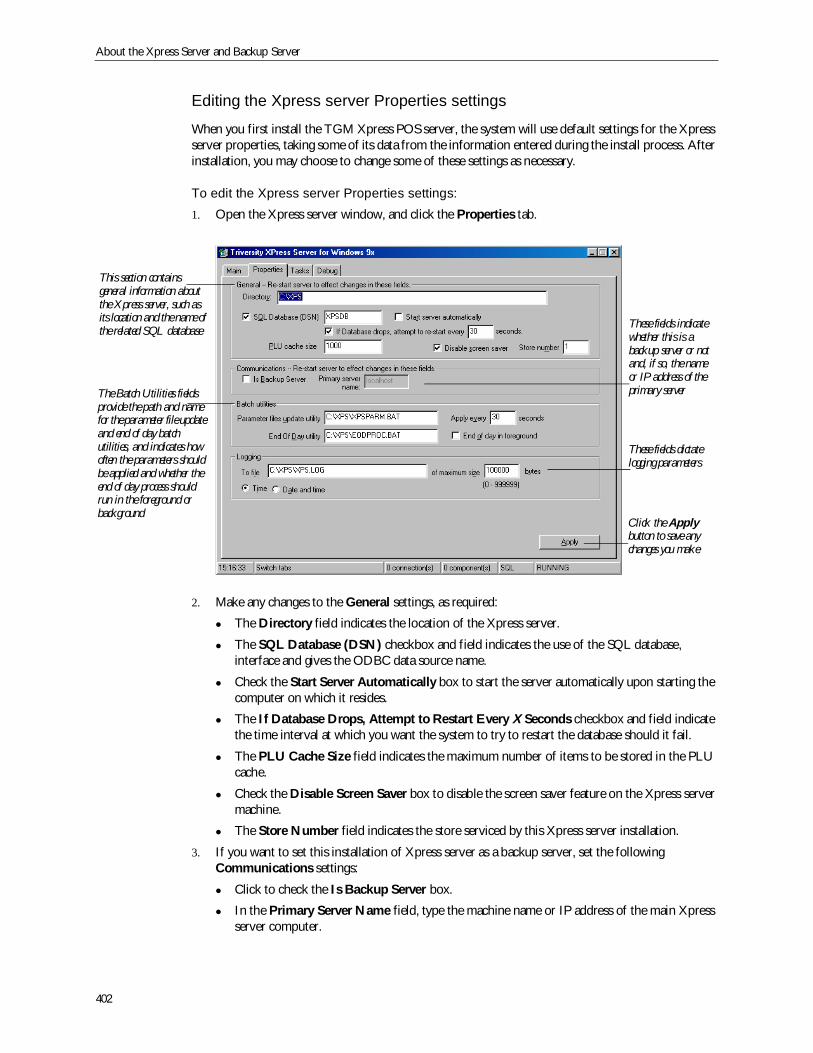
About the Xpress Server and Backup Server
402
Editing the Xpress server Properties settings
When you first install the TGM Xpress POS server, the system will use default settings for the Xpressserver properties, taking some of its data from the information entered during the install process. Afterinstallation, you may choose to change some of these settings as necessary.
To edit the Xpress server Properties settings:1. Open the Xpress server window, and click the Properties tab.
2. Make any changes to the General settings, as required:
The Directory field indicates the location of the Xpress server.
The SQL Database (DSN) checkbox and field indicates the use of the SQL database,interface and gives the ODBC data source name.
Check the Start Server Automatically box to start the server automatically upon starting thecomputer on which it resides.
The If Database Drops, Attempt to Restart Every X Seconds checkbox and field indicatethe time interval at which you want the system to try to restart the database should it fail.
The PLU Cache Size field indicates the maximum number of items to be stored in the PLUcache.
Check the Disable Screen Saver box to disable the screen saver feature on the Xpress servermachine.
The Store Number field indicates the store serviced by this Xpress server installation.
3. If you want to set this installation of Xpress server as a backup server, set the followingCommunications settings:
Click to check the Is Backup Server box.
In the Primary Server Name field, type the machine name or IP address of the main Xpressserver computer.
These fields dictatelogging parameters
This section containsgeneral information aboutthe Xpress server, such asits location and the name ofthe related SQL database
Click the Applybutton to save anychanges you make
These fields indicatewhether this is abackup server or notand, if so, the nameor IP address of theprimary serverThe Batch Utilities fields
provide the path and namefor the parameter file updateand end of day batchutilities, and indicates howoften the parameters shouldbe applied and whether theend of day process shouldrun in the foreground orbackground
About the Xpress server
403
Note: For more information about setting a backup Xpress server, see “Aboutthe backup server” on page 406.
4. Make any changes to the Batch Utilities settings, as required:
The Parameter Files Update Utility field indicates the location of the parameter updatebatch process utility (the default location is C:\XPS\XPSPARM.BAT). In the related ApplyEvery X Seconds box, enter the number of seconds for the interval at which you want newparameter files to be applied (parameters are delivered when the system detects a newnewparm.trg file).
The End of Day Utility field indicates the location of the end of day batch process utility (thedefault location is C:\XPS\EODPROC.BAT). Click to check the End of Day inForeground box if you want the end of day functions to appear onscreen; leave this boxunchecked to run the end of day functions in the background.
5. Make any changes to the Logging settings, as required:
The To File field indicates the file to which logging information will be saved, and the relatedOf Maximum Size X Bytes box indicates the maximum size of the log file.
Click either the Time or Date and Time bubble to indicate how you want the log file to bestamped.
6. After you have made all necessary changes, click Apply.
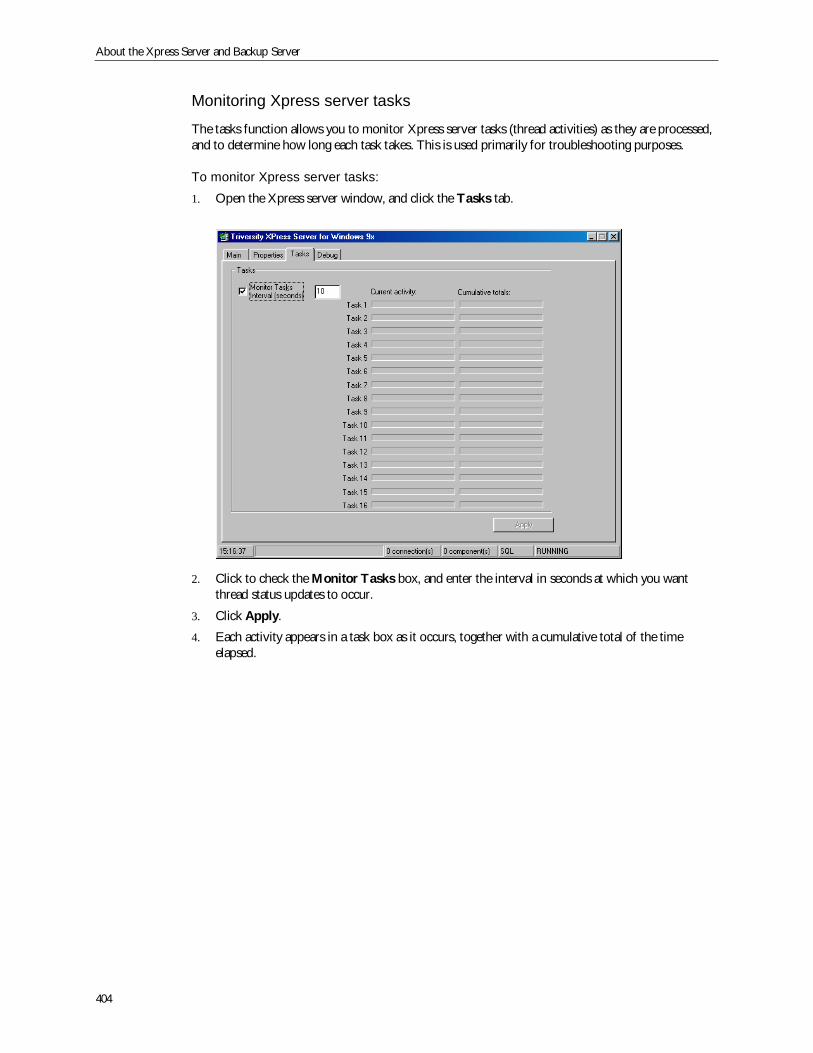
About the Xpress Server and Backup Server
404
Monitoring Xpress server tasks
The tasks function allows you to monitor Xpress server tasks (thread activities) as they are processed,and to determine how long each task takes. This is used primarily for troubleshooting purposes.
To monitor Xpress server tasks:1. Open the Xpress server window, and click the Tasks tab.
2. Click to check the Monitor Tasks box, and enter the interval in seconds at which you wantthread status updates to occur.
3. Click Apply.
4. Each activity appears in a task box as it occurs, together with a cumulative total of the timeelapsed.
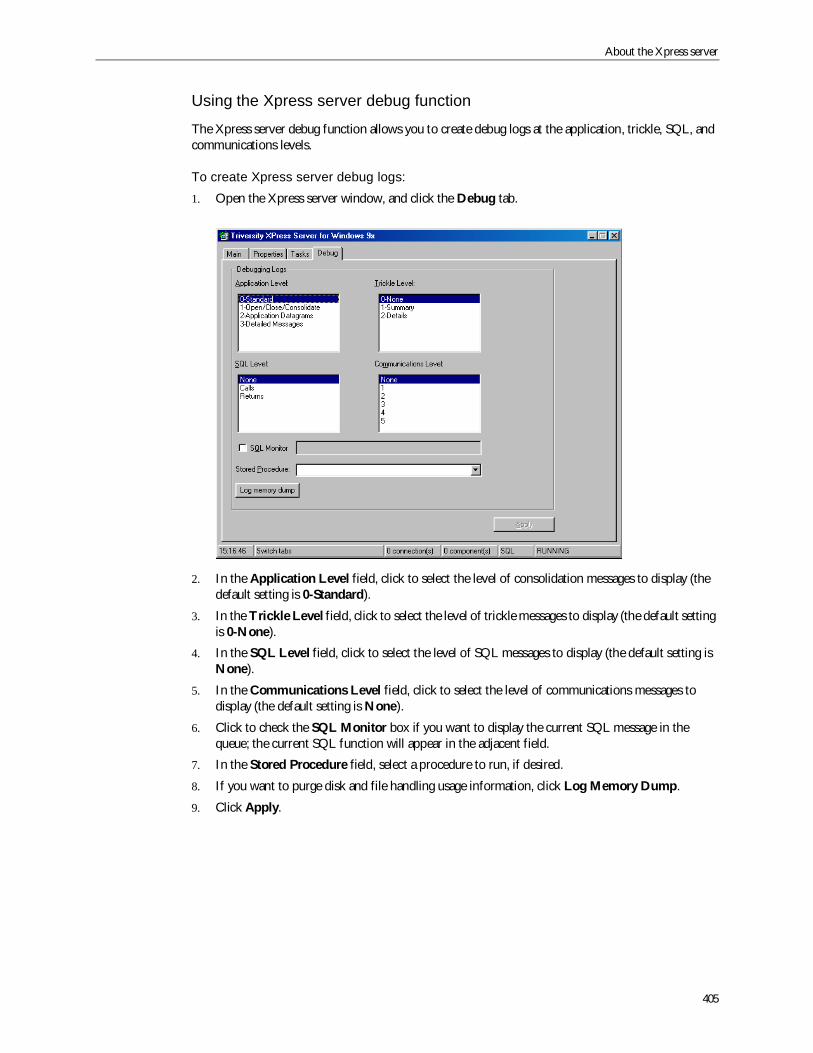
About the Xpress server
405
Using the Xpress server debug function
The Xpress server debug function allows you to create debug logs at the application, trickle, SQL, andcommunications levels.
To create Xpress server debug logs:1. Open the Xpress server window, and click the Debug tab.
2. In the Application Level field, click to select the level of consolidation messages to display (thedefault setting is 0-Standard).
3. In the Trickle Level field, click to select the level of trickle messages to display (the default settingis 0-None).
4. In the SQL Level field, click to select the level of SQL messages to display (the default setting isNone).
5. In the Communications Level field, click to select the level of communications messages todisplay (the default setting is None).
6. Click to check the SQL Monitor box if you want to display the current SQL message in thequeue; the current SQL function will appear in the adjacent field.
7. In the Stored Procedure field, select a procedure to run, if desired.
8. If you want to purge disk and file handling usage information, click Log Memory Dump.
9. Click Apply.
About the Xpress Server and Backup Server
406
About the backup serverBecause it is important for you to be able to continue processing transactions even if your main servergoes down, you can designate a backup Xpress server. The backup server is set up to support yourmain server processes, so that if your Xpress server experiences a failure, the backup server cancontinue to process transactions, and price and customer information look ups. Transaction Log andJournal File information is also trickled to the backup server to provide an extra level of sales dataredundancy.
The backup server provides the following functionality:
Access to the SQL PLU table from the POS
Access to the SQL Promotion table from the POS
Access to the SQL Customer table from the POS (for retrieval of existing information, but notadding new customers)
Access to the SQL PLU Cross Reference table from the POS
Access to the SQL PLU Link table from the POS
Access to the SQL PLU Level Cluster table from the POS
Automatic product synchronization of the following tables from the main Xpress server:
PLU
Promotion
Customer
PLU Cross Reference
PLU Link
PLU Level Cluster
Credit service (for supported credit services)
Trickling of electronic journal and transaction log files
Setting up a backup serverFor information on how to set up a backup server, see the Installation Guide for the SAP POS TGMcomponents.
Backup server functionalityThis section outlines the POS Xpress and Xpress server functionality supported by the backup serverimplementation.
POS function Backup server supported?
Opening/Closing Functions:
Sign On Yes
Secure Mode On Yes
Secure Mode Off Yes
Sign Off Yes
Secure Mode On Yes
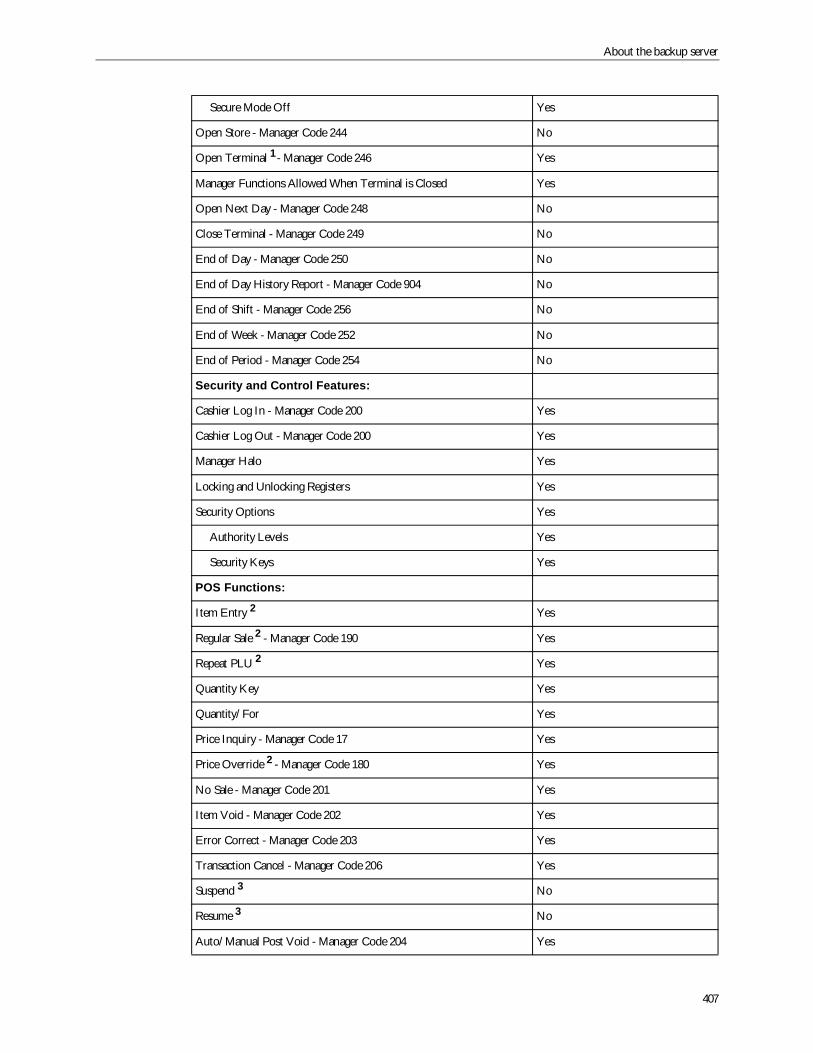
About the backup server
407
Secure Mode Off Yes
Open Store - Manager Code 244 No
Open Terminal 1 - Manager Code 246 Yes
Manager Functions Allowed When Terminal is Closed Yes
Open Next Day - Manager Code 248 No
Close Terminal - Manager Code 249 No
End of Day - Manager Code 250 No
End of Day History Report - Manager Code 904 No
End of Shift - Manager Code 256 No
End of Week - Manager Code 252 No
End of Period - Manager Code 254 No
Security and Control Features:
Cashier Log In - Manager Code 200 Yes
Cashier Log Out - Manager Code 200 Yes
Manager Halo Yes
Locking and Unlocking Registers Yes
Security Options Yes
Authority Levels Yes
Security Keys Yes
POS Functions:
Item Entry 2 Yes
Regular Sale 2 - Manager Code 190 Yes
Repeat PLU 2 Yes
Quantity Key Yes
Quantity/For Yes
Price Inquiry - Manager Code 17 Yes
Price Override 2 - Manager Code 180 Yes
No Sale - Manager Code 201 Yes
Item Void - Manager Code 202 Yes
Error Correct - Manager Code 203 Yes
Transaction Cancel - Manager Code 206 Yes
Suspend 3 No
Resume 3 No
Auto/Manual Post Void - Manager Code 204 Yes
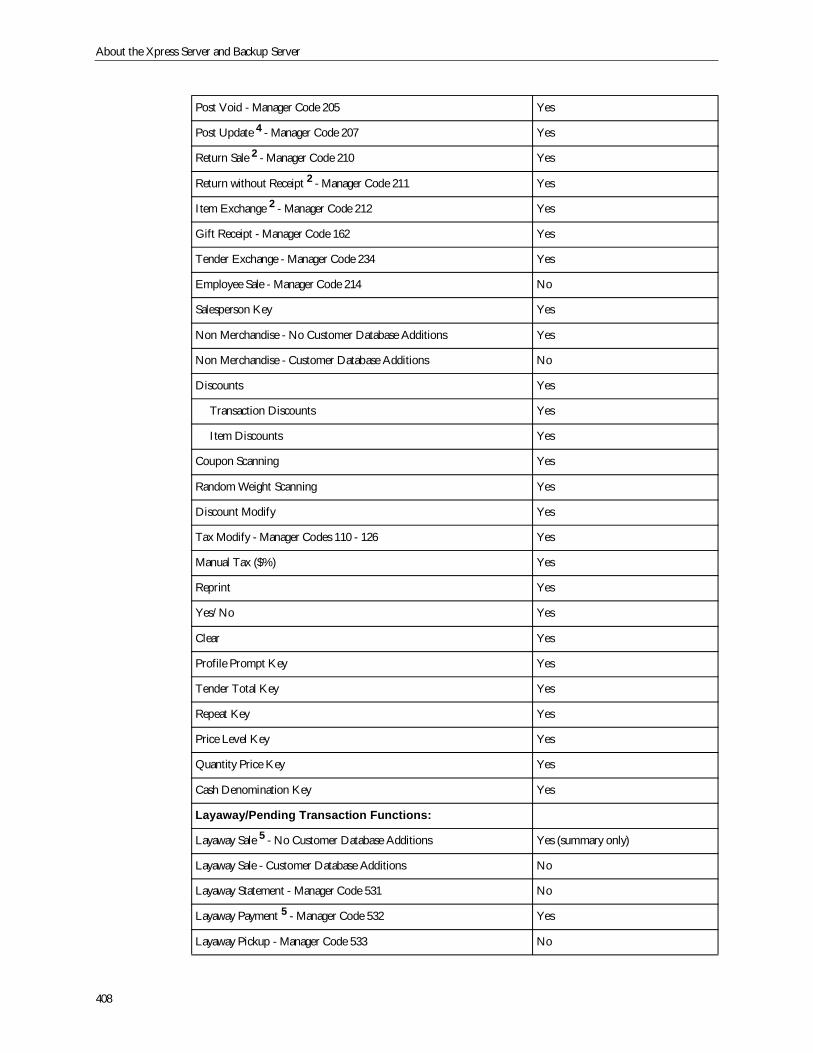
About the Xpress Server and Backup Server
408
Post Void - Manager Code 205 Yes
Post Update 4 - Manager Code 207 Yes
Return Sale 2 - Manager Code 210 Yes
Return without Receipt 2 - Manager Code 211 Yes
Item Exchange 2 - Manager Code 212 Yes
Gift Receipt - Manager Code 162 Yes
Tender Exchange - Manager Code 234 Yes
Employee Sale - Manager Code 214 No
Salesperson Key Yes
Non Merchandise - No Customer Database Additions Yes
Non Merchandise - Customer Database Additions No
Discounts Yes
Transaction Discounts Yes
Item Discounts Yes
Coupon Scanning Yes
Random Weight Scanning Yes
Discount Modify Yes
Tax Modify - Manager Codes 110 - 126 Yes
Manual Tax ($%) Yes
Reprint Yes
Yes/No Yes
Clear Yes
Profile Prompt Key Yes
Tender Total Key Yes
Repeat Key Yes
Price Level Key Yes
Quantity Price Key Yes
Cash Denomination Key Yes
Layaway/Pending Transaction Functions:
Layaway Sale 5 - No Customer Database Additions Yes (summary only)
Layaway Sale - Customer Database Additions No
Layaway Statement - Manager Code 531 No
Layaway Payment 5 - Manager Code 532 Yes
Layaway Pickup - Manager Code 533 No
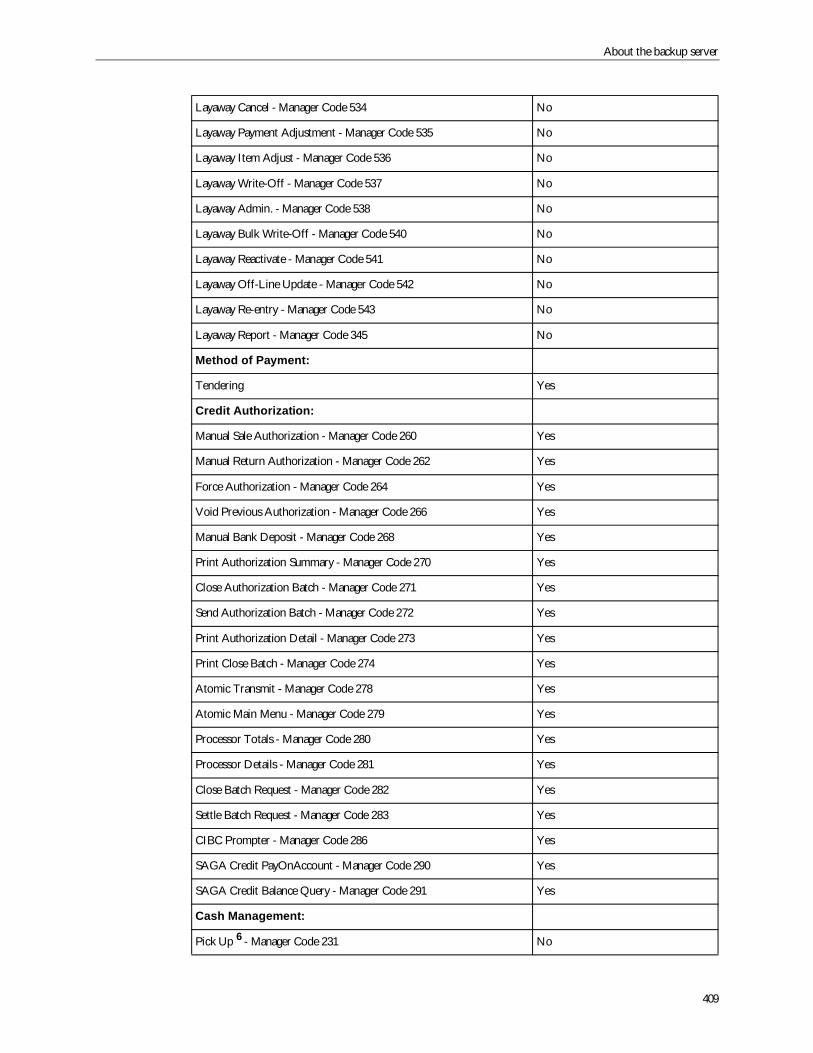
About the backup server
409
Layaway Cancel - Manager Code 534 No
Layaway Payment Adjustment - Manager Code 535 No
Layaway Item Adjust - Manager Code 536 No
Layaway Write-Off - Manager Code 537 No
Layaway Admin. - Manager Code 538 No
Layaway Bulk Write-Off - Manager Code 540 No
Layaway Reactivate - Manager Code 541 No
Layaway Off-Line Update - Manager Code 542 No
Layaway Re-entry - Manager Code 543 No
Layaway Report - Manager Code 345 No
Method of Payment:
Tendering Yes
Credit Authorization:
Manual Sale Authorization - Manager Code 260 Yes
Manual Return Authorization - Manager Code 262 Yes
Force Authorization - Manager Code 264 Yes
Void Previous Authorization - Manager Code 266 Yes
Manual Bank Deposit - Manager Code 268 Yes
Print Authorization Summary - Manager Code 270 Yes
Close Authorization Batch - Manager Code 271 Yes
Send Authorization Batch - Manager Code 272 Yes
Print Authorization Detail - Manager Code 273 Yes
Print Close Batch - Manager Code 274 Yes
Atomic Transmit - Manager Code 278 Yes
Atomic Main Menu - Manager Code 279 Yes
Processor Totals - Manager Code 280 Yes
Processor Details - Manager Code 281 Yes
Close Batch Request - Manager Code 282 Yes
Settle Batch Request - Manager Code 283 Yes
CIBC Prompter - Manager Code 286 Yes
SAGA Credit PayOnAccount - Manager Code 290 Yes
SAGA Credit Balance Query - Manager Code 291 Yes
Cash Management:
Pick Up 6 - Manager Code 231 No
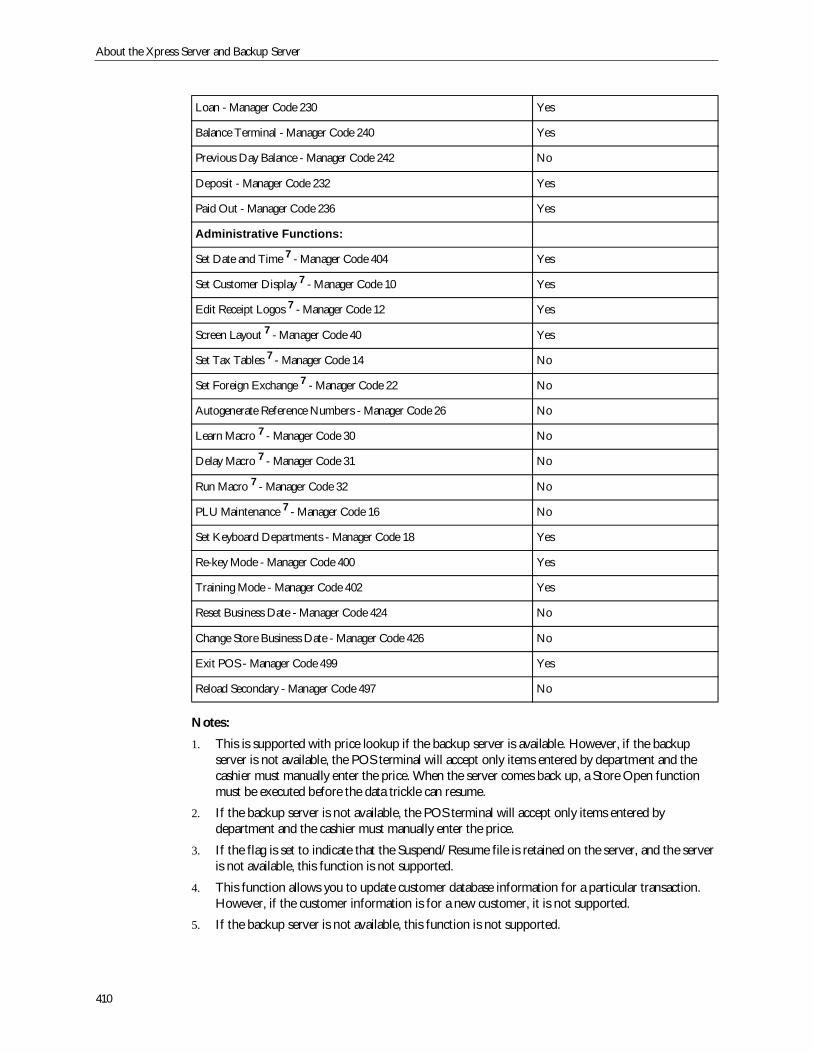
About the Xpress Server and Backup Server
410
Notes:
1. This is supported with price lookup if the backup server is available. However, if the backupserver is not available, the POS terminal will accept only items entered by department and thecashier must manually enter the price. When the server comes back up, a Store Open functionmust be executed before the data trickle can resume.
2. If the backup server is not available, the POS terminal will accept only items entered bydepartment and the cashier must manually enter the price.
3. If the flag is set to indicate that the Suspend/Resume file is retained on the server, and the serveris not available, this function is not supported.
4. This function allows you to update customer database information for a particular transaction.However, if the customer information is for a new customer, it is not supported.
5. If the backup server is not available, this function is not supported.
Loan - Manager Code 230 Yes
Balance Terminal - Manager Code 240 Yes
Previous Day Balance - Manager Code 242 No
Deposit - Manager Code 232 Yes
Paid Out - Manager Code 236 Yes
Administrative Functions:
Set Date and Time 7 - Manager Code 404 Yes
Set Customer Display 7 - Manager Code 10 Yes
Edit Receipt Logos 7 - Manager Code 12 Yes
Screen Layout 7 - Manager Code 40 Yes
Set Tax Tables 7 - Manager Code 14 No
Set Foreign Exchange 7 - Manager Code 22 No
Autogenerate Reference Numbers - Manager Code 26 No
Learn Macro 7 - Manager Code 30 No
Delay Macro 7 - Manager Code 31 No
Run Macro 7 - Manager Code 32 No
PLU Maintenance 7 - Manager Code 16 No
Set Keyboard Departments - Manager Code 18 Yes
Re-key Mode - Manager Code 400 Yes
Training Mode - Manager Code 402 Yes
Reset Business Date - Manager Code 424 No
Change Store Business Date - Manager Code 426 No
Exit POS - Manager Code 499 Yes
Reload Secondary - Manager Code 497 No

About the backup server
411
6. This function can be executed; however, no “Pickup Is Due” notifications will be sent from theserver.
7. This function is supported at the POS terminal; however the function will be effective only on thePOS terminal on which it is executed.

About the Xpress Server and Backup Server
412
413
8Operating the Databases andUtilities
This section describes how to use and manipulate the databases and non-database utilities. Topics inthis section include:
Database validation and viewing
Using the non-database utilities
Troubleshooting end of day file problems
Database encryptionTransactionware GM can safeguard information such as customer names and credit card numbersthrough processes which encrypt or mask sensitive data as it is transmitted from the POS to the XpressServer or beyond, or stored in the TLogs, journals or databases. You can define specific parameters tocontrol some aspects of these processes such as which encryption key to activate when several keyshave been defined, or which portion of data in a string of data to mask.
Through its security module, Transactionware GM supports the use of multiple encryption keys. Thismodule maintains a library of secret keys and allows the active secret encryption key to be changed atany time as the need arises.
To support multiple keys, the key index ID used to encrypt a database record is stored in the record’sheader. Access to encrypted data requires it to be decrypted using that encryption key index. New datawritten to the database is always encrypted with the active encryption key index on the Xpress Server.Existing data uses the encryption index that was retrieved from the database to re-encrypt the data andthe encrypt key index value is written to the database along with the data.
Viewing and validating databasesBefore learning how to troubleshoot a database, it is first necessary to understand a few basics of whata database is. The very basic definition is “a collection of data”. Databases are made up of files, records,and fields.
File: It is a file in which data of a certain type is kept. For example, the PLU database holds all ofthe data referencing sku numbers, their individual prices, and so forth.
Records: Normally, the data within each file is divided up into ‘records’. Each record containsinformation related to a certain item. For example, we can look at a phonebook as a database. Thephonebook is a collection of data all related to phone numbers. Individual records in thephonebook are the information related to each individual phone number - a person’s name,address, and so forth.
Operating the Databases and Utilities
414
Fields: Each record can further be broken down into ‘fields’. A field is an entry in a record. Forexample, the ‘name’ field in our phonebook contains the person’s name who owns a particularnumber.
Viewing the databasesThe store component applications place captured data into two SQL databases: backoff.db andjournal.db.
The majority of issues revolve around the backoff.db file as it is the larger database that contains allthe tables surrounding the data flow. Any requests from the POS or Store Manager generally accessone or many tables within the backoff.db file. The journal.db file contains journal data (organized forsearching and reporting) and signature images (stored if using a signature capture device). In order toview the information within the tables of a database, a tool such as SQL Central must be used.
1. To open SQL Central, on the Windows task bar, click Start, point to Programs, then TriversityInc., and then SQL Central.
2. On the Sybase Central menu bar, click Connect.
3. On the next dialog box, in the UserID field, type DBA. In the Password field, type SQL.
4. If the database has already been started before opening SQL Central, click OK to automaticallyconnect to that open database at this time.
If there are no databases currently running, click Browse to specify the path and filename of thedatabase to which you wish to connect.
Note: Remember that the backoff.db and journal.db files are stored, bydefault, in c:\Program Files\Triversity Databases\.
5. Click OK to complete the connect process. The database connect is successful if the databasename appears in the Sybase Central window, beneath the Utilities folder.
6. Click the + sign to the left of the database name to expand and view its contents.
7. Click the + sign to the left of backoff (dba) to view the various folders within the backoff.dbdatabase.
8. Click the + sign to the left of the Tables folder to view the names of all the tables within thebackoff.db database.
9. To view the data within a given table, right-click the desired table, and select View Data from thedrop-down list.
After you choose to view the data, the Interactive SQL (ISQL) application appears in a new window.
The upper portion of the window displays all the fields and records for the selected table.
The middle portion of the window displays the statistics for the selected table, such as numberof rows and amount of time to open the table.
The lower portion displays the actual SQL command used to perform the action requested.
Validating the databasesValidating a database is often one of the first steps in troubleshooting since it is a quick and easy way totell if the database is corrupt. The simplest way to validate a database or table is to use a databaseapplication such as SQL Central.
1. Click the right mouse button on the object within the “Sybase Central” window that you wish tovalidate. You can choose to validate an entire database [backoff.db (dba) or journal.db (dba)] ora single table.
Viewing and validating databases
415
2. In the drop-down list, click Validate.
3. When the validation process is finished, a message appears. If the table or database has passedvalidation, the message box reads ‘No Errors Reported’.
Backing up a databaseBacking up a database doesn’t really fall into the category of utilities for troubleshooting but it is ahighly recommended task to perform regularly. Existence of a backup makes solving problems muchsimpler.
To backup a database:1. In SQL Central, click the Utilities folder in the left pane to display a list of SQL utilities in the right
pane.
2. Double-click Backup Database.
3. In the next dialog box, click the top radio button and type the path to the database you want toback up.
4. Click Next.
5. In the User Id field type DBA, and in the Password field type SQL. Click Next.
6. Specify the path where the backup will be saved.
7. At the bottom of the dialog box you must check the button corresponding to the option(s) youwish to save.You can save one or both of the Main Database File and the Transaction LogFile.
8. In the next dialog box, you must specify what is to be done with the selected database’s logs.
Rename or Erase the old one and start a new log with another name.
Continue using the original log.
9. The last dialog box verifies which database is being backed up and where the backup will beplaced.
10. Click Finish to complete the backup.
Erasing the databasesIf the database validation fails, meaning that part of the database is corrupt, you must take action tomend or replace the corrupt database. The simplest solution occurs when a store has a corruptdatabase but performs daily backups. In this case, the current corrupt database can be erased, and thebackup from the previous day reloaded.
To erase a database:1. Using SQL Central, click on the Utilities folder in the left portion of the window to display a list of
SQL utilities in the right portion.
2. In the SQL Central right pane, double-click Erase Database.
3. On the next dialog box you must specify the full path and name of the database you wish to erase.
4. Click Next.
5. The second dialog box within the ‘Erase’ utility asks which components of the selected databaseyou wish to erase.
Click the top check box if you wish to erase the data, structure and write files of the selecteddatabase.

Operating the Databases and Utilities
416
Click the lower check box if you wish to erase the database’s log file.
6. Click Next.
7. The final dialog box displays information regarding the files to be erased.
8. Click Finish.
Activating a database from a backupContinuing with the troubleshooting experience, if a database has failed validation, and we have a validbackup, we will erase the corrupt database and replace it with our backup.
To activate a backup database:1. Locate your backup file.
2. Locate the database working directory.
3. Copy that backup into the working directory.
The default directory for all databases is c:\Program Files\Triversity Databases. Within thatdirectory is another directory called Backup, which is the recommended directory to placebackups.
Copy the required backup file(s) from the Backup directory to the Databases directory.
Unloading a databaseAnother tool for finding the source of a database problem is using the DBUnload utility. By unloadingthe database and reloading it in segments, you can identify where the problem lies and whether it is astructural or data-related issue.
To unload a database or table:1. Using ‘SQL Central’, right-click the database or table you want to unload.
2. In the drop-down list, click Unload. The Unload Database Table dialog box appears.
3. If choosing to unload individual tables, click to check the table(s) you want to include in theunload, or click All to select all tables.
4. Once the desired tables have been checked, click Next.
5. In the next dialog box specify the path where the ‘Reload’ executable will be stored, then clickNext.
6. In the third window of the ‘Unload’ dialog box you must specify the components of the databaseto be unloaded.
Database Structure
Data
Structure and Data
7. Specify whether the unloaded file is to be stored on the server or whether it is to be stored onsome client machine.
8. Specify the full path to the directory where the unloaded files will be stored, and then click Next.
9. Complete any Other Information in the fifth window of the Unload dialog box, and then clickNext.
Other Information includes the levels of view dependency within the database (if applicable), theability to order the data (if checked), and the user name of the Data Base Owner.
Viewing and validating databases
417
10. Review the summary information in the final window of the dialog box, then click Finish tounload the specified table(s).
11. The end result of the ‘Unload’ is a placement of all unloaded tables as .dat files into the Unloaddirectory specified in step 6, and a reload.SQL file in the directory specified in step 3.
Reloading a databaseWhenever a table or database is unloaded, Sybase creates a reload.sql file, which contains a series ofSQL commands designed to reload the database structure and data. The sequence of functions atroubleshooter tends to use is first, to unload the suspected table or database, erase that table ordatabase, then reload the table or database.
To reload an entire database that has been previously unloaded:1. Ensure that the Sybase server is running.
2. Using ‘SQL Central’, click on the ‘Utilities’ folder.
3. Double-click the left mouse button on the ‘ISQL’ (Interactive SQL) utility.
4. When the Interactive SQL Logon window appears, login as dba with sql as the password.
5. In the Command window (lower portion) of the ISQL screen, type the SQL command to read thereload.sql file.
The command consists of two parts:
Read: Tells SQL to search for a file and read (or run) that file.
Path and File Name: Specifies the location and name of the required ‘reload.sql’ file.
6. Click Execute. ISQL retrieves the reload.sql file and starts reading through all of the SQLcommands written within it. The file recreates the structure and data of all tables and functionsfrom the database. As the file is read, the Command portion of the ISQL screen displays thecommands being read from the file.
Reloading a tableReloading a table that has been unloaded is slightly different than reloading an entire database that hasbeen unloaded. Regardless of what is unloaded from the database, the reload.sql file is identical. It iscreated to reload the entire database even if only one or two tables have been unloaded. Because of thisfact, when reloading tables you must use only the portions of the reload.sql file that relate to thespecified tables.
1. Locate the reload.sql file (located by default in the C:\Program Files\Triversity Databasesdirectory) and open it using Microsoft Wordpad.
2. Click the Edit menu, and then click Find.
3. In the Find What field, type the name of the table you have unloaded, and then click Find Next.If you have unloaded more than one table, search for all entries of a given table before searchingfor another table (that is, search for one table name at a time).
4. Highlight the full SQL command surrounding the required table name for every mention of thename that is found in the reload.sql file.
5. Right-click any portion of the highlighted SQL command, and then click Copy.
6. Open ISQL.
7. In the ISQL window, right-click the Command section (at the end of any previously pastedcommands) and then click Paste.

Operating the Databases and Utilities
418
8. Repeat steps 2 through 7 until all SQL commands referencing the unloaded table(s) are copiedfrom the reload.sql file into the Command section of the ISQL window.
9. Click Execute to reload the table(s).
Examining the SQL/Sybase Database Server startupMany times a database will pass a validation even if the customer continues to experience problems.There are many possible explanations for this, including insufficient cache size, faulty connection,improper database path, or many others. A useful tool for the support staff is re-opening the SQL/Sybase Database Server and examining the message window. Often, the server will be unable to openand will specify the place at which the fault occurred.
Starting the server is a relatively simple end-user task but in order to troubleshoot it you should beaware of the different components of its open. These opening components can be seen by viewing theserver’s properties.
1. In the Windows task bar, click Start, point to Programs, and then click Triversity Inc.
2. Click the right mouse button over the server name in the resulting menu.
3. Select Properties in the final resulting menu. The Properties window displays some informationregarding the server, most importantly is the Target. The Target field can be quite long,containing an extensive command, which will start the server. A typical entry in the Target fieldappears below.
The first portion, C:\sqlany50\win32\dbsrv50.exe is the path and file name for theexecutable (dbsrv50) that launches the server. This executable requires more information, thatis why the Target field contains the other flags.
The second portion, -c 16m indicates the amount of RAM to allocate for database cache.Other possible amounts include 4m, 8m, and 32m.
The third portion, -n Name indicates the user-defined name of the database. For example, theTraining room may have -n TrainingServer at this location of the Target.
The next portion, -xtcpip indicates the communications protocol to be used, in this case weare using TCP/IP. If this portion of the command line is eliminated, the server will search forconnections using all protocols upon opening.
The remainder of the command line is the full path and name of each of the databases youwish to connect to upon startup of the server.
Starting the server from DOSStarting the SQL/Sybase Database Server from DOS gives the troubleshooter easy access to changingthe many flags within the command line to get an idea as to where the customer problem is occurring.
1. Copy the Target field contents from the server properties and paste it at a DOS prompt.
2. The SQL/Sybase Database Server will open in another window.
3. Maximize the Messages window to view all the messages as the server is opening.
4. After the standard copyright material, the first lines of information that appear in the messageswindow are in reference to the communication protocol.
5. The server will attempt to link using the protocol specified in the MS-DOS command line (forexample, –xtcpip).
6. Once all protocols have been tested, the server attempts to set aside the specified amount of RAMin cache (for example, –c 16m).
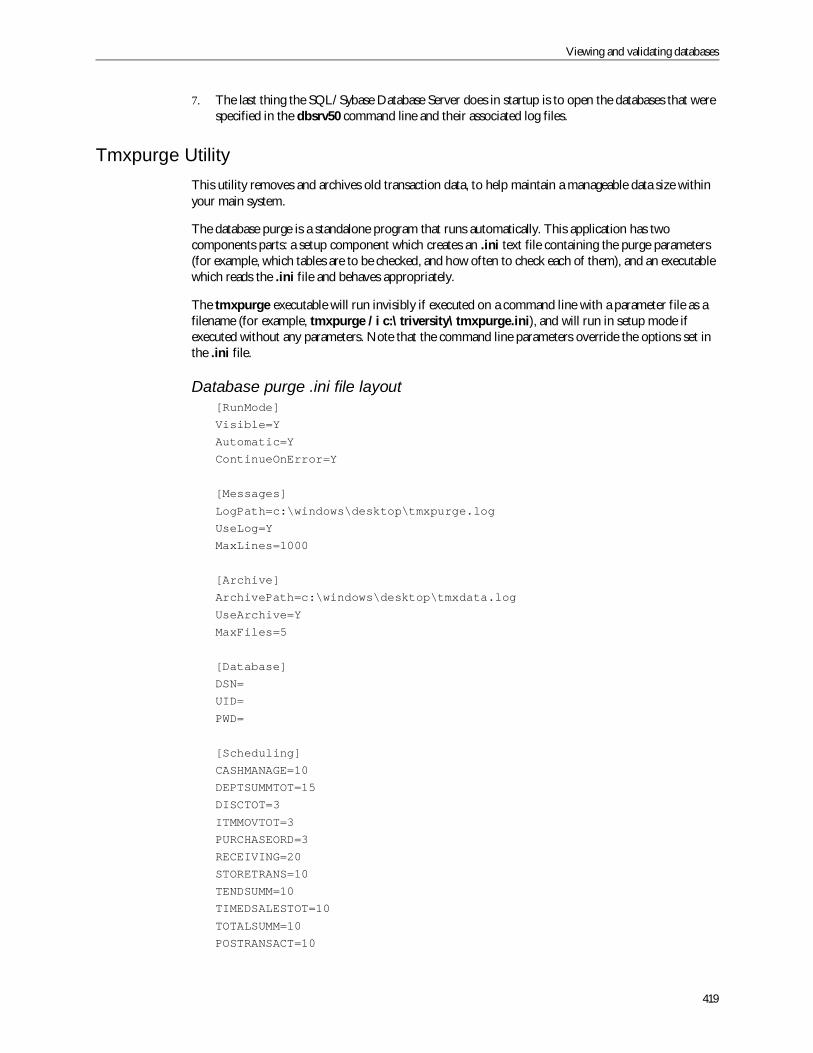
Viewing and validating databases
419
7. The last thing the SQL/Sybase Database Server does in startup is to open the databases that werespecified in the dbsrv50 command line and their associated log files.
Tmxpurge UtilityThis utility removes and archives old transaction data, to help maintain a manageable data size withinyour main system.
The database purge is a standalone program that runs automatically. This application has twocomponents parts: a setup component which creates an .ini text file containing the purge parameters(for example, which tables are to be checked, and how often to check each of them), and an executablewhich reads the .ini file and behaves appropriately.
The tmxpurge executable will run invisibly if executed on a command line with a parameter file as afilename (for example, tmxpurge /i c:\triversity\tmxpurge.ini), and will run in setup mode ifexecuted without any parameters. Note that the command line parameters override the options set inthe .ini file.
Database purge .ini file layout[RunMode]
Visible=Y
Automatic=Y
ContinueOnError=Y
[Messages]
LogPath=c:\windows\desktop\tmxpurge.log
UseLog=Y
MaxLines=1000
[Archive]
ArchivePath=c:\windows\desktop\tmxdata.log
UseArchive=Y
MaxFiles=5
[Database]
DSN=
UID=
PWD=
[Scheduling]
CASHMANAGE=10
DEPTSUMMTOT=15
DISCTOT=3
ITMMOVTOT=3
PURCHASEORD=3
RECEIVING=20
STORETRANS=10
TENDSUMM=10
TIMEDSALESTOT=10
TOTALSUMM=10
POSTRANSACT=10
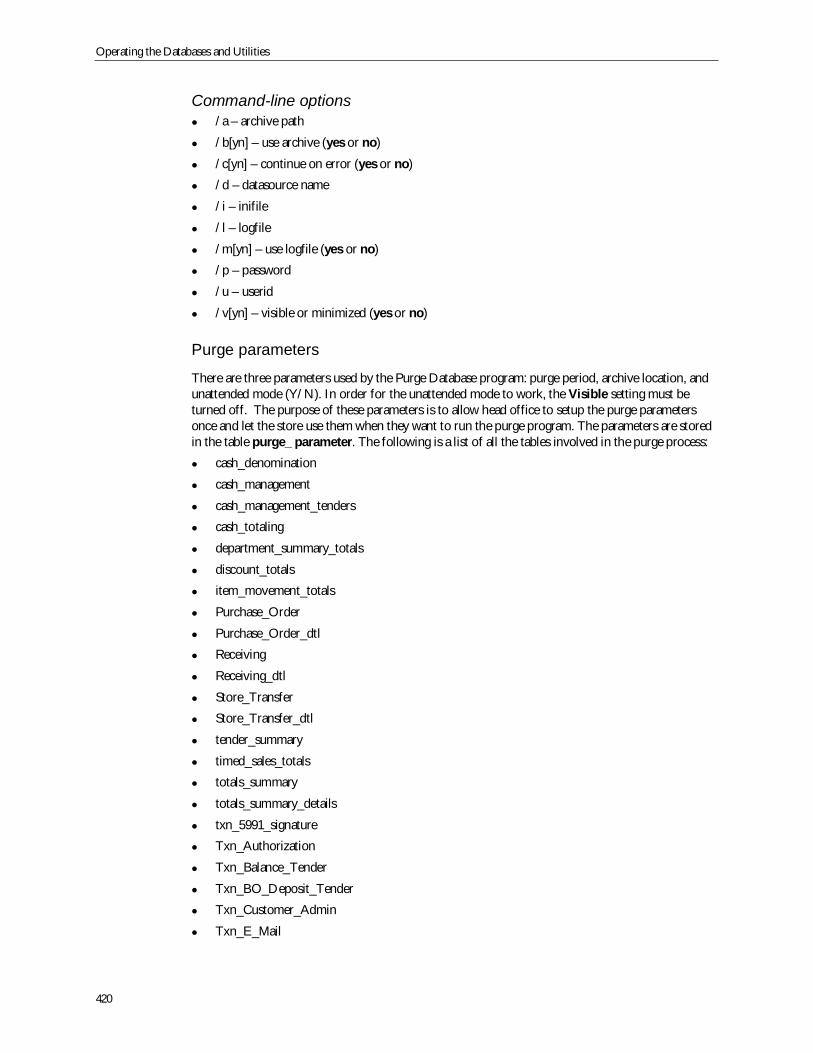
Operating the Databases and Utilities
420
Command-line options/a – archive path
/b[yn] – use archive (yes or no)
/c[yn] – continue on error (yes or no)
/d – datasource name
/i – inifile
/l – logfile
/m[yn] – use logfile (yes or no)
/p – password
/u – userid
/v[yn] – visible or minimized (yes or no)
Purge parameters
There are three parameters used by the Purge Database program: purge period, archive location, andunattended mode (Y/N). In order for the unattended mode to work, the Visible setting must beturned off. The purpose of these parameters is to allow head office to setup the purge parametersonce and let the store use them when they want to run the purge program. The parameters are storedin the table purge_ parameter. The following is a list of all the tables involved in the purge process:
cash_denomination
cash_management
cash_management_tenders
cash_totaling
department_summary_totals
discount_totals
item_movement_totals
Purchase_Order
Purchase_Order_dtl
Receiving
Receiving_dtl
Store_Transfer
Store_Transfer_dtl
tender_summary
timed_sales_totals
totals_summary
totals_summary_details
txn_5991_signature
Txn_Authorization
Txn_Balance_Tender
Txn_BO_Deposit_Tender
Txn_Customer_Admin
Txn_E_Mail
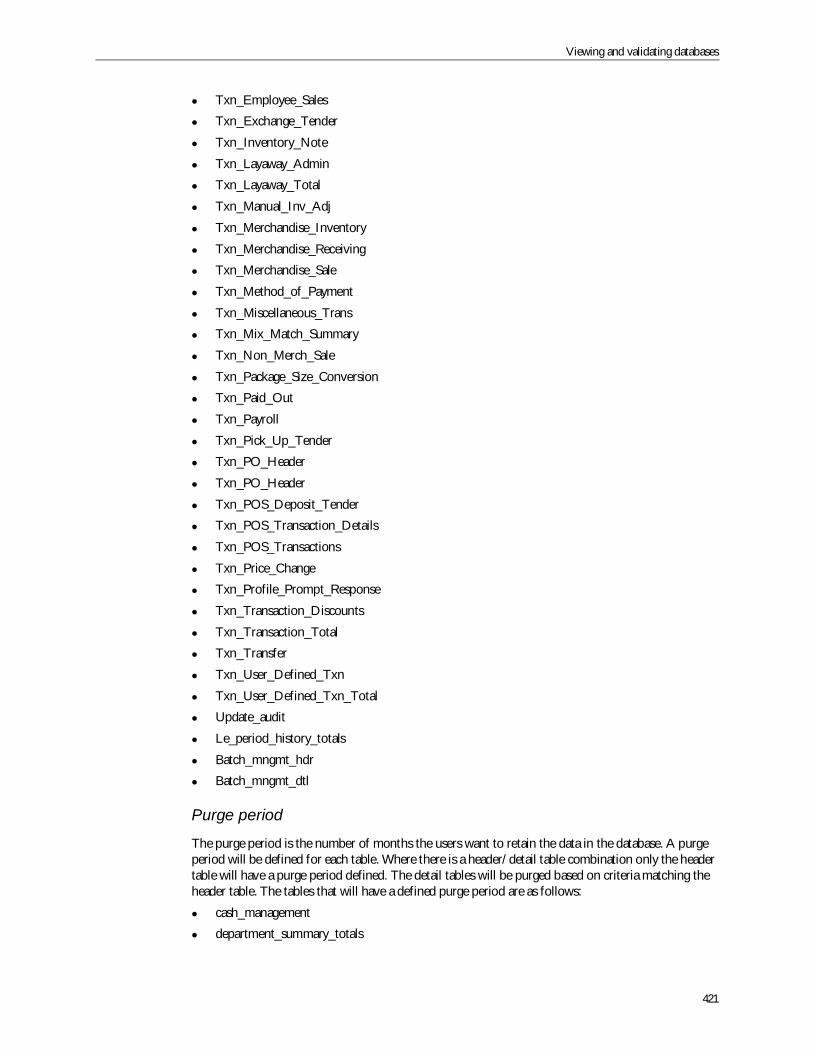
Viewing and validating databases
421
Txn_Employee_Sales
Txn_Exchange_Tender
Txn_Inventory_Note
Txn_Layaway_Admin
Txn_Layaway_Total
Txn_Manual_Inv_Adj
Txn_Merchandise_Inventory
Txn_Merchandise_Receiving
Txn_Merchandise_Sale
Txn_Method_of_Payment
Txn_Miscellaneous_Trans
Txn_Mix_Match_Summary
Txn_Non_Merch_Sale
Txn_Package_Size_Conversion
Txn_Paid_Out
Txn_Payroll
Txn_Pick_Up_Tender
Txn_PO_Header
Txn_PO_Header
Txn_POS_Deposit_Tender
Txn_POS_Transaction_Details
Txn_POS_Transactions
Txn_Price_Change
Txn_Profile_Prompt_Response
Txn_Transaction_Discounts
Txn_Transaction_Total
Txn_Transfer
Txn_User_Defined_Txn
Txn_User_Defined_Txn_Total
Update_audit
Le_period_history_totals
Batch_mngmt_hdr
Batch_mngmt_dtl
Purge period
The purge period is the number of months the users want to retain the data in the database. A purgeperiod will be defined for each table. Where there is a header/detail table combination only the headertable will have a purge period defined. The detail tables will be purged based on criteria matching theheader table. The tables that will have a defined purge period are as follows:
cash_management
department_summary_totals
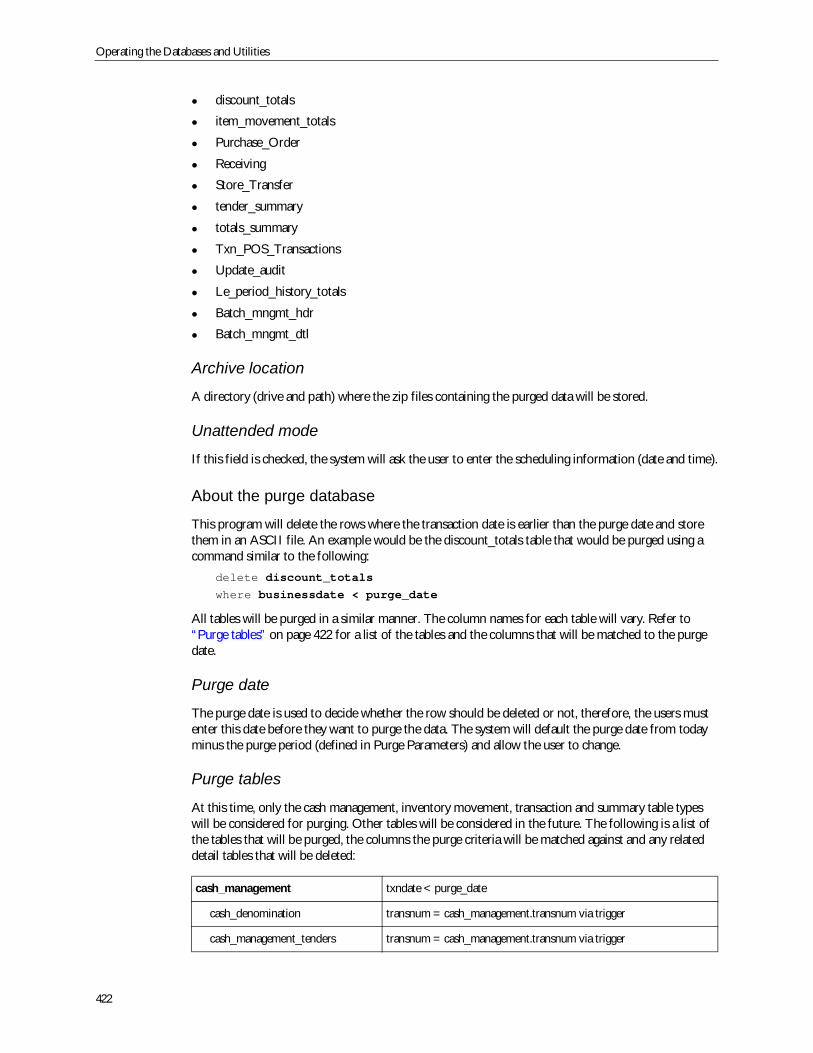
Operating the Databases and Utilities
422
discount_totals
item_movement_totals
Purchase_Order
Receiving
Store_Transfer
tender_summary
totals_summary
Txn_POS_Transactions
Update_audit
Le_period_history_totals
Batch_mngmt_hdr
Batch_mngmt_dtl
Archive location
A directory (drive and path) where the zip files containing the purged data will be stored.
Unattended mode
If this field is checked, the system will ask the user to enter the scheduling information (date and time).
About the purge database
This program will delete the rows where the transaction date is earlier than the purge date and storethem in an ASCII file. An example would be the discount_totals table that would be purged using acommand similar to the following:
delete discount_totalswhere businessdate < purge_date
All tables will be purged in a similar manner. The column names for each table will vary. Refer to“Purge tables” on page 422 for a list of the tables and the columns that will be matched to the purgedate.
Purge date
The purge date is used to decide whether the row should be deleted or not, therefore, the users mustenter this date before they want to purge the data. The system will default the purge date from todayminus the purge period (defined in Purge Parameters) and allow the user to change.
Purge tables
At this time, only the cash management, inventory movement, transaction and summary table typeswill be considered for purging. Other tables will be considered in the future. The following is a list ofthe tables that will be purged, the columns the purge criteria will be matched against and any relateddetail tables that will be deleted:
cash_management txndate < purge_date
cash_denomination transnum = cash_management.transnum via trigger
cash_management_tenders transnum = cash_management.transnum via trigger
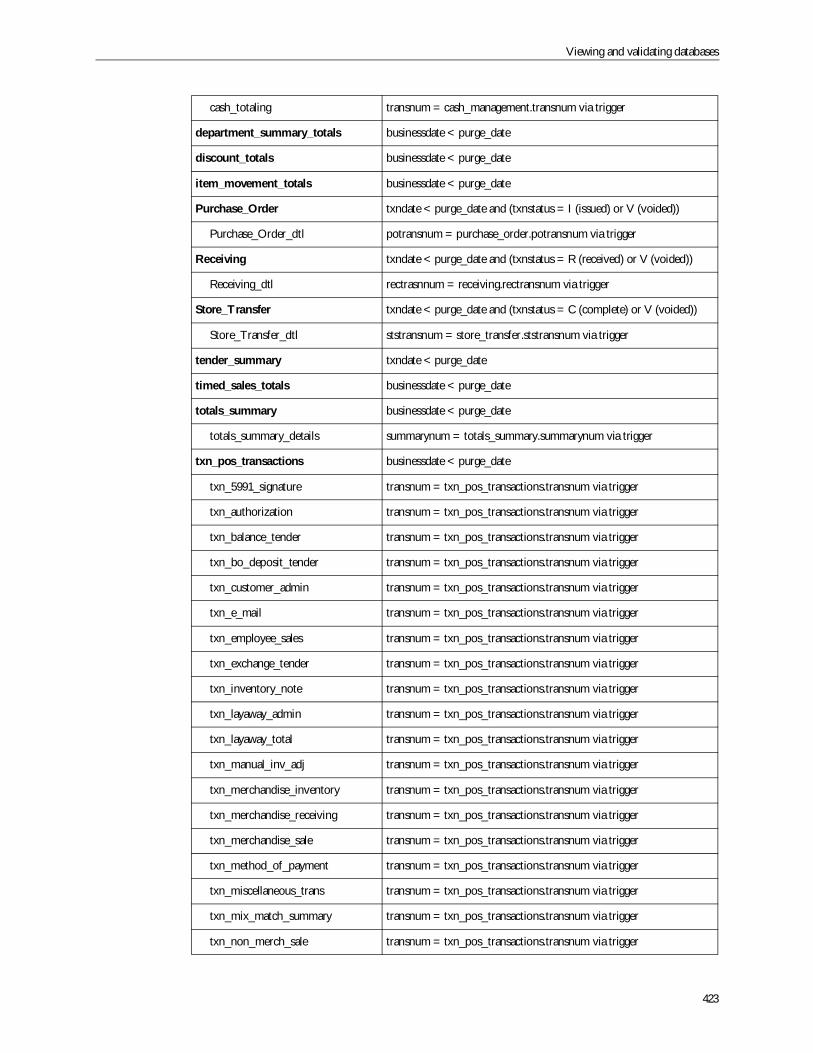
Viewing and validating databases
423
cash_totaling transnum = cash_management.transnum via trigger
department_summary_totals businessdate < purge_date
discount_totals businessdate < purge_date
item_movement_totals businessdate < purge_date
Purchase_Order txndate < purge_date and (txnstatus = I (issued) or V (voided))
Purchase_Order_dtl potransnum = purchase_order.potransnum via trigger
Receiving txndate < purge_date and (txnstatus = R (received) or V (voided))
Receiving_dtl rectrasnnum = receiving.rectransnum via trigger
Store_Transfer txndate < purge_date and (txnstatus = C (complete) or V (voided))
Store_Transfer_dtl ststransnum = store_transfer.ststransnum via trigger
tender_summary txndate < purge_date
timed_sales_totals businessdate < purge_date
totals_summary businessdate < purge_date
totals_summary_details summarynum = totals_summary.summarynum via trigger
txn_pos_transactions businessdate < purge_date
txn_5991_signature transnum = txn_pos_transactions.transnum via trigger
txn_authorization transnum = txn_pos_transactions.transnum via trigger
txn_balance_tender transnum = txn_pos_transactions.transnum via trigger
txn_bo_deposit_tender transnum = txn_pos_transactions.transnum via trigger
txn_customer_admin transnum = txn_pos_transactions.transnum via trigger
txn_e_mail transnum = txn_pos_transactions.transnum via trigger
txn_employee_sales transnum = txn_pos_transactions.transnum via trigger
txn_exchange_tender transnum = txn_pos_transactions.transnum via trigger
txn_inventory_note transnum = txn_pos_transactions.transnum via trigger
txn_layaway_admin transnum = txn_pos_transactions.transnum via trigger
txn_layaway_total transnum = txn_pos_transactions.transnum via trigger
txn_manual_inv_adj transnum = txn_pos_transactions.transnum via trigger
txn_merchandise_inventory transnum = txn_pos_transactions.transnum via trigger
txn_merchandise_receiving transnum = txn_pos_transactions.transnum via trigger
txn_merchandise_sale transnum = txn_pos_transactions.transnum via trigger
txn_method_of_payment transnum = txn_pos_transactions.transnum via trigger
txn_miscellaneous_trans transnum = txn_pos_transactions.transnum via trigger
txn_mix_match_summary transnum = txn_pos_transactions.transnum via trigger
txn_non_merch_sale transnum = txn_pos_transactions.transnum via trigger
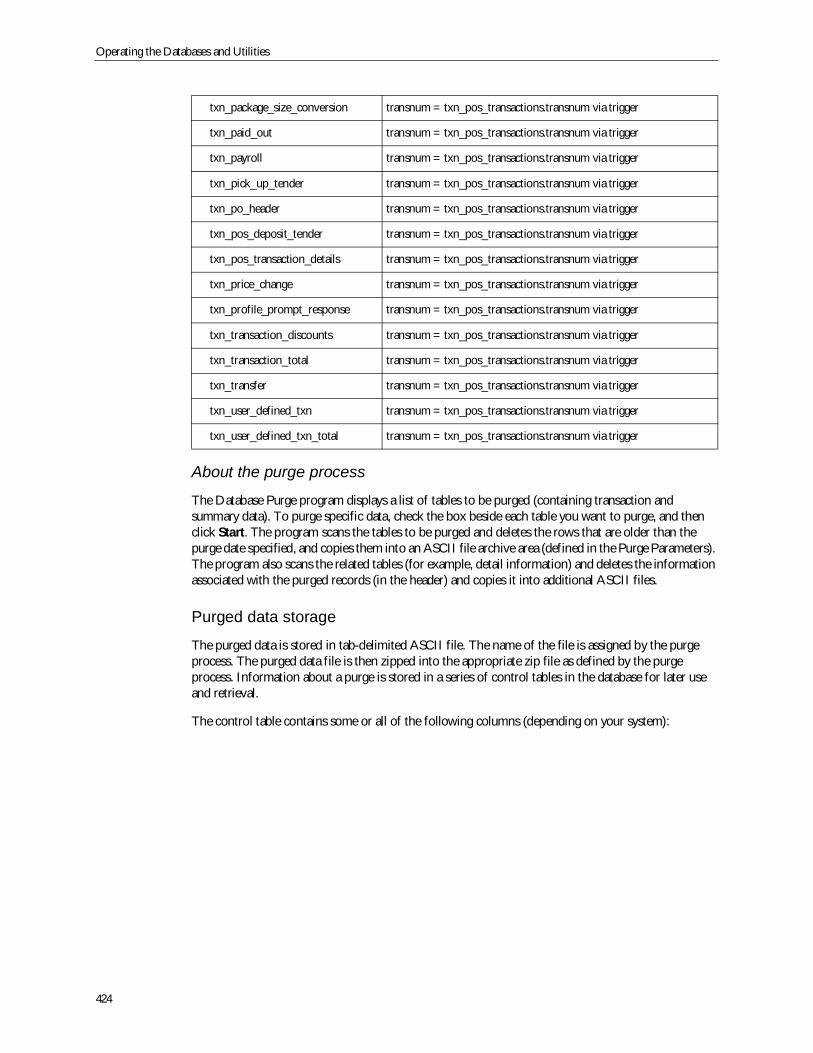
Operating the Databases and Utilities
424
About the purge process
The Database Purge program displays a list of tables to be purged (containing transaction andsummary data). To purge specific data, check the box beside each table you want to purge, and thenclick Start. The program scans the tables to be purged and deletes the rows that are older than thepurge date specified, and copies them into an ASCII file archive area (defined in the Purge Parameters).The program also scans the related tables (for example, detail information) and deletes the informationassociated with the purged records (in the header) and copies it into additional ASCII files.
Purged data storage
The purged data is stored in tab-delimited ASCII file. The name of the file is assigned by the purgeprocess. The purged data file is then zipped into the appropriate zip file as defined by the purgeprocess. Information about a purge is stored in a series of control tables in the database for later useand retrieval.
The control table contains some or all of the following columns (depending on your system):
txn_package_size_conversion transnum = txn_pos_transactions.transnum via trigger
txn_paid_out transnum = txn_pos_transactions.transnum via trigger
txn_payroll transnum = txn_pos_transactions.transnum via trigger
txn_pick_up_tender transnum = txn_pos_transactions.transnum via trigger
txn_po_header transnum = txn_pos_transactions.transnum via trigger
txn_pos_deposit_tender transnum = txn_pos_transactions.transnum via trigger
txn_pos_transaction_details transnum = txn_pos_transactions.transnum via trigger
txn_price_change transnum = txn_pos_transactions.transnum via trigger
txn_profile_prompt_response transnum = txn_pos_transactions.transnum via trigger
txn_transaction_discounts transnum = txn_pos_transactions.transnum via trigger
txn_transaction_total transnum = txn_pos_transactions.transnum via trigger
txn_transfer transnum = txn_pos_transactions.transnum via trigger
txn_user_defined_txn transnum = txn_pos_transactions.transnum via trigger
txn_user_defined_txn_total transnum = txn_pos_transactions.transnum via trigger
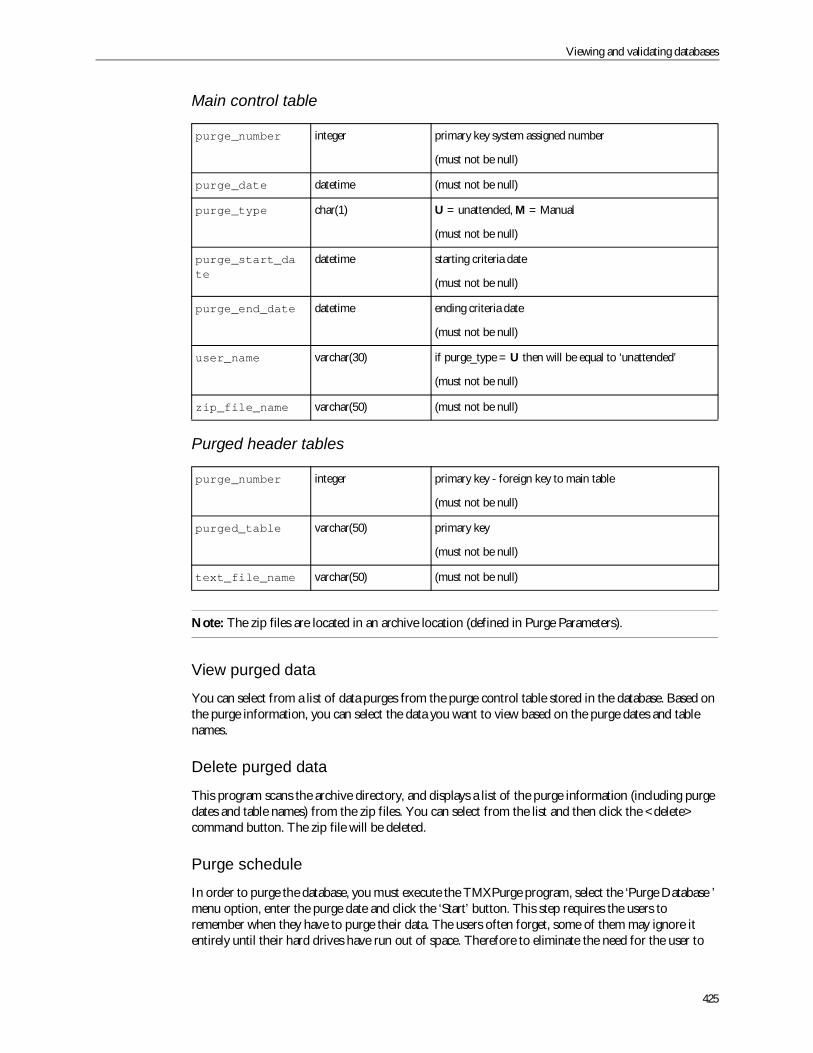
Viewing and validating databases
425
Main control table
Purged header tables
Note: The zip files are located in an archive location (defined in Purge Parameters).
View purged data
You can select from a list of data purges from the purge control table stored in the database. Based onthe purge information, you can select the data you want to view based on the purge dates and tablenames.
Delete purged data
This program scans the archive directory, and displays a list of the purge information (including purgedates and table names) from the zip files. You can select from the list and then click the <delete>command button. The zip file will be deleted.
Purge schedule
In order to purge the database, you must execute the TMXPurge program, select the ‘Purge Database ’menu option, enter the purge date and click the ‘Start’ button. This step requires the users toremember when they have to purge their data. The users often forget, some of them may ignore itentirely until their hard drives have run out of space. Therefore to eliminate the need for the user to
purge_number integer primary key system assigned number
(must not be null)
purge_date datetime (must not be null)
purge_type char(1) U = unattended, M = Manual
(must not be null)
purge_start_date
datetime starting criteria date
(must not be null)
purge_end_date datetime ending criteria date
(must not be null)
user_name varchar(30) if purge_type = U then will be equal to ‘unattended’
(must not be null)
zip_file_name varchar(50) (must not be null)
purge_number integer primary key - foreign key to main table
(must not be null)
purged_table varchar(50) primary key
(must not be null)
text_file_name varchar(50) (must not be null)
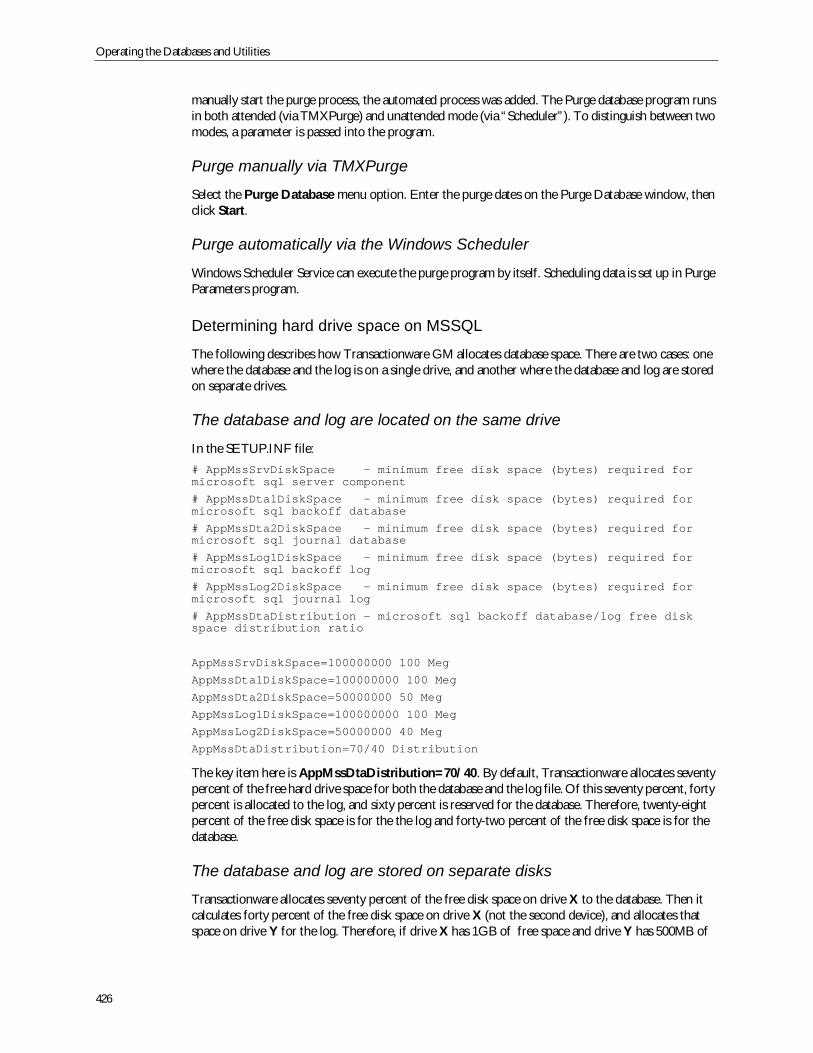
Operating the Databases and Utilities
426
manually start the purge process, the automated process was added. The Purge database program runsin both attended (via TMXPurge) and unattended mode (via “Scheduler”). To distinguish between twomodes, a parameter is passed into the program.
Purge manually via TMXPurge
Select the Purge Database menu option. Enter the purge dates on the Purge Database window, thenclick Start.
Purge automatically via the Windows Scheduler
Windows Scheduler Service can execute the purge program by itself. Scheduling data is set up in PurgeParameters program.
Determining hard drive space on MSSQL
The following describes how Transactionware GM allocates database space. There are two cases: onewhere the database and the log is on a single drive, and another where the database and log are storedon separate drives.
The database and log are located on the same drive
In the SETUP.INF file:# AppMssSrvDiskSpace - minimum free disk space (bytes) required formicrosoft sql server component
# AppMssDta1DiskSpace - minimum free disk space (bytes) required formicrosoft sql backoff database
# AppMssDta2DiskSpace - minimum free disk space (bytes) required formicrosoft sql journal database
# AppMssLog1DiskSpace - minimum free disk space (bytes) required formicrosoft sql backoff log
# AppMssLog2DiskSpace - minimum free disk space (bytes) required formicrosoft sql journal log
# AppMssDtaDistribution - microsoft sql backoff database/log free diskspace distribution ratio
AppMssSrvDiskSpace=100000000 100 Meg
AppMssDta1DiskSpace=100000000 100 Meg
AppMssDta2DiskSpace=50000000 50 Meg
AppMssLog1DiskSpace=100000000 100 Meg
AppMssLog2DiskSpace=50000000 40 Meg
AppMssDtaDistribution=70/40 Distribution
The key item here is AppMssDtaDistribution=70/40. By default, Transactionware allocates seventypercent of the free hard drive space for both the database and the log file. Of this seventy percent, fortypercent is allocated to the log, and sixty percent is reserved for the database. Therefore, twenty-eightpercent of the free disk space is for the the log and forty-two percent of the free disk space is for thedatabase.
The database and log are stored on separate disks
Transactionware allocates seventy percent of the free disk space on drive X to the database. Then itcalculates forty percent of the free disk space on drive X (not the second device), and allocates thatspace on drive Y for the log. Therefore, if drive X has 1GB of free space and drive Y has 500MB of
Using the non-database utilities
427
free space, 700MB of drive X will be allocated for the database and 400MB (forty percent of 1GB) ofdrive Y will be allocated for the log.
Using the non-database utilitiesYou POS system comes with a set of tools that allow you to analyze and manage non-SQL databasefiles. These utilities are DOS-based standalone products designed to assist you in detecting andrepairing data file difficulties you may encounter.
Some key features of the utilities are as follows:
DOS-based
Command line driven
Convert binary-based files to ASCII
Converted files can be viewed in any text editor
Can be used on both the Server and POS files
This section describes each of the utilities, and explains any flags which may be used with them. Thecommand line structure is the same for all of the utilities; it consists simply of the name of the utilityyou want to execute.
Flags are used to perform additional tasks or options within the parameters of the utility. Squarebrackets indicate that a flag is optional. The command line structure for the flags is as follows: The name of the ASCII file that will be created.
The name of the file from which the information is converted.
Note: Before any of the utilities are used, you need to perform a complete backup of your databasefiles. Also, the server should be offline while the files are being examined or repaired; otherwise filecorruption may occur.
Understanding how utilities deal with encryption processesTransactionware GM can safeguard information such as customer names and credit card numbersthrough processes which encrypt or mask sensitive data as it is transmitted from the POS to the XpressServer or beyond, or stored in the TLogs, journals or databases. You can define specific parameters tocontrol some aspects of these processes such as which encryption key to activate when several keyshave been defined, or which portion of data in a string of data should be masked.
Through its security module, Transactionware GM now supports the use of multiple encryption keys.This module maintains a library of secret keys and allows the active secret encryption key to bechanged at any time as the need arises.
To support multiple keys, the key index ID used to encrypt a database record is stored in the record’sheader. Access to encrypted data requires it to be decrypted using that encryption key index. New datawritten to the database is always encrypted with the active encryption key index on the Xpress Server.Existing data uses the encryption index that was retrieved from the database to re-encrypt the data andthe encrypt key index value is written to the database along with the data. The utilities cvtlog.exe,safutil.exe and dcdump.exe read the key index from their respective record types and decrypt thecontents of the record. These utilities will not decrypt any information if the encryption key from therecord is not installed on the machine where the utility is being run.
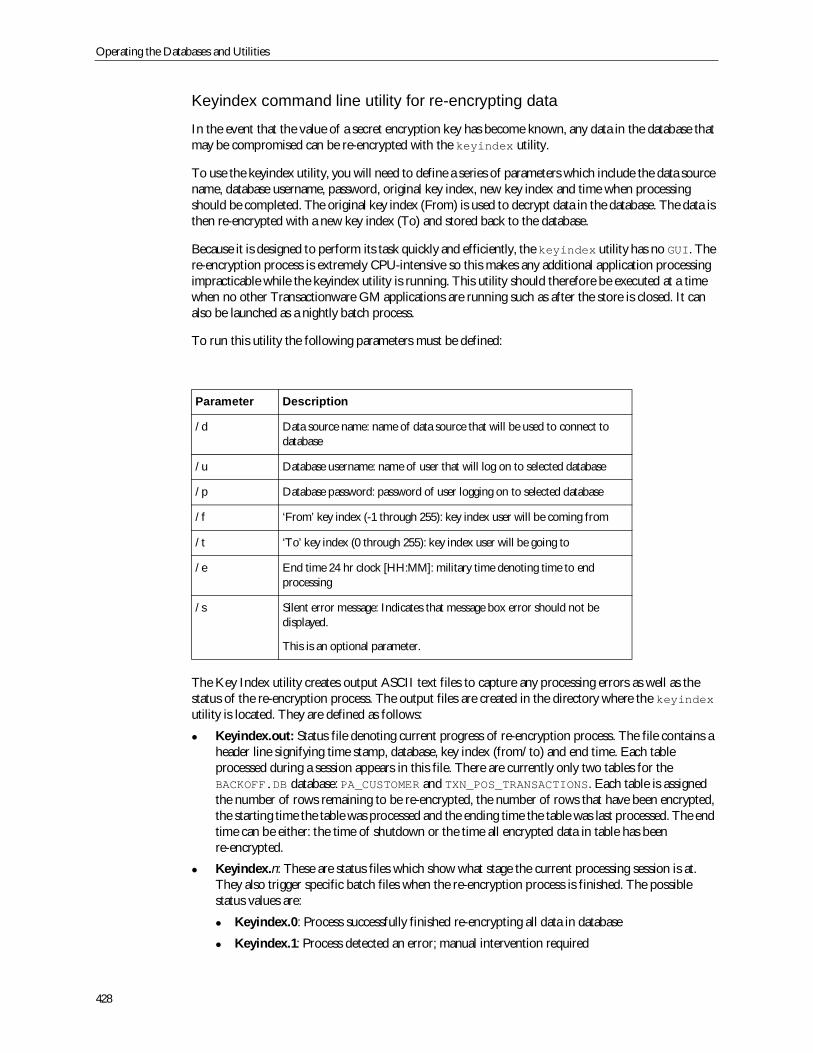
Operating the Databases and Utilities
428
Keyindex command line utility for re-encrypting data
In the event that the value of a secret encryption key has become known, any data in the database thatmay be compromised can be re-encrypted with the keyindex utility.
To use the keyindex utility, you will need to define a series of parameters which include the data sourcename, database username, password, original key index, new key index and time when processingshould be completed. The original key index (From) is used to decrypt data in the database. The data isthen re-encrypted with a new key index (To) and stored back to the database.
Because it is designed to perform its task quickly and efficiently, the keyindex utility has no GUI. There-encryption process is extremely CPU-intensive so this makes any additional application processingimpracticable while the keyindex utility is running. This utility should therefore be executed at a timewhen no other Transactionware GM applications are running such as after the store is closed. It canalso be launched as a nightly batch process.
To run this utility the following parameters must be defined:
The Key Index utility creates output ASCII text files to capture any processing errors as well as thestatus of the re-encryption process. The output files are created in the directory where the keyindexutility is located. They are defined as follows:
Keyindex.out: Status file denoting current progress of re-encryption process. The file contains aheader line signifying time stamp, database, key index (from/to) and end time. Each tableprocessed during a session appears in this file. There are currently only two tables for theBACKOFF.DB database: PA_CUSTOMER and TXN_POS_TRANSACTIONS. Each table is assignedthe number of rows remaining to be re-encrypted, the number of rows that have been encrypted,the starting time the table was processed and the ending time the table was last processed. The endtime can be either: the time of shutdown or the time all encrypted data in table has beenre-encrypted.
Keyindex.n: These are status files which show what stage the current processing session is at.They also trigger specific batch files when the re-encryption process is finished. The possiblestatus values are:
Keyindex.0: Process successfully finished re-encrypting all data in database
Keyindex.1: Process detected an error; manual intervention required
Parameter Description
/d Data source name: name of data source that will be used to connect todatabase
/u Database username: name of user that will log on to selected database
/p Database password: password of user logging on to selected database
/f ‘From’ key index (-1 through 255): key index user will be coming from
/t ‘To’ key index (0 through 255): key index user will be going to
/e End time 24 hr clock [HH:MM]: military time denoting time to endprocessing
/s Silent error message: Indicates that message box error should not bedisplayed.
This is an optional parameter.
Using the non-database utilities
429
Keyindex.2: Process successfully re-encrypted data; table data remains to be encrypted
Keyindex.err: Error file used to capture error messages for the purpose of diagnosing anypotential problems that may have occurred during the execution of the keyindex utility such asinvalid command line parameters supplied to program.
The keyindex utility retrieves, decrypts, encrypts and updates data in blocks of approximately 100rows at a time. When the data is updated back to the database, the re-encrypted data is automaticallycommitted to the database. It is highly recommended to backup the database prior to executing the keyindex utility. Even though processing in small batches can reduce the likelihood the chances of losingdata, it does not reduce the risk of database corruption. Processing in smaller batches mitigates the riskof losing large amounts of data should data corruption, such as a power surge, occur.
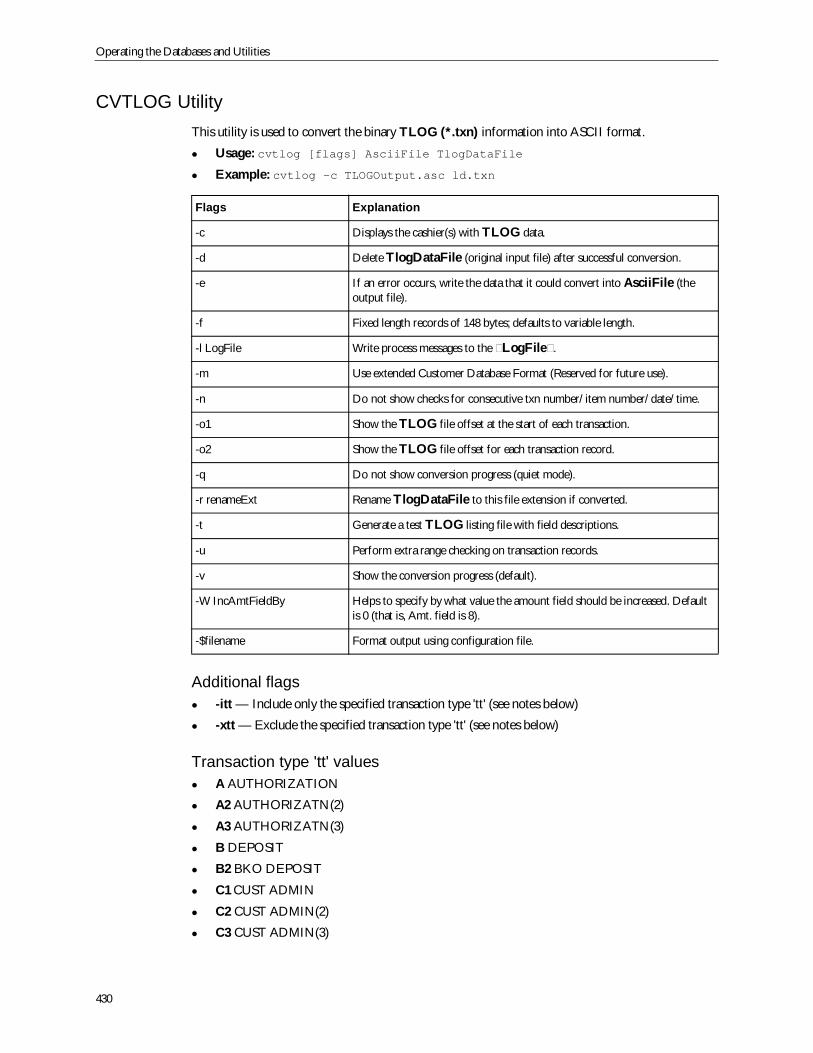
Operating the Databases and Utilities
430
CVTLOG UtilityThis utility is used to convert the binary TLOG (*.txn) information into ASCII format.
Usage: cvtlog [flags] AsciiFile TlogDataFile
Example: cvtlog -c TLOGOutput.asc ld.txn
Additional flags-itt — Include only the specified transaction type 'tt' (see notes below)
-xtt — Exclude the specified transaction type 'tt' (see notes below)
Transaction type 'tt' valuesA AUTHORIZATION
A2 AUTHORIZATN(2)
A3 AUTHORIZATN(3)
B DEPOSIT
B2 BKO DEPOSIT
C1 CUST ADMIN
C2 CUST ADMIN(2)
C3 CUST ADMIN(3)
Flags Explanation
-c Displays the cashier(s) with TLOG data.
-d Delete TlogDataFile (original input file) after successful conversion.
-e If an error occurs, write the data that it could convert into AsciiFile (theoutput file).
-f Fixed length records of 148 bytes; defaults to variable length.
-l LogFile Write process messages to the LogFile .
-m Use extended Customer Database Format (Reserved for future use).
-n Do not show checks for consecutive txn number/item number/date/time.
-o1 Show the TLOG file offset at the start of each transaction.
-o2 Show the TLOG file offset for each transaction record.
-q Do not show conversion progress (quiet mode).
-r renameExt Rename TlogDataFile to this file extension if converted.
-t Generate a test TLOG listing file with field descriptions.
-u Perform extra range checking on transaction records.
-v Show the conversion progress (default).
-W IncAmtFieldBy Helps to specify by what value the amount field should be increased. Defaultis 0 (that is, Amt. field is 8).
-$filename Format output using configuration file.
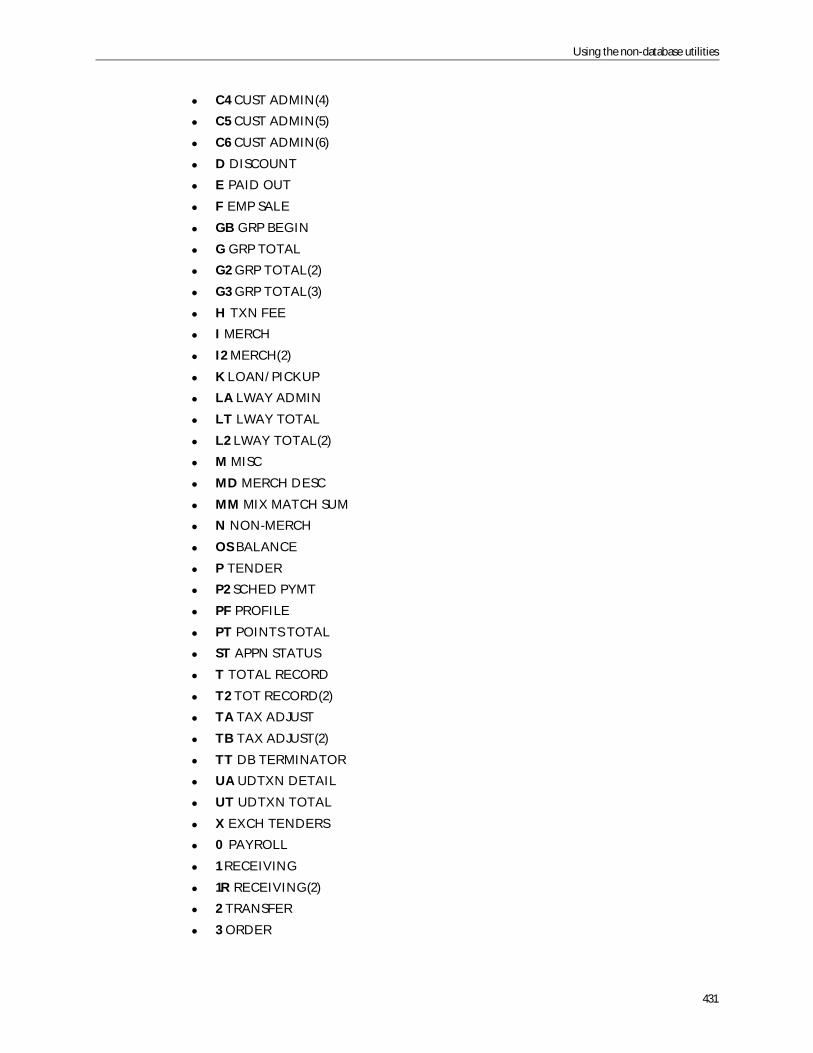
Using the non-database utilities
431
C4 CUST ADMIN(4)
C5 CUST ADMIN(5)
C6 CUST ADMIN(6)
D DISCOUNT
E PAID OUT
F EMP SALE
GB GRP BEGIN
G GRP TOTAL
G2 GRP TOTAL(2)
G3 GRP TOTAL(3)
H TXN FEE
I MERCH
I2 MERCH(2)
K LOAN/PICKUP
LA LWAY ADMIN
LT LWAY TOTAL
L2 LWAY TOTAL(2)
M MISC
MD MERCH DESC
MM MIX MATCH SUM
N NON-MERCH
OS BALANCE
P TENDER
P2 SCHED PYMT
PF PROFILE
PT POINTS TOTAL
ST APPN STATUS
T TOTAL RECORD
T2 TOT RECORD(2)
TA TAX ADJUST
TB TAX ADJUST(2)
TT DB TERMINATOR
UA UDTXN DETAIL
UT UDTXN TOTAL
X EXCH TENDERS
0 PAYROLL
1 RECEIVING
1R RECEIVING(2)
2 TRANSFER
3 ORDER
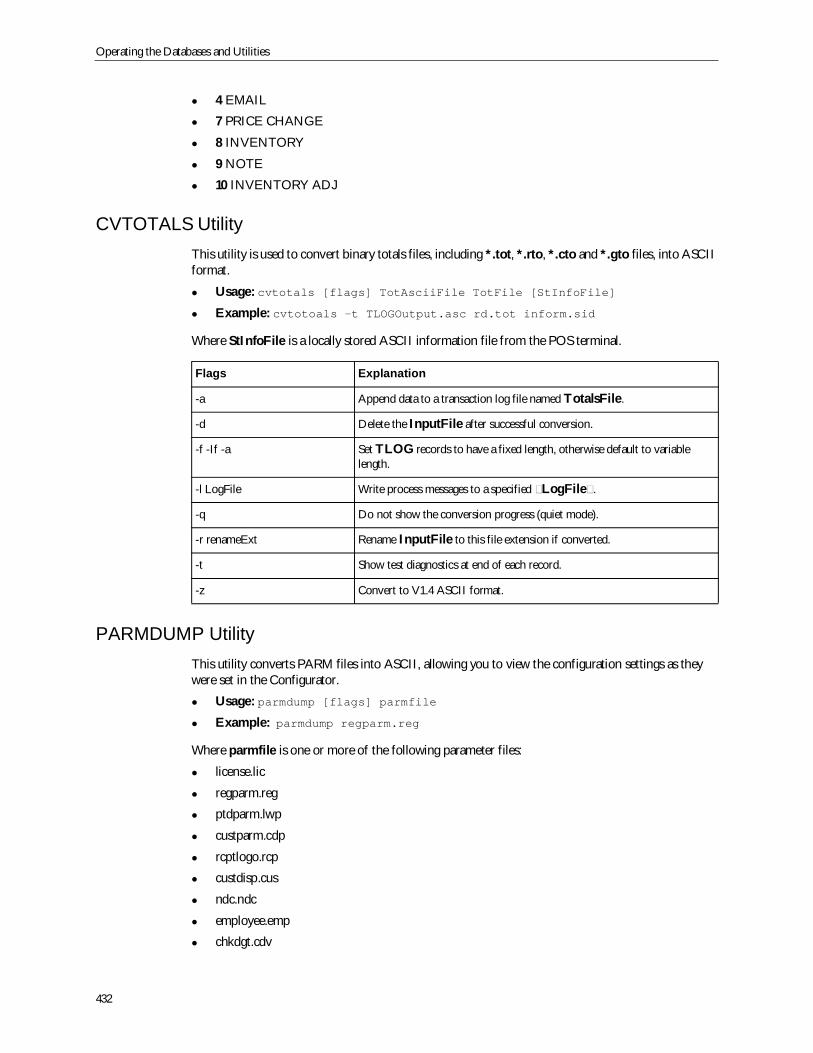
Operating the Databases and Utilities
432
4 EMAIL
7 PRICE CHANGE
8 INVENTORY
9 NOTE
10 INVENTORY ADJ
CVTOTALS UtilityThis utility is used to convert binary totals files, including *.tot, *.rto, *.cto and *.gto files, into ASCIIformat.
Usage: cvtotals [flags] TotAsciiFile TotFile [StInfoFile]
Example: cvtotoals -t TLOGOutput.asc rd.tot inform.sid
Where StInfoFile is a locally stored ASCII information file from the POS terminal.
PARMDUMP UtilityThis utility converts PARM files into ASCII, allowing you to view the configuration settings as theywere set in the Configurator.
Usage: parmdump [flags] parmfile
Example: parmdump regparm.reg
Where parmfile is one or more of the following parameter files:
license.lic
regparm.reg
ptdparm.lwp
custparm.cdp
rcptlogo.rcp
custdisp.cus
ndc.ndc
employee.emp
chkdgt.cdv
Flags Explanation
-a Append data to a transaction log file named TotalsFile.
-d Delete the InputFile after successful conversion.
-f -If -a Set TLOG records to have a fixed length, otherwise default to variablelength.
-l LogFile Write process messages to a specified LogFile .
-q Do not show the conversion progress (quiet mode).
-r renameExt Rename InputFile to this file extension if converted.
-t Show test diagnostics at end of each record.
-z Convert to V1.4 ASCII format.
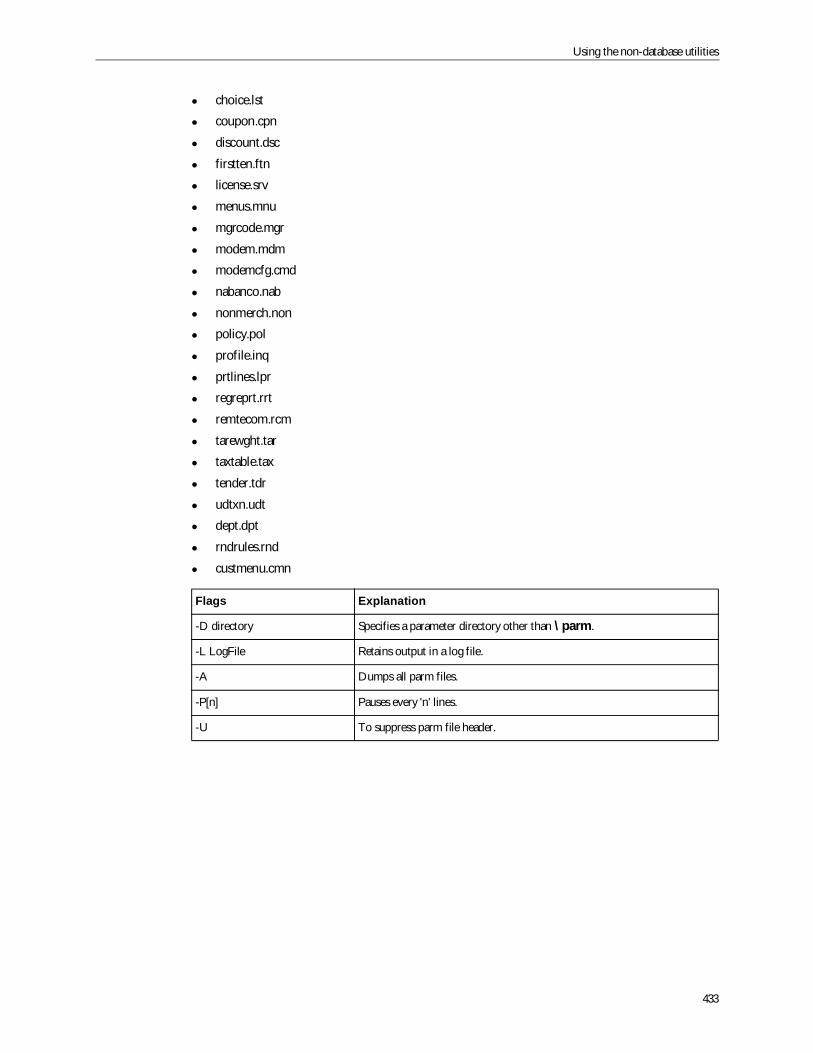
Using the non-database utilities
433
choice.lst
coupon.cpn
discount.dsc
firstten.ftn
license.srv
menus.mnu
mgrcode.mgr
modem.mdm
modemcfg.cmd
nabanco.nab
nonmerch.non
policy.pol
profile.inq
prtlines.lpr
regreprt.rrt
remtecom.rcm
tarewght.tar
taxtable.tax
tender.tdr
udtxn.udt
dept.dpt
rndrules.rnd
custmenu.cmn
Flags Explanation
-D directory Specifies a parameter directory other than \parm.
-L LogFile Retains output in a log file.
-A Dumps all parm files.
-P[n] Pauses every 'n' lines.
-U To suppress parm file header.
Operating the Databases and Utilities
434
Database encryption utilityThis section describes the database encryption utility developed to ensure that PCI-compliancerequirements regarding the safeguarding of personal customer information are met. KEYINDEX.EXE isthe command line utility developed to handle both single and multiple encryption key CISP modules.KEYINDEX.EXE can be run multiple times in order to re-encrypt data using different keys.
KEYINDEX.EXE accepts the following parameters:
/d data source name: Name of data source that will be used to connect to database
/u database username: Name of user that will log on to selected database
/p database password: Password of user logging on to selected database
/e end time 24 hr clock [HH:MM]: Military time denoting time to end processing
/s silent error message: Optional parameter which specifies that message box error should not bedisplayed.
/f ‘from’ key index (-1 though 255): key index user will be coming ‘from’
/t ‘to’ key index (-1 through 255): key index user will be going ‘to’
The purpose of this utility is to re-encrypt data in the database. KEYINDEX.EXE uses the supplied‘From’ key index value to decrypt data as it is retrieved from the database, and the supplied ‘To’ keyindex value to encrypt data as it is updated back to the database. The range of acceptable index valuesare (-1) for un-encrypted data, (0) for key index 1, and up to (255) for key index 254. You should notethat there is a restriction in place which does not allow the utility to decrypt data that has already beenencrypted by the utility.
Once the encryption process is successfully completed, there is no further need to run the databaseencryption utility again. Any data added to the database after the PCI compliancy module is activatedwill be encrypted by default.
Note: This utility must be run regardless of whether or not Transactionware GM product suite isinitially installed with the PCI compliancy module activated. The utility will define database encryptionobjects not present in a default BACKOFF.DB database.
Because KEYINDEX.EXE is designed to be executed in the most efficient manner possible, it does nothave a GUI. Since the encryption process is extremely CPU intensive, it can be a burden on your systemto process additional applications while the encryption utility is running. Ideally, this utility should berun while no other applications are being used. For example it might ideally be launched as part of anightly batch process after the store is closed and the employees have gone home.
Status files
KEYINDEX.EXE creates output ASCII text files which capture the status of the current encryptionprocess as well as any processing errors. The output files are created in the directory where theencryption utility is located. They are defined as follows:
Note: KEYINDEX.? status files allow batch files to be written so appropriate action can be taken whenthe re-encryption process is finished.
KEYINDEX.OUT: Status file which provides the current progress of the re-encrypt process. This filecontains a header line which shows the start and end time stamps, database, and key index (from/to).Each table processed in a session is represented in this file. Currently, for the BACKOFF.DB database
Using the non-database utilities
435
there are only two tables: PA_CUSTOMER and TXN_POS_TRANSACTIONS. For each table, the numberof rows remaining to be re-encrypted, the number of rows encrypted, and the starting and endingtimes when the table was processed are shown. The end time can be either the time of shutdown or thetime when all encrypted data in the table has been re-encrypted.
KEYINDEX.0: Successfully finished re-encrypting all data in the database.
KEYINDEX.1: Detected an error. Manual intervention is required.
KEYINDEX.2: Successfully re-encrypting data, table data remains to be encrypted.
KEYINDEX.ERR: Error file used to capture error messages for the purpose of diagnosing any potentialproblems that may have occurred while the key index utility was running. For example, when an invalidcommand line parameter was provided.
The database encryption utilities retrieve, decrypt, encrypt and update data in blocks of approximately100 rows at a time. When the data is updated back to the database, the newly encrypted data isautomatically committed to the database. It is highly recommended that the database is backed up priorto executing the encryption utility. Although processing in small batches reduces the chances of losinga night’s worth of data re-encryption due to a power outage, it does not reduce the potential risk ofdatabase corruption which also renders database content unusable.
Troubleshooting end of day data problemsThis section describes some common difficulties encountered during the EOD process, andinstructions for correcting the difficulties.
Rebuilding the TLOG and journal
One of the key causes for End of Day difficulties is a corrupt TLOG or Journal on the server. To testfor corruption you would use the utility CVTLog. Once you discover the corrupted TLOG, you mustrebuild it in the following manner.
1. Click Stop Server on Xpress Server.
2. Using Windows Explorer, navigate to the \XPS\sdata directory.
3. Locate the current day’s .txn (TLOG) and .jrn files for the troubled terminal(s).
4. Copy and rename each of the files located in step 2. You may leave them in the same directory(\sdata) as long as they are renamed.
5. Delete the original files that were located in step 2.
6. Restart the Xpress Server by clicking Start Server.
Rebuilding the \sdata directory
Another possible cause of end of day problems is a corruption of files in the \XPS\sdata directory onthe server. Your power may have failed in the middle of the day causing the files to be of a differentsize or time than the source files from the register(s). If all else fails, an attempt may be made to restorethe situation by rebuilding the entire \sdata directory.
1. Click Stop Server on Xpress Server.
2. Using Windows Explorer, navigate to the \XPS\sdata directory and copy the state.srv file into atemporary folder somewhere outside of the \sdata directory.
3. Delete all contents of the \sdata directory.
4. Paste the state.srv file back into the \sdata directory.
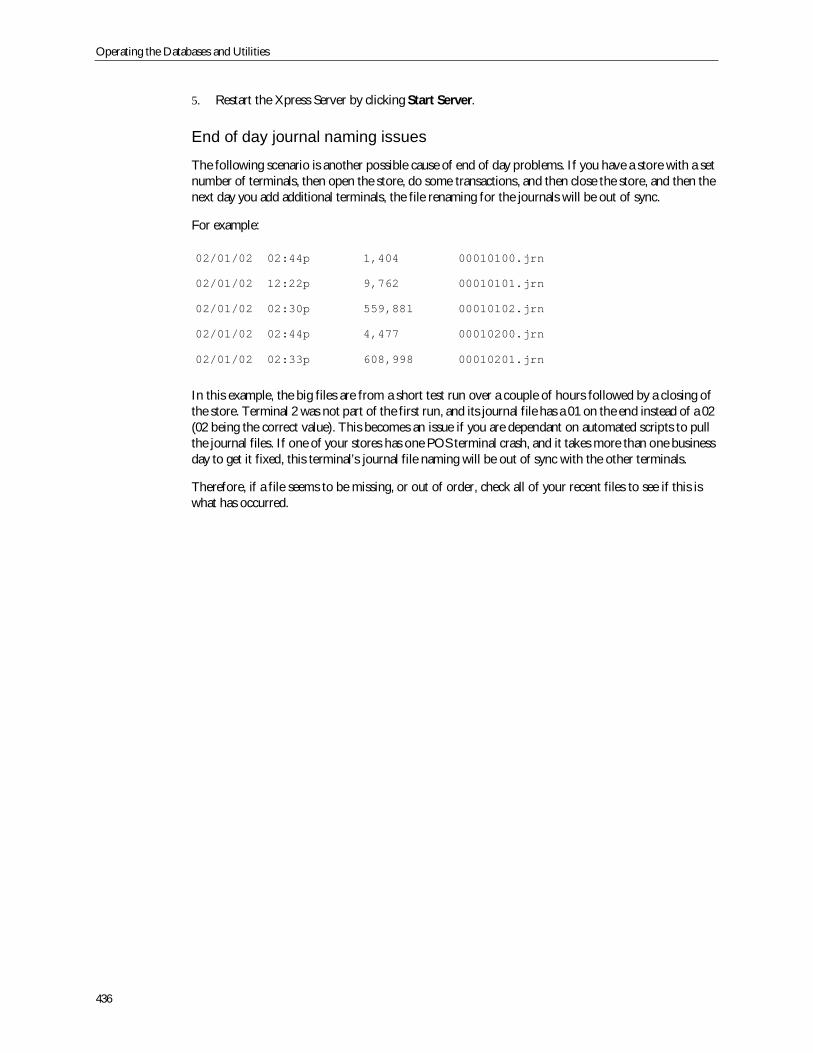
Operating the Databases and Utilities
436
5. Restart the Xpress Server by clicking Start Server.
End of day journal naming issues
The following scenario is another possible cause of end of day problems. If you have a store with a setnumber of terminals, then open the store, do some transactions, and then close the store, and then thenext day you add additional terminals, the file renaming for the journals will be out of sync.
For example:
In this example, the big files are from a short test run over a couple of hours followed by a closing ofthe store. Terminal 2 was not part of the first run, and its journal file has a 01 on the end instead of a 02(02 being the correct value). This becomes an issue if you are dependant on automated scripts to pullthe journal files. If one of your stores has one POS terminal crash, and it takes more than one businessday to get it fixed, this terminal’s journal file naming will be out of sync with the other terminals.
Therefore, if a file seems to be missing, or out of order, check all of your recent files to see if this iswhat has occurred.
02/01/02 02:44p 1,404 00010100.jrn
02/01/02 12:22p 9,762 00010101.jrn
02/01/02 02:30p 559,881 00010102.jrn
02/01/02 02:44p 4,477 00010200.jrn
02/01/02 02:33p 608,998 00010201.jrn
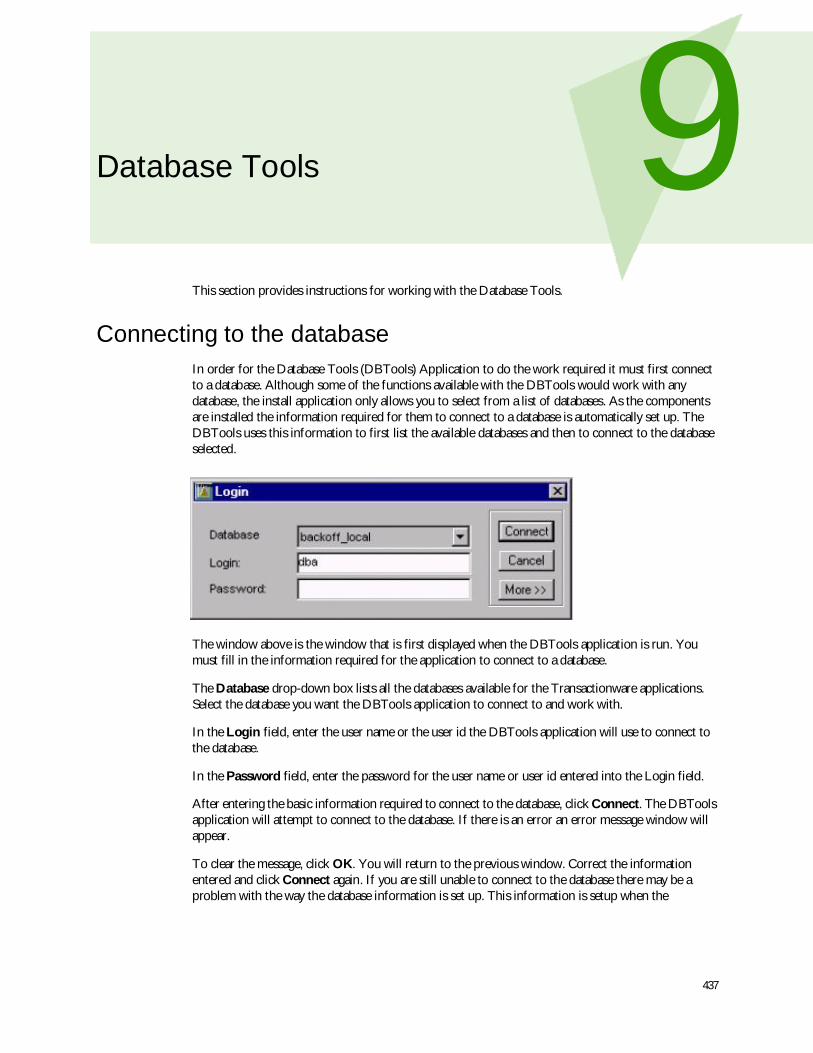
437
9Database Tools
This section provides instructions for working with the Database Tools.
Connecting to the databaseIn order for the Database Tools (DBTools) Application to do the work required it must first connectto a database. Although some of the functions available with the DBTools would work with anydatabase, the install application only allows you to select from a list of databases. As the componentsare installed the information required for them to connect to a database is automatically set up. TheDBTools uses this information to first list the available databases and then to connect to the databaseselected.
The window above is the window that is first displayed when the DBTools application is run. Youmust fill in the information required for the application to connect to a database.
The Database drop-down box lists all the databases available for the Transactionware applications.Select the database you want the DBTools application to connect to and work with.
In the Login field, enter the user name or the user id the DBTools application will use to connect tothe database.
In the Password field, enter the password for the user name or user id entered into the Login field.
After entering the basic information required to connect to the database, click Connect. The DBToolsapplication will attempt to connect to the database. If there is an error an error message window willappear.
To clear the message, click OK. You will return to the previous window. Correct the informationentered and click Connect again. If you are still unable to connect to the database there may be aproblem with the way the database information is set up. This information is setup when the
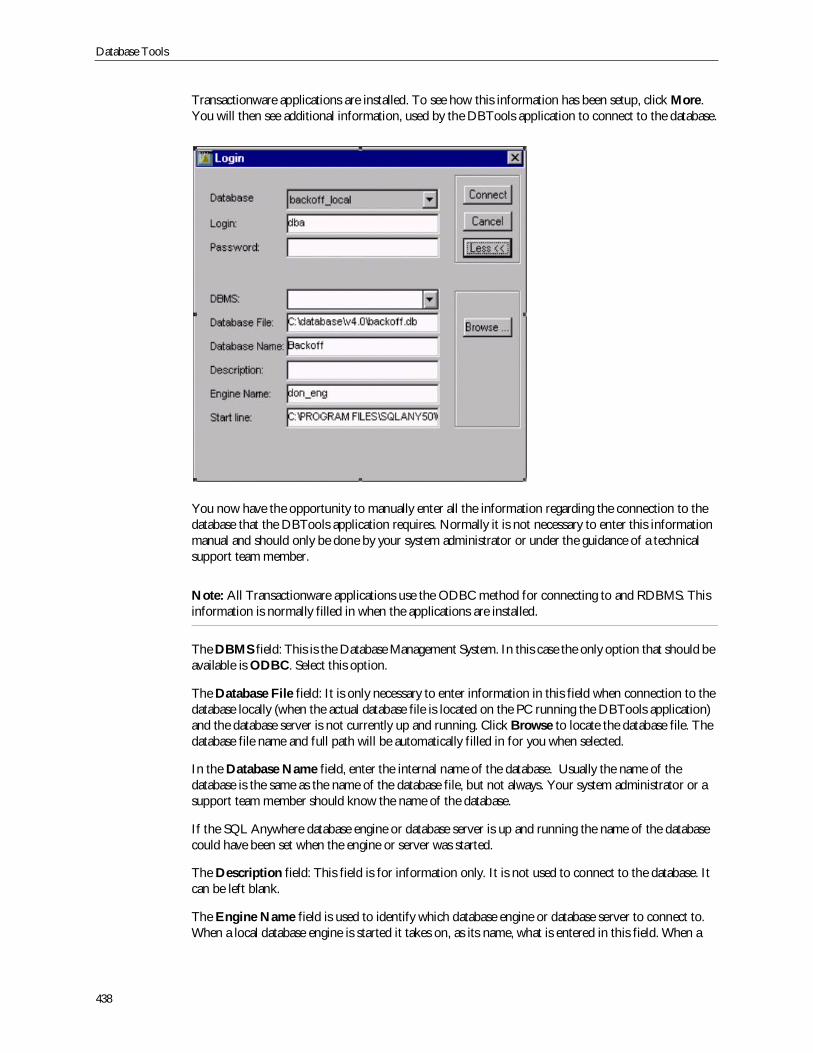
Database Tools
438
Transactionware applications are installed. To see how this information has been setup, click More.You will then see additional information, used by the DBTools application to connect to the database.
You now have the opportunity to manually enter all the information regarding the connection to thedatabase that the DBTools application requires. Normally it is not necessary to enter this informationmanual and should only be done by your system administrator or under the guidance of a technicalsupport team member.
Note: All Transactionware applications use the ODBC method for connecting to and RDBMS. Thisinformation is normally filled in when the applications are installed.
The DBMS field: This is the Database Management System. In this case the only option that should beavailable is ODBC. Select this option.
The Database File field: It is only necessary to enter information in this field when connection to thedatabase locally (when the actual database file is located on the PC running the DBTools application)and the database server is not currently up and running. Click Browse to locate the database file. Thedatabase file name and full path will be automatically filled in for you when selected.
In the Database Name field, enter the internal name of the database. Usually the name of thedatabase is the same as the name of the database file, but not always. Your system administrator or asupport team member should know the name of the database.
If the SQL Anywhere database engine or database server is up and running the name of the databasecould have been set when the engine or server was started.
The Description field: This field is for information only. It is not used to connect to the database. Itcan be left blank.
The Engine Name field is used to identify which database engine or database server to connect to.When a local database engine is started it takes on, as its name, what is entered in this field. When a
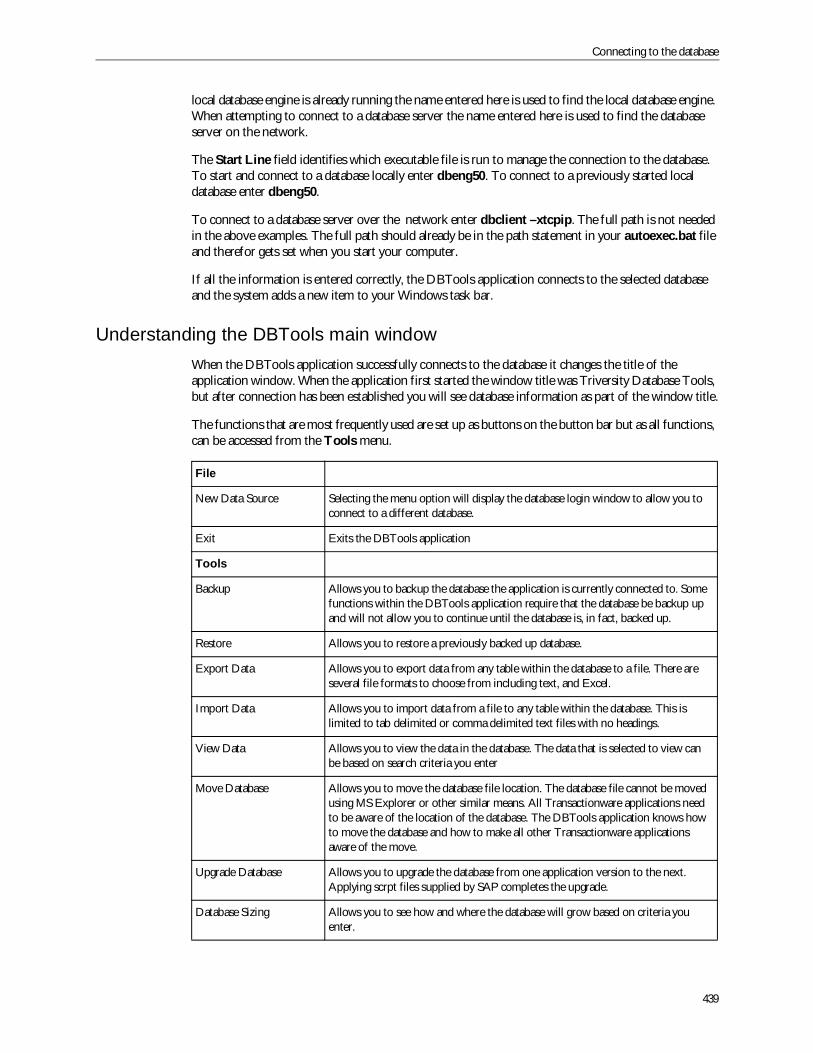
Connecting to the database
439
local database engine is already running the name entered here is used to find the local database engine.When attempting to connect to a database server the name entered here is used to find the databaseserver on the network.
The Start Line field identifies which executable file is run to manage the connection to the database.To start and connect to a database locally enter dbeng50. To connect to a previously started localdatabase enter dbeng50.
To connect to a database server over the network enter dbclient –xtcpip. The full path is not neededin the above examples. The full path should already be in the path statement in your autoexec.bat fileand therefor gets set when you start your computer.
If all the information is entered correctly, the DBTools application connects to the selected databaseand the system adds a new item to your Windows task bar.
Understanding the DBTools main windowWhen the DBTools application successfully connects to the database it changes the title of theapplication window. When the application first started the window title was Triversity Database Tools,but after connection has been established you will see database information as part of the window title.
The functions that are most frequently used are set up as buttons on the button bar but as all functions,can be accessed from the Tools menu.
File
New Data Source Selecting the menu option will display the database login window to allow you toconnect to a different database.
Exit Exits the DBTools application
Tools
Backup Allows you to backup the database the application is currently connected to. Somefunctions within the DBTools application require that the database be backup upand will not allow you to continue until the database is, in fact, backed up.
Restore Allows you to restore a previously backed up database.
Export Data Allows you to export data from any table within the database to a file. There areseveral file formats to choose from including text, and Excel.
Import Data Allows you to import data from a file to any table within the database. This islimited to tab delimited or comma delimited text files with no headings.
View Data Allows you to view the data in the database. The data that is selected to view canbe based on search criteria you enter
Move Database Allows you to move the database file location. The database file cannot be movedusing MS Explorer or other similar means. All Transactionware applications needto be aware of the location of the database. The DBTools application knows howto move the database and how to make all other Transactionware applicationsaware of the move.
Upgrade Database Allows you to upgrade the database from one application version to the next.Applying scrpt files supplied by SAP completes the upgrade.
Database Sizing Allows you to see how and where the database will grow based on criteria youenter.
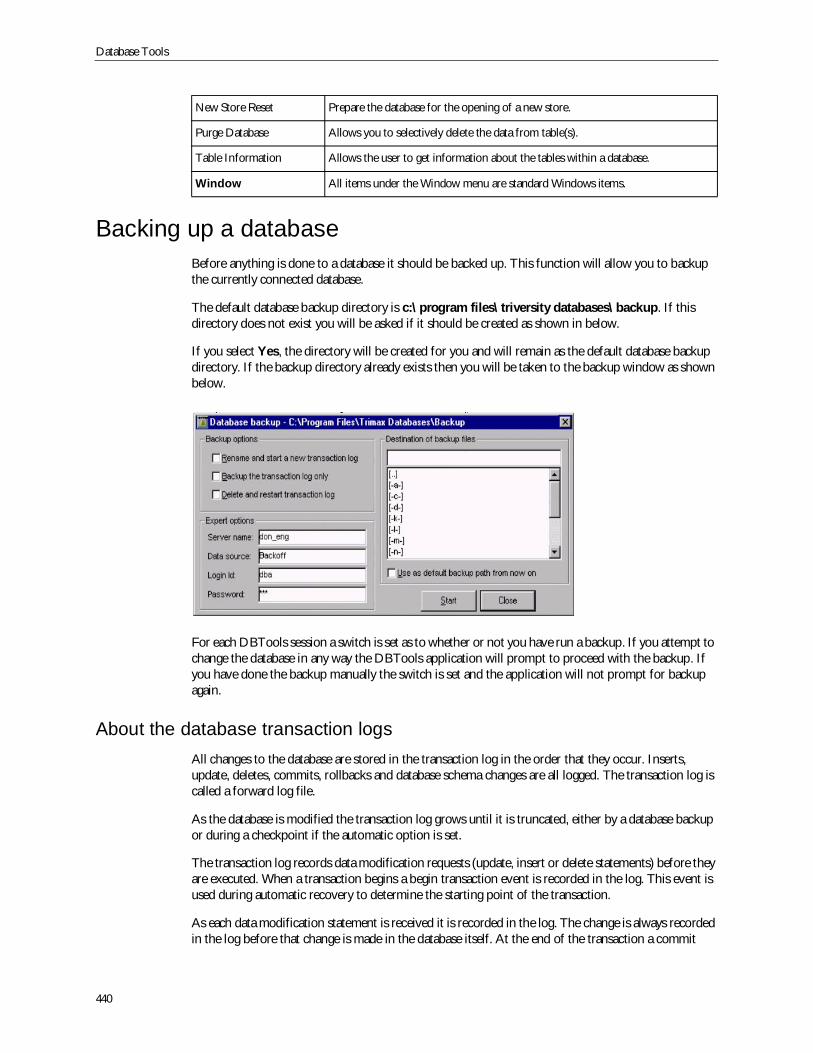
Database Tools
440
Backing up a databaseBefore anything is done to a database it should be backed up. This function will allow you to backupthe currently connected database.
The default database backup directory is c:\program files\triversity databases\backup. If thisdirectory does not exist you will be asked if it should be created as shown in below.
If you select Yes, the directory will be created for you and will remain as the default database backupdirectory. If the backup directory already exists then you will be taken to the backup window as shownbelow.
For each DBTools session a switch is set as to whether or not you have run a backup. If you attempt tochange the database in any way the DBTools application will prompt to proceed with the backup. Ifyou have done the backup manually the switch is set and the application will not prompt for backupagain.
About the database transaction logsAll changes to the database are stored in the transaction log in the order that they occur. Inserts,update, deletes, commits, rollbacks and database schema changes are all logged. The transaction log iscalled a forward log file.
As the database is modified the transaction log grows until it is truncated, either by a database backupor during a checkpoint if the automatic option is set.
The transaction log records data modification requests (update, insert or delete statements) before theyare executed. When a transaction begins a begin transaction event is recorded in the log. This event isused during automatic recovery to determine the starting point of the transaction.
As each data modification statement is received it is recorded in the log. The change is always recordedin the log before that change is made in the database itself. At the end of the transaction a commit
New Store Reset Prepare the database for the opening of a new store.
Purge Database Allows you to selectively delete the data from table(s).
Table Information Allows the user to get information about the tables within a database.
Window All items under the Window menu are standard Windows items.
Exporting data
441
transaction record is logged. This delineates the transaction and also allows automatic recovery toquery this log record and find out if the transaction completed successfully.
When a backup of the database is done the transaction log can be affected in different ways. Whenrequesting a database backup using the DBTools application you have 3 choices as to what will happenthe database log. The three choices are as follows:
Rename and Start a New Transaction Log: This option forces a checkpoint and the followingto occur:
A copy is made of the current working transaction log file and saved to the directory specifiedin the command line.
The current transaction log remains in its current directory but is renamed using the formatYYMMDDxx.log where xx is a number from 00 to 99 and YYMMDD represents the currentyear, month and day. This file is then no longer the current transaction log.
A new transaction log file is generated that contains no transactions. It is given the name ofthe file previously considered the current transaction log and is used by the database engine asthe current transaction log.
Delete and Restart the Transaction Log: With this option the existing transaction log is backupup then the original is deleted and a new transaction log is started with the same name. This optioncauses the backup to wait for a point when all transactions from all connections are committed.
Backup the Transaction Log Only: This can be used as an incremental backup since thetransaction log can be applied to the most recently backed up copy of the database files.
Specifying the destination of backup filesThis is a list of the available drives and directories. To changes the current drive/directory use themouse pointer to double click over the drive/directory desired. The title of the window changes aseach drive/directory is selected to indicate the current drive/directory. The list box will change toreflect the available selections for the current drive/directory. To move back up the directory treeselect the parent directory ‘[..]’.
Check the box Use as default backup path from now on if you want to use the currently selecteddrive/directory as the default location for all subsequent database backups.
Note: If at all possible the backup location should be on another drive. Either a second physical driveon the same machine running the database engine or a mapped network drive. It is not very safe tokeep the backed up files on the same drive as the running database.
About the Expert optionsThese options should not be altered; they are for use by support personnel only.
Click Start to start the backup. A small window will appear indicating that a function is being started todo the actual backup. When this small window disappears the backup is completed.
Exporting dataThis function allows you to export the data from a table to a file. The DBTools application gives youseveral file formats to choose from. If you want to import the data back into another database you
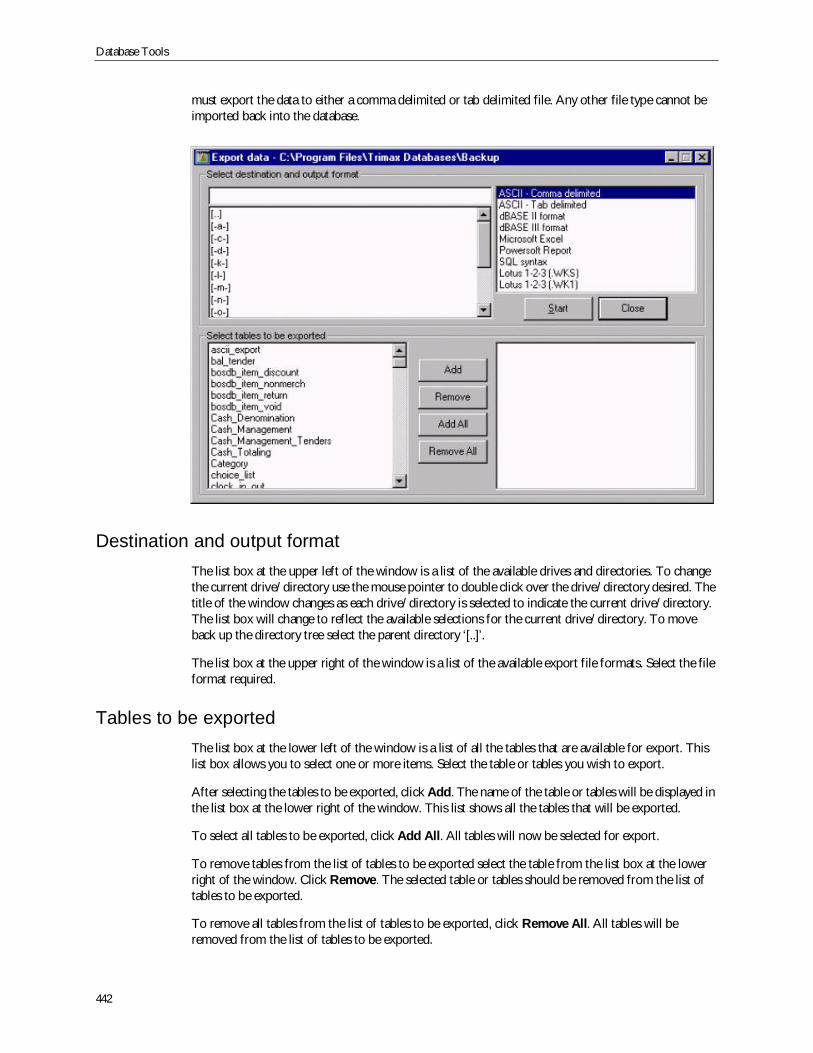
Database Tools
442
must export the data to either a comma delimited or tab delimited file. Any other file type cannot beimported back into the database.
Destination and output formatThe list box at the upper left of the window is a list of the available drives and directories. To changethe current drive/directory use the mouse pointer to double click over the drive/directory desired. Thetitle of the window changes as each drive/directory is selected to indicate the current drive/directory.The list box will change to reflect the available selections for the current drive/directory. To moveback up the directory tree select the parent directory ‘[..]’.
The list box at the upper right of the window is a list of the available export file formats. Select the fileformat required.
Tables to be exportedThe list box at the lower left of the window is a list of all the tables that are available for export. Thislist box allows you to select one or more items. Select the table or tables you wish to export.
After selecting the tables to be exported, click Add. The name of the table or tables will be displayed inthe list box at the lower right of the window. This list shows all the tables that will be exported.
To select all tables to be exported, click Add All. All tables will now be selected for export.
To remove tables from the list of tables to be exported select the table from the list box at the lowerright of the window. Click Remove. The selected table or tables should be removed from the list oftables to be exported.
To remove all tables from the list of tables to be exported, click Remove All. All tables will beremoved from the list of tables to be exported.

Exporting data
443
Once you have selected all the tables to be exported, click Start. Once the export has completed therewill be one file for each of the tables selected for export. The name of the file will correspond to thename of the table. The extension of the file will correspond to the export file format selected.
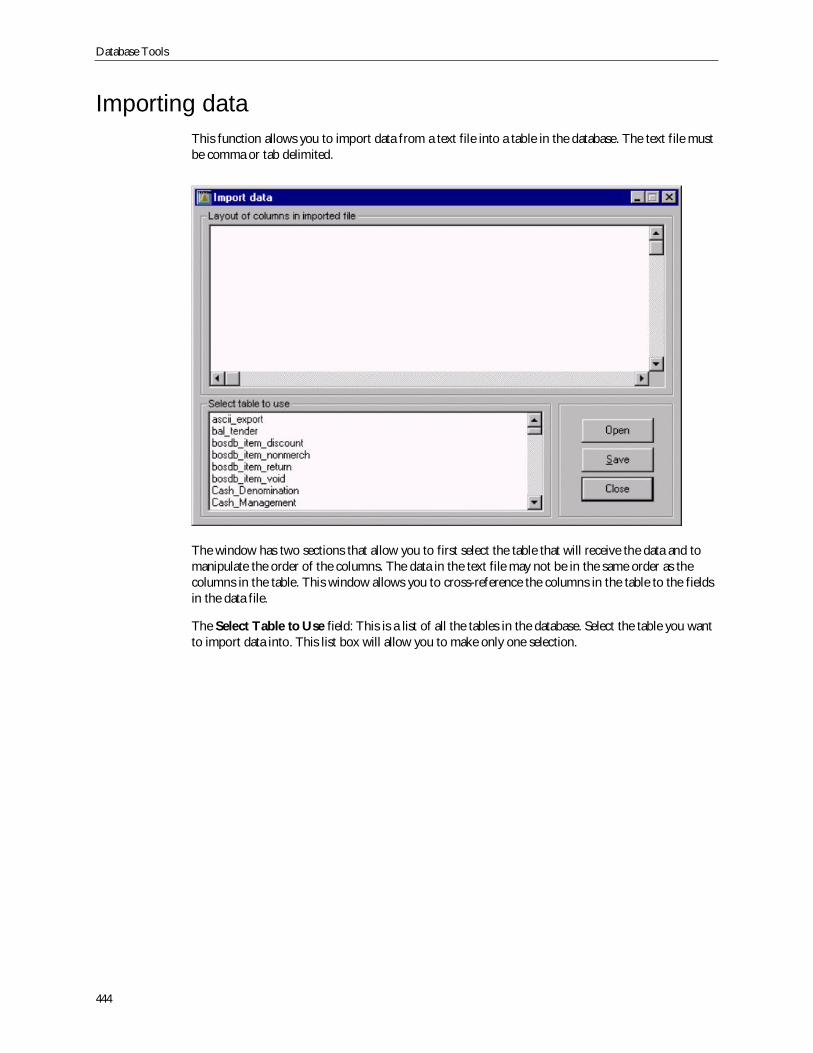
Database Tools
444
Importing dataThis function allows you to import data from a text file into a table in the database. The text file mustbe comma or tab delimited.
The window has two sections that allow you to first select the table that will receive the data and tomanipulate the order of the columns. The data in the text file may not be in the same order as thecolumns in the table. This window allows you to cross-reference the columns in the table to the fieldsin the data file.
The Select Table to Use field: This is a list of all the tables in the database. Select the table you wantto import data into. This list box will allow you to make only one selection.

Importing data
445
Once you have selected the table you want, this section will changes to show all the columns from thetable in the correct order.
The Layout of Columns in Imported File field: If the order of the columns doesn’t match the orderof the data in the text file you can move the columns around to match what is in the text file. Thecolumn order in the example below matches the order of the columns in the actual table.
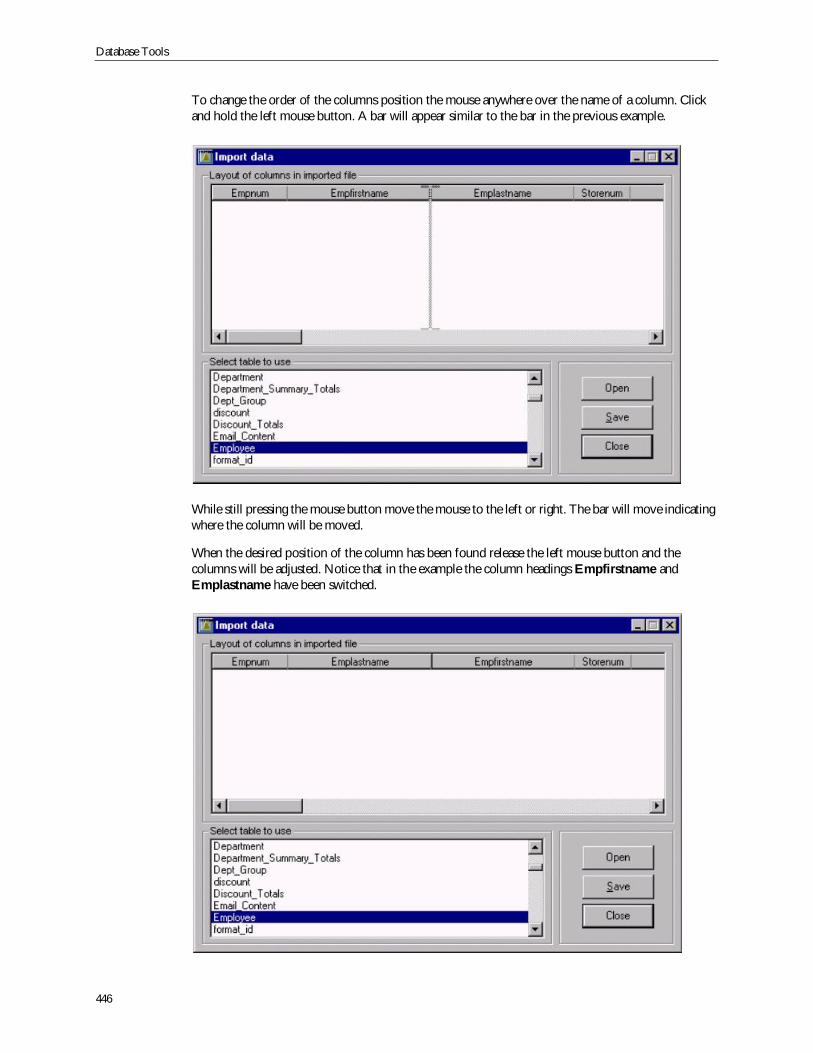
Database Tools
446
To change the order of the columns position the mouse anywhere over the name of a column. Clickand hold the left mouse button. A bar will appear similar to the bar in the previous example.
While still pressing the mouse button move the mouse to the left or right. The bar will move indicatingwhere the column will be moved.
When the desired position of the column has been found release the left mouse button and thecolumns will be adjusted. Notice that in the example the column headings Empfirstname andEmplastname have been switched.
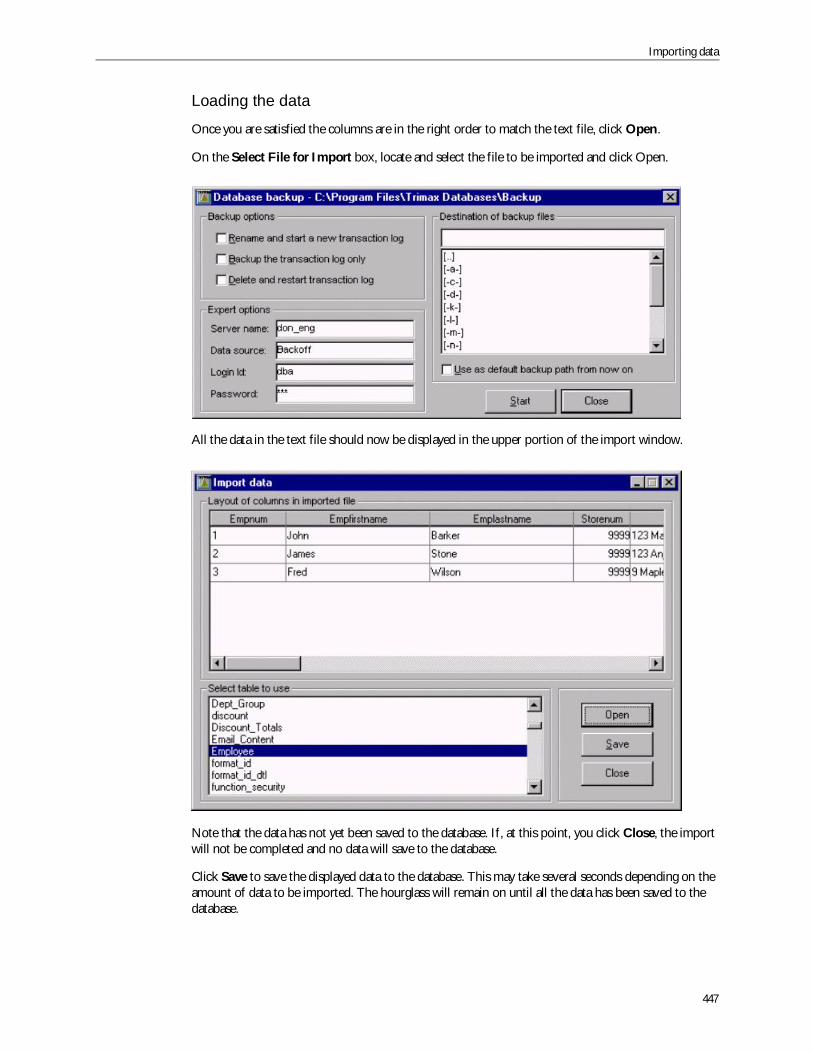
Importing data
447
Loading the data
Once you are satisfied the columns are in the right order to match the text file, click Open.
On the Select File for Import box, locate and select the file to be imported and click Open.
All the data in the text file should now be displayed in the upper portion of the import window.
Note that the data has not yet been saved to the database. If, at this point, you click Close, the importwill not be completed and no data will save to the database.
Click Save to save the displayed data to the database. This may take several seconds depending on theamount of data to be imported. The hourglass will remain on until all the data has been saved to thedatabase.

Database Tools
448
All tables in the database have a primary key that is made up of a combination of columns so that eachprimary key is unique. This is the way the database distinguishes one row of data from another andallows the database engine to quickly locate rows. Because of the primary key restriction duplicate datais not allowed in the primary keys. If you have attempted to import data that is a duplicate of what isalready in the table you will get an error. The import process cannot be completed. You will have tofind the duplicate data in your text file and remove it. Only then can you complete the import.
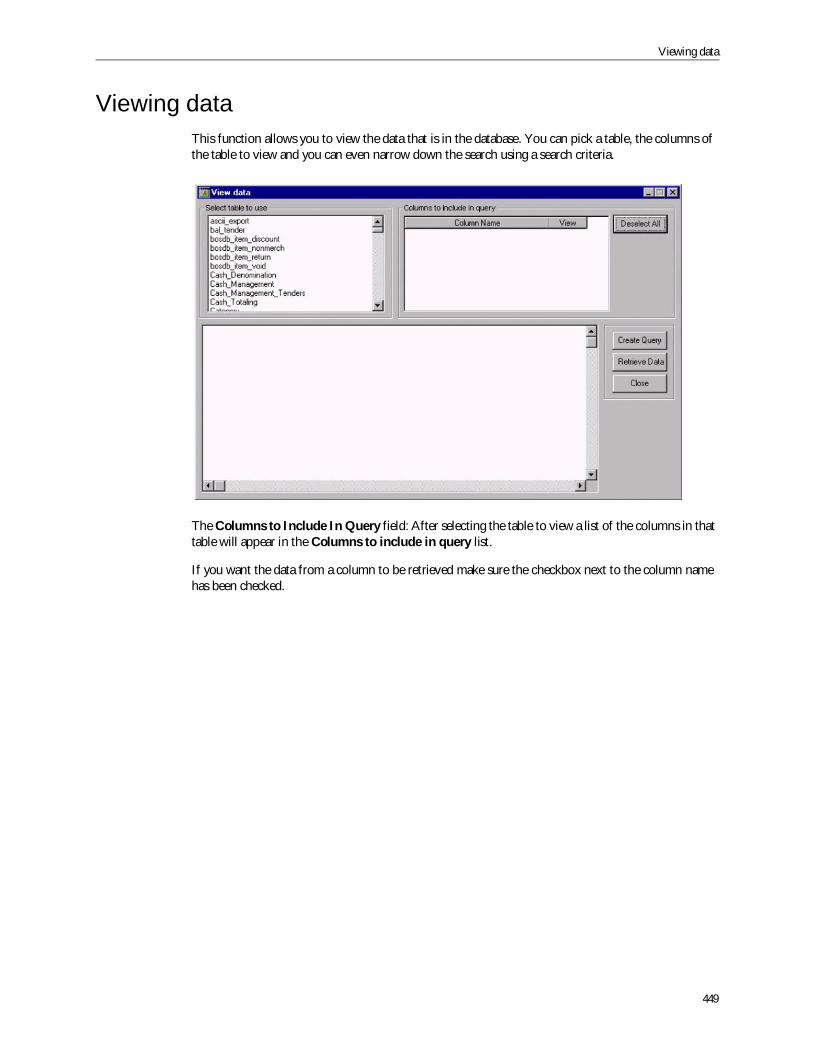
Viewing data
449
Viewing dataThis function allows you to view the data that is in the database. You can pick a table, the columns ofthe table to view and you can even narrow down the search using a search criteria.
The Columns to Include In Query field: After selecting the table to view a list of the columns in thattable will appear in the Columns to include in query list.
If you want the data from a column to be retrieved make sure the checkbox next to the column namehas been checked.
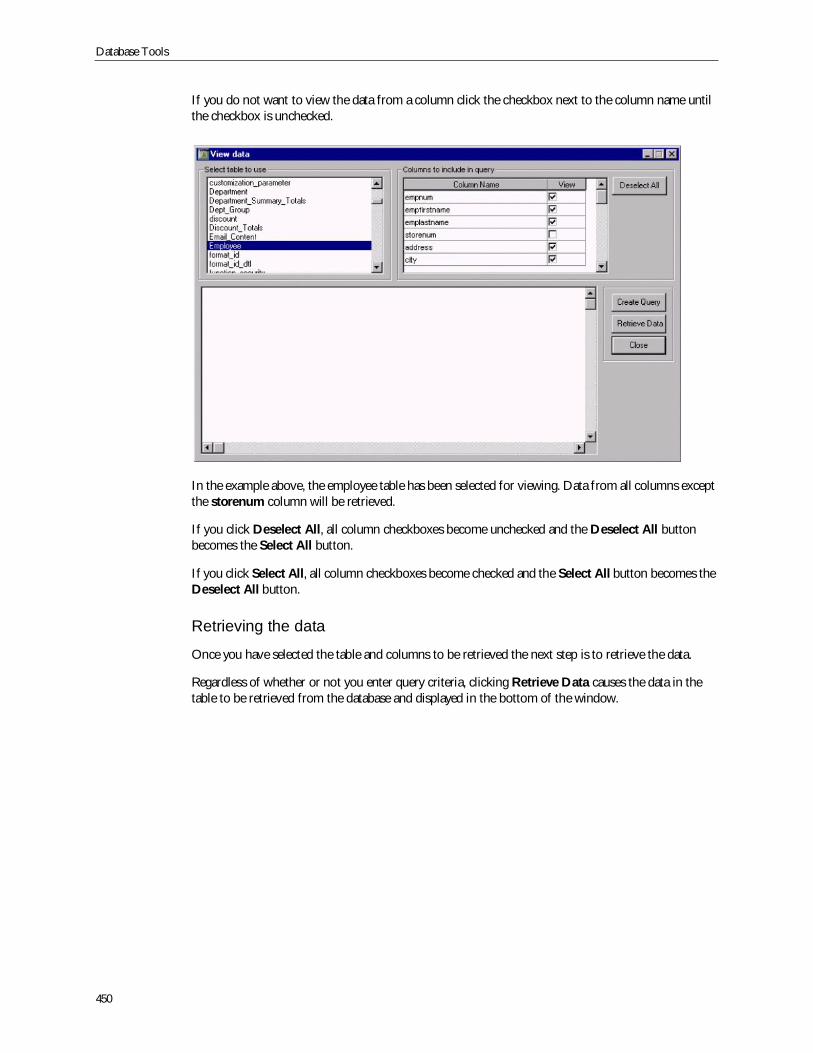
Database Tools
450
If you do not want to view the data from a column click the checkbox next to the column name untilthe checkbox is unchecked.
In the example above, the employee table has been selected for viewing. Data from all columns exceptthe storenum column will be retrieved.
If you click Deselect All, all column checkboxes become unchecked and the Deselect All buttonbecomes the Select All button.
If you click Select All, all column checkboxes become checked and the Select All button becomes theDeselect All button.
Retrieving the data
Once you have selected the table and columns to be retrieved the next step is to retrieve the data.
Regardless of whether or not you enter query criteria, clicking Retrieve Data causes the data in thetable to be retrieved from the database and displayed in the bottom of the window.
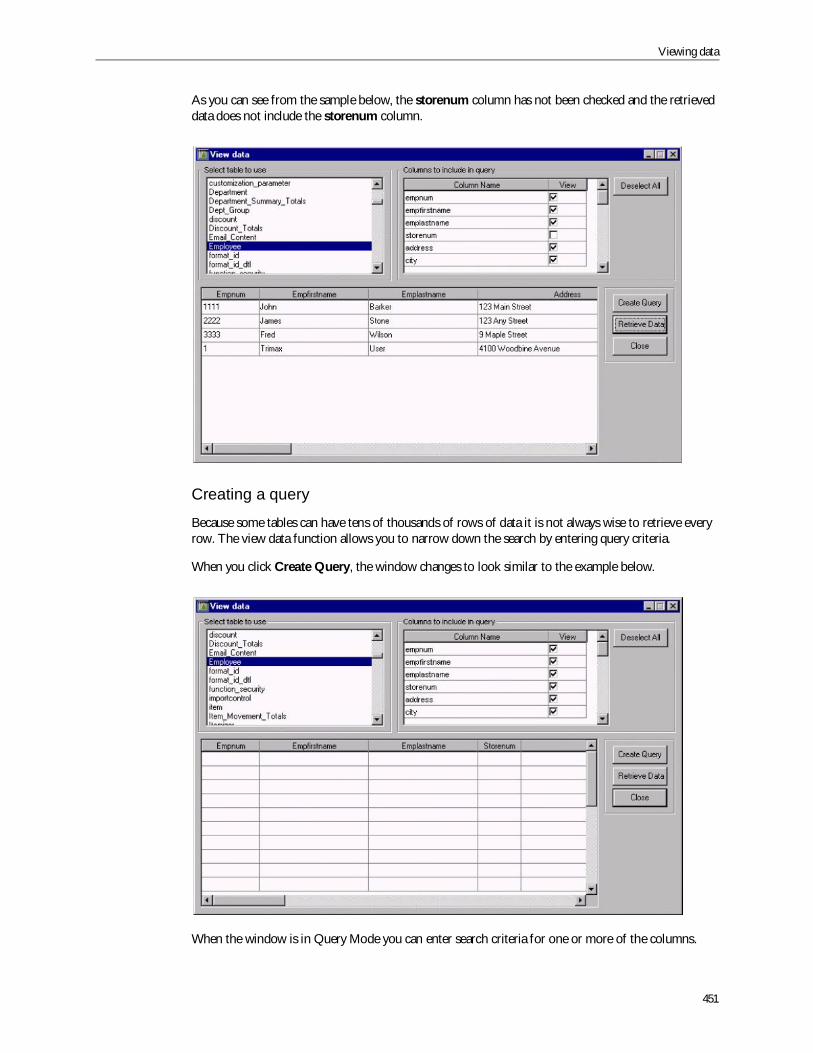
Viewing data
451
As you can see from the sample below, the storenum column has not been checked and the retrieveddata does not include the storenum column.
Creating a query
Because some tables can have tens of thousands of rows of data it is not always wise to retrieve everyrow. The view data function allows you to narrow down the search by entering query criteria.
When you click Create Query, the window changes to look similar to the example below.
When the window is in Query Mode you can enter search criteria for one or more of the columns.
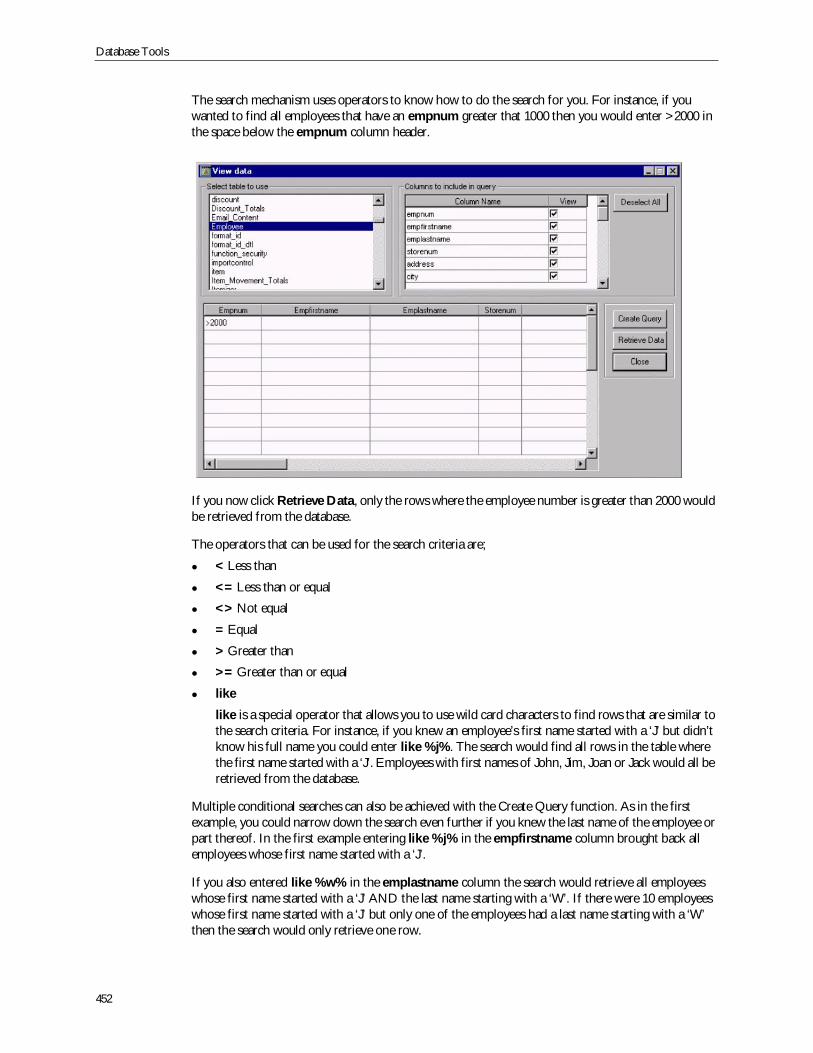
Database Tools
452
The search mechanism uses operators to know how to do the search for you. For instance, if youwanted to find all employees that have an empnum greater that 1000 then you would enter >2000 inthe space below the empnum column header.
If you now click Retrieve Data, only the rows where the employee number is greater than 2000 wouldbe retrieved from the database.
The operators that can be used for the search criteria are;
< Less than
<= Less than or equal
<> Not equal
= Equal
> Greater than
>= Greater than or equal
like
like is a special operator that allows you to use wild card characters to find rows that are similar tothe search criteria. For instance, if you knew an employee’s first name started with a ‘J’ but didn’tknow his full name you could enter like %j%. The search would find all rows in the table wherethe first name started with a ‘J’. Employees with first names of John, Jim, Joan or Jack would all beretrieved from the database.
Multiple conditional searches can also be achieved with the Create Query function. As in the firstexample, you could narrow down the search even further if you knew the last name of the employee orpart thereof. In the first example entering like %j% in the empfirstname column brought back allemployees whose first name started with a ‘J’.
If you also entered like %w% in the emplastname column the search would retrieve all employeeswhose first name started with a ‘J’ AND the last name starting with a ‘W’. If there were 10 employeeswhose first name started with a ‘J’ but only one of the employees had a last name starting with a ‘W’then the search would only retrieve one row.
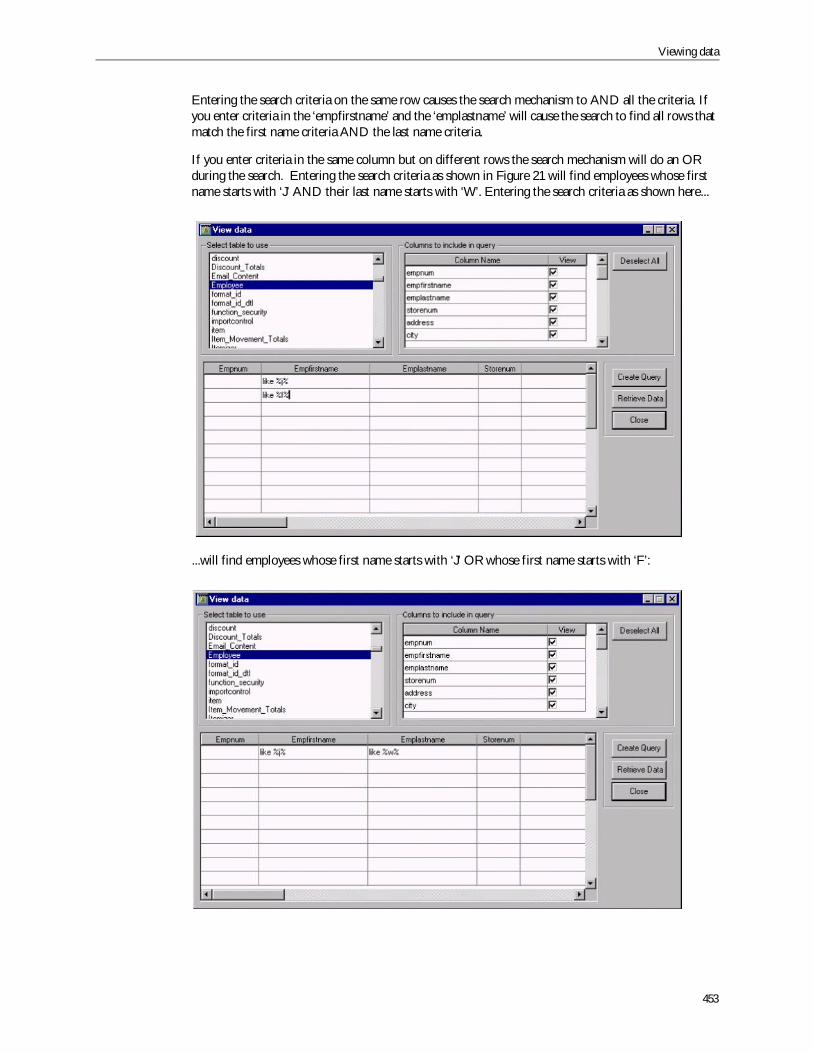
Viewing data
453
Entering the search criteria on the same row causes the search mechanism to AND all the criteria. Ifyou enter criteria in the ‘empfirstname’ and the ‘emplastname’ will cause the search to find all rows thatmatch the first name criteria AND the last name criteria.
If you enter criteria in the same column but on different rows the search mechanism will do an ORduring the search. Entering the search criteria as shown in Figure 21 will find employees whose firstname starts with ‘J’ AND their last name starts with ‘W’. Entering the search criteria as shown here...
...will find employees whose first name starts with ‘J’ OR whose first name starts with ‘F’:
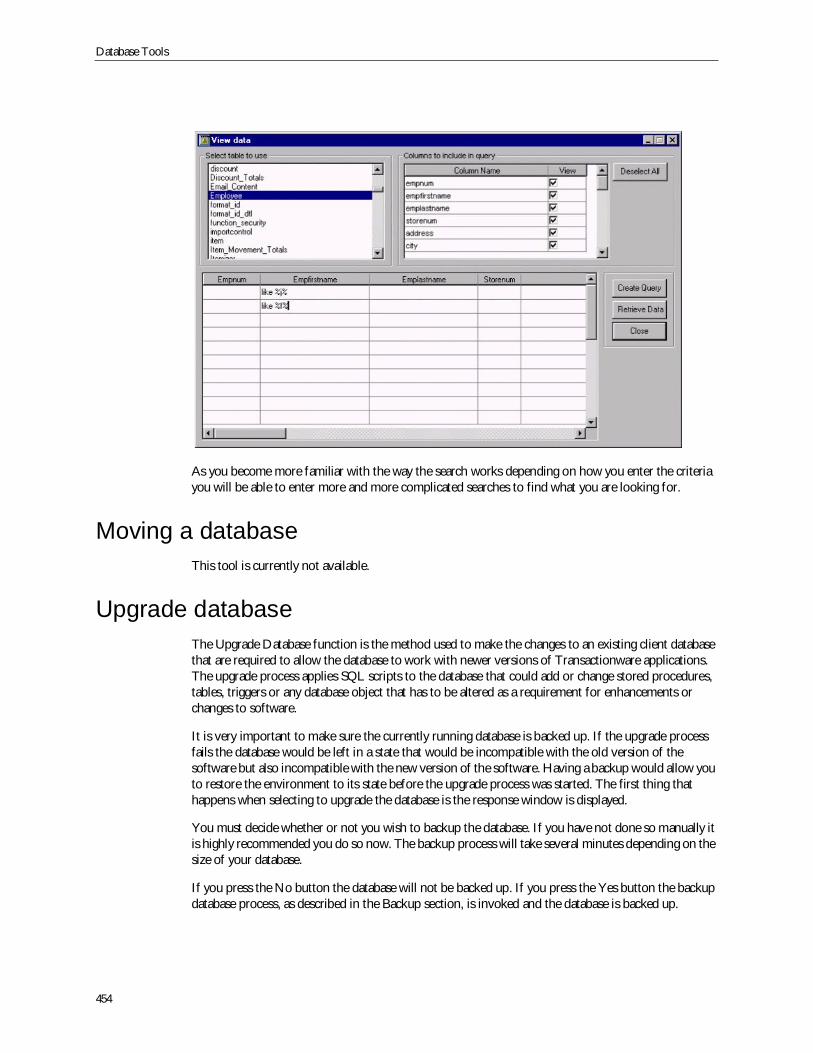
Database Tools
454
As you become more familiar with the way the search works depending on how you enter the criteriayou will be able to enter more and more complicated searches to find what you are looking for.
Moving a databaseThis tool is currently not available.
Upgrade databaseThe Upgrade Database function is the method used to make the changes to an existing client databasethat are required to allow the database to work with newer versions of Transactionware applications.The upgrade process applies SQL scripts to the database that could add or change stored procedures,tables, triggers or any database object that has to be altered as a requirement for enhancements orchanges to software.
It is very important to make sure the currently running database is backed up. If the upgrade processfails the database would be left in a state that would be incompatible with the old version of thesoftware but also incompatible with the new version of the software. Having a backup would allow youto restore the environment to its state before the upgrade process was started. The first thing thathappens when selecting to upgrade the database is the response window is displayed.
You must decide whether or not you wish to backup the database. If you have not done so manually itis highly recommended you do so now. The backup process will take several minutes depending on thesize of your database.
If you press the No button the database will not be backed up. If you press the Yes button the backupdatabase process, as described in the Backup section, is invoked and the database is backed up.
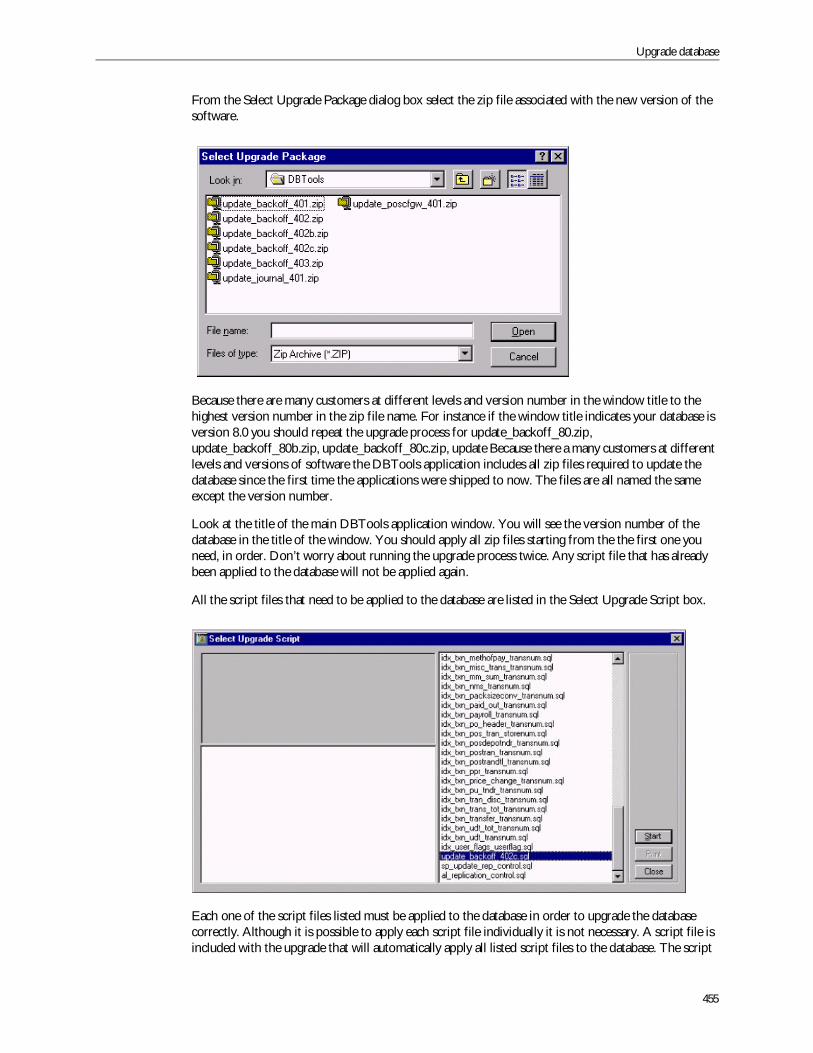
Upgrade database
455
From the Select Upgrade Package dialog box select the zip file associated with the new version of thesoftware.
Because there are many customers at different levels and version number in the window title to thehighest version number in the zip file name. For instance if the window title indicates your database isversion 8.0 you should repeat the upgrade process for update_backoff_80.zip,update_backoff_80b.zip, update_backoff_80c.zip, update Because there a many customers at differentlevels and versions of software the DBTools application includes all zip files required to update thedatabase since the first time the applications were shipped to now. The files are all named the sameexcept the version number.
Look at the title of the main DBTools application window. You will see the version number of thedatabase in the title of the window. You should apply all zip files starting from the the first one youneed, in order. Don’t worry about running the upgrade process twice. Any script file that has alreadybeen applied to the database will not be applied again.
All the script files that need to be applied to the database are listed in the Select Upgrade Script box.
Each one of the script files listed must be applied to the database in order to upgrade the databasecorrectly. Although it is possible to apply each script file individually it is not necessary. A script file isincluded with the upgrade that will automatically apply all listed script files to the database. The script
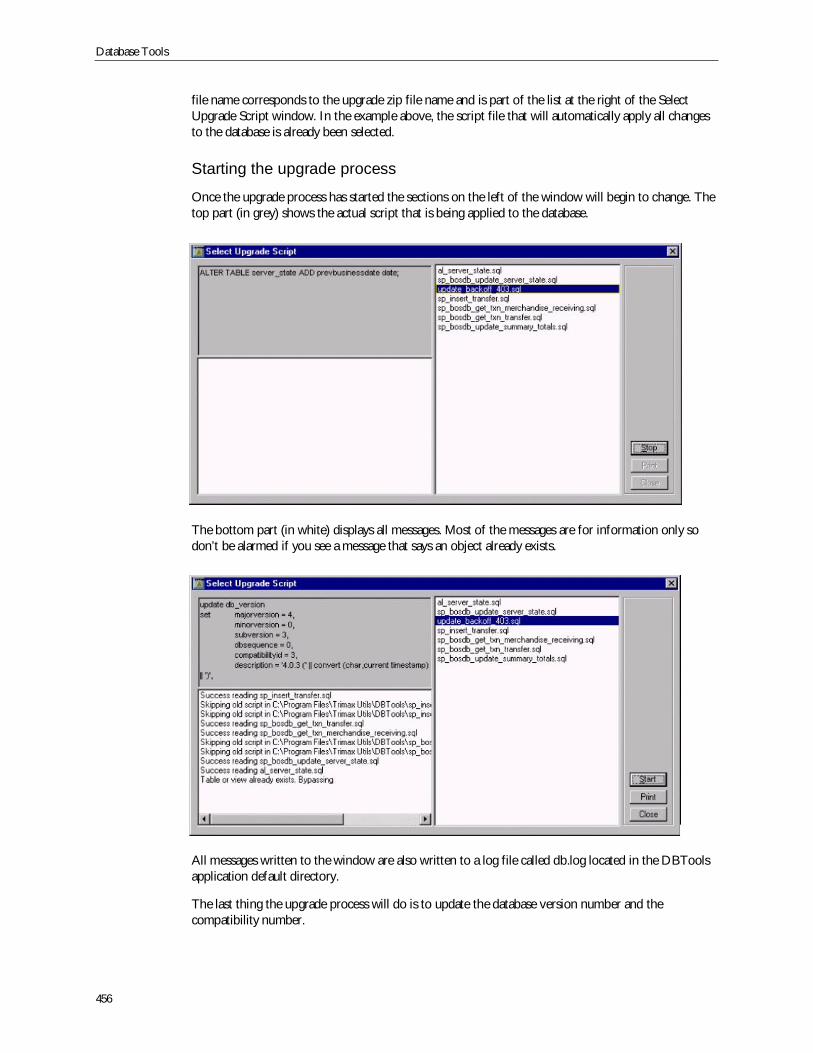
Database Tools
456
file name corresponds to the upgrade zip file name and is part of the list at the right of the SelectUpgrade Script window. In the example above, the script file that will automatically apply all changesto the database is already been selected.
Starting the upgrade process
Once the upgrade process has started the sections on the left of the window will begin to change. Thetop part (in grey) shows the actual script that is being applied to the database.
The bottom part (in white) displays all messages. Most of the messages are for information only sodon’t be alarmed if you see a message that says an object already exists.
All messages written to the window are also written to a log file called db.log located in the DBToolsapplication default directory.
The last thing the upgrade process will do is to update the database version number and thecompatibility number.
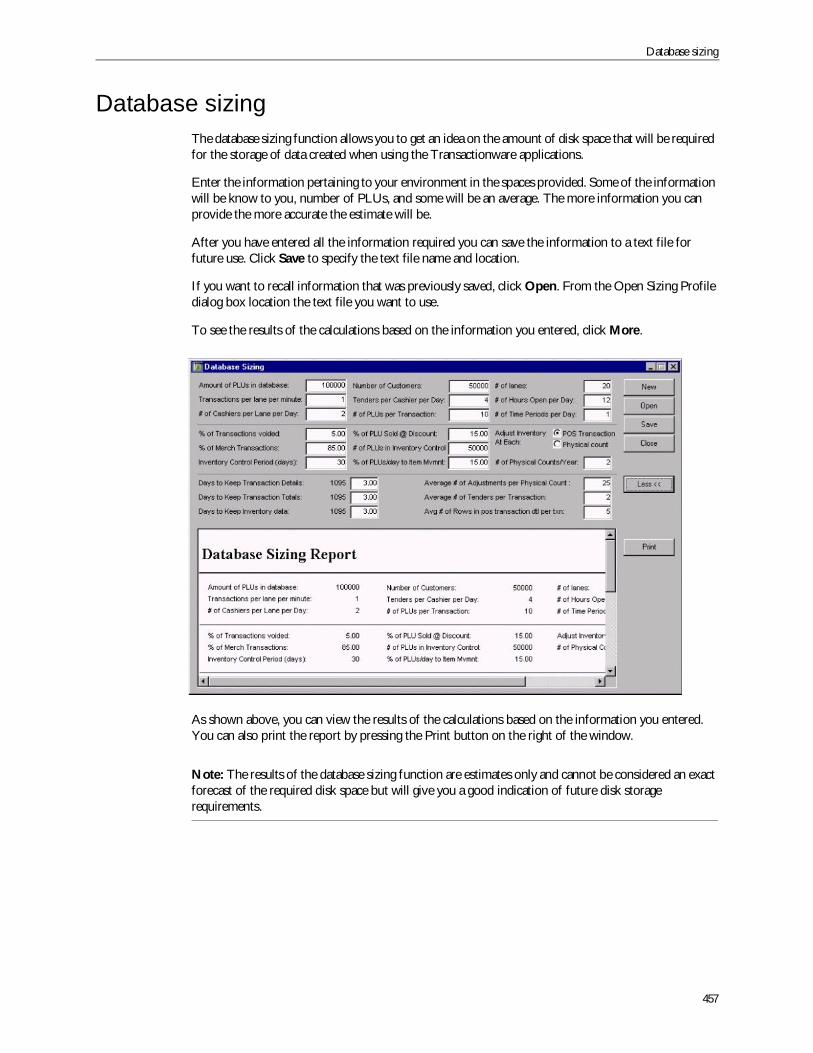
Database sizing
457
Database sizingThe database sizing function allows you to get an idea on the amount of disk space that will be requiredfor the storage of data created when using the Transactionware applications.
Enter the information pertaining to your environment in the spaces provided. Some of the informationwill be know to you, number of PLUs, and some will be an average. The more information you canprovide the more accurate the estimate will be.
After you have entered all the information required you can save the information to a text file forfuture use. Click Save to specify the text file name and location.
If you want to recall information that was previously saved, click Open. From the Open Sizing Profiledialog box location the text file you want to use.
To see the results of the calculations based on the information you entered, click More.
As shown above, you can view the results of the calculations based on the information you entered.You can also print the report by pressing the Print button on the right of the window.
Note: The results of the database sizing function are estimates only and cannot be considered an exactforecast of the required disk space but will give you a good indication of future disk storagerequirements.
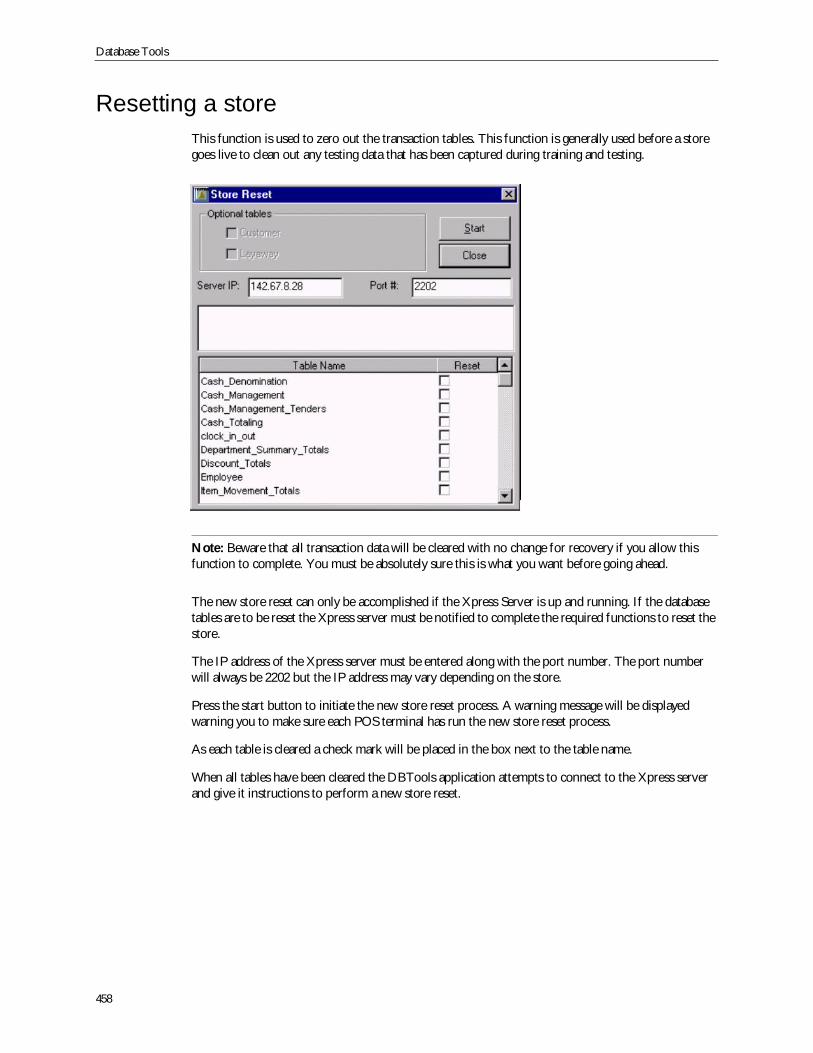
Database Tools
458
Resetting a storeThis function is used to zero out the transaction tables. This function is generally used before a storegoes live to clean out any testing data that has been captured during training and testing.
Note: Beware that all transaction data will be cleared with no change for recovery if you allow thisfunction to complete. You must be absolutely sure this is what you want before going ahead.
The new store reset can only be accomplished if the Xpress Server is up and running. If the databasetables are to be reset the Xpress server must be notified to complete the required functions to reset thestore.
The IP address of the Xpress server must be entered along with the port number. The port numberwill always be 2202 but the IP address may vary depending on the store.
Press the start button to initiate the new store reset process. A warning message will be displayedwarning you to make sure each POS terminal has run the new store reset process.
As each table is cleared a check mark will be placed in the box next to the table name.
When all tables have been cleared the DBTools application attempts to connect to the Xpress serverand give it instructions to perform a new store reset.
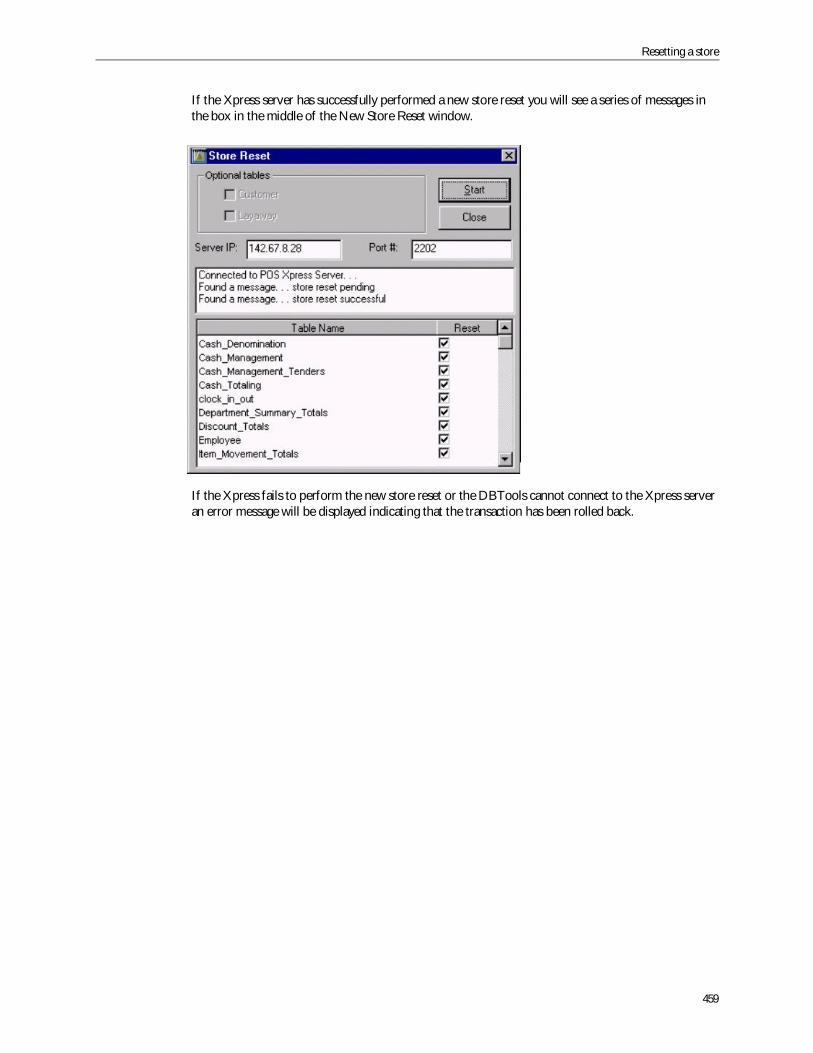
Resetting a store
459
If the Xpress server has successfully performed a new store reset you will see a series of messages inthe box in the middle of the New Store Reset window.
If the Xpress fails to perform the new store reset or the DBTools cannot connect to the Xpress serveran error message will be displayed indicating that the transaction has been rolled back.
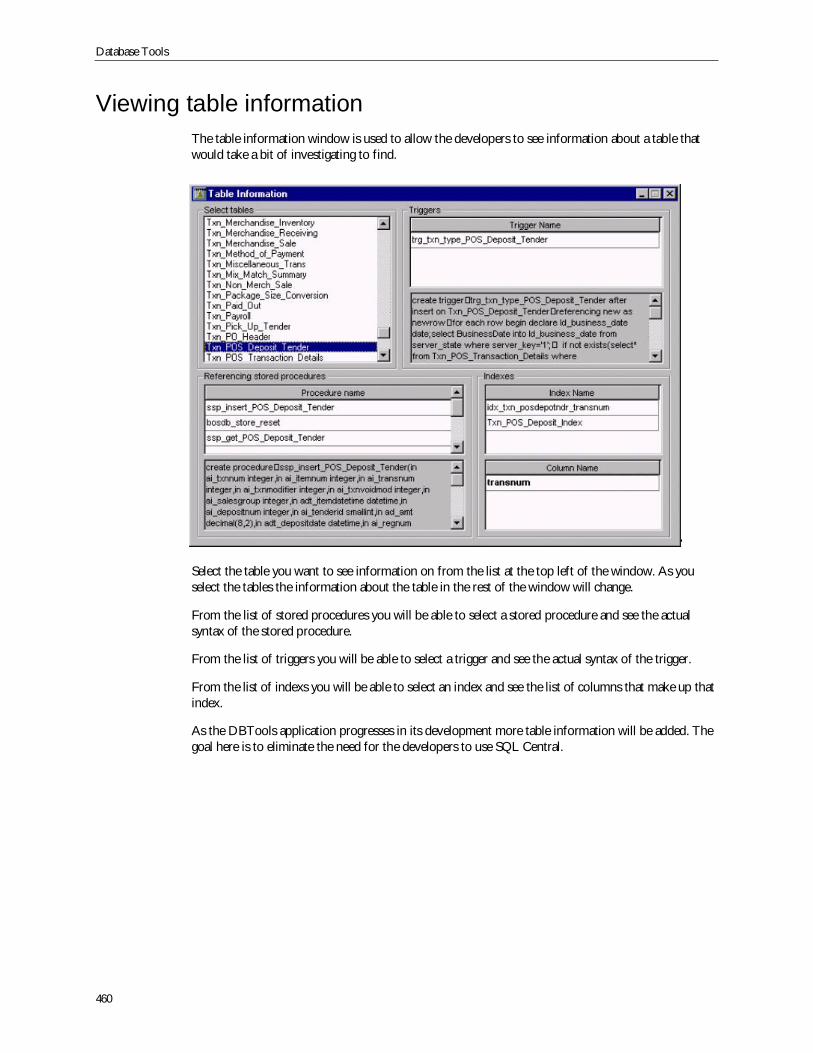
Database Tools
460
Viewing table informationThe table information window is used to allow the developers to see information about a table thatwould take a bit of investigating to find.
Select the table you want to see information on from the list at the top left of the window. As youselect the tables the information about the table in the rest of the window will change.
From the list of stored procedures you will be able to select a stored procedure and see the actualsyntax of the stored procedure.
From the list of triggers you will be able to select a trigger and see the actual syntax of the trigger.
From the list of indexs you will be able to select an index and see the list of columns that make up thatindex.
As the DBTools application progresses in its development more table information will be added. Thegoal here is to eliminate the need for the developers to use SQL Central.
461
10Translation & LanguageSupport
This section describes the language support features in the TGM applications and includes topics suchas how to prepare a translation package for the POS application suite and how to configuremultiple-language support for your system.
Note: To run Transactionware in another language you must run your system on a platform specific toor supporting the language you want to use. For example, to run Transactionware in the Thai language,you must be running a Thai language version of Windows, and you must have theCourier_Mono_Thai font installed. This version uses code page 1252 and the languages supported bythis code page.
Translating literal files in POS and Store Manager
POS Xpress for WindowsName: LITDEF.TXT
Format: Text file
Tools: Plain text editor supporting foreign characters; MKLIT.EXE; LITDEF.H
To translate POS Xpress for use in another language:1. Open the LITDEF.TXT file in the text editor and translate the text within double quotes. For
example:"%d TERMINALS ALREADY OPEN"
Do not modify the text outside of the quotation marks.
2. Pay special attention to the lines with text similar to:.LITLEN 40
The number 40 indicates the number of bytes allowed for the translation.
3. When translating the example above into a European language, you can enter up to 40 charactersfor the translation. However, if you are doing a translation for an Asian language that usesdouble-byte characters (DBCS), you can only use half of the number specified. In the example,you can use a maximum of 20 DBCS characters because each character requires 2 bytes. If thespecified number of bytes is exceeded, an error will be generated when converting this file for useby an SAP program. See the section entitled “Following the translation process:” on page 462.
Translation & Language Support
462
Note: Do not alter any symbol(s) that follow the % sign, such as %-12s or %d.These symbols are placeholders for information while the program is running.Also, if there is more than one symbol per line, such as CANNOT %s FORPUMP#%02d, %s, do not change the order in which the symbols appear inthe line. For example, TEXT %02d TEXT %s TEXT %s is incorrect, butTEXT %s %02d TEXT %s TEXT is a valid translation because the originalorder of %s %02d %s is preserved. Also, when you find a ‘~’ symbol at thestart of a line, it means that this line contains a variable code. This will beidentified by another ‘~’ symbol surrounding a code string. Do not remove ortranslate the code string. This contains instructions for the application to insertinformation from a transaction. For example, in the following text ~~PTDS~REC EXISTS, you would not translate ‘PTDS’ but you should translate ‘RECEXISTS’.
Following the translation process:1. In a DOS session, run the following:
mklit litdef.txt litdef.h literal.lit
If there are no errors, the newly generated literal.lit file contains the translated text andcan replace the existing file in the product.
If errors appear, it is likely the number of characters allowed for a given literal has been exceededand the translation needs to be shortened. The error will indicate which literal is problematic.
2. Restart the server and the POS Xpress to apply the new literal file.
Store ManagerName: POS Manager
Format: Powerbuilder application against a SQL Database
Tools: Complete installation of POS and Xpress Server; translate_objects.txt;translate_original.txt
To translate Store Manager for use in another language:1. Copy the latest version of translate_objects.txt and translate_original.txt to the installation
path of the Store Manager and overwrite the existing files.
2. Start the Store Manager. Note that only an authorized user with full update access (a user withlevel 4 access) to the Translation Window can translate the original texts.
3. Open the Translation Window by selecting Main Menu>Parameters Setup>Translation.Translating texts by using the Translation option is the most generic and effective way toaccomplish the task, particularly if translation involves switching to another language. Every singlepiece of text can be translated here.
4. Click Synchronize to automatically process the translate_objects.txt and translate_original.txtfiles to begin the translation. Click Translate All Objects. A list of all the items to be translatedwill appear in the left most column of the 2-column display. Begin translating the text in thecolumn Original and enter the translated version in column Translated.
When translating most of the text, you will immediately see what the translated text will look like in thereal world, as it shows up in the test area at the bottom of the Translation Window. Also, the spincontrol (two small arrows facing up and down) sometimes appears beside the text displayed in the testarea. This allows you to adjust the width of the text to fit the translated text. Press and hold theappropriate arrow to see the size of the frame surrounding the changing text.
Supporting multiple languages and translation
463
Note: When translating text, keep the double-slash separators between the parts of the text (thisapplies to the double-action command buttons and menus’ texts that include the option text itself, helptext to be displayed at the bottom of the screen and short and long toolbar texts), as well as theplaceholders for the dynamic arguments and new lines (^@ and ^/ sequences), that may appear in themessage file’s texts.
The best way to see all of the translated text is to sign-off and sign-on again.
After completing a translation, first click on the Save button and then the Exit button. Control returnsto the original window and the just completed translation is immediately applied.
Supporting multiple languages and translationSAP POS applications can be implemented in a number of languages and configured to supportadditional languages according to users’ preferences or store requirements. This section outlines all thefunctions and utilities which allow you to implement your language strategy.
Configure a main store language at installation with access to other defined languages (providedthese have been loaded to the system language databases.)
Designate an employee’s main language which may be the same or different than the main storelanguage with the ability to have the application interfaces displayed to them in their preferredlanguage. This feature also allows you to let the employee override the language set for them andchoose a different language at signon or on-the-fly while working in the application (POS only.)
Use text extraction utilities to create text files to submit for translation. (Utilities vary bycomponent)
Use text import utilities to apply translated files back into the system. (Utilities vary bycomponent)
Maintain or edit translated texts to suit your needs
Create on-the-spot translations for POS-bound configuration description fields. The targetlanguage does not need to be one that is loaded in the language database (but the selected languageand its ISO code must be registered in the Xpress Languages screen. Applies to the Configuratorapplication only.)
Access the multi-language files when offline from the language database.
Note: These capabilities represent the language support features of the overall TGM product suite anddiffer from component to component. Distinctions in the implementation of the language features willbe addressed per component where relevant.
Where the store language is setSAP Point of Sale provides a base set of languages for the TGM components at installation time. Thesecan run under various country-specific Windows operating systems which support the regional settingsand standard keyboards typically used in these countries.
Configurator— The Xpress Languages screen in the Configurator shows all the available languagesinstalled with the application and allows you to designate or modify a language as the main storelanguage (by making sure that it is defined by ID #1 and that it appears at the top of the list.) You canalso make newly-translated languages available to your system by adding them to this list. For detailed
Translation & Language Support
464
information on how to set languages in the Xpress Languages screen, please see the Configurator UserGuide.
Note: The parameter file produced by the language records in the Configurator’s Xpress Languagesscreen is called LANGUAGE.ASC.
POS/Store Manager— The Store Manager application does not provide maintenance screens tomaintain the languages set for the store. These are downloaded from the Configurator application. Youcan use the BACKOFF.INI file to set a reference for the store language.
Working with the *.ini files
You can also set or modify the main language of a store through a language option in the relevant*.ini file. The following list shows the *.ini files associated with each application. These are put inplace by the installation process however you can modify, add languages or switch the main storelanguage by changing the values of these options, as required.
WARNING! If the lang.ini file is not found in the required directory, the POS and Xpress Serverapplications will not support any of the multiple language features.
POS and Xpress Server— For the POS and Xpress Server, the language parameter is located in asection of the lang.ini file called ‘Language of the store’ as shown in the following example. Hereyou can find a list of all the translated languages that are available in your system and ensure that themain language parameter is set as required. You can add additional languages and their ISO codes tothis list as they become available.
Example of the Language setting in lang.ini:#Language of the Store:
#ENGLISH=ENG
#FRENCH=FRE
#SPANISH=SPA
#GERMAN=GER
DEFAULTLANGUAGE=GER
Configurator— For the Configurator, the language parameter is located in a section of theposcfgw.ini file called ‘Application’ and can be set as shown in the following example.
Example of the Language setting in poscfgw.ini:#Application
Language=GER
SAP POS application Name of *.ini file Where the *.ini file is located
For POS and Xpress Server lang.ini \Program Files\SAP\Retail Systems\XpressServer\parm directory
For Store Manager bkoff.ini \Program Files\SAP\Retail Systems\Store Manager
For Configurator poscfgw.ini \Program Files\SAP\Retail Systems\StoreConfigurator
For Electronic Journal Viewer journal.ini \Program Files\SAP\Retail Systems\Sales JournalViewer
Supporting multiple languages and translation
465
Store Manager— The language parameter is located in a section of the backoff.ini file called‘Application’ and can be set as shown in the following example:
Example of the Language setting in backoff.ini:#Application
Language=GER
Electronic Journal Viewer— Language support in the Electronic Journal Viewer is defined throughthe journal.ini file. The Language key is located under the Application section of the file:
Example of the Language setting in journal.ini:#Application
Language=GER
This attribute is defined during installation.
The Electronic Journal Viewer does not support an employee’s language support on its own - thereason is because no active employee database is maintained for the Electronic Journal Viewerapplication. When you launch the journal viewer application from the command line: JOURNAL.EXEor EJP.EXE, the language set in the JOURNAL.INI file is displayed. When the Electronic JournalViewer is launched from within the Store Manager application, the language of the employee who iscurrently signed on to the Store Manager application overrides the store language. In this way, theactive language of the employee is temporarily transferred to the Electronic Journal Viewer.
Texts in the journal files are not translated by the Electronic Journal Viewer. They are displayed in thelanguage they were captured in the POS. Only text labels, literals and messages are translated.
A Translation maintenance window is available in the Electronic Journal Viewer to allow applicationobject texts, literal files and messages to be translated. Since there is no database available in theElectronic Journal Viewer, the user is required to select the language for which the text translationshould apply from within the Translation window. Access to the window is also controlled by settingsin the journal.ini file.
The Electronic Journal Viewer contains translations for English, French, Spanish and German. Thereare no maintenance windows available to define the languages of the application.
Setting a preferred language for an employeeIn addition to the main store language, you can also set a different language for each employee in yourstore based on their preference. You can choose any language that has been installed with the system,or translated after the fact. For example, at a store where the default language is set to French, Helgewho is of German descent may use the German interface while her colleague, Pedro can chooseSpanish. The system will switch the display language of the application to the employee’s preferredlanguage when they sign on. The following is a list of areas in the application where you can set theemployee’s preferred language. For detailed information on how to set the employee’s preferredlanguage, see the relevant user guides for each application.
Store Manager— Employee Maintenance screen
Electronic Journal Viewer— If accessed from a command line, the language displayed is thelanguage of the store. If a user accesses the Electronic Journal Viewer through the Store Managerapplication, then the Electronic Journal Viewer will display in their set language.
Configurator— Employee Maintenance and User Access Maintenance screens
POS— Language files are downloaded from Configurator but the POS provides the ChangeLanguage function (Manager Code 433) which allows an employee to change the language of theinterface.
Translation & Language Support
466
empxtxn.asc file— You can edit an employee’s record directly in the Transaction Employee file(empxtxn.asc)and download this file to the store.
Allowing an employee to choose a language at signon
The SAP POS language support feature provides you with even greater flexibility by allowing anemployee to choose another language (other than the one set for them in their profile) when they signon. This setting is also available in the Employee Maintenance screens of the Configurator and StoreManager, as well as the System Settings screen of the Configurator application. When you activate thisoption, the language choices available to the employee are those into which the application has beenformally translated.
Note: The preferred language setting and the option to choose a language at signon affect only theinterface that the employee sees. Any customer-facing interfaces such as the customer display, anyperipheral equipment used by customers such as the electronic signature capture device or any printedmedia, TLog or database data remain in the default language of the store. Additionally, any informationentered into the POS or the Store Manager applications remains in the language of the store.
Allowing an employee to switch languages on-the-fly
In the POS application, the language support feature includes a function called Change Language whichallows the cashier to change the system working language to a different language. This function can beactivated through Manager Code 433. The available languages are those into which the application hasbeen formally translated.
Note: This function cannot be activated during a transaction that has already been started.
Translating configuration descriptions in the ConfiguratorTo support multi-language requirements for new configuration definitions you create for the POS, theConfigurator application provides a language feature which allows you to create an immediatetranslation of any description field you create in the Configurator to download to the POS. Forexample, you can provide a translation of all your defined Tenders or Non-merchandise items. You cantranslate these descriptions into any language, even into one that the system has not been formallytranslated into. (This means that you do not need to create an additional literal file for this language. )The only prerequisite is that you register that language name and its ISO code in the Xpress Languageconfiguration screen in the Configurator application before you begin. For detailed information onhow to do this, see the relevant section in the Configurator User Guide.
Offline translation file supportBecause the translations which support multiple languages exist in databases which are only availableafter a user signs, the required language may not be initially displayed until a connection to the databaseis established. To support the availability of the main store language before this, for example on theSignon screen, various offline files support the SAP POS applications.
Configurator— An offline file called POSCFGW.OFL is available in the Configurator application toprovide translated interface texts until a connection with the database is established. POSCFGW.OFL isan ASCII file which contains references to objects and their translated text. There are separate sectionsin POSCFGW.OFL for each language defined for the Configurator application.
Supporting multiple languages and translation
467
The following is an example of POSCFGW.OFL:[ENG Translation]
u_action_ok::text=&OK
MSG::E12=Release information not available. Please notify SAP Support
MSG::E13=Wrong number of input arguments, Input arguments: [Password][Drive\Path]
MSG::E14=Error in input arguments, Drive\Path is not valid
MSG::M0=Microhelp
…
The POSCFGW.OFL file is generated when the application translatable object configuration filestranslate_objects_cfg.txt and translate_original_cfg.txt are applied by theConfigurator application in a translatable objects synchronization process. During this process, thereferences to the offline translatable objects are extracted from the USERDB.DB database and used topopulate the offline language translation file.
Store Manager— Since the Store Manager application is database-driven and translated text files areprovided by the database, store language support may not be available until after a user signs on to theapplication and connects to the database. To ensure that the required language support is availablebefore a user signs on, such as on the Signon screen, the Store Manager application uses an ASCII textfile BACKOFF.OFL (Offline Language Translation file) to provide language support for translatedinterface texts until the connection with the database has been established.
The BACKOFF.OFL file contains a separate section for each language defined for the store. This allowsmultiple offline translations to be available for any language defined for the store in the BKOFF.INIfile.
The following is an example of a section in BACKOFF.OFL defined for English translations (ISOcode=ENG):[ENG Translation]
d_elapsed_time::elapsedtime_t=>>>Elapsed Time
d_srvconnect_info::connected_t=>>>Connected
d_srvconnect_info::license_t=>>>License
d_srvconnect_info::port_t=>>>Port #
d_srvconnect_info::server_t=>>>Server Address
d_srvconnect_info::version_t=>>>Version
m_mdi_frame::[1]=>>>&Topics
…
The offline language file contains references to any object, literal or message and associated translatedtext that are defined to display in offline mode. BACKOFF.OFL is automatically generated when theapplication translatable object configuration files translate_original.txt andtranslate_objects.txt are applied by the Store Manager application to synchronize the set oftranslatable objects. During this synchronization process, the references to the offline translatableobjects are extracted from the BACKOFF database and used to populate the offline language translationfile.
The existing Translation maintenance window within the Store Manager application allows the user todefine translations for any of the translatable objects, including those objects denoted as being offline.When the translations are saved through the Translation window, the BACKOFF.OFL file willautomatically be updated with the translations. For more information on the Store ManagerTranslation window, see “Translating literal files in POS and Store Manager” on page 461.

Translation & Language Support
468
Electronic Journal Viewer— As with the Store Manager application, there is an offline languagetranslation file available for the Electronic Journal Viewer called JOURNAL.OFL. This file is used totranslate any messages, literals and object texts required before the application connects to theJOURNAL database. The layout of JOURNAL.OFL consists of a reference to the object and thetranslated text. There is a separate section in the offline language file for each language defined for theElectronic Journal Viewer application. This allows translated text to be displayed in the language of thestore.
The offline language file is automatically created when the application translation object configurationfiles translate_objects_jrl.txt and translate_original_jrl.txt are applied by theElectronic Journal Viewer application to synchronize translatable objects.
Using the translation utilitiesTo further enhance the availability of multiple languages in the application suite, SAP POS providesutilities which allow you to extract relevant literal and text files and submit them for translation. Afterthey are translated, you can use the utilities to apply the translated texts back into the system. Thefollowing section describes the various utilities and how you can use them.
SAP POS application Utility used for translation What it does
POS Binary to ASCII Literal FileExtract utility mkascii.exe
Takes system binary file literal.lit and convertsit to an ASCII text file called litdef.txt
Store Manager Translation Export/ImportDatabase utility txtxlt.exe
Exports all translatable objects, messages andliterals used by the application to an ASCIItext file.
Upon translation, the utility loads thetranslated files into the production databasetranslation tables.
This utility is incorporated into the buildprocess. This allows the productiondatabases to be installed with the translatedlanguages.
Configurator Translation Export/ImportDatabase utility txtxlt.exe
same as above
Electronic Journal Viewer Translation Export/ImportDatabase utility txtxlt.exe
same as above
Supporting multiple languages and translation
469
Implementing multiple languagesMost features and capabilities which support multiple languages in your SAP POS applications areapplied when the applications are installed. However to make any changes to the original series ofavailable languages, such as adding a new language, or to change the main language of the store, youwill need to change some settings in various areas of your system. In addition, to maintain languageconsistency across your system landscape, you may also need to configure settings in other areas ofyour POS such as its operating system. The following procedures outline the types of configurationsand settings you need to check or make, along with steps you need to perform to ensure that multiplelanguage support is fully implemented in your SAP POS product suite.
To ensure complete implementation of multiple languages for your store:1. Determine the main language of the store.
2. When installing the required database application (Microsoft SQL or Sybase), at the languageprompt, set the language of the store as the default language for the database.
3. In the operating system settings for the POS pc, set the regional and language settings to matchthe country, language and keyboard settings required at the store. These are located at thefollowing path: Control Panel >Regional and Language Options.
4. When installing the SAP POS applications, set the language of the store in each requiredcomponent. If the language of the store is not one of the languages provided, select English. Ifrequired, install default demo parameters for the initial setup only. For details on installing the SAPPOS application suite, see the Install Guide.
5. In the Terminal > Xpress Languages screen of the Configurator application, define all thelanguages you would like to make available at your store. For information on how to do this seethe relevant section in the Configurator User Guide.
Note: The main language of the store must be the first language in the list.
6. In the Configurator application, create all the base store parameter files you will need at the POS.Use the language of the store in any text fields as required. The following is a list of the parameterfiles you can create.
Tender
Non-Merchandise
Standard Menus
Custom Menus
Profile Prompts
User-Defined Transactions
Returns
Choice Lists
Taxes
Discounts
Manager Codes
As you create parameter file definitions in any of the parameter files shown above, you can alsoenter text translations for any descriptive fields that the cashier will see. These are downloaded tothe POS along with the parameter file information. These fields appear in a different color in theConfigurator application. For information on how to do this, see the Configurator User Guide.
Translation & Language Support
470
Note: If a translation is not provided, the convert process uses the text from thelanguage of the store.
7. Define the store language in each of the required *.ini parameter files. For more informationon the *.ini files for each application, see “Where the store language is set” on page 463.
8. Use the Configurator application to download the parameter files containing the translated fieldsto the Xpress Servers base parm directory. See the Configurator User Guide for information on howto do this. The base parm directory is located at C:\program files\SAP\RetailSystems\Xpress Server\parm. As the Xpress Server processes these files, it will createsub-directories for each language defined under the base parm directory.
Note: The multi-language convert process will create parms as well as someparm sub-directories.
9. Stop and restart all applications.
10. Create all the product files for the store such as the PLU/SKU (plutxn.asc) and Promotion(promotxn.asc) files according to established methods (For example, using third-party or otherstore back-end applications.) Ensure that any text fields in these files are set to the language of thestore. Download these files to the base parm directory in the POS Xpress Server.
11. Create store employee records. For each employee, ensure that their alternate language preferenceis set. This can be done through Employee Maintenance screens in the Configurator and StoreManager applications, or through direct input into the Transaction Employee file(empxtxn.asc.)See the Configurator and Store Manager User Guides for information on theEmployee Maintenance windows.
12. Create the POS literal files for each of the required languages. Literal files contain the field andtext labels and messages which are displayed at the POS. For information on how to do this, see“How to create translation files for the POS application” on page 471. At installation, defaultparameters are provided for the following languages:
13. If you need to translate your system into a language that was not provided when your system wasinstalled, you can use the DB Export/Import utility (txtxlt.exe) to create files to submit totranslation for the databases of each of the following applications: Configurator, POS/StoreManager, Electronic Journal Viewer. To create the export files, do the following:
The DB Export/Import utility is located in the\Program Files\Common Files\SAPShared\Retail Systems directory and is launched by running txtxlt.exe. Begin byrunning txtxlt.exe.
Submit the output text files for translation.
When the translated text files are returned, run txtxlt.exe again to import the translatedtext to the database.
If the product suite is being distributed through disk images, the translations can be added to themaster image using this utility. If the software is being installed directly at the store, a commandline version of the utility can be used to load the translations at the store:
Language Literal file name
English Literal.lit
German German.lit
French French.lit
Spanish Spanish.lit
Supporting multiple languages and translation
471
Example of the Import command line:TXTXLT –I DUTCH –f ALL –d BACKOFFMS –u user –p password – t IMPORT –c 1–s c:\translation
Note: For detailed information on how to use the DB Export/Import utility(txtxlt.exe), see “Using the DB Export/Import Database utility” onpage 473.
14. If you need to translate your POS system files into a language that was not provided when yoursystem was installed, you can use the mkascii.exe utility to create a text file (LITDEF.TXT) tosubmit to translation. (When the translated files are returned, you can use mklit.exe to apply themback into the application.)
Note: For detailed information on how to use the mkascii.exe utility, see“How to create translation files for the POS application” on page 471.
How to create translation files for the POS applicationThis procedure describes how to extract, convert and use the literal file (literal.lit) from the POSapplication for translation using the MKASCII.EXE utility, and how to use the MKLIT.EXE utility toapply translated files back into the application.
To create a literal file:1. Obtain a copy of the POS literal text file (litdef.txt). This can be found in \Program
Files\SAP\Retail Systems\Utilities directory:
2. Copy the existing literal.lit file to the utilities directory (\Program Files\SAP\RetailSystems\Utilities). The literal.lit is part of the demo parameters.
3. From a command line prompt, run the mkascii.exe utility to generate an ASCII file fortranslation as in the following example. This converts the binary literal file into ASCII format.Cd \Program Files\SAP\Retail Systems\Utilities
Mkascii literal.lit litdef.h litdef.txt litnew.txt
This process creates a text file called litnew.txt which contains all the literals used in all of theTGM applications. The file name is optional; you can use any file name you like.
For more information on mkascii.exe, see “About mkascii.exe” on page 472.
4. Submit this file (litnew.txt)for translation.
5. When the translated litnew.txt is returned, run the mklit.exe utility to build a new literalfile (litnew.lit) and convert the ASCII format back into binary format. You can do thisthrough the following command:Cd \Program Files\SAP\Retail Systems\Utilities
Mklit litnew.txt litdef.h litnew.lit
6. After the files have been converted, copy them to the store Xpress Server directories and renamethem as required. Copy the literal file for the store language to the base parm directory. This literalfile must be called literal.lit.
7. Place literal files for any additional alternate languages in their corresponding language directoryaccording to definitions set up in the Xpress Languages Maintenance screen in the Configuratorapplication.
For example:\parm\FRENCH\FRENCH.LIT
\parm\SPANISH\SPANISH.LIT
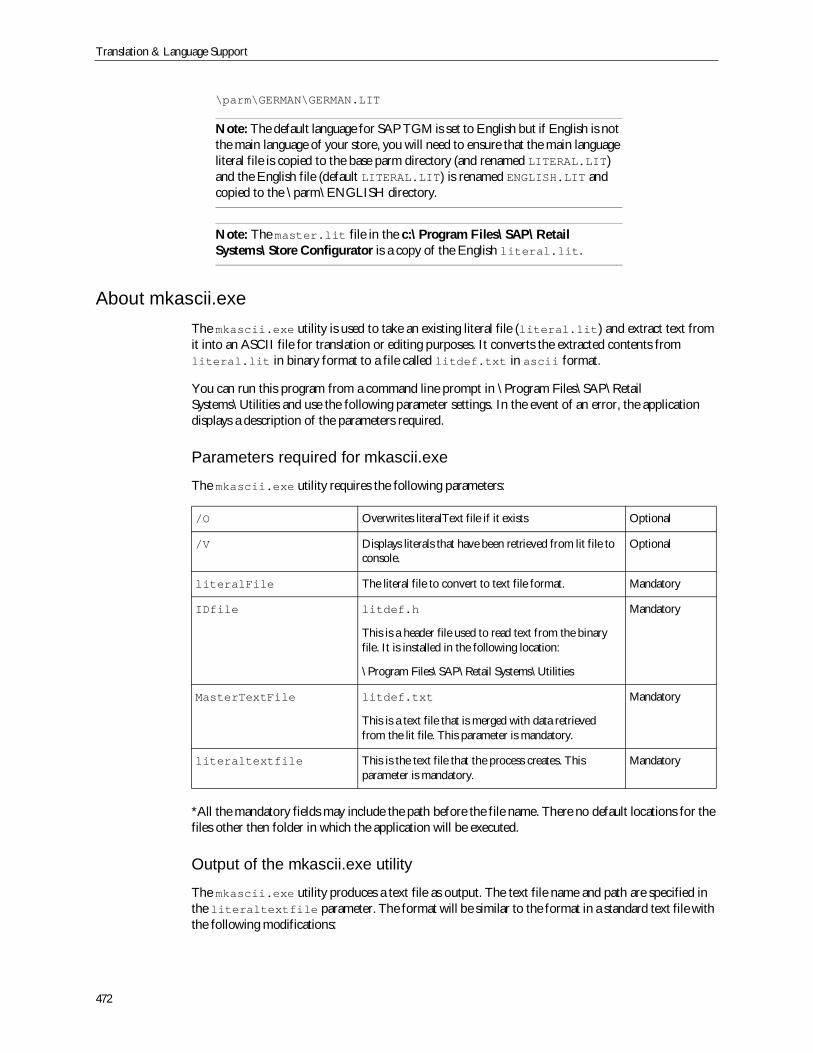
Translation & Language Support
472
\parm\GERMAN\GERMAN.LIT
Note: The default language for SAP TGM is set to English but if English is notthe main language of your store, you will need to ensure that the main languageliteral file is copied to the base parm directory (and renamed LITERAL.LIT)and the English file (default LITERAL.LIT) is renamed ENGLISH.LIT andcopied to the \parm\ENGLISH directory.
Note: The master.lit file in the c:\Program Files\SAP\RetailSystems\Store Configurator is a copy of the English literal.lit.
About mkascii.exeThe mkascii.exe utility is used to take an existing literal file (literal.lit) and extract text fromit into an ASCII file for translation or editing purposes. It converts the extracted contents fromliteral.lit in binary format to a file called litdef.txt in ascii format.
You can run this program from a command line prompt in \Program Files\SAP\RetailSystems\Utilities and use the following parameter settings. In the event of an error, the applicationdisplays a description of the parameters required.
Parameters required for mkascii.exe
The mkascii.exe utility requires the following parameters:
*All the mandatory fields may include the path before the file name. There no default locations for thefiles other then folder in which the application will be executed.
Output of the mkascii.exe utility
The mkascii.exe utility produces a text file as output. The text file name and path are specified inthe literaltextfile parameter. The format will be similar to the format in a standard text file withthe following modifications:
/O Overwrites literalText file if it exists Optional
/V Displays literals that have been retrieved from lit file toconsole.
Optional
literalFile The literal file to convert to text file format. Mandatory
IDfile litdef.h
This is a header file used to read text from the binaryfile. It is installed in the following location:
\Program Files\SAP\Retail Systems\Utilities
Mandatory
MasterTextFile litdef.txt
This is a text file that is merged with data retrievedfrom the lit file. This parameter is mandatory.
Mandatory
literaltextfile This is the text file that the process creates. Thisparameter is mandatory.
Mandatory
Supporting multiple languages and translation
473
Separator text is added to the end of each line after the “##” characters as it appears in the Mastertext file. This to allow comparison of master text and the text in the literal file.
For specific index numbers, “<N>” followed by the old constant name and test description incase the textual constant changed the name at the end of the line after the “##” special character.N will stand for the line where the identifier had been moved to. If N is 0, it means that theidentifier no longer exists. Original text and identifiers will follow. This is to allow investigation ofany possible issues.
If at the end of the line after the ## sign, @@ line appears it means that this line does not exist inthe original file. If the same identifier is located in other location of the lit file, the text from thisidentifier will be added after the @@ sign.
Using the DB Export/Import Database utilityAn application called TXTXLT.EXE supports translation of the Configurator, Store Manager, andElectronic Journal Viewer applications by extracting and reintegrating translation files. It is located inthe following directory: c:\Program Files\Common Files\SAP Shared\Retail Systems. You canexecute it in both online or command line modes.
Online mode1. To access the application, enter a user name, password and provide the Data Source (Database)
name in the Logon Window.
2. Choose one of the following options:
Export option— The export option allows you to export all the text available for translationto a designated file (*.txt). Choose the language of the export files and the directory to whichthey will be added. In the drop-down list, choose a layout for the export file. The options are:
Export all Translatable Objects In a Single file— Exports the translatable text into onefile.
Separate Export Files for Each Translation Category— Divides the translatable textinto different object categories. For example, DW.txt contains all the datawindowtranslatable text. The name of the file will contain a reference to the type of object itcontains.
Separate Export Files For Each Translatable Object— This option creates a separatefile for each object that contains translatable text.
Import option— The import option takes the translated files and imports them back into thedatabase.
To successfully import the translated file, you will need to add the language to the ‘TranslationFile Identifier’ section of the txtxlt.ini file as follows. This file is located in the \ProgramFiles\Common Files\SAP Shared\Retail Systems folder.[Translator File Identifier]
ENGLISH=EN
FRENCH=FR
SPANISH=ES
GERMAN=DE
There are two options for importing translated data.
Import Translatable Objects From File Contents— The application creates the nameof the file based on the name of the parent object. This option is used to import when thefiles are either a single file, or the translation is broken down by category. Using this optionon files that have been broken down by object will cause an error as the object name isdiscerned from the file name in this case.
Translation & Language Support
474
Generate Translatable Object Key From File Name— Use this option when the fileshave been broken down by object. The file name will contain the name of the object to beimported.
The import can be performed one file at a time, or on all files with the .TXT extension. Thetranslations are loaded into the Translate_Translated table in the database specified at logon.
Command Line Mode
When running from a command line, the utility can be run to either export or import translatable/translated data. All options available in online mode can be accessed using switches. The following is alist of switches to be used. '-l','-f','-d','-u','-p','-t','-c','-s','/l','/f','/d','/u','/p','/t','/c', '/s' the switches canbe identified as a dash ‘-‘ or a slash ‘/’.
–l represents the language, for example –l ENGLISH
–f is the file name i.e. –f ENGLISH.TXT, if the task is export (-t EXPORT) and the category is greaterthan 1 (-c 2) then the file name is irrelevant as the export facility will create multiple files based on thecategory. When in import mode (-t IMPORT) the user has the option to import all the files by usingthe ALL reserved word i.e. –f ALL.
–d is the database name where the export file is to be created from or the translated data is to beimported into. i.e. –d BACKOFFSY9 for the Store Manager database in Sybase.
–u represents the user name i.e. –u dba.
–p is the password i.e. –p sql
–t the task either IMPORT or EXPORT
–c is the options for the import or export. When –t EXPORT then the options for –c are 1 single filecreated, 2 create files by category 3 files created for each object. When –t IMPORT –c 1 import usingfile contents, -c 2 get object name from file name (only used when the translated data is stored in eachobject).
–s subdirectory where the user wishes to either Export the file or Import the file from.
Examples
The following example creates an export file called ENGLISH.TXT into the c:\translation directory:TXTXLT –l ENGLISH –f ENGLISH.TXT –d BACKOFFMS –u trimax –p maxtri –tEXPORT –c 1 –s c:\translation
This example exports the files and breaks them down by category the file name is irrelevant in thiscase:TXTXLT –l ENGLISH –f irrelevant –d BACKOFFMS –u trimax –p maxtri –t EXPORT–c 2 –s c:\translation
Import all the files in c:\translation and use the option to derive the object names from the filesassuming that the files are broken down by object:TXTXLT –l ENGLISH –f ALL –d BACKOFFMS –u trimax –p maxtri –t IMPORT –c 2 –s c:\translation
Upon completion, a log file is created in the directory where the application resides TXTXLT.logwhich indicates success or failure of the command line option.
475
IIndex
Symbols.txn files 32
Numerics1 (receiving record) 8110 (inventory manual adjustment record) 8611 (inventory package size conversion record) 861R (receiving record part 2) 822 (transfers record) 833 (purchase orders record) 834 (e-mail record) 845 (external download data record) 847 (price changes record) 848 (inventory counts record) 859 (inventory special note record) 85
AA (authorization record) 68A2 (authorization response record, for PS2000) 69A2 (authorization response record, for Visanet) 70A3 (authorization record with encryption) 70A5 (extended authorization record) 73AA (customer admin record type AA with encryption) 69AC (authorization record with encryption) 72activating database from backup 416add customer information (207) 384adjustment item for pending transaction (223) 385administration for pending transaction (225) 386after sale tax adjustment record for itemizer tender tax 64after sale tax adjustment record part 2 64AR (refund authorization) 99ASCII files 32
discounts totals 121salesperson productivity 119timed sales analysis 122
assign department to key (18) 382Atomic credit functions setup (279) 388authorization batch send (272) 388authorization record 68
type A3 with encryption 70type AA with encryption 69with encryption 72
authorization response recordPS2000 69Visanet 70
auto-generated reference numbers (26) 382
BB (POS deposits) 75B.O. deposits 75B2 (B.O. deposits) 75B3 (POS deposits) 76back office specific parameters 353backing up databases 415backoffice parameter table
definition 128format 128value 128
backup server 397backup to disk (410) 390balance cash drawer (240) 387balance previous day (242) 387balance record 77bank deposit (232) 386barcode (coupon) additional parameters 282barcode parameters 280bulk write-off for pending transaction (226) 386business date
last 76, 77business date set for store (426) 391business date set for terminal (424) 391
CC1 (customer admin record type 1) 52C2 (customer admin record type 2) 53C3 (customer admin record type 3) 53C4 (customer admin record type 4) 54C5 (customer admin record type 5) 54C6 (customer admin record type 6) 55CA (customer admin record type 1 with encryption) 52cancel pending transaction (220) 385cancel transaction (206) 384capture file formats
inventory upload file 123cash drawer (201) 384cash float or loan (230) 386cashier validation list 384catalogue (order book) file format 170category file records 129category file update records 129
476
CB (customer admin record type 2 with encryption) 53CD (customer admin record type 4 with encryption) 54CE (customer admin record type 5 with encryption) 54centralized returns authorization POS.ini parameters
AUTHREFUNDS 340CVTLOG_INCREASELENGTHBY 341CVTLOG_TXNNUMDIGITS 341CVTLOG_USECURRENCYCODEFLAG 341EXCHTOGGLE 340Recall Entire Transaction 340RETURNLOOKUPFORER 340
CF (customer admin record type 6 with encryption) 55change language (433) 391change password at POS (199) 384check account balance (291) 388check authorization
NCIS/Velocity PLUS 326Rocky Mountain Retail Systems 326TeleCheck 319
check authorization parameters 314choice ID 77CIBC PIN pad menu (286) 388cleared (898) 394clock in (170) 384clock out (172) 384close all terminals end of day (250) 387close terminal for day (249) 387close totals for payment processor (282) 388closing totals summary file 116
total types 116communication diagnostics (8) 381configurable warning/beep tones during item entry 276consolidated total records 98consumer price verifier parameters 300copy parameter files (414) 390correct error (203) 384correct sale authorization (262) 387coupon barcode additional parameters 282credit authorization
Harmonic Systems 371credit authorization batch close (271) 388credit authorization batch print (274) 388credit authorization batch to bank deposit (283) 388credit authorization by phone (264) 387credit authorization for sale (260) 387credit authorization record 68credit authorization record with encryption 69credit authorization record with extended amount fields 70credit authorization record with extended amount fields with
encryption 72credit authorization report (273) 388credit authorization specific parameters 318credit authorizations total (270) 388credit batch transmit to Atomic (278) 388credit card identification parameters 302credit card totals from payment processor (280) 388credit diagnostic parameters 334credit transaction details from processor (281) 388credit transaction types 107
CREDITLOG 335cross reference file records 129customer admin record
type 1 52type 1 with encryption 52type 2 53type 2 with encryption 53type 3 53type 4 54type 4 with encryption 54type 5 54type 5 with encryption 54type 6 55type 6 with encryption 55
customer card replacement (156) 383customer database 2 parameters 362customer database parameters 358customer file format (Store Manager) 130customer message type and display (10) 381customer points adjustment record 96customer points for loyalty table 132customer points history (432) 391customer purchase history (431) 391customer records delete (10006) 395customer records inquiry (10004) 395customer records update (10005) 395customer status type file format (Store Manager) 133CVTLOG utility 32, 430CVTOTALS utility 432
DD (discounts) 60D1 (discounts, pro-rated) 61D3 (discounts, pro-rated plus with cvtlog file) 61D3 (discounts, with cvtlog file) 61data
purging 419data record length 33database encryption
PCI compliance 434database utilities
Tmxpurge 419databases 413-419
see also non-database utilitiesactivating from a backup 416backing up 415, 440backup file destination 441connecting 437end of day troubleshootingerasing 415examining SQL/Sybase Database server startup 418exporting data 441fields 414files 413moving 454records 413reloading 417sizing 457
477
starting the SQL/Sybase Database server from DOS 418store reset 458table information 460transaction logs 440unloading 416upgrading 454validating 413, 414viewing 413, 414
date/time set (404) 390days
missing 77DBTools
backing up a database 440backup file destination 441connecting to the database 437database sizing 457database transaction logs 440expert options 441export destination and format 442exporting data 441importing data 444main window 439moving a database 454queries 451store reset 458table information 460upgrading a database 454
debit authorization record 68debit authorization record with encryption 69debit authorization record with extended amount fields 70debit authorization record with extended amount fields with
encryption 72debit transaction BIN file format 134debit transaction types 107define terminal settings 381delete POS files (418) 390department by cashier by terminal group file 117department file records 134department file update records 137department group file records 141department group file update records 141department menu description parameters 298department records inquiry (10009) 395department records update (10010) 395department summary file 115deptcategory records inquiry (10013) 395deptcategory records update (10014) 395deptgroup records inquiry (10011) 395deptgroup records update (10012) 395depttone 276detail record
payroll clock in/out export file 114purchase order file 119
diagnostic for communication equipment (902) 394diagnostic for terminal (900) 394discount
auto 377POS 377
discount file update records 142
discount inclusion/exclusion file 146discount related parameters 377discount types 112discount void for current transaction (633) 393discount void last (634) 393discounts 60discounts (pro-rated plus with cvtlog file) 61discounts (pro-rated) 61discounts totals ACII file
fixed length output 121discounts totals ASCII file 121discounts, with cvtlog file 61disk available (996) 394display settings (40) 382DOS startup
SQL/Sybase Database server 418download file formats 127
backoffice parameter definition table 128backoffice parameter format table 128backoffice parameter value table 128category file records 129category file update records 129cross reference records 129customer (Store Manager) 130customer points for loyalty table 132customer status type (Store Manager) 133debit transaction BIN files 177department file records 134department file update records 137department group file records 141department group file update records 141discount inclusion/exclusion file 146discount update records 142full employee 147full negative 148full PLU file 148full positive file 151inventory bucket definition (Store Manager) 151inventory bucket movement definition (Store
Manager) 152inventory control (Store Manager) 153inventory count (physical inventory) 154inventory upload trigger file 157jurisdiction ID table 158jurisdiction table 158jurisdiction tax tables 159languages 160link transaction records 161loyalty Allegiance configuration record 162loyalty component configuration table 162loyalty program eligibility table 166loyalty program records 163loyalty program table 165loyalty, customer points table 132mix match table 167order book (catalogue) 170PLU file update records 172PLU supplemental updates 177price batch 177
478
price batch management setup 178price level/quantity transaction records 178promotional file update records 179purchase order format 181receiving 155, 189safe ID records 182store (Store Manager) 184store in-store transfers 185store transfers 184, 186supplemental attributes definition 187supplemental code types 188supplemental codes 188supplemental data 188tare weight 189tax tables 189tender 191tender denominations 190transaction employee 199transaction level pricing rules 201transaction negative 202transaction positive 202use department 204vendor (Store Manager) 205vendor/SKU 205
EE (paid out record) 73E3 (Paid out) 74e-mail record 84embedded weight/price barcode parameters 280employee file (full) 147employee records delete (10003) 394employee records inquiry (10001) 394employee records update (10002) 394employee sale (215) 385employee sale record 61empties return processing (434) 391encrypted price check (725) 393encryption 413end empties return (435) 391end of day
non-required .rd files configuration in POS.ini 275trigger file parameters 275troubleshooting
journal naming issues 436rebuilding data directory 435rebuilding TLOG and journal 435
end of period totals to zero (254) 387end of week totals to zero (252) 387end training mode for POS terminal (403) 390erasing databases 415exchange item (212) 385exchange tenders 78exit POS (499) 392exit POS application with error 0 release (490) 391exit POS application with error 1 release (491) 391exit POS application with error 2 release (492) 391exit POS application with error 3 release (493) 391
exit POS application with error 4 release (494) 391exit POS application with error 5 release (495) 391exit POS application with error 6 release (496) 391export file
payroll clock in/out 114extended authorization record 73external download data record 84
FF (employee sale record) 61F2 (fuel-sale record part 2) 42fields
contents 33file
.txn 32ASCII 32customer format (Store Manager) 130customer status type format (Store Manager) 133full employee 147full negative 148full positive 151inventory bucket definition (Store Manager) 151inventory bucket movement definition (Store
Manager) 152inventory control format (Store Manager) 153inventory upload fiile 123inventory upload trigger fiile 157order book (catalogue) 170order guide format 172price batch format 177price batch management setup format 178price level/quantity transaction records 178purchase order format 181receiving 155store format (Store Manager) 184store in-stores transfers 185store transfers 184store transfers out 186supplemental attributes definition format 187supplemental code types 188supplemental codes contents format 188supplemental codes format 188supplemental date format 128, 172, 188tender denominations format 190TLOG 32transaction employee 199transaction level pricing rules 201transaction negative 202transaction positive 202use department format 204vendor format (Store Manager) 205vendor/SKU format 205
file downloadbackoffice parameter definition table 128backoffice parameter format table 128backoffice parameter value table 128category file records 129category file update records 129
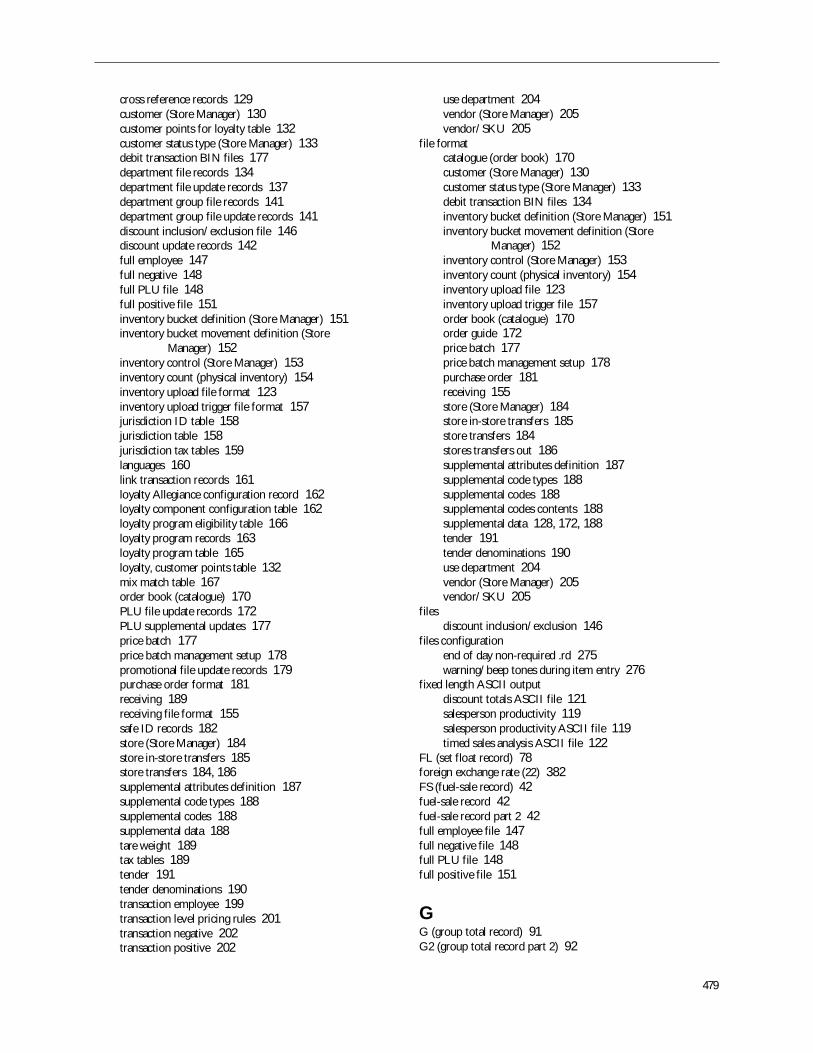
479
cross reference records 129customer (Store Manager) 130customer points for loyalty table 132customer status type (Store Manager) 133debit transaction BIN files 177department file records 134department file update records 137department group file records 141department group file update records 141discount inclusion/exclusion file 146discount update records 142full employee 147full negative 148full PLU file 148full positive file 151inventory bucket definition (Store Manager) 151inventory bucket movement definition (Store
Manager) 152inventory control (Store Manager) 153inventory count (physical inventory) 154inventory upload file format 123inventory upload trigger file format 157jurisdiction ID table 158jurisdiction table 158jurisdiction tax tables 159languages 160link transaction records 161loyalty Allegiance configuration record 162loyalty component configuration table 162loyalty program eligibility table 166loyalty program records 163loyalty program table 165loyalty, customer points table 132mix match table 167order book (catalogue) 170PLU file update records 172PLU supplemental updates 177price batch 177price batch management setup 178promotional file update records 179purchase order format 181receiving 189receiving file format 155safe ID records 182store (Store Manager) 184store in-store transfers 185store transfers 184, 186supplemental attributes definition 187supplemental code types 188supplemental codes 188supplemental data 188tare weight 189tax tables 189tender 191tender denominations 190transaction employee 199transaction level pricing rules 201transaction negative 202transaction positive 202
use department 204vendor (Store Manager) 205vendor/SKU 205
file formatcatalogue (order book) 170customer (Store Manager) 130customer status type (Store Manager) 133debit transaction BIN files 134inventory bucket definition (Store Manager) 151inventory bucket movement definition (Store
Manager) 152inventory control (Store Manager) 153inventory count (physical inventory) 154inventory upload file 123inventory upload trigger file 157order book (catalogue) 170order guide 172price batch 177price batch management setup 178purchase order 181receiving 155store (Store Manager) 184store in-store transfers 185store transfers 184stores transfers out 186supplemental attributes definition 187supplemental code types 188supplemental codes 188supplemental codes contents 188supplemental data 128, 172, 188tender 191tender denominations 190use department 204vendor (Store Manager) 205vendor/SKU 205
filesdiscount inclusion/exclusion 146
files configurationend of day non-required .rd 275warning/beep tones during item entry 276
fixed length ASCII outputdiscount totals ASCII file 121salesperson productivity 119salesperson productivity ASCII file 119timed sales analysis ASCII file 122
FL (set float record) 78foreign exchange rate (22) 382FS (fuel-sale record) 42fuel-sale record 42fuel-sale record part 2 42full employee file 147full negative file 148full PLU file 148full positive file 151
GG (group total record) 91G2 (group total record part 2) 92
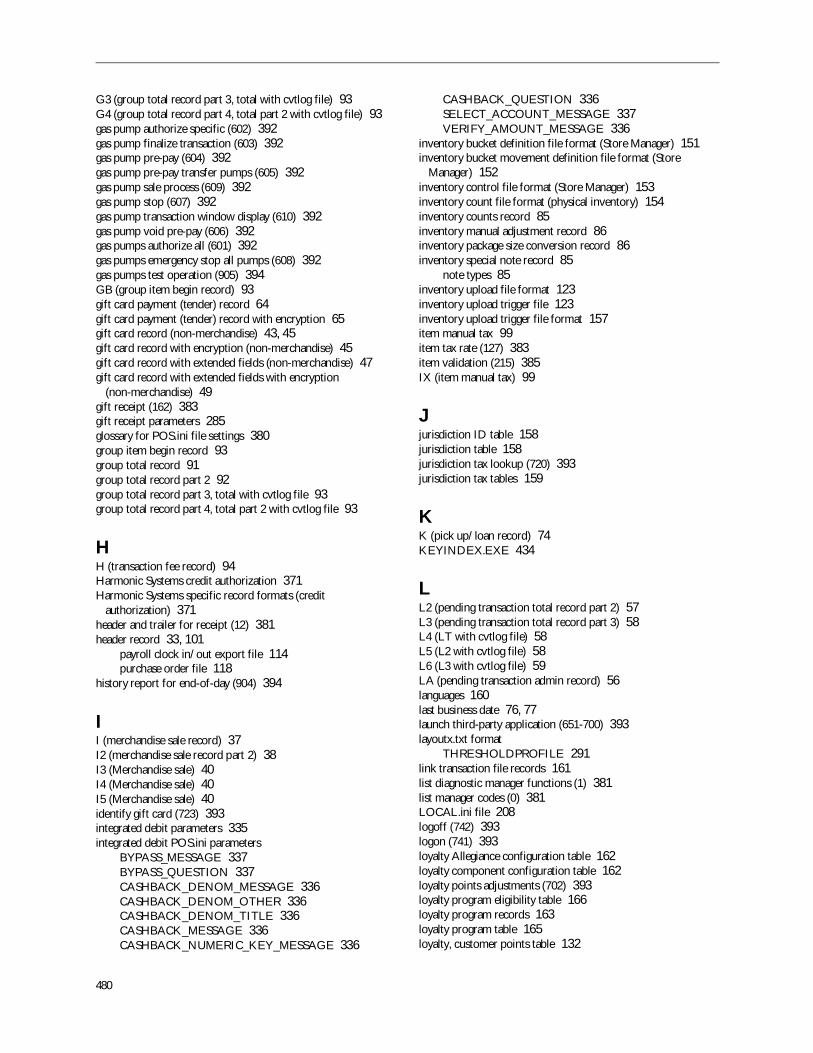
480
G3 (group total record part 3, total with cvtlog file) 93G4 (group total record part 4, total part 2 with cvtlog file) 93gas pump authorize specific (602) 392gas pump finalize transaction (603) 392gas pump pre-pay (604) 392gas pump pre-pay transfer pumps (605) 392gas pump sale process (609) 392gas pump stop (607) 392gas pump transaction window display (610) 392gas pump void pre-pay (606) 392gas pumps authorize all (601) 392gas pumps emergency stop all pumps (608) 392gas pumps test operation (905) 394GB (group item begin record) 93gift card payment (tender) record 64gift card payment (tender) record with encryption 65gift card record (non-merchandise) 43, 45gift card record with encryption (non-merchandise) 45gift card record with extended fields (non-merchandise) 47gift card record with extended fields with encryption
(non-merchandise) 49gift receipt (162) 383gift receipt parameters 285glossary for POS.ini file settings 380group item begin record 93group total record 91group total record part 2 92group total record part 3, total with cvtlog file 93group total record part 4, total part 2 with cvtlog file 93
HH (transaction fee record) 94Harmonic Systems credit authorization 371Harmonic Systems specific record formats (credit
authorization) 371header and trailer for receipt (12) 381header record 33, 101
payroll clock in/out export file 114purchase order file 118
history report for end-of-day (904) 394
II (merchandise sale record) 37I2 (merchandise sale record part 2) 38I3 (Merchandise sale) 40I4 (Merchandise sale) 40I5 (Merchandise sale) 40identify gift card (723) 393integrated debit parameters 335integrated debit POS.ini parameters
BYPASS_MESSAGE 337BYPASS_QUESTION 337CASHBACK_DENOM_MESSAGE 336CASHBACK_DENOM_OTHER 336CASHBACK_DENOM_TITLE 336CASHBACK_MESSAGE 336CASHBACK_NUMERIC_KEY_MESSAGE 336
CASHBACK_QUESTION 336SELECT_ACCOUNT_MESSAGE 337VERIFY_AMOUNT_MESSAGE 336
inventory bucket definition file format (Store Manager) 151inventory bucket movement definition file format (Store
Manager) 152inventory control file format (Store Manager) 153inventory count file format (physical inventory) 154inventory counts record 85inventory manual adjustment record 86inventory package size conversion record 86inventory special note record 85
note types 85inventory upload file format 123inventory upload trigger file 123inventory upload trigger file format 157item manual tax 99item tax rate (127) 383item validation (215) 385IX (item manual tax) 99
Jjurisdiction ID table 158jurisdiction table 158jurisdiction tax lookup (720) 393jurisdiction tax tables 159
KK (pick up/loan record) 74KEYINDEX.EXE 434
LL2 (pending transaction total record part 2) 57L3 (pending transaction total record part 3) 58L4 (LT with cvtlog file) 58L5 (L2 with cvtlog file) 58L6 (L3 with cvtlog file) 59LA (pending transaction admin record) 56languages 160last business date 76, 77launch third-party application (651-700) 393layoutx.txt format
THRESHOLDPROFILE 291link transaction file records 161list diagnostic manager functions (1) 381list manager codes (0) 381LOCAL.ini file 208logoff (742) 393logon (741) 393loyalty Allegiance configuration table 162loyalty component configuration table 162loyalty points adjustments (702) 393loyalty program eligibility table 166loyalty program records 163loyalty program table 165loyalty, customer points table 132
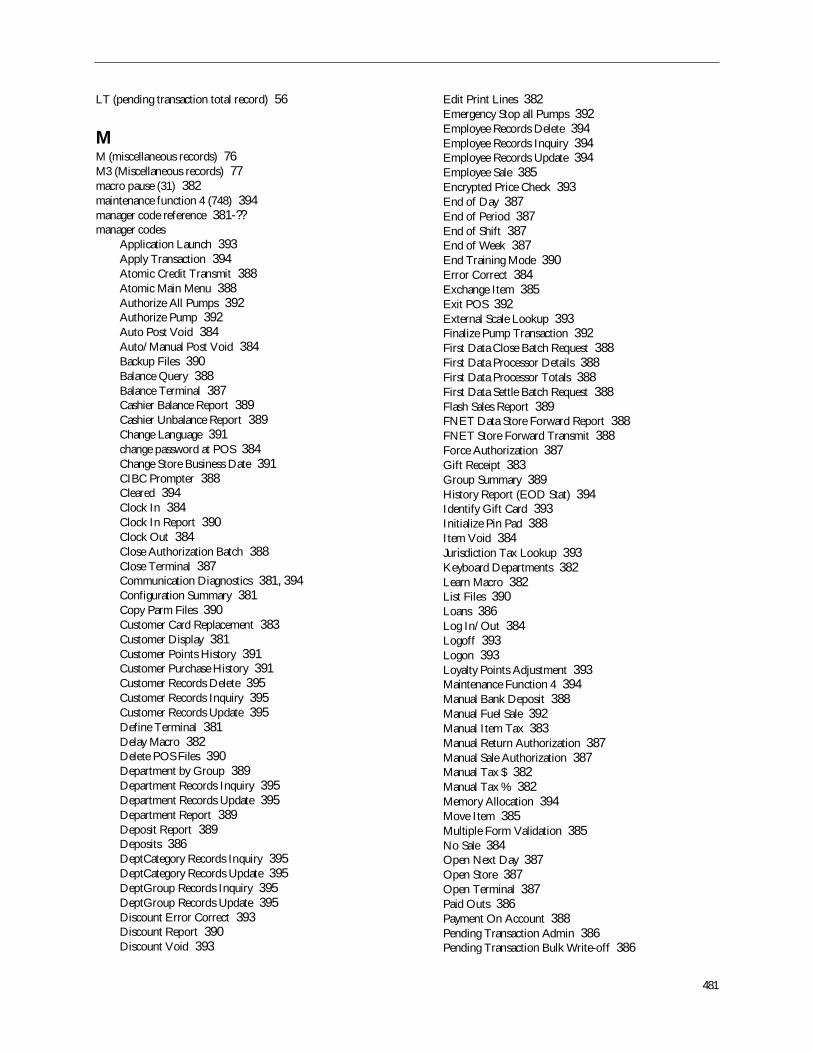
481
LT (pending transaction total record) 56
MM (miscellaneous records) 76M3 (Miscellaneous records) 77macro pause (31) 382maintenance function 4 (748) 394manager code reference 381-??manager codes
Application Launch 393Apply Transaction 394Atomic Credit Transmit 388Atomic Main Menu 388Authorize All Pumps 392Authorize Pump 392Auto Post Void 384Auto/Manual Post Void 384Backup Files 390Balance Query 388Balance Terminal 387Cashier Balance Report 389Cashier Unbalance Report 389Change Language 391change password at POS 384Change Store Business Date 391CIBC Prompter 388Cleared 394Clock In 384Clock In Report 390Clock Out 384Close Authorization Batch 388Close Terminal 387Communication Diagnostics 381, 394Configuration Summary 381Copy Parm Files 390Customer Card Replacement 383Customer Display 381Customer Points History 391Customer Purchase History 391Customer Records Delete 395Customer Records Inquiry 395Customer Records Update 395Define Terminal 381Delay Macro 382Delete POS Files 390Department by Group 389Department Records Inquiry 395Department Records Update 395Department Report 389Deposit Report 389Deposits 386DeptCategory Records Inquiry 395DeptCategory Records Update 395DeptGroup Records Inquiry 395DeptGroup Records Update 395Discount Error Correct 393Discount Report 390Discount Void 393
Edit Print Lines 382Emergency Stop all Pumps 392Employee Records Delete 394Employee Records Inquiry 394Employee Records Update 394Employee Sale 385Encrypted Price Check 393End of Day 387End of Period 387End of Shift 387End of Week 387End Training Mode 390Error Correct 384Exchange Item 385Exit POS 392External Scale Lookup 393Finalize Pump Transaction 392First Data Close Batch Request 388First Data Processor Details 388First Data Processor Totals 388First Data Settle Batch Request 388Flash Sales Report 389FNET Data Store Forward Report 388FNET Store Forward Transmit 388Force Authorization 387Gift Receipt 383Group Summary 389History Report (EOD Stat) 394Identify Gift Card 393Initialize Pin Pad 388Item Void 384Jurisdiction Tax Lookup 393Keyboard Departments 382Learn Macro 382List Files 390Loans 386Log In/Out 384Logoff 393Logon 393Loyalty Points Adjustment 393Maintenance Function 4 394Manual Bank Deposit 388Manual Fuel Sale 392Manual Item Tax 383Manual Return Authorization 387Manual Sale Authorization 387Manual Tax $ 382Manual Tax % 382Memory Allocation 394Move Item 385Multiple Form Validation 385No Sale 384Open Next Day 387Open Store 387Open Terminal 387Paid Outs 386Payment On Account 388Pending Transaction Admin 386Pending Transaction Bulk Write-off 386
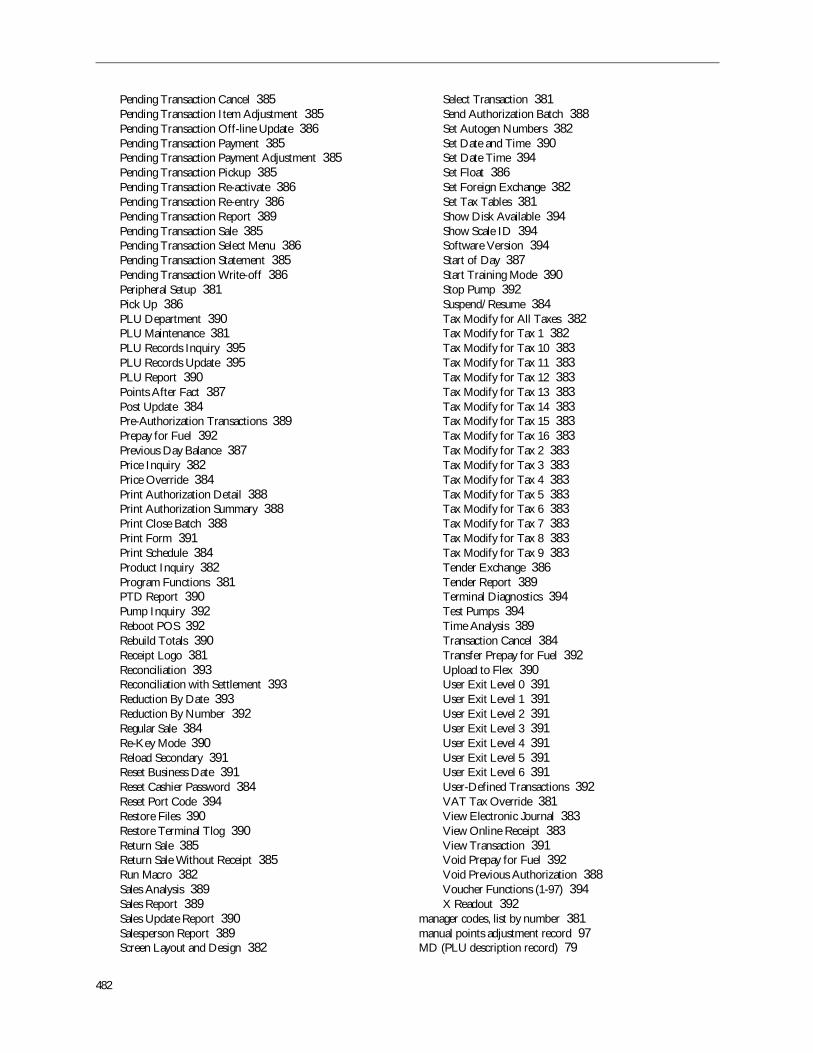
482
Pending Transaction Cancel 385Pending Transaction Item Adjustment 385Pending Transaction Off-line Update 386Pending Transaction Payment 385Pending Transaction Payment Adjustment 385Pending Transaction Pickup 385Pending Transaction Re-activate 386Pending Transaction Re-entry 386Pending Transaction Report 389Pending Transaction Sale 385Pending Transaction Select Menu 386Pending Transaction Statement 385Pending Transaction Write-off 386Peripheral Setup 381Pick Up 386PLU Department 390PLU Maintenance 381PLU Records Inquiry 395PLU Records Update 395PLU Report 390Points After Fact 387Post Update 384Pre-Authorization Transactions 389Prepay for Fuel 392Previous Day Balance 387Price Inquiry 382Price Override 384Print Authorization Detail 388Print Authorization Summary 388Print Close Batch 388Print Form 391Print Schedule 384Product Inquiry 382Program Functions 381PTD Report 390Pump Inquiry 392Reboot POS 392Rebuild Totals 390Receipt Logo 381Reconciliation 393Reconciliation with Settlement 393Reduction By Date 393Reduction By Number 392Regular Sale 384Re-Key Mode 390Reload Secondary 391Reset Business Date 391Reset Cashier Password 384Reset Port Code 394Restore Files 390Restore Terminal Tlog 390Return Sale 385Return Sale Without Receipt 385Run Macro 382Sales Analysis 389Sales Report 389Sales Update Report 390Salesperson Report 389Screen Layout and Design 382
Select Transaction 381Send Authorization Batch 388Set Autogen Numbers 382Set Date and Time 390Set Date Time 394Set Float 386Set Foreign Exchange 382Set Tax Tables 381Show Disk Available 394Show Scale ID 394Software Version 394Start of Day 387Start Training Mode 390Stop Pump 392Suspend/Resume 384Tax Modify for All Taxes 382Tax Modify for Tax 1 382Tax Modify for Tax 10 383Tax Modify for Tax 11 383Tax Modify for Tax 12 383Tax Modify for Tax 13 383Tax Modify for Tax 14 383Tax Modify for Tax 15 383Tax Modify for Tax 16 383Tax Modify for Tax 2 383Tax Modify for Tax 3 383Tax Modify for Tax 4 383Tax Modify for Tax 5 383Tax Modify for Tax 6 383Tax Modify for Tax 7 383Tax Modify for Tax 8 383Tax Modify for Tax 9 383Tender Exchange 386Tender Report 389Terminal Diagnostics 394Test Pumps 394Time Analysis 389Transaction Cancel 384Transfer Prepay for Fuel 392Upload to Flex 390User Exit Level 0 391User Exit Level 1 391User Exit Level 2 391User Exit Level 3 391User Exit Level 4 391User Exit Level 5 391User Exit Level 6 391User-Defined Transactions 392VAT Tax Override 381View Electronic Journal 383View Online Receipt 383View Transaction 391Void Prepay for Fuel 392Void Previous Authorization 388Voucher Functions (1-97) 394X Readout 392
manager codes, list by number 381manual points adjustment record 97MD (PLU description record) 79
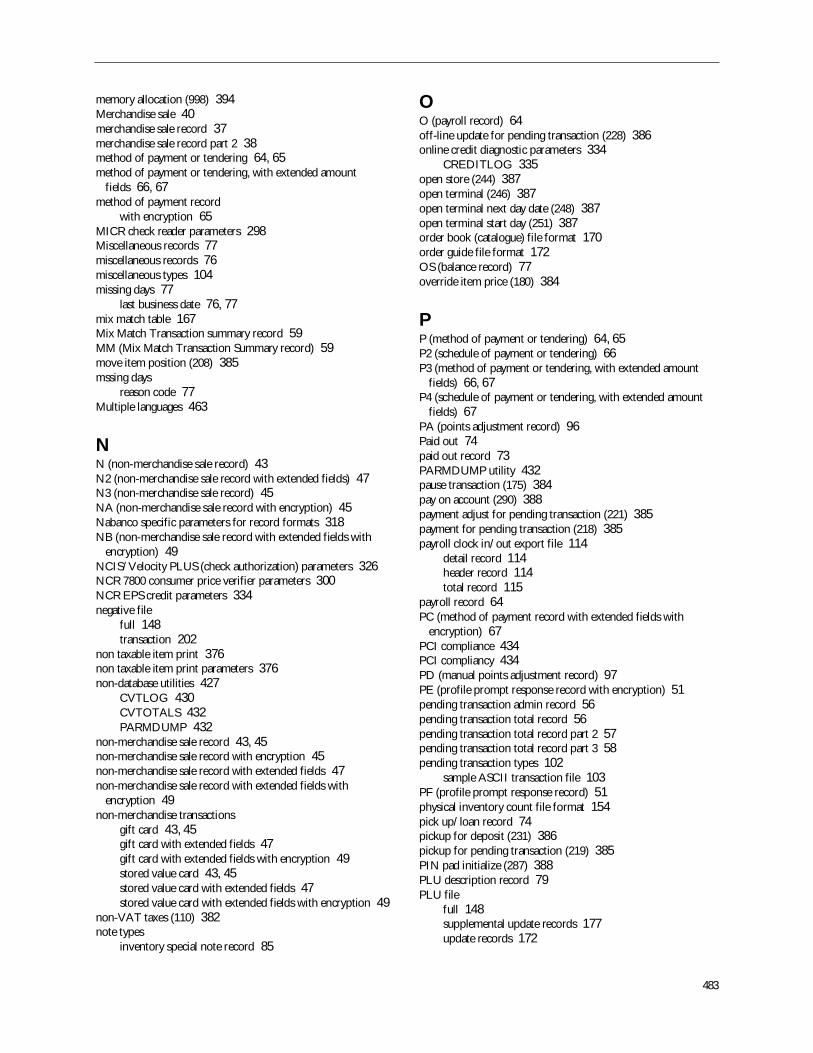
483
memory allocation (998) 394Merchandise sale 40merchandise sale record 37merchandise sale record part 2 38method of payment or tendering 64, 65method of payment or tendering, with extended amount
fields 66, 67method of payment record
with encryption 65MICR check reader parameters 298Miscellaneous records 77miscellaneous records 76miscellaneous types 104missing days 77
last business date 76, 77mix match table 167Mix Match Transaction summary record 59MM (Mix Match Transaction Summary record) 59move item position (208) 385mssing days
reason code 77Multiple languages 463
NN (non-merchandise sale record) 43N2 (non-merchandise sale record with extended fields) 47N3 (non-merchandise sale record) 45NA (non-merchandise sale record with encryption) 45Nabanco specific parameters for record formats 318NB (non-merchandise sale record with extended fields with
encryption) 49NCIS/Velocity PLUS (check authorization) parameters 326NCR 7800 consumer price verifier parameters 300NCR EPS credit parameters 334negative file
full 148transaction 202
non taxable item print 376non taxable item print parameters 376non-database utilities 427
CVTLOG 430CVTOTALS 432PARMDUMP 432
non-merchandise sale record 43, 45non-merchandise sale record with encryption 45non-merchandise sale record with extended fields 47non-merchandise sale record with extended fields with
encryption 49non-merchandise transactions
gift card 43, 45gift card with extended fields 47gift card with extended fields with encryption 49stored value card 43, 45stored value card with extended fields 47stored value card with extended fields with encryption 49
non-VAT taxes (110) 382note types
inventory special note record 85
OO (payroll record) 64off-line update for pending transaction (228) 386online credit diagnostic parameters 334
CREDITLOG 335open store (244) 387open terminal (246) 387open terminal next day date (248) 387open terminal start day (251) 387order book (catalogue) file format 170order guide file format 172OS (balance record) 77override item price (180) 384
PP (method of payment or tendering) 64, 65P2 (schedule of payment or tendering) 66P3 (method of payment or tendering, with extended amount
fields) 66, 67P4 (schedule of payment or tendering, with extended amount
fields) 67PA (points adjustment record) 96Paid out 74paid out record 73PARMDUMP utility 432pause transaction (175) 384pay on account (290) 388payment adjust for pending transaction (221) 385payment for pending transaction (218) 385payroll clock in/out export file 114
detail record 114header record 114total record 115
payroll record 64PC (method of payment record with extended fields with
encryption) 67PCI compliance 434PCI compliancy 434PD (manual points adjustment record) 97PE (profile prompt response record with encryption) 51pending transaction admin record 56pending transaction total record 56pending transaction total record part 2 57pending transaction total record part 3 58pending transaction types 102
sample ASCII transaction file 103PF (profile prompt response record) 51physical inventory count file format 154pick up/loan record 74pickup for deposit (231) 386pickup for pending transaction (219) 385PIN pad initialize (287) 388PLU description record 79PLU file
full 148supplemental update records 177update records 172
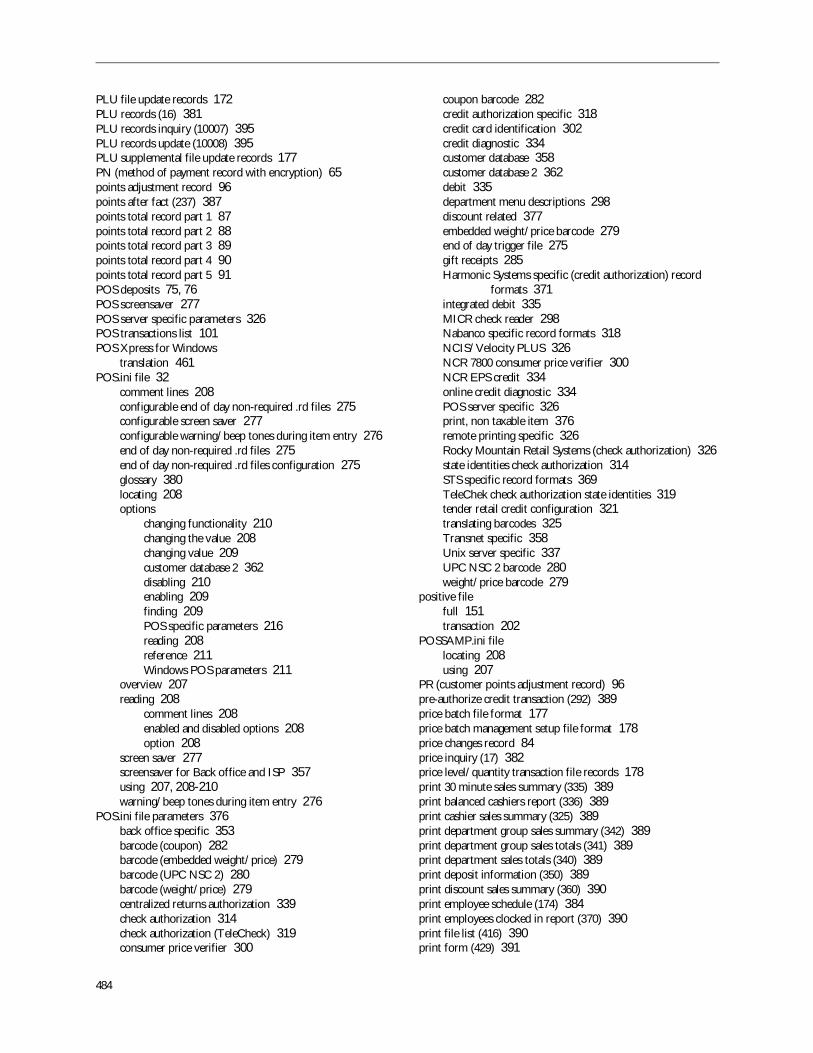
484
PLU file update records 172PLU records (16) 381PLU records inquiry (10007) 395PLU records update (10008) 395PLU supplemental file update records 177PN (method of payment record with encryption) 65points adjustment record 96points after fact (237) 387points total record part 1 87points total record part 2 88points total record part 3 89points total record part 4 90points total record part 5 91POS deposits 75, 76POS screensaver 277POS server specific parameters 326POS transactions list 101POS Xpress for Windows
translation 461POS.ini file 32
comment lines 208configurable end of day non-required .rd files 275configurable screen saver 277configurable warning/beep tones during item entry 276end of day non-required .rd files 275end of day non-required .rd files configuration 275glossary 380locating 208options
changing functionality 210changing the value 208changing value 209customer database 2 362disabling 210enabling 209finding 209POS specific parameters 216reading 208reference 211Windows POS parameters 211
overview 207reading 208
comment lines 208enabled and disabled options 208option 208
screen saver 277screensaver for Back office and ISP 357using 207, 208-210warning/beep tones during item entry 276
POS.ini file parameters 376back office specific 353barcode (coupon) 282barcode (embedded weight/price) 279barcode (UPC NSC 2) 280barcode (weight/price) 279centralized returns authorization 339check authorization 314check authorization (TeleCheck) 319consumer price verifier 300
coupon barcode 282credit authorization specific 318credit card identification 302credit diagnostic 334customer database 358customer database 2 362debit 335department menu descriptions 298discount related 377embedded weight/price barcode 279end of day trigger file 275gift receipts 285Harmonic Systems specific (credit authorization) record
formats 371integrated debit 335MICR check reader 298Nabanco specific record formats 318NCIS/Velocity PLUS 326NCR 7800 consumer price verifier 300NCR EPS credit 334online credit diagnostic 334POS server specific 326print, non taxable item 376remote printing specific 326Rocky Mountain Retail Systems (check authorization) 326state identities check authorization 314STS specific record formats 369TeleChek check authorization state identities 319tender retail credit configuration 321translating barcodes 325Transnet specific 358Unix server specific 337UPC NSC 2 barcode 280weight/price barcode 279
positive filefull 151transaction 202
POSSAMP.ini filelocating 208using 207
PR (customer points adjustment record) 96pre-authorize credit transaction (292) 389price batch file format 177price batch management setup file format 178price changes record 84price inquiry (17) 382price level/quantity transaction file records 178print 30 minute sales summary (335) 389print balanced cashiers report (336) 389print cashier sales summary (325) 389print department group sales summary (342) 389print department group sales totals (341) 389print department sales totals (340) 389print deposit information (350) 389print discount sales summary (360) 390print employee schedule (174) 384print employees clocked in report (370) 390print file list (416) 390print form (429) 391
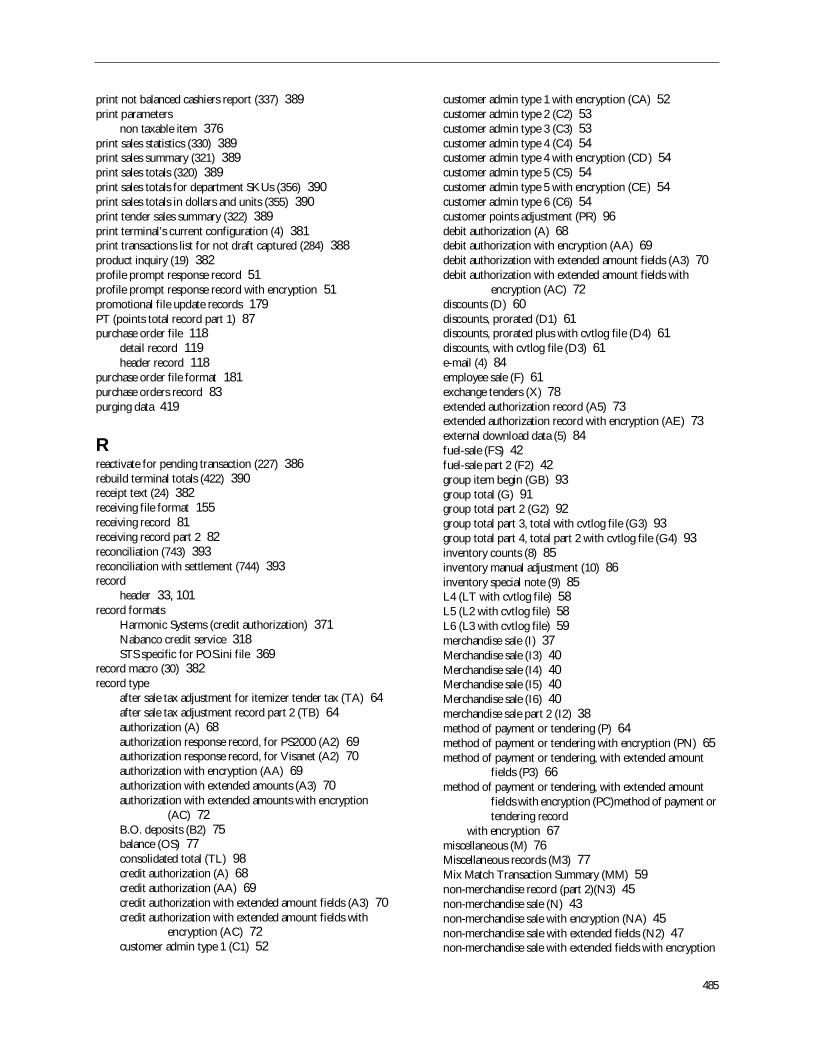
485
print not balanced cashiers report (337) 389print parameters
non taxable item 376print sales statistics (330) 389print sales summary (321) 389print sales totals (320) 389print sales totals for department SKUs (356) 390print sales totals in dollars and units (355) 390print tender sales summary (322) 389print terminal’s current configuration (4) 381print transactions list for not draft captured (284) 388product inquiry (19) 382profile prompt response record 51profile prompt response record with encryption 51promotional file update records 179PT (points total record part 1) 87purchase order file 118
detail record 119header record 118
purchase order file format 181purchase orders record 83purging data 419
Rreactivate for pending transaction (227) 386rebuild terminal totals (422) 390receipt text (24) 382receiving file format 155receiving record 81receiving record part 2 82reconciliation (743) 393reconciliation with settlement (744) 393record
header 33, 101record formats
Harmonic Systems (credit authorization) 371Nabanco credit service 318STS specific for POS.ini file 369
record macro (30) 382record type
after sale tax adjustment for itemizer tender tax (TA) 64after sale tax adjustment record part 2 (TB) 64authorization (A) 68authorization response record, for PS2000 (A2) 69authorization response record, for Visanet (A2) 70authorization with encryption (AA) 69authorization with extended amounts (A3) 70authorization with extended amounts with encryption
(AC) 72B.O. deposits (B2) 75balance (OS) 77consolidated total (TL) 98credit authorization (A) 68credit authorization (AA) 69credit authorization with extended amount fields (A3) 70credit authorization with extended amount fields with
encryption (AC) 72customer admin type 1 (C1) 52
customer admin type 1 with encryption (CA) 52customer admin type 2 (C2) 53customer admin type 3 (C3) 53customer admin type 4 (C4) 54customer admin type 4 with encryption (CD) 54customer admin type 5 (C5) 54customer admin type 5 with encryption (CE) 54customer admin type 6 (C6) 54customer points adjustment (PR) 96debit authorization (A) 68debit authorization with encryption (AA) 69debit authorization with extended amount fields (A3) 70debit authorization with extended amount fields with
encryption (AC) 72discounts (D) 60discounts, prorated (D1) 61discounts, prorated plus with cvtlog file (D4) 61discounts, with cvtlog file (D3) 61e-mail (4) 84employee sale (F) 61exchange tenders (X) 78extended authorization record (A5) 73extended authorization record with encryption (AE) 73external download data (5) 84fuel-sale (FS) 42fuel-sale part 2 (F2) 42group item begin (GB) 93group total (G) 91group total part 2 (G2) 92group total part 3, total with cvtlog file (G3) 93group total part 4, total part 2 with cvtlog file (G4) 93inventory counts (8) 85inventory manual adjustment (10) 86inventory special note (9) 85L4 (LT with cvtlog file) 58L5 (L2 with cvtlog file) 58L6 (L3 with cvtlog file) 59merchandise sale (I) 37Merchandise sale (I3) 40Merchandise sale (I4) 40Merchandise sale (I5) 40Merchandise sale (I6) 40merchandise sale part 2 (I2) 38method of payment or tendering (P) 64method of payment or tendering with encryption (PN) 65method of payment or tendering, with extended amount
fields (P3) 66method of payment or tendering, with extended amount
fields with encryption (PC)method of payment ortendering record
with encryption 67miscellaneous (M) 76Miscellaneous records (M3) 77Mix Match Transaction Summary (MM) 59non-merchandise record (part 2)(N3) 45non-merchandise sale (N) 43non-merchandise sale with encryption (NA) 45non-merchandise sale with extended fields (N2) 47non-merchandise sale with extended fields with encryption
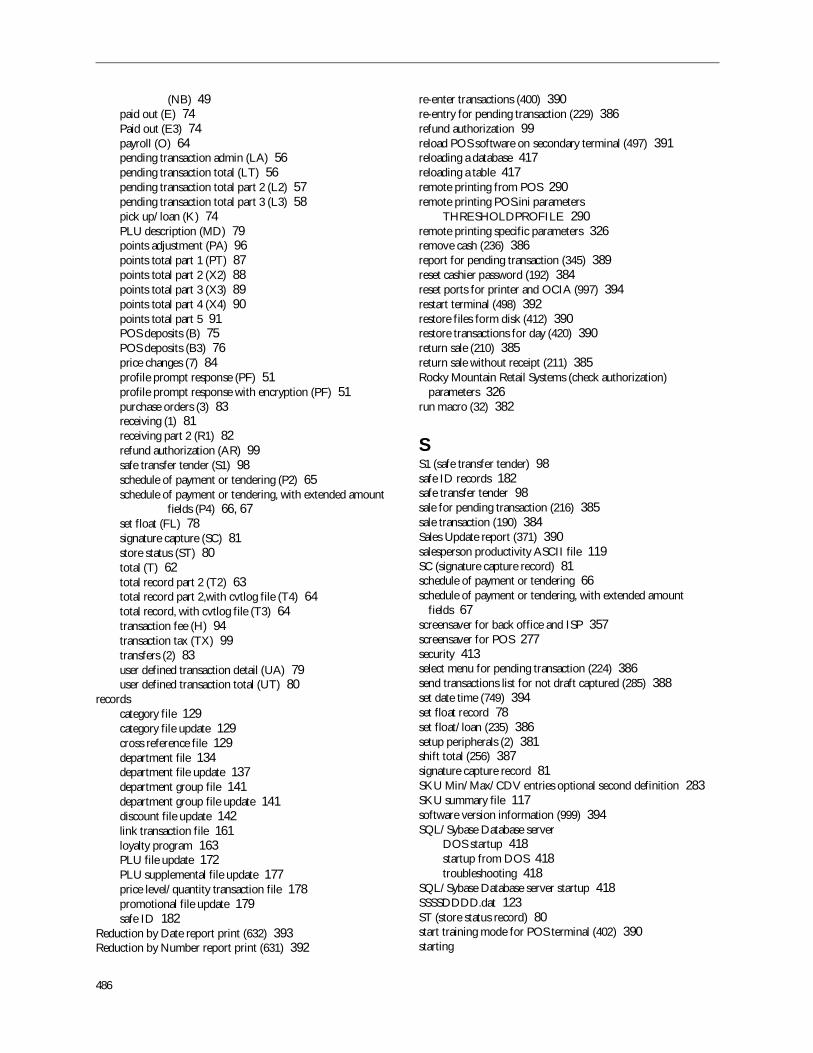
486
(NB) 49paid out (E) 74Paid out (E3) 74payroll (O) 64pending transaction admin (LA) 56pending transaction total (LT) 56pending transaction total part 2 (L2) 57pending transaction total part 3 (L3) 58pick up/loan (K) 74PLU description (MD) 79points adjustment (PA) 96points total part 1 (PT) 87points total part 2 (X2) 88points total part 3 (X3) 89points total part 4 (X4) 90points total part 5 91POS deposits (B) 75POS deposits (B3) 76price changes (7) 84profile prompt response (PF) 51profile prompt response with encryption (PF) 51purchase orders (3) 83receiving (1) 81receiving part 2 (R1) 82refund authorization (AR) 99safe transfer tender (S1) 98schedule of payment or tendering (P2) 65schedule of payment or tendering, with extended amount
fields (P4) 66, 67set float (FL) 78signature capture (SC) 81store status (ST) 80total (T) 62total record part 2 (T2) 63total record part 2,with cvtlog file (T4) 64total record, with cvtlog file (T3) 64transaction fee (H) 94transaction tax (TX) 99transfers (2) 83user defined transaction detail (UA) 79user defined transaction total (UT) 80
recordscategory file 129category file update 129cross reference file 129department file 134department file update 137department group file 141department group file update 141discount file update 142link transaction file 161loyalty program 163PLU file update 172PLU supplemental file update 177price level/quantity transaction file 178promotional file update 179safe ID 182
Reduction by Date report print (632) 393Reduction by Number report print (631) 392
re-enter transactions (400) 390re-entry for pending transaction (229) 386refund authorization 99reload POS software on secondary terminal (497) 391reloading a database 417reloading a table 417remote printing from POS 290remote printing POS.ini parameters
THRESHOLDPROFILE 290remote printing specific parameters 326remove cash (236) 386report for pending transaction (345) 389reset cashier password (192) 384reset ports for printer and OCIA (997) 394restart terminal (498) 392restore files form disk (412) 390restore transactions for day (420) 390return sale (210) 385return sale without receipt (211) 385Rocky Mountain Retail Systems (check authorization)
parameters 326run macro (32) 382
SS1 (safe transfer tender) 98safe ID records 182safe transfer tender 98sale for pending transaction (216) 385sale transaction (190) 384Sales Update report (371) 390salesperson productivity ASCII file 119SC (signature capture record) 81schedule of payment or tendering 66schedule of payment or tendering, with extended amount
fields 67screensaver for back office and ISP 357screensaver for POS 277security 413select menu for pending transaction (224) 386send transactions list for not draft captured (285) 388set date time (749) 394set float record 78set float/loan (235) 386setup peripherals (2) 381shift total (256) 387signature capture record 81SKU Min/Max/CDV entries optional second definition 283SKU summary file 117software version information (999) 394SQL/Sybase Database server
DOS startup 418startup from DOS 418troubleshooting 418
SQL/Sybase Database server startup 418SSSSDDDD.dat 123ST (store status record) 80start training mode for POS terminal (402) 390starting
487
trickle process 398Xpress server 398
state identities check authorization parameters 314statement for pending transaction (217) 385stopping
Xpress server 399store file format (Store Manager) 184store in-store transfers in file format 185Store Manager
translation 462store reset 458store status record 80store transfers in file format 184store transfers out file format 186stored value card payment (tender) record 64stored value card payment (tender) record with encryption 65stored value card record (non-merchandise) 43, 45stored value card record with encryption (non-merchandise) 45stored value card record with extended fields
(non-merchandise) 47stored value card record with extended fields with encryption
(non-merchandise) 49STS specific parameters for record formats 369summary file
closing totals 116department 115SKU 117
supplemental attributes definition file format 187supplemental code types file format 188supplemental codes contents file format 188supplemental codes file format 188supplemental data file format 128, 172, 188supptone 277
TT (total record) 62T2 (total record part 2) 63T3 (total record part 3, T with cvtlog file) 64T4 (total record part 4, total part 2 with cvtlog file) 64TA (after sale tax adjuster for itemizer tender tax) 64tables
backoffice parameter definition 128, 188backoffice parameter format 128backoffice parameter value 128customer points for loyalty 132jurisdiction 158jurisdiction ID 158languages 160loyalty Allegiance configuration 162loyalty component configuration 162loyalty program 165loyalty program eligibility 166loyalty, customer points for 132mix match 167reloading 417tax 189tax (jurisdiction) 159
tare weight 189
tare weight record fields 189tax
jurisdiction tables 159Tax 1 enable (111) 382Tax 10 enable (120) 383Tax 11 enable (121) 383Tax 12 enable (122) 383Tax 13 enable (123) 383Tax 14 enable (124) 383Tax 15 enable (125) 383Tax 16 enable (126) 383Tax 2 enable (112) 383Tax 3 enable (113) 383Tax 4 enable (114) 383Tax 5 enable (115) 383Tax 6 enable (116) 383Tax 7 enable (117) 383Tax 8 enable (118) 383Tax 9 enable (119) 383tax amount (109) 382tax rates (108) 382tax tables 189tax tables (14) 381TB (after sale tax adjustment record part 2) 64TeleCheck check authorization state identities 319tender denominations file format 190tender exchange (234) 386tender file format 191tender record 64tender record with encryption 65tender retail credit configuration parameters 321terminal group file
department by cashier 117timed sales analysis ASCII file 122TL (consolidated total records 98TLOG file 32Tmxpurge utility 419total record 62
payroll clock in/out export file 115total record part 2 63total record part 3,T with cvtlog 64total record part 4, total part 2 with cvtlog file 64total types 108
closing totals summary file 116transaction employee file 199transaction fee record 94transaction file
employee 199link 161negative 202positive 202price level/quantity 178
transaction modifiersvalid transaction types 101
transaction negative file 202transaction positive file 202transaction tax 99transaction types
discounts 112

488
miscellaneous 104pending 102POS list 101total 108user defined transaction detail record 80valid 101
transaction void flagsvalid transaction types 101
transactions apply (909) 394transfers record 83translating barcode parameters 325translation ??-463
POS Xpress for Windows 461Store Manager 462
Translation support 463transmit deposit to bank (268) 388Transmit upload data 390Transnet specific parameters 358transportation permit printing 290troubleshooting
end of day. see end of daySQL/Sybase Database server 418
TX (transaction tax) 99
UUA (user defined transaction detail record) 79Unix server specific parameters 337unloading a database 416UPC NSC 2 barcode parameters 280UPC NSC5 coupon barcode additional parameters 282update records
category file 129department file 137department group file 141discount file 142PLU file 172PLU supplemental file 177promotional 179
upload to disk (408) 390use department file format 204user defined transaction detail record 79
transaction types 80user defined transaction total record 80user-defined transaction (501-599) 392UT (user defined transaction total record) 80utilities
non-database 427
Vvalid transaction types 101
transaction modifiers 101transaction void flags 101
validating databases 414VAT tax override (3) 381vendor file format (Store Manager) 205vendor/SKU file format 205view journal (160) 383
view online receipt (168) 383view transaction (430) 391viewing databases 414void current day transaction (205) 384void item from sale (202) 384void previous credit authorization (266) 388void previous day transaction (204) 384voucher functions (801-897) 394
Wwarning/beep tones configuration for item entry 276weight/price barcode parameters 280write off for pending transaction (223) 386
XX (exchange tenders) 78X report print (630) 392X2 (points total record part 2) 88X3 (points total record part 3) 89X4 (points total record part 4) 90X5 (points total record part 5) 91Xpress server 397
starting 398stopping 399


