Embed Size (px)
Citation preview

User’s Guide Ref. no: 303035E Fourth Edition, February 2007
Rosemount TankMaster.net Configuration
www.rosemount-tg.com

Rosemount TankMaster.net Configuration
User’s Guide Fourth Edition
Copyright © 2001 – 2007 Rosemount Tank Radar AB
3 Rosemount TankMaster.net Fourth Edition, February 2007
Copyright © 2001 – 2007 Rosemount Tank Radar AB
Copyright law and international treaties protect this program. Unauthorized reproduction, distribution of this program or any portion of it may result in severe civil and criminal penalties, and will be prosecuted to the maximum extent possible under the law.
Rosemount TankMaster.net 4 Fourth Edition, February 2007
Overview of Manuals
Overview of Manuals TMn2Installation.pdf
This manual describes the procedure for installing TankMaster.net on Windows 2000 Server, Windows XP Pro and Windows 2003 Server with Internet Information Services (IIS). Before installing TankMaster.net Server, minimum system requirements have to be met that are mentioned in this manual. The manual also presents the minimum system requirements for installing TankMaster.net.
TMn2Config.pdf
This manual describes the procedure for configuring the TankMaster.net Server. The information that is viewed on the TankMaster.net Website/WAP website is set by the Administrator using the TankMaster.net Configuration application. The manual describes how the Administrator can create, edit, delete and assign rights to the Users and Groups for viewing tanks.
TMn2DataCollector.pdf
This manual describes the DataCollector application, which displays the Live and Static data of the tanks polled with the current date and time. The manual also explains how to start and end the application manually or automatically. The data collected by this application is displayed on the TankMaster.net Website/WAP websites.
TMn2Website.pdf
This manual provides a detailed description of various menus, products, information etc which are viewed by the user on the website. The user can change limited details of his profile, view details of all products, individual tanks, view graphs and download tank information in Excel format.
TMn2UserStatus.pdf
This manual gives a detailed description of the information that is available on users who are logged on to the TMn2Web website. It also displays the current page being viewed by the user, the session Id assigned, session start time and session expiry time. Only the Administrator can access this website.
Rosemount TankMaster.net 5 Fourth Edition, February 2007

Overview of Manuals
TMn2Wapsite.pdf This manual describes how the TankMaster.net WAP website works using an Internet browser. It also describes how to view details of individual tanks and product groups.
6 Rosemount TankMaster.net Fourth Edition, February 2007
Contents
Contents
1.0 Introduction .........................................................................................9
1.1 Overview..........................................................................................9 1.1.1 Map Servers and Tanks................................................................9 1.1.2 Setup Users ..............................................................................10 1.1.3 Setup Groups ............................................................................10 1.1.4 Setup HTML Info .....................................................................10
2.0 Menus ...............................................................................................11 2.1 TankMaster.net Configuration menus................................................11
2.1.1 File Menu.................................................................................11 2.1.2 Advanced Menu........................................................................12 2.1.3 Help Menu ...............................................................................13
2.2 Live Data Items menus ....................................................................14 2.2.1 File Menu.................................................................................14 2.2.2 Help Menu ...............................................................................15
2.3 Static Data Items menus...................................................................16 2.3.1 File Menu.................................................................................16 2.3.2 Help Menu ...............................................................................17
3.0 Status bar...........................................................................................18 4.0 Configuration of the TMn2Config application.......................................19
4.1 Map Servers and Tanks....................................................................20 4.1.1 To map TankMaster Server to your local machine........................23 4.1.2 To Unmap the TankMaster Server from the local machine ............24
4.2 Setup Users ....................................................................................24 4.2.1 To Add a User ..........................................................................25 4.2.2 To Edit a User...........................................................................26 4.2.3 To Delete a User .......................................................................27 4.2.4 To assign rights to the User ........................................................27
4.3 Setup Groups ..................................................................................27 4.3.1 To Add a Group ........................................................................29 4.3.2 To Edit A Group .......................................................................31 4.3.3 To Delete a Group.....................................................................33
4.4 Setup HTML info............................................................................34 4.4.1 To set the company name for display on the website ....................34 4.4.2 To set the name of the location of this site ...................................34 4.4.3 To display the ‘Support’ Message...............................................34 4.4.4 To set the ‘Support’ email address ..............................................35 4.4.5 To set the ‘Support’ phone number .............................................35 4.4.6 To set the ‘Support’ fax number .................................................35 4.4.7 To set the Company Logo ..........................................................35
4.5 Data Polling....................................................................................35 4.5.1 Live Data Items ........................................................................36 4.5.2 Static Data Items .......................................................................37
Rosemount TankMaster.net 7 Fourth Edition, February 2007

Contents
5.0 Keyboard Map ...................................................................................39 5.1 Function Keys for TankMaster.net Configuration window ..................39 5.2 Action Keys for TankMaster.net Configuration window .....................39
6.0 Glossary ............................................................................................41 7.0 Troubleshooting .................................................................................46
8 Rosemount TankMaster.net Fourth Edition, February 2007
Introduction
1.0 Introduction
1.1 Overview
The main aim of TankMaster.net is to make data of the tanks and products available to users all over the world from offices, residences or WAP phones. This data is available to users who are assigned a Username and Password by the administrator. Users can only read the data available on the website and view/download data in the form of Excel spreadsheets for editing. The configuration of TankMaster.net is achieved with the help of the TankMaster.net Configuration and TankMaster.net DataCollector applications. TankMaster.net Configuration The TMn2Config application is used to create users, groups and set up a connection between machines on which the TankMaster Server and the TankMaster.net Server have been installed. The topics mentioned below, help the administrator to configure the TankMaster.net website. The administrator has to setup the following options in the TankMaster.net Configuration. Only the administrator can login to this configuration. The default username and password are admin. It is recommended that the password be changed at the earliest. Illegal Characters Certain characters cannot be used for Excel Sheet names (in TMn, the Product names are used as Sheet names). No product can have any of the following characters: \, /, ?, *, [, ]. The product name should not exceed 31 characters. Prohibited characters for all of TMn are: |, *, %, <, >, {,},’ (single quote), “ (double quote). None of the User names, Group names, Server Names, Server Aliases, Tank Names, Tank Aliases, Titles or Descriptions can use any of the above characters. A few ANSII characters are invalid in UTF-8 and UTF-16 (for example, ASCII 160). These will give trouble in Web/Wap pages.
1.1.1 Map Servers and Tanks
The Map Servers & Tanks tab allows the administrator to map Servers to the client machine. The Mapping of Servers on the client machine allows the administrator to connect to the TankMaster Server. This can be installed on various client machines that are connected on the Local Area Network (LAN). You can access the tanks available in the TankMaster Server only if the TankMaster Server is mapped to your local machine. To view the data of the tanks on the web site you have to map at least one Server on the client machine. The administrator can also control the Properties
Rosemount TankMaster.net 9 Fourth Edition, February 2007
Introduction
and Refresh Rates of the Live and Static Tank Data of the tanks on a TankMaster Server. Refer to Section 4.1 for details on Mapping Servers and Tanks.
1.1.2 Setup Users
The Setup Users tab allows the administrator to add, edit and delete users. Only these users have access to the TankMaster.net website. The last user in the group of administrators cannot be deleted. The administrator assigns the users their LoginID and Passwords in the Setup Users tab of the TankMaster.net Configuration. The users created by the administrator form a group. A user can be assigned to more than one group. When TankMaster.net is installed, two default users are created namely, Admin and DEMO. To create groups the administrator will have to use the Setup Groups option. A User Name cannot be duplicated and must be unique. Refer to Section 4.2 for details on Setting up Users.
1.1.3 Setup Groups
The Setup Groups tab allows the administrator to create groups by adding existing users. The users of the group will be able to view, on the website, details of the tanks that are assigned to them. When TankMaster.net is installed on the machine, two default groups are created in the Setup Groups tab, Administrators and DEMO GROUP. The users and tanks in these groups can be added and removed. The Administrators group cannot be deleted. A group name cannot be duplicated and must be unique. Refer to Section 4.3 for details on Setting up Groups.
1.1.4 Setup HTML Info
The Setup HTML Info tab of the TankMaster.net Configuration allows the administrator to set up the Company’s name and location that will be displayed on the TankMaster.net website on the top left corner. This Company name and location of the site will be the one to which the TankMaster.net belongs. The Setup HTML Info option allows the administrator to add the support email address, Fax number and Telephone number which will be displayed on the bottom left corner of the website. Refer to Section 4.4 for details on Setting up HTML Info.
Note! All configuration changes made in the TankMaster.net Configuration
application will be saved in the TMnConfig.mdb file located in the \ProgramFiles\Saab\TankMasternet\TMnData directory. This file contains details of mapped tanks, user and group details and info to be displayed on the TankMaster.net website.
10 Rosemount TankMaster.net Fourth Edition, February 2007
Menus
2.0 Menus
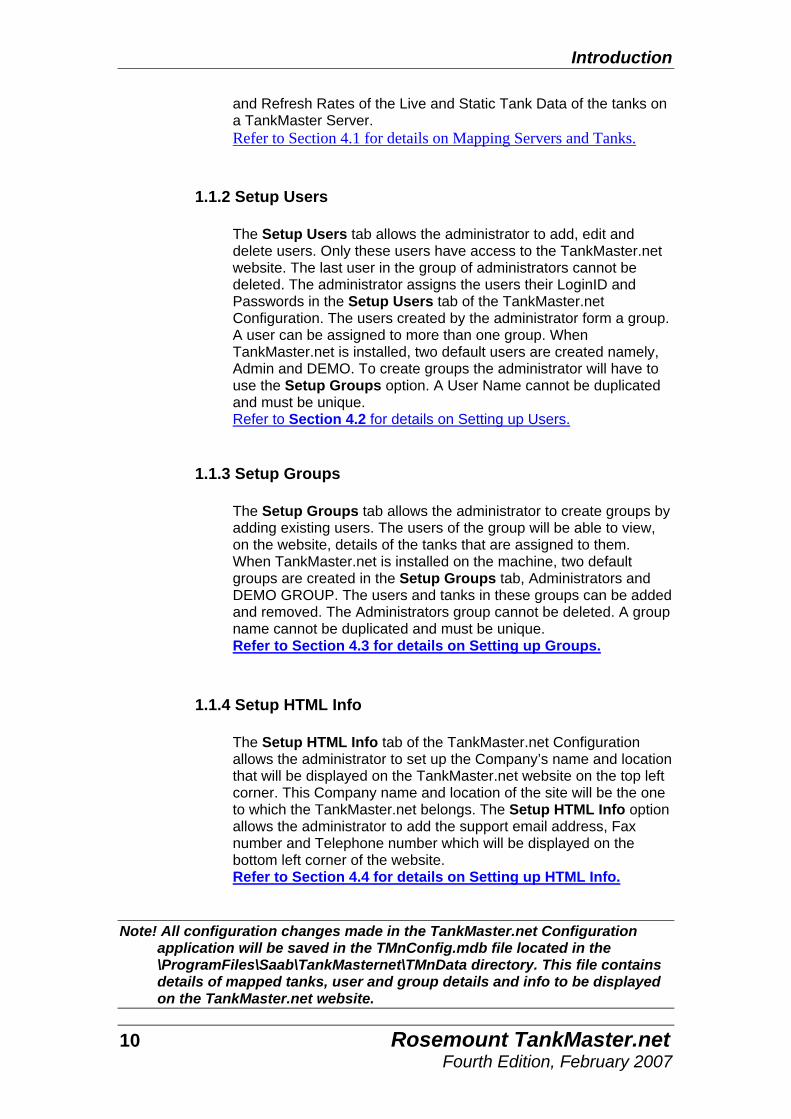
Menu bar
2.1 TankMaster.net Configuration menus
2.1.1 File Menu
The File menu has two sub menus Save / Apply and Exit / Cancel.
Rosemount TankMaster.net 11 Fourth Edition, February 2007
Menus
Save / Apply The Save /Apply sub menu saves the data entered by the administrator. Exit / Cancel The Exit / Cancel sub menu closes the application window.
2.1.2 Advanced Menu
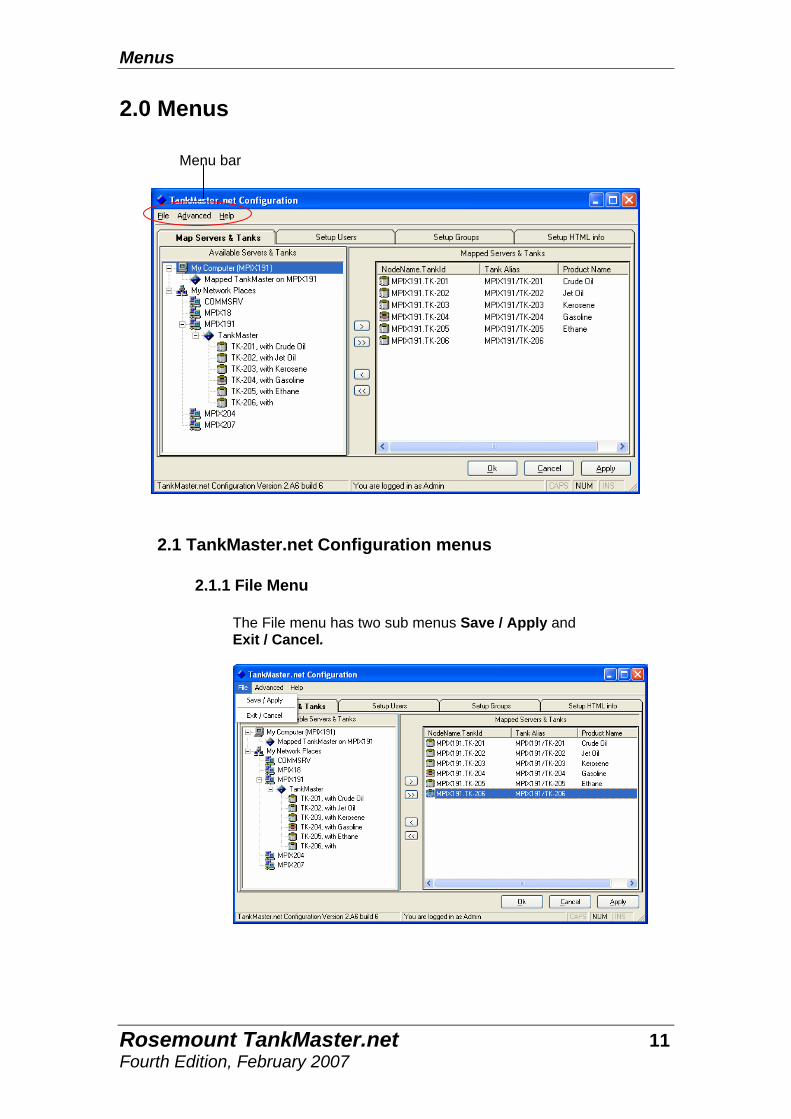
The Advanced menu has a sub menu called Data Polling. This option has two sub menus, Live Tank Data and Static Tank Data.
Live Tank Data The Live Tank Data option opens the Live Data Items window. It allows the administrator to select the OPC items for Current data. Refer to Section 4.5.1 for details on Live Tank Data. Static Tank Data The Static Tank Data option opens the Static Data Items window. It allows the administrator to select the OPC items for Static data. Refer to Section 4.5.2 for details on Static Tank Data.
12 Rosemount TankMaster.net Fourth Edition, February 2007
Menus
2.1.3 Help Menu
Note! Pressing the F1 key on the keyboard will take you to the help section of the relevant page.
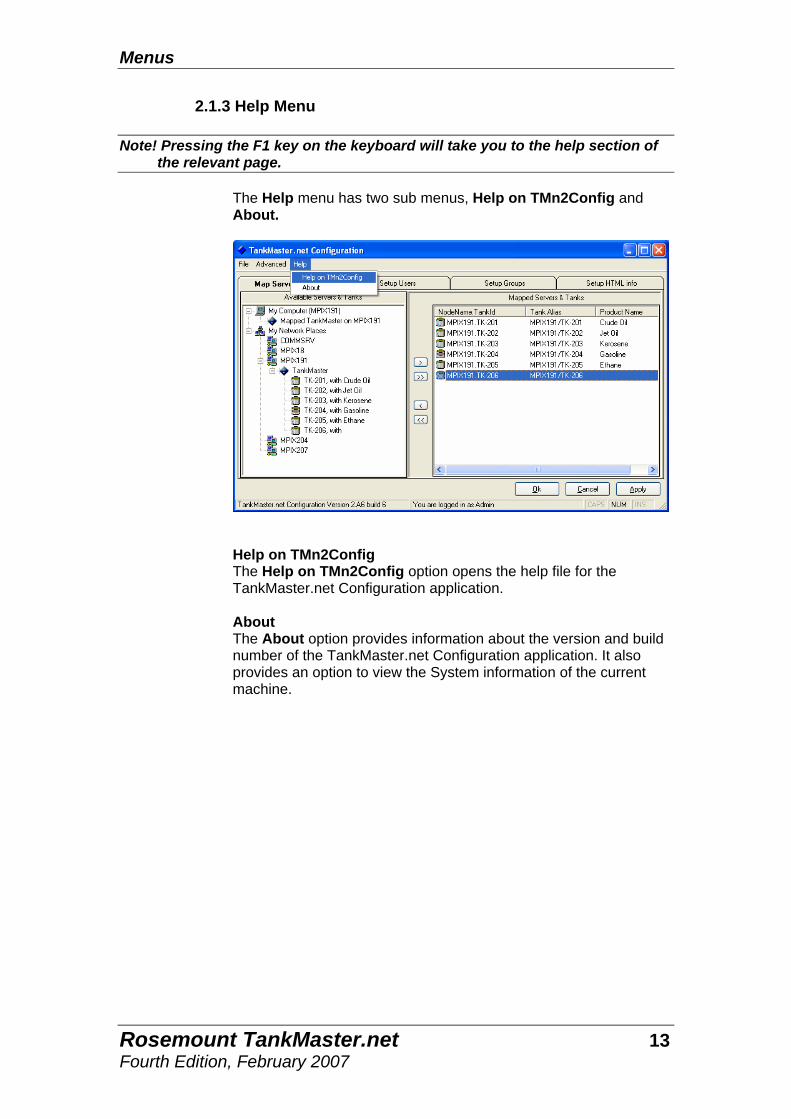
The Help menu has two sub menus, Help on TMn2Config and About.
Help on TMn2Config The Help on TMn2Config option opens the help file for the TankMaster.net Configuration application. About The About option provides information about the version and build number of the TankMaster.net Configuration application. It also provides an option to view the System information of the current machine.
Rosemount TankMaster.net 13 Fourth Edition, February 2007
Menus
2.2 Live Data Items menus
2.2.1 File Menu
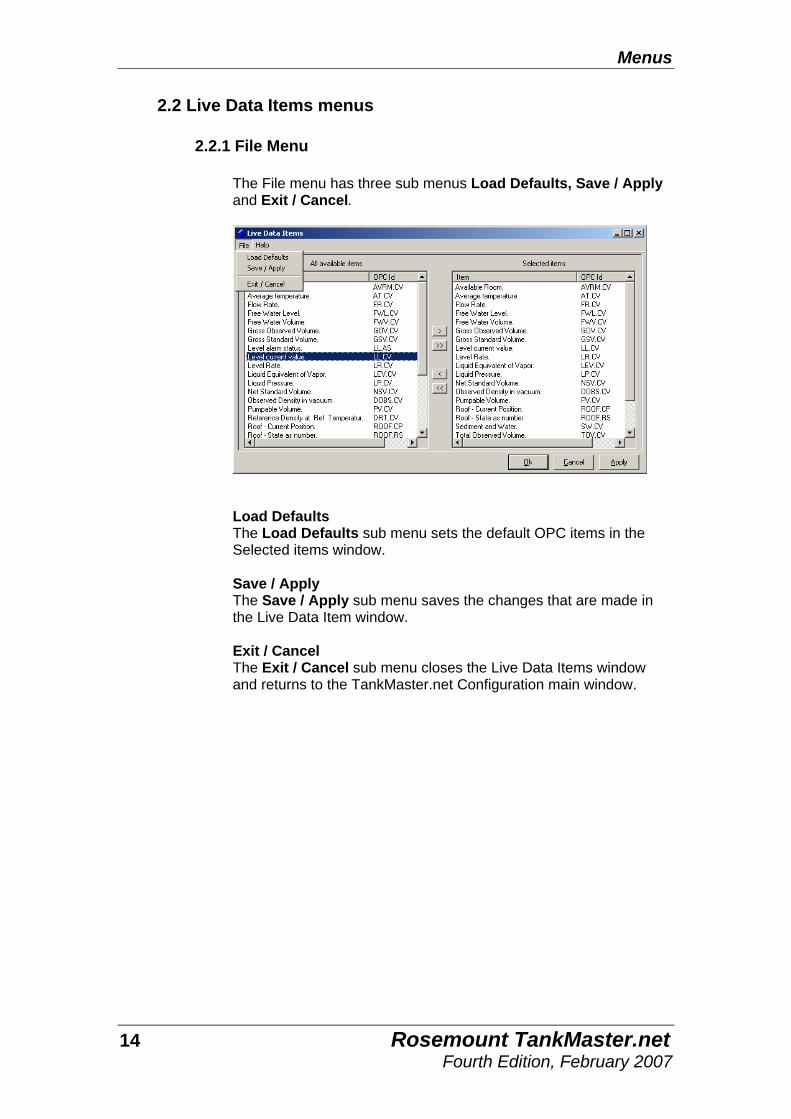
The File menu has three sub menus Load Defaults, Save / Apply and Exit / Cancel.
Load Defaults The Load Defaults sub menu sets the default OPC items in the Selected items window. Save / Apply The Save / Apply sub menu saves the changes that are made in the Live Data Item window. Exit / Cancel The Exit / Cancel sub menu closes the Live Data Items window and returns to the TankMaster.net Configuration main window.
14 Rosemount TankMaster.net Fourth Edition, February 2007
Menus
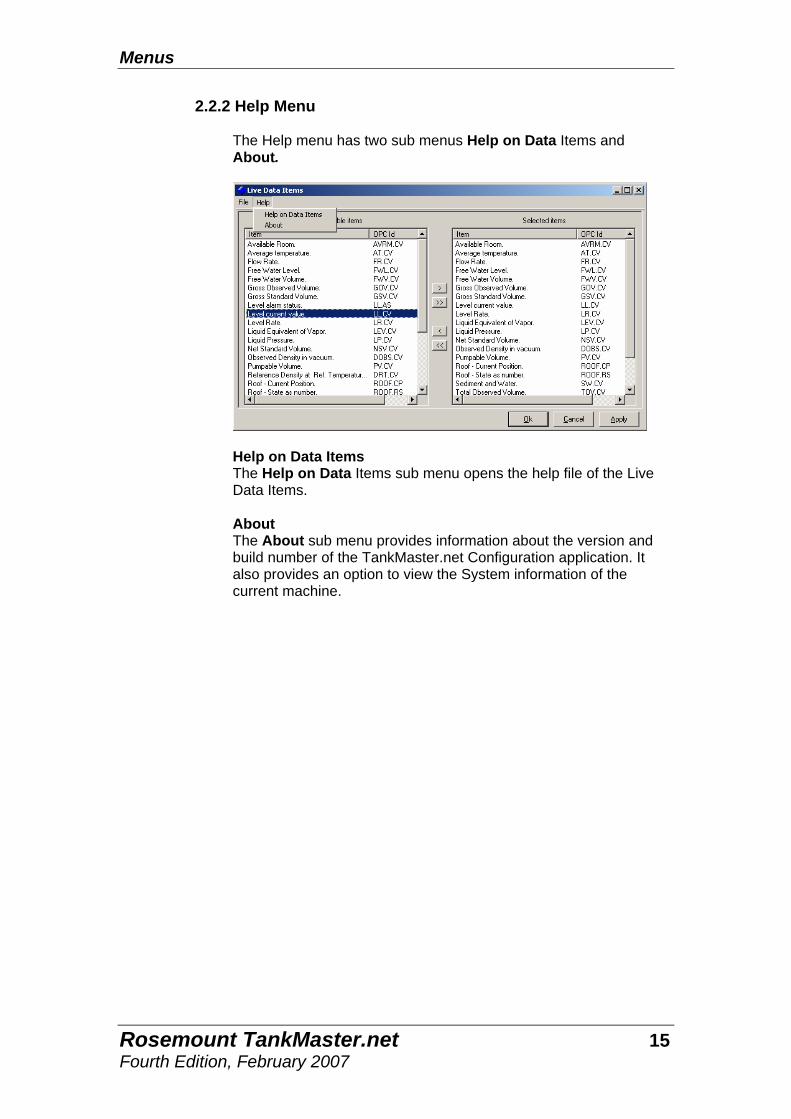
2.2.2 Help Menu The Help menu has two sub menus Help on Data Items and About.
Help on Data Items The Help on Data Items sub menu opens the help file of the Live Data Items. About The About sub menu provides information about the version and build number of the TankMaster.net Configuration application. It also provides an option to view the System information of the current machine.
Rosemount TankMaster.net 15 Fourth Edition, February 2007

Menus
2.3 Static Data Items menus
2.3.1 File Menu The File menu has three sub menus Load Defaults, Save / Apply and Exit / Cancel.
Load Defaults The Load Defaults sub menu sets the default OPC items in the Selected items window. Save / Apply The Save / Apply sub menu saves the changes that are made in the Static Data Item window. Exit / Cancel The Exit / Cancel sub menu closes the Static Data Items window and returns to the TankMaster.net Configuration main window.
16 Rosemount TankMaster.net Fourth Edition, February 2007
Menus
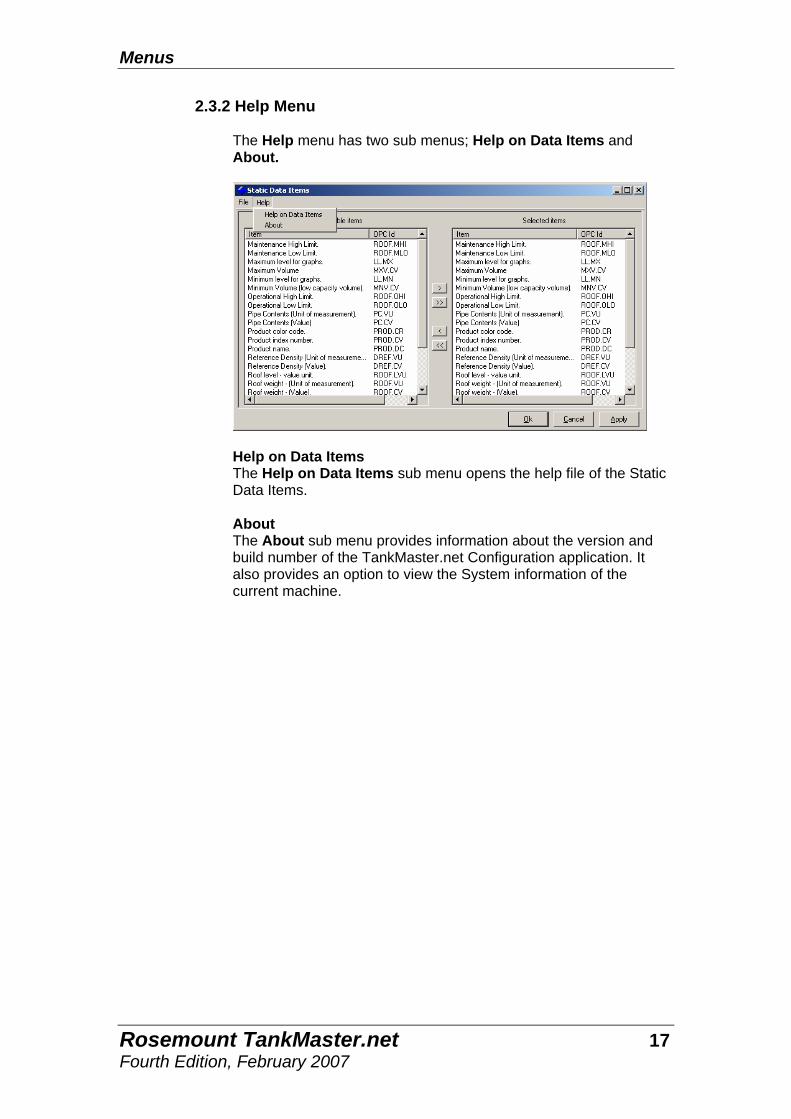
2.3.2 Help Menu The Help menu has two sub menus; Help on Data Items and About.
Help on Data Items The Help on Data Items sub menu opens the help file of the Static Data Items. About The About sub menu provides information about the version and build number of the TankMaster.net Configuration application. It also provides an option to view the System information of the current machine.
Rosemount TankMaster.net 17 Fourth Edition, February 2007
Status bar
3.0 Status bar
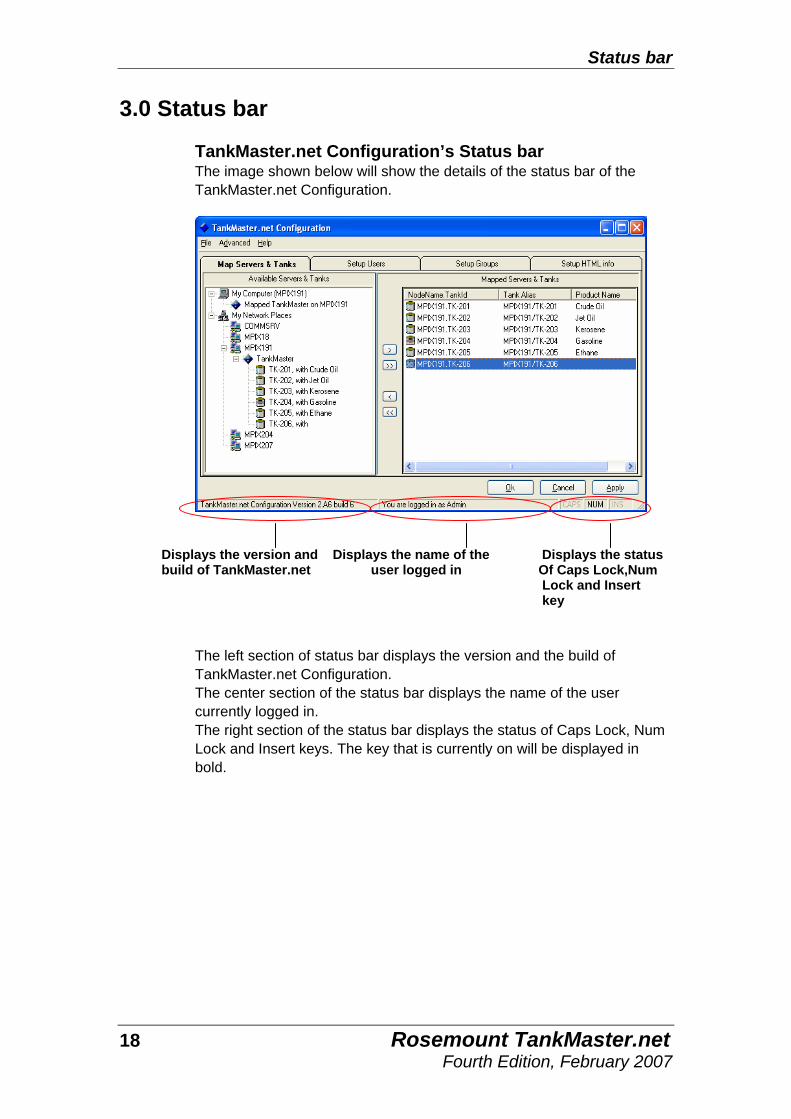
TankMaster.net Configuration’s Status bar The image shown below will show the details of the status bar of the TankMaster.net Configuration.
Displays the version and Displays the name of the Displays the status build of TankMaster.net user logged in Of Caps Lock,Num Lock and Insert key
The left section of status bar displays the version and the build of TankMaster.net Configuration. The center section of the status bar displays the name of the user currently logged in. The right section of the status bar displays the status of Caps Lock, Num Lock and Insert keys. The key that is currently on will be displayed in bold.
18 Rosemount TankMaster.net Fourth Edition, February 2007
Configuration of the TMn2Config application
4.0 Configuration of the TMn2Config application
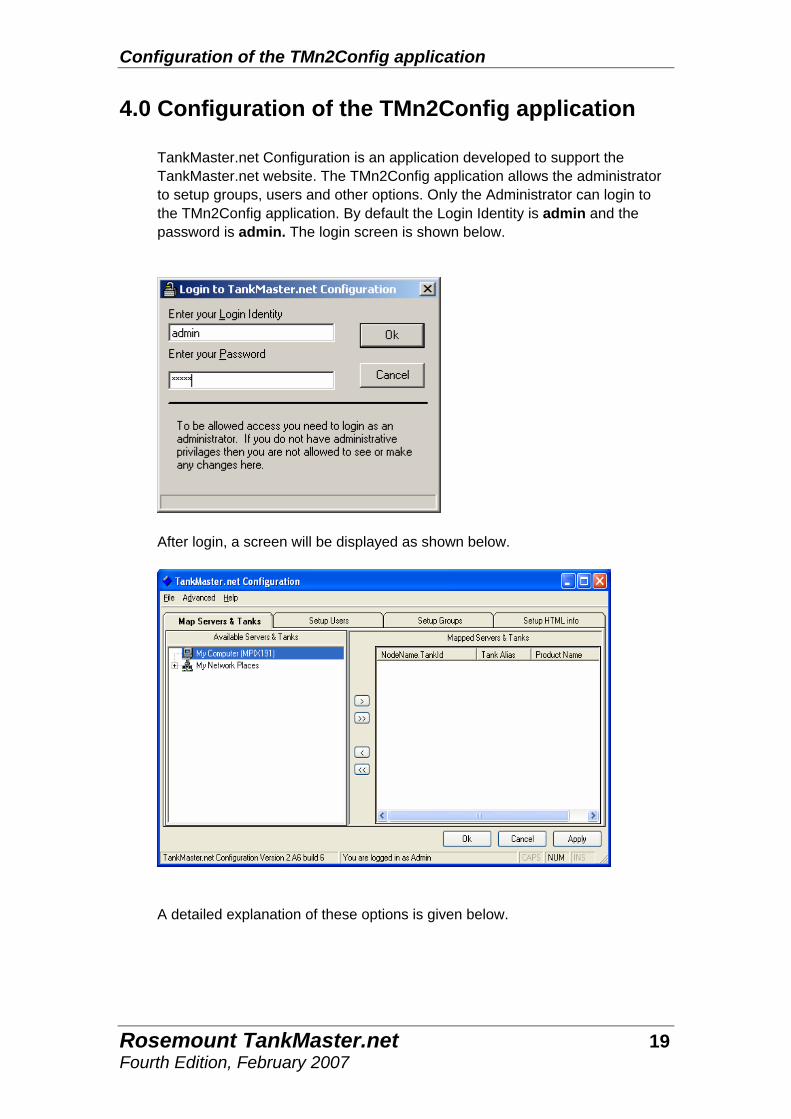
TankMaster.net Configuration is an application developed to support the TankMaster.net website. The TMn2Config application allows the administrator to setup groups, users and other options. Only the Administrator can login to the TMn2Config application. By default the Login Identity is admin and the password is admin. The login screen is shown below.
After login, a screen will be displayed as shown below.
A detailed explanation of these options is given below.
Rosemount TankMaster.net 19 Fourth Edition, February 2007
Configuration of the TMn2Config application
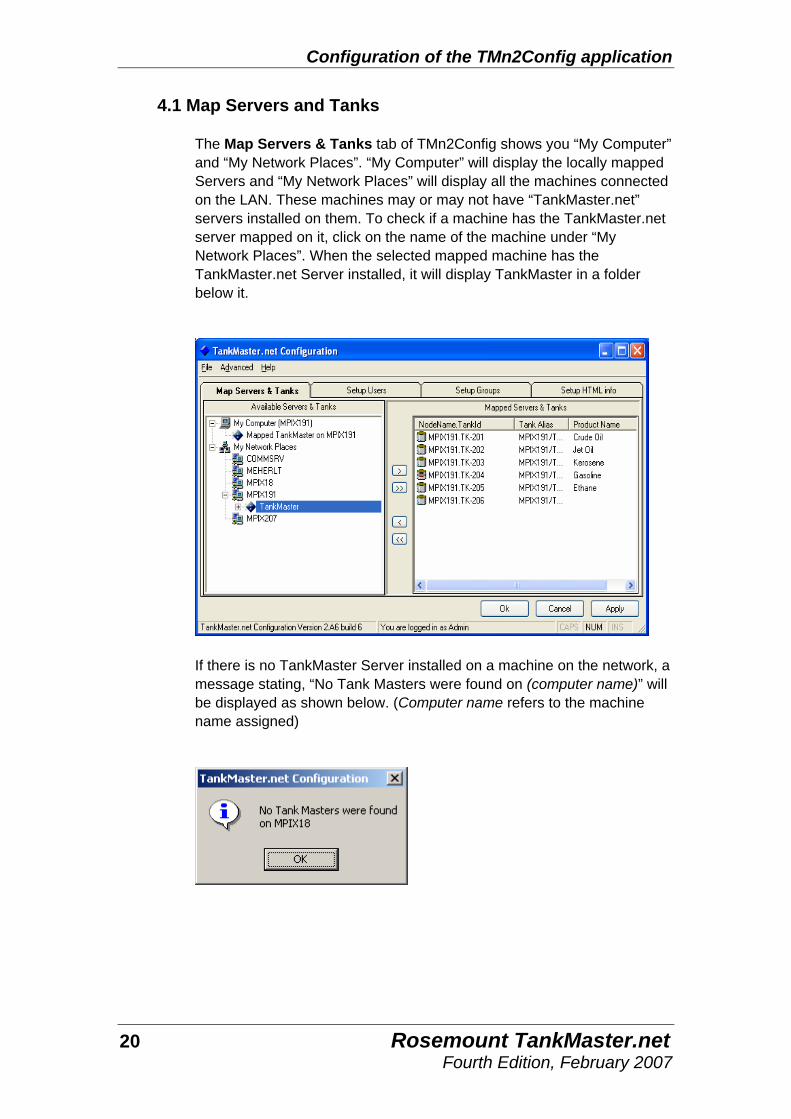
4.1 Map Servers and Tanks The Map Servers & Tanks tab of TMn2Config shows you “My Computer” and “My Network Places”. “My Computer” will display the locally mapped Servers and “My Network Places” will display all the machines connected on the LAN. These machines may or may not have “TankMaster.net” servers installed on them. To check if a machine has the TankMaster.net server mapped on it, click on the name of the machine under “My Network Places”. When the selected mapped machine has the TankMaster.net Server installed, it will display TankMaster in a folder below it.
If there is no TankMaster Server installed on a machine on the network, a message stating, “No Tank Masters were found on (computer name)” will be displayed as shown below. (Computer name refers to the machine name assigned)
20 Rosemount TankMaster.net Fourth Edition, February 2007
Configuration of the TMn2Config application
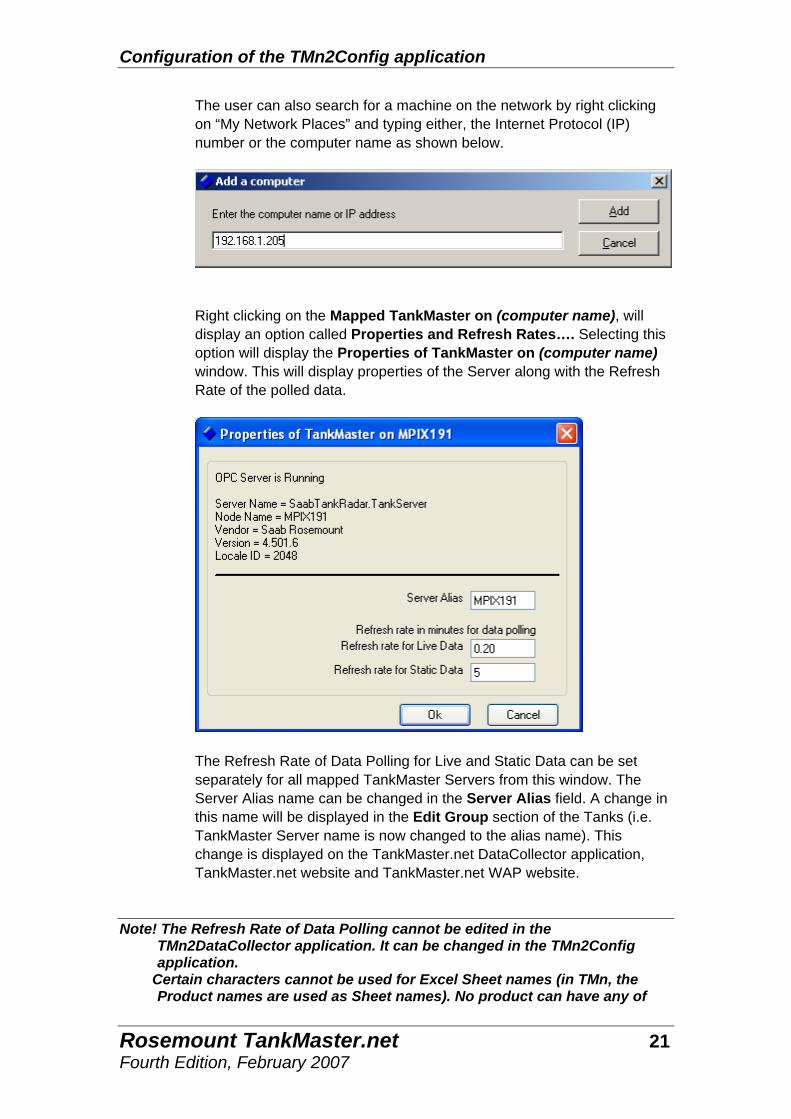
The user can also search for a machine on the network by right clicking on “My Network Places” and typing either, the Internet Protocol (IP) number or the computer name as shown below.
Right clicking on the Mapped TankMaster on (computer name), will display an option called Properties and Refresh Rates…. Selecting this option will display the Properties of TankMaster on (computer name) window. This will display properties of the Server along with the Refresh Rate of the polled data.
The Refresh Rate of Data Polling for Live and Static Data can be set separately for all mapped TankMaster Servers from this window. The Server Alias name can be changed in the Server Alias field. A change in this name will be displayed in the Edit Group section of the Tanks (i.e. TankMaster Server name is now changed to the alias name). This change is displayed on the TankMaster.net DataCollector application, TankMaster.net website and TankMaster.net WAP website.
Note! The Refresh Rate of Data Polling cannot be edited in the TMn2DataCollector application. It can be changed in the TMn2Config application.
Certain characters cannot be used for Excel Sheet names (in TMn, the Product names are used as Sheet names). No product can have any of
Rosemount TankMaster.net 21 Fourth Edition, February 2007
Configuration of the TMn2Config application
the following characters: \, /, ?, *, [, ]. The product name should not exceed 31 characters.
Prohibited characters for all of TMn are: |, *, %, <, >, {,},’ (single quote), “ (double quote). None of the User names, Group names, Server Names, Server Aliases, Tank Names, Tank Aliases, Titles or Descriptions can use any of the above characters. A few ANSII characters are invalid in UTF-8 and UTF-16 (for example, ASCII 160). These will give trouble in Web/Wap pages.
22 Rosemount TankMaster.net Fourth Edition, February 2007
Configuration of the TMn2Config application
4.1.1 To map TankMaster Server to your local machine
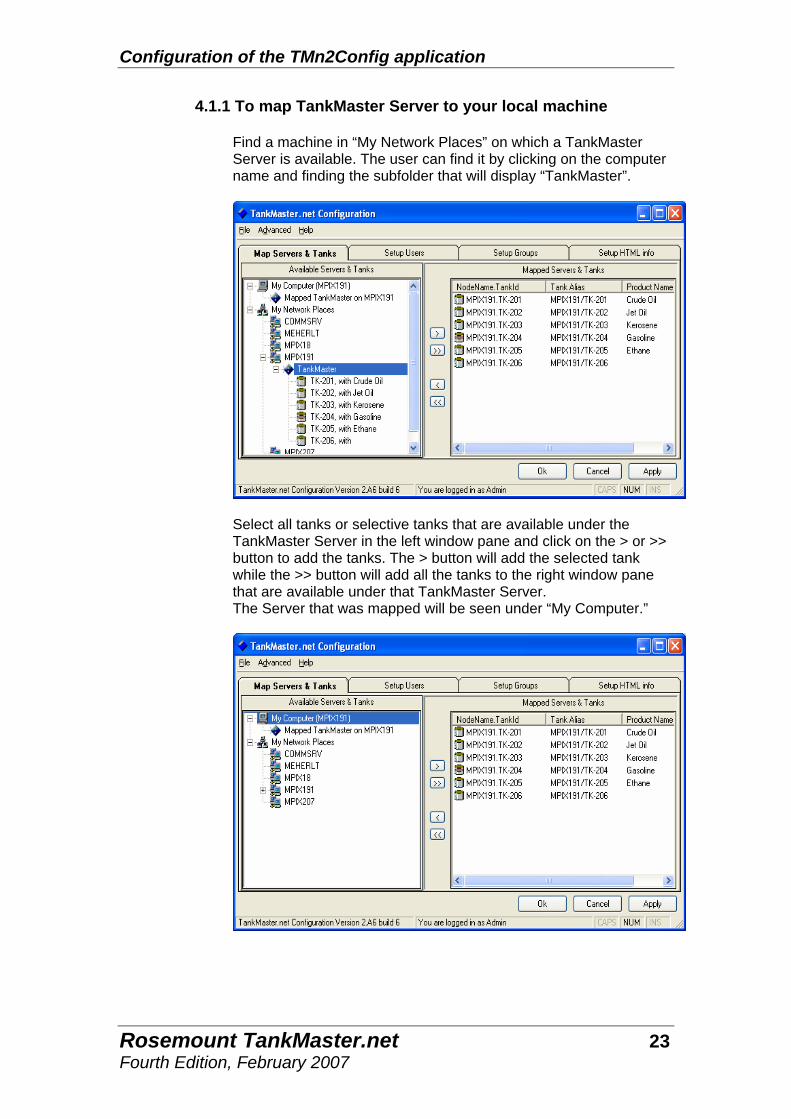
Find a machine in “My Network Places” on which a TankMaster Server is available. The user can find it by clicking on the computer name and finding the subfolder that will display “TankMaster”.
Select all tanks or selective tanks that are available under the TankMaster Server in the left window pane and click on the > or >> button to add the tanks. The > button will add the selected tank while the >> button will add all the tanks to the right window pane that are available under that TankMaster Server. The Server that was mapped will be seen under “My Computer.”
Rosemount TankMaster.net 23 Fourth Edition, February 2007
Configuration of the TMn2Config application
Note! If you click on the Ok button, the application will save the changes and close. If you click on the Cancel button without clicking on the Apply button, you will be prompted to save the changes made. If you click on the Apply button, changes made will be saved without exiting from the application.
4.1.2 To Unmap the TankMaster Server from the local machine
Select all tanks or selective tanks that are available under the TankMaster Server in the right window pane and click on the < or << button to remove the tanks. The < button will remove the selected tank while the << button will remove all the tanks from the right window pane that are available under that TankMaster Server. When all the tanks of a particular TankMaster Server are removed, that TankMaster Server automatically gets unmapped from “My Computer” and will no longer be visible.
Note! If you click on the Ok button, the application will save the changes and
close. If you click on the Cancel button without clicking on the Apply button, you will be prompted to save the changes made. If you click on the Apply button, changes made will be saved without exiting from the application.
4.2 Setup Users
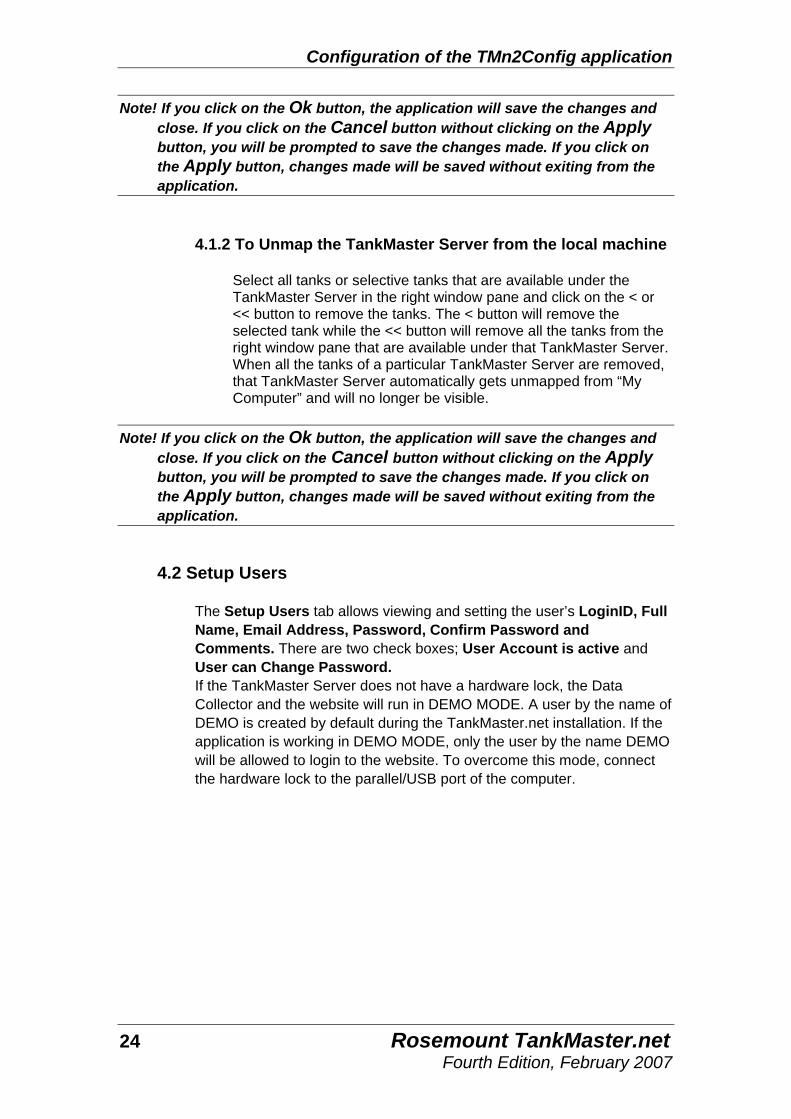
The Setup Users tab allows viewing and setting the user’s LoginID, Full Name, Email Address, Password, Confirm Password and Comments. There are two check boxes; User Account is active and User can Change Password. If the TankMaster Server does not have a hardware lock, the Data Collector and the website will run in DEMO MODE. A user by the name of DEMO is created by default during the TankMaster.net installation. If the application is working in DEMO MODE, only the user by the name DEMO will be allowed to login to the website. To overcome this mode, connect the hardware lock to the parallel/USB port of the computer.
24 Rosemount TankMaster.net Fourth Edition, February 2007
Configuration of the TMn2Config application
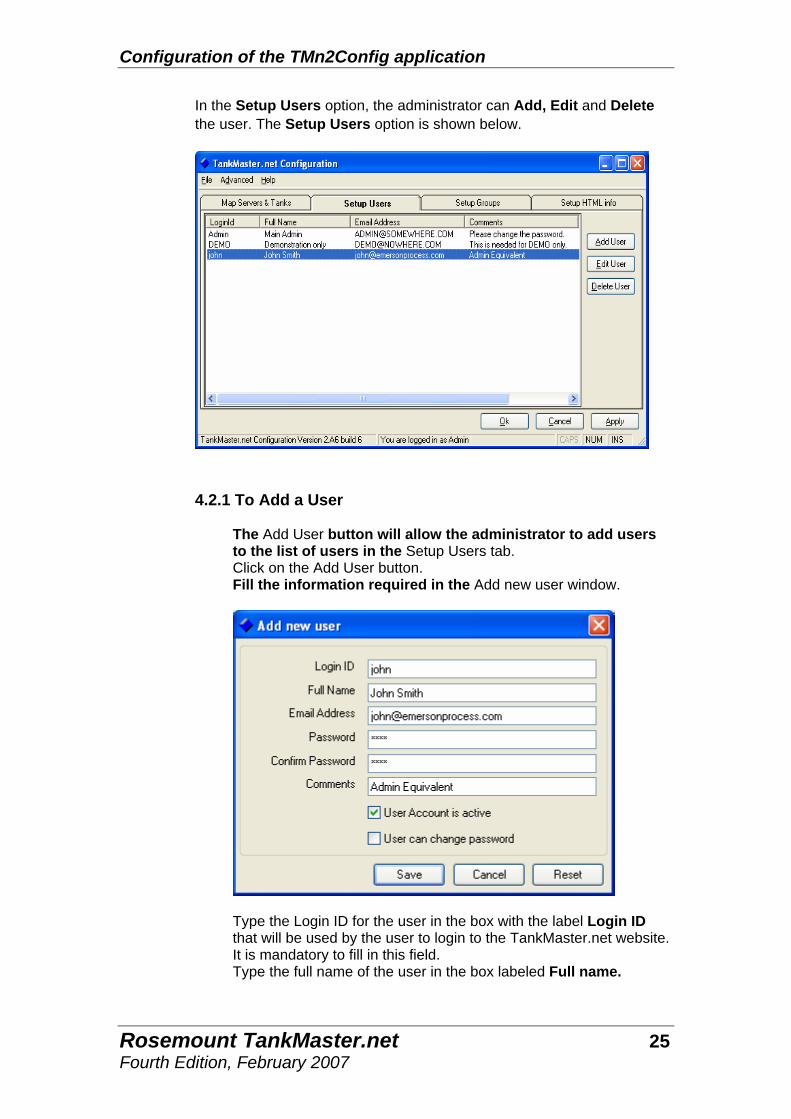
In the Setup Users option, the administrator can Add, Edit and Delete the user. The Setup Users option is shown below.
4.2.1 To Add a User The Add User button will allow the administrator to add users to the list of users in the Setup Users tab. Click on the Add User button. Fill the information required in the Add new user window.
Type the Login ID for the user in the box with the label Login ID that will be used by the user to login to the TankMaster.net website. It is mandatory to fill in this field. Type the full name of the user in the box labeled Full name.
Rosemount TankMaster.net 25 Fourth Edition, February 2007
Configuration of the TMn2Config application
It is optional to fill in this field. Type the Email address of the user in the box labeled Email Address. It is optional to fill in this field. Type the password for the user to log into the TankMaster.net website in the box labeled Password. Retype the password in the box with the Confirm Password label for confirmation of password. When the password is typed, it will be displayed as “******” for security purposes. It is mandatory to fill in these fields. In the box labeled Comments type information for identifying the user. It is optional to fill in this field. To activate the user, check the User Account is Activated checkbox. If the checkbox is not checked, the user will not be able to login to the TankMaster.net website. To give the user rights to change his/her Password, check the User can change password checkbox. By default, this checkbox is unchecked. If the checkbox is not checked, the user will not be able to change his/her password. To save changes, click on the Save button. The Save button will not add a user permanently in the database. To add a user in the database you will have to click on the Apply button.
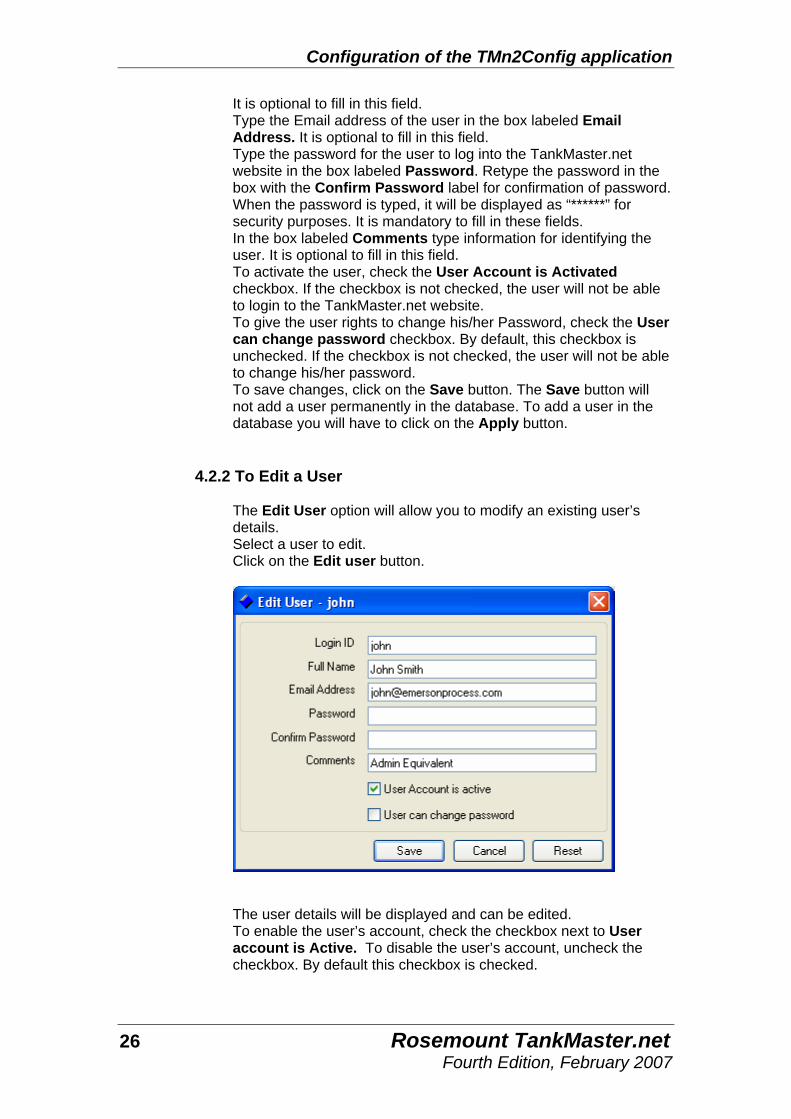
4.2.2 To Edit a User The Edit User option will allow you to modify an existing user’s details. Select a user to edit. Click on the Edit user button.
The user details will be displayed and can be edited. To enable the user’s account, check the checkbox next to User account is Active. To disable the user’s account, uncheck the checkbox. By default this checkbox is checked.
26 Rosemount TankMaster.net Fourth Edition, February 2007

Configuration of the TMn2Config application
To give the user rights to change his/her Password, check the User can change password checkbox. By default, this checkbox is unchecked. If the checkbox is not checked, the user will not be able to change his/her password. To save changes, click on the Save button. The Save button will not edit the user details permanently in the database. To edit the user details in the database you will have to click on the Apply button.
Note! Certain characters cannot be used for Excel Sheet names (in TMn, the
Product names are used as Sheet names). No product can have any of the following characters: \, /, ?, *, [, ]. The product name should not exceed 31 characters.
Prohibited characters for all of TMn are: |, *, %, <, >, {,},’ (single quote), “ (double quote). None of the User names, Group names, Server Names, Server Aliases, Tank Names, Tank Aliases, Titles or Descriptions can use any of the above characters. A few ANSII characters are invalid in UTF-8 and UTF-16 (for example, ASCII 160). These will give trouble in Web/Wap pages.
4.2.3 To Delete a User To Delete a User, select the user and click on the Delete button. You can also use the “Del” key on the keyboard to do the same. The last user in the Administrators group cannot be deleted. To remove a user from the database you will have to click on the Apply button.
4.2.4 To assign rights to the User The Administrator can give the user two rights, Activate User right and Change Password right. The Activate User right allows the user to login to the website and the Change Password right allows the user to change his/her password. These rights can be assigned to the user while creating them by checking the User account is activated and User can Change Password checkboxes.
4.3 Setup Groups
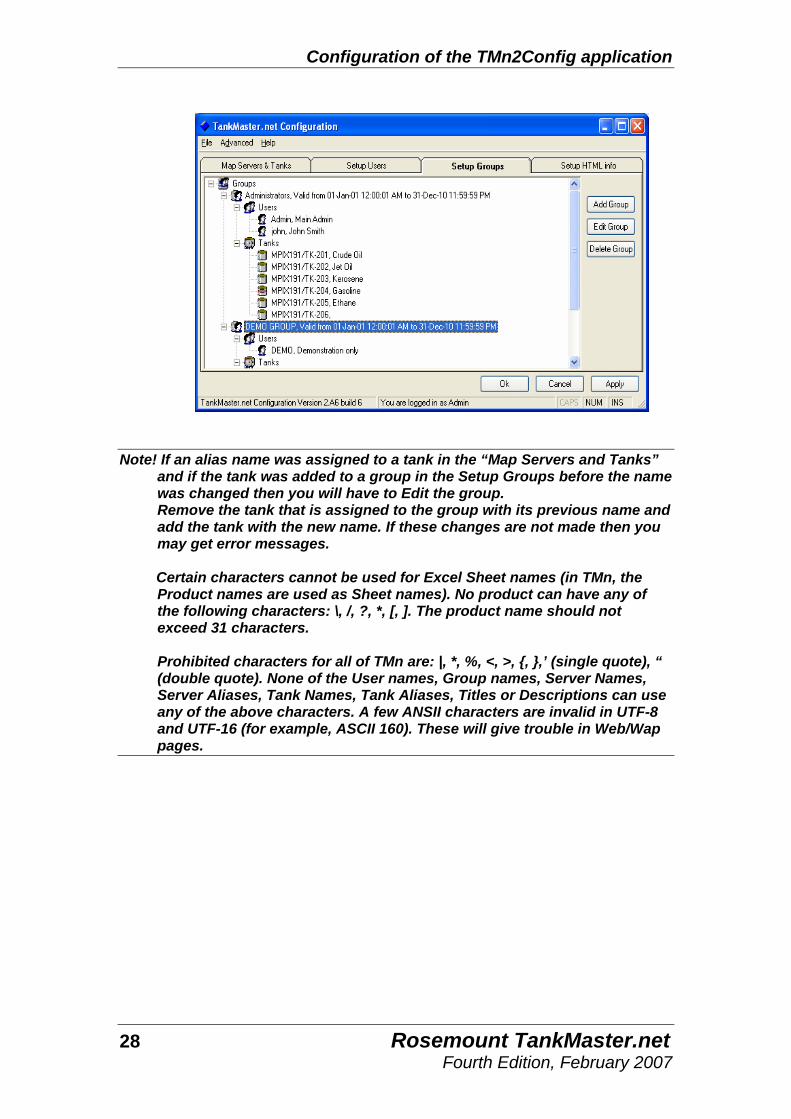
The Setup Groups tab allows the Administrator to Add, Edit and Delete Groups. When TankMaster.net is installed, two default groups, Administrators and DEMO GROUP are created. The existing users can be added or removed from a group. The Administrators group and the last user of the Administrators group cannot be deleted. The DEMO GROUP will contain the DEMO user who will be able to access the TankMaster.net website in DEMO MODE (without the hardware lock installed). This group can be deleted unlike the group Administrators.
Rosemount TankMaster.net 27 Fourth Edition, February 2007
Configuration of the TMn2Config application
Note! If an alias name was assigned to a tank in the “Map Servers and Tanks”
and if the tank was added to a group in the Setup Groups before the name was changed then you will have to Edit the group. Remove the tank that is assigned to the group with its previous name and add the tank with the new name. If these changes are not made then you may get error messages.
Certain characters cannot be used for Excel Sheet names (in TMn, the
Product names are used as Sheet names). No product can have any of the following characters: \, /, ?, *, [, ]. The product name should not exceed 31 characters.
Prohibited characters for all of TMn are: |, *, %, <, >, {, },’ (single quote), “
(double quote). None of the User names, Group names, Server Names, Server Aliases, Tank Names, Tank Aliases, Titles or Descriptions can use any of the above characters. A few ANSII characters are invalid in UTF-8 and UTF-16 (for example, ASCII 160). These will give trouble in Web/Wap pages.
28 Rosemount TankMaster.net Fourth Edition, February 2007
Configuration of the TMn2Config application
4.3.1 To Add a Group
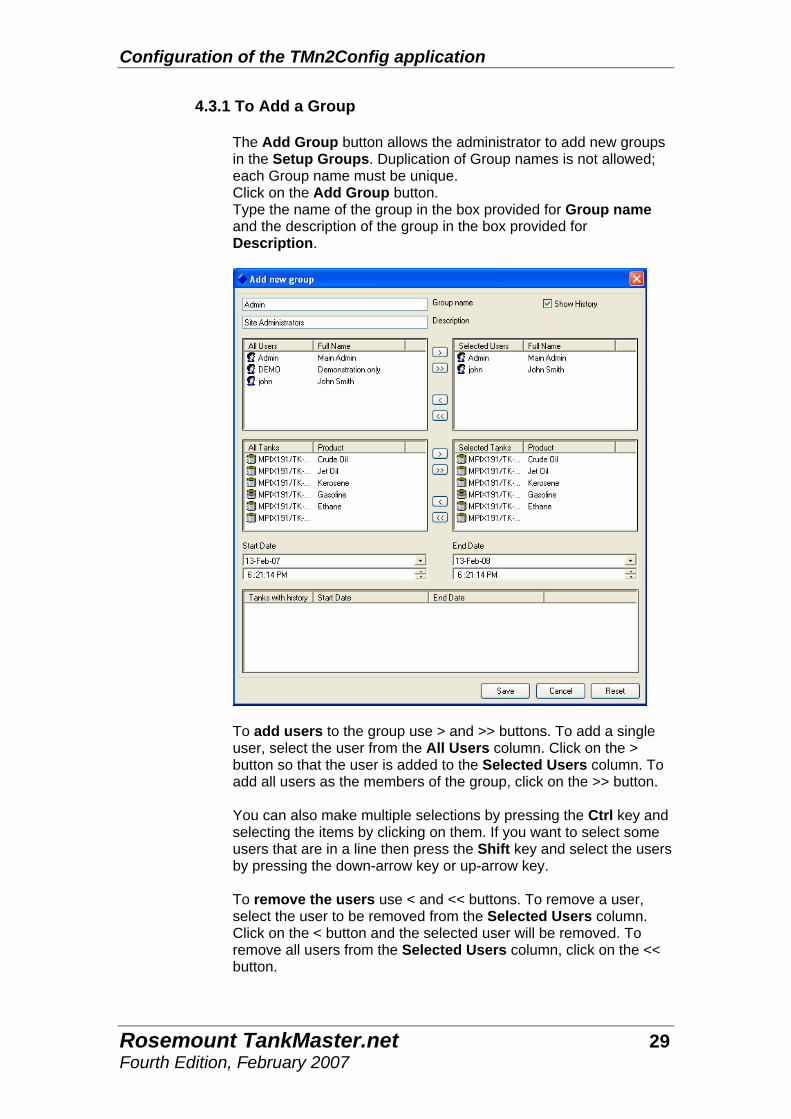
The Add Group button allows the administrator to add new groups in the Setup Groups. Duplication of Group names is not allowed; each Group name must be unique. Click on the Add Group button. Type the name of the group in the box provided for Group name and the description of the group in the box provided for Description.
To add users to the group use > and >> buttons. To add a single user, select the user from the All Users column. Click on the > button so that the user is added to the Selected Users column. To add all users as the members of the group, click on the >> button. You can also make multiple selections by pressing the Ctrl key and selecting the items by clicking on them. If you want to select some users that are in a line then press the Shift key and select the users by pressing the down-arrow key or up-arrow key. To remove the users use < and << buttons. To remove a user, select the user to be removed from the Selected Users column. Click on the < button and the selected user will be removed. To remove all users from the Selected Users column, click on the << button.
Rosemount TankMaster.net 29 Fourth Edition, February 2007
Configuration of the TMn2Config application
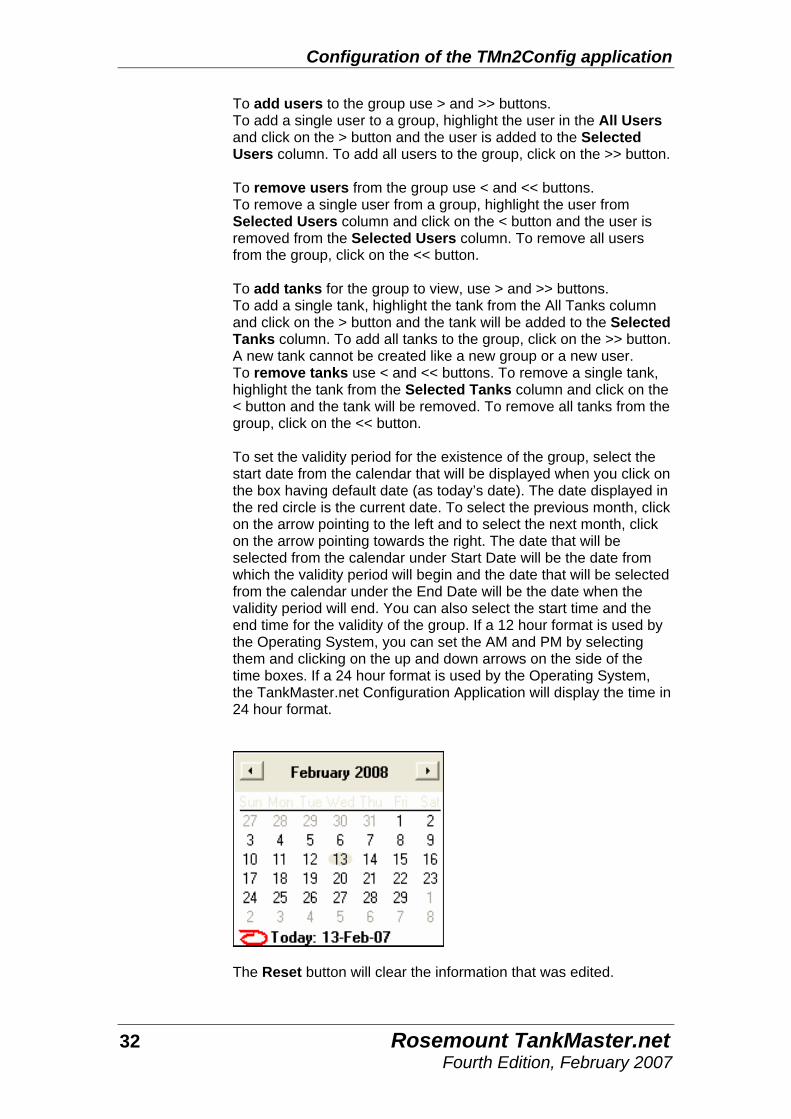
You can also make multiple selections by pressing the Ctrl key and selecting the users by clicking on them. If you want to select some users that are in a line then press the Shift key and select the users by pressing the down-arrow key or up-arrow key. To add tanks that the group will have rights to view use > and >> buttons. To add single tanks select the tank to be added to the group from the All Tanks column. Click on the > button and the selected tank will be added to the Selected Tanks column. To add all tanks to the group, click on the >> button. A new tank cannot be created like a new group or like a new user. You can also make multiple selections by pressing the Ctrl key and selecting the tanks by clicking on them. If you want to select some tanks that are in a line then press the Shift key and select the tanks by pressing the down-arrow key or up-arrow key. To remove tanks use < and << buttons. To remove a single tank select the tank to be removed from the Selected Tanks column. Click on the < button and the selected tank will be removed. To remove all the tanks from the Selected Tanks column, click on the << button. You can also make multiple selections by pressing the Ctrl key and selecting the tanks by clicking on them. If you want to select some tanks that are in a line then press the Shift key and select the tanks by pressing the down-arrow key or up-arrow key. To set the validity period for the existence of the group, select the start date from the calendar that will be displayed when you click on the box having default date (as today’s date). The date displayed in the red circle is the current date. To select the previous month, click on the arrow pointing to the left and to select the next month, click on the arrow pointing towards the right. The date that will be selected from the calendar under the Start Date will be the date from which the validity period will begin and the date that will be selected from the calendar under the End Date will be the date when the validity period will end. You can also select the start time and the end time for the validity of the group. If a 12 hour format is used by the Operating System, you can set the AM and PM by selecting them and clicking on the up and down arrows on the side of the time boxes. If a 24 hour format is used by the Operating System, the TankMaster.net Configuration Application will display the time in 24 hour format.
30 Rosemount TankMaster.net Fourth Edition, February 2007

Configuration of the TMn2Config application
The Reset button will clear the information that was entered. The Cancel button will cancel all changes made and exit from the Add new group window. The Save button will save changes.
4.3.2 To Edit A Group
The Edit Group button allows changes to be made in the existing groups. The group Administrators cannot be renamed or deleted. The last user in this group cannot be deleted. To edit a group follow the steps given below: Select the group that has to be edited. Click on the Edit Group button or double click on the Group name. A window called Edit Group will be displayed.
Rosemount TankMaster.net 31 Fourth Edition, February 2007
Configuration of the TMn2Config application
To add users to the group use > and >> buttons. To add a single user to a group, highlight the user in the All Users and click on the > button and the user is added to the Selected Users column. To add all users to the group, click on the >> button. To remove users from the group use < and << buttons. To remove a single user from a group, highlight the user from Selected Users column and click on the < button and the user is removed from the Selected Users column. To remove all users from the group, click on the << button. To add tanks for the group to view, use > and >> buttons. To add a single tank, highlight the tank from the All Tanks column and click on the > button and the tank will be added to the Selected Tanks column. To add all tanks to the group, click on the >> button. A new tank cannot be created like a new group or a new user. To remove tanks use < and << buttons. To remove a single tank, highlight the tank from the Selected Tanks column and click on the < button and the tank will be removed. To remove all tanks from the group, click on the << button. To set the validity period for the existence of the group, select the start date from the calendar that will be displayed when you click on the box having default date (as today’s date). The date displayed in the red circle is the current date. To select the previous month, click on the arrow pointing to the left and to select the next month, click on the arrow pointing towards the right. The date that will be selected from the calendar under Start Date will be the date from which the validity period will begin and the date that will be selected from the calendar under the End Date will be the date when the validity period will end. You can also select the start time and the end time for the validity of the group. If a 12 hour format is used by the Operating System, you can set the AM and PM by selecting them and clicking on the up and down arrows on the side of the time boxes. If a 24 hour format is used by the Operating System, the TankMaster.net Configuration Application will display the time in 24 hour format.
The Reset button will clear the information that was edited.
32 Rosemount TankMaster.net Fourth Edition, February 2007

Configuration of the TMn2Config application
The Cancel button will cancel all changes made and exit from the Edit group window. The Save button will save changes.
4.3.3 To Delete a Group
To delete a group, select the group to be deleted and click on the Delete Group button. To save changes made to the database click on the Apply button. The Administrators group and the last user in this group cannot be deleted.
Rosemount TankMaster.net 33 Fourth Edition, February 2007
Configuration of the TMn2Config application
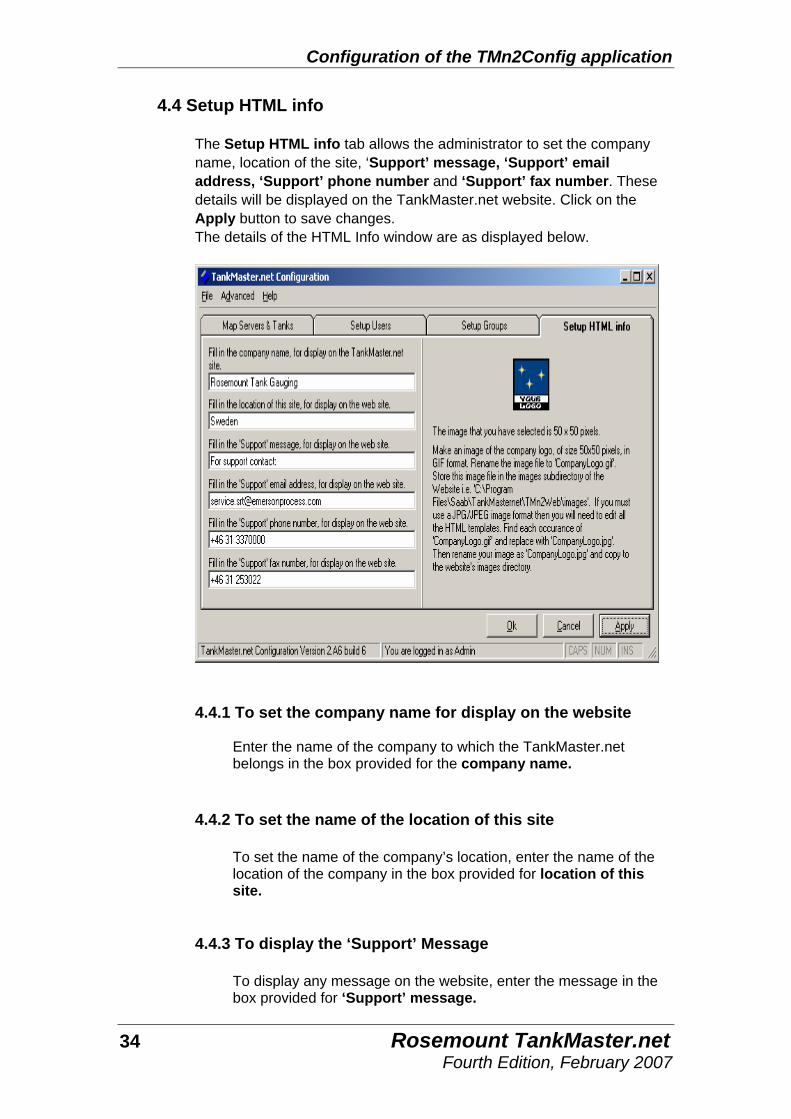
4.4 Setup HTML info The Setup HTML info tab allows the administrator to set the company name, location of the site, ‘Support’ message, ‘Support’ email address, ‘Support’ phone number and ‘Support’ fax number. These details will be displayed on the TankMaster.net website. Click on the Apply button to save changes. The details of the HTML Info window are as displayed below.
4.4.1 To set the company name for display on the website
Enter the name of the company to which the TankMaster.net belongs in the box provided for the company name.
4.4.2 To set the name of the location of this site
To set the name of the company’s location, enter the name of the location of the company in the box provided for location of this site.
4.4.3 To display the ‘Support’ Message
To display any message on the website, enter the message in the box provided for ‘Support’ message.
34 Rosemount TankMaster.net Fourth Edition, February 2007
Configuration of the TMn2Config application
4.4.4 To set the ‘Support’ email address
To set the Email address, enter the email address in the box provided for the ‘Support’ email address.
4.4.5 To set the ‘Support’ phone number
To set the phone number, enter the phone number in the box provided for the ‘Support’ phone number.
4.4.6 To set the ‘Support’ fax number
To set the fax number, enter the fax number in the box provided for the ‘Support’ fax number.
4.4.7 To set the Company Logo Save an image of the Company Logo of size 50 x 50 pixels in GIF format. Rename the image file name to “CompanyLogo.gif” and store the image in the TMn2Web\Images subdirectory. If you must use a JPG/JPEG image format you will need to edit all the HTML templates. Find each occurrence of “CompanyLogo.gif” and replace with CompanyLogo.jpg”. The CompanyLogo will be displayed on the top left of the TankMaster.net website.
Note! The image file must preferably be in .GIF or .JPG/JPEG format only.
4.5 Data Polling
The Data Polling option can be accessed by selecting the Advanced option on the menu bar. The Data Polling option has two sub menus, Live Data Items and Static Data Items. Static Data Items are OPC items whose data will be static as related to a tank and can be polled at a different and slower rate. Live Data Items are OPC items whose data is current and are polled frequently.
Rosemount TankMaster.net 35 Fourth Edition, February 2007
Configuration of the TMn2Config application
4.5.1 Live Data Items
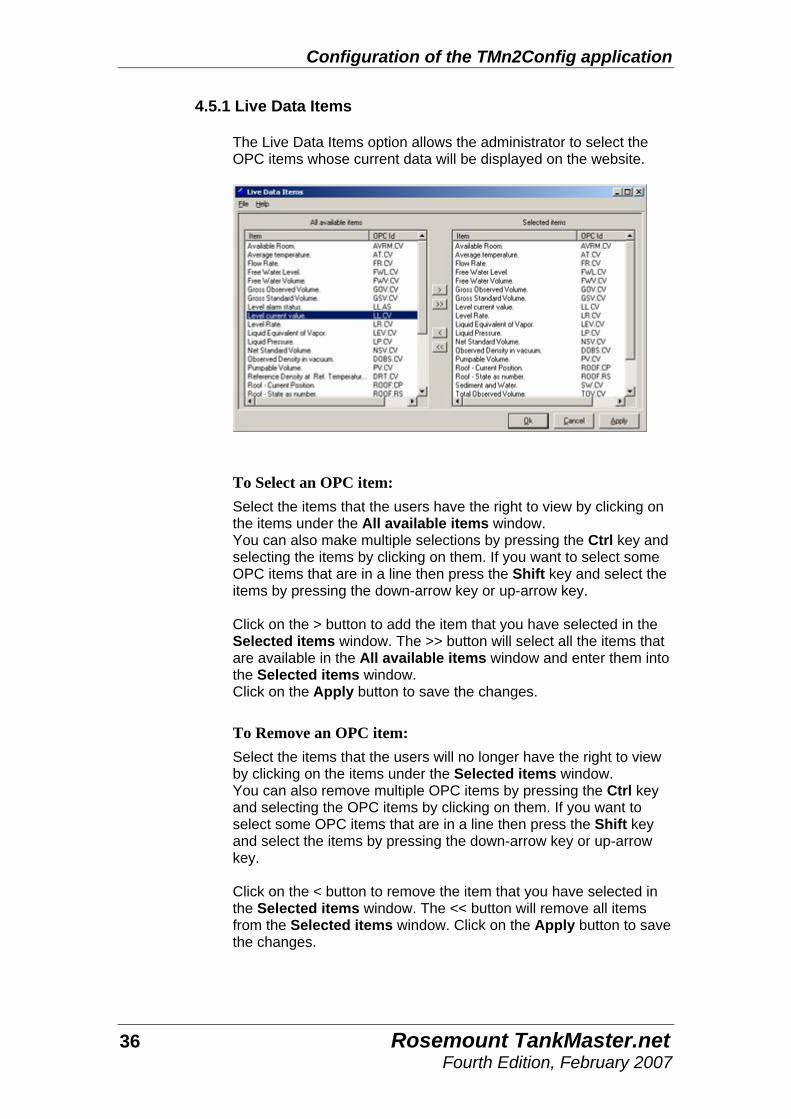
The Live Data Items option allows the administrator to select the OPC items whose current data will be displayed on the website.
To Select an OPC item: Select the items that the users have the right to view by clicking on the items under the All available items window. You can also make multiple selections by pressing the Ctrl key and selecting the items by clicking on them. If you want to select some OPC items that are in a line then press the Shift key and select the items by pressing the down-arrow key or up-arrow key. Click on the > button to add the item that you have selected in the Selected items window. The >> button will select all the items that are available in the All available items window and enter them into the Selected items window. Click on the Apply button to save the changes.
To Remove an OPC item: Select the items that the users will no longer have the right to view by clicking on the items under the Selected items window. You can also remove multiple OPC items by pressing the Ctrl key and selecting the OPC items by clicking on them. If you want to select some OPC items that are in a line then press the Shift key and select the items by pressing the down-arrow key or up-arrow key. Click on the < button to remove the item that you have selected in the Selected items window. The << button will remove all items from the Selected items window. Click on the Apply button to save the changes.
36 Rosemount TankMaster.net Fourth Edition, February 2007

Configuration of the TMn2Config application
Note! If you click on the Ok button, the application will save the changes and close. If you click on the Cancel button without clicking on the Apply button, you will be prompted to save the changes made. If you click on the Apply button, changes made will be saved without exiting from the application. You can add or remove the items in the available items list by editing the “AvailableCurrent.txt” file located in the “TMnApp” directory.
4.5.2 Static Data Items
The Static Data Items option allows you to select those OPC items whose data will be static as related to a tank and can be polled at a different and slower rate.
To Select the OPC items: Select the items that are listed under the All available items window by clicking on them. You can also select multiple items by pressing the Ctrl key and selecting the OPC items by clicking on them. If you want to select some OPC items that are in a line then press the Shift key and select the items by pressing the down-arrow key or up-arrow key. Click on the > button to add the item that has been selected in the Selected items window. The >> button will select all the items that are available in the All available items window and enter them into the Selected items window. Click on the Apply button to save the changes.
To Remove the OPC items: Select the items that you want to remove by clicking on them from the Selected items list. You can also remove multiple OPC items by pressing the Ctrl key and selecting the OPC items by clicking on them. If you want to select some OPC items that are in a line then press the Shift key
Rosemount TankMaster.net 37 Fourth Edition, February 2007
Configuration of the TMn2Config application
and select the items by pressing the down-arrow key or up-arrow key. Click on the < button to remove the selected item and to remove all the items click on << button. Click on the Apply button to save the changes.
Note! If you click on the Ok button, the application will save the changes and
close. If you click on the Cancel button without clicking on the Apply button, you will be prompted to save the changes made. If you click on the Apply button, changes made will be saved without exiting from the application.
You can add or remove the items in the available items list by editing the “AvailableStatic.txt” file located in the “TMnApp” directory.
38 Rosemount TankMaster.net Fourth Edition, February 2007
Keyboard Map
5.0 Keyboard Map
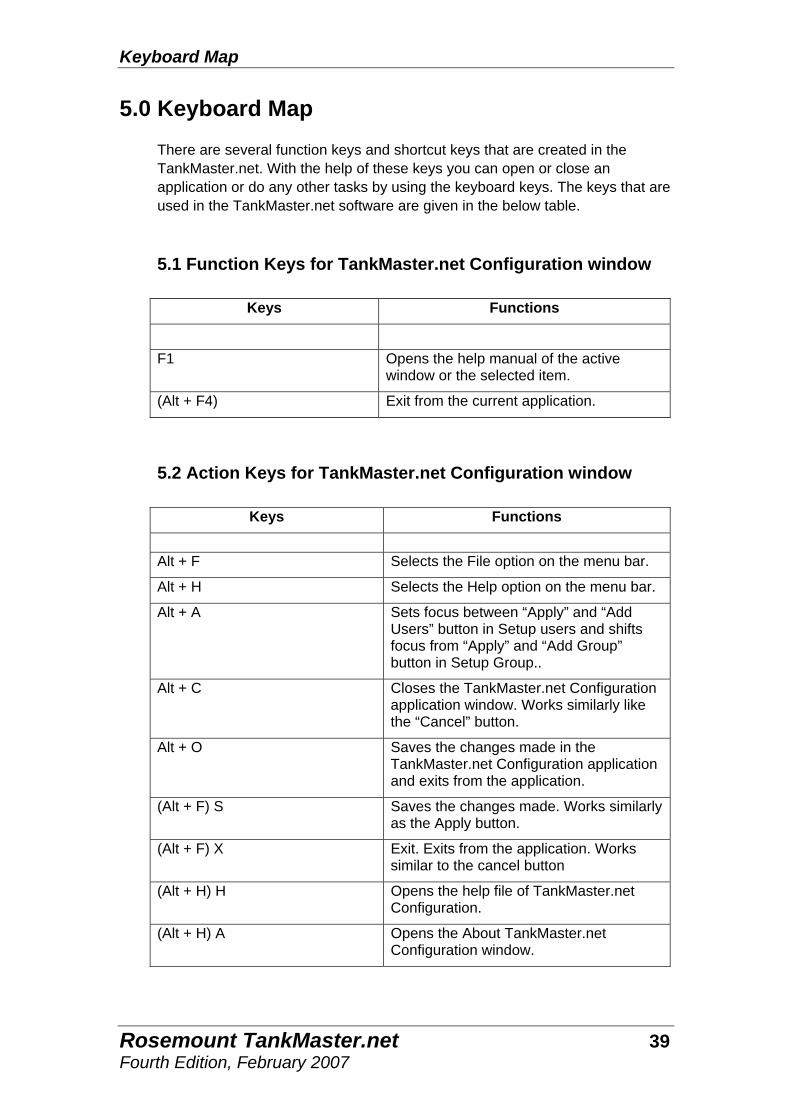
There are several function keys and shortcut keys that are created in the TankMaster.net. With the help of these keys you can open or close an application or do any other tasks by using the keyboard keys. The keys that are used in the TankMaster.net software are given in the below table. 5.1 Function Keys for TankMaster.net Configuration window
Keys Functions
F1 Opens the help manual of the active window or the selected item.
(Alt + F4) Exit from the current application.
5.2 Action Keys for TankMaster.net Configuration window
Keys Functions
Alt + F Selects the File option on the menu bar.
Alt + H Selects the Help option on the menu bar.
Alt + A Sets focus between “Apply” and “Add Users” button in Setup users and shifts focus from “Apply” and “Add Group” button in Setup Group..
Alt + C Closes the TankMaster.net Configuration application window. Works similarly like the “Cancel” button.
Alt + O Saves the changes made in the TankMaster.net Configuration application and exits from the application.
(Alt + F) S Saves the changes made. Works similarly as the Apply button.
(Alt + F) X Exit. Exits from the application. Works similar to the cancel button
(Alt + H) H Opens the help file of TankMaster.net Configuration.
(Alt + H) A Opens the About TankMaster.net Configuration window.
Rosemount TankMaster.net 39 Fourth Edition, February 2007
Keyboard Map
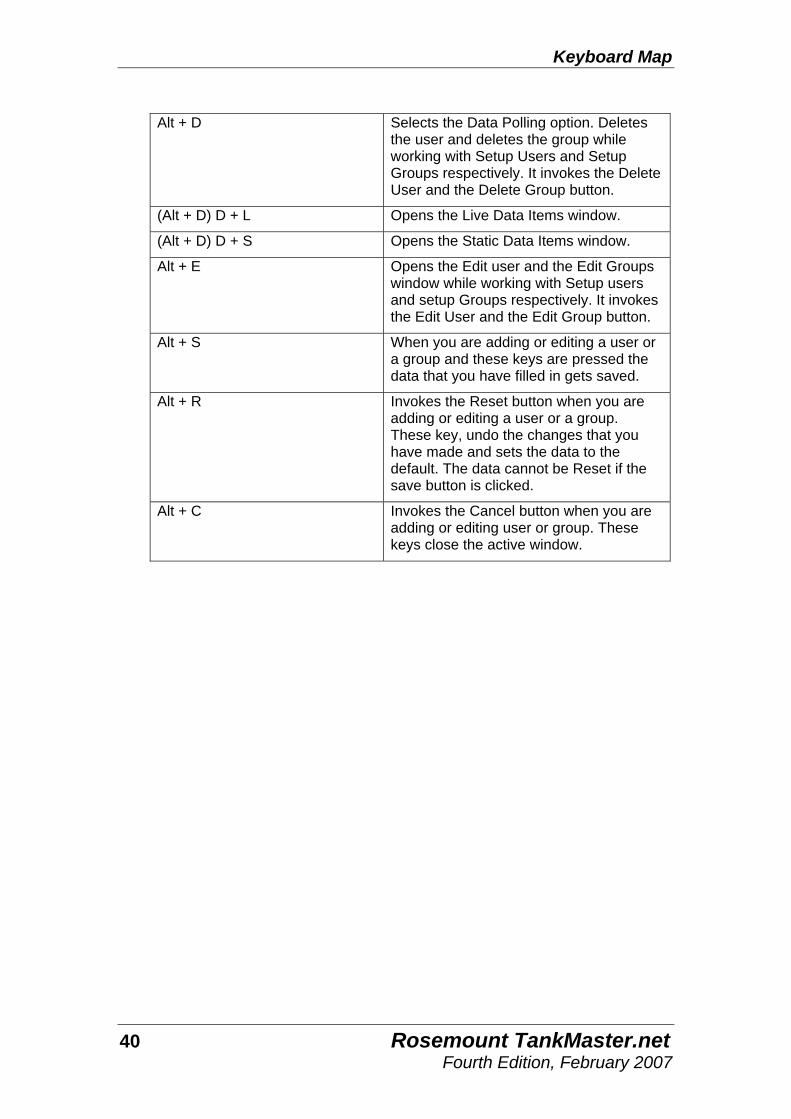
Alt + D Selects the Data Polling option. Deletes
the user and deletes the group while working with Setup Users and Setup Groups respectively. It invokes the Delete User and the Delete Group button.
(Alt + D) D + L Opens the Live Data Items window.
(Alt + D) D + S Opens the Static Data Items window.
Alt + E Opens the Edit user and the Edit Groups window while working with Setup users and setup Groups respectively. It invokes the Edit User and the Edit Group button.
Alt + S When you are adding or editing a user or a group and these keys are pressed the data that you have filled in gets saved.
Alt + R Invokes the Reset button when you are adding or editing a user or a group. These key, undo the changes that you have made and sets the data to the default. The data cannot be Reset if the save button is clicked.
Alt + C Invokes the Cancel button when you are adding or editing user or group. These keys close the active window.
40 Rosemount TankMaster.net Fourth Edition, February 2007
Glossary
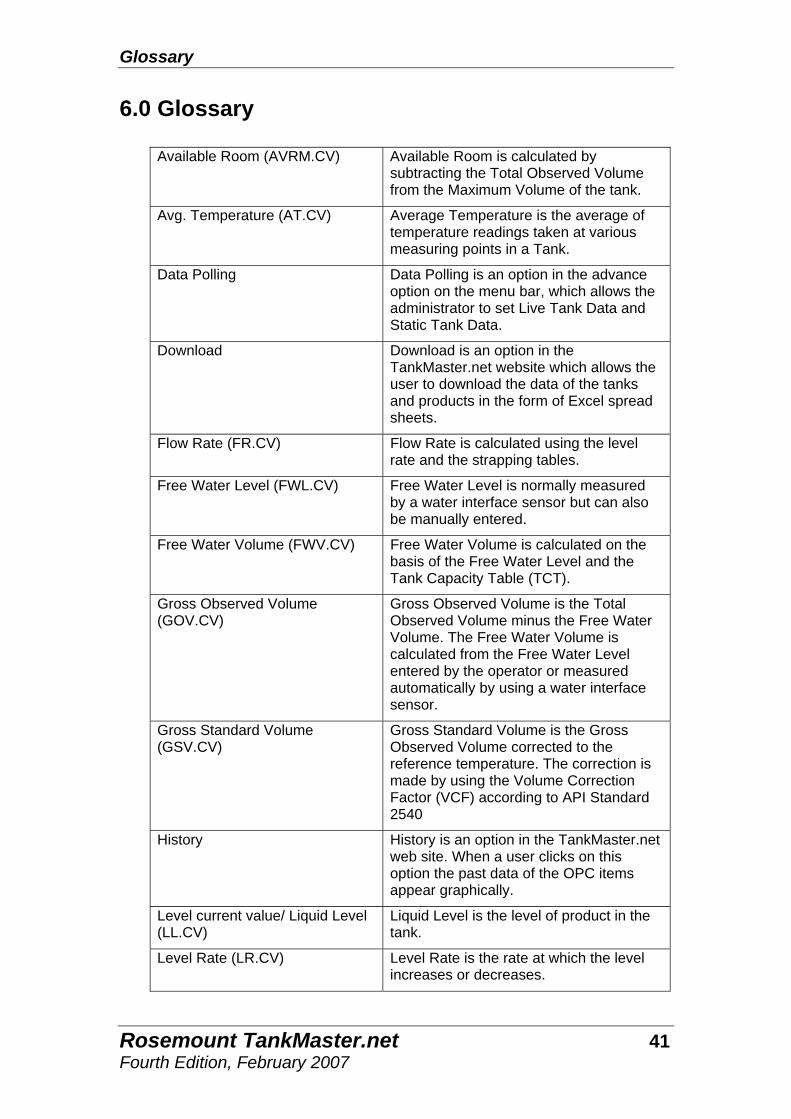
6.0 Glossary
Available Room (AVRM.CV) Available Room is calculated by subtracting the Total Observed Volume from the Maximum Volume of the tank.
Avg. Temperature (AT.CV) Average Temperature is the average of temperature readings taken at various measuring points in a Tank.
Data Polling Data Polling is an option in the advance option on the menu bar, which allows the administrator to set Live Tank Data and Static Tank Data.
Download Download is an option in the TankMaster.net website which allows the user to download the data of the tanks and products in the form of Excel spread sheets.
Flow Rate (FR.CV) Flow Rate is calculated using the level rate and the strapping tables.
Free Water Level (FWL.CV) Free Water Level is normally measured by a water interface sensor but can also be manually entered.
Free Water Volume (FWV.CV) Free Water Volume is calculated on the basis of the Free Water Level and the Tank Capacity Table (TCT).
Gross Observed Volume (GOV.CV)
Gross Observed Volume is the Total Observed Volume minus the Free Water Volume. The Free Water Volume is calculated from the Free Water Level entered by the operator or measured automatically by using a water interface sensor.
Gross Standard Volume (GSV.CV)
Gross Standard Volume is the Gross Observed Volume corrected to the reference temperature. The correction is made by using the Volume Correction Factor (VCF) according to API Standard 2540
History History is an option in the TankMaster.net web site. When a user clicks on this option the past data of the OPC items appear graphically.
Level current value/ Liquid Level (LL.CV)
Liquid Level is the level of product in the tank.
Level Rate (LR.CV) Level Rate is the rate at which the level increases or decreases.
Rosemount TankMaster.net 41 Fourth Edition, February 2007

Glossary
Live Data Item The Live Data Item is an option in the
TankMaster.net Configuration, which allows the user to set those OPC items whose live data will be visible to the users on the internet/intranet.
Liquid Equivalent of Vapor (LEV.CV)
Liquid Equivalent of Vapor is the corresponding liquid equivalent volume of the gas above the product surface in liquid gas tanks.
Liquid Pressure (LP.CV) Liquid Pressure is the current liquid pressure that is automatically measured if a pressure sensor is installed. A pressure value can also be manually entered.
Mapping Servers and Tanks Mapping Servers and Tanks is an option in the TankMaster.net Configuration application where the administrator can map servers and tanks on the local machine.
Max level Max level is the maximum level that a product can be filled in a tank.
Maximum Volume (MXV.CV) Maximum Volume is the volume that corresponds to the maximum product level.
Minimum level for graphs (LL.MN)
Minimum level for graphs is the minimum level of product allowed in a tank displayed graphically.
Minimum Volume (low capacity volume) (MNV.CV)
Minimum Volume is the volume below the outlet pipe
Net Standard Volume (NSV.CV) Net Standard Volume is the Gross Standard Volume minus dissolved sediment and water. For liquid gas tanks the liquid equivalent volume of the gas above the product surface is added.
Observed Density / Observed density in vacuum (DOBS.CV)
Observed Density is calculated by recalculating the manually entered Reference Density at the current temperature. For Hybrid Tank Gauging the Observed Density is measured automatically by using inputs from sensors for Liquid and Vapor pressures.
Overview Overview is an option available on the TankMaster.net web site where the user can view the overview of “All Tanks”, “All Groups” and the “Schematic”.
Pipe Contents (Unit of measurement) (PC.VU)
Unit of measurement for the product in the pipeline
42 Rosemount TankMaster.net Fourth Edition, February 2007
Glossary
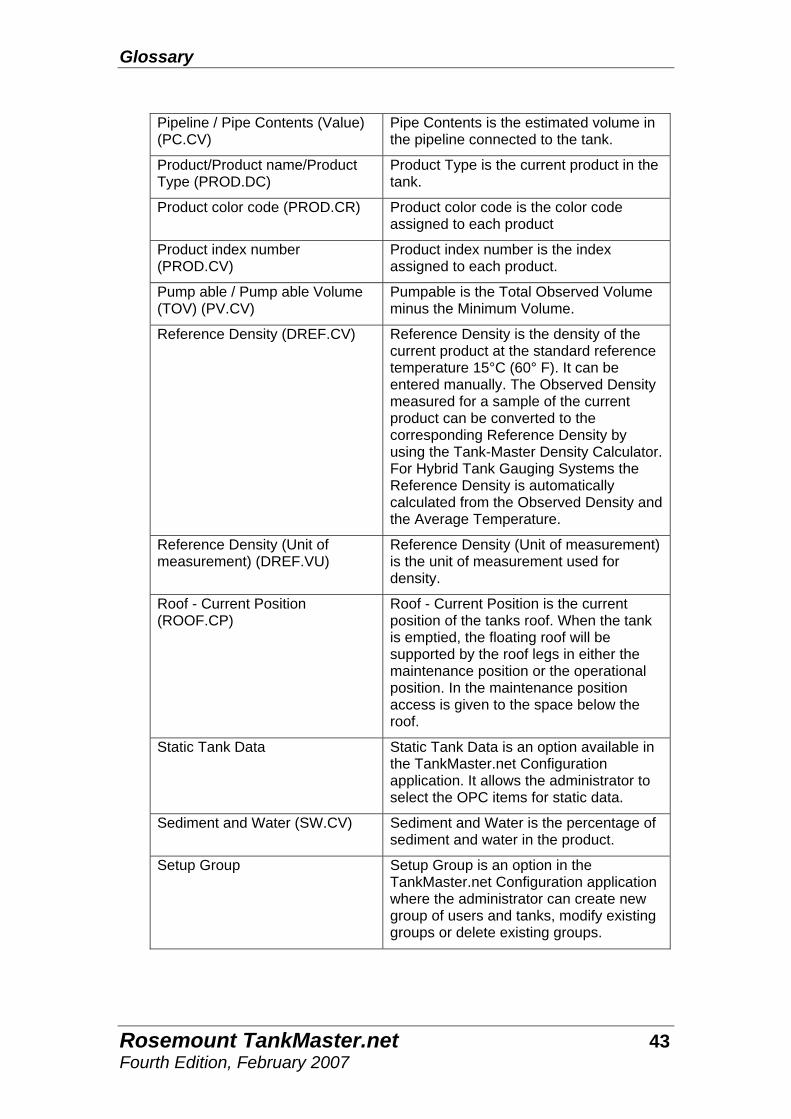
Pipeline / Pipe Contents (Value) (PC.CV)
Pipe Contents is the estimated volume in the pipeline connected to the tank.
Product/Product name/Product Type (PROD.DC)
Product Type is the current product in the tank.
Product color code (PROD.CR) Product color code is the color code assigned to each product
Product index number (PROD.CV)
Product index number is the index assigned to each product.
Pump able / Pump able Volume (TOV) (PV.CV)
Pumpable is the Total Observed Volume minus the Minimum Volume.
Reference Density (DREF.CV) Reference Density is the density of the current product at the standard reference temperature 15°C (60° F). It can be entered manually. The Observed Density measured for a sample of the current product can be converted to the corresponding Reference Density by using the Tank-Master Density Calculator. For Hybrid Tank Gauging Systems the Reference Density is automatically calculated from the Observed Density and the Average Temperature.
Reference Density (Unit of measurement) (DREF.VU)
Reference Density (Unit of measurement) is the unit of measurement used for density.
Roof - Current Position (ROOF.CP)
Roof - Current Position is the current position of the tanks roof. When the tank is emptied, the floating roof will be supported by the roof legs in either the maintenance position or the operational position. In the maintenance position access is given to the space below the roof.
Static Tank Data Static Tank Data is an option available in the TankMaster.net Configuration application. It allows the administrator to select the OPC items for static data.
Sediment and Water (SW.CV) Sediment and Water is the percentage of sediment and water in the product.
Setup Group Setup Group is an option in the TankMaster.net Configuration application where the administrator can create new group of users and tanks, modify existing groups or delete existing groups.
Rosemount TankMaster.net 43 Fourth Edition, February 2007
Glossary
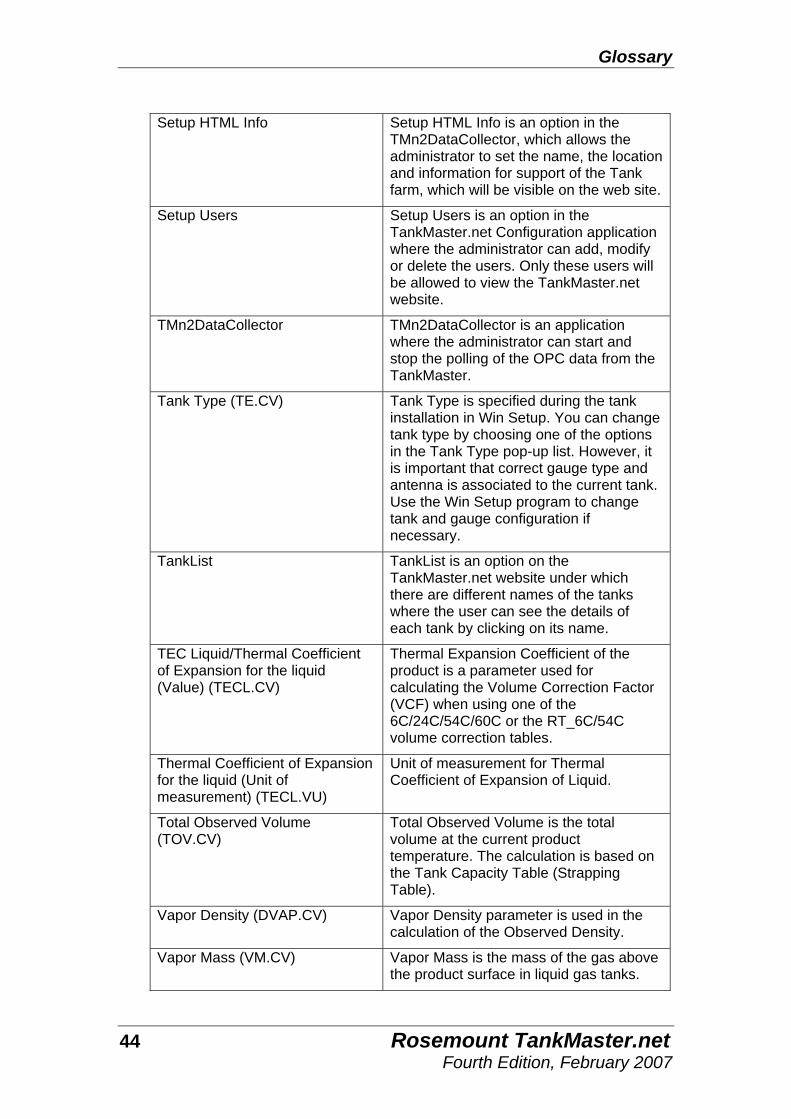
Setup HTML Info Setup HTML Info is an option in the
TMn2DataCollector, which allows the administrator to set the name, the location and information for support of the Tank farm, which will be visible on the web site.
Setup Users Setup Users is an option in the TankMaster.net Configuration application where the administrator can add, modify or delete the users. Only these users will be allowed to view the TankMaster.net website.
TMn2DataCollector TMn2DataCollector is an application where the administrator can start and stop the polling of the OPC data from the TankMaster.
Tank Type (TE.CV) Tank Type is specified during the tank installation in Win Setup. You can change tank type by choosing one of the options in the Tank Type pop-up list. However, it is important that correct gauge type and antenna is associated to the current tank. Use the Win Setup program to change tank and gauge configuration if necessary.
TankList TankList is an option on the TankMaster.net website under which there are different names of the tanks where the user can see the details of each tank by clicking on its name.
TEC Liquid/Thermal Coefficient of Expansion for the liquid (Value) (TECL.CV)
Thermal Expansion Coefficient of the product is a parameter used for calculating the Volume Correction Factor (VCF) when using one of the 6C/24C/54C/60C or the RT_6C/54C volume correction tables.
Thermal Coefficient of Expansion for the liquid (Unit of measurement) (TECL.VU)
Unit of measurement for Thermal Coefficient of Expansion of Liquid.
Total Observed Volume (TOV.CV)
Total Observed Volume is the total volume at the current product temperature. The calculation is based on the Tank Capacity Table (Strapping Table).
Vapor Density (DVAP.CV) Vapor Density parameter is used in the calculation of the Observed Density.
Vapor Mass (VM.CV) Vapor Mass is the mass of the gas above the product surface in liquid gas tanks.
44 Rosemount TankMaster.net Fourth Edition, February 2007
Glossary
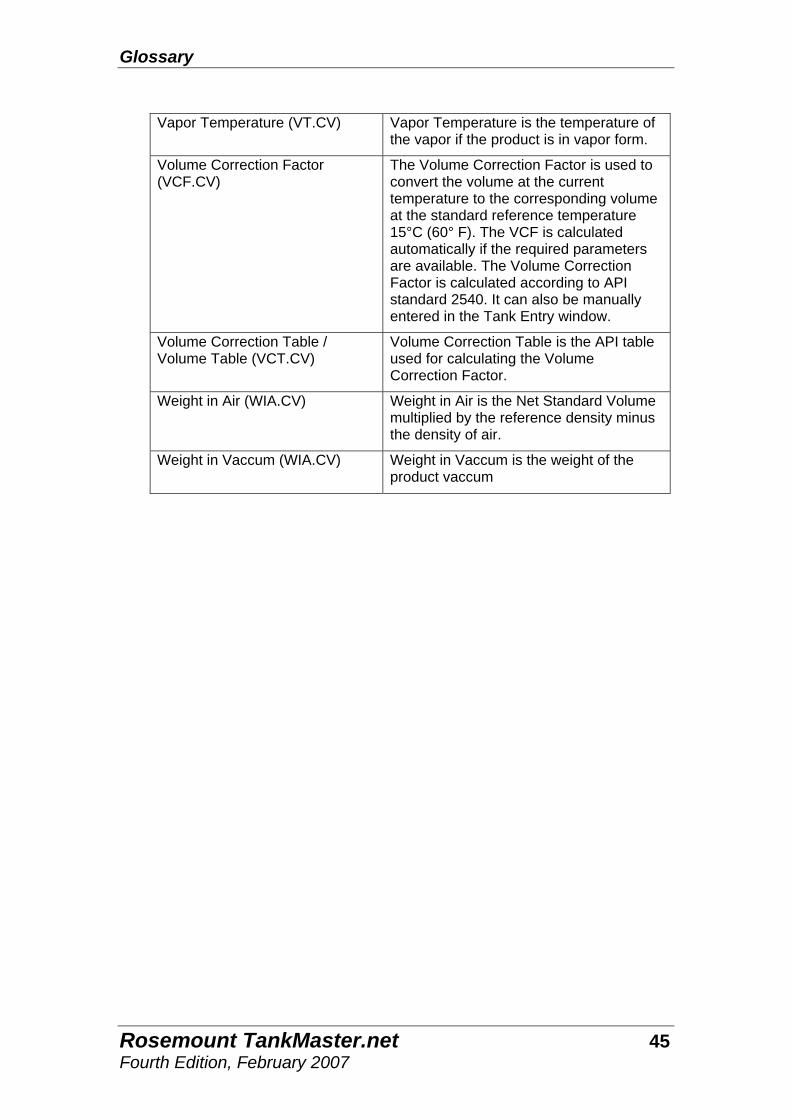
Vapor Temperature (VT.CV) Vapor Temperature is the temperature of
the vapor if the product is in vapor form.
Volume Correction Factor (VCF.CV)
The Volume Correction Factor is used to convert the volume at the current temperature to the corresponding volume at the standard reference temperature 15°C (60° F). The VCF is calculated automatically if the required parameters are available. The Volume Correction Factor is calculated according to API standard 2540. It can also be manually entered in the Tank Entry window.
Volume Correction Table / Volume Table (VCT.CV)
Volume Correction Table is the API table used for calculating the Volume Correction Factor.
Weight in Air (WIA.CV) Weight in Air is the Net Standard Volume multiplied by the reference density minus the density of air.
Weight in Vaccum (WIA.CV) Weight in Vaccum is the weight of the product vaccum
Rosemount TankMaster.net 45 Fourth Edition, February 2007
Troubleshooting
7.0 Troubleshooting What if I cannot login to the TankMaster.net Configuration application? Only administrators or administrator equivalent users can login to the Tankmaster.net Configuration application. If you have got administrator rights and are unable to login, your login name or password may be incorrect. What if I cannot map servers and tanks? If you cannot map servers and tanks, it may be due to: A server malfunction, the server may not be switched on or the network connection may have been lost. The I.P. number of the server may be entered incorrectly. The local machine may not be logged onto the network. What if I cannot add a user? If you cannot add a user, a user with the same User Name may already exist on the network. Duplication of User Names is not permitted. What if I cannot delete a user? The last user in the Administrators group cannot be deleted. All users cannot be deleted. What if I cannot setup a group? If you cannot setup a group, a group with the same Group Name may already exist on the network. A Group Name cannot be duplicated and must be unique. What if I cannot delete a group? The group Administrators cannot be deleted. All other groups can be deleted. What if I get an error while renaming a user, group, Server, Tank names or Server and Tank aliases? You could be using prohibited characters like: |, *, %, <, >, {,},’ (single quote), “ (double quote). Refer to Section 1.1 for details on Illegal characters
46 Rosemount TankMaster.net Fourth Edition, February 2007


User’s Guide Ref. no: 303035E Fourth Edition, February 2007
Emerson Process Management Rosemount Tank Gauging Box 130 45 SE-402 51 Göteborg SWEDEN Tel (International): +46 31 337 00 00 Fax (International): +46 31 25 30 22 E-mail: [email protected] www.rosemount-tg.com
Copyright © Rosemount Tank Radar AB. Fourth Edition. February 2007. Ref. no: 303035E.


