Embed Size (px)
Citation preview

Restaurant Enterprise SeriesVersion 3.1Setup Instructions
General Information
About This Document
This document provides installation and setup instructions for theMICROS Restaurant Enterprise Series (RES) Version 3.1 software. Theprocess ensures the proper transfer and configuration of the files,programs, and databases required for the smooth operation of theapplications.
The procedures described in this document are applicable to both newand upgraded systems.
To help you navigate the document, information is organized in sectionsand displayed in the following sequence:
� Who Should be Reading This Document
� What the Reader Should Already Know
� Before You Begin: Tips, Traps, and Precautions
� Site Requirements
� Running Server Setup
� Running Client Setup
MD0003-052July 9, 2002Page 1 of 54
General InformationWho Should be Reading this Document
� Appendix A: Microsoft Windows NT® Service Pack Installation
� Appendix B: Digicom Diskless Desktop Workstation Setup
� Appendix C: SEI KDS Client Hardware Setup
� Appendix D: Non-Interactive Install
Who Should be Reading this Document
This document is intended for the following audiences:
� MICROS Installers/Programmers
� MICROS Dealers
� MICROS Customer Service
� MICROS Training Personnel
� MIS Personnel
What the Reader Should Already Know
This document assumes that you have the following knowledge orexpertise:
� Operational understanding of PCs
� Understanding of POS terminology and concepts
� Working knowledge of the Microsoft Windows interface
MD0003-052July 9, 2002Page 2 of 54
RES Setup ProceduresBefore You Begin: Tips, Traps, and Precautions
RES Setup Procedures
Before You Begin: Tips, Traps, and Precautions
Before running the RES Setup procedure, the following should be noted:
� The individual installing the software must be logged on as“Administrator” before running RES Setup on a Microsoft®Windows NT® or Windows 2000 system.
� Make sure that all programs/applications are closed on the PC. If thesystem detects an active program/process during the installationroutine, a notification to close them may display.
� This version of the software requires an activation code for eachmodule (Version 3.0).
� The MICROSSVC user introduced in 3700 Version 2.5 requires anNT user license. Along with the 10 user license limit in NTWorkstation, this could be an issue for sites currently using 10 userlicenses and upgrading from a previous Version of 3700 to Version2.5 or higher.
� In order to view the online documentation, Microsoft InternetExplorer 5.5 with Service Pack 2 must be set as your default browser.
� With this release, MICROS no longer supports database Version2.5 or below. The conversion process will only work withdatabase Version 2.6 or higher.
� When upgrading from Res 2.6 to Res 3.1, the DeliveryDispatch.cfgfile is saved, but the new file is significantly larger and cannot beused as is. When Delivery Dispatch is started for the first time afterconversion, a new config file will be generated. Settings can then bechanged to suit the user.
� An existing Version 2.6/3.0 database with multiple languages createdthrough the Translate.exe application may not convert properly. Thefirst language in the database, which is the English US language, willconvert correctly.
MD0003-052July 9, 2002Page 3 of 54
RES Setup ProceduresBefore You Begin: Tips, Traps, and Precautions
� An incomplete or incorrect translation of the other languages mightoccur when creating a Version 2.6 database from the demo database.The Version 2.6 database had a problem with the second language.Therefore, if any other languages were derived from the secondlanguage files, it could result in an improper translation.
When the database is converted from Version 2.6 to 3.0, the systemwill detect the bad fields and insert the English US words and/orphrases. The user will be left with a second language that is partiallytranslated, but still usable. A post-conversion check of all languagetranslations is therefore recommended with the understanding thatadditional translation may be required.
Due to the nature of the problem, MICROS cannot predict how muchof a given language will translate. During testing, the success rateranged from 20-45%.
It should be noted that this problem applies only to databaseconversions and does not affect any POS Operations languagestranslated through the Translator.exe application. Please follownormal procedures for this application to update your language for thenew version of the software.
� The conversion script prior to RES version 3.1 does not supportcustom tables. As a result, when a RES Version 2.6 database withtotals in the ap_export tables is converted to a Version 3.0 database,the following tables are lost:
ap_export_entry_addl_dtlap_export_rpt_dtl
Follow these steps to work around this issue:
1. Select Start | Run | DBISQL.2. Enter your user ID and password.3. Using the UNLOAD statement, extract the ap_export
information from the Version 2.6 database to a file.4. Convert the Version 2.6 database to Version 3.0.5. Convert the Version 3.0 database to Version 3.1.6. Using the LOAD statement, insert the previously extracted
ap_export information into the Version 3.1 database.
MD0003-052July 9, 2002Page 4 of 54
RES Setup ProceduresBefore You Begin: Tips, Traps, and Precautions
� Before installing Win 2000 on the server, make sure that OPOSdevices and related software are Win 2000-compliant. Failure to doso may prevent KDS Controller from loading after setup.
� When installing on two or more clients, be sure to wait at least 3seconds between the start of each client setup. Failure to do so cancause one or more of the clients to hang.
� MICROS does not support remote installations to a client running alater version than the one installed on the server. To downgrade theclient to an earlier version of RES, you must first manually deleteMICROS from the clients and then reinstall the required version.
� This version of the software supports PCWS Model 64 or higher as aclient only. A minimimum of 32 MB of RAM is required.
� If a PCWS is to be used as the RES server, MICROS recommends thePCWS Model Eclipse.
� The Guest Services Solution (GSS) Backoffice application is notinitially supported in RES Version 3.1, but will be made availablelater in a service pack release. Attempts to launch the program via theStart Menu | MICROS Applications | GSS Backoffice will display amessage to that effect.
� After converting to RES Version 3.1, the system retains a copy of thegsspreconv.bat and gsspostconv.bat files for GSS-users in theMicros\Common\Scripts directory. These files are unnecessary foranything other than converting a 2.6 GSS database; however,attempting to convert a non-GSS database while these scripts are inplace will cause that conversion to fail. MICROS recommendsrenaming these files unless (and until) you plan to convert a 2.6 GSSdatabase.
� When updating from a previous version of RES, if you change thedrive where the Documentation files are installed, be aware that thesystem will not automatically delete the old Documentation filesfrom the previous directory location. You must delete them manually.
If no change is made to the location (i.e., the letter drive remains thesame), the system will overwrite the old Documentation files.
MD0003-052July 9, 2002Page 5 of 54
RES Setup ProceduresBefore You Begin: Tips, Traps, and Precautions
� The KDS Display Application will not run on RES Server runningWindows 2000 Server Edition. (It will run on Windows 2000 Pro.)
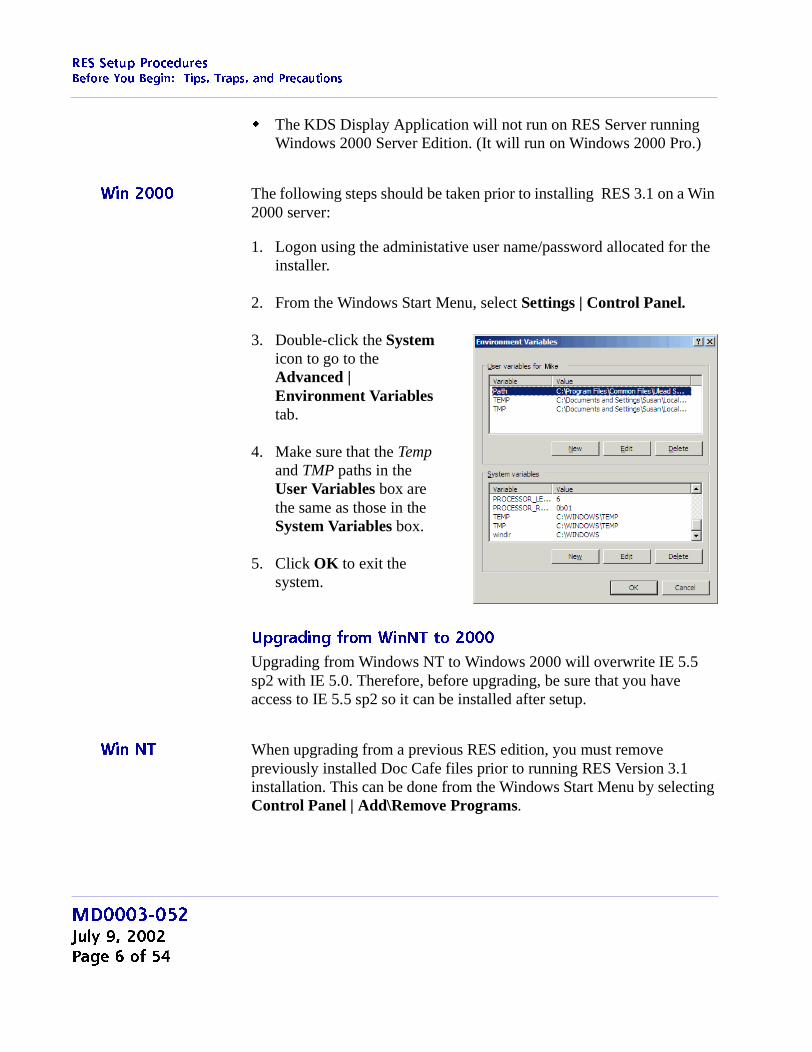
Win 2000 The following steps should be taken prior to installing RES 3.1 on a Win2000 server:
1. Logon using the administative user name/password allocated for theinstaller.
2. From the Windows Start Menu, select Settings | Control Panel.
3. Double-click the Systemicon to go to theAdvanced |Environment Variablestab.
4. Make sure that the Tempand TMP paths in theUser Variables box arethe same as those in theSystem Variables box.
5. Click OK to exit thesystem.
Upgrading from WinNT to 2000
Upgrading from Windows NT to Windows 2000 will overwrite IE 5.5sp2 with IE 5.0. Therefore, before upgrading, be sure that you haveaccess to IE 5.5 sp2 so it can be installed after setup.
Win NT When upgrading from a previous RES edition, you must removepreviously installed Doc Cafe files prior to running RES Version 3.1installation. This can be done from the Windows Start Menu by selectingControl Panel | Add\Remove Programs.
MD0003-052July 9, 2002Page 6 of 54
RES Setup ProceduresSite Requirements
Site Requirements In order to successfully install and enable a RES Setup system, thefollowing requirements must be met:
NOTE: NT 4.0 sp 6a and IE 5.5 sp 2 do not automatically install as partof RES setup. They must be manually installed by the user.
Additional Software Requirements
The following software tools are automatically installed with RES Setup.These application versions must not be changed by the installation ofthird-party software. Any changes to the software application will makethe RES System unsupportable.
NT Serverand Clients
Win 2000Server
95/98Clients
NT 4.0 sp 6a or greater X
IE 5.5 sp 2 or greater X X X
MDAC 2.6 (setup willinstall)
X X X
Application Version
Microsoft DCOM 1.0
ODBC 3.52
Sybase Adaptive Server 6.03.3114
Crystal Reports Professional* 8.0.0.85
Borland Delphi 5.1.1.1
Sentinel Software Key Driver 5.3.9.0
Adobe Acrobat Reader 5.0
*Crystal Reports viewer is installed with RES. Ifreport development is required, the installer mustload a full version of Crystal Report Professional. Ifdone, RES Setup must be reloaded afterwards.
MD0003-052July 9, 2002Page 7 of 54
RES Setup ProceduresSite Requirements
Hard-Drive Space Requirements
The space requirements listed below assume that the full range of optionsare to be installed:
*Setup saves a copy of all existing MICROS files until installation iscomplete. In the event that setup is cancelled before completion, thesystem can rollback to its original condition.
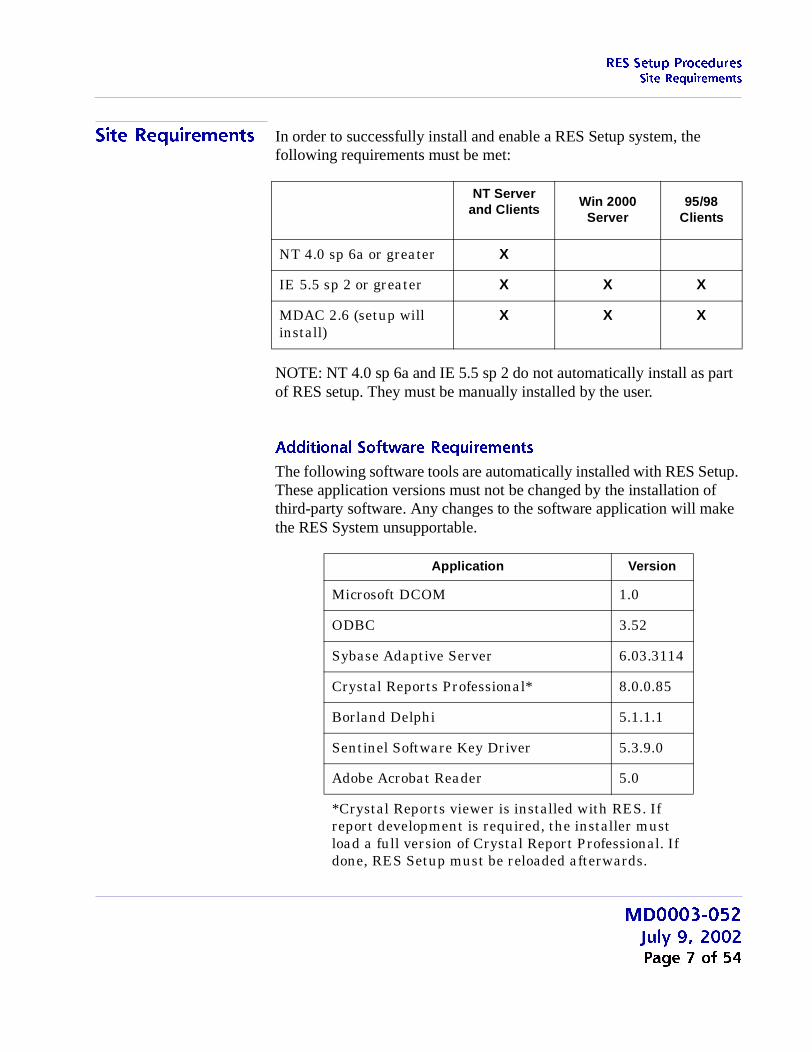
Prior to setup, the system calculates how much space is required forinstallation of the selected features. If the available disk space isinadequate, the following message is displayed:
For Server Out of Disk Space
RES Environment NT Server NT Client 95 Client
Clean, no prior RESinstallation
1.2 GB 463 MB 403 MB
Over existing RES(without rollback*)
1.3 GB +size of DB
360 MB 360 MB
Over existing RES(with rollback*)
n/a 518 MB 700 MB
MD0003-052July 9, 2002Page 8 of 54
RES Setup ProceduresSite Requirements
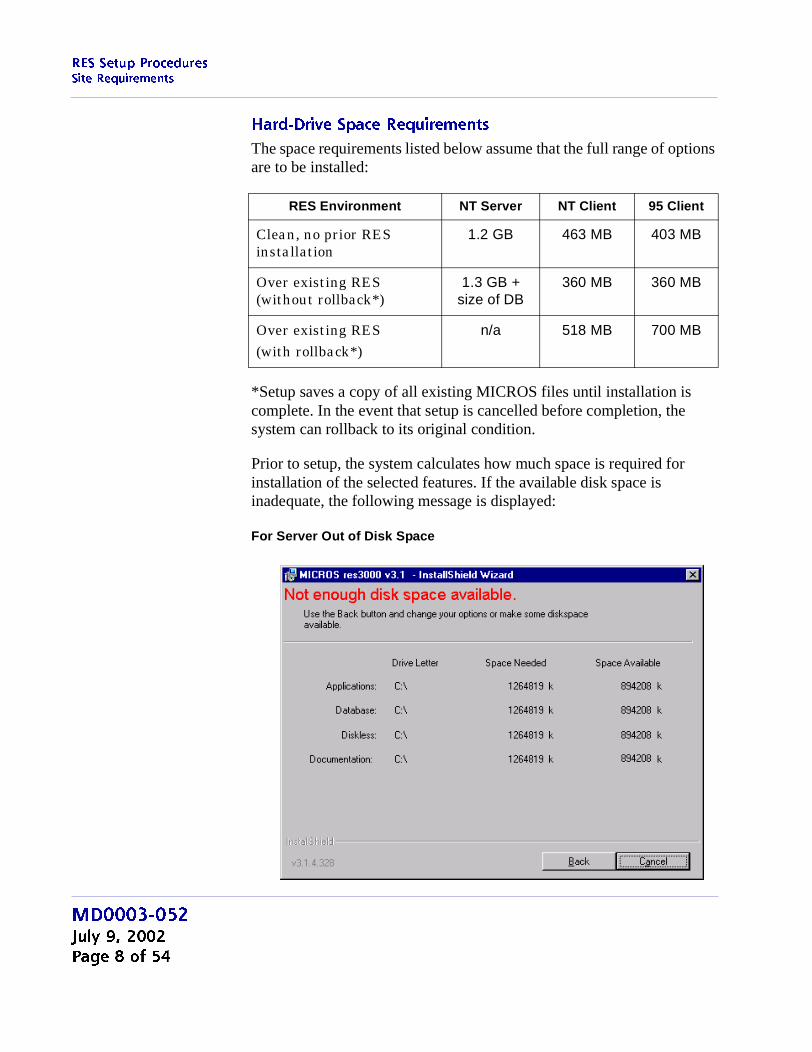
For Client Out of Disk Space
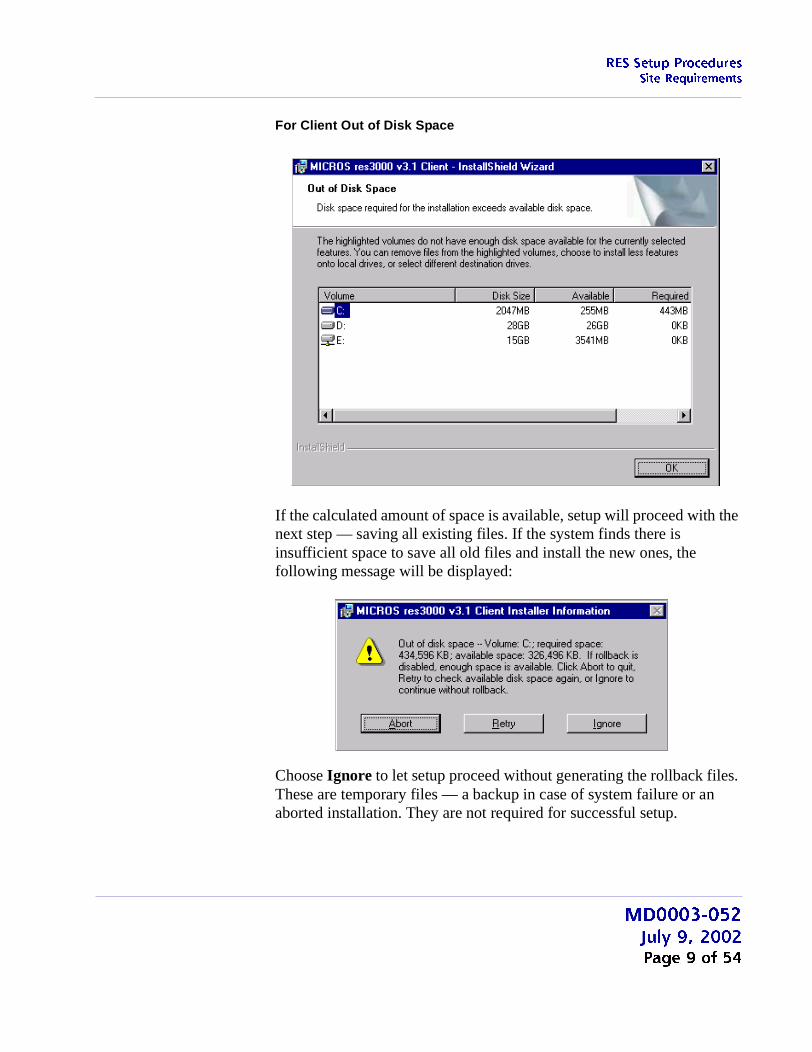
If the calculated amount of space is available, setup will proceed with thenext step — saving all existing files. If the system finds there isinsufficient space to save all old files and install the new ones, thefollowing message will be displayed:
Choose Ignore to let setup proceed without generating the rollback files.These are temporary files — a backup in case of system failure or anaborted installation. They are not required for successful setup.
MD0003-052July 9, 2002Page 9 of 54
RES Setup ProceduresSite Requirements
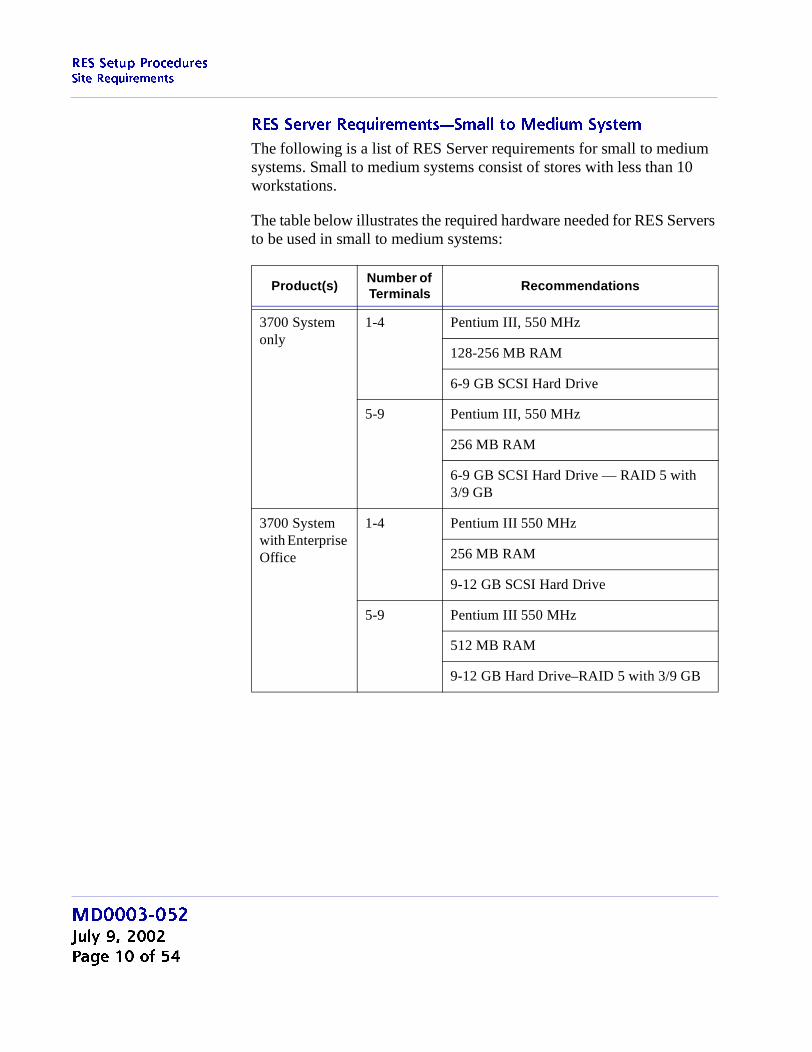
RES Server Requirements—Small to Medium System
The following is a list of RES Server requirements for small to mediumsystems. Small to medium systems consist of stores with less than 10workstations.
The table below illustrates the required hardware needed for RES Serversto be used in small to medium systems:
Product(s)Number ofTerminals
Recommendations
3700 Systemonly
1-4 Pentium III, 550 MHz
128-256 MB RAM
6-9 GB SCSI Hard Drive
5-9 Pentium III, 550 MHz
256 MB RAM
6-9 GB SCSI Hard Drive — RAID 5 with3/9 GB
3700 Systemwith EnterpriseOffice
1-4 Pentium III 550 MHz
256 MB RAM
9-12 GB SCSI Hard Drive
5-9 Pentium III 550 MHz
512 MB RAM
9-12 GB Hard Drive–RAID 5 with 3/9 GB
MD0003-052July 9, 2002Page 10 of 54
RES Setup ProceduresSite Requirements
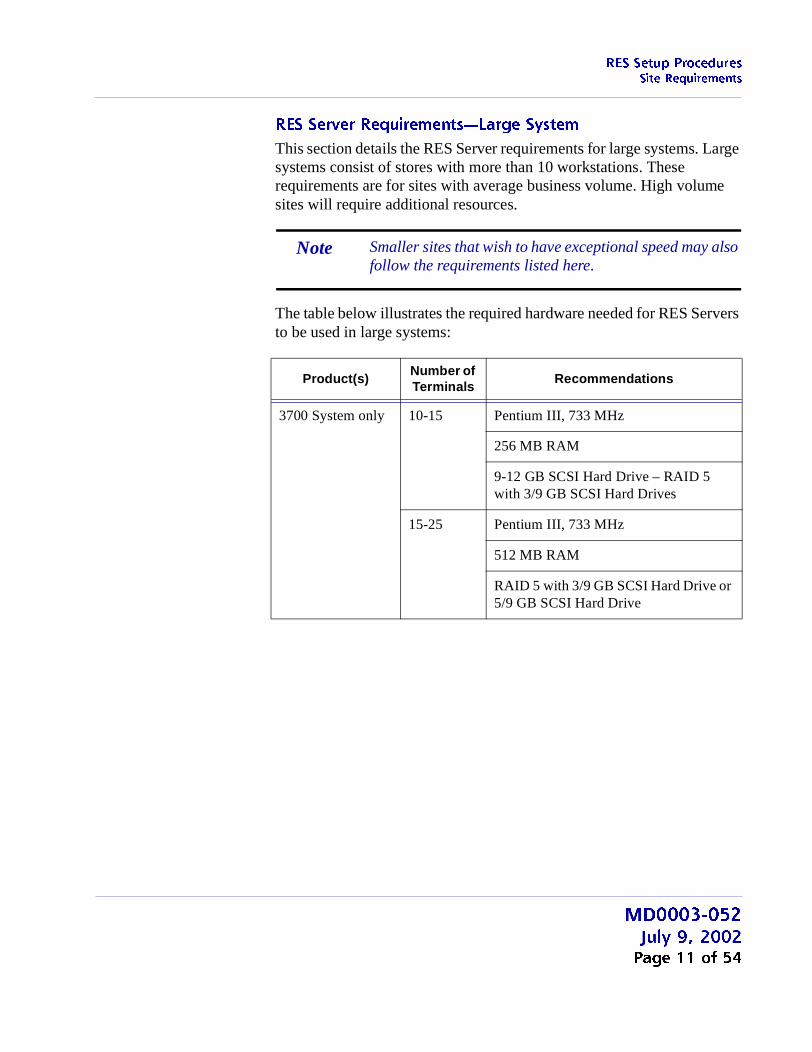
RES Server Requirements—Large System
This section details the RES Server requirements for large systems. Largesystems consist of stores with more than 10 workstations. Theserequirements are for sites with average business volume. High volumesites will require additional resources.
The table below illustrates the required hardware needed for RES Serversto be used in large systems:
Note Smaller sites that wish to have exceptional speed may alsofollow the requirements listed here.
Product(s)Number ofTerminals
Recommendations
3700 System only 10-15 Pentium III, 733 MHz
256 MB RAM
9-12 GB SCSI Hard Drive – RAID 5with 3/9 GB SCSI Hard Drives
15-25 Pentium III, 733 MHz
512 MB RAM
RAID 5 with 3/9 GB SCSI Hard Drive or5/9 GB SCSI Hard Drive
MD0003-052July 9, 2002Page 11 of 54
RES Setup ProceduresSite Requirements
Product(s)Number ofTerminals
Recommendations
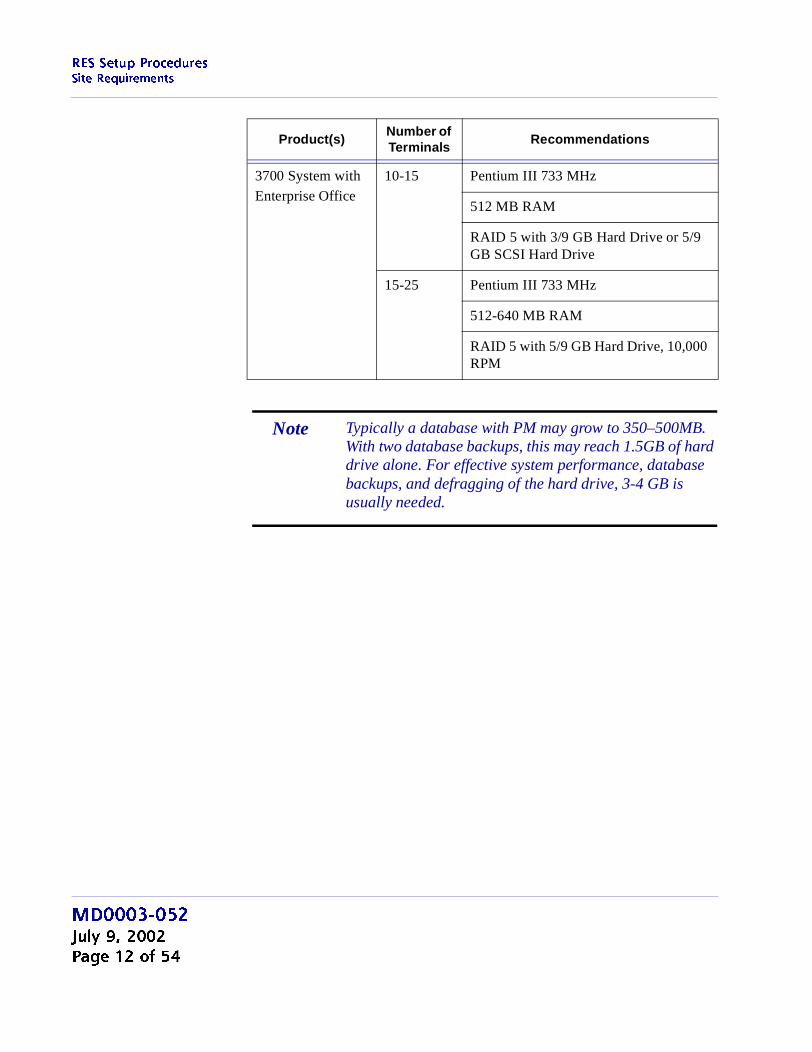
3700 System with
Enterprise Office
10-15 Pentium III 733 MHz
512 MB RAM
RAID 5 with 3/9 GB Hard Drive or 5/9GB SCSI Hard Drive
15-25 Pentium III 733 MHz
512-640 MB RAM
RAID 5 with 5/9 GB Hard Drive, 10,000RPM
Note Typically a database with PM may grow to 350–500MB.With two database backups, this may reach 1.5GB of harddrive alone. For effective system performance, databasebackups, and defragging of the hard drive, 3-4 GB isusually needed.
MD0003-052July 9, 2002Page 12 of 54
RES Setup ProceduresSite Requirements
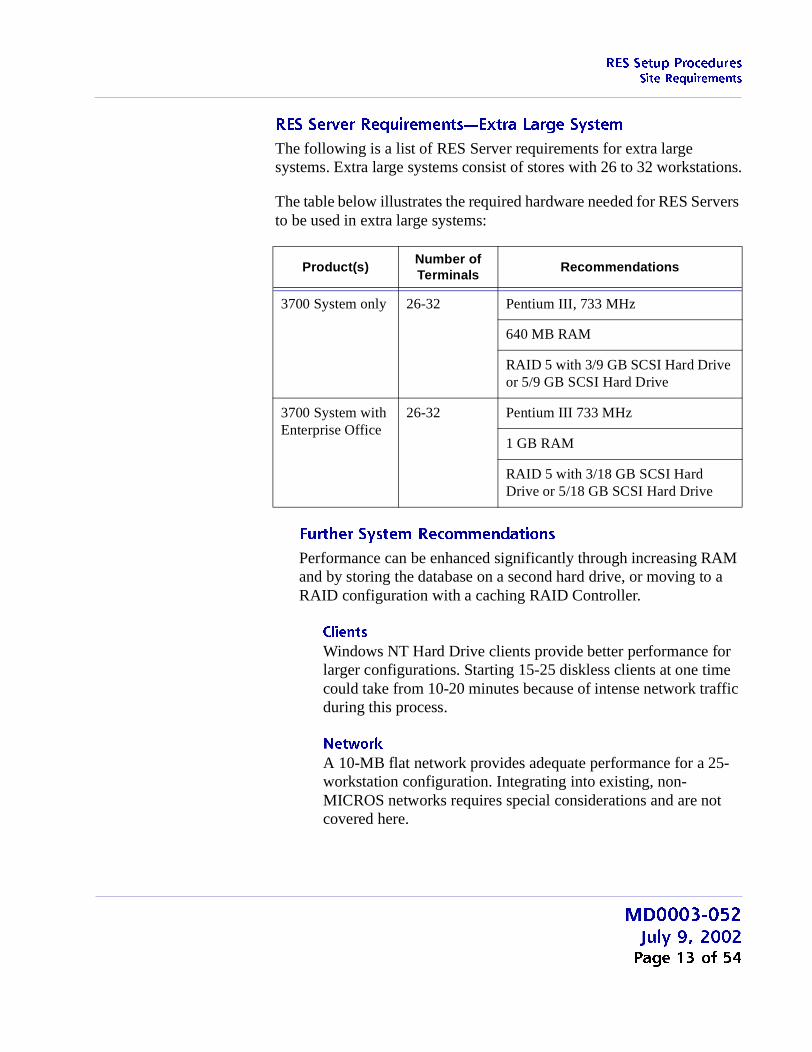
RES Server Requirements—Extra Large System
The following is a list of RES Server requirements for extra largesystems. Extra large systems consist of stores with 26 to 32 workstations.
The table below illustrates the required hardware needed for RES Serversto be used in extra large systems:
Further System Recommendations
Performance can be enhanced significantly through increasing RAMand by storing the database on a second hard drive, or moving to aRAID configuration with a caching RAID Controller.
Clients
Windows NT Hard Drive clients provide better performance forlarger configurations. Starting 15-25 diskless clients at one timecould take from 10-20 minutes because of intense network trafficduring this process.
Network
A 10-MB flat network provides adequate performance for a 25-workstation configuration. Integrating into existing, non-MICROS networks requires special considerations and are notcovered here.
Product(s)Number ofTerminals
Recommendations
3700 System only 26-32 Pentium III, 733 MHz
640 MB RAM
RAID 5 with 3/9 GB SCSI Hard Driveor 5/9 GB SCSI Hard Drive
3700 System withEnterprise Office
26-32 Pentium III 733 MHz
1 GB RAM
RAID 5 with 3/18 GB SCSI HardDrive or 5/18 GB SCSI Hard Drive
MD0003-052July 9, 2002Page 13 of 54
RES Setup ProceduresRunning Server Setup
Running Server Setup
MICROS provides two methods for running RES Setup on a server—interactive and non-interactive. The most common method is theinteractive (attended) mode, which provides a series of questions andoptions to guide you toward successful installation of the software.
The non-interactive (unattended) method is new in RES 3000.Procedurally, the method functions as an interactive session, but uses apre-configured response file to answer the system queries presentedduring installation. This method is intended for use by customers withlarge rollout requirements. Its purpose is to ensure a uniform installationacross locations.
Follow the steps below to install your system software on a RES ServerPC. If you are upgrading from a previous version of MICROS 3700software, you should bring the Restaurant to OFF using MICROSControl Panel. You should also power off all diskless and hard-driveclients.
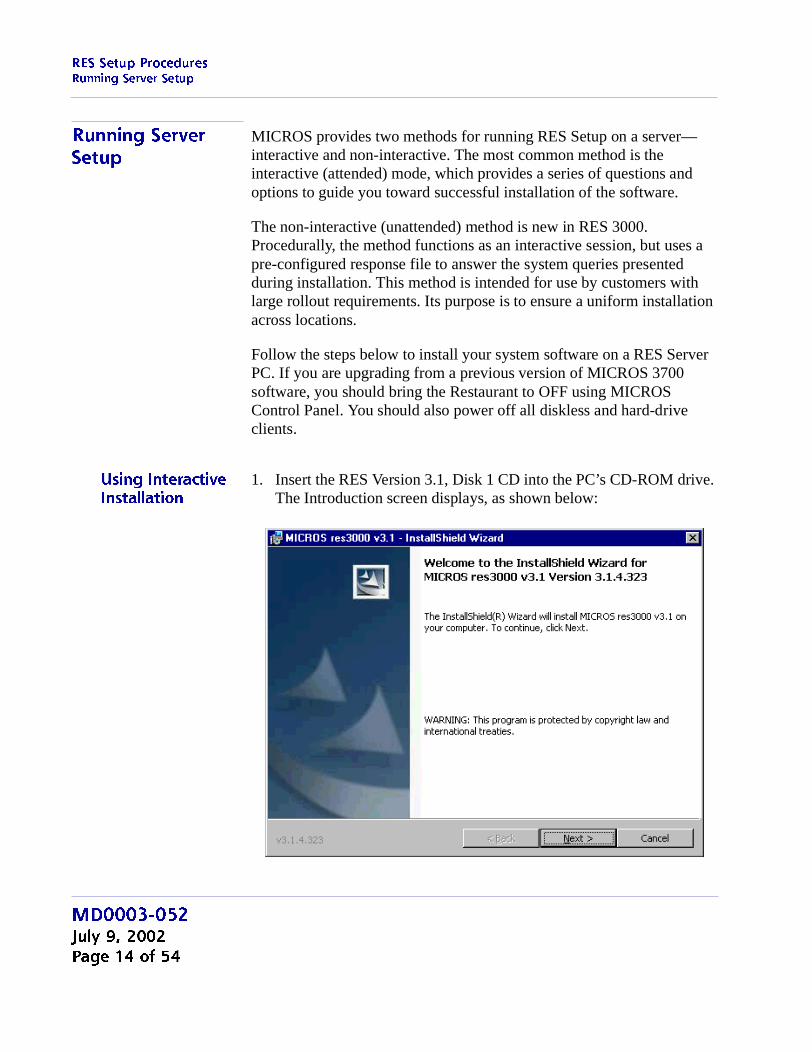
Using Interactive Installation
1. Insert the RES Version 3.1, Disk 1 CD into the PC’s CD-ROM drive.The Introduction screen displays, as shown below:
MD0003-052July 9, 2002Page 14 of 54
RES Setup ProceduresRunning Server Setup
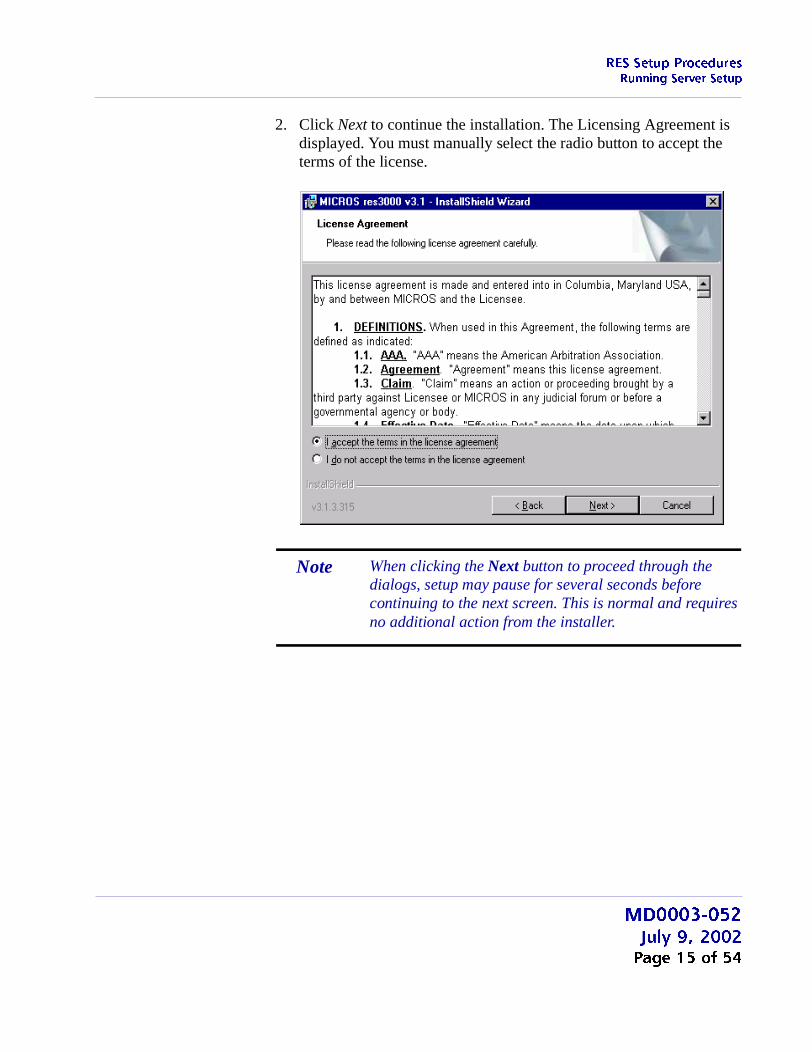
2. Click Next to continue the installation. The Licensing Agreement isdisplayed. You must manually select the radio button to accept theterms of the license.
Note When clicking the Next button to proceed through thedialogs, setup may pause for several seconds beforecontinuing to the next screen. This is normal and requiresno additional action from the installer.
MD0003-052July 9, 2002Page 15 of 54
RES Setup ProceduresRunning Server Setup
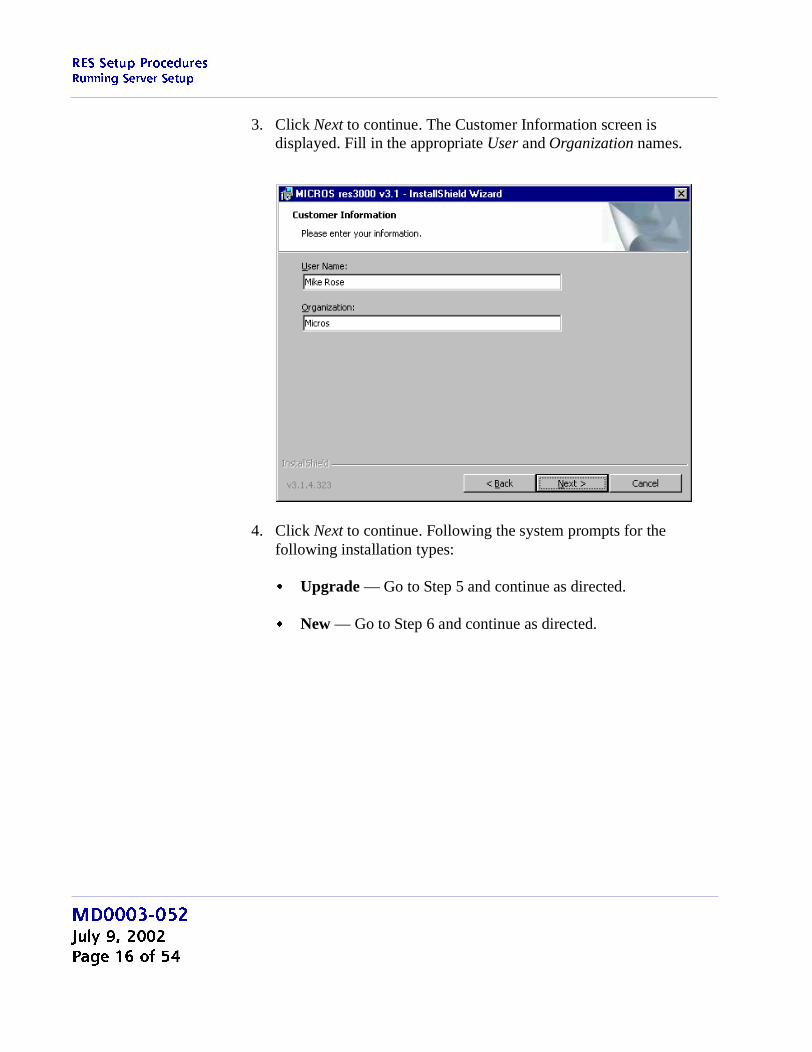
3. Click Next to continue. The Customer Information screen isdisplayed. Fill in the appropriate User and Organization names.
4. Click Next to continue. Following the system prompts for thefollowing installation types:
� Upgrade — Go to Step 5 and continue as directed.
� New — Go to Step 6 and continue as directed.
MD0003-052July 9, 2002Page 16 of 54
RES Setup ProceduresRunning Server Setup
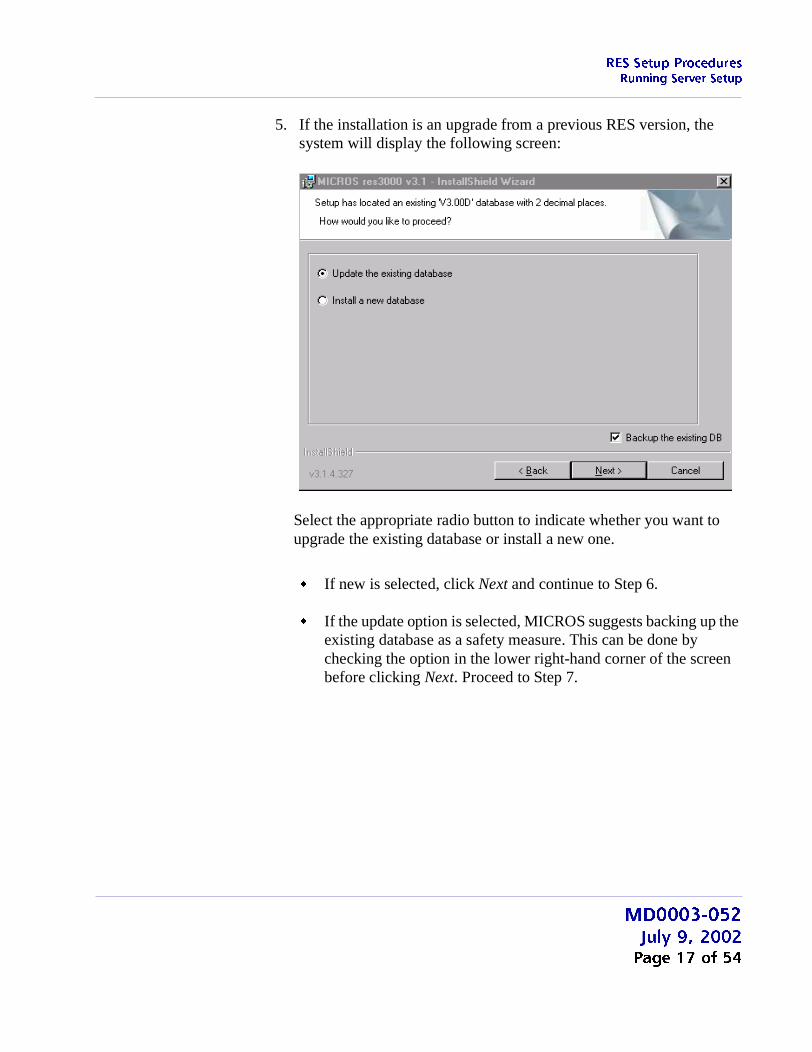
5. If the installation is an upgrade from a previous RES version, thesystem will display the following screen:
Select the appropriate radio button to indicate whether you want toupgrade the existing database or install a new one.
� If new is selected, click Next and continue to Step 6.
� If the update option is selected, MICROS suggests backing up theexisting database as a safety measure. This can be done bychecking the option in the lower right-hand corner of the screenbefore clicking Next. Proceed to Step 7.
MD0003-052July 9, 2002Page 17 of 54
RES Setup ProceduresRunning Server Setup
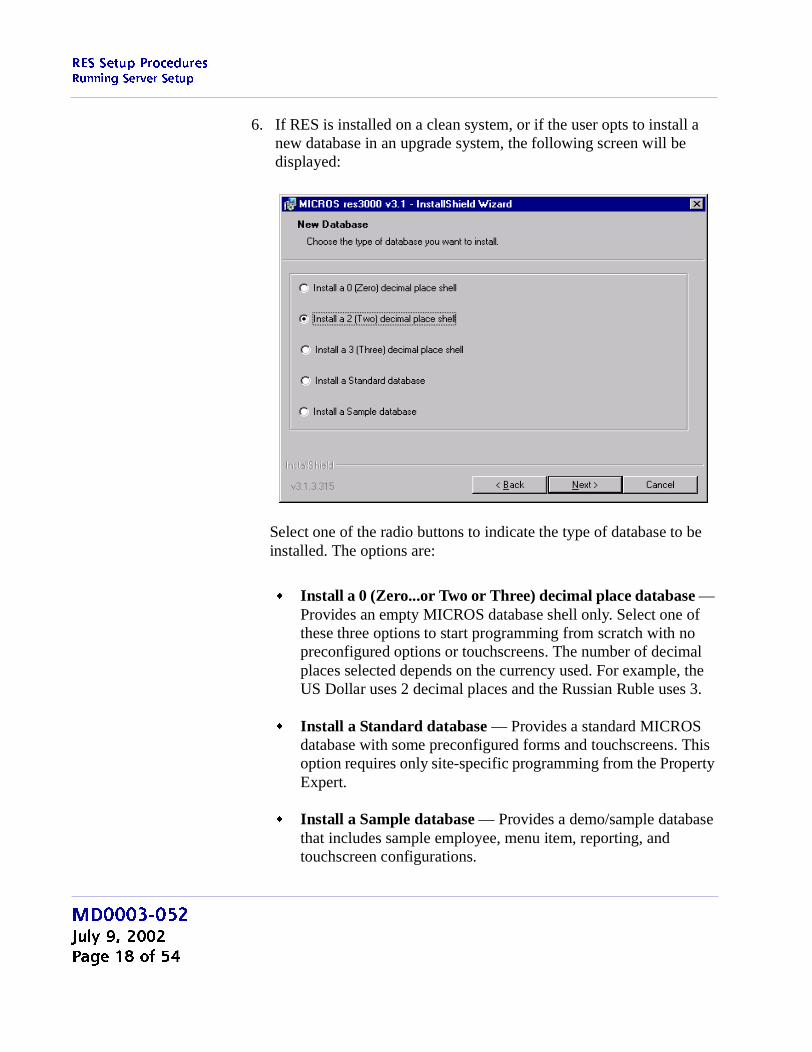
6. If RES is installed on a clean system, or if the user opts to install anew database in an upgrade system, the following screen will bedisplayed:
Select one of the radio buttons to indicate the type of database to beinstalled. The options are:
� Install a 0 (Zero...or Two or Three) decimal place database —Provides an empty MICROS database shell only. Select one ofthese three options to start programming from scratch with nopreconfigured options or touchscreens. The number of decimalplaces selected depends on the currency used. For example, theUS Dollar uses 2 decimal places and the Russian Ruble uses 3.
� Install a Standard database — Provides a standard MICROSdatabase with some preconfigured forms and touchscreens. Thisoption requires only site-specific programming from the PropertyExpert.
� Install a Sample database — Provides a demo/sample databasethat includes sample employee, menu item, reporting, andtouchscreen configurations.
MD0003-052July 9, 2002Page 18 of 54
RES Setup ProceduresRunning Server Setup
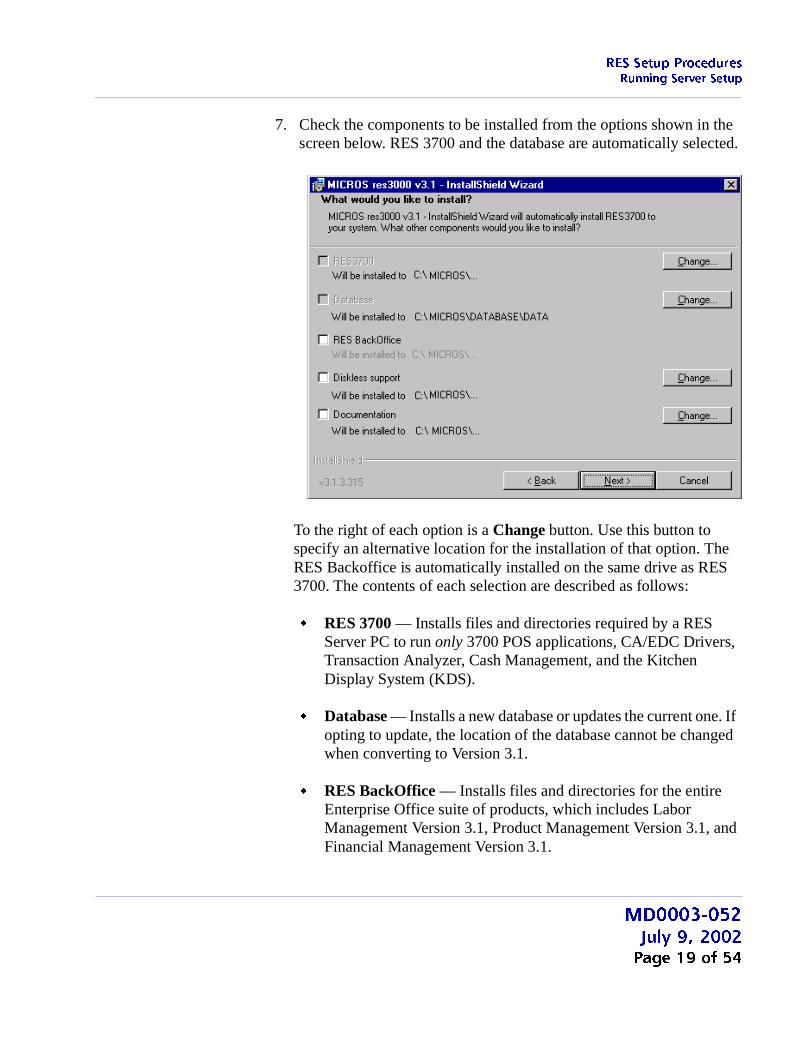
7. Check the components to be installed from the options shown in thescreen below. RES 3700 and the database are automatically selected.
To the right of each option is a Change button. Use this button tospecify an alternative location for the installation of that option. TheRES Backoffice is automatically installed on the same drive as RES3700. The contents of each selection are described as follows:
� RES 3700 — Installs files and directories required by a RESServer PC to run only 3700 POS applications, CA/EDC Drivers,Transaction Analyzer, Cash Management, and the KitchenDisplay System (KDS).
� Database — Installs a new database or updates the current one. Ifopting to update, the location of the database cannot be changedwhen converting to Version 3.1.
� RES BackOffice — Installs files and directories for the entireEnterprise Office suite of products, which includes LaborManagement Version 3.1, Product Management Version 3.1, andFinancial Management Version 3.1.
MD0003-052July 9, 2002Page 19 of 54

RES Setup ProceduresRunning Server Setup
� Documentation — Installs all the documentation files. Unlikeprevious versions, RES 3.1 allows you to choose whether or notto copy the documentation files to the hard drive duringinstallation. Documentation does take up 55 MB of space, andMICROS does recommend that it be included.
8. Click Next to continue.
Installing RES 3.1 over an existing RES installation requires 1.3 GBof free space plus the size of the database. Installing onto a cleansystem requires approximately 1.2 GB of free space. Wheninsufficient disk space is available, the system provides the followingnotification.
Note Previous versions of RES automatically installed thecorrect version of Adobe Acrobat Reader necessaryto view the help files. RES 3.1 does not do this.Adobe Acrobat Reader Version 5.0 is required toread the help files. It is included on Disk 2 of theRES 3.1 CDs in the support folder.
MD0003-052July 9, 2002Page 20 of 54
RES Setup ProceduresRunning Server Setup
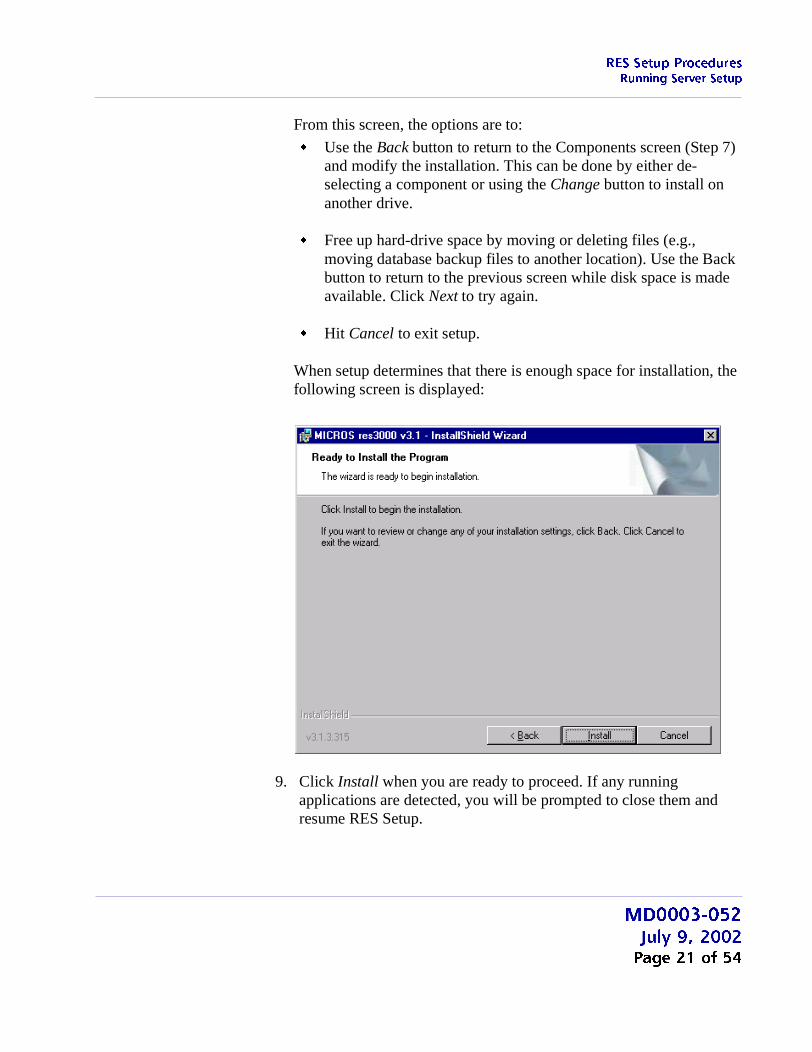
From this screen, the options are to:
� Use the Back button to return to the Components screen (Step 7)and modify the installation. This can be done by either de-selecting a component or using the Change button to install onanother drive.
� Free up hard-drive space by moving or deleting files (e.g.,moving database backup files to another location). Use the Backbutton to return to the previous screen while disk space is madeavailable. Click Next to try again.
� Hit Cancel to exit setup.
When setup determines that there is enough space for installation, thefollowing screen is displayed:
9. Click Install when you are ready to proceed. If any runningapplications are detected, you will be prompted to close them andresume RES Setup.
MD0003-052July 9, 2002Page 21 of 54
RES Setup ProceduresRunning Server Setup
10. Follow the prompts during installation, changing from Disk 1 to Disk2 and back, as required. After switching the disks, allow 3 secondsfor the CD ROM drive to activate before hitting the OK button tocontinue with the setup...
Note Installation times will vary. A new installation may take upto an hour to complete, depending on the speed of theserver. With an upgrade, the amount of time could increaseto several hours, depending on the server speed, previousRES version, and size of the existing database. Whenupgrading from 2.6, for example, setup will first convertthe database to 3.0 format before moving on to the 3.1conversion.
Note When running server setup across a network, the systemwill not automatically prompt you to change the disksduring installation. As a workaround, one of the followingmethods should be used to complete setup:
Method 1: With Disk 1 in the PC, map a drive from theserver location to the PC’s CD-ROM drive and start setup.During the installation, an error message will bedisplayed, indicating that the system cannot finddeliveryConfig.exe. This is the cue to insert Disk 2. Switchthe disk and click Retry. Setup will continue. You may needto switch the CD’s twice before the installation process iscomplete.
Method 2: Before running setup, copy the contents of Disk1 to a network hard-drive. Then copy the folders from Disk2 into the Disk 1 tree. When complete, map a drive fromthe server to the Disk 1 tree on the network drive and beginsetup.
MD0003-052July 9, 2002Page 22 of 54
RES Setup ProceduresRunning Server Setup
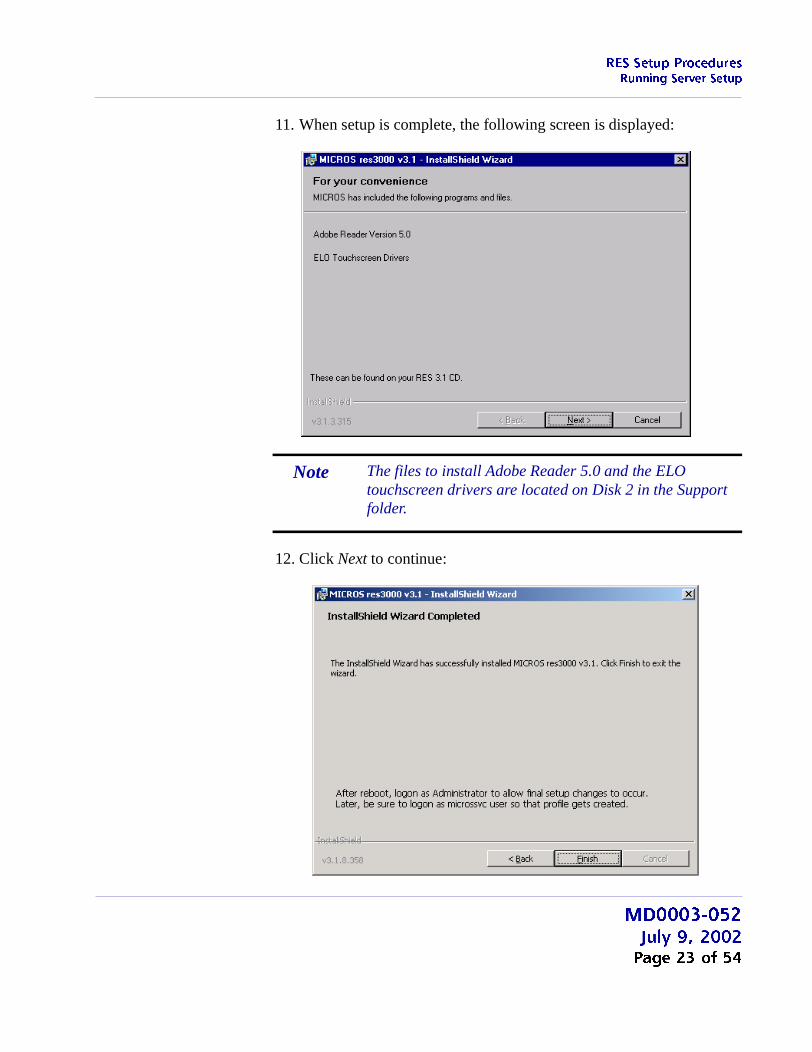
11. When setup is complete, the following screen is displayed:
12. Click Next to continue:
Note The files to install Adobe Reader 5.0 and the ELOtouchscreen drivers are located on Disk 2 in the Supportfolder.
MD0003-052July 9, 2002Page 23 of 54
RES Setup ProceduresRunning Server Setup
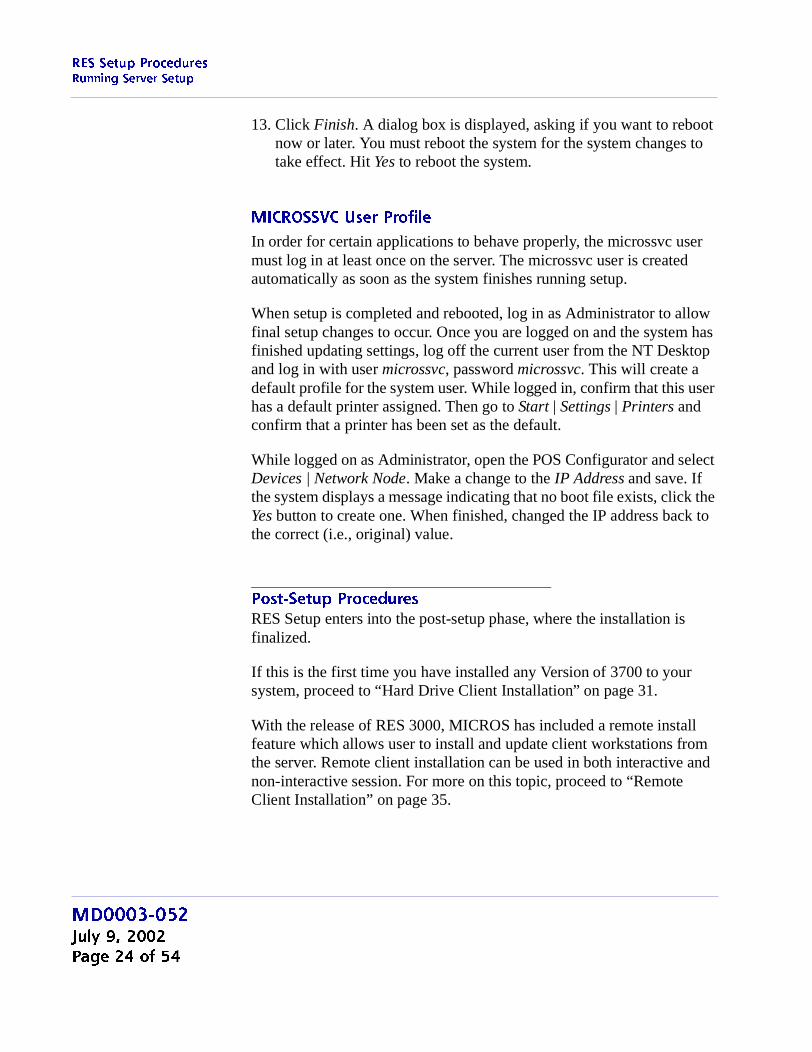
13. Click Finish. A dialog box is displayed, asking if you want to rebootnow or later. You must reboot the system for the system changes totake effect. Hit Yes to reboot the system.
MICROSSVC User Profile
In order for certain applications to behave properly, the microssvc usermust log in at least once on the server. The microssvc user is createdautomatically as soon as the system finishes running setup.
When setup is completed and rebooted, log in as Administrator to allowfinal setup changes to occur. Once you are logged on and the system hasfinished updating settings, log off the current user from the NT Desktopand log in with user microssvc, password microssvc. This will create adefault profile for the system user. While logged in, confirm that this userhas a default printer assigned. Then go to Start | Settings | Printers andconfirm that a printer has been set as the default.
While logged on as Administrator, open the POS Configurator and selectDevices | Network Node. Make a change to the IP Address and save. Ifthe system displays a message indicating that no boot file exists, click theYes button to create one. When finished, changed the IP address back tothe correct (i.e., original) value.
Post-Setup ProceduresRES Setup enters into the post-setup phase, where the installation isfinalized.
If this is the first time you have installed any Version of 3700 to yoursystem, proceed to “Hard Drive Client Installation” on page 31.
With the release of RES 3000, MICROS has included a remote installfeature which allows user to install and update client workstations fromthe server. Remote client installation can be used in both interactive andnon-interactive session. For more on this topic, proceed to “RemoteClient Installation” on page 35.
MD0003-052July 9, 2002Page 24 of 54
RES Setup ProceduresRunning Server Setup
MICROS RES Setup Log File
RES Setup creates a log file named “MICROS RES SETUP.log” for bothclients and servers. This file documents all events during setup in casesome part of the installation is in question and the log is needed forreference. Under Windows NT/2000, the file resides in the WinNT folder.Under Windows 95/98, the file resides in the Windows folder.
If unattended or Remote Install is used, the log is stored as RESSetup.log.Under Windows NT/2000, the file resides in the Winnt/System32 folder.Under Windows 95/98, the file resides in the Windows folder.
Sybase Central Plug-In
The Sybase version used by the RES application was upgraded for theRES 3000 release. In the past, users who wanted to open Sybase Centralcould launch the program after setup through the Windows Start Menu.Beginning with RES 3000, a plug-in must be manually added beforeaccess is allowed.
Follow these steps to add the sybase plug-in:
1. From the Windows Start Menu, select Programs | MicrosApplications | Utilities | Database | Sybase Adaptive ServerAnywhere | Sybase Central.
2. From the main menu, select Tools | Plug-ins.
3. Click on the Change button.
4. Choose the plug-in for ‘Adaptive Server Anywhere.’
5. Click OK.
6. Click Close.
Once the plug-in is added, you can exit the program or continue to workin Sybase Central. The plug-in only needs to be added once. After theinitial selection, the program will again be available from the start menu.
MD0003-052July 9, 2002Page 25 of 54
RES Setup ProceduresRunning Server Setup
Perl Runtime for Quickbooks
Beginning with Version 3.1, RES Setup will no longer automaticallyinstall the Perl Runtime program required for use with the Quickbooksinterface. The Perl program will still be available on the RES 3.1 CDDisk 2. If necessary, it can be added to the appropriate directory asfollows:
1. In the MICROS directory, create a Support folder and Utils sub-folder.
2. Copy the Perl.exe from the RES CD Disk 2 \Micros\Support\Utils tothe same path on the hard drive.
Maintenance Options
Beginning with RES 3000 Version 3.1, users will be able to remove,repair, or modify the database installation after initial setup is complete.This is done with the application setup disks, which include three newmaintenance options.
To access the maintenance options:
1. Insert Disk 1 into the server’s CD ROM to launch the setup program.The system searches for a current installation and, when one isdetected, displays the RES maintenance screen:
Note Before making any changes to your system, MICROSstrongly recommends saving a copy of the currentdatabase.
MD0003-052July 9, 2002Page 26 of 54
RES Setup ProceduresRunning Server Setup
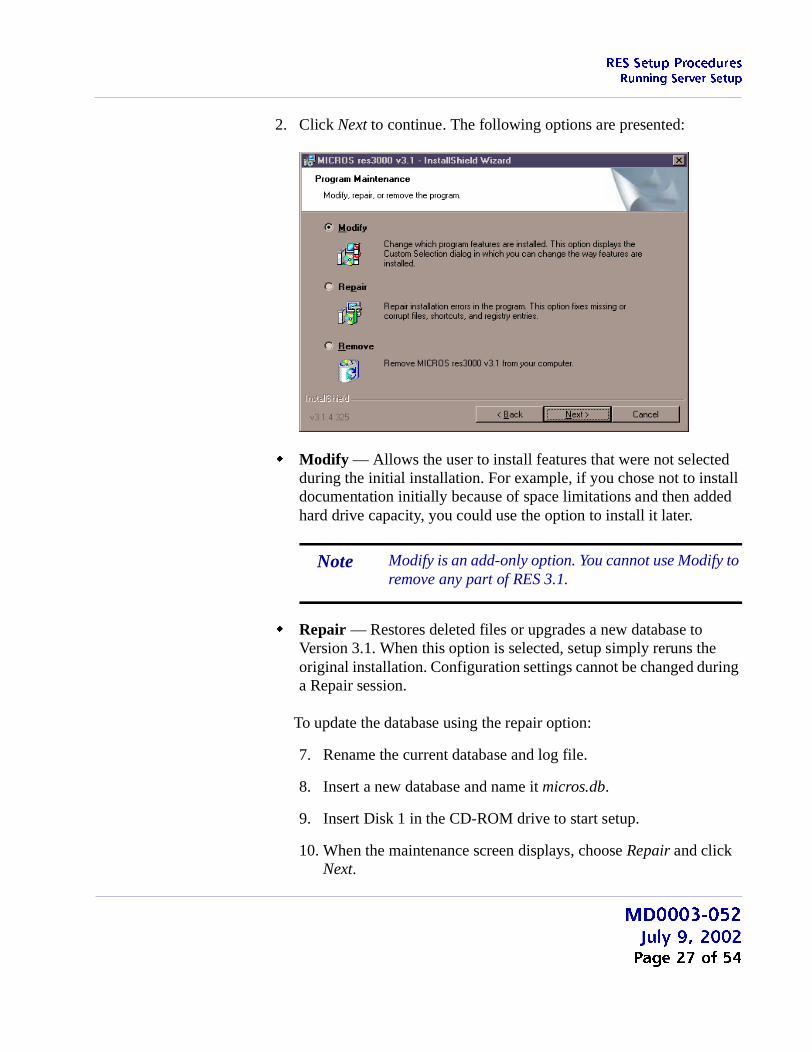
2. Click Next to continue. The following options are presented:
� Modify — Allows the user to install features that were not selectedduring the initial installation. For example, if you chose not to installdocumentation initially because of space limitations and then addedhard drive capacity, you could use the option to install it later.
� Repair — Restores deleted files or upgrades a new database toVersion 3.1. When this option is selected, setup simply reruns theoriginal installation. Configuration settings cannot be changed duringa Repair session.
To update the database using the repair option:
7. Rename the current database and log file.
8. Insert a new database and name it micros.db.
9. Insert Disk 1 in the CD-ROM drive to start setup.
10. When the maintenance screen displays, choose Repair and clickNext.
Note Modify is an add-only option. You cannot use Modify toremove any part of RES 3.1.
MD0003-052July 9, 2002Page 27 of 54
RES Setup ProceduresRunning Server Setup
� Remove — Removes files, services and environment variablesinstalled by RES 3.1. This option does NOT remove any filesgenerated or inserted after setup completes. It will not delete theregistry settings. As a precaution, the database is not removed either.
To remove RES 3.1:
1. Save the database to a safe location outside of the MICROS tree.
2. From the Windows Start Menu, select Settings | Control Panel |Add/Remove Program or insert Disk 1 in the CD-ROM drive tolaunch setup.
3. When the maintenance screen displays, choose Remove and clickNext.
4. After the Remove process is complete, click Yes at the prompt toreboot the system.
5. Open the Windows Explorer and save any custom files, reports,etc. from the Micros tree to another location. Delete the Microstree.
Note Registry settings do not have to be manually deleted, asthey will be overwritten when the application isreinstalled. Should you opt to delete them manually, besure to save the license codes first. Then use regedit todelete HLKM\Software\Micros.
Although all path information created by RES 3.1 isremoved, some parameters left over from previousversions can be missed. Be sure to check and manuallydelete any MICROS path information, especially if youintend to reinstall RES to a new (letter) drive location.
MD0003-052July 9, 2002Page 28 of 54
RES Setup ProceduresRunning Server Setup
Move MICROS to a New Drive
To move MICROS folder to a different drive, you must remove theprevious Version 2.6 or 3.0 software, install Version 3.1, and convert thedatabase. To do this:
1. From the Windows Start Menu, select Programs | MICROSApplications | MICROS Control Panel to launch the interface.
2. Click the button to set the Restaurant to OFF.
3. Open the Windows Explorer and navigate to the MICROS\Database\Data folder.
4. Save the micros.db and micros.log to another folder or directory(i.e., not within MICROS tree)
5. From the Windows Start Menu, select Settings | Control Panel |Services. Stop all MICROS services, including:
� MICROS 3700 System
� MICROS Distribited Service Manager
� MICROS LM Com Scheduler
6. Open Windows Explorer and manually delete the MICROS tree.
7. Select Start | Run | Regedit.
8. Go to My Computer\HKey_Local_Machine and delete the following:
� Software\MICROS
� Software\MICROS Professional Service
� Software\MICROS Systems, Inc.
� System\CurrentControlSet\Services\3700d
� System\CurrentControlSet\Services\MicrosDistributedServiceManager
� System\CurrentControlSet\Services\MicrosCashManagementComServer
� System\CurrentControlSet\Services\Microsdesk
� System\CurrentControlSet\Services\SQLANYs_sqlServerName
MD0003-052July 9, 2002Page 29 of 54
RES Setup ProceduresRunning Server Setup
� System\CurrentControlSet\Services\svcCashManager
� System\CurrentControlSet\Services\svcComScheduler
9. Reopen the Control Panel and select System | Environment. Delete allmicros environment variables, including:
� ASANY
� DBDIR
� DisklessDrive
� MICROSDrive
� RESDBDIR
� RESDISKLESS
� RESROOTDIR
� SQLANY
Delete just the portions of the path that are in the Micros tree.
Ex: c:\MICROS\Database\Data...
Hit Set
Hit Apply
10. Reboot the PC.
11. Install Res 3.1 to new the new drive. When prompted, choose the‘new database’ option as part of the installation.
12. When the installation is complete, navigate to the new MICROS\Database\Data folder and delete or rename the newly installed (i.e.,empty) Micros.db and micros.log.
13. Copy the original micros.db and micros.log into the newMicros\Database\Data folder.
14. Open a DOS window and change to your current Database Datadirectory. Execute the following command:
dblog -t micros.log micros.db
15. Run RES 3.1 setup again. Choose "Repair" to convert DB.
MD0003-052July 9, 2002Page 30 of 54
RES Setup ProceduresRunning Server Setup
Hard Drive Client Installation
To successfully run Netsetup, the following steps must be taken:
For Windows NT clients
1. Verify that Windows NT Service Pack 6a 128-bit Version isinstalled properly.
2. Verify that Internet Explorer 5.5 sp2 (or higher) is installedproperly.
3. Enable the Windows Autologon feature as the microssvc user:
� Select Start | Run | Regedit.
� Go to My Computer\HKEY_LOCAL_MACHINE\Software\Microsoft\Windows NT\CurrentVersion\Winlogon.
� Verify that these three STRING values are added/modified:
� AutoAdminLogon = 1
� DefaultUserName = microssvc
� DefaultPassword = microssvc
4. Close Regedit and reboot the workstation. This Windows NTclient should automatically login after the above steps have beencompleted.
5. Launch Netsetup:
� Open Windows Explorer.
� Map a drive to the \\SERVERNAME\Netsetup directory.
� Verify that the RECONNECT AT LOGON option isselected. This must be done in order for Netsetup to installproperly.
� In the Netsetup directory, double-click Setup.exe to start thesetup process. The setup process has a series of prompts andselections similar to the screens mentioned earlier. After setuphas finished, you are asked to reboot the workstation. SelectYes to reboot.
MD0003-052July 9, 2002Page 31 of 54
RES Setup ProceduresRunning Server Setup
For Windows 95/98 Clients
1. Verify that the Primary Network Logon is Client for MicrosoftNetworks, and that “File and Print Sharing” is enabled.
� Select Start | Settings | Control Panel | Network.
� Click “File and Print Sharing” and verify that both options arechecked.
� Change the Primary Network Logon to Client for MicrosoftNetworks, then reboot.
� When prompted for user name and password, enter microssvcfor user name and miccrossvc for password. If prompted for aWindows password, leave the field blank.
2. Verify that Internet Explorer 5.5 sp 2 (or higher) is installedproperly.
3. Enable Windows Autologon feature as the microssvc user.
� Select Start | Run | Regedit.
� Go to My Computer\HKEY_LOCAL_MACHINE\Software\Microsoft\Windows\CurrentVersion\Winlogon.
� Ensure that these three STRING values are added/modified:
� AutoAdminLogon = 1
� DefaultUserName = microssvc
� DefaultPassword = microssvc
4. Close Regedit and reboot the workstation. The Windows 95/98client should automatically login after the above has beencompleted.
MD0003-052July 9, 2002Page 32 of 54
RES Setup ProceduresRunning Server Setup
5. Launch Netsetup:
� Open Windows Explorer.
� Map a drive to the \\SERVERNAME\Netsetup Directory.
� Verify that the RECONNECT AT LOGON option isselected. This must be done in order for Netsetup to installproperly.
� Go to the \Netsetup folder and double-click Setup.exe to startthe setup process. The setup process has a series of promptsand selections similar to the screens mentioned earlier. Aftersetup has finished, you are asked to reboot the workstation.Select Yes to reboot.
MD0003-052July 9, 2002Page 33 of 54

RES Setup ProceduresRunning Server Setup
For Windows 2000 Clients (Backoffice Only)
In this release of RES 3000, only Backoffice Win2K clients aresupported. Win2K clients running POS operations will be supportedin a future release.
Follow these steps prior to installing RES 3.1:
1. Logon as the Administrative user who will be installing theprogram.
2. Select Start | Settings | Control Panel | System | Advanced |Environment.
3. Set the User Variables (Temp and Tmp) to the same values as theSystem Temp and Tmp variables.
4. Verify that Internet Explorer 5.5 sp 2 (or higher) is installedproperly.
5. Launch Netsetup:
� Open Windows Explorer.
� Map a drive to the \\SERVERNAME\Netsetup Directory.
� Verify that the RECONNECT AT LOGON option isselected. This must be done in order for Netsetup to installproperly.
� Go to the \Netsetup folder and double-click Setup.exe to startthe setup process. The setup process has a series of promptsand selections similar to the screens mentioned earlier. Aftersetup has finished, you are asked to reboot the workstation.Select Yes to reboot.
Warning Upgrading from Windows NT to Windows 2000 willoverwrite IE 5.5 sp 2 with IE 5.0. Before upgrading, besure you have access to IE 5.5 sp 2 so that it can bereinstalled later.
MD0003-052July 9, 2002Page 34 of 54
RES Setup ProceduresRunning Client Setup
Running Client Setup
With the release of RES 3000, MICROS has included a remote installfeature that allows users to install and update client workstations from theserver. Remote client installation can be used in both interactive and non-interactive sessions.
Remote Client Installation
In previous releases, users were required to run setup from each client viathe \netsetup directory on the server. This can become quite cumbersomeif a site has many workstations to upgrade.
Beginning with Version 3.00, service packs or new releases that areinstalled to the server may be installed to each client without having torun Netsetup manually. This is accomplished by the use of twomechanisms, Remoteinstall.exe and DSM.exe. These files are installedto the server and all disk-based clients after client installation hasfinished via Netsetup.
When Remote Install is executed by command line or automatically,Remoteinstall.exe runs a shortcut file pointing to the server's setup.exefile. It uses the microssvc user created by the setup program. Specialrequirements are listed below to ensure that this works correctly.
Remote Install Requirements
1. Remote install is only available for 3.0 clients and up. This releasedoes not support use of remote install to upgrade from Version 2.6clients to Version 3.x clients.
2. Attended client installation (v3.0 or higher) must have been run atleast once. Remote Install uses a shortcut to run the Setup.exe fromthe server's \netsetup directory. This shortcut is created when clientinstallation is run from the \netsetup directory.
MD0003-052July 9, 2002Page 35 of 54
RES Setup ProceduresRunning Client Setup
MICROSSVC User Permissions
For Windows NT clients:
Enable Windows Autologon feature as the microssvc user:
1. Select Start | Run | Regedit.
2. Go to My Computer\HKLM\Software\Microsoft\WindowsNT\CurrentVersion\Winlogon.
3. Verify that these three STRING values are added/modified:
� AutoAdminLogon = 1
� DefaultUserName = microssvc
� DefaultPassword = microssvc
4. Close Regedit and reboot the workstation. This Windows NTclient should automatically login after the above steps have beencompleted.
For Windows 95/98 clients:
For Windows 95/98 clients, verify that the Primary Network Logon isClient for Microsoft Networks.
1. Select Start | Settings | Control Panel | Network.
2. Change the Primary Network Logon to Client for MicrosoftNetworks and reboot.
3. When prompted for user name and password, enter microssvc forthe user name and for the password. If prompted for a Windowspassword, leave both fields blank.
4. Enable the Windows Autologon feature as the microssvc user:
� Select Start | Run | Regedit.
� Go to My Computer\HKEY_LOCAL_MACHINE\Software\Microsoft\Windows\CurrentVersion\Winlogon.
MD0003-052July 9, 2002Page 36 of 54
RES Setup ProceduresRunning Client Setup
� Ensure that these three STRING values are added/modified:
� AutoAdminLogon = 1
� DefaultUserName = microssvc
� DefaultPassword = microssvc
5. Close Regedit and reboot the workstation. This Windows 95/98client should automatically login after the above steps have beencompleted.
Remote Install Usage
There are two methods of executing Remote Install. The first method isby way of command line execution. This is the most common way to runan unattended client install. The second method is automatic unattendedinstall. This method is executed if the Distributed Service Manager(DSM) detects a difference between the registries of the server and theclient. If they are different, unattended client installation is triggeredautomatically on the client. The second method is reserved primarily for3.0 and later releases.
Command Line Execution from the Server
The syntax of the command line is as follows:
Remoteinstall [/?] [-h] [nodename]
where
-h or /? - Prints a help message
nodename - Computer name of the client
If you specified remoteinstall pcws01, PCWS01 will begin to runthe unattended client installation. No further action is needed fromyou.
MD0003-052July 9, 2002Page 37 of 54
RES Setup ProceduresRunning Client Setup
Automatic Unattended Install
For Version 3.0 or 3.1 customers with hard-drive clients who havemet the requirements, the system will automatically launch remoteinstall from their Version 3.0/3.1 clients after the server has beenupgraded with RES 3000 software. The following is a summary ofthe upgrade events:
� Current Version 3.0/3.1 customer will bring Restaurant to OFFusing MICROS Control Panel.
� All diskless and hard-drive clients are shut down.
� RES 3.1 Setup is run on the server. Server is rebooted after mainsetup portion is complete.
� Hard-drive clients are powered on. Once each client entersWindows 95/98/NT, Unattended Client installation will begin oneach hard-drive client without user intervention.
� The clients will automatically reboot when setup is complete.
� Diskless clients are rebuilt using POS Configurator and theNetwork node form.
� User is now upgraded to RES 3000 Version 3.1 and uses theMICROS Control Panel to bring the Restaurant to Front ofHouse.
MD0003-052July 9, 2002Page 38 of 54
Appendix A: Microsoft Windows NT® Service Pack InstallationRunning Client Setup
Appendix A: Microsoft Windows NT® Service Pack Installation
Prior to installing or updating your RES application suite, your RESServer PC should be equipped with the latest software. Doing so willreduce setup time, address known issues, and increase systemfunctionality.
The following sections provide a cross-reference of standard softwarerequirements for supported versions of RES.
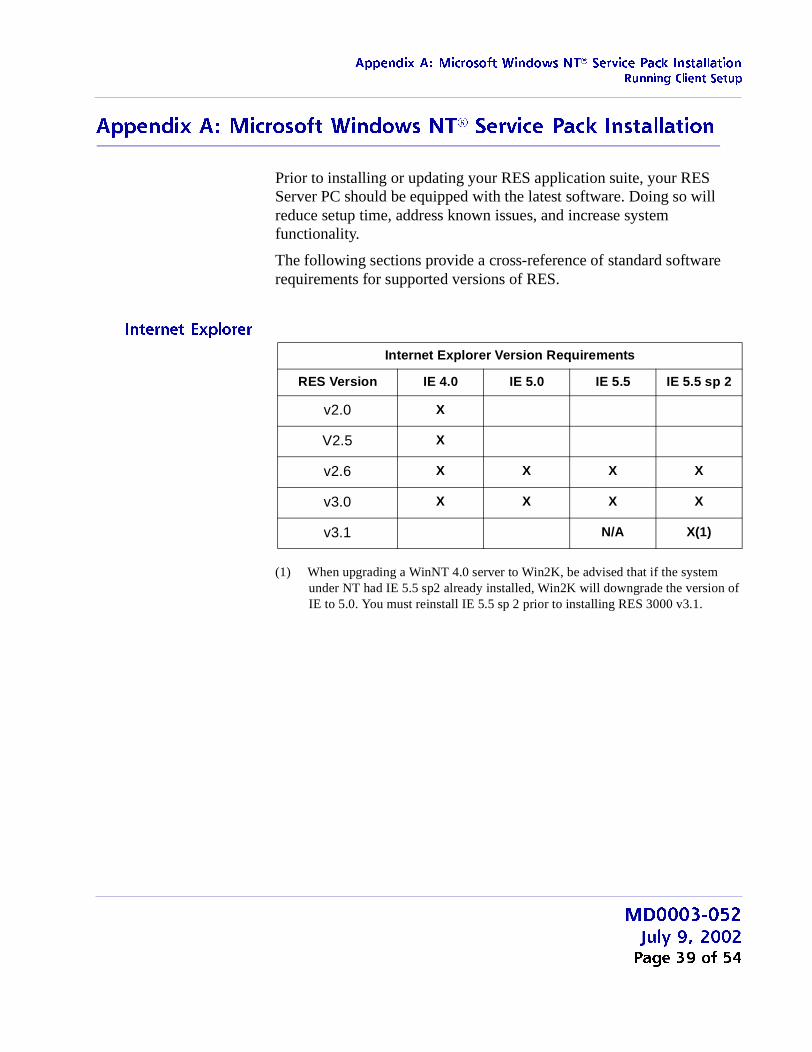
Internet Explorer
(1) When upgrading a WinNT 4.0 server to Win2K, be advised that if the systemunder NT had IE 5.5 sp2 already installed, Win2K will downgrade the version ofIE to 5.0. You must reinstall IE 5.5 sp 2 prior to installing RES 3000 v3.1.
Internet Explorer Version Requirements
RES Version IE 4.0 IE 5.0 IE 5.5 IE 5.5 sp 2
v2.0 X
V2.5 X
v2.6 X X X X
v3.0 X X X X
v3.1 N/A X(1)
MD0003-052July 9, 2002Page 39 of 54
Appendix A: Microsoft Windows NT® Service Pack InstallationRunning Client Setup
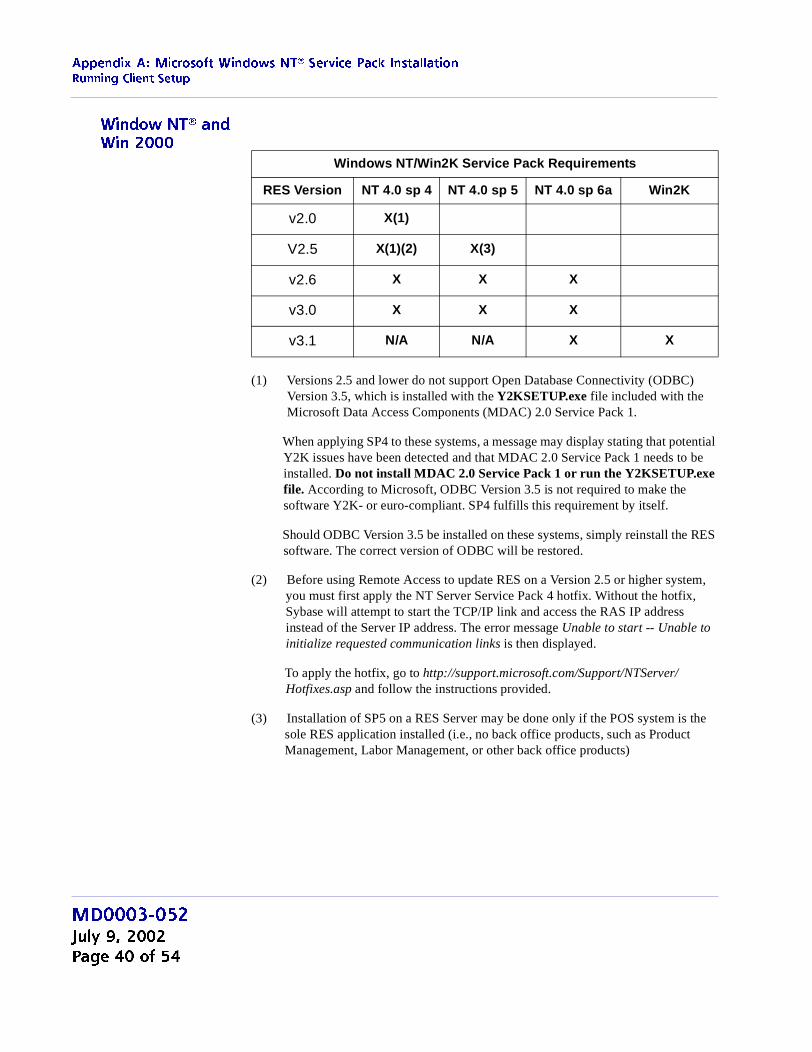
Window NT® and Win 2000
(1) Versions 2.5 and lower do not support Open Database Connectivity (ODBC)Version 3.5, which is installed with the Y2KSETUP.exe file included with theMicrosoft Data Access Components (MDAC) 2.0 Service Pack 1.
When applying SP4 to these systems, a message may display stating that potentialY2K issues have been detected and that MDAC 2.0 Service Pack 1 needs to beinstalled. Do not install MDAC 2.0 Service Pack 1 or run the Y2KSETUP.exefile. According to Microsoft, ODBC Version 3.5 is not required to make thesoftware Y2K- or euro-compliant. SP4 fulfills this requirement by itself.
Should ODBC Version 3.5 be installed on these systems, simply reinstall the RESsoftware. The correct version of ODBC will be restored.
(2) Before using Remote Access to update RES on a Version 2.5 or higher system,you must first apply the NT Server Service Pack 4 hotfix. Without the hotfix,Sybase will attempt to start the TCP/IP link and access the RAS IP addressinstead of the Server IP address. The error message Unable to start -- Unable toinitialize requested communication links is then displayed.
To apply the hotfix, go to http://support.microsoft.com/Support/NTServer/Hotfixes.asp and follow the instructions provided.
(3) Installation of SP5 on a RES Server may be done only if the POS system is thesole RES application installed (i.e., no back office products, such as ProductManagement, Labor Management, or other back office products)
Windows NT/Win2K Service Pack Requirements
RES Version NT 4.0 sp 4 NT 4.0 sp 5 NT 4.0 sp 6a Win2K
v2.0 X(1)
V2.5 X(1)(2) X(3)
v2.6 X X X
v3.0 X X X
v3.1 N/A N/A X X
MD0003-052July 9, 2002Page 40 of 54
Appendix B: Digicom Diskless Desktop Workstation SetupCreating a Bootable DOS Diskette
Appendix B: Digicom Diskless Desktop Workstation Setup
This section provides setup information for the Digicom DisklessDesktop Workstation. The setup process involves creating a bootableDOS diskette, setting the BIOS options, and configuring Serial Port andLAN cards.
Creating a Bootable DOS Diskette
To set up the Digicom Diskless Desktop Workstation, you will need tocreate a bootable DOS diskette to configure the Digicom. (Because oflicensing concerns, the disk cannot be shipped with the DesktopWorkstation kit.) This procedure cannot be performed on a Windows NTsystem.
You will also need a PC keyboard that has an AT-style connector (not thesmaller, PS/2-style connector).
Optional: To configure a Digicom Desktop Workstation with a harddrive, install Windows 95 and the appropriate network protocols.
Follow these steps to create a bootable DOS diskette:
1. Insert a blank floppy diskette into the A: drive of a PC that is runningeither Windows 95, Windows 3.x, or DOS operating system.
2. For a Windows 95 system, select Start | Run.For a Windows 3.1 or DOS system, go to the DOS command line.
3. Type format a:/s.
4. Press Enter. The system formats the floppy disk in the A: drive andinstalls Microsoft system files.
MD0003-052July 9, 2002Page 41 of 54
Appendix B: Digicom Diskless Desktop Workstation SetupSetting the BIOS Options
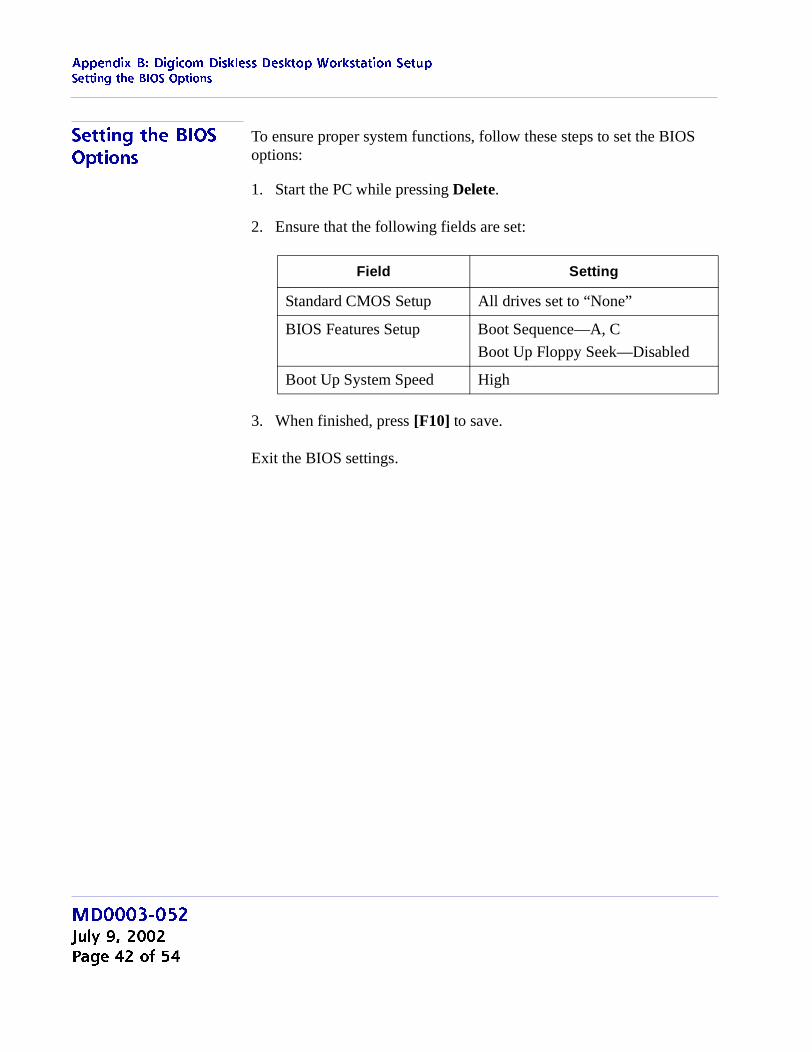
Setting the BIOS Options
To ensure proper system functions, follow these steps to set the BIOSoptions:
1. Start the PC while pressing Delete.
2. Ensure that the following fields are set:
3. When finished, press [F10] to save.
Exit the BIOS settings.
Field Setting
Standard CMOS Setup All drives set to “None”
BIOS Features Setup Boot Sequence—A, C
Boot Up Floppy Seek—Disabled
Boot Up System Speed High
MD0003-052July 9, 2002Page 42 of 54
Appendix B: Digicom Diskless Desktop Workstation SetupConfiguring the Serial Port Card
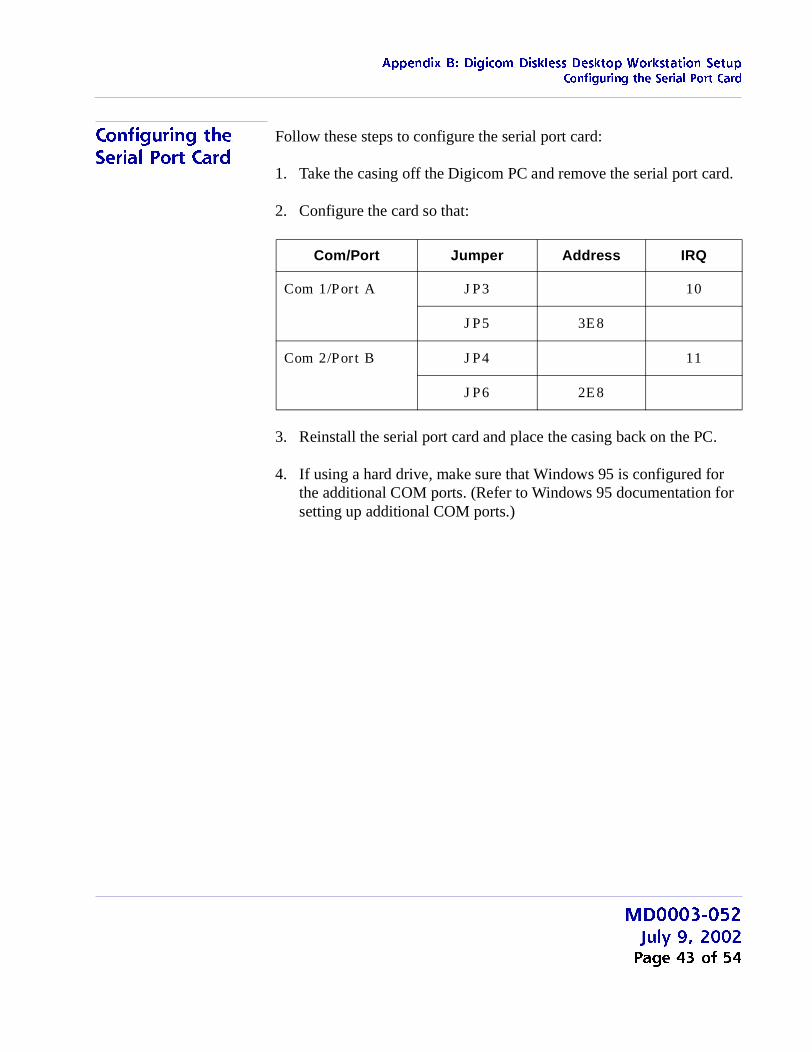
Configuring the Serial Port Card
Follow these steps to configure the serial port card:
1. Take the casing off the Digicom PC and remove the serial port card.
2. Configure the card so that:
3. Reinstall the serial port card and place the casing back on the PC.
4. If using a hard drive, make sure that Windows 95 is configured forthe additional COM ports. (Refer to Windows 95 documentation forsetting up additional COM ports.)
Com/Port Jumper Address IRQ
Com 1/Port A JP3 10
JP5 3E8
Com 2/Port B JP4 11
JP6 2E8
MD0003-052July 9, 2002Page 43 of 54
Appendix B: Digicom Diskless Desktop Workstation SetupConfiguring the LAN Card
Configuring the LAN Card
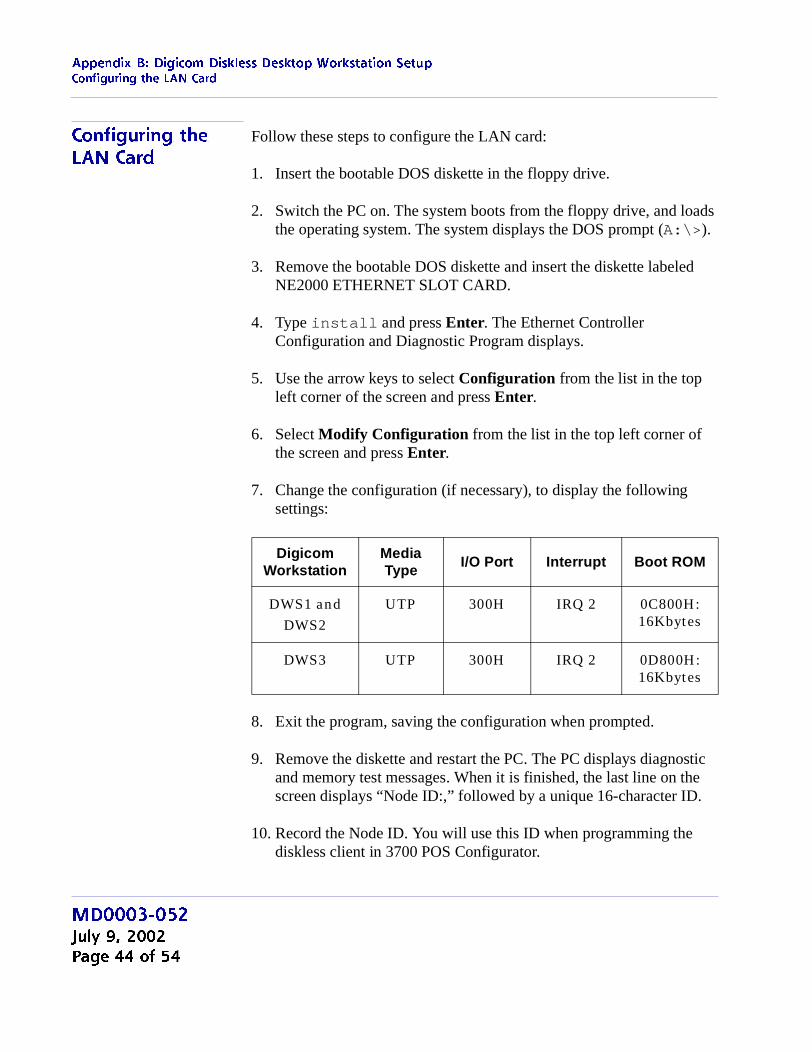
Follow these steps to configure the LAN card:
1. Insert the bootable DOS diskette in the floppy drive.
2. Switch the PC on. The system boots from the floppy drive, and loadsthe operating system. The system displays the DOS prompt (A:\>).
3. Remove the bootable DOS diskette and insert the diskette labeledNE2000 ETHERNET SLOT CARD.
4. Type install and press Enter. The Ethernet ControllerConfiguration and Diagnostic Program displays.
5. Use the arrow keys to select Configuration from the list in the topleft corner of the screen and press Enter.
6. Select Modify Configuration from the list in the top left corner ofthe screen and press Enter.
7. Change the configuration (if necessary), to display the followingsettings:
8. Exit the program, saving the configuration when prompted.
9. Remove the diskette and restart the PC. The PC displays diagnosticand memory test messages. When it is finished, the last line on thescreen displays “Node ID:,” followed by a unique 16-character ID.
10. Record the Node ID. You will use this ID when programming thediskless client in 3700 POS Configurator.
DigicomWorkstation
MediaType
I/O Port Interrupt Boot ROM
DWS1 andDWS2
UTP 300H IRQ 2 0C800H:16Kbytes
DWS3 UTP 300H IRQ 2 0D800H:16Kbytes
MD0003-052July 9, 2002Page 44 of 54
Appendix C: SEI KDS Client Hardware SetupServer Connections
Appendix C: SEI KDS Client Hardware Setup
With the release of KDS Veresion 3.1, RES has added support for theSelect Electronics, Inc. (SEI) hardware platform. SEI offers aneconomical alternative to the traditional PC-based KDS system.
SEI KDS runs on the 32-bit OASys processor, which can host up to 4independent video monitors and 4 2x9 bump bars. An EV1000 videocard is required for each monitor connected to the base unit. Withmultiple units, up to 16 KDS displays can be linked to a single POSserver.
Within the RES kitchen, a mix of both SEI KDS and traditional units isallowed.
This section provides information for setup of the SEI KDS hardwareonly. For additional information on configuring the RES KDS clients,refer to SEI KDS Client Support topic in the KDS Online FeatureReference Manual.
Server Connections OASys units can be connected to the POS server in two ways:
1. RS232 (com port) — This method allows the OASys unit to use allfour slots for SE video cards (i.e., four KDS clients supported perOASys unit.)
2. TCP/IP (Ethernet) — This method uses one of the unit’s four slotsfor a network card. The other three can be used for SE video cards(i.e., three KDS clients supported per OASys unit.)
Note The OASys KDS includes a duplicate video port with eachvideo card. The duplicate can be connected to a secondmonitor, allowing 2 monitors to display identicalinformation. Some restrictions may apply. Refer to thevendor’s documentation for more information.
MD0003-052July 9, 2002Page 45 of 54

Appendix C: SEI KDS Client Hardware SetupHardware Setup
Hardware Setup SEI OASys offers “out-of-the-box,” plug-n-play hardware that can be setup and ready to go in minutes. This section describes the basic stepsneeded to assemble and connect the base units, bump bars, videodisplays, and related cables in preparation for configuring the system.
Before You Begin Before attempting to assemble each SEI OASys unit, assemble thefollowing equipment:
� 1 OASys Processor Base Unit
� 1-4 EV1000 or AV1000 Video Cards (one for each KDS display to belinked to the base unit)
� 1 Ethernet Card (Optional; for connecting to the server via a network)
� 1-4 Bump Bars (one for each KDS display to be linked to the baseunit)
� Phillips-head Screwdriver
� Flat-head Screwdriver
� Copy of the Select Electronics OASys KDS Hardware InstallationManual (Available from their website, http://www.selectelectronics.com/). Refer to this document for backgroundinformation and clarification of terms.
Warning For yor safety and the integrity of the equipment, do notdisconnect ANYTHING to the OASys base unit withoutfirst disconnecting the power.
MD0003-052July 9, 2002Page 46 of 54
Appendix C: SEI KDS Client Hardware SetupHardware Setup
For Ethernet Communication
Follow these steps to set up the hardware for connection to the networkserver:
1. Using the screwdrivers, remove the cover from the OASys unit.
2. Locate the OASys video cards required for this unit. Cards may beloose or pre-loaded.
3. Set the ID dip switches for each of the video cards. Dip switchesindicate the slot where the card resides in the base unit.
4. Load the video cards in their assigned slots.
5. Insert the network card into CN5.
6. Plug in the bump bar. Bump bar IDs should be set to 1 (factorydefault) for all bump bars.
7. Attach and turn on all monitors.
8. Attach power cable and turn on system. The system starts initializingthe monitors, writing first to Monitor 1 and then confirming setup onthe rest of the monitors. When complete, confirm that each monitordisplays the appropriate video assignment.
9. Disconnect the power and attach a PC Keyboard to the OASys baseunit.
10. Plug in power again.
Tip Each video card must be assigned a unique ID # (location)in the base unit. To avoid confusion, MICROS recommendslabeling the cards sequentially; where CN2=ID1,CN3=ID2, and CN4=ID3. (CN1 is reserved for the SerialCard.
Note A keyboard must be attached to activate the setup utility.
MD0003-052July 9, 2002Page 47 of 54
Appendix C: SEI KDS Client Hardware SetupHardware Setup
11. When the OASys Setup Utility displays, select 1 to enter the base unitconfiguration.
12. On the Vendors screen, select 9 to go to the next page.
13. Select 5 for MICROS Ethernet. When the prompt "You have selectedMICROS Ethernet" displays, select Y to confirm.
14. At the prompt, enter the full IP Address of the base unit.
15. When the full IP address has been typed in, press Enter one moretime. At the prompt, select Y to confirm the address.
16. At the prompt, enter the RES System Subnet Mask, using the Enterkey to move between IP octets.
17. Press Enter one more and, at the prompt, select Y to confirm theaddress.
18. The system will now ask you to program your ethernet card withspecific IRQ (10), I/O Address (0x300) and Half Duplex. Be sure toconfirm in later steps that your ethernet card is set up this way.
19. Select Y to continue to the ethernet card setup utility. At this point thesystem will automatically take you to the Ethernet Adapter Setup andDiagnostic Utility.
20. From the main menu, select View Configuration to review settings. Ifa change is necessary, select Setup to return to the configurationscreens.
21. When all changes are complete, power off the base unit and unplugthe keyboard.
22. Plug the ethernet cable into the base unit and power the base unitback on. The base unit will automatically display video assignmentson each monitor and be ready for RES KDS client configuration.
Note To move to the next IP octet, press the Enter key.
MD0003-052July 9, 2002Page 48 of 54
Appendix C: SEI KDS Client Hardware SetupHardware Setup
For RS232 Communication
Follow these steps to set up the hardware for com port communication:
1. Using the screwdrivers, remove the cover from the OASys unit.
2. Locate the OASys video cards required for this unit. Cards may beloose or pre-loaded.
3. Set the ID dip switches for each of the video cards. Dip switchesindicate the slot where the card resides in the base unit.
4. Load the video cards in their assigned slots.
5. Plug in the bump bar. Bump bar IDs should be set to 1 (factorydefault) for all bump bars.
6. Attach and turn on all monitors.
7. Attach power cable and turn on system. The system starts initializingthe monitors, writing first to Monitor 1 and then confirming setup onthe rest of the monitors. When complete, confirm that each monitordisplays the appropriate video assignment.
8. Disconnect the power and attach a PC Keyboard to the OASys baseunit.
9. Plug in power again.
10. When the OASys Setup Utility displays, select 1 to enter the base unitconfiguration.
11. On the Vendors screen, select 9 to go to the next page.
Tip Each video card must be assigned a unique ID # (location)in the base unit. To avoid confusion, MICROS recommendslabeling the cards sequentially; where CN2=ID1,CN3=ID2, CN4=ID3, and CN5=ID4. (CN1 is reserved forthe Serial Card.
Note A keyboard must be attached to activate the setup utility.
MD0003-052July 9, 2002Page 49 of 54
Appendix C: SEI KDS Client Hardware SetupHardware Setup
12. Select 4 for MICROS RS232. When the prompt "You have selectedMICROS RS232" displays, select Y to confirm.
13. When all changes are complete, power off the base unit and unplugthe keyboard.
14. Plug the serial cable into the base unit and power the base unit backon. On boot up, the system will display "MICROS RS232 Version." Itwill then automatically display video assignments on each monitorand be ready for RES KDS client configuration.
MD0003-052July 9, 2002Page 50 of 54
Appendix D: Non-Interactive InstallHardware Setup
Appendix D: Non-Interactive Install
This appendix provides instructions for setting the system propertiesrequired to perform a non-interactive installation on a system Server.
Follow these steps to run server setup in unattended mode:
1. Create a Disk1 folder on the local drive.
2. Insert Disk1 into the CD-ROM and copy the contents to the Disk1folder.
3. Insert Disk2 into the CD-ROM and copy the contents to the Disk1folder.
4. Create a file called ResSetup.ini and place it in the root directory ofDisk1. (Use the directions and examples in the following section tocreate your own ResSetup.ini).
5. Open a DOS window and run the following from a command line:
[PathToSetup.exe]\Setup.exe /v”/qb /l*v C:\WINNT\MicrosResSetup.log REBOOTPROMPT=S”
Warning Modification of the ResSetup.ini is extremely dangerousand designed for advanced users only.
Note Before copying, the system will display a messageindicating that some files and folders already exist andasking if you wish to overwrite them. Select Yes to All.
MD0003-052July 9, 2002Page 51 of 54
Appendix D: Non-Interactive InstallCreating a ResSetup.ini File
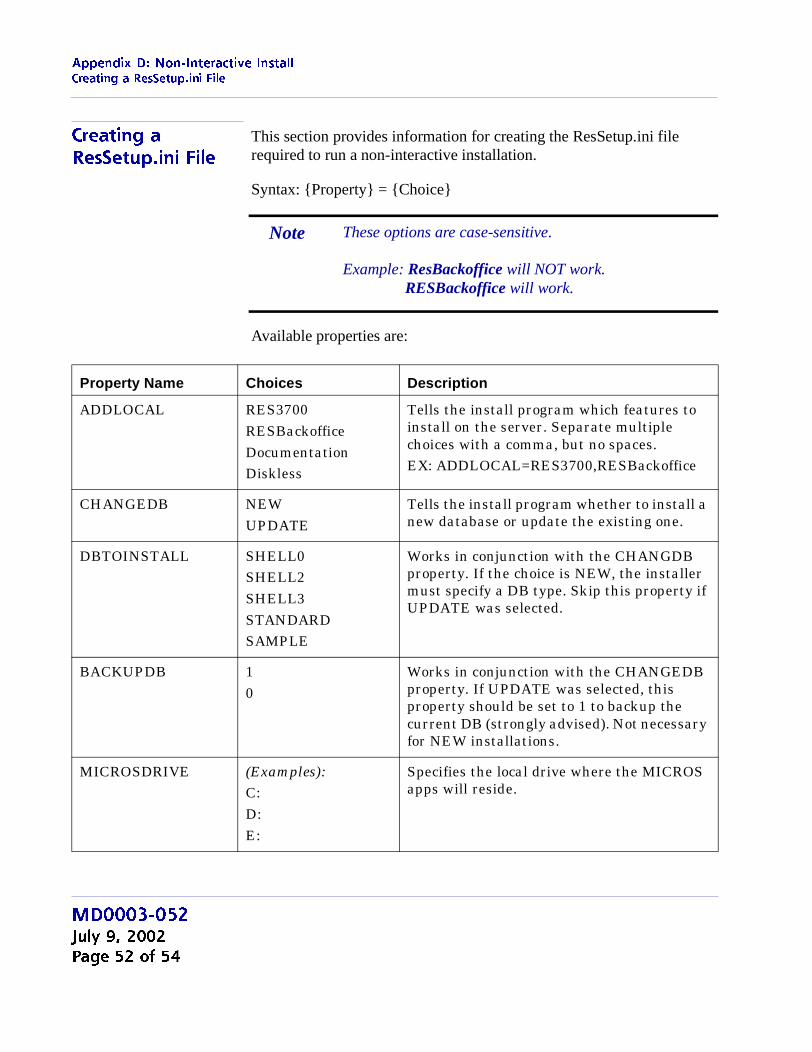
Creating a ResSetup.ini File
This section provides information for creating the ResSetup.ini filerequired to run a non-interactive installation.
Syntax: {Property} = {Choice}
Available properties are:
Note These options are case-sensitive.
Example: ResBackoffice will NOT work.RESBackoffice will work.
Property Name Choices Description
ADDLOCAL RES3700RESBackofficeDocumentationDiskless
Tells the install program which features toinstall on the server. Separate multiplechoices with a comma, but no spaces.EX: ADDLOCAL=RES3700,RESBackoffice
CHANGEDB NEWUPDATE
Tells the install program whether to install anew database or update the existing one.
DBTOINSTALL SHELL0SHELL2SHELL3STANDARDSAMPLE
Works in conjunction with the CHANGDBproperty. If the choice is NEW, the installermust specify a DB type. Skip this property ifUPDATE was selected.
BACKUPDB 10
Works in conjunction with the CHANGEDBproperty. If UPDATE was selected, thisproperty should be set to 1 to backup thecurrent DB (strongly advised). Not necessaryfor NEW installations.
MICROSDRIVE (Examples):C:D:E:
Specifies the local drive where the MICROSapps will reside.
MD0003-052July 9, 2002Page 52 of 54

Appendix D: Non-Interactive InstallCreating a ResSetup.ini File
Example 1 (New Installation, All options installed)(Database stored on D: drive, all else on C)
[PROPERTIES]
ADDLOCAL=RES3700,RESBackoffice,Documentation,DisklessCHANGEDB=NEWDBTOINSTALL=SAMPLEMICROSDRIVE=C:DBDIR=D:DOCDRIVE=C:DISKLESSDRIVE=C:
DBDIR (Examples):C:D:E:
Specifies the local drive where the DB willreside.
DOCDRIVE (Examples):C:D:E:
Specifies the local drive where theDocumentation will reside.
DISKLESSDRIVE (Examples):C:D:E:
Specifies the local drive where the Disklessfiles will reside.
Property Name Choices Description
Note Setup will look for the label [PROPERTIES] and willread everything below it. Anything above the[PROPERTIES] label will be ignored.
MD0003-052July 9, 2002Page 53 of 54
Appendix D: Non-Interactive InstallCreating a ResSetup.ini File
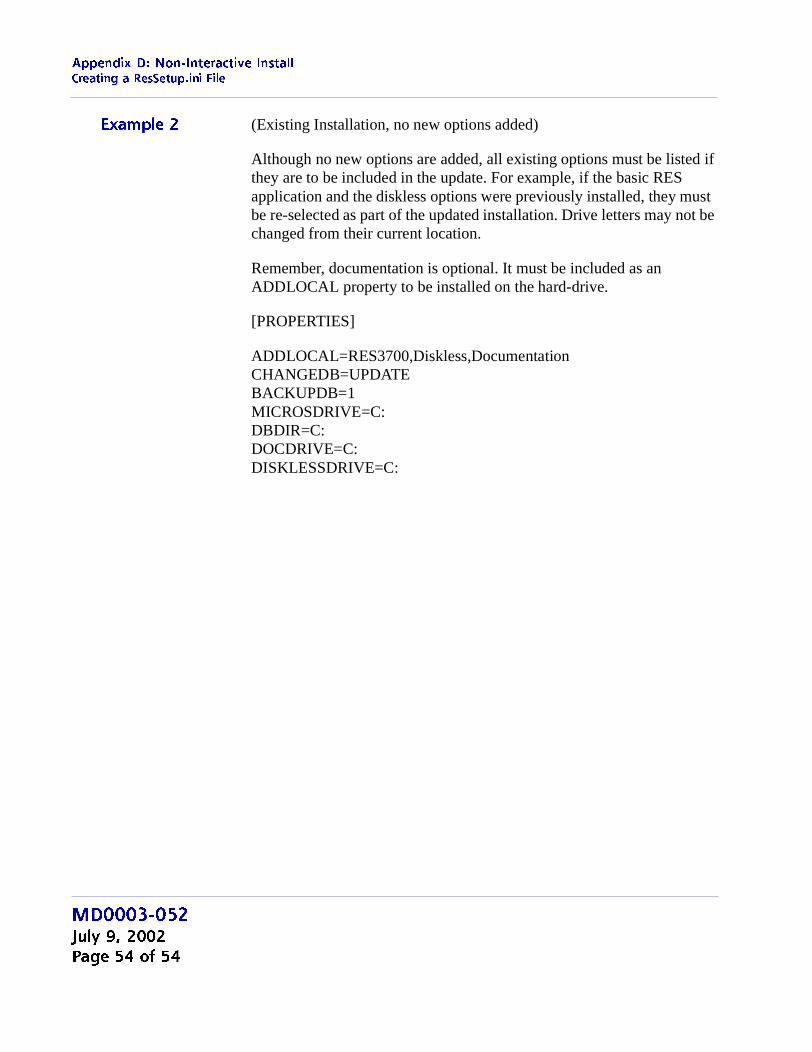
Example 2 (Existing Installation, no new options added)
Although no new options are added, all existing options must be listed ifthey are to be included in the update. For example, if the basic RESapplication and the diskless options were previously installed, they mustbe re-selected as part of the updated installation. Drive letters may not bechanged from their current location.
Remember, documentation is optional. It must be included as anADDLOCAL property to be installed on the hard-drive.
[PROPERTIES]
ADDLOCAL=RES3700,Diskless,DocumentationCHANGEDB=UPDATEBACKUPDB=1MICROSDRIVE=C:DBDIR=C:DOCDRIVE=C:DISKLESSDRIVE=C:
MD0003-052July 9, 2002Page 54 of 54