Embed Size (px)
Citation preview
Red Hat Enterprise Linux 9
Securing networks
Configuring secured networks and network communication
Last Updated: 2022-05-19


Red Hat Enterprise Linux 9 Securing networks
Configuring secured networks and network communication
Legal Notice
Copyright © 2022 Red Hat, Inc.
The text of and illustrations in this document are licensed by Red Hat under a Creative CommonsAttribution–Share Alike 3.0 Unported license ("CC-BY-SA"). An explanation of CC-BY-SA isavailable athttp://creativecommons.org/licenses/by-sa/3.0/. In accordance with CC-BY-SA, if you distribute this document or an adaptation of it, you mustprovide the URL for the original version.
Red Hat, as the licensor of this document, waives the right to enforce, and agrees not to assert,Section 4d of CC-BY-SA to the fullest extent permitted by applicable law.
Red Hat, Red Hat Enterprise Linux, the Shadowman logo, the Red Hat logo, JBoss, OpenShift,Fedora, the Infinity logo, and RHCE are trademarks of Red Hat, Inc., registered in the United Statesand other countries.
Linux ® is the registered trademark of Linus Torvalds in the United States and other countries.
Java ® is a registered trademark of Oracle and/or its affiliates.
XFS ® is a trademark of Silicon Graphics International Corp. or its subsidiaries in the United Statesand/or other countries.
MySQL ® is a registered trademark of MySQL AB in the United States, the European Union andother countries.
Node.js ® is an official trademark of Joyent. Red Hat is not formally related to or endorsed by theofficial Joyent Node.js open source or commercial project.
The OpenStack ® Word Mark and OpenStack logo are either registered trademarks/service marksor trademarks/service marks of the OpenStack Foundation, in the United States and othercountries and are used with the OpenStack Foundation's permission. We are not affiliated with,endorsed or sponsored by the OpenStack Foundation, or the OpenStack community.
All other trademarks are the property of their respective owners.
Abstract
This title assists administrators with securing networks, connected machines, and networkcommunication against various attacks.
. . . . . . . . . . . . . . . . . . . . . . . . . . . . . . . . . . . . . . . . . . . . . . . . . . . . . . . . . . . . . . . . . . . . . . . . . . . . . . . . . . . . . . . . . . . . . . . . . . . . . . . . . . . . . . . . . . . . . . . . . . . . . . . . . . . . . . . . . . . . . . . . . . . . . . . . . . . . . . . . . . . . . . . . . . . . . . . . . . . . . . . . . . . . . . . . . . . . . . . . . . . . . . . . . . . . . . . . . . . . . . . . . . . . . . . . . . . . . . . . . . . . . . . . . . . . . . . . . . . . . . . . . . . . . . . . . . . . . . . .
. . . . . . . . . . . . . . . . . . . . . . . . . . . . . . . . . . . . . . . . . . . . . . . . . . . . . . . . . . . . . . . . . . . . . . . . . . . . . . . . . . . . . . . . . . . . . . . . . . . . . . . . . . . . . . . . . . . . . . . . . . . . . . . . . . . . . . . . . . . . . . . . . . . . . . . . . . . . . . . . . . . . . . . . . . . . . . . . . . . . . . . . . . . . . . . . . . . . . . . . . . . . . . . . . . . . . . . . . . . . . . . . . . . . . . . . . . . . . . . . . . . . . . . . . . . . . . . . . . . . . . . . . . . . . . . . . . . . . . . .
. . . . . . . . . . . . . . . . . . . . . . . . . . . . . . . . . . . . . . . . . . . . . . . . . . . . . . . . . . . . . . . . . . . . . . . . . . . . . . . . . . . . . . . . . . . . . . . . . . . . . . . . . . . . . . . . . . . . . . . . . . . . . . . . . . . . . . . . . . . . . . . . . . . . . . . . . . . . . . . . . . . . . . . . . . . . . . . . . . . . . . . . . . . . . . . . . . . . . . . . . . . . . . . . . . . . . . . . . . . . . . . . . . . . . . . . . . . . . . . . . . . . . . . . . . . . . . . . . . . . . . . . . . . . . . . . . . . . . . . .
. . . . . . . . . . . . . . . . . . . . . . . . . . . . . . . . . . . . . . . . . . . . . . . . . . . . . . . . . . . . . . . . . . . . . . . . . . . . . . . . . . . . . . . . . . . . . . . . . . . . . . . . . . . . . . . . . . . . . . . . . . . . . . . . . . . . . . . . . . . . . . . . . . . . . . . . . . . . . . . . . . . . . . . . . . . . . . . . . . . . . . . . . . . . . . . . . . . . . . . . . . . . . . . . . . . . . . . . . . . . . . . . . . . . . . . . . . . . . . . . . . . . . . . . . . . . . . . . . . . . . . . . . . . . . . . . . . . . . . . .
. . . . . . . . . . . . . . . . . . . . . . . . . . . . . . . . . . . . . . . . . . . . . . . . . . . . . . . . . . . . . . . . . . . . . . . . . . . . . . . . . . . . . . . . . . . . . . . . . . . . . . . . . . . . . . . . . . . . . . . . . . . . . . . . . . . . . . . . . . . . . . . . . . . . . . . . . . . . . . . . . . . . . . . . . . . . . . . . . . . . . . . . . . . . . . . . . . . . . . . . . . . . . . . . . . . . . . . . . . . . . . . . . . . . . . . . . . . . . . . . . . . . . . . . . . . . . . . . . . . . . . . . . . . . . . . . . . . . . . . .
. . . . . . . . . . . . . . . . . . . . . . . . . . . . . . . . . . . . . . . . . . . . . . . . . . . . . . . . . . . . . . . . . . . . . . . . . . . . . . . . . . . . . . . . . . . . . . . . . . . . . . . . . . . . . . . . . . . . . . . . . . . . . . . . . . . . . . . . . . . . . . . . . . . . . . . . . . . . . . . . . . . . . . . . . . . . . . . . . . . . . . . . . . . . . . . . . . . . . . . . . . . . . . . . . . . . . . . . . . . . . . . . . . . . . . . . . . . . . . . . . . . . . . . . . . . . . . . . . . . . . . . . . . . . . . . . . . . . . . . .
. . . . . . . . . . . . . . . . . . . . . . . . . . . . . . . . . . . . . . . . . . . . . . . . . . . . . . . . . . . . . . . . . . . . . . . . . . . . . . . . . . . . . . . . . . . . . . . . . . . . . . . . . . . . . . . . . . . . . . . . . . . . . . . . . . . . . . . . . . . . . . . . . . . . . . . . . . . . . . . . . . . . . . . . . . . . . . . . . . . . . . . . . . . . . . . . . . . . . . . . . . . . . . . . . . . . . . . . . . . . . . . . . . . . . . . . . . . . . . . . . . . . . . . . . . . . . . . . . . . . . . . . . . . . . . . . . . . . . . . .
Table of Contents
MAKING OPEN SOURCE MORE INCLUSIVE
PROVIDING FEEDBACK ON RED HAT DOCUMENTATION
CHAPTER 1. USING SECURE COMMUNICATIONS BETWEEN TWO SYSTEMS WITH OPENSSH1.1. SSH AND OPENSSH1.2. CONFIGURING AND STARTING AN OPENSSH SERVER1.3. SETTING AN OPENSSH SERVER FOR KEY-BASED AUTHENTICATION1.4. GENERATING SSH KEY PAIRS1.5. USING SSH KEYS STORED ON A SMART CARD1.6. MAKING OPENSSH MORE SECURE1.7. CONNECTING TO A REMOTE SERVER USING AN SSH JUMP HOST1.8. CONNECTING TO REMOTE MACHINES WITH SSH KEYS USING SSH-AGENT1.9. ADDITIONAL RESOURCES
CHAPTER 2. CONFIGURING SECURE COMMUNICATION WITH THE SSH SYSTEM ROLES2.1. SSH SERVER SYSTEM ROLE VARIABLES2.2. CONFIGURING OPENSSH SERVERS USING THE SSH SERVER SYSTEM ROLE2.3. SSH CLIENT SYSTEM ROLE VARIABLES2.4. CONFIGURING OPENSSH CLIENTS USING THE SSH CLIENT SYSTEM ROLE2.5. USING THE SSH SERVER SYSTEM ROLE FOR NON-EXCLUSIVE CONFIGURATION
CHAPTER 3. PLANNING AND IMPLEMENTING TLS3.1. SSL AND TLS PROTOCOLS3.2. SECURITY CONSIDERATIONS FOR TLS IN RHEL 9
3.2.1. Protocols3.2.2. Cipher suites3.2.3. Public key length
3.3. HARDENING TLS CONFIGURATION IN APPLICATIONS3.3.1. Configuring the Apache HTTP server3.3.2. Configuring the Nginx HTTP and proxy server3.3.3. Configuring the Dovecot mail server
CHAPTER 4. CONFIGURING A VPN WITH IPSEC4.1. LIBRESWAN AS AN IPSEC VPN IMPLEMENTATION4.2. AUTHENTICATION METHODS IN LIBRESWAN4.3. INSTALLING LIBRESWAN4.4. CREATING A HOST-TO-HOST VPN4.5. CONFIGURING A SITE-TO-SITE VPN4.6. CONFIGURING A REMOTE ACCESS VPN4.7. CONFIGURING A MESH VPN4.8. DEPLOYING A FIPS-COMPLIANT IPSEC VPN4.9. PROTECTING THE IPSEC NSS DATABASE BY A PASSWORD4.10. CONFIGURING AN IPSEC VPN TO USE TCP4.11. CONFIGURING AUTOMATIC DETECTION AND USAGE OF ESP HARDWARE OFFLOAD TO ACCELERATEAN IPSEC CONNECTION4.12. CONFIGURING ESP HARDWARE OFFLOAD ON A BOND TO ACCELERATE AN IPSEC CONNECTION4.13. CONFIGURING IPSEC CONNECTIONS THAT OPT OUT OF THE SYSTEM-WIDE CRYPTO POLICIES4.14. TROUBLESHOOTING IPSEC VPN CONFIGURATIONS4.15. ADDITIONAL RESOURCES
CHAPTER 5. CONFIGURING VPN CONNECTIONS WITH IPSEC BY USING THE VPN RHEL SYSTEM ROLE5.1. CREATING A HOST-TO-HOST VPN WITH IPSEC USING THE VPN SYSTEM ROLE
4
5
6679
1011
12151617
1818
20232527
29292930303131313232
3434353637383940424446
4647494954
5555
Table of Contents
1
. . . . . . . . . . . . . . . . . . . . . . . . . . . . . . . . . . . . . . . . . . . . . . . . . . . . . . . . . . . . . . . . . . . . . . . . . . . . . . . . . . . . . . . . . . . . . . . . . . . . . . . . . . . . . . . . . . . . . . . . . . . . . . . . . . . . . . . . . . . . . . . . . . . . . . . . . . . . . . . . . . . . . . . . . . . . . . . . . . . . . . . . . . . . . . . . . . . . . . . . . . . . . . . . . . . . . . . . . . . . . . . . . . . . . . . . . . . . . . . . . . . . . . . . . . . . . . . . . . . . . . . . . . . . . . . . . . . . . . . .
. . . . . . . . . . . . . . . . . . . . . . . . . . . . . . . . . . . . . . . . . . . . . . . . . . . . . . . . . . . . . . . . . . . . . . . . . . . . . . . . . . . . . . . . . . . . . . . . . . . . . . . . . . . . . . . . . . . . . . . . . . . . . . . . . . . . . . . . . . . . . . . . . . . . . . . . . . . . . . . . . . . . . . . . . . . . . . . . . . . . . . . . . . . . . . . . . . . . . . . . . . . . . . . . . . . . . . . . . . . . . . . . . . . . . . . . . . . . . . . . . . . . . . . . . . . . . . . . . . . . . . . . . . . . . . . . . . . . . . . .
5.2. CREATING AN OPPORTUNISTIC MESH VPN CONNECTION WITH IPSEC BY USING THE VPN SYSTEMROLE5.3. ADDITIONAL RESOURCES
CHAPTER 6. SECURING NETWORK SERVICES6.1. SECURING THE RPCBIND SERVICE6.2. SECURING THE RPC.MOUNTD SERVICE6.3. SECURING THE NFS SERVICE
6.3.1. Export options for securing an NFS server6.3.2. Mount options for securing an NFS client6.3.3. Securing NFS with firewall
6.4. SECURING THE FTP SERVICE6.4.1. Securing the FTP greeting banner6.4.2. Preventing anonymous access and uploads in FTP6.4.3. Securing user accounts for FTP6.4.4. Additional resources
6.5. SECURING HTTP SERVERS6.5.1. Security enhancements in httpd.conf6.5.2. Securing the Nginx server configuration
6.6. SECURING POSTGRESQL BY LIMITING ACCESS TO AUTHENTICATED LOCAL USERS6.7. SECURING THE MEMCACHED SERVICE
6.7.1. Hardening Memcached against DDoS
CHAPTER 7. USING MACSEC TO ENCRYPT LAYER-2 TRAFFIC IN THE SAME PHYSICAL NETWORK7.1. CONFIGURING A MACSEC CONNECTION USING NMCLI7.2. ADDITIONAL RESOURCES
5759
606061
626264656666676768686870717272
747476
Red Hat Enterprise Linux 9 Securing networks
2

Table of Contents
3

MAKING OPEN SOURCE MORE INCLUSIVERed Hat is committed to replacing problematic language in our code, documentation, and webproperties. We are beginning with these four terms: master, slave, blacklist, and whitelist. Because of theenormity of this endeavor, these changes will be implemented gradually over several upcoming releases.For more details, see our CTO Chris Wright’s message .
Red Hat Enterprise Linux 9 Securing networks
4
PROVIDING FEEDBACK ON RED HAT DOCUMENTATIONWe appreciate your input on our documentation. Please let us know how we could make it better.
For simple comments on specific passages:
1. Make sure you are viewing the documentation in the Multi-page HTML format. In addition,ensure you see the Feedback button in the upper right corner of the document.
2. Use your mouse cursor to highlight the part of text that you want to comment on.
3. Click the Add Feedback pop-up that appears below the highlighted text.
4. Follow the displayed instructions.
For submitting feedback via Bugzilla, create a new ticket:
1. Go to the Bugzilla website.
2. As the Component, use Documentation.
3. Fill in the Description field with your suggestion for improvement. Include a link to therelevant part(s) of documentation.
4. Click Submit Bug.
PROVIDING FEEDBACK ON RED HAT DOCUMENTATION
5
CHAPTER 1. USING SECURE COMMUNICATIONS BETWEENTWO SYSTEMS WITH OPENSSH
SSH (Secure Shell) is a protocol which provides secure communications between two systems using aclient-server architecture and allows users to log in to server host systems remotely. Unlike otherremote communication protocols, such as FTP or Telnet, SSH encrypts the login session, which preventsintruders to collect unencrypted passwords from the connection.
Red Hat Enterprise Linux includes the basic OpenSSH packages: the general openssh package, the openssh-server package and the openssh-clients package. Note that the OpenSSH packages requirethe OpenSSL package openssl-libs, which installs several important cryptographic libraries that enable OpenSSH to provide encrypted communications.
1.1. SSH AND OPENSSH
SSH (Secure Shell) is a program for logging into a remote machine and executing commands on thatmachine. The SSH protocol provides secure encrypted communications between two untrusted hostsover an insecure network. You can also forward X11 connections and arbitrary TCP/IP ports over thesecure channel.
The SSH protocol mitigates security threats, such as interception of communication between twosystems and impersonation of a particular host, when you use it for remote shell login or file copying.This is because the SSH client and server use digital signatures to verify their identities. Additionally, allcommunication between the client and server systems is encrypted.
A host key authenticates hosts in the SSH protocol. Host keys are cryptographic keys that aregenerated automatically when OpenSSH is first installed, or when the host boots for the first time.
OpenSSH is an implementation of the SSH protocol supported by Linux, UNIX, and similar operatingsystems. It includes the core files necessary for both the OpenSSH client and server. The OpenSSHsuite consists of the following user-space tools:
ssh is a remote login program (SSH client).
sshd is an OpenSSH SSH daemon.
scp is a secure remote file copy program.
sftp is a secure file transfer program.
ssh-agent is an authentication agent for caching private keys.
ssh-add adds private key identities to ssh-agent.
ssh-keygen generates, manages, and converts authentication keys for ssh.
ssh-copy-id is a script that adds local public keys to the authorized_keys file on a remote SSHserver.
ssh-keyscan gathers SSH public host keys.
NOTE
Red Hat Enterprise Linux 9 Securing networks
6
NOTE
In RHEL 9, the Secure copy protocol (SCP) is replaced with the SSH File TransferProtocol (SFTP) by default. This is because SCP has already caused security issues, forexample CVE-2020-15778.
If SFTP is unavailable or incompatible in your scenario, you can use the -O option to forceuse of the original SCP/RCP protocol.
For additional information, see the OpenSSH SCP protocol deprecation in Red HatEnterprise Linux 9 article.
Two versions of SSH currently exist: version 1, and the newer version 2. The OpenSSH suite in RHELsupports only SSH version 2. It has an enhanced key-exchange algorithm that is not vulnerable toexploits known in version 1.
OpenSSH, as one of core cryptographic subsystems of RHEL, uses system-wide crypto policies. Thisensures that weak cipher suites and cryptographic algorithms are disabled in the default configuration.To modify the policy, the administrator must either use the update-crypto-policies command to adjustthe settings or manually opt out of the system-wide crypto policies.
The OpenSSH suite uses two sets of configuration files: one for client programs (that is, ssh, scp, and sftp), and another for the server (the sshd daemon).
System-wide SSH configuration information is stored in the /etc/ssh/ directory. User-specific SSHconfiguration information is stored in ~/.ssh/ in the user’s home directory. For a detailed list ofOpenSSH configuration files, see the FILES section in the sshd(8) man page.
Additional resources
Man pages listed by using the man -k ssh command
Using system-wide cryptographic policies
1.2. CONFIGURING AND STARTING AN OPENSSH SERVER
Use the following procedure for a basic configuration that might be required for your environment andfor starting an OpenSSH server. Note that after the default RHEL installation, the sshd daemon isalready started and server host keys are automatically created.
Prerequisites
The openssh-server package is installed.
Procedure
1. Start the sshd daemon in the current session and set it to start automatically at boot time:
# systemctl start sshd# systemctl enable sshd
2. To specify different addresses than the default 0.0.0.0 (IPv4) or :: (IPv6) for the ListenAddress directive in the /etc/ssh/sshd_config configuration file and to use a slowerdynamic network configuration, add the dependency on the network-online.target target unit
CHAPTER 1. USING SECURE COMMUNICATIONS BETWEEN TWO SYSTEMS WITH OPENSSH
7

to the sshd.service unit file. To achieve this, create the /etc/systemd/system/sshd.service.d/local.conf file with the following content:
[Unit]Wants=network-online.targetAfter=network-online.target
3. Review if OpenSSH server settings in the /etc/ssh/sshd_config configuration file meet therequirements of your scenario.
4. Optionally, change the welcome message that your OpenSSH server displays before a clientauthenticates by editing the /etc/issue file, for example:
Welcome to ssh-server.example.comWarning: By accessing this server, you agree to the referenced terms and conditions.
Ensure that the Banner option is not commented out in /etc/ssh/sshd_config and its valuecontains /etc/issue:
# less /etc/ssh/sshd_config | grep BannerBanner /etc/issue
Note that to change the message displayed after a successful login you have to edit the /etc/motd file on the server. See the pam_motd man page for more information.
5. Reload the systemd configuration and restart sshd to apply the changes:
# systemctl daemon-reload# systemctl restart sshd
Verification
1. Check that the sshd daemon is running:
# systemctl status sshd● sshd.service - OpenSSH server daemon Loaded: loaded (/usr/lib/systemd/system/sshd.service; enabled; vendor preset: enabled) Active: active (running) since Mon 2019-11-18 14:59:58 CET; 6min ago Docs: man:sshd(8) man:sshd_config(5) Main PID: 1149 (sshd) Tasks: 1 (limit: 11491) Memory: 1.9M CGroup: /system.slice/sshd.service └─1149 /usr/sbin/sshd -D -oCiphers=aes128-ctr,aes256-ctr,aes128-cbc,aes256-cbc -oMACs=hmac-sha2-256,>
Nov 18 14:59:58 ssh-server-example.com systemd[1]: Starting OpenSSH server daemon...Nov 18 14:59:58 ssh-server-example.com sshd[1149]: Server listening on 0.0.0.0 port 22.Nov 18 14:59:58 ssh-server-example.com sshd[1149]: Server listening on :: port 22.Nov 18 14:59:58 ssh-server-example.com systemd[1]: Started OpenSSH server daemon.
2. Connect to the SSH server with an SSH client.
Red Hat Enterprise Linux 9 Securing networks
8
# ssh [email protected] key fingerprint is SHA256:dXbaS0RG/UzlTTku8GtXSz0S1++lPegSy31v3L/FAEc.Are you sure you want to continue connecting (yes/no/[fingerprint])? yesWarning: Permanently added 'ssh-server-example.com' (ECDSA) to the list of known hosts.
[email protected]'s password:
Additional resources
sshd(8) and sshd_config(5) man pages.
1.3. SETTING AN OPENSSH SERVER FOR KEY-BASEDAUTHENTICATION
To improve system security, enforce key-based authentication by disabling password authentication onyour OpenSSH server.
Prerequisites
The openssh-server package is installed.
The sshd daemon is running on the server.
Procedure
1. Open the /etc/ssh/sshd_config configuration in a text editor, for example:
# vi /etc/ssh/sshd_config
2. Change the PasswordAuthentication option to no:
PasswordAuthentication no
On a system other than a new default installation, check that PubkeyAuthentication no has notbeen set and the ChallengeResponseAuthentication directive is set to no. If you areconnected remotely, not using console or out-of-band access, test the key-based login processbefore disabling password authentication.
3. To use key-based authentication with NFS-mounted home directories, enable the use_nfs_home_dirs SELinux boolean:
# setsebool -P use_nfs_home_dirs 1
4. Reload the sshd daemon to apply the changes:
# systemctl reload sshd
Additional resources
sshd(8), sshd_config(5), and setsebool(8) man pages.
CHAPTER 1. USING SECURE COMMUNICATIONS BETWEEN TWO SYSTEMS WITH OPENSSH
9
1.4. GENERATING SSH KEY PAIRS
Use this procedure to generate an SSH key pair on a local system and to copy the generated public keyto an OpenSSH server. If the server is configured accordingly, you can log in to the OpenSSH serverwithout providing any password.
IMPORTANT
If you complete the following steps as root, only root is able to use the keys.
Procedure
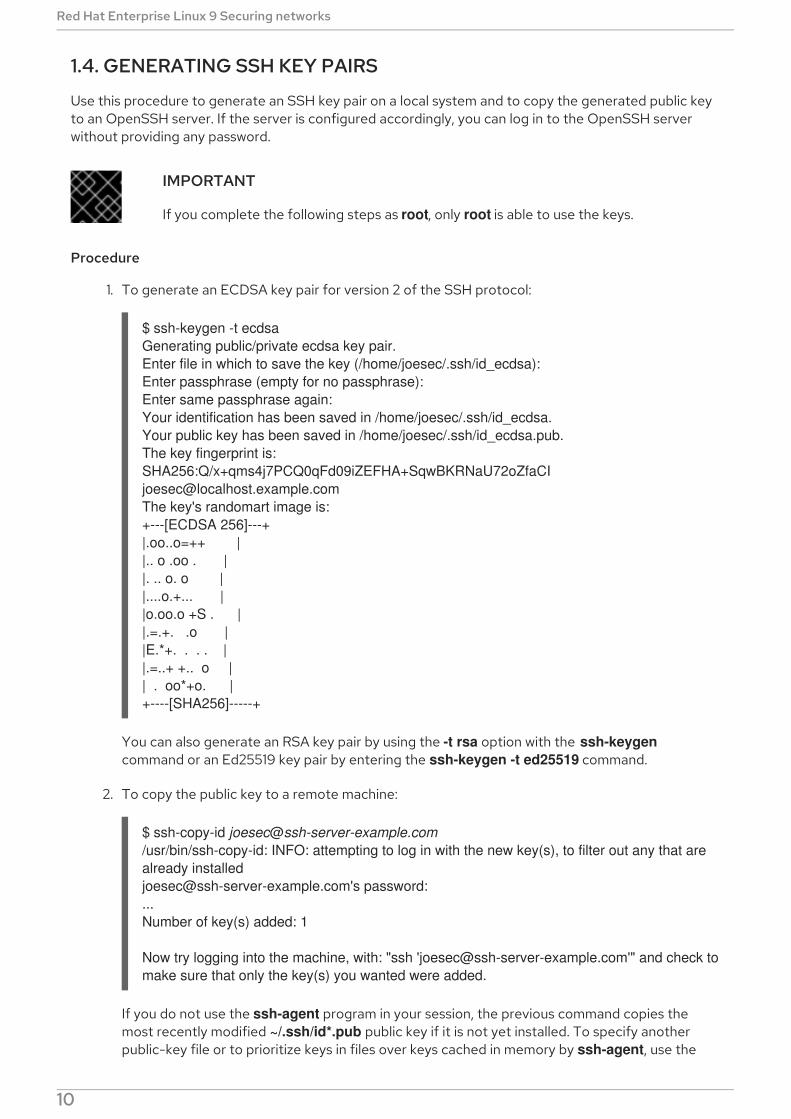
1. To generate an ECDSA key pair for version 2 of the SSH protocol:
$ ssh-keygen -t ecdsaGenerating public/private ecdsa key pair.Enter file in which to save the key (/home/joesec/.ssh/id_ecdsa):Enter passphrase (empty for no passphrase):Enter same passphrase again:Your identification has been saved in /home/joesec/.ssh/id_ecdsa.Your public key has been saved in /home/joesec/.ssh/id_ecdsa.pub.The key fingerprint is:SHA256:Q/x+qms4j7PCQ0qFd09iZEFHA+SqwBKRNaU72oZfaCI [email protected] key's randomart image is:+---[ECDSA 256]---+|.oo..o=++ ||.. o .oo . ||. .. o. o ||....o.+... ||o.oo.o +S . ||.=.+. .o ||E.*+. . . . ||.=..+ +.. o || . oo*+o. |+----[SHA256]-----+
You can also generate an RSA key pair by using the -t rsa option with the ssh-keygencommand or an Ed25519 key pair by entering the ssh-keygen -t ed25519 command.
2. To copy the public key to a remote machine:
$ ssh-copy-id [email protected]/usr/bin/ssh-copy-id: INFO: attempting to log in with the new key(s), to filter out any that are already [email protected]'s password:...Number of key(s) added: 1
Now try logging into the machine, with: "ssh '[email protected]'" and check to make sure that only the key(s) you wanted were added.
If you do not use the ssh-agent program in your session, the previous command copies themost recently modified ~/.ssh/id*.pub public key if it is not yet installed. To specify anotherpublic-key file or to prioritize keys in files over keys cached in memory by ssh-agent, use the
Red Hat Enterprise Linux 9 Securing networks
10
ssh-copy-id command with the -i option.
NOTE
If you reinstall your system and want to keep previously generated key pairs, back up the ~/.ssh/ directory. After reinstalling, copy it back to your home directory. You can do thisfor all users on your system, including root.
Verification
1. Log in to the OpenSSH server without providing any password:
$ ssh [email protected] message....Last login: Mon Nov 18 18:28:42 2019 from ::1
Additional resources
ssh-keygen(1) and ssh-copy-id(1) man pages.
1.5. USING SSH KEYS STORED ON A SMART CARD
Red Hat Enterprise Linux enables you to use RSA and ECDSA keys stored on a smart card on OpenSSHclients. Use this procedure to enable authentication using a smart card instead of using a password.
Prerequisites
On the client side, the opensc package is installed and the pcscd service is running.
Procedure
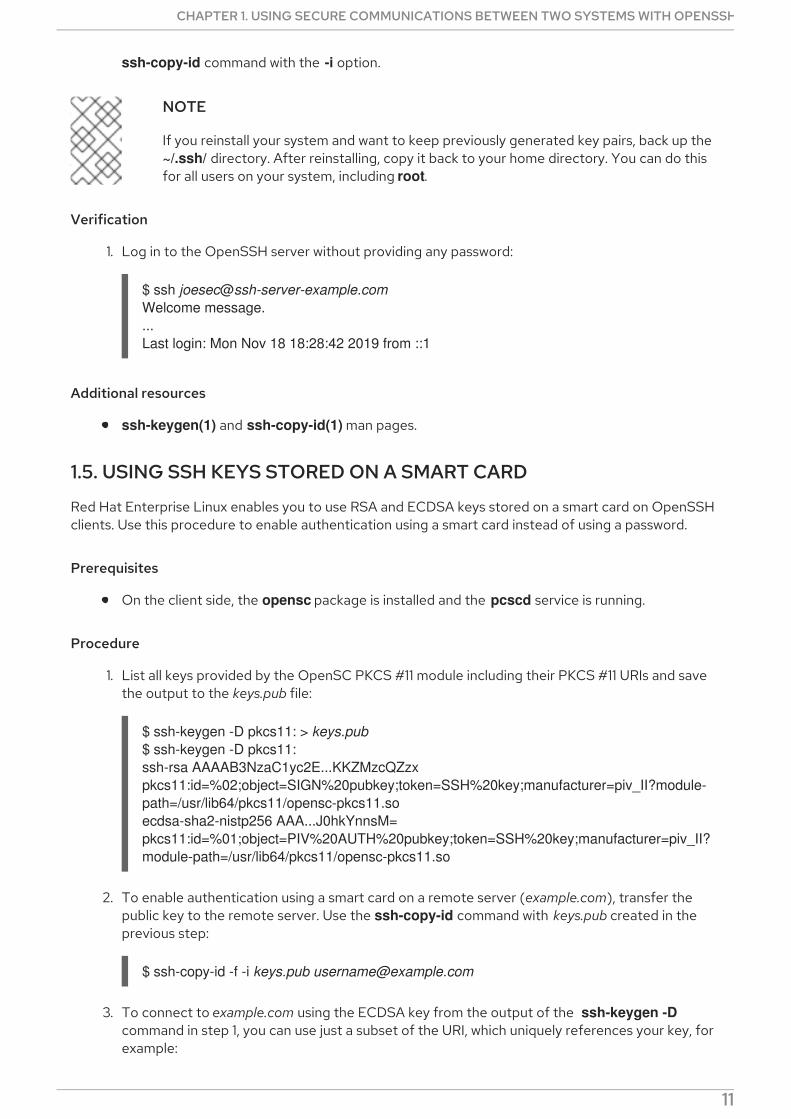
1. List all keys provided by the OpenSC PKCS #11 module including their PKCS #11 URIs and savethe output to the keys.pub file:
$ ssh-keygen -D pkcs11: > keys.pub$ ssh-keygen -D pkcs11:ssh-rsa AAAAB3NzaC1yc2E...KKZMzcQZzx pkcs11:id=%02;object=SIGN%20pubkey;token=SSH%20key;manufacturer=piv_II?module-path=/usr/lib64/pkcs11/opensc-pkcs11.soecdsa-sha2-nistp256 AAA...J0hkYnnsM= pkcs11:id=%01;object=PIV%20AUTH%20pubkey;token=SSH%20key;manufacturer=piv_II?module-path=/usr/lib64/pkcs11/opensc-pkcs11.so
2. To enable authentication using a smart card on a remote server (example.com), transfer thepublic key to the remote server. Use the ssh-copy-id command with keys.pub created in theprevious step:
$ ssh-copy-id -f -i keys.pub [email protected]
3. To connect to example.com using the ECDSA key from the output of the ssh-keygen -Dcommand in step 1, you can use just a subset of the URI, which uniquely references your key, forexample:
CHAPTER 1. USING SECURE COMMUNICATIONS BETWEEN TWO SYSTEMS WITH OPENSSH
11
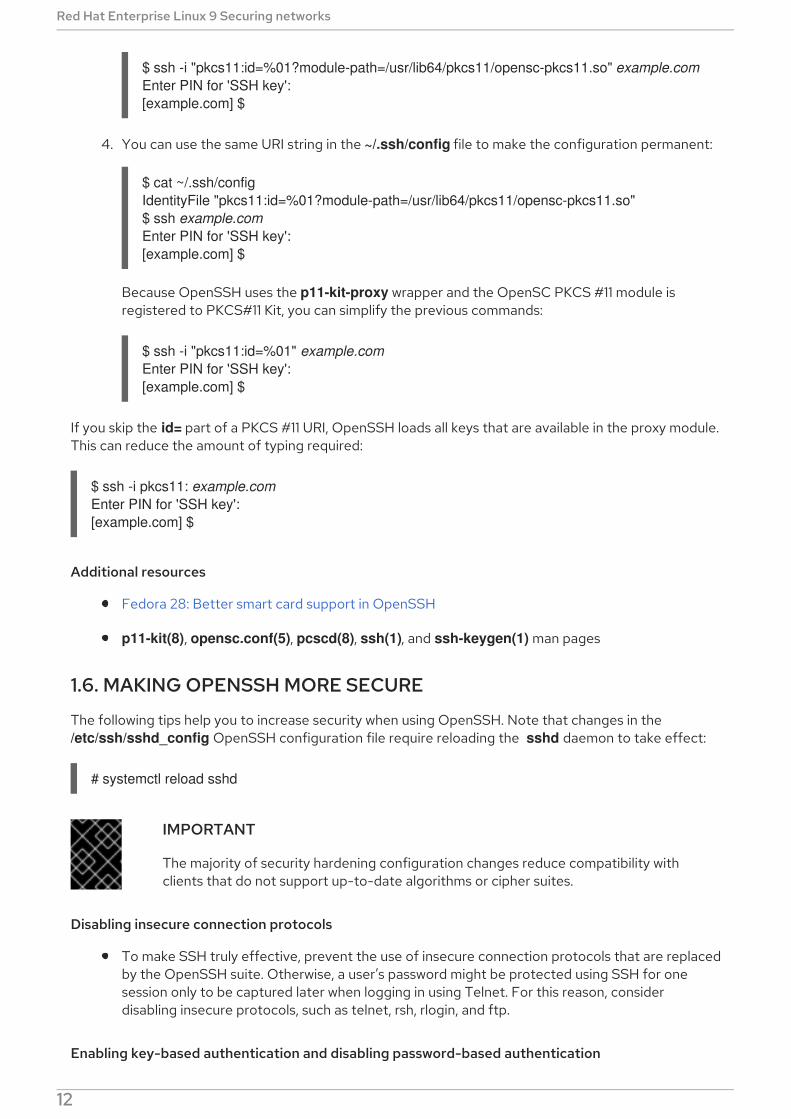
$ ssh -i "pkcs11:id=%01?module-path=/usr/lib64/pkcs11/opensc-pkcs11.so" example.comEnter PIN for 'SSH key':[example.com] $
4. You can use the same URI string in the ~/.ssh/config file to make the configuration permanent:
$ cat ~/.ssh/configIdentityFile "pkcs11:id=%01?module-path=/usr/lib64/pkcs11/opensc-pkcs11.so"$ ssh example.comEnter PIN for 'SSH key':[example.com] $
Because OpenSSH uses the p11-kit-proxy wrapper and the OpenSC PKCS #11 module isregistered to PKCS#11 Kit, you can simplify the previous commands:
$ ssh -i "pkcs11:id=%01" example.comEnter PIN for 'SSH key':[example.com] $
If you skip the id= part of a PKCS #11 URI, OpenSSH loads all keys that are available in the proxy module.This can reduce the amount of typing required:
$ ssh -i pkcs11: example.comEnter PIN for 'SSH key':[example.com] $
Additional resources
Fedora 28: Better smart card support in OpenSSH
p11-kit(8), opensc.conf(5), pcscd(8), ssh(1), and ssh-keygen(1) man pages
1.6. MAKING OPENSSH MORE SECURE
The following tips help you to increase security when using OpenSSH. Note that changes in the /etc/ssh/sshd_config OpenSSH configuration file require reloading the sshd daemon to take effect:
# systemctl reload sshd
IMPORTANT
The majority of security hardening configuration changes reduce compatibility withclients that do not support up-to-date algorithms or cipher suites.
Disabling insecure connection protocols
To make SSH truly effective, prevent the use of insecure connection protocols that are replacedby the OpenSSH suite. Otherwise, a user’s password might be protected using SSH for onesession only to be captured later when logging in using Telnet. For this reason, considerdisabling insecure protocols, such as telnet, rsh, rlogin, and ftp.
Enabling key-based authentication and disabling password-based authentication
Red Hat Enterprise Linux 9 Securing networks
12
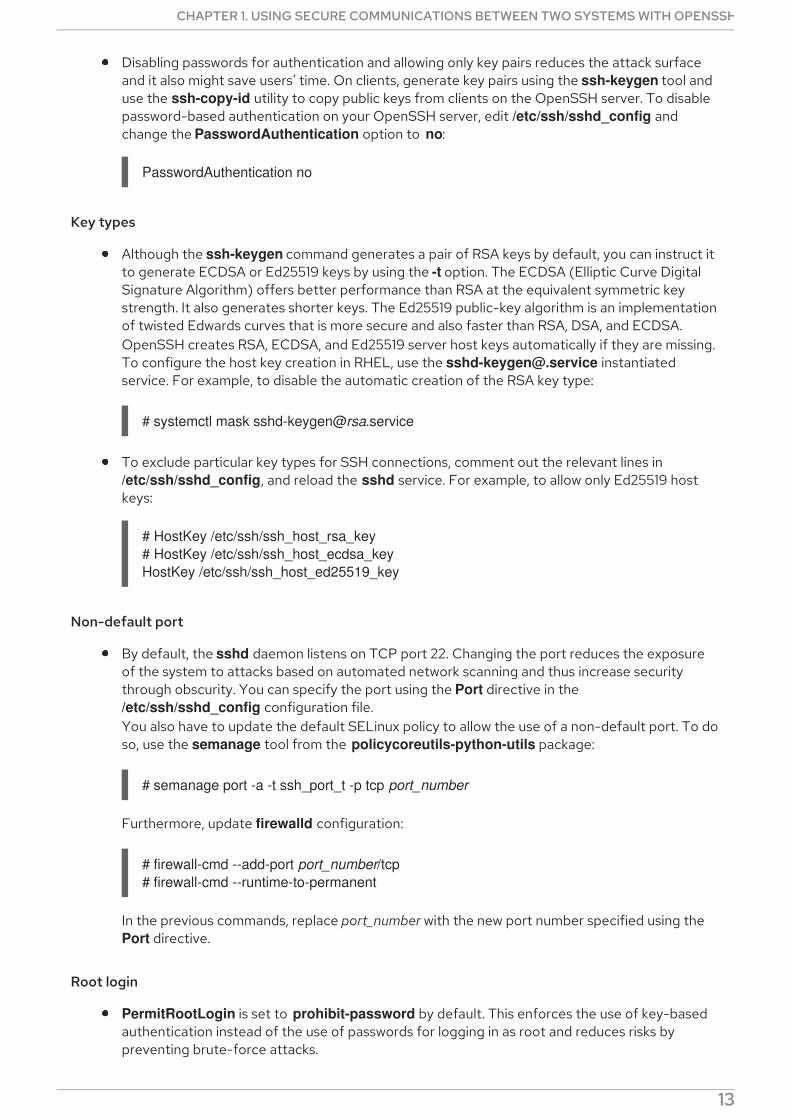
Disabling passwords for authentication and allowing only key pairs reduces the attack surfaceand it also might save users’ time. On clients, generate key pairs using the ssh-keygen tool anduse the ssh-copy-id utility to copy public keys from clients on the OpenSSH server. To disablepassword-based authentication on your OpenSSH server, edit /etc/ssh/sshd_config andchange the PasswordAuthentication option to no:
PasswordAuthentication no
Key types
Although the ssh-keygen command generates a pair of RSA keys by default, you can instruct itto generate ECDSA or Ed25519 keys by using the -t option. The ECDSA (Elliptic Curve DigitalSignature Algorithm) offers better performance than RSA at the equivalent symmetric keystrength. It also generates shorter keys. The Ed25519 public-key algorithm is an implementationof twisted Edwards curves that is more secure and also faster than RSA, DSA, and ECDSA.OpenSSH creates RSA, ECDSA, and Ed25519 server host keys automatically if they are missing.To configure the host key creation in RHEL, use the [email protected] instantiatedservice. For example, to disable the automatic creation of the RSA key type:
# systemctl mask [email protected]
To exclude particular key types for SSH connections, comment out the relevant lines in /etc/ssh/sshd_config, and reload the sshd service. For example, to allow only Ed25519 hostkeys:
# HostKey /etc/ssh/ssh_host_rsa_key# HostKey /etc/ssh/ssh_host_ecdsa_keyHostKey /etc/ssh/ssh_host_ed25519_key
Non-default port
By default, the sshd daemon listens on TCP port 22. Changing the port reduces the exposureof the system to attacks based on automated network scanning and thus increase securitythrough obscurity. You can specify the port using the Port directive in the /etc/ssh/sshd_config configuration file.You also have to update the default SELinux policy to allow the use of a non-default port. To doso, use the semanage tool from the policycoreutils-python-utils package:
# semanage port -a -t ssh_port_t -p tcp port_number
Furthermore, update firewalld configuration:
# firewall-cmd --add-port port_number/tcp# firewall-cmd --runtime-to-permanent
In the previous commands, replace port_number with the new port number specified using the Port directive.
Root login
PermitRootLogin is set to prohibit-password by default. This enforces the use of key-basedauthentication instead of the use of passwords for logging in as root and reduces risks bypreventing brute-force attacks.
CHAPTER 1. USING SECURE COMMUNICATIONS BETWEEN TWO SYSTEMS WITH OPENSSH
13
CAUTION
Enabling logging in as the root user is not a secure practice because the administrator cannotaudit which users run which privileged commands. For using administrative commands, log inand use sudo instead.
Using the X Security extension
The X server in Red Hat Enterprise Linux clients does not provide the X Security extension.Therefore, clients cannot request another security layer when connecting to untrusted SSHservers with X11 forwarding. Most applications are not able to run with this extension enabledanyway.By default, the ForwardX11Trusted option in the /etc/ssh/ssh_config.d/05-redhat.conf file isset to yes, and there is no difference between the ssh -X remote_machine (untrusted host)and ssh -Y remote_machine (trusted host) command.
If your scenario does not require the X11 forwarding feature at all, set the X11Forwardingdirective in the /etc/ssh/sshd_config configuration file to no.
Restricting access to specific users, groups, or domains
The AllowUsers and AllowGroups directives in the /etc/ssh/sshd_config configuration fileserver enable you to permit only certain users, domains, or groups to connect to your OpenSSHserver. You can combine AllowUsers and AllowGroups to restrict access more precisely, forexample:
AllowUsers *@192.168.1.*,*@10.0.0.*,!*@192.168.1.2AllowGroups example-group
The previous configuration lines accept connections from all users from systems in 192.168.1.*and 10.0.0.* subnets except from the system with the 192.168.1.2 address. All users must be inthe example-group group. The OpenSSH server denies all other connections.
Note that using allowlists (directives starting with Allow) is more secure than using blocklists(options starting with Deny) because allowlists block also new unauthorized users or groups.
Changing system-wide cryptographic policies
OpenSSH uses RHEL system-wide cryptographic policies, and the default system-widecryptographic policy level offers secure settings for current threat models. To make yourcryptographic settings more strict, change the current policy level:
# update-crypto-policies --set FUTURESetting system policy to FUTURE
To opt-out of the system-wide crypto policies for your OpenSSH server, uncomment the linewith the CRYPTO_POLICY= variable in the /etc/sysconfig/sshd file. After this change, valuesthat you specify in the Ciphers, MACs, KexAlgoritms, and GSSAPIKexAlgorithms sections inthe /etc/ssh/sshd_config file are not overridden. Note that this task requires deep expertise inconfiguring cryptographic options.
See Using system-wide cryptographic policies in the Security hardening title for moreinformation.
Additional resources
Red Hat Enterprise Linux 9 Securing networks
14

sshd_config(5), ssh-keygen(1), crypto-policies(7), and update-crypto-policies(8) man pages.
1.7. CONNECTING TO A REMOTE SERVER USING AN SSH JUMP HOST
Use this procedure for connecting your local system to a remote server through an intermediary server,also called jump host.
Prerequisites
A jump host accepts SSH connections from your local system.
A remote server accepts SSH connections only from the jump host.
Procedure
1. Define the jump host by editing the ~/.ssh/config file on your local system, for example:
Host jump-server1 HostName jump1.example.com
The Host parameter defines a name or alias for the host you can use in ssh commands. Thevalue can match the real host name, but can also be any string.
The HostName parameter sets the actual host name or IP address of the jump host.
2. Add the remote server jump configuration with the ProxyJump directive to ~/.ssh/config fileon your local system, for example:
Host remote-server HostName remote1.example.com ProxyJump jump-server1
3. Use your local system to connect to the remote server through the jump server:
$ ssh remote-server
The previous command is equivalent to the ssh -J jump-server1 remote-server command ifyou omit the configuration steps 1 and 2.
NOTE
CHAPTER 1. USING SECURE COMMUNICATIONS BETWEEN TWO SYSTEMS WITH OPENSSH
15
NOTE
You can specify more jump servers and you can also skip adding host definitions to theconfigurations file when you provide their complete host names, for example:
$ ssh -J jump1.example.com,jump2.example.com,jump3.example.com remote1.example.com
Change the host name-only notation in the previous command if the user names or SSHports on the jump servers differ from the names and ports on the remote server, forexample:
$ ssh -J [email protected]:75,[email protected]:75,[email protected]:75 [email protected]:220
Additional resources
ssh_config(5) and ssh(1) man pages.
1.8. CONNECTING TO REMOTE MACHINES WITH SSH KEYS USINGSSH-AGENT
To avoid entering a passphrase each time you initiate an SSH connection, you can use the ssh-agentutility to cache the private SSH key. The private key and the passphrase remain secure.
Prerequisites
You have a remote host with SSH daemon running and reachable through the network.
You know the IP address or hostname and credentials to log in to the remote host.
You have generated an SSH key pair with a passphrase and transferred the public key to theremote machine.
Procedure
1. Optional: Verify you can use the key to authenticate to the remote host:
a. Connect to the remote host using SSH:
$ ssh [email protected] hostname
b. Enter the passphrase you set while creating the key to grant access to the private key.
$ ssh [email protected] hostname host.example.com
2. Start the ssh-agent.
$ eval $(ssh-agent)Agent pid 20062
Red Hat Enterprise Linux 9 Securing networks
16
3. Add the key to ssh-agent.
$ ssh-add ~/.ssh/id_rsaEnter passphrase for ~/.ssh/id_rsa:Identity added: ~/.ssh/id_rsa ([email protected])
Verification
Optional: Log in to the host machine using SSH.
$ ssh [email protected]
Last login: Mon Sep 14 12:56:37 2020
Note that you did not have to enter the passphrase.
1.9. ADDITIONAL RESOURCES
sshd(8), ssh(1), scp(1), sftp(1), ssh-keygen(1), ssh-copy-id(1), ssh_config(5), sshd_config(5), update-crypto-policies(8), and crypto-policies(7) man pages.
OpenSSH Home Page
Configuring SELinux for applications and services with non-standard configurations
Controlling network traffic using firewalld
CHAPTER 1. USING SECURE COMMUNICATIONS BETWEEN TWO SYSTEMS WITH OPENSSH
17
CHAPTER 2. CONFIGURING SECURE COMMUNICATION WITHTHE SSH SYSTEM ROLES
As an administrator, you can use the SSHD System Role to configure SSH servers and the SSH SystemRole to configure SSH clients consistently on any number of RHEL systems at the same time using theAnsible Core package.
2.1. SSH SERVER SYSTEM ROLE VARIABLES
In an SSH Server System Role playbook, you can define the parameters for the SSH configuration fileaccording to your preferences and limitations.
If you do not configure these variables, the System Role produces an sshd_config file that matches theRHEL defaults.
In all cases, Booleans correctly render as yes and no in sshd configuration. You can define multi-lineconfiguration items using lists. For example:
sshd_ListenAddress: - 0.0.0.0 - '::'
renders as:
ListenAddress 0.0.0.0ListenAddress ::
Variables for the SSH Server System Role
sshd_enable
If set to False, the role is completely disabled. Defaults to True.
sshd_skip_defaults
If set to True, the System Role does not apply default values. Instead, you specify the complete setof configuration defaults by using either the sshd dict, or sshd_Key variables. Defaults to False.
sshd_manage_service
If set to False, the service is not managed, which means it is not enabled on boot and does not startor reload. Defaults to True except when running inside a container or AIX, because the Ansibleservice module does not currently support enabled for AIX.
sshd_allow_reload
If set to False, sshd does not reload after a change of configuration. This can help withtroubleshooting. To apply the changed configuration, reload sshd manually. Defaults to the samevalue as sshd_manage_service except on AIX, where sshd_manage_service defaults to False but sshd_allow_reload defaults to True.
sshd_install_service
If set to True, the role installs service files for the sshd service. This overrides files provided in theoperating system. Do not set to True unless you are configuring a second instance and you alsochange the sshd_service variable. Defaults to False.The role uses the files pointed by the following variables as templates:
Red Hat Enterprise Linux 9 Securing networks
18
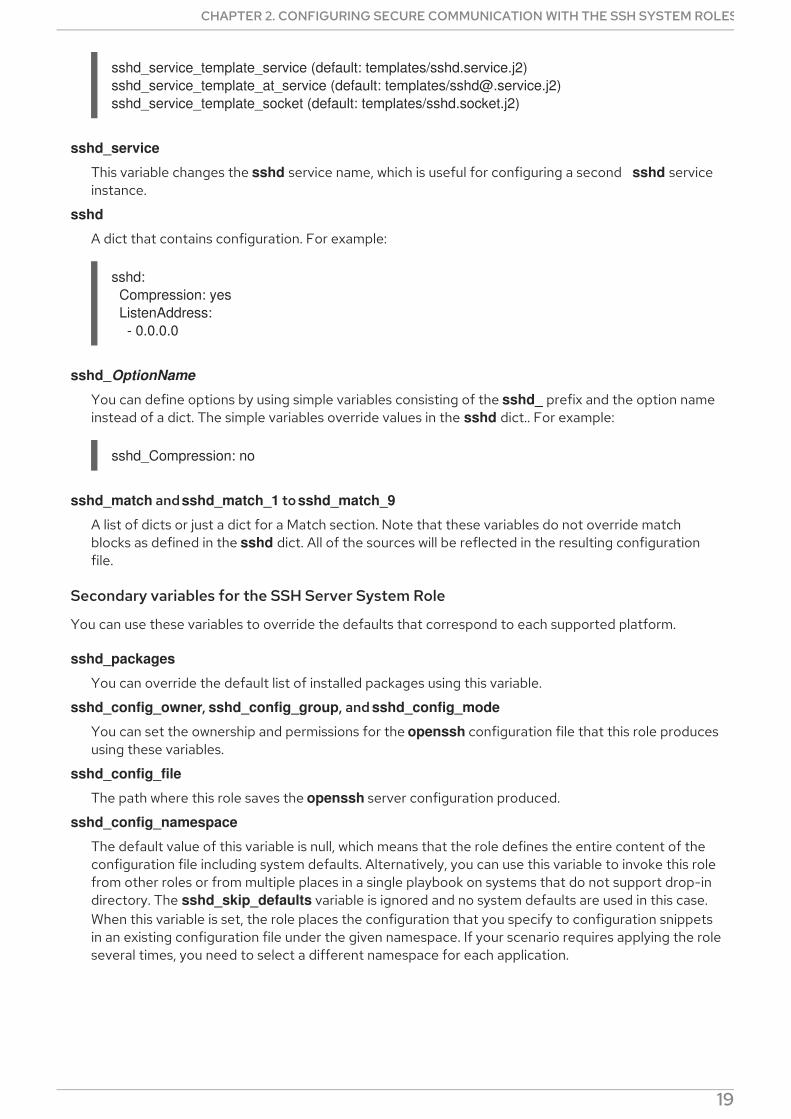
sshd_service_template_service (default: templates/sshd.service.j2)sshd_service_template_at_service (default: templates/[email protected])sshd_service_template_socket (default: templates/sshd.socket.j2)
sshd_service
This variable changes the sshd service name, which is useful for configuring a second sshd serviceinstance.
sshd
A dict that contains configuration. For example:
sshd: Compression: yes ListenAddress: - 0.0.0.0
sshd_OptionName
You can define options by using simple variables consisting of the sshd_ prefix and the option nameinstead of a dict. The simple variables override values in the sshd dict.. For example:
sshd_Compression: no
sshd_match and sshd_match_1 to sshd_match_9
A list of dicts or just a dict for a Match section. Note that these variables do not override matchblocks as defined in the sshd dict. All of the sources will be reflected in the resulting configurationfile.
Secondary variables for the SSH Server System Role
You can use these variables to override the defaults that correspond to each supported platform.
sshd_packages
You can override the default list of installed packages using this variable.
sshd_config_owner, sshd_config_group, and sshd_config_mode
You can set the ownership and permissions for the openssh configuration file that this role producesusing these variables.
sshd_config_file
The path where this role saves the openssh server configuration produced.
sshd_config_namespace
The default value of this variable is null, which means that the role defines the entire content of theconfiguration file including system defaults. Alternatively, you can use this variable to invoke this rolefrom other roles or from multiple places in a single playbook on systems that do not support drop-indirectory. The sshd_skip_defaults variable is ignored and no system defaults are used in this case.When this variable is set, the role places the configuration that you specify to configuration snippetsin an existing configuration file under the given namespace. If your scenario requires applying the roleseveral times, you need to select a different namespace for each application.
NOTE
CHAPTER 2. CONFIGURING SECURE COMMUNICATION WITH THE SSH SYSTEM ROLES
19
NOTE
Limitations of the openssh configuration file still apply. For example, only the firstoption specified in a configuration file is effective for most of the configurationoptions.
Technically, the role places snippets in "Match all" blocks, unless they contain other match blocks, toensure they are applied regardless of the previous match blocks in the existing configuration file. Thisallows configuring any non-conflicting options from different roles invocations.
sshd_binary
The path to the sshd executable of openssh.
sshd_service
The name of the sshd service. By default, this variable contains the name of the sshd service thatthe target platform uses. You can also use it to set the name of the custom sshd service when therole uses the sshd_install_service variable.
sshd_verify_hostkeys
Defaults to auto. When set to auto, this lists all host keys that are present in the producedconfiguration file, and generates any paths that are not present. Additionally, permissions and fileowners are set to default values. This is useful if the role is used in the deployment stage to makesure the service is able to start on the first attempt. To disable this check, set this variable to anempty list [].
sshd_hostkey_owner, sshd_hostkey_group, sshd_hostkey_mode
Use these variables to set the ownership and permissions for the host keys from sshd_verify_hostkeys.
sshd_sysconfig
On RHEL-based systems, this variable configures additional details of the sshd service. If set to true, this role manages also the /etc/sysconfig/sshd configuration file based on the followingconfiguration. Defaults to false.
sshd_sysconfig_override_crypto_policy
In RHEL, when set to true, this variable overrides the system-wide crypto policy. Defaults to false.
sshd_sysconfig_use_strong_rng
On RHEL-based systems, this variable can force sshd to reseed the openssl random numbergenerator with the number of bytes given as the argument. The default is 0, which disables thisfunctionality. Do not turn this on if the system does not have a hardware random number generator.
2.2. CONFIGURING OPENSSH SERVERS USING THE SSH SERVERSYSTEM ROLE
You can use the SSH Server System Role to configure multiple SSH servers by running an Ansibleplaybook.
NOTE
You can use the SSH Server System Role with other System Roles that change SSH andSSHD configuration, for example the Identity Management RHEL System Roles. Toprevent the configuration from being overwritten, make sure that the SSH Server roleuses namespaces (RHEL 8 and earlier versions) or a drop-in directory (RHEL 9).
Red Hat Enterprise Linux 9 Securing networks
20
Prerequisites
Access and permissions to one or more managed nodes, which are systems you want toconfigure with the SSHD System Role.
Access and permissions to a control node, which is a system from which Red Hat Ansible Coreconfigures other systems.On the control node:
The ansible-core and rhel-system-roles packages are installed.
IMPORTANT
RHEL 8.0-8.5 provided access to a separate Ansible repository that contains AnsibleEngine 2.9 for automation based on Ansible. Ansible Engine contains command-lineutilities such as ansible, ansible-playbook, connectors such as docker and podman, andmany plugins and modules. For information on how to obtain and install Ansible Engine,see the How to download and install Red Hat Ansible Engine Knowledgebase article.
RHEL 8.6 and 9.0 have introduced Ansible Core (provided as the ansible-core package),which contains the Ansible command-line utilities, commands, and a small set of built-inAnsible plugins. RHEL provides this package through the AppStream repository, and ithas a limited scope of support. For more information, see the Scope of support for theAnsible Core package included in the RHEL 9 and RHEL 8.6 and later AppStreamrepositories Knowledgebase article.
An inventory file which lists the managed nodes.
Procedure
1. Copy the example playbook for the SSH Server System Role:
# cp /usr/share/doc/rhel-system-roles/sshd/example-root-login-playbook.yml path/custom-playbook.yml
2. Open the copied playbook by using a text editor, for example:
# vim path/custom-playbook.yml
---- hosts: all tasks: - name: Configure sshd to prevent root and password login except from particular subnet include_role: name: rhel-system-roles.sshd vars: sshd: # root login and password login is enabled only from a particular subnet PermitRootLogin: no PasswordAuthentication: no Match: - Condition: "Address 192.0.2.0/24" PermitRootLogin: yes PasswordAuthentication: yes
CHAPTER 2. CONFIGURING SECURE COMMUNICATION WITH THE SSH SYSTEM ROLES
21
The playbook configures the managed node as an SSH server configured so that:
password and root user login is disabled
password and root user login is enabled only from the subnet 192.0.2.0/24
You can modify the variables according to your preferences. For more details, see SSH ServerSystem Role variables .
3. Optional: Verify playbook syntax.
# ansible-playbook --syntax-check path/custom-playbook.yml
4. Run the playbook on your inventory file:
# ansible-playbook -i inventory_file path/custom-playbook.yml
...
PLAY RECAP**************************************************
localhost : ok=12 changed=2 unreachable=0 failed=0skipped=10 rescued=0 ignored=0
Verification
1. Log in to the SSH server:
$ ssh [email protected]
Where:
user1 is a user on the SSH server.
10.1.1.1 is the IP address of the SSH server.
2. Check the contents of the sshd_config file on the SSH server:
$ vim /etc/ssh/sshd_config
# Ansible managedHostKey /etc/ssh/ssh_host_rsa_keyHostKey /etc/ssh/ssh_host_ecdsa_keyHostKey /etc/ssh/ssh_host_ed25519_keyAcceptEnv LANG LC_CTYPE LC_NUMERIC LC_TIME LC_COLLATE LC_MONETARY LC_MESSAGESAcceptEnv LC_PAPER LC_NAME LC_ADDRESS LC_TELEPHONE LC_MEASUREMENTAcceptEnv LC_IDENTIFICATION LC_ALL LANGUAGEAcceptEnv XMODIFIERSAuthorizedKeysFile .ssh/authorized_keysChallengeResponseAuthentication noGSSAPIAuthentication yesGSSAPICleanupCredentials noPasswordAuthentication no
Red Hat Enterprise Linux 9 Securing networks
22

PermitRootLogin noPrintMotd noSubsystem sftp /usr/libexec/openssh/sftp-serverSyslogFacility AUTHPRIVUsePAM yesX11Forwarding yesMatch Address 192.0.2.0/24 PasswordAuthentication yes PermitRootLogin yes
3. Check that you can connect to the server as root from the 192.0.2.0/24 subnet:
a. Determine your IP address:
$ hostname -I192.0.2.1
If the IP address is within the 192.0.2.1 - 192.0.2.254 range, you can connect to the server.
b. Connect to the server as root:
$ ssh [email protected]
Additional resources
/usr/share/doc/rhel-system-roles/sshd/README.md file.
ansible-playbook(1) man page.
2.3. SSH CLIENT SYSTEM ROLE VARIABLES
In an SSH Client System Role playbook, you can define the parameters for the client SSH configurationfile according to your preferences and limitations.
If you do not configure these variables, the System Role produces a global ssh_config file that matchesthe RHEL defaults.
In all cases, booleans correctly render as yes or no in ssh configuration. You can define multi-lineconfiguration items using lists. For example:
LocalForward: - 22 localhost:2222 - 403 localhost:4003
renders as:
LocalForward 22 localhost:2222LocalForward 403 localhost:4003
NOTE
The configuration options are case sensitive.
CHAPTER 2. CONFIGURING SECURE COMMUNICATION WITH THE SSH SYSTEM ROLES
23
Variables for the SSH Client System Role
ssh_user
You can define an existing user name for which the System Role modifies user-specificconfiguration. The user-specific configuration is saved in ~/.ssh/config of the given user. Thedefault value is null, which modifies global configuration for all users.
ssh_skip_defaults
Defaults to auto. If set to auto, the System Role writes the system-wide configuration file /etc/ssh/ssh_config and keeps the RHEL defaults defined there. Creating a drop-in configurationfile, for example by defining the ssh_drop_in_name variable, automatically disables the ssh_skip_defaults variable.
ssh_drop_in_name
Defines the name for the drop-in configuration file, which is placed in the system-wide drop-indirectory. The name is used in the template /etc/ssh/ssh_config.d/{ssh_drop_in_name}.conf toreference the configuration file to be modified. If the system does not support drop-in directory, thedefault value is null. If the system supports drop-in directories, the default value is 00-ansible.
WARNING
If the system does not support drop-in directories, setting this option will makethe play fail.
The suggested format is NN-name, where NN is a two-digit number used for ordering theconfiguration files and name is any descriptive name for the content or the owner of the file.
ssh
A dict that contains configuration options and their respective values.
ssh_OptionName
You can define options by using simple variables consisting of the ssh_ prefix and the option nameinstead of a dict. The simple variables override values in the ssh dict.
ssh_additional_packages
This role automatically installs the openssh and openssh-clients packages, which are needed forthe most common use cases. If you need to install additional packages, for example, openssh-keysign for host-based authentication, you can specify them in this variable.
ssh_config_file
The path to which the role saves the configuration file produced. Default value:
If the system has a drop-in directory, the default value is defined by the template /etc/ssh/ssh_config.d/{ssh_drop_in_name}.conf.
If the system does not have a drop-in directory, the default value is /etc/ssh/ssh_config.
if the ssh_user variable is defined, the default value is ~/.ssh/config.
ssh_config_owner, ssh_config_group, ssh_config_mode
The owner, group and modes of the created configuration file. By default, the owner of the file is
Red Hat Enterprise Linux 9 Securing networks
24
The owner, group and modes of the created configuration file. By default, the owner of the file is root:root, and the mode is 0644. If ssh_user is defined, the mode is 0600, and the owner and groupare derived from the user name specified in the ssh_user variable.
2.4. CONFIGURING OPENSSH CLIENTS USING THE SSH CLIENTSYSTEM ROLE
You can use the SSH Client System Role to configure multiple SSH clients by running an Ansibleplaybook.
NOTE
You can use the SSH Client System Role with other system roles that change SSH andSSHD configuration, for example the Identity Management RHEL System Roles. Toprevent the configuration from being overwritten, make sure that the SSH Client roleuses a drop-in directory (default from RHEL 8).
Prerequisites
Access and permissions to one or more managed nodes, which are systems you want toconfigure with the SSH Client System Role.
Access and permissions to a control node, which is a system from which Red Hat Ansible Coreconfigures other systems.On the control node:
The ansible-core and rhel-system-roles packages are installed.
IMPORTANT
RHEL 8.0-8.5 provided access to a separate Ansible repository that contains AnsibleEngine 2.9 for automation based on Ansible. Ansible Engine contains command-lineutilities such as ansible, ansible-playbook, connectors such as docker and podman, andmany plugins and modules. For information on how to obtain and install Ansible Engine,see the How to download and install Red Hat Ansible Engine Knowledgebase article.
RHEL 8.6 and 9.0 have introduced Ansible Core (provided as the ansible-core package),which contains the Ansible command-line utilities, commands, and a small set of built-inAnsible plugins. RHEL provides this package through the AppStream repository, and ithas a limited scope of support. For more information, see the Scope of support for theAnsible Core package included in the RHEL 9 and RHEL 8.6 and later AppStreamrepositories Knowledgebase article.
An inventory file which lists the managed nodes.
Procedure
1. Create a new playbook.yml file with the following content:
---- hosts: all tasks: - name: "Configure ssh clients" include_role:
CHAPTER 2. CONFIGURING SECURE COMMUNICATION WITH THE SSH SYSTEM ROLES
25
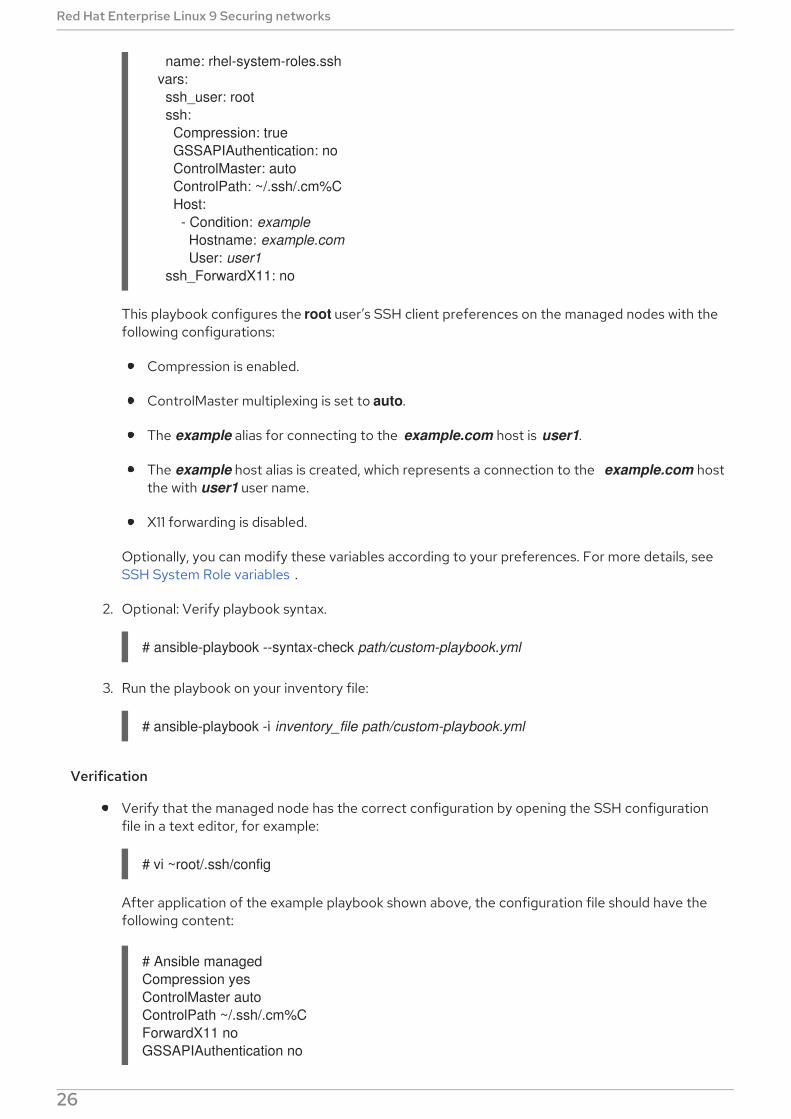
name: rhel-system-roles.ssh vars: ssh_user: root ssh: Compression: true GSSAPIAuthentication: no ControlMaster: auto ControlPath: ~/.ssh/.cm%C Host: - Condition: example Hostname: example.com User: user1 ssh_ForwardX11: no
This playbook configures the root user’s SSH client preferences on the managed nodes with thefollowing configurations:
Compression is enabled.
ControlMaster multiplexing is set to auto.
The example alias for connecting to the example.com host is user1.
The example host alias is created, which represents a connection to the example.com hostthe with user1 user name.
X11 forwarding is disabled.
Optionally, you can modify these variables according to your preferences. For more details, seeSSH System Role variables .
2. Optional: Verify playbook syntax.
# ansible-playbook --syntax-check path/custom-playbook.yml
3. Run the playbook on your inventory file:
# ansible-playbook -i inventory_file path/custom-playbook.yml
Verification
Verify that the managed node has the correct configuration by opening the SSH configurationfile in a text editor, for example:
# vi ~root/.ssh/config
After application of the example playbook shown above, the configuration file should have thefollowing content:
# Ansible managedCompression yesControlMaster autoControlPath ~/.ssh/.cm%CForwardX11 noGSSAPIAuthentication no
Red Hat Enterprise Linux 9 Securing networks
26
Host example Hostname example.com User user1
2.5. USING THE SSH SERVER SYSTEM ROLE FOR NON-EXCLUSIVECONFIGURATION
Normally, applying the SSH Server System Role overwrites the entire configuration. This may beproblematic if you have previously adjusted the configuration, for example with a different System Roleor playbook. To apply the SSH Server System Role for only selected configuration options while keepingother options in place, you can use the non-exclusive configuration.
In RHEL 8 and earlier, you can apply the non-exclusive configuration with a configuration snippet. Formore information, see Using the SSH Server System Role for non-exclusive configuration in RHEL 8documentation.
In RHEL 9, you can apply the non-exclusive configuration by using files in a drop-in directory. Thedefault configuration file is already placed in the drop-in directory as /etc/ssh/sshd_config.d/00-ansible_system_role.conf.
Prerequisites
Access and permissions to one or more managed nodes, which are systems you want toconfigure with the SSH Server System Role.
Access and permissions to a control node, which is a system from which Red Hat Ansible Coreconfigures other systems.On the control node:
The ansible-core package is installed.
An inventory file which lists the managed nodes.
A playbook for a different RHEL System Role. For additional information, see Applying arole.
Procedure
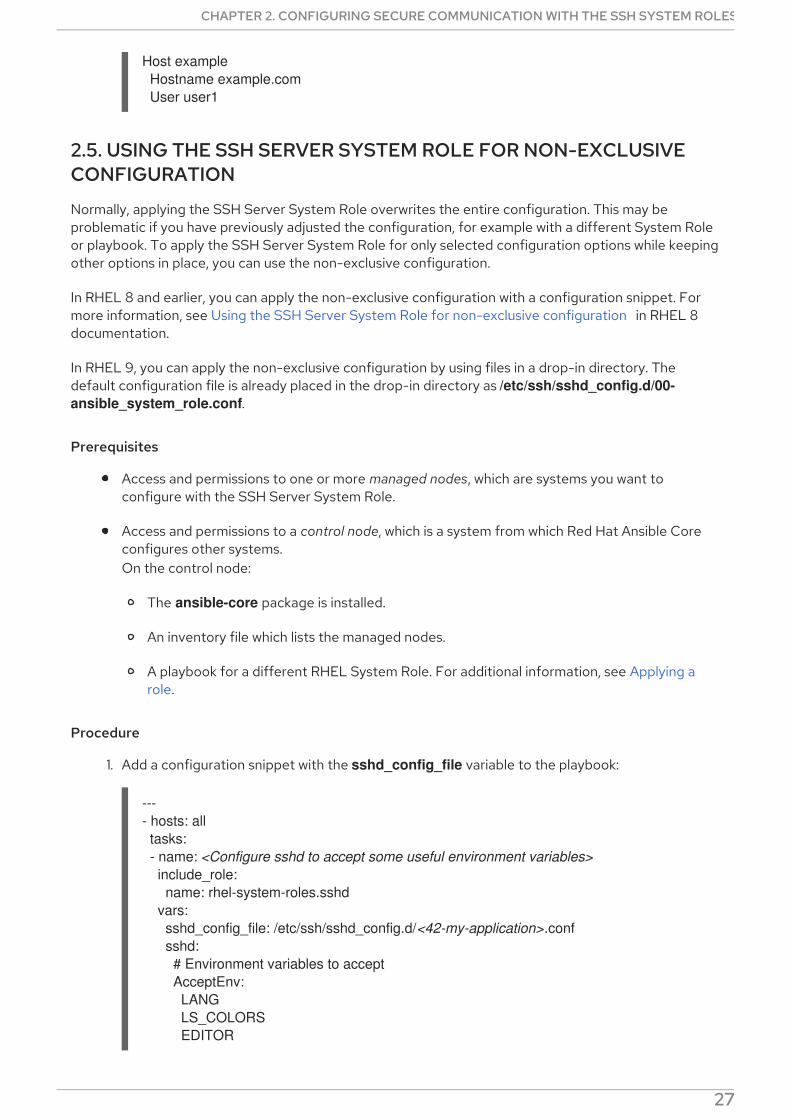
1. Add a configuration snippet with the sshd_config_file variable to the playbook:
---- hosts: all tasks: - name: <Configure sshd to accept some useful environment variables> include_role: name: rhel-system-roles.sshd vars: sshd_config_file: /etc/ssh/sshd_config.d/<42-my-application>.conf sshd: # Environment variables to accept AcceptEnv: LANG LS_COLORS EDITOR
In the sshd_config_file variable, define the .conf file into which the SSH Server System Role
CHAPTER 2. CONFIGURING SECURE COMMUNICATION WITH THE SSH SYSTEM ROLES
27
In the sshd_config_file variable, define the .conf file into which the SSH Server System Rolewrites the configuration options.
Use a two-digit prefix, for example 42- to specify the order in which the configuration files willbe applied.
When you apply the playbook to the inventory, the role adds the following configuration optionsto the file defined by the sshd_config_file variable.
# Ansible managed#AcceptEnv LANG LS_COLORS EDITOR
Verification
Optional: Verify playbook syntax.
# ansible-playbook --syntax-check playbook.yml -i inventory_file
Additional resources
/usr/share/doc/rhel-system-roles/sshd/README.md file.
ansible-playbook(1) man page.
Red Hat Enterprise Linux 9 Securing networks
28
CHAPTER 3. PLANNING AND IMPLEMENTING TLSTLS (Transport Layer Security) is a cryptographic protocol used to secure network communications.When hardening system security settings by configuring preferred key-exchange protocols,authentication methods, and encryption algorithms, it is necessary to bear in mind that the broader therange of supported clients, the lower the resulting security. Conversely, strict security settings lead tolimited compatibility with clients, which can result in some users being locked out of the system. Be sureto target the strictest available configuration and only relax it when it is required for compatibilityreasons.
3.1. SSL AND TLS PROTOCOLS
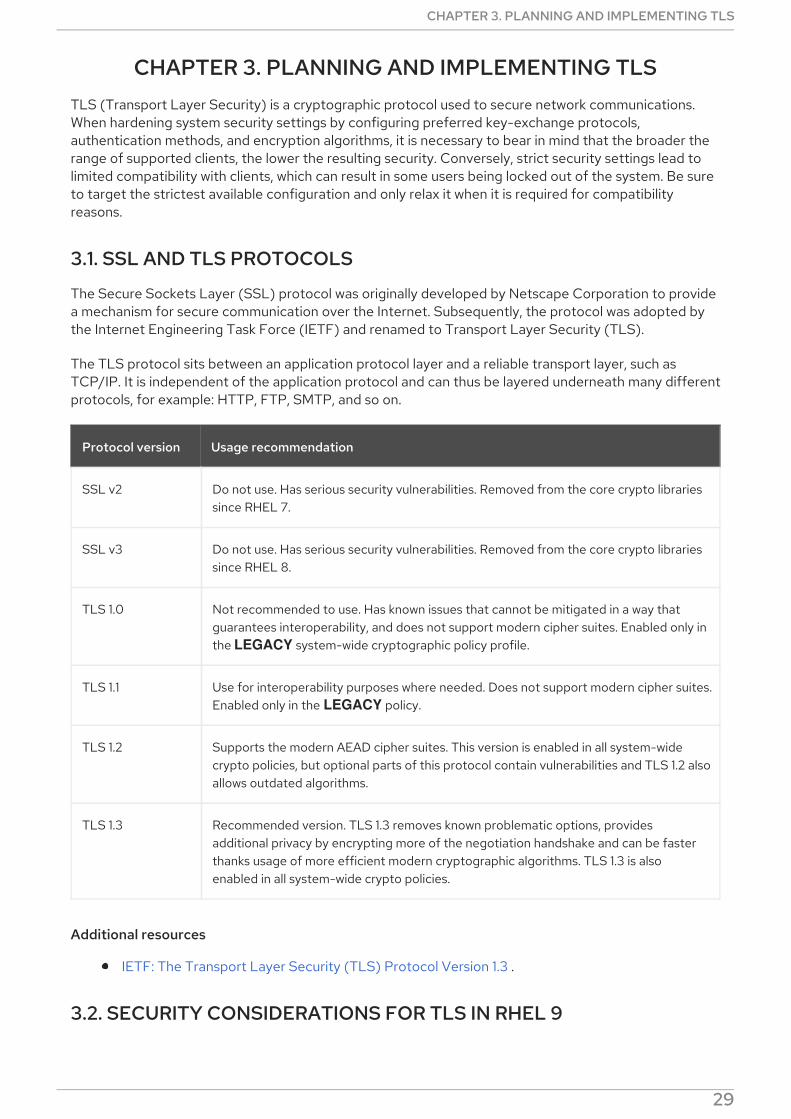
The Secure Sockets Layer (SSL) protocol was originally developed by Netscape Corporation to providea mechanism for secure communication over the Internet. Subsequently, the protocol was adopted bythe Internet Engineering Task Force (IETF) and renamed to Transport Layer Security (TLS).
The TLS protocol sits between an application protocol layer and a reliable transport layer, such asTCP/IP. It is independent of the application protocol and can thus be layered underneath many differentprotocols, for example: HTTP, FTP, SMTP, and so on.
Protocol version Usage recommendation
SSL v2 Do not use. Has serious security vulnerabilities. Removed from the core crypto librariessince RHEL 7.
SSL v3 Do not use. Has serious security vulnerabilities. Removed from the core crypto librariessince RHEL 8.
TLS 1.0 Not recommended to use. Has known issues that cannot be mitigated in a way thatguarantees interoperability, and does not support modern cipher suites. Enabled only inthe LEGACY system-wide cryptographic policy profile.
TLS 1.1 Use for interoperability purposes where needed. Does not support modern cipher suites.Enabled only in the LEGACY policy.
TLS 1.2 Supports the modern AEAD cipher suites. This version is enabled in all system-widecrypto policies, but optional parts of this protocol contain vulnerabilities and TLS 1.2 alsoallows outdated algorithms.
TLS 1.3 Recommended version. TLS 1.3 removes known problematic options, providesadditional privacy by encrypting more of the negotiation handshake and can be fasterthanks usage of more efficient modern cryptographic algorithms. TLS 1.3 is alsoenabled in all system-wide crypto policies.
Additional resources
IETF: The Transport Layer Security (TLS) Protocol Version 1.3 .
3.2. SECURITY CONSIDERATIONS FOR TLS IN RHEL 9
In RHEL 9, TLS configuration is performed using the system-wide cryptographic policies mechanism.
CHAPTER 3. PLANNING AND IMPLEMENTING TLS
29
In RHEL 9, TLS configuration is performed using the system-wide cryptographic policies mechanism.TLS versions below 1.2 are not supported anymore. DEFAULT, FUTURE and LEGACY cryptographicpolicies allow only TLS 1.2 and 1.3. See Using system-wide cryptographic policies for more information.
The default settings provided by libraries included in RHEL 9 are secure enough for most deployments.The TLS implementations use secure algorithms where possible while not preventing connections fromor to legacy clients or servers. Apply hardened settings in environments with strict security requirementswhere legacy clients or servers that do not support secure algorithms or protocols are not expected orallowed to connect.
The most straightforward way to harden your TLS configuration is switching the system-widecryptographic policy level to FUTURE using the update-crypto-policies --set FUTURE command.
WARNING
Algorithms disabled for the LEGACY cryptographic policy do not conform to RedHat’s vision of RHEL 9 security, and their security properties are not reliable.Consider moving away from using these algorithms instead of re-enabling them. Ifyou do decide to re-enable them, for example for interoperability with oldhardware, treat them as insecure and apply extra protection measures, such asisolating their network interactions to separate network segments. Do not use themacross public networks.
If you decide to not follow RHEL system-wide crypto policies or create custom cryptographic policiestailored to your setup, use the following recommendations for preferred protocols, cipher suites, andkey lengths on your custom configuration:
3.2.1. Protocols
The latest version of TLS provides the best security mechanism. TLS 1.2 is now the minimum versioneven when using the LEGACY cryptographic policy. Re-enabling older protocol versions is possiblethrough either opting out of cryptographic policies or providing a custom policy, but the resultingconfiguration will not be supported.
Note that even though that RHEL 9 supports TLS version 1.3, not all features of this protocol are fullysupported by RHEL 9 components. For example, the 0-RTT (Zero Round Trip Time) feature, whichreduces connection latency, is not yet fully supported by the Apache web server.
3.2.2. Cipher suites
Modern, more secure cipher suites should be preferred to old, insecure ones. Always disable the use ofeNULL and aNULL cipher suites, which do not offer any encryption or authentication at all. If at allpossible, ciphers suites based on RC4 or HMAC-MD5, which have serious shortcomings, should also bedisabled. The same applies to the so-called export cipher suites, which have been intentionally madeweaker, and thus are easy to break.
While not immediately insecure, cipher suites that offer less than 128 bits of security should not beconsidered for their short useful life. Algorithms that use 128 bits of security or more can be expected tobe unbreakable for at least several years, and are thus strongly recommended. Note that while 3DESciphers advertise the use of 168 bits, they actually offer 112 bits of security.
Red Hat Enterprise Linux 9 Securing networks
30
Always prefer cipher suites that support (perfect) forward secrecy (PFS), which ensures theconfidentiality of encrypted data even in case the server key is compromised. This rules out the fastRSA key exchange, but allows for the use of ECDHE and DHE. Of the two, ECDHE is the faster andtherefore the preferred choice.
You should also prefer AEAD ciphers, such as AES-GCM, over CBC-mode ciphers as they are notvulnerable to padding oracle attacks. Additionally, in many cases, AES-GCM is faster than AES in CBCmode, especially when the hardware has cryptographic accelerators for AES.
Note also that when using the ECDHE key exchange with ECDSA certificates, the transaction is evenfaster than a pure RSA key exchange. To provide support for legacy clients, you can install two pairs ofcertificates and keys on a server: one with ECDSA keys (for new clients) and one with RSA keys (forlegacy ones).
3.2.3. Public key length
When using RSA keys, always prefer key lengths of at least 3072 bits signed by at least SHA-256, whichis sufficiently large for true 128 bits of security.
WARNING
The security of your system is only as strong as the weakest link in the chain. Forexample, a strong cipher alone does not guarantee good security. The keys and thecertificates are just as important, as well as the hash functions and keys used by theCertification Authority (CA) to sign your keys.
3.3. HARDENING TLS CONFIGURATION IN APPLICATIONS
In RHEL, system-wide crypto policies provide a convenient way to ensure that your applications usingcryptographic libraries do not allow known insecure protocols, ciphers, or algorithms.
If you want to harden your TLS-related configuration with your customized cryptographic settings, youcan use the cryptographic configuration options described in this section, and override the system-widecrypto policies just in the minimum required amount.
Regardless of the configuration you choose to use, always make sure to mandate that your serverapplication enforces server-side cipher order , so that the cipher suite to be used is determined by theorder you configure.
3.3.1. Configuring the Apache HTTP server
The Apache HTTP Server can use both OpenSSL and NSS libraries for its TLS needs. RHEL 9provides the mod_ssl functionality through eponymous packages:
# dnf install mod_ssl
The mod_ssl package installs the /etc/httpd/conf.d/ssl.conf configuration file, which can be used tomodify the TLS-related settings of the Apache HTTP Server.
Install the httpd-manual package to obtain complete documentation for the Apache HTTP Server,
CHAPTER 3. PLANNING AND IMPLEMENTING TLS
31

including TLS configuration. The directives available in the /etc/httpd/conf.d/ssl.conf configuration fileare described in detail in the /usr/share/httpd/manual/mod/mod_ssl.html file. Examples of varioussettings are described in the /usr/share/httpd/manual/ssl/ssl_howto.html file.
When modifying the settings in the /etc/httpd/conf.d/ssl.conf configuration file, be sure to consider thefollowing three directives at the minimum:
SSLProtocol
Use this directive to specify the version of TLS or SSL you want to allow.
SSLCipherSuite
Use this directive to specify your preferred cipher suite or disable the ones you want to disallow.
SSLHonorCipherOrder
Uncomment and set this directive to on to ensure that the connecting clients adhere to the order ofciphers you specified.
For example, to use only the TLS 1.2 and 1.3 protocol:
SSLProtocol all -SSLv3 -TLSv1 -TLSv1.1
See the Configuring TLS encryption on an Apache HTTP Server chapter in the Deploying web serversand reverse proxies document for more information.
3.3.2. Configuring the Nginx HTTP and proxy server
To enable TLS 1.3 support in Nginx, add the TLSv1.3 value to the ssl_protocols option in the serversection of the /etc/nginx/nginx.conf configuration file:
server { listen 443 ssl http2; listen [::]:443 ssl http2; .... ssl_protocols TLSv1.2 TLSv1.3; ssl_ciphers ....}
See the Adding TLS encryption to an Nginx web server chapter in the Deploying web servers andreverse proxies document for more information.
3.3.3. Configuring the Dovecot mail server
To configure your installation of the Dovecot mail server to use TLS, modify the /etc/dovecot/conf.d/10-ssl.conf configuration file. You can find an explanation of some of the basicconfiguration directives available in that file in the /usr/share/doc/dovecot/wiki/SSL.DovecotConfiguration.txt file, which is installed along with thestandard installation of Dovecot.
When modifying the settings in the /etc/dovecot/conf.d/10-ssl.conf configuration file, be sure toconsider the following three directives at the minimum:
ssl_protocols
Use this directive to specify the version of TLS or SSL you want to allow or disable.
Red Hat Enterprise Linux 9 Securing networks
32
ssl_cipher_list
Use this directive to specify your preferred cipher suites or disable the ones you want to disallow.
ssl_prefer_server_ciphers
Uncomment and set this directive to yes to ensure that the connecting clients adhere to the order ofciphers you specified.
For example, the following line in /etc/dovecot/conf.d/10-ssl.conf allows only TLS 1.1 and later:
ssl_protocols = !SSLv2 !SSLv3 !TLSv1
Additional resources
Deploying web servers and reverse proxies
config(5) and ciphers(1) man pages.
Recommendations for Secure Use of Transport Layer Security (TLS) and Datagram TransportLayer Security (DTLS).
Mozilla SSL Configuration Generator.
SSL Server Test.
CHAPTER 3. PLANNING AND IMPLEMENTING TLS
33
CHAPTER 4. CONFIGURING A VPN WITH IPSECIn RHEL 9, a virtual private network (VPN) can be configured using the IPsec protocol, which issupported by the Libreswan application.
4.1. LIBRESWAN AS AN IPSEC VPN IMPLEMENTATION
In RHEL, a Virtual Private Network (VPN) can be configured using the IPsec protocol, which is supportedby the Libreswan application. Libreswan is a continuation of the Openswan application, and manyexamples from the Openswan documentation are interchangeable with Libreswan.
The IPsec protocol for a VPN is configured using the Internet Key Exchange (IKE) protocol. The termsIPsec and IKE are used interchangeably. An IPsec VPN is also called an IKE VPN, IKEv2 VPN, XAUTHVPN, Cisco VPN or IKE/IPsec VPN. A variant of an IPsec VPN that also uses the Level 2 TunnelingProtocol (L2TP) is usually called an L2TP/IPsec VPN, which requires the xl2tpd package provided by theoptional repository.
Libreswan is an open-source, user-space IKE implementation. IKE v1 and v2 are implemented as a user-level daemon. The IKE protocol is also encrypted. The IPsec protocol is implemented by the Linux kernel,and Libreswan configures the kernel to add and remove VPN tunnel configurations.
The IKE protocol uses UDP port 500 and 4500. The IPsec protocol consists of two protocols:
Encapsulated Security Payload (ESP), which has protocol number 50.
Authenticated Header (AH), which has protocol number 51.
The AH protocol is not recommended for use. Users of AH are recommended to migrate to ESP with nullencryption.
The IPsec protocol provides two modes of operation:
Tunnel Mode (the default)
Transport Mode.
You can configure the kernel with IPsec without IKE. This is called Manual Keying. You can also configuremanual keying using the ip xfrm commands, however, this is strongly discouraged for security reasons.Libreswan interfaces with the Linux kernel using netlink. Packet encryption and decryption happen in theLinux kernel.
Libreswan uses the Network Security Services (NSS) cryptographic library. Both Libreswan and NSS arecertified for use with the Federal Information Processing Standard (FIPS) Publication 140-2.
IMPORTANT
IKE/IPsec VPNs, implemented by Libreswan and the Linux kernel, is the only VPNtechnology recommended for use in RHEL. Do not use any other VPN technologywithout understanding the risks of doing so.
In RHEL, Libreswan follows system-wide cryptographic policies by default. This ensures thatLibreswan uses secure settings for current threat models including IKEv2 as a default protocol. SeeUsing system-wide crypto policies for more information.
Libreswan does not use the terms "source" and "destination" or "server" and "client" because IKE/IPsec
Red Hat Enterprise Linux 9 Securing networks
34
are peer to peer protocols. Instead, it uses the terms "left" and "right" to refer to end points (the hosts).This also allows you to use the same configuration on both end points in most cases. However,administrators usually choose to always use "left" for the local host and "right" for the remote host.
The leftid and rightid options serve as identification of the respective hosts in the authenticationprocess. See the ipsec.conf(5) man page for more information.
4.2. AUTHENTICATION METHODS IN LIBRESWAN
Libreswan supports several authentication methods, each of which fits a different scenario.
Pre-Shared key (PSK)
Pre-Shared Key (PSK) is the simplest authentication method. For security reasons, do not use PSKsshorter than 64 random characters. In FIPS mode, PSKs must comply with a minimum-strengthrequirement depending on the integrity algorithm used. You can set PSK by using the authby=secretconnection.
Raw RSA keys
Raw RSA keys are commonly used for static host-to-host or subnet-to-subnet IPsec configurations.Each host is manually configured with the public RSA keys of all other hosts, and Libreswan sets up anIPsec tunnel between each pair of hosts. This method does not scale well for large numbers of hosts.
You can generate a raw RSA key on a host using the ipsec newhostkey command. You can listgenerated keys by using the ipsec showhostkey command. The leftrsasigkey= line is required forconnection configurations that use CKA ID keys. Use the authby=rsasig connection option for raw RSAkeys.
X.509 certificates
X.509 certificates are commonly used for large-scale deployments with hosts that connect to a commonIPsec gateway. A central certificate authority (CA) signs RSA certificates for hosts or users. This centralCA is responsible for relaying trust, including the revocations of individual hosts or users.
For example, you can generate X.509 certificates using the openssl command and the NSS certutilcommand. Because Libreswan reads user certificates from the NSS database using the certificates'nickname in the leftcert= configuration option, provide a nickname when you create a certificate.
If you use a custom CA certificate, you must import it to the Network Security Services (NSS) database.You can import any certificate in the PKCS #12 format to the Libreswan NSS database by using the ipsec import command.
WARNING
Libreswan requires an Internet Key Exchange (IKE) peer ID as a subject alternativename (SAN) for every peer certificate as described in section 3.1 of RFC 4945 .Disabling this check by changing the require-id-on-certificated= option can makethe system vulnerable to man-in-the-middle attacks.
Use the authby=rsasig connection option for authentication based on X.509 certificates using RSAwith SHA-2. You can further limit it for ECDSA digital signatures using SHA-2 by setting authby= to
CHAPTER 4. CONFIGURING A VPN WITH IPSEC
35
ecdsa and RSA Probabilistic Signature Scheme (RSASSA-PSS) digital signatures based authenticationwith SHA-2 through authby=rsa-sha2. The default value is authby=rsasig,ecdsa.
The certificates and the authby= signature methods should match. This increases interoperability andpreserves authentication in one digital-signature system.
NULL authentication
NULL authentication is used to gain mesh encryption without authentication. It protects against passiveattacks but not against active attacks. However, because IKEv2 allows asymmetric authenticationmethods, NULL authentication can also be used for internet-scale opportunistic IPsec. In this model,clients authenticate the server, but servers do not authenticate the client. This model is similar to securewebsites using TLS. Use authby=null for NULL authentication.
Protection against quantum computers
In addition to the previously mentioned authentication methods, you can use the Post-quantum Pre-shared Key (PPK) method to protect against possible attacks by quantum computers. Individual clientsor groups of clients can use their own PPK by specifying a PPK ID that corresponds to an out-of-bandconfigured pre-shared key.
Using IKEv1 with pre-shared keys provides protection against quantum attackers. The redesign of IKEv2does not offer this protection natively. Libreswan offers the use of Post-quantum Pre-shared Key (PPK)to protect IKEv2 connections against quantum attacks.
To enable optional PPK support, add ppk=yes to the connection definition. To require PPK, add ppk=insist. Then, each client can be given a PPK ID with a secret value that is communicated out-of-band (and preferably quantum safe). The PPK’s should be very strong in randomness and not based ondictionary words. The PPK ID and PPK data are stored in ipsec.secrets, for example:
@west @east : PPKS "user1" "thestringismeanttobearandomstr"
The PPKS option refers to static PPKs. This experimental function uses one-time-pad-based DynamicPPKs. Upon each connection, a new part of the one-time pad is used as the PPK. When used, that partof the dynamic PPK inside the file is overwritten with zeros to prevent re-use. If there is no more one-time-pad material left, the connection fails. See the ipsec.secrets(5) man page for more information.
WARNING
The implementation of dynamic PPKs is provided as an unsupported TechnologyPreview. Use with caution.
4.3. INSTALLING LIBRESWAN
This procedure describes the steps for installing and starting the Libreswan IPsec/IKE VPNimplementation.
Prerequisites
The AppStream repository is enabled.
Red Hat Enterprise Linux 9 Securing networks
36

Procedure
1. Install the libreswan packages:
# dnf install libreswan
2. If you are re-installing Libreswan, remove its old database files and create a new database:
# systemctl stop ipsec# rm /var/lib/ipsec/nss/*db# ipsec initnss
3. Start the ipsec service, and enable the service to be started automatically on boot:
# systemctl enable ipsec --now
4. Configure the firewall to allow 500 and 4500/UDP ports for the IKE, ESP, and AH protocols byadding the ipsec service:
# firewall-cmd --add-service="ipsec"# firewall-cmd --runtime-to-permanent
4.4. CREATING A HOST-TO-HOST VPN
To configure [application]Libreswan to create a host-to-host IPsec VPN between two hosts referred toas left and right using authentication by raw RSA keys, enter the following commands on both of thehosts:
Prerequisites
Libreswan is installed and the ipsec service is started on each node.
Procedure
1. Generate a raw RSA key pair on each host:
# ipsec newhostkey
2. The previous step returned the generated key’s ckaid. Use that ckaid with the followingcommand on left, for example:
# ipsec showhostkey --left --ckaid 2d3ea57b61c9419dfd6cf43a1eb6cb306c0e857d
The output of the previous command generated the leftrsasigkey= line required for theconfiguration. Do the same on the second host (right):
# ipsec showhostkey --right --ckaid a9e1f6ce9ecd3608c24e8f701318383f41798f03
3. In the /etc/ipsec.d/ directory, create a new my_host-to-host.conf file. Write the RSA host keysfrom the output of the ipsec showhostkey commands in the previous step to the new file. Forexample:
CHAPTER 4. CONFIGURING A VPN WITH IPSEC
37
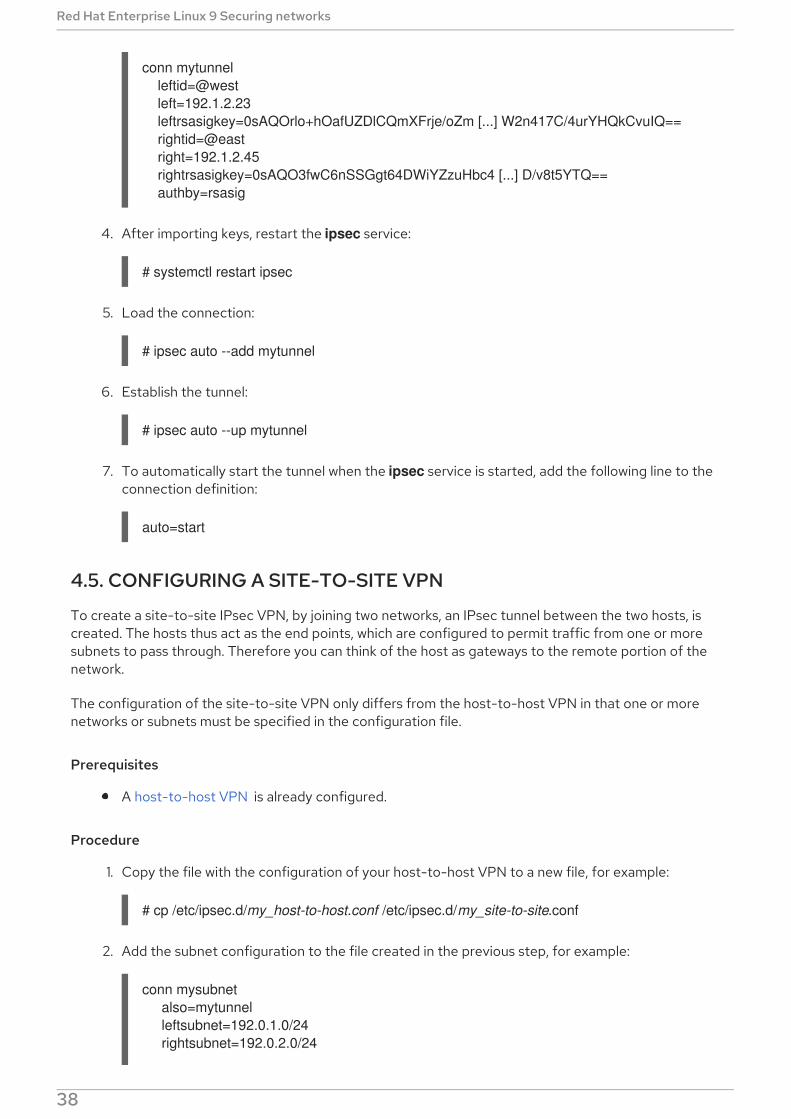
conn mytunnel leftid=@west left=192.1.2.23 leftrsasigkey=0sAQOrlo+hOafUZDlCQmXFrje/oZm [...] W2n417C/4urYHQkCvuIQ== rightid=@east right=192.1.2.45 rightrsasigkey=0sAQO3fwC6nSSGgt64DWiYZzuHbc4 [...] D/v8t5YTQ== authby=rsasig
4. After importing keys, restart the ipsec service:
# systemctl restart ipsec
5. Load the connection:
# ipsec auto --add mytunnel
6. Establish the tunnel:
# ipsec auto --up mytunnel
7. To automatically start the tunnel when the ipsec service is started, add the following line to theconnection definition:
auto=start
4.5. CONFIGURING A SITE-TO-SITE VPN
To create a site-to-site IPsec VPN, by joining two networks, an IPsec tunnel between the two hosts, iscreated. The hosts thus act as the end points, which are configured to permit traffic from one or moresubnets to pass through. Therefore you can think of the host as gateways to the remote portion of thenetwork.
The configuration of the site-to-site VPN only differs from the host-to-host VPN in that one or morenetworks or subnets must be specified in the configuration file.
Prerequisites
A host-to-host VPN is already configured.
Procedure
1. Copy the file with the configuration of your host-to-host VPN to a new file, for example:
# cp /etc/ipsec.d/my_host-to-host.conf /etc/ipsec.d/my_site-to-site.conf
2. Add the subnet configuration to the file created in the previous step, for example:
conn mysubnet also=mytunnel leftsubnet=192.0.1.0/24 rightsubnet=192.0.2.0/24
Red Hat Enterprise Linux 9 Securing networks
38
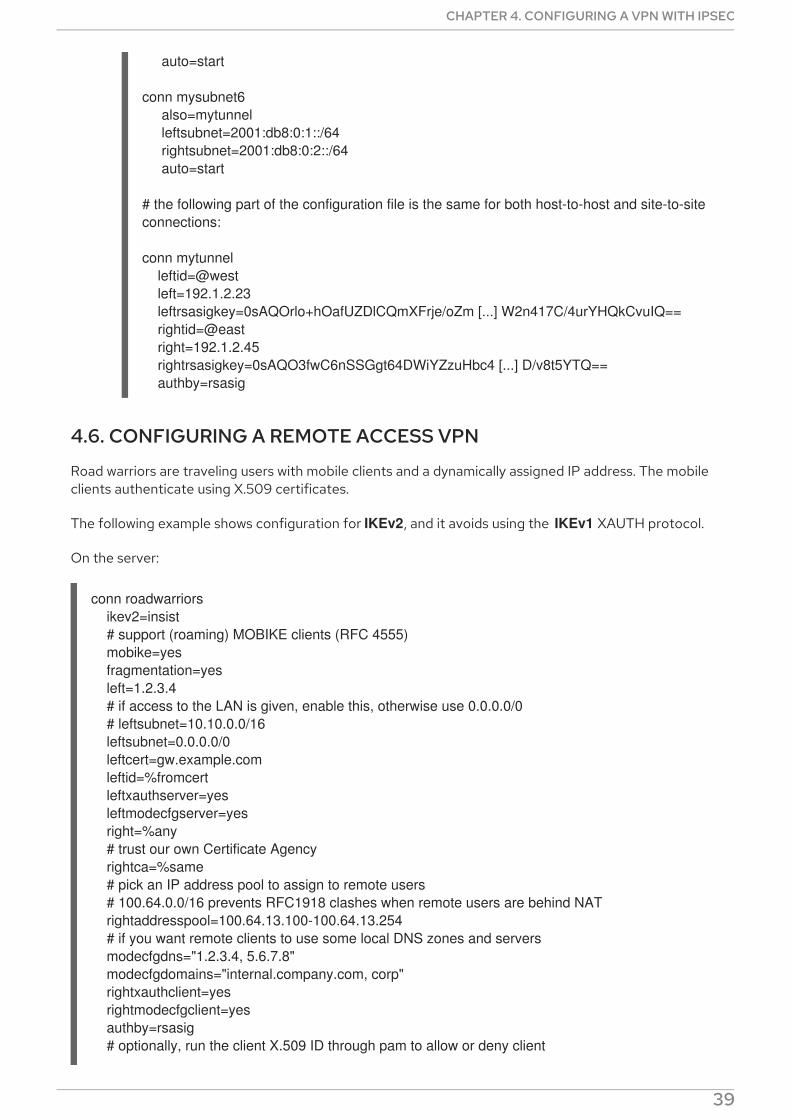
auto=start
conn mysubnet6 also=mytunnel leftsubnet=2001:db8:0:1::/64 rightsubnet=2001:db8:0:2::/64 auto=start
# the following part of the configuration file is the same for both host-to-host and site-to-site connections:
conn mytunnel leftid=@west left=192.1.2.23 leftrsasigkey=0sAQOrlo+hOafUZDlCQmXFrje/oZm [...] W2n417C/4urYHQkCvuIQ== rightid=@east right=192.1.2.45 rightrsasigkey=0sAQO3fwC6nSSGgt64DWiYZzuHbc4 [...] D/v8t5YTQ== authby=rsasig
4.6. CONFIGURING A REMOTE ACCESS VPN
Road warriors are traveling users with mobile clients and a dynamically assigned IP address. The mobileclients authenticate using X.509 certificates.
The following example shows configuration for IKEv2, and it avoids using the IKEv1 XAUTH protocol.
On the server:
conn roadwarriors ikev2=insist # support (roaming) MOBIKE clients (RFC 4555) mobike=yes fragmentation=yes left=1.2.3.4 # if access to the LAN is given, enable this, otherwise use 0.0.0.0/0 # leftsubnet=10.10.0.0/16 leftsubnet=0.0.0.0/0 leftcert=gw.example.com leftid=%fromcert leftxauthserver=yes leftmodecfgserver=yes right=%any # trust our own Certificate Agency rightca=%same # pick an IP address pool to assign to remote users # 100.64.0.0/16 prevents RFC1918 clashes when remote users are behind NAT rightaddresspool=100.64.13.100-100.64.13.254 # if you want remote clients to use some local DNS zones and servers modecfgdns="1.2.3.4, 5.6.7.8" modecfgdomains="internal.company.com, corp" rightxauthclient=yes rightmodecfgclient=yes authby=rsasig # optionally, run the client X.509 ID through pam to allow or deny client
CHAPTER 4. CONFIGURING A VPN WITH IPSEC
39
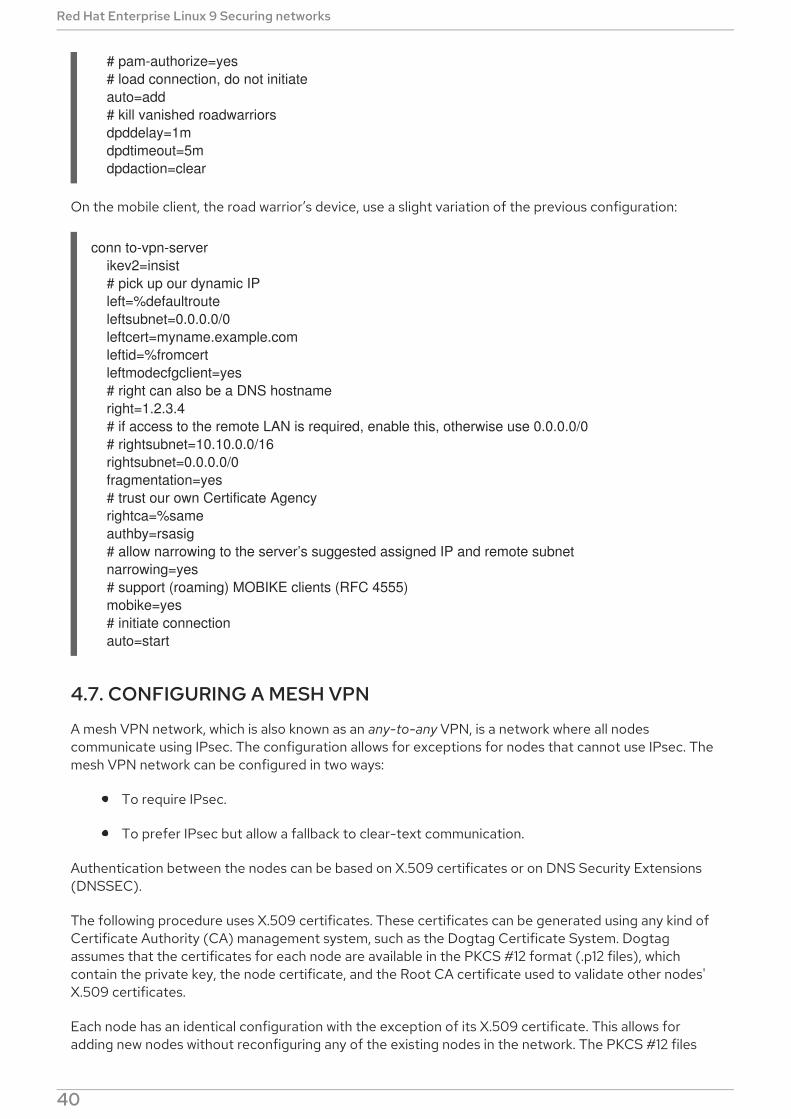
# pam-authorize=yes # load connection, do not initiate auto=add # kill vanished roadwarriors dpddelay=1m dpdtimeout=5m dpdaction=clear
On the mobile client, the road warrior’s device, use a slight variation of the previous configuration:
conn to-vpn-server ikev2=insist # pick up our dynamic IP left=%defaultroute leftsubnet=0.0.0.0/0 leftcert=myname.example.com leftid=%fromcert leftmodecfgclient=yes # right can also be a DNS hostname right=1.2.3.4 # if access to the remote LAN is required, enable this, otherwise use 0.0.0.0/0 # rightsubnet=10.10.0.0/16 rightsubnet=0.0.0.0/0 fragmentation=yes # trust our own Certificate Agency rightca=%same authby=rsasig # allow narrowing to the server’s suggested assigned IP and remote subnet narrowing=yes # support (roaming) MOBIKE clients (RFC 4555) mobike=yes # initiate connection auto=start
4.7. CONFIGURING A MESH VPN
A mesh VPN network, which is also known as an any-to-any VPN, is a network where all nodescommunicate using IPsec. The configuration allows for exceptions for nodes that cannot use IPsec. Themesh VPN network can be configured in two ways:
To require IPsec.
To prefer IPsec but allow a fallback to clear-text communication.
Authentication between the nodes can be based on X.509 certificates or on DNS Security Extensions(DNSSEC).
The following procedure uses X.509 certificates. These certificates can be generated using any kind ofCertificate Authority (CA) management system, such as the Dogtag Certificate System. Dogtagassumes that the certificates for each node are available in the PKCS #12 format (.p12 files), whichcontain the private key, the node certificate, and the Root CA certificate used to validate other nodes'X.509 certificates.
Each node has an identical configuration with the exception of its X.509 certificate. This allows foradding new nodes without reconfiguring any of the existing nodes in the network. The PKCS #12 files
Red Hat Enterprise Linux 9 Securing networks
40
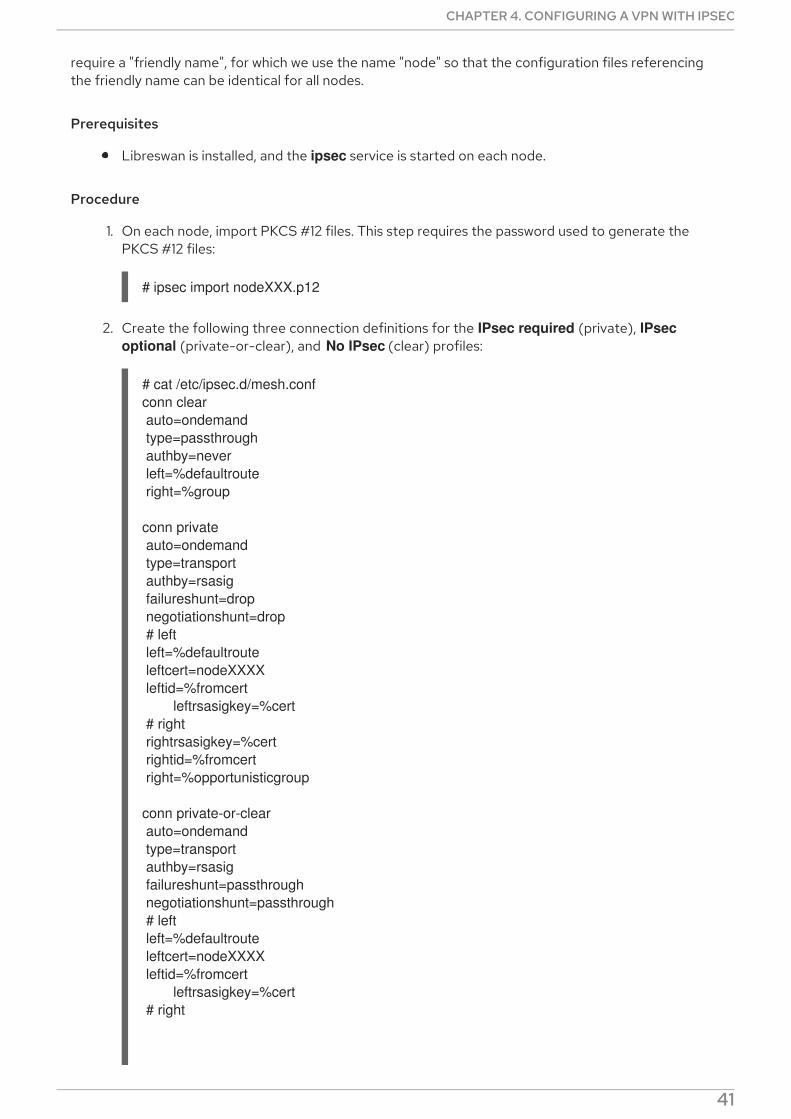
require a "friendly name", for which we use the name "node" so that the configuration files referencingthe friendly name can be identical for all nodes.
Prerequisites
Libreswan is installed, and the ipsec service is started on each node.
Procedure
1. On each node, import PKCS #12 files. This step requires the password used to generate thePKCS #12 files:
# ipsec import nodeXXX.p12
2. Create the following three connection definitions for the IPsec required (private), IPsec optional (private-or-clear), and No IPsec (clear) profiles:
# cat /etc/ipsec.d/mesh.confconn clear auto=ondemand type=passthrough authby=never left=%defaultroute right=%group
conn private auto=ondemand type=transport authby=rsasig failureshunt=drop negotiationshunt=drop # left left=%defaultroute leftcert=nodeXXXX leftid=%fromcert leftrsasigkey=%cert # right rightrsasigkey=%cert rightid=%fromcert right=%opportunisticgroup
conn private-or-clear auto=ondemand type=transport authby=rsasig failureshunt=passthrough negotiationshunt=passthrough # left left=%defaultroute leftcert=nodeXXXX leftid=%fromcert leftrsasigkey=%cert # right
CHAPTER 4. CONFIGURING A VPN WITH IPSEC
41
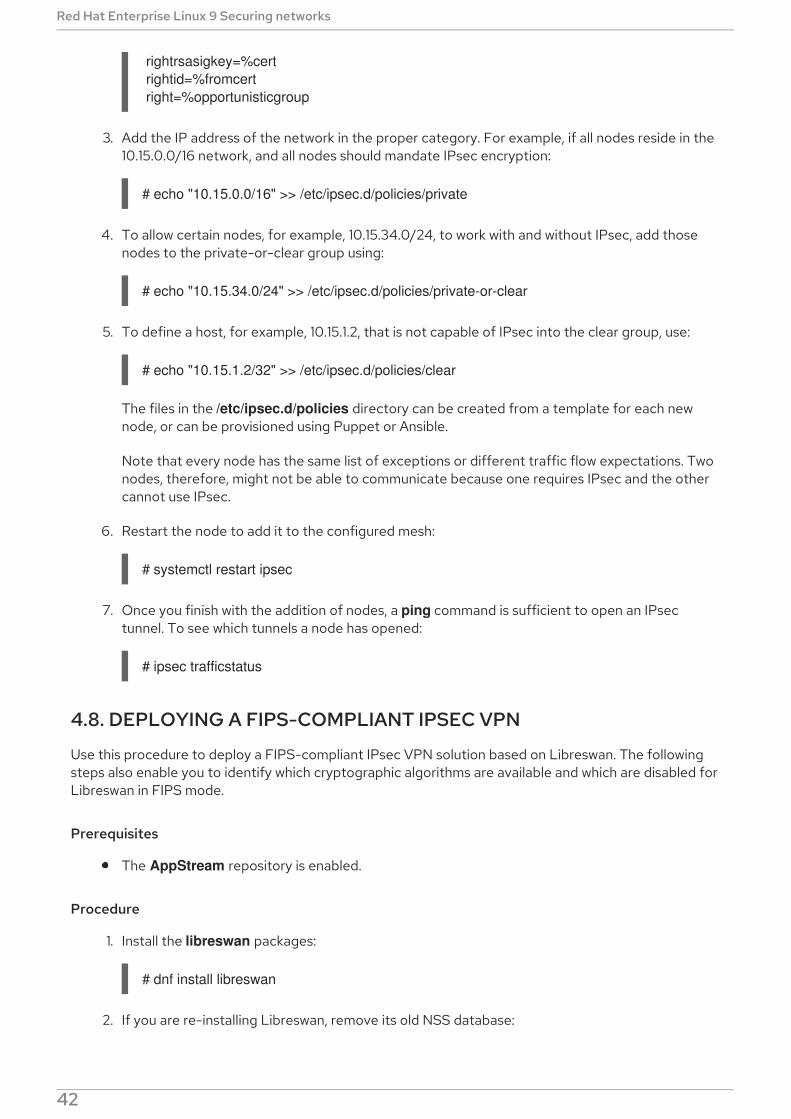
rightrsasigkey=%cert rightid=%fromcert right=%opportunisticgroup
3. Add the IP address of the network in the proper category. For example, if all nodes reside in the10.15.0.0/16 network, and all nodes should mandate IPsec encryption:
# echo "10.15.0.0/16" >> /etc/ipsec.d/policies/private
4. To allow certain nodes, for example, 10.15.34.0/24, to work with and without IPsec, add thosenodes to the private-or-clear group using:
# echo "10.15.34.0/24" >> /etc/ipsec.d/policies/private-or-clear
5. To define a host, for example, 10.15.1.2, that is not capable of IPsec into the clear group, use:
# echo "10.15.1.2/32" >> /etc/ipsec.d/policies/clear
The files in the /etc/ipsec.d/policies directory can be created from a template for each newnode, or can be provisioned using Puppet or Ansible.
Note that every node has the same list of exceptions or different traffic flow expectations. Twonodes, therefore, might not be able to communicate because one requires IPsec and the othercannot use IPsec.
6. Restart the node to add it to the configured mesh:
# systemctl restart ipsec
7. Once you finish with the addition of nodes, a ping command is sufficient to open an IPsectunnel. To see which tunnels a node has opened:
# ipsec trafficstatus
4.8. DEPLOYING A FIPS-COMPLIANT IPSEC VPN
Use this procedure to deploy a FIPS-compliant IPsec VPN solution based on Libreswan. The followingsteps also enable you to identify which cryptographic algorithms are available and which are disabled forLibreswan in FIPS mode.
Prerequisites
The AppStream repository is enabled.
Procedure
1. Install the libreswan packages:
# dnf install libreswan
2. If you are re-installing Libreswan, remove its old NSS database:
Red Hat Enterprise Linux 9 Securing networks
42
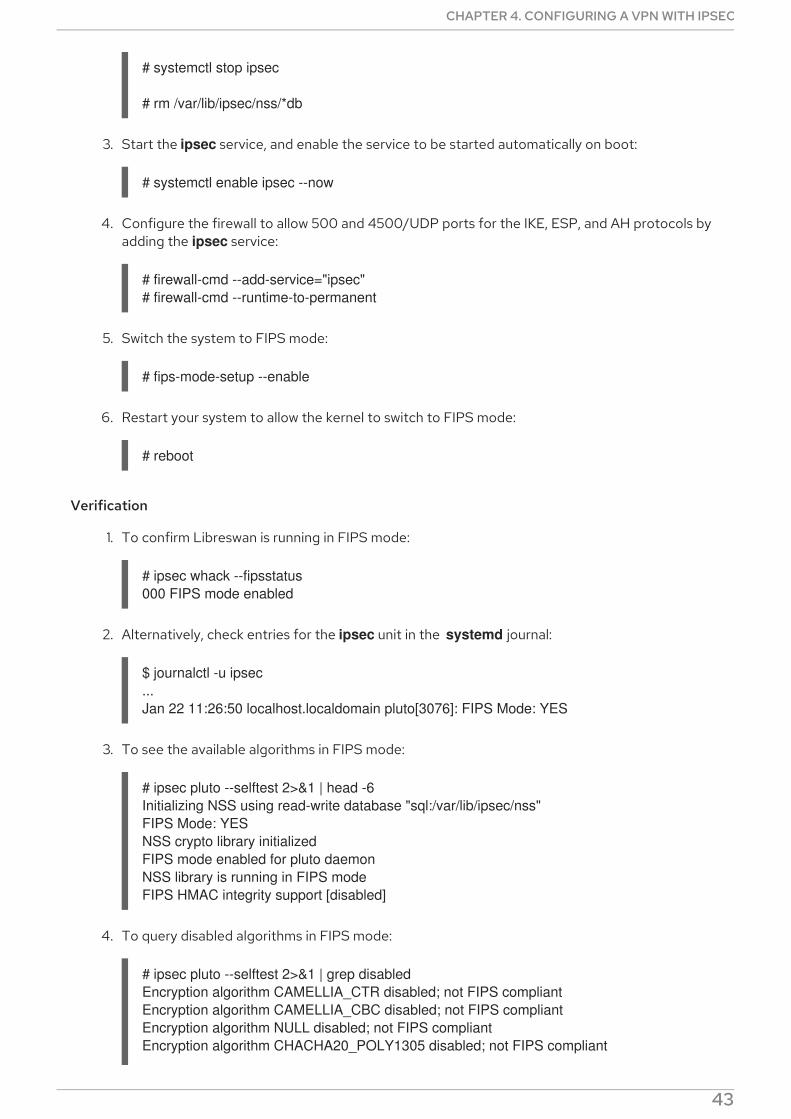
# systemctl stop ipsec
# rm /var/lib/ipsec/nss/*db
3. Start the ipsec service, and enable the service to be started automatically on boot:
# systemctl enable ipsec --now
4. Configure the firewall to allow 500 and 4500/UDP ports for the IKE, ESP, and AH protocols byadding the ipsec service:
# firewall-cmd --add-service="ipsec"# firewall-cmd --runtime-to-permanent
5. Switch the system to FIPS mode:
# fips-mode-setup --enable
6. Restart your system to allow the kernel to switch to FIPS mode:
# reboot
Verification
1. To confirm Libreswan is running in FIPS mode:
# ipsec whack --fipsstatus000 FIPS mode enabled
2. Alternatively, check entries for the ipsec unit in the systemd journal:
$ journalctl -u ipsec...Jan 22 11:26:50 localhost.localdomain pluto[3076]: FIPS Mode: YES
3. To see the available algorithms in FIPS mode:
# ipsec pluto --selftest 2>&1 | head -6Initializing NSS using read-write database "sql:/var/lib/ipsec/nss"FIPS Mode: YESNSS crypto library initializedFIPS mode enabled for pluto daemonNSS library is running in FIPS modeFIPS HMAC integrity support [disabled]
4. To query disabled algorithms in FIPS mode:
# ipsec pluto --selftest 2>&1 | grep disabledEncryption algorithm CAMELLIA_CTR disabled; not FIPS compliantEncryption algorithm CAMELLIA_CBC disabled; not FIPS compliantEncryption algorithm NULL disabled; not FIPS compliantEncryption algorithm CHACHA20_POLY1305 disabled; not FIPS compliant
CHAPTER 4. CONFIGURING A VPN WITH IPSEC
43
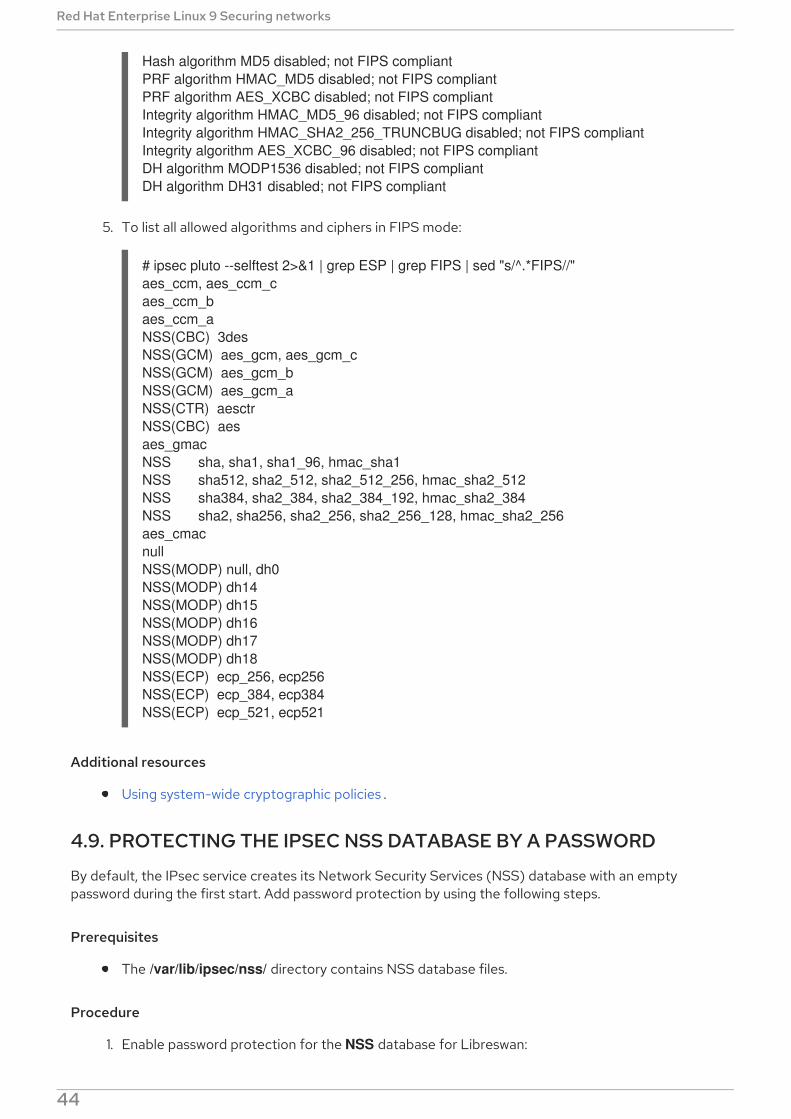
Hash algorithm MD5 disabled; not FIPS compliantPRF algorithm HMAC_MD5 disabled; not FIPS compliantPRF algorithm AES_XCBC disabled; not FIPS compliantIntegrity algorithm HMAC_MD5_96 disabled; not FIPS compliantIntegrity algorithm HMAC_SHA2_256_TRUNCBUG disabled; not FIPS compliantIntegrity algorithm AES_XCBC_96 disabled; not FIPS compliantDH algorithm MODP1536 disabled; not FIPS compliantDH algorithm DH31 disabled; not FIPS compliant
5. To list all allowed algorithms and ciphers in FIPS mode:
# ipsec pluto --selftest 2>&1 | grep ESP | grep FIPS | sed "s/^.*FIPS//"aes_ccm, aes_ccm_caes_ccm_baes_ccm_aNSS(CBC) 3desNSS(GCM) aes_gcm, aes_gcm_cNSS(GCM) aes_gcm_bNSS(GCM) aes_gcm_aNSS(CTR) aesctrNSS(CBC) aesaes_gmacNSS sha, sha1, sha1_96, hmac_sha1NSS sha512, sha2_512, sha2_512_256, hmac_sha2_512NSS sha384, sha2_384, sha2_384_192, hmac_sha2_384NSS sha2, sha256, sha2_256, sha2_256_128, hmac_sha2_256aes_cmacnullNSS(MODP) null, dh0NSS(MODP) dh14NSS(MODP) dh15NSS(MODP) dh16NSS(MODP) dh17NSS(MODP) dh18NSS(ECP) ecp_256, ecp256NSS(ECP) ecp_384, ecp384NSS(ECP) ecp_521, ecp521
Additional resources
Using system-wide cryptographic policies .
4.9. PROTECTING THE IPSEC NSS DATABASE BY A PASSWORD
By default, the IPsec service creates its Network Security Services (NSS) database with an emptypassword during the first start. Add password protection by using the following steps.
Prerequisites
The /var/lib/ipsec/nss/ directory contains NSS database files.
Procedure
1. Enable password protection for the NSS database for Libreswan:
Red Hat Enterprise Linux 9 Securing networks
44
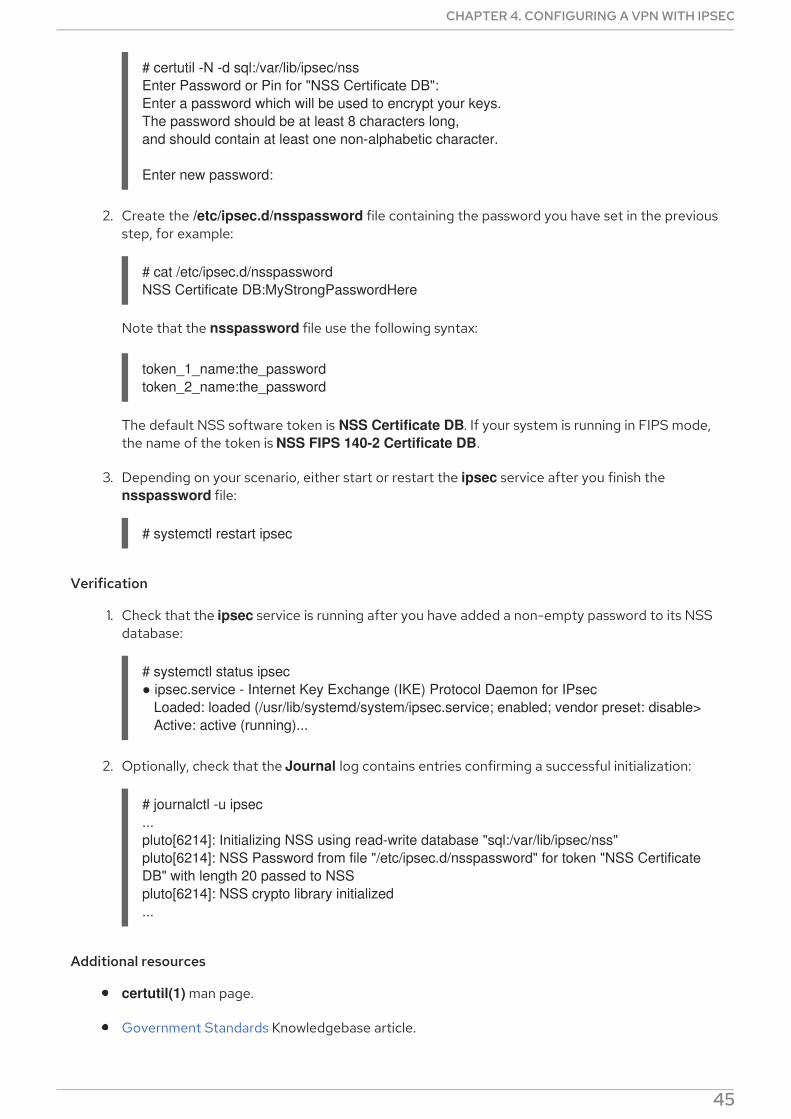
# certutil -N -d sql:/var/lib/ipsec/nssEnter Password or Pin for "NSS Certificate DB":Enter a password which will be used to encrypt your keys.The password should be at least 8 characters long,and should contain at least one non-alphabetic character.
Enter new password:
2. Create the /etc/ipsec.d/nsspassword file containing the password you have set in the previousstep, for example:
# cat /etc/ipsec.d/nsspasswordNSS Certificate DB:MyStrongPasswordHere
Note that the nsspassword file use the following syntax:
token_1_name:the_passwordtoken_2_name:the_password
The default NSS software token is NSS Certificate DB. If your system is running in FIPS mode,the name of the token is NSS FIPS 140-2 Certificate DB.
3. Depending on your scenario, either start or restart the ipsec service after you finish the nsspassword file:
# systemctl restart ipsec
Verification
1. Check that the ipsec service is running after you have added a non-empty password to its NSSdatabase:
# systemctl status ipsec● ipsec.service - Internet Key Exchange (IKE) Protocol Daemon for IPsec Loaded: loaded (/usr/lib/systemd/system/ipsec.service; enabled; vendor preset: disable> Active: active (running)...
2. Optionally, check that the Journal log contains entries confirming a successful initialization:
# journalctl -u ipsec...pluto[6214]: Initializing NSS using read-write database "sql:/var/lib/ipsec/nss"pluto[6214]: NSS Password from file "/etc/ipsec.d/nsspassword" for token "NSS Certificate DB" with length 20 passed to NSSpluto[6214]: NSS crypto library initialized...
Additional resources
certutil(1) man page.
Government Standards Knowledgebase article.
CHAPTER 4. CONFIGURING A VPN WITH IPSEC
45
4.10. CONFIGURING AN IPSEC VPN TO USE TCP
Libreswan supports TCP encapsulation of IKE and IPsec packets as described in RFC 8229. With thisfeature, you can establish IPsec VPNs on networks that prevent traffic transmitted via UDP andEncapsulating Security Payload (ESP). You can configure VPN servers and clients to use TCP either as afallback or as the main VPN transport protocol. Because TCP encapsulation has bigger performancecosts, use TCP as the main VPN protocol only if UDP is permanently blocked in your scenario.
Prerequisites
A remote-access VPN is already configured.
Procedure
1. Add the following option to the /etc/ipsec.conf file in the config setup section:
listen-tcp=yes
2. To use TCP encapsulation as a fallback option when the first attempt over UDP fails, add thefollowing two options to the client’s connection definition:
enable-tcp=fallbacktcp-remoteport=4500
Alternatively, if you know that UDP is permanently blocked, use the following options in theclient’s connection configuration:
enable-tcp=yestcp-remoteport=4500
Additional resources
IETF RFC 8229: TCP Encapsulation of IKE and IPsec Packets .
4.11. CONFIGURING AUTOMATIC DETECTION AND USAGE OF ESPHARDWARE OFFLOAD TO ACCELERATE AN IPSEC CONNECTION
Offloading Encapsulating Security Payload (ESP) to the hardware accelerates IPsec connections overEthernet. By default, Libreswan detects if hardware supports this feature and, as a result, enables ESPhardware offload. This procedure describes how to enable the automatic detection in case that thefeature was disabled or explicitly enabled.
Prerequisites
The network card supports ESP hardware offload.
The network driver supports ESP hardware offload.
The IPsec connection is configured and works.
Procedure
1. Edit the Libreswan configuration file in the /etc/ipsec.d/ directory of the connection that should
Red Hat Enterprise Linux 9 Securing networks
46

1. Edit the Libreswan configuration file in the /etc/ipsec.d/ directory of the connection that shoulduse automatic detection of ESP hardware offload support.
2. Ensure the nic-offload parameter is not set in the connection’s settings.
3. If you removed nic-offload, restart the ipsec service:
# systemctl restart ipsec
Verification
If the network card supports ESP hardware offload support, following these steps to verify the result:
1. Display the tx_ipsec and rx_ipsec counters of the Ethernet device the IPsec connection uses:
# ethtool -S enp1s0 | egrep "_ipsec" tx_ipsec: 10 rx_ipsec: 10
2. Send traffic through the IPsec tunnel. For example, ping a remote IP address:
# ping -c 5 remote_ip_address
3. Display the tx_ipsec and rx_ipsec counters of the Ethernet device again:
# ethtool -S enp1s0 | egrep "_ipsec" tx_ipsec: 15 rx_ipsec: 15
If the counter values have increased, ESP hardware offload works.
Additional resources
Configuring a VPN with IPsec
4.12. CONFIGURING ESP HARDWARE OFFLOAD ON A BOND TOACCELERATE AN IPSEC CONNECTION
Offloading Encapsulating Security Payload (ESP) to the hardware accelerates IPsec connections. If youuse a network bond for fail-over reasons, the requirements and the procedure to configure ESPhardware offload are different from those using a regular Ethernet device. For example, in this scenario,you enable the offload support on the bond, and the kernel applies the settings to the ports of the bond.
Prerequisites
All network cards in the bond support ESP hardware offload.
The network driver supports ESP hardware offload on a bond device. In RHEL, only the ixgbedriver supports this feature.
The bond is configured and works.
The bond uses the active-backup mode. The bonding driver does not support any other modesfor this feature.
CHAPTER 4. CONFIGURING A VPN WITH IPSEC
47

The IPsec connection is configured and works.
Procedure
1. Enable ESP hardware offload support on the network bond:
# nmcli connection modify bond0 ethtool.feature-esp-hw-offload on
This command enables ESP hardware offload support on the bond0 connection.
2. Reactivate the bond0 connection:
# nmcli connection up bond0
3. Edit the Libreswan configuration file in the /etc/ipsec.d/ directory of the connection that shoulduse ESP hardware offload, and append the nic-offload=yes statement to the connection entry:
conn example ... nic-offload=yes
4. Restart the ipsec service:
# systemctl restart ipsec
Verification
1. Display the active port of the bond:
# grep "Currently Active Slave" /proc/net/bonding/bond0Currently Active Slave: enp1s0
2. Display the tx_ipsec and rx_ipsec counters of the active port:
# ethtool -S enp1s0 | egrep "_ipsec" tx_ipsec: 10 rx_ipsec: 10
3. Send traffic through the IPsec tunnel. For example, ping a remote IP address:
# ping -c 5 remote_ip_address
4. Display the tx_ipsec and rx_ipsec counters of the active port again:
# ethtool -S enp1s0 | egrep "_ipsec" tx_ipsec: 15 rx_ipsec: 15
If the counter values have increased, ESP hardware offload works.
Additional resources
Red Hat Enterprise Linux 9 Securing networks
48

Configuring network bonding
The Configuring a VPN with IPsec section in the Securing networks documentation
Configuring a VPN with IPsec chapter in the Securing networks document.
4.13. CONFIGURING IPSEC CONNECTIONS THAT OPT OUT OF THESYSTEM-WIDE CRYPTO POLICIES
Overriding system-wide crypto-policies for a connection
The RHEL system-wide cryptographic policies create a special connection called %default. Thisconnection contains the default values for the ikev2, esp, and ike options. However, you can overridethe default values by specifying the mentioned option in the connection configuration file.
For example, the following configuration allows connections that use IKEv1 with AES and SHA-1 or SHA-2, and IPsec (ESP) with either AES-GCM or AES-CBC:
conn MyExample ... ikev2=never ike=aes-sha2,aes-sha1;modp2048 esp=aes_gcm,aes-sha2,aes-sha1 ...
Note that AES-GCM is available for IPsec (ESP) and for IKEv2, but not for IKEv1.
Disabling system-wide crypto policies for all connections
To disable system-wide crypto policies for all IPsec connections, comment out the following line in the /etc/ipsec.conf file:
include /etc/crypto-policies/back-ends/libreswan.config
Then add the ikev2=never option to your connection configuration file.
Additional resources
Using system-wide cryptographic policies .
4.14. TROUBLESHOOTING IPSEC VPN CONFIGURATIONS
Problems related to IPsec VPN configurations most commonly occur due to several main reasons. If youare encountering such problems, you can check if the cause of the problem corresponds to any of thefollowing scenarios, and apply the corresponding solution.
Basic connection troubleshooting
Most problems with VPN connections occur in new deployments, where administrators configuredendpoints with mismatched configuration options. Also, a working configuration can suddenly stopworking, often due to newly introduced incompatible values. This could be the result of an administratorchanging the configuration. Alternatively, an administrator may have installed a firmware update or apackage update with different default values for certain options, such as encryption algorithms.
CHAPTER 4. CONFIGURING A VPN WITH IPSEC
49

To confirm that an IPsec VPN connection is established:
# ipsec trafficstatus006 #8: "vpn.example.com"[1] 192.0.2.1, type=ESP, add_time=1595296930, inBytes=5999, outBytes=3231, id='@vpn.example.com', lease=100.64.13.5/32
If the output is empty or does not show an entry with the connection name, the tunnel is broken.
To check that the problem is in the connection:
1. Reload the vpn.example.com connection:
# ipsec auto --add vpn.example.com002 added connection description "vpn.example.com"
2. Next, initiate the VPN connection:
# ipsec auto --up vpn.example.com
Firewall-related problems
The most common problem is that a firewall on one of the IPsec endpoints or on a router between theendpoints is dropping all Internet Key Exchange (IKE) packets.
For IKEv2, an output similar to the following example indicates a problem with a firewall:
# ipsec auto --up vpn.example.com181 "vpn.example.com"[1] 192.0.2.2 #15: initiating IKEv2 IKE SA181 "vpn.example.com"[1] 192.0.2.2 #15: STATE_PARENT_I1: sent v2I1, expected v2R1010 "vpn.example.com"[1] 192.0.2.2 #15: STATE_PARENT_I1: retransmission; will wait 0.5 seconds for response010 "vpn.example.com"[1] 192.0.2.2 #15: STATE_PARENT_I1: retransmission; will wait 1 seconds for response010 "vpn.example.com"[1] 192.0.2.2 #15: STATE_PARENT_I1: retransmission; will wait 2 seconds for...
For IKEv1, the output of the initiating command looks like:
# ipsec auto --up vpn.example.com002 "vpn.example.com" #9: initiating Main Mode102 "vpn.example.com" #9: STATE_MAIN_I1: sent MI1, expecting MR1010 "vpn.example.com" #9: STATE_MAIN_I1: retransmission; will wait 0.5 seconds for response010 "vpn.example.com" #9: STATE_MAIN_I1: retransmission; will wait 1 seconds for response010 "vpn.example.com" #9: STATE_MAIN_I1: retransmission; will wait 2 seconds for response...
Because the IKE protocol, which is used to set up IPsec, is encrypted, you can troubleshoot only a limitedsubset of problems using the tcpdump tool. If a firewall is dropping IKE or IPsec packets, you can try tofind the cause using the tcpdump utility. However, tcpdump cannot diagnose other problems with IPsecVPN connections.
Red Hat Enterprise Linux 9 Securing networks
50
To capture the negotiation of the VPN and all encrypted data on the eth0 interface:
# tcpdump -i eth0 -n -n esp or udp port 500 or udp port 4500 or tcp port 4500
Mismatched algorithms, protocols, and policies
VPN connections require that the endpoints have matching IKE algorithms, IPsec algorithms, and IPaddress ranges. If a mismatch occurs, the connection fails. If you identify a mismatch by using one of thefollowing methods, fix it by aligning algorithms, protocols, or policies.
If the remote endpoint is not running IKE/IPsec, you can see an ICMP packet indicating it. Forexample:
# ipsec auto --up vpn.example.com...000 "vpn.example.com"[1] 192.0.2.2 #16: ERROR: asynchronous network error report on wlp2s0 (192.0.2.2:500), complainant 198.51.100.1: Connection refused [errno 111, origin ICMP type 3 code 3 (not authenticated)]...
Example of mismatched IKE algorithms:
# ipsec auto --up vpn.example.com...003 "vpn.example.com"[1] 193.110.157.148 #3: dropping unexpected IKE_SA_INIT message containing NO_PROPOSAL_CHOSEN notification; message payloads: N; missing payloads: SA,KE,Ni
Example of mismatched IPsec algorithms:
# ipsec auto --up vpn.example.com...182 "vpn.example.com"[1] 193.110.157.148 #5: STATE_PARENT_I2: sent v2I2, expected v2R2 {auth=IKEv2 cipher=AES_GCM_16_256 integ=n/a prf=HMAC_SHA2_256 group=MODP2048}002 "vpn.example.com"[1] 193.110.157.148 #6: IKE_AUTH response contained the error notification NO_PROPOSAL_CHOSEN
A mismatched IKE version could also result in the remote endpoint dropping the requestwithout a response. This looks identical to a firewall dropping all IKE packets.
Example of mismatched IP address ranges for IKEv2 (called Traffic Selectors - TS):
# ipsec auto --up vpn.example.com...1v2 "vpn.example.com" #1: STATE_PARENT_I2: sent v2I2, expected v2R2 {auth=IKEv2 cipher=AES_GCM_16_256 integ=n/a prf=HMAC_SHA2_512 group=MODP2048}002 "vpn.example.com" #2: IKE_AUTH response contained the error notification TS_UNACCEPTABLE
Example of mismatched IP address ranges for IKEv1:
# ipsec auto --up vpn.example.com...
CHAPTER 4. CONFIGURING A VPN WITH IPSEC
51

031 "vpn.example.com" #2: STATE_QUICK_I1: 60 second timeout exceeded after 0 retransmits. No acceptable response to our first Quick Mode message: perhaps peer likes no proposal
When using PreSharedKeys (PSK) in IKEv1, if both sides do not put in the same PSK, the entireIKE message becomes unreadable:
# ipsec auto --up vpn.example.com...003 "vpn.example.com" #1: received Hash Payload does not match computed value223 "vpn.example.com" #1: sending notification INVALID_HASH_INFORMATION to 192.0.2.23:500
In IKEv2, the mismatched-PSK error results in an AUTHENTICATION_FAILED message:
# ipsec auto --up vpn.example.com...002 "vpn.example.com" #1: IKE SA authentication request rejected by peer: AUTHENTICATION_FAILED
Maximum transmission unit
Other than firewalls blocking IKE or IPsec packets, the most common cause of networking problemsrelates to an increased packet size of encrypted packets. Network hardware fragments packets largerthan the maximum transmission unit (MTU), for example, 1500 bytes. Often, the fragments are lost andthe packets fail to re-assemble. This leads to intermittent failures, when a ping test, which uses small-sized packets, works but other traffic fails. In this case, you can establish an SSH session but the terminalfreezes as soon as you use it, for example, by entering the 'ls -al /usr' command on the remote host.
To work around the problem, reduce MTU size by adding the mtu=1400 option to the tunnelconfiguration file.
Alternatively, for TCP connections, enable an iptables rule that changes the MSS value:
# iptables -I FORWARD -p tcp --tcp-flags SYN,RST SYN -j TCPMSS --clamp-mss-to-pmtu
If the previous command does not solve the problem in your scenario, directly specify a lower size in the set-mss parameter:
# iptables -I FORWARD -p tcp --tcp-flags SYN,RST SYN -j TCPMSS --set-mss 1380
Network address translation (NAT)
When an IPsec host also serves as a NAT router, it could accidentally remap packets. The followingexample configuration demonstrates the problem:
conn myvpn left=172.16.0.1 leftsubnet=10.0.2.0/24 right=172.16.0.2 rightsubnet=192.168.0.0/16…
The system with address 172.16.0.1 have a NAT rule:
Red Hat Enterprise Linux 9 Securing networks
52
iptables -t nat -I POSTROUTING -o eth0 -j MASQUERADE
If the system on address 10.0.2.33 sends a packet to 192.168.0.1, then the router translates the source10.0.2.33 to 172.16.0.1 before it applies the IPsec encryption.
Then, the packet with the source address 10.0.2.33 no longer matches the conn myvpn configuration,and IPsec does not encrypt this packet.
To solve this problem, insert rules that exclude NAT for target IPsec subnet ranges on the router, in thisexample:
iptables -t nat -I POSTROUTING -s 10.0.2.0/24 -d 192.168.0.0/16 -j RETURN
Kernel IPsec subsystem bugs
The kernel IPsec subsystem might fail, for example, when a bug causes a desynchronizing of the IKE userspace and the IPsec kernel. To check for such problems:
$ cat /proc/net/xfrm_statXfrmInError 0XfrmInBufferError 0...
Any non-zero value in the output of the previous command indicates a problem. If you encounter thisproblem, open a new support case, and attach the output of the previous command along with thecorresponding IKE logs.
Libreswan logs
Libreswan logs using the syslog protocol by default. You can use the journalctl command to find logentries related to IPsec. Because the corresponding entries to the log are sent by the pluto IKE daemon,search for the “pluto” keyword, for example:
$ journalctl -b | grep pluto
To show a live log for the ipsec service:
$ journalctl -f -u ipsec
If the default level of logging does not reveal your configuration problem, enable debug logs by addingthe plutodebug=all option to the config setup section in the /etc/ipsec.conf file.
Note that debug logging produces a lot of entries, and it is possible that either the journald or syslogdservice rate-limits the syslog messages. To ensure you have complete logs, redirect the logging to afile. Edit the /etc/ipsec.conf, and add the logfile=/var/log/pluto.log in the config setup section.
Additional resources
Troubleshooting problems using log files .
tcpdump(8) and ipsec.conf(5) man pages.
Using and configuring firewalld
CHAPTER 4. CONFIGURING A VPN WITH IPSEC
53

4.15. ADDITIONAL RESOURCES
ipsec(8), ipsec.conf(5), ipsec.secrets(5), ipsec_auto(8), and ipsec_rsasigkey(8) man pages.
/usr/share/doc/libreswan-version/ directory.
The website of the upstream project .
The Libreswan Project Wiki .
All Libreswan man pages .
NIST Special Publication 800-77: Guide to IPsec VPNs .
Red Hat Enterprise Linux 9 Securing networks
54
CHAPTER 5. CONFIGURING VPN CONNECTIONS WITH IPSECBY USING THE VPN RHEL SYSTEM ROLE
With the VPN System Role, you can configure VPN connections on RHEL systems by using Red HatAnsible Automation Platform. You can use it to set up host-to-host, network-to-network, VPN RemoteAccess Server, and mesh configurations.
For host-to-host connections, the role sets up a VPN tunnel between each pair of hosts in the list of vpn_connections using the default parameters, including generating keys as needed. Alternatively, youcan configure it to create an opportunistic mesh configuration between all hosts listed. The role assumesthat the names of the hosts under hosts are the same as the names of the hosts used in the Ansibleinventory, and that you can use those names to configure the tunnels.
NOTE
The VPN RHEL System Role currently supports only Libreswan, which is an IPsecimplementation, as the VPN provider.
5.1. CREATING A HOST-TO-HOST VPN WITH IPSEC USING THE VPNSYSTEM ROLE
You can use the VPN System Role to configure host-to-host connections by running an Ansibleplaybook on the control node, which will configure all the managed nodes listed in an inventory file.
Prerequisites
Access and permissions to one or more managed nodes, which are systems you want toconfigure with the VPN System Role.
Access and permissions to a control node, which is a system from which Red Hat Ansible Coreconfigures other systems.On the control node:
The ansible-core and rhel-system-roles packages are installed.
IMPORTANT
RHEL 8.0-8.5 provided access to a separate Ansible repository that contains AnsibleEngine 2.9 for automation based on Ansible. Ansible Engine contains command-lineutilities such as ansible, ansible-playbook, connectors such as docker and podman, andmany plugins and modules. For information on how to obtain and install Ansible Engine,see the How to download and install Red Hat Ansible Engine Knowledgebase article.
RHEL 8.6 and 9.0 have introduced Ansible Core (provided as the ansible-core package),which contains the Ansible command-line utilities, commands, and a small set of built-inAnsible plugins. RHEL provides this package through the AppStream repository, and ithas a limited scope of support. For more information, see the Scope of support for theAnsible Core package included in the RHEL 9 and RHEL 8.6 and later AppStreamrepositories Knowledgebase article.
An inventory file which lists the managed nodes.
Procedure
CHAPTER 5. CONFIGURING VPN CONNECTIONS WITH IPSEC BY USING THE VPN RHEL SYSTEM ROLE
55
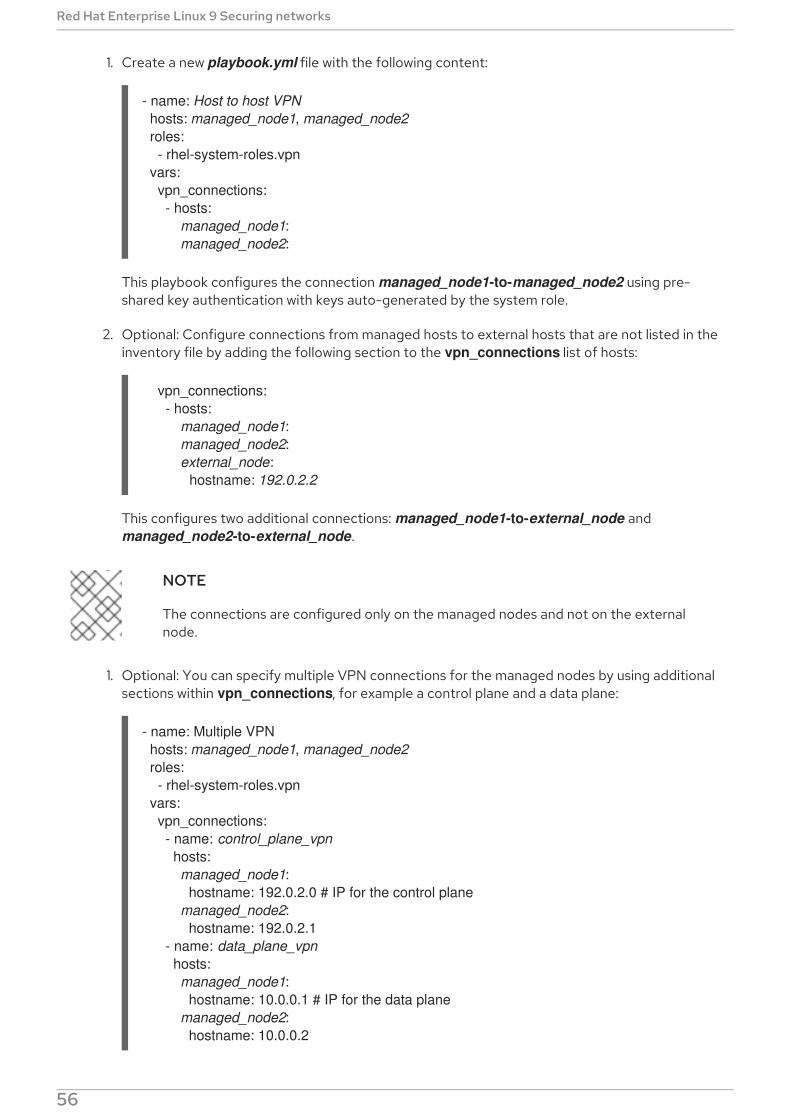
1. Create a new playbook.yml file with the following content:
- name: Host to host VPN hosts: managed_node1, managed_node2 roles: - rhel-system-roles.vpn vars: vpn_connections: - hosts: managed_node1: managed_node2:
This playbook configures the connection managed_node1-to-managed_node2 using pre-shared key authentication with keys auto-generated by the system role.
2. Optional: Configure connections from managed hosts to external hosts that are not listed in theinventory file by adding the following section to the vpn_connections list of hosts:
vpn_connections: - hosts: managed_node1: managed_node2: external_node: hostname: 192.0.2.2
This configures two additional connections: managed_node1-to-external_node and managed_node2-to-external_node.
NOTE
The connections are configured only on the managed nodes and not on the externalnode.
1. Optional: You can specify multiple VPN connections for the managed nodes by using additionalsections within vpn_connections, for example a control plane and a data plane:
- name: Multiple VPN hosts: managed_node1, managed_node2 roles: - rhel-system-roles.vpn vars: vpn_connections: - name: control_plane_vpn hosts: managed_node1: hostname: 192.0.2.0 # IP for the control plane managed_node2: hostname: 192.0.2.1 - name: data_plane_vpn hosts: managed_node1: hostname: 10.0.0.1 # IP for the data plane managed_node2: hostname: 10.0.0.2
Red Hat Enterprise Linux 9 Securing networks
56

2. Optional: You can modify the variables according to your preferences. For more details, see the /usr/share/doc/rhel-system-roles/vpn/README.md file.
3. Optional: Verify playbook syntax.
# ansible-playbook --syntax-check /path/to/file/playbook.yml -i /path/to/file/inventory_file
4. Run the playbook on your inventory file:
# ansible-playbook -i /path/to/file/inventory_file /path/to/file/playbook.yml
Verification
1. On the managed nodes, confirm that the connection is successfully loaded:
# ipsec status | grep connection.name
Replace connection.name with the name of the connection from this node, for example managed_node1-to-managed_node2.
NOTE
By default, the role generates a descriptive name for each connection it creates from theperspective of each system. For example, when creating a connection between managed_node1 and managed_node2, the descriptive name of this connection on managed_node1 is managed_node1-to-managed_node2 but on managed_node2 theconnection is named managed_node2-to-managed_node1.
1. On the managed nodes, confirm that the connection is successfully started:
# ipsec trafficstatus | grep connection.name
2. Optional: If a connection did not successfully load, manually add the connection by entering thefollowing command. This will provide more specific information indicating why the connectionfailed to establish:
# ipsec auto --add connection.name
NOTE
Any errors that may have occurred during the process of loading and starting theconnection are reported in the logs, which can be found in /var/log/pluto.log.Because these logs are hard to parse, try to manually add the connection toobtain log messages from the standard output instead.
5.2. CREATING AN OPPORTUNISTIC MESH VPN CONNECTION WITHIPSEC BY USING THE VPN SYSTEM ROLE
You can use the VPN System Role to configure an opportunistic mesh VPN connection that usescertificates for authentication by running an Ansible playbook on the control node, which will configureall the managed nodes listed in an inventory file.
CHAPTER 5. CONFIGURING VPN CONNECTIONS WITH IPSEC BY USING THE VPN RHEL SYSTEM ROLE
57
Authentication with certificates is configured by defining the auth_method: cert parameter in theplaybook. The VPN System Role assumes that the IPsec Network Security Services (NSS) crypto library,which is defined in the /etc/ipsec.d directory, contains the necessary certificates. By default, the nodename is used as the certificate nickname. In this example, this is managed_node1. You can definedifferent certificate names by using the cert_name attribute in your inventory.
In the following example procedure, the control node, which is the system from which you will run theAnsible playbook, shares the same classless inter-domain routing (CIDR) number as both of themanaged nodes (192.0.2.0/24) and has the IP address 192.0.2.7. Therefore, the control node falls underthe private policy which is automatically created for CIDR 192.0.2.0/24.
To prevent SSH connection loss during the play, a clear policy for the control node is included in the listof policies. Note that there is also an item in the policies list where the CIDR is equal to default. This isbecause this playbook overrides the rule from the default policy to make it private instead of private-or-clear.
Prerequisites
Access and permissions to one or more managed nodes, which are systems you want toconfigure with the VPN System Role.
On all the managed nodes, the NSS database in the /etc/ipsec.d directory contains all thecertificates necessary for peer authentication. By default, the node name is used as thecertificate nickname.
Access and permissions to a control node, which is a system from which Red Hat Ansible Coreconfigures other systems.On the control node:
The ansible-core and rhel-system-roles packages are installed.
IMPORTANT
RHEL 8.0-8.5 provided access to a separate Ansible repository that contains AnsibleEngine 2.9 for automation based on Ansible. Ansible Engine contains command-lineutilities such as ansible, ansible-playbook, connectors such as docker and podman, andmany plugins and modules. For information on how to obtain and install Ansible Engine,see the How to download and install Red Hat Ansible Engine Knowledgebase article.
RHEL 8.6 and 9.0 have introduced Ansible Core (provided as the ansible-core package),which contains the Ansible command-line utilities, commands, and a small set of built-inAnsible plugins. RHEL provides this package through the AppStream repository, and ithas a limited scope of support. For more information, see the Scope of support for theAnsible Core package included in the RHEL 9 and RHEL 8.6 and later AppStreamrepositories Knowledgebase article.
An inventory file which lists the managed nodes.
Procedure
1. Create a new playbook.yml file with the following content:
- name: Mesh VPN hosts: managed_node1, managed_node2, managed_node3 roles:
Red Hat Enterprise Linux 9 Securing networks
58
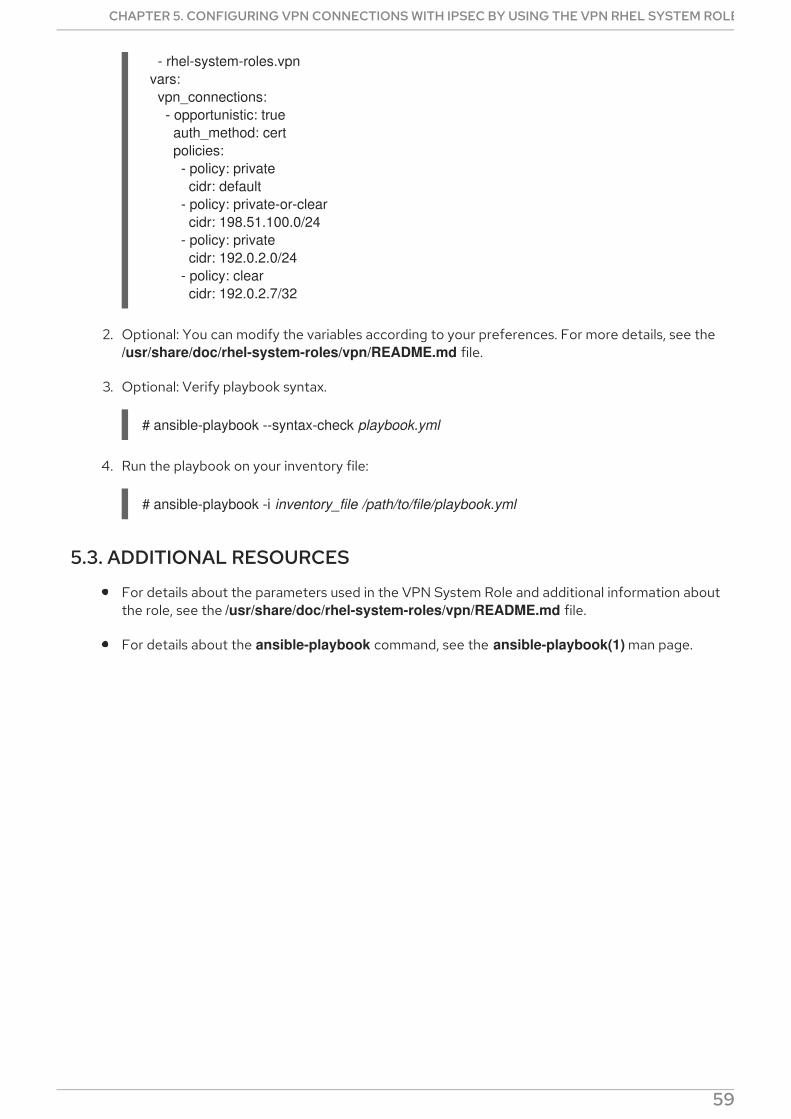
- rhel-system-roles.vpn vars: vpn_connections: - opportunistic: true auth_method: cert policies: - policy: private cidr: default - policy: private-or-clear cidr: 198.51.100.0/24 - policy: private cidr: 192.0.2.0/24 - policy: clear cidr: 192.0.2.7/32
2. Optional: You can modify the variables according to your preferences. For more details, see the /usr/share/doc/rhel-system-roles/vpn/README.md file.
3. Optional: Verify playbook syntax.
# ansible-playbook --syntax-check playbook.yml
4. Run the playbook on your inventory file:
# ansible-playbook -i inventory_file /path/to/file/playbook.yml
5.3. ADDITIONAL RESOURCES
For details about the parameters used in the VPN System Role and additional information aboutthe role, see the /usr/share/doc/rhel-system-roles/vpn/README.md file.
For details about the ansible-playbook command, see the ansible-playbook(1) man page.
CHAPTER 5. CONFIGURING VPN CONNECTIONS WITH IPSEC BY USING THE VPN RHEL SYSTEM ROLE
59
CHAPTER 6. SECURING NETWORK SERVICESRed Hat Enterprise Linux 9 supports many different types of network servers. Their network servicescan expose the system security to risks of various types of attacks, such as denial of service attacks(DoS), distributed denial of service attacks (DDoS), script vulnerability attacks, and buffer overflowattacks.
To increase the system security against attacks, it is important to monitor active network services thatyou use. For example, when a network service is running on a machine, its daemon listens forconnections on network ports, and this can reduce the security. To limit exposure to attacks over thenetwork, all services that are unused should be turned off.
6.1. SECURING THE RPCBIND SERVICE
The rpcbind service is a dynamic port-assignment daemon for remote procedure calls (RPC) servicessuch as Network Information Service (NIS) and Network File System (NFS). Because it has weakauthentication mechanisms and can assign a wide range of ports for the services it controls, it isimportant to secure rpcbind.
You can secure rpcbind by restricting access to all networks and defining specific exceptions usingfirewall rules on the server.
NOTE
The rpcbind service is required on NFSv3 servers.
NFSv4 does not require the rpcbind service to listen on the network.
Prerequisites
The rpcbind package is installed.
The firewalld package is installed and the service is running.
Procedure
1. Add firewall rules, for example:
Limit TCP connection and accept packages only from the 192.168.0.0/24 host via the 111port:
# firewall-cmd --add-rich-rule='rule family="ipv4" port port="111" protocol="tcp" source address="192.168.0.0/24" invert="True" drop'
Limit TCP connection and accept packages only from local host via the 111 port:
# firewall-cmd --add-rich-rule='rule family="ipv4" port port="111" protocol="tcp" source address="127.0.0.1" accept'
Limit UDP connection and accept packages only from the 192.168.0.0/24 host via the 111port:
# firewall-cmd --permanent --add-rich-rule='rule family="ipv4" port port="111" protocol="udp" source address="192.168.0.0/24" invert="True" drop'
To make the firewall settings permanent, use the --permanent option when adding firewall
Red Hat Enterprise Linux 9 Securing networks
60
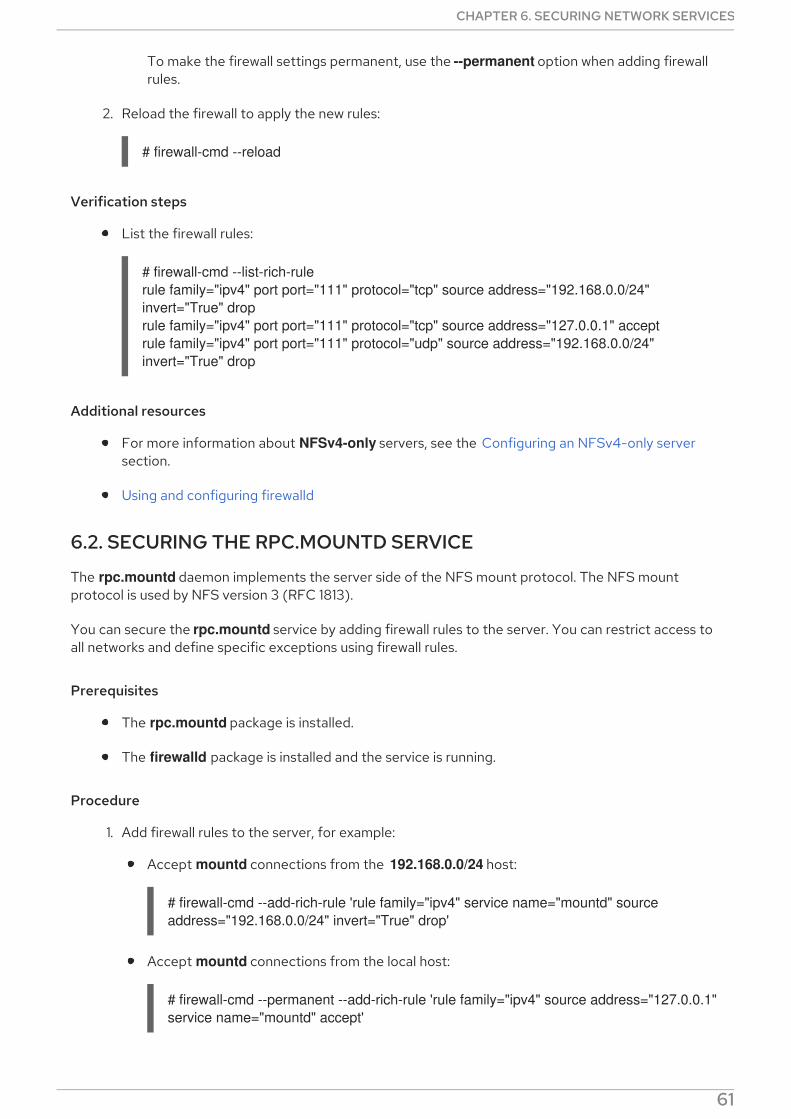
To make the firewall settings permanent, use the --permanent option when adding firewallrules.
2. Reload the firewall to apply the new rules:
# firewall-cmd --reload
Verification steps
List the firewall rules:
# firewall-cmd --list-rich-rulerule family="ipv4" port port="111" protocol="tcp" source address="192.168.0.0/24" invert="True" droprule family="ipv4" port port="111" protocol="tcp" source address="127.0.0.1" acceptrule family="ipv4" port port="111" protocol="udp" source address="192.168.0.0/24" invert="True" drop
Additional resources
For more information about NFSv4-only servers, see the Configuring an NFSv4-only serversection.
Using and configuring firewalld
6.2. SECURING THE RPC.MOUNTD SERVICE
The rpc.mountd daemon implements the server side of the NFS mount protocol. The NFS mountprotocol is used by NFS version 3 (RFC 1813).
You can secure the rpc.mountd service by adding firewall rules to the server. You can restrict access toall networks and define specific exceptions using firewall rules.
Prerequisites
The rpc.mountd package is installed.
The firewalld package is installed and the service is running.
Procedure
1. Add firewall rules to the server, for example:
Accept mountd connections from the 192.168.0.0/24 host:
# firewall-cmd --add-rich-rule 'rule family="ipv4" service name="mountd" source address="192.168.0.0/24" invert="True" drop'
Accept mountd connections from the local host:
# firewall-cmd --permanent --add-rich-rule 'rule family="ipv4" source address="127.0.0.1" service name="mountd" accept'
To make the firewall settings permanent, use the --permanent option when adding firewall
CHAPTER 6. SECURING NETWORK SERVICES
61
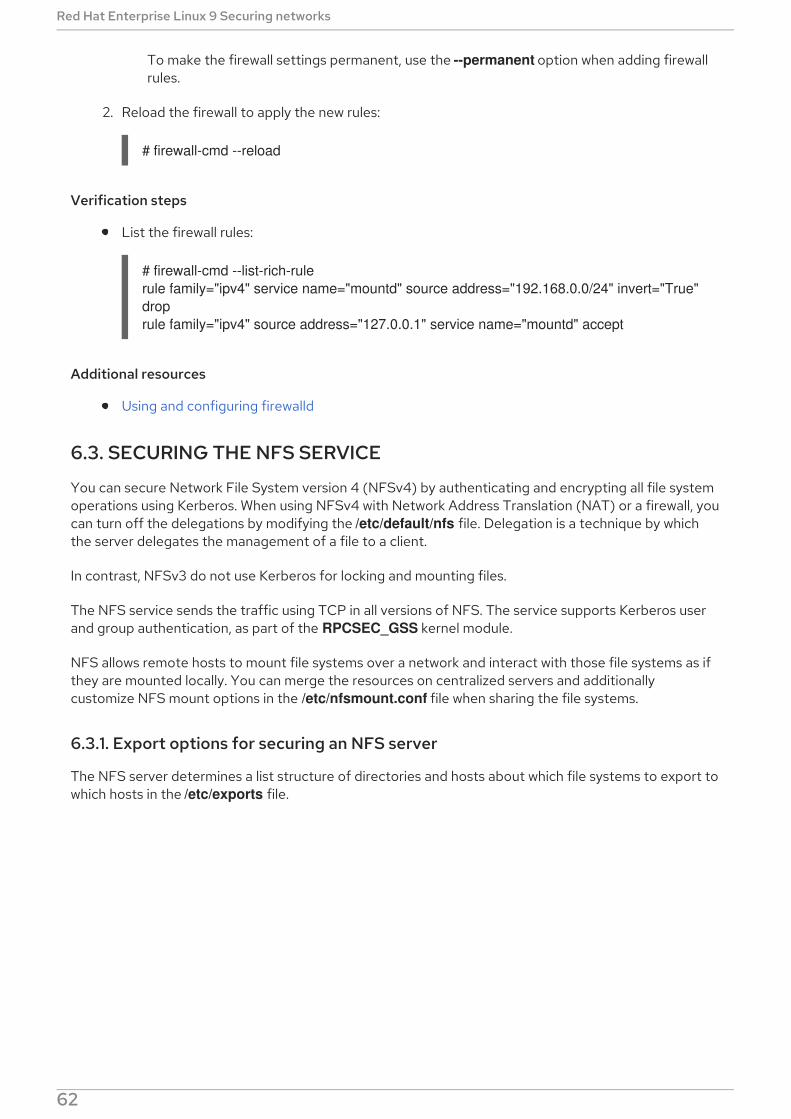
To make the firewall settings permanent, use the --permanent option when adding firewallrules.
2. Reload the firewall to apply the new rules:
# firewall-cmd --reload
Verification steps
List the firewall rules:
# firewall-cmd --list-rich-rulerule family="ipv4" service name="mountd" source address="192.168.0.0/24" invert="True" droprule family="ipv4" source address="127.0.0.1" service name="mountd" accept
Additional resources
Using and configuring firewalld
6.3. SECURING THE NFS SERVICE
You can secure Network File System version 4 (NFSv4) by authenticating and encrypting all file systemoperations using Kerberos. When using NFSv4 with Network Address Translation (NAT) or a firewall, youcan turn off the delegations by modifying the /etc/default/nfs file. Delegation is a technique by whichthe server delegates the management of a file to a client.
In contrast, NFSv3 do not use Kerberos for locking and mounting files.
The NFS service sends the traffic using TCP in all versions of NFS. The service supports Kerberos userand group authentication, as part of the RPCSEC_GSS kernel module.
NFS allows remote hosts to mount file systems over a network and interact with those file systems as ifthey are mounted locally. You can merge the resources on centralized servers and additionallycustomize NFS mount options in the /etc/nfsmount.conf file when sharing the file systems.
6.3.1. Export options for securing an NFS server
The NFS server determines a list structure of directories and hosts about which file systems to export towhich hosts in the /etc/exports file.
Red Hat Enterprise Linux 9 Securing networks
62
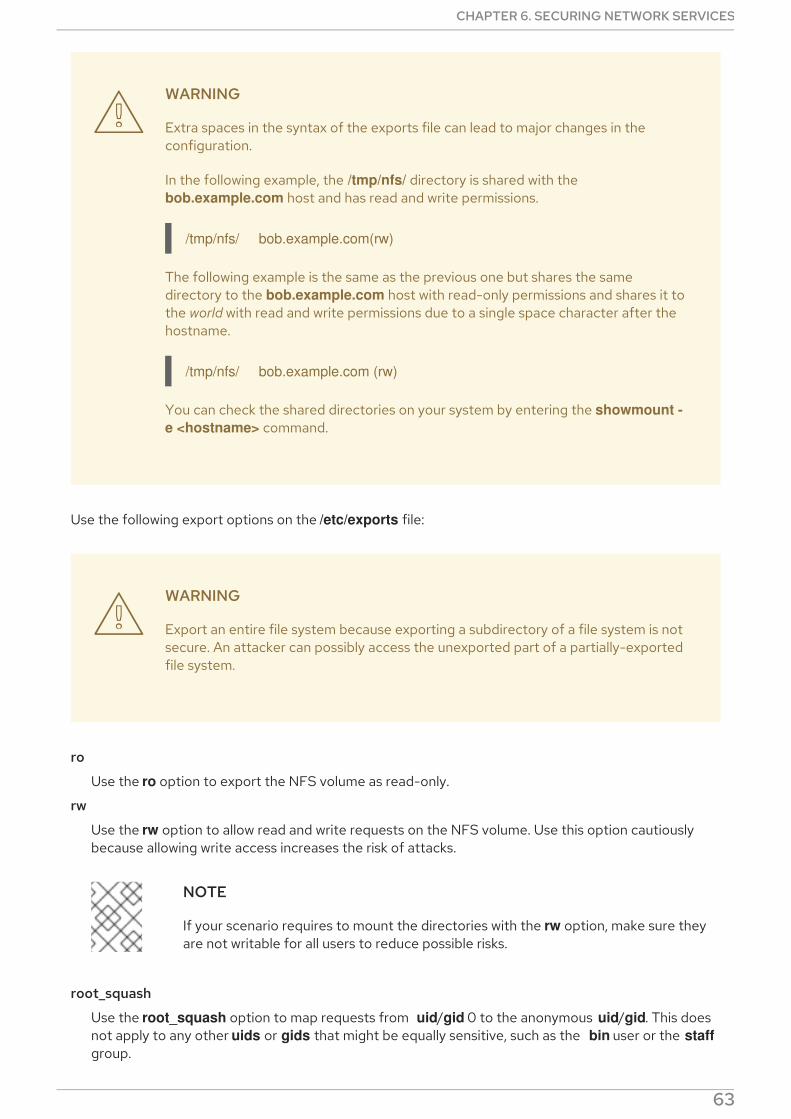
WARNING
Extra spaces in the syntax of the exports file can lead to major changes in theconfiguration.
In the following example, the /tmp/nfs/ directory is shared with the bob.example.com host and has read and write permissions.
/tmp/nfs/ bob.example.com(rw)
The following example is the same as the previous one but shares the samedirectory to the bob.example.com host with read-only permissions and shares it tothe world with read and write permissions due to a single space character after thehostname.
/tmp/nfs/ bob.example.com (rw)
You can check the shared directories on your system by entering the showmount -e <hostname> command.
Use the following export options on the /etc/exports file:
WARNING
Export an entire file system because exporting a subdirectory of a file system is notsecure. An attacker can possibly access the unexported part of a partially-exportedfile system.
ro
Use the ro option to export the NFS volume as read-only.
rw
Use the rw option to allow read and write requests on the NFS volume. Use this option cautiouslybecause allowing write access increases the risk of attacks.
NOTE
If your scenario requires to mount the directories with the rw option, make sure theyare not writable for all users to reduce possible risks.
root_squash
Use the root_squash option to map requests from uid/gid 0 to the anonymous uid/gid. This doesnot apply to any other uids or gids that might be equally sensitive, such as the bin user or the staffgroup.
CHAPTER 6. SECURING NETWORK SERVICES
63
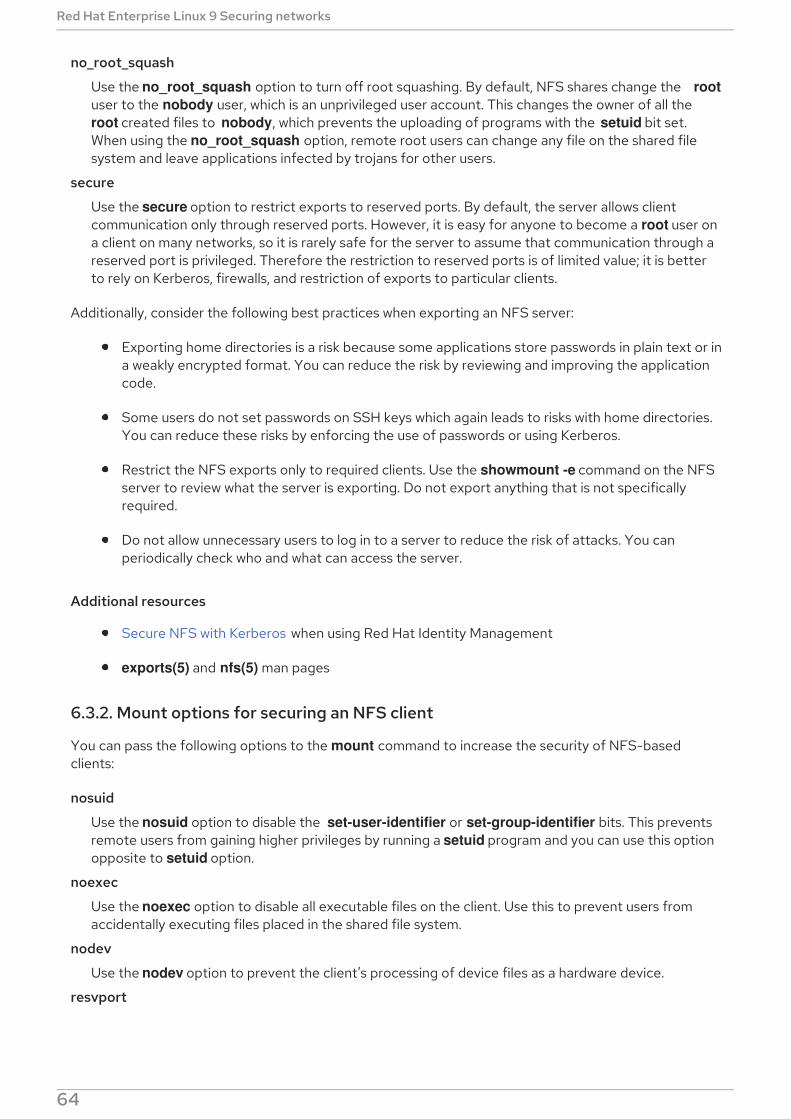
no_root_squash
Use the no_root_squash option to turn off root squashing. By default, NFS shares change the rootuser to the nobody user, which is an unprivileged user account. This changes the owner of all the root created files to nobody, which prevents the uploading of programs with the setuid bit set.When using the no_root_squash option, remote root users can change any file on the shared filesystem and leave applications infected by trojans for other users.
secure
Use the secure option to restrict exports to reserved ports. By default, the server allows clientcommunication only through reserved ports. However, it is easy for anyone to become a root user ona client on many networks, so it is rarely safe for the server to assume that communication through areserved port is privileged. Therefore the restriction to reserved ports is of limited value; it is betterto rely on Kerberos, firewalls, and restriction of exports to particular clients.
Additionally, consider the following best practices when exporting an NFS server:
Exporting home directories is a risk because some applications store passwords in plain text or ina weakly encrypted format. You can reduce the risk by reviewing and improving the applicationcode.
Some users do not set passwords on SSH keys which again leads to risks with home directories.You can reduce these risks by enforcing the use of passwords or using Kerberos.
Restrict the NFS exports only to required clients. Use the showmount -e command on the NFSserver to review what the server is exporting. Do not export anything that is not specificallyrequired.
Do not allow unnecessary users to log in to a server to reduce the risk of attacks. You canperiodically check who and what can access the server.
Additional resources
Secure NFS with Kerberos when using Red Hat Identity Management
exports(5) and nfs(5) man pages
6.3.2. Mount options for securing an NFS client
You can pass the following options to the mount command to increase the security of NFS-basedclients:
nosuid
Use the nosuid option to disable the set-user-identifier or set-group-identifier bits. This preventsremote users from gaining higher privileges by running a setuid program and you can use this optionopposite to setuid option.
noexec
Use the noexec option to disable all executable files on the client. Use this to prevent users fromaccidentally executing files placed in the shared file system.
nodev
Use the nodev option to prevent the client’s processing of device files as a hardware device.
resvport
Use the resvport option to restrict communication to a reserved port and you can use a privileged
Red Hat Enterprise Linux 9 Securing networks
64
Use the resvport option to restrict communication to a reserved port and you can use a privilegedsource port to communicate with the server. The reserved ports are reserved for privileged users andprocesses such as the root user.
sec
Use the sec option on the NFS server to choose the RPCGSS security flavor for accessing files onthe mount point. Valid security flavors are none, sys, krb5, krb5i, and krb5p.
IMPORTANT
The MIT Kerberos libraries provided by the krb5-libs package do not support the DataEncryption Standard (DES) algorithm in new deployments. DES is deprecated anddisabled by default in Kerberos libraries because of security and compatibility reasons.Use newer and more secure algorithms instead of DES, unless your environment requiresDES for compatibility reasons.
6.3.3. Securing NFS with firewall
To secure the firewall on an NFS server, keep only the required ports open. Do not use the NFSconnection port numbers for any other service.
Prerequisites
The nfs-utils package is installed.
The firewalld package is installed and running.
Procedure
On NFSv4, the firewall must open TCP port 2049.
On NFSv3, open four additional ports with 2049:
1. rpcbind service assigns the NFS ports dynamically, which might cause problems whencreating firewall rules. To simplify this process, use the /etc/nfs.conf file to specify whichports to use:
a. Set TCP and UDP port for mountd (rpc.mountd) in the [mountd] section in port=<value> format.
b. Set TCP and UDP port for statd (rpc.statd) in the [statd] section in port=<value>format.
2. Set the TCP and UDP port for the NFS lock manager (nlockmgr) in the /etc/nfs.conf file:
a. Set TCP port for nlockmgr (rpc.statd) in the [lockd] section in port=value format.Alternatively, you can use the nlm_tcpport option in the /etc/modprobe.d/lockd.conffile.
b. Set UDP port for nlockmgr (rpc.statd) in the [lockd] section in udp-port=valueformat. Alternatively, you can use the nlm_udpport option in the /etc/modprobe.d/lockd.conf file.
Verification steps
List the active ports and RPC programs on the NFS server:
CHAPTER 6. SECURING NETWORK SERVICES
65
$ rpcinfo -p
Additional resources
Secure NFS with Kerberos when using Red Hat Identity Management
exports(5) and nfs(5) man pages
6.4. SECURING THE FTP SERVICE
You can use the File Transfer Protocol (FTP) to transfer files over a network. Because all FTPtransactions with the server, including user authentication, are unencrypted, you should ensure it isconfigured securely.
RHEL 9 provides two FTP servers:
Red Hat Content Accelerator (tux) - a kernel-space web server with FTP capabilities.
Very Secure FTP Daemon (vsftpd) - a standalone, security-oriented implementation of the FTPservice.
The following security guidelines are for setting up the vsftpd FTP service.
6.4.1. Securing the FTP greeting banner
When a user connects to the FTP service, FTP shows a greeting banner, which by default includesversion information that could be useful for attackers to identify weaknesses in a system. You canprevent the attackers from accessing this information by changing the default banner.
You can define a custom banner by editing the /etc/banners/ftp.msg file to either directly include asingle-line message, or to refer to a separate file, which can contain a multi-line message.
Procedure
To define a single line message, add the following option to the /etc/vsftpd/vsftpd.conf file:
ftpd_banner=Hello, all activity on ftp.example.com is logged.
To define a message in a separate file:
Create a .msg file which contains the banner message, for example /etc/banners/ftp.msg:
######### Hello, all activity on ftp.example.com is logged. #########
To simplify the management of multiple banners, place all banners into the /etc/banners/directory.
Add the path to the banner file to the banner_file option in the /etc/vsftpd/vsftpd.conf file:
banner_file=/etc/banners/ftp.msg
Verification
Red Hat Enterprise Linux 9 Securing networks
66
Display the modified banner:
$ ftp localhostTrying ::1…Connected to localhost (::1).Hello, all activity on ftp.example.com is logged.
6.4.2. Preventing anonymous access and uploads in FTP
By default, installing the vsftpd package creates the /var/ftp/ directory and a directory tree foranonymous users with read-only permissions on the directories. Because anonymous users can accessthe data, do not store sensitive data in these directories.
To increase the security of the system, you can configure the FTP server to allow anonymous users toupload files to a specific directory and prevent anonymous users from reading data. In the followingprocedure, the anonymous user must be able to upload files in the directory owned by the root user butnot change it.
Procedure
Create a write-only directory in the /var/ftp/pub/ directory:
# mkdir /var/ftp/pub/upload# chmod 730 /var/ftp/pub/upload# ls -ld /var/ftp/pub/uploaddrwx-wx---. 2 root ftp 4096 Nov 14 22:57 /var/ftp/pub/upload
Add the following lines to the /etc/vsftpd/vsftpd.conf file:
anon_upload_enable=YESanonymous_enable=YES
Optional: If your system has SELinux enabled and enforcing, enable SELinux boolean attributes allow_ftpd_anon_write and allow_ftpd_full_access.
WARNING
Allowing anonymous users to read and write in directories might lead to the serverbecoming a repository for stolen software.
6.4.3. Securing user accounts for FTP
FTP transmits usernames and passwords unencrypted over insecure networks for authentication. Youcan improve the security of FTP by denying system users access to the server from their user accounts.
Perform as many of the following steps as applicable for your configuration.
Procedure
CHAPTER 6. SECURING NETWORK SERVICES
67
Disable all user accounts in the vsftpd server, by adding the following line to the /etc/vsftpd/vsftpd.conf file:
local_enable=NO
Disable FTP access for specific accounts or specific groups of accounts, such as the root userand users with sudo privileges, by adding the usernames to the /etc/pam.d/vsftpd PAMconfiguration file.
Disable user accounts, by adding the usernames to the /etc/vsftpd/ftpusers file.
6.4.4. Additional resources
ftpd_selinux(8) man page
6.5. SECURING HTTP SERVERS
6.5.1. Security enhancements in httpd.conf
You can enhance the security of the Apache HTTP server by configuring security options in the /etc/httpd/conf/httpd.conf file.
Always verify that all scripts running on the system work correctly before putting them into production.
Ensure that only the root user has write permissions to any directory containing scripts or CommonGateway Interfaces (CGI). To change the directory ownership to root user with write permissions, enterthe following commands:
# chown root directory-name# chmod 755 directory-name
In the /etc/httpd/conf/httpd.conf file, you can configure the following options:
FollowSymLinks
This directive is enabled by default and follows symbolic links in the directory.
Indexes
This directive is enabled by default. Disable this directive to prevent visitors from browsing files onthe server.
UserDir
This directive is disabled by default because it can confirm the presence of a user account on thesystem. To activate user directory browsing for all user directories other than /root/, use the UserDir enabled and UserDir disabled root directives. To add users to the list of disabled accounts, add aspace-delimited list of users on the UserDir disabled line.
ServerTokens
This directive controls the server response header field which is sent back to clients. You can use thefollowing parameters to customize the information:
ServerTokens Full
provides all available information such as web server version number, server operating systemdetails, installed Apache modules, for example:
Apache/2.4.37 (Red Hat Enterprise Linux) MyMod/1.2
Red Hat Enterprise Linux 9 Securing networks
68
ServerTokens Full-Release
provides all available information with release versions, for example:
Apache/2.4.37 (Red Hat Enterprise Linux) (Release 41.module+el8.5.0+11772+c8e0c271)
ServerTokens Prod / ServerTokens ProductOnly
provides the web server name, for example:
Apache
ServerTokens Major
provides the web server major release version, for example:
Apache/2
ServerTokens Minor
provides the web server minor release version, for example:
Apache/2.4
ServerTokens Min / ServerTokens Minimal
provides the web server minimal release version, for example:
Apache/2.4.37
ServerTokens OS
provides the web server release version and operating system, for example:
Apache/2.4.37 (Red Hat Enterprise Linux)
Use the ServerTokens Prod option to reduce the risk of attackers gaining any valuableinformation about your system.
IMPORTANT
Do not remove the IncludesNoExec directive. By default, the Server Side Includes (SSI)module cannot execute commands. Changing this can allow an attacker to entercommands on the system.
Removing httpd modules
You can remove the httpd modules to limit the functionality of the HTTP server. To do so, editconfiguration files in the /etc/httpd/conf.modules.d/ or /etc/httpd/conf.d/ directory. For example, toremove the proxy module:
echo '# All proxy modules disabled' > /etc/httpd/conf.modules.d/00-proxy.conf
Additional resources
CHAPTER 6. SECURING NETWORK SERVICES
69
Additional resources
The Apache HTTP server
Customizing the SELinux policy for the Apache HTTP server
6.5.2. Securing the Nginx server configuration
Nginx is a high-performance HTTP and proxy server. You can harden your Nginx configuration with thefollowing configuration options.
Procedure
To disable version strings, modify the server_tokens configuration option:
server_tokens off;
This option stops displaying additional details such as server version number. This configurationdisplays only the server name in all requests served by Nginx, for example:
$ curl -sI http://localhost | grep ServerServer: nginx
Add extra security headers that mitigate certain known web application vulnerabilities in specific/etc/nginx/ conf files:
For example, the X-Frame-Options header option denies any page outside of your domainto frame any content served by Nginx, mitigating clickjacking attacks:
add_header X-Frame-Options "SAMEORIGIN";
For example, the x-content-type header prevents MIME-type sniffing in certain olderbrowsers:
add_header X-Content-Type-Options nosniff;
For example, the X-XSS-Protection header enables Cross-Site Scripting (XSS) filtering,which prevents browsers from rendering potentially malicious content included in aresponse by Nginx:
add_header X-XSS-Protection "1; mode=block";
You can limit the services exposed to the public and limit what they do and accept from thevisitors, for example:
limit_except GET { allow 192.168.1.0/32; deny all;}
The snippet will limit access to all methods except GET and HEAD.
You can disable HTTP methods, for example:
Red Hat Enterprise Linux 9 Securing networks
70

# Allow GET, PUT, POST; return "405 Method Not Allowed" for all others.if ( $request_method !~ ^(GET|PUT|POST)$ ) { return 405;}
You can configure SSL to protect the data served by your Nginx web server, consider serving itover HTTPS only. Furthermore, you can generate a secure configuration profile for enabling SSLin your Nginx server using the Mozilla SSL Configuration Generator. The generatedconfiguration ensures that known vulnerable protocols (for example, SSLv2 and SSLv3),ciphers, and hashing algorithms (for example, 3DES and MD5) are disabled. You can also usethe SSL Server Test to verify that your configuration meets modern security requirements.
Additional resources
Mozilla SSL Configuration Generator
SSL Server Test
6.6. SECURING POSTGRESQL BY LIMITING ACCESS TOAUTHENTICATED LOCAL USERS
PostgreSQL is an object-relational database management system (DBMS). In Red Hat Enterprise Linux,PostgreSQL is provided by the postgresql-server package.
You can reduce the risks of attacks by configuring client authentication. The pg_hba.conf configurationfile stored in the database cluster’s data directory controls the client authentication. Follow theprocedure to configure PostgreSQL for host-based authentication.
Procedure
1. Install PostgreSQL:
# yum install postgresql-server
2. Initialize a database storage area using one of the following options:
a. Using the initdb utility:
$ initdb -D /home/postgresql/db1/
The initdb command with the -D option creates the directory you specify if it does notalready exist, for example /home/postgresql/db1/. This directory then contains all the datastored in the database and also the client authentication configuration file.
b. Using the postgresql-setup script:
$ postgresql-setup --initdb
By default, the script uses the /var/lib/pgsql/data/ directory. This script helps systemadministrators with basic database cluster administration.
3. To allow any authenticated local users to access any database with their usernames, modify thefollowing line in the pg_hba.conf file:
CHAPTER 6. SECURING NETWORK SERVICES
71
local all all trust
This can be problematic when you use layered applications that create database users and nolocal users. If you do not want to explicitly control all user names on the system, remove the local line entry from the pg_hba.conf file.
4. Restart the database to apply the changes:
# systemctl restart postgresql
The previous command updates the database and also verifies the syntax of the configurationfile.
6.7. SECURING THE MEMCACHED SERVICE
Memcached is an open source, high-performance, distributed memory object caching system. It canimprove the performance of dynamic web applications by lowering database load.
Memcached is an in-memory key-value store for small chunks of arbitrary data, such as strings andobjects, from results of database calls, API calls, or page rendering. Memcached allows assigningmemory from underutilized areas to applications that require more memory.
In 2018, vulnerabilities of DDoS amplification attacks by exploiting Memcached servers exposed to thepublic internet were discovered. These attacks took advantage of Memcached communication using theUDP protocol for transport. The attack was effective because of the high amplification ratio where arequest with the size of a few hundred bytes could generate a response of a few megabytes or evenhundreds of megabytes in size.
In most situations, the memcached service does not need to be exposed to the public Internet. Suchexposure may have its own security problems, allowing remote attackers to leak or modify informationstored in Memcached.
Follow the section to harden the system using Memcached service against possible DDoS attacks.
6.7.1. Hardening Memcached against DDoS
To mitigate security risks, perform as many of the following steps as applicable for your configuration.
Procedure
Configure a firewall in your LAN. If your Memcached server should be accessible only in yourlocal network, do not route external traffic to ports used by the memcached service. Forexample, remove the default port 11211 from the list of allowed ports:
# firewall-cmd --remove-port=11211/udp# firewall-cmd --runtime-to-permanent
If you use a single Memcached server on the same machine as your application, set up memcached to listen to localhost traffic only. Modify the OPTIONS value in the /etc/sysconfig/memcached file:
OPTIONS="-l 127.0.0.1,::1"
Enable Simple Authentication and Security Layer (SASL) authentication:
1. Modify or add the /etc/sasl2/memcached.conf file:
Red Hat Enterprise Linux 9 Securing networks
72

1. Modify or add the /etc/sasl2/memcached.conf file:
sasldb_path: /path.to/memcached.sasldb
2. Add an account in the SASL database:
# saslpasswd2 -a memcached -c cacheuser -f /path.to/memcached.sasldb
3. Ensure that the database is accessible for the memcached user and group:
# chown memcached:memcached /path.to/memcached.sasldb
4. Enable SASL support in Memcached by adding the -S value to the OPTIONS parameter inthe /etc/sysconfig/memcached file:
OPTIONS="-S"
5. Restart the Memcached server to apply the changes:
# systemctl restart memcached
6. Add the username and password created in the SASL database to the Memcached clientconfiguration of your application.
Encrypt communication between Memcached clients and servers with TLS:
1. Enable encrypted communication between Memcached clients and servers with TLS byadding the -Z value to the OPTIONS parameter in the /etc/sysconfig/memcached file:
OPTIONS="-Z"
2. Add the certificate chain file path in the PEM format using the -o ssl_chain_cert option.
3. Add a private key file path using the -o ssl_key option.
CHAPTER 6. SECURING NETWORK SERVICES
73

CHAPTER 7. USING MACSEC TO ENCRYPT LAYER-2 TRAFFICIN THE SAME PHYSICAL NETWORK
You can use MACsec to secure the communication between two devices (point-to-point). For example,your branch office is connected over a Metro-Ethernet connection with the central office, you canconfigure MACsec on the two hosts that connect the offices to increase the security.
Media Access Control security (MACsec) is a layer 2 protocol that secures different traffic types overthe Ethernet links including:
dynamic host configuration protocol (DHCP)
address resolution protocol (ARP)
Internet Protocol version 4 / 6 (IPv4 / IPv6) and
any traffic over IP such as TCP or UDP
MACsec encrypts and authenticates all traffic in LANs, by default with the GCM-AES-128 algorithm, anduses a pre-shared key to establish the connection between the participant hosts. If you want to changethe pre-shared key, you need to update the NM configuration on all hosts in the network that usesMACsec.
A MACsec connection uses an Ethernet device, such as an Ethernet network card, VLAN, or tunneldevice, as parent. You can either set an IP configuration only on the MACsec device to communicatewith other hosts only using the encrypted connection, or you can also set an IP configuration on theparent device. In the latter case, you can use the parent device to communicate with other hosts using anunencrypted connection and the MACsec device for encrypted connections.
MACsec does not require any special hardware. For example, you can use any switch, except if you wantto encrypt traffic only between a host and a switch. In this scenario, the switch must also supportMACsec.
In other words, there are 2 common methods to configure MACsec;
host to host and
host to switch then switch to other host(s)
IMPORTANT
You can use MACsec only between hosts that are in the same (physical or virtual) LAN.
7.1. CONFIGURING A MACSEC CONNECTION USING NMCLI
You can configure Ethernet interfaces to use MACsec using the nmcli utility. This procedure describeshow to create a MACsec connection between two hosts that are connected over Ethernet.
Procedure
1. On the first host on which you configure MACsec:
Create the connectivity association key (CAK) and connectivity-association key name(CKN) for the pre-shared key:
Red Hat Enterprise Linux 9 Securing networks
74
a. Create a 16-byte hexadecimal CAK:
# dd if=/dev/urandom count=16 bs=1 2> /dev/null | hexdump -e '1/2 "%04x"'50b71a8ef0bd5751ea76de6d6c98c03a
b. Create a 32-byte hexadecimal CKN:
# dd if=/dev/urandom count=32 bs=1 2> /dev/null | hexdump -e '1/2 "%04x"'f2b4297d39da7330910a74abc0449feb45b5c0b9fc23df1430e1898fcf1c4550
2. On both hosts you want to connect over a MACsec connection:
3. Create the MACsec connection:
# nmcli connection add type macsec con-name macsec0 ifname macsec0 connection.autoconnect yes macsec.parent enp1s0 macsec.mode psk macsec.mka-cak 50b71a8ef0bd5751ea76de6d6c98c03a macsec.mka-ckn f2b4297d39da7330910a7abc0449feb45b5c0b9fc23df1430e1898fcf1c4550
Use the CAK and CKN generated in the previous step in the macsec.mka-cak and macsec.mka-ckn parameters. The values must be the same on every host in the MACsec-protected network.
4. Configure the IP settings on the MACsec connection.
a. Configure the IPv4 settings. For example, to set a static IPv4 address, network mask,default gateway, and DNS server to the macsec0 connection, enter:
# nmcli connection modify macsec0 ipv4.method manual ipv4.addresses '192.0.2.1/24' ipv4.gateway '192.0.2.254' ipv4.dns '192.0.2.253'
b. Configure the IPv6 settings. For example, to set a static IPv6 address, network mask,default gateway, and DNS server to the macsec0 connection, enter:
# nmcli connection modify macsec0 ipv6.method manual ipv6.addresses '2001:db8:1::1/32' ipv6.gateway '2001:db8:1::fffe' ipv6.dns '2001:db8:1::fffd'
5. Activate the connection:
# nmcli connection up macsec0
Verification steps
1. Verify that the traffic is encrypted:
# tcpdump -nn -i enp1s0
2. Optional: Display the unencrypted traffic:
# tcpdump -nn -i macsec0
3. Display MACsec statistics:
CHAPTER 7. USING MACSEC TO ENCRYPT LAYER-2 TRAFFIC IN THE SAME PHYSICAL NETWORK
75

# ip macsec show
4. Display individual counters for each type of protection: integrity-only (encrypt off) andencryption (encrypt on)
# ip -s macsec show
7.2. ADDITIONAL RESOURCES
MACsec: a different solution to encrypt network traffic blog.
Red Hat Enterprise Linux 9 Securing networks
76