Embed Size (px)
Citation preview
CONFIDENTIAL2018-08
Receiving and fulfilling ordersAriba Network
© 2
018
SAP
SE o
r an
SAP affi
liate
com
pany
. All r
ight
s re
serv
ed.
THE BEST RUN
Content
Topics about purchase orders. . . . . . . . . . . . . . . . . . . . . . . . . . . . . . . . . . . . . . . . . . . . . . . . . . . . . .5What are purchase orders and service orders?. . . . . . . . . . . . . . . . . . . . . . . . . . . . . . . . . . . . . . . . . . . 5
Order routing. . . . . . . . . . . . . . . . . . . . . . . . . . . . . . . . . . . . . . . . . . . . . . . . . . . . . . . . . . . . . . . . 7Typical purchase order life cycle. . . . . . . . . . . . . . . . . . . . . . . . . . . . . . . . . . . . . . . . . . . . . . . . . . . . . . 7
Topics about viewing details for orders or releases. . . . . . . . . . . . . . . . . . . . . . . . . . . . . . . . . . . . . 9How to find orders or releases and organize results. . . . . . . . . . . . . . . . . . . . . . . . . . . . . . . . . . . . . . . . 9
How to search for orders and releases. . . . . . . . . . . . . . . . . . . . . . . . . . . . . . . . . . . . . . . . . . . . . . . 9Search filters for orders and releases. . . . . . . . . . . . . . . . . . . . . . . . . . . . . . . . . . . . . . . . . . . . . . . 11How to allow your search filter preferences to be saved. . . . . . . . . . . . . . . . . . . . . . . . . . . . . . . . . . 13How to save and clear search filter preferences for a page. . . . . . . . . . . . . . . . . . . . . . . . . . . . . . . . 13
How to view orders or releases. . . . . . . . . . . . . . . . . . . . . . . . . . . . . . . . . . . . . . . . . . . . . . . . . . . . . . 14How to view details for previous scheduling agreement releases. . . . . . . . . . . . . . . . . . . . . . . . . . . . . . 16How to view order attachments. . . . . . . . . . . . . . . . . . . . . . . . . . . . . . . . . . . . . . . . . . . . . . . . . . . . . 17How to download a custom PDF for an order. . . . . . . . . . . . . . . . . . . . . . . . . . . . . . . . . . . . . . . . . . . . 17How to respond to order inquiries. . . . . . . . . . . . . . . . . . . . . . . . . . . . . . . . . . . . . . . . . . . . . . . . . . . . 18Order statuses. . . . . . . . . . . . . . . . . . . . . . . . . . . . . . . . . . . . . . . . . . . . . . . . . . . . . . . . . . . . . . . . . 19
Routing status. . . . . . . . . . . . . . . . . . . . . . . . . . . . . . . . . . . . . . . . . . . . . . . . . . . . . . . . . . . . . . . 19Order status. . . . . . . . . . . . . . . . . . . . . . . . . . . . . . . . . . . . . . . . . . . . . . . . . . . . . . . . . . . . . . . . 19Settlement statuses. . . . . . . . . . . . . . . . . . . . . . . . . . . . . . . . . . . . . . . . . . . . . . . . . . . . . . . . . . 20
Order view settings and options. . . . . . . . . . . . . . . . . . . . . . . . . . . . . . . . . . . . . . . . . . . . . . . . . . . . . 21Language and currency. . . . . . . . . . . . . . . . . . . . . . . . . . . . . . . . . . . . . . . . . . . . . . . . . . . . . . . . 21Credit card numbers. . . . . . . . . . . . . . . . . . . . . . . . . . . . . . . . . . . . . . . . . . . . . . . . . . . . . . . . . . .21Advanced pricing details. . . . . . . . . . . . . . . . . . . . . . . . . . . . . . . . . . . . . . . . . . . . . . . . . . . . . . . . 21Expected value and overall limit for unplanned line items. . . . . . . . . . . . . . . . . . . . . . . . . . . . . . . . . 22Total landed cost. . . . . . . . . . . . . . . . . . . . . . . . . . . . . . . . . . . . . . . . . . . . . . . . . . . . . . . . . . . . . 22Direct material fields. . . . . . . . . . . . . . . . . . . . . . . . . . . . . . . . . . . . . . . . . . . . . . . . . . . . . . . . . . 22Payment terms and Incoterms. . . . . . . . . . . . . . . . . . . . . . . . . . . . . . . . . . . . . . . . . . . . . . . . . . . 22
Topics about confirming or rejecting orders. . . . . . . . . . . . . . . . . . . . . . . . . . . . . . . . . . . . . . . . . . 24Order confirmations. . . . . . . . . . . . . . . . . . . . . . . . . . . . . . . . . . . . . . . . . . . . . . . . . . . . . . . . . . . . . 24How to confirm or reject an entire order. . . . . . . . . . . . . . . . . . . . . . . . . . . . . . . . . . . . . . . . . . . . . . . 25How to partially confirm, back-order, or reject purchase order items. . . . . . . . . . . . . . . . . . . . . . . . . . . 27Line-item level information on order confirmations. . . . . . . . . . . . . . . . . . . . . . . . . . . . . . . . . . . . . . . 28The items to confirm list. . . . . . . . . . . . . . . . . . . . . . . . . . . . . . . . . . . . . . . . . . . . . . . . . . . . . . . . . . 29
Workflow for the items to confirm list . . . . . . . . . . . . . . . . . . . . . . . . . . . . . . . . . . . . . . . . . . . . . . 30How to confirm purchase order line items. . . . . . . . . . . . . . . . . . . . . . . . . . . . . . . . . . . . . . . . . . . 30
2 C O N F I D E N T I A LReceiving and fulfilling orders
Content
How to edit shipping dates, delivery dates, or quantity when creating an order confirmation. . . . . . . . 31Delivery date tolerances. . . . . . . . . . . . . . . . . . . . . . . . . . . . . . . . . . . . . . . . . . . . . . . . . . . . . . . . 32How to reject an entire order for material items. . . . . . . . . . . . . . . . . . . . . . . . . . . . . . . . . . . . . . . 32
Topics about sending ship notices to customers. . . . . . . . . . . . . . . . . . . . . . . . . . . . . . . . . . . . . . 34Ship notices. . . . . . . . . . . . . . . . . . . . . . . . . . . . . . . . . . . . . . . . . . . . . . . . . . . . . . . . . . . . . . . . . . . 34Draft ship notices. . . . . . . . . . . . . . . . . . . . . . . . . . . . . . . . . . . . . . . . . . . . . . . . . . . . . . . . . . . . . . . 35How to create a ship notice. . . . . . . . . . . . . . . . . . . . . . . . . . . . . . . . . . . . . . . . . . . . . . . . . . . . . . . . 36
Ship notice fields. . . . . . . . . . . . . . . . . . . . . . . . . . . . . . . . . . . . . . . . . . . . . . . . . . . . . . . . . . . . . 37How to create a ship notice from a scheduling agreement release. . . . . . . . . . . . . . . . . . . . . . . . . . . . . 42How to create a ship notice from several orders and releases. . . . . . . . . . . . . . . . . . . . . . . . . . . . . . . . 43How to create a ship notice with one ship-to address for all items. . . . . . . . . . . . . . . . . . . . . . . . . . . . . 44Ship notice barcode labels. . . . . . . . . . . . . . . . . . . . . . . . . . . . . . . . . . . . . . . . . . . . . . . . . . . . . . . . .44
How to download a ship notice barcode label. . . . . . . . . . . . . . . . . . . . . . . . . . . . . . . . . . . . . . . . . 46How to view items to ship by shipment priority status or date range. . . . . . . . . . . . . . . . . . . . . . . . . . . 48How to create a draft ship notice . . . . . . . . . . . . . . . . . . . . . . . . . . . . . . . . . . . . . . . . . . . . . . . . . . . . 48How to edit a draft ship notice. . . . . . . . . . . . . . . . . . . . . . . . . . . . . . . . . . . . . . . . . . . . . . . . . . . . . . 49Canceling ship notices. . . . . . . . . . . . . . . . . . . . . . . . . . . . . . . . . . . . . . . . . . . . . . . . . . . . . . . . . . . 49
Topics about direct material fields for order and invoice collaboration. . . . . . . . . . . . . . . . . . . . . . 51How to add a section to an invoice header. . . . . . . . . . . . . . . . . . . . . . . . . . . . . . . . . . . . . . . . . . . . . . 51How to add a section to an invoice line item. . . . . . . . . . . . . . . . . . . . . . . . . . . . . . . . . . . . . . . . . . . . .52Direct material fields for ship notice collaboration: changes to supplier user interface. . . . . . . . . . . . . . . 52Direct material fields for purchase orders. . . . . . . . . . . . . . . . . . . . . . . . . . . . . . . . . . . . . . . . . . . . . . 54
Topics about scheduling agreement releases. . . . . . . . . . . . . . . . . . . . . . . . . . . . . . . . . . . . . . . . . 56How to create a ship notice from a scheduling agreement release. . . . . . . . . . . . . . . . . . . . . . . . . . . . . 56How to view details for previous scheduling agreement releases. . . . . . . . . . . . . . . . . . . . . . . . . . . . . . 57How to search on customer part number or customer location. . . . . . . . . . . . . . . . . . . . . . . . . . . . . . . 58Customer part number, release level, and customer location fields. . . . . . . . . . . . . . . . . . . . . . . . . . . . 58
Topics about sending service sheets to customers. . . . . . . . . . . . . . . . . . . . . . . . . . . . . . . . . . . . .60Service sheets. . . . . . . . . . . . . . . . . . . . . . . . . . . . . . . . . . . . . . . . . . . . . . . . . . . . . . . . . . . . . . . . . 60How to create a service sheet. . . . . . . . . . . . . . . . . . . . . . . . . . . . . . . . . . . . . . . . . . . . . . . . . . . . . . 62
Service sheet header fields. . . . . . . . . . . . . . . . . . . . . . . . . . . . . . . . . . . . . . . . . . . . . . . . . . . . . .64How to edit and resubmit a failed or rejected service sheet. . . . . . . . . . . . . . . . . . . . . . . . . . . . . . . . . . 65How to download a service sheet PDF. . . . . . . . . . . . . . . . . . . . . . . . . . . . . . . . . . . . . . . . . . . . . . . . .66How to view status update request attachments. . . . . . . . . . . . . . . . . . . . . . . . . . . . . . . . . . . . . . . . . 66How to search for a unit of measure on a service sheet. . . . . . . . . . . . . . . . . . . . . . . . . . . . . . . . . . . . .66Service sheet statuses. . . . . . . . . . . . . . . . . . . . . . . . . . . . . . . . . . . . . . . . . . . . . . . . . . . . . . . . . . . 67
Routing statuses. . . . . . . . . . . . . . . . . . . . . . . . . . . . . . . . . . . . . . . . . . . . . . . . . . . . . . . . . . . . . 67Document statuses. . . . . . . . . . . . . . . . . . . . . . . . . . . . . . . . . . . . . . . . . . . . . . . . . . . . . . . . . . . 68
Topics about using CSV templates to respond to large orders. . . . . . . . . . . . . . . . . . . . . . . . . . . . 72
Receiving and fulfilling ordersContent C O N F I D E N T I A L 3
CSV templates for responding to large orders. . . . . . . . . . . . . . . . . . . . . . . . . . . . . . . . . . . . . . . . . . . 72How to download large orders in CSV format. . . . . . . . . . . . . . . . . . . . . . . . . . . . . . . . . . . . . . . . . . . . 73How to download CSV templates. . . . . . . . . . . . . . . . . . . . . . . . . . . . . . . . . . . . . . . . . . . . . . . . . . . . 73How to change the routing method for order response documents. . . . . . . . . . . . . . . . . . . . . . . . . . . . 74How to upload order confirmations and ship notices in CSV format. . . . . . . . . . . . . . . . . . . . . . . . . . . . 74
Order confirmation standard CSV template. . . . . . . . . . . . . . . . . . . . . . . . . . . . . . . . . . . . . . . . . . 75Ship notice standard CSV template. . . . . . . . . . . . . . . . . . . . . . . . . . . . . . . . . . . . . . . . . . . . . . . . 76
Revision history. . . . . . . . . . . . . . . . . . . . . . . . . . . . . . . . . . . . . . . . . . . . . . . . . . . . . . . . . . . . . . . 79
4 C O N F I D E N T I A LReceiving and fulfilling orders
Content

Topics about purchase orders
In this section:
What are purchase orders and service orders? [page 5]
Typical purchase order life cycle [page 7]
What are purchase orders and service orders?Purchase orders are documents that your customers send to you in order to request goods or services from your company. Your customer’s procurement application assigns a unique number to each order it generates. Ariba Network tracks transactions by these assigned numbers.
Purchase orders you receive through Ariba Network can contain the following types of information:
● Material items, such as raw materials or furniture.● General service items, such as janitorial services, or labor service items, such as contract labor, that do not
require separate tracking.● Service items that require separate tracking.● Travel and expense items, such as airline flights or car rentals.● Blanket purchase order items, such as any frequently purchased items or services.● Total landed cost details, such as allowances and freight charges.
Material orders
Material orders can contain lines for both material items and general service items or labor items that don’t require separate tracking. The typical order fulfillment cycle for a material order is as follows:
Receiving and fulfilling ordersTopics about purchase orders C O N F I D E N T I A L 5
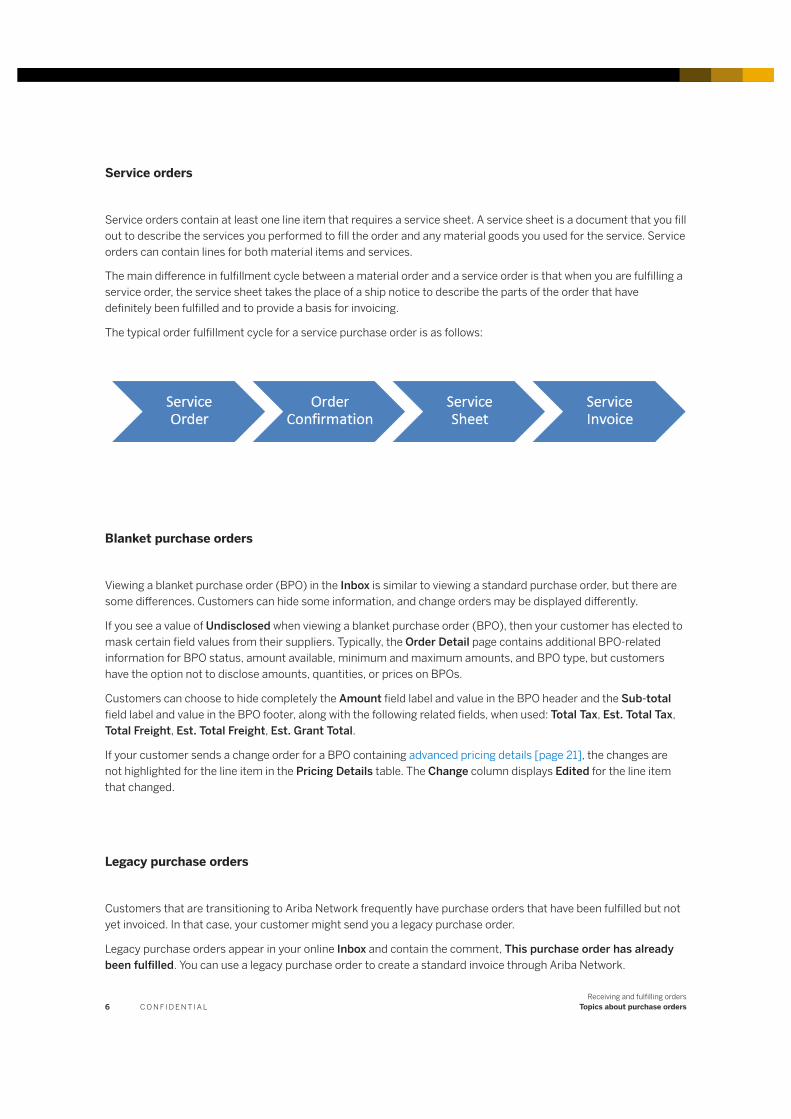
Service orders
Service orders contain at least one line item that requires a service sheet. A service sheet is a document that you fill out to describe the services you performed to fill the order and any material goods you used for the service. Service orders can contain lines for both material items and services.
The main difference in fulfillment cycle between a material order and a service order is that when you are fulfilling a service order, the service sheet takes the place of a ship notice to describe the parts of the order that have definitely been fulfilled and to provide a basis for invoicing.
The typical order fulfillment cycle for a service purchase order is as follows:
Blanket purchase orders
Viewing a blanket purchase order (BPO) in the Inbox is similar to viewing a standard purchase order, but there are some differences. Customers can hide some information, and change orders may be displayed differently.
If you see a value of Undisclosed when viewing a blanket purchase order (BPO), then your customer has elected to mask certain field values from their suppliers. Typically, the Order Detail page contains additional BPO-related information for BPO status, amount available, minimum and maximum amounts, and BPO type, but customers have the option not to disclose amounts, quantities, or prices on BPOs.
Customers can choose to hide completely the Amount field label and value in the BPO header and the Sub-total field label and value in the BPO footer, along with the following related fields, when used: Total Tax, Est. Total Tax, Total Freight, Est. Total Freight, Est. Grant Total.
If your customer sends a change order for a BPO containing advanced pricing details [page 21], the changes are not highlighted for the line item in the Pricing Details table. The Change column displays Edited for the line item that changed.
Legacy purchase orders
Customers that are transitioning to Ariba Network frequently have purchase orders that have been fulfilled but not yet invoiced. In that case, your customer might send you a legacy purchase order.
Legacy purchase orders appear in your online Inbox and contain the comment, This purchase order has already been fulfilled. You can use a legacy purchase order to create a standard invoice through Ariba Network.
6 C O N F I D E N T I A LReceiving and fulfilling orders
Topics about purchase orders
Order routing
When a customer sends an order to you through Ariba Network, you have different options that you can configure for receiving it.
● You can always view it in the Inbox of your Ariba Network account, even if your account is configured for additional routing methods.
● You can also route it to an email account or fax machine.● If you are using an order fulfillment system that can be integrated with Ariba Network, you can configure your
account to send orders to your order fulfillment system through cXML or EDI.
For more information about the different order routing options and how to resolve order routing problems, see the Administration and Configuration Configuring Document Routing Electronic Order Routing section of
the Learning Center.
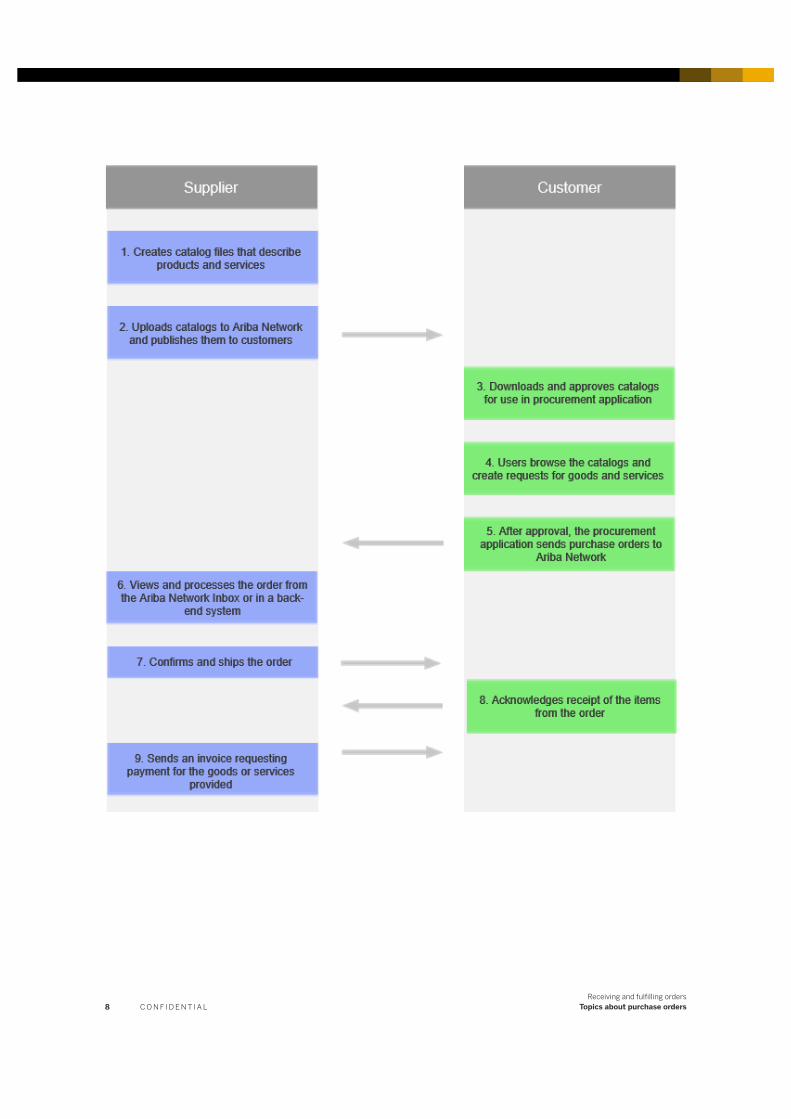
Typical purchase order life cycleWhen you create a catalog of your products and services, your customers can issue a purchase order based on your catalog. Purchase orders can include catalog or non-catalog items.
The following diagram shows the typical life cycle of a catalog-based purchase order on Ariba Network.
Receiving and fulfilling ordersTopics about purchase orders C O N F I D E N T I A L 7
8 C O N F I D E N T I A LReceiving and fulfilling orders
Topics about purchase orders
Topics about viewing details for orders or releases
In this section:
How to find orders or releases and organize results [page 9]
How to view orders or releases [page 14]
How to view details for previous scheduling agreement releases [page 16]
How to view order attachments [page 17]
How to download a custom PDF for an order [page 17]
How to respond to order inquiries [page 18]
Order statuses [page 19]
Order view settings and options [page 21]
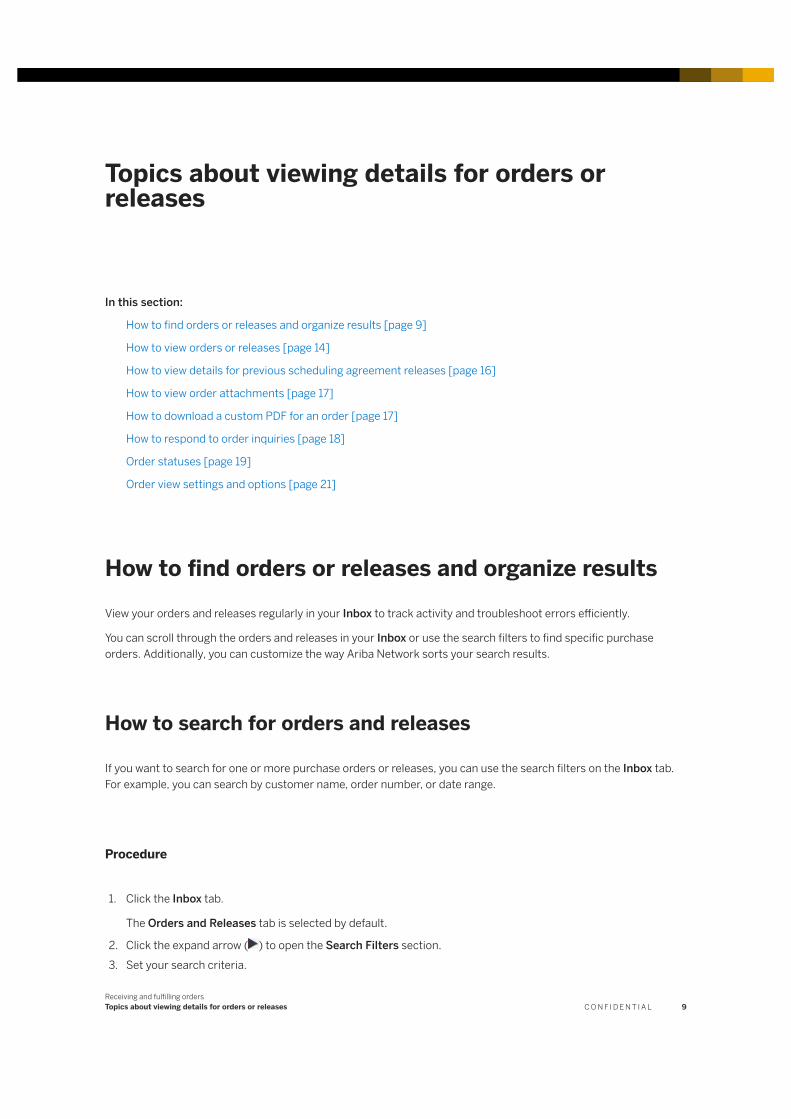
How to find orders or releases and organize results
View your orders and releases regularly in your Inbox to track activity and troubleshoot errors efficiently.
You can scroll through the orders and releases in your Inbox or use the search filters to find specific purchase orders. Additionally, you can customize the way Ariba Network sorts your search results.
How to search for orders and releases
If you want to search for one or more purchase orders or releases, you can use the search filters on the Inbox tab. For example, you can search by customer name, order number, or date range.
Procedure
1. Click the Inbox tab.
The Orders and Releases tab is selected by default.
2. Click the expand arrow ( ) to open the Search Filters section.3. Set your search criteria.
Receiving and fulfilling ordersTopics about viewing details for orders or releases C O N F I D E N T I A L 9
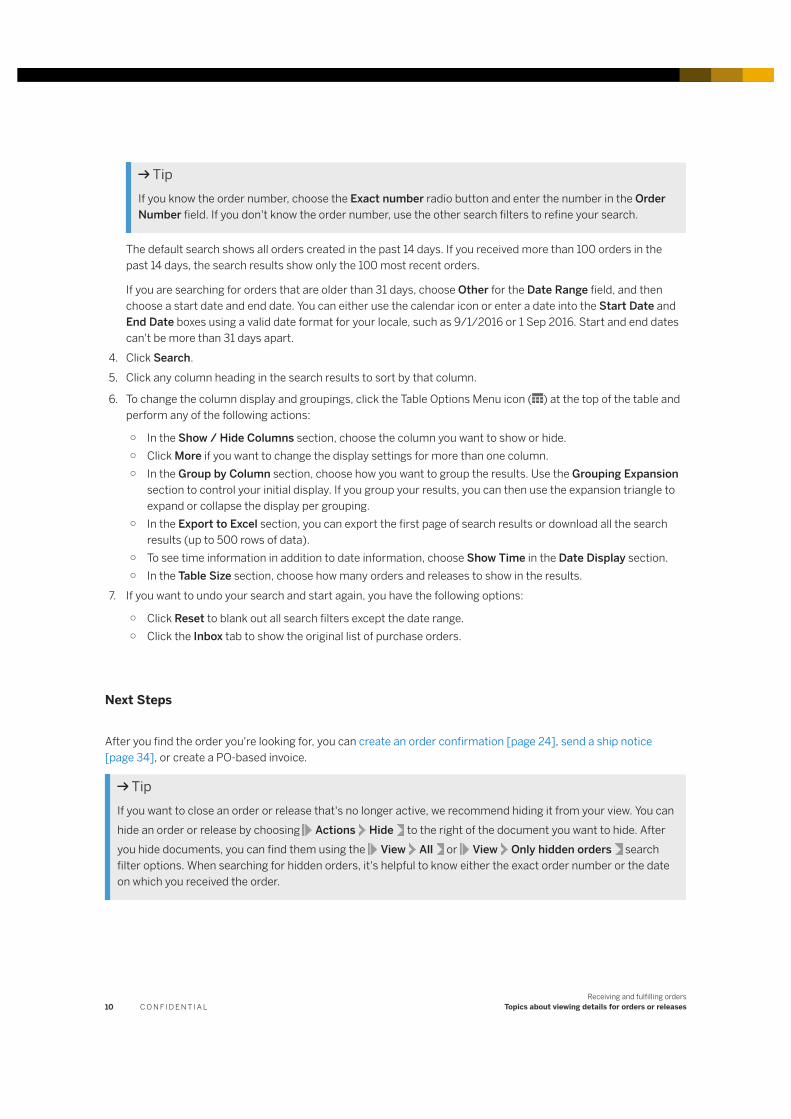
TipIf you know the order number, choose the Exact number radio button and enter the number in the Order Number field. If you don't know the order number, use the other search filters to refine your search.
The default search shows all orders created in the past 14 days. If you received more than 100 orders in the past 14 days, the search results show only the 100 most recent orders.
If you are searching for orders that are older than 31 days, choose Other for the Date Range field, and then choose a start date and end date. You can either use the calendar icon or enter a date into the Start Date and End Date boxes using a valid date format for your locale, such as 9/1/2016 or 1 Sep 2016. Start and end dates can't be more than 31 days apart.
4. Click Search.5. Click any column heading in the search results to sort by that column.
6. To change the column display and groupings, click the Table Options Menu icon () at the top of the table and perform any of the following actions:
○ In the Show / Hide Columns section, choose the column you want to show or hide.○ Click More if you want to change the display settings for more than one column.○ In the Group by Column section, choose how you want to group the results. Use the Grouping Expansion
section to control your initial display. If you group your results, you can then use the expansion triangle to expand or collapse the display per grouping.
○ In the Export to Excel section, you can export the first page of search results or download all the search results (up to 500 rows of data).
○ To see time information in addition to date information, choose Show Time in the Date Display section.○ In the Table Size section, choose how many orders and releases to show in the results.
7. If you want to undo your search and start again, you have the following options:
○ Click Reset to blank out all search filters except the date range.○ Click the Inbox tab to show the original list of purchase orders.
Next Steps
After you find the order you're looking for, you can create an order confirmation [page 24], send a ship notice [page 34], or create a PO-based invoice.
TipIf you want to close an order or release that's no longer active, we recommend hiding it from your view. You can hide an order or release by choosing Actions Hide to the right of the document you want to hide. After you hide documents, you can find them using the View All or View Only hidden orders search filter options. When searching for hidden orders, it's helpful to know either the exact order number or the date on which you received the order.
10 C O N F I D E N T I A LReceiving and fulfilling orders
Topics about viewing details for orders or releases

Search filters for orders and releases
The following table describes how to use each search filter on the Orders and Releases tab of the Inbox to narrow down and refine purchase order search results:
Filter Description
Customer Choose a customer from the list to view purchase orders from that customer.
To add another customer to the selection, click Add More to the right of the field, and then select another customer from the list.
To remove a selected customer, click the x button to the right of the customer's name.
Order Number Search by purchase order number. Purchase order numbers are case-sensitive. For example, PO123 is different from po123. Your customer's purchasing system assigns order numbers.
NoteYou can specify whether you're searching for a partial or exact order number. When you choose Exact number, all hidden orders with this purchase order number also show up.
Buyer Location Code Find all purchase orders with particular location codes. You can enter multiple buyer location codes separated by commas. Your customers can add a location code to purchase orders to help you identify the exact delivery location for an address.
Invoice Number Locate a purchase order by its corresponding invoice number. Invoice numbers are case-sensitive. For example, INV123 is different from inv123.
Date Range Search by the date the purchase order reached Ariba Network. You can choose one of the following ranges: Last 24 hours, Last 7 days, Last 14 days, Last 31 days, or Other. Use Other to search for orders that are older than 31 days.
NoteIf you choose Other, you need to specify the start and end dates. This custom date range is limited to 14 days.
Start Date and End Date Search by the date on which Ariba Network received the order. The maximum date range is 14 days.
Min. Amount and Max. Amount Search by the purchase order's total amount. Don't enter currency symbols. To search above or below a given amount, enter only one amount. To search within a range, enter both amounts.
Order Status Search by purchase order document status [page 20].
View Search for purchase orders by choosing one of the following options: All, All except hidden orders, Only orders with inquiries, or Only hidden orders.
Receiving and fulfilling ordersTopics about viewing details for orders or releases C O N F I D E N T I A L 11
Filter Description
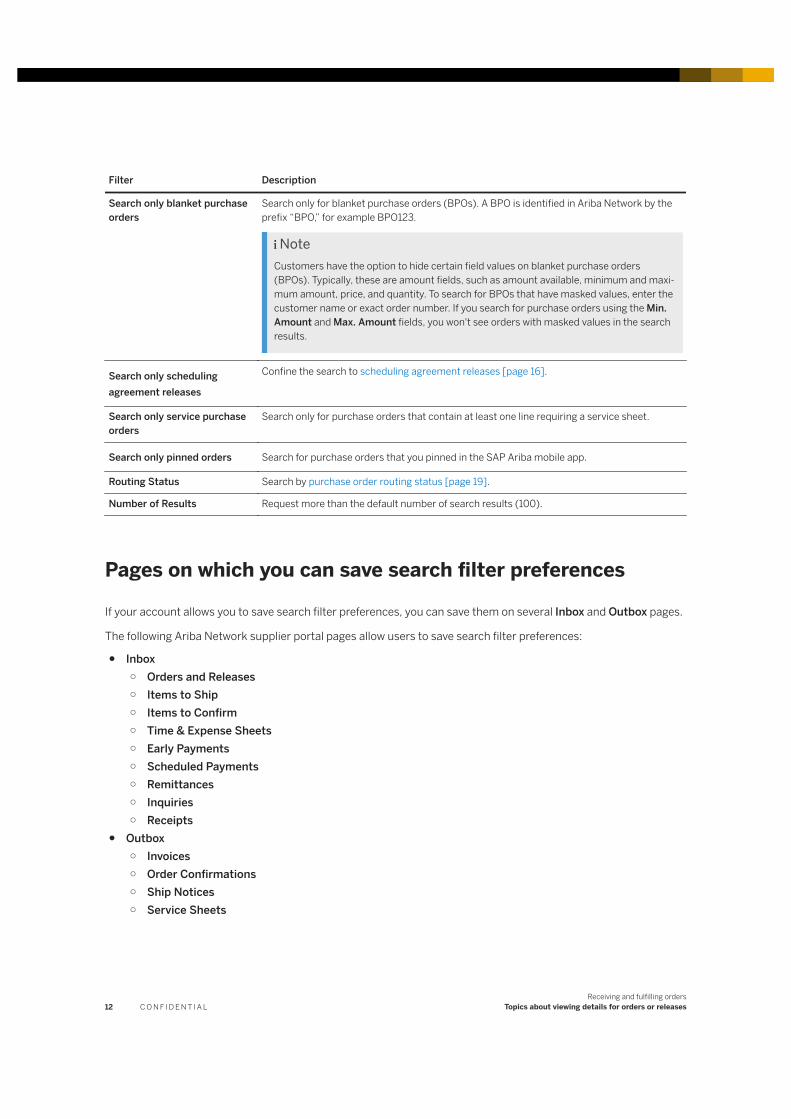
Search only blanket purchase orders
Search only for blanket purchase orders (BPOs). A BPO is identified in Ariba Network by the prefix “BPO,” for example BPO123.
NoteCustomers have the option to hide certain field values on blanket purchase orders (BPOs). Typically, these are amount fields, such as amount available, minimum and maximum amount, price, and quantity. To search for BPOs that have masked values, enter the customer name or exact order number. If you search for purchase orders using the Min. Amount and Max. Amount fields, you won't see orders with masked values in the search results.
Search only scheduling agreement releases
Confine the search to scheduling agreement releases [page 16].
Search only service purchase orders
Search only for purchase orders that contain at least one line requiring a service sheet.
Search only pinned orders Search for purchase orders that you pinned in the SAP Ariba mobile app.
Routing Status Search by purchase order routing status [page 19].
Number of Results Request more than the default number of search results (100).
Pages on which you can save search filter preferences
If your account allows you to save search filter preferences, you can save them on several Inbox and Outbox pages.
The following Ariba Network supplier portal pages allow users to save search filter preferences:
● Inbox○ Orders and Releases○ Items to Ship○ Items to Confirm○ Time & Expense Sheets○ Early Payments○ Scheduled Payments○ Remittances○ Inquiries○ Receipts
● Outbox○ Invoices○ Order Confirmations○ Ship Notices○ Service Sheets
12 C O N F I D E N T I A LReceiving and fulfilling orders
Topics about viewing details for orders or releases

How to allow your search filter preferences to be saved
Before you can save search filter preferences, you must enable the feature for your account. The feature is not automatically enabled for all users.
Procedure
1. Click your name at the top of the dashboard.The user profile menu appears.
2. Click My Account.The My Account page appears.
3. In the Preferences section, check Allow me to save filter preferences in the Inbox/Outbox.4. Click Save.
At the top of the page, SAP Ariba displays a message indicating that your account settings have been successfully updated.
5. Click Close.
How to save and clear search filter preferences for a page
You can save search filter preferences for each document type in your Inbox and Outbox. Your filter preferences are saved in your user account, and only you can use them.
Prerequisites
Update your account settings to allow you to save filter preferences. See How to allow your search filter preferences to be saved [page 13].
LimitationsYou can save only one set of filter preferences per page. When you save filter preferences, any previously saved filter preferences for that page are overwritten and cannot be retrieved.
Procedure
1. Click the Inbox or Outbox.2. Click a tab. For example, the Orders and Releases tab is selected by default in the Inbox.3. Click the triangle to the left of Search Filters to show the filters.4. Specify search filters for the page.
Receiving and fulfilling ordersTopics about viewing details for orders or releases C O N F I D E N T I A L 13
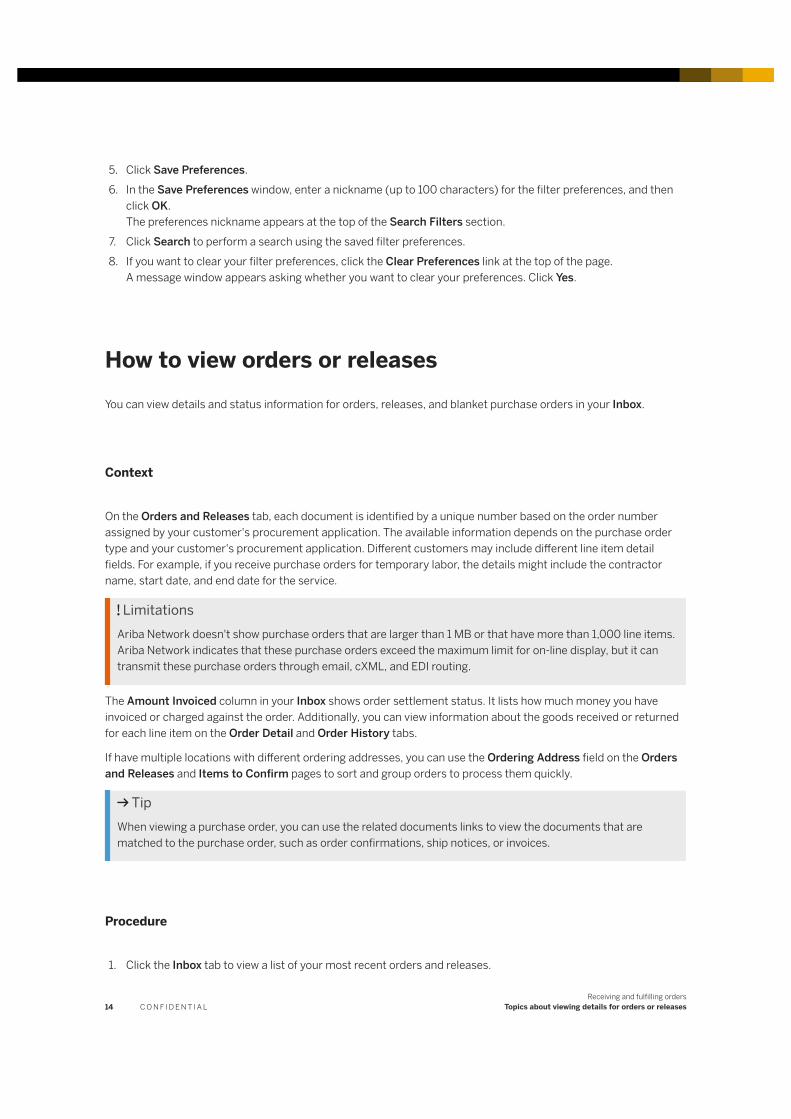
5. Click Save Preferences.6. In the Save Preferences window, enter a nickname (up to 100 characters) for the filter preferences, and then
click OK.The preferences nickname appears at the top of the Search Filters section.
7. Click Search to perform a search using the saved filter preferences.8. If you want to clear your filter preferences, click the Clear Preferences link at the top of the page.
A message window appears asking whether you want to clear your preferences. Click Yes.
How to view orders or releasesYou can view details and status information for orders, releases, and blanket purchase orders in your Inbox.
Context
On the Orders and Releases tab, each document is identified by a unique number based on the order number assigned by your customer's procurement application. The available information depends on the purchase order type and your customer's procurement application. Different customers may include different line item detail fields. For example, if you receive purchase orders for temporary labor, the details might include the contractor name, start date, and end date for the service.
LimitationsAriba Network doesn't show purchase orders that are larger than 1 MB or that have more than 1,000 line items. Ariba Network indicates that these purchase orders exceed the maximum limit for on-line display, but it can transmit these purchase orders through email, cXML, and EDI routing.
The Amount Invoiced column in your Inbox shows order settlement status. It lists how much money you have invoiced or charged against the order. Additionally, you can view information about the goods received or returned for each line item on the Order Detail and Order History tabs.
If have multiple locations with different ordering addresses, you can use the Ordering Address field on the Orders and Releases and Items to Confirm pages to sort and group orders to process them quickly.
TipWhen viewing a purchase order, you can use the related documents links to view the documents that are matched to the purchase order, such as order confirmations, ship notices, or invoices.
Procedure
1. Click the Inbox tab to view a list of your most recent orders and releases.
14 C O N F I D E N T I A LReceiving and fulfilling orders
Topics about viewing details for orders or releases
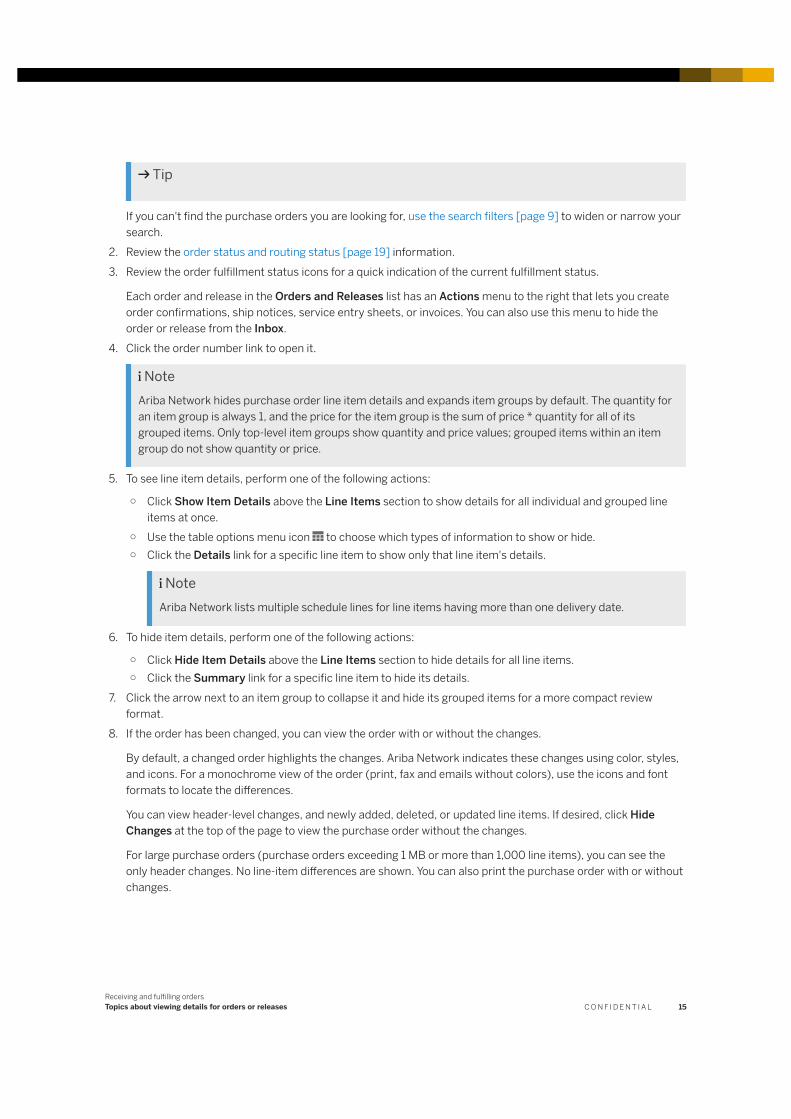
Tip
If you can't find the purchase orders you are looking for, use the search filters [page 9] to widen or narrow your search.
2. Review the order status and routing status [page 19] information.3. Review the order fulfillment status icons for a quick indication of the current fulfillment status.
Each order and release in the Orders and Releases list has an Actions menu to the right that lets you create order confirmations, ship notices, service entry sheets, or invoices. You can also use this menu to hide the order or release from the Inbox.
4. Click the order number link to open it.
NoteAriba Network hides purchase order line item details and expands item groups by default. The quantity for an item group is always 1, and the price for the item group is the sum of price * quantity for all of its grouped items. Only top-level item groups show quantity and price values; grouped items within an item group do not show quantity or price.
5. To see line item details, perform one of the following actions:
○ Click Show Item Details above the Line Items section to show details for all individual and grouped line items at once.
○ Use the table options menu icon to choose which types of information to show or hide.○ Click the Details link for a specific line item to show only that line item's details.
NoteAriba Network lists multiple schedule lines for line items having more than one delivery date.
6. To hide item details, perform one of the following actions:
○ Click Hide Item Details above the Line Items section to hide details for all line items.○ Click the Summary link for a specific line item to hide its details.
7. Click the arrow next to an item group to collapse it and hide its grouped items for a more compact review format.
8. If the order has been changed, you can view the order with or without the changes.
By default, a changed order highlights the changes. Ariba Network indicates these changes using color, styles, and icons. For a monochrome view of the order (print, fax and emails without colors), use the icons and font formats to locate the differences.
You can view header-level changes, and newly added, deleted, or updated line items. If desired, click Hide Changes at the top of the page to view the purchase order without the changes.
For large purchase orders (purchase orders exceeding 1 MB or more than 1,000 line items), you can see the only header changes. No line-item differences are shown. You can also print the purchase order with or without changes.
Receiving and fulfilling ordersTopics about viewing details for orders or releases C O N F I D E N T I A L 15
Next Steps
When viewing a purchase order, you can create order confirmations, ship notices, service sheets, or invoices.
How to view details for previous scheduling agreement releasesA scheduling agreement release defines the quantities and dates for the shipments desired for a specific item. For detailed tracking of previous shipments, view the details of previous releases.
Context
Scheduling agreement releases appear in the list of documents on the Orders and Releases tab of your Inbox. You can view details from previous scheduling agreement releases.
NoteDirect material includes all items, such as raw materials and parts, required to assemble or manufacture a complete product.
Customers often want to procure predefined quantities of materials in releases to be received on predetermined dates. For example, a customer might order 100 items, delivered 10 at a time, on a weekly basis. In this case, the customer might send a scheduling agreement release to you.
A scheduling agreement release can have multiple schedule lines for any single line in a purchase order or other business document. A single schedule line contains fields for delivery date and time and for scheduled quantity and unit of measure.
Customers can periodically communicate releases to you, and you can create ship notices for materials requested through scheduling agreement releases. From the Items to Ship tab, you can create a single ship notice containing items from several purchase orders that all are due by the same date.
Scheduling agreement releases have the following limitations:
● Scheduling agreement releases don't support order confirmations.● You can't use scheduling agreement releases for order confirmations.● The processing of non-scheduled items is not affected by scheduling agreement releases.
Procedure
1. Click the Inbox tab.2. Expand Search Filters, and choose Search only scheduling agreement releases.
16 C O N F I D E N T I A LReceiving and fulfilling orders
Topics about viewing details for orders or releases

3. Click the order number of a scheduling agreement release to open it.4. Click the Previous Releases tab.5. To view additional details, click Show Release Detail.
How to view order attachmentsYou can view attachments associated with purchase orders. Orders and order line items with attachments are identified by a paper clip icon next to the order number or order line number.
Procedure
1. Click the Inbox tab.2. Click an order number link to open the order.3. Do one of the following:
○ For header-level attachments, go to the Attachments area.○ For line-level attachments, click the Details link within a line item to show its attachments.
4. Click the name of an attachment.5. Perform one of the following actions:
○ Save the file if you want to send it to someone or review it later. Large files can take several minutes to download.
○ Open the file to view it online. Your web browser starts the process to show the attachment. If your web browser doesn't recognize a file format, it prompts you to save the file.
NoteAttachments expire 18 months after Ariba Network receives them. After they expire, they are no longer available online. If you need attachments that have expired, contact your customer directly.
How to download a custom PDF for an orderIf your customer has defined custom layouts for orders and assigned them to your Ariba Network account, you can download a custom PDF for each order.
Procedure
1. Click the Inbox tab.
Receiving and fulfilling ordersTopics about viewing details for orders or releases C O N F I D E N T I A L 17
2. Click an order number link to open it.3. At the top of page, click Download PDF, and choose a layout from the dropdown list.
NoteIf the Download PDF link doesn't display a drowdown list of layouts, your customer hasn't provided any custom order layouts to you.
4. Your browser downloads a PDF file containing the order. You can open it in a PDF application (for example, Adobe Reader) or save the file to your computer.
How to respond to order inquiries
After sending you an order, customers can send you order inquiries to ask about the status of a specific order. You reply to an inquiry to provide customers with information that falls outside of an order confirmation or ship notice.
Context
Order inquiries are tracked with orders so that both you and your customers can keep track of them. The number of inquiries you have received against a specific order is shown in the Inquiries column of the Orders and Releases list on the Inbox tab. You also receive alerts to let you know when you have received an order inquiry.
Procedure
1. Click the Inbox tab.2. Click the number link in the Inquiries column for the order that has an inquiry to which you want to respond.
The Inquiry Detail page opens.3. Click Reply.4. To reply to an inquiry about the order as a whole, enter your reply in the Comments field at the header level. To
reply to inquiries about specific line items, enter your replies in the Comments fields for the respective line items.
NoteIn cases where your customer has not allowed line-item-level responses, the order inquiry message that appears on the Inquiry Detail tab states that your customer requires an order confirmation as reply.
5. Click Next.6. Review your comments, and then click Submit.
18 C O N F I D E N T I A LReceiving and fulfilling orders
Topics about viewing details for orders or releases
Order statusesAriba Network shows the current routing, processing, and settlement statuses for each order.
Routing status
Routing Status indicates whether a purchase order or service order is queued, sent, acknowledged, or if routing failed.
Ariba Network displays the following routing statuses for orders:
Routing Status Definition
Queued Initial state. Ariba Network received the order but no further action was taken.
Sent Ariba Network sent the order to your account.
Acknowledged You received the order.
Failed Ariba Network experienced a problem routing the order to your preferred order routing method. For example, your back end order fulfillment system could have experienced a problem that prevented Ariba Network from successfully routing the order. You can resend orders that have a Failed routing status.
Order status
Order Status indicates where the order stands in regard to your processing of the order.
Ariba Network displays the following statuses for orders and releases in the Home dashboard and on the Orders and Releases table on the Inbox tab:
Order Status Definition
New Initial state. You have not updated the order status.
Changed Your customer canceled or replaced the order by a sending a subsequent (changed) order.
Confirmed You agreed to ship all line items.
Receiving and fulfilling ordersTopics about viewing details for orders or releases C O N F I D E N T I A L 19
Order Status Definition
Partially Confirmed
Partially Shipped
Partially Serviced
Partially Invoiced
Partially Rejected
The order is in progress.
If you update part of a purchase order, Ariba Network reports the partial status for the entire purchase order. For example, if you partially confirmed an order and then you partially ship either the previously confirmed order line or a different order line, the purchase order status is set to Partially Shipped. You can still continue to confirm order line items regardless of the shipping status until you have confirmed all order lines.
For service orders, you can continue to create service sheets for unplanned service lines up to their hidden maximum amounts (which may be larger than their subtotals) or planned service lines up to their subtotals. The service order status is set to Partially Serviced until all of the service lines are serviced.
Serviced The order is fully serviced. You cannot create any more service sheets for any more service lines in the order.
Shipped Final state. You shipped the entire order.
Invoiced The order is fully invoiced. The Amount Invoiced column shows how much money you have invoiced or charged against the purchase order. For older purchase orders, Ariba Network displays Yes to indicating that you have submitted invoices.
Received
Partially Received
Returned
Statuses for receipts that are sent by the buyer from their ERP system. The purchase order status is updated based on this information. On the Order Detail page, each line item detail section displays the quantity of goods received or returned for that line item based on the information in the receipts.
Failed Ariba Network experienced a problem routing the order to your account. You can resend failed orders.
Settlement statuses
Settlement status indicates how you can settle payment for an order you fulfilled.
The Settlement column in your Inbox shows whether you need to create an invoice or charge a purchasing card (PCard) for a given order:
Settlement Description
Invoice Create an invoice to settle the order.
PCard Charge a PCard through your own charging system.
The Amount Invoiced column in your Inbox shows how much money you have invoiced or charged against the order.
20 C O N F I D E N T I A LReceiving and fulfilling orders
Topics about viewing details for orders or releases
Order view settings and optionsSome order information shows up based on customer language and currency settings. Other information depends on how you set up your catalogs and what viewing permissions you have.
Language and currency
Your customers determine the language of the purchase order content, such as line item descriptions or comments.
Ariba Network doesn't perform currency conversion for purchase orders. All monetary amounts show up in the currencies chosen by your customers. Your customers’ choices of language do not affect purchase order section titles, messages, tool tips, hint text, and field labels in the Ariba Network interface. Those are controlled by the language you configured for your web browser. If your web browser is configured for a language that isn't supported by Ariba Network, you'll see everything in English.
Credit card numbers
For increased security, Ariba Network masks card numbers by printing only the last four digits of credit card and PCard numbers in fax and email purchase orders. To view the full credit card account number, you can either click the link in the email or log in to your Ariba Network account and go to your Inbox. You need to have the Credit Card Number Access permission to view complete credit card numbers.
Ariba Network always passes full credit card and PCard numbers when sending purchase orders through cXML or EDI.
Advanced pricing details
You can upload a catalog containing items with advanced pricing details to allow your customers to send you purchase orders that include these items.
When viewing a purchase order, the Pricing Details table shows the Price Details and Unit Details sections for a line item. You can view the Unit Details section only when the unit of measure for the ordered item differs from the unit of measure for the price unit quantity specified or if the pricing is based on a different price unit quantity than 1. The advanced pricing details are also available when printing the purchase orders.
If you receive a change order for a blanket purchase order, the changes are not highlighted for the line item in the Pricing Details table. The Change column shows Edited for the line item that was changed.
NoteAriba Network doesn't support the advanced pricing details on contract documents.
Receiving and fulfilling ordersTopics about viewing details for orders or releases C O N F I D E N T I A L 21
Expected value and overall limit for unplanned line items
Customers can pass expected value and overall limit values for unplanned line items by using extrinsics. You can see the Expected Value field at the line-item level of the purchase order, while the Overall Limit field is hidden from your view. You can't submit service sheets that include unplanned line items with a value that exceeds the Overall Limit
Total landed cost
Total landed cost refers to the total cost of the products in the purchase order, along with the additional cost elements such as taxes, allowances, and charges. Purchase orders with total landed cost elements calculate and present the final amount payable by the customer.
When a customer sends a purchase order that includes total landed cost elements, Ariba Network shows the total landed cost information on the purchase order page. Total landed cost elements are applied at the individual line-item level or at the header level of a purchase order.
The Order Confirmation page shows the total landed cost information with modifications only if the order confirmation document is sent to Ariba Network through cXML.
Direct material fields
Direct material fields appear on purchase orders to make collaboration with your customer easier.
The following fields appear in the purchase order header if they are populated with data:
● Shipping Dates section○ Requested Delivery○ Earliest Delivery○ Latest Delivery○ Goods Pick Up
● Contact Information section: Includes any number of contact information fields, such as fields labeled manager, accountStatus, or accountID. However, Ariba Network automatically formats the field label for a contact person to Contact Person.
Payment terms and Incoterms
Payment Terms
The Payment Terms section of the order header has this format:
[Discount Rate %][Discount Term] NET [Regular Term][Payment Terms Explanation]
22 C O N F I D E N T I A LReceiving and fulfilling orders
Topics about viewing details for orders or releases
For example, the payment terms and their explanation might look like this:
PAYMENT TERMS1.000 % 14 NET 30After receipt of invoice: 14days 1% disc. 30days net
Incoterms
Incoterms are a series of predefined commercial terms published by the International Chamber of Commerce (ICC). The Incoterms three-letter trade terms are related to common contractual sales practices. They are intended primarily to clearly communicate the tasks, costs, and risks associated with the transportation and delivery of goods. The Incoterms 2010 edition supports the following 11 rules:
● EXW (Ex Works)● FCA (Free Carrier)● CPT (Carriage Paid To)● CIP (Carriage And Insurance Paid To)● DAT (Delivered At Terminal)● DAP (Delivered At Place)● DDP (Delivered Duty Paid)● FAS (Free Alongside Ship)● FOB (Free On Board)● CFR (Cost and Freight)● CIF (Cost, Insurance and Freight)
For detailed descriptions of the Incoterms rules, see the International Chamber of Commerce website .
Incoterms information can appear at the header and line-item level of purchase orders. The Incoterms section looks like this:
Incoterms InformationIncoterms Code: EXW (Ex Works)Incoterms Location: Lima
Receiving and fulfilling ordersTopics about viewing details for orders or releases C O N F I D E N T I A L 23
Topics about confirming or rejecting orders
In this section:
Order confirmations [page 24]
How to confirm or reject an entire order [page 25]
How to partially confirm, back-order, or reject purchase order items [page 27]
Line-item level information on order confirmations [page 28]
The items to confirm list [page 29]
Order confirmationsAn order confirmation indicates that you have agreed to ship items to your customer. You can review any documents that you have sent to your customers after retrieving them from your Outbox.
You can send order confirmations either manually or automatically to your customers. If you have an automated order generation system, you can send cXML or EDI order confirmations to your customers.
You are required to provide a confirmation number when confirming or partially confirming orders. Confirmation numbers can be any value from your internal systems, such as your order-processing application. If you don't have an internally-generated confirmation number, you can use any value, such as the purchase order number, with 'OC' prefixed; for example: OC1234.
You can attach one or more files to order confirmations at either the header or line level to give additional information to your customers. For example, you can send scanned copies of ship notices and service entry sheets.
In some cases you might be required to add an attachment to an order confirmation. For example, your customer might require you to add attachments for invoices that contain service line items.
NoteCustomers can disallow certain characters in the filenames of attachments that you upload.
You can also change advanced pricing details when confirming individual line items if your customer allows you to edit these values. When you change the values, Ariba Network shows the original and changed values for the line item in the Current Order Status section.
If your customer flagged an item as completed on the order, the following warning appears for the item: The buyer has marked this as Completed. This warning does not prevent you from submitting an order confirmation.
You can confirm individual line items with advanced pricing details for the following:
● Confirm with different status (Shipped, Backordered, Rejected)● Confirm partial quantities● Edit Unit Price, Price Unit Quantity, Price Unit, Unit Conversion, Shipping, and Tax at the line-item level.
24 C O N F I D E N T I A LReceiving and fulfilling orders
Topics about confirming or rejecting orders
How to confirm or reject an entire order
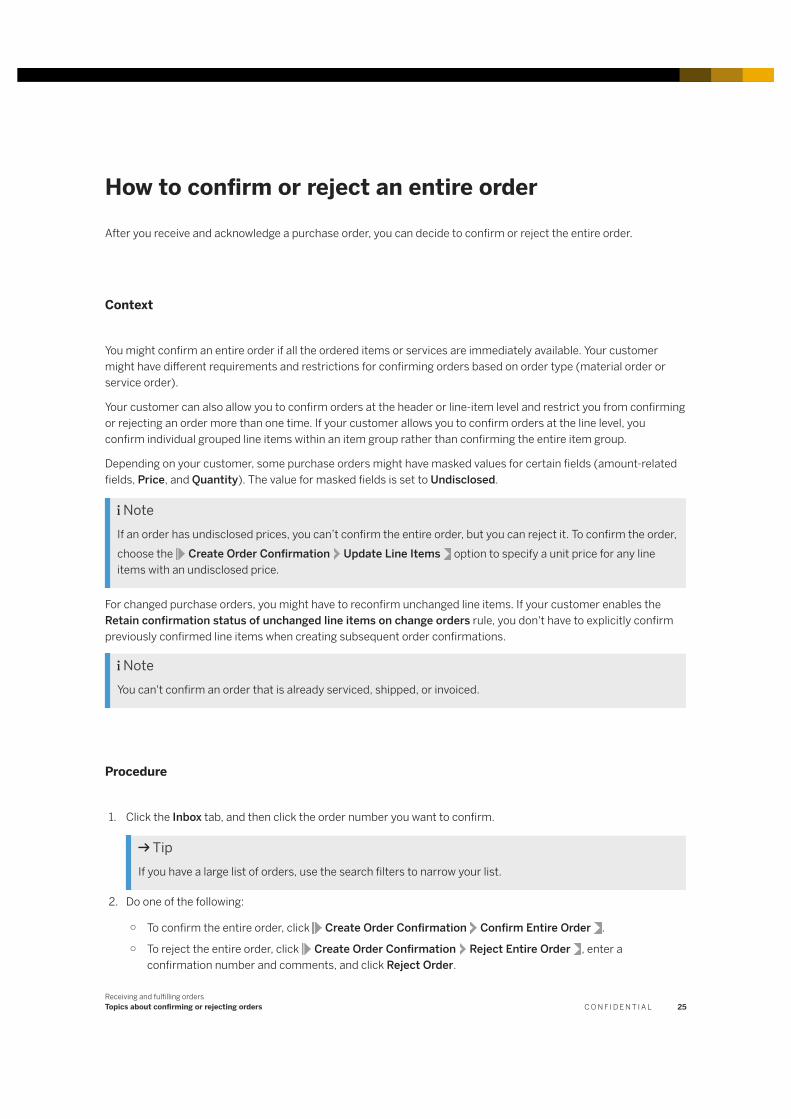
After you receive and acknowledge a purchase order, you can decide to confirm or reject the entire order.
Context
You might confirm an entire order if all the ordered items or services are immediately available. Your customer might have different requirements and restrictions for confirming orders based on order type (material order or service order).
Your customer can also allow you to confirm orders at the header or line-item level and restrict you from confirming or rejecting an order more than one time. If your customer allows you to confirm orders at the line level, you confirm individual grouped line items within an item group rather than confirming the entire item group.
Depending on your customer, some purchase orders might have masked values for certain fields (amount-related fields, Price, and Quantity). The value for masked fields is set to Undisclosed.
NoteIf an order has undisclosed prices, you can’t confirm the entire order, but you can reject it. To confirm the order, choose the Create Order Confirmation Update Line Items option to specify a unit price for any line items with an undisclosed price.
For changed purchase orders, you might have to reconfirm unchanged line items. If your customer enables the Retain confirmation status of unchanged line items on change orders rule, you don't have to explicitly confirm previously confirmed line items when creating subsequent order confirmations.
NoteYou can't confirm an order that is already serviced, shipped, or invoiced.
Procedure
1. Click the Inbox tab, and then click the order number you want to confirm.
TipIf you have a large list of orders, use the search filters to narrow your list.
2. Do one of the following:
○ To confirm the entire order, click Create Order Confirmation Confirm Entire Order .
○ To reject the entire order, click Create Order Confirmation Reject Entire Order , enter a confirmation number and comments, and click Reject Order.
Receiving and fulfilling ordersTopics about confirming or rejecting orders C O N F I D E N T I A L 25
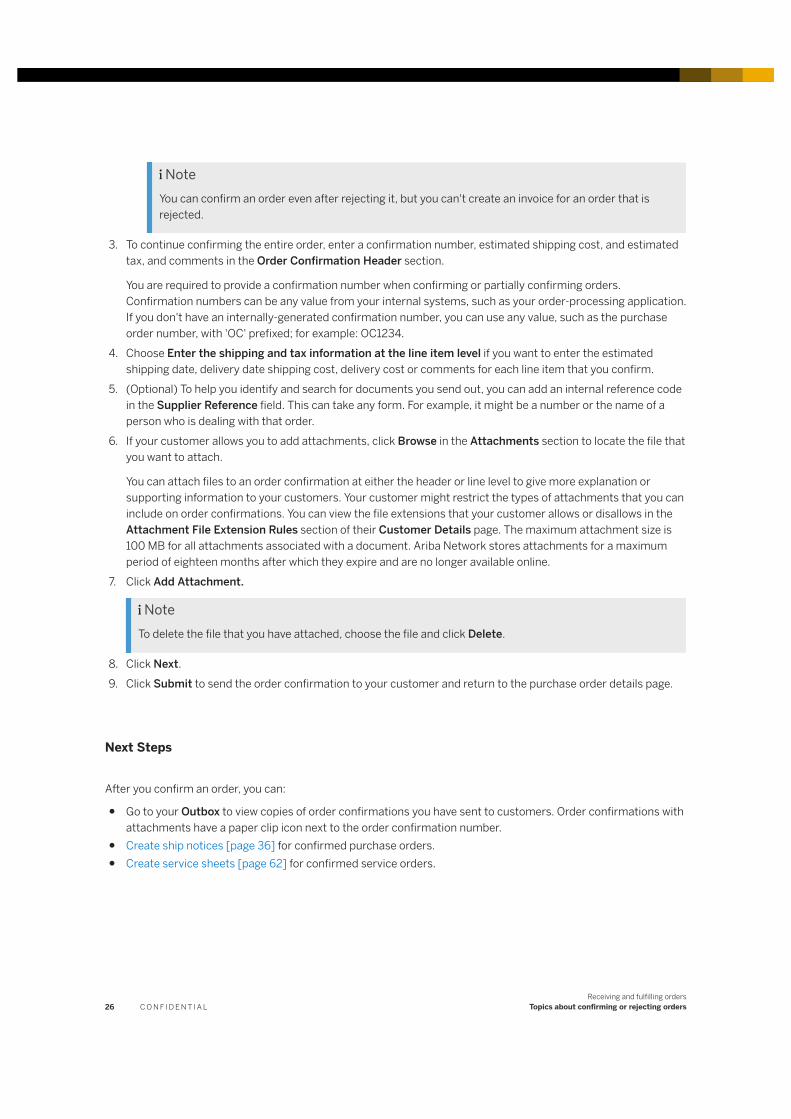
NoteYou can confirm an order even after rejecting it, but you can't create an invoice for an order that is rejected.
3. To continue confirming the entire order, enter a confirmation number, estimated shipping cost, and estimated tax, and comments in the Order Confirmation Header section.
You are required to provide a confirmation number when confirming or partially confirming orders. Confirmation numbers can be any value from your internal systems, such as your order-processing application. If you don't have an internally-generated confirmation number, you can use any value, such as the purchase order number, with 'OC' prefixed; for example: OC1234.
4. Choose Enter the shipping and tax information at the line item level if you want to enter the estimated shipping date, delivery date shipping cost, delivery cost or comments for each line item that you confirm.
5. (Optional) To help you identify and search for documents you send out, you can add an internal reference code in the Supplier Reference field. This can take any form. For example, it might be a number or the name of a person who is dealing with that order.
6. If your customer allows you to add attachments, click Browse in the Attachments section to locate the file that you want to attach.
You can attach files to an order confirmation at either the header or line level to give more explanation or supporting information to your customers. Your customer might restrict the types of attachments that you can include on order confirmations. You can view the file extensions that your customer allows or disallows in the Attachment File Extension Rules section of their Customer Details page. The maximum attachment size is 100 MB for all attachments associated with a document. Ariba Network stores attachments for a maximum period of eighteen months after which they expire and are no longer available online.
7. Click Add Attachment.
NoteTo delete the file that you have attached, choose the file and click Delete.
8. Click Next.9. Click Submit to send the order confirmation to your customer and return to the purchase order details page.
Next Steps
After you confirm an order, you can:
● Go to your Outbox to view copies of order confirmations you have sent to customers. Order confirmations with attachments have a paper clip icon next to the order confirmation number.
● Create ship notices [page 36] for confirmed purchase orders.● Create service sheets [page 62] for confirmed service orders.
26 C O N F I D E N T I A LReceiving and fulfilling orders
Topics about confirming or rejecting orders
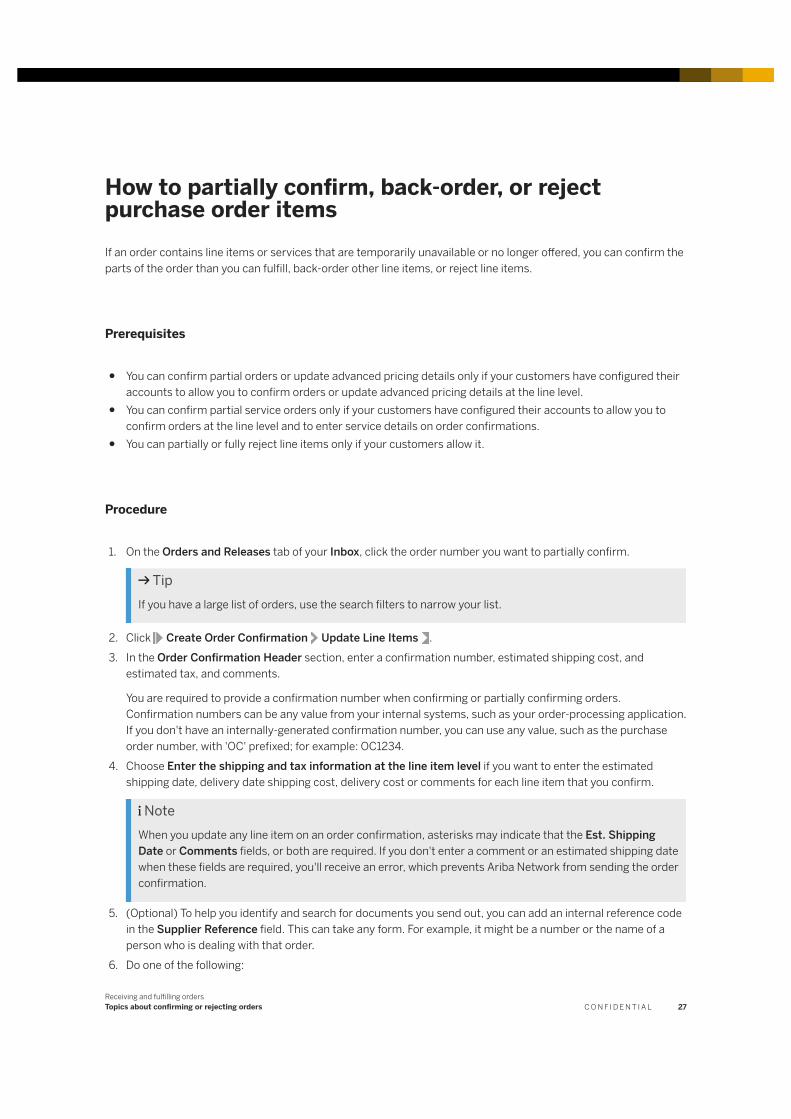
How to partially confirm, back-order, or reject purchase order itemsIf an order contains line items or services that are temporarily unavailable or no longer offered, you can confirm the parts of the order than you can fulfill, back-order other line items, or reject line items.
Prerequisites
● You can confirm partial orders or update advanced pricing details only if your customers have configured their accounts to allow you to confirm orders or update advanced pricing details at the line level.
● You can confirm partial service orders only if your customers have configured their accounts to allow you to confirm orders at the line level and to enter service details on order confirmations.
● You can partially or fully reject line items only if your customers allow it.
Procedure
1. On the Orders and Releases tab of your Inbox, click the order number you want to partially confirm.
TipIf you have a large list of orders, use the search filters to narrow your list.
2. Click Create Order Confirmation Update Line Items .3. In the Order Confirmation Header section, enter a confirmation number, estimated shipping cost, and
estimated tax, and comments.
You are required to provide a confirmation number when confirming or partially confirming orders. Confirmation numbers can be any value from your internal systems, such as your order-processing application. If you don't have an internally-generated confirmation number, you can use any value, such as the purchase order number, with 'OC' prefixed; for example: OC1234.
4. Choose Enter the shipping and tax information at the line item level if you want to enter the estimated shipping date, delivery date shipping cost, delivery cost or comments for each line item that you confirm.
NoteWhen you update any line item on an order confirmation, asterisks may indicate that the Est. Shipping Date or Comments fields, or both are required. If you don't enter a comment or an estimated shipping date when these fields are required, you'll receive an error, which prevents Ariba Network from sending the order confirmation.
5. (Optional) To help you identify and search for documents you send out, you can add an internal reference code in the Supplier Reference field. This can take any form. For example, it might be a number or the name of a person who is dealing with that order.
6. Do one of the following:
Receiving and fulfilling ordersTopics about confirming or rejecting orders C O N F I D E N T I A L 27
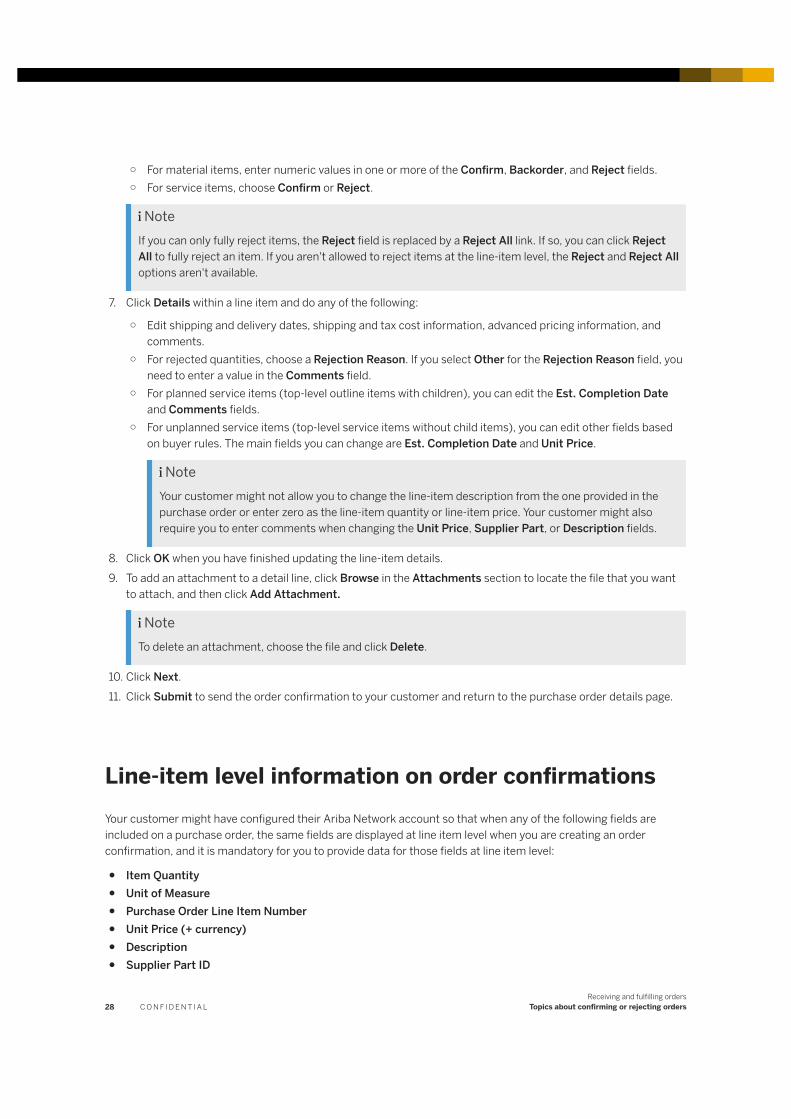
○ For material items, enter numeric values in one or more of the Confirm, Backorder, and Reject fields.○ For service items, choose Confirm or Reject.
NoteIf you can only fully reject items, the Reject field is replaced by a Reject All link. If so, you can click Reject All to fully reject an item. If you aren't allowed to reject items at the line-item level, the Reject and Reject All options aren't available.
7. Click Details within a line item and do any of the following:
○ Edit shipping and delivery dates, shipping and tax cost information, advanced pricing information, and comments.
○ For rejected quantities, choose a Rejection Reason. If you select Other for the Rejection Reason field, you need to enter a value in the Comments field.
○ For planned service items (top-level outline items with children), you can edit the Est. Completion Date and Comments fields.
○ For unplanned service items (top-level service items without child items), you can edit other fields based on buyer rules. The main fields you can change are Est. Completion Date and Unit Price.
NoteYour customer might not allow you to change the line-item description from the one provided in the purchase order or enter zero as the line-item quantity or line-item price. Your customer might also require you to enter comments when changing the Unit Price, Supplier Part, or Description fields.
8. Click OK when you have finished updating the line-item details.9. To add an attachment to a detail line, click Browse in the Attachments section to locate the file that you want
to attach, and then click Add Attachment.
NoteTo delete an attachment, choose the file and click Delete.
10. Click Next.11. Click Submit to send the order confirmation to your customer and return to the purchase order details page.
Line-item level information on order confirmationsYour customer might have configured their Ariba Network account so that when any of the following fields are included on a purchase order, the same fields are displayed at line item level when you are creating an order confirmation, and it is mandatory for you to provide data for those fields at line item level:
● Item Quantity● Unit of Measure● Purchase Order Line Item Number● Unit Price (+ currency)● Description● Supplier Part ID
28 C O N F I D E N T I A LReceiving and fulfilling orders
Topics about confirming or rejecting orders
● Customer Part ID● Need by Date (Delivery Date in the order confirmation)● Price Unit● Unit Conversion● Price Unit Quantity
When these fields are mandatory at line item level, when creating an order confirmation:
● Line item level information is mandatory for an entire order confirmation and an entire order rejection. (If a cXML order confirmation only contains header information, it fails).
● If items are confirmed as-is, backordered or rejected, the information in all required fields at line item level must be the same as that on the order (with the exception of the delivery date).
● The following order confirmation-related fields must also be sent for each line item:○ Item Confirmation Type○ Item Confirmed Quantity
● In the case of service orders with a parent-child structure, whether suppliers are required to send only parent or parent and child item information in an order confirmation depends on the Require that if suppliers confirm service orders, they do so at the child line level rule. Whether or not this rule is enabled, every line item in the order confirmation (at parent and child level) must contain data for the mandatory fields that were sent in the order.
● For material orders, if the buyer has not enabled the Allow suppliers to send order confirmations for material orders at the line-item level rule, the system will reject the order confirmation from the supplier if it is different from the order.For service orders, if the buyer has not enabled the Allow suppliers to send order confirmations for service orders at the line-item level rule, the system will reject the order confirmation from the supplier if it is different from the order.
● If the Allow suppliers to reject quantities for material orders at the line-item level in order confirmationsrule is enabled, the supplier can still reject orders entirely.
● The Require suppliers to provide a reason when they reject an order rule is enforced when a cXML order confirmation has all items fully rejected, unless the rule that requires suppliers to provide a reason when they reject an order at the line-item level is also enabled.
● The Require suppliers to provide a reason when they reject an order at the line-item level rule is enforced for every rejected item in the order confirmation cXML. If all items in the order confirmation cXML are rejected, the rule should only be enforced if there isn’t a rejection reason at header level.
The items to confirm listIn the order collaboration process for direct materials, suppliers typically strive to establish long-term, repeat business with their customers. From the supplier perspective, a successful business model involves a continual flow of incoming purchase orders from a number of buying customers. The supplier must efficiently process these incoming purchase orders: confirming line items when confirmation is required, creating ship notices, and shipping goods. Also, the supplier must process purchase orders that have been changed. Further, the supplier must not confirm orders for quantities or delivery dates that are not achievable. The process of confirming orders quickly and correctly therefore can be very challenging because of the sheer volume of data and the level of detail required.
The items to confirm list feature enables the supplier to efficiently confirm incoming purchase orders across multiple customers. The items to confirm list displays a list of purchase orders that includes information critical for a supplier to accurately confirm many order details simultaneously.
Receiving and fulfilling ordersTopics about confirming or rejecting orders C O N F I D E N T I A L 29
In this section:
Workflow for the items to confirm list [page 30]
How to confirm purchase order line items [page 30]
How to edit shipping dates, delivery dates, or quantity when creating an order confirmation [page 31]
Delivery date tolerances [page 32]
How to reject an entire order for material items [page 32]
Workflow for the items to confirm list
1. Search for purchase order line items.2. View purchase order line items, with the default sort showing the items that should be confirmed first.3. Confirm purchase orders in one of the following ways:
○ Confirm one or more entire purchase orders at the header level○ Confirm or reject single purchase order line items, or modify quantities before confirming a line item, using
the update line item option○ Confirm or reject multiple purchase order line items, including line items from different purchase orders
How to confirm purchase order line items
Context
You can confirm individual line items from a purchase order. Do the following.
Procedure
1. On the Inbox tab, click Items to Confirm.2. Optional: To search for specific purchase orders, click the triangle next to Search Filters to expand the search
filters pane. Search by customer, order number or part number, category (consignment items, subcontract items, or both) and constrain the search as needed by using any of the controls in the pane.
3. Do one of the following:
○ To confirm a single line item, click Actions for the desired purchase order line item. Then click one of the following:○ Confirm Entire Order○ Confirm Requested Quantity○ Update Line Item
Enter information into the required fields of the order confirmation. Click Next, and review the information.
30 C O N F I D E N T I A LReceiving and fulfilling orders
Topics about confirming or rejecting orders

NoteIf Confirm Entire Order is used for order confirmation, the fields Est. Shipping Date, Est. Delivery Date, Est. Shipping Cost, and Est. Tax Cost are hidden when the following conditions exist:
○ The default transaction rule Allow suppliers to send order confirmations for material orders at the line-item level is enabled.
○ Each purchase order item has at least one schedule line.
○ To confirm the requested quantities for purchase order line items, select one or more purchase orders. Then, click Confirm Requested Quantities, and review the information.
○ To reject the requested quantities for purchase order line items, click Actions for the desired purchase order. Then, click Reject Requested Quantity, and review the information.The Reject Requested Quantity button might be disabled for orders for material items if the buyer has determined this in their business rules. If the buyer has enabled this capability for material orders, an editable Reject field is also available where the supplier can enter the quantity they want to reject for a line item. This applies only to orders for material items.
○ To confirm an entire order, click Actions for the order desired. Then, click Confirm Entire Order.○ To confirm one or more entire orders, select the purchase orders desired. Then, click the Confirm Entire
Orders button, and review the information.
If you select multiple line items and click “Confirm Requested Quantities” or “Confirm Entire Orders”, the system generates multiple order confirmations with auto-created confirmation numbers. In this situation the supplier cannot enter their own confirmation numbers.
If the buyer's business rules are configured to allow it, you might be able to edit quantity, estimated shipping date, and estimated delivery date for line items on the Items to Confirm table.
If the buyer has set tolerances for quantity or delivery dates, you will encounter error messages on the user interface if you try to confirm quantities or delivery dates that are outside the permitted tolerances.
When the Only items that can be confirmed filter option is selected, a Select All check box is available on the Items to Confirm table. This is available for confirmable items only. When all items are selected, users can then use the existing Confirm Requested Quantities and Confirm Entire Orders actions on all selected items.
4. Click Submit.
How to edit shipping dates, delivery dates, or quantity when creating an order confirmation
Prerequisites
The Allow supplier to edit estimated shipping dates, delivery dates, and quantities rule must be enabled by the buyer for estimated shipping dates, delivery dates, and quantities to be editable for line items.
Receiving and fulfilling ordersTopics about confirming or rejecting orders C O N F I D E N T I A L 31
Procedure
1. Log in to your Ariba Network supplier account.
2. Select Inbox Orders and Releases Items to Confirm .3. Search for the order for which you want to create an order confirmation.4. For orders without schedule lines, do the following:
○ To edit the quantity to be confirmed for a line item, enter a quantity in the Qty to Confirm field for that line item and press the Enter key. Note that the quantity you enter here cannot be greater that the figure in the Unconfirmed Qty field.
○ To edit the estimated shipping date for a line item, select a date in the Estimated Shipping field for that line item.
○ To edit the estimated delivery date for a line item, select a date in the Estimated Delivery field for that line item. Note that the delivery date cannot be before the shipping date.
5. For orders with schedule lines, click Edit in the Schedule Line column for the line item you want to edit, and do the following:
○ Enter an updated Estimated Shipping Date, Estimated Delivery Date, or Quantity for any schedule line. The Need By date is included in the Estimated Delivery Date fields by default. This can be overwritten for any schedule line.
○ Click Accept.6. Select the check-box for the line item, and click Confirm Requested Quantities.
Delivery date tolerances
A buyer might include tolerances for delivery dates on the back end when creating a purchase order. A delivery date tolerance is the maximum number of days the actual delivery date can differ from the delivery date on an order.
If tolerances were applied to an order, the supplier cannot enter a delivery date that is outside the tolerance when creating an order confirmation. While entering delivery dates on the order confirmation, if the supplier enters a delivery date that is outside the permitted tolerance, a message is displayed to indicate this.
Delivery date tolerances can only apply to purchase order line items that have requested delivery dates.
How to reject an entire order for material items
If an order is for material items only, and the buyer has disabled a rule that allows suppliers to reject quantity by order confirmation for material orders, suppliers cannot reject an entire order, and the Reject Entire Order button is disabled in the following locations:
● On the action menu that displays when you click the Create Order Confirmation icon ( ) at Inbox Orders and Releases .
● On the action menu that displays when you click the Create Order Confirmation icon ( ) at the bottom of the table at Inbox Orders and Releases . In this instance the Reject Entire Order button is not grayed out,
32 C O N F I D E N T I A LReceiving and fulfilling orders
Topics about confirming or rejecting orders
but if you select an order and then select Reject Entire Order, an error message displays to let you know that you cannot reject the entire order.
● On the two action menus that display when you click Create Order Confirmation on the order details page at Inbox Orders and Releases and open an order.
For orders containing material items only, the rule must be enabled for the Reject Entire Order button to be enabled. If an order is for services, or a mixture of service and material items, this rule does not apply, and suppliers can reject an entire order whether the rule is enabled or not.
Receiving and fulfilling ordersTopics about confirming or rejecting orders C O N F I D E N T I A L 33
Topics about sending ship notices to customers
In this section:
Ship notices [page 34]
Draft ship notices [page 35]
How to create a ship notice [page 36]
How to create a ship notice from a scheduling agreement release [page 42]
How to create a ship notice from several orders and releases [page 43]
How to create a ship notice with one ship-to address for all items [page 44]
Ship notice barcode labels [page 44]
How to view items to ship by shipment priority status or date range [page 48]
How to create a draft ship notice [page 48]
How to edit a draft ship notice [page 49]
Canceling ship notices [page 49]
Ship noticesYou can generate ship notices manually or send them automatically from your external order management system to Ariba Network though cXML or EDI.
When you create a ship notice, Ariba Network applies the information to the affected line items and sends the information to your customers. You can review ship notices that you submitted in your Outbox.
Whether you can send ship notices to your customers depends on your customers' settings. Your customers can:
● Prevent you from sending ship notices altogether. Ariba Network disables the Create Ship Notice option.● Prevent you from including attachments with ship notices.● Restrict the kinds of files you can provide as attachments to ship notices. You can view the file extensions that
your buyer allows or disallows in the Attachment File Extension Rules section of their Customer Details page.● Allow you to create ship notices at the line-item level. If so, you create ship notices for individual items within an
item group rather than for the entire item group as a unit.● Allow you to ship partial orders when you create ship notices at the line-item level.● Allow you to include terms of delivery on ship notices even when the customer's purchase order does not
provide this information. If the customer provides terms of delivery, you can change this information on your ship notice.
● Allow you to add terms of delivery fields at either header or line-item levels.● Allow you to include transport information on ship notices even when the customer’s purchase order does not
provide this information. You can add transport information and additional fields only at the header level. If the customer provides transport information, you can change this information on your ship notice.
34 C O N F I D E N T I A LReceiving and fulfilling orders
Topics about sending ship notices to customers
● Allow you to enter the actual shipping or estimated shipping date in your ship notices.
NoteIf a customer sends you a blanket purchase order (BPO) with masked values for certain fields (for example, amount-related fields, price, or quantity), the value for the masked fields is set to Undisclosed on the BPO. You can't create ship notices for BPOs with undisclosed fields.
Even if you set the shipping status through cXML or EDI, you can update the shipping status manually on Ariba Network using the Create Ship Notice button for that order. If you change the order shipping status manually for these orders, make sure that you keep your external order management system updated with the order information stored on Ariba Network.
LimitationsYou can't create a ship notice for a purchase order that includes one or more service lines. Create a service sheet [page 62] for service orders instead.
If a customer has uploaded their own unit of measure data, you can search for units of measure for packaging dimensions on a ship notice.
If your customers allow it, you can attach files to ship notices to provide more explanation or supporting information. Attachments can be in any format allowed by your customer, such as Word documents, fax images, or Excel spreadsheets. The maximum attachment size is 100 MB for all attachments associated with a ship notice.
Ariba Network always stores attachments online, and you can view them in your Ariba Network account. Attachments expire 18 months after Ariba Network receives them. After they expire, they are no longer available for viewing.
Draft ship noticesSuppliers can save a draft version of a ship notice while it is being created.
In addition, suppliers can download a PDF version of a draft ship notice if the download PDF functionality has been configured for them by the buyer.
Draft ship notices can be edited, deleted, or submitted. Ariba Network deletes draft ship notices automatically after seven days.
NoteDraft ship notices are not considered in balance tracking or for validations, such as ability to invoice up to shipped quantity.
Related Information
How to create a draft ship notice [page 48]How to edit a draft ship notice [page 49]
Receiving and fulfilling ordersTopics about sending ship notices to customers C O N F I D E N T I A L 35
How to download a ship notice barcode label [page 46]
How to create a ship noticeYou can create ship notices to keep your customers informed about when they can expect to receive the items they ordered from your company.
Procedure
1. Go to Inbox Orders and Releases , and then click the order number you plan to ship.2. Click Create Ship Notice at the top of the purchase order.3. In the Ship Notice Header section, enter the information for this shipment.
At minimum, you need to provide a Packing Slip ID, Tracking #, and the address where you are shipping from.4. (Optional) To help you identify and search for documents you send out, you can add an internal reference code
in the Supplier Reference field. This can take any form. For example, it might be a number or the name of a person who is dealing with that order.
5. In the Item section, do one of the following:
○ For each line item, in the Ship Qty field, enter the number of that item that is included in this shipment.○ To indicate that none of a particular item is included in this shipment, click the Remove link to the right of
that line item. This removes the item from the current ship notice but not from the source purchase order. The item remains available for future ship notices.
NoteIf the order contains advanced pricing details, Ariba Network shows the pricing details for the line items when you create ship notices. If the customer flagged an item as completed on the order, the following warning appears for the item: The buyer has marked this as Completed. This warning does not prevent you from submitting the ship notice.
6. (Optional) Enter the ID number for the batch in which each item was made into the Batch ID field.7. If you need to add shipping information on line item level, click Details for a line item to show the Create Ship
Notice Shipping Details page.8. To enter hazardous materials instructions, enter a description of the hazardous materials to be shipped, select
a hazardous materials code system from the Code Type menu, and enter the code.9. To change the terms of delivery, enter the necessary information in the Delivery Information section.10. To enter serial numbers or asset information, enter the item’s serial number or asset tag and click Add. Repeat
as necessary to add more serial numbers or asset tags.11. Click Next. Confirm the information on the review page. To make changes, click Previous.
Any serial number and asset information you entered appears on this page.12. Click Submit.
Ariba Network sends the ship notice to your customer and returns you to your Inbox.
36 C O N F I D E N T I A LReceiving and fulfilling orders
Topics about sending ship notices to customers

Next Steps
After you create a ship notice, you can:
● Review copies of ship notices you have sent in your Outbox.● Review order status information in your Inbox. You can see updated status information for orders in the Order
Status column.● Create invoices against the order.
Related Information
How to create a ship notice from a scheduling agreement release [page 42]How to create a ship notice from several orders and releases [page 43]
Ship notice fields
When you create a ship notice, you can provide information about the order, such as shipping dates, transport information, and delivery details.
The following table lists default fields available when creating ship notices.
Field Description
Ship From and Deliver To
Contact Person This field appears for the Ship From and Deliver To sections only and shows up only when imported from cXML.
Shipping
Packing Slip ID The packing slip number from your shipping system or carrier.
Invoice # The associated invoice number.
Requested Delivery Date Delivery date requested by the buyer.
Ship Notice Type Choose a value:
● Actual: Lets you specify the Actual Shipping Date and Actual Delivery Date.● Estimated: Lets you specify the Estimated Shipping Date and Estimated Delivery Date.
Actual Shipping Date/Estimated Shipping Date
Actual or estimated date the goods shipped.
Actual Delivery Date/Estimated Delivery Date
Actual or estimated date for delivery of goods.
Hazard Type Select one of the following classifications of dangerous goods:
● Unitied Nations Dangerous Goods● International Marine Organization Dangerous Goods● North American Hazardous Goods
Receiving and fulfilling ordersTopics about sending ship notices to customers C O N F I D E N T I A L 37
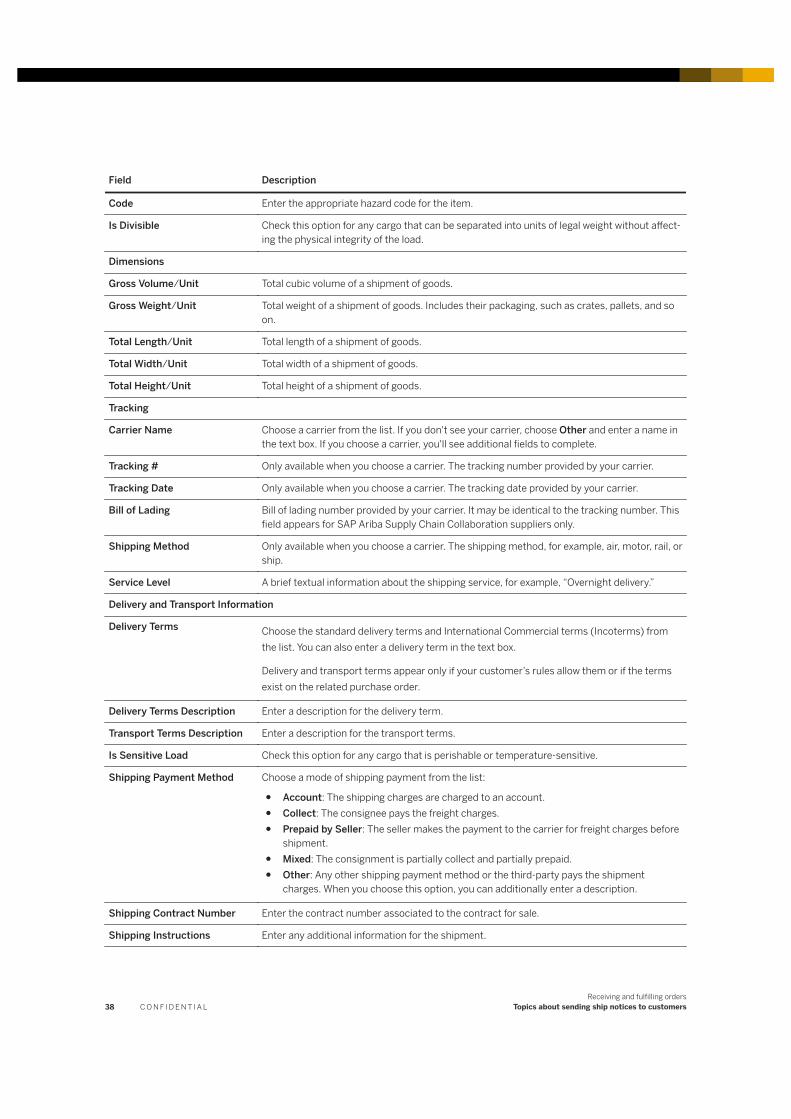
Field Description
Code Enter the appropriate hazard code for the item.
Is Divisible Check this option for any cargo that can be separated into units of legal weight without affect-ing the physical integrity of the load.
Dimensions
Gross Volume/Unit Total cubic volume of a shipment of goods.
Gross Weight/Unit Total weight of a shipment of goods. Includes their packaging, such as crates, pallets, and so on.
Total Length/Unit Total length of a shipment of goods.
Total Width/Unit Total width of a shipment of goods.
Total Height/Unit Total height of a shipment of goods.
Tracking
Carrier Name Choose a carrier from the list. If you don't see your carrier, choose Other and enter a name in the text box. If you choose a carrier, you'll see additional fields to complete.
Tracking # Only available when you choose a carrier. The tracking number provided by your carrier.
Tracking Date Only available when you choose a carrier. The tracking date provided by your carrier.
Bill of Lading Bill of lading number provided by your carrier. It may be identical to the tracking number. This field appears for SAP Ariba Supply Chain Collaboration suppliers only.
Shipping Method Only available when you choose a carrier. The shipping method, for example, air, motor, rail, or ship.
Service Level A brief textual information about the shipping service, for example, “Overnight delivery.”
Delivery and Transport Information
Delivery Terms Choose the standard delivery terms and International Commercial terms (Incoterms) from the list. You can also enter a delivery term in the text box.
Delivery and transport terms appear only if your customer’s rules allow them or if the terms exist on the related purchase order.
Delivery Terms Description Enter a description for the delivery term.
Transport Terms Description Enter a description for the transport terms.
Is Sensitive Load Check this option for any cargo that is perishable or temperature-sensitive.
Shipping Payment Method Choose a mode of shipping payment from the list:
● Account: The shipping charges are charged to an account.● Collect: The consignee pays the freight charges.● Prepaid by Seller: The seller makes the payment to the carrier for freight charges before
shipment.● Mixed: The consignment is partially collect and partially prepaid.● Other: Any other shipping payment method or the third-party pays the shipment
charges. When you choose this option, you can additionally enter a description.
Shipping Contract Number Enter the contract number associated to the contract for sale.
Shipping Instructions Enter any additional information for the shipment.
38 C O N F I D E N T I A LReceiving and fulfilling orders
Topics about sending ship notices to customers
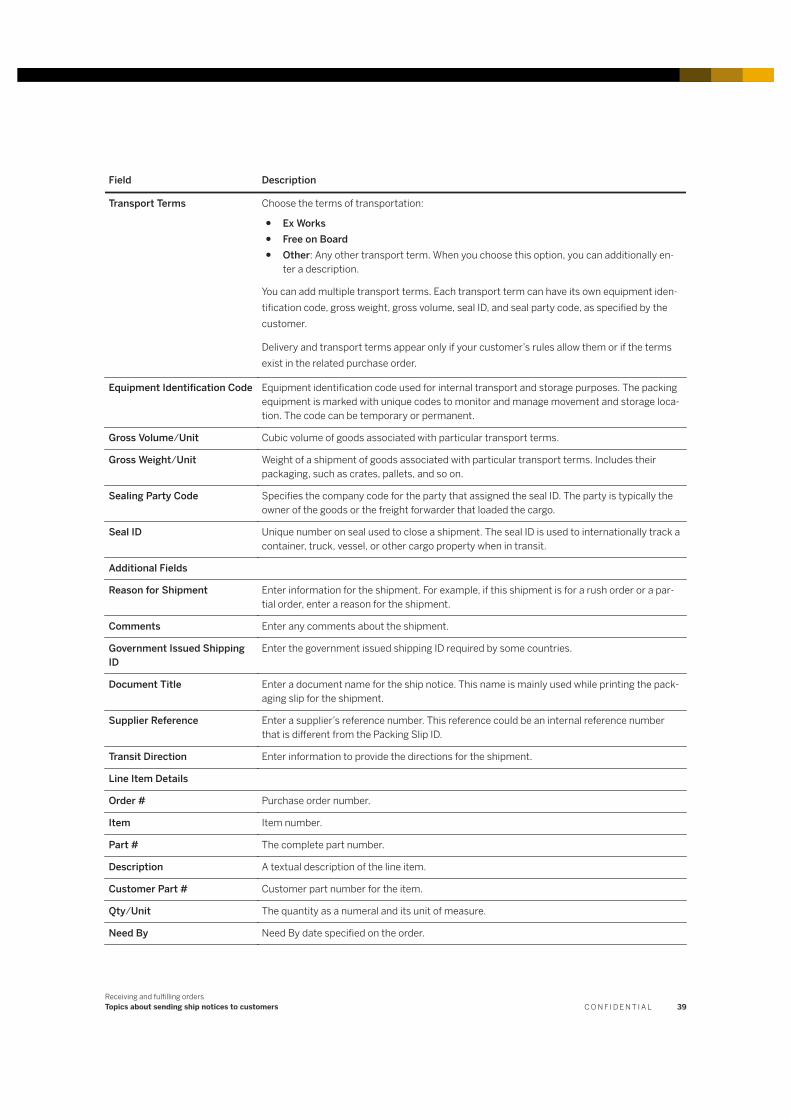
Field Description
Transport Terms Choose the terms of transportation:
● Ex Works● Free on Board● Other: Any other transport term. When you choose this option, you can additionally en
ter a description.
You can add multiple transport terms. Each transport term can have its own equipment identification code, gross weight, gross volume, seal ID, and seal party code, as specified by the customer.
Delivery and transport terms appear only if your customer’s rules allow them or if the terms exist in the related purchase order.
Equipment Identification Code Equipment identification code used for internal transport and storage purposes. The packing equipment is marked with unique codes to monitor and manage movement and storage location. The code can be temporary or permanent.
Gross Volume/Unit Cubic volume of goods associated with particular transport terms.
Gross Weight/Unit Weight of a shipment of goods associated with particular transport terms. Includes their packaging, such as crates, pallets, and so on.
Sealing Party Code Specifies the company code for the party that assigned the seal ID. The party is typically the owner of the goods or the freight forwarder that loaded the cargo.
Seal ID Unique number on seal used to close a shipment. The seal ID is used to internationally track a container, truck, vessel, or other cargo property when in transit.
Additional Fields
Reason for Shipment Enter information for the shipment. For example, if this shipment is for a rush order or a partial order, enter a reason for the shipment.
Comments Enter any comments about the shipment.
Government Issued Shipping ID
Enter the government issued shipping ID required by some countries.
Document Title Enter a document name for the ship notice. This name is mainly used while printing the packaging slip for the shipment.
Supplier Reference Enter a supplier’s reference number. This reference could be an internal reference number that is different from the Packing Slip ID.
Transit Direction Enter information to provide the directions for the shipment.
Line Item Details
Order # Purchase order number.
Item Item number.
Part # The complete part number.
Description A textual description of the line item.
Customer Part # Customer part number for the item.
Qty/Unit The quantity as a numeral and its unit of measure.
Need By Need By date specified on the order.
Receiving and fulfilling ordersTopics about sending ship notices to customers C O N F I D E N T I A L 39
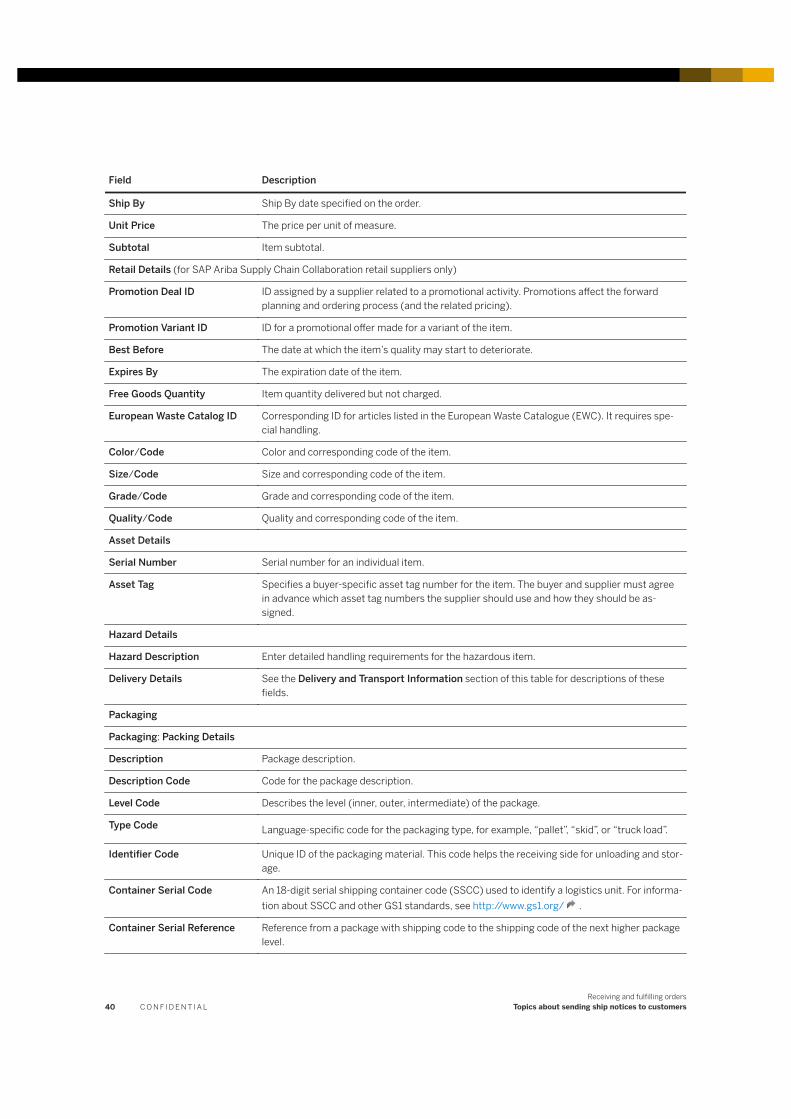
Field Description
Ship By Ship By date specified on the order.
Unit Price The price per unit of measure.
Subtotal Item subtotal.
Retail Details (for SAP Ariba Supply Chain Collaboration retail suppliers only)
Promotion Deal ID ID assigned by a supplier related to a promotional activity. Promotions affect the forward planning and ordering process (and the related pricing).
Promotion Variant ID ID for a promotional offer made for a variant of the item.
Best Before The date at which the item’s quality may start to deteriorate.
Expires By The expiration date of the item.
Free Goods Quantity Item quantity delivered but not charged.
European Waste Catalog ID Corresponding ID for articles listed in the European Waste Catalogue (EWC). It requires special handling.
Color/Code Color and corresponding code of the item.
Size/Code Size and corresponding code of the item.
Grade/Code Grade and corresponding code of the item.
Quality/Code Quality and corresponding code of the item.
Asset Details
Serial Number Serial number for an individual item.
Asset Tag Specifies a buyer-specific asset tag number for the item. The buyer and supplier must agree in advance which asset tag numbers the supplier should use and how they should be assigned.
Hazard Details
Hazard Description Enter detailed handling requirements for the hazardous item.
Delivery Details See the Delivery and Transport Information section of this table for descriptions of these fields.
Packaging
Packaging: Packing Details
Description Package description.
Description Code Code for the package description.
Level Code Describes the level (inner, outer, intermediate) of the package.
Type Code Language-specific code for the packaging type, for example, “pallet”, “skid”, or “truck load”.
Identifier Code Unique ID of the packaging material. This code helps the receiving side for unloading and storage.
Container Serial Code An 18-digit serial shipping container code (SSCC) used to identify a logistics unit. For information about SSCC and other GS1 standards, see http://www.gs1.org/ .
Container Serial Reference Reference from a package with shipping code to the shipping code of the next higher package level.
40 C O N F I D E N T I A LReceiving and fulfilling orders
Topics about sending ship notices to customers

Field Description
Global Individual Asset ID An 18-digit ID used to identify an asset. For information about Global Individual Asset ID (GIAI) and other GS1 standards, see http://www.gs1.org/ .
Returnable Package ID An ID that helps the supplier handle the return of the package.
Tracking ID An ID used by the supplier to track the package.
Shipping Mark Information about packaging proposals and packaging hierarchy.
Transport Cargo The transport cargo category. Select one of the following values:
● Freight Containers● Large Freight Containers● Liquid Bulk Goods● Mobile Non-Self-Propelled Units● Mobile Self-Propelled Units● Palletized● Pre-Slung● Solid Bulk Goods
Packaging: Dimensions
Length/Unit Enter the length of the packaging or item.
Width/Unit Enter the width of the packaging or item.
Height/Unit Enter the height of the packaging or item.
Weight/Unit Enter the weight or net weight of the packaging or item.
Volume/Unit Enter the volume or net volume of the packaging or item.
Gross Volume/Unit Enter the total volume of the package (including packaging).
Gross Weight/Unit Enter the total weight of the package (including packaging).
Unit Gross Weight/Unit Enter the total weight per unit of the item (including packaging).
Unit Net Weight/Unit Enter the net weight per unit of the item (excluding packaging).
Stack Height/Unit Enter the total height of the stacked packages.
Packaging: Quantities
Ordered Quantity/Unit Displays the ordered quantity for a given line item.
Dispatch Quantity/Unit Enter the delivered quantity for a given line item.
Free Goods Quantity/Unit Enter the quantity delivered without any cost to the buyer. For example, samples, redemptions, promotions, fill-ups, and so on.
Quantity Variance Note Enter detailed information about a partial delivery. You can also note whether an item has different quantity measurements. For example, 1 lot = 500 pieces.
Receiving and fulfilling ordersTopics about sending ship notices to customers C O N F I D E N T I A L 41
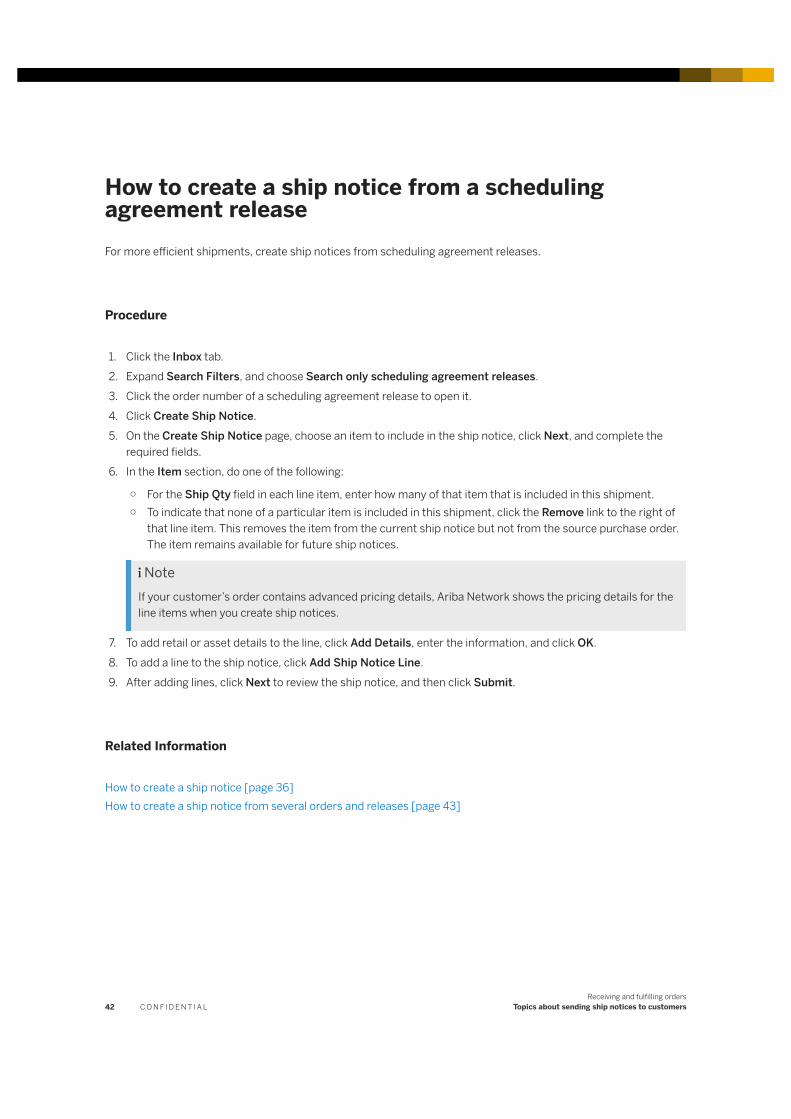
How to create a ship notice from a scheduling agreement releaseFor more efficient shipments, create ship notices from scheduling agreement releases.
Procedure
1. Click the Inbox tab.2. Expand Search Filters, and choose Search only scheduling agreement releases.3. Click the order number of a scheduling agreement release to open it.4. Click Create Ship Notice.5. On the Create Ship Notice page, choose an item to include in the ship notice, click Next, and complete the
required fields.6. In the Item section, do one of the following:
○ For the Ship Qty field in each line item, enter how many of that item that is included in this shipment.○ To indicate that none of a particular item is included in this shipment, click the Remove link to the right of
that line item. This removes the item from the current ship notice but not from the source purchase order. The item remains available for future ship notices.
NoteIf your customer’s order contains advanced pricing details, Ariba Network shows the pricing details for the line items when you create ship notices.
7. To add retail or asset details to the line, click Add Details, enter the information, and click OK.8. To add a line to the ship notice, click Add Ship Notice Line.9. After adding lines, click Next to review the ship notice, and then click Submit.
Related Information
How to create a ship notice [page 36]How to create a ship notice from several orders and releases [page 43]
42 C O N F I D E N T I A LReceiving and fulfilling orders
Topics about sending ship notices to customers
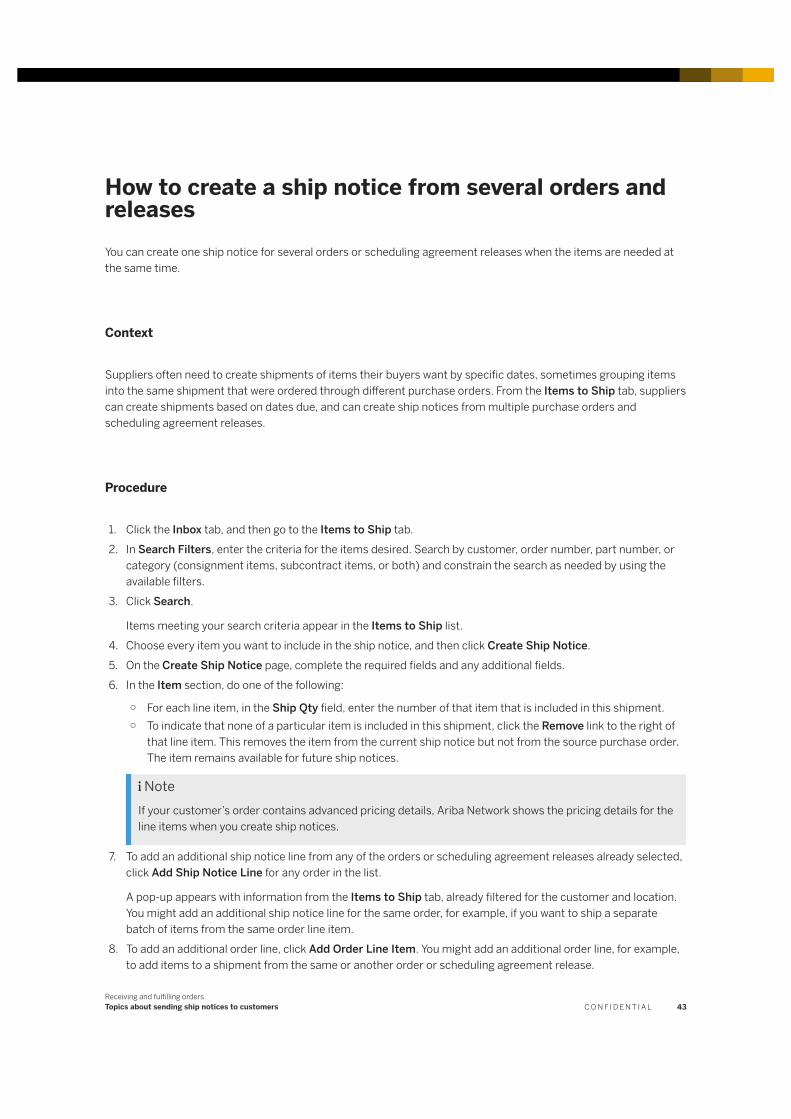
How to create a ship notice from several orders and releasesYou can create one ship notice for several orders or scheduling agreement releases when the items are needed at the same time.
Context
Suppliers often need to create shipments of items their buyers want by specific dates, sometimes grouping items into the same shipment that were ordered through different purchase orders. From the Items to Ship tab, suppliers can create shipments based on dates due, and can create ship notices from multiple purchase orders and scheduling agreement releases.
Procedure
1. Click the Inbox tab, and then go to the Items to Ship tab.2. In Search Filters, enter the criteria for the items desired. Search by customer, order number, part number, or
category (consignment items, subcontract items, or both) and constrain the search as needed by using the available filters.
3. Click Search.
Items meeting your search criteria appear in the Items to Ship list.4. Choose every item you want to include in the ship notice, and then click Create Ship Notice.5. On the Create Ship Notice page, complete the required fields and any additional fields.6. In the Item section, do one of the following:
○ For each line item, in the Ship Qty field, enter the number of that item that is included in this shipment.○ To indicate that none of a particular item is included in this shipment, click the Remove link to the right of
that line item. This removes the item from the current ship notice but not from the source purchase order. The item remains available for future ship notices.
NoteIf your customer’s order contains advanced pricing details, Ariba Network shows the pricing details for the line items when you create ship notices.
7. To add an additional ship notice line from any of the orders or scheduling agreement releases already selected, click Add Ship Notice Line for any order in the list.
A pop-up appears with information from the Items to Ship tab, already filtered for the customer and location. You might add an additional ship notice line for the same order, for example, if you want to ship a separate batch of items from the same order line item.
8. To add an additional order line, click Add Order Line Item. You might add an additional order line, for example, to add items to a shipment from the same or another order or scheduling agreement release.
Receiving and fulfilling ordersTopics about sending ship notices to customers C O N F I D E N T I A L 43
9. Search for the desired order or scheduling agreement release.10. Choose any item you want to add to the ship notice, and then click Add Selected Items.11. Click Next to review the ship notice, and then click Submit.
How to create a ship notice with one ship-to address for all itemsIf a customer does not allow multiple ship-to addresses on a ship notice, only one address is used for all items.
Prerequisites
The customer does not allow multiple ship-to addresses on a ship notice.
Procedure
1. On the Inbox > Orders and Releases tab, click the order number you plan to ship.2. Click Create Ship Notice at the top of the order.
The Create Ship Notice wizard appears.3. On the Items to Ship wizard step, select items for one ship-to address.4. Click Next.
NoteYou can’t go back to the Items to Ship wizard step.
5. Complete the ship notice, including the required Packing Slip ID field, and then click Next.6. Confirm the ship notice information on the review page, including the Deliver To address. To make changes,
click Previous.7. Click Submit.
Ship notice barcode labelsTo facilitate the shipping of goods, Ariba Network allows suppliers to download barcode labels directly from a ship notice in PDF format.
Ship notice barcode labels help buyers and suppliers to accelerate their logistics processes. They can use barcode scanners to quickly scan the barcodes for shipment information for their systems.
44 C O N F I D E N T I A LReceiving and fulfilling orders
Topics about sending ship notices to customers
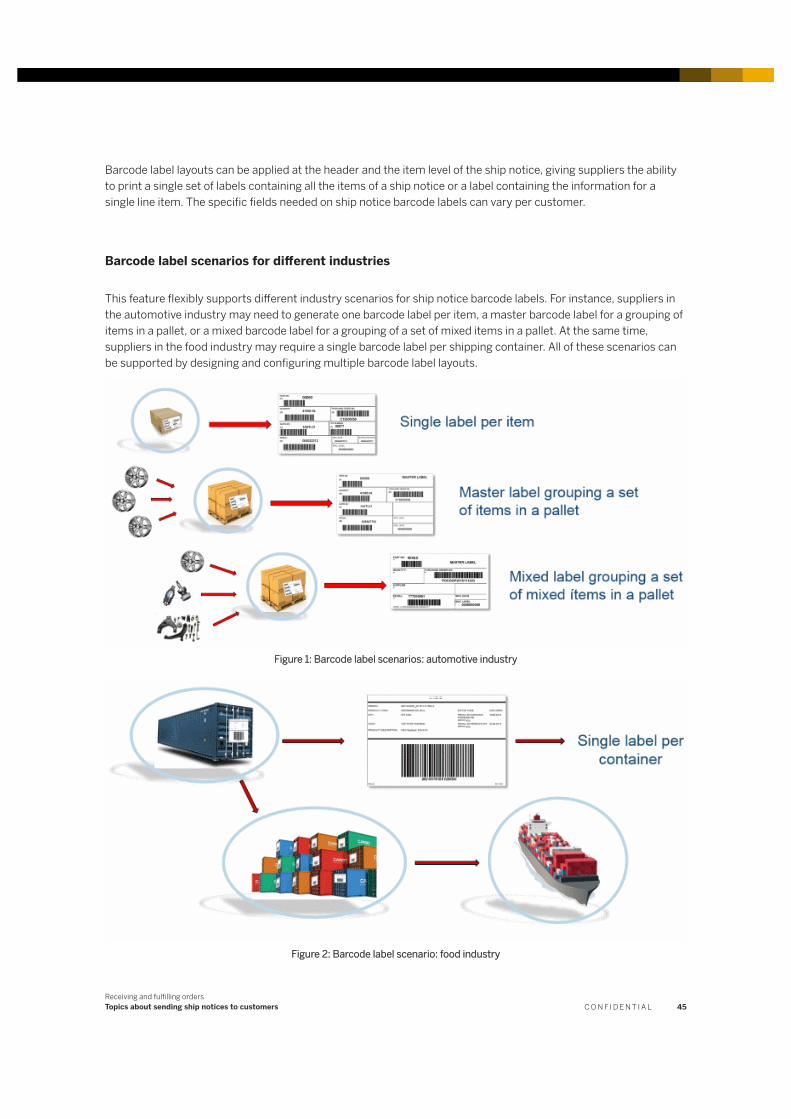
Barcode label layouts can be applied at the header and the item level of the ship notice, giving suppliers the ability to print a single set of labels containing all the items of a ship notice or a label containing the information for a single line item. The specific fields needed on ship notice barcode labels can vary per customer.
Barcode label scenarios for different industries
This feature flexibly supports different industry scenarios for ship notice barcode labels. For instance, suppliers in the automotive industry may need to generate one barcode label per item, a master barcode label for a grouping of items in a pallet, or a mixed barcode label for a grouping of a set of mixed items in a pallet. At the same time, suppliers in the food industry may require a single barcode label per shipping container. All of these scenarios can be supported by designing and configuring multiple barcode label layouts.
Figure 1: Barcode label scenarios: automotive industry
Figure 2: Barcode label scenario: food industry
Receiving and fulfilling ordersTopics about sending ship notices to customers C O N F I D E N T I A L 45
Supported barcode types
Ariba Network uses Barcode4J 2.1 to generate barcodes. The Barcode4J library supports the following 1D and 2D barcode types:
● Interleaved 2 of 5● ITF-14● Code 39● Code 128● EAN-128, GS1-128 (based on Code 128)● Codabar● UPC-A and UPC-E (with supplementals)● EAN-13 and EAN-8 (with supplementals)● POSTNET● Royal Mail Customer Barcode (Four State)● USPS Intelligent Mail (4-State Customer Barcode)● PDF 417 (ISO/IEC 15438:2001(E))● DataMatrix (ISO/IEC 16022:2000(E))
For more information about Barcode4J, go to http://barcode4j.sourceforge.net/ .
Related Information
How to download a ship notice barcode label [page 46]
How to download a ship notice barcode label
If your customer allows you to download ship notice barcode labels, you can download them from the Create Ship Notice wizard or from an existing ship notice to accelerate your logistics processes.
Prerequisites
● A customer needs to define one or more PDF layouts for ship notice barcode labels and then assign them to your account.
● Depending on the ship notice barcode labels configuration, you can download labels for the entire ship notice or for particular line items.
46 C O N F I D E N T I A LReceiving and fulfilling orders
Topics about sending ship notices to customers
How to download a barcode label when you create a ship notice
Procedure
1. Go to Inbox Orders and Releases , and then click the order number you plan to ship.2. Click Create Ship Notice at the top of the purchase order.
The Create Ship Notice page appears.3. Enter required fields (such as Packing Slip ID) and shipping quantities for items.4. At the top of the page or to the right of a line item, click Download PDF.
NoteIf Download PDF isn’t available at the top of the page or within the line items, your customer doesn’t allow you to download ship notice barcode labels. You can contact your customer to request this functionality.
5. Click one of the barcode label layouts from the list.6. Your browser downloads a PDF file containing the barcode label. Open it in a PDF application (for example,
Adobe Reader) to print it, or save the file locally.7. Click Done to return to the ship notice.
How to download a barcode label from an existing ship notice
Procedure
1. Click the Outbox tab, and then go to the Ship Notices tab.2. Click a ship notice to open it.3. At the top of the Detail tab or to the right of a line item, click Download PDF, and choose one of the barcode
label layouts from the dropdown list.
NoteIf Download PDF isn’t available at the top of the ship notice or within the line items, your customer doesn’t allow you to print ship notice barcode labels. You can contact your customer to request this functionality.
4. Your browser downloads a PDF file containing the barcode label. Open it in a PDF application (for example, Adobe Reader) to print it, or save the file locally.
Related Information
Draft ship notices [page 35]
Receiving and fulfilling ordersTopics about sending ship notices to customers C O N F I D E N T I A L 47
How to view items to ship by shipment priority status or date range
Procedure
1. Click the Inbox tab, and then go to the Items to Ship tab.2. Do one of the following in the Search Filters section:
○ To filter by shipment priority status, enter the order number that has shipment priorities defined in the Order Number field, check either the Need by date or Ship by date option to determine the sort order, and then choose View by PO priority.
○ In the Date Range field, choose Other. Define the date range by selecting dates in the Start Date and End Date fields.
3. Click Search.
The Items to be Shipped table for the customer is sorted by Priority, Sub-priority, Need By, Ship By, or date range, depending on the sort order selected.
NoteWhen you choose View by PO priority, you can't remove the Priority, Sub-priority, Need By, or Ship By, columns from the Items to be Shipped table. However, you can still add or remove other columns from the table.
4. Optional: Items to be Shipped is sorted in ascending order by Priority, but you can sort this in descending order by Priority by clicking the Priority column heading.
NoteYou can also group items to be shipped by shipment priority by clicking the table options menu icon and choosing Ship By under Group by Column.
How to create a draft ship notice
Procedure
1. Go to Inbox Orders and Releases and select a purchase order.2. Click on the Create Ship Notice button and select Save.
The message “Ship notice (ship notice number) is saved. The saved ship notice will be kept until dd/mm/yy.” is displayed.
3. Click Exit.4. Select Save to save the draft ship notice.
48 C O N F I D E N T I A LReceiving and fulfilling orders
Topics about sending ship notices to customers
How to edit a draft ship notice
Procedure
1. Go to Outbox Drafts and click on the Ship Notices tab.2. Select the radio button for the relevant ship notice and click Edit.
Canceling ship notices
If permitted by the buyer in their business rules configuration, suppliers can cancel a submitted ship notice for business or technical reasons where the goods were not yet fully received.
This applies to all ship notices, including those that were created without reference to a purchase order (non-PO ship notices).
A ship notice can be canceled from the supplier user interface, by using the Cancel button at the top of the ship notice details page, or through cXML. For information about canceling ship notices through cXML, see the cXML Solutions Guide.
When a ship notice is canceled its status is updated to “Canceled” and the canceled ship notice is retained as part of the document history associated with the purchase order for which the ship notice was created originally. A message is displayed on the canceled ship notice to indicate that it was canceled, and Ariba Network sends an email notification of the canceled ship notice to the buyer.
The supplier can create a new ship notice for the purchase order.
Note● A draft ship notice cannot be canceled.● Upon cancellation of a ship notice, Ariba Network does not consider the quantities of the ‘canceled’ ship
notice in any validations, such as the ability for the supplier to invoice only up to the shipped quantity.
Prerequisites
● You can cancel a ship notice that has the “Sent” status only if your customer’s business rules allow you to cancel ship notices.
● You must have Inbox Access and Outbox Access user permissions to be able to create and manage ship notices.
Receiving and fulfilling ordersTopics about sending ship notices to customers C O N F I D E N T I A L 49
Limitations
● A ship notice cancellation is a transaction that can be executed only at header level; individual line items cannot be canceled.
● The CSV upload for ship notice does not support the option to cancel a previously created ship notice.● It is not possible to cancel a ship notice where line items are associated with an invoice.● Ship notices that are associated with a goods receipt in Ariba Network cannot be canceled.
50 C O N F I D E N T I A LReceiving and fulfilling orders
Topics about sending ship notices to customers
Topics about direct material fields for order and invoice collaboration
In this section:
How to add a section to an invoice header [page 51]
How to add a section to an invoice line item [page 52]
Direct material fields for ship notice collaboration: changes to supplier user interface [page 52]
Direct material fields for purchase orders [page 54]
How to add a section to an invoice headerAdd sections to an invoice header to expose important details for invoice collaboration.
Context
Suppliers and buyers often collaborate in the creation of invoices for direct-material orders. This collaboration requires the exchange of information specific to direct material orders. This feature facilitates the invoice collaboration process by allowing more detailed description of materials being procured. This feature also allows the supplier to perform invoice collaboration through the Ariba Network user interface. This is particularly helpful for suppliers that do not have EDI, cXML, or other integrated business-to-business mechanisms in place.
Direct material suppliers can view direct material fields, and can enter data into many of them directly in the Ariba Network user interface. The direct material fields appear in purchase orders, ship notices, invoices, and goods receipt notifications for direct material suppliers.
NoteDirect material includes all items, such as raw materials and parts, required to assemble or manufacture a complete product.
As a supplier, you can add sections to the invoice header for shipping documents, amount details, and additional reference documents and date.
Procedure
1. In the invoice header, click Add to Header.
Receiving and fulfilling ordersTopics about direct material fields for order and invoice collaboration C O N F I D E N T I A L 51
2. In the menu, select any section you want to add to the invoice header.3. Repeat the first two steps to add additional sections.
How to add a section to an invoice line item
Add sections to an invoice line item to expose important details for invoice collaboration.
Context
As a supplier, you can add sections to invoice line items for shipping documents, retail details, and informational pricing.
Procedure
1. In an invoice line item, click Line Item Actions.2. In the menu, select any section you want to add to the invoice.3. Repeat the first two steps to add additional sections.
Direct material fields for ship notice collaboration: changes to supplier user interface
Direct material fields appear in the ship notice header, ship notice line items, and ship notice details, to facilitate ship notice collaboration.
Suppliers and buyers often collaborate in the creation of purchase orders, invoices, and ship notices for direct-material orders. This collaboration requires the exchange of information specific to direct material orders. These features facilitate the collaboration process by allowing more detailed description of materials being procured. These features also allow the supplier to collaborate through the Ariba Network user interface. This is particularly helpful for suppliers that do not have EDI, cXML, or other integrated business-to-business mechanisms in place.
NoteDirect material includes all items, such as raw materials and parts, required to assemble or manufacture a complete product.
52 C O N F I D E N T I A LReceiving and fulfilling orders
Topics about direct material fields for order and invoice collaboration
Ship notice header
The following sections and fields appear in the ship notice header. Delivery and transport terms appear only if the buyer’s rules allow them or if the terms exist in the related purchase order.
● Contact Person. (in Ship From and Deliver To in the ship notice header only, and only when imported from cXML)
● Requested Delivery Date● Gross Weight *● Gross Volume *● Transport Seal ID● Transport Sealing Party Code● Equipment Identification Code● Transport Terms. (Suppliers can now add multiple transport terms. Each transport term can have its own
equipment identification code, gross weight, gross volume, seal ID and seal party code, as specified by the buyer.)
● Transport Dimensions * (The units of the transport dimensions are customizable.)
* An asterisk indicates buyers can configure the field values.
Ship notice line items
The following field appears in the ship notice line items.
● Customer Part #
Ship notice details
The following fields appear in the ship notice line item details.
● Buyer Part ID● Packaging Structure● Product ID EAN/UPC● Promotional Deal ID● Promotional Variant ID● EUR Waste Catalog ID● Retail Details. * (Retail details may include color, color code, size, size code, grade, grade code, quality, and
quality code, as specified by the buyer.)● Package Details Dimensions. * (The units of the package details dimensions are customizable. Package
dimensions may include any package dimensions, such as height or weight, as specified by the buyer.)
* An asterisk indicates buyers can configure the field values.
Receiving and fulfilling ordersTopics about direct material fields for order and invoice collaboration C O N F I D E N T I A L 53
Direct material fields for purchase ordersDirect material fields appear in purchase orders to facilitate purchase order collaboration between buyers and suppliers.
Purchase order header
Suppliers and buyers often collaborate in the creation of purchase orders for direct-material orders. This collaboration requires the exchange of information specific to direct material orders. This feature facilitates the purchase order collaboration process by allowing more detailed description of materials being procured. This feature also allows the supplier to perform order collaboration through the Ariba Network user interface. This is particularly helpful for suppliers that do not have EDI, cXML, or other integrated business-to-business mechanisms in place.
NoteDirect material includes all items, such as raw materials and parts, required to assemble or manufacture a complete product.
The purchase order header displays shipping data, and purchase order line items display retail details and product details.
The following section and fields appear in the purchase order header.
● Shipping Dates section○ Requested Delivery○ Earliest Delivery○ Latest Delivery○ Goods Pick Up
● Contact Information This section may include any number of fields of contact information, such as fields labeled manager, accountStatus, or accountID. However, Ariba Network automatically formats the field label for a contact person to Contact Person.
Purchase order line items
The following section and fields appear in the purchase order line items:
● Retail Details section○ Promotion Deal ID○ Promotion Variant ID○ Product EAN/UPC○ European Waste Catalog ID
● Product Details section This section may include any number of fields of product details, such as fields labeled weight, style, or volume. However, Ariba Network automatically formats the field labels for eight common characteristics, as follows:
54 C O N F I D E N T I A LReceiving and fulfilling orders
Topics about direct material fields for order and invoice collaboration

○ Size○ Size Code○ Quality○ Quality Code○ Grade○ Grade Code○ Color○ Color Code
Customer part #, revision Level, and customer location fields
The Customer Part #, Revision Level, and Customer Location fields appear as table column headers in the following locations, starting from an open purchase order:
● Order Details● Create Order Confirmation > Update Line Items > Update Item Status● Create Order Confirmation > Confirm Entire Order > Confirm Entire Order● Create Order Confirmation > Confirm Entire Order > Review Order Confirmation● Order History● Create Ship Notice, in the Order Items area of the summary page.
Related Information
How to search on customer part number or customer location [page 58]
Receiving and fulfilling ordersTopics about direct material fields for order and invoice collaboration C O N F I D E N T I A L 55
Topics about scheduling agreement releases
In this section:
How to create a ship notice from a scheduling agreement release [page 56]
How to view details for previous scheduling agreement releases [page 57]
How to search on customer part number or customer location [page 58]
Customer part number, release level, and customer location fields [page 58]
How to create a ship notice from a scheduling agreement release
For more efficient shipments, create ship notices from scheduling agreement releases.
Context
Buyers often want to procure pre-defined quantities of materials in releases to be received on pre-determined dates. For example, a buyer might order 100 items, but might want them delivered, 10 items at a time, on a weekly basis. A buyer might therefore send a scheduling agreement release to a supplier.
A scheduling agreement release can have multiple schedule lines for any single line in a purchase order or other business document. A single schedule line contains fields for delivery date and time, and for scheduled quantity and unit of measure. Buyers create schedule agreement releases with external ERP systems.
Prior to this release, suppliers could view schedule lines, but could not use them in the creation of ship notices through the Ariba Network user interface. With this release, scheduling agreement releases become visible in the Ariba Network user interface. Buyers can periodically communicate releases to their suppliers; and suppliers can create ship notices for materials requested through scheduling agreement releases. From the Items to Ship tab, a supplier can create a single ship notice containing items from several purchase orders that all are due by the same date.
NoteDirect material includes all items, such as raw materials and parts, required to assemble or manufacture a complete product.
Scheduling agreement releases now appear in the list of documents on the Orders and Releases tab. Suppliers can create ship notices from scheduling agreement releases.
56 C O N F I D E N T I A LReceiving and fulfilling orders
Topics about scheduling agreement releases

NoteThe tab that previously was labeled Purchase Orders in the Ariba Network user interface is now labeled Orders and Releases.
Procedure
1. Click the Inbox tab.2. Expand Search Filters, and select Search only scheduling agreement releases.3. Click the order number of a scheduling agreement release to open it.4. Click Create Ship Notice.5. Select an item to include in the ship notice, click Next, and fill in required fields in the Create Ship Notice page.6. For each line in the list of purchase order items, enter the number of items to ship in Ship Qty.7. To add retail details or asset details to the line, click Add Details, enter the information, and click OK.8. To add a line to the ship notice, click Add Ship Notice Line.9. When done adding lines, click Next. Confirm the information in the document. Click Submit.10. Click Done.
How to view details for previous scheduling agreement releasesFor detailed tracking of previous shipments, view the details of previous releases.
Context
Scheduling agreement releases appear in the list of documents on the Orders and Releases tab. Suppliers can view details from previous scheduling agreement releases.
NoteThe tab that previously was labeled Purchase Orders in the Ariba Network user interface is now labeled Orders and Releases.
Procedure
1. Click the Inbox tab.
Receiving and fulfilling ordersTopics about scheduling agreement releases C O N F I D E N T I A L 57
2. Expand Search Filters, and select Search only scheduling agreement releases.3. Click the order number of a scheduling agreement release to open it.4. Click the Previous Releases tab5. To view additional details, click Show Release Detail.
How to search on customer part number or customer location
Context
NoteA search by either of these fields will only return POs and SARs that contain a value for the search field.
Procedure
1. Log in to your Ariba Network supplier account.2. Select Inbox > Orders and Releases > Items to Ship.
3. If the search filters are not visible, click to view the Search Filters area.4. In the Customer Part # or Customer Location field, type the first letters in a PO or SAR name to return all
documents whose names start with those letters.You can enter multiple search terms separated by commas. For example, type "C, D" in the Customer Location field to return all POs and SARs where the customer location begins with C, c, D, or d.
Customer part number, release level, and customer location fields
The Customer Part #, Revision Level, and Customer Location fields appear as table column headers in the following locations, from an open scheduling agreement release:
● Release Detail● Processing History● Release History● Create Ship Notice > Add Details (for a line item)● Create Ship Notice, in the Order Items area of the summary page.
58 C O N F I D E N T I A LReceiving and fulfilling orders
Topics about scheduling agreement releases
Related Information
How to search on customer part number or customer location [page 58]
Receiving and fulfilling ordersTopics about scheduling agreement releases C O N F I D E N T I A L 59
Topics about sending service sheets to customers
In this section:
Service sheets [page 60]
How to create a service sheet [page 62]
How to edit and resubmit a failed or rejected service sheet [page 65]
How to download a service sheet PDF [page 66]
How to view status update request attachments [page 66]
How to search for a unit of measure on a service sheet [page 66]
Service sheet statuses [page 67]
Service sheetsA service sheet (sometimes called a “service entry sheet”) describes one or more line items you fulfilled in response to a service order.
People in your company who fulfill services at a work site create and send service sheets to customers to describe the services they performed. Service sheets can include contact information for the field contractor, field engineer, and approver.
NoteYou can't send a ship notice for service orders. You send a service sheet instead.
You can create service sheets on Ariba Network or transmit them from third-party systems using cXML. If your customer supports service sheet CSV upload, you can also upload service sheet CSV files. Ariba Network doesn't let you submit service sheets until you receive your first service order from a customer.
Depending on the nature of the order and your company’s business processes, you might create one service sheet to describe a one-time service or periodic service sheets for service projects that span longer time frames. You might be the only person at your company creating service sheets for the order, or there might be different people at your company creating service sheets for different parts of the order.
A service sheet needs to contain at least one service line from the purchase order on which it is based. You can create a service sheet for one or more service lines in a service order. Service sheets can contain both service and material goods lines.
NoteYou can't create service sheets for purchase orders with lines that have the type “service” but do not require a service sheet.
60 C O N F I D E N T I A LReceiving and fulfilling orders
Topics about sending service sheets to customers
Service orders can contain separate, individual lines for goods that are not part of a service line. Because service sheets can contain both material goods and service lines, and you can't create ship notices for service orders, you can add information about non-service line items to service sheets to let customers know you fulfilled them and to allow your company to invoice them.
Your ability to send service sheets to your customers and to perform the following actions depends on their configuration:
● If your customer allows attachments for service sheets, you can only attach them at the header level.● Edit quantity, unit of measure, unit price, or subtotal amounts for service purchase order lines● Add ad hoc items● Add contract or catalog items
Your customer may require start and end dates either at line level or the header of service sheets. If so, the start and end date fields are required on the Create Service Sheet page.
You can create service sheets against blanket (unplanned) service lines in service purchase orders, but you can't create them against blanket purchase orders (BPOs). For BPOs, you need to create a ship notice [page 36].
If the customer flagged an item as completed on the order, the following warning appears for the item: The buyer has marked this as Completed. This warning does not prevent you from submitting a service sheet.
Planned and unplanned service lines
Service lines on service orders are either planned or unplanned.
Planned service lines describe specific pieces of work and have set quantities and amounts as well as a hidden maximum amount. Your customers use planned lines for orders where they know exactly what work they want performed. When you create a service sheet for a planned line, all of the grouped items under it are automatically added to the service sheet. If your customer’s business rules allow you to add ad hoc items to service sheets and the hidden maximum amount is larger than the line’s subtotal, you can also add line items under a planned line to describe additional goods or services you needed to perform the work. Your customer might also specify tolerances to limit how much you add to a planned line.
Unplanned service lines are blanket purchase order lines; the subtotal might be visible or hidden, and they always have a hidden maximum amount. Your customers use unplanned lines for orders where they know the overall piece of work they want performed, but they want you to provide the detail of the services and goods you needed for it. If your customer places orders with unplanned lines, they need to enable the business rule that allows you to add ad hoc items to service sheets. You then add material goods and service lines under the unplanned line on the service sheet to describe how you performed the work.
Service sheets accumulate against purchase orders in the same way that ship notices do. Service sheets for unplanned service lines accumulate against the unplanned line’s subtotal only, not its unit price or quantity.
Determining if a service line is planned or unplanned helps you know what information you may be allowed to provide to the customer in your service sheet.
Receiving and fulfilling ordersTopics about sending service sheets to customers C O N F I D E N T I A L 61
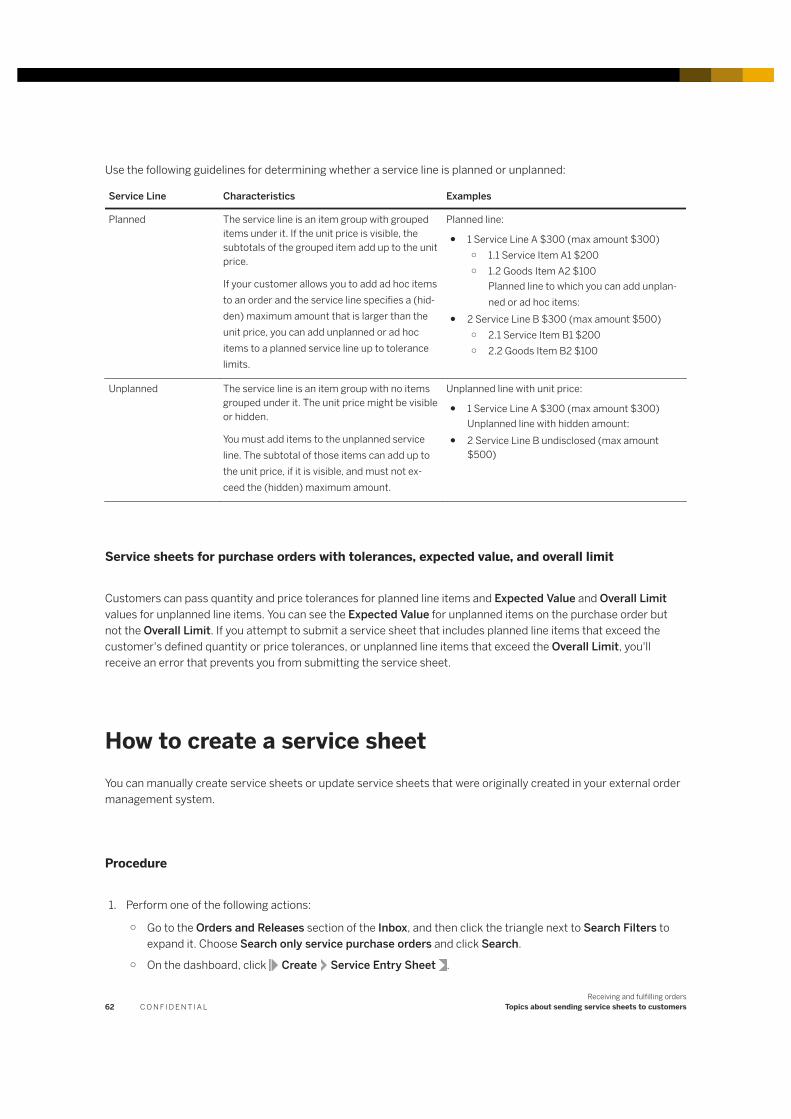
Use the following guidelines for determining whether a service line is planned or unplanned:
Service Line Characteristics Examples
Planned The service line is an item group with grouped items under it. If the unit price is visible, the subtotals of the grouped item add up to the unit price.
If your customer allows you to add ad hoc items to an order and the service line specifies a (hidden) maximum amount that is larger than the unit price, you can add unplanned or ad hoc items to a planned service line up to tolerance limits.
Planned line:
● 1 Service Line A $300 (max amount $300)○ 1.1 Service Item A1 $200○ 1.2 Goods Item A2 $100
Planned line to which you can add unplanned or ad hoc items:
● 2 Service Line B $300 (max amount $500)○ 2.1 Service Item B1 $200○ 2.2 Goods Item B2 $100
Unplanned The service line is an item group with no items grouped under it. The unit price might be visible or hidden.
You must add items to the unplanned service line. The subtotal of those items can add up to the unit price, if it is visible, and must not exceed the (hidden) maximum amount.
Unplanned line with unit price:
● 1 Service Line A $300 (max amount $300)Unplanned line with hidden amount:
● 2 Service Line B undisclosed (max amount $500)
Service sheets for purchase orders with tolerances, expected value, and overall limit
Customers can pass quantity and price tolerances for planned line items and Expected Value and Overall Limit values for unplanned line items. You can see the Expected Value for unplanned items on the purchase order but not the Overall Limit. If you attempt to submit a service sheet that includes planned line items that exceed the customer's defined quantity or price tolerances, or unplanned line items that exceed the Overall Limit, you'll receive an error that prevents you from submitting the service sheet.
How to create a service sheetYou can manually create service sheets or update service sheets that were originally created in your external order management system.
Procedure
1. Perform one of the following actions:
○ Go to the Orders and Releases section of the Inbox, and then click the triangle next to Search Filters to expand it. Choose Search only service purchase orders and click Search.
○ On the dashboard, click Create Service Entry Sheet .
62 C O N F I D E N T I A LReceiving and fulfilling orders
Topics about sending service sheets to customers

2. Click the service order number for which you want to create a service sheet, and then click Create Service Sheet at the top of the order.
3. On the Select Item to Create Service Sheet page, choose an item to add to the service sheet.
NoteYou can only see the Select Item to Create Service Sheet page if your customer allows it.
4. In the Service Sheet Header area, perform the following actions:
○ Enter information such as the service sheet number, service dates, and contact information for the field contractor, engineer, and approver.
○ To add a comment, click Add Comment and enter comment text.○ To add one or more attachments, click Add Attachment, browse to the attachment file, and click Add
Attachment. You can only add attachments to service sheets at the header level; customers can set a business rule to require you to add at least one attachment per service sheet.
5. (Optional) To help you identify and search for documents that you send to customers, you can add an internal reference code in the Supplier Reference field. For example, it might be a number or the name of a person who is dealing with that order.
6. In the Service Sheet Line Items area, choose any purchase order lines you don't want to include in the service sheet, and then click Delete.
NoteA service sheet needs to include at least one service line.
7. Enter details of the services you performed for the included lines, such as quantities, unit prices, and service period start and end dates.
By default, service lines use the service period start and end dates specified on the purchase order.8. If your customer’s business rules allow you to add ad hoc items to service sheets, choose a purchase order
item group and click Add Ad Hoc Item to add the item under it, and then perform the following steps:a. Choose the type of line you want to add: Service for a service line or Material for a material goods line.b. Enter a part number and description for the item.c. Enter the Quantity, Unit, Unit Price, and Subtotal for the item. Unit and Subtotal are required for service
lines.d. (Optional) Add or edit the service period start and end dates.
By default, the individual ad hoc lines you add to a service sheet use the service period from the service sheet’s header if it has them; otherwise, they are bank. Ad hoc lines you add as grouped items under an item group use the item group’s service period dates if it has them by default; otherwise they use the header dates. You can edit any default service dates for ad hoc lines.
e. (Optional) Click Comments and enter comment text for the line.9. If your customer allows you to punch in to their Ariba procurement site to add contract or catalog items to
service sheets, choose a purchase order item group and click Add Contract/Catalog Item to add the item under it, and then perform the following steps:a. The Add Item page opens to display items configured for invoicing on the related contract. Depending on
the type of contract and the way your customer has configured the catalog, the Add Item page either displays the catalog main view or the item list view. For example, an item-level contract displays all available items for invoicing directly in item list view mode, while a supplier-level contract displays the
Receiving and fulfilling ordersTopics about sending service sheets to customers C O N F I D E N T I A L 63
catalog main view for browsing and searching. On the catalog main page, browse by category, follow the category links, or search by keyword or part number to narrow the list of items.
b. On the catalog item's listing page, click Add Item to add the item tot he shopping cart. Note that the price you see on this page reflects the price before contract pricing terms are applied. Contract pricing terms are applied when you add the item to the service sheet.
c. If your customer allows you to add non-catalog items to service sheets during punch in, click Add Non-Catalog Item and enter information for the item.
d. Click the shopping cart icon in the upper right corner of the screen at any time to edit your shopping cart contents.
e. Click Done.
NoteYou can save service sheets as drafts to work on them at different times before you submit them. Ariba Network stores draft service sheets for 14 days after the last time you edited them. To save a service sheet, click Save at the top of the service sheet page. To open a saved draft service sheet, in your Outbox, click Drafts, then click the Service Sheets tab.
10. Click Next.11. Review the information you entered and click Submit. You can't cancel a service sheet once it is submitted.
Results
Ariba Network sends the service sheet to your customer. You can see it in the related documents for the purchase order and on the Service Sheets tab in your Outbox.
The status of a service line in a purchase order is set to Serviced once you create service sheets against it up to the subtotal amount. If the line is unplanned and has a hidden maximum amount larger than the subtotal, you can continue to create service sheets against it up to that maximum amount.
Service sheet header fields
When you create, edit, or resubmit a service sheet you need to be familiar with the data fields available to you. Default service sheet header fields provide general information about the service sheet. Your customers can customize the labels for the default fields or remove them from the service sheet header.
The following table describes the default header fields for service sheets:
Field Description
Service Sheet # A unique identifier for the service sheet.
Service Sheet Date The date on which the service sheet was created. The default date is the current date.
64 C O N F I D E N T I A LReceiving and fulfilling orders
Topics about sending service sheets to customers
Field Description
Service Start Date
Service End Date
The start and end dates for the time in which you performed the service. If you specify these dates at the header level, they become the default service start and end dates for each line in the service sheet that does not have its own start and end dates set separately. You can also edit the start and end dates for individual lines at the line level.
Field Contractor Name, Email, Phone Contact information for the person in your company who manages or performs the service work. This could be you or a site supervisor.
Field Engineer Name, Email, Phone Contact information for the person in your customer’s organization who manages or supervises the service work at the work site.
Approver Name, Email, Phone Contact information for the person in your customer’s organization who approves the service work. The approver is not necessarily the person who ordered the work. Your customers can set a business rule to require the approver name and email address; phone number is always optional.
How to edit and resubmit a failed or rejected service sheetYou can correct any errors on a failed or rejected service sheet and resubmit it to your customer.
Context
A service sheet can fail when service sheet line items don't match the information from the purchase order. Your customer provides a reason when rejecting a service sheet.
Procedure
1. In the Outbox, choose the failed or rejected service sheet and click Edit.2. If the service sheet was rejected, enter a new service sheet number.3. Edit the service sheet to correct any errors.4. Review the information you entered, and then click Submit.
Results
Ariba Network sends the updated service sheet to your customer. The rejected service sheet is still available in your Outbox and in the purchase order’s related documents with a status of Rejected and a routing status of Obsoleted.
Receiving and fulfilling ordersTopics about sending service sheets to customers C O N F I D E N T I A L 65
How to download a service sheet PDFYou can download a PDF copy of a service sheet to print or save for your records.
Procedure
1. Click the Outbox tab, and then go to the Service Sheets tab.2. Click a service sheet number to open it.3. Choose Download PDF.
The document number of the service sheet becomes the filename of the PDF.
How to view status update request attachmentsYou can view and download attachments that are included with status update requests from your customers, regardless of the status.
Procedure
1. Click the Outbox tab, and then go to the Service Sheets tab.2. Click a service sheet number to open it.3. Go to the History tab of the service sheet.4. Click a status update request attachment under the Comments section to view or download it.
How to search for a unit of measure on a service sheetIf a buyer allows you to edit the unit of measure on service sheets, you can type a unit of measure symbol, select one from a list, or search for a unit of measure.
Procedure
1. On a service sheet, select the Unit field for a line item or a header field.
66 C O N F I D E N T I A LReceiving and fulfilling orders
Topics about sending service sheets to customers
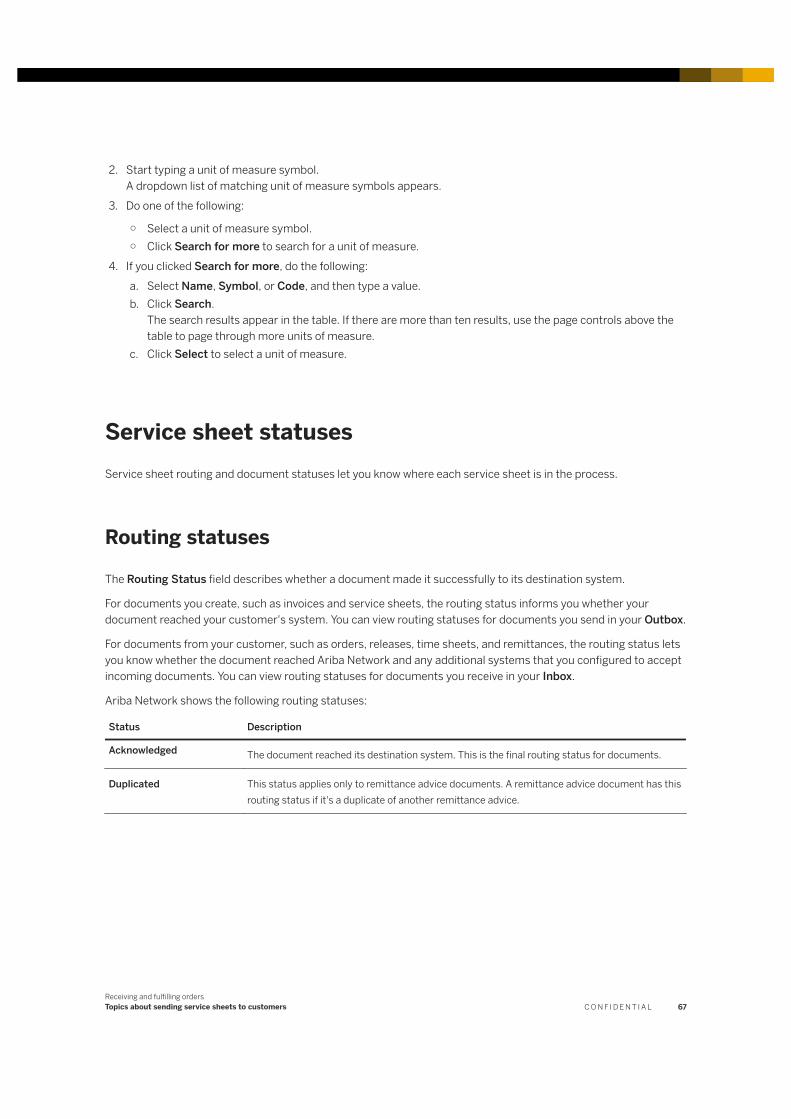
2. Start typing a unit of measure symbol.A dropdown list of matching unit of measure symbols appears.
3. Do one of the following:
○ Select a unit of measure symbol.○ Click Search for more to search for a unit of measure.
4. If you clicked Search for more, do the following:a. Select Name, Symbol, or Code, and then type a value.b. Click Search.
The search results appear in the table. If there are more than ten results, use the page controls above the table to page through more units of measure.
c. Click Select to select a unit of measure.
Service sheet statusesService sheet routing and document statuses let you know where each service sheet is in the process.
Routing statuses
The Routing Status field describes whether a document made it successfully to its destination system.
For documents you create, such as invoices and service sheets, the routing status informs you whether your document reached your customer's system. You can view routing statuses for documents you send in your Outbox.
For documents from your customer, such as orders, releases, time sheets, and remittances, the routing status lets you know whether the document reached Ariba Network and any additional systems that you configured to accept incoming documents. You can view routing statuses for documents you receive in your Inbox.
Ariba Network shows the following routing statuses:
Status Description
Acknowledged The document reached its destination system. This is the final routing status for documents.
Duplicated This status applies only to remittance advice documents. A remittance advice document has this routing status if it's a duplicate of another remittance advice.
Receiving and fulfilling ordersTopics about sending service sheets to customers C O N F I D E N T I A L 67
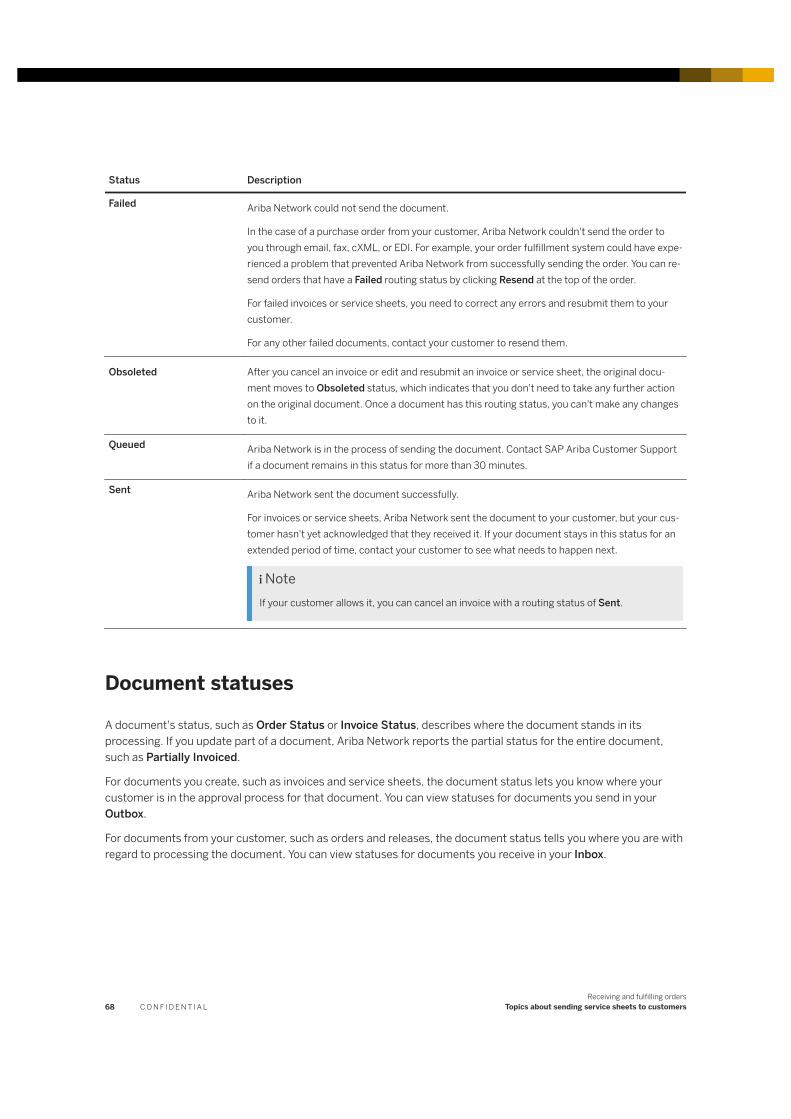
Status Description
Failed Ariba Network could not send the document.
In the case of a purchase order from your customer, Ariba Network couldn't send the order to you through email, fax, cXML, or EDI. For example, your order fulfillment system could have experienced a problem that prevented Ariba Network from successfully sending the order. You can resend orders that have a Failed routing status by clicking Resend at the top of the order.
For failed invoices or service sheets, you need to correct any errors and resubmit them to your customer.
For any other failed documents, contact your customer to resend them.
Obsoleted After you cancel an invoice or edit and resubmit an invoice or service sheet, the original document moves to Obsoleted status, which indicates that you don't need to take any further action on the original document. Once a document has this routing status, you can't make any changes to it.
Queued Ariba Network is in the process of sending the document. Contact SAP Ariba Customer Support if a document remains in this status for more than 30 minutes.
Sent Ariba Network sent the document successfully.
For invoices or service sheets, Ariba Network sent the document to your customer, but your customer hasn't yet acknowledged that they received it. If your document stays in this status for an extended period of time, contact your customer to see what needs to happen next.
NoteIf your customer allows it, you can cancel an invoice with a routing status of Sent.
Document statuses
A document's status, such as Order Status or Invoice Status, describes where the document stands in its processing. If you update part of a document, Ariba Network reports the partial status for the entire document, such as Partially Invoiced.
For documents you create, such as invoices and service sheets, the document status lets you know where your customer is in the approval process for that document. You can view statuses for documents you send in your Outbox.
For documents from your customer, such as orders and releases, the document status tells you where you are with regard to processing the document. You can view statuses for documents you receive in your Inbox.
68 C O N F I D E N T I A LReceiving and fulfilling orders
Topics about sending service sheets to customers
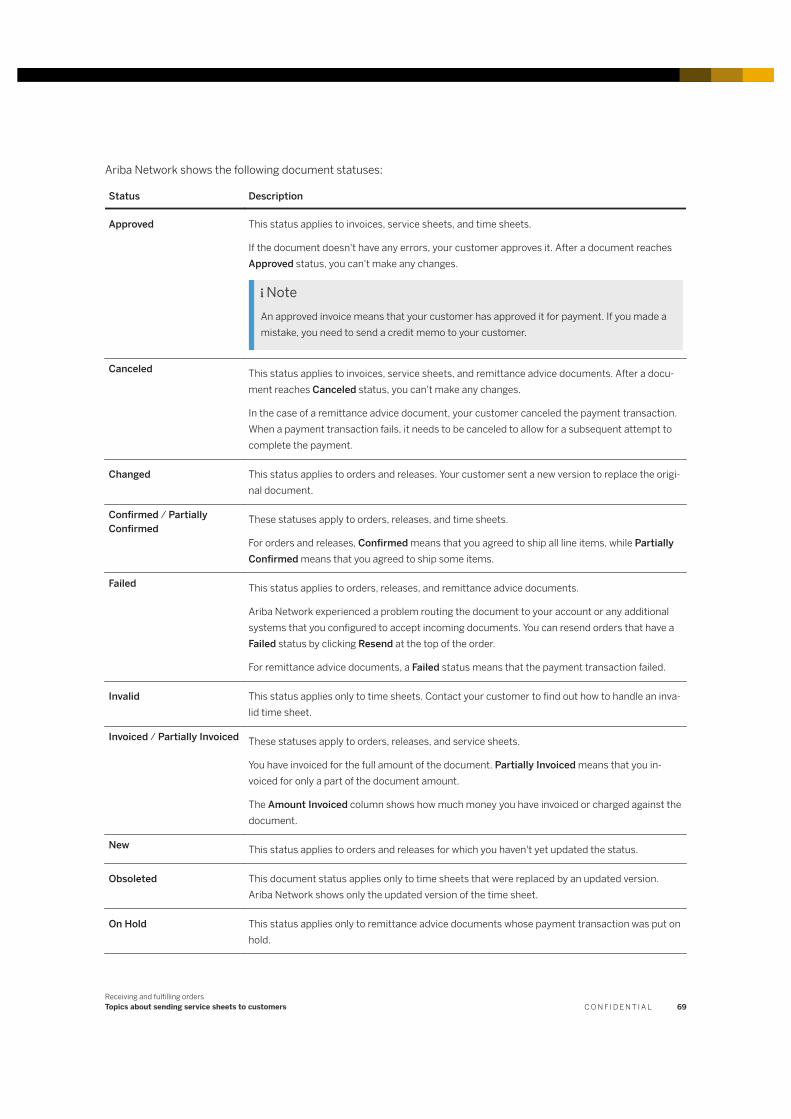
Ariba Network shows the following document statuses:
Status Description
Approved This status applies to invoices, service sheets, and time sheets.
If the document doesn't have any errors, your customer approves it. After a document reaches Approved status, you can't make any changes.
NoteAn approved invoice means that your customer has approved it for payment. If you made a mistake, you need to send a credit memo to your customer.
Canceled This status applies to invoices, service sheets, and remittance advice documents. After a document reaches Canceled status, you can't make any changes.
In the case of a remittance advice document, your customer canceled the payment transaction. When a payment transaction fails, it needs to be canceled to allow for a subsequent attempt to complete the payment.
Changed This status applies to orders and releases. Your customer sent a new version to replace the original document.
Confirmed / Partially Confirmed
These statuses apply to orders, releases, and time sheets.
For orders and releases, Confirmed means that you agreed to ship all line items, while Partially Confirmed means that you agreed to ship some items.
Failed This status applies to orders, releases, and remittance advice documents.
Ariba Network experienced a problem routing the document to your account or any additional systems that you configured to accept incoming documents. You can resend orders that have a Failed status by clicking Resend at the top of the order.
For remittance advice documents, a Failed status means that the payment transaction failed.
Invalid This status applies only to time sheets. Contact your customer to find out how to handle an invalid time sheet.
Invoiced / Partially Invoiced These statuses apply to orders, releases, and service sheets.
You have invoiced for the full amount of the document. Partially Invoiced means that you invoiced for only a part of the document amount.
The Amount Invoiced column shows how much money you have invoiced or charged against the document.
New This status applies to orders and releases for which you haven't yet updated the status.
Obsoleted This document status applies only to time sheets that were replaced by an updated version. Ariba Network shows only the updated version of the time sheet.
On Hold This status applies only to remittance advice documents whose payment transaction was put on hold.
Receiving and fulfilling ordersTopics about sending service sheets to customers C O N F I D E N T I A L 69
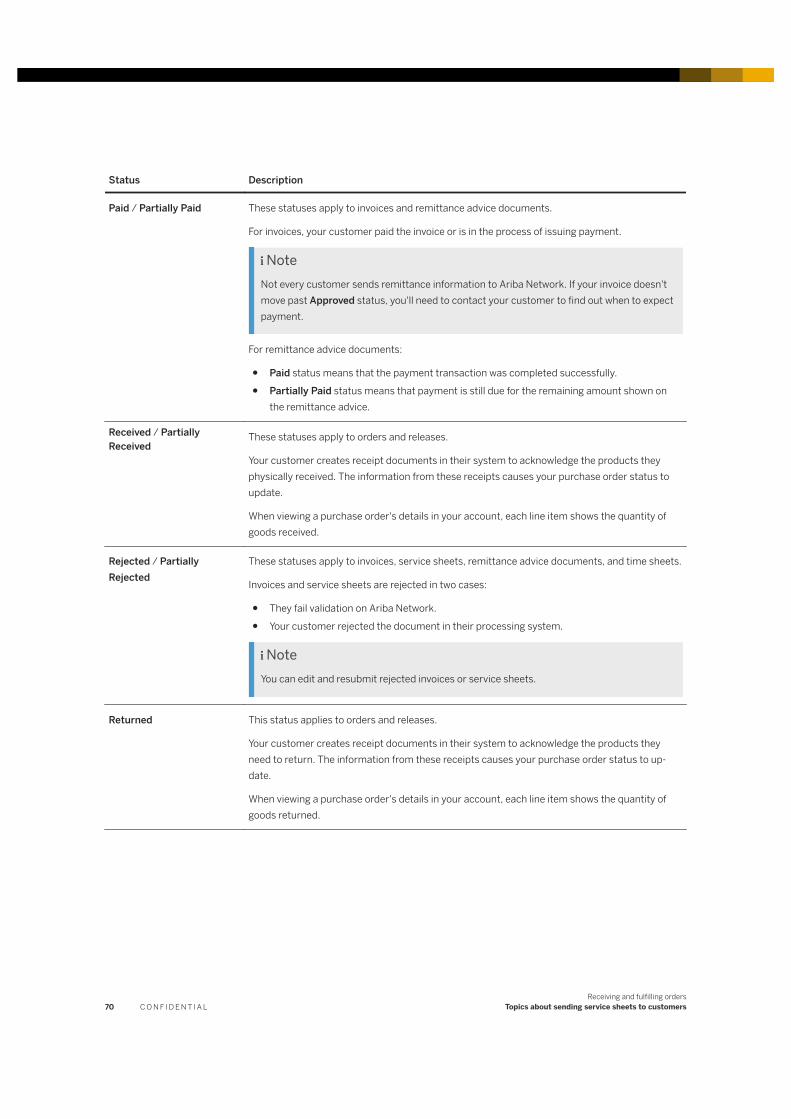
Status Description
Paid / Partially Paid These statuses apply to invoices and remittance advice documents.
For invoices, your customer paid the invoice or is in the process of issuing payment.
NoteNot every customer sends remittance information to Ariba Network. If your invoice doesn't move past Approved status, you'll need to contact your customer to find out when to expect payment.
For remittance advice documents:
● Paid status means that the payment transaction was completed successfully.● Partially Paid status means that payment is still due for the remaining amount shown on
the remittance advice.
Received / Partially Received
These statuses apply to orders and releases.
Your customer creates receipt documents in their system to acknowledge the products they physically received. The information from these receipts causes your purchase order status to update.
When viewing a purchase order's details in your account, each line item shows the quantity of goods received.
Rejected / Partially Rejected
These statuses apply to invoices, service sheets, remittance advice documents, and time sheets.
Invoices and service sheets are rejected in two cases:
● They fail validation on Ariba Network.● Your customer rejected the document in their processing system.
NoteYou can edit and resubmit rejected invoices or service sheets.
Returned This status applies to orders and releases.
Your customer creates receipt documents in their system to acknowledge the products they need to return. The information from these receipts causes your purchase order status to update.
When viewing a purchase order's details in your account, each line item shows the quantity of goods returned.
70 C O N F I D E N T I A LReceiving and fulfilling orders
Topics about sending service sheets to customers
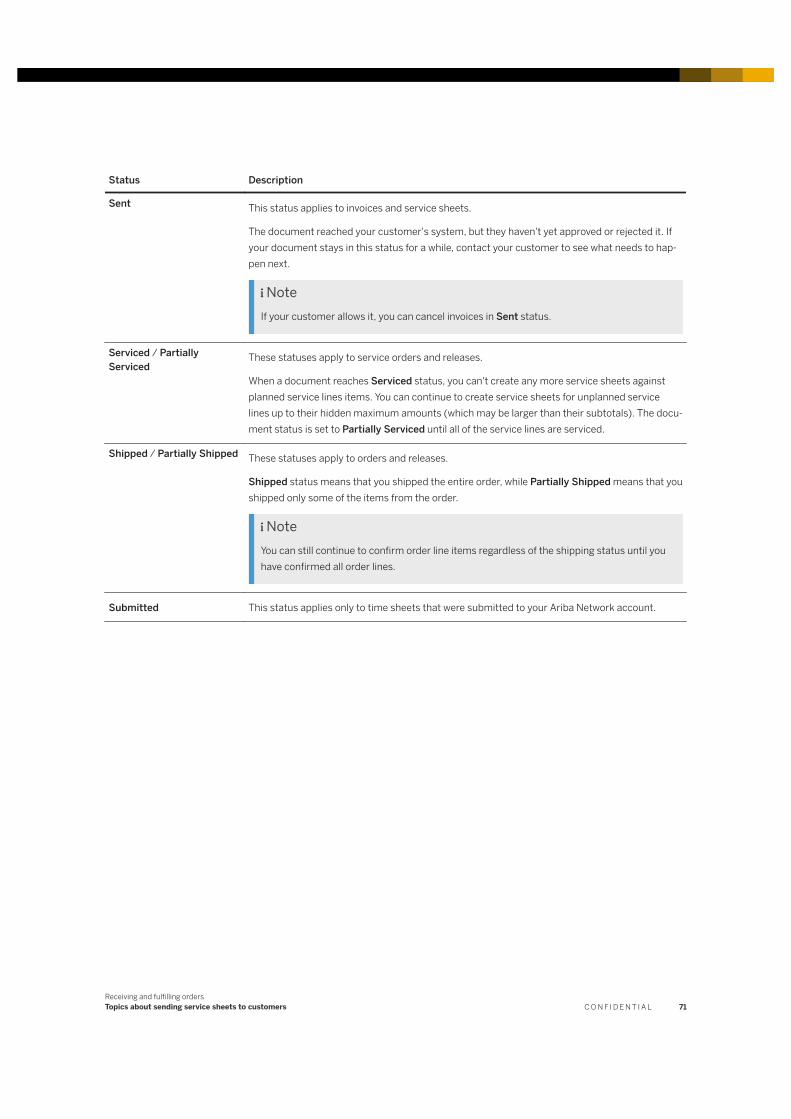
Status Description
Sent This status applies to invoices and service sheets.
The document reached your customer's system, but they haven't yet approved or rejected it. If your document stays in this status for a while, contact your customer to see what needs to happen next.
NoteIf your customer allows it, you can cancel invoices in Sent status.
Serviced / Partially Serviced
These statuses apply to service orders and releases.
When a document reaches Serviced status, you can't create any more service sheets against planned service lines items. You can continue to create service sheets for unplanned service lines up to their hidden maximum amounts (which may be larger than their subtotals). The document status is set to Partially Serviced until all of the service lines are serviced.
Shipped / Partially Shipped These statuses apply to orders and releases.
Shipped status means that you shipped the entire order, while Partially Shipped means that you shipped only some of the items from the order.
NoteYou can still continue to confirm order line items regardless of the shipping status until you have confirmed all order lines.
Submitted This status applies only to time sheets that were submitted to your Ariba Network account.
Receiving and fulfilling ordersTopics about sending service sheets to customers C O N F I D E N T I A L 71
Topics about using CSV templates to respond to large orders
In this section:
CSV templates for responding to large orders [page 72]
How to download large orders in CSV format [page 73]
How to download CSV templates [page 73]
How to change the routing method for order response documents [page 74]
How to upload order confirmations and ship notices in CSV format [page 74]
CSV templates for responding to large ordersAlthough Ariba Network supports documents up to 10,000 lines, you can't view or edit documents larger than 1,000 lines in the user interface. If a document is larger than 1,000 lines (such as a large order), you can see only the header of the document when you open it. You can't view the line item details. To download the complete order, you can open the order and download it in CSV format.
NoteYou also can't view line item details for large orders received through email or fax.
You can submit large order confirmations or ship notices (up to 10,000 lines) by uploading CSV files using standard templates. You can download CSV templates [page 73] to help you create these documents and upload them to Ariba Network.
Each standard CSV template has the following six header rows at the top of the template:
● Row 1: Character encoding (for example, 8859_1).● Row 2: Template information (for example, version and template type).● Row 3: Field names.● Row 4: Whether the field is required or optional.● Row 5: Data type (for example, Boolean, String, Integer, or Decimal).● Row 6: Field description explaining the data to enter in the field.
Starting at row 7, you can enter data in the template. When you upload the CSV file, Ariba Network imports data from row 7 and below.
NoteAlthough the header rows (rows 1 through 6) are not imported, make sure not to remove them. Otherwise, you'll receive errors when you try to upload the CSV file.
72 C O N F I D E N T I A LReceiving and fulfilling orders
Topics about using CSV templates to respond to large orders
How to download large orders in CSV formatWhen you download a large order in CSV format, the file contains all items from the order. You can use the file as the basis for an order confirmation, ship notice, or invoice. The file doesn't include header-level taxes, allowances, or charges.
Procedure
1. Click the Inbox tab.2. In the Orders and Releases section, find the large purchase order you want to download.3. Click Download CSV.4. Follow the instructions in your browser to save or view the file.
NoteYou can open CSV files in a spreadsheet program, such as Microsoft Excel.
How to download CSV templatesWhen you download CSV templates for order confirmations, ship notices, and invoices, you can use the templates to upload CSV files for large documents. Your customers might offer customized templates for you to use. Otherwise, Ariba offers standard templates to suppliers.
Procedure
1. On the Home page, choose CSV Templates from the CSV Documents menu.2. Choose a template, and then click Download.3. Choose a location where you want to save the CSV file, and then click Save.
Receiving and fulfilling ordersTopics about using CSV templates to respond to large orders C O N F I D E N T I A L 73
How to change the routing method for order response documentsBefore you can upload order confirmations or ship notices in CSV format, you need to change the routing method for order response documents to cXML.
Procedure
1. In the upper right corner of the home dashboard, choose Company Settings Electronic Order Routing .2. On the Electronic Order Routing tab, find the Other Document Types section.3. For Order Response Documents, choose cXML.4. Click Save.
How to upload order confirmations and ship notices in CSV formatYou can use a standard order confirmation or ship notice CSV template to upload order confirmations or ship notices to Ariba Network for purchase orders with more than 1,000 lines.
Prerequisites
● Download the CSV templates [page 73].● Prepare the CSV file for the type of document you are uploading.● Update the routing method for order response documents [page 74] to cXML.
Procedure
1. On the Home page, choose one of the following options from the CSV Documents menu:
○ Order Confirmation CSV○ Ship Notice CSV
2. In the Customer list, choose a customer.3. Click Browse to select the CSV file.4. Click the import button, which is based on the type of CSV upload:
○ Import CSV Order Confirmation
74 C O N F I D E N T I A LReceiving and fulfilling orders
Topics about using CSV templates to respond to large orders
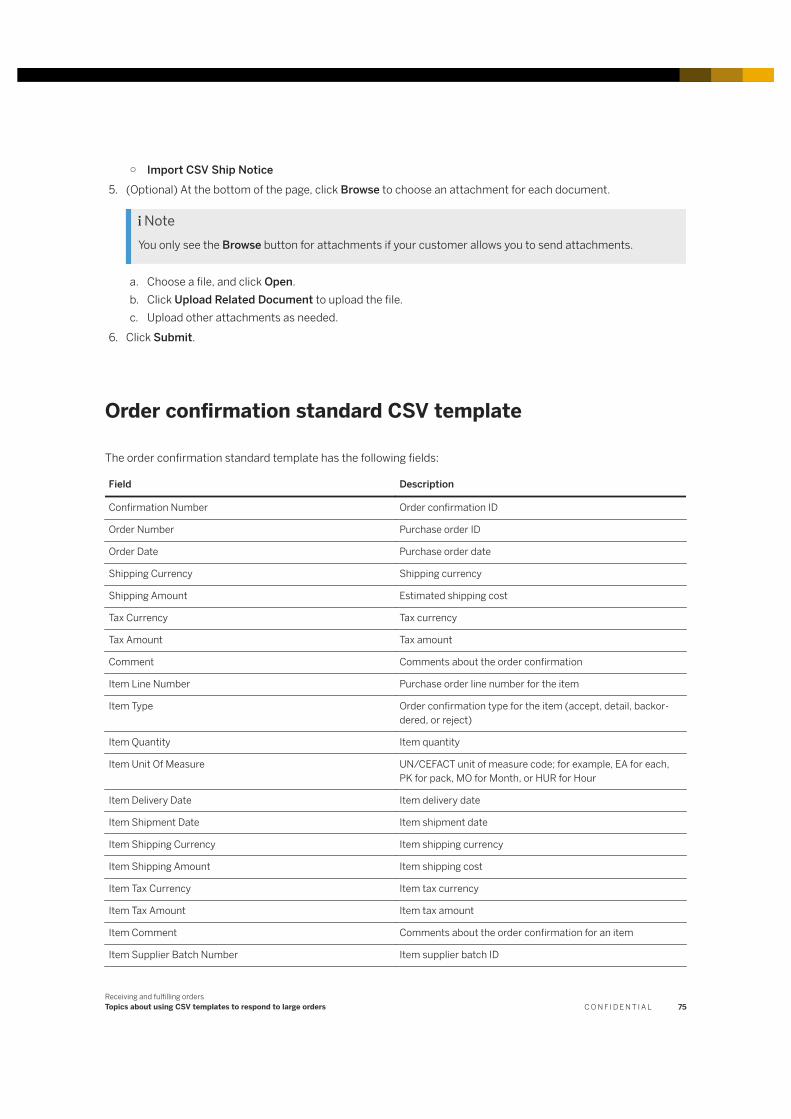
○ Import CSV Ship Notice5. (Optional) At the bottom of the page, click Browse to choose an attachment for each document.
NoteYou only see the Browse button for attachments if your customer allows you to send attachments.
a. Choose a file, and click Open.b. Click Upload Related Document to upload the file.c. Upload other attachments as needed.
6. Click Submit.
Order confirmation standard CSV template
The order confirmation standard template has the following fields:
Field Description
Confirmation Number Order confirmation ID
Order Number Purchase order ID
Order Date Purchase order date
Shipping Currency Shipping currency
Shipping Amount Estimated shipping cost
Tax Currency Tax currency
Tax Amount Tax amount
Comment Comments about the order confirmation
Item Line Number Purchase order line number for the item
Item Type Order confirmation type for the item (accept, detail, backordered, or reject)
Item Quantity Item quantity
Item Unit Of Measure UN/CEFACT unit of measure code; for example, EA for each, PK for pack, MO for Month, or HUR for Hour
Item Delivery Date Item delivery date
Item Shipment Date Item shipment date
Item Shipping Currency Item shipping currency
Item Shipping Amount Item shipping cost
Item Tax Currency Item tax currency
Item Tax Amount Item tax amount
Item Comment Comments about the order confirmation for an item
Item Supplier Batch Number Item supplier batch ID
Receiving and fulfilling ordersTopics about using CSV templates to respond to large orders C O N F I D E N T I A L 75
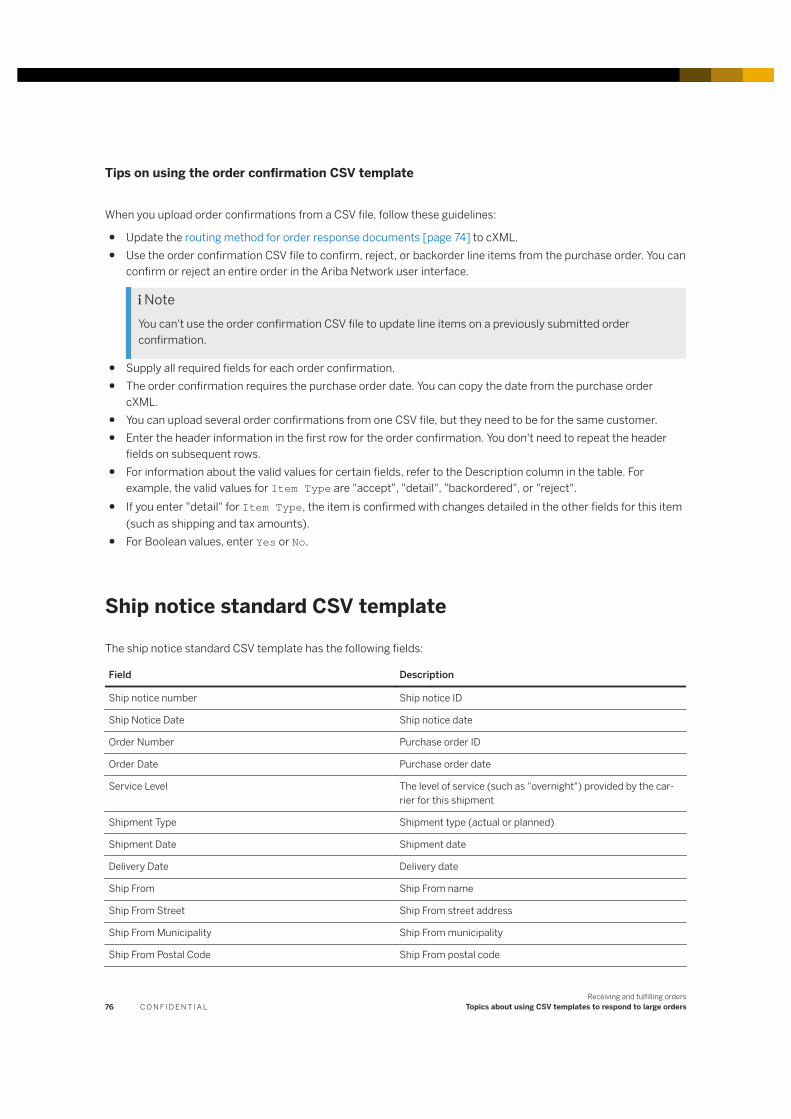
Tips on using the order confirmation CSV template
When you upload order confirmations from a CSV file, follow these guidelines:
● Update the routing method for order response documents [page 74] to cXML.● Use the order confirmation CSV file to confirm, reject, or backorder line items from the purchase order. You can
confirm or reject an entire order in the Ariba Network user interface.
NoteYou can't use the order confirmation CSV file to update line items on a previously submitted order confirmation.
● Supply all required fields for each order confirmation.● The order confirmation requires the purchase order date. You can copy the date from the purchase order
cXML.● You can upload several order confirmations from one CSV file, but they need to be for the same customer.● Enter the header information in the first row for the order confirmation. You don't need to repeat the header
fields on subsequent rows.● For information about the valid values for certain fields, refer to the Description column in the table. For
example, the valid values for Item Type are "accept", "detail", "backordered", or "reject".● If you enter "detail" for Item Type, the item is confirmed with changes detailed in the other fields for this item
(such as shipping and tax amounts).● For Boolean values, enter Yes or No.
Ship notice standard CSV template
The ship notice standard CSV template has the following fields:
Field Description
Ship notice number Ship notice ID
Ship Notice Date Ship notice date
Order Number Purchase order ID
Order Date Purchase order date
Service Level The level of service (such as "overnight") provided by the carrier for this shipment
Shipment Type Shipment type (actual or planned)
Shipment Date Shipment date
Delivery Date Delivery date
Ship From Ship From name
Ship From Street Ship From street address
Ship From Municipality Ship From municipality
Ship From Postal Code Ship From postal code
76 C O N F I D E N T I A LReceiving and fulfilling orders
Topics about using CSV templates to respond to large orders
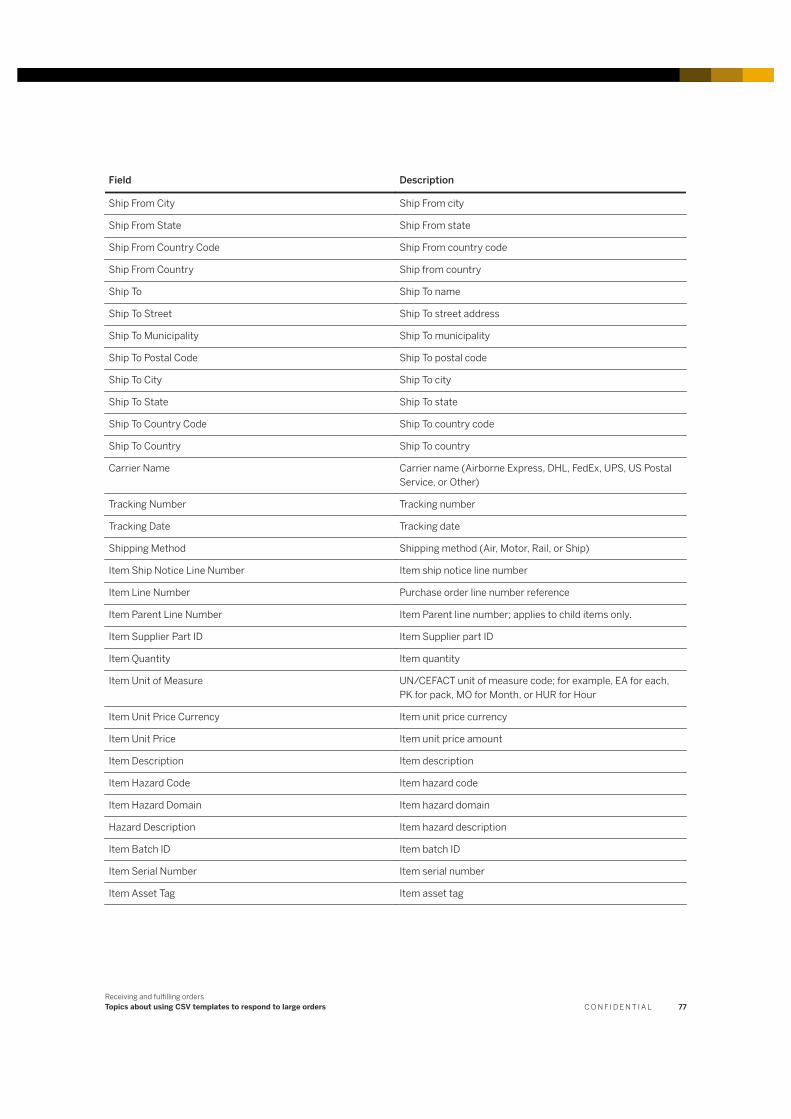
Field Description
Ship From City Ship From city
Ship From State Ship From state
Ship From Country Code Ship From country code
Ship From Country Ship from country
Ship To Ship To name
Ship To Street Ship To street address
Ship To Municipality Ship To municipality
Ship To Postal Code Ship To postal code
Ship To City Ship To city
Ship To State Ship To state
Ship To Country Code Ship To country code
Ship To Country Ship To country
Carrier Name Carrier name (Airborne Express, DHL, FedEx, UPS, US Postal Service, or Other)
Tracking Number Tracking number
Tracking Date Tracking date
Shipping Method Shipping method (Air, Motor, Rail, or Ship)
Item Ship Notice Line Number Item ship notice line number
Item Line Number Purchase order line number reference
Item Parent Line Number Item Parent line number; applies to child items only.
Item Supplier Part ID Item Supplier part ID
Item Quantity Item quantity
Item Unit of Measure UN/CEFACT unit of measure code; for example, EA for each, PK for pack, MO for Month, or HUR for Hour
Item Unit Price Currency Item unit price currency
Item Unit Price Item unit price amount
Item Description Item description
Item Hazard Code Item hazard code
Item Hazard Domain Item hazard domain
Hazard Description Item hazard description
Item Batch ID Item batch ID
Item Serial Number Item serial number
Item Asset Tag Item asset tag
Receiving and fulfilling ordersTopics about using CSV templates to respond to large orders C O N F I D E N T I A L 77
Tips on using the ship notice CSV template
When you upload ship notices from a CSV file, follow these guidelines:
● Update the routing method for order response documents [page 74] to cXML.● Supply all required fields for each ship notice.● You can upload several ship notices from one CSV file, but they need to be for the same customer.● Enter the header information in the first row for the ship notice. You don't need to repeat the header fields on
subsequent rows.● For information about the valid values for certain fields, refer to the Description column in the table. For
example, the valid values for Shipment Type are "actual" or "planned".● For Boolean values, enter Yes or No.
78 C O N F I D E N T I A LReceiving and fulfilling orders
Topics about using CSV templates to respond to large orders

Revision history
The following table provides a brief history of the updates to this guide. SAP Ariba updates the technical documentation for its cloud solutions when:
● software changes delivered in service packs or hot fixes require a documentation update to correctly reflect the new or changed functionality
● the existing content is incorrect or user feedback indicated that important content is missing
SAP Ariba reserves the right to update its technical documentation without prior notification. Most documentation updates will be made available in the same week as the software service packs are released, but critical documentation updates may be released at any time.
Month/Year of Update Updated Chapter/Section Short Description of Change
August 2018 Topics about confirming or rejecting orders
Added topics about the Items To Confirm list.
July 2018 Topics about sending service sheets to customers
Updated topic: Service sheets.
May 2018 Topics about sending ship notices to customers
Added topics:
● Ship notice barcode labels● How to create a ship notice with one ship-to address for all
items
March 2018 Topics about viewing details for orders or releases
Updated topic: How to download a custom PDF for an order.
Topics about confirming or rejecting orders
Updated topic: How to confirm or reject an entire order.
Topics about sending ship notices to customers
Updated topics:
● Draft ship notices● How to download a ship notice barcode label● How to create a draft ship notice● How to edit a draft ship notice
January 2018 Topics about sending ship notices to customers
Updated topic: Ship notices. For customers that uploaded unit of measure data, you can search for units of measure for packaging information.
Topics about sending service sheets to customers
Added topic on how to search for a unit of measure on a service sheet.
November 2017 Topics about using CSV templates to respond to large orders
Updated topic (removed limitation): How to upload order confir-mations and ship notices in CSV format.
Topics about sending ship notices to customers
Updated topic: Ship notice fields.
Receiving and fulfilling ordersRevision history C O N F I D E N T I A L 79
Month/Year of Update Updated Chapter/Section Short Description of Change
September 2017 Topics about sending ship notices to customers
Updated topic: How to print a ship notice barcode label.
80 C O N F I D E N T I A LReceiving and fulfilling orders
Revision history
Important Disclaimers and Legal Information
HyperlinksSome links are classified by an icon and/or a mouseover text. These links provide additional information.About the icons:
● Links with the icon : You are entering a Web site that is not hosted by SAP. By using such links, you agree (unless expressly stated otherwise in your agreements with SAP) to this:
● The content of the linked-to site is not SAP documentation. You may not infer any product claims against SAP based on this information.● SAP does not agree or disagree with the content on the linked-to site, nor does SAP warrant the availability and correctness. SAP shall not be liable for any
damages caused by the use of such content unless damages have been caused by SAP's gross negligence or willful misconduct.
● Links with the icon : You are leaving the documentation for that particular SAP product or service and are entering a SAP-hosted Web site. By using such links, you agree that (unless expressly stated otherwise in your agreements with SAP) you may not infer any product claims against SAP based on this information.
Beta and Other Experimental FeaturesExperimental features are not part of the officially delivered scope that SAP guarantees for future releases. This means that experimental features may be changed by SAP at any time for any reason without notice. Experimental features are not for productive use. You may not demonstrate, test, examine, evaluate or otherwise use the experimental features in a live operating environment or with data that has not been sufficiently backed up.The purpose of experimental features is to get feedback early on, allowing customers and partners to influence the future product accordingly. By providing your feedback (e.g. in the SAP Community), you accept that intellectual property rights of the contributions or derivative works shall remain the exclusive property of SAP.
Example CodeAny software coding and/or code snippets are examples. They are not for productive use. The example code is only intended to better explain and visualize the syntax and phrasing rules. SAP does not warrant the correctness and completeness of the example code. SAP shall not be liable for errors or damages caused by the use of example code unless damages have been caused by SAP's gross negligence or willful misconduct.
Gender-Related LanguageWe try not to use gender-specific word forms and formulations. As appropriate for context and readability, SAP may use masculine word forms to refer to all genders.
Receiving and fulfilling ordersImportant Disclaimers and Legal Information C O N F I D E N T I A L 81
www.ariba.com
© 2018 SAP SE or an SAP affiliate company. All rights reserved.
No part of this publication may be reproduced or transmitted in any form or for any purpose without the express permission of SAP SE or an SAP affiliate company. The information contained herein may be changed without prior notice.
Some software products marketed by SAP SE and its distributors contain proprietary software components of other software vendors. National product specifications may vary.
These materials are provided by SAP SE or an SAP affiliate company for informational purposes only, without representation or warranty of any kind, and SAP or its affiliated companies shall not be liable for errors or omissions with respect to the materials. The only warranties for SAP or SAP affiliate company products and services are those that are set forth in the express warranty statements accompanying such products and services, if any. Nothing herein should be construed as constituting an additional warranty.
SAP and other SAP products and services mentioned herein as well as their respective logos are trademarks or registered trademarks of SAP SE (or an SAP affiliate company) in Germany and other countries. All other product and service names mentioned are the trademarks of their respective companies.
Please see https://www.sap.com/about/legal/trademark.html for additional trademark information and notices.
THE BEST RUN


![[ORDERS (INCOMPLETE MATTERS / IAs / CRLMPs)]](https://img.dokumen.tips/doc/110x75/6323e293be5419ea700ece07/orders-incomplete-matters-ias-crlmps.jpg)


