Embed Size (px)
Citation preview
Real Estate Services
2020 Administrative Procedures
Updated: June 4, 2020
sugarloaf\RPS\Policies\Policies & Procedures
TABLE OF CONTENTS PAGE NUMBER
Administrative Duties 4
New Hire Procedure 6
Directions to Campus Card Office 9
Directions to Access Services 12
Accessing Outage Calendar 14
Ordering RES Professional Supplies 16
Creating Occupancy & Vacancy Maps 19
Cash Receipts 21
Procurement and Travel Card Reimbursement Report 24
Antenna Site Access 26
Grandview – Management & Leasing –PO procedures 28
Lease/MOU/License/Amendment Procedure 32
Late Fees 34
Outside Leases – Signature Process 36
Procedure to Lease Off-Campus Space 38
Space Request Overview 40
Private Use Space Request Form 42
Antenna Site/Rooftop Space Use Request Form 47
Cell Antenna Site Requirements and Application 49
Updating Website 53
ProLease Management 56
DocuSign & Updating the A-Z Listing 60
Certificates of Insurance 62
New Outside Tenant Procedures 66
CU Mailer’s Guide 69
Surplus Property Disposal 81
WIP & Response Time Reports 96
Page 3 of 99
Administrative Duties
Page 4 of 99
Miscellaneous
Administrative Duties
• Answer all phone calls. Screen & forward call or take detailed message for intended recipient
• Greet office visitors and direct to desired location or take message
• Receive mail delivery and distribute accordingly
• Water office plants semi-weekly
• Place phone calls and send emails at the request of RES staff
Printer/Scanner Operations – Xerox Work centre 7835
Link to User Manual: http://download.support.xerox.com/pub/docs/WC780X/userdocs/any-os/en_GB/wc780x_user_guide_ck1.5_en-us.pdf
• Check & Refill paper a minimum of once a week. If printing volume is unusually high, refill as needed
• Monitor paper inventory and order as needed (see Marketplace procedures)
• Clear paper jams by following prompts on printer screen
• At request of senior RES staff, print, copy, and scan documents
Tenant Contact List
File Location: \\sugarloaf\rps\Administrative, choose Excel file “ADMIN SPREADSHEETS”
• Update list with every new lease, license agreement, MOU, amendment, and all other miscellaneous
notifications
RBS & RES Annual Budget Books
At the beginning of each fiscal year RES accountant will provide budget information which must be printed & bound.
After information received, double-check that it’s been reviewed & approved by senior RES staff
• Take budget with previous year’s budget book to FedEx office and instruct them to bound new information
exactly as it was the previous year. This includes tab placement, cover page, and ensuring pages aren’t cut off at
the bounding border.
• This procedure may also be modified to bind the books in-house; or sending an electronic version depending on
circumstances.
Real Estate Services Department Email
Login: FMRES
Password: Res#123456
Alias: [email protected] Current Owner: Steven Stasica
**To change ownership, call 5HELP or submit a ticket through OIT and request a change in ownership. This should take 1-2
days and OIT can assist you further with the process.
Page 5 of 99
New Hire Procedure
Page 6 of 99
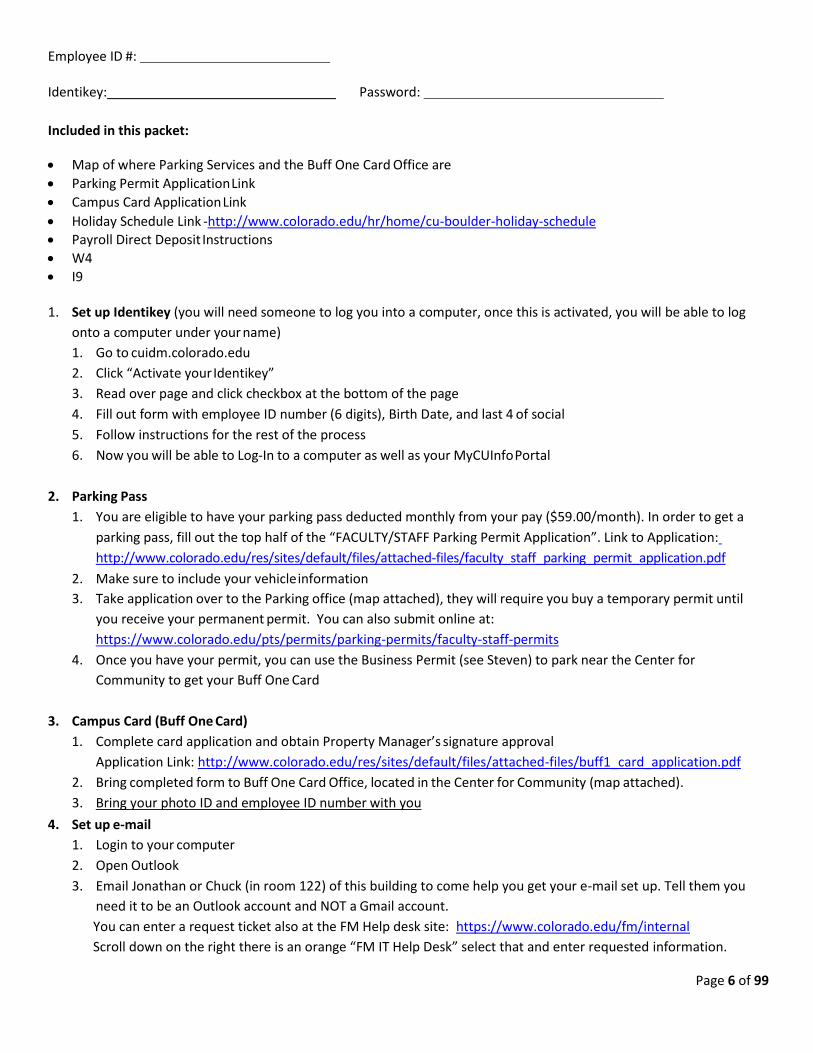
Employee ID #:
Identikey: Password:
Included in this packet:
• Map of where Parking Services and the Buff One Card Office are
• Parking Permit Application Link
• Campus Card Application Link
• Holiday Schedule Link -http://www.colorado.edu/hr/home/cu-boulder-holiday-schedule • Payroll Direct Deposit Instructions
• W4
• I9
1. Set up Identikey (you will need someone to log you into a computer, once this is activated, you will be able to log
onto a computer under your name)
1. Go to cuidm.colorado.edu
2. Click “Activate your Identikey”
3. Read over page and click checkbox at the bottom of the page
4. Fill out form with employee ID number (6 digits), Birth Date, and last 4 of social
5. Follow instructions for the rest of the process
6. Now you will be able to Log-In to a computer as well as your MyCUInfo Portal
2. Parking Pass
1. You are eligible to have your parking pass deducted monthly from your pay ($59.00/month). In order to get a
parking pass, fill out the top half of the “FACULTY/STAFF Parking Permit Application”. Link to Application:
http://www.colorado.edu/res/sites/default/files/attached-files/faculty_staff_parking_permit_application.pdf
2. Make sure to include your vehicle information
3. Take application over to the Parking office (map attached), they will require you buy a temporary permit until
you receive your permanent permit. You can also submit online at:
https://www.colorado.edu/pts/permits/parking-permits/faculty-staff-permits
4. Once you have your permit, you can use the Business Permit (see Steven) to park near the Center for
Community to get your Buff One Card
3. Campus Card (Buff One Card)
1. Complete card application and obtain Property Manager’s signature approval
Application Link: http://www.colorado.edu/res/sites/default/files/attached-files/buff1_card_application.pdf
2. Bring completed form to Buff One Card Office, located in the Center for Community (map attached).
3. Bring your photo ID and employee ID number with you
4. Set up e-mail
1. Login to your computer
2. Open Outlook
3. Email Jonathan or Chuck (in room 122) of this building to come help you get your e-mail set up. Tell them you
need it to be an Outlook account and NOT a Gmail account.
You can enter a request ticket also at the FM Help desk site: https://www.colorado.edu/fm/internal
Scroll down on the right there is an orange “FM IT Help Desk” select that and enter requested information.
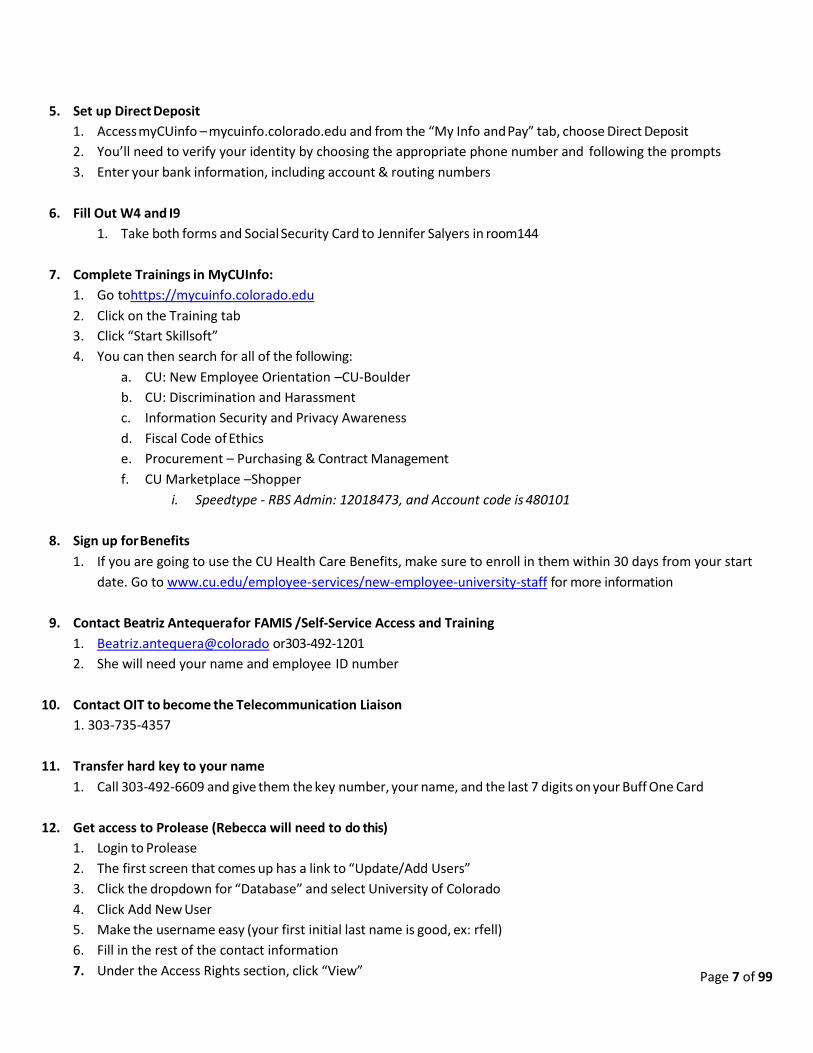
5. Set up Direct Deposit
1. Access myCUinfo – mycuinfo.colorado.edu and from the “My Info and Pay” tab, choose Direct Deposit
2. You’ll need to verify your identity by choosing the appropriate phone number and following the prompts
3. Enter your bank information, including account & routing numbers
6. Fill Out W4 and I9
1. Take both forms and Social Security Card to Jennifer Salyers in room144
7. Complete Trainings in MyCUInfo:
1. Go tohttps://mycuinfo.colorado.edu
2. Click on the Training tab
3. Click “Start Skillsoft”
4. You can then search for all of the following:
a. CU: New Employee Orientation –CU-Boulder
b. CU: Discrimination and Harassment
c. Information Security and Privacy Awareness
d. Fiscal Code of Ethics
e. Procurement – Purchasing & Contract Management
f. CU Marketplace –Shopper
i. Speedtype - RBS Admin: 12018473, and Account code is 480101
8. Sign up for Benefits
1. If you are going to use the CU Health Care Benefits, make sure to enroll in them within 30 days from your start
date. Go to www.cu.edu/employee-services/new-employee-university-staff for more information
9. Contact Beatriz Antequera for FAMIS /Self-Service Access and Training
1. Beatriz.antequera@colorado or303-492-1201
2. She will need your name and employee ID number
10. Contact OIT to become the Telecommunication Liaison
1. 303-735-4357
11. Transfer hard key to your name
1. Call 303-492-6609 and give them the key number, your name, and the last 7 digits on your Buff One Card
12. Get access to Prolease (Rebecca will need to do this)
1. Login to Prolease
2. The first screen that comes up has a link to “Update/Add Users”
3. Click the dropdown for “Database” and select University of Colorado
4. Click Add New User
5. Make the username easy (your first initial last name is good, ex: rfell)
6. Fill in the rest of the contact information
7. Under the Access Rights section, click “View” Page 7 of 99
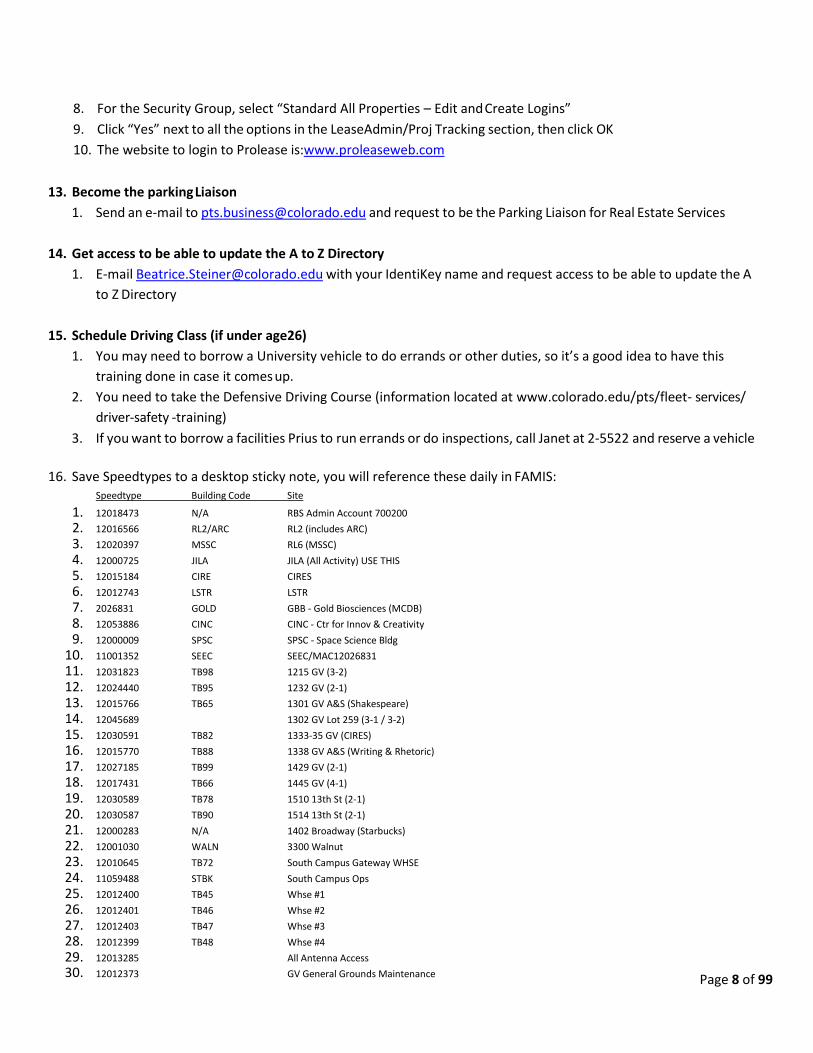
8. For the Security Group, select “Standard All Properties – Edit and Create Logins”
9. Click “Yes” next to all the options in the LeaseAdmin/Proj Tracking section, then click OK
10. The website to login to Prolease is:www.proleaseweb.com
13. Become the parking Liaison
1. Send an e-mail to [email protected] and request to be the Parking Liaison for Real Estate Services
14. Get access to be able to update the A to Z Directory
1. E-mail [email protected] with your IdentiKey name and request access to be able to update the A
to Z Directory
15. Schedule Driving Class (if under age26)
1. You may need to borrow a University vehicle to do errands or other duties, so it’s a good idea to have this
training done in case it comes up.
2. You need to take the Defensive Driving Course (information located at www.colorado.edu/pts/fleet- services/
driver-safety -training)
3. If you want to borrow a facilities Prius to run errands or do inspections, call Janet at 2-5522 and reserve a vehicle
16. Save Speedtypes to a desktop sticky note, you will reference these daily in FAMIS:
Speedtype Building Code Site
Page 8 of 99
1. 12018473 N/A RBS Admin Account 700200
2. 12016566 RL2/ARC RL2 (includes ARC)
3. 12020397 MSSC RL6 (MSSC)
4. 12000725 JILA JILA (All Activity) USE THIS
5. 12015184 CIRE CIRES
6. 12012743 LSTR LSTR
7. 2026831 GOLD GBB - Gold Biosciences (MCDB)
8. 12053886 CINC CINC - Ctr for Innov & Creativity
9. 12000009 SPSC SPSC - Space Science Bldg
10. 11001352 SEEC SEEC/MAC12026831
11. 12031823 TB98 1215 GV (3-2)
12. 12024440 TB95 1232 GV (2-1)
13. 12015766 TB65 1301 GV A&S (Shakespeare)
14. 12045689 1302 GV Lot 259 (3-1 / 3-2)
15. 12030591 TB82 1333-35 GV (CIRES)
16. 12015770 TB88 1338 GV A&S (Writing & Rhetoric)
17. 12027185 TB99 1429 GV (2-1)
18. 12017431 TB66 1445 GV (4-1)
19. 12030589 TB78 1510 13th St (2-1)
20. 12030587 TB90 1514 13th St (2-1)
21. 12000283 N/A 1402 Broadway (Starbucks)
22. 12001030 WALN 3300 Walnut
23. 12010645 TB72 South Campus Gateway WHSE
24. 11059488 STBK South Campus Ops
25. 12012400 TB45 Whse #1
26. 12012401 TB46 Whse #2
27. 12012403 TB47 Whse #3
28. 12012399 TB48 Whse #4
29. 12013285 All Antenna Access
30. 12012373 GV General Grounds Maintenance

Page 9 of 99
Directions to Campus Card
Office
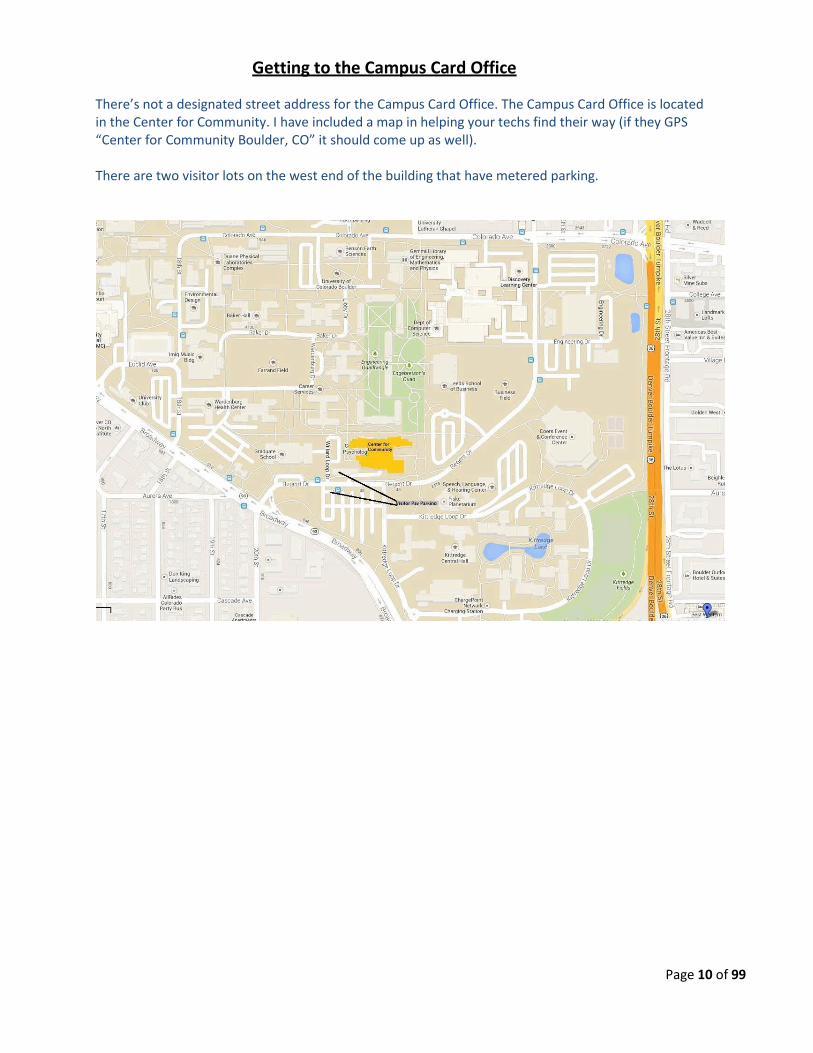
Getting to the Campus Card Office
There’s not a designated street address for the Campus Card Office. The Campus Card Office is located in the Center for Community. I have included a map in helping your techs find their way (if they GPS “Center for Community Boulder, CO” it should come up as well).
There are two visitor lots on the west end of the building that have metered parking.
Page 10 of 99

Page 11 of 99
Directions to Access Services
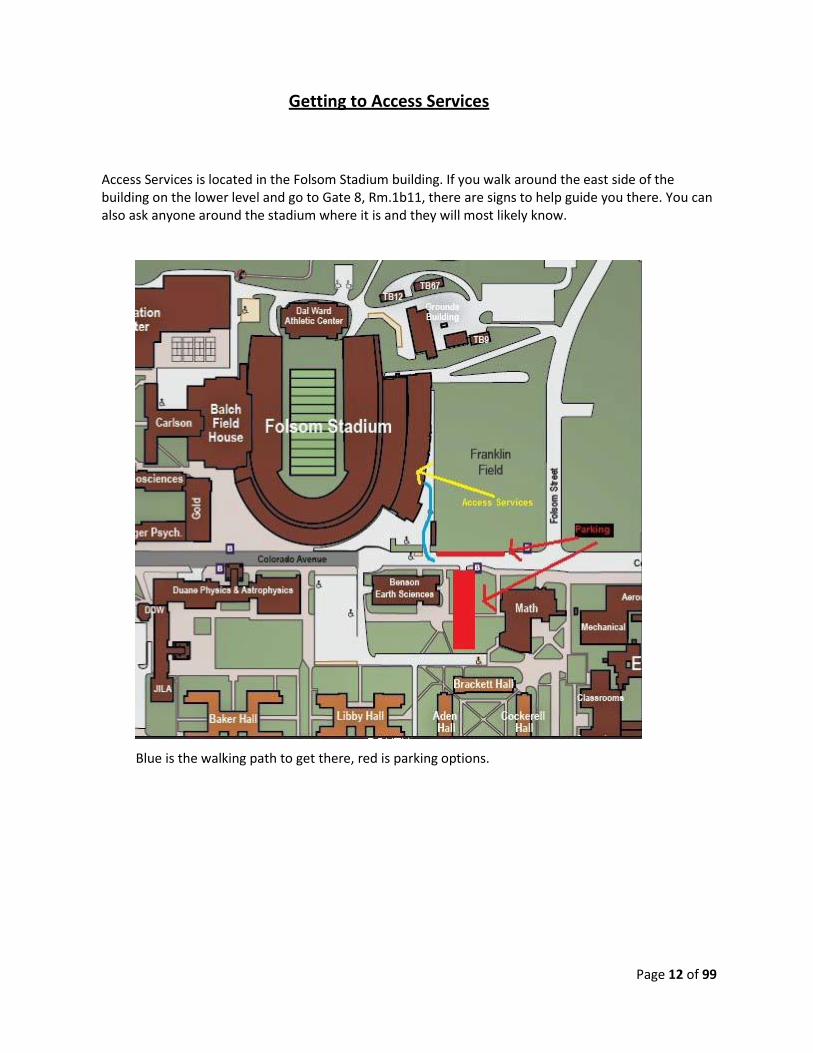
Getting to Access Services
Access Services is located in the Folsom Stadium building. If you walk around the east side of the building on the lower level and go to Gate 8, Rm.1b11, there are signs to help guide you there. You can also ask anyone around the stadium where it is and they will most likely know.
Blue is the walking path to get there, red is parking options.
Page 12 of 99

Page 13 of 99
Accessing Outage Calendar
Page 14 of 99
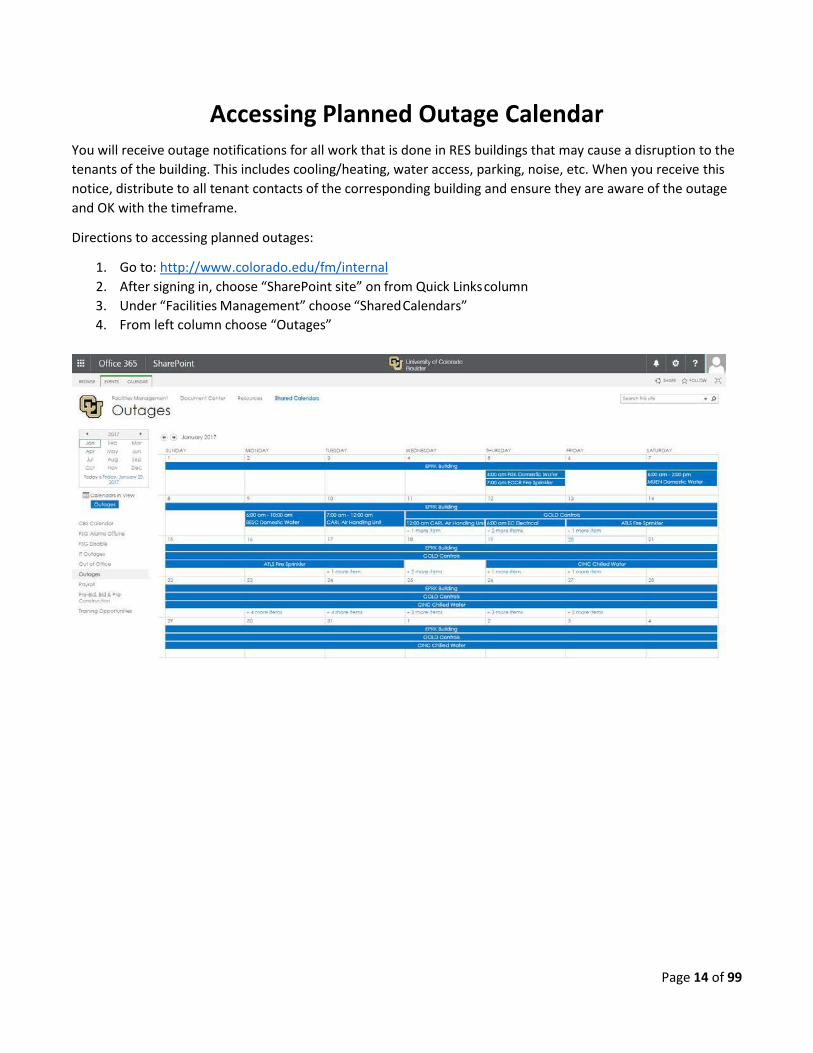
Accessing Planned Outage Calendar You will receive outage notifications for all work that is done in RES buildings that may cause a disruption to the
tenants of the building. This includes cooling/heating, water access, parking, noise, etc. When you receive this
notice, distribute to all tenant contacts of the corresponding building and ensure they are aware of the outage
and OK with the timeframe.
Directions to accessing planned outages:
1. Go to: http://www.colorado.edu/fm/internal
2. After signing in, choose “SharePoint site” on from Quick Links column
3. Under “Facilities Management” choose “Shared Calendars”
4. From left column choose “Outages”
Page 15 of 99
Ordering RES Professional Supplies
Page 16 of 99
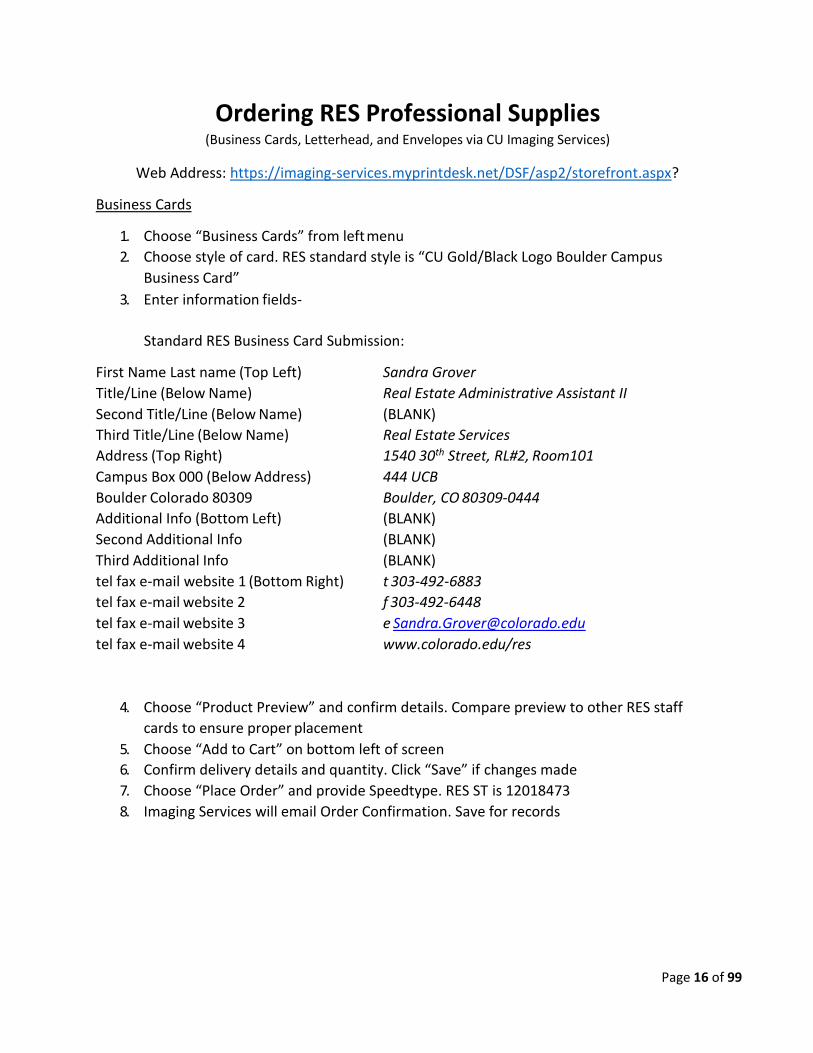
Ordering RES Professional Supplies (Business Cards, Letterhead, and Envelopes via CU Imaging Services)
Web Address: https://imaging-services.myprintdesk.net/DSF/asp2/storefront.aspx?
Business Cards
1. Choose “Business Cards” from left menu
2. Choose style of card. RES standard style is “CU Gold/Black Logo Boulder Campus
Business Card”
3. Enter information fields-
Standard RES Business Card Submission:
First Name Last name (Top Left) Sandra Grover
Title/Line (Below Name) Real Estate Administrative Assistant II
Second Title/Line (Below Name) (BLANK)
Third Title/Line (Below Name) Real Estate Services
Address (Top Right) 1540 30th Street, RL#2, Room101
Campus Box 000 (Below Address) 444 UCB
Boulder Colorado 80309 Boulder, CO 80309-0444
Additional Info (Bottom Left) (BLANK)
Second Additional Info (BLANK)
Third Additional Info (BLANK)
tel fax e-mail website 1 (Bottom Right) t 303-492-6883
tel fax e-mail website 2 f 303-492-6448
tel fax e-mail website 3 e [email protected]
tel fax e-mail website 4 www.colorado.edu/res
4. Choose “Product Preview” and confirm details. Compare preview to other RES staff
cards to ensure proper placement
5. Choose “Add to Cart” on bottom left of screen
6. Confirm delivery details and quantity. Click “Save” if changes made
7. Choose “Place Order” and provide Speedtype. RES ST is 12018473
8. Imaging Services will email Order Confirmation. Save for records
Page 17 of 99
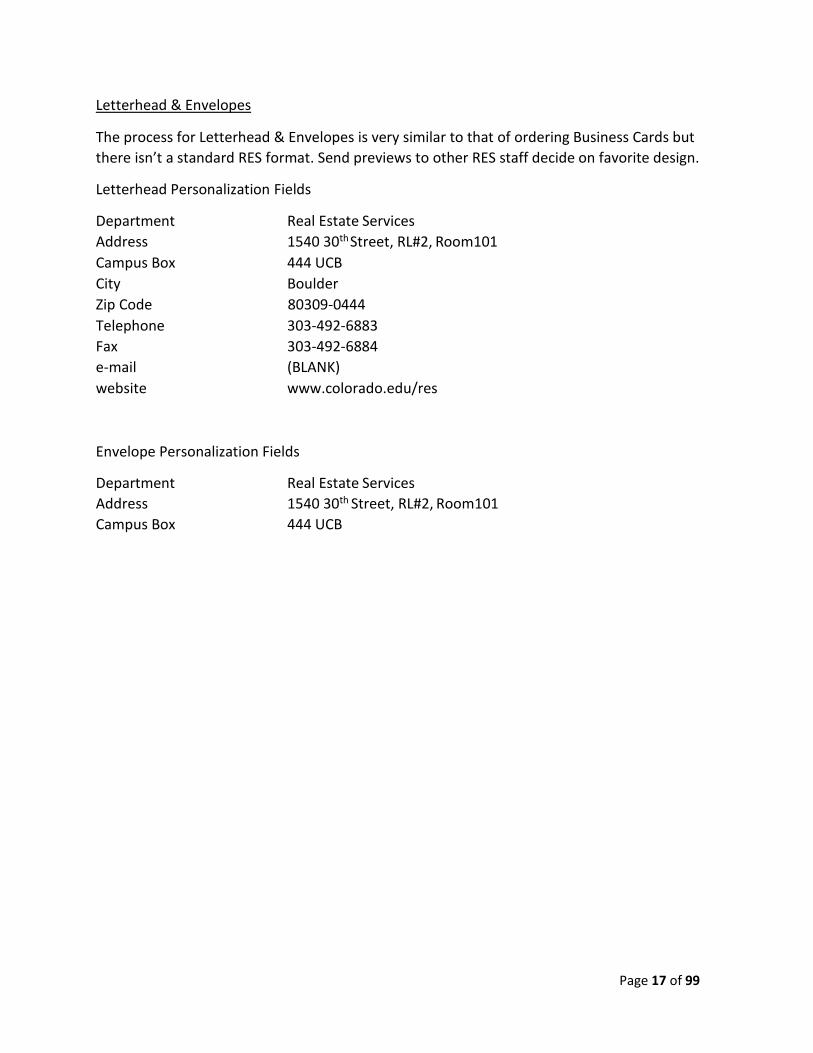
Letterhead & Envelopes
The process for Letterhead & Envelopes is very similar to that of ordering Business Cards but
there isn’t a standard RES format. Send previews to other RES staff decide on favorite design.
Letterhead Personalization Fields
Department Real Estate Services
Address 1540 30th
Street, RL#2, Room101
Campus Box 444 UCB
City Boulder
Zip Code 80309-0444
Telephone 303-492-6883
Fax 303-492-6884
e-mail (BLANK)
website www.colorado.edu/res
Envelope Personalization Fields
Department Real Estate Services
Address 1540 30th Street, RL#2, Room101
Campus Box 444 UCB

Page 18 of 99
Creating Occupancy & Vacancy Maps
Page 19 of 99
Creating Occupancy & Vacancy Maps 1. Go to CAD Office Website: http://fm.colorado.edu/internal/cad/index.html
2. From the top left of screen, choose building by Code, Name, or Number
3. Select appropriate floor. This opens up CAD drawing
4. Open “Snipping Tool” application from your desktop Windows Start Menu
5. Click “New” and then use the tool to grab the screen shot of the map
6. Right click on the screen shot and select “Copy”
7. Open Paint and paste the screen shot into Paint
8. From here, use the paint bucket to color rooms, and customize the entire map to be what you need
9. Use the font tool to create legends & add the building name. Do not delete the map compass
10. Once completed, save as a JPEG file
11. To convert to PDF, right click on the file in the folder and select the “Convert to PDF” option

Cash Receipts
Page 20 of 99
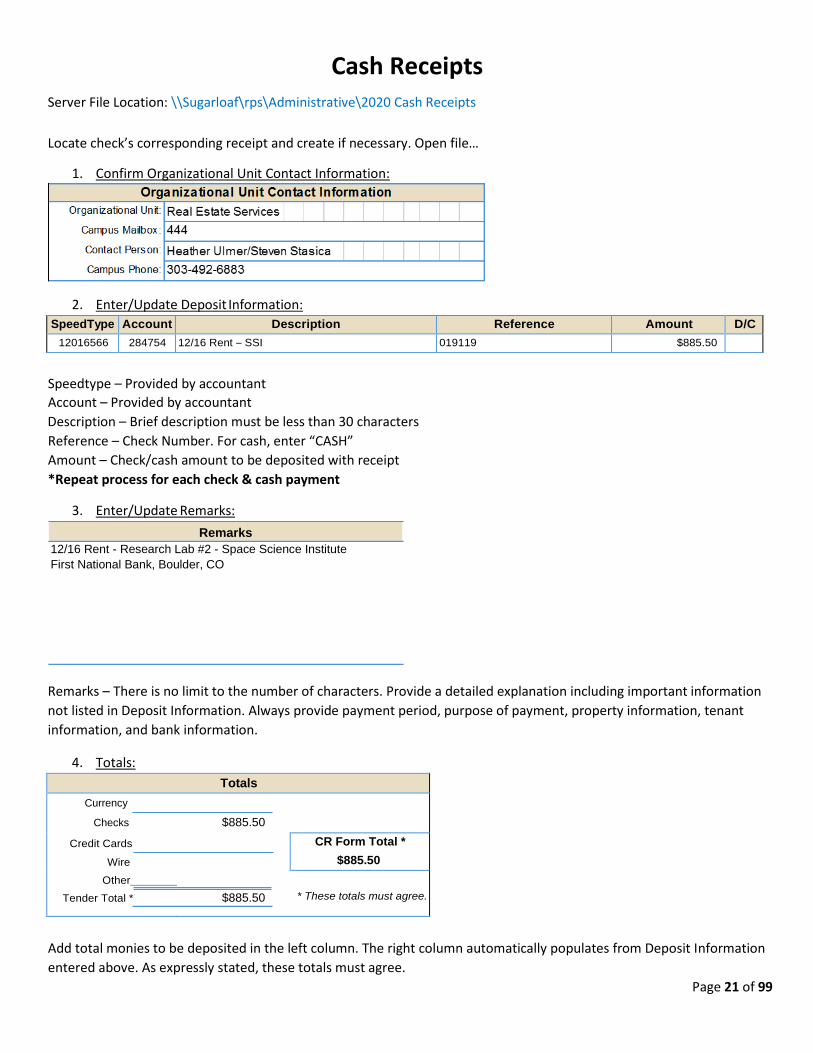
Cash Receipts Server File Location: \\Sugarloaf\rps\Administrative\2020 Cash Receipts
Locate check’s corresponding receipt and create if necessary. Open file…
1. Confirm Organizational Unit Contact Information:
2. Enter/Update Deposit Information:
SpeedType Account Description Reference Amount D/C
12016566 284754 12/16 Rent – SSI 019119 $885.50
Speedtype – Provided by accountant
Account – Provided by accountant
Description – Brief description must be less than 30 characters
Reference – Check Number. For cash, enter “CASH”
Amount – Check/cash amount to be deposited with receipt
*Repeat process for each check & cash payment
3. Enter/Update Remarks:
Remarks – There is no limit to the number of characters. Provide a detailed explanation including important information
not listed in Deposit Information. Always provide payment period, purpose of payment, property information, tenant
information, and bank information.
4. Totals:
Totals
Currency
Checks
$885.50
Credit Cards
Wire
CR Form Total *
$885.50
Other
Tender Total *
$885.50
* These totals must agree.
Add total monies to be deposited in the left column. The right column automatically populates from Deposit Information
entered above. As expressly stated, these totals must agree.
Page 21 of 99
12/16 Rent - Research Lab #2 - Space Science Institute
First National Bank, Boulder, CO
Remarks
5. Stamp Check:
Each check must be endorsed/stamped with the following:
For Deposit Only
Regents of the University of Colorado
Organizational Unit Name
Campus Bank Account Number (available from appropriate campus bursar's office)
SpeedType/Account #s (use smaller font for this line of information so the bank does not mistake it for part of the Bank Account #)
Each check must be stamped with RES provided stamp in signature area. Stamp will contain above information and you
must list each Speedtype and Account # that was entered in Deposit Information (#2 above).
Campus Bank Account Number: NWB 1823472752
Organizational Unit Name: Real Estate Services
For reordering purposes, Stamp can be found on CU Marketplace, Staples site: model 2000 Plus Printer 50
6. Print 2 copies of receipt.
One is sent with payment to Bursar’s office and the other is filed in RES’ rent collection records
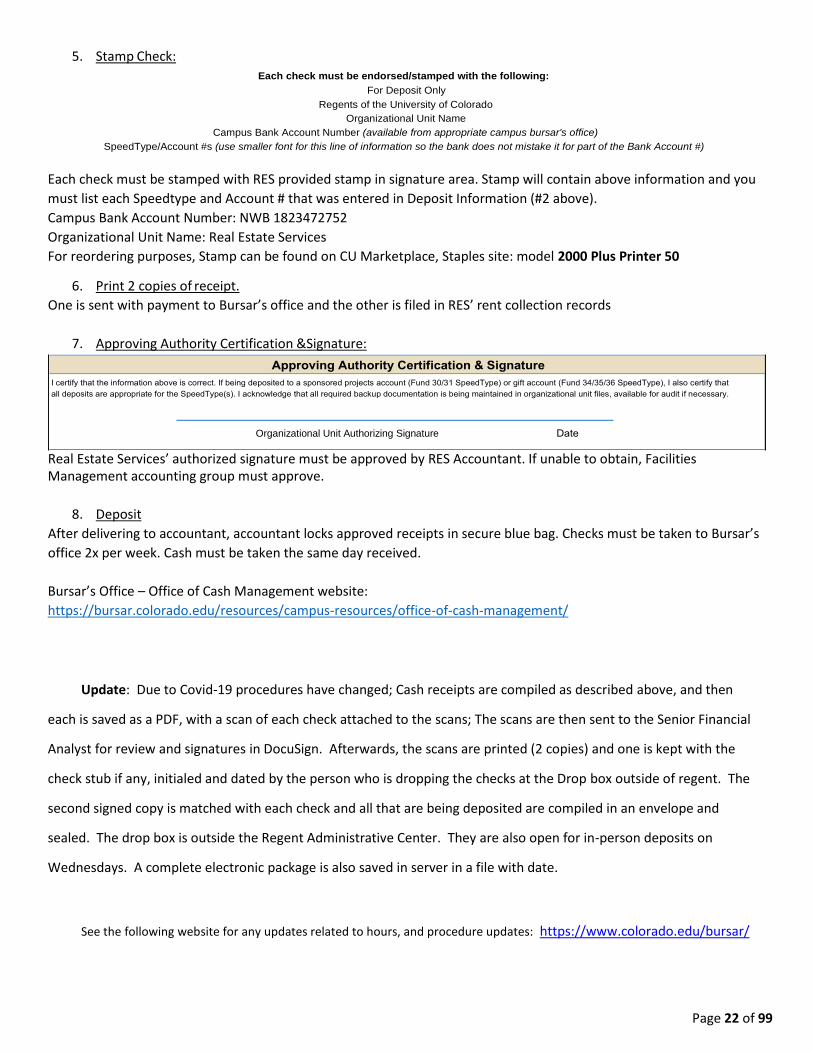
7. Approving Authority Certification &Signature:
Real Estate Services’ authorized signature must be approved by RES Accountant. If unable to obtain, Facilities Management accounting group must approve.
8. Deposit
After delivering to accountant, accountant locks approved receipts in secure blue bag. Checks must be taken to Bursar’s
office 2x per week. Cash must be taken the same day received.
Bursar’s Office – Office of Cash Management website:
https://bursar.colorado.edu/resources/campus-resources/office-of-cash-management/
Update: Due to Covid-19 procedures have changed; Cash receipts are compiled as described above, and then
each is saved as a PDF, with a scan of each check attached to the scans; The scans are then sent to the Senior Financial
Analyst for review and signatures in DocuSign. Afterwards, the scans are printed (2 copies) and one is kept with the
check stub if any, initialed and dated by the person who is dropping the checks at the Drop box outside of regent. The
second signed copy is matched with each check and all that are being deposited are compiled in an envelope and
sealed. The drop box is outside the Regent Administrative Center. They are also open for in-person deposits on
Wednesdays. A complete electronic package is also saved in server in a file with date.
See the following website for any updates related to hours, and procedure updates: https://www.colorado.edu/bursar/
Page 22 of 99
Organizational Unit Authorizing Signature
Reconcilement of Expense reports and Purchase Card or travel card
Expenses need to be processed for reimbursement within 30 days; For Procurement Card and Travel Card Reimbursement Reports, receipts need to be processed in the report via the Concur payment system within 30 days. If a report is not processed within that time, a reminder warning notice will be sent to your email. If successive reports are late, privileges could be revoked. Begin by accessing Concur via your campus portal. 1. Log in to your campus portal and locate your CU Resources section. 2. Under the Business Applications area, select the Concur Travel & Expense System link.
Step 1 Create the Expense Report
Step 2 Add Expenses
Step 3 Allocate Expenses
Step 4 Attach Documents
Step 5 Set Approval Flow
Step 6 Submit the Expense Report
Travel card reimbursements follow the same steps, but require more information such as mileage, meals and per diem. For more information on Expense Reports choose from the links below:
Concur – The Expense Report Process
https://www.cu.edu/psc/expense-report-process
Reconciling Procurement Card with Concur
https://www.cu.edu/psc/training/reconciling-procurement-card-concur
Page 24 of 99

Page 25 of 99
Antenna Site Access
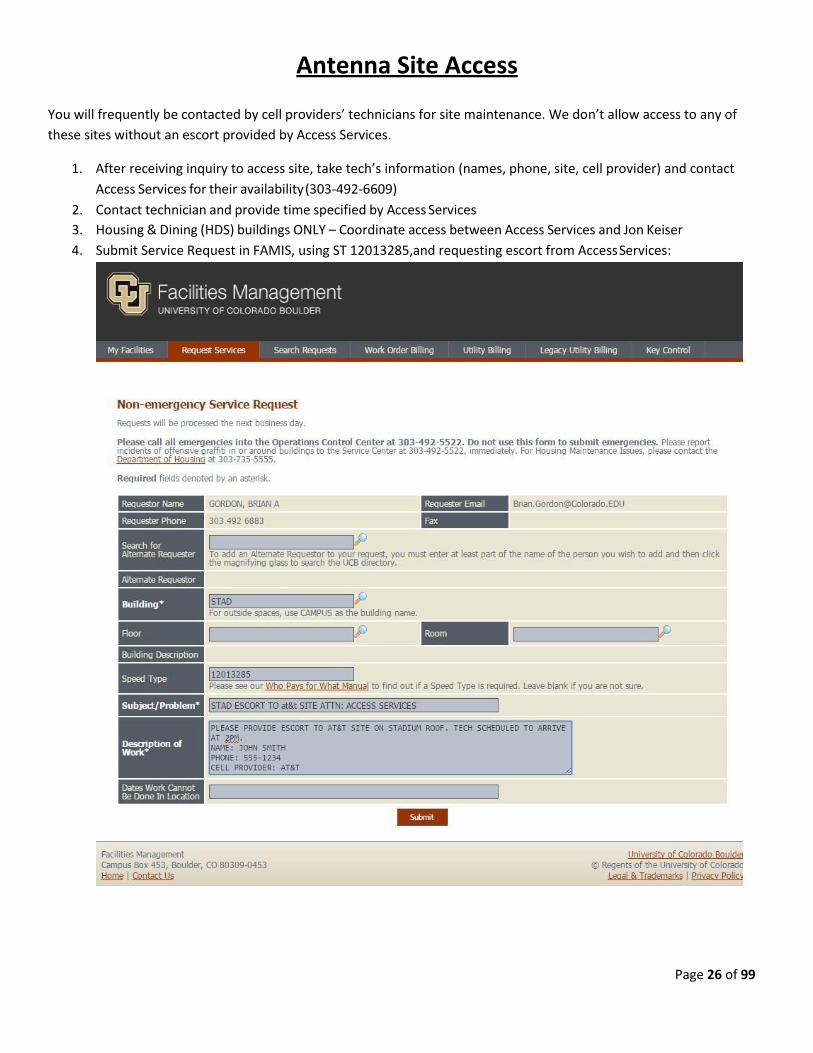
Antenna Site Access
You will frequently be contacted by cell providers’ technicians for site maintenance. We don’t allow access to any of
these sites without an escort provided by Access Services.
1. After receiving inquiry to access site, take tech’s information (names, phone, site, cell provider) and contact
Access Services for their availability (303-492-6609)
2. Contact technician and provide time specified by Access Services
3. Housing & Dining (HDS) buildings ONLY – Coordinate access between Access Services and Jon Keiser
4. Submit Service Request in FAMIS, using ST 12013285,and requesting escort from Access Services:
Page 26 of 99
Page 31 of 99
Lease/MOU/License/Amendment
Procedure
Lease Agreement/MOU/License Agreement/Amendment Process (Wet Signatures)
1. Executed Space Request Form received and saved to server (internal/external or private use)
2. Notification that a lease or amendment needs to be drafted from Director(s) or Real Estate Officer (REO) or Junior Real Estate Officer (JREO)
3. Junior Real Estate Officer or Administrative Assistant drafts contract by using the appropriate template and gives the draft to REO or Junior REO as case may be.
4. REO reviews and marks corrections then returns draft to person who drafted, usually the Administrative Assistant
5. Administrative Assistant makes changes and gives updated contract, draft, routing sheet and memo to REO/JREO
6. REO reviews final copy and returns to Administrative Assistant for distribution
7. Administrative Assistant prints enough copies for all signees to get copies, marks with “sign here” tabs, and puts in mailing/interoffice envelope for distribution
8. Administrative Assistant maintains tracking information via FedEx site
9. Contract returns with tenant signature, Administrative Assistant distributes to remaining signees
10. Lease Agreements must be approved by Legal before being sent to Vice Chancellor for Infrastructure & Sustainability
11. Once all necessary signatures are present, Administrative assistant scans the contract into the appropriate digital filing space as “final executed lease/MOU”
12. Remaining executed are distributed with the appropriate Memo attached
13. Data is entered in ProLease and file is stored in ProLease database
14. Update tickler of critical dates administrative sheet, update contact list, update rent roll, create space plan form (if necessary), and update website occupancy maps with updated lease end date
15. Scan of any new Lease is distributed to Financial Analyst and cc REO, and Junior REO
Lease Agreement/MOU/License Agreement/Amendment Process (Digital Signatures)
1. Executed Space Request Form received and saved to server (internal/external or private use)*note, space request form not required for existing leases or MOU’s
2. Notification that a lease needs to be drafted from the Real Estate Officer (REO) or Executive Director
3. Administrative Assistant drafts contract by using the appropriate template
4. Administrative Assistant makes a routing sheet including the REO, RES Financial Analyst and Executive Director
5. Administrative Assistant combines the contract and routing sheet into one PDF document and uploads into DocuSign
6. In DocuSign, Administrative Assistant formats the document to be initialed by Junior REO, REO, RES Financial Analyst, and
Executive Director, and inserts signature placeholders (include signature, date, name, and title). If the document being
distributed is a lease agreement amendment, the original lease agreement as well as other amendments must be attached
as well so that other parties can reference. Note: If Tenant is an outside tenant, the executed private use space request
form must be also included in package.
7. Agreement is then routed to appropriate parties, which each of them signing off on it. Once the document is fully
executed, all parties receive an executed copy
8. Save executed document into digital file with name formatted as such:
a. BUILDING TENANT Fully Executed MOU/Lease Agreement TERMDATE
i. MSSC Graduate School of Banking Fully Executed Lease Agreement 6-1-13 thru7-31-15
9. Data is entered into ProLease including critical dates and lease options, if any
10. Update tickler of critical dates, contact list, update rent roll, create space planning form (if needed) and update website occupancy maps with lease term end date.
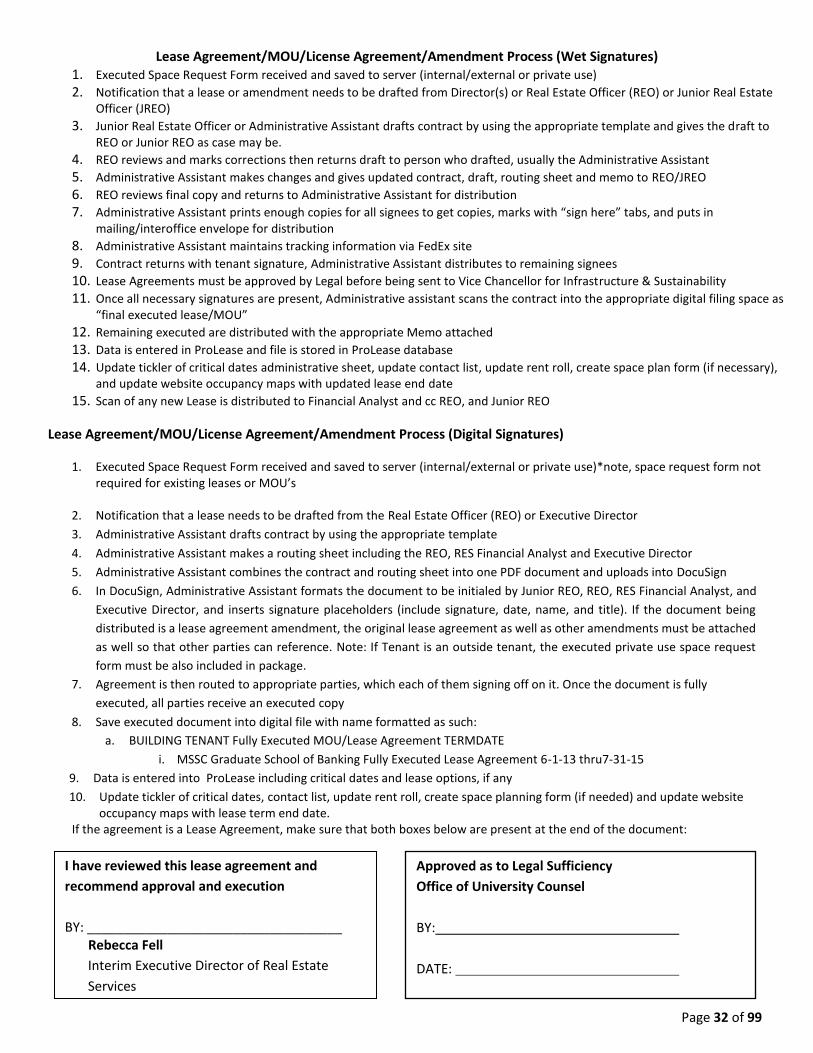
If the agreement is a Lease Agreement, make sure that both boxes below are present at the end of the document:
Page 32 of 99
I have reviewed this lease agreement and
recommend approval and execution
BY: ___________________________________
Rebecca Fell
Interim Executive Director of Real Estate
Services
Approved as to Legal Sufficiency
Office of University Counsel
BY:
DATE:

Page 33 of 99
Late Fees
Page 34 of 99
Late Fees - Occasionally our outside tenants require extra motivation to pay their rent by the due date.
To help motivate we have various late fee requirements built into the agreements.
Grandview Residential – “The Lessee shall be charged a late fee of $75.00 for rents received after the
10th day of the month.”
Send a reminder to the Grandview students who have not paid via email (blind copy all, cc financial
analyst and RE Officers) a week prior to the 10th so they are aware in advance they may be charged if
rent is not received.
Office/Lab/Parking - Leases & License Agreements – The following is standard language (updated 06.20)
“Late Charges. If any installment of Rent or any other payment payable by Tenant to Landlord under
this Lease shall not be paid on or before five (5) days after the date due, Tenant will pay to Landlord
a late charge equal to five percent (5%) of such past due payment, which late charge shall be in
addition to any interest elsewhere provided for.”
- Enforcement of late fees is at the discretion of RES
- For all tenants whose lease does not contain late fee language (or any of the other recent
template updates), it must be added with the next lease amendment, extension, or future
negotiation

Page 35 of 99
Outside Leases Signature Process
Page 36 of 99
Commercial State Leases Wet Signatures/DocuSign
When a CU Boulder Department (department) requires off campus space, the department must complete the Off Campus Space Request Form located on the Real Estate Services (RES) Website https://www.colorado.edu/res/tenant-information under Tenant Information TAB and click on Outside Use Space Request Form. Once the form is complete and fully executed via DocuSign E-signature, the Executive Director of Real Estate Services (Director) will submit to State Broker (Broker) and set up a meeting with Broker and Department to discuss department needs. The Broker, Department and Director will find space and negotiate the lease terms.
Tenant Authorization Letter: Prior to distributing the lease for signature, the Broker will submit a
Tenant Authorization Letter (TAL) to RES for execution.
RES will distribute via DocuSign for E-signature in the following order:
1. Director review 2. CU Boulder legal review 3. Vice Chancellor for Infrastructure and Sustainability for signature.
Once a lease is negotiated:
1. Broker will draft the lease and distribute for review to Office of State Architect (State), RES and Landlord (LL)
2. Broker will finalize lease with four (4) hard copies to be executed. **Note DocuSign is now an option in lieu of Wet signatures
3. Broker will obtain LL signature. 4. Broker will send LL Executed lease to RES for further execution (see distribution below).
It is the responsibility of RES to distribute leases to the appropriate parties, execute in a timely manner,
and routed in the following order:
**Always contact each party ahead of time to let them know Outside Lease is either going to be coming via DocuSign or require wet signatures. See contacts for each office for who to notify. This is sent out prior to routing and updates are sent during routing as it gets close to each party.
• Attach a Contract routing sheet, provide a brief summary of contract, and any deadline for final
signatures • **Note: If insurance language on the state lease has been changed, Risk Management must sign
lease. Routing:
1. Steven Stasica (sign routing sheet) 2. Rebecca Fell (sign routing sheet)
• Risk Management (if applicable, sign routing sheet): • Craig Leedholm (designated signatory) • Email– [email protected]
Page 37 of 99
• Phone: 303.860.5676 • Office: Craig Leedholm, Risk Mgmt.
University of Colorado 1800 Grant Street, Suite 700 Campus Box 014A Denver, CO 80203-1187
3. University Counsel: (13 UCB) (Contact UCB legal services @ [email protected])
Note: include a private note in DocuSign for Clair, with who reviewed lease previously, so she can assign the lease to them for faster execution.
• Email: Clair Novi at [email protected]
• Phone: 303-492-4420
• Office: Legal Cottage, 13 UCB
4. Carla Ho-A (sign routing sheet) Requested by Patrick O’Rourke’s office; generally needs to sign when
money is involved: contact Noah Judson (Special Assistant to CFO) at [email protected] • Phone: 303-492-3224 • Office: Chancellor’s Building, 914 Broadway, Room 209 near Ida Mae & Courtney
5. David Kang (sign routing sheet/Real Estate)(Requested by Patrick O’Rourke’s office): Contact
Courtney Kjelland at
• Email: [email protected] • Phone: 303-735-4508 • Office: Chancellor’s Building, 914 Broadway, 2nd floor at the end of hallway
6. Patrick O’Rourke (sign routing sheet): (contact Cary Ihme
• Email: [email protected] • Phone: 303-492-8627 • Office: 914 Broadway, 90 UCB, Boulder, CO 80309
7. Chancellor’s Chief of Staff *requested to be added prior to Chancellor
Catherine Shea (sign routing sheet)
• Email: [email protected]
• Phone: 303-492-7896
8. Regents of the University of Colorado: Chancellor (signs) (contact Scott E. Bocim)
• Scott Bocim handles the hard-copy signature requests for the Chancellor, his email is [email protected]
Phone: 303-492-8908
17 UCB
• Mark Berg handles the DocuSign signature requests for the Chancellor, his email is [email protected]
Phone: 303-492-8909
Page 36 of 99
• Shannon Chinatti, Assistant to the Chancellor, helpful for scheduling a signing time for wet signatures
303-492-7033
9. Office of the State Architect, Real Estate Program
• Contact: Brandon Ates, Manager, Real Estate Programs
Email: [email protected]
Phone: 303-866-5458
Address: 1525 Sherman Street, Suite 112 Denver, Colorado, 80203
• Chris Swigert, Real Estate Specialist
Phone: 303-866-2109
Email: [email protected]
10. Campus Controller - Leila McCamey ([email protected]) Interim Controller (6.1.2020)
(Back up signatory is Deputy Controller*if position exists) (579 UCB) Contact: Chyrl Taylor
• Email: [email protected]
• Phone: 303-492-2618
• Office: 579 UCB
Delivery may require utilization of FedEx (or similar trackable shipping service), courier
service, or personal delivery (Do NOT use Campus Mail due to unreliability).
Once the lease is fully executed, scan the original executed lease and documents, save on the RES network, RES ProLease, and update Rent Roll and contacts on the Admin. Spreadsheet. Place a hard copy in the RES hard file and distribute to appropriate recipients:
• Landlord – Hard copy
• Tenant – Hard Copy
• JLL – Digital Copy
• Office of the State Architect- Hard Copy For digital DocuSign packages ask the broker to distribute a final Executed copy to the Landlord.
Useful Contacts:
Chancellor’s Office………………Mark Berge 303-492-8909 [email protected] (assistant to
Chancellor)
Campus Controller’s Office………..Chyrl Taylor 303-492-2618 [email protected] (assistant to
Controller)
University Counsel…………………….Clair Novi 303-492-4420 [email protected] (Executive Assistant)
CU Real Estate Foundation………..David Chadwick 303-860-6120 [email protected]
Office of the State Architect……...Brandon Ates 303-866-5458
[email protected] (Real Estate Programs)
Page 39 of 99
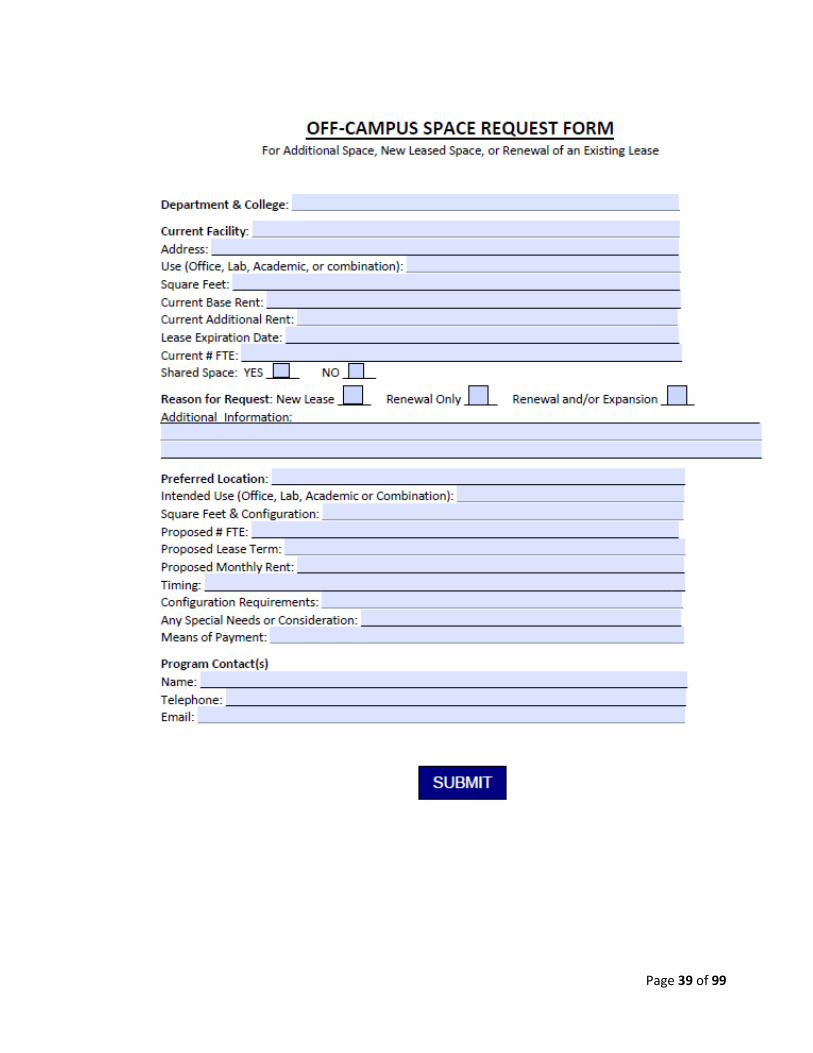
Procedure to Lease
Off-Campus Space
Page 38 of 99
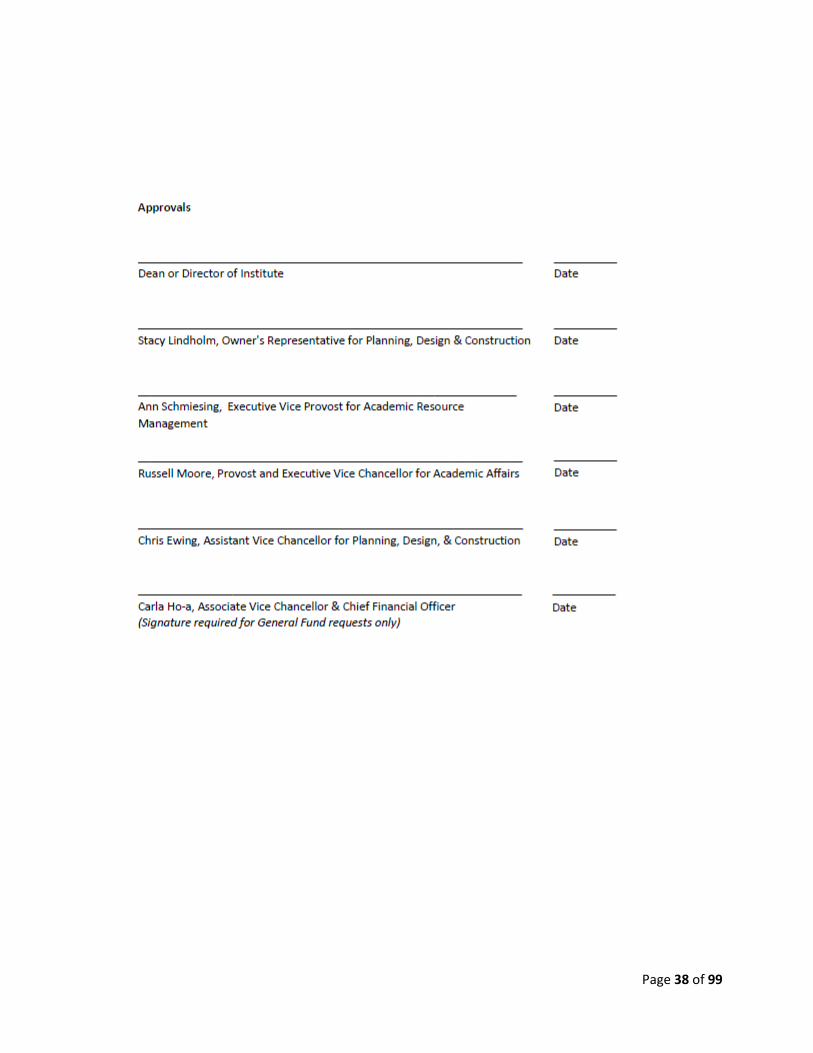
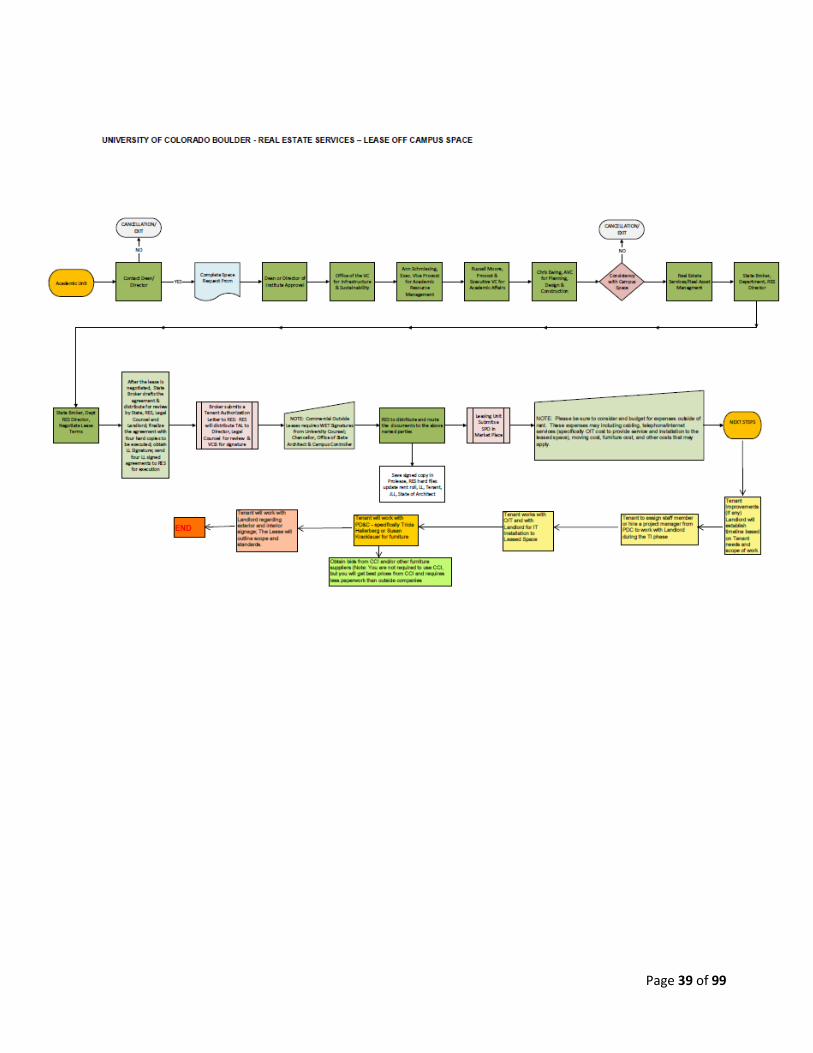
Procedure to Lease Off-Campus Space
CU Boulder Campus
Page 39 of 99
Page 38 of 99
Page 39 of 99

Page 40 of 99
Space Request Overview
Page 41 of 99
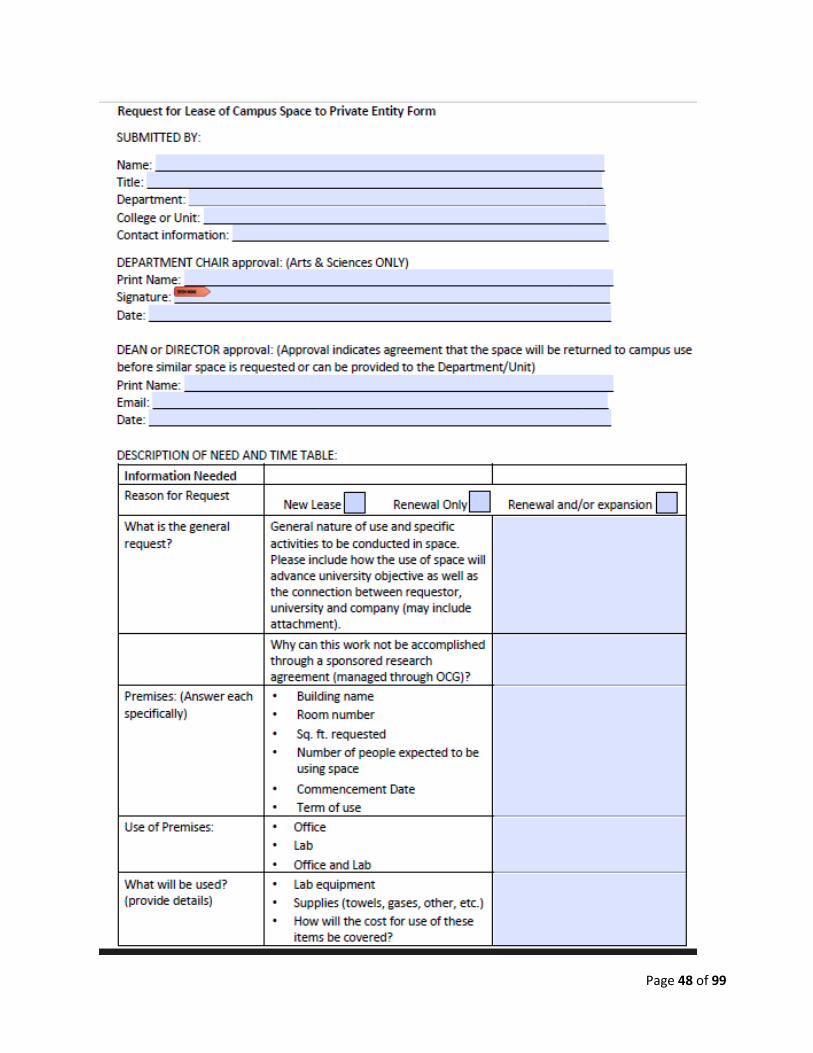
Private Use Space Request Form &
Antenna Site & Rooftop Space Use Request Form
Template File Location: \\Sugarloaf\rps\Request for Private Use of Space\Template
• As CU departments and outside organizations inquire about utilization of CU space, the 1st
step is always completing a space use request form
• There are 2 versions: One for rooftop space and the other for building space
• Prior to uploading for DocuSign distribution approval, confirm that the entire form is filled out
with no omitted information
• Only after full execution will you begin drafting the lease, license, or MOU agreement
Page 42 of 99
Private Use Space Request Form
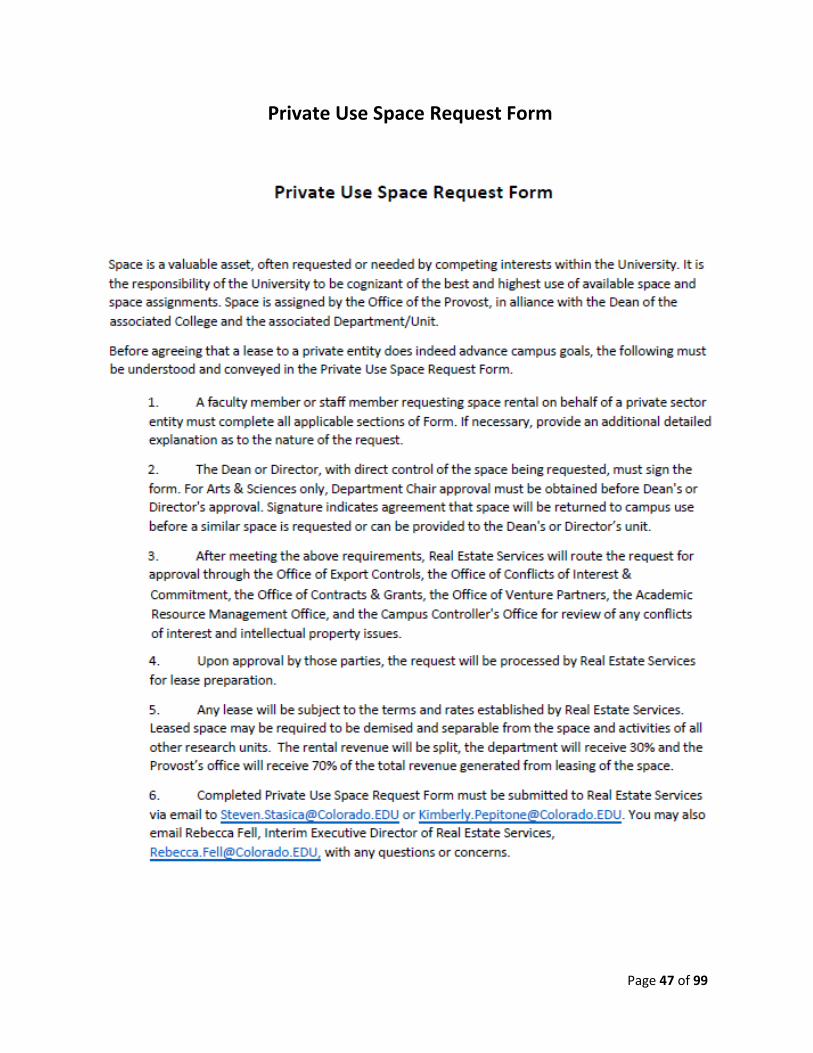
Page 47 of 99
Private Use Space Request Form
Page 48 of 99
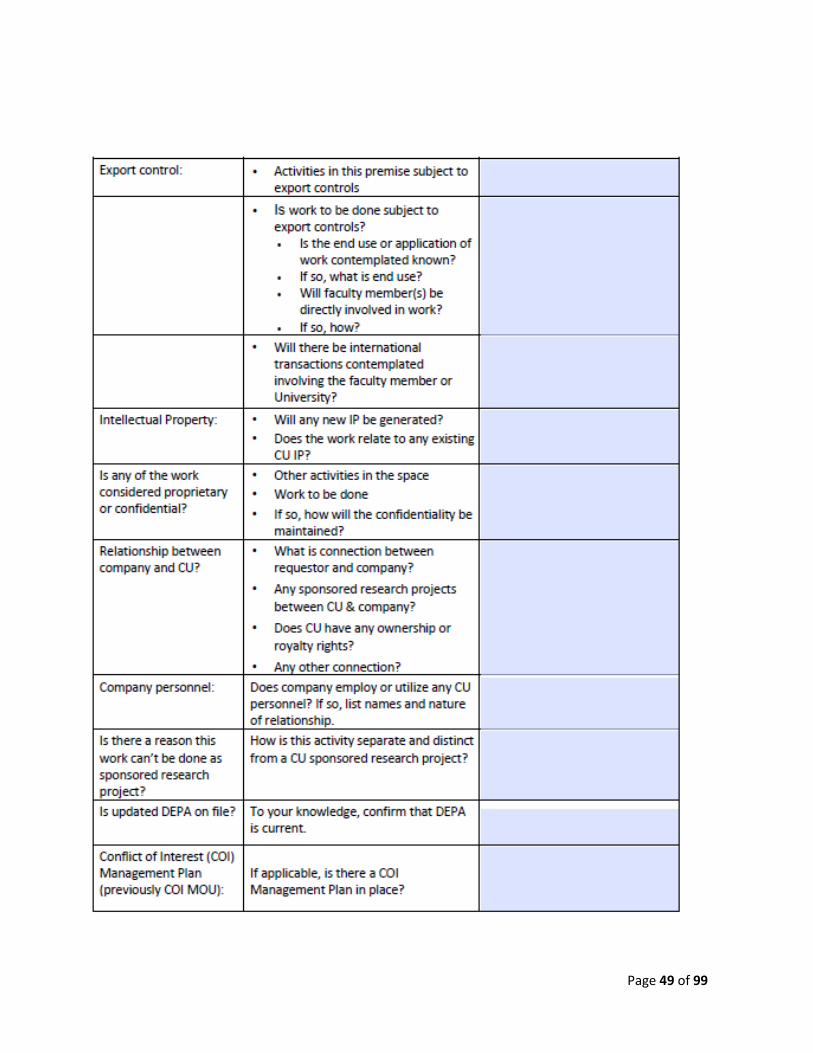
Page 49 of 99
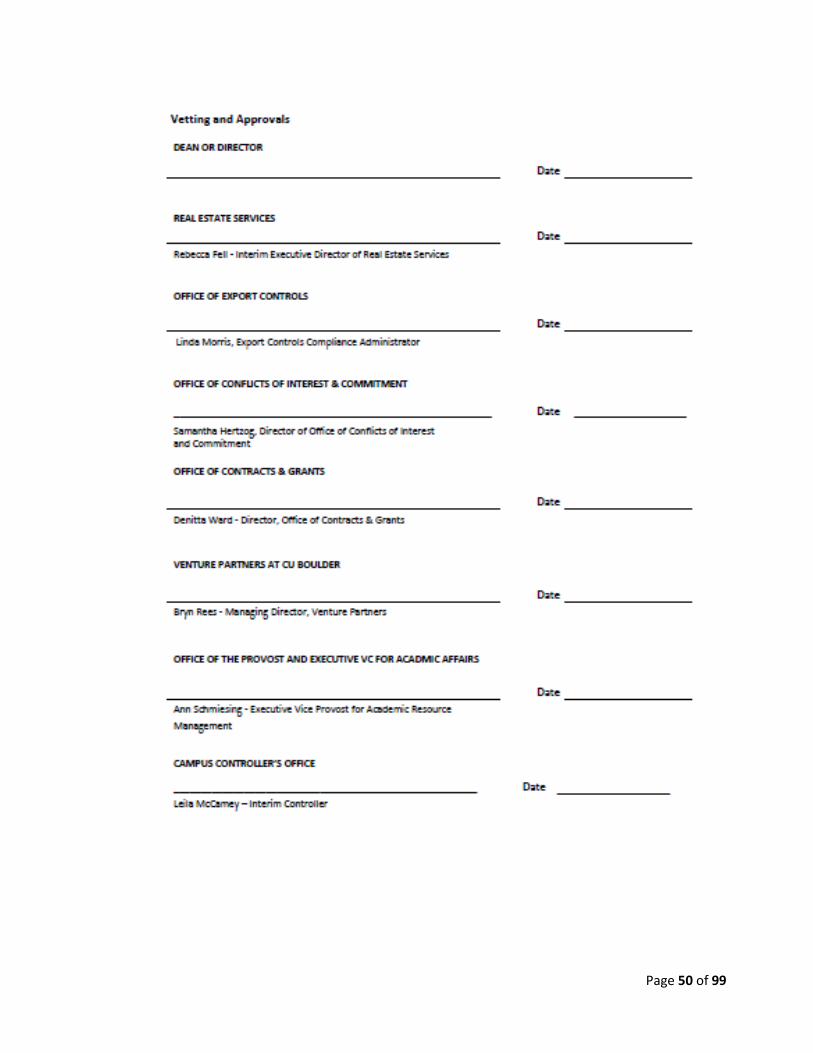
Page 50 of 99
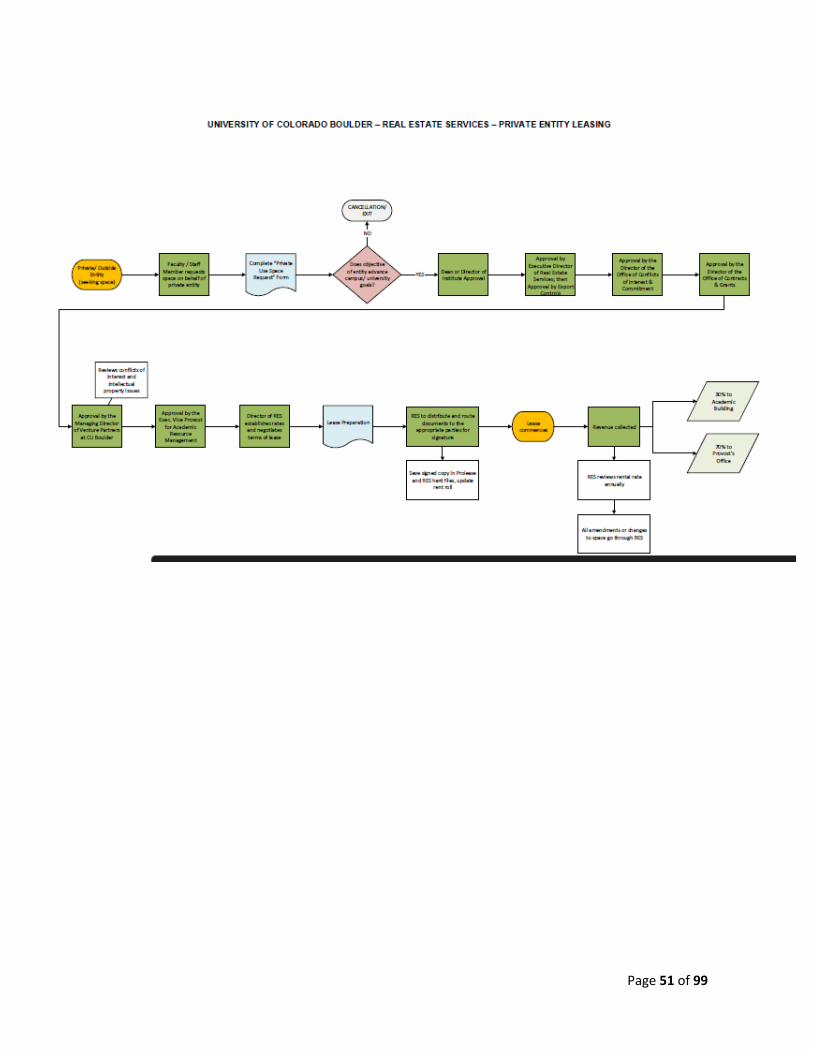
Page 51 of 99
Page 52 of 99
Antenna Site & Rooftop Space
Use Request Form
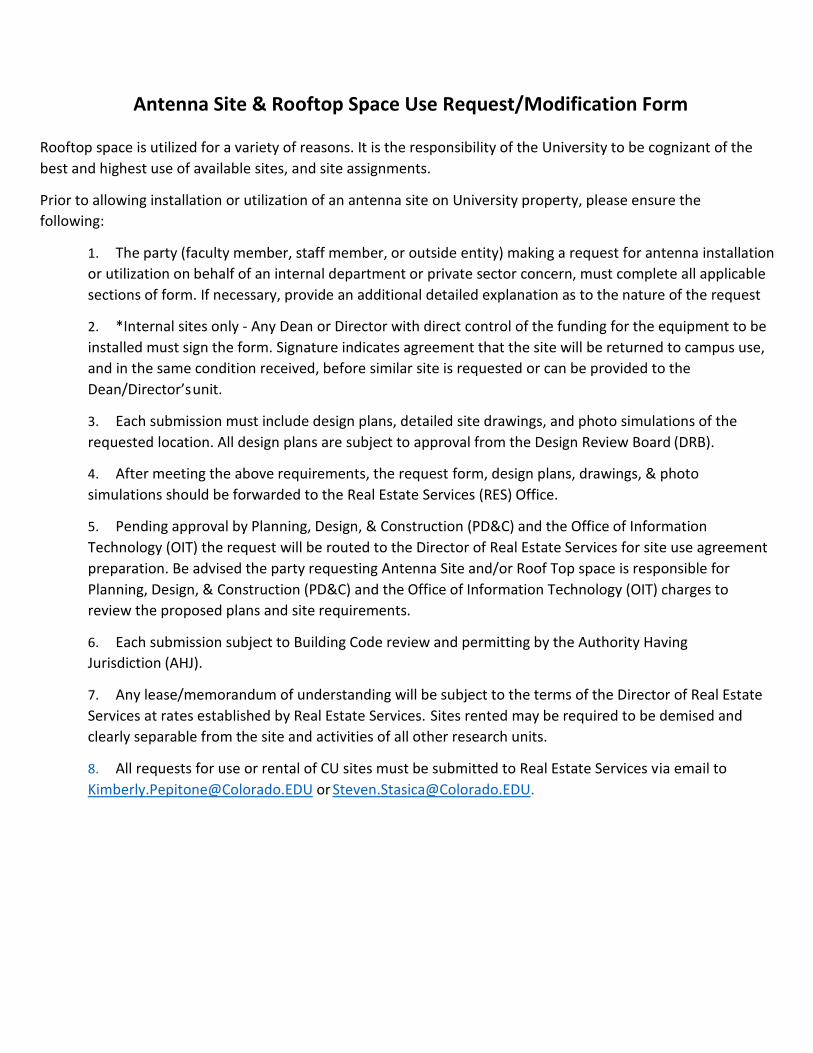
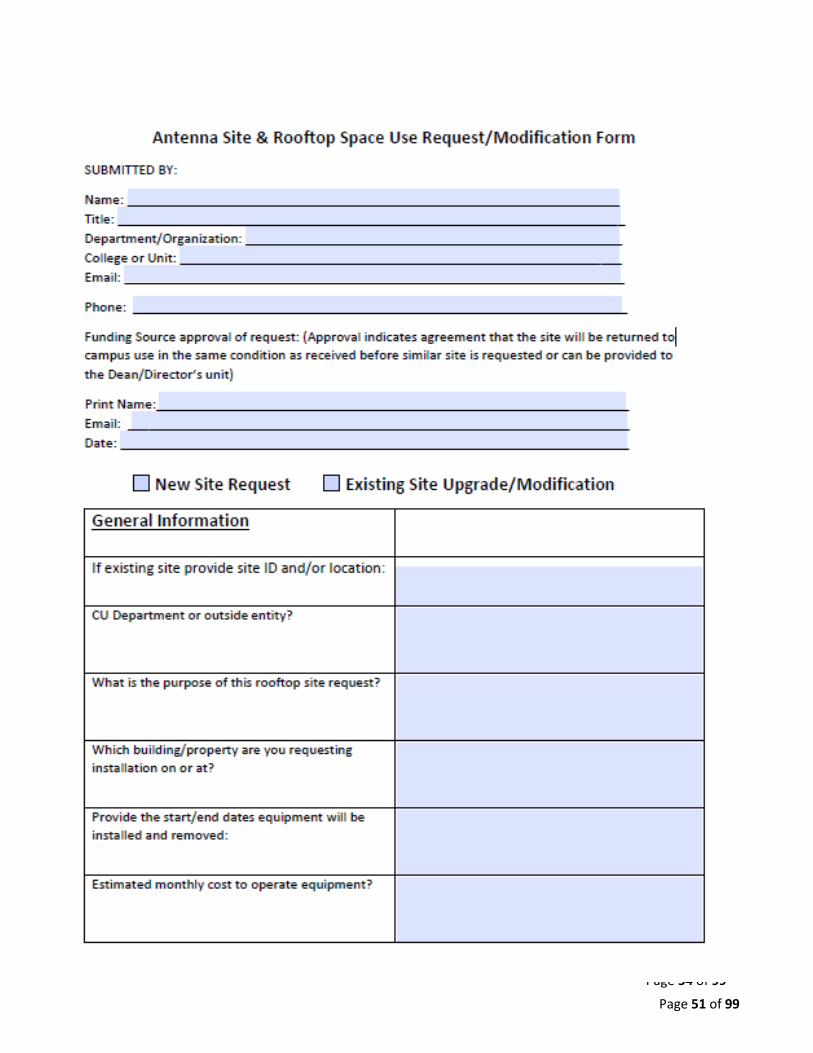
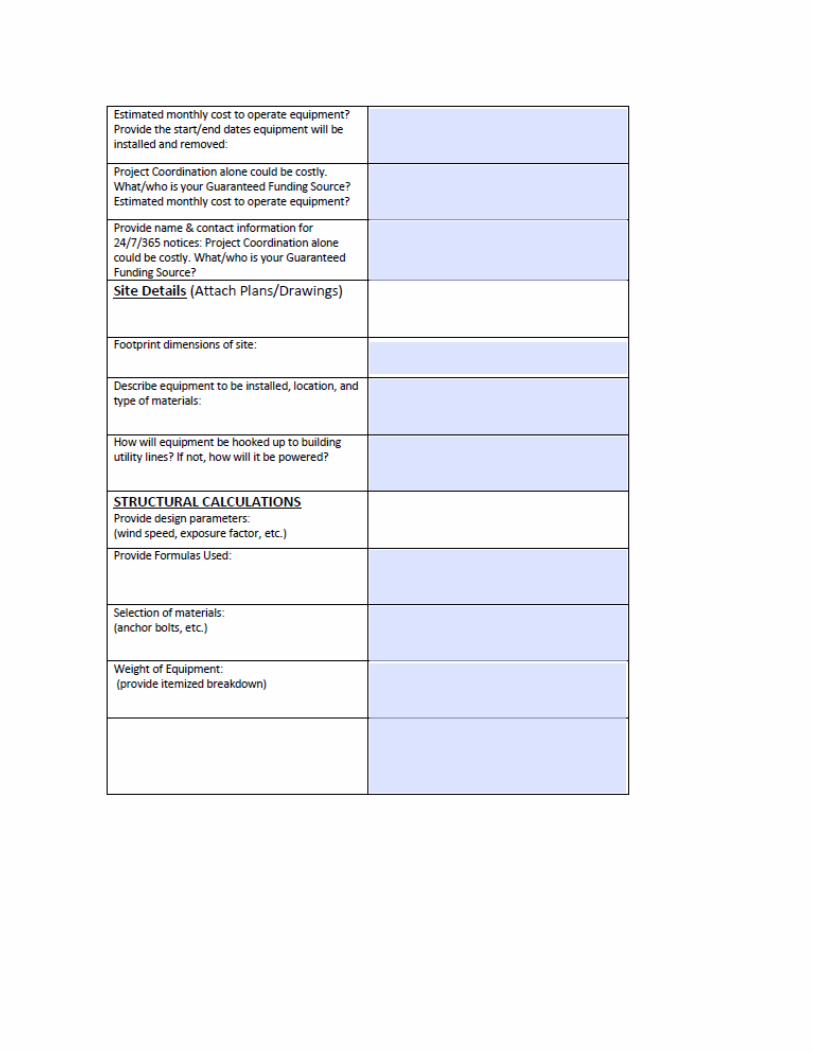
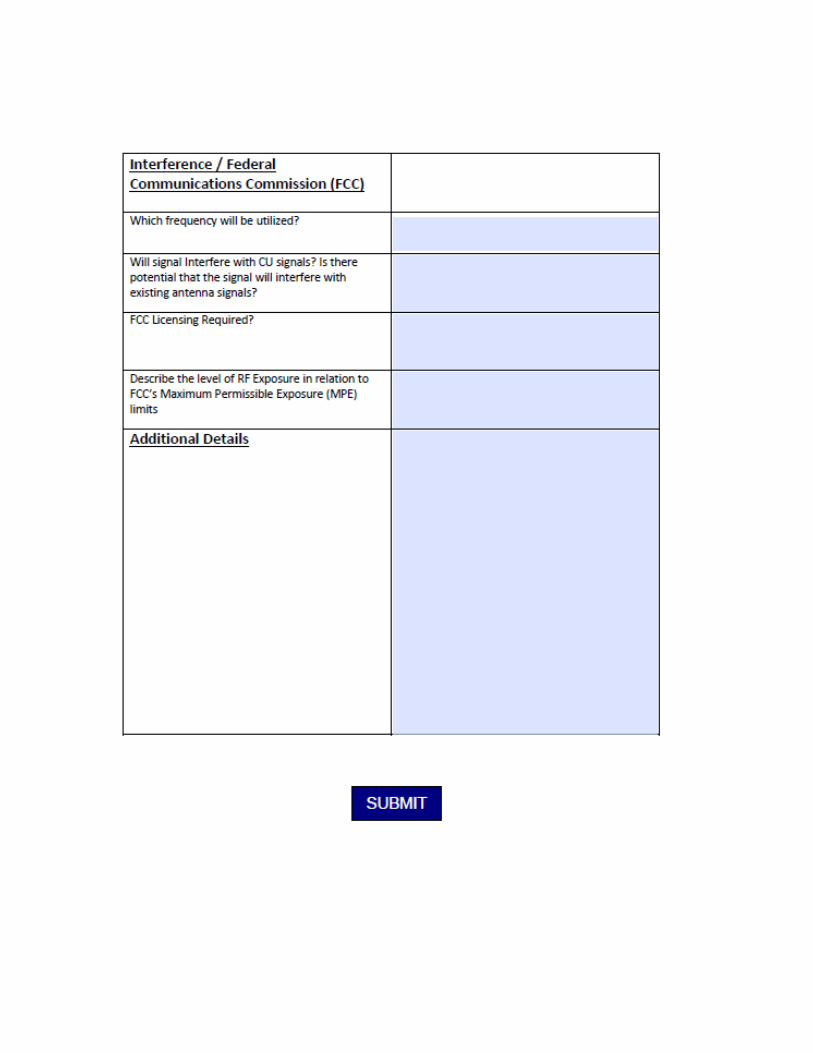
Antenna Site & Rooftop Space Use Request/Modification Form
Rooftop space is utilized for a variety of reasons. It is the responsibility of the University to be cognizant of the
best and highest use of available sites, and site assignments.
Prior to allowing installation or utilization of an antenna site on University property, please ensure the
following:
1. The party (faculty member, staff member, or outside entity) making a request for antenna installation
or utilization on behalf of an internal department or private sector concern, must complete all applicable
sections of form. If necessary, provide an additional detailed explanation as to the nature of the request
2. *Internal sites only - Any Dean or Director with direct control of the funding for the equipment to be
installed must sign the form. Signature indicates agreement that the site will be returned to campus use,
and in the same condition received, before similar site is requested or can be provided to the
Dean/Director’s unit.
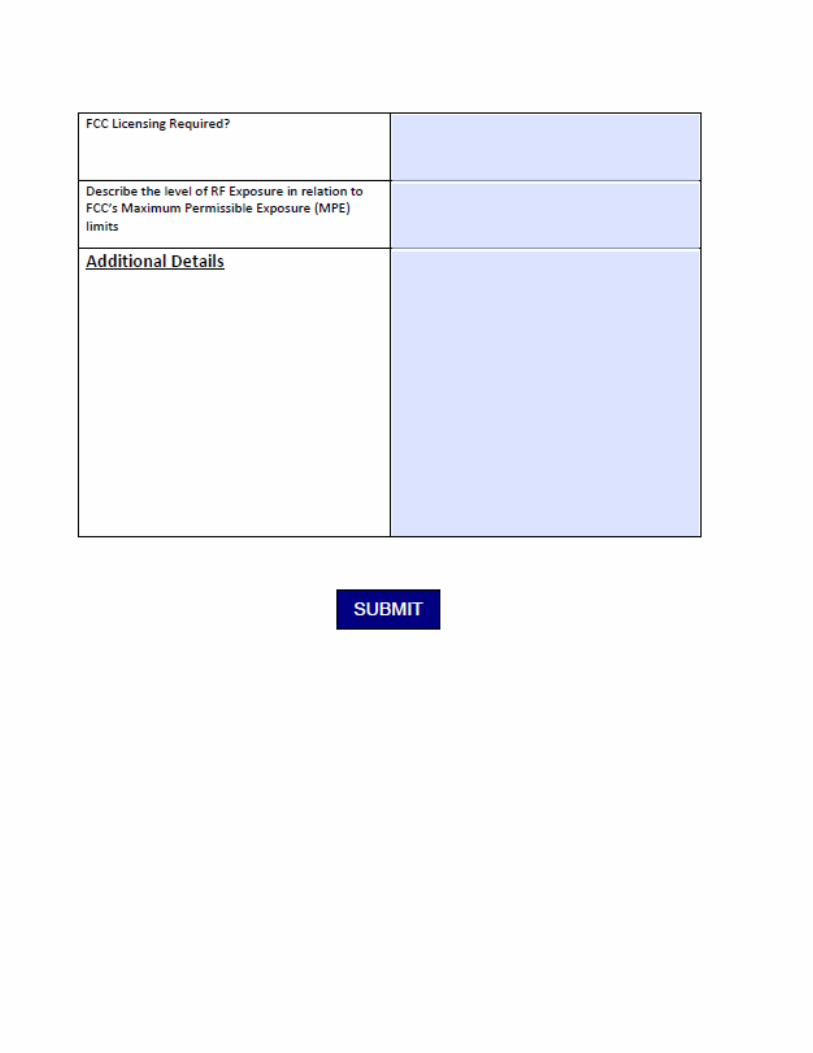
3. Each submission must include design plans, detailed site drawings, and photo simulations of the
requested location. All design plans are subject to approval from the Design Review Board (DRB).
4. After meeting the above requirements, the request form, design plans, drawings, & photo
simulations should be forwarded to the Real Estate Services (RES) Office.
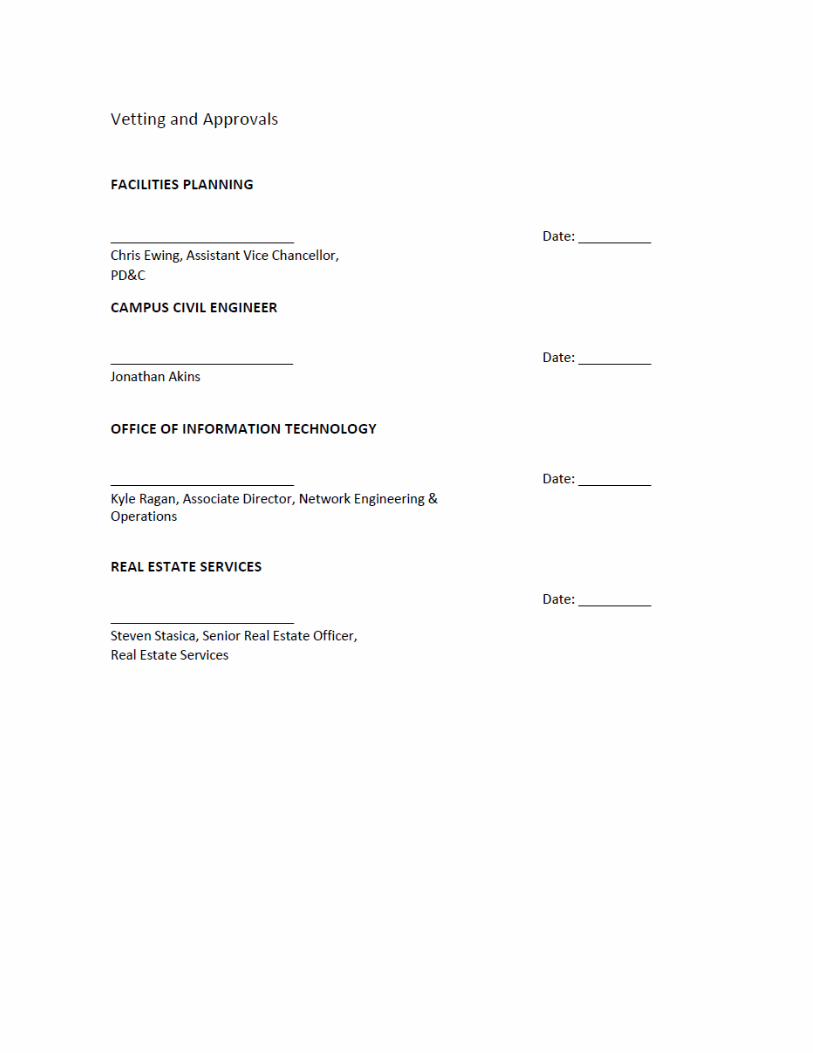
5. Pending approval by Planning, Design, & Construction (PD&C) and the Office of Information
Technology (OIT) the request will be routed to the Director of Real Estate Services for site use agreement
preparation. Be advised the party requesting Antenna Site and/or Roof Top space is responsible for
Planning, Design, & Construction (PD&C) and the Office of Information Technology (OIT) charges to
review the proposed plans and site requirements.
6. Each submission subject to Building Code review and permitting by the Authority Having
Jurisdiction (AHJ).
7. Any lease/memorandum of understanding will be subject to the terms of the Director of Real Estate
Services at rates established by Real Estate Services. Sites rented may be required to be demised and
clearly separable from the site and activities of all other research units.
8. All requests for use or rental of CU sites must be submitted to Real Estate Services via email to
Page 54 of 99
Page 51 of 99

Page 52 of 99

Cell Antenna Site
Requirements
& Application
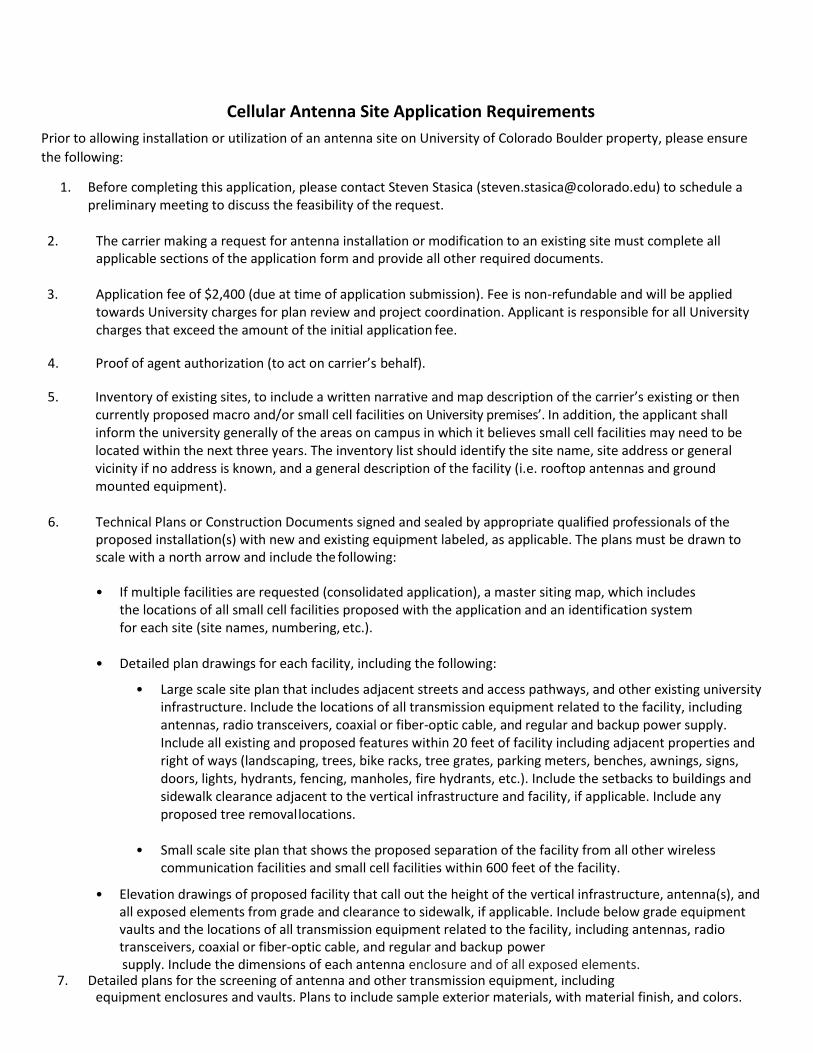
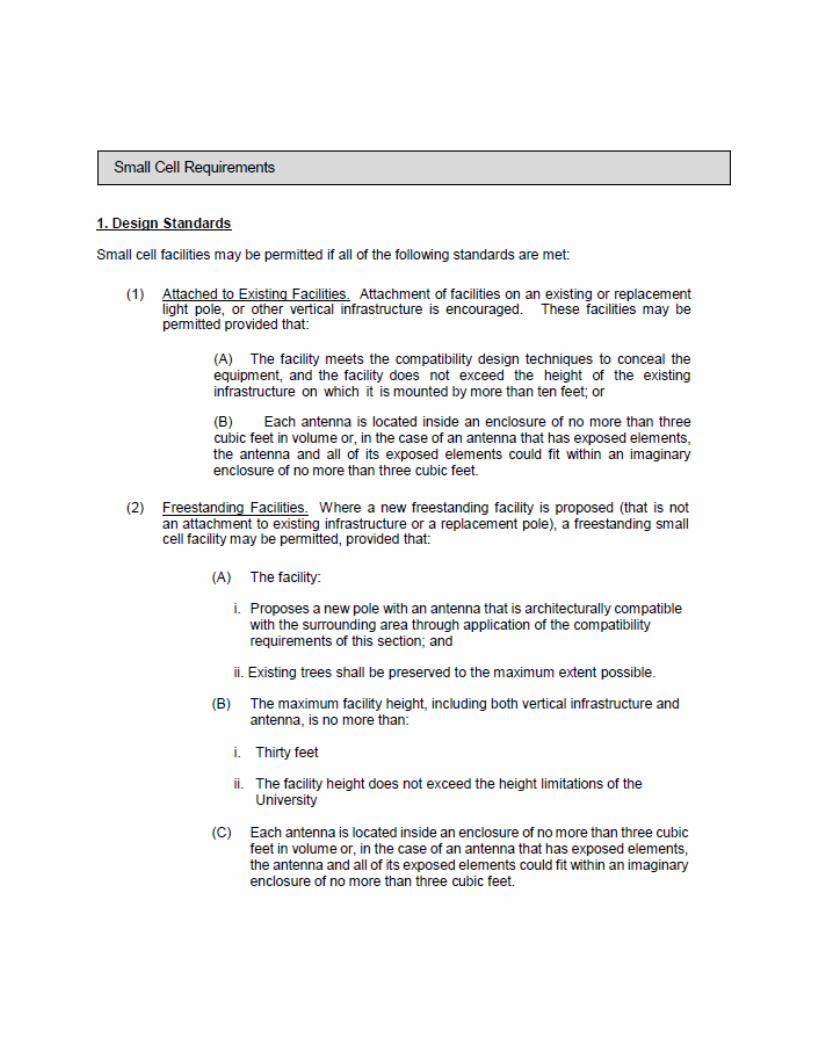
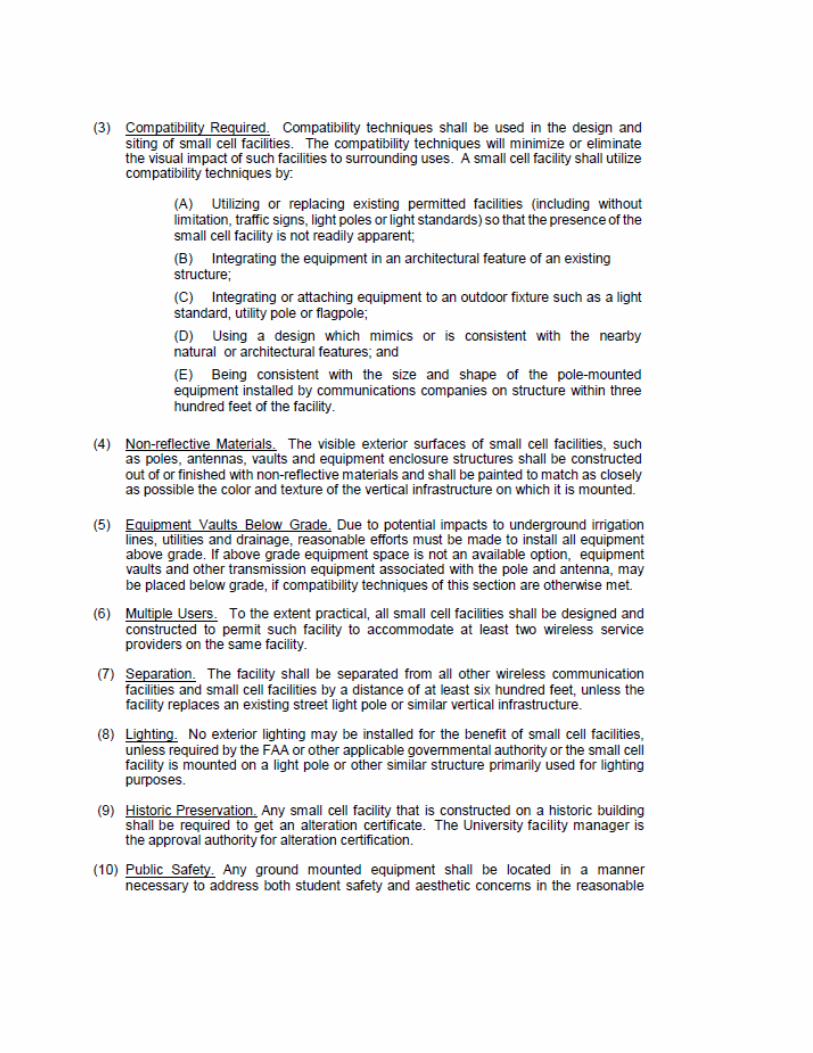
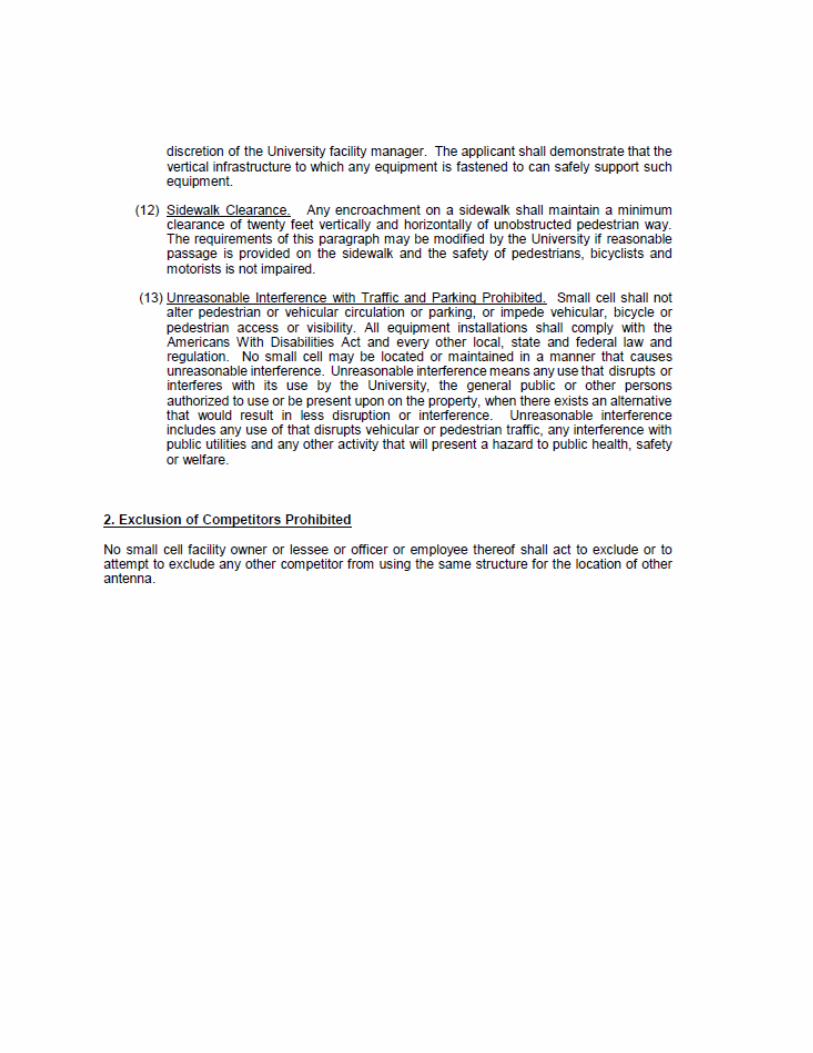
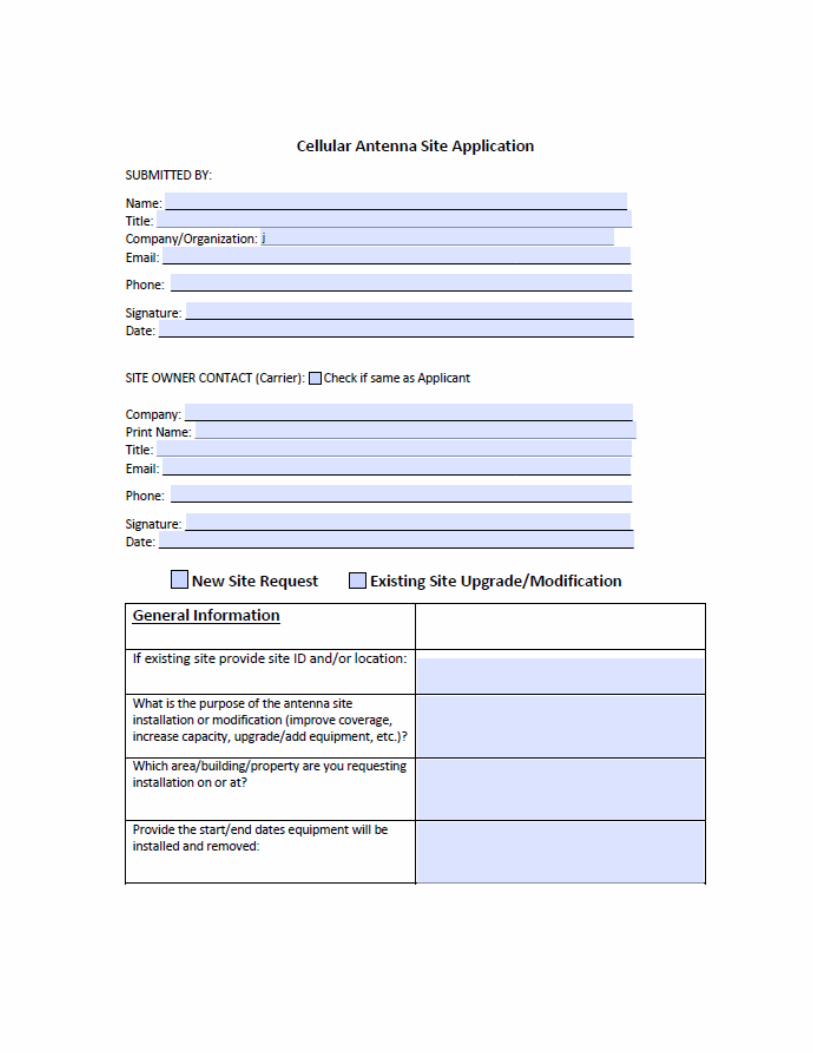
Cellular Antenna Site Application Requirements
Prior to allowing installation or utilization of an antenna site on University of Colorado Boulder property, please ensure
the following:
1. Before completing this application, please contact Steven Stasica ([email protected]) to schedule a preliminary meeting to discuss the feasibility of the request.
2. The carrier making a request for antenna installation or modification to an existing site must complete all
applicable sections of the application form and provide all other required documents.
3. Application fee of $2,400 (due at time of application submission). Fee is non-refundable and will be applied towards University charges for plan review and project coordination. Applicant is responsible for all University charges that exceed the amount of the initial application fee.
4. Proof of agent authorization (to act on carrier’s behalf).
5. Inventory of existing sites, to include a written narrative and map description of the carrier’s existing or then currently proposed macro and/or small cell facilities on University premises’. In addition, the applicant shall inform the university generally of the areas on campus in which it believes small cell facilities may need to be located within the next three years. The inventory list should identify the site name, site address or general vicinity if no address is known, and a general description of the facility (i.e. rooftop antennas and ground mounted equipment).
6. Technical Plans or Construction Documents signed and sealed by appropriate qualified professionals of the
proposed installation(s) with new and existing equipment labeled, as applicable. The plans must be drawn to scale with a north arrow and include the following:
• If multiple facilities are requested (consolidated application), a master siting map, which includes
the locations of all small cell facilities proposed with the application and an identification system for each site (site names, numbering, etc.).
• Detailed plan drawings for each facility, including the following:
• Large scale site plan that includes adjacent streets and access pathways, and other existing university infrastructure. Include the locations of all transmission equipment related to the facility, including antennas, radio transceivers, coaxial or fiber-optic cable, and regular and backup power supply. Include all existing and proposed features within 20 feet of facility including adjacent properties and right of ways (landscaping, trees, bike racks, tree grates, parking meters, benches, awnings, signs, doors, lights, hydrants, fencing, manholes, fire hydrants, etc.). Include the setbacks to buildings and sidewalk clearance adjacent to the vertical infrastructure and facility, if applicable. Include any proposed tree removal locations.
• Small scale site plan that shows the proposed separation of the facility from all other wireless
communication facilities and small cell facilities within 600 feet of the facility.
• Elevation drawings of proposed facility that call out the height of the vertical infrastructure, antenna(s), and all exposed elements from grade and clearance to sidewalk, if applicable. Include below grade equipment vaults and the locations of all transmission equipment related to the facility, including antennas, radio transceivers, coaxial or fiber-optic cable, and regular and backup power
supply. Include the dimensions of each antenna enclosure and of all exposed elements. 7. Detailed plans for the screening of antenna and other transmission equipment, including
equipment enclosures and vaults. Plans to include sample exterior materials, with material finish, and colors.

8. If placed on existing vertical infrastructure, engineering analysis demonstrating that the existing vertical infrastructure can support the additional loads created by the attachment(s).
9. If new or replacement vertical infrastructure is proposed, provide specifications and attachment
details for the new structure.
10. If below grade equipment vaults are proposed, specifications on proposed vault and cover and plans showing the horizontal and vertical distances from all existing utilities, property lines, and easement boundaries. Include details on materials removed and/or replaced in the right of way (concrete, asphalt, masonry, or stonework, etc.). Provide details for drainage of vault including discharge of pumping equipment.
11. Attachment details.
• Photographs of existing conditions and photo simulations of proposed installation(s) demonstrating
architectural compatibility and screening method. Include a map depicting where the photographs were taken.
• If new or replacement vertical infrastructure is proposed, a report from a qualified and licensed professional engineer and/or statement from the manufacturer that describes the capacity for collocation.
• If a facility is proposed on existing structure, a letter from a qualified and licensed professional
engineer certifying that the antenna installations will be placed in a manner so that the size, appearance, and function of the structure will not be considerably altered.
12. Additional materials as requested at the time of staff review.
13. Pending approval by Planning, Design, & Construction (PD&C) and the Office of Information Technology (OIT) the request will be routed to the Director of Real Estate Services for site use agreement preparation. Be advised the party requesting Antenna Site and/or Roof Top space is responsible for Planning, Design, & Construction (PD&C) and the Office of Information Technology (OIT) charges to review the proposed plans, site requirements, and project coordination.
14. Each submission subject to Building Code review and permitting by the Authority Having Jurisdiction (AHJ).
15. Any lease/license agreement will be subject to the terms of the Director of Real Estate Services at rates established by Real Estate Services. Sites rented may be required to be demised and clearly separable from the site and activities of all other research units.
16. All applications must be submitted to Real Estate Services via email to [email protected] or
[email protected], or by using the 'SUBMIT' button at the end of this form (ONLY compatible with Internet Explorer).


Updating website
Page 53 of 99
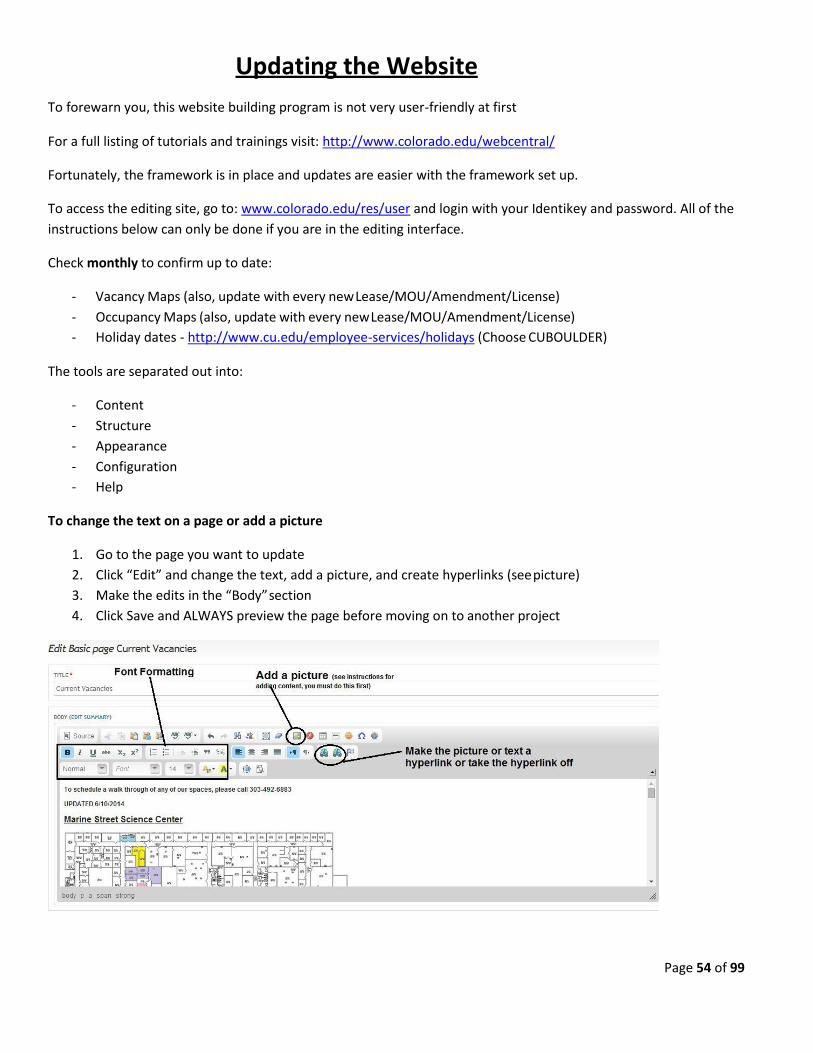
Updating the Website
To forewarn you, this website building program is not very user-friendly at first
For a full listing of tutorials and trainings visit: http://www.colorado.edu/webcentral/
Fortunately, the framework is in place and updates are easier with the framework set up.
To access the editing site, go to: www.colorado.edu/res/user and login with your Identikey and password. All of the
instructions below can only be done if you are in the editing interface.
Check monthly to confirm up to date:
- Vacancy Maps (also, update with every new Lease/MOU/Amendment/License)
- Occupancy Maps (also, update with every new Lease/MOU/Amendment/License)
- Holiday dates - http://www.cu.edu/employee-services/holidays (Choose CUBOULDER)
The tools are separated out into:
- Content
- Structure
- Appearance
- Configuration
- Help
To change the text on a page or add a picture
1. Go to the page you want to update
2. Click “Edit” and change the text, add a picture, and create hyperlinks (see picture)
3. Make the edits in the “Body” section
4. Click Save and ALWAYS preview the page before moving on to another project
Page 54 of 99


Page 55 of 99
To add content (PDF, JPG, Word Document)
1. Go to “Content” at the top bar of menus then click “Add Content”
2. Select “File” and Name it something easy along with the file type (MSSC Occupancy Map JPG)
3. Click “Choose File”, navigate to the file, click Open, then Upload
4. Click Save
To Put New Content on a Page
1. Go to “Content” and click on the picture/PDF/etc. you want to add
2. Copy the “Preferred Version” URL
3. Navigate to page that you want to add content to and click Edit
4. If adding a picture, click the picture icon (noted in picture above) and paste the URL copied in step 2 then click
OK
5. If creating a hyperlink that takes you to a PDF or other website, click on the picture or highlight text you want to
link to the other content and click the hyperlink icon. Paste the URL copied in step 2 into the URL blank and click
OK
To Update Content Already on a Page
1. Go to “Content” and click on the item that you wish to update (Ex: MSSC Vacancy Map PDF)
2. Click Edit
3. Remove the existing file by clicking “Remove”
4. Upload new file by selecting “Choose File”, double-clicking on the file, then click “Upload”
5. Click “Save”
ProLease Management
Page 56 of 99
Page 57 of 99
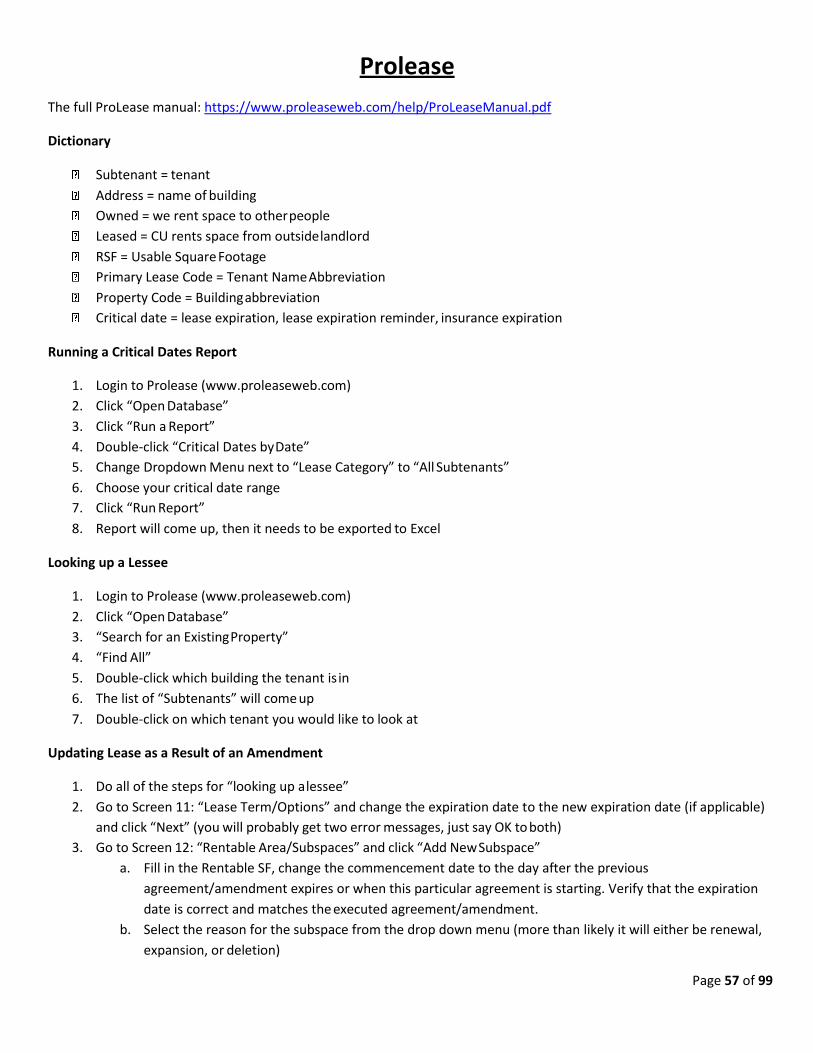
Prolease
The full ProLease manual: https://www.proleaseweb.com/help/ProLeaseManual.pdf
Dictionary
Subtenant = tenant
Address = name of building
Owned = we rent space to other people
Leased = CU rents space from outside landlord
RSF = Usable Square Footage
Primary Lease Code = Tenant Name Abbreviation
Property Code = Building abbreviation
Critical date = lease expiration, lease expiration reminder, insurance expiration
Running a Critical Dates Report
1. Login to Prolease (www.proleaseweb.com)
2. Click “Open Database”
3. Click “Run a Report”
4. Double-click “Critical Dates by Date”
5. Change Dropdown Menu next to “Lease Category” to “All Subtenants”
6. Choose your critical date range
7. Click “Run Report”
8. Report will come up, then it needs to be exported to Excel
Looking up a Lessee
1. Login to Prolease (www.proleaseweb.com)
2. Click “Open Database”
3. “Search for an Existing Property”
4. “Find All”
5. Double-click which building the tenant is in
6. The list of “Subtenants” will come up
7. Double-click on which tenant you would like to look at
Updating Lease as a Result of an Amendment
1. Do all of the steps for “looking up a lessee”
2. Go to Screen 11: “Lease Term/Options” and change the expiration date to the new expiration date (if applicable)
and click “Next” (you will probably get two error messages, just say OK to both)
3. Go to Screen 12: “Rentable Area/Subspaces” and click “Add New Subspace”
a. Fill in the Rentable SF, change the commencement date to the day after the previous
agreement/amendment expires or when this particular agreement is starting. Verify that the expiration
date is correct and matches the executed agreement/amendment.
b. Select the reason for the subspace from the drop down menu (more than likely it will either be renewal,
expansion, or deletion)
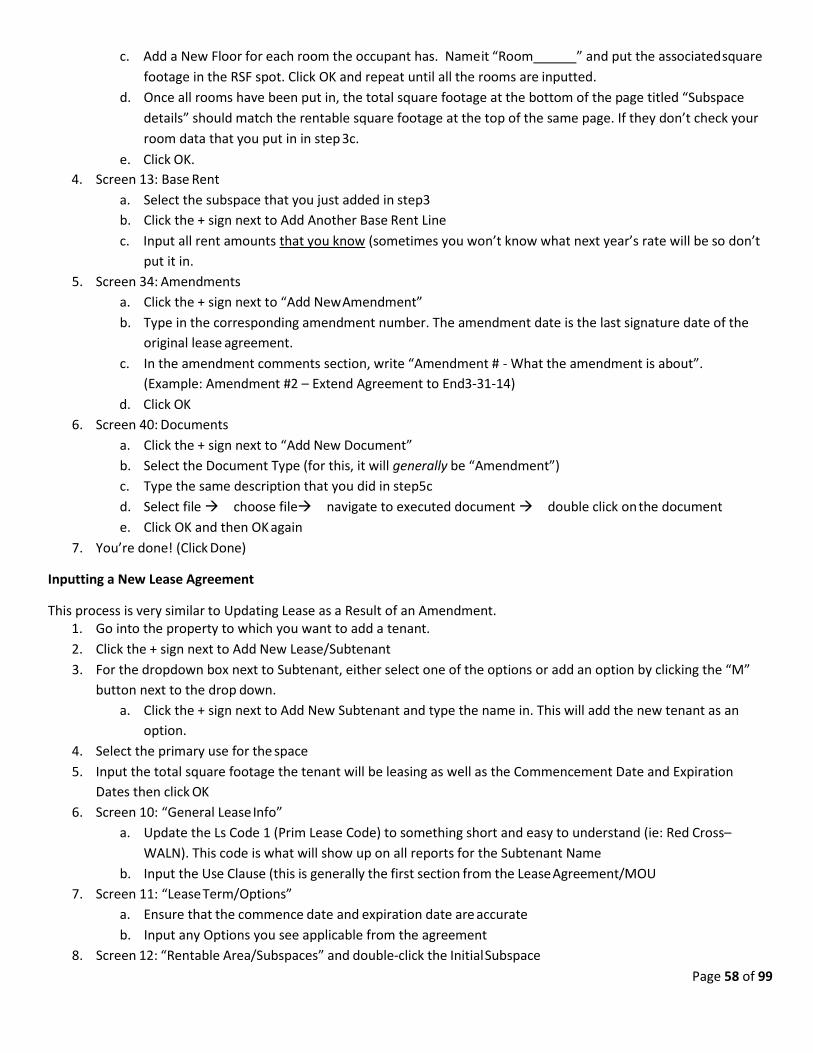
c. Add a New Floor for each room the occupant has. Name it “Room ” and put the associated square
footage in the RSF spot. Click OK and repeat until all the rooms are inputted.
d. Once all rooms have been put in, the total square footage at the bottom of the page titled “Subspace
details” should match the rentable square footage at the top of the same page. If they don’t check your
room data that you put in in step 3c.
e. Click OK.
4. Screen 13: Base Rent
a. Select the subspace that you just added in step3
b. Click the + sign next to Add Another Base Rent Line
c. Input all rent amounts that you know (sometimes you won’t know what next year’s rate will be so don’t
put it in.
5. Screen 34: Amendments
a. Click the + sign next to “Add New Amendment”
b. Type in the corresponding amendment number. The amendment date is the last signature date of the
original lease agreement.
c. In the amendment comments section, write “Amendment # - What the amendment is about”.
(Example: Amendment #2 – Extend Agreement to End3-31-14)
d. Click OK
6. Screen 40: Documents
a. Click the + sign next to “Add New Document”
b. Select the Document Type (for this, it will generally be “Amendment”)
c. Type the same description that you did in step5c
d. Select file → choose file→ navigate to executed document → double click on the document
e. Click OK and then OK again
7. You’re done! (Click Done)
Inputting a New Lease Agreement
This process is very similar to Updating Lease as a Result of an Amendment. 1. Go into the property to which you want to add a tenant.
2. Click the + sign next to Add New Lease/Subtenant
3. For the dropdown box next to Subtenant, either select one of the options or add an option by clicking the “M”
button next to the drop down.
a. Click the + sign next to Add New Subtenant and type the name in. This will add the new tenant as an
option.
4. Select the primary use for the space
5. Input the total square footage the tenant will be leasing as well as the Commencement Date and Expiration
Dates then click OK
6. Screen 10: “General Lease Info”
a. Update the Ls Code 1 (Prim Lease Code) to something short and easy to understand (ie: Red Cross–
WALN). This code is what will show up on all reports for the Subtenant Name
b. Input the Use Clause (this is generally the first section from the Lease Agreement/MOU
7. Screen 11: “Lease Term/Options”
a. Ensure that the commence date and expiration date are accurate
b. Input any Options you see applicable from the agreement
8. Screen 12: “Rentable Area/Subspaces” and double-click the Initial Subspace
Page 58 of 99
Page 59 of 99
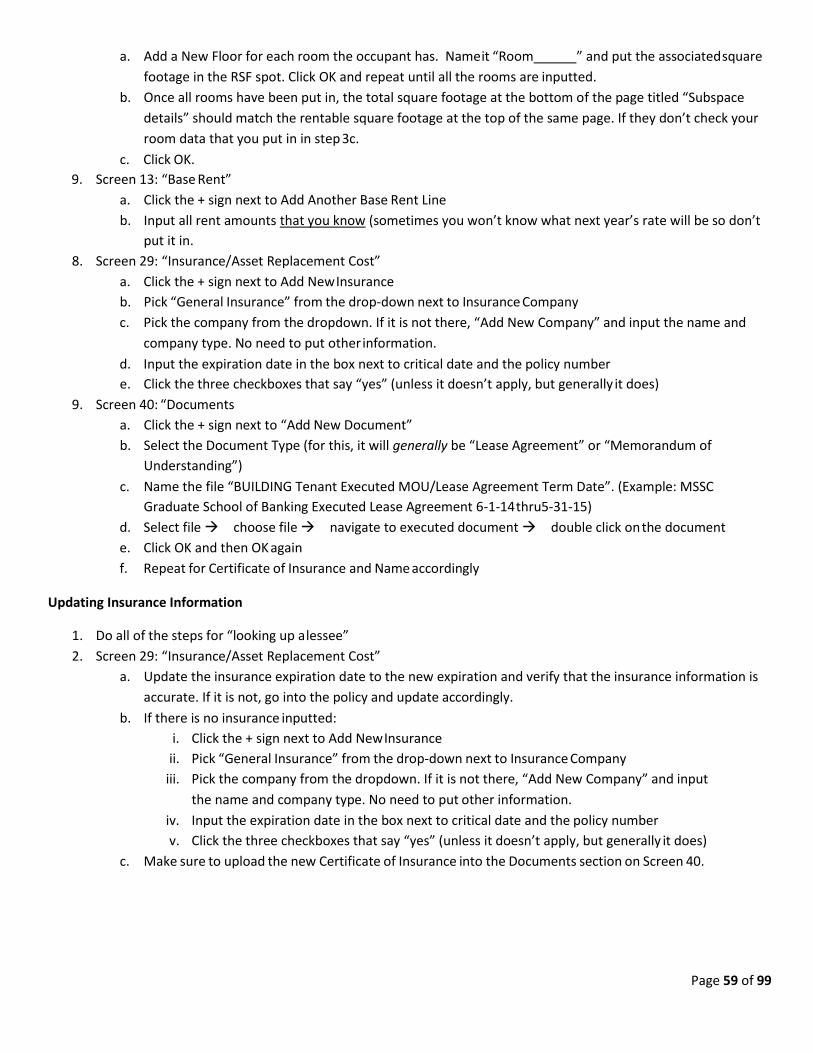
a. Add a New Floor for each room the occupant has. Name it “Room ” and put the associated square
footage in the RSF spot. Click OK and repeat until all the rooms are inputted.
b. Once all rooms have been put in, the total square footage at the bottom of the page titled “Subspace
details” should match the rentable square footage at the top of the same page. If they don’t check your
room data that you put in in step 3c.
c. Click OK.
9. Screen 13: “Base Rent”
a. Click the + sign next to Add Another Base Rent Line
b. Input all rent amounts that you know (sometimes you won’t know what next year’s rate will be so don’t
put it in.
8. Screen 29: “Insurance/Asset Replacement Cost”
a. Click the + sign next to Add New Insurance
b. Pick “General Insurance” from the drop-down next to Insurance Company
c. Pick the company from the dropdown. If it is not there, “Add New Company” and input the name and
company type. No need to put other information.
d. Input the expiration date in the box next to critical date and the policy number
e. Click the three checkboxes that say “yes” (unless it doesn’t apply, but generally it does)
9. Screen 40: “Documents
a. Click the + sign next to “Add New Document”
b. Select the Document Type (for this, it will generally be “Lease Agreement” or “Memorandum of
Understanding”)
c. Name the file “BUILDING Tenant Executed MOU/Lease Agreement Term Date”. (Example: MSSC
Graduate School of Banking Executed Lease Agreement 6-1-14 thru5-31-15)
d. Select file → choose file → navigate to executed document → double click on the document
e. Click OK and then OK again
f. Repeat for Certificate of Insurance and Name accordingly
Updating Insurance Information
1. Do all of the steps for “looking up a lessee”
2. Screen 29: “Insurance/Asset Replacement Cost”
a. Update the insurance expiration date to the new expiration and verify that the insurance information is
accurate. If it is not, go into the policy and update accordingly.
b. If there is no insurance inputted:
i. Click the + sign next to Add New Insurance
ii. Pick “General Insurance” from the drop-down next to Insurance Company
iii. Pick the company from the dropdown. If it is not there, “Add New Company” and input
the name and company type. No need to put other information.
iv. Input the expiration date in the box next to critical date and the policy number
v. Click the three checkboxes that say “yes” (unless it doesn’t apply, but generally it does)
c. Make sure to upload the new Certificate of Insurance into the Documents section on Screen 40.

Page 60 of 99
DocuSign & Updating the A-Z
Listing
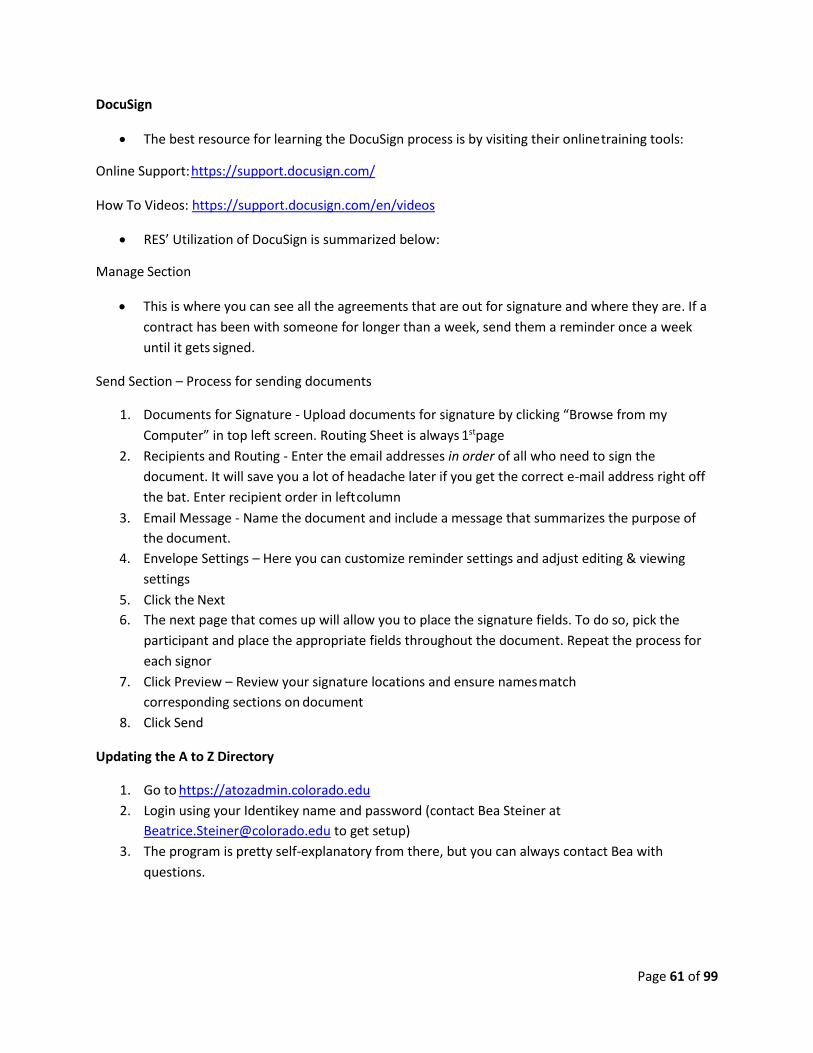
DocuSign
• The best resource for learning the DocuSign process is by visiting their online training tools:
Online Support: https://support.docusign.com/
How To Videos: https://support.docusign.com/en/videos
• RES’ Utilization of DocuSign is summarized below:
Manage Section
• This is where you can see all the agreements that are out for signature and where they are. If a
contract has been with someone for longer than a week, send them a reminder once a week
until it gets signed.
Send Section – Process for sending documents
1. Documents for Signature - Upload documents for signature by clicking “Browse from my
Computer” in top left screen. Routing Sheet is always 1stpage
2. Recipients and Routing - Enter the email addresses in order of all who need to sign the
document. It will save you a lot of headache later if you get the correct e-mail address right off
the bat. Enter recipient order in left column
3. Email Message - Name the document and include a message that summarizes the purpose of
the document.
4. Envelope Settings – Here you can customize reminder settings and adjust editing & viewing
settings
5. Click the Next
6. The next page that comes up will allow you to place the signature fields. To do so, pick the
participant and place the appropriate fields throughout the document. Repeat the process for
each signor
7. Click Preview – Review your signature locations and ensure names match
corresponding sections on document
8. Click Send
Updating the A to Z Directory
1. Go to https://atozadmin.colorado.edu
2. Login using your Identikey name and password (contact Bea Steiner at
[email protected] to get setup)
3. The program is pretty self-explanatory from there, but you can always contact Bea with
questions.
Page 61 of 99

Page 62 of 99
Certificates of Insurance

Page 63 of 99
Certificates of Insurance (COI)
All non-CU departments are required to have a current Certificate of Insurance on file
After every staff meeting, check critical date report from ProLease and confirm all COIs are current. If they are
not, contact tenant immediately requesting they send you one (digital or hard copy). If necessary, provide
sample COI.
• It is required by CU Risk Management that all COIs have the verbiage: “The Regents of the University of
Colorado, a Body Corporate, and its officers, employees, agents and volunteers are Additional Insured as
respects General Liability”. This is specified in the lease language.
• All insurance certificates must be saved to the tenant’s server file and entered into ProLease
In ProLease, make sure to upload the document as well as input the policy. If existing policy information is in
place, only update the expiration and confirm policy number is correct
• Liquor Liability – Remove if unnecessary (red font in requirements below)
Send all COIs received to CU Risk Management: Chad Medina ([email protected]) Carolyn Peet ([email protected])
After COI is current, approved by Risk Management, and files updated, erase off critical date tickler
Standard Lease Insurance Requirements
The following language is current approved insurance language as of 6.4.2020
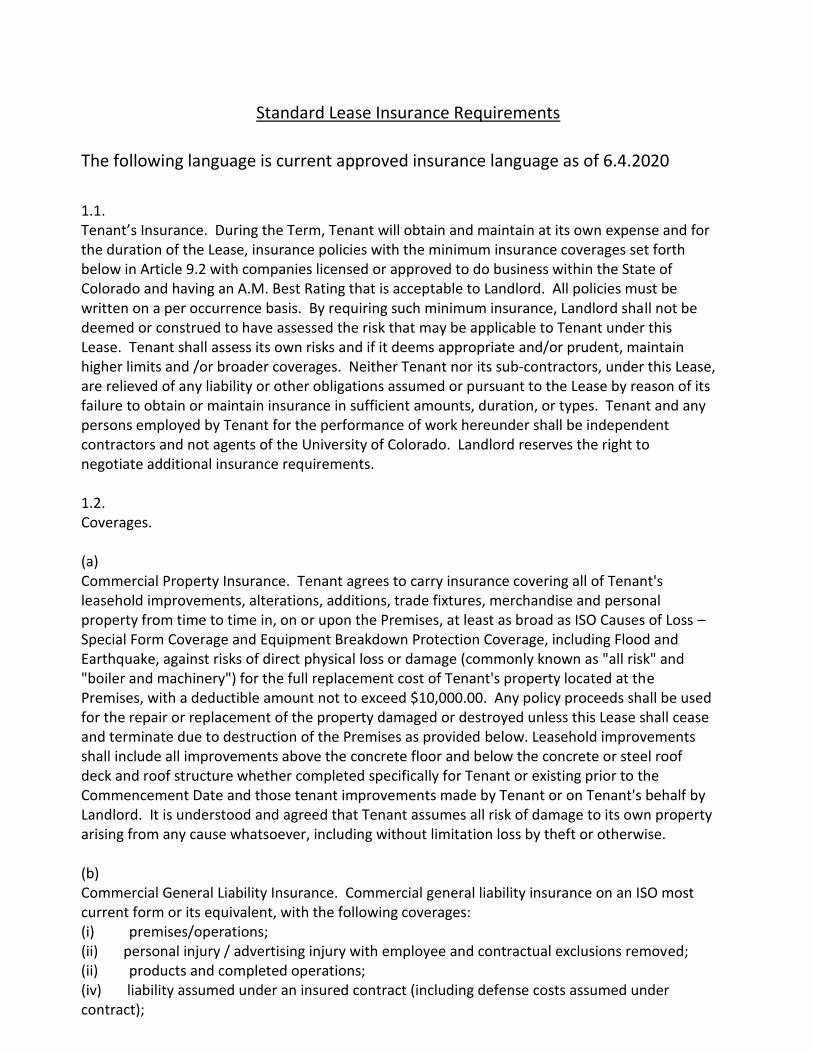
1.1. Tenant’s Insurance. During the Term, Tenant will obtain and maintain at its own expense and for the duration of the Lease, insurance policies with the minimum insurance coverages set forth below in Article 9.2 with companies licensed or approved to do business within the State of Colorado and having an A.M. Best Rating that is acceptable to Landlord. All policies must be written on a per occurrence basis. By requiring such minimum insurance, Landlord shall not be deemed or construed to have assessed the risk that may be applicable to Tenant under this Lease. Tenant shall assess its own risks and if it deems appropriate and/or prudent, maintain higher limits and /or broader coverages. Neither Tenant nor its sub-contractors, under this Lease, are relieved of any liability or other obligations assumed or pursuant to the Lease by reason of its failure to obtain or maintain insurance in sufficient amounts, duration, or types. Tenant and any persons employed by Tenant for the performance of work hereunder shall be independent contractors and not agents of the University of Colorado. Landlord reserves the right to negotiate additional insurance requirements. 1.2. Coverages. (a) Commercial Property Insurance. Tenant agrees to carry insurance covering all of Tenant's leasehold improvements, alterations, additions, trade fixtures, merchandise and personal property from time to time in, on or upon the Premises, at least as broad as ISO Causes of Loss – Special Form Coverage and Equipment Breakdown Protection Coverage, including Flood and Earthquake, against risks of direct physical loss or damage (commonly known as "all risk" and "boiler and machinery") for the full replacement cost of Tenant's property located at the Premises, with a deductible amount not to exceed $10,000.00. Any policy proceeds shall be used for the repair or replacement of the property damaged or destroyed unless this Lease shall cease and terminate due to destruction of the Premises as provided below. Leasehold improvements shall include all improvements above the concrete floor and below the concrete or steel roof deck and roof structure whether completed specifically for Tenant or existing prior to the Commencement Date and those tenant improvements made by Tenant or on Tenant's behalf by Landlord. It is understood and agreed that Tenant assumes all risk of damage to its own property arising from any cause whatsoever, including without limitation loss by theft or otherwise. (b) Commercial General Liability Insurance. Commercial general liability insurance on an ISO most current form or its equivalent, with the following coverages: (i) premises/operations; (ii) personal injury / advertising injury with employee and contractual exclusions removed; (ii) products and completed operations; (iv) liability assumed under an insured contract (including defense costs assumed under contract);
Page 65 of 99
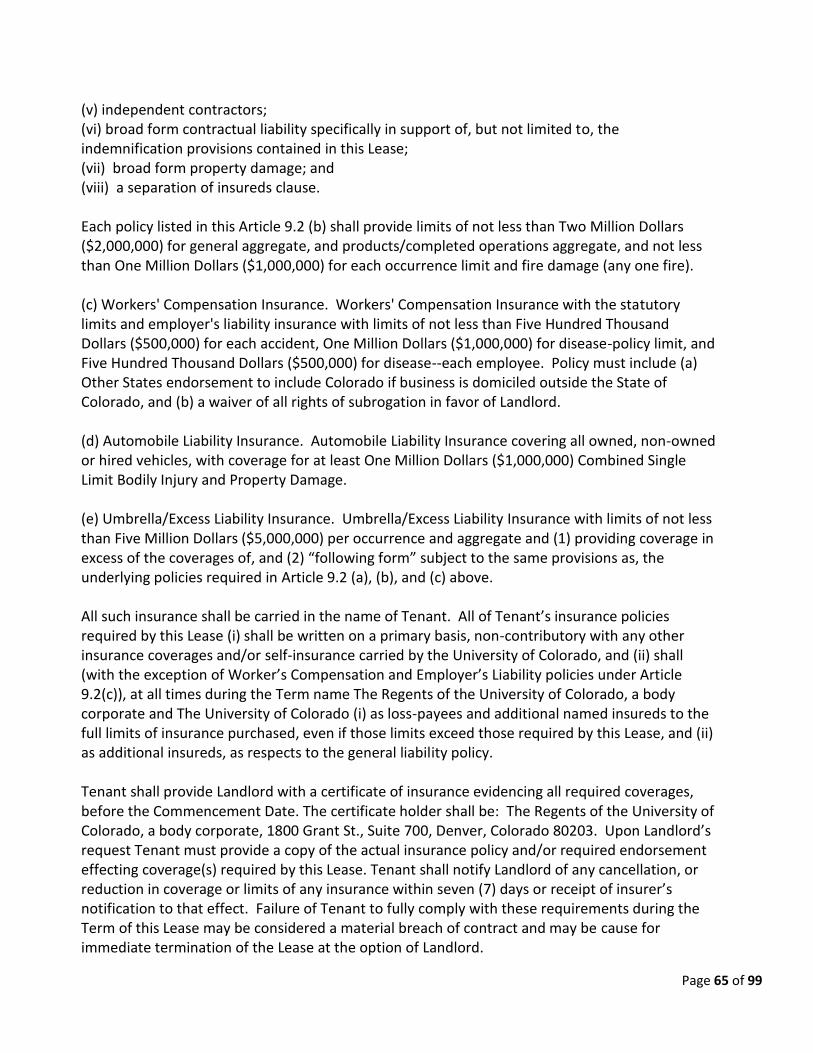
(v) independent contractors; (vi) broad form contractual liability specifically in support of, but not limited to, the indemnification provisions contained in this Lease; (vii) broad form property damage; and (viii) a separation of insureds clause. Each policy listed in this Article 9.2 (b) shall provide limits of not less than Two Million Dollars ($2,000,000) for general aggregate, and products/completed operations aggregate, and not less than One Million Dollars ($1,000,000) for each occurrence limit and fire damage (any one fire). (c) Workers' Compensation Insurance. Workers' Compensation Insurance with the statutory limits and employer's liability insurance with limits of not less than Five Hundred Thousand Dollars ($500,000) for each accident, One Million Dollars ($1,000,000) for disease-policy limit, and Five Hundred Thousand Dollars ($500,000) for disease--each employee. Policy must include (a) Other States endorsement to include Colorado if business is domiciled outside the State of Colorado, and (b) a waiver of all rights of subrogation in favor of Landlord. (d) Automobile Liability Insurance. Automobile Liability Insurance covering all owned, non-owned or hired vehicles, with coverage for at least One Million Dollars ($1,000,000) Combined Single Limit Bodily Injury and Property Damage. (e) Umbrella/Excess Liability Insurance. Umbrella/Excess Liability Insurance with limits of not less than Five Million Dollars ($5,000,000) per occurrence and aggregate and (1) providing coverage in excess of the coverages of, and (2) “following form” subject to the same provisions as, the underlying policies required in Article 9.2 (a), (b), and (c) above. All such insurance shall be carried in the name of Tenant. All of Tenant’s insurance policies required by this Lease (i) shall be written on a primary basis, non-contributory with any other insurance coverages and/or self-insurance carried by the University of Colorado, and (ii) shall (with the exception of Worker’s Compensation and Employer’s Liability policies under Article 9.2(c)), at all times during the Term name The Regents of the University of Colorado, a body corporate and The University of Colorado (i) as loss-payees and additional named insureds to the full limits of insurance purchased, even if those limits exceed those required by this Lease, and (ii) as additional insureds, as respects to the general liability policy. Tenant shall provide Landlord with a certificate of insurance evidencing all required coverages, before the Commencement Date. The certificate holder shall be: The Regents of the University of Colorado, a body corporate, 1800 Grant St., Suite 700, Denver, Colorado 80203. Upon Landlord’s request Tenant must provide a copy of the actual insurance policy and/or required endorsement effecting coverage(s) required by this Lease. Tenant shall notify Landlord of any cancellation, or reduction in coverage or limits of any insurance within seven (7) days or receipt of insurer’s notification to that effect. Failure of Tenant to fully comply with these requirements during the Term of this Lease may be considered a material breach of contract and may be cause for immediate termination of the Lease at the option of Landlord.
1.3. Waiver of Subrogation. Landlord and Tenant (to the extent Tenant is authorized by the Constitution and laws of the State of Colorado) each agree that with respect to any third–party insurance policy maintained, or required to be maintained, by it under this Lease, such policy of insurance shall contain a waiver of the insurer’s subrogation rights with respect to any amounts paid under such policy or policies. Landlord and Tenant each agree to (i) immediately give written notice to each insurance company that has issued to it, or in the future issues to it, policies of insurance with respect to this Lease; (ii) cause such insurance policies to be properly endorsed, as necessary, to evidence the waiver of the insurer’s subrogation rights; and (iii) provide reasonable proof of such waiver of subrogation rights to the other party. Further, to the extent of insurance proceeds received, the parties respectively waive and release any and all claims against the other party for damages caused or contributed to by the other party. 1.4. Indemnification. Tenant shall indemnify and hold Landlord Indemnified Parties harmless from and against any and all losses, costs (including reasonable attorney’s fees), damages, liabilities and expenses (collectively, “Losses”) incurred by the Landlord Indemnified Parties as a result of claims, demands, penalties or prosecutions, caused by, allegedly caused by or contributed to by the acts or omissions of Tenant, its employees or agents, and shall defend on behalf of the Landlord Indemnified Parties any suit brought against the Landlord Indemnified Parties for any such Loss and shall reimburse Landlord in connection therewith. Tenant agrees that the insurance requirements specified in this Lease do not reduce the liability Tenant has assumed in this Article 9.4.
Also: Host Liquor Liability – where applicable $1,000,000
Where the Lessee will distribute alcoholic
beverages on University leased premises, Host
Liquor Liability insurance is required.

Page 67 of 99
New Outside Tenant
Procedures

Page 67 of 99
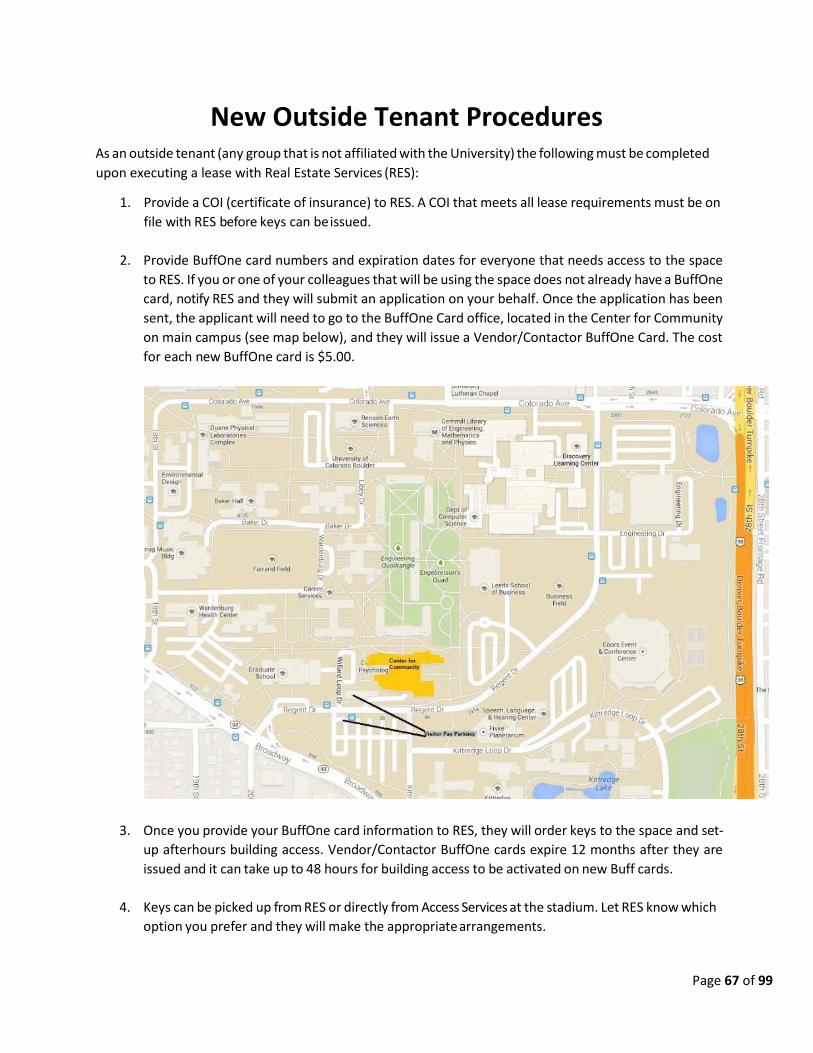
New Outside Tenant Procedures As an outside tenant (any group that is not affiliated with the University) the following must be completed
upon executing a lease with Real Estate Services (RES):
1. Provide a COI (certificate of insurance) to RES. A COI that meets all lease requirements must be on
file with RES before keys can be issued.
2. Provide BuffOne card numbers and expiration dates for everyone that needs access to the space
to RES. If you or one of your colleagues that will be using the space does not already have a BuffOne
card, notify RES and they will submit an application on your behalf. Once the application has been
sent, the applicant will need to go to the BuffOne Card office, located in the Center for Community
on main campus (see map below), and they will issue a Vendor/Contactor BuffOne Card. The cost
for each new BuffOne card is $5.00.
3. Once you provide your BuffOne card information to RES, they will order keys to the space and set-
up afterhours building access. Vendor/Contactor BuffOne cards expire 12 months after they are
issued and it can take up to 48 hours for building access to be activated on new Buff cards.
4. Keys can be picked up from RES or directly from Access Services at the stadium. Let RES know which
option you prefer and they will make the appropriate arrangements.
5. Outside tenants are not allowed to use UCB internet/telephone connections. If you require
telephone and/or internet service, you will need to contract with an internet service provider (ISP)
in the area (CenturyLink, Comcast, etc.). Per your lease agreement, as the tenant you are
responsible for all the ISP associated costs (installation, fees, etc.). Most outside tenants go with
CenturyLink as all RES buildings already have the infrastructure in place that is compatible with
CenturyLink’s service and therefore the installation is much less expensive compared to other ISPs.
a. If the space you are leasing does not already have an Ethernet jack, one will need to be
installed before the ISP comes out to install/activate service. To have a jack installed,
contact RES and they will make arrangements to have a jack installed. New jack
installations usually take at least 2 weeks to be completed from the time they are
requested.
b. Once you have a confirmed the installation date/time with your ISP, contact RES and they
will make arrangements to have a representative with the University IT department open
the nearest telecom closet while the ISP tech is installing/activating your service.
6. If there are any issues with the space during your tenancy (heating/cooling not working properly,
leaks, damages, lock issues, etc.), please contact RES immediately and they will work to resolve
the issue as quickly as possible. RES can be reached by calling 303-492-6883 or by emailing
Page 68 of 99
CU Mailer’s Guide
Page 69 of 99
Page 70 of 99
Mailer's Guide, Distribution Center The CU-Boulder community of 30,000 students and more than 8,000 faculty and staff requires all the postal services of
an ordinary community. In addition, CU needs many specialized services for handling the unique activities of university
life.
Mailing Services consists of two different service operations: Distribution processes incoming mail for the campus, while
Meterline processes outgoing first class, international mail, UPS, and FedEx.
Both service operations of Mailing Services are located at the Distribution Center (3300 Walnut St). Our mailing address
for all services is 60 UCB.
Mailing Services processed approximately 2.5 million pieces of incoming mail last year and approximately 97,000 pieces
of outgoing mail.
Mailing Services encourages interested parties to tour the department. To arrange a tour contact the manager of the
particular service area that is of interest to you or 303-492-6242.
Note: Significant updates have occurred with the COVID-19 virus; Updates include calling ahead, and picking up
mail directly from Distribution at scheduled time. Once arriving you must call Distribution again, and let them
know you are there, and which vehicle you are in. they will bring the mail to you/your vehicle. If you have mail
that needs to be mailed through distribution, you must bring it to distribution, call them, and let them know you
have mail to be dropped off. Please see the below site, and check back for updates as needed.
https://www.colorado.edu/fm/2020/03/12/distribution-center-mailpackage-service-update
Hours of Operation
Distribution Center Reception Office:
Monday through Friday, 7:30 A.M. to 5:00 P.M.
(Summer hours: 7:30 A.M. to 4:30 P.M.)
Meterline and Distribution teams:
Monday through Friday, 7:30 A.M. to 12:00 Noon and 1:00 P.M. to 4:30 P.M (year round)
Stamps/USPS products
The UCB Mailing Services is not a post office and is not able to provide any USPS products or services to individuals on a
cash-for-service basis (e.g. money orders, stamps, etc.). Find your closest USPS office.
Mailing Supplies
The Mailing Services receptionist will provide university departments with supplies for preparation of their outgoing mail
at no charge (rubber bands, return receipts, customs forms, mail trays, mail tubs, etc.). Contact 303-492-6242.
Packaging supplies (envelopes, address labels, tape, etc.) may be purchased from the CU Bookstore.
USPS and University Policies
In accordance with the Private Express Statutes as interpreted by the Postal Service (regulations 39 C.F.R. parts 310 and
320), the campus mail service is for university business only.
A. Letters must be sent by, and/or addressed to staff and faculty members in their official capacity as
Page 71 of 99
representatives of UCB.
B. Personal letters of staff, faculty, or students may not be carried within the campus mail system (i.e.
advertisements of a house for sale/rent, personal Christmas cards, Credit Union statements, etc.)
C. Outside businesses have very limited access to the campus mail system. While University departments may
use the campus mail system for University business, departments may not serve as a conduit of mail for the
letters of outside organizations or individuals.
D. The University may carry letters of its bona fide affiliated student or faculty organizations to campus
destinations. The restrictions outlined above apply.
Mail carriers are not permitted to pick up personal mail (i.e. bills, correspondence, etc.), for input into the U.S. Postal
system. Departments and/or individuals must use the various U.S. Mail collection boxes located throughout campus for
non-University business and/or personal mail.
University Policy
All incoming and outgoing mail processed by the University must relate to the business of the University. Mailing
Services may audit all campus mailings for content by visually inspecting a random sample from each mailing to ensure
compliance with the relevant statutes and policies. Mailing Services Distribution Supervisor and/or Distribution
Manager will be responsible for auditing campus mailings for compliance with these regulations.
- I. Mailing Services may not be used for commercial, personal or private gain or for commercial advertising for
organizations or individuals not affiliated with the University.
- II. Mailing Services can only accept mailings that clearly demonstrate that the mailing is sponsored by the
University of Colorado system. Acceptable mailings are written on University letterhead, have a University
return address, or clearly and prominently state that the function is sponsored by a University department.
- III. Mailing Services operations may not be used in any manner to imply University endorsement of a partisan,
political, sectarian, or religious position.
- IV. Mailing Services may not be used for fund raising, except as approved by the Vice Chancellor for
Administration.
- V. The University may carry letters of its bona fide affiliated student or faculty organizations to campus
destinations. The restrictions outlined in this policy apply.
- VI. Outside businesses are not generally allowed access to the Campus mail system.
A. While University departments may use the Campus mail system for University business, departments may not serve
as a conduit for mail for the letters of outside organizations or individuals unless the material relates to the business of
the University.
B. Material generated off-campus must include a cover letter on University letterhead, stating that the mailing is
sponsored by a University department.
Billing Information
All charges appear in batch "MSS01" and reference "JE00055". All postage charges appear in code 565; all Mailing
Services labor charges appear in code 567. All charges are fully listed on the Peoplesoft statement with the tracking
number and the IN number if one was received. Departments are required to control the sending of mail and which
speed type is used. An online system to look at Mailing Services Billing is in the construction stage and is projected to be

Page 72 of 99
available by July 2007.
Zip Codes
The ZIP Code for Boulder campus departmental offices is 80309 plus the appropriate four-digit ZIP Code "add-on." The
four-digit add-on is your departmental campus box number, plus the appropriate number of zeros to total four
digits. For example:
Board of Regents = 80309-0003
Mailing Services = 80309-0060
Human Resources = 80309-0565
The ZIP code for Boulder campus residence halls is 80310.
Private Carriers
Mailing Services accepts and delivers USPS mail only. Private carriers, such as United Parcel Service (UPS), Federal
Express, Airborne, and Pony Express deliver directly to the departments.
Campus Addresses
A campus box number assignment corresponds to a particular delivery route/location on campus. It determines how
effectively your mail processes from receipt to delivery. This includes where your mail is sorted, who is sorting your
mail, where your mail is queued for the route, and the order of delivery. UCB campus box numbers are maintained and
assigned by the Mailing Services General Manager or Distribution Supervisor. If a department changes location such
that the new location is on a different delivery route, the campus box number may be changed. Relocation's may also
require us to change our delivery routes to accommodate the move. Contact the Distribution Supervisor at 2-2444 as
soon as possible when departmental moves are planned to prepare for the change if one is required.
If a change in box number is necessary, Mailing Services maintains a one-year grace period on the old box number to
allow time for the department to notify correspondents, change letterhead, etc. Mail addressed to an old box number is
forwarded to the new box number assignment during this time.
If your department is planning to move on a regular basis or will be re-locating to an off-campus location, other
arrangements may be made for you to receive your mail.
Mailing Services evaluates requests for new box numbers solely from the standpoint of mail volume and geographical
location. Due to the steady increase in mail volume and growth of departments, combined with our fixed physical
resources, Mailing Services is forced to centralize mail stops and box numbers as much as possible. Contact the
Distribution Supervisor for further details at X2-2444.
Page 73 of 99
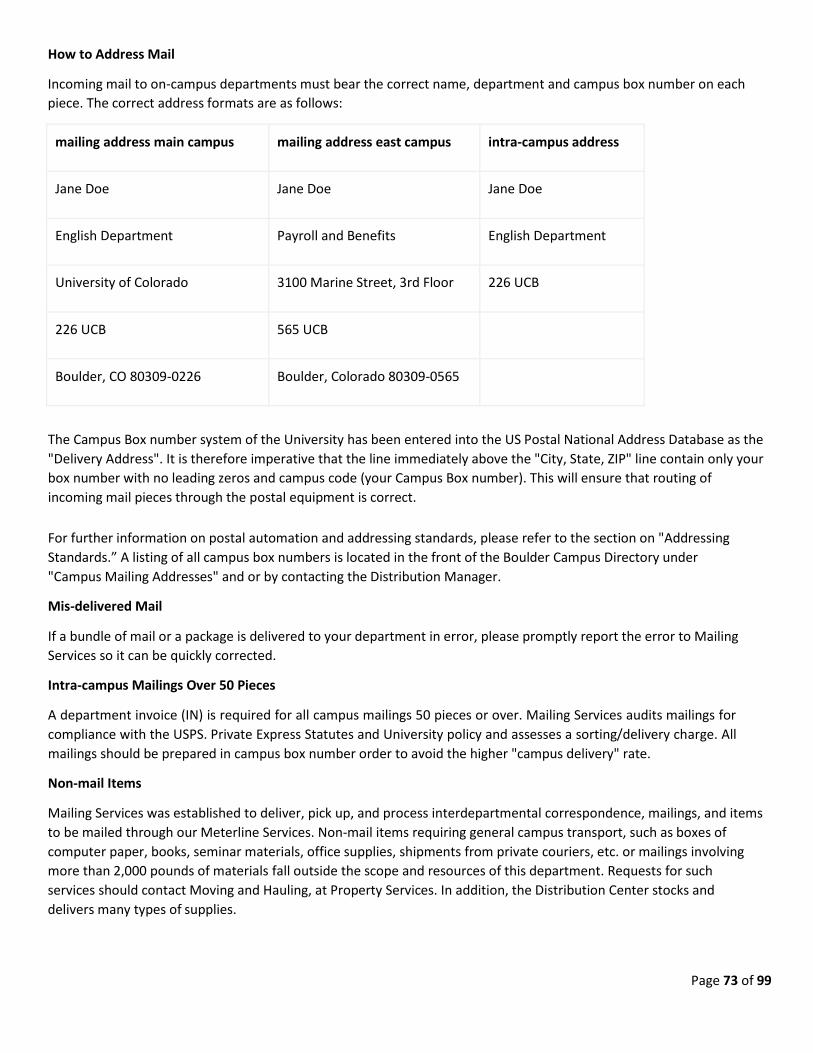
How to Address Mail
Incoming mail to on-campus departments must bear the correct name, department and campus box number on each
piece. The correct address formats are as follows:
mailing address main campus mailing address east campus intra-campus address
Jane Doe Jane Doe Jane Doe
English Department Payroll and Benefits English Department
University of Colorado 3100 Marine Street, 3rd Floor 226 UCB
226 UCB 565 UCB
Boulder, CO 80309-0226 Boulder, Colorado 80309-0565
The Campus Box number system of the University has been entered into the US Postal National Address Database as the
"Delivery Address". It is therefore imperative that the line immediately above the "City, State, ZIP" line contain only your
box number with no leading zeros and campus code (your Campus Box number). This will ensure that routing of
incoming mail pieces through the postal equipment is correct.
For further information on postal automation and addressing standards, please refer to the section on "Addressing
Standards.” A listing of all campus box numbers is located in the front of the Boulder Campus Directory under
"Campus Mailing Addresses" and or by contacting the Distribution Manager.
Mis-delivered Mail
If a bundle of mail or a package is delivered to your department in error, please promptly report the error to Mailing
Services so it can be quickly corrected.
Intra-campus Mailings Over 50 Pieces
A department invoice (IN) is required for all campus mailings 50 pieces or over. Mailing Services audits mailings for
compliance with the USPS. Private Express Statutes and University policy and assesses a sorting/delivery charge. All
mailings should be prepared in campus box number order to avoid the higher "campus delivery" rate.
Non-mail Items
Mailing Services was established to deliver, pick up, and process interdepartmental correspondence, mailings, and items
to be mailed through our Meterline Services. Non-mail items requiring general campus transport, such as boxes of
computer paper, books, seminar materials, office supplies, shipments from private couriers, etc. or mailings involving
more than 2,000 pounds of materials fall outside the scope and resources of this department. Requests for such
services should contact Moving and Hauling, at Property Services. In addition, the Distribution Center stocks and
delivers many types of supplies.
Page 74 of 99
Reusable Envelopes
Mailing Services encourages the use of reusable envelopes for use on campus. Despite our efforts to keep the campus
supplied with these envelopes, the demand is greater than our supply. We request that any department that have an
excess supply of reusable envelopes to send them to Mailing Services so that they may reused. If you have a large
quantity of reusable envelopes to return to Mailing Services, please call in a package pick-up. Please label your bundle
"empty envelopes for reuse" and be sure that all envelopes are empty before returning them to Mailing Services.
Receipt of Express, Registered, Certified, and Insured Mail
"USPS accountable mail" is defined as "articles sent registered, certified, insured, and express which require a signature
upon receipt as proof of delivery." Mailing Services receives this mail from the USPS between 9:00 and 10:00
AM. Monday through Friday with the exception of Holidays. The Distribution Supervisor verifies and signs for each
piece from the USPS and then creates a manifest of this mail for departmental signatures to complete the audit
trail. Distribution delivers this mail on a separate delivery route between 10:00 AM and 3:00 P.M. The addressee or a
responsible person at the addressee’s department must sign for these articles when campus carriers attempt delivery. If
the carrier cannot obtain a signature for the article, the article will be returned to Mailing Services and a notice of its
arrival will be mailed to the addressee. The articles can either be picked up at the Distribution Center (3300 Walnut) or
re-delivery may be requested for the next day, provided there will be someone available to sign for the article.
If the USPS receives additional Express mail for the University during the day, they will make a special trip to Mailing
Services. Normally a Periodical delivery arrives around 3:00 P.M. Mailing Services will call the department upon
receipt. The department may come to Mailing Services to pick up the piece, or have it delivered the following morning
on the regular accountables route.
If a department needs to know if a particular piece of express mail has arrived, or pick it up ASAP, please contact Mailing
Services at x2-6242. We will contact you by phone as soon as possible and make the piece available for pick up. For an
additional charge, the department may request an "Express Services" delivery, and the piece will then be delivered to
the department within one hour.
Preparation of Outgoing Mail
The mail from each stop on each route is merged with the other departments on the route. To ensure same day
processing, outgoing mail must be separated into:
1) Campus mail
2) Mail to be metered (separate international)
3) Stamped mail and business reply
Each bundle must be securely rubber-banded, so that mail for each department and/or account number is not
separated. The bundle is directed to the appropriate service area upon the return to Mailing Services. Loose mail is
more likely to be delayed as well as damaged (bent, crushed) when merged with hundreds of other pieces along the
route. All mail sent off campus must have a University return address.
Rubber bands are available through Mailing Services for bundling mail at no cost. Please contact our receptionist at x2-
6242 if you need rubber bands.
Package Pick-up Requests
Distribution package carriers pick up packages or large quantities of mail from departments for processing by Mailing
Services that the letter carriers are not able to pick up on their walking routes. To schedule a pickup of this type of mail,
Page 75 of 99
please click on this link to go to the Package Pickup Request form. This mail should be placed for pick up in the normal
carrier stop in the department. For same-day service, requests must be called in to Mailing Services by 8:30 AM for
departments, which normally receive their package mail in the mornings, and by 12:00 Noon for departments receiving
their package mail in the afternoon.
When scheduling a package pickup, you will receive a package pickup number. Place this number on each package,
bundle, or tray being picked-up. Loose mail will not be picked-up; box or bundle items to prevent loss and/or damage.
Mailing Services may spread out package pick-ups of 5 or more packages or boxes over two or more days (depending on
the quantity) in order to maintain the daily campus delivery/pick up schedules.
Same-day pick up of large quantities of mail, emergency/immediate pickups, and pickups in locations other than the
standard mail stop in the department depend on the availability of our resources (personnel/vehicles). A prorated labor
charge may be assessed to the department for such pickups.
To schedule a large mailing with the Supervisor of the Meterline call (2-2443) prior to calling for a package pickup.
Equipment: A damage waiver must be signed for equipment such as computers being picked up for shipment through
Mailing Services Meterline Services. Please identify such items when requesting a package pickup.
Hazardous Materials: There are strict rules for shipping hazardous materials. All hazardous materials will ship through
the Distribution Center rather than Mailing Services. Please contact Materiel Management at the Distribution Center for
further information.
Boulder-Denver Shuttle
Distribution operates the Boulder-Denver Shuttle Service on a daily schedule, Monday through Friday. Regular daily
stops are made to the State Services Building, the UCD Campus (currently being distributed through Auraria Business
Services), and the Health Sciences Center.
Mail for the Boulder-Denver Shuttle received at Mailing Service before 12:00 Noon will be delivered that same
afternoon to the various stops along the route.
Mail destined for delivery on the Shuttle must carry the correct department name, delivery address, and city of
destination. To expedite handling of items, the words “DENVER SHUTTLE" should be placed on each piece, bundle, or
package to be delivered from Boulder to Denver. Likewise, correspondents should write "BOULDER SHUTTLE" on all mail
sent from Denver to Boulder.
As with UCB mail service, the Shuttle service is for the transfer of University correspondence rather than non-
correspondence items such as boxes of materials, paper, goods, etc. However, Mailing Services will try to accommodate
boxes when space allows. The limited capacity of the vehicle, combined with the varying quantities of mail to be picked
up or delivered at each stop prevent any guarantee of delivery of non-correspondence items.
Express Service
Express Service is an on-call service designed to move small non-mail items and time sensitive correspondence to
destinations on the Boulder campus or within Boulder city limits. The targeted turnaround time for this service is 1 ½
hour. Mailing Services can handle most items through Messenger Service; however, large equipment or large quantities
of items should be referred to Moving and Hauling at Property Services. They can be reached at 2-6524.
The current cost of Messenger Service is $15.00 per delivery stop. If a department has items going to different
destinations, $15.00 will be assessed for the first delivery stop and $10.00 for each additional delivery stop.
Departmental speedtypes will be taken with the order over the phone for billing.
Page 76 of 99
This service is offered 8:00 A.M. to 11:00 and 1:00 P.M. to 3:30 P.M. weekdays. After you have requested this service,
our receptionist will request the following information: account number to be billed, contact
person/department/building/ room number and phone number for pickup, and the same information for delivery.
The item for delivery should be packaged, addressed and ready for delivery at the time the call is made. If requested,
proof of delivery will be obtained when the item is delivered; therefore, the recipient or a departmental representative
must be available to sign for the item at the time of delivery.
Campus Certified Mail
Due to the volume of mail received and processed each day, it is not possible to trace missing mail unless the pieces
have been sent in "accountable" form. Campus certified service is available to provide proof of delivery for important
items. Campus certified mail is handled similarly to USPS certified mail within the campus mail system.
There is a nominal fee per piece for this service. When your department wishes to send a campus certified through the
campus mail system, please complete a campus certified form and retain the top copy for your records. The bottom two
copies should be attached to the article. Please deliver the article to Mailing Services at 3300 Walnut St. so that the
article can be properly logged in. Campus Certified mail can be placed in your outgoing mail for pickup by Mailing
Services. It would be best to separate them so they don’t get mixed with other outgoing mail. Campus certified forms
are available by calling our receptionist (2-6242). Please note that for same-day delivery of campus certified mail to be
delivered on the Boulder-Denver Shuttle, the campus certified must be received by Mailing Services at 3300 Walnut St.
by 11:45 A.M. to allow sufficient processing time.
Insufficient Address/Forwarding
Incoming USPS and intra-campus mail that has an insufficient address (undeliverable) will be delayed. We regularly
receive campus mail with only a name (sometimes only a first name!) to work with. To avoid delays or returns, it is
imperative to inform your correspondents of your correct and complete address.
Mailing Services uses the latest monthly Payroll database listing of personnel to determine the proper mailing
address. This same listing is used to correct mailing lists. It is important that your PAF reflect the correct information.
Misaddressed Periodical and Standard (non-profit) bulk mailings are treated in accordance with the U.S. Postal policies:
Periodicals (normally a publication such as a magazine) which are insufficiently addressed are sent through to the
addressee after the correct mailing address has been determined.
Standard (non-profit) bulk mail consists of circulars, printed matter, newsletters, catalogues, and the like. If the
minimum addressing requirement for this class of mail is not met, the piece will be recycled unless an endorsement for
"address correction requested" is specified on the piece. In this instance, the piece will be returned to sender with the
address correction.
Change of Address
Mailing Services provides change of address cards for departments to correct mailing addresses or delete unwanted
correspondence. The department must complete the card and return it to Mailing Services. Mailing Services will pay for
the postage on all business related change of address cards.
It is the responsibility of the individual departments to forward all mail addressed to former staff and faculty members,
as the U.S. Postal Service and Mailing Services does not maintain change of address files for the University.
Page 77 of 99
Meterline Services
--Preparation of mail to be metered--
Speed types
Use of a departmental IN (Invoice) is optional for processing First Class daily mail. If an IN is not used, the speed type
should be written in the upper left hand corner of the individual piece or on the top piece of each bundle. Any individual
piece or bundle of outgoing daily business mail requiring postage must have valid speed type included. The speed type
on a piece or bundle authorizes Mailing Services to post that mail and recharge the department. Mail without a speed
type will be delayed, and could be returned to the department. Avoid any writing in the upper right hand corner of the
envelope, or along the bottom of the envelope 5/8” from the bottom.
Departmental/ Mailing Services Invoices
An invoice (IN) is required for any USPS special services (i.e. registered, express, certified, or insured mail) and all UPS or
FedEx services. In addition, all INs for UPS or Federal Express shipments must include the street address of the
recipient. This information serves as a tracking record for your parcels. Please be specific as to the service
requested. IN’s will not be processed without an authorizing signature and a valid account number.
University of Colorado department return address
A CU return address must appear on each piece of mail to be sent off campus. This policy is to ensure compliance with
the Colorado Revised Statutes 24-30-1111 regarding the penalty for private use of State installed postage meters.
Foreign Mail
Foreign mail should be separated from Domestic Mail and clearly identified to ensure that it will be processed with the
correct postage. All foreign addresses must have the destination country spelled out in full (no abbreviations). Any
USPS, UPS or FedEx packages being shipped to a foreign destination that have a commercial value or over 1 lb., must
include a description of contents and value for customs. This includes packages sent to APO addresses. Failure to
include this information may result in a delay in shipping the package.
Default classes for processing mail
Unmarked domestic mail will automatically be processed at the first class rate. To avoid paying higher postage rates
than necessary, consider lower rates such as media or library mail and mark the desired rate on the mailing piece. If it is
necessary to have the same day post mark on your mail, put a note on the piece or bundle, stating “Today’s post mark
required.”
Unmarked Foreign mail will automatically be processed at the air letter class or air parcel post class if over 4 lbs. To
avoid paying higher rates than necessary, consider economy letter post or economy parcel post rates, and mark your
package accordingly.
Call ahead for larger mailings
If you have a mailing larger than 2000 letters or 500 flats, notify the Meterline at 2-2443 one day in advance, to
guarantee timely processing. Unscheduled mailings will be processed the same day only if time permits.
Page 78 of 99
Information or Supplies
If you would like information on rates, the best way to ship packages, or to order USPS or FedEx supplies, call the
Meterline at 2-2443 or 2-2445.
More information about fees and classes of services:
US Postal Service
UPS Fedex
--Labor charges--
Labor charges may be assessed for mail to be metered that requires additional preparation or handling. Mailings that
may be assessed these charges are listed as follows:
• A. Envelopes that cannot be sealed at the same time that they are metered, (flaps that are perpendicular to the
address) may be assessed a hand seal or machine seal charge for over 50 pieces. Please note that clasp
envelopes cannot be run through the meter machines without damaging the equipment.
• B. Mailings over 50 pieces that have a permit number that has to be blocked out, or that require a meter tape,
may be assessed an additional handlingfee.
• C. If you have 10 or more pieces of special services (i.e. Certified, Registered, Express) for processing, a labor
charge may be assessed. If return receipts are requested, labor charges will be reduced if you fill out the return
receipts prior to submitting the mailing to the Meterline. Please contact Mailing Services if you need a supply of
return receipts.
• D. If you have more than 10 foreign packages that require customs forms, you may be assessed a handling fee
for filling out the required forms. To avoid this fee, call Mailing Services for a supply of customs forms.
• E. Mail requiring extra labor or preparation will be processed last, and may not go out the same day it is
received.
Schedules/Deadlines
If you miss the regular scheduled pick up at your department, mail can be dropped off at the Mailing Services Office at
3300 Walnut Street, Boulder, CO. Outgoing mail to be metered and UPS or FedEx mail to be processed by the Meterline
must be at Mailing Services before 3:00 P.M. for same-day posting and delivery. Special emergency or rush requests
after 3:00 P.M. will be considered if time and volume permit.
Currently, our post office mail is shipped to the Boulder Post Office at 3:45 P.M., Monday through Friday.
UPS and Federal Express pick up from Mailing Services by 3.45 P.M. Monday through Friday. Mailing Services does not
have accounts with DHL, Airborne Express or FedEx ground, so we can only accept pre-printed authorized return
shipments for these vendors.
Page 79 of 99
Block recharge on account numbers: Departments can flag account numbers through Mailing Services so that they are
not recharged for daily mail to be metered. To flag an account number, send a memo to the Mailing Services accountant
at 60 UCB. This flag affects daily mail only and does not affect transactions requested on an IN.
State Law - Meters
A special add plate reading "State of Colorado Official Mail, Penalty for Private Use" is required for each meter machine
on campus. Violations of this policy can result in the loss of meter privileges. Any person who uses a state-installed
meter for private purposes commits a Class-3 misdemeanor and shall be punished as provided in Section HB1170, LDO
83-0038/1, 1093 (up to $750.00 fine/6 months imprisonment).
Business Reply Mail
Business Reply Mail (BRM) enables a department to provide its correspondents with return reply envelopes or cards
which the correspondent can return without paying postage. The BRM permit holder (UCB Mailing Services) is then
assessed the regular first-class rate plus a BRM handling fee on each piece that is returned. Pre-printed BRM envelopes
and cards are used mostly on this campus for return of information requested or questionnaires. The advantage of BRM
is that the department pays postage and fees only on the replies which are returned.
Permit #165 is currently approved for the BRMAS (Business Reply Mail Accounting Service) program. Approval requires
at least 98% of the incoming UCB permit #165 BRM pieces conform to USPS automation specifications. This program
reduces the BRM handling fee.
Departments wishing to use permit #165 for BRM envelopes and cards must have approval for the card or envelope
from Imaging Services prior to printing. Departments wishing to use old BRM card or envelope stock also need to have
the BRM stock reviewed. The Postal Service will create and provide UCB with the BRMAS template that is needed at no
charge. BRM pieces that are printed incorrectly jeopardize the 7 cent per piece BRMAS discount for the rest of the
campus. Departments printing off-campus or using materials that do not meet USPS specifications may not use permit
account #165.
BRM Processing through Mailing Services
BRM arrives daily from the USPS. Mailing Services will recharge all postage and fees billed to the University to the
individual departments. The department should have a valid account number pre-printed on the BRM envelope or
card. If the account number printed on your BRM piece is not current, please contact Jeremy Pine at 2-2206 to update
the account number. Mailing Services sorts all BRM pieces according to the account number printed on them,
bundled, date-stamped and returned to the department with the quantity of pieces indicated on the bundle. There is
normally a 24-hour turnaround from the receipt of the BRM pieces by Mailing Services to delivery of the pieces to the
department. However, if the amount charged to our account by the Post Office does not correspond to the amount to
an additional day delay may occur while the billing issue can be resolved.
Courtesy Reply Mail
Courtesy reply provides the sender with a pre-printed card or envelope to return, but does not provide the postage. The
mailer must put the appropriate postage on the return piece. To expedite the return of this mail through the automated
equipment of the Postal Service, templates are available to pre-print the appropriate FIMs and barcode on the return
piece.
Address correction/Return Services
Ancillary Services are provided by the USPS for mail endorsed "Address Correction Requested," and/or "Return Postage
Guaranteed." These services provide for a correct mailing address and/or return of the mail piece for mail undeliverable
Page 80 of 99
as addressed. Fees charged to the University by the USPS for these services requested by the mailer are recharged to
the individual departments. As of November 1988, the USPS implemented new requirements for mailers who use
endorsements to request address correction and return service. In essence, the approved placement, size,
abbreviation, and clear space are standardized. If the mail does not match the updated standards it will rejected by the
USPS.
Addressing Standards
The USPS standards for addressing have changed to accommodate the high-speed automated equipment used in post
offices nationwide. This equipment includes optical character readers (OCRs) and bar code sorters (BCSs), programmed
to "read" and sort up to 10 pieces per Periodical. To ensure proper delivery of outgoing mail, decrease
processing/delivery time and take advantage of postage discounts, mail must be "machineable" (right size and shape to
go through equipment) and electronically "readable". Following are the general format and address rules to follow:
* Use white or light-colored envelopes, and type (no script) the address in black ink. The OCRs cannot recognize or read
an address block if there is not enough contrast between the background color of the envelope and the ink used to type
the address. Avoid using red or green envelopes, as the OCR cannot "read" the piece.
* Center the address on the envelope.
* Format all lines of the address with a uniform left margin.
* The typewriter or printer used should leave a clear space between each character. If any characters in the address
touch each other, the OCR cannot tell where one ends and another one begins.
* Do not use any punctuation in the address, except for the hyphen in the ZIP + 4 Code. Place one full character space
between words and between the state abbreviation and ZIP Code.
* Do not place any printing below the city/state/ZIP Code line. Place any "attention" line above the firm name.
* Make sure city/state/ZIP Code line is at least one inch above the bottom edge of the envelope.
* The address should be parallel to the bottom edge of the envelope, not slanted.
* In the last line of the address, spell out the city name in its entirety and use the appropriate two-character state
abbreviation.
* The line immediately above the city/state/ZIP Code should indicate where you want the piece delivered. This is
important if both the street address and post office box number must be used in the address block. (This process called
"dual addressing" should be avoided whenever possible.)
* Use ZIP + 4 codes whenever possible.
* The address must be clearly visible in windowed envelopes, even when inserts shift.
Mail that is unreadable by the USPS equipment, it is routed to a letter sorting machine where the information is
manually keyed in. This will cause a delay of about a day in the routing of the piece of mail.
Page 81 of 99
State Abbreviations
Alabama AL Washington WA
Alaska AK Wisconsin WI
Arizona AZ Wyoming WY
Arkansas AR
California CA
Colorado CO
Connecticut CT
Delaware DE
District of Columbia DC
Florida FL
Georgia GA
Guam GU
Hawaii HI
Idaho ID Illinois
IL Indiana IN
Iowa IA Kansas
KS Kentucky KY
Louisiana LA
Maine ME
Massachusetts MA
Michigan MI
Minnesota MN
Mississippi MS
Missouri MO
Montana MT
Nebraska NE
Nevada NV
New Hampshire NH
New Jersey NJ
New Mexico NM
New York NY
North Carolina NC
North Dakota ND
Ohio OH
Oklahoma OK
Pennsylvania PA
Puerto Rico PR
Rhode Island RI
South Carolina SC
South Dakota SD
Tennessee TN
Texas TX
Utah UT
Vermont VT
Virginia VA
Virgin Islands VI
Surplus Property Disposal
Page 81 of 99
Property Services - Surplus Property Definitions The definitions below are intended to assist campus departments with their disposal of surplus property. (Revised 4/22/2014)
Definition Who to Contact Surplus Property*:
• All electronics** (anything that plugs into anything else or operates on
batteries): Computers, laptops, webcams, speakers, palm pilots,
mice/keyboards, monitors, faxes, printers, etc.
• Media such as hard drives, floppy discs, CDs, tapes, etc.
• All furniture and lab equipment
• Broken metal frame items (chairs, file cabinets) from which scrap metal can
be salvaged & recycled.
• Wooden pallets or shipping crates in re-usable condition
Submit a surplus disposal request to Property Services
(online, via department liaison) 492-6524.
* All items with a CU TAG must be listed in the appropriate
box in the disposal request.
**Individual SERIAL NUMBERS must be included in the
disposal request for all electronics items. (serial numbers not
necessary for mice, keyboards, sound or video cards).
Materiel Management, 492-6369
Recyclable Waste:
• Broken wooden pallets
• Toner cartridges
• Scrap metal
• Cardboard boxes
• Compact Fluorescent Lamps (CFLs) and mercury containing
bulbs
• Rechargeable/Alkaline Batteries
• Cell phones, MP3s/IPODs and chargers
CU Recycling, 492-5321
Submit Waste Tags to EH&S and Facilities Management,
492-7845
http://www.colorado.edu/ehs/programs/links.html
or 492-7845 for drop-off locations
Drop off at the UMC, Norlin Library, Darley Commons, or
campus mail to 207 UCB
Construction Waste:
• Construction materials such as lumber, carpet pieces, ceiling tiles, floor tiles,
etc.
Construction Waste is the responsibility of the contractor and
should never be abandoned at the work site nor placed in CU
dumpsters. Please work with your project manager for issues
relating to construction waste.
Planning, Design & Construction, 492-5511
Re-usable Office Supplies:
• Staplers, tape dispenser, scissors, 3-ring binders, etc.
Environmental Center, 492-8308
Trash:
• Broken wooden furniture (treated wood cannot be recycled)
• Styrofoam
• Discarded office items such as protractors, dishware, etc.
Campus departments can place these items directly into CU
dumpsters.
Page 82 of 99
Surplus Management
System (SMS) Guide for:
University of Colorado
Boulder Updated 8/2016
Page 83 of 99
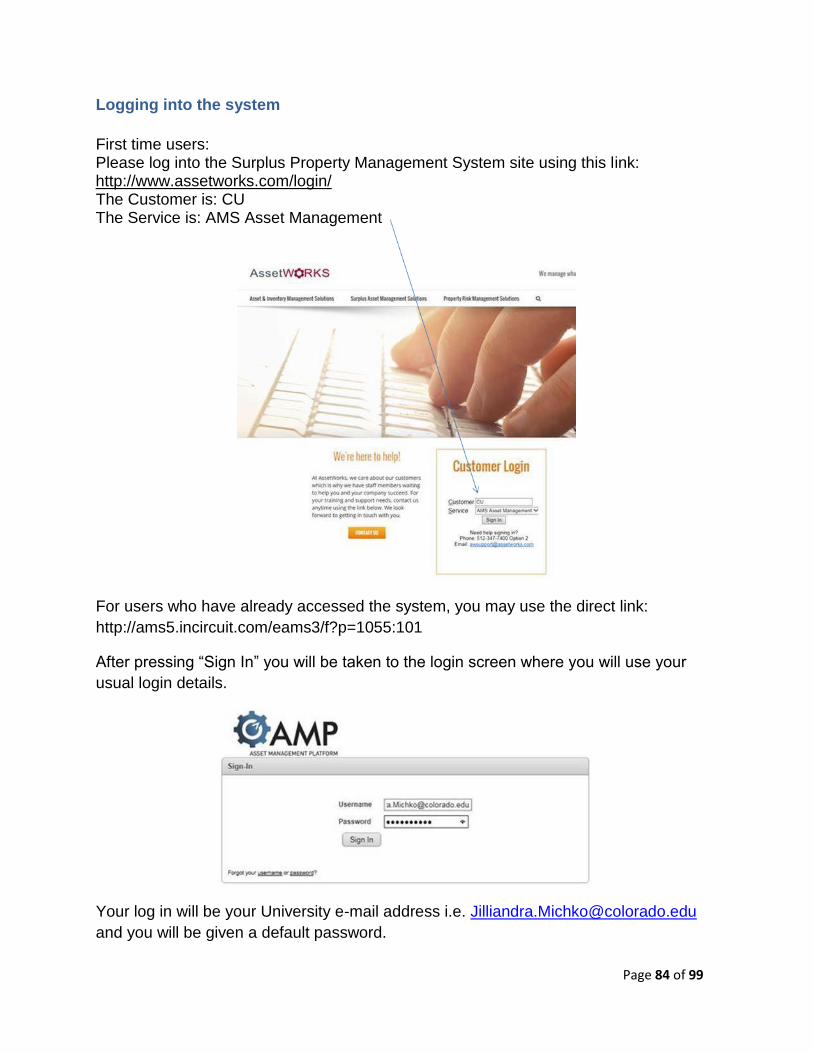
Logging into the system
First time users: Please log into the Surplus Property Management System site using this link: http://www.assetworks.com/login/ The Customer is: CU The Service is: AMS Asset Management
For users who have already accessed the system, you may use the direct link:
http://ams5.incircuit.com/eams3/f?p=1055:101
After pressing “Sign In” you will be taken to the login screen where you will use your
usual login details.
Your log in will be your University e-mail address i.e. [email protected]
and you will be given a default password.
Page 84 of 99

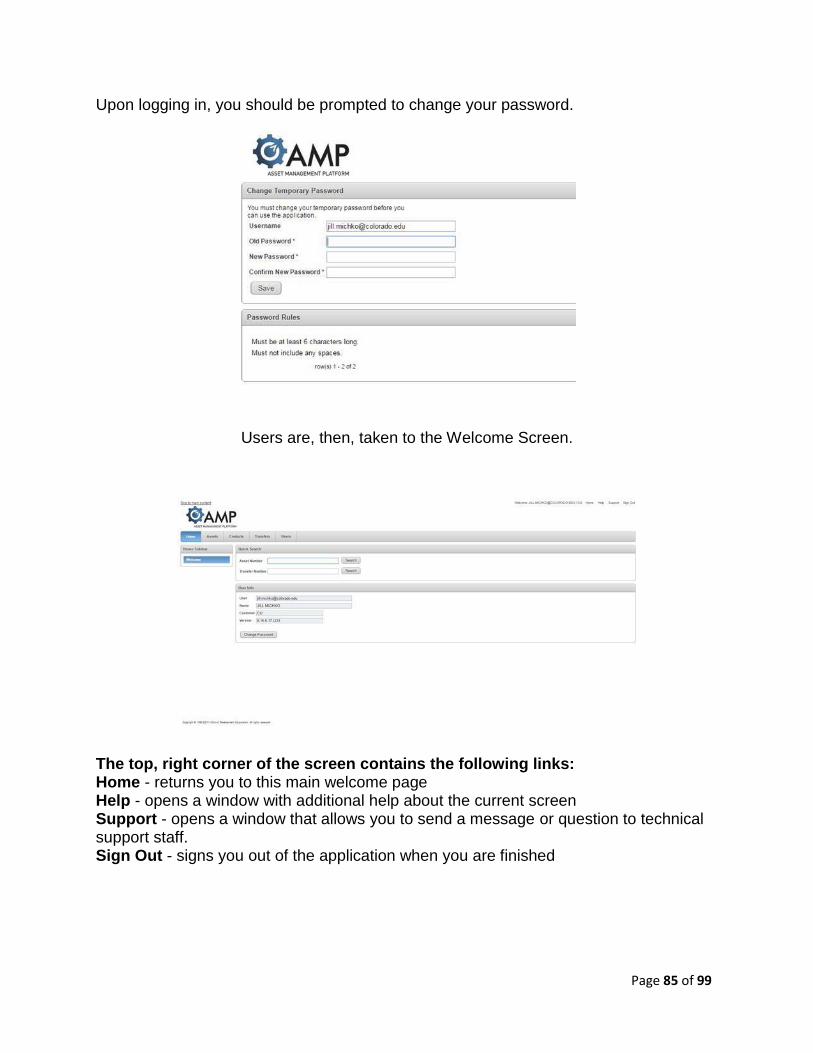
Page 85 of 99
Upon logging in, you should be prompted to change your password.
Users are, then, taken to the Welcome Screen.
The top, right corner of the screen contains the following links: Home - returns you to this main welcome page Help - opens a window with additional help about the current screen Support - opens a window that allows you to send a message or question to technical support staff. Sign Out - signs you out of the application when you are finished
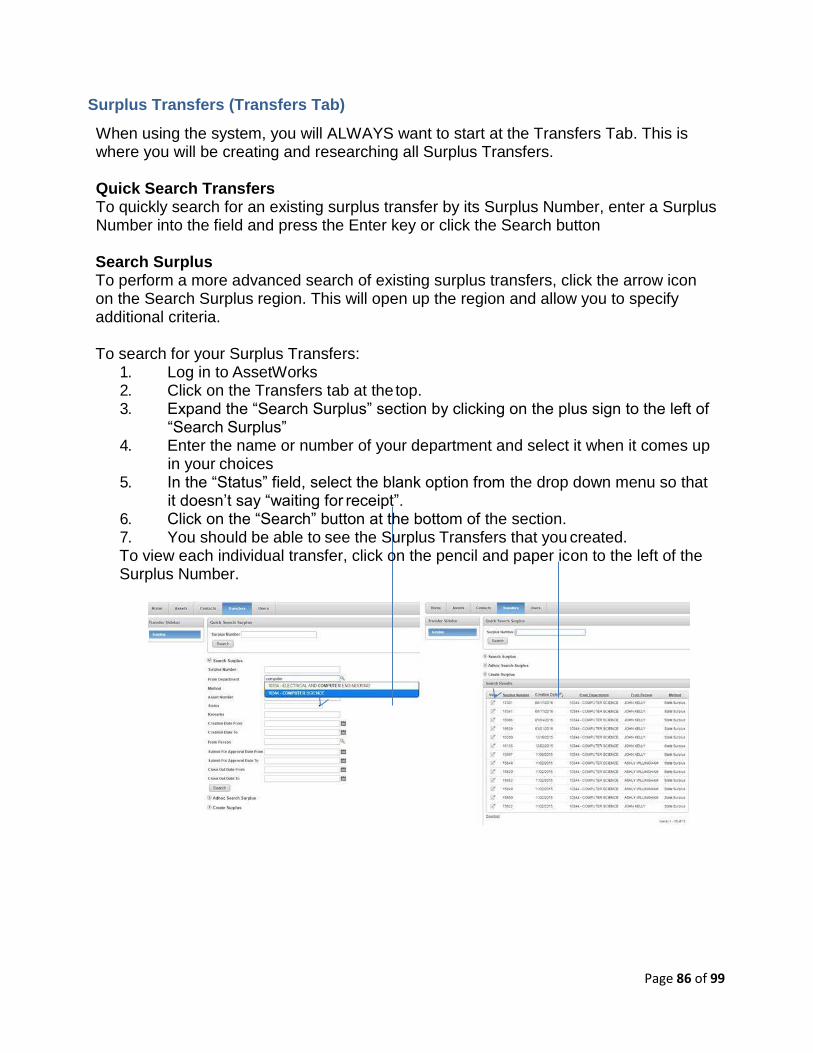
Surplus Transfers (Transfers Tab)
When using the system, you will ALWAYS want to start at the Transfers Tab. This is where you will be creating and researching all Surplus Transfers.
Quick Search Transfers To quickly search for an existing surplus transfer by its Surplus Number, enter a Surplus Number into the field and press the Enter key or click the Search button
Search Surplus To perform a more advanced search of existing surplus transfers, click the arrow icon on the Search Surplus region. This will open up the region and allow you to specify additional criteria.
To search for your Surplus Transfers:
1. Log in to AssetWorks 2. Click on the Transfers tab at the top. 3. Expand the “Search Surplus” section by clicking on the plus sign to the left of
“Search Surplus” 4. Enter the name or number of your department and select it when it comes up
in your choices 5. In the “Status” field, select the blank option from the drop down menu so that
it doesn’t say “waiting for receipt”. 6. Click on the “Search” button at the bottom of the section. 7. You should be able to see the Surplus Transfers that you created. To view each individual transfer, click on the pencil and paper icon to the left of the Surplus Number.
Page 86 of 99
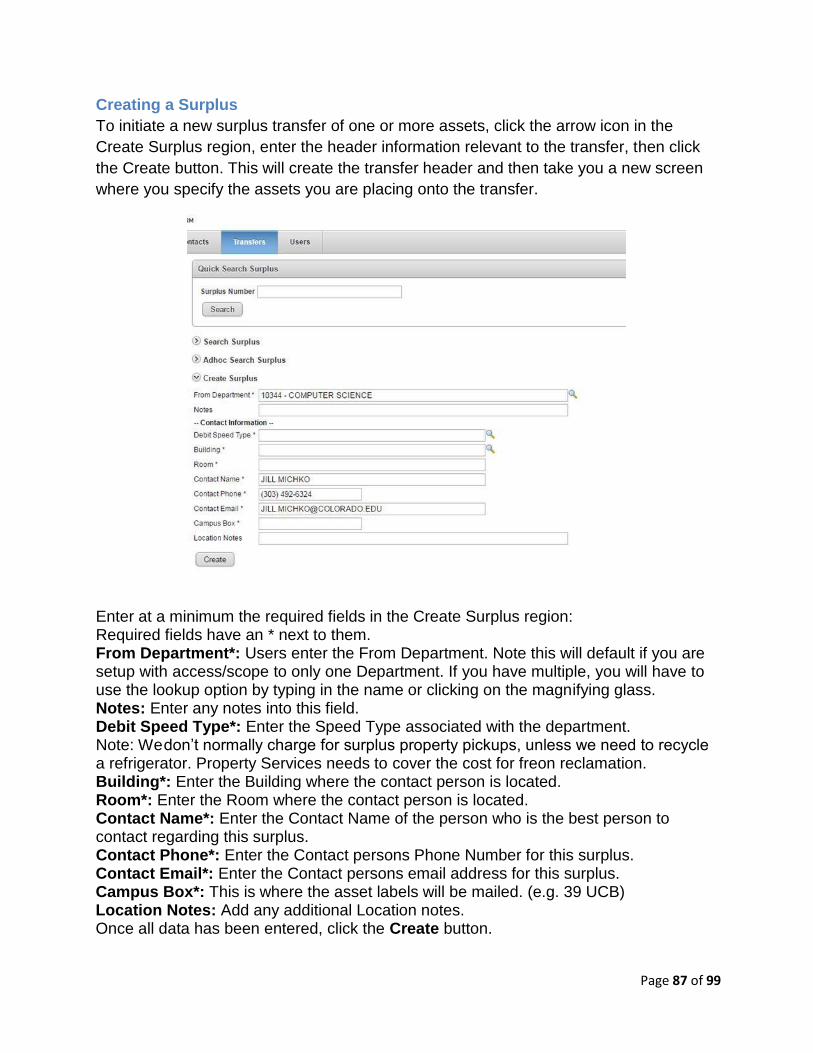
Page 87 of 99
Creating a Surplus
To initiate a new surplus transfer of one or more assets, click the arrow icon in the
Create Surplus region, enter the header information relevant to the transfer, then click
the Create button. This will create the transfer header and then take you a new screen
where you specify the assets you are placing onto the transfer.
Enter at a minimum the required fields in the Create Surplus region: Required fields have an * next to them. From Department*: Users enter the From Department. Note this will default if you are setup with access/scope to only one Department. If you have multiple, you will have to use the lookup option by typing in the name or clicking on the magnifying glass. Notes: Enter any notes into this field. Debit Speed Type*: Enter the Speed Type associated with the department. Note: We don’t normally charge for surplus property pickups, unless we need to recycle a refrigerator. Property Services needs to cover the cost for freon reclamation. Building*: Enter the Building where the contact person is located. Room*: Enter the Room where the contact person is located. Contact Name*: Enter the Contact Name of the person who is the best person to contact regarding this surplus. Contact Phone*: Enter the Contact persons Phone Number for this surplus. Contact Email*: Enter the Contact persons email address for this surplus. Campus Box*: This is where the asset labels will be mailed. (e.g. 39 UCB) Location Notes: Add any additional Location notes. Once all data has been entered, click the Create button.
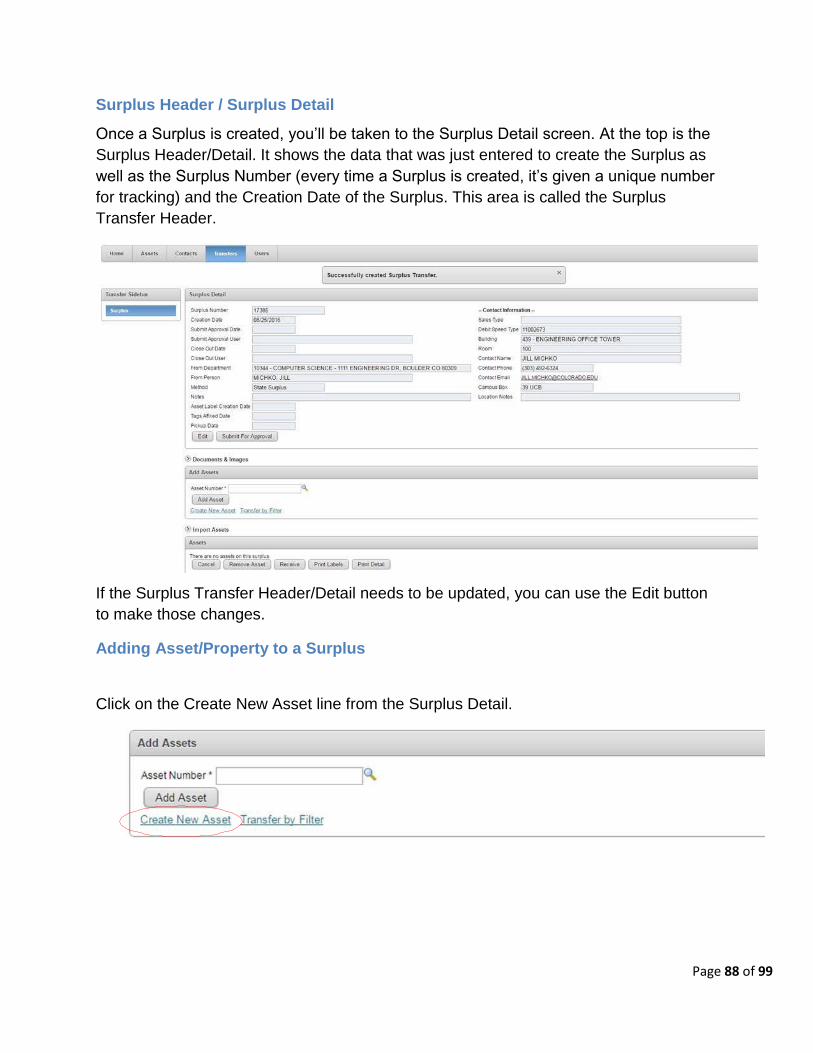
Surplus Header / Surplus Detail
Once a Surplus is created, you’ll be taken to the Surplus Detail screen. At the top is the
Surplus Header/Detail. It shows the data that was just entered to create the Surplus as
well as the Surplus Number (every time a Surplus is created, it’s given a unique number
for tracking) and the Creation Date of the Surplus. This area is called the Surplus
Transfer Header.
If the Surplus Transfer Header/Detail needs to be updated, you can use the Edit button
to make those changes.
Adding Asset/Property to a Surplus
Click on the Create New Asset line from the Surplus Detail.
Page 88 of 99
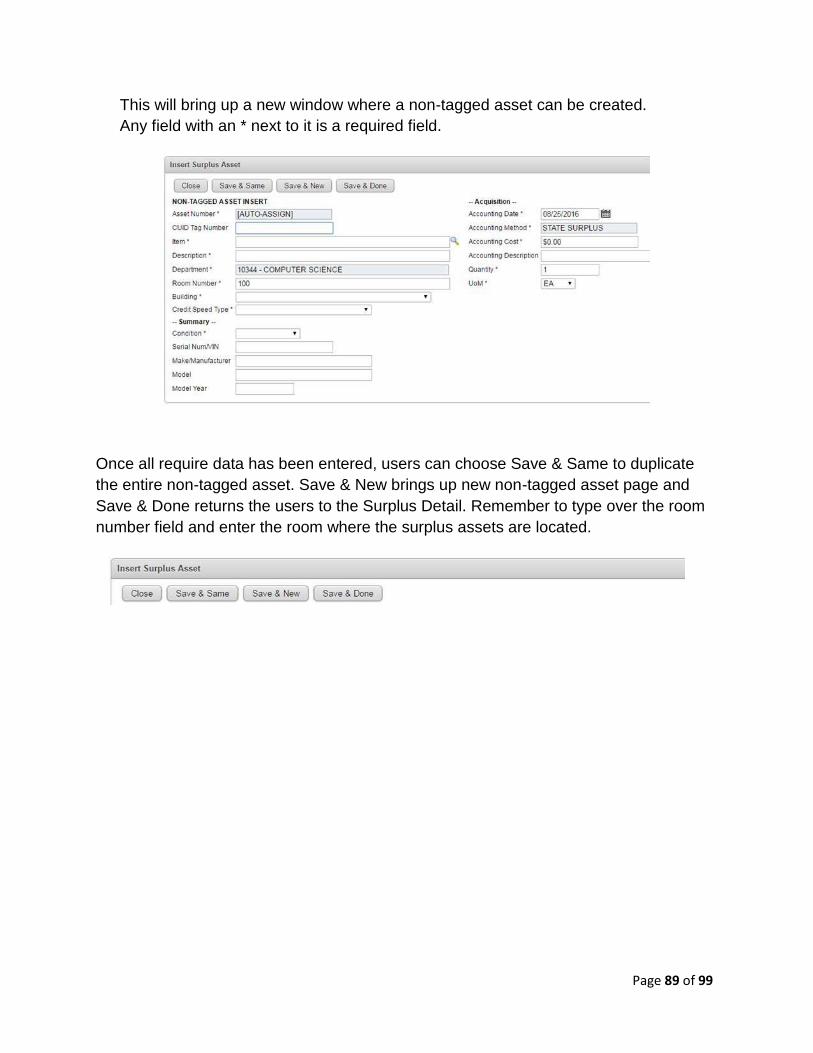
Page 89 of 99
This will bring up a new window where a non-tagged asset can be created.
Any field with an * next to it is a required field.
Once all require data has been entered, users can choose Save & Same to duplicate
the entire non-tagged asset. Save & New brings up new non-tagged asset page and
Save & Done returns the users to the Surplus Detail. Remember to type over the room
number field and enter the room where the surplus assets are located.

Page 90 of 99
Importing Asset/Property to a Surplus from a .csv file
1. You may find a copy of our Asset Import spreadsheet on our website here:
https://www.colorado.edu/fm/node/6067/attachment/newest
2. Columns A through H are required fields
3. Column I (Serial Number/VIN) is required if you are entering the following
a. COMPUTER/DESKTOP CPU
b. COMPUTER/LAPTOP
c. HARD DRIVE
d. SERVER
e. Vehicle
4. Enter in information for each asset until all assets have been entered.
5. Delete the header row from the spreadsheet as well as the * notes at the bottom
of the spreadsheet.
6. Save the file as a CSV (MS_DOS) file, and remember where you saved it.
7. Upload the file to your transfer
Click on the Import Assets arrow icon in the middle of the Screen.
Click on the browse button and find the CSV. File you have created for import. Once
you have found the file click on the Import Assets Button.
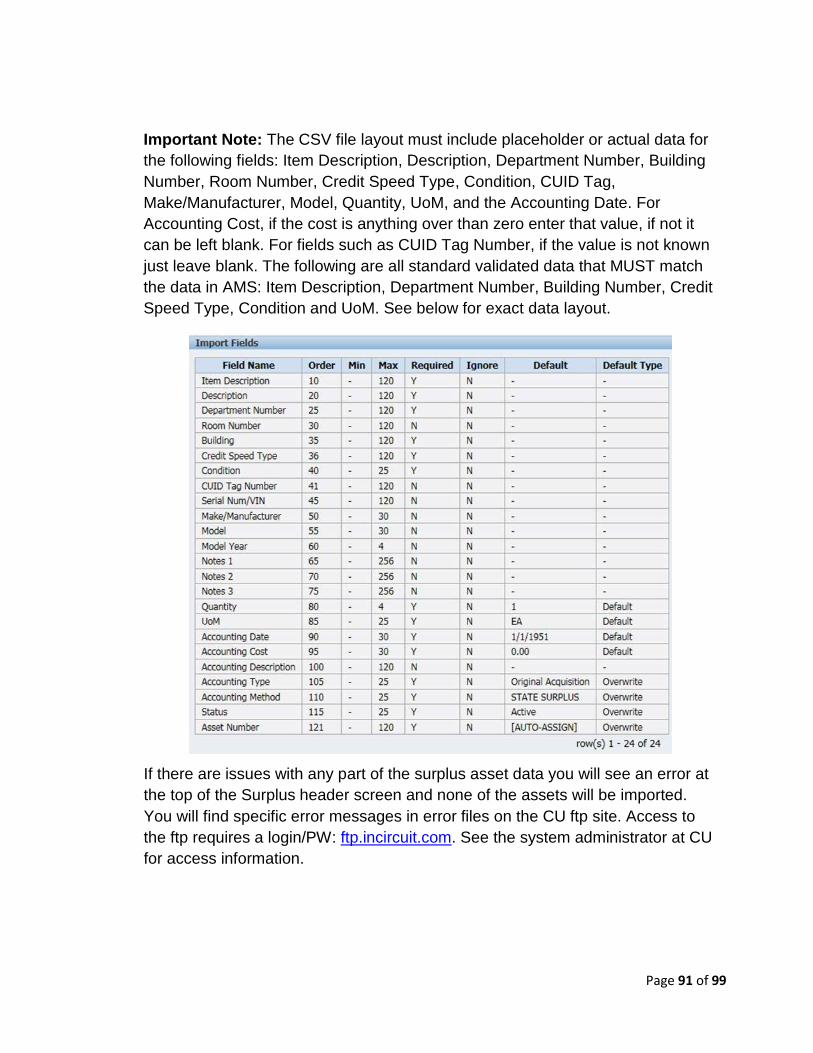
Page 91 of 99
Important Note: The CSV file layout must include placeholder or actual data for
the following fields: Item Description, Description, Department Number, Building
Number, Room Number, Credit Speed Type, Condition, CUID Tag,
Make/Manufacturer, Model, Quantity, UoM, and the Accounting Date. For
Accounting Cost, if the cost is anything over than zero enter that value, if not it
can be left blank. For fields such as CUID Tag Number, if the value is not known
just leave blank. The following are all standard validated data that MUST match
the data in AMS: Item Description, Department Number, Building Number, Credit
Speed Type, Condition and UoM. See below for exact data layout.
If there are issues with any part of the surplus asset data you will see an error at
the top of the Surplus header screen and none of the assets will be imported.
You will find specific error messages in error files on the CU ftp site. Access to
the ftp requires a login/PW: ftp.incircuit.com. See the system administrator at CU
for access information.
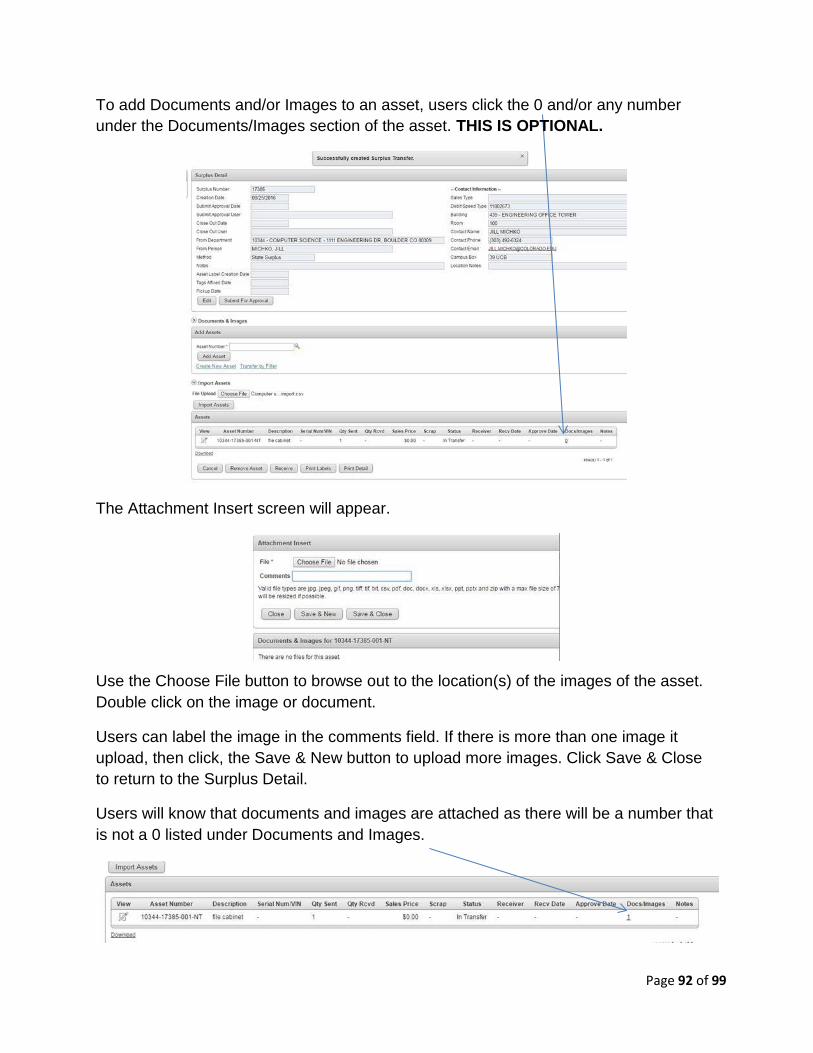
Page 92 of 99
To add Documents and/or Images to an asset, users click the 0 and/or any number
under the Documents/Images section of the asset. THIS IS OPTIONAL.
The Attachment Insert screen will appear.
Use the Choose File button to browse out to the location(s) of the images of the asset.
Double click on the image or document.
Users can label the image in the comments field. If there is more than one image it
upload, then click, the Save & New button to upload more images. Click Save & Close
to return to the Surplus Detail.
Users will know that documents and images are attached as there will be a number that
is not a 0 listed under Documents and Images.
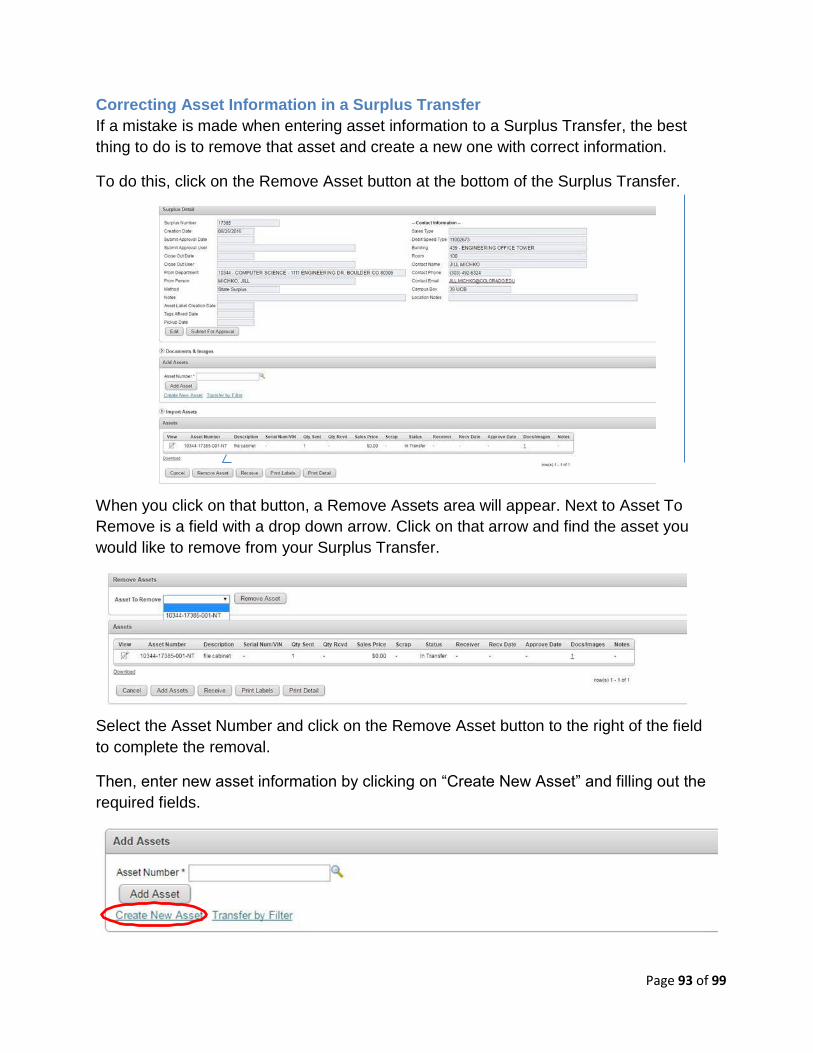
Page 93 of 99
Correcting Asset Information in a Surplus Transfer
If a mistake is made when entering asset information to a Surplus Transfer, the best
thing to do is to remove that asset and create a new one with correct information.
To do this, click on the Remove Asset button at the bottom of the Surplus Transfer.
When you click on that button, a Remove Assets area will appear. Next to Asset To
Remove is a field with a drop down arrow. Click on that arrow and find the asset you
would like to remove from your Surplus Transfer.
Select the Asset Number and click on the Remove Asset button to the right of the field
to complete the removal.
Then, enter new asset information by clicking on “Create New Asset” and filling out the
required fields.
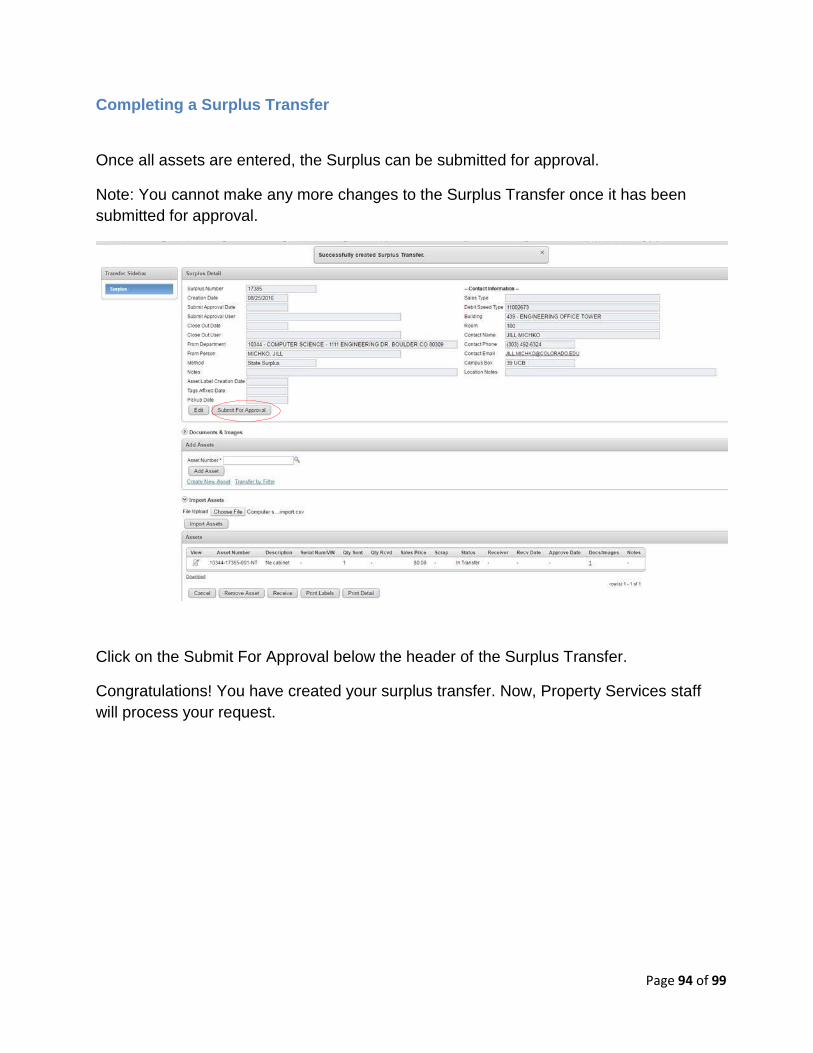
Page 94 of 99
Completing a Surplus Transfer
Once all assets are entered, the Surplus can be submitted for approval.
Note: You cannot make any more changes to the Surplus Transfer once it has been
submitted for approval.
Click on the Submit For Approval below the header of the Surplus Transfer.
Congratulations! You have created your surplus transfer. Now, Property Services staff
will process your request.
Page 95 of 99
What Happens Next . . .
After your disposal request has been entered and authorized in the Surplus Property
Management System, property services staff will email the contact person with
instructions.
Labels will be sent to the disposal request contact person through campus mail with a
note instructing them to contact Steve Marvel when the labels have been affixed to all
surplus items.
When Property Services has been notified that the items are ready, they will schedule
the crew to come and remove your surplus.
On average, it takes Property Services six calendar days to pick up a disposal request
from the date the department notifies us the tags have been affixed and the items are
ready for pick up.
Property Services completes approximately 150 disposal requests each month. The
scope of one disposal request can range from a single item to a multiple-truck pick-up.
Property Services is Generally Funded to pick up surplus property on the CU Boulder
campus. That means, your surplus items will be picked up at no charge to your
department. An exception to this, is our $95 charge for refrigerant reclamation to cover
our hazardous materials disposal costs.
Jack Brubaker, [email protected] (303-492-7207) and Jilliandra Michko,
[email protected] (303-492-6324) are available to help you with the
process of registering your department and creating disposal requests.

WIP Report
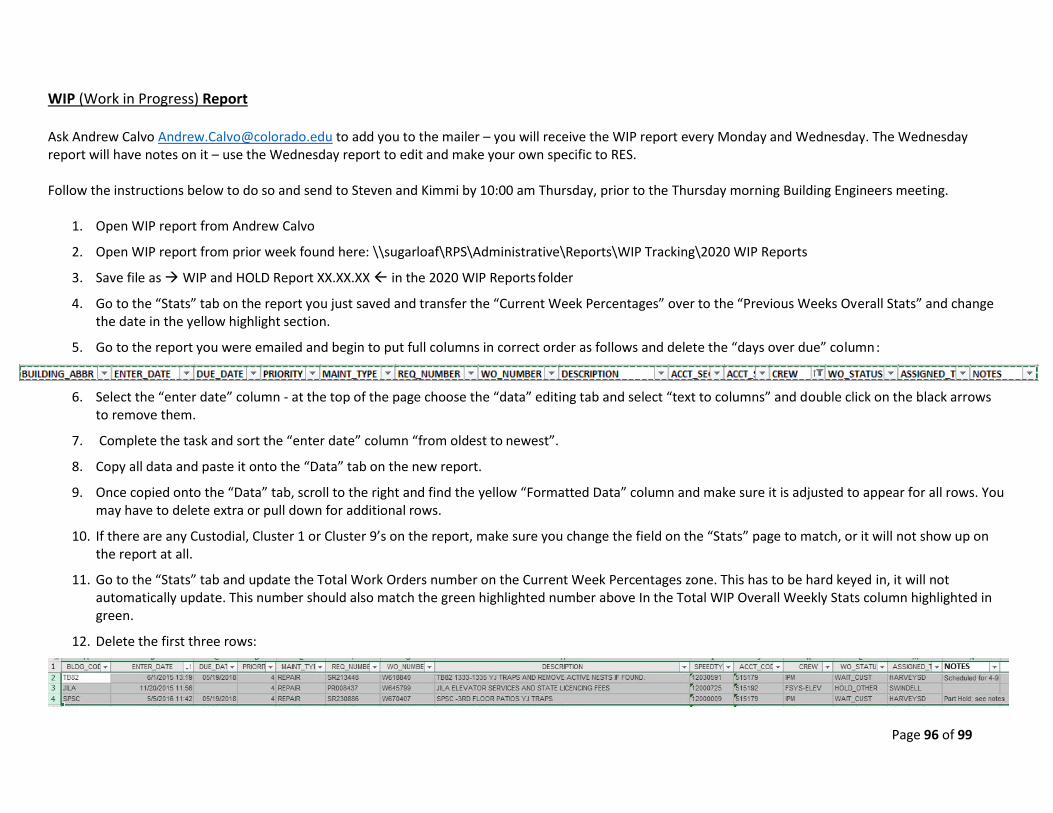
WIP (Work in Progress) Report
Ask Andrew Calvo [email protected] to add you to the mailer – you will receive the WIP report every Monday and Wednesday. The Wednesday report will have notes on it – use the Wednesday report to edit and make your own specific to RES.
Follow the instructions below to do so and send to Steven and Kimmi by 10:00 am Thursday, prior to the Thursday morning Building Engineers meeting.
1. Open WIP report from Andrew Calvo
2. Open WIP report from prior week found here: \\sugarloaf\RPS\Administrative\Reports\WIP Tracking\2020 WIP Reports
3. Save file as → WIP and HOLD Report XX.XX.XX in the 2020 WIP Reports folder
4. Go to the “Stats” tab on the report you just saved and transfer the “Current Week Percentages” over to the “Previous Weeks Overall Stats” and change the date in the yellow highlight section.
5. Go to the report you were emailed and begin to put full columns in correct order as follows and delete the “days over due” column :
6. Select the “enter date” column - at the top of the page choose the “data” editing tab and select “text to columns” and double click on the black arrows to remove them.
7. Complete the task and sort the “enter date” column “from oldest to newest”.
8. Copy all data and paste it onto the “Data” tab on the new report.
9. Once copied onto the “Data” tab, scroll to the right and find the yellow “Formatted Data” column and make sure it is adjusted to appear for all rows. You may have to delete extra or pull down for additional rows.
10. If there are any Custodial, Cluster 1 or Cluster 9’s on the report, make sure you change the field on the “Stats” page to match, or it will not show up on the report at all.
11. Go to the “Stats” tab and update the Total Work Orders number on the Current Week Percentages zone. This has to be hard keyed in, it will not automatically update. This number should also match the green highlighted number above In the Total WIP Overall Weekly Stats column highlighted in green.
12. Delete the first three rows:
Page 96 of 99
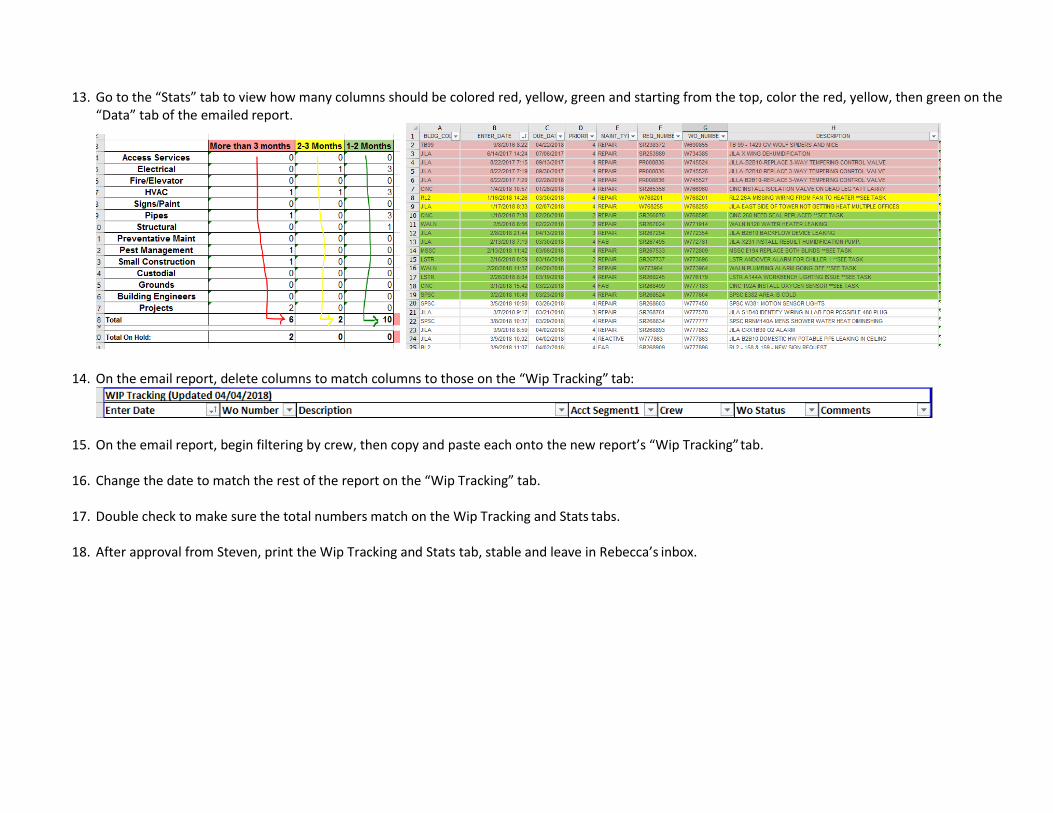
13. Go to the “Stats” tab to view how many columns should be colored red, yellow, green and starting from the top, color the red, yellow, then green on the “Data” tab of the emailed report.
14. On the email report, delete columns to match columns to those on the “Wip Tracking” tab:
15. On the email report, begin filtering by crew, then copy and paste each onto the new report’s “Wip Tracking” tab.
16. Change the date to match the rest of the report on the “Wip Tracking” tab.
17. Double check to make sure the total numbers match on the Wip Tracking and Stats tabs.
18. After approval from Steven, print the Wip Tracking and Stats tab, stable and leave in Rebecca’s inbox.
Page 97 of 99
Response Time Report
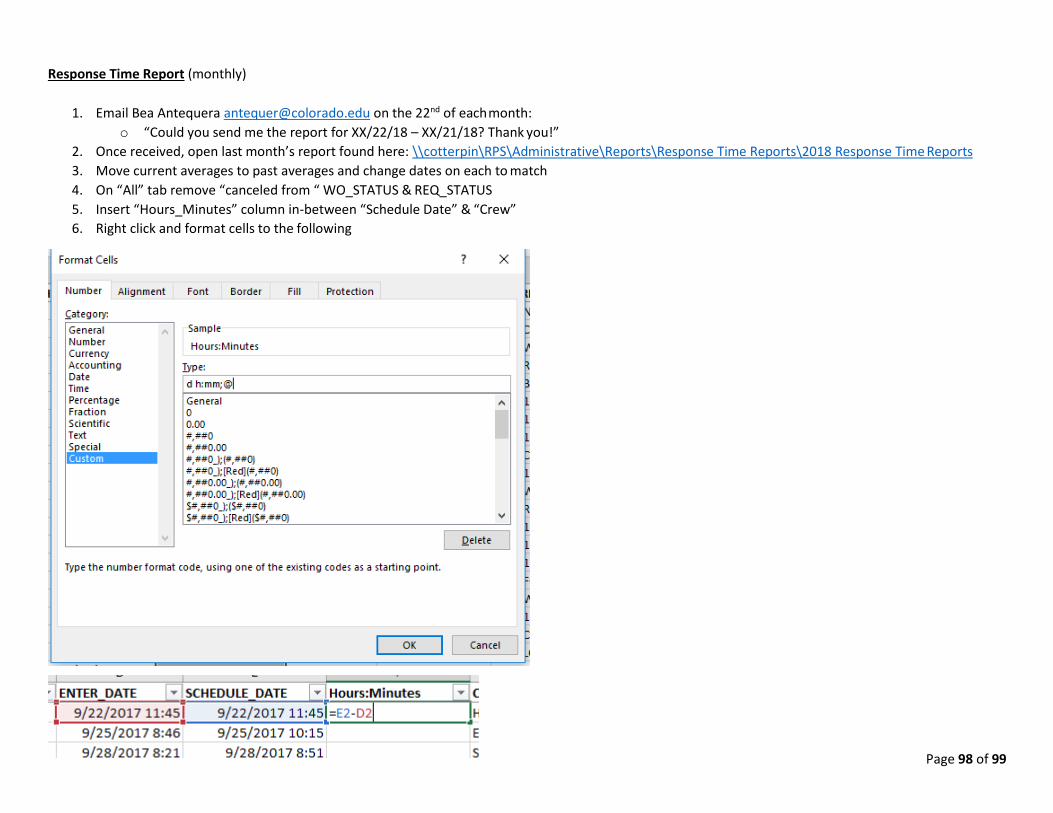
Response Time Report (monthly)
1. Email Bea Antequera [email protected] on the 22nd of each month:
o “Could you send me the report for XX/22/18 – XX/21/18? Thank you!”
2. Once received, open last month’s report found here: \\cotterpin\RPS\Administrative\Reports\Response Time Reports\2018 Response Time Reports
3. Move current averages to past averages and change dates on each to match
4. On “All” tab remove “canceled from “ WO_STATUS & REQ_STATUS
5. Insert “Hours_Minutes” column in-between “Schedule Date” & “Crew”
6. Right click and format cells to the following
Page 98 of 99
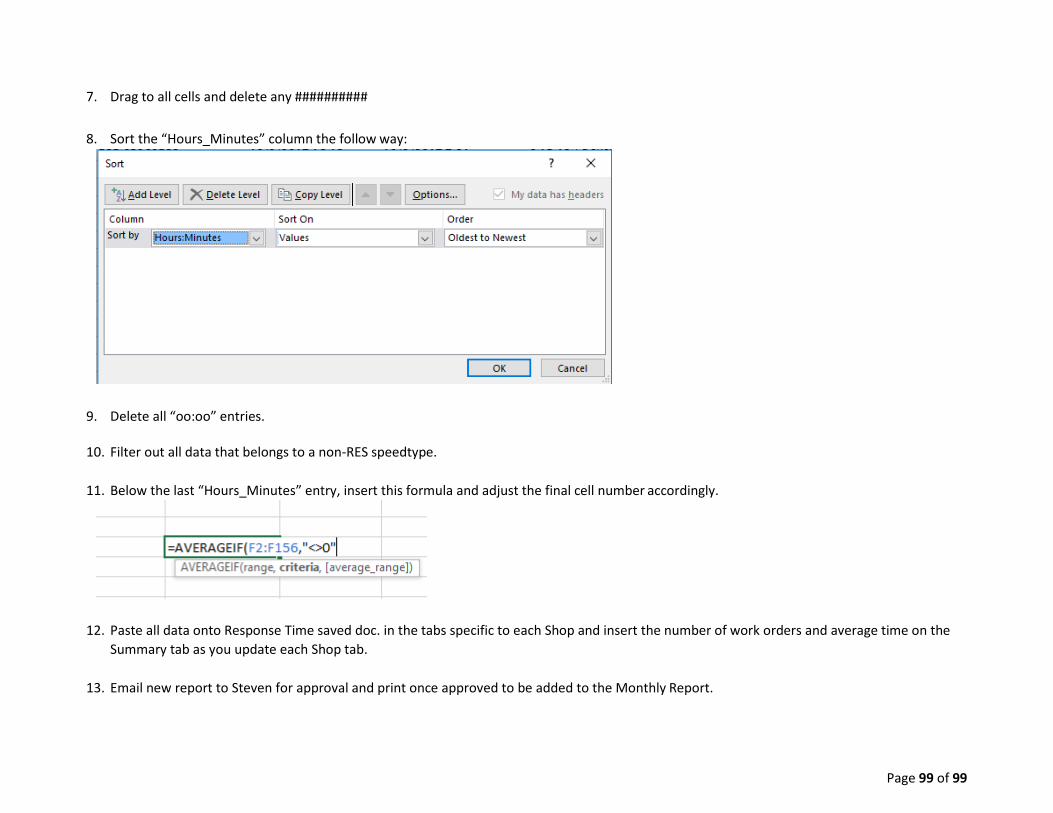
Page 99 of 99
7. Drag to all cells and delete any ##########
8. Sort the “Hours_Minutes” column the follow way:
9. Delete all “oo:oo” entries.
10. Filter out all data that belongs to a non-RES speedtype.
11. Below the last “Hours_Minutes” entry, insert this formula and adjust the final cell number accordingly.
12. Paste all data onto Response Time saved doc. in the tabs specific to each Shop and insert the number of work orders and average time on the
Summary tab as you update each Shop tab.
13. Email new report to Steven for approval and print once approved to be added to the Monthly Report.