Embed Size (px)
Citation preview
1
1
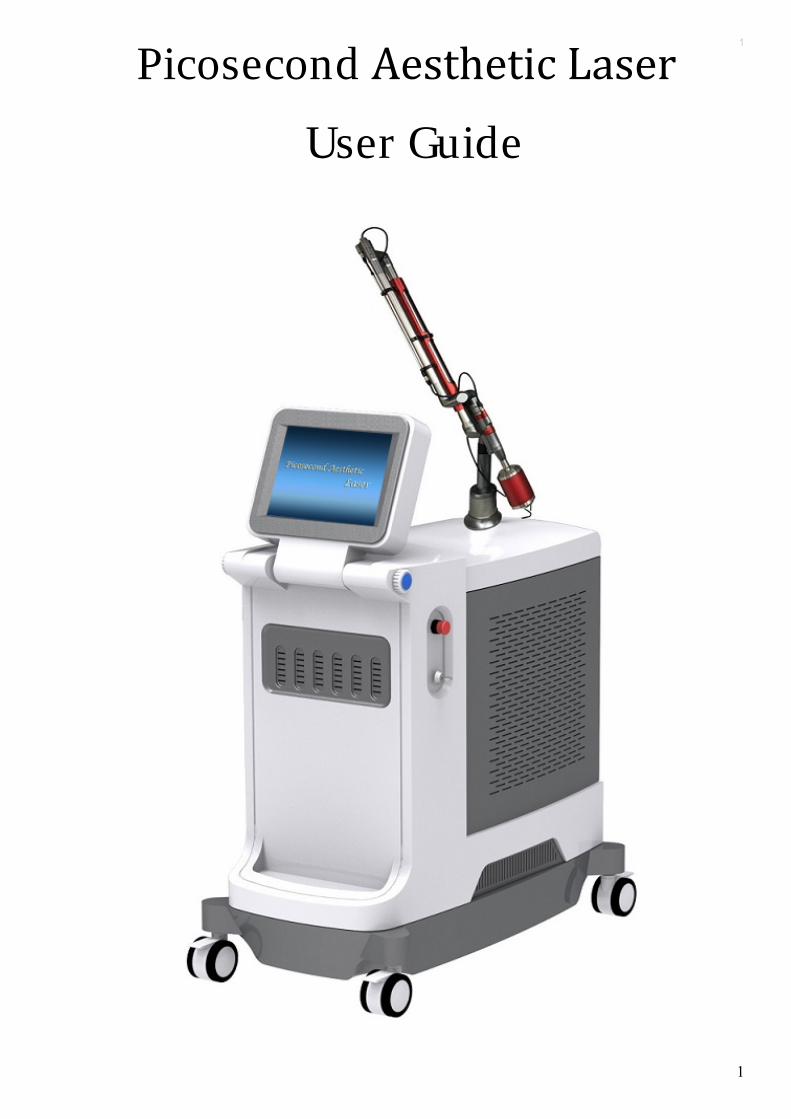
Picosecond Aesthetic Laser
User Guide
1
2
Thank you and congratulations on your choice of theThe serial number is located on the nameplate located on the rear of the device; please record below forfuture reference:
Model Number:
Serial Number:
Purchase Date:
Purchased From:
Before Installing or Operating this equipment, please read theseinstructions carefully, and keep near the device for future reference.
ND-12
1
3
Table of Contents:
Chapter 1 - Introduction of Laser Eyebrow & Tattoo Removal Equipment..............................051.1 Treatment principle.................................................................................................................051.2 Introduction…..................................................................................................................1.3 Device Structure.....................................................................................................................05
1.3.1 Power Supply.…............................................................................................................051.3.2 Laser Handpiece............................................................................................................051.3.3 Control Panel.................................................................................................................051.3.4 Power Controls..............................................................................................................0
1.4 Technical Specifications.........................................................................................................01.5 wavelengths...........................................................................................................................01.6 Applications............................................................................................................................061.7 Reference Table.....................................................................................................................0
Chapter 2 - Safety and Compliance..............................................................................................072.1 Introduction............................................................................................................................072.2 Laser classification.................................................................................................................072.3 Operator Responsibilities.......................................................................................................
2.3.1 User Training.................................................................................................................2.3.2 Client Safety...................................................................................................................08
2.4 Treatment Room.................................................................................................................... 082.4.1 Beam Reflection...........................................................................................................
2.5 Safety Precautions.................................................................................................................092.6 Optical Safety.........................................................................................................................092.7 Electrical Safety......................................................................................................................2.8 Fire Prevention.......................................................................................................................12.9 Device Compliance............................................................................................................1
Chapter 3 - Installation Procedure................................................................................................13.1 Unpacking & Checking Contents...........................................................................................13.2 Installation Requirements.......................................................................................................13.3 Connect the Detachable Hand Piece………………………………………………………..…....3.4 Filling the Cooling Water Tank................................................................................................3.4.1 Overview of the back of ……………………………………………………..……….3.4.2 Procedure for injecting Cooling Water……………………………….……………..………1
3.5 Select Treatment Tip..............................................................................................................3.6 Install Foot Switch Pedal........................................................................................................13.7 Connect Power Supply …......................................................................................................
Chapter 4 - Operational Methods..................................................................................................14.1 Safe Operation.......................................................................................................................4.2 Examination...........................................................................................................................4.3 Using The Device Interface....................................................................................................4.4 Pausing Operation.................................................................................................................14.5 Closing the Machine...............................................................................................................
4.5.1 Emergency Shut Down………………………………………………………………..……..4.6 Treatment Shot Counter.........................................................................................................4.7 Temperature Display and Protection......................................................................................1
Chapter 5 - Operating Instructions...............................................................................................15.1 Client Consultation.................................................................................................................5.2 Explanation of Treatment.......................................................................................................5.3 Matters that can Influence Laser Treatment...........................................................................5.4 Side Effects............................................................................................................................5.5 Aftercare.................................................................................................................................5.6 Medical History.......................................................................................................................
5.6.1 Contraindications..................................................... .....................................................5.6.2 Photosensitivity Considerations................................... .................................................1
5.7 Skin typing............................................................... ..............................................................5.8 Client Consent.................................................... ...................................................................5.9 Patch Testing........................................................... ..............................................................5.10 Treatment............................................................. ...............................................................
Chapter 6 - Operation Skill and Technique..................................................................................
ND-12
55
5
6
.......05
0707
08
0900001111111111121231331313135151515
5
6616161616171717818181819
19

1
4
6.1 Demands before Operation....................................................................................................6.2 Parameters.............................................................................................................................6.36.46.5
Adjusting the Focal Point (Spot Size)How to control the energy of laser treatmentOperating Technique..............................................................................................................26. .1 Eyebrow removal...........................................................................................................6. .2 Eye line removal............................................................................................................6. .3 Lip line removal..............................................................................................................6. .4 Tattoo removal...............................................................................................................6. .5 Speckle and naevi removal............................................................................................6. .6 Birthmark and nevus of Ota removal.............................................................................
Chapter 7- The Maintenance of Laser Instrument......................................................................7.1 General Cleaning...................................................................................................................7.2 Clean The Output Lens..........................................................................................................7.3 Cooling Water changes..........................................................................................................7.4 Transport, Storage and Moving..............................................................................................7.5 Troubleshooting Guide...........................................................................................................
Chapter 8 - Detailed Function Introduction .............................................................
28
8.1 Embroider Eyebrow...............................................................................................................8.2 Hair Removal.........................................................................................................................8.3 Nevus of Ota..........................................................................................................................8.4 Speckle Removal...................................................................................................................8.5 Tattoo Removal......................................................................................................................8.6 Birthmark................................................................................................................................
Chapter 9 - The Knowledge Collection of Laser Removal……………...…………………..…......Chapter 10 - The Advantages of Laser Treatment…………………………..………………..……..
Sample Client Treatment Forms…………………………………………………………………..……
Disposal of your old appliance
1. When this crossed-out wheelie bin symbol is attached to a product it means theproduct is covered by the European Directive 2002/96/EC.
2. All electrical and electronic products should be disposed of separately from themunicipal waste stream via designated collection facilities appointed by thegovernment or the local authorities.
3. The correct disposal of your old appliance will help prevent potential negativeconsequences for the environment and human health
4. For more detailed information about the disposal of your old appliance, pleasecontact your city office, waste disposal service or the shop where youpurchased the product.
.............
277
277
25252626262626
232323232342
555555
1919
.....................................................................................20.........................................................................21
2222222222223
1
5
Removal Equipment
1.1 Treatment Principle:The Q-Switch laser delivers specific-wavelengths of light extremely quickly (in nano-seconds) at a veryhigh energy. These pulses are selectively absorbed by the tattoo pigment, shattering it into tiny fragmentssmall enough for the body to recognise the particles as a foreign object, and over the next several weekssome of particles (in shallow cuticle) are discharged from the body and the other part (in deep tissue) areabsorbed and digested by the body's macrophages and removed out of the body by the immune system.Since the specific wavelengths used can only be absorbed by pigment particles, no lasting injury happens tonormal skin and normal tissues.Q-Switch laser systems can now remove all types of tattoo with little or no scarring. Professional andamateur tattoos, as well as traumatic tattoos, resulting from accidents, are treated successfully.
1.2 Introduction:Product Type:Picosure Laser Machine
1.3 Device Structure:
The Picosure Laser Machine System structure consists of the following units:
1.3.1 Power Supply:The power supply is assembled in the main unit.
1.3.2 Laser Hand Piece: Joint arm
1.3.3 Control Panel:The Control Panel consists of:(1) LCD screen(2) Touch key pad(3) Pedal control switch,(4) The power on/off key switch(5) Emergency shut off button
1.3.4 Power Controls:
The Key Switch: Use the key to turn power on or off. Remove key and keep safe when not in useEmergency Button: Press the red emergency button to shut machine down and cut power supplyimmediately. Pull button out to restore power.
1.4 Technical Specifications:
Laser Type: Picosure Laser
Wavelength: 1064nm & 532nm&755nm
Spot Size: 2~10mm can adjustable
Maximum single pulse Energy: 1000mJ
YAG Bar Size: ¢ 7
Repetition Rate: 1-15Hz adjustable
Xenon Lamp size: 65mm
Operation Interface: 15” dual· colour LCD Screen
1.5 Wavelengths
Chapter 1 - Introduction of Laser Eyebrow & Tattoo

1
6
The laser has three interchangeable treatment tips, each offering different wavelengths: 1064 nm &532nm&755nm.
The 1064nm is for treatment of blue or black ink pigment in the skin, this tip is slightly shorter and has around mirror inside.
The 532nm is for treatment of red and brown tattoo pigment in the skin, this tip is longer and has a squaremirror.
The 755nm is for skin rejuvenation .
1.6 Applications
1. Remove black, blue, coffee, brown and all kinds of tattoo;2. Pigmentation formed by pathological changes of pigment skin and mixed colour, dermis spot, fleck,
black nevus, age pigment, birthmark and Nevus of Ota;3. Remove all kinds of embroider eyebrow, embroider lip, soak lip, embroider eye line and lip line.
1.7 Reference table of all kinds of treatment period and case history:
Case Treatmenttimes
Treatment intervals(intervals of twotreatments)
Remark(requirements intreatments)
Embroider eyebrow 1~3 30~45 daysprotect eyeball whentreating eyebrow
Embroider eye line 1~3 45~60 days protect eyeball whentreating eyebrow
Eye lip, Soak lip,Embroider lip 1~3 30~45 days choose 532nm the light
head
Tattoo 1~4 30~45 days Good effect if blood spotsoccur
Age pigmentFleck 1~4 30~45 days Good effect if blood spots
occur
NevusBirthmark 3~5 30~45 days Good effect if blood spots
occur
1
7
2. 1 IntroductionThis chapter describes the safe use of Active Q-Switch Nd: YAG Laser system. Each operator mustread and understand this User Manual completely prior to starting the device.
The EN and IEC 60825 series of standard and technical reports covers the safety aspects of laser products,forming the basis both of manufacturer’s requirements for conformity to product legislation and, for Europeancountries that have no National laser user standards, the best practice guide for safe laser use.
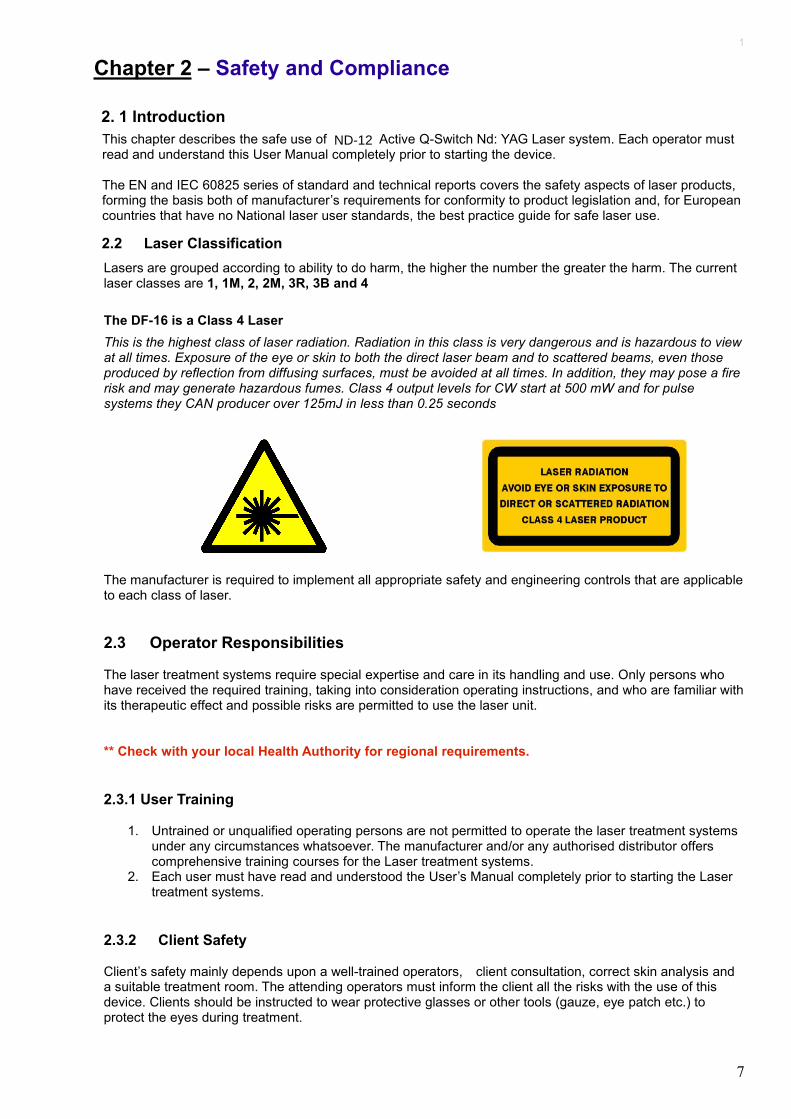
2.2 Laser ClassificationLasers are grouped according to ability to do harm, the higher the number the greater the harm. The currentlaser classes are 1, 1M, 2, 2M, 3R, 3B and 4
The DF-16 is a Class 4 LaserThis is the highest class of laser radiation. Radiation in this class is very dangerous and is hazardous to viewat all times. Exposure of the eye or skin to both the direct laser beam and to scattered beams, even thoseproduced by reflection from diffusing surfaces, must be avoided at all times. In addition, they may pose a firerisk and may generate hazardous fumes. Class 4 output levels for CW start at 500 mW and for pulsesystems they CAN producer over 125mJ in less than 0.25 seconds
The manufacturer is required to implement all appropriate safety and engineering controls that are applicableto each class of laser.
2.3 Operator Responsibilities
The laser treatment systems require special expertise and care in its handling and use. Only persons whohave received the required training, taking into consideration operating instructions, and who are familiar withits therapeutic effect and possible risks are permitted to use the laser unit.
** Check with your local Health Authority for regional requirements.
2.3.1 User Training
1. Untrained or unqualified operating persons are not permitted to operate the laser treatment systemsunder any circumstances whatsoever. The manufacturer and/or any authorised distributor offerscomprehensive training courses for the Laser treatment systems.
2. Each user must have read and understood the User’s Manual completely prior to starting the Lasertreatment systems.
2.3.2 Client Safety
Client’s safety mainly depends upon a well-trained operators, client consultation, correct skin analysis anda suitable treatment room. The attending operators must inform the client all the risks with the use of thisdevice. Clients should be instructed to wear protective glasses or other tools (gauze, eye patch etc.) toprotect the eyes during treatment.
ND-12
Chapter 2 – Safety and Compliance
1
8
2.4 Treatment Room
Laser and IPL treatments should be carried out in a dedicated laser operating room, this room should bedesignated as a Controlled Area
Each entrance to the Controlled Area should be clearly labelled with warning signal of laser radiation. Provide an indication of the state of readiness of the laser For all optical radiation equipment in use a sign stating: EYE PROTECTION MUST BE WORN Take measures to prevent others from entering the room at the time of operation of the equipment. Appropriate precaution signs and labels should also be posted inside the room
2.4.1 Beam Reflection
Take measurements to avoid possible reflections of the laser beam that could result assessed hazards, it isrecommended the following minimum measures should be taken:
1. Windows should be kept to a minimum, be opaque and protected by blinds. These should be non-reflective and may need to be fireproof where higher-powered lasers are used.
2. Walls, ceilings and fittings should be painted with a light coloured matt paint to enhance illuminationand minimise specular reflections.
3. Reflecting surfaces such as the use of glass- fronted cupboards have been avoided.4. Ensure any reflective surfaces are covered where necessary5. Keep optical trolley free from clutter and remove jewellery, wrist watches etc.
The illumination in the operating room should be sufficient, so that the operator can observe skin reactionand perform the operation. A high level of illumination will minimise pupil size and reduce the risk of straylaser light reaching the retina.
Additional equipments are recommended such as air conditioning, laser plume extractor anddehumidifying machine etc.
2.5 Safety Precautions
HANDLE WITH CARE: Precision fragile laser components are installed inside theoperating hand piece of this product, prevent from dropping during use or storage.
1. Please make sure to turn off the instrument when you clean the laser or the laser lens.2. Never emit laser beams onto an area not to be treated.3. When moving the gun during treatment or placing the gun after treatment is finished, the operator
should point the end opening of the gun to a safe direction.4. The key switch is used to turn the unit on and off. Please remove the key when the unit is not in use
to prevent unauthorised access.5. The emergency cut off switch is used to shut down the device in case of any emergency. After
engaging the emergency shut off button, turn the device off by rotating the key in a counterclockwise direction.
6. Rotating the emergency cut off switch in the direction indicated by the white arrows will release thebutton.
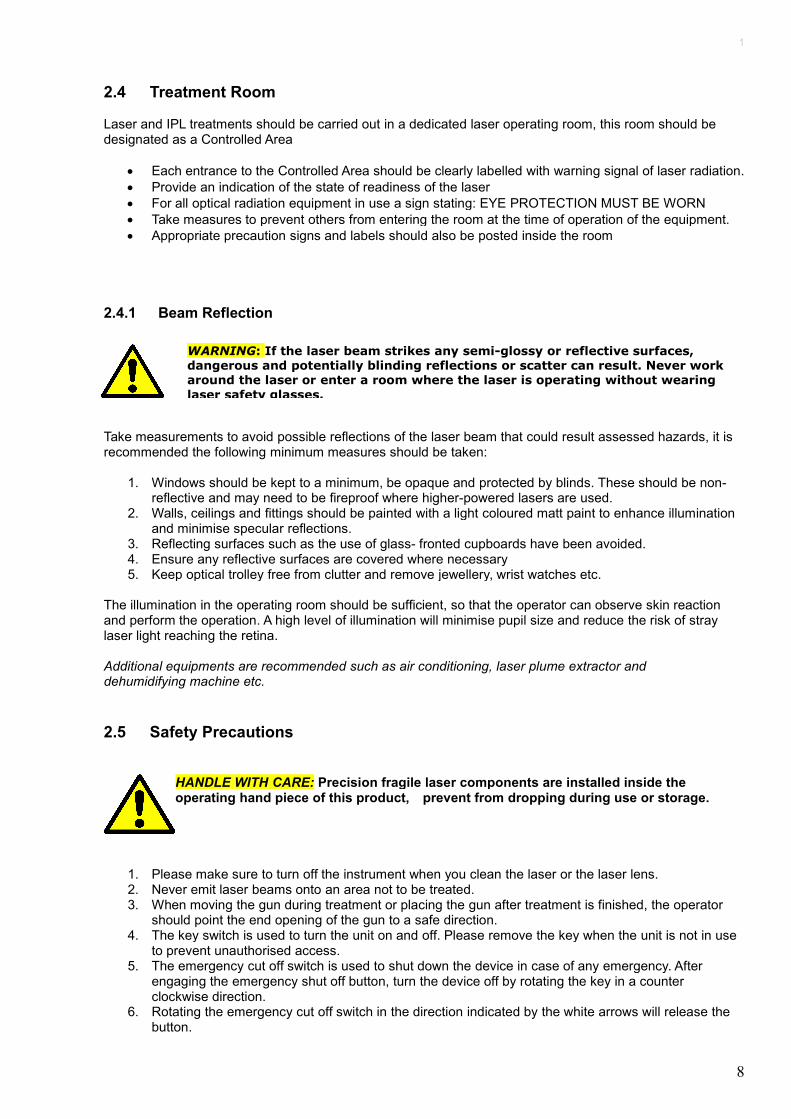
WARNING: If the laser beam strikes any semi-glossy or reflective surfaces,dangerous and potentially blinding reflections or scatter can result. Never workaround the laser or enter a room where the laser is operating without wearinglaser safety glasses.
1
9
2.6 Optical Safety
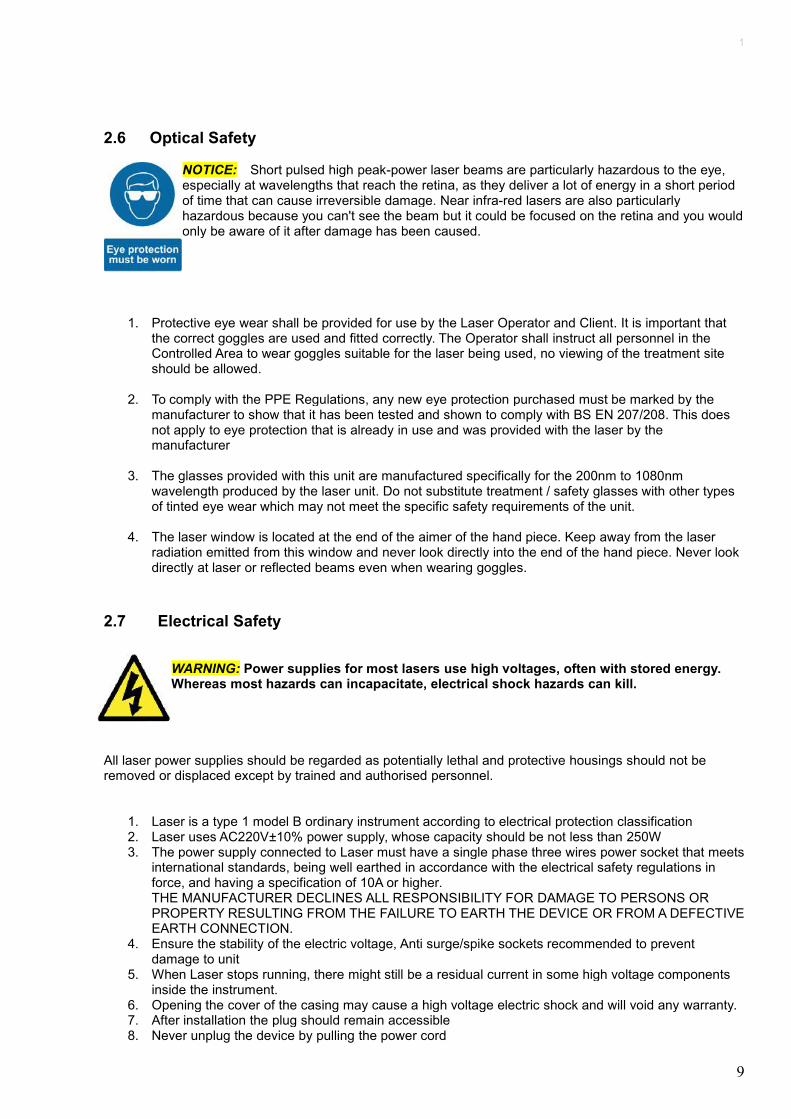
NOTICE: Short pulsed high peak-power laser beams are particularly hazardous to the eye,especially at wavelengths that reach the retina, as they deliver a lot of energy in a short periodof time that can cause irreversible damage. Near infra-red lasers are also particularlyhazardous because you can't see the beam but it could be focused on the retina and you wouldonly be aware of it after damage has been caused.
1. Protective eye wear shall be provided for use by the Laser Operator and Client. It is important thatthe correct goggles are used and fitted correctly. The Operator shall instruct all personnel in theControlled Area to wear goggles suitable for the laser being used, no viewing of the treatment siteshould be allowed.
2. To comply with the PPE Regulations, any new eye protection purchased must be marked by themanufacturer to show that it has been tested and shown to comply with BS EN 207/208. This doesnot apply to eye protection that is already in use and was provided with the laser by themanufacturer
3. The glasses provided with this unit are manufactured specifically for the 200nm to 1080nmwavelength produced by the laser unit. Do not substitute treatment / safety glasses with other typesof tinted eye wear which may not meet the specific safety requirements of the unit.
4. The laser window is located at the end of the aimer of the hand piece. Keep away from the laserradiation emitted from this window and never look directly into the end of the hand piece. Never lookdirectly at laser or reflected beams even when wearing goggles.
2.7 Electrical Safety
WARNING: Power supplies for most lasers use high voltages, often with stored energy.Whereas most hazards can incapacitate, electrical shock hazards can kill.
All laser power supplies should be regarded as potentially lethal and protective housings should not beremoved or displaced except by trained and authorised personnel.
1. Laser is a type 1 model B ordinary instrument according to electrical protection classification2. Laser uses AC220V±10% power supply, whose capacity should be not less than 250W3. The power supply connected to Laser must have a single phase three wires power socket that meets
international standards, being well earthed in accordance with the electrical safety regulations inforce, and having a specification of 10A or higher.THE MANUFACTURER DECLINES ALL RESPONSIBILITY FOR DAMAGE TO PERSONS ORPROPERTY RESULTING FROM THE FAILURE TO EARTH THE DEVICE OR FROM A DEFECTIVEEARTH CONNECTION.
4. Ensure the stability of the electric voltage, Anti surge/spike sockets recommended to preventdamage to unit
5. When Laser stops running, there might still be a residual current in some high voltage componentsinside the instrument.
6. Opening the cover of the casing may cause a high voltage electric shock and will void any warranty.7. After installation the plug should remain accessible8. Never unplug the device by pulling the power cord
1
10
Before the Laser leaves the factory, it has already been marked the local rated voltage according to thecustomers’ request.The F12 corresponds to the electricity requirement as follows:AC110V -230V±10%,10A,50/60Hz
CAUTION: Ensure that the electric voltage rating of this instrument (AC220V±10% orAC110V±10%refer to system labelling) matches the electric voltage of the outlet.
2.8 Fire Prevention
WARNINGHigh power lasers have a potential for igniting combustible materials.
1. The laser light device generates thermal energy. Avoid using combustible material such as acetoneor alcohol near the device.
2. If alcohol based products are used to disinfect the laser device, ensure that the alcohol hascompletely evaporated prior to operation.
3. Flammable and explosive objects, anesthesia, drugs, alcohol, gas etc, should be removed from thelaser treatment room.
2.9 Device Compliance
This equipment is powered by a high voltage power supply capable of high current output.There are no user serviceable components in this system.This laser complies with 93/42/EEC, EMC and LVD.
Chapter 3 - Installation procedure
The process of installation includes:
Unpacking the device and checking contents. Assembly of its components and ensure that all connections are firmly in place. Fill the water tank with distilled water only. Installation treatment hand piece and connect the power supply Switch on the device and test all functions / parameters of the system
3.1 Unpack and Check contentsUnpack the unit, remove all packaging material, and examine for damages.Do Not proceed with installation if unit is damaged.
Item Qty Item Qty
Main Unit 1 Spare Fuse 1
Detachable joint arm 1 Training Manual 1
Protecting glasses 1 Hand piece holder 1
1
11
Client Eye Covering 1 Foot switch 1
Key 2 Electrical source line 1
Water pipe 1 Funnel 1
3.2 Installation Requirements
Place the equipment on a flat, steady surface in the operation room or treatment room which the temperatureis between 22—28° and the humidity is below 10%.Keep the fans and vents clear of any obstructions to maintain airflow and prevent overheating.
3.3 How to Connect the Detachable Hand Piece
Joint arm install
3.4 Filling the Cooling Water Tank
CAUTION: Operating machine when the water tank has no water or has not enough water isabsolutely prohibited!
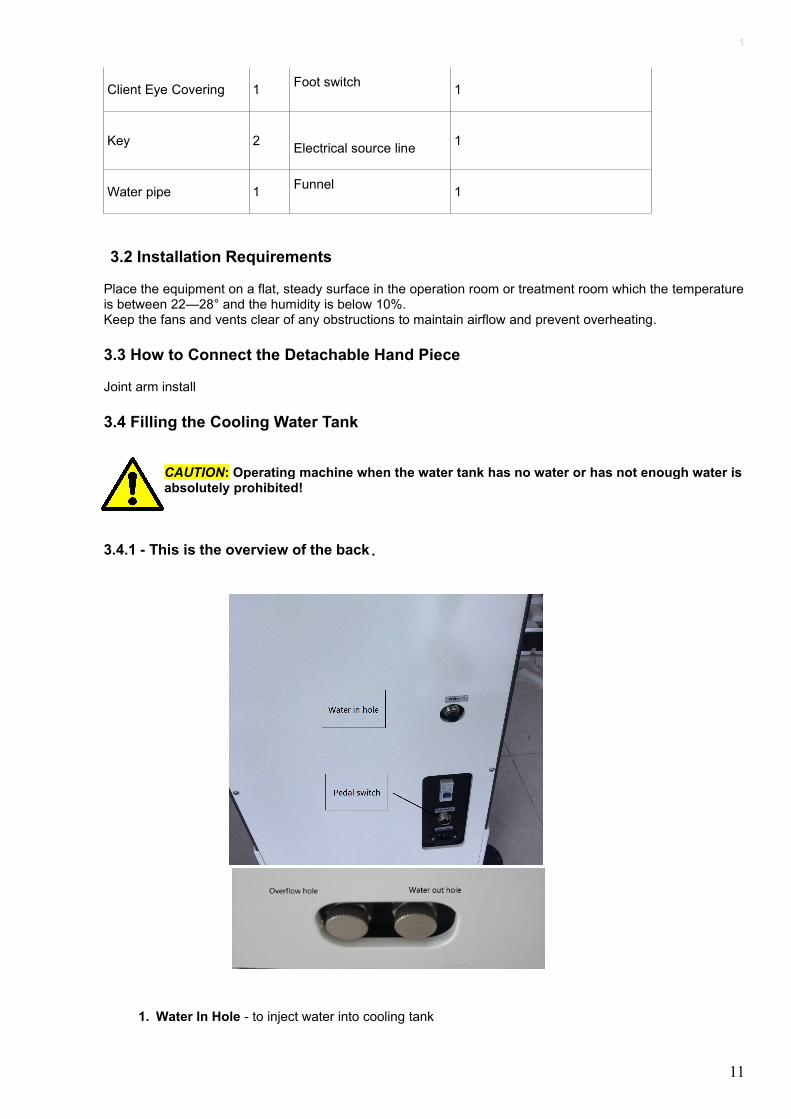
3.4.1 - This is the overview of the back .
1. Water In Hole - to inject water into cooling tank
1
12
2. Overflow Hole - indicates when cooling tank is full
3. Water Out Hole - to empty cooling tank
CAUTION: Only use distilled or pure water in this device, DO NOT use tap or bottleddrinking water
We advise pure water, just because normal water has scale, using normal water will result in:
A risk of blocking the water pipe, Potential burn out of the hand piece Weakening the power. Invalidate any warranty
3.4.2 - Procedure for Injecting Cooling Water
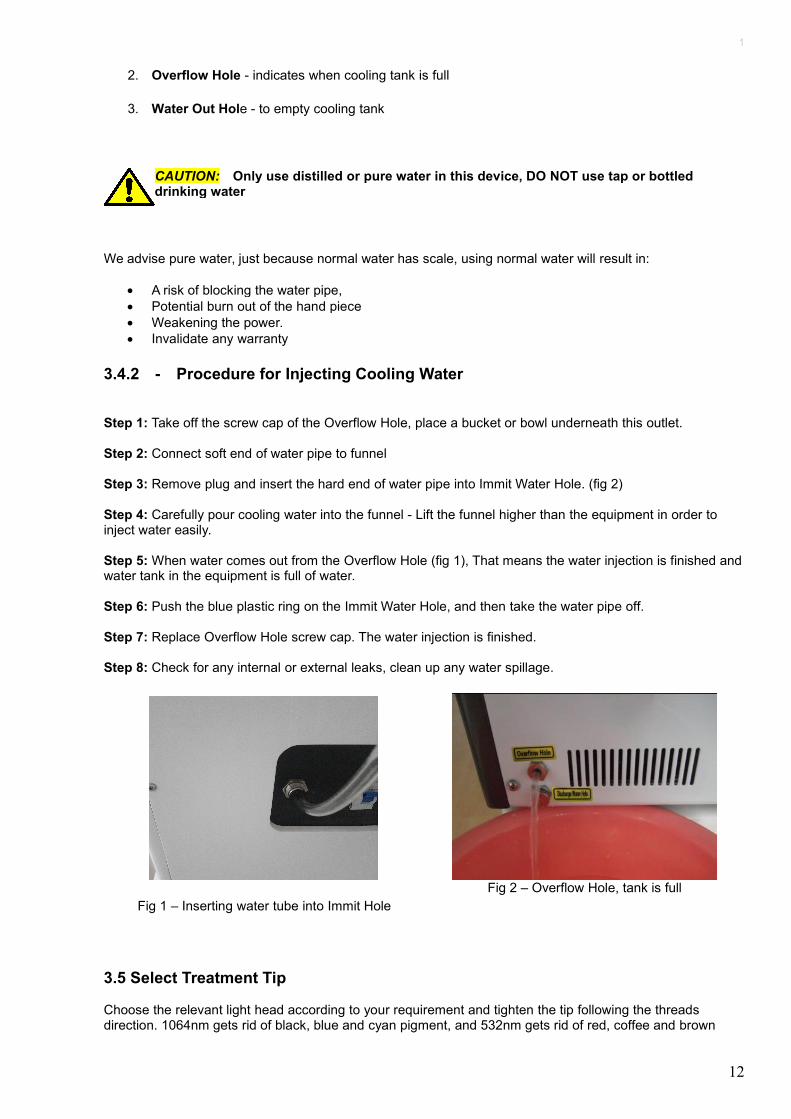
Step 1: Take off the screw cap of the Overflow Hole, place a bucket or bowl underneath this outlet.
Step 2: Connect soft end of water pipe to funnel
Step 3: Remove plug and insert the hard end of water pipe into Immit Water Hole. (fig 2)
Step 4: Carefully pour cooling water into the funnel - Lift the funnel higher than the equipment in order toinject water easily.
Step 5:When water comes out from the Overflow Hole (fig 1), That means the water injection is finished andwater tank in the equipment is full of water.
Step 6: Push the blue plastic ring on the Immit Water Hole, and then take the water pipe off.
Step 7: Replace Overflow Hole screw cap. The water injection is finished.
Step 8: Check for any internal or external leaks, clean up any water spillage.
Fig 1 – Inserting water tube into Immit HoleFig 2 – Overflow Hole, tank is full
3.5 Select Treatment Tip
Choose the relevant light head according to your requirement and tighten the tip following the threadsdirection. 1064nm gets rid of black, blue and cyan pigment, and 532nm gets rid of red, coffee and brown
1
13
pigment.1064 nm treatment tip is usually used for debugging and testing the apparatus energy.
Having made sure that there is no internal or external leakage; you can now connect the foot pedal andpower lead.
3.6 Install Foot Switch Pedal
Make sure that the notch on the switch is facing upward, align the notch and tighten the switch clockwise.Ensure the connection is firmly secure whilst being careful not to over tighten.
3.7 Connect Power Supply
Connect one end of the mains lead to the rear of the machine, and insert the plug into the three pin mainsoutlet.After the instrument is connected as described above, it is ready for use. The operational procedure isexplained in chapter 4
Chapter 4 – Operational MethodsOperation methods for LCD interface4.1 Safe Operation
Make sure the operation room is clear when operating the equipment. Operators must wear white or light coloured work clothes in order to reduce radiation to body. The illumination in the operating room should be sufficient, so that the operator can observe skin
reaction and perform the operation. Don’t use any reflective surfaces while you use the laser machine. The operator must carry out a full consultation before any laser treatment know about the diseases
and symptoms of the clients and tell them the possible normal responses during and after operation. Operators who are professional must keep the laser beam away from non-treated areas. Operators must make sure the clients eyes are properly protected when treating the embroider eye
line, because any damage to the eyes is irreversible.4.2 Examination
Examine the equipment completely if installed according to the installation instructions and requirements.Check the water level is normal and the working environment is suitable.
4.3 Using the Device Interface
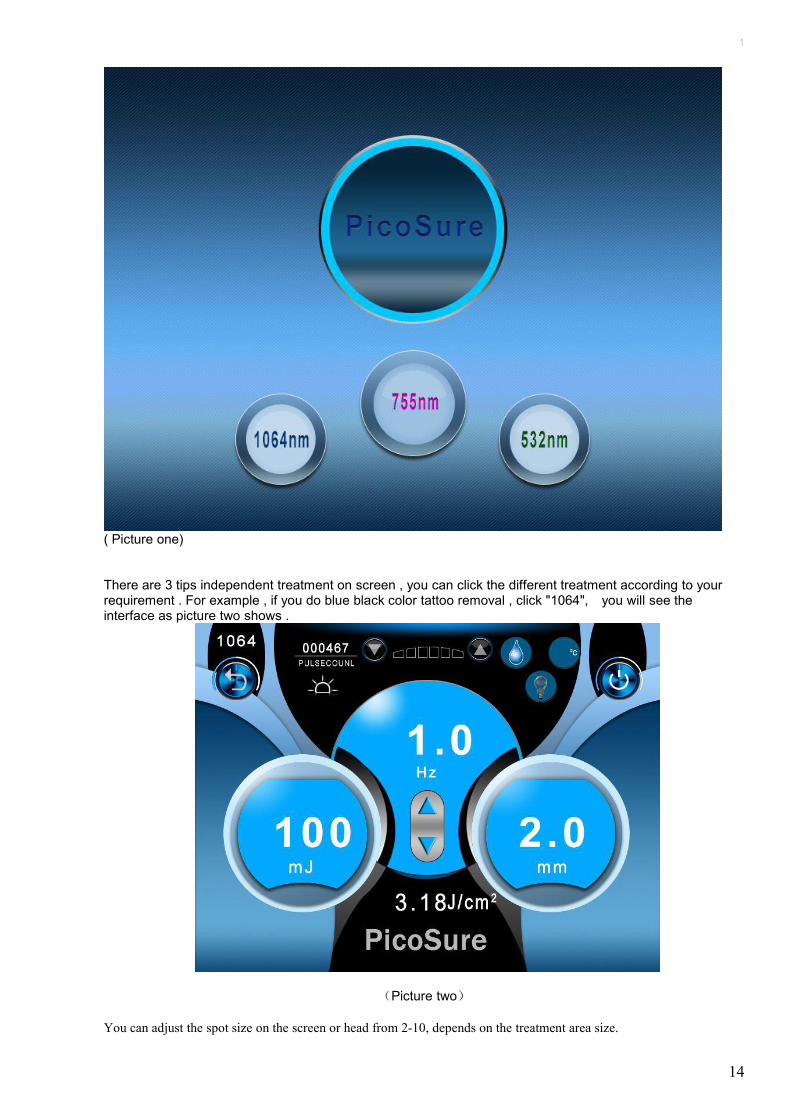
Step 1:When you turn on the machine , you will see the interface as picture one shows
1
14
( Picture one)
There are 3 tips independent treatment on screen , you can click the different treatment according to yourrequirement . For example , if you do blue black color tattoo removal , click "1064", you will see theinterface as picture two shows .
(Picture two)
You can adjust the spot size on the screen or head from 2-10, depends on the treatment area size.
1
15
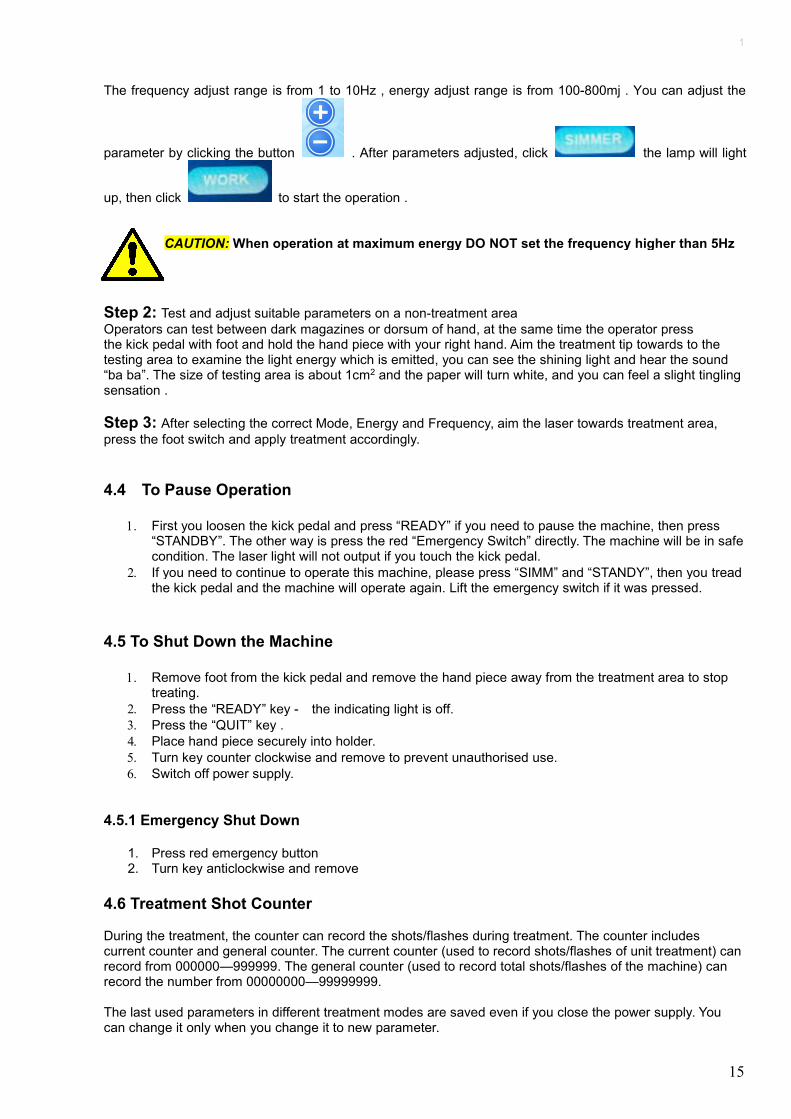
The frequency adjust range is from 1 to 10Hz , energy adjust range is from 100-800mj . You can adjust the
parameter by clicking the button . After parameters adjusted, click the lamp will light
up, then click to start the operation .
CAUTION:When operation at maximum energy DO NOT set the frequency higher than 5Hz
Step 2: Test and adjust suitable parameters on a non-treatment areaOperators can test between dark magazines or dorsum of hand, at the same time the operator pressthe kick pedal with foot and hold the hand piece with your right hand. Aim the treatment tip towards to thetesting area to examine the light energy which is emitted, you can see the shining light and hear the sound“ba ba”. The size of testing area is about 1cm2 and the paper will turn white, and you can feel a slight tinglingsensation .
Step 3: After selecting the correct Mode, Energy and Frequency, aim the laser towards treatment area,press the foot switch and apply treatment accordingly.
4.4 To Pause Operation
First you loosen the kick pedal and press “READY” if you need to pause the machine, then press“STANDBY”. The other way is press the red “Emergency Switch” directly. The machine will be in safecondition. The laser light will not output if you touch the kick pedal.
If you need to continue to operate this machine, please press “SIMM” and “STANDY”, then you treadthe kick pedal and the machine will operate again. Lift the emergency switch if it was pressed.
4.5 To Shut Down the Machine
Remove foot from the kick pedal and remove the hand piece away from the treatment area to stoptreating.
Press the “READY” key - the indicating light is off. Press the “QUIT” key . Place hand piece securely into holder. Turn key counter clockwise and remove to prevent unauthorised use. Switch off power supply.
4.5.1 Emergency Shut Down
1. Press red emergency button2. Turn key anticlockwise and remove
4.6 Treatment Shot Counter
During the treatment, the counter can record the shots/flashes during treatment. The counter includescurrent counter and general counter. The current counter (used to record shots/flashes of unit treatment) canrecord from 000000—999999. The general counter (used to record total shots/flashes of the machine) canrecord the number from 00000000—99999999.
The last used parameters in different treatment modes are saved even if you close the power supply. Youcan change it only when you change it to new parameter.
1
16
4.7 Temperature Display and Protection
There is error protection function for monitoring the water temperature and circulation.It will display “ERROR” in the relevant function area, an audible alarm will be emitted and the machine willcease to work. The controlling will exit when you touch any key, and turn to the welcome interface.
Chapter 5 - The Operation of Laser Instrument5.1. Client Consultation
A full consultation and patch test is to be carried out before any treatment takes place.Consult in private and make client feel comfortable, the consultation will enable you to establish if the clientis a suitable candidate for laser therapy.
Consultation Process:
5.2 Explain to the client how the Q-Switched Nd: YAG treatment works
The Active Q-Switch laser delivers specific-wavelengths of light extremely quickly (in nano-seconds) at avery high energy. These pulses are selectively absorbed by the tattoo pigment, shattering it into tinyfragments small enough for the body to recognise the particles as a foreign object, and over the next severalweeks some of particles (in shallow cuticle) are discharged from the body and the other part (in deep tissue)are absorbed and digested by the body's macrophages and removed out of the body by the immune system.Since the specific wavelengths used can only be absorbed by pigment particles, no lasting injury happens tonormal skin and normal tissues.Q-Switch laser systems can now remove all types of tattoo with little or no scarring. Professional andamateur tattoos, as well as traumatic tattoos, resulting from accidents, are treated successfully.Multiple treatments will be required
5.3 Matters that can Influence Laser Treatment
There are many factors which can affect the results of successful treatments and complete removal is notalways achievable.
Clients should be given realistic expectations of treatment results, and complete removal of pigment cannever be guaranteed.
Amateur or professional tattoo – Amateur tattoos are easier to remove as usually they are not asdeep as professional tattoos and the ink is more sparsely applied. Amateur tattoos are usually only asingle colour (black or blue), whereas many professional tattoos are multi-coloured.
Type of ink used - The pigment divided into plants pigment, mixture pigment, and chemical pigment.The plant based pigment is the easiest to dispel, while the chemical pigment is most difficult. Ifpigment contains iron and lead in the mixture and chemical pigment, it may not react well to lasertreatment and can be difficult to remove.
Depth of ink - Generally speaking the deeper the pigment, the more difficult to remove. And it alsotakes many times to dispel. It will easy to dispel if the depth of the pigment is thin. Any treatment willnot react well if the pigment is chemical based, even the depth of the pigment is thin.
Colours in tattoo – Black and blue tattoos are the easiest to remove while the green and yellowpigments are the hardest as there is not an ideal wavelength that either of these colours absorb.Tattoo's that have had white (titanium oxide) applied cannot be removed until the white has faded.
UV inks cannot be treated. Age of tattoo - Older tattoos usually easier to treat, new tattoos contain more pigment (ink) and
often multiple colours. Clients own healing ability - The different physique of people. The factors include age, skin, and
body immunity and so on.
5.4 Side Effects
A superficial burn wound can be created by the laser tattoo removal treatment, The immediate whitening ofthe treated area is the inks reaction to the absorption of the lasers light energy creating steam within the
1
17
surface of your skin which usually last for several minutes.
Clients May Experience;
Swelling or Bruising Pinprick Bleeding Feeling of Sunburn Blisters, Scabs and Crusts Pigmentation changes due to loss of skin pigment can occur (temporary except in rare cases). Dry Itchy skin Temporary hair loss Infection
Although times can vary, Complete healing usually takes 4-6 weeks. Some extreme cases can be up to 3months to heal properly.Scabbing and blistering routinely occur following treatment and usually occur 8-72 hours after the treatment,which can last 1-2 weeks or longer. When the scabs separates, the skin in the treated area may look pale orpink.
Hemoglobin of the tissue has a strong absorption of the 532nm wavelength. Using the 532 nm wavelengthincreases the risk of swelling phenomenon, skin surface turning white after vaporization, epidermal necrosis,a certain loss of pigment or pigmentation.Due to personal immune system difference an increased restoration period between treatments may berequired.
5.5 Treatment Aftercare
After Laser Tattoo Removal Treatment
Cold compresses (not ice) and recommended skin care products may be useful to reduce swelling ordiscomfort.
You may take over-the-counter pain or anti-inflammatory medication. Hydrocortisone (steroid) creammay decrease any itching or skin irritation. Antibiotic ointment (such as Neosporin) may be used ifskin is broken to prevent infection.
Your skin will be fragile for 2 to 3 days. Use gentle cleansers, but do not rub the skin vigorously andavoid hot water during this time. Skin moisturisers may be used and make-up can be applied if theskin is not broken.
Avoid sun exposure and tanning creams during the entire course of treatments. Use SPF 30 orgreater on the treatment area at all times.
The treatment area may be left open and uncovered. Do not scrub the area. Do not use anyproducts on the treated area without first consulting our staff.
Avoid soaking for 24 to 48 hours. No hot tubs, whirlpools or baths, but showers are okay. Avoid excessive sweating for 24 to 48 hours. No saunas or vigorous working out. Keep areas well moisturised and allow scabs to fall off on their own. This is an expected occurrence
with tattoo/pigment removal. Avoid irritants such as Retin-A, Retinol, Renova, glycolics, bleaching creams and exfoliants for one
week. Refrain from alcohol for 3-7 days. It is best avoid smoking for a period of several weeks before and after your procedure, as smoking
constricts the capillaries and taxes the immune system, thereby slowing healing and results
5.6 Medical History
Operator must record details of clients medical history. All patients must complete and sign the historyprofile prior to treatment. The medical history is reviewed and confirmed with the patient during theirconsultation.
5.6.1 Contraindications
1
18
DO NOT treat anyone with the following conditions unless client obtains a signed letter from his/her doctorconfirming that the medical condition(s) will not prevent client having laser treatments;
Lupus or other autoimmune deficiency Pregnant or Breast Feeding Bleeding abnormalities Treatment of Acne in the last six months Kelloid or very thick scarring Inflammatory Skin Conditions (e.g: Psoriasis) or Injuries Hypo-Pigmentation Rheumatoid Arthritis “Gold” Therapy Herpes simplex or fever blisters Diabetes Epilepsy Cancer HIV/AIDS Used St John's Wort in the past 3 months Newly Tanned skin (includes; natural suntan, tanning bed, fake tans) in last 30 days Waxing/Plucking/Electrolysis/Sugaring within last 6 weeks Wearing a Pacemaker, or any Metal Pins/Plates
Note:
This list is not fully comprehensive and others factors may arise during consultation
5.6.2 Photosensitivity Considerations
Many prescription drugs and herbal remedies can cause increased Photosensitivity meaning the skinbecomes more sensitive to light.Photosensitivity reactions are generally either Photo-Toxic or Photo-Allergic. Photo-toxic drugs are morecommon than photo-allergic drugs. Reactions can include:
Extreme sunburn Swelling Stinging and Burning Hives
It is important that you obtain a list of common photosensitising medications for reference.
5.7 Skin Typing
One of the important parameters for the success of laser treatments is the correct typing of the skin.
Skin type is often categorized according to the Fitzpatrick skin type scale, which ranges from very fair (skintype I) to very dark (skin type VI). The two main factors that influence skin type and the treatment programmedevised by physicians are:
Genetic disposition Reaction to sun exposure and tanning habits
Skin type is determined genetically and is one of the many aspects of your overall appearance, which alsoincludes the colour of eyes, hair, etc. The way skin reacts to sun exposure is another important factor incorrectly assessing skin types. Recent tanning (sun bathing, artificial tanning or tanning creams) has a majorimpact on the evaluation of your skin colour. Treat as next darker type if unsure.
5.8 Client Consent
All patients must complete and sign client consent to treatment form prior to treatment. The medical history isreviewed and confirmed with the patient during their consultation.
5.9 Patch Test
1
19
Patch tests should be applied to establish the highest level of energy that the patient’s skin can toleratewithout adverse reaction.
Determine the patient’s skin type and select the settings for the three test spots accordingly. Remove any make-up or lotions and cleanly shave the area to be tested. Make sure the area is
completely dry. Each test spot should be clearly delineated. Increasing energy for each successive spot left to right
or bottom to top for consistency in assessment and documentation. After 5-10 minutes, record the initial reaction on the test spot notes. Test spots on patients with skin types V and VI should be at least 2 weeks prior to treatment in case
of late emerging side effects. Other skin types may not have to wait as long. Upon return, treat the patient at the highest energy tested that did not cause an adverse reaction
(crusting, blistering or pigment change).
5.10 Treatment
1. We advise you take the second treatment 6 weeks after the first.2. You can shave the eyebrow before removing the eyebrow with device in order to examine the effect.3. Take photos before and after every treatment for reference4. We advise you that you should treat large tattoos and nevus little by little and time by time to avoid to
much discomfort to the client. You can also help build client confidence by seeing the contrastbetween before and after the treatments.
5. There maybe the sound of the pigment breaking when you treat the deep tissue of the tattoobecause of the strong absorption to laser energy with 1064nm. The tint colour of the pigment cancome out the cuticle after absorbing the energy.
6. Use a lower energy over bony and thin-skinned areas,7. The results of tattoo removal will be more noticeable in the first few treatments, due to there being
more pigment.8. The function of digesting and transportation of the macrophage can continue for a long time, and the
colour can fade more during this period.
Chapter 6 - Operation Skill and Technique6.1 Demands before operation
Before each treatment, the user must check the functional performance of the device in order toavoid any risk of harm to patients or other persons. If the device is used in together with peripheralunits, the User’s Manuals for the peripheral units must also be read thoroughly and understood.
Operators should complete a consultation and build a client file. Clean the treatment area, disinfect utensil, and shave the treatment area if necessary. You must pay
attention that the area to be treated must be dry, as the treatment will be affected if there is water inthe treatment area.
The operator should wear white clothes and relevant wavelength glasses. Keep the operation roomclean and make sure illumination is bright enough.You should keep the temperature is between 22 and 28°C, and avoid the laser irradiating nontreatment area.
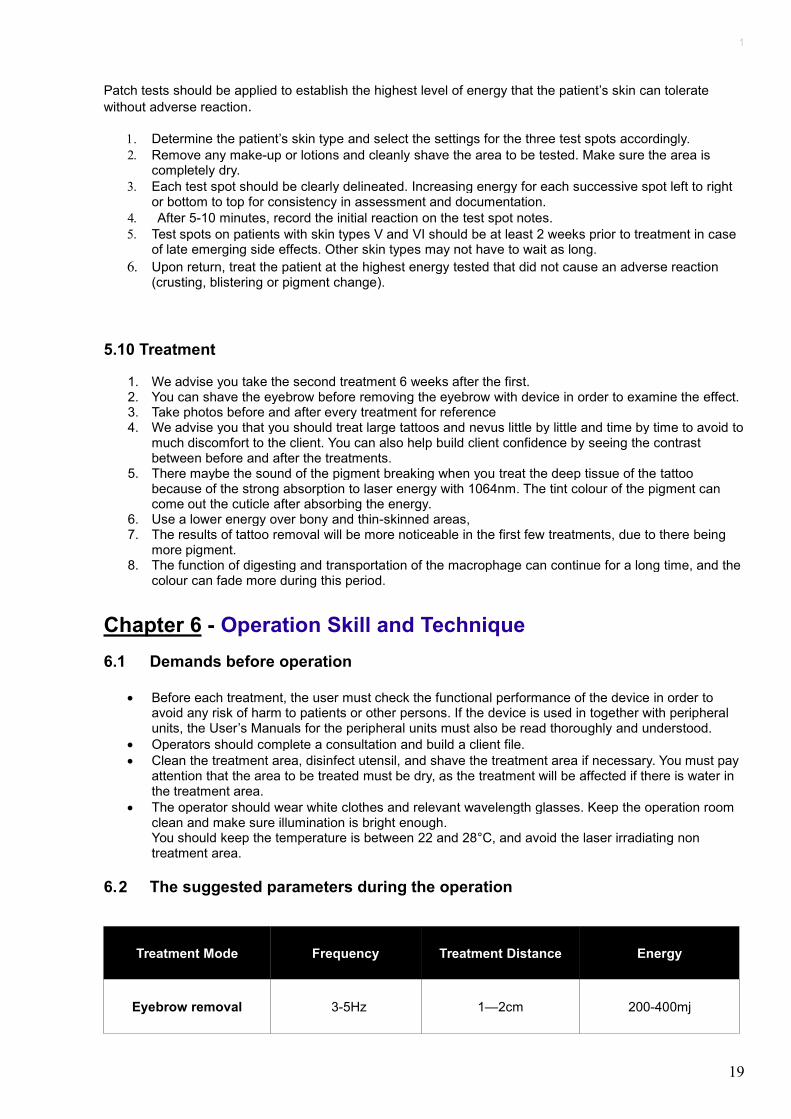
6. The suggested parameters during the operation
Treatment Mode Frequency Treatment Distance Energy
Eyebrow removal 3-5Hz 1—2cm 200-400mj
2
1
20
Eye line removal 1--2Hz 1—2cm 200-350mj
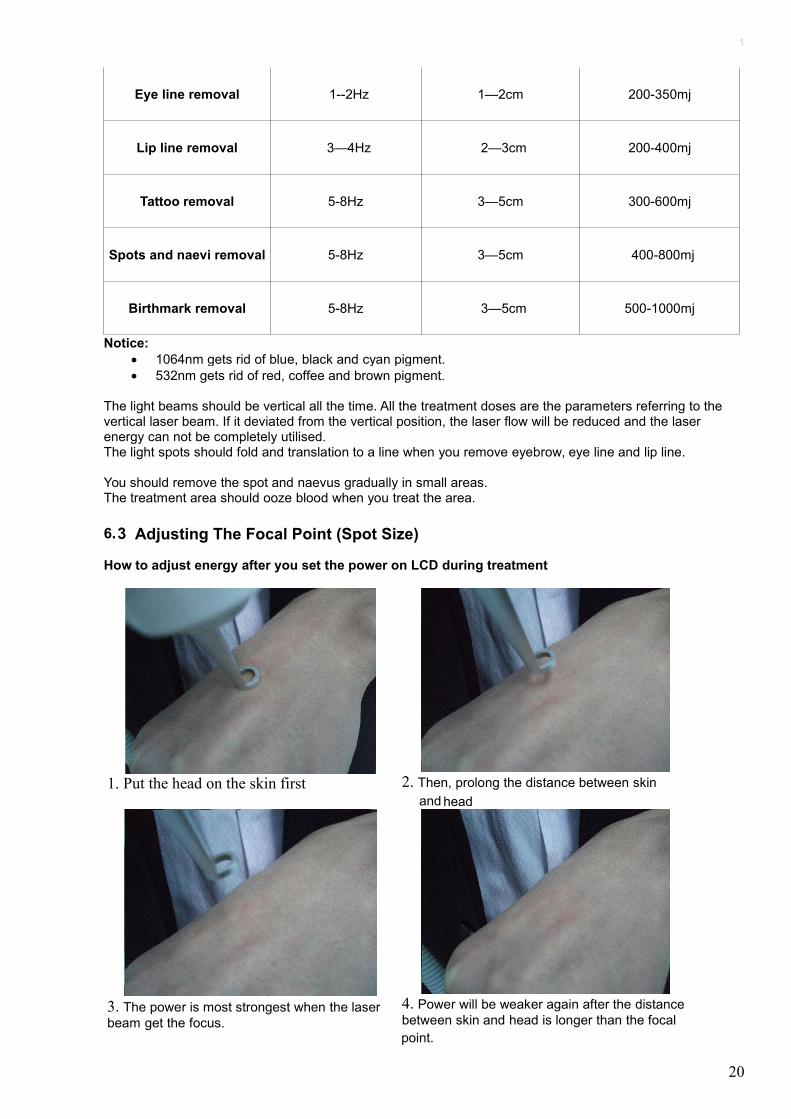
Lip line removal 3—4Hz 2—3cm 200-400mj
Tattoo removal 5-8Hz 3—5cm 300-600mj
Spots and naevi removal 5-8Hz 3—5cm 400-800mj
Birthmark removal 5-8Hz 3—5cm 500-1000mj
Notice: 1064nm gets rid of blue, black and cyan pigment. 532nm gets rid of red, coffee and brown pigment.
The light beams should be vertical all the time. All the treatment doses are the parameters referring to thevertical laser beam. If it deviated from the vertical position, the laser flow will be reduced and the laserenergy can not be completely utilised.The light spots should fold and translation to a line when you remove eyebrow, eye line and lip line.
You should remove the spot and naevus gradually in small areas.The treatment area should ooze blood when you treat the area.
6. Adjusting The Focal Point (Spot Size)
How to adjust energy after you set the power on LCD during treatment
1. Put the head on the skin first 2. Then, prolong the distance between skinandhead
3. The power is most strongest when the laserbeam get the focus.
4. Power will be weaker again after the distancebetween skin and head is longer than the focalpoint.
3
1
21
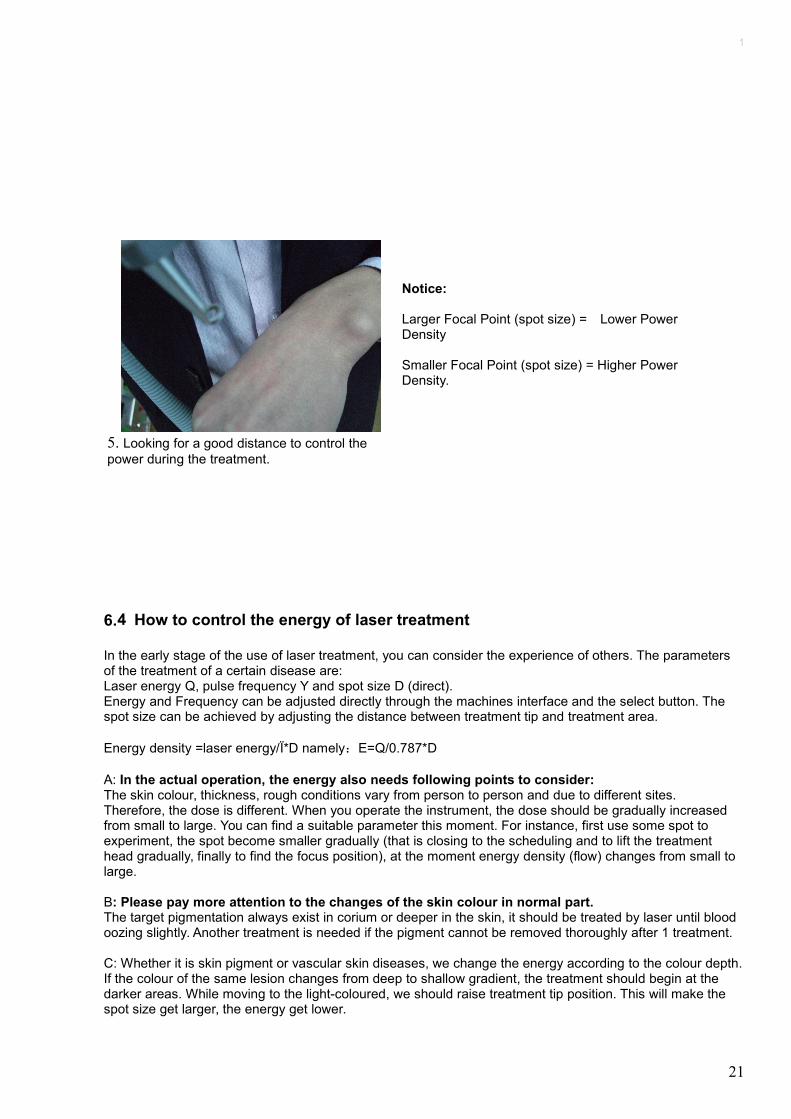
5. Looking for a good distance to control thepower during the treatment.
Notice:
Larger Focal Point (spot size) = Lower PowerDensity
Smaller Focal Point (spot size) = Higher PowerDensity.
6. How to control the energy of laser treatment
In the early stage of the use of laser treatment, you can consider the experience of others. The parametersof the treatment of a certain disease are:Laser energy Q, pulse frequency Y and spot size D (direct).Energy and Frequency can be adjusted directly through the machines interface and the select button. Thespot size can be achieved by adjusting the distance between treatment tip and treatment area.
Energy density =laser energy/Ï*D namely:E=Q/0.787*D
A: In the actual operation, the energy also needs following points to consider:The skin colour, thickness, rough conditions vary from person to person and due to different sites.Therefore, the dose is different. When you operate the instrument, the dose should be gradually increasedfrom small to large. You can find a suitable parameter this moment. For instance, first use some spot toexperiment, the spot become smaller gradually (that is closing to the scheduling and to lift the treatmenthead gradually, finally to find the focus position), at the moment energy density (flow) changes from small tolarge.
B: Please pay more attention to the changes of the skin colour in normal part.The target pigmentation always exist in corium or deeper in the skin, it should be treated by laser until bloodoozing slightly. Another treatment is needed if the pigment cannot be removed thoroughly after 1 treatment.
C: Whether it is skin pigment or vascular skin diseases, we change the energy according to the colour depth.If the colour of the same lesion changes from deep to shallow gradient, the treatment should begin at thedarker areas. While moving to the light-coloured, we should raise treatment tip position. This will make thespot size get larger, the energy get lower.
4
1
22
D: If treatment area is large and location is deep, too deep and large area treatment once will lead to localedema, blisters and exudates. So a layered and slicing treatment is suggested.
6. Operating Technique Introduction for Different Treatments
6. .1 Eyebrow Removal
a. Removing single blue and black eyebrow:The light speed can be set to 5Hz; the distance from treatment tip to skin is 1 ~ 2cm. You may treat from thehead or may from the tail of the eyebrow. You can take the second treatment if there is colour restoration.The energy can add 20-40mJ and the treatment tip to skin distance can increase up 2-3cm in order toincrease the effect.b. Shaded eyebrow removal ( the shaded eyebrow can be removed clearly 2 or 3 times)Set the light speed to 3Hz and the energy can be selected according to the above form.First you can treat with 1064nm in 2-3cm distance, and then you can treat with 532nm the second time. Thebrown pigment contains mixed pigment, so it could take more than two treatments; the treatment intervalperiod is from 45 to 90 days. You can choose different light head according to the remaining colour.
6. .2 Eye Line Removal
The light speed can be set to 5Hz, and the energy should be set to the lowest point. It is about 2-3cmdistance from treatment tip to the treatment area, and the light will be seen as reference.The client’s eyes should be protected with thick medical cloth and eye coverings.First you remove the client’s lower eye line, and the client should close his/her eyes, at the same time theclients eyeball needs to be looking upwards.The operator presses the cloth with index finger, and peels away the lower eyelid with middle finger.When you remove the upper eye line the client should close his/her eyes with eyeball looking downwards.The operator presses the cloth with middle finger and pulls the eyelid with index finger.
6. .3 Lip line removal
The light speed can be set to 5Hz, and the energy can be selected according to the reference table above.The distance from treatment tip to the treatment area is 3-4cm space.You can remove the black, coffee and deep red with 1064nm for the first treatment and then use 532nm forthe second.You can use 532nm to remove thin red, red, thin coffee and thin brown. You must pay attention that you carryout the second treatment of removing lip line, soak lip and the lip’s tattoo within 6 months of the firsttreatment.The course of treatment is from 45 to 60 days until it is clear.
6. .4 Tattoo removal
The light speed can be set to 3Hz/5Hz, and you can select the energy according to the reference tableabove. The distance between treatment tip to treatment area is 3 or 4cm.The effect will be best if there is blood speckles/pinprick bleeding.The light head of 1064nm gets rid of blue and black pigment while 532nm gets rid of red and coffee pigment.The interval between treatments is from 45 to 90 days and course continued until it is clear.
6. .5 Speckle and naevi removal
The light speed can be set to 3Hz/5Hz, and you can select the energy according to the reference tableabove. The distance between treatment tip and treatment area is 3 or 4cm. The effect will be best if there isblood speckles/pinprick bleeding.
5
5
5
5
5
5
1
23
The light head of 532nm gets rid of red pigmentation while 1064nm gets rid of speckle and naevi.The course of treatment is from 15 to 30 days until it is clear.
6.7.6 Birthmark and nevus of Ota removal
The light speed can be set to 3Hz/5Hz, and you can select the energy according to the reference tableabove. The distance between treatment tip to treatment area is 3 or 4cm. The effect will be best if there isblood speckles/pinprick bleeding.The light head of 532nm gets rid of red pigmentation while 1064nm gets rid of birthmark.The course of treatment is from 45 to 90 days until it is clear.
Chapter 7 - Maintenance of Laser Instrument
This section describes daily maintenance of the Laser treatment system that can carried out by the customer.Only personnel trained and/or approved by the manufacturer are authorised to maintain the inner workings ofthis device. Any manipulation to the system may cause damage to the device and will void any warranty.
Ordinary maintenance of the machine
7.1 General Cleaning
Clean the outer part of the equipment regularly with soft damp cloth or microfibre cloth. You may also use aneutral detergent, and alcohol free wipes, but do not allow any liquid to seep into the machine.
7.2 Clean the output lens
You should clean the lens regularly after use. The spatter of pigment and tissue which splash into the lens inthe treatment period may influence the light energy and make the laser become hot. You can loosen off thelens with screwdriver and clean the lens with anhydrous alcohol and a cotton swab. You must keep thegleaming convex surface towards to the inside. Otherwise, it can break if the direction is wrong.
7.3 Regular cooling water changes are required
The frequency of water changing depends on usage;
If you operate the machine on a daily basis, change water every 14 days. If you operate the machine once or twice a week, change water after 30 days.
Remove the screw cap from the Discharge Water Hole and drain approximately 2/3 of the water and replacescrew.Remove screw caps from the Overflow Hole and Water Immit Hole; refill the cooling water level as perinstallation instructions. Allow the water to properly circulate for 5 minutes before preheating.
PLEASE NOTE: The cooling water must be distilled water or pure water, and we advice you use prepareddistilled water or pure water which is sold in the market. Mineral water and tap water is not suitable to use, asthe impurities in the water will cause a build up of scale which will affect the normal workings of the deviceand cause irreparable damage which will void any warranty.
7.4 Transport, Storage and Moving
1
24
1. The machine is portable equipment, easy to move.2. Keep and use the original packaging when moving or storing3. Do not shake or drop the device4. If relocating in treatment room, keep device level when carrying.5. Must not hit the light head of treatment, because it has exact optics system.6. Keep water pipe and treatment handle securely packaged by sprung materials.7. Before carrying any long distance, empty cooling water from the water tank.
7.5 Troubleshooting Guide
1. The machine will not start1. Check the power supply has electricity and the attaching plugs are securely inserted both ends and
socket is switched on2. Check the red emergency button is released.3. Check key is in correct position4. Examine fuse and replace if necessary
2. The water cycle is abnormal when you start the machine Check the water level, if there is not enough water inside to cycle properly this will trigger the water
level cut-out switch. Holding the tube of hand piece, then start the machine to feel water cycle. Replace the cooling water inside as per instructions and shake the machine gently to reset the water
level switch.
3. There is no laser beam output when you press the pedal.1. Check that the machine is in the correct working state2. Check the pedal, cable and connecting plug for damage, if any part is damaged contact us for a
replacement.3. Check the working key is pressed.4. Check energy level output. You can increase the energy through adjust the energy key.
4. The energy becomes weak or there is no light that comes out.1. The machine can not work as effectively if the energy is too low, increase energy level2. The lens is dirty. You should clean the lens as directed.3. The X-light is burnt out; you should change the laser gun.4. You must stop working and not use the machine in 30 minutes if the apparatus has overheated.5. Loosen off the light head and examine if the primary lens is damaged.6. Check the handle and the light head carefully for signs of water leakage. You must change them if
there are any leaks.
5. You may get an electric shock when you touch the machine.1. Dry weather and chemical fibre clothes can increase static shocks.2. You should use the three grounding plugs and the electrical outlet must be correctly earthed.3. The voltage is unstable, you should introduce a voltage stabilizer
6. The machine leaks water1. Manipulation handle leaks water.2. Water leaks because of strong shaking or dropping during transportation.3. The water tank and the water pump leak water.4. Please send the equipment to the company at once or counter-claim from the freight company
according to the above situation.
7. There is noise in the operating process when you press the preheating key.1. If the device has not been used for a long time, the instrument will simmer slowly. Please turn off and
restart the machine.2. Please raise the temperature appropriately if indoor temperature is too low. You can install air
conditioning.3. The fans are broken or the fans have friction with other parts. Please change a new fan or clear the
fans obstruction.4. The indoor humidity is too high, keep the room dry.5. If the xenon is burnt out, please replace the xenon lamp.
1
25
8. Energy weakens gradually during use of instrument1. Any impurities adhered to the treatment tip lens will lead to blocking the light, please check the lens.
If there is any pigmentation, dirt or dust etc.; clean as directed.2. Check if the operation hand piece is hot, please let the instrument rest for 30 minutes or replace the
cooling water.3. Check the lens. If it is broken, please contact the manufacturer or distributor immediately.
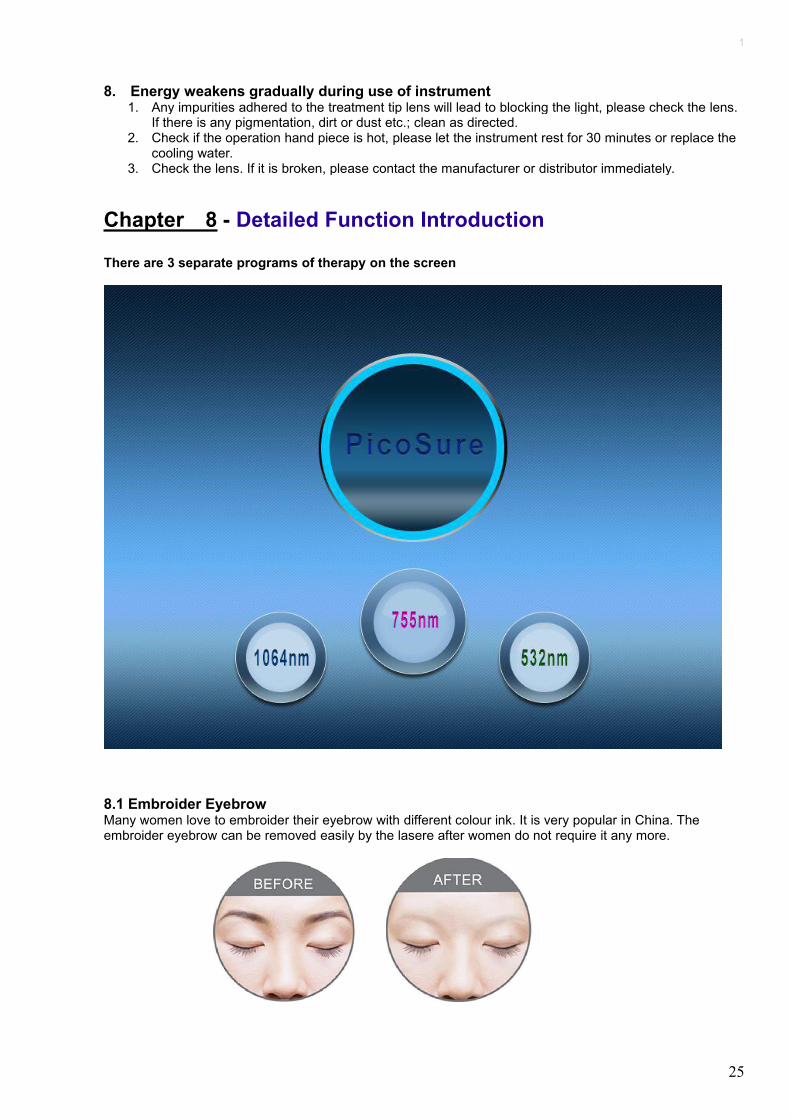
Chapter 8 - Detailed Function Introduction
There are 3 separate programs of therapy on the screen
8.1 Embroider EyebrowMany women love to embroider their eyebrow with different colour ink. It is very popular in China. Theembroider eyebrow can be removed easily by the lasere after women do not require it any more.
1
26
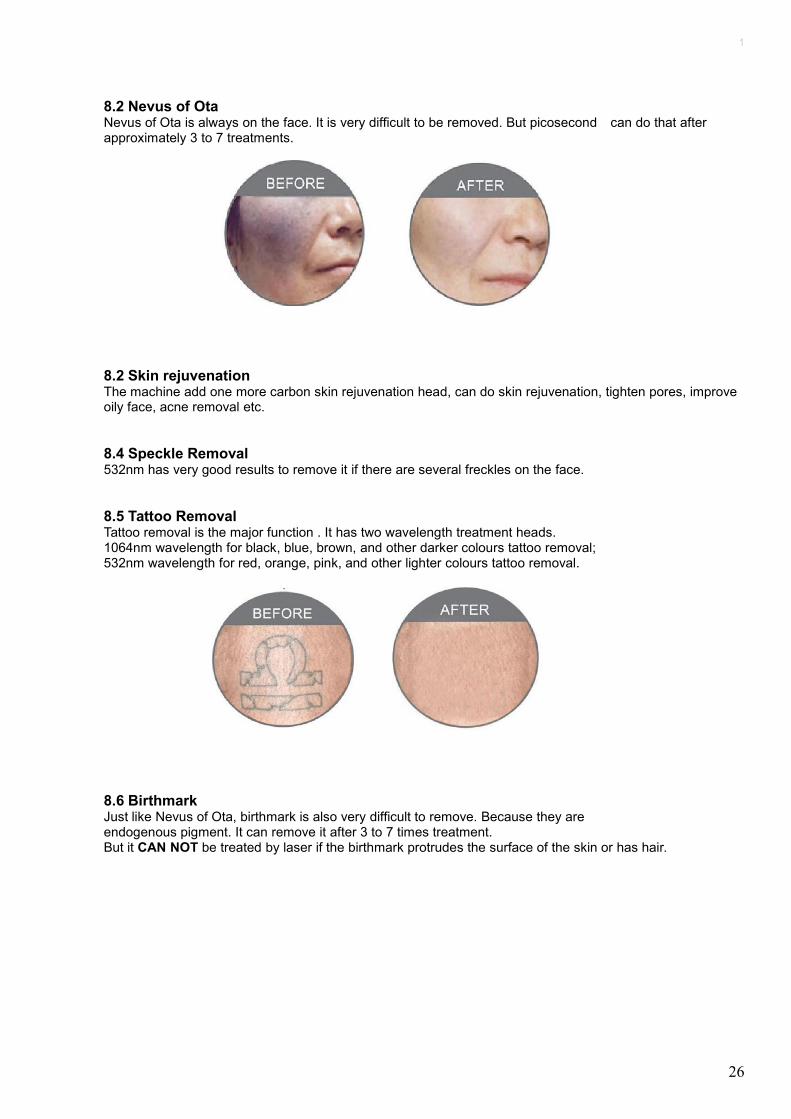
8.2 Nevus of OtaNevus of Ota is always on the face. It is very difficult to be removed. But picosecond can do that afterapproximately 3 to 7 treatments.
8.2 Skin rejuvenationThe machine add one more carbon skin rejuvenation head, can do skin rejuvenation, tighten pores, improveoily face, acne removal etc.
8.4 Speckle Removal532nm has very good results to remove it if there are several freckles on the face.
8.5 Tattoo RemovalTattoo removal is the major function . It has two wavelength treatment heads.1064nm wavelength for black, blue, brown, and other darker colours tattoo removal;532nm wavelength for red, orange, pink, and other lighter colours tattoo removal.
8.6 BirthmarkJust like Nevus of Ota, birthmark is also very difficult to remove. Because they areendogenous pigment. It can remove it after 3 to 7 times treatment.But it CAN NOT be treated by laser if the birthmark protrudes the surface of the skin or has hair.

1
27
Further Information;
1. It also has good effect for other pigmentation formed by pathological changes of pigmented skin andmixed colour.2. The 3 separate ptips of therapy can be selected freely. And the parameters (Power,Frequency) in each application (e.g. Tattoo) can be stored in its own file, which can bedirectly used next time. The data in an application does not need re-adjustment. It makeseasy operation and quicker treatment.
Chapter 9 - The knowledge collection of laser removal
1. The differences between the first and the second eye brow removal:You should use the energy which near the focus energy for the first treatment. Distance can begreater than the first time and the energy can be gradually increased during subsequent treatments.
2. The reason that the coffee turns to blue and black: -It is normal reaction if the coffee turns to blue and black because the coffee is a mixture pigmentwhich includes iron, lead ion, iron ion. And all these ion can produces pigmentation, so we advice youremove the pigment with 1064nm for the first time and then use 532nm. You can examine the effecthalf one month later. You can use 1064nm to remove if the colour turns to blue, and use 532nm if itturns to red.
3. Why does some red eyebrow have no reaction after removing?The pigment does not belong to plant pigment but the chemical pigment, and the iron has reached into derma layer so it is difficult to remove. You should use the focus energy of 1064nm to break up thepigment until blood spots appear, and then you remove it with 532nm.
4. How to remove the speckle of the face?There are good effects on removing drought spot and butterfly speckle which can be caused byclimate. The deep and hereditary speckles are difficult to remove while shallow and formed byacquired factors. You can use the focus energy to remove the senile plaque until blood spots appear.There are three treatment courses with an interval of 45 days between treatments.
5. The treatment ways to remove naevi.Using the focus energy to remove the naevi until blood spots appear.
6. Can the scar constitution be removed?A few people can be removed but the effect is not great. You should not use the focus energy, Use alarge spot size and low energy.
7. Can the pregnant woman be removed the eyebrow?Pregnant women are not allowed to accept the laser removal treatment.
8. How to remove the red blood streak and what degree will be OK?We don’t suggest that you remove the red blood streak, because the 532nm can absorb thehemoglobin in the blood. It can form the purpura to cause the operation fail.
Chapter 10 - The Advantages of laser treatmentLaser treatment has many advantages as below for eyebrow and eye line removal, compared to the traditionsurgery such as dispelling, frozen, electrocautery, chemical (medicine) +dispelling.
1. Less bleeding, the laser beam is very narrow and easy to target only exposure lesions. It doesn’thurt or injure the surrounding systems: at the same time laser has the effect of “hot welding” to the
1
28
vessel. It can close the vessel. Therefore it will be less likely to bleed.2. It has less pain. On the one hand because of the thermal coagulation, the nerve ending is damaged
and reduces the feeling of pain. On the other hand the treatment area is small and the treatmenttime is short. Therefore, patients feel less pain. This treatment doesn’t need anesthesia, althoughsome patients may prefer to apply a topical anaesthetic or numbing cream to the skin surface beforeany treatment.
3. The quality of surgery is high. Because there is minimal bleeding during treatment, it leaves aclear view to remove target. Of course it also needs the quality assurance and responsibility of theoperator.
4. The time of surgery is short. The energy of laser is large and centralized. Completing the point ofthe treatment only needs a few nanoseconds and a few milliseconds.
5. less scar: As following the advanced “the principle of selective absorption” to finish laser beauty, itwon’t cause normal tissue irreversible damage, so there is no scar.
6. Fewer recrudescences: as the laser treatment to the lesions is complete, the injury to thesurrounding normal tissue is minimal. Therefore, the rate of the recrudescence is much smaller thantraditional therapy.
Laser Tattoo Removal - Sample Consent Form
Consent: Explanation of TreatmentThe laser is a form of light that specifically targets tattoo pigment in the skin. The tattoo pigment absorbs thelaser light and is broken up into small fragments. These tiny fragments of pigment are then taken away bythe body naturally in the 2~3 weeks following the treatment. It typically takes 8-12 sessions of laser treatmentto remove a tattoo. With laser tattoo removal it is normal to experience inflammation of the skin thatcomprises or redness, swelling, crusting and occasional blistering. The skin may bleed or swell. This reactiontypically lasts a few days and is helped by topical ointment and gentle washing of the skin. Rarely, scarring ofthe skin surface and pigment loss can occur.
Consent: Explanation of Serious or Frequently Occurring Risks1. Pain associated with the laser light – typically like an elastic band hitting the skin2. Skin redness and swelling of the skin surface that typically lasts several days3. Crusting of the surface of the skin and rarely blistering.4. Bleeding of the skin5. Loss of colour of the skin, or more rarely increased brown hyperpigmentation.6. Risk of hypertrophic or keloid scar that may be permanent.7. Small risk of permanent scarring, typically a white mark.8. Risk of failure of the treatment to remove the tattoo
Other risks discussed with the patient
Statement of patient
I agree to the procedure described above
I agree that I must wear eye protection during treatment sessions
I understand that the results of treatment may vary with each individual and that the success of treatmentcan never be guaranteed.
I understand that there may be side-effects that can include reddening of the skin, bruising, mild burning orblistering, increased pigmentation and very rarely scarring
I understand that multiple treatments may be required to achieve the desired result and improvement.
1
29
Name (please print): __________________________________ Signed:_________________________
Dated: _____________________
Operator Confirmation of Consent (I have confirmed that the patient has no further questions and wishesthe procedure to go ahead)
Name (please print): __________________________________ Signed:_________________________
Dated: _____________________
Fitzpatrick Skin Type - Sample FormName: _____________________________________________ Date: ________________________
Please answer the following questions by circling the number which best describes you. Your clinician will total thescore during the consultation.
My ethnic origin is closest to: I. Very fair (Celtic and Scandinavian)
II. Fair-skinned Caucasians with light hair and light eyes
III. Pale-skinned Caucasians with dark hair and dark eyes
IV. Olive-skinned (Mediterranean, someAsian, some Hispanic)
V. Dark-skinned (Middle Eastern, Hispanic, Asians, some Africans)
VI. Very dark-skinned (African)
My eye colour is: Light blue 0
Blue/green 1
Green/gray/golden 2
Hazel/light brown 3
Brown 4
My natural hair colour at age 18 was: Red 0
Blonde 1
Light brown 2
Dark brown 3
Black 4
The colour of my skin that is not normallyexposed to sun is:
Pink to reddish 0
Very pale 1
Pale with a beige tint 2
Light brown 3
Medium to dark brown 4
1
30
Dark brown-black 6
If I go out into the sun for an hour or sowithout sunscreen and have not been outin the sun for weeks, my skin will:
Burn, blister and peel 0
Burn, then when the burn resolves there is little or no colour change 1
Burn, but then turns to tan in a few days 2
Get pink, but then turns to tan quickly 3
Just tan 4
Just gets darker 5
My skin colour is so dark I can’t tell 6
When was the last time the area to be treatedwas exposed to natural sunlight, tanningbooths or artificial tanning cream?
Longer than one month ago 0
Within the past month 1
Within the past two weeks 3
Within the past week 4
Total Score =
If your score is: Your skin type is: Notes:
0 ~ 3 I
4 ~ 7 II
8 ~ 11 III
12 ~ 15 IV
16 ~ 19 V
20 ~ 24 VI
Laser Tattoo Removal Patch Test Form
Patch Test 1: Colour Tested: _____________________________
Parameter Test Patch 1 Test Patch 2 Test Patch 3Wavelength
Energy
Frequency
Distance
Pulse Width
Comments:
Patch Test 2: Colour Tested: _____________________________
Client Name: _______________________________________
Skin Type: _______
Treatment Area: ____________________________________
Date:_____________________

1
31
Parameter Test Patch 1 Test Patch 2 Test Patch 3Wavelength
Energy
Frequency
Distance
Pulse Width
Comments:
Patch Test 3: Colour Tested: _____________________________
Parameter Test Patch 1 Test Patch 2 Test Patch 3Wavelength
Energy
Frequency
Distance
Pulse Width
Comments:
Laser Treatment Record Form
Date
Change ofMedicationsChange of Skin Type
Wavelength
Energy
Client Name: _______________________________________
Skin Type: _______
Treatment Area: ____________________________________
Date:______________________
1
32
Frequency
Distance
Topical AnestheticusedOintment Applied
Reaction
Time Taken
Comments
Cost
Sample client after care instructions
Tattoo Removal Aftercare Advice
The following notes are important. Please read them carefully.
Before Treatment• Avoid exposure to sunlight, sun-beds and fake tan for at least 4 weeks.• If the tattooed area is covered by hair, please shave the area 1 day prior to treatment.• Do advise us of any change in medication.
After Treatment• If the skin has not broken, a dry sterile dressing will be placed over the treated area to protect it.• The area will become raised and feel hot and can be cooled with the use of a cold compress, ice pack or apack of peas from the freezer wrapped in a clean cloth.(Do not apply ice directly to the skin as this can cause a burn).• As long as the skin is unbroken cooling products such as Aloe Vera gel can be used to give relief to thesunburn type feeling of the treated area.• E45 cream, Aloe Vera gel or Vaseline can be used to relieve the itching which normally occurs 3-5 daysafter the treatment.
Whilst Healing• Avoid restrictive clothing.• Avoid perfume or body lotions to the area.• Avoid hot baths or continuous soaking.• Avoid heat treatments such as saunas and steam rooms.• Avoid swimming.• Avoid lying in the sun or using sun beds.• Avoid picking at any scabs.• Avoid allowing the area to become scrapped.
Take great care of the treated area in order to obtain the best end result.


