Embed Size (px)
Citation preview
Automatic Port Configuration for Dell EMC Networking N-Series Switches Dell EMC Networking Solutions Engineering May 2017

2 Automatic Port Configuration for Dell Networking N-Series | v1.0
Revisions
Date Description Authors
May 2017 Initial Release v1.0 Victor Teeter, Ravindra Kadiyala, Asha Chen-Phang
THIS WHITE PAPER IS FOR INFORMATIONAL PURPOSES ONLY, AND MAY CONTAIN TYPOGRAPHICAL ERRORS AND TECHNICAL INACCURACIES. THE CONTENT IS PROVIDED AS IS, WITHOUT EXPRESS OR IMPLIED WARRANTIES OF ANY KIND.
Copyright © 2017 Dell Inc. or its subsidiaries. All Rights Reserved. Except as stated below, no part of this document may be reproduced, distributed or transmitted in any form or by any means, without express permission of Dell.
You may distribute this document within your company or organization only, without alteration of its contents.
THIS DOCUMENT IS PROVIDED “AS-IS”, AND WITHOUT ANY WARRANTY, EXPRESS OR IMPLIED. IMPLIED WARRANTIES OF MERCHANTABILITY AND FITNESS FOR A PARTICULAR PURPOSE ARE SPECIFICALLY DISCLAIMED. PRODUCT WARRANTIES APPLICABLE TO THE DELL PRODUCTS DESCRIBED IN THIS DOCUMENT MAY BE FOUND AT: http://www.dell.com/learn/us/en/vn/terms-of-sale-commercial-and-public-sector-warranties
Performance of network reference architectures discussed in this document may vary with differing deployment conditions, network loads, and the like. Third party products may be included in reference architectures for the convenience of the reader. Inclusion of such third party products does not necessarily constitute Dell’s recommendation of those products. Please consult your Dell representative for additional information.
Trademarks used in this text: Dell™, the Dell logo, Dell Boomi™, PowerEdge™, PowerVault™, PowerConnect™, OpenManage™, EqualLogic™, Compellent™, KACE™, FlexAddress™, Force10™ and Vostro™ are trademarks of Dell Inc. EMC VNX®, and EMC Unisphere® are registered trademarks of Dell. Other Dell trademarks may be used in this document. Cisco Nexus®, Cisco MDS®, Cisco NX-0S®, and other Cisco Catalyst® are registered trademarks of Cisco System Inc. Intel®, Pentium®, Xeon®, Core® and Celeron® are registered trademarks of Intel Corporation in the U.S. and other countries. AMD® is a registered trademark and AMD Opteron™, AMD Phenom™ and AMD Sempron™ are trademarks of Advanced Micro Devices, Inc. Microsoft®, Windows®, Windows Server®, Internet Explorer®, MS-DOS®, Windows Vista® and Active Directory® are either trademarks or registered trademarks of Microsoft Corporation in the United States and/or other countries. Red Hat® and Red Hat® Enterprise Linux® are registered trademarks of Red Hat, Inc. in the United States and/or other countries. Novell® and SUSE® are registered trademarks of Novell Inc. in the United States and other countries. Oracle® is a registered trademark of Oracle Corporation and/or its affiliates. VMware®, Virtual SMP®, vMotion®, vCenter® and vSphere® are registered trademarks or trademarks of VMware, Inc. in the United States or other countries. IBM® is a registered trademark of International Business Machines Corporation. Broadcom® and NetXtreme® are registered trademarks of QLogic Corporation. Other trademarks and trade names may be used in this document to refer to either the entities claiming the marks and/or names or their products and are the property of their respective owners. Dell disclaims proprietary interest in the marks and names of others.
3 Automatic Port Configuration for Dell Networking N-Series | v1.0
Contents 1 Introduction ................................................................................................................................................................... 5
1.1 Purpose of this document ................................................................................................................................... 5
1.2 Supported switches ............................................................................................................................................. 6
1.3 Attachable IP devices .......................................................................................................................................... 6
2 Understanding CLI macros ........................................................................................................................................... 8
2.1 Built-in macros ..................................................................................................................................................... 8
2.2 Passing parameters .......................................................................................................................................... 11
2.3 Custom macros ................................................................................................................................................. 12
3 Creating the Auto Port Profile scripting tool ................................................................................................................ 15 3.1 Py (Python) script file: autoport.py ................................................................................................................... 16
3.2 PRM (parameter) file: autoport.prm ................................................................................................................. 25
4 Applying and executing the Python script (with PRM file) .......................................................................................... 27 4.1 Validating script behavior .................................................................................................................................. 28
5 Disabling the script ...................................................................................................................................................... 29
6 Auto Port Profile script flowchart ................................................................................................................................. 30 7 Troubleshooting .......................................................................................................................................................... 31 8 Best practices and tips ................................................................................................................................................ 34
8.1 Planning and creating scripts ............................................................................................................................ 34
8.2 Testing scripts ................................................................................................................................................... 34
8.3 Deploying and maintaining scripts .................................................................................................................... 35
9 Command quick reference .......................................................................................................................................... 36
A Glossary of Terms ....................................................................................................................................................... 37 B Device identification using LLDP ................................................................................................................................ 38 C Additional Resources .................................................................................................................................................. 40 D Support and Feedback ................................................................................................................................................ 41
4 Automatic Port Configuration for Dell Networking N-Series | v1.0
Executive Summary Within an autonomous network, administrators are often responsible for dozens of network switches and hundreds of network ports. Each port can provide network connectivity to one of many device types including laptops, servers, storage, wireless access points (AP), IP phones, cameras, clocks, printers, lights, controllers, monitors, sensors, routers, and other switches. Each device type typically requires a different set of commands to configure the port in which the device is plugged in. The majority of ports in a switch are typically used and it is the responsibility of the network administrator to provide and maintain the proper configuration for the switch and each port.
This guide provides an efficient method of automating Dell EMC Networking N-Series switches to detect devices being plugged into those switches. The method further allows the switches to automatically configure the corresponding ports for those devices. This Auto Port Profile feature allows for minimal effort on the part of the network administrator when attaching devices, while decreasing the chance of human error.

5 Automatic Port Configuration for Dell Networking N-Series | v1.0
1 Introduction This document is a supplement to the Dell EMC Networking N-Series User Guides listed in the Additional Resources section on page 38. The step-by-step instructions provide examples to help network administrators configure Dell EMC Networking N-Series switches to detect when devices are being plugged into a switch, then automatically configures the corresponding ports for those devices. Two existing Dell EMC Networking N-Series features, Python scripting and CLI macros, are joined to implement this efficient method of automatic port provisioning.
Python scripting
Dell EMC Networking N-Series switches with firmware 6.3.x.x and later support installation and execution of Python applications to assist in configuring these switches. Network administrators often take advantage of this feature when they have several switches requiring configuration changes at once, or when one or more switches require frequent changes. Scripting allows efficiencies in performing management tasks such as regular backups of switch configurations or firmware updates. Any number of CLI commands may be automated with the use of a Python script. Dell EMC Networking N-Series supports Python version 2.7.10.
CLI macros
CLI macros provide a convenient way to save and distribute common configurations. A CLI macro is a set of the CLI commands having a unique name. When a CLI macro is applied, the commands contained within the macro are executed and added to the running-configuration. When the macro is applied to an interface, the existing configuration is not lost. Instead, the new commands are added to the configuration. N-Series switches offer several pre-defined, built-in CLI macros that may be applied to one or more interfaces on a switch to quickly configure their settings. Up to 50 user-defined, custom macros are also supported. This guide discusses the use of both custom and built-in instances.
A Python script example is provided in this guide that allows a switch to automatically detect new devices as they are connected to the switch, and then applies the appropriate CLI macros to configure the corresponding ports.
1.1 Purpose of this document Table 1 provides details regarding the purpose of this guide:
Is/Is not This guide is / does This guide is not / does not a supplement to the N-Series User Guide a Python reference manual an instruction guide for how to create custom scripts contain completed scripts for every situation show examples for automating configurations include scripts for all device types for Dell EMC N-series switches running DNOS a guide for C-Series, S-Series or other switches provided to help network administrators who use Python understand it’s capabilities on N-Series
imply or claim that Dell EMC maintains or supports any example scripts within

6 Automatic Port Configuration for Dell Networking N-Series | v1.0
1.2 Supported switches Examples in this guide use Dell EMC Networking N2024P, N2128PX-ON, and N3048P switches. However, scripts and commands shown in this guide will run on any N-Series switches with firmware version 6.3 or later, including:
N1524, N1524P, N1548, N1548P, N2024, N2024P, N2048, N2048P, N2128PX-ON, N3024, N3024F, N3024P, N3048, N3048P, N3132PX-ON, N4032, N4032F, N4064, N4064F This guide describes implementations that typically use PoE switches and devices. However, non-PoE switches and devices may also take advantage of these automation features.
Note: Dell EMC strongly advises switch administrators to maintain Dell EMC Networking N-Series switches with the latest version of the Dell EMC Networking Operating System. For critical infrastructure, Dell EMC recommends prestaging new releases into a non-critical portion of the network to verify configurations and operations prior to installing into a production environment.
1.3 Attachable IP devices Figure 1 demonstrates how a variety of devices can be physically connected to an Ethernet network switch. Each port where a device is attached requires specific commands to properly configure the switch to allow the attached device to effectively communicate with the rest of the network. Wireless APs, IP phones, cameras, and other devices are just a small sample of the types of equipment available on the market today that can be employed over an Ethernet network.
Example IP devices attached to an Ethernet switch for passing network traffic
The network administrator can decide which device types they want to support for automatic port configuration and program their script accordingly. This guide uses IP phones, Wireless APs, and other switches as examples. This device list can easily be modified with other device types.

7 Automatic Port Configuration for Dell Networking N-Series | v1.0
Though Power over Ethernet (PoE) switches and devices are typically used for the type of implementation described throughout this guide, non-PoE switches and devices may also take advantage of these automation features. PoE only allows for the connected devices to be powered through the network cable.
When using the method and scripts provided in this guide, the N-Series switch must be up and running prior to connecting end devices that are expected to be automatically configured. The examples start with a minimal configuration and only contain a user id, password, and management IP address.

8 Automatic Port Configuration for Dell Networking N-Series | v1.0
2 Understanding CLI macros The Python script example provided in this guide allows you to add support for any number of end-user devices expected to attach to your switch. You may choose which macros to include in your script based on the type of devices you anticipate attaching. Dell EMC recommends selecting and testing the CLI macros required for the job prior to automating and implementing on a large scale.
CLI macros may have up to three variables replaced by values provided from a parameters (.prm) file upon application of the macro. Macros can be applied to specific interfaces, a range of interfaces, or the global configuration.
Note: Variables are often referred to as keys. Both terms are used in this guide.
There are two types of macros:
• Built-In: predefined macros available in the switch OS, which cannot be changed or deleted. • Custom: user-defined macros, which allow the operator to bundle multiple built-in macros and/or
add-remove commands as desired. Up to 50 user-defined macros are supported.
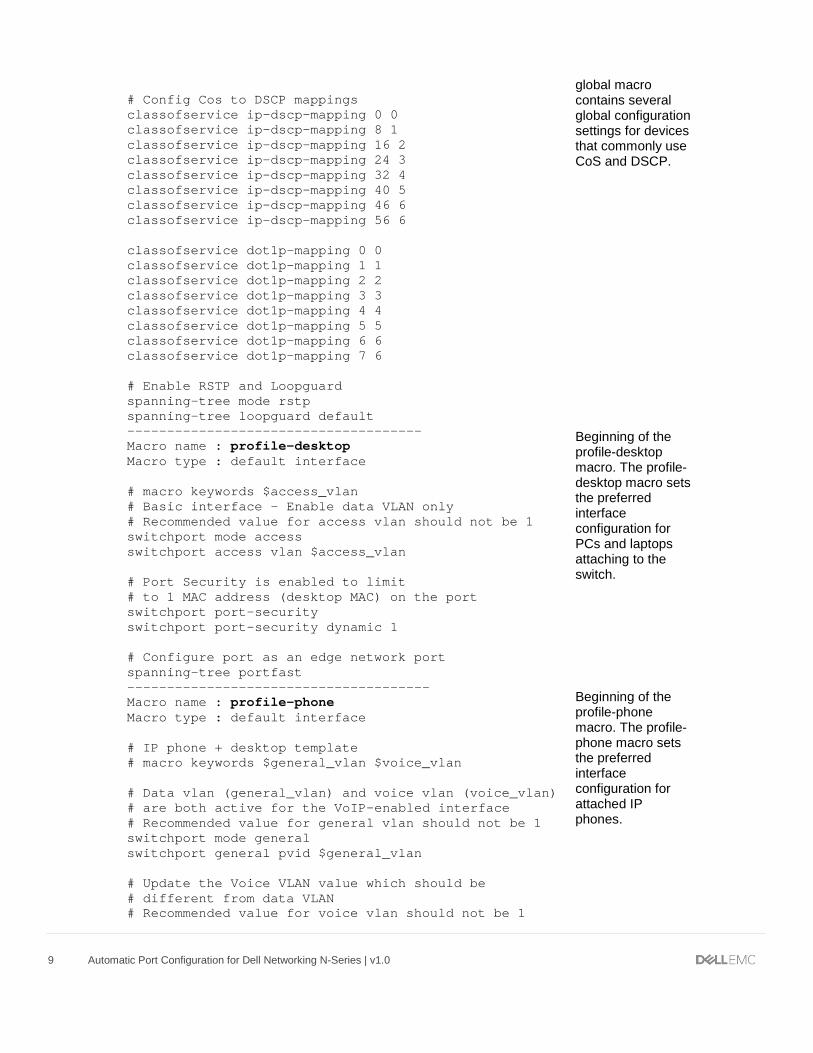
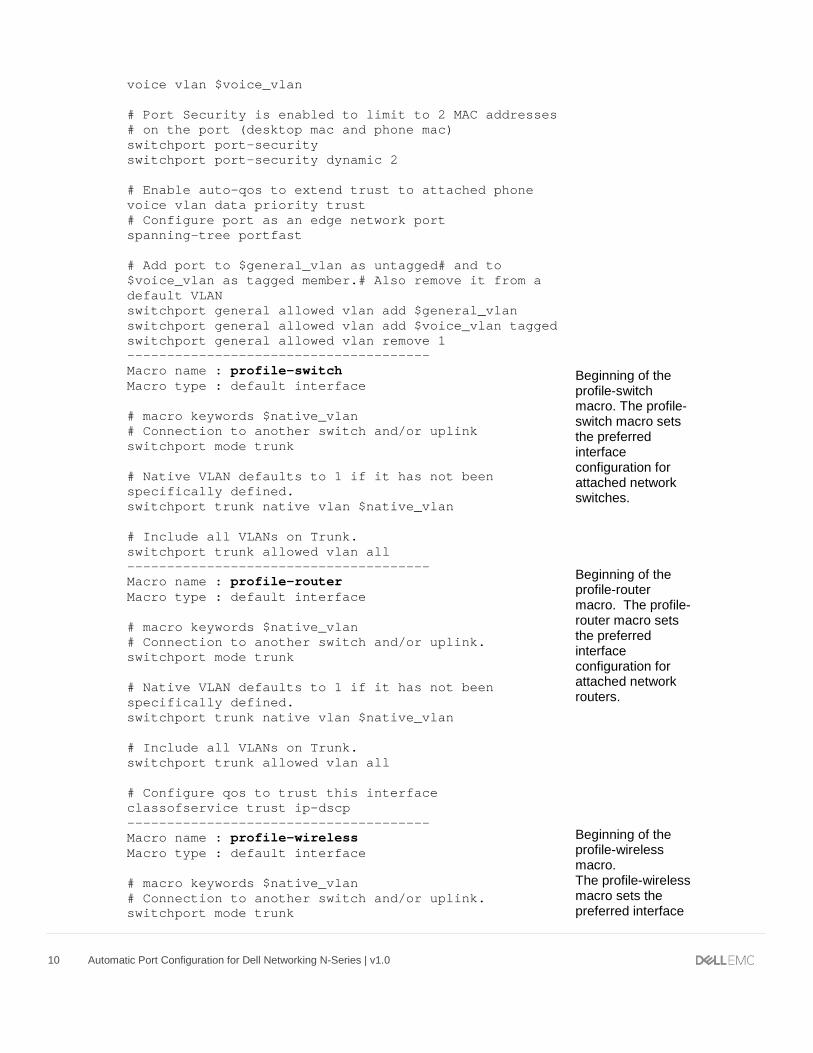
2.1 Built-in macros There are two types of built-in macros. Global macros add commands to the global configuration of the switch, while interface macros add commands directly to one or more interfaces on the switch. There are two global macros (profile-global and profile-compellent-nas) and five interface macros. Run the show parser macro brief command to see a summarized list of all built-in macros available on the N-Series switch.
N3024P#show parser macro brief default global : profile-global default interface : profile-desktop default interface : profile-phone default interface : profile-switch default interface : profile-router default interface : profile-wireless default global : profile-compellent-nas
Run the show parser macro command for a detailed list of the built-in macros including all commands contained within each macro. Notice that each keyword variable starts with a dollar sign ($). Each of these keywords requires an external parameter be passed to it to complete the command. Up to three keys may be passed to a macro file. Section 2.2 Passing parameters provides an example of how to pass parameters when executing the macro from a command line.
command and output description
console#show parser macro Total number of macros = 7 -------------------------------------- Macro name : profile-global Macro type : default global
Beginning of the profile-global macro. The profile-
9 Automatic Port Configuration for Dell Networking N-Series | v1.0
# Config Cos to DSCP mappings classofservice ip-dscp-mapping 0 0 classofservice ip-dscp-mapping 8 1 classofservice ip-dscp-mapping 16 2 classofservice ip-dscp-mapping 24 3 classofservice ip-dscp-mapping 32 4 classofservice ip-dscp-mapping 40 5 classofservice ip-dscp-mapping 46 6 classofservice ip-dscp-mapping 56 6 classofservice dot1p-mapping 0 0 classofservice dot1p-mapping 1 1 classofservice dot1p-mapping 2 2 classofservice dot1p-mapping 3 3 classofservice dot1p-mapping 4 4 classofservice dot1p-mapping 5 5 classofservice dot1p-mapping 6 6 classofservice dot1p-mapping 7 6 # Enable RSTP and Loopguard spanning-tree mode rstp spanning-tree loopguard default ------------------------------------- Macro name : profile-desktop Macro type : default interface # macro keywords $access_vlan # Basic interface - Enable data VLAN only # Recommended value for access vlan should not be 1 switchport mode access switchport access vlan $access_vlan # Port Security is enabled to limit # to 1 MAC address (desktop MAC) on the port switchport port-security switchport port-security dynamic 1 # Configure port as an edge network port spanning-tree portfast -------------------------------------- Macro name : profile-phone Macro type : default interface # IP phone + desktop template # macro keywords $general_vlan $voice_vlan # Data vlan (general_vlan) and voice vlan (voice_vlan) # are both active for the VoIP-enabled interface # Recommended value for general vlan should not be 1 switchport mode general switchport general pvid $general_vlan # Update the Voice VLAN value which should be # different from data VLAN # Recommended value for voice vlan should not be 1
global macro contains several global configuration settings for devices that commonly use CoS and DSCP. Beginning of the profile-desktop macro. The profile-desktop macro sets the preferred interface configuration for PCs and laptops attaching to the switch. Beginning of the profile-phone macro. The profile-phone macro sets the preferred interface configuration for attached IP phones.
10 Automatic Port Configuration for Dell Networking N-Series | v1.0
voice vlan $voice_vlan # Port Security is enabled to limit to 2 MAC addresses # on the port (desktop mac and phone mac) switchport port-security switchport port-security dynamic 2 # Enable auto-qos to extend trust to attached phone voice vlan data priority trust # Configure port as an edge network port spanning-tree portfast # Add port to $general_vlan as untagged# and to $voice_vlan as tagged member.# Also remove it from a default VLAN switchport general allowed vlan add $general_vlan switchport general allowed vlan add $voice_vlan tagged switchport general allowed vlan remove 1 -------------------------------------- Macro name : profile-switch Macro type : default interface # macro keywords $native_vlan # Connection to another switch and/or uplink switchport mode trunk
# Native VLAN defaults to 1 if it has not been specifically defined. switchport trunk native vlan $native_vlan # Include all VLANs on Trunk. switchport trunk allowed vlan all -------------------------------------- Macro name : profile-router Macro type : default interface # macro keywords $native_vlan # Connection to another switch and/or uplink. switchport mode trunk # Native VLAN defaults to 1 if it has not been specifically defined. switchport trunk native vlan $native_vlan # Include all VLANs on Trunk. switchport trunk allowed vlan all # Configure qos to trust this interface classofservice trust ip-dscp -------------------------------------- Macro name : profile-wireless Macro type : default interface # macro keywords $native_vlan # Connection to another switch and/or uplink. switchport mode trunk
Beginning of the profile-switch macro. The profile-switch macro sets the preferred interface configuration for attached network switches. Beginning of the profile-router macro. The profile-router macro sets the preferred interface configuration for attached network routers. Beginning of the profile-wireless macro. The profile-wireless macro sets the preferred interface

11 Automatic Port Configuration for Dell Networking N-Series | v1.0
2.2 Passing parameters Scripts often contain variables that allow for users to pass unique values to the script in the form of parameters. This prevents the need to hard-code the macro script each time it is to be used in a slightly different capacity.
Variables contained in the profile scripts are indicated by a dollar sign ($) as the first character. Each variable, or keyword, requires an external parameter be passed to it to complete the command. The below CLI output demonstrates how to manually pass parameters when executing the macro from a command line.
Commands are provided showing an example (profile-phone) macro being applied to interface gi1/0/1. This macro requires two parameters in order for it to work: $general_vlan and $voice_vlan. This example begins by showing no IP phone configuration present on the interface.
console#show running-config interface gigabitethernet 1/0/1
Create VLANs that may be applied to any switch interface:
console#config console(config)#vlan 10,20 console(config-vlan10,20)#exit
Apply the profile-phone macro to the interface while passing it the two VLAN parameters:
console(config)#interface gigabitethernet 1/0/1
# Native VLAN defaults to 1 if it has not been specifically defined. switchport trunk native vlan $native_vlan # Include all VLANs on Trunk. switchport trunk allowed vlan all # Configure qos to trust this interface classofservice trust ip-dscp -------------------------------------- Macro name : profile-compellent-nas Macro type : default global # macro keywords $interface_name # Compellent NAS macro flowcontrol system jumbo mtu 9216 # interface $interface_name no storm-control unicast spanning-tree portfast exit
configuration for attached Wireless APs. Beginning of the profile-compellent-nas macro. This macro contains several global settings for traffic tuning of Compellent NAS devices. See the N-Series User Guide for more information on using this macro.

12 Automatic Port Configuration for Dell Networking N-Series | v1.0
console(config-if-Gi1/0/1)#macro apply profile-phone $general_vlan 10 $voice_vlan 20 console(config-if-Gi1/0/1)#exit console(config)#exit
Re-run the show command to display the new port settings:
console#show running-config interface gigabitethernet 1/0/1 spanning-tree portfast switchport mode general switchport general pvid 10 switchport general allowed vlan add 10 switchport general allowed vlan add 20 tagged switchport general allowed vlan remove 1 switchport port-security switchport port-security dynamic 2 voice vlan 20 macro description profile-phone
Note: The show running-configuration command shows the comment “macro description profile-xxxx” on all interface configurations where a macro was used in configuring the interface.
2.3 Custom macros The Dell EMC Networking N-Series switch also gives the user the ability to create their own custom macros. This may be necessary if none of the built-in macros provide the desired configuration needed for a port.
In the example below, a custom macro profile-shaper is created. The new macro is then modified to be used for traffic shaping when devices requiring 60Mbps speeds are discovered on a 1Gbps port. The commands in bold are ran from the CLI prompt.
Display the list of macros available:
console#show parser macro brief default global : profile-global default interface : profile-desktop default interface : profile-phone default interface : profile-switch default interface : profile-router default interface : profile-wireless default global : profile-compellent-nas
13 Automatic Port Configuration for Dell Networking N-Series | v1.0
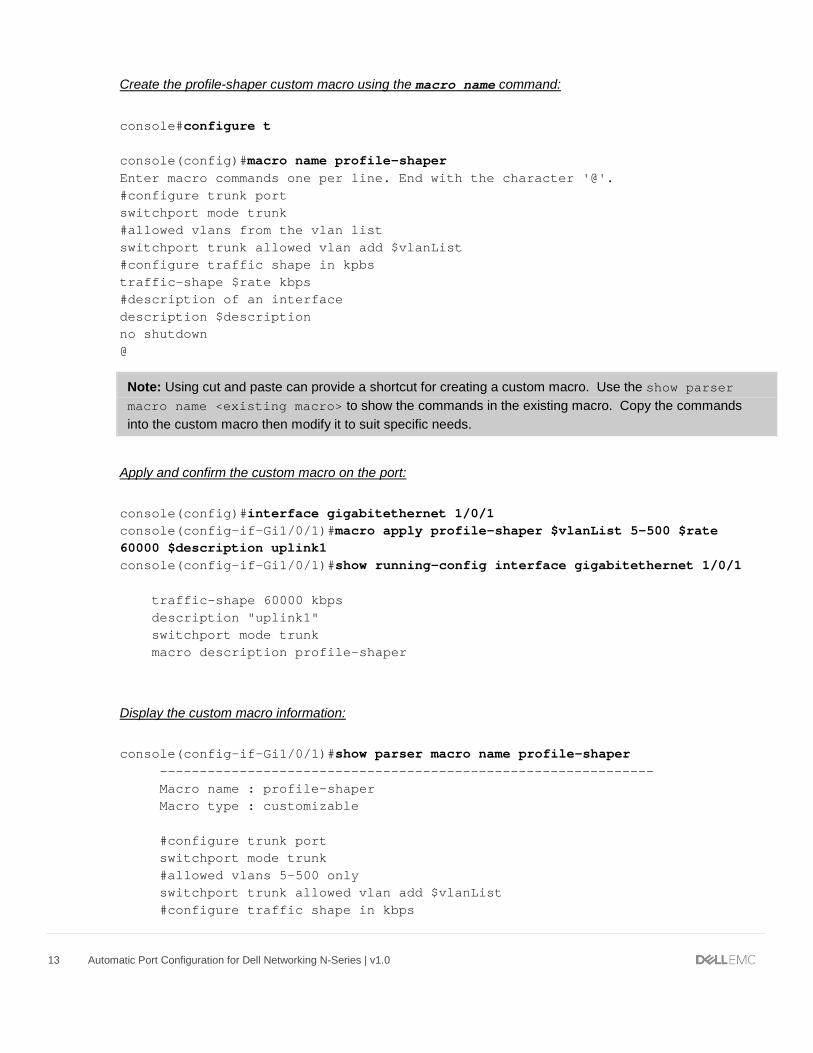
Create the profile-shaper custom macro using the macro name command:
console#configure t console(config)#macro name profile-shaper Enter macro commands one per line. End with the character '@'. #configure trunk port switchport mode trunk #allowed vlans from the vlan list switchport trunk allowed vlan add $vlanList #configure traffic shape in kpbs traffic-shape $rate kbps #description of an interface description $description no shutdown @
Note: Using cut and paste can provide a shortcut for creating a custom macro. Use the show parser macro name <existing macro> to show the commands in the existing macro. Copy the commands into the custom macro then modify it to suit specific needs.
Apply and confirm the custom macro on the port:
console(config)#interface gigabitethernet 1/0/1 console(config-if-Gi1/0/1)#macro apply profile-shaper $vlanList 5-500 $rate 60000 $description uplink1 console(config-if-Gi1/0/1)#show running-config interface gigabitethernet 1/0/1 traffic-shape 60000 kbps description "uplink1" switchport mode trunk macro description profile-shaper
Display the custom macro information:
console(config-if-Gi1/0/1)#show parser macro name profile-shaper -------------------------------------------------------------- Macro name : profile-shaper Macro type : customizable #configure trunk port switchport mode trunk #allowed vlans 5-500 only switchport trunk allowed vlan add $vlanList #configure traffic shape in kbps
14 Automatic Port Configuration for Dell Networking N-Series | v1.0
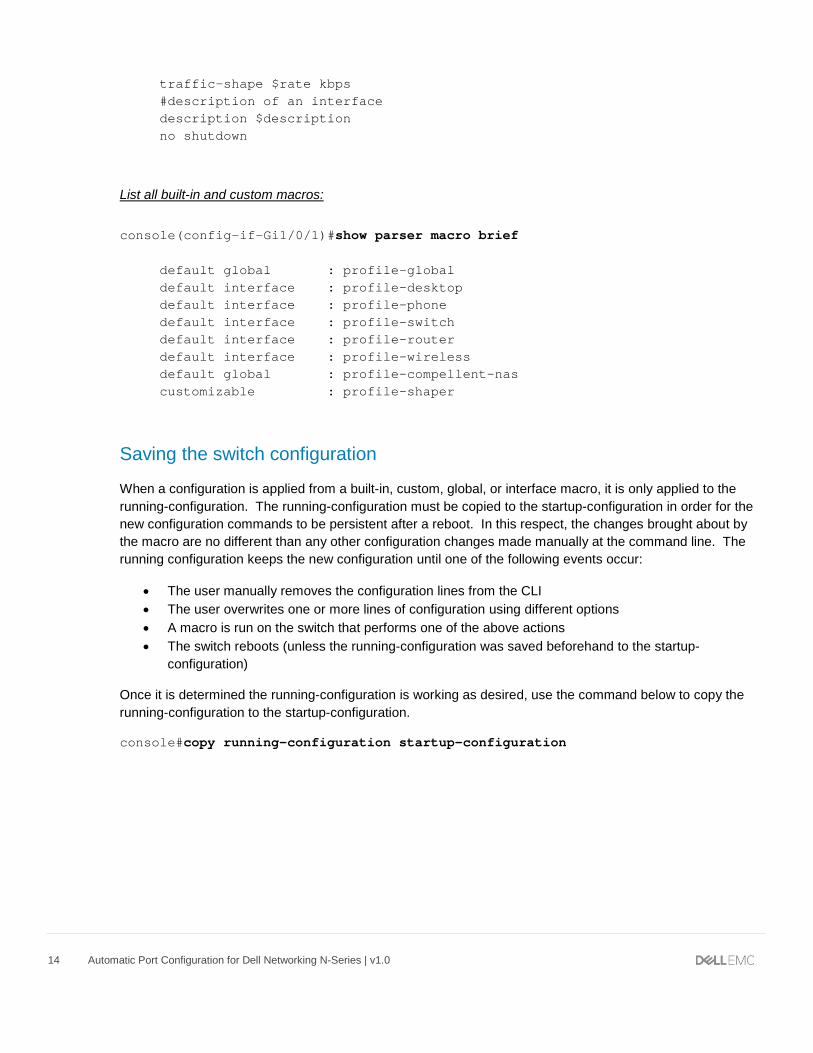
traffic-shape $rate kbps #description of an interface description $description no shutdown
List all built-in and custom macros:
console(config-if-Gi1/0/1)#show parser macro brief default global : profile-global default interface : profile-desktop default interface : profile-phone default interface : profile-switch default interface : profile-router default interface : profile-wireless default global : profile-compellent-nas customizable : profile-shaper
Saving the switch configuration
When a configuration is applied from a built-in, custom, global, or interface macro, it is only applied to the running-configuration. The running-configuration must be copied to the startup-configuration in order for the new configuration commands to be persistent after a reboot. In this respect, the changes brought about by the macro are no different than any other configuration changes made manually at the command line. The running configuration keeps the new configuration until one of the following events occur:
• The user manually removes the configuration lines from the CLI • The user overwrites one or more lines of configuration using different options • A macro is run on the switch that performs one of the above actions • The switch reboots (unless the running-configuration was saved beforehand to the startup-
configuration)
Once it is determined the running-configuration is working as desired, use the command below to copy the running-configuration to the startup-configuration.
console#copy running-configuration startup-configuration
15 Automatic Port Configuration for Dell Networking N-Series | v1.0
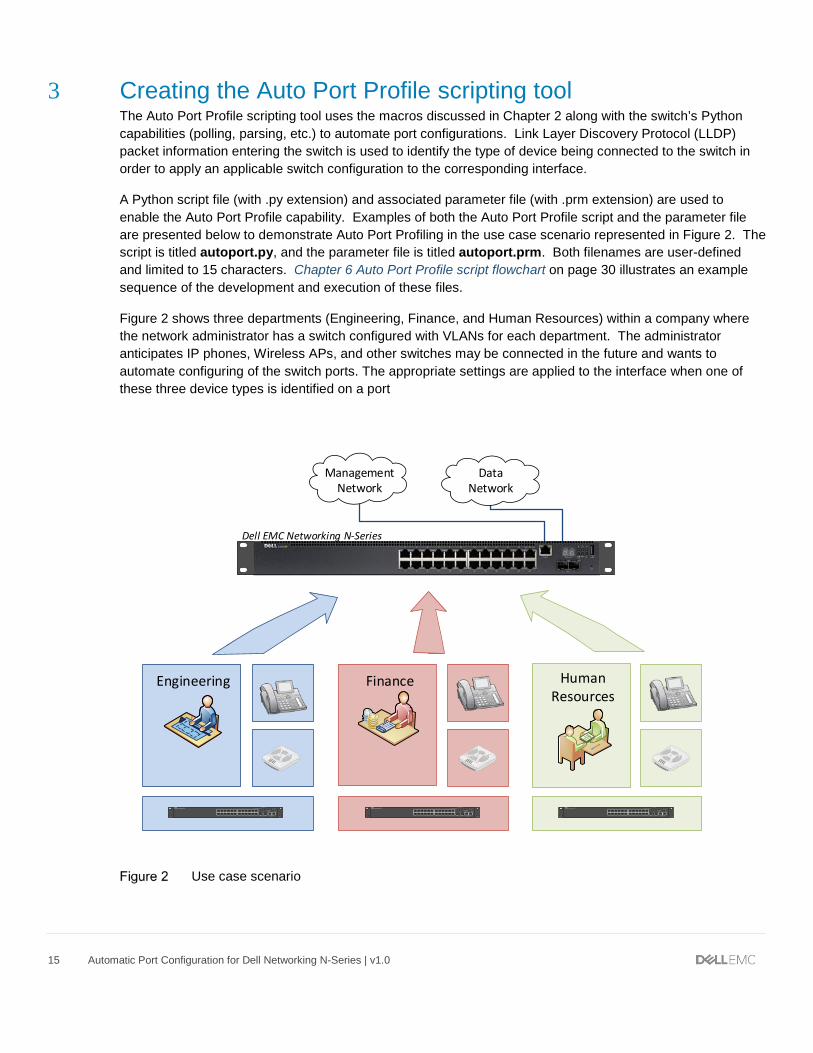
3 Creating the Auto Port Profile scripting tool The Auto Port Profile scripting tool uses the macros discussed in Chapter 2 along with the switch’s Python capabilities (polling, parsing, etc.) to automate port configurations. Link Layer Discovery Protocol (LLDP) packet information entering the switch is used to identify the type of device being connected to the switch in order to apply an applicable switch configuration to the corresponding interface.
A Python script file (with .py extension) and associated parameter file (with .prm extension) are used to enable the Auto Port Profile capability. Examples of both the Auto Port Profile script and the parameter file are presented below to demonstrate Auto Port Profiling in the use case scenario represented in Figure 2. The script is titled autoport.py, and the parameter file is titled autoport.prm. Both filenames are user-defined and limited to 15 characters. Chapter 6 Auto Port Profile script flowchart on page 30 illustrates an example sequence of the development and execution of these files.
Figure 2 shows three departments (Engineering, Finance, and Human Resources) within a company where the network administrator has a switch configured with VLANs for each department. The administrator anticipates IP phones, Wireless APs, and other switches may be connected in the future and wants to automate configuring of the switch ports. The appropriate settings are applied to the interface when one of these three device types is identified on a port
FinanceEngineering
1
2
3
4
5
6
7
8
9
10
11
12
13
14
15
16
17
18
19
20
21
22
23
24
FDX/HDX
LNK/ACT
DIAGSTACK ID
G1 G2 G4G3
LNK/ACT FDX/HDX
MASTER RPS PWR
FAN TEMP
RESETSELECT
LNK/ACT
LNK/ACT
STACKINGPORT
1 2 3 4
5 6 7 8
Human Resources
21 22 23 24
LNK ACT
Reset
Stack No.M MPSFan
PWRStatus
COMBO PORTS
LNK POE
2 4 6 8 10 12 14 16 18 20 22 24
1 3 5 7 9 11 13 15 17 19 21 23
Management Network
Dell EMC Networking N-Series
1
2
3
4
5
6
7
8
9
10
11
12
13
14
15
16
17
18
19
20
21
22
23
24
FDX/HDX
LNK/ACT
DIAGSTACK ID
G1 G2 G4G3
LNK/ACT FDX/HDX
MASTER RPS PWR
FAN TEMP
RESETSELECT
LNK/ACT
LNK/ACT
STACKINGPORT
1 2 3 4
5 6 7 8
1
2
3
4
5
6
7
8
9
10
11
12
13
14
15
16
17
18
19
20
21
22
23
24
FDX/HDX
LNK/ACT
DIAGSTACK ID
G1 G2 G4G3
LNK/ACT FDX/HDX
MASTER RPS PWR
FAN TEMP
RESETSELECT
LNK/ACT
LNK/ACT
STACKINGPORT
1 2 3 4
5 6 7 8
Data Network
Use case scenario
16 Automatic Port Configuration for Dell Networking N-Series | v1.0
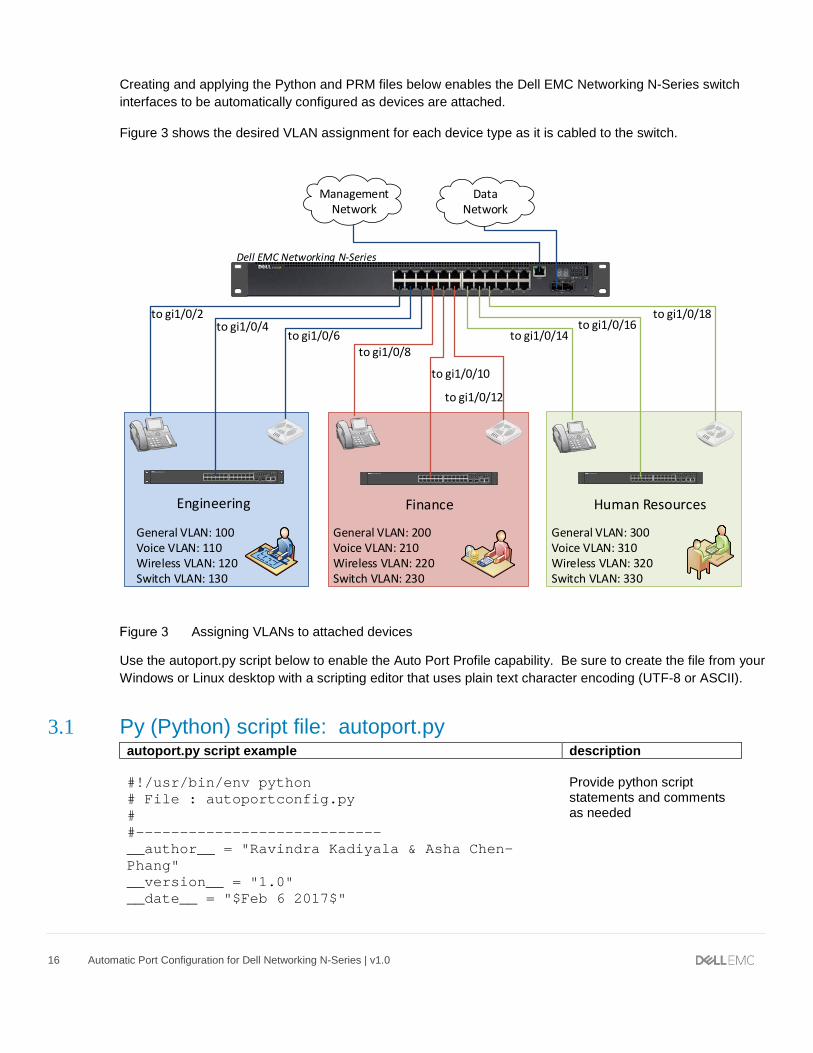
Creating and applying the Python and PRM files below enables the Dell EMC Networking N-Series switch interfaces to be automatically configured as devices are attached.
Figure 3 shows the desired VLAN assignment for each device type as it is cabled to the switch.
1
2
3
4
5
6
7
8
9
10
11
12
13
14
15
16
17
18
19
20
21
22
23
24
FDX/HDX
LNK/ACT
DIAGSTACK ID
G1 G2 G4G3
LNK/ACT FDX/HDX
MASTER RPS PWR
FAN TEMP
RESETSELECT
LNK/ACT
LNK/ACT
STACKINGPORT
1 2 3 4
5 6 7 8
Engineering
1
2
3
4
5
6
7
8
9
10
11
12
13
14
15
16
17
18
19
20
21
22
23
24
FDX/HDX
LNK/ACT
DIAGSTACK ID
G1 G2 G4G3
LNK/ACT FDX/HDX
MASTER RPS PWR
FAN TEMP
RESETSELECT
LNK/ACT
LNK/ACT
STACKINGPORT
1 2 3 4
5 6 7 8 1
2
3
4
5
6
7
8
9
10
11
12
13
14
15
16
17
18
19
20
21
22
23
24
FDX/HDX
LNK/ACT
DIAGSTACK ID
G1 G2 G4G3
LNK/ACT FDX/HDX
MASTER RPS PWR
FAN TEMP
RESETSELECT
LNK/ACT
LNK/ACT
STACKINGPORT
1 2 3 4
5 6 7 8
21 22 23 24
LNK ACT
Reset
Stack No.M MPSFan
PWRStatus
COMBO PORTS
LNK POE
2 4 6 8 10 12 14 16 18 20 22 24
1 3 5 7 9 11 13 15 17 19 21 23
General VLAN: 100Voice VLAN: 110Wireless VLAN: 120Switch VLAN: 130
General VLAN: 200Voice VLAN: 210Wireless VLAN: 220Switch VLAN: 230
General VLAN: 300Voice VLAN: 310Wireless VLAN: 320Switch VLAN: 330
Dell EMC Networking N-Series
Management Network
Data Network
to gi1/0/2to gi1/0/4
to gi1/0/6to gi1/0/8
to gi1/0/10
to gi1/0/12
to gi1/0/14to gi1/0/16
to gi1/0/18
Finance Human Resources
Assigning VLANs to attached devices
Use the autoport.py script below to enable the Auto Port Profile capability. Be sure to create the file from your Windows or Linux desktop with a scripting editor that uses plain text character encoding (UTF-8 or ASCII).
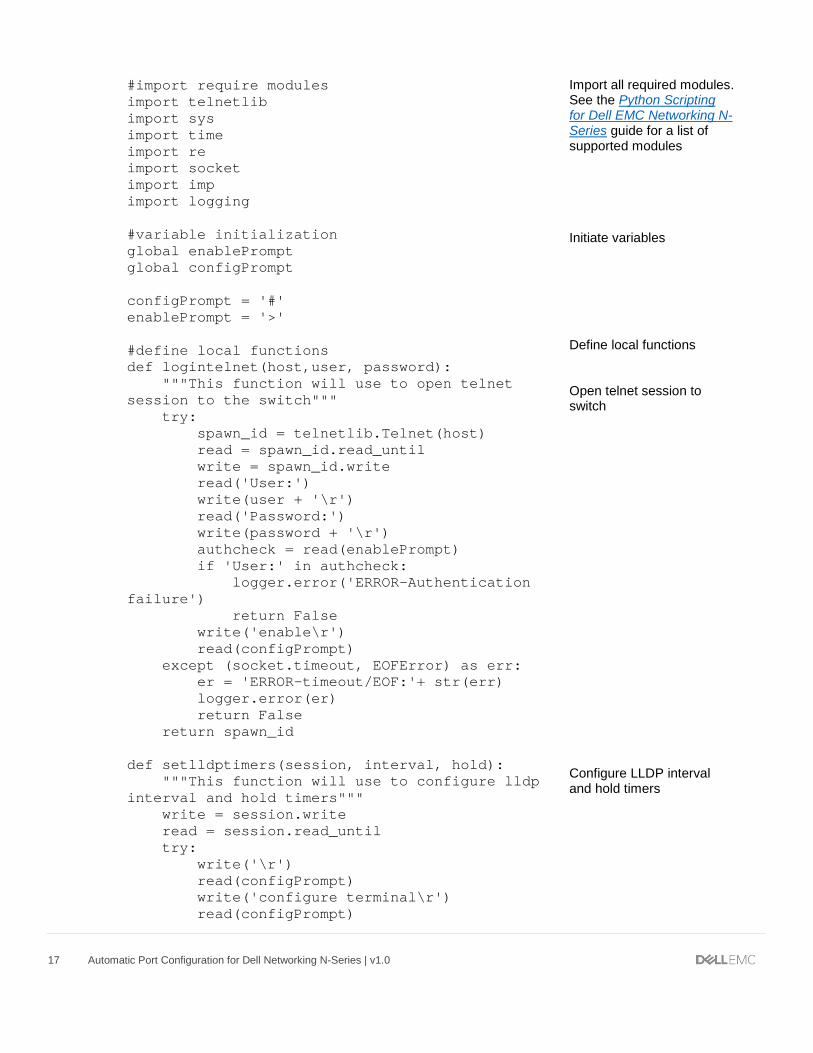
3.1 Py (Python) script file: autoport.py autoport.py script example description #!/usr/bin/env python # File : autoportconfig.py # #---------------------------- __author__ = "Ravindra Kadiyala & Asha Chen-Phang" __version__ = "1.0" __date__ = "$Feb 6 2017$"
Provide python script statements and comments as needed
17 Automatic Port Configuration for Dell Networking N-Series | v1.0
#import require modules import telnetlib import sys import time import re import socket import imp import logging #variable initialization global enablePrompt global configPrompt configPrompt = '#' enablePrompt = '>' #define local functions def logintelnet(host,user, password): """This function will use to open telnet session to the switch""" try: spawn_id = telnetlib.Telnet(host) read = spawn_id.read_until write = spawn_id.write read('User:') write(user + '\r') read('Password:') write(password + '\r') authcheck = read(enablePrompt) if 'User:' in authcheck: logger.error('ERROR-Authentication failure') return False write('enable\r') read(configPrompt) except (socket.timeout, EOFError) as err: er = 'ERROR-timeout/EOF:'+ str(err) logger.error(er) return False return spawn_id def setlldptimers(session, interval, hold): """This function will use to configure lldp interval and hold timers""" write = session.write read = session.read_until try: write('\r') read(configPrompt) write('configure terminal\r') read(configPrompt)
Import all required modules. See the Python Scripting for Dell EMC Networking N-Series guide for a list of supported modules Initiate variables Define local functions Open telnet session to switch Configure LLDP interval and hold timers

18 Automatic Port Configuration for Dell Networking N-Series | v1.0
write('lldp timers interval ' + str(interval) +'\r') read(configPrompt) write('lldp timer hold ' + str(hold) +'\r') read(configPrompt) write('exit\r') read(configPrompt) except Exception as err: er = 'ERROR-Fail to configure lldp timers:' + str(err) logger.error(er) return False return True def getlldpifname(session): """This function is used to get lldp interface list on the switch""" write = session.write read = session.read_until try: write('\r') read(configPrompt) write('terminal length 0\r') read(configPrompt) write('show lldp remote-device all\r') lldpdetails = read(configPrompt) gigint = re.compile("^Gi\d/\d/\d+", re.MULTILINE) gigintlist = gigint.findall(lldpdetails) teint = re.compile("^Te\d/\d/\d+", re.MULTILINE) teintlist = teint.findall(lldpdetails) lldpiflist = gigintlist + teintlist except Exception as err: er = 'ERROR-Fail to get lldp interfaces info:' + str(err) logger.error(er) return False return lldpiflist def readparams(filename): """This function will use to read the parameters from the .prm file""" try: f = open(filename) global params params = imp.load_source('params', "", f) f.close() except Exception as err:
Display error if failure occurs Obtain LLDP interface listing from the switch Display error if failure occurs Read parameters from the parameter (.prm) file

19 Automatic Port Configuration for Dell Networking N-Series | v1.0
er = 'ERROR-Fail to read parameter file:' + str(err) logger.error(er) return False return True def getlldpdetails(session, ifname): """This function will use to get lldp remote-device details on the switch""" write = session.write read = session.read_until retval =[] try: write('\r') read(configPrompt) write('terminal length 0\r') read(configPrompt) for i in ifname: write('show lldp remote-device detail' +' '+ i +' \r') output = read(configPrompt) portid = re.search('(?<=Port\sID:\s).+\S', output) sysname = re.search('(?<=System\sName:\s).+\S', output) sysdesc = re.search('(?<=System\sDescription:\s).+\S', output) portdesc = re.search('(?<=Port\sDescription:\s).+\S', output) syscapsupp = re.search('(?<=Capabilities\sSupported:\s).+\S', output) syscapen = re.search('(?<=Capabilities\sEnabled:\s).+\S', output) lldpfields = [portid, portdesc, syscapsupp, syscapen, sysdesc] for field in lldpfields: if field != None: lldpfields[lldpfields.index(field)] = field.group() res = {'interface':i, 'portid': lldpfields[0],'portdesc': lldpfields[1],'syscapsupp': lldpfields[2],'syscapen': lldpfields[3 ],'sysdesc':lldpfields[4]} retval.append(res)
Display error if failure occurs Retrieve LLDP details from device connecting to the switch Retrieve system capabilities supported by the device to identify device type Retrieve system capabilities enabled on the device to identify device type

20 Automatic Port Configuration for Dell Networking N-Series | v1.0
except Exception as err: er = 'ERROR- getlldpdetails:' + str(err) logger.error(er) retval = False return retval def converttolist(intlist): """This function will use to convert interfaces range to list""" ret = [] iflist= intlist.split() try: for index in range(0,len(iflist)): if '-' in iflist[index]: splitint = intlist.split('-') intind1 = splitint[0] intind2 = splitint[1] splitind1 = intind1.split('/') splitind2 = intind2.split('/') ifid1 = splitind1[-1] ifid2 = splitind2[-1] for x in range(int(ifid1),int(ifid2)+1): res = str(intind1[0:6]) + str(x) ret.append(res) else: ret.append(iflist[index]) except Exception as err: er = 'ERROR-Fail to convert interfaces to list:' + str(err) logger.error(er) return ret def applymacro(session,lldpdata): """This function will apply macro on the switch""" write = session.write read = session.read_until macroerr = ['Error', 'No value', 'does not', 'Invalid'] macroprm =[] ret = True var = vars(params).keys() for index in var: if '_' not in index: macroprm.append(index) try: for ind in range(0, len(lldpdata)):
Display error if failure occurs Convert an interface range to a list Display error if failure occurs Function to apply the appropriate macro Display error if failure occurs
21 Automatic Port Configuration for Dell Networking N-Series | v1.0
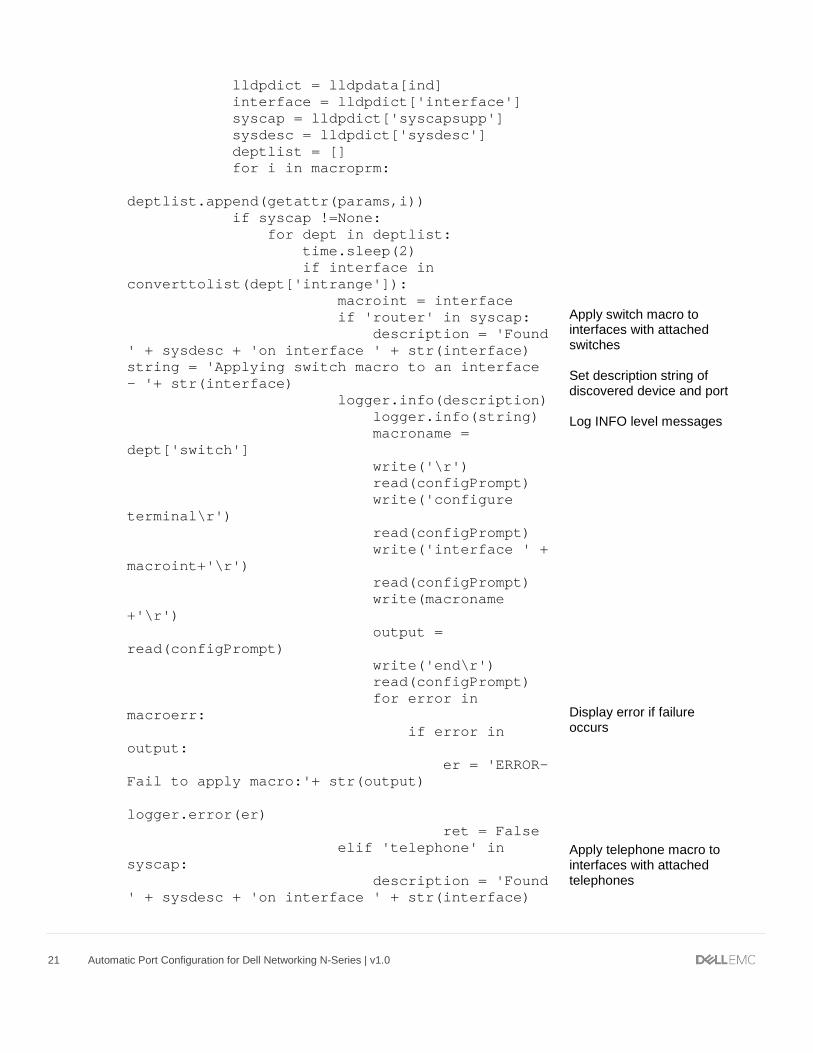
lldpdict = lldpdata[ind] interface = lldpdict['interface'] syscap = lldpdict['syscapsupp'] sysdesc = lldpdict['sysdesc'] deptlist = [] for i in macroprm: deptlist.append(getattr(params,i)) if syscap !=None: for dept in deptlist: time.sleep(2) if interface in converttolist(dept['intrange']): macroint = interface if 'router' in syscap: description = 'Found ' + sysdesc + 'on interface ' + str(interface) string = 'Applying switch macro to an interface - '+ str(interface) logger.info(description) logger.info(string) macroname = dept['switch'] write('\r') read(configPrompt) write('configure terminal\r') read(configPrompt) write('interface ' + macroint+'\r') read(configPrompt) write(macroname +'\r') output = read(configPrompt) write('end\r') read(configPrompt) for error in macroerr: if error in output: er = 'ERROR-Fail to apply macro:'+ str(output) logger.error(er) ret = False elif 'telephone' in syscap: description = 'Found ' + sysdesc + 'on interface ' + str(interface)
Apply switch macro to interfaces with attached switches Set description string of discovered device and port Log INFO level messages Display error if failure occurs Apply telephone macro to interfaces with attached telephones

22 Automatic Port Configuration for Dell Networking N-Series | v1.0
string = 'Applying telephone macro to an interface - '+ str(interface) logger.info(description) logger.info(string) macroname = dept['telephone'] write('\r') read(configPrompt) write('configure terminal\r') read(configPrompt) write('interface ' + macroint+'\r') read(configPrompt) write(macroname +'\r') output = read(configPrompt) write('end\r') read(configPrompt) for error in macroerr: if error in output: er = 'ERROR-Fail to apply macro:' + str(output) logger.error(er) ret = False elif 'WLAN access point' in syscap: description = 'Found ' + sysdesc + 'on interface ' + str(interface) string = 'Applying WLAN access point macro to an interface - '+ str(interface) logger.info(description) logger.info(string) macroname = dept['wlanap'] write('\r') read(configPrompt) write('configure terminal\r') read(configPrompt) write('interface ' + macroint+'\r') read(configPrompt) write(macroname +'\r')
Set description string of discovered device and port Log INFO level messages Display error if failure occurs Apply Wireless AP macro to interfaces with AP devices attached Set description string of discovered device and port Log INFO level messages

23 Automatic Port Configuration for Dell Networking N-Series | v1.0
output = read(configPrompt) write('end\r') read(configPrompt) for error in macroerr: if error in output: er = 'ERROR-Fail to apply macro:'+ str(output) logger.error(er) ret = False except Exception as err: er = 'ERROR-apply macro:' + str(err) logger.error(er) return False return ret def getnewint(session, iflist1, iflist2): ret =[] for inter in iflist2: if inter not in iflist1: ret.append(inter) return ret # if __name__ == '__main__': #start test execution #configure logging logger = logging.getLogger('Autoport') logger.setLevel(logging.INFO) ch = logging.StreamHandler() ch.setLevel(logging.INFO) formatter = logging.Formatter('%(asctime)s - %(name)s - %(levelname)s - %(message)s') ch.setFormatter(formatter) logger.addHandler(ch) fh = logging.FileHandler('/mnt/fastpath/user-apps/autoport.log') fh.setLevel(logging.INFO) fh.setFormatter(formatter) logger.addHandler(fh) # logger.info('Application AutoportMacro is started') #get parameters from param file if readparams('/mnt/fastpath/user-apps/autoport.prm'):
Display error if failure occurs Start of the main function The autoport.log file is created on the switch in the user-apps directory. Script output is exported here for verification and debugging Python script reads .prm file for instructions
24 Automatic Port Configuration for Dell Networking N-Series | v1.0
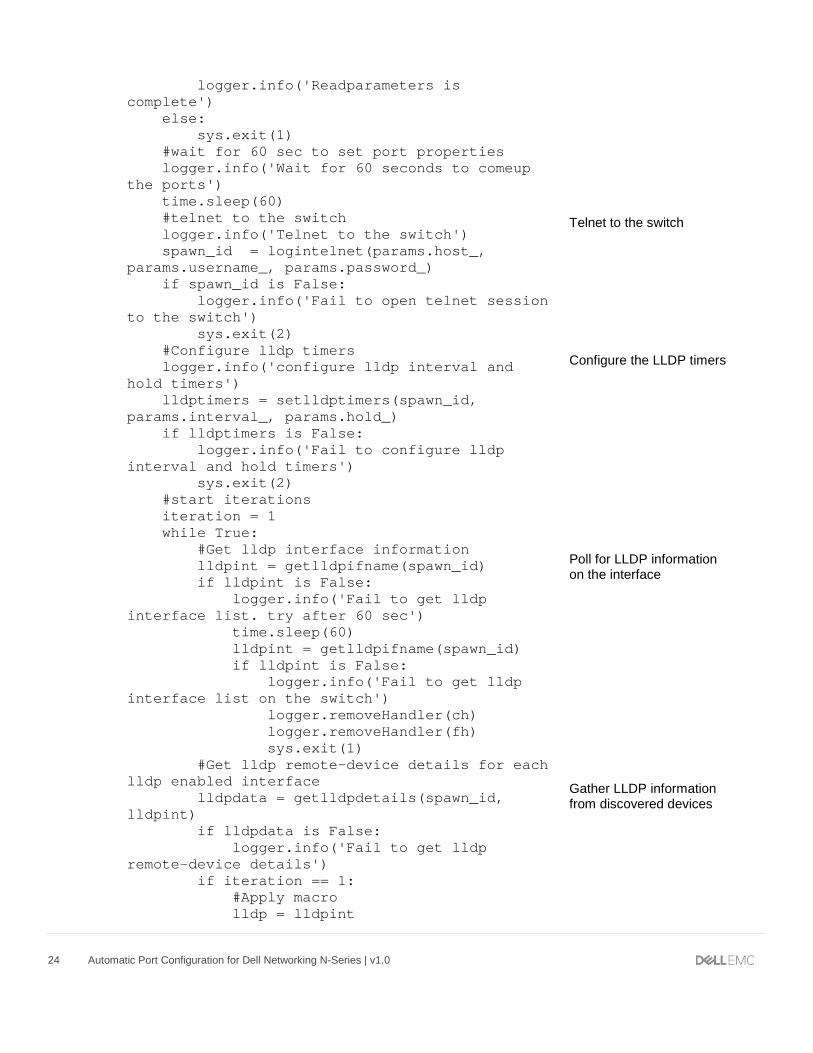
logger.info('Readparameters is complete') else: sys.exit(1) #wait for 60 sec to set port properties logger.info('Wait for 60 seconds to comeup the ports') time.sleep(60) #telnet to the switch logger.info('Telnet to the switch') spawn_id = logintelnet(params.host_, params.username_, params.password_) if spawn_id is False: logger.info('Fail to open telnet session to the switch') sys.exit(2) #Configure lldp timers logger.info('configure lldp interval and hold timers') lldptimers = setlldptimers(spawn_id, params.interval_, params.hold_) if lldptimers is False: logger.info('Fail to configure lldp interval and hold timers') sys.exit(2) #start iterations iteration = 1 while True: #Get lldp interface information lldpint = getlldpifname(spawn_id) if lldpint is False: logger.info('Fail to get lldp interface list. try after 60 sec') time.sleep(60) lldpint = getlldpifname(spawn_id) if lldpint is False: logger.info('Fail to get lldp interface list on the switch') logger.removeHandler(ch) logger.removeHandler(fh) sys.exit(1) #Get lldp remote-device details for each lldp enabled interface lldpdata = getlldpdetails(spawn_id, lldpint) if lldpdata is False: logger.info('Fail to get lldp remote-device details') if iteration == 1: #Apply macro lldp = lldpint
Telnet to the switch Configure the LLDP timers Poll for LLDP information on the interface Gather LLDP information from discovered devices
25 Automatic Port Configuration for Dell Networking N-Series | v1.0
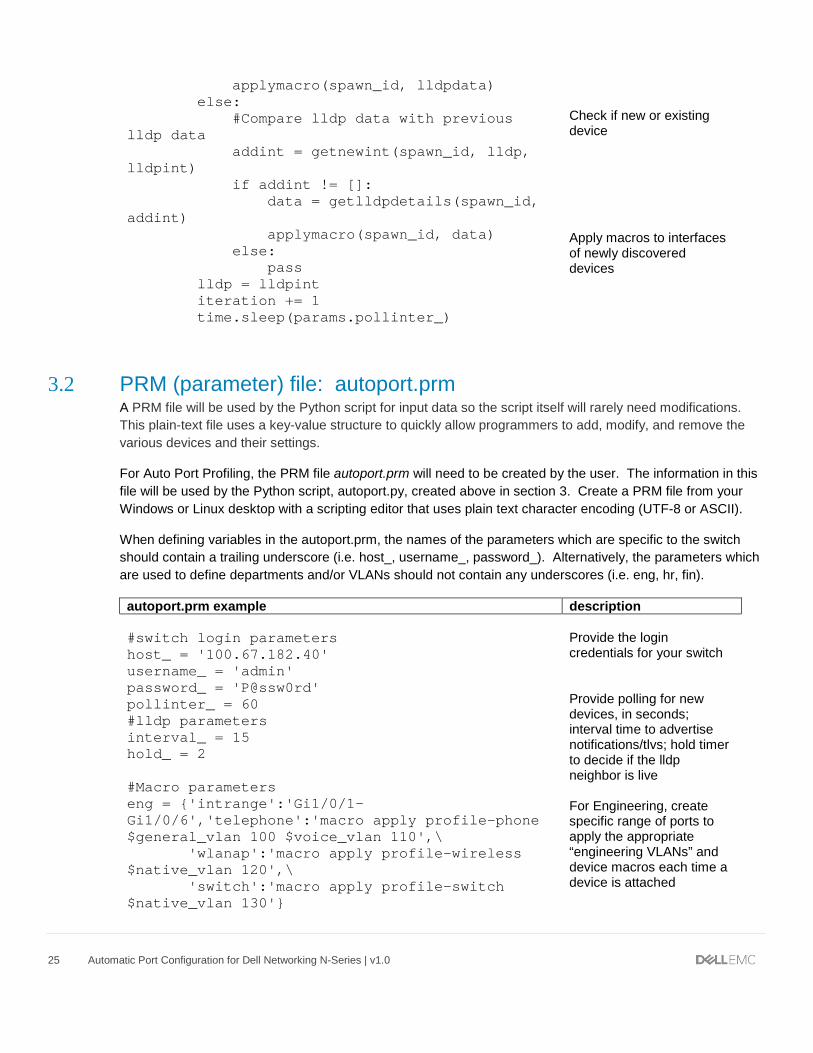
3.2 PRM (parameter) file: autoport.prm A PRM file will be used by the Python script for input data so the script itself will rarely need modifications. This plain-text file uses a key-value structure to quickly allow programmers to add, modify, and remove the various devices and their settings.
For Auto Port Profiling, the PRM file autoport.prm will need to be created by the user. The information in this file will be used by the Python script, autoport.py, created above in section 3. Create a PRM file from your Windows or Linux desktop with a scripting editor that uses plain text character encoding (UTF-8 or ASCII).
When defining variables in the autoport.prm, the names of the parameters which are specific to the switch should contain a trailing underscore (i.e. host_, username_, password_). Alternatively, the parameters which are used to define departments and/or VLANs should not contain any underscores (i.e. eng, hr, fin).
applymacro(spawn_id, lldpdata) else: #Compare lldp data with previous lldp data addint = getnewint(spawn_id, lldp, lldpint) if addint != []: data = getlldpdetails(spawn_id, addint) applymacro(spawn_id, data) else: pass lldp = lldpint iteration += 1 time.sleep(params.pollinter_)
Check if new or existing device Apply macros to interfaces of newly discovered devices
autoport.prm example description #switch login parameters host_ = '100.67.182.40' username_ = 'admin' password_ = 'P@ssw0rd' pollinter_ = 60 #lldp parameters interval_ = 15 hold_ = 2 #Macro parameters eng = {'intrange':'Gi1/0/1-Gi1/0/6','telephone':'macro apply profile-phone $general_vlan 100 $voice_vlan 110',\ 'wlanap':'macro apply profile-wireless $native_vlan 120',\ 'switch':'macro apply profile-switch $native_vlan 130'}
Provide the login credentials for your switch Provide polling for new devices, in seconds; interval time to advertise notifications/tlvs; hold timer to decide if the lldp neighbor is live For Engineering, create specific range of ports to apply the appropriate “engineering VLANs” and device macros each time a device is attached
26 Automatic Port Configuration for Dell Networking N-Series | v1.0
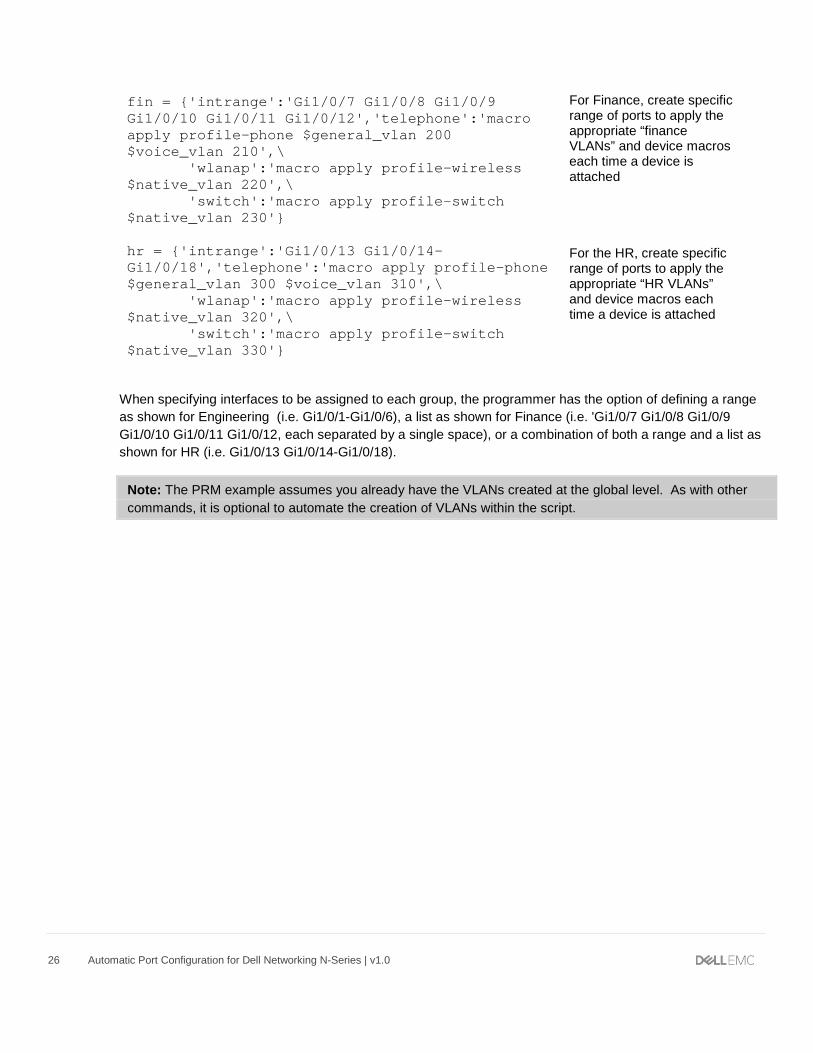
When specifying interfaces to be assigned to each group, the programmer has the option of defining a range as shown for Engineering (i.e. Gi1/0/1-Gi1/0/6), a list as shown for Finance (i.e. 'Gi1/0/7 Gi1/0/8 Gi1/0/9 Gi1/0/10 Gi1/0/11 Gi1/0/12, each separated by a single space), or a combination of both a range and a list as shown for HR (i.e. Gi1/0/13 Gi1/0/14-Gi1/0/18).
Note: The PRM example assumes you already have the VLANs created at the global level. As with other commands, it is optional to automate the creation of VLANs within the script.
fin = {'intrange':'Gi1/0/7 Gi1/0/8 Gi1/0/9 Gi1/0/10 Gi1/0/11 Gi1/0/12','telephone':'macro apply profile-phone $general_vlan 200 $voice_vlan 210',\ 'wlanap':'macro apply profile-wireless $native_vlan 220',\ 'switch':'macro apply profile-switch $native_vlan 230'} hr = {'intrange':'Gi1/0/13 Gi1/0/14-Gi1/0/18','telephone':'macro apply profile-phone $general_vlan 300 $voice_vlan 310',\ 'wlanap':'macro apply profile-wireless $native_vlan 320',\ 'switch':'macro apply profile-switch $native_vlan 330'}
For Finance, create specific range of ports to apply the appropriate “finance VLANs” and device macros each time a device is attached For the HR, create specific range of ports to apply the appropriate “HR VLANs” and device macros each time a device is attached

27 Automatic Port Configuration for Dell Networking N-Series | v1.0
4 Applying and executing the Python script (with PRM file) This chapter provides instructions on how to transfer the Python script and parameter file to the switch and run the script.
Note: Complete instructions on how to transfer, enable, run, disable, and remove a script to and from a switch are available in the deployment guide, Python Scripting for Dell EMC Networking N-Series.
Enter the commands below from the switch command line to copy the PRM file to the N-Series switch:
commands to add or update the parameter (.prm) file description console#copy source-url/autoport.prm application autoport.prm
console#dir user-apps
copy the parameter file from the source to the switch (use the application option) confirm the parameter file was copied to the user-apps directory
Enter the commands below from the switch to apply and execute the Python script on the N-Series switch:
commands to apply the Python script description
console#copy source-url/autoport.tgz application autoport.tgz
console#dir user-apps
console(config)#application install autoport.py auto-restart
console#show application
console#application start autoport.py
console#show process app-resource-list
copy the Python script (compressed with .tgz or .tar.gz) from the source to the switch (use the application option) confirm the Python script was copied to the user-apps directory configuration mode command loads script into switch memory. This does not start the script, but enables it to be started. verify script is loaded into memory. Scripts listed in the show applications command also have an entry in the running-configuration. execute the Python script autoport.py shows up in list when running
Note: Be sure to save the running-configuration to the startup-configuration if the script needs to run after a switch reload.
28 Automatic Port Configuration for Dell Networking N-Series | v1.0
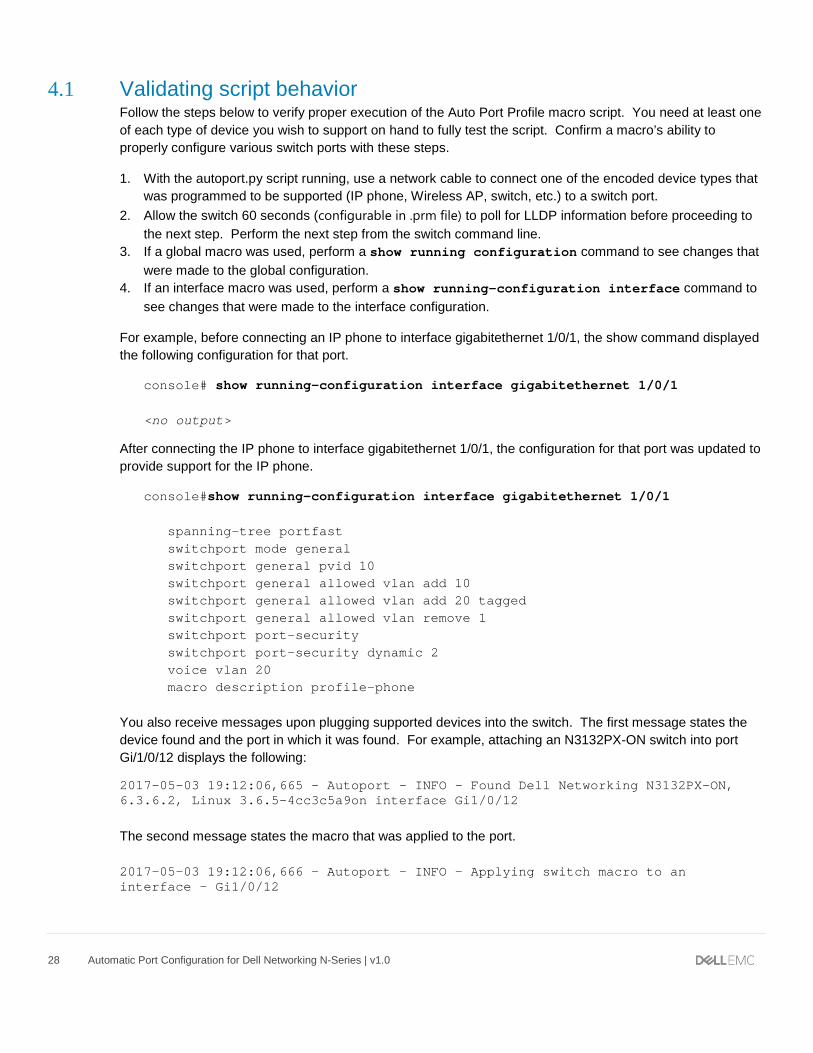
4.1 Validating script behavior Follow the steps below to verify proper execution of the Auto Port Profile macro script. You need at least one of each type of device you wish to support on hand to fully test the script. Confirm a macro’s ability to properly configure various switch ports with these steps.
1. With the autoport.py script running, use a network cable to connect one of the encoded device types that was programmed to be supported (IP phone, Wireless AP, switch, etc.) to a switch port.
2. Allow the switch 60 seconds (configurable in .prm file) to poll for LLDP information before proceeding to the next step. Perform the next step from the switch command line.
3. If a global macro was used, perform a show running configuration command to see changes that were made to the global configuration.
4. If an interface macro was used, perform a show running-configuration interface command to see changes that were made to the interface configuration.
For example, before connecting an IP phone to interface gigabitethernet 1/0/1, the show command displayed the following configuration for that port.
console# show running-configuration interface gigabitethernet 1/0/1
<no output>
After connecting the IP phone to interface gigabitethernet 1/0/1, the configuration for that port was updated to provide support for the IP phone.
console#show running-configuration interface gigabitethernet 1/0/1 spanning-tree portfast switchport mode general switchport general pvid 10 switchport general allowed vlan add 10 switchport general allowed vlan add 20 tagged switchport general allowed vlan remove 1 switchport port-security switchport port-security dynamic 2 voice vlan 20 macro description profile-phone You also receive messages upon plugging supported devices into the switch. The first message states the device found and the port in which it was found. For example, attaching an N3132PX-ON switch into port Gi/1/0/12 displays the following:
2017-05-03 19:12:06,665 - Autoport - INFO - Found Dell Networking N3132PX-ON, 6.3.6.2, Linux 3.6.5-4cc3c5a9on interface Gi1/0/12 The second message states the macro that was applied to the port. 2017-05-03 19:12:06,666 - Autoport - INFO - Applying switch macro to an interface - Gi1/0/12
29 Automatic Port Configuration for Dell Networking N-Series | v1.0
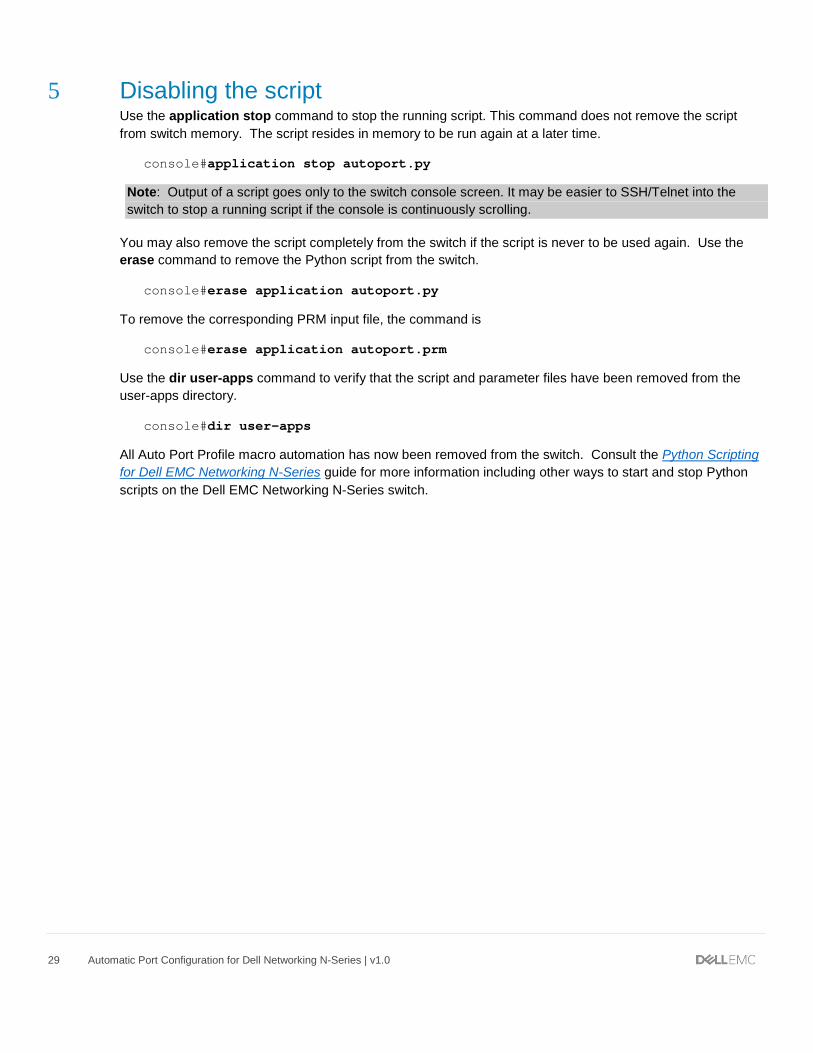
5 Disabling the script Use the application stop command to stop the running script. This command does not remove the script from switch memory. The script resides in memory to be run again at a later time.
console#application stop autoport.py
Note: Output of a script goes only to the switch console screen. It may be easier to SSH/Telnet into the switch to stop a running script if the console is continuously scrolling.
You may also remove the script completely from the switch if the script is never to be used again. Use the erase command to remove the Python script from the switch.
console#erase application autoport.py
To remove the corresponding PRM input file, the command is
console#erase application autoport.prm
Use the dir user-apps command to verify that the script and parameter files have been removed from the user-apps directory.
console#dir user-apps
All Auto Port Profile macro automation has now been removed from the switch. Consult the Python Scripting for Dell EMC Networking N-Series guide for more information including other ways to start and stop Python scripts on the Dell EMC Networking N-Series switch.
30 Automatic Port Configuration for Dell Networking N-Series | v1.0
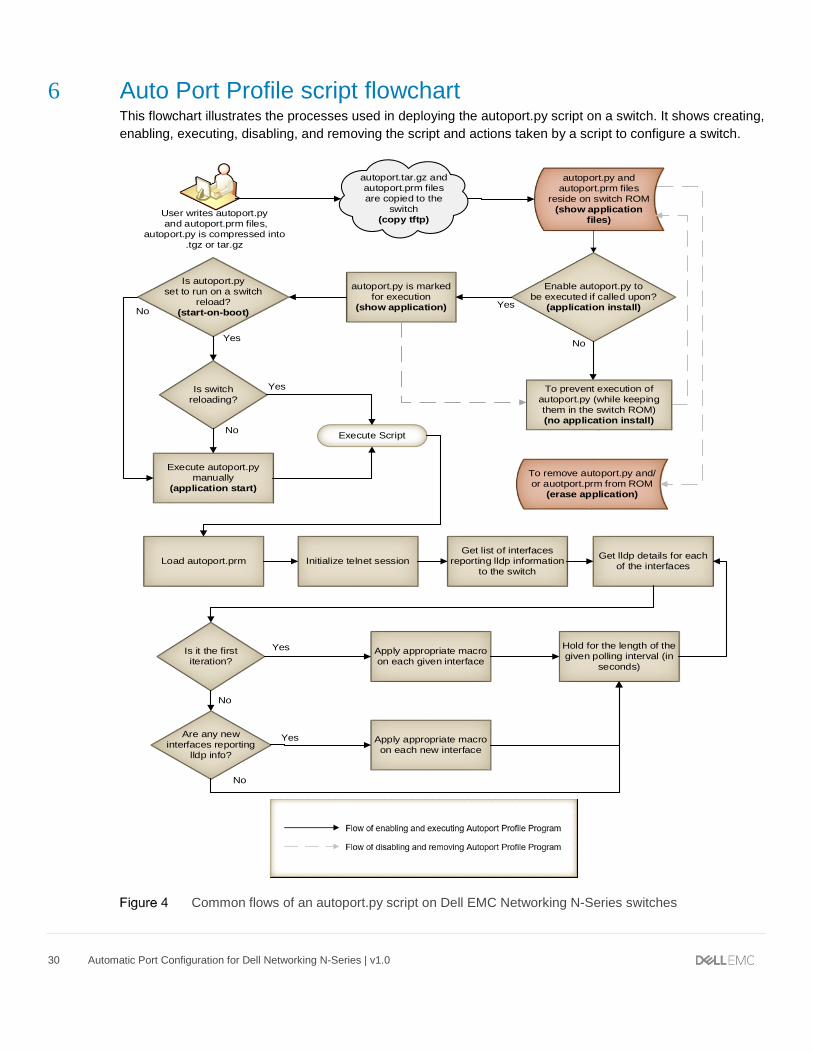
6 Auto Port Profile script flowchart This flowchart illustrates the processes used in deploying the autoport.py script on a switch. It shows creating, enabling, executing, disabling, and removing the script and actions taken by a script to configure a switch.
User writes autoport.py and autoport.prm files,
autoport.py is compressed into.tgz or tar.gz
autoport.py and autoport.prm files
reside on switch ROM(show application
files)
Enable autoport.py tobe executed if called upon?
(application install)
autoport.py is marked for execution
(show application)
Is autoport.pyset to run on a switch
reload?(start-on-boot)
Is switch reloading?
Execute autoport.py manually
(application start)
Execute Script
To remove autoport.py and/or auotport.prm from ROM
(erase application)
No
Yes
Yes
No
No
Yes
autoport.tar.gz and autoport.prm files are copied to the
switch(copy tftp)
Load autoport.prm Initialize telnet sessionGet list of interfaces
reporting lldp information to the switch
Get lldp details for each of the interfaces
Is it the first iteration?
Apply appropriate macro on each given interface
Yes Hold for the length of the given polling interval (in
seconds)
Are any new interfaces reporting
lldp info?
No
No
Apply appropriate macro on each new interface
Yes
To prevent execution of autoport.py (while keeping them in the switch ROM)(no application install)
Common flows of an autoport.py script on Dell EMC Networking N-Series switches

31 Automatic Port Configuration for Dell Networking N-Series | v1.0
7 Troubleshooting Table 2 provides tips on how to help alleviate problems that may be encountered when working with various concepts and features covered in this document.
Troubleshooting Problem Possible Solution(s) error “ImportError: no module” is received when importing a module into Python
The module you are trying to use is not available. Double-check the spelling of the module. It is possible that the module is valid for Python but not supported in the Dell EMC Networking N-Series switch. A complete list of supported modules for N-Series can be found in the “Python Scripting for Dell EMC Networking N-Series” deployment guide.
Error “execl: Exec format error” when running the “application start” command
Make sure both the compressed file (.tar.gz or .tgz) and the uncompressed file permissions are set to “execute” before copying the file onto the switch. Make sure the script is created and saved with a scripting editor that uses plain text character encoding (UTF-8 or ASCII). This ensures that no special (hidden) characters are embedded within the file preventing it from executing properly. Common text editors such as those used for word processing typically add special characters that restrict scripts from properly executing.
Error when attempting to start script using the “application start” command
Check to make sure the first line in the script is #!/user/bin/env python.
No output on the screen If after starting the application script, expected output does not display in the CLI session, be sure to view the serial console for output and not an SSH or Telnet session. Python scripts only send output to the serial console. Make sure the script is running by using the “show process app-resource-list” command.
Script files are missing from the user-apps directory or when typing “show application files,” even though the TFTP copy was successful
Check to see if the script filename has exceeded 16 characters (including extensions). There is a limitation of 16 characters for Python script filenames. The compressed file (with a .tgz or .tar.gz extension) also has this limitation.

32 Automatic Port Configuration for Dell Networking N-Series | v1.0
“tar: no gzip magic” message is seen while copying the compressed file to the switch or “Unable to unpack archive…” message is seen while copying the compressed file to the switch
The method used to compress the file is not acceptable, and the switch is not able to unpack it. Be sure to compress the script into a gzipped tar archive, with either a .tgz or .tar.gz extension. Refer to the “Python Scripting for Dell EMC Networking N-Series” deployment guide for more information. To verify whether or not the file was properly decompressed after copying to the switch, run the “show application files” command. Any script files that still show a compress extension (e.g. .tgz or .tar.gz) were not properly compressed and therefore could not be decompressed. Instructions on proper compression of a file can be found in the “Python Scripting for Dell EMC Networking N-Series” deployment guide. Note: The switch unpacks the file during copying and . strips any “compress” extensions off of the script file. .
Script is not running properly using the “start-on-boot” parameter For example, the script is not able to contact the TFTP/FTP server or Telnet outside of itself in the first few seconds after a reload, when using “start-on-boot” to initiate the script
The script may be starting too soon, not allowing for the network to be fully discovered by the switch. After a switch reload, ports need time to initiate and connect to the network. Protocols like spanning tree, DHCP, and LLDP require a short period of time to discover the network. Stacked switches can take additional time in completing a discovery. Note: The Auto Port Profile macro (autoport.py) does not work on stacked switches. Scripts should be written to allow time for the switch ports to be fully functional. This can be done in multiple ways. Below are two examples. 1. In the beginning of the script, include a “ping” loop to the desired remote server (e.g. TFTP server) and exit the loop once the destination is reachable. This is generally the recommended method since it allows the script to initiate and complete in the most efficient manner. It also requires the least amount of debugging and maintenance.
2. In the beginning of the script, import the time Python module and use time.sleep() to hard-code a delay. This is less efficient than method 1 above, since it is difficult to determine how long of a delay is needed. Selecting a duration that is too long adds unnecessary delays in completing the script. Any duration selected today may need to be changed at a later date as other influences change on the network, switch or switch stack.

33 Automatic Port Configuration for Dell Networking N-Series | v1.0
Device is not detected when plugged into the switch or Port is not automatically configured as expected
Check to make sure the latest firmwares are applied on both the device and the switch. Make sure an appropriate default gateway is set on the switch. Check to make sure all required licenses have been purchased and applied to the product. This is often the case when using a controller device on the same network that is used to communicate with the end device (e.g. Controllers for Wireless Access Points or IP cameras) Confirm that any controller required on the network is accessible to the end device being plugged in (e.g. Network Controller for a Wireless Access Point). Check that the expected LLDP packet information is present in the show lldp command. If not, confirm that the LLDP and TLVs are enabled on the remote device. These protocols are enabled by default on some devices but must be enabled manually on others. The Dell EMC 55xx switch is one example where the LLDP and TLVs must be manually enabled. The show lldp command used for gathering LLDP device information for creating the example script in this guide is show lldp remote-device detail gigabitethernet x/y/z. Perform a show running-config to verify the comment “macro description profile-xxxx” is shown on all interface configurations where a macro was used. If the device is a PoE powered device (PD), make sure it has been given enough time to boot up and to start passing LLDP traffic. Check the log file in user-apps directory called autoport.log for more information.
Error <188> Apr 29 23:11:28 Autoport-1 POE[PoE Req]: pc_poe_pwrdsne.c(4333) 562 %% Please configure Power Managementmode to Class Based for 802.3at devices
This is a notification/error for 802.3at devices. While devices may work while getting this error, it is recommended to set the following power options from global and interface (single or range) configuration modes: console(config)#power inline management dynamic console(config)#power inline detection dot3at+legacy console(config-if-Gin/n/n)#power inline auto

34 Automatic Port Configuration for Dell Networking N-Series | v1.0
8 Best practices and tips This chapter provides several best practices and tips for planning, creating, testing, deploying and maintaining scripts. Additional tips for scripting can be found in the Python Scripting for Dell EMC Networking N-Series deployment guide.
8.1 Planning and creating scripts Before automating a system, it is best to first solve most issues found in the manual process. Dell EMC recommends selecting and testing the proper CLI macros for the job prior to using in a script and implementing on a large scale. See Chapter 2: Understanding CLI macros for more information.
The example script in this document uses the LLDP protocol to identify the various devices that may be attaching to the Dell N-Series switch. Use switch CLI commands like show lldp statistics all, show lldp remote-device and show lldp med remote-device to identify which LLDP parameters are common to the device type you wish to automate. For example, plugging in one or more wireless APs and running the command show lldp remote-device detail gigabitethernet x/y/z on the corresponding interfaces shows things like system name, description, capabilities supported, and capabilities enabled. The programmer must then choose the field they want to use to identify the device. The example script in this guide used the “System Capabilities Supported” information. This field was chosen after discovering that twelve out of twelve different AP models attached and tested provided the same information of “bridge, WLAN access point.” This was used in the script to identify when an AP was attaching to the switch and subsequent application of the profile-wireless macro. See Appendix B Device identification using LLDP for more examples of where to look for LLDP information. To show only commands in the running-configuration that contain LLDP statements, use the command show running config all | include lldp.
8.2 Testing scripts Administrators can test Python scripts without having to compress and then copy the compressed Python script to the switch each time between edits. The recommended method is to use a Linux system to run the Python scripts while establishing a telnet connection to the switch under test. For instance, Dell EMC labs tested the autoport.py script on an N-Series several times from a remote Ubuntu system until the script was fully validated and working. Save valuable time by doing this prior to performing the tftp copy onto the switch. This saves valuable time, drastically cutting down on compression (tar.gz and tgz) and copying (tftp) tasks between debugging sessions.
Dell EMC validated the script using Ubuntu v. 14.04 with Python v. 2.7.6 installed (default). As written, this script requires no changes since the ”hostname = 'xx.xx.xx.xx'” line uses the actual OOB IP address of the switch. The loopback IP address would also work but only after being copied to the switch. If using the loopback address in the script, you must temporarily changed to the OOB/ management IP address. This allows remote testing to access the switch over the network.
From the Ubuntu terminal command line, go to the folder where the script resides, or set the path accordingly, in order to execute the script. Run the script by typing python <script.py> and Enter. The script runs just as if running it directly from the switch.
35 Automatic Port Configuration for Dell Networking N-Series | v1.0
Note: Ubuntu is only one example of how to run Python scripts. Alternatives validated by Dell EMC include the use of the Python IDLE command line on Windows 10 to run the script, and directly from the Windows built-in command prompt with Python installed.
8.3 Deploying and maintaining scripts Python scripting output is displayed from the console. For a single switch, use the console cable that comes with the Dell EMC Networking N-Series switch to view the console output. This is the preferred method for those situations where there are only a few switches involved. See the User Guide for your switch for more information on how to use the console port.
A console switch may also be used to allow the administrator to view several switches’ console outputs from a single management station. This is usually helpful when there are several switches requiring the administrator to regularly test or manage Python scripts. See the Python Scripting for Dell EMC Networking N-Series deployment guide for an example network topology that uses a console switch to manage the network.
36 Automatic Port Configuration for Dell Networking N-Series | v1.0
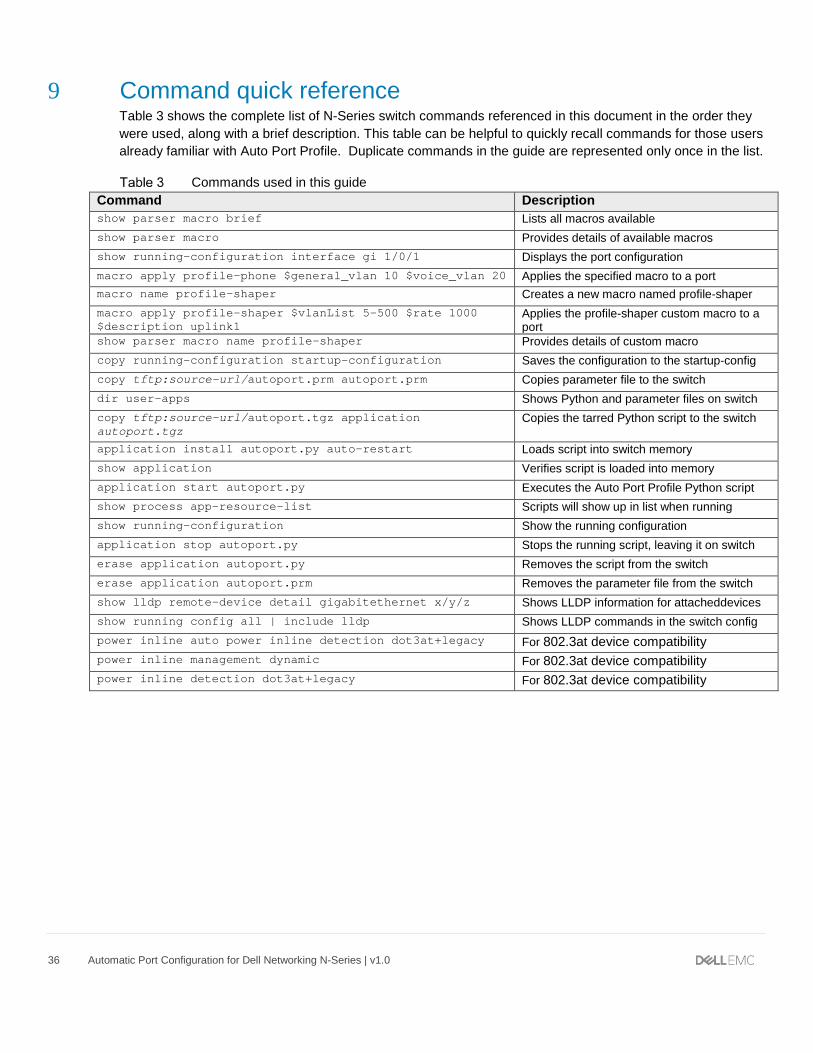
9 Command quick reference Table 3 shows the complete list of N-Series switch commands referenced in this document in the order they were used, along with a brief description. This table can be helpful to quickly recall commands for those users already familiar with Auto Port Profile. Duplicate commands in the guide are represented only once in the list.
Commands used in this guide Command Description show parser macro brief Lists all macros available show parser macro Provides details of available macros show running-configuration interface gi 1/0/1 Displays the port configuration macro apply profile-phone $general_vlan 10 $voice_vlan 20 Applies the specified macro to a port macro name profile-shaper Creates a new macro named profile-shaper macro apply profile-shaper $vlanList 5-500 $rate 1000 $description uplink1
Applies the profile-shaper custom macro to a port
show parser macro name profile-shaper
Provides details of custom macro copy running-configuration startup-configuration Saves the configuration to the startup-config copy tftp:source-url/autoport.prm autoport.prm Copies parameter file to the switch dir user-apps Shows Python and parameter files on switch copy tftp:source-url/autoport.tgz application autoport.tgz
Copies the tarred Python script to the switch
application install autoport.py auto-restart Loads script into switch memory show application Verifies script is loaded into memory application start autoport.py Executes the Auto Port Profile Python script
show process app-resource-list
Scripts will show up in list when running show running-configuration Show the running configuration application stop autoport.py Stops the running script, leaving it on switch erase application autoport.py Removes the script from the switch erase application autoport.prm
Removes the parameter file from the switch show lldp remote-device detail gigabitethernet x/y/z Shows LLDP information for attacheddevices show running config all | include lldp Shows LLDP commands in the switch config power inline auto power inline detection dot3at+legacy For 802.3at device compatibility power inline management dynamic
For 802.3at device compatibility power inline detection dot3at+legacy For 802.3at device compatibility

37 Automatic Port Configuration for Dell Networking N-Series | v1.0
A Glossary of Terms
console – the interface that uses the serial port of a switch for management purposes.
console switch – a device that allows management of several switches from a single management station, via the console port on each switch.
CLI (command line interface) – a text-based interface for issuing commands to a switch (typically uses Telnet, SSH, or a serial console).
LLDP (Link Layer Discovery Protocol) – a layer 2 protocol used by network devices to identify themselves and their capabilities to neighbor devices on the network.
macro – a file containing several commands that allows the user to execute them simply by entering a single command. Macros are typically used to automate tasks that need to be repeated regularly or often.
module (Python) – a pre-written Python script (from the Python library) available for programmers to import and use in their own programs to save time.
OOB port – the Out-of-Band port, the port used to connect devices to the OOB management network.
Out-of-band – a separate management network that takes management traffic off of the production network.
package – similar to a module and often used interchangeably, part of the Python library of pre-written code for users.
PoE – Power over Ethernet; the concept of powering Ethernet networked devices over the same copper Cat cable that is carrying data.
PD – powered device; usually an end device, powered by PoE.
prm file – parameter file used as an input file for a Python script.
Python – a popular, high-level programming language with a vast standard library.
serial port - a serial interface through which users may communicate with the switch requiring a single cable, a “console cable,” between the switch and a computer.
SSH (Secure Shell) – a network protocol that allows users to securely log into a switch or other system on the same network.
tarball – a single compressed file that contains one or more other files to be transported as one, unpacked, then used in another area or application.
Telnet - a network protocol that allows users to log into a switch’s command line interface. Telnet is less secure than SSH.
TFTP – Trivial File Transfer Protocol, a common protocol used to transfer files between local and remote hosts.
VLAN (virtual local area network, or virtual LAN) - logical subgroups that are partitioned off a physical network in order to create separate broadcast domains.

38 Automatic Port Configuration for Dell Networking N-Series | v1.0
B Device identification using LLDP
LLDP is a layer 2, vendor-neutral protocol used by network devices to identify themselves and their capabilities to neighboring devices on the network. Identifying information must be obtained through LLDP in order for the Auto Port Profile script to work. Any number of fields resulting from a show lldp command may be used to identify devices. The autoport.py script in this guide used the “System Capabilities Supported” information to identify Wireless APs, IP phones, and network switches. Though not a comprehensive list, Table 4 shows some of the more standard LLDP fields that may be used. It is up to the Python script developer to determine which field(s) are best used for their purpose.
Example LLDP fields used to identify equipment LLDP field Examples of field content Example equipment identified Model Name CP-7941G, CP-8961, CP9971 IP phones Media Policy Application Type Voice, Voice/Voice Signaling IP phones System Name MAC addresses, hostnames, camera Wireless APs, IP phones, Cameras System Description Axis, Snome, ArubaOS, Polycom Wireless APs, Cameras System Capabilities Supported Telephone, WLAN, router Network Switches, IP phones, APs System Capabilities Enabled Bridge, telephone, WLAN, router Network Switches, IP phones, APs
Table 5 shows example devices readily identified by the System Capabilities Supported field upon running the show lldp remote-device detail gigabitethernet x/y/z command. The first column shows the device being attached. The second column shows identifying information that can be used by the script to distinguish the device type being attached. Many of these devices were used in validating the example script in this guide.
Example equipment identified using System Capabilities Supported Device attached to switch port System Capabilities Supported Aastra IP Phone 6721 telephone Cisco IP Phone 7941 telephone Cisco IP Phone 8961 bridge, telephone Cisco IP Phone 9971 bridge, telephone Polycom Phone VVX500 bridge, telephone Snom IP Phone bridge, telephone Ruckus ZoneFlex R510 bridge, WLAN access point, router Ruckus ZoneFlex R710 bridge, WLAN access point, router Aerohive AP130 bridge, WLAN access point Aerohive HiveAP 141 bridge, WLAN access point Aerohive AP230 bridge, WLAN access point Dell AP105 bridge, WLAN access point Dell AP135 bridge, WLAN access point Dell AP-175P bridge, WLAN access point Dell W-AP205 bridge, WLAN access point Dell W-IAP93 bridge, WLAN access point Dell W-IAP105 bridge, WLAN access point Dell W-IAP109 bridge, WLAN access point Dell W-IAP204 bridge, WLAN access point

39 Automatic Port Configuration for Dell Networking N-Series | v1.0
Dell W-IAP205 bridge, WLAN access point Dell W-IAP277 bridge, WLAN access point Dell W-IAP314 bridge, WLAN access point Dell W-IAP335 bridge, WLAN access point Axis IP Camera station only Sony IP Camera station only Dell PowerConnect 5524 bridge, router Dell EMC N2048 switch bridge, router Dell EMC N3132PX-ON bridge, router Dell EMC N2128PX-ON bridge, router Dell EMC X1008 bridge Dell W-7010 Wireless Controller bridge, router Dell S3048-ON repeater, bridge, router
40 Automatic Port Configuration for Dell Networking N-Series | v1.0
C Additional Resources
Support.dell.com is focused on meeting your needs with proven services and support.
DellTechCenter.com is an IT Community where you can connect with Dell EMC customers and Dell EMC employees to share knowledge, best practices and information about Dell EMC products and installations.
Referenced or recommended Dell EMC publications:
• Dell EMC Networking Support - http://www.dell.com/support
• Dell EMC TechCenter (community forums and blogs for Dell EMC customers)
- http://delltechcenter.com
• Python Scripting for Dell EMC Networking N-Series - http://en.community.dell.com/techcenter/networking/m/networking_files/20442227/download
• Dell EMC Networking Whitepapers
- http://en.community.dell.com/techcenter/networking/p/guides
• Dell EMC Networking N15xx User Guides and Firmware downloads - http://www.dell.com/support/home/us/en/19/product-support/product/networking-n1500-series
• Dell EMC Networking N2xxx User Guides and Firmware downloads
- http://www.dell.com/support/home/us/en/19/product-support/product/networking-n2000-series
• Dell EMC Networking N3xxx User Guides and Firmware downloads - http://www.dell.com/support/home/us/en/19/product-support/product/networking-n3000-series
• Dell EMC Networking N4xxx User Guides and Firmware downloads
- http://www.dell.com/support/home/us/en/19/product-support/product/networking-n4000-series

41 Automatic Port Configuration for Dell Networking N-Series | v1.0
D Support and Feedback
Contacting Technical Support
Support Contact Information Web: http://Support.Dell.com/ Telephone: USA: 1-800-945-3355
Feedback for this document
We encourage readers of this publication to provide feedback on the quality and usefulness of this deployment guide by sending an email to [email protected]
About Dell EMC
Dell EMC is a worldwide leader in data center and campus solutions, which includes the manufacturing and distribution of servers, network switches, storage devices, personal computers, and related hardware and software. For more information on these and other products, please visit the Dell EMC website at http://www.dell.com.


