Embed Size (px)
Citation preview
D:\810nouhin\4080199111\408019911KP57XBRUC\01COV-KP57XBRUC\01COVUC.fm masterpage:Cover
4-080-199-11 (1)
© 2000 Sony Corporation
Model name1[KP-57XBR10W]Model name2[KP-65XBR10W][4-080-199-11 (1)]
Projection TVProjection TVProjection TVProjection TV
KP-57XBR10WKP-65XBR10W
Operating Instructions
D:\810nouhin\4080199111\408019911KP57XBRUC\02US-COV-KP57XBRUC\02WAR.fm masterpage:Warning
Op
en H
ere
Fo
r T
able
of
Co
nte
nts
an
d R
emo
te C
on
tro
l Gra
ph
ics
Model name1[KP-57XBR10W] Model name2[KP-65XBR10W][4-080-199-11 (1)]
WARNINGTo prevent fire or shock hazard, do not expose the TV to rain or moisture.
This symbol is intended to alert the user to the presence of uninsulated “dangerous voltage” within the product’s enclosure that may be of sufficient magnitude to constitute a risk of electric shock to persons.
This symbol is intended to alert the user to the presence of important operating and maintenance (servicing) instructions in the literature accompanying the appliance.
CAUTIONTo prevent electric shock, do not use this polarized AC plug with an extension cord, receptacle or other outlet unless the blades can be fully inserted to prevent blade exposure.
CAUTIONWhen using TV games, computers, and similar products with your projection TV, keep the brightness and contrast functions at low settings. If a fixed (non-moving) pattern is left on the screen for long periods of time especially at a high brightness or contrast setting, the image can be permanently imprinted onto the screen. These types of imprints are not covered by your warranty because they are the result of misuse.
Note on Caption VisionThis television receiver provides display of television closed captioning in accordance with §15.119 of the FCC rules.
Note on convergence adjustmentBefore you use your projection TV, make sure to adjust convergence. For details, see on page 25.
Note to CATV system installerThis reminder is provided to call the CATV system installer’s attention to Article 820-40 of the NEC that provides guidelines for proper grounding and, in particular, specifies that the cable ground shall be connected to the grounding system of the building, as close to the point of cable entry as practical.
Use of this television receiver for other than private viewing of programs broadcast on UHF or VHF or transmitted by cable companies for the use of the general public may require authorization from the broadcaster/cable company and/or program owner.
NOTIFICATIONThis equipment has been tested and found to comply with the limits for a Class B digital device pursuant to Part 15 of the FCC Rules. These limits are designed to provide reasonable protection against harmful interference in a residential installation. This equipment generates, uses, and can radiate radio frequency energy and, if not installed and used in accordance with the instructions, may cause harmful interference with radio communications. However, there is no guarantee that interference will not occur in a particular installation. If this equipment does cause harmful interference to radio or television reception, which can be determined by turning the equipment off and on, the user is encouraged to try to correct the interference by one or more of the following measures:
• Reorient or relocate the receiving antennas.
• Increase the separation between the equipment and receiver.
• Connect the equipment into an outlet on a circuit different from that to which the receiver is connected.
• Consult the dealer or an experienced radio/TV technician for help.
This document is for the remote control RM-Y907
MODELS: KP-57XBR10W, KP-65XBR10W
Please keep this notice with the instruction manual.
ATTENTIONPour prévenir les chocs électriques, ne pas utiliser cette fiche polarisée avec un prolongateur, une prise de courant ou une autre sortie de courant, sauf si les lames peuvent tre inserées à fond sans en laisser aucune partie à decouvert.
Owner’s RecordThe model and serial numbers are located at the rear of the projection TV, below the Sony logo, on the sticker, and also on the TV box (white label). Record these numbers in the spaces provided below. Refer to them whenever you call upon your Sony dealer regarding this product.
Model No.
Serial No.
CAUTIONRISK OF ELECTRIC SHOCK
DO NOT OPEN
ATTENTIONRISQUE DE CHOC ELECTRIQUE,
NE PAS OUVRIR
PRECAUCIONRIESGO DE CHOQUE ELECTRICO
CAUTION : TO REDUCE THE RISK OF ELECTRIC SHOCK,
DO NOT REMOVE COVER (OR BACK).
NO USER-SERVICEABLE PARTS INSIDE.
REFER SERVICING TO QUALIFIED SERVICE PERSONNEL.
NO ABRIR
You are cautioned that any changes or modifications not expressly approved in this manual could void your authority to operate this equipment.
As an ENERGY STAR Partner, Sony Corporation has determined that this product meets the ENERGY STAR guidelines for energy efficiency.
D:\810nouhin\4080199111\408019911KP57XBRUC\02US-COV-KP57XBRUC\03REM.fm masterpage:Remocon
1[KP-57XBR10W] Model name2[KP-65XBR10W][4-080-199-11 (1)]
R6, 56)
ION6, 56)
6)
ttons6)
6, 54)
6)
k3)
P/EL INDEX0 - 34)
EO7)
Getting to know the Getting to know the Getting to know the Getting to know the buttons on the remote buttons on the remote buttons on the remote buttons on the remote controlcontrolcontrolcontrolNames of the buttons on the remote control are presented in different colors to represent the available functions.
Button color
Black:Press to select the component you want to control; e.g. VCR/MDP/DVD Player, SAT/CABLE, or projection TV.
Green:Buttons relevant to power operations, like turning the projection TV, SAT/CABLE, or VCR/MDP/DVD Player on or off
Label color
White:TV/VCR/MDP/DVD Player/SAT/CABLE operation buttons
Yellow:PIP, P&P, and CHANNEL INDEX operation buttons
Blue:SAT operation buttons
Pink:DVD Player operation buttons
Model name
2
5
8
1
4
7
3
6
9
WIDE MODE TV/VIDEO ANT
MUTING
AV 1 2 3 DVD/MDP
TVPOWER
DISPLAYDVD/VCR
SAT/CABLE
FUNCTIONDVD/VCR SAT/CABLE TV
SLEEP
DVD MENU
TITLE
RECTV/VCR
MTSCODE SET
MTS(page 37)
AV1/2/3/DVD/MDP
switch(page 54)
VCR/DVD/MDP
operationbuttons(page 55)
CODE SET (pages 54,
56)
SLEEP(page 27)
TV
2
5
8
0
1
4
7
3
6
9JUMP
ENTER
MENU
RESET
VOL CH
(pages 27, 56)
JUMP(page 26)
MENU(page 36)
VOL +/–(page 26)
RESET(pages 37, 38)
ANT(page 2
0-9 bu(page 2
ENTER(pages 2
CH +/–(page 2
Joystic(page 2
WIDE MODE(page 29)
(page 2
Remote ControlRemote ControlRemote ControlRemote ControlIn the instructions that follow, we will refer to
the buttons on your remote control.Keep this flap unfolded and use this page for reference.
For a detailed explanation of most buttons, see “Watching the TV” on page 26.
WIDE MODE TV/VIDEO ANT
MUTING TV
OFFAUDIO SWAP
TV/SAT
PICTUREMODE
GUIDE ACTIVE
POSITIONLEFT RIGHT
ZOOM IN
FREEZE
CC
POWER
DISPLAYDVD/VCR
SAT/CABLE
FUNCTION DVD/VCR SAT/CABLE TV
MUTING(page 26)
GUIDE/[CC]
POWE(pages 2
FUNCT(pages 2
DISPLAY(page 27)TV/SAT/
PICTUREMODE
(page 36)
PIP/P&CHANN(pages 3
TV/VID
D:\810nouhin\4080199111\408019911KP57XBRUC\02US-COV-KP57XBRUC\01COVTOC.fm masterpage:Left
Model name1[KP-57XBR10W] Model name2[KP-65XBR10W][4-080-199-11 (1)]
Table of ContentsTable of ContentsTable of ContentsTable of Contents
Before You BeginBefore You BeginBefore You BeginBefore You BeginWelcome! . . . . . . . . . . . . . . . . . . . . . . . .1Using this Manual . . . . . . . . . . . . . . . . .2Precautions . . . . . . . . . . . . . . . . . . . . . . .2Important Safeguards . . . . . . . . . . . . . .3
Installing and Connecting Installing and Connecting Installing and Connecting Installing and Connecting the Projection TVthe Projection TVthe Projection TVthe Projection TVCarrying Your Projection TV. . . . . . . . . . . . . 6
Installing the Projection TV . . . . . . . . . . . . . . 6
Mounting the Rear Speakers (not supplied). . 6
Connector Types . . . . . . . . . . . . . . . . . . . . . . 7
Making Connections . . . . . . . . . . . . . . . . . . . 8
Connecting Directly to a Cable or an Antenna . . . . . . . . . . . . . . . . . . . . . . 8
Connecting a Cable Box . . . . . . . . . . . 9
Connecting an Antenna/Cable TV System to a VCR . . . . . . . . . . . . . . 10
Connecting a VCR and Projection TV to a Cable Box . . . . . . . . . . . . . . . . . . 11
Connecting a DTV (Digital Television) Receiver . . . . . . . . . . . . . . . . . . . . . 12
Connecting a Satellite Receiver (SAT) . . . . . . . . . . . . . . . . . . . . . . . 14
Connecting a Satellite Receiver (SAT) and VCR . . . . . . . . . . . . . . . 15
Connecting a Camcorder . . . . . . . . . . 16
Connecting Two VCRs for Tape Editing . . . . . . . . . . . . . . . . . . . . . . 17
Connecting a DVD Player With S Video or Composite Video Output Connectors . . . . . . . . . . . . . . . . . . . 18
Connecting a DVD Player With Component Video Output Connectors . . . . . . . . . . . . . . . . . . . 19
Connecting an AV Receiver . . . . . . . 20
Connecting an Audio System . . . . . . . 21
Connecting an Amplifier That Supports Dolby Pro Logic Decoder . . . . . . . 22
Basic Set UpBasic Set UpBasic Set UpBasic Set UpUsing the Remote Control. . . . . . . . . . . . . . . 23
Setting Up the Projection TV Automatically 24
Adjusting the Convergence Automatically (FLASH FOCUS) . . . . . . . . . . . . . . . . . . . 25
Using Your New Projection Using Your New Projection Using Your New Projection Using Your New Projection TVTVTVTVWatching the TV. . . . . . . . . . . . . . . . . . . . . . 26
Watching Digital TV. . . . . . . . . . . . . . . . . . . 28
Watching the Picture in Wide Screen Mode Automatically — AUTO WIDE . . . . . . . . 28
Watching the Picture in Wide Screen Mode Manually — WIDE MODE . . . . . . . . . . . 29
Watching Two Programs at One Time — PIP. . . . . . . . . . . . . . . . . . . . . . . . . . . . 30
Watching Two Programs at One Time — P&P (Twin View™) . . . . . . . . . . . . . . 32
Using CHANNEL INDEX . . . . . . . . . . . . . 33
Adjusting Your SET UP Adjusting Your SET UP Adjusting Your SET UP Adjusting Your SET UP (menus)(menus)(menus)(menus)Learning Menu Selection. . . . . . . . . . . . . . . 35
Using the VIDEO Menu . . . . . . . . . . . . 36
Using the AUDIO Menu . . . . . . . . . . . . 37
Adjusting the Speaker Volume for Customized Surround Mode . . . . . 38
Using the TIMER Menu . . . . . . . . . . . . 39
Using the WIDE SCREEN MODE Menu . . . . . . . . . . . . . . . . . . . . . . . . . . . . 40
Using the CHANNEL SET UP Menu . . 41
Setting and Selecting FAVORITE CHANNEL . . . . . . . . . . . . . . . . . . . . . . . 42
Setting FAVORITE CHANNEL manually . . . . . . . . . . . . . . . . . . . . 43
Resetting FAVORITE CHANNEL choices . . . . . . . . . . . . . . . . . . . . . 43
Using FAVORITE CHANNEL . . . . 44
Using the SET UP Menu . . . . . . . . . . . . 44
Using the PARENTAL CONTROL Feature 47
D:\810nouhin\4080199111\408019911KP57XBRUC\02US-COV-KP57XBRUC\01COVTOCp1.fm
Model name1[KP-57XBR10W] Model name2[KP-65XBR10W][4-080-199-11 (1)]
Activating the PARENTAL CONTROL feature . . . . . . . . . . . . . . . . . . . . . . 47
Selecting a Custom Rating . . . . . . . . 49
Changing the Password . . . . . . . . . . . 51
What the Ratings Mean . . . . . . . . . . . . . . . . 52
Additional OperationsAdditional OperationsAdditional OperationsAdditional OperationsOperating Video Equipment. . . . . . . . . . . . . 54
Setting the Manufacturer’s Code . . . 54
Operating video equipment . . . . . . . . 55
Operating a Cable Box or Satellite Receiver (SAT) . . . . . . . . . . . . . . . . . . . . . . . . . . . . 56
Setting the Manufacturer’s Code . . . 56
Operating a cable box or satellite receiver . . . . . . . . . . . . . . . . . . . . . 56
Additional InformationAdditional InformationAdditional InformationAdditional InformationTroubleshooting . . . . . . . . . . . . . . . . . . . . . 57
Specifications . . . . . . . . . . . . . . . . . . . . . . . . 60
Index. . . . . . . . . . . . . . . . . . . . . . . . . . . . . . . 61
* Manufactured under license from Dolby Laboratories Licensing Corporation. Additionally licensed under Canadian patent number 1,037,877. “Dolby,” the double-D symbol ; and “Pro Logic” are trademarks of Dolby Laboratories Licensing Corporation
Before You BeginBefore You BeginBefore You BeginBefore You Begin
Welcome!Thank you for purchasing the Sony Projection TV. This manual is for models KP-57XBR10W and KP-65XBR10W.
Model KP-57XBR10W is used for illustration purposes.
The features you will enjoy include:
• “1080i Capable,” enabling you to receive the 1080i, 720p, 480p and 480i digital TV formats. By using the VIDEO 5 (DTV) IN jacks, you can connect a DTV (digital television) receiver to view DTV programs.The VIDEO 5 (DTV) IN jacks also function as R/G/B connectors with SYNC signal (HD/VD), but are not compatible with a computer’s 5BNC video output connectors.
• WIDE SCREEN MODE, allowing you to watch 4:3 normal broadcasts in wide screen mode (16:9 aspect ratio).
• AUTO WIDE, allowing you to select the wide screen mode automatically.
• PARENTAL CONTROL, enabling you to block programs that are unsuitable for your children.
• DRC (Digital Reality Creation), a technology unique to Sony, allowing you to obtain a finer, more detailed picture with four-times higher density than the conventional NTSC picture. (not available for input from the VIDEO 5 (DTV) IN jacks)
• MID (Multi Image Driver), a newly developed device, allowing you to enjoy the following features and, at the same time, to use your projection TV easily. (not available for input from the VIDEO 5 (DTV) IN jacks)
— Picture & Picture (P&P) with zoom-in function (Twin View™)
— Picture-in-Picture (PIP)— CHANNEL INDEX, allowing you to view and
choose from twelve programs— FAVORITE CHANNEL, allowing you to view
and choose from eight of your favorite channels• FLASH FOCUS, allowing you to adjust
convergence automatically.
• Two Y/PB/PR inputs for DVD Player connection (480p format capability is on the VIDEO 5 (DTV) IN jacks).
• Four AUDIO/VIDEO/S VIDEO inputs.
1
Before Y
ou Begin
D:\810nouhin\4080199111\408019911KP57XBRUC\02US-COV-KP57XBRUC\04WEL.fm masterpage:Left
l name1[KP-57XBR10W] Model name2[KP-65XBR10W][4-080-199-11 (1)]
t
.
InstallingInstallingInstallingInstalling• To prevent internal heat buildup, do not block the
ventilation openings.
• Do not install the projection TV in a hot or humid place, or in a place subject to excessive dust or mechanical vibration.
• Avoid operating the projection TV at temperature below 5°C (41°F).
• If the projection TV is transported directly from a cold to a warm location, or if the room temperature changes suddenly, the picture may be blurred or show poor color. In this case, please wait a few hours to let the moisture evaporate before turning on the projection TV.
• To obtain the best picture, do not expose the screen to direct illumination or direct sunlight. It is recommended to use spot lighting directed down from the ceiling or to cover the windows that face the screen with opaque drapery. It is desirable to install the projection TV in a room where the floor and walls are not of a reflective material.
2
Mode
Using this ManualWe recommend that you carefully review the contents of the following four sections in the order provided to ensure that you fully understand the operation of your new projection TV.
1 Installing and Connecting the Projection TVThis section guides you through your initial set up. It shows you how to install your projection TV, to connect your new components and to connect to the antenna and cable.
2 Basic SetupThis section teaches you the basic skills needed to operate your new projection TV, including Easy Set Up. It shows you how to operate the remote control’s special functions.
3 Using Your New Projection TVThis section shows you how to begin using your new projection TV. It shows you how to use your remote control’s features.
4 Adjusting Your Set Up (menus)This section teaches you how to access on-screen menus and adjust your projection TV’s settings.
Instructions in this manual are written for the remote control. Similar controls may be found on the projection TV console.
PrecautionsSafetySafetySafetySafety• Operate the projection TV only on 120 V AC.
• The plug is designed, for safety purposes, to fit intothe wall outlet only one way. If you are unable to insert the plug fully into the outlet, contact your dealer.
• If any liquid or solid object should fall inside the cabinet, unplug the projection TV immediately andhave it checked by qualified service personnel before operating it further.
• If you will not be using the projection TV for several days, disconnect the power by pulling the plug itself. Never pull on the cord.
For details concerning safety precautions, see “Important Safeguards” on page 3.
Note on cleaningNote on cleaningNote on cleaningNote on cleaningClean the cabinet of the projection TV with a drysoft cloth. To remove dust from the screen, wipe igently with a soft cloth. Stubborn stains may be removed with a cloth slightly dampened with solution of mild soap and warm water. Never use strong solvents such as thinner or benzine for cleaning.
If the picture becomes dark after using the projection TV for a long period of time, it may benecessary to clean the inside of the projection TVConsult qualified service personnel.
3
D:\810nouhin\4080199111\408019911KP57XBRUC\02US-COV-KP57XBRUC\04WEL.fm masterpage:Right
Before Y
ou Begin
l name1[KP-57XBR10W] Model name2[KP-65XBR10W][4-080-199-11 (1)]
For the set with a
the possibility of an internal malfunction that could create a fire hazard.
Object and Liquid EntryNever push objects of any kind into the set through the cabinet slots as they may touch dangerous voltage points or short out parts that could result in a fire or electric shock. Never spill liquid of any kind on the set.
AttachmentsDo not use attachments not recommended by the manufacturer, as they may cause hazards.
CleaningUnplug the set from the wall outlet before cleaning or polishing it. Do not use liquid cleaners or aerosol cleaners. Use a cloth lightly dampened with water for cleaning the exterior of the set.
(continued)
Mode
Important SafeguardsFor your protection, please read these instructions completely, and keep this manual for future reference.
Carefully observe and comply with all warnings, cautions and instructions placed on the set, or described in the operating instructions or service manual.
WARNINGWARNINGWARNINGWARNINGTo guard against injury, the following basic safety precautions should be observed in the installation, use, and servicing of the set.
UseUseUseUsePower SourcesThis set should be operated only from the type of power source indicated on the serial/model plate.If you are not sure of the type of electrical power
supplied to your home, consult your dealer or local power company. For those sets designed to operate from battery power, refer to the operating instructions.
Grounding or PolarizationThis set is equipped with a polarized AC power cord plug (a plug having one blade wider than the other), or with a three-wire grounding type plug (a plug having a third pin for grounding). Follow the instructions below:
polarized AC power cord plug
This plug will fit into the power outlet only one way. This is a safety feature. If you are unable to insert the plug fully into the outlet, try reversing the plug. If the plug should still fail to fit, contact your electrician to have a suitable outlet installed. Do not defeat the safety purpose of the polarized plug by forcing it in.
Alternate WarningFor the set with a three-wire grounding type AC plug
This plug will only fit into a grounding-type poweroutlet. This is a safety feature. If you are unable toinsert the plug into the outlet, contact your electrician to have a suitable outlet installed. Do not defeat the safety purpose of the grounding plug.
OverloadingDo not overload wall outlets,extension cords or convenience receptacles beyond their capacity, since this can result in fire or electric shock.
Always turn the set off whenit is not to be used. When theset is left unattended and unused for long periods of time, unplug it from the walloutlet as a precaution against
D:\810nouhin\4080199111\408019911KP57XBRUC\02US-COV-KP57XBRUC\04WEL.fm masterpage:Left
l name1[KP-57XBR10W] Model name2[KP-65XBR10W][4-080-199-11 (1)]
,
t
r
Power-Cord Protection Do not allow anything to rest on or roll over the power cord, and do not place the set where the power cord is subject to wear or abuse.
AntennasOutdoor Antenna Grounding — If an outdoor antenna is installed, follow the precautions below.
An outdoor antenna system should not be located in the vicinity of overhead power lines or other electric light or power circuits, or where it can come in contact with such power lines or circuits.
WHEN INSTALLING AN OUTDOOR ANTENNA SYSTEM, EXTREME CARE SHOULD BE TAKEN TO KEEP FROM CONTACTING SUCH POWER LINES OR CIRCUITS AS CONTACT WITH THEM IS ALMOST INVARIABLY FATAL.
Be sure the antenna system is grounded so as to provide some protection against voltage surges and built-up static charges.
Section 810 of the National Electrical Code (NEC) in USA and Section 54 of the Canadian Electrical Code in Canada provides information with respect to proper grounding of the mast and supporting structure, grounding of the lead-in wire to an antenna discharge unit, size of grounding conductors, location of antenna discharge unit, connection to grounding electrodes, and requirements for the grounding electrode.
4
Mode
If a snapping or popping sound from a projection TV set is continuous or frequent while the projection TV is operating, unplug the projection TV and consult your dealer or service technician. It is normal for some projection TV sets to
make occasional snapping or popping sounds, particularly when being turned on or off.
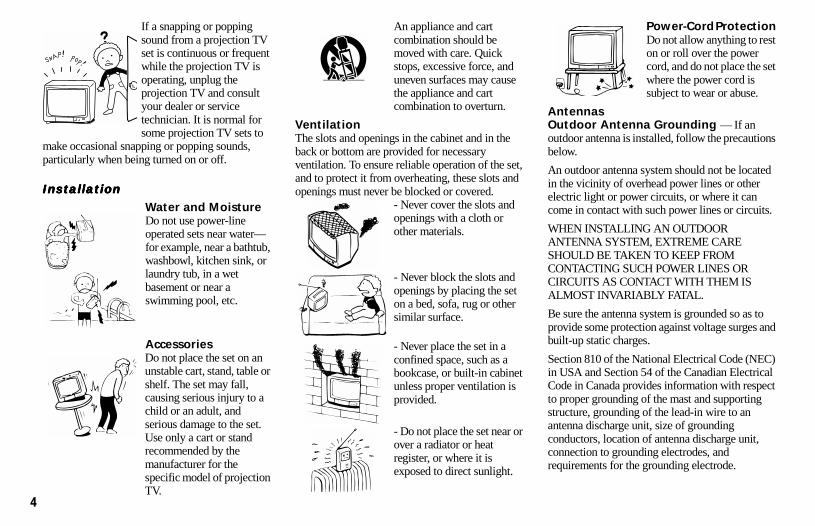
InstallationInstallationInstallationInstallationWater and MoistureDo not use power-line operated sets near water—for example, near a bathtub, washbowl, kitchen sink, or laundry tub, in a wet basement or near a swimming pool, etc.
AccessoriesDo not place the set on an unstable cart, stand, table or shelf. The set may fall, causing serious injury to a child or an adult, and serious damage to the set. Use only a cart or stand recommended by the manufacturer for the specific model of projection TV.
An appliance and cart combination should be moved with care. Quick stops, excessive force, and uneven surfaces may cause the appliance and cart combination to overturn.
VentilationThe slots and openings in the cabinet and in the back or bottom are provided for necessary ventilation. To ensure reliable operation of the setand to protect it from overheating, these slots andopenings must never be blocked or covered.
- Never cover the slots and openings with a cloth or other materials.
- Never block the slots and openings by placing the set on a bed, sofa, rug or other similar surface.
- Never place the set in a confined space, such as a bookcase, or built-in cabineunless proper ventilation is provided.
- Do not place the set near oover a radiator or heat register, or where it is exposed to direct sunlight.
5
D:\810nouhin\4080199111\408019911KP57XBRUC\02US-COV-KP57XBRUC\04WEL.fm masterpage:Right
Before Y
ou Begin
l name1[KP-57XBR10W] Model name2[KP-65XBR10W][4-080-199-11 (1)]
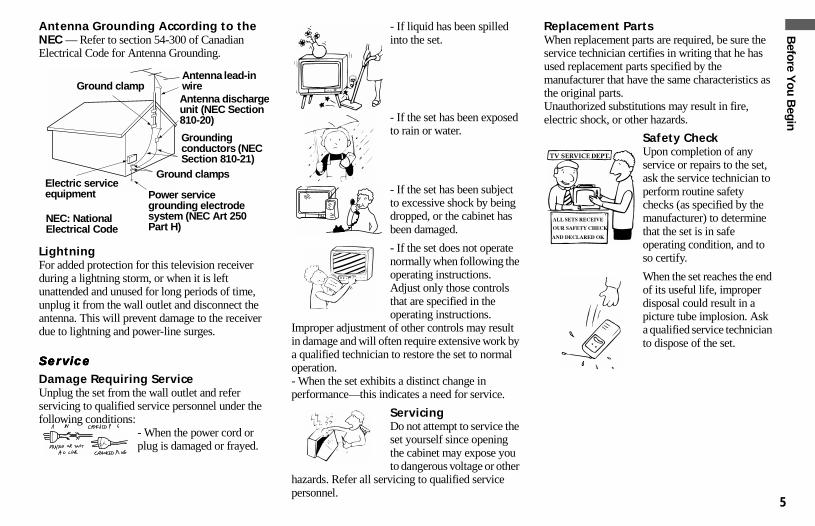
Antenna Grounding According to the - If liquid has been spilled
Replacement PartsWhen replacement parts are required, be sure the service technician certifies in writing that he has used replacement parts specified by the manufacturer that have the same characteristics as the original parts.Unauthorized substitutions may result in fire, electric shock, or other hazards.
Safety CheckUpon completion of any service or repairs to the set, ask the service technician to perform routine safety checks (as specified by the manufacturer) to determine that the set is in safe operating condition, and to so certify.
When the set reaches the end of its useful life, improper disposal could result in a picture tube implosion. Ask a qualified service technician to dispose of the set.
Mode
NEC — Refer to section 54-300 of Canadian Electrical Code for Antenna Grounding.
LightningFor added protection for this television receiver during a lightning storm, or when it is left unattended and unused for long periods of time, unplug it from the wall outlet and disconnect the antenna. This will prevent damage to the receiver due to lightning and power-line surges.
ServiceServiceServiceServiceDamage Requiring ServiceUnplug the set from the wall outlet and refer servicing to qualified service personnel under the following conditions:
- When the power cord or plug is damaged or frayed.
into the set.
- If the set has been exposedto rain or water.
- If the set has been subject to excessive shock by being dropped, or the cabinet has been damaged.
- If the set does not operate normally when following theoperating instructions. Adjust only those controls that are specified in the operating instructions.
Improper adjustment of other controls may result in damage and will often require extensive work bya qualified technician to restore the set to normal operation.- When the set exhibits a distinct change in performance—this indicates a need for service.
ServicingDo not attempt to service theset yourself since opening the cabinet may expose you to dangerous voltage or other
hazards. Refer all servicing to qualified service personnel.
Ground clamp
Electric service equipment
Antenna lead-in wireAntenna dischargeunit (NEC Section 810-20)
Grounding conductors (NEC Section 810-21)
Ground clamps
Power service grounding electrode system (NEC Art 250 Part H)
NEC: National Electrical Code
D:\810nouhin\4080199111\408019911KP57XBRUC\02US-COV-KP57XBRUC\05INT.fm masterpage:First-Left
l name1[KP-57XBR10W] Model name2[KP-65XBR10W][4-080-199-11 (1)]
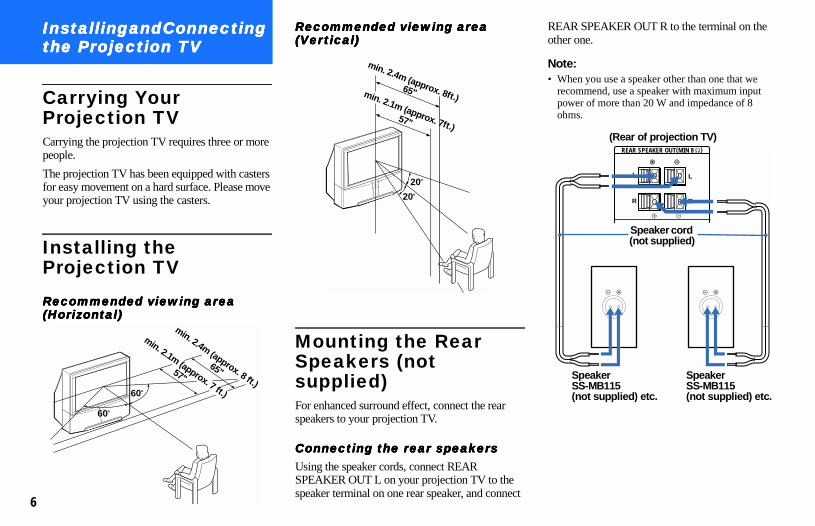
REAR SPEAKER OUT R to the terminal on the other one.
Note:• When you use a speaker other than one that we
recommend, use a speaker with maximum input power of more than 20 W and impedance of 8 ohms.
L
R
REAR SPEAKER OUT(MIN 8 )
L
R
(Rear of projection TV)
Speaker cord (not supplied)
SpeakerSS-MB115 (not supplied) etc.
Speaker SS-MB115 (not supplied) etc.
6
Mode
Installing and Connecting Installing and Connecting Installing and Connecting Installing and Connecting the Projection TVthe Projection TVthe Projection TVthe Projection TV
Carrying Your Projection TVCarrying the projection TV requires three or more people.
The projection TV has been equipped with casters for easy movement on a hard surface. Please move your projection TV using the casters.
Installing the Projection TV
Recommended viewing area Recommended viewing area Recommended viewing area Recommended viewing area (Horizontal)(Horizontal)(Horizontal)(Horizontal)
Recommended viewing area Recommended viewing area Recommended viewing area Recommended viewing area (Vertical)(Vertical)(Vertical)(Vertical)
Mounting the Rear Speakers (not supplied)For enhanced surround effect, connect the rear speakers to your projection TV.
Connecting the rear speakersConnecting the rear speakersConnecting the rear speakersConnecting the rear speakersUsing the speaker cords, connect REAR SPEAKER OUT L on your projection TV to the speaker terminal on one rear speaker, and connect
60˚
60 60˚
min. 2.1m (approx. 7 ft.)
57"
min. 2.4m (approx. 8 ft.)
65"
20˚
20˚
min. 2.4m (approx. 8ft.)65"min. 2.1m (approx. 7ft.)
57"
7
D:\810nouhin\4080199111\408019911KP57XBRUC\02US-COV-KP57XBRUC\05INT.fm masterpage:Right
Installing and Connecting the P
rojection TV
l name1[KP-57XBR10W] Model name2[KP-65XBR10W][4-080-199-11 (1)]
Component video cable for a DTV Component video cable for a DTV Component video cable for a DTV Component video cable for a DTV receiverreceiverreceiverreceiver
G/Y - GreenB/PB - BlueR/PR - RedHD - GrayVD - Black
CONTROL S cableCONTROL S cableCONTROL S cableCONTROL S cableSony cable for CONTROL S connections. These features are exclusive to Sony products and allow greater control of all Sony equipment.
(continued)
Push into connection.
Push into connection.
Mode
InstallationInstallationInstallationInstallationFor optimum surround effect, mount the rear speakers in the following places (as shown in the illustration):
• on a wall, as high as the listener’s ears.
• on a table, as high as the listener’s ears.
Connector TypesYou may find it necessary to use some of the following connector types during set up.
Coaxial cableCoaxial cableCoaxial cableCoaxial cableStandard TV cable and antenna cable
S Video cableS Video cableS Video cableS Video cableHigh quality video cable for enhanced picture quality
Audio/Video cableAudio/Video cableAudio/Video cableAudio/Video cable
Video - YellowAudio (Left) - WhiteAudio (Right) - Red
Some DVD Players are equipped with the following three video connectors.
Y - GreenPB (CB, Cb or B–Y) - BluePR (CR, Cr or R–Y) - Red
Rear speakerProjection TV
(Rear of projection TV)
Left rear speaker
Right rear speaker
Plug Type
Screw-on TypePush into connection.
Screw into connection.
Align guides and push into connection.
Push into connection.

D:\810nouhin\4080199111\408019911KP57XBRUC\02US-COV-KP57XBRUC\05INT.fm masterpage:Left
l name1[KP-57XBR10W] Model name2[KP-65XBR10W][4-080-199-11 (1)]
C
Cable or antennaCable or antennaCable or antennaCable or antennaThis is the simplest connection. Connection is made directly from the cable or antenna to the projection TV.
Cable and antennaCable and antennaCable and antennaCable and antennaYou may find it convenient to use the following set up if your cable provider does not feature local channels that you are able to receive using an antenna.
Select Cable or ANT mode by pressing ANT on the remote control.
• VHF
and
• UHF
75-ohm coaxial cable(Rear of
projection TV)VHF/UHF
EAC-66 U/V mixer (not supplied)
300-ohm twin lead cable
Cable(Rear of projection TV)
VHF/UHF
CATV cable
Antenna cable
(Rear of projection TV)
AUX
VHF/UHF
8
Mode
About the About the About the About the CONTROL S IN/OUT CONTROL S IN/OUT CONTROL S IN/OUT CONTROL S IN/OUT jacksjacksjacksjacksTo control other Sony equipment with the projection TV’s remote control, connect the CONTROL S IN jack of the equipment to the CONTROL S OUT jack on the projection TV with the CONTROL S cable.
To control the projection TV with a remote control for another Sony product, connect the CONTROL S OUT jack of the equipment to the CONTROL S IN jack on the projection TV with the CONTROL S cable.
Making Connections
The connection you choose will depend on the cable found in your home. Newer homes will be equipped with standard coaxial cable (see A); older homes will probably have 300-ohm twin leadcable (see B); still other homes may contain both(see C).
A
BS VIDEO
VIDEO
AUDIO
L
R R
VIDEO
(MONO)
IN
IN
CONTROL S
IN OUT
OUTVIDEO 4
VIDEO 1 VIDEO 3
VIDEO 5 (DTV) SELECT
Y
PB
PR
Y/G
HD VD
PB/B
PR/R
L(MONO)
R
L
AUDIO
AUDIOCOMPONENT
VHF/UHF
AUX
CONTROL S
IN OUT
Connecting Directly to a Cableor an Antenna
• VHF onlyor
• VHF/UHFor
• Cable
75-ohm coaxial cable
(Rear of projection TV)
VHF/UHF
• VHF onlyor
• UHF onlyor
• VHF/UHF
300-ohm twin lead cable
(Rear of projection TV)
VHF/UHF
Antenna connector
9
D:\810nouhin\4080199111\408019911KP57XBRUC\02US-COV-KP57XBRUC\05INT.fm masterpage:Right
Installing and Connecting the P
rojection TV
l name1[KP-57XBR10W] Model name2[KP-65XBR10W][4-080-199-11 (1)]
For this set up, you can switch between scrambled
)
Mode
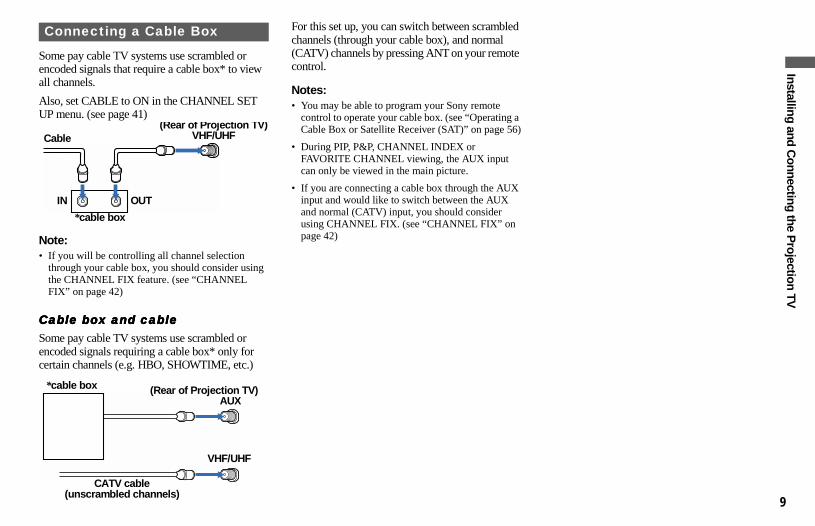
Some pay cable TV systems use scrambled or encoded signals that require a cable box* to view all channels.
Also, set CABLE to ON in the CHANNEL SET UP menu. (see page 41)
Note:• If you will be controlling all channel selection
through your cable box, you should consider using the CHANNEL FIX feature. (see “CHANNEL FIX” on page 42)
Cable box and cableCable box and cableCable box and cableCable box and cableSome pay cable TV systems use scrambled or encoded signals requiring a cable box* only for certain channels (e.g. HBO, SHOWTIME, etc.)
channels (through your cable box), and normal (CATV) channels by pressing ANT on your remotecontrol.
Notes:• You may be able to program your Sony remote
control to operate your cable box. (see “Operating aCable Box or Satellite Receiver (SAT)” on page 56
• During PIP, P&P, CHANNEL INDEX or FAVORITE CHANNEL viewing, the AUX input can only be viewed in the main picture.
• If you are connecting a cable box through the AUXinput and would like to switch between the AUX and normal (CATV) input, you should consider using CHANNEL FIX. (see “CHANNEL FIX” on page 42)
Connecting a Cable Box
(Rear of Projection TV)VHF/UHFCable
IN OUT
*cable box
*cable box (Rear of Projection TV) AUX
VHF/UHF
CATV cable(unscrambled channels)

10
D:\810nouhin\4080199111\408019911KP57XBRUC\02US-COV-KP57XBRUC\06INT.fm masterpage:Left
l name1[KP-57XBR10W] Model name2[KP-65XBR10W][4-080-199-11 (1)]
Disconnect all power sources before making any connections.
1 Attach the coaxial cable from the incoming cable connection or antenna to IN on the VCR.
2 Using a coaxial cable, connect OUT on the VCR to VHF/UHF on the projection TV.
3 Using AUDIO and S VIDEO* cables, connect AUDIO and S VIDEO OUT on the VCR to AUDIO and S VIDEO IN on the projection TV (White-AUDIO Left, Red-AUDIO Right).
* If your VCR is not equipped with S VIDEO, use a VIDEO cable (yellow) instead of the S VIDEO cable.
Note:• If you are connecting a monaural VCR, connect
only the single audio output to the left (MONO) input on the projection TV.
Connecting an Antenna/Cable TV System to a VCR
LINEOUT
OUT
IN
AUDIO R AUDIO L VIDEO S VIDEO
VHF/UHFLINE
IN
S VIDEO
VIDEO
AUDIO
L
R R
VIDEO
(MONO)
IN
IN
CONTROL S
IN OUT
OUTVIDEO 4
VIDEO 1 VIDEO 3
VIDEO 5 (DTV) SELECT
Y
PB
PR
Y/G
HD VD
PB/B
PR/R
L(MONO)
R
L
AUDIO
AUDIOCOMPONENT
VHF/UHF
AUX
(Rear of projection TV)
VIDEOAUDIO-LAUDIO-R
3
2
VMC-810S/820S (not supplied)
YC-15V/30V (not supplied)
Coaxial cable
VCR1Cable/Antenna
S VIDEO
Mode

11
D:\810nouhin\4080199111\408019911KP57XBRUC\02US-COV-KP57XBRUC\06INT.fm masterpage:Right
l name1[KP-57XBR10W] Model name2[KP-65XBR10W][4-080-199-11 (1)]
Installing and Connecting the P
rojection TVDisconnect all power sources before making any connections.
1 Connect the single (input) jack of the splitter to the incoming cable connection, and connect the other two (output) jacks (using the coaxial cable) to IN on the cable box and VHF/UHF on the projection TV.
2 Using a coaxial cable, connect OUT on the cable box to IN on the VCR.
3 Using AUDIO and S VIDEO* cables, connect AUDIO and S VIDEO OUT on the VCR to AUDIO and S VIDEO IN on the projection TV (White-AUDIO Left, Red-AUDIO Right).
* If your VCR is not equipped with S VIDEO, use a VIDEO cable (yellow) instead of the S VIDEO cable.
Note:• To view scrambled channels through the cable box,
select the video input which the cable box is connected to by pressing TV/VIDEO.
Connecting a VCR and Projection TV to a Cable Box
S VIDEO
VIDEO
AUDIO
R R
VIDEO
IN
IN
CONTROL S
IN OUT
OUTVIDEO 4
VIDEO 1 VIDEO 3
VIDEO 5 (DTV) SELECT
Y
PB
PR
Y/G
HD VD
PB/B
PR/R
L(MONO)
R
L
AUDIO
AUDIOCOMPONENT
VHF/UHF
AUX
LINEOUT
OUT
IN
AUDIO R AUDIO L VIDEO S VIDEO
VHF/UHFLINE
IN
L(MONO)
OUT
IN
(Rear of projection TV)
S VIDEOAUDIO-RAUDIO-LVIDEO
VMC-810S/820S (not supplied)
YC-15V/30V (not supplied)
Coaxial cable
VCR
Cable/Antenna
Cable box Splitter(not supplied)
1
3
2
Mode
12
D:\810nouhin\4080199111\408019911KP57XBRUC\02US-COV-KP57XBRUC\06INT.fm masterpage:Left
l name1[KP-57XBR10W] Model name2[KP-65XBR10W][4-080-199-11 (1)]
Disconnect all power sources before making any connections.
Before connecting, be sure to read the Operating Instructions of the DTV receiver.
Connecting a DTV (digital Connecting a DTV (digital Connecting a DTV (digital Connecting a DTV (digital television) receiver with the Y/Ptelevision) receiver with the Y/Ptelevision) receiver with the Y/Ptelevision) receiver with the Y/PBBBB////PPPPRRRR (component video input) jacks (component video input) jacks (component video input) jacks (component video input) jacks
1 Attach the coaxial cable from the roof antenna to VHF/UHF on the DTV receiver.
2 Using three VIDEO cables, connect Y, PB and PR of COMPONENT VIDEO OUT on the DTV receiver to Y, PB and PR of VIDEO 5 (DTV) IN on the projection TV.
3 Using an AUDIO cable, connect LINE OUT on the DTV receiver to AUDIO of VIDEO 5 (DTV) IN on the projection TV (White-AUDIO Left, Red-AUDIO Right).
4 Select VIDEO 5 by the TV/VIDEO button.
5 Select the SET UP menu and set DTV INPUT to Y PB PR. (see “DTV INPUT” on page 47)
Note:• Some DTV receiver terminals may be labeled
differently. If so, connect as follows:Connect Y (green) to Y.Connect PB (blue) to CB, Cb or B-Y.Connect PR (red) to CR, Cr or R-Y.
Connecting a DTV (Digital Television) Receiver
S VIDEO
1
VIDEO
L
R
VHF/UHF(DTV)
(MONO)
AUDIO OUT
2 Y
PB
PR1 2 3VIDEO OUT
S VIDEO
VIDEO
AUDIO
L
R R
VIDEO
(MONO)
IN
IN
CONTROL S
IN OUT
OUTVIDEO 4
VIDEO 1 VIDEO 3
VIDEO 5 (DTV) SELECT
Y
PB
PR
Y/G
HD VD
PB/B
PR/R
L(MONO)
R
L
AUDIO
AUDIOCOMPONENT
VHF/UHF
AUX
3
2
1
VMC-10HG (not supplied)
AUDIO-L
RK-74A (not supplied)
Y
AUDIO-R
PB
PR
DTV receiver
Roof Antenna
Mode
13
D:\810nouhin\4080199111\408019911KP57XBRUC\02US-COV-KP57XBRUC\06INT.fm masterpage:Right
l name1[KP-57XBR10W] Model name2[KP-65XBR10W][4-080-199-11 (1)]
Installing and Connecting the P
rojection TVDisconnect all power sources before making any connections.
Connecting a DTV (digital Connecting a DTV (digital Connecting a DTV (digital Connecting a DTV (digital television) receiver with the G/B/R/television) receiver with the G/B/R/television) receiver with the G/B/R/television) receiver with the G/B/R/HD/VD jacksHD/VD jacksHD/VD jacksHD/VD jacks
1 Attach the coaxial cable from the roof antenna to VHF/UHF on the DTV receiver.
2 Using a component video cable for DTV receiver, connect G, B, R, HD and VD of VIDEO OUT on the DTV receiver to G, B, R, HD and VD respectively of VIDEO 5 (DTV) IN on the projection TV.If the DTV receiver is equipped with the Y/PB/PR jacks, proceed to step 2 in “Connecting a DTV (digital television) receiver with the Y/PB/PR (component video input) jacks on page 12.
3 Using an AUDIO cable, connect AUDIO OUT on the DTV receiver to AUDIO of VIDEO 5 (DTV) IN on the projection TV (White-AUDIO Left, Red-AUDIO Right).
4 Select VIDEO 5 by the TV/VIDEO button.
5 Select the SET UP menu and set DTV INPUT to R.G.B. (see “DTV INPUT” on page 47)
S VIDEO
1
VIDEO
L
R
VHF/UHF(DTV)
(MONO)
AUDIO OUT
2 Y
PB
PR
R
G
B
HD
VD1 2 3 4VIDEO OUT
S VIDEO
VIDEO
AUDIO
L
R R
VIDEO
(MONO)
IN
IN
CONTROL S
IN OUT
OUTVIDEO 4
VIDEO 1 VIDEO 3
VIDEO 5 (DTV) SELECT
Y
PB
PR
Y/G
HD VD
PB/B
PR/R
L(MONO)
R
L
AUDIO
AUDIOCOMPONENT
VHF/UHF
AUX
3
2
1
Component video cable for DTV receiver (not supplied)
AUDIO-R AUDIO-L
RK-74A (not supplied)
HDVD
GBR
DTV receiver
Roof Antenna
HDVD
RGB
Mode
14
D:\810nouhin\4080199111\408019911KP57XBRUC\02US-COV-KP57XBRUC\06INT.fm masterpage:Left
l name1[KP-57XBR10W] Model name2[KP-65XBR10W][4-080-199-11 (1)]
Disconnect all power sources before making any connections.
1 Connect the cable from the satellite antenna to the satellite receiver.
2 Attach the coaxial cable from the incoming cable connection or antenna to VHF/UHF on the projection TV.
3 Using AUDIO and S VIDEO cables, connect AUDIO and S VIDEO OUT on the satellite receiver to AUDIO and S VIDEO IN on the projection TV (White-AUDIO Left, Red-AUDIO Right).
Note:• To view input from the satellite receiver, select the
video input which the satellite receiver is connected to by pressing TV/VIDEO on the remote control.
Connecting a Satellite Receiver (SAT)
S VIDEO
VIDEO
AUDIO
L
R R
VIDEO
(MONO)
IN
IN
CONTROL S
IN OUT
OUTVIDEO 4
VIDEO 1 VIDEO 3
VIDEO 5 (DTV) SELECT
Y
PB
PR
Y/G
HD VD
PB/B
PR/R
L(MONO)
R
L
AUDIO
AUDIOCOMPONENT
VHF/UHF
AUX
VHF/UHF
S VIDEO
OUT
IN
LINE OUT
SATELLITE IN
AUDIO R AUDIO L VIDEO
(Rear of projection TV)
RK-74A (not supplied)
YC-15V/30V (not supplied)
S-VIDEOAUDIO-LAUDIO-R
1
3
2
Satellite receiver
Cable/Antenna
Satellite antenna cable
Mode
15
D:\810nouhin\4080199111\408019911KP57XBRUC\02US-COV-KP57XBRUC\06INT.fm masterpage:Right
l name1[KP-57XBR10W] Model name2[KP-65XBR10W][4-080-199-11 (1)]
Installing and Connecting the P
rojection TVDisconnect all power sources before making any connections.
1 Connect the cable from the satellite antenna to the satellite receiver.
2 Attach the coaxial cable from the incoming cable connection or antenna to VHF/UHF IN on the VCR.
3 Using a coaxial cable, connect VHF/UHF OUT on the VCR to VHF/UHF on the projection TV.
4 Using AUDIO and S VIDEO* cables, connect AUDIO and S VIDEO OUT on the satellite receiver to AUDIO and S VIDEO IN on the VCR.
5 Using AUDIO and S VIDEO* cables, connect AUDIO and S VIDEO OUT on the VCR to AUDIO and S VIDEO IN on the projection TV (White-AUDIO Left, Red-AUDIO Right).
* If your VCR or satellite receiver is not equipped with S VIDEO, use a VIDEO cable (yellow) instead of the S VIDEO cable.
Note:• To view input from the satellite receiver or VCR,
select the video input which your satellite receiver or VCR is connected to by pressing TV/VIDEO on the remote control.
Connecting a Satellite Receiver (SAT) and VCR
S VIDEO
VIDEO
AUDIO
L
R R
VIDEO
(MONO)
IN
IN
CONTROL S
IN OUT
OUTVIDEO 4
VIDEO 1 VIDEO 3
VIDEO 5 (DTV) SELECT
Y
PB
PR
Y/G
HD VD
PB/B
PR/R
L(MONO)
R
L
AUDIO
AUDIOCOMPONENT
VHF/UHF
AUX
LINEOUT
OUT
IN
AUDIO R AUDIO L VIDEO S VIDEO
VHF/UHFLINE
IN
AUDIO R AUDIO L VIDEO
SATELLITE INVHF/UHF
S VIDEO
OUT
IN
LINE OUT
(Rear of projection TV)
AUDIO-R
VMC-810S/820S (not supplied)
YC-15V/30V (not supplied)
S VIDEO AUDIO-L
4
2
Cable/Antenna
Satellite antenna cable
VIDEO
5VCR
VMC-810S/820S (not supplied)
YC-15V/30V (not supplied)
1
3
Satellite receiver
Mode
16
D:\810nouhin\4080199111\408019911KP57XBRUC\02US-COV-KP57XBRUC\06INT.fm masterpage:Left
l name1[KP-57XBR10W] Model name2[KP-65XBR10W][4-080-199-11 (1)]
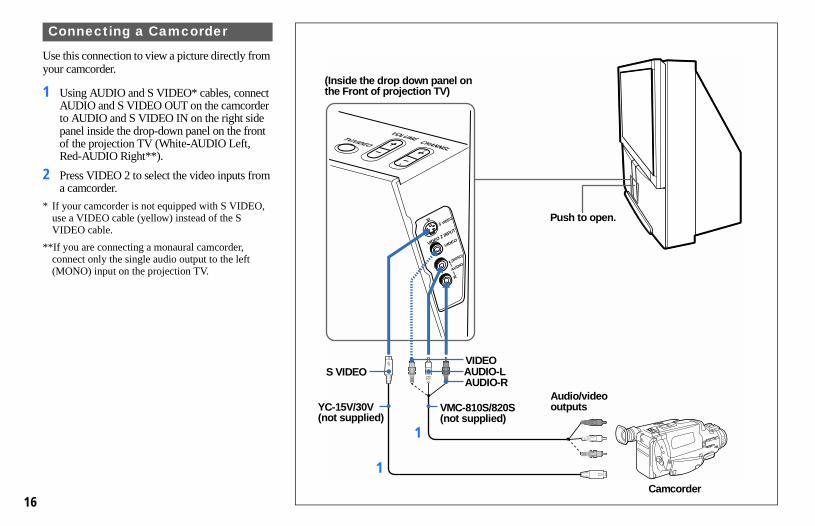
Use this connection to view a picture directly from your camcorder.
1 Using AUDIO and S VIDEO* cables, connect AUDIO and S VIDEO OUT on the camcorder to AUDIO and S VIDEO IN on the right side panel inside the drop-down panel on the front of the projection TV (White-AUDIO Left, Red-AUDIO Right**).
2 Press VIDEO 2 to select the video inputs from a camcorder.
* If your camcorder is not equipped with S VIDEO, use a VIDEO cable (yellow) instead of the S VIDEO cable.
**If you are connecting a monaural camcorder, connect only the single audio output to the left (MONO) input on the projection TV.
Connecting a Camcorder
VIDEO 2 INPUTS VIDEO
VIDEO
AUDIOL(MONO)
R
VOLUME TV/VIDEO CHANNEL+–+–
(Inside the drop down panel on the Front of projection TV)
VIDEOAUDIO-LAUDIO-R
VMC-810S/820S(not supplied)
Audio/video outputs
Camcorder
1
1
S VIDEO
YC-15V/30V(not supplied)
Push to open.
Mode

17
D:\810nouhin\4080199111\408019911KP57XBRUC\02US-COV-KP57XBRUC\06INT.fm masterpage:Right
l name1[KP-57XBR10W] Model name2[KP-65XBR10W][4-080-199-11 (1)]
Installing and Connecting the P
rojection TVDisconnect all power sources before making any connections.
SELECT OUT allows you to use a second VCR to record a program being played by the primary VCR or to perform tape editing and dubbing.
1 Connect the VCR intended for playback using the connection instructions on page 10 of this manual.
2 Using an AUDIO/VIDEO cable, connect AUDIO and VIDEO IN on the VCR intended for recording to AUDIO and VIDEO OUT of SELECT OUT on the projection TV.
Notes:• Do not change the input signal while editing
through SELECT OUT.
• When connecting a single VCR to the projection TV: if VCR LINE OUT is connected to VIDEO IN on the projection TV, do not connect the SELECT OUT on the projection TV to the VCR LINE INPUT (see right). Doing so will cause program interference and other viewing problems.
• You can select the output signal from SELECT OUT of the SET UP menu. (see “SELECT OUT” on page 45)
• When the projection TV turns off, the signal is not output through SELECT OUT.
Connecting Two VCRs for Tape Editing
S VIDEO
VIDEO
AUDIO
L
R R
VIDEO
(MONO)
IN
IN
CONTROL S
IN OUT
OUTVIDEO 4
VIDEO 1 VIDEO 3
VIDEO 5 (DTV) SELECT
Y
PB
PR
Y/G
HD VD
PB/B
PR/R
L(MONO)
R
L
AUDIO
AUDIOCOMPONENT
VHF/UHF
AUX
AUDIO R AUDIO L VIDEOLINEOUT
OUT
IN
AUDIO R AUDIO L VIDEOLINE
IN
OUT
IN
(Rear of projection TV)
AUDIO-R
VCR (for playback)
AUDIO-L
2
VIDEO
VMC-810S/820S(not supplied)
VIDEOAUDIO-LAUDIO-R
VCR (for recording)
VMC-810S/820S (not supplied)
1
LINEOUTIN
SELECTOUT
VIDEO IN
Indicates direction of signal
(Rear of projection TV)
Mode
18
D:\810nouhin\4080199111\408019911KP57XBRUC\02US-COV-KP57XBRUC\06INT.fm masterpage:Left
l name1[KP-57XBR10W] Model name2[KP-65XBR10W][4-080-199-11 (1)]
Disconnect all power sources before making any connections.
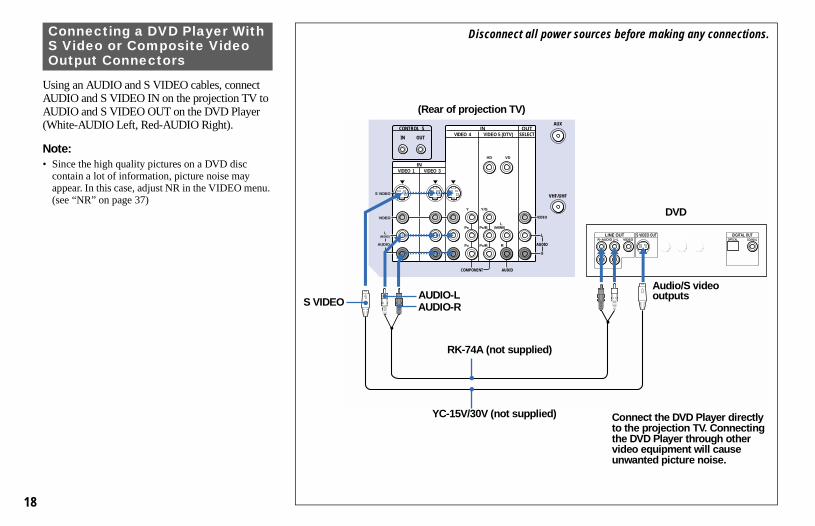
Using an AUDIO and S VIDEO cables, connect AUDIO and S VIDEO IN on the projection TV to AUDIO and S VIDEO OUT on the DVD Player (White-AUDIO Left, Red-AUDIO Right).
Note:• Since the high quality pictures on a DVD disc
contain a lot of information, picture noise may appear. In this case, adjust NR in the VIDEO menu. (see “NR” on page 37)
Connecting a DVD Player With S Video or Composite Video Output Connectors
S VIDEO
VIDEO
AUDIO
L
R R
VIDEO
(MONO)
IN
IN
CONTROL S
IN OUT
OUTVIDEO 4
VIDEO 1 VIDEO 3
VIDEO 5 (DTV) SELECT
Y
PB
PR
Y/G
HD VD
PB/B
PR/R
L(MONO)
R
L
AUDIO
AUDIOCOMPONENT
VHF/UHF
AUX
R-YR-YY B-YB-YCOMPONENT VIDEO OUTCOMPONENT VIDEO OUTLINE OUT S VIDEO OUT DIGITAL OUT
R–AUDIO 1–L VIDEO OPTICAL COAXIAL
Connect the DVD Player directly to the projection TV. Connecting the DVD Player through other video equipment will cause unwanted picture noise.
(Rear of projection TV)
RK-74A (not supplied)
Audio/S video outputs
DVD
YC-15V/30V (not supplied)
AUDIO-LAUDIO-RS VIDEO
Mode
19
D:\810nouhin\4080199111\408019911KP57XBRUC\02US-COV-KP57XBRUC\06INT.fm masterpage:Right
l name1[KP-57XBR10W] Model name2[KP-65XBR10W][4-080-199-11 (1)]
Installing and Connecting the P
rojection TVDisconnect all power sources before making any connections.
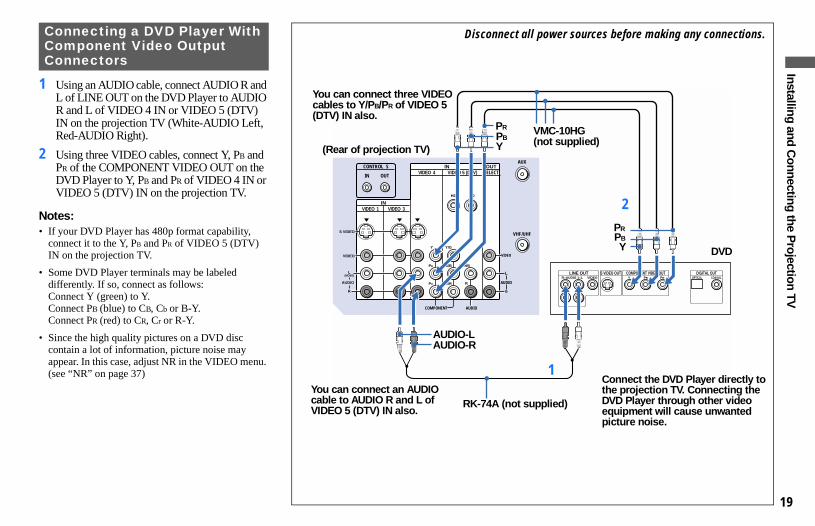
1 Using an AUDIO cable, connect AUDIO R and L of LINE OUT on the DVD Player to AUDIO R and L of VIDEO 4 IN or VIDEO 5 (DTV) IN on the projection TV (White-AUDIO Left, Red-AUDIO Right).
2 Using three VIDEO cables, connect Y, PB and PR of the COMPONENT VIDEO OUT on the DVD Player to Y, PB and PR of VIDEO 4 IN or VIDEO 5 (DTV) IN on the projection TV.
Notes:• If your DVD Player has 480p format capability,
connect it to the Y, PB and PR of VIDEO 5 (DTV) IN on the projection TV.
• Some DVD Player terminals may be labeled differently. If so, connect as follows:Connect Y (green) to Y.Connect PB (blue) to CB, Cb or B-Y.Connect PR (red) to CR, Cr or R-Y.
• Since the high quality pictures on a DVD disc contain a lot of information, picture noise may appear. In this case, adjust NR in the VIDEO menu. (see “NR” on page 37)
Connecting a DVD Player With Component Video Output Connectors
S VIDEO
VIDEO
AUDIO
L
R R
VIDEO
(MONO)
IN
IN
CONTROL S
IN OUT
OUTVIDEO 4
VIDEO 1 VIDEO 3
VIDEO 5 (DTV) SELECT
Y
PB
PR
Y/G
HD VD
PB/B
PR/R
L(MONO)
R
L
AUDIO
AUDIOCOMPONENT
VHF/UHF
AUX
LINE OUT S VIDEO OUT DIGITAL OUTR–AUDIO 1–L VIDEO OPTICAL COAXIALPRY PB
COMPONENT VIDEO OUT
Connect the DVD Player directly to the projection TV. Connecting the DVD Player through other video equipment will cause unwanted picture noise.
(Rear of projection TV)
AUDIO-L
RK-74A (not supplied)
DVD
VMC-10HG (not supplied)
AUDIO-R
2
1
PR
PB
Y
PRPBY
You can connect three VIDEO cables to Y/PB/PR of VIDEO 5 (DTV) IN also.
You can connect an AUDIO cable to AUDIO R and L of VIDEO 5 (DTV) IN also.
Mode
20
D:\810nouhin\4080199111\408019911KP57XBRUC\02US-COV-KP57XBRUC\06INT.fm masterpage:Left
l name1[KP-57XBR10W] Model name2[KP-65XBR10W][4-080-199-11 (1)]
Disconnect all power sources before making any connections.
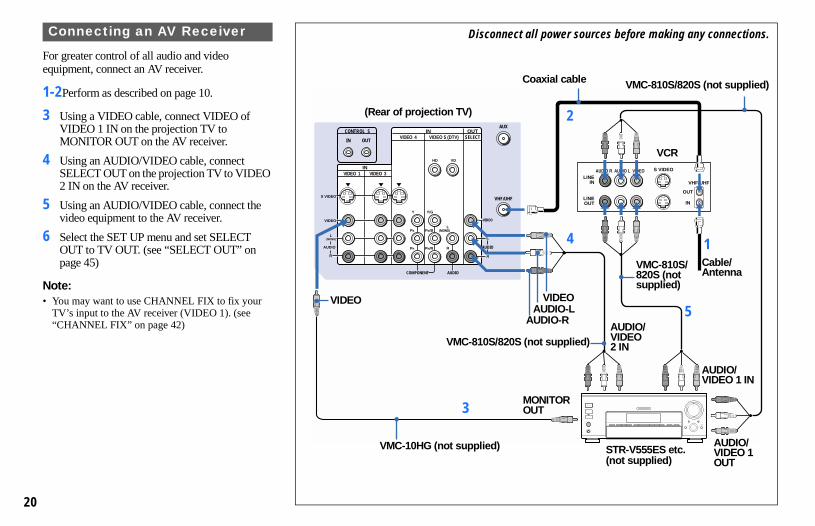
For greater control of all audio and video equipment, connect an AV receiver.
1-2Perform as described on page 10.
3 Using a VIDEO cable, connect VIDEO of VIDEO 1 IN on the projection TV to MONITOR OUT on the AV receiver.
4 Using an AUDIO/VIDEO cable, connect SELECT OUT on the projection TV to VIDEO 2 IN on the AV receiver.
5 Using an AUDIO/VIDEO cable, connect the video equipment to the AV receiver.
6 Select the SET UP menu and set SELECT OUT to TV OUT. (see “SELECT OUT” on page 45)
Note:• You may want to use CHANNEL FIX to fix your
TV’s input to the AV receiver (VIDEO 1). (see “CHANNEL FIX” on page 42)
Connecting an AV Receiver
S VIDEO
VIDEO
AUDIO
L
R R
VIDEO
(MONO)
IN
IN
CONTROL S
IN OUT
OUTVIDEO 4
VIDEO 1 VIDEO 3
VIDEO 5 (DTV) SELECT
Y
PB
PR
Y/G
HD VD
PB/B
PR/R
L(MONO)
R
L
AUDIO
AUDIOCOMPONENT
VHF/UHF
AUX
LINEOUT
OUT
IN
AUDIO R AUDIO L VIDEO S VIDEO
VHF/UHFLINE
IN
AOFF
A+B
B
– +
0 10
1 9
8
7
2
3
6
5
4
1 / u
+–
– +
Coaxial cable VMC-810S/820S (not supplied)
VCR
3
5
2
Cable/Antenna
VMC-810S/820S (not supplied)
AUDIO/VIDEO 1 IN
AUDIO/VIDEO 1 OUT
STR-V555ES etc. (not supplied)
AUDIO/VIDEO 2 INVMC-810S/820S (not supplied)
VMC-10HG (not supplied)
4
VIDEO
AUDIO-RAUDIO-L
1
MONITOR OUT
VIDEO
(Rear of projection TV)
Mode
21
D:\810nouhin\4080199111\408019911KP57XBRUC\02US-COV-KP57XBRUC\06INT.fm masterpage:Right
l name1[KP-57XBR10W] Model name2[KP-65XBR10W][4-080-199-11 (1)]
Installing and Connecting the P
rojection TVDisconnect all power sources before making any connections.
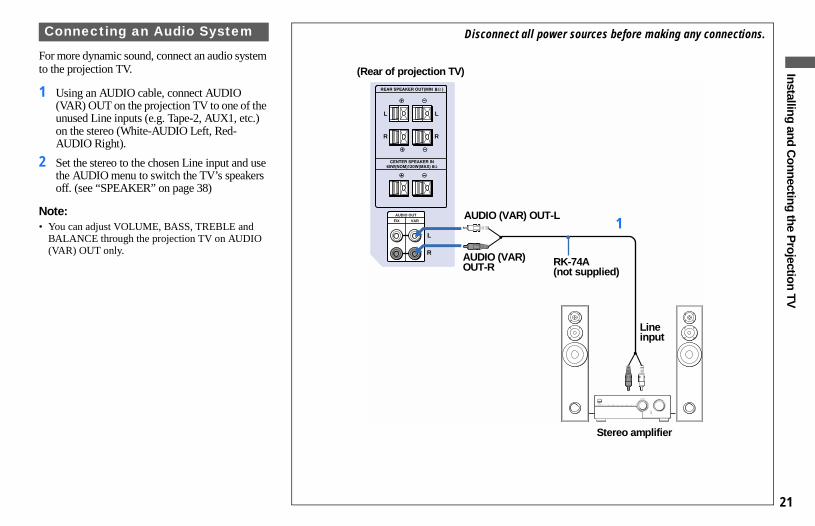
For more dynamic sound, connect an audio system to the projection TV.
1 Using an AUDIO cable, connect AUDIO (VAR) OUT on the projection TV to one of the unused Line inputs (e.g. Tape-2, AUX1, etc.) on the stereo (White-AUDIO Left, Red-AUDIO Right).
2 Set the stereo to the chosen Line input and use the AUDIO menu to switch the TV’s speakers off. (see “SPEAKER” on page 38)
Note:• You can adjust VOLUME, BASS, TREBLE and
BALANCE through the projection TV on AUDIO (VAR) OUT only.
Connecting an Audio System
R
L
AUDIO OUT
VARFIX
L
R
L
R
PHONES
SPEAKERS
A•
•
•
•OFF
A+B
–10 +10
TONE
SUBSONIC
EON LINK
BSOURCE
• ••TAPE1 TAPE2
BASS
0•
••
–10 +10
TREBLE
0•
••
LEFT RIGHT
BALANCE
•
••
TAPE MONITOR
LOUDNESS
¯ ON ¿ OFF ¯ ON ¿ OFF
PROTECTIONINPUT SELECTOR VOLUME
SOURCE DIRECT0 10
TAPE1/DATEON LINK SACD/CD TUNER PHONOAUXTAPE2/MD
POWER
(Rear of projection TV)
AUDIO (VAR) OUT-L
AUDIO (VAR) OUT-R RK-74A
(not supplied)
Line input
1
Stereo amplifier
Mode
22
D:\810nouhin\4080199111\408019911KP57XBRUC\02US-COV-KP57XBRUC\06INT.fm masterpage:Left
l name1[KP-57XBR10W] Model name2[KP-65XBR10W][4-080-199-11 (1)]
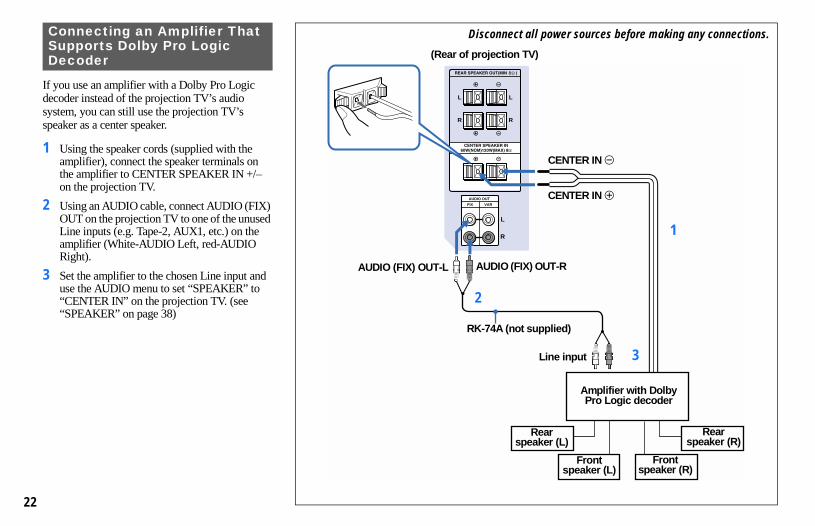
Disconnect all power sources before making any connections.
If you use an amplifier with a Dolby Pro Logic decoder instead of the projection TV’s audio system, you can still use the projection TV’s speaker as a center speaker.
1 Using the speaker cords (supplied with the amplifier), connect the speaker terminals on the amplifier to CENTER SPEAKER IN +/– on the projection TV.
2 Using an AUDIO cable, connect AUDIO (FIX) OUT on the projection TV to one of the unused Line inputs (e.g. Tape-2, AUX1, etc.) on the amplifier (White-AUDIO Left, red-AUDIO Right).
3 Set the amplifier to the chosen Line input and use the AUDIO menu to set “SPEAKER” to “CENTER IN” on the projection TV. (see “SPEAKER” on page 38)
Connecting an Amplifier That Supports Dolby Pro Logic Decoder
R
L
AUDIO OUT
VARFIX
L
R
L
R
(Rear of projection TV)
CENTER IN #
CENTER IN 3
AUDIO (FIX) OUT-L AUDIO (FIX) OUT-R
RK-74A (not supplied)
Line input
Amplifier with Dolby Pro Logic decoder
Rear speaker (L)
Rear speaker (R)
Front speaker (R)
Front speaker (L)
1
2
3
Mode
D:\810nouhin\4080199111\408019911KP57XBRUC\02US-COV-KP57XBRUC\07SET.fm masterpage:First-Right
23
Basic S
et Up
l name1[KP-57XBR10W] Model name2[KP-65XBR10W][4-080-199-11 (1)]
Adjusting slidersAdjusting slidersAdjusting slidersAdjusting slidersWhen menu items present a slider ( or ), move the joystick up, down, left or right to adjust the setting.
On-line help/instructionsOn-line help/instructionsOn-line help/instructionsOn-line help/instructionsSeveral menu windows will provide prompts and instructions to assist you in navigating through the different functions.
Mode
Basic Set UpBasic Set UpBasic Set UpBasic Set Up
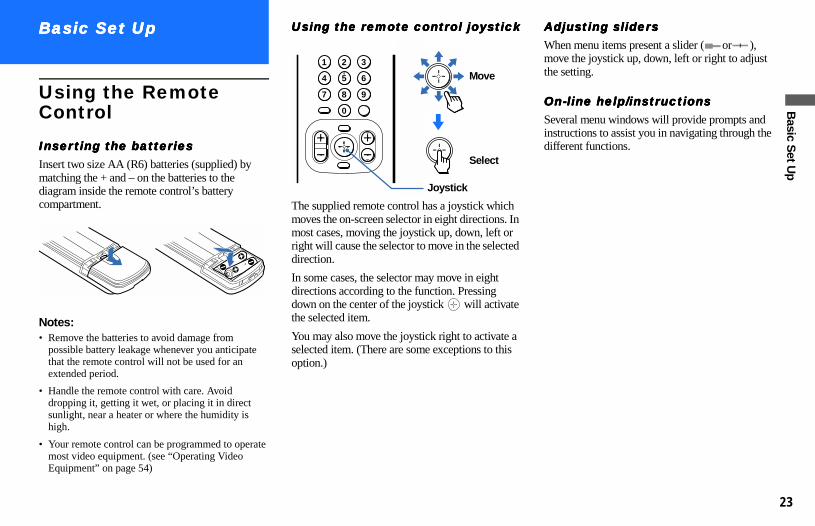
Using the Remote Control
Inserting the batteriesInserting the batteriesInserting the batteriesInserting the batteriesInsert two size AA (R6) batteries (supplied) by matching the + and – on the batteries to the diagram inside the remote control’s battery compartment.
Notes:• Remove the batteries to avoid damage from
possible battery leakage whenever you anticipate that the remote control will not be used for an extended period.
• Handle the remote control with care. Avoid dropping it, getting it wet, or placing it in direct sunlight, near a heater or where the humidity is high.
• Your remote control can be programmed to operate most video equipment. (see “Operating Video Equipment” on page 54)
Using the remote control Using the remote control Using the remote control Using the remote control joystickjoystickjoystickjoystick
The supplied remote control has a joystick which moves the on-screen selector in eight directions. Inmost cases, moving the joystick up, down, left or right will cause the selector to move in the selecteddirection.
In some cases, the selector may move in eight directions according to the function. Pressing down on the center of the joystick will activatethe selected item.
You may also move the joystick right to activate a selected item. (There are some exceptions to this option.)
2
8
0
1
4
7
3
6
9
5
m
Move
Select
Joystick
D:\810nouhin\4080199111\408019911KP57XBRUC\02US-COV-KP57XBRUC\07SET.fm masterpage:Left
l name1[KP-57XBR10W] Model name2[KP-65XBR10W][4-080-199-11 (1)]
e The screen will change to reflect your choice.
4 Press VOLUME – to continue.
5 Press CHANNEL + to preset channels automatically.
“AUTO PROGRAM” appears and the projection TV starts scanning and presetting channels automatically. While scanning, the received channel will be displayed on the sub screen. When all the receivable channels are stored, the lowest numbered channel will be displayed.
ESPAÑOL :ENGLISH :
[ CH – ] [ CH + ]
Press [ SET UP ] to exit.
First Please connect the antenna.
AUTO SET UP : [ VOL – ]
CHANNEL
VOLUME CONTINUE TO AUTO PROGRAM?
YES: [CH +] NO : [CH –]
CHANNEL
AUTO PROGRAM
24
Mode
Setting Up the Projection TV AutomaticallyThe AUTO SET UP feature will allow you to set the on-screen language and set all receivable channels.
The AUTO SET UP feature does not apply for installations that use a cable box for all channel selection.
You can also set up the projection TV manually. (see “Using the CHANNEL SET UP Menu” on page 41)
Notes:• Perform this function during the day, with the
antenna and/or cable properly connected, to ensure that all available channels will be broadcasting and receivable.
• Before you perform AUTO SET UP again, make sure that the input from ANT (not AUX) is selected by pressing ANT until “AUX” does not appear next to the channel number.
• When you perform AUTO PROGRAM, your CHANNEL FIX and ON/OFF TIMER settings will be erased.
• When you perform AUTO SET UP, all the settings in the VIDEO and AUDIO menus are reset to the factory settings.
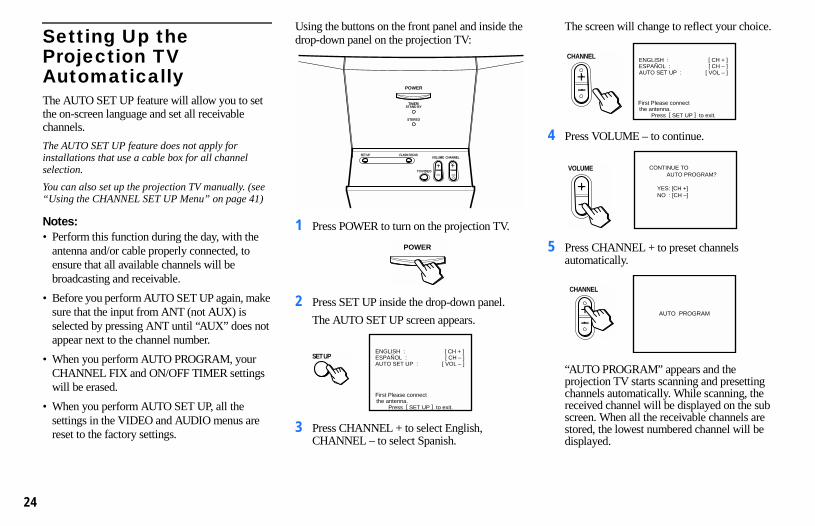
Using the buttons on the front panel and inside thdrop-down panel on the projection TV:
1 Press POWER to turn on the projection TV.
2 Press SET UP inside the drop-down panel.
The AUTO SET UP screen appears.
3 Press CHANNEL + to select English, CHANNEL – to select Spanish.
CHANNELVOLUME
+–
+–
TV/VIDEO
STEREO
TIMER/STAND BY
POWER
FLASH FOCUSSET UP
POWER
Press [ SET UP ] to exit.
First Please connect the antenna.
ESPAÑOL :ENGLISH :
AUTO SET UP : [ CH – ] [ CH + ]
[ VOL – ]SET UP
25
D:\810nouhin\4080199111\408019911KP57XBRUC\02US-COV-KP57XBRUC\07SET.fm masterpage:Right
Basic S
et Up
l name1[KP-57XBR10W] Model name2[KP-65XBR10W][4-080-199-11 (1)]
Tip z
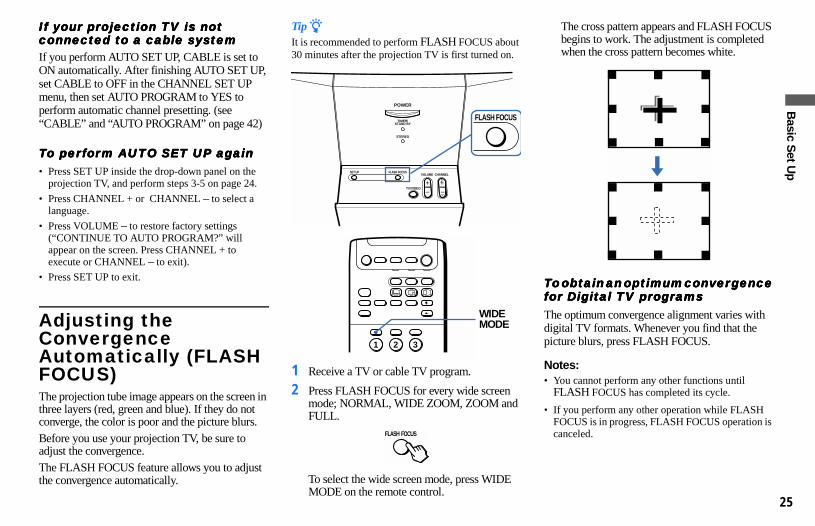
The cross pattern appears and FLASH FOCUS begins to work. The adjustment is completed when the cross pattern becomes white.
To obtain an optimum convergence To obtain an optimum convergence To obtain an optimum convergence To obtain an optimum convergence for Digital TV programsfor Digital TV programsfor Digital TV programsfor Digital TV programsThe optimum convergence alignment varies with digital TV formats. Whenever you find that the picture blurs, press FLASH FOCUS.
Notes:• You cannot perform any other functions until
FLASH FOCUS has completed its cycle.
• If you perform any other operation while FLASH FOCUS is in progress, FLASH FOCUS operation is canceled.
Mode
If your projection TV is not If your projection TV is not If your projection TV is not If your projection TV is not connected to a cable systemconnected to a cable systemconnected to a cable systemconnected to a cable systemIf you perform AUTO SET UP, CABLE is set to ON automatically. After finishing AUTO SET UP, set CABLE to OFF in the CHANNEL SET UP menu, then set AUTO PROGRAM to YES to perform automatic channel presetting. (see “CABLE” and “AUTO PROGRAM” on page 42)
To perform AUTO SET UP againTo perform AUTO SET UP againTo perform AUTO SET UP againTo perform AUTO SET UP again• Press SET UP inside the drop-down panel on the
projection TV, and perform steps 3-5 on page 24.
• Press CHANNEL + or CHANNEL – to select a language.
• Press VOLUME – to restore factory settings (“CONTINUE TO AUTO PROGRAM?” will appear on the screen. Press CHANNEL + to execute or CHANNEL – to exit).
• Press SET UP to exit.
Adjusting the Convergence Automatically (FLASH FOCUS)The projection tube image appears on the screen in three layers (red, green and blue). If they do not converge, the color is poor and the picture blurs.Before you use your projection TV, be sure to adjust the convergence. The FLASH FOCUS feature allows you to adjust the convergence automatically.
It is recommended to perform FLASH FOCUS about30 minutes after the projection TV is first turned on.
1 Receive a TV or cable TV program.
2 Press FLASH FOCUS for every wide screen mode; NORMAL, WIDE ZOOM, ZOOM andFULL.
To select the wide screen mode, press WIDE MODE on the remote control.
CHANNELVOLUME
+–
+–
TV/VIDEO
STEREO
TIMER/STAND BY
POWER
FLASH FOCUSSET UP
FLASH FOCUS
21
4
3
65
WIDEMODE
FLASH FOCUS
D:\810nouhin\4080199111\408019911KP57XBRUC\02US-COV-KP57XBRUC\08CTV.fm masterpage:First-Left
l name1[KP-57XBR10W] Model name2[KP-65XBR10W][4-080-199-11 (1)]
r r r r
r
Press to scan through the channels (+ up or – down).
Press to adjust the volume (+ up or – down).
Press to alternate or jump back and forth between two channels. The projection TV will jump between the current channel and the last channel selected using the 0-9 buttons.
Press to mute the sound. “MUTING” will appear on the screen and will dim three seconds later. To restore sound, press again or press VOL +.
This is useful when you need to copy down information that appears on the TV’s screen.
Press to freeze the picture.
Press again or press (OFF) to cancel.
If you select TWIN as a FREEZE MODE in the SET UP menu, you can freeze the desired scene and display it on the left while viewing the normal picture on the right. (see “FREEZE MODE” on page 46)
CH +/–
VOL +/–
JUMP
MUTING
FREEZE — (yellow labeled button)
26
Mode
Using Your New Using Your New Using Your New Using Your New Projection TVProjection TVProjection TVProjection TV
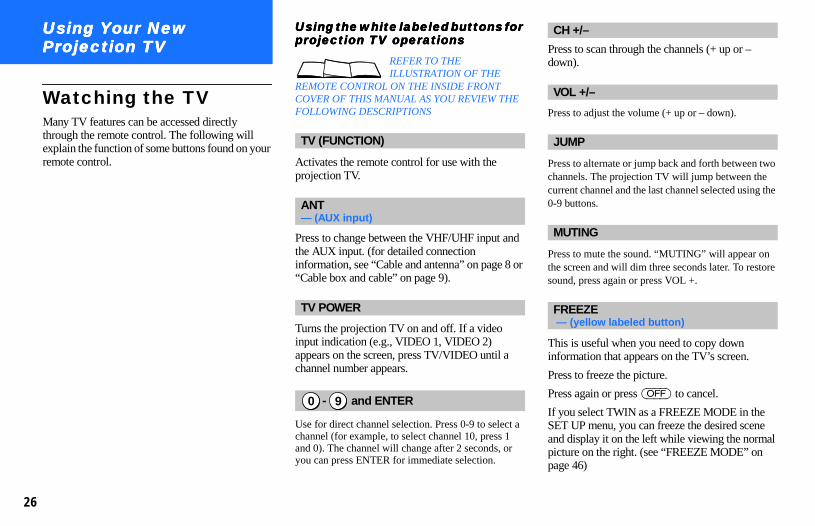
Watching the TVMany TV features can be accessed directly through the remote control. The following will explain the function of some buttons found on your remote control.
Using the white labeled buttons foUsing the white labeled buttons foUsing the white labeled buttons foUsing the white labeled buttons foprojection TV operationsprojection TV operationsprojection TV operationsprojection TV operations
REFER TO THE ILLUSTRATION OF THE
REMOTE CONTROL ON THE INSIDE FRONT COVER OF THIS MANUAL AS YOU REVIEW THEFOLLOWING DESCRIPTIONS
Activates the remote control for use with the projection TV.
Press to change between the VHF/UHF input andthe AUX input. (for detailed connection information, see “Cable and antenna” on page 8 o“Cable box and cable” on page 9).
Turns the projection TV on and off. If a video input indication (e.g., VIDEO 1, VIDEO 2) appears on the screen, press TV/VIDEO until a channel number appears.
Use for direct channel selection. Press 0-9 to select achannel (for example, to select channel 10, press 1 and 0). The channel will change after 2 seconds, or you can press ENTER for immediate selection.
TV (FUNCTION)
ANT— (AUX input)
TV POWER
and ENTER0 9-

27
D:\810nouhin\4080199111\408019911KP57XBRUC\02US-COV-KP57XBRUC\08CTV.fm masterpage:Right
Using Y
our New
Projection TV
l name1[KP-57XBR10W] Model name2[KP-65XBR10W][4-080-199-11 (1)]
Notes:
Press PICTURE MODE repeatedly to directly choose one of five different video modes that best suits the program you are watching.
VIVID:Select for enhanced picture contrast and sharpness.
STANDARD:Select to display a standard picture for normal viewing environments.
MOVIE:Select to display a finely detailed picture for low light environments.
GAME:Select to display graphics such as a video game.
PRO (Professional):Select to display a picture with minimum enhancements.
When you select each mode, you can also adjust the picture quality (such as BRIGHTNESS, COLOR, etc.) to suit your taste.
For details, see “MODE” on page 36.
PICTURE MODE
Mode
• The FREEZE button does not function with the picture from VIDEO 5 (DTV) IN.
• If the frozen picture mode is not canceled for more than an hour, the normal picture is resumed automatically.
Press repeatedly until the projection TV displays the approximate time in minutes (30, 60, or 90) that you want the projection TV to remain on before shutting off automatically.
Cancel by pressing until “SLEEP OFF” appears.
Press to display the channel number, current time, channel caption (if set), and MTS mode (if SAP is selected). The SAP indication disappears and the other indications dim three seconds later.
To turn the display off, press DISPLAY again.
Press repeatedly to scroll through available displays:
Caption Vision
Displayed on the screen if the broadcaster offers this service. (see “CAPTION VISION” on page 45)
XDS (Extended Data Service)Displays a network name, program name, programtype, program length, program description, call letters and time of the show if the broadcaster offers this service.
No display“OFF” appears and the display is canceled.
Press repeatedly to scroll through available video inputs:
TV, VIDEO 1, VIDEO 2, VIDEO 3, VIDEO 4 and VIDEO 5
If you select SKIP as a VIDEO LABEL in the SETUP menu, your projection TV will skip the video input you selected. (see “VIDEO LABEL” on page46)
Press to scroll through the Multi-channel TV Sound (MTS) options. (see “MTS” on page 37)
SLEEP
DISPLAY
[CC]
TV/VIDEO
MTS
D:\810nouhin\4080199111\408019911KP57XBRUC\02US-COV-KP57XBRUC\08CTV.fm masterpage:Left
l name1[KP-57XBR10W] Model name2[KP-65XBR10W][4-080-199-11 (1)]
e )
Watching the Picture in Wide Screen Mode Automatically — — — — AUTO WIDEWhen a 480i format signal with an ID-1 (16:9 aspect ratio recorded) signal is received, the projection TV automatically selects wide screen mode.
Notes:• When the AUTO WIDE function does not work
correctly due to the quality of signal, select wide screen mode manually. (see page 29)
• The AUTO WIDE function does not work when the following signals are received:
- 480i format signal without an ID-1 (aspect ratio recorded) signal
- 480p format signal- 720p/1080i format signals (The picture is always
displayed in FULL mode)
Set AUTO WIDE in the WIDE SCREEN MODE menu to ON. (see page 40)
To deactivate the AUTO WIDE functionSet AUTO WIDE in the WIDE SCREEN MODE menu to OFF. (see page 40)
Activating the AUTO WIDE function
28
Mode
Watching Digital TV When you have connected the DTV receiver, you can enjoy digital TV programs. This projection TV is capable of receiving the 1080i, 720p, 480p and 480i digital TV formats.
Note:This projection TV is not capable of displaying a 720p format signal as it is. When the 720p format signal is received, it is converted into a 480p format signal.
1 Connect the DTV receiver to VIDEO 5 (DTV) IN on the projection TV. (for details, see pages 13 and 12)
2 Press TV/VIDEO to select VIDEO 5. The digital TV format being received is displayed on the screen for three seconds.
Note:• You cannot select VIDEO 5 unless a DTV
receiver is connected.
3 Select a digital channel on the DTV receiver. For details, see the Operating Instructions of the DTV receiver.
4 Adjust the volume on this projection TV.
Tip zThe optimum convergence alignment varies with digital TV formats. Whenever you find that the picturblurs, press FLASH FOCUS. (for details, see page 25
To view a digital TV program
TV/VIDEO
DTV FORMAT : 480p
29
D:\810nouhin\4080199111\408019911KP57XBRUC\02US-COV-KP57XBRUC\08CTV.fm masterpage:Right
Using Y
our New
Projection TV
l name1[KP-57XBR10W] Model name2[KP-65XBR10W][4-080-199-11 (1)]
AUTO WIDE function works again when:
- video input signals are changed (see “TV/VIDEO” on page 27)
- the projection TV is turned off- DIRECT PLAY is selected (see page 46)- ON/OFF TIMER works (see page 40)- AUTO WIDE in WIDE SCREEN MODE menu is
set to ON again (see page 40).
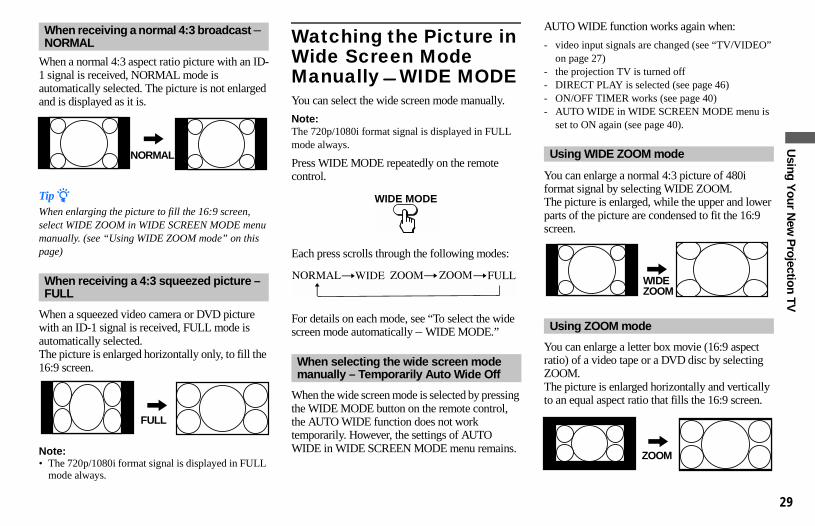
You can enlarge a normal 4:3 picture of 480i format signal by selecting WIDE ZOOM. The picture is enlarged, while the upper and lower parts of the picture are condensed to fit the 16:9 screen.
You can enlarge a letter box movie (16:9 aspect ratio) of a video tape or a DVD disc by selecting ZOOM. The picture is enlarged horizontally and vertically to an equal aspect ratio that fills the 16:9 screen.
Using WIDE ZOOM mode
Using ZOOM mode
WIDE ZOOM
,
ZOOM,
Mode
When a normal 4:3 aspect ratio picture with an ID-1 signal is received, NORMAL mode is automatically selected. The picture is not enlarged and is displayed as it is.
Tip zWhen enlarging the picture to fill the 16:9 screen, select WIDE ZOOM in WIDE SCREEN MODE menu manually. (see “Using WIDE ZOOM mode” on this page)
When a squeezed video camera or DVD picture with an ID-1 signal is received, FULL mode is automatically selected.The picture is enlarged horizontally only, to fill the 16:9 screen.
Note:• The 720p/1080i format signal is displayed in FULL
mode always.
Watching the Picture in Wide Screen Mode Manually — — — — WIDE MODEYou can select the wide screen mode manually.
Note:The 720p/1080i format signal is displayed in FULL mode always.
Press WIDE MODE repeatedly on the remote control.
Each press scrolls through the following modes:
For details on each mode, see “To select the wide screen mode automatically – WIDE MODE.”
When the wide screen mode is selected by pressingthe WIDE MODE button on the remote control, the AUTO WIDE function does not work temporarily. However, the settings of AUTO WIDE in WIDE SCREEN MODE menu remains.
When receiving a normal 4:3 broadcast – NORMAL
When receiving a 4:3 squeezed picture – FULL
NORMAL,
FULL,
When selecting the wide screen mode manually – Temporarily Auto Wide Off
WIDE MODE
D:\810nouhin\4080199111\408019911KP57XBRUC\02US-COV-KP57XBRUC\08CTV.fm masterpage:Left
l name1[KP-57XBR10W] Model name2[KP-65XBR10W][4-080-199-11 (1)]
”
Using the yellow labeled buttons Using the yellow labeled buttons Using the yellow labeled buttons Using the yellow labeled buttons for PIP operationsfor PIP operationsfor PIP operationsfor PIP operations
REFER TO THE ILLUSTRATION OF THE
REMOTE CONTROL ON THE INSIDE FRONT COVER OF THIS MANUAL AS YOU REVIEW THE FOLLOWING DESCRIPTION
Tip zIf you press RESET in PIP mode, the window picture will move to the bottom right (factory-preset location).
Press to display a window picture.
Each time you press this button, the picture size will change (1/4 t 1/9 t 1/16).
Press (OFF) to close the window picture.
Press to change the location of the window picture (counterclockwise) around the main picture.
Press to select either the main or window picture in order to change the TV channel or video source using the white labeled buttons below. The symbol “b” (or “B”) will appear to indicate which picture’s channel or input mode can be changed.
t
e
POSITION
ACTIVE
30
Mode
Notes:• Depending on the picture format, black bands may
be present on the top and bottom of the screen.
• For ZOOM and WIDE ZOOM modes you can adjust the vertical position of the picture. (see “V CENTER” on page 41)
Watching Two Programs at One Time— PIPThe Picture-in-Picture (PIP) feature allows you toview two channels simultaneously, one in the fullsize “main” picture and one in a smaller “windowpicture.
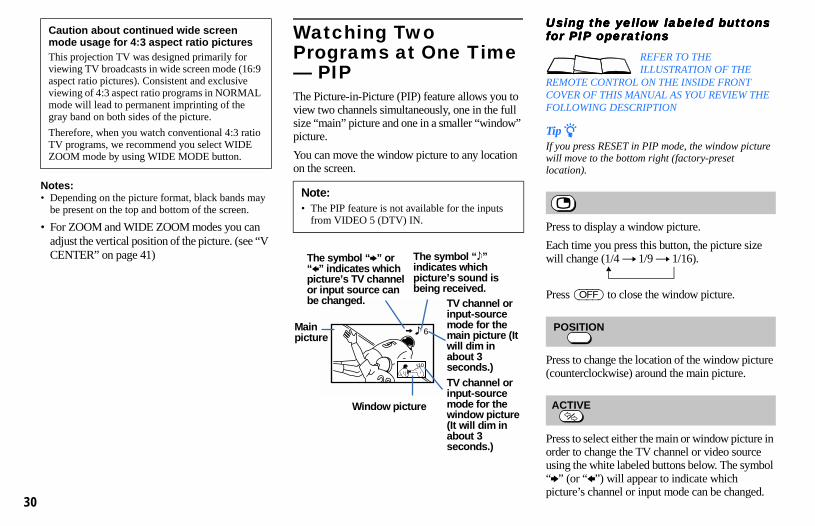
You can move the window picture to any locationon the screen.
Caution about continued wide screen mode usage for 4:3 aspect ratio picturesThis projection TV was designed primarily for viewing TV broadcasts in wide screen mode (16:9 aspect ratio pictures). Consistent and exclusive viewing of 4:3 aspect ratio programs in NORMAL mode will lead to permanent imprinting of the gray band on both sides of the picture.
Therefore, when you watch conventional 4:3 ratio TV programs, we recommend you select WIDE ZOOM mode by using WIDE MODE button.
Note:• The PIP feature is not available for the inputs
from VIDEO 5 (DTV) IN.
1010
6
10
The symbol “b” or “B” indicates which picture’s TV channel or input source can be changed.
The symbol “9” indicates which picture’s sound is being received.
Main picture
TV channel or input-source mode for the main picture (Iwill dim in about 3 seconds.)TV channel or input-source mode for the window pictur(It will dim in about 3 seconds.)
Window picture
31
D:\810nouhin\4080199111\408019911KP57XBRUC\02US-COV-KP57XBRUC\08CTV.fm masterpage:Right
Using Y
our New
Projection TV
l name1[KP-57XBR10W] Model name2[KP-65XBR10W][4-080-199-11 (1)]
Press to cancel the PIP function and return to normal viewing.
Notes:• If one of the pictures received through PIP is snowy,
the entire screen may become unstable. In this case, erase the snowy channel. (see “CHANNEL SKIP” on page 41)
• If you select VIDEO 5 when the main picture is active, the window picture disappears and you can view the picture from VIDEO 5 (DTV) IN. When the window picture is active, you cannot view the picture from VIDEO 5 (DTV) IN.
OFF
Mode
To change the location of the window picture, move the joystick in any direction and release it when the picture is in the desired location.
Press repeatedly to scroll through the available video inputs for the picture on which the symbol “b” (or “B”) is displayed. (see “TV/VIDEO” on page 27)
Press to select the TV channel on which the symbol “b” (or “B”) is displayed. (for details, see “Watching the TV” on page 26)
Press to change between the VHF/UHF input and the AUX input for the picture on which the symbol “b” (or “B”) is displayed.
Press to alternate sound between the main picture and the window picture. The symbol “9” will appear for a few seconds to indicate which picture’s sound is being received.
This is useful when you need to copy down information that appears on the TV’s screen.
Press to freeze the main and window pictures.
Press again to resume PIP viewing. Press (OFF) to cancel and resume normal TV viewing.
Press to switch the audio and video of the main picture and the window picture.
Each time you press SWAP, the picture and sound of the two will be exchanged.
Press to access CHANNEL INDEX for direct channel selection. (see “Using CHANNEL INDEX” on page 33)
— (white labeled button)
— (white labeled button)
— (white labeled button)
— (white labeled button)
TV/VIDEO
CH
0 9-JUMP
or or
and ENTER
ANT
AUDIO
FREEZE
SWAP
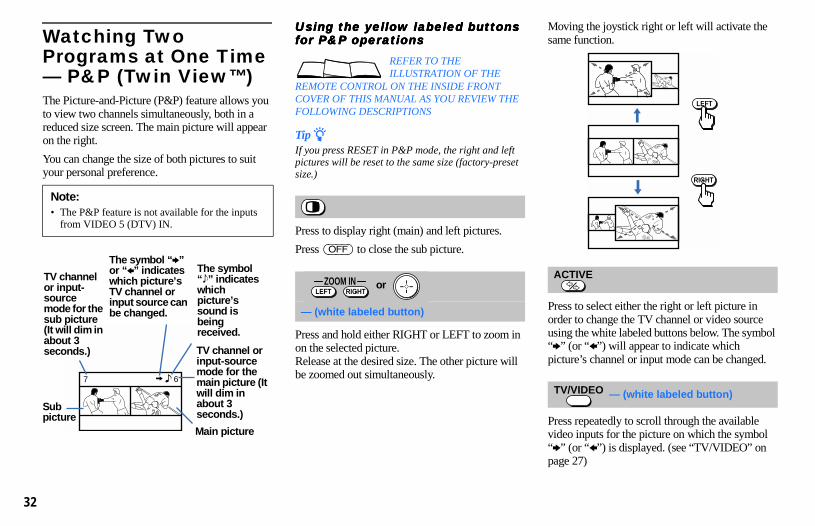
D:\810nouhin\4080199111\408019911KP57XBRUC\02US-COV-KP57XBRUC\08CTV.fm masterpage:Left
l name1[KP-57XBR10W] Model name2[KP-65XBR10W][4-080-199-11 (1)]
Moving the joystick right or left will activate the same function.
Press to select either the right or left picture in order to change the TV channel or video source using the white labeled buttons below. The symbol “b” (or “B”) will appear to indicate which picture’s channel or input mode can be changed.
Press repeatedly to scroll through the available video inputs for the picture on which the symbol “b” (or “B”) is displayed. (see “TV/VIDEO” on page 27)
— (white labeled button)
LEFT
RIGHT
ACTIVE
TV/VIDEO
32
Mode
Watching Two Programs at One Time — P&P (Twin View™)The Picture-and-Picture (P&P) feature allows you to view two channels simultaneously, both in a reduced size screen. The main picture will appear on the right.
You can change the size of both pictures to suit your personal preference.
Using the yellow labeled buttonsUsing the yellow labeled buttonsUsing the yellow labeled buttonsUsing the yellow labeled buttonsfor P&P operationsfor P&P operationsfor P&P operationsfor P&P operations
REFER TO THE ILLUSTRATION OF THE
REMOTE CONTROL ON THE INSIDE FRONT COVER OF THIS MANUAL AS YOU REVIEW THEFOLLOWING DESCRIPTIONS
Tip zIf you press RESET in P&P mode, the right and left pictures will be reset to the same size (factory-presetsize.)
Press to display right (main) and left pictures.
Press (OFF) to close the sub picture.
Press and hold either RIGHT or LEFT to zoom inon the selected picture. Release at the desired size. The other picture willbe zoomed out simultaneously.
Note:• The P&P feature is not available for the inputs
from VIDEO 5 (DTV) IN.
67
TV channel or input-source mode for the sub picture (It will dim in about 3 seconds.) TV channel or
input-source mode for the main picture (It will dim in about 3 seconds.)
Main picture
Sub picture
The symbol “b” or “B” indicates which picture’s TV channel or input source can be changed.
The symbol “9” indicates which picture’s sound is being received.
— (white labeled button)
LEFT RIGHTZOOM IN or
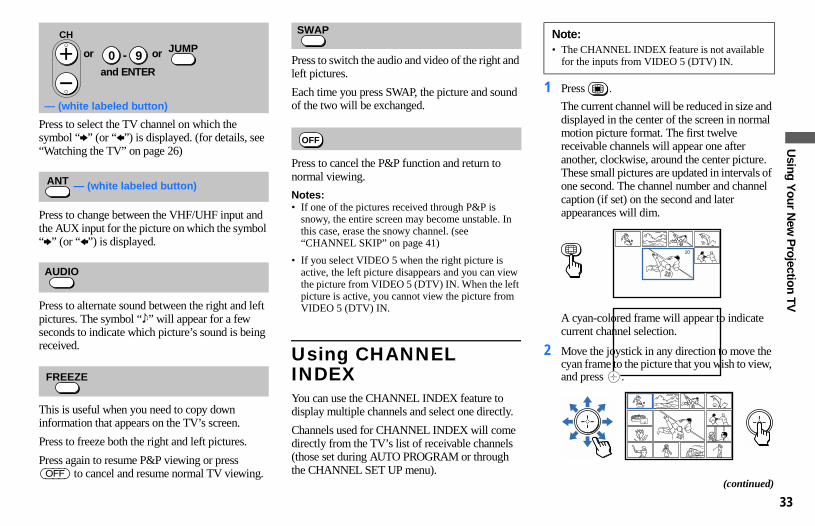
33
D:\810nouhin\4080199111\408019911KP57XBRUC\02US-COV-KP57XBRUC\08CTV.fm masterpage:Right
Using Y
our New
Projection TV
l name1[KP-57XBR10W] Model name2[KP-65XBR10W][4-080-199-11 (1)]
1 Press .
The current channel will be reduced in size and displayed in the center of the screen in normal motion picture format. The first twelve receivable channels will appear one after another, clockwise, around the center picture. These small pictures are updated in intervals of one second. The channel number and channel caption (if set) on the second and later appearances will dim.
A cyan-colored frame will appear to indicate current channel selection.
2 Move the joystick in any direction to move the cyan frame to the picture that you wish to view, and press .
(continued)
Note:• The CHANNEL INDEX feature is not available
for the inputs from VIDEO 5 (DTV) IN.
10
Reciipe f l ou r - - - - 2suga r - - - 1/2sa l t - - - - - 1/2bu t te r - - - 1
Mode
Press to select the TV channel on which the symbol “b” (or “B”) is displayed. (for details, see “Watching the TV” on page 26)
Press to change between the VHF/UHF input and the AUX input for the picture on which the symbol “b” (or “B”) is displayed.
Press to alternate sound between the right and left pictures. The symbol “9” will appear for a few seconds to indicate which picture’s sound is being received.
This is useful when you need to copy down information that appears on the TV’s screen.
Press to freeze both the right and left pictures.
Press again to resume P&P viewing or press (OFF) to cancel and resume normal TV viewing.
Press to switch the audio and video of the right andleft pictures.
Each time you press SWAP, the picture and sound of the two will be exchanged.
Press to cancel the P&P function and return to normal viewing.
Notes:• If one of the pictures received through P&P is
snowy, the entire screen may become unstable. In this case, erase the snowy channel. (see “CHANNEL SKIP” on page 41)
• If you select VIDEO 5 when the right picture is active, the left picture disappears and you can viewthe picture from VIDEO 5 (DTV) IN. When the leftpicture is active, you cannot view the picture from VIDEO 5 (DTV) IN.
Using CHANNEL INDEXYou can use the CHANNEL INDEX feature to display multiple channels and select one directly.
Channels used for CHANNEL INDEX will come directly from the TV’s list of receivable channels (those set during AUTO PROGRAM or through the CHANNEL SET UP menu).
— (white labeled button)
— (white labeled button)
CH
0 9- JUMPor or
and ENTER
ANT
AUDIO
FREEZE
SWAP
OFF

D:\810nouhin\4080199111\408019911KP57XBRUC\02US-COV-KP57XBRUC\08CTV.fm masterpage:Left
l name1[KP-57XBR10W] Model name2[KP-65XBR10W][4-080-199-11 (1)]
e
Using the white labeled buttons for Using the white labeled buttons for Using the white labeled buttons for Using the white labeled buttons for center picture operationscenter picture operationscenter picture operationscenter picture operations
REFER TO THE ILLUSTRATION OF THE
REMOTE CONTROL ON THE INSIDE FRONT COVER OF THIS MANUAL AS YOU REVIEW THE FOLLOWING DESCRIPTIONS
Press to scroll the center picture through the video inputs.
The surrounding channels will not change.
Press to switch the center picture between the VHF/UHF input and the AUX input.
Press to select a channel for the center picture. (for details, see “Watching the TV” on page 26)
TV/VIDEO
ANT
CH
0 9- JUMPor or
and ENTER
34
Mode
The selected channel will zoom in and move to the center, and the sound of that channel will be heard.
3 If you wish to view another channel, repeat step 2.
To view the normal picture of the selected channel, proceed to step 4.
4 Press .
The center picture will be enlarged for normal viewing.
Notes:• You cannot move the cyan frame until all of the
surrounding pictures appear.
• The projection TV will continually update each of the surrounding pictures while the CHANNEL INDEX screen is displayed.
• Sound will only be heard from the center picture.
• If one of the pictures received through CHANNEL INDEX is snowy, the entire screen may become unstable. In this case, erase the snowy channel. (see “CHANNEL SKIP” on page 41)
• If you leave the CHANNEL INDEX screen displayed for an hour without any additional operation, CHANNEL INDEX is canceled and thenormal picture reappears.
Using the yellow labeled buttonsUsing the yellow labeled buttonsUsing the yellow labeled buttonsUsing the yellow labeled buttonsfor CHANNEL INDEX operationsfor CHANNEL INDEX operationsfor CHANNEL INDEX operationsfor CHANNEL INDEX operations
REFER TO THE ILLUSTRATION OF THE
REMOTE CONTROL ON THE INSIDE FRONT COVER OF THIS MANUAL AS YOU REVIEW THEFOLLOWING DESCRIPTIONS
Press to display the next twelve receivable channels.
Press to cancel the current operation and return tonormal TV viewing.
Press to freeze the center picture.
Press again to cancel the frozen picture and resumnormal center picture viewing.
Rec i i pe f l ou r - - - - 2suga r - - - 1/2sa l t - - - - - 1/2bu t te r - - - 1
OFF
FREEZE
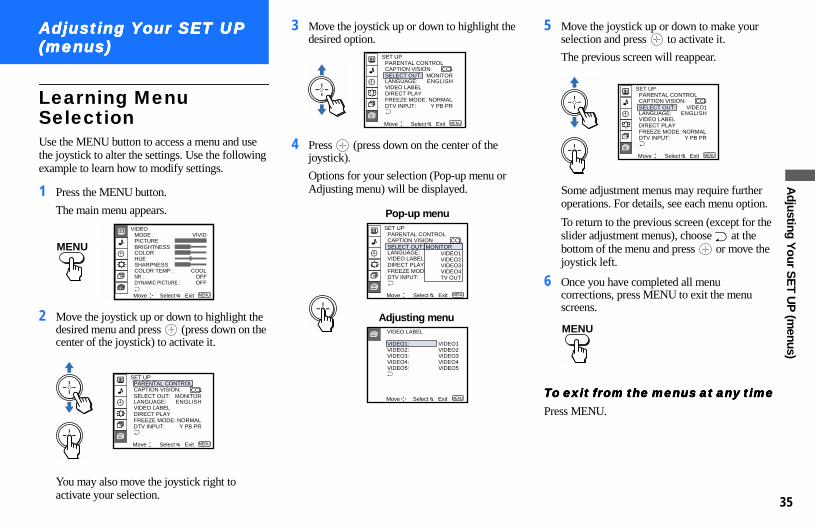
35
D:\810nouhin\4080199111\408019911KP57XBRUC\02US-COV-KP57XBRUC\09CTV.fm masterpage:First-Right
Adjusting Y
our SE
T UP
(menus)
l name1[KP-57XBR10W] Model name2[KP-65XBR10W][4-080-199-11 (1)]
3 Move the joystick up or down to highlight the 5 Move the joystick up or down to make your selection and press to activate it.
The previous screen will reappear.
Some adjustment menus may require further operations. For details, see each menu option.
To return to the previous screen (except for the slider adjustment menus), choose at the bottom of the menu and press or move the joystick left.
6 Once you have completed all menu corrections, press MENU to exit the menu screens.
To exit from the menus at any timeTo exit from the menus at any timeTo exit from the menus at any timeTo exit from the menus at any timePress MENU.
DTV INPUT: Y PB PRFREEZE MODE: NORMAL
LANGUAGE: ENGLISH
Move Select Exit MENU
SET UPPARENTAL CONTROLCAPTION VISION:
VIDEO LABELDIRECT PLAY
CC1SELECT OUT: VIDEO1
MENU
Mode
Adjusting Your SET UP Adjusting Your SET UP Adjusting Your SET UP Adjusting Your SET UP (menus)(menus)(menus)(menus)
Learning Menu SelectionUse the MENU button to access a menu and use the joystick to alter the settings. Use the following example to learn how to modify settings.
1 Press the MENU button.
The main menu appears.
2 Move the joystick up or down to highlight the desired menu and press (press down on the center of the joystick) to activate it.
You may also move the joystick right to activate your selection.
desired option.
4 Press (press down on the center of the joystick).
Options for your selection (Pop-up menu or Adjusting menu) will be displayed.
MENU
VIDEOMODE : VIVIDPICTURE
HUECOLORBRIGHTNESS
SHARPNESSCOLOR TEMP : COOLNR : OFFDYNAMIC PICTURE : OFF
Move Select Exit MENU
DTV INPUT: Y PB PRFREEZE MODE: NORMAL
LANGUAGE: ENGLISH
Move Select Exit MENU
SET UPPARENTAL CONTROLCAPTION VISION:
VIDEO LABELDIRECT PLAY
CC1SELECT OUT: MONITOR
DTV INPUT: Y PB PRFREEZE MODE: NORMAL
LANGUAGE: ENGLISH
Move Select Exit MENU
SET UPPARENTAL CONTROLCAPTION VISION:
VIDEO LABELDIRECT PLAY
CC1SELECT OUT: MONITOR
DTV INPUT: R.G.BFREEZE MODE:NORNAL
LANGUAGE: ENGLISH
TV OUT
Move Select Exit MENU
SET UPPARENTAL CONTROLCAPTION VISION
VIDEO LABELDIRECT PLAY
CC1
VIDEO1VIDEO2VIDEO3VIDEO4
SELECT OUT: MONITOR
TV OUT
VIDEO LABEL
VIDEO1VIDEO2VIDEO3VIDEO4VIDEO5
VIDEO1:VIDEO2:VIDEO3:VIDEO4:VIDEO5:
Move Select Exit MENU
Pop-up menu
Adjusting menu

D:\810nouhin\4080199111\408019911KP57XBRUC\02US-COV-KP57XBRUC\09CTV.fm masterpage:Left
l name1[KP-57XBR10W] Model name2[KP-65XBR10W][4-080-199-11 (1)]
s.
t.
Adjust slider right (up) to increase color intensity.
Adjust slider left (down) to decrease color intensity.
Adjust slider right (up) to increase the green tones.
Adjust slider left (down) to increase the red tones.
Adjust slider right (up) to sharpen the picture.
Adjust slider left (down) to soften the picture.
COOL:Select to give the white colors a blueish tint.
NEUTRAL:Select to give the white colors a neutral tint.
WARM:Select to give the white colors a reddish tint.
COLOR— Picture Adjustment
HUE— Picture Adjustment
SHARPNESS— Picture Adjustment
COLOR TEMP— White Intensity (Color Temperature) Adjustment
36
Mode
Using the VIDEO Menu
For detailed information on using the remote control to modify menu settings, refer to “Learning Menu Selection” on page 35.
To select the VIDEO To select the VIDEO To select the VIDEO To select the VIDEO menu: menu: menu: menu:
You can choose one of five different video modes that best suits the program you are watching. You can also adjust the picture quality (such as BRIGHTNESS, COLOR, etc.) for each MODE to suit your taste.
First select each MODE individually before adjusting the picture quality.
VIVID:Select for enhanced picture contrast and sharpnes
STANDARD:Select to display a standard picture for normal viewing environments.
MOVIE:Select to display a finely detailed picture for low light environments.
GAME:Select to display graphics such as a video game.
PRO (Professional):Select to display a picture with minimum enhancements.
Press PICTURE MODE on the remote control for direct selection of a MODE setting.
Adjust slider right (up) to increase picture contras
Adjust slider left (down) to decrease picture contrast.
Adjust slider right (up) to brighten the picture.
Adjust slider left (down) to darken the picture.
MODE— Customized picture viewing
VIDEOMODE : VIVIDPICTURE
HUECOLORBRIGHTNESS
SHARPNESSCOLOR TEMP : COOLNR : OFFDYNAMIC PICTURE : OFF
Move Select Exit MENU
Sliders}
MENU
Display , Highlight , Select
PICTURE— Picture Adjustment
BRIGHTNESS— Picture Adjustment
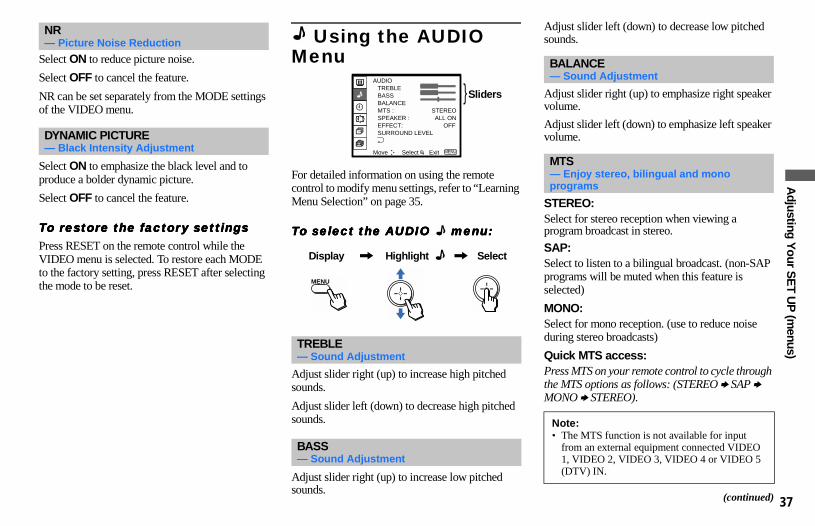
37
D:\810nouhin\4080199111\408019911KP57XBRUC\02US-COV-KP57XBRUC\09CTV.fm masterpage:Right
Adjusting Y
our SE
T UP
(menus)
l name1[KP-57XBR10W] Model name2[KP-65XBR10W][4-080-199-11 (1)]
Adjust slider left (down) to decrease low pitched sounds.
Adjust slider right (up) to emphasize right speaker volume.
Adjust slider left (down) to emphasize left speaker volume.
STEREO: Select for stereo reception when viewing a program broadcast in stereo.
SAP: Select to listen to a bilingual broadcast. (non-SAP programs will be muted when this feature is selected)
MONO: Select for mono reception. (use to reduce noise during stereo broadcasts)
Quick MTS access:Press MTS on your remote control to cycle through the MTS options as follows: (STEREO b SAP b MONO b STEREO).
(continued)
BALANCE— Sound Adjustment
MTS— Enjoy stereo, bilingual and mono programs
Note:• The MTS function is not available for input
from an external equipment connected VIDEO 1, VIDEO 2, VIDEO 3, VIDEO 4 or VIDEO 5 (DTV) IN.
Mode
Select ON to reduce picture noise.
Select OFF to cancel the feature.
NR can be set separately from the MODE settings of the VIDEO menu.
Select ON to emphasize the black level and to produce a bolder dynamic picture.
Select OFF to cancel the feature.
To restore the To restore the To restore the To restore the factory settingsfactory settingsfactory settingsfactory settingsPress RESET on the remote control while the VIDEO menu is selected. To restore each MODE to the factory setting, press RESET after selecting the mode to be reset.
Using the AUDIO Menu
For detailed information on using the remote control to modify menu settings, refer to “LearningMenu Selection” on page 35.
To select the AUDIO To select the AUDIO To select the AUDIO To select the AUDIO menu: menu: menu: menu:
Adjust slider right (up) to increase high pitched sounds.
Adjust slider left (down) to decrease high pitched sounds.
Adjust slider right (up) to increase low pitched sounds.
NR— Picture Noise Reduction
DYNAMIC PICTURE— Black Intensity Adjustment
TREBLE— Sound Adjustment
BASS— Sound Adjustment
AUDIOTREBLEBASSBALANCEMTS : STEREOSPEAKER : ALL ONEFFECT: OFFSURROUND LEVEL
Move Select Exit MENU
Sliders}
MENU
Display , Highlight , Select
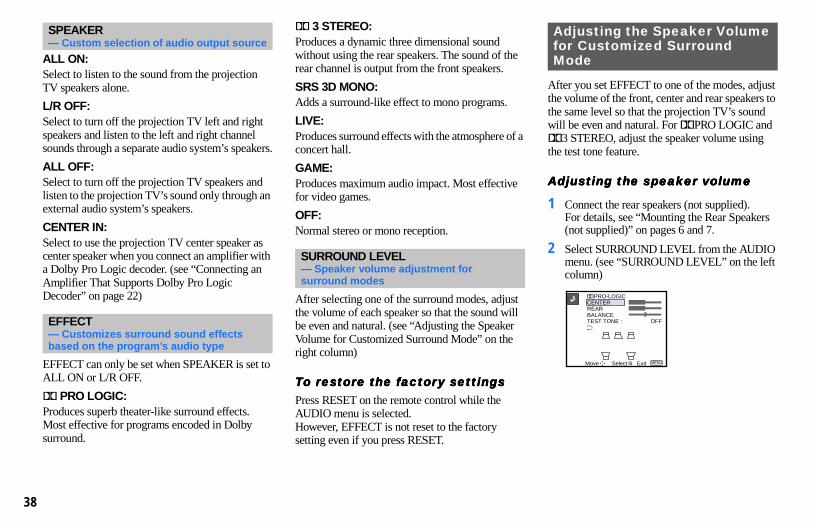
D:\810nouhin\4080199111\408019911KP57XBRUC\02US-COV-KP57XBRUC\09CTV.fm masterpage:Left
l name1[KP-57XBR10W] Model name2[KP-65XBR10W][4-080-199-11 (1)]
a
After you set EFFECT to one of the modes, adjust the volume of the front, center and rear speakers to the same level so that the projection TV’s sound will be even and natural. For ;PRO LOGIC and ;3 STEREO, adjust the speaker volume using the test tone feature.
Adjusting the speaker volumeAdjusting the speaker volumeAdjusting the speaker volumeAdjusting the speaker volume
1 Connect the rear speakers (not supplied).For details, see “Mounting the Rear Speakers (not supplied)” on pages 6 and 7.
2 Select SURROUND LEVEL from the AUDIO menu. (see “SURROUND LEVEL” on the left column)
Adjusting the Speaker Volume for Customized Surround Mode
;PRO-LOGIC
REARBALANCETEST TONE : OFF
CENTER
Move Select Exit MENU
38
Mode
ALL ON:Select to listen to the sound from the projection TV speakers alone.
L/R OFF:Select to turn off the projection TV left and right speakers and listen to the left and right channel sounds through a separate audio system’s speakers.
ALL OFF:Select to turn off the projection TV speakers and listen to the projection TV’s sound only through an external audio system’s speakers.
CENTER IN:Select to use the projection TV center speaker as center speaker when you connect an amplifier with a Dolby Pro Logic decoder. (see “Connecting an Amplifier That Supports Dolby Pro Logic Decoder” on page 22)
EFFECT can only be set when SPEAKER is set to ALL ON or L/R OFF.
; PRO LOGIC:Produces superb theater-like surround effects. Most effective for programs encoded in Dolby surround.
; 3 STEREO:Produces a dynamic three dimensional sound without using the rear speakers. The sound of therear channel is output from the front speakers.
SRS 3D MONO:Adds a surround-like effect to mono programs.
LIVE:Produces surround effects with the atmosphere of concert hall.
GAME:Produces maximum audio impact. Most effective for video games.
OFF:Normal stereo or mono reception.
After selecting one of the surround modes, adjustthe volume of each speaker so that the sound willbe even and natural. (see “Adjusting the Speaker Volume for Customized Surround Mode” on the right column)
To restore the To restore the To restore the To restore the factory settingsfactory settingsfactory settingsfactory settingsPress RESET on the remote control while the AUDIO menu is selected. However, EFFECT is not reset to the factory setting even if you press RESET.
SPEAKER— Custom selection of audio output source
EFFECT— Customizes surround sound effects based on the program’s audio type
SURROUND LEVEL— Speaker volume adjustment for surround modes
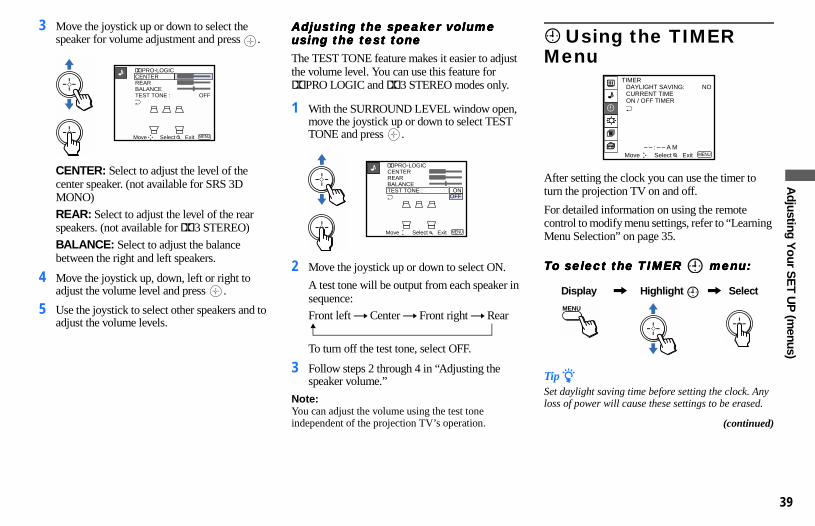
39
D:\810nouhin\4080199111\408019911KP57XBRUC\02US-COV-KP57XBRUC\09CTV.fm masterpage:Right
Adjusting Y
our SE
T UP
(menus)
l name1[KP-57XBR10W] Model name2[KP-65XBR10W][4-080-199-11 (1)]
3 Move the joystick up or down to select the
Using the TIMER Menu
After setting the clock you can use the timer to turn the projection TV on and off.
For detailed information on using the remote control to modify menu settings, refer to “Learning Menu Selection” on page 35.
To select the TIMER menu:To select the TIMER menu:To select the TIMER menu:To select the TIMER menu:
Tip zSet daylight saving time before setting the clock. Any loss of power will cause these settings to be erased.
(continued)
TIMERDAYLIGHT SAVING: NOCURRENT TIMEON / OFF TIMER
– – : – – A MMove Select Exit MENU
MENU
Display , Highlight , Select
Mode
speaker for volume adjustment and press .
CENTER: Select to adjust the level of the center speaker. (not available for SRS 3D MONO)
REAR: Select to adjust the level of the rear speakers. (not available for ;3 STEREO)
BALANCE: Select to adjust the balance between the right and left speakers.
4 Move the joystick up, down, left or right to adjust the volume level and press .
5 Use the joystick to select other speakers and to adjust the volume levels.
Adjusting the speaker volume Adjusting the speaker volume Adjusting the speaker volume Adjusting the speaker volume using the test toneusing the test toneusing the test toneusing the test toneThe TEST TONE feature makes it easier to adjust the volume level. You can use this feature for ;PRO LOGIC and ;3 STEREO modes only.
1 With the SURROUND LEVEL window open, move the joystick up or down to select TEST TONE and press .
2 Move the joystick up or down to select ON.
A test tone will be output from each speaker insequence:
Front left t Center t Front right t Rear
To turn off the test tone, select OFF.
3 Follow steps 2 through 4 in “Adjusting the speaker volume.”
Note:You can adjust the volume using the test tone independent of the projection TV’s operation.
;PRO-LOGIC
REARBALANCETEST TONE : OFF
CENTER
Move Select Exit MENU
REARBALANCETEST TONE : ON
OFF
CENTER;PRO-LOGIC
Move Select Exit MENU
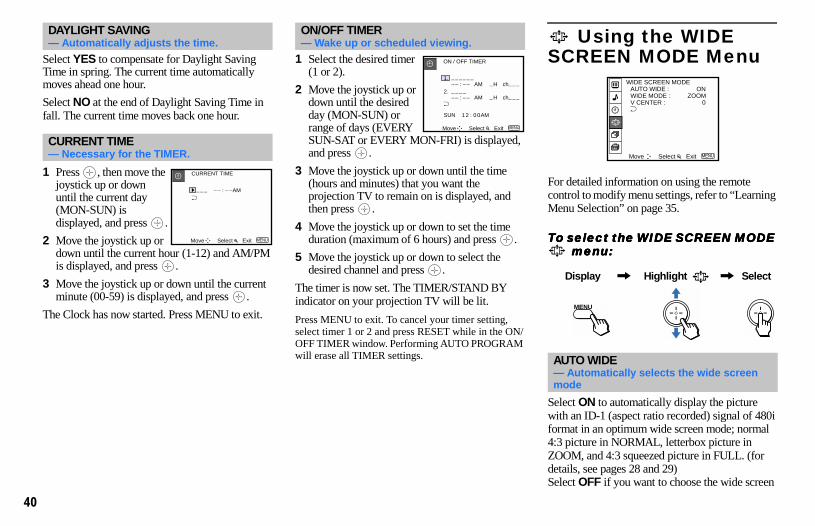
D:\810nouhin\4080199111\408019911KP57XBRUC\02US-COV-KP57XBRUC\09CTV.fm masterpage:Left
l name1[KP-57XBR10W] Model name2[KP-65XBR10W][4-080-199-11 (1)]
,
/
Using the WIDE SCREEN MODE Menu
For detailed information on using the remote control to modify menu settings, refer to “Learning Menu Selection” on page 35.
To select the WIDE SCREEN MODE To select the WIDE SCREEN MODE To select the WIDE SCREEN MODE To select the WIDE SCREEN MODE menu: menu: menu: menu:
Select ON to automatically display the picture with an ID-1 (aspect ratio recorded) signal of 480i format in an optimum wide screen mode; normal 4:3 picture in NORMAL, letterbox picture in ZOOM, and 4:3 squeezed picture in FULL. (for details, see pages 28 and 29)Select OFF if you want to choose the wide screen
AUTO WIDE— Automatically selects the wide screen mode
WIDE SCREEN MODEAUTO WIDE : ONWIDE MODE : ZOOMV CENTER : 0
Move Select Exit MENU
MENU
Display , Highlight , Select
40
Mode
Select YES to compensate for Daylight Saving Time in spring. The current time automatically moves ahead one hour.
Select NO at the end of Daylight Saving Time in fall. The current time moves back one hour.
1 Press , then move the joystick up or down until the current day (MON-SUN) is displayed, and press .
2 Move the joystick up or down until the current hour (1-12) and AM/PM is displayed, and press .
3 Move the joystick up or down until the current minute (00-59) is displayed, and press .
The Clock has now started. Press MENU to exit.
1 Select the desired timer (1 or 2).
2 Move the joystick up or down until the desired day (MON-SUN) or range of days (EVERY SUN-SAT or EVERY MON-FRI) is displayedand press .
3 Move the joystick up or down until the time (hours and minutes) that you want the projection TV to remain on is displayed, and then press .
4 Move the joystick up or down to set the time duration (maximum of 6 hours) and press .
5 Move the joystick up or down to select the desired channel and press .
The timer is now set. The TIMER/STAND BY indicator on your projection TV will be lit.
Press MENU to exit. To cancel your timer setting, select timer 1 or 2 and press RESET while in the ONOFF TIMER window. Performing AUTO PROGRAMwill erase all TIMER settings.
DAYLIGHT SAVING— Automatically adjusts the time.
CURRENT TIME— Necessary for the TIMER.
CURRENT TIME
– – – –– : –AM–
Move Select Exit MENU
ON/OFF TIMER— Wake up or scheduled viewing.
ON / OFF TIMER
2.
– – – –– ––– : –– AM – H ch– – –– – – ––– : –– AM – H ch– – –
SUN 12 : 0AM0
1.
Move Select Exit MENU
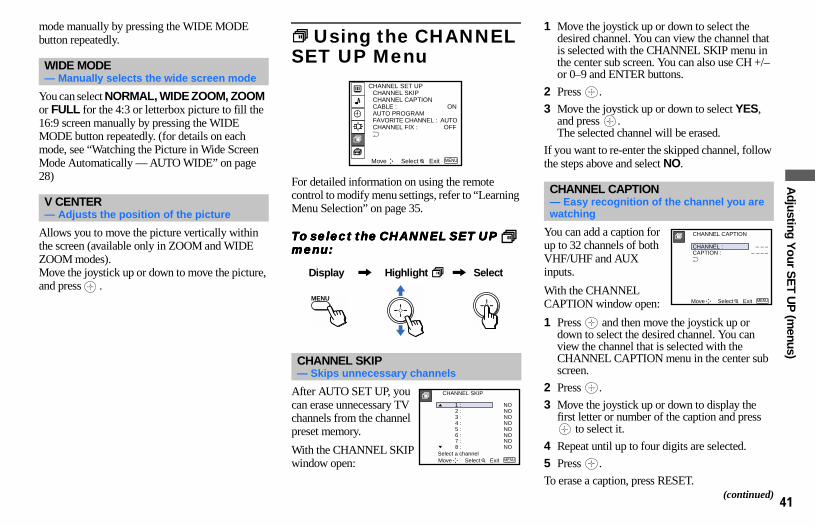
41
D:\810nouhin\4080199111\408019911KP57XBRUC\02US-COV-KP57XBRUC\09CTV.fm masterpage:Right
Adjusting Y
our SE
T UP
(menus)
l name1[KP-57XBR10W] Model name2[KP-65XBR10W][4-080-199-11 (1)]
mode manually by pressing the WIDE MODE
1 Move the joystick up or down to select the desired channel. You can view the channel that is selected with the CHANNEL SKIP menu in the center sub screen. You can also use CH +/– or 0–9 and ENTER buttons.
2 Press .
3 Move the joystick up or down to select YES, and press .The selected channel will be erased.
If you want to re-enter the skipped channel, follow the steps above and select NO.
You can add a caption for up to 32 channels of both VHF/UHF and AUX inputs.
With the CHANNEL CAPTION window open:
1 Press and then move the joystick up or down to select the desired channel. You can view the channel that is selected with the CHANNEL CAPTION menu in the center sub screen.
2 Press .
3 Move the joystick up or down to display the first letter or number of the caption and press
to select it.
4 Repeat until up to four digits are selected.
5 Press .
To erase a caption, press RESET.(continued)
CHANNEL CAPTION— Easy recognition of the channel you are watching
CHANNEL CAPTION
CAPTION : – – – –CHANNEL : – – –
Move Select Exit MENU
Mode
button repeatedly.
You can select NORMAL, WIDE ZOOM, ZOOM or FULL for the 4:3 or letterbox picture to fill the 16:9 screen manually by pressing the WIDE MODE button repeatedly. (for details on each mode, see “Watching the Picture in Wide Screen Mode Automatically — AUTO WIDE” on page 28)
Allows you to move the picture vertically within the screen (available only in ZOOM and WIDE ZOOM modes).Move the joystick up or down to move the picture, and press .
Using the CHANNEL SET UP Menu
For detailed information on using the remote control to modify menu settings, refer to “LearningMenu Selection” on page 35.
To select the CHANNEL SET UP To select the CHANNEL SET UP To select the CHANNEL SET UP To select the CHANNEL SET UP menu:menu:menu:menu:
After AUTO SET UP, you can erase unnecessary TV channels from the channel preset memory.
With the CHANNEL SKIP window open:
WIDE MODE— Manually selects the wide screen mode
V CENTER— Adjusts the position of the picture
CHANNEL SKIP— Skips unnecessary channels
CHANNEL SET UPCHANNEL SKIPCHANNEL CAPTIONCABLE : ONAUTO PROGRAMFAVORITE CHANNEL : AUTO CHANNEL FIX : OFF
Move Select Exit MENU
MENU
Display , Highlight , Select
CHANNEL SKIP
Select a channel
2 :3 :4 :5 :6 :7 :8 :
NO1 :
Move Select Exit MENU
NONONONONONONO
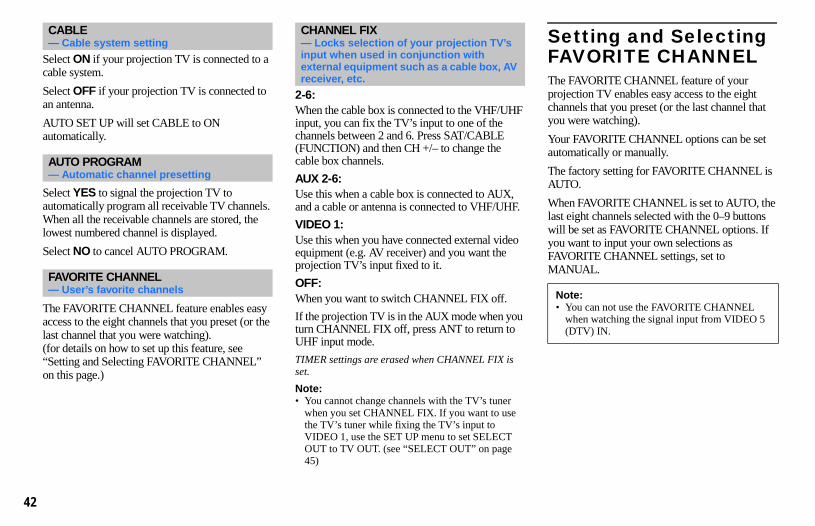
D:\810nouhin\4080199111\408019911KP57XBRUC\02US-COV-KP57XBRUC\09CTV.fm masterpage:Left
l name1[KP-57XBR10W] Model name2[KP-65XBR10W][4-080-199-11 (1)]
Setting and Selecting FAVORITE CHANNELThe FAVORITE CHANNEL feature of your projection TV enables easy access to the eight channels that you preset (or the last channel that you were watching).
Your FAVORITE CHANNEL options can be set automatically or manually.
The factory setting for FAVORITE CHANNEL is AUTO.
When FAVORITE CHANNEL is set to AUTO, the last eight channels selected with the 0–9 buttons will be set as FAVORITE CHANNEL options. If you want to input your own selections as FAVORITE CHANNEL settings, set to MANUAL.
Note:• You can not use the FAVORITE CHANNEL
when watching the signal input from VIDEO 5 (DTV) IN.
42
Mode
Select ON if your projection TV is connected to a cable system.
Select OFF if your projection TV is connected to an antenna.
AUTO SET UP will set CABLE to ON automatically.
Select YES to signal the projection TV to automatically program all receivable TV channels. When all the receivable channels are stored, the lowest numbered channel is displayed.
Select NO to cancel AUTO PROGRAM.
The FAVORITE CHANNEL feature enables easy access to the eight channels that you preset (or the last channel that you were watching). (for details on how to set up this feature, see “Setting and Selecting FAVORITE CHANNEL” on this page.)
2-6:When the cable box is connected to the VHF/UHFinput, you can fix the TV’s input to one of the channels between 2 and 6. Press SAT/CABLE (FUNCTION) and then CH +/– to change the cable box channels.
AUX 2-6:Use this when a cable box is connected to AUX, and a cable or antenna is connected to VHF/UHF.
VIDEO 1: Use this when you have connected external videoequipment (e.g. AV receiver) and you want the projection TV’s input fixed to it.
OFF:When you want to switch CHANNEL FIX off.
If the projection TV is in the AUX mode when youturn CHANNEL FIX off, press ANT to return to UHF input mode.
TIMER settings are erased when CHANNEL FIX is set.
Note:• You cannot change channels with the TV’s tuner
when you set CHANNEL FIX. If you want to use the TV’s tuner while fixing the TV’s input to VIDEO 1, use the SET UP menu to set SELECT OUT to TV OUT. (see “SELECT OUT” on page 45)
CABLE— Cable system setting
AUTO PROGRAM— Automatic channel presetting
FAVORITE CHANNEL— User’s favorite channels
CHANNEL FIX— Locks selection of your projection TV’s input when used in conjunction with external equipment such as a cable box, AV receiver, etc.

43
D:\810nouhin\4080199111\408019911KP57XBRUC\02US-COV-KP57XBRUC\09CTV.fm masterpage:Right
Adjusting Y
our SE
T UP
(menus)
l name1[KP-57XBR10W] Model name2[KP-65XBR10W][4-080-199-11 (1)]
3 Move the joystick up or down to select a
You have the option of returning to the FAVORITE CHANNEL screen to adjust any of your favorite channel choices.
Simply proceed as described in “Setting FAVORITE CHANNEL manually” (skip step 2 if MANUAL is already selected).
When you reach step 3, select the position you want to change and press . Press RESET to clear the channel for that position.
Move the joystick up or down to select a new channel.Press MENU when you are done.
Note:• The FAVORITE CHANNEL feature is not
available for the picture input from AUX or VIDEO 5 (DTV) IN.
(continued)
Resetting FAVORITE CHANNEL choices
FAVORITE CHANNEL
Select a channel
2 .3 .4 .5 .6 .7 .8 .
Move Select Exit MENU
1 .2
1022304052
125
SPTN
_ _ _
Mode
1 Select FAVORITE CHANNEL from the CHANNEL SET UP menu. (see page 41)
2 Move the joystick up or down to select MANUAL and press .
The FAVORITE CHANNEL menu will appear. If you set CHANNEL CAPTION names (e.g. CNN, HBO), they will also be displayed. (see “CHANNEL CAPTION” on page 41)
position (1–8), and press .
4 Move the joystick up or down to select a channel.
You have now selected a favorite channel.
5 Press and use the joystick to program otherfavorite channels. (Follow steps 3 and 4.)
6 Press MENU when you have finished.
Your favorite channels are now ready for use.
Setting FAVORITE CHANNEL manually
CHANNEL SET UPCHANNEL SKIPCHANNEL CAPTIONCABLE : ONAUTO PROGRAM
CHANNEL FIX : MANUAL
Move Select Exit MENU
FAVORITE CHANNEL : AUTO
FAVORITE CHANNEL
Select a position
2 .3 .4 .5 .6 .7 .8 .
Move Select Exit MENU
1 .2
1022304052
125
1
SPTN
CNN
FAVORITE CHANNEL
Select a channel
2 .3 .4 .5 .6 .7 .8 .
Move Select Exit MENU
1 .2
1022304052
125
SPTN
1 CNN
FAVORITE CHANNEL
Select a channel
2 .3 .4 .5 .6 .7 .8 .
Move Select Exit MENU
1 .125
1022304052
125
SPTN
1 CNN
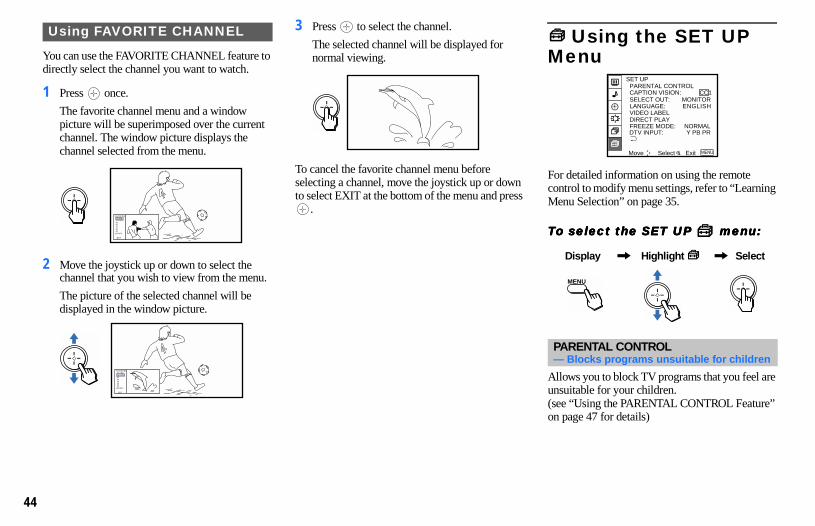
D:\810nouhin\4080199111\408019911KP57XBRUC\02US-COV-KP57XBRUC\09CTV.fm masterpage:Left
l name1[KP-57XBR10W] Model name2[KP-65XBR10W][4-080-199-11 (1)]
s
Using the SET UP Menu
For detailed information on using the remote control to modify menu settings, refer to “Learning Menu Selection” on page 35.
To select the SET UP menu:To select the SET UP menu:To select the SET UP menu:To select the SET UP menu:
Allows you to block TV programs that you feel are unsuitable for your children.(see “Using the PARENTAL CONTROL Feature” on page 47 for details)
PARENTAL CONTROL— Blocks programs unsuitable for children
Move Select Exit MENU
SET UPPARENTAL CONTROLCAPTION VISION: SELECT OUT: MONITORLANGUAGE: ENGLISHVIDEO LABELDIRECT PLAYFREEZE MODE: NORMAL
CC1
DTV INPUT: Y PB PR
MENU
Display , Highlight , Select
44
Mode
You can use the FAVORITE CHANNEL feature to directly select the channel you want to watch.
1 Press once.
The favorite channel menu and a window picture will be superimposed over the current channel. The window picture displays the channel selected from the menu.
2 Move the joystick up or down to select the channel that you wish to view from the menu.
The picture of the selected channel will be displayed in the window picture.
3 Press to select the channel.
The selected channel will be displayed for normal viewing.
To cancel the favorite channel menu before selecting a channel, move the joystick up or downto select EXIT at the bottom of the menu and pres
.
Using FAVORITE CHANNEL
FAVORITES 12 CNN 36 ESPN 50 60 70 80 90120 MTV
EXIT
FAVORITES 12 CNN 36 ESPN 50 60 70 80 90120 MTV
EXIT

45
D:\810nouhin\4080199111\408019911KP57XBRUC\02US-COV-KP57XBRUC\09CTV.fm masterpage:Right
Adjusting Y
our SE
T UP
(menus)
l name1[KP-57XBR10W] Model name2[KP-65XBR10W][4-080-199-11 (1)]
If you select TV OUT, the following pop-up menu appears.
Select YES only if you have connected an AV receiver, with no other equipment, to your projection TV. You can always select the signal from the receiver by pressing TV/VIDEO once.
Select NO if you have connected multiple components to your projection TV. You can select an input (VIDEO1 – VIDEO4) with the TV/VIDEO button.
Note:• The SELECT OUT signal is only available when
the projection TV is on.
Select from available languages (ENGLISH or ESPAÑOL) to display all menus in your language of choice.
LANGUAGE— User’s preferred language
DTV INPUT: R.G.BDTV ASPECT: 4:3
FREEZE MODE:
Move Select Exit MENU
SET UPPARENTAL CONTROLCAPTION VISION:
LANGUAGE: SELECT OUT:
VIDEO LABELDIRECT PLAY
CC1
VIDEO1MONITOR
VIDEO2VIDEO3VIDEO4TV OUT
Set up using YESonly VIDEO1 input? NO
Mode
Some programs are broadcast with Caption Vision.To display Caption Vision, select [CC][CC][CC][CC] 1, [CC][CC][CC][CC] 2, [CC][CC][CC][CC] 3, [CC][CC][CC][CC] 4, TEXT1, TEXT2, TEXT3 or TEXT4 from the menu. Then press the [CC] button until Caption Vision is displayed.
[CC][CC][CC][CC] 1, [CC][CC][CC][CC] 2, [CC][CC][CC][CC] 3 or [CC][CC][CC][CC] 4 displays a printed version of the dialogue or sound effects of a program. (The mode should be set to [CC][CC][CC][CC] 1 for most programs.) TEXT1, TEXT2, TEXT3 or TEXT4 displays network/station information presented using either half or the whole screen.
Note:• Poor reception of TV programs can cause errors in
Caption Vision and XDS.Captions may appear with a white box or other errors instead of the intended text.
You can select the desired output signal from the SELECT OUT jacks at the rear of the projection TV.
MONITOR:Select to edit tapes while monitoring. SELECT OUT outputs the picture displayed on the screen.
VIDEO1–VIDEO4:Select to edit tapes while viewing an input image different from that being recorded. SELECT OUToutputs the signal input to the projection TV regardless of the displayed picture on the screen.
TV OUT:Select if you connect an AV receiver to VIDEO 1 IN. SELECT OUT outputs the signal that the TV istuned to, regardless of the displayed picture. (see “Connecting an AV Receiver” on page 20 for connection)
CAPTION VISION— Television closed caption display
DTV INPUT: Y PB PRFREEZE MODE:NORMAL
SELECT OUT:MONITORLANGUAGE: ENGLISH
Move Select Exit MENU
SET UPPARENTAL CONTROLCAPTION VISION
VIDEO LABELDIRECT PLAY TEXT1
TEXT2TEXT3TEXT4
CC1CC2CC3CC4
SELECT OUT— Output signal selection from SELECT OUT
Note:• SELECT OUT setting is not available for the
inputs from VIDEO 5 (DTV) IN.
DTV INPUT: R.G.BFREEZE MODE:NORNAL
LANGUAGE: ENGLISH
Move Select Exit MENU
SET UPPARENTAL CONTROLCAPTION VISION
VIDEO LABELDIRECT PLAY
CC1
VIDEO1VIDEO2VIDEO3VIDEO4
SELECT OUT: MONITOR
TV OUT

D:\810nouhin\4080199111\408019911KP57XBRUC\02US-COV-KP57XBRUC\09CTV.fm masterpage:Left
l name1[KP-57XBR10W] Model name2[KP-65XBR10W][4-080-199-11 (1)]
/
.
t
Useful when you need to copy down information that appears on the TV’s screen.
NORMAL:Select to freeze the whole picture on the screen by pressing FREEZE.
TWIN:Select to freeze the desired scene and display it on the left of the screen while viewing the normal picture of the current channel on the right by pressing FREEZE.
FREEZE MODE— Freeze picture mode
Note:• The FREEZE MODE feature is not available for
the inputs from VIDEO 5 (DTV) IN jacks.
Rec ipe f l ou r - - - - 2suga r - - - 1/2sa l t - - - - - 1/2bu t te r - - - 1
The current picture freezes.
46
Mode
This feature allows you to label each input mode so that you can easily identify the connected equipment (e.g. you can label VIDEO 1 IN as VHS).
With the VIDEO LABEL window open:
1 Move the joystick up or down to select the input mode you want to label and press .
2 Move the joystick up or down to select the label and press .
VIDEO LABEL Options:VIDEO 1: VIDEO 1, VHS, 8mm, BETA, LD, SAT, DVD, AV RECEIVER, SKIP
VIDEO 2–4: VIDEO 2–4, VHS, 8mm, BETA, LD, SAT, DVD, SKIP
VIDEO 5: VIDEO 5, DTV, DVD, SKIP
If you select SKIP, your projection TV will skip this connection when you scan through video sources using the TV/VIDEO button.
This feature allows you to switch the input mode from the TV to a Sony VCR (MDP or DVD) and start playing by only pressing the N (playback) button on the remote control. You have to set the AV 1/23/DVD/MDP switch on the remote control (e.g., you connect your VCR to the VIDEO 3 IN jacks and set the AV 1/2/3/DVD/MDP switch to VTR 3)With the DIRECT PLAY window open:
1 Move the joystick up or down to select the inputo which your video equipment is connected, and press .
2 Move the joystick up or down to select the position of the AV 1/2/3/DVD/MDP switch, andpress .
VIDEO LABEL— Easy recognition of connected equipment (e.g. SAT, VHS, etc.)
VIDEO LABEL
VIDEO1VIDEO2VIDEO3VIDEO4VIDEO5
VIDEO1:VIDEO2:VIDEO3:VIDEO4:VIDEO5:
Move Select Exit MENU
VIDEO LABEL
VIDEO1:VIDEO2:VIDEO3:VIDEO4:VIDEO5:
VIDEO1VHS8mm
BETALD
SATDVD
AV RECEIVERSKIP
Move Select Exit MENU
DIRECT PLAY— Easy operation of a connected VCR
Note:• DIRECT PLAY setting is not available for the
inputs from VIDEO 5 (DTV) IN.
DIRECT PLAY
VIDEO1:VIDEO2:VIDEO3:VIDEO4:
OFFOFFOFFOFF
1 2 3 DVD/MDP
Move Select Exit MENU
DIRECT PLAY
VIDEO1:VIDEO2:VIDEO3:VIDEO4:
OFFAV1AV2AV3
DVD/MDP1 2 3 DVD/MDP
Move Select Exit MENU
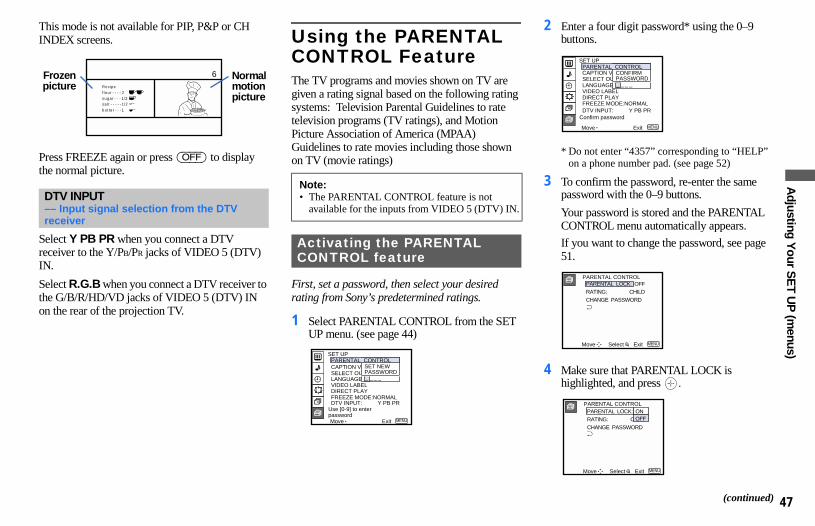
47
D:\810nouhin\4080199111\408019911KP57XBRUC\02US-COV-KP57XBRUC\09CTV.fm masterpage:Right
Adjusting Y
our SE
T UP
(menus)
l name1[KP-57XBR10W] Model name2[KP-65XBR10W][4-080-199-11 (1)]
This mode is not available for PIP, P&P or CH
2 Enter a four digit password* using the 0–9 buttons.
* Do not enter “4357” corresponding to “HELP” on a phone number pad. (see page 52)
3 To confirm the password, re-enter the same password with the 0–9 buttons.
Your password is stored and the PARENTAL CONTROL menu automatically appears.
If you want to change the password, see page 51.
4 Make sure that PARENTAL LOCK is highlighted, and press .
(continued)
Move Exit MENU
SET UP
CAPTION VISION:
Confirm password
SELECT OUT: LANGUAGE:ENGLISH VIDEO LABELDIRECT PLAY
CONFIRMPASSWORD_
FREEZE MODE:NORMALDTV INPUT: Y PB PR
PARENTAL CONTROL
_ _ _
PARENTAL CONTROL
Move Select Exit MENU
OFFPARENTAL LOCK:RATING: CHILDCHANGE PASSWORD
PARENTAL LOCK:RATING: CHILDCHANGE PASSWORD
PARENTAL CONTROL
Move Select Exit MENU
ONOFF
Mode
INDEX screens.
Press FREEZE again or press (OFF) to display the normal picture.
Select Y PB PR when you connect a DTV receiver to the Y/PB/PR jacks of VIDEO 5 (DTV) IN.
Select R.G.B when you connect a DTV receiver to the G/B/R/HD/VD jacks of VIDEO 5 (DTV) IN on the rear of the projection TV.
Using the PARENTAL CONTROL FeatureThe TV programs and movies shown on TV are given a rating signal based on the following ratingsystems: Television Parental Guidelines to rate television programs (TV ratings), and Motion Picture Association of America (MPAA) Guidelines to rate movies including those shown on TV (movie ratings)
First, set a password, then select your desired rating from Sony’s predetermined ratings.
1 Select PARENTAL CONTROL from the SET UP menu. (see page 44)
DTV INPUT–– Input signal selection from the DTV receiver
Rec ipe f l ou r - - - - 2suga r - - - 1/2sa l t - - - - - 1/2bu t te r - - - 1
6Frozenpicture
Normal motion picture
Note:• The PARENTAL CONTROL feature is not
available for the inputs from VIDEO 5 (DTV) IN.
Activating the PARENTAL CONTROL feature
DTV INPUT: R.G.B
DTV ASPECT: 4:3Move Exit MENU
SET UP
CAPTION VISION:
Use [0-9] to enterpassword
SELECT OUT: LANGUAGE:ENGLISH VIDEO LABELDIRECT PLAY
DTV INPUT: Y PB PR
SET NEWPASSWORD_
FREEZE MODE:NORMAL
PARENTAL CONTROL
_ _ _
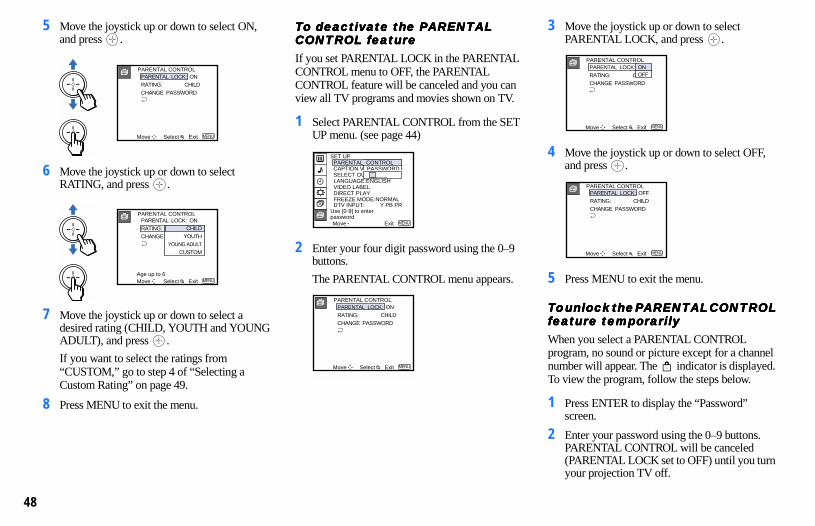
D:\810nouhin\4080199111\408019911KP57XBRUC\02US-COV-KP57XBRUC\09CTV.fm masterpage:Left
l name1[KP-57XBR10W] Model name2[KP-65XBR10W][4-080-199-11 (1)]
3 Move the joystick up or down to select PARENTAL LOCK, and press .
4 Move the joystick up or down to select OFF, and press .
5 Press MENU to exit the menu.
To unlock the PARENTAL CONTROL To unlock the PARENTAL CONTROL To unlock the PARENTAL CONTROL To unlock the PARENTAL CONTROL feature temporarilyfeature temporarilyfeature temporarilyfeature temporarilyWhen you select a PARENTAL CONTROL program, no sound or picture except for a channel number will appear. The indicator is displayed. To view the program, follow the steps below.
1 Press ENTER to display the “Password” screen.
2 Enter your password using the 0–9 buttons. PARENTAL CONTROL will be canceled (PARENTAL LOCK set to OFF) until you turn your projection TV off.
PARENTAL LOCK:RATING: CHILDCHANGE PASSWORD
PARENTAL CONTROL
Move Select Exit MENU
ONOFF
PARENTAL CONTROLPARENTAL LOCK:RATING: CHILDCHANGE PASSWORD
Move Select Exit MENU
OFF
48
Mode
5 Move the joystick up or down to select ON, and press .
6 Move the joystick up or down to select RATING, and press .
7 Move the joystick up or down to select a desired rating (CHILD, YOUTH and YOUNG ADULT), and press .
If you want to select the ratings from “CUSTOM,” go to step 4 of “Selecting a Custom Rating” on page 49.
8 Press MENU to exit the menu.
To deactivate the PARENTAL To deactivate the PARENTAL To deactivate the PARENTAL To deactivate the PARENTAL CONTROL featureCONTROL featureCONTROL featureCONTROL featureIf you set PARENTAL LOCK in the PARENTALCONTROL menu to OFF, the PARENTAL CONTROL feature will be canceled and you can view all TV programs and movies shown on TV.
1 Select PARENTAL CONTROL from the SETUP menu. (see page 44)
2 Enter your four digit password using the 0–9 buttons.
The PARENTAL CONTROL menu appears.
PARENTAL CONTROLPARENTAL LOCK:RATING: CHILDCHANGE PASSWORD
Move Select Exit MENU
ON
PARENTAL CONTROL
MoveAge up to 6
Select Exit MENU
ONPARENTAL LOCK:RATING: CHANGE PASSWORD
CHILDYOUTH
YOUNG ADULTCUSTOM
Move Exit MENU
SET UP
CAPTION VISION:
Use [0-9] to enterpassword
SELECT OUT: LANGUAGE:ENGLISH VIDEO LABELDIRECT PLAY
PASSWORD_
FREEZE MODE:NORMAL
PARENTAL CONTROL
_ _ _
DTV INPUT: Y PB PR
PARENTAL CONTROLPARENTAL LOCK:RATING: CHILDCHANGE PASSWORD
Move Select Exit MENU
ON
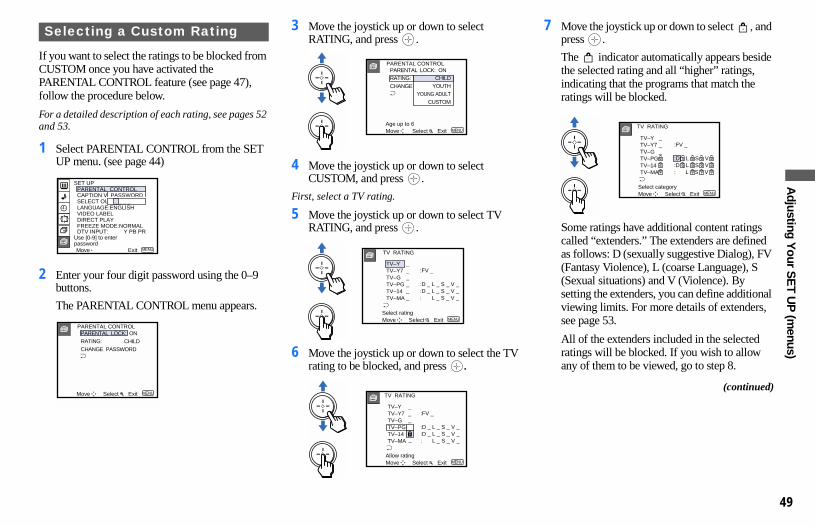
49
D:\810nouhin\4080199111\408019911KP57XBRUC\02US-COV-KP57XBRUC\09CTV.fm masterpage:Right
Adjusting Y
our SE
T UP
(menus)
l name1[KP-57XBR10W] Model name2[KP-65XBR10W][4-080-199-11 (1)]
3 Move the joystick up or down to select
7 Move the joystick up or down to select , and press .
The indicator automatically appears beside the selected rating and all “higher” ratings, indicating that the programs that match the ratings will be blocked.
Some ratings have additional content ratings called “extenders.” The extenders are defined as follows: D (sexually suggestive Dialog), FV (Fantasy Violence), L (coarse Language), S (Sexual situations) and V (Violence). By setting the extenders, you can define additional viewing limits. For more details of extenders, see page 53.
All of the extenders included in the selected ratings will be blocked. If you wish to allow any of them to be viewed, go to step 8.
(continued)
TV RATING
MoveSelect category
Select Exit MENU
TV–YTV–Y7TV–GTV–PGTV–14TV–MA
__ :FV __– :D – L – S – V –– :D – L – S – V –– : L – S – V
Mode
If you want to select the ratings to be blocked from CUSTOM once you have activated the PARENTAL CONTROL feature (see page 47), follow the procedure below.
For a detailed description of each rating, see pages 52 and 53.
1 Select PARENTAL CONTROL from the SET UP menu. (see page 44)
2 Enter your four digit password using the 0–9 buttons.
The PARENTAL CONTROL menu appears.
RATING, and press .
4 Move the joystick up or down to select CUSTOM, and press .
First, select a TV rating.
5 Move the joystick up or down to select TV RATING, and press .
6 Move the joystick up or down to select the TVrating to be blocked, and press .
Selecting a Custom Rating
Move Exit MENU
SET UP
CAPTION VISION:
Use [0-9] to enterpassword
SELECT OUT: LANGUAGE:ENGLISH VIDEO LABELDIRECT PLAY
PASSWORD_
FREEZE MODE:NORMAL
PARENTAL CONTROL
_ _ _
DTV INPUT: Y PB PR
PARENTAL CONTROLPARENTAL LOCK:RATING: CHILDCHANGE PASSWORD
Move Select Exit MENU
ON
PARENTAL CONTROL
MoveAge up to 6
Select Exit MENU
ONPARENTAL LOCK:RATING: CHANGE PASSWORD
CHILDYOUTH
YOUNG ADULTCUSTOM
TV RATING
MoveSelect rating
Select Exit MENU
TV–YTV–Y7TV–GTV–PGTV–14TV–MA
__ :FV ___ :D _ L _ S _ V __ :D _ L _ S _ V __ : L _ S _ V _
TV RATING
MoveAllow rating
Select Exit MENU
TV–YTV–Y7TV–GTV–PGTV–14TV–MA
__ :FV __ :D _ L _ S _ V __ :D _ L _ S _ V _ : L _ S _ V _ _
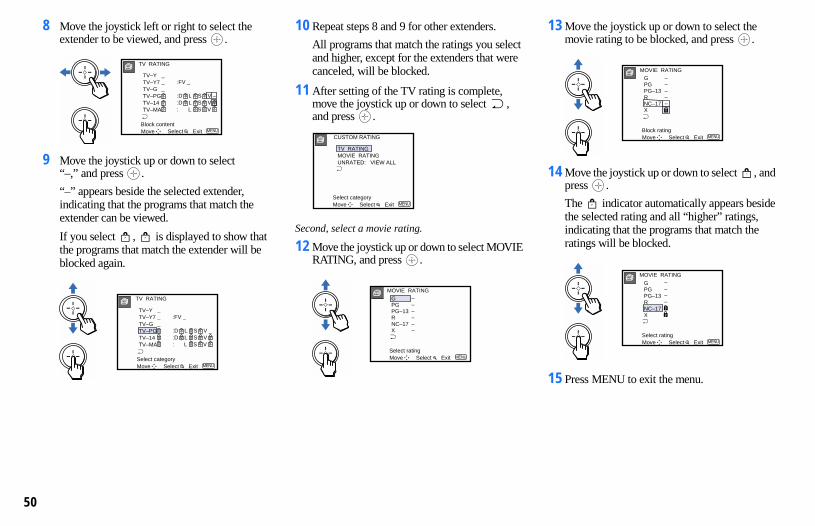
D:\810nouhin\4080199111\408019911KP57XBRUC\02US-COV-KP57XBRUC\09CTV.fm masterpage:Left
l name1[KP-57XBR10W] Model name2[KP-65XBR10W][4-080-199-11 (1)]
t
13 Move the joystick up or down to select the movie rating to be blocked, and press .
14 Move the joystick up or down to select , and press .
The indicator automatically appears beside the selected rating and all “higher” ratings, indicating that the programs that match the ratings will be blocked.
15 Press MENU to exit the menu.
MOVIE RATING
MoveBlock rating
Select Exit MENU
GPGPG–13RNC–17 X
–– –– – –
MOVIE RATING
MoveSelect rating
Select Exit MENU
GPGPG–13RNC–17 X
–– –– – –
50
Mode
8 Move the joystick left or right to select the extender to be viewed, and press .
9 Move the joystick up or down to select “–,” and press .
“–” appears beside the selected extender, indicating that the programs that match the extender can be viewed.
If you select , is displayed to show that the programs that match the extender will be blocked again.
10 Repeat steps 8 and 9 for other extenders.
All programs that match the ratings you selecand higher, except for the extenders that werecanceled, will be blocked.
11 After setting of the TV rating is complete, move the joystick up or down to select , and press .
Second, select a movie rating.
12 Move the joystick up or down to select MOVIERATING, and press .
TV RATING
MoveBlock content
Select Exit MENU
TV–YTV–Y7TV–GTV–PGTV–14TV–MA
__ :FV __– :D – L – S – V –– :D – L – S – V –– : L – S – V
TV RATING
MoveSelect category
Select Exit MENU
TV–YTV–Y7TV–GTV–PGTV–14TV–MA
__ :FV __– :D – L – S – V _– :D – L – S – V –– : L – S – V
CUSTOM RATING
MoveSelect category
Select Exit MENU
TV RATINGMOVIE RATINGUNRATED: VIEW ALL
MOVIE RATING
MoveSelect rating
Select Exit MENU
GPGPG–13RNC–17 X
–– –– – –
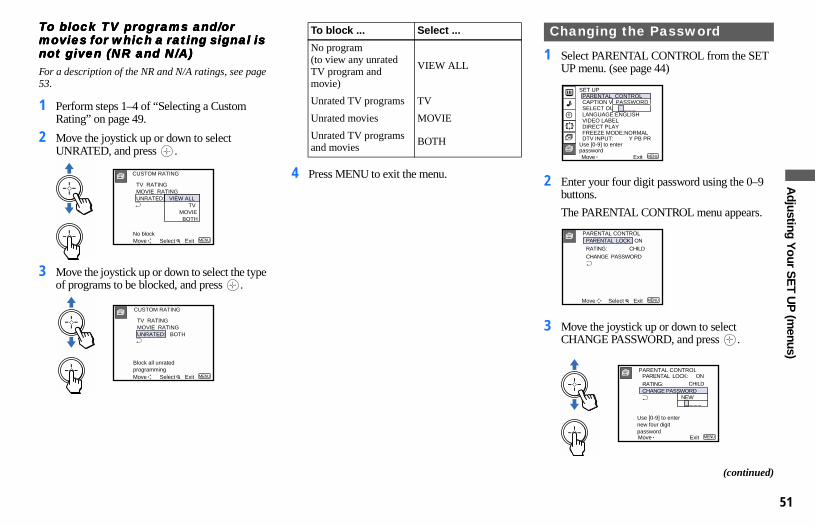
51
D:\810nouhin\4080199111\408019911KP57XBRUC\02US-COV-KP57XBRUC\09CTV.fm masterpage:Right
Adjusting Y
our SE
T UP
(menus)
l name1[KP-57XBR10W] Model name2[KP-65XBR10W][4-080-199-11 (1)]
1 Select PARENTAL CONTROL from the SET UP menu. (see page 44)
2 Enter your four digit password using the 0–9 buttons.
The PARENTAL CONTROL menu appears.
3 Move the joystick up or down to select CHANGE PASSWORD, and press .
(continued)
Changing the Password
Move Exit MENU
SET UP
CAPTION VISION:
Use [0-9] to enterpassword
SELECT OUT: LANGUAGE:ENGLISH VIDEO LABELDIRECT PLAY
PASSWORD_
FREEZE MODE:NORMAL
PARENTAL CONTROL
_ _ _
DTV INPUT: Y PB PR
PARENTAL CONTROLPARENTAL LOCK:RATING: CHILDCHANGE PASSWORD
Move Select Exit MENU
ON
PARENTAL CONTROLPARENTAL LOCK: ONRATING:CHANGE PASSWORD
Move Exit MENU
CHILD
Use [0-9] to enternew four digitpassword
NEW_ _ _ _
Mode
To block TV programs and/or To block TV programs and/or To block TV programs and/or To block TV programs and/or movies for which a rating signal is movies for which a rating signal is movies for which a rating signal is movies for which a rating signal is not given (NR and N/A)not given (NR and N/A)not given (NR and N/A)not given (NR and N/A)For a description of the NR and N/A ratings, see page 53.
1 Perform steps 1–4 of “Selecting a Custom Rating” on page 49.
2 Move the joystick up or down to select UNRATED, and press .
3 Move the joystick up or down to select the type of programs to be blocked, and press .
4 Press MENU to exit the menu.CUSTOM RATING
MoveNo block
Select Exit MENU
TV RATINGMOVIE RATINGUNRATED: VIEW ALL TV MOVIE BOTH
CUSTOM RATING
Move Select Exit MENU
TV RATINGMOVIE RATINGUNRATED: BOTH
Block all unratedprogramming
To block ... Select ...
No program (to view any unrated TV program and movie)
VIEW ALL
Unrated TV programs TV
Unrated movies MOVIE
Unrated TV programs and movies
BOTH
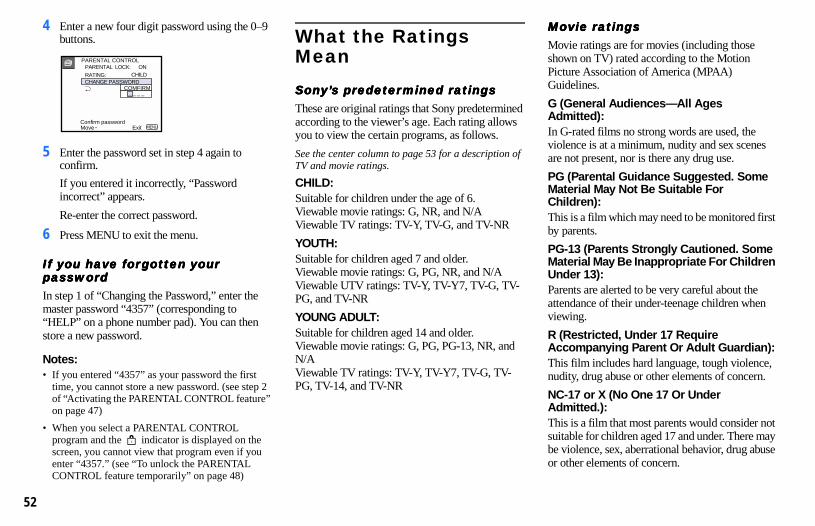
D:\810nouhin\4080199111\408019911KP57XBRUC\02US-COV-KP57XBRUC\09CTV.fm masterpage:Left
l name1[KP-57XBR10W] Model name2[KP-65XBR10W][4-080-199-11 (1)]
f
Movie ratings Movie ratings Movie ratings Movie ratings Movie ratings are for movies (including those shown on TV) rated according to the Motion Picture Association of America (MPAA) Guidelines.
G (General Audiences—All Ages Admitted):In G-rated films no strong words are used, the violence is at a minimum, nudity and sex scenes are not present, nor is there any drug use.
PG (Parental Guidance Suggested. Some Material May Not Be Suitable For Children):This is a film which may need to be monitored first by parents.
PG-13 (Parents Strongly Cautioned. Some Material May Be Inappropriate For Children Under 13):Parents are alerted to be very careful about the attendance of their under-teenage children when viewing.
R (Restricted, Under 17 Require Accompanying Parent Or Adult Guardian):This film includes hard language, tough violence, nudity, drug abuse or other elements of concern.
NC-17 or X (No One 17 Or Under Admitted.):This is a film that most parents would consider not suitable for children aged 17 and under. There may be violence, sex, aberrational behavior, drug abuse or other elements of concern.
52
Mode
4 Enter a new four digit password using the 0–9 buttons.
5 Enter the password set in step 4 again to confirm.
If you entered it incorrectly, “Password incorrect” appears.
Re-enter the correct password.
6 Press MENU to exit the menu.
If you have forgotten your If you have forgotten your If you have forgotten your If you have forgotten your passwordpasswordpasswordpasswordIn step 1 of “Changing the Password,” enter the master password “4357” (corresponding to “HELP” on a phone number pad). You can then store a new password.
Notes:• If you entered “4357” as your password the first
time, you cannot store a new password. (see step 2 of “Activating the PARENTAL CONTROL feature” on page 47)
• When you select a PARENTAL CONTROL program and the indicator is displayed on the screen, you cannot view that program even if you enter “4357.” (see “To unlock the PARENTAL CONTROL feature temporarily” on page 48)
What the Ratings Mean
Sony’s predetermined ratingsSony’s predetermined ratingsSony’s predetermined ratingsSony’s predetermined ratingsThese are original ratings that Sony predeterminedaccording to the viewer’s age. Each rating allows you to view the certain programs, as follows.
See the center column to page 53 for a description oTV and movie ratings.
CHILD:Suitable for children under the age of 6.Viewable movie ratings: G, NR, and N/AViewable TV ratings: TV-Y, TV-G, and TV-NR
YOUTH:Suitable for children aged 7 and older.Viewable movie ratings: G, PG, NR, and N/AViewable UTV ratings: TV-Y, TV-Y7, TV-G, TV-PG, and TV-NR
YOUNG ADULT:Suitable for children aged 14 and older.Viewable movie ratings: G, PG, PG-13, NR, and N/AViewable TV ratings: TV-Y, TV-Y7, TV-G, TV-PG, TV-14, and TV-NR
PARENTAL CONTROL
Move Exit MENUConfirm password
PARENTAL LOCK: ONRATING:CHANGE PASSWORD
CHILD
COMFIRM_ _ _ _
53
D:\810nouhin\4080199111\408019911KP57XBRUC\02US-COV-KP57XBRUC\09CTV.fm masterpage:Right
Adjusting Y
our SE
T UP
(menus)
l name1[KP-57XBR10W] Model name2[KP-65XBR10W][4-080-199-11 (1)]
NR (Not Rated): TV-14 (Parents Strongly Cautioned):
V (Violence):Programs containing violence
There may be some profanity, violence or brief nudity in these programs.
Mode
This is a film that a producer has not rated, intending to have his film widely released.
N/A (Not Applicable):This is a film that a producer considers outside the scope of the MPAA ratings.
Note:• NR and N/A ratings are shown together as
UNRATED in the menu.
TV ratings TV ratings TV ratings TV ratings TV ratings are for TV programs rated according to the Television Parental Guidelines.
TV-Y (All Children):This program is designed for young children aged 2–6 and is appropriate for all children.
TV-Y7 (Directed to Older Children):This program is designed for children aged 7 and above. Themes and elements in this program may include mild fantasy violence or slapstick violence, or may frighten children under the age of 7.
TV-G (General Audience):Most parents would find this program suitable for all ages. It contains little or no violence, no strong language and little or no sexual dialog or situations.
TV-PG (Parental Guidance Suggested):This program contains some material that parents may find unsuitable for younger children.
This program contains some material that many parents would find unsuitable for children under the age of 14.
TV-MA (Mature Audience Only):This program is specifically designed to be viewedby adults and therefore may be unsuitable for children under the age of 17.
TV-NR (Not Rated/Unrated):This is a program broadcast without any rating, such as news, news flashes or sports.
Note:• The TV-NR rating is shown as UNRATED in the
menu.
About the extenders of TV ratingsAbout the extenders of TV ratingsAbout the extenders of TV ratingsAbout the extenders of TV ratingsTV-Y7, TV-PG, TV-14 and TV-MA ratings have additional content ratings called “extenders” to define additional viewing limits. The extenders aredefined as follows:
D (sexually suggestive Dialog):Programs containing suggestive dialog, or sexual innuendo
FV (Fantasy Violence):Programs containing cartoon violence occurring inTV-Y7 programs only
L (coarse Language):Programs containing coarse language
S (Sexual situations):Programs containing sexual content
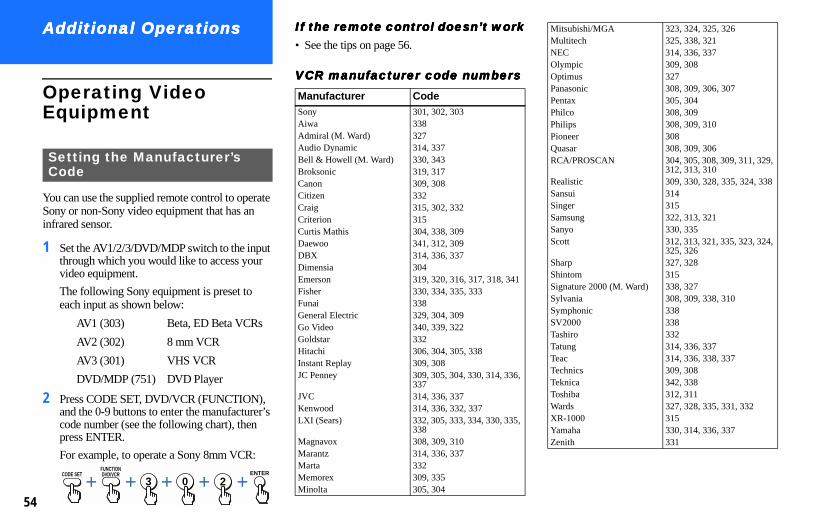
D:\810nouhin\4080199111\408019911KP57XBRUC\02US-COV-KP57XBRUC\10OVE.fm masterpage:First-Left
l name1[KP-57XBR10W] Model name2[KP-65XBR10W][4-080-199-11 (1)]
,
,
Mitsubishi/MGA 323, 324, 325, 326Multitech 325, 338, 321NEC 314, 336, 337Olympic 309, 308Optimus 327Panasonic 308, 309, 306, 307Pentax 305, 304Philco 308, 309Philips 308, 309, 310Pioneer 308Quasar 308, 309, 306RCA/PROSCAN 304, 305, 308, 309, 311, 329,
312, 313, 310Realistic 309, 330, 328, 335, 324, 338Sansui 314Singer 315Samsung 322, 313, 321Sanyo 330, 335Scott 312, 313, 321, 335, 323, 324,
325, 326Sharp 327, 328Shintom 315Signature 2000 (M. Ward) 338, 327Sylvania 308, 309, 338, 310Symphonic 338SV2000 338Tashiro 332Tatung 314, 336, 337Teac 314, 336, 338, 337Technics 309, 308Teknica 342, 338Toshiba 312, 311Wards 327, 328, 335, 331, 332XR-1000 315Yamaha 330, 314, 336, 337Zenith 331
54
Mode
Additional OperationsAdditional OperationsAdditional OperationsAdditional Operations
Operating Video Equipment
You can use the supplied remote control to operate Sony or non-Sony video equipment that has an infrared sensor.
1 Set the AV1/2/3/DVD/MDP switch to the input through which you would like to access your video equipment.
The following Sony equipment is preset to each input as shown below:
AV1 (303) Beta, ED Beta VCRs
AV2 (302) 8 mm VCR
AV3 (301) VHS VCR
DVD/MDP (751) DVD Player
2 Press CODE SET, DVD/VCR (FUNCTION), and the 0-9 buttons to enter the manufacturer’s code number (see the following chart), then press ENTER.
For example, to operate a Sony 8mm VCR:
If the remote control doesn’t workIf the remote control doesn’t workIf the remote control doesn’t workIf the remote control doesn’t work• See the tips on page 56.
VCR manufacturer code numbersVCR manufacturer code numbersVCR manufacturer code numbersVCR manufacturer code numbers
Setting the Manufacturer’s Code
23 0CODE SET ENTERDVD/VCR
FUNCTION
Manufacturer CodeSony 301, 302, 303Aiwa 338Admiral (M. Ward) 327Audio Dynamic 314, 337Bell & Howell (M. Ward) 330, 343Broksonic 319, 317Canon 309, 308Citizen 332Craig 315, 302, 332Criterion 315Curtis Mathis 304, 338, 309Daewoo 341, 312, 309DBX 314, 336, 337Dimensia 304Emerson 319, 320, 316, 317, 318, 341Fisher 330, 334, 335, 333Funai 338General Electric 329, 304, 309Go Video 340, 339, 322Goldstar 332Hitachi 306, 304, 305, 338Instant Replay 309, 308JC Penney 309, 305, 304, 330, 314, 336
337JVC 314, 336, 337Kenwood 314, 336, 332, 337LXI (Sears) 332, 305, 333, 334, 330, 335
338Magnavox 308, 309, 310Marantz 314, 336, 337Marta 332Memorex 309, 335Minolta 305, 304
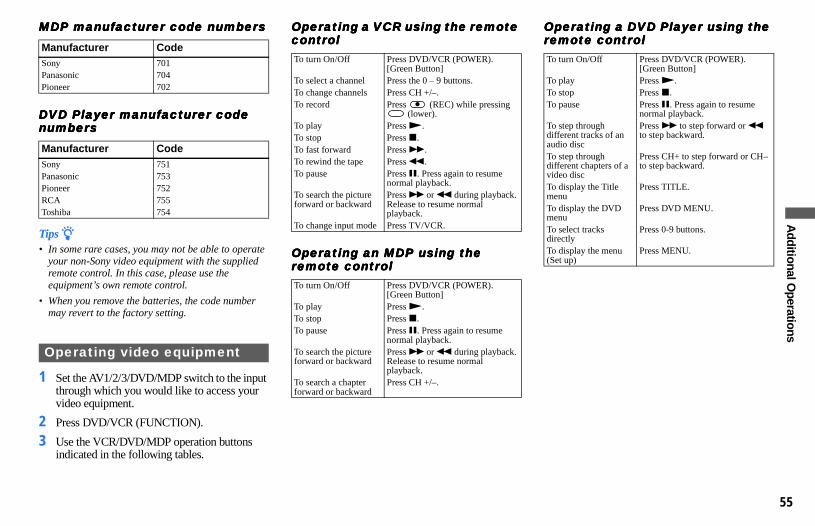
55
D:\810nouhin\4080199111\408019911KP57XBRUC\02US-COV-KP57XBRUC\10OVE.fm masterpage:Right
Additional O
perations
l name1[KP-57XBR10W] Model name2[KP-65XBR10W][4-080-199-11 (1)]
Operating a DVD Player using the Operating a DVD Player using the Operating a DVD Player using the Operating a DVD Player using the remote controlremote controlremote controlremote controlTo turn On/Off Press DVD/VCR (POWER).
[Green Button]To play Press N.To stop Press x.To pause Press X. Press again to resume
normal playback.To step through different tracks of an audio disc
Press M to step forward or m to step backward.
To step through different chapters of a video disc
Press CH+ to step forward or CH– to step backward.
To display the Title menu
Press TITLE.
To display the DVD menu
Press DVD MENU.
To select tracks directly
Press 0-9 buttons.
To display the menu (Set up)
Press MENU.
Mode
MDP manufacturer code numbersMDP manufacturer code numbersMDP manufacturer code numbersMDP manufacturer code numbers
DVD Player manufacturer code DVD Player manufacturer code DVD Player manufacturer code DVD Player manufacturer code numbersnumbersnumbersnumbers
Tips z• In some rare cases, you may not be able to operate
your non-Sony video equipment with the supplied remote control. In this case, please use the equipment’s own remote control.
• When you remove the batteries, the code number may revert to the factory setting.
1 Set the AV1/2/3/DVD/MDP switch to the input through which you would like to access your video equipment.
2 Press DVD/VCR (FUNCTION).
3 Use the VCR/DVD/MDP operation buttons indicated in the following tables.
Operating a VCR using the remoteOperating a VCR using the remoteOperating a VCR using the remoteOperating a VCR using the remotecontrolcontrolcontrolcontrol
Operating an MDP using the Operating an MDP using the Operating an MDP using the Operating an MDP using the remote controlremote controlremote controlremote control
Manufacturer CodeSony 701Panasonic 704Pioneer 702
Manufacturer CodeSony 751Panasonic 753Pioneer 752RCA 755Toshiba 754
Operating video equipment
To turn On/Off Press DVD/VCR (POWER).[Green Button]
To select a channel Press the 0 – 9 buttons.To change channels Press CH +/–.To record Press (REC) while pressing
(lower). To play Press N.To stop Press x.To fast forward Press M.To rewind the tape Press m.To pause Press X. Press again to resume
normal playback.To search the picture forward or backward
Press M or m during playback. Release to resume normal playback.
To change input mode Press TV/VCR.
To turn On/Off Press DVD/VCR (POWER).[Green Button]
To play Press N.To stop Press x.To pause Press X. Press again to resume
normal playback.To search the picture forward or backward
Press M or m during playback. Release to resume normal playback.
To search a chapter forward or backward
Press CH +/–.

D:\810nouhin\4080199111\408019911KP57XBRUC\02US-COV-KP57XBRUC\10OVE.fm masterpage:Left
l name1[KP-57XBR10W] Model name2[KP-65XBR10W][4-080-199-11 (1)]
r.
receiver.
If the remote control doesn’t workIf the remote control doesn’t workIf the remote control doesn’t workIf the remote control doesn’t work• Try repeating the set up procedures using the
other codes listed for your equipment.
To operate the projection TVTo operate the projection TVTo operate the projection TVTo operate the projection TVPress TV (FUNCTION). Then use the projection TV control buttons to control the projection TV.
Tips z• If more than one code number is listed, try entering
them one by one until you come to the correct code for your equipment.
• If you enter a new code number, the code number you previously entered at that setting is erased.
• In some rare cases, you may not be able to operate your equipment with the supplied remote control. In this case, use the equipment’s own remote control unit.
• Whenever you remove the batteries — to replace them, for example — if too much time is taken, the code numbers may revert to the factory setting and must be reset.
,
56
Mode
Operating a Cable Box or Satellite Receiver (SAT)
You can program the supplied remote control to operate a cable box or satellite receiver.
Press CODE SET, SAT/CABLE (FUNCTION), and the 0-9 buttons to enter the manufacturer’s code number (see the following chart), then press ENTER.
For example, to operate a Sony satellite receiver:
Manufacturer code numbers (cableManufacturer code numbers (cableManufacturer code numbers (cableManufacturer code numbers (cablebox)box)box)box)
Manufacturer code numbers Manufacturer code numbers Manufacturer code numbers Manufacturer code numbers (Satellite receiver)(Satellite receiver)(Satellite receiver)(Satellite receiver)
1 Press SAT/CABLE (POWER) [Green Button]to turn on/off the cable box or satellite receive
2 Press SAT/CABLE (FUNCTION).
3 For other operations, refer to the operating instructions that come with the equipment. Blue-labeled buttons such as the GUIDE button can be used only with a satellite
Setting the Manufacturer’s Code
18 0CODE SET ENTERSAT/CABLE
FUNCTION
Manufacturer CodeGemini 233Hamlin/Regal 222, 223, 224, 225, 226Jerrold/G. I. 201, 202, 203, 204, 205, 222
206, 207, 208, 218Macom 230, 231, 232Magnavox 234Oak 227, 228, 229Panasonic 219, 220, 221Philips 236, 237, 238, 239, 240, 241Pioneer 214, 215Samsung 235Scientific Atlanta 209, 210, 211Tocom 216, 217Zenith 212, 213
Manufacturer Code numberSony 801 (preset code for remote
control)General Electric 802RCA/PROSCAN 802
Operating a cable box or satellite receiver
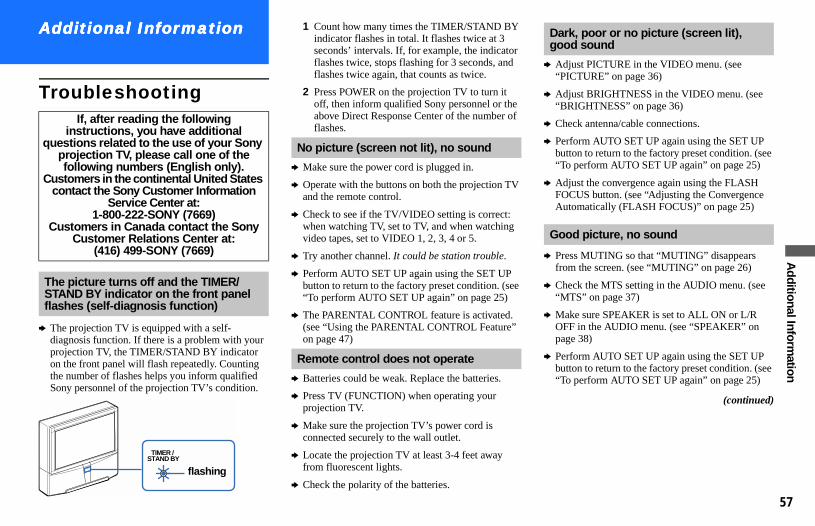
57
D:\810nouhin\4080199111\408019911KP57XBRUC\02US-COV-KP57XBRUC\11TRB.fm masterpage:First-Right
Additional Inform
ation
l name1[KP-57XBR10W] Model name2[KP-65XBR10W][4-080-199-11 (1)]
1 Count how many times the TIMER/STAND BY
b Adjust PICTURE in the VIDEO menu. (see “PICTURE” on page 36)
b Adjust BRIGHTNESS in the VIDEO menu. (see “BRIGHTNESS” on page 36)
b Check antenna/cable connections.
b Perform AUTO SET UP again using the SET UP button to return to the factory preset condition. (see “To perform AUTO SET UP again” on page 25)
b Adjust the convergence again using the FLASH FOCUS button. (see “Adjusting the Convergence Automatically (FLASH FOCUS)” on page 25)
b Press MUTING so that “MUTING” disappears from the screen. (see “MUTING” on page 26)
b Check the MTS setting in the AUDIO menu. (see “MTS” on page 37)
b Make sure SPEAKER is set to ALL ON or L/R OFF in the AUDIO menu. (see “SPEAKER” on page 38)
b Perform AUTO SET UP again using the SET UP button to return to the factory preset condition. (see “To perform AUTO SET UP again” on page 25)
(continued)
Dark, poor or no picture (screen lit), good sound
Good picture, no sound
Mode
Additional InformationAdditional InformationAdditional InformationAdditional Information
Troubleshooting
b The projection TV is equipped with a self-diagnosis function. If there is a problem with your projection TV, the TIMER/STAND BY indicator on the front panel will flash repeatedly. Counting the number of flashes helps you inform qualified Sony personnel of the projection TV’s condition.
indicator flashes in total. It flashes twice at 3 seconds’ intervals. If, for example, the indicatorflashes twice, stops flashing for 3 seconds, and flashes twice again, that counts as twice.
2 Press POWER on the projection TV to turn it off, then inform qualified Sony personnel or the above Direct Response Center of the number of flashes.
b Make sure the power cord is plugged in.
b Operate with the buttons on both the projection TVand the remote control.
b Check to see if the TV/VIDEO setting is correct: when watching TV, set to TV, and when watching video tapes, set to VIDEO 1, 2, 3, 4 or 5.
b Try another channel. It could be station trouble.
b Perform AUTO SET UP again using the SET UP button to return to the factory preset condition. (see“To perform AUTO SET UP again” on page 25)
b The PARENTAL CONTROL feature is activated. (see “Using the PARENTAL CONTROL Feature” on page 47)
b Batteries could be weak. Replace the batteries.
b Press TV (FUNCTION) when operating your projection TV.
b Make sure the projection TV’s power cord is connected securely to the wall outlet.
b Locate the projection TV at least 3-4 feet away from fluorescent lights.
b Check the polarity of the batteries.
If, after reading the following instructions, you have additional
questions related to the use of your Sony projection TV, please call one of the following numbers (English only).
Customers in the continental United States contact the Sony Customer Information
Service Center at:1-800-222-SONY (7669)
Customers in Canada contact the Sony Customer Relations Center at:
(416) 499-SONY (7669)
The picture turns off and the TIMER/STAND BY indicator on the front panel flashes (self-diagnosis function)
TIMER / STAND BY
flashing
No picture (screen not lit), no sound
Remote control does not operate
D:\810nouhin\4080199111\408019911KP57XBRUC\02US-COV-KP57XBRUC\11TRB.fm masterpage:Left
l name1[KP-57XBR10W] Model name2[KP-65XBR10W][4-080-199-11 (1)]
s
e
b If the item you want to choose appears in gray, you cannot select it.
b Press the projection TV’s power button off and on again.
b Check the connection with a cable box again. (see pages 9 and 11)
b Make sure CABLE is ON in the CHANNEL SET UP menu. (see “CABLE” on page 42)
b Use AUTO PROGRAM to add receivable channels that are not presently in the TV’s memory. (see “AUTO PROGRAM” on page 42)
b Increase the volume at the cable box. Then press TV (FUNCTION) and adjust the projection TV’s volume.
b Make sure CABLE is ON in the CHANNEL SET UP menu. (see “CABLE” on page 42)
b Use AUTO PROGRAM to add receivable channels that are not presently in the TV’s memory. (see “AUTO PROGRAM” on page 42)
Cannot operate the menu
Cannot receive any channels when using cable TV
Cannot gain enough volume when using a cable box
CHANNEL INDEX does not display all available channels
58
Mode
b Check the DTV INPUT setting in the SET UP menu. (see “DTV INPUT” on page 47)
b Check the connections between the DTV receiver and the projection TV. (see pages 12 and 13)
b Check your local listings to find out if you can receive digital broadcasts in your area.
b Make sure CABLE is OFF in the CHANNEL SET UP menu. (see “CABLE” on page 42)
b Use AUTO PROGRAM to add receivable channels that are not presently in the TV’s memory. (see “AUTO PROGRAM” on page 42)
b Adjust the COLOR in the VIDEO menu. (see “COLOR” on page 36)
b Black and white programs cannot be seen in color.
b Perform AUTO SET UP again using the SET UP button to return to the factory preset condition. (see “To perform AUTO SET UP again” on page 25)
b Check the CABLE setting in the CHANNEL SETUP menu. (see “CABLE” on page 42)
b Check the antenna/cable connections.
b Make sure the channel is broadcasting programs.
b Press ANT to change the input mode. (see “ANT”on page 26)
b Adjust the antenna.
b Keep the projection TV away from noise sources such as cars, neon signs or hair-dryers.
b Use AUTO PROGRAM to add receivable channelthat are not presently in TV’s memory. (see “AUTOPROGRAM” on page 42)
b Try turning CHANNEL FIX off. (see “CHANNELFIX” on page 42)
b Use a highly directional outdoor antenna or a cabl(when the problem is caused by reflections from nearby mountains or tall buildings).
Cannot receive digital channels (when a DTV receiver is connected)
Cannot receive upper channels (UHF) when using an antenna
No color
Only snow and noise appear on the screen
Dotted lines or stripes
TV is fixed to one channel
Double images or ghosts

59
D:\810nouhin\4080199111\408019911KP57XBRUC\02US-COV-KP57XBRUC\11TRB.fm masterpage:Right
Additional Inform
ation
l name1[KP-57XBR10W] Model name2[KP-65XBR10W][4-080-199-11 (1)]
Mode
b Verify that FAVORITE CHANNEL is set to MANUAL in the CHANNEL SET UP menu. (see “Setting FAVORITE CHANNEL manually” on page 43)
b Ensure that VIDEO LABEL is not set to SKIP. (see “VIDEO LABEL” on page 46)
b SELECT OUT will not record both images in PIP or P&P. Only the main picture will be recorded.
b If you are recording the main picture and you switch to the sound of the sub picture using the AUDIO button, the main picture will be recorded with sound from the other program.
b Some shooting games which involve pointing a light beam at the TV screen with an electronic gun or rifle cannot be used with this projection TV. For details, see the instruction manual supplied with the video game software.
FAVORITE CHANNEL does not display your choices
Some video sources do not appear when you press TV/VIDEO
Recording through SELECT OUT does not function properly when recording in PIP or P&P mode
Cannot play shooting games
D:\810nouhin\4080199111\408019911KP57XBRUC\02US-COV-KP57XBRUC\11TRB.fm masterpage:Left
l name1[KP-57XBR10W] Model name2[KP-65XBR10W][4-080-199-11 (1)]
.
Dimensions (W/H/D)1,380 � 1,400 � 680 mm (54 3/8 � 55 1/8 � 26 7/8 inches)
(KP-57XBR10W)1,558 � 1,574 � 735 mm (61 3/8 � 62 � 29 inches)
(KP-65XBR10W)
Mass126 kg (277 lbs 12 oz) (KP-57XBR10W)148 kg (326 lbs 4 oz) (KP-65XBR10W)
Supplied accessoriesRemote control: RM-Y907 (1) Batteries size: AA (R6) (2)
Optional accessoriesConnecting cables:
RK-G34, RK-74A, RKG-69HG, VMC-10HG, VMC-720M, VMC-810S/820S, YC-15V/30V
U/V mixer: EAC-66Rear speakers: SS-MB115AV receiver: STR-V555ES
Design and specifications are subject to change without notice.
60
Mode
SpecificationsProjection system3 picture tubes, 3 lenses, horizontal in-line system
Picture tube7-inch high-brightness monochrome tubes (6.3 raster size),
with optical coupling and liquid cooling system
Projection lensesHigh performance, large diameter hybrid lens F1.1
Television systemAmerican TV standard
Channel coverageVHF: 2–13/UHF: 14 –69/CATV: 1 – 125
Antenna75 ohm external terminal for VHF/UHF
Screen size (measured diagonally)57 inches (KP-57XBR10W)65 inches (KP-65XBR10W)
Inputs/outputsVIDEO 1/3 INVIDEO 2 INPUTS VIDEO IN (4-pin mini DIN):
Y: 1 Vp-p, 75-ohms unbalanced, sync negativeC: 0.286 Vp-p (Burst signal), 75 ohms
VIDEO (phono jack): 1 Vp-p, 75-ohms unbalanced, sync negative
AUDIO (phono jacks): 500 mVrms (100% modulation), Impedance: 47 kilohms
VIDEO 4 INS VIDEO IN (4-pin mini DIN):
Y: 1 Vp-p, 75-ohms unbalanced, sync negativeC: 0.286 Vp-p (Burst signal), 75 ohms
VIDEO (phono jack): 1 Vp-p, 75-ohms unbalanced, sync negative
AUDIO (phono jacks): 500 mVrms (100% modulation), Impedance: 47 kilohms
Y: 1 Vp-p, 75 ohms, sync negativePB: 0.7 Vp-p, 75 ohmsPR: 0.7 Vp-p, 75 ohms
VIDEO 5 (DTV) IN Maximum scanning rate: 1080iY: 1 Vp-p, 75 ohms, negative or tri-level syncPB: 0.7 Vp-p, 75 ohmsPR: 0.7 Vp-p, 75 ohmsorG: 0.7 Vp-pB: 0.7 Vp-pR: 0.7 Vp-pHD: 0.5–5 Vp-p, 2.2 kilohmsVD: 0.6–5 Vp-p, 2.2 kilohmsNote:The VIDEO 5 (DTV) IN jacks are not compatible with a computer’s 5BNC (R/G/B/HD/VD) video output connectorsAUDIO (phono jacks): 500 mVrms (100% modulation),
Impedance: 47 kilohms SELECT OUTVIDEO (phono jack): 1 Vp-p, 75-ohms unbalanced, sync
negativeAUDIO (phono jacks): 470 mVrms (100% modulation),
Impedance: 47 kilohmsAUDIO (VAR) OUT (phono jacks): 950 mVrms (100%
modulation)AUDIO (FIX) OUT (phono jacks): 500 mVrms (100%
modulation)CONTROL S IN/OUT: minijacks
SpeakerTweeter: 100 mm (4”) � 2Woofer: 160 mm (6 3/8”) � 2Center: 100 mm (4”) � 2
Speaker outputFront: 20 W � 2Center: 20 W � 1Rear: 20 W � 2
Power requirement120 V AC, 60 Hz
Power consumptionIn use (Max.): 300 WIn standby: 1 W
61
D:\810nouhin\4080199111\408019911KP57XBRUC\02US-COV-KP57XBRUC\01COVIX.fm masterpage:Right
Additional Inform
ation
l name1[KP-57XBR10W] Model name2[KP-65XBR10W][4-080-199-11 (1)]
COLOR TEMP . . . . . . . . . . . . . . . . 36 LIVE . . . . . . . . . . . . . . . . . . . . . .38 . . . . . . . . . .38 . . . . . . . . . .38
. . . . . . .37, 38L . . . . . . . . . .42 . . . . . . . . . .43 . . . . . . . . . .25 . . . .26, 31, 33
. . . . . . . . . .46 . . . . . . . . . .46
. . . . . . .13, 47
. . . . . . . . . . .8 . . . . . . . . . .36
. . . . . . . . . .23 . . . . . . . . . .26
. . . . . . . . . .45
. . . . . . . . . .37 . . . . . . . . . .41 . . . . . . . . . .44 . . . . . . . . . .39 . . . . . . . . . .36
MMDP operation. . . . . . . . . . . . . . . . 55Menu selection. . . . . . . . . . . . . . . . 35MODE
GAME . . . . . . . . . . . . . . . . . 27, 36MOVIE . . . . . . . . . . . . . . . . 27, 36PRO . . . . . . . . . . . . . . . . . . . 27, 36STANDARD . . . . . . . . . . . . 27, 36VIVID . . . . . . . . . . . . . . . . . 27, 36
Movie rating. . . . . . . . . . . . . . . . . . 52MTS
MONO . . . . . . . . . . . . . . . . . . . . 37SAP . . . . . . . . . . . . . . . . . . . . . . 37STEREO . . . . . . . . . . . . . . . . . . 37
MUTING button . . . . . . . . . . . . . . 26
NNR . . . . . . . . . . . . . . . . . . . . . . . . . 37
OON/OFF TIMER . . . . . . . . . . . . . . 40On-line help . . . . . . . . . . . . . . . . . . 23Operating video equipment . . . . . . 54
PPARENTAL CONTROL. . . . . . . . 47Password . . . . . . . . . . . . . . . . . . . . 47PICTURE. . . . . . . . . . . . . . . . . . . . 36PICTURE MODE button. . . . . . . . 36Picture-and-Picture (P&P) . . . . . . . 32Picture-in-Picture (PIP) . . . . . . . . . 30PIP/P&P operations
ACTIVE. . . . . . . . . . . . . . . . 30, 32ANT. . . . . . . . . . . . . . . . . . . 31, 33AUDIO . . . . . . . . . . . . . . . . 31, 33CH +/– . . . . . . . . . . . . . . . . . 31, 33CHANNEL INDEX. . . . . . . . . . 33
Mode
Index
AACTIVE button . . . . . . . . . . . . 30, 32ANT button. . . . . . . . . . . . . 26, 31, 33Antenna cable . . . . . . . . . . . . . . . . . . 8Antenna connector . . . . . . . . . . . . . . 8AUDIO button . . . . . . . . . . . . . 31, 33AUDIO menu operations 9. . . . . . . 37Audio/Video cable . . . . . . . . . . . . . . 7AUTO PROGRAM . . . . . . . . . . . . 42AUTO SET UP. . . . . . . . . . . . . . . . 24AUX Hookup . . . . . . . . . . . . . . . . . . 9
BBALANCE . . . . . . . . . . . . . . . . . . . 37BASS . . . . . . . . . . . . . . . . . . . . . . . 37BRIGHTNESS . . . . . . . . . . . . . . . . 36
CCABLE . . . . . . . . . . . . . . . . . . . . . . 42Cable box
connection. . . . . . . . . . . . . . . . 9, 11operation . . . . . . . . . . . . . . . . . . . 56
CAPTION VISION . . . . . . . . . . . . 45CATV cable . . . . . . . . . . . . . . . . . . . 8CC button . . . . . . . . . . . . . . . . . . . . 27CH +/– buttons . . . . . . . . . . . . . . . . 26CHANNEL CAPTION. . . . . . . . . . 41CHANNEL FIX . . . . . . . . . . . . . . . 42CHANNEL INDEX . . . . . . . . . . . . 33CHANNEL SET UP menu
operations . . . . . . . . . . . . 41CHANNEL SKIP . . . . . . . . . . . . . . 41Coaxial cable . . . . . . . . . . . . . . . 7, 10COLOR. . . . . . . . . . . . . . . . . . . . . . 36
Connecting Projection TV toamplifier that supports Dolby
Pro Logic decoder. . . . . . . . . . 22antenna . . . . . . . . . . . . . . . . . . . . .8audio system . . . . . . . . . . . . . . . . 21AV receiver. . . . . . . . . . . . . . . . . 20cable . . . . . . . . . . . . . . . . . . . . . . .8cable box and cable. . . . . . . . . . . .9camcorder . . . . . . . . . . . . . . . . . . 16DTV receiver . . . . . . . . . . . . 12, 13DVD Player. . . . . . . . . . . . . . 18, 19satellite receiver . . . . . . . . . . . . . 14satellite receiver and VCR . . . . . 15two VCRs . . . . . . . . . . . . . . . . . . 17VCR . . . . . . . . . . . . . . . . . . . 10, 11
CONTROL S feature . . . . . . . . . . . .8Convergence . . . . . . . . . . . . . . . . . . 25CURRENT TIME . . . . . . . . . . . . . . 40
DDAYLIGHT SAVING . . . . . . . . . . 40Digital TV program. . . . . . . . . . . . . 28DIRECT PLAY. . . . . . . . . . . . . . . . 46DISPLAY button. . . . . . . . . . . . . . . 27DRC . . . . . . . . . . . . . . . . . . . . . . . . .1DTV INPUT . . . . . . . . . . . . . . . . . . 47DVD
connection. . . . . . . . . . . . . . . 18, 19operation . . . . . . . . . . . . . . . . . . . 55
DYNAMIC PICTURE . . . . . . . . . . 37
EEditing using SELECT OUT . . . . . 17EFFECT . . . . . . . . . . . . . . . . . . . . . 38
;3 STEREO . . . . . . . . . . . . . . . 38GAME. . . . . . . . . . . . . . . . . . . . . 38
;PRO LOGIC. . . .SRS 3D MONO. . . .
FFactory settings . . . . . .FAVORITE CHANNE
selecting. . . . . . . . . .setting . . . . . . . . . . .
FLASH FOCUS. . . . . .FREEZE button . . . . . .FREEZE MODE
NORMAL . . . . . . . .TWIN . . . . . . . . . . .
GG/B/R/HD/VD. . . . . . .
HHookups. . . . . . . . . . . .HUE. . . . . . . . . . . . . . .
JJoystick . . . . . . . . . . . .JUMP button . . . . . . . .
LLANGUAGE selectionLearning menus
AUDIO . . . . . . . . . .CHANNEL SET UPSET UP . . . . . . . . . .TIMER . . . . . . . . . .VIDEO . . . . . . . . . .
D:\810nouhin\4080199111\408019911KP57XBRUC\02US-COV-KP57XBRUC\01COVIX.fm
masterpage:Left
l name1[KP-57XBR10W] Model name2[KP-65XBR10W][4-080-199-11 (1)]
FREEZE . . . . . . . . . . . . . . . . 31, 33 SHARPNESS . . . . . . . . . . . . . . . . . 36 V . . . . . . .10, 11e numbers . .54 . . . . . . . . . .55 . . . . . . . . . .46s . . . . .36 . . . . . . . . . .26
. . . . . . . . . .29E . . . . . . . . . .29 . . . . . . . . . .29 . . . . . . . . . .28 . . . . . . . . . .29 . . . . . . . . . .29E menu . . . . . . . . . .40
XXDS . . . . . . . . . . . . . . . . . . . . . . . . 27
YY/PB/PR. . . . . . . . . . . . . . . . . . . 12, 19
If, after reading this instruction manual, you have additional questions related to the use of
your Sony projection TV, please call one of the following numbers (English only).
Customers in the continental United States contact the Sony Customer
Information Service Center at:1-800-222-SONY (7669)
Customers in Canada contact the Sony Customer Relations Center at:
(416) 499-SONY (7669)
Mode
Printed in U.S.A
POSITION . . . . . . . . . . . . . . . . . 30SWAP. . . . . . . . . . . . . . . . . . 31, 33TV/VIDEO . . . . . . . . . . . . . . 31, 32Zoom in feature . . . . . . . . . . . . . 32
RRear speakers . . . . . . . . . . . . . . . . . . 6Remote control
Battery installation . . . . . . . . . . . 23Function buttons . . . . . . . . . . . . . 26Graphic illustration. . . inside cover
SS Video cable . . . . . . . . . . . . . . . . . . 7Safety . . . . . . . . . . . . . . . . . . . . . . . . 2SAP. . . . . . . . . . . . . . . . . . . . . . . . . 37Satellite receiver operation . . . . . . . 56Select button . . . . . . . . . . . . . . . . . . 23SELECT OUT . . . . . . . . . . . . . . . . 45SET UP button . . . . . . . . . . . . . . . . 24SET UP menu operations . . . . 44Setting up the projection TV
automatically . . . . . . . . . . . . . 24
SLEEP button . . . . . . . . . . . . . . . . . 27Sliders . . . . . . . . . . . . . . . . . . . . . . . 23SPEAKER
ALL OFF . . . . . . . . . . . . . . . . . . 38ALL ON . . . . . . . . . . . . . . . . . . . 38CENTER IN . . . . . . . . . . . . . . . . 38L/R OFF . . . . . . . . . . . . . . . . . . . 38
Specifications . . . . . . . . . . . . . . . . . 60Splitter . . . . . . . . . . . . . . . . . . . . . . . 11SURROUND LEVEL . . . . . . . . . . . 38SWAP button . . . . . . . . . . . . . . 31, 33
TTEST TONE . . . . . . . . . . . . . . . . . . 39TIMER menu operations . . . . 39TREBLE . . . . . . . . . . . . . . . . . . . . . 37Troubleshooting . . . . . . . . . . . . . . . 57TV (FUNCTION) button . . . . . . . . 26TV POWER button . . . . . . . . . . . . . 26TV rating . . . . . . . . . . . . . . . . . . . . . 53TV/VIDEO button. . . . . . . . . . . . . . 27
VCR. . . . . . . . . . . . . . .VCR manufacturer codVCR operation. . . . . . .VIDEO LABEL. . . . . .VIDEO menu operationVOL +/– buttons . . . . .
WWIDE MODE button. .WIDE SCREEN MOD
FULL. . . . . . . . . . . .NORMAL . . . . . . . .Wide screen mode . .WIDE ZOOM . . . . .ZOOM . . . . . . . . . . .
WIDE SCREEN MOD operation . .


