Embed Size (px)
Citation preview
OTRS Administration ManualRelease 7.0
OTRS AG
Jan 30, 2022

Contents
1 Introduction 31.1 Getting Started . . . . . . . . . . . . . . . . . . . . . . . . . . . . . . . . . . . . . . . . . . . . 41.2 Become OTRS Expert . . . . . . . . . . . . . . . . . . . . . . . . . . . . . . . . . . . . . . . . 5
2 Ticket Settings 72.1 Attachments . . . . . . . . . . . . . . . . . . . . . . . . . . . . . . . . . . . . . . . . . . . . . 7
2.1.1 Manage Attachments . . . . . . . . . . . . . . . . . . . . . . . . . . . . . . . . . . . . 92.1.2 Attachment Settings . . . . . . . . . . . . . . . . . . . . . . . . . . . . . . . . . . . . 10
2.2 Auto Responses . . . . . . . . . . . . . . . . . . . . . . . . . . . . . . . . . . . . . . . . . . . 102.2.1 Manage Auto Responses . . . . . . . . . . . . . . . . . . . . . . . . . . . . . . . . . 102.2.2 Auto Response Settings . . . . . . . . . . . . . . . . . . . . . . . . . . . . . . . . . . 112.2.3 Auto Response Variables . . . . . . . . . . . . . . . . . . . . . . . . . . . . . . . . . 14
2.3 Priorities . . . . . . . . . . . . . . . . . . . . . . . . . . . . . . . . . . . . . . . . . . . . . . . 142.3.1 Manage Priorities . . . . . . . . . . . . . . . . . . . . . . . . . . . . . . . . . . . . . . 162.3.2 Priority Settings . . . . . . . . . . . . . . . . . . . . . . . . . . . . . . . . . . . . . . . 18
2.4 Queues . . . . . . . . . . . . . . . . . . . . . . . . . . . . . . . . . . . . . . . . . . . . . . . . 182.4.1 Manage Queues . . . . . . . . . . . . . . . . . . . . . . . . . . . . . . . . . . . . . . 182.4.2 Queue Settings . . . . . . . . . . . . . . . . . . . . . . . . . . . . . . . . . . . . . . . 20
2.5 Queues � Auto Responses . . . . . . . . . . . . . . . . . . . . . . . . . . . . . . . . . . . . . 232.5.1 Manage Queues � Auto Responses Relations . . . . . . . . . . . . . . . . . . . . . . 232.5.2 Queues � Auto Responses Settings . . . . . . . . . . . . . . . . . . . . . . . . . . . . 24
2.6 Salutations . . . . . . . . . . . . . . . . . . . . . . . . . . . . . . . . . . . . . . . . . . . . . . 242.6.1 Manage Salutations . . . . . . . . . . . . . . . . . . . . . . . . . . . . . . . . . . . . 252.6.2 Salutation Settings . . . . . . . . . . . . . . . . . . . . . . . . . . . . . . . . . . . . . 252.6.3 Salutation Variables . . . . . . . . . . . . . . . . . . . . . . . . . . . . . . . . . . . . 28
2.7 Service Level Agreements . . . . . . . . . . . . . . . . . . . . . . . . . . . . . . . . . . . . . 292.7.1 Manage Service Level Agreements . . . . . . . . . . . . . . . . . . . . . . . . . . . . 292.7.2 Service Level Agreement Settings . . . . . . . . . . . . . . . . . . . . . . . . . . . . 31
2.8 Services . . . . . . . . . . . . . . . . . . . . . . . . . . . . . . . . . . . . . . . . . . . . . . . 322.8.1 Manage Services . . . . . . . . . . . . . . . . . . . . . . . . . . . . . . . . . . . . . . 332.8.2 Service Settings . . . . . . . . . . . . . . . . . . . . . . . . . . . . . . . . . . . . . . 34
2.9 Signatures . . . . . . . . . . . . . . . . . . . . . . . . . . . . . . . . . . . . . . . . . . . . . . 342.9.1 Manage Signatures . . . . . . . . . . . . . . . . . . . . . . . . . . . . . . . . . . . . . 342.9.2 Signature Settings . . . . . . . . . . . . . . . . . . . . . . . . . . . . . . . . . . . . . 372.9.3 Signature Variables . . . . . . . . . . . . . . . . . . . . . . . . . . . . . . . . . . . . . 37
2.10 SMS Templates . . . . . . . . . . . . . . . . . . . . . . . . . . . . . . . . . . . . . . . . . . . 38
i
2.10.1 Manage SMS Templates . . . . . . . . . . . . . . . . . . . . . . . . . . . . . . . . . . 382.10.2 SMS Template Settings . . . . . . . . . . . . . . . . . . . . . . . . . . . . . . . . . . 412.10.3 SMS Template Variables . . . . . . . . . . . . . . . . . . . . . . . . . . . . . . . . . . 41
2.11 SMS Templates � Queues . . . . . . . . . . . . . . . . . . . . . . . . . . . . . . . . . . . . . . 432.11.1 Manage SMS Templates � Queues Relations . . . . . . . . . . . . . . . . . . . . . . 43
2.12 States . . . . . . . . . . . . . . . . . . . . . . . . . . . . . . . . . . . . . . . . . . . . . . . . . 442.12.1 Manage States . . . . . . . . . . . . . . . . . . . . . . . . . . . . . . . . . . . . . . . 452.12.2 State Settings . . . . . . . . . . . . . . . . . . . . . . . . . . . . . . . . . . . . . . . . 46
2.13 Templates . . . . . . . . . . . . . . . . . . . . . . . . . . . . . . . . . . . . . . . . . . . . . . 482.13.1 Manage Templates . . . . . . . . . . . . . . . . . . . . . . . . . . . . . . . . . . . . . 482.13.2 Template Settings . . . . . . . . . . . . . . . . . . . . . . . . . . . . . . . . . . . . . . 492.13.3 Template Variables . . . . . . . . . . . . . . . . . . . . . . . . . . . . . . . . . . . . . 52
2.14 Templates � Attachments . . . . . . . . . . . . . . . . . . . . . . . . . . . . . . . . . . . . . . 532.14.1 Manage Templates � Attachments Relations . . . . . . . . . . . . . . . . . . . . . . . 53
2.15 Templates � Queues . . . . . . . . . . . . . . . . . . . . . . . . . . . . . . . . . . . . . . . . . 542.15.1 Manage Templates � Queues Relations . . . . . . . . . . . . . . . . . . . . . . . . . . 54
2.16 Types . . . . . . . . . . . . . . . . . . . . . . . . . . . . . . . . . . . . . . . . . . . . . . . . . 562.16.1 Manage Types . . . . . . . . . . . . . . . . . . . . . . . . . . . . . . . . . . . . . . . 562.16.2 Type Settings . . . . . . . . . . . . . . . . . . . . . . . . . . . . . . . . . . . . . . . . 57
3 Communication & Notifications 593.1 Admin Notification . . . . . . . . . . . . . . . . . . . . . . . . . . . . . . . . . . . . . . . . . . 59
3.1.1 Administrative Message Settings . . . . . . . . . . . . . . . . . . . . . . . . . . . . . 593.2 Appointment Notifications . . . . . . . . . . . . . . . . . . . . . . . . . . . . . . . . . . . . . . 61
3.2.1 Manage Appointment Notifications . . . . . . . . . . . . . . . . . . . . . . . . . . . . 613.2.2 Appointment Notification Settings . . . . . . . . . . . . . . . . . . . . . . . . . . . . . 623.2.3 Appointment Notification Variables . . . . . . . . . . . . . . . . . . . . . . . . . . . . 69
3.3 Communication Log . . . . . . . . . . . . . . . . . . . . . . . . . . . . . . . . . . . . . . . . . 703.3.1 Communication Log Overview . . . . . . . . . . . . . . . . . . . . . . . . . . . . . . . 70
3.4 Email Addresses . . . . . . . . . . . . . . . . . . . . . . . . . . . . . . . . . . . . . . . . . . . 713.4.1 Manage Email Addresses . . . . . . . . . . . . . . . . . . . . . . . . . . . . . . . . . 723.4.2 Email Address Settings . . . . . . . . . . . . . . . . . . . . . . . . . . . . . . . . . . 73
3.5 PGP Keys . . . . . . . . . . . . . . . . . . . . . . . . . . . . . . . . . . . . . . . . . . . . . . 743.5.1 Manage PGP Keys . . . . . . . . . . . . . . . . . . . . . . . . . . . . . . . . . . . . . 74
3.6 Postmaster Filters . . . . . . . . . . . . . . . . . . . . . . . . . . . . . . . . . . . . . . . . . . 763.6.1 Manage Postmaster Filters . . . . . . . . . . . . . . . . . . . . . . . . . . . . . . . . 763.6.2 Postmaster Filter Settings . . . . . . . . . . . . . . . . . . . . . . . . . . . . . . . . . 77
3.7 PostMaster Mail Accounts . . . . . . . . . . . . . . . . . . . . . . . . . . . . . . . . . . . . . 803.7.1 Manage Mail Accounts . . . . . . . . . . . . . . . . . . . . . . . . . . . . . . . . . . . 813.7.2 Mail Account Settings . . . . . . . . . . . . . . . . . . . . . . . . . . . . . . . . . . . 82
3.8 S/MIME Certificates . . . . . . . . . . . . . . . . . . . . . . . . . . . . . . . . . . . . . . . . . 833.8.1 Manage S/MIME Certificates . . . . . . . . . . . . . . . . . . . . . . . . . . . . . . . 84
3.9 Ticket Notifications . . . . . . . . . . . . . . . . . . . . . . . . . . . . . . . . . . . . . . . . . 853.9.1 Manage Ticket Notifications . . . . . . . . . . . . . . . . . . . . . . . . . . . . . . . . 863.9.2 Ticket Notification Settings . . . . . . . . . . . . . . . . . . . . . . . . . . . . . . . . . 873.9.3 Ticket Notification Variables . . . . . . . . . . . . . . . . . . . . . . . . . . . . . . . . 95
4 Users, Groups & Roles 994.1 Agents . . . . . . . . . . . . . . . . . . . . . . . . . . . . . . . . . . . . . . . . . . . . . . . . 99
4.1.1 Manage Agents . . . . . . . . . . . . . . . . . . . . . . . . . . . . . . . . . . . . . . . 994.1.2 Agent Settings . . . . . . . . . . . . . . . . . . . . . . . . . . . . . . . . . . . . . . . 1024.1.3 Agent Back Ends . . . . . . . . . . . . . . . . . . . . . . . . . . . . . . . . . . . . . . 102
4.2 Agents � Groups . . . . . . . . . . . . . . . . . . . . . . . . . . . . . . . . . . . . . . . . . . . 1074.2.1 Manage Agents � Groups Relations . . . . . . . . . . . . . . . . . . . . . . . . . . . . 107
ii
4.2.2 Agents � Groups Relations Reference . . . . . . . . . . . . . . . . . . . . . . . . . . . 1094.3 Agents � Roles . . . . . . . . . . . . . . . . . . . . . . . . . . . . . . . . . . . . . . . . . . . . 110
4.3.1 Manage Agents � Roles Relations . . . . . . . . . . . . . . . . . . . . . . . . . . . . . 1104.4 Customers . . . . . . . . . . . . . . . . . . . . . . . . . . . . . . . . . . . . . . . . . . . . . . 111
4.4.1 Manage Customers . . . . . . . . . . . . . . . . . . . . . . . . . . . . . . . . . . . . . 1114.4.2 Customer Settings . . . . . . . . . . . . . . . . . . . . . . . . . . . . . . . . . . . . . 113
4.5 Customers � Groups . . . . . . . . . . . . . . . . . . . . . . . . . . . . . . . . . . . . . . . . . 1144.5.1 Manage Customers � Groups Relations . . . . . . . . . . . . . . . . . . . . . . . . . . 1154.5.2 Customers � Groups Relations Reference . . . . . . . . . . . . . . . . . . . . . . . . 117
4.6 Customer Users . . . . . . . . . . . . . . . . . . . . . . . . . . . . . . . . . . . . . . . . . . . 1174.6.1 Manage Customer Users . . . . . . . . . . . . . . . . . . . . . . . . . . . . . . . . . 1174.6.2 Customer User Settings . . . . . . . . . . . . . . . . . . . . . . . . . . . . . . . . . . 1214.6.3 Customer User Back Ends . . . . . . . . . . . . . . . . . . . . . . . . . . . . . . . . . 1214.6.4 Multiple Customer User Back Ends . . . . . . . . . . . . . . . . . . . . . . . . . . . . 1304.6.5 Customer User Data in Dynamic Fields . . . . . . . . . . . . . . . . . . . . . . . . . . 131
4.7 Customer Users � Customers . . . . . . . . . . . . . . . . . . . . . . . . . . . . . . . . . . . . 1314.7.1 Manage Customer Users � Customers Relations . . . . . . . . . . . . . . . . . . . . 132
4.8 Customer Users � Groups . . . . . . . . . . . . . . . . . . . . . . . . . . . . . . . . . . . . . . 1334.8.1 Manage Customer Users � Groups Relations . . . . . . . . . . . . . . . . . . . . . . 1354.8.2 Customer Users � Groups Relations Reference . . . . . . . . . . . . . . . . . . . . . 136
4.9 Customer Users � Services . . . . . . . . . . . . . . . . . . . . . . . . . . . . . . . . . . . . . 1364.9.1 Manage Customers Users � Services Relations . . . . . . . . . . . . . . . . . . . . . 1364.9.2 Manage Default Services . . . . . . . . . . . . . . . . . . . . . . . . . . . . . . . . . 138
4.10 Groups . . . . . . . . . . . . . . . . . . . . . . . . . . . . . . . . . . . . . . . . . . . . . . . . 1384.10.1 Manage Groups . . . . . . . . . . . . . . . . . . . . . . . . . . . . . . . . . . . . . . . 1384.10.2 Group Settings . . . . . . . . . . . . . . . . . . . . . . . . . . . . . . . . . . . . . . . 1404.10.3 Default Groups . . . . . . . . . . . . . . . . . . . . . . . . . . . . . . . . . . . . . . . 140
4.11 Roles . . . . . . . . . . . . . . . . . . . . . . . . . . . . . . . . . . . . . . . . . . . . . . . . . 1404.11.1 Manage Roles . . . . . . . . . . . . . . . . . . . . . . . . . . . . . . . . . . . . . . . 1414.11.2 Role Settings . . . . . . . . . . . . . . . . . . . . . . . . . . . . . . . . . . . . . . . . 142
4.12 Roles � Groups . . . . . . . . . . . . . . . . . . . . . . . . . . . . . . . . . . . . . . . . . . . . 1424.12.1 Manage Roles � Groups Relations . . . . . . . . . . . . . . . . . . . . . . . . . . . . 1424.12.2 Roles � Groups Relations Reference . . . . . . . . . . . . . . . . . . . . . . . . . . . 143
5 Processes & Automation 1455.1 Access Control Lists (ACL) . . . . . . . . . . . . . . . . . . . . . . . . . . . . . . . . . . . . . 145
5.1.1 Manage Access Control Lists . . . . . . . . . . . . . . . . . . . . . . . . . . . . . . . 1455.1.2 ACL Settings . . . . . . . . . . . . . . . . . . . . . . . . . . . . . . . . . . . . . . . . 1495.1.3 Edit ACL Structure . . . . . . . . . . . . . . . . . . . . . . . . . . . . . . . . . . . . . 1495.1.4 ACL Examples . . . . . . . . . . . . . . . . . . . . . . . . . . . . . . . . . . . . . . . 1505.1.5 ACL Reference . . . . . . . . . . . . . . . . . . . . . . . . . . . . . . . . . . . . . . . 156
5.2 Dynamic Fields . . . . . . . . . . . . . . . . . . . . . . . . . . . . . . . . . . . . . . . . . . . 1615.2.1 Manage Dynamic Fields . . . . . . . . . . . . . . . . . . . . . . . . . . . . . . . . . . 1615.2.2 Dynamic Field Settings . . . . . . . . . . . . . . . . . . . . . . . . . . . . . . . . . . . 1635.2.3 Display Dynamic Fields on Screens . . . . . . . . . . . . . . . . . . . . . . . . . . . . 1755.2.4 Add Dynamic Fields to Search Engine . . . . . . . . . . . . . . . . . . . . . . . . . . 1755.2.5 Set Default Value via Ticket Event Module . . . . . . . . . . . . . . . . . . . . . . . . 1765.2.6 Set Default Value via User Preferences . . . . . . . . . . . . . . . . . . . . . . . . . . 177
5.3 Generic Agent . . . . . . . . . . . . . . . . . . . . . . . . . . . . . . . . . . . . . . . . . . . . 1785.3.1 Manage Generic Agent Jobs . . . . . . . . . . . . . . . . . . . . . . . . . . . . . . . 1785.3.2 Generic Agent Job Settings . . . . . . . . . . . . . . . . . . . . . . . . . . . . . . . . 179
5.4 Process Management . . . . . . . . . . . . . . . . . . . . . . . . . . . . . . . . . . . . . . . . 1845.4.1 Manage Processes . . . . . . . . . . . . . . . . . . . . . . . . . . . . . . . . . . . . . 1845.4.2 Process Elements . . . . . . . . . . . . . . . . . . . . . . . . . . . . . . . . . . . . . 186
iii
5.4.3 Process Modules . . . . . . . . . . . . . . . . . . . . . . . . . . . . . . . . . . . . . . 1895.4.4 Example process . . . . . . . . . . . . . . . . . . . . . . . . . . . . . . . . . . . . . . 198
5.5 Web Services . . . . . . . . . . . . . . . . . . . . . . . . . . . . . . . . . . . . . . . . . . . . 2195.5.1 Generic Interface . . . . . . . . . . . . . . . . . . . . . . . . . . . . . . . . . . . . . . 2205.5.2 Manage Web Services . . . . . . . . . . . . . . . . . . . . . . . . . . . . . . . . . . . 2245.5.3 Web Service Settings . . . . . . . . . . . . . . . . . . . . . . . . . . . . . . . . . . . 228
6 External Interface 2476.1 Customer Service Catalogue . . . . . . . . . . . . . . . . . . . . . . . . . . . . . . . . . . . . 247
6.1.1 Manage Categories . . . . . . . . . . . . . . . . . . . . . . . . . . . . . . . . . . . . . 2476.1.2 Manage Items . . . . . . . . . . . . . . . . . . . . . . . . . . . . . . . . . . . . . . . . 249
6.2 Custom Pages . . . . . . . . . . . . . . . . . . . . . . . . . . . . . . . . . . . . . . . . . . . . 2526.2.1 Manage Custom Pages . . . . . . . . . . . . . . . . . . . . . . . . . . . . . . . . . . 2526.2.2 Custom Page Settings . . . . . . . . . . . . . . . . . . . . . . . . . . . . . . . . . . . 255
6.3 Home Page . . . . . . . . . . . . . . . . . . . . . . . . . . . . . . . . . . . . . . . . . . . . . 2556.3.1 Hero Unit . . . . . . . . . . . . . . . . . . . . . . . . . . . . . . . . . . . . . . . . . . 2556.3.2 Ticket List . . . . . . . . . . . . . . . . . . . . . . . . . . . . . . . . . . . . . . . . . . 2576.3.3 Image Teasers . . . . . . . . . . . . . . . . . . . . . . . . . . . . . . . . . . . . . . . 2576.3.4 Link Lists . . . . . . . . . . . . . . . . . . . . . . . . . . . . . . . . . . . . . . . . . . 2596.3.5 Content Cards . . . . . . . . . . . . . . . . . . . . . . . . . . . . . . . . . . . . . . . 260
6.4 Layout . . . . . . . . . . . . . . . . . . . . . . . . . . . . . . . . . . . . . . . . . . . . . . . . 2606.4.1 Include Custom Scripts . . . . . . . . . . . . . . . . . . . . . . . . . . . . . . . . . . . 2646.4.2 Cookies and Local Storage . . . . . . . . . . . . . . . . . . . . . . . . . . . . . . . . 268
7 OTRS Group Services 2697.1 Cloud Services . . . . . . . . . . . . . . . . . . . . . . . . . . . . . . . . . . . . . . . . . . . . 269
7.1.1 Manage Cloud Services . . . . . . . . . . . . . . . . . . . . . . . . . . . . . . . . . . 2697.2 Support Data Collector . . . . . . . . . . . . . . . . . . . . . . . . . . . . . . . . . . . . . . . 271
7.2.1 Manage Support Data Collector . . . . . . . . . . . . . . . . . . . . . . . . . . . . . . 2727.2.2 Collected Data . . . . . . . . . . . . . . . . . . . . . . . . . . . . . . . . . . . . . . . 273
7.3 System Registration . . . . . . . . . . . . . . . . . . . . . . . . . . . . . . . . . . . . . . . . . 2757.3.1 Manage System Registration . . . . . . . . . . . . . . . . . . . . . . . . . . . . . . . 276
8 Administration 2798.1 Calendars . . . . . . . . . . . . . . . . . . . . . . . . . . . . . . . . . . . . . . . . . . . . . . 279
8.1.1 Manage Calendars . . . . . . . . . . . . . . . . . . . . . . . . . . . . . . . . . . . . . 2798.1.2 Calendar Settings . . . . . . . . . . . . . . . . . . . . . . . . . . . . . . . . . . . . . . 2818.1.3 Import Appointments . . . . . . . . . . . . . . . . . . . . . . . . . . . . . . . . . . . . 282
8.2 Chat Channels . . . . . . . . . . . . . . . . . . . . . . . . . . . . . . . . . . . . . . . . . . . . 2838.2.1 Manage Chat Channels . . . . . . . . . . . . . . . . . . . . . . . . . . . . . . . . . . 2838.2.2 Chat Channel Settings . . . . . . . . . . . . . . . . . . . . . . . . . . . . . . . . . . . 2848.2.3 Enable Chat Support . . . . . . . . . . . . . . . . . . . . . . . . . . . . . . . . . . . . 285
8.3 FAQ Category . . . . . . . . . . . . . . . . . . . . . . . . . . . . . . . . . . . . . . . . . . . . 2858.3.1 Manage FAQ Categories . . . . . . . . . . . . . . . . . . . . . . . . . . . . . . . . . . 2858.3.2 FAQ Category Settings . . . . . . . . . . . . . . . . . . . . . . . . . . . . . . . . . . . 286
8.4 FAQ Language . . . . . . . . . . . . . . . . . . . . . . . . . . . . . . . . . . . . . . . . . . . . 2878.4.1 Manage FAQ Languages . . . . . . . . . . . . . . . . . . . . . . . . . . . . . . . . . 2888.4.2 FAQ Language Settings . . . . . . . . . . . . . . . . . . . . . . . . . . . . . . . . . . 288
8.5 Package Manager . . . . . . . . . . . . . . . . . . . . . . . . . . . . . . . . . . . . . . . . . . 2898.5.1 Manage Packages . . . . . . . . . . . . . . . . . . . . . . . . . . . . . . . . . . . . . 289
8.6 Performance Log . . . . . . . . . . . . . . . . . . . . . . . . . . . . . . . . . . . . . . . . . . 2928.7 Session Management . . . . . . . . . . . . . . . . . . . . . . . . . . . . . . . . . . . . . . . . 292
8.7.1 Manage Sessions . . . . . . . . . . . . . . . . . . . . . . . . . . . . . . . . . . . . . . 2948.8 SQL Box . . . . . . . . . . . . . . . . . . . . . . . . . . . . . . . . . . . . . . . . . . . . . . . 295
iv
8.8.1 Query SQL statements . . . . . . . . . . . . . . . . . . . . . . . . . . . . . . . . . . . 2968.8.2 SQL Settings . . . . . . . . . . . . . . . . . . . . . . . . . . . . . . . . . . . . . . . . 2978.8.3 SQL Examples . . . . . . . . . . . . . . . . . . . . . . . . . . . . . . . . . . . . . . . 297
8.9 System Configuration . . . . . . . . . . . . . . . . . . . . . . . . . . . . . . . . . . . . . . . . 2978.9.1 Manage System Configurations . . . . . . . . . . . . . . . . . . . . . . . . . . . . . . 2988.9.2 Using The Navigation Tree . . . . . . . . . . . . . . . . . . . . . . . . . . . . . . . . . 3028.9.3 Import And Export System Configurations . . . . . . . . . . . . . . . . . . . . . . . . 304
8.10 System Log . . . . . . . . . . . . . . . . . . . . . . . . . . . . . . . . . . . . . . . . . . . . . 3048.11 System Maintenance . . . . . . . . . . . . . . . . . . . . . . . . . . . . . . . . . . . . . . . . 305
8.11.1 Manage System Maintenance . . . . . . . . . . . . . . . . . . . . . . . . . . . . . . . 3068.11.2 System Maintenance Settings . . . . . . . . . . . . . . . . . . . . . . . . . . . . . . . 308
9 Tutorials 3119.1 Archiving Tickets . . . . . . . . . . . . . . . . . . . . . . . . . . . . . . . . . . . . . . . . . . . 3119.2 FAQ Approval . . . . . . . . . . . . . . . . . . . . . . . . . . . . . . . . . . . . . . . . . . . . 312
10 Glossary 313
Index 315
v

vi
OTRS Administration Manual, Release 7.0
This work is copyrighted by OTRS AG (https://otrs.com), Zimmersmühlenweg 11, 61440 Oberursel, Ger-many.
Contents 1

OTRS Administration Manual, Release 7.0
2 Contents
CHAPTER 1
Introduction
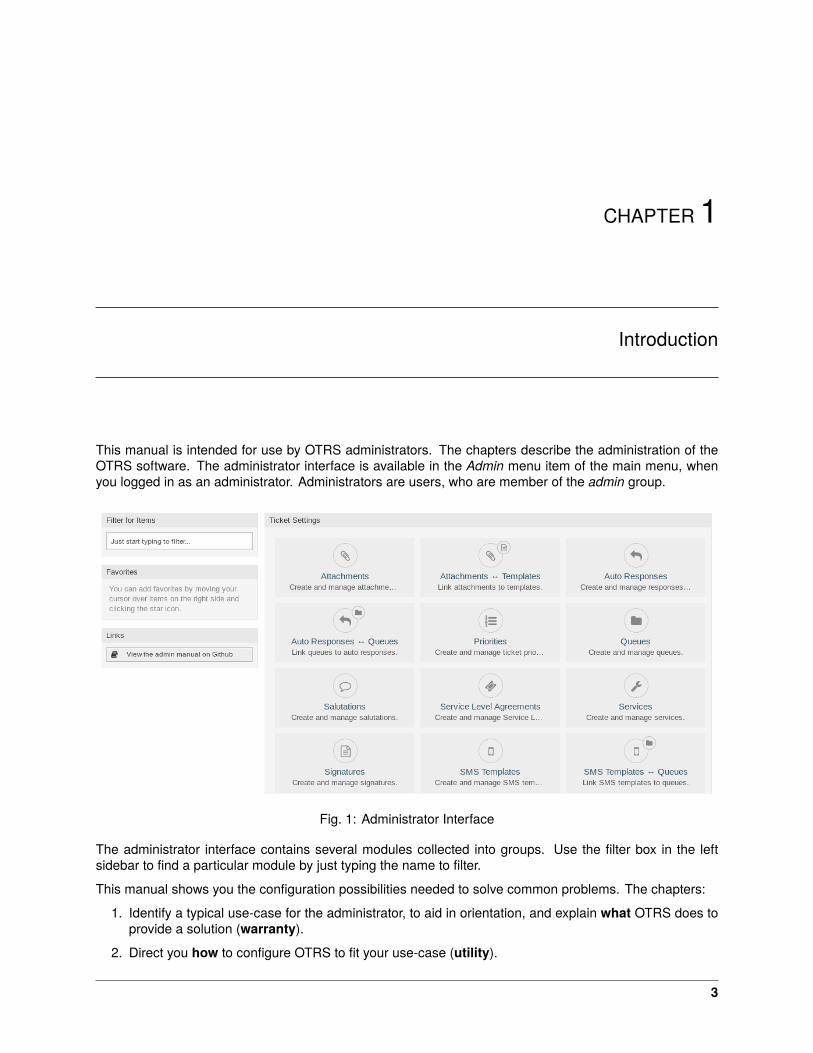
This manual is intended for use by OTRS administrators. The chapters describe the administration of theOTRS software. The administrator interface is available in the Admin menu item of the main menu, whenyou logged in as an administrator. Administrators are users, who are member of the admin group.
Fig. 1: Administrator Interface
The administrator interface contains several modules collected into groups. Use the filter box in the leftsidebar to find a particular module by just typing the name to filter.
This manual shows you the configuration possibilities needed to solve common problems. The chapters:
1. Identify a typical use-case for the administrator, to aid in orientation, and explain what OTRS does toprovide a solution (warranty).
2. Direct you how to configure OTRS to fit your use-case (utility).
3

OTRS Administration Manual, Release 7.0
The chapters are the same as the modules in the administrator interface. The order of the chapters are alsothe same as they are displayed alphabetically in the (English) administrator interface. However, the stepsto do to configure a fresh new OTRS installation is different from this order. We recommend to configureOTRS to do the steps as explained below.
1.1 Getting Started
Note: The installation of OTRS is explained in a separate Installation Guide. To install OTRS or upgradeOTRS from a previous version, follow the steps describe there.
After the installation of OTRS is finished, you can login to the system with user root@localhost and usingthe generated password.
A fresh new OTRS installation contains only the default settings. You need to customize your system to workproperly and meet your needs.
First, you need to check some System Configuration and modify the values, if needed. FQDN, SystemIDand SendmailModule::Host are the most important. Defining the TimeWorkingHours setting for workinghours and the TimeVacationDays setting for public holidays are also needed to calculate the escalationtimes correctly in OTRS.
Then, open the PostMaster Mail Accounts module to add email addresses used by the system. For sendingemail, you can add more Email Addresses.
To improve the security, PGP Keys or S/MIME Certificates can be used for encryption of emails.
Let’s continue with users, but you might need to add some Groups and/or Roles to the system first. It isrecommended to create new groups for each main queues. There are some groups in your OTRS, but noroles are defined by default. You can add roles, if needed, and you can set the Roles � Groups relations.
The next step is to add Agents to the system and set the Agents � Groups and/or Agents � Roles relations.
Now you can add Customers and Customer Users. Customers are companies and customer users are theemployees of the company.
Note: Both agents and customer users can log in using Active Directory or LDAP for authentication. Inthese cases doesn’t need to add users manually.
Like for agents, customers users can also assign to groups using the Customer Users � Groups managementscreen. Similarly, Customer Users � Customers relations can also be set.
Your OTRS installation already contains a standard salutation and a standard signature, but you might needto edit them or create new Salutations and Signatures. Queues can not be created without salutations andsignatures, and only one salutation and signature can be assigned to a queue.
After system addresses, salutations, signatures, groups are set, you can continue the setup with Queues.Each queue has to assign to a group, and only the group members can see the tickets in the assignedqueue.
Now you can add Auto Responses and assign them to queues using the Queues � Auto Responses man-agement screen. Your OTRS installation already contains some automatic responses, you can use or editthem instead of create new ones.
To reduce the time needed for answering the tickets, Templates or SMS Templates can be created.
4 Chapter 1. Introduction
OTRS Administration Manual, Release 7.0
Normal templates can contain Attachments, and you can assign the uploaded attachments to templatesusing the Templates � Attachments management screen.
When templates are created, you can set the templates to use in queues in the Templates � Queues or SMSTemplates � Queues management screens.
You need to review the default Priorities, States and Types, and add new elements, if needed.
The customer requests can be categorize into services. If you would like to use this possibility, then createsome Services and set the Customer Users � Services relations. Furthermore, Service Level Agreementscan be assign to the services.
Now you can add some notifications to be received by agents, if particular events occur. You can do this inthe Ticket Notifications screen.
To help agents to organize appointments, you can setup the Calendars and the Appointment Notifications.
Tickets, articles and other objects in OTRS can be extended with Dynamic Fields or can be reduced withAccess Control Lists (ACL).
Without doing everything manually, the number of failure can be reduced. Automatize some process inOTRS using Generic Agent jobs or creating processes with Process Management. The incoming emailscan be pre-processed and dispatched automatically by defining some Postmaster Filters.
If external systems need to integrate with OTRS, Web Services will be very useful for this.
However OTRS has many features by default, you can extend the functionality by installing packages withthe Package Manager.
If your system is ready for productive work, don’t forget to register it by using the System Registrationprocedure.
Finally, you can set the Home Page, the Custom Pages and the Layout of the external interface, as well asyou can define a Customer Service Catalogue displayed in the external interface.
1.2 Become OTRS Expert
The next chapters of this manual describe the features and configuration settings of OTRS more detailed.There is a separated manual for Configuration Options References, that gives you a good overview of SystemConfiguration, that can be modify the behavior of OTRS.
1.2. Become OTRS Expert 5

OTRS Administration Manual, Release 7.0
6 Chapter 1. Introduction
CHAPTER 2
Ticket Settings
A ticket is similar to a medical report created for a hospital patient. When a patient first visits the hospital,a medical report is created to hold all necessary personal and medical information on him. Over multiplevisits, as he is attended to by the same or additional doctors, the attending doctor updates the report byadding new information on the patient’s health and the ongoing treatment. This allows any other doctorsor the nursing staff to get a complete picture on the case at hand. When the patient recovers and leaves thehospital, all information from the medical report is archived and the report is closed.
Ticket systems such as OTRS handle tickets like normal emails. The messages are saved in the system.When a customer sends a request, a new ticket is generated by the system which is comparable to a newmedical report being created. The response to this new ticket is comparable to a doctor’s entry in themedical report. A ticket is closed if an answer is sent back to the customer, or if the ticket is separatelyclosed by the system. If a customer responds again on an already closed ticket, the ticket is reopened withthe new information added.
Every ticket is stored and archived with complete information. Since tickets are handled like normal emails,attachments and contextual annotations will also be stored with each email. In addition, information onrelevant dates, employees involved, working time needed for ticket resolution, etc. are also saved. At anylater stage, tickets can be sorted, and it is possible to search through and analyze all information usingdifferent filtering mechanisms.
2.1 Attachments
For any size of organization it is often required to send a service agreement, the terms of service or a privacystatement out when a customer signs a contract.
OTRS can handle an infinite number of attachments (PDF, image, etc.) and can bundle them into templates.Your agents don’t need to maintain the attachments on their own, nor don’t they need to upload themagain and again - they can just use the predefined templates.
Use this screen to add attachments for use in templates. A fresh OTRS installation doesn’t contain anyattachments by default. The attachment management screen is available in the Attachments module of theTicket Settings group.
7
OTRS Administration Manual, Release 7.0
Fig. 1: Ticket Zoom Screen
Fig. 2: Attachment Management Screen
8 Chapter 2. Ticket Settings
OTRS Administration Manual, Release 7.0
2.1.1 Manage Attachments
To add an attachment:
1. Click on the Add Attachments button in the left sidebar.
2. Fill in the required fields.
3. Click on the Save button.
Fig. 3: Add Attachment Screen
To edit an attachment:
1. Click on an attachment in the list of attachments.
2. Modify the fields.
3. Click on the Save or Save and finish button.
Fig. 4: Edit Attachment Screen
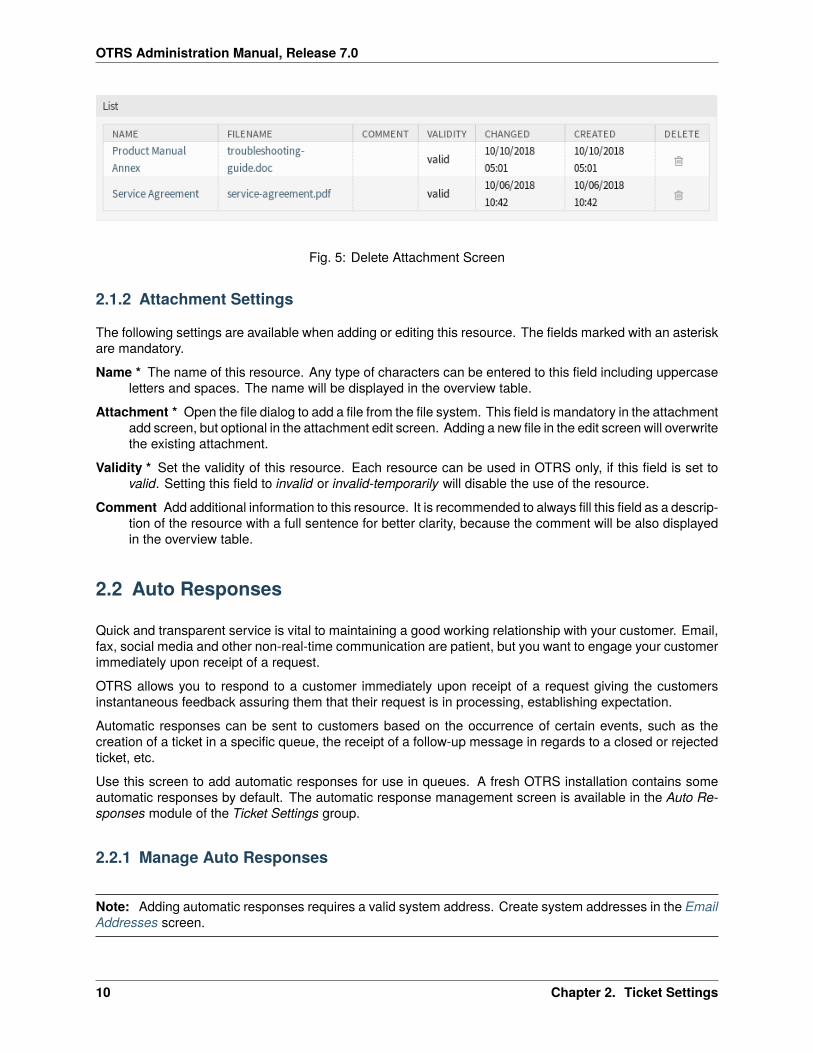
To delete an attachment:
1. Click on the trash icon in the last column of the overview table.
2. Click on the Confirm button.
Note: If several attachments are added to the system, use the filter box to find a particular attachment byjust typing the name to filter.
2.1. Attachments 9
OTRS Administration Manual, Release 7.0
Fig. 5: Delete Attachment Screen
2.1.2 Attachment Settings
The following settings are available when adding or editing this resource. The fields marked with an asteriskare mandatory.
Name * The name of this resource. Any type of characters can be entered to this field including uppercaseletters and spaces. The name will be displayed in the overview table.
Attachment * Open the file dialog to add a file from the file system. This field is mandatory in the attachmentadd screen, but optional in the attachment edit screen. Adding a new file in the edit screen will overwritethe existing attachment.
Validity * Set the validity of this resource. Each resource can be used in OTRS only, if this field is set tovalid. Setting this field to invalid or invalid-temporarily will disable the use of the resource.
Comment Add additional information to this resource. It is recommended to always fill this field as a descrip-tion of the resource with a full sentence for better clarity, because the comment will be also displayedin the overview table.
2.2 Auto Responses
Quick and transparent service is vital to maintaining a good working relationship with your customer. Email,fax, social media and other non-real-time communication are patient, but you want to engage your customerimmediately upon receipt of a request.
OTRS allows you to respond to a customer immediately upon receipt of a request giving the customersinstantaneous feedback assuring them that their request is in processing, establishing expectation.
Automatic responses can be sent to customers based on the occurrence of certain events, such as thecreation of a ticket in a specific queue, the receipt of a follow-up message in regards to a closed or rejectedticket, etc.
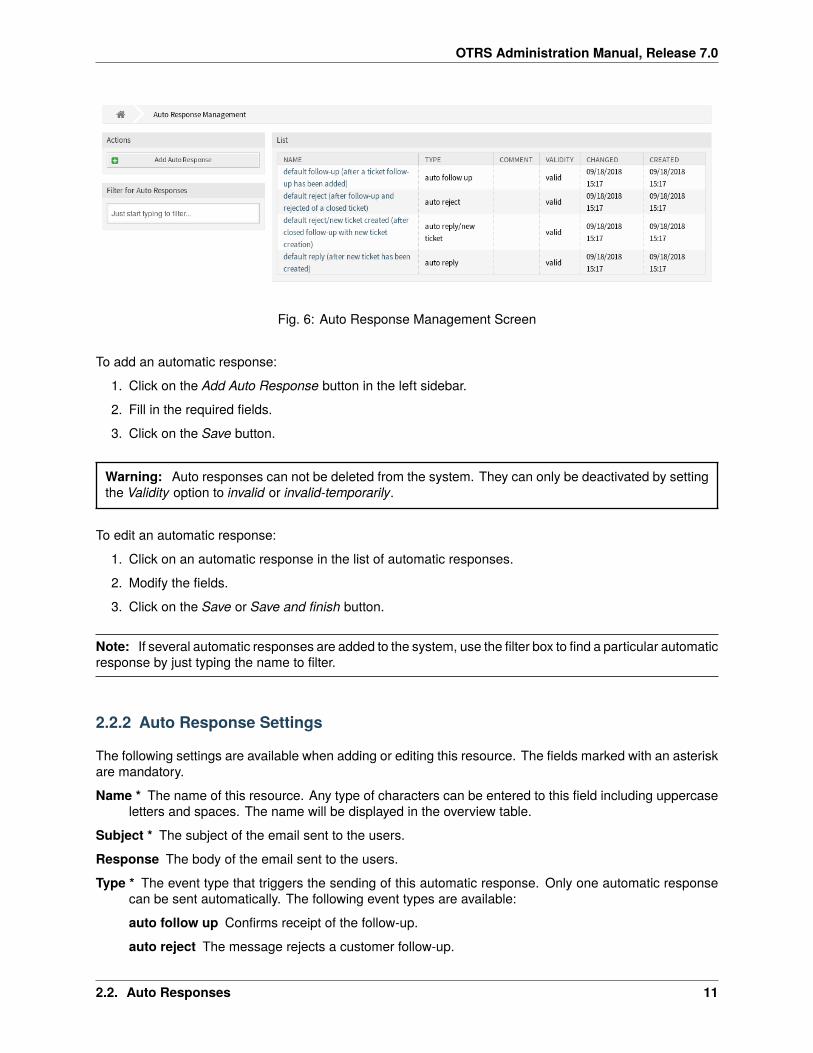
Use this screen to add automatic responses for use in queues. A fresh OTRS installation contains someautomatic responses by default. The automatic response management screen is available in the Auto Re-sponses module of the Ticket Settings group.
2.2.1 Manage Auto Responses
Note: Adding automatic responses requires a valid system address. Create system addresses in the EmailAddresses screen.
10 Chapter 2. Ticket Settings
OTRS Administration Manual, Release 7.0
Fig. 6: Auto Response Management Screen
To add an automatic response:
1. Click on the Add Auto Response button in the left sidebar.
2. Fill in the required fields.
3. Click on the Save button.
Warning: Auto responses can not be deleted from the system. They can only be deactivated by settingthe Validity option to invalid or invalid-temporarily.
To edit an automatic response:
1. Click on an automatic response in the list of automatic responses.
2. Modify the fields.
3. Click on the Save or Save and finish button.
Note: If several automatic responses are added to the system, use the filter box to find a particular automaticresponse by just typing the name to filter.
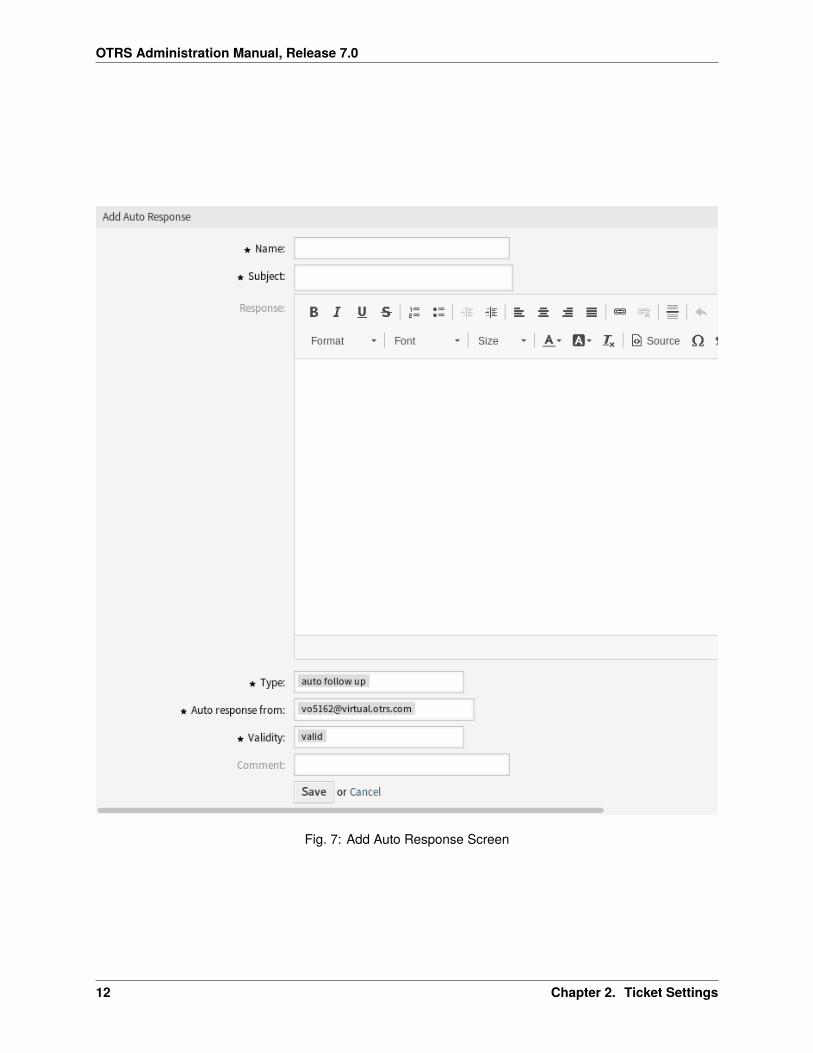
2.2.2 Auto Response Settings
The following settings are available when adding or editing this resource. The fields marked with an asteriskare mandatory.
Name * The name of this resource. Any type of characters can be entered to this field including uppercaseletters and spaces. The name will be displayed in the overview table.
Subject * The subject of the email sent to the users.
Response The body of the email sent to the users.
Type * The event type that triggers the sending of this automatic response. Only one automatic responsecan be sent automatically. The following event types are available:
auto follow up Confirms receipt of the follow-up.
auto reject The message rejects a customer follow-up.
2.2. Auto Responses 11
OTRS Administration Manual, Release 7.0
Fig. 7: Add Auto Response Screen
12 Chapter 2. Ticket Settings
OTRS Administration Manual, Release 7.0
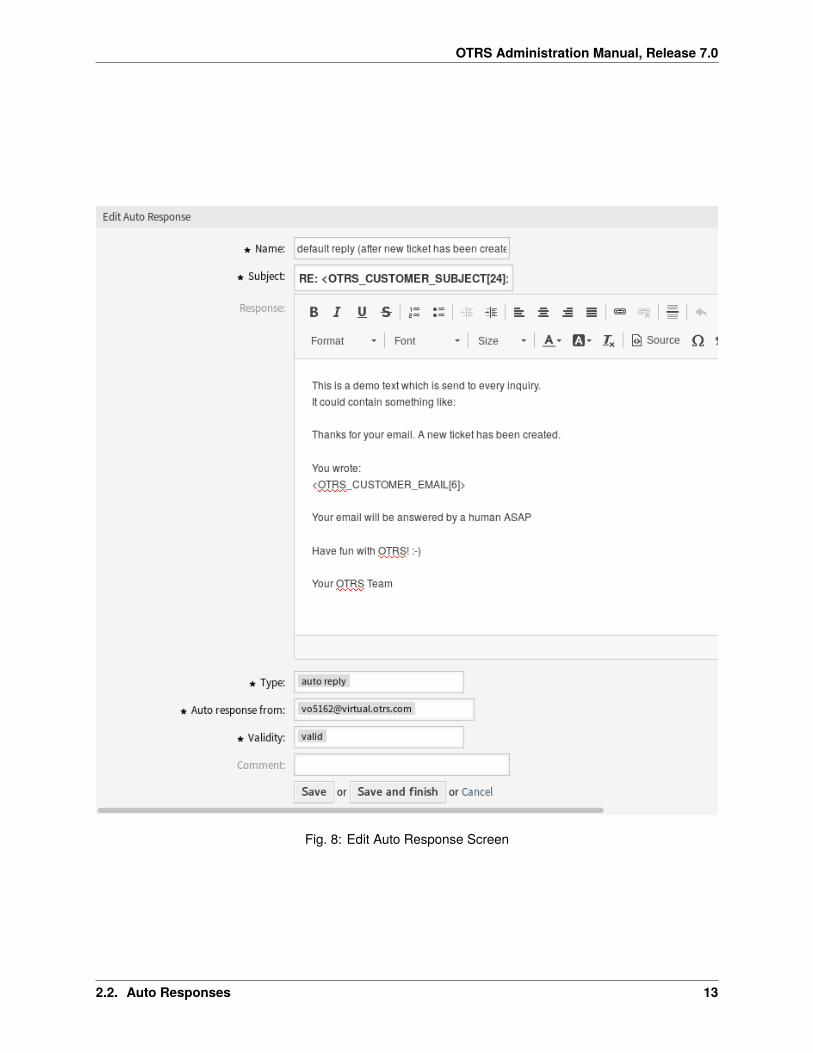
Fig. 8: Edit Auto Response Screen
2.2. Auto Responses 13
OTRS Administration Manual, Release 7.0
auto remove Deletion of a ticket, done by the system.
auto reply A newly raised ticket will trigger this auto response.
auto reply/new ticket This message informs the customer of the new ticket number.
Auto response from * The sender email address, from which the automatic response will be sent.
Validity * Set the validity of this resource. Each resource can be used in OTRS only, if this field is set tovalid. Setting this field to invalid or invalid-temporarily will disable the use of the resource.
Comment Add additional information to this resource. It is recommended to always fill this field as a descrip-tion of the resource with a full sentence for better clarity, because the comment will be also displayedin the overview table.
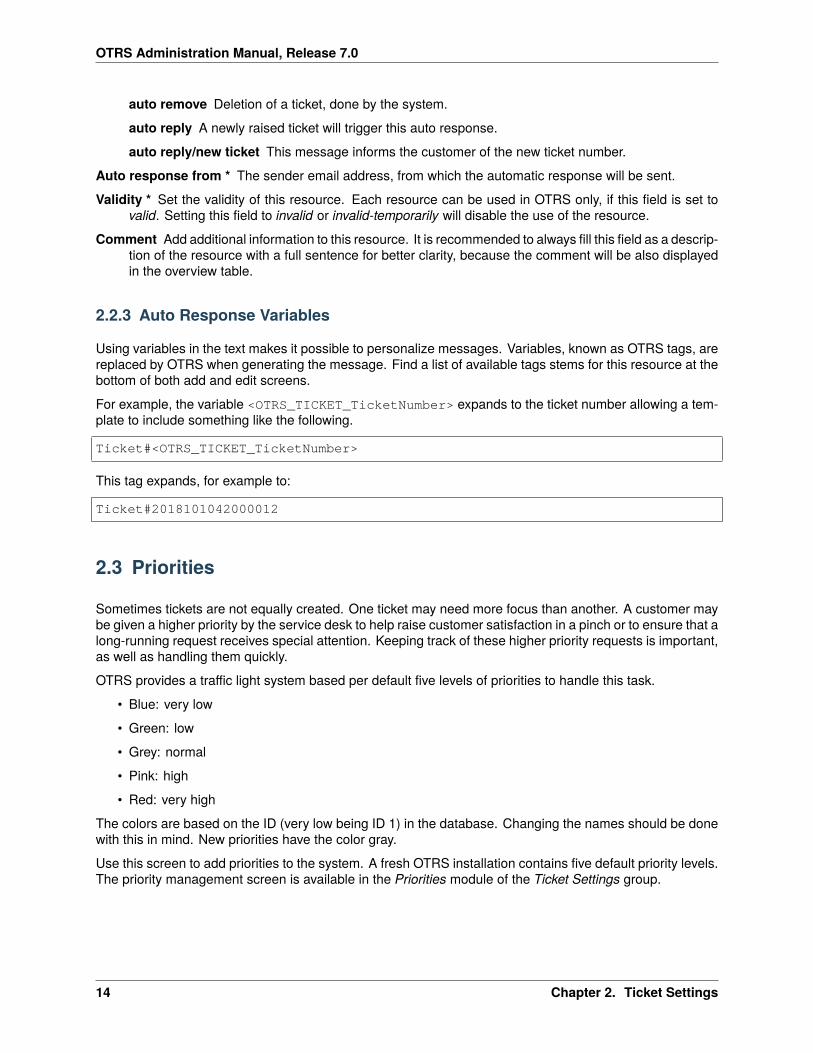
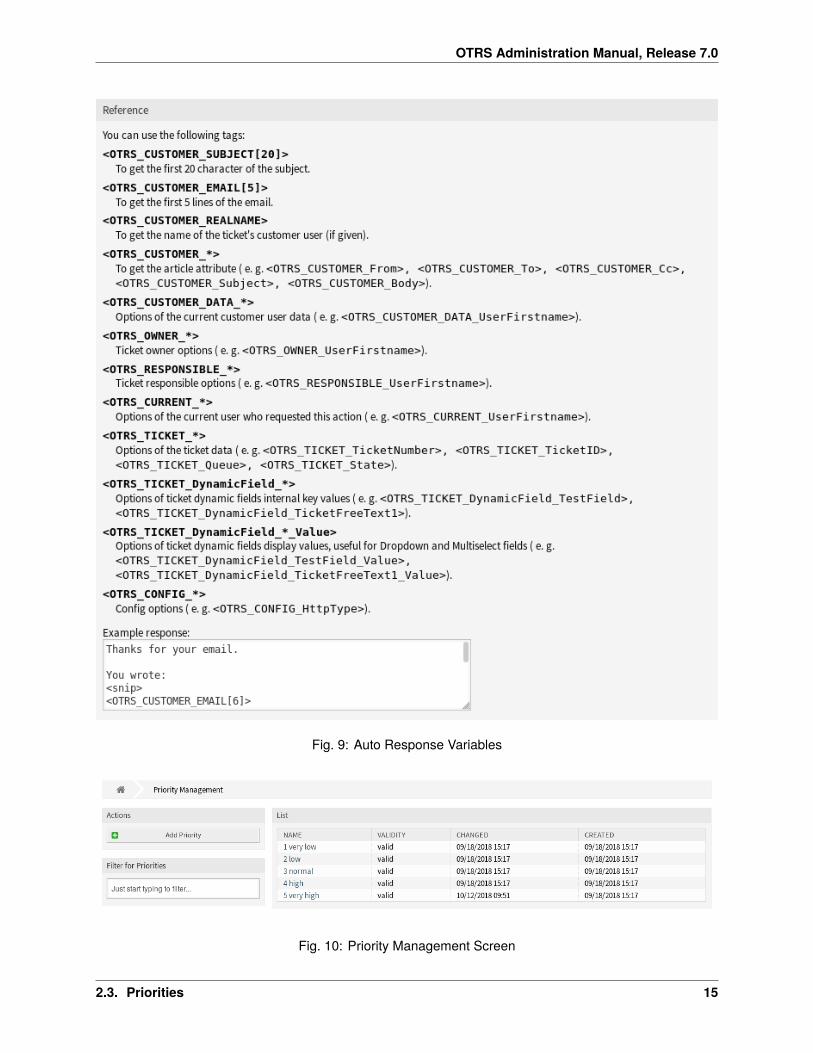
2.2.3 Auto Response Variables
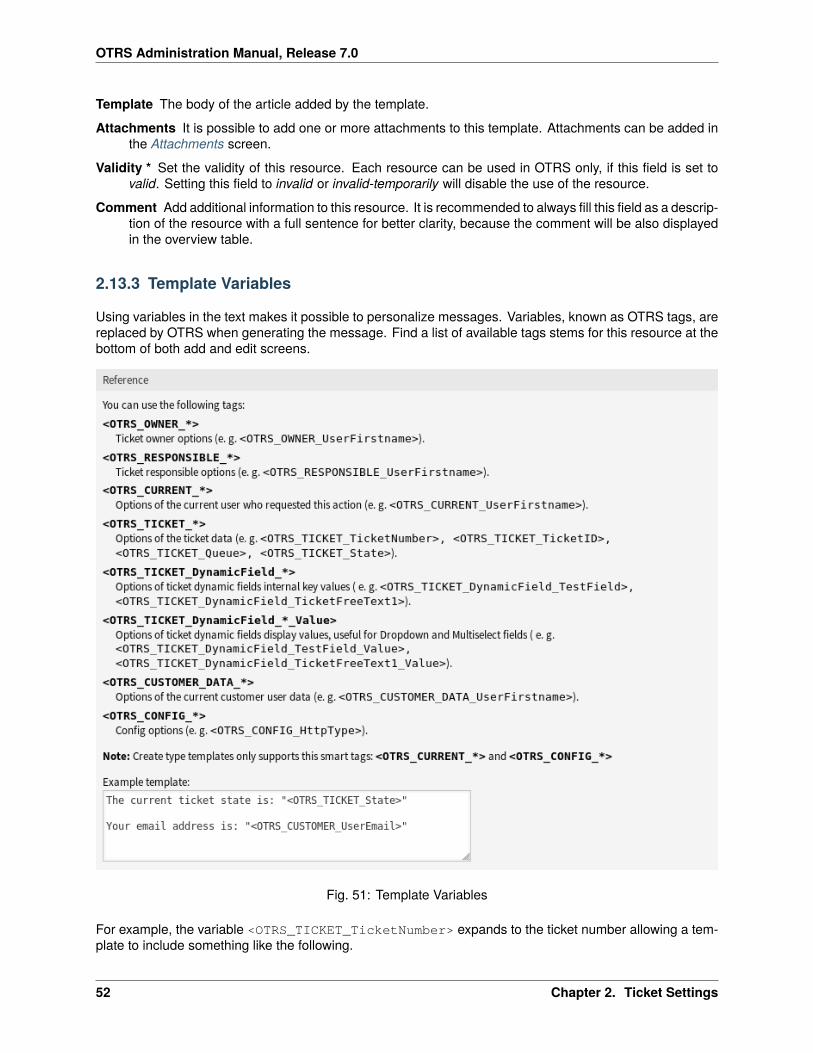
Using variables in the text makes it possible to personalize messages. Variables, known as OTRS tags, arereplaced by OTRS when generating the message. Find a list of available tags stems for this resource at thebottom of both add and edit screens.
For example, the variable <OTRS_TICKET_TicketNumber> expands to the ticket number allowing a tem-plate to include something like the following.
Ticket#<OTRS_TICKET_TicketNumber>
This tag expands, for example to:
Ticket#2018101042000012
2.3 Priorities
Sometimes tickets are not equally created. One ticket may need more focus than another. A customer maybe given a higher priority by the service desk to help raise customer satisfaction in a pinch or to ensure that along-running request receives special attention. Keeping track of these higher priority requests is important,as well as handling them quickly.
OTRS provides a traffic light system based per default five levels of priorities to handle this task.
• Blue: very low
• Green: low
• Grey: normal
• Pink: high
• Red: very high
The colors are based on the ID (very low being ID 1) in the database. Changing the names should be donewith this in mind. New priorities have the color gray.
Use this screen to add priorities to the system. A fresh OTRS installation contains five default priority levels.The priority management screen is available in the Priorities module of the Ticket Settings group.
14 Chapter 2. Ticket Settings
OTRS Administration Manual, Release 7.0
Fig. 9: Auto Response Variables
Fig. 10: Priority Management Screen
2.3. Priorities 15
OTRS Administration Manual, Release 7.0
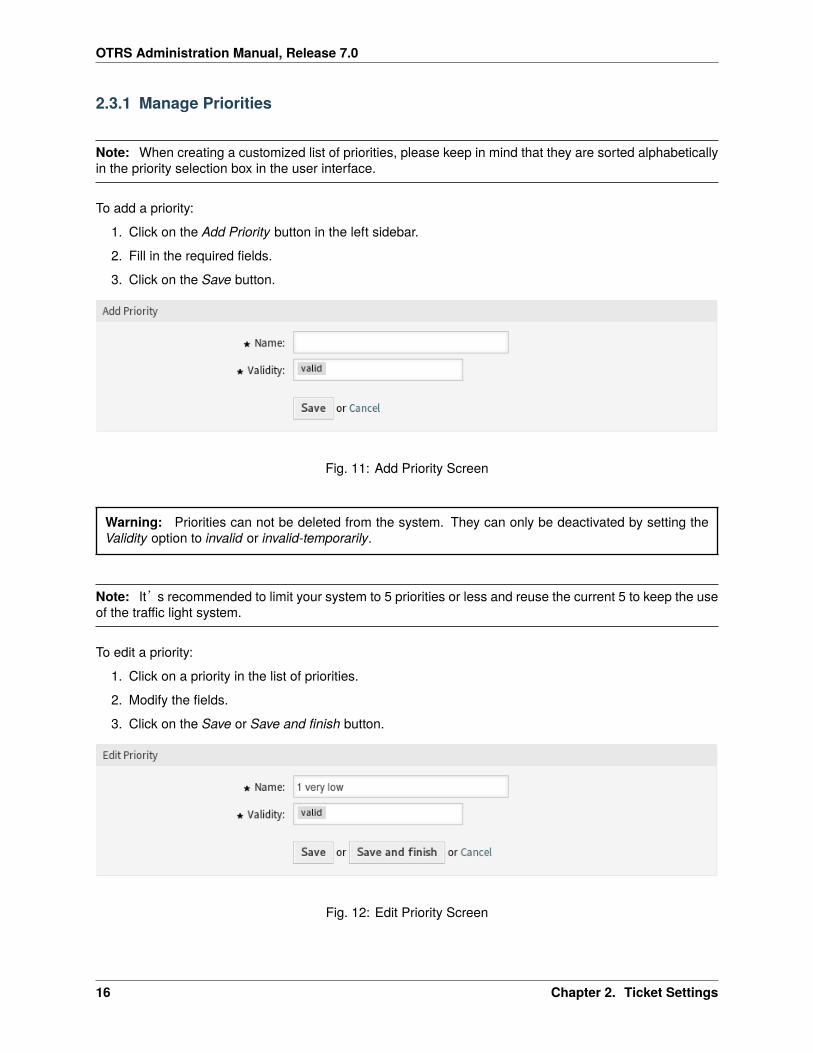
2.3.1 Manage Priorities
Note: When creating a customized list of priorities, please keep in mind that they are sorted alphabeticallyin the priority selection box in the user interface.
To add a priority:
1. Click on the Add Priority button in the left sidebar.
2. Fill in the required fields.
3. Click on the Save button.
Fig. 11: Add Priority Screen
Warning: Priorities can not be deleted from the system. They can only be deactivated by setting theValidity option to invalid or invalid-temporarily.
Note: It’s recommended to limit your system to 5 priorities or less and reuse the current 5 to keep the useof the traffic light system.
To edit a priority:
1. Click on a priority in the list of priorities.
2. Modify the fields.
3. Click on the Save or Save and finish button.
Fig. 12: Edit Priority Screen
16 Chapter 2. Ticket Settings
OTRS Administration Manual, Release 7.0
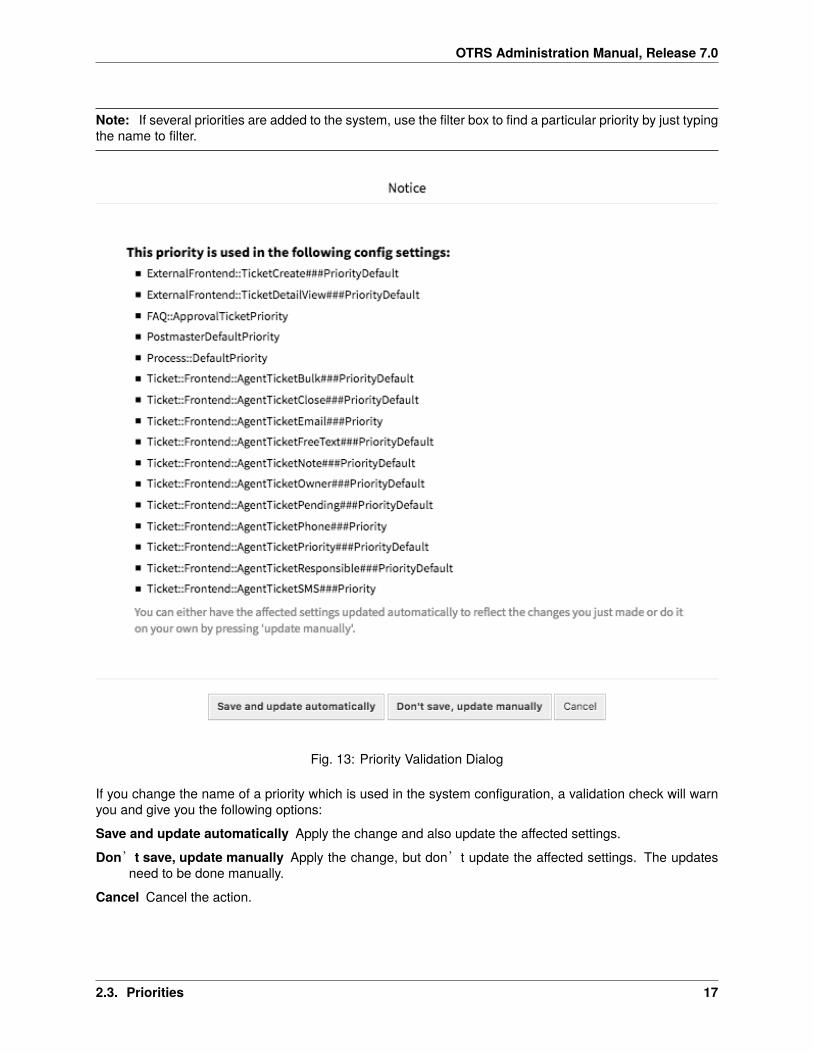
Note: If several priorities are added to the system, use the filter box to find a particular priority by just typingthe name to filter.
Fig. 13: Priority Validation Dialog
If you change the name of a priority which is used in the system configuration, a validation check will warnyou and give you the following options:
Save and update automatically Apply the change and also update the affected settings.
Don’t save, update manually Apply the change, but don’t update the affected settings. The updatesneed to be done manually.
Cancel Cancel the action.
2.3. Priorities 17
OTRS Administration Manual, Release 7.0
Warning: Changing the name of this object should be done with care, the check only provides verifi-cation for certain settings and ignores things where the name can’t be verified. Some examples aredashboard filters, access control lists (ACLs), and processes (sequence flow actions) to name a few.Documentation of your setup is key to surviving a name change.
2.3.2 Priority Settings
The following settings are available when adding or editing this resource. The fields marked with an asteriskare mandatory.
Name * The name of this resource. Any type of characters can be entered to this field including uppercaseletters and spaces. The name will be displayed in the overview table.
Validity * Set the validity of this resource. Each resource can be used in OTRS only, if this field is set tovalid. Setting this field to invalid or invalid-temporarily will disable the use of the resource.
2.4 Queues
Teams need a workspace and the ability to dispatch work based on skill level, security level, department orresponsibility just to name a few. Other teams may also need to view or react in these requests as well.
OTRS uses queues to provide your teams with structure. Queues provide a powerful way to divide anddisperse the work to the responsible group of people.
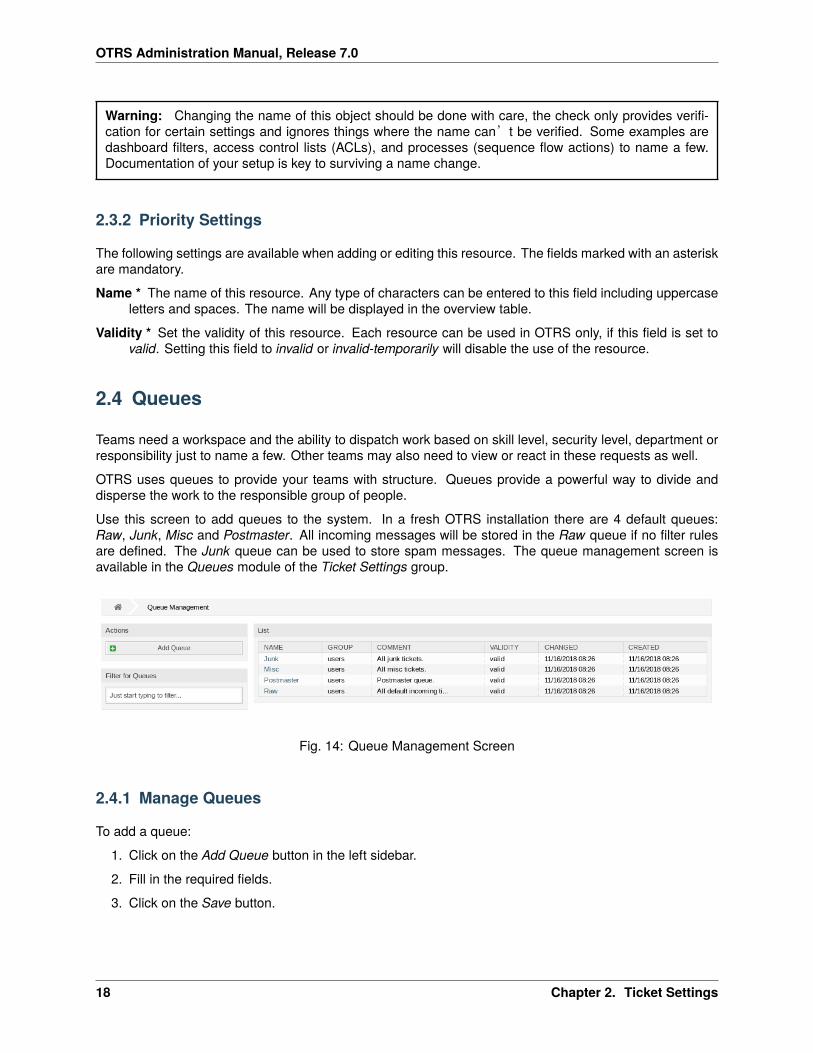
Use this screen to add queues to the system. In a fresh OTRS installation there are 4 default queues:Raw, Junk, Misc and Postmaster. All incoming messages will be stored in the Raw queue if no filter rulesare defined. The Junk queue can be used to store spam messages. The queue management screen isavailable in the Queues module of the Ticket Settings group.
Fig. 14: Queue Management Screen
2.4.1 Manage Queues
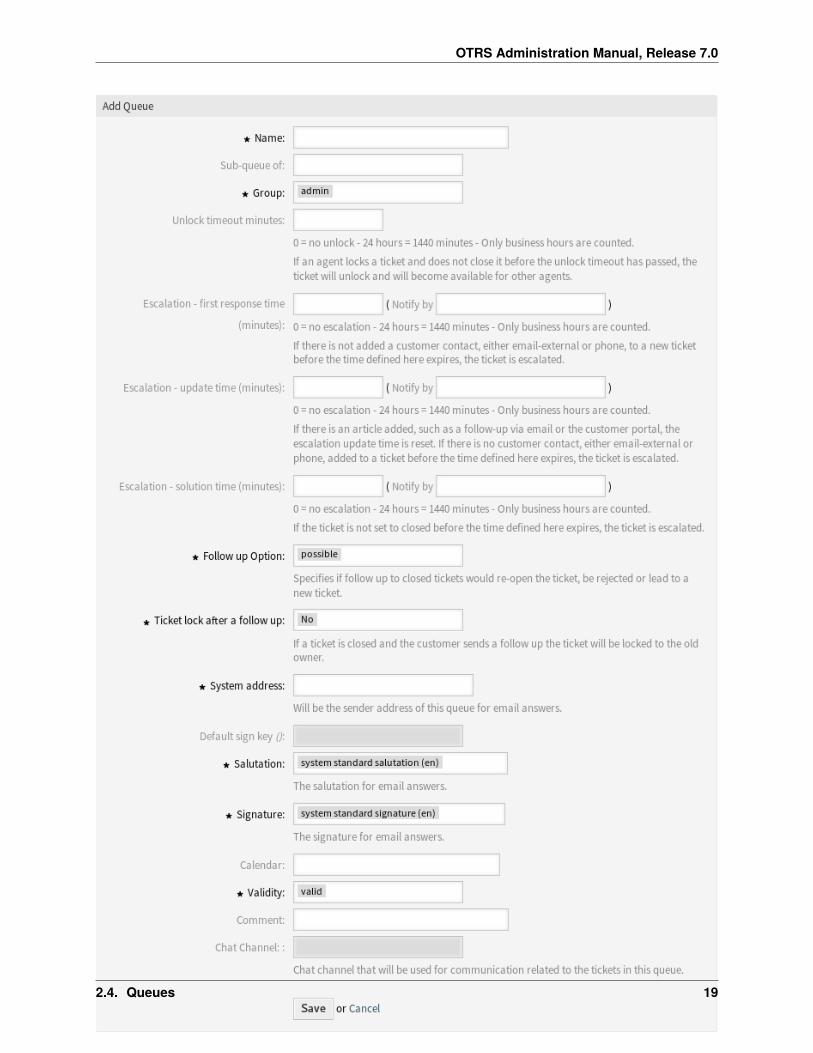
To add a queue:
1. Click on the Add Queue button in the left sidebar.
2. Fill in the required fields.
3. Click on the Save button.
18 Chapter 2. Ticket Settings
OTRS Administration Manual, Release 7.0
Fig. 15: Add Queue Screen
2.4. Queues 19
OTRS Administration Manual, Release 7.0
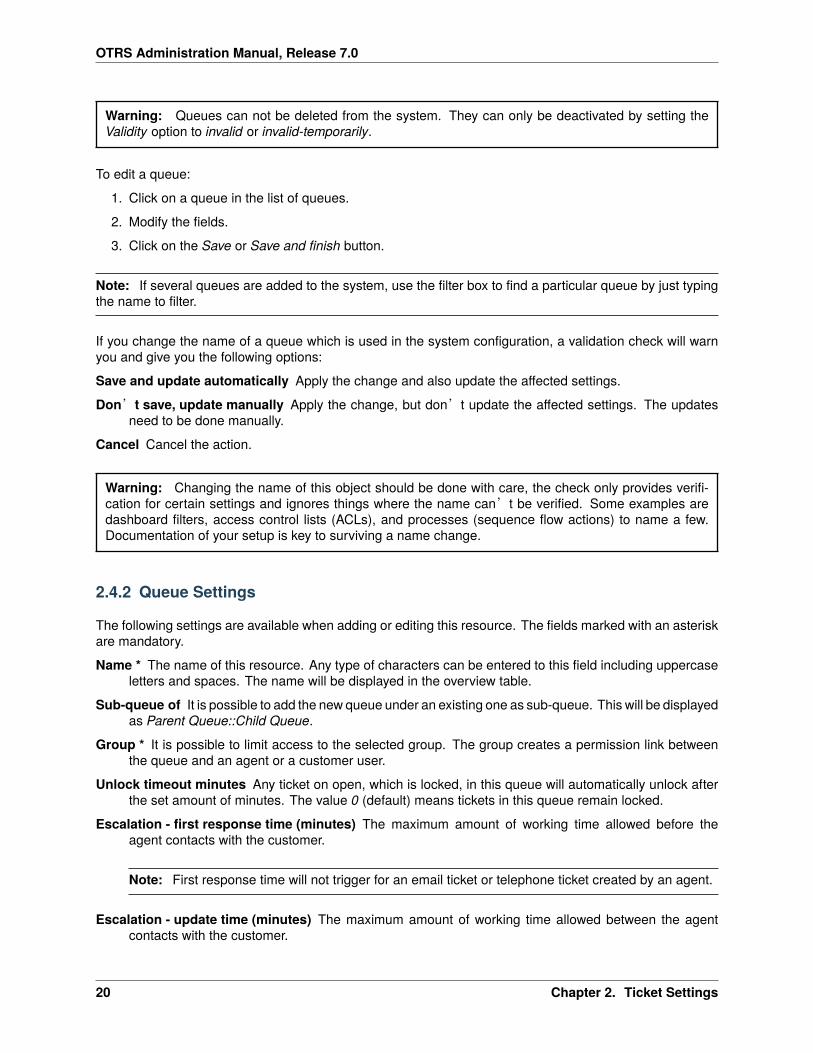
Warning: Queues can not be deleted from the system. They can only be deactivated by setting theValidity option to invalid or invalid-temporarily.
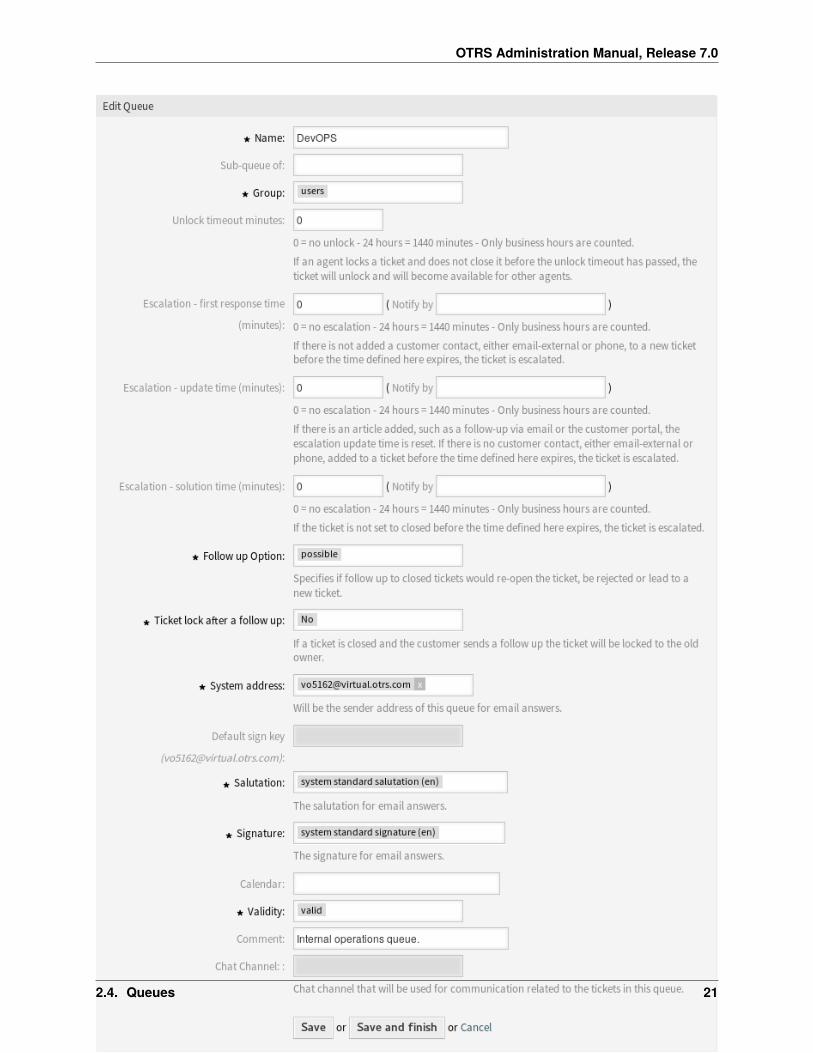
To edit a queue:
1. Click on a queue in the list of queues.
2. Modify the fields.
3. Click on the Save or Save and finish button.
Note: If several queues are added to the system, use the filter box to find a particular queue by just typingthe name to filter.
If you change the name of a queue which is used in the system configuration, a validation check will warnyou and give you the following options:
Save and update automatically Apply the change and also update the affected settings.
Don’t save, update manually Apply the change, but don’t update the affected settings. The updatesneed to be done manually.
Cancel Cancel the action.
Warning: Changing the name of this object should be done with care, the check only provides verifi-cation for certain settings and ignores things where the name can’t be verified. Some examples aredashboard filters, access control lists (ACLs), and processes (sequence flow actions) to name a few.Documentation of your setup is key to surviving a name change.
2.4.2 Queue Settings
The following settings are available when adding or editing this resource. The fields marked with an asteriskare mandatory.
Name * The name of this resource. Any type of characters can be entered to this field including uppercaseletters and spaces. The name will be displayed in the overview table.
Sub-queue of It is possible to add the new queue under an existing one as sub-queue. This will be displayedas Parent Queue::Child Queue.
Group * It is possible to limit access to the selected group. The group creates a permission link betweenthe queue and an agent or a customer user.
Unlock timeout minutes Any ticket on open, which is locked, in this queue will automatically unlock afterthe set amount of minutes. The value 0 (default) means tickets in this queue remain locked.
Escalation - first response time (minutes) The maximum amount of working time allowed before theagent contacts with the customer.
Note: First response time will not trigger for an email ticket or telephone ticket created by an agent.
Escalation - update time (minutes) The maximum amount of working time allowed between the agentcontacts with the customer.
20 Chapter 2. Ticket Settings
OTRS Administration Manual, Release 7.0
Fig. 16: Edit Queue Screen
2.4. Queues 21

OTRS Administration Manual, Release 7.0
Fig. 17: Queue Validation Dialog
Escalation - solution time (minutes) The maximum amount of working time allowed until the ticket ismarked as solved.
Note: Solution time will not reset if the ticket is reopened.
Follow up Option * Specify the handling of a follow up on closed tickets. Possible values:
new ticket The follow up will create a new ticket.
possible The follow up will reopen the already closed ticket.
reject The follow up will be rejected.
See also:
See Auto Responses chapter for more information.
Ticket lock after a follow up * Only applicable if the Follow up Option is set to possible. Locks the pre-viously closed ticket, upon reopening, to the last owner. This ensures that a follow up for a ticket isprocessed by the agent that has previously handled that ticket.
Warning: This does not take out-of-office into account. Use this setting with care to ensure or incombination with Unlock timeout minutes.
System address * Select one of the Email Addresses as the sender identity for this queue.
Note: This is an ID in the database. Making changes to the Email Addresses can have adverseeffects here.
Default sign key This is only active if PGP Keys or S/MIME Certificates is enabled in the System Configu-ration. Choose the key to sign emails per default.
Salutation * Select one of the defined Salutations.
22 Chapter 2. Ticket Settings
OTRS Administration Manual, Release 7.0
Signature * Select one of the defined Signatures.
Calendar Select the calendar which defines working hours for this queue. Calendars are defined in theSystem Configuration.
Validity * Set the validity of this resource. Each resource can be used in OTRS only, if this field is set tovalid. Setting this field to invalid or invalid-temporarily will disable the use of the resource.
Comment Add additional information to this resource. It is recommended to always fill this field as a descrip-tion of the resource with a full sentence for better clarity, because the comment will be also displayedin the overview table.
Chat Channel Chat channel that will be used for communication related to the tickets in this queue.
2.5 Queues � Auto Responses
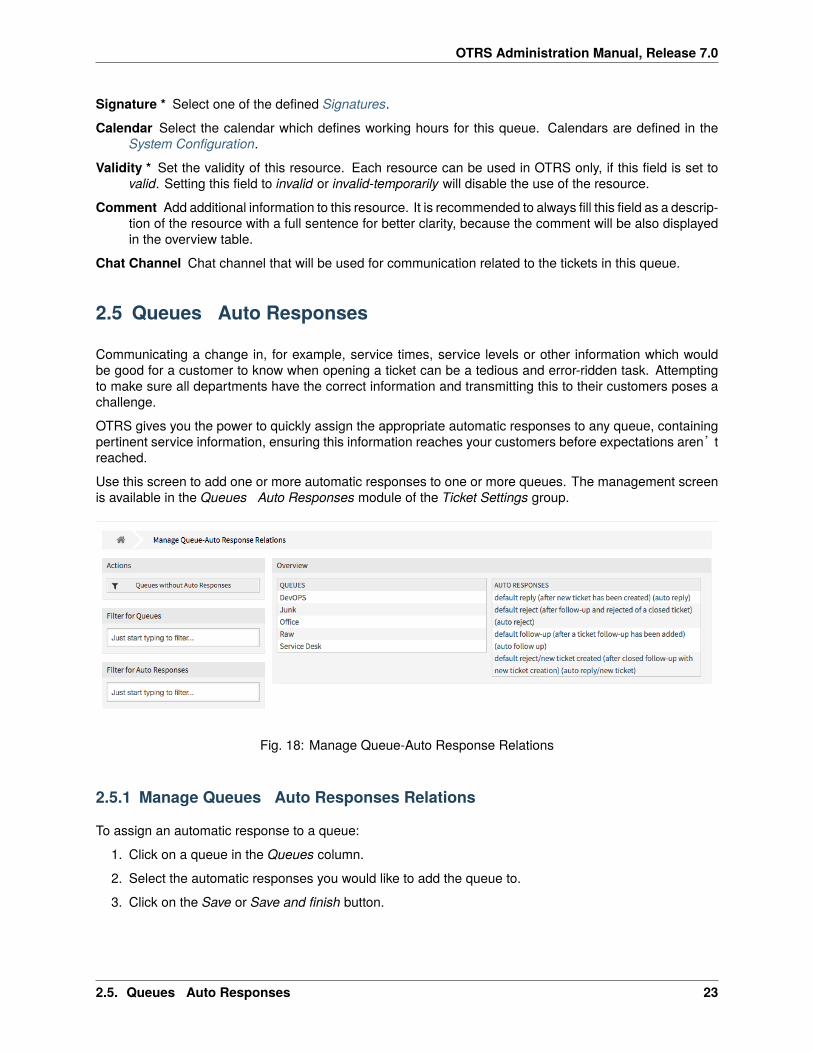
Communicating a change in, for example, service times, service levels or other information which wouldbe good for a customer to know when opening a ticket can be a tedious and error-ridden task. Attemptingto make sure all departments have the correct information and transmitting this to their customers poses achallenge.
OTRS gives you the power to quickly assign the appropriate automatic responses to any queue, containingpertinent service information, ensuring this information reaches your customers before expectations aren’treached.
Use this screen to add one or more automatic responses to one or more queues. The management screenis available in the Queues � Auto Responses module of the Ticket Settings group.
Fig. 18: Manage Queue-Auto Response Relations
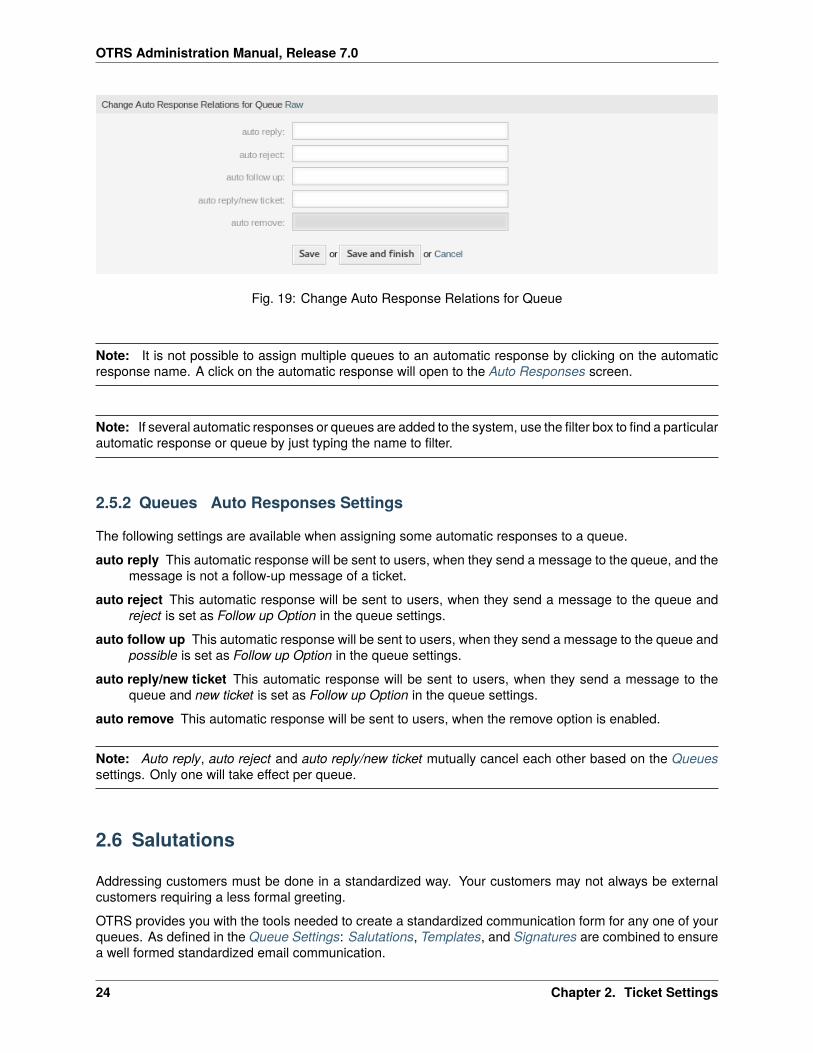
2.5.1 Manage Queues � Auto Responses Relations
To assign an automatic response to a queue:
1. Click on a queue in the Queues column.
2. Select the automatic responses you would like to add the queue to.
3. Click on the Save or Save and finish button.
2.5. Queues � Auto Responses 23
OTRS Administration Manual, Release 7.0
Fig. 19: Change Auto Response Relations for Queue
Note: It is not possible to assign multiple queues to an automatic response by clicking on the automaticresponse name. A click on the automatic response will open to the Auto Responses screen.
Note: If several automatic responses or queues are added to the system, use the filter box to find a particularautomatic response or queue by just typing the name to filter.
2.5.2 Queues � Auto Responses Settings
The following settings are available when assigning some automatic responses to a queue.
auto reply This automatic response will be sent to users, when they send a message to the queue, and themessage is not a follow-up message of a ticket.
auto reject This automatic response will be sent to users, when they send a message to the queue andreject is set as Follow up Option in the queue settings.
auto follow up This automatic response will be sent to users, when they send a message to the queue andpossible is set as Follow up Option in the queue settings.
auto reply/new ticket This automatic response will be sent to users, when they send a message to thequeue and new ticket is set as Follow up Option in the queue settings.
auto remove This automatic response will be sent to users, when the remove option is enabled.
Note: Auto reply, auto reject and auto reply/new ticket mutually cancel each other based on the Queuessettings. Only one will take effect per queue.
2.6 Salutations
Addressing customers must be done in a standardized way. Your customers may not always be externalcustomers requiring a less formal greeting.
OTRS provides you with the tools needed to create a standardized communication form for any one of yourqueues. As defined in the Queue Settings: Salutations, Templates, and Signatures are combined to ensurea well formed standardized email communication.
24 Chapter 2. Ticket Settings

OTRS Administration Manual, Release 7.0
Salutations can be linked to one or more Queues. A salutation is used only in email answers to tickets.
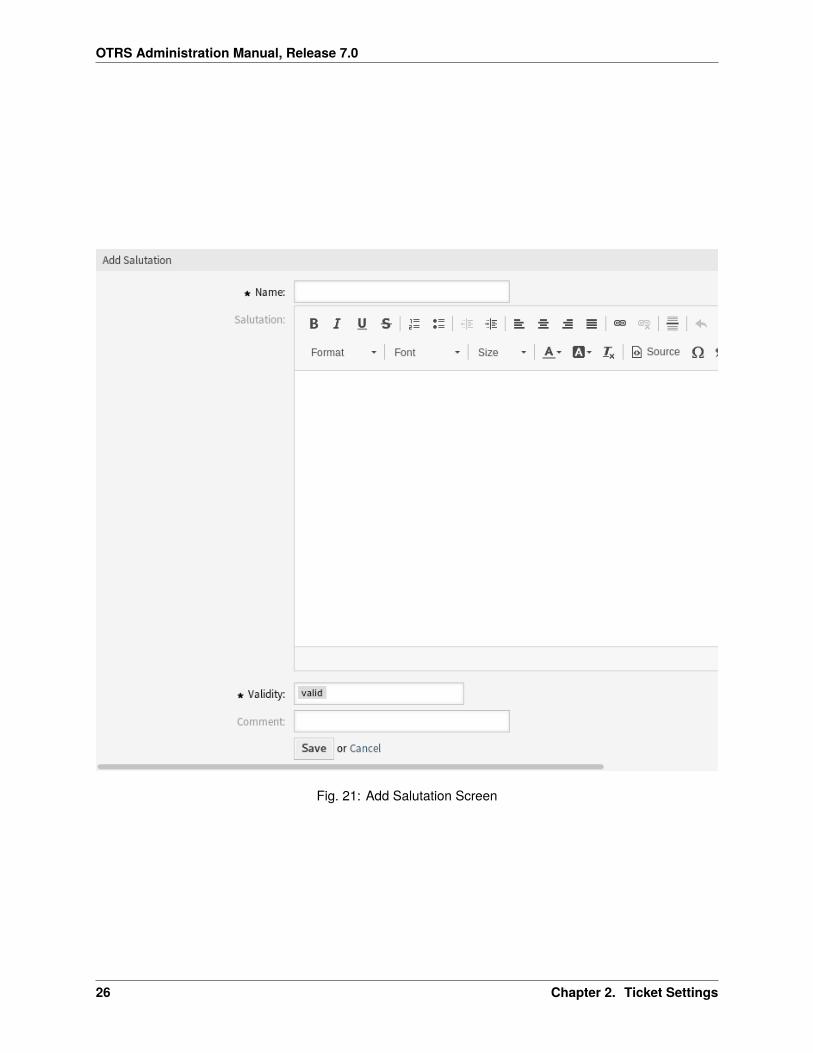
Use this screen to add salutations to the system. A fresh OTRS installation already contains a standardsalutation. The salutation management screen is available in the Salutations module of the Ticket Settingsgroup.
Fig. 20: Salutation Management Screen
2.6.1 Manage Salutations
To add a salutation:
1. Click on the Add Salutation button in the left sidebar.
2. Fill in the required fields.
3. Click on the Save button.
Warning: Salutations can not be deleted from the system. They can only be deactivated by setting theValidity option to invalid or invalid-temporarily.
To edit a salutation:
1. Click on a salutation in the list of salutations.
2. Modify the fields.
3. Click on the Save or Save and finish button.
Note: If several salutations are added to the system, use the filter box to find a particular salutation by justtyping the name to filter.
Warning: Before invalidating this object, please go to the Queues module of the Ticket Settings groupand make sure all queues using this setting are using a valid object.
2.6.2 Salutation Settings
The following settings are available when adding or editing this resource. The fields marked with an asteriskare mandatory.
2.6. Salutations 25
OTRS Administration Manual, Release 7.0
Fig. 21: Add Salutation Screen
26 Chapter 2. Ticket Settings

OTRS Administration Manual, Release 7.0
Fig. 22: Edit Salutation Screen
2.6. Salutations 27

OTRS Administration Manual, Release 7.0
Name * The name of this resource. Any type of characters can be entered to this field including uppercaseletters and spaces. The name will be displayed in the overview table.
Salutation The text that will be placed to the beginning of new emails.
Validity * Set the validity of this resource. Each resource can be used in OTRS only, if this field is set tovalid. Setting this field to invalid or invalid-temporarily will disable the use of the resource.
Comment Add additional information to this resource. It is recommended to always fill this field as a descrip-tion of the resource with a full sentence for better clarity, because the comment will be also displayedin the overview table.
2.6.3 Salutation Variables
Using variables in the text makes it possible to personalize messages. Variables, known as OTRS tags, arereplaced by OTRS when generating the message. Find a list of available tags stems for this resource at thebottom of both add and edit screens.
Fig. 23: Salutation Variables
For example, the variable <OTRS_CUSTOMER_DATA_UserLastname> expands to the customer’s lastname to be included in something like the following.
Dear <OTRS_CUSTOMER_DATA_UserFirstname> <OTRS_CUSTOMER_DATA_UserLastname>,
This tag expands, for example to:
Dear Lisa Wagner,
28 Chapter 2. Ticket Settings
OTRS Administration Manual, Release 7.0
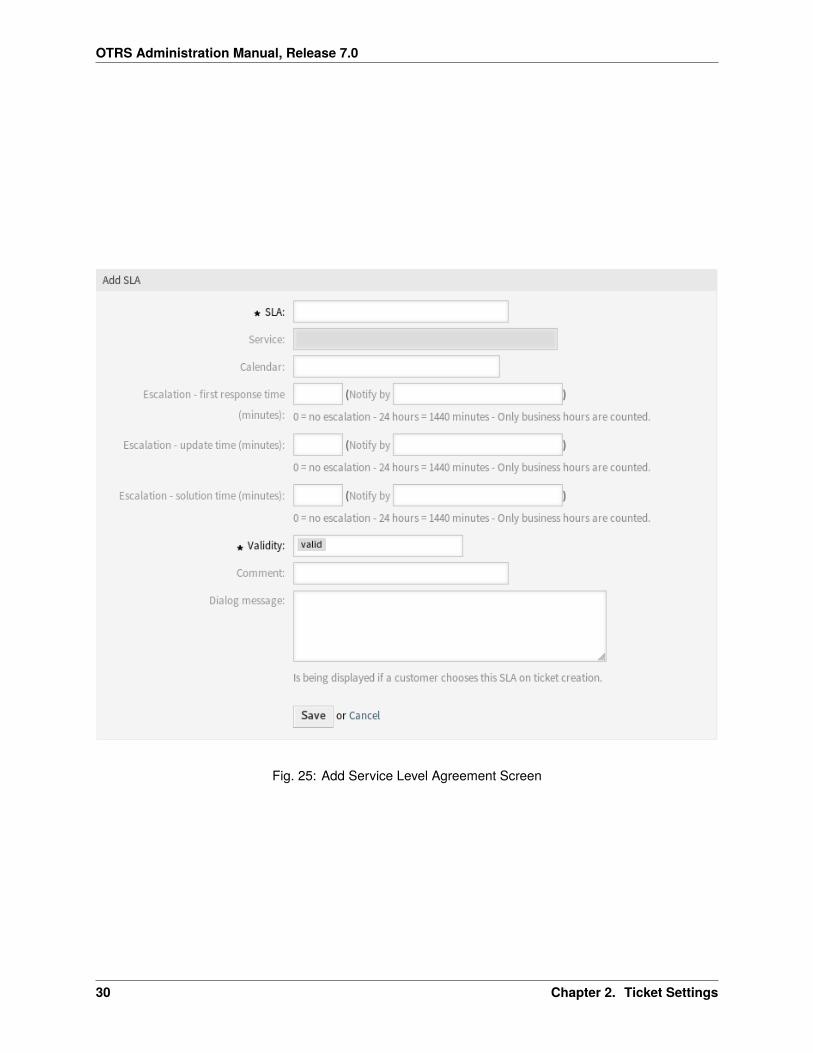
2.7 Service Level Agreements
Your organization must meet the time demands of your customers. Timely service matters. Response toquestions, updates on issues, and solutions must be provided in an agreed amount of time. The agent mustreceive notification of possible breaches, to prevent ticket escalation.
OTRS scales well with your needs and offers management of service level agreements (SLAs). OTRSprovides you with the possibility to create numerous service level agreements covering all of your service andcustomer need. Each SLA can cover multiple services and define the availability of service and escalationperiods.
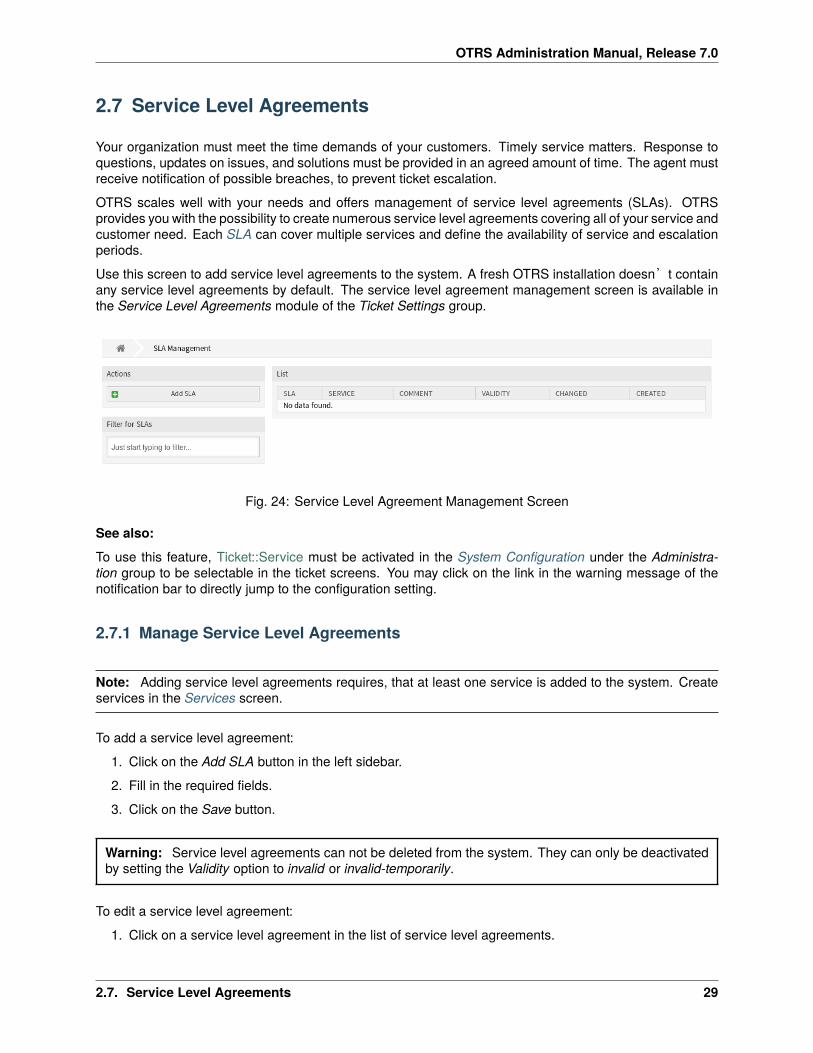
Use this screen to add service level agreements to the system. A fresh OTRS installation doesn’t containany service level agreements by default. The service level agreement management screen is available inthe Service Level Agreements module of the Ticket Settings group.
Fig. 24: Service Level Agreement Management Screen
See also:
To use this feature, Ticket::Service must be activated in the System Configuration under the Administra-tion group to be selectable in the ticket screens. You may click on the link in the warning message of thenotification bar to directly jump to the configuration setting.
2.7.1 Manage Service Level Agreements
Note: Adding service level agreements requires, that at least one service is added to the system. Createservices in the Services screen.
To add a service level agreement:
1. Click on the Add SLA button in the left sidebar.
2. Fill in the required fields.
3. Click on the Save button.
Warning: Service level agreements can not be deleted from the system. They can only be deactivatedby setting the Validity option to invalid or invalid-temporarily.
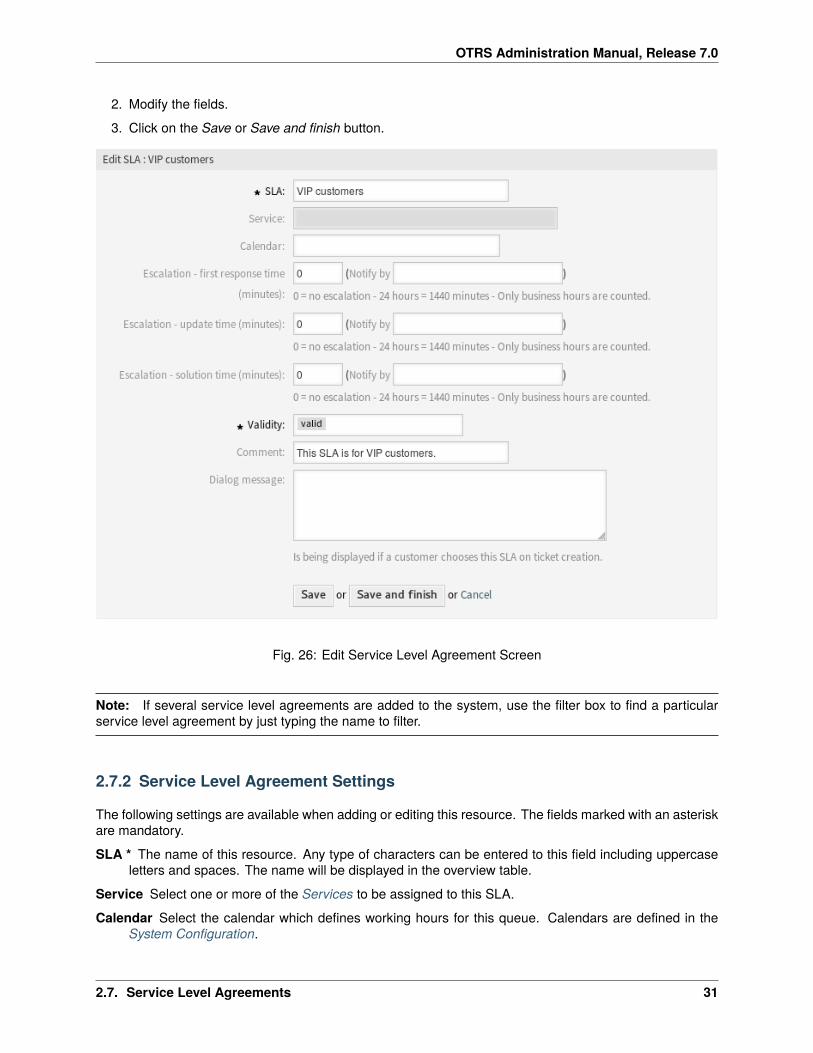
To edit a service level agreement:
1. Click on a service level agreement in the list of service level agreements.
2.7. Service Level Agreements 29
OTRS Administration Manual, Release 7.0
Fig. 25: Add Service Level Agreement Screen
30 Chapter 2. Ticket Settings
OTRS Administration Manual, Release 7.0
2. Modify the fields.
3. Click on the Save or Save and finish button.
Fig. 26: Edit Service Level Agreement Screen
Note: If several service level agreements are added to the system, use the filter box to find a particularservice level agreement by just typing the name to filter.
2.7.2 Service Level Agreement Settings
The following settings are available when adding or editing this resource. The fields marked with an asteriskare mandatory.
SLA * The name of this resource. Any type of characters can be entered to this field including uppercaseletters and spaces. The name will be displayed in the overview table.
Service Select one or more of the Services to be assigned to this SLA.
Calendar Select the calendar which defines working hours for this queue. Calendars are defined in theSystem Configuration.
2.7. Service Level Agreements 31

OTRS Administration Manual, Release 7.0
Escalation - first response time (minutes) The maximum amount of working time allowed before theagent contacts with the customer.
Note: First response time will not trigger for an email ticket or telephone ticket created by an agent.
Escalation - update time (minutes) The maximum amount of working time allowed between the agentcontacts with the customer.
Escalation - solution time (minutes) The maximum amount of working time allowed until the ticket ismarked as solved.
Note: Solution time will not reset if the ticket is reopened.
Validity * Set the validity of this resource. Each resource can be used in OTRS only, if this field is set tovalid. Setting this field to invalid or invalid-temporarily will disable the use of the resource.
Comment Add additional information to this resource. It is recommended to always fill this field as a descrip-tion of the resource with a full sentence for better clarity, because the comment will be also displayedin the overview table.
Dialog message Is being displayed if a customer chooses this SLA on ticket creation (only in the externalinterface).
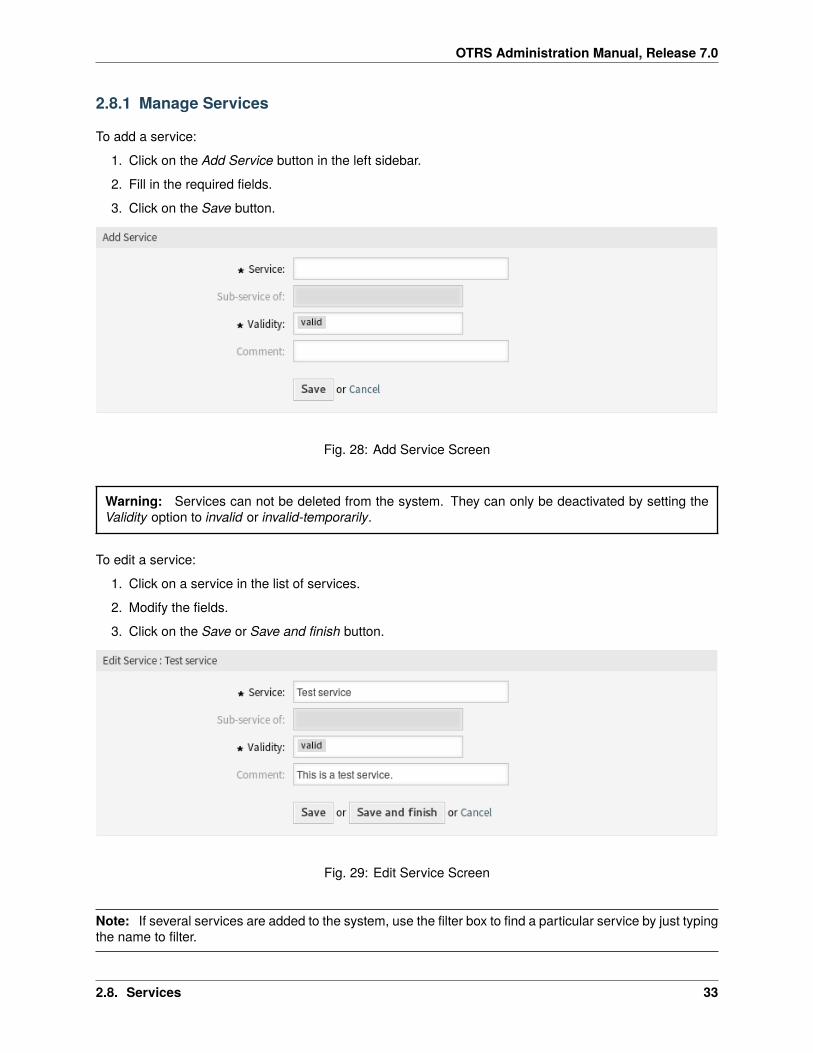
2.8 Services
Requests to your service desk should be categorized based on affected service to correctly reach a teamof experts to deal with the issue. Because not all your agents can deal with specific problems. Lack ofexperience or access to resources to fix an issue requires defining the service affected in a ticket helps tocategorize the issue and target the correct teams.
OTRS allows adding all services offered to your customers. These services may be later bound to ServiceLevel Agreements to ensure a timely solution based on customer-specific agreements.
Use this screen to add services to the system. A fresh OTRS installation doesn’t contain any services bydefault. The service management screen is available in the Services module of the Ticket Settings group.
Fig. 27: Service Management Screen
See also:
To use this feature, Ticket::Service must be activated in the System Configuration under the Administra-tion group to be selectable in the ticket screens. You may click on the link in the warning message of thenotification bar to directly jump to the configuration setting.
32 Chapter 2. Ticket Settings
OTRS Administration Manual, Release 7.0
2.8.1 Manage Services
To add a service:
1. Click on the Add Service button in the left sidebar.
2. Fill in the required fields.
3. Click on the Save button.
Fig. 28: Add Service Screen
Warning: Services can not be deleted from the system. They can only be deactivated by setting theValidity option to invalid or invalid-temporarily.
To edit a service:
1. Click on a service in the list of services.
2. Modify the fields.
3. Click on the Save or Save and finish button.
Fig. 29: Edit Service Screen
Note: If several services are added to the system, use the filter box to find a particular service by just typingthe name to filter.
2.8. Services 33
OTRS Administration Manual, Release 7.0
Warning: Changing the name of this object should be done with care, the check only provides verifi-cation for certain settings and ignores things where the name can’t be verified. Some examples aredashboard filters, access control lists (ACLs), and processes (sequence flow actions) to name a few.Documentation of your setup is key to surviving a name change.
2.8.2 Service Settings
The following settings are available when adding or editing this resource. The fields marked with an asteriskare mandatory.
Service * The name of this resource. Any type of characters can be entered to this field including uppercaseletters and spaces. The name will be displayed in the overview table.
Sub-service of It is possible to add the new service under an existing one as sub-service. This will bedisplayed as Parent Service::Child Service.
Validity * Set the validity of this resource. Each resource can be used in OTRS only, if this field is set tovalid. Setting this field to invalid or invalid-temporarily will disable the use of the resource.
Comment Add additional information to this resource. It is recommended to always fill this field as a descrip-tion of the resource with a full sentence for better clarity, because the comment will be also displayedin the overview table.
Note: A service can only be selectable in the ticket screens, if the service is assigned to the customer userof the ticket or it is set as default service for all customer users in the Customer Users � Services screen.
2.9 Signatures
Corporate identity and team information are essential in each communication. The name of the employeewriting and other vital details like disclaimers are some examples of necessary information to include in thecommunication with the customer.
OTRS provides you with the same tools here, as with Salutations, to create a standardized communicationform for any one of your queues. As defined in the Queue Settings: Salutations, Templates, and Signaturesare combined to ensure a well formed standardized email communication.
Signatures can be linked to one or more Queues. A signature is used only in email answers to tickets.
Use this screen to add signatures to the system. A fresh OTRS installation already contains a standardsignature. The signature management screen is available in the Signatures module of the Ticket Settingsgroup.
2.9.1 Manage Signatures
To add a signature:
1. Click on the Add Signature button in the left sidebar.
2. Fill in the required fields.
3. Click on the Save button.
34 Chapter 2. Ticket Settings

OTRS Administration Manual, Release 7.0
Fig. 30: Signature Management Screen
Fig. 31: Add Signature Screen
2.9. Signatures 35
OTRS Administration Manual, Release 7.0
Warning: Signatures can not be deleted from the system. They can only be deactivated by setting theValidity option to invalid or invalid-temporarily.
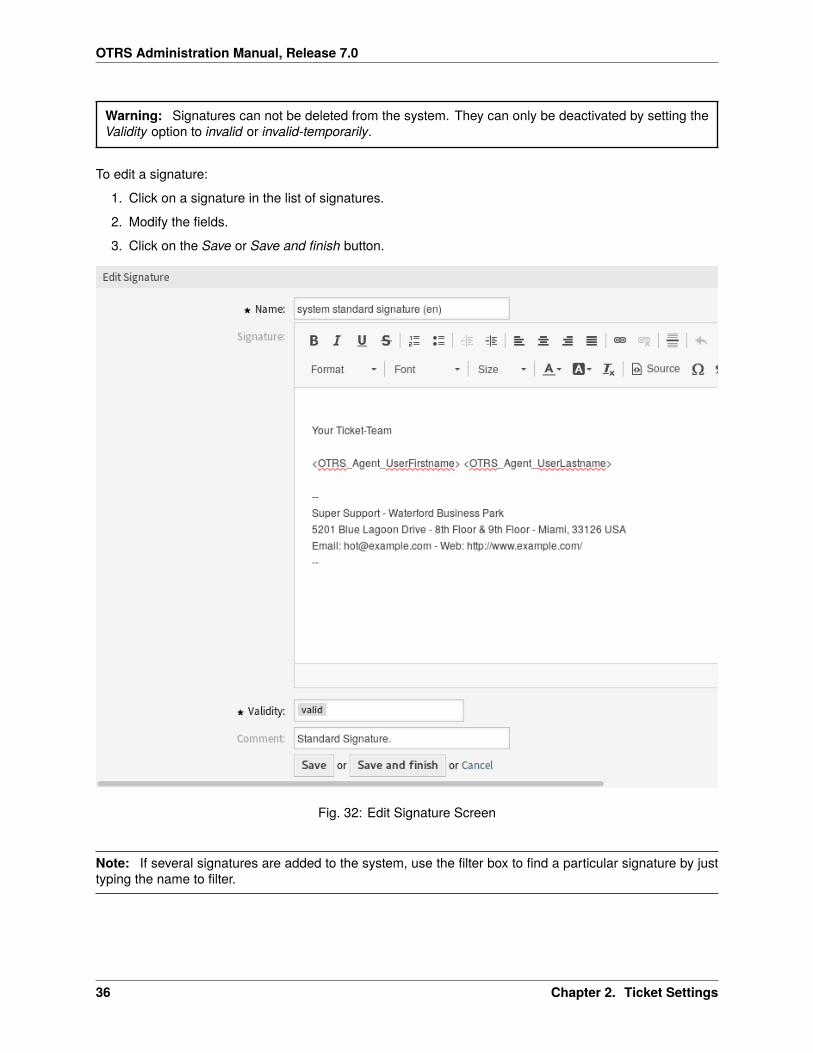
To edit a signature:
1. Click on a signature in the list of signatures.
2. Modify the fields.
3. Click on the Save or Save and finish button.
Fig. 32: Edit Signature Screen
Note: If several signatures are added to the system, use the filter box to find a particular signature by justtyping the name to filter.
36 Chapter 2. Ticket Settings

OTRS Administration Manual, Release 7.0
Warning: Before invalidating this object, please go to the Queues module of the Ticket Settings groupand make sure all queues using this setting are using a valid object.
2.9.2 Signature Settings
The following settings are available when adding or editing this resource. The fields marked with an asteriskare mandatory.
Name * The name of this resource. Any type of characters can be entered to this field including uppercaseletters and spaces. The name will be displayed in the overview table.
Signature The text that will be placed to the end of new emails.
Validity * Set the validity of this resource. Each resource can be used in OTRS only, if this field is set tovalid. Setting this field to invalid or invalid-temporarily will disable the use of the resource.
Comment Add additional information to this resource. It is recommended to always fill this field as a descrip-tion of the resource with a full sentence for better clarity, because the comment will be also displayedin the overview table.
2.9.3 Signature Variables
Using variables in the text makes it possible to personalize messages. Variables, known as OTRS tags, arereplaced by OTRS when generating the message. Find a list of available tags stems for this resource at thebottom of both add and edit screens.
Fig. 33: Signature Variables
2.9. Signatures 37
OTRS Administration Manual, Release 7.0
For example, the variable <OTRS_CURRENT_UserFirstname> <OTRS_CURRENT_UserLastname> ex-pands to the agent’s first and last name allowing a template to include something like the following.
Best regards,
<OTRS_CURRENT_UserFirstname> <OTRS_CURRENT_UserLastname>
This tag expands, for example to:
Best regards,
Steven Weber
2.10 SMS Templates
An on-call duty should be alarmed about incidents on an email servers, therefore cannot get an email fromOTRS. Additionally, in the case where customers have no internet access, it’s imperative to ensure goodcontact.
OTRS provides SMS as a cloud service and allows, as with email, management of this communication viatemplates.
An SMS template is a default text which helps your agents to write faster tickets or answers.
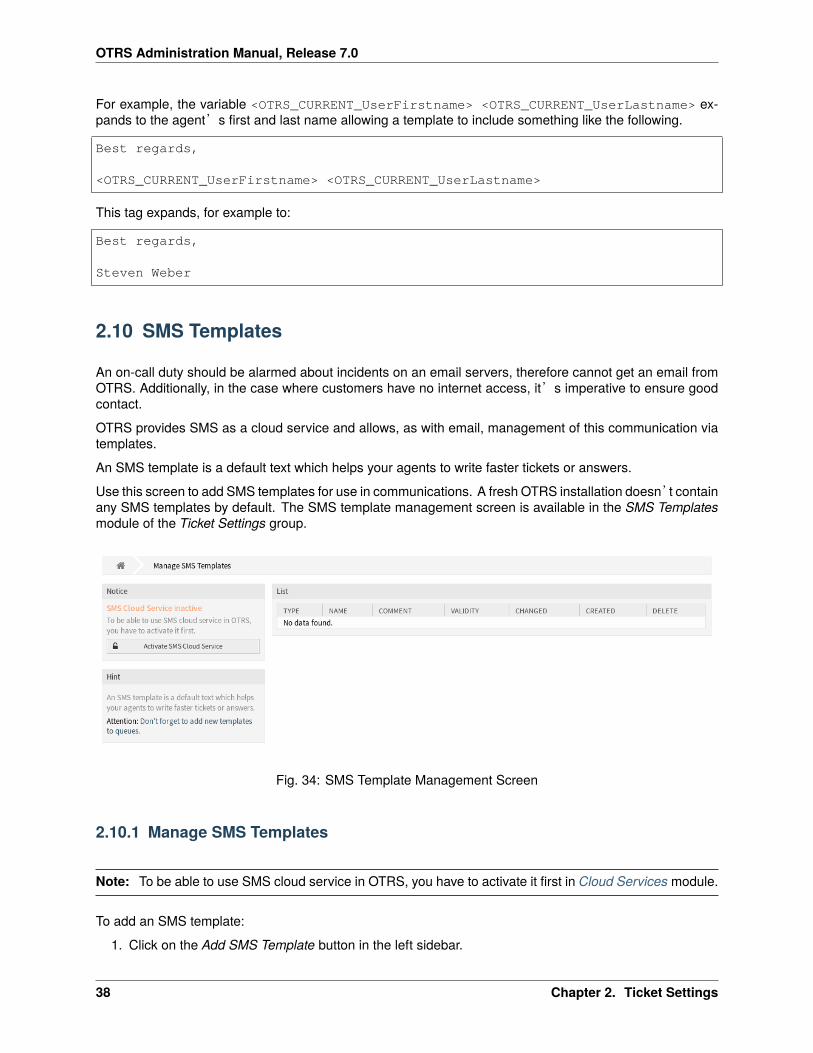
Use this screen to add SMS templates for use in communications. A fresh OTRS installation doesn’t containany SMS templates by default. The SMS template management screen is available in the SMS Templatesmodule of the Ticket Settings group.
Fig. 34: SMS Template Management Screen
2.10.1 Manage SMS Templates
Note: To be able to use SMS cloud service in OTRS, you have to activate it first in Cloud Services module.
To add an SMS template:
1. Click on the Add SMS Template button in the left sidebar.
38 Chapter 2. Ticket Settings

OTRS Administration Manual, Release 7.0
Fig. 35: Activate SMS Cloud Service
2. Fill in the required fields.
3. Click on the Save button.
Fig. 36: Add SMS Template Screen
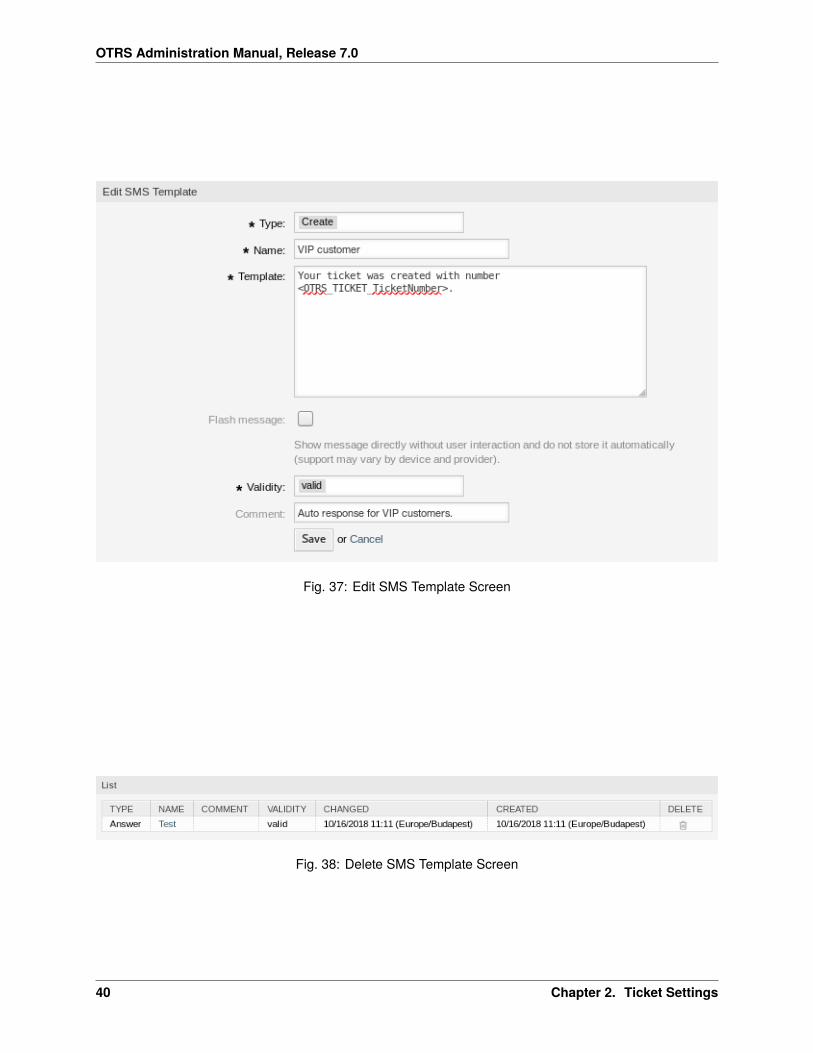
To edit an SMS template:
1. Click on an SMS template in the list of SMS templates.
2. Modify the fields.
3. Click on the Save or Save and finish button.
To delete an SMS template:
1. Click on the trash icon in the list of SMS templates.
2. Click on the Confirm button.
2.10. SMS Templates 39
OTRS Administration Manual, Release 7.0
Fig. 37: Edit SMS Template Screen
Fig. 38: Delete SMS Template Screen
40 Chapter 2. Ticket Settings
OTRS Administration Manual, Release 7.0
Note: If several SMS templates are added to the system, a filter box is useful to find a particular SMStemplate by just typing to filter.
2.10.2 SMS Template Settings
The following settings are available when adding or editing this resource. The fields marked with an asteriskare mandatory.
Type * There are different kind of SMS templates that are used for different purposes. A template can be:
Answer To be used as a ticket response with Reply via SMS in the article menu of the ticket screen.
Create To be used for a new SMS ticket.
SMSOutbound To be used for sending a new SMS to a customer user from within the ticket menu ofthe ticket screen.
Name * The name of this resource. Any type of characters can be entered to this field including uppercaseletters and spaces. The name will be displayed in the overview table.
Template The body of the email sent to the users.
Warning: The maximum length of text message that you can send is 918 characters. However, if yousend more than 160 characters then your message will be broken down in to chunks of 153 charactersbefore being sent to the recipient’s handset. We recommend keeping the messages to less than 160characters.
Flash message Show message directly without user interaction and do not store it automatically (supportmay vary by device and provider).
Validity * Set the validity of this resource. Each resource can be used in OTRS only, if this field is set tovalid. Setting this field to invalid or invalid-temporarily will disable the use of the resource.
Comment Add additional information to this resource. It is recommended to always fill this field as a descrip-tion of the resource with a full sentence for better clarity, because the comment will be also displayedin the overview table.
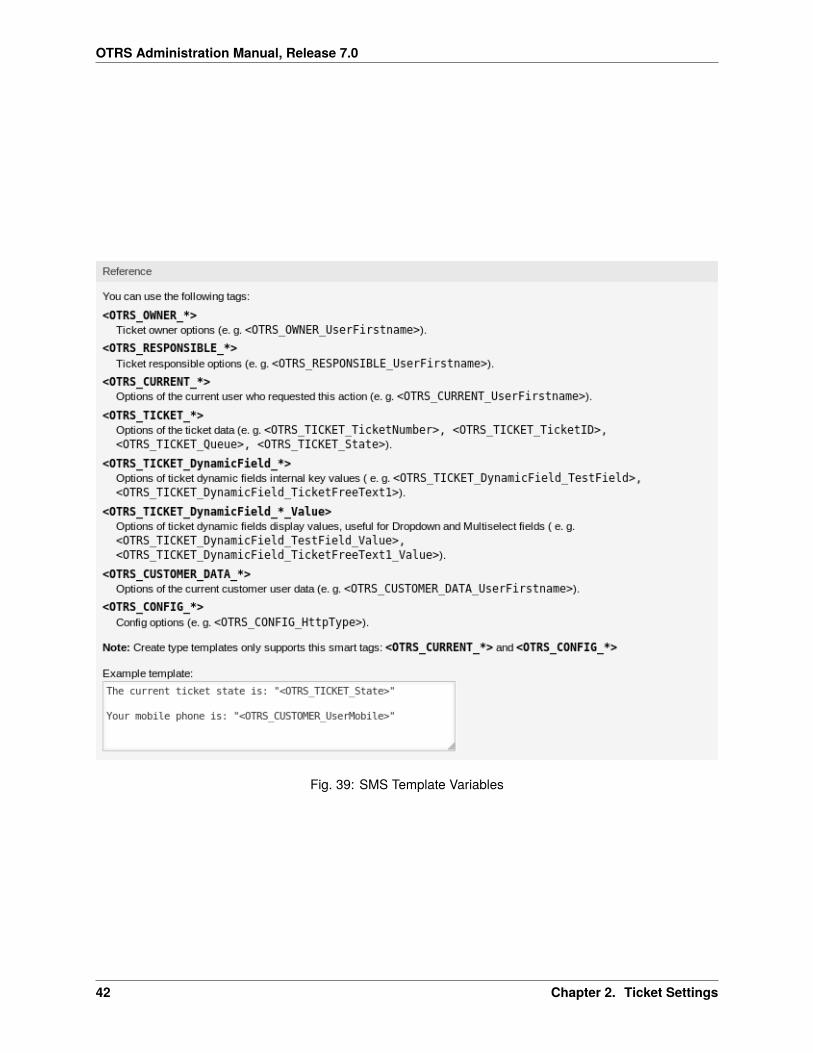
2.10.3 SMS Template Variables
Using variables in the text makes it possible to personalize messages. Variables, known as OTRS tags, arereplaced by OTRS when generating the message. Find a list of available tags stems for this resource at thebottom of both add and edit screens.
For example, the variable <OTRS_TICKET_TicketNumber> expands to the ticket number allowing an SMStemplate to include something like the following.
Ticket#<OTRS_TICKET_TicketNumber> has been raised in <OTRS_Ticket_Queue>.
This tag expands, for example to:
Ticket#2018101042000012 has been raised in Postmaster.
2.10. SMS Templates 41
OTRS Administration Manual, Release 7.0
Fig. 39: SMS Template Variables
42 Chapter 2. Ticket Settings
OTRS Administration Manual, Release 7.0
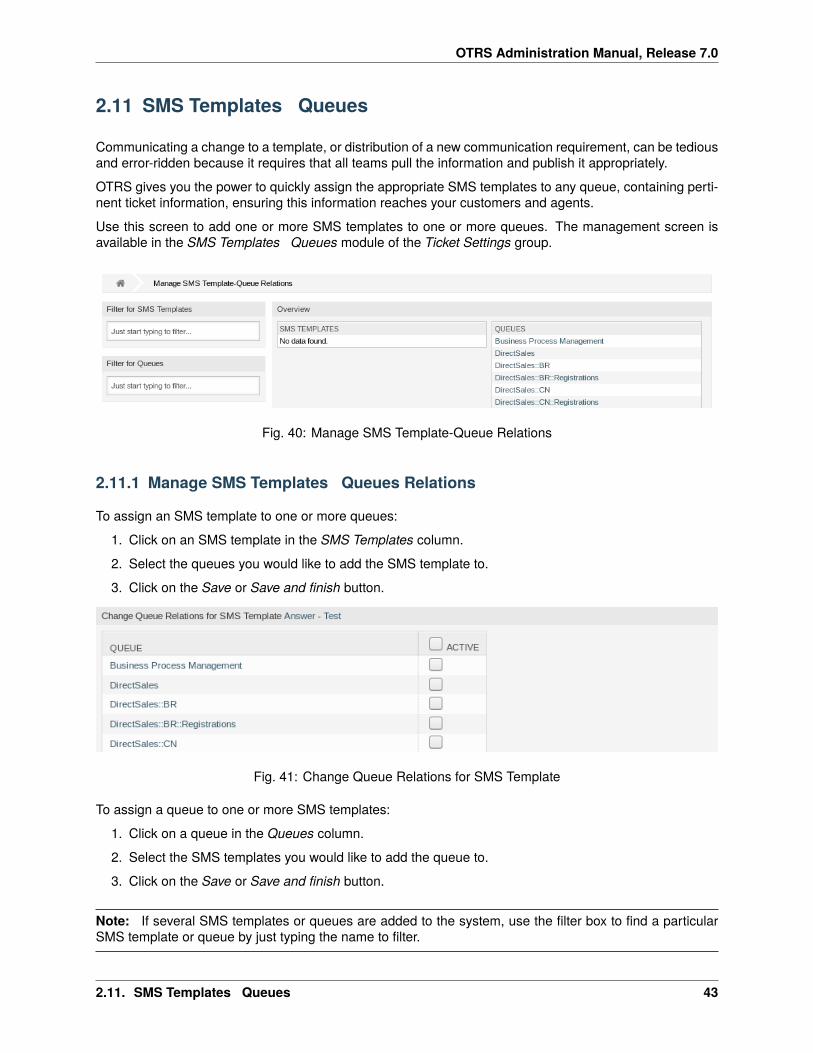
2.11 SMS Templates � Queues
Communicating a change to a template, or distribution of a new communication requirement, can be tediousand error-ridden because it requires that all teams pull the information and publish it appropriately.
OTRS gives you the power to quickly assign the appropriate SMS templates to any queue, containing perti-nent ticket information, ensuring this information reaches your customers and agents.
Use this screen to add one or more SMS templates to one or more queues. The management screen isavailable in the SMS Templates � Queues module of the Ticket Settings group.
Fig. 40: Manage SMS Template-Queue Relations
2.11.1 Manage SMS Templates � Queues Relations
To assign an SMS template to one or more queues:
1. Click on an SMS template in the SMS Templates column.
2. Select the queues you would like to add the SMS template to.
3. Click on the Save or Save and finish button.
Fig. 41: Change Queue Relations for SMS Template
To assign a queue to one or more SMS templates:
1. Click on a queue in the Queues column.
2. Select the SMS templates you would like to add the queue to.
3. Click on the Save or Save and finish button.
Note: If several SMS templates or queues are added to the system, use the filter box to find a particularSMS template or queue by just typing the name to filter.
2.11. SMS Templates � Queues 43

OTRS Administration Manual, Release 7.0
Fig. 42: Change SMS Template Relations for Queue
Multiple SMS templates or queues can be assigned in both screens at the same time. Additionally clickingon an SMS template or clicking on a queue in the relations screen will open the Edit SMS Template screenor the Edit Queue screen accordingly.
Warning: Accessing a queue or an SMS template provides no back link to the relations screen.
2.12 States
Active tracking of tickets leads to a better sense of workload and provides metrics as a key performanceindicator. Sorting tasks and setting appointments can help to level-off the workload and keep your servicedesk running.
OTRS uses ticket states to ensure that your agents always know which tickets are being attended to andwhich not. Additionally, detailed reports on the states of your tickets can be provided by ticket search orreports and personalized sorting is possible using dashboards and queue and service overviews.
Nine states are pre-defined. More states can be added, but the default states are enough to get you goingand mostly enough for any situation.
The default states are the following:
closed successful A ticket is complete. The customer received a solution which worked.
closed unsuccessful A ticket is complete. The customer received no solution or the solution was notappropriate.
merged The ticket content is found in a different ticket.
new The ticket is created by the customer without contact with an agent.
open The ticket is currently in progress. Customer and agent are in contact with each another.
pending auto close+ The ticket will be set as closed successful upon reaching the pending time.
pending auto close- The ticket will be set as closed unsuccessful upon reaching the pending time.
pending reminder The ticket should be worked on again upon reaching the pending time.
removed The ticket has been removed from the system.
Note: Pending jobs are checked per default every two hours and forty-five minutes. This time is a statictime, which means the times are 02:45, 04:45, 06:45 and so on. The job can be run more often or seldomand are configured in the System Configuration module of the Administration group.
44 Chapter 2. Ticket Settings
OTRS Administration Manual, Release 7.0
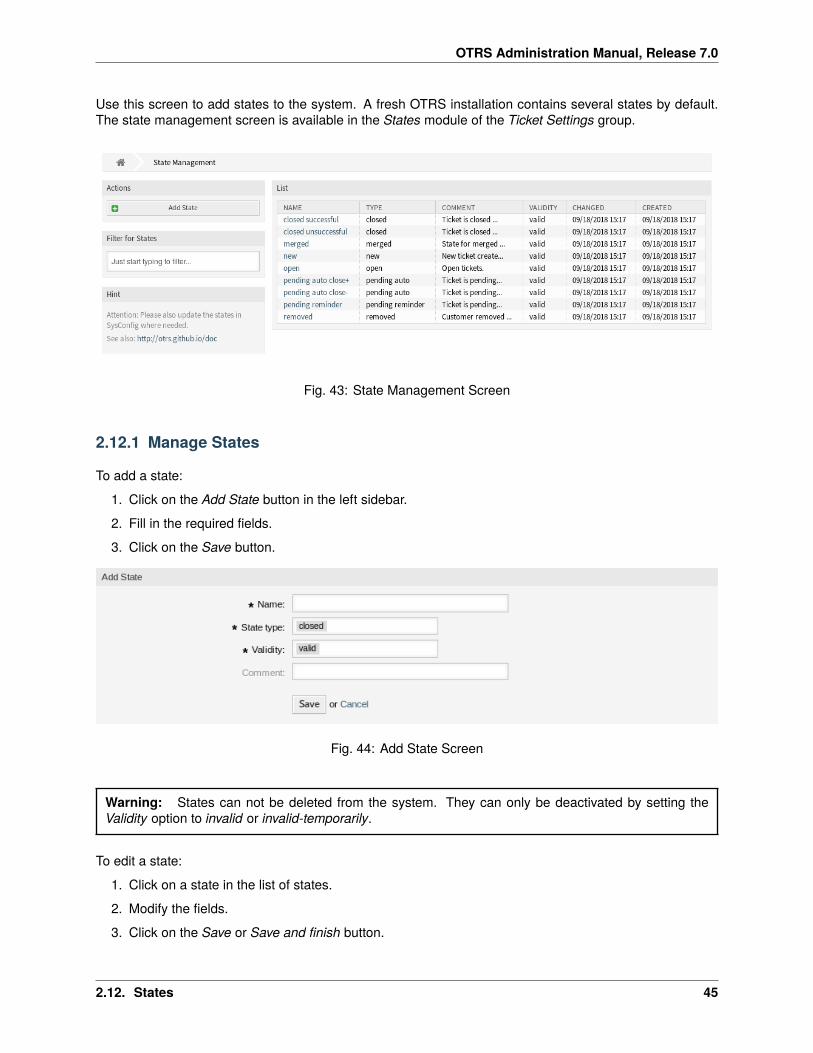
Use this screen to add states to the system. A fresh OTRS installation contains several states by default.The state management screen is available in the States module of the Ticket Settings group.
Fig. 43: State Management Screen
2.12.1 Manage States
To add a state:
1. Click on the Add State button in the left sidebar.
2. Fill in the required fields.
3. Click on the Save button.
Fig. 44: Add State Screen
Warning: States can not be deleted from the system. They can only be deactivated by setting theValidity option to invalid or invalid-temporarily.
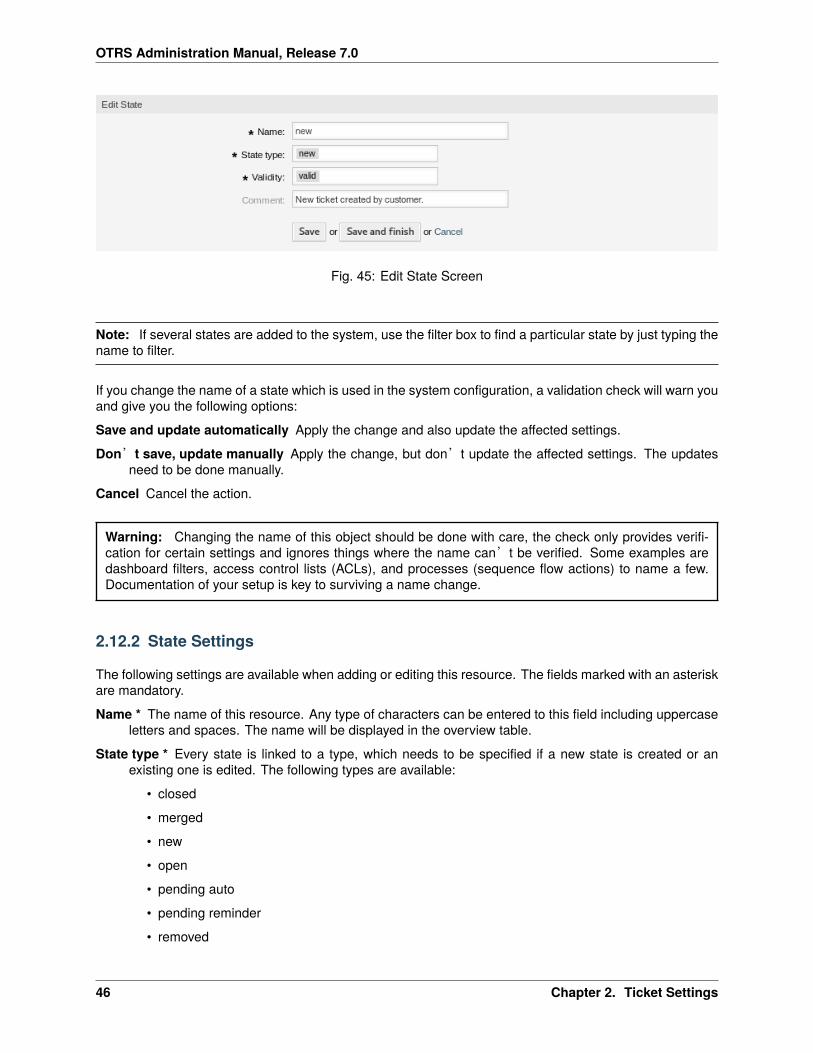
To edit a state:
1. Click on a state in the list of states.
2. Modify the fields.
3. Click on the Save or Save and finish button.
2.12. States 45
OTRS Administration Manual, Release 7.0
Fig. 45: Edit State Screen
Note: If several states are added to the system, use the filter box to find a particular state by just typing thename to filter.
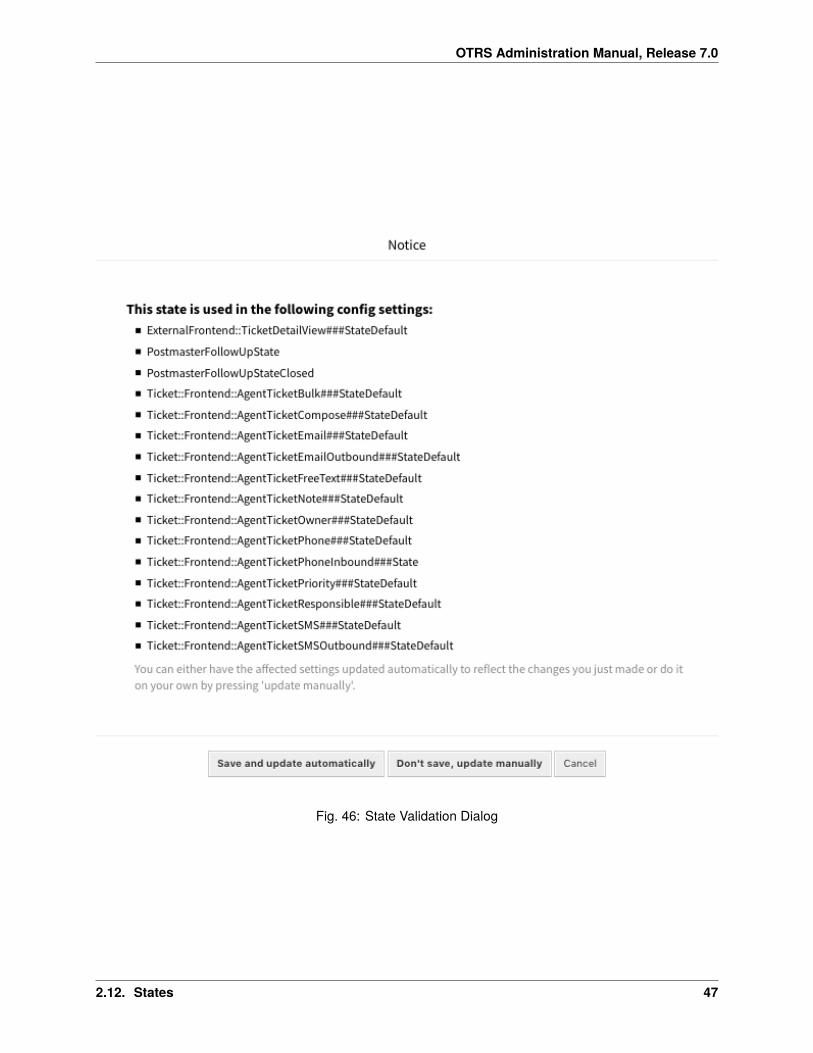
If you change the name of a state which is used in the system configuration, a validation check will warn youand give you the following options:
Save and update automatically Apply the change and also update the affected settings.
Don’t save, update manually Apply the change, but don’t update the affected settings. The updatesneed to be done manually.
Cancel Cancel the action.
Warning: Changing the name of this object should be done with care, the check only provides verifi-cation for certain settings and ignores things where the name can’t be verified. Some examples aredashboard filters, access control lists (ACLs), and processes (sequence flow actions) to name a few.Documentation of your setup is key to surviving a name change.
2.12.2 State Settings
The following settings are available when adding or editing this resource. The fields marked with an asteriskare mandatory.
Name * The name of this resource. Any type of characters can be entered to this field including uppercaseletters and spaces. The name will be displayed in the overview table.
State type * Every state is linked to a type, which needs to be specified if a new state is created or anexisting one is edited. The following types are available:
• closed
• merged
• new
• open
• pending auto
• pending reminder
• removed
46 Chapter 2. Ticket Settings
OTRS Administration Manual, Release 7.0
Fig. 46: State Validation Dialog
2.12. States 47
OTRS Administration Manual, Release 7.0
Note: State types are predefined and cannot be changed in the software due to their special me-chanics. When adding new states for pending auto and pending reminder state types you must makefurther configurations in the System Configuration module of the Administration group.
Validity * Set the validity of this resource. Each resource can be used in OTRS only, if this field is set tovalid. Setting this field to invalid or invalid-temporarily will disable the use of the resource.
Comment Add additional information to this resource. It is recommended to always fill this field as a descrip-tion of the resource with a full sentence for better clarity, because the comment will be also displayedin the overview table.
See also:
The following configuration options are relevant and noteworthy when managing states:
• Daemon::SchedulerCronTaskManager::Task###TicketPendingCheck
• Ticket::StateAfterPending
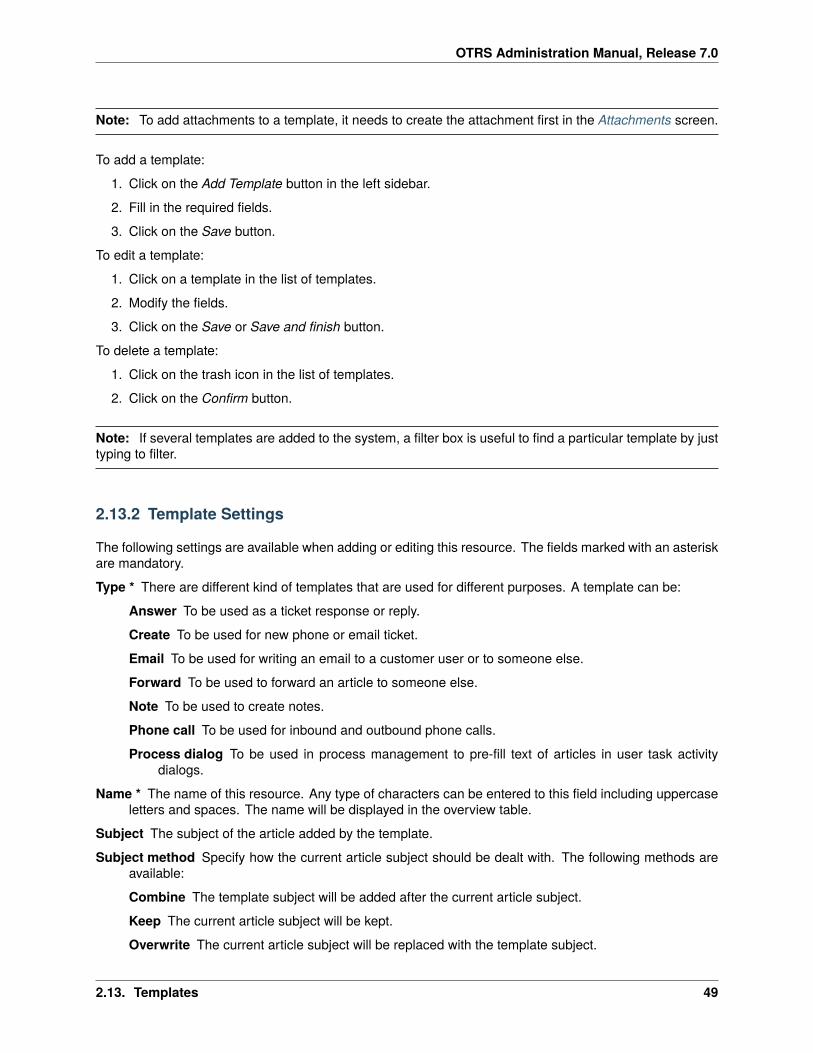
2.13 Templates
Providing the correct and consistent answer all the time regardless of employee or knowledge-level is im-portant to maintain a professional appearance to your customers. Additionally, speed in sending standardanswers is key to wading through the masses of requests in growing service desks.
OTRS templates offer you a variety of ways to deal with standardizing communications and help to pre-definetexts so that the customer always receives the same level and quality of service from all agents.
Use this screen to add templates for use in communications. A fresh OTRS installation already contains atemplate by default. The template management screen is available in the Templates module of the TicketSettings group.
Fig. 47: Template Management Screen
2.13.1 Manage Templates
48 Chapter 2. Ticket Settings
OTRS Administration Manual, Release 7.0
Note: To add attachments to a template, it needs to create the attachment first in the Attachments screen.
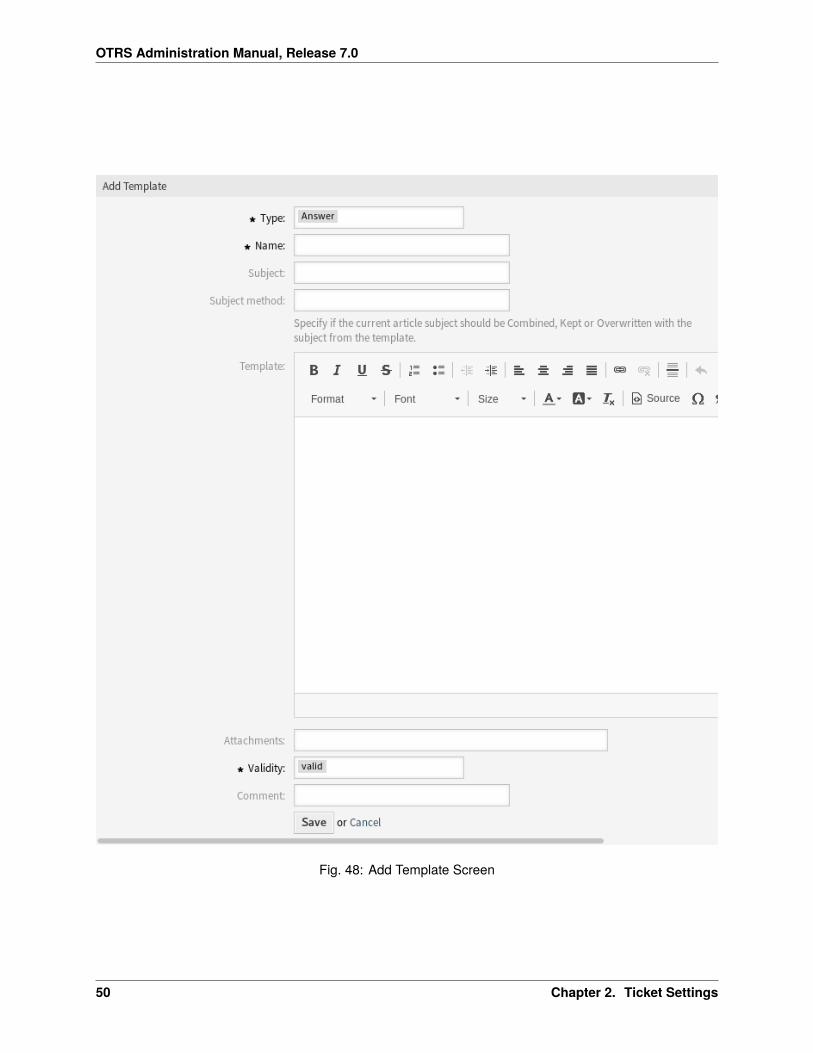
To add a template:
1. Click on the Add Template button in the left sidebar.
2. Fill in the required fields.
3. Click on the Save button.
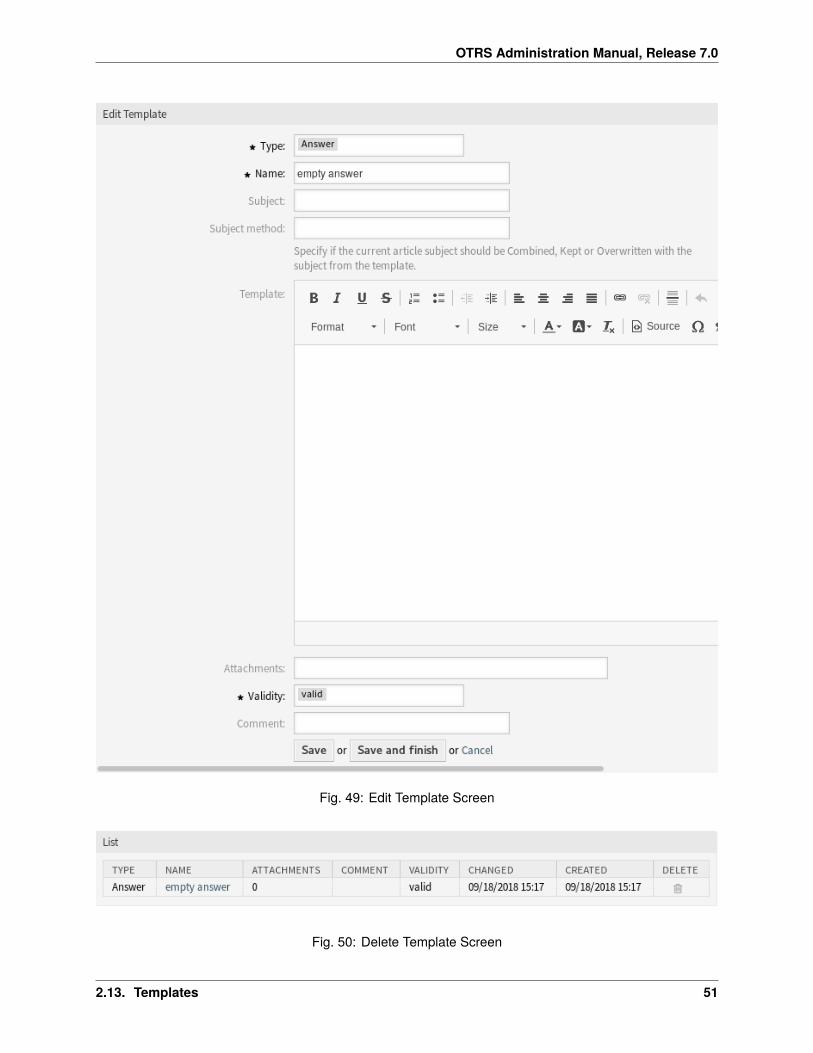
To edit a template:
1. Click on a template in the list of templates.
2. Modify the fields.
3. Click on the Save or Save and finish button.
To delete a template:
1. Click on the trash icon in the list of templates.
2. Click on the Confirm button.
Note: If several templates are added to the system, a filter box is useful to find a particular template by justtyping to filter.
2.13.2 Template Settings
The following settings are available when adding or editing this resource. The fields marked with an asteriskare mandatory.
Type * There are different kind of templates that are used for different purposes. A template can be:
Answer To be used as a ticket response or reply.
Create To be used for new phone or email ticket.
Email To be used for writing an email to a customer user or to someone else.
Forward To be used to forward an article to someone else.
Note To be used to create notes.
Phone call To be used for inbound and outbound phone calls.
Process dialog To be used in process management to pre-fill text of articles in user task activitydialogs.
Name * The name of this resource. Any type of characters can be entered to this field including uppercaseletters and spaces. The name will be displayed in the overview table.
Subject The subject of the article added by the template.
Subject method Specify how the current article subject should be dealt with. The following methods areavailable:
Combine The template subject will be added after the current article subject.
Keep The current article subject will be kept.
Overwrite The current article subject will be replaced with the template subject.
2.13. Templates 49
OTRS Administration Manual, Release 7.0
Fig. 48: Add Template Screen
50 Chapter 2. Ticket Settings
OTRS Administration Manual, Release 7.0
Fig. 49: Edit Template Screen
Fig. 50: Delete Template Screen
2.13. Templates 51
OTRS Administration Manual, Release 7.0
Template The body of the article added by the template.
Attachments It is possible to add one or more attachments to this template. Attachments can be added inthe Attachments screen.
Validity * Set the validity of this resource. Each resource can be used in OTRS only, if this field is set tovalid. Setting this field to invalid or invalid-temporarily will disable the use of the resource.
Comment Add additional information to this resource. It is recommended to always fill this field as a descrip-tion of the resource with a full sentence for better clarity, because the comment will be also displayedin the overview table.
2.13.3 Template Variables
Using variables in the text makes it possible to personalize messages. Variables, known as OTRS tags, arereplaced by OTRS when generating the message. Find a list of available tags stems for this resource at thebottom of both add and edit screens.
Fig. 51: Template Variables
For example, the variable <OTRS_TICKET_TicketNumber> expands to the ticket number allowing a tem-plate to include something like the following.
52 Chapter 2. Ticket Settings
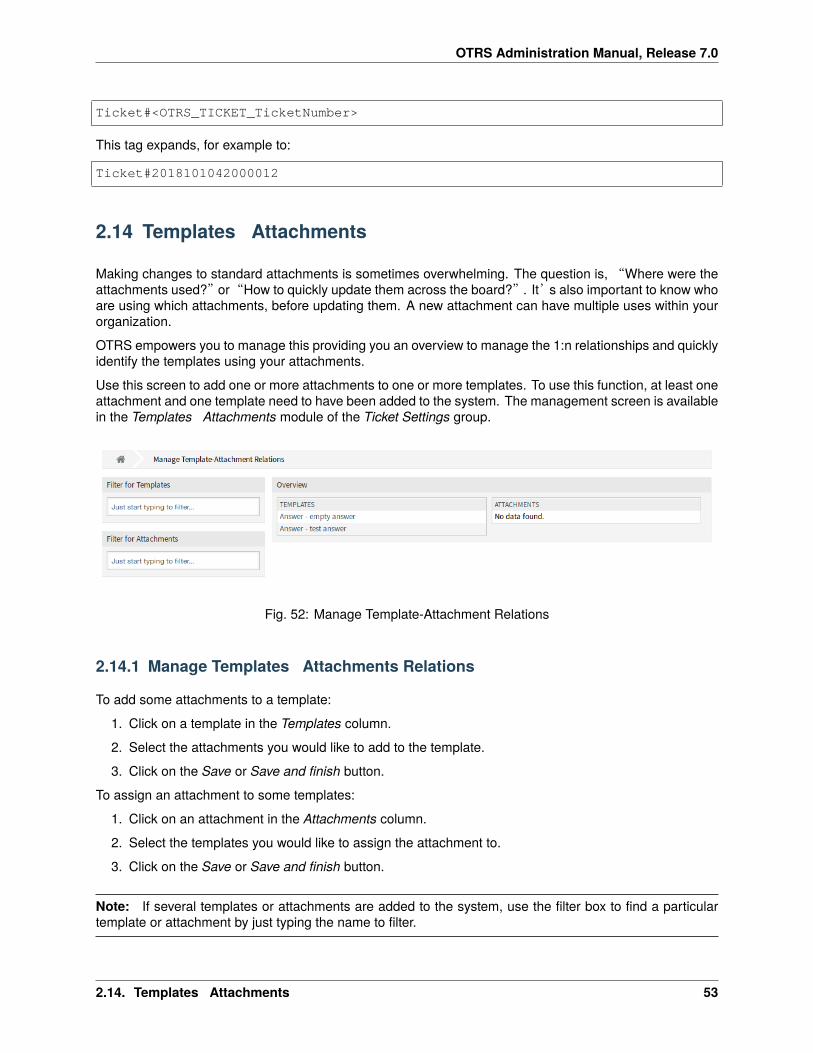
OTRS Administration Manual, Release 7.0
Ticket#<OTRS_TICKET_TicketNumber>
This tag expands, for example to:
Ticket#2018101042000012
2.14 Templates � Attachments
Making changes to standard attachments is sometimes overwhelming. The question is,“Where were theattachments used?”or“How to quickly update them across the board?”. It’s also important to know whoare using which attachments, before updating them. A new attachment can have multiple uses within yourorganization.
OTRS empowers you to manage this providing you an overview to manage the 1:n relationships and quicklyidentify the templates using your attachments.
Use this screen to add one or more attachments to one or more templates. To use this function, at least oneattachment and one template need to have been added to the system. The management screen is availablein the Templates � Attachments module of the Ticket Settings group.
Fig. 52: Manage Template-Attachment Relations
2.14.1 Manage Templates � Attachments Relations
To add some attachments to a template:
1. Click on a template in the Templates column.
2. Select the attachments you would like to add to the template.
3. Click on the Save or Save and finish button.
To assign an attachment to some templates:
1. Click on an attachment in the Attachments column.
2. Select the templates you would like to assign the attachment to.
3. Click on the Save or Save and finish button.
Note: If several templates or attachments are added to the system, use the filter box to find a particulartemplate or attachment by just typing the name to filter.
2.14. Templates � Attachments 53

OTRS Administration Manual, Release 7.0
Fig. 53: Change Attachment Relations for Template
Fig. 54: Change Template Relations for Attachment
Multiple templates or attachments can be assigned in both screens at the same time. Additionally clickingon a template or clicking on an attachment in the relations screen will open the Edit Template screen or theEdit Attachment screen accordingly.
Warning: Accessing a template or an attachment provides no back link to the relations screen.
2.15 Templates � Queues
Sharing, distributing and making changes to standard text modules and information for sharing with cus-tomers or communication between teams can be an impossible mission.
OTRS can quickly aid you in ensuring that all of your teams have the correct templates available for use byassignment based on the queue.
Use this screen to add one or more templates to one or more queues. To use this function, at least onetemplate and one queue need to have been added to the system. The management screen is available inthe Templates � Queues module of the Ticket Settings group.
2.15.1 Manage Templates � Queues Relations
To assign a template to a queue:
1. Click on a template in the Templates column.
2. Select the queues you would like to add the template to.
3. Click on the Save or Save and finish button.
54 Chapter 2. Ticket Settings
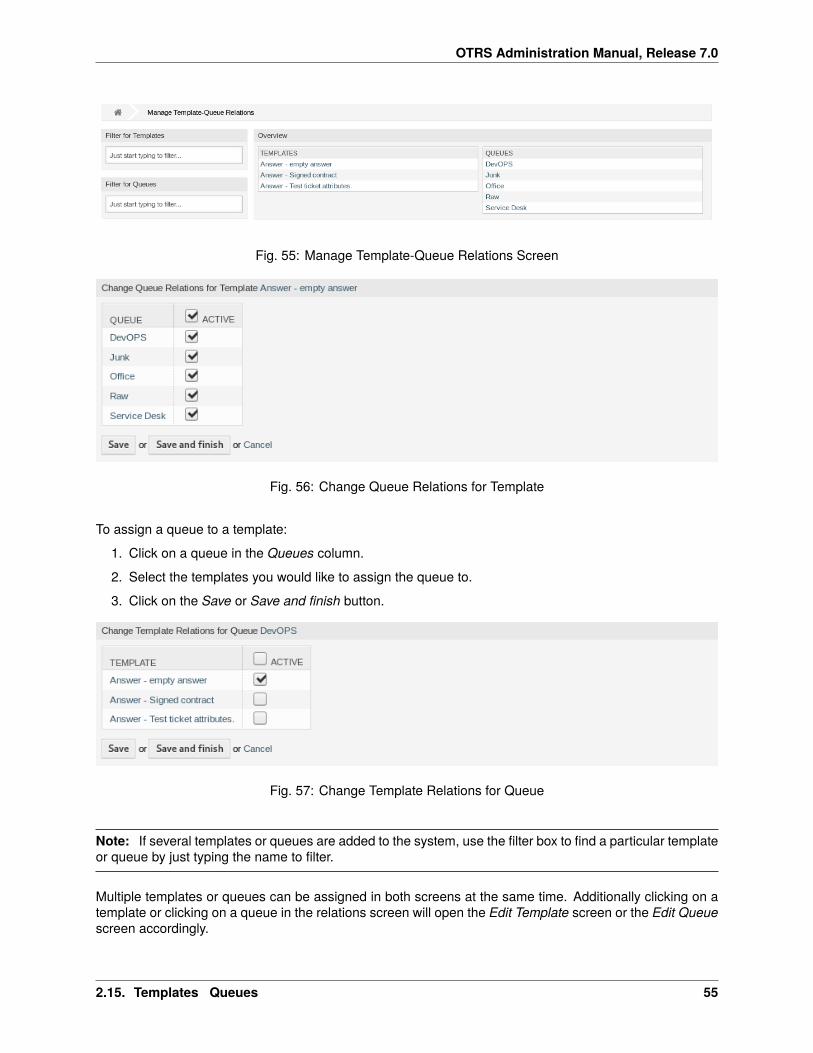
OTRS Administration Manual, Release 7.0
Fig. 55: Manage Template-Queue Relations Screen
Fig. 56: Change Queue Relations for Template
To assign a queue to a template:
1. Click on a queue in the Queues column.
2. Select the templates you would like to assign the queue to.
3. Click on the Save or Save and finish button.
Fig. 57: Change Template Relations for Queue
Note: If several templates or queues are added to the system, use the filter box to find a particular templateor queue by just typing the name to filter.
Multiple templates or queues can be assigned in both screens at the same time. Additionally clicking on atemplate or clicking on a queue in the relations screen will open the Edit Template screen or the Edit Queuescreen accordingly.
2.15. Templates � Queues 55
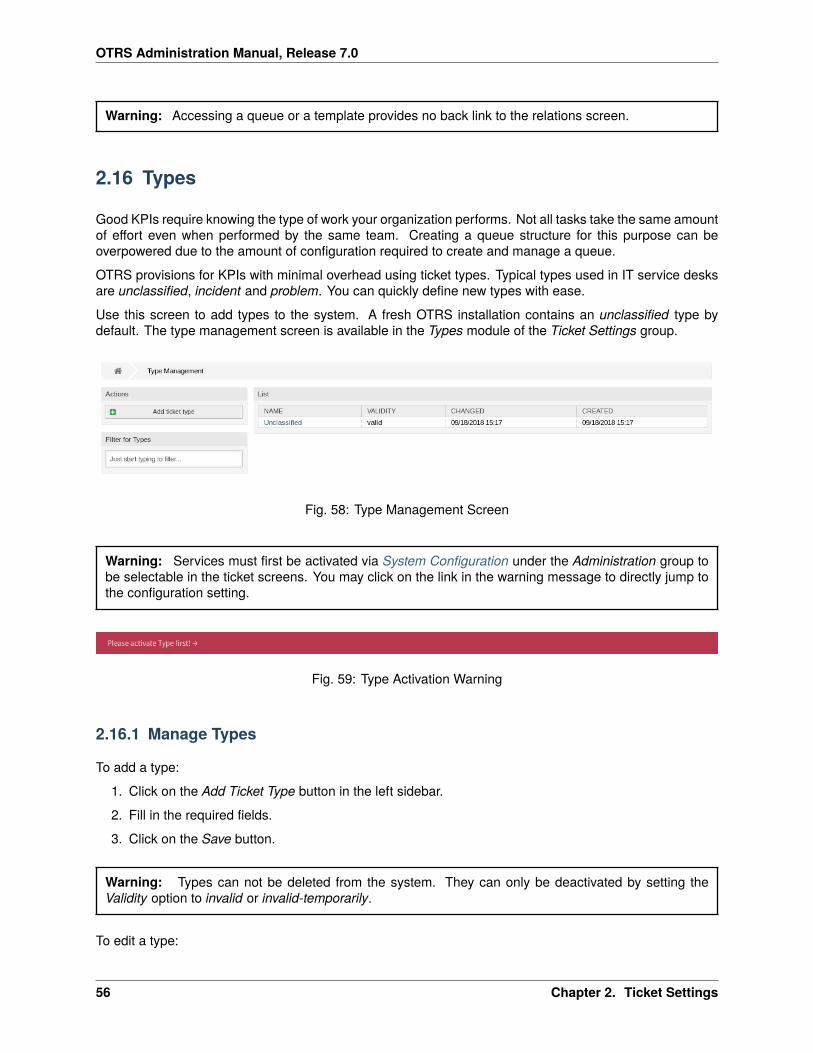
OTRS Administration Manual, Release 7.0
Warning: Accessing a queue or a template provides no back link to the relations screen.
2.16 Types
Good KPIs require knowing the type of work your organization performs. Not all tasks take the same amountof effort even when performed by the same team. Creating a queue structure for this purpose can beoverpowered due to the amount of configuration required to create and manage a queue.
OTRS provisions for KPIs with minimal overhead using ticket types. Typical types used in IT service desksare unclassified, incident and problem. You can quickly define new types with ease.
Use this screen to add types to the system. A fresh OTRS installation contains an unclassified type bydefault. The type management screen is available in the Types module of the Ticket Settings group.
Fig. 58: Type Management Screen
Warning: Services must first be activated via System Configuration under the Administration group tobe selectable in the ticket screens. You may click on the link in the warning message to directly jump tothe configuration setting.
Fig. 59: Type Activation Warning
2.16.1 Manage Types
To add a type:
1. Click on the Add Ticket Type button in the left sidebar.
2. Fill in the required fields.
3. Click on the Save button.
Warning: Types can not be deleted from the system. They can only be deactivated by setting theValidity option to invalid or invalid-temporarily.
To edit a type:
56 Chapter 2. Ticket Settings
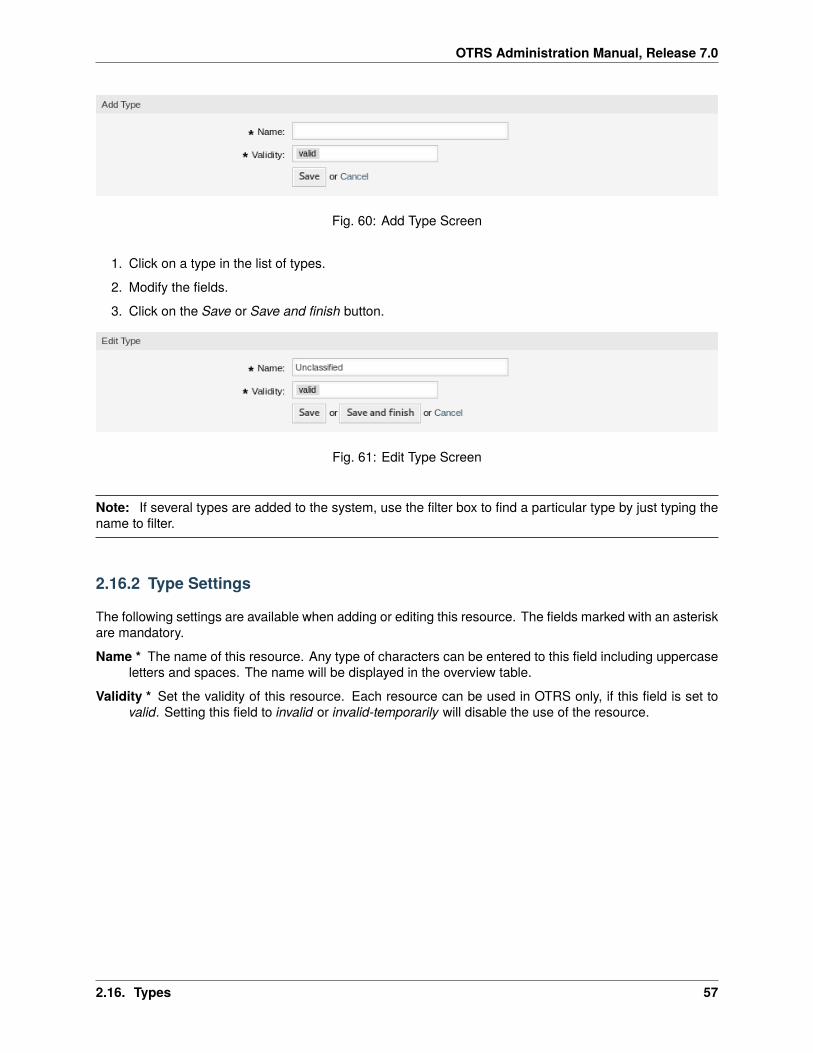
OTRS Administration Manual, Release 7.0
Fig. 60: Add Type Screen
1. Click on a type in the list of types.
2. Modify the fields.
3. Click on the Save or Save and finish button.
Fig. 61: Edit Type Screen
Note: If several types are added to the system, use the filter box to find a particular type by just typing thename to filter.
2.16.2 Type Settings
The following settings are available when adding or editing this resource. The fields marked with an asteriskare mandatory.
Name * The name of this resource. Any type of characters can be entered to this field including uppercaseletters and spaces. The name will be displayed in the overview table.
Validity * Set the validity of this resource. Each resource can be used in OTRS only, if this field is set tovalid. Setting this field to invalid or invalid-temporarily will disable the use of the resource.
2.16. Types 57

OTRS Administration Manual, Release 7.0
58 Chapter 2. Ticket Settings
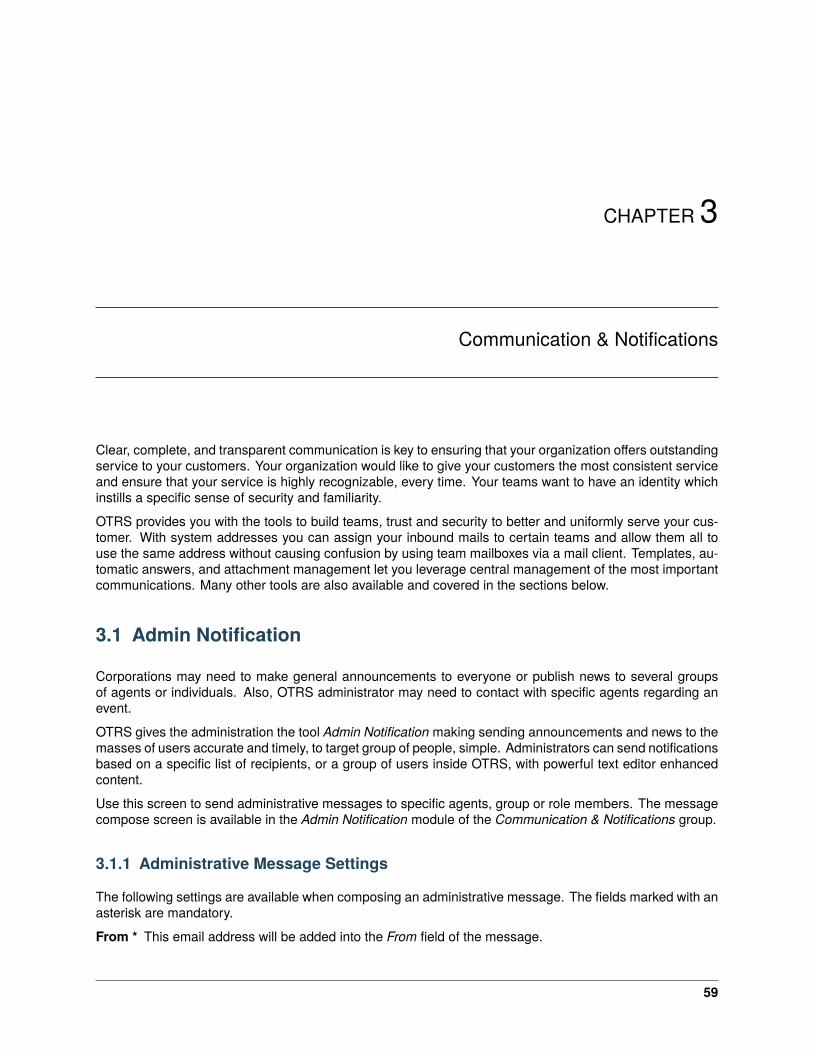
CHAPTER 3
Communication & Notifications
Clear, complete, and transparent communication is key to ensuring that your organization offers outstandingservice to your customers. Your organization would like to give your customers the most consistent serviceand ensure that your service is highly recognizable, every time. Your teams want to have an identity whichinstills a specific sense of security and familiarity.
OTRS provides you with the tools to build teams, trust and security to better and uniformly serve your cus-tomer. With system addresses you can assign your inbound mails to certain teams and allow them all touse the same address without causing confusion by using team mailboxes via a mail client. Templates, au-tomatic answers, and attachment management let you leverage central management of the most importantcommunications. Many other tools are also available and covered in the sections below.
3.1 Admin Notification
Corporations may need to make general announcements to everyone or publish news to several groupsof agents or individuals. Also, OTRS administrator may need to contact with specific agents regarding anevent.
OTRS gives the administration the tool Admin Notification making sending announcements and news to themasses of users accurate and timely, to target group of people, simple. Administrators can send notificationsbased on a specific list of recipients, or a group of users inside OTRS, with powerful text editor enhancedcontent.
Use this screen to send administrative messages to specific agents, group or role members. The messagecompose screen is available in the Admin Notification module of the Communication & Notifications group.
3.1.1 Administrative Message Settings
The following settings are available when composing an administrative message. The fields marked with anasterisk are mandatory.
From * This email address will be added into the From field of the message.
59
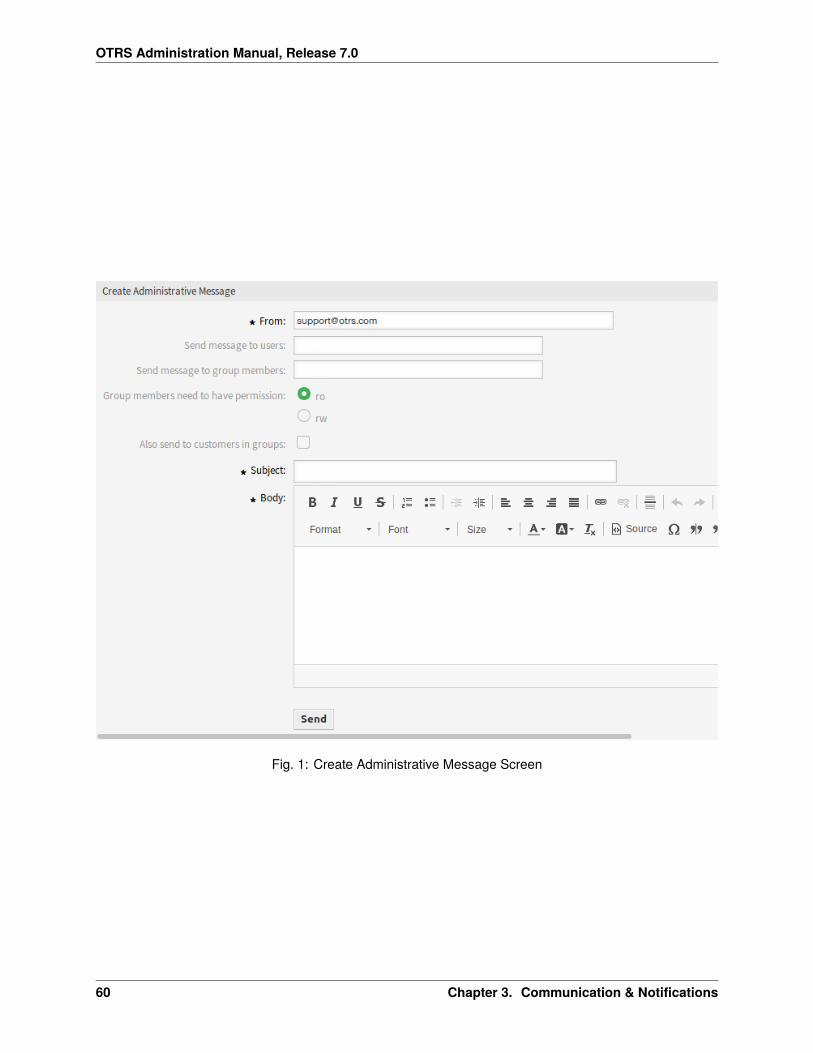
OTRS Administration Manual, Release 7.0
Fig. 1: Create Administrative Message Screen
60 Chapter 3. Communication & Notifications
OTRS Administration Manual, Release 7.0
Send message to users One or more Agents can be selected in this field, to whom the message will besent.
Send message to group members One or more Groups can be selected in this field, to whose membersthe message will be sent.
Group members need to have permission With these radio buttons can be selected, if a group memberneed read-only or read-write permissions to receive the message.
Also send to customers in groups Select this checkbox to send the message also for customers ingroups.
Note: This option is available only, if the CustomerGroupSupport setting is enabled.
Subject * The subject of the messages.
Body * The body text of the message.
3.2 Appointment Notifications
Missing appointments can damage your image with a customer. Once there is an appointment assigned inthe calendar, it’s normal to receive notification:
• Upon a new or changed event
• Upon cancellation of an event
• Before the event, as a reminder
Notification relieves the agent the stress of mentally tracking appointments.
OTRS appointment notifications satisfies this need. Here an administrator can easily set notifications withgeneral rules, including trigger events and filters. Afterward, appointments fitting the bill notify the correctusers at the correct time.
Use this screen to add appointment notifications to the system. In a fresh OTRS installation an appoint-ment reminder notification is already added by default. The appointment notification management screen isavailable in the Appointment Notifications module of the Communication & Notifications group.
3.2.1 Manage Appointment Notifications
To add an appointment notification:
1. Click on the Add Notification button in the left sidebar.
2. Fill in the required fields as explained in Appointment Notification Settings.
3. Click on the Save button.
To edit an appointment notification:
1. Click on an appointment notification in the list of appointment notifications.
2. Modify the fields as explained in Appointment Notification Settings.
3. Click on the Save or Save and finish button.
To delete an appointment notification:
1. Click on the trash icon in the list of appointment notifications.
3.2. Appointment Notifications 61

OTRS Administration Manual, Release 7.0
Fig. 2: Appointment Notification Management Screen
2. Click on the Confirm button.
Fig. 3: Delete Appointment Notification Screen
To export all appointment notifications:
1. Click on the Export Notifications button in the left sidebar.
2. Choose a location in your computer to save the Export_Notification.yml file.
To import appointment notifications:
1. Click on the Browse… button in the left sidebar.
2. Select a previously exported .yml file.
3. Click on the Overwrite existing notifications? checkbox, if you would like to overwrite the existingnotifications.
4. Click on the Import Notification configuration button.
3.2.2 Appointment Notification Settings
The following settings are available when adding or editing this resource. The fields marked with an asteriskare mandatory.
62 Chapter 3. Communication & Notifications
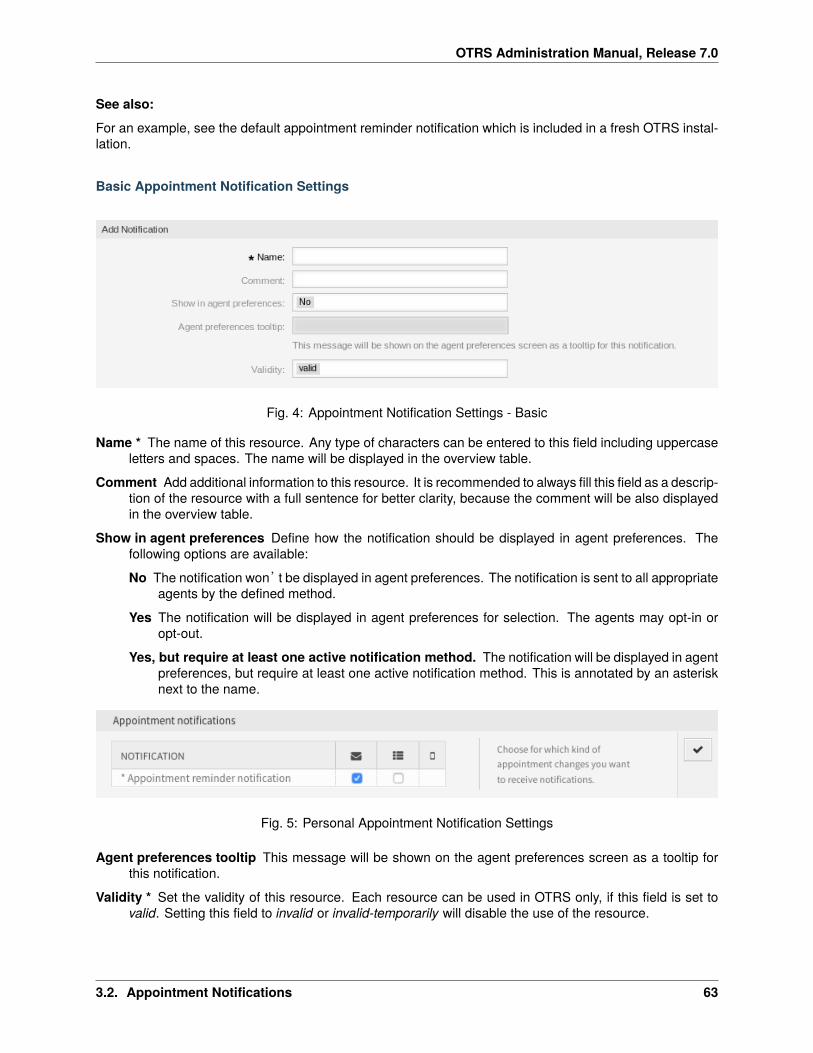
OTRS Administration Manual, Release 7.0
See also:
For an example, see the default appointment reminder notification which is included in a fresh OTRS instal-lation.
Basic Appointment Notification Settings
Fig. 4: Appointment Notification Settings - Basic
Name * The name of this resource. Any type of characters can be entered to this field including uppercaseletters and spaces. The name will be displayed in the overview table.
Comment Add additional information to this resource. It is recommended to always fill this field as a descrip-tion of the resource with a full sentence for better clarity, because the comment will be also displayedin the overview table.
Show in agent preferences Define how the notification should be displayed in agent preferences. Thefollowing options are available:
No The notification won’t be displayed in agent preferences. The notification is sent to all appropriateagents by the defined method.
Yes The notification will be displayed in agent preferences for selection. The agents may opt-in oropt-out.
Yes, but require at least one active notification method. The notification will be displayed in agentpreferences, but require at least one active notification method. This is annotated by an asterisknext to the name.
Fig. 5: Personal Appointment Notification Settings
Agent preferences tooltip This message will be shown on the agent preferences screen as a tooltip forthis notification.
Validity * Set the validity of this resource. Each resource can be used in OTRS only, if this field is set tovalid. Setting this field to invalid or invalid-temporarily will disable the use of the resource.
3.2. Appointment Notifications 63
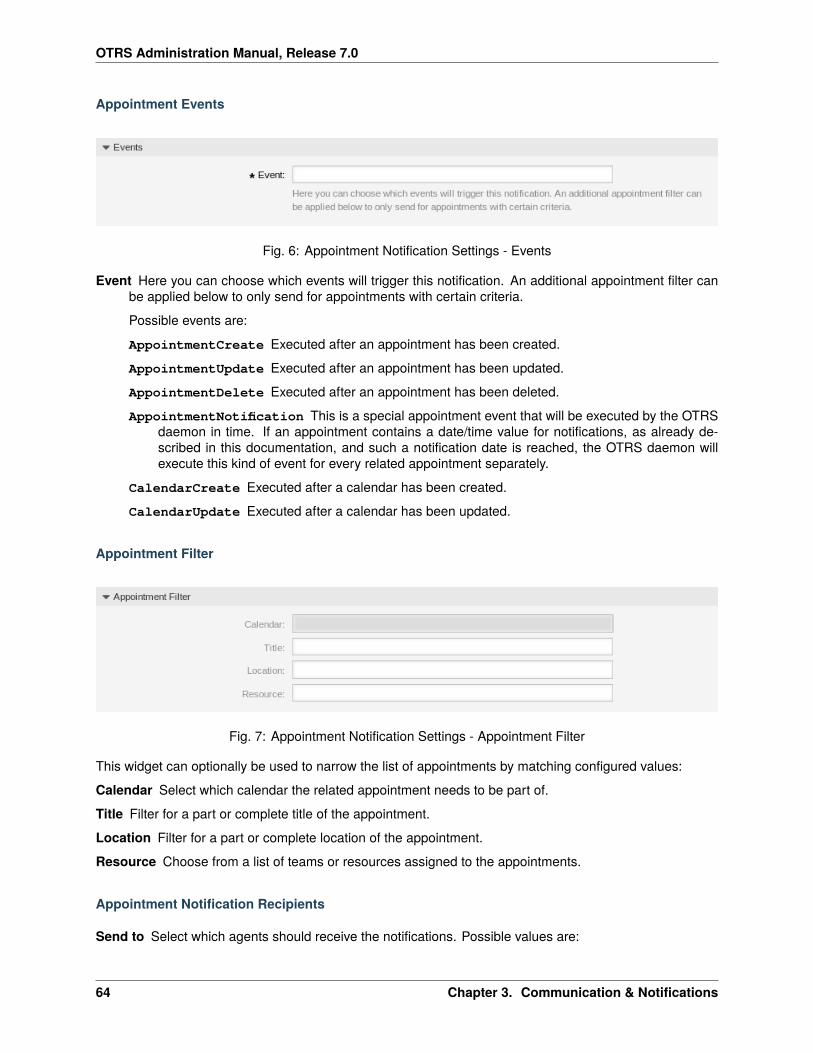
OTRS Administration Manual, Release 7.0
Appointment Events
Fig. 6: Appointment Notification Settings - Events
Event Here you can choose which events will trigger this notification. An additional appointment filter canbe applied below to only send for appointments with certain criteria.
Possible events are:
AppointmentCreate Executed after an appointment has been created.
AppointmentUpdate Executed after an appointment has been updated.
AppointmentDelete Executed after an appointment has been deleted.
AppointmentNotification This is a special appointment event that will be executed by the OTRSdaemon in time. If an appointment contains a date/time value for notifications, as already de-scribed in this documentation, and such a notification date is reached, the OTRS daemon willexecute this kind of event for every related appointment separately.
CalendarCreate Executed after a calendar has been created.
CalendarUpdate Executed after a calendar has been updated.
Appointment Filter
Fig. 7: Appointment Notification Settings - Appointment Filter
This widget can optionally be used to narrow the list of appointments by matching configured values:
Calendar Select which calendar the related appointment needs to be part of.
Title Filter for a part or complete title of the appointment.
Location Filter for a part or complete location of the appointment.
Resource Choose from a list of teams or resources assigned to the appointments.
Appointment Notification Recipients
Send to Select which agents should receive the notifications. Possible values are:
64 Chapter 3. Communication & Notifications
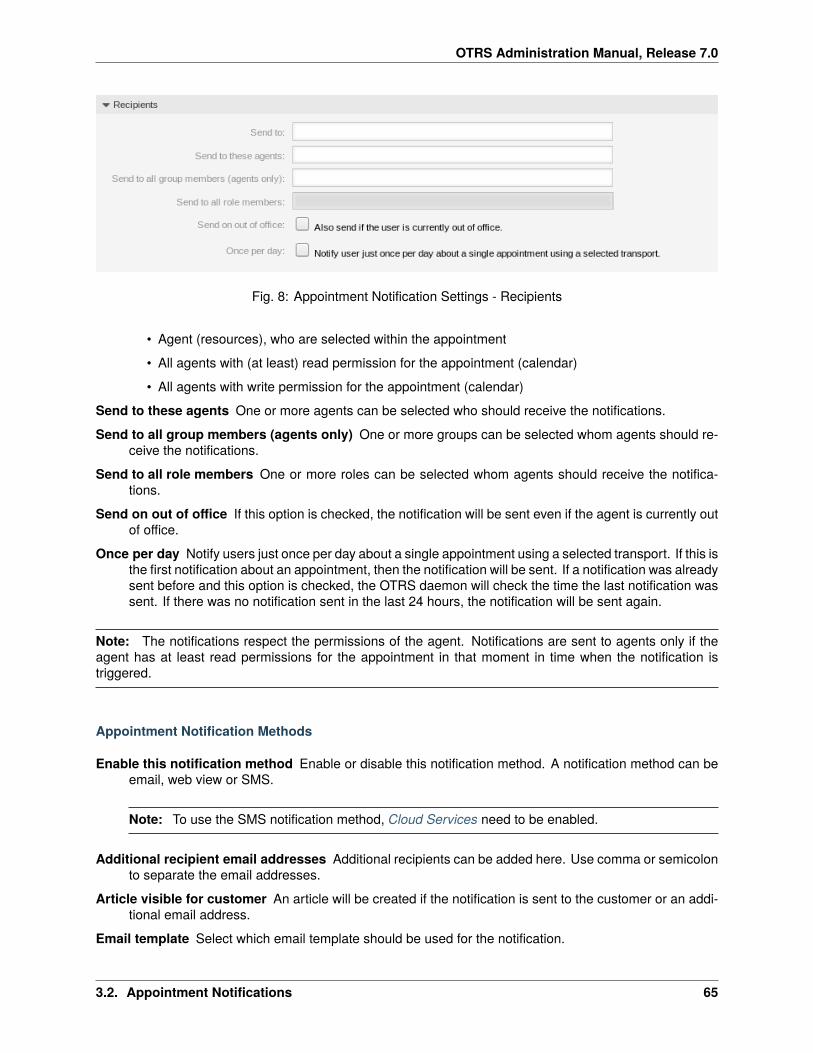
OTRS Administration Manual, Release 7.0
Fig. 8: Appointment Notification Settings - Recipients
• Agent (resources), who are selected within the appointment
• All agents with (at least) read permission for the appointment (calendar)
• All agents with write permission for the appointment (calendar)
Send to these agents One or more agents can be selected who should receive the notifications.
Send to all group members (agents only) One or more groups can be selected whom agents should re-ceive the notifications.
Send to all role members One or more roles can be selected whom agents should receive the notifica-tions.
Send on out of office If this option is checked, the notification will be sent even if the agent is currently outof office.
Once per day Notify users just once per day about a single appointment using a selected transport. If this isthe first notification about an appointment, then the notification will be sent. If a notification was alreadysent before and this option is checked, the OTRS daemon will check the time the last notification wassent. If there was no notification sent in the last 24 hours, the notification will be sent again.
Note: The notifications respect the permissions of the agent. Notifications are sent to agents only if theagent has at least read permissions for the appointment in that moment in time when the notification istriggered.
Appointment Notification Methods
Enable this notification method Enable or disable this notification method. A notification method can beemail, web view or SMS.
Note: To use the SMS notification method, Cloud Services need to be enabled.
Additional recipient email addresses Additional recipients can be added here. Use comma or semicolonto separate the email addresses.
Article visible for customer An article will be created if the notification is sent to the customer or an addi-tional email address.
Email template Select which email template should be used for the notification.
3.2. Appointment Notifications 65
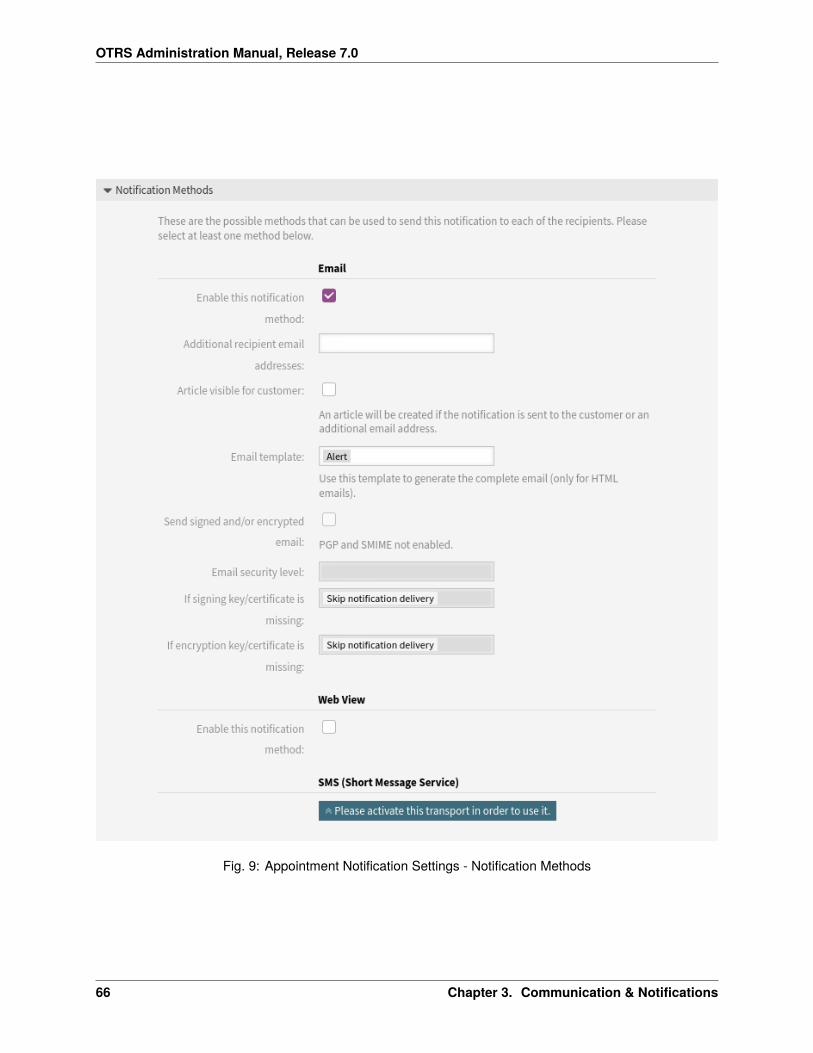
OTRS Administration Manual, Release 7.0
Fig. 9: Appointment Notification Settings - Notification Methods
66 Chapter 3. Communication & Notifications
OTRS Administration Manual, Release 7.0
Note: Additional email templates can be added by placing a .tt file into the folder <OTRS_Home>/Kernel/Output/HTML/Templates/Standard/NotificationEvent/Email/. See the existingemail templates for an example.
Send signed and/or encrypted email Checking this option will encrypt the notification email.
Note: To use this feature, PGP Keys or S/MIME Certificates need to be enabled.
Email security level If Enable email security is checked, then this setting is activated. The following optionsare available:
PGP sign only Sign only the notification email with PGP key. If no PGP keys have been added to thesystem, this option is not visible.
PGP encrypt only Encrypt only the notification email with PGP key. If no PGP keys have been addedto the system, this option is not visible.
PGP sign and encrypt Sign and encrypt the notification email with PGP key. If no PGP keys havebeen added to the system, this option is not visible.
SMIME sign only Sign only the notification email with S/MIME certificate. If no S/MIME certificateshave been added to the system, this option is not visible.
SMIME encrypt only Encrypt only the notification email with S/MIME certificate. If no S/MIME certifi-cates have been added to the system, this option is not visible.
SMIME sign and encrypt Sign and encrypt the notification email with S/MIME certificate. If noS/MIME certificates have been added to the system, this option is not visible.
Note: To use this feature, PGP Keys or S/MIME Certificates need to be enabled.
If signing key/certificate is missing Select the method, that should be used if signing key or certificate ismissing.
If encryption key/certificate is missing: Select the method, that should be used if encryption key or cer-tificate is missing.
Appointment Notification Text
The main content of a notification can be added for each languages with localized subject and body text. Itis also possible to define static text content mixed with OTRS smart tags.
Subject * The localized subject for a specific language.
Text * The localized body text for a specific language.
Add new notification language Select which languages should be added to create localized notifications.The language of the customer or agent will be used as found in the customer and agent preferences.Secondarily, the system default language will be chosen. The fall back will always be English.
Warning: Deleting a language from the DefaultUsedLanguages setting that already has a notificationtext here will make the notification text unusable. If a language is not present or enabled on the system,the corresponding notification text could be deleted if it is not needed anymore.
3.2. Appointment Notifications 67
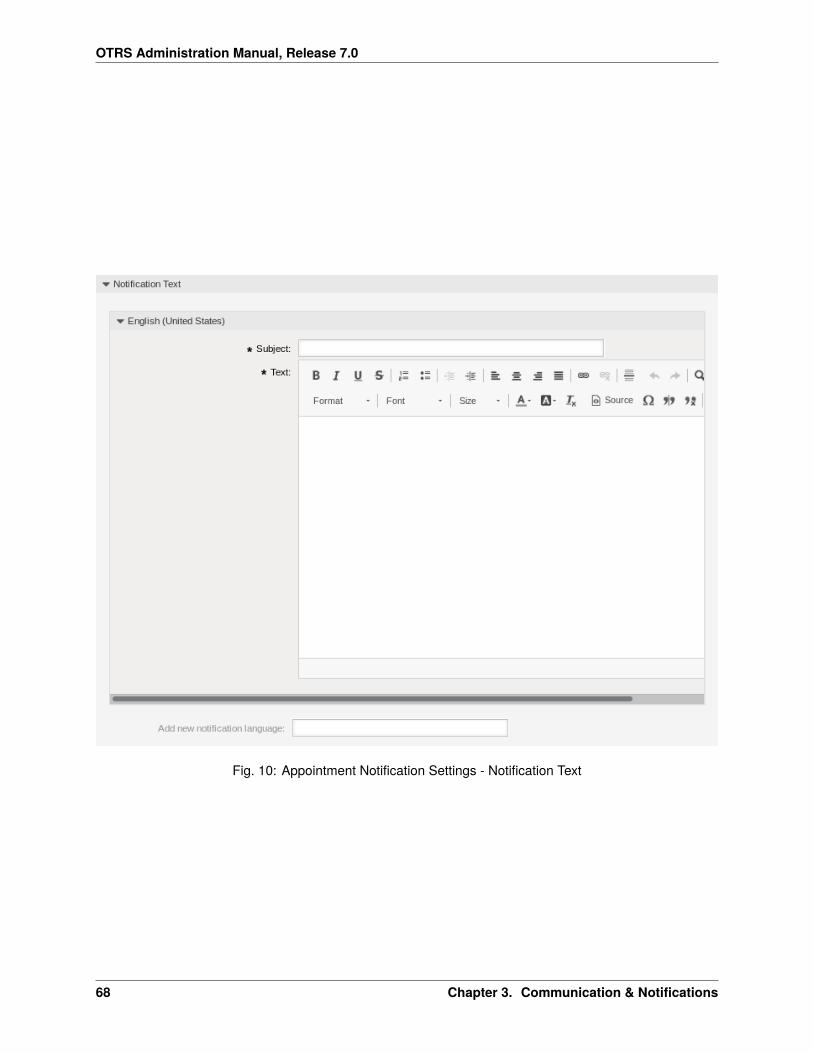
OTRS Administration Manual, Release 7.0
Fig. 10: Appointment Notification Settings - Notification Text
68 Chapter 3. Communication & Notifications
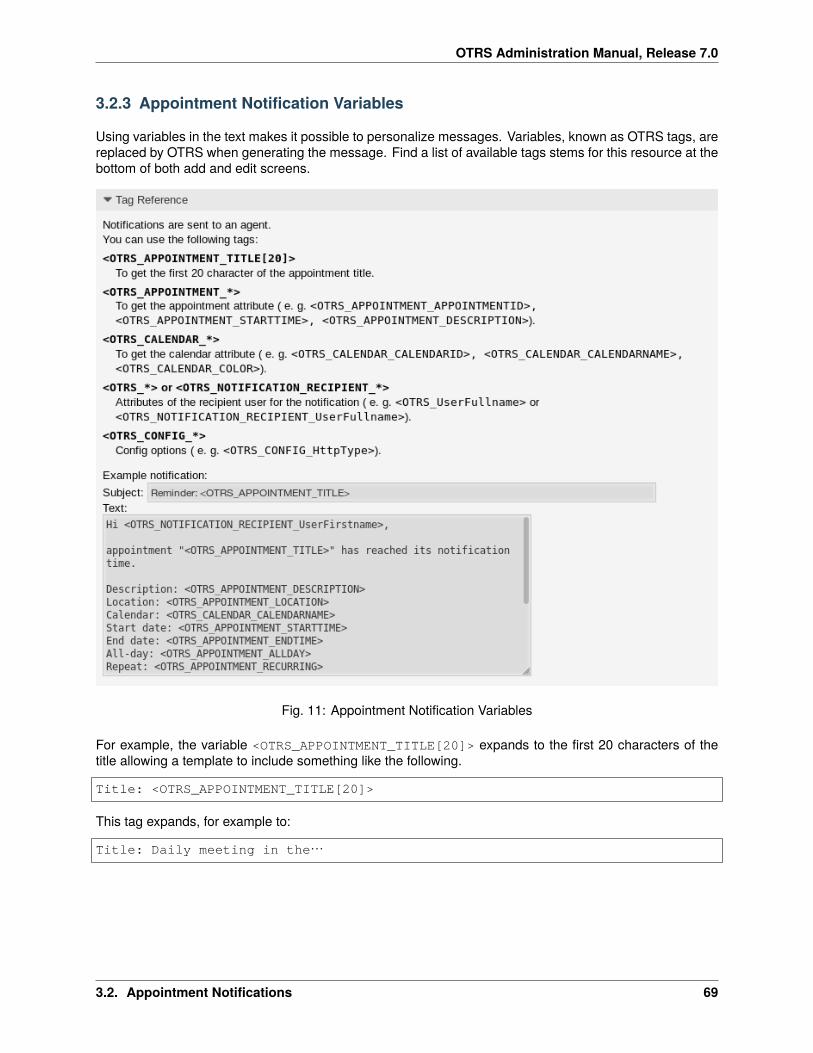
OTRS Administration Manual, Release 7.0
3.2.3 Appointment Notification Variables
Using variables in the text makes it possible to personalize messages. Variables, known as OTRS tags, arereplaced by OTRS when generating the message. Find a list of available tags stems for this resource at thebottom of both add and edit screens.
Fig. 11: Appointment Notification Variables
For example, the variable <OTRS_APPOINTMENT_TITLE[20]> expands to the first 20 characters of thetitle allowing a template to include something like the following.
Title: <OTRS_APPOINTMENT_TITLE[20]>
This tag expands, for example to:
Title: Daily meeting in the…
3.2. Appointment Notifications 69
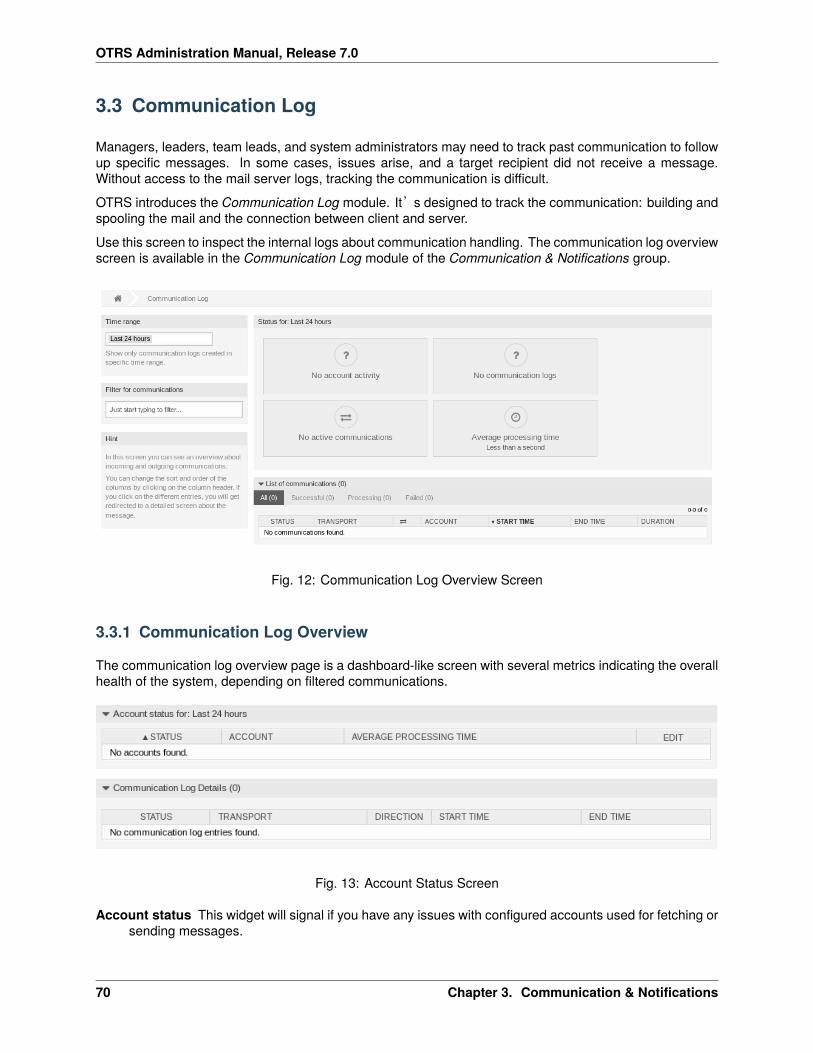
OTRS Administration Manual, Release 7.0
3.3 Communication Log
Managers, leaders, team leads, and system administrators may need to track past communication to followup specific messages. In some cases, issues arise, and a target recipient did not receive a message.Without access to the mail server logs, tracking the communication is difficult.
OTRS introduces the Communication Log module. It’s designed to track the communication: building andspooling the mail and the connection between client and server.
Use this screen to inspect the internal logs about communication handling. The communication log overviewscreen is available in the Communication Log module of the Communication & Notifications group.
Fig. 12: Communication Log Overview Screen
3.3.1 Communication Log Overview
The communication log overview page is a dashboard-like screen with several metrics indicating the overallhealth of the system, depending on filtered communications.
Fig. 13: Account Status Screen
Account status This widget will signal if you have any issues with configured accounts used for fetching orsending messages.
70 Chapter 3. Communication & Notifications
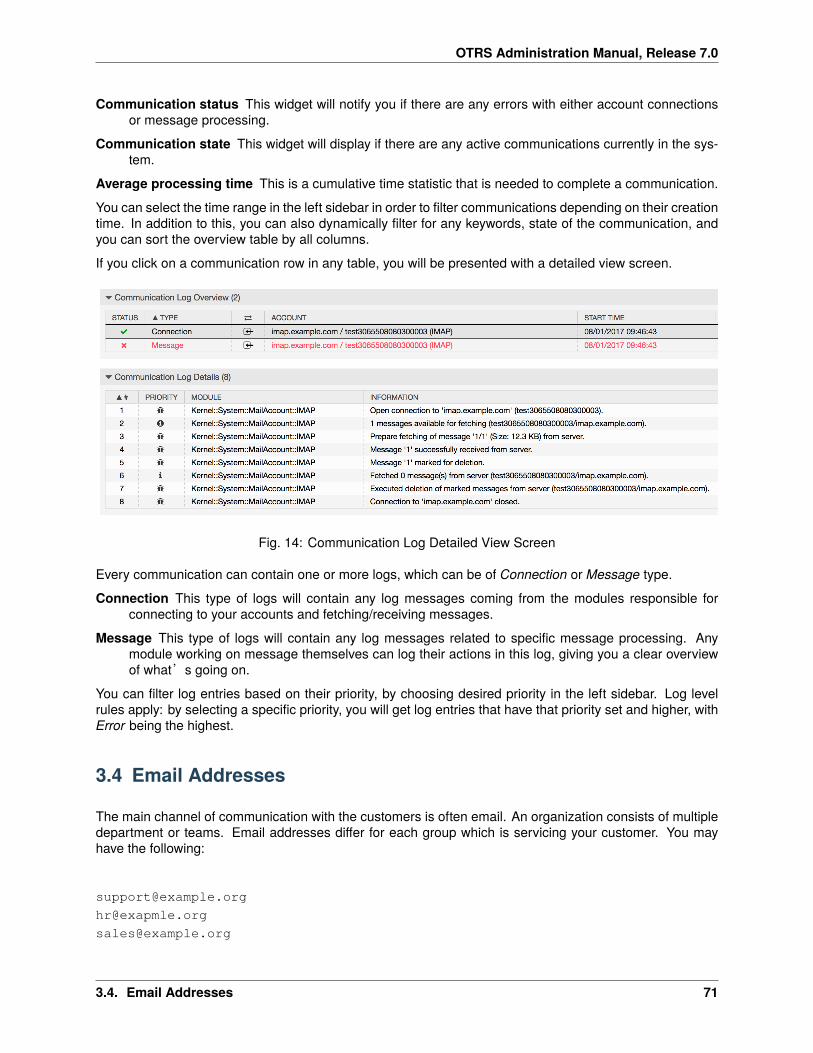
OTRS Administration Manual, Release 7.0
Communication status This widget will notify you if there are any errors with either account connectionsor message processing.
Communication state This widget will display if there are any active communications currently in the sys-tem.
Average processing time This is a cumulative time statistic that is needed to complete a communication.
You can select the time range in the left sidebar in order to filter communications depending on their creationtime. In addition to this, you can also dynamically filter for any keywords, state of the communication, andyou can sort the overview table by all columns.
If you click on a communication row in any table, you will be presented with a detailed view screen.
Fig. 14: Communication Log Detailed View Screen
Every communication can contain one or more logs, which can be of Connection or Message type.
Connection This type of logs will contain any log messages coming from the modules responsible forconnecting to your accounts and fetching/receiving messages.
Message This type of logs will contain any log messages related to specific message processing. Anymodule working on message themselves can log their actions in this log, giving you a clear overviewof what’s going on.
You can filter log entries based on their priority, by choosing desired priority in the left sidebar. Log levelrules apply: by selecting a specific priority, you will get log entries that have that priority set and higher, withError being the highest.
3.4 Email Addresses
The main channel of communication with the customers is often email. An organization consists of multipledepartment or teams. Email addresses differ for each group which is servicing your customer. You mayhave the following:
[email protected]@[email protected]
3.4. Email Addresses 71
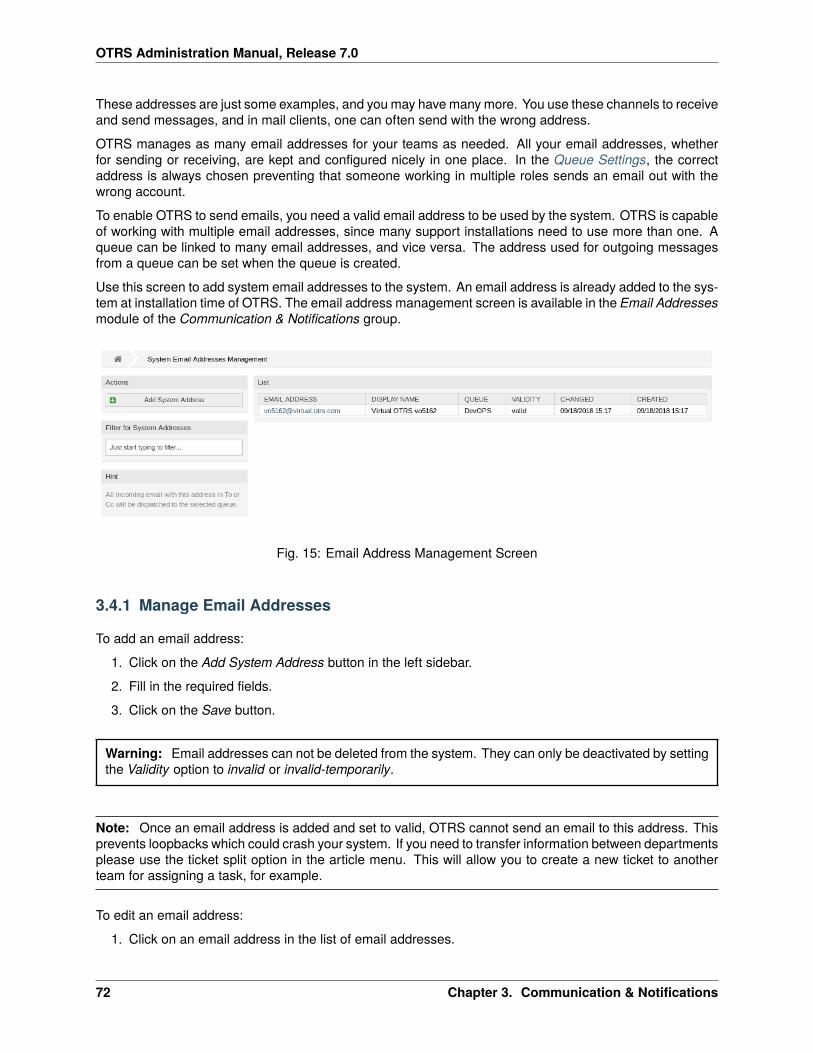
OTRS Administration Manual, Release 7.0
These addresses are just some examples, and you may have many more. You use these channels to receiveand send messages, and in mail clients, one can often send with the wrong address.
OTRS manages as many email addresses for your teams as needed. All your email addresses, whetherfor sending or receiving, are kept and configured nicely in one place. In the Queue Settings, the correctaddress is always chosen preventing that someone working in multiple roles sends an email out with thewrong account.
To enable OTRS to send emails, you need a valid email address to be used by the system. OTRS is capableof working with multiple email addresses, since many support installations need to use more than one. Aqueue can be linked to many email addresses, and vice versa. The address used for outgoing messagesfrom a queue can be set when the queue is created.
Use this screen to add system email addresses to the system. An email address is already added to the sys-tem at installation time of OTRS. The email address management screen is available in the Email Addressesmodule of the Communication & Notifications group.
Fig. 15: Email Address Management Screen
3.4.1 Manage Email Addresses
To add an email address:
1. Click on the Add System Address button in the left sidebar.
2. Fill in the required fields.
3. Click on the Save button.
Warning: Email addresses can not be deleted from the system. They can only be deactivated by settingthe Validity option to invalid or invalid-temporarily.
Note: Once an email address is added and set to valid, OTRS cannot send an email to this address. Thisprevents loopbacks which could crash your system. If you need to transfer information between departmentsplease use the ticket split option in the article menu. This will allow you to create a new ticket to anotherteam for assigning a task, for example.
To edit an email address:
1. Click on an email address in the list of email addresses.
72 Chapter 3. Communication & Notifications
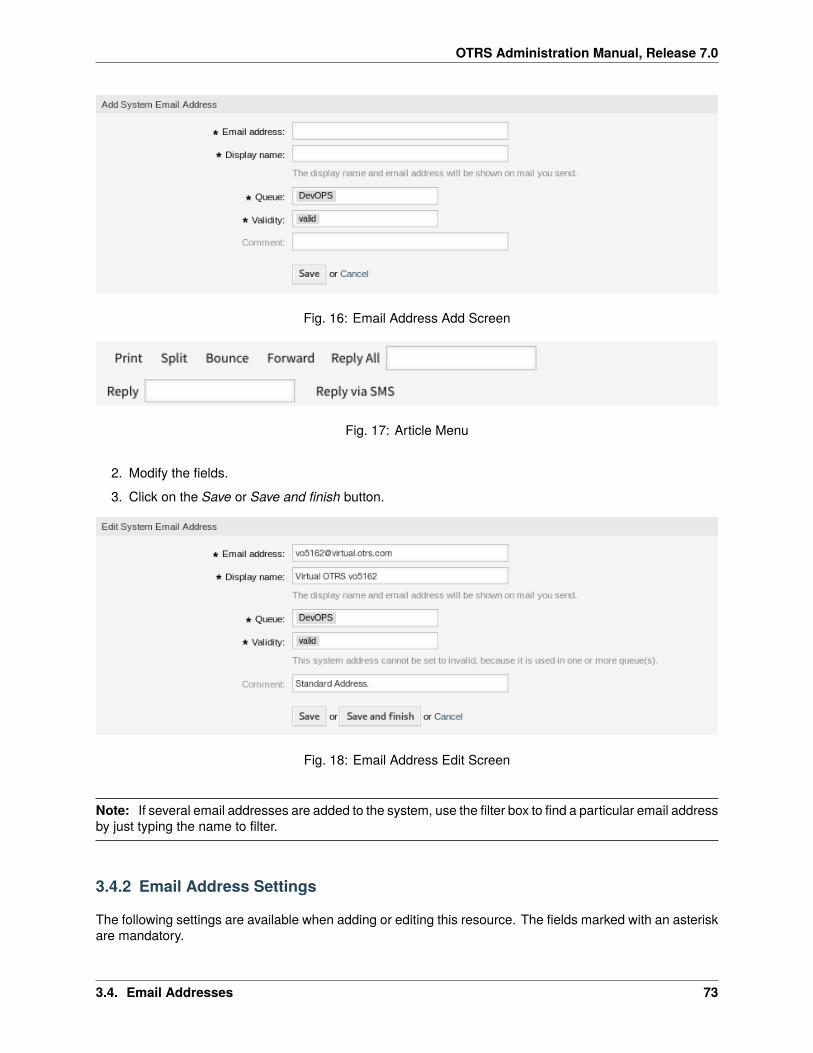
OTRS Administration Manual, Release 7.0
Fig. 16: Email Address Add Screen
Fig. 17: Article Menu
2. Modify the fields.
3. Click on the Save or Save and finish button.
Fig. 18: Email Address Edit Screen
Note: If several email addresses are added to the system, use the filter box to find a particular email addressby just typing the name to filter.
3.4.2 Email Address Settings
The following settings are available when adding or editing this resource. The fields marked with an asteriskare mandatory.
3.4. Email Addresses 73
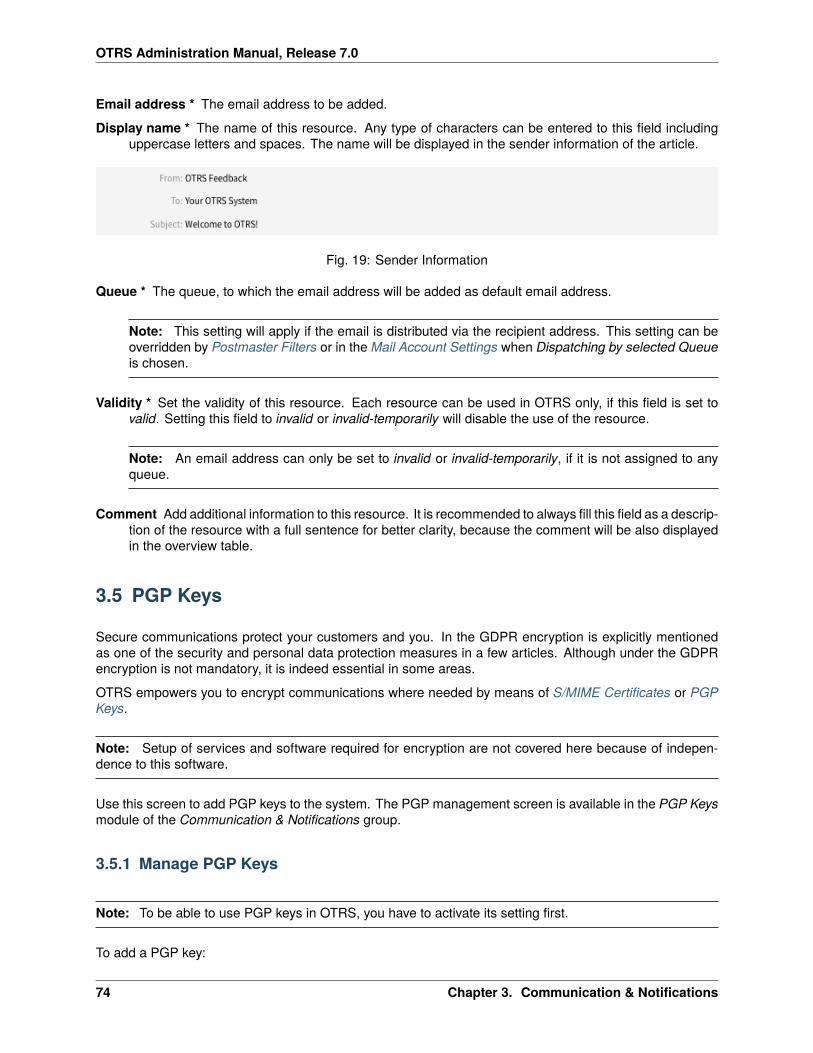
OTRS Administration Manual, Release 7.0
Email address * The email address to be added.
Display name * The name of this resource. Any type of characters can be entered to this field includinguppercase letters and spaces. The name will be displayed in the sender information of the article.
Fig. 19: Sender Information
Queue * The queue, to which the email address will be added as default email address.
Note: This setting will apply if the email is distributed via the recipient address. This setting can beoverridden by Postmaster Filters or in the Mail Account Settings when Dispatching by selected Queueis chosen.
Validity * Set the validity of this resource. Each resource can be used in OTRS only, if this field is set tovalid. Setting this field to invalid or invalid-temporarily will disable the use of the resource.
Note: An email address can only be set to invalid or invalid-temporarily, if it is not assigned to anyqueue.
Comment Add additional information to this resource. It is recommended to always fill this field as a descrip-tion of the resource with a full sentence for better clarity, because the comment will be also displayedin the overview table.
3.5 PGP Keys
Secure communications protect your customers and you. In the GDPR encryption is explicitly mentionedas one of the security and personal data protection measures in a few articles. Although under the GDPRencryption is not mandatory, it is indeed essential in some areas.
OTRS empowers you to encrypt communications where needed by means of S/MIME Certificates or PGPKeys.
Note: Setup of services and software required for encryption are not covered here because of indepen-dence to this software.
Use this screen to add PGP keys to the system. The PGP management screen is available in the PGP Keysmodule of the Communication & Notifications group.
3.5.1 Manage PGP Keys
Note: To be able to use PGP keys in OTRS, you have to activate its setting first.
To add a PGP key:
74 Chapter 3. Communication & Notifications
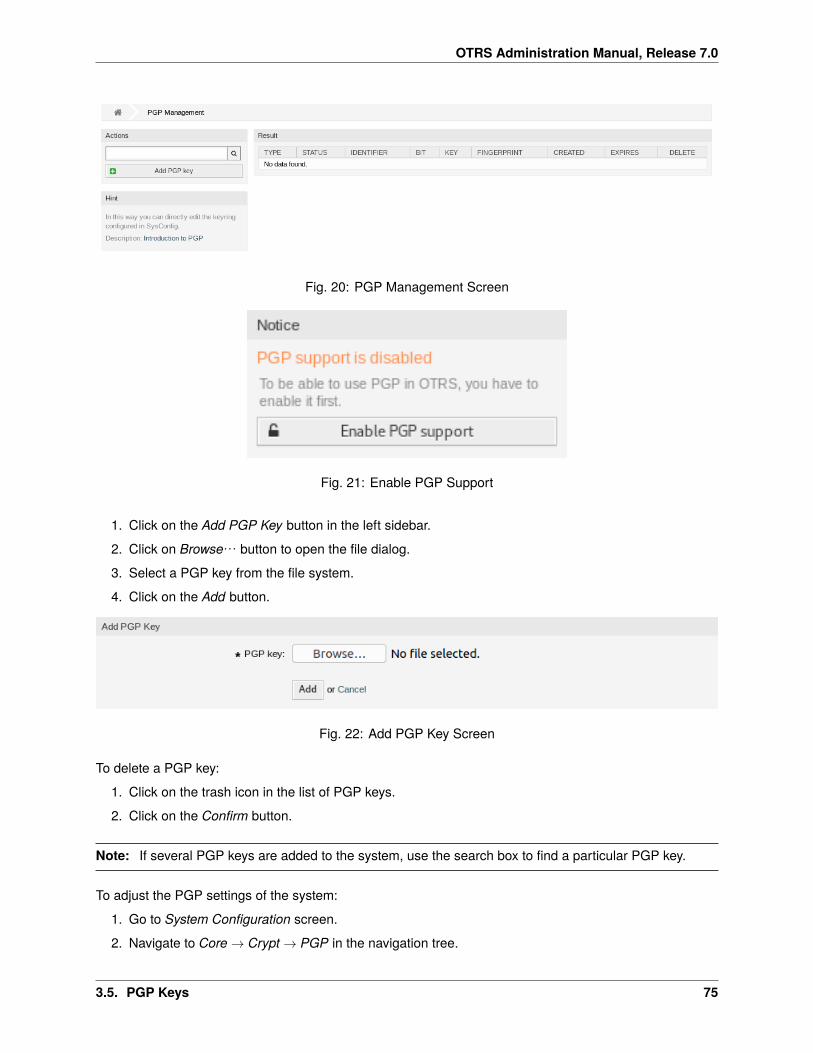
OTRS Administration Manual, Release 7.0
Fig. 20: PGP Management Screen
Fig. 21: Enable PGP Support
1. Click on the Add PGP Key button in the left sidebar.
2. Click on Browse… button to open the file dialog.
3. Select a PGP key from the file system.
4. Click on the Add button.
Fig. 22: Add PGP Key Screen
To delete a PGP key:
1. Click on the trash icon in the list of PGP keys.
2. Click on the Confirm button.
Note: If several PGP keys are added to the system, use the search box to find a particular PGP key.
To adjust the PGP settings of the system:
1. Go to System Configuration screen.
2. Navigate to Core → Crypt → PGP in the navigation tree.
3.5. PGP Keys 75
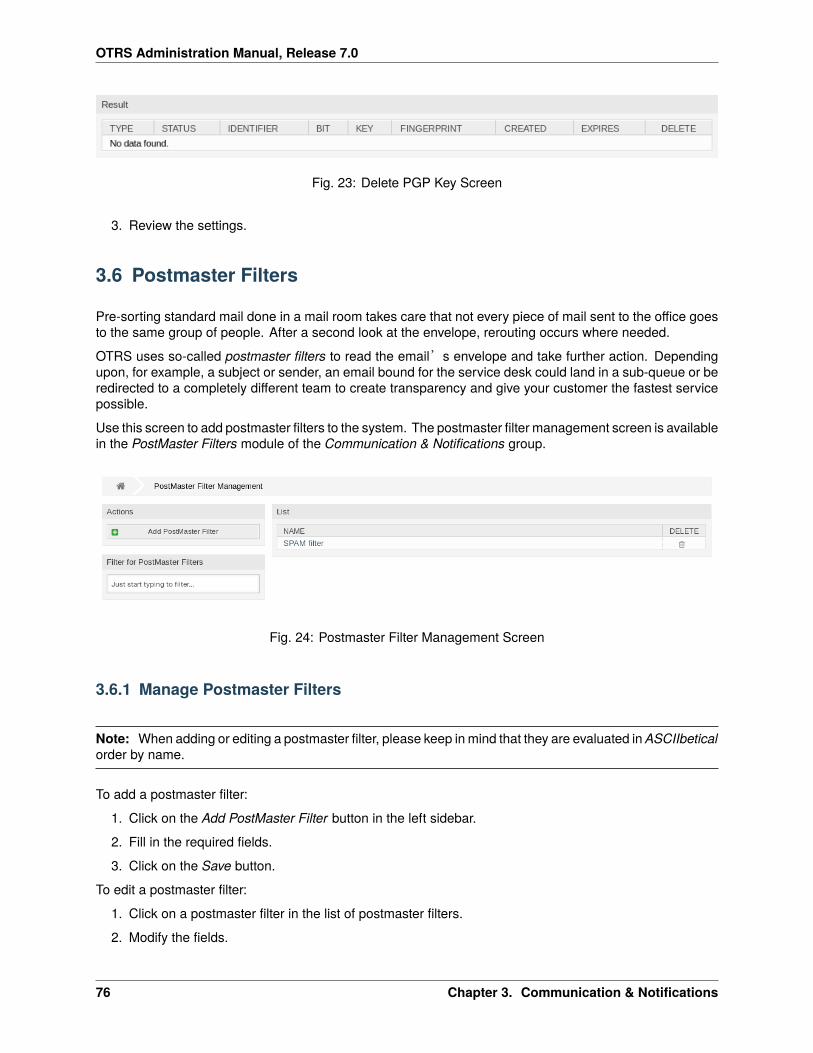
OTRS Administration Manual, Release 7.0
Fig. 23: Delete PGP Key Screen
3. Review the settings.
3.6 Postmaster Filters
Pre-sorting standard mail done in a mail room takes care that not every piece of mail sent to the office goesto the same group of people. After a second look at the envelope, rerouting occurs where needed.
OTRS uses so-called postmaster filters to read the email’s envelope and take further action. Dependingupon, for example, a subject or sender, an email bound for the service desk could land in a sub-queue or beredirected to a completely different team to create transparency and give your customer the fastest servicepossible.
Use this screen to add postmaster filters to the system. The postmaster filter management screen is availablein the PostMaster Filters module of the Communication & Notifications group.
Fig. 24: Postmaster Filter Management Screen
3.6.1 Manage Postmaster Filters
Note: When adding or editing a postmaster filter, please keep in mind that they are evaluated in ASCIIbeticalorder by name.
To add a postmaster filter:
1. Click on the Add PostMaster Filter button in the left sidebar.
2. Fill in the required fields.
3. Click on the Save button.
To edit a postmaster filter:
1. Click on a postmaster filter in the list of postmaster filters.
2. Modify the fields.
76 Chapter 3. Communication & Notifications
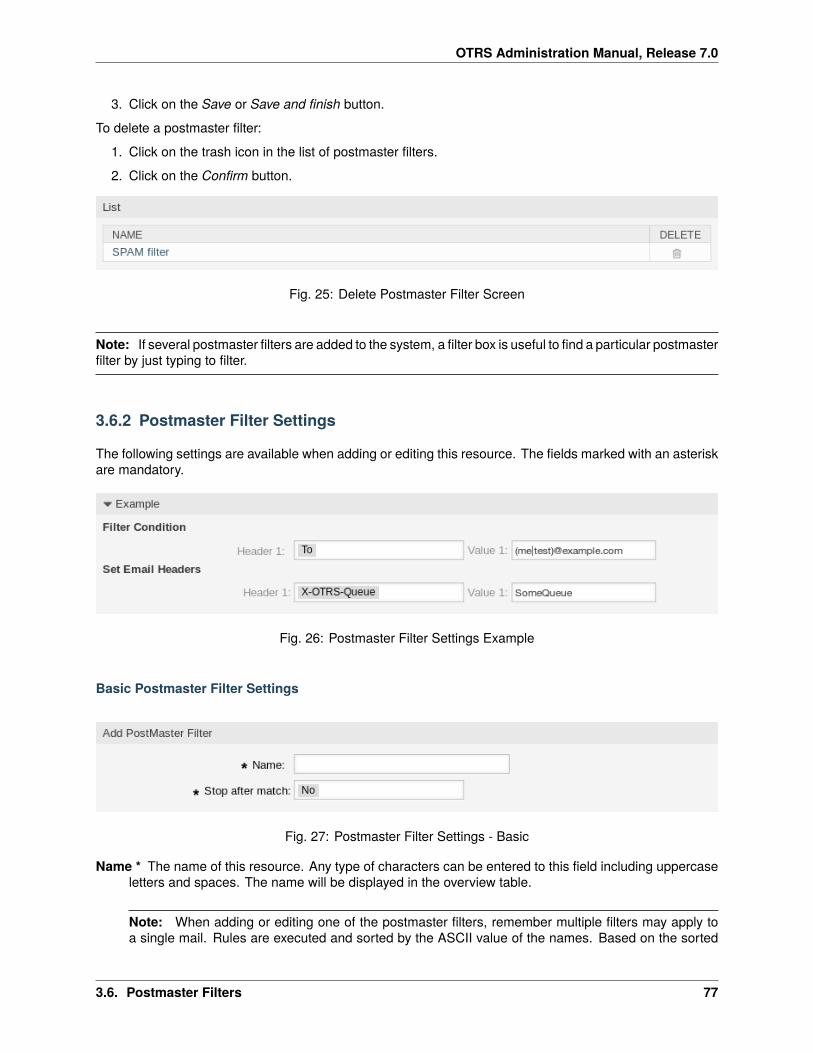
OTRS Administration Manual, Release 7.0
3. Click on the Save or Save and finish button.
To delete a postmaster filter:
1. Click on the trash icon in the list of postmaster filters.
2. Click on the Confirm button.
Fig. 25: Delete Postmaster Filter Screen
Note: If several postmaster filters are added to the system, a filter box is useful to find a particular postmasterfilter by just typing to filter.
3.6.2 Postmaster Filter Settings
The following settings are available when adding or editing this resource. The fields marked with an asteriskare mandatory.
Fig. 26: Postmaster Filter Settings Example
Basic Postmaster Filter Settings
Fig. 27: Postmaster Filter Settings - Basic
Name * The name of this resource. Any type of characters can be entered to this field including uppercaseletters and spaces. The name will be displayed in the overview table.
Note: When adding or editing one of the postmaster filters, remember multiple filters may apply toa single mail. Rules are executed and sorted by the ASCII value of the names. Based on the sorted
3.6. Postmaster Filters 77
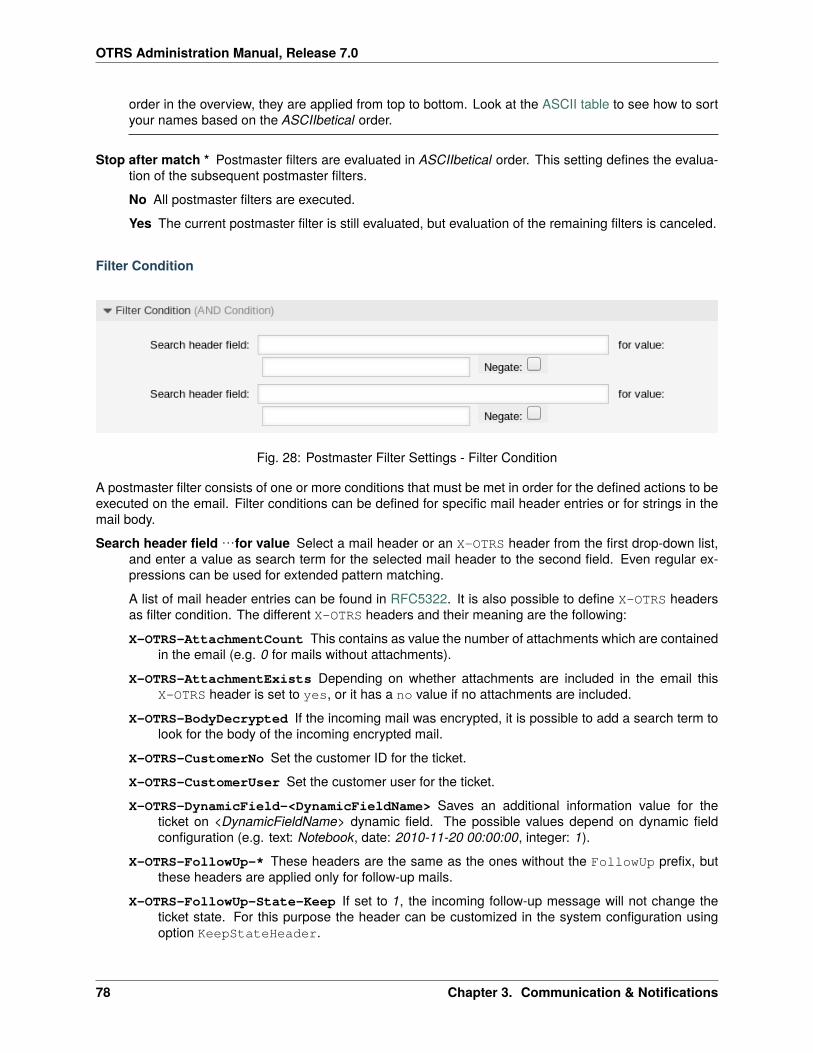
OTRS Administration Manual, Release 7.0
order in the overview, they are applied from top to bottom. Look at the ASCII table to see how to sortyour names based on the ASCIIbetical order.
Stop after match * Postmaster filters are evaluated in ASCIIbetical order. This setting defines the evalua-tion of the subsequent postmaster filters.
No All postmaster filters are executed.
Yes The current postmaster filter is still evaluated, but evaluation of the remaining filters is canceled.
Filter Condition
Fig. 28: Postmaster Filter Settings - Filter Condition
A postmaster filter consists of one or more conditions that must be met in order for the defined actions to beexecuted on the email. Filter conditions can be defined for specific mail header entries or for strings in themail body.
Search header field…for value Select a mail header or an X-OTRS header from the first drop-down list,and enter a value as search term for the selected mail header to the second field. Even regular ex-pressions can be used for extended pattern matching.
A list of mail header entries can be found in RFC5322. It is also possible to define X-OTRS headersas filter condition. The different X-OTRS headers and their meaning are the following:
X-OTRS-AttachmentCount This contains as value the number of attachments which are containedin the email (e.g. 0 for mails without attachments).
X-OTRS-AttachmentExists Depending on whether attachments are included in the email thisX-OTRS header is set to yes, or it has a no value if no attachments are included.
X-OTRS-BodyDecrypted If the incoming mail was encrypted, it is possible to add a search term tolook for the body of the incoming encrypted mail.
X-OTRS-CustomerNo Set the customer ID for the ticket.
X-OTRS-CustomerUser Set the customer user for the ticket.
X-OTRS-DynamicField-<DynamicFieldName> Saves an additional information value for theticket on <DynamicFieldName> dynamic field. The possible values depend on dynamic fieldconfiguration (e.g. text: Notebook, date: 2010-11-20 00:00:00, integer: 1).
X-OTRS-FollowUp-* These headers are the same as the ones without the FollowUp prefix, butthese headers are applied only for follow-up mails.
X-OTRS-FollowUp-State-Keep If set to 1, the incoming follow-up message will not change theticket state. For this purpose the header can be customized in the system configuration usingoption KeepStateHeader.
78 Chapter 3. Communication & Notifications
OTRS Administration Manual, Release 7.0
X-OTRS-Ignore If set to Yes or True, the incoming message will completely be ignored and neverdelivered to the system.
X-OTRS-IsVisibleForCustomer Controls if the article is shown to customer users. Possible val-ues are 0 or 1.
X-OTRS-Lock Set the lock state of a ticket. Possible values are lock or unlock.
X-OTRS-Loop If set to Yes or True, no auto answer is delivered to the sender of the message (mailloop protection).
X-OTRS-Owner Set the agent as owner for the ticket.
X-OTRS-OwnerID Set the agent ID as owner for the ticket.
X-OTRS-Priority Set the priority for the ticket.
X-OTRS-Queue Defines the queue in which the ticket should be sorted. If a queue is set with thisheader, this setting has priority over all other filter rules that refer to queues. If you use a sub-queue, specify it as Parent::Sub.
X-OTRS-Responsible Set the agent as responsible for the ticket.
X-OTRS-ResponsibleID Set the agent ID as responsible for the ticket.
X-OTRS-SenderType Set the sender type for the ticket. Possible values are agent, system orcustomer.
X-OTRS-Service Set the service for the ticket. If you use a sub-service, specify it as Parent::Sub.
X-OTRS-SLA Set the service level agreement for the ticket.
X-OTRS-State Set the state for the ticket.
X-OTRS-State-PendingTime Set the pending time for the ticket (you should sent a pending statevia X-OTRS-State). You can specify absolute dates like 2010-11-20 00:00:00 or relative dates,based on the arrival time of the email. Use the form + $Number $Unit, where $Unit can be s(seconds), m (minutes), h (hours) or d (days). Only one unit can be specified. Examples of validsettings: +50s (pending in 50 seconds), +30m (30 minutes), +12d (12 days).
Note: Settings like +1d 12h are not possible. You can specify +36h instead.
X-OTRS-Title Set the title for the ticket.
X-OTRS-Type Set the type for the ticket.
Warning: These headers must be manually injected into the mail by means not provided for by OTRS.OTRS only accepts X-OTRS headers from trusted sources.
See also:
The Mail Account Settings defines the trust level.
Negate If checked, the condition will use the negate search term.
Set Email Headers
In this section you can choose the actions that are triggered if the filter rules match.
3.6. Postmaster Filters 79
OTRS Administration Manual, Release 7.0
Fig. 29: Postmaster Filter Settings - Set Email Headers
Set email header…with value Select an X-OTRS header from the first drop-down list, and add a value tothe second field that should be set as value of the selected X-OTRS header.
See also:
The X-OTRS headers are already described above.
3.7 PostMaster Mail Accounts
Just as a company doesn’t just have one department which receives traditional mail, your service desk willalso serve multiple teams. Each team can have its physical email mailbox.
OTRS eases setup for email mailboxes. OTRS manages polling one or multiple email mailboxes of anyinternet standard type.
Use this screen to add mail accounts to the system. The mail account management screen is available inthe PostMaster Mail Accounts module of the Communication & Notifications group.
Fig. 30: Mail Account Management Screen
80 Chapter 3. Communication & Notifications
OTRS Administration Manual, Release 7.0
Warning: When fetching mail, OTRS deletes the mail from the POP or IMAP server. There is no optionto also keep a copy on the server. If you want to retain a copy on the server, you should create forwardingrules on your mail server. Please consult your mail server documentation for details.
Note: If you choose IMAP, you can specify a folder for collection. Selective dispatching of mails is thenpossible.
All data for the mail accounts are saved in the OTRS database. The bin/otrs.Console.plMaint::PostMaster::MailAccountFetch command uses the settings in the database and fetchesthe mail. You can execute it manually to check if all your mail settings are working properly.
On a default installation, the mail is fetched every 10 minutes when the OTRS daemon is running.
3.7.1 Manage Mail Accounts
To add a mail account:
1. Click on the Add Mail Account button in the left sidebar.
2. Fill in the required fields.
3. Click on the Save button.
Fig. 31: Add Mail Account Screen
To edit a mail account:
1. Click on a mail account in the list of mail accounts.
2. Modify the fields.
3.7. PostMaster Mail Accounts 81
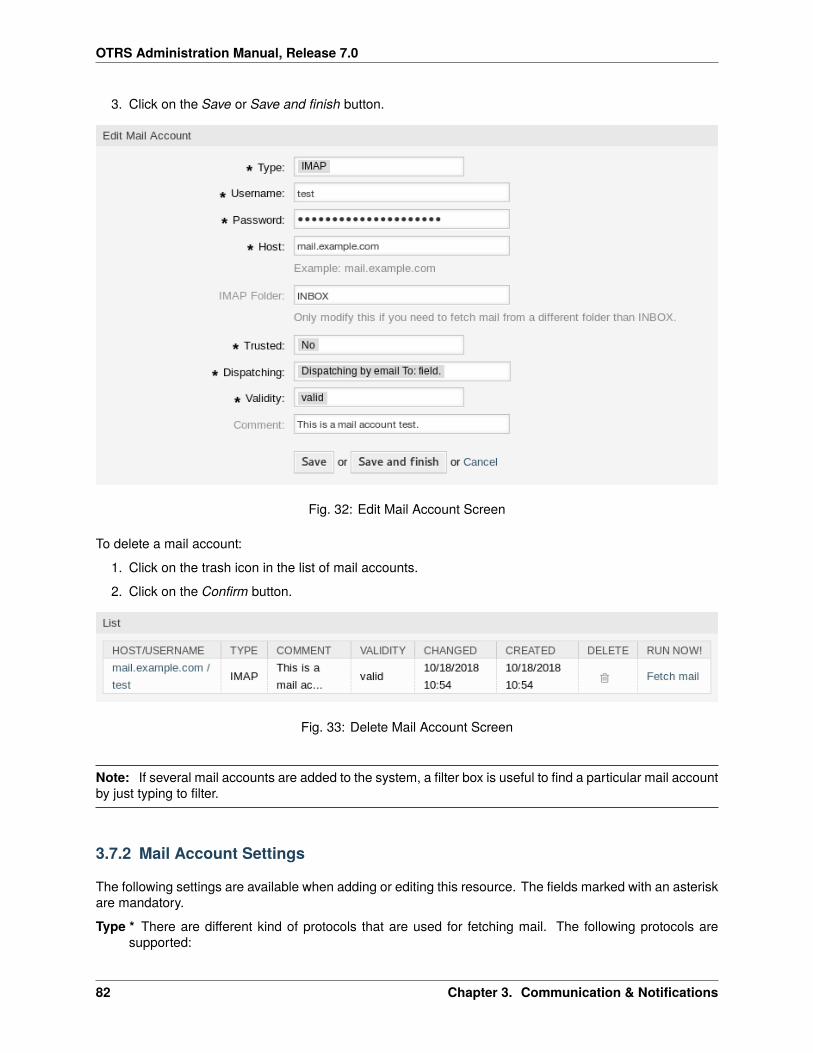
OTRS Administration Manual, Release 7.0
3. Click on the Save or Save and finish button.
Fig. 32: Edit Mail Account Screen
To delete a mail account:
1. Click on the trash icon in the list of mail accounts.
2. Click on the Confirm button.
Fig. 33: Delete Mail Account Screen
Note: If several mail accounts are added to the system, a filter box is useful to find a particular mail accountby just typing to filter.
3.7.2 Mail Account Settings
The following settings are available when adding or editing this resource. The fields marked with an asteriskare mandatory.
Type * There are different kind of protocols that are used for fetching mail. The following protocols aresupported:
82 Chapter 3. Communication & Notifications
OTRS Administration Manual, Release 7.0
• IMAP
• IMAPS
• IMAPTLS
• POP3
• POP3S
• POP3TLS
Username * The username of the mail account.
Password * The password of the mail account.
Host * The host name of the mail account. Specify how the current article subject should be dealt with. Thefollowing methods are available:
IMAP Folder The folder in the mail account to be fetched. Other folders remain untouched.
Trusted If Yes is selected, any X-OTRS headers attached to an incoming message are evaluated and ex-ecuted. Because the X-OTRS header can execute some actions in the ticket system, you should setthis option to Yes only for known senders.
See also:
The X-OTRS headers are explained in the filter conditions of Postmaster Filters.
Dispatching The distribution of incoming messages can be controlled if they need to be sorted by queueor by the content of the To: field.
Dispatching by email To: field The system checks if a queue is linked with the address in the To:field of the incoming mail. You can link an address to a queue in the Email Addresses screen. Ifthe address in the To: field is linked with a queue, the new message will be sorted into the linkedqueue. If no link is found between the address in the To: field and any queue, then the messageflows into the Raw queue in the system, which is the postmaster default queue after a defaultinstallation.
See also:
The postmaster default queue can be changed in system configuration setting PostmasterDe-faultQueue.
Dispatching by selected Queue All incoming messages will be sorted into the specified queue. Theaddress where the mail was sent to is disregarded in this case.
Validity * Set the validity of this resource. Each resource can be used in OTRS only, if this field is set tovalid. Setting this field to invalid or invalid-temporarily will disable the use of the resource.
Comment Add additional information to this resource. It is recommended to always fill this field as a descrip-tion of the resource with a full sentence for better clarity, because the comment will be also displayedin the overview table.
3.8 S/MIME Certificates
Faculty and staff have key roles safeguarding critical information by implementing information security poli-cies, standards, and controls. Safe email communication is a vital part of protecting this communication.
OTRS empowers you to encrypt communications where needed by means of S/MIME Certificates or PGPKeys.
3.8. S/MIME Certificates 83
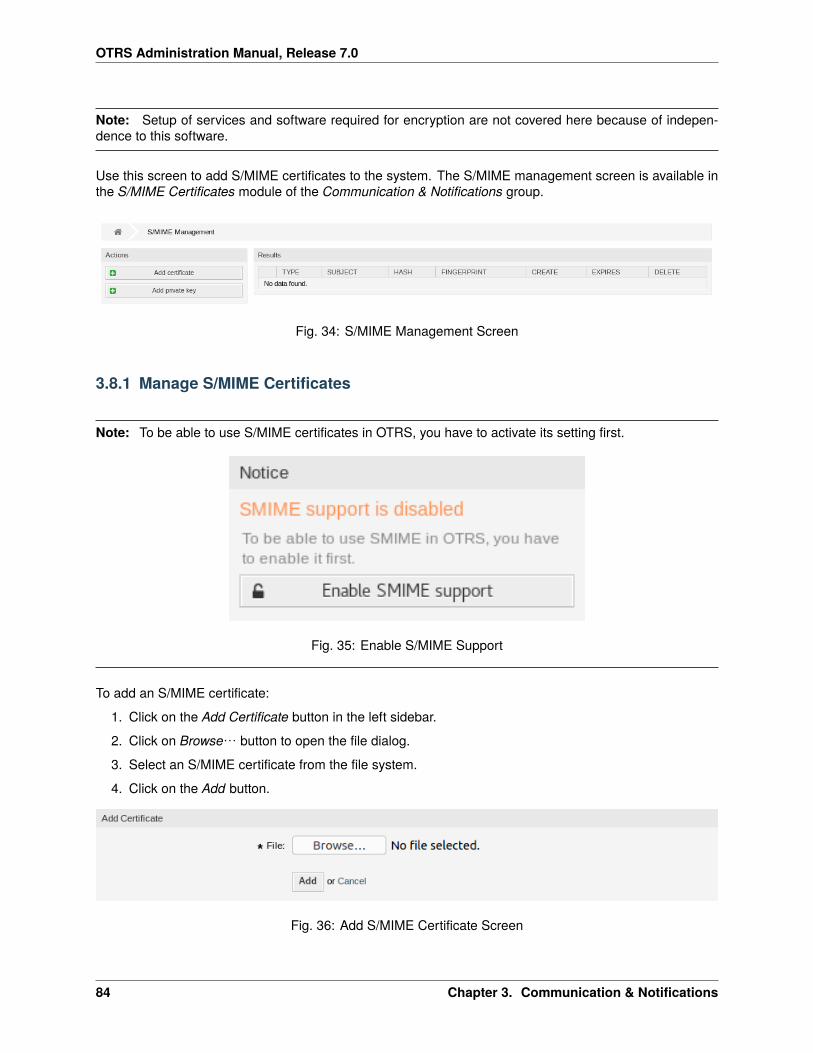
OTRS Administration Manual, Release 7.0
Note: Setup of services and software required for encryption are not covered here because of indepen-dence to this software.
Use this screen to add S/MIME certificates to the system. The S/MIME management screen is available inthe S/MIME Certificates module of the Communication & Notifications group.
Fig. 34: S/MIME Management Screen
3.8.1 Manage S/MIME Certificates
Note: To be able to use S/MIME certificates in OTRS, you have to activate its setting first.
Fig. 35: Enable S/MIME Support
To add an S/MIME certificate:
1. Click on the Add Certificate button in the left sidebar.
2. Click on Browse… button to open the file dialog.
3. Select an S/MIME certificate from the file system.
4. Click on the Add button.
Fig. 36: Add S/MIME Certificate Screen
84 Chapter 3. Communication & Notifications
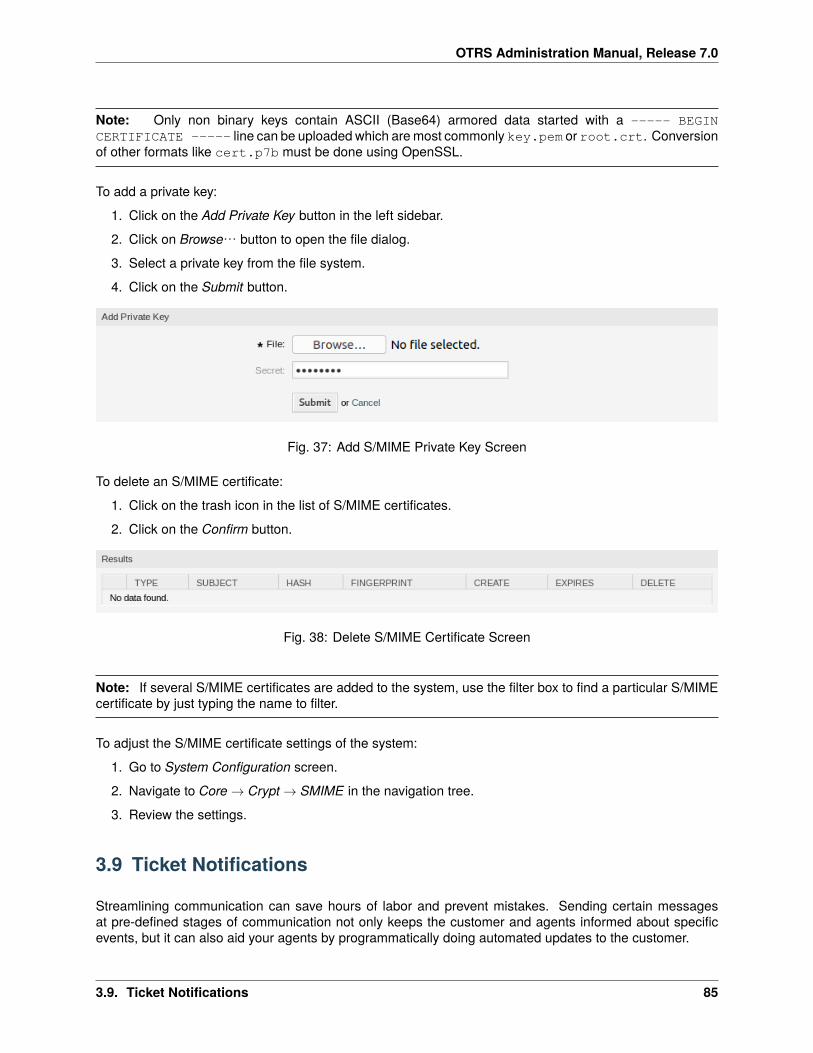
OTRS Administration Manual, Release 7.0
Note: Only non binary keys contain ASCII (Base64) armored data started with a ----- BEGINCERTIFICATE ----- line can be uploaded which are most commonly key.pem or root.crt. Conversionof other formats like cert.p7b must be done using OpenSSL.
To add a private key:
1. Click on the Add Private Key button in the left sidebar.
2. Click on Browse… button to open the file dialog.
3. Select a private key from the file system.
4. Click on the Submit button.
Fig. 37: Add S/MIME Private Key Screen
To delete an S/MIME certificate:
1. Click on the trash icon in the list of S/MIME certificates.
2. Click on the Confirm button.
Fig. 38: Delete S/MIME Certificate Screen
Note: If several S/MIME certificates are added to the system, use the filter box to find a particular S/MIMEcertificate by just typing the name to filter.
To adjust the S/MIME certificate settings of the system:
1. Go to System Configuration screen.
2. Navigate to Core → Crypt → SMIME in the navigation tree.
3. Review the settings.
3.9 Ticket Notifications
Streamlining communication can save hours of labor and prevent mistakes. Sending certain messagesat pre-defined stages of communication not only keeps the customer and agents informed about specificevents, but it can also aid your agents by programmatically doing automated updates to the customer.
3.9. Ticket Notifications 85

OTRS Administration Manual, Release 7.0
The flexible OTRS is an industry leader in email communication and offers you complete control of notifica-tions based on any event in your system.
Use this screen to add ticket notifications to the system. In a fresh OTRS installation several ticket notifi-cations are already added by default. The ticket notification management screen is available in the TicketNotifications module of the Communication & Notifications group.
Fig. 39: Ticket Notification Management Screen
3.9.1 Manage Ticket Notifications
To add a ticket notification:
1. Click on the Add Notification button in the left sidebar.
2. Fill in the required fields as explained in Ticket Notification Settings.
3. Click on the Save button.
To edit a ticket notification:
1. Click on a ticket notification in the list of ticket notifications.
2. Modify the fields as explained in Ticket Notification Settings.
3. Click on the Save or Save and finish button.
86 Chapter 3. Communication & Notifications
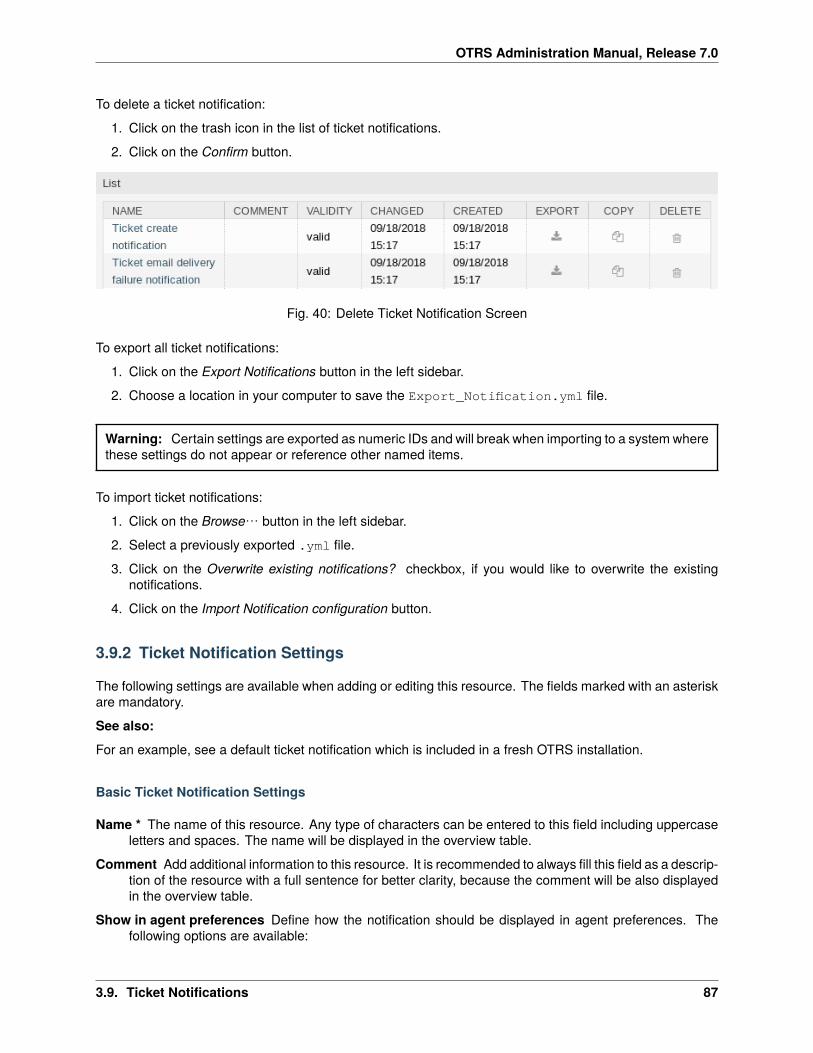
OTRS Administration Manual, Release 7.0
To delete a ticket notification:
1. Click on the trash icon in the list of ticket notifications.
2. Click on the Confirm button.
Fig. 40: Delete Ticket Notification Screen
To export all ticket notifications:
1. Click on the Export Notifications button in the left sidebar.
2. Choose a location in your computer to save the Export_Notification.yml file.
Warning: Certain settings are exported as numeric IDs and will break when importing to a system wherethese settings do not appear or reference other named items.
To import ticket notifications:
1. Click on the Browse… button in the left sidebar.
2. Select a previously exported .yml file.
3. Click on the Overwrite existing notifications? checkbox, if you would like to overwrite the existingnotifications.
4. Click on the Import Notification configuration button.
3.9.2 Ticket Notification Settings
The following settings are available when adding or editing this resource. The fields marked with an asteriskare mandatory.
See also:
For an example, see a default ticket notification which is included in a fresh OTRS installation.
Basic Ticket Notification Settings
Name * The name of this resource. Any type of characters can be entered to this field including uppercaseletters and spaces. The name will be displayed in the overview table.
Comment Add additional information to this resource. It is recommended to always fill this field as a descrip-tion of the resource with a full sentence for better clarity, because the comment will be also displayedin the overview table.
Show in agent preferences Define how the notification should be displayed in agent preferences. Thefollowing options are available:
3.9. Ticket Notifications 87
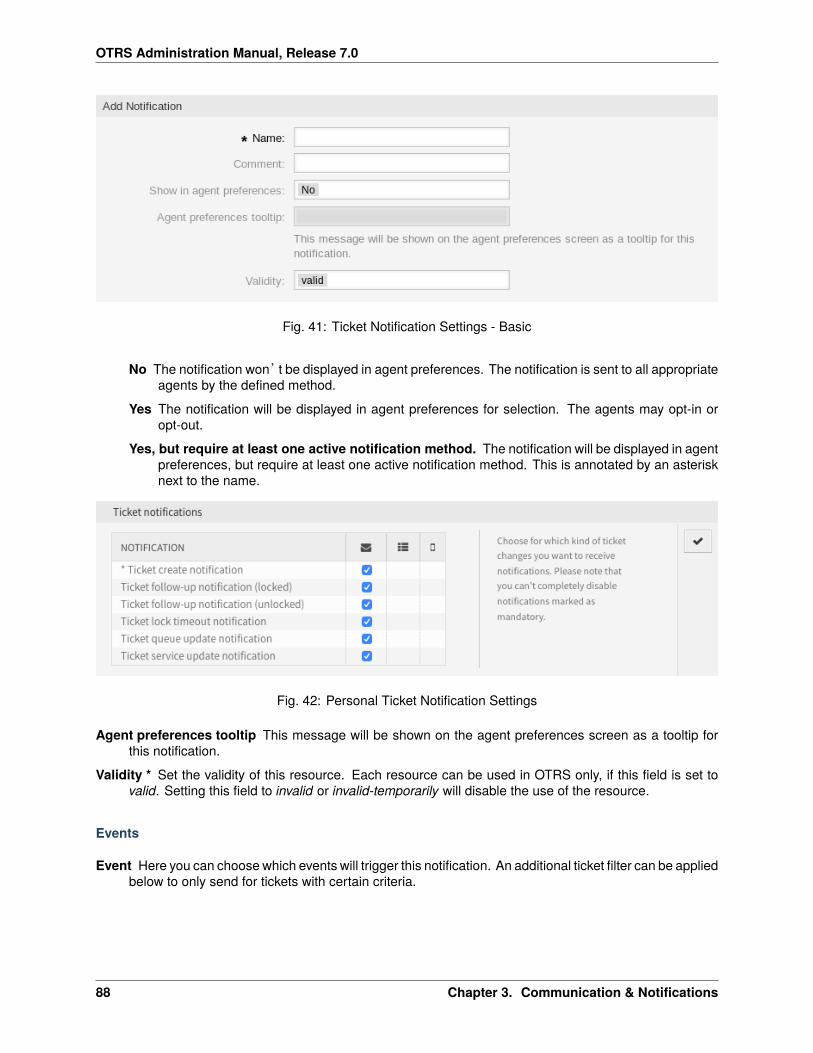
OTRS Administration Manual, Release 7.0
Fig. 41: Ticket Notification Settings - Basic
No The notification won’t be displayed in agent preferences. The notification is sent to all appropriateagents by the defined method.
Yes The notification will be displayed in agent preferences for selection. The agents may opt-in oropt-out.
Yes, but require at least one active notification method. The notification will be displayed in agentpreferences, but require at least one active notification method. This is annotated by an asterisknext to the name.
Fig. 42: Personal Ticket Notification Settings
Agent preferences tooltip This message will be shown on the agent preferences screen as a tooltip forthis notification.
Validity * Set the validity of this resource. Each resource can be used in OTRS only, if this field is set tovalid. Setting this field to invalid or invalid-temporarily will disable the use of the resource.
Events
Event Here you can choose which events will trigger this notification. An additional ticket filter can be appliedbelow to only send for tickets with certain criteria.
88 Chapter 3. Communication & Notifications
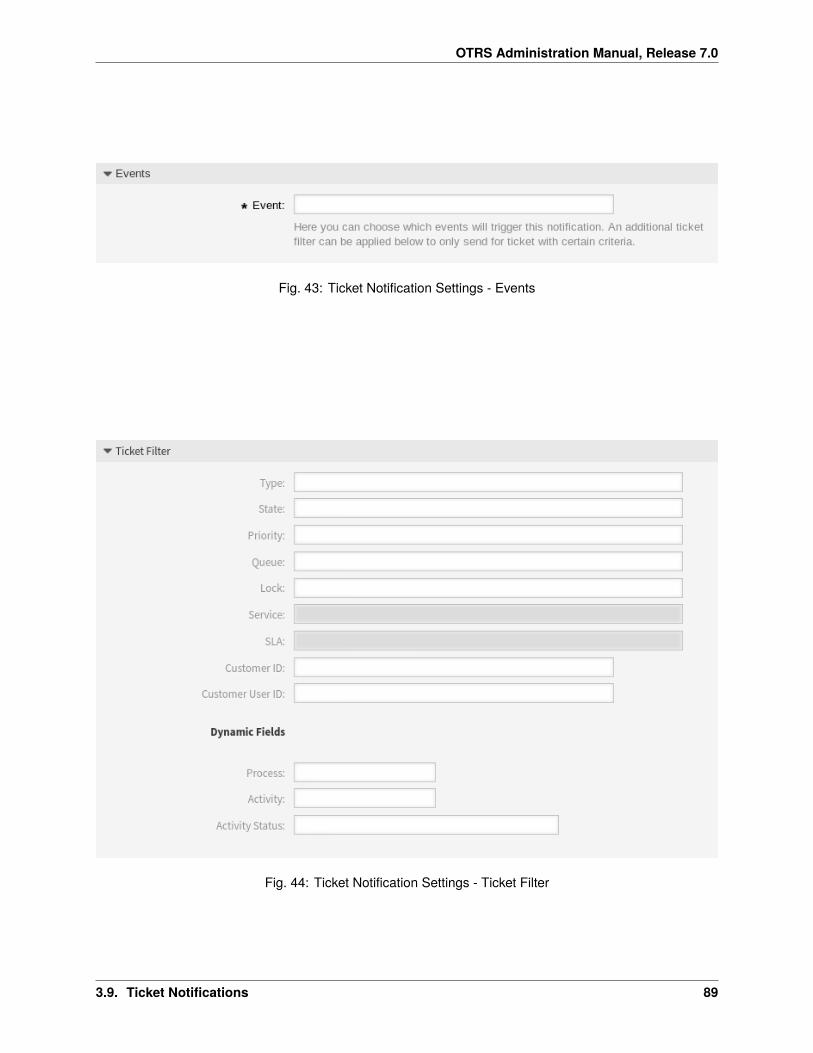
OTRS Administration Manual, Release 7.0
Fig. 43: Ticket Notification Settings - Events
Fig. 44: Ticket Notification Settings - Ticket Filter
3.9. Ticket Notifications 89
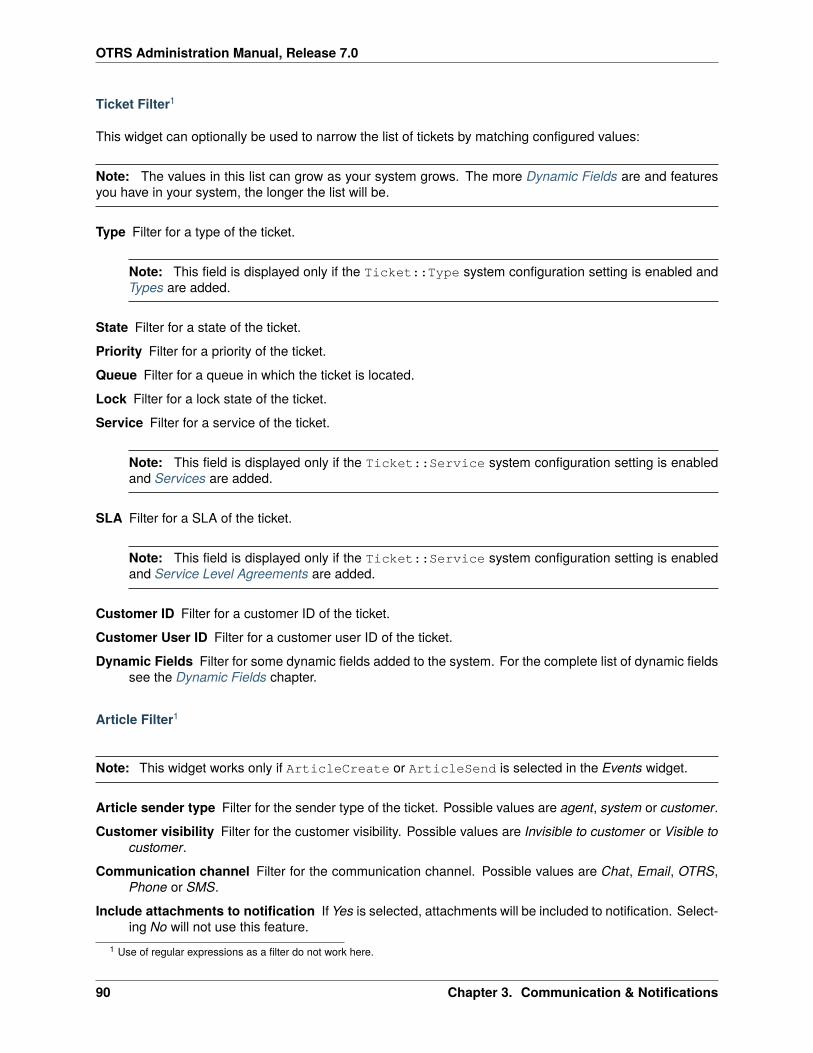
OTRS Administration Manual, Release 7.0
Ticket Filter1
This widget can optionally be used to narrow the list of tickets by matching configured values:
Note: The values in this list can grow as your system grows. The more Dynamic Fields are and featuresyou have in your system, the longer the list will be.
Type Filter for a type of the ticket.
Note: This field is displayed only if the Ticket::Type system configuration setting is enabled andTypes are added.
State Filter for a state of the ticket.
Priority Filter for a priority of the ticket.
Queue Filter for a queue in which the ticket is located.
Lock Filter for a lock state of the ticket.
Service Filter for a service of the ticket.
Note: This field is displayed only if the Ticket::Service system configuration setting is enabledand Services are added.
SLA Filter for a SLA of the ticket.
Note: This field is displayed only if the Ticket::Service system configuration setting is enabledand Service Level Agreements are added.
Customer ID Filter for a customer ID of the ticket.
Customer User ID Filter for a customer user ID of the ticket.
Dynamic Fields Filter for some dynamic fields added to the system. For the complete list of dynamic fieldssee the Dynamic Fields chapter.
Article Filter1
Note: This widget works only if ArticleCreate or ArticleSend is selected in the Events widget.
Article sender type Filter for the sender type of the ticket. Possible values are agent, system or customer.
Customer visibility Filter for the customer visibility. Possible values are Invisible to customer or Visible tocustomer.
Communication channel Filter for the communication channel. Possible values are Chat, Email, OTRS,Phone or SMS.
Include attachments to notification If Yes is selected, attachments will be included to notification. Select-ing No will not use this feature.
1 Use of regular expressions as a filter do not work here.
90 Chapter 3. Communication & Notifications
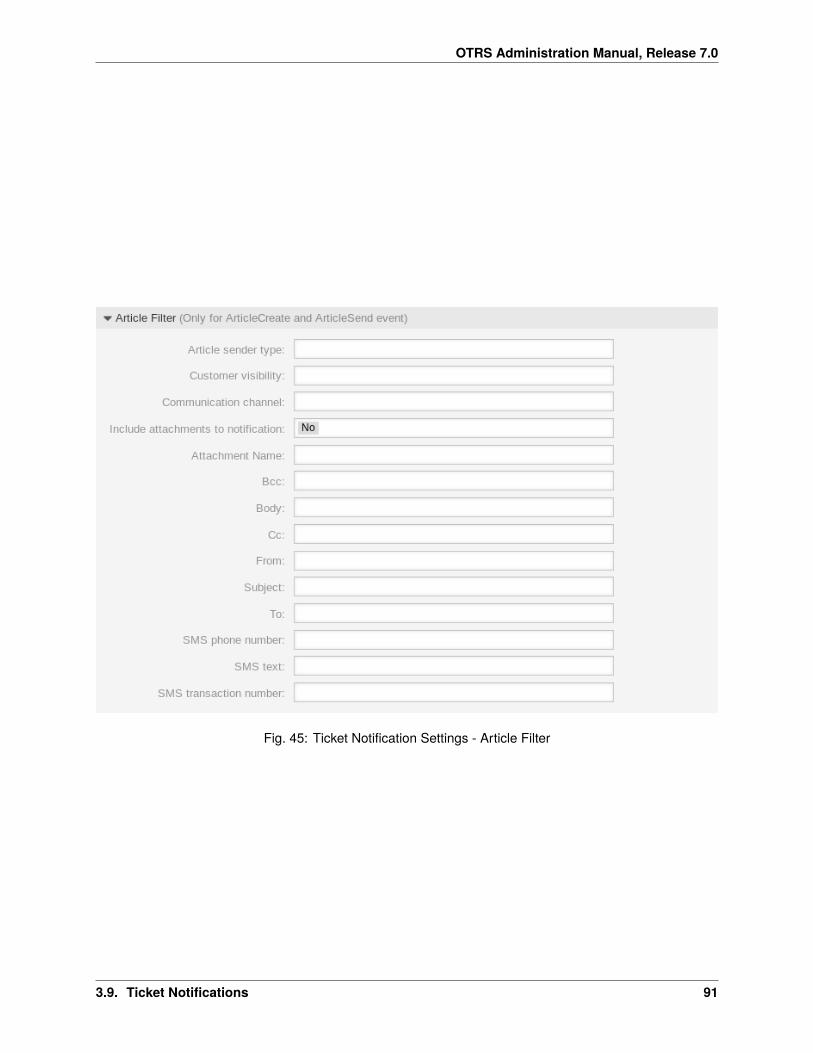
OTRS Administration Manual, Release 7.0
Fig. 45: Ticket Notification Settings - Article Filter
3.9. Ticket Notifications 91
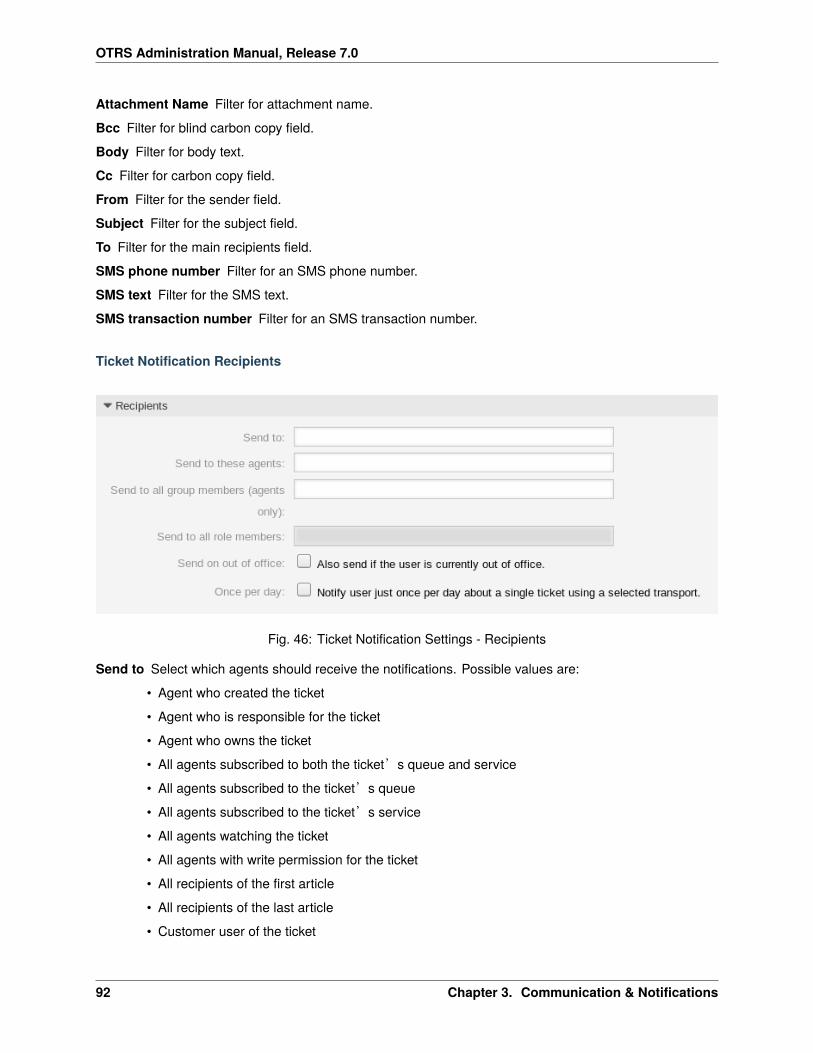
OTRS Administration Manual, Release 7.0
Attachment Name Filter for attachment name.
Bcc Filter for blind carbon copy field.
Body Filter for body text.
Cc Filter for carbon copy field.
From Filter for the sender field.
Subject Filter for the subject field.
To Filter for the main recipients field.
SMS phone number Filter for an SMS phone number.
SMS text Filter for the SMS text.
SMS transaction number Filter for an SMS transaction number.
Ticket Notification Recipients
Fig. 46: Ticket Notification Settings - Recipients
Send to Select which agents should receive the notifications. Possible values are:
• Agent who created the ticket
• Agent who is responsible for the ticket
• Agent who owns the ticket
• All agents subscribed to both the ticket’s queue and service
• All agents subscribed to the ticket’s queue
• All agents subscribed to the ticket’s service
• All agents watching the ticket
• All agents with write permission for the ticket
• All recipients of the first article
• All recipients of the last article
• Customer user of the ticket
92 Chapter 3. Communication & Notifications
OTRS Administration Manual, Release 7.0
Send to these agents One or more agents can be selected who should receive the notifications.
Send to all group members (agents only) One or more groups can be selected whom agents should re-ceive the notifications.
Send to all role members One or more roles can be selected whom agents should receive the notifica-tions.
Send on out of office If this option is checked, the notification will be sent even if the agent is currently outof office.
Once per day Notify users just once per day about a single ticket using a selected transport. If this is thefirst notification about a ticket, then the notification will be sent. If a notification was already sent beforeand this option is checked, the OTRS daemon will check the time the last notification was sent. If therewas no notification sent in the last 24 hours, the notification will be sent again.
Note: The notifications respect the permissions of the agent. Notifications are sent to agents only if theagent has at least read permissions for the ticket in that moment in time when the notification is triggered.
Ticket Notification Methods
Enable this notification method Enable or disable this notification method. A notification method can beemail, web view or SMS.
Note: To use the SMS notification method, Cloud Services need to be enabled.
Active by default in agent preferences This is the default value for assigned recipient agents who didn’t make a choice for this notification in their preferences yet. If the box is enabled, the notification willbe sent to such agents.
Note: This field is displayed only if Yes is selected in the Show in agent preferences setting above.
Additional recipient email addresses Additional recipients can be added here. Use comma or semicolonto separate the email addresses.
Article visible for customer An article will be created if the notification is sent to the customer or an addi-tional email address.
Email template Select which email template should be used for the notification.
Note: Additional email templates can be added by placing a .tt file into the folder <OTRS_Home>/Kernel/Output/HTML/Templates/Standard/NotificationEvent/Email/. See the existingemail templates for an example.
Send signed and/or encrypted email Checking this option will encrypt the notification email.
Note: To use this feature, PGP Keys or S/MIME Certificates need to be enabled.
Email security level If Enable email security is checked, then this setting is activated. The following optionsare available:
3.9. Ticket Notifications 93
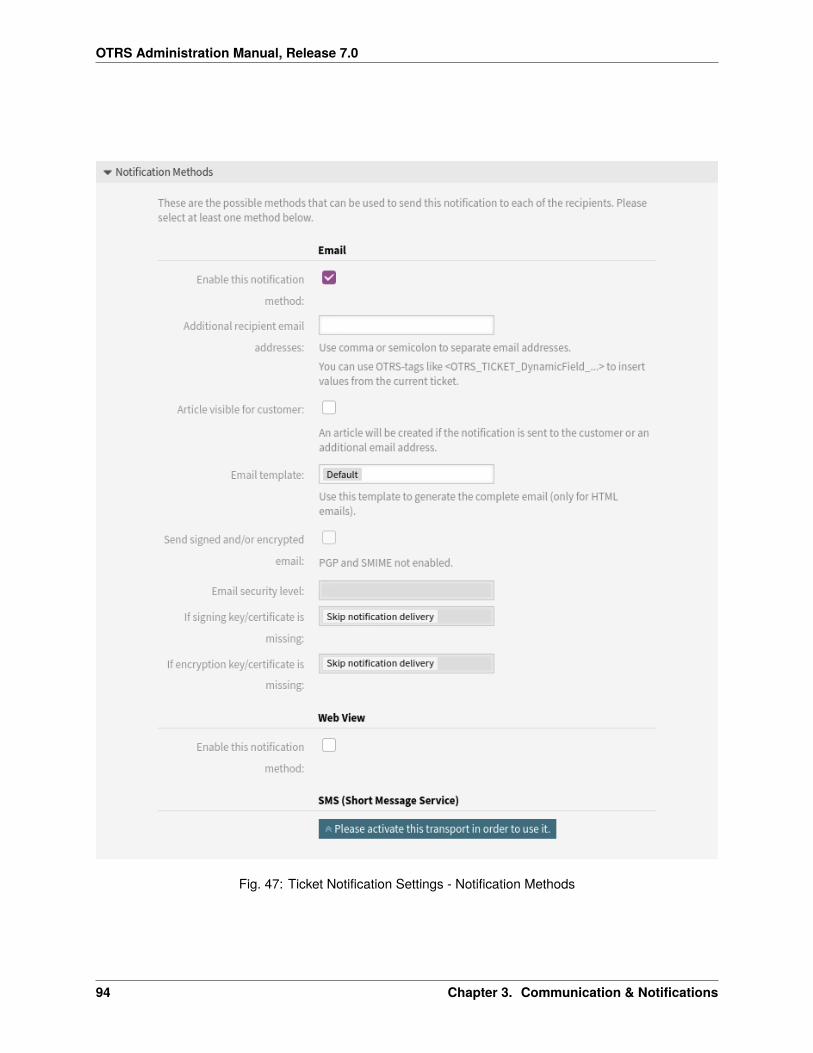
OTRS Administration Manual, Release 7.0
Fig. 47: Ticket Notification Settings - Notification Methods
94 Chapter 3. Communication & Notifications
OTRS Administration Manual, Release 7.0
PGP sign only Sign only the notification email with PGP key. If no PGP keys have been added to thesystem, this option is not visible.
PGP encrypt only Encrypt only the notification email with PGP key. If no PGP keys have been addedto the system, this option is not visible.
PGP sign and encrypt Sign and encrypt the notification email with PGP key. If no PGP keys havebeen added to the system, this option is not visible.
SMIME sign only Sign only the notification email with S/MIME certificate. If no S/MIME certificateshave been added to the system, this option is not visible.
SMIME encrypt only Encrypt only the notification email with S/MIME certificate. If no S/MIME certifi-cates have been added to the system, this option is not visible.
SMIME sign and encrypt Sign and encrypt the notification email with S/MIME certificate. If noS/MIME certificates have been added to the system, this option is not visible.
Note: To use this feature, PGP Keys or S/MIME Certificates need to be enabled.
If signing key/certificate is missing Select the method, that should be used if signing key or certificate ismissing.
If encryption key/certificate is missing: Select the method, that should be used if encryption key or cer-tificate is missing.
Notification Text
The main content of a notification can be added for each languages with localized subject and body text. Itis also possible to define static text content mixed with OTRS smart tags.
Subject * The localized subject for a specific language.
Text * The localized body text for a specific language.
Add new notification language Select which languages should be added to create localized notifications.The language of the customer or agent will be used as found in the customer and agent preferences.Secondarily, the system default language will be chosen. The fall back will always be English.
Warning: Deleting a language from the DefaultUsedLanguages setting that already has a notificationtext here will make the notification text unusable. If a language is not present or enabled on the system,the corresponding notification text could be deleted if it is not needed anymore.
3.9.3 Ticket Notification Variables
Using variables in the text makes it possible to personalize messages. Variables, known as OTRS tags, arereplaced by OTRS when generating the message. Find a list of available tags stems for this resource at thebottom of both add and edit screens.
For example, the variable <OTRS_TICKET_TicketNumber> expands to the ticket number allowing a tem-plate to include something like the following.
Ticket#<OTRS_TICKET_TicketNumber>
This tag expands, for example to:
3.9. Ticket Notifications 95
OTRS Administration Manual, Release 7.0
Fig. 48: Ticket Notification Settings - Notification Text
96 Chapter 3. Communication & Notifications
OTRS Administration Manual, Release 7.0
Fig. 49: Ticket Notification Variables
3.9. Ticket Notifications 97
OTRS Administration Manual, Release 7.0
Ticket#2018101042000012
98 Chapter 3. Communication & Notifications
CHAPTER 4
Users, Groups & Roles
Simple and complex organizations need a flexible way to control access to their service desk. Access,resources, and permissions must be orchestrated so that, the users and customers have access to theresources they need and their data is protected as needed by the system.
OTRS provides powerful tools for this purpose and their use is described in the following chapter.
4.1 Agents
Agent and access management for your service desk should be easy. Flexibility in adding, editing, invalidat-ing access and a quick overview of which permissions a user has will help you maintain a clean permissionssystem and record of your setup in OTRS.
OTRS aids you giving you the power to manage agents within OTRS across multiple back ends. OTRScan use up-to ten back end sources, even marking some as read-only. Managing user settings centrally, anadministrator can quickly invalidate a compromised account or set an account to out-of-office in case of anunexpected illness.
Use this screen to add agents to the system. A fresh OTRS installation contains an agent with administratorprivileges by default. The agent management screen is available in the Agents module of the Users, Groups& Roles group.
Warning: The superuser account username is root@localhost. Don’t use the superuser account towork with OTRS! Create new agents and work with these accounts instead. One of the adverse effectsis that Access Control Lists (ACL) will not have an effect on this user.
4.1.1 Manage Agents
99
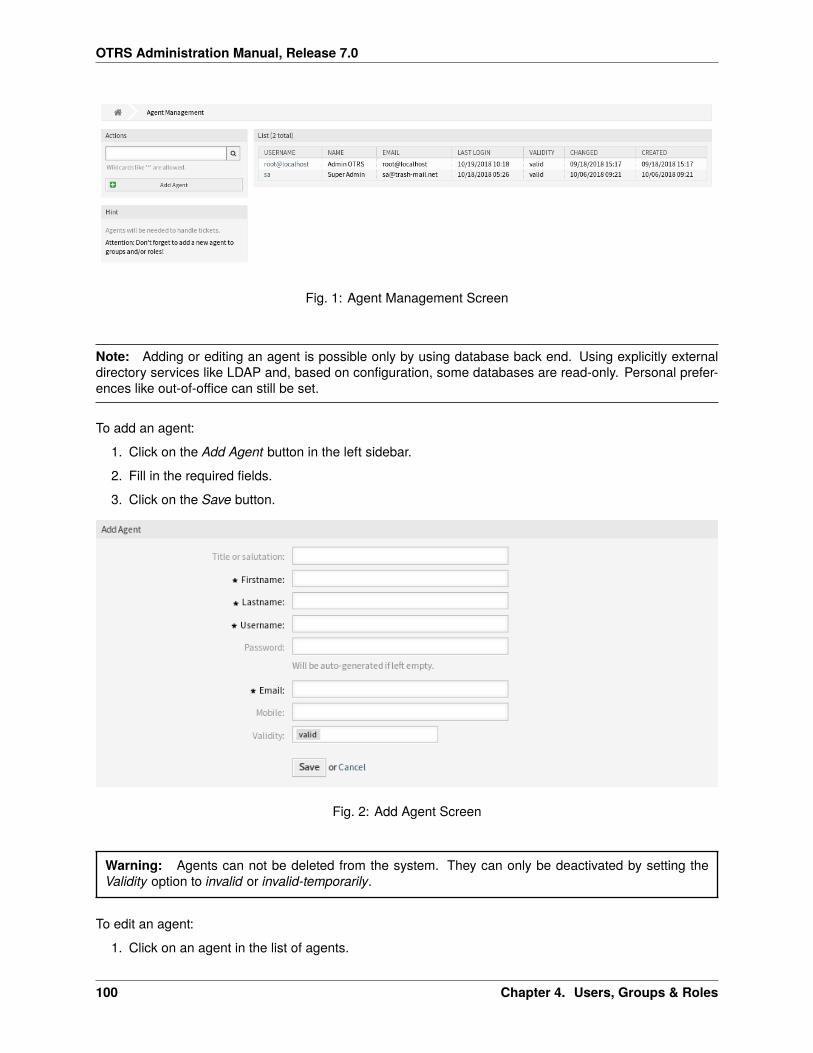
OTRS Administration Manual, Release 7.0
Fig. 1: Agent Management Screen
Note: Adding or editing an agent is possible only by using database back end. Using explicitly externaldirectory services like LDAP and, based on configuration, some databases are read-only. Personal prefer-ences like out-of-office can still be set.
To add an agent:
1. Click on the Add Agent button in the left sidebar.
2. Fill in the required fields.
3. Click on the Save button.
Fig. 2: Add Agent Screen
Warning: Agents can not be deleted from the system. They can only be deactivated by setting theValidity option to invalid or invalid-temporarily.
To edit an agent:
1. Click on an agent in the list of agents.
100 Chapter 4. Users, Groups & Roles
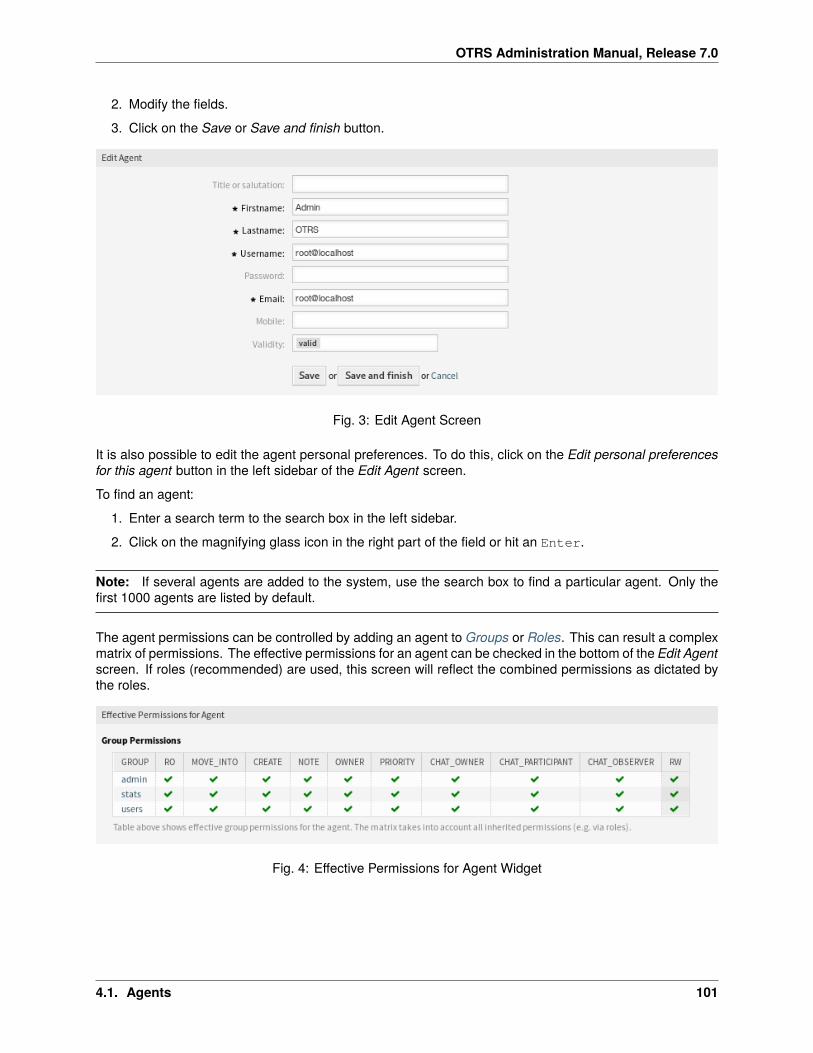
OTRS Administration Manual, Release 7.0
2. Modify the fields.
3. Click on the Save or Save and finish button.
Fig. 3: Edit Agent Screen
It is also possible to edit the agent personal preferences. To do this, click on the Edit personal preferencesfor this agent button in the left sidebar of the Edit Agent screen.
To find an agent:
1. Enter a search term to the search box in the left sidebar.
2. Click on the magnifying glass icon in the right part of the field or hit an Enter.
Note: If several agents are added to the system, use the search box to find a particular agent. Only thefirst 1000 agents are listed by default.
The agent permissions can be controlled by adding an agent to Groups or Roles. This can result a complexmatrix of permissions. The effective permissions for an agent can be checked in the bottom of the Edit Agentscreen. If roles (recommended) are used, this screen will reflect the combined permissions as dictated bythe roles.
Fig. 4: Effective Permissions for Agent Widget
4.1. Agents 101
OTRS Administration Manual, Release 7.0
4.1.2 Agent Settings
The following settings are available when adding or editing this resource. The fields marked with an asteriskare mandatory.
Note: These are the default fields available for the internal database table.
Title or salutation Some name prefix can be added here like Mr., Dr., Jr., etc.
Firstname * The first name of the agent.
Lastname * The last name of the agent.
See also:
The agent display name can be set via the system configuration setting FirstnameLastnameOrder.
Username * The username of the agent to login to the system.
Password The password of the agent. This will be auto-generated if left empty.
Email * The email address of the agent.
Note: The email syntax and validity of an available MX record could prevent you from submitting thisform. For some systems it may be acceptable to turn off these checks.
Mobile The mobile phone number of the agent.
Validity * Set the validity of this resource. Each resource can be used in OTRS only, if this field is set tovalid. Setting this field to invalid or invalid-temporarily will disable the use of the resource.
4.1.3 Agent Back Ends
Agents can be read and synchronized from an Active Directory® or LDAP server.
The administrator interface does not support the configuration of external back ends. Administrators need toedit the file Kernel/Config.pm by copying and pasting code snippets from Kernel/Config/Defaults.pm manually in case of using On-Premise system.
If you already have agent back end (e.g. SAP), it is possible to write a module that uses it.
Warning: Do not modify the file Kernel/Config/Defaults.pm, it will be overwritten after upgradingthe system! Copy and paste the code snippets into Kernel/Config.pm instead.
Note: The following configurations are taken care of by the Customer Solution Team in OTRS. Pleasecontact the Customer Solution Team via [email protected] or in the OTRS Portal.
Agent Back End - Database
The default user authentication back end for agents is the OTRS database. With this back end, all agentdata can be edited via the administrator interface.
102 Chapter 4. Users, Groups & Roles
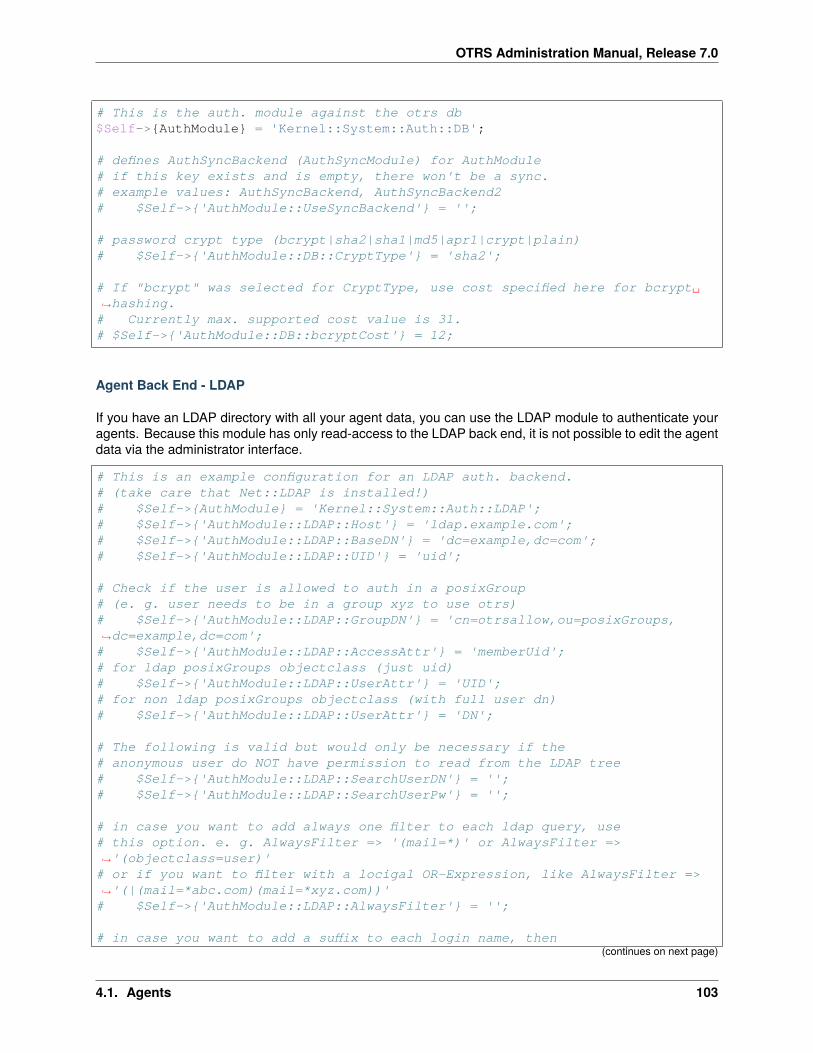
OTRS Administration Manual, Release 7.0
# This is the auth. module against the otrs db$Self->{AuthModule} = 'Kernel::System::Auth::DB';
# defines AuthSyncBackend (AuthSyncModule) for AuthModule# if this key exists and is empty, there won't be a sync.# example values: AuthSyncBackend, AuthSyncBackend2# $Self->{'AuthModule::UseSyncBackend'} = '';
# password crypt type (bcrypt|sha2|sha1|md5|apr1|crypt|plain)# $Self->{'AuthModule::DB::CryptType'} = 'sha2';
# If "bcrypt" was selected for CryptType, use cost specified here for bcrypt␣↪→hashing.
# Currently max. supported cost value is 31.# $Self->{'AuthModule::DB::bcryptCost'} = 12;
Agent Back End - LDAP
If you have an LDAP directory with all your agent data, you can use the LDAP module to authenticate youragents. Because this module has only read-access to the LDAP back end, it is not possible to edit the agentdata via the administrator interface.
# This is an example configuration for an LDAP auth. backend.# (take care that Net::LDAP is installed!)# $Self->{AuthModule} = 'Kernel::System::Auth::LDAP';# $Self->{'AuthModule::LDAP::Host'} = 'ldap.example.com';# $Self->{'AuthModule::LDAP::BaseDN'} = 'dc=example,dc=com';# $Self->{'AuthModule::LDAP::UID'} = 'uid';
# Check if the user is allowed to auth in a posixGroup# (e. g. user needs to be in a group xyz to use otrs)# $Self->{'AuthModule::LDAP::GroupDN'} = 'cn=otrsallow,ou=posixGroups,↪→dc=example,dc=com';
# $Self->{'AuthModule::LDAP::AccessAttr'} = 'memberUid';# for ldap posixGroups objectclass (just uid)# $Self->{'AuthModule::LDAP::UserAttr'} = 'UID';# for non ldap posixGroups objectclass (with full user dn)# $Self->{'AuthModule::LDAP::UserAttr'} = 'DN';
# The following is valid but would only be necessary if the# anonymous user do NOT have permission to read from the LDAP tree# $Self->{'AuthModule::LDAP::SearchUserDN'} = '';# $Self->{'AuthModule::LDAP::SearchUserPw'} = '';
# in case you want to add always one filter to each ldap query, use# this option. e. g. AlwaysFilter => '(mail=*)' or AlwaysFilter =>↪→'(objectclass=user)'
# or if you want to filter with a locigal OR-Expression, like AlwaysFilter =>↪→'(|(mail=*abc.com)(mail=*xyz.com))'
# $Self->{'AuthModule::LDAP::AlwaysFilter'} = '';
# in case you want to add a suffix to each login name, then(continues on next page)
4.1. Agents 103
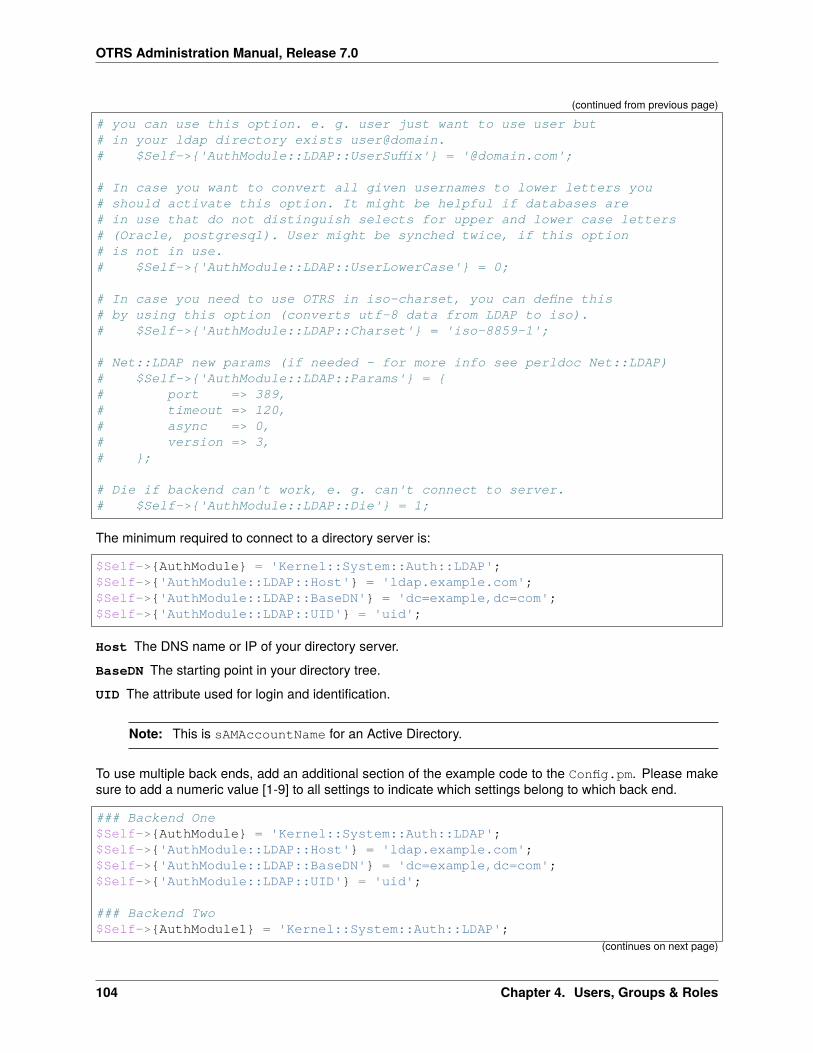
OTRS Administration Manual, Release 7.0
(continued from previous page)
# you can use this option. e. g. user just want to use user but# in your ldap directory exists user@domain.# $Self->{'AuthModule::LDAP::UserSuffix'} = '@domain.com';
# In case you want to convert all given usernames to lower letters you# should activate this option. It might be helpful if databases are# in use that do not distinguish selects for upper and lower case letters# (Oracle, postgresql). User might be synched twice, if this option# is not in use.# $Self->{'AuthModule::LDAP::UserLowerCase'} = 0;
# In case you need to use OTRS in iso-charset, you can define this# by using this option (converts utf-8 data from LDAP to iso).# $Self->{'AuthModule::LDAP::Charset'} = 'iso-8859-1';
# Net::LDAP new params (if needed - for more info see perldoc Net::LDAP)# $Self->{'AuthModule::LDAP::Params'} = {# port => 389,# timeout => 120,# async => 0,# version => 3,# };
# Die if backend can't work, e. g. can't connect to server.# $Self->{'AuthModule::LDAP::Die'} = 1;
The minimum required to connect to a directory server is:
$Self->{AuthModule} = 'Kernel::System::Auth::LDAP';$Self->{'AuthModule::LDAP::Host'} = 'ldap.example.com';$Self->{'AuthModule::LDAP::BaseDN'} = 'dc=example,dc=com';$Self->{'AuthModule::LDAP::UID'} = 'uid';
Host The DNS name or IP of your directory server.
BaseDN The starting point in your directory tree.
UID The attribute used for login and identification.
Note: This is sAMAccountName for an Active Directory.
To use multiple back ends, add an additional section of the example code to the Config.pm. Please makesure to add a numeric value [1-9] to all settings to indicate which settings belong to which back end.
### Backend One$Self->{AuthModule} = 'Kernel::System::Auth::LDAP';$Self->{'AuthModule::LDAP::Host'} = 'ldap.example.com';$Self->{'AuthModule::LDAP::BaseDN'} = 'dc=example,dc=com';$Self->{'AuthModule::LDAP::UID'} = 'uid';
### Backend Two$Self->{AuthModule1} = 'Kernel::System::Auth::LDAP';
(continues on next page)
104 Chapter 4. Users, Groups & Roles
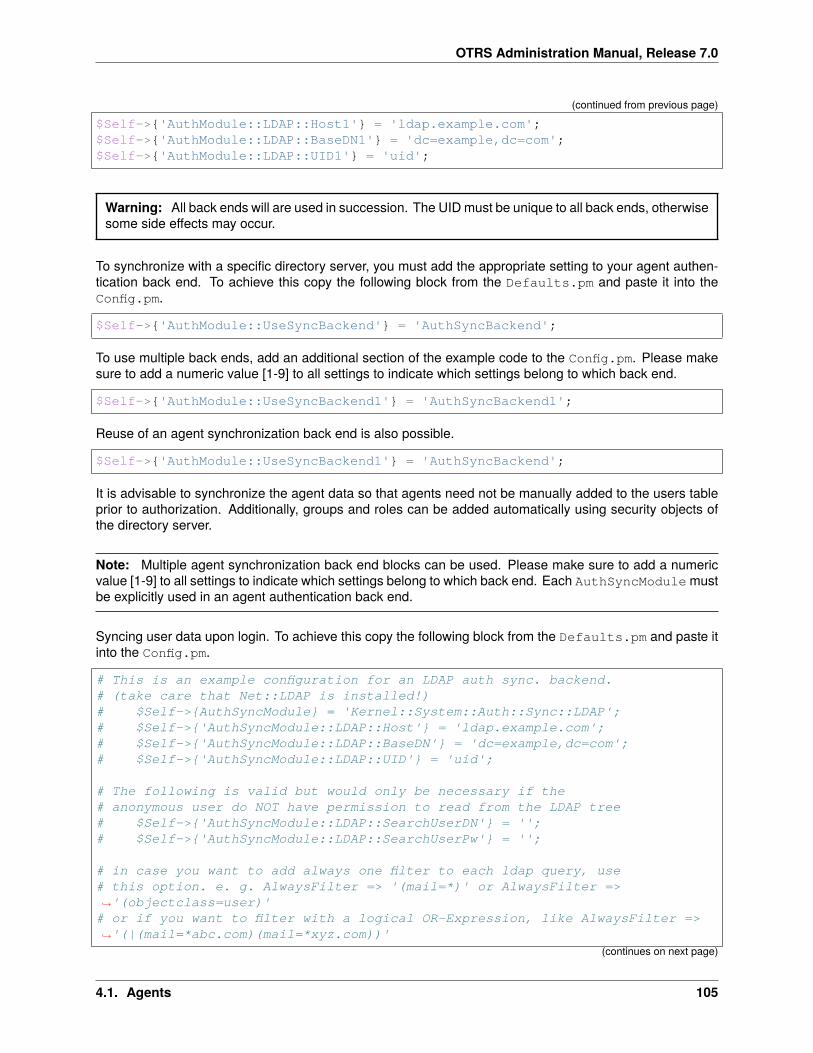
OTRS Administration Manual, Release 7.0
(continued from previous page)
$Self->{'AuthModule::LDAP::Host1'} = 'ldap.example.com';$Self->{'AuthModule::LDAP::BaseDN1'} = 'dc=example,dc=com';$Self->{'AuthModule::LDAP::UID1'} = 'uid';
Warning: All back ends will are used in succession. The UID must be unique to all back ends, otherwisesome side effects may occur.
To synchronize with a specific directory server, you must add the appropriate setting to your agent authen-tication back end. To achieve this copy the following block from the Defaults.pm and paste it into theConfig.pm.
$Self->{'AuthModule::UseSyncBackend'} = 'AuthSyncBackend';
To use multiple back ends, add an additional section of the example code to the Config.pm. Please makesure to add a numeric value [1-9] to all settings to indicate which settings belong to which back end.
$Self->{'AuthModule::UseSyncBackend1'} = 'AuthSyncBackend1';
Reuse of an agent synchronization back end is also possible.
$Self->{'AuthModule::UseSyncBackend1'} = 'AuthSyncBackend';
It is advisable to synchronize the agent data so that agents need not be manually added to the users tableprior to authorization. Additionally, groups and roles can be added automatically using security objects ofthe directory server.
Note: Multiple agent synchronization back end blocks can be used. Please make sure to add a numericvalue [1-9] to all settings to indicate which settings belong to which back end. Each AuthSyncModule mustbe explicitly used in an agent authentication back end.
Syncing user data upon login. To achieve this copy the following block from the Defaults.pm and paste itinto the Config.pm.
# This is an example configuration for an LDAP auth sync. backend.# (take care that Net::LDAP is installed!)# $Self->{AuthSyncModule} = 'Kernel::System::Auth::Sync::LDAP';# $Self->{'AuthSyncModule::LDAP::Host'} = 'ldap.example.com';# $Self->{'AuthSyncModule::LDAP::BaseDN'} = 'dc=example,dc=com';# $Self->{'AuthSyncModule::LDAP::UID'} = 'uid';
# The following is valid but would only be necessary if the# anonymous user do NOT have permission to read from the LDAP tree# $Self->{'AuthSyncModule::LDAP::SearchUserDN'} = '';# $Self->{'AuthSyncModule::LDAP::SearchUserPw'} = '';
# in case you want to add always one filter to each ldap query, use# this option. e. g. AlwaysFilter => '(mail=*)' or AlwaysFilter =>↪→'(objectclass=user)'
# or if you want to filter with a logical OR-Expression, like AlwaysFilter =>↪→'(|(mail=*abc.com)(mail=*xyz.com))'
(continues on next page)
4.1. Agents 105
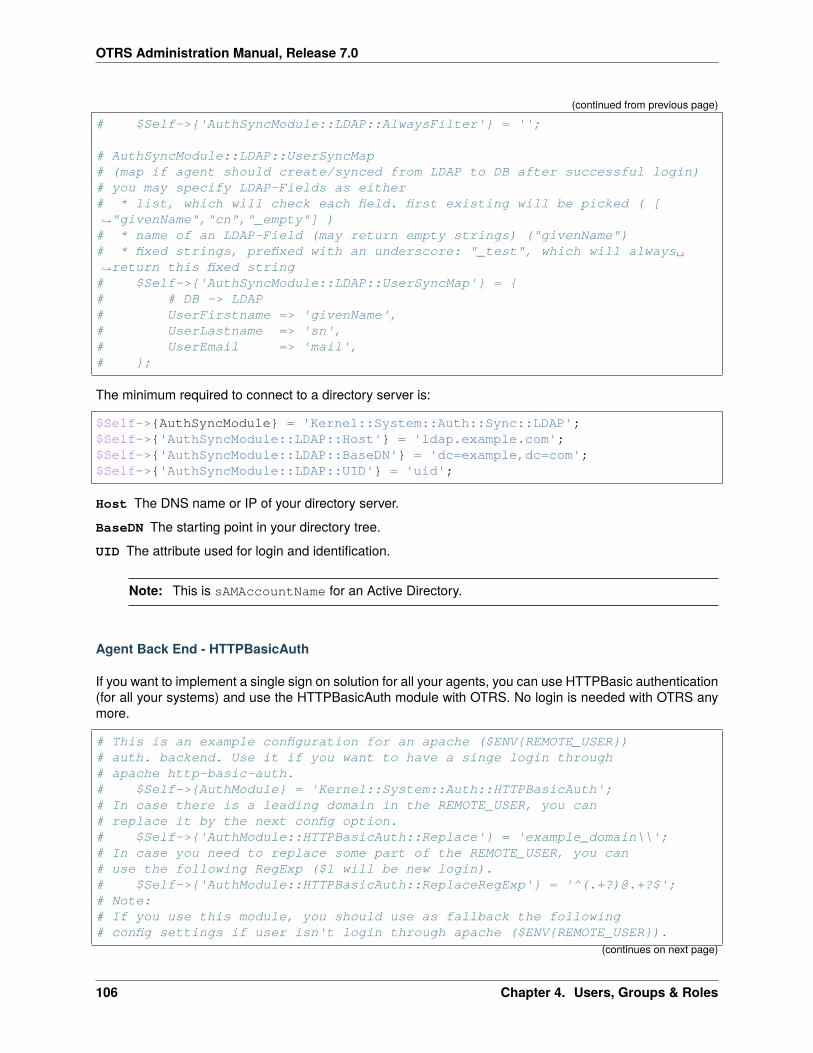
OTRS Administration Manual, Release 7.0
(continued from previous page)
# $Self->{'AuthSyncModule::LDAP::AlwaysFilter'} = '';
# AuthSyncModule::LDAP::UserSyncMap# (map if agent should create/synced from LDAP to DB after successful login)# you may specify LDAP-Fields as either# * list, which will check each field. first existing will be picked ( [↪→"givenName","cn","_empty"] )
# * name of an LDAP-Field (may return empty strings) ("givenName")# * fixed strings, prefixed with an underscore: "_test", which will always␣↪→return this fixed string
# $Self->{'AuthSyncModule::LDAP::UserSyncMap'} = {# # DB -> LDAP# UserFirstname => 'givenName',# UserLastname => 'sn',# UserEmail => 'mail',# };
The minimum required to connect to a directory server is:
$Self->{AuthSyncModule} = 'Kernel::System::Auth::Sync::LDAP';$Self->{'AuthSyncModule::LDAP::Host'} = 'ldap.example.com';$Self->{'AuthSyncModule::LDAP::BaseDN'} = 'dc=example,dc=com';$Self->{'AuthSyncModule::LDAP::UID'} = 'uid';
Host The DNS name or IP of your directory server.
BaseDN The starting point in your directory tree.
UID The attribute used for login and identification.
Note: This is sAMAccountName for an Active Directory.
Agent Back End - HTTPBasicAuth
If you want to implement a single sign on solution for all your agents, you can use HTTPBasic authentication(for all your systems) and use the HTTPBasicAuth module with OTRS. No login is needed with OTRS anymore.
# This is an example configuration for an apache ($ENV{REMOTE_USER})# auth. backend. Use it if you want to have a singe login through# apache http-basic-auth.# $Self->{AuthModule} = 'Kernel::System::Auth::HTTPBasicAuth';# In case there is a leading domain in the REMOTE_USER, you can# replace it by the next config option.# $Self->{'AuthModule::HTTPBasicAuth::Replace'} = 'example_domain\\';# In case you need to replace some part of the REMOTE_USER, you can# use the following RegExp ($1 will be new login).# $Self->{'AuthModule::HTTPBasicAuth::ReplaceRegExp'} = '^(.+?)@.+?$';# Note:# If you use this module, you should use as fallback the following# config settings if user isn't login through apache ($ENV{REMOTE_USER}).
(continues on next page)
106 Chapter 4. Users, Groups & Roles
OTRS Administration Manual, Release 7.0
(continued from previous page)
# $Self->{LoginURL} = 'http://host.example.com/not-authorised-for-otrs.html↪→';
# $Self->{LogoutURL} = 'http://host.example.com/thanks-for-using-otrs.html↪→';
Note: Multiple agent synchronization back end blocks can be used. Please make sure to add a numericvalue [1-9] to all settings to indicate which settings belong to which back end. Each AuthModule must beexplicitly used in an agent authentication back end.
Agent Back End - Radius
The settings shown in example below can be used to authenticate your agents against a Radius server.
# This is example configuration to auth. agents against a radius server.# $Self->{'AuthModule'} = 'Kernel::System::Auth::Radius';# $Self->{'AuthModule::Radius::Host'} = 'radiushost';# $Self->{'AuthModule::Radius::Password'} = 'radiussecret';
# Die if backend can't work, e. g. can't connect to server.# $Self->{'AuthModule::Radius::Die'} = 1;
4.2 Agents � Groups
Efficient and straightforward management of permissions is essential in a growing business. Easy assign-ment of a particular user to a group for quick access, or to remove access, to resources is a must in everycase.
The OTRS interface provides you both with the possibility to manage an agent’s access to one or moreparticular groups. As well, you can change multiple users access to any one group, efficiently and elegantly.
Use this screen to add one or more agents to one or more groups. To use this function, at least one agentand one group need to have been added to the system. The management screen is available in the Agents� Groups module of the Users, Groups & Roles group.
4.2.1 Manage Agents � Groups Relations
To assign some groups to an agent:
1. Click on an agent in the Agents column.
2. Select the permissions you would like to connect the agent to groups with.
3. Click on the Save or Save and finish button.
To assign some agents to a group:
1. Click on a group in the Groups column.
2. Select the permissions you would like to connect the group to agents with.
3. Click on the Save or Save and finish button.
4.2. Agents � Groups 107
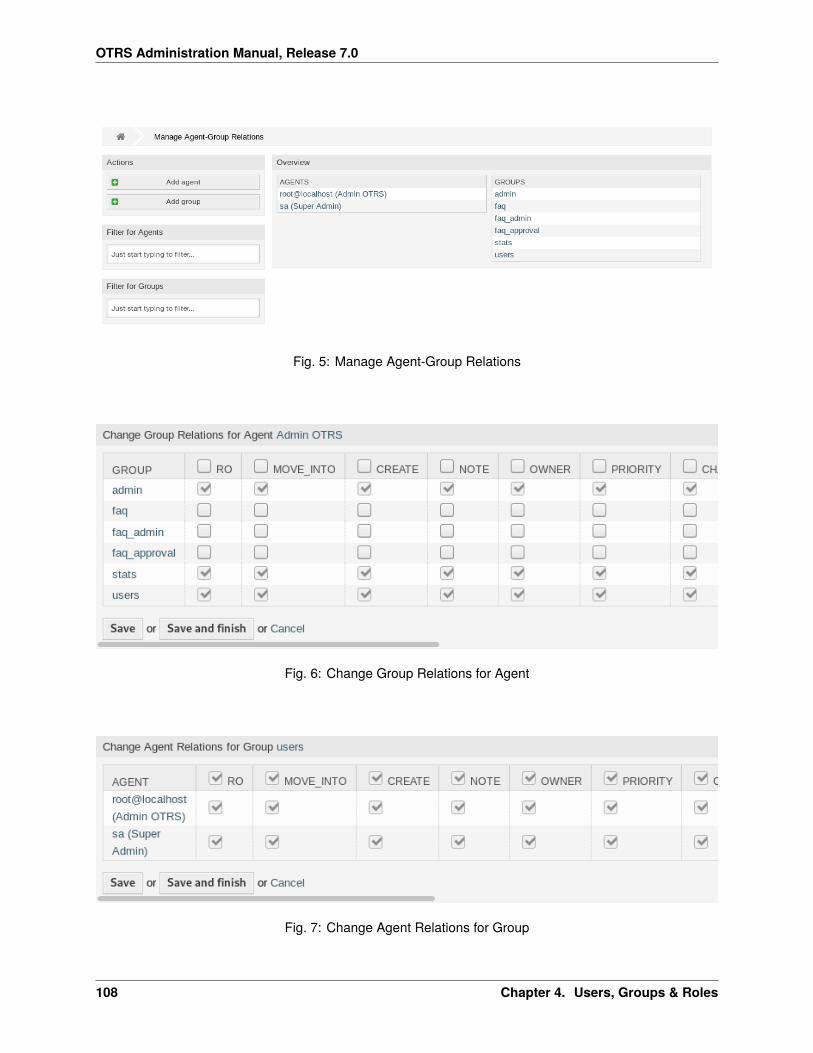
OTRS Administration Manual, Release 7.0
Fig. 5: Manage Agent-Group Relations
Fig. 6: Change Group Relations for Agent
Fig. 7: Change Agent Relations for Group
108 Chapter 4. Users, Groups & Roles
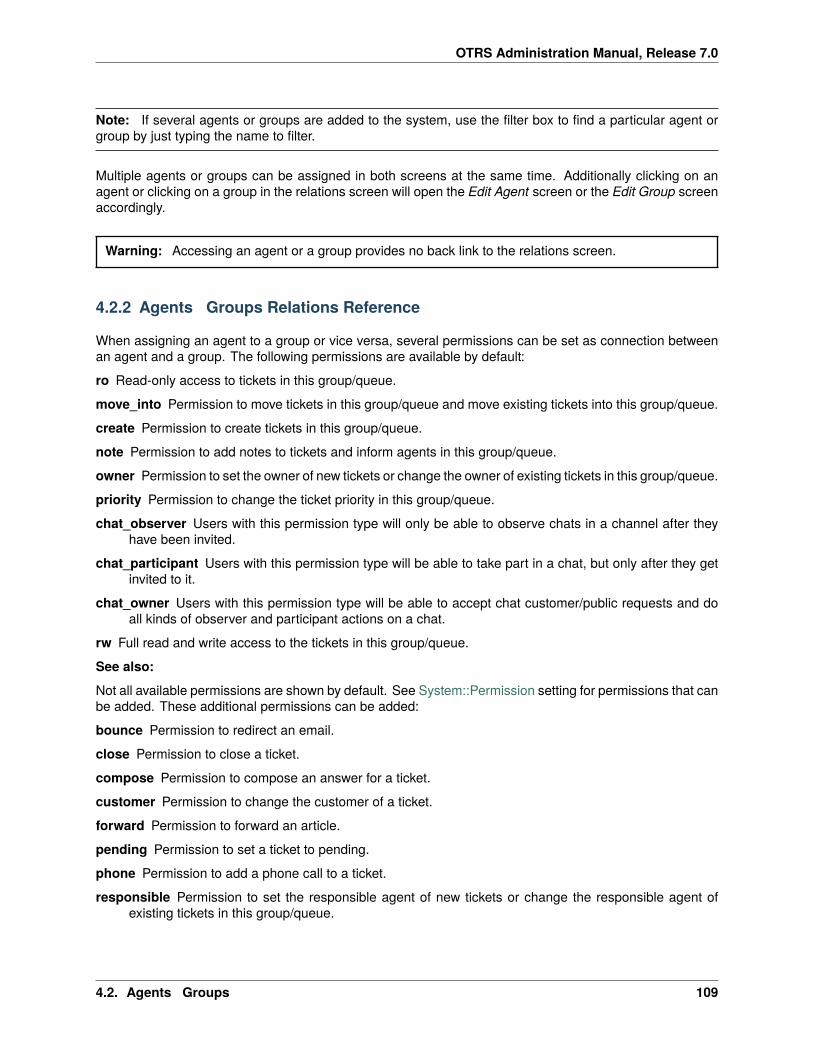
OTRS Administration Manual, Release 7.0
Note: If several agents or groups are added to the system, use the filter box to find a particular agent orgroup by just typing the name to filter.
Multiple agents or groups can be assigned in both screens at the same time. Additionally clicking on anagent or clicking on a group in the relations screen will open the Edit Agent screen or the Edit Group screenaccordingly.
Warning: Accessing an agent or a group provides no back link to the relations screen.
4.2.2 Agents � Groups Relations Reference
When assigning an agent to a group or vice versa, several permissions can be set as connection betweenan agent and a group. The following permissions are available by default:
ro Read-only access to tickets in this group/queue.
move_into Permission to move tickets in this group/queue and move existing tickets into this group/queue.
create Permission to create tickets in this group/queue.
note Permission to add notes to tickets and inform agents in this group/queue.
owner Permission to set the owner of new tickets or change the owner of existing tickets in this group/queue.
priority Permission to change the ticket priority in this group/queue.
chat_observer Users with this permission type will only be able to observe chats in a channel after theyhave been invited.
chat_participant Users with this permission type will be able to take part in a chat, but only after they getinvited to it.
chat_owner Users with this permission type will be able to accept chat customer/public requests and doall kinds of observer and participant actions on a chat.
rw Full read and write access to the tickets in this group/queue.
See also:
Not all available permissions are shown by default. See System::Permission setting for permissions that canbe added. These additional permissions can be added:
bounce Permission to redirect an email.
close Permission to close a ticket.
compose Permission to compose an answer for a ticket.
customer Permission to change the customer of a ticket.
forward Permission to forward an article.
pending Permission to set a ticket to pending.
phone Permission to add a phone call to a ticket.
responsible Permission to set the responsible agent of new tickets or change the responsible agent ofexisting tickets in this group/queue.
4.2. Agents � Groups 109
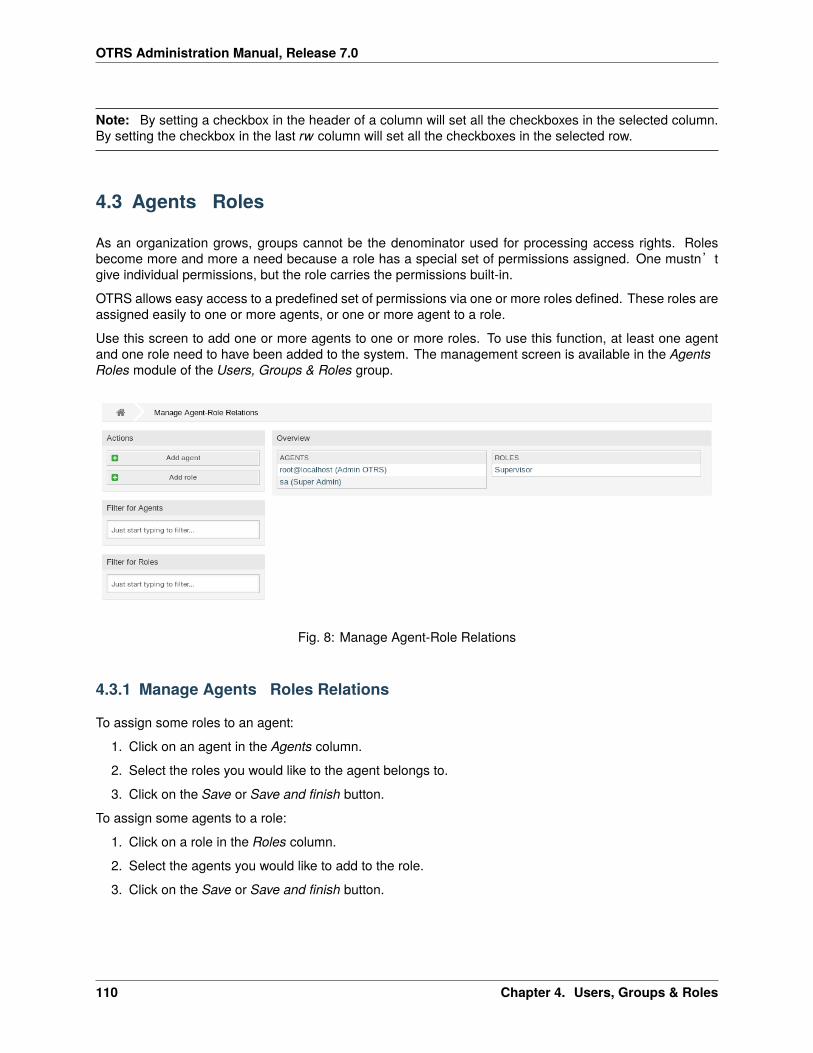
OTRS Administration Manual, Release 7.0
Note: By setting a checkbox in the header of a column will set all the checkboxes in the selected column.By setting the checkbox in the last rw column will set all the checkboxes in the selected row.
4.3 Agents � Roles
As an organization grows, groups cannot be the denominator used for processing access rights. Rolesbecome more and more a need because a role has a special set of permissions assigned. One mustn’tgive individual permissions, but the role carries the permissions built-in.
OTRS allows easy access to a predefined set of permissions via one or more roles defined. These roles areassigned easily to one or more agents, or one or more agent to a role.
Use this screen to add one or more agents to one or more roles. To use this function, at least one agentand one role need to have been added to the system. The management screen is available in the Agents �Roles module of the Users, Groups & Roles group.
Fig. 8: Manage Agent-Role Relations
4.3.1 Manage Agents � Roles Relations
To assign some roles to an agent:
1. Click on an agent in the Agents column.
2. Select the roles you would like to the agent belongs to.
3. Click on the Save or Save and finish button.
To assign some agents to a role:
1. Click on a role in the Roles column.
2. Select the agents you would like to add to the role.
3. Click on the Save or Save and finish button.
110 Chapter 4. Users, Groups & Roles
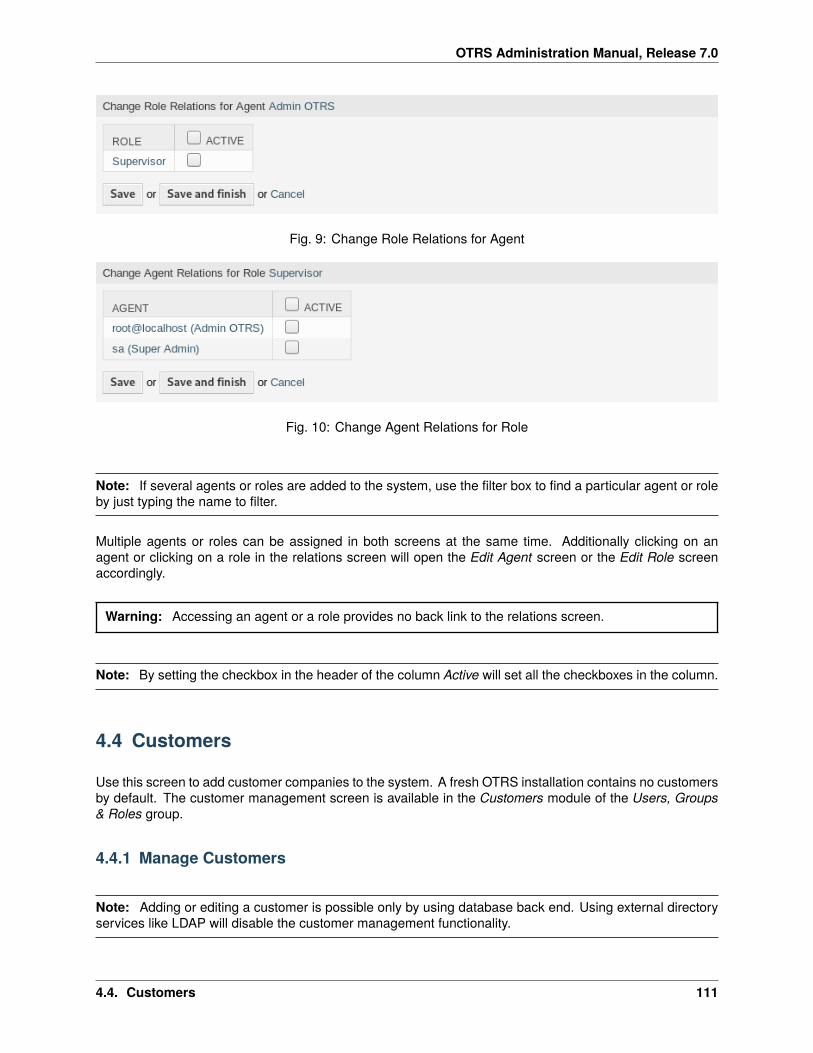
OTRS Administration Manual, Release 7.0
Fig. 9: Change Role Relations for Agent
Fig. 10: Change Agent Relations for Role
Note: If several agents or roles are added to the system, use the filter box to find a particular agent or roleby just typing the name to filter.
Multiple agents or roles can be assigned in both screens at the same time. Additionally clicking on anagent or clicking on a role in the relations screen will open the Edit Agent screen or the Edit Role screenaccordingly.
Warning: Accessing an agent or a role provides no back link to the relations screen.
Note: By setting the checkbox in the header of the column Active will set all the checkboxes in the column.
4.4 Customers
Use this screen to add customer companies to the system. A fresh OTRS installation contains no customersby default. The customer management screen is available in the Customers module of the Users, Groups& Roles group.
4.4.1 Manage Customers
Note: Adding or editing a customer is possible only by using database back end. Using external directoryservices like LDAP will disable the customer management functionality.
4.4. Customers 111
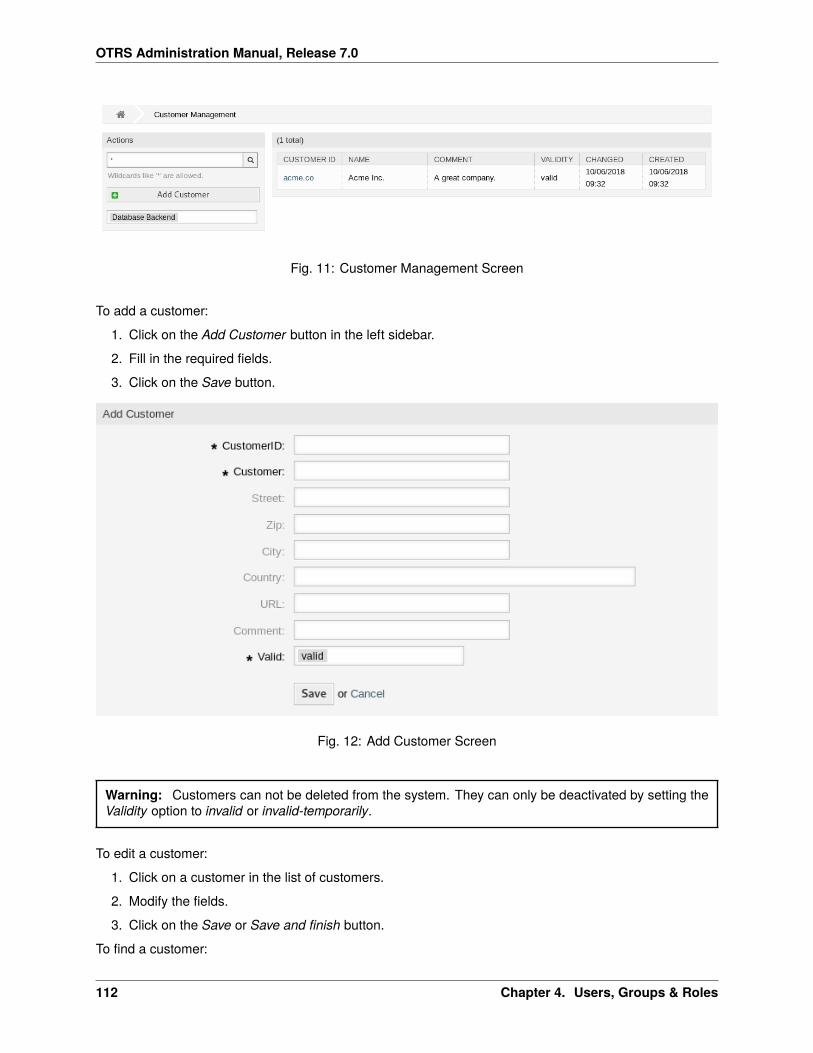
OTRS Administration Manual, Release 7.0
Fig. 11: Customer Management Screen
To add a customer:
1. Click on the Add Customer button in the left sidebar.
2. Fill in the required fields.
3. Click on the Save button.
Fig. 12: Add Customer Screen
Warning: Customers can not be deleted from the system. They can only be deactivated by setting theValidity option to invalid or invalid-temporarily.
To edit a customer:
1. Click on a customer in the list of customers.
2. Modify the fields.
3. Click on the Save or Save and finish button.
To find a customer:
112 Chapter 4. Users, Groups & Roles
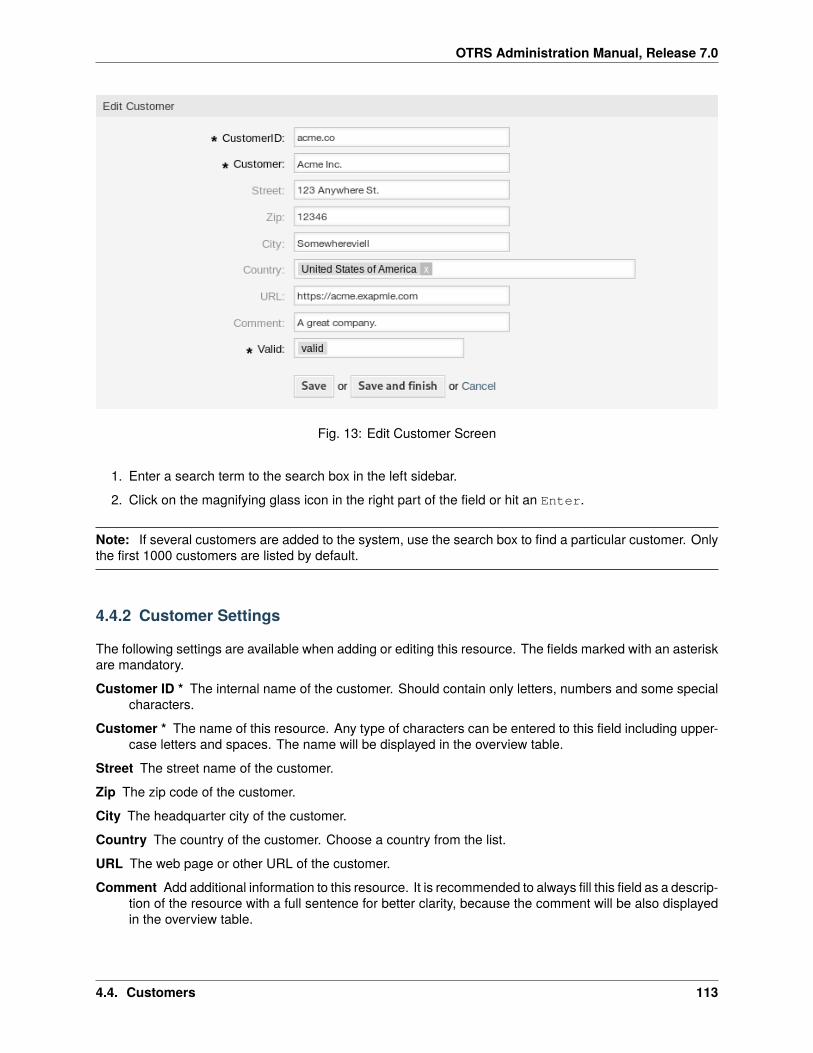
OTRS Administration Manual, Release 7.0
Fig. 13: Edit Customer Screen
1. Enter a search term to the search box in the left sidebar.
2. Click on the magnifying glass icon in the right part of the field or hit an Enter.
Note: If several customers are added to the system, use the search box to find a particular customer. Onlythe first 1000 customers are listed by default.
4.4.2 Customer Settings
The following settings are available when adding or editing this resource. The fields marked with an asteriskare mandatory.
Customer ID * The internal name of the customer. Should contain only letters, numbers and some specialcharacters.
Customer * The name of this resource. Any type of characters can be entered to this field including upper-case letters and spaces. The name will be displayed in the overview table.
Street The street name of the customer.
Zip The zip code of the customer.
City The headquarter city of the customer.
Country The country of the customer. Choose a country from the list.
URL The web page or other URL of the customer.
Comment Add additional information to this resource. It is recommended to always fill this field as a descrip-tion of the resource with a full sentence for better clarity, because the comment will be also displayedin the overview table.
4.4. Customers 113
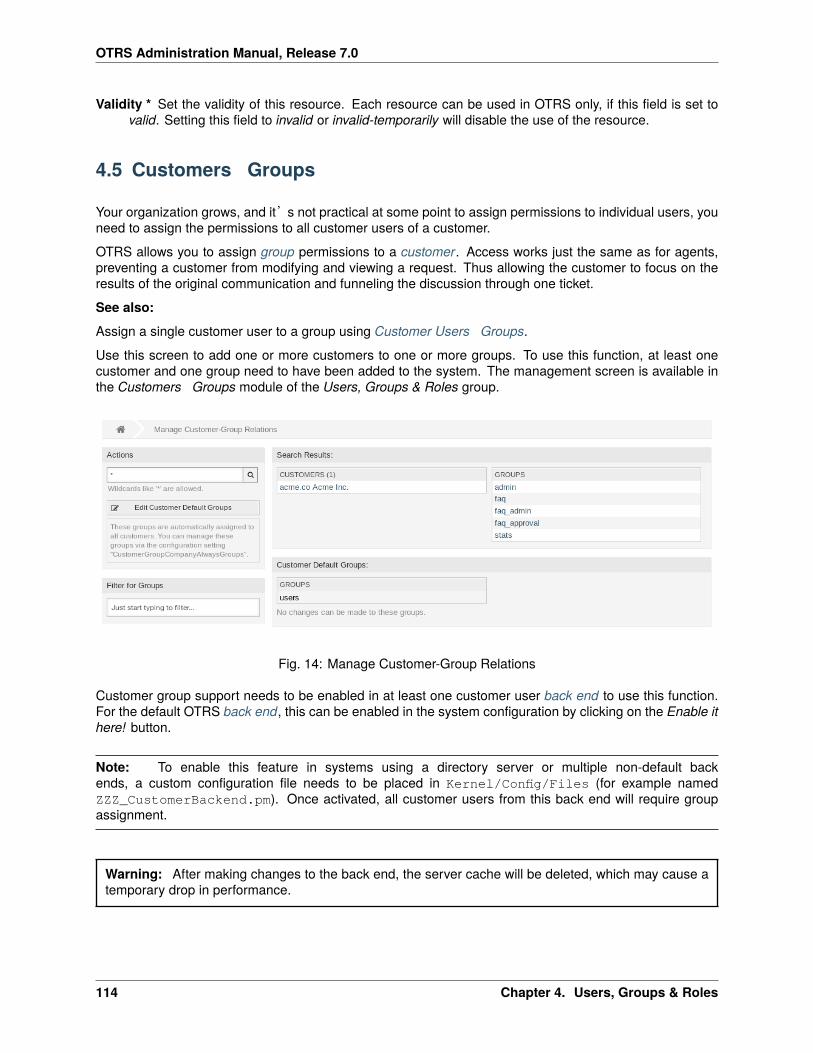
OTRS Administration Manual, Release 7.0
Validity * Set the validity of this resource. Each resource can be used in OTRS only, if this field is set tovalid. Setting this field to invalid or invalid-temporarily will disable the use of the resource.
4.5 Customers � Groups
Your organization grows, and it’s not practical at some point to assign permissions to individual users, youneed to assign the permissions to all customer users of a customer.
OTRS allows you to assign group permissions to a customer. Access works just the same as for agents,preventing a customer from modifying and viewing a request. Thus allowing the customer to focus on theresults of the original communication and funneling the discussion through one ticket.
See also:
Assign a single customer user to a group using Customer Users � Groups.
Use this screen to add one or more customers to one or more groups. To use this function, at least onecustomer and one group need to have been added to the system. The management screen is available inthe Customers � Groups module of the Users, Groups & Roles group.
Fig. 14: Manage Customer-Group Relations
Customer group support needs to be enabled in at least one customer user back end to use this function.For the default OTRS back end, this can be enabled in the system configuration by clicking on the Enable ithere! button.
Note: To enable this feature in systems using a directory server or multiple non-default backends, a custom configuration file needs to be placed in Kernel/Config/Files (for example namedZZZ_CustomerBackend.pm). Once activated, all customer users from this back end will require groupassignment.
Warning: After making changes to the back end, the server cache will be deleted, which may cause atemporary drop in performance.
114 Chapter 4. Users, Groups & Roles
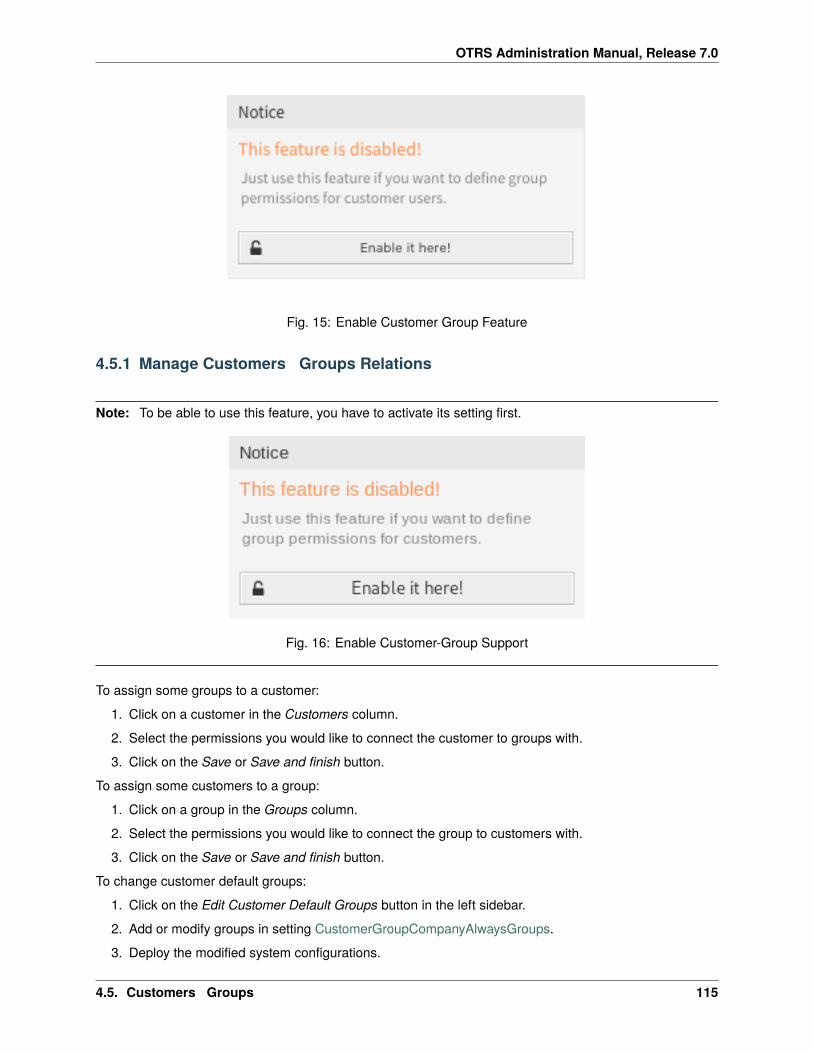
OTRS Administration Manual, Release 7.0
Fig. 15: Enable Customer Group Feature
4.5.1 Manage Customers � Groups Relations
Note: To be able to use this feature, you have to activate its setting first.
Fig. 16: Enable Customer-Group Support
To assign some groups to a customer:
1. Click on a customer in the Customers column.
2. Select the permissions you would like to connect the customer to groups with.
3. Click on the Save or Save and finish button.
To assign some customers to a group:
1. Click on a group in the Groups column.
2. Select the permissions you would like to connect the group to customers with.
3. Click on the Save or Save and finish button.
To change customer default groups:
1. Click on the Edit Customer Default Groups button in the left sidebar.
2. Add or modify groups in setting CustomerGroupCompanyAlwaysGroups.
3. Deploy the modified system configurations.
4.5. Customers � Groups 115
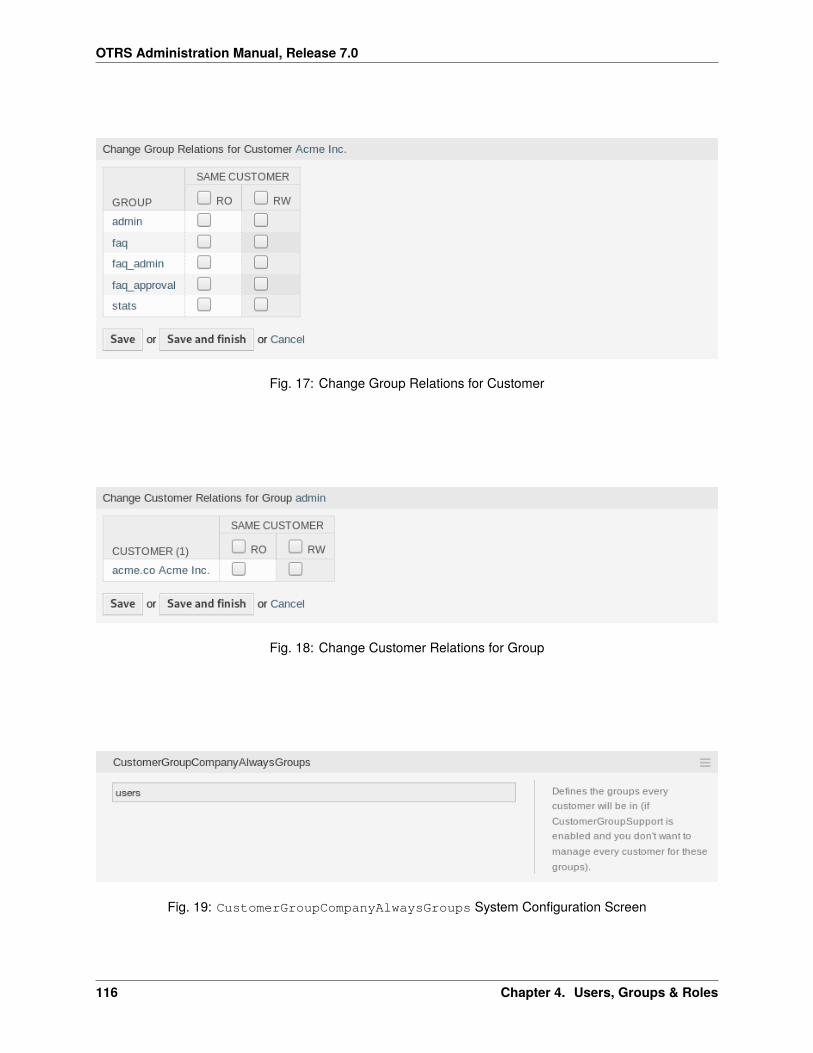
OTRS Administration Manual, Release 7.0
Fig. 17: Change Group Relations for Customer
Fig. 18: Change Customer Relations for Group
Fig. 19: CustomerGroupCompanyAlwaysGroups System Configuration Screen
116 Chapter 4. Users, Groups & Roles
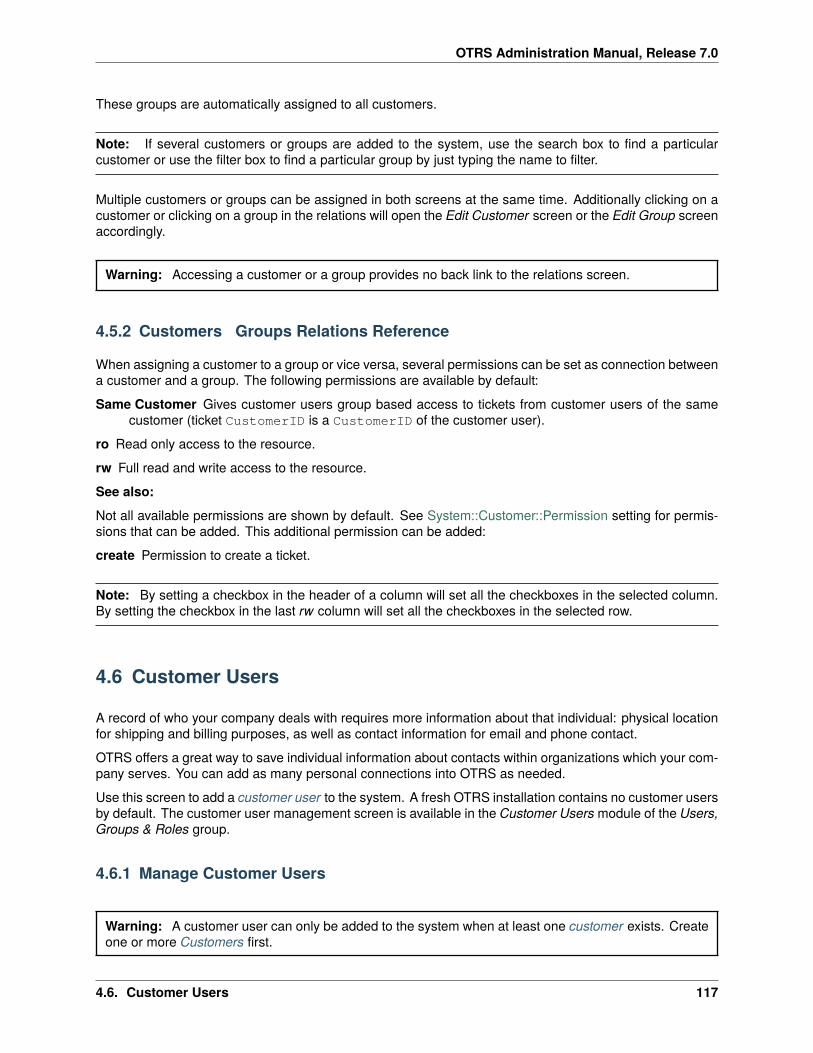
OTRS Administration Manual, Release 7.0
These groups are automatically assigned to all customers.
Note: If several customers or groups are added to the system, use the search box to find a particularcustomer or use the filter box to find a particular group by just typing the name to filter.
Multiple customers or groups can be assigned in both screens at the same time. Additionally clicking on acustomer or clicking on a group in the relations will open the Edit Customer screen or the Edit Group screenaccordingly.
Warning: Accessing a customer or a group provides no back link to the relations screen.
4.5.2 Customers � Groups Relations Reference
When assigning a customer to a group or vice versa, several permissions can be set as connection betweena customer and a group. The following permissions are available by default:
Same Customer Gives customer users group based access to tickets from customer users of the samecustomer (ticket CustomerID is a CustomerID of the customer user).
ro Read only access to the resource.
rw Full read and write access to the resource.
See also:
Not all available permissions are shown by default. See System::Customer::Permission setting for permis-sions that can be added. This additional permission can be added:
create Permission to create a ticket.
Note: By setting a checkbox in the header of a column will set all the checkboxes in the selected column.By setting the checkbox in the last rw column will set all the checkboxes in the selected row.
4.6 Customer Users
A record of who your company deals with requires more information about that individual: physical locationfor shipping and billing purposes, as well as contact information for email and phone contact.
OTRS offers a great way to save individual information about contacts within organizations which your com-pany serves. You can add as many personal connections into OTRS as needed.
Use this screen to add a customer user to the system. A fresh OTRS installation contains no customer usersby default. The customer user management screen is available in the Customer Users module of the Users,Groups & Roles group.
4.6.1 Manage Customer Users
Warning: A customer user can only be added to the system when at least one customer exists. Createone or more Customers first.
4.6. Customer Users 117
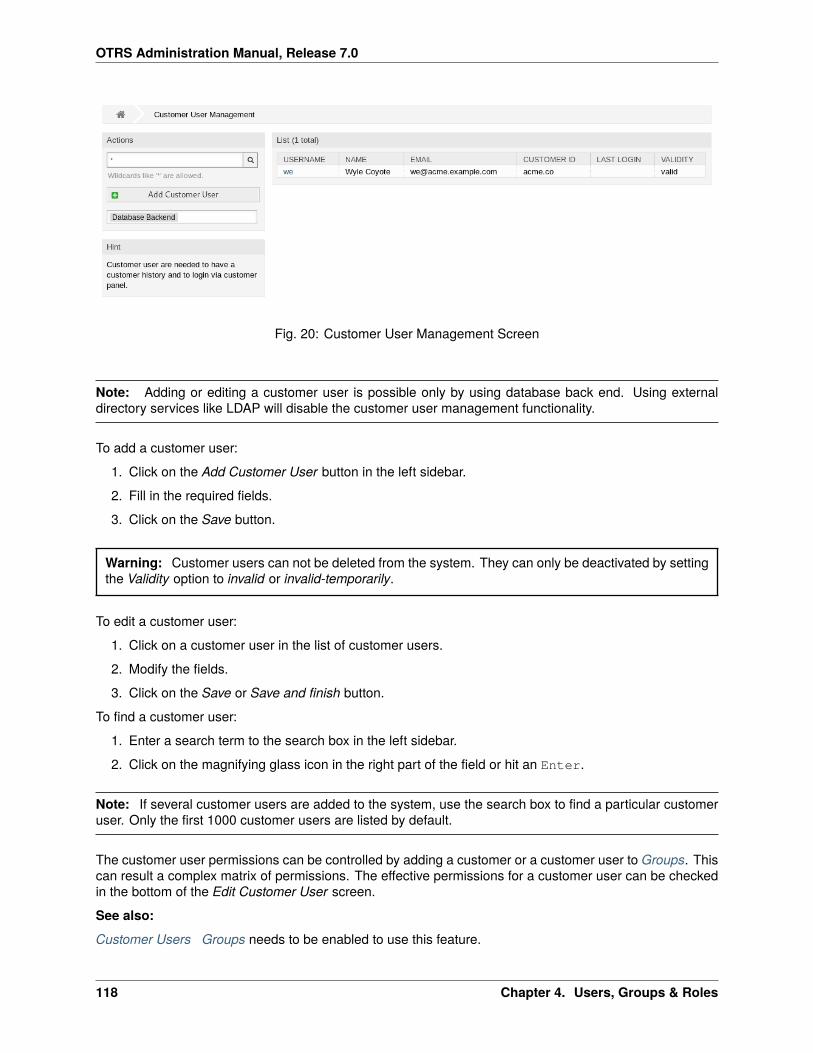
OTRS Administration Manual, Release 7.0
Fig. 20: Customer User Management Screen
Note: Adding or editing a customer user is possible only by using database back end. Using externaldirectory services like LDAP will disable the customer user management functionality.
To add a customer user:
1. Click on the Add Customer User button in the left sidebar.
2. Fill in the required fields.
3. Click on the Save button.
Warning: Customer users can not be deleted from the system. They can only be deactivated by settingthe Validity option to invalid or invalid-temporarily.
To edit a customer user:
1. Click on a customer user in the list of customer users.
2. Modify the fields.
3. Click on the Save or Save and finish button.
To find a customer user:
1. Enter a search term to the search box in the left sidebar.
2. Click on the magnifying glass icon in the right part of the field or hit an Enter.
Note: If several customer users are added to the system, use the search box to find a particular customeruser. Only the first 1000 customer users are listed by default.
The customer user permissions can be controlled by adding a customer or a customer user to Groups. Thiscan result a complex matrix of permissions. The effective permissions for a customer user can be checkedin the bottom of the Edit Customer User screen.
See also:
Customer Users � Groups needs to be enabled to use this feature.
118 Chapter 4. Users, Groups & Roles
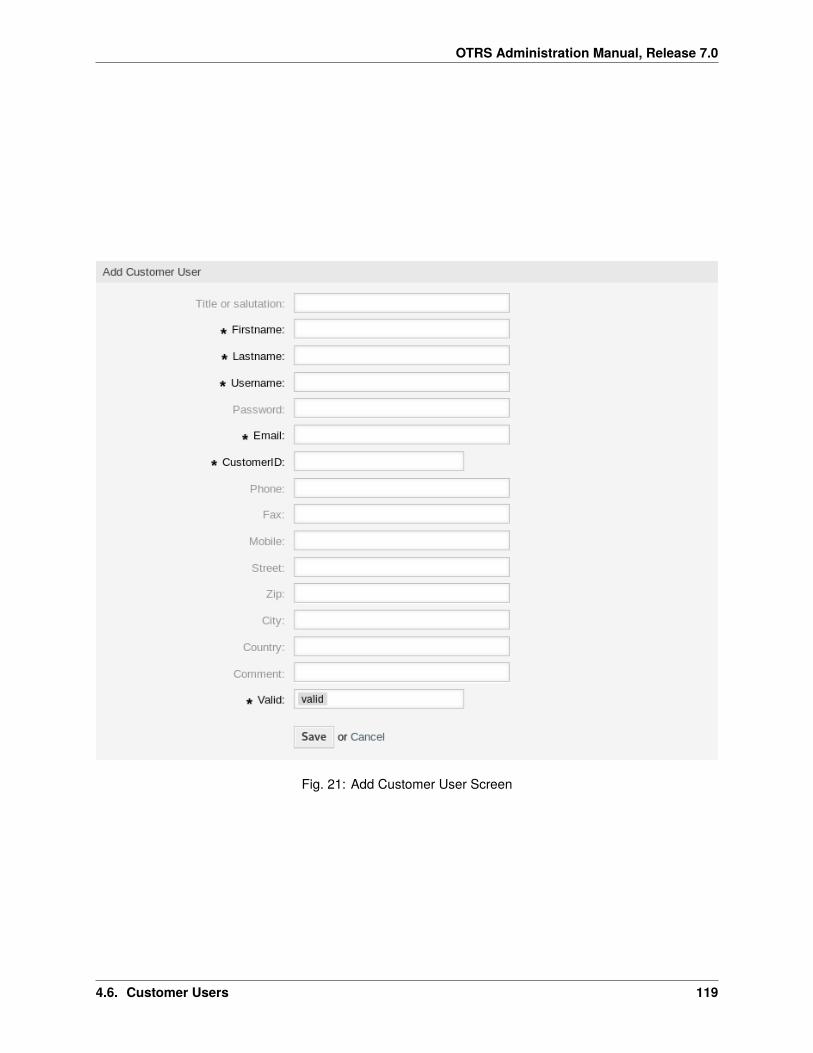
OTRS Administration Manual, Release 7.0
Fig. 21: Add Customer User Screen
4.6. Customer Users 119
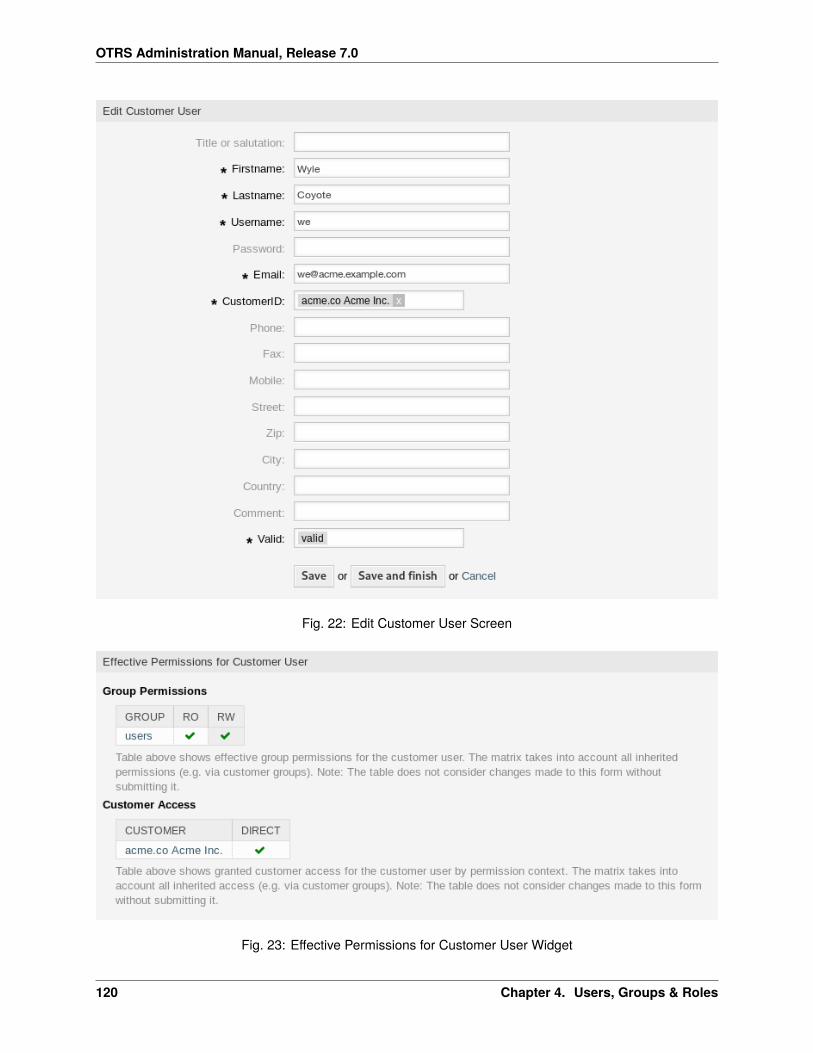
OTRS Administration Manual, Release 7.0
Fig. 22: Edit Customer User Screen
Fig. 23: Effective Permissions for Customer User Widget
120 Chapter 4. Users, Groups & Roles
OTRS Administration Manual, Release 7.0
4.6.2 Customer User Settings
The following settings are available when adding or editing this resource. The fields marked with an asteriskare mandatory.
Note: These are the default fields available for the internal database table.
Title or salutation Some name prefix can be added here like Mr., Dr., Jr., etc.
Firstname * The first name of the customer user.
Lastname * The last name of the customer user.
Username * The username of the customer user to login to the system.
Password The password of the customer user. This will be auto-generated if left empty.
Email * The email address of the customer user.
Customer * The customer company the customer user belongs to. Select a customer from the list of Cus-tomers.
Phone The phone number of the customer user.
Fax The fax number of the customer user.
Mobile The cellphone number of the customer user.
Street The street name of the customer.
Zip The zip code of the customer.
City The headquarter city of the customer.
Country The country of the customer user.
Comment Add additional information to this resource. It is recommended to always fill this field as a descrip-tion of the resource with a full sentence for better clarity, because the comment will be also displayedin the overview table.
Validity * Set the validity of this resource. Each resource can be used in OTRS only, if this field is set tovalid. Setting this field to invalid or invalid-temporarily will disable the use of the resource.
See also:
It is possible to assign multiple customers to customer users via the Customer Users � Customers screen.
4.6.3 Customer User Back Ends
The system works with many customer user data attributes such as username, email address, phone num-ber, etc. These attributes are displayed in both the agent and the external interface, and also used for theauthentication of customer users.
Customer data used or displayed within the system is highly customizable. The user login and the emailaddress are always needed for customer authentication.
The administrator interface does not support the configuration of external back ends. Administrators need toedit the file Kernel/Config.pm by copying and pasting code snippets from Kernel/Config/Defaults.pm manually in case of using On-Premise system.
If you already have another customer back end (e.g. SAP), it is possible to write a module that uses it.
4.6. Customer Users 121
OTRS Administration Manual, Release 7.0
Warning: Do not modify the file Kernel/Config/Defaults.pm, it will be overwritten after upgradingthe system! Copy and paste the code snippets into Kernel/Config.pm instead.
Note: The following configurations are taken care of by the Customer Solution Team in OTRS. Pleasecontact the Customer Solution Team via [email protected] or in the OTRS Portal.
Customer User Back End - Database
The default user authentication back end for customer users is the OTRS database. With this back end, allcustomer user data can be edited via the administrator interface.
# This is the auth. module for the otrs db# you can also configure it using a remote database$Self->{'Customer::AuthModule'} =↪→'Kernel::System::CustomerAuth::DB';
$Self->{'Customer::AuthModule::DB::Table'} = 'customer_user';$Self->{'Customer::AuthModule::DB::CustomerKey'} = 'login';$Self->{'Customer::AuthModule::DB::CustomerPassword'} = 'pw';
# $Self->{'Customer::AuthModule::DB::DSN'} =↪→"DBI:mysql:database=customerdb;host=customerdbhost";
# $Self->{'Customer::AuthModule::DB::User'} = "some_user";# $Self->{'Customer::AuthModule::DB::Password'} = "some_password";
# if you use odbc or you want to define a database type (without autodetection)# $Self->{'Customer::AuthModule::DB::Type'} = 'mysql';
# password crypt type (bcrypt|sha2|sha1|md5|apr1|crypt|plain)# $Self->{'Customer::AuthModule::DB::CryptType'} = 'sha2';
The example below shows the configuration of a database customer back end, which uses customer userdata stored in the database table customer_user.
# CustomerUser# (customer user database backend and settings)$Self->{CustomerUser} = {
Name => Translatable('Database Backend'),Module => 'Kernel::System::CustomerUser::DB',Params => {
# if you want to use an external database, add the# required settings
# DSN => 'DBI:odbc:yourdsn',# Type => 'mssql', # only for ODBC connections# DSN => 'DBI:mysql:database=customerdb;host=customerdbhost',# User => '',# Password => '',
Table => 'customer_user',# ForeignDB => 0, # set this to 1 if your table does not have␣↪→create_time, create_by, change_time and change_by fields
(continues on next page)
122 Chapter 4. Users, Groups & Roles
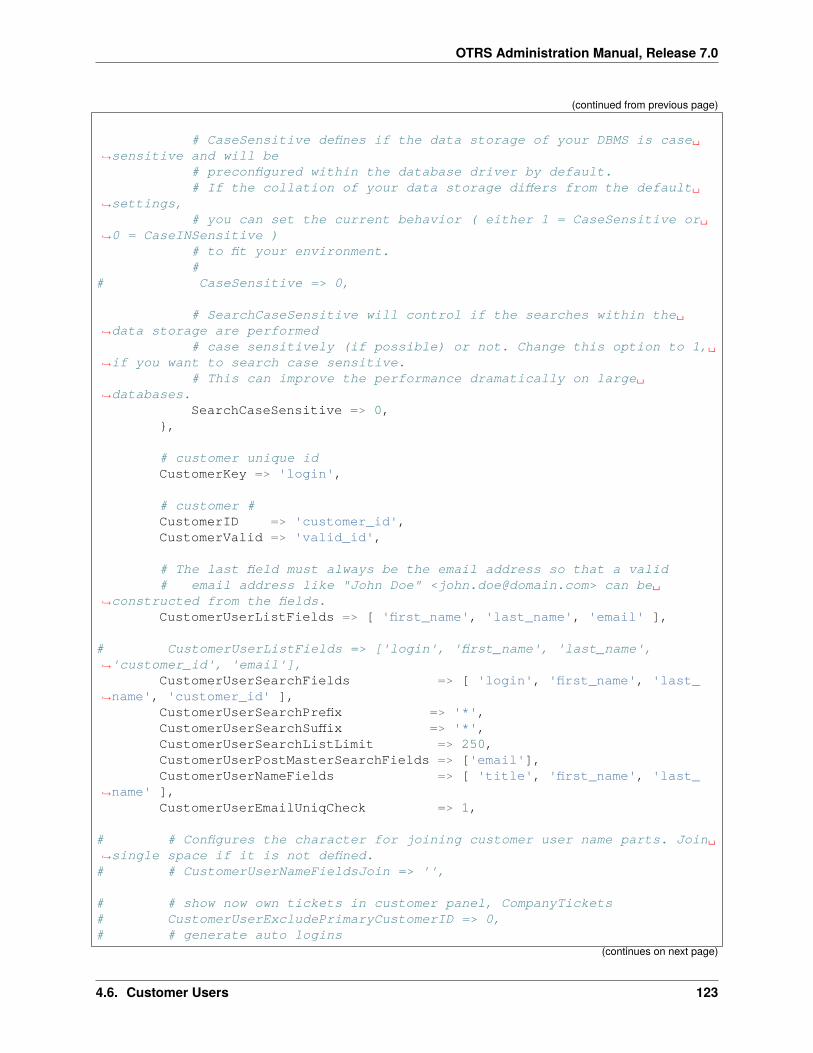
OTRS Administration Manual, Release 7.0
(continued from previous page)
# CaseSensitive defines if the data storage of your DBMS is case␣↪→sensitive and will be
# preconfigured within the database driver by default.# If the collation of your data storage differs from the default␣
↪→settings,# you can set the current behavior ( either 1 = CaseSensitive or␣
↪→0 = CaseINSensitive )# to fit your environment.#
# CaseSensitive => 0,
# SearchCaseSensitive will control if the searches within the␣↪→data storage are performed
# case sensitively (if possible) or not. Change this option to 1,␣↪→if you want to search case sensitive.
# This can improve the performance dramatically on large␣↪→databases.
SearchCaseSensitive => 0,},
# customer unique idCustomerKey => 'login',
# customer #CustomerID => 'customer_id',CustomerValid => 'valid_id',
# The last field must always be the email address so that a valid# email address like "John Doe" <[email protected]> can be␣
↪→constructed from the fields.CustomerUserListFields => [ 'first_name', 'last_name', 'email' ],
# CustomerUserListFields => ['login', 'first_name', 'last_name',↪→'customer_id', 'email'],
CustomerUserSearchFields => [ 'login', 'first_name', 'last_↪→name', 'customer_id' ],
CustomerUserSearchPrefix => '*',CustomerUserSearchSuffix => '*',CustomerUserSearchListLimit => 250,CustomerUserPostMasterSearchFields => ['email'],CustomerUserNameFields => [ 'title', 'first_name', 'last_
↪→name' ],CustomerUserEmailUniqCheck => 1,
# # Configures the character for joining customer user name parts. Join␣↪→single space if it is not defined.
# # CustomerUserNameFieldsJoin => '',
# # show now own tickets in customer panel, CompanyTickets# CustomerUserExcludePrimaryCustomerID => 0,# # generate auto logins
(continues on next page)
4.6. Customer Users 123
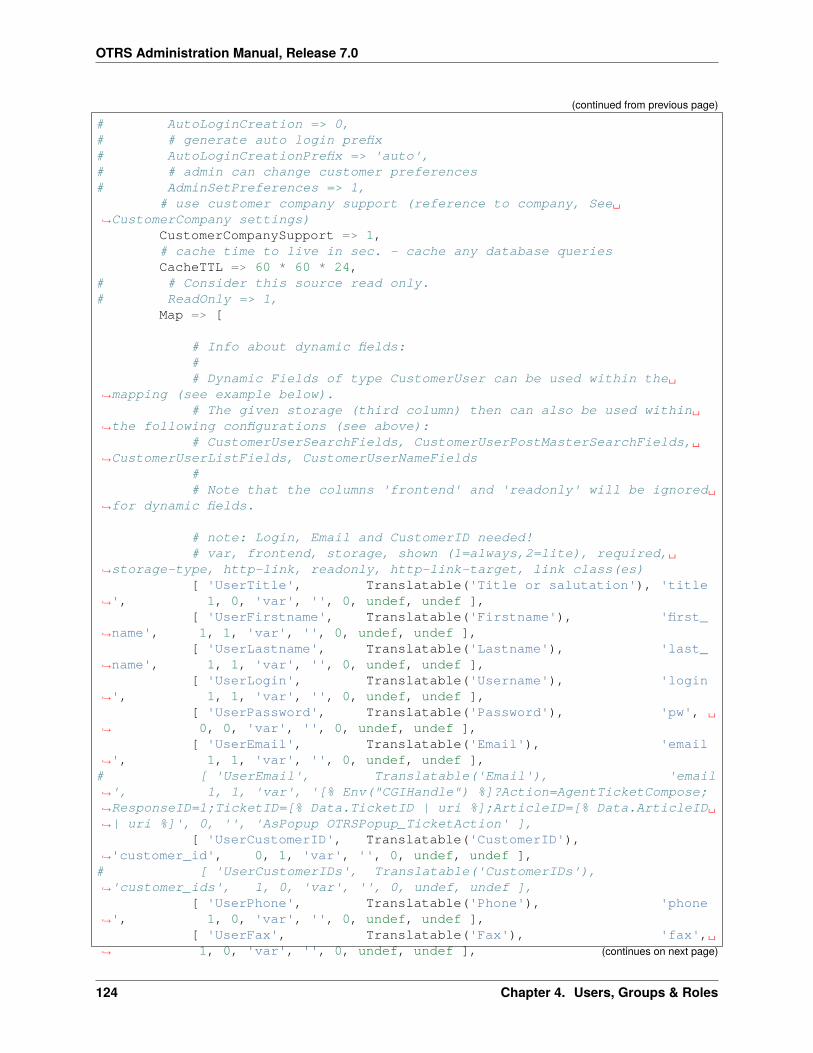
OTRS Administration Manual, Release 7.0
(continued from previous page)
# AutoLoginCreation => 0,# # generate auto login prefix# AutoLoginCreationPrefix => 'auto',# # admin can change customer preferences# AdminSetPreferences => 1,
# use customer company support (reference to company, See␣↪→CustomerCompany settings)
CustomerCompanySupport => 1,# cache time to live in sec. - cache any database queriesCacheTTL => 60 * 60 * 24,
# # Consider this source read only.# ReadOnly => 1,
Map => [
# Info about dynamic fields:## Dynamic Fields of type CustomerUser can be used within the␣
↪→mapping (see example below).# The given storage (third column) then can also be used within␣
↪→the following configurations (see above):# CustomerUserSearchFields, CustomerUserPostMasterSearchFields,␣
↪→CustomerUserListFields, CustomerUserNameFields## Note that the columns 'frontend' and 'readonly' will be ignored␣
↪→for dynamic fields.
# note: Login, Email and CustomerID needed!# var, frontend, storage, shown (1=always,2=lite), required,␣
↪→storage-type, http-link, readonly, http-link-target, link class(es)[ 'UserTitle', Translatable('Title or salutation'), 'title
↪→', 1, 0, 'var', '', 0, undef, undef ],[ 'UserFirstname', Translatable('Firstname'), 'first_
↪→name', 1, 1, 'var', '', 0, undef, undef ],[ 'UserLastname', Translatable('Lastname'), 'last_
↪→name', 1, 1, 'var', '', 0, undef, undef ],[ 'UserLogin', Translatable('Username'), 'login
↪→', 1, 1, 'var', '', 0, undef, undef ],[ 'UserPassword', Translatable('Password'), 'pw', ␣
↪→ 0, 0, 'var', '', 0, undef, undef ],[ 'UserEmail', Translatable('Email'), 'email
↪→', 1, 1, 'var', '', 0, undef, undef ],# [ 'UserEmail', Translatable('Email'), 'email↪→', 1, 1, 'var', '[% Env("CGIHandle") %]?Action=AgentTicketCompose;↪→ResponseID=1;TicketID=[% Data.TicketID | uri %];ArticleID=[% Data.ArticleID␣↪→| uri %]', 0, '', 'AsPopup OTRSPopup_TicketAction' ],
[ 'UserCustomerID', Translatable('CustomerID'),↪→'customer_id', 0, 1, 'var', '', 0, undef, undef ],
# [ 'UserCustomerIDs', Translatable('CustomerIDs'),↪→'customer_ids', 1, 0, 'var', '', 0, undef, undef ],
[ 'UserPhone', Translatable('Phone'), 'phone↪→', 1, 0, 'var', '', 0, undef, undef ],
[ 'UserFax', Translatable('Fax'), 'fax',␣↪→ 1, 0, 'var', '', 0, undef, undef ], (continues on next page)
124 Chapter 4. Users, Groups & Roles
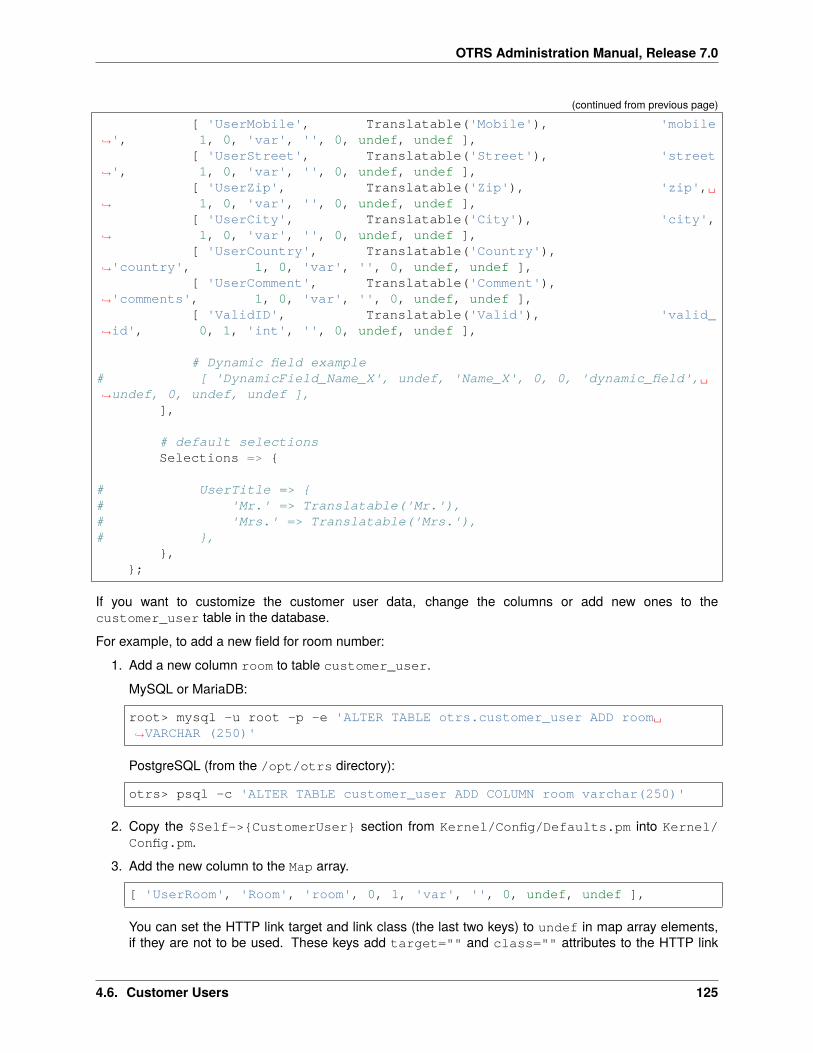
OTRS Administration Manual, Release 7.0
(continued from previous page)
[ 'UserMobile', Translatable('Mobile'), 'mobile↪→', 1, 0, 'var', '', 0, undef, undef ],
[ 'UserStreet', Translatable('Street'), 'street↪→', 1, 0, 'var', '', 0, undef, undef ],
[ 'UserZip', Translatable('Zip'), 'zip',␣↪→ 1, 0, 'var', '', 0, undef, undef ],
[ 'UserCity', Translatable('City'), 'city',↪→ 1, 0, 'var', '', 0, undef, undef ],
[ 'UserCountry', Translatable('Country'),↪→'country', 1, 0, 'var', '', 0, undef, undef ],
[ 'UserComment', Translatable('Comment'),↪→'comments', 1, 0, 'var', '', 0, undef, undef ],
[ 'ValidID', Translatable('Valid'), 'valid_↪→id', 0, 1, 'int', '', 0, undef, undef ],
# Dynamic field example# [ 'DynamicField_Name_X', undef, 'Name_X', 0, 0, 'dynamic_field',␣↪→undef, 0, undef, undef ],
],
# default selectionsSelections => {
# UserTitle => {# 'Mr.' => Translatable('Mr.'),# 'Mrs.' => Translatable('Mrs.'),# },
},};
If you want to customize the customer user data, change the columns or add new ones to thecustomer_user table in the database.
For example, to add a new field for room number:
1. Add a new column room to table customer_user.
MySQL or MariaDB:
root> mysql -u root -p -e 'ALTER TABLE otrs.customer_user ADD room␣↪→VARCHAR (250)'
PostgreSQL (from the /opt/otrs directory):
otrs> psql -c 'ALTER TABLE customer_user ADD COLUMN room varchar(250)'
2. Copy the $Self->{CustomerUser} section from Kernel/Config/Defaults.pm into Kernel/Config.pm.
3. Add the new column to the Map array.
[ 'UserRoom', 'Room', 'room', 0, 1, 'var', '', 0, undef, undef ],
You can set the HTTP link target and link class (the last two keys) to undef in map array elements,if they are not to be used. These keys add target="" and class="" attributes to the HTTP link
4.6. Customer Users 125
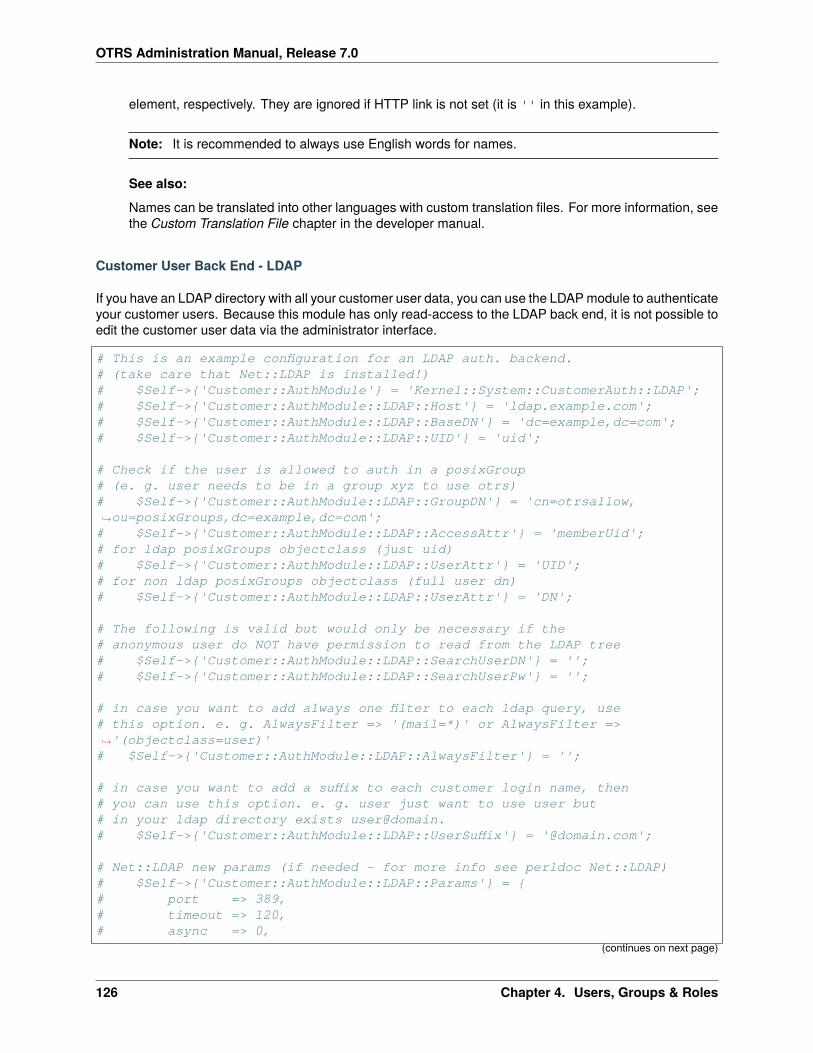
OTRS Administration Manual, Release 7.0
element, respectively. They are ignored if HTTP link is not set (it is '' in this example).
Note: It is recommended to always use English words for names.
See also:
Names can be translated into other languages with custom translation files. For more information, seethe Custom Translation File chapter in the developer manual.
Customer User Back End - LDAP
If you have an LDAP directory with all your customer user data, you can use the LDAP module to authenticateyour customer users. Because this module has only read-access to the LDAP back end, it is not possible toedit the customer user data via the administrator interface.
# This is an example configuration for an LDAP auth. backend.# (take care that Net::LDAP is installed!)# $Self->{'Customer::AuthModule'} = 'Kernel::System::CustomerAuth::LDAP';# $Self->{'Customer::AuthModule::LDAP::Host'} = 'ldap.example.com';# $Self->{'Customer::AuthModule::LDAP::BaseDN'} = 'dc=example,dc=com';# $Self->{'Customer::AuthModule::LDAP::UID'} = 'uid';
# Check if the user is allowed to auth in a posixGroup# (e. g. user needs to be in a group xyz to use otrs)# $Self->{'Customer::AuthModule::LDAP::GroupDN'} = 'cn=otrsallow,↪→ou=posixGroups,dc=example,dc=com';
# $Self->{'Customer::AuthModule::LDAP::AccessAttr'} = 'memberUid';# for ldap posixGroups objectclass (just uid)# $Self->{'Customer::AuthModule::LDAP::UserAttr'} = 'UID';# for non ldap posixGroups objectclass (full user dn)# $Self->{'Customer::AuthModule::LDAP::UserAttr'} = 'DN';
# The following is valid but would only be necessary if the# anonymous user do NOT have permission to read from the LDAP tree# $Self->{'Customer::AuthModule::LDAP::SearchUserDN'} = '';# $Self->{'Customer::AuthModule::LDAP::SearchUserPw'} = '';
# in case you want to add always one filter to each ldap query, use# this option. e. g. AlwaysFilter => '(mail=*)' or AlwaysFilter =>↪→'(objectclass=user)'
# $Self->{'Customer::AuthModule::LDAP::AlwaysFilter'} = '';
# in case you want to add a suffix to each customer login name, then# you can use this option. e. g. user just want to use user but# in your ldap directory exists user@domain.# $Self->{'Customer::AuthModule::LDAP::UserSuffix'} = '@domain.com';
# Net::LDAP new params (if needed - for more info see perldoc Net::LDAP)# $Self->{'Customer::AuthModule::LDAP::Params'} = {# port => 389,# timeout => 120,# async => 0,
(continues on next page)
126 Chapter 4. Users, Groups & Roles
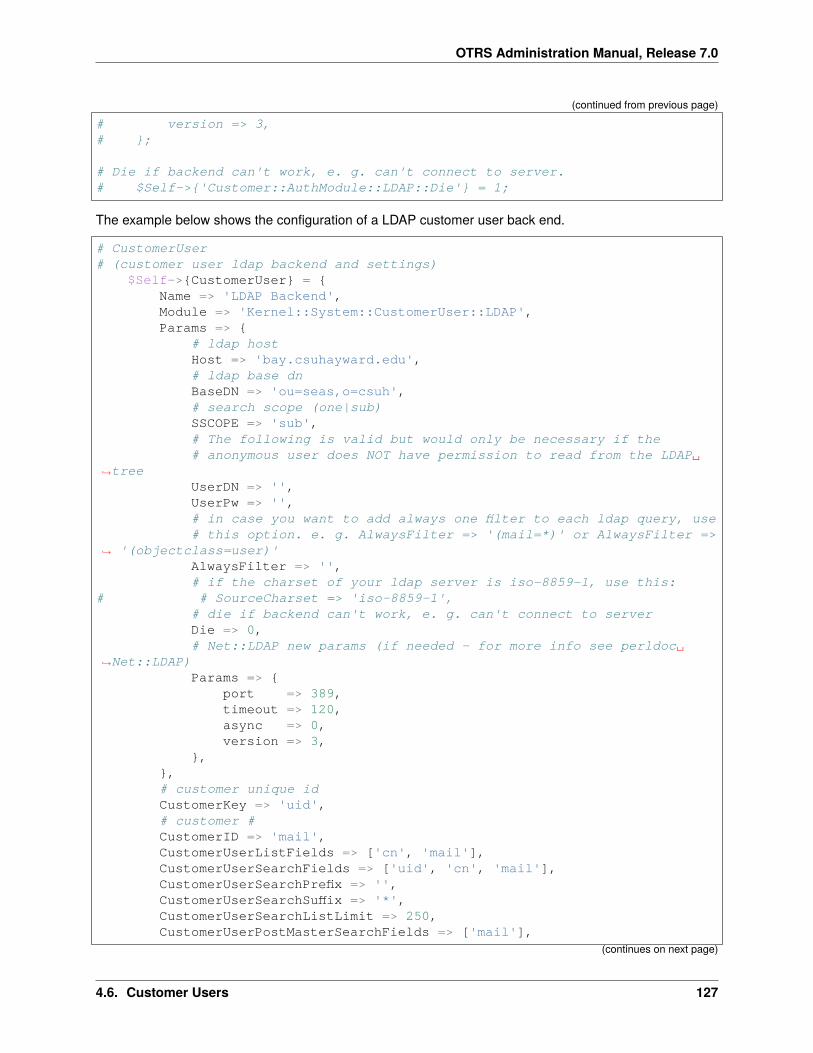
OTRS Administration Manual, Release 7.0
(continued from previous page)
# version => 3,# };
# Die if backend can't work, e. g. can't connect to server.# $Self->{'Customer::AuthModule::LDAP::Die'} = 1;
The example below shows the configuration of a LDAP customer user back end.
# CustomerUser# (customer user ldap backend and settings)
$Self->{CustomerUser} = {Name => 'LDAP Backend',Module => 'Kernel::System::CustomerUser::LDAP',Params => {
# ldap hostHost => 'bay.csuhayward.edu',# ldap base dnBaseDN => 'ou=seas,o=csuh',# search scope (one|sub)SSCOPE => 'sub',# The following is valid but would only be necessary if the# anonymous user does NOT have permission to read from the LDAP␣
↪→treeUserDN => '',UserPw => '',# in case you want to add always one filter to each ldap query, use# this option. e. g. AlwaysFilter => '(mail=*)' or AlwaysFilter =>
↪→ '(objectclass=user)'AlwaysFilter => '',# if the charset of your ldap server is iso-8859-1, use this:
# # SourceCharset => 'iso-8859-1',# die if backend can't work, e. g. can't connect to serverDie => 0,# Net::LDAP new params (if needed - for more info see perldoc␣
↪→Net::LDAP)Params => {
port => 389,timeout => 120,async => 0,version => 3,
},},# customer unique idCustomerKey => 'uid',# customer #CustomerID => 'mail',CustomerUserListFields => ['cn', 'mail'],CustomerUserSearchFields => ['uid', 'cn', 'mail'],CustomerUserSearchPrefix => '',CustomerUserSearchSuffix => '*',CustomerUserSearchListLimit => 250,CustomerUserPostMasterSearchFields => ['mail'],
(continues on next page)
4.6. Customer Users 127
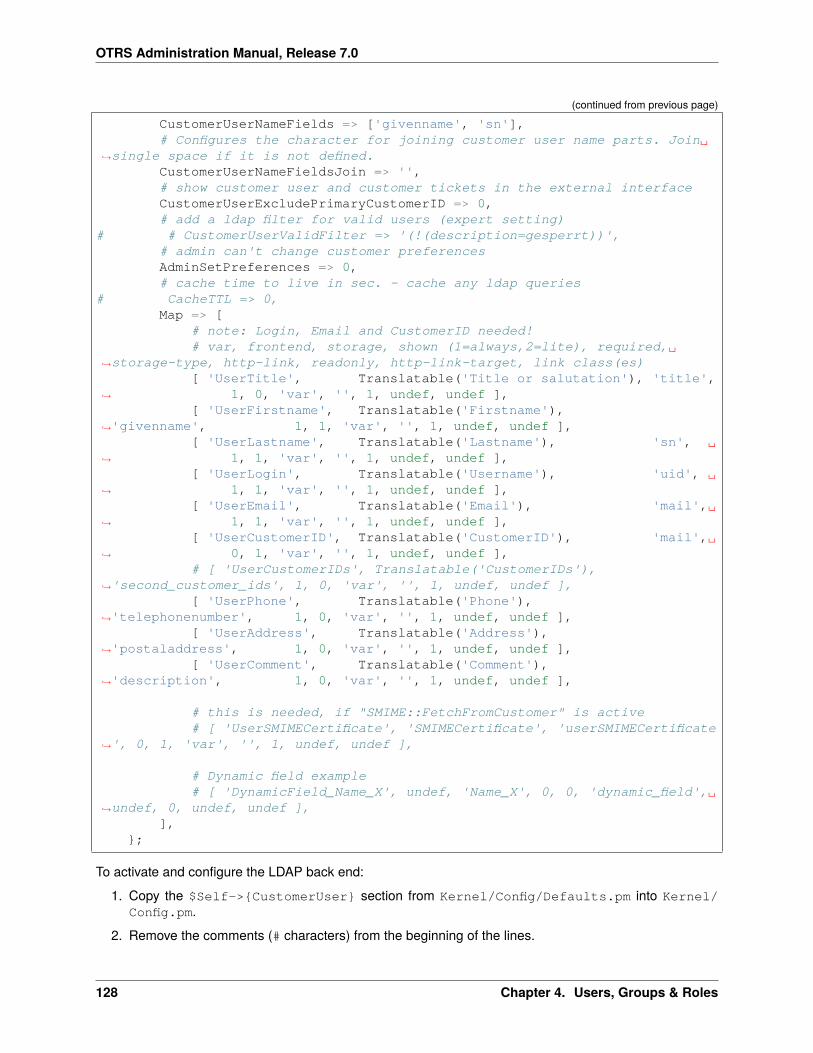
OTRS Administration Manual, Release 7.0
(continued from previous page)
CustomerUserNameFields => ['givenname', 'sn'],# Configures the character for joining customer user name parts. Join␣
↪→single space if it is not defined.CustomerUserNameFieldsJoin => '',# show customer user and customer tickets in the external interfaceCustomerUserExcludePrimaryCustomerID => 0,# add a ldap filter for valid users (expert setting)
# # CustomerUserValidFilter => '(!(description=gesperrt))',# admin can't change customer preferencesAdminSetPreferences => 0,# cache time to live in sec. - cache any ldap queries
# CacheTTL => 0,Map => [
# note: Login, Email and CustomerID needed!# var, frontend, storage, shown (1=always,2=lite), required,␣
↪→storage-type, http-link, readonly, http-link-target, link class(es)[ 'UserTitle', Translatable('Title or salutation'), 'title',
↪→ 1, 0, 'var', '', 1, undef, undef ],[ 'UserFirstname', Translatable('Firstname'),
↪→'givenname', 1, 1, 'var', '', 1, undef, undef ],[ 'UserLastname', Translatable('Lastname'), 'sn', ␣
↪→ 1, 1, 'var', '', 1, undef, undef ],[ 'UserLogin', Translatable('Username'), 'uid', ␣
↪→ 1, 1, 'var', '', 1, undef, undef ],[ 'UserEmail', Translatable('Email'), 'mail',␣
↪→ 1, 1, 'var', '', 1, undef, undef ],[ 'UserCustomerID', Translatable('CustomerID'), 'mail',␣
↪→ 0, 1, 'var', '', 1, undef, undef ],# [ 'UserCustomerIDs', Translatable('CustomerIDs'),
↪→'second_customer_ids', 1, 0, 'var', '', 1, undef, undef ],[ 'UserPhone', Translatable('Phone'),
↪→'telephonenumber', 1, 0, 'var', '', 1, undef, undef ],[ 'UserAddress', Translatable('Address'),
↪→'postaladdress', 1, 0, 'var', '', 1, undef, undef ],[ 'UserComment', Translatable('Comment'),
↪→'description', 1, 0, 'var', '', 1, undef, undef ],
# this is needed, if "SMIME::FetchFromCustomer" is active# [ 'UserSMIMECertificate', 'SMIMECertificate', 'userSMIMECertificate
↪→', 0, 1, 'var', '', 1, undef, undef ],
# Dynamic field example# [ 'DynamicField_Name_X', undef, 'Name_X', 0, 0, 'dynamic_field',␣
↪→undef, 0, undef, undef ],],
};
To activate and configure the LDAP back end:
1. Copy the $Self->{CustomerUser} section from Kernel/Config/Defaults.pm into Kernel/Config.pm.
2. Remove the comments (# characters) from the beginning of the lines.
128 Chapter 4. Users, Groups & Roles
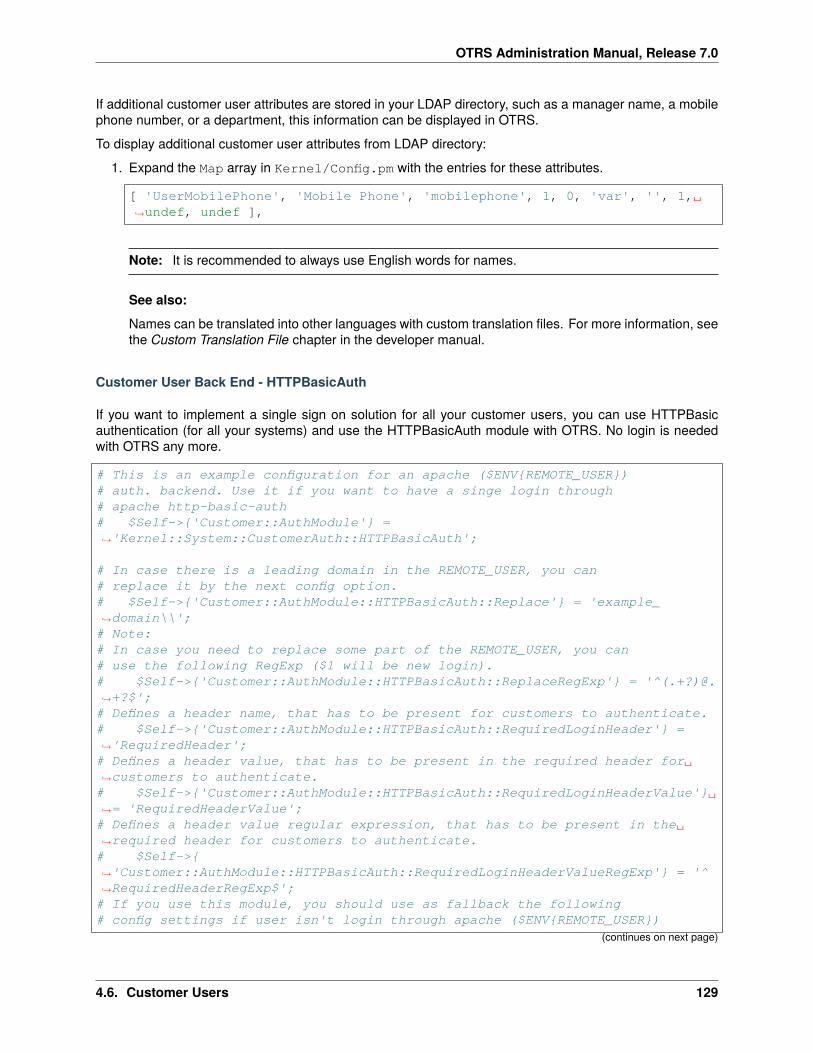
OTRS Administration Manual, Release 7.0
If additional customer user attributes are stored in your LDAP directory, such as a manager name, a mobilephone number, or a department, this information can be displayed in OTRS.
To display additional customer user attributes from LDAP directory:
1. Expand the Map array in Kernel/Config.pm with the entries for these attributes.
[ 'UserMobilePhone', 'Mobile Phone', 'mobilephone', 1, 0, 'var', '', 1,␣↪→undef, undef ],
Note: It is recommended to always use English words for names.
See also:
Names can be translated into other languages with custom translation files. For more information, seethe Custom Translation File chapter in the developer manual.
Customer User Back End - HTTPBasicAuth
If you want to implement a single sign on solution for all your customer users, you can use HTTPBasicauthentication (for all your systems) and use the HTTPBasicAuth module with OTRS. No login is neededwith OTRS any more.
# This is an example configuration for an apache ($ENV{REMOTE_USER})# auth. backend. Use it if you want to have a singe login through# apache http-basic-auth# $Self->{'Customer::AuthModule'} =↪→'Kernel::System::CustomerAuth::HTTPBasicAuth';
# In case there is a leading domain in the REMOTE_USER, you can# replace it by the next config option.# $Self->{'Customer::AuthModule::HTTPBasicAuth::Replace'} = 'example_↪→domain\\';
# Note:# In case you need to replace some part of the REMOTE_USER, you can# use the following RegExp ($1 will be new login).# $Self->{'Customer::AuthModule::HTTPBasicAuth::ReplaceRegExp'} = '^(.+?)@.↪→+?$';
# Defines a header name, that has to be present for customers to authenticate.# $Self->{'Customer::AuthModule::HTTPBasicAuth::RequiredLoginHeader'} =↪→'RequiredHeader';
# Defines a header value, that has to be present in the required header for␣↪→customers to authenticate.
# $Self->{'Customer::AuthModule::HTTPBasicAuth::RequiredLoginHeaderValue'}␣↪→= 'RequiredHeaderValue';
# Defines a header value regular expression, that has to be present in the␣↪→required header for customers to authenticate.
# $Self->{↪→'Customer::AuthModule::HTTPBasicAuth::RequiredLoginHeaderValueRegExp'} = '^↪→RequiredHeaderRegExp$';
# If you use this module, you should use as fallback the following# config settings if user isn't login through apache ($ENV{REMOTE_USER})
(continues on next page)
4.6. Customer Users 129
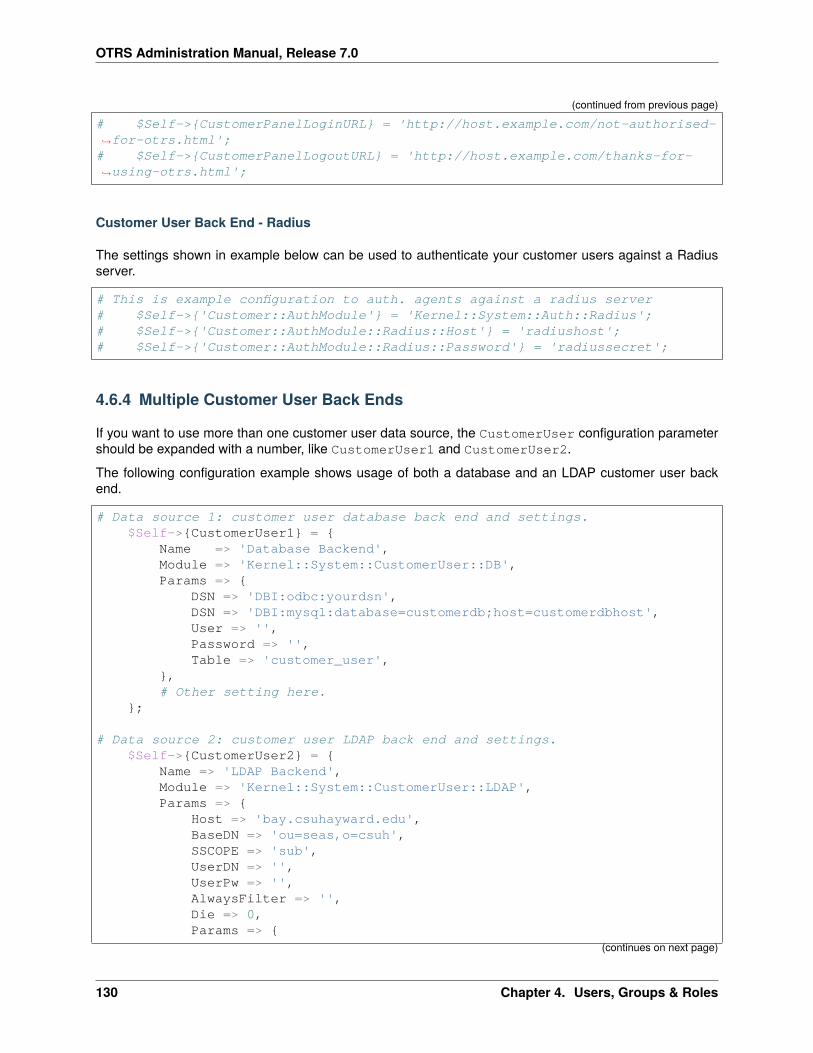
OTRS Administration Manual, Release 7.0
(continued from previous page)
# $Self->{CustomerPanelLoginURL} = 'http://host.example.com/not-authorised-↪→for-otrs.html';
# $Self->{CustomerPanelLogoutURL} = 'http://host.example.com/thanks-for-↪→using-otrs.html';
Customer User Back End - Radius
The settings shown in example below can be used to authenticate your customer users against a Radiusserver.
# This is example configuration to auth. agents against a radius server# $Self->{'Customer::AuthModule'} = 'Kernel::System::Auth::Radius';# $Self->{'Customer::AuthModule::Radius::Host'} = 'radiushost';# $Self->{'Customer::AuthModule::Radius::Password'} = 'radiussecret';
4.6.4 Multiple Customer User Back Ends
If you want to use more than one customer user data source, the CustomerUser configuration parametershould be expanded with a number, like CustomerUser1 and CustomerUser2.
The following configuration example shows usage of both a database and an LDAP customer user backend.
# Data source 1: customer user database back end and settings.$Self->{CustomerUser1} = {
Name => 'Database Backend',Module => 'Kernel::System::CustomerUser::DB',Params => {
DSN => 'DBI:odbc:yourdsn',DSN => 'DBI:mysql:database=customerdb;host=customerdbhost',User => '',Password => '',Table => 'customer_user',
},# Other setting here.
};
# Data source 2: customer user LDAP back end and settings.$Self->{CustomerUser2} = {
Name => 'LDAP Backend',Module => 'Kernel::System::CustomerUser::LDAP',Params => {
Host => 'bay.csuhayward.edu',BaseDN => 'ou=seas,o=csuh',SSCOPE => 'sub',UserDN => '',UserPw => '',AlwaysFilter => '',Die => 0,Params => {
(continues on next page)
130 Chapter 4. Users, Groups & Roles
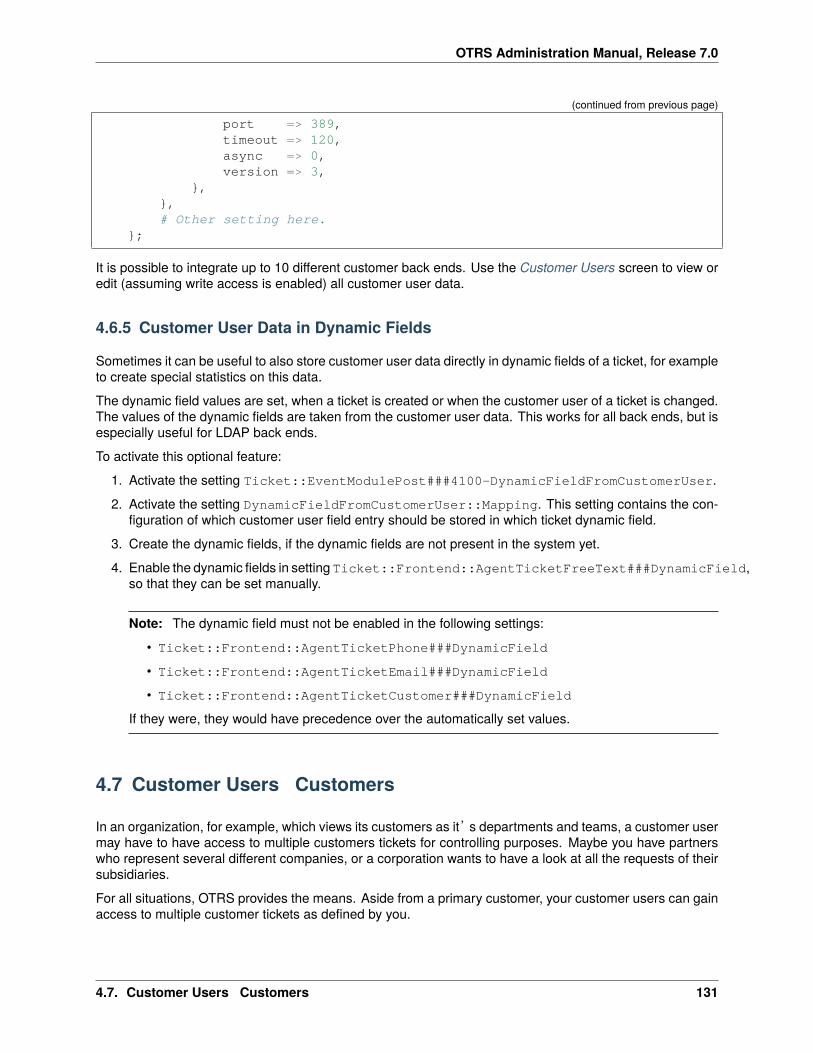
OTRS Administration Manual, Release 7.0
(continued from previous page)
port => 389,timeout => 120,async => 0,version => 3,
},},# Other setting here.
};
It is possible to integrate up to 10 different customer back ends. Use the Customer Users screen to view oredit (assuming write access is enabled) all customer user data.
4.6.5 Customer User Data in Dynamic Fields
Sometimes it can be useful to also store customer user data directly in dynamic fields of a ticket, for exampleto create special statistics on this data.
The dynamic field values are set, when a ticket is created or when the customer user of a ticket is changed.The values of the dynamic fields are taken from the customer user data. This works for all back ends, but isespecially useful for LDAP back ends.
To activate this optional feature:
1. Activate the setting Ticket::EventModulePost###4100-DynamicFieldFromCustomerUser.
2. Activate the setting DynamicFieldFromCustomerUser::Mapping. This setting contains the con-figuration of which customer user field entry should be stored in which ticket dynamic field.
3. Create the dynamic fields, if the dynamic fields are not present in the system yet.
4. Enable the dynamic fields in setting Ticket::Frontend::AgentTicketFreeText###DynamicField,so that they can be set manually.
Note: The dynamic field must not be enabled in the following settings:
• Ticket::Frontend::AgentTicketPhone###DynamicField
• Ticket::Frontend::AgentTicketEmail###DynamicField
• Ticket::Frontend::AgentTicketCustomer###DynamicField
If they were, they would have precedence over the automatically set values.
4.7 Customer Users � Customers
In an organization, for example, which views its customers as it’s departments and teams, a customer usermay have to have access to multiple customers tickets for controlling purposes. Maybe you have partnerswho represent several different companies, or a corporation wants to have a look at all the requests of theirsubsidiaries.
For all situations, OTRS provides the means. Aside from a primary customer, your customer users can gainaccess to multiple customer tickets as defined by you.
4.7. Customer Users � Customers 131
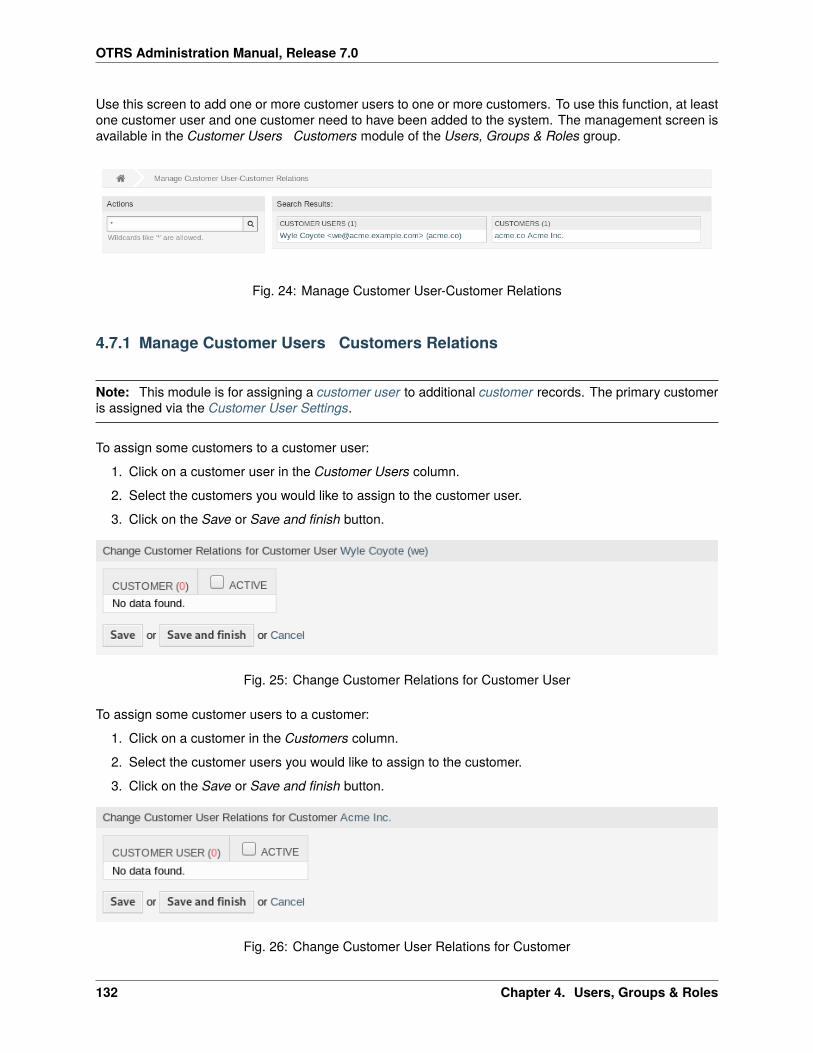
OTRS Administration Manual, Release 7.0
Use this screen to add one or more customer users to one or more customers. To use this function, at leastone customer user and one customer need to have been added to the system. The management screen isavailable in the Customer Users � Customers module of the Users, Groups & Roles group.
Fig. 24: Manage Customer User-Customer Relations
4.7.1 Manage Customer Users � Customers Relations
Note: This module is for assigning a customer user to additional customer records. The primary customeris assigned via the Customer User Settings.
To assign some customers to a customer user:
1. Click on a customer user in the Customer Users column.
2. Select the customers you would like to assign to the customer user.
3. Click on the Save or Save and finish button.
Fig. 25: Change Customer Relations for Customer User
To assign some customer users to a customer:
1. Click on a customer in the Customers column.
2. Select the customer users you would like to assign to the customer.
3. Click on the Save or Save and finish button.
Fig. 26: Change Customer User Relations for Customer
132 Chapter 4. Users, Groups & Roles
OTRS Administration Manual, Release 7.0
Before OTRS version 7.0.14 it was only possible to enable or disable access to company tickets for customerusers for every customer user back end via CustomerUserExcludePrimaryCustomerID parameter. Itwas not possible to select the primary customer ID, because it was assumed to be always there anyways,and for the same reason it is still not possible if CustomerUserExcludePrimaryCustomerID is disabledfor that customer user back end.
In order to allow privilege separation for customer users of a common company, it should be possible toremove access to tickets of the same company and then individually reassign access to specific customerusers. Then these customer users have company ticket access while all others do not.
To allow privilege separation for the customer users of the same company:
1. Go to the System Configuration screen.
2. Search for the setting CustomerDisableCompanyTicketAccess and enable it to make sure notall customer users get access to company tickets until the configuration is finished.
3. Copy the $Self->{CustomerUser} section from Kernel/Config/Defaults.pm into Kernel/Config.pm.
4. Remove the comment (# character) from the beginning of the line containedCustomerUserExcludePrimaryCustomerID and set the value to 1.
CustomerUserExcludePrimaryCustomerID => 1,
5. Set Customer Users � Customers relations for customer users who need to have access to companytickets.
6. Go to the System Configuration screen.
7. Search for the setting CustomerDisableCompanyTicketAccess and disable it to allow access tocompany tickets only for customer users configured in step 5.
Note: If several customer users or customers are added to the system, use the search box to find a particularcustomer user or customer. Only the first 1000 customer users and customers are listed by default.
Multiple customer users or customers can be assigned in both screens at the same time. Additionally clickingon a customer user or clicking on a customer in the relations screen will open the Edit Customer User screenor the Edit Customer screen accordingly.
Warning: Accessing a customer user or a customer provides no back link to the relations screen.
Note: By setting a checkbox in the header of a column will set all the checkboxes in the selected column.
4.8 Customer Users � Groups
Customer users shouldn’t need to be bothered with the internal workings of your service desk. A single pointof contact request can trigger several processes within your organization, all of which having the customeruser information attached and are visible to the customer.
OTRS allows you to assign group permissions to customer users. Access works just the same as for agents,preventing a customer from modifying and viewing a request. Thus allowing the customer to focus on theresults of the original communication and funneling the discussion through one ticket.
4.8. Customer Users � Groups 133
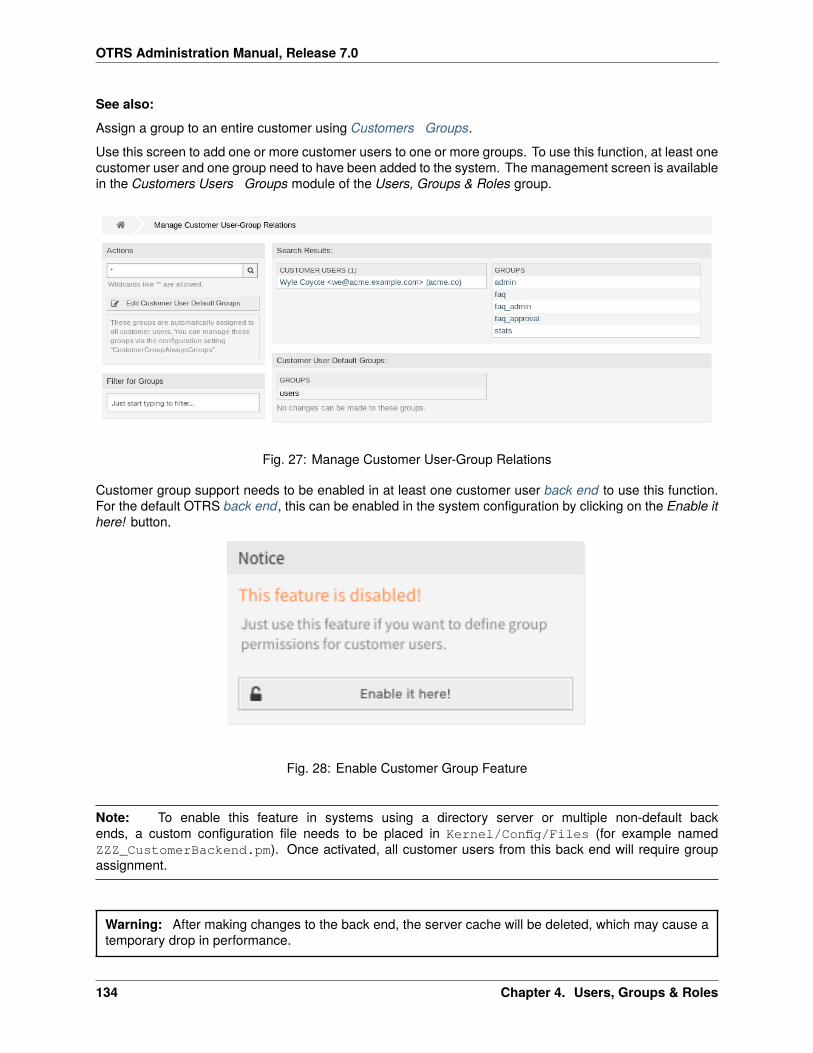
OTRS Administration Manual, Release 7.0
See also:
Assign a group to an entire customer using Customers � Groups.
Use this screen to add one or more customer users to one or more groups. To use this function, at least onecustomer user and one group need to have been added to the system. The management screen is availablein the Customers Users � Groups module of the Users, Groups & Roles group.
Fig. 27: Manage Customer User-Group Relations
Customer group support needs to be enabled in at least one customer user back end to use this function.For the default OTRS back end, this can be enabled in the system configuration by clicking on the Enable ithere! button.
Fig. 28: Enable Customer Group Feature
Note: To enable this feature in systems using a directory server or multiple non-default backends, a custom configuration file needs to be placed in Kernel/Config/Files (for example namedZZZ_CustomerBackend.pm). Once activated, all customer users from this back end will require groupassignment.
Warning: After making changes to the back end, the server cache will be deleted, which may cause atemporary drop in performance.
134 Chapter 4. Users, Groups & Roles
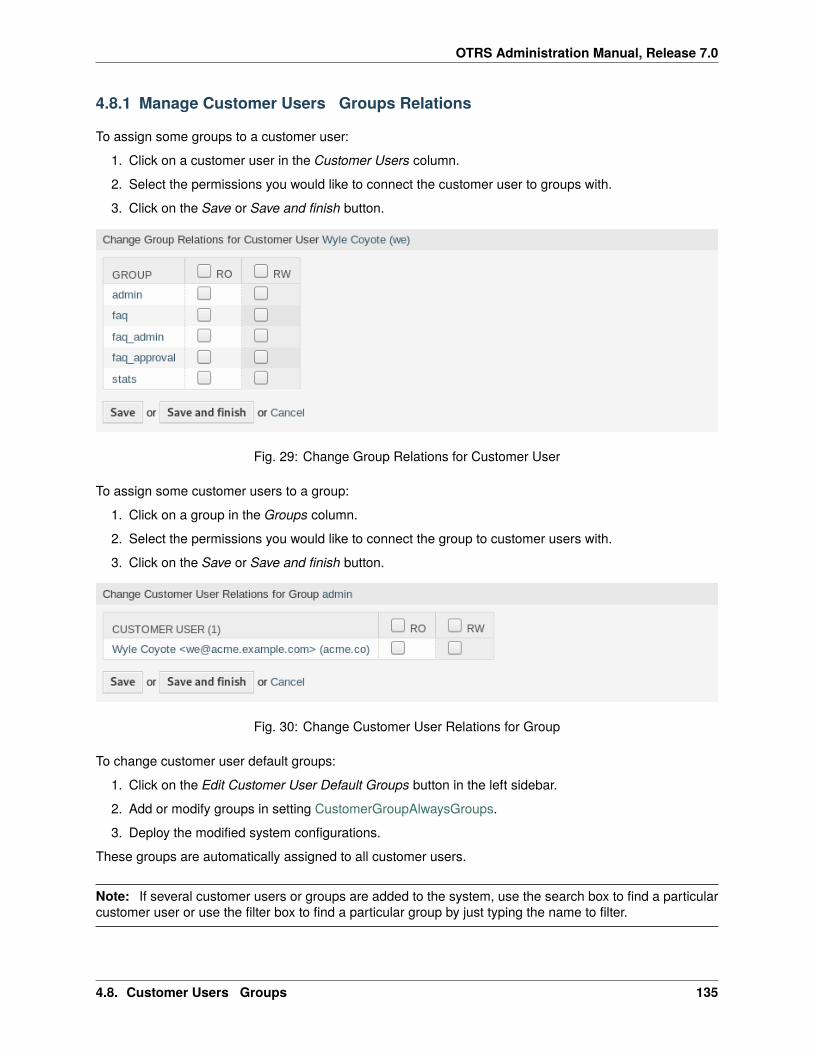
OTRS Administration Manual, Release 7.0
4.8.1 Manage Customer Users � Groups Relations
To assign some groups to a customer user:
1. Click on a customer user in the Customer Users column.
2. Select the permissions you would like to connect the customer user to groups with.
3. Click on the Save or Save and finish button.
Fig. 29: Change Group Relations for Customer User
To assign some customer users to a group:
1. Click on a group in the Groups column.
2. Select the permissions you would like to connect the group to customer users with.
3. Click on the Save or Save and finish button.
Fig. 30: Change Customer User Relations for Group
To change customer user default groups:
1. Click on the Edit Customer User Default Groups button in the left sidebar.
2. Add or modify groups in setting CustomerGroupAlwaysGroups.
3. Deploy the modified system configurations.
These groups are automatically assigned to all customer users.
Note: If several customer users or groups are added to the system, use the search box to find a particularcustomer user or use the filter box to find a particular group by just typing the name to filter.
4.8. Customer Users � Groups 135

OTRS Administration Manual, Release 7.0
Fig. 31: CustomerGroupAlwaysGroups System Configuration Screen
Multiple customer users or groups can be assigned in both screens at the same time. Additionally clickingon a customer user or clicking on a group in the relations screen will open the Edit Customer User screenor the Edit Group screen accordingly.
Warning: Accessing a customer user or a group provides no back link to the relations screen.
4.8.2 Customer Users � Groups Relations Reference
When assigning a customer user to a group or vice versa, several permissions can be set as connectionbetween a customer user and a group. The following permissions are available by default:
ro Read only access to the resource.
rw Full read and write access to the resource.
See also:
Not all available permissions are shown by default. See System::Customer::Permission setting for permis-sions that can be added. This additional permission can be added:
create Permission to create a ticket.
Note: By setting a checkbox in the header of a column will set all the checkboxes in the selected column.By setting the checkbox in the last rw column will set all the checkboxes in the selected row.
4.9 Customer Users � Services
Use this screen to add one or more customer users to one or more services. To use this function, at leastone customer user and one service need to have been added to the system. The management screen isavailable in the Customers Users � Services module of the Users, Groups & Roles group.
4.9.1 Manage Customers Users � Services Relations
To allocate some services to a customer user:
1. Click on a customer user in the Customer Users column.
2. Select the services you would like to allocate to the customer user.
3. Click on the Save or Save and finish button.
136 Chapter 4. Users, Groups & Roles
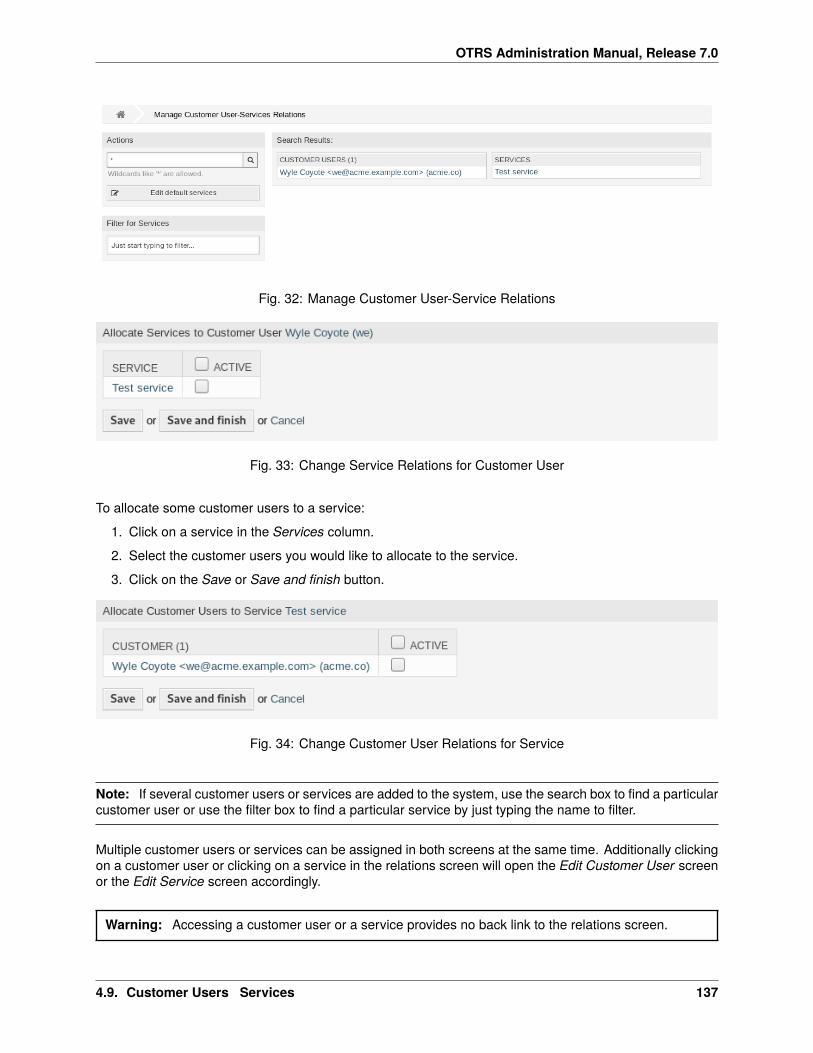
OTRS Administration Manual, Release 7.0
Fig. 32: Manage Customer User-Service Relations
Fig. 33: Change Service Relations for Customer User
To allocate some customer users to a service:
1. Click on a service in the Services column.
2. Select the customer users you would like to allocate to the service.
3. Click on the Save or Save and finish button.
Fig. 34: Change Customer User Relations for Service
Note: If several customer users or services are added to the system, use the search box to find a particularcustomer user or use the filter box to find a particular service by just typing the name to filter.
Multiple customer users or services can be assigned in both screens at the same time. Additionally clickingon a customer user or clicking on a service in the relations screen will open the Edit Customer User screenor the Edit Service screen accordingly.
Warning: Accessing a customer user or a service provides no back link to the relations screen.
4.9. Customer Users � Services 137
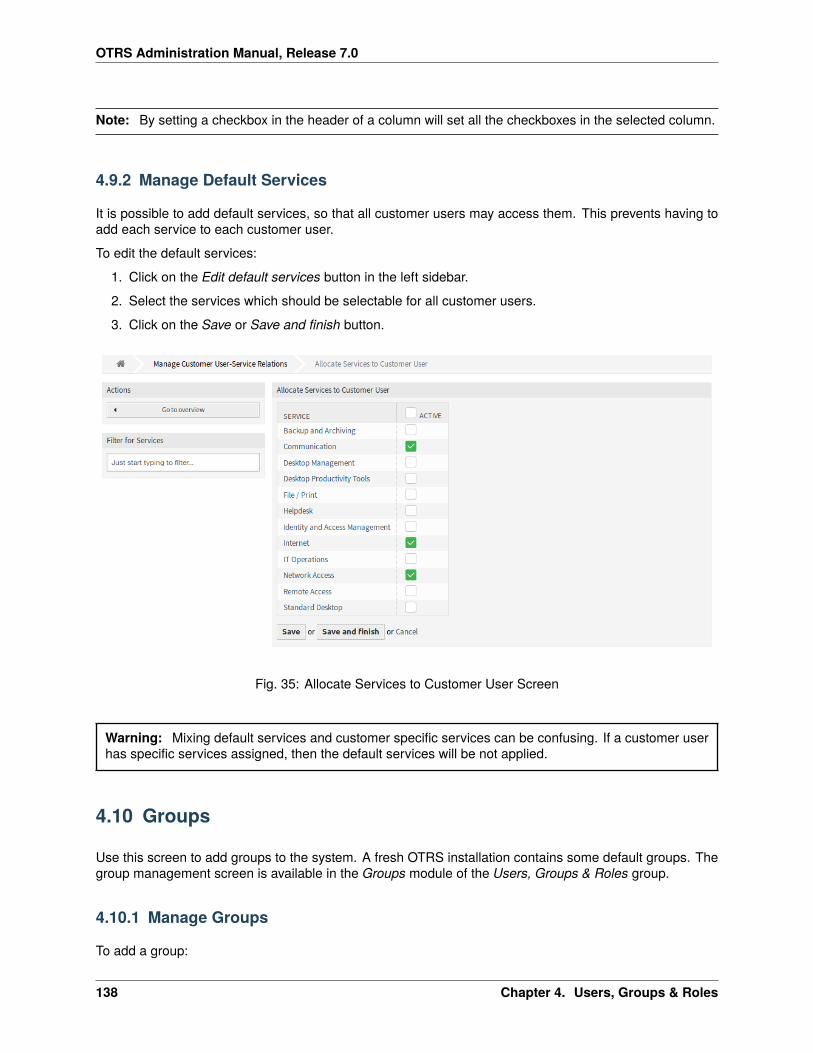
OTRS Administration Manual, Release 7.0
Note: By setting a checkbox in the header of a column will set all the checkboxes in the selected column.
4.9.2 Manage Default Services
It is possible to add default services, so that all customer users may access them. This prevents having toadd each service to each customer user.
To edit the default services:
1. Click on the Edit default services button in the left sidebar.
2. Select the services which should be selectable for all customer users.
3. Click on the Save or Save and finish button.
Fig. 35: Allocate Services to Customer User Screen
Warning: Mixing default services and customer specific services can be confusing. If a customer userhas specific services assigned, then the default services will be not applied.
4.10 Groups
Use this screen to add groups to the system. A fresh OTRS installation contains some default groups. Thegroup management screen is available in the Groups module of the Users, Groups & Roles group.
4.10.1 Manage Groups
To add a group:
138 Chapter 4. Users, Groups & Roles
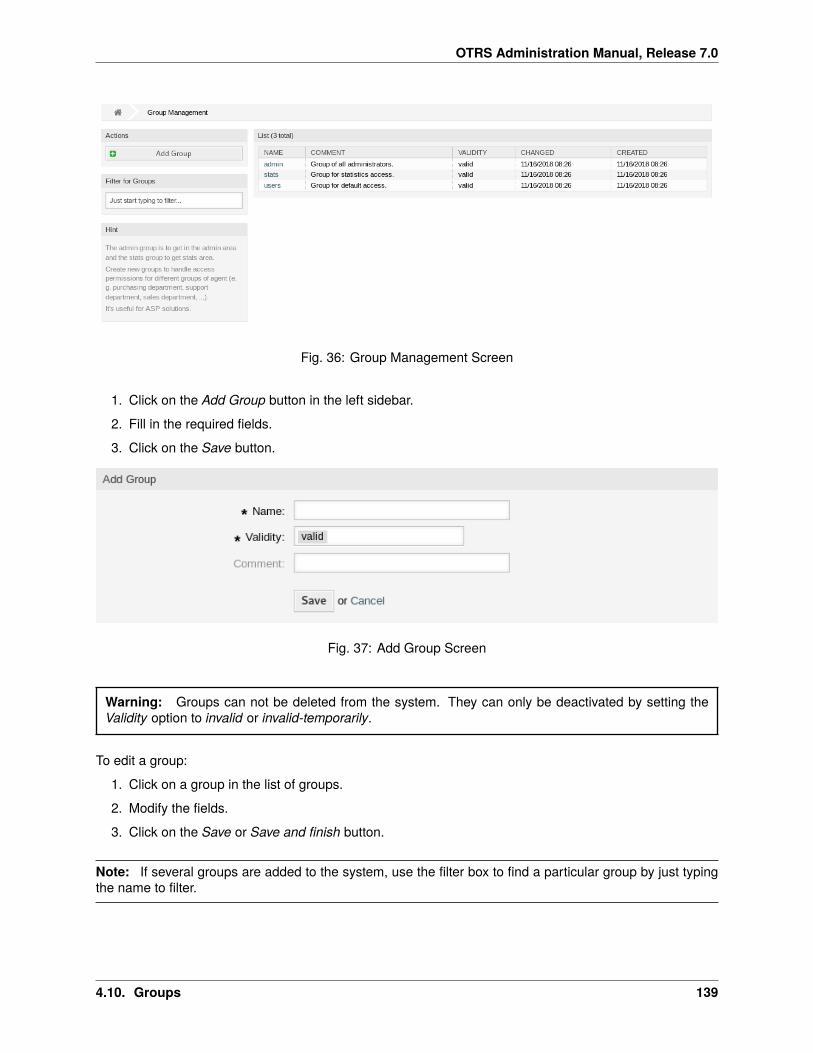
OTRS Administration Manual, Release 7.0
Fig. 36: Group Management Screen
1. Click on the Add Group button in the left sidebar.
2. Fill in the required fields.
3. Click on the Save button.
Fig. 37: Add Group Screen
Warning: Groups can not be deleted from the system. They can only be deactivated by setting theValidity option to invalid or invalid-temporarily.
To edit a group:
1. Click on a group in the list of groups.
2. Modify the fields.
3. Click on the Save or Save and finish button.
Note: If several groups are added to the system, use the filter box to find a particular group by just typingthe name to filter.
4.10. Groups 139
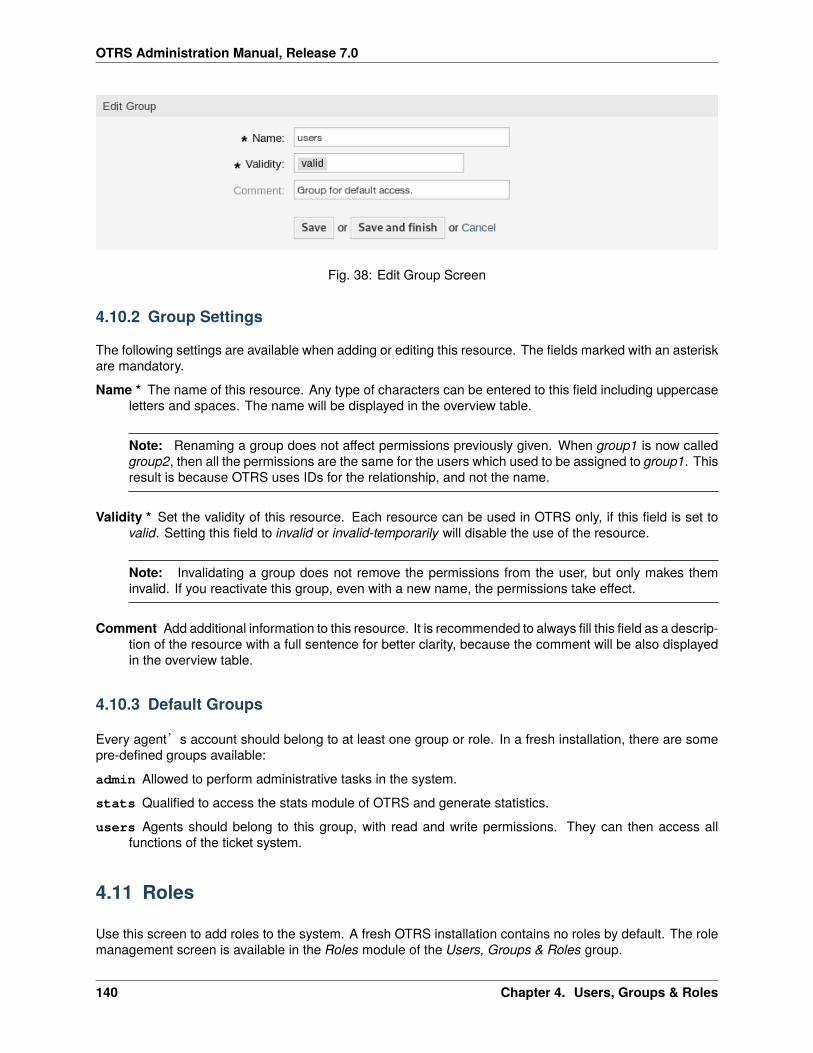
OTRS Administration Manual, Release 7.0
Fig. 38: Edit Group Screen
4.10.2 Group Settings
The following settings are available when adding or editing this resource. The fields marked with an asteriskare mandatory.
Name * The name of this resource. Any type of characters can be entered to this field including uppercaseletters and spaces. The name will be displayed in the overview table.
Note: Renaming a group does not affect permissions previously given. When group1 is now calledgroup2, then all the permissions are the same for the users which used to be assigned to group1. Thisresult is because OTRS uses IDs for the relationship, and not the name.
Validity * Set the validity of this resource. Each resource can be used in OTRS only, if this field is set tovalid. Setting this field to invalid or invalid-temporarily will disable the use of the resource.
Note: Invalidating a group does not remove the permissions from the user, but only makes theminvalid. If you reactivate this group, even with a new name, the permissions take effect.
Comment Add additional information to this resource. It is recommended to always fill this field as a descrip-tion of the resource with a full sentence for better clarity, because the comment will be also displayedin the overview table.
4.10.3 Default Groups
Every agent’s account should belong to at least one group or role. In a fresh installation, there are somepre-defined groups available:
admin Allowed to perform administrative tasks in the system.
stats Qualified to access the stats module of OTRS and generate statistics.
users Agents should belong to this group, with read and write permissions. They can then access allfunctions of the ticket system.
4.11 Roles
Use this screen to add roles to the system. A fresh OTRS installation contains no roles by default. The rolemanagement screen is available in the Roles module of the Users, Groups & Roles group.
140 Chapter 4. Users, Groups & Roles
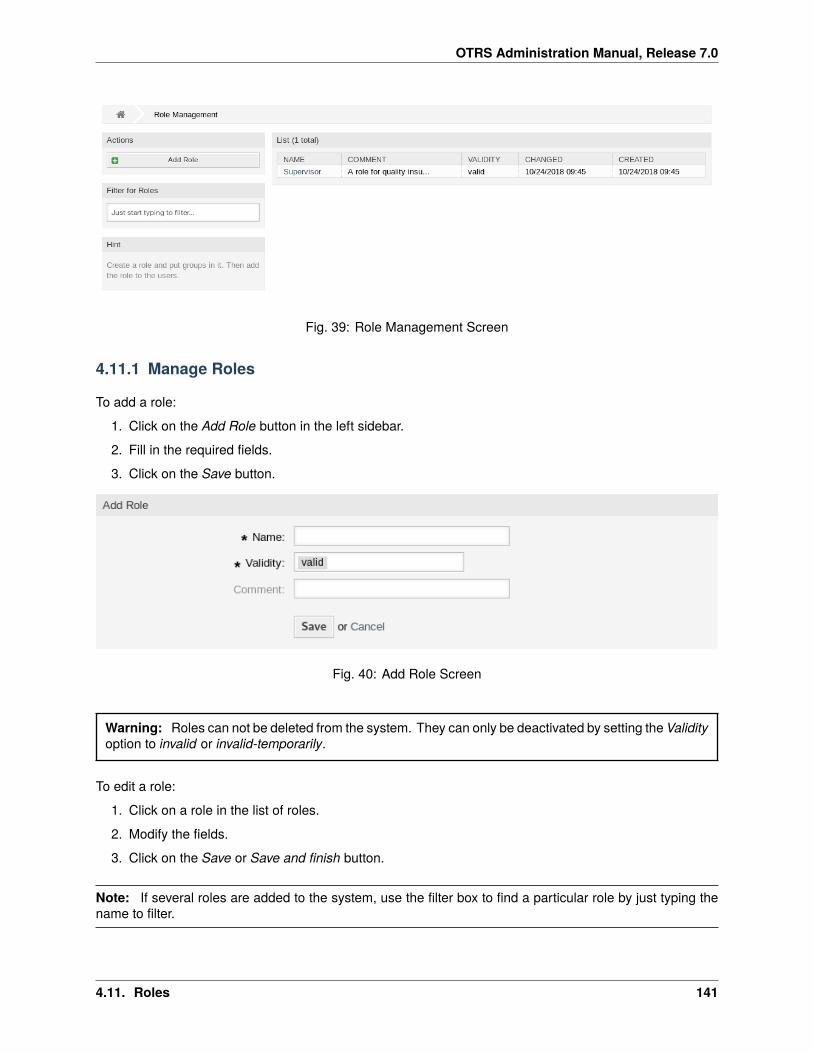
OTRS Administration Manual, Release 7.0
Fig. 39: Role Management Screen
4.11.1 Manage Roles
To add a role:
1. Click on the Add Role button in the left sidebar.
2. Fill in the required fields.
3. Click on the Save button.
Fig. 40: Add Role Screen
Warning: Roles can not be deleted from the system. They can only be deactivated by setting the Validityoption to invalid or invalid-temporarily.
To edit a role:
1. Click on a role in the list of roles.
2. Modify the fields.
3. Click on the Save or Save and finish button.
Note: If several roles are added to the system, use the filter box to find a particular role by just typing thename to filter.
4.11. Roles 141
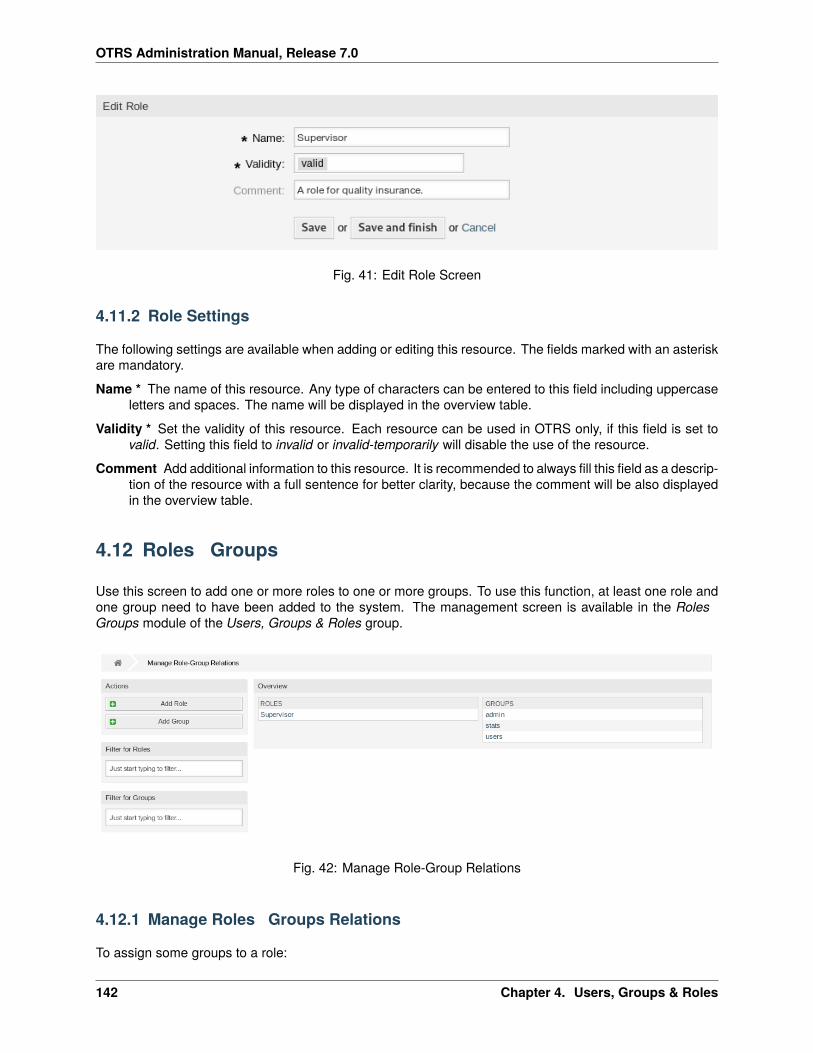
OTRS Administration Manual, Release 7.0
Fig. 41: Edit Role Screen
4.11.2 Role Settings
The following settings are available when adding or editing this resource. The fields marked with an asteriskare mandatory.
Name * The name of this resource. Any type of characters can be entered to this field including uppercaseletters and spaces. The name will be displayed in the overview table.
Validity * Set the validity of this resource. Each resource can be used in OTRS only, if this field is set tovalid. Setting this field to invalid or invalid-temporarily will disable the use of the resource.
Comment Add additional information to this resource. It is recommended to always fill this field as a descrip-tion of the resource with a full sentence for better clarity, because the comment will be also displayedin the overview table.
4.12 Roles � Groups
Use this screen to add one or more roles to one or more groups. To use this function, at least one role andone group need to have been added to the system. The management screen is available in the Roles �Groups module of the Users, Groups & Roles group.
Fig. 42: Manage Role-Group Relations
4.12.1 Manage Roles � Groups Relations
To assign some groups to a role:
142 Chapter 4. Users, Groups & Roles
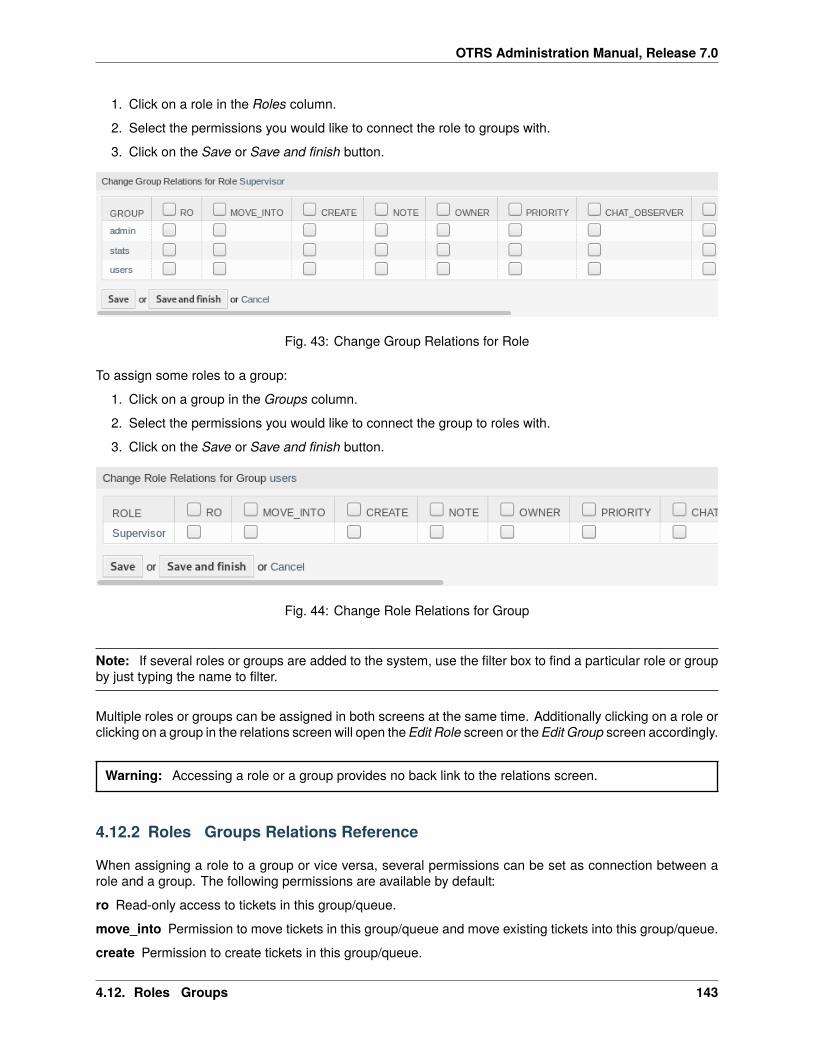
OTRS Administration Manual, Release 7.0
1. Click on a role in the Roles column.
2. Select the permissions you would like to connect the role to groups with.
3. Click on the Save or Save and finish button.
Fig. 43: Change Group Relations for Role
To assign some roles to a group:
1. Click on a group in the Groups column.
2. Select the permissions you would like to connect the group to roles with.
3. Click on the Save or Save and finish button.
Fig. 44: Change Role Relations for Group
Note: If several roles or groups are added to the system, use the filter box to find a particular role or groupby just typing the name to filter.
Multiple roles or groups can be assigned in both screens at the same time. Additionally clicking on a role orclicking on a group in the relations screen will open the Edit Role screen or the Edit Group screen accordingly.
Warning: Accessing a role or a group provides no back link to the relations screen.
4.12.2 Roles � Groups Relations Reference
When assigning a role to a group or vice versa, several permissions can be set as connection between arole and a group. The following permissions are available by default:
ro Read-only access to tickets in this group/queue.
move_into Permission to move tickets in this group/queue and move existing tickets into this group/queue.
create Permission to create tickets in this group/queue.
4.12. Roles � Groups 143
OTRS Administration Manual, Release 7.0
note Permission to add notes to tickets and inform agents in this group/queue.
owner Permission to set the owner of new tickets or change the owner of existing tickets in this group/queue.
priority Permission to change the ticket priority in this group/queue.
chat_observer Users with this permission type will only be able to observe chats in a channel after theyhave been invited.
chat_participant Users with this permission type will be able to take part in a chat, but only after they getinvited to it.
chat_owner Users with this permission type will be able to accept chat customer/public requests and doall kinds of observer and participant actions on a chat.
rw Full read and write access to the tickets in this group/queue.
See also:
Not all available permissions are shown by default. See System::Permission setting for permissions that canbe added. These additional permissions can be added:
bounce Permission to redirect an email.
close Permission to close a ticket.
compose Permission to compose an answer for a ticket.
customer Permission to change the customer of a ticket.
forward Permission to forward an article.
pending Permission to set a ticket to pending.
phone Permission to add a phone call to a ticket.
responsible Permission to set the responsible agent of new tickets or change the responsible agent ofexisting tickets in this group/queue.
Note: By setting a checkbox in the header of a column will set all the checkboxes in the selected column.By setting the checkbox in the last rw column will set all the checkboxes in the selected row.
144 Chapter 4. Users, Groups & Roles
CHAPTER 5
Processes & Automation
Working effectively with tickets requires more than just the possibility to manually change their state, addinformation, communicate with other persons and finally close the tickets.
Automation frees agents from reoccurring and time-consuming tasks and allows them to focus on activities,where their interaction is required.
Process management guides customer users and agents through ticket creation to closure ensuring thattickets take defined workflows at any time.
OTRS offers many options to automate tasks based on events, time, external systems and defined pro-cesses. OTRS also includes the possibility to add individual information types to tickets and help agents tolower their error rate when working with tickets by allowing only defined activities for tickets in specific states.
5.1 Access Control Lists (ACL)
Working with tickets can become a bewildering task. Many options are given to process, or close tickets,even if they are not needed in the current state of a ticket or due to the role of the current agent. Hidingunneeded entries cleans up the menu bar and gets it easier to work with, hiding values from dynamic fieldsor next queues lowers chance of human error.
OTRS uses access control lists (ACL) to restrict agents and customer users on ticket options, allowingonly correct and meaningful activities with a ticket. OTRS administrators can easily generate ACLs in thegraphical interface to prevent ticket closure until meeting specific requirements, prevent tickets from beingmoved to queues before adding the defined information and much more.
Use this screen to manage access control lists in the system. A fresh OTRS installation contains no accesscontrol lists by default. The access control lists management screen is available in the Access Control Lists(ACL) module of the Processes & Automation group.
5.1.1 Manage Access Control Lists
145
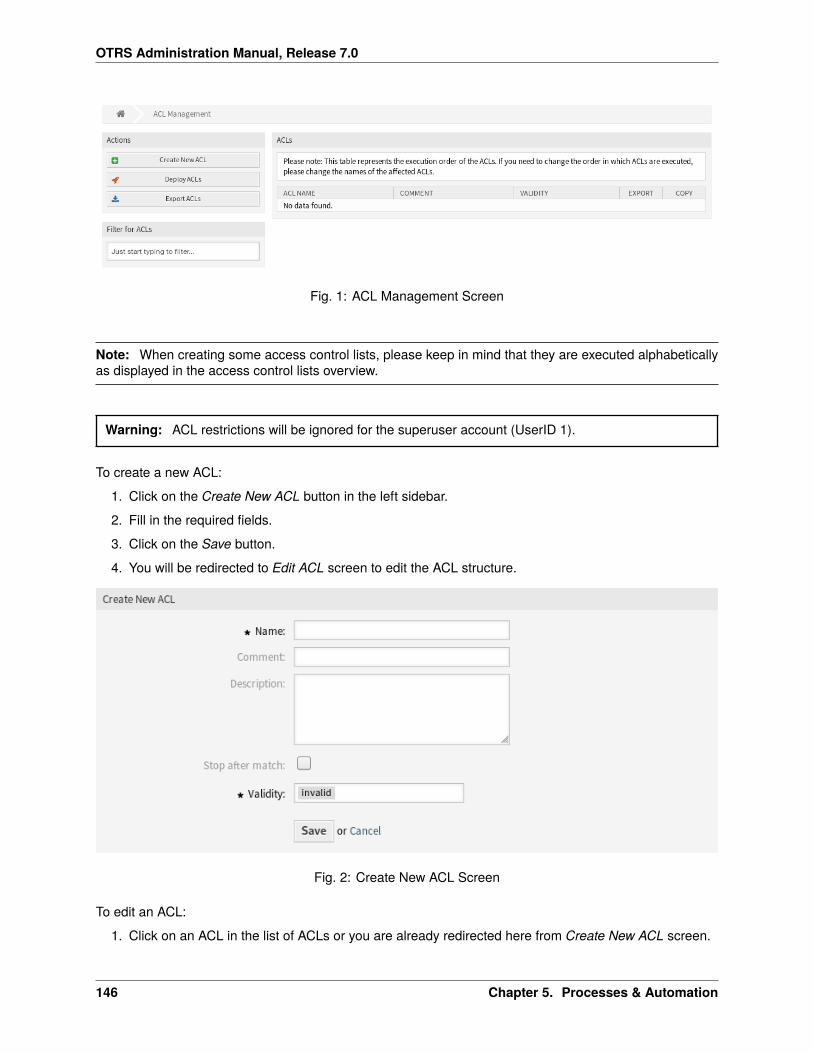
OTRS Administration Manual, Release 7.0
Fig. 1: ACL Management Screen
Note: When creating some access control lists, please keep in mind that they are executed alphabeticallyas displayed in the access control lists overview.
Warning: ACL restrictions will be ignored for the superuser account (UserID 1).
To create a new ACL:
1. Click on the Create New ACL button in the left sidebar.
2. Fill in the required fields.
3. Click on the Save button.
4. You will be redirected to Edit ACL screen to edit the ACL structure.
Fig. 2: Create New ACL Screen
To edit an ACL:
1. Click on an ACL in the list of ACLs or you are already redirected here from Create New ACL screen.
146 Chapter 5. Processes & Automation
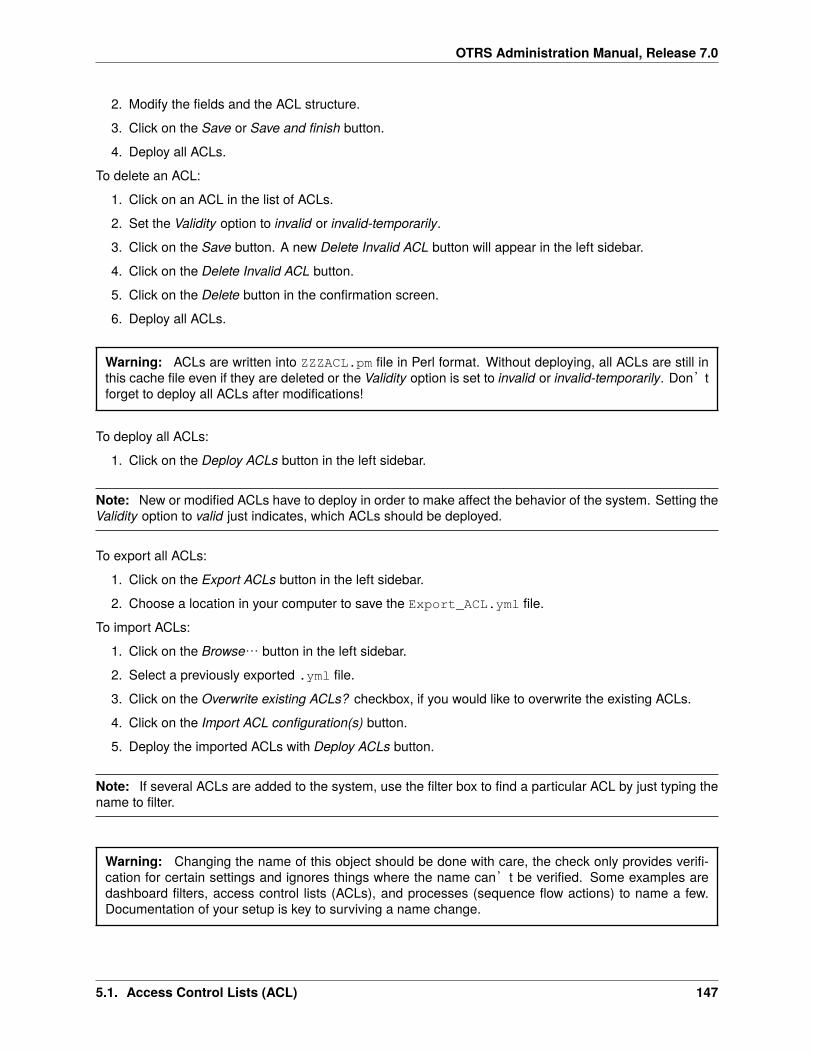
OTRS Administration Manual, Release 7.0
2. Modify the fields and the ACL structure.
3. Click on the Save or Save and finish button.
4. Deploy all ACLs.
To delete an ACL:
1. Click on an ACL in the list of ACLs.
2. Set the Validity option to invalid or invalid-temporarily.
3. Click on the Save button. A new Delete Invalid ACL button will appear in the left sidebar.
4. Click on the Delete Invalid ACL button.
5. Click on the Delete button in the confirmation screen.
6. Deploy all ACLs.
Warning: ACLs are written into ZZZACL.pm file in Perl format. Without deploying, all ACLs are still inthis cache file even if they are deleted or the Validity option is set to invalid or invalid-temporarily. Don’tforget to deploy all ACLs after modifications!
To deploy all ACLs:
1. Click on the Deploy ACLs button in the left sidebar.
Note: New or modified ACLs have to deploy in order to make affect the behavior of the system. Setting theValidity option to valid just indicates, which ACLs should be deployed.
To export all ACLs:
1. Click on the Export ACLs button in the left sidebar.
2. Choose a location in your computer to save the Export_ACL.yml file.
To import ACLs:
1. Click on the Browse… button in the left sidebar.
2. Select a previously exported .yml file.
3. Click on the Overwrite existing ACLs? checkbox, if you would like to overwrite the existing ACLs.
4. Click on the Import ACL configuration(s) button.
5. Deploy the imported ACLs with Deploy ACLs button.
Note: If several ACLs are added to the system, use the filter box to find a particular ACL by just typing thename to filter.
Warning: Changing the name of this object should be done with care, the check only provides verifi-cation for certain settings and ignores things where the name can’t be verified. Some examples aredashboard filters, access control lists (ACLs), and processes (sequence flow actions) to name a few.Documentation of your setup is key to surviving a name change.
5.1. Access Control Lists (ACL) 147
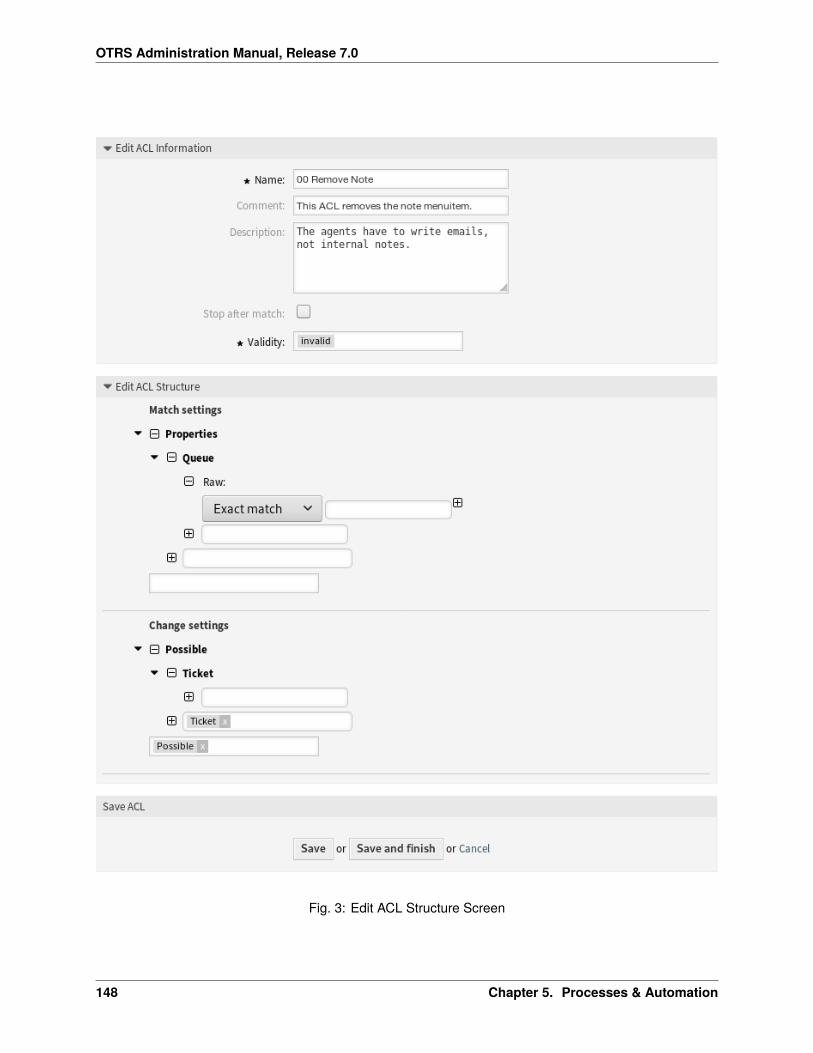
OTRS Administration Manual, Release 7.0
Fig. 3: Edit ACL Structure Screen
148 Chapter 5. Processes & Automation
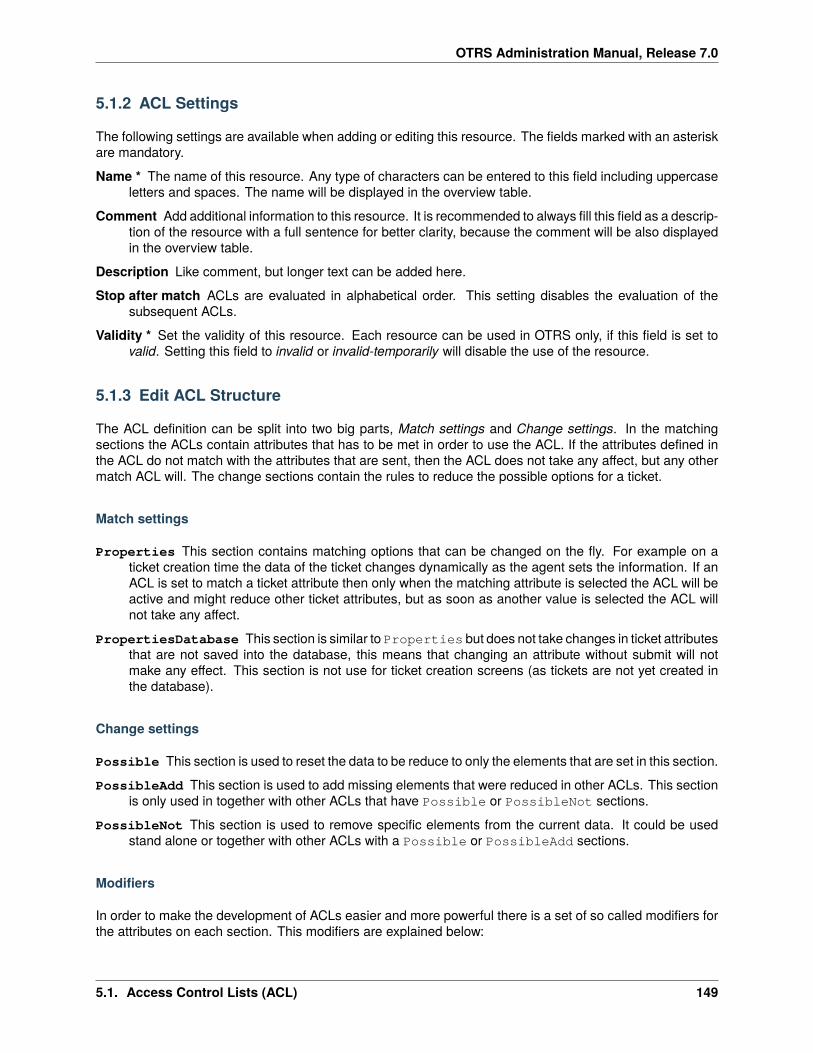
OTRS Administration Manual, Release 7.0
5.1.2 ACL Settings
The following settings are available when adding or editing this resource. The fields marked with an asteriskare mandatory.
Name * The name of this resource. Any type of characters can be entered to this field including uppercaseletters and spaces. The name will be displayed in the overview table.
Comment Add additional information to this resource. It is recommended to always fill this field as a descrip-tion of the resource with a full sentence for better clarity, because the comment will be also displayedin the overview table.
Description Like comment, but longer text can be added here.
Stop after match ACLs are evaluated in alphabetical order. This setting disables the evaluation of thesubsequent ACLs.
Validity * Set the validity of this resource. Each resource can be used in OTRS only, if this field is set tovalid. Setting this field to invalid or invalid-temporarily will disable the use of the resource.
5.1.3 Edit ACL Structure
The ACL definition can be split into two big parts, Match settings and Change settings. In the matchingsections the ACLs contain attributes that has to be met in order to use the ACL. If the attributes defined inthe ACL do not match with the attributes that are sent, then the ACL does not take any affect, but any othermatch ACL will. The change sections contain the rules to reduce the possible options for a ticket.
Match settings
Properties This section contains matching options that can be changed on the fly. For example on aticket creation time the data of the ticket changes dynamically as the agent sets the information. If anACL is set to match a ticket attribute then only when the matching attribute is selected the ACL will beactive and might reduce other ticket attributes, but as soon as another value is selected the ACL willnot take any affect.
PropertiesDatabase This section is similar to Properties but does not take changes in ticket attributesthat are not saved into the database, this means that changing an attribute without submit will notmake any effect. This section is not use for ticket creation screens (as tickets are not yet created inthe database).
Change settings
Possible This section is used to reset the data to be reduce to only the elements that are set in this section.
PossibleAdd This section is used to add missing elements that were reduced in other ACLs. This sectionis only used in together with other ACLs that have Possible or PossibleNot sections.
PossibleNot This section is used to remove specific elements from the current data. It could be usedstand alone or together with other ACLs with a Possible or PossibleAdd sections.
Modifiers
In order to make the development of ACLs easier and more powerful there is a set of so called modifiers forthe attributes on each section. This modifiers are explained below:
5.1. Access Control Lists (ACL) 149
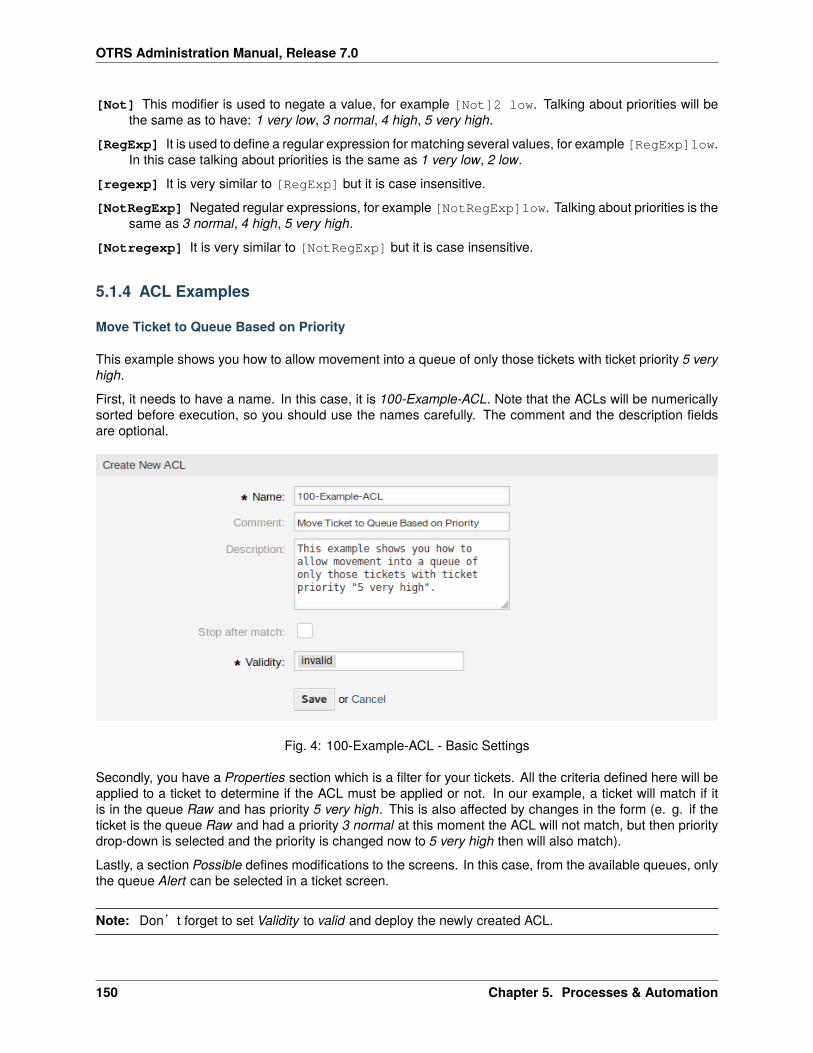
OTRS Administration Manual, Release 7.0
[Not] This modifier is used to negate a value, for example [Not]2 low. Talking about priorities will bethe same as to have: 1 very low, 3 normal, 4 high, 5 very high.
[RegExp] It is used to define a regular expression for matching several values, for example [RegExp]low.In this case talking about priorities is the same as 1 very low, 2 low.
[regexp] It is very similar to [RegExp] but it is case insensitive.
[NotRegExp] Negated regular expressions, for example [NotRegExp]low. Talking about priorities is thesame as 3 normal, 4 high, 5 very high.
[Notregexp] It is very similar to [NotRegExp] but it is case insensitive.
5.1.4 ACL Examples
Move Ticket to Queue Based on Priority
This example shows you how to allow movement into a queue of only those tickets with ticket priority 5 veryhigh.
First, it needs to have a name. In this case, it is 100-Example-ACL. Note that the ACLs will be numericallysorted before execution, so you should use the names carefully. The comment and the description fieldsare optional.
Fig. 4: 100-Example-ACL - Basic Settings
Secondly, you have a Properties section which is a filter for your tickets. All the criteria defined here will beapplied to a ticket to determine if the ACL must be applied or not. In our example, a ticket will match if itis in the queue Raw and has priority 5 very high. This is also affected by changes in the form (e. g. if theticket is the queue Raw and had a priority 3 normal at this moment the ACL will not match, but then prioritydrop-down is selected and the priority is changed now to 5 very high then will also match).
Lastly, a section Possible defines modifications to the screens. In this case, from the available queues, onlythe queue Alert can be selected in a ticket screen.
Note: Don’t forget to set Validity to valid and deploy the newly created ACL.
150 Chapter 5. Processes & Automation
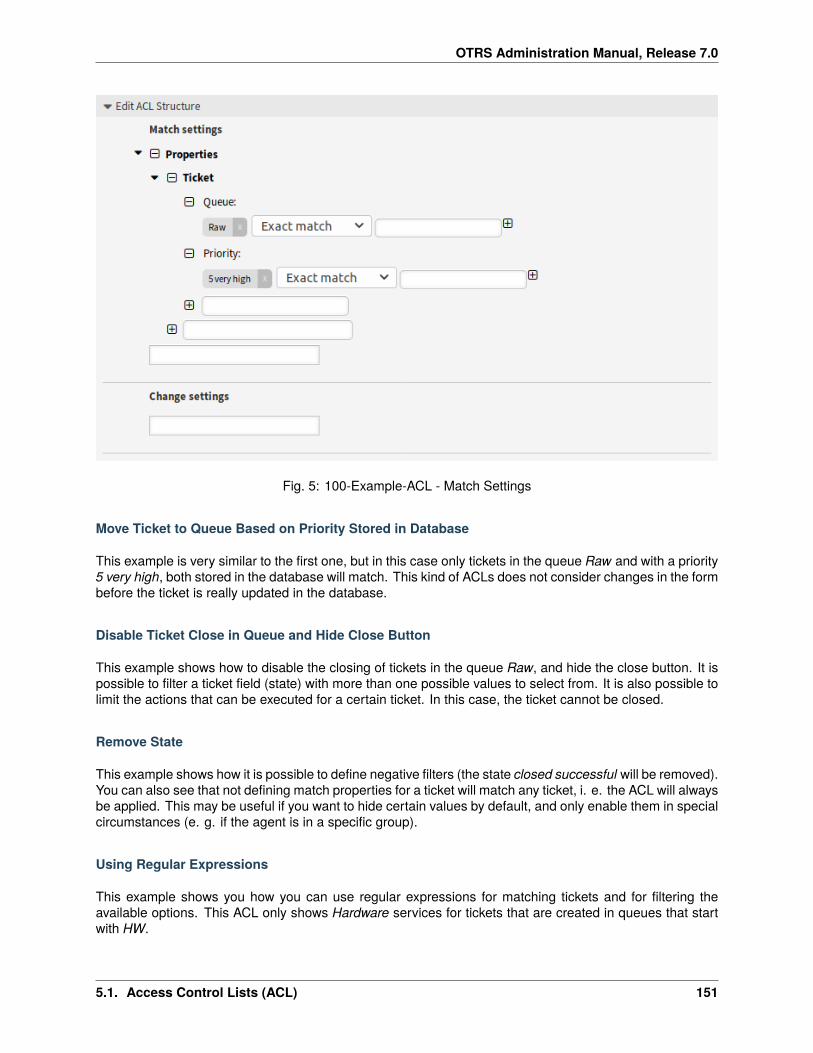
OTRS Administration Manual, Release 7.0
Fig. 5: 100-Example-ACL - Match Settings
Move Ticket to Queue Based on Priority Stored in Database
This example is very similar to the first one, but in this case only tickets in the queue Raw and with a priority5 very high, both stored in the database will match. This kind of ACLs does not consider changes in the formbefore the ticket is really updated in the database.
Disable Ticket Close in Queue and Hide Close Button
This example shows how to disable the closing of tickets in the queue Raw, and hide the close button. It ispossible to filter a ticket field (state) with more than one possible values to select from. It is also possible tolimit the actions that can be executed for a certain ticket. In this case, the ticket cannot be closed.
Remove State
This example shows how it is possible to define negative filters (the state closed successful will be removed).You can also see that not defining match properties for a ticket will match any ticket, i. e. the ACL will alwaysbe applied. This may be useful if you want to hide certain values by default, and only enable them in specialcircumstances (e. g. if the agent is in a specific group).
Using Regular Expressions
This example shows you how you can use regular expressions for matching tickets and for filtering theavailable options. This ACL only shows Hardware services for tickets that are created in queues that startwith HW.
5.1. Access Control Lists (ACL) 151

OTRS Administration Manual, Release 7.0
Fig. 6: 100-Example-ACL - Change Settings
152 Chapter 5. Processes & Automation
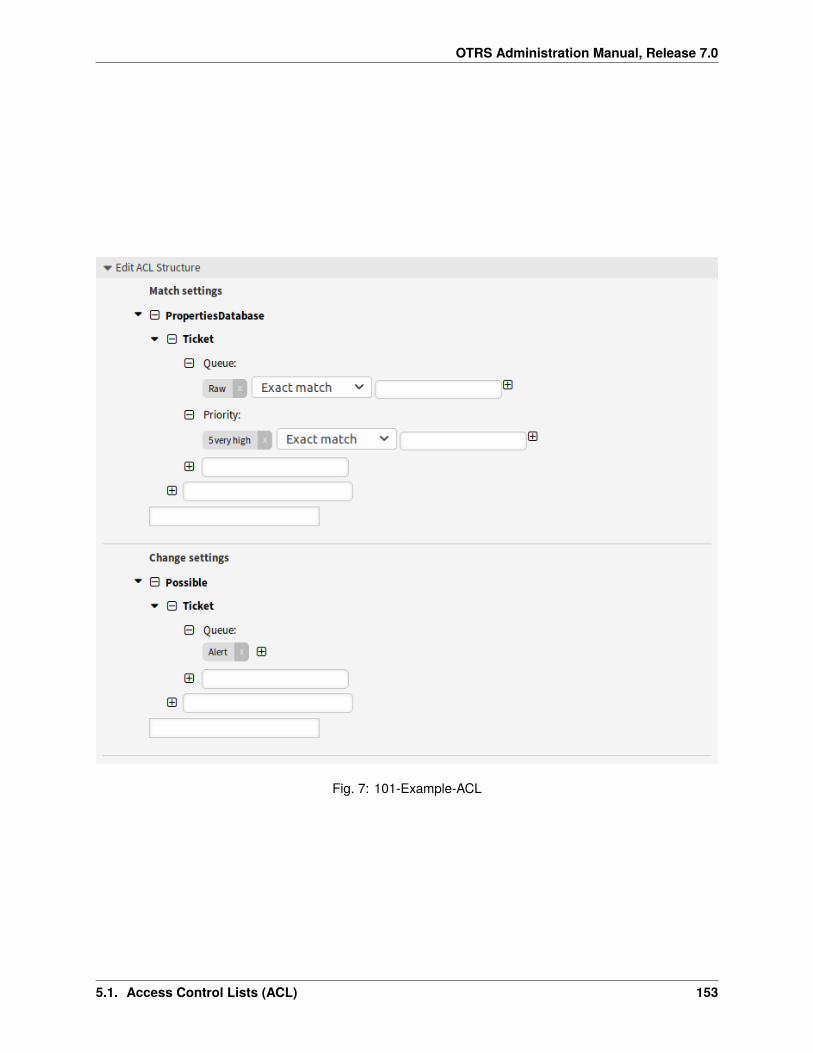
OTRS Administration Manual, Release 7.0
Fig. 7: 101-Example-ACL
5.1. Access Control Lists (ACL) 153
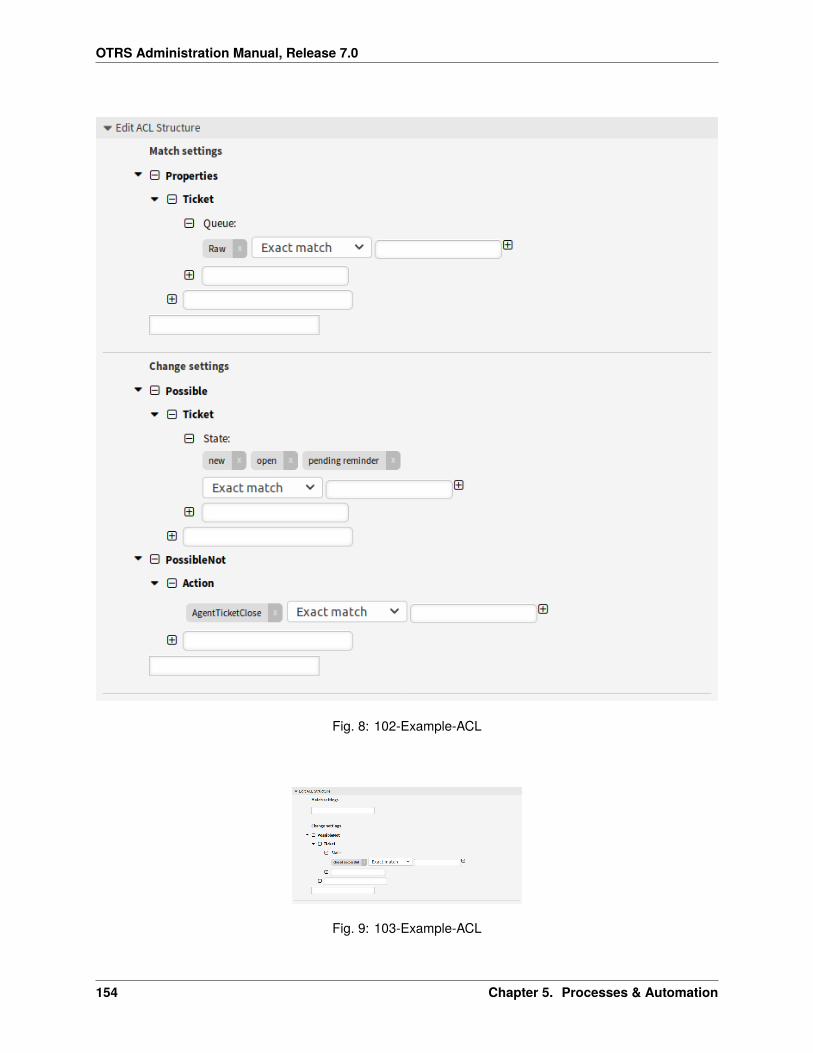
OTRS Administration Manual, Release 7.0
Fig. 8: 102-Example-ACL
Fig. 9: 103-Example-ACL
154 Chapter 5. Processes & Automation
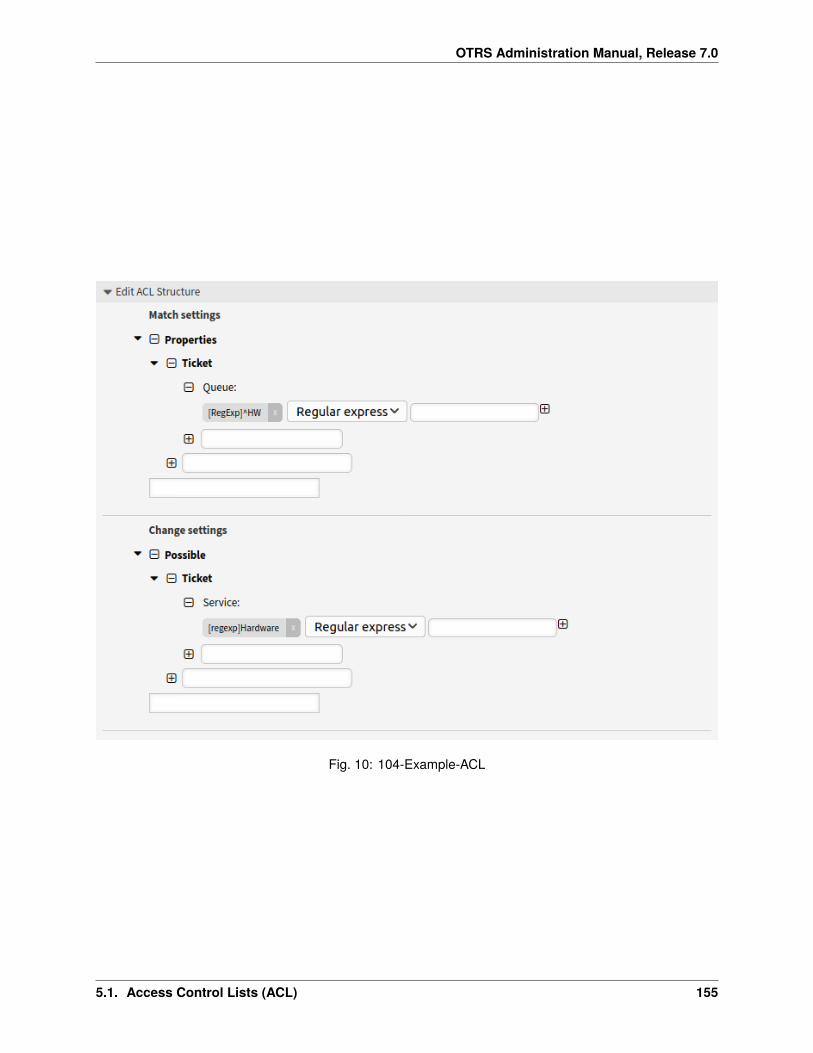
OTRS Administration Manual, Release 7.0
Fig. 10: 104-Example-ACL
5.1. Access Control Lists (ACL) 155
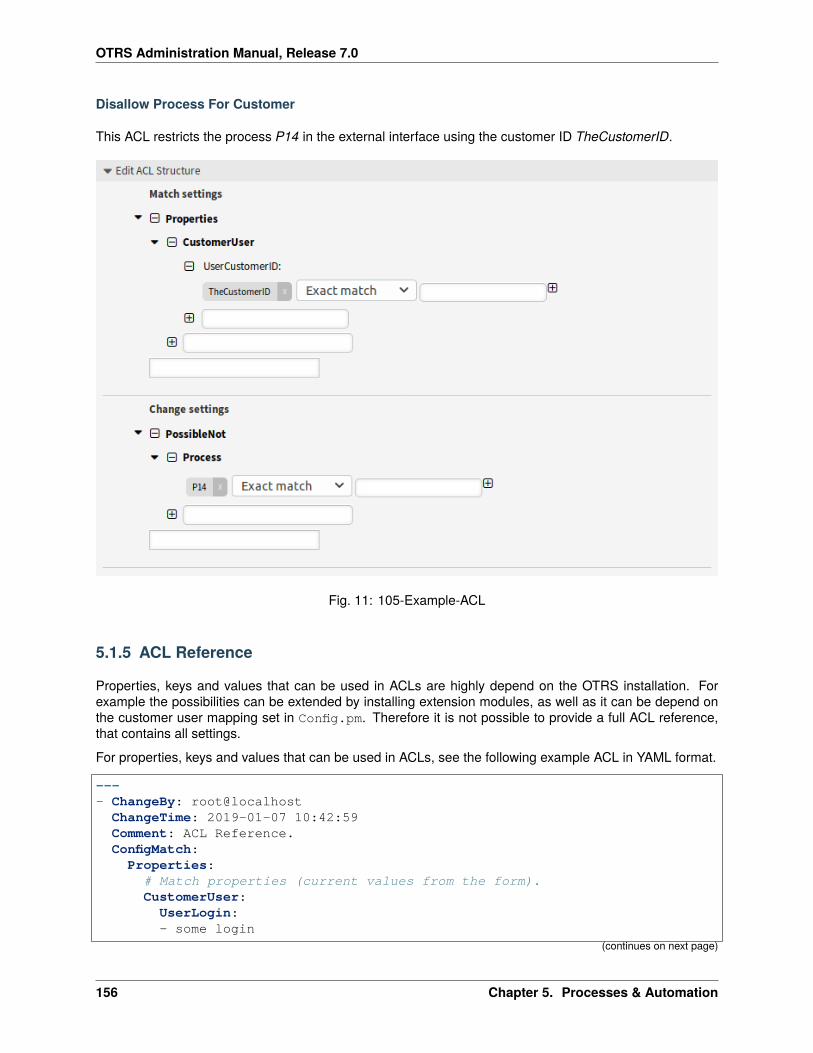
OTRS Administration Manual, Release 7.0
Disallow Process For Customer
This ACL restricts the process P14 in the external interface using the customer ID TheCustomerID.
Fig. 11: 105-Example-ACL
5.1.5 ACL Reference
Properties, keys and values that can be used in ACLs are highly depend on the OTRS installation. Forexample the possibilities can be extended by installing extension modules, as well as it can be depend onthe customer user mapping set in Config.pm. Therefore it is not possible to provide a full ACL reference,that contains all settings.
For properties, keys and values that can be used in ACLs, see the following example ACL in YAML format.
---- ChangeBy: root@localhost
ChangeTime: 2019-01-07 10:42:59Comment: ACL Reference.ConfigMatch:
Properties:# Match properties (current values from the form).CustomerUser:
UserLogin:- some login
(continues on next page)
156 Chapter 5. Processes & Automation
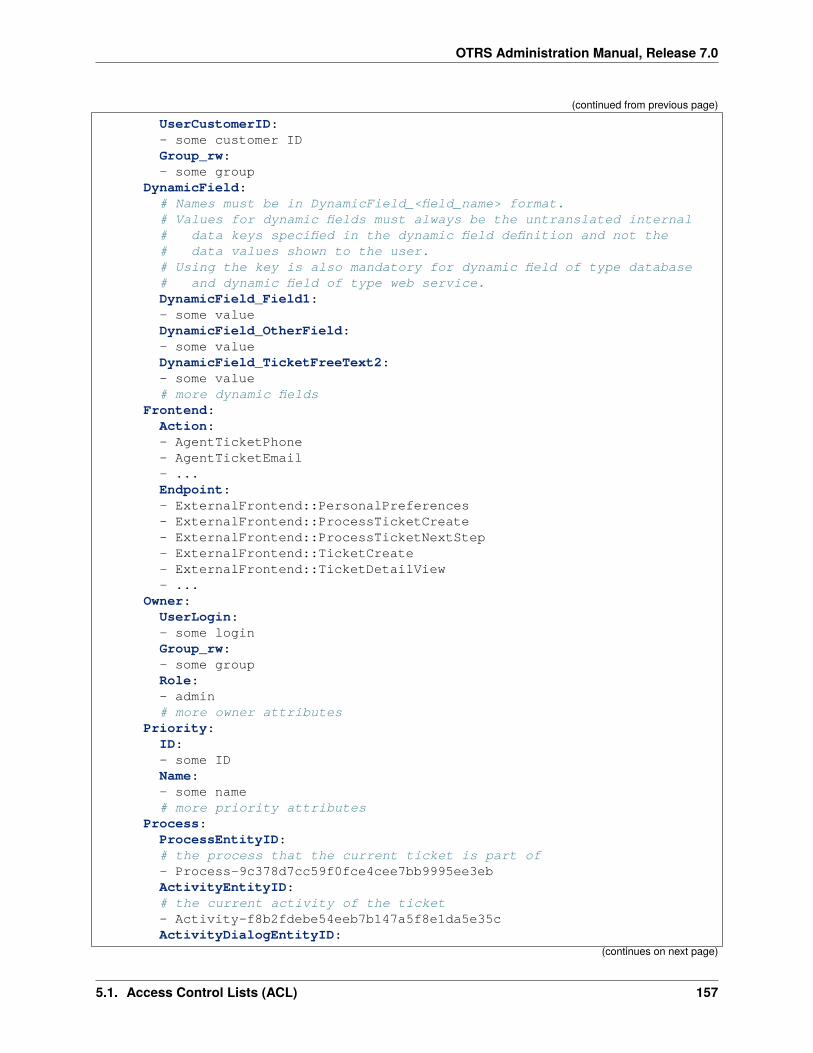
OTRS Administration Manual, Release 7.0
(continued from previous page)
UserCustomerID:- some customer IDGroup_rw:- some group
DynamicField:# Names must be in DynamicField_<field_name> format.# Values for dynamic fields must always be the untranslated internal# data keys specified in the dynamic field definition and not the# data values shown to the user.# Using the key is also mandatory for dynamic field of type database# and dynamic field of type web service.DynamicField_Field1:- some valueDynamicField_OtherField:- some valueDynamicField_TicketFreeText2:- some value# more dynamic fields
Frontend:Action:- AgentTicketPhone- AgentTicketEmail- ...Endpoint:- ExternalFrontend::PersonalPreferences- ExternalFrontend::ProcessTicketCreate- ExternalFrontend::ProcessTicketNextStep- ExternalFrontend::TicketCreate- ExternalFrontend::TicketDetailView- ...
Owner:UserLogin:- some loginGroup_rw:- some groupRole:- admin# more owner attributes
Priority:ID:- some IDName:- some name# more priority attributes
Process:ProcessEntityID:# the process that the current ticket is part of- Process-9c378d7cc59f0fce4cee7bb9995ee3ebActivityEntityID:# the current activity of the ticket- Activity-f8b2fdebe54eeb7b147a5f8e1da5e35cActivityDialogEntityID:
(continues on next page)
5.1. Access Control Lists (ACL) 157
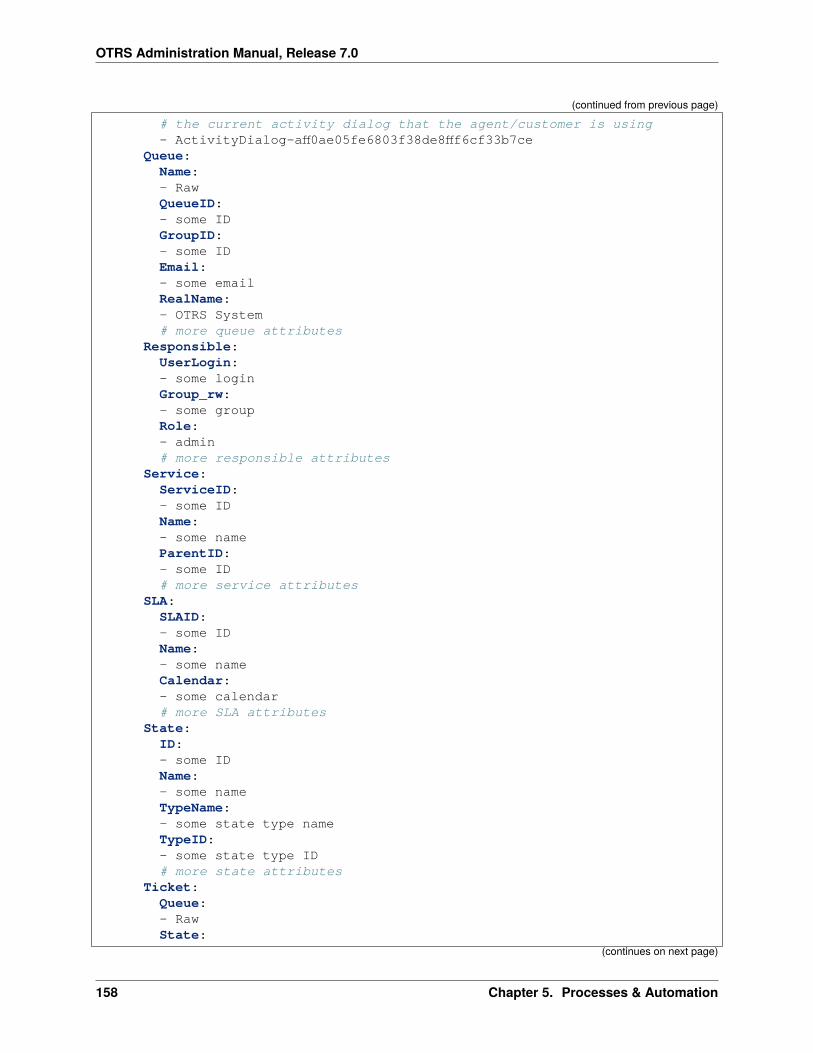
OTRS Administration Manual, Release 7.0
(continued from previous page)
# the current activity dialog that the agent/customer is using- ActivityDialog-aff0ae05fe6803f38de8fff6cf33b7ce
Queue:Name:- RawQueueID:- some IDGroupID:- some IDEmail:- some emailRealName:- OTRS System# more queue attributes
Responsible:UserLogin:- some loginGroup_rw:- some groupRole:- admin# more responsible attributes
Service:ServiceID:- some IDName:- some nameParentID:- some ID# more service attributes
SLA:SLAID:- some IDName:- some nameCalendar:- some calendar# more SLA attributes
State:ID:- some IDName:- some nameTypeName:- some state type nameTypeID:- some state type ID# more state attributes
Ticket:Queue:- RawState:
(continues on next page)
158 Chapter 5. Processes & Automation
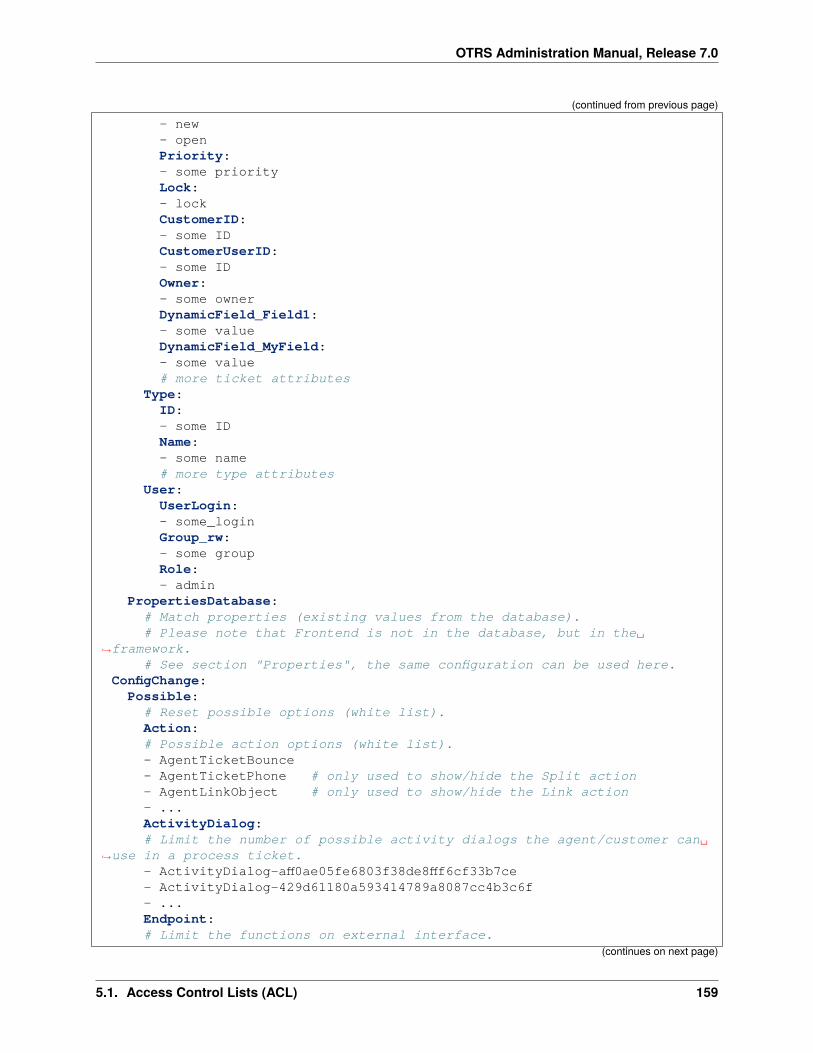
OTRS Administration Manual, Release 7.0
(continued from previous page)
- new- openPriority:- some priorityLock:- lockCustomerID:- some IDCustomerUserID:- some IDOwner:- some ownerDynamicField_Field1:- some valueDynamicField_MyField:- some value# more ticket attributes
Type:ID:- some IDName:- some name# more type attributes
User:UserLogin:- some_loginGroup_rw:- some groupRole:- admin
PropertiesDatabase:# Match properties (existing values from the database).# Please note that Frontend is not in the database, but in the␣
↪→framework.# See section "Properties", the same configuration can be used here.
ConfigChange:Possible:
# Reset possible options (white list).Action:# Possible action options (white list).- AgentTicketBounce- AgentTicketPhone # only used to show/hide the Split action- AgentLinkObject # only used to show/hide the Link action- ...ActivityDialog:# Limit the number of possible activity dialogs the agent/customer can␣
↪→use in a process ticket.- ActivityDialog-aff0ae05fe6803f38de8fff6cf33b7ce- ActivityDialog-429d61180a593414789a8087cc4b3c6f- ...Endpoint:# Limit the functions on external interface.
(continues on next page)
5.1. Access Control Lists (ACL) 159
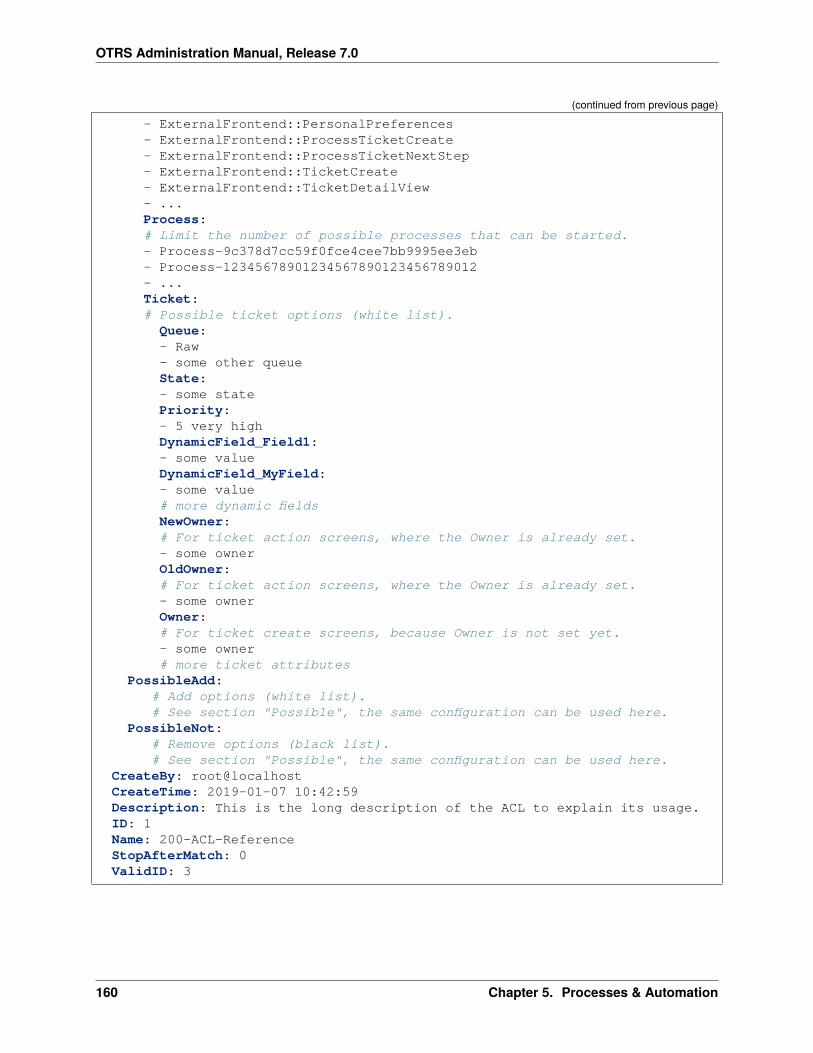
OTRS Administration Manual, Release 7.0
(continued from previous page)
- ExternalFrontend::PersonalPreferences- ExternalFrontend::ProcessTicketCreate- ExternalFrontend::ProcessTicketNextStep- ExternalFrontend::TicketCreate- ExternalFrontend::TicketDetailView- ...Process:# Limit the number of possible processes that can be started.- Process-9c378d7cc59f0fce4cee7bb9995ee3eb- Process-12345678901234567890123456789012- ...Ticket:# Possible ticket options (white list).
Queue:- Raw- some other queueState:- some statePriority:- 5 very highDynamicField_Field1:- some valueDynamicField_MyField:- some value# more dynamic fieldsNewOwner:# For ticket action screens, where the Owner is already set.- some ownerOldOwner:# For ticket action screens, where the Owner is already set.- some ownerOwner:# For ticket create screens, because Owner is not set yet.- some owner# more ticket attributes
PossibleAdd:# Add options (white list).# See section "Possible", the same configuration can be used here.
PossibleNot:# Remove options (black list).# See section "Possible", the same configuration can be used here.
CreateBy: root@localhostCreateTime: 2019-01-07 10:42:59Description: This is the long description of the ACL to explain its usage.ID: 1Name: 200-ACL-ReferenceStopAfterMatch: 0ValidID: 3
160 Chapter 5. Processes & Automation
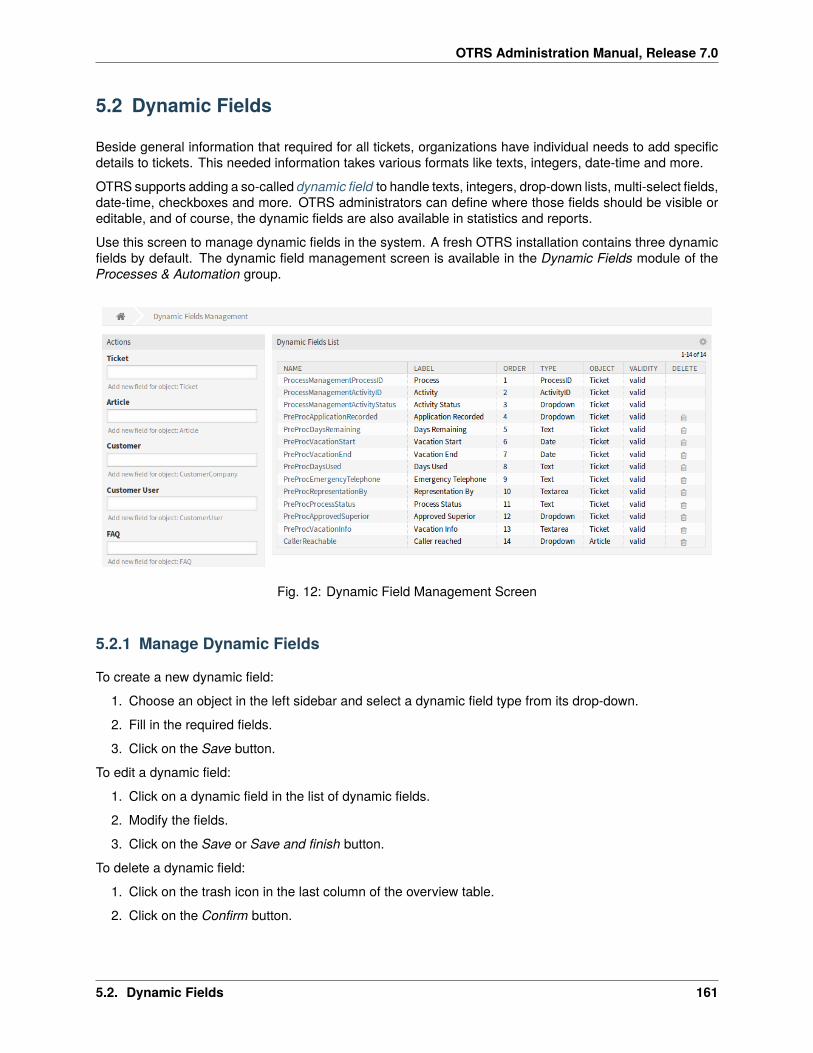
OTRS Administration Manual, Release 7.0
5.2 Dynamic Fields
Beside general information that required for all tickets, organizations have individual needs to add specificdetails to tickets. This needed information takes various formats like texts, integers, date-time and more.
OTRS supports adding a so-called dynamic field to handle texts, integers, drop-down lists, multi-select fields,date-time, checkboxes and more. OTRS administrators can define where those fields should be visible oreditable, and of course, the dynamic fields are also available in statistics and reports.
Use this screen to manage dynamic fields in the system. A fresh OTRS installation contains three dynamicfields by default. The dynamic field management screen is available in the Dynamic Fields module of theProcesses & Automation group.
Fig. 12: Dynamic Field Management Screen
5.2.1 Manage Dynamic Fields
To create a new dynamic field:
1. Choose an object in the left sidebar and select a dynamic field type from its drop-down.
2. Fill in the required fields.
3. Click on the Save button.
To edit a dynamic field:
1. Click on a dynamic field in the list of dynamic fields.
2. Modify the fields.
3. Click on the Save or Save and finish button.
To delete a dynamic field:
1. Click on the trash icon in the last column of the overview table.
2. Click on the Confirm button.
5.2. Dynamic Fields 161
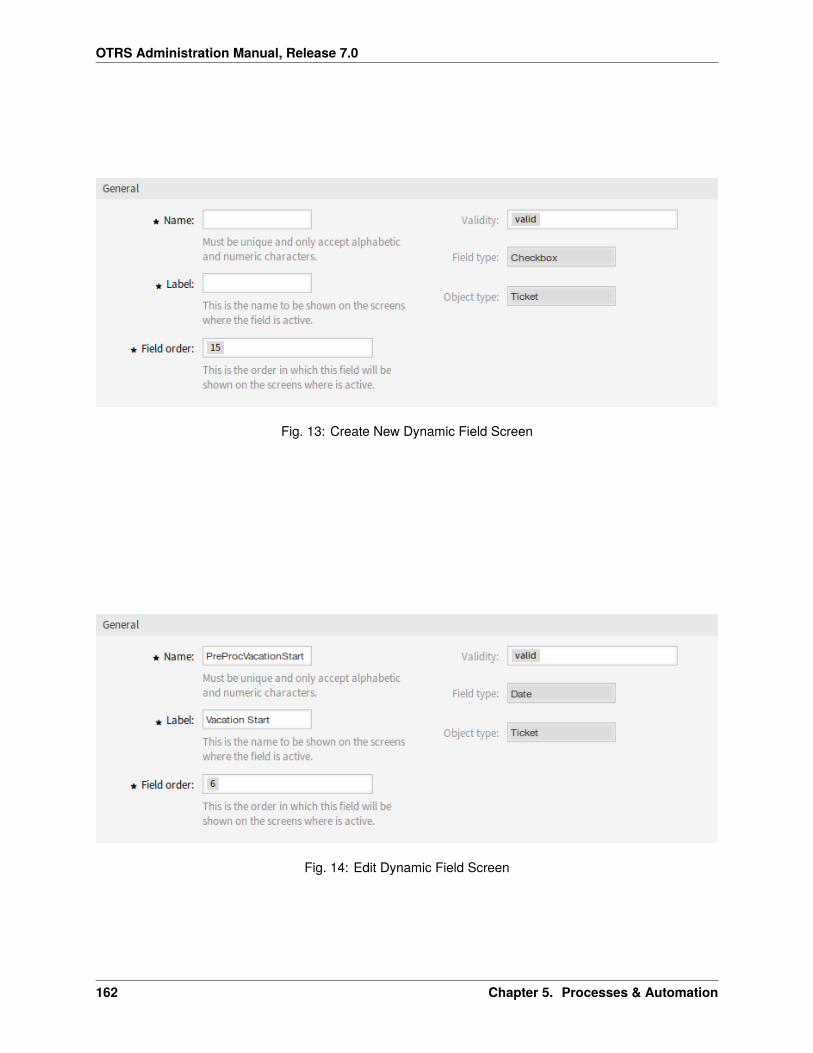
OTRS Administration Manual, Release 7.0
Fig. 13: Create New Dynamic Field Screen
Fig. 14: Edit Dynamic Field Screen
162 Chapter 5. Processes & Automation
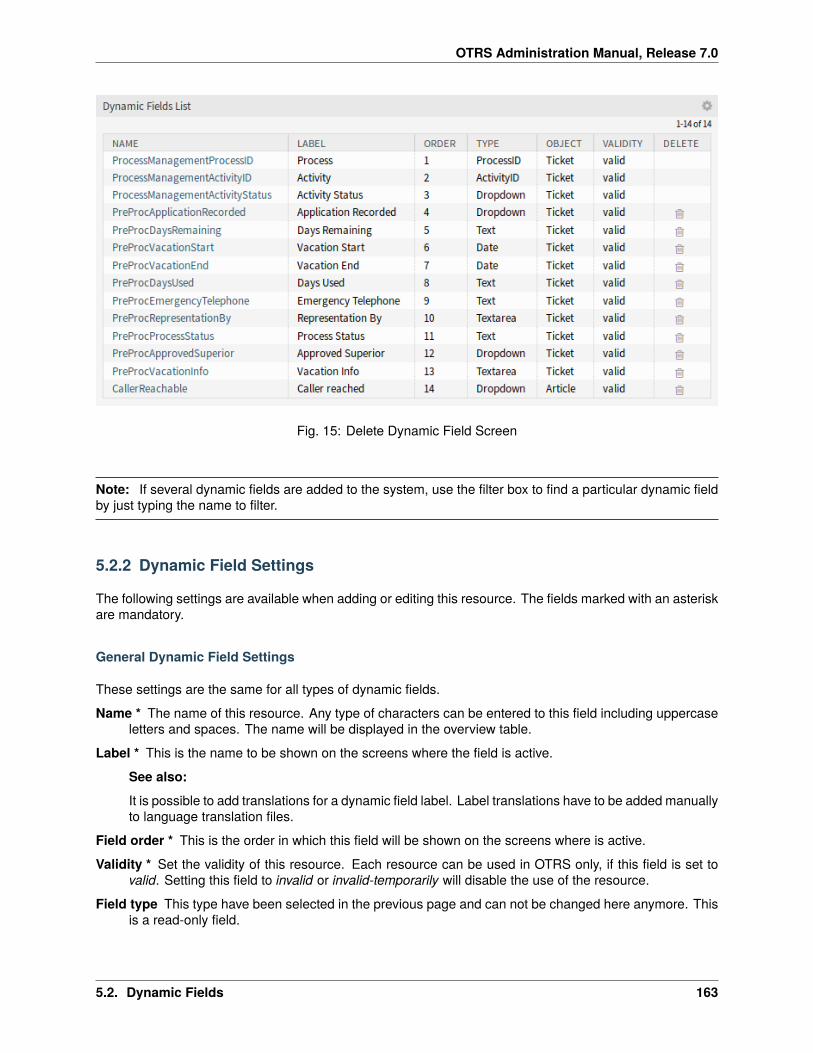
OTRS Administration Manual, Release 7.0
Fig. 15: Delete Dynamic Field Screen
Note: If several dynamic fields are added to the system, use the filter box to find a particular dynamic fieldby just typing the name to filter.
5.2.2 Dynamic Field Settings
The following settings are available when adding or editing this resource. The fields marked with an asteriskare mandatory.
General Dynamic Field Settings
These settings are the same for all types of dynamic fields.
Name * The name of this resource. Any type of characters can be entered to this field including uppercaseletters and spaces. The name will be displayed in the overview table.
Label * This is the name to be shown on the screens where the field is active.
See also:
It is possible to add translations for a dynamic field label. Label translations have to be added manuallyto language translation files.
Field order * This is the order in which this field will be shown on the screens where is active.
Validity * Set the validity of this resource. Each resource can be used in OTRS only, if this field is set tovalid. Setting this field to invalid or invalid-temporarily will disable the use of the resource.
Field type This type have been selected in the previous page and can not be changed here anymore. Thisis a read-only field.
5.2. Dynamic Fields 163
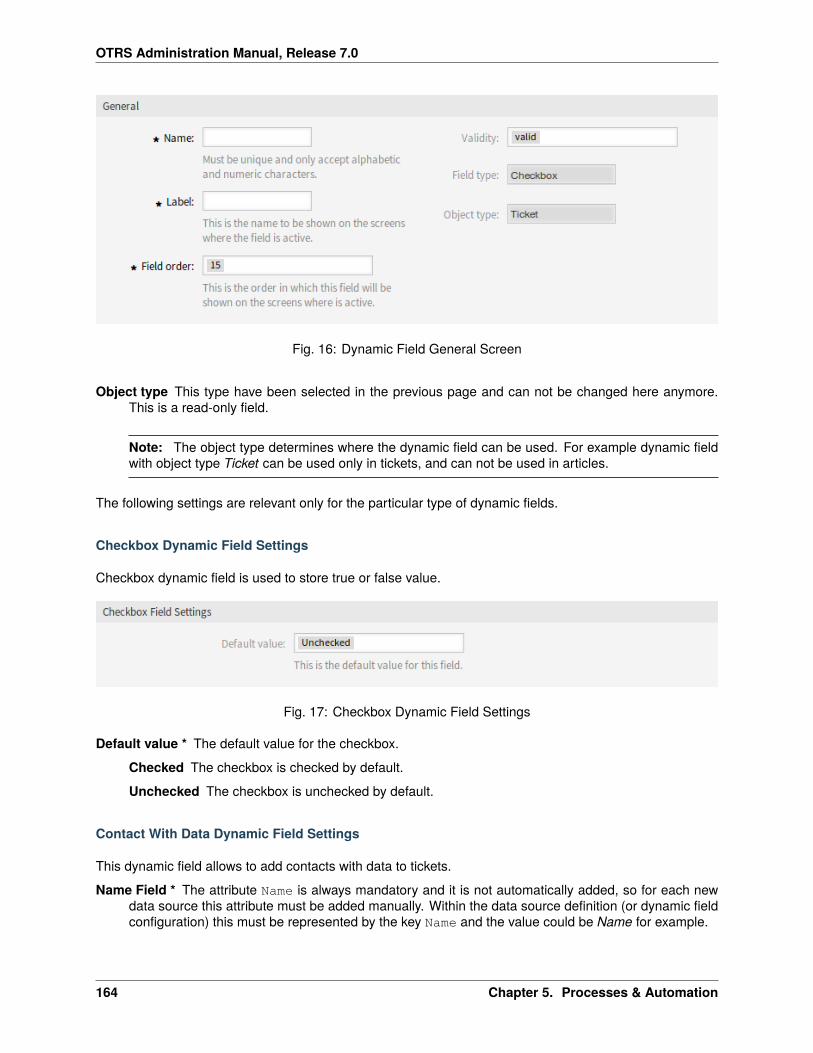
OTRS Administration Manual, Release 7.0
Fig. 16: Dynamic Field General Screen
Object type This type have been selected in the previous page and can not be changed here anymore.This is a read-only field.
Note: The object type determines where the dynamic field can be used. For example dynamic fieldwith object type Ticket can be used only in tickets, and can not be used in articles.
The following settings are relevant only for the particular type of dynamic fields.
Checkbox Dynamic Field Settings
Checkbox dynamic field is used to store true or false value.
Fig. 17: Checkbox Dynamic Field Settings
Default value * The default value for the checkbox.
Checked The checkbox is checked by default.
Unchecked The checkbox is unchecked by default.
Contact With Data Dynamic Field Settings
This dynamic field allows to add contacts with data to tickets.
Name Field * The attribute Name is always mandatory and it is not automatically added, so for each newdata source this attribute must be added manually. Within the data source definition (or dynamic fieldconfiguration) this must be represented by the key Name and the value could be Name for example.
164 Chapter 5. Processes & Automation
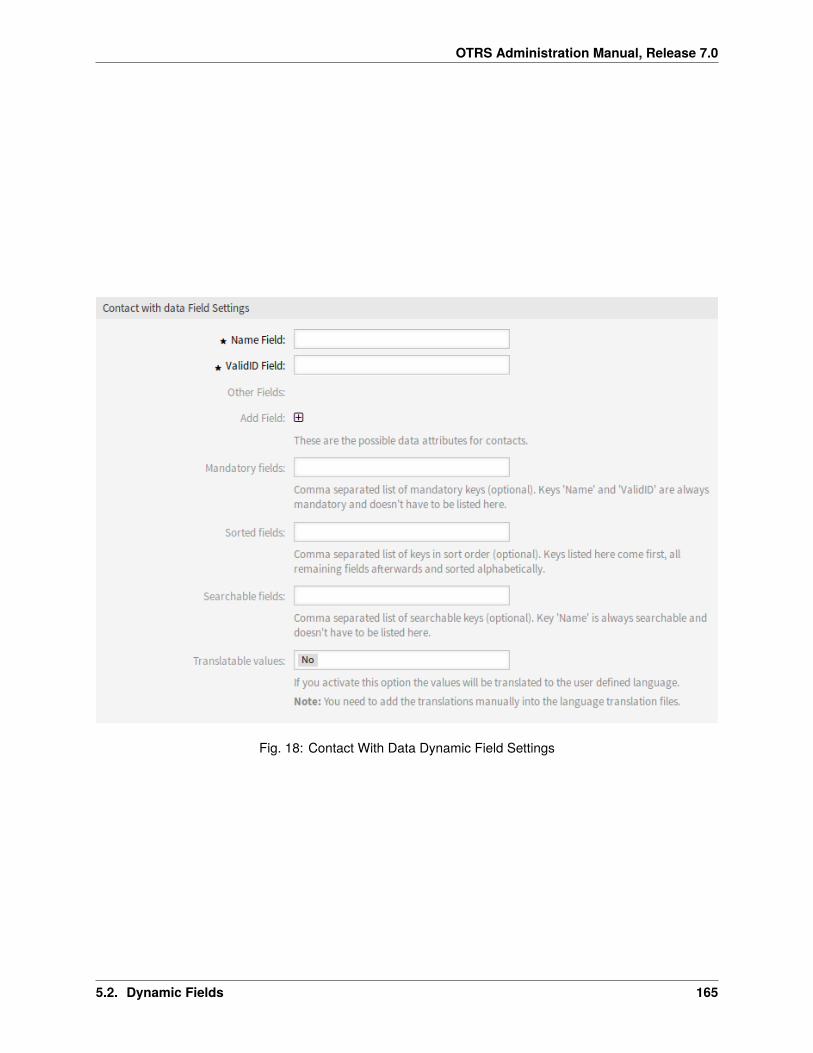
OTRS Administration Manual, Release 7.0
Fig. 18: Contact With Data Dynamic Field Settings
5.2. Dynamic Fields 165
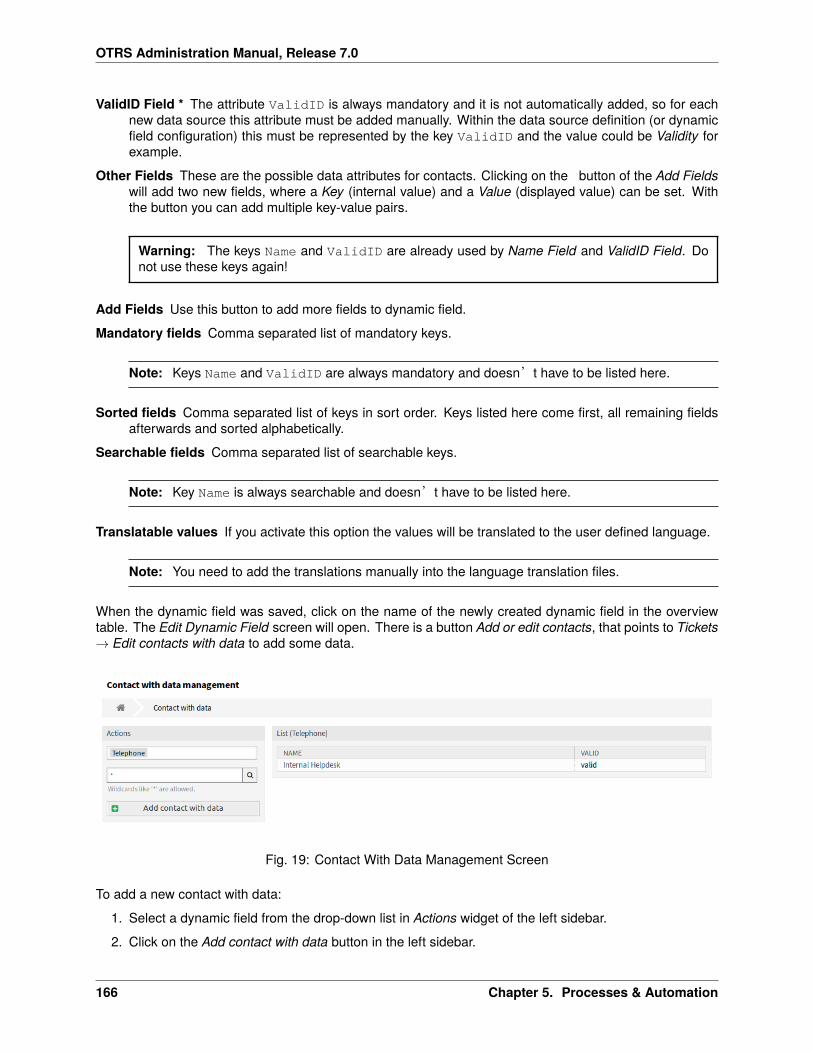
OTRS Administration Manual, Release 7.0
ValidID Field * The attribute ValidID is always mandatory and it is not automatically added, so for eachnew data source this attribute must be added manually. Within the data source definition (or dynamicfield configuration) this must be represented by the key ValidID and the value could be Validity forexample.
Other Fields These are the possible data attributes for contacts. Clicking on the � button of the Add Fieldswill add two new fields, where a Key (internal value) and a Value (displayed value) can be set. Withthe button you can add multiple key-value pairs.
Warning: The keys Name and ValidID are already used by Name Field and ValidID Field. Donot use these keys again!
Add Fields Use this button to add more fields to dynamic field.
Mandatory fields Comma separated list of mandatory keys.
Note: Keys Name and ValidID are always mandatory and doesn’t have to be listed here.
Sorted fields Comma separated list of keys in sort order. Keys listed here come first, all remaining fieldsafterwards and sorted alphabetically.
Searchable fields Comma separated list of searchable keys.
Note: Key Name is always searchable and doesn’t have to be listed here.
Translatable values If you activate this option the values will be translated to the user defined language.
Note: You need to add the translations manually into the language translation files.
When the dynamic field was saved, click on the name of the newly created dynamic field in the overviewtable. The Edit Dynamic Field screen will open. There is a button Add or edit contacts, that points to Tickets→ Edit contacts with data to add some data.
Fig. 19: Contact With Data Management Screen
To add a new contact with data:
1. Select a dynamic field from the drop-down list in Actions widget of the left sidebar.
2. Click on the Add contact with data button in the left sidebar.
166 Chapter 5. Processes & Automation
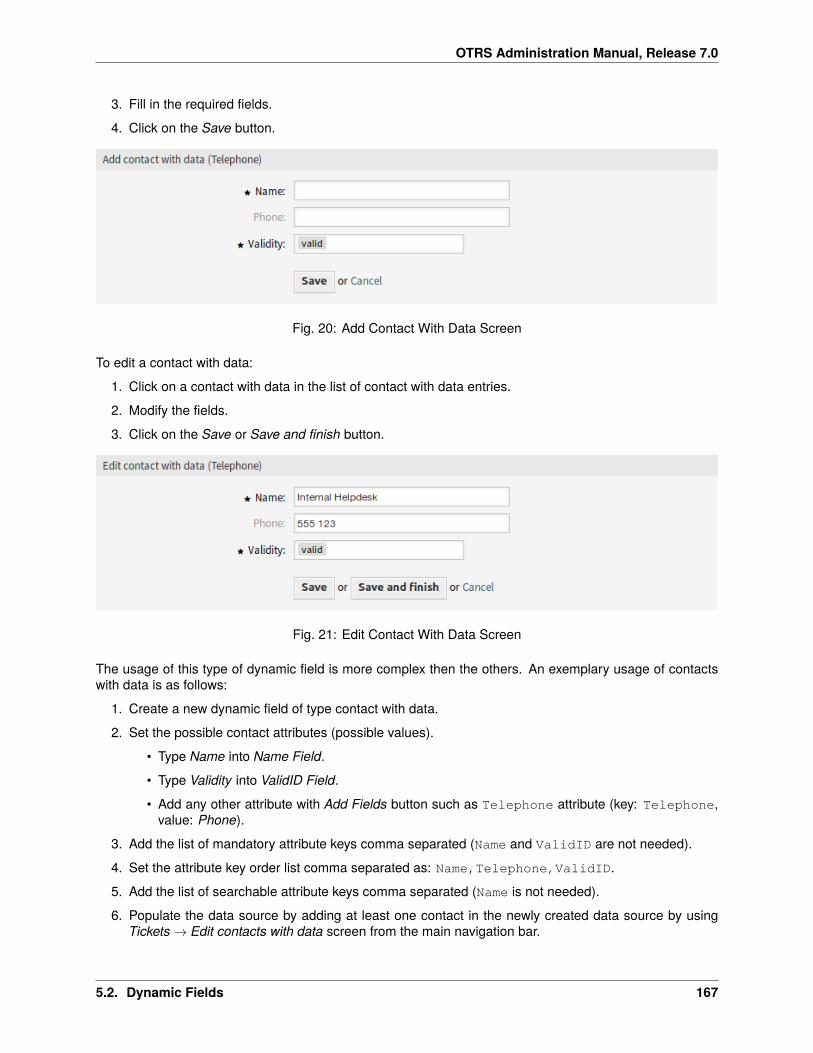
OTRS Administration Manual, Release 7.0
3. Fill in the required fields.
4. Click on the Save button.
Fig. 20: Add Contact With Data Screen
To edit a contact with data:
1. Click on a contact with data in the list of contact with data entries.
2. Modify the fields.
3. Click on the Save or Save and finish button.
Fig. 21: Edit Contact With Data Screen
The usage of this type of dynamic field is more complex then the others. An exemplary usage of contactswith data is as follows:
1. Create a new dynamic field of type contact with data.
2. Set the possible contact attributes (possible values).
• Type Name into Name Field.
• Type Validity into ValidID Field.
• Add any other attribute with Add Fields button such as Telephone attribute (key: Telephone,value: Phone).
3. Add the list of mandatory attribute keys comma separated (Name and ValidID are not needed).
4. Set the attribute key order list comma separated as: Name,Telephone,ValidID.
5. Add the list of searchable attribute keys comma separated (Name is not needed).
6. Populate the data source by adding at least one contact in the newly created data source by usingTickets → Edit contacts with data screen from the main navigation bar.
5.2. Dynamic Fields 167
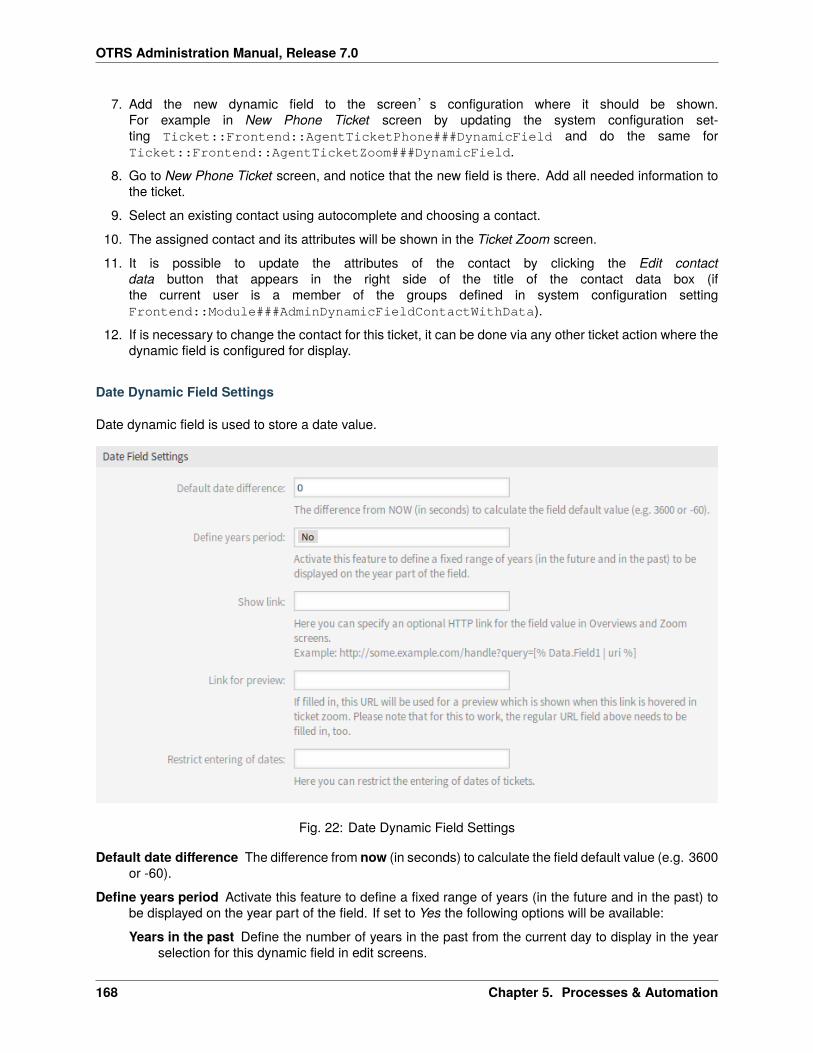
OTRS Administration Manual, Release 7.0
7. Add the new dynamic field to the screen’s configuration where it should be shown.For example in New Phone Ticket screen by updating the system configuration set-ting Ticket::Frontend::AgentTicketPhone###DynamicField and do the same forTicket::Frontend::AgentTicketZoom###DynamicField.
8. Go to New Phone Ticket screen, and notice that the new field is there. Add all needed information tothe ticket.
9. Select an existing contact using autocomplete and choosing a contact.
10. The assigned contact and its attributes will be shown in the Ticket Zoom screen.
11. It is possible to update the attributes of the contact by clicking the Edit contactdata button that appears in the right side of the title of the contact data box (ifthe current user is a member of the groups defined in system configuration settingFrontend::Module###AdminDynamicFieldContactWithData).
12. If is necessary to change the contact for this ticket, it can be done via any other ticket action where thedynamic field is configured for display.
Date Dynamic Field Settings
Date dynamic field is used to store a date value.
Fig. 22: Date Dynamic Field Settings
Default date difference The difference from now (in seconds) to calculate the field default value (e.g. 3600or -60).
Define years period Activate this feature to define a fixed range of years (in the future and in the past) tobe displayed on the year part of the field. If set to Yes the following options will be available:
Years in the past Define the number of years in the past from the current day to display in the yearselection for this dynamic field in edit screens.
168 Chapter 5. Processes & Automation
OTRS Administration Manual, Release 7.0
Years in the future Define the number of years in the future from the current day to display in the yearselection for this dynamic field in edit screens.
Note: If no years period is specified, the system uses the default value for the period: 10 years (5years in the past and 5 years in the future).
Show link Here you can specify an optional HTTP link for the field value in overviews and zoom screens.Examples:
• The value of dynamic field named Field1 is part of the link:
https://some.example.com/handle?query=[% Data.Field1 | uri %]
• The value of dynamic field named Field1 is the complete link with and without protocol:
[% Data.Field1 %]https://[% Data.Field1 %]
• The value of dynamic field named 100Field needs special handling, because the name of thedynamic field starts with a number:
https://some.example.com/handle?query=[% Data.item("100Field")␣↪→| uri %]
If special characters (&, @, :, /, etc.) should not be encoded, use url instead of uri filter.
Link for preview If filled in, this URL will be used for a preview which is shown when this link is hovered inticket zoom. Please note that for this to work, the regular URL field above needs to be filled in, too.
Restrict entering of dates Here you can restrict the entering of dates of tickets.
Prevent entry of dates in the future Selecting this option will prevent entering a date that is after thecurrent date.
Prevent entry of dates in the past Selecting this option will prevent entering a date that is before thecurrent date.
Date / Time Dynamic Field Settings
Date / time dynamic field is used to store a date time value.
The settings for this type of dynamic field is the same as for date dynamic field.
Dropdown Dynamic Field Settings
Drop-down dynamic field is used to store a single value, from a closed list.
Possible values These are the possible data attributes for contacts. Clicking on the � button will add twonew fields, where a key (internal value) and a value (displayed value) can be set. With the button youcan add multiple key-value pairs.
Default value This is the default value for this field and this will be shown on the edit screens.
Add empty value If this option is activated an extra value is defined to show as a - in the list of possiblevalues. This special value is empty internally.
Tree View Activate this option to display values as a tree. If you use a sub-value, specify it as Parent::Sub.
5.2. Dynamic Fields 169
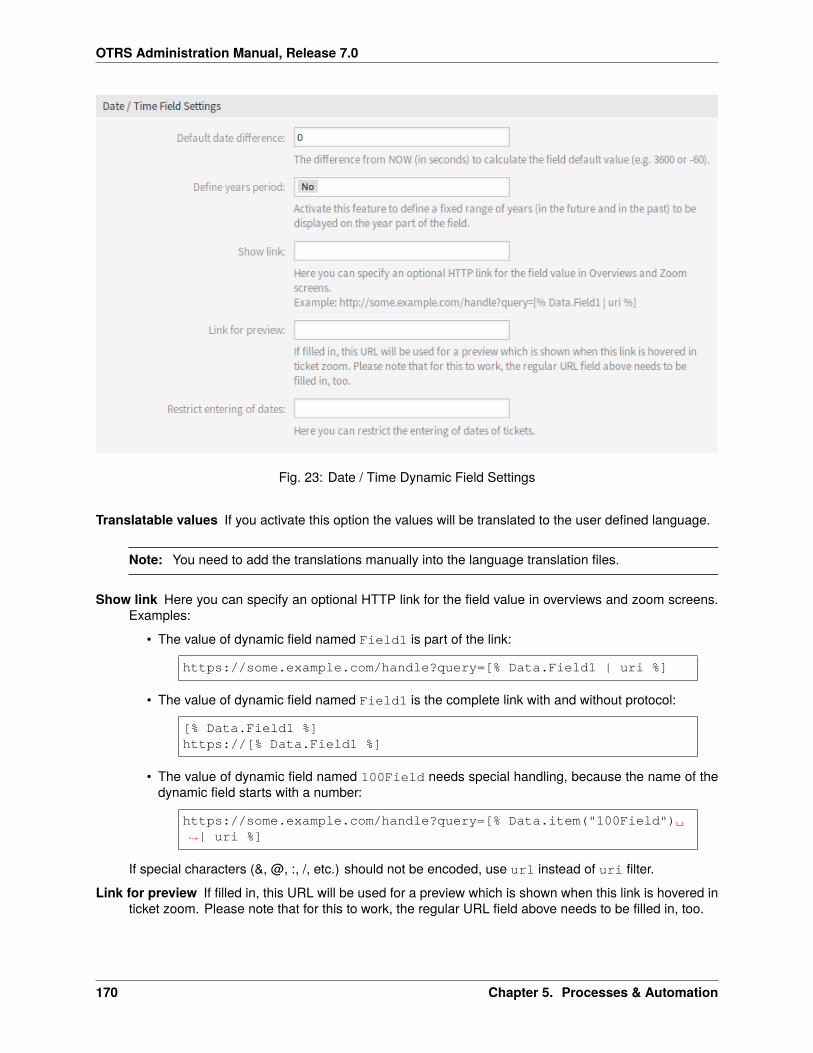
OTRS Administration Manual, Release 7.0
Fig. 23: Date / Time Dynamic Field Settings
Translatable values If you activate this option the values will be translated to the user defined language.
Note: You need to add the translations manually into the language translation files.
Show link Here you can specify an optional HTTP link for the field value in overviews and zoom screens.Examples:
• The value of dynamic field named Field1 is part of the link:
https://some.example.com/handle?query=[% Data.Field1 | uri %]
• The value of dynamic field named Field1 is the complete link with and without protocol:
[% Data.Field1 %]https://[% Data.Field1 %]
• The value of dynamic field named 100Field needs special handling, because the name of thedynamic field starts with a number:
https://some.example.com/handle?query=[% Data.item("100Field")␣↪→| uri %]
If special characters (&, @, :, /, etc.) should not be encoded, use url instead of uri filter.
Link for preview If filled in, this URL will be used for a preview which is shown when this link is hovered inticket zoom. Please note that for this to work, the regular URL field above needs to be filled in, too.
170 Chapter 5. Processes & Automation
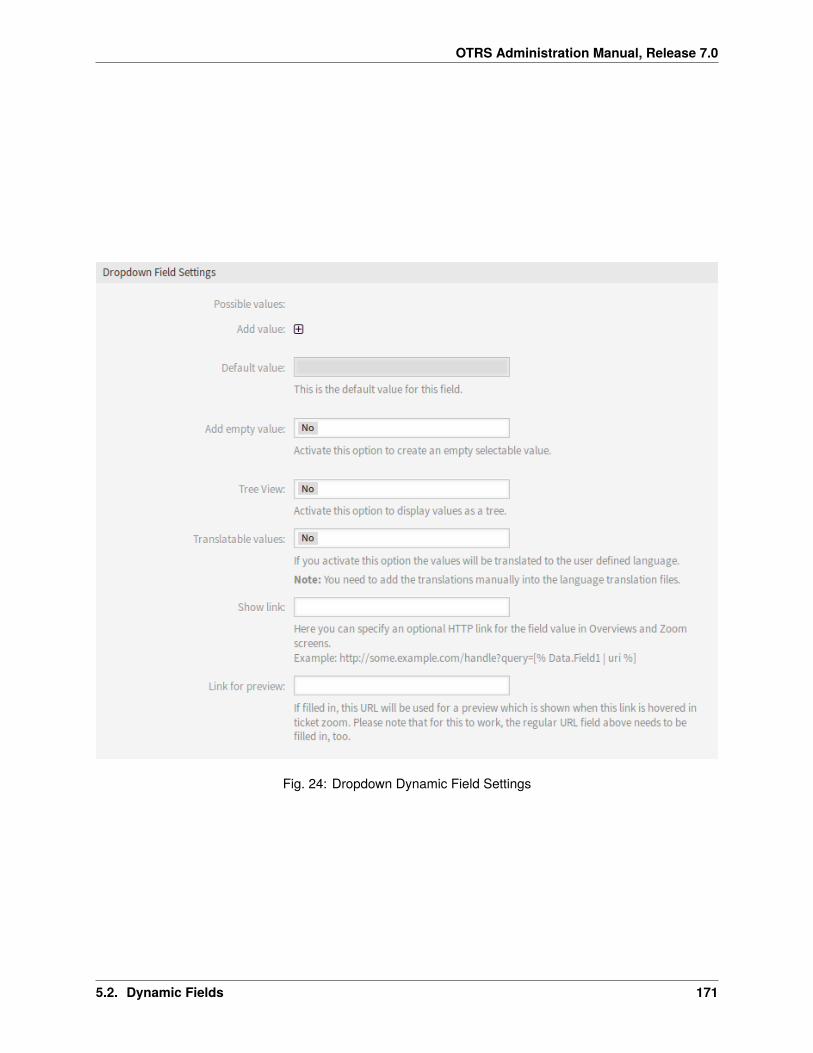
OTRS Administration Manual, Release 7.0
Fig. 24: Dropdown Dynamic Field Settings
5.2. Dynamic Fields 171
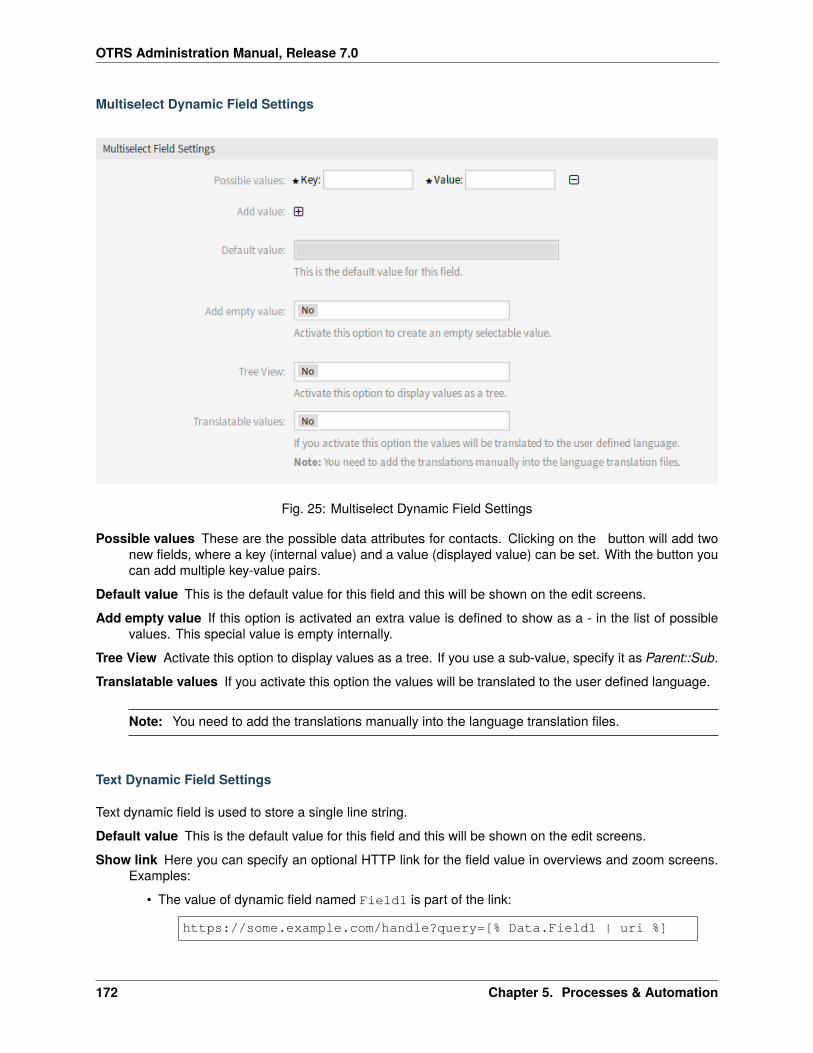
OTRS Administration Manual, Release 7.0
Multiselect Dynamic Field Settings
Fig. 25: Multiselect Dynamic Field Settings
Possible values These are the possible data attributes for contacts. Clicking on the � button will add twonew fields, where a key (internal value) and a value (displayed value) can be set. With the button youcan add multiple key-value pairs.
Default value This is the default value for this field and this will be shown on the edit screens.
Add empty value If this option is activated an extra value is defined to show as a - in the list of possiblevalues. This special value is empty internally.
Tree View Activate this option to display values as a tree. If you use a sub-value, specify it as Parent::Sub.
Translatable values If you activate this option the values will be translated to the user defined language.
Note: You need to add the translations manually into the language translation files.
Text Dynamic Field Settings
Text dynamic field is used to store a single line string.
Default value This is the default value for this field and this will be shown on the edit screens.
Show link Here you can specify an optional HTTP link for the field value in overviews and zoom screens.Examples:
• The value of dynamic field named Field1 is part of the link:
https://some.example.com/handle?query=[% Data.Field1 | uri %]
172 Chapter 5. Processes & Automation
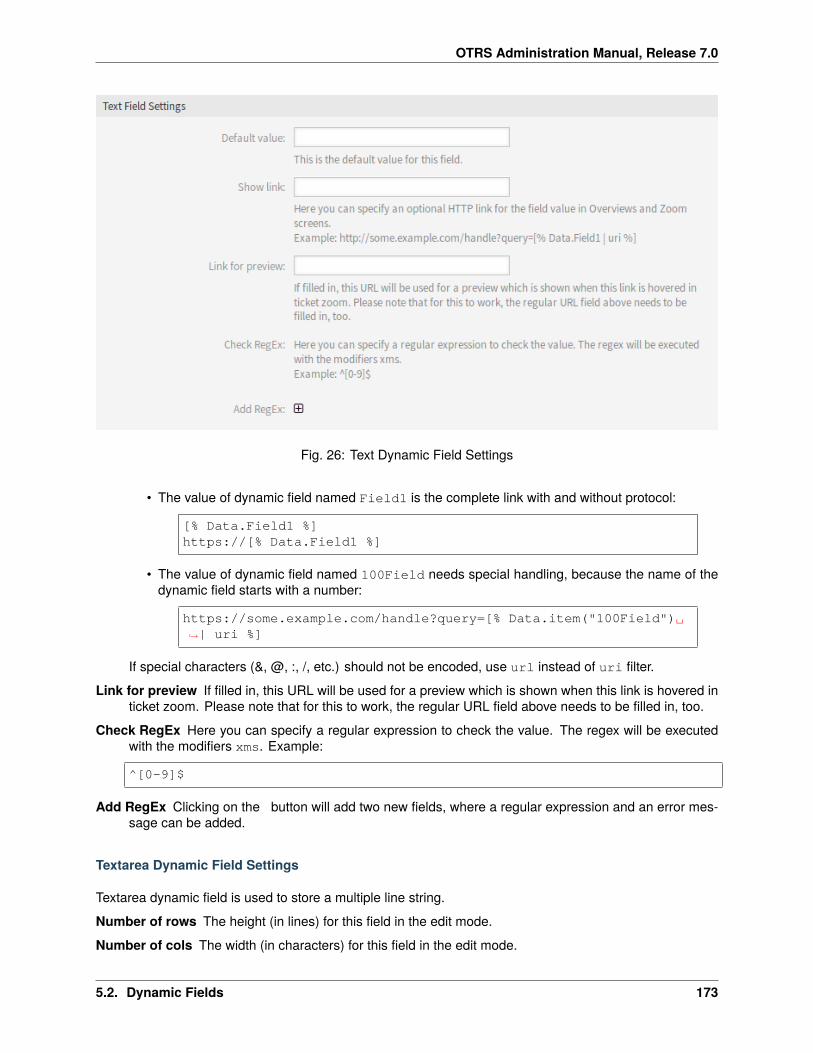
OTRS Administration Manual, Release 7.0
Fig. 26: Text Dynamic Field Settings
• The value of dynamic field named Field1 is the complete link with and without protocol:
[% Data.Field1 %]https://[% Data.Field1 %]
• The value of dynamic field named 100Field needs special handling, because the name of thedynamic field starts with a number:
https://some.example.com/handle?query=[% Data.item("100Field")␣↪→| uri %]
If special characters (&, @, :, /, etc.) should not be encoded, use url instead of uri filter.
Link for preview If filled in, this URL will be used for a preview which is shown when this link is hovered inticket zoom. Please note that for this to work, the regular URL field above needs to be filled in, too.
Check RegEx Here you can specify a regular expression to check the value. The regex will be executedwith the modifiers xms. Example:
^[0-9]$
Add RegEx Clicking on the � button will add two new fields, where a regular expression and an error mes-sage can be added.
Textarea Dynamic Field Settings
Textarea dynamic field is used to store a multiple line string.
Number of rows The height (in lines) for this field in the edit mode.
Number of cols The width (in characters) for this field in the edit mode.
5.2. Dynamic Fields 173
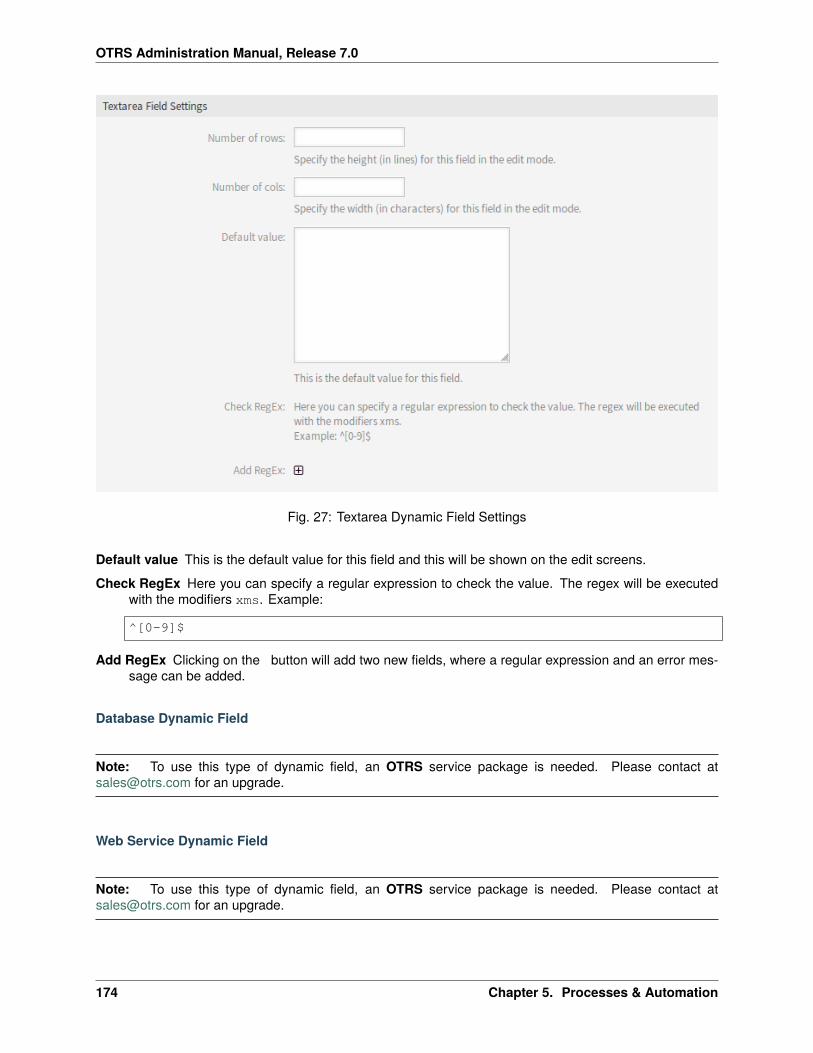
OTRS Administration Manual, Release 7.0
Fig. 27: Textarea Dynamic Field Settings
Default value This is the default value for this field and this will be shown on the edit screens.
Check RegEx Here you can specify a regular expression to check the value. The regex will be executedwith the modifiers xms. Example:
^[0-9]$
Add RegEx Clicking on the � button will add two new fields, where a regular expression and an error mes-sage can be added.
Database Dynamic Field
Note: To use this type of dynamic field, an OTRS service package is needed. Please contact [email protected] for an upgrade.
Web Service Dynamic Field
Note: To use this type of dynamic field, an OTRS service package is needed. Please contact [email protected] for an upgrade.
174 Chapter 5. Processes & Automation
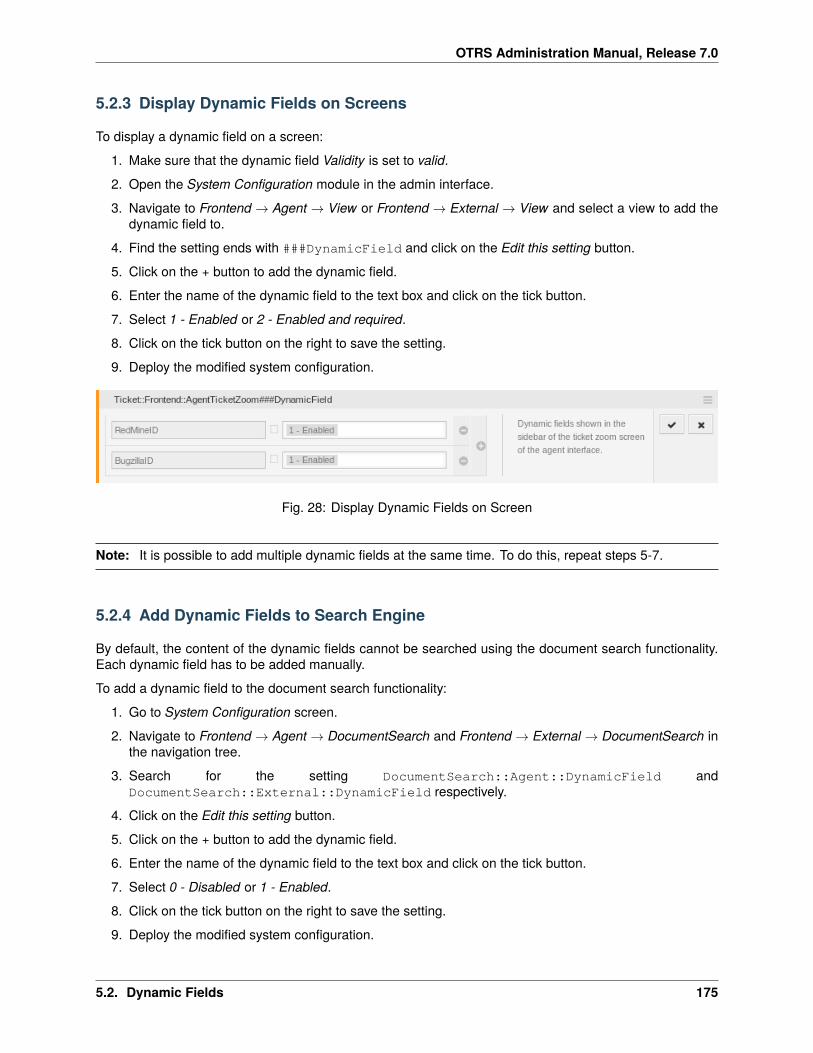
OTRS Administration Manual, Release 7.0
5.2.3 Display Dynamic Fields on Screens
To display a dynamic field on a screen:
1. Make sure that the dynamic field Validity is set to valid.
2. Open the System Configuration module in the admin interface.
3. Navigate to Frontend → Agent → View or Frontend → External → View and select a view to add thedynamic field to.
4. Find the setting ends with ###DynamicField and click on the Edit this setting button.
5. Click on the + button to add the dynamic field.
6. Enter the name of the dynamic field to the text box and click on the tick button.
7. Select 1 - Enabled or 2 - Enabled and required.
8. Click on the tick button on the right to save the setting.
9. Deploy the modified system configuration.
Fig. 28: Display Dynamic Fields on Screen
Note: It is possible to add multiple dynamic fields at the same time. To do this, repeat steps 5-7.
5.2.4 Add Dynamic Fields to Search Engine
By default, the content of the dynamic fields cannot be searched using the document search functionality.Each dynamic field has to be added manually.
To add a dynamic field to the document search functionality:
1. Go to System Configuration screen.
2. Navigate to Frontend → Agent → DocumentSearch and Frontend → External → DocumentSearch inthe navigation tree.
3. Search for the setting DocumentSearch::Agent::DynamicField andDocumentSearch::External::DynamicField respectively.
4. Click on the Edit this setting button.
5. Click on the + button to add the dynamic field.
6. Enter the name of the dynamic field to the text box and click on the tick button.
7. Select 0 - Disabled or 1 - Enabled.
8. Click on the tick button on the right to save the setting.
9. Deploy the modified system configuration.
5.2. Dynamic Fields 175
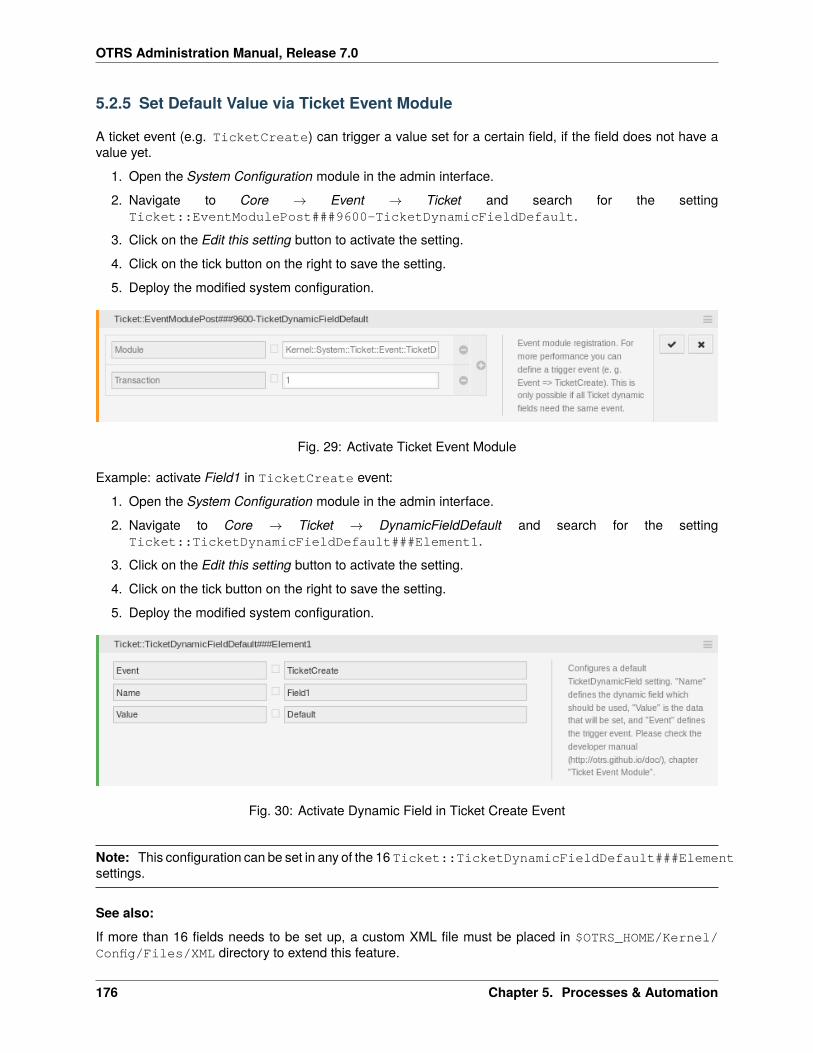
OTRS Administration Manual, Release 7.0
5.2.5 Set Default Value via Ticket Event Module
A ticket event (e.g. TicketCreate) can trigger a value set for a certain field, if the field does not have avalue yet.
1. Open the System Configuration module in the admin interface.
2. Navigate to Core → Event → Ticket and search for the settingTicket::EventModulePost###9600-TicketDynamicFieldDefault.
3. Click on the Edit this setting button to activate the setting.
4. Click on the tick button on the right to save the setting.
5. Deploy the modified system configuration.
Fig. 29: Activate Ticket Event Module
Example: activate Field1 in TicketCreate event:
1. Open the System Configuration module in the admin interface.
2. Navigate to Core → Ticket → DynamicFieldDefault and search for the settingTicket::TicketDynamicFieldDefault###Element1.
3. Click on the Edit this setting button to activate the setting.
4. Click on the tick button on the right to save the setting.
5. Deploy the modified system configuration.
Fig. 30: Activate Dynamic Field in Ticket Create Event
Note: This configuration can be set in any of the 16 Ticket::TicketDynamicFieldDefault###Elementsettings.
See also:
If more than 16 fields needs to be set up, a custom XML file must be placed in $OTRS_HOME/Kernel/Config/Files/XML directory to extend this feature.
176 Chapter 5. Processes & Automation
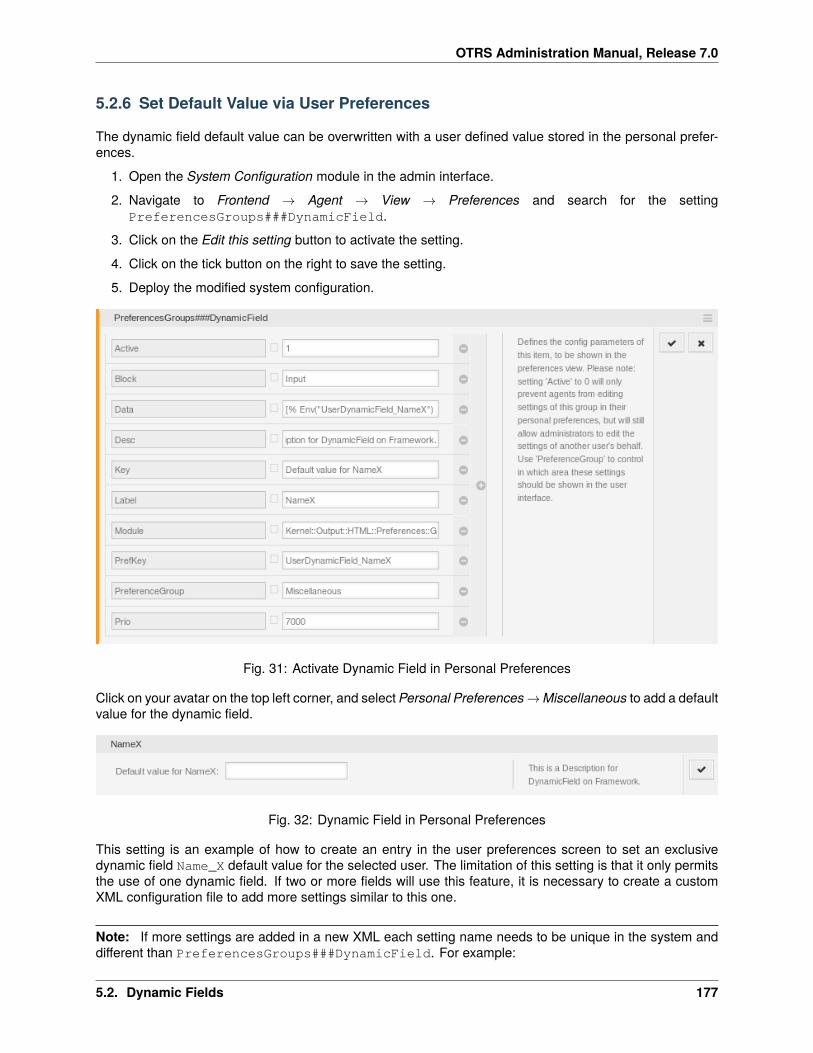
OTRS Administration Manual, Release 7.0
5.2.6 Set Default Value via User Preferences
The dynamic field default value can be overwritten with a user defined value stored in the personal prefer-ences.
1. Open the System Configuration module in the admin interface.
2. Navigate to Frontend → Agent → View → Preferences and search for the settingPreferencesGroups###DynamicField.
3. Click on the Edit this setting button to activate the setting.
4. Click on the tick button on the right to save the setting.
5. Deploy the modified system configuration.
Fig. 31: Activate Dynamic Field in Personal Preferences
Click on your avatar on the top left corner, and select Personal Preferences → Miscellaneous to add a defaultvalue for the dynamic field.
Fig. 32: Dynamic Field in Personal Preferences
This setting is an example of how to create an entry in the user preferences screen to set an exclusivedynamic field Name_X default value for the selected user. The limitation of this setting is that it only permitsthe use of one dynamic field. If two or more fields will use this feature, it is necessary to create a customXML configuration file to add more settings similar to this one.
Note: If more settings are added in a new XML each setting name needs to be unique in the system anddifferent than PreferencesGroups###DynamicField. For example:
5.2. Dynamic Fields 177
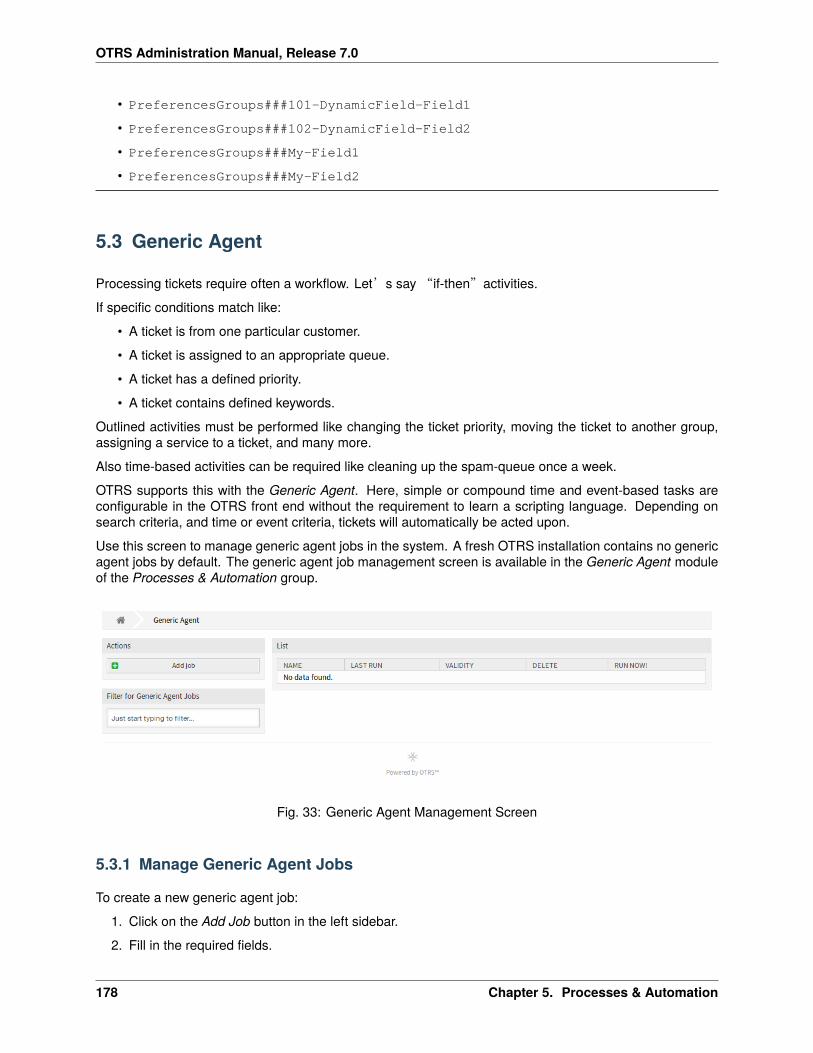
OTRS Administration Manual, Release 7.0
• PreferencesGroups###101-DynamicField-Field1
• PreferencesGroups###102-DynamicField-Field2
• PreferencesGroups###My-Field1
• PreferencesGroups###My-Field2
5.3 Generic Agent
Processing tickets require often a workflow. Let’s say“if-then”activities.
If specific conditions match like:
• A ticket is from one particular customer.
• A ticket is assigned to an appropriate queue.
• A ticket has a defined priority.
• A ticket contains defined keywords.
Outlined activities must be performed like changing the ticket priority, moving the ticket to another group,assigning a service to a ticket, and many more.
Also time-based activities can be required like cleaning up the spam-queue once a week.
OTRS supports this with the Generic Agent. Here, simple or compound time and event-based tasks areconfigurable in the OTRS front end without the requirement to learn a scripting language. Depending onsearch criteria, and time or event criteria, tickets will automatically be acted upon.
Use this screen to manage generic agent jobs in the system. A fresh OTRS installation contains no genericagent jobs by default. The generic agent job management screen is available in the Generic Agent moduleof the Processes & Automation group.
Fig. 33: Generic Agent Management Screen
5.3.1 Manage Generic Agent Jobs
To create a new generic agent job:
1. Click on the Add Job button in the left sidebar.
2. Fill in the required fields.
178 Chapter 5. Processes & Automation
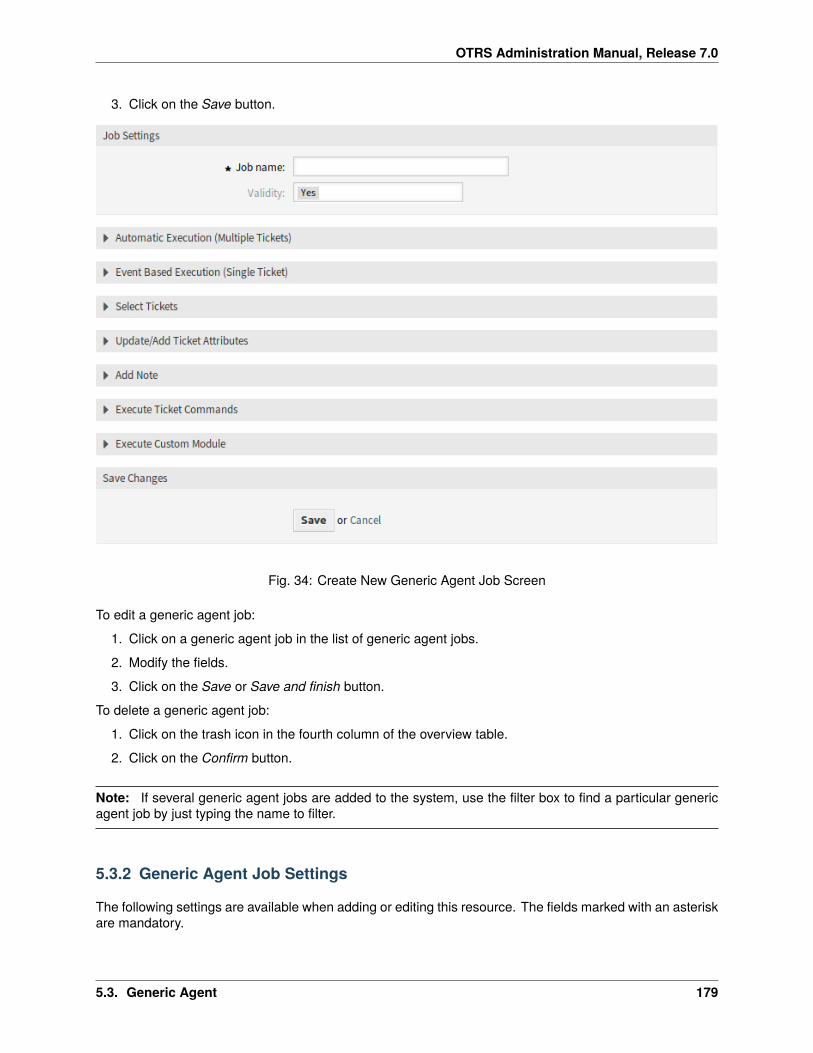
OTRS Administration Manual, Release 7.0
3. Click on the Save button.
Fig. 34: Create New Generic Agent Job Screen
To edit a generic agent job:
1. Click on a generic agent job in the list of generic agent jobs.
2. Modify the fields.
3. Click on the Save or Save and finish button.
To delete a generic agent job:
1. Click on the trash icon in the fourth column of the overview table.
2. Click on the Confirm button.
Note: If several generic agent jobs are added to the system, use the filter box to find a particular genericagent job by just typing the name to filter.
5.3.2 Generic Agent Job Settings
The following settings are available when adding or editing this resource. The fields marked with an asteriskare mandatory.
5.3. Generic Agent 179
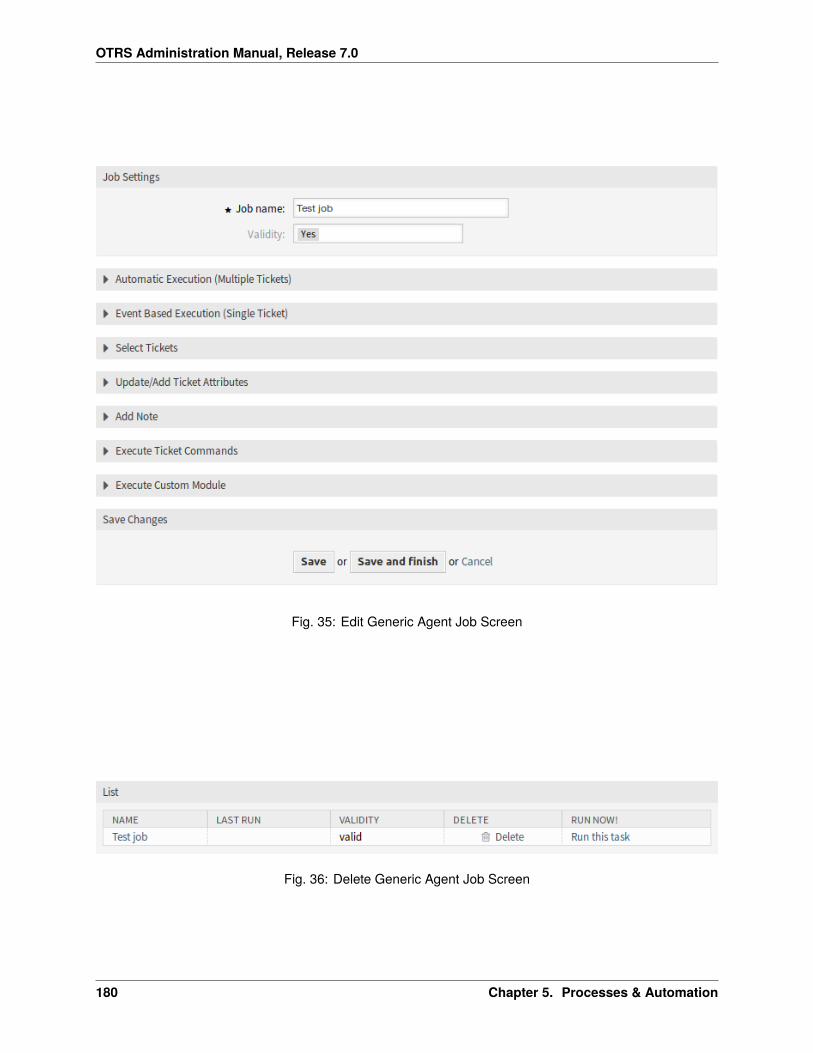
OTRS Administration Manual, Release 7.0
Fig. 35: Edit Generic Agent Job Screen
Fig. 36: Delete Generic Agent Job Screen
180 Chapter 5. Processes & Automation
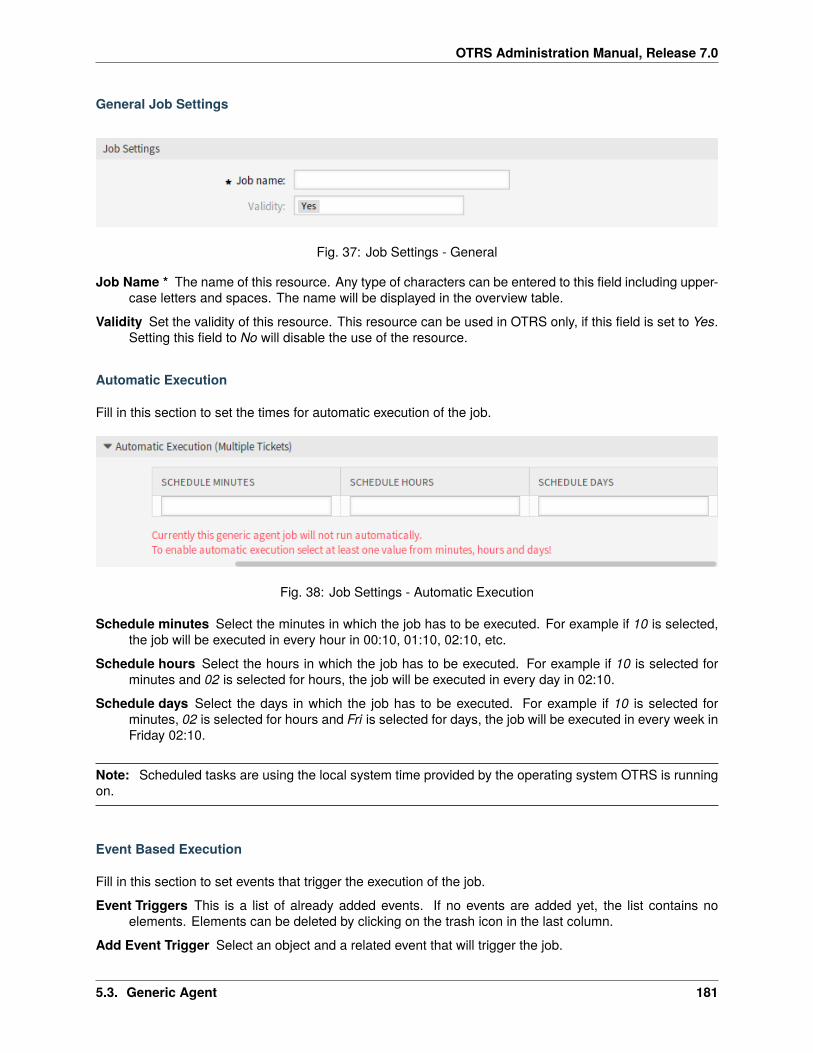
OTRS Administration Manual, Release 7.0
General Job Settings
Fig. 37: Job Settings - General
Job Name * The name of this resource. Any type of characters can be entered to this field including upper-case letters and spaces. The name will be displayed in the overview table.
Validity Set the validity of this resource. This resource can be used in OTRS only, if this field is set to Yes.Setting this field to No will disable the use of the resource.
Automatic Execution
Fill in this section to set the times for automatic execution of the job.
Fig. 38: Job Settings - Automatic Execution
Schedule minutes Select the minutes in which the job has to be executed. For example if 10 is selected,the job will be executed in every hour in 00:10, 01:10, 02:10, etc.
Schedule hours Select the hours in which the job has to be executed. For example if 10 is selected forminutes and 02 is selected for hours, the job will be executed in every day in 02:10.
Schedule days Select the days in which the job has to be executed. For example if 10 is selected forminutes, 02 is selected for hours and Fri is selected for days, the job will be executed in every week inFriday 02:10.
Note: Scheduled tasks are using the local system time provided by the operating system OTRS is runningon.
Event Based Execution
Fill in this section to set events that trigger the execution of the job.
Event Triggers This is a list of already added events. If no events are added yet, the list contains noelements. Elements can be deleted by clicking on the trash icon in the last column.
Add Event Trigger Select an object and a related event that will trigger the job.
5.3. Generic Agent 181
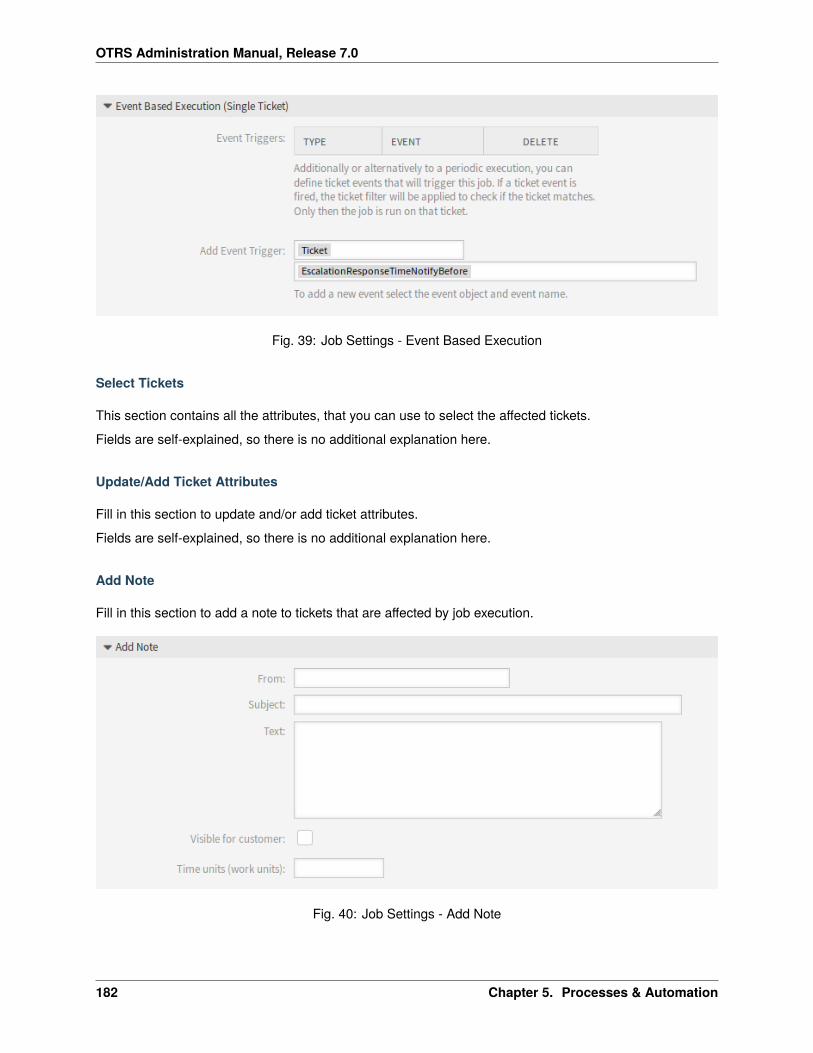
OTRS Administration Manual, Release 7.0
Fig. 39: Job Settings - Event Based Execution
Select Tickets
This section contains all the attributes, that you can use to select the affected tickets.
Fields are self-explained, so there is no additional explanation here.
Update/Add Ticket Attributes
Fill in this section to update and/or add ticket attributes.
Fields are self-explained, so there is no additional explanation here.
Add Note
Fill in this section to add a note to tickets that are affected by job execution.
Fig. 40: Job Settings - Add Note
182 Chapter 5. Processes & Automation
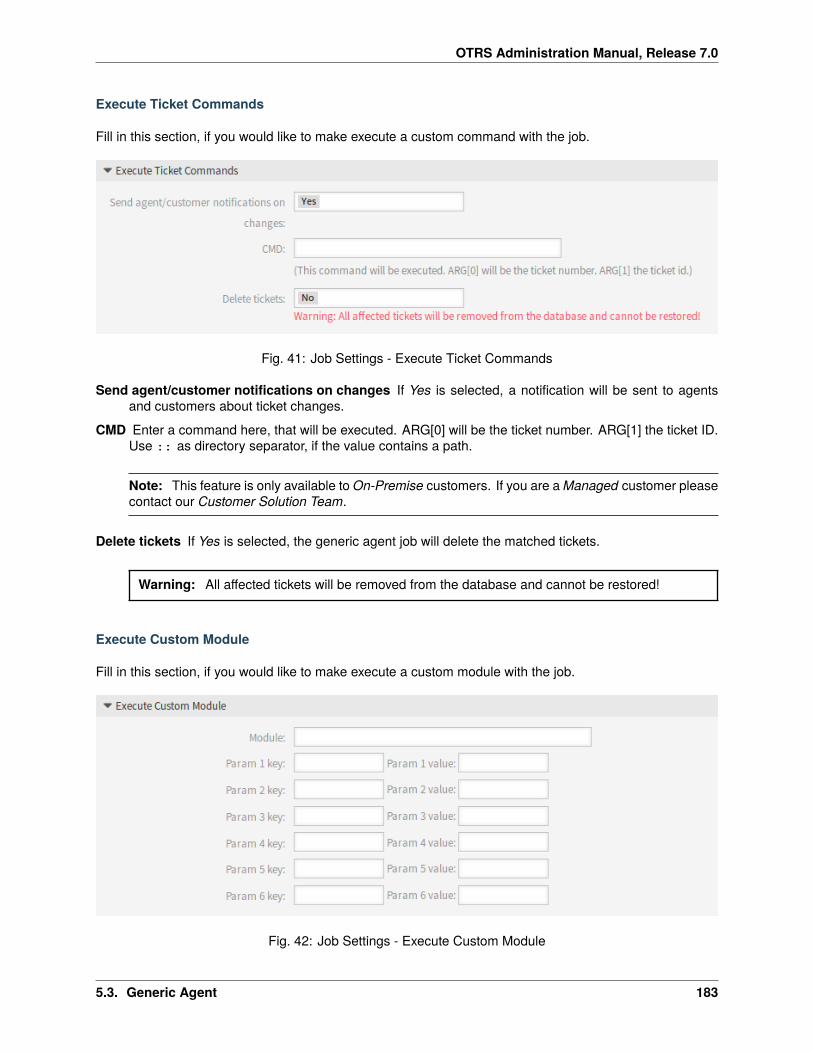
OTRS Administration Manual, Release 7.0
Execute Ticket Commands
Fill in this section, if you would like to make execute a custom command with the job.
Fig. 41: Job Settings - Execute Ticket Commands
Send agent/customer notifications on changes If Yes is selected, a notification will be sent to agentsand customers about ticket changes.
CMD Enter a command here, that will be executed. ARG[0] will be the ticket number. ARG[1] the ticket ID.Use :: as directory separator, if the value contains a path.
Note: This feature is only available to On-Premise customers. If you are a Managed customer pleasecontact our Customer Solution Team.
Delete tickets If Yes is selected, the generic agent job will delete the matched tickets.
Warning: All affected tickets will be removed from the database and cannot be restored!
Execute Custom Module
Fill in this section, if you would like to make execute a custom module with the job.
Fig. 42: Job Settings - Execute Custom Module
5.3. Generic Agent 183
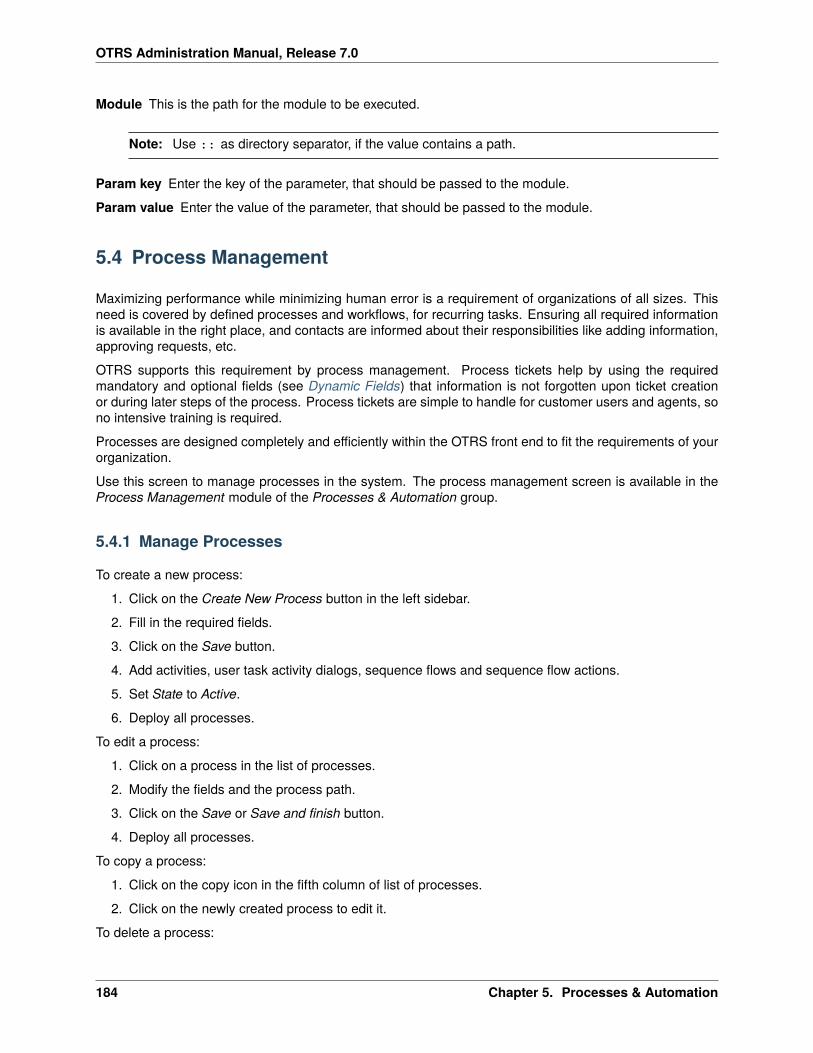
OTRS Administration Manual, Release 7.0
Module This is the path for the module to be executed.
Note: Use :: as directory separator, if the value contains a path.
Param key Enter the key of the parameter, that should be passed to the module.
Param value Enter the value of the parameter, that should be passed to the module.
5.4 Process Management
Maximizing performance while minimizing human error is a requirement of organizations of all sizes. Thisneed is covered by defined processes and workflows, for recurring tasks. Ensuring all required informationis available in the right place, and contacts are informed about their responsibilities like adding information,approving requests, etc.
OTRS supports this requirement by process management. Process tickets help by using the requiredmandatory and optional fields (see Dynamic Fields) that information is not forgotten upon ticket creationor during later steps of the process. Process tickets are simple to handle for customer users and agents, sono intensive training is required.
Processes are designed completely and efficiently within the OTRS front end to fit the requirements of yourorganization.
Use this screen to manage processes in the system. The process management screen is available in theProcess Management module of the Processes & Automation group.
5.4.1 Manage Processes
To create a new process:
1. Click on the Create New Process button in the left sidebar.
2. Fill in the required fields.
3. Click on the Save button.
4. Add activities, user task activity dialogs, sequence flows and sequence flow actions.
5. Set State to Active.
6. Deploy all processes.
To edit a process:
1. Click on a process in the list of processes.
2. Modify the fields and the process path.
3. Click on the Save or Save and finish button.
4. Deploy all processes.
To copy a process:
1. Click on the copy icon in the fifth column of list of processes.
2. Click on the newly created process to edit it.
To delete a process:
184 Chapter 5. Processes & Automation
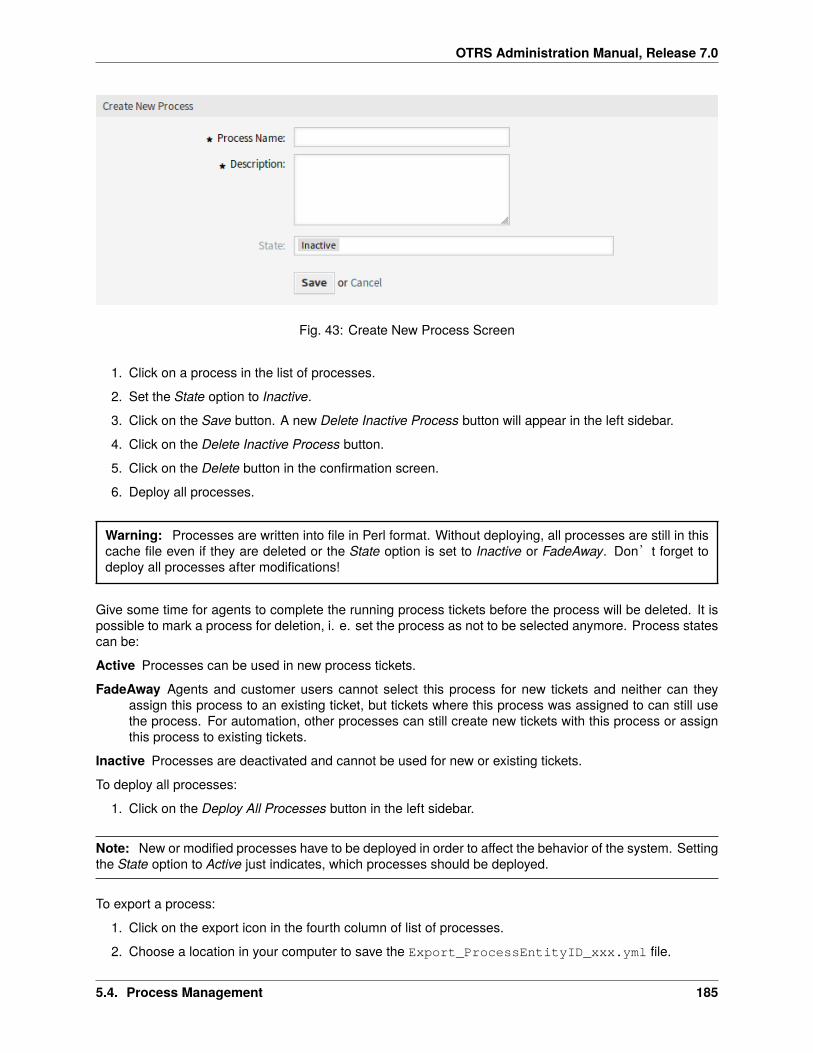
OTRS Administration Manual, Release 7.0
Fig. 43: Create New Process Screen
1. Click on a process in the list of processes.
2. Set the State option to Inactive.
3. Click on the Save button. A new Delete Inactive Process button will appear in the left sidebar.
4. Click on the Delete Inactive Process button.
5. Click on the Delete button in the confirmation screen.
6. Deploy all processes.
Warning: Processes are written into file in Perl format. Without deploying, all processes are still in thiscache file even if they are deleted or the State option is set to Inactive or FadeAway. Don’t forget todeploy all processes after modifications!
Give some time for agents to complete the running process tickets before the process will be deleted. It ispossible to mark a process for deletion, i. e. set the process as not to be selected anymore. Process statescan be:
Active Processes can be used in new process tickets.
FadeAway Agents and customer users cannot select this process for new tickets and neither can theyassign this process to an existing ticket, but tickets where this process was assigned to can still usethe process. For automation, other processes can still create new tickets with this process or assignthis process to existing tickets.
Inactive Processes are deactivated and cannot be used for new or existing tickets.
To deploy all processes:
1. Click on the Deploy All Processes button in the left sidebar.
Note: New or modified processes have to be deployed in order to affect the behavior of the system. Settingthe State option to Active just indicates, which processes should be deployed.
To export a process:
1. Click on the export icon in the fourth column of list of processes.
2. Choose a location in your computer to save the Export_ProcessEntityID_xxx.yml file.
5.4. Process Management 185

OTRS Administration Manual, Release 7.0
Warning: The exported file contains only the process itself, and doesn’t contain the Queues, Agents,Dynamic Fields, etc. needed for the process.
To import a process:
1. Click on the Browse… button of the Configuration Import widget in the left sidebar.
2. Select a previously exported .yml file.
3. Click on the Import process configuration button.
4. Deploy all processes.
Note: Before import a process, it is still necessary to create all Queues, Agents and Dynamic Fields, as wellas to set System Configuration, that are needed by each process before the import. If the process requiresthe use of Access Control Lists (ACL) those are also needed to be set manually.
Note: If several processes are added to the system, use the filter box to find a particular process by justtyping the name to filter.
5.4.2 Process Elements
The element names of the process modeler have been adapted to the Business Process Model and Notation(BPMN) ISO naming convention. The following task activities can be used as basic elements of the process.
Script task activity Script task activity is executed by the process management module and it can setdynamic field values or manage tickets automatically.
Fig. 44: Script Task Activity Window
The following settings are available when adding or editing this resource. The fields marked with anasterisk are mandatory.
186 Chapter 5. Processes & Automation
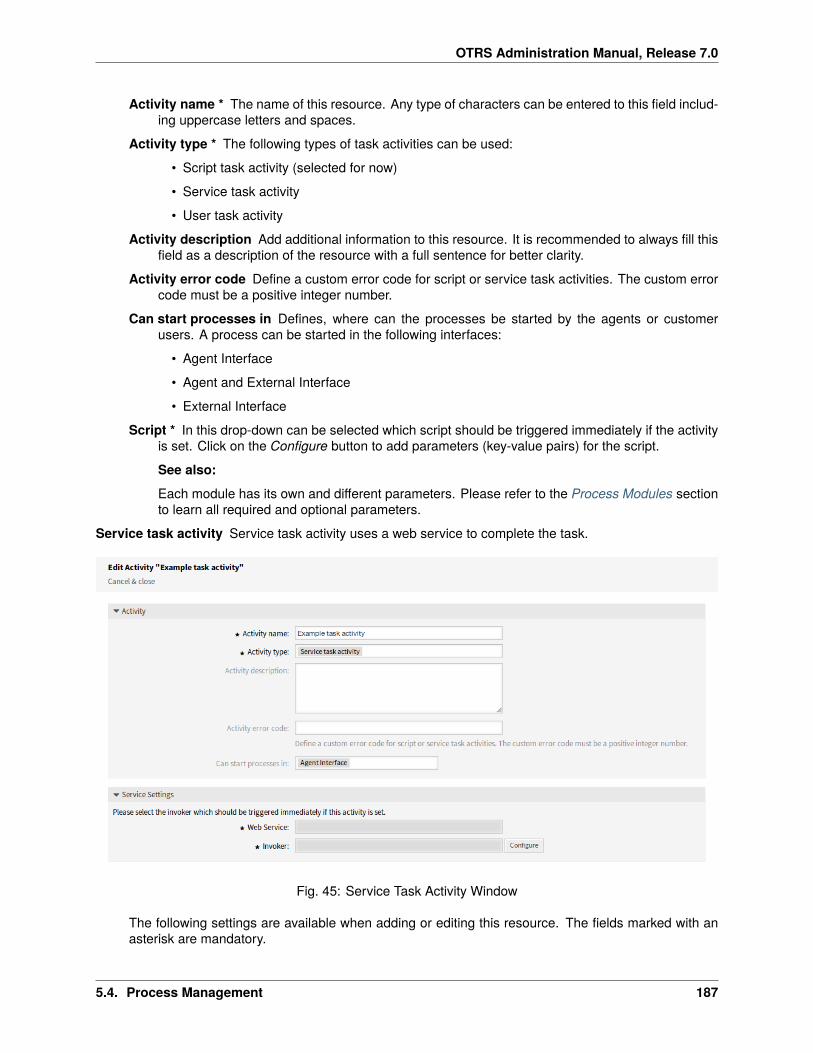
OTRS Administration Manual, Release 7.0
Activity name * The name of this resource. Any type of characters can be entered to this field includ-ing uppercase letters and spaces.
Activity type * The following types of task activities can be used:
• Script task activity (selected for now)
• Service task activity
• User task activity
Activity description Add additional information to this resource. It is recommended to always fill thisfield as a description of the resource with a full sentence for better clarity.
Activity error code Define a custom error code for script or service task activities. The custom errorcode must be a positive integer number.
Can start processes in Defines, where can the processes be started by the agents or customerusers. A process can be started in the following interfaces:
• Agent Interface
• Agent and External Interface
• External Interface
Script * In this drop-down can be selected which script should be triggered immediately if the activityis set. Click on the Configure button to add parameters (key-value pairs) for the script.
See also:
Each module has its own and different parameters. Please refer to the Process Modules sectionto learn all required and optional parameters.
Service task activity Service task activity uses a web service to complete the task.
Fig. 45: Service Task Activity Window
The following settings are available when adding or editing this resource. The fields marked with anasterisk are mandatory.
5.4. Process Management 187
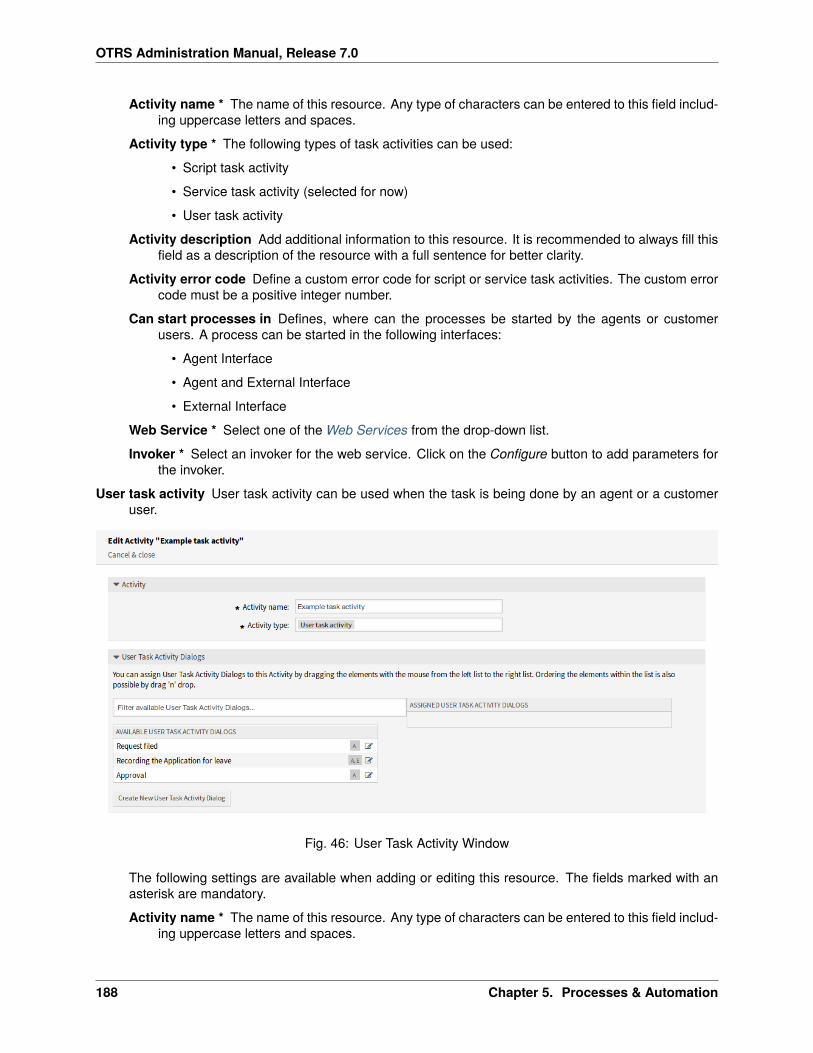
OTRS Administration Manual, Release 7.0
Activity name * The name of this resource. Any type of characters can be entered to this field includ-ing uppercase letters and spaces.
Activity type * The following types of task activities can be used:
• Script task activity
• Service task activity (selected for now)
• User task activity
Activity description Add additional information to this resource. It is recommended to always fill thisfield as a description of the resource with a full sentence for better clarity.
Activity error code Define a custom error code for script or service task activities. The custom errorcode must be a positive integer number.
Can start processes in Defines, where can the processes be started by the agents or customerusers. A process can be started in the following interfaces:
• Agent Interface
• Agent and External Interface
• External Interface
Web Service * Select one of the Web Services from the drop-down list.
Invoker * Select an invoker for the web service. Click on the Configure button to add parameters forthe invoker.
User task activity User task activity can be used when the task is being done by an agent or a customeruser.
Fig. 46: User Task Activity Window
The following settings are available when adding or editing this resource. The fields marked with anasterisk are mandatory.
Activity name * The name of this resource. Any type of characters can be entered to this field includ-ing uppercase letters and spaces.
188 Chapter 5. Processes & Automation
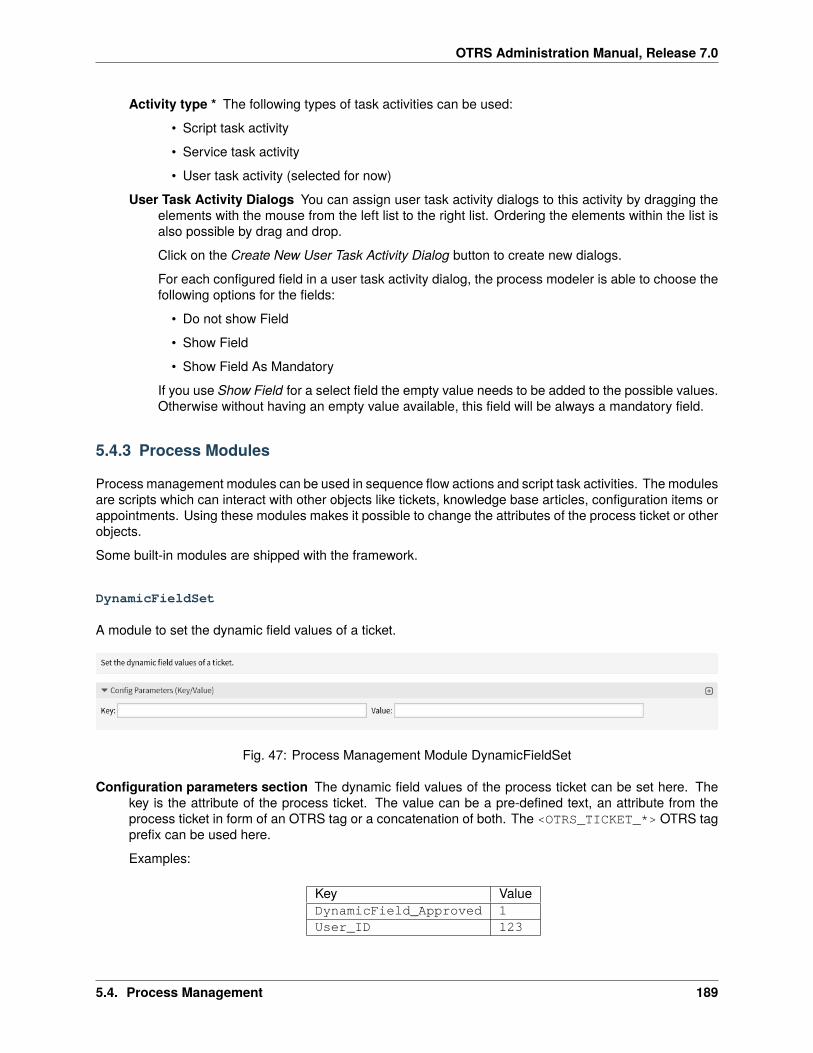
OTRS Administration Manual, Release 7.0
Activity type * The following types of task activities can be used:
• Script task activity
• Service task activity
• User task activity (selected for now)
User Task Activity Dialogs You can assign user task activity dialogs to this activity by dragging theelements with the mouse from the left list to the right list. Ordering the elements within the list isalso possible by drag and drop.
Click on the Create New User Task Activity Dialog button to create new dialogs.
For each configured field in a user task activity dialog, the process modeler is able to choose thefollowing options for the fields:
• Do not show Field
• Show Field
• Show Field As Mandatory
If you use Show Field for a select field the empty value needs to be added to the possible values.Otherwise without having an empty value available, this field will be always a mandatory field.
5.4.3 Process Modules
Process management modules can be used in sequence flow actions and script task activities. The modulesare scripts which can interact with other objects like tickets, knowledge base articles, configuration items orappointments. Using these modules makes it possible to change the attributes of the process ticket or otherobjects.
Some built-in modules are shipped with the framework.
DynamicFieldSet
A module to set the dynamic field values of a ticket.
Fig. 47: Process Management Module DynamicFieldSet
Configuration parameters section The dynamic field values of the process ticket can be set here. Thekey is the attribute of the process ticket. The value can be a pre-defined text, an attribute from theprocess ticket in form of an OTRS tag or a concatenation of both. The <OTRS_TICKET_*> OTRS tagprefix can be used here.
Examples:
Key ValueDynamicField_Approved 1User_ID 123
5.4. Process Management 189
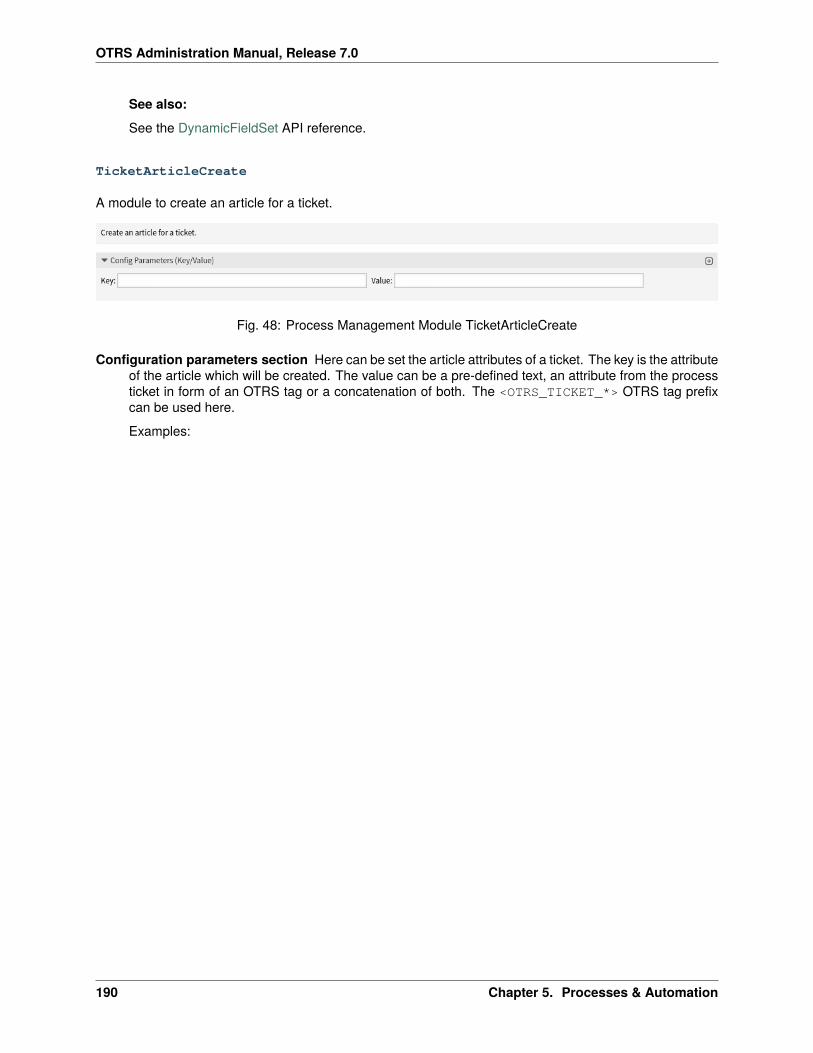
OTRS Administration Manual, Release 7.0
See also:
See the DynamicFieldSet API reference.
TicketArticleCreate
A module to create an article for a ticket.
Fig. 48: Process Management Module TicketArticleCreate
Configuration parameters section Here can be set the article attributes of a ticket. The key is the attributeof the article which will be created. The value can be a pre-defined text, an attribute from the processticket in form of an OTRS tag or a concatenation of both. The <OTRS_TICKET_*> OTRS tag prefixcan be used here.
Examples:
190 Chapter 5. Processes & Automation
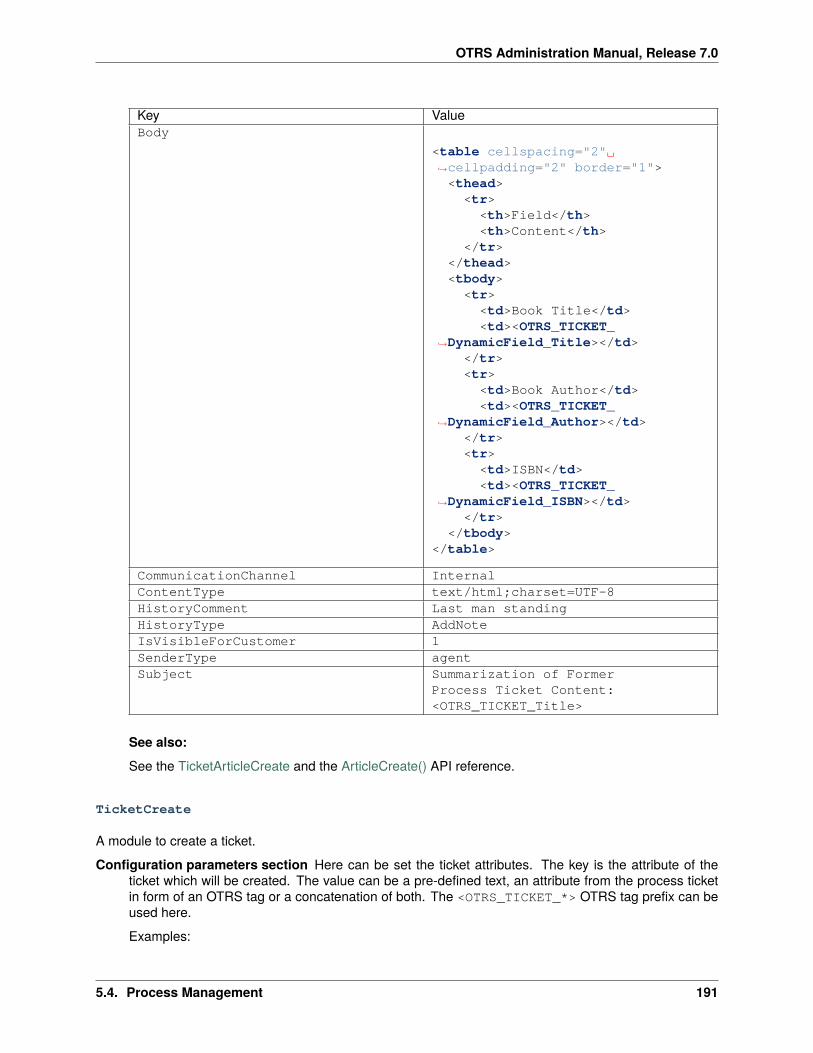
OTRS Administration Manual, Release 7.0
Key ValueBody
<table cellspacing="2"␣↪→cellpadding="2" border="1">
<thead><tr>
<th>Field</th><th>Content</th>
</tr></thead><tbody>
<tr><td>Book Title</td><td><OTRS_TICKET_
↪→DynamicField_Title></td></tr><tr>
<td>Book Author</td><td><OTRS_TICKET_
↪→DynamicField_Author></td></tr><tr>
<td>ISBN</td><td><OTRS_TICKET_
↪→DynamicField_ISBN></td></tr>
</tbody></table>
CommunicationChannel InternalContentType text/html;charset=UTF-8HistoryComment Last man standingHistoryType AddNoteIsVisibleForCustomer 1SenderType agentSubject Summarization of Former
Process Ticket Content:<OTRS_TICKET_Title>
See also:
See the TicketArticleCreate and the ArticleCreate() API reference.
TicketCreate
A module to create a ticket.
Configuration parameters section Here can be set the ticket attributes. The key is the attribute of theticket which will be created. The value can be a pre-defined text, an attribute from the process ticketin form of an OTRS tag or a concatenation of both. The <OTRS_TICKET_*> OTRS tag prefix can beused here.
Examples:
5.4. Process Management 191
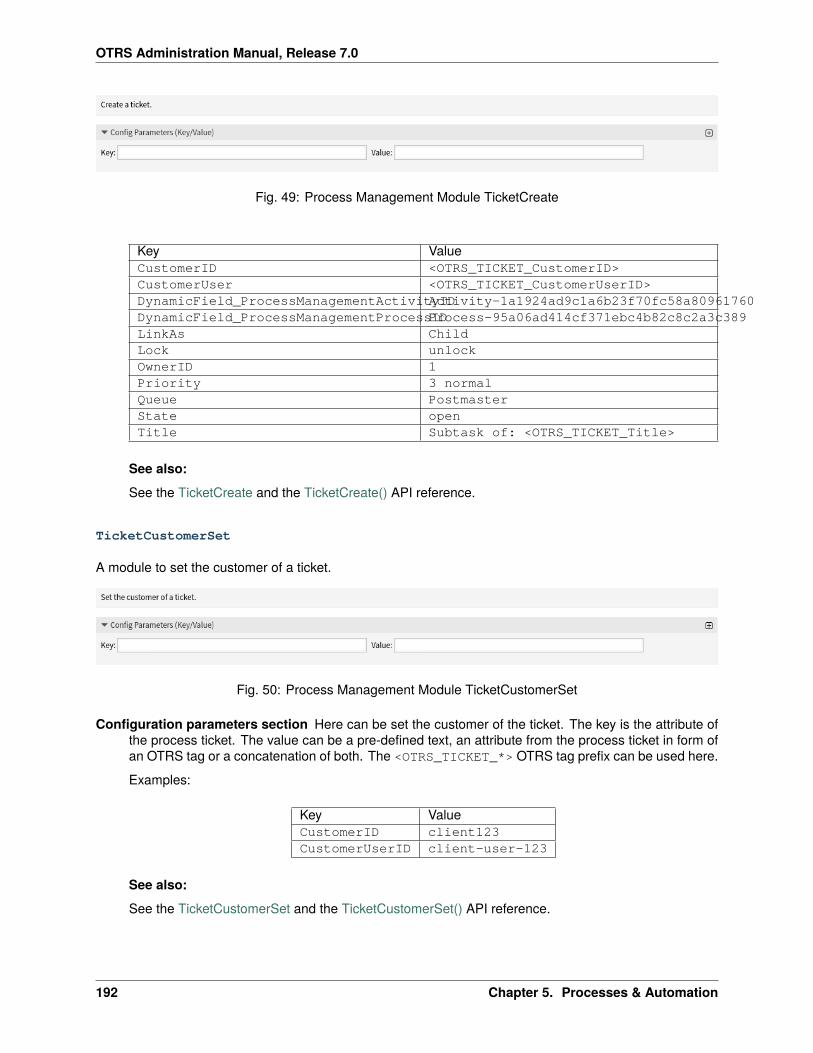
OTRS Administration Manual, Release 7.0
Fig. 49: Process Management Module TicketCreate
Key ValueCustomerID <OTRS_TICKET_CustomerID>CustomerUser <OTRS_TICKET_CustomerUserID>DynamicField_ProcessManagementActivityIDActivity-1a1924ad9c1a6b23f70fc58a80961760DynamicField_ProcessManagementProcessIDProcess-95a06ad414cf371ebc4b82c8c2a3c389LinkAs ChildLock unlockOwnerID 1Priority 3 normalQueue PostmasterState openTitle Subtask of: <OTRS_TICKET_Title>
See also:
See the TicketCreate and the TicketCreate() API reference.
TicketCustomerSet
A module to set the customer of a ticket.
Fig. 50: Process Management Module TicketCustomerSet
Configuration parameters section Here can be set the customer of the ticket. The key is the attribute ofthe process ticket. The value can be a pre-defined text, an attribute from the process ticket in form ofan OTRS tag or a concatenation of both. The <OTRS_TICKET_*> OTRS tag prefix can be used here.
Examples:
Key ValueCustomerID client123CustomerUserID client-user-123
See also:
See the TicketCustomerSet and the TicketCustomerSet() API reference.
192 Chapter 5. Processes & Automation
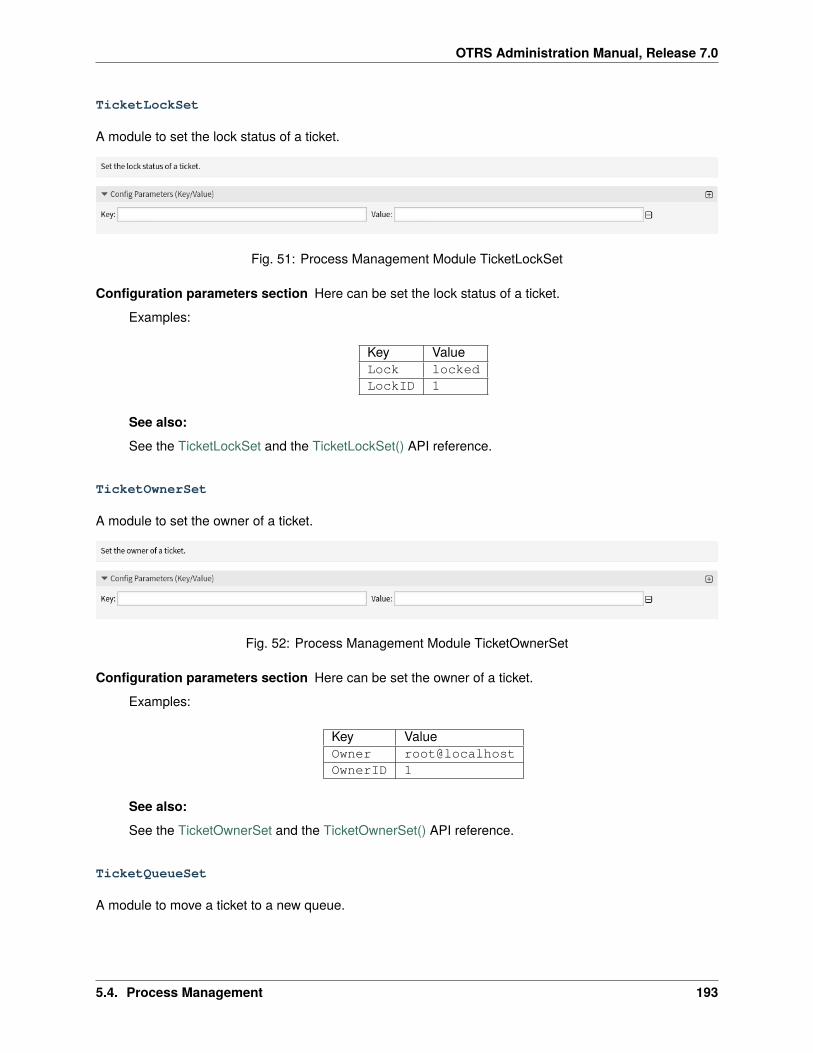
OTRS Administration Manual, Release 7.0
TicketLockSet
A module to set the lock status of a ticket.
Fig. 51: Process Management Module TicketLockSet
Configuration parameters section Here can be set the lock status of a ticket.
Examples:
Key ValueLock lockedLockID 1
See also:
See the TicketLockSet and the TicketLockSet() API reference.
TicketOwnerSet
A module to set the owner of a ticket.
Fig. 52: Process Management Module TicketOwnerSet
Configuration parameters section Here can be set the owner of a ticket.
Examples:
Key ValueOwner root@localhostOwnerID 1
See also:
See the TicketOwnerSet and the TicketOwnerSet() API reference.
TicketQueueSet
A module to move a ticket to a new queue.
5.4. Process Management 193
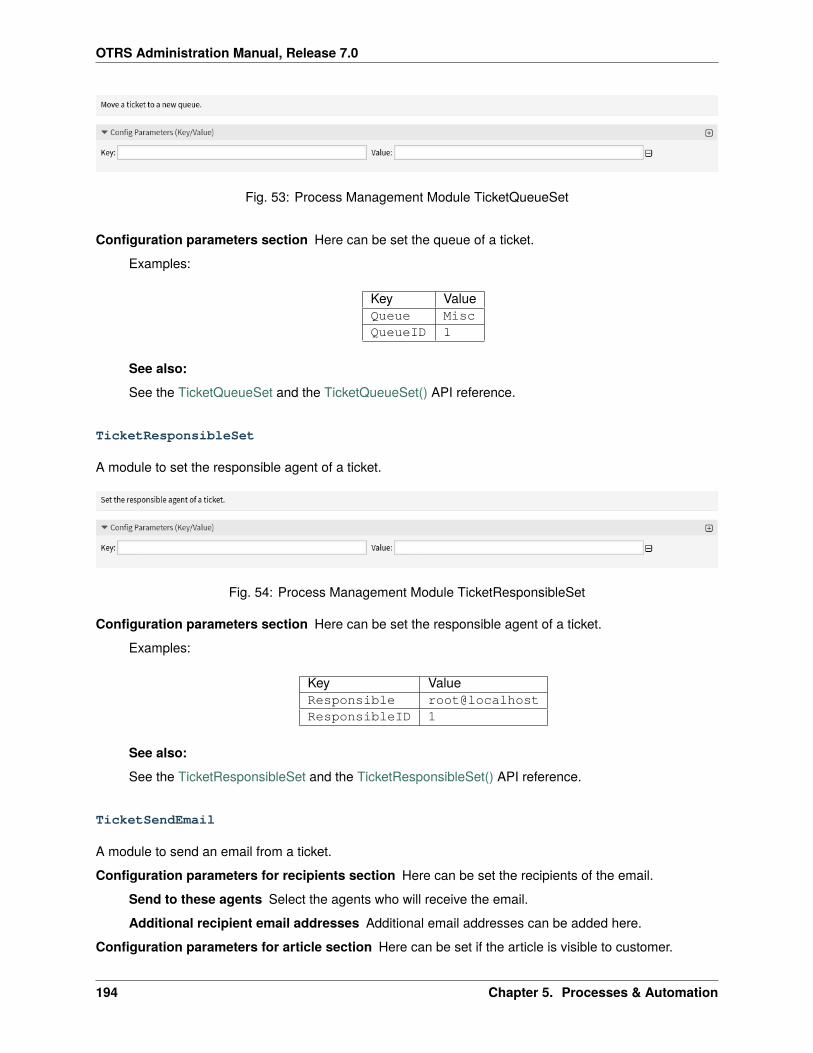
OTRS Administration Manual, Release 7.0
Fig. 53: Process Management Module TicketQueueSet
Configuration parameters section Here can be set the queue of a ticket.
Examples:
Key ValueQueue MiscQueueID 1
See also:
See the TicketQueueSet and the TicketQueueSet() API reference.
TicketResponsibleSet
A module to set the responsible agent of a ticket.
Fig. 54: Process Management Module TicketResponsibleSet
Configuration parameters section Here can be set the responsible agent of a ticket.
Examples:
Key ValueResponsible root@localhostResponsibleID 1
See also:
See the TicketResponsibleSet and the TicketResponsibleSet() API reference.
TicketSendEmail
A module to send an email from a ticket.
Configuration parameters for recipients section Here can be set the recipients of the email.
Send to these agents Select the agents who will receive the email.
Additional recipient email addresses Additional email addresses can be added here.
Configuration parameters for article section Here can be set if the article is visible to customer.
194 Chapter 5. Processes & Automation
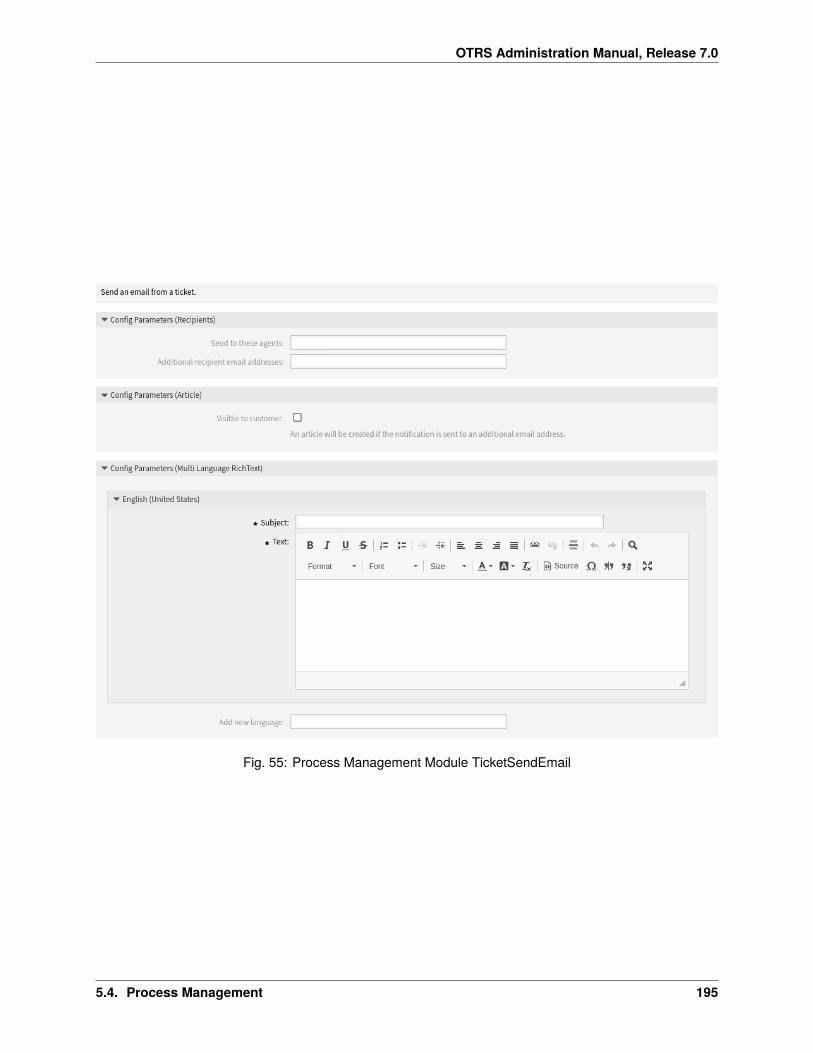
OTRS Administration Manual, Release 7.0
Fig. 55: Process Management Module TicketSendEmail
5.4. Process Management 195
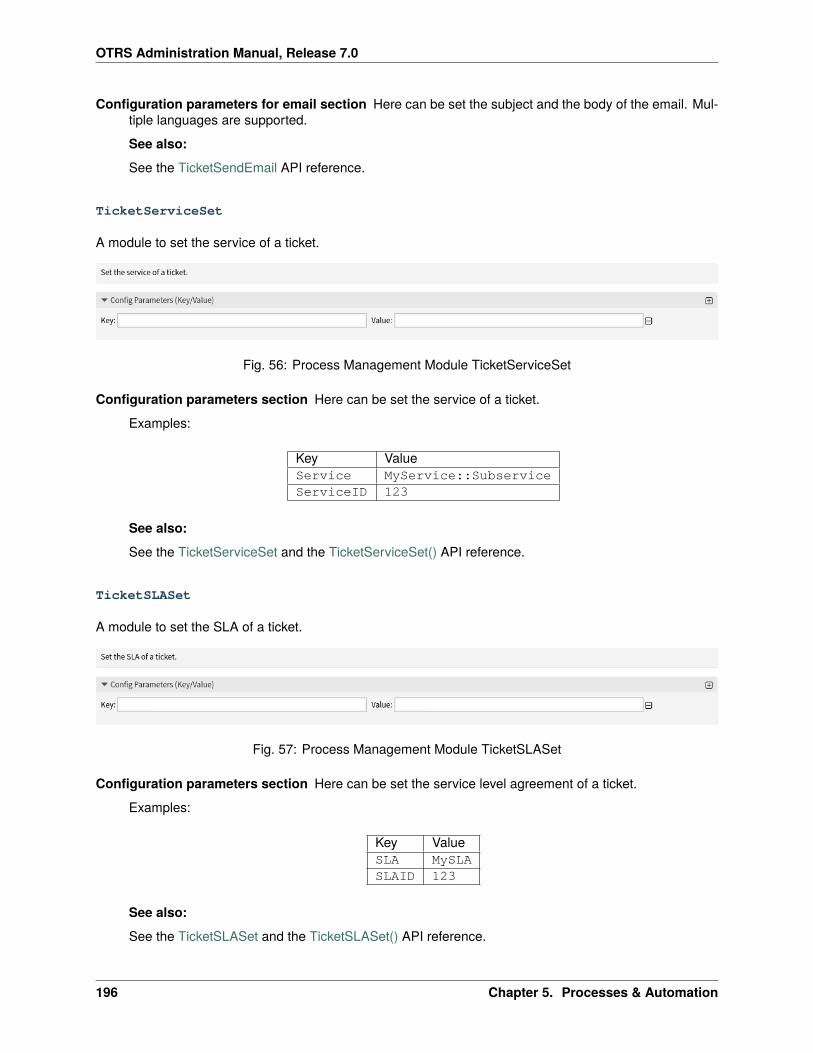
OTRS Administration Manual, Release 7.0
Configuration parameters for email section Here can be set the subject and the body of the email. Mul-tiple languages are supported.
See also:
See the TicketSendEmail API reference.
TicketServiceSet
A module to set the service of a ticket.
Fig. 56: Process Management Module TicketServiceSet
Configuration parameters section Here can be set the service of a ticket.
Examples:
Key ValueService MyService::SubserviceServiceID 123
See also:
See the TicketServiceSet and the TicketServiceSet() API reference.
TicketSLASet
A module to set the SLA of a ticket.
Fig. 57: Process Management Module TicketSLASet
Configuration parameters section Here can be set the service level agreement of a ticket.
Examples:
Key ValueSLA MySLASLAID 123
See also:
See the TicketSLASet and the TicketSLASet() API reference.
196 Chapter 5. Processes & Automation
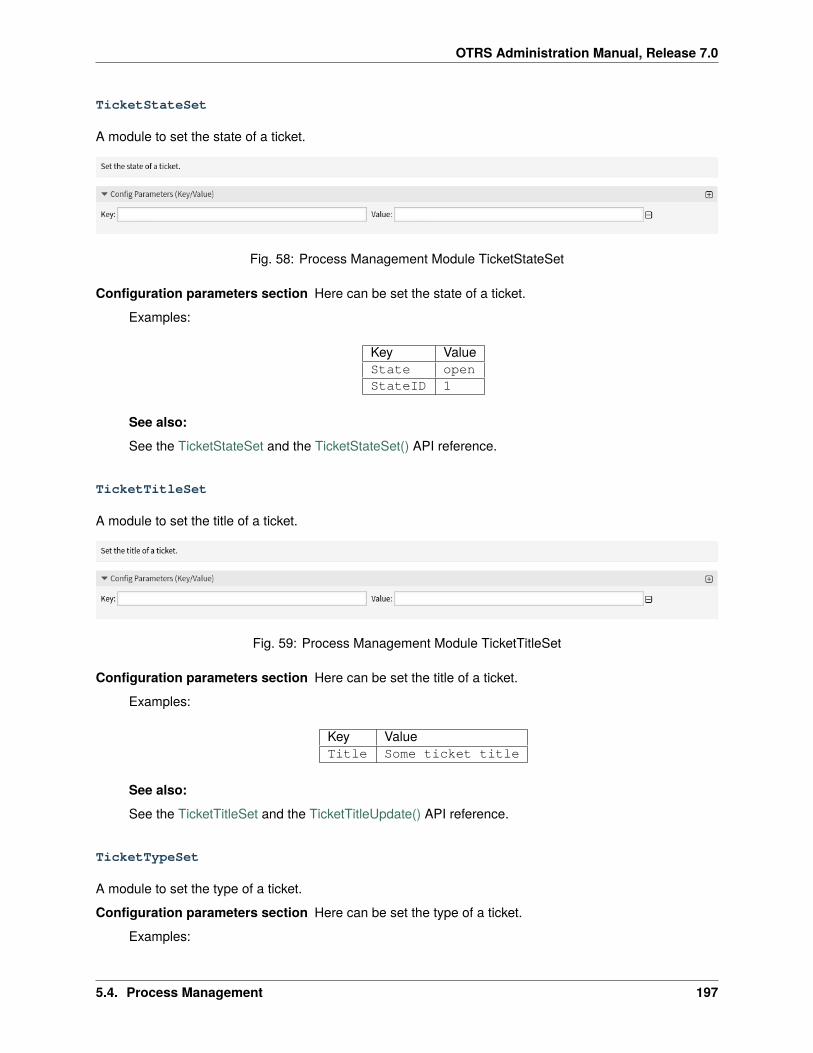
OTRS Administration Manual, Release 7.0
TicketStateSet
A module to set the state of a ticket.
Fig. 58: Process Management Module TicketStateSet
Configuration parameters section Here can be set the state of a ticket.
Examples:
Key ValueState openStateID 1
See also:
See the TicketStateSet and the TicketStateSet() API reference.
TicketTitleSet
A module to set the title of a ticket.
Fig. 59: Process Management Module TicketTitleSet
Configuration parameters section Here can be set the title of a ticket.
Examples:
Key ValueTitle Some ticket title
See also:
See the TicketTitleSet and the TicketTitleUpdate() API reference.
TicketTypeSet
A module to set the type of a ticket.
Configuration parameters section Here can be set the type of a ticket.
Examples:
5.4. Process Management 197
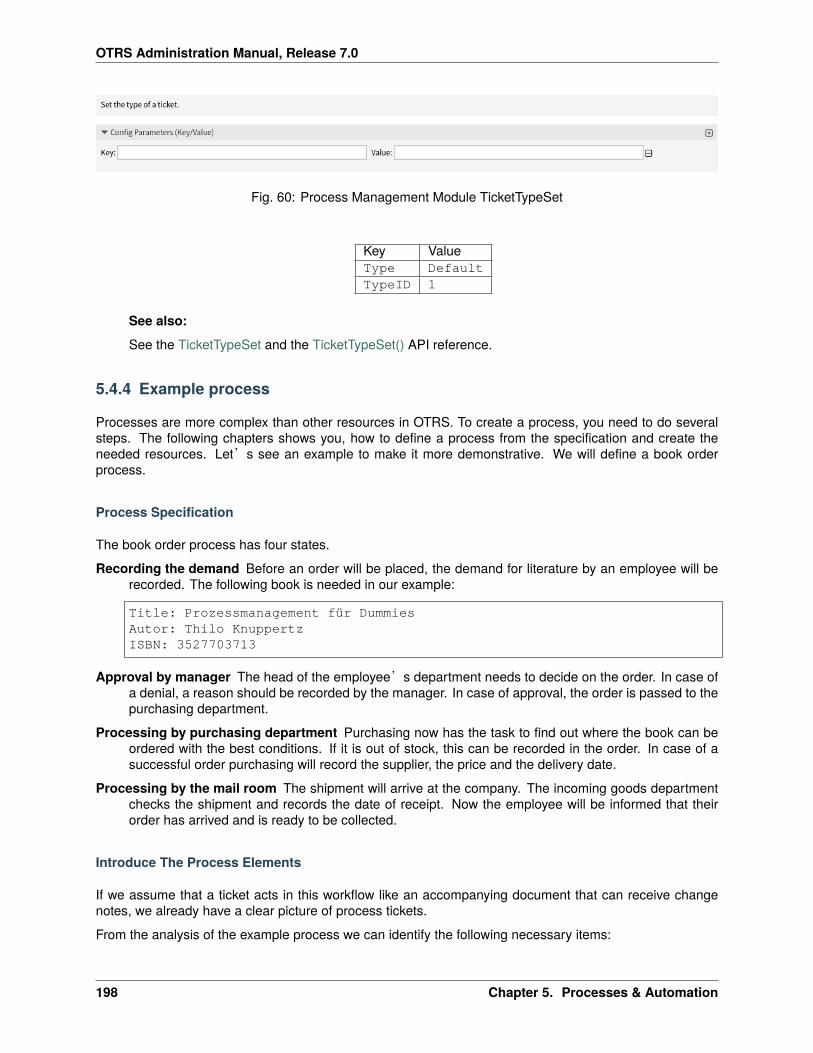
OTRS Administration Manual, Release 7.0
Fig. 60: Process Management Module TicketTypeSet
Key ValueType DefaultTypeID 1
See also:
See the TicketTypeSet and the TicketTypeSet() API reference.
5.4.4 Example process
Processes are more complex than other resources in OTRS. To create a process, you need to do severalsteps. The following chapters shows you, how to define a process from the specification and create theneeded resources. Let’s see an example to make it more demonstrative. We will define a book orderprocess.
Process Specification
The book order process has four states.
Recording the demand Before an order will be placed, the demand for literature by an employee will berecorded. The following book is needed in our example:
Title: Prozessmanagement für DummiesAutor: Thilo KnuppertzISBN: 3527703713
Approval by manager The head of the employee’s department needs to decide on the order. In case ofa denial, a reason should be recorded by the manager. In case of approval, the order is passed to thepurchasing department.
Processing by purchasing department Purchasing now has the task to find out where the book can beordered with the best conditions. If it is out of stock, this can be recorded in the order. In case of asuccessful order purchasing will record the supplier, the price and the delivery date.
Processing by the mail room The shipment will arrive at the company. The incoming goods departmentchecks the shipment and records the date of receipt. Now the employee will be informed that theirorder has arrived and is ready to be collected.
Introduce The Process Elements
If we assume that a ticket acts in this workflow like an accompanying document that can receive changenotes, we already have a clear picture of process tickets.
From the analysis of the example process we can identify the following necessary items:
198 Chapter 5. Processes & Automation
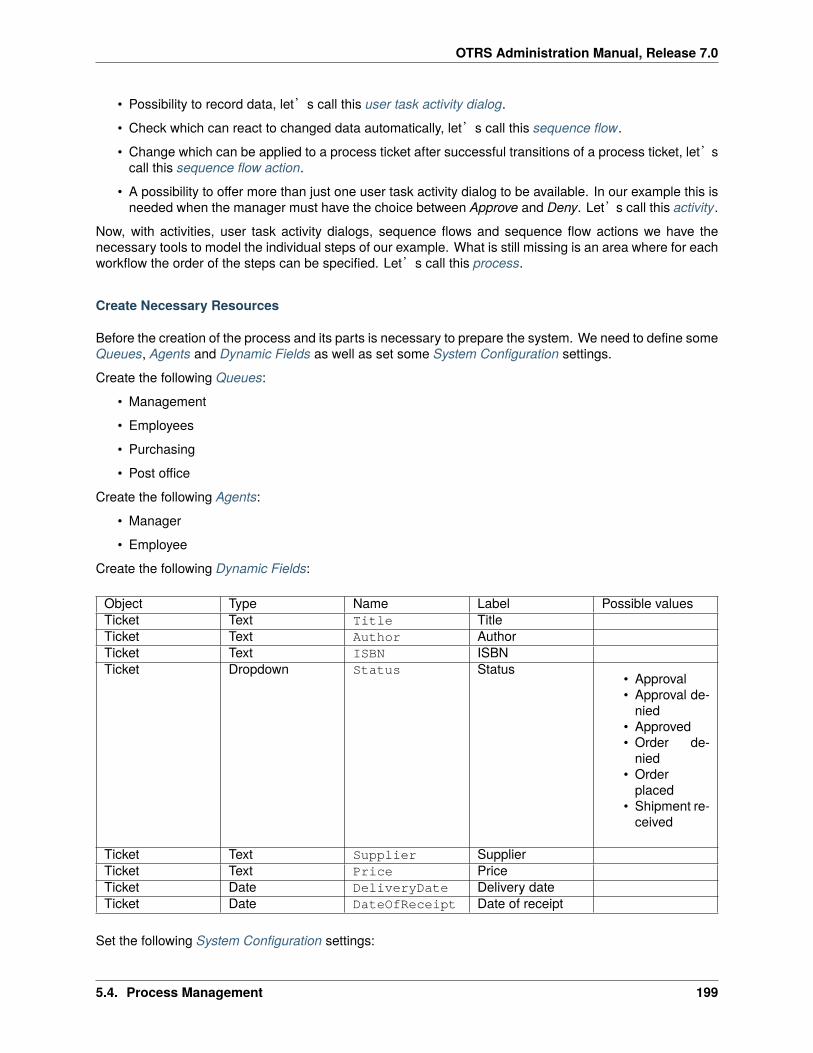
OTRS Administration Manual, Release 7.0
• Possibility to record data, let’s call this user task activity dialog.
• Check which can react to changed data automatically, let’s call this sequence flow.
• Change which can be applied to a process ticket after successful transitions of a process ticket, let’scall this sequence flow action.
• A possibility to offer more than just one user task activity dialog to be available. In our example this isneeded when the manager must have the choice between Approve and Deny. Let’s call this activity.
Now, with activities, user task activity dialogs, sequence flows and sequence flow actions we have thenecessary tools to model the individual steps of our example. What is still missing is an area where for eachworkflow the order of the steps can be specified. Let’s call this process.
Create Necessary Resources
Before the creation of the process and its parts is necessary to prepare the system. We need to define someQueues, Agents and Dynamic Fields as well as set some System Configuration settings.
Create the following Queues:
• Management
• Employees
• Purchasing
• Post office
Create the following Agents:
• Manager
• Employee
Create the following Dynamic Fields:
Object Type Name Label Possible valuesTicket Text Title TitleTicket Text Author AuthorTicket Text ISBN ISBNTicket Dropdown Status Status
• Approval• Approval de-
nied• Approved• Order de-
nied• Order
placed• Shipment re-
ceived
Ticket Text Supplier SupplierTicket Text Price PriceTicket Date DeliveryDate Delivery dateTicket Date DateOfReceipt Date of receipt
Set the following System Configuration settings:
5.4. Process Management 199
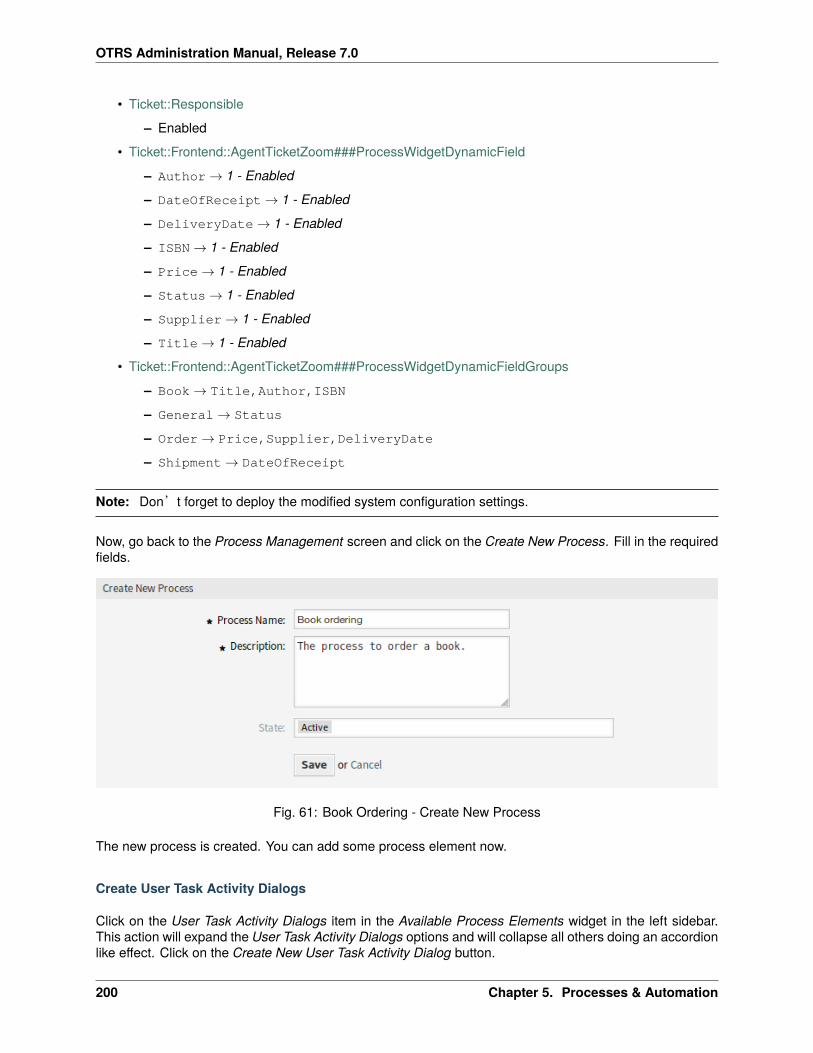
OTRS Administration Manual, Release 7.0
• Ticket::Responsible
– Enabled
• Ticket::Frontend::AgentTicketZoom###ProcessWidgetDynamicField
– Author → 1 - Enabled
– DateOfReceipt → 1 - Enabled
– DeliveryDate → 1 - Enabled
– ISBN → 1 - Enabled
– Price → 1 - Enabled
– Status → 1 - Enabled
– Supplier → 1 - Enabled
– Title → 1 - Enabled
• Ticket::Frontend::AgentTicketZoom###ProcessWidgetDynamicFieldGroups
– Book → Title,Author,ISBN
– General → Status
– Order → Price,Supplier,DeliveryDate
– Shipment → DateOfReceipt
Note: Don’t forget to deploy the modified system configuration settings.
Now, go back to the Process Management screen and click on the Create New Process. Fill in the requiredfields.
Fig. 61: Book Ordering - Create New Process
The new process is created. You can add some process element now.
Create User Task Activity Dialogs
Click on the User Task Activity Dialogs item in the Available Process Elements widget in the left sidebar.This action will expand the User Task Activity Dialogs options and will collapse all others doing an accordionlike effect. Click on the Create New User Task Activity Dialog button.
200 Chapter 5. Processes & Automation
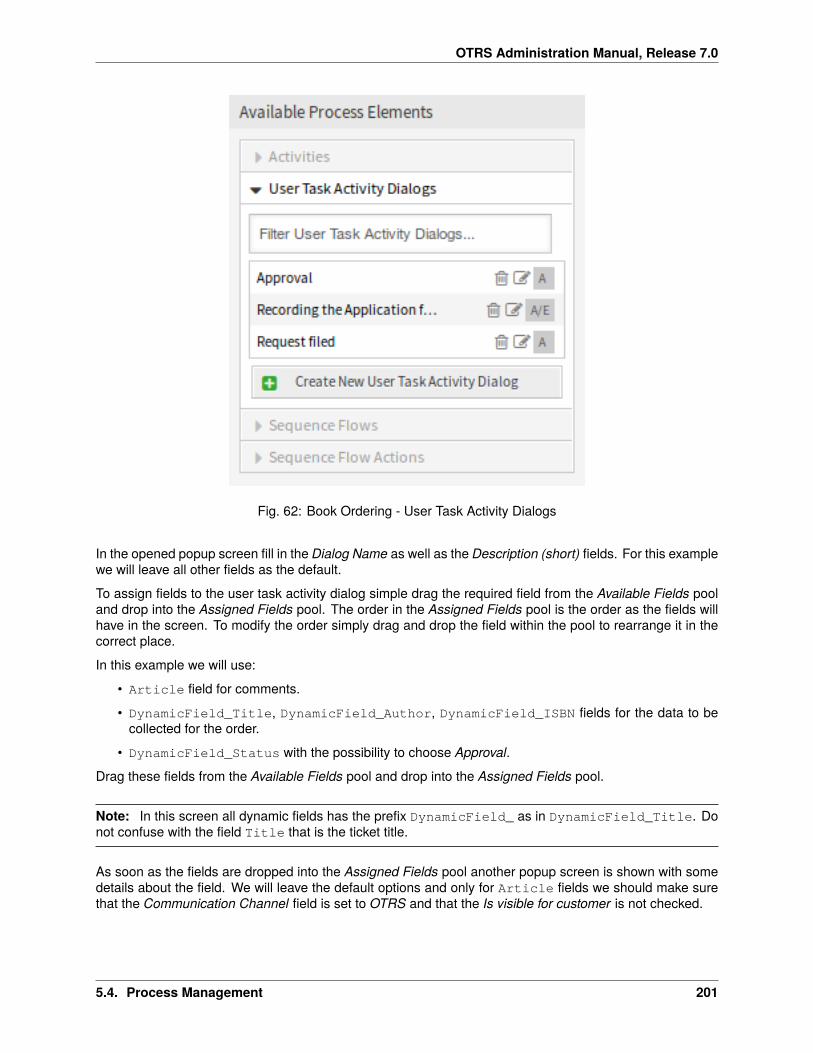
OTRS Administration Manual, Release 7.0
Fig. 62: Book Ordering - User Task Activity Dialogs
In the opened popup screen fill in the Dialog Name as well as the Description (short) fields. For this examplewe will leave all other fields as the default.
To assign fields to the user task activity dialog simple drag the required field from the Available Fields pooland drop into the Assigned Fields pool. The order in the Assigned Fields pool is the order as the fields willhave in the screen. To modify the order simply drag and drop the field within the pool to rearrange it in thecorrect place.
In this example we will use:
• Article field for comments.
• DynamicField_Title, DynamicField_Author, DynamicField_ISBN fields for the data to becollected for the order.
• DynamicField_Status with the possibility to choose Approval.
Drag these fields from the Available Fields pool and drop into the Assigned Fields pool.
Note: In this screen all dynamic fields has the prefix DynamicField_ as in DynamicField_Title. Donot confuse with the field Title that is the ticket title.
As soon as the fields are dropped into the Assigned Fields pool another popup screen is shown with somedetails about the field. We will leave the default options and only for Article fields we should make surethat the Communication Channel field is set to OTRS and that the Is visible for customer is not checked.
5.4. Process Management 201
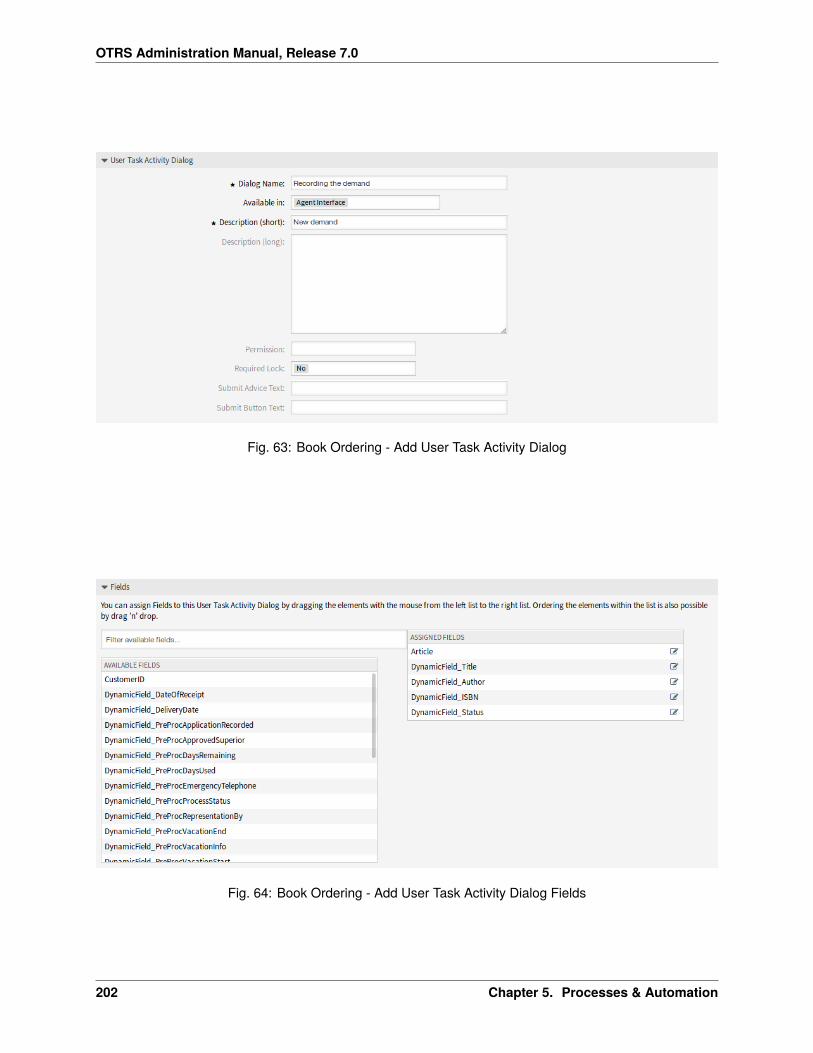
OTRS Administration Manual, Release 7.0
Fig. 63: Book Ordering - Add User Task Activity Dialog
Fig. 64: Book Ordering - Add User Task Activity Dialog Fields
202 Chapter 5. Processes & Automation
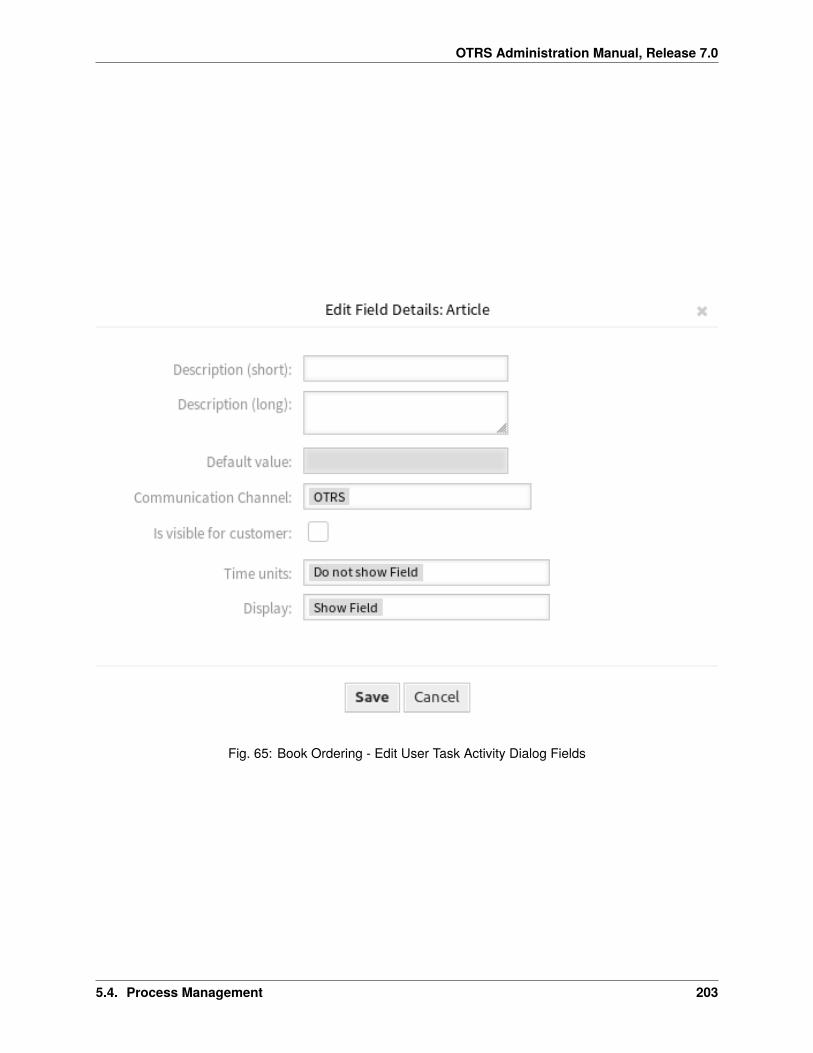
OTRS Administration Manual, Release 7.0
Fig. 65: Book Ordering - Edit User Task Activity Dialog Fields
5.4. Process Management 203
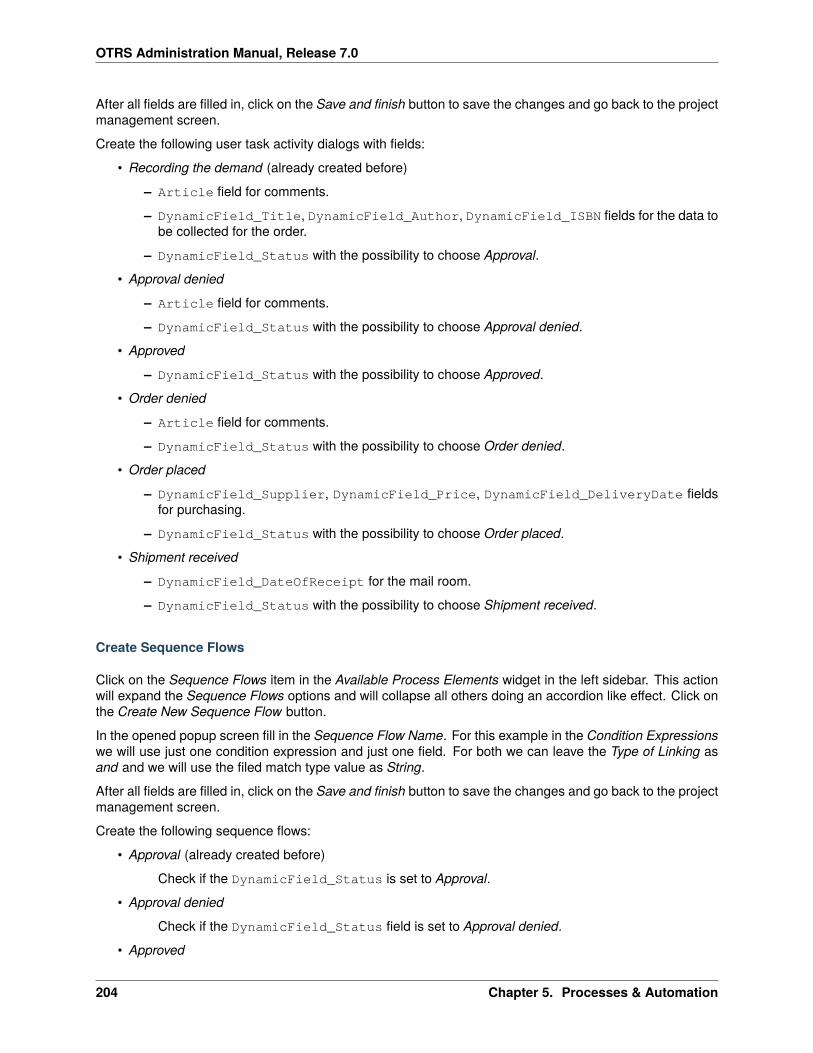
OTRS Administration Manual, Release 7.0
After all fields are filled in, click on the Save and finish button to save the changes and go back to the projectmanagement screen.
Create the following user task activity dialogs with fields:
• Recording the demand (already created before)
– Article field for comments.
– DynamicField_Title, DynamicField_Author, DynamicField_ISBN fields for the data tobe collected for the order.
– DynamicField_Status with the possibility to choose Approval.
• Approval denied
– Article field for comments.
– DynamicField_Status with the possibility to choose Approval denied.
• Approved
– DynamicField_Status with the possibility to choose Approved.
• Order denied
– Article field for comments.
– DynamicField_Status with the possibility to choose Order denied.
• Order placed
– DynamicField_Supplier, DynamicField_Price, DynamicField_DeliveryDate fieldsfor purchasing.
– DynamicField_Status with the possibility to choose Order placed.
• Shipment received
– DynamicField_DateOfReceipt for the mail room.
– DynamicField_Status with the possibility to choose Shipment received.
Create Sequence Flows
Click on the Sequence Flows item in the Available Process Elements widget in the left sidebar. This actionwill expand the Sequence Flows options and will collapse all others doing an accordion like effect. Click onthe Create New Sequence Flow button.
In the opened popup screen fill in the Sequence Flow Name. For this example in the Condition Expressionswe will use just one condition expression and just one field. For both we can leave the Type of Linking asand and we will use the filed match type value as String.
After all fields are filled in, click on the Save and finish button to save the changes and go back to the projectmanagement screen.
Create the following sequence flows:
• Approval (already created before)
Check if the DynamicField_Status is set to Approval.
• Approval denied
Check if the DynamicField_Status field is set to Approval denied.
• Approved
204 Chapter 5. Processes & Automation
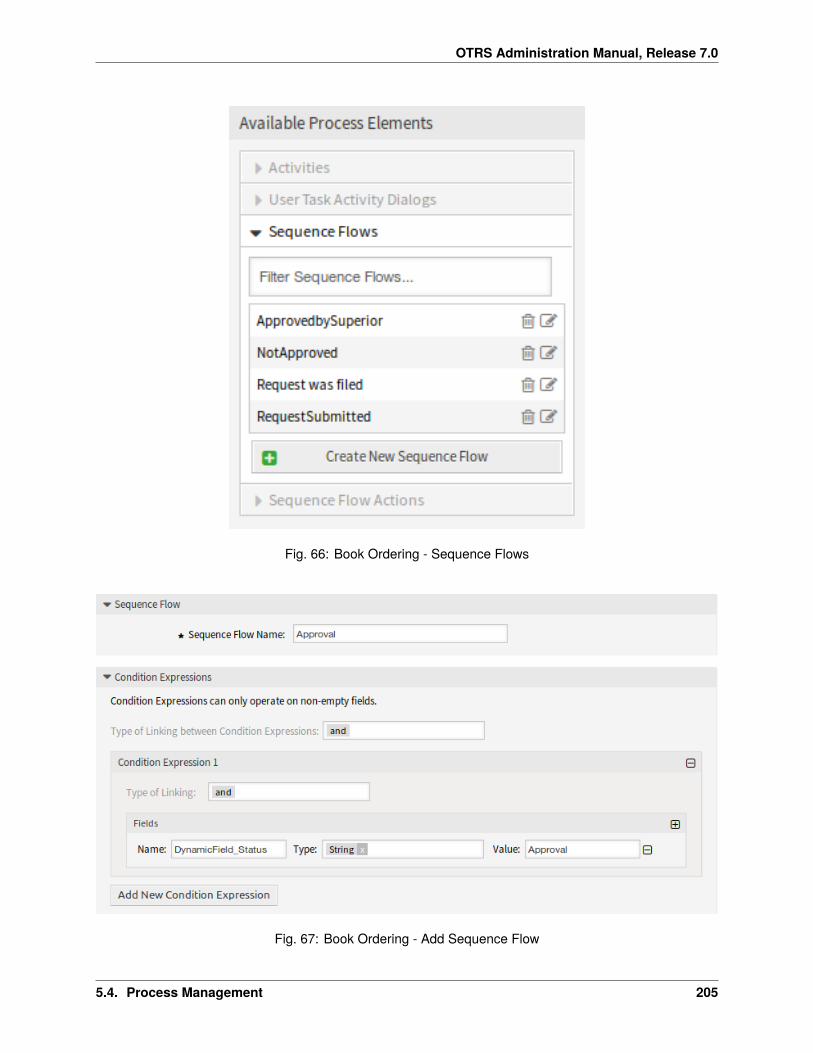
OTRS Administration Manual, Release 7.0
Fig. 66: Book Ordering - Sequence Flows
Fig. 67: Book Ordering - Add Sequence Flow
5.4. Process Management 205
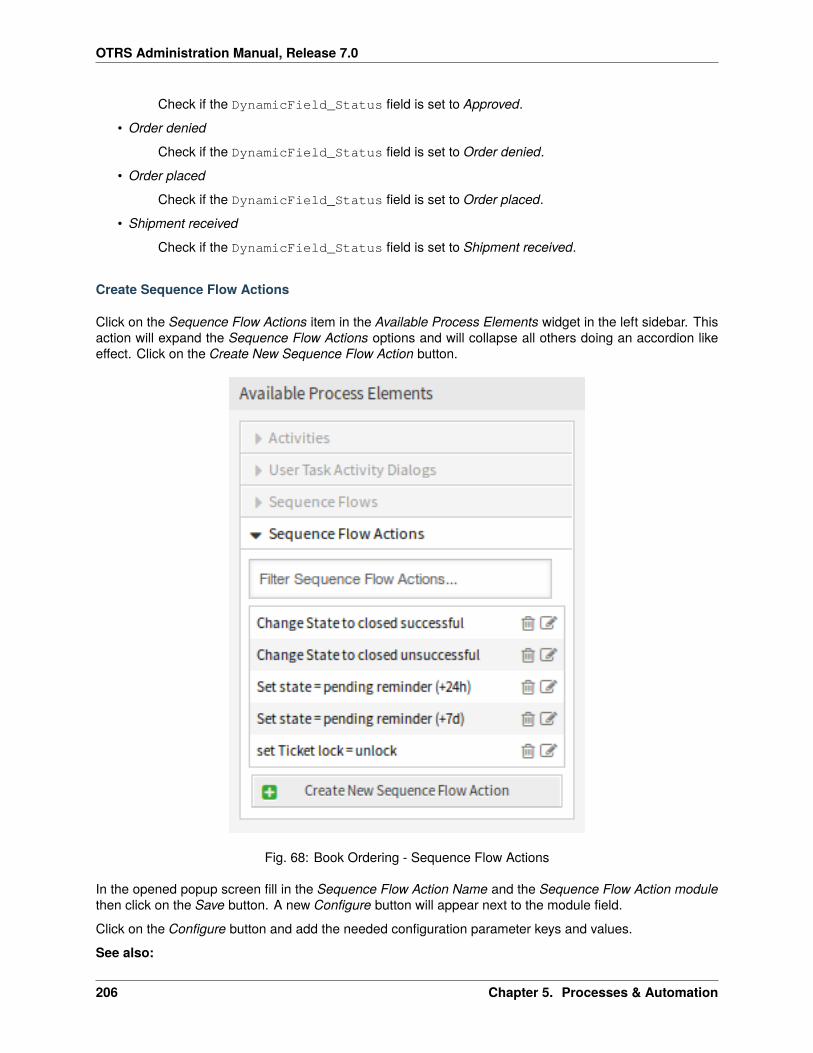
OTRS Administration Manual, Release 7.0
Check if the DynamicField_Status field is set to Approved.
• Order denied
Check if the DynamicField_Status field is set to Order denied.
• Order placed
Check if the DynamicField_Status field is set to Order placed.
• Shipment received
Check if the DynamicField_Status field is set to Shipment received.
Create Sequence Flow Actions
Click on the Sequence Flow Actions item in the Available Process Elements widget in the left sidebar. Thisaction will expand the Sequence Flow Actions options and will collapse all others doing an accordion likeeffect. Click on the Create New Sequence Flow Action button.
Fig. 68: Book Ordering - Sequence Flow Actions
In the opened popup screen fill in the Sequence Flow Action Name and the Sequence Flow Action modulethen click on the Save button. A new Configure button will appear next to the module field.
Click on the Configure button and add the needed configuration parameter keys and values.
See also:
206 Chapter 5. Processes & Automation
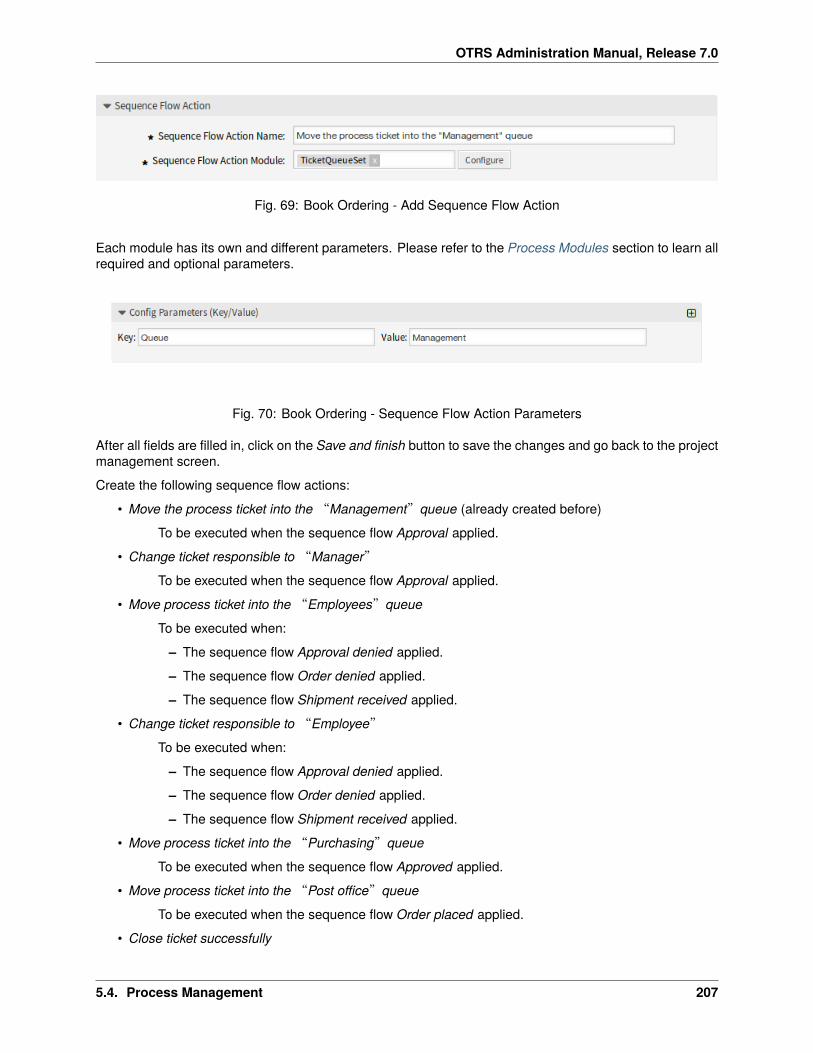
OTRS Administration Manual, Release 7.0
Fig. 69: Book Ordering - Add Sequence Flow Action
Each module has its own and different parameters. Please refer to the Process Modules section to learn allrequired and optional parameters.
Fig. 70: Book Ordering - Sequence Flow Action Parameters
After all fields are filled in, click on the Save and finish button to save the changes and go back to the projectmanagement screen.
Create the following sequence flow actions:
• Move the process ticket into the“Management”queue (already created before)
To be executed when the sequence flow Approval applied.
• Change ticket responsible to“Manager”
To be executed when the sequence flow Approval applied.
• Move process ticket into the“Employees”queue
To be executed when:
– The sequence flow Approval denied applied.
– The sequence flow Order denied applied.
– The sequence flow Shipment received applied.
• Change ticket responsible to“Employee”
To be executed when:
– The sequence flow Approval denied applied.
– The sequence flow Order denied applied.
– The sequence flow Shipment received applied.
• Move process ticket into the“Purchasing”queue
To be executed when the sequence flow Approved applied.
• Move process ticket into the“Post office”queue
To be executed when the sequence flow Order placed applied.
• Close ticket successfully
5.4. Process Management 207
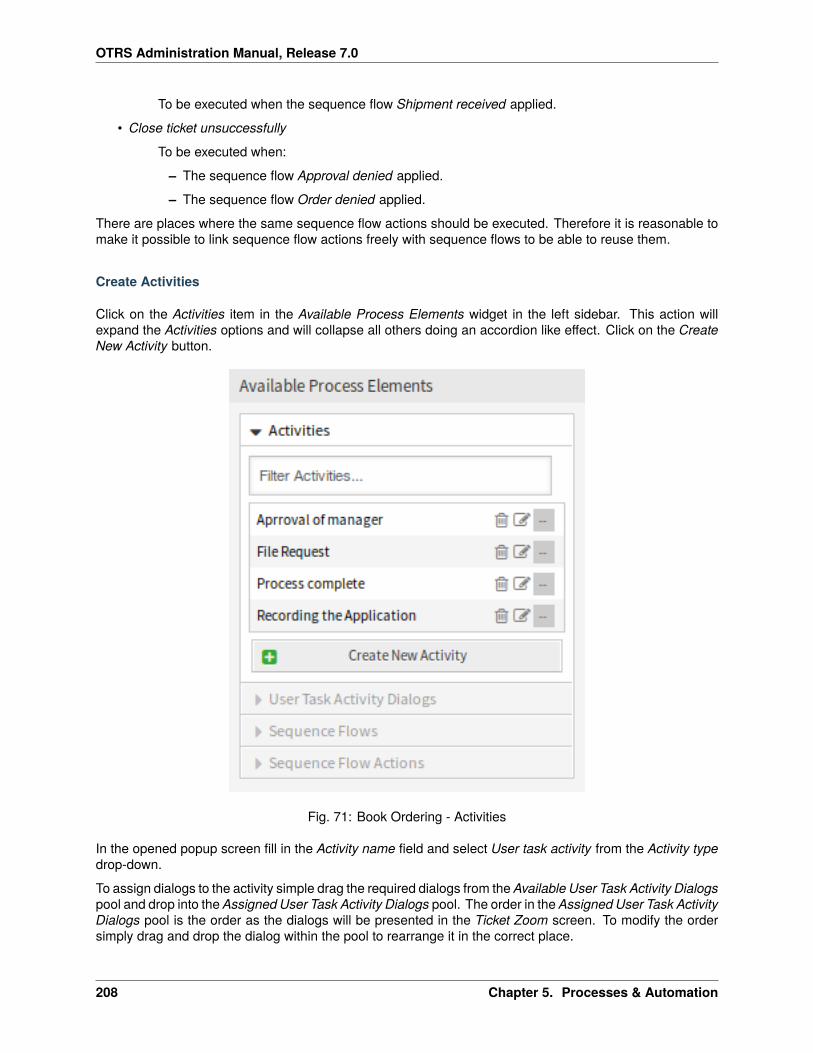
OTRS Administration Manual, Release 7.0
To be executed when the sequence flow Shipment received applied.
• Close ticket unsuccessfully
To be executed when:
– The sequence flow Approval denied applied.
– The sequence flow Order denied applied.
There are places where the same sequence flow actions should be executed. Therefore it is reasonable tomake it possible to link sequence flow actions freely with sequence flows to be able to reuse them.
Create Activities
Click on the Activities item in the Available Process Elements widget in the left sidebar. This action willexpand the Activities options and will collapse all others doing an accordion like effect. Click on the CreateNew Activity button.
Fig. 71: Book Ordering - Activities
In the opened popup screen fill in the Activity name field and select User task activity from the Activity typedrop-down.
To assign dialogs to the activity simple drag the required dialogs from the Available User Task Activity Dialogspool and drop into the Assigned User Task Activity Dialogs pool. The order in the Assigned User Task ActivityDialogs pool is the order as the dialogs will be presented in the Ticket Zoom screen. To modify the ordersimply drag and drop the dialog within the pool to rearrange it in the correct place.
208 Chapter 5. Processes & Automation
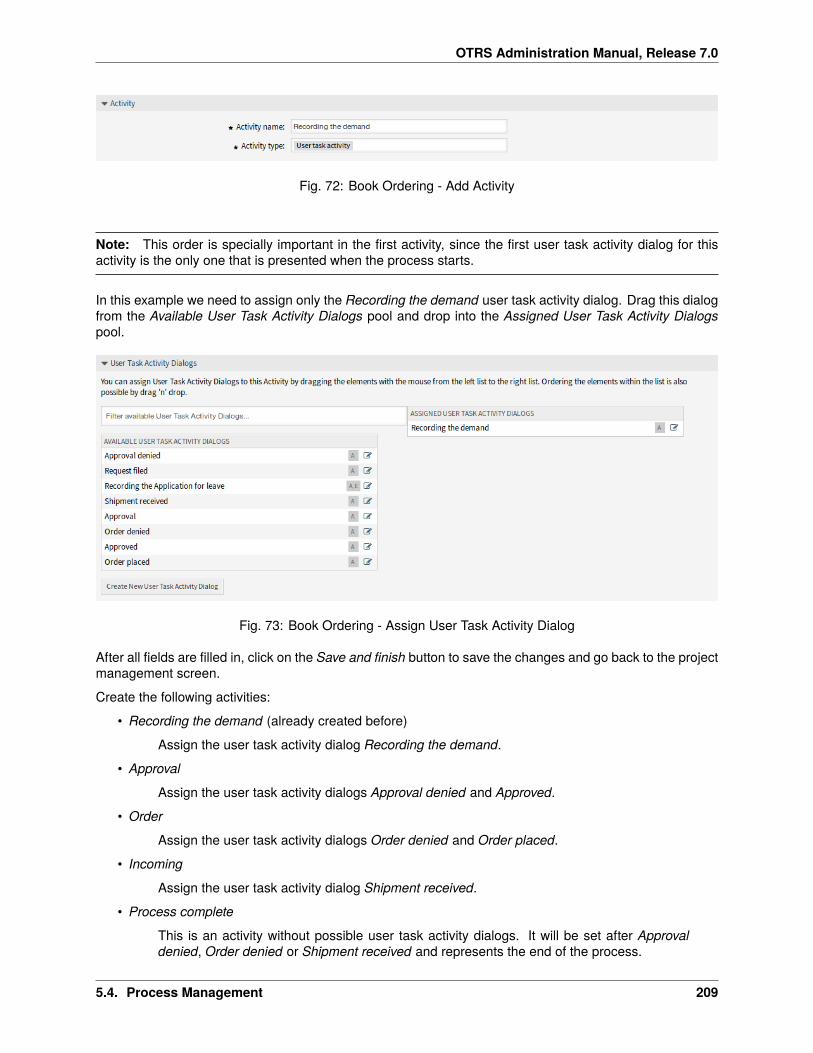
OTRS Administration Manual, Release 7.0
Fig. 72: Book Ordering - Add Activity
Note: This order is specially important in the first activity, since the first user task activity dialog for thisactivity is the only one that is presented when the process starts.
In this example we need to assign only the Recording the demand user task activity dialog. Drag this dialogfrom the Available User Task Activity Dialogs pool and drop into the Assigned User Task Activity Dialogspool.
Fig. 73: Book Ordering - Assign User Task Activity Dialog
After all fields are filled in, click on the Save and finish button to save the changes and go back to the projectmanagement screen.
Create the following activities:
• Recording the demand (already created before)
Assign the user task activity dialog Recording the demand.
• Approval
Assign the user task activity dialogs Approval denied and Approved.
• Order
Assign the user task activity dialogs Order denied and Order placed.
• Incoming
Assign the user task activity dialog Shipment received.
• Process complete
This is an activity without possible user task activity dialogs. It will be set after Approvaldenied, Order denied or Shipment received and represents the end of the process.
5.4. Process Management 209
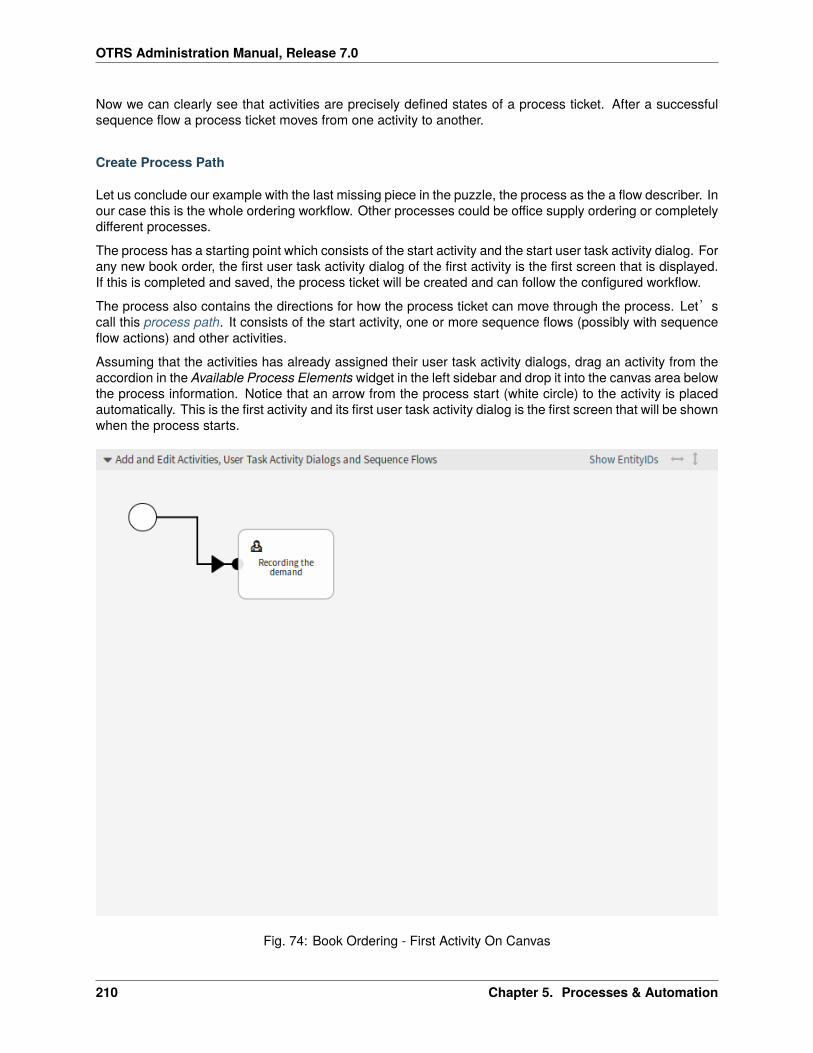
OTRS Administration Manual, Release 7.0
Now we can clearly see that activities are precisely defined states of a process ticket. After a successfulsequence flow a process ticket moves from one activity to another.
Create Process Path
Let us conclude our example with the last missing piece in the puzzle, the process as the a flow describer. Inour case this is the whole ordering workflow. Other processes could be office supply ordering or completelydifferent processes.
The process has a starting point which consists of the start activity and the start user task activity dialog. Forany new book order, the first user task activity dialog of the first activity is the first screen that is displayed.If this is completed and saved, the process ticket will be created and can follow the configured workflow.
The process also contains the directions for how the process ticket can move through the process. Let’scall this process path. It consists of the start activity, one or more sequence flows (possibly with sequenceflow actions) and other activities.
Assuming that the activities has already assigned their user task activity dialogs, drag an activity from theaccordion in the Available Process Elements widget in the left sidebar and drop it into the canvas area belowthe process information. Notice that an arrow from the process start (white circle) to the activity is placedautomatically. This is the first activity and its first user task activity dialog is the first screen that will be shownwhen the process starts.
Fig. 74: Book Ordering - First Activity On Canvas
210 Chapter 5. Processes & Automation
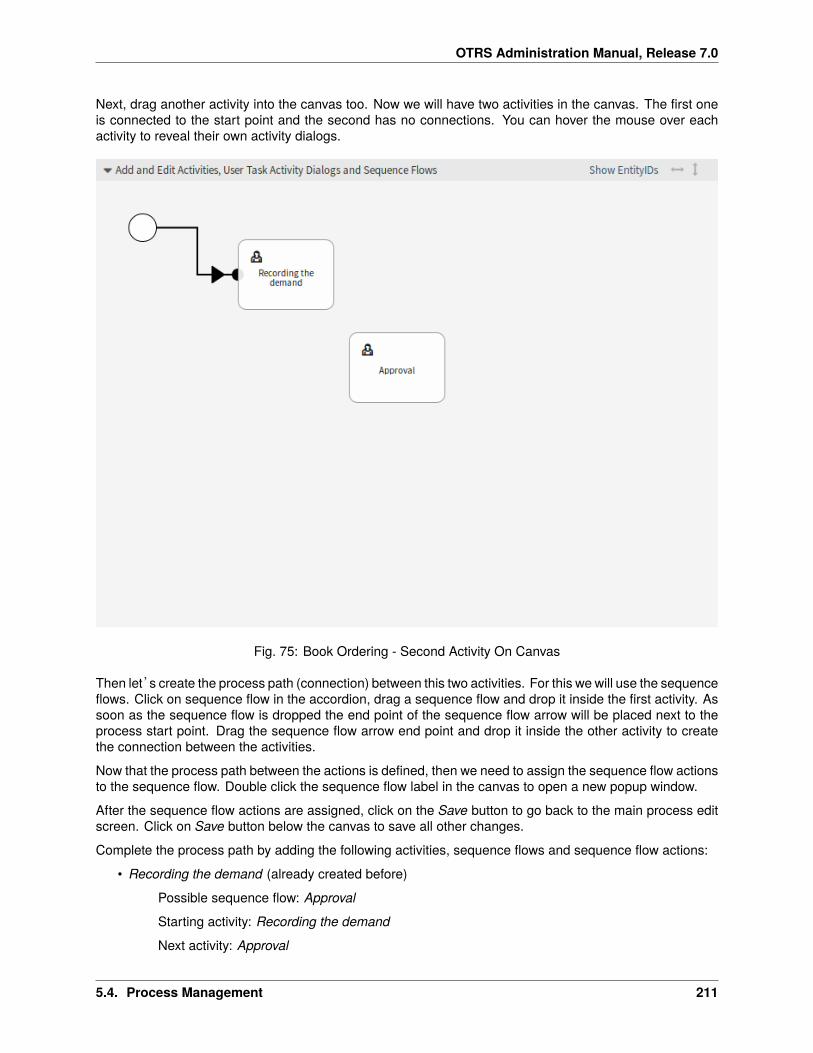
OTRS Administration Manual, Release 7.0
Next, drag another activity into the canvas too. Now we will have two activities in the canvas. The first oneis connected to the start point and the second has no connections. You can hover the mouse over eachactivity to reveal their own activity dialogs.
Fig. 75: Book Ordering - Second Activity On Canvas
Then let’s create the process path (connection) between this two activities. For this we will use the sequenceflows. Click on sequence flow in the accordion, drag a sequence flow and drop it inside the first activity. Assoon as the sequence flow is dropped the end point of the sequence flow arrow will be placed next to theprocess start point. Drag the sequence flow arrow end point and drop it inside the other activity to createthe connection between the activities.
Now that the process path between the actions is defined, then we need to assign the sequence flow actionsto the sequence flow. Double click the sequence flow label in the canvas to open a new popup window.
After the sequence flow actions are assigned, click on the Save button to go back to the main process editscreen. Click on Save button below the canvas to save all other changes.
Complete the process path by adding the following activities, sequence flows and sequence flow actions:
• Recording the demand (already created before)
Possible sequence flow: Approval
Starting activity: Recording the demand
Next activity: Approval
5.4. Process Management 211

OTRS Administration Manual, Release 7.0
Fig. 76: Book Ordering - First Sequence Flow On Canvas
212 Chapter 5. Processes & Automation
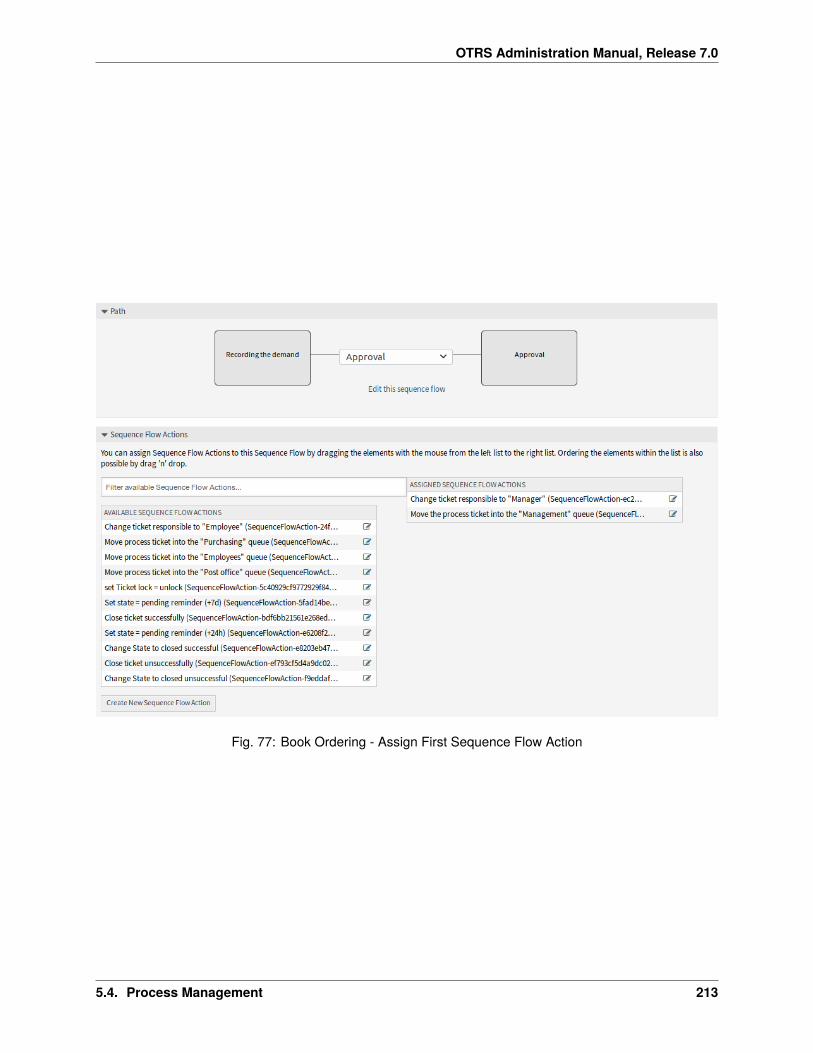
OTRS Administration Manual, Release 7.0
Fig. 77: Book Ordering - Assign First Sequence Flow Action
5.4. Process Management 213
OTRS Administration Manual, Release 7.0
If the condition of this activity is fulfilled, the ticket will move to activity Approval.
Additionally, the following sequence flow actions are executed:
– Move the process ticket into the“Management”queue
– Change ticket responsible to“Manager”
The activity Recording the demand is a defined step of the process ticket, where there is thepossibility for the sequence flow Approval. If this applies, the ticket will move to the next activ-ity Approval, and the sequence flow actions Move the process ticket into the“Management”queue and Change ticket responsible to“Manager”are executed. In the activity Approval,the user task activity dialogs Approval denied and Approved are available.
• Approval
Possible sequence flow: Approval denied
Starting activity: Approval
Next activity: Process complete
If this matches, the process ticket will move to activity Process complete.
Additionally, the following sequence flow actions are executed:
– Move process ticket into the“Employees”queue
– Change ticket responsible to“Employee”
– Close ticket unsuccessfully
Possible sequence flow: Approved
Starting activity: Approval
Next activity: Order
If this matches, the process ticket will move to activity Order.
Additionally, the following sequence flow actions are executed:
– Move process ticket into the“Purchasing”queue
We can see that from the current activity, which defines a step of the process ticket, thereare one or more possibilities for sequence flow which have exactly one target activity (andpossibly one or more sequence flow actions).
• Order
Possible sequence flow: Order denied
Starting activity: Order
Next activity: Process complete
If this matches, the process ticket will move to activity Process complete.
Additionally, the following sequence flow actions are executed:
– Move process ticket into the“Employees”queue
– Change ticket responsible to“Employee”
– Close ticket unsuccessfully
Possible sequence flow: Order placed
Starting activity: Order
214 Chapter 5. Processes & Automation
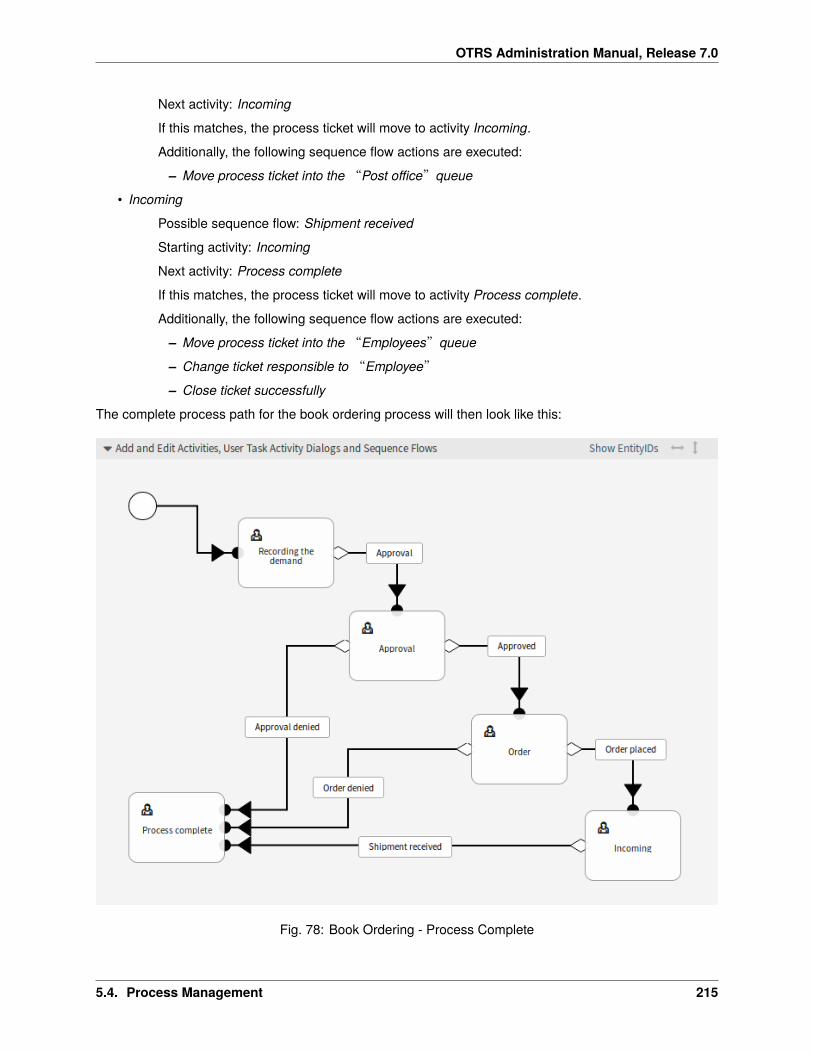
OTRS Administration Manual, Release 7.0
Next activity: Incoming
If this matches, the process ticket will move to activity Incoming.
Additionally, the following sequence flow actions are executed:
– Move process ticket into the“Post office”queue
• Incoming
Possible sequence flow: Shipment received
Starting activity: Incoming
Next activity: Process complete
If this matches, the process ticket will move to activity Process complete.
Additionally, the following sequence flow actions are executed:
– Move process ticket into the“Employees”queue
– Change ticket responsible to“Employee”
– Close ticket successfully
The complete process path for the book ordering process will then look like this:
Fig. 78: Book Ordering - Process Complete
5.4. Process Management 215
OTRS Administration Manual, Release 7.0
After you finish the process path, click on Save and finish button below the canvas to go back to the processmanagement screen.
Click on the Deploy All Processes button in the left sidebar. This will gather all processes information form thedatabase and create a cache file (in Perl language). This cache file is actually the processes configurationthat the system will use to create or use process tickets.
Note: Any change that is made on the process will require to re-deploy the process in order to get thechange reflected in the system.
Create Access Control Lists
With the help of Access Control Lists (ACL), the selectable values in process tickets can be limited. SomeACLs have to be defined for the book ordering process to operate correctly.
In this section, all necessary ACLs are defined. Each ACL is added here in YAML format, so you can copythem, save them as separate .yml files and import them in the ACL management screen.
Warning: The exported ACLs contain the activity dialog IDs from the system, where they were exportedfrom. Do not forget to change the IDs based on your process. Otherwise the ACLs will not work.
See also:
Use the Show EntityIDs link in the header of the process canvas to see the entity IDs. For the activity dialogs,hover the mouse over the name in the list of activity dialogs in the left sidebar to see the ID.
001-ACL-BookOrderingStatus This ACL enables only the Approval value for the Status dynamic fieldin the Recording the demand activity dialog.
---- ChangeBy: root@localhost
ChangeTime: 2020-04-18 15:46:16Comment: ApprovalConfigChange:
Possible:Ticket:
DynamicField_Status:- Approval
ConfigMatch:Properties:
Process:ActivityDialogEntityID:- ActivityDialog-bfa31751ee47f8d8ec3a15e4cf1de732
CreateBy: root@localhostCreateTime: 2020-04-18 15:42:06Description: ''ID: 1Name: 001-ACL-BookOrderingStatusStopAfterMatch: 0ValidID: 1
002-ACL-BookOrderingStatus This ACL enables only the Approval denied value for the Status dy-namic field in the Approval denied activity dialog.
216 Chapter 5. Processes & Automation
OTRS Administration Manual, Release 7.0
---- ChangeBy: root@localhost
ChangeTime: 2020-04-18 15:46:08Comment: Approval deniedConfigChange:
Possible:Ticket:
DynamicField_Status:- Approval denied
ConfigMatch:Properties:
Process:ActivityDialogEntityID:- ActivityDialog-1ce810fd3668ce799f25cf968b139427
CreateBy: root@localhostCreateTime: 2020-04-18 15:44:21Description: ''ID: 2Name: 002-ACL-BookOrderingStatusStopAfterMatch: 0ValidID: 1
003-ACL-BookOrderingStatus This ACL enables only the Approved value for the Status dynamicfield in the Approved activity dialog.
---- ChangeBy: root@localhost
ChangeTime: 2020-04-18 15:47:04Comment: ApprovedConfigChange:
Possible:Ticket:
DynamicField_Status:- Approved
ConfigMatch:Properties:
Process:ActivityDialogEntityID:- ActivityDialog-96b8e0d7f8a0e69e170f7871cbb83e15
CreateBy: root@localhostCreateTime: 2020-04-18 15:46:22Description: ''ID: 3Name: 003-ACL-BookOrderingStatusStopAfterMatch: 0ValidID: 1
004-ACL-BookOrderingStatus This ACL enables only the Order denied value for the Status dynamicfield in the Order denied activity dialog.
---- ChangeBy: root@localhost
ChangeTime: 2020-04-18 15:48:07(continues on next page)
5.4. Process Management 217
OTRS Administration Manual, Release 7.0
(continued from previous page)
Comment: Order deniedConfigChange:
Possible:Ticket:
DynamicField_Status:- Order denied
ConfigMatch:Properties:
Process:ActivityDialogEntityID:- ActivityDialog-5b60db9960a9cd488f448e3308cc8b4f
CreateBy: root@localhostCreateTime: 2020-04-18 15:47:07Description: ''ID: 4Name: 004-ACL-BookOrderingStatusStopAfterMatch: 0ValidID: 1
005-ACL-BookOrderingStatus This ACL enables only the Order placed value for the Status dynamicfield in the Order placed activity dialog.
---- ChangeBy: root@localhost
ChangeTime: 2020-04-18 15:48:51Comment: Order placedConfigChange:
Possible:Ticket:
DynamicField_Status:- Order placed
ConfigMatch:Properties:
Process:ActivityDialogEntityID:- ActivityDialog-a756ccae6ae83f356faa8333549a87f0
CreateBy: root@localhostCreateTime: 2020-04-18 15:48:13Description: ''ID: 5Name: 005-ACL-BookOrderingStatusStopAfterMatch: 0ValidID: 1
006-ACL-BookOrderingStatus This ACL enables only the Shipment received value for the Statusdynamic field in the Shipment received activity dialog.
---- ChangeBy: root@localhost
ChangeTime: 2020-04-18 15:49:41Comment: Shipment receivedConfigChange:
(continues on next page)
218 Chapter 5. Processes & Automation
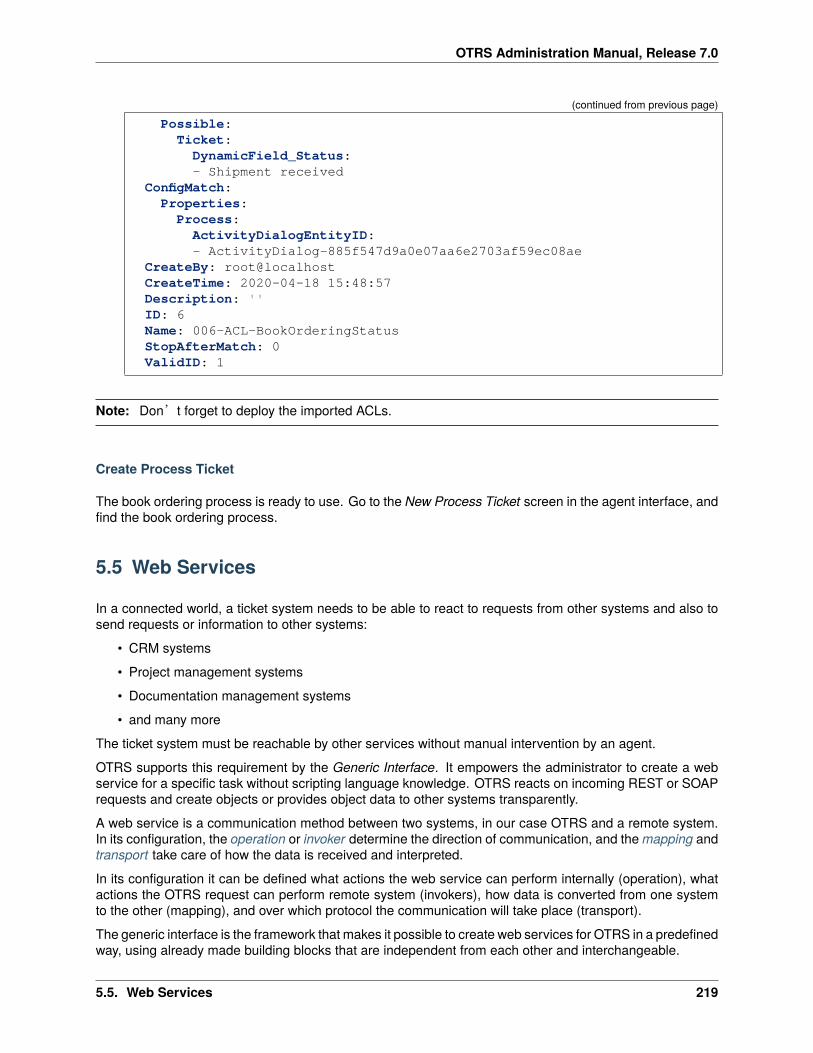
OTRS Administration Manual, Release 7.0
(continued from previous page)
Possible:Ticket:
DynamicField_Status:- Shipment received
ConfigMatch:Properties:
Process:ActivityDialogEntityID:- ActivityDialog-885f547d9a0e07aa6e2703af59ec08ae
CreateBy: root@localhostCreateTime: 2020-04-18 15:48:57Description: ''ID: 6Name: 006-ACL-BookOrderingStatusStopAfterMatch: 0ValidID: 1
Note: Don’t forget to deploy the imported ACLs.
Create Process Ticket
The book ordering process is ready to use. Go to the New Process Ticket screen in the agent interface, andfind the book ordering process.
5.5 Web Services
In a connected world, a ticket system needs to be able to react to requests from other systems and also tosend requests or information to other systems:
• CRM systems
• Project management systems
• Documentation management systems
• and many more
The ticket system must be reachable by other services without manual intervention by an agent.
OTRS supports this requirement by the Generic Interface. It empowers the administrator to create a webservice for a specific task without scripting language knowledge. OTRS reacts on incoming REST or SOAPrequests and create objects or provides object data to other systems transparently.
A web service is a communication method between two systems, in our case OTRS and a remote system.In its configuration, the operation or invoker determine the direction of communication, and the mapping andtransport take care of how the data is received and interpreted.
In its configuration it can be defined what actions the web service can perform internally (operation), whatactions the OTRS request can perform remote system (invokers), how data is converted from one systemto the other (mapping), and over which protocol the communication will take place (transport).
The generic interface is the framework that makes it possible to create web services for OTRS in a predefinedway, using already made building blocks that are independent from each other and interchangeable.
5.5. Web Services 219
OTRS Administration Manual, Release 7.0
5.5.1 Generic Interface
The generic interface consists of a multiple layer framework that lets OTRS communicate with other systemsvia a web service. This communication could be bi-directional:
• OTRS as provider: OTRS acts as a server listening to requests from the external system, processingthe information, performing the requested action, and answering the request.
• OTRS as requester: OTRS acts as a client collecting information, sending the request to the remotesystem, and waiting for the response.
Generic Interface Layers
The generic interface is build based on a layer model, to be flexible and easy to customize.
A layer is a set of files, which control how the generic interface performs different parts of a web service.Using the right configuration, one can build different web services for different external systems withoutcreating new modules.
Note: If the remote system does not support the current bundled modules of the generic interface, specialmodules need to be developed for that specific web service.
Network Transport This layer is responsible for the correct communication with the remote system. Itreceives requests and generates responses when acting as provider, and generates requests andreceives responses when acting as requester.
Requester communication could be initiated during an event triggered by a generic interface module orany other OTRS module. This event is caught by the event handler and depending on the configurationthe event will be processed directly by the requester object or delegated to the scheduler (a separateddaemon designed to process tasks asynchronously).
Data Mapping This layer is responsible for translating data structures between OTRS and the remote sys-tem (data internal and data external layers). Usually remote systems have different data structuresthan OTRS (including different values and names for those values), and here resides the importanceof the layer to change the received information into something that OTRS can understand and on theopposite way send the information to each remote system using their data dictionaries.
Example: Priority (OTRS) might be called Prio in a remote system and it could be that value 1 verylow (OTRS) should be mapped to Information in the remote system.
Controller Controllers are collections of similar operations or invokers. For example, a ticket controllermight contain several standard ticket operations. Custom controllers can be implemented, for examplea TicketExternalCompany controller which may contain similar functions as the standard ticketcontroller, but with a different data interface, or function names (to adapt to the remote system functionnames) or complete different code.
One application for generic interface could be to synchronize information with one remote system thatonly can talk with another remote system of the same kind. In this case new controllers needs to bedeveloped and the operations and invokers has to emulate the remote system behavior in such waythat the interface that OTRS exposes is similar to the interface of the remote system.
Operation (OTRS as a provider) An operation is a single action that can be performed within OTRS. Alloperations have the same programming interface, they receive the data into one specific parameter,and return a data structure with a success status, potential error message and returning data.
220 Chapter 5. Processes & Automation
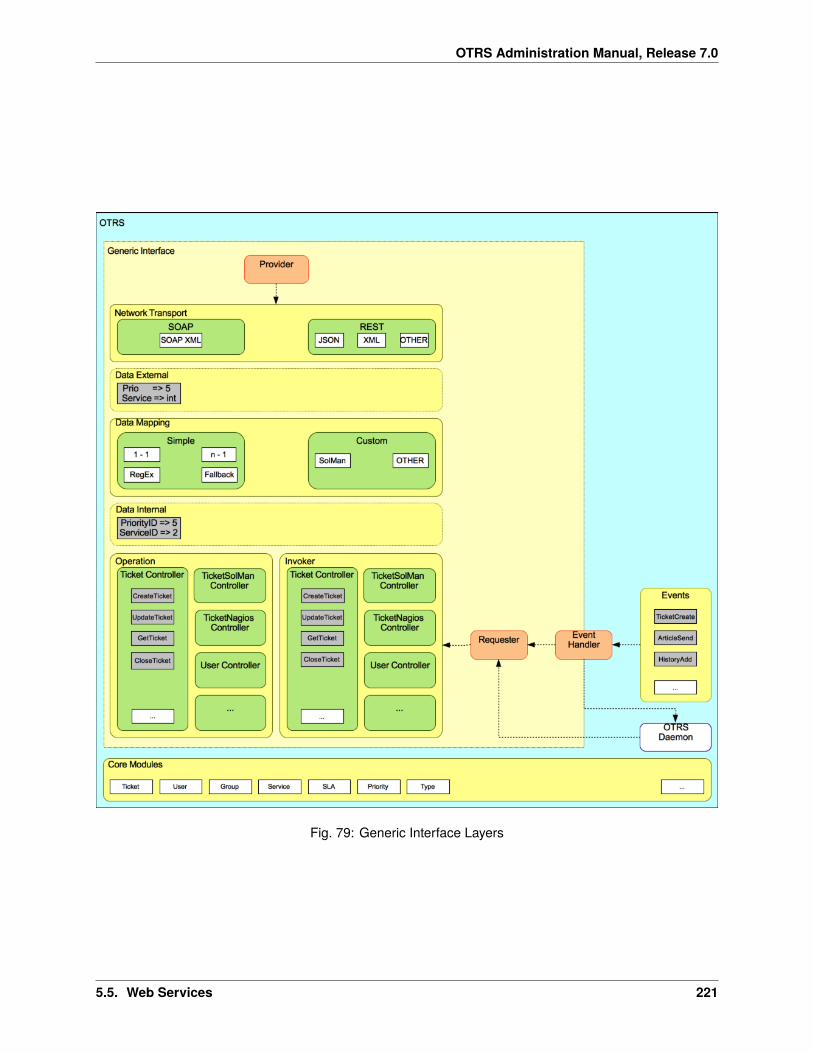
OTRS Administration Manual, Release 7.0
Fig. 79: Generic Interface Layers
5.5. Web Services 221

OTRS Administration Manual, Release 7.0
Normally operations uses the already mapped data (internal) to call core modules and perform actionsin OTRS like: create a ticket, update a user, invalidate a queue, send a notification, etc. An operationhas full access to the OTRS API to perform the action.
Invoker (OTRS as a requester) An invoker is an action that OTRS performs against a remote system. In-vokers use the OTRS core modules to process and collect the needed information to create the request.When the information is ready it has to be mapped to the remote system format in order to be sent tothe remote system, that will process the information, execute the action and send the response back,to either process the success or handle errors.
Generic Interface Communication Flow
The generic interface has a defined flow to perform actions as a provider and as a requester. These flowsare described below:
OTRS as Provider
Remote Request:
1. HTTP request
• OTRS receives HTTP request and passes it through the layers.
• The provider module is in charge to execute and control these actions.
2. Network transport
• The network transport module decodes the data payload and separates the operation name fromthe rest of the data.
• The operation name and the operation data are returned to the provider.
3. Data external
• Data as sent from the remote system (this is not a module based layer).
4. Mapping
• The data is transformed from the external system format to the OTRS internal format as specifiedin the mapping configuration for this operation (mapping for incoming request data).
• The already transformed data is returned to the provider.
5. Data internal
• Data as transformed and prepared to be passed to the operation (This is not a module basedlayer).
6. Operation
• Receives and validates data.
• Performs user access control.
• Executes the action.
OTRS Response:
1. Operation
• Returns result data to the provider.
2. Data internal
222 Chapter 5. Processes & Automation
OTRS Administration Manual, Release 7.0
• Data as returned from operation.
3. Mapping
• The data is transformed back to the remote system format as specified in the mapping configu-ration (mapping for outgoing response data).
• The already transformed data is returned to the provider.
4. Data external
• Data as transformed and prepared to be passed to network transport as response.
5. Network transport
• Receives the data already in the remote system format.
• Constructs a valid response for this network transport type.
6. HTTP response
• The response is sent back to the web service client.
• In the case of an error, an error response is sent to the remote system (e.g. SOAP fault, HTTPerror, etc).
OTRS as Requester
OTRS Request:
1. Event trigger handler
• Based on the web service configuration determines if the request will be synchronous or asyn-chronous.
– Synchronous
* A direct call to the requester is made in order to create a new request and to pass itthrough the layers.
– Asynchronous
* Create a new generic interface (requester) task for the OTRS daemon (by delegatingthe request execution to the scheduler daemon, the user experience could be highlyimproved, otherwise all the time needed to prepare the request and the remote executionwill be added to the OTRS events that trigger those requests).
* In its next cycle the OTRS daemon process reads the new task and creates a call to therequester that will create a new request and then passes it through the layers.
2. Invoker
• Receives data from the event.
• Validates received data (if needed).
• Call core modules to complement the data (if needed).
• Return the request data structure or send a stop communication signal to the requester, to grace-fully cancel the request.
3. Data internal
• Data as passed from the invoker (this is not a module based layer).
4. Mapping
5.5. Web Services 223
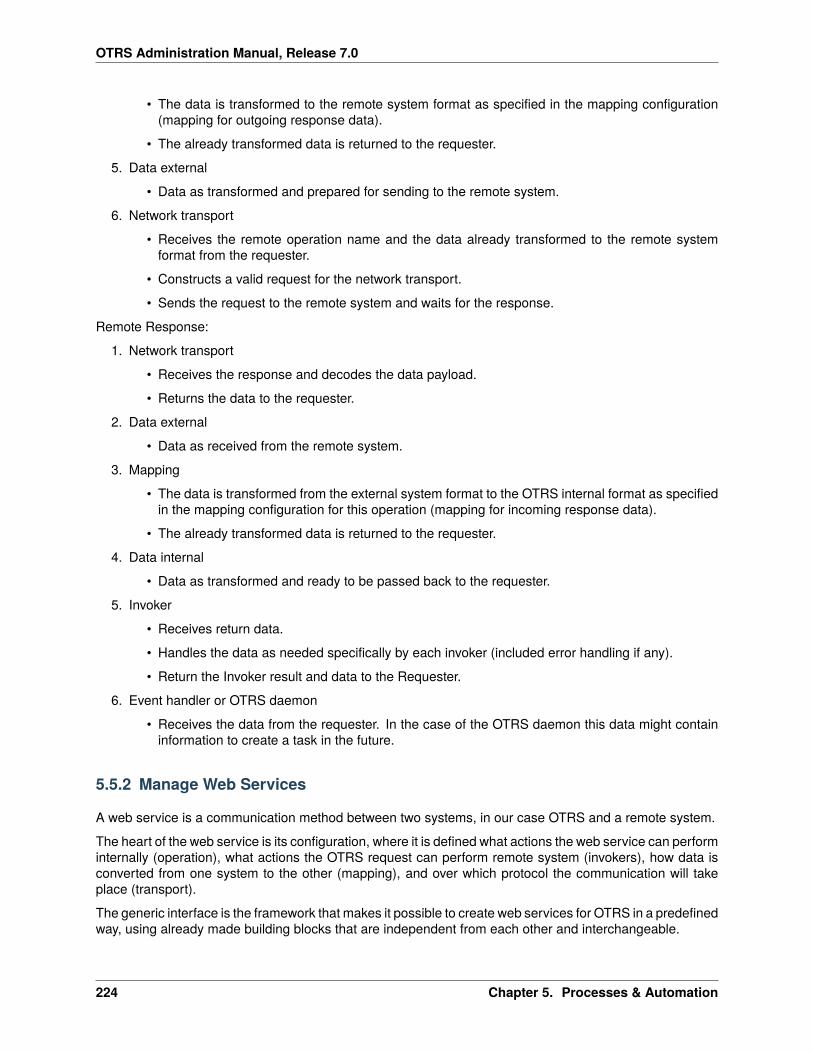
OTRS Administration Manual, Release 7.0
• The data is transformed to the remote system format as specified in the mapping configuration(mapping for outgoing response data).
• The already transformed data is returned to the requester.
5. Data external
• Data as transformed and prepared for sending to the remote system.
6. Network transport
• Receives the remote operation name and the data already transformed to the remote systemformat from the requester.
• Constructs a valid request for the network transport.
• Sends the request to the remote system and waits for the response.
Remote Response:
1. Network transport
• Receives the response and decodes the data payload.
• Returns the data to the requester.
2. Data external
• Data as received from the remote system.
3. Mapping
• The data is transformed from the external system format to the OTRS internal format as specifiedin the mapping configuration for this operation (mapping for incoming response data).
• The already transformed data is returned to the requester.
4. Data internal
• Data as transformed and ready to be passed back to the requester.
5. Invoker
• Receives return data.
• Handles the data as needed specifically by each invoker (included error handling if any).
• Return the Invoker result and data to the Requester.
6. Event handler or OTRS daemon
• Receives the data from the requester. In the case of the OTRS daemon this data might containinformation to create a task in the future.
5.5.2 Manage Web Services
A web service is a communication method between two systems, in our case OTRS and a remote system.
The heart of the web service is its configuration, where it is defined what actions the web service can performinternally (operation), what actions the OTRS request can perform remote system (invokers), how data isconverted from one system to the other (mapping), and over which protocol the communication will takeplace (transport).
The generic interface is the framework that makes it possible to create web services for OTRS in a predefinedway, using already made building blocks that are independent from each other and interchangeable.
224 Chapter 5. Processes & Automation
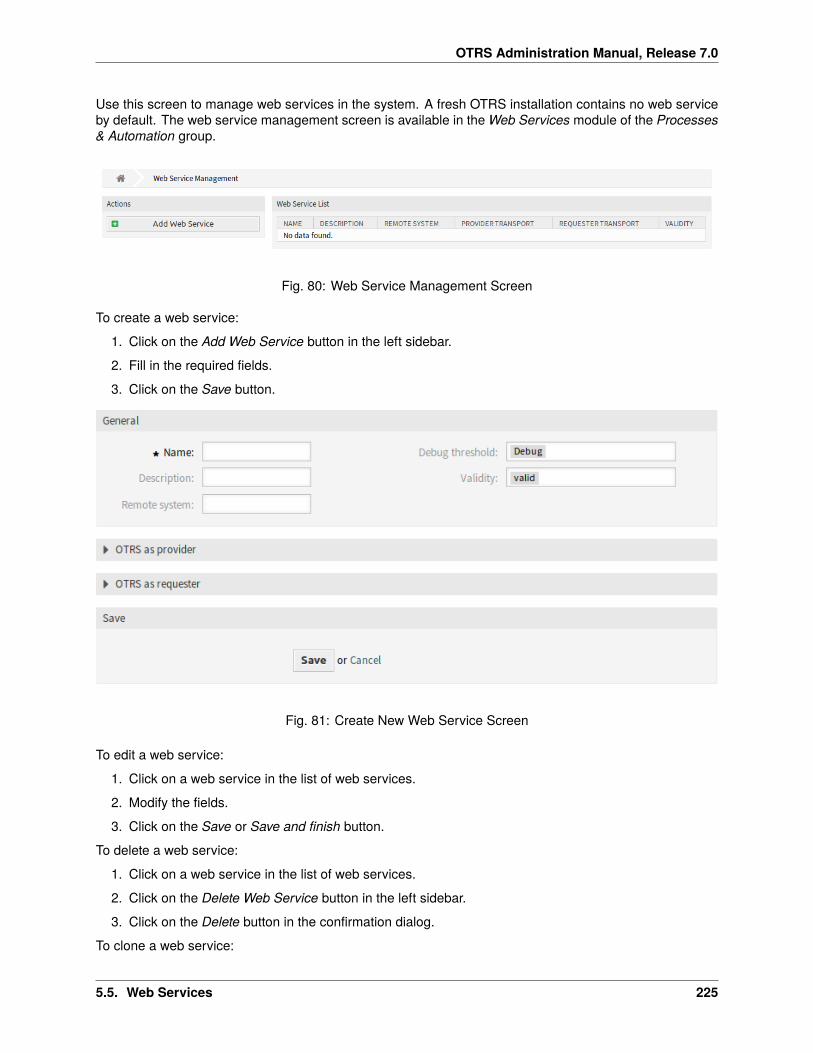
OTRS Administration Manual, Release 7.0
Use this screen to manage web services in the system. A fresh OTRS installation contains no web serviceby default. The web service management screen is available in the Web Services module of the Processes& Automation group.
Fig. 80: Web Service Management Screen
To create a web service:
1. Click on the Add Web Service button in the left sidebar.
2. Fill in the required fields.
3. Click on the Save button.
Fig. 81: Create New Web Service Screen
To edit a web service:
1. Click on a web service in the list of web services.
2. Modify the fields.
3. Click on the Save or Save and finish button.
To delete a web service:
1. Click on a web service in the list of web services.
2. Click on the Delete Web Service button in the left sidebar.
3. Click on the Delete button in the confirmation dialog.
To clone a web service:
5.5. Web Services 225
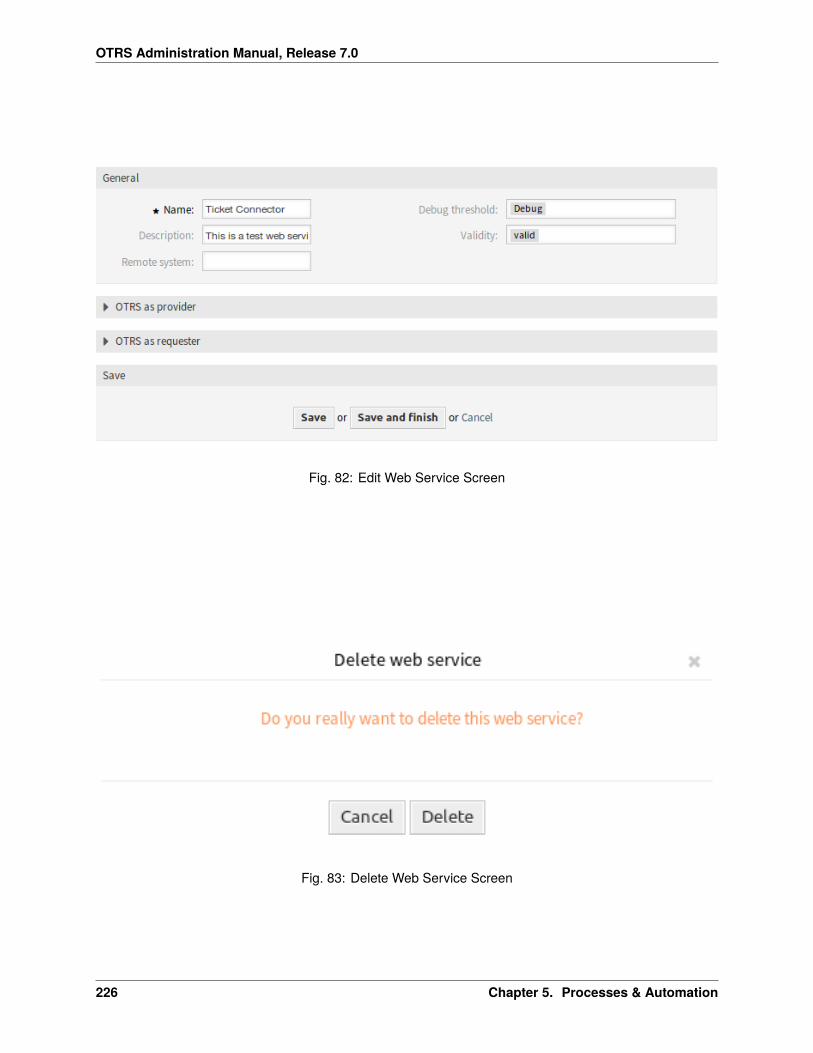
OTRS Administration Manual, Release 7.0
Fig. 82: Edit Web Service Screen
Fig. 83: Delete Web Service Screen
226 Chapter 5. Processes & Automation
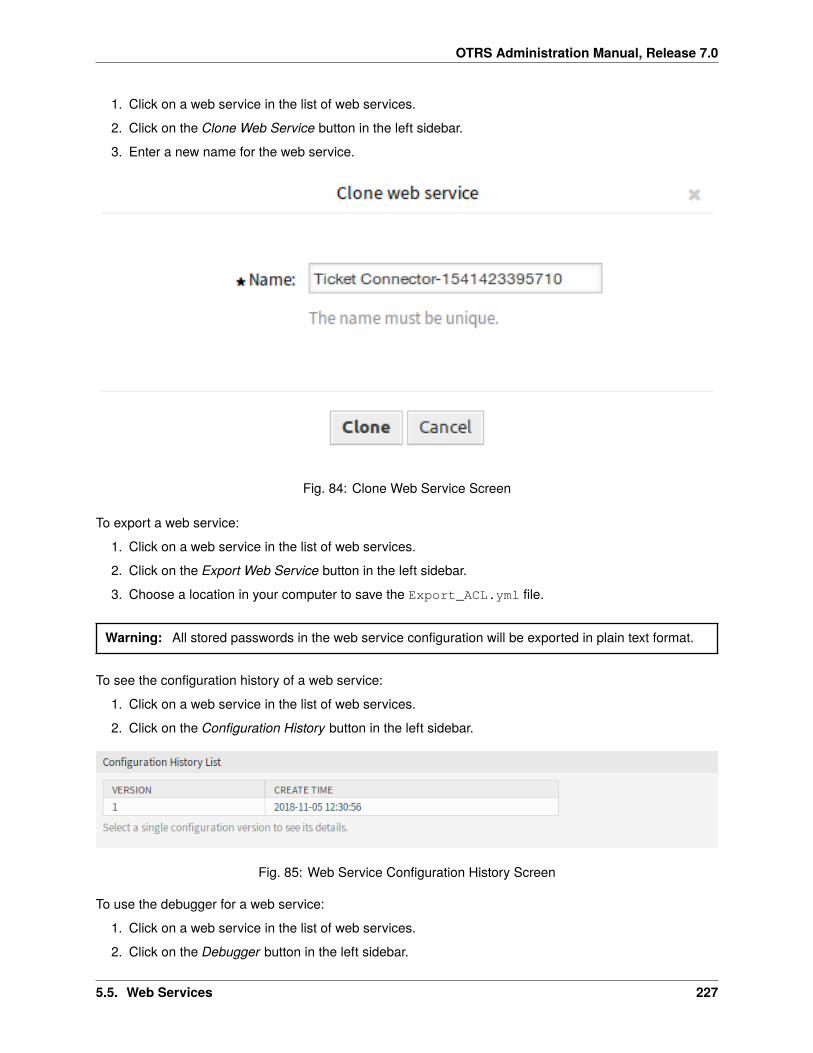
OTRS Administration Manual, Release 7.0
1. Click on a web service in the list of web services.
2. Click on the Clone Web Service button in the left sidebar.
3. Enter a new name for the web service.
Fig. 84: Clone Web Service Screen
To export a web service:
1. Click on a web service in the list of web services.
2. Click on the Export Web Service button in the left sidebar.
3. Choose a location in your computer to save the Export_ACL.yml file.
Warning: All stored passwords in the web service configuration will be exported in plain text format.
To see the configuration history of a web service:
1. Click on a web service in the list of web services.
2. Click on the Configuration History button in the left sidebar.
Fig. 85: Web Service Configuration History Screen
To use the debugger for a web service:
1. Click on a web service in the list of web services.
2. Click on the Debugger button in the left sidebar.
5.5. Web Services 227
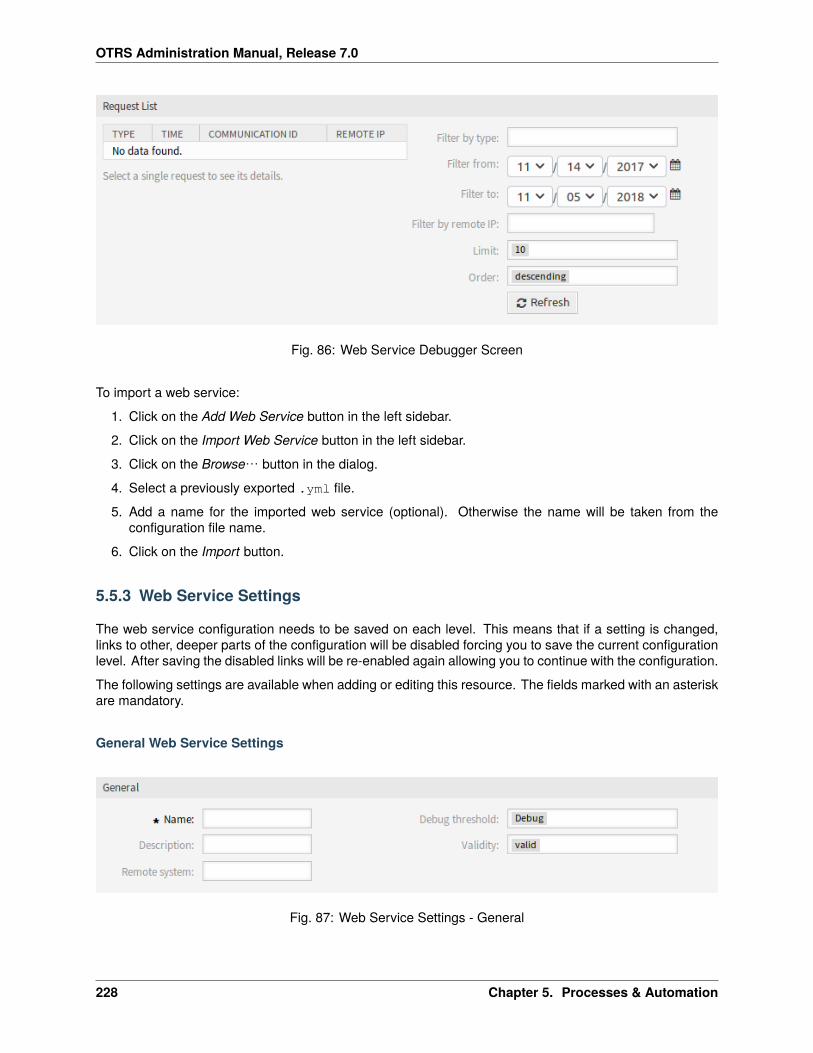
OTRS Administration Manual, Release 7.0
Fig. 86: Web Service Debugger Screen
To import a web service:
1. Click on the Add Web Service button in the left sidebar.
2. Click on the Import Web Service button in the left sidebar.
3. Click on the Browse… button in the dialog.
4. Select a previously exported .yml file.
5. Add a name for the imported web service (optional). Otherwise the name will be taken from theconfiguration file name.
6. Click on the Import button.
5.5.3 Web Service Settings
The web service configuration needs to be saved on each level. This means that if a setting is changed,links to other, deeper parts of the configuration will be disabled forcing you to save the current configurationlevel. After saving the disabled links will be re-enabled again allowing you to continue with the configuration.
The following settings are available when adding or editing this resource. The fields marked with an asteriskare mandatory.
General Web Service Settings
Fig. 87: Web Service Settings - General
228 Chapter 5. Processes & Automation
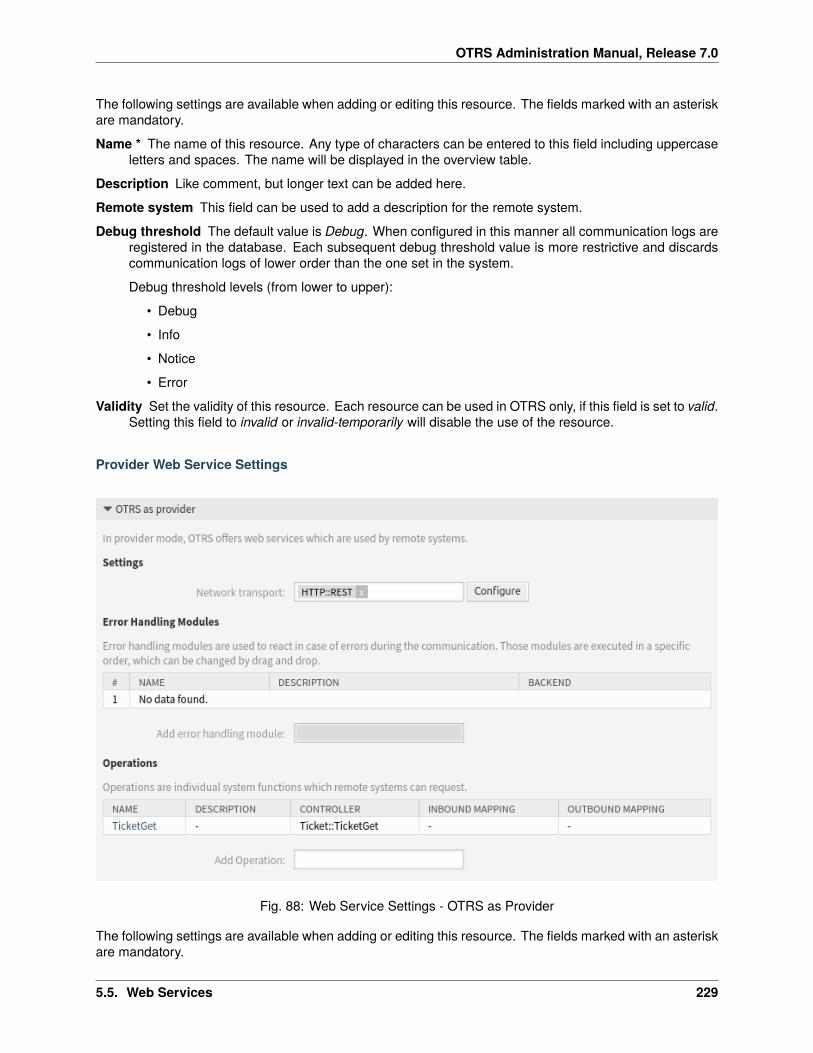
OTRS Administration Manual, Release 7.0
The following settings are available when adding or editing this resource. The fields marked with an asteriskare mandatory.
Name * The name of this resource. Any type of characters can be entered to this field including uppercaseletters and spaces. The name will be displayed in the overview table.
Description Like comment, but longer text can be added here.
Remote system This field can be used to add a description for the remote system.
Debug threshold The default value is Debug. When configured in this manner all communication logs areregistered in the database. Each subsequent debug threshold value is more restrictive and discardscommunication logs of lower order than the one set in the system.
Debug threshold levels (from lower to upper):
• Debug
• Info
• Notice
• Error
Validity Set the validity of this resource. Each resource can be used in OTRS only, if this field is set to valid.Setting this field to invalid or invalid-temporarily will disable the use of the resource.
Provider Web Service Settings
Fig. 88: Web Service Settings - OTRS as Provider
The following settings are available when adding or editing this resource. The fields marked with an asteriskare mandatory.
5.5. Web Services 229
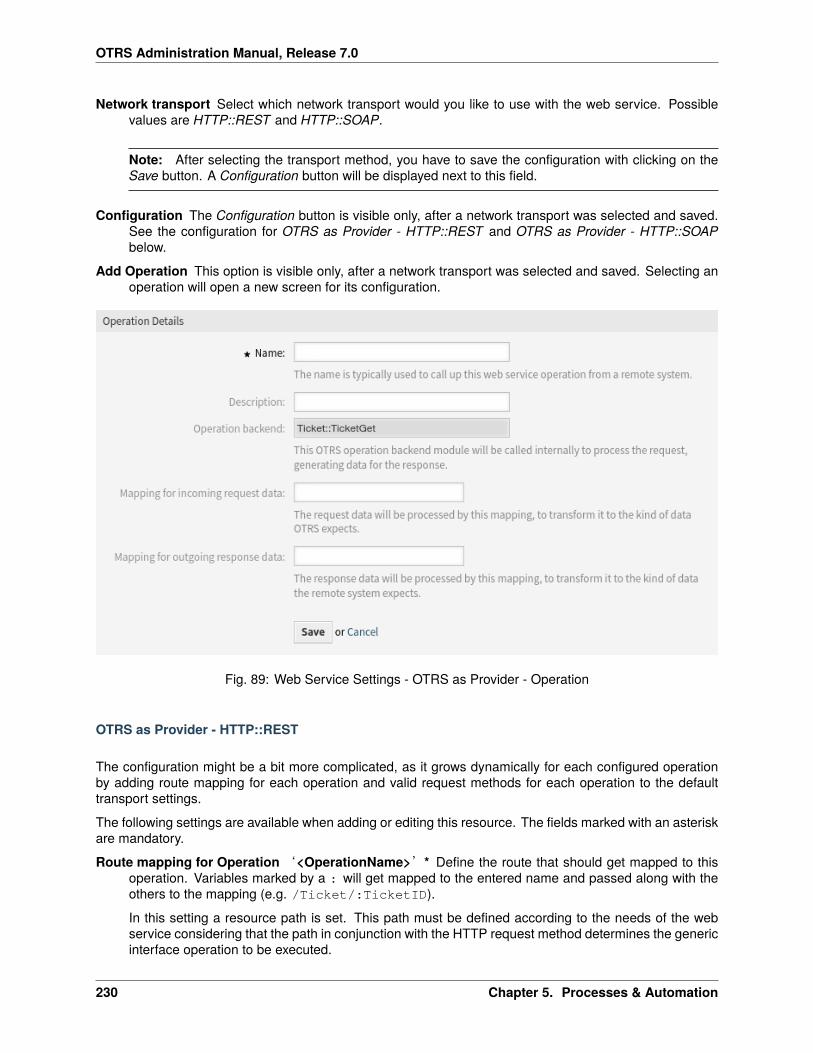
OTRS Administration Manual, Release 7.0
Network transport Select which network transport would you like to use with the web service. Possiblevalues are HTTP::REST and HTTP::SOAP.
Note: After selecting the transport method, you have to save the configuration with clicking on theSave button. A Configuration button will be displayed next to this field.
Configuration The Configuration button is visible only, after a network transport was selected and saved.See the configuration for OTRS as Provider - HTTP::REST and OTRS as Provider - HTTP::SOAPbelow.
Add Operation This option is visible only, after a network transport was selected and saved. Selecting anoperation will open a new screen for its configuration.
Fig. 89: Web Service Settings - OTRS as Provider - Operation
OTRS as Provider - HTTP::REST
The configuration might be a bit more complicated, as it grows dynamically for each configured operationby adding route mapping for each operation and valid request methods for each operation to the defaulttransport settings.
The following settings are available when adding or editing this resource. The fields marked with an asteriskare mandatory.
Route mapping for Operation‘<OperationName>’* Define the route that should get mapped to thisoperation. Variables marked by a : will get mapped to the entered name and passed along with theothers to the mapping (e.g. /Ticket/:TicketID).
In this setting a resource path is set. This path must be defined according to the needs of the webservice considering that the path in conjunction with the HTTP request method determines the genericinterface operation to be executed.
230 Chapter 5. Processes & Automation

OTRS Administration Manual, Release 7.0
Fig. 90: Web Service Settings - OTRS as Provider - HTTP::REST
5.5. Web Services 231
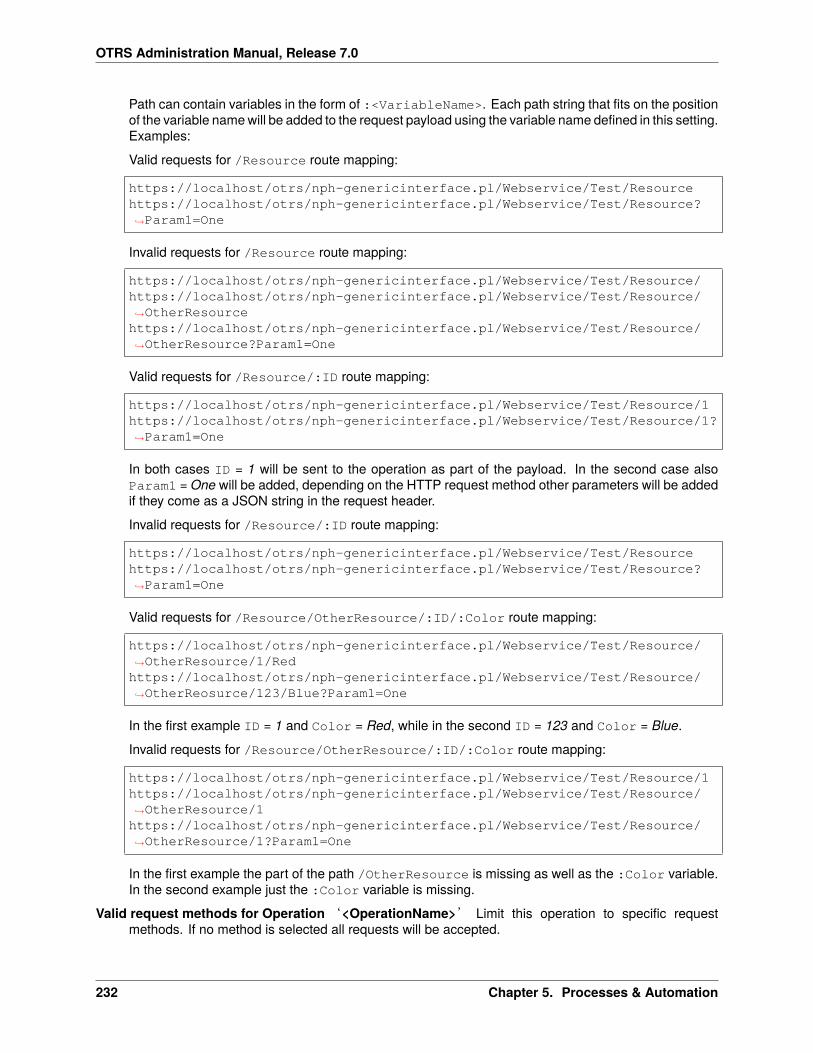
OTRS Administration Manual, Release 7.0
Path can contain variables in the form of :<VariableName>. Each path string that fits on the positionof the variable name will be added to the request payload using the variable name defined in this setting.Examples:
Valid requests for /Resource route mapping:
https://localhost/otrs/nph-genericinterface.pl/Webservice/Test/Resourcehttps://localhost/otrs/nph-genericinterface.pl/Webservice/Test/Resource?↪→Param1=One
Invalid requests for /Resource route mapping:
https://localhost/otrs/nph-genericinterface.pl/Webservice/Test/Resource/https://localhost/otrs/nph-genericinterface.pl/Webservice/Test/Resource/↪→OtherResource
https://localhost/otrs/nph-genericinterface.pl/Webservice/Test/Resource/↪→OtherResource?Param1=One
Valid requests for /Resource/:ID route mapping:
https://localhost/otrs/nph-genericinterface.pl/Webservice/Test/Resource/1https://localhost/otrs/nph-genericinterface.pl/Webservice/Test/Resource/1?↪→Param1=One
In both cases ID = 1 will be sent to the operation as part of the payload. In the second case alsoParam1 = One will be added, depending on the HTTP request method other parameters will be addedif they come as a JSON string in the request header.
Invalid requests for /Resource/:ID route mapping:
https://localhost/otrs/nph-genericinterface.pl/Webservice/Test/Resourcehttps://localhost/otrs/nph-genericinterface.pl/Webservice/Test/Resource?↪→Param1=One
Valid requests for /Resource/OtherResource/:ID/:Color route mapping:
https://localhost/otrs/nph-genericinterface.pl/Webservice/Test/Resource/↪→OtherResource/1/Red
https://localhost/otrs/nph-genericinterface.pl/Webservice/Test/Resource/↪→OtherReosurce/123/Blue?Param1=One
In the first example ID = 1 and Color = Red, while in the second ID = 123 and Color = Blue.
Invalid requests for /Resource/OtherResource/:ID/:Color route mapping:
https://localhost/otrs/nph-genericinterface.pl/Webservice/Test/Resource/1https://localhost/otrs/nph-genericinterface.pl/Webservice/Test/Resource/↪→OtherResource/1
https://localhost/otrs/nph-genericinterface.pl/Webservice/Test/Resource/↪→OtherResource/1?Param1=One
In the first example the part of the path /OtherResource is missing as well as the :Color variable.In the second example just the :Color variable is missing.
Valid request methods for Operation‘<OperationName>’ Limit this operation to specific requestmethods. If no method is selected all requests will be accepted.
232 Chapter 5. Processes & Automation

OTRS Administration Manual, Release 7.0
The HTTP request methods to determine the operation to use together with the route mapping, possibleoptions: CONNECT, DELETE, GET, HEAD, OPTIONS, PATCH, POST, PUT and TRACE.
Totally different operations can share exactly the same mapping path, but the request method must beunique for each operation, in order to determine correctly the operation to use on each request.
Maximum message length * Specifies the maximum size (in bytes) for REST messages that OTRS willprocess.
Send Keep-Alive * This configuration defines if incoming connections should get closed or kept alive.
Optionally, you may want to define additional response headers. These may be used to add static headervalues to every response. Just click on the Add response header button and fill both key and value fields.There is no limit in number of additional header lines.
OTRS as Provider - HTTP::SOAP
It is quite simple to configure the HTTP::SOAP protocol as provider.
The following settings are available when adding or editing this resource. The fields marked with an asteriskare mandatory.
Namespace * URI to give SOAP methods a context, reducing ambiguities.
Maximum message length * Specifies the maximum size (in bytes) for SOAP messages that OTRS willprocess.
Optionally, you may want to define additional response headers. These may be used to add static headervalues to every response. Just click on the Add response header button and fill both key and value fields.There is no limit in number of additional header lines.
Any other settings are self-explanatory and have default values.
Web Service Operation
The actions that can be performed when you are using OTRS as a provider are called operations. Eachoperation belongs to a controller. Controllers are collections of operations or invokers, normally operationsfrom the same controller need similar settings and share the same configuration dialog. But each operationcan have independent configuration dialogs if needed.
The following settings are available when adding or editing this resource. The fields marked with an asteriskare mandatory.
Name * The name of this resource. Any type of characters can be entered to this field including uppercaseletters and spaces. The name will be displayed in the overview table.
Description Add additional information to this resource. It is recommended to always fill this field as adescription of the resource with a full sentence for better clarity, because the description will be alsodisplayed in the overview table.
Operation backend This OTRS operation back end module will be called internally to process the request,generating data for the response.
The operation back end is pre-populated and cannot be edited. You will see this parameter when youchoose the operation on the web service edit screen. The field is only informative.
Mapping for incoming request data The request data will be processed by this mapping, to transform itto the kind of data OTRS expects.
5.5. Web Services 233
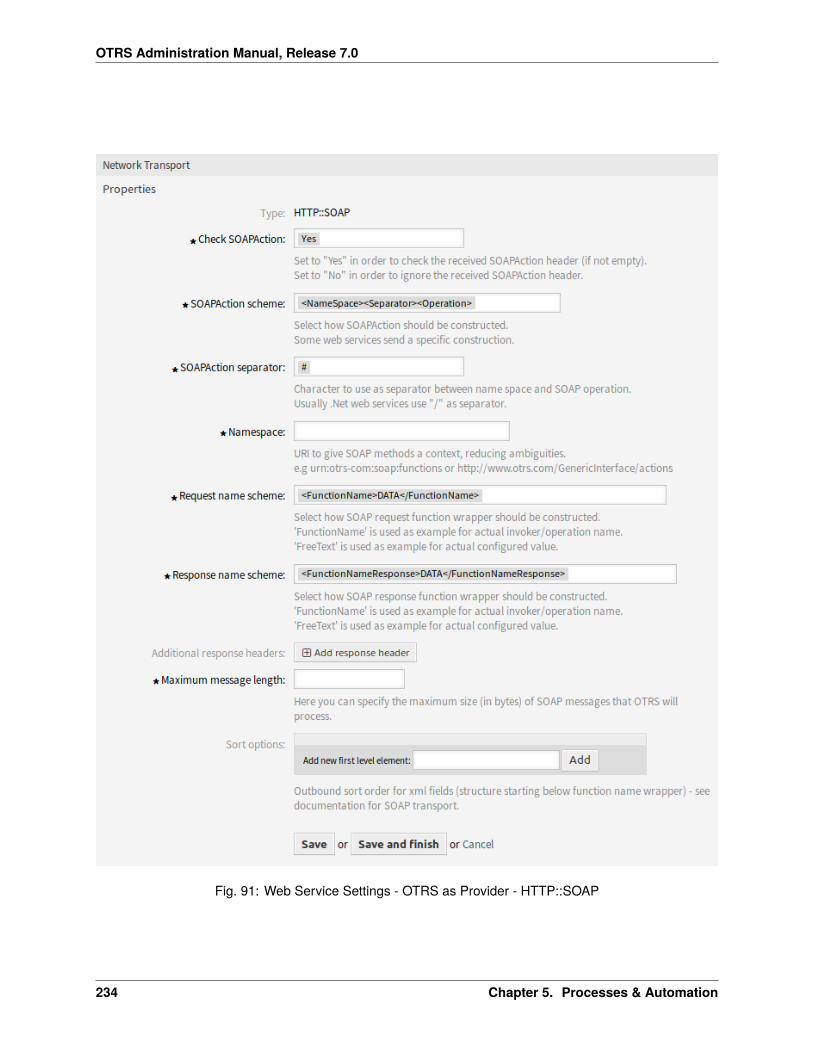
OTRS Administration Manual, Release 7.0
Fig. 91: Web Service Settings - OTRS as Provider - HTTP::SOAP
234 Chapter 5. Processes & Automation
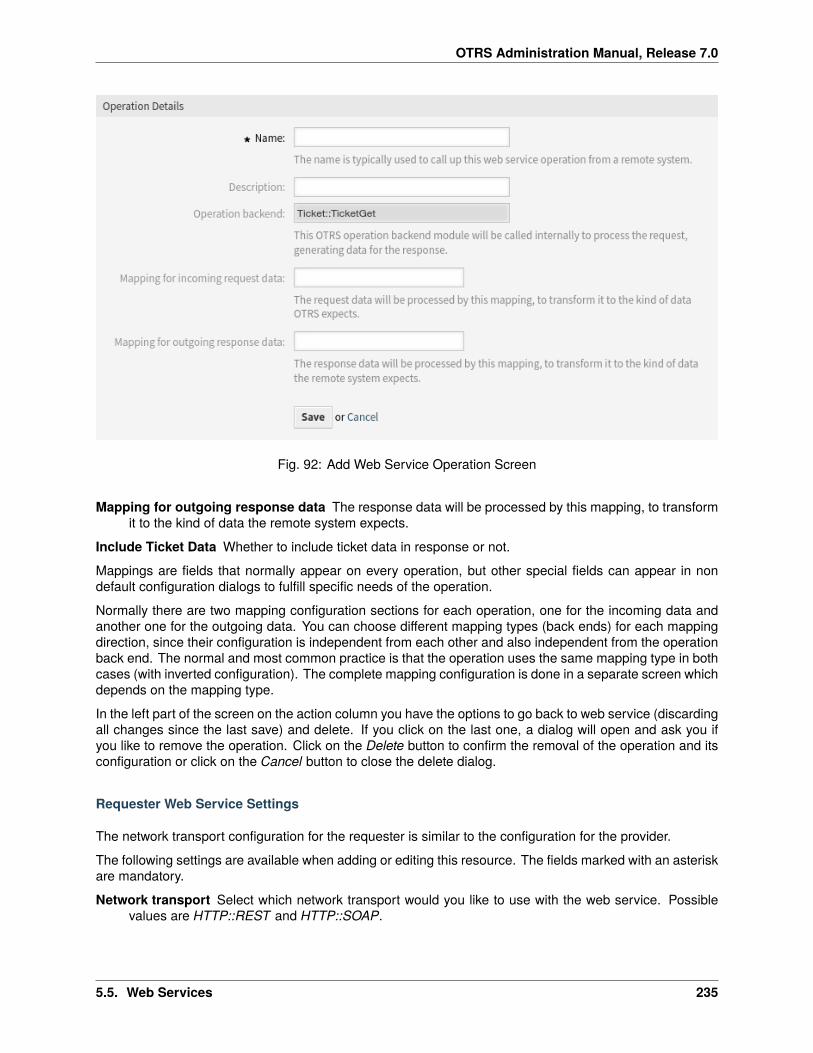
OTRS Administration Manual, Release 7.0
Fig. 92: Add Web Service Operation Screen
Mapping for outgoing response data The response data will be processed by this mapping, to transformit to the kind of data the remote system expects.
Include Ticket Data Whether to include ticket data in response or not.
Mappings are fields that normally appear on every operation, but other special fields can appear in nondefault configuration dialogs to fulfill specific needs of the operation.
Normally there are two mapping configuration sections for each operation, one for the incoming data andanother one for the outgoing data. You can choose different mapping types (back ends) for each mappingdirection, since their configuration is independent from each other and also independent from the operationback end. The normal and most common practice is that the operation uses the same mapping type in bothcases (with inverted configuration). The complete mapping configuration is done in a separate screen whichdepends on the mapping type.
In the left part of the screen on the action column you have the options to go back to web service (discardingall changes since the last save) and delete. If you click on the last one, a dialog will open and ask you ifyou like to remove the operation. Click on the Delete button to confirm the removal of the operation and itsconfiguration or click on the Cancel button to close the delete dialog.
Requester Web Service Settings
The network transport configuration for the requester is similar to the configuration for the provider.
The following settings are available when adding or editing this resource. The fields marked with an asteriskare mandatory.
Network transport Select which network transport would you like to use with the web service. Possiblevalues are HTTP::REST and HTTP::SOAP.
5.5. Web Services 235
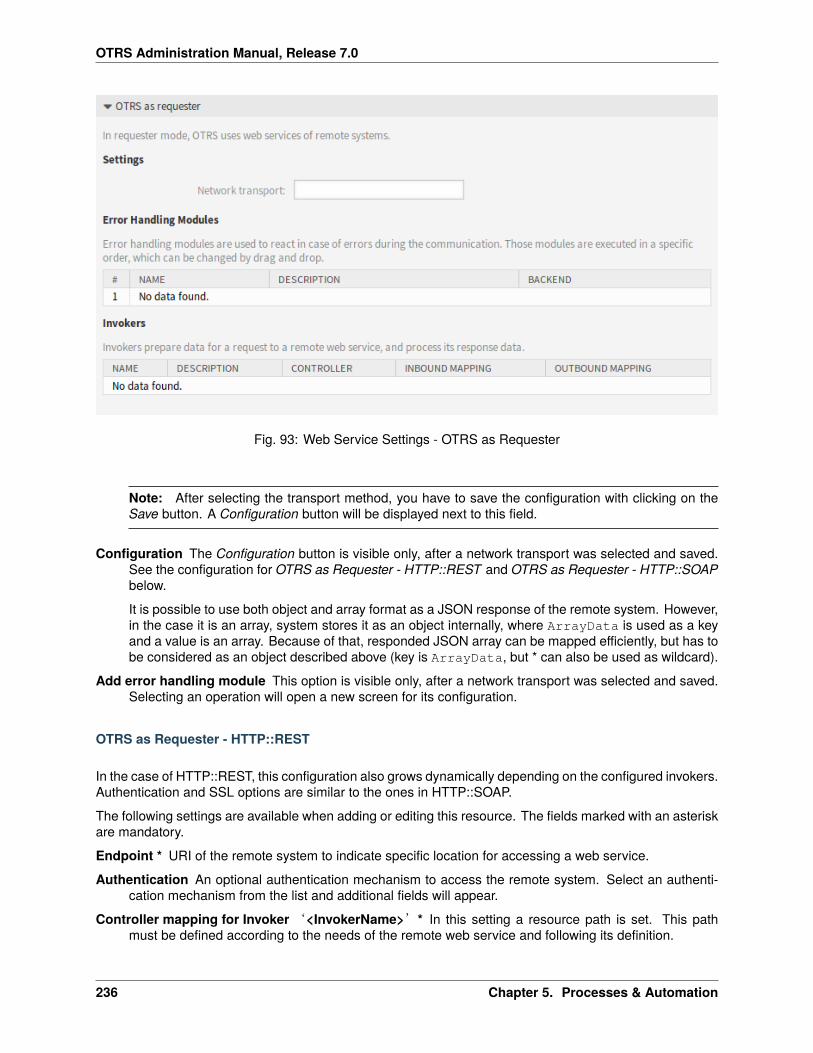
OTRS Administration Manual, Release 7.0
Fig. 93: Web Service Settings - OTRS as Requester
Note: After selecting the transport method, you have to save the configuration with clicking on theSave button. A Configuration button will be displayed next to this field.
Configuration The Configuration button is visible only, after a network transport was selected and saved.See the configuration for OTRS as Requester - HTTP::REST and OTRS as Requester - HTTP::SOAPbelow.
It is possible to use both object and array format as a JSON response of the remote system. However,in the case it is an array, system stores it as an object internally, where ArrayData is used as a keyand a value is an array. Because of that, responded JSON array can be mapped efficiently, but has tobe considered as an object described above (key is ArrayData, but * can also be used as wildcard).
Add error handling module This option is visible only, after a network transport was selected and saved.Selecting an operation will open a new screen for its configuration.
OTRS as Requester - HTTP::REST
In the case of HTTP::REST, this configuration also grows dynamically depending on the configured invokers.Authentication and SSL options are similar to the ones in HTTP::SOAP.
The following settings are available when adding or editing this resource. The fields marked with an asteriskare mandatory.
Endpoint * URI of the remote system to indicate specific location for accessing a web service.
Authentication An optional authentication mechanism to access the remote system. Select an authenti-cation mechanism from the list and additional fields will appear.
Controller mapping for Invoker‘<InvokerName>’* In this setting a resource path is set. This pathmust be defined according to the needs of the remote web service and following its definition.
236 Chapter 5. Processes & Automation
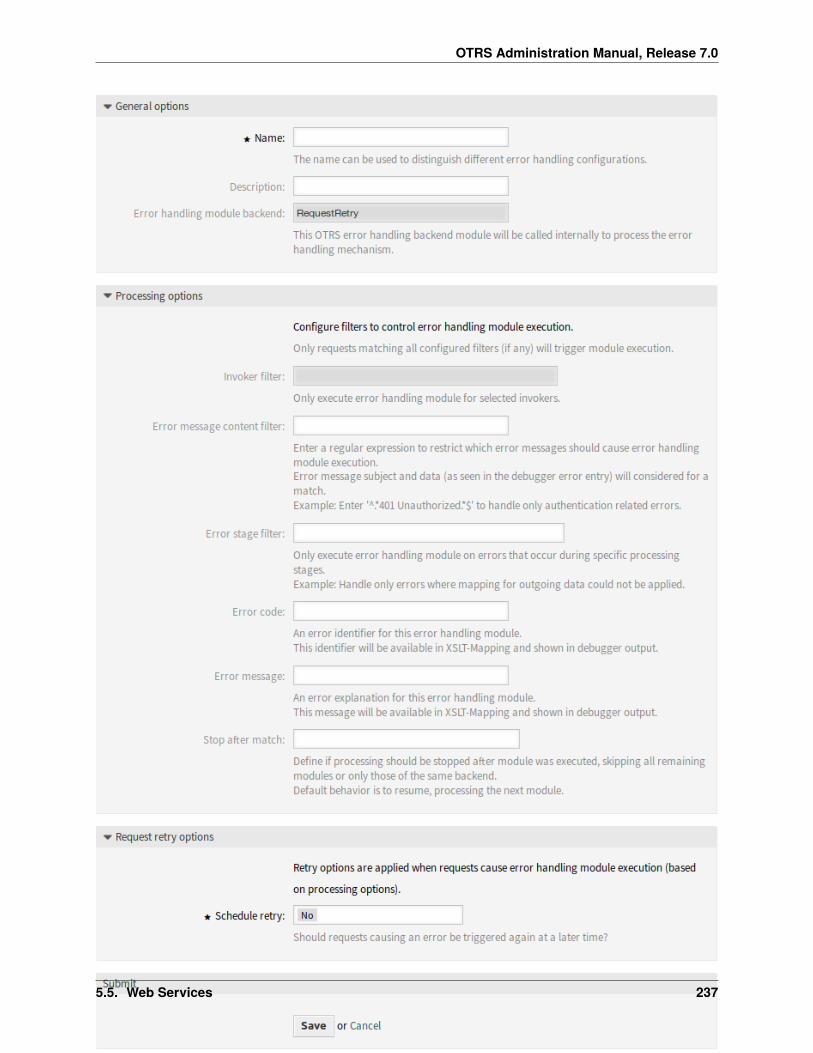
OTRS Administration Manual, Release 7.0
Fig. 94: Web Service Settings - OTRS as Provider - Error Handling Module
5.5. Web Services 237
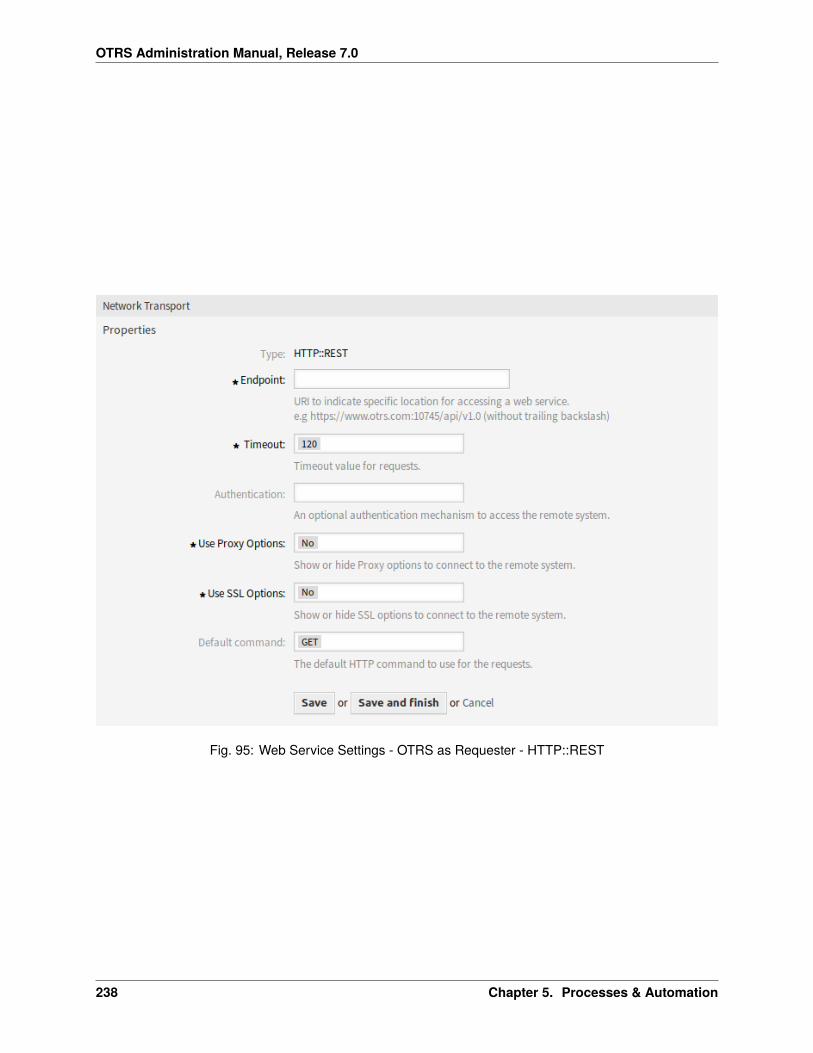
OTRS Administration Manual, Release 7.0
Fig. 95: Web Service Settings - OTRS as Requester - HTTP::REST
238 Chapter 5. Processes & Automation

OTRS Administration Manual, Release 7.0
Path can contain variables in the form of :<VariableName> for each variable name that matchesthe current data (to be sent), will be replaced by the corresponding data value. This matched variablenames and values will be removed from the current data. Depending on the HTTP request commandthe remaining data could be sent as a JSON string in the request body or as query parameters withinthe URI.
Examples for data Var1 = One, Var2 = Two, Var3 = Three and Var4 = Four.
• Controller mapping: /Resource, after replacements: /Resource, remaining data: Var1 = One,Var2 = Two, Var3 = Three and Var4 = Four
• Controller mapping: /Resource/:Var1, after replacements: /Resource/One, remaining data:Var2 = Two, Var3 = Three and Var4 = Four
• Controller mapping: /Resource/:Var1?Param1=:Var2&Var3=:Var3, after replacements:/Resource/One?Param1=Two&Var3=Three, remaining data: Var4 = Four
Valid request command for Invoker‘<InvokerName>’ This determines the HTTP request method touse. Possible options: CONNECT, DELETE, GET, HEAD, OPTIONS, PATCH, POST, PUT andTRACE. If no command is selected, Default command is used.
Default command Used as a fall-back for all invokers without a defined request command.
Any other settings are self-explanatory and have default values.
OTRS as Requester - HTTP::SOAP
For the requester HTTP::SOAP network transport there are more fields to be set.
The following settings are available when adding or editing this resource. The fields marked with an asteriskare mandatory.
Endpoint * URI of the remote system to indicate specific location for accessing a web service.
Namespace * URI to give SOAP methods a context, reducing ambiguities.
Encoding The character encoding for the SOAP message contents.
Authentication An optional authentication mechanism to access the remote system. Select an authenti-cation mechanism from the list and additional fields will appear.
Any other settings are self-explanatory and have default values.
Web Service Invoker
The actions that can be performed when you are using OTRS as a requester are called invokers. Eachinvoker belongs to a controller (controllers are collections of operations or invokers). Usually invokers fromthe same controller need similar settings and share the same configuration dialogs. Each invoker can haveindependent configuration dialogs if needed.
The following settings are available when adding or editing this resource. The fields marked with an asteriskare mandatory.
Name * The name of this resource. Any type of characters can be entered to this field including uppercaseletters and spaces. The name will be displayed in the overview table.
Description Add additional information to this resource. It is recommended to always fill this field as adescription of the resource with a full sentence for better clarity, because the description will be alsodisplayed in the overview table.
5.5. Web Services 239
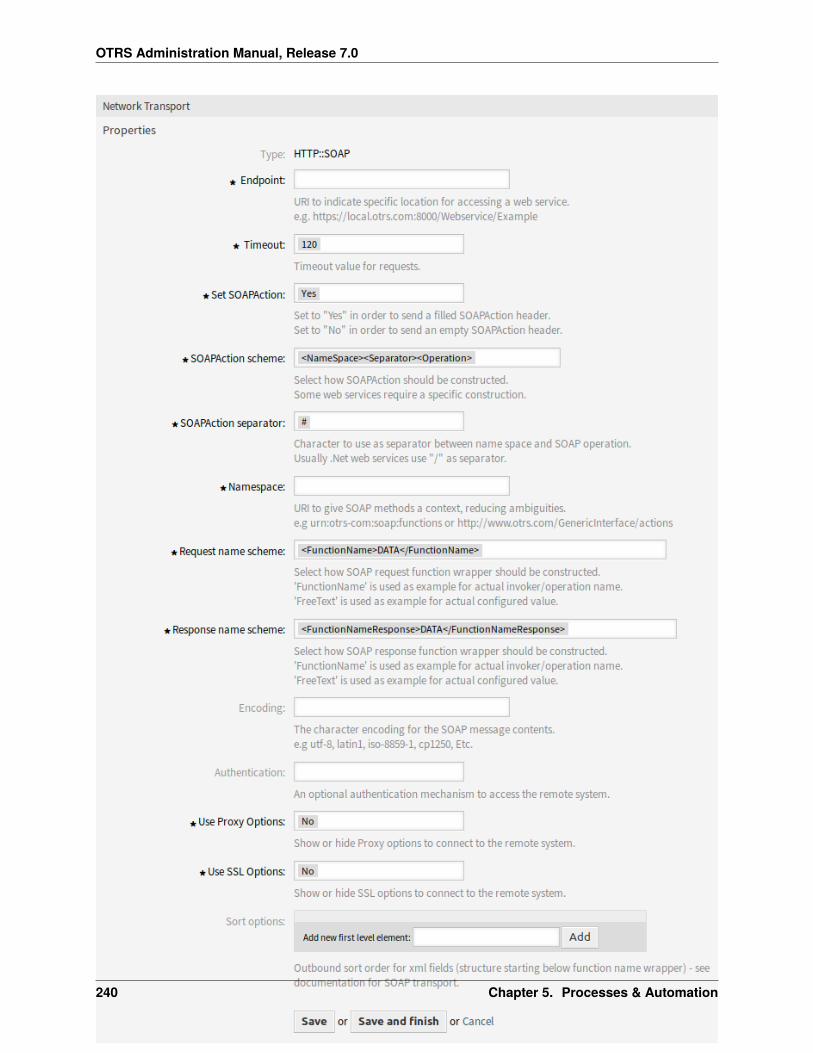
OTRS Administration Manual, Release 7.0
Fig. 96: Web Service Settings - OTRS as Requester - HTTP::SOAP
240 Chapter 5. Processes & Automation
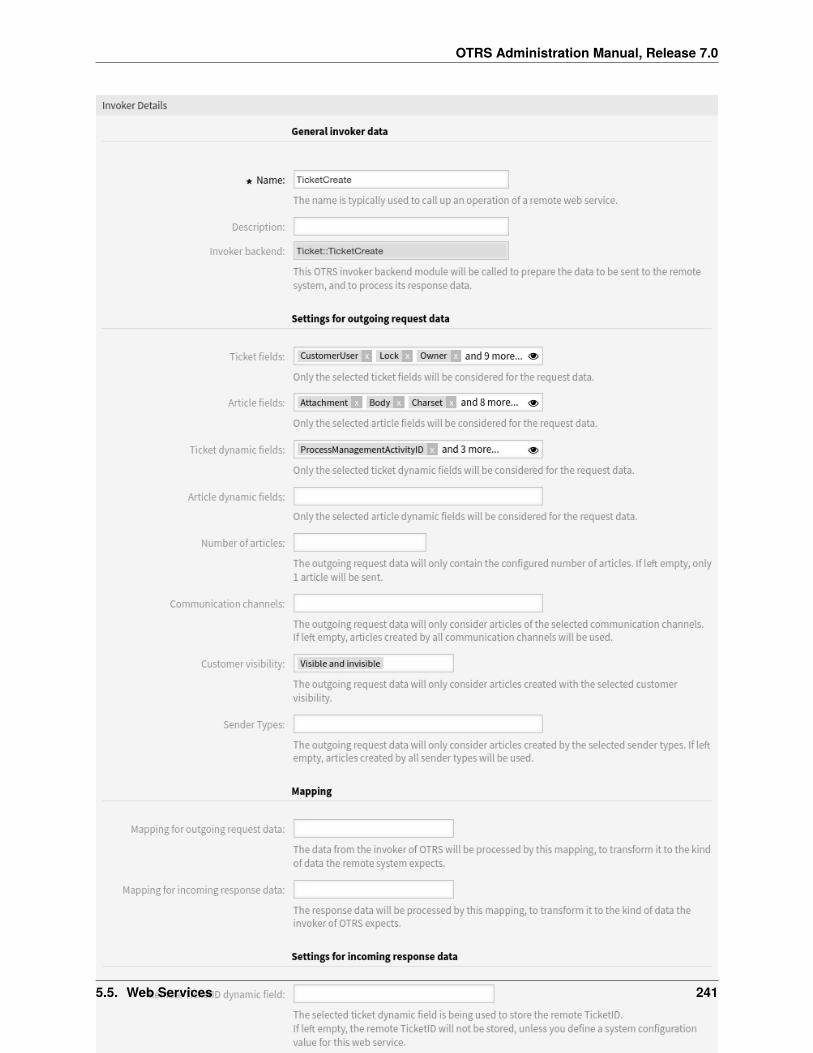
OTRS Administration Manual, Release 7.0
Fig. 97: Add Web Service Invoker Screen
5.5. Web Services 241
OTRS Administration Manual, Release 7.0
Invoker backend This OTRS invoker back end module will be called to prepare the data to be sent to theremote system, and to process its response data.
The invoker back end is pre-populated and cannot be edited. You will see this parameter when youchoose the invoker on the web service edit screen. The field is only informative.
Mapping for outgoing request data The data from the invoker of OTRS will be processed by this mapping,to transform it to the kind of data the remote system expects.
Mapping for incoming response data The response data will be processed by this mapping, to transformit to the kind of data the invoker of OTRS expects.
Additionally the list of event triggers and other special fields can appear on non default configuration dialogsto fulfill special needs of the invoker.
Normally there are two mapping configuration sections for each invoker, one for the incoming data andanother one for the outgoing data. You can choose different mapping types (back ends) for each mappingdirection, since their configuration is independent from each other and also independent from the invokerback end. The normal and most common practice is that the invoker uses the same mapping type in bothcases, with inverted configuration. The complete mapping configuration is done in a separate screen, whichdepends on the mapping type.
Event triggers are events within OTRS such as TicketCreate, ArticleSend, etc. These can act astriggers to execute the invoker. Each invoker needs to have at least one event trigger registered, or theinvoker will be useless, because it will never be called. Additionally a set of rules (conditions) for each eventcan be defined to have more control over the triggering of the events. These rules depend on the data ofthe object associated with the event. The asynchronous property of the event triggers define if the OTRSprocess will handle the invoker or if it will be delegated to the OTRS daemon.
Note: The OTRS daemon is a separate set of process that executes tasks in the background. Using thisthe OTRS process itself will not be affected if the remote system takes a long time to respond, if it is notavailable or if there are network problems. If you do not use the OTRS daemon using web services canmake OTRS slow or non-responsive. Therefore it is highly recommend to use asynchronous event triggersas often as possible.
To add an event trigger, first select the event family from the first list, then the event name from the secondlist, then set the asynchronous property (if unchecked means that the event trigger will not be asynchronous)and finally click on the plus button. A new event trigger will be created and it will be listed on the invokerevent triggers list.
From the event triggers list each events shows if it contains conditions or not. The edit button next to thecondition property allows to add or edit the current conditions of the event.
To delete an event trigger, simply locate the event trigger to be deleted in the event triggers list and click onthe trash icon at the end of the row. This will open a dialog that asks you if you are sure to delete the eventtrigger. Click on the Delete button to remove the event trigger from the list, or click on the Cancel button toclose the dialog.
In the left part of the screen on the action column you have the options to go back to web service (discardingall changes since the last save) and delete. If you click on the last one, a dialog will open and ask youif you like to remove the invoker. Click on the Delete button to confirm the removal of the invoker and itsconfiguration or click on the Cancel button to close the delete dialog.
242 Chapter 5. Processes & Automation
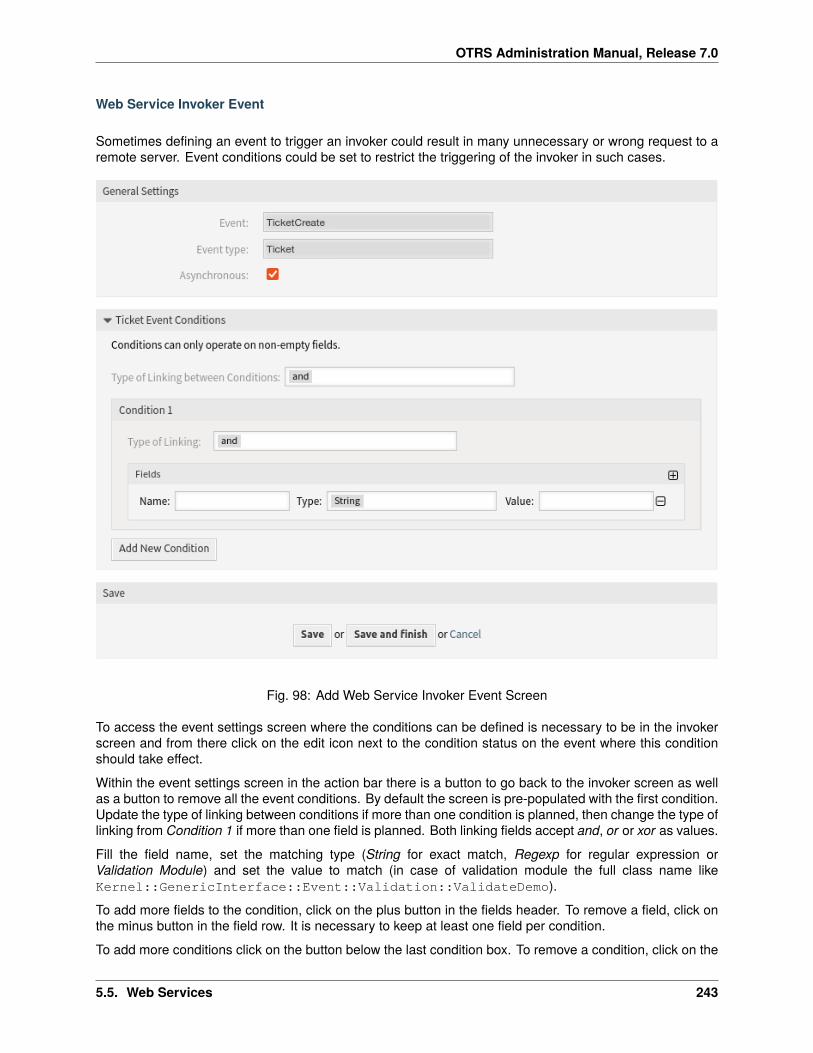
OTRS Administration Manual, Release 7.0
Web Service Invoker Event
Sometimes defining an event to trigger an invoker could result in many unnecessary or wrong request to aremote server. Event conditions could be set to restrict the triggering of the invoker in such cases.
Fig. 98: Add Web Service Invoker Event Screen
To access the event settings screen where the conditions can be defined is necessary to be in the invokerscreen and from there click on the edit icon next to the condition status on the event where this conditionshould take effect.
Within the event settings screen in the action bar there is a button to go back to the invoker screen as wellas a button to remove all the event conditions. By default the screen is pre-populated with the first condition.Update the type of linking between conditions if more than one condition is planned, then change the type oflinking from Condition 1 if more than one field is planned. Both linking fields accept and, or or xor as values.
Fill the field name, set the matching type (String for exact match, Regexp for regular expression orValidation Module) and set the value to match (in case of validation module the full class name likeKernel::GenericInterface::Event::Validation::ValidateDemo).
To add more fields to the condition, click on the plus button in the fields header. To remove a field, click onthe minus button in the field row. It is necessary to keep at least one field per condition.
To add more conditions click on the button below the last condition box. To remove a condition, click on the
5.5. Web Services 243
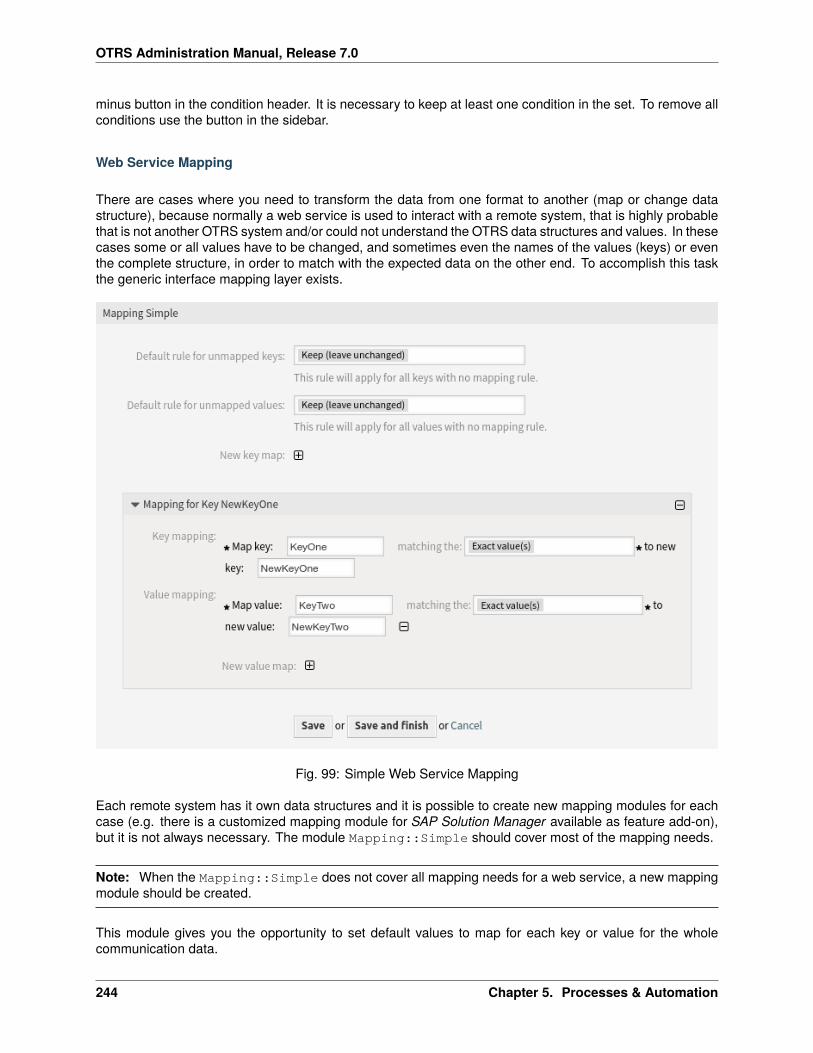
OTRS Administration Manual, Release 7.0
minus button in the condition header. It is necessary to keep at least one condition in the set. To remove allconditions use the button in the sidebar.
Web Service Mapping
There are cases where you need to transform the data from one format to another (map or change datastructure), because normally a web service is used to interact with a remote system, that is highly probablethat is not another OTRS system and/or could not understand the OTRS data structures and values. In thesecases some or all values have to be changed, and sometimes even the names of the values (keys) or eventhe complete structure, in order to match with the expected data on the other end. To accomplish this taskthe generic interface mapping layer exists.
Fig. 99: Simple Web Service Mapping
Each remote system has it own data structures and it is possible to create new mapping modules for eachcase (e.g. there is a customized mapping module for SAP Solution Manager available as feature add-on),but it is not always necessary. The module Mapping::Simple should cover most of the mapping needs.
Note: When the Mapping::Simple does not cover all mapping needs for a web service, a new mappingmodule should be created.
This module gives you the opportunity to set default values to map for each key or value for the wholecommunication data.
244 Chapter 5. Processes & Automation
OTRS Administration Manual, Release 7.0
At the beginning of the screen you will see a general section where you can set the default rules that willapply for all the unmapped keys and values. There are three options available, these options are listedbelow:
Keep (leave unchanged) It does not touch the keys or values in any way.
Ignore (drop key/value pair) When this is applied to the key it deletes the key and value, because whena key is deleted then in consequence its associated value is deleted too. When this is applied to thevalue, only the value is deleted, keeping the key, that now will be associated to an empty value.
Map to (use provided value as default) All keys and/or values without a defined map rule will use this asdefault. When you select this option a new text field will appear to set this default.
Clicking on the plus button for new key map will display a new box for a single mapping configuration. Youcan add as many key mappings as needed. Just click on the plus button again and a new mapping box willappear below the existing one. From this mapping boxes you can define a map for a single key, with thenext options:
Exact value(s) The old key string will be changed to a new one if the old key matches exactly.
Regular expression The key string will be replaced following a regular expression rule.
Pressing the new value map plus button will display a new row for a value map. Here it is also possible todefine rules for each value to be mapped with the same options as for the key map (exact value and regularexpression). You can add as many values to map as needed, and if you want to delete one of them, justclick on the minus button for each mapping value row.
Deleting the complete key mapping section (box) is possible, just push on the minus button located on theup right corner of each box that you want to delete.
If you need to delete a complete mapping configuration, go back to the corresponding operation or invokerscreen, look for the mapping direction that you select before and set its value to -, and save the configurationto apply the changes.
It is possible to define XSLT templates for mapping.
5.5. Web Services 245
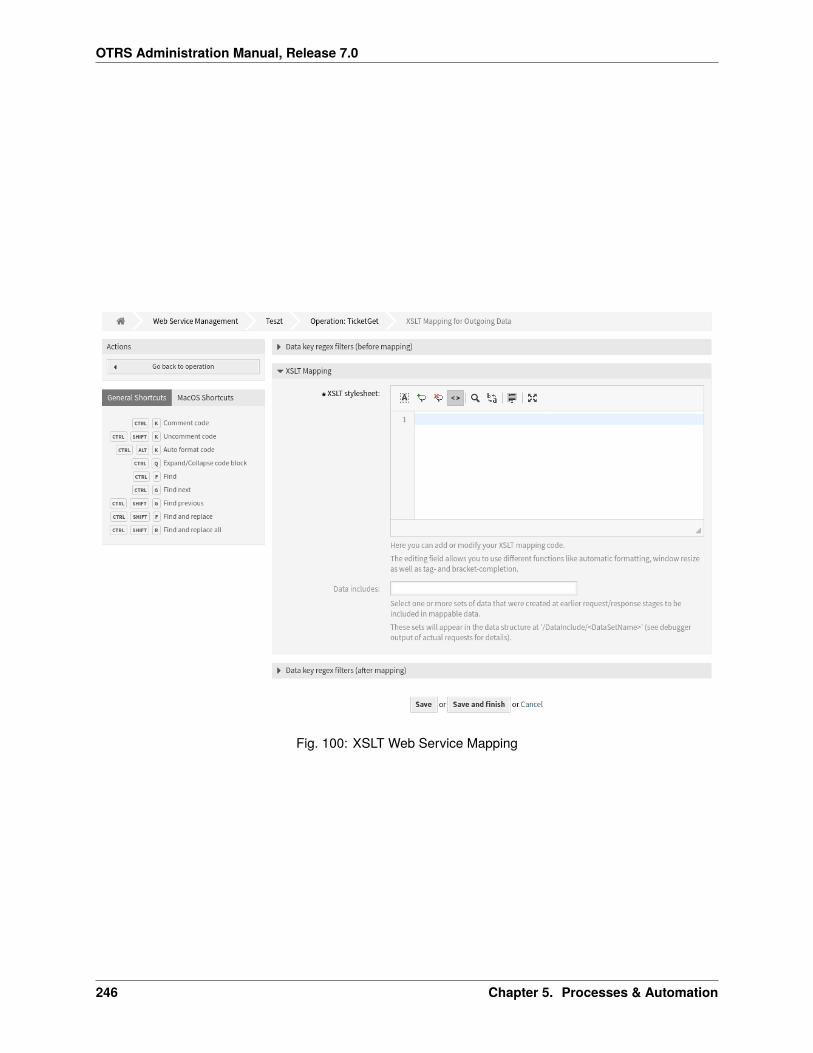
OTRS Administration Manual, Release 7.0
Fig. 100: XSLT Web Service Mapping
246 Chapter 5. Processes & Automation
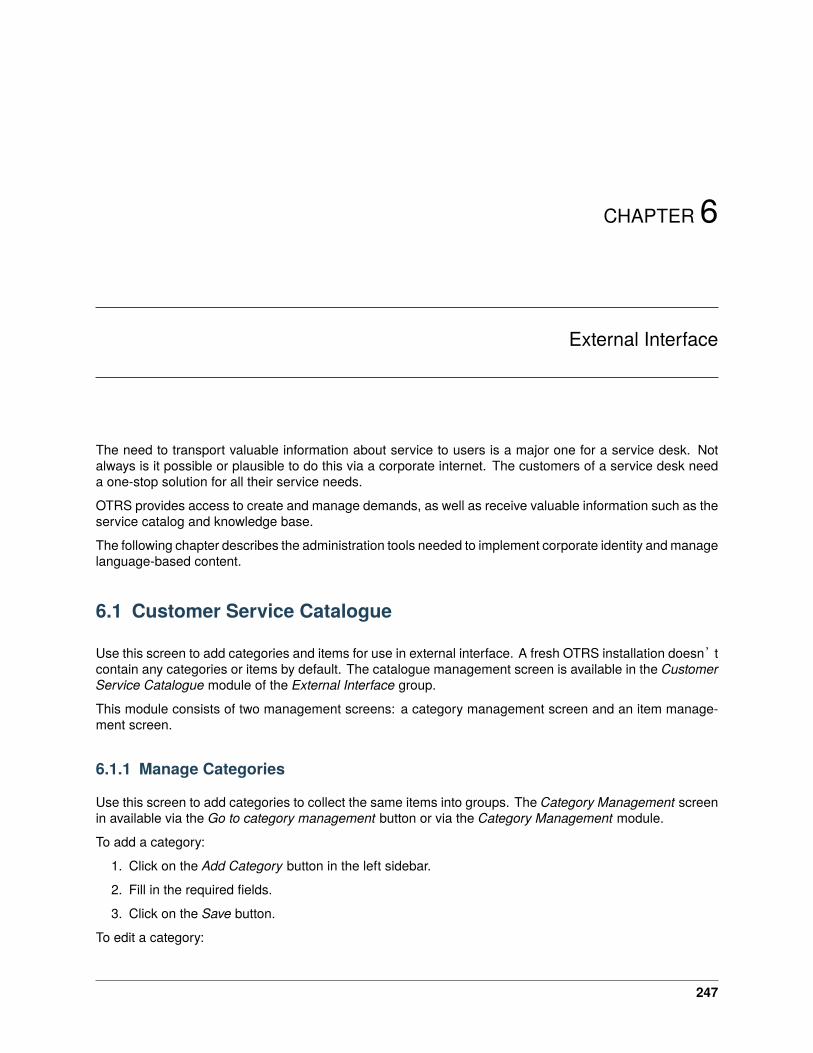
CHAPTER 6
External Interface
The need to transport valuable information about service to users is a major one for a service desk. Notalways is it possible or plausible to do this via a corporate internet. The customers of a service desk needa one-stop solution for all their service needs.
OTRS provides access to create and manage demands, as well as receive valuable information such as theservice catalog and knowledge base.
The following chapter describes the administration tools needed to implement corporate identity and managelanguage-based content.
6.1 Customer Service Catalogue
Use this screen to add categories and items for use in external interface. A fresh OTRS installation doesn’tcontain any categories or items by default. The catalogue management screen is available in the CustomerService Catalogue module of the External Interface group.
This module consists of two management screens: a category management screen and an item manage-ment screen.
6.1.1 Manage Categories
Use this screen to add categories to collect the same items into groups. The Category Management screenin available via the Go to category management button or via the Category Management module.
To add a category:
1. Click on the Add Category button in the left sidebar.
2. Fill in the required fields.
3. Click on the Save button.
To edit a category:
247
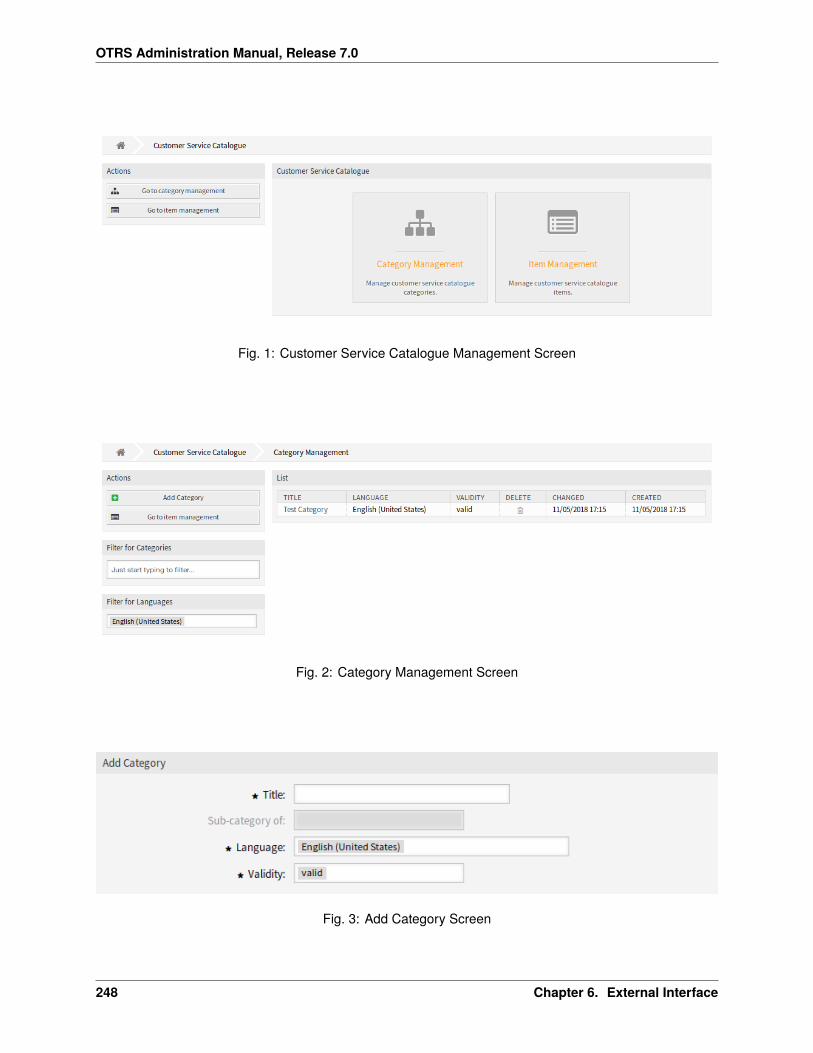
OTRS Administration Manual, Release 7.0
Fig. 1: Customer Service Catalogue Management Screen
Fig. 2: Category Management Screen
Fig. 3: Add Category Screen
248 Chapter 6. External Interface

OTRS Administration Manual, Release 7.0
1. Click on a category in the list of categories.
2. Modify the fields.
3. Click on the Save or Save and finish button.
Fig. 4: Edit Category Screen
To delete a category:
1. Click on the trash icon in the Delete column of the overview table.
2. Click on the Confirm button.
Fig. 5: Delete Category Screen
Note: If several categories are added to the system, use the filter box to find a particular category by justtyping the name to filter.
Category Settings
The following settings are available when adding or editing this resource. The fields marked with an asteriskare mandatory.
Title * The name of this resource. Any type of characters can be entered to this field including uppercaseletters and spaces. The name will be displayed in the overview table.
Sub-category of It is possible to add the new category under an existing one as sub-category. This will bedisplayed as Parent Category::Child Category.
Language * Select a language from the available languages of the system.
Validity * Set the validity of this resource. Each resource can be used in OTRS only, if this field is set tovalid. Setting this field to invalid or invalid-temporarily will disable the use of the resource.
6.1.2 Manage Items
Use this screen to add items to the catalogue. Items can be collected into categories. The Item Managementscreen in available via the Go to item management button or via the Item Management module.
6.1. Customer Service Catalogue 249
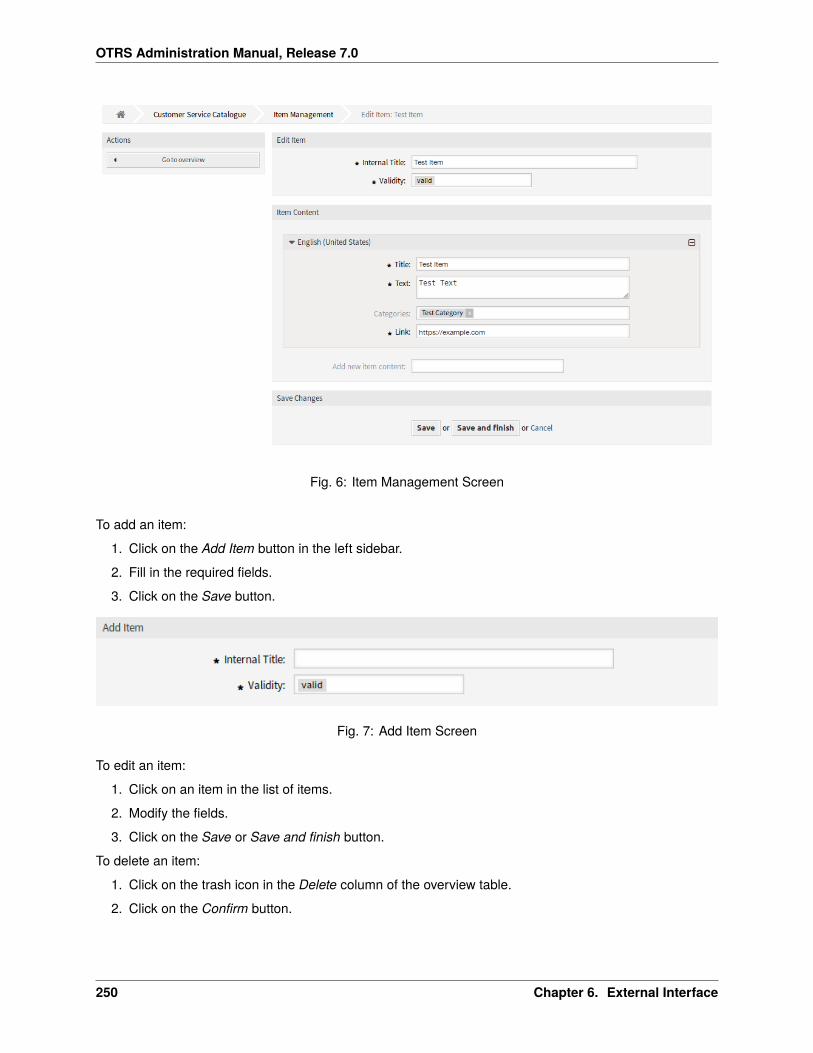
OTRS Administration Manual, Release 7.0
Fig. 6: Item Management Screen
To add an item:
1. Click on the Add Item button in the left sidebar.
2. Fill in the required fields.
3. Click on the Save button.
Fig. 7: Add Item Screen
To edit an item:
1. Click on an item in the list of items.
2. Modify the fields.
3. Click on the Save or Save and finish button.
To delete an item:
1. Click on the trash icon in the Delete column of the overview table.
2. Click on the Confirm button.
250 Chapter 6. External Interface
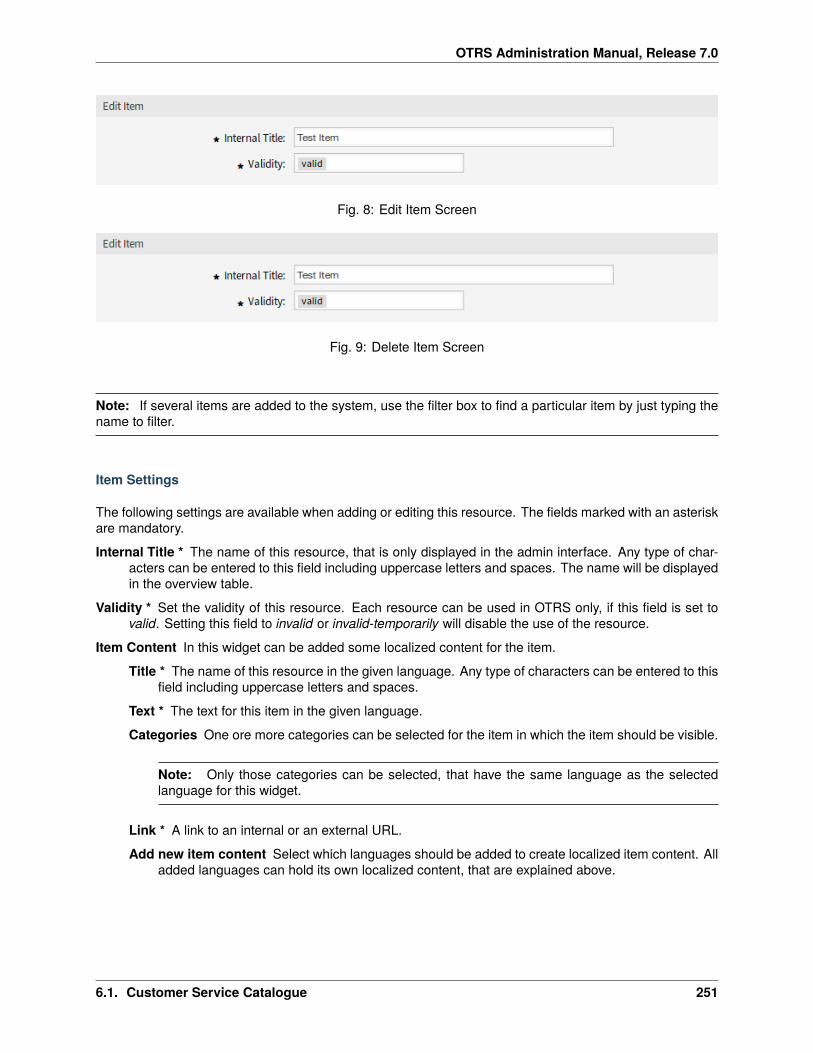
OTRS Administration Manual, Release 7.0
Fig. 8: Edit Item Screen
Fig. 9: Delete Item Screen
Note: If several items are added to the system, use the filter box to find a particular item by just typing thename to filter.
Item Settings
The following settings are available when adding or editing this resource. The fields marked with an asteriskare mandatory.
Internal Title * The name of this resource, that is only displayed in the admin interface. Any type of char-acters can be entered to this field including uppercase letters and spaces. The name will be displayedin the overview table.
Validity * Set the validity of this resource. Each resource can be used in OTRS only, if this field is set tovalid. Setting this field to invalid or invalid-temporarily will disable the use of the resource.
Item Content In this widget can be added some localized content for the item.
Title * The name of this resource in the given language. Any type of characters can be entered to thisfield including uppercase letters and spaces.
Text * The text for this item in the given language.
Categories One ore more categories can be selected for the item in which the item should be visible.
Note: Only those categories can be selected, that have the same language as the selectedlanguage for this widget.
Link * A link to an internal or an external URL.
Add new item content Select which languages should be added to create localized item content. Alladded languages can hold its own localized content, that are explained above.
6.1. Customer Service Catalogue 251
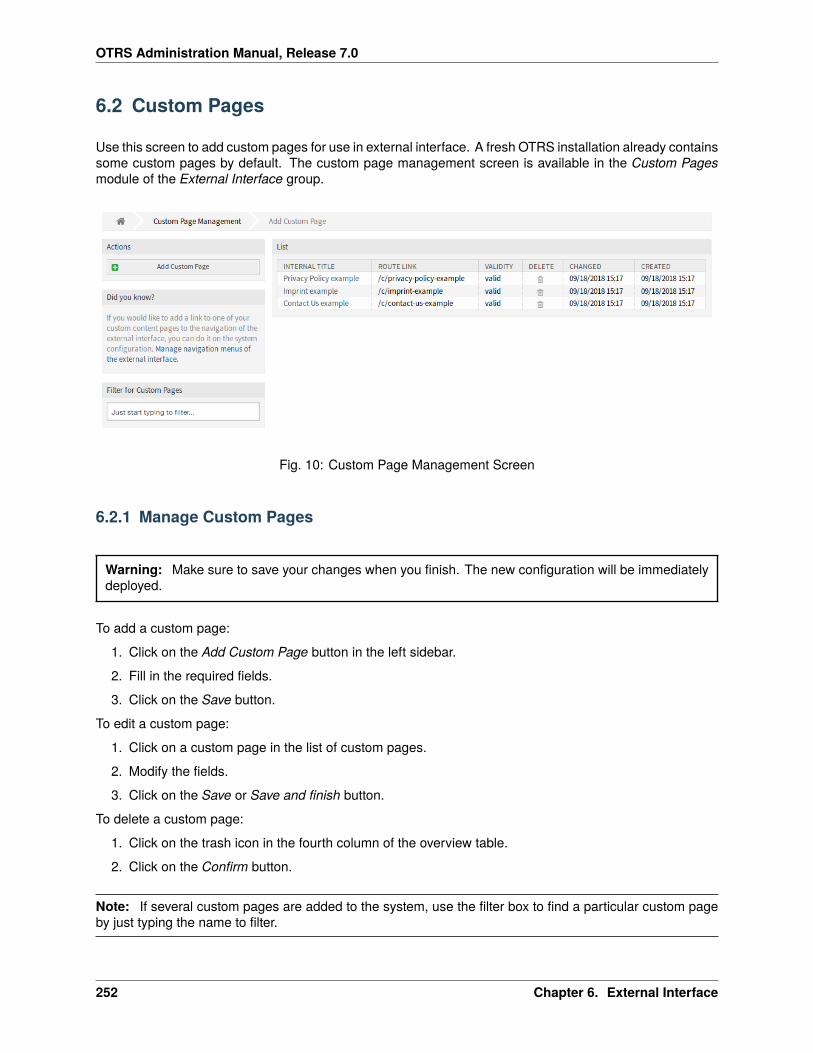
OTRS Administration Manual, Release 7.0
6.2 Custom Pages
Use this screen to add custom pages for use in external interface. A fresh OTRS installation already containssome custom pages by default. The custom page management screen is available in the Custom Pagesmodule of the External Interface group.
Fig. 10: Custom Page Management Screen
6.2.1 Manage Custom Pages
Warning: Make sure to save your changes when you finish. The new configuration will be immediatelydeployed.
To add a custom page:
1. Click on the Add Custom Page button in the left sidebar.
2. Fill in the required fields.
3. Click on the Save button.
To edit a custom page:
1. Click on a custom page in the list of custom pages.
2. Modify the fields.
3. Click on the Save or Save and finish button.
To delete a custom page:
1. Click on the trash icon in the fourth column of the overview table.
2. Click on the Confirm button.
Note: If several custom pages are added to the system, use the filter box to find a particular custom pageby just typing the name to filter.
252 Chapter 6. External Interface
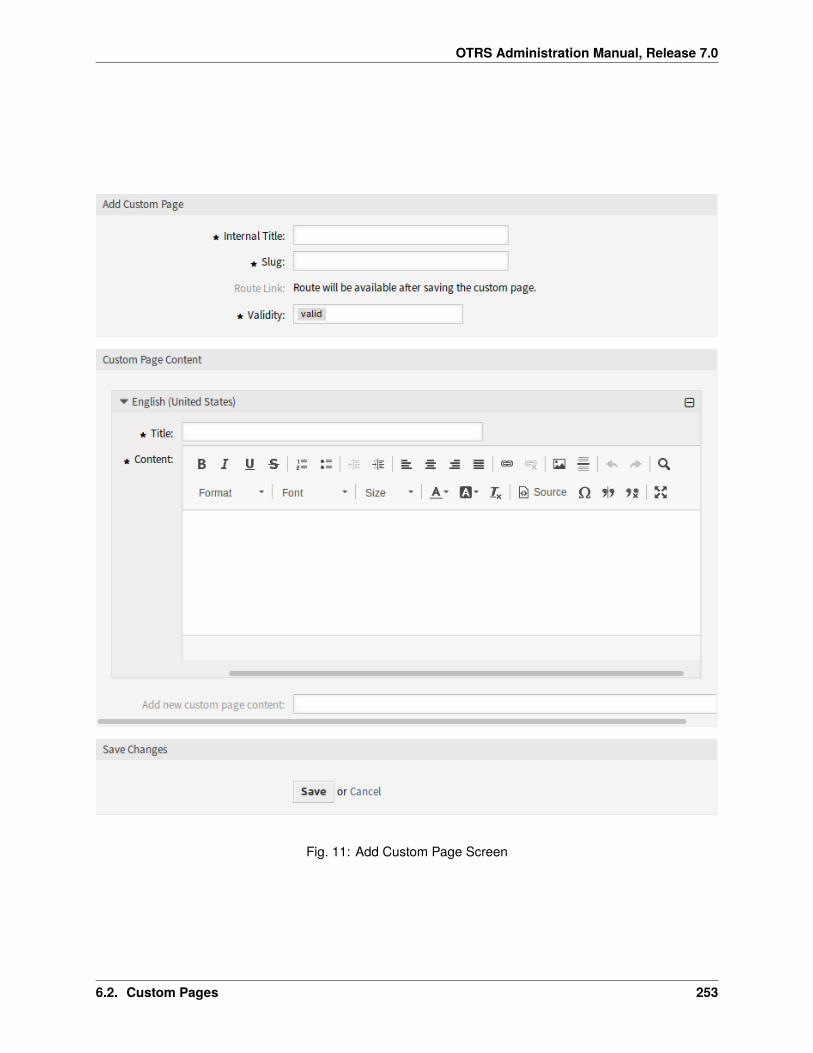
OTRS Administration Manual, Release 7.0
Fig. 11: Add Custom Page Screen
6.2. Custom Pages 253
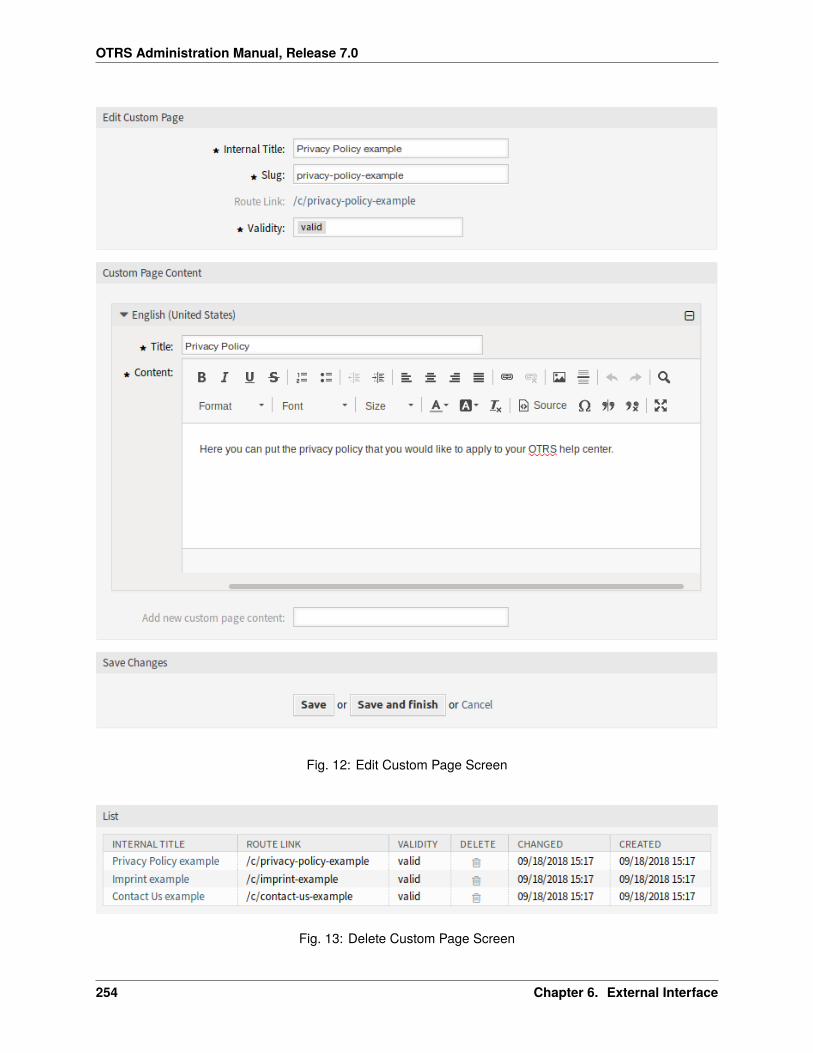
OTRS Administration Manual, Release 7.0
Fig. 12: Edit Custom Page Screen
Fig. 13: Delete Custom Page Screen
254 Chapter 6. External Interface
OTRS Administration Manual, Release 7.0
6.2.2 Custom Page Settings
The following settings are available when adding or editing this resource. The fields marked with an asteriskare mandatory.
Internal Title * The name of this resource, that is only displayed in the admin interface. Any type of char-acters can be entered to this field including uppercase letters and spaces. The name will be displayedin the overview table.
Slug * This will be the URL of the custom page. Recommended characters are lowercase letters, numbersand minus sign.
Validity * Set the validity of this resource. Each resource can be used in OTRS only, if this field is set tovalid. Setting this field to invalid or invalid-temporarily will disable the use of the resource.
Custom Page Content In this widget can be added some localized content for the item.
Title * The name of this resource in the given language. Any type of characters can be entered to thisfield including uppercase letters and spaces.
Content * The text for this item in the given language.
Add new custom page content Select which languages should be added to create localized itemcontent. All added languages can hold its own localized content, that are explained above.
6.3 Home Page
Use this screen to define home page configuration for different user languages, that are displayed in theexternal interface. The home page management screen is available in the Home Page module of the ExternalInterface group.
This screen contains several widget for each languages, where localized content can be added.
Warning: Make sure to save your changes when you finish. The new configuration will be immediatelydeployed.
The following settings are available when adding or editing this resource. The fields marked with an asteriskare mandatory.
6.3.1 Hero Unit
This is the main widget of the external interface.
Title This is the most important sentence or motto of the home page.
Background Style Define the behavior of background image and background color. The following optionsare available:
• Only use the background image
• Only use the background color
• Use the background image and overlay it with the selected color
Background Image Select an image used as background image for the hero unit. To select an image, clickon the Select image to upload button and chose an image from your file system.
6.3. Home Page 255
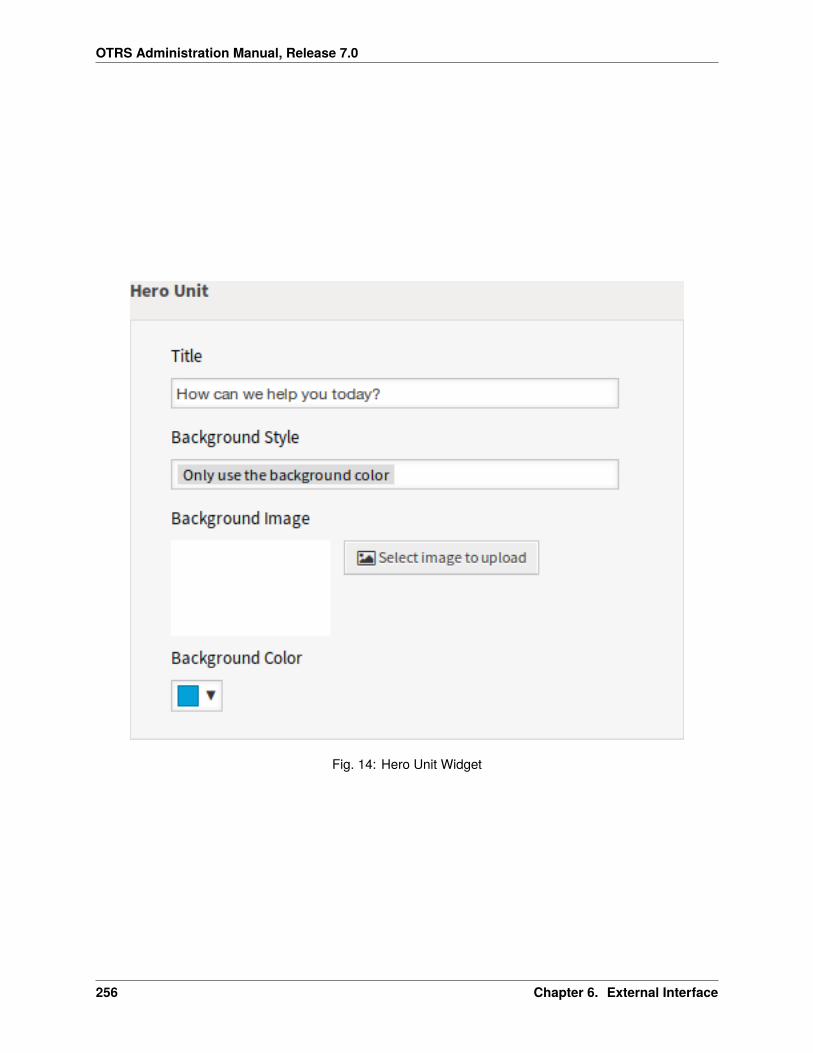
OTRS Administration Manual, Release 7.0
Fig. 14: Hero Unit Widget
256 Chapter 6. External Interface

OTRS Administration Manual, Release 7.0
Background Color To change the background color, just select a new color from the color palette. Youcan chose from the pre-selected colors or define other colors by choosing it from the color selector ortyping the hexadecimal value.
6.3.2 Ticket List
This widget is available only to logged in customer users. If the ticket list is enabled, the tickets of thecustomer users are displayed under the Hero Unit (search field). If the ticket list is disabled, the customerusers can see the tickets only in the My Tickets screen.
Fig. 15: Ticket List Widget
Show a ticket list for logged in users This setting defines if the ticket list should be visible for logged inusers or not.
Row Title This is an optional title for the row, that contains this widget in the external interface.
6.3.3 Image Teasers
The image teasers are displayed in a separate row in the external interface.
Row Title This is an optional title for the row, that contains this widget in the external interface.
Row Background Color To change the background color, just select a new color from the color palette. Youcan chose from the pre-selected colors or define other colors by choosing it from the color selector ortyping the hexadecimal value.
You can add up to three image teasers by clicking on the Add button in the top right corner of the widget.
Image Select an image to display it in the image teaser widget. To select an image, click on the Selectimage to upload button and chose an image from your file system.
Title * The heading text that are displayed in this item.
Text * The text for this item.
Link Target * An URL that will be opened after clicking on this item in the external interface.
6.3. Home Page 257
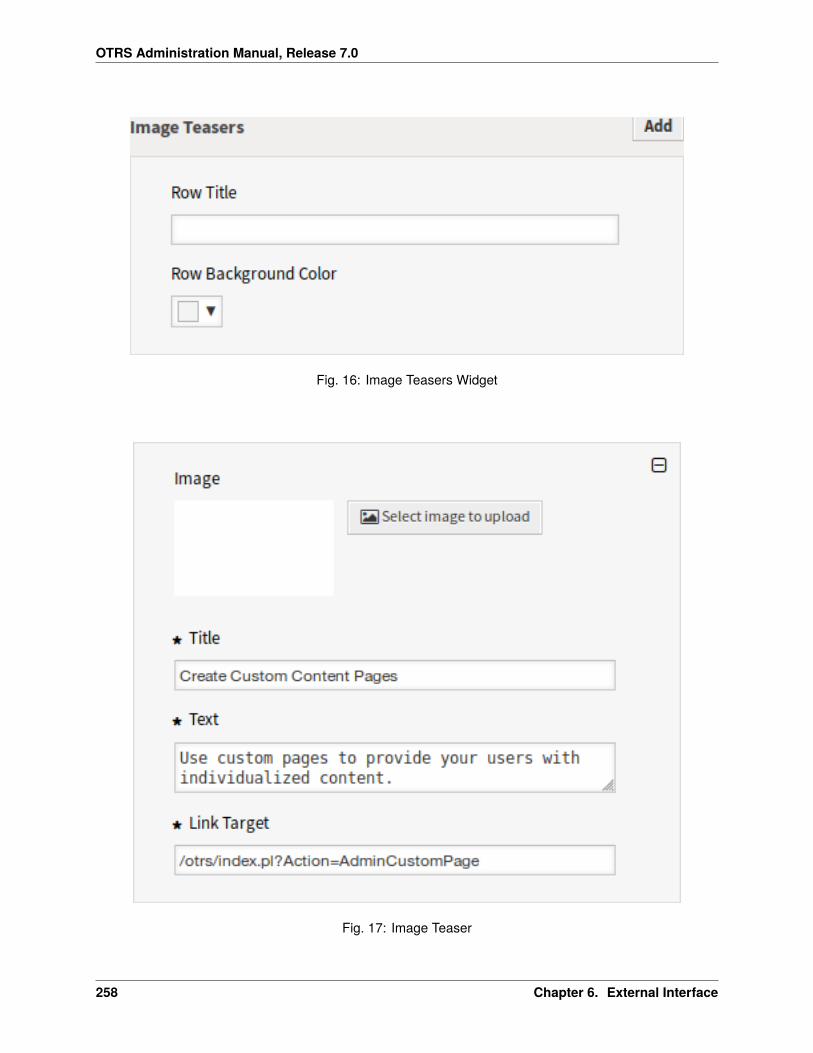
OTRS Administration Manual, Release 7.0
Fig. 16: Image Teasers Widget
Fig. 17: Image Teaser
258 Chapter 6. External Interface
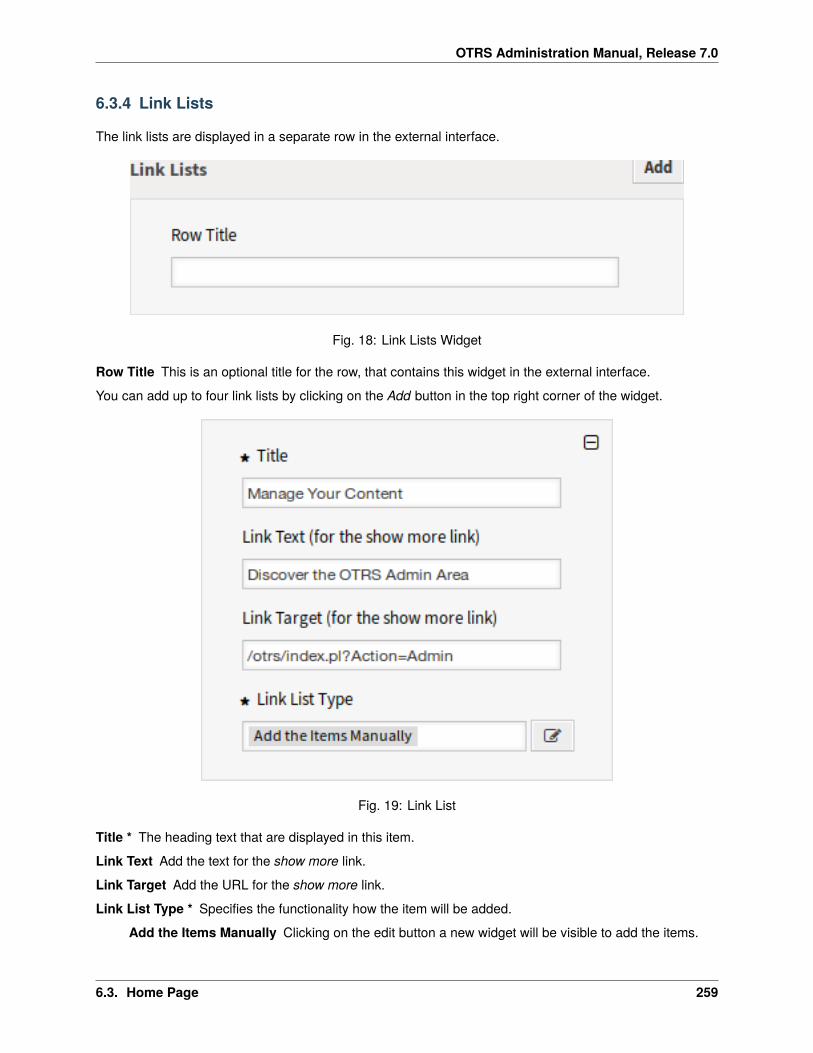
OTRS Administration Manual, Release 7.0
6.3.4 Link Lists
The link lists are displayed in a separate row in the external interface.
Fig. 18: Link Lists Widget
Row Title This is an optional title for the row, that contains this widget in the external interface.
You can add up to four link lists by clicking on the Add button in the top right corner of the widget.
Fig. 19: Link List
Title * The heading text that are displayed in this item.
Link Text Add the text for the show more link.
Link Target Add the URL for the show more link.
Link List Type * Specifies the functionality how the item will be added.
Add the Items Manually Clicking on the edit button a new widget will be visible to add the items.
6.3. Home Page 259
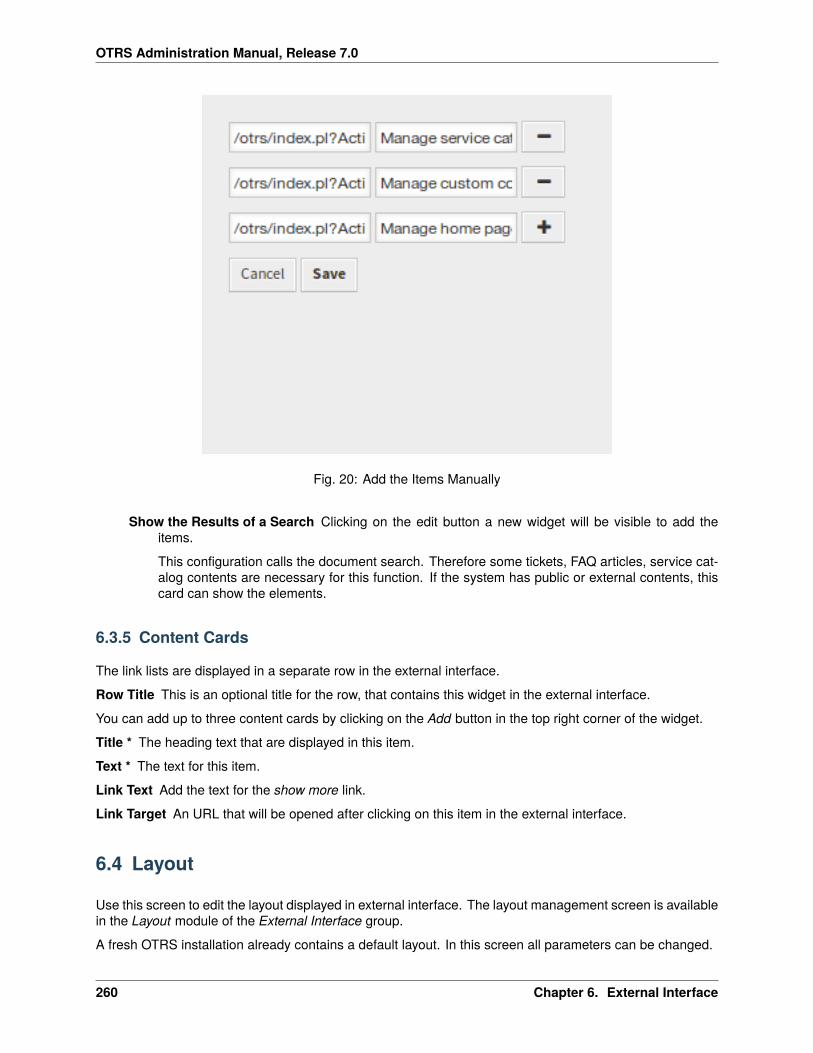
OTRS Administration Manual, Release 7.0
Fig. 20: Add the Items Manually
Show the Results of a Search Clicking on the edit button a new widget will be visible to add theitems.
This configuration calls the document search. Therefore some tickets, FAQ articles, service cat-alog contents are necessary for this function. If the system has public or external contents, thiscard can show the elements.
6.3.5 Content Cards
The link lists are displayed in a separate row in the external interface.
Row Title This is an optional title for the row, that contains this widget in the external interface.
You can add up to three content cards by clicking on the Add button in the top right corner of the widget.
Title * The heading text that are displayed in this item.
Text * The text for this item.
Link Text Add the text for the show more link.
Link Target An URL that will be opened after clicking on this item in the external interface.
6.4 Layout
Use this screen to edit the layout displayed in external interface. The layout management screen is availablein the Layout module of the External Interface group.
A fresh OTRS installation already contains a default layout. In this screen all parameters can be changed.
260 Chapter 6. External Interface
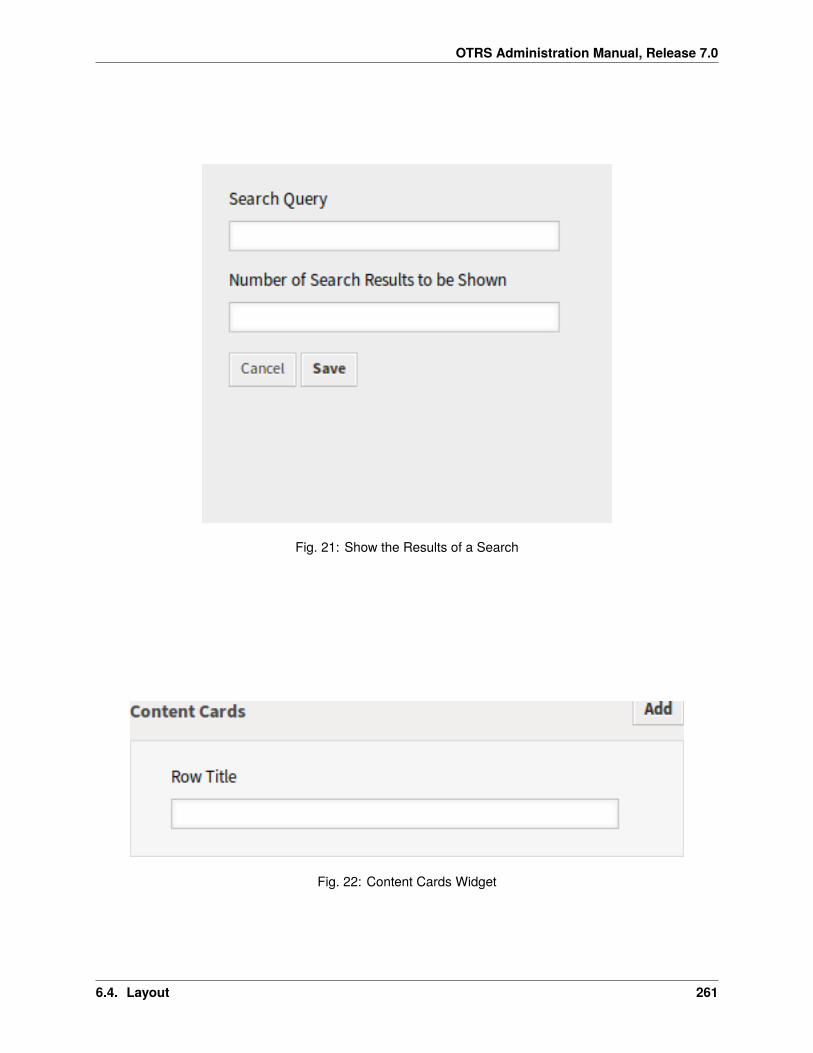
OTRS Administration Manual, Release 7.0
Fig. 21: Show the Results of a Search
Fig. 22: Content Cards Widget
6.4. Layout 261
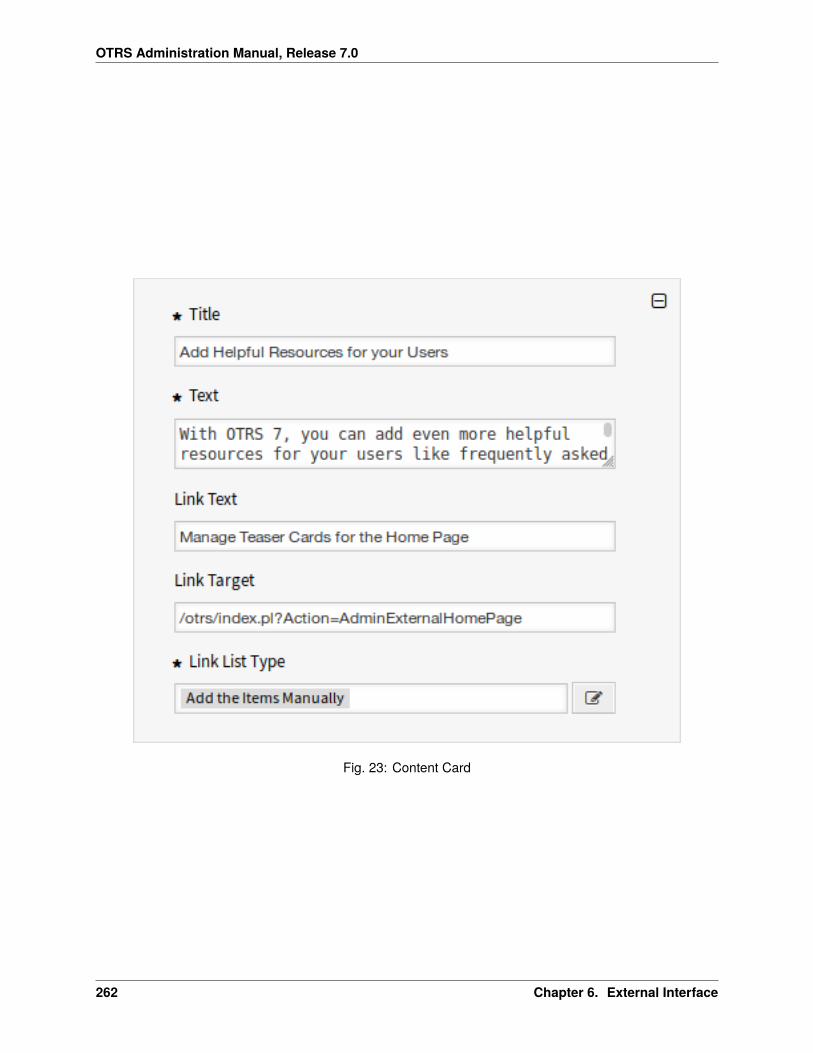
OTRS Administration Manual, Release 7.0
Fig. 23: Content Card
262 Chapter 6. External Interface
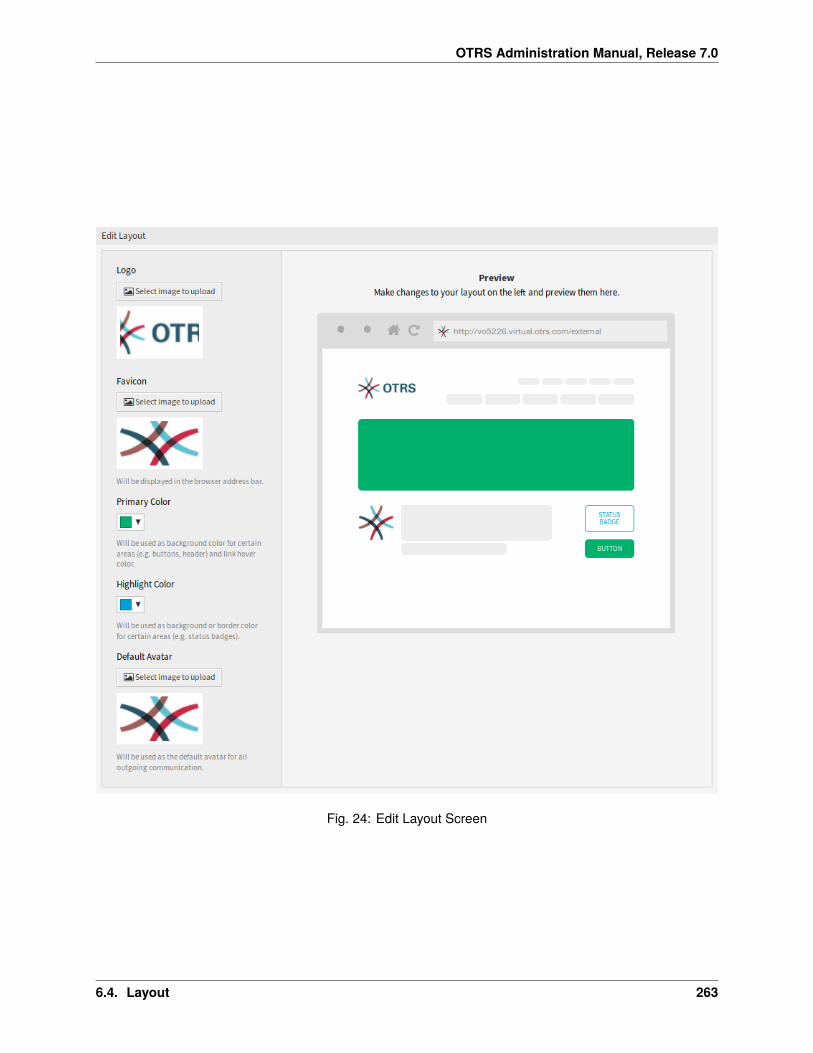
OTRS Administration Manual, Release 7.0
Fig. 24: Edit Layout Screen
6.4. Layout 263
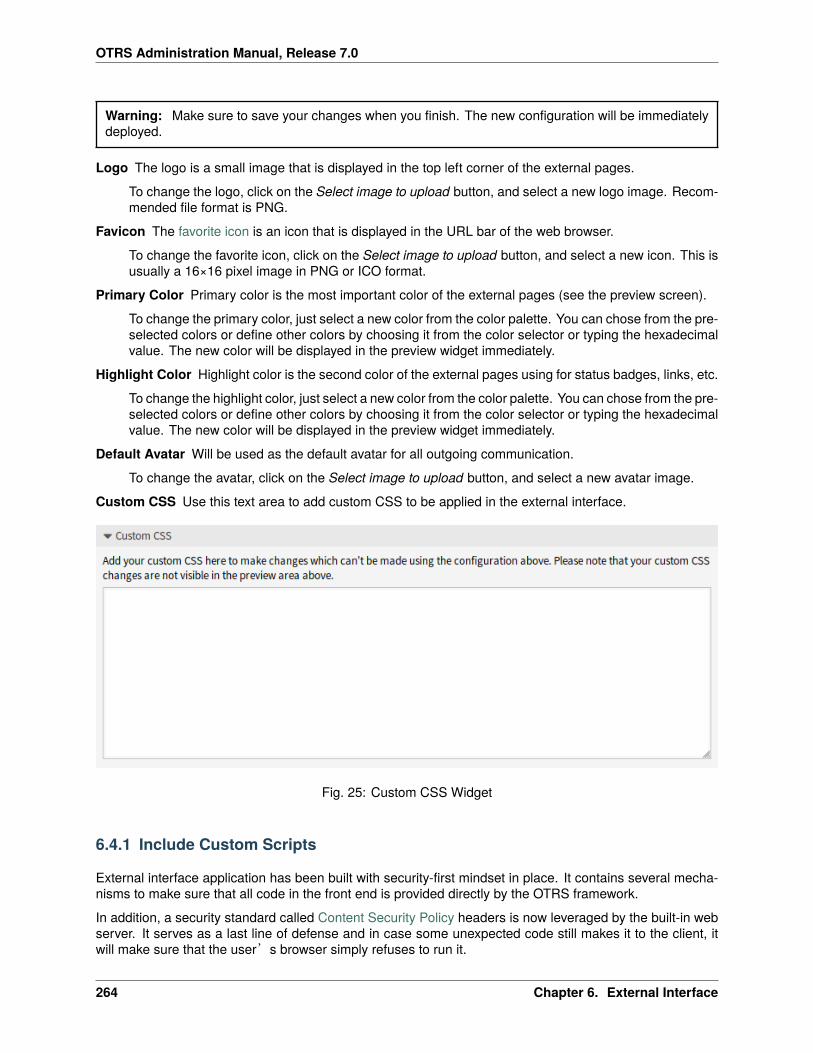
OTRS Administration Manual, Release 7.0
Warning: Make sure to save your changes when you finish. The new configuration will be immediatelydeployed.
Logo The logo is a small image that is displayed in the top left corner of the external pages.
To change the logo, click on the Select image to upload button, and select a new logo image. Recom-mended file format is PNG.
Favicon The favorite icon is an icon that is displayed in the URL bar of the web browser.
To change the favorite icon, click on the Select image to upload button, and select a new icon. This isusually a 16×16 pixel image in PNG or ICO format.
Primary Color Primary color is the most important color of the external pages (see the preview screen).
To change the primary color, just select a new color from the color palette. You can chose from the pre-selected colors or define other colors by choosing it from the color selector or typing the hexadecimalvalue. The new color will be displayed in the preview widget immediately.
Highlight Color Highlight color is the second color of the external pages using for status badges, links, etc.
To change the highlight color, just select a new color from the color palette. You can chose from the pre-selected colors or define other colors by choosing it from the color selector or typing the hexadecimalvalue. The new color will be displayed in the preview widget immediately.
Default Avatar Will be used as the default avatar for all outgoing communication.
To change the avatar, click on the Select image to upload button, and select a new avatar image.
Custom CSS Use this text area to add custom CSS to be applied in the external interface.
Fig. 25: Custom CSS Widget
6.4.1 Include Custom Scripts
External interface application has been built with security-first mindset in place. It contains several mecha-nisms to make sure that all code in the front end is provided directly by the OTRS framework.
In addition, a security standard called Content Security Policy headers is now leveraged by the built-in webserver. It serves as a last line of defense and in case some unexpected code still makes it to the client, itwill make sure that the user’s browser simply refuses to run it.
264 Chapter 6. External Interface
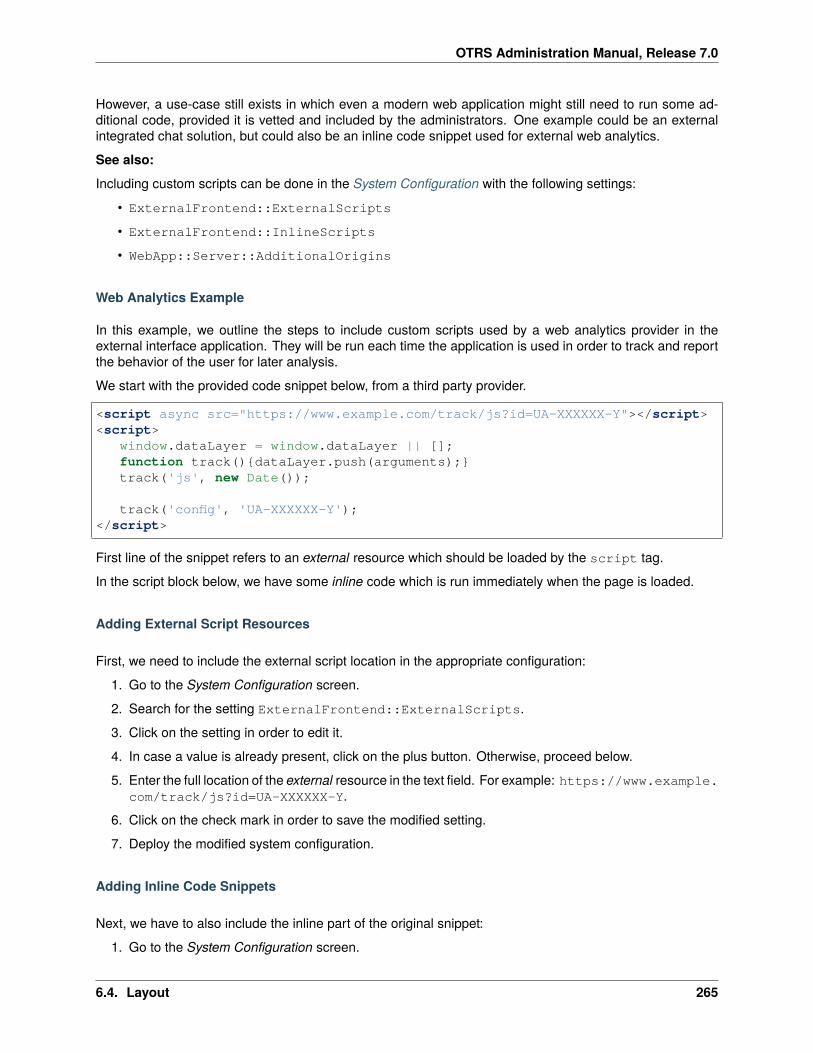
OTRS Administration Manual, Release 7.0
However, a use-case still exists in which even a modern web application might still need to run some ad-ditional code, provided it is vetted and included by the administrators. One example could be an externalintegrated chat solution, but could also be an inline code snippet used for external web analytics.
See also:
Including custom scripts can be done in the System Configuration with the following settings:
• ExternalFrontend::ExternalScripts
• ExternalFrontend::InlineScripts
• WebApp::Server::AdditionalOrigins
Web Analytics Example
In this example, we outline the steps to include custom scripts used by a web analytics provider in theexternal interface application. They will be run each time the application is used in order to track and reportthe behavior of the user for later analysis.
We start with the provided code snippet below, from a third party provider.
<script async src="https://www.example.com/track/js?id=UA-XXXXXX-Y"></script><script>
window.dataLayer = window.dataLayer || [];function track(){dataLayer.push(arguments);}track('js', new Date());
track('config', 'UA-XXXXXX-Y');</script>
First line of the snippet refers to an external resource which should be loaded by the script tag.
In the script block below, we have some inline code which is run immediately when the page is loaded.
Adding External Script Resources
First, we need to include the external script location in the appropriate configuration:
1. Go to the System Configuration screen.
2. Search for the setting ExternalFrontend::ExternalScripts.
3. Click on the setting in order to edit it.
4. In case a value is already present, click on the plus button. Otherwise, proceed below.
5. Enter the full location of the external resource in the text field. For example: https://www.example.com/track/js?id=UA-XXXXXX-Y.
6. Click on the check mark in order to save the modified setting.
7. Deploy the modified system configuration.
Adding Inline Code Snippets
Next, we have to also include the inline part of the original snippet:
1. Go to the System Configuration screen.
6.4. Layout 265

OTRS Administration Manual, Release 7.0
2. Search for the setting ExternalFrontend::InlineScripts.
3. Click on the setting in order to edit it.
4. In case a value is already present, click on the plus button. Otherwise, proceed below.
5. Enter the full code snippet in the text area, minus any script tags. For example:
window.dataLayer = window.dataLayer || [];function track(){dataLayer.push(arguments);}track('js', new Date());
track('config', 'UA-XXXXXX-Y');
6. Click on the check mark in order to save the modified setting.
7. Deploy the modified system configuration.
Rebuilding the External Interface Application
In order to apply the changes, we also need to rebuild the external interface application. Drop down to shell,and execute the following command:
bin/otrs.WebServer.pl --deploy-assets
Whitelisting Additional Origins in the Security Headers
If you now try to access the external interface application, you will be able to verify that the scripts areincluded in the code. However, your browser will probably block access to all inline and external resources,therefore the code might fail with some errors.
This behavior is by design, since external resources can only be loaded if they are specifically whitelisted inthe Content Security Policy headers.
To check for blocked code, please use suitable web browser inspection tools. In our example, we will beusing Mozilla Firefox and its web console available via Tools → Web Developer → Web Console menu item,or via the F12 shortcut key.
For the example code snippet, you might receive following errors in the console when the application isaccessed:
Fig. 26: Browser Console Errors and Warnings
From the console errors we can see that the external script resource was prevented from being loaded (lines1 and 3). In addition to that, two evaluation calls were also blocked (lines 2 and 5). All errors reference aContent Security Policy rule under the name of script-src, which signals script resources.
266 Chapter 6. External Interface
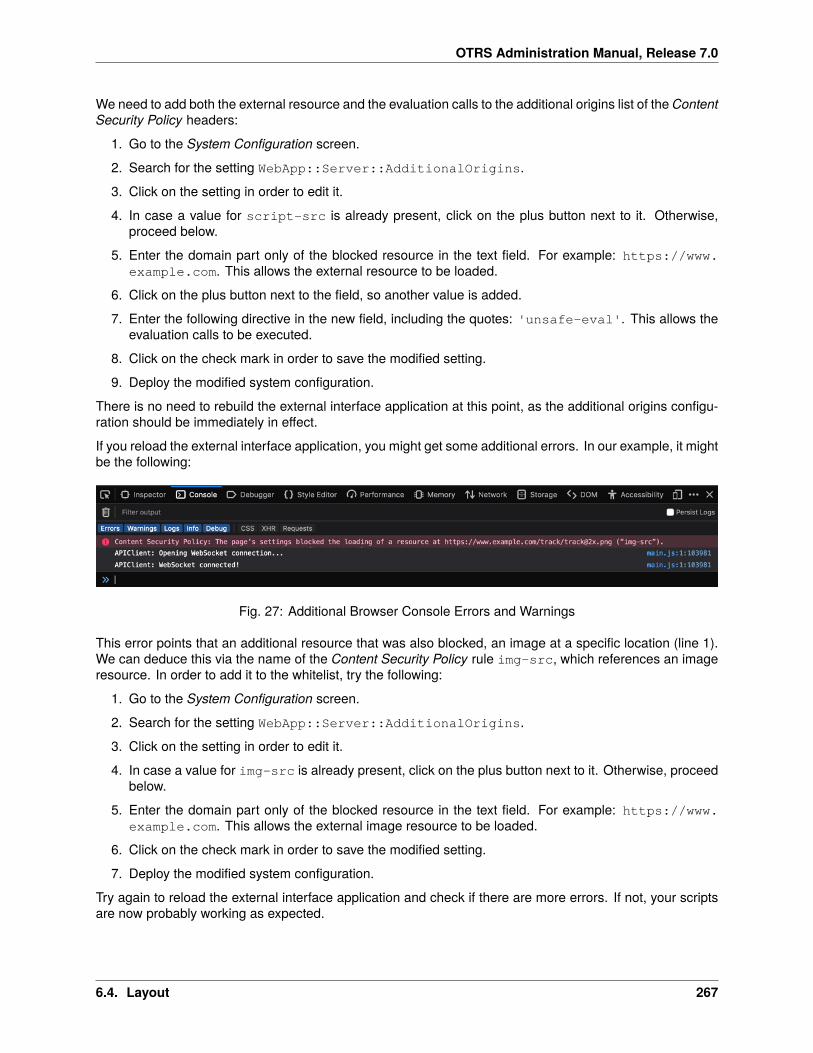
OTRS Administration Manual, Release 7.0
We need to add both the external resource and the evaluation calls to the additional origins list of the ContentSecurity Policy headers:
1. Go to the System Configuration screen.
2. Search for the setting WebApp::Server::AdditionalOrigins.
3. Click on the setting in order to edit it.
4. In case a value for script-src is already present, click on the plus button next to it. Otherwise,proceed below.
5. Enter the domain part only of the blocked resource in the text field. For example: https://www.example.com. This allows the external resource to be loaded.
6. Click on the plus button next to the field, so another value is added.
7. Enter the following directive in the new field, including the quotes: 'unsafe-eval'. This allows theevaluation calls to be executed.
8. Click on the check mark in order to save the modified setting.
9. Deploy the modified system configuration.
There is no need to rebuild the external interface application at this point, as the additional origins configu-ration should be immediately in effect.
If you reload the external interface application, you might get some additional errors. In our example, it mightbe the following:
Fig. 27: Additional Browser Console Errors and Warnings
This error points that an additional resource that was also blocked, an image at a specific location (line 1).We can deduce this via the name of the Content Security Policy rule img-src, which references an imageresource. In order to add it to the whitelist, try the following:
1. Go to the System Configuration screen.
2. Search for the setting WebApp::Server::AdditionalOrigins.
3. Click on the setting in order to edit it.
4. In case a value for img-src is already present, click on the plus button next to it. Otherwise, proceedbelow.
5. Enter the domain part only of the blocked resource in the text field. For example: https://www.example.com. This allows the external image resource to be loaded.
6. Click on the check mark in order to save the modified setting.
7. Deploy the modified system configuration.
Try again to reload the external interface application and check if there are more errors. If not, your scriptsare now probably working as expected.
6.4. Layout 267
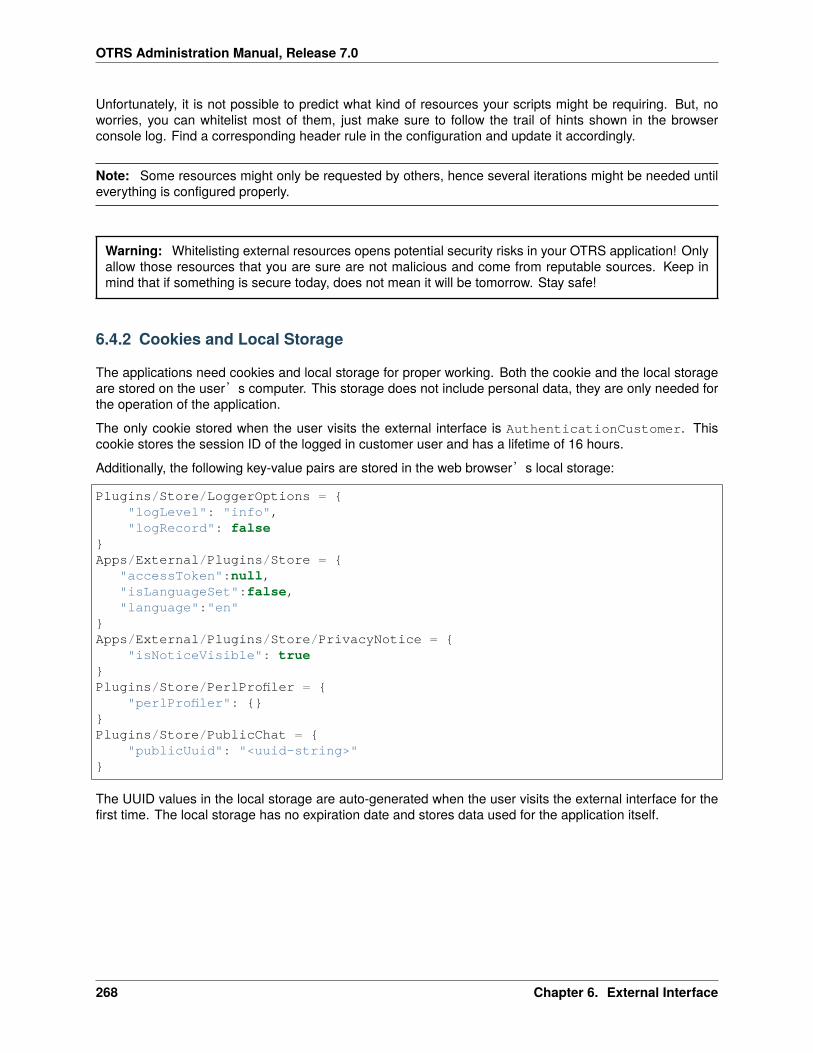
OTRS Administration Manual, Release 7.0
Unfortunately, it is not possible to predict what kind of resources your scripts might be requiring. But, noworries, you can whitelist most of them, just make sure to follow the trail of hints shown in the browserconsole log. Find a corresponding header rule in the configuration and update it accordingly.
Note: Some resources might only be requested by others, hence several iterations might be needed untileverything is configured properly.
Warning: Whitelisting external resources opens potential security risks in your OTRS application! Onlyallow those resources that you are sure are not malicious and come from reputable sources. Keep inmind that if something is secure today, does not mean it will be tomorrow. Stay safe!
6.4.2 Cookies and Local Storage
The applications need cookies and local storage for proper working. Both the cookie and the local storageare stored on the user’s computer. This storage does not include personal data, they are only needed forthe operation of the application.
The only cookie stored when the user visits the external interface is AuthenticationCustomer. Thiscookie stores the session ID of the logged in customer user and has a lifetime of 16 hours.
Additionally, the following key-value pairs are stored in the web browser’s local storage:
Plugins/Store/LoggerOptions = {"logLevel": "info","logRecord": false
}Apps/External/Plugins/Store = {
"accessToken":null,"isLanguageSet":false,"language":"en"
}Apps/External/Plugins/Store/PrivacyNotice = {
"isNoticeVisible": true}Plugins/Store/PerlProfiler = {
"perlProfiler": {}}Plugins/Store/PublicChat = {
"publicUuid": "<uuid-string>"}
The UUID values in the local storage are auto-generated when the user visits the external interface for thefirst time. The local storage has no expiration date and stores data used for the application itself.
268 Chapter 6. External Interface
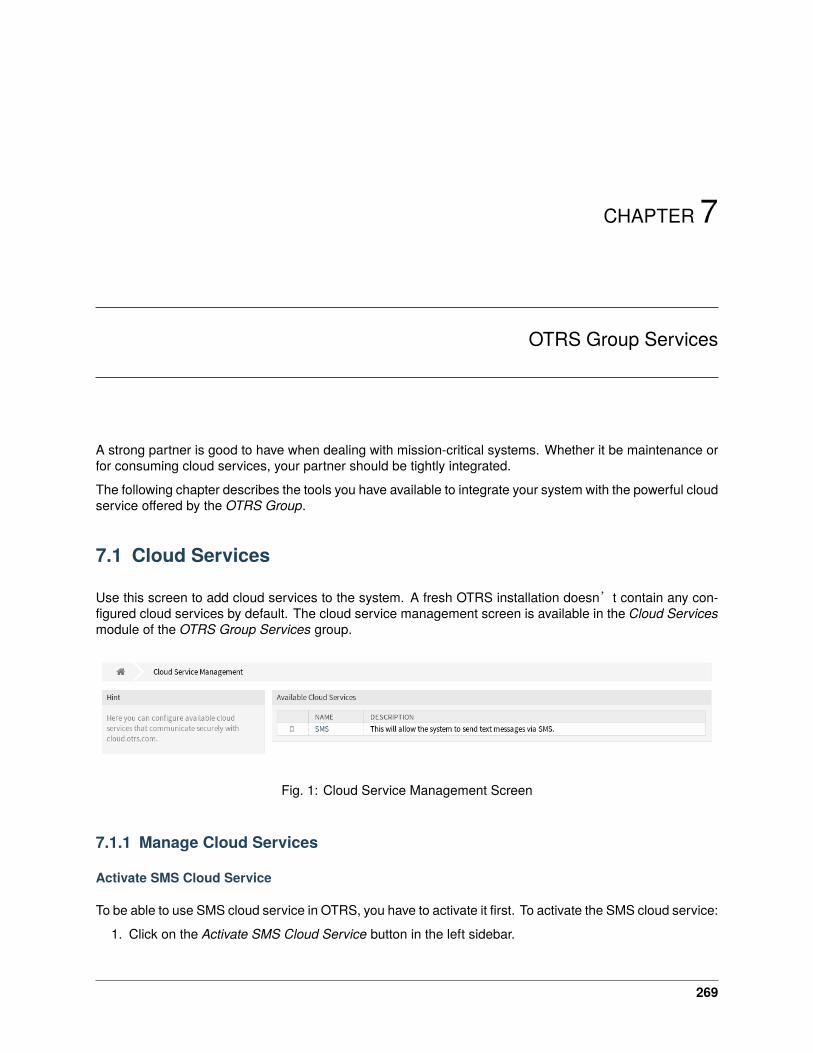
CHAPTER 7
OTRS Group Services
A strong partner is good to have when dealing with mission-critical systems. Whether it be maintenance orfor consuming cloud services, your partner should be tightly integrated.
The following chapter describes the tools you have available to integrate your system with the powerful cloudservice offered by the OTRS Group.
7.1 Cloud Services
Use this screen to add cloud services to the system. A fresh OTRS installation doesn’t contain any con-figured cloud services by default. The cloud service management screen is available in the Cloud Servicesmodule of the OTRS Group Services group.
Fig. 1: Cloud Service Management Screen
7.1.1 Manage Cloud Services
Activate SMS Cloud Service
To be able to use SMS cloud service in OTRS, you have to activate it first. To activate the SMS cloud service:
1. Click on the Activate SMS Cloud Service button in the left sidebar.
269
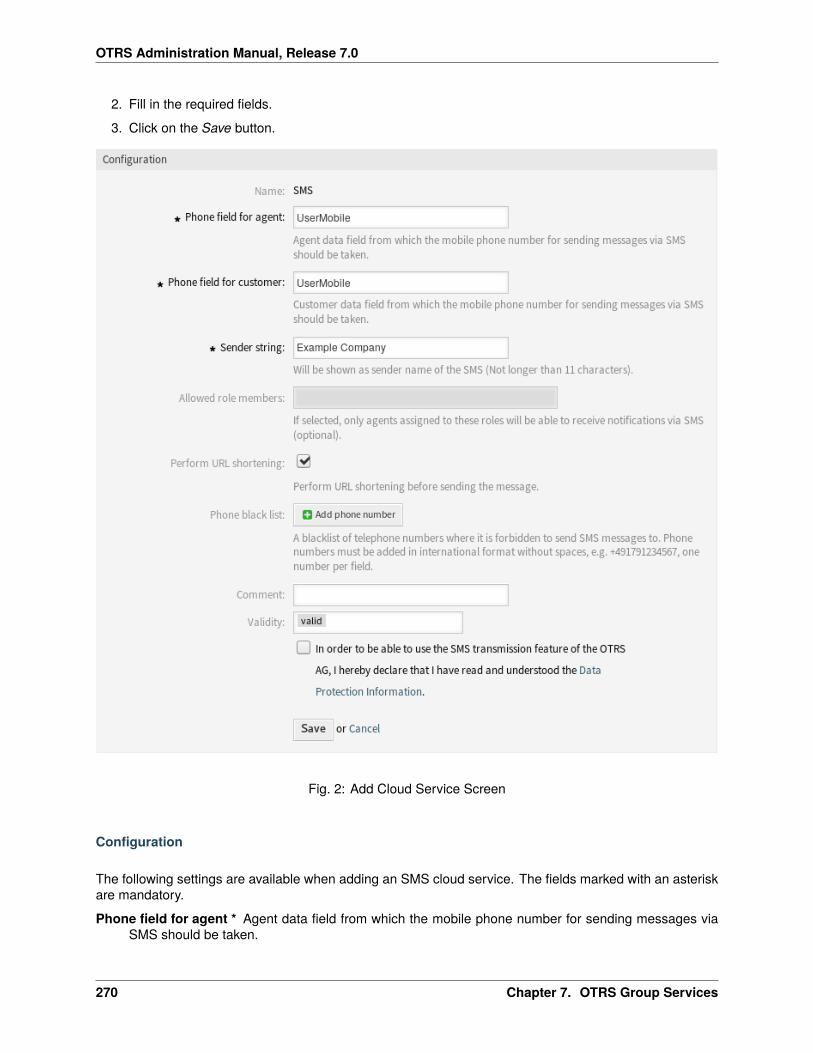
OTRS Administration Manual, Release 7.0
2. Fill in the required fields.
3. Click on the Save button.
Fig. 2: Add Cloud Service Screen
Configuration
The following settings are available when adding an SMS cloud service. The fields marked with an asteriskare mandatory.
Phone field for agent * Agent data field from which the mobile phone number for sending messages viaSMS should be taken.
270 Chapter 7. OTRS Group Services
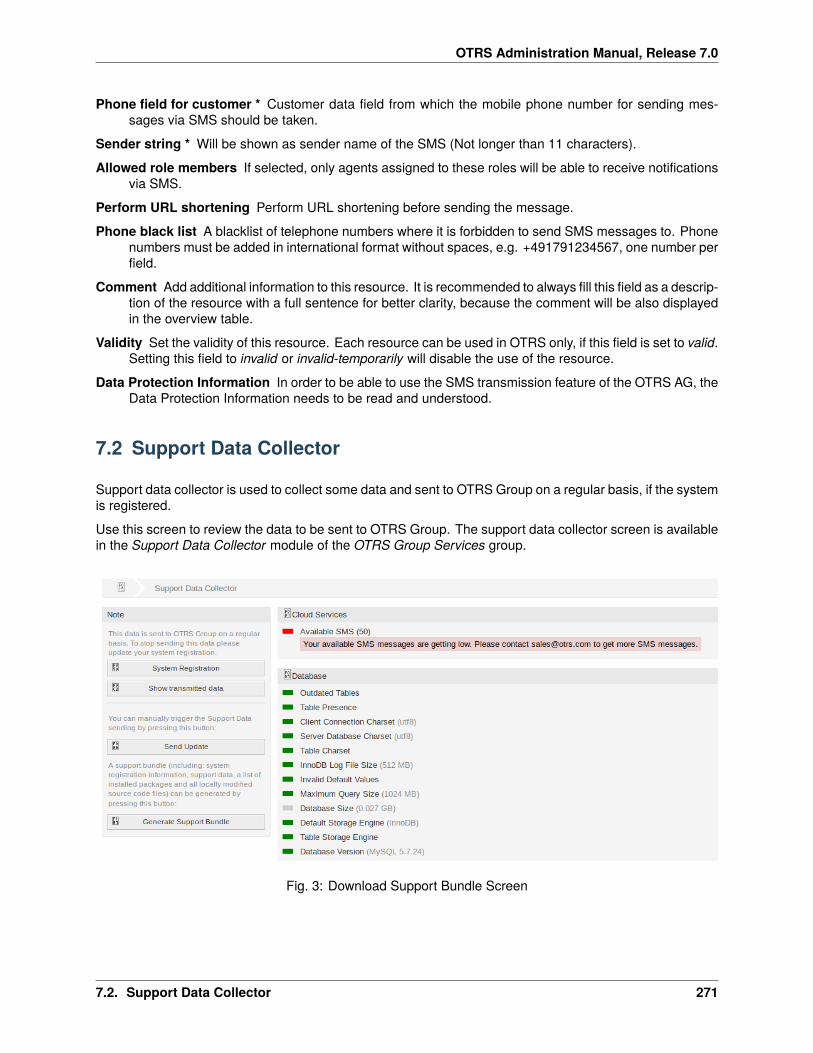
OTRS Administration Manual, Release 7.0
Phone field for customer * Customer data field from which the mobile phone number for sending mes-sages via SMS should be taken.
Sender string * Will be shown as sender name of the SMS (Not longer than 11 characters).
Allowed role members If selected, only agents assigned to these roles will be able to receive notificationsvia SMS.
Perform URL shortening Perform URL shortening before sending the message.
Phone black list A blacklist of telephone numbers where it is forbidden to send SMS messages to. Phonenumbers must be added in international format without spaces, e.g. +491791234567, one number perfield.
Comment Add additional information to this resource. It is recommended to always fill this field as a descrip-tion of the resource with a full sentence for better clarity, because the comment will be also displayedin the overview table.
Validity Set the validity of this resource. Each resource can be used in OTRS only, if this field is set to valid.Setting this field to invalid or invalid-temporarily will disable the use of the resource.
Data Protection Information In order to be able to use the SMS transmission feature of the OTRS AG, theData Protection Information needs to be read and understood.
7.2 Support Data Collector
Support data collector is used to collect some data and sent to OTRS Group on a regular basis, if the systemis registered.
Use this screen to review the data to be sent to OTRS Group. The support data collector screen is availablein the Support Data Collector module of the OTRS Group Services group.
Fig. 3: Download Support Bundle Screen
7.2. Support Data Collector 271
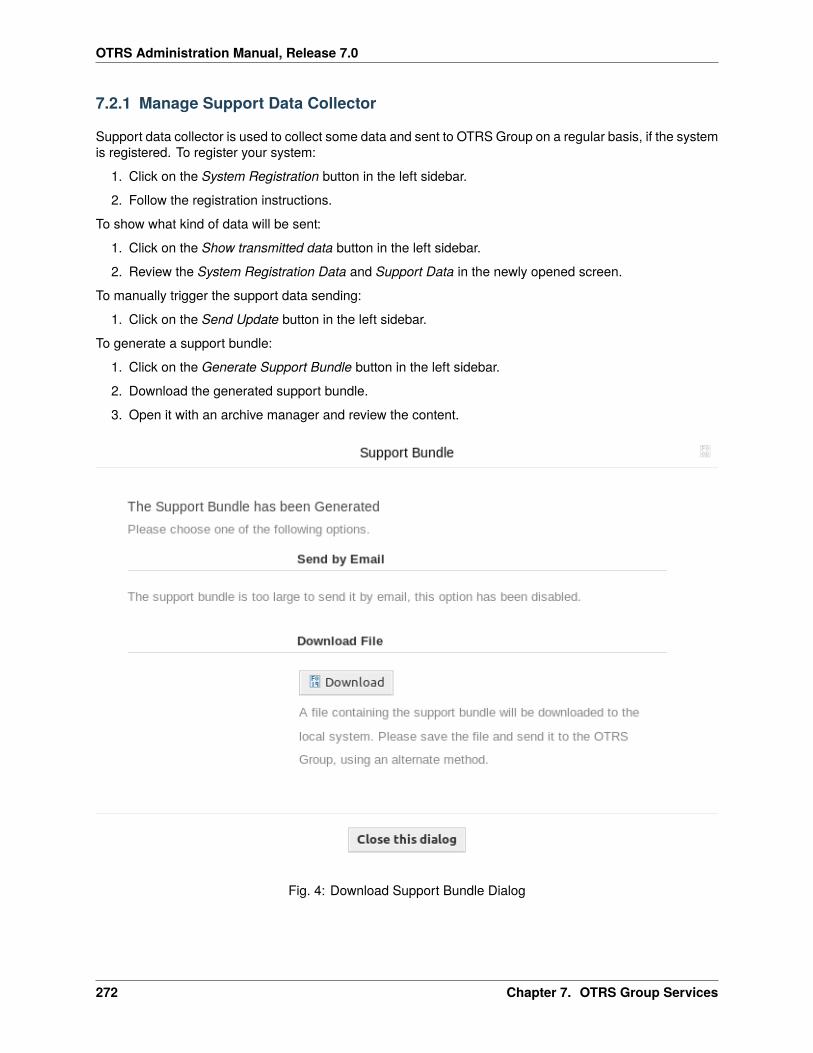
OTRS Administration Manual, Release 7.0
7.2.1 Manage Support Data Collector
Support data collector is used to collect some data and sent to OTRS Group on a regular basis, if the systemis registered. To register your system:
1. Click on the System Registration button in the left sidebar.
2. Follow the registration instructions.
To show what kind of data will be sent:
1. Click on the Show transmitted data button in the left sidebar.
2. Review the System Registration Data and Support Data in the newly opened screen.
To manually trigger the support data sending:
1. Click on the Send Update button in the left sidebar.
To generate a support bundle:
1. Click on the Generate Support Bundle button in the left sidebar.
2. Download the generated support bundle.
3. Open it with an archive manager and review the content.
Fig. 4: Download Support Bundle Dialog
272 Chapter 7. OTRS Group Services
OTRS Administration Manual, Release 7.0
7.2.2 Collected Data
The screen contains several sections. Each section has some entries with a traffic light, that indicates thefollowing:
• Gray LED means information, just displays a value.
• Green LED means OK, the entry has a good value.
• Yellow LED means notification, you have to check the value, but it is not an error.
• Red LED means error, you have to do something to solve the issue.
Cloud Services Section
This section displays information about OTRS cloud services.
Available SMS This entry shows information about your available SMS messages. If they are getting low,the LED changes to red.
Database Section
This section displays information about the database used by OTRS.
Outdated Tables Display the outdated database tables. Green LED means, there are no outdated tables.
Table Presence Display whether all needed tables exist in the database or not.
Client Connection Charset Display the character set for the client connection. It must be utf8.
Server Database Charset Display the character set of the database server. It must be utf8.
Table Charset Display the character set of the database table. It must be utf8.
InnoDB Log File Size Display the log file size for InnoDB driver. It must be at least 512 MB.
Invalid Default Values Display the invalid default values. Green LED means, there are no invalid defaultvalues.
Maximum Query Size Display the maximum size of a database query. It must be at least 1024 MB.
Database Size Display the size of database. This is just an information.
Default Storage Engine Display the default storage engine of the database. It must be InnoDB.
Table Storage Engine Display the storage engine of the database tables. It must be InnoDB.
Database Version Display the database driver version. Green LED means, the version is high enough.
Document Search Section
This section displays information about document search and the used cluster.
Cluster The name of the used cluster.
Cluster Health Details Display some internal variables of the used cluster.
Indices Health Display information about indices.
Indices Size Display the size of each index.
Node Health Display information about the used node.
7.2. Support Data Collector 273

OTRS Administration Manual, Release 7.0
Operating System Section
This section displays information about the running operating system and installed software components.
Environment Dependencies Display information about environment dependencies.
OTRS Disk Partition Display the disk partition to where OTRS is installed.
Information Disk Partitions Usage Display the used space per disk partitions.
Distribution Display the distribution name of the operating system.
Kernel Version Display the kernel version of the operating system.
System Load Display the system load of the operating system. The system load should be at maximumthe number of CPUs the system has (e.g. a load of 8 or less on a system with 8 CPUs is OK).
Perl Version Display the version of Perl.
Free Swap Space (%) Display the free swap space as percentages. There should be more than 60% freeswap space.
Used Swap Space (MB) Display the used swap space in megabytes. There should be no more than 200MB swap space used.
OTRS Section
This section displays information about the OTRS instance.
Article Search Index Status Display information about indexed articles.
Articles Per Communication Channel Display the number of articles per communication channels.
Communication Log Display aggregated information about communications.
Communication Log Account Status (last 24 hours) Display information about communication log ac-count status in the last 24 hours.
Concurrent Users Details Display information about the logged in users at the same time separated byhourly.
Concurrent Users Display information about the number of maximum logged in users in the same time.
Config Settings Display some important configuration settings from system configurations.
Daemon Display whether the OTRS daemon is running or not.
Database Records Display the main OTRS object and the related number of records in the database.
Default Admin Password Green LED means, that the default administrator password was changed.
Email Sending Queue Display the number of emails that are queued for sending.
Domain Name Display the fully qualified domain name set in system configuration setting FQDN.
File System Writable Display whether the file system is writable or not.
Legacy Configuration Backups Green LED means, there are no legacy configuration backup files found.
Package Installation Status Green LED means, that all packages are installed correctly.
Package Framework Version Status Green LED means, that the OTRS framework version is suitable forthe installed packages.
Package Verification Status Green LED means, that all installed packages are verified by the OTRSGroup.
274 Chapter 7. OTRS Group Services
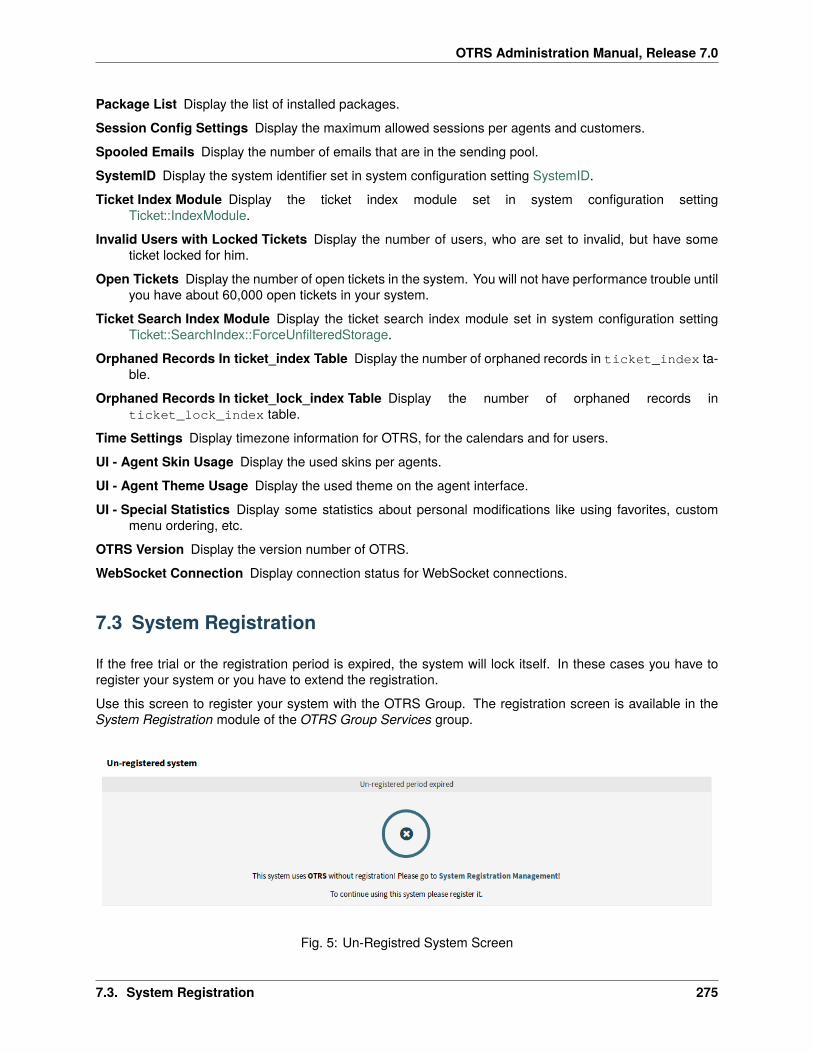
OTRS Administration Manual, Release 7.0
Package List Display the list of installed packages.
Session Config Settings Display the maximum allowed sessions per agents and customers.
Spooled Emails Display the number of emails that are in the sending pool.
SystemID Display the system identifier set in system configuration setting SystemID.
Ticket Index Module Display the ticket index module set in system configuration settingTicket::IndexModule.
Invalid Users with Locked Tickets Display the number of users, who are set to invalid, but have someticket locked for him.
Open Tickets Display the number of open tickets in the system. You will not have performance trouble untilyou have about 60,000 open tickets in your system.
Ticket Search Index Module Display the ticket search index module set in system configuration settingTicket::SearchIndex::ForceUnfilteredStorage.
Orphaned Records In ticket_index Table Display the number of orphaned records in ticket_index ta-ble.
Orphaned Records In ticket_lock_index Table Display the number of orphaned records inticket_lock_index table.
Time Settings Display timezone information for OTRS, for the calendars and for users.
UI - Agent Skin Usage Display the used skins per agents.
UI - Agent Theme Usage Display the used theme on the agent interface.
UI - Special Statistics Display some statistics about personal modifications like using favorites, custommenu ordering, etc.
OTRS Version Display the version number of OTRS.
WebSocket Connection Display connection status for WebSocket connections.
7.3 System Registration
If the free trial or the registration period is expired, the system will lock itself. In these cases you have toregister your system or you have to extend the registration.
Use this screen to register your system with the OTRS Group. The registration screen is available in theSystem Registration module of the OTRS Group Services group.
Fig. 5: Un-Registred System Screen
7.3. System Registration 275
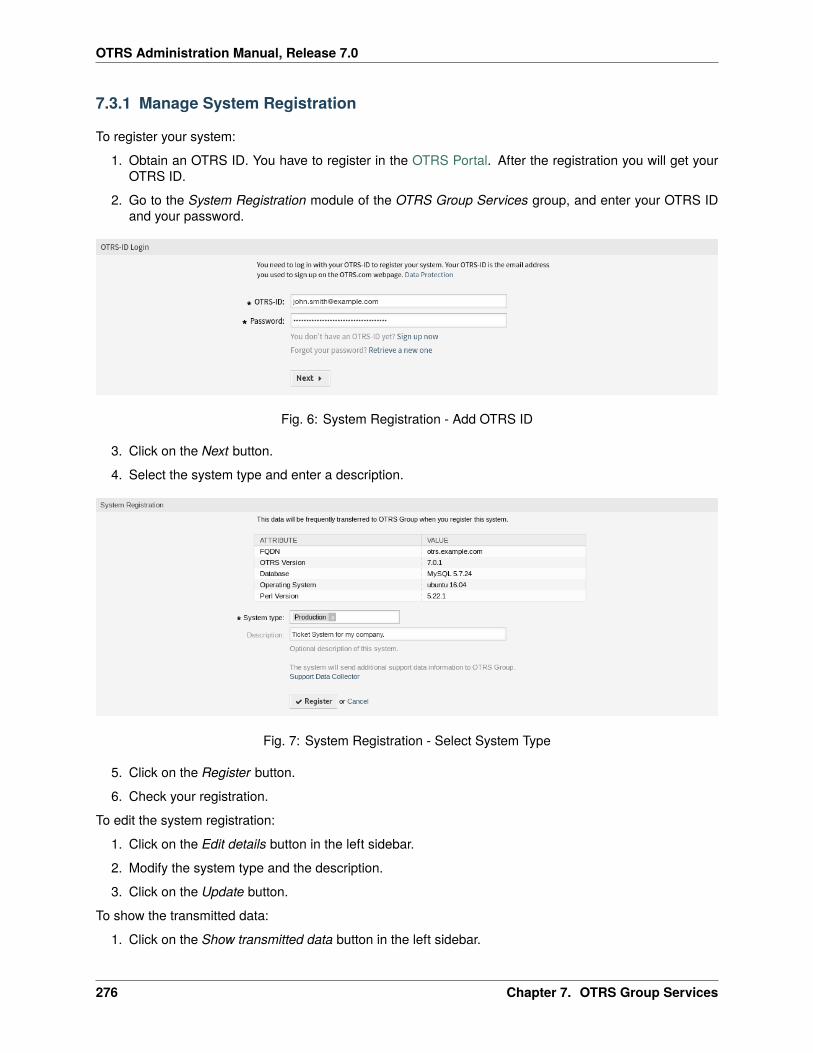
OTRS Administration Manual, Release 7.0
7.3.1 Manage System Registration
To register your system:
1. Obtain an OTRS ID. You have to register in the OTRS Portal. After the registration you will get yourOTRS ID.
2. Go to the System Registration module of the OTRS Group Services group, and enter your OTRS IDand your password.
Fig. 6: System Registration - Add OTRS ID
3. Click on the Next button.
4. Select the system type and enter a description.
Fig. 7: System Registration - Select System Type
5. Click on the Register button.
6. Check your registration.
To edit the system registration:
1. Click on the Edit details button in the left sidebar.
2. Modify the system type and the description.
3. Click on the Update button.
To show the transmitted data:
1. Click on the Show transmitted data button in the left sidebar.
276 Chapter 7. OTRS Group Services

OTRS Administration Manual, Release 7.0
Fig. 8: Registered System
Fig. 9: Edit System Registration Screen
2. Review the data in JSON format.
See also:
Detailed explanation of the fields is available in the Support Data Collector chapter.
To overview the registered system:
1. Click on the Overview of registered systems button in the left sidebar.
2. Log in to the OTRS Portal.
3. Review the list of registered systems.
To deregister a system:
1. Click on the Deregister system button in the left sidebar.
Note: You can’t deregister your system if you’re using the STORM powered by OTRS™ or having avalid service contract.
7.3. System Registration 277
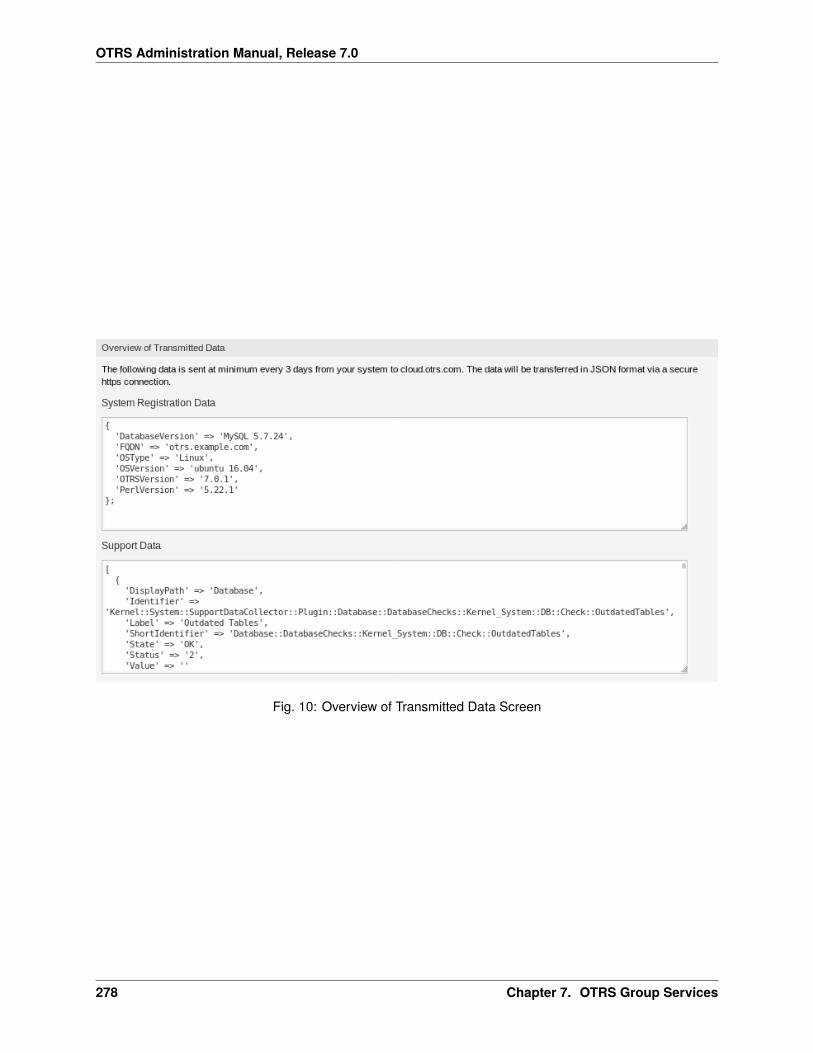
OTRS Administration Manual, Release 7.0
Fig. 10: Overview of Transmitted Data Screen
278 Chapter 7. OTRS Group Services
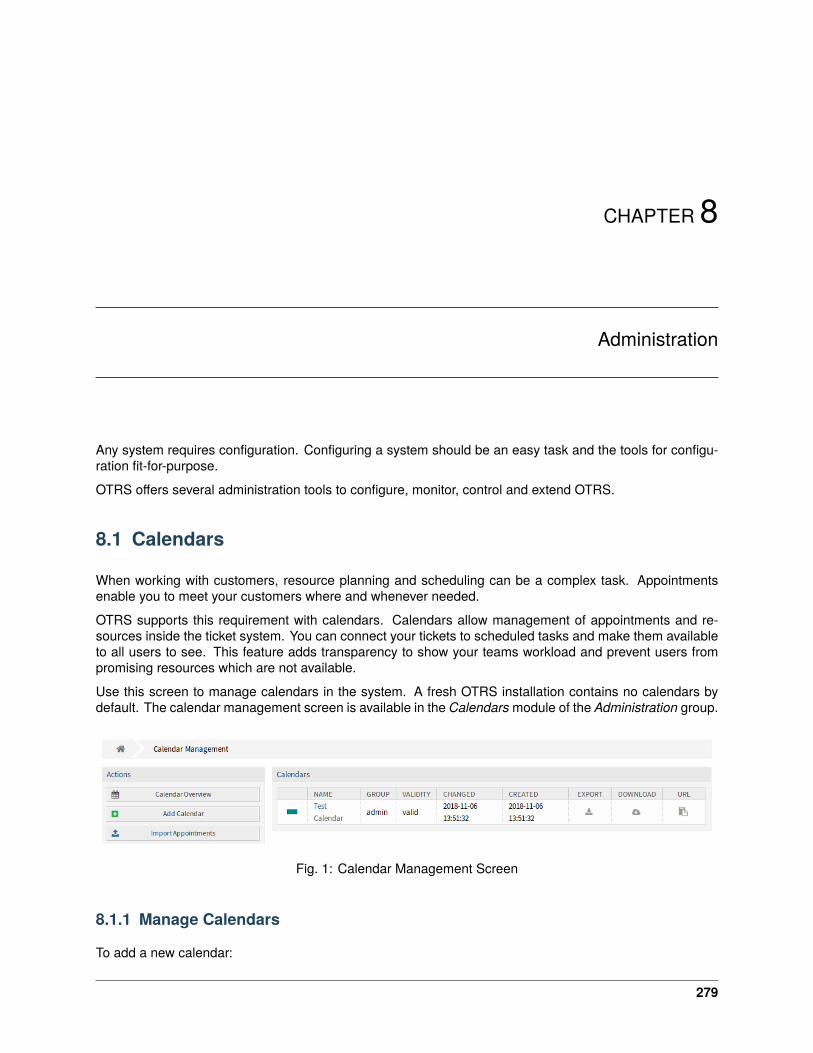
CHAPTER 8
Administration
Any system requires configuration. Configuring a system should be an easy task and the tools for configu-ration fit-for-purpose.
OTRS offers several administration tools to configure, monitor, control and extend OTRS.
8.1 Calendars
When working with customers, resource planning and scheduling can be a complex task. Appointmentsenable you to meet your customers where and whenever needed.
OTRS supports this requirement with calendars. Calendars allow management of appointments and re-sources inside the ticket system. You can connect your tickets to scheduled tasks and make them availableto all users to see. This feature adds transparency to show your teams workload and prevent users frompromising resources which are not available.
Use this screen to manage calendars in the system. A fresh OTRS installation contains no calendars bydefault. The calendar management screen is available in the Calendars module of the Administration group.
Fig. 1: Calendar Management Screen
8.1.1 Manage Calendars
To add a new calendar:
279
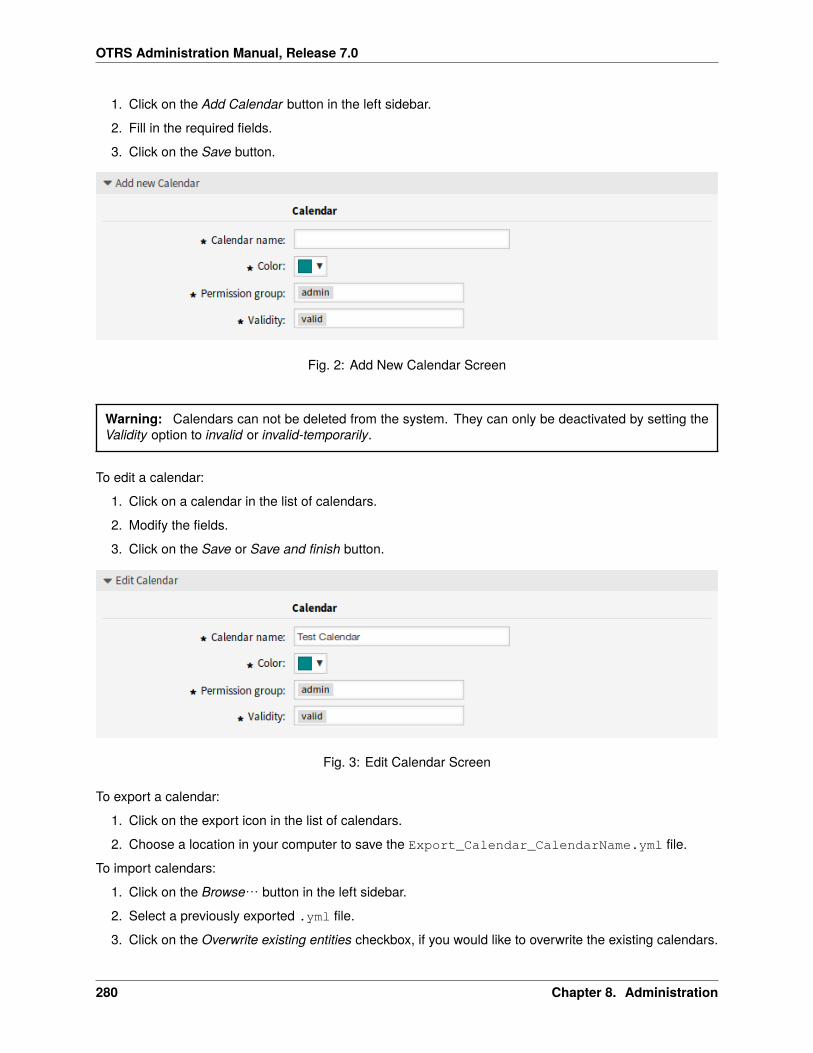
OTRS Administration Manual, Release 7.0
1. Click on the Add Calendar button in the left sidebar.
2. Fill in the required fields.
3. Click on the Save button.
Fig. 2: Add New Calendar Screen
Warning: Calendars can not be deleted from the system. They can only be deactivated by setting theValidity option to invalid or invalid-temporarily.
To edit a calendar:
1. Click on a calendar in the list of calendars.
2. Modify the fields.
3. Click on the Save or Save and finish button.
Fig. 3: Edit Calendar Screen
To export a calendar:
1. Click on the export icon in the list of calendars.
2. Choose a location in your computer to save the Export_Calendar_CalendarName.yml file.
To import calendars:
1. Click on the Browse… button in the left sidebar.
2. Select a previously exported .yml file.
3. Click on the Overwrite existing entities checkbox, if you would like to overwrite the existing calendars.
280 Chapter 8. Administration
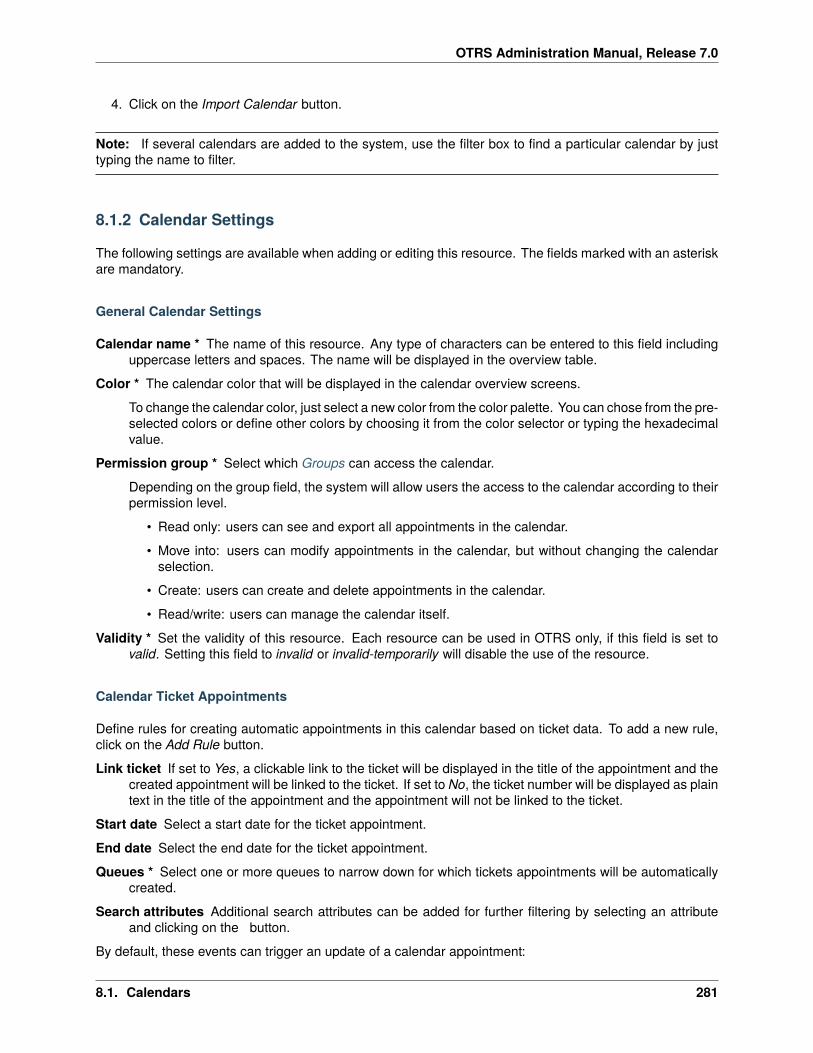
OTRS Administration Manual, Release 7.0
4. Click on the Import Calendar button.
Note: If several calendars are added to the system, use the filter box to find a particular calendar by justtyping the name to filter.
8.1.2 Calendar Settings
The following settings are available when adding or editing this resource. The fields marked with an asteriskare mandatory.
General Calendar Settings
Calendar name * The name of this resource. Any type of characters can be entered to this field includinguppercase letters and spaces. The name will be displayed in the overview table.
Color * The calendar color that will be displayed in the calendar overview screens.
To change the calendar color, just select a new color from the color palette. You can chose from the pre-selected colors or define other colors by choosing it from the color selector or typing the hexadecimalvalue.
Permission group * Select which Groups can access the calendar.
Depending on the group field, the system will allow users the access to the calendar according to theirpermission level.
• Read only: users can see and export all appointments in the calendar.
• Move into: users can modify appointments in the calendar, but without changing the calendarselection.
• Create: users can create and delete appointments in the calendar.
• Read/write: users can manage the calendar itself.
Validity * Set the validity of this resource. Each resource can be used in OTRS only, if this field is set tovalid. Setting this field to invalid or invalid-temporarily will disable the use of the resource.
Calendar Ticket Appointments
Define rules for creating automatic appointments in this calendar based on ticket data. To add a new rule,click on the Add Rule button.
Link ticket If set to Yes, a clickable link to the ticket will be displayed in the title of the appointment and thecreated appointment will be linked to the ticket. If set to No, the ticket number will be displayed as plaintext in the title of the appointment and the appointment will not be linked to the ticket.
Start date Select a start date for the ticket appointment.
End date Select the end date for the ticket appointment.
Queues * Select one or more queues to narrow down for which tickets appointments will be automaticallycreated.
Search attributes Additional search attributes can be added for further filtering by selecting an attributeand clicking on the � button.
By default, these events can trigger an update of a calendar appointment:
8.1. Calendars 281
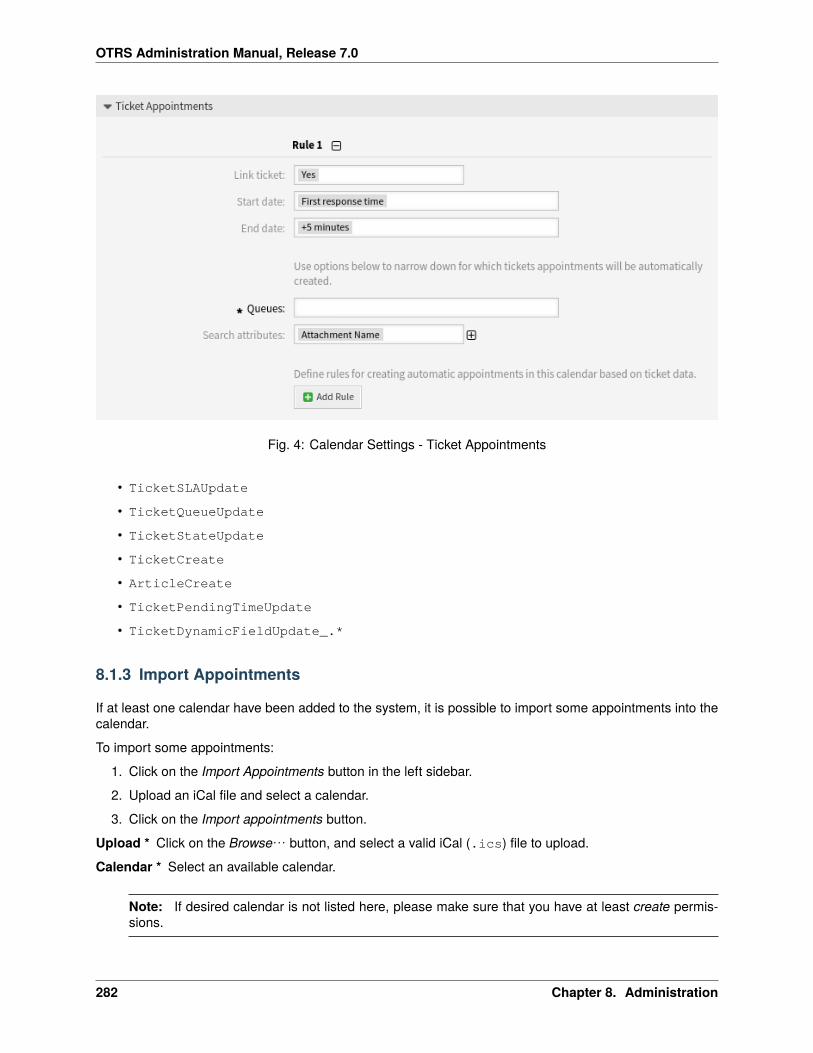
OTRS Administration Manual, Release 7.0
Fig. 4: Calendar Settings - Ticket Appointments
• TicketSLAUpdate
• TicketQueueUpdate
• TicketStateUpdate
• TicketCreate
• ArticleCreate
• TicketPendingTimeUpdate
• TicketDynamicFieldUpdate_.*
8.1.3 Import Appointments
If at least one calendar have been added to the system, it is possible to import some appointments into thecalendar.
To import some appointments:
1. Click on the Import Appointments button in the left sidebar.
2. Upload an iCal file and select a calendar.
3. Click on the Import appointments button.
Upload * Click on the Browse… button, and select a valid iCal (.ics) file to upload.
Calendar * Select an available calendar.
Note: If desired calendar is not listed here, please make sure that you have at least create permis-sions.
282 Chapter 8. Administration
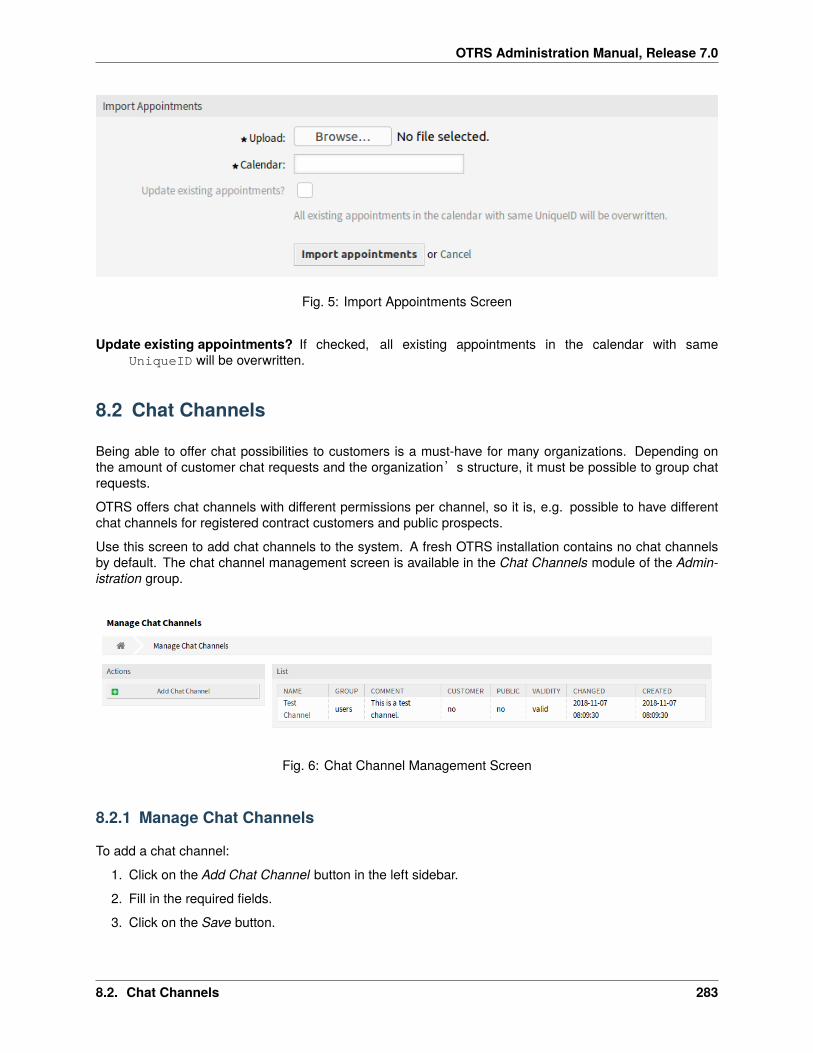
OTRS Administration Manual, Release 7.0
Fig. 5: Import Appointments Screen
Update existing appointments? If checked, all existing appointments in the calendar with sameUniqueID will be overwritten.
8.2 Chat Channels
Being able to offer chat possibilities to customers is a must-have for many organizations. Depending onthe amount of customer chat requests and the organization’s structure, it must be possible to group chatrequests.
OTRS offers chat channels with different permissions per channel, so it is, e.g. possible to have differentchat channels for registered contract customers and public prospects.
Use this screen to add chat channels to the system. A fresh OTRS installation contains no chat channelsby default. The chat channel management screen is available in the Chat Channels module of the Admin-istration group.
Fig. 6: Chat Channel Management Screen
8.2.1 Manage Chat Channels
To add a chat channel:
1. Click on the Add Chat Channel button in the left sidebar.
2. Fill in the required fields.
3. Click on the Save button.
8.2. Chat Channels 283

OTRS Administration Manual, Release 7.0
Fig. 7: Add Chat Channel Screen
Warning: Chat channels can not be deleted from the system. They can only be deactivated by settingthe Validity option to invalid or invalid-temporarily.
To edit a chat channel:
1. Click on a chat channel in the list of chat channels.
2. Modify the fields.
3. Click on the Save or Save and finish button.
Fig. 8: Edit Chat Channel Screen
8.2.2 Chat Channel Settings
The following settings are available when adding or editing this resource. The fields marked with an asteriskare mandatory.
284 Chapter 8. Administration
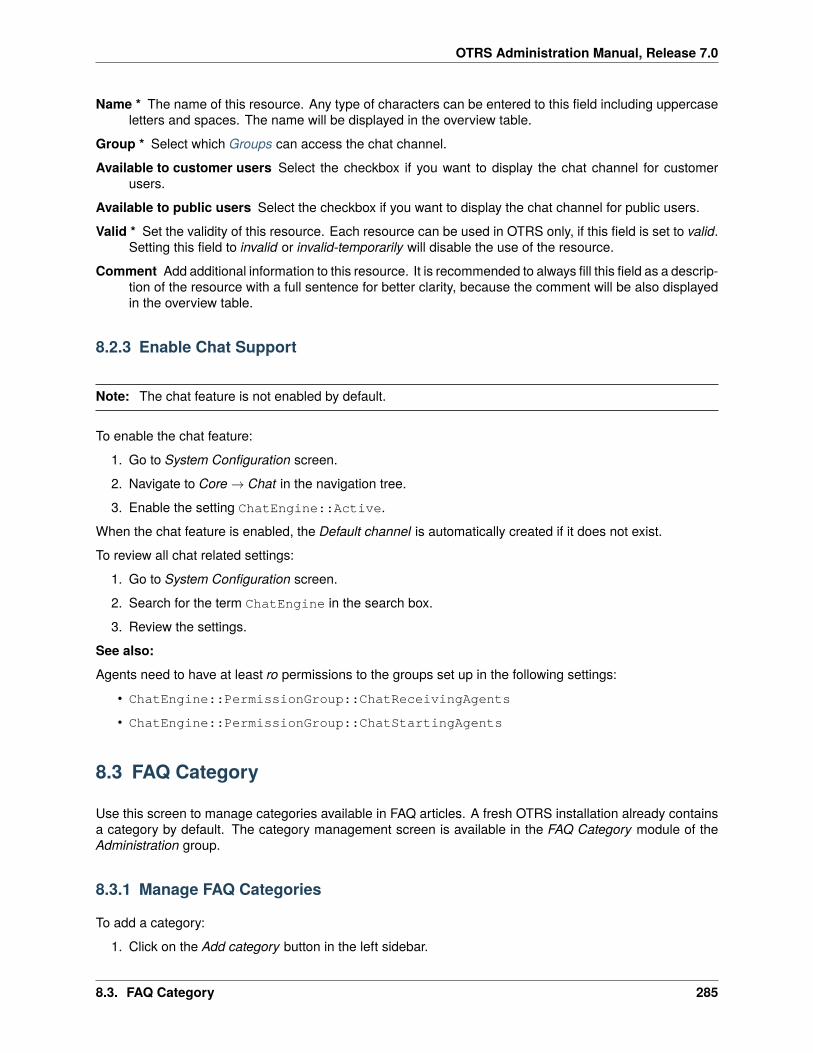
OTRS Administration Manual, Release 7.0
Name * The name of this resource. Any type of characters can be entered to this field including uppercaseletters and spaces. The name will be displayed in the overview table.
Group * Select which Groups can access the chat channel.
Available to customer users Select the checkbox if you want to display the chat channel for customerusers.
Available to public users Select the checkbox if you want to display the chat channel for public users.
Valid * Set the validity of this resource. Each resource can be used in OTRS only, if this field is set to valid.Setting this field to invalid or invalid-temporarily will disable the use of the resource.
Comment Add additional information to this resource. It is recommended to always fill this field as a descrip-tion of the resource with a full sentence for better clarity, because the comment will be also displayedin the overview table.
8.2.3 Enable Chat Support
Note: The chat feature is not enabled by default.
To enable the chat feature:
1. Go to System Configuration screen.
2. Navigate to Core → Chat in the navigation tree.
3. Enable the setting ChatEngine::Active.
When the chat feature is enabled, the Default channel is automatically created if it does not exist.
To review all chat related settings:
1. Go to System Configuration screen.
2. Search for the term ChatEngine in the search box.
3. Review the settings.
See also:
Agents need to have at least ro permissions to the groups set up in the following settings:
• ChatEngine::PermissionGroup::ChatReceivingAgents
• ChatEngine::PermissionGroup::ChatStartingAgents
8.3 FAQ Category
Use this screen to manage categories available in FAQ articles. A fresh OTRS installation already containsa category by default. The category management screen is available in the FAQ Category module of theAdministration group.
8.3.1 Manage FAQ Categories
To add a category:
1. Click on the Add category button in the left sidebar.
8.3. FAQ Category 285
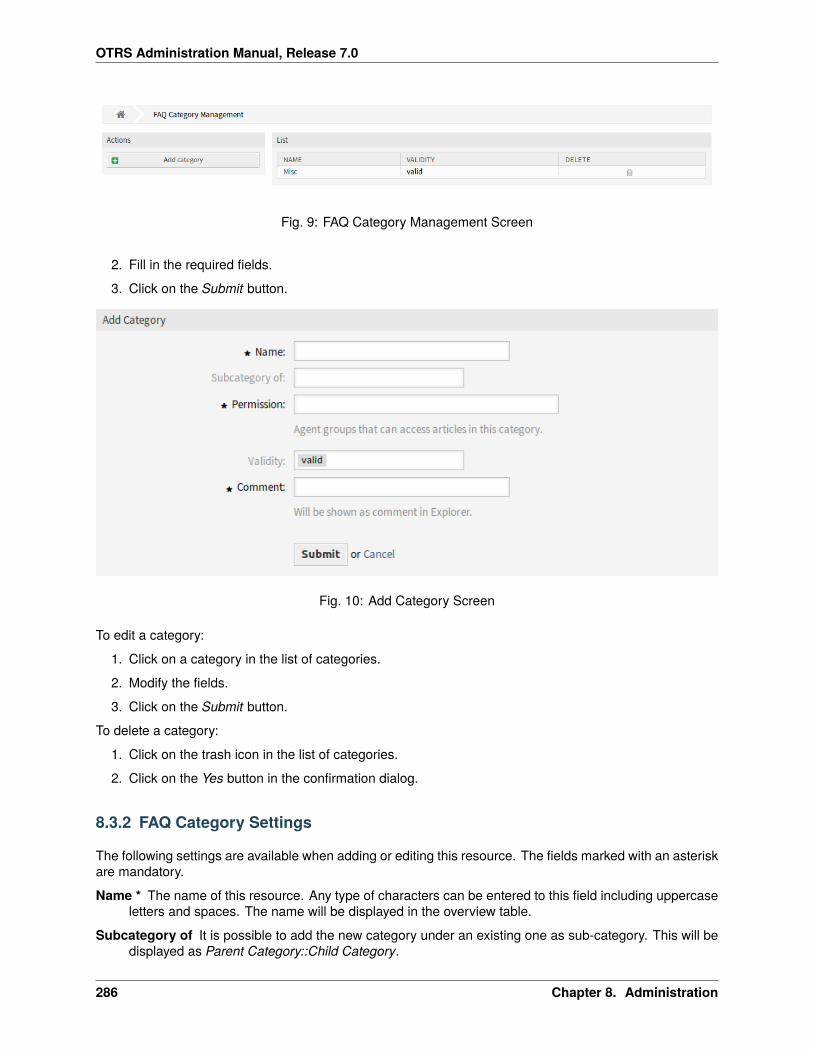
OTRS Administration Manual, Release 7.0
Fig. 9: FAQ Category Management Screen
2. Fill in the required fields.
3. Click on the Submit button.
Fig. 10: Add Category Screen
To edit a category:
1. Click on a category in the list of categories.
2. Modify the fields.
3. Click on the Submit button.
To delete a category:
1. Click on the trash icon in the list of categories.
2. Click on the Yes button in the confirmation dialog.
8.3.2 FAQ Category Settings
The following settings are available when adding or editing this resource. The fields marked with an asteriskare mandatory.
Name * The name of this resource. Any type of characters can be entered to this field including uppercaseletters and spaces. The name will be displayed in the overview table.
Subcategory of It is possible to add the new category under an existing one as sub-category. This will bedisplayed as Parent Category::Child Category.
286 Chapter 8. Administration
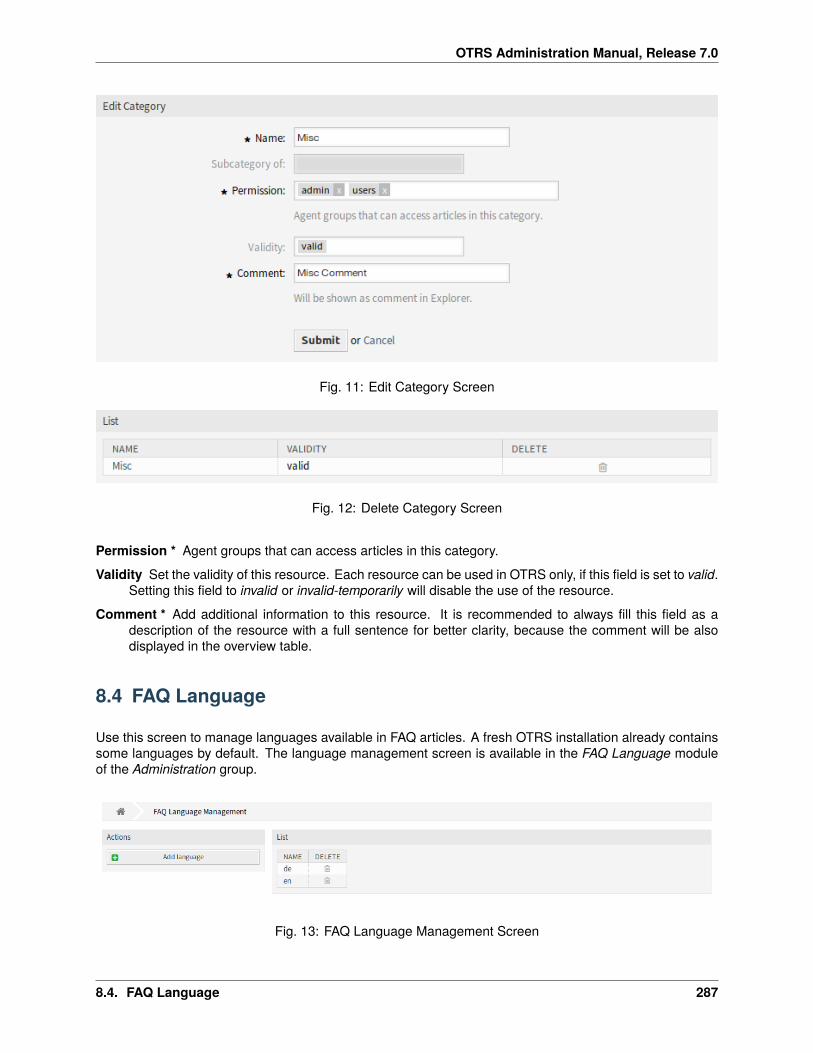
OTRS Administration Manual, Release 7.0
Fig. 11: Edit Category Screen
Fig. 12: Delete Category Screen
Permission * Agent groups that can access articles in this category.
Validity Set the validity of this resource. Each resource can be used in OTRS only, if this field is set to valid.Setting this field to invalid or invalid-temporarily will disable the use of the resource.
Comment * Add additional information to this resource. It is recommended to always fill this field as adescription of the resource with a full sentence for better clarity, because the comment will be alsodisplayed in the overview table.
8.4 FAQ Language
Use this screen to manage languages available in FAQ articles. A fresh OTRS installation already containssome languages by default. The language management screen is available in the FAQ Language moduleof the Administration group.
Fig. 13: FAQ Language Management Screen
8.4. FAQ Language 287
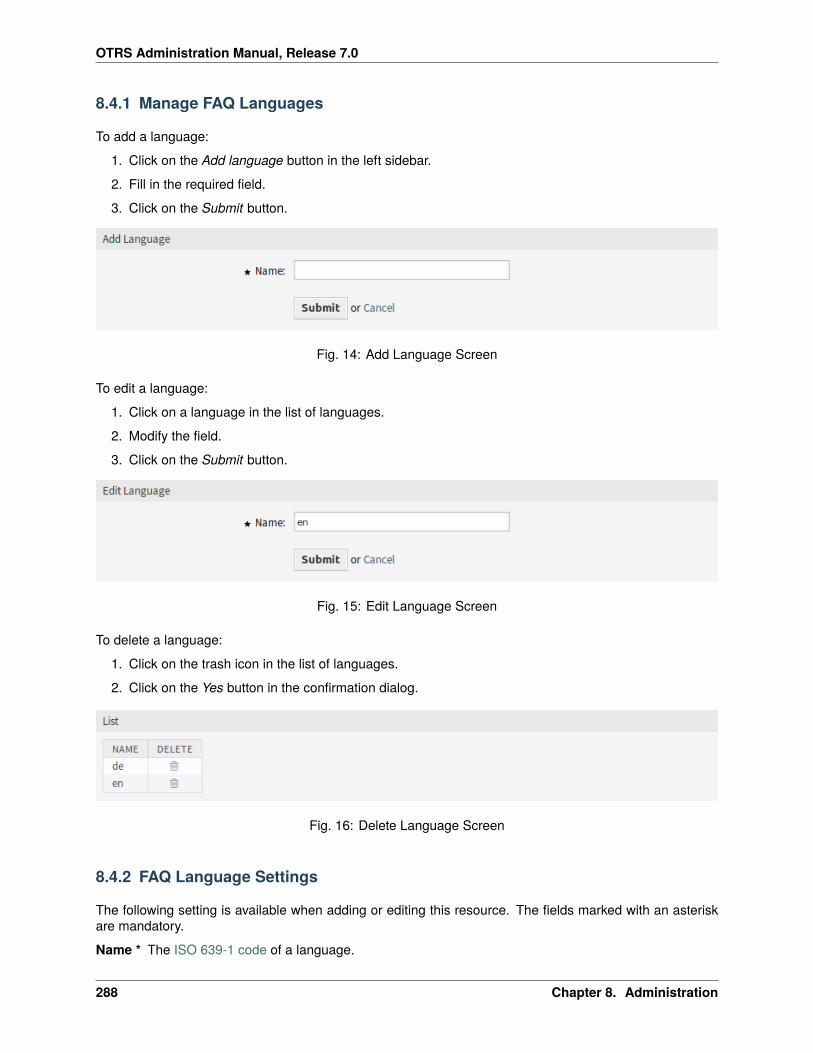
OTRS Administration Manual, Release 7.0
8.4.1 Manage FAQ Languages
To add a language:
1. Click on the Add language button in the left sidebar.
2. Fill in the required field.
3. Click on the Submit button.
Fig. 14: Add Language Screen
To edit a language:
1. Click on a language in the list of languages.
2. Modify the field.
3. Click on the Submit button.
Fig. 15: Edit Language Screen
To delete a language:
1. Click on the trash icon in the list of languages.
2. Click on the Yes button in the confirmation dialog.
Fig. 16: Delete Language Screen
8.4.2 FAQ Language Settings
The following setting is available when adding or editing this resource. The fields marked with an asteriskare mandatory.
Name * The ISO 639-1 code of a language.
288 Chapter 8. Administration
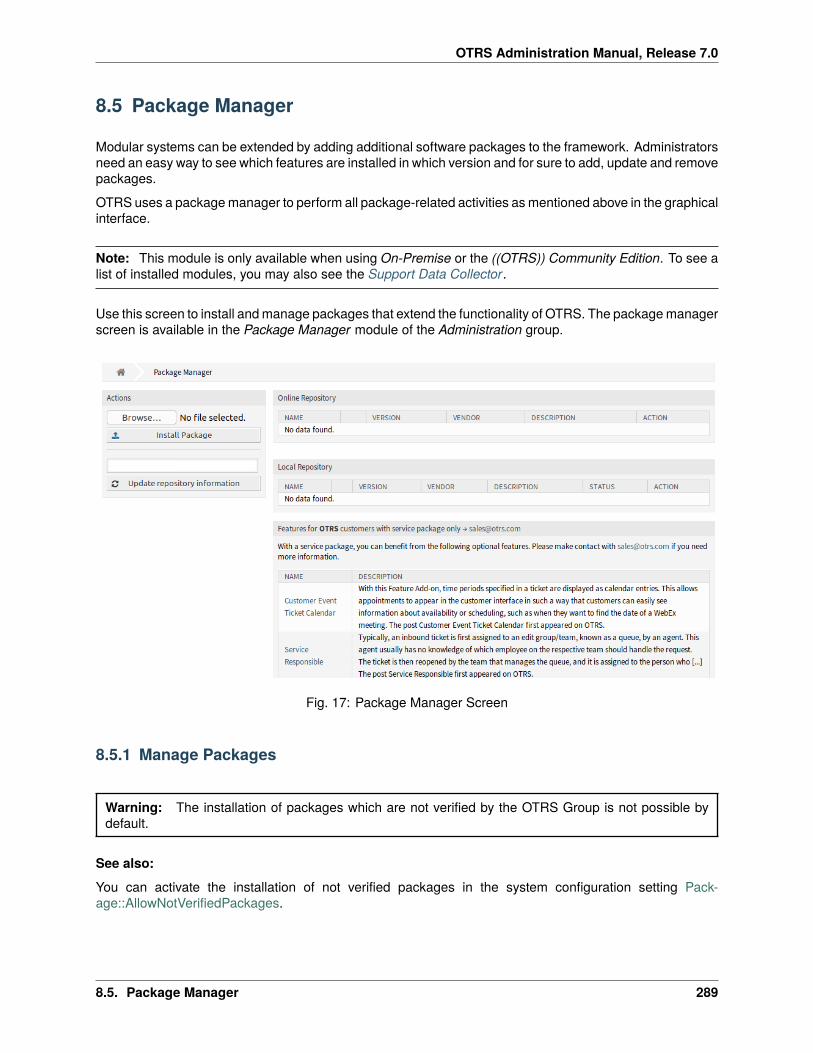
OTRS Administration Manual, Release 7.0
8.5 Package Manager
Modular systems can be extended by adding additional software packages to the framework. Administratorsneed an easy way to see which features are installed in which version and for sure to add, update and removepackages.
OTRS uses a package manager to perform all package-related activities as mentioned above in the graphicalinterface.
Note: This module is only available when using On-Premise or the ((OTRS)) Community Edition. To see alist of installed modules, you may also see the Support Data Collector.
Use this screen to install and manage packages that extend the functionality of OTRS. The package managerscreen is available in the Package Manager module of the Administration group.
Fig. 17: Package Manager Screen
8.5.1 Manage Packages
Warning: The installation of packages which are not verified by the OTRS Group is not possible bydefault.
See also:
You can activate the installation of not verified packages in the system configuration setting Pack-age::AllowNotVerifiedPackages.
8.5. Package Manager 289
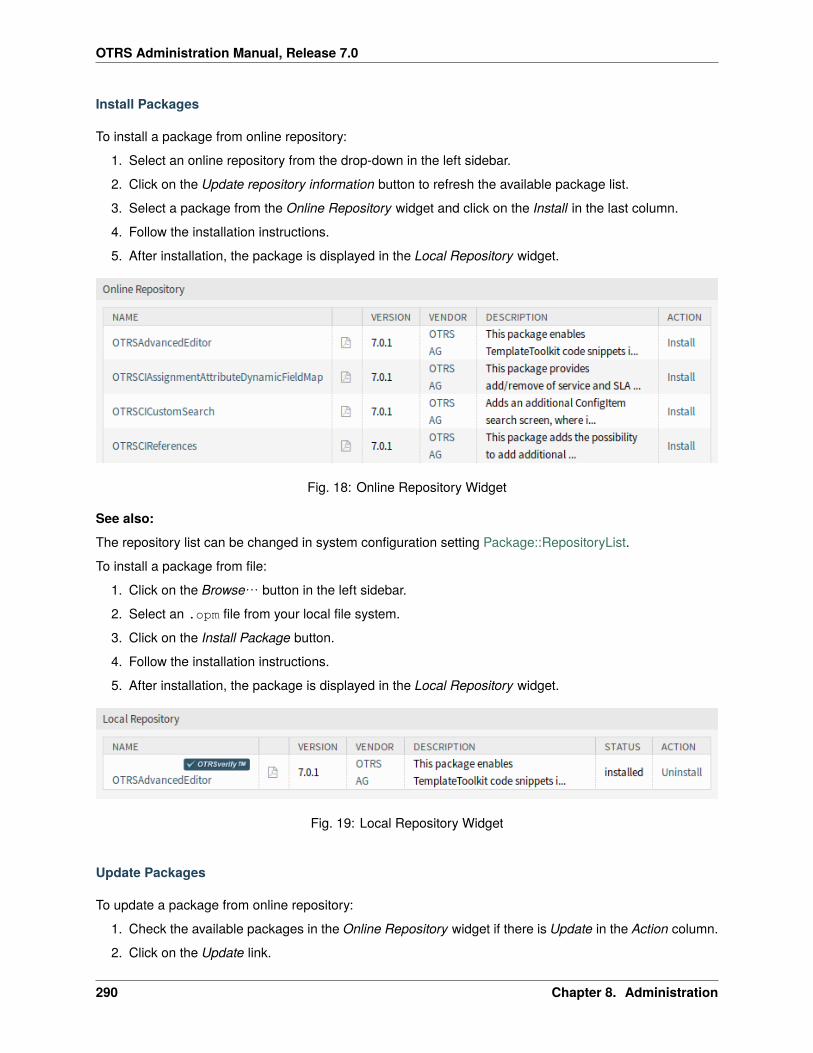
OTRS Administration Manual, Release 7.0
Install Packages
To install a package from online repository:
1. Select an online repository from the drop-down in the left sidebar.
2. Click on the Update repository information button to refresh the available package list.
3. Select a package from the Online Repository widget and click on the Install in the last column.
4. Follow the installation instructions.
5. After installation, the package is displayed in the Local Repository widget.
Fig. 18: Online Repository Widget
See also:
The repository list can be changed in system configuration setting Package::RepositoryList.
To install a package from file:
1. Click on the Browse… button in the left sidebar.
2. Select an .opm file from your local file system.
3. Click on the Install Package button.
4. Follow the installation instructions.
5. After installation, the package is displayed in the Local Repository widget.
Fig. 19: Local Repository Widget
Update Packages
To update a package from online repository:
1. Check the available packages in the Online Repository widget if there is Update in the Action column.
2. Click on the Update link.
290 Chapter 8. Administration
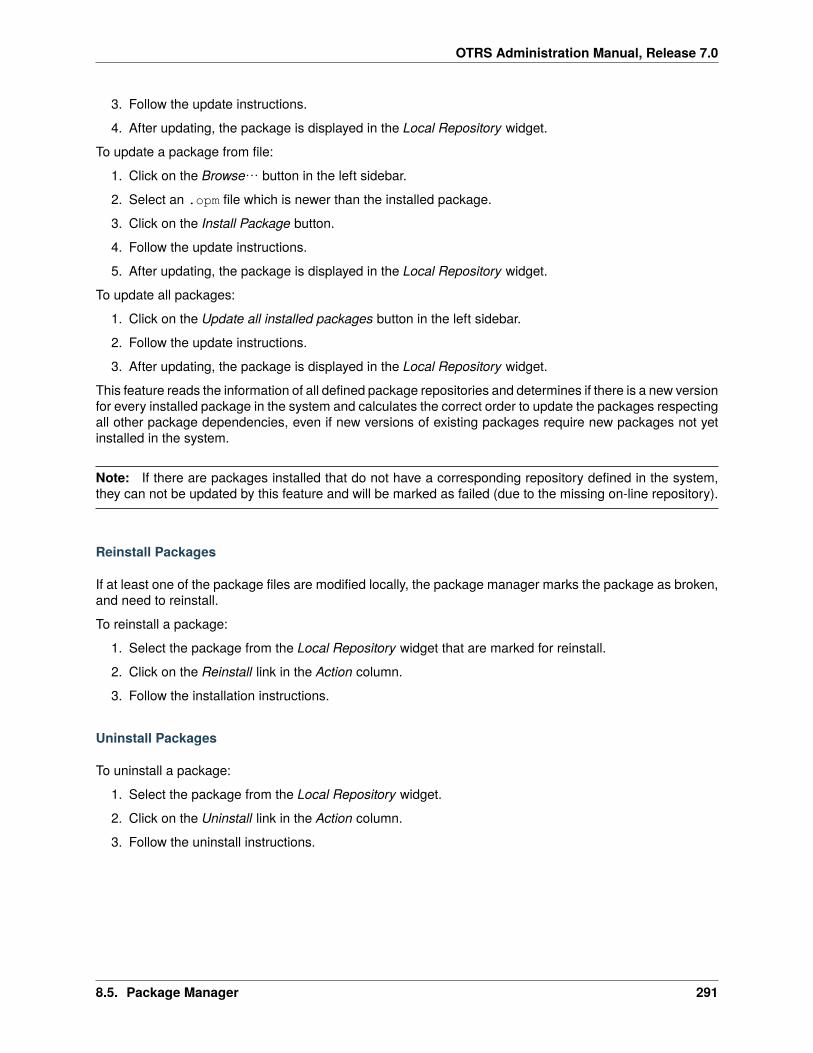
OTRS Administration Manual, Release 7.0
3. Follow the update instructions.
4. After updating, the package is displayed in the Local Repository widget.
To update a package from file:
1. Click on the Browse… button in the left sidebar.
2. Select an .opm file which is newer than the installed package.
3. Click on the Install Package button.
4. Follow the update instructions.
5. After updating, the package is displayed in the Local Repository widget.
To update all packages:
1. Click on the Update all installed packages button in the left sidebar.
2. Follow the update instructions.
3. After updating, the package is displayed in the Local Repository widget.
This feature reads the information of all defined package repositories and determines if there is a new versionfor every installed package in the system and calculates the correct order to update the packages respectingall other package dependencies, even if new versions of existing packages require new packages not yetinstalled in the system.
Note: If there are packages installed that do not have a corresponding repository defined in the system,they can not be updated by this feature and will be marked as failed (due to the missing on-line repository).
Reinstall Packages
If at least one of the package files are modified locally, the package manager marks the package as broken,and need to reinstall.
To reinstall a package:
1. Select the package from the Local Repository widget that are marked for reinstall.
2. Click on the Reinstall link in the Action column.
3. Follow the installation instructions.
Uninstall Packages
To uninstall a package:
1. Select the package from the Local Repository widget.
2. Click on the Uninstall link in the Action column.
3. Follow the uninstall instructions.
8.5. Package Manager 291
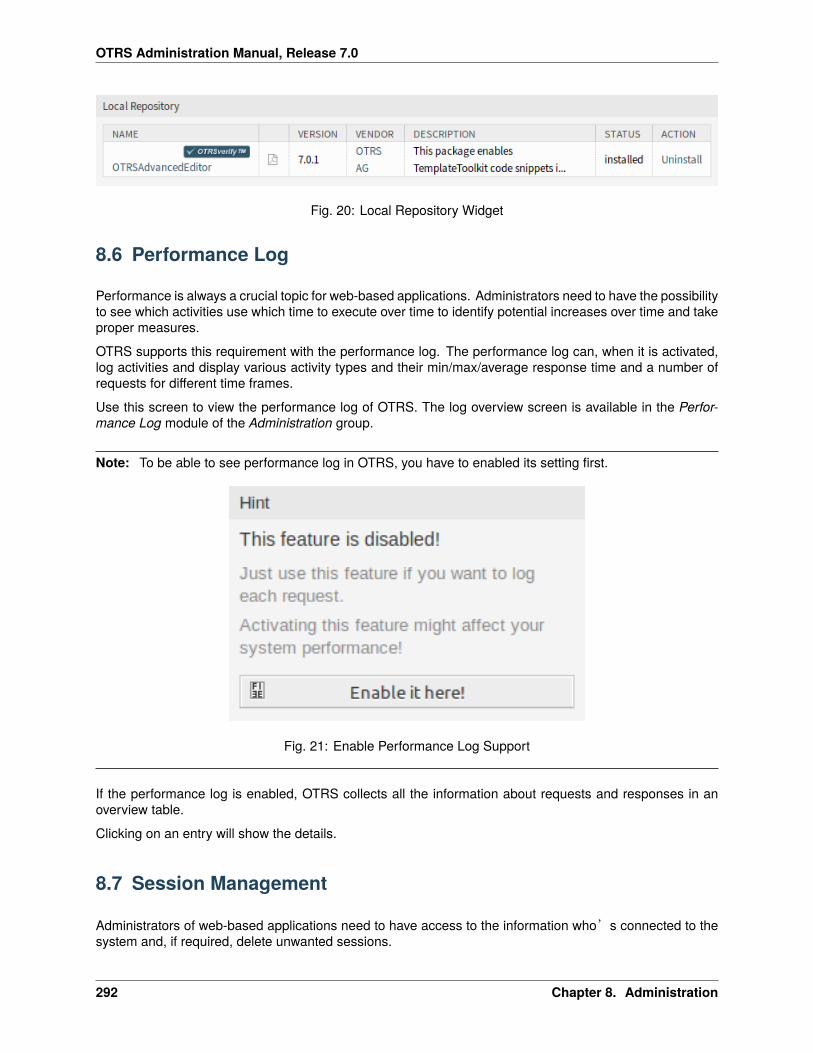
OTRS Administration Manual, Release 7.0
Fig. 20: Local Repository Widget
8.6 Performance Log
Performance is always a crucial topic for web-based applications. Administrators need to have the possibilityto see which activities use which time to execute over time to identify potential increases over time and takeproper measures.
OTRS supports this requirement with the performance log. The performance log can, when it is activated,log activities and display various activity types and their min/max/average response time and a number ofrequests for different time frames.
Use this screen to view the performance log of OTRS. The log overview screen is available in the Perfor-mance Log module of the Administration group.
Note: To be able to see performance log in OTRS, you have to enabled its setting first.
Fig. 21: Enable Performance Log Support
If the performance log is enabled, OTRS collects all the information about requests and responses in anoverview table.
Clicking on an entry will show the details.
8.7 Session Management
Administrators of web-based applications need to have access to the information who’s connected to thesystem and, if required, delete unwanted sessions.
292 Chapter 8. Administration
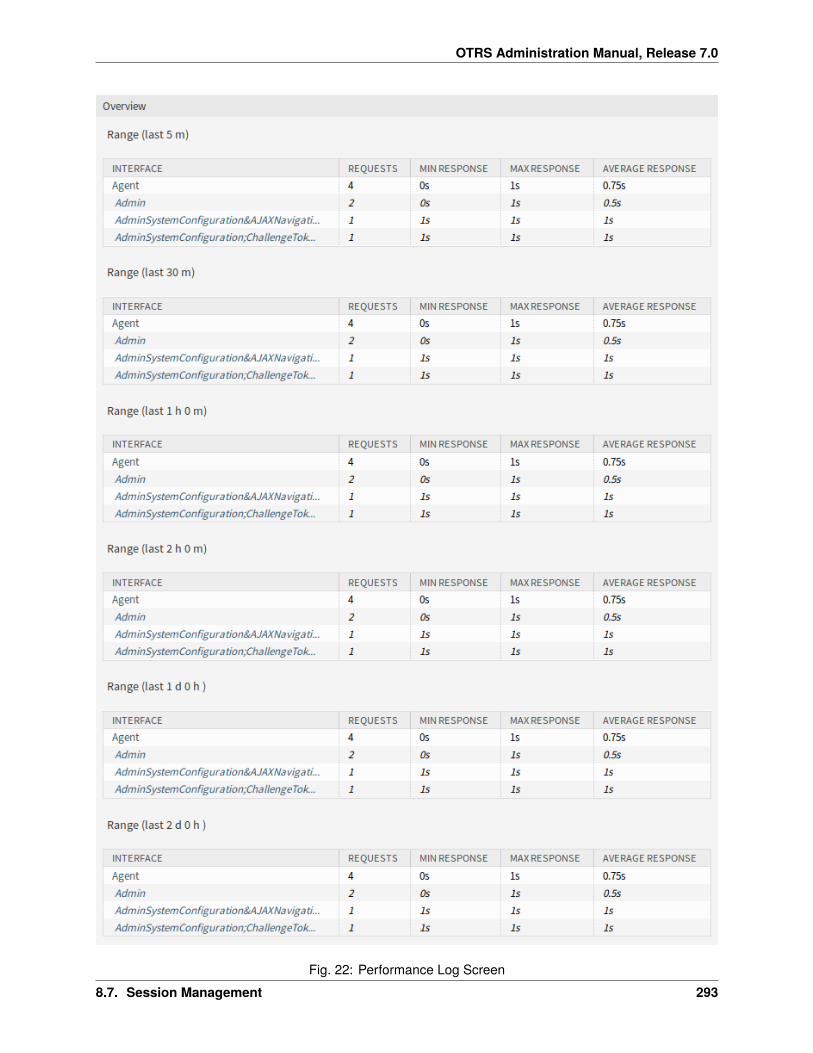
OTRS Administration Manual, Release 7.0
Fig. 22: Performance Log Screen8.7. Session Management 293
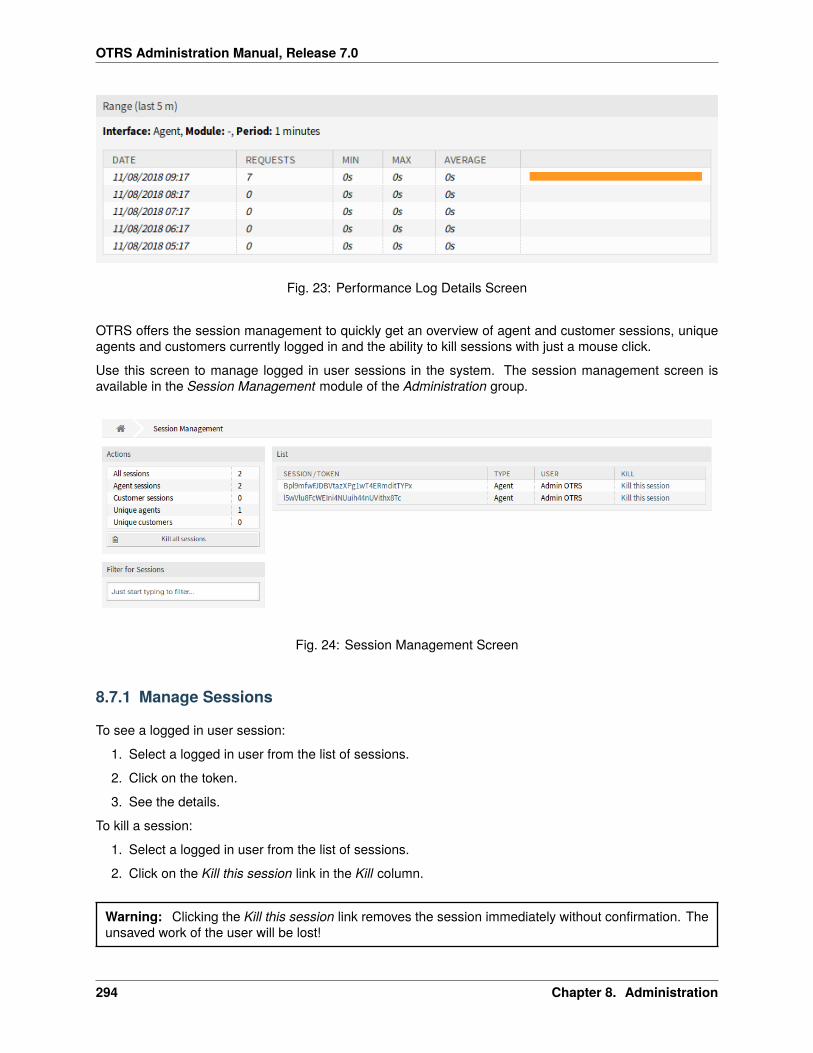
OTRS Administration Manual, Release 7.0
Fig. 23: Performance Log Details Screen
OTRS offers the session management to quickly get an overview of agent and customer sessions, uniqueagents and customers currently logged in and the ability to kill sessions with just a mouse click.
Use this screen to manage logged in user sessions in the system. The session management screen isavailable in the Session Management module of the Administration group.
Fig. 24: Session Management Screen
8.7.1 Manage Sessions
To see a logged in user session:
1. Select a logged in user from the list of sessions.
2. Click on the token.
3. See the details.
To kill a session:
1. Select a logged in user from the list of sessions.
2. Click on the Kill this session link in the Kill column.
Warning: Clicking the Kill this session link removes the session immediately without confirmation. Theunsaved work of the user will be lost!
294 Chapter 8. Administration
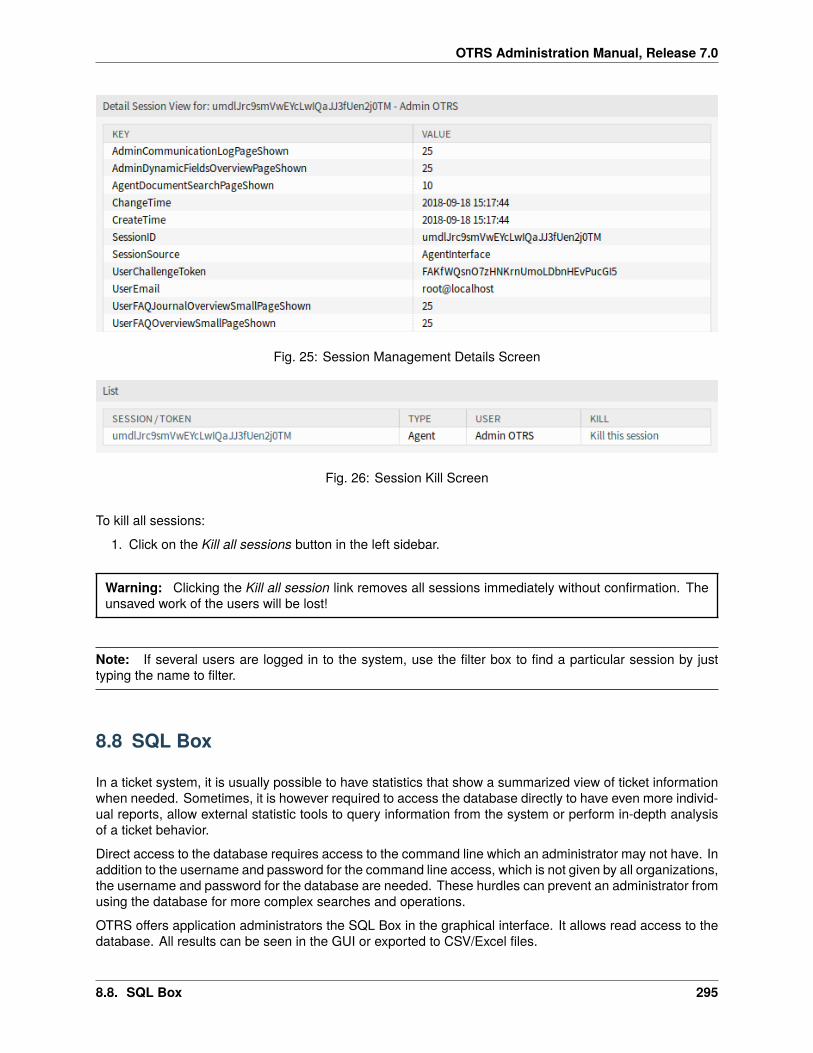
OTRS Administration Manual, Release 7.0
Fig. 25: Session Management Details Screen
Fig. 26: Session Kill Screen
To kill all sessions:
1. Click on the Kill all sessions button in the left sidebar.
Warning: Clicking the Kill all session link removes all sessions immediately without confirmation. Theunsaved work of the users will be lost!
Note: If several users are logged in to the system, use the filter box to find a particular session by justtyping the name to filter.
8.8 SQL Box
In a ticket system, it is usually possible to have statistics that show a summarized view of ticket informationwhen needed. Sometimes, it is however required to access the database directly to have even more individ-ual reports, allow external statistic tools to query information from the system or perform in-depth analysisof a ticket behavior.
Direct access to the database requires access to the command line which an administrator may not have. Inaddition to the username and password for the command line access, which is not given by all organizations,the username and password for the database are needed. These hurdles can prevent an administrator fromusing the database for more complex searches and operations.
OTRS offers application administrators the SQL Box in the graphical interface. It allows read access to thedatabase. All results can be seen in the GUI or exported to CSV/Excel files.
8.8. SQL Box 295
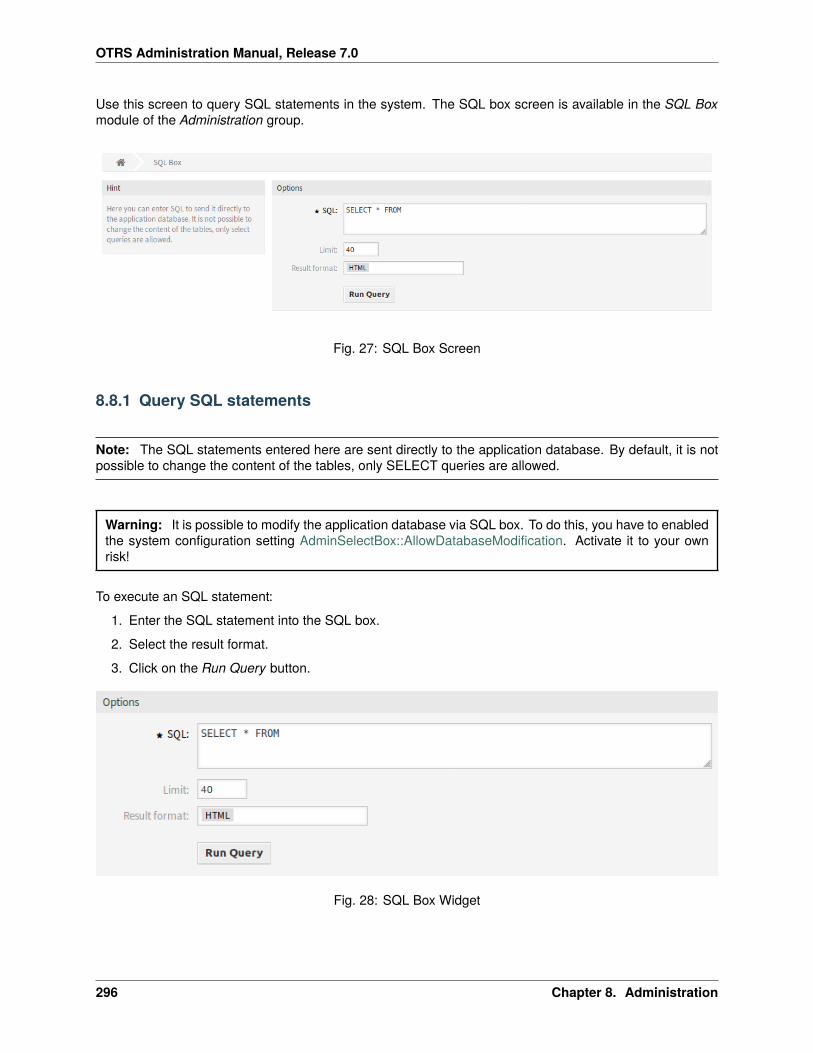
OTRS Administration Manual, Release 7.0
Use this screen to query SQL statements in the system. The SQL box screen is available in the SQL Boxmodule of the Administration group.
Fig. 27: SQL Box Screen
8.8.1 Query SQL statements
Note: The SQL statements entered here are sent directly to the application database. By default, it is notpossible to change the content of the tables, only SELECT queries are allowed.
Warning: It is possible to modify the application database via SQL box. To do this, you have to enabledthe system configuration setting AdminSelectBox::AllowDatabaseModification. Activate it to your ownrisk!
To execute an SQL statement:
1. Enter the SQL statement into the SQL box.
2. Select the result format.
3. Click on the Run Query button.
Fig. 28: SQL Box Widget
296 Chapter 8. Administration
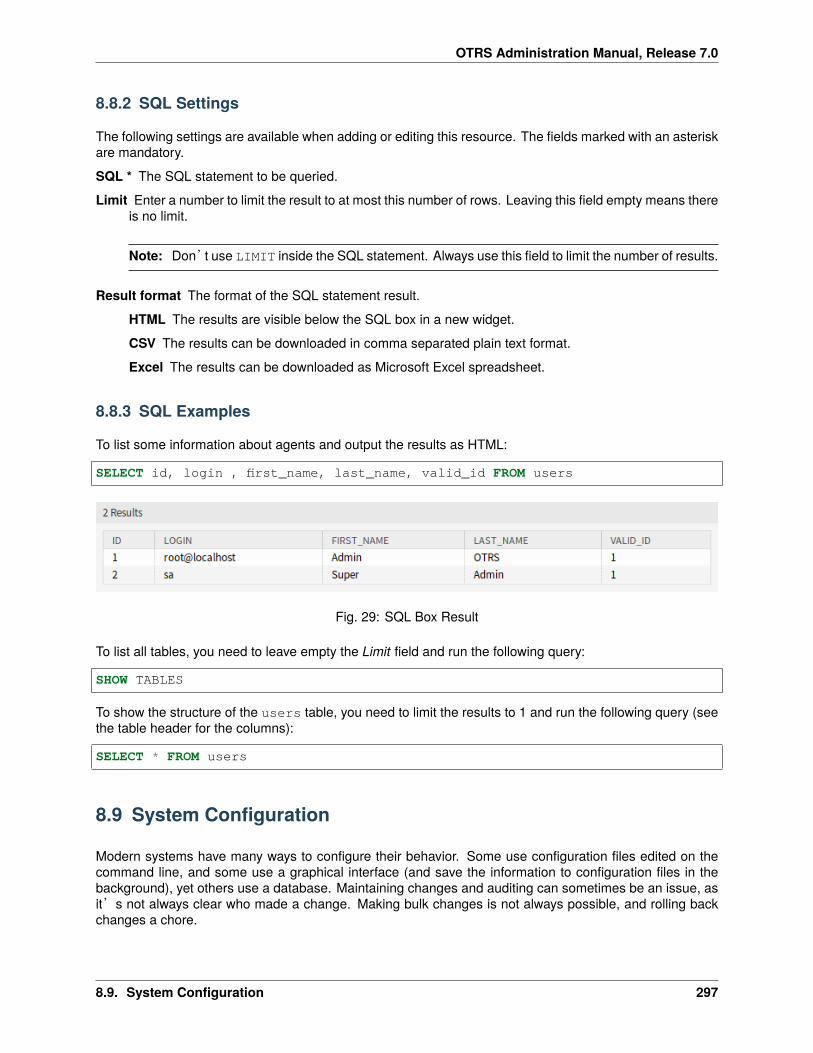
OTRS Administration Manual, Release 7.0
8.8.2 SQL Settings
The following settings are available when adding or editing this resource. The fields marked with an asteriskare mandatory.
SQL * The SQL statement to be queried.
Limit Enter a number to limit the result to at most this number of rows. Leaving this field empty means thereis no limit.
Note: Don’t use LIMIT inside the SQL statement. Always use this field to limit the number of results.
Result format The format of the SQL statement result.
HTML The results are visible below the SQL box in a new widget.
CSV The results can be downloaded in comma separated plain text format.
Excel The results can be downloaded as Microsoft Excel spreadsheet.
8.8.3 SQL Examples
To list some information about agents and output the results as HTML:
SELECT id, login , first_name, last_name, valid_id FROM users
Fig. 29: SQL Box Result
To list all tables, you need to leave empty the Limit field and run the following query:
SHOW TABLES
To show the structure of the users table, you need to limit the results to 1 and run the following query (seethe table header for the columns):
SELECT * FROM users
8.9 System Configuration
Modern systems have many ways to configure their behavior. Some use configuration files edited on thecommand line, and some use a graphical interface (and save the information to configuration files in thebackground), yet others use a database. Maintaining changes and auditing can sometimes be an issue, asit’s not always clear who made a change. Making bulk changes is not always possible, and rolling backchanges a chore.
8.9. System Configuration 297
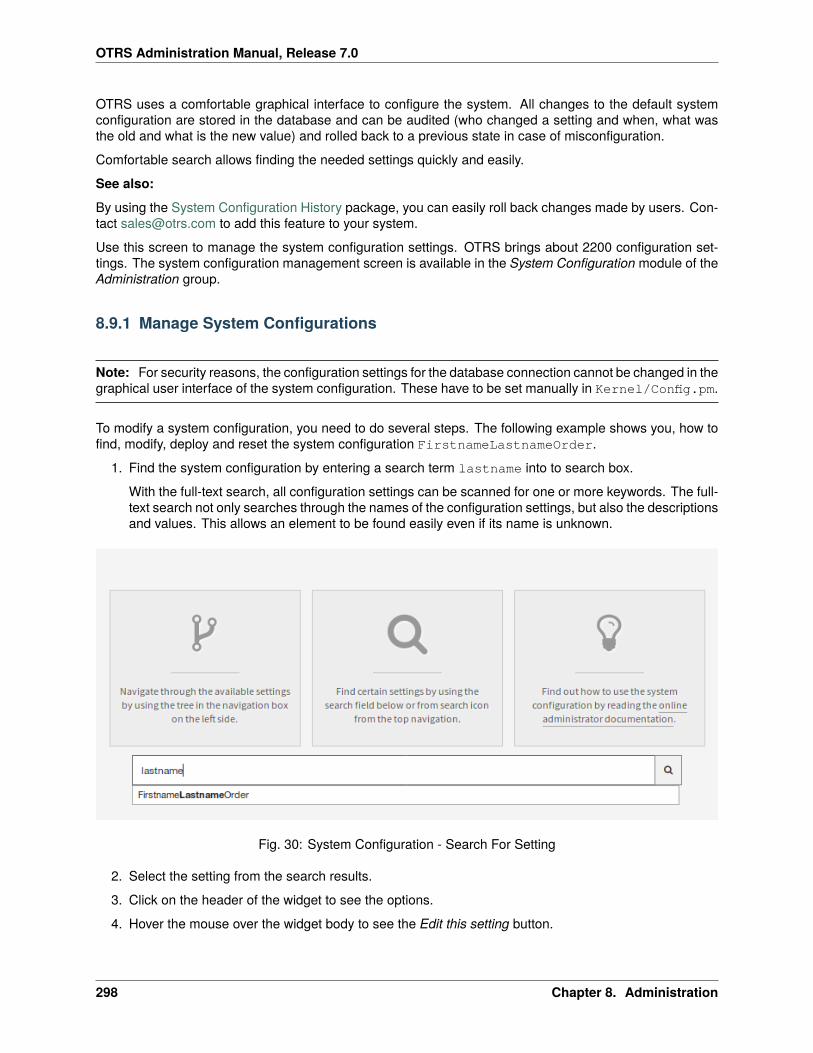
OTRS Administration Manual, Release 7.0
OTRS uses a comfortable graphical interface to configure the system. All changes to the default systemconfiguration are stored in the database and can be audited (who changed a setting and when, what wasthe old and what is the new value) and rolled back to a previous state in case of misconfiguration.
Comfortable search allows finding the needed settings quickly and easily.
See also:
By using the System Configuration History package, you can easily roll back changes made by users. Con-tact [email protected] to add this feature to your system.
Use this screen to manage the system configuration settings. OTRS brings about 2200 configuration set-tings. The system configuration management screen is available in the System Configuration module of theAdministration group.
8.9.1 Manage System Configurations
Note: For security reasons, the configuration settings for the database connection cannot be changed in thegraphical user interface of the system configuration. These have to be set manually in Kernel/Config.pm.
To modify a system configuration, you need to do several steps. The following example shows you, how tofind, modify, deploy and reset the system configuration FirstnameLastnameOrder.
1. Find the system configuration by entering a search term lastname into to search box.
With the full-text search, all configuration settings can be scanned for one or more keywords. The full-text search not only searches through the names of the configuration settings, but also the descriptionsand values. This allows an element to be found easily even if its name is unknown.
Fig. 30: System Configuration - Search For Setting
2. Select the setting from the search results.
3. Click on the header of the widget to see the options.
4. Hover the mouse over the widget body to see the Edit this setting button.
298 Chapter 8. Administration
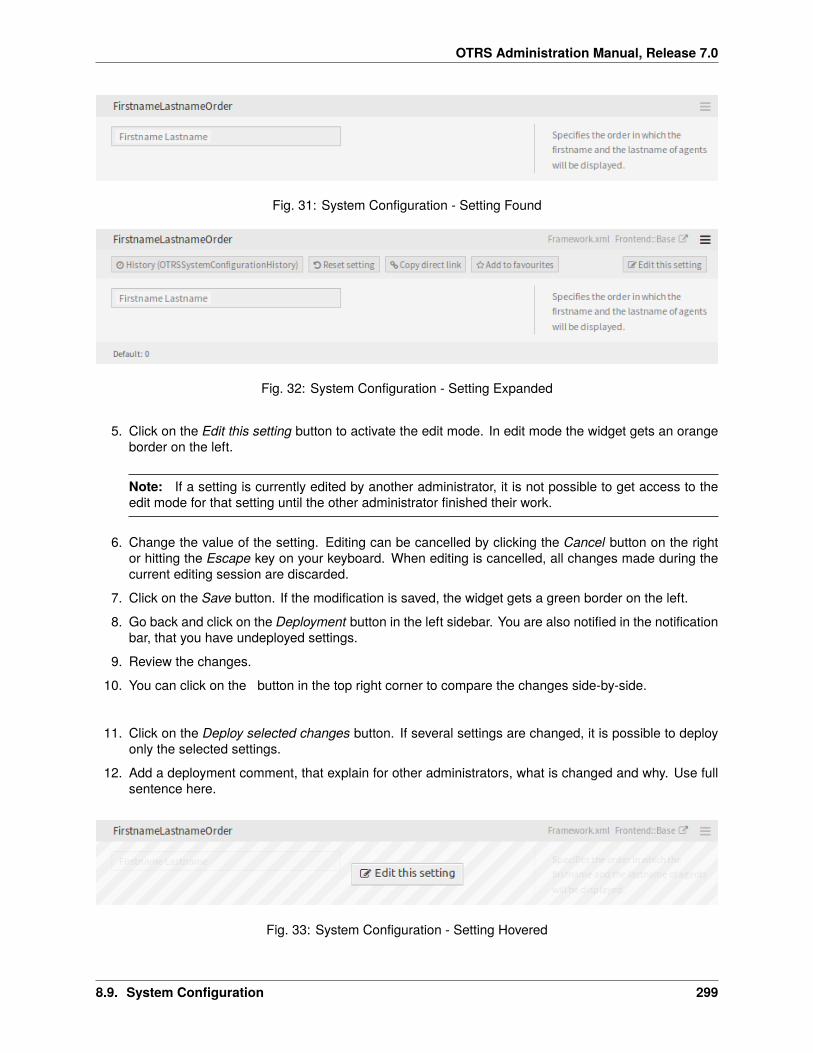
OTRS Administration Manual, Release 7.0
Fig. 31: System Configuration - Setting Found
Fig. 32: System Configuration - Setting Expanded
5. Click on the Edit this setting button to activate the edit mode. In edit mode the widget gets an orangeborder on the left.
Note: If a setting is currently edited by another administrator, it is not possible to get access to theedit mode for that setting until the other administrator finished their work.
6. Change the value of the setting. Editing can be cancelled by clicking the Cancel button on the rightor hitting the Escape key on your keyboard. When editing is cancelled, all changes made during thecurrent editing session are discarded.
7. Click on the Save button. If the modification is saved, the widget gets a green border on the left.
8. Go back and click on the Deployment button in the left sidebar. You are also notified in the notificationbar, that you have undeployed settings.
9. Review the changes.
10. You can click on the � button in the top right corner to compare the changes side-by-side.
11. Click on the Deploy selected changes button. If several settings are changed, it is possible to deployonly the selected settings.
12. Add a deployment comment, that explain for other administrators, what is changed and why. Use fullsentence here.
Fig. 33: System Configuration - Setting Hovered
8.9. System Configuration 299
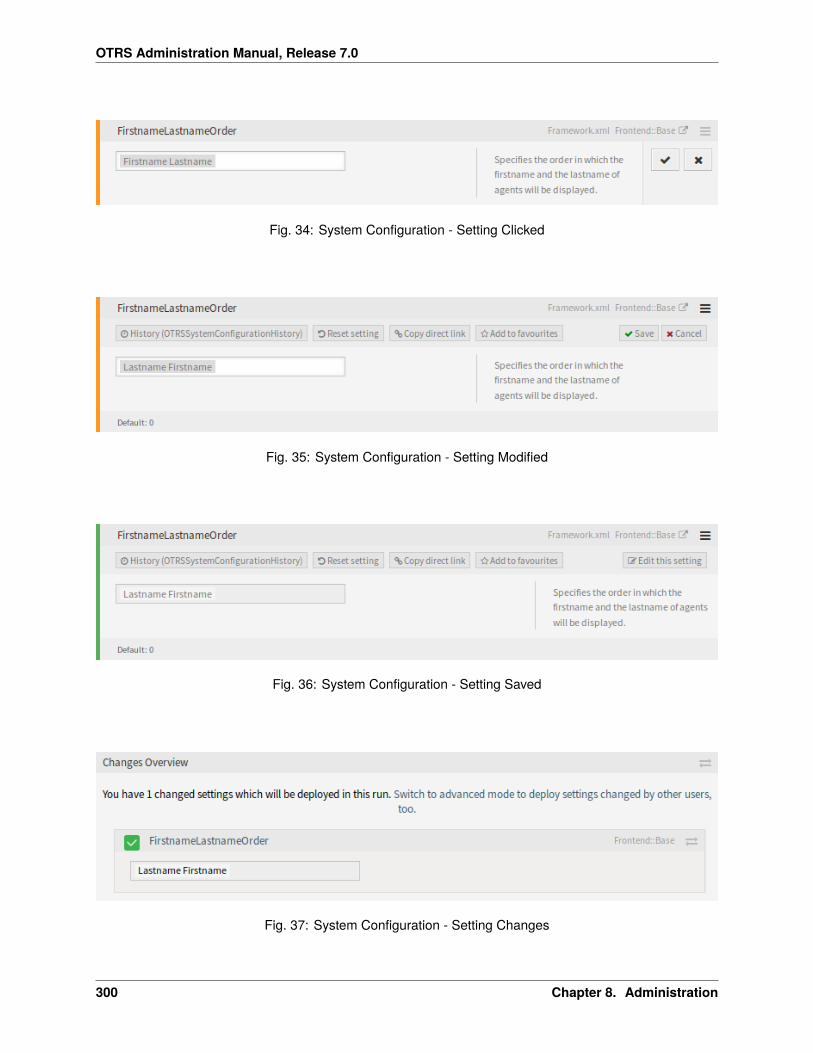
OTRS Administration Manual, Release 7.0
Fig. 34: System Configuration - Setting Clicked
Fig. 35: System Configuration - Setting Modified
Fig. 36: System Configuration - Setting Saved
Fig. 37: System Configuration - Setting Changes
300 Chapter 8. Administration
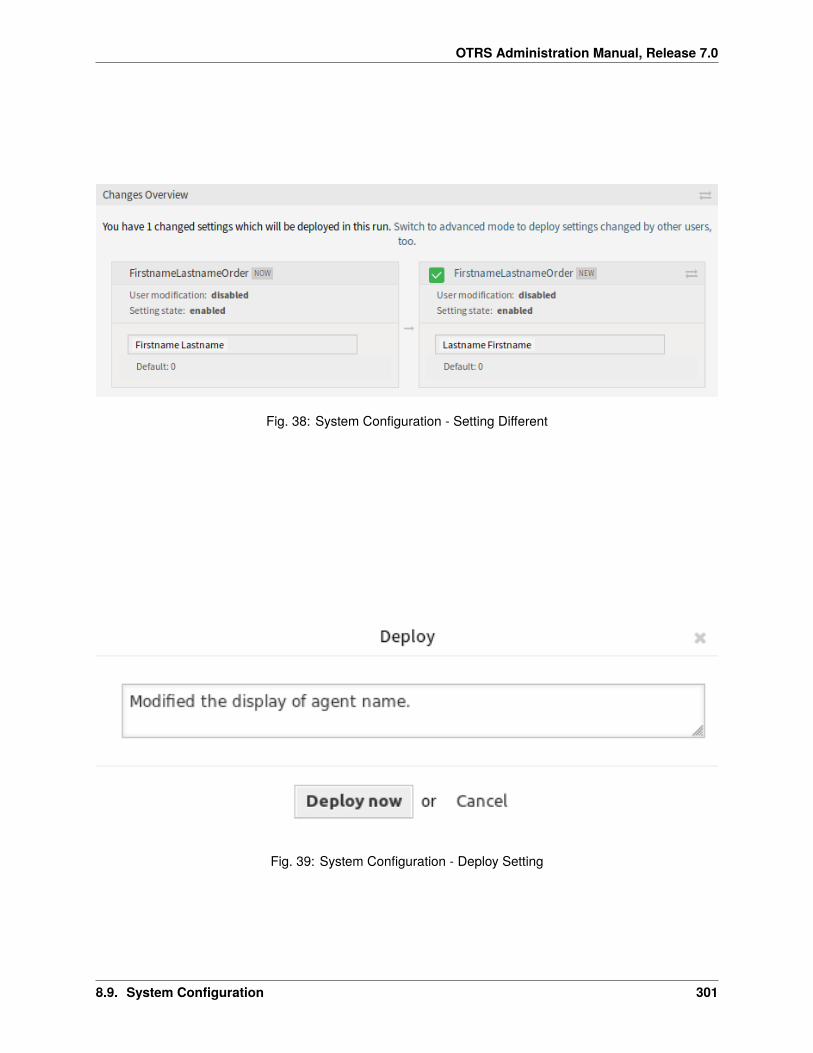
OTRS Administration Manual, Release 7.0
Fig. 38: System Configuration - Setting Different
Fig. 39: System Configuration - Deploy Setting
8.9. System Configuration 301
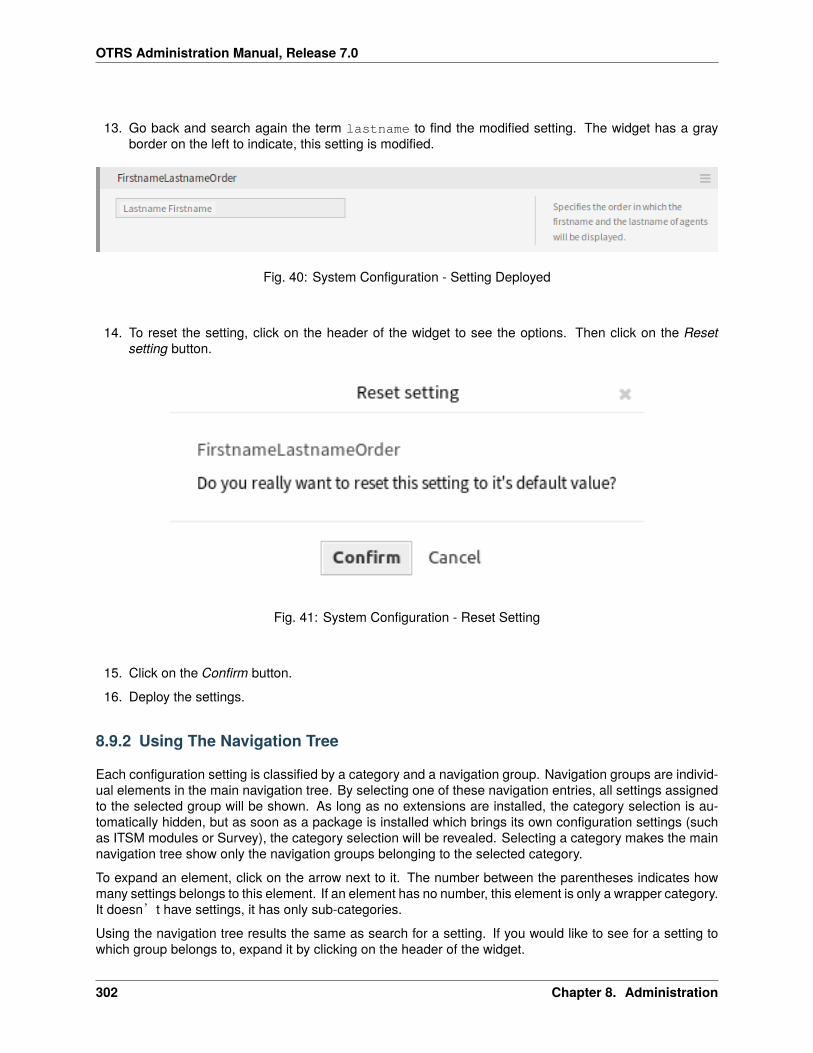
OTRS Administration Manual, Release 7.0
13. Go back and search again the term lastname to find the modified setting. The widget has a grayborder on the left to indicate, this setting is modified.
Fig. 40: System Configuration - Setting Deployed
14. To reset the setting, click on the header of the widget to see the options. Then click on the Resetsetting button.
Fig. 41: System Configuration - Reset Setting
15. Click on the Confirm button.
16. Deploy the settings.
8.9.2 Using The Navigation Tree
Each configuration setting is classified by a category and a navigation group. Navigation groups are individ-ual elements in the main navigation tree. By selecting one of these navigation entries, all settings assignedto the selected group will be shown. As long as no extensions are installed, the category selection is au-tomatically hidden, but as soon as a package is installed which brings its own configuration settings (suchas ITSM modules or Survey), the category selection will be revealed. Selecting a category makes the mainnavigation tree show only the navigation groups belonging to the selected category.
To expand an element, click on the arrow next to it. The number between the parentheses indicates howmany settings belongs to this element. If an element has no number, this element is only a wrapper category.It doesn’t have settings, it has only sub-categories.
Using the navigation tree results the same as search for a setting. If you would like to see for a setting towhich group belongs to, expand it by clicking on the header of the widget.
302 Chapter 8. Administration
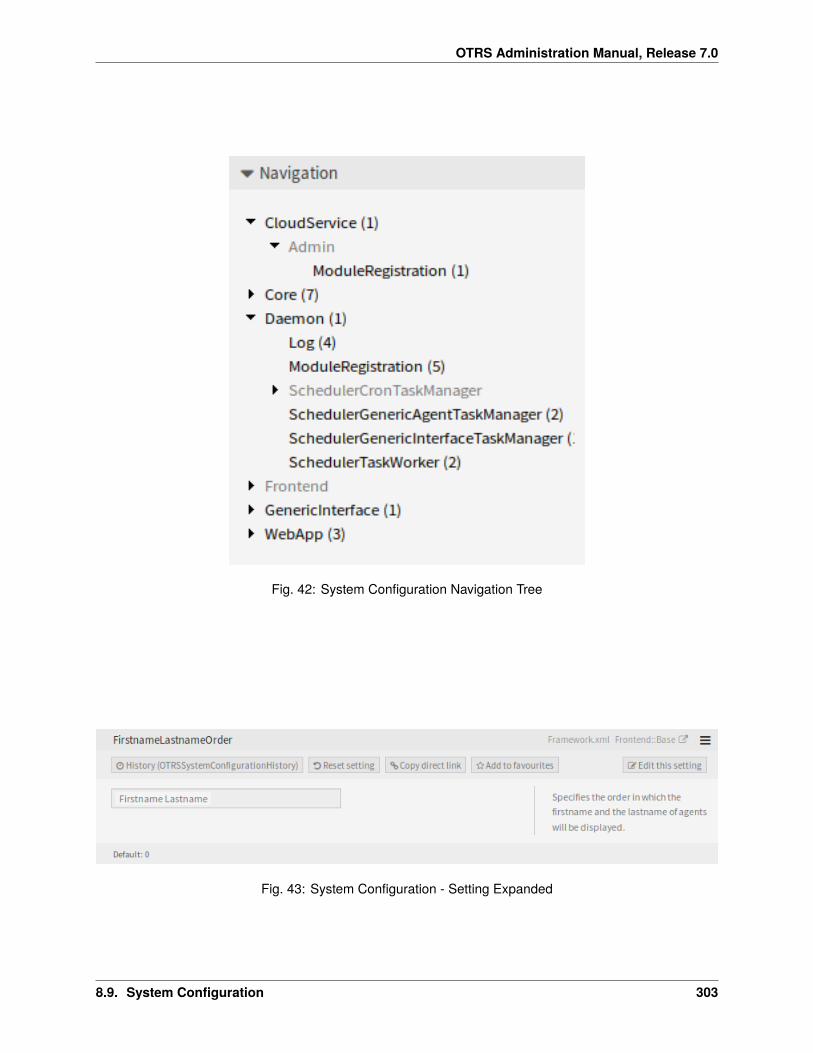
OTRS Administration Manual, Release 7.0
Fig. 42: System Configuration Navigation Tree
Fig. 43: System Configuration - Setting Expanded
8.9. System Configuration 303
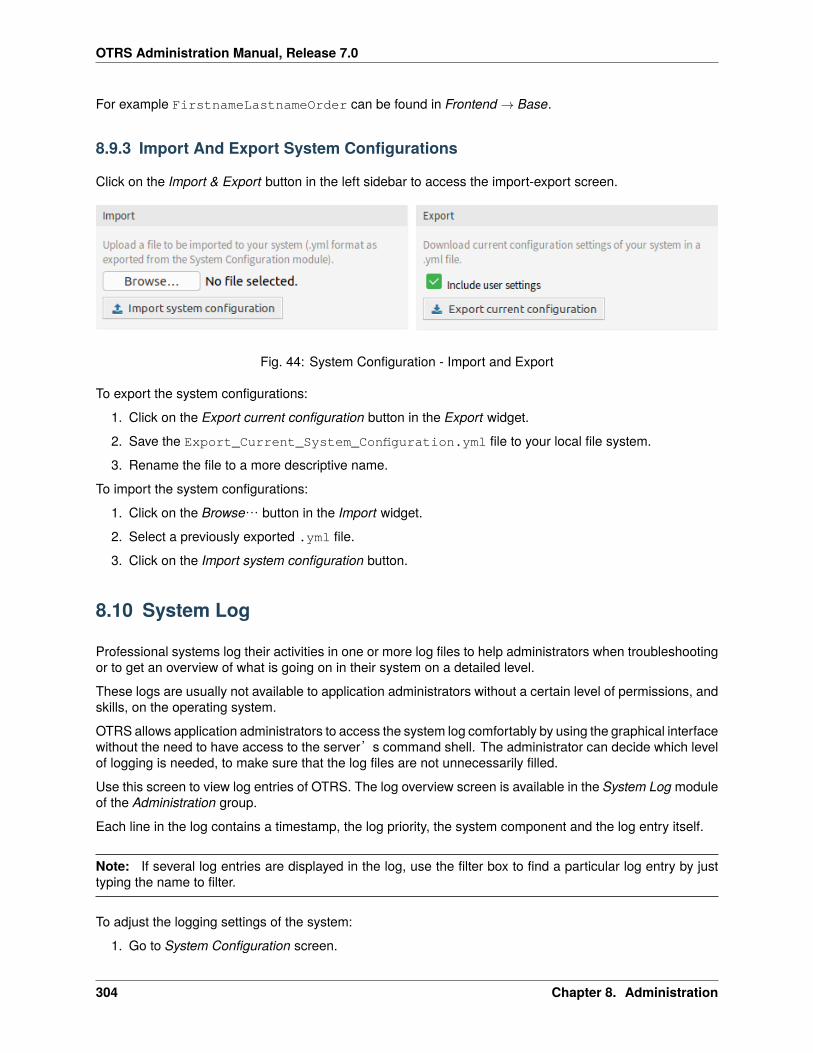
OTRS Administration Manual, Release 7.0
For example FirstnameLastnameOrder can be found in Frontend → Base.
8.9.3 Import And Export System Configurations
Click on the Import & Export button in the left sidebar to access the import-export screen.
Fig. 44: System Configuration - Import and Export
To export the system configurations:
1. Click on the Export current configuration button in the Export widget.
2. Save the Export_Current_System_Configuration.yml file to your local file system.
3. Rename the file to a more descriptive name.
To import the system configurations:
1. Click on the Browse… button in the Import widget.
2. Select a previously exported .yml file.
3. Click on the Import system configuration button.
8.10 System Log
Professional systems log their activities in one or more log files to help administrators when troubleshootingor to get an overview of what is going on in their system on a detailed level.
These logs are usually not available to application administrators without a certain level of permissions, andskills, on the operating system.
OTRS allows application administrators to access the system log comfortably by using the graphical interfacewithout the need to have access to the server’s command shell. The administrator can decide which levelof logging is needed, to make sure that the log files are not unnecessarily filled.
Use this screen to view log entries of OTRS. The log overview screen is available in the System Log moduleof the Administration group.
Each line in the log contains a timestamp, the log priority, the system component and the log entry itself.
Note: If several log entries are displayed in the log, use the filter box to find a particular log entry by justtyping the name to filter.
To adjust the logging settings of the system:
1. Go to System Configuration screen.
304 Chapter 8. Administration
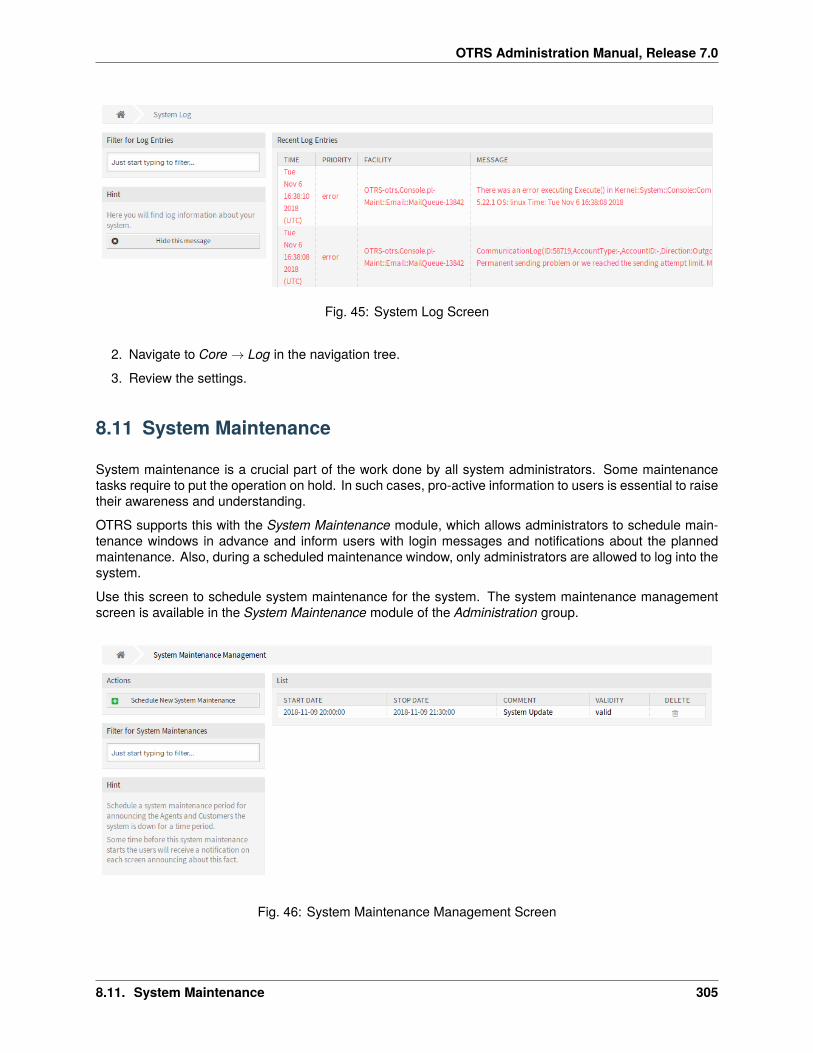
OTRS Administration Manual, Release 7.0
Fig. 45: System Log Screen
2. Navigate to Core → Log in the navigation tree.
3. Review the settings.
8.11 System Maintenance
System maintenance is a crucial part of the work done by all system administrators. Some maintenancetasks require to put the operation on hold. In such cases, pro-active information to users is essential to raisetheir awareness and understanding.
OTRS supports this with the System Maintenance module, which allows administrators to schedule main-tenance windows in advance and inform users with login messages and notifications about the plannedmaintenance. Also, during a scheduled maintenance window, only administrators are allowed to log into thesystem.
Use this screen to schedule system maintenance for the system. The system maintenance managementscreen is available in the System Maintenance module of the Administration group.
Fig. 46: System Maintenance Management Screen
8.11. System Maintenance 305
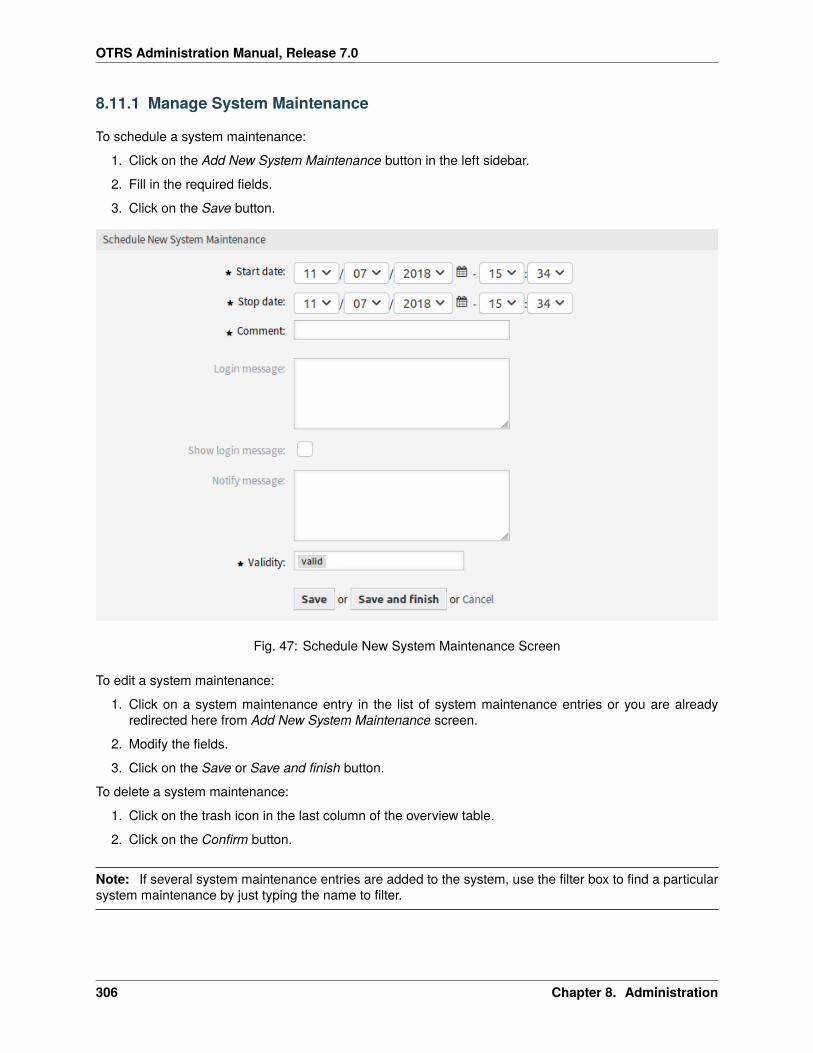
OTRS Administration Manual, Release 7.0
8.11.1 Manage System Maintenance
To schedule a system maintenance:
1. Click on the Add New System Maintenance button in the left sidebar.
2. Fill in the required fields.
3. Click on the Save button.
Fig. 47: Schedule New System Maintenance Screen
To edit a system maintenance:
1. Click on a system maintenance entry in the list of system maintenance entries or you are alreadyredirected here from Add New System Maintenance screen.
2. Modify the fields.
3. Click on the Save or Save and finish button.
To delete a system maintenance:
1. Click on the trash icon in the last column of the overview table.
2. Click on the Confirm button.
Note: If several system maintenance entries are added to the system, use the filter box to find a particularsystem maintenance by just typing the name to filter.
306 Chapter 8. Administration
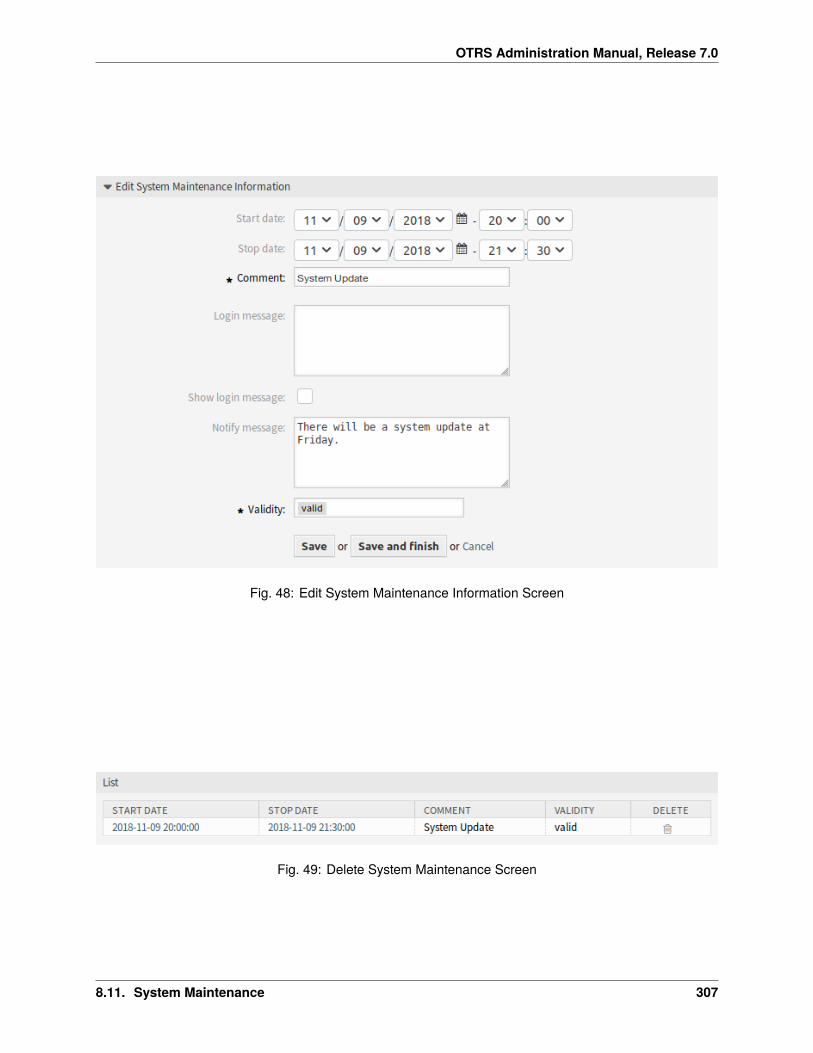
OTRS Administration Manual, Release 7.0
Fig. 48: Edit System Maintenance Information Screen
Fig. 49: Delete System Maintenance Screen
8.11. System Maintenance 307
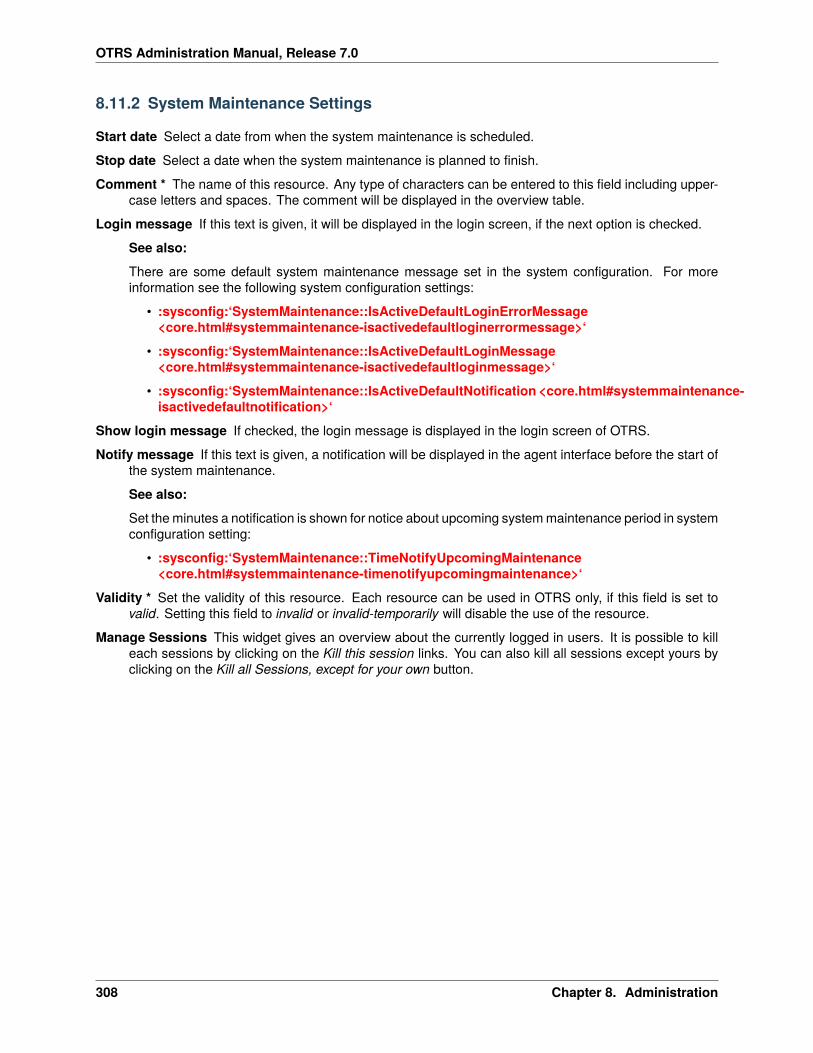
OTRS Administration Manual, Release 7.0
8.11.2 System Maintenance Settings
Start date Select a date from when the system maintenance is scheduled.
Stop date Select a date when the system maintenance is planned to finish.
Comment * The name of this resource. Any type of characters can be entered to this field including upper-case letters and spaces. The comment will be displayed in the overview table.
Login message If this text is given, it will be displayed in the login screen, if the next option is checked.
See also:
There are some default system maintenance message set in the system configuration. For moreinformation see the following system configuration settings:
• :sysconfig:‘SystemMaintenance::IsActiveDefaultLoginErrorMessage<core.html#systemmaintenance-isactivedefaultloginerrormessage>‘
• :sysconfig:‘SystemMaintenance::IsActiveDefaultLoginMessage<core.html#systemmaintenance-isactivedefaultloginmessage>‘
• :sysconfig:‘SystemMaintenance::IsActiveDefaultNotification <core.html#systemmaintenance-isactivedefaultnotification>‘
Show login message If checked, the login message is displayed in the login screen of OTRS.
Notify message If this text is given, a notification will be displayed in the agent interface before the start ofthe system maintenance.
See also:
Set the minutes a notification is shown for notice about upcoming system maintenance period in systemconfiguration setting:
• :sysconfig:‘SystemMaintenance::TimeNotifyUpcomingMaintenance<core.html#systemmaintenance-timenotifyupcomingmaintenance>‘
Validity * Set the validity of this resource. Each resource can be used in OTRS only, if this field is set tovalid. Setting this field to invalid or invalid-temporarily will disable the use of the resource.
Manage Sessions This widget gives an overview about the currently logged in users. It is possible to killeach sessions by clicking on the Kill this session links. You can also kill all sessions except yours byclicking on the Kill all Sessions, except for your own button.
308 Chapter 8. Administration
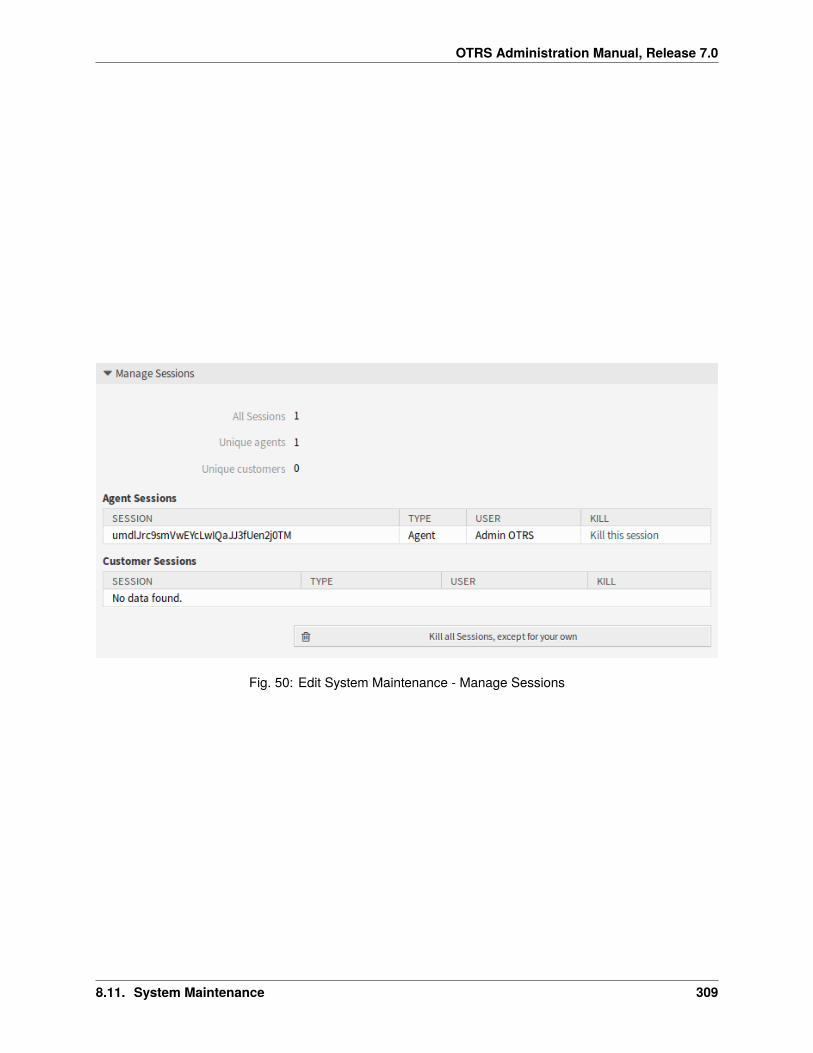
OTRS Administration Manual, Release 7.0
Fig. 50: Edit System Maintenance - Manage Sessions
8.11. System Maintenance 309

OTRS Administration Manual, Release 7.0
310 Chapter 8. Administration
CHAPTER 9
Tutorials
Any system requires configuration. Configuring a system should be an easy task and the tools for configu-ration fit-for-purpose.
OTRS offers several administration tools to configure, monitor, control and extend OTRS.
9.1 Archiving Tickets
OTRS can be used as an audit-proof system. In this case deleting closed tickets may not be a good idea.Therefore a feature has been implemented that allows you to archive tickets.
Tickets that match certain criteria can be marked as archived. These tickets are not accessed if an agentdo a regular ticket search or run a generic agent job. The system itself does not have to deal with a hugeamount of tickets any longer as only the latest tickets are taken into consideration. This can result in a hugeperformance gain on large systems.
To use the archive feature:
1. Go to the System Configuration screen.
2. Search for the setting Ticket::ArchiveSystem and enable the setting.
3. Go to the Generic Agent screen.
4. Click on the Add job button in the left sidebar.
5. Provide a name in the Job Settings section, and select proper options to schedule this job.
6. Define the ticket filters in the Select Tickets section. It might be a good idea to only archive thosetickets in a closed state that have been closed a few months before.
7. In the Update/Add Ticket Attributes section, set the field Archive selected tickets to archive tickets.
8. Click on the Save button.
9. Run the job. The system will display all tickets which will be archived when executing the generic agentjob.
311
OTRS Administration Manual, Release 7.0
Note: When you search for tickets, the system default is to search tickets which are not archived. If you wantto search through archived tickets also, simply add the Archive search filter while defining search criteria.
9.2 FAQ Approval
OTRS has an FAQ approval feature. If you activate the approval feature all newly created FAQs also createa new ticket in a predefined queue. The persons who need to approve the FAQ entries can then act on thesetickets and approve the FAQ articles if they see fit. As long as the article has not been approved the articlewill not be visible in the external interface.
The approval function can be activated via the FAQ::ApprovalRequired system configuration setting.The following system configuration settings may be useful to set this feature properly:
FAQ::ApprovalGroupFAQ::ApprovalRequiredFAQ::ApprovalTicketBodyFAQ::ApprovalTicketDefaultStateFAQ::ApprovalTicketPriorityFAQ::ApprovalTicketSubjectFAQ::ApprovalTicketType
The approval message can be defined in the FAQ::ApprovalTicketBody setting. You can modify thetext if you need, and you can also use OTRS smart tags that will be substituted with their actual values whenthe approval note is generated. The available OTRS smart tags are listed in the table below.
Name Description<OTRS_FAQ_CATEGORY> Category name of the FAQ article.<OTRS_FAQ_CATEGORYID> Category ID of the FAQ article.<OTRS_FAQ_LANGUAGE> Language of the FAQ article.<OTRS_FAQ_ITEMID> Item ID of the FAQ article.<OTRS_FAQ_NUMBER> FAQ number of the FAQ article.<OTRS_FAQ_TITLE> Title of the FAQ article.<OTRS_FAQ_AUTHOR> Author name of the FAQ article.<OTRS_FAQ_STATE> State (visibility) of the FAQ article.
312 Chapter 9. Tutorials
CHAPTER 10
Glossary
Activity Part of the process management.
Agent An agent is a user which services customer users. The person working for your organization.
Back end A configuration file, module, script or other functional item within OTRS which is not reachablevia the browser.
Calendar Defines working hours, time-zone, and holidays to be applied when using escalation times.
Customer Physical organizations to which customer users are assigned. These provide the function togroup users together which belong to a single organization.
Customer User Physical persons, and their contact data, which belong to a customer. These are the peopleraising tickets.
Dynamic Field A field used in tickets and articles to extend the data which can be saved in a ticket or article.They are saved from values in the database or accessed from outside resources.
Escalation Times The defined amount of working time before a ticket breaches an agreement.
Front end The graphical interface to OTRS as viewed in a browser.
Group This is a resource within OTRS. An agent or a customer can be assigned permissions to this resourceas needed. Additionally, they can be used for access control, processes and web services.
Invoker An invoker is a special Perl module which allows OTRS to provide information to a remote systemvia REST or HTTP. Invokers must be developed in Perl by a back end developer.
Mapping A mapping allows OTRS to provide inbound and outbound translation of data allowing us to offera specific data construction to rebuild incoming structures to meet our needs.
Operation Similar to a web hook, a provider operation offers a specific sub-set of OTRS Perl API function-ality to external systems.
Process Part of the process management.
Process Path Part of the process management.
Resource A resource is any object which has effective permissions. This can be, but is not limited to, aticket, dashboard widget, statistic, or module.
313
OTRS Administration Manual, Release 7.0
Screen A graphical interface to OTRS viewed in a browser (see also Front end).
Service A means of delivering added value to customers by making it easier for customers or helping themto achieve their desired results without them having to personally bear the responsibility for specificcosts and risks.
Service Level Agreement A service level agreement (SLA) is a contract between a service provider (ei-ther internal or external) and the end user that defines the level of service expected from the serviceprovider. SLAs are output-based in that their purpose is specifically to define what the customer willreceive.
Service Request (see also Ticket).
Sequence Flow Part of the process management.
Sequence Flow Action Part of the process management.
SLA (see also Service Level Agreement).
Ticket A ticket is a collection of all communications with a customer during the course of a service request.A ticket contains article, which are the communication received from or sent to customers, agents,external systems, etc. Tickets belong to a customer user, are assigned to agents and reside in queues.
Transport A transport is the method chosen for communication. OTRS support REST and SOAP.
User Task Activity Dialog Part of the process management.
Working Time A definition of minutes passed during the defined working hours of any calendar.
314 Chapter 10. Glossary
Index
AActivity, 313Agent, 313
BBack end, 313
CCalendar, 313Customer, 313Customer User, 313
DDynamic Field, 313
EEscalation Times, 313
FFront end, 313
GGroup, 313
IInvoker, 313
MMapping, 313
OOperation, 313
PProcess, 313Process Path, 313
RResource, 313
SScreen, 314Sequence Flow, 314Sequence Flow Action, 314Service, 314Service Level Agreement, 314Service Request, 314SLA, 314
TTicket, 314Transport, 314
UUser Task Activity Dialog, 314
WWorking Time, 314
315


![Reporting Diversity Manual [AZ].pdf](https://img.dokumen.tips/doc/110x75/631a60b25d5809cabd0f6073/reporting-diversity-manual-azpdf.jpg)


