Embed Size (px)
Citation preview
OpenText™ ApplicationXtender®Web AccessVersion 16.3
User Guide

Legal Notice
This documentation has been created for software version 16.3.It is also valid for subsequent software versions as long as no new document version is shipped withthe product or is published at https://knowledge.opentext.com.
Open Text Corporation
275 Frank Tompa Drive, Waterloo, Ontario, Canada, N2L 0A1
Tel: +1-519-888-7111Toll Free Canada/USA: 1-800-499-6544 International: +800-4996-5440Fax: +1-519-888-0677Support: https://support.opentext.comFor more information, visit https://www.opentext.com
Copyright © 2017 Open Text. All Rights Reserved.
Trademarks owned by Open Text.
Adobe and Adobe PDF Library are trademarks or registered trademarks of Adobe Systems Inc. inthe U.S. and other countries.
Disclaimer
No Warranties and Limitation of Liability
Every effort has been made to ensure the accuracy of the features and techniques presented in thispublication. However, Open Text Corporation and its affiliates accept no responsibility and offer nowarranty whether expressed or implied, for the accuracy of this publication.
Table of Contents
Preface ................................................................................................................................ 7
Chapter 1 Getting Started ............................................................................................ 9Common features of ApplicationXtender Web Access ......................................... 9Document storage and display .......................................................................... 10Supported files ............................................................................................. 10Image files ............................................................................................... 10COLD, ERM, and text files ........................................................................ 10Rich Text Format, Hypertext Markup Language, and ExtensibleMarkup Language files ............................................................................. 11Portable document format files .................................................................. 11
Unsupported files ......................................................................................... 11Foreign files ............................................................................................. 11OLE objects .............................................................................................. 12
Operational modes ........................................................................................... 12ApplicationXtender Web Access Document Viewer ............................................ 12Document types supported by Document Viewer ........................................... 12
Logging in to ApplicationXtender Web Access ................................................... 13Logging in by using CM security configuration .............................................. 13Logging in by using Windows security configuration...................................... 14Logging in by using ADFS or CAS................................................................. 14
Switching between multiple data sources ........................................................... 15Changing your password .................................................................................. 15Application List view........................................................................................ 16Keyboard Shortcuts .......................................................................................... 16Logging out of ApplicationXtender Web Access ................................................. 16Automatic logout ......................................................................................... 16Session expiration......................................................................................... 17
Chapter 2 Customizing Your System ........................................................................... 19Configuring data source user settings ................................................................ 19Configuring user settings for an application ....................................................... 25Using the Endorsement feature ..................................................................... 26
Chapter 3 Creating Documents .................................................................................... 27Enabling the scanner......................................................................................... 27Configuring the scanner.................................................................................... 27Importing and scanning documents................................................................... 27Creating documents in batches .......................................................................... 28Uploading batches........................................................................................ 28Working with batch lists ............................................................................... 29Batch list menu and toolbar options ........................................................... 29
3
Table of Contents
Unlocking batches ............................................................................... 30Refreshing the uploaded batches list ...................................................... 30
Managing batches......................................................................................... 31Adding pages to batches ........................................................................... 31Switching between importing and indexing states ...................................... 31Copying or moving batch pages ................................................................ 31
Indexing .......................................................................................................... 32ApplicationXtender document indexes .......................................................... 32Indexing types.............................................................................................. 33Manual indexing ...................................................................................... 33Auto indexing .......................................................................................... 33Key Reference indexing ............................................................................ 33
Indexing batches manually............................................................................ 34Attaching batch pages to documents.......................................................... 35Additional operations for a batch............................................................... 35
Using the existing index data......................................................................... 36Selecting a task after batch indexing............................................................... 37Using the Auto Index feature ........................................................................ 37Using the Key Reference feature .................................................................... 38
Full-text indexing ............................................................................................. 38
Chapter 4 Retrieving Documents ................................................................................. 39Query functionality .......................................................................................... 39Single-application searches ............................................................................... 40Creating queries ........................................................................................... 40Using advanced index value search criteria ................................................ 40Using full-text queries............................................................................... 41Using expression search operators ......................................................... 42
Using document retention query options ................................................... 43Searching document properties ......................................................................... 43Multiple application searches ............................................................................ 44Configuring multi-application searches.......................................................... 44Using multi-application searches ................................................................... 45
Working with saved searches ............................................................................ 45Working with query results ............................................................................... 46Exporting selected documents ....................................................................... 46Document display from query results ............................................................ 46Printing selected documents.......................................................................... 47Exporting selected COLD documents............................................................. 48Emailing selected documents ........................................................................ 48Exporting document indexes ......................................................................... 49Submitting selected documents to workflow .................................................. 50Submitting selected documents for full-text indexing ...................................... 50Submitting selected documents to process OCR.............................................. 50Deleting selected documents ......................................................................... 51Performing Ad Hoc Text Search on Selected Documents ................................. 51The difference between xPlore and non-xPlore Applications........................ 51Wilcard support ....................................................................................... 52
Customizing the Query Results view ............................................................. 52
Chapter 5 Viewing Documents ..................................................................................... 53Using Thumbnails ............................................................................................ 53Operation modes .............................................................................................. 54Normal mode............................................................................................... 54Check-in/check-out mode.............................................................................. 54
4
Table of Contents
Read-only mode ........................................................................................... 56Reason Audit mode ...................................................................................... 57
Document Viewer toolbar and menu options...................................................... 57Viewing subpages ........................................................................................ 57Viewing versions of a page............................................................................ 57Displaying image information ....................................................................... 58Adding annotations ...................................................................................... 58Viewing document properties ....................................................................... 58Viewing revision history ............................................................................... 58Using text view ............................................................................................ 59Performing a text search................................................................................ 59
Viewing foreign files......................................................................................... 59Viewing ApplicationXtender Reports Management reports ................................. 59
Chapter 6 Managing Documents .................................................................................. 61Using the email functionality............................................................................. 61Registering email addresses .......................................................................... 61Changing the registered email address........................................................... 62Saving email ................................................................................................ 62
Creating new page versions .............................................................................. 63Moving or copying document pages .................................................................. 63Exporting documents........................................................................................ 64Adding pages to ApplicationXtender documents................................................ 65Scanning pages to documents............................................................................ 65Field masking................................................................................................... 65Modifying index field values ............................................................................. 66Batch deleting documents ................................................................................. 66
Chapter 7 Annotations ................................................................................................. 69Annotation types .............................................................................................. 69Creating line and shape annotations .................................................................. 70Configuring annotation properties................................................................. 70Adding annotation types............................................................................... 71Interaction between redactions and OCR/full-text ....................................... 72
Creating text annotations .................................................................................. 73Rubber stamp annotations................................................................................. 73Adding rubber stamp annotations ................................................................. 73
Hiding annotations........................................................................................... 74Modifying annotations...................................................................................... 74Deleting annotations......................................................................................... 75Managing annotation security ........................................................................... 75Configuring rubber stamp security ................................................................ 76
Chapter 8 Working with Document Retention .............................................................. 79Retention concepts............................................................................................ 79Filing documents for retention........................................................................... 80Managing documents under retention ............................................................... 81Retention Administration wizard ...................................................................... 81
5

Table of Contents
6
Preface
This guide provides instructions about using ApplicationXtender Web Access to create and manageApplicationXtender documents. For more information about hardware and software requirements,see the OpenText ApplicationXtender Release Notes.
Revision historyRevision date Description
December 2017 Initial publication
7

Preface
8
Chapter 1Getting Started
ApplicationXtender Web Access enables you to create, index, retrieve, and manageApplicationXtender documents.
ApplicationXtender Web Access uses the ApplicationXtender security profiles. When you log inwith an ApplicationXtender username and password, the ApplicationXtender access privilegesand restrictions are in effect throughout the ApplicationXtender Web Access session. The accessprivileges that are granted to your user account control the documents that you can access withinApplicationXtender Web Access and the functionalities that are available when you work withdocuments.
Understanding ApplicationXtender concepts and terms can help you use ApplicationXtender WebAccess more effectively. For more information, see the OpenText ApplicationXtender AdministrationGuide.
Common features of ApplicationXtender WebAccessApplicationXtender Web Access provides you with many functionalities to work with content.These functionalities enable you to:• Scan documents to create new or add to existing documents or batches, using Captiva CloudToolkit.
• Add electronic files to the ApplicationXtender repository as individual documents, batches,and individual pages.
• Index documents by specifying information in the application-specific index fields. Indexingenables you to organize, search, and retrieve documents efficiently. You can also index batchesthat have been added to applications by using other ApplicationXtender products.
• Retrieve documents by using various search methods, such as index value searches, multipleapplication searches, and document property searches. You can also select documents to view,edit, and print, and you can email documents and pages as attachments or links.
• Attach annotations or redactions to highlight important information, comment on the contents ofthe page, or block areas of the page from view.
• Modify index field values and export document indexes.
• File documents for retention to protect them from accidental losses.
9
Getting Started
Document storage and displayYou can store any type of file in ApplicationXtender. Depending on the type, ApplicationXtenderstores files as supported or unsupported file types. When you capture electronic files,ApplicationXtender first verifies the file type, and then stores the file as the identified type (such asimage, text, foreign file format). The functions available are file-type dependent. Features that areavailable with one file type might not be available in another. Also, supported and unsupported filestypes are displayed in different ways.
Supported files
The ApplicationXtender Web Access Document Viewer displays the content of supported file types.Natively supported file types include: text files, Computer Output to Laser Disk (COLD) documents,Enterprise Report Management (ERM) files, image files (JPEG, GIF, TIFF, Windows Bitmap, PCX,DCX, and TGA), Rich Text Format (RTF) files, Hypertext Markup Language (HTML) files, ExtensibleMarkup Language (XML) files, and Adobe Portable Document Format (PDF) files.
You can add annotations to image, text, and PDF files, and you can process image files and image-onlyPDF files by using Optical Character Recognition (OCR). (OCR requires an optional purchase.)You can also print, email, and export these files.
Note: Non-image PDF and non-text PDF files will not be OCRed by the index agent.
Image files
Image files are stored in common formats such as TIFF, JPEG, GIF, and Bitmap. The Render Serverrenders all other image formats, including TIFF, into one of these formats to enable proper display ofimage files in different platforms and browsers.
By default, ApplicationXtender Web Access stores images in their native format (for example, a TIFFfile is stored as a TIFF file). It can also store image files in a different format if ApplicationXtendersupports that format. When you store an image file in a specific image format, ApplicationXtenderignores the original format and stores all images in the selected format.
Note: Progressive JPEG files are not supported. These files are imported as foreign files.
COLD, ERM, and text files
COLD data is the report data that is generated from existing applications, which are indexed by usingan extraction process, and downloaded into ApplicationXtender applications. After the import, thefiles are stored in the compressed text file format that is proprietary to ApplicationXtender.
Form overlays that are added (from ApplicationXtender Reports Management) to these documentsenable you to view the report data in the context of a standard form. You cannot add form overlaysto PDF documents from ApplicationXtender Reports Management. The Render Server rendersCOLD and ERM documents with form overlays.
10
Getting Started
Note: Usually, text files display as text files; otherwise, they display as foreign files. ASCII, EBCDIC,and EBCDIK are the supported text formats.
Rich Text Format, Hypertext Markup Language, and ExtensibleMarkup Language files
ApplicationXtender stores RTF, HTML, and XML files as foreign files. A web page is typically inHTML format. If you have access to the Index Agent for full-text indexing, you can submit RTFand HTML files for full-text indexing.
Portable document format files
The Render Server renders PDF files as images.
You can add annotations to a PDF file and also perform functions such as printing, exporting, andemailing.
If the software cannot extract text from a PDF file, the pages are processed for text content byusing OCR. If you have access to the Index Agent for full-text indexing, you can submit PDF filesfor full-text indexing.
Note: Non-image PDF and non-text PDF files will not be OCRed by the index agent.
Unsupported files
Unsupported files are stored in ApplicationXtender in their native format and include foreign filesand Object Linking and Embedding (OLE) files.
Foreign files
When you import files that are not natively supported in ApplicationXtender, it stores them asforeign files, in their native file format.
Pages that are imported as foreign files are represented as a link. To view the contents of the page andpage information, first export the foreign file and then open it in a third-party viewer. Annotationbuttons, zoom controls, and the rotate function are not available for foreign files.
You can perform functions such as printing, exporting, and emailing for foreign files. If you haveaccess to an Index Agent for full-text indexing, you can submit foreign files to the Index Agent.
11
Getting Started
OLE objects
When you insert a file that is not supported as an object, through ApplicationXtender DocumentManager, ApplicationXtender uses OLE to embed the file. The OLE objects are stored in their nativefile format. You can view only the page information of these objects in ApplicationXtender WebAccess. You cannot submit OLE objects for full-text indexing.
Operational modesYour access to different functionalities also depends on the ApplicationXtender operational modes:check-in/check-out mode, normal mode, and reason audit mode. For more information, see theOpenText ApplicationXtender Administration Guide.
ApplicationXtender Web Access DocumentViewerApplicationXtender Web Access Document Viewer is a cross-platform and cross-browser compatiblemodule of ApplicationXtender Web Access. The viewer supports Microsoft Internet Explorer,Microsoft Edge, Mozilla Firefox, Apple Safari, and Google Chrome. It enables you to view imagesthat are rendered by the Render Server.
Document types supported by Document Viewer
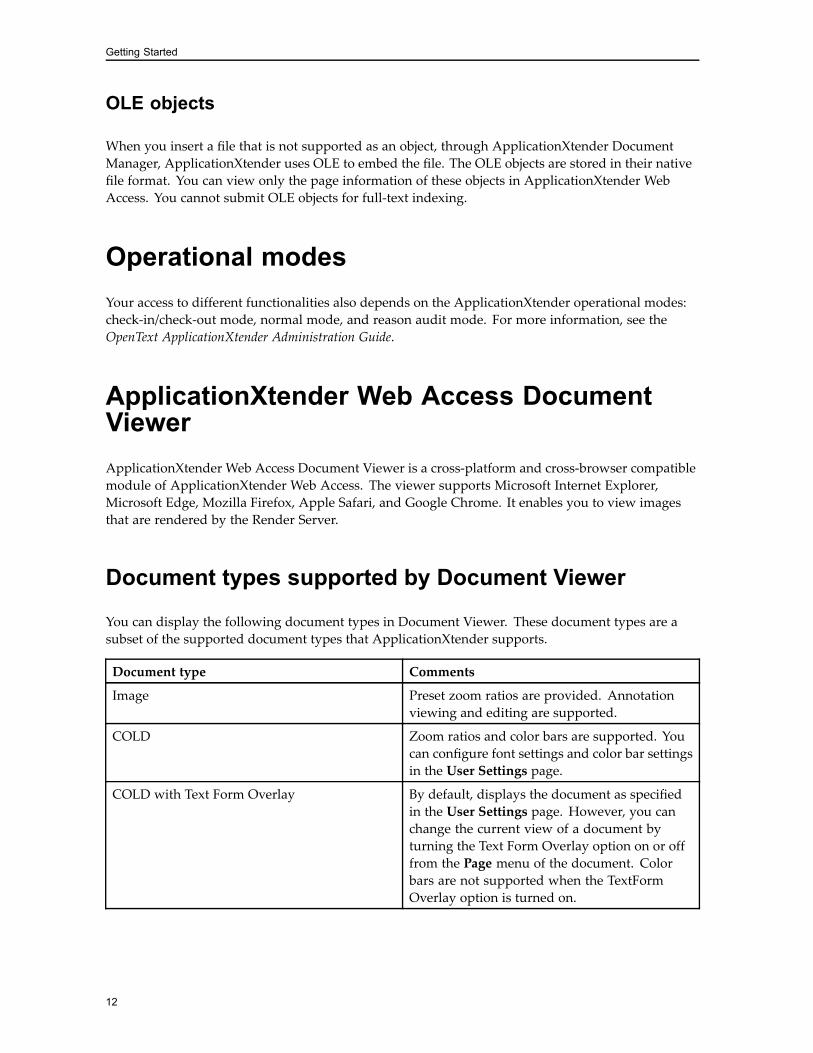
You can display the following document types in Document Viewer. These document types are asubset of the supported document types that ApplicationXtender supports.
Document type Comments
Image Preset zoom ratios are provided. Annotationviewing and editing are supported.
COLD Zoom ratios and color bars are supported. Youcan configure font settings and color bar settingsin the User Settings page.
COLD with Text Form Overlay By default, displays the document as specifiedin the User Settings page. However, you canchange the current view of a document byturning the Text Form Overlay option on or offfrom the Page menu of the document. Colorbars are not supported when the TextFormOverlay option is turned on.
12
Getting Started
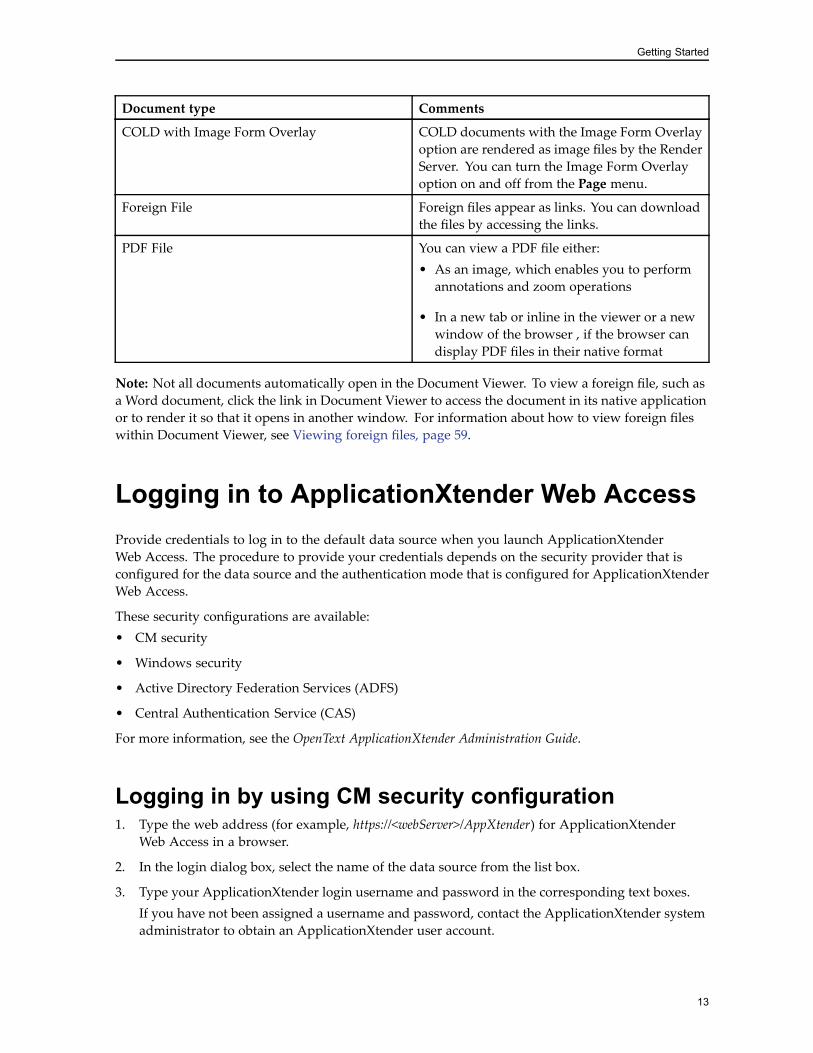
Document type Comments
COLD with Image Form Overlay COLD documents with the Image Form Overlayoption are rendered as image files by the RenderServer. You can turn the Image Form Overlayoption on and off from the Page menu.
Foreign File Foreign files appear as links. You can downloadthe files by accessing the links.
PDF File You can view a PDF file either:• As an image, which enables you to performannotations and zoom operations
• In a new tab or inline in the viewer or a newwindow of the browser , if the browser candisplay PDF files in their native format
Note: Not all documents automatically open in the Document Viewer. To view a foreign file, such asa Word document, click the link in Document Viewer to access the document in its native applicationor to render it so that it opens in another window. For information about how to view foreign fileswithin Document Viewer, see Viewing foreign files, page 59.
Logging in to ApplicationXtender Web AccessProvide credentials to log in to the default data source when you launch ApplicationXtenderWeb Access. The procedure to provide your credentials depends on the security provider that isconfigured for the data source and the authentication mode that is configured for ApplicationXtenderWeb Access.
These security configurations are available:• CM security
• Windows security
• Active Directory Federation Services (ADFS)
• Central Authentication Service (CAS)
For more information, see the OpenText ApplicationXtender Administration Guide.
Logging in by using CM security configuration1. Type the web address (for example, https://<webServer>/AppXtender) for ApplicationXtender
Web Access in a browser.
2. In the login dialog box, select the name of the data source from the list box.
3. Type your ApplicationXtender login username and password in the corresponding text boxes.If you have not been assigned a username and password, contact the ApplicationXtender systemadministrator to obtain an ApplicationXtender user account.
13
Getting Started
4. To enable the full-text search capability during the session, select Request Full-Text SearchSupport.After you select this option, the option remains enabled so that you have full-text search supporteach time you log in. You can cancel this support, if required.
Note: If your ApplicationXtender user account does not include full-text privileges, or if youhave full-text privileges but the maximum number of full-text licenses has been exceeded, thefull-text criteria section does not appear when you create or edit a search criterion.
5. Click SIGN IN. ApplicationXtender Web Access displays a list of applications.
Logging in by using Windows security configuration
If the ApplicationXtender system administrator has not enabled automatic login for Windowssecurity, log in to a Windows security data source in the same way that you log in to a CM securitydata source.
The ApplicationXtender system administrator can enable automatic login when configuringWindows security. The system administrator can also request full-text license support at the timeof automatic login. For Internet Explorer or Chrome browsers, the Windows security providerautomatically authenticates users logging in to ApplicationXtender Web Access, without the need togo through the application login dialog box. If the Windows account is invalid for the data source,the login attempt fails.
Note: For the Firefox browser, or if the deployment is not configured for the Internet Exploreror Chrome browsers, a dialog box prompts you for your Windows credentials to log in toApplicationXtender Web Access.
For information about security configurations, see the OpenText ApplicationXtender AdministrationGuide.
Logging in by using ADFS or CAS
Both ADFS and CAS provide Single Sign-On (SSO) authentication services. The ApplicationXtenderadministrator must configure ADFS or CAS information in the web.config file to enableApplicationXtender Web Access to support ADFS or CAS. The ADFS or CAS servers must beconfigured to be able to return the user information to ApplicationXtender Web Access for validation.To enable validation, the user information must be added into the ApplicationXtender data sourcein advance.
1. Click the CAS LOGIN or the ADFS LOGIN button on the login page.The web browser redirects you to the CAS/ADFS server login page.
2. Type your CAS or ADFS server login username and password.
14
Getting Started
One of these events occurs:
• The CAS/ADFS server verifies the credentials, and, if found invalid, waits for you to type thecorrect credentials.
• The CAS/ADFS server verifies the credentials, and, if found valid, redirects the browserto ApplicationXtender Web Access, along with the user information (login credentials).ApplicationXtender Web Access compares the user information with the data available in theAX data source. If it finds a match, the ApplicationXtender Web Access home page appears.
• If ApplicationXtender Web Access fails to find a matching record in the ApplicationXtenderdata source, it displays an error message and redirects you to its login page. Try the SSO loginagain or log in by using CM or Windows credentials.
Switching between multiple data sourcesAfter you log in to a data source, you can see the current data source name and your login name on thetitle bar. If multiple data sources are available, you can select any of the other available data sourceswithin ApplicationXtender Web Access. This feature enables you to work with applications from twoor more data sources during a single session. You must have security rights to access the data sources.
To switch to another data source, select a data source from the list box next to the data source nameon the title bar. When you select a data source, one of these events occurs:• If you have already logged in to the selected data source, you are automatically switched to it.
• If you have not yet logged in to the selected data source, the login dialog box appears. Thelogin depends on the security provider for the data source and the authentication mode that isconfigured for ApplicationXtender Web Access.
For information about logging in to a data source with CM, Windows, ADFS, and CAS securityconfigurations, see Logging in to ApplicationXtender Web Access, page 13.
Changing your passwordAt any time during the ApplicationXtender Web Access session, you can change your password forany active data source that is configured with CM security. When you change your password for adata source, your ApplicationXtender password for that data source also changes.
Note: If the ApplicationXtender administrator configures ApplicationXtender by using theWindows NT security model, you cannot change your password within ApplicationXtenderWeb Access. Instead, you can change your password by using Windows NT. YourApplicationXtender/ApplicationXtender Web Access password automatically changes to thepassword you set by using Windows NT.
For more information, see the OpenText ApplicationXtender Administration Guide.
To change the password for a data source:1. In the Application List view, click your login name on the title bar and select Change Password
from the list box.
15

Getting Started
2. In the Change Password dialog box, type your current password and then a new password.
3. To confirm the change, type the new password again.
4. Click CHANGE.
Application List viewThe Application List view consists of a tree structure that lists the applications you can access fromthe data source. When you click an application from the tree view on the left, the list of queries thatare configured for the application appears in the right panel. You can create new queries and runexisting queries for an application from this view. The new and saved queries also appear under therespective applications in the Application List view.
Keyboard ShortcutsApplicationXtender Web Access includes keyboard shortcuts to perform certain functions, such asuploading documents and batches, managing batches, and working within documents. Press thequestion mark key to display a menu that describes the available keyboard shortcuts for the view.
Logging out of ApplicationXtender Web AccessWhen you finish working with ApplicationXtender Web Access, log out correctly to ensure that thelicense assigned to you is available to another user.
To log out, click the Log Out icon on the right-most of the title bar.
If you logged in by using the SSO feature, click your login name on the title bar and select SSOLogout from the list. You are now logged out of both ApplicationXtender Web Access and theexternal authentication server.
Automatic logout
The ApplicationXtender system administrator can configure ApplicationXtender Web Access toenable automatic logout. If automatic logout is configured, you are automatically logged out whenyou close the browser window.
Note: You are also automatically logged out when you perform a refresh or type another addressin the address bar. When you perform an automatic logout, a pop-up window appears to sendthe logout request to the server. If you have blocked the pop-up window in the browser setting,the automatic logout function does not work.
16

Getting Started
Session expiration
If ApplicationXtenderWeb Access remains in an inactive state longer than the predefined period, yoursession expires. The system administrator configures this period. You are redirected to the login pagewhen you try to perform an operation. After successful login, you can then perform the operation.
For more information, see the OpenText ApplicationXtender Administration Guide.
17

Getting Started
18
Chapter 2Customizing Your System
User settings are configured at these two levels, each independent of the other:• Data Source: Configure settings that belong to a data source.
• Application: Configure settings that belong a specific application.
Your configuration option settings are saved in the ApplicationXtender server as part of your userprofile. Depending on the ApplicationXtender security privileges that are granted to your profile,you might not have access to, or be able to view, all the options. These settings stay in effect foryour ApplicationXtender Web Access sessions, regardless of which workstation you are workingon or which browser type you use to log in. You can change the configuration settings at any timeto meet your requirements.
For more information about configuring user profiles, see the OpenText ApplicationXtenderAdministration Guide.
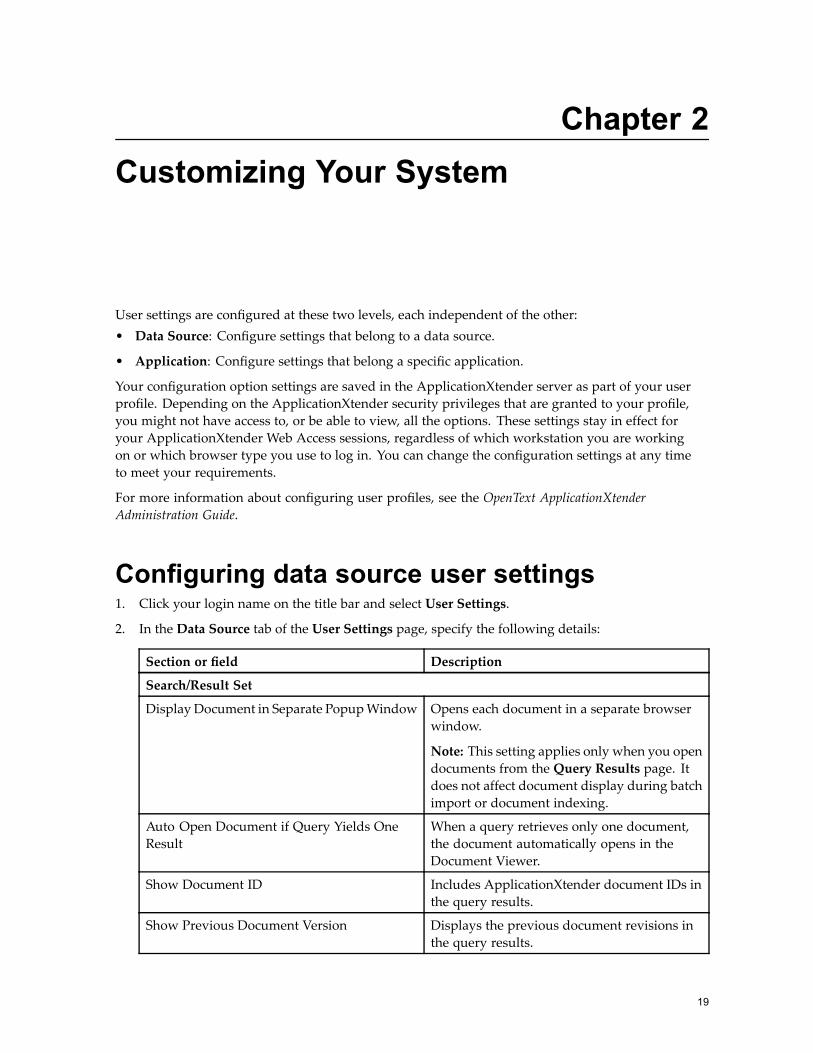
Configuring data source user settings1. Click your login name on the title bar and select User Settings.
2. In the Data Source tab of the User Settings page, specify the following details:
Section or field Description
Search/Result Set
Display Document in Separate PopupWindow Opens each document in a separate browserwindow.
Note: This setting applies only when you opendocuments from the Query Results page. Itdoes not affect document display during batchimport or document indexing.
Auto Open Document if Query Yields OneResult
When a query retrieves only one document,the document automatically opens in theDocument Viewer.
Show Document ID Includes ApplicationXtender document IDs inthe query results.
Show Previous Document Version Displays the previous document revisions inthe query results.
19
Customizing Your System
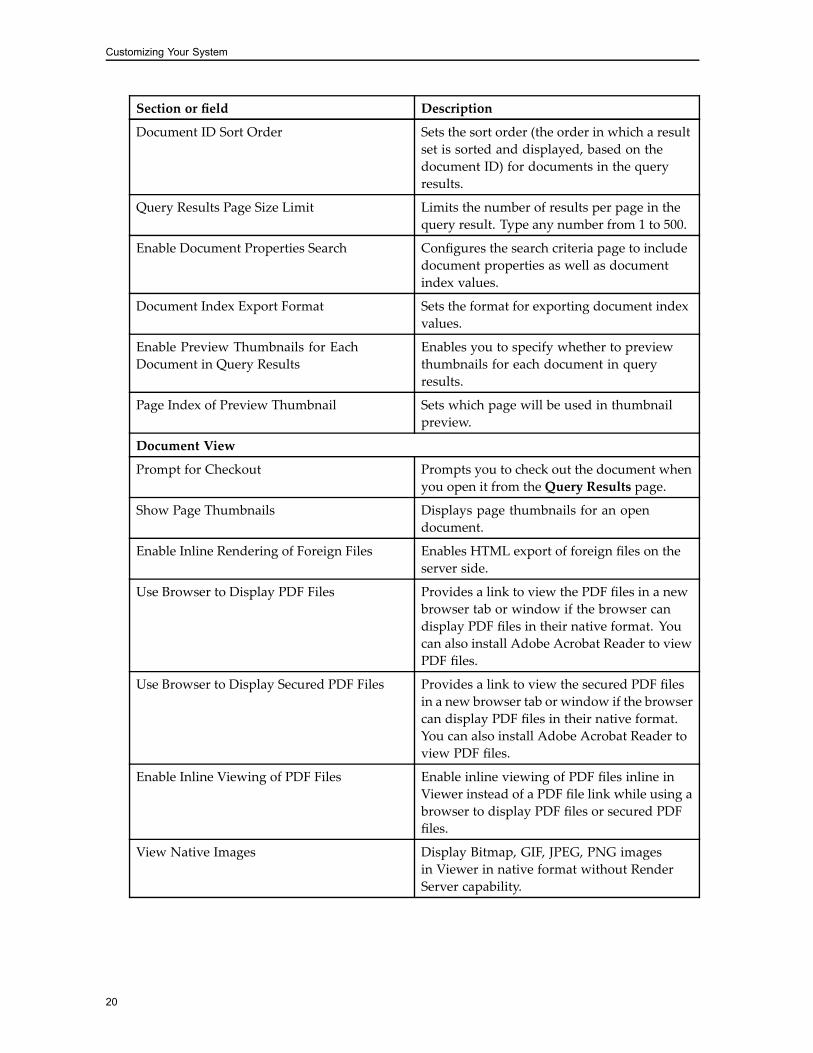
Section or field Description
Document ID Sort Order Sets the sort order (the order in which a resultset is sorted and displayed, based on thedocument ID) for documents in the queryresults.
Query Results Page Size Limit Limits the number of results per page in thequery result. Type any number from 1 to 500.
Enable Document Properties Search Configures the search criteria page to includedocument properties as well as documentindex values.
Document Index Export Format Sets the format for exporting document indexvalues.
Enable Preview Thumbnails for EachDocument in Query Results
Enables you to specify whether to previewthumbnails for each document in queryresults.
Page Index of Preview Thumbnail Sets which page will be used in thumbnailpreview.
Document View
Prompt for Checkout Prompts you to check out the document whenyou open it from the Query Results page.
Show Page Thumbnails Displays page thumbnails for an opendocument.
Enable Inline Rendering of Foreign Files Enables HTML export of foreign files on theserver side.
Use Browser to Display PDF Files Provides a link to view the PDF files in a newbrowser tab or window if the browser candisplay PDF files in their native format. Youcan also install Adobe Acrobat Reader to viewPDF files.
Use Browser to Display Secured PDF Files Provides a link to view the secured PDF filesin a new browser tab or window if the browsercan display PDF files in their native format.You can also install Adobe Acrobat Reader toview PDF files.
Enable Inline Viewing of PDF Files Enable inline viewing of PDF files inline inViewer instead of a PDF file link while using abrowser to display PDF files or secured PDFfiles.
View Native Images Display Bitmap, GIF, JPEG, PNG imagesin Viewer in native format without RenderServer capability.
20
Customizing Your System
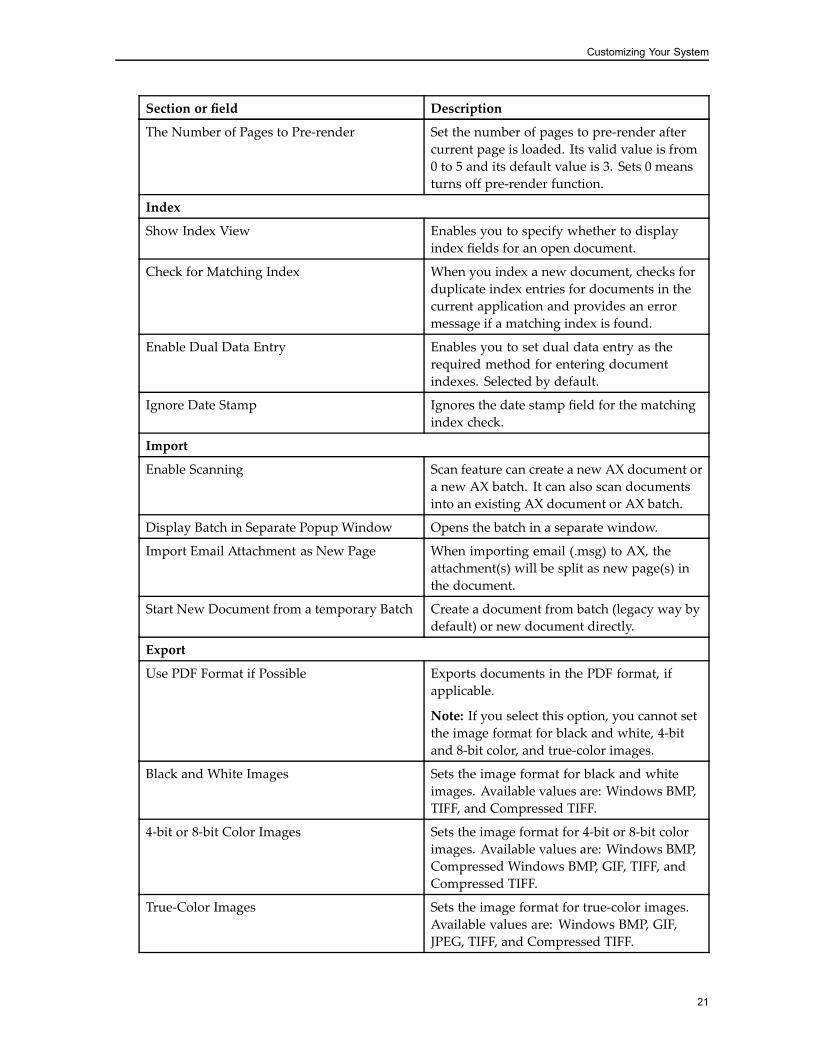
Section or field Description
The Number of Pages to Pre-render Set the number of pages to pre-render aftercurrent page is loaded. Its valid value is from0 to 5 and its default value is 3. Sets 0 meansturns off pre-render function.
Index
Show Index View Enables you to specify whether to displayindex fields for an open document.
Check for Matching Index When you index a new document, checks forduplicate index entries for documents in thecurrent application and provides an errormessage if a matching index is found.
Enable Dual Data Entry Enables you to set dual data entry as therequired method for entering documentindexes. Selected by default.
Ignore Date Stamp Ignores the date stamp field for the matchingindex check.
Import
Enable Scanning Scan feature can create a new AX document ora new AX batch. It can also scan documentsinto an existing AX document or AX batch.
Display Batch in Separate Popup Window Opens the batch in a separate window.
Import Email Attachment as New Page When importing email (.msg) to AX, theattachment(s) will be split as new page(s) inthe document.
Start New Document from a temporary Batch Create a document from batch (legacy way bydefault) or new document directly.
Export
Use PDF Format if Possible Exports documents in the PDF format, ifapplicable.
Note: If you select this option, you cannot setthe image format for black and white, 4-bitand 8-bit color, and true-color images.
Black and White Images Sets the image format for black and whiteimages. Available values are: Windows BMP,TIFF, and Compressed TIFF.
4-bit or 8-bit Color Images Sets the image format for 4-bit or 8-bit colorimages. Available values are: Windows BMP,Compressed Windows BMP, GIF, TIFF, andCompressed TIFF.
True-Color Images Sets the image format for true-color images.Available values are: Windows BMP, GIF,JPEG, TIFF, and Compressed TIFF.
21
Customizing Your System
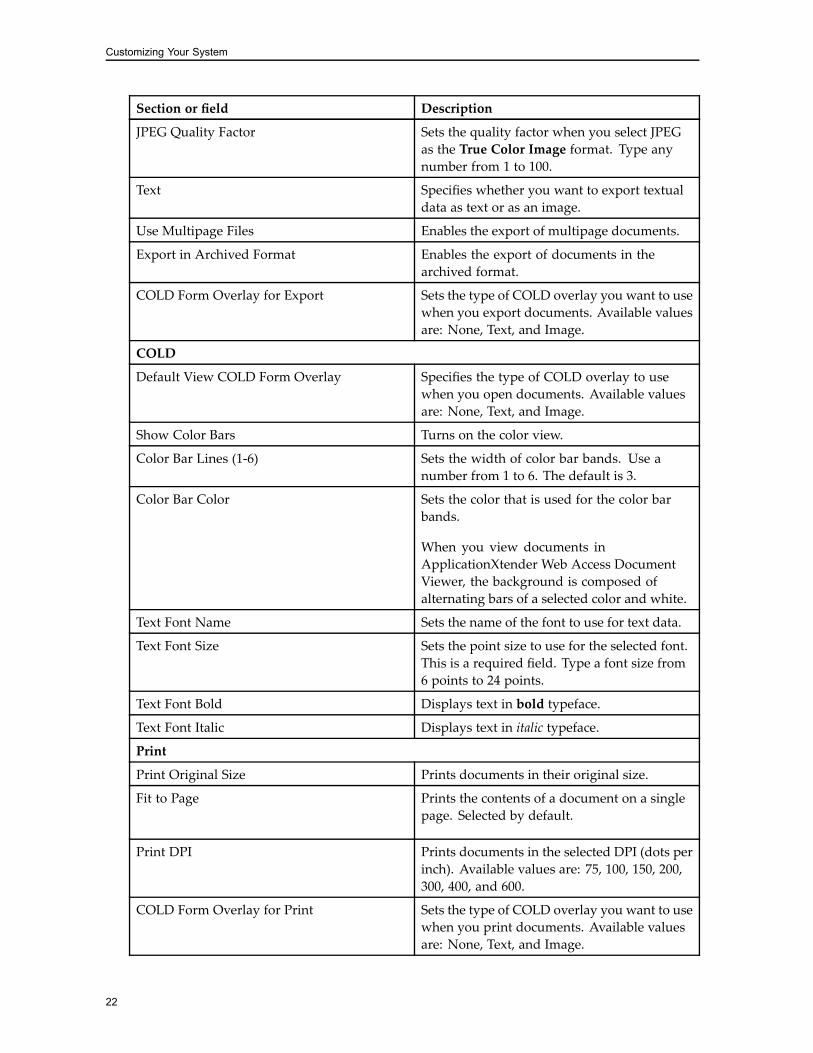
Section or field Description
JPEG Quality Factor Sets the quality factor when you select JPEGas the True Color Image format. Type anynumber from 1 to 100.
Text Specifies whether you want to export textualdata as text or as an image.
Use Multipage Files Enables the export of multipage documents.
Export in Archived Format Enables the export of documents in thearchived format.
COLD Form Overlay for Export Sets the type of COLD overlay you want to usewhen you export documents. Available valuesare: None, Text, and Image.
COLD
Default View COLD Form Overlay Specifies the type of COLD overlay to usewhen you open documents. Available valuesare: None, Text, and Image.
Show Color Bars Turns on the color view.
Color Bar Lines (1-6) Sets the width of color bar bands. Use anumber from 1 to 6. The default is 3.
Color Bar Color Sets the color that is used for the color barbands.
When you view documents inApplicationXtender Web Access DocumentViewer, the background is composed ofalternating bars of a selected color and white.
Text Font Name Sets the name of the font to use for text data.
Text Font Size Sets the point size to use for the selected font.This is a required field. Type a font size from6 points to 24 points.
Text Font Bold Displays text in bold typeface.
Text Font Italic Displays text in italic typeface.
Print Original Size Prints documents in their original size.
Fit to Page Prints the contents of a document on a singlepage. Selected by default.
Print DPI Prints documents in the selected DPI (dots perinch). Available values are: 75, 100, 150, 200,300, 400, and 600.
COLD Form Overlay for Print Sets the type of COLD overlay you want to usewhen you print documents. Available valuesare: None, Text, and Image.
22
Customizing Your System
Section or field Description
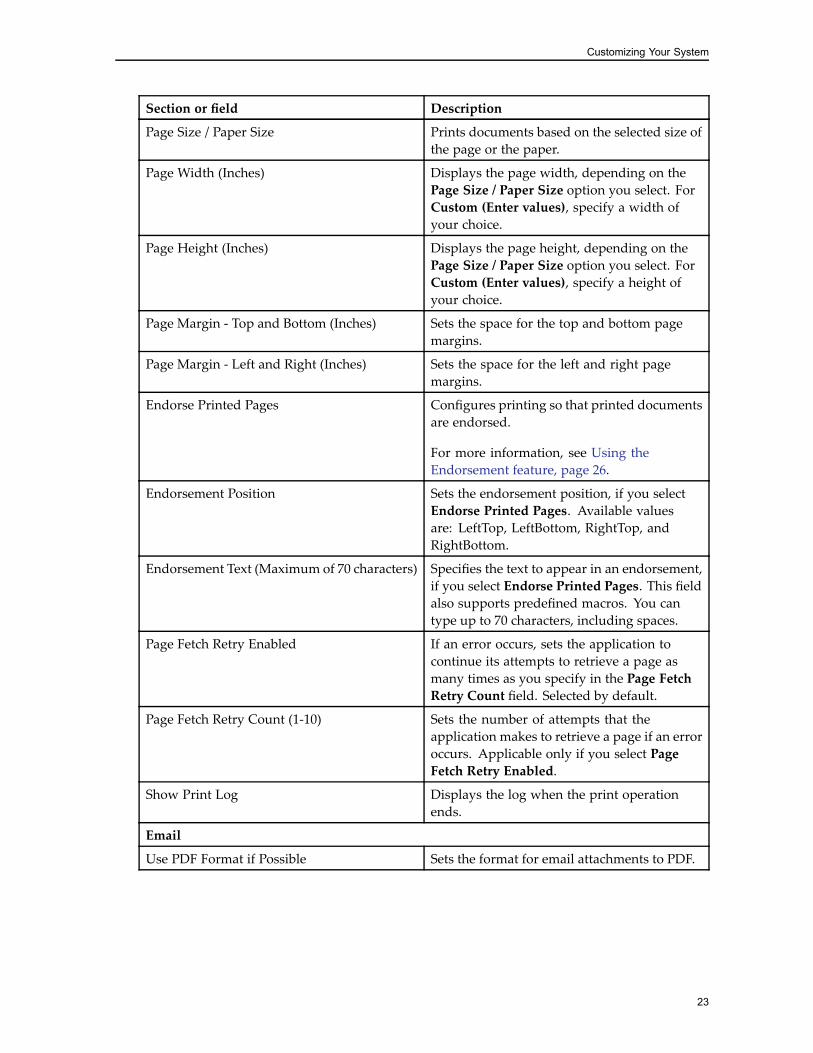
Page Size / Paper Size Prints documents based on the selected size ofthe page or the paper.
Page Width (Inches) Displays the page width, depending on thePage Size / Paper Size option you select. ForCustom (Enter values), specify a width ofyour choice.
Page Height (Inches) Displays the page height, depending on thePage Size / Paper Size option you select. ForCustom (Enter values), specify a height ofyour choice.
Page Margin - Top and Bottom (Inches) Sets the space for the top and bottom pagemargins.
Page Margin - Left and Right (Inches) Sets the space for the left and right pagemargins.
Endorse Printed Pages Configures printing so that printed documentsare endorsed.
For more information, see Using theEndorsement feature, page 26.
Endorsement Position Sets the endorsement position, if you selectEndorse Printed Pages. Available valuesare: LeftTop, LeftBottom, RightTop, andRightBottom.
Endorsement Text (Maximum of 70 characters) Specifies the text to appear in an endorsement,if you select Endorse Printed Pages. This fieldalso supports predefined macros. You cantype up to 70 characters, including spaces.
Page Fetch Retry Enabled If an error occurs, sets the application tocontinue its attempts to retrieve a page asmany times as you specify in the Page FetchRetry Count field. Selected by default.
Page Fetch Retry Count (1-10) Sets the number of attempts that theapplication makes to retrieve a page if an erroroccurs. Applicable only if you select PageFetch Retry Enabled.
Show Print Log Displays the log when the print operationends.
Use PDF Format if Possible Sets the format for email attachments to PDF.
23
Customizing Your System
Section or field Description
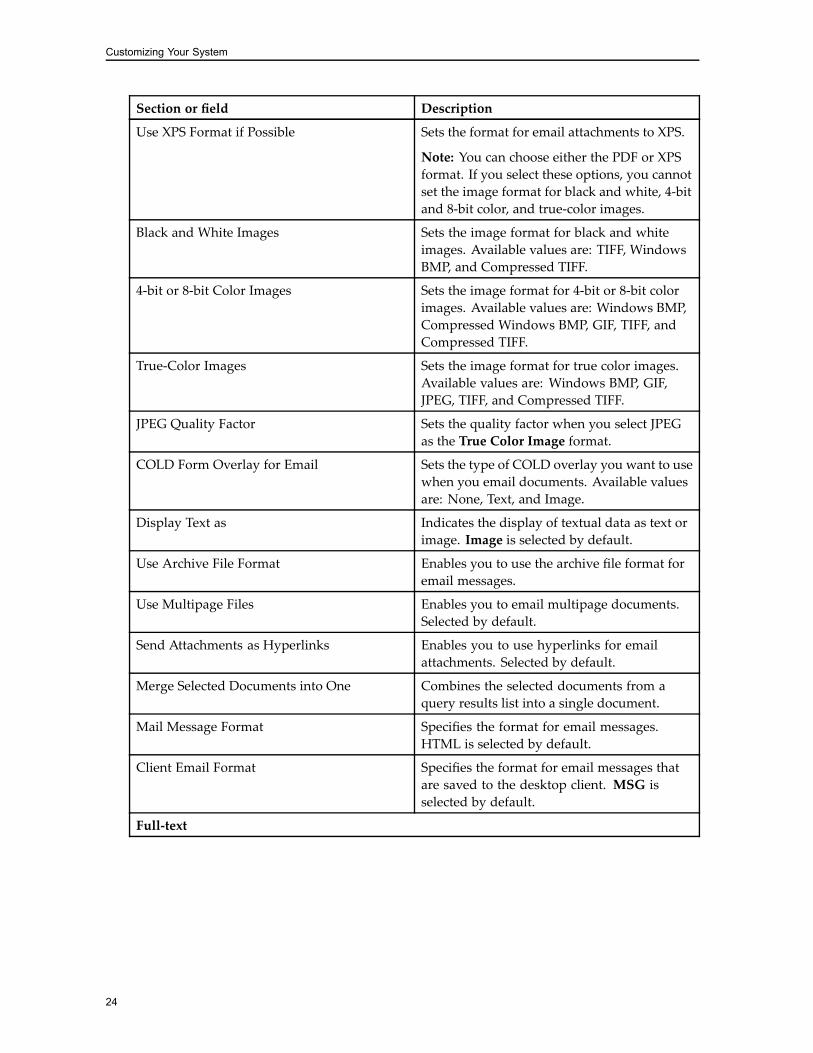
Use XPS Format if Possible Sets the format for email attachments to XPS.
Note: You can choose either the PDF or XPSformat. If you select these options, you cannotset the image format for black and white, 4-bitand 8-bit color, and true-color images.
Black and White Images Sets the image format for black and whiteimages. Available values are: TIFF, WindowsBMP, and Compressed TIFF.
4-bit or 8-bit Color Images Sets the image format for 4-bit or 8-bit colorimages. Available values are: Windows BMP,Compressed Windows BMP, GIF, TIFF, andCompressed TIFF.
True-Color Images Sets the image format for true color images.Available values are: Windows BMP, GIF,JPEG, TIFF, and Compressed TIFF.
JPEG Quality Factor Sets the quality factor when you select JPEGas the True Color Image format.
COLD Form Overlay for Email Sets the type of COLD overlay you want to usewhen you email documents. Available valuesare: None, Text, and Image.
Display Text as Indicates the display of textual data as text orimage. Image is selected by default.
Use Archive File Format Enables you to use the archive file format foremail messages.
Use Multipage Files Enables you to email multipage documents.Selected by default.
Send Attachments as Hyperlinks Enables you to use hyperlinks for emailattachments. Selected by default.
Merge Selected Documents into One Combines the selected documents from aquery results list into a single document.
Mail Message Format Specifies the format for email messages.HTML is selected by default.
Client Email Format Specifies the format for email messages thatare saved to the desktop client. MSG isselected by default.
Full-text
24
Customizing Your System
Section or field Description
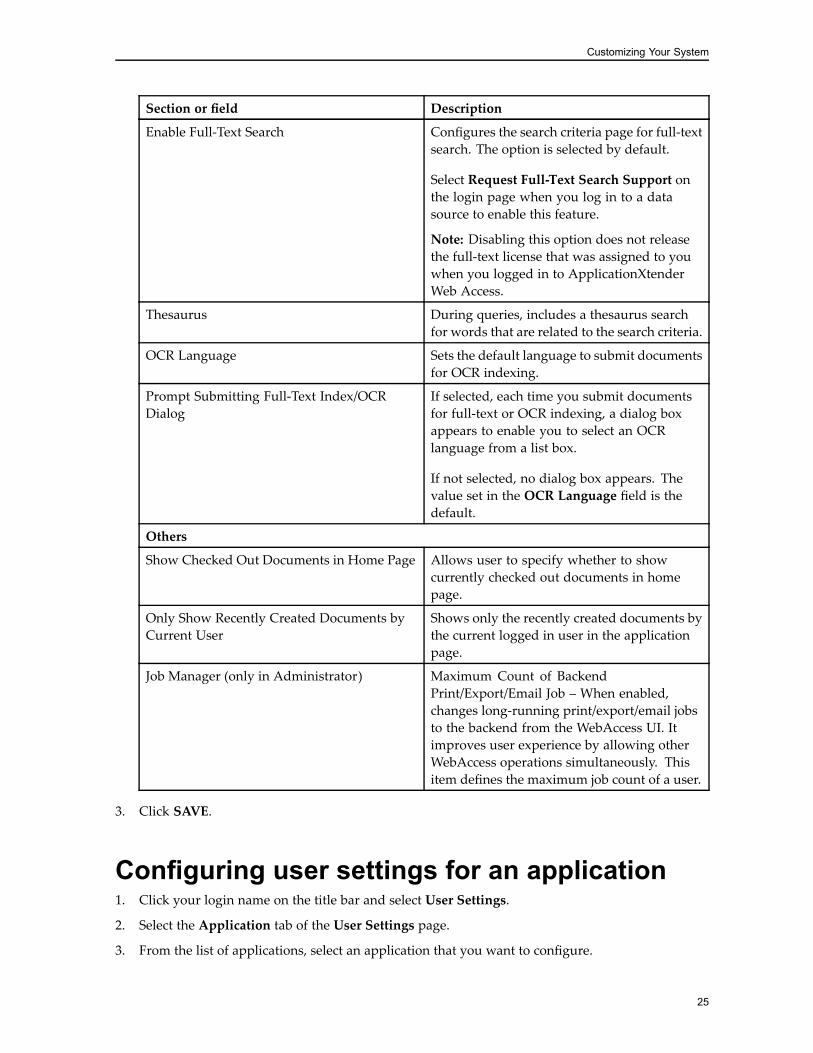
Enable Full-Text Search Configures the search criteria page for full-textsearch. The option is selected by default.
Select Request Full-Text Search Support onthe login page when you log in to a datasource to enable this feature.
Note: Disabling this option does not releasethe full-text license that was assigned to youwhen you logged in to ApplicationXtenderWeb Access.
Thesaurus During queries, includes a thesaurus searchfor words that are related to the search criteria.
OCR Language Sets the default language to submit documentsfor OCR indexing.
Prompt Submitting Full-Text Index/OCRDialog
If selected, each time you submit documentsfor full-text or OCR indexing, a dialog boxappears to enable you to select an OCRlanguage from a list box.
If not selected, no dialog box appears. Thevalue set in the OCR Language field is thedefault.
Others
Show Checked Out Documents in Home Page Allows user to specify whether to showcurrently checked out documents in homepage.
Only Show Recently Created Documents byCurrent User
Shows only the recently created documents bythe current logged in user in the applicationpage.
Job Manager (only in Administrator) Maximum Count of BackendPrint/Export/Email Job – When enabled,changes long-running print/export/email jobsto the backend from the WebAccess UI. Itimproves user experience by allowing otherWebAccess operations simultaneously. Thisitem defines the maximum job count of a user.
3. Click SAVE.
Configuring user settings for an application1. Click your login name on the title bar and select User Settings.
2. Select the Application tab of the User Settings page.
3. From the list of applications, select an application that you want to configure.
25
Customizing Your System
4. From the list of index fields for the selected application, select a value to designate as the title ofall documents that belong to the application.
5. Click SAVE.
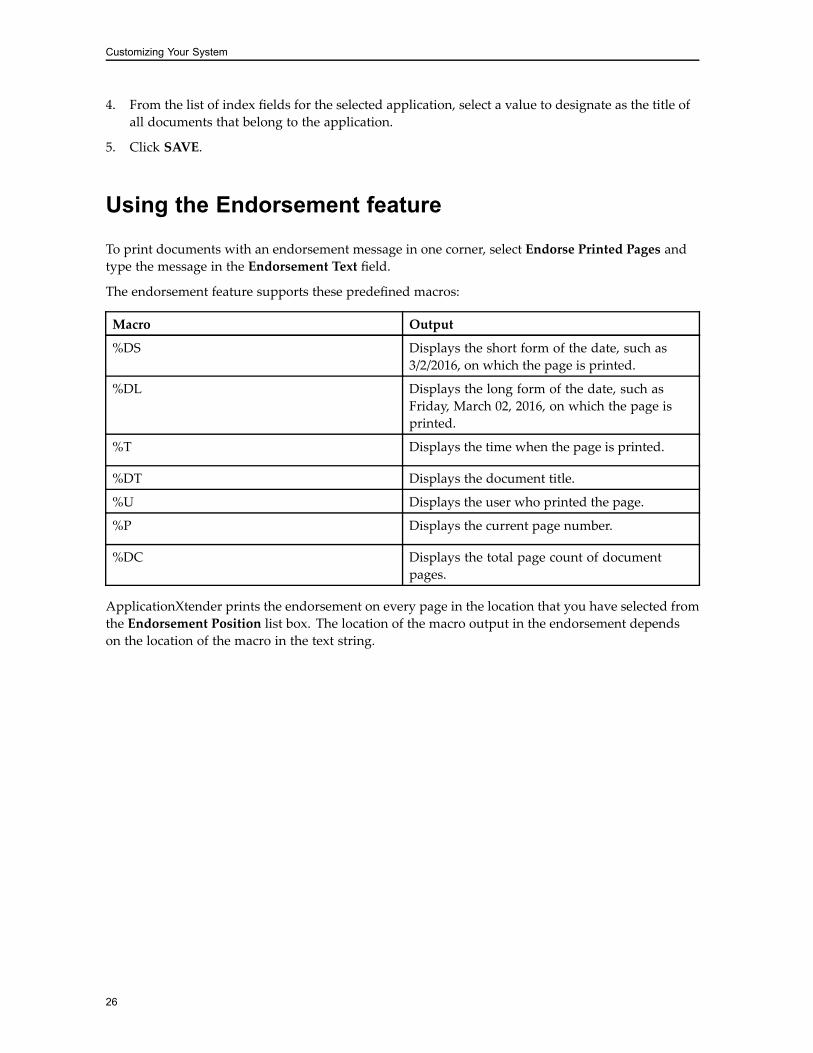
Using the Endorsement feature
To print documents with an endorsement message in one corner, select Endorse Printed Pages andtype the message in the Endorsement Text field.
The endorsement feature supports these predefined macros:
Macro Output
%DS Displays the short form of the date, such as3/2/2016, on which the page is printed.
%DL Displays the long form of the date, such asFriday, March 02, 2016, on which the page isprinted.
%T Displays the time when the page is printed.
%DT Displays the document title.
%U Displays the user who printed the page.
%P Displays the current page number.
%DC Displays the total page count of documentpages.
ApplicationXtender prints the endorsement on every page in the location that you have selected fromthe Endorsement Position list box. The location of the macro output in the endorsement dependson the location of the macro in the text string.
26
Chapter 3Creating Documents
ApplicationXtender Web Access enables you to store and organize many types of informationas documents. The documents are organized in applications for easy retrieval. Authorizedusers can scan or upload electronically formatted files into ApplicationXtender Web Access. AnApplicationXtender document can contain one or more electronically formatted files. A documentcan have one or more sets of indexes that you can use to search for the document.
Enabling the scannerBefore scanning any documents, the scanner must be enabled.
1. Click <User Name> then User Settings in the upper right corner.
2. In the left side list, click Import then check the box for Enable Scanning.
3. Click Save.
Configuring the scannerScanners can be configured from the AX Web Access application.
1. Click the plus (+) symbol in the upper right corner, then New Document.
2. Click the Scanner icon.
3. Select the scanner you want to configure from the list presnted and click OK.
4. Click the down arrow beside the Scanner icon and configure the settings. You can also click theSettings icon and open the Advanced Settings dialog for more configuration options.
Importing and scanning documents1. Select the application that you want to add a document to.
2. Perform either step:
a. Click the file cabinet drawer icon in the toolbar and select New Document or click the NEWDOCUMENT button.
27
Creating Documents
b. Drag and drop the electronic file or files from your desktop into the main panel.
Note: If you enabled the thumbnails view in the User Settings page, you can also drag anddrop the electronic file or files from your desktop into the thumbnails view.
Drag and drop files to the inline render frame of a foreign file to add pages is not supported,but you can drag files to the outside area of the frame, such as the thumbnail.
3. A blank document is created. You can browse and select one or more files or scan the page(s) tothe document. If you enabled the thumbnails view in the User Settings page, you can use thepage thumbnails that appear on the left to navigate through the pages.If you have selected more than one file, the pages are appended sequentially.
4. If you checked the user setting Start New Document from a temporary Batch under Import, youcan choose whether you want to index the document now or later:• To index immediately after the upload, specify relevant values in the index fields that areavailable for the selected application, and then click SAVE.
• To continue without indexing, click CANCEL.
A message indicates that the document is not indexed. ClickDELETE to delete the unindexeddocument or KEEP to continue without deletion. The document is added to the UploadedBatches list as a temporary batch to be indexed later. By default, the document is saved with aname that includes your login ID and the date and time you uploaded the document. Forexample, SYSOP - 8/1/2015 7:02:01 PM.
For more information, see Indexing batches manually, page 34.
Note: When applying the default import setting (un-check Start New Document from a temporaryBatch), an imported file will be lost if the user creates a new document without saving the index. Ifthe user setting Start New Document from a temporary Batch under the.Import category is checked,the unsaved document will be kept as batch in the same application.
Creating documents in batchesIn addition to adding documents individually, ApplicationXtender Web Access enables you to createand index documents in batches.
Note: If you enabled Display Batch in Separate Popup Windows under Index in the User Settingspage, the batch index opens in a pop-up window. This occurs when you create a new document or anew batch, or drag and drop files to create a new document or a new batch.
Uploading batches1. Select the application that you want to add a document to.
2. Click the file cabinet drawer icon in the toolbar and select New Batch from the list box or or clickthe NEW BATCH button on the application home page.
3. In the New Batch dialog box, specify the following details:
28
Creating Documents
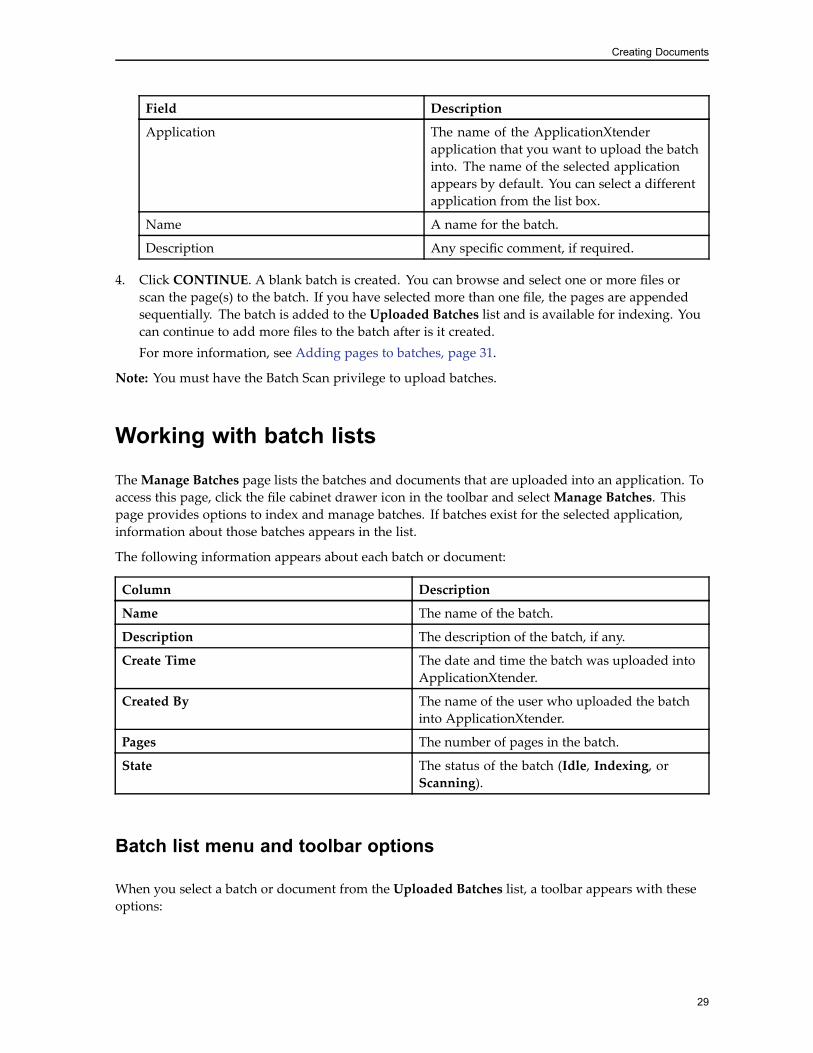
Field Description
Application The name of the ApplicationXtenderapplication that you want to upload the batchinto. The name of the selected applicationappears by default. You can select a differentapplication from the list box.
Name A name for the batch.
Description Any specific comment, if required.
4. Click CONTINUE. A blank batch is created. You can browse and select one or more files orscan the page(s) to the batch. If you have selected more than one file, the pages are appendedsequentially. The batch is added to the Uploaded Batches list and is available for indexing. Youcan continue to add more files to the batch after is it created.For more information, see Adding pages to batches, page 31.
Note: You must have the Batch Scan privilege to upload batches.
Working with batch lists
TheManage Batches page lists the batches and documents that are uploaded into an application. Toaccess this page, click the file cabinet drawer icon in the toolbar and selectManage Batches. Thispage provides options to index and manage batches. If batches exist for the selected application,information about those batches appears in the list.
The following information appears about each batch or document:
Column Description
Name The name of the batch.
Description The description of the batch, if any.
Create Time The date and time the batch was uploaded intoApplicationXtender.
Created By The name of the user who uploaded the batchinto ApplicationXtender.
Pages The number of pages in the batch.
State The status of the batch (Idle, Indexing, orScanning).
Batch list menu and toolbar options
When you select a batch or document from the Uploaded Batches list, a toolbar appears with theseoptions:
29
Creating Documents
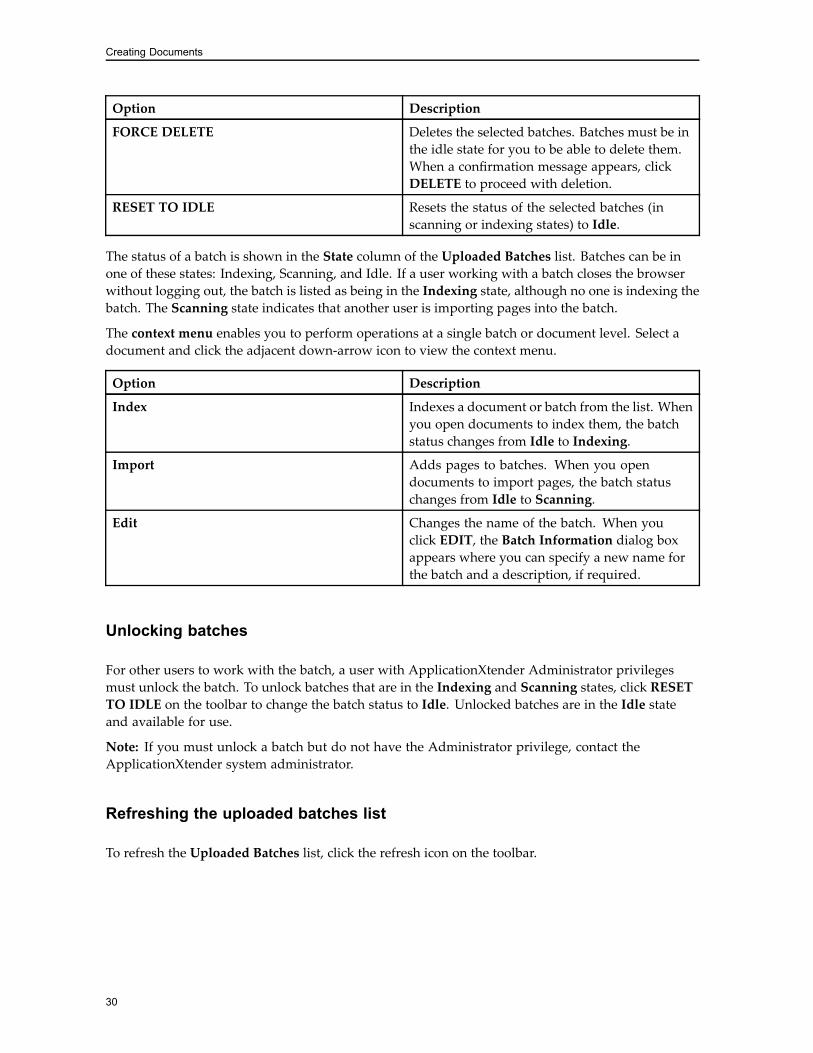
Option Description
FORCE DELETE Deletes the selected batches. Batches must be inthe idle state for you to be able to delete them.When a confirmation message appears, clickDELETE to proceed with deletion.
RESET TO IDLE Resets the status of the selected batches (inscanning or indexing states) to Idle.
The status of a batch is shown in the State column of the Uploaded Batches list. Batches can be inone of these states: Indexing, Scanning, and Idle. If a user working with a batch closes the browserwithout logging out, the batch is listed as being in the Indexing state, although no one is indexing thebatch. The Scanning state indicates that another user is importing pages into the batch.
The context menu enables you to perform operations at a single batch or document level. Select adocument and click the adjacent down-arrow icon to view the context menu.
Option Description
Index Indexes a document or batch from the list. Whenyou open documents to index them, the batchstatus changes from Idle to Indexing.
Import Adds pages to batches. When you opendocuments to import pages, the batch statuschanges from Idle to Scanning.
Edit Changes the name of the batch. When youclick EDIT, the Batch Information dialog boxappears where you can specify a new name forthe batch and a description, if required.
Unlocking batches
For other users to work with the batch, a user with ApplicationXtender Administrator privilegesmust unlock the batch. To unlock batches that are in the Indexing and Scanning states, click RESETTO IDLE on the toolbar to change the batch status to Idle. Unlocked batches are in the Idle stateand available for use.
Note: If you must unlock a batch but do not have the Administrator privilege, contact theApplicationXtender system administrator.
Refreshing the uploaded batches list
To refresh the Uploaded Batches list, click the refresh icon on the toolbar.
30
Creating Documents
Managing batches
ApplicationXtender Web Access provides several ways to manage batches. You can add pages toApplicationXtender documents or batches. The pages can be of the same object type or of a differentobject type. You can also switch between different states, move or copy pages, delete batches orbatch pages, and so on.
Note: If you enabled Display Batch in Separate Popup Windows under Index in the User Settingspage so that the batch index opens in a pop-up window, ensure that you click the Close Window iconto close the batch. Otherwise, the batch lock is not released until the session expires.
Adding pages to batches1. From the Uploaded Batches list, select a batch, and then click Import on the context menu.
The first page of the selected batch appears in the Document Viewer. The Uploaded Batches listdisplays the status of the batch as Scanning.
2. Perform either step:
a. Click the Add Page icon on the Page toolbar. In the Add New Page dialog box, select the filethat you want to add and then click UPLOAD.
b. Drag and drop the electronic file or files from your desktop into the main panel.The files are appended to the end of the current document. The page thumbnails also appearin the appropriate location.
Switching between importing and indexing states
You can switch between the importing (scanning) and indexing states when adding (importing)pages to a batch. The batch is in the Scanning state during an import. To switch to the Indexingstate, click the New Document icon on the Batch toolbar. To switch back to the Scanning state,click CANCEL on the index panel on the right.
Copying or moving batch pages
ApplicationXtender Web Access enables you to copy or move batch pages betweenApplicationXtender applications. It processes the pages as a new batch in the target application. Youmust have the Batch Scan privilege for the target application to copy and move batch pages.
1. From the Uploaded Batches list, select a batch, and then click Import on the context menu.The selected batch opens in the Document Viewer.
2. Click the Copy Move Pages icon on the Batch toolbar.
3. In the Copy or Move Pages to New Batch dialog box, specify the following:
31
Creating Documents
Field Description
Document Pages The page number of the batch pages you wantto move or copy.
To specify a continuous page range, inserta hyphen between the first and last page.Example: 1-4.
To specify separate pages, insert a commabetween each page. Example: 2,4.
Target Application The application to which you want to moveor copy the pages.
Batch Name The name of the batch.
Index New Document Indexes the batch immediately after copyingor moving the pages. If you do not select thisoption, select the batch from the UploadedBatches list when you are ready to index thebatch.
4. ClickMOVE if you want to move the selected batch pages from the source application.
5. Click COPY if you want to leave a copy of the batch pages in the source application.
IndexingAfter you upload an electronic file or a set of electronic files into ApplicationXtender applications,you must index the files and the individual files in each batch to save them as ApplicationXtenderdocuments. Authorized users can use the index data to retrieve them from the ApplicationXtenderdatabase.
ApplicationXtender document indexes
The ApplicationXtender system administrator specifies the data that is required to retrieve documentsthat belong to a particular application. This set of data is known as the index of the document.Different applications have different types of index data.
The administrator can also configure the index fields for dual data entry so that an index field has twoinput fields instead of one. The information that you type in both fields must match. If it does not,an error message appears when you try to save the index. Dual data entry provides data validationwhen you specify index information during document creation.
Note: You have the option to change the dual data entry configuration that the administrator hasdefined. You can change this setting when you define a profile in the User Settings page.
32
Creating Documents
Indexing types
The ApplicationXtender administrator sets up index fields and specifies their characteristics whencreating and configuring an application. The indexing options depend on whether the selectedapplication is configured for automatic or manual indexing.
Manual indexing
During manual indexing, you can specify the values for the index fields one at a time, select anexisting index record, or copy the index data of another document and paste them into the relevantindex fields of the current document.
For batch pages, you have two options:• Select an existing document index and append the batch pages to the corresponding document.
• Copy an existing index to create new ApplicationXtender documents.
Auto indexing
You can use the Auto Index function to specify data in one or more index fields. You can click theauto index icon on the top left of index panel and it will find a match, select the data from the recordin the Auto Index table.
Note: If the ApplicationXtender system administrator configures to retain the Auto Index record, therecord remains in the table, even after you select it.
For instructions, see Using the Auto Index feature, page 37.
Key Reference indexing
The Key Reference indexing feature operates similarly to automatic indexing. The Key Referencefeature is useful for automatically populating the index information, changing the index informationfrequently, or both.
Note: When you modify document indexes that are created by using the Key Reference feature,updating index field data on one document might automatically update data in the same field onother documents with the same key index value.• When you modify a data field value on an existing index record, ApplicationXtender finds allindex records with the same key value and makes the same change to those records.
• When you modify the key field value on an existing index record, ApplicationXtender modifiesonly that document; all other documents having the original key value remain unchanged.
Example 3-1. Key Field Versus Data FieldAssume that for the HR application, the ApplicationXtender system administrator has configuredEmployee ID as the key field and Employee Last Name as a data field. If you modify the Employee ID field
33
Creating Documents
for an index record, the other documents with the same employee ID are not affected. However, if youmodify the Employee Last Name, the value changes in all other documents with the same Employee ID.
Note: The Auto Index or Key Reference functionalities are available for indexing only if theApplicationXtender system administrator configures the ApplicationXtender applications withfields enabled for Auto Index or Key Reference.
For more information, see Using the Auto Index feature, page 37 and Using the Key Referencefeature, page 38.
Indexing batches manually
You can index batches when you upload them, or later, by selecting the batches from the list ofuploaded batches for an application.
1. Depending on when you decide to index a document, perform one of the following:
a. To index a document immediately after you upload it, click the New Document icon on theBatch toolbar.
b. To index a document from the list of uploaded batches:
i. Select the relevant application.
ii. Click file cabinet drawer icon and selectManage Batches.On theManage Batches page, you can view the list of Uploaded Batches for the selectedapplication. The batch state indicates the status of the batch. Batches that are availablefor indexing show a status of Idle. When a batch is selected for indexing, its statusautomatically changes to Indexing.
iii. Select a batch from the list and then click Index on the context menu.
Note: The batch state automatically changes from Idle to Indexing (you can view the statein the Uploaded Batches list). This state prevents other users from accessing the batch.
2. For the first page that appears in the Document Viewer, type the appropriate information fromthe document into each index field.You can also use the Select Index option to populate the index fields. For instructions, see Usingthe existing index data, page 36.
Note: It is recommended that you populate all the fields for which data is available to makethe document index as complete as possible.
To clear the index information and retype new data in the fields, if required, click the ClearIndex icon on the index panel toolbar.
3. After you finish providing the relevant data, click SAVE.
Note:• If you have indexed a document, all the pages in the document inherit the index data. TheApplicationXtender repository stores the electronic file and its index information.
• If you have indexed a batch, the current page is indexed and saved as a newApplicationXtender document, and the next page in the batch appears in the Document
34
Creating Documents
Viewer. You can attach more batch pages to this document or create a new ApplicationXtenderdocument to index the remaining pages.
You can modify the index data after the Save operation, if required. ClickMODIFY to edit the indexfields. Modify the values in the index fields as necessary, or use the Select Index feature or theCopy/Paste Index option to use an existing index data.
For more information, see Using the existing index data, page 36 and Additional operations for abatch, page 35.
Attaching batch pages to documents
Attaching batch pages to the current ApplicationXtender document enables you to index the rest ofthe pages without having to reenter the index information.
If only a few batch pages are part of the current document, you can attach the additional pagesone page at a time. If all pages are part of the current document, you can attach all the pagessimultaneously.
To attach the current page to the current ApplicationXtender document:1. From the Page toolbar, click the Attach Current Page icon.
The current page is removed from the batch and appended to the current ApplicationXtenderdocument. The next page in the batch appears in the viewer.
2. Repeat step 1 to attach additional pages to the current document.
3. After attaching the last batch page that belongs to the current document, click theNewDocumenticon to create a new ApplicationXtender document for indexing the remaining pages.
4. Type the necessary information in the index fields and click SAVE.ApplicationXtender Web Access saves the indexed page as a new ApplicationXtender document.You can continue to attach more pages to this document or create another document. If there areno more pages in the batch, a message indicates that all the batch pages have been indexed.
5. Select the next operation from the message dialog box.
To attach all batch pages to the current document:1. Perform either step:
a. From the Page toolbar, click the Attach All Pages icon.
b. Drag and drop the electronic file or files from the thumbnail panel.All the remaining batch pages are attached to the current ApplicationXtender document, and thedocument is saved.A message appears that indicates all the batch pages have been indexed.
2. Select the next operation from the message dialog box.
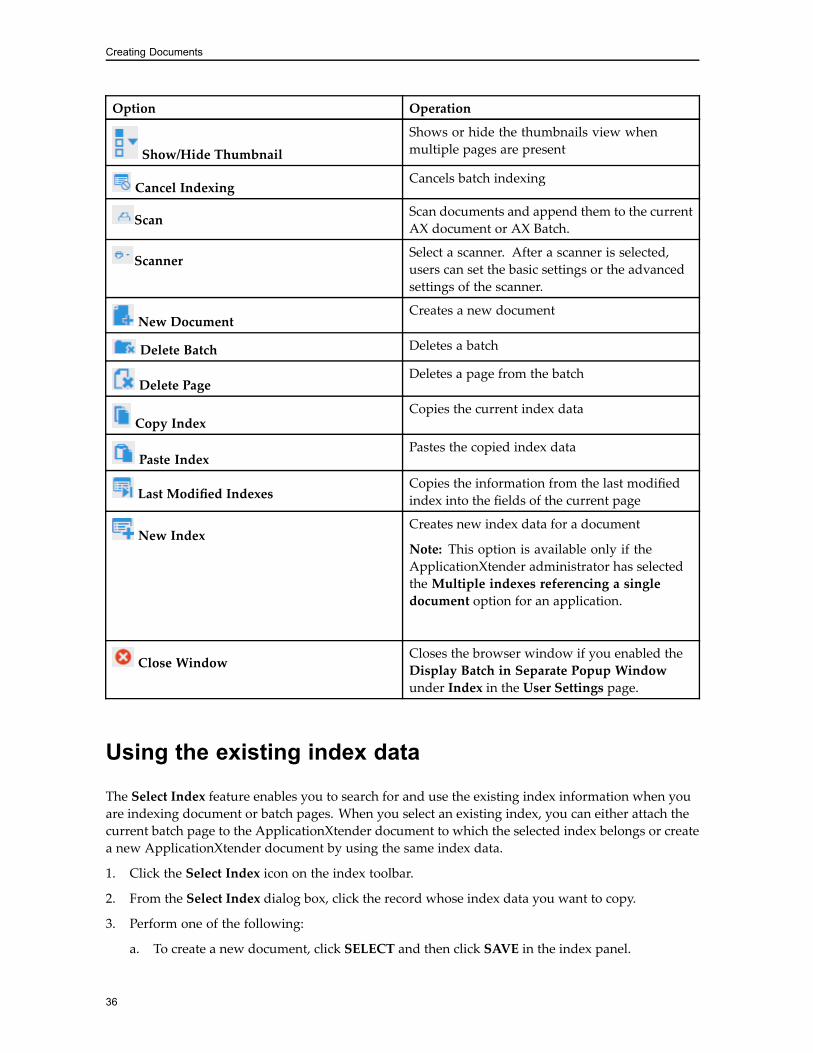
Additional operations for a batch
During batch indexing, you can use the toolbar options to perform additional operations.
35
Creating Documents
Option Operation
Show/Hide Thumbnail
Shows or hide the thumbnails view whenmultiple pages are present
Cancel IndexingCancels batch indexing
Scan Scan documents and append them to the currentAX document or AX Batch.
Scanner Select a scanner. After a scanner is selected,users can set the basic settings or the advancedsettings of the scanner.
New DocumentCreates a new document
Delete Batch Deletes a batch
Delete PageDeletes a page from the batch
Copy IndexCopies the current index data
Paste IndexPastes the copied index data
Last Modified IndexesCopies the information from the last modifiedindex into the fields of the current page
New IndexCreates new index data for a document
Note: This option is available only if theApplicationXtender administrator has selectedthe Multiple indexes referencing a singledocument option for an application.
Close WindowCloses the browser window if you enabled theDisplay Batch in Separate Popup Windowunder Index in the User Settings page.
Using the existing index data
The Select Index feature enables you to search for and use the existing index information when youare indexing document or batch pages. When you select an existing index, you can either attach thecurrent batch page to the ApplicationXtender document to which the selected index belongs or createa new ApplicationXtender document by using the same index data.
1. Click the Select Index icon on the index toolbar.
2. From the Select Index dialog box, click the record whose index data you want to copy.
3. Perform one of the following:
a. To create a new document, click SELECT and then click SAVE in the index panel.
36
Creating Documents
If you have indexed a document, all the pages inherit the index data and are saved as asingle ApplicationXtender document. For a batch, only the current page is indexed andsaved as a new ApplicationXtender document. For more information, see Indexing batchesmanually, page 34.
b. To append the batch pages to the existing ApplicationXtender document, click ATTACH.If you have indexed a document, all the pages inherit the index data and are appended tothe existing ApplicationXtender document. For a batch, only the current page is indexed tothe existing ApplicationXtender document. You can continue to attach additional pages orcreate a new document to index the remaining pages. For more information, see Attachingbatch pages to documents, page 35.
Selecting a task after batch indexing
When you index and save the last page in a batch, ApplicationXtender Web Access automatically exitsthe batch indexing mode and displays a message that indicates that all batch pages have been indexed.
In addition to the message, the dialog box also provides options to perform the following tasks:• Index another batch
• Import a new batch
• Return to the Application List page
• View the most recently indexed document
• Log out of ApplicationXtender Web Access
Using the Auto Index feature1. From the list of applications, select the required application, click file cabinet drawer icon in
the toolbar, and then selectManage Batches.In theManage Batches page, you can view the list of Uploaded Batches for the selectedapplication.
2. Select a document or a batch from the list and then click Index on the context menu. The firstpage in the batch appears in the Document Viewer.
3. Specify adequate index data to limit the number of matches from the Auto Index table to oneor few records.
4. Click the Auto Index icon on the index toolbar.
Note: If you do not specify any data, ApplicationXtender Web Access retrieves all the recordsfrom the auto index table.
5. From the Auto Index Result dialog box, click the record whose index information you want touse, and then click SELECT.The index fields are populated with data from the selected Auto Index record. If only onematching record is found, ApplicationXtender Web Access populates the remaining index fieldswith the relevant data. If no matching records are found, an error message appears.
37
Creating Documents
If you want to delete document indexes from the Auto Index Result dialog box, highlight therelevant records and then click the Delete icon.
6. Click SAVE.After the Save operation, you can modify the index data, if required.
Using the Key Reference feature1. From the list of applications, select the required application, click the file cabinet drawer icon in
the toolbar, and then selectManage Batches.In theManage Batches page, you can view the list of Uploaded Batches for the selectedapplication.
2. Select a document or a batch from the list and then click Index on the context menu. The firstpage in the batch appears in the Document Viewer.
3. Specify a value in the key index field, and then press the Tab key.ApplicationXtender Web Access retrieves the data from the Key Reference table and populatesthe remaining index fields. No action occurs if a matching key reference value is not found.
4. Click SAVE.
Full-text indexingFull-text indexing makes ApplicationXtender Web Access documents retrievable by using a full-textquery. To enable this, first submit the documents to a full-text queue on the ApplicationXtender IndexAgent for full-text indexing. After a document has been indexed, you can search for the document byusing words within the document text.
The ApplicationXtender system administrator configures the full-text engine information inApplicationXtender Administrator and ApplicationXtender Index Agent. At least one full-text queuemust be active to submit documents for indexing. New document can be automatically submittedfor full-text indexing.
38
Chapter 4Retrieving Documents
ApplicationXtender Web Access provides a variety of robust search and retrieval methods thatinclude search by index, search by wildcard, search by a list of values, expression search, full-textsearch, and combination search.
If the Document Properties Search is enabled, you can also search for document properties such asthe name of the author, date, and keywords. You can even combine search options to retrieve themost relevant documents.
The ApplicationXtender Index Agent, an add-on module for ApplicationXtender, supports full-textindexing. This enables you to run searches that are based on full-text data. If you have a full-textlicense and full-text permission, the Search Criteria page appears with the Full-Text Search Criteriasection whether you have full-text data or not. The ApplicationXtender Index Agent uses the xPlorefull-text engine to submit documents to the full-text database. The xPlore full-text engine enablesyou to perform queries that are based on a thesaurus as well. Queries can also include both theindex and the full-text search values.
Note: The full-text search feature is enabled if you select the Request Full-Text Search Supportoption on the login page.
If you have the Report View privilege, in addition to searching applications for documents, you can alsoquery the applications for reports that are generated by ApplicationXtender Reports Management.
For more information, see Viewing ApplicationXtender Reports Management reports, page 59.
After you retrieve a document, you can view, print, annotate, add and delete pages or documents,and modify index and document properties.
Query functionalityYou can search either one application or across multiple applications simultaneously, if theapplications reside within the same data source. The query functionality enables you to create anew query, edit an existing query, and run a query. Saved queries appear under the applicationto which they belong.
39
Retrieving Documents
Single-application searchesApplicationXtender Web Access enables you to use several different methods to set search criteria forsearching a single application.
Creating queries1. From the list of applications, select the required application.
2. Click New Query.
3. In the New Search page, specify the search criteria by using the index fields and other availableoptions.
Note: For more information, see Using advanced index value search criteria, page 40.
4. Select Include previous document revisions, if you want the search to retrieve both current andprevious versions of documents that meet the search criteria.
Note: This option is automatically checked if you selected Show Previous Document Versionunder Search/Result Set in the User Settings page. If you clear this selected option, thespecification in the profile settings is not affected.
5. Perform one of the following actions:• Click RUN to run the query without saving it for future use.
• Click SAVE to be able to run the query at any time.
1. In the Save Search dialog box, specify a name for the query.
2. Select Available to all users to share the query with other users (public query).
If you do not select this option, the query is considered a private query that only you andthe users with the Administrator privilege can access.
3. Click SAVE.
The query is saved under the relevant application and in the navigation panel. You canclick a saved query in the navigation panel to execute the query.
Using advanced index value search criteria
In addition to specifying index values for a basic index name search, you can use advanced indexvalue search methods to search for a wider range of documents. You can use these search methods:• Wildcards
• List of Values
• Expressions
40
Retrieving Documents
To use the wildcard character:1. In the New Search page, specify the index data by using the asterisk character in at least one
field. For example, specify SM* to search for documents with a name that begins with thecharacters “SM.”
2. Click RUN to begin the search process. ApplicationXtender Web Access searches the activeapplication for all records that match the specified criteria. If matching documents are found,a list of those documents appears in the Query Results page.
To use the search list:1. In the New Search page, select the index field for which you want to specify a list of values, and
then click the Search list icon that is next to the field.
2. In the List Search dialog box, specify a value for the index field.
3. Click Add to add the value to the list.
4. Repeat steps 2 and 3 for each value that you want to include in the list.To edit the values, you can replace a value from the list with a new value, delete a value, ordelete the list.
5. Click OK.
6. Click RUN to start the search.
To use expressions:1. In the New Search page, select the index field for which you want to specify a range, and then
click the Search range icon that is next to the field.
2. In the Range Search dialog box, select the type of comparison you want to use.
Note: The DATE and TIMESTAMP fields support two additional expressions. TheWithin andOlder Than expressions enable you to specify a number of days from the time of execution,rather than specify a date. For example, a value of 60 for the Older Than type of comparisonindicates a search for documents that are older than 60 days.
3. Specify a value for the selected index field.
Note: If you select Between, also type a value in the And text box.
4. Click OK.
Note:• Ensure that you use the correct format to specify an expression syntax. If the expression syntax isincorrect, an error message appears.
• An expression search does not return any null index values. To search for a null index value, use{Null} or <Null> as the search criteria.
Using full-text queries
There are four types of full-text searches: All Words, Any Words, Exact Phrase, and Expression. Thethesaurus feature enables you to search for words that are related to the search criteria. It contains a
41
Retrieving Documents
list of synonyms or keys for possible words to be used in a search. You can also query for differentversions of a document.
For information about the thesaurus feature, see the OpenText Documentum xPlore Administrationand Development Guide.
To use the full-text query criteria:1. In the New Search page, select a Search Type for the full-text query.
2. Type the search criteria.
3. Select Thesaurus to search for synonyms.ApplicationXtender Web Access searches the thesaurus for synonyms or keys for words in thesearch criteria.
Note: This option is available only when the xPlore full-text engine is used to submit documentsto the full-text database. For more information, see the ApplicationXtender Administration Guide.
4. If you want to run the query without saving it for future use, click RUN.If the query retrieves only one document that includes the search criteria, the document opens inDocument Viewer. Otherwise, you can select a document from the Query Results page, whichlists the documents that include the search criteria.The Document Viewer opens to the page that includes the first instance of the search criteria,or hit. Each hit in the page is highlighted. Also, a Full-Text Search Results pop-up windowindicates the number of hits on the current page and the total number of hits in the document.The pop-up window also enables you to move between the pages that include hits.
Note: For unsupported files, the Document Viewer opens to the page that includes the firstinstance of the search criteria and the Full-Text Search Results pop-up window, however, the hitsare not highlighted.
5. If you want to run the query at any time, click SAVE.
a. In the Save dialog box, specify a name for the query.
b. Select Available to all users to share the query with other users.
c. Click SAVE.The query is saved under the relevant application and in the navigation panel.
Note:• If the full-text search option is All Words, Any Words, or Exact Phrase, the characters&@#$%^_~`:-+=\/\[]{}!,;() in the full-text search criteria are replaced with a blank space. Quotationmarks or single quotation marks must appear in pairs in the search criteria.
• If the full-text search option is Expression, the characters &@#$%^_~`:-+=\/\[]{}!,; in the full-textsearch criteria are replaced with a blank space.
Using expression search operators
Expression operators enable a focused document search. You can build a query by combiningwords or text strings with expression operators such as and and or. You can also combine operatorsfor more complex searches.
42
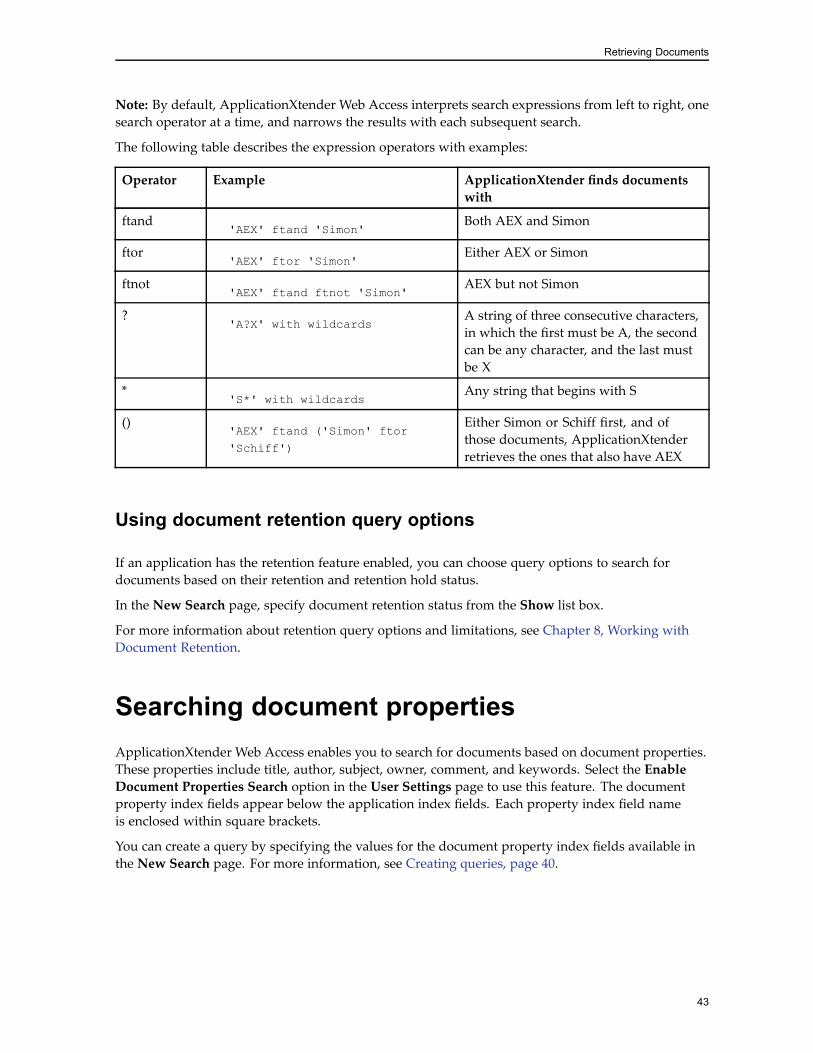
Retrieving Documents
Note: By default, ApplicationXtender Web Access interprets search expressions from left to right, onesearch operator at a time, and narrows the results with each subsequent search.
The following table describes the expression operators with examples:
Operator Example ApplicationXtender finds documentswith
ftand'AEX' ftand 'Simon'
Both AEX and Simon
ftor'AEX' ftor 'Simon'
Either AEX or Simon
ftnot'AEX' ftand ftnot 'Simon'
AEX but not Simon
?'A?X' with wildcards
A string of three consecutive characters,in which the first must be A, the secondcan be any character, and the last mustbe X
*'S*' with wildcards
Any string that begins with S
()'AEX' ftand ('Simon' ftor
'Schiff')
Either Simon or Schiff first, and ofthose documents, ApplicationXtenderretrieves the ones that also have AEX
Using document retention query options
If an application has the retention feature enabled, you can choose query options to search fordocuments based on their retention and retention hold status.
In the New Search page, specify document retention status from the Show list box.
For more information about retention query options and limitations, see Chapter 8, Working withDocument Retention.
Searching document propertiesApplicationXtender Web Access enables you to search for documents based on document properties.These properties include title, author, subject, owner, comment, and keywords. Select the EnableDocument Properties Search option in the User Settings page to use this feature. The documentproperty index fields appear below the application index fields. Each property index field nameis enclosed within square brackets.
You can create a query by specifying the values for the document property index fields available inthe New Search page. For more information, see Creating queries, page 40.
43

Retrieving Documents
Multiple application searchesYou can use the Multiple Application Search functionality to create and run queries. These queriessearch multiple ApplicationXtender applications for the selected index information, full-textinformation, or both. For example, by using a multiple application search, you can search threedifferent applications for information about the Social Security number 111-22-3333. Or, you couldsearch for all documents containing the text “most recent software releases.”
Multiple application searches must be configured to search applications that are within the samedata source.
Note: You cannot query for reports that are generated by ApplicationXtender Reports Managementacross multiple applications.
Configuring multi-application searches1. From the list of applications, select the application that you want to create a multiple application
search for.
2. Click the Search icon in the toolbar and select NewMulti-Application Search.
3. In the Configure Multiple Applications Search dialog box, select the applications that you wantto include in the query and click the Add icon, which is in between the two text boxes, to add theselected applications (along with the associated index fields) to the Query Applications list.
4. Configure the index fields for the multi-application query. The fields that are not used in a searchcriteria are identified by an X next to the field. You have the following choices for each field:• Click a field once to make it displayable. A check mark appears next to the selected field toindicate that it appears in the search results, but is not used as a search criterion.
Note: If an index field that is made displayable is not common to the other selectedapplications, the field appears in the query results, but does not show any information fordocuments that are retrieved from those applications.
• Click a field twice to make it searchable. A search symbol appears next to the selected field toindicate that it is used as a search field for querying documents.
Note: Each application participating in a cross-application query must have at least onesearchable field.
5. Type a name for the multiple application search.
6. Select Available to all users to share the query with other users (public query).If you do not select this option, other users are restricted from using this query and the query isconsidered private.
7. Click SAVE.The Edit Search page displays the index fields that were configured as searchable.
8. Specify the search criteria and save the query.You can use wildcards, expressions, full-text, and combination queries to define the search criteria.For more information, see Creating queries, page 40.
44
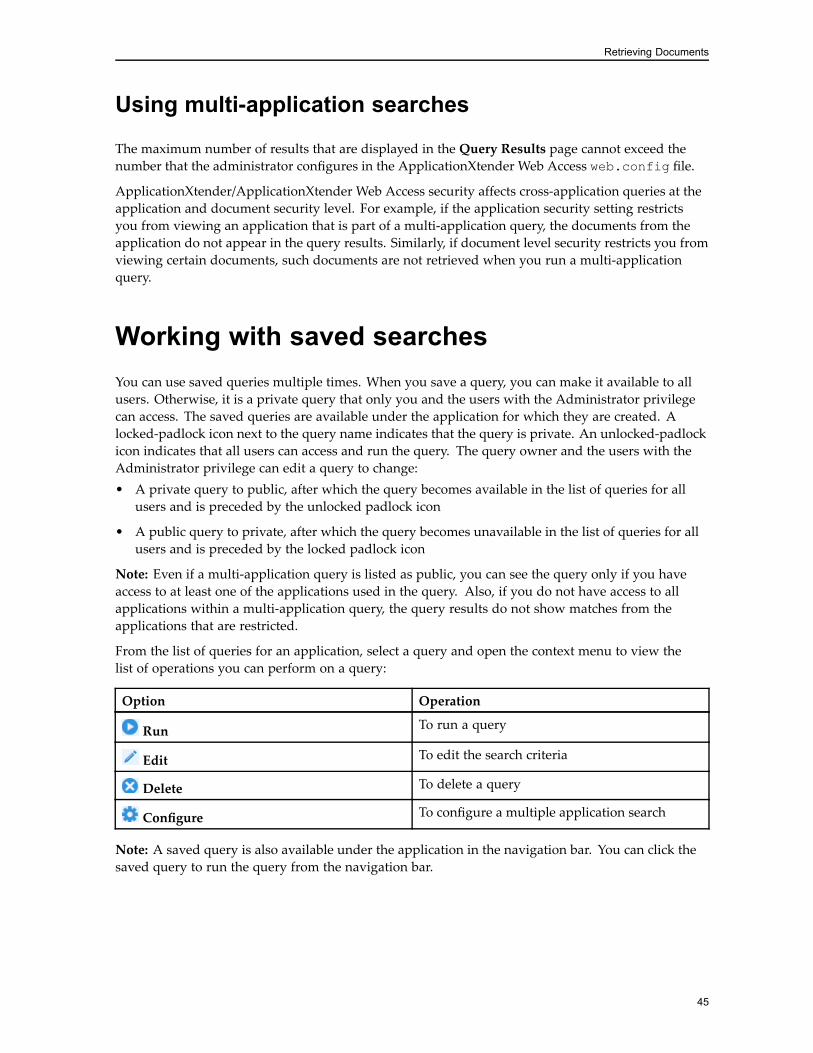
Retrieving Documents
Using multi-application searches
The maximum number of results that are displayed in the Query Results page cannot exceed thenumber that the administrator configures in the ApplicationXtender Web Access web.config file.
ApplicationXtender/ApplicationXtender Web Access security affects cross-application queries at theapplication and document security level. For example, if the application security setting restrictsyou from viewing an application that is part of a multi-application query, the documents from theapplication do not appear in the query results. Similarly, if document level security restricts you fromviewing certain documents, such documents are not retrieved when you run a multi-applicationquery.
Working with saved searchesYou can use saved queries multiple times. When you save a query, you can make it available to allusers. Otherwise, it is a private query that only you and the users with the Administrator privilegecan access. The saved queries are available under the application for which they are created. Alocked-padlock icon next to the query name indicates that the query is private. An unlocked-padlockicon indicates that all users can access and run the query. The query owner and the users with theAdministrator privilege can edit a query to change:• A private query to public, after which the query becomes available in the list of queries for allusers and is preceded by the unlocked padlock icon
• A public query to private, after which the query becomes unavailable in the list of queries for allusers and is preceded by the locked padlock icon
Note: Even if a multi-application query is listed as public, you can see the query only if you haveaccess to at least one of the applications used in the query. Also, if you do not have access to allapplications within a multi-application query, the query results do not show matches from theapplications that are restricted.
From the list of queries for an application, select a query and open the context menu to view thelist of operations you can perform on a query:
Option Operation
Run To run a query
Edit To edit the search criteria
Delete To delete a query
Configure To configure a multiple application search
Note: A saved query is also available under the application in the navigation bar. You can click thesaved query to run the query from the navigation bar.
45
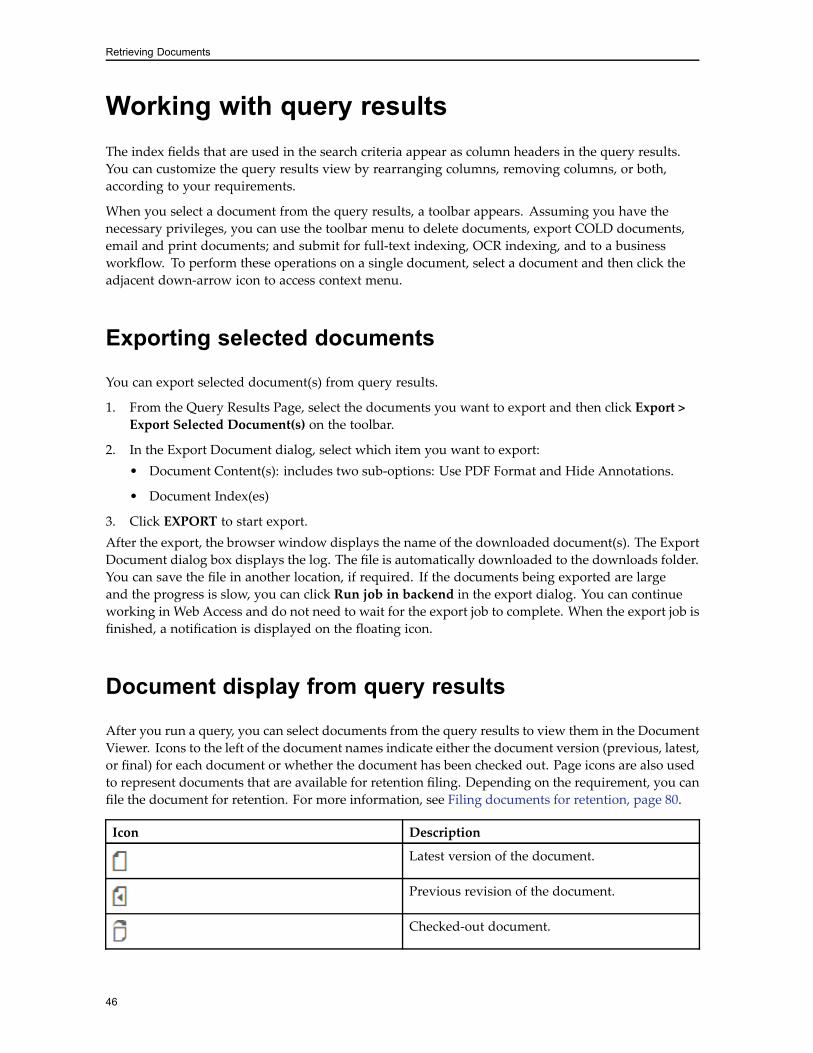
Retrieving Documents
Working with query resultsThe index fields that are used in the search criteria appear as column headers in the query results.You can customize the query results view by rearranging columns, removing columns, or both,according to your requirements.
When you select a document from the query results, a toolbar appears. Assuming you have thenecessary privileges, you can use the toolbar menu to delete documents, export COLD documents,email and print documents; and submit for full-text indexing, OCR indexing, and to a businessworkflow. To perform these operations on a single document, select a document and then click theadjacent down-arrow icon to access context menu.
Exporting selected documents
You can export selected document(s) from query results.
1. From the Query Results Page, select the documents you want to export and then click Export >Export Selected Document(s) on the toolbar.
2. In the Export Document dialog, select which item you want to export:• Document Content(s): includes two sub-options: Use PDF Format and Hide Annotations.
• Document Index(es)
3. Click EXPORT to start export.After the export, the browser window displays the name of the downloaded document(s). The ExportDocument dialog box displays the log. The file is automatically downloaded to the downloads folder.You can save the file in another location, if required. If the documents being exported are largeand the progress is slow, you can click Run job in backend in the export dialog. You can continueworking in Web Access and do not need to wait for the export job to complete. When the export job isfinished, a notification is displayed on the floating icon.
Document display from query results
After you run a query, you can select documents from the query results to view them in the DocumentViewer. Icons to the left of the document names indicate either the document version (previous, latest,or final) for each document or whether the document has been checked out. Page icons are also usedto represent documents that are available for retention filing. Depending on the requirement, you canfile the document for retention. For more information, see Filing documents for retention, page 80.
Icon Description
Latest version of the document.
Previous revision of the document.
Checked-out document.
46
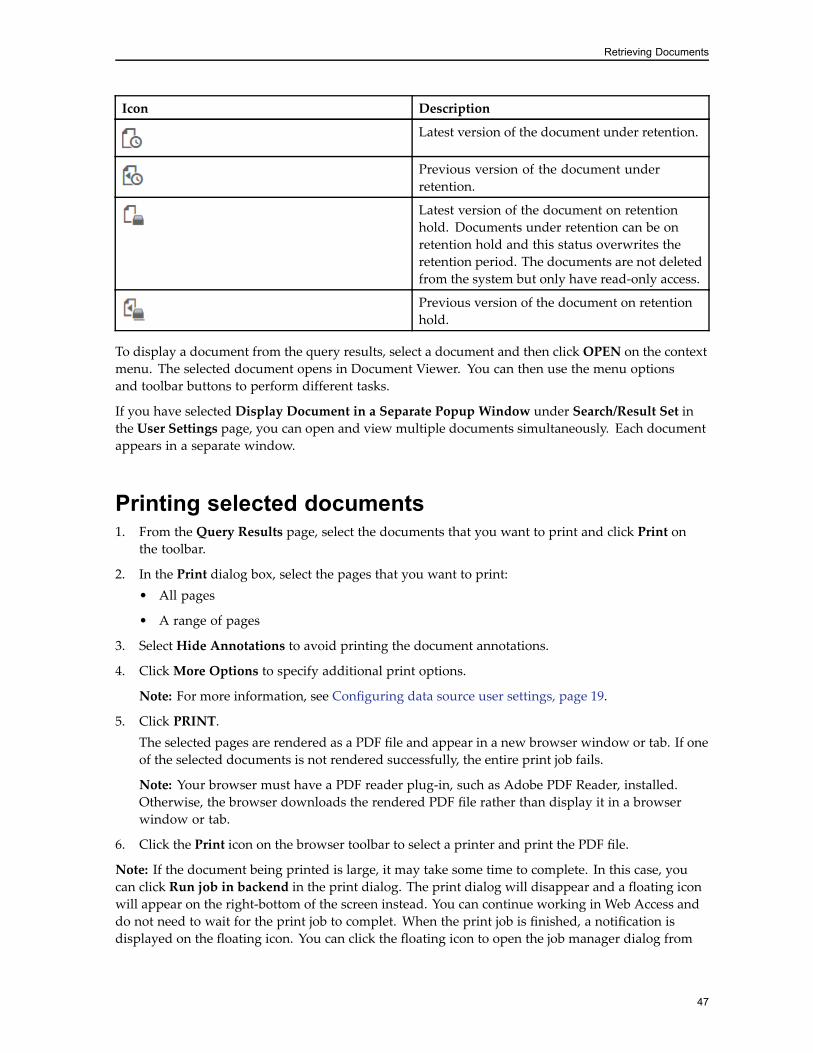
Retrieving Documents
Icon Description
Latest version of the document under retention.
Previous version of the document underretention.
Latest version of the document on retentionhold. Documents under retention can be onretention hold and this status overwrites theretention period. The documents are not deletedfrom the system but only have read-only access.
Previous version of the document on retentionhold.
To display a document from the query results, select a document and then click OPEN on the contextmenu. The selected document opens in Document Viewer. You can then use the menu optionsand toolbar buttons to perform different tasks.
If you have selected Display Document in a Separate Popup Window under Search/Result Set inthe User Settings page, you can open and view multiple documents simultaneously. Each documentappears in a separate window.
Printing selected documents1. From the Query Results page, select the documents that you want to print and click Print on
the toolbar.
2. In the Print dialog box, select the pages that you want to print:• All pages
• A range of pages
3. Select Hide Annotations to avoid printing the document annotations.
4. ClickMore Options to specify additional print options.
Note: For more information, see Configuring data source user settings, page 19.
5. Click PRINT.The selected pages are rendered as a PDF file and appear in a new browser window or tab. If oneof the selected documents is not rendered successfully, the entire print job fails.
Note: Your browser must have a PDF reader plug-in, such as Adobe PDF Reader, installed.Otherwise, the browser downloads the rendered PDF file rather than display it in a browserwindow or tab.
6. Click the Print icon on the browser toolbar to select a printer and print the PDF file.
Note: If the document being printed is large, it may take some time to complete. In this case, youcan click Run job in backend in the print dialog. The print dialog will disappear and a floating iconwill appear on the right-bottom of the screen instead. You can continue working in Web Access anddo not need to wait for the print job to complet. When the print job is finished, a notification isdisplayed on the floating icon. You can click the floating icon to open the job manager dialog from
47
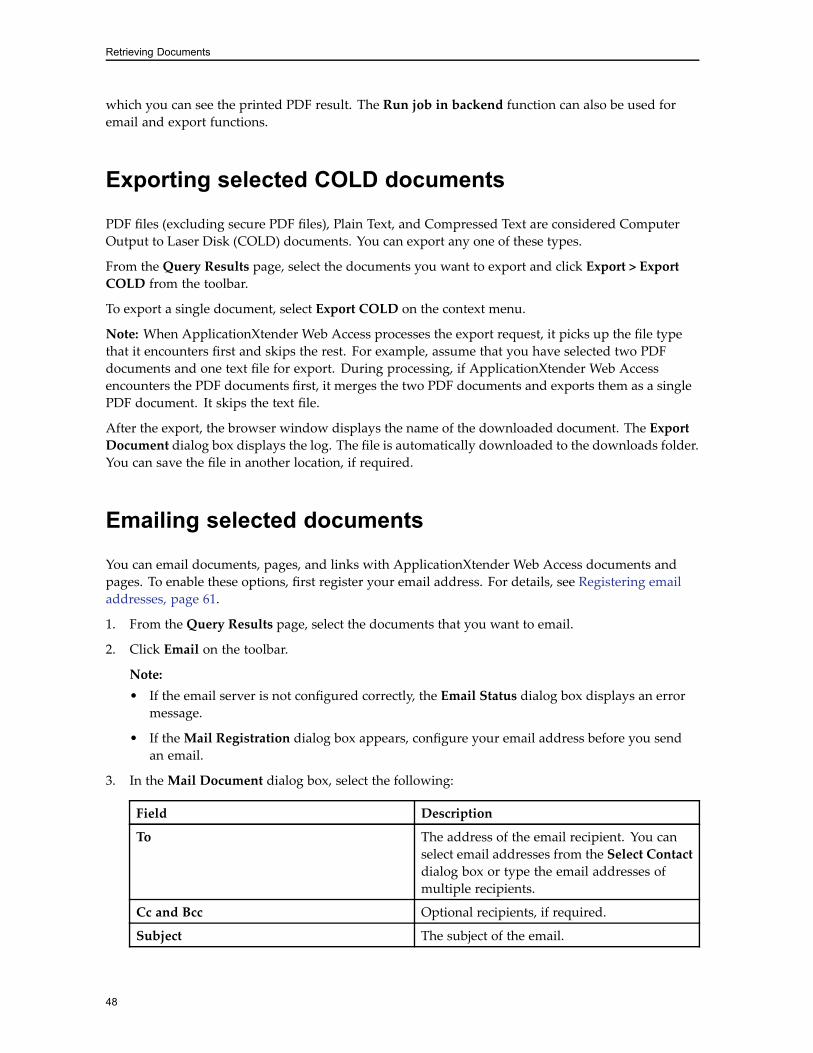
Retrieving Documents
which you can see the printed PDF result. The Run job in backend function can also be used foremail and export functions.
Exporting selected COLD documents
PDF files (excluding secure PDF files), Plain Text, and Compressed Text are considered ComputerOutput to Laser Disk (COLD) documents. You can export any one of these types.
From the Query Results page, select the documents you want to export and click Export > ExportCOLD from the toolbar.
To export a single document, select Export COLD on the context menu.
Note: When ApplicationXtender Web Access processes the export request, it picks up the file typethat it encounters first and skips the rest. For example, assume that you have selected two PDFdocuments and one text file for export. During processing, if ApplicationXtender Web Accessencounters the PDF documents first, it merges the two PDF documents and exports them as a singlePDF document. It skips the text file.
After the export, the browser window displays the name of the downloaded document. The ExportDocument dialog box displays the log. The file is automatically downloaded to the downloads folder.You can save the file in another location, if required.
Emailing selected documents
You can email documents, pages, and links with ApplicationXtender Web Access documents andpages. To enable these options, first register your email address. For details, see Registering emailaddresses, page 61.
1. From the Query Results page, select the documents that you want to email.
2. Click Email on the toolbar.
Note:• If the email server is not configured correctly, the Email Status dialog box displays an errormessage.
• If theMail Registration dialog box appears, configure your email address before you sendan email.
3. In theMail Document dialog box, select the following:
Field Description
To The address of the email recipient. You canselect email addresses from the Select Contactdialog box or type the email addresses ofmultiple recipients.
Cc and Bcc Optional recipients, if required.
Subject The subject of the email.
48
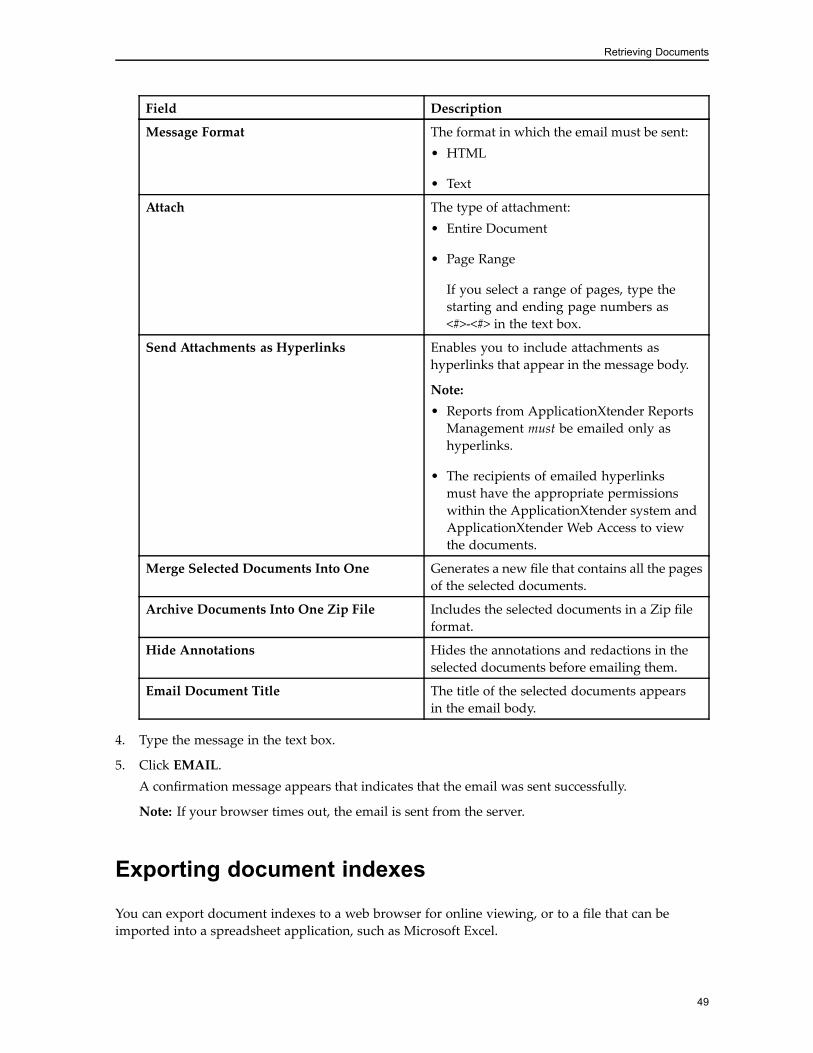
Retrieving Documents
Field Description
Message Format The format in which the email must be sent:• HTML
• Text
Attach The type of attachment:• Entire Document
• Page Range
If you select a range of pages, type thestarting and ending page numbers as<#>-<#> in the text box.
Send Attachments as Hyperlinks Enables you to include attachments ashyperlinks that appear in the message body.
Note:• Reports from ApplicationXtender ReportsManagement must be emailed only ashyperlinks.
• The recipients of emailed hyperlinksmust have the appropriate permissionswithin the ApplicationXtender system andApplicationXtender Web Access to viewthe documents.
Merge Selected Documents Into One Generates a new file that contains all the pagesof the selected documents.
Archive Documents Into One Zip File Includes the selected documents in a Zip fileformat.
Hide Annotations Hides the annotations and redactions in theselected documents before emailing them.
Email Document Title The title of the selected documents appearsin the email body.
4. Type the message in the text box.
5. Click EMAIL.A confirmation message appears that indicates that the email was sent successfully.
Note: If your browser times out, the email is sent from the server.
Exporting document indexes
You can export document indexes to a web browser for online viewing, or to a file that can beimported into a spreadsheet application, such as Microsoft Excel.
49
Retrieving Documents
1. From the list of queries for an application, select a query and run it.
2. From theQuery Results page, select one or more documents, and then click Export on the toolbar.
3. Select a method for exporting the indexes:• To export all the index values from the query results, click Export All Indexes from the list.
• To export only a chosen set of indexes, select the required documents from the query results,and then click Export > Export Selected Document(s) > Document Index(es) from the list.
ApplicationXtender Web Access saves the indexes as a Tab Separated Value (TSV) file or aComma Separated Value (CSV) file.
Submitting selected documents to workflow
You can submit documents to a business workflow if the ApplicationXtender Workflow IntegrationModule is configured in ApplicationXtender Administrator.
Note: You must be granted permission to submit documents to a workflow.
1. From the Query Results page, select the documents that you want to submit.
2. ClickWorkflow.
3. Select a business process from the list.
Note: The business processes are created in the ApplicationXtender Workflow Manager andApplicationXtender Workflow Integration Module is used to connect to the workflow. Log in toApplicationXtender Workflow Manager to check if the submission was successful.
Submitting selected documents for full-text indexing1. From the Query Results page, select one or more documents, and then click Submit on the
toolbar.
2. Click Full-Text Index Job from the list, and then select the appropriate OCR Language.
3. Click SUBMIT.A confirmation message appears that indicates a successful submission.
Submitting selected documents to process OCR1. From the Query Results page, select one or more documents, and then click SUBMIT on the
toolbar.
2. Click OCR Job from the list, and then select the appropriate OCR Language.
3. Click SUBMIT.A confirmation message appears that indicates a successful submission.
50
Retrieving Documents
Deleting selected documents1. Select the documents that you want to delete from the Query Results page.
2. Click Delete on the toolbar.
3. In the confirmation message dialog box, click DELETE to confirm the operation.
Performing Ad Hoc Text Search on Selected Documents
After submitting a query and receiving a list of documents matching the search criteria, you canfurther refine the results or locate the text content by performing an ad hoc text search on the recordsin the result set.
1. Locate the text search section on the query result toolbar, then type the keywords in the textsearch input.
2. Click the Text Search icon to launch text search on selected documents in the query result. TheText Search dialog appears.• If there is no selected document, all documents in the current query result page are searched.
• Alternatively, you can also perform a text search on a single document from the query resultcontext menu Ad Hoc Text Search.
3. During a search, the progress is displayed at the bottom of the Text Search dialog.• Click the Cancel button to stop text searching while it is processing.
• You can also search for other keywords from dedicated documents by entering keywords inthe search input and clicking the Text Search button in the search dialog
4. Text search results are listed in the text search dialog. The text search results are organizedas follows:• The first four hit pages for each hit document are listed by default. Click theMore hit pageslink to view more hit pages.
• Hit words are highlighted for each page. To show more hit words, click theMore hits link.
• If specified keywords are not found in any document, the message The specified text was notfound is displayed.
5. To view any document in the list of text search hits, click the Page# link or the hit wordhighlighted for the document you want to view.
The difference between xPlore and non-xPlore Applications
If an Application is using xPlore full-text engine, the text search is based on xPlore. Web Accesssubmits the text search criteria to xPlore, gets the hit information and then shows the UI. Besides textdocument and the documents have OCRed text file, PDF, Office documents and other documentssupported by xPlore can be searched via text search. The text search result on query result alwaysdisplays text result with hit information for both texture file and other files. But when opening the
51
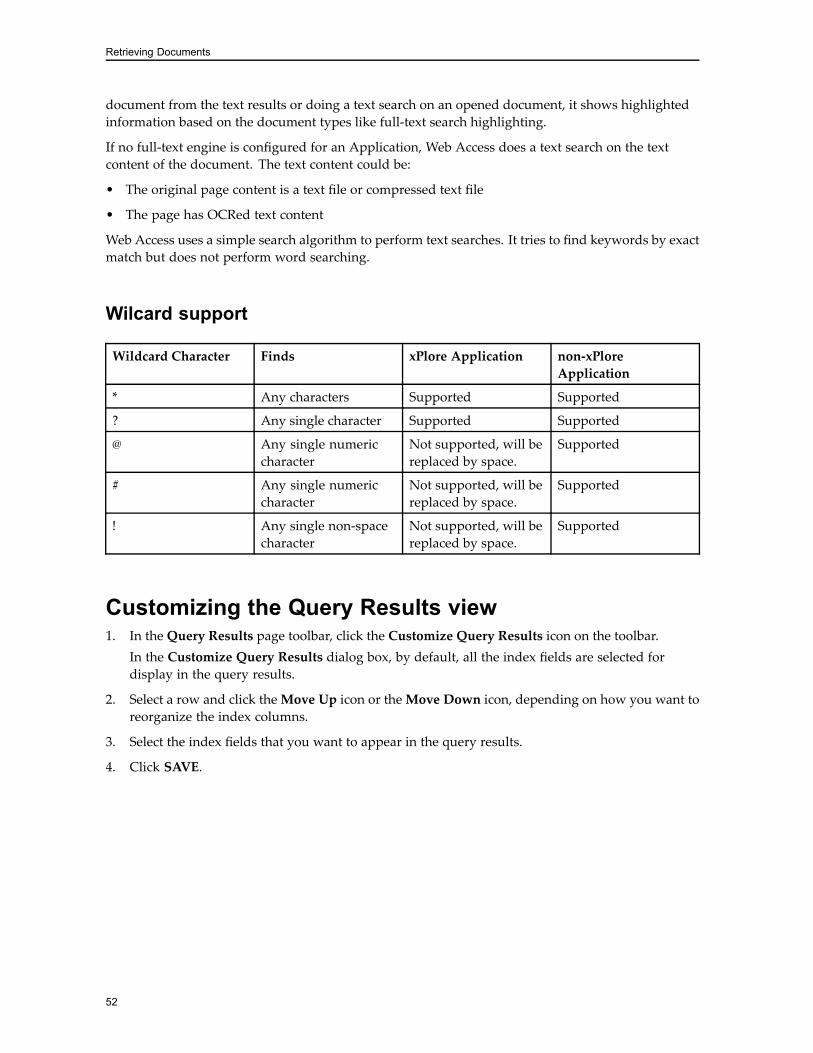
Retrieving Documents
document from the text results or doing a text search on an opened document, it shows highlightedinformation based on the document types like full-text search highlighting.
If no full-text engine is configured for an Application, Web Access does a text search on the textcontent of the document. The text content could be:
• The original page content is a text file or compressed text file
• The page has OCRed text content
Web Access uses a simple search algorithm to perform text searches. It tries to find keywords by exactmatch but does not perform word searching.
Wilcard support
Wildcard Character Finds xPlore Application non-xPloreApplication
* Any characters Supported Supported
? Any single character Supported Supported
@ Any single numericcharacter
Not supported, will bereplaced by space.
Supported
# Any single numericcharacter
Not supported, will bereplaced by space.
Supported
! Any single non-spacecharacter
Not supported, will bereplaced by space.
Supported
Customizing the Query Results view1. In the Query Results page toolbar, click the Customize Query Results icon on the toolbar.
In the Customize Query Results dialog box, by default, all the index fields are selected fordisplay in the query results.
2. Select a row and click theMove Up icon or theMove Down icon, depending on how you want toreorganize the index columns.
3. Select the index fields that you want to appear in the query results.
4. Click SAVE.
52
Chapter 5Viewing Documents
Effective data storage and retrieval is vital to a useful document imaging system. When a documentis retrieved from storage, however, the focus shifts from your ability to access data to your ability tomanipulate data. Displaying a retrieved document in a way that highlights important data ensuresefficient data processing.
ApplicationXtender Web Access provides different viewing modes. In addition to viewing adocument, you can also view specific details such as the revision history, document versions, imagedetails, and document properties.
Using ThumbnailsThumbnails are links to individual pages in a document that enable you to locate and display a pagefrom a large document quickly. When you view a document in the Document Viewer, the pagethumbnails appear to the left of the document image.
1. If the thumbnails view is not enabled, select the Show Page Thumbnails option underDocumentView in the User Settings page.
2. In an open document, click the Show/Hide Thumbnail icon on the left of the toolbar to hideor view page thumbnails.
3. In the thumbnail view, click the down-arrow at the upper right to show the thumbnail viewtoolbar, which is hidden by default.
4. Select a single page thumbnail, or press:• Ctrl and then select multiple page thumbnails.
• Shift and select a beginning page thumbnail and an ending page thumbnail to select a range.
• Ctrl +Shift and then select page thumbnails and retain any previously selected pagethumbnails.
The selected page thumbnails include a check mark on the upper left.You can then perform these tasks:• Drag and drop selected page thumbnails to reorder pages.
• Cut and paste selected page thumbnails to move pages.
• Delete selected page thumbnails to delete pages.
53
Viewing Documents
• Email, export, or print only the selected page thumbnails.
• Change the page thumbnail size by using the slider on the thumbnail view toolbar.
Note: You cannot cut, paste, or delete page thumbnails in read-only documents or indocuments for which you do not have permission. You cannot cut, paste, or drag and droppage thumbnails in a batch thumbnail view.
5. Optionally, drag an electronic file (or files) from your desktop into the thumbnails view andhover over the page thumbnail before which you want to place the file. Then, drop the file toinsert it into the document.
Operation modesApplicationXtender Web Access has four modes of operation: normal mode, check-in/check-outmode, read-only mode, and reason audit mode. The normal and check-in/check-out modes ofoperation enable the use of revision control in ApplicationXtender. Revision control keeps track ofwhich user is working on a document and can also be used to track previous revisions of a document.Reason audit mode is used to audit document-related operations, such as document export andprinting, and record the reason that they are performed.
Normal mode
If your system is configured with the normal display mode, you can open documents only in thismode. When ApplicationXtender Web Access is in the normal mode, use of revision controlis optional. You can open and modify documents, and, when you close them, the changes areautomatically saved to the ApplicationXtender document repository.
You can check out documents in the normal mode to prevent other users from making changeswhile you are working on a document. However, users are not required to check out a documentbefore making modifications.
Note: The reverse is also true. If another user checks out a document, you cannot modify the samedocument until the user checks it in. To prevent accidental data loss, it is strongly recommended thatyou check out documents before you modify them.
Check-in/check-out mode
ApplicationXtender Web Access check-in/check-out mode provides a more secure level of versioncontrol than is provided in normal mode. It is strongly recommended that you check out anydocument that you intend to edit. If you change a document without checking it out, accidental dataloss can occur if another user makes changes to the same document simultaneously.
For example, assume that you are editing a document and have added a few pages of new data. Youhave not checked out the document. Another user opens the same document, without seeing thechanges that you have made (because you are currently working on them), and makes additionalchanges. Meanwhile, you close and save the document. When the other user closes and saves the
54
Viewing Documents
same document, their changes are saved, overwriting your work. All of your changes are lost. If youhad checked out the document beforemaking changes, the other user would have been able to openthe document only in read-only mode and could not have made any changes until you checkedin the document.
If the ApplicationXtender system administrator has enabled the check-in/check-out mode on theApplicationXtender Web Access server, or if you have selected the Prompt for Checkout optionunder Document View in the User Settings page, you are prompted to specify whether you wantto check out the document or open it as read-only. The prompt does not appear if you open thefollowing types of documents:• A previous revision of the document
• The final revision of a document
• A checked-out document; the document opens as read-only if checked out by another user andcontinues in checked-out mode (resume check-out mode) if checked out by the current user
Note: A resumed checkout might fail for a user who works on multiple workstations. If a useropens the document that is checked out on workstation A and then tries to do the same onworkstation B, the resumed checkout fails on workstation B, and the document opens as read-only.
If you do not select Prompt for Checkout, you can open the document and then check it out byselecting Check Out from the Document menu.
When you check out a document, a copy of the document as it exists in the ApplicationXtenderrepository is created and this copy becomes your working copy. Even when you close a document,you can keep the document checked out to continue working on it.
If you have selected the Prompt for Checkout option for the application that you are using, you cancheck in the final revision of a document. After you check in the final revision, users can open thedocument only in the read-only mode.
Note: Users with the deletion privilege can delete the final revision of a document from theApplicationXtender repository.
You can also cancel the checkout by selecting Cancel Checkout from theDocumentmenu. When youcancel the checkout, the working copy is deleted and ApplicationXtender considers the documentrevision in the repository as the current revision. The changes that you made to the working copy arediscarded.
When you finish your changes, you can choose to check the document back into the repository.You can check in a document by selecting Check In from the Document menu. When you checkin a document, identify the status of the document revision. You can assign the revision as minor,major, or a replacement for the current revision.
The following table lists the three document revision types and describes their functions:
55
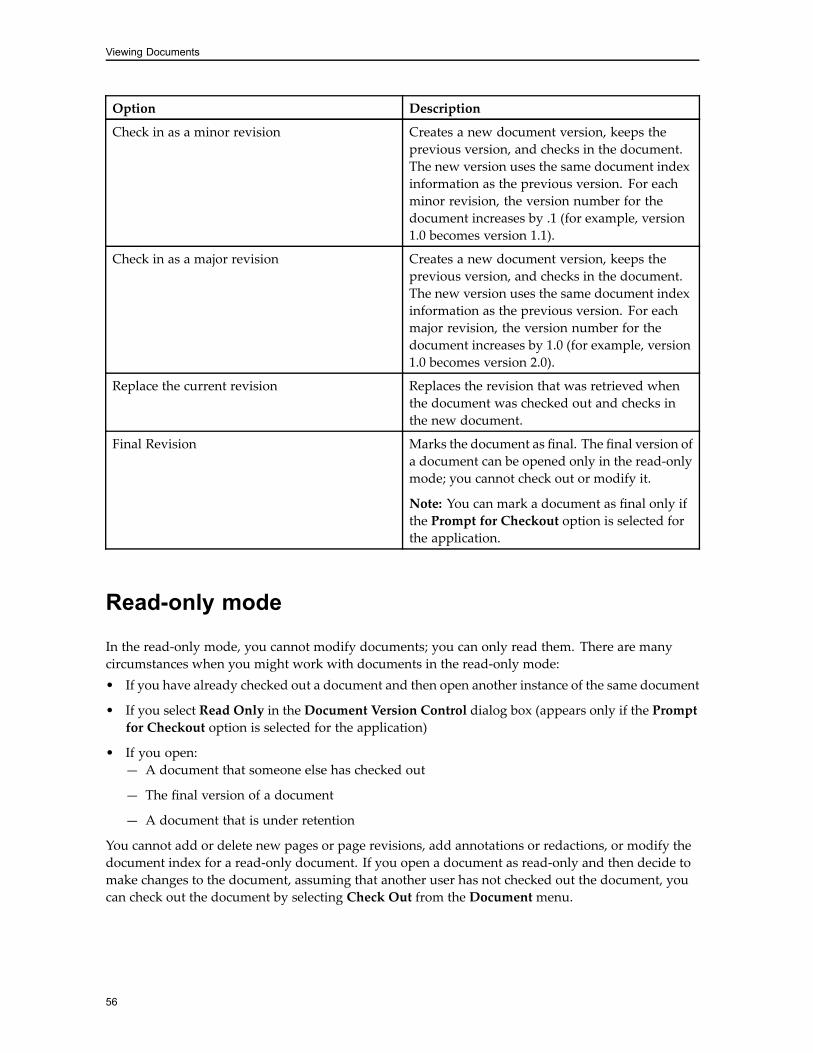
Viewing Documents
Option Description
Check in as a minor revision Creates a new document version, keeps theprevious version, and checks in the document.The new version uses the same document indexinformation as the previous version. For eachminor revision, the version number for thedocument increases by .1 (for example, version1.0 becomes version 1.1).
Check in as a major revision Creates a new document version, keeps theprevious version, and checks in the document.The new version uses the same document indexinformation as the previous version. For eachmajor revision, the version number for thedocument increases by 1.0 (for example, version1.0 becomes version 2.0).
Replace the current revision Replaces the revision that was retrieved whenthe document was checked out and checks inthe new document.
Final Revision Marks the document as final. The final version ofa document can be opened only in the read-onlymode; you cannot check out or modify it.
Note: You can mark a document as final only ifthe Prompt for Checkout option is selected forthe application.
Read-only mode
In the read-only mode, you cannot modify documents; you can only read them. There are manycircumstances when you might work with documents in the read-only mode:• If you have already checked out a document and then open another instance of the same document
• If you select Read Only in the Document Version Control dialog box (appears only if the Promptfor Checkout option is selected for the application)
• If you open:— A document that someone else has checked out
— The final version of a document
— A document that is under retention
You cannot add or delete new pages or page revisions, add annotations or redactions, or modify thedocument index for a read-only document. If you open a document as read-only and then decide tomake changes to the document, assuming that another user has not checked out the document, youcan check out the document by selecting Check Out from the Documentmenu.
56
Viewing Documents
Reason Audit mode
The ApplicationXtender system administrator configures the Reason Audit mode at the applicationlevel to facilitate compliance with the Health Insurance Portability and Accountability Act of 1996(HIPAA). If configured, when you select to view, print, export, or email one or more documents,ApplicationXtender Web Access displays the Reason Code Required dialog box. In this dialog box,select a task that you want to perform and describe the reason for performing the task.
Document Viewer toolbar and menu optionsThe Document Viewer toolbar includes buttons that enable you to manipulate document images,print document pages, and display information about images, among other things. If you have theproper permissions, you can use other buttons to make annotations and redactions including lines,arrows, highlights, and text annotations. You can use the buttons to show or hide annotations, save ordelete annotations, and position annotations with reference to a document or batch page.
The Document and Page menus also provide options to perform a wide range of operations on anopen document. The EMAIL, PRINT, and EXPORT options enable you to perform these operationsdirectly from the browser. For more information, see Printing selected documents, page 47, Emailingselected documents, page 48 and Exporting selected COLD documents, page 48.
Note: If Enable Inline Rendering of Foreign Files under Document View is selected in the UserSettings page and Render foreign files as HTML is enabled on the server, foreign files are renderedas HTML rather than links that can be used to download or open the foreign file. If the foreign file isan unrecognized file type, it appears as a link that you can use to download the file.
Viewing subpages
If there is more than one subpage in a page (for example, in an Information and Content Exchange(ICE), TIFF, DCX, or PDF page format), you can use the Next Subpage and Previous Subpagebuttons to navigate through the subpages.
Viewing versions of a page
If more than one version of a page exists, ApplicationXtender displays the latest version by default.You can use the Previous Page Version and Next Page Version buttons to navigate through all theversions of a page. You can also add a new page version, delete the current version, and delete allprevious versions by using the appropriate buttons on the Page Version toolbar.
57
Viewing Documents
Displaying image information
You can view the image information for a displayed document by selecting Display ImageInformation from the Page menu on the toolbar.
Adding annotations
When you work with documents, several types of annotations are available. You can add textannotations that can be viewed as actual text or as an icon. All annotations, including text, can beplaced within documents in the transparent or opaque (filled) mode.
Note: When you add annotations to a document with subpages, you can add annotations only tothe first subpage of the document.
For more information, see Chapter 7, Annotations.
Viewing document properties
The Document Properties page enables you to view information about an active document. To viewthis information, select Document Properties from the Documentmenu on the toolbar.
You can view basic information such as the name of the application, revision number, name of theperson who created and the date of creation, and the login ID of the person who has checked outthe document, including the date and time of checkout. These are system properties assigned byApplicationXtender Web Access. You cannot change them.
You can specify the following additional information:• Title of the document
• Subject of the document
• Author of the document
• Relevant keywords related to the content of the document
• Comments about the document
After specifying the details, you can save the properties or reset the properties to their original values.You can retrieve documents by using these document properties in a search criteria.
Viewing revision history
When you create multiple versions of a document, ApplicationXtender creates a record of the revisionhistory. It lists the revisions that have been made, the user who has checked in each revision, the datethe revision was made, and the check-in comment. You can also open or delete a specific revision.
To view the revision history, select Revision History from the Documentmenu on the toolbar.
58
Viewing Documents
Using text view
During the OCR process, a scanned image of a document or a page is converted into actual text. Textview shows the OCR result of the image. To view the actual text, select Text View from the Pagemenu on the toolbar.
Performing a text search
1. Click the Text Search button to perform a text search in the opened document. The Text Searchdialog appears.
2. Enter keywords in the search input filed and click the Text Searchbutton to begin searching.
3. If the keywords are found, the viewer navigates to the first hit page and highlights the hit words.
If the keyword are not found, the viewer displays The specified text was not found.
4. Click the Previous Hit Page or Next Hit Page button in the Text Search dialog to navigate toother hit pages.
Viewing foreign filesThe ApplicationXtender Web Access administrator determines the method that ApplicationXtenderWeb Access uses to processes foreign files.
The HTML versions of foreign files are displayed if the administrator has configured the system forthis feature and you have selected Enable Inline Rendering of Foreign Files for Document Viewin the User Settings page.
If you do not select Enable Inline Rendering of Foreign Files, the name of the foreign file appears asa link in the Document Viewer. You can download the file or render it to open in another window.To open or save the foreign file, click the download link. If the native application of the file isinstalled on your workstation, you can view the file in that application. If the native application is notinstalled, you can only save the file.
Viewing ApplicationXtender ReportsManagement reportsYou can retrieve reports from the ApplicationXtender Reports Management module by creating areport specific query.
To create a new report query:1. From the list of applications, select the application for which you want to create a query.
2. Click the Search icon on the toolbar and select New Report Search from the list.
3. Specify the search criteria to locate the reports you want to retrieve.
59
Viewing Documents
Note: There are only three fields: TIMESTAMP, DESC (Description), and RPTTYPE (ReportType). You can use all the index field query methods on these fields. For more information, seeSingle-application searches, page 40.
4. Click RUN to run the query.
Note: If you do not have an ApplicationXtender Reports Management license, an error messageappears after you click RUN.
5. In the Query Results page, select the report that you want to view and then click Open on thecontext menu.The report appears in the Document Viewer.
You can navigate through the pages of the report and then email them.
60
Chapter 6Managing Documents
A full range of document management functionality is available in ApplicationXtender Web Access,including the ability to print, email, delete, and export documents and pages. You can also modifythe index field values of documents.
Using the email functionalityYou can email selected documents either as inserted files or links. You can access the emailfunctionality from the Query Results page or within Document Viewer.
Note: You can save email messages in MSG or EML format and open them in an email client suchas Outlook. You do not need to register your email address in this mode. The ApplicationXtendersystem administrator enables the Save Mail to Client setting to enable you to use this mode.
Caution: If your WX server has Outlook x64 installed, the client email for MSG format will notwork due to compatibility issues. To resolve this, perform one of the following actions.• Uninstall Outlook 64bit and install Outlook 32bit.
or• Uninstall Outlook 64bit and rerun the Web Access Installer. It will install the CDOcomponent.
Registering email addresses
Before you can email documents, register your email address in the system.
1. In the Mail Registration dialog box, type your email address in the SMTP format([email protected]).
2. Click OK.
3. After the system processes and adds your email address into the repository, it sends aconfirmation code to the registered email address.
4. Open your email client and check for a message with the ApplicationXtender Web Access EmailRegistration ID. Open the message and copy the confirmation code from the message.
61
Managing Documents
5. Return to theMail Registration dialog box and paste the confirmation code in the correspondingtext box.
Note:• If you accidentally delete the email message before copying confirmation code, click Resendconfirmation code to the supplied email address to have another confirmation code sent tothe registered email address.
• Always use the most recent confirmation code.
6. Click OK.TheMail Document dialog box appears where you can specify the details for emailingdocuments.
For more information, see Emailing selected documents, page 48.
Changing the registered email address
If your email address changes, update your registered email address with the new address.
1. From the Query Results page, select the documents that you want to email.
2. Click Email on the toolbar.
3. In theMail Document dialog box, click the Change link.
4. In theMail Registration dialog box, replace the current email address with your new emailaddress.
5. Click OK.
Saving email
You can save unsent email messages as MSG or EML files. You can then open the saved messages inan email client application and send it at a later time.
1. From the Query Results page, select the documents or pages that you want to email.
2. Click Email on the toolbar.
3. Select All Pages or specify a page range.
4. Type a subject and the body of the message.
5. Select the email options.
6. Select eitherMSG Format or EML format.
7. Click EMAIL.
62
Managing Documents
Creating new page versionsApplicationXtender Web Access enables you to save up to 255 versions of a single document page.
1. Locate the document to which you want to add pages, by querying the correspondingApplicationXtender application.
2. From the Query Results page, select the document and then click Open on the context menu.The first page of the document appears in the Document Viewer.
3. Select a page by using the page thumbnails, click the Page menu on the toolbar and then selectNew Version.
4. In the New Page Version dialog box, browse and select an electronic file.
5. Click UPLOAD.ApplicationXtender Web Access displays the new version of the page. If you have uploadedmore versions, you can view the total number of versions for the page and also move fromone version to another.
Moving or copying document pagesApplicationXtender Web Access enables you to move or copy document pages betweenApplicationXtender applications. It processes the pages as a new batch in the target application. Youmust have the Batch Scan privilege for the target application and the Delete Page privilege for thesource application to move pages. The Batch Scan privilege for the target application is sufficient tocopy pages.
1. Locate the document to which you want to add pages, by querying the correspondingApplicationXtender application.
2. From the Query Results page, select the document, and then click Open on the context menu.
3. Select the document page by using the page thumbnails, click theDocumentmenu on the toolbar,and then select Copy or Move Pages.
4. In the Copy or Move Pages to New Batch dialog box, specify the following:
63
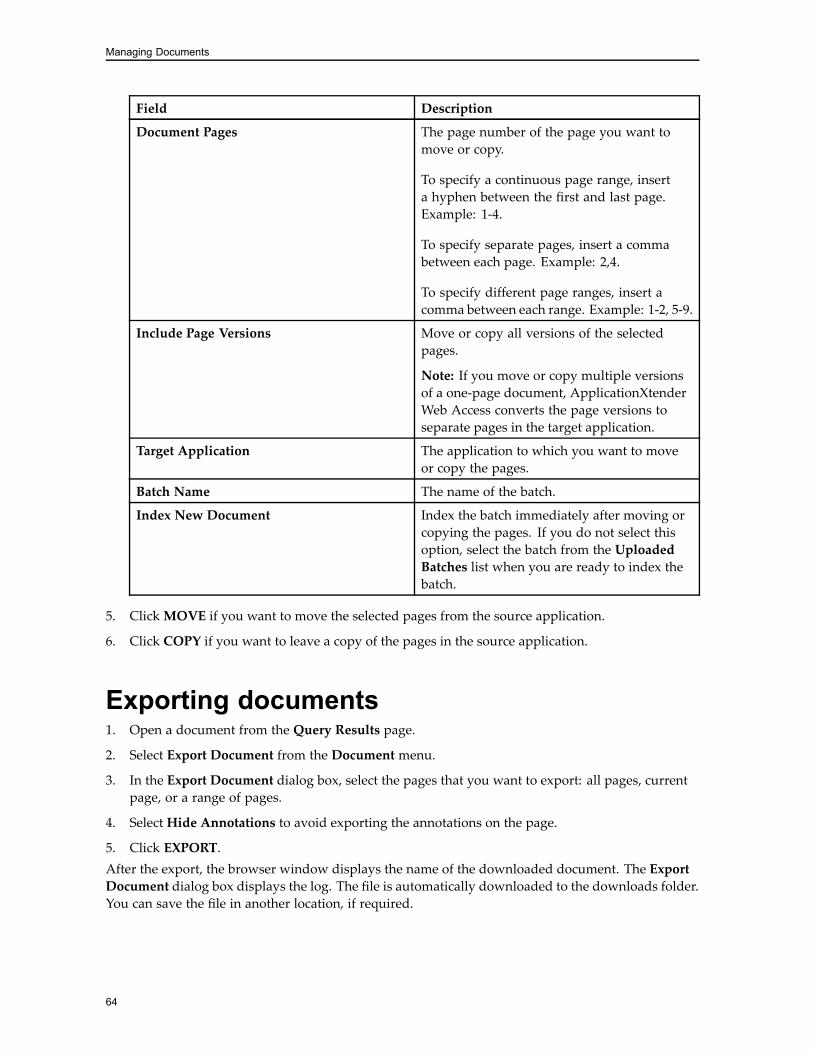
Managing Documents
Field Description
Document Pages The page number of the page you want tomove or copy.
To specify a continuous page range, inserta hyphen between the first and last page.Example: 1-4.
To specify separate pages, insert a commabetween each page. Example: 2,4.
To specify different page ranges, insert acomma between each range. Example: 1-2, 5-9.
Include Page Versions Move or copy all versions of the selectedpages.
Note: If you move or copy multiple versionsof a one-page document, ApplicationXtenderWeb Access converts the page versions toseparate pages in the target application.
Target Application The application to which you want to moveor copy the pages.
Batch Name The name of the batch.
Index New Document Index the batch immediately after moving orcopying the pages. If you do not select thisoption, select the batch from the UploadedBatches list when you are ready to index thebatch.
5. ClickMOVE if you want to move the selected pages from the source application.
6. Click COPY if you want to leave a copy of the pages in the source application.
Exporting documents1. Open a document from the Query Results page.
2. Select Export Document from the Document menu.
3. In the Export Document dialog box, select the pages that you want to export: all pages, currentpage, or a range of pages.
4. Select Hide Annotations to avoid exporting the annotations on the page.
5. Click EXPORT.After the export, the browser window displays the name of the downloaded document. The ExportDocument dialog box displays the log. The file is automatically downloaded to the downloads folder.You can save the file in another location, if required.
64
Managing Documents
Adding pages to ApplicationXtenderdocuments1. Locate the document to which you want to add pages, by querying the corresponding
ApplicationXtender application.
2. From the Query Results page, select the document, and then click Open on the context menu.
3. To append new pages to the end of the document, drag and drop the electronic file or files fromyour desktop into the open document area.
4. To insert the new pages before or after a particular page in the document:
a. Select the page thumbnail. The page appears in the Document Viewer.
b. From the Page menu, select New Page.
c. In the Add New Page dialog box, browse and select the electronic file that you want toappend to the document.
d. Select the position where you want to add the new pages.
e. Click UPLOAD.The new pages are inserted in the document at the selected insertion point. Thumbnails ofthe uploaded pages appear at the corresponding point in the sequence of thumbnails.
When you add a mail file (.MSG format) to a document, you can choose to add the mail attachmentas new pages. When you do so, the new uploaded file will be split into several pages, dependingon how many attachments the file has. The user setting Import Email Attachment as New Pageenables or disables this function.
Scanning pages to documentsYou can also add pages to batches by scanning (New Page, Replace Page and New Version).
For New Page operation, you can scan and insert the scanned pages before or after the current page,or append to the current document.
For Replace Page , you can scan and replace the current page with the scanned page (only the firstpage scanned is used to replace the current page).
For New Version , you can scan and create a new page version for the current page (only the firstpage scanned is used to replace the current page version).
Field maskingApplicationXtender administrators can use a validation mask to specify the exact format (characterpattern) required for each text index field that is associated with an application. If the administratorselects the Validation Mask option for a text field (in ApplicationXtender Administrator),ApplicationXtender performs a character-by-character validation of each value that you specify foran index field during the document indexing process. This action ensures that data is stored in thedatabase in the designated format.
65
Managing Documents
ApplicationXtender extends the concept of field masking to enable administrators to mask fielddisplay values. This feature prevents you from viewing confidential data in index fields.
You can view the index fields when you view documents from the Query Results page. The maskedfield values are not visible in the ApplicationXtender Web Access user interface, regardless of userpermissions. An asterisk (*) appears in place of each masked character in the index field. You canmodify the index values for masked fields, but you cannot view the original value.
Modifying index field valuesIf you have the appropriate permissions, you can access ApplicationXtender documents and modifytheir index field values. For information about indexing instructions, see Indexing batches manually,page 34 and Using the Auto Index feature, page 37.
1. From the list of applications, select an application and run a query.
2. From the Query Results page, select the document, and then click Open on the context menu.The first page of the document appears in the Document Viewer. If you have selected ShowIndex View under Index in the User Settings page, the current index values for the documentalso appear in the index fields. Otherwise, click the arrow icon on the center right of the page toopen the index view.
3. ClickMODIFY.
4. Make the necessary changes to the index data.
Note: If you have selected Enable Dual Data Entry under Index in the User Settings page, typethe relevant field values twice to validate the value.
5. Click SAVE.
Batch deleting documentsIf you have Delete Doc and Retention Administrator permissions on an application, you can batchdelete the documents in that application.
1. Select an application from the list.
2. Click the plus (+) symbol in the upper right corner, then Retention Administration.
3. In the SELECT MODE tab, select Dispose of documents from the application then click NEXT.
4. In the SEARCH DOCUMENTS tab, input the query criteria and click NEXT.
Note: The default maximum number of query results retrieved per query is 1000. You can changethe value ofMaxQueryResults in the file web.config to change the maximum number ofquery results retrieved per query.
5. In the SELECT DOCUMENTS tab, select the radio button Process all documents found or selectthe documents you want to delete and click RUN.
66

Managing Documents
6. In the PROCESS RESULT tab, click FINISH or RESTART to end the process.
67

Managing Documents
68
Chapter 7Annotations
ApplicationXtenderWeb Access enables authorized users to attach annotations to ApplicationXtenderdocument or batch pages to highlight important information, comment on the contents of the page, orblock areas of the page from view. You can add annotations to images, text, and PDF files.
Note: If your user account includes annotation group options but does not give you individualannotation privileges, set the annotation group as the default to be able to use the annotation features.The ApplicationXtender system administrator can specify this setting for your user account inApplicationXtender Administrator.
You can customize annotation properties to create the effects that you want. For example, you canchange the line width and colors of annotations. Or you can use the filled setting with the redactionfeature to make annotations opaque to block sections of a document from view. A show/hide featureenables you to view or hide annotations with a click. You can also save or delete annotations.
There is no limit to the number of annotations you can place on a page; however, many annotationsmight slow or distort page rendering.
In addition to placing multiple annotations on an image, you can overlap annotations, extending oneannotation over another. A new annotation, if added to overlap an existing one, is placed on the top orfront “layer” of the page. The existing annotation is placed on the bottom or back “layer” of the page.
Note: When overlapping annotations, create the annotations by using the redaction feature so thatthe colors appear opaque. Otherwise, the colors appear transparent and you might be unable todistinguish between the two annotations.
Annotation typesThere are five types of annotations that you can add to ApplicationXtender documents:• Line annotations: These include the straight line, the freehand line, the arrow, and the polyline.— You can use the freehand line feature to draw curved lines, straight lines, and combinationlines (lines with curved parts and straight parts).
— A polyline consists of a series of straight lines connecting multiple points or nodes. Becausethe nodes defining the polyline do not have to be aligned, you can create line annotations thatare not straight lines. Polyline annotations can contain angles and can even delineate shapes.You cannot fill color to a shape that you create with the polyline annotation. To create a customshape by using straight lines and a fill color, use the polygon shape annotation.
• Shape annotations: These include the rectangle, the rounded rectangle, the oval, and the polygon.
69
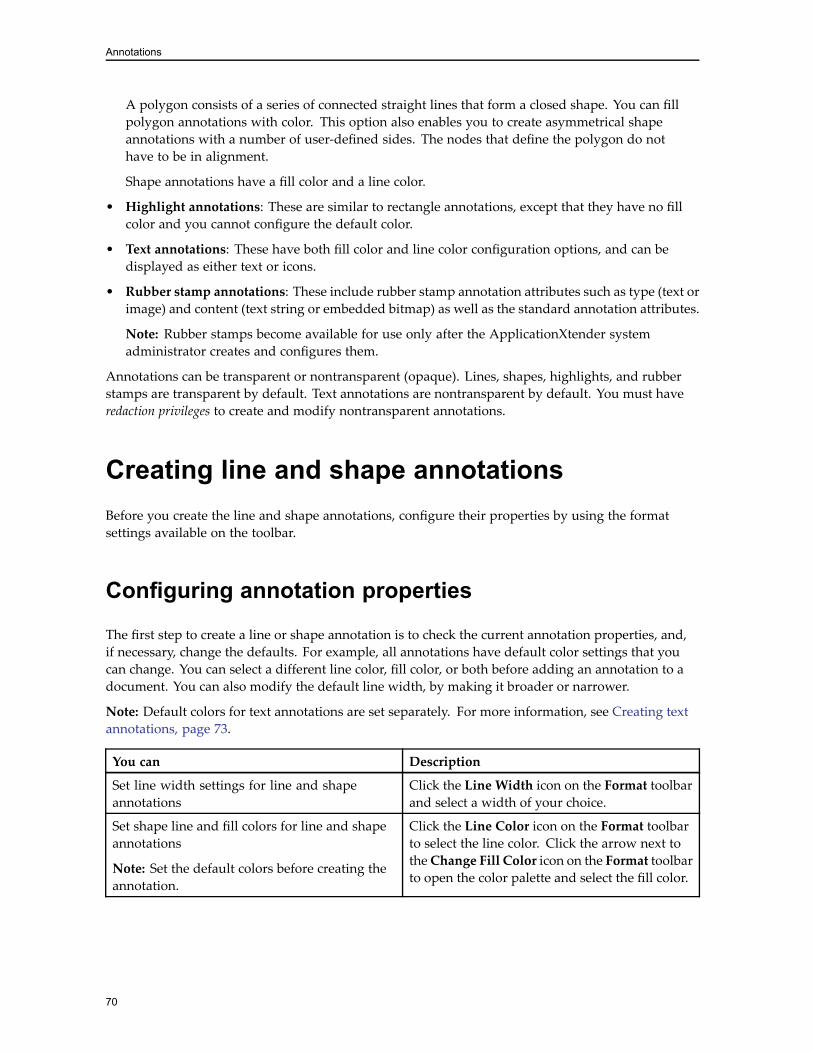
Annotations
A polygon consists of a series of connected straight lines that form a closed shape. You can fillpolygon annotations with color. This option also enables you to create asymmetrical shapeannotations with a number of user-defined sides. The nodes that define the polygon do nothave to be in alignment.
Shape annotations have a fill color and a line color.
• Highlight annotations: These are similar to rectangle annotations, except that they have no fillcolor and you cannot configure the default color.
• Text annotations: These have both fill color and line color configuration options, and can bedisplayed as either text or icons.
• Rubber stamp annotations: These include rubber stamp annotation attributes such as type (text orimage) and content (text string or embedded bitmap) as well as the standard annotation attributes.
Note: Rubber stamps become available for use only after the ApplicationXtender systemadministrator creates and configures them.
Annotations can be transparent or nontransparent (opaque). Lines, shapes, highlights, and rubberstamps are transparent by default. Text annotations are nontransparent by default. You must haveredaction privileges to create and modify nontransparent annotations.
Creating line and shape annotationsBefore you create the line and shape annotations, configure their properties by using the formatsettings available on the toolbar.
Configuring annotation properties
The first step to create a line or shape annotation is to check the current annotation properties, and,if necessary, change the defaults. For example, all annotations have default color settings that youcan change. You can select a different line color, fill color, or both before adding an annotation to adocument. You can also modify the default line width, by making it broader or narrower.
Note: Default colors for text annotations are set separately. For more information, see Creating textannotations, page 73.
You can Description
Set line width settings for line and shapeannotations
Click the Line Width icon on the Format toolbarand select a width of your choice.
Set shape line and fill colors for line and shapeannotations
Note: Set the default colors before creating theannotation.
Click the Line Color icon on the Format toolbarto select the line color. Click the arrow next totheChange Fill Color icon on the Format toolbarto open the color palette and select the fill color.
70
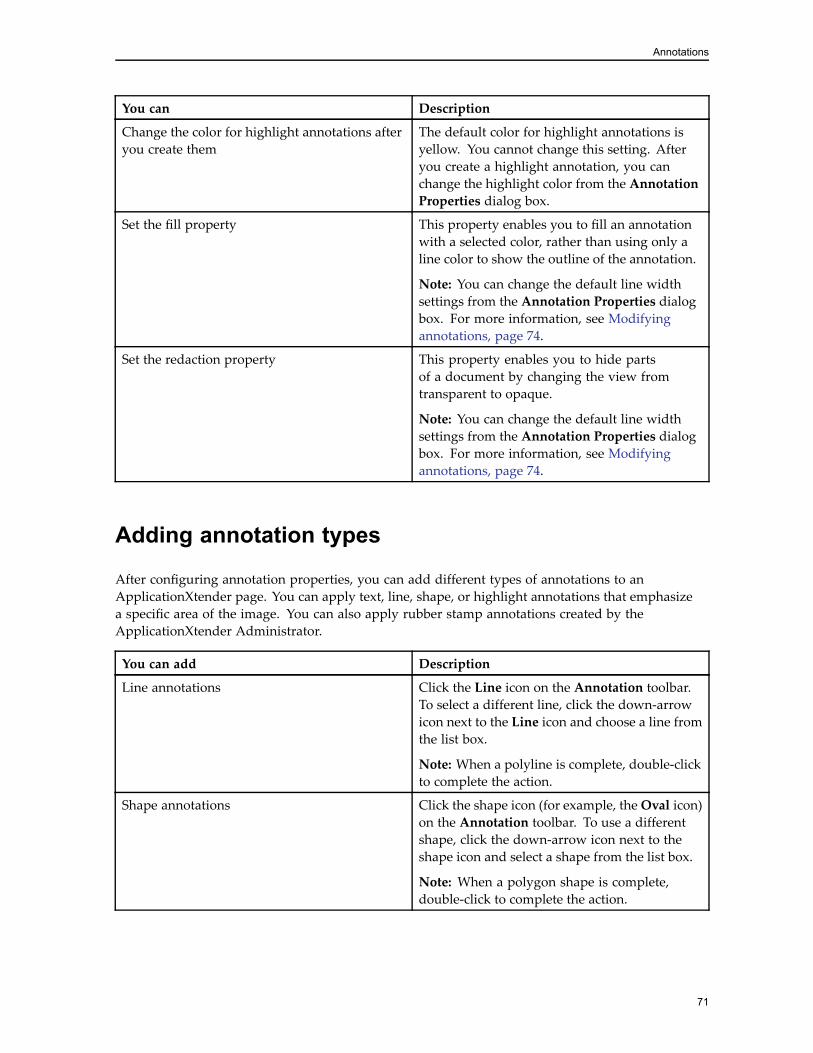
Annotations
You can Description
Change the color for highlight annotations afteryou create them
The default color for highlight annotations isyellow. You cannot change this setting. Afteryou create a highlight annotation, you canchange the highlight color from the AnnotationProperties dialog box.
Set the fill property This property enables you to fill an annotationwith a selected color, rather than using only aline color to show the outline of the annotation.
Note: You can change the default line widthsettings from the Annotation Properties dialogbox. For more information, see Modifyingannotations, page 74.
Set the redaction property This property enables you to hide partsof a document by changing the view fromtransparent to opaque.
Note: You can change the default line widthsettings from the Annotation Properties dialogbox. For more information, see Modifyingannotations, page 74.
Adding annotation types
After configuring annotation properties, you can add different types of annotations to anApplicationXtender page. You can apply text, line, shape, or highlight annotations that emphasizea specific area of the image. You can also apply rubber stamp annotations created by theApplicationXtender Administrator.
You can add Description
Line annotations Click the Line icon on the Annotation toolbar.To select a different line, click the down-arrowicon next to the Line icon and choose a line fromthe list box.
Note: When a polyline is complete, double-clickto complete the action.
Shape annotations Click the shape icon (for example, theOval icon)on the Annotation toolbar. To use a differentshape, click the down-arrow icon next to theshape icon and select a shape from the list box.
Note: When a polygon shape is complete,double-click to complete the action.
71
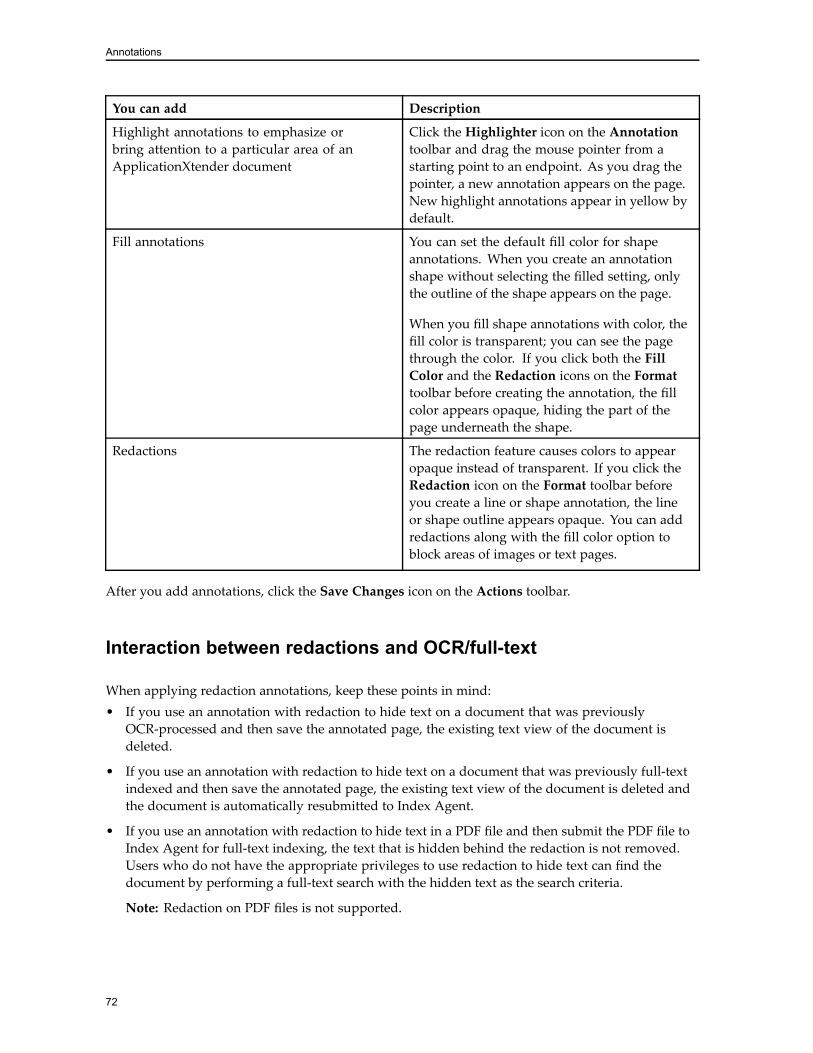
Annotations
You can add Description
Highlight annotations to emphasize orbring attention to a particular area of anApplicationXtender document
Click the Highlighter icon on the Annotationtoolbar and drag the mouse pointer from astarting point to an endpoint. As you drag thepointer, a new annotation appears on the page.New highlight annotations appear in yellow bydefault.
Fill annotations You can set the default fill color for shapeannotations. When you create an annotationshape without selecting the filled setting, onlythe outline of the shape appears on the page.
When you fill shape annotations with color, thefill color is transparent; you can see the pagethrough the color. If you click both the FillColor and the Redaction icons on the Formattoolbar before creating the annotation, the fillcolor appears opaque, hiding the part of thepage underneath the shape.
Redactions The redaction feature causes colors to appearopaque instead of transparent. If you click theRedaction icon on the Format toolbar beforeyou create a line or shape annotation, the lineor shape outline appears opaque. You can addredactions along with the fill color option toblock areas of images or text pages.
After you add annotations, click the Save Changes icon on the Actions toolbar.
Interaction between redactions and OCR/full-text
When applying redaction annotations, keep these points in mind:• If you use an annotation with redaction to hide text on a document that was previouslyOCR-processed and then save the annotated page, the existing text view of the document isdeleted.
• If you use an annotation with redaction to hide text on a document that was previously full-textindexed and then save the annotated page, the existing text view of the document is deleted andthe document is automatically resubmitted to Index Agent.
• If you use an annotation with redaction to hide text in a PDF file and then submit the PDF file toIndex Agent for full-text indexing, the text that is hidden behind the redaction is not removed.Users who do not have the appropriate privileges to use redaction to hide text can find thedocument by performing a full-text search with the hidden text as the search criteria.
Note: Redaction on PDF files is not supported.
72
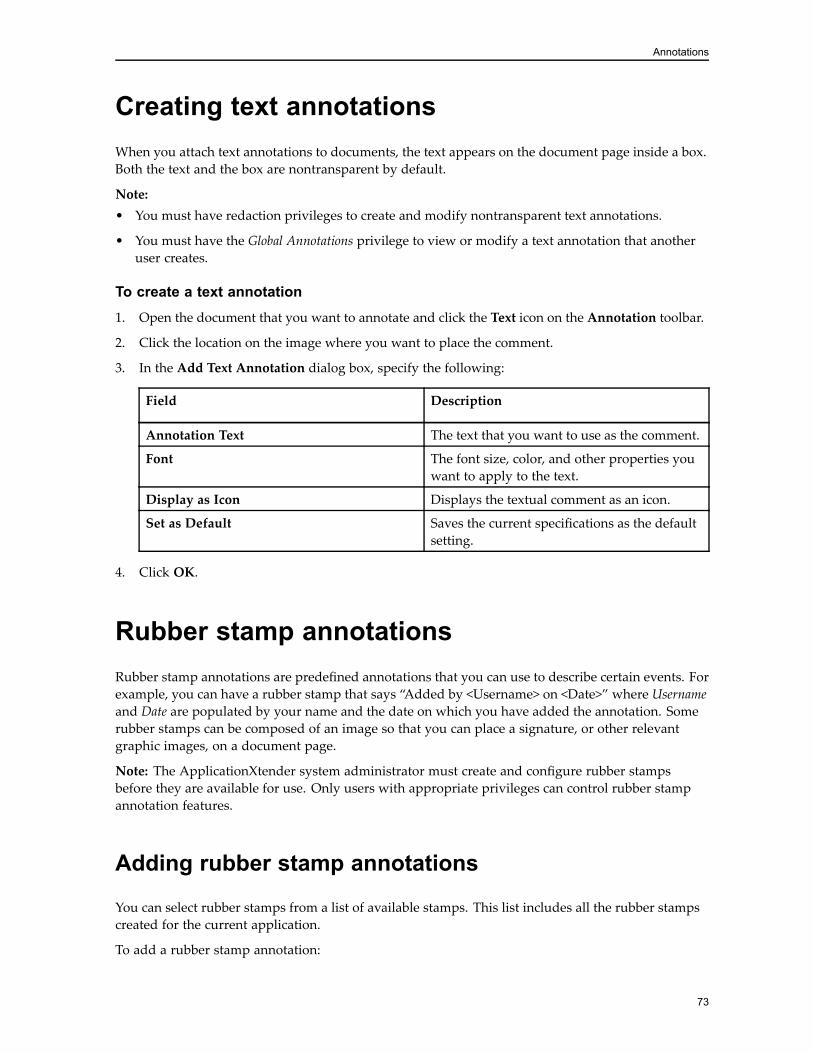
Annotations
Creating text annotationsWhen you attach text annotations to documents, the text appears on the document page inside a box.Both the text and the box are nontransparent by default.
Note:• You must have redaction privileges to create and modify nontransparent text annotations.
• You must have the Global Annotations privilege to view or modify a text annotation that anotheruser creates.
To create a text annotation1. Open the document that you want to annotate and click the Text icon on the Annotation toolbar.
2. Click the location on the image where you want to place the comment.
3. In the Add Text Annotation dialog box, specify the following:
Field Description
Annotation Text The text that you want to use as the comment.
Font The font size, color, and other properties youwant to apply to the text.
Display as Icon Displays the textual comment as an icon.
Set as Default Saves the current specifications as the defaultsetting.
4. Click OK.
Rubber stamp annotationsRubber stamp annotations are predefined annotations that you can use to describe certain events. Forexample, you can have a rubber stamp that says “Added by <Username> on <Date>” where Usernameand Date are populated by your name and the date on which you have added the annotation. Somerubber stamps can be composed of an image so that you can place a signature, or other relevantgraphic images, on a document page.
Note: The ApplicationXtender system administrator must create and configure rubber stampsbefore they are available for use. Only users with appropriate privileges can control rubber stampannotation features.
Adding rubber stamp annotations
You can select rubber stamps from a list of available stamps. This list includes all the rubber stampscreated for the current application.
To add a rubber stamp annotation:
73
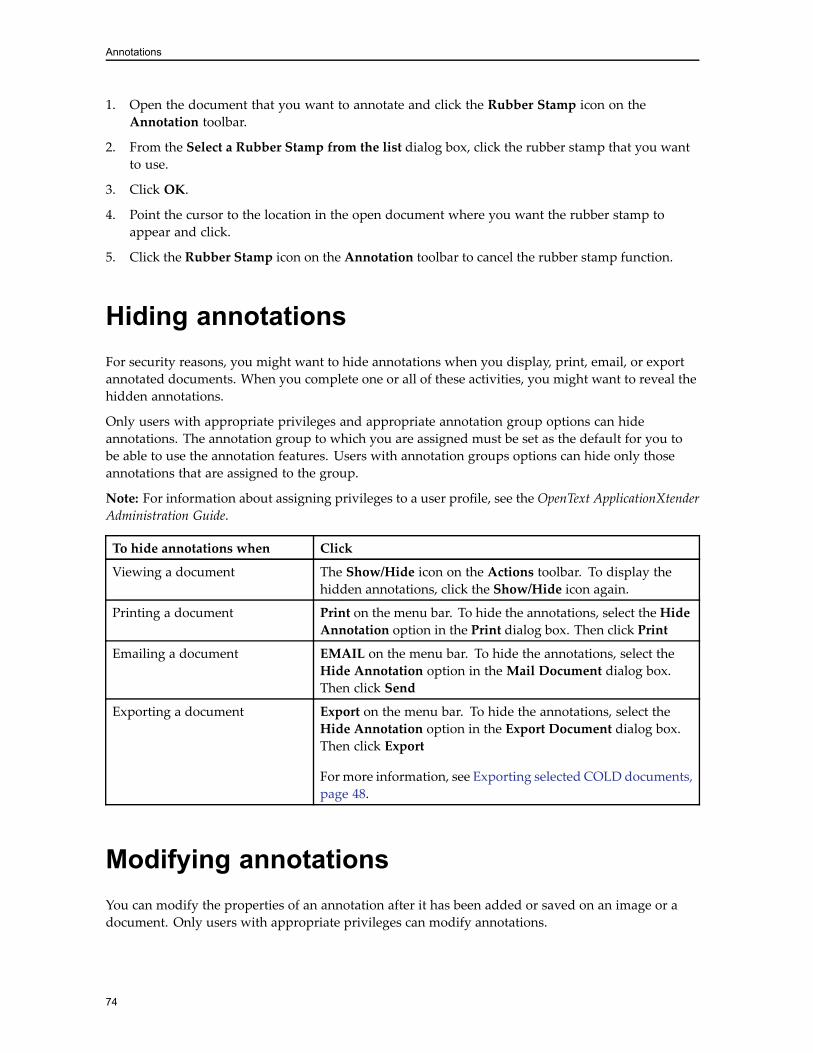
Annotations
1. Open the document that you want to annotate and click the Rubber Stamp icon on theAnnotation toolbar.
2. From the Select a Rubber Stamp from the list dialog box, click the rubber stamp that you wantto use.
3. Click OK.
4. Point the cursor to the location in the open document where you want the rubber stamp toappear and click.
5. Click the Rubber Stamp icon on the Annotation toolbar to cancel the rubber stamp function.
Hiding annotationsFor security reasons, you might want to hide annotations when you display, print, email, or exportannotated documents. When you complete one or all of these activities, you might want to reveal thehidden annotations.
Only users with appropriate privileges and appropriate annotation group options can hideannotations. The annotation group to which you are assigned must be set as the default for you tobe able to use the annotation features. Users with annotation groups options can hide only thoseannotations that are assigned to the group.
Note: For information about assigning privileges to a user profile, see the OpenText ApplicationXtenderAdministration Guide.
To hide annotations when Click
Viewing a document The Show/Hide icon on the Actions toolbar. To display thehidden annotations, click the Show/Hide icon again.
Printing a document Print on the menu bar. To hide the annotations, select the HideAnnotation option in the Print dialog box. Then click Print
Emailing a document EMAIL on the menu bar. To hide the annotations, select theHide Annotation option in theMail Document dialog box.Then click Send
Exporting a document Export on the menu bar. To hide the annotations, select theHide Annotation option in the Export Document dialog box.Then click Export
Formore information, see Exporting selected COLD documents,page 48.
Modifying annotationsYou can modify the properties of an annotation after it has been added or saved on an image or adocument. Only users with appropriate privileges can modify annotations.
74
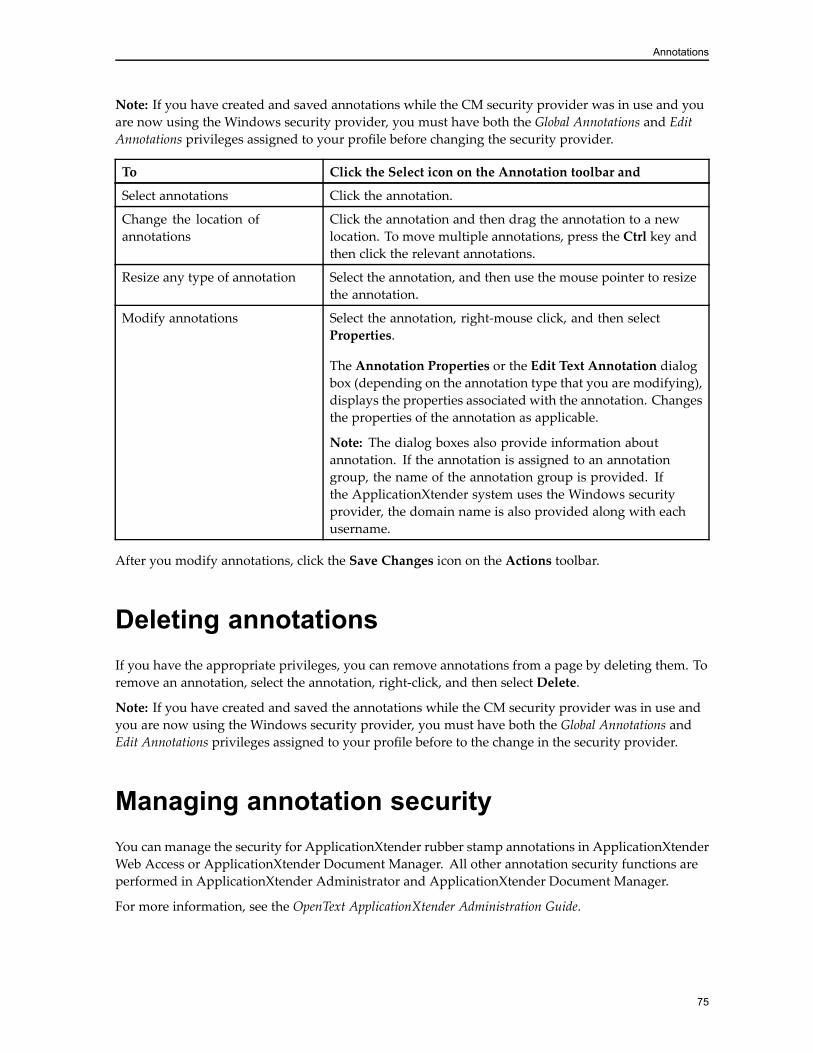
Annotations
Note: If you have created and saved annotations while the CM security provider was in use and youare now using the Windows security provider, you must have both the Global Annotations and EditAnnotations privileges assigned to your profile before changing the security provider.
To Click the Select icon on the Annotation toolbar and
Select annotations Click the annotation.
Change the location ofannotations
Click the annotation and then drag the annotation to a newlocation. To move multiple annotations, press the Ctrl key andthen click the relevant annotations.
Resize any type of annotation Select the annotation, and then use the mouse pointer to resizethe annotation.
Modify annotations Select the annotation, right-mouse click, and then selectProperties.
The Annotation Properties or the Edit Text Annotation dialogbox (depending on the annotation type that you are modifying),displays the properties associated with the annotation. Changesthe properties of the annotation as applicable.
Note: The dialog boxes also provide information aboutannotation. If the annotation is assigned to an annotationgroup, the name of the annotation group is provided. Ifthe ApplicationXtender system uses the Windows securityprovider, the domain name is also provided along with eachusername.
After you modify annotations, click the Save Changes icon on the Actions toolbar.
Deleting annotationsIf you have the appropriate privileges, you can remove annotations from a page by deleting them. Toremove an annotation, select the annotation, right-click, and then select Delete.
Note: If you have created and saved the annotations while the CM security provider was in use andyou are now using the Windows security provider, you must have both the Global Annotations andEdit Annotations privileges assigned to your profile before to the change in the security provider.
Managing annotation securityYou can manage the security for ApplicationXtender rubber stamp annotations in ApplicationXtenderWeb Access or ApplicationXtender Document Manager. All other annotation security functions areperformed in ApplicationXtender Administrator and ApplicationXtender Document Manager.
For more information, see the OpenText ApplicationXtender Administration Guide.
75
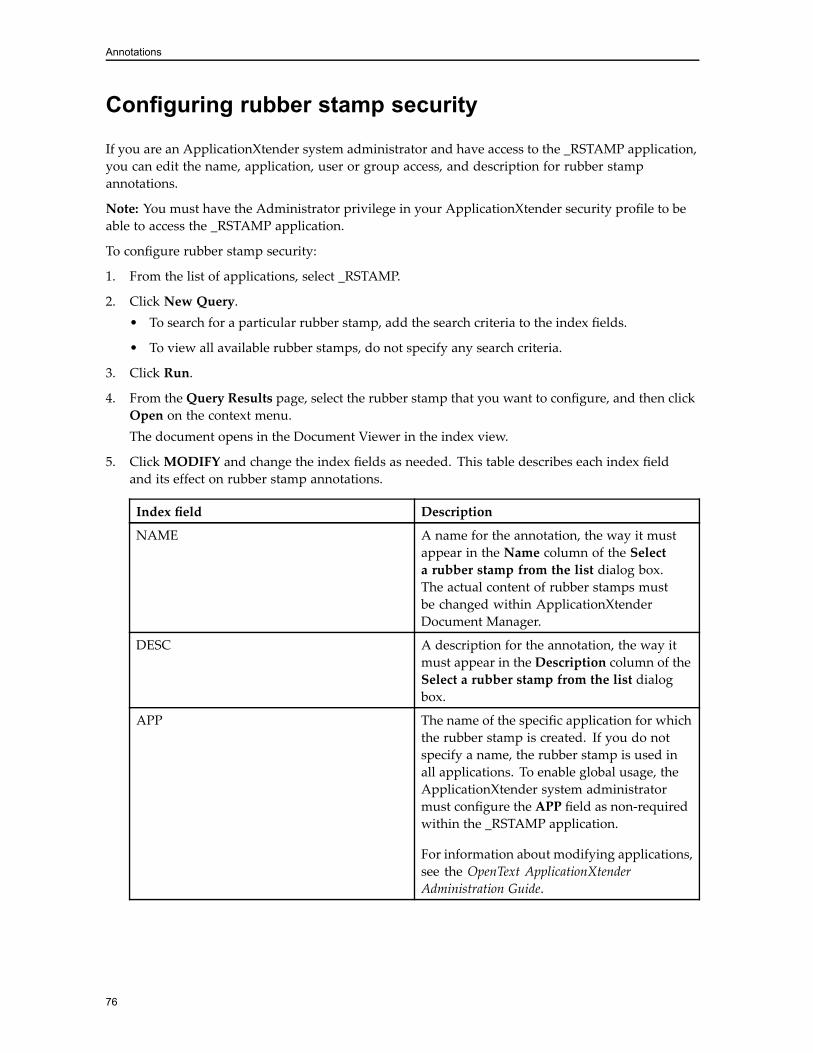
Annotations
Configuring rubber stamp security
If you are an ApplicationXtender system administrator and have access to the _RSTAMP application,you can edit the name, application, user or group access, and description for rubber stampannotations.
Note: You must have the Administrator privilege in your ApplicationXtender security profile to beable to access the _RSTAMP application.
To configure rubber stamp security:
1. From the list of applications, select _RSTAMP.
2. Click New Query.• To search for a particular rubber stamp, add the search criteria to the index fields.
• To view all available rubber stamps, do not specify any search criteria.
3. Click Run.
4. From the Query Results page, select the rubber stamp that you want to configure, and then clickOpen on the context menu.The document opens in the Document Viewer in the index view.
5. ClickMODIFY and change the index fields as needed. This table describes each index fieldand its effect on rubber stamp annotations.
Index field Description
NAME A name for the annotation, the way it mustappear in the Name column of the Selecta rubber stamp from the list dialog box.The actual content of rubber stamps mustbe changed within ApplicationXtenderDocument Manager.
DESC A description for the annotation, the way itmust appear in the Description column of theSelect a rubber stamp from the list dialogbox.
APP The name of the specific application for whichthe rubber stamp is created. If you do notspecify a name, the rubber stamp is used inall applications. To enable global usage, theApplicationXtender system administratormust configure the APP field as non-requiredwithin the _RSTAMP application.
For information about modifying applications,see the OpenText ApplicationXtenderAdministration Guide.
76

Annotations
Index field Description
USER The names of the individual users or usergroups who can use the rubber stamp. Donot specify the names if you want to allow allusers to access the rubber stamp. To enableglobal usage, the ApplicationXtender systemadministrator must configure the USERfield as non-required within the _RSTAMPapplication.
For information about modifying applications,see the OpenText ApplicationXtenderAdministration Guide.
DOMAIN If the underlying ApplicationXtender systemuses the Windows security provider, indicatesthe name of the domain associated with thisrubber stamp. Do not specify a value of if youwant to make the rubber stamp available to alldomains. If the ApplicationXtender systemuses the CM security provider, leave this fieldblank.
For more information about securityproviders, see the OpenText ApplicationXtenderInstallation Guide.
6. Click SAVE.
77

Annotations
78
Chapter 8Working with Document Retention
ApplicationXtender Software Retention Management is a licensed feature that protects documentsfrom loss, whether accidental or malicious. This feature also ensures that documents are retainedin an ApplicationXtender repository for a specified period, in accordance with legal, regulatory,fiscal, and operational requirements.
Note:• The retention administrator creates retention policies that determine the duration for whichdocuments must remain in the ApplicationXtender repository and also manages documentsunder retention.
• You cannot file documents that are imported from ApplicationXtender Reports Management forretention in ApplicationXtender Web Access.
• You cannot file a document for retention if it is checked out.
Retention conceptsApplicationXtender Web Access displays the retention options if your application is configured forApplicationXtender software retention and Retention Administrator or Retention User permission isgranted to your user account.
Note: You do not need Retention Administrator or Retention User permission to query aretention-enabled application for documents by retention status or by retention hold status. To searchfor documents under retention, select an option from the Show list box in the search page.
You cannot modify or delete the documents that are filed for retention until the expiry of the retentionperiod. After the end of the retention period, the retention administrator determines whether toremove the document from the ApplicationXtender repository or to retain the document in therepository as a writable document.
Documents under retention are in the read-only mode. You cannot check the documents out of theApplicationXtender repository to change, however, you can use these ApplicationXtender features tocreate a new copy of the document:• The Copy or Move Pages feature. For more information, see Moving or copying document pages,page 63.
• The Export and Import features. For more information, see Exporting selected COLD documents,page 48 and Adding pages to batches, page 31.
79
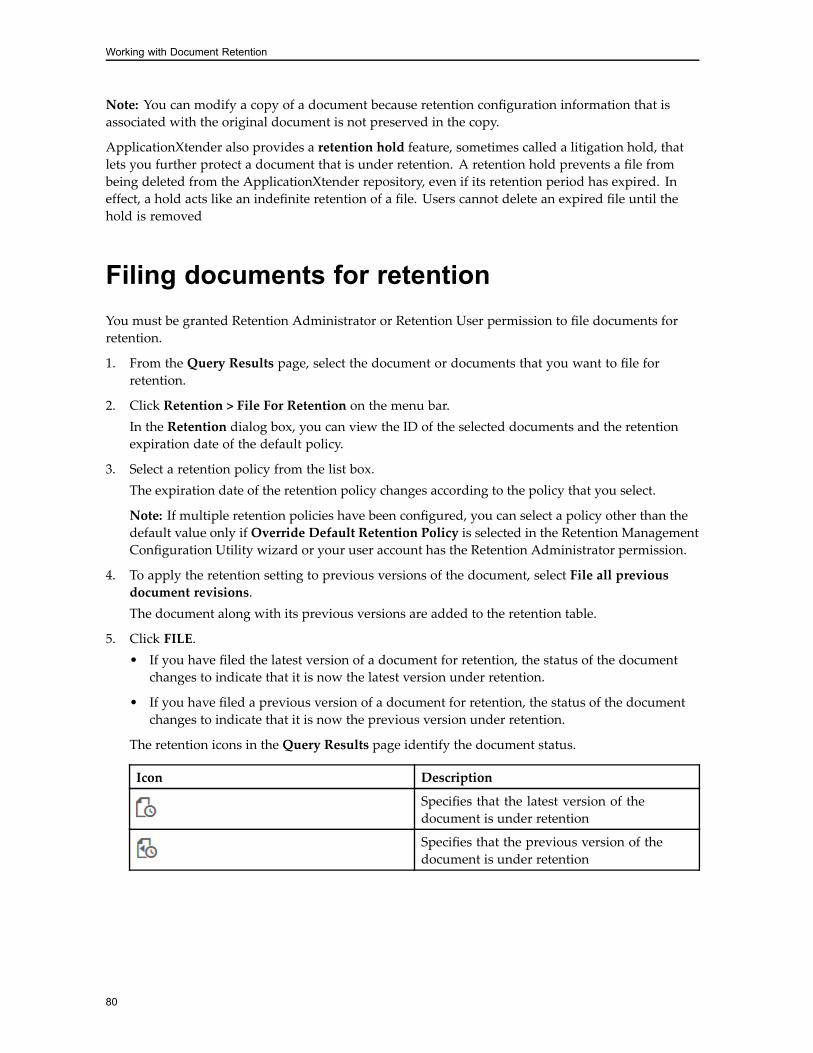
Working with Document Retention
Note: You can modify a copy of a document because retention configuration information that isassociated with the original document is not preserved in the copy.
ApplicationXtender also provides a retention hold feature, sometimes called a litigation hold, thatlets you further protect a document that is under retention. A retention hold prevents a file frombeing deleted from the ApplicationXtender repository, even if its retention period has expired. Ineffect, a hold acts like an indefinite retention of a file. Users cannot delete an expired file until thehold is removed
Filing documents for retentionYou must be granted Retention Administrator or Retention User permission to file documents forretention.
1. From the Query Results page, select the document or documents that you want to file forretention.
2. Click Retention > File For Retention on the menu bar.In the Retention dialog box, you can view the ID of the selected documents and the retentionexpiration date of the default policy.
3. Select a retention policy from the list box.The expiration date of the retention policy changes according to the policy that you select.
Note: If multiple retention policies have been configured, you can select a policy other than thedefault value only if Override Default Retention Policy is selected in the Retention ManagementConfiguration Utility wizard or your user account has the Retention Administrator permission.
4. To apply the retention setting to previous versions of the document, select File all previousdocument revisions.The document along with its previous versions are added to the retention table.
5. Click FILE.• If you have filed the latest version of a document for retention, the status of the documentchanges to indicate that it is now the latest version under retention.
• If you have filed a previous version of a document for retention, the status of the documentchanges to indicate that it is now the previous version under retention.
The retention icons in the Query Results page identify the document status.
Icon Description
Specifies that the latest version of thedocument is under retention
Specifies that the previous version of thedocument is under retention
80
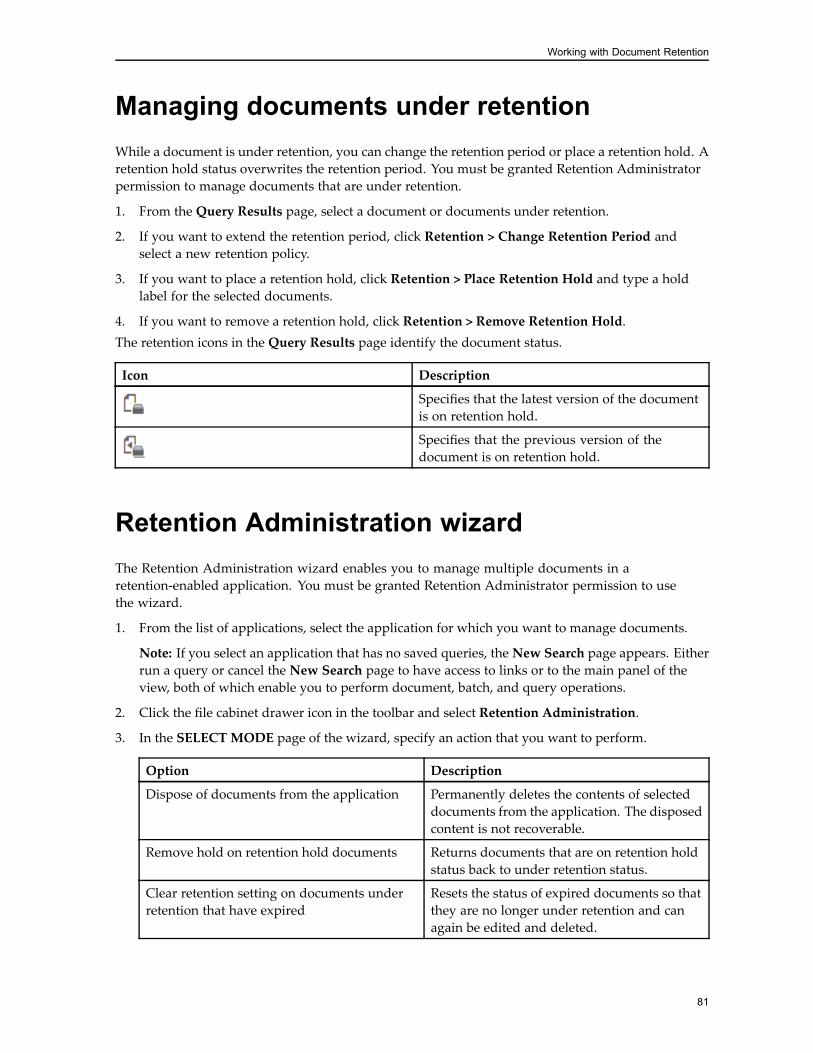
Working with Document Retention
Managing documents under retentionWhile a document is under retention, you can change the retention period or place a retention hold. Aretention hold status overwrites the retention period. You must be granted Retention Administratorpermission to manage documents that are under retention.
1. From the Query Results page, select a document or documents under retention.
2. If you want to extend the retention period, click Retention > Change Retention Period andselect a new retention policy.
3. If you want to place a retention hold, click Retention > Place Retention Hold and type a holdlabel for the selected documents.
4. If you want to remove a retention hold, click Retention > Remove Retention Hold.The retention icons in the Query Results page identify the document status.
Icon Description
Specifies that the latest version of the documentis on retention hold.
Specifies that the previous version of thedocument is on retention hold.
Retention Administration wizardThe Retention Administration wizard enables you to manage multiple documents in aretention-enabled application. You must be granted Retention Administrator permission to usethe wizard.
1. From the list of applications, select the application for which you want to manage documents.
Note: If you select an application that has no saved queries, theNew Search page appears. Eitherrun a query or cancel the New Search page to have access to links or to the main panel of theview, both of which enable you to perform document, batch, and query operations.
2. Click the file cabinet drawer icon in the toolbar and select Retention Administration.
3. In the SELECT MODE page of the wizard, specify an action that you want to perform.
Option Description
Dispose of documents from the application Permanently deletes the contents of selecteddocuments from the application. The disposedcontent is not recoverable.
Remove hold on retention hold documents Returns documents that are on retention holdstatus back to under retention status.
Clear retention setting on documents underretention that have expired
Resets the status of expired documents so thatthey are no longer under retention and canagain be edited and deleted.
81
Working with Document Retention
Option Description
Dispose documents under retention that haveexpired
Permanently deletes the contents ofdocuments with an expired retention periodfrom the application. The disposed content isnot recoverable.
Export and dispose of documents underretention that have expired
Exports and then deletes the contents ofdocuments with an expired retention periodfrom the application. The disposed content isnot recoverable. Options include:• The UNC path to save the exported files to
• Specifies whether to delete the contents ofthe selected documents permanently afterexport. The option is enabled by default.
• Specifies whether to generate the IndexImage Import script file for exporteddocuments. The option is disabled bydefault.
4. In the SEARCH DOCUMENTS page of the wizard, specify the query criteria to search for thedocuments on which you want to perform the operation.Some query options are overridden and set to a fixed value.
If you selected: Then the query criteria is set to:
Dispose of documents from application All documents, except for those documentson retention
Remove hold on retention hold documents Only documents that are on retention hold
All other options Only documents that are on retention, but arenot on retention hold
5. In the SELECT DOCUMENTS page of the wizard, review the query results and specify selecteddocuments or all documents to process.
6. In the PROCESS RESULT page of the wizard, click either:• FINISH to return to the application page
• RESTART to return to the SELECT MODE page of the wizard
82


