Embed Size (px)
Citation preview

Fable 3 Guide
by Samuel Claiborn
In Fable 3 an entire kingdom can be yours, and the only thing standing between you and the throne is Albion's biggest jerk, who just happens to be your brother. Before you can incite a revolution, you'll have to put in some time as a Hero: There are warlords to slay, keys to find, and gnomes to shoot. Each act directly affects the future, and brings you a bit closer to the ultimate seat of power. In this IGN Guide we'll show you how to become the ruler of Albion -- whether you choose to be a dastardly despot or a benevolent monarch is up to you!
Fable 3 Guide Contents
Game Walkthrough including collectible locations and boss videos
Side Quests mini-guide
Silver Keys, Gold Keys, Auroran Flowers and Gnome Locations - 100% COMPLETE!
Demon Doors explained, with video!
Achievement guide
Common Questions & Answers
© 2010, IGN Entertainment, Inc. May not be sold, distributed, transmitted, displayed, published or broadcast, in whole or part, without IGN's
express permission. You may not alter or remove any trademark, copyright or other notice from copies of the content. All rights reserved.
»
More »
Page 1 of 244IGN.com | Fable III Guide
© 2010 IGN Entertainment, Inc.

Fable 3 Walkthrough
Life in the Castle
Leaving the Castle
The Sanctuary
A New Hero
Mistpeak Valley
Brightwall Village
The Reliquary
In Wolf's Clothing
Leaders & Followers
Mercenary Camp
Boss: Captain Saker
Mistpeak Monorail Station
The Hole
The Hollow Legion
Mourningwood
Lieutenant Simmons
Sunset House
Mourningwood Revisited
The Bowerstone Resistance
Kidnapped
The Masquerade
Traitors
Darkness Incarnate
»
»
»
»
»
»
»
»
»
»
Page 2 of 244IGN.com | Fable III Guide
© 2010 IGN Entertainment, Inc.

Aurora
The Battle for Albion
The Weight of the World / 365 Days
The Weight of the World / 339 Days
Desert Star
The Weight of the World / 294 Days
Crime and Punishment
The Weight of the World / 252 Days
The Weight of the World / 121 Days
Stolen Statues
Silverpines
Do the Ends Justify the Means?
Fable 3 Walkthrough
Life in the Castle
Choose a Prince or Princess -- must HOLD A to choose until it tells you may let go. Neither sex has a gameplay advantage, so the choice will only reflect pronouns and who you can romance!
After getting out of bed, choose an outfit -- this is purely a style choice as well, so don't fret about it too much. You now need to find your friend. It's a big castle, but luckily you have your "Trail of Crumbs" to follow. Throughout the game, this golden, sparkly trail will show the shortest route from your feet to your destination.
»
»
»
»
»
»
»
= Leaving the Castle A New Hero In Wolf's Clothing Leaders & FollowersLife in the Castle
Page 3 of 244IGN.com | Fable III Guide
© 2010 IGN Entertainment, Inc.

Follow the trail down the staircases to the green courtyard. At the edge of the area you'll find your friend. During the conversation, hold A or X when prompted to interact with your friend. Hold the RIGHT TRIGGER to look at the city when prompted.
Now, hold the LEFT TRIGGER to hold your friend's hand. You just have to tap it once to hold hands, and you can tap it again to let go. Follow the golden trail once again to its destination up the stairs and inside the castle.
Just outside the door you can peek in with RIGHT TRIGGER and listen, or just run inside and into the golden circle. You are now presented with your first moral choice: Do you scare the staff straight or sympathize with them? Choices like these will do little more than alter your outward appearance, and we'll be writing this walkthrough from a relatively "good" perspective (and of course playing "evil" on our own time, heh heh). Remember to HOLD A or X to make the choice -- you cannot just tap the button.
Page 4 of 244IGN.com | Fable III Guide
© 2010 IGN Entertainment, Inc.

After your speech, follow Walter down the golden path to visit your brother. When you come across the mob, you can sign the petition or rub your arse on it in insult -- again, this is up to you!
In the next room, hold A at the end of the golden path to grab a sword from the rack. Now, follow Walter's direction and fight him with X. Hold X to block his attacks and swipe at him until he orders you to perform a Flourish.
You can hold X, press towards Walter with the LEFT ANALOG STICK and let go of X to perform a "Flourish." These attacks are powerful and often lead to a dramatic new camera perspective in battle, so pepper them into your combat when you have the time to fully charge the attack.
After your training is complete, follow the trail to your brother's chamber. You can now hold A to run. After you confront your evil brother, you'll be presented with a reprehensible decision. The morals of the decision are questionable -- unless you're a Vulcan and believe the needs of the many outweigh the needs of the few. It would seem a better idea for players choosing the moral high ground to choose to kill your friend, but this is up to you.
Page 5 of 244IGN.com | Fable III Guide
© 2010 IGN Entertainment, Inc.

After this scene, follow Walter once again. Remember, you can HOLD A to run now, so there's no need to dilly-dally. Enter the Catacombs using the door at the bottom of the stairs in the courtyard.
Fable 3 Walkthrough
Leaving the Castle
At the shrine (who lit all these candles?) a cutscene will occur and you will receive the Guild Seal. Press and hold A to accept it.
In the Road to Rule you will meet Theresa, the Seer. She will guide you through the first gate of the Road to Rule. As you progress through the game, you will be able to pass though more gates by completing tasks and gaining followers.
= Life in the Castle A New Hero In Wolf's Clothing Leaders & FollowersLeaving the Castle
Page 6 of 244IGN.com | Fable III Guide
© 2010 IGN Entertainment, Inc.

Beyond each gate are chests that can be opened to upgrade your weapons, earn new skills and more. You'll need to spend Guild Seals on these, but the first chest will cost you only one. Hold A to open the chest and accept the Fireball Spell.
Fireball burns your Targets and blasts them back a step. Press B and push the ANALOG STICK in the direction of an enemy to toss a fireball. You can HOLD B to charge an attack and unleash a ring of fire that damages any enemies around you. Upgrading the spell will allow you to increase this area and reduce the charge time for the attack. This is a great spell that you will find great use for throughout the game -- stick with it and you'll be just fine!
Approach the misty seal around the next gate and HOLD A to exit the Road to Rule. Back in the Catacombs, use your new spell to open a staircase leading down into the gloom.
Follow Jasper and Walter down the path and into the large cavern. Run down the hill and you'll come to a fork in the road, with the gold path leading away from a dead end. Explore the dead end
Page 7 of 244IGN.com | Fable III Guide
© 2010 IGN Entertainment, Inc.

(don't cross the bridge) to find a special collectible.
Silver Key (Bowerstone Castle 1/2)
The path leading down from the Catacombs entrance in the castle courtyard comes upon a giant open cave. When it splits at a fork, take the left path to a dead end (do not cross the rock bridge) to find this Silver Key.
Silver Keys should be collected to not only score the I Am The Keymaster Achievement, but to unlock Silver Chests around Albion. These chests have a number on them that corresponds to your key count, and so you'll need to amass keys to get a chance at what's inside.
Across the bridge you'll come across you first real foes: Bats! The bats can be easily disposed of with your Fireball Spell. Point at them with the LEFT ANALOG STICK and press X repeatedly to fire your spell at each cloud of bats. This will swiftly eliminate them. Be sure to shoot a few Fireballs at Jasper to rid him of bats -- don't worry, you cannot hurt him.
On your way down the path you may notice a Gold Door -- you need a Gold Key to open it, and so you'll have to return later! Inside you'll find 30 Guild Seals.
Silver Key
Return Later
Page 8 of 244IGN.com | Fable III Guide
© 2010 IGN Entertainment, Inc.

Keep moving down the path shooting Fireball at packs of bats. Enter the sewers and eventually, on the far side, you'll find a Cullis Gate. Cast Fireball while standing on it to activate it.
Fable 3 Walkthrough
The Sanctuary
The Sanctuary is a glorified pause screen complete with rooms for menus allowing you to change gear, weapons, options and more. You'll eventually be able to access it by pressing START at any time.
Jasper will pour over the Book of Heroes in this strange realm. Approach the map in the center of the room and press A to activate it.
Now, highlight the Dweller Camp as instructed and press X and then A to fast travel there -- you'll be instantly transported to the snowy Dweller Camp.
= Life in the Castle Leaving the Castle In Wolf's Clothing Leaders & Followers
A New Hero
1 2 3 4 5 6 7
Page 9 of 244IGN.com | Fable III Guide
© 2010 IGN Entertainment, Inc.

A New Hero
Dweller Camp
S I L V E R K E Y S : 1 / G O L D K E Y S : 0 / G N O M E S : 1
The frigid village is full of starved denizens whom you cannot interact with very well at this time (you can only emit unpleasant gasses if you choose to talk to them). Later you'll be able to emote in different ways that will help you earn Guild Seals.
Follow Walter to gates to Sabine's digs ignoring the villagers for now. At the end of the gold path, Walter will give you 500 Gold to buy some new clothes. Follow the new path back towards the
A 5 Silver Key Chest on the ridge behind a row of houses across from Sabine's gate cannot be opened until you have -- you guessed it -- 5 Silver Keys. Inside is a common potion, so don't fret over it too much!
Before heading down the path to get your new Dweller duds, head downhill to the village gate. It's shut tight, but a path forking up the mountain here leads to a series of switchbacks that terminate at a small pound. Swim out to the center of the pond and stop over the swell of water. Press A to dive down and score a Wedding Ring! You can sell this for Gold or use to woo someone later on.
Return Later
Page 10 of 244IGN.com | Fable III Guide
© 2010 IGN Entertainment, Inc.

Now, follow the gold path to the clothing store. Purchase the Dweller garb and press START when Jasper begins to yammer about the Sanctuary. You can now visit the Sanctuary to change clothes and look at your map. Enter the open door with the clothes hanger above it and approach the mannequin with your new outfit hanging on it.
Use the buttons shown to put on the Dweller outfit. Now, press START to exit the Sanctuary and return to the village. You can now follow the gold path back to Walter and Sabine.
In the cutscene that ensues Sabine will list off some pretty outrageous demands. There's no use arguing though -- you now need to make it to the library in Brightwall.
If you face Sabine's locked gate and run to the right, you can peer past the gap between the fence and wall to see a Silver Key... You'll have to
Return Later
Page 11 of 244IGN.com | Fable III Guide
© 2010 IGN Entertainment, Inc.

return for this later.
Fable 3 Walkthrough
Mistpeak Valley
S I L V E R K E Y S : 6 / G O L D K E Y S : 1 / G N O M E S : 7
Head down the path into Mistpeak Valley. Before leaving the valley, you should explore its environs for treasure and collectibles. First, take a right at the first fork in the road, by the signpost/lamp pointing to Brightwall. This path will take you back up the mountain, up a flight of stairs, around a wooden walkway and finally to a rickety bridge.
Return to the 5 Silver Key Chest at the top of the mountain path later. Inside is a potion, making it not exactly worth the effort unless you happen to be in the area with 5 keys.
You should pass a Silver Key Chest and then find the terminus of the path at some ruins across the bridge. Amongst the ruins you'll find a chest with 20G inside. Pay keen attention to your dog on your treasure hunts: the Dig Spots he unearths can also yield treasure.
= Life in the Castle Leaving the Castle In Wolf's Clothing Leaders & Followers
Return Later
A New Hero
1 2 3 4 5 6 7
Page 12 of 244IGN.com | Fable III Guide
© 2010 IGN Entertainment, Inc.

When you come upon the Dig Spot, your dog will search a bit and then stop. Press A when prompted to dig up a gem you can sell, gold or items. Your pup's nose will also turn up keys and treasure chests, so listen for that bark!
As you cross the first bridge on the gold path, you'll encounter some new enemies. Wolves can be dealt with easily -- just send a few Fireballs their way. You can charge an attack and send a stronger Fireball at a wolf to kill it instantly. Just keep your distance. If you get in close, the wolves will maul you and, without a sword, you'll have to rely on your relatively weak area attack magic.
Cross the area where you fought the wolves and you can explore some ruins around a pit with a skeleton in it for some Dig Spot goodies.
Just as you come out of the snowy mountains a large pack of wolves will attack. Stay back and fire at them from safety. In this area you'll find a long bridge leading back up towards the snow. A cave entrance is here and a treasure chest with 30G inside.
Page 13 of 244IGN.com | Fable III Guide
© 2010 IGN Entertainment, Inc.

A cave entrance is on the opposite side of the path as well and another treasure chest here contains a Health Potion. This can be found by passing the road leading to Brightwall and turning right just as the snow gives way to greenery.
It's time to tread on green grass again, so head down into the green basin and look for the end of the valley that you've been criss-crossing on the way down. Following the path in the valley leads to the Mistpeak Valley Demon Door. The big prize is just past the valley that leads to the Demon Door.
The Mistpeak Valley Demon Door's requirements are beyond your capabilities right now. Return later.
Silver Key (Mistpeak Valley 1/6)
Head towards the valley that leads back to the Demon Door in Mistpeak
Return Later
Silver Key
Page 14 of 244IGN.com | Fable III Guide
© 2010 IGN Entertainment, Inc.

Valley. Don't enter the valley path. Take a right at its entrance and search the piles of logs for a Silver Key.
Now, dive into the water. You can find two Dive Spots in the small lake. One is to the left of the entrance to the Mercenaries' camp at one end of the lake. Another is just off the coast of the tiny island in the middle of the lake. Be sure to explore the far side of the lake for Dig Spots. Make your way to the end of the lake with the Trolley Station (which you cannot use as of yet).
Silver Key (Mistpeak Valley 2/6)
At the end of the lake opposite the Mercenaries' camp is the Mistpeak Trolley Station. Head uphill from here towards the mountains. A Silver Key can be found here at an overlook with a view of Brightwall.
Silver Key
Page 15 of 244IGN.com | Fable III Guide
© 2010 IGN Entertainment, Inc.

Follow your gold path back up into the snowy area. Just below the Key you'll find a chest with a Health Potion inside. Another chest with a Health potion can be found behind some ruins just before the final stretch of path leading to the Brightwall exit. Cross the bridge and enter Brightwall Village.
Fable 3 Walkthrough
Brightwall Village
S I L V E R K E Y S : 5 / G O L D K E Y S : 0 / G N O M E S : 5
Before crossing the bridge into Brightwall, hang a left and follow the path to the "Spurious Nuttock" house. On the way you can find a chest with some gold in it, but the real prize remains at the end of the path.
Silver Key (Brightwall, 1/5)
By the house outside of Brightwall Village's walls, "Spurious Nuttock," is a small bridge with a set of stairs leading down below. Take the stairs to the Silver Key.
In Brightwall you can do a number of things: Sell your wares, buy weapons and items, make money
= Life in the Castle Leaving the Castle In Wolf's Clothing Leaders & Followers
Silver Key
A New Hero
1 2 3 4 5 6 7
Page 16 of 244IGN.com | Fable III Guide
© 2010 IGN Entertainment, Inc.

at a job... Although now is not the best time to get distracted. Before heading to the Library feel free to get a lay of the land and score some loot while you are at it.
The Brightwall Village Demon Door is just to the left as you enter the village. Near the Demon door, you can search the rear side of Ye Quill & Quandary Pub for a chest with some gold inside.
Enter the door at the top of the side-stairs of Brightwall Blades to find a chest with gold inside.
Behind Fabulous Furnishings you'll find a path leading to a dead end with a chest with a Jet inside.
Rare Book (1/30) Famous Kings of History: Markus Ivy
Enter the top floor of the Ye Quill & Quandary Pub in Brightwall and grab this book of the nightstand of the bedroom. Collect all 30 Rare Books for the Brightwall Book Club Achievement.
Rare Book
Page 17 of 244IGN.com | Fable III Guide
© 2010 IGN Entertainment, Inc.

A 10 Silver Key Chest can be found on a green patch at the top of the stairs near the entrance to Fabulous Furnishings. Inside is 50,000G, so don't forget about it!
Silver Key (Brightwall 2/5)
Facing the Library in Brightwall, take a left and explore the patch of grass and trees littered with boulders. Behind the row of boulders is a Silver Key.
Silver Key (Brightwall 3/5)
A Silver Key can be found behind the House of Cluck, between the building and the city wall.
Return Later
Silver Key
Silver Key
Page 18 of 244IGN.com | Fable III Guide
© 2010 IGN Entertainment, Inc.

A treasure chest with an Amethyst inside (jewels can be sold or given as gifts) can be found in the barn along the city wall by the House of Cluck. Near this chest is a wishing well with a "Letter to Bernard" page on the ground. There's no explanation for this as of yet.
After looting Brightwall Village, head to the Library in Brightwall Academy at the top of the hill. Inside you can check all of the smaller bookshelves for gold and other goodies, so run along the entry hall and hit A to make some modest scores.
Before talking to the Librarian, Samuel, head left into adjacent room to read a "Letter to Saul" (what's the deal with these letters?). If you run down the stairs you can open a chest with 50G inside -- you cannot get this easily after talking to the Librarian unless you back track.
Now, talk to Samuel and follow him down the stairs to the door to the Reliquary. Hold A to place the Guild Seal in its lock and open it.
Page 19 of 244IGN.com | Fable III Guide
© 2010 IGN Entertainment, Inc.

Fable 3 Walkthrough
The Reliquary
You'll find your first real battles in the Reliquary, and your first real treasures as well, so pay attention to your surroundings and your dog as you progress deeper into the caves.
Along the left side of the entryway is a hall with plenty of bookshelves you can loot and a 1 Silver Key Chest -- hey, you have 1 Silver Key (right?)! Open it to find the book "Dog Training Combat 2."
To use Dog Training Combat 2 and other books for your dog, you must whistle by pressing A to call your dog to you. While interacting, press UP on the D-Pad to select the book and teach your dog the new trick. In this case, your dog will learn to attack enemies on the ground.
Rare Book (2/30) How to Be a Master Swordsman
Search the left side of the entryway to find a pedestal with a Rare Book on it titled "How to Be a Master Swordsman." Collect all 30 Rare Books for the Brightwall Book Club Achievement.
= Life in the Castle Leaving the Castle In Wolf's Clothing Leaders & Followers
Rare Book
A New Hero
1 2 3 4 5 6 7
Page 20 of 244IGN.com | Fable III Guide
© 2010 IGN Entertainment, Inc.

You can find a Dig Spot with 40G in it along the left hallway as well. After looting, follow the golden trail into the next chamber. Don't follow it to the right, head left to find a chest with a Health Potion inside.
On the opposite side of the room, at the terminus of your gold path, is an object you can only interact with by equipping a melee weapon. Press START and Jasper will show you a new room of the Sanctuary: The Armory.
In the Armory you can equip melee weapons and, soon enough, firearms. Your initial choices for melee weapons are the Hero Hammer and Hero Sword. The hammer is more powerful and can damage multiple enemies -- but it's a bit slower than the sword. It will grow bigger with use, whereas the quick and deadly sword will gain other attributes. You can press START to enter the Armory at any time to switch between the two. After much consideration and gameplay, we've settled on the hammer as the better weapon due to its multiple-enemy-damaging properties. The choice, of course, is yours.
Page 21 of 244IGN.com | Fable III Guide
© 2010 IGN Entertainment, Inc.

Now, exit the Sanctuary and smack the blue disc ("Flit Switch") with your melee weapon. This will extend a bridge across the chasm.
The locked door here requires a key. Not a Silver Key, just a regular, old key. You can get keys for this area in Side Quests later in the game. Another locked door lies across the cahsm and down the stairs -- just beyond an unlocked door.
Cross onto the central platform and a clump of blue, glowing globs will greet you. Get to know these -- they signify Hollow Men! You may be tempted to use your melee weapon, and it's quite effective against Hollow Men, but soon you will be overwhelmed by the many spawning skeletons.
When you are overwhelmed, roll away from the pack and charge your Fireball spell. Wait until it extends to a large circle and, as the Hollow Men approach, fry them, Repeat the "roll and fry" technique.
Return Later
Page 22 of 244IGN.com | Fable III Guide
© 2010 IGN Entertainment, Inc.

Fable 3 Walkthrough
Now, cross the bridge to the far side and divert from the gold path to head down the stairs. You'll find a Dig Spot on the way down and, through the door at the bottom, you can find a set of stairs with a chest with a Jet inside.
Now, follow the path to the next area. Hit the red Flit Switch with a Fireball by pointing at it and pressing B to fire.
The next area features blocks with glowing arrows. Blocks appear as you step on the glowing arrows. You can only get additional glowing arrows to appear by destroying the Hollow Men that appear from the blue glob clusters.
Your goal should be to get to the three chests in the area. Head for the middle one first. Charge your Fireball attack ahead of time to take on the Hollow Men. Step on the arrow to make a path to the central chest. Inside are the Military Gloves (clothing is purely cosmetic, you won't gain any defensive benefits from it).
= Life in the Castle Leaving the Castle In Wolf's Clothing Leaders & Followers
A New Hero
1 2 3 4 5 6 7
Page 23 of 244IGN.com | Fable III Guide
© 2010 IGN Entertainment, Inc.

Now, hop back onto the previous block and head towards the next chest. Defeat another clump of Hollow Men and you can create a path to the chest with a Summon Creatures Potion inside. This potion can be used during battle to distract and damage enemies with a summoned ally.
Now, create a path to the middle chest using new blocks and move around it and towards the chest in the distance. Inside this chest is a Slow Time Potion. This can be used by hitting the D-Pad to select it in battle. Time will slow, affecting enemies and, to a lesser degree, you. Use it to do tons of damage.
You are now free to move in any direction, but the blocks will eventually take you to a set of stairs leading down. Don't worry about the other stuff in this area -- you can return here in a bit.
At the bottom of the stairs is a ledge you can leap off of. From here, leap into the water far below. In the pool you can dive at a Dive Spot for an Amethyst.
Page 24 of 244IGN.com | Fable III Guide
© 2010 IGN Entertainment, Inc.

Fable 3 Walkthrough
Approach the sealed door and stand in front of it. Charge a fireball by holding B and press towards the door to release the charged Fireball. ONLY A CHARGED FIREBALL will open this door -- not a regular magic attack!
Enter the door and smack the Hollow Men with your melee weapon. Remember: You can use a Flourish attack by holding X and then releasing it as you point towards an enemy. This does more damage.
You should find 40G in a Dig Spot nearby before heading up the stairs. A skeleton on the ground has a note that you can read by pressing A and get a clue about this room.
Silver Key (Brightwall 4/5)
Note: This requires the Fireball spell. In The Reliquary under the Library/Brightwall Academy, just past the room with the appearing blocks, follow the linear path through the area. You will dive into a pool below and head through a magically sealed
= Life in the Castle Leaving the Castle In Wolf's Clothing Leaders & Followers
Silver Key
A New Hero
1 2 3 4 5 6 7
Page 25 of 244IGN.com | Fable III Guide
© 2010 IGN Entertainment, Inc.

door. On the far side you'll come across a skeleton with a scrap of paper. The paper hints at what you must do here: Light all the torches in the room with Fireball by aiming at them and firing the magic projectiles at each. Light all eight to open the locked door. The Silver Key is on the far side.
Head out into a large cavern through the hole in the wall and you'll encounter more Hollow Men. Fight them off and let your pup sniff out a nearby Dig Spot with a Jet inside.
As you re-enter the cliff wall at the top of the stairs your dog should spot a nearby treasure. Take the path leading away from the golden trail and you should find a chest with 50G inside. But just past this chest is a path leading upwards...
Silver Key (Brightwall 5/5)
Just past Silver Key 4 in the Reliquary you'll move upwards along a path on the outside of the structure. When you head back inside at the top of the ramp, the path forks. Head out towards the ledge with a chest on it and pass the chest to head up a ramp that leads back to the room with the appearing blocks. You'll actually be on a platform above the appearing blocks, and in the center of this platform is a switch. Pull the switch and several Hollow Men will appear. Destroy them and a staircase will appear on the far side of the room. Use the blocks to get to it and a block will appear at the top of the stairs letting you access a room with two sarcophagi in it. The Silver Key can be found here.
Silver Key
Page 26 of 244IGN.com | Fable III Guide
© 2010 IGN Entertainment, Inc.

Vault down from the Silver Key to return to the ramp that will lead you back down to where you need to be. At the end of the gold path is a yellow Flit Switch. Press START to enter the Sanctuary and head into the armory. Here you will learn about two types of firearm: The Rifle and Pistol. The Rifle is more powerful, but with smaller cartridges, and we prefer it to the Pistol, which is more accurate. You can charge firearms for Flourishes like melee weapons and automatically target enemies by tapping Y. You can hold the LEFT TRIGGER to enter aiming mode and pick off distant enemies.
For now, exit the Sanctuary and tap Y to activate the Flit Switch by shooting it with your firearm. Repeatedly hit Y to riddle the Hollow Men at the top of the stairs with bullets. You now have a full arsenal: Melee weapon, firearm and magic! Use all three in constant rotation to bring your foes to their knees.
Page 27 of 244IGN.com | Fable III Guide
© 2010 IGN Entertainment, Inc.

Fight your way up the ramps with your newfound skills. A chest on one platform contains 3 Slow Potions and a Dig Spot behind a round section of wall yields another. Remember to roll away from large groups of Hollow Men and charge a Fireball area attack to damage them all at once.
Fable 3 Walkthrough
At the top of the ramps you'll find a doorway leading to the treasure you seek: The Music Box. Note that before approaching it, you can run around the rear side of the platform for a Dig Spot worth 75G.
= Life in the Castle Leaving the Castle In Wolf's Clothing Leaders & Followers
A New Hero
1 2 3 4 5 6 7
Page 28 of 244IGN.com | Fable III Guide
© 2010 IGN Entertainment, Inc.

Now, grab the Music Box and enter the Road to Rule. After the cutscenes, continue through the next gate of the Road to Rule. Here is where you'll be doing all of your upgrading -- Weapons, Magic, Social Skills and more can be upgraded by spending Guild Seals on chests. Each upgrade "stacks," so if you buy Melee Level 3 later on, you will automatically get levels 1 and 2. This means there is no need to spend money on anything but what you need right now.
Our preferred strategy is to upgrade Ranged and Magic each time, but wait for Melee weapons. Also, the Landlord and Dye packs are pointless -- if cheap -- since you'll be able to purchase levels 2 and 3 pretty soon and those include the ones you've skipped.
Finally, the additional spell here, Shock, isn't worth dropping cash on for now. Stick with Fireball (leveled up!) and you'll be better off. Upgrading your Ranged is less essential but still a good idea since it adds ammo to your clip (less reloads!) and upgrades your long-range damage. It's always better to take on enemies from afar where they can't hurt you! You'll be back here before you know it with access to more chests. To recap, we recommend buying these upgrades:
� Ranged Level 1 � Magic Level 1 � Friend Expression Pack (Expression Packs don't "stack")
Exit the Road to Rule and you'll find yourself back in the Library above. Your task now is to meet up with Sir Walter in the pub. You can now FAST TRAVEL to places you've visited by pressing START to enter the Sanctuary and approaching the map. Choose a location and zoom in. Now, press X to select a location and you can instantly transport yourself there. A certain amount of time will pass, so don't be alarmed when you show up at your destination in the middle of the night.
Page 29 of 244IGN.com | Fable III Guide
© 2010 IGN Entertainment, Inc.

Fable 3 Walkthrough
In Wolf's Clothing
Use Fast Travel to head to the Ye Quill & Quandary in Brightwall Village. Follow Walter into the pub and strip the Mercenary of his garb. Enter the Sanctuary and head into the clothing room. Approach the mannequin with your new garb on it and follow the button commands to put on the outfit.
You'll still need a few things to complete the look, and you'll need 1000G to purchase these things. It's time to get to work!
If you don't have 1000G in hand then you'll need to do some work or sell some of your possessions. There are two easy jobs nearby, Lute Hero and Pie Maker. Both are between the pub and the Academy and marked with "!" on screen.
= Life in the Castle Leaving the Castle A New Hero Leaders & FollowersIn Wolf's Clothing
Page 30 of 244IGN.com | Fable III Guide
© 2010 IGN Entertainment, Inc.

Both of these games involve hitting the A (GREEN) or X (BLUE) button as a cursor passes over a row of matching colors. Tap the right button as the cursor hits a color for an entire sequence to earn a small bit of cash. This small bit of cash is multiplied by a certain amount depending on how good you are. For each successful row of colors you complete, you get an additional multiplier, up to 10. This means that you can earn 80G each round in Lute Hero, for instance -- but it ain't easy!
As soon as you make 1000G you are ready to purchase your costume pieces -- but feel free to keep working.
Follow the gold path to Moustache Mansions an purchase the Mercenary Beard and Mercenary Right Arm Tattoo from the pedestals. Just walk up to them and press A.
Now, enter the Sanctuary and approach the mannequin with your clothes on it. You can cycle through the facial accoutrements and tattoos by pressing the triggers. Equip both the tattoo and beard you just bought in addition to the Mercenary Outfit if you haven't yet. You are now ready to
Page 31 of 244IGN.com | Fable III Guide
© 2010 IGN Entertainment, Inc.

sneak into the Mercenary Camp.
Fable 3 Walkthrough
Leaders and Followers
Mercenary Camp
S I L V E R K E Y S : 1 / G O L D K E Y S : 0 / G N O M E S : 1
The Mercenary Camp can be accessed via Mistpeak Valley -- look for the gate at one end of the lake. With your Mercenary outfit you'll be allowed through the gate.
Immediately upon entering the camp, grab the chest to the right. A Health Potion is inside. A Dig Spot on the left side of the path holds 150G. If you'd like to, you can interact with the two idiots on the right -- by farting on one of them.
Take the path leading off to the right, away from the golden path, to find a Dig Spot with a Summon Creatures Potion and chest with an Auroran Back Tatoo.
= Life in the Castle Leaving the Castle A New Hero In Wolf's Clothing
Leaders & Followers
1 2 3 4 5 6 7
Page 32 of 244IGN.com | Fable III Guide
© 2010 IGN Entertainment, Inc.

If you attack the Mercenaries, they will fight back -- they are technically enemies, so you can choose to pick a fight if you wish.
In the next area is a chest on the far right with a Mercenary Left Arm Tattoo inside. This won't help your "Jimmy" outfit. The jig is up at the next gate. The Mercenaries here will attack you, so get ready to take them all on with a fully charged Fireball area attack.
After that you can finish them off with your gun and sword. Beyond the next gate lie many, many more Mercenaries.
As you look up the hill, pull out your firearm and press the LEFT TRIGGER to aim over the barrel of the gun. Press LEFT or RIGHT on the RIGHT ANALOG STICK to select a target. Using this method, you can hang back and take potshots at enemies and, more importantly, explosive barrels.
Page 33 of 244IGN.com | Fable III Guide
© 2010 IGN Entertainment, Inc.

The red barrels can take out multiple enemies but you need to shoot them to get them to explode. These Mercenaries are especially vulnerable to gunfire, but a few Fireballs will keep them back if they rush you.
A chest with a Mercenary Chest Tattoo is at the top of the first watch tower you come to. From here you can aim at Mercenaries in the distance. Try to shoot out more barrels before moving on.
Fable 3 Walkthrough
As you move up the path, your dog should find a Dig Spot with a Mercenary Left Leg Tattoo in it. More Mercenaries are holed up behind sandbags at the top of the ramp. Fire at them and try to hit barrels -- even blind firing by tapping Y will likely result in explosions.
= Life in the Castle Leaving the Castle A New Hero In Wolf's Clothing
Leaders & Followers
1 2 3 4 5 6 7
Page 34 of 244IGN.com | Fable III Guide
© 2010 IGN Entertainment, Inc.

As you loop around, you'll find yourself very close to a special treasure.
Silver Key (Mercenary camp 1/1)
As you make your way through the camp, you'll eventually come to a series of paths leading up past a pair of guard towers. Just before the ring where you fight the boss is a hill with a guard tower and a bunch of dog cages on it. Under this guard tower you'll find a Silver Key.
From the top of the second guard tower, shoot at barrels and Mercs below. You can charge a Flourish attack with your firearm by holding Y for a few seconds. The resulting shot should kill a Merc.
When you've thinned them out, run down the hill and finish off any stragglers. In a chest to your left is a Mercenary face Tattoo. Ahead is a wooden fort with an open gate. Do not enter this yet. Instead, search the far side of the gate for a chest and a Dig Spot. You'll get a few Slow time potions and a Mercenary Back Tattoo.
Silver Key
Page 35 of 244IGN.com | Fable III Guide
© 2010 IGN Entertainment, Inc.

Save your game before entering the ring.
Boss: Captain Saker
Inside the ring you'll find Captain Saker -- and he is angry. Saker's attacks vary depending on how close you are to him. Get in his face and he'll perform powerful melee attacks. It's best to keep your distance.
He'll switch to attacking with the highly damaging, but easy to avoid, Molotov cocktails. You can avoid these by rolling as soon as he lights one. This means you'll be rolling quite a bit. However, you should be able to attack with Fireball between his tosses.
Rolling around and tossing Fireballs is really the key to winning this match, but there's a twist: He'll call for reinforcements. This is a good time to use the Slow Time potion. Activate one with the D-
Page 36 of 244IGN.com | Fable III Guide
© 2010 IGN Entertainment, Inc.

Pad and use the time to charge your Fireball magic. This should knock out the weaker foes.
The rest can be deal with by -- you guessed it -- rolling around and tossing Fireballs. Mix in some gunplay and you have a recipe for victory. Eventually Saker will collapse and you'll be able to make a choice: Spare him or kill him. If you spare him he'll show up on your Road to Rule, but kill him if you are looking to max out your evilness.
Fable 3 Walkthrough
Speaking of the Road to Rule, enter the vortex to be transported there after the fight. You can now upgrade your offensive attacks and a few other things. Here are our recommendations:
= Life in the Castle Leaving the Castle A New Hero In Wolf's Clothing
Leaders & Followers
1 2 3 4 5 6 7
Page 37 of 244IGN.com | Fable III Guide
© 2010 IGN Entertainment, Inc.

� Magic Level 2 � Lover Expression Pack � Family Pack
You can hold off on the rest until the next round of upgrades and get by just fine. You'll want the Expression and Family pack only if you feel like screwing around with this stuff -- there's plenty of time for it down the road! Exit the Road to Rule.
You'll get Saker's Flag, a trophy that will appear in the Sanctuary, for beating him. After beating him you are summoned back to Brightwall Village. Fast Travel there to rendezvous with Walter and finish your last task for Sabine.
Walter and Samuel are in Ye Quill & Quandary Pub. Enter the pub and listen to their plan. After that, press START and listen to Jasper's discovery in the Sanctuary. You can see a number of Side Quests appear on your map. You'll need to perform a few of these to get the following of Brightwall's people. While we will cover all Side Quests in our Side Quest section, there are two that you should initiate right now: Gnomes are Great and Missing Child.
Page 38 of 244IGN.com | Fable III Guide
© 2010 IGN Entertainment, Inc.

Head to the Academy and turn right to find a set of stairs leading down to an area full of gnome figurines and some giant frog statues. Talk to the man there to begin Gnomes are Great. Note: You can now use the map in the Sanctuary to switch between Side Quests and plan a gold path accordingly.
Gnomes Are Great
5 G U I L D S E A L S / B R I G H T W A L L V I L L A G E
Talk to the man just down the stairs from the Academy in Brightwall Village to initiate this quest. The package is in a broken wagon in Mistpeak Valley. Fast Travel to Mistpeak Valley and run uphill from the lake and you'll come across an overturned wagon. Destroy the Mercs around the wagon and pick up the large gargoyle on the ground.
Fast Travel back to Brightwall and hold A to place the gargoyle on the platform next to Jonathon. He'll cast some black magic on the thing and you'll be free to leave... this is not over yet!
Side Quest
Page 39 of 244IGN.com | Fable III Guide
© 2010 IGN Entertainment, Inc.

Fable 3 Walkthrough
Take this opportunity to go find the Missing Child. Talk to the woman on the far end of the bridge leading into town to initiate Missing Child. Now, Fast Travel to Mistpeak Valley.
The Missing Child is in a cave that your gold path leads to. Before heading into this cave, you may want to search the nearby caves for goodies.
Silver Key (Mistpeak Valley 3/6)
In Mistpeak Valley there are two caves above the Demon Door, as you can see on the map. One is directly above the Demon Door and one is to the right of it. You want to enter the latter cave. Follow it back until you come to a rock bridge. Cross it and the Silver Key is floating on the far side. This appears above a ledge with the 'Missing Child' Side Quest's child appears, but separate entrances lead to the child and the key itself.
Gold Key (Mistpeak Valley 1/1)
If you examine the map of Mistpeak Valley, you can make out two caves entrances above the Demon Door and one on the far side of the level up in the hills. Travel to the latter cave -- you can get there by running uphill from the lake and hanging a left just before the path to Brightwall Village. You can follow a grassy ridge past a treasure chest to find this cave entrance to Chillbreath Cavern -- it is not an icy entrance, it is a thawed, brownish cave entrance. Run through this cave and take the path leading upwards. You should pass a 15 Silver Key chest on the way amongst various other Dig Spots and chests. Keep heading uphill and eventually you'll come to an exit at the very top. Once outside again, run down the short hill and you'll find the Gold Key floating amongst some ruins.
= Life in the Castle Leaving the Castle A New Hero In Wolf's Clothing
Silver Key
Gold Key
Leaders & Followers
1 2 3 4 5 6 7
Page 40 of 244IGN.com | Fable III Guide
© 2010 IGN Entertainment, Inc.

A 15 Silver Key chest can be found in the Chillbreath Caverns path that leads to the Gold Key of Mistpeak Valley.
Rare Book (8/30) Famous Killers: Xavier Smedley
In the Chillbreath Caverns cave that leads to the Gold Key of Mistpeak Valley, near the bottom of the path that slopes down at the beginning of the cave is an ice pool with a frozen waterfall. Look for a path leading to a small bed with a treasure chest and this book. Collect all 30 Rare Books for the Brightwall Book Club Achievement.
Return Later
Rare Book
Page 41 of 244IGN.com | Fable III Guide
© 2010 IGN Entertainment, Inc.

Missing Child
5 G U I L D S S E A L S / B R I G H T W A L L V I L L A G E
This Missing Child quest will lead you to a cave in the hills above the Mistpeak Valley Demon Door. Enter the cave and you should find a Dig Spot and a Chest (hidden down a looped path which splits off the main path) on your way to the child's location. Press LEFT TRIGGER when near the child to hold her hand and begin to make your way out of the cavern. Note: If you meet the child, leave the cavern, and return before holding her hand, you can make all the wolves in the cavern disappear!
Your path back to Brightwall will be littered with wolves. These weak enemies are no match for your leveled up magic! Use charged area attacks repeatedly to take them out. Once you get back to the bridge in Brightwall the child will run to her mother and you will win 5 Guild Seals.
Side Quest
Page 42 of 244IGN.com | Fable III Guide
© 2010 IGN Entertainment, Inc.

With these Side Quests finished, you should still need some additional Guild Seals to move on. First, return to the 10 Silver Key Chest in Brightwall village and open it for 50,000G! This should make things easier.
Fable 3 Walkthrough
You may also start the Gnomes are Evil Side Quest now, and you should do so since you'll be exploring quite a bit in the future.
Gnomes Are Evil
4 0 G U I L D S S E A L S / B R I G H T W A L L V I L L A G E
Note: You must complete the "Gnomes Are Great" Side Quest and leave town before this Side Quest becomes avaialble. Talk to Jonathon in the Gnome-filled grotto by the Brightwall Academy/Library after you complete Gnomes are Great and he'll tell you the Gnomes have escaped. Follow the path to the first Gnome in the Misgnomer House. Here you will find the first Gnome (Brightwall Village 1/5). Stop just inside the door and pull out your gun. Press the LEFT TRIGGER to entire first-person aiming mode and look up.
= Life in the Castle Leaving the Castle A New Hero In Wolf's Clothing
Side Quest
Leaders & Followers
1 2 3 4 5 6 7
Page 43 of 244IGN.com | Fable III Guide
© 2010 IGN Entertainment, Inc.

A Gnome is suspended across from the door in the corner of the house. Shoot it. Now, return to Jonathon. It turns out there are 49 more of these awful creatures scattered about Albion. You need to shoot every one of them to complete this Side Quest! Head over to our Keys & Collectibles section for the locations of all 50 Gnomes in Fable 3.
For better or worse, Gnomes won't sit in silence. You can hear them vocally insulting you wherever they are. Listen for the distinctive voice while you explore!
Now you can choose from one of several remaining Side Quests in Brightwall Village to gain your remaining Guild Seals.
Chicken Chaser
1 0 G U I L D S S E A L S / B R I G H T W A L L V I L L A G E
Talk to the fellow in the chicken coop/pen on the left side of the Brightwall Village Map and he'll give you a Chicken Costume. Put it on and you'll gain a super power -- well, a "power." You'll be able to press A amongst a group of chickens and get them to follow you. Your dog will help you find the three groups of chickens, but here are their exact locations:
Run down the road from the chicken pen and the first group is under the archway.
Side Quest
Page 44 of 244IGN.com | Fable III Guide
© 2010 IGN Entertainment, Inc.
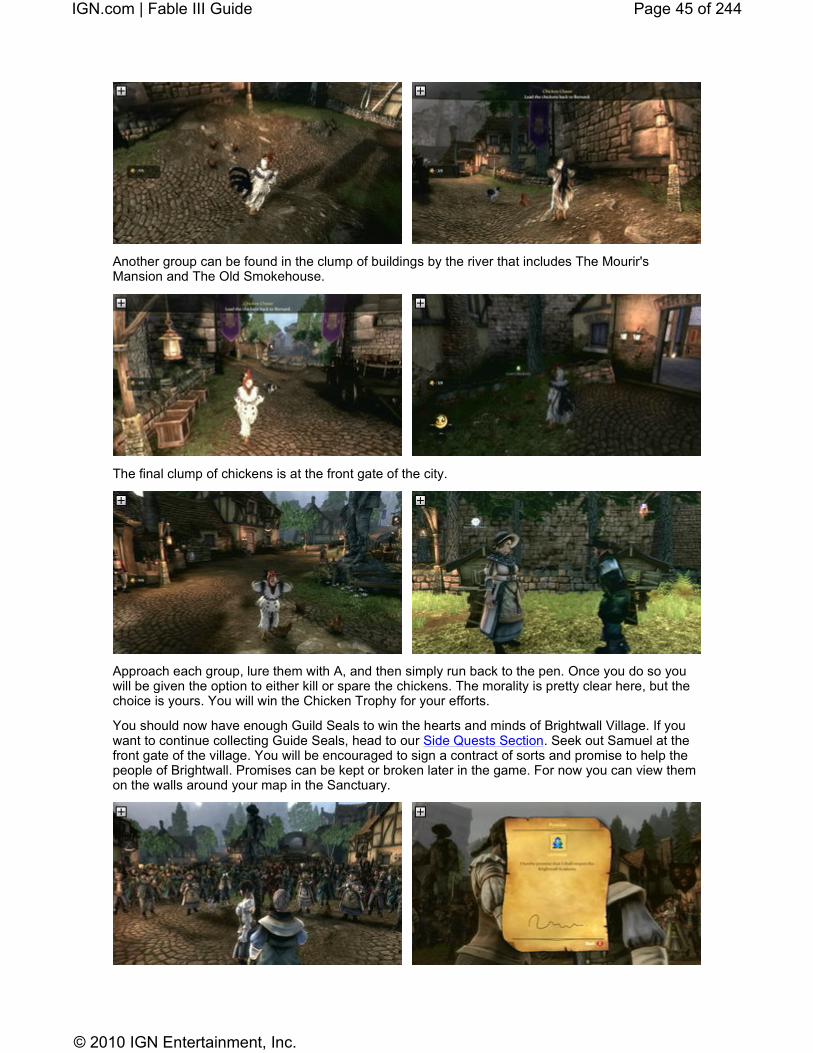
Another group can be found in the clump of buildings by the river that includes The Mourir's Mansion and The Old Smokehouse.
The final clump of chickens is at the front gate of the city.
Approach each group, lure them with A, and then simply run back to the pen. Once you do so you will be given the option to either kill or spare the chickens. The morality is pretty clear here, but the choice is yours. You will win the Chicken Trophy for your efforts.
You should now have enough Guild Seals to win the hearts and minds of Brightwall Village. If you want to continue collecting Guide Seals, head to our Side Quests Section. Seek out Samuel at the front gate of the village. You will be encouraged to sign a contract of sorts and promise to help the people of Brightwall. Promises can be kept or broken later in the game. For now you can view them on the walls around your map in the Sanctuary.
Page 45 of 244IGN.com | Fable III Guide
© 2010 IGN Entertainment, Inc.

Now, fast travel to the Dweller Camp and Sabine will laud you for fulfilling his wishes. You'll have to promise to help Sabine and the Dwellers with a similar contract. After that, enter the portal to warp to the Road to Rule.
In the Road to Rule, skip out on the Ice Storm spell for now and pick up the Joker Expression Pack. You can wait to upgrade your stuff -- but if you have money to burn and you plan on doing a bunch of Side Quests, go ahead and upgrade. We highly recommend waiting until Level 3, though!
Exit the Road to Rule and you'll be instructed to follow Sir Walter to the Monorail Station in Mistpeak Valley. However, if you LEAVE THE CAMP and return, you can score a treasure:
Silver Key Dweller Camp (1/1)
Behind the Caravan of Poom in Sabine's circle of dwellings you can score a Silver Key. You cannot do this until you sign a contract with Sabine and the Dwellers, however. Leave the camp after signing the contract and return again to find Sabine's gate open.
Now, you can fast travel to Mistpeak Valley and search the opposite end of the lake from the Mercenary Camp to find the Monorail Station. Now's as good a time as any -- better even since you'll be moving on to new, vast areas -- to catch up on collectibles like Rare Books and Gnomes. Head over to the Keys & Collectibles section to catch up on the collectibles for Mistpeak Valley, Brightwall Village, Dweller Camp and the Mercenary Camp.
Silver Key
Page 46 of 244IGN.com | Fable III Guide
© 2010 IGN Entertainment, Inc.

Fable 3 Walkthrough
Mistpeak Monorail Station
Meet Sir Walter in the Mistpeak Monorail Station at the opposite end of the lake in Mistpeak valley from the Mercenary Camp. Inside, cross the platform and run up the stairs to join Sir Walter.
After the cutscene, Sir Walter will pry open the gate. Enter the first elevator you come to on the other side and take it down into The Hole.
The Hole [Mistpeak Valley]
Run down the path to the wreckage until you encounter the Hobbes. Hobbes come in many different varieties, but these are particularly susceptible to fire. Charge a Fireball attack and fry the little buggers.
Upon arriving at the wreckage you should hear a familiar jeering (if you've completed the "Gnomes are Evil" Side Quest).
= Life in the Castle Leaving the Castle A New Hero In Wolf's Clothing
Leaders & Followers
1 2 3 4 5 6 7
Page 47 of 244IGN.com | Fable III Guide
© 2010 IGN Entertainment, Inc.

Mistpeak Valley [The Hole] (6/7)
At the entrance to The Hole via the Mistpeak Monorail Station elevator, run down towards the burning wreckage of the Monorail. A post on the far side of the wreckage has a Gnome sticking to it.
Cross the bridge and take shots at the barrels around the Hobbes to eliminate them. In the next area you will encounter a bunch of barrels at a crossroads. You won't have to guess at the barrels' contents: Inside are more Hobbes. The armored Hobbes can still be fried but you may want to smash them with your Hero Hammer if they get close.
Silver Key (Mistpeak Valley [The Hole], 4/6)
Just past the monorail wreckage is a bridge and a ramp leading down to a room full of barrels. Run behind the rack of barrels to score this easy Silver Key.
Nearby is a door that can only open with the Technician's Key. Return
Gnome
Silver Key
Return Later
Page 48 of 244IGN.com | Fable III Guide
© 2010 IGN Entertainment, Inc.

later with the key (found at the end of this tunnel) for some goodies.
Continue down the path. Across the cavern is a line of Hobbes and some poorly-planned fortifications complete with explosive barrel supports. Shoot as many of these as you can before continuing.
Your powered-up Fireball spell will do a good job eliminating the armed Hobbes that appear in this passage. Always go for the biggest Hobbe first! A nearby treasure chest in the wreckage of the Hobbe fort contains a gem.
Now, a Summoner Hobbe will block your path. Hang a right at the blocked doorway and swim around to flank it. On the way you can grab a Slow Time Potion at the Dive Spot. While you can use your magic to quickly eliminate the Hobbes around the Summoner, use your ranged weapon to take the magic user out. Melee weapons will get you burned and magic isn't as effective.
Page 49 of 244IGN.com | Fable III Guide
© 2010 IGN Entertainment, Inc.

Fable 3 Walkthrough
The real Hobbes surprise is down the path a ways. In the subterranean castle, several Summoner Hobbes will raise a force field and begin throwing skeletal Hobbes at you. Just charge your magic attack and release it repeatedly. The faster you ride the arena of summoned creatures, the faster you can break the Summoners' spells.
Once the force field drops, encompass the central platform in a few fiery blasts before finishing off the Summoners with ranged weapon flourishes.
With the last Hobbe dead you'll be faced with a portal to the Road to Rule. This time around, we recommend purchasing the following:
� Spell Weaving � Ice Storm Spell � Entrepreneur Pack
With the awesome Spell Weaving upgrade you can equip two spells for a unique combo attack or double up one to increase its effect. We highly recommend you grab the Ice Storm spell now and
= Life in the Castle Leaving the Castle A New Hero In Wolf's Clothing
Leaders & Followers
1 2 3 4 5 6 7
Page 50 of 244IGN.com | Fable III Guide
© 2010 IGN Entertainment, Inc.

equip both the Fireball and Ice Storm spells in the Sanctuary.
Just go to the Armory and face the rear wall to access your gauntlets. You'll be given the Fire/Ice combo option here. The Ice Storm will rain ice down on a small area after your Fireball hits. Sweet! Note: If you want to combine Fireball with Vortex and have the Guild Seals to burn from Side Quests, do so -- it's a pretty darn powerful combo as well.
Mistpeak Valley [The Hole] (7/7)
After fighting Hobbes in the subterranean castle/arena, you can shoot this Gnome off of the castle wall above the entrance on the inner side.
After Sir Walter spooks the final Hobbe and the force field is removed from the arena, cross the bridge and hang a left down the long ramp -- don't follow the gold trail out quite yet!
Gnome
Page 51 of 244IGN.com | Fable III Guide
© 2010 IGN Entertainment, Inc.

At the end of the path is a chest with the Technician's Key inside. With this key you can back track to the area with the barrels -- nearly all the way back to the wreckage -- to open the locked door. Several Dig Spots lay beyond it, and a special treasure, as well...
Silver Key (Mistpeak Valley [The Hole], 5/6)
At the end of The Hole you'll fight off some Hobbes in an Arena. Beyond the Arena is a bridge. Cross it and take a left and you'll find a windy path that leads to the Technicians Key. Near the Mistpeak entrance -- and wreckage -- is an area with a bunch of barrels. A door here can be opened with the key. Run up he flight of stairs beyond the door and follow the path. Once you cross a stone bridge, turn right and you'll come to an overlook with a view of the subterranean castle/Hobbe arena. The Silver Key is here.
Now, follow your gold path out of The Hole.
Silver Key
Page 52 of 244IGN.com | Fable III Guide
© 2010 IGN Entertainment, Inc.

Fable 3 Walkthrough
The Hollow Legion
Mourningwood
S I L V E R K E Y S : 4 / G O L D K E Y S : 0 / G N O M E S : 3
Your search for allies has brought you to Mourningwood (heh heh). On your right you should pass a chest with a Health Potion inside. Cross the bridge and continue straight for a Dig Spot and another chest with some sellable items inside.
Before going down the ramp, search the ridge above the path leading down for a 10 Silver Key Chest. You should have enough Silver Keys for this now, and if you don't, head to our Keys and Collectibles section to catch up! Inside you'll find a Legendary Weapon, sweet!
= « Bow. Resistance Masquerade Traitors »
Hollow Legion
1 2 3 4 5 6
Page 53 of 244IGN.com | Fable III Guide
© 2010 IGN Entertainment, Inc.

Down the sloping path you'll pass under the bridge and encounter a hard-to-miss chest with another Legendary Weapon inside, the Bonesmasher. Equip this now by entering the Sanctuary. This weapon is especially useful against Hollow Men, and you'll be seeing plenty of Hollow Men shortly.
Unlike your Hero Weapons, Legendary Weapons each have three upgrades you can get by performing certain tasks. Examine the Bonesmasher in the Sanctuary by looking at it and pressing Y and you will see its three upgrades and their requirements. Time to kill some Hollow Men!
Enter the fort and listen to the conversation. Ben Finn will then head up to the mortar on the fort wall. As he does, grab any potions you may want at the shop in the fort (we recommend a few Slow Time and Health Potions on hand at ALL TIMES).
Ben Finn will then direct you to use the Mortar, a large Hollow-Man-shattering cannon. Al you have to do is point and fire. Aim the circle over the two Scarecrows and press A to fire a shot.
Page 54 of 244IGN.com | Fable III Guide
© 2010 IGN Entertainment, Inc.

The resulting explosion is a bit slow, so moving targets will be tougher to hit. Soon you will be swarmed by Hollow Men as they stream down the hill towards the fort. Your job is to destroy as many of them as possible. This is much easier to do with the slow-firing cannon when they appear in groups of four or more.
Always aim for groups before stragglers. There's no other trick to this area. You just keep firing as close as you can to groups of Hollow Men and pick off stragglers when you can.
Fable 3 Walkthrough
Soon you will be called away to defend the back door of the fort. Vault off the edge of the wall and run into the glowing circle. Immediately charge a magic attack and unleash it. Just doing this repeatedly is a great way to destroy Hollow Men. You should throw in some flourishes with your Bonesmasher pistol to begin inching towards its upgrades as well.
= « Bow. Resistance Masquerade Traitors »
Hollow Legion
1 2 3 4 5 6
Page 55 of 244IGN.com | Fable III Guide
© 2010 IGN Entertainment, Inc.

Boss: Lieutenant Simmons
The undead Simmons appears after you destroy a few dozen Hollow Men. He'll teleport after taking some damage and repeatedly summon groups of Hollow Men. His attacks can mostly be avoided by rolling around. You'll want to implement some potions in this fight to make things faster. Slow time and especially Summon Creatures will come in handy.
Try to alternate wide area magic attacks, which take out the smaller Hollow Men, with charged attacks you send right at Simmons. Flourish attacks from the Bonesmasher are especially effective as well. If you get a flourish "close-up shot." you can still fire shots while time slows. Use this to your advantage.
Simmons will occasionally glow red or blue in his chest and send a magic attack your way. You can roll to avoid these, but they will do some serious damage if they connect. Don't be afraid to heal up if you need to, it's better than starting the fight over!
Page 56 of 244IGN.com | Fable III Guide
© 2010 IGN Entertainment, Inc.

After the battle, move to leave the fort and you'll be told to sign a promise to put Major Swift in your royal army. After this you get to access the Road to Rule once again.
This time, bring your ranged weapon up to date so you can begin using the Bonesmasher more. You'll also want to upgrade your magic, but you can still hold off on your Melee weapon for now. Purchase these -- but you'll only need the last two if you are playing as an evil character:
� Magic Level 3 � Ranged Level 3 � Bully Expression Pack � Theft Pack
Returned to the real world you'll receive Simmons' Head as a trophy for your gallery and Sir Walter will beckon you to Bowerstone Industrial. You need only run through the Mourningwood marshes to get there, but it's worth stopping for some treasure along the way.
Page 57 of 244IGN.com | Fable III Guide
© 2010 IGN Entertainment, Inc.

Run up the hill from the mortar field and stick to the left to find an open crypt with a chest inside. You can score a Health Potion here.
Silver Key (Mourningwood, 1/4)
Starting at the fort, run up the hill you defended with the mortar cannon and stick to the right side. You should spot a Silver Key in a small enclosure before you reach the gravestones. If its blocked in, you'll need to bust it out with a melee weapon or a Fireball spell.
Mourningwood (1/3)
Starting at the fort, run up the hill you defended with the mortar cannon and stick to the right side. Before you get to the grave yard, explore the ruins at the top of the hill. Run under the archway here and turn around to find a Gnome stuck to it.
Silver Key
Gnome
Page 58 of 244IGN.com | Fable III Guide
© 2010 IGN Entertainment, Inc.

Now, make your way through the graveyard. On the far side you'll come to a series of trenches. Do not enter the trenches. Instead, hang a left and enter the spooky gate that leads to Sunset House. Here's you can find some easy Silver Keys among other treasures.
Fable 3 Walkthrough
Sunset House
S I L V E R K E Y S : 2 / G O L D K E Y S : 0 / G N O M E S : 1
Begin your exploration of the Sunset House area by hanging a left towards the Demon Door as soon as you enter the area.
Return Later
The Sunset House Demon Door is directly to the left as soon as you enter the area. Return as Queen (or King) of Albion to access this Demon Door -- this will happen as part of the main quest you progress through the game. You can just walk right in and claim your 1,000,000 Gold prize in
= « Bow. Resistance Masquerade Traitors »
Hollow Legion
1 2 3 4 5 6
Page 59 of 244IGN.com | Fable III Guide
© 2010 IGN Entertainment, Inc.

the "Pools of Sorrow" area.
Silver Key (Sunset House, 1/2)
Hang a left as soon as you enter the Sunset House area form Mourningwood. You should come upon the Demon Door. Facing the Demon Door, head to the left again to find the Silver Key nestled amongst the boulders.
Sunset House (1/1)
Facing Sunset House, examine the corner of the house to your right. This Gnome is on some boulders above a small pool.
Silver Key (Sunset House, 2/2)
Facing Sunset House's front door, turn right and run to through the woods to this key in the corner of the area.
If you've been following the walkthrough closely, you should already have a Gold Key which you can use to open the Gold Key Door in the Sunset House area. The door is located within the walls surround the house's yard. As soon as you enter the gate, turn right and run to the opposite side of the level from the gazebo. A path leads to the Gold Key Door.
Silver Key
Gnome
Silver Key
Page 60 of 244IGN.com | Fable III Guide
© 2010 IGN Entertainment, Inc.

If you don't have the Gold Key from Mistpeak Valley, head over to our Keys and Collectibles section to grab it and return here. Beyond the Gold Key Door is a Legendary Weapon!
Finally, just behind the gazebo is a bench with a book on it.
Sunset House (10/30) The Extraordinary Homunculus of Baron von Orfen
This book can be found behind the gazebo in the Sunset House area. The gazebo is to the left of the large, ghostly mansion.
You can now get a bunch of Guild Seals and other treasures inside the Sunset House if you wish. Just head over to our Side Quests section and read about how to unlock the house and the mysteries within. Otherwise, head back to Mourningwood and continue following Sir Walter's trail to Bowerstone Industrial.
Rare Book
Page 61 of 244IGN.com | Fable III Guide
© 2010 IGN Entertainment, Inc.

Fable 3 Walkthrough
Sunset House
2 0 S E A L S / S U N S E T H O U S E
Note: Make sure you have Magic Level 3 or some of the fights can be tough in Susnet House. The mystery of the glowing, ghostly Sunset House begins in the gazebo in the front yard area. When you approach the gazebo during the day, the four statues here have specific poses during the day -- at night they don't match up. Your goal is to make the night poses match the day poses. To switch between night and day, you need only run down the path to Mourningwood and return.
The four statues can be posed at night by pressing A. they each have quite a few poses.
� The man nearest to you as you enter the gazebo from path is holding his right arm with his left as if he's checking his watch.
� Moving clockwise around the group, the woman is crouching with her arms out and her mouth open ide.
� Moving clockwise to the next statue, a man points out with his index finger towards the forest.
� Finally, moving clockwise the last woman has both arms raised and is screaming.
= « Bow. Resistance Masquerade Traitors »
Side Quest
Hollow Legion
1 2 3 4 5 6
Page 62 of 244IGN.com | Fable III Guide
© 2010 IGN Entertainment, Inc.

Leave to Mourningwood and return at night and pose the sculptures by approach them individually and hitting A. Pose all four correctly and the Sunset House will pop into existence, the door unlocked.
Inside the house there's little you can do but run up the stairs and sleep in the bed -- although a book on the first floor admonishes you strongly against this! You will be transported to a new area. Approach the chest on the chessboard and attempt to open it.
Boss (?): Chesty
Chesty will challenge you to a game of chess -- but fear not! You won't have to beat him, or even play chess for more than five minutes (phew). After about four moves, Chesty will destroy the game. Approach Chesty again and he'll describe a new game.
Page 63 of 244IGN.com | Fable III Guide
© 2010 IGN Entertainment, Inc.

Destroy the Hobbes (the "pawns") in the first wave of Chesty's challenge by charging a magic attack early and unleashing it as soon as they crowd you.
Talk to Chesty again and he'll send a second wave at you consisting of Auroran ninjas and Mercs. Once again a charged Fireball can do most of the work.
Talk to Chesty again and you'll fight a pair of large Hobbes. After that are significantly weaker versions of Lt. Simmons and Saker, two early game bosses. Fireball can do all the work for you, but you should roll around a bit to avoid their attacks. After this, Chesty will return you to the mansion.
Fable 3 Walkthrough
You can now return here in co-op if you wish to play chess, but since you are alone, why not seek out some of Sunset House's treasures?
= « Bow. Resistance Masquerade Traitors »
Hollow Legion
1 2 3 4 5 6
Page 64 of 244IGN.com | Fable III Guide
© 2010 IGN Entertainment, Inc.

Head into the hallway that's just to the right as you enter the building In the dining room, approach the mirror and look through to the far side. A glowing skull hangs here. If you look to the right through the mirror you should see a glowing blue spot on the wall.
Your goal is to lead the skull to this blue spot. To do so, walk to the corner of the room between the couch and the bust. Face the wall and walk against it until the skull clicks into place in a cutscene.
Now, you'll need to do this two more times. Walk straight across the room from here and face the opposing wall at the edge of the couch (on the far side of the room from the mirror). This should activate the second switch.
Now, smash out the knight armor near the globe and align the final skull switch. You can now approach the mirror and vault through it.
Page 65 of 244IGN.com | Fable III Guide
© 2010 IGN Entertainment, Inc.

You won't get a prompt, though, so just walk up to the mirror and press A. Up the stairs you'll find a Health Potion in a chest and clothes in the various furniture pieces. On the lower floor, shoot the green crystal ball in the corner of the room to open the locked door.
Inside the locked door you'll find a Legendary Weapon! Vault back through the mirror and run back through the burnt house. In the room with the skeleton shoot the parallel green orb to open a room with a chest. Inside you'll find a Slow Time Potion.
Page 66 of 244IGN.com | Fable III Guide
© 2010 IGN Entertainment, Inc.

Fable 3 Walkthrough
Back in Mourningwood, head down into the trenches as you follow the gold trail towards the small village of hippies. In the trenches you can find numerous dig spots and there are few treasure chests to be had in the area. Since you can regularly buy potions and make easy money at jobs now, we'll only cover the most significant treasures in new areas -- Gnomes, Silver Keys, Legendary Weapons, Silver Chests etc.
You should encounter many Hollow Men if you are traveling by night In Mourningwood. This is a great place to use -- and level up -- the Bonecrusher pistol!
As you approach the village from the trenches you can find Mourningwood's Demon Door along the cliff wall to the right.
You must max out your Melee or Ranged weapon skills (purchase Level 5 on the Road to Rule) AND get all three upgrades for a Legendary Weapon to access this Demon Door. While you can purchase Level 5 for 100 Guild Seals on the Road to Rule, you'll have to do some work to upgrade your Legendary Weapon of choice. Any Legendary Weapon (NOT your Hero weapons) has three upgrades that you can read about by pressing Y in the Sanctuary while examing the weapon. After getting your weapon preppep, you need only to pull it out in front of the Demon Door for it to open. Inside is an awesome space-scape called Planet One. Here you can get the Military Costume and a Summon Creatures Potion.
Silver Key (Mourning Wood, 2/4)
As you approach the village in Mourningwood from the graveyard you should pass through some trenches. Just as you emerge, look for some ruined arches
= « Bow. Resistance Masquerade Traitors »
Return Later
Silver Key
Hollow Legion
1 2 3 4 5 6
Page 67 of 244IGN.com | Fable III Guide
© 2010 IGN Entertainment, Inc.
outside the ring of the hippy village. A Silver Key floats under these arches. You can't reach it from the village side -- you'll have to go around the back.
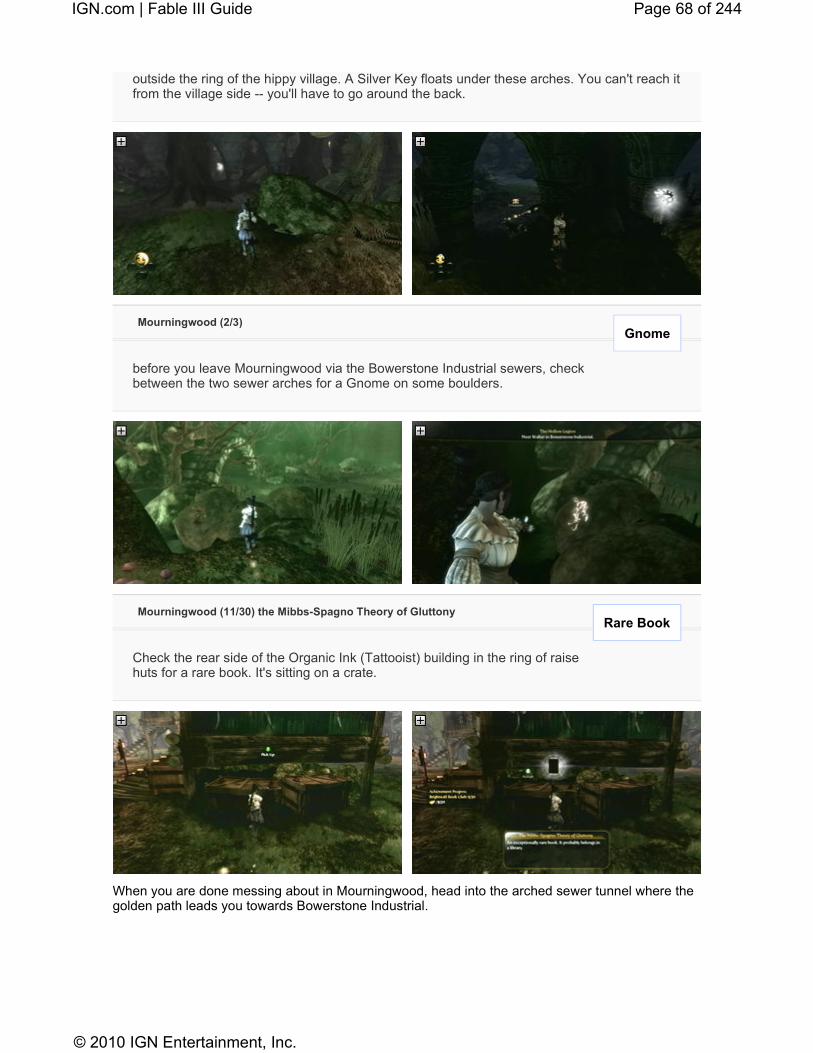
Mourningwood (2/3)
before you leave Mourningwood via the Bowerstone Industrial sewers, check between the two sewer arches for a Gnome on some boulders.
Mourningwood (11/30) the Mibbs-Spagno Theory of Gluttony
Check the rear side of the Organic Ink (Tattooist) building in the ring of raise huts for a rare book. It's sitting on a crate.
When you are done messing about in Mourningwood, head into the arched sewer tunnel where the golden path leads you towards Bowerstone Industrial.
Gnome
Rare Book
Page 68 of 244IGN.com | Fable III Guide
© 2010 IGN Entertainment, Inc.

Instead of exploring the city now, just follow Sir Walter to the protest in the streets. You cannot even fire a weapon at this point, so there's no point in exploring.
After the protest, follow the gold path to the entrance to the Sewers where you'll meet the Bowerstone Resistance.
In the Sewers you should spot a Silver Key just as you enter the Bowerstone Resistance's headquarters. To get to this key you'll have to use a different Sewers entrance under the large crane in the corner of Bowerstone Industrial.
All you need to do is follow the gold trail and watch cutscenes in the Sewers. After meeting Page
Return Later
Page 69 of 244IGN.com | Fable III Guide
© 2010 IGN Entertainment, Inc.

you will be given 50 Guild Seals and the option to upgrade. Since you won't be fighting for a while, there's really no need to upgrade anything but expressions (if you want them). Your next task is to gather 100 Guild Seals. Time to explore Bowerstone! As you leave the Sewers, open doors and roam around a bit in the Resistance HQ to find some minor treasures and Dig Spots.
Fable 3 Walkthrough
The Bowerstone Resistance
Bowerstone Industrial
S I L V E R K E Y S : 4 / G O L D K E Y S : 0 / G N O M E S : 5
Bowerstone Industrial has plenty of work for an aspiring Hero such as yourself. Before embarking on Side Quests, seek out the city's secrets. Since you're already stinky from the Sewers, why not seek out the other entrance so you can score a key and some other goodies. As you leave the Resistance Headquarters, duck into the nearest pub.
Bowerstone Industrial (12/30) Famous Killers: Terence Posture
This book can be found inside The Riveter's Rest Pub, a corner bar by a bridge in Bowerstone Industrial. Examine a table near the piano to score this book.
Bowerstone Industrial (1/5)
This Gnome can be found under the bridge by The Riveter's Rest Pub. It's directly under the bridge on the side where Revear shot the protester.
= « Hollow Legion
Rare Book
Gnome
Bow. Resistance
1 2
Page 70 of 244IGN.com | Fable III Guide
© 2010 IGN Entertainment, Inc.

After collecting these goodies topside, look for a crane along the river on the far side of the small bridge. Run down the steps to find a door hidden under the crane. This is another section of the Sewers that you saw earlier -- in fact, the Silver Key you spotted in the Resistance headquarters is right around the corner!
Silver Key (Bowerstone Industrial [Sewers], 1/4)
In Bowerstone Industrial you'll find a crane alongside the river just across the bridge from The Riveter's Rest -- it's right where Reaver executed the protester. Run down the stairs under the crane and enter the door here to find a section of the Sewers separate from the Resistance HQ. Turn right as you enter to find this Silver Key.
Bowerstone Industrial [Sewers] (2/5)
In Bowerstone Industrial you'll find a crane alongside the river just across the bridge from The Riveter's Rest -- it's right where Reaver executed the protester. Run down the stairs under the crane and enter the door here to find a section of the Sewers separate from the Resistance HQ. Turn left upon entering and the Gnome will be directly ahead of you, just past the T-intersection. Cross the small channel of water by using some stairs around the side and head into the room with the Gnome on the ceiling.
Silver Key
Gnome
Page 71 of 244IGN.com | Fable III Guide
© 2010 IGN Entertainment, Inc.

You will encounter quite a few human enemies in here so get your Fireball spell ready. After shooting the Gnome and getting your key, seek out the Health Potion in the chest by the Gnome room and head out through the way you entered.
Now, head back across the bridge towards the Resistance HQ entrance and the Pub and cross the bridge nearest to it. An archway leads to a small area with a 10 Silver Key Chest here. Open it for 50,000 Gold! Don't have enough Silver Keys? Head to our Keys and Collectibles section.
Silver Key (Bowerstone Industrial, 2/4)
In a large factory by the coast with open doors, head to the upper level via stairs by the door to find a Silver Key blocked off by steam. To get to it you'll have to hit some switches in order. There's one nearest the top of the stairs on the "left" side of the upper level. Hit that first. Now, hit the one closest to the key on the right side. Head over to the switch across from this one, nearest the key on the left side. Now, return to the first switch you hit and a path to the Silver Key will be opened.
Silver Key
Page 72 of 244IGN.com | Fable III Guide
© 2010 IGN Entertainment, Inc.

Bowerstone Industrial (3/5)
This Gnome can be found high on a building near the bridge nearest to the shipyard. It's on the wall of the building right at the end of the bridge above a poster with a skull and crossbones on it.
Finally, you can enter the massive double doors to Reaver's Factory -- where he shot the protester -- and run up the ramps beginning at the back of the room to find a 5 Key Silver Chest with 5 Slow Time Potions inside.
Gnome
Page 73 of 244IGN.com | Fable III Guide
© 2010 IGN Entertainment, Inc.

You now need to complete Side Quests to gather the requisite 100 Guild Seals. Start with "Kidnapped" in Bowerstone Industrial. It should appear on your map, so set your marker and follow the gold trail to the dark street where this quest occurs.
Fable 3 Walkthrough
Kidnapped
3 0 S E A L S / B O W E R S T O N E I N D U S T R I A L
The frightened fiancé of the kidnap victim will lead you to a nearby door. Wait for the conversation to play out and enter the door. A hatch on the ground will take you to the Cesspools.
Bowerstone Industrial [Cesspools] (13/30) Dangerous Things: Gunpowder
Note: You must play the "Kidnapped" Side Quest to access the Cesspools. In the Cesspools entrance (after you hop down the hatch in Bowerstone) you'll find a few
= « Hollow Legion
Side Quest
Rare Book
Bow. Resistance
1 2
Page 74 of 244IGN.com | Fable III Guide
© 2010 IGN Entertainment, Inc.

tables with thugs around them. A table on the left holds this book.
When you get to the door, the men in the room will attack. They are tough, but your magic should be tougher by this point. Use combo magic and ranged weapon flourishes to eliminate them.
In the next room you'll find out that the fiancé is far below. Vault off the end of the floor to enter the Cesspools, proper. Here you'll meet Gerald (or Geraldine) whom you must lead out of the Cesspools by holding his hand. Drag him forward and, at the a T-intersection in the tunnel, look for some boards with a familiar glint behind them.
Note: If you chose to save your friend at the beginning of the game and have your brother kill the townspeople, your friend will appear here. Lead him or her out and you can reunite -- and marry!
Silver Key (Bowerstone Industrial [Cesspools], 3/4)
When you dive into the Cesspools, run up the first ramp and look for a T-intersection. An area of the tunnel walls here is boarded up but you can make out a Silver Key through it. Bash your way through with a melee weapon to score the key.
Silver Key
Page 75 of 244IGN.com | Fable III Guide
© 2010 IGN Entertainment, Inc.

As you make your way through the pools bats will attack. Send a few fireballs at them and grab Gerald(ine) again.
Bowerstone Industrial [Cesspools], (4/5)
In the Cesspools, vault down into the abyss and follow the path up. At one point the path will veer to the right but this Gnome is hanging out in front of you before you turn. It's hanging on the wall just past a skylight.
In the next area you'll encounter Hobbes. They are easy to handle, but make sure Gerald(ine) stays back a ways. Grab the chest in this area and keep an ear out for your dog's bark -- he'll find Dig Spots nearby.
There's only one more ambush between you and the surface. Before you exit the Cesspools, you'll have to the option to dissuade the kidnapee from returning to his fiancé (evil) or encourage him to
Gnome
Page 76 of 244IGN.com | Fable III Guide
© 2010 IGN Entertainment, Inc.

(good). You can also choose to not weigh in and your morality will be unaffected.
After doing the "Kidnapped" Side Quest, you are free to make some Guild Seals by opening Demon Doors and completing other Side Quests. We recommend these since you'll be able to open up new places later in the game and begin some collectible-based quests as well:
� "The Pen is Mightier..." (Brightwall Village) - Get rewarded for the Rare Books � "Special Delivery" (Dweller Camp) and "An Evil Presence" (Brightwall Village) - Opens more of the Reliquary � "Peace Love and Homicide" and "Excavation" (Mourningwood) - Opens the Dark Sanctum � "Bored to Death" and "Gone but Not Forgotten" (Mourningwood) - Opens the Ossuary � "Restoration" (Millfields) - Opens Driftwood
In addition to these Side Quests, you may be interested in catching up on your Demon Doors and collectibles, like Silver Keys, Rare Books and Gnomes in the many new areas that are available to you. All of these sections in the guide are 100% complete, so you have nothing to lose by exploring a bit on your own.
Finally, now is the time to start investing in shops and property. Purchasing shops and setting a price will yield immediate results -- cash every 5 minutes! You'll need to begin your real estate empire early if you want to be able to run Albion later in the game (without stealing and being evil -- if you want to steal and be evil, don't worry about purchasing real estate!). For now, just get one or two high-priced shops in Bowerstone Market. We prefer the pubs -- but it's up to you! As long as you have money rolling in you'll be better off down the road.
Fable 3 Walkthrough
After doing the "Kidnapped" Side Quest, you are free to make some Guild Seals by opening Demon Doors and completing other Side Quests. We recommend these since you'll be able to open up new places later in the game and begin some collectible-based quests as well:
� "The Pen is Mightier..." (Brightwall Village) - Get rewarded for the Rare Books � "Special Delivery" (Dweller Camp) and "An Evil Presence" (Brightwall Village) - Opens more of the Reliquary � "Peace Love and Homicide" and "Excavation" (Mourningwood) - Opens the Dark Sanctum � "Bored to Death" and "Gone but Not Forgotten" (Mourningwood) - Opens the Ossuary
= « Hollow Legion Bow. Resistance Traitors »Masquerade
Page 77 of 244IGN.com | Fable III Guide
© 2010 IGN Entertainment, Inc.

� "Restoration" (Millfields) - Opens Driftwood
In addition to these Side Quests, you may be interested in catching up on your Demon Doors and collectibles, like Silver Keys, Rare Books and Gnomes in the many new areas that are available to you. All of these sections in the guide are 100% complete, so you have nothing to lose by exploring a bit on your own.
Finally, now is the time to start investing in shops and property. Purchasing shops and setting a price will yield immediate results -- cash every 5 minutes! You'll need to begin your real estate empire early if you want to be able to run Albion later in the game (without stealing and being evil -- if you want to steal and be evil, don't worry about purchasing real estate!). For now, just get one or two high-priced shops in Bowerstone Market. We prefer the pubs -- but it's up to you! As long as you have money rolling in you'll be better off down the road.
Head back to the Resistance HQ in the sewers of Bowerstone Industrial and run back to the room with the map. Here you will witness the Resistance planning an infiltration of Reaver's not-so-humble abode. After the discussion, Page will kick you out. Meet up with her in Millfields when you are ready for a challenge. Beware: A long battle is ahead, so you may want to stock up on potions before heading into the fray!
The Masquerade
Millfields
S I L V E R K E Y S : 5 / G O L D K E Y S : 0 / G N O M E S : 7
The large lake at the center of Millfields is surrounded by houses and factories that make up the "suburbs" of Bowerstone. There are Rare Books, Silver Keys and Gnomes to be found in this new area. Since we have them all covered in the Keys and Collectibles section, why not hop over there and see what you can turn up before heading to Reaver's place?
On your way through Millfields you may encounter the Millfields Demon Door, which we cover in our Demon Doors section. This is a good time to open this door, so feel free to give it a whirl.
Page 78 of 244IGN.com | Fable III Guide
© 2010 IGN Entertainment, Inc.

Also, keep an eye out for the 20 Silver Key Chest. You should easily have 20 Silver Keys by now, thanks to our Silver Keys list, so crack open this chest for your prize: A Legendary Weapon!
Meet Page in front of Reaver's Manor. She'll tell you to put on your Masquerade costume. Do so in the Sanctuary and enter the manor. Inside you'll find all of the doors locked, so don't worry about collectibles.
Return to Reaver's Manor later for a Silver Key and a Rare Book.
Follow the butler and he will lead you right into Reaver's trap. As Reaver spins his "Wheel of Misfortune," you'll have to fight groups of enemies. Each group of enemies is at the end of a long hall. In the first hall you'll find a Health Potion in a chest.
In the first room you'll find Hobbes. A Fireball/Icestorm weave is your best bet against these critters. Just keep charging the spell and unleashing it in a wide radius. The larger Hobbes may take a charged blast or two directed right at them to kill them.
Return Later
Page 79 of 244IGN.com | Fable III Guide
© 2010 IGN Entertainment, Inc.

Head back into the main chamber for another spin of the wheel. Grab the Slow Time potion in the new hallway. Use your Bonesmasher weapon and Fireball to cut through the Hollow horde. Make sure to aim for the large Hollow Men with two swords when they appear since they will endlessly summon more foes if you don't take them out
The next wave consists of mercenaries. You'll need to roll quite a bit during this battle thanks to Molotovs and fireballs from the large mercs. These guys are easiest to take out with your ranged weapons, so be sure send some bullets their way.
A new enemy type, Sand Furies, are fast and extremely deadly. Roll and use wide-area magic attacks to attack them, but get ready to use a Health Potion as soon as you see your screen turn crimson. Other potions can help with this battle.
The same goes for the final wave of Balverines -- use potions or you will probably be knocked out!
Page 80 of 244IGN.com | Fable III Guide
© 2010 IGN Entertainment, Inc.

The guys go down easiest with a directed, charged magic attack but their tendency to leap out of the way just in time can be annoying. Try to hit the Balverines distracted by Page. Avoid using melee weapons on these guys -- if they get in close you are finished!
After the battle, Page will ask you to promise to end the exploitation of Bowerstone and you'll get to head to the Road to Rule once again. This time we recommend bringing your Magic and Ranged powers up to Level 4, but still skip out on the Melee option unless you plan on leveling up a melee weapon sometime soon. Also, pick up the Scary Expression pack. If you don't have enough Guild Seals for your desired purchases, take the time to complete some Side Quests for easy Seals.
Fable 3 Walkthrough
Traitors
As we mentioned earlier, it is crucial to start buying property now to increase your supply of Gold if you want to beat the game with the best ending. Before you head to Bowerstone Castle, make sure your real estate empire will be paying out while you are "away." We recommend that you raise prices and rents to "Highest" levels for the most expensive places -- the tenants may complain but you need several million Gold for late game activities (if you are trying to be morally good). You must repair houses if you plan on raising the rent or tenants will refuse to pay. This modest cost is nominal so bite the bullet and repair the house -- then raise the rent! You'll probably need to start small, but be sure to purchase these places and start wringing some money out of them:
= « Hollow Legion Bow. Resistance Masquerade »Traitors
Page 81 of 244IGN.com | Fable III Guide
© 2010 IGN Entertainment, Inc.

� Bowerstone Market - Bowerstone Broker (Pawnbroker), The Cock in the Crown (Pub) � Brightwall - Brightwall Brokerage (Pawnbroker), Ye Quill & Quandary (Pub), Brightwall
Blades (Weapons) � Millfields - All houses � Silverpines - The Werehouse
Play some Side Quests to pass the time while you gain profits -- a total amount of profits will be added every 5 minutes of game time. With your properties in order, head to Bowerstone Castle. After the cutscene you'll be directed to Bowerstone Industrial's Sewers.
After you meet in the sewers you have ONE LAST CHANCE to do Side Quests in Albion -- you will be able to complete them all later, but it will be a while before you have a chance. You may also want to stock up on potions for some vigorous battles ahead.
Follow Ben Finn to the gate protected by soldiers. Beyond it you'll fight quite a few soldiers. Luckily there are explosive barrels all over the area that will make this fight easier. Use your ranged weapon liberally and you are bound to hit one every few seconds.
Page 82 of 244IGN.com | Fable III Guide
© 2010 IGN Entertainment, Inc.

Take the stairs up and grab the potion from the chest. Vault off the tall platform to the ground below and head through the door.
As explosions rock the docks, look for the destroyed pulley out on a distant dock. You can now grab the potion from a chest here. Outside you'll encounter more soldiers and explosive barrels to assist in their swift demise.
After disposing of the enemy, follow the gold trail to the large clipper ship that will bear you to Aurora. Or at least part of the way... Before getting on, make sure to use the Road to Rule to purchase any spells you want -- like Lightning -- for the fights ahead since you won't be able to use certain elements of the Sanctuary for a while.
Page 83 of 244IGN.com | Fable III Guide
© 2010 IGN Entertainment, Inc.

Fable 3 Walkthrough
Darkness Incarnate
You'll awaken in Aurora. The only path ahead seems to be through a dark cave, but it will get even darker before you exit on the far side. Unlike most areas in Fable 3, you won't be able to return to this area, but there's only one treasure chest to find...
Soon you'll come to a structure with stairs leading down. Search for a path leading away from the stairs for a chest with a gem inside.
At the bottom of the stairs, wait for Sir Walter to survey the scene, then look for a skeleton on the floor with a book nearby. Press A when prompted to pick up the book and another cutscene will take place. Head down the stairs and you'll find yourself in a very dark place.
In open area ahead Walter discovers the switch across the way. You can vault down to the lower level and run around to activate this switch. After this, traverse the room and Walter will open the blocked path ahead using his book.
= « Battle for Albion Weight of the World
Darkness Incarnate
1 2
Page 84 of 244IGN.com | Fable III Guide
© 2010 IGN Entertainment, Inc.

In the next hallways you'll encounter a new type of enemy, Shadows. These weak creatures attempt to swarm you which makes them easier to clear out with charged magic attacks. Fireball weaved with Ice Storm works well, and Shock seems to do a high amount of damage on its own.
Keep moving through the hallways and towards the exit. Another pack of enemies will attack as an ugly face reveals itself to Walter. Use your magic to keep them away.
Run to down the linear path following the gold trail. When you jump down to the sandy area, Walter will be snatched away.
Countless Shadows attack as you head ever upwards and towards the light. You can kill them easily or just run past them.
Page 85 of 244IGN.com | Fable III Guide
© 2010 IGN Entertainment, Inc.

When you find Walter he's incapacitated. It's up to you to stave off the waves of enemies, beginning with more Shadows. A lot more. In this battle, charged magic attacks and rolling are your best options.
Fireball weaved with Ice Storm will not only damage enemies allowing you to roll to safety, but will also keep raining ice down on the spot you left to help finish off stragglers.
This method is especially effective against the armor-clad Minions that appear next. Always keep rolling form these enemies who can only attack at close range. Charge your magic and unleash it in a large radius. Roll away as the spell takes effect.
After a half dozen Minions are dealt with, a Sentinel will challenge you. These tough-looking enemies are actually pushovers if you take care of them from a distance: Charge your magic to three or four levels and fire it directly at the Sentinel. It will only take three charged, directed attacks
Page 86 of 244IGN.com | Fable III Guide
© 2010 IGN Entertainment, Inc.

to kill it!
Now, take Walter by the hand and head out the door on the side of the room. Follow the trail out to the light of the Shifting Sands desert.
Fable 3 Walkthrough
Shifting Sands
You cannot grab any collectibles until you return to the Shifting Sands later in the game, so don't worry about it now. You now face a choice that will affect your moral standing: you can leave Walter or lead him across the desert. No matter your choice, Walter will be fine in the end, so don't sweat it! If you choose to leave him you'll tilt your morality meter towards "evil," and even if you lead him a bit and then let go you'll get the evil points, so beware.
In the desert you'll encounter Walter in several hallucinations. In one you'll have to fight off some Shadows, but mainly you'll just have to listen to a lot of dialogue and follow the gold path. Eventually the darkness will catch up with you…
= « Battle for Albion Weight of the World
Darkness Incarnate
1 2
Page 87 of 244IGN.com | Fable III Guide
© 2010 IGN Entertainment, Inc.

When you wake up you'll see a familiar face. Ben Finn and an Auroran named Kalin have revived you and brought you to the City of Aurora.
City of Aurora
Like the Shifting Sands, you cannot do much in Aurora at the moment. Kalin will let you explore the ruined city, but you can really only run up and down one road. On this road, approach the man by the shrine your gold path leads to and listen to his story.
After this your dog will seek out more shrines if you want to listen to the memories of Aurorans. One can be found on the tall spire in the plaza and another is up the road a bit just over a low wall. You don't have to explore at all, though; you can just run back to Kalin on the temple steps to continue.
Page 88 of 244IGN.com | Fable III Guide
© 2010 IGN Entertainment, Inc.

Kalin will make you promise to restore Aurora. With another promise to keep -- or to break -- you'll find yourself in the Road to Rule. Be sure to pick up the one new spell here: Blades!
Weave Blades with Fireball for a truly awesome spell. Board the ship to return to Albion.
Fable 3 Walkthrough
The Battle for Albion
Bowerstone Old Quarter
S I L V E R K E Y S : 2 / G O L D K E Y S : 0 / G N O M E S : 2
The revolution is raging in Bowerstone Old Quarter and your path to the kingdom is blocked by enemy soldiers. With your new Blades + Fireball combo you should be able to cut through them easily. Now that you can access the Sanctuary once again, equip this combo spell
A chest can be found to your right on the beach. The path to the mortar has many soldiers, some good, some evil. You can only target the evil ones. Hang back and used charged magic to pick off one soldier at a time. If they charge you, spend some time charging an area attack and unleash it once they crowd you.
= « Darkness Incarnate Weight of the WorldBattle for Albion
Page 89 of 244IGN.com | Fable III Guide
© 2010 IGN Entertainment, Inc.

At the top of the path you must kill the complement of soldiers around the mortar. This will allow Kalin to destroy the gate. Fight your way past the pig statue.
When you get to the line of sandbags, target the explosive barrels to kill the enemies taking cover behind them. The downed buildings will make your path a bit confusing, but the gold path will lead you to the top of the Old Quarter.
Follow the path around the statue and then cross the bridge. Here you'll need to take a detour over some rubble. Vault down below and you'll meet up with Page.
Page 90 of 244IGN.com | Fable III Guide
© 2010 IGN Entertainment, Inc.

The fight will take you through a burning building. Clamber over the rubble and on the far side you'll encounter the final group of enemies -- clustered conveniently around an exploding barrel. Nail it with your ranged weapon from afar and close in on the castle gate.
Fable 3 Walkthrough
Weight of the World
365 Days
The moment has finally come: You have been crowned Ruler of Albion! Unfortunately, your troubles are just beginning. In the Weight of the World you will have to make decisions that affect the world itself.
= « Darkness Incarnate Battle for Albion
Weight of the World
1 2 3 4 5 6 7 8 9
Page 91 of 244IGN.com | Fable III Guide
© 2010 IGN Entertainment, Inc.

Bowerstone Castle
S I L V E R K E Y S : 2 / G O L D K E Y S : 0 / G N O M E S : 3
Your schedule will help guide you through major decisions and quests, but you can still do Side Quests. In fact, when you gain control and are tasked with judging Logan, you can actually just fast travel somewhere else and do what you want. You can also freely explore the castle, so stop by the Keys and Collectibles section to see the Gnomes, Silver Keys and Rare Books now available to you.
Return to the castle when you collect your 50th Silver Key to open the Silver Key Chest in the garden. Face the entrance to the Reliquary and turn right to find this chest in the garden. Inside is a Legendary Weapon and 2,000,000 Gold!!
You may also notice a locked door in the library of Bowerstone Castle. It's your castle now, so what's up this locked door? Well, four statues in the room with the locked door form a puzzle that will unlock this door. You need to read the statues' incriptions in order. They talk about three heroes. First read the description on the statue to the left of the locked door. Now, read the statue to the right of the locked door. A door leading out of the room also has two statues on either side of it. Read the statue on the right of this door, and finally read the last statue's description to the left of this door. As the story completes, the door will open to reveal a chest with a gem inside.
Note: As Ruler of Albion, you can now open the Sunset House Demon Door for 1,000,000 Gold (this should help immenslely in the next segment of the game) and, by upgrading a Level 5 wepon, you can also access the Mourningwood Demon Door.
Judge Logan, Former King of Albion
Note: You may notice in the pictures of our first ruling as king we sported a classy Chicken Outfit. Put this on and make a judgment to get the Coronation Chicken Achievement.
Each judgment you make will affect your morality, and the choices are usually clear. In this case, choosing to spare your brother will tilt you towards the "good" side. This decision isn't as grave as
Return Later
Page 92 of 244IGN.com | Fable III Guide
© 2010 IGN Entertainment, Inc.

many others you'll make:
� Kill - Evil morality boost � Spare - Good morality boost
After making your decision you will be transported to the final leg of the Road to Rule -- and warned of an imminent attack. Buy Magic Level 5 for sure and ranged Level 5 if you can. Return here to fully max out your powers as you rack up Guild Seals!
When you leave the Road to Rule you'll be immediately tasked with another decision, this one part moral and part monetary:
� Raise Taxes - One time boost of 200,000 Gold, Evil morality boost � Keep taxes - No money lost or gained, no morality boost � Lower taxes - One time loss of 200,000 Gold, Good morality boost
The economics of saving Albion are quite simple: In one year, you will have to make 6,500,000 Gold to save every citizen of Albion. Each unit of gold directly corresponds to a life. The gold cannot just sit in your pockets (or in the Sanctuary). You MUST transfer it to the Royal Treasury using the ledger Hobson introduces you to.
Page 93 of 244IGN.com | Fable III Guide
© 2010 IGN Entertainment, Inc.
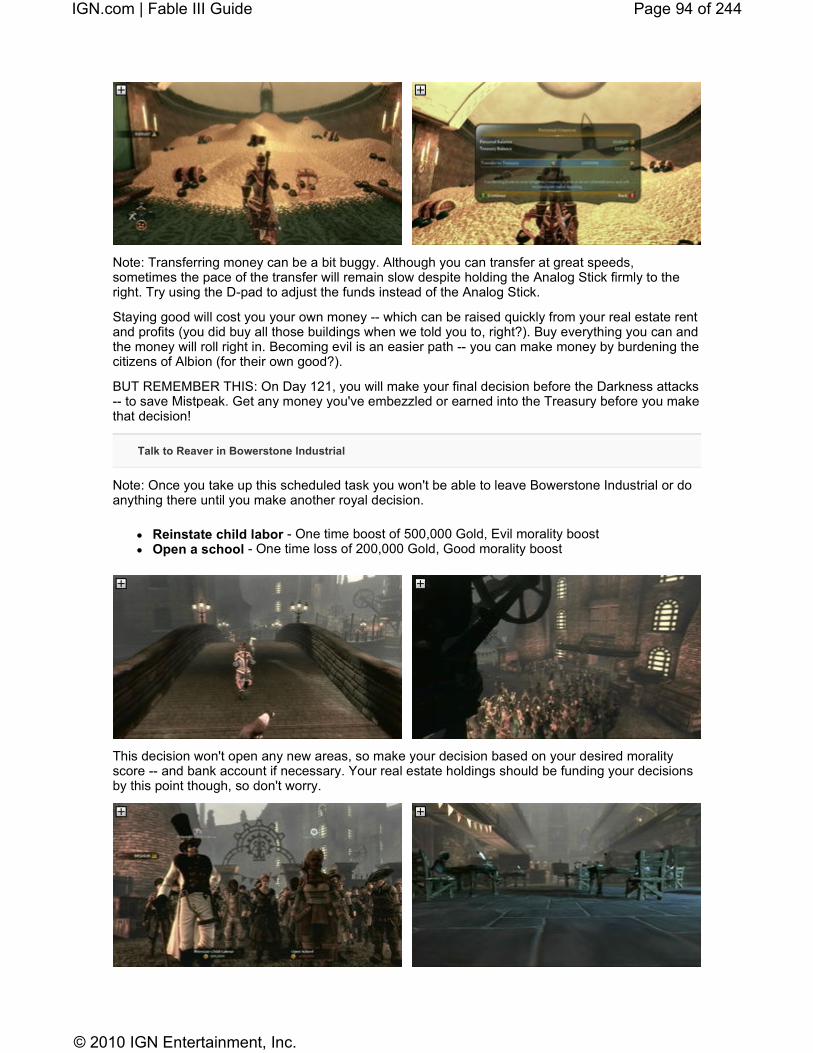
Note: Transferring money can be a bit buggy. Although you can transfer at great speeds, sometimes the pace of the transfer will remain slow despite holding the Analog Stick firmly to the right. Try using the D-pad to adjust the funds instead of the Analog Stick.
Staying good will cost you your own money -- which can be raised quickly from your real estate rent and profits (you did buy all those buildings when we told you to, right?). Buy everything you can and the money will roll right in. Becoming evil is an easier path -- you can make money by burdening the citizens of Albion (for their own good?).
BUT REMEMBER THIS: On Day 121, you will make your final decision before the Darkness attacks -- to save Mistpeak. Get any money you've embezzled or earned into the Treasury before you make that decision!
Talk to Reaver in Bowerstone Industrial
Note: Once you take up this scheduled task you won't be able to leave Bowerstone Industrial or do anything there until you make another royal decision.
� Reinstate child labor - One time boost of 500,000 Gold, Evil morality boost � Open a school - One time loss of 200,000 Gold, Good morality boost
This decision won't open any new areas, so make your decision based on your desired morality score -- and bank account if necessary. Your real estate holdings should be funding your decisions by this point though, so don't worry.
Page 94 of 244IGN.com | Fable III Guide
© 2010 IGN Entertainment, Inc.

Consider Proposal to Rebuild the Old Quarter
The shops and homes you own in the Old Quarter not only generate funds for you but also provide places to shop. Furthermore, you won’t be able to get one Silver Key there if you haven't already retrieved it. All other items can be found in the ruins but this Key.
� Rebuild the Old Quarter - One time loss of 550,000 Gold, Good morality boost, access to rent and shops
� Leave the Old Quarter in Ruins - Lose no Gold, Evil morality boost, no more Old Quarter properties or shops
If you choose to rebuild it, make sure you own lots of property in the Old Quarter to make up for your loss!
Fable 3 Walkthrough
Weight of the World // 339 Days
Set the Guard Budget
Immediately following the last decision you'll have to make another ruling on a new day. This one is mainly economic. This decision affects your checkbook more than your morality, so make your decision based on your funds -- but remember that you can easily line your pockets with Gold via real estate!
� Raise the Guard Budget - One time loss of 200,000 Gold, Good morality boost
= « Darkness Incarnate Battle for Albion
Weight of the World
1 2 3 4 5 6 7 8 9
Page 95 of 244IGN.com | Fable III Guide
© 2010 IGN Entertainment, Inc.

� Lower the Guard Budget - One time gain of 200,000 Gold, Evil morality boost � Maintain the Status Quo - No morality boost and no gold lost or gained
Note: Take this time to do any Side Quests you may want to get done -- the next few decisions won't give you a break.
Choose an Interior Design
This decision doesn't affect your Treasury funds OR morality. Choose whichever design suits your fancy. The changes aren't even that noticeable -- although you may hear different reactions from castle visitors if the place is made scarier.
� Good Décor - No effect on gold or morality � Evil Décor - No effect on gold or morality
Decide the Fate of Aurora
This is one of the biggest decisions you make in the game. Regardless of your decision, Aurora will still have real estate available to purchase and you can access the Demon Door. However, a mined Aurora offers a Legendary Weapon in the new Auroran Mine area.
� Keep Promise and Rebuild - One time loss of 700,000 Gold, Good morality boost, Aurora is repaired with more shops
� Break Promise and Reopen the Mine - One time gain of 500,000 Gold, Evil morality boost, one additional Side Quest and a Legendary Weapon in the Mine
Page 96 of 244IGN.com | Fable III Guide
© 2010 IGN Entertainment, Inc.

Fable 3 Walkthrough
The Desert Star
City of Aurora
S I L V E R K E Y S : 2 / G O L D K E Y S : 0 / G N O M E S : 2
You now have unfettered access to Aurora and the surrounding areas. In our Keys and Collectibles section we cover all of the Silver Keys, Gold Keys, Gnomes and Rare Books to be found in Aurora, so take some time to track them down.
A new collectible, Auroran Flowers, can only be found in the new areas. These are related to the Side Quest called "Temple's Treasure." Unfortunately you cannot activate this Side Quest yet. You can, however, begin collecting flowers. All of the Auroran Flowers locations can be found here.
While we cover the locations of the City of Aurora's Rare Books, Gnomes and Silver Keys in the Keys and Collectibles section of the guide, you should note that you can also open a 20 Silver Key
= « Darkness Incarnate Battle for Albion
Weight of the World
1 2 3 4 5 6 7 8 9
Page 97 of 244IGN.com | Fable III Guide
© 2010 IGN Entertainment, Inc.

Chest on your second visit to the city. Run up the temple stairs but don't enter the temple. Search the left side of the landing while facing the entrance and you should see a massive boulder with this chest behind it. Inside is a Legendary Weapon.
Return with a 100% Good or Evil morality rating to open the City of Aurora Demon Door.
You can now purchase shops and houses in Aurora to increase your rent and profits. Do so right away -- time is, quite literally, money!
After looting the City of Aurora, run up the long, sandy path past the Demon Door in to find an entrance to the Shifting Sands desert.
Shifting Sands
S I L V E R K E Y S : 5 / G O L D K E Y S : 1 / G N O M E S : 4
As soon as you leave the City of Aurora and enter the Shifting Sands, hang a right and you should come to the cave entrance of Sandfall Palace. Youc an get two Gnomes on your way to the Palace, but there are more goodies in the Shifting Sands to find if you feel like exploring. For a full rundown on the Rare Books, Gnomes and Silver Keys in Shifting Sands, check out the Keys and Collectibles section of the guide.
Return Later
Page 98 of 244IGN.com | Fable III Guide
© 2010 IGN Entertainment, Inc.

Shifting Sands (1/4)
Just as you exit Aurora City and enter the Shifting Sands, look to the left to find this Gnome on a column on the massive steps.
Shifting Sands (2/4)
Run down the path that leads to the cave entrance to Sandfall Palace. Standing in front of the cave entrance, facing it, turn left and you should see this Gnome on the cliff wall.
Fable 3 Walkthrough
Sandfall Temple is crawling with Sand Furies. Your Blades spell is a great defense against them, but they will back away if you charge an area attack. Target them with charged attacks and shoot them with a powerful ranged weapon to keep them from crowding you. If they do get it close, charge an area attack and they will back away.
Gnome
Gnome
= « Darkness Incarnate Battle for Albion
Weight of the World
1 2 3 4 5 6 7 8 9
Page 99 of 244IGN.com | Fable III Guide
© 2010 IGN Entertainment, Inc.

As you enter the temple, be sure not to miss out on a Silver Key behind a locked door. A chest can be found here as well with a tattoo inside.
Silver Key (Shifting Sands [Sandfall Palace], 4/5)
You can access Sandfall Palace after you become the Ruler of Albion and pursue the quest to find the giant diamond. Just as you come to the first area with water, look for a locked door. Above the door is a Flit Switch. Shoot it four times to enter the door -- it will move around so you have to shoot it before it resets -- and you'll find the key.
Shifting Sands [Sandfall Palace] (Green, 8/12)
As soon as you get to the first pool of water, run down the leftmost stairs to the beach and search the palm trees for this bloom.
Shifting Sands [Sandfall Palace] (Red, 9/12)
When you come to the first pool, search the landing above the platform with the palm tree. A small sandy recess here holds this bloom.
Silver Key
Flower
Flower
Page 100 of 244IGN.com | Fable III Guide
© 2010 IGN Entertainment, Inc.

Cross the bridge over the first pool of water. You'll encounter more Furies on the way. A Rare Book can be found on the far side. Enter the door to find another, smaller pool.
Shifting Sands [Sandfall Palace] (1/2) Dangerous Things: Ladders
Cross the bridge over the first massive pool you come to. On the far side, don't enter the door. Turn right at the door and go down the short staircase to find this Rare Book. It's under the upper, inaccessible bridge.
In the second pool room, explore a bit for Auroran Flowers and a chest behind the stairs (with a lame tattoo inside).
Shifting Sands [Sandfall Palace] (Blue, 10/12)
In the second room with shallow water, search under the staircase leading to the second level. A shrine on the wall holds this flower.
Rare Book
Flower
Page 101 of 244IGN.com | Fable III Guide
© 2010 IGN Entertainment, Inc.

Shifting Sands [Sandfall Palace] (Green, 11/12)
In the second room with shallow water, take a left at the stairs and cross the semi-deep pool. In the corner you'll find lots of rubble, a chest and a green flower by a palm tree.
Head up the stairs and cross the raised walkway to the room with the diamond.
Shifting Sands [Sandfall Palace] (3/4)
You can only access Sandfall Palace one you are tasked with tracking down the massive diamond as Ruler of Albion. Right before the room with the diamond is a large raised walkway. You'll find this Gnome just outside the door to the diamond room by a torch.
Flower
Gnome
Page 102 of 244IGN.com | Fable III Guide
© 2010 IGN Entertainment, Inc.

Before grabbing the diamond, check the nearby corner for a Silver Key...
Silver Key (Shifting Sands [Sandfall Palace], 5/5)
You can access Sandfall Palace after you become the Ruler of Albion and pursue the quest to find the giant diamond. In the final room, where you find the diamond, you'll find this key in the corner to the left of the massive gem.
After snatching the Diamond you will have to fight your way out of Sandfall Palace. The Furies will appear in large numbers, but they won't take any new strategies. Try using area magic by charging it and release it just as it expands and encompasses the Furies at the perimeter. They'll move back quickly for every charge level but you can catch them if you release at the right moment.
Silver Key
Page 103 of 244IGN.com | Fable III Guide
© 2010 IGN Entertainment, Inc.

Take the door that opens in the diamond chamber to find a shortcut out of the palace. You'll find two chests on the way. You can vault off the upper walkway into the pool below and then swim to shore. The exit is just ahead!
Shifting Sands [Sandfall Palace] (Red, 12/12)
When you get to the diamond room, take the door to the right. As you enter the adjacent hallway, this flower will be just to your left.
Return to the castle and meet with Hobson in the Treasury. You now have a decision to make -- should you keep the cash made from the heist or put it in the Treasury? Regardless of your decision
Flower
Page 104 of 244IGN.com | Fable III Guide
© 2010 IGN Entertainment, Inc.

you will get 50 Guild Seals. Remember : You can always move this money around later!
� Keep the money - 700,000 Gold in your pocket, Evil morality boost � Donate the money - 700,000 Gold to the Treasury, Good morality boost
Fable 3 Walkthrough
Weight of the World // 294 days
Adjust Child Benefits
On the 294th day you'll be presented with your first ruling of the day, to restore child benefits or institute a tax -- or do nothing! This decision won't affect anything but your Gold and morality.
� Restore child benefits - One time loss of 200,000 Gold, Good morality boost � Maintain status quo - No effect on Gold or morality � Institute child tax - One time gain of 200,000 Gold, Evil morality boost
Consider Bowerstone Orphanage Proposal
Next on the agenda is another big decision -- but first take some time to do pending Side Quests and adjust your real estate empire. You can begin the "Temple's Treasure" Side Quest in Aurora now and begin getting rewarded for Auroran Flower collecting.
= « Darkness Incarnate Battle for Albion
Weight of the World
1 2 3 4 5 6 7 8 9
Page 105 of 244IGN.com | Fable III Guide
© 2010 IGN Entertainment, Inc.

If you want to adopt a child for the Adopt or Die Achievement or the Brightwall Demon Door, do so now -- your next decision is whether or not to eliminate the orphanage.
In the throne room you can now choose to change the local orphanage into a brothel for a huge profit -- and a cool Side Quest called "Whorezone." You can always choose the moral high ground, though and retain the ability to adopt children.
� Renovate the orphanage - One time loss of 50,000 Gold, Good morality boost, adoption available
� Convert to brothel - One time gain of 1,250,000 Gold, Evil morality boost, "Whorezone" Side Quest
Consider Bowerstone Sewage Proposal
This decision will either cost you money or Good morality points -- it's your call. Flooding the Mourningwood marsh with sewage won't directly affect the landscape or change anything but the scent of the place, which was probably already pretty rank.
� Build sewage plant - One time loss of 150,000 Gold, Good morality boost � Flood Mourningwood - No money lost or gained, Evil morality boost
Page 106 of 244IGN.com | Fable III Guide
© 2010 IGN Entertainment, Inc.

Fable 3 Walkthrough
Crime and Punishment
Head to Bowerstone Industrial to meet with Page in the old Resistance HQ (why hasn't she moved out of the sewers?). On your way there why not grab a key that's finally accessible?
Silver Key (Bowerstone Industrial, 4/4)
Near the docks is a large military warehouse you can enter across the canal from the factory with Silver Key 2. The red elevator at the top of the stairs on the upper floor is open and the key is floating inside. This is the same area you had to fight through to get to your ship to leave for Aurora. You'll have to come back as Ruler of Albion to get this key.
Page will tell you of a heist going down in Bowerstone Market. Fast travel to the pub and enter it.
Inside the Cock in the Crown pub you'll have to fight for your life. A single charged spell attack followed with some ranged weapon blasts should clear the room and win you the Hideout Key.
Take this key across the bridge in the Market and down the stairs. The entrance to the Hideout is on
= « Darkness Incarnate Battle for Albion
Silver Key
Weight of the World
1 2 3 4 5 6 7 8 9
Page 107 of 244IGN.com | Fable III Guide
© 2010 IGN Entertainment, Inc.

the platform under the bridge.
In the Hideout, Nigel Ferret will leave you to his minions. Shoot first and skip asking questions altogether. Take the door at the bottom of the stairs in the first room and surprise the sleeping foes with a magic attack.
Follow the gold path through the doors of the Hideout and stop in the area with the jail cells.
Silver Key (Bowerstone Market [Hideout], 3/3)
You can only get this key once you are Ruler of Albion. During the Weight of the World you will be asked to meet with Page and then prevent a robbery. As you make your way through The Hideout you'll come to a room with jail cells. Across from the cells is door you can open. Head down into the basement and open the cell around the corner with the Silver Key in it.
Silver Key
Page 108 of 244IGN.com | Fable III Guide
© 2010 IGN Entertainment, Inc.

Just ahead is a room with Ferret and two large bodyguards. The bodyguards are much easier to handle with a Slow Time Potion. If you have one, use it and then direct charged magic attacks at one to finish it off. With only one left, the battle is much easier.
Deciding Ferret's fate can get you some Gold at the cost of some Good morality points. No matter what you choose, you'll get 50 Guild Seals to spend on upgrades in the Road to Rule.
� Take Bribe - 100,000 Gold, Evil morality boost � Leave Ferret - No Gold, Good morality boost
Fable 3 Walkthrough
Weight of the World // 252 days
Determine Alcohol Policy
On the 252nd day, you get to make a decision about booze. This decision is tough, since you'll gain some immediate funds for banning alcohol but you'll also lose the ability to purchase it. Alcohol is great for putting on weight in order to appease the Millfields Demon Door, among other things.
� Remove Drink Limit - One time loss of 100,000 Gold, Good morality boost � Outlaw Alcohol - One time gain of 100,000 Gold, Evil morality boost, no more booze to buy � Keep Drink Limit - No Gold, no change
= « Darkness Incarnate Battle for Albion
Weight of the World
1 2 3 4 5 6 7 8 9
Page 109 of 244IGN.com | Fable III Guide
© 2010 IGN Entertainment, Inc.

Note: If you plan on turning Bower lake into a mine, this is your last chance to explore it unchanged!
Rule on the Academy
You now have the opportunity to make good on your promise to Samuel by opening the Academy to the public. This will not affect anything but your Gold supply and morality.
� Free Academy - One time loss of 150,000 Gold, Good morality boost � Charge Tuition - One time gain of 300,000 Gold, Evil morality boost
Rule on Bower Lake
Your next decision has dire consequences. If you drain Bower Lake, a new area -- a Mine -- will be available to explore. There are no significant treasures inside, but you can do two Side Quests you wouldn't otherwise be able to do. The area will lose all of its natural beauty, however, and you won't be able to access the gazebo in the center of the lake for the East Hare Egg Easter egg (not that big of a deal).
� Drain the Lake - One time gain of 400,000 Gold, Evil morality boost, access to the Mine and two Side Quests
� Maintain the Lake - One time loss of 50,000 Gold, Good morality boost, Bower Lake isn't hideous
Page 110 of 244IGN.com | Fable III Guide
© 2010 IGN Entertainment, Inc.

Stolen Statue
For your final portion of Day 252 you'll be asked to meet with a "wealthy patron" in Millfields. Head to the rim of Bower Lake and meet the woman in question. She'll send you to Silverpines to track down a stolen statue.
Silverpines
S I L V E R K E Y S : 2 / G O L D K E Y S : 0 / G N O M E S : 2
In Silverpines a lone Balverine will greet you and seemingly lead you through the area. On your way through Silverpines you can grab the area's Silver Keys, Rare Books and Gnomes. One key can be found just before you enter the village.
Silver Key (Silverpines, 1/2)
As you enter Silverpines from Millfields, head towards the small village. At the edge of the village, before you reach the wall, veer left on the path and you'll find this Silver Key.
In the village you'll hear about s serious Balverine problem that's been plaguing the populace. Take
Silver Key
Page 111 of 244IGN.com | Fable III Guide
© 2010 IGN Entertainment, Inc.

this time to explore the town and its small mine.
Silver Key (Silverpines [Mine], 2/2)
In Silverpines there is a mine with an entrance around the circle of buildings in the village. Enter the mine and you'll find the key at the very end of the mine cart rails.
Silverpines (1/2)
This Gnome is hanging just to the right of the entrance to the mine in the middle of the village.
Silverpines Rare Book (1/1) The Very Unsafe Book for Boys Vol. 3: Boxing
Starting from the Millfields entrance and run through the area. In the village, run around the side of the very first house you come to on your left. On the side of the house is a crate with this book on it.
Silverpines (2/2)
Silver Key
Gnome
Rare Book
Gnome
Page 112 of 244IGN.com | Fable III Guide
© 2010 IGN Entertainment, Inc.

Starting from the Millfields entrance, run through the area. After you pass through the village, turn right just past the gate as you leave. You should find a graveyard at the end of the path. Follow a secret path behind the crypt in the graveyard to a mining tower. On the tower is a Gnome.
Your path will lead you to some torch-lit ruins deep in the forest. Here you will meet a peculiar lycanthrope named Connor -- who happens to be a bit of a misanthrope as well. He will ask you to destroy the four torches that protect the town in Silverpines from Balverines he lords over.
� Destroy the Torches - Peaceful Balvernines live in the town, will not affect your purchased property, Evil morality boost
� Defend the town - People will remain in the town, will not affect your purchased property, Good morality boost
To aid the Balverines, simply approach the blue torches at each of the town gates and shoot them or whack them with a melee weapon. As you do so, the town will attack you. As the Balverines close in on the townies, help the creatures slaughter the people of the town.
If you choose to defend the town you will have to fight off a few packs of Balverines on your way to it. A charged Blades + Fireball spell is all you need to kill them in seconds, but a good ranged weapon helps as well.
Page 113 of 244IGN.com | Fable III Guide
© 2010 IGN Entertainment, Inc.

In town, Connor will challenge you as a white Balverine. Two half-charged Blade attacks directed at him should do the trick.
Whichever way you choose to deal with the village, it's up to you to return the White One statue to the lady in Millfields. When you do you will be faced with another choice.
� Keep the reward - One time gain of 500,000 Gold for your pockets, Evil morality boost � Donate the reward to the treasury - One time gain of 500,000 Gold for treasury, Good
morality boost
The cool half-million Gold you'll receive is well worth the action. You can shift the money around as you please after you earn it. Additonally, you'll gain 50 Guild Seals.
Page 114 of 244IGN.com | Fable III Guide
© 2010 IGN Entertainment, Inc.

Fable 3 Walkthrough
Weight of the World // 121 Days
The game may tell you you have 121 days, but this is technically your LAST DAY before the Darkness invades, so MAKE SURE YOU HAVE 6,500,000 GOLD IN YOUR TREASURY by the time you finish today's tasks. In fact, you probably want to make sure you already have your funds in order before you even begin the day's events.
If you need any final boosts of money, remember that the 50 Silver Key Chest in Bowerstone Castle's garden area has 2,000,000 Gold in it. Also, the Sunset House Demon door has an easy 1,000,000 for you to grab as well.
Your real estate purchases from earlier in the game should be paying out like crazy by now, but if you need to earn a bit more money from your investments, try plugging in your controller (so it doesn't shut off) standing in a safe place and just accruing money from the 5 minute payouts until you have enough. The "days" that pass won't count as actual days left until the attack.
To make things worse, your day begins with a potential dent in the treasury.
Make a Decision on Albion's Failing Economy
� Bail out the economy - One time loss of 500,000 Gold, Good morality boost, stores stay open
� Let the economy collapse - No loss of Gold, Evil morality boost, many stores close permanently
You now have your final chance to do any Side Quests, collecting or multiplayer to fill out the treasury. Get 6,500,000 in the Royal Treasury (NOT your personal account) and you will save all citizens of Albion. If you are planning on saving Mistpeak and protecting Aurora for the Good
= « Darkness Incarnate Battle for Albion
Weight of the World
1 2 3 4 5 6 7 8 9
Page 115 of 244IGN.com | Fable III Guide
© 2010 IGN Entertainment, Inc.

morality points, add another 600,000 to the bank -- bringing it to a 7,100,000 Gold total.
After the final battle, those you do not save will appear as bodies littering the ground. Additionally, many shops will be unattended. You will still be able to find collectibles and finish Side Quests, however. In fact, after you beat the game MORE Side Quests will become available to you.
Determine Military Protection for Aurora
� Build Desert Fort - One time loss of 300,000 Gold, Good morality boost, new area to explore in Shifting Sands with shops
� Reject the Proposal - No loss or gain of Gold, Evil morality boost, Shifting Sands remains the same
Your final decision will come hot on the heels of the previous one. This decision will slightly affect the look of Mistpeak Valley but this one is mainly moral -- should you keep your promise to Sabine?
Decide the Fate of Mistpeak Valley
� Deforest Mistpeak - One time loss of 300,000 Gold, Good morality boost, Mistpeak remains unchanged
� Protect Mistpeak - No loss or gain of Gold, Evil morality boost, Mistpeak has visibly less trees, more piles of logs
Fable 3 Walkthrough
Do the Ends Justify the Means?
After the decision on Mistpeak on Day 121 you will be whisked away to the Road to Rule. Here you will gain a pair of white wings if you have made overwhelmingly Good decisions, or Red wings if you have been Evil. The wings appear when you charge a flourish for a melee or ranged weapon.
= « Darkness Incarnate Battle for Albion
Weight of the World
1 2 3 4 5 6 7 8 9
Page 116 of 244IGN.com | Fable III Guide
© 2010 IGN Entertainment, Inc.

Take a chance to spend any Guild Seals on remaining upgrades. Make sure you have Blades+Fireball ready for the final fight. After this final campaign mission you will still be able to make new purchases, but whatever you buy now will have to carry you through the final battle.
You'll get to put your wings to use your new upgrades on some Shadows. Shadows and other beasts come out of the ground via black portals, so avoid these.
Charged Blades + Fireball spells will get you through this level. Use wide area attacks on Shadows and then shoot them with your ranged weapon.
After your detour through the alley -- follow the gold path -- you'll begin to encounter Minions. For these armor-clad Shadows you'll need to direct your magic. Charge it for about 4 seconds and release, rolling away before the Minions close in.
Page 117 of 244IGN.com | Fable III Guide
© 2010 IGN Entertainment, Inc.

Take the path along the river and you'll eventually encounter a groups of Minions in a narrow passage. Keep rolling away to charge your attacks, avoiding area magic in such cramped quarters.
On the bridge you'll encounter your first Sentinel. Stay at the base of the bridge, charge a magic attack fully and unleash it. The Blades should take care of the Sentinel in one or two blasts depending on your current level.
Ahead you'll encounter one more Sentinel which can be handled in the same manner. Ignore its attacks and stay on the offensive. You can always chug a potion if you need it.
The final encounter is just ahead: A possessed Walter will take you on with many of the same qualities as the other manifestations of the Darkness.
Page 118 of 244IGN.com | Fable III Guide
© 2010 IGN Entertainment, Inc.

It would be misleading to say that this fight is complex or difficult, because it is actually quite simply -- and short -- if you have your Blades at the ready.
Charge a magic attack for about four seconds, fire it at Walter and then roll out of the way to avoid his ensuing attacks. Do this approximately six times and the fight will be over. That's it!
After defeating the Darkness, the world may be a very different place depending on how many people you saved. If you've saved everyone, then you will find things just the way you left them -- you'll also get the Tough Love Achievement for saving all 6,500,000 residents of Albion.
With the main quest complete, there are still a few Side Quests to take care of, including some new ones, so head on over to the Side Quests Section and finish exploring Albion!
Page 119 of 244IGN.com | Fable III Guide
© 2010 IGN Entertainment, Inc.

Fable 3 Side Quests
Brightwall Village
Gnomes are Great
Missing Child
Gnomes are Evil
Chicken Chaser
Missing Play
The Pen is Mightier...
A Marriage of Inconvenience
An Ancient Key [Reliquary]
An Evil Presence [Reliquary]
Sunset House
Chesty and the Ghost Mansion
Bowerstone Industrial
Kidnapped
One Ring to Find
Mourningwood
Bored to Death
Gone But Not Forgotten
Peace, Love and Homicide
»
»
»
»
Page 120 of 244IGN.com | Fable III Guide
© 2010 IGN Entertainment, Inc.

In Mourning
Excavation
Awakening [Dark Sanctum]
Leverage [Dark Sanctum]
Loot in the Dark Sanctum (The Tenderiser)
Millfields
Restoration
The Final Insult
Dweller Camp
Special Delivery
Bowerstone Market
Reaver's Unmentionables
An Island Getaway
Bowerstone Old Quarter
Framed for Murder
Driftwood
Pest Control
Giftwood for Driftwood
Fable 3 Side Quests
Gnomes Are Great
5 G U I L D S E A L S / B R I G H T W A L L V I L L A G E
Talk to the man just down the stairs from the Academy in Brightwall Village to initiate this quest. The package is in a broken wagon in Mistpeak Valley. Fast Travel to Mistpeak Valley and run uphill from the lake and you'll come across an overturned wagon. Destroy the Mercs around the wagon and pick up the large gargoyle on the ground.
»
»
»
»
»
= Mistpeak Sunset House Bowerstone Ind. Mourningwood »
Side Quest
Brightwall
1 2 3 4 5
Page 121 of 244IGN.com | Fable III Guide
© 2010 IGN Entertainment, Inc.

Fast Travel back to Brightwall and hold A to place the gargoyle on the platform next to Jonathon. He'll cast some black magic on the thing and you'll be free to leave... this is not over yet!
Missing Child
5 G U I L D S S E A L S / B R I G H T W A L L V I L L A G E
This Missing Child quest will lead you to a cave in the hills above the Mistpeak Valley Demon Door. Enter the cave and you should find a Dig Spot and a Chest (hidden down a looped path which splits off the main path) on your way to the child's location. Press LEFT TRIGGER when near the child to hold her hand and begin to make your way out of the cavern. Note: If you meet the child, leave the cavern, and return before holding her hand, you can make all the wolves in the cavern disappear!
Your path back to Brightwall will be littered with wolves. These weak enemies are no match for your
Side Quest
Page 122 of 244IGN.com | Fable III Guide
© 2010 IGN Entertainment, Inc.

leveled up magic! Use charged area attacks repeatedly to take them out. Once you get back to the bridge in Brightwall the child will run to her mother and you will win 5 Guild Seals.
Gnomes Are Evil
4 0 G U I L D S S E A L S / B R I G H T W A L L V I L L A G E
Note: You must complete the "Gnomes Are Great" Side Quest and leave town before this Side Quest becomes avaialble. Talk to Jonathon in the Gnome-filled grotto by the Brightwall Academy/Library after you complete Gnomes are Great and he'll tell you the Gnomes have escaped. Follow the path to the first Gnome in the Misgnomer House. Here you will find the first Gnome (Brightwall Village 1/5). Stop just inside the door and pull out your gun. Press the LEFT TRIGGER to entire first-person aiming mode and look up.
A Gnome is suspended across from the door in the corner of the house. Shoot it. Now, return to Jonathon. It turns out there are 49 more of these awful creatures scattered about Albion. You need to shoot every one of them to complete this Side Quest! Head over to our Keys & Collectibles section for the locations of all 50 Gnomes in Fable 3.
Side Quest
Page 123 of 244IGN.com | Fable III Guide
© 2010 IGN Entertainment, Inc.

For better or worse, Gnomes won't sit in silence. You can hear them vocally insulting you wherever they are. Listen for the distinctive voice while you explore!
Fable 3 Side Quests
Chicken Chaser
1 0 G U I L D S S E A L S / B R I G H T W A L L V I L L A G E
Talk to the fellow in the chicken coop/pen on the left side of the Brightwall Village Map and he'll give you a Chicken Costume. Put it on and you'll gain a super power -- well, a "power." You'll be able to press A amongst a group of chickens and get them to follow you. Your dog will help you find the three groups of chickens, but here are their exact locations:
Run down the road from the chicken pen and the first group is under the archway.
= Mistpeak Sunset House Bowerstone Ind. Mourningwood »
Side Quest
Brightwall
1 2 3 4 5
Page 124 of 244IGN.com | Fable III Guide
© 2010 IGN Entertainment, Inc.

Another group can be found in the clump of buildings by the river that includes The Mourir's Mansion and The Old Smokehouse.
The final clump of chickens is at the front gate of the city.
Approach each group, lure them with A, and then simply run back to the pen. Once you do so you will be given the option to either kill or spare the chickens. The morality is pretty clear here, but the choice is yours. You will win the Chicken Trophy for your efforts.
Missing Play
2 0 S E A L S / B R I G H T W A L L V I L L A G E
Talk to the pair of thespians outside the Brightwall village Academy to begin this Side Quest. Enter the Academy and run down the steps towards the Reliquary entrance. Open the doors that close in your face and make your way to the bottom room.
Side Quest
Page 125 of 244IGN.com | Fable III Guide
© 2010 IGN Entertainment, Inc.

Grab the glowing book out of the corner of the room and you'll be transported to another realm...
Meet up with the sleuth Ransom Locke and listen to his theory -- it seems you'll have to appease the ghost who has trapped you here in order to escape. Put on the costume you'll find in the next area and choose the following option when prompted: Declare Love.
Put on the Chicken Costume in the next scene and shoose this option when prompted: Tickle.
Now you'll need to duke it out with some phantom actors in the final scene. These ghosts seem to be especially susceptible to Fireball, so use that as much as possible. After they are destroyed you'll be returned to reality.
Page 126 of 244IGN.com | Fable III Guide
© 2010 IGN Entertainment, Inc.

After watching the play you helped create, you will receive your 20 Guild Seals, an Achievement called "Tragical-Comical-Historical" and the Trophy, The Complete Works of Philipth Morley. Not bad.
Fable 3 Side Quests
Sunset House
2 0 S E A L S / S U N S E T H O U S E
Note: Make sure you have Magic Level 3 or some of the fights can be tough in Susnet House. You can access the Sunset House via Mourningwood. The mystery of the glowing, ghostly Sunset House begins in the gazebo in the front yard area. When you approach the gazebo during the day, the four statues here have specific poses during the day -- at night they don't match up. Your goal is to make the night poses match the day poses. To switch between night and day, you need only run down the path to Mourningwood and return.
The four statues can be posed at night by pressing A. they each have quite a few poses.
= Brightwall Mistpeak Bowerstone Ind. Mourningwood »
Side Quest
Sunset House
Page 127 of 244IGN.com | Fable III Guide
© 2010 IGN Entertainment, Inc.

� The man nearest to you as you enter the gazebo from path is holding his right arm with his left as if he's checking his watch.
� Moving clockwise around the group, the woman is crouching with her arms out and her mouth open ide.
� Moving clockwise to the next statue, a man points out with his index finger towards the forest.
� Finally, moving clockwise the last woman has both arms raised and is screaming.
Leave to Mourningwood and return at night and pose the sculptures by approach them individually and hitting A. Pose all four correctly and the Sunset House will pop into existence, the door unlocked.
Inside the house there's little you can do but run up the stairs and sleep in the bed -- although a book on the first floor admonishes you strongly against this! You will be transported to a new area. Approach the chest on the chessboard and attempt to open it.
Page 128 of 244IGN.com | Fable III Guide
© 2010 IGN Entertainment, Inc.

Boss (?): Chesty
Chesty will challenge you to a game of chess -- but fear not! You won't have to beat him, or even play chess for more than five minutes (phew). After about four moves, Chesty will destroy the game. Approach Chesty again and he'll describe a new game.
Destroy the Hobbes (the "pawns") in the first wave of Chesty's challenge by charging a magic attack early and unleashing it as soon as they crowd you.
Talk to Chesty again and he'll send a second wave at you consisting of Auroran ninjas and Mercs. Once again a charged Fireball can do most of the work.
Talk to Chesty again and you'll fight a pair of large Hobbes. After that are significantly weaker versions of Lt. Simmons and Saker, two early game bosses. Fireball can do all the work for you, but
Page 129 of 244IGN.com | Fable III Guide
© 2010 IGN Entertainment, Inc.

you should roll around a bit to avoid their attacks. After this, Chesty will return you to the mansion.
You can now return here in co-op if you wish to play chess, but since you are alone, why not seek out some of Sunset House's treasures?
Head into the hallway that's just to the right as you enter the building In the dining room, approach the mirror and look through to the far side. A glowing skull hangs here. If you look to the right through the mirror you should see a glowing blue spot on the wall.
Your goal is to lead the skull to this blue spot. To do so, walk to the corner of the room between the couch and the bust. Face the wall and walk against it until the skull clicks into place in a cutscene.
Now, you'll need to do this two more times. Walk straight across the room from here and face the opposing wall at the edge of the couch (on the far side of the room from the mirror). This should activate the second switch.
Page 130 of 244IGN.com | Fable III Guide
© 2010 IGN Entertainment, Inc.

Now, smash out the knight armor near the globe and align the final skull switch. You can now approach the mirror and vault through it.
You won't get a prompt, though, so just walk up to the mirror and press A. Up the stairs you'll find a Health Potion in a chest and clothes in the various furniture pieces. On the lower floor, shoot the green crystal ball in the corner of the room to open the locked door.
Inside the locked door you'll find a Legendary Weapon! Vault back through the mirror and run back through the burnt house. In the room with the skeleton shoot the parallel green orb to open a room with a chest. Inside you'll find a Slow Time Potion.
Page 131 of 244IGN.com | Fable III Guide
© 2010 IGN Entertainment, Inc.

Fable 3 Side Quests
Kidnapped
3 0 S E A L S / B O W E R S T O N E I N D U S T R I A L
The frightened fiancé of the kidnap victim will lead you to a nearby door. Wait for the conversation to play out and enter the door. A hatch on the ground will take you to the Cesspools.
Bowerstone Industrial [Cesspools] (13/30) Dangerous Things: Gunpowder
Note: You must play the "Kidnapped" Side Quest to access the Cesspools. In the Cesspools entrance (after you hop down the hatch in Bowerstone) you'll find a few tables with thugs around them. A table on the left holds this book.
When you get to the door, the men in the room will attack. They are tough, but your magic should be tougher by this point. Use combo magic and ranged weapon flourishes to eliminate them.
= Brightwall Mistpeak Sunset House Mourningwood »
Side Quest
Rare Book
Bowerstone Ind.
Page 132 of 244IGN.com | Fable III Guide
© 2010 IGN Entertainment, Inc.

In the next room you'll find out that the fiancé is far below. Vault off the end of the floor to enter the Cesspools, proper. Here you'll meet Gerald (or Geraldine) whom you must lead out of the Cesspools by holding his hand. Drag him forward and, at the a T-intersection in the tunnel, look for some boards with a familiar glint behind them.
Note: If you chose to save your friend at the beginning of the game and have your brother kill the townspeople, your friend will appear here. Lead him or her out and you can reunite -- and marry!
Silver Key (Bowerstone Industrial [Cesspools], 3/4)
When you dive into the Cesspools, run up the first ramp and look for a T-intersection. An area of the tunnel walls here is boarded up but you can make out a Silver Key through it. Bash your way through with a melee weapon to score the key.
As you make your way through the pools bats will attack. Send a few fireballs at them and grab Gerald(ine) again.
Silver Key
Page 133 of 244IGN.com | Fable III Guide
© 2010 IGN Entertainment, Inc.

Bowerstone Industrial [Cesspools], (4/5)
In the Cesspools, vault down into the abyss and follow the path up. At one point the path will veer to the right but this Gnome is hanging out in front of you before you turn. It's hanging on the wall just past a skylight.
In the next area you'll encounter Hobbes. They are easy to handle, but make sure Gerald(ine) stays back a ways. Grab the chest in this area and keep an ear out for your dog's bark -- he'll find Dig Spots nearby.
There's only one more ambush between you and the surface. Before you exit the Cesspools, you'll have to the option to dissuade the kidnapee from returning to his fiancé (evil) or encourage him to (good). You can also choose to not weigh in and your morality will be unaffected.
Gnome
Page 134 of 244IGN.com | Fable III Guide
© 2010 IGN Entertainment, Inc.

One Ring to Find
5 S E A L S / B O W E R S T O N E I N D U S T R I A L
James in Bowerstone Industrial lost a ring. You dog can sniff it out, so follow the trail leading into the Sewers via a door along one of the canals. In the Sewers you will encounter Hobbes and, for some reason, Mercenaries.
Fight them off as you make your way to the far end of the Sewers. Your dog should find a Dig Spot under a skylight with this ring -- all enemies in the area must be dead for your dog to sniff it out. Return it to James for your Seals -- first you should seek out the Silver Key and Gnome in the Sewers!.
Bowerstone Industrial [Sewers] (2/5)
In Bowerstone Industrial you'll find a crane alongside the river just across the bridge from The Riveter's Rest -- it's right where Reaver executed the protester. Run down the stairs under the crane and enter the door here to find a section of the Sewers separate from the Resistance HQ. Turn left upon entering and the Gnome will be directly ahead of you, just past the T-intersection. Cross the small channel of water by using some stairs around the side and head into the room with the Gnome on the ceiling.
Side Quest
Gnome
Page 135 of 244IGN.com | Fable III Guide
© 2010 IGN Entertainment, Inc.

Silver Key (Bowerstone Industrial [Sewers], 1/4)
In Bowerstone Industrial you'll find a crane alongside the river just across the bridge from The Riveter's Rest -- it's right where Reaver executed the protester. Run down the stairs under the crane and enter the door here to find a section of the Sewers separate from the Resistance HQ. Turn right as you enter to find this Silver Key.
Fable 3 Side Quests
The Pen is Mightier...
1 0 - 5 0 S E A L S / B R I G H T W A L L V I L L A G E
Note: This quest is available after meeting with the Bowerstone Resistance. Enter the Academy in Brightwall and turn right. You'll find Samuel and a room full of book pedestals. We cover the locations of each and every Rare Book in our Keys and Collectibles section.
Silver Key
= Mistpeak Sunset House Bowerstone Ind. Mourningwood »
Side Quest
Brightwall
1 2 3 4 5
Page 136 of 244IGN.com | Fable III Guide
© 2010 IGN Entertainment, Inc.

Return books to each pedestal after finding them and you will be rewarded with a Rare Book Quest. For the Rare Book Quests you'll be able to follow the gold trail right to each book. For each of these Rare(r) Books returned you'll get 10 Guild Seals!
Here are the Rare Books you can only get as part of a mini-quest.
Mistpeak Valley [Chillbreath Caverns] Rare Book (3/3) Book of Mysteries
Note: This book WILL NOT APPEAR unless you've returned five books to Samuel and started the Side Quest to find the Book of Mysteries. Enter the Gold Key cavern entrance -- it's brown, not frozen and just up from the Monorail Station, before you reach the snow line. Run downhill in the cave until you get to the large, frozen lake with a dock. Cross the lake to the far side and follow the path upwards. It will eventually cross a stone bridge and terminate by some bedding and books. On a table here you'll find the Book of Mysteries.
Bowerstone Old Quarter Rare Book (2/2) The Invocation of the Watchers
Rare Book
Rare Book
Page 137 of 244IGN.com | Fable III Guide
© 2010 IGN Entertainment, Inc.

After returning 10 Rare Books to the library for Samuel, he will give you the Trapdoor Key which can be used in Bowerstone Old Quarter (before it is destroyed!). Follow the gold path to Throckbibble Mansion and enter the trap door in the basement. You must shoot a Flit Switch on one of the pedestals in the "collection" of rare items. Hit it twice and then kill the Hobbes. Use the correct attacks to hit the Flit Switch three more times. Some bookshelves will move to reveal this book.
Mourningwood Rare Book (3/3) The Pangs of Sunset
Return 15 books to Samuel and you will be given the quest to find this book in Mourningwood. Your dog will then lead you to the grave by a tree where this book is buried. Prepare for many, many Hollowmen.
Shifting Sands (2/2) Reaver on Reaver
You'll have to return 20 books to Samuel in the Library to get the quest to find this book. It will not appear otherwise. The best way to get to this book is to let you dog sniff it out as part of the Side Quest. It is in the middle of the Shifting Sands by some crates and a shovel.
Brightwall Village [Reliquary] (6/6) Book of Doom
You'll have to return all of the other 29 books to Samuel in the Library to get the quest to find this book. It will not appear otherwise and you need the key given to you by Samuel as part of the quest. The final locked door of the Reliquary is just to your right as you head down the stairs towards the spot where you encountered your first Hollow Men and received the first gun. Enter this door and follow the hallways until you reach the Book of Doom.
Fable 3 Side Quests
Rare Book
Rare Book
Rare Book
= Brightwall Mistpeak Sunset House Bowerstone Ind. »Mourningwood
Page 138 of 244IGN.com | Fable III Guide
© 2010 IGN Entertainment, Inc.

Bored to Death
1 0 S E A L S / M O U R N I N G W O O D
Note: This quest is available after meeting with the Bowerstone Resistance. Meet Sam and Max in the Mourningwood grave yard. Meet Sam and Max just up the hill from the fort. They will send you to Millfields, where a small graveyard holds the grave of their mother. Your dog will find a Dig Spot at her rather large grave. Digging here yields the Normanomicon.
Fight off the many Hollow Men that appear and eventually a Hollow Man leader will come out of a nearby crypt. Concentrate charged magic attacks on him and he'll stop spawning enemies.
Note that a Silver Key can be found on the path above this cemetery. You can pick up a rare Book as well inside the crypt where the large Hollow Man leader appears. You must now return this to Sam and Max where you first met them in Mourningwood. After this you can leave the area and return to do the "Gone but Not Forgotten" Side Quest that opens the Ossuary.
Gone but Not Forgotten
3 0 S E A L S / M O U R N I N G W O O D
Note: you must complete Bored to Death and leave the area before tackling this quest. Meet Sam where you left him with his awesome ghost party. He will lead you to a door in a crypt that will take
Side Quest
Side Quest
1 2 3
Page 139 of 244IGN.com | Fable III Guide
© 2010 IGN Entertainment, Inc.

you to the Ossuary.
In the Ossuary, approach Max in a pack of ghosts and grab his had with the LEFT TRIGGER. Drag him towards the entrance and he'll suddenly zip off. You'll now need to follow him through the Ossuary, fighting off packs of Hollow Men along the way.
Silver Key (Mourningwood [The Ossuary], 3/4)
You'll need to finish the "Bored to Death" Side Quest with Sam and Max in Mourningwood to get the "Gone but not Forgotten" Side Quest that allows you to enter The Ossuary. In the Ossuary, search the tombs on your right as soon as you enter the area. The fourth one you come to has a Silver Key inside.
Silver Key (Mourningwood [The Ossuary], 4/4)
You'll need to finish the "Bored to Death" Side Quest with Sam and Max in Mourningwood to get the "Gone but not Forgotten" Side Quest that allows you to enter The Ossuary. As you enter the Ossuary, turn left and run up the stairs. At the top, turn left and vault off the platform to land right next to this key.
Silver Key
Silver Key
Page 140 of 244IGN.com | Fable III Guide
© 2010 IGN Entertainment, Inc.

In Mourningwood you can access the Ossuary through a door in the graveyard after completing two side quests: Bored to Death and Gone but Not Forgotten (which involve Sam, Max and the Normanomicon). In the Ossuary, turn left and head of the stairs just as you enter to find the Gold Door. Beyond it is a sarcophagus you can open for a Legendary Weapon.
In the Ossuary spotlights can be seen illuminating the ground. If you get caught in a spotlight, more Hollow Men will attack you.
Head up the stairs and fight your way across the upper area, following in Max's footsteps. Vault down the other side and follow Max to the large tree. As you pursue Max he'll start summoning ghosts to fight you. They are easy to fend off with your regular weapons, but a large Fireball attack clears them out quickly.
Gold Key Door
Page 141 of 244IGN.com | Fable III Guide
© 2010 IGN Entertainment, Inc.
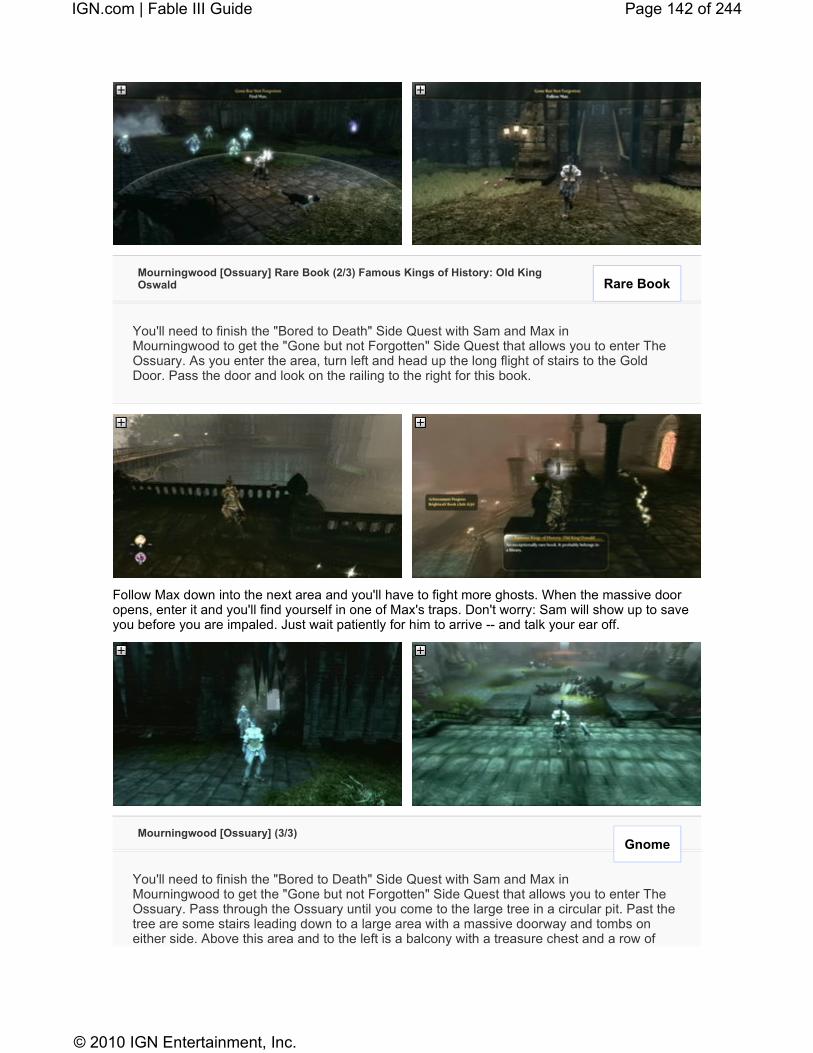
Mourningwood [Ossuary] Rare Book (2/3) Famous Kings of History: Old King Oswald
You'll need to finish the "Bored to Death" Side Quest with Sam and Max in Mourningwood to get the "Gone but not Forgotten" Side Quest that allows you to enter The Ossuary. As you enter the area, turn left and head up the long flight of stairs to the Gold Door. Pass the door and look on the railing to the right for this book.
Follow Max down into the next area and you'll have to fight more ghosts. When the massive door opens, enter it and you'll find yourself in one of Max's traps. Don't worry: Sam will show up to save you before you are impaled. Just wait patiently for him to arrive -- and talk your ear off.
Mourningwood [Ossuary] (3/3)
You'll need to finish the "Bored to Death" Side Quest with Sam and Max in Mourningwood to get the "Gone but not Forgotten" Side Quest that allows you to enter The Ossuary. Pass through the Ossuary until you come to the large tree in a circular pit. Past the tree are some stairs leading down to a large area with a massive doorway and tombs on either side. Above this area and to the left is a balcony with a treasure chest and a row of
Rare Book
Gnome
Page 142 of 244IGN.com | Fable III Guide
© 2010 IGN Entertainment, Inc.

tombs. Between the third and fourth tomb on the balcony is a Gnome.
In the next area you'll find more Hollow Men spotlights. You don't have to fight them, but you might as well if you are leveling up your Bonesmasher or just interested in the Health and Slow Time Potions in the nearby chests.
Finally Sam and Max will both turn on you. As they summon ghosts you'll also have to fight Hollow Men if you step into the light. Roll around and let off charged magic attacks to kill large groups of enemies. Note that the book is sitting on a pedestal under the massive organ.
When Sam exclaims that he has an idea, the organ will sap the barrier of souls around the book allowing you to run up to the pedestal and nab it. This will end the quest.
Page 143 of 244IGN.com | Fable III Guide
© 2010 IGN Entertainment, Inc.

Fable 3 Side Quests
Peace, Love and Homicide
1 5 S E A L S / M O U R N I N G W O O D
Note: This Side Quest will start you on the path to unlocking the Dark Sanctum and a Legendary Weapon at the cost of a few morality points -- you have to do some evil things. Nothing that can't be balanced out later in the game, but here's fair warning! Meet up with Lesley by the fiery force-field in Mourningwood. He'll send you on a hit mission to kill one of the villagers. Travel to the far side of Mourningwood. Rhys is in the town with a circle of gold around him.
Approach him and pull out your weapon. You'll then be given a prompt to turn off Safe Mode by pressing DOWN on the D-Pad. When you do this you will be able to hit innocents with weapons, so be sure to just kill Rhys! Hit him with a ranged or melee weapon and he will go down pretty easy. Return to Lesley for your reward. Come back here later to open the Dark Sanctum and pursue the "Excavation" Side Quest.
In Mourning
5 S E A L S / M O U R N I N G W O O D
This easy Side Quest begins in Mourningwood's small circular village. Grab the woman's hand and run her all the way to the graveyard on the far side of the trenches. There will be several Hollow Men encounters along the way, but most of them you can outrun.
= Brightwall Mistpeak Sunset House Bowerstone Ind. »
Side Quest
Side Quest
Mourningwood
1 2 3
Page 144 of 244IGN.com | Fable III Guide
© 2010 IGN Entertainment, Inc.

Excavation
5 S E A L S / M O U R N I N G W O O D
Note: You must complete Peace, Love and Homicide before this Side Quest appears in Mourningwood. Take the path leading out of Mourningwood to the new area called the Dark Sanctum. It’s a path leading away from the fort. For an easy 5 Seals, give 5,000 Gold to Lesley in the Dark Sanctum. Return here later to access the Dark Sanctum's interior and a few more Side Quests.
Awakening
5 S E A L S / M O U R N I N G W O O D [ D A R K S A N C T U M ]
Note: You'll have to complete both Peace, Love and Homicide and Excavation for this quest to appear. This Side Quest is an easy 5 Guild Seals. Enter the Dark Sanctum and kill all the Hollow Men in the entrance -- there are only a dozen or so. This will unlock more of the Dark Sanctum area and the Side Quest "Leverage" which allows you to drop your Morality points quickly should you so desire...
Side Quest
Side Quest
Page 145 of 244IGN.com | Fable III Guide
© 2010 IGN Entertainment, Inc.

Leverage
1 0 S E A L S / M O U R N I N G W O O D [ D A R K S A N C T U M ]
Note: You'll have to complete Peace, Love and Homicide, Excavation and Awakening for this quest to appear. This quest will open the rest of the Dark Sanctum (but it will need a few days of repair before you can get the Legendary Weapon there). Rendezvous with Lesley at the Sacrificial BBQ Pit. It's in need of a lever buried deep inside the Dark Sanctum.
Follow the path up the stairs and into the Sanctum with your new Dark Sanctum Key. You'll come to a large room with the same appearing platforms you saw in the Reliquary. Step on the blue arrows to either make more blocks appear or more enemies. The enemies are in small, easy to handle groups, so we recommend just stepping on all the switches and practicing your combat skills.
When you get to the stationary platform midway, kill all the Hollow Men to make a platform appear on the far side. Continue through to the next area where you'll find this very important lever in a sarcophagus. Return it to Lesley for your 10 Seals.
You can now use the Sacrificial BBQ Pit to kill innocents you drag into the Sanctum. Simply place them on the platform and pull the lever. This will kill them, netting you a huge amount of evil points! In fact, you can start right now -- just pull the lever!
Side Quest
Page 146 of 244IGN.com | Fable III Guide
© 2010 IGN Entertainment, Inc.

You can return to the Dark Sanctum later to hit the Flit Switch blocked by rubble in the corner of the sarcophagus room. This will lead you to a Legendary Weapon!
Fable 3 Side Quests
Looting the Dark Sanctum (for The Tenderiser)
M O U R N I N G W O O D [ D A R K S A N C T U M ]
After completing "Peace, Love and Homicide," "Excavation," "Awakening" and "Leverage" Side Quests in Mourningwood, leave and return to the Sanctum to find it filled with masquerading weirdoes. You can loot the area for treasure and even a Legendary Weapon (The Tenderiser), but it will take a bit of effort!
First of all, a Flit Switch on the base of the massive statue opens a door behind the Sacrificial BBQ Pit. A clothing item is in the chest beyond the door. Beyond the statue on the opposite side is a chest with a rare gem in it which you can sell for big money.
Return Later
= Brightwall Mistpeak Sunset House Bowerstone Ind. »
Loot Quest
Mourningwood
1 2 3
Page 147 of 244IGN.com | Fable III Guide
© 2010 IGN Entertainment, Inc.

The real prize begins with hitting a Flit Switch in the sarcophagus room where you originally found the lever for "Leverage." In the corner of this room is a blue Flit Switch. Hit it and run quickly to the doorway to shoot it a second time. It will settle in the next room.
Four torches must now be lit in this enemy-filled area. One is directly to your left as you enter the room from the sarcophagus room.
Two more are on the bridge in the middle of the room. A final torch is by the door on the far side. Light all four and two more Flit Switches will appear.
Hit both in quick succession and they will slowly head towards the front of the inner Sanctum. If they stop, shoot them with magic quickly. Soon the Flit Switches will multiply and settle on upright coffins above the massive statue. Hit them all with magic and run down the stairs.
Page 148 of 244IGN.com | Fable III Guide
© 2010 IGN Entertainment, Inc.

The switches will open a door leading to a new area. In this new area there are four more torches to light.
The first torch is to your immediate left. Step on the blue arrows to make platforms appear around the area. Follow them straight to the torch and light it with Fireball. Now, head up the platforms to the high torch on the same side of the room.
Use your ranged weapon to pick off Hollow Men at a distance and light the torch. Run back to the entrance and head the other way. Vault off the appearing block and run up to the high torch.
From here, vault down to the central platform under the chest. With the final torch lit you can use the new appearing platforms to reach the chest with The Tenderiser inside. You'll have to be pretty evil to max out its powers!
Page 149 of 244IGN.com | Fable III Guide
© 2010 IGN Entertainment, Inc.
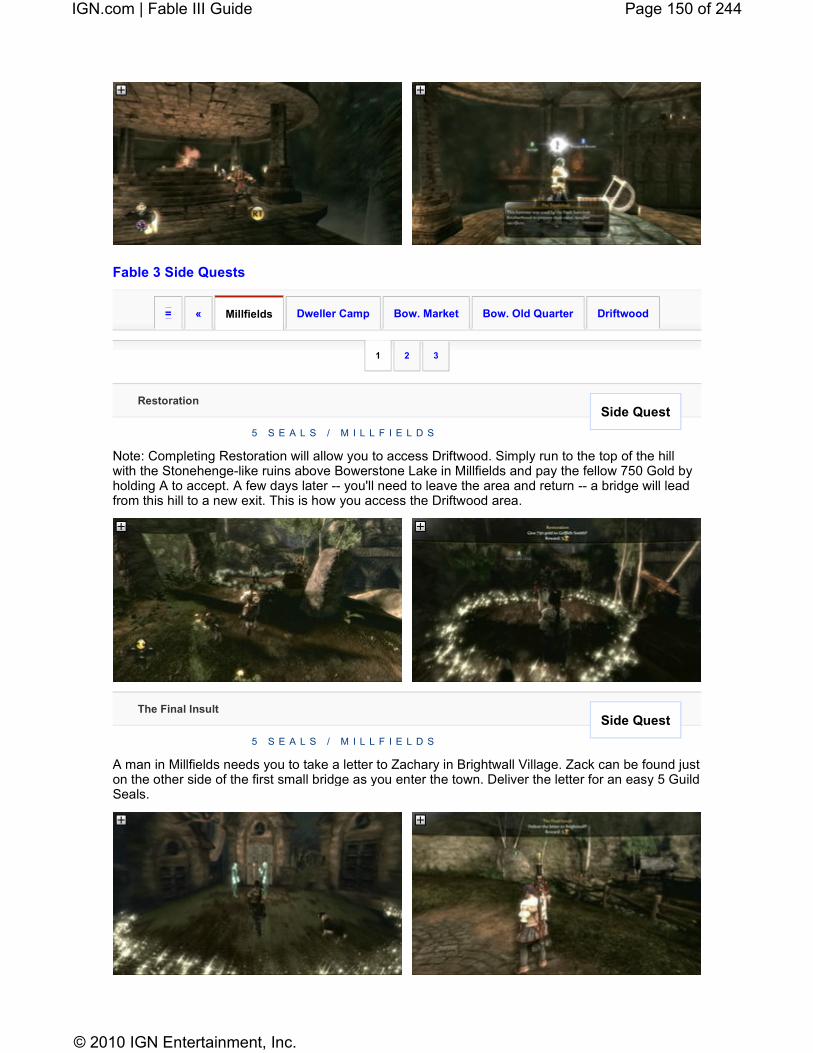
Fable 3 Side Quests
Restoration
5 S E A L S / M I L L F I E L D S
Note: Completing Restoration will allow you to access Driftwood. Simply run to the top of the hill with the Stonehenge-like ruins above Bowerstone Lake in Millfields and pay the fellow 750 Gold by holding A to accept. A few days later -- you'll need to leave the area and return -- a bridge will lead from this hill to a new exit. This is how you access the Driftwood area.
The Final Insult
5 S E A L S / M I L L F I E L D S
A man in Millfields needs you to take a letter to Zachary in Brightwall Village. Zack can be found just on the other side of the first small bridge as you enter the town. Deliver the letter for an easy 5 Guild Seals.
= « Dweller Camp Bow. Market Bow. Old Quarter Driftwood
Side Quest
Side Quest
Millfields
1 2 3
Page 150 of 244IGN.com | Fable III Guide
© 2010 IGN Entertainment, Inc.

Fable 3 Side Quests
COMING SOON
Fable 3 Side Quests
Special Delivery
5 S E A L S / D W E L L E R C A M P
Note: This quest is available after meeting with the Bowerstone Resistance. In the Dweller Camp you will receive a package from Saul's Sister. Take it to Saul in Brightwall Academy. As you enter the Academy, turn left to find Saul.
This will begin a series of quests that will lead you deeper into the Reliquary and eventually to a Gold Key Door! Check back with Saul later for " An Evil Presence" Side Quest.
= « Dweller Camp Bow. Market Bow. Old Quarter Driftwood
= « Millfields Bow. Market Bow. Old Quarter Driftwood
Side Quest
Millfields
1 2 3
Dweller Camp
Page 151 of 244IGN.com | Fable III Guide
© 2010 IGN Entertainment, Inc.

Fable 3 Side Quests
Reaver's Unmentionables
5 S E A L S / B O W E R S T O N E M A R K E T
Note: This quest will allow you to access Reaver's Manor for a rare Book and a Silver Key. It is only available after the Masquerade quest. Meet the Reaver fan Benjamina just outside the city wall in Bowerstone Market.
Millfields [Reaver's Manor] Rare Book (2/3) Dangerous Things: Lightning
Enter Reaver's Manor by either purchasing it, completing the game as an evil ally of Reaver or as part of the "Reaver's Unmentionables" Side Quest. Turn left as you enter and, in the room with the statue and fireplace, search the table by the windows.
= « Millfields Dweller Camp Bow. Old Quarter Driftwood
Side Quest
Rare Book
Bow. Market
1 2
Page 152 of 244IGN.com | Fable III Guide
© 2010 IGN Entertainment, Inc.

Fast Travel to Millfields and enter Reaver's Manor. Inside the gold trail will seemingly lead to a dead-end bedroom. However, you can search a bookshelf on the far side of the room to reveal a secret passage back to Reaver's true bedroom. Search the tbale next to the bed for his underwear. In this room you can find a number of Potions and Condoms as well.
Fast travel back to Benjamina to get your Seals.
Silver Key (Millfields [Reaver's Manor], 5/7)
In Reaver's Manor, run up to the upper level and enter the bedroom to the right of the dining area. In the bedroom, approach the bookshelf and press A to activate a secret door. In the bedroom at the end of the secret hallway, grab the key behind the bed.
An Island Getaway
5 S E A L S / B O W E R S T O N E M A R K E T
Note: You must have completed the "Restoration" and "Pest Control" Side Quests before this quest appears in Bowerstone Market. In the pub in Bowerstone Market you'll find a man who wants to escape to Driftwood. He has a few mercenaries on his tail, so gear up for a battle.
Silver Key
Side Quest
Page 153 of 244IGN.com | Fable III Guide
© 2010 IGN Entertainment, Inc.

Run out of Bowerstone Market towards Millfields while holding Rusty's hand. In Millfields you'll encounter several packs of mercs. Fend them off and use the bridge by the Stonehenge-like ruins to lead Rusty to Driftwood. Once you get him to the island you'll receive your Seals.
Fable 3 Side Quests
COMING SOON
Fable 3 Side Quests
Framed for Murder
5 S E A L S / B O W E R S T O N E O L D Q U A R T E R
The artist in Bowerstone wants you to kill Thomas Kaidkin in Brightwater. This will affect your moral standing, but you can pay a $500 fine to guards to avoid any trouble. Later on your moral decisions will greatly swing the pendulum to good or evil, so a few murders here or there won't affect much!
= « Millfields Dweller Camp Bow. Old Quarter Driftwood
= « Millfields Dweller Camp Bow. Market Driftwood
Side Quest
Bow. Market
1 2
Bow. Old Quarter
1 2
Page 154 of 244IGN.com | Fable III Guide
© 2010 IGN Entertainment, Inc.

Fable 3 Side Quests
COMING SOON
Fable 3 Side Quests
Pest Control
5 S E A L S / D R I F T W O O D
Note: You must complete the "Restoration" Side Quest in Millfields to open the bridge to Driftwood, a separate area of Albion. To make Driftwood available on the map you'll have to first head back to Millfields and use the bridge you paid for. It's at the top of the hill with the Stonehenge-like ruins. Just across the bridge is a path to Driftwood.
= « Millfields Dweller Camp Bow. Market Driftwood
= « Millfields Dweller Camp Bow. Market Bow. Old Quarter
Side Quest
Bow. Old Quarter
1 2
Driftwood
Page 155 of 244IGN.com | Fable III Guide
© 2010 IGN Entertainment, Inc.

In Driftwood, talk to the man in the gypsy camp to initiate Pest Control. There are four groups of Hobbes on the islands. The gold path leads you to each group starting on the leftmost island and moving all the way to the right.
After all four packs of Hobbes are eliminated, return to the man for your Seals. Now, wait a bit and your next Driftwood-related Side Quest will appear, "An Island Getaway" in Bowerstone Market.
Giftwood for Driftwood
1 0 S E A L S / D R I F T W O O D
Note: You must have completed the "Restoration" and "Pest Control" Side Quests before this quest appears in Driftwood. The gypsy settlers have moved out onto one of the islands. Meet them here and accept the letter from one.
Travel to Silverpines and run through the entire area. On the far side of the village your gold path should lead you to this small cabin. Deliver the letter and you will get your Seals. Return to Driftwood after a few in-game days to see his work.
Side Quest
Page 156 of 244IGN.com | Fable III Guide
© 2010 IGN Entertainment, Inc.

Fable 3 Side Quests
A Marriage of Inconvenience
2 0 S E A L S / B R I G H T W A L L V I L L A G E
Note: This quest is only available after completing The Bowerstone Resistance. This Side Quest features different people depending on your sex. Meet Wilma/William outside the house and he/she will explain that a divorce is in order. To go about instigating the divorce you'll need to convince the spouse inside the house to fall in love with you and eventually call for a divorce.
For this you'll need several expressions packs from the Road to Rule, they cost 5 Guild Seals and are well worth the purchase. Make sure you have the Lovers Expression pack and the Marriage pack. Be sure to HOLD the A button until it flashes when performing an expression to get more out of it.
= Mistpeak Sunset House Bowerstone Ind. Mourningwood »
Side Quest
Brightwall
1 2 3 4 5
Page 157 of 244IGN.com | Fable III Guide
© 2010 IGN Entertainment, Inc.

After you increase the spouse's affinity for you with dancing, patty-cake and other expressions, he or she will ask for jewelry or a gem. You can buy items like these in variety shops in Brightwall and Bowerstone Market -- you'll often find gems in dig spots and jewelry in cabinets and furniture, so you may have these items already.
After giving your present to the spouse, perform a few more expressions to tilt the affection meter at the bottom of your screen into the green. You will now be asked to take the spouse on a date.
Grab the spouse and drag him or her to the long bridge outside Brightwall. Here you'll have to kiss the spouse and then propose -- you won't have to go through with the marriage, so fear not!
Head back to the house and watch the conversation play out. At this point you have a choice: To kill William/Wilma or to just walk out. The morality is pretty clear here, and the resulting effect on your morality meter is not trivial. Make your choice to get your 20 Guild Seals.
An Ancient Key
5 S E A L S / B R I G H T W A L L V I L L A G E [ R E L I Q U A R Y ]
Note: You must complete the Dweller Camp Side Quest "Special Delivery" before this quest appears. Also, you'll be able to access a Gold Key Door in the Reliquary after completing this Side Quest (if you have a Gold Key)! Meet Saul near the entrance to the Reliquary inside the Academy. He’ll give you the Key of Forbidden Knowledge.
Side Quest
Page 158 of 244IGN.com | Fable III Guide
© 2010 IGN Entertainment, Inc.

Lead Saul by the hand through the first hall of moldy books and then down the stairs into the large chamber. The door you need to access is at the very bottom of this chamber. Hollow Men appear frequently as you delve deeper into the Reliquary so have Fireball and the Bonesmasher pistol armed to take them out.
Keep taking stairs down and enter the door at the very bottom. The next door is just up the stairs beyond the last door, but a large group of Hollow Men will stop you here. Beyond the door at the top of the stairs is the secret room. Return here later to unlock even more doors in the "An Evil Presence" Side Quest! For more on the Gold Key Door you can now access, head to our Keys and Collectibles section. You can also pick up a Rare Book in the new area.
Brightwall Village [Reliquary] Rare Book (5/6) Famous Killers: Carl Tendency
After completing the "An Ancient Key" Side Quest you'll have access to a secret library in the Reliquary (with a Gold Key). On a pedestal in the corner you'll find this book.
An Evil Presence
5 S E A L S / B R I G H T W A L L [ R E L I Q U A R Y ]
Note: You must complete the Dweller Camp Side Quest "Special Delivery" and the Brightwall
Rare Book
Side Quest
Page 159 of 244IGN.com | Fable III Guide
© 2010 IGN Entertainment, Inc.

Village quest "An Ancient Key" before this quest appears. Reunite with Saul in the Academy just outside the doors to the Reliquary and he'll give you yet another key. This opens a door in the hidden library area that was previously locked. The goal of this quest is to kill all Hollow Men you encounter -- which should be second nature to you by now!
There's nothing of interest in the new area but a chest with a rare gem (these are worth more money than usual). Meet back with Saul again to get your 5 Seals.
Fable 3 Keys and Collectibles
Silver Keys
Gold Keys
Rare Books
Gnomes
Auroran Flowers
Fable 3 Silver Keys
Silver Keys can be used to open Silver Key Chests. These chests, scattered throughout Albion, each require a certain amount of Silver Keys to open. Collecting all Silver and Gold Keys will also land you the I Am The Keymaster Achievement.
»
»
»
»
»
= Gold Keys Rare Books Gnomes Flowers
Silver Keys
1-10 11-20 21-30 31-40 41-50
Page 160 of 244IGN.com | Fable III Guide
© 2010 IGN Entertainment, Inc.
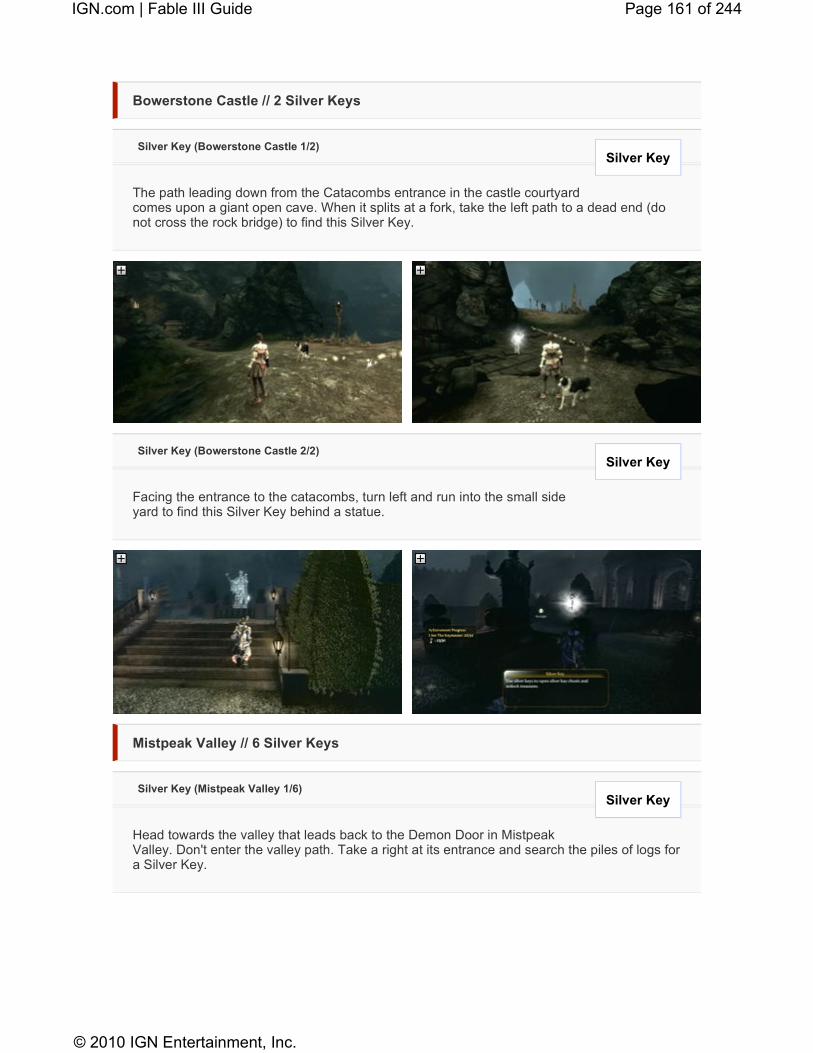
Bowerstone Castle // 2 Silver Keys
Silver Key (Bowerstone Castle 1/2)
The path leading down from the Catacombs entrance in the castle courtyard comes upon a giant open cave. When it splits at a fork, take the left path to a dead end (do not cross the rock bridge) to find this Silver Key.
Silver Key (Bowerstone Castle 2/2)
Facing the entrance to the catacombs, turn left and run into the small side yard to find this Silver Key behind a statue.
Mistpeak Valley // 6 Silver Keys
Silver Key (Mistpeak Valley 1/6)
Head towards the valley that leads back to the Demon Door in Mistpeak Valley. Don't enter the valley path. Take a right at its entrance and search the piles of logs for a Silver Key.
Silver Key
Silver Key
Silver Key
Page 161 of 244IGN.com | Fable III Guide
© 2010 IGN Entertainment, Inc.

Silver Key (Mistpeak Valley 2/6)
At the end of the lake opposite the Mercenaries' camp is the Mistpeak Trolley Station. Head uphill from here towards the mountains. A Silver Key can be found here at an overlook with a view of Brightwall.
Silver Key (Mistpeak Valley 3/6)
In Mistpeak Valley there are two caves above the Demon Door, as you can see on the map. One is directly above the Demon Door and one is to the right of it. You want to enter the latter cave. Follow it back until you come to a rock bridge. Cross it and the Silver Key is floating on the far side. This appears above a ledge with the 'Missing Child' Side Quest's child appears, but separate entrances lead to the child and the key itself.
Silver Key (Mistpeak Valley [The Hole], 4/6)
Just past the monorail wreckage is a bridge and a ramp leading down to a room full of barrels. Run behind the rack of barrels to score this easy Silver Key.
Silver Key
Silver Key
Silver Key
Page 162 of 244IGN.com | Fable III Guide
© 2010 IGN Entertainment, Inc.

Silver Key (Mistpeak Valley [The Hole], 5/6)
At the end of The Hole you'll fight off some Hobbes in an Arena. Beyond the Arena is a bridge. Cross it and take a left and you'll find a windy path that leads to the Technicians Key. Near the Mistpeak entrance -- and wreckage -- is an area with a bunch of barrels. A door here can be opened with the key. Run up he flight of stairs beyond the door and follow the path. Once you cross a stone bridge, turn right and you'll come to an overlook with a view of the subterranean castle/Hobbe arena. The Silver Key is here.
Silver Key (Mistpeak Valley [The Hole], 6/6)
The final key in Mistpeak Valley can only be acquired after you have access to the Millfields area. In Millfields, enter the Millfields Monorail Station entrance. Head up the stairs and cross the platform to find this key, which technically counts as a Mistpeak Valley key.
Brightwall Village // 5 Silver Keys
Silver Key
Silver Key
Page 163 of 244IGN.com | Fable III Guide
© 2010 IGN Entertainment, Inc.

Silver Key (Brightwall, 1/5)
By the house outside of Brightwall Village's walls, "Spurious Nuttock," is a small bridge with a set of stairs leading down below. Take the stairs to the Silver Key.
Silver Key (Brightwall 2/5)
Facing the Library in Brightwall, take a left and explore the patch of grass and trees littered with boulders. Behind the row of boulders is a Silver Key.
Fable 3 Silver Keys
Silver Key (Brightwall 3/5)
A Silver Key can be found behind the House of Cluck, between the building and the city wall.
Silver Key (Brightwall 4/5)
Note: This requires the Fireball spell. In The Reliquary under the
Silver Key
Silver Key
= Gold Keys Rare Books Gnomes Flowers
Silver Key
Silver Key
Silver Keys
1-10 11-20 21-30 31-40 41-50
Page 164 of 244IGN.com | Fable III Guide
© 2010 IGN Entertainment, Inc.

Library/Brightwall Academy, just past the room with the appearing blocks, follow the linear path through the area. You will dive into a pool below and head through a magically sealed door. On the far side you'll come across a skeleton with a scrap of paper. The paper hints at what you must do here: Light all the torches in the room with Fireball by aiming at them and firing the magic projectiles at each. Light all eight to open the locked door. The Silver Key is on the far side.
Silver Key (Brightwall 5/5)
Just past Silver Key 4 in the Reliquary you'll move upwards along a path on the outside of the structure. When you head back inside at the top of the ramp, the path forks. Head out towards the ledge with a chest on it and pass the chest to head up a ramp that leads back to the room with the appearing blocks. You'll actually be on a platform above the appearing blocks, and in the center of this platform is a switch. Pull the switch and several Hollow Men will appear. Destroy them and a staircase will appear on the far side of the room. Use the blocks to get to it and a block will appear at the top of the stairs letting you access a room with two sarcophagi in it. The Silver Key can be found here.
Silver Key
Page 165 of 244IGN.com | Fable III Guide
© 2010 IGN Entertainment, Inc.

Mercenary Camp // 1 Silver Key
Silver Key (Mercenary camp 1/1)
As you make your way through the camp, you'll eventually come to a series of paths leading up past a pair of guard towers. Just before the ring where you fight the boss is a hill with a guard tower and a bunch of dog cages on it. Under this guard tower you'll find a Silver Key.
Dweller Camp // 1 Silver Key
Silver Key Dweller Camp (1/1)
Behind the Caravan of Poom in Sabine's circle of dwellings you can score a Silver Key. You cannot do this until you sign a contract with Sabine and the Dwellers, however. Leave the camp after signing the contract and return again to find Sabine's gate open.
Mourningwood // 4 Silver Keys
Silver Key
Silver Key
Page 166 of 244IGN.com | Fable III Guide
© 2010 IGN Entertainment, Inc.

Silver Key (Mourningwood, 1/4)
Starting at the fort, run up the hill you defended with the mortar cannon and stick to the right side. You should spot a Silver Key in a small enclosure before you reach the gravestones. If its blocked in, you'll need to bust it out with a melee weapon or a Fireball spell.
Silver Key (Mourning Wood, 2/4)
As you approach the village in Mourningwood from the graveyard you should pass through some trenches. Just as you emerge, look for some ruined arches outside the ring of the hippy village. A Silver Key floats under these arches. You can't reach it from the village side -- you'll have to go around the back.
Silver Key (Mourningwood [The Ossuary], 3/4)
You'll need to finish the "Bored to Death" Side Quest with Sam and Max in Mourningwood to get the "Gone but not Forgotten" Side Quest that allows you to enter The Ossuary. In the Ossuary, search the tombs on your right as soon as you enter the area. The fourth one you come to has a Silver Key inside.
Silver Key
Silver Key
Silver Key
Page 167 of 244IGN.com | Fable III Guide
© 2010 IGN Entertainment, Inc.

Silver Key (Mourningwood [The Ossuary], 4/4)
You'll need to finish the "Bored to Death" Side Quest with Sam and Max in Mourningwood to get the "Gone but not Forgotten" Side Quest that allows you to enter The Ossuary. As you enter the Ossuary, turn left and run up the stairs. At the top, turn left and vault off the platform to land right next to this key.
Sunset House // 2 Silver Keys
Silver Key (Sunset House, 1/2)
Hang a left as soon as you enter the Sunset House area from Mourningwood. You should come upon the Demon Door. Facing the Demon Door, head to the left again to find the Silver Key nestled amongst the boulders.
Silver Key
Silver Key
Page 168 of 244IGN.com | Fable III Guide
© 2010 IGN Entertainment, Inc.

Fable 3 Silver Keys
Silver Key (Sunset House, 2/2)
Facing Sunset House's front door, turn right and run to through the woods to this key in the corner of the area.
Bowerstone Industrial // 4 Silver Keys
Silver Key (Bowerstone Industrial [Sewers], 1/4)
In Bowerstone Industrial you'll find a crane alongside the river just across the bridge from The Riveter's Rest -- it's right where Reaver executed the protester. Run down the stairs under the crane and enter the door here to find a section of the Sewers separate from the Resistance HQ. Turn right as you enter to find this Silver Key.
Silver Key (Bowerstone Industrial, 2/4)
In a large factory by the coast with open doors, head to the upper level via stairs by the door to find a Silver Key blocked off by steam. To get to it you'll have to hit some switches in order. There's one nearest the top of the stairs on the "left" side of the upper level. Hit that first. Now, hit the one closest to the key on the right side. Head over to the switch across from this one, nearest the key on the left side. Now, return to the first switch you hit and a path to the Silver Key will be opened.
= Gold Keys Rare Books Gnomes Flowers
Silver Key
Silver Key
Silver Key
Silver Keys
1-10 11-20 21-30 31-40 41-50
Page 169 of 244IGN.com | Fable III Guide
© 2010 IGN Entertainment, Inc.

Silver Key (Bowerstone Industrial [Cesspools], 3/4)
When you dive into the Cesspools, run up the first ramp and look for a T-intersection. An area of the tunnel walls here is boarded up but you can make out a Silver Key through it. Bash your way through with a melee weapon to score the key.
Silver Key (Bowerstone Industrial, 4/4)
Near the docks is a large military warehouse you can enter across the canal from the factory with Silver Key 2. The red elevator at the top of the stairs on the upper floor is open and the key is floating inside. This is the same area you had to fight through to get to
Silver Key
Silver Key
Page 170 of 244IGN.com | Fable III Guide
© 2010 IGN Entertainment, Inc.

your ship to leave for Aurora. You'll have to come back as Ruler of Albion to get this key.
Bowerstone Market // 4 Silver Keys
Silver Key (Bowerstone Market, 1/3)
On the end of the bridge opposite the clock tower, take the stairs down to the shop stalls below the bridge. At the end with the fish stalls you'll find a Silver Key behind the stands.
Silver Key (Bowerstone Market, 2/3)
Near the entrance to Bowerstone Castle is a house on the left called Hauteville Heights. Enter this house and exit through the rear door to find this key in the backyard.
Silver Key (Bowerstone Market [Hideout], 3/3)
You can only get this key once you are Ruler of Albion. During the Weight of the World you will be asked to meet with Page and then prevent a robbery. As you make your way through The Hideout you'll come to a room with jail cells. Across from the cells is door you can open. Head down into the basement and open the cell around the corner with the Silver Key in it.
Bowerstone Old Quarter // 2 Silver Keys
Small Key (Bowerstone Old Quarter, 1/2)
Leave the front gate towards the ocean. The key is just to the right under a large tree along the wall. You'll have to walk down the stone path a bit to get to this area.
Silver Key
Silver Key
Silver Key
Silver Key
Page 171 of 244IGN.com | Fable III Guide
© 2010 IGN Entertainment, Inc.

Small Key (Bowerstone Old Quarter, 2/2)
Note: You cannot get this Silver Key if you don't restore Bowerstone as Ruler of Albion and the city falls to ruin -- you can get it before you do this, though! Run uphill under the bridge in the Old Quarter past the pig statue. Near the top of the hill is a small park with a statue in it. Around the edge of the park is a house called the Nightshade House. Purchase this house and you can access the second floor to find the Silver Key.
Fable 3 Silver Keys
Millfields // 7 Silver Keys
Silver Key (Millfields, 1/7)
As you enter Millfields from Bowerstone Market, you'll have to run down the path a bit before you come to Bower Lake. As you come up on top of the tall ridge overlooking the lake, you'll pass a small graveyard where you dig up the Normanomicon in the "Bored to Death" Side Quest with Sam and Max. A tiny path leads right to this key from the graveyard.
Silver Key (Millfields, 2/7)
As you enter Millfields from Bowerstone Market, you'll pass Pepperpot Cave. Across from the cave entrance is a path leading up to a factory building on the ridge above the entrance to the Millfields Monorail. You'll have to hop a fence to find the small path
Silver Key
= Gold Keys Rare Books Gnomes Flowers
Silver Key
Silver Key
Silver Keys
1-10 11-20 21-30 31-40 41-50
Page 172 of 244IGN.com | Fable III Guide
© 2010 IGN Entertainment, Inc.

leading up the factory. On the side of the building over the Monorail entrance is a small wood box with this key inside.
Silver Key (Millfields, 3/7)
Locate the entrance to Dankwater Cavern up in the hills to the right as you get to Bower Lake from the Bowerstone Market path. From the cavern entrance, run straight out of the cave and jump down into the pond and swim to the left to find this key. It's below one of the statues with a telescope.
Silver Key (Millfields [Pepperpot Cavern], 4/7)
As you enter Millfields from Bowerstone Market, you'll pass Pepperpot Cave on your right. Break the boards on the door and enter the cave and you'll encounter many Hobbes. At the far end of the cave, cross the water to find this key.
Silver Key (Millfields [Reaver's Manor], 5/7)
In Reaver's Manor, run up to the upper level and enter the bedroom to the right of the dining area. In the bedroom, approach the bookshelf and press A to activate a secret door. In the bedroom at the end of the secret hallway, grab the key behind the bed.
Silver Key (Millfields [Dankwater Cavern], 6/7)
You can only access this key after accepting the Hobnobbing with Hobbes quest after you fight the Darkness at the end of the game. Even after completing this quest you won't be able to access the lower portion of the cave until after you return later on. You can see this key just as you enter the cavern, but you'll need to swim out into the water to reach it. Run down the path and enter the water at the bottom of the ramp. Swim left and exit
Silver Key
Silver Key
Silver Key
Silver Key
Page 173 of 244IGN.com | Fable III Guide
© 2010 IGN Entertainment, Inc.

the water. Take a right on the path when it branches to get to the key.
Silver Key (Millfields [Dankwater Cavern], 7/7)
You can only access this key after accepting the Hobnobbing with Hobbes quest after you fight the Darkness at the end of the game. Even after completing this quest you won't be able to access the lower portion of the cave until after you return later on. Run down the path and enter the water at the bottom of the ramp. Turn right and swim through the rocks. Follow the winding path up to this key.
Silverpines // 2 Silver Keys
Silver Key (Silverpines, 1/2)
As you enter Silverpines from Millfields, head towards the small village. At the edge of the village, before you reach the wall, veer left on the path and you'll find this Silver Key.
Silver Key (Silverpines [Mine], 2/2)
In Silverpines there is a mine with an entrance around the circle of buildings in the village. Enter the mine and you'll find the key at the very end of the mine cart rails.
Driftwood // 2 Silver Keys
Silver Key
Silver Key
Silver Key
Page 174 of 244IGN.com | Fable III Guide
© 2010 IGN Entertainment, Inc.

Silver Key (Driftwood, 1/2)
Driftwood is an area that you can access after completing the "Restoration" Side Quest in Millfields (pay 750 Gold to repair the bridge at the Stonehenge-like blocks). In Driftwood, run through the Gypsy camp and dive into the water. Swim for the leftmost island. Climb to the top of the island and look for the kettle/pot in the small camp on the island's peak. Leave the kettle and walk off the edge of the small cliff towards the spire and you'll drop to this key.
Fable 3 Silver Keys
Silver Key (Driftwood [Cave], 2/2)
Driftwood is an area that you can access after completing the "Restoration" Side Quest in Millfields (pay 750 Gold to repair the bridge at the Stonehenge-like blocks). In Driftwood, run through the Gypsy camp and dive into the water. Swim out to the large island in the center and, just as you get to the shore, you should spot a cave. Enter eth cave to find this key.
City of Aurora // 2 Silver Keys
Silver Key (City of Aurora, 1/2)
Follow the ramp up past the Demon Door and you'll pass through two flags. Before exiting to the Shifting Sands, look for a small nook on the right with this key.
Silver Key
= Gold Keys Rare Books Gnomes Flowers
Silver Key
Silver Key
Silver Keys
1-10 11-20 21-30 31-40 41-50
Page 175 of 244IGN.com | Fable III Guide
© 2010 IGN Entertainment, Inc.

Silver Key (City of Aurora, 2/2)
This key is really tough to find, but you can see it on a rocky bridge over one of the paths leading through the houses of Aurora. Near the key, up high on the hill between the Demon Door area and the massive temple steps, is a candle-filled shrine by a door blocked by boulders. NOTE: THIS WILL BE THE MINE ENTRANCE IF YOU CHOOSE TO DESTROY AURORA. Facing the shrine/mine entrance, head to the right to find a secluded rock path by the cliff that leads to a rocky bridge above the key. At the end of this bridge is a chest. Before crossing the bridge, vault off this bridge to a rooftop below. Keep vaulting off the rooftops to the key below.
Shifting Sands // 5 Silver Keys
Silver Key (Shifting Sands, 1/5)
Entering from the City of Aurora, head towards the massive stone arch linking the stone area to the dune area. To the right of the arch on the rocky side is a small hill with this key.
Silver Key
Silver Key
Page 176 of 244IGN.com | Fable III Guide
© 2010 IGN Entertainment, Inc.

Silver Key (Shifting Sands, 2/5)
Entering from the City of Aurora, head towards the massive stone arch linking the stone area to the dune area. Pass under the stone arch to the dunes side and hang a left to find a small depressing with this key in it.
Silver Key (Shifting Sands, 3/5)
Entering from the City of Aurora, head towards the massive stone arch linking the stone area to the dune area. Pass under the stone arch to the dunes side and head straight for the Veiled Path entrance. In the dead center of the dunes you'll find a collapsed column with this key beneath it.
Silver Key (Shifting Sands [Sandfall Palace], 4/5)
You can access Sandfall Palace after you become the Ruler of Albion and pursue the quest to find the giant diamond. Just as you come to the first area with water, look for a locked door. Above the door is a Flit Switch. Shoot it four times to enter the door -- it will move around so you have to shoot it before it resets -- and you'll find the key.
Silver Key (Shifting Sands [Sandfall Palace], 5/5)
You can access Sandfall Palace after you become the Ruler of Albion and pursue the quest to find the giant diamond. In the final room, where you find the diamond, you'll find this key in the corner to the left of the massive gem.
Silver Key
Silver Key
Silver Key
Silver Key
Page 177 of 244IGN.com | Fable III Guide
© 2010 IGN Entertainment, Inc.

Veiled Path // 2 Silver Keys
Small Key (Veiled Path, 1/2)
At the far end of The Veiled Path is a Silver Key. Just make it to the top of the stairs and the key is floating in the corner to the right.
Small Key (Veiled Path [Enigma], 2/2)
At the staircase at the far end of The Veiled Path is the entrance to an area called The Enigma. Don't let the small area fool you, there's more to The Enigma -- look for a Flit Switch at the end of the room. It's above the door. Use the Fireball gauntlet (alone) to light the torches in the next area. An opening to the right will reveal this Silver Key on a circular stand. It's in the room with the colored panels.
Silver Key
Silver Key
Page 178 of 244IGN.com | Fable III Guide
© 2010 IGN Entertainment, Inc.

Fable 3 Gold Keys
Gold Keys can be used to open Gold Key Doors. These doors, scattered throughout Albion, each require one amount of Gold Key to open. Treasure can be found on the other side. Collecting all Silver and Gold Keys will also land you the I Am The Keymaster Achievement. Any key can be used for any door, so choose wisely! A special fifth Gold Key can be found in the Sanctuary, scroll to the bottom of the page to learn about this super-secret key and its special chest.
Gold Key (Mistpeak Valley 1/1)
If you examine the map of Mistpeak Valley, you can make out two caves entrances above the Demon Door and one on the far side of the level up in the hills. Travel to the latter cave -- you can get there by running uphill from the lake and hanging a left just before the path to Brightwall Village. You can follow a grassy ridge past a treasure chest to find this cave entrance to Chillbreath Cavern -- it is not an icy entrance, it is a thawed, brownish cave entrance. Run through this cave and take the path leading upwards. You should pass a 15 Silver Key chest on the way amongst various other Dig Spots and chests. Keep heading uphill and eventually you'll come to an exit at the very top. Once outside again, run down the short hill and you'll find the Gold Key floating amongst some ruins.
Gold Key (Driftwood 1/1)
Driftwood is an area that you can access after completing the "Restoration" Side Quest in Millfields (pay 750 Gold to repair the bridge). In Driftwood, complete these Side Quests to help reach the coastal islands: Pest Control and Giftwood for Driftwood. After this, leave and return to the area after a few in-game days. You MUST wait until the boat appears on the main island and the mine is built around the docks on the same island. Now you can reach a Flit Switch on an island across the new bridge to the far, far right. It's at the edge of the new gypsy town. Now you can follow the Flit Switch around the area and hit it with you melee and ranged weapons. Climb the mountain in pursuit of the switch. The switch will take
= Silver Keys Rare Books Gnomes Flowers
Gold Key 1
Gold Key 2
Gold Keys
Page 179 of 244IGN.com | Fable III Guide
© 2010 IGN Entertainment, Inc.

you to the leftmost island, up a path and across a new bridge to the top of the central island. A warp zone at the top will take you to the Gold Key.
Gold Key (The Veiled Path [Aurora], 1/1)
At the staircase at the far end of The Veiled Path is the entrance to an area called The Enigma. Don't let the small area fool you, there's more to The Enigma -- look for a Flit Switch at the end of the room. It's above the door. Use the Fireball gauntlet (alone) to light the torches in the next area. In the room with the colored floor panels, examine the flames on the wall. These flames reveal the order in which you must step on the panels: YELLOW, BLUE, YELLOW, RED, BLUE, RED, BLUE, RED. The Gold Key is just beyond the door.
Gold Key (Shifting Sands [Aurora], 1/1)
To get this Gold Key, first you need to have access to the Aurora continent. In the city, do the quest "A Key to a Greater Key." This quest became available to me after completing the main game. Talk to the guy who offers the quest near the tatooist and he'll sell you a key for 4,000 Gold. Once you have that key, there won't be a bread crumb trail telling you where to use it. Go to Shifting Sands and run across the vast dunes. On the far side, turn left and follow the cliff face until you find a little path down by some ruins. At the bottom, use the key given to you and you will unlock an area that contains the Gold Key.
Gold Key 3
Gold Key 4
Page 180 of 244IGN.com | Fable III Guide
© 2010 IGN Entertainment, Inc.

Step on the platforms to fight enemies and slowly make your way to the key.
Gold Key Door Locations
On your way down the path in the Catacombs under Bowerstone Castle (which you traverse in the very beginning of the game), you may notice a Gold Door -- you need a Gold Key to open it, and so you'll have to return much alter when you have access to the castle AND a key. Inside you'll find 30 Guild Seals.
In the Sunset House area, enter the main gate and take a right as soon as you set foot on the lawn. A winding path leads back to the Gold Key Door here. It's directly across from the gazebo. Inside this Gold Key Door you'll find a Legendary Weapon (we found the Hammer of Wilmageddon).
In Mourningwood you can access the Ossuary through a door in the graveyard after completing two side quests: Bored to Death and Gone but Not Forgotten (which involve Sam, Max and the Normanomicon). In the Ossuary, turn left just as you enter to find the Gold Door. Beyond it is a sarcophagus you can open for a Legendary Weapon.
Gold Key Door
Gold Key Door
Gold Key Door
Page 181 of 244IGN.com | Fable III Guide
© 2010 IGN Entertainment, Inc.

In the Reliquary under the Academy in Brightwall Village you can find a well-hidden Gold Key Door. To get to it, you'll need to complete the Special Delivery (Dweller Camp) and The Ancient Key (Academy) Side Quests. In the latter Side Quest you can lead Saul to a secret library in the Reliquary. Here you can make out a Flit Switch on the wall -- it takes four shots from a firearm to activate it. Head up the stairs and through the door on the left. Here is a melee Flit Switch you can smack. It will float down below to the large room where you first encountered Hollow Men and received your first gun. Vault off the edge and smack it again. After taking on the wave of Hollow Men, stairs and platforms will align to lead to the Gold Key Door -- starting just past the central platform on the thin bridge. There are five chests in the area beyond called The Prism with the various pieces of the complete Highway Man Costume.
The Special Gold Key and Chest
Once you are the Ruler of Albion, enter the treasure room in The Sanctuary (your pause menu) and look up and you should be able to spot a Gold Key. To reach it, you'll need to make some 5,000,000 Gold. The Scrooge McDuck-like pile will lift you to the key. One way to do this is to buy shops early and often to start turning a profit. High-priced shops turn higher profits. You can get a cool million from the Sunset House Demon Door as well. A special chest to match this key lies at the very bottom of your Gold hoard. To reach it once you have the key, transfer ALL of your funds to the Albion Treasury. This will take 5 transactions of 1 million Gold. Now, return to the Sanctuary and open the chest for a Legendary Weapon.
Gold Key Door
Page 182 of 244IGN.com | Fable III Guide
© 2010 IGN Entertainment, Inc.

Fable 3 Rare Books
Talk to Samuel in Brightwall Village (the librarian at the Academy) to initiate a Side Quest called "The Pen is Mightier..." For this Side Quest, and the Brightwall Book Club Achievement, you must collect 30 Rare Books in Albion. Show them to Samuel occasionally for rewards.
Brightwall Village // 6 Books
Brightwall Village Rare Book (1/6) Famous Kings of History: Markus Ivy
Enter the top floor of the Ye Quill & Quandary Pub in Brightwall and grab this book of the nightstand of the bedroom.
Brightwall Village [Reliquary] Rare Book (2/6) How to Be a Master Swordsman
Search the left side of the entryway to the Reliquary to find a pedestal with a Rare Book on it titled "How to Be a Master Swordsman."
Brightwall Village Rare Book (3/6) Attack of the Killer Puffins
Behind Fabulous Furnishings is a windowsill with this book on it.
= Silver Keys Gold Keys Gnomes Flowers
Rare Book
Rare Book
Rare Book
Rare Books
1-10 11-20 21-30
Page 183 of 244IGN.com | Fable III Guide
© 2010 IGN Entertainment, Inc.

Brightwall Village Rare Book (4/6) The Very Unsafe Book for Boys Vol. 2: Ovens
In the Two-Knock house nearest to the Academy, break into the upper level (or purchase the house to unlock the doors) and grab this book off the banister.
Brightwall Village [Reliquary] Rare Book (5/6) Famous Killers: Carl Tendency
After completing the "An Ancient Key" Side Quest you'll have access to a secret library in the Reliquary (with a Gold Key). On a pedestal in the corner you'll find this book.
Brightwall Village [Reliquary] (6/6) Book of Doom
You'll have to return all of the other 29 books to Samuel in the Library to get the quest to find this book. It will not appear otherwise and you need the key given to you by Samuel as part of the quest. The final locked door of the Reliquary is just to your right as you head down the stairs towards the spot where you encountered your first Hollow Men and received the first gun. Enter this door and follow the hallways until you reach the Book of
Rare Book
Rare Book
Rare Book
Page 184 of 244IGN.com | Fable III Guide
© 2010 IGN Entertainment, Inc.

Doom.
Dweller Camp // 1 Book
Dweller Camp Rare Book (1/1) Famous Kings of History: King Cedric
At the top of the winding mountain path above the village is a hut called Wimpet's Sniffle. Inside by the bed you'll find this Rare Book.
Mistpeak Valley // 3 Books
Mistpeak Valley [Chillbreath Caverns] Rare Book (1/3) Famous Killers: Xavier Smedley
In the Chillbreath Caverns cave that leads to the Gold Key of Mistpeak Valley, near the bottom of the path that slopes down at the beginning of the cave is an ice pool with a frozen waterfall. Look for a path leading to a small bed with a treasure chest and this book.
Mistpeak Valley Rare Book (2/3) How To Be a Crack Shot
Look for this book in the small booth outside the Monorail entrance. It's on the window sill.
Rare Book
Rare Book
Rare Book
Page 185 of 244IGN.com | Fable III Guide
© 2010 IGN Entertainment, Inc.

Mistpeak Valley [Chillbreath Caverns] Rare Book (3/3) Book of Mysteries
Note: This book WILL NOT APPEAR unless you've returned five books to Samuel and started the Side Quest to find the Book of Mysteries. Enter the Gold Key cavern entrance -- it's brown, not frozen and just up from the Monorail Station, before you reach the snow line. Run downhill in the cave until you get to the large, frozen lake with a dock. Cross the lake to the far side and follow the path upwards. It will eventually cross a stone bridge and terminate by some bedding and books. On a table here you'll find the Book of Mysteries.
Rare Book
Page 186 of 244IGN.com | Fable III Guide
© 2010 IGN Entertainment, Inc.

Fable 3 Rare Books
Sunset House // 1 Book
Sunset House Rare Book (1/1) The Extraordinary Homunculus of Baron von Orfen
This book can be found behind the gazebo in the Sunset House area. The gazebo is to the left of the large, ghostly mansion.
Mourningwood // 3 Books
Mourningwood Rare Book (1/3) The Mibbs-Spagno Theory of Gluttony
Check the rear side of the Organic Ink (Tattooist) building in the ring of raise huts for a rare book. It's sitting on a crate.
Mourningwood [Ossuary] Rare Book (2/3) Famous Kings of History: Old King Oswald
You'll need to finish the "Bored to Death" Side Quest with Sam and Max in Mourningwood to get the "Gone but not Forgotten" Side Quest that allows you to enter The Ossuary. As you enter the area, turn left and head up the long flight of stairs to the Gold Door. Pass the door and look on the railing to the right for this book.
= Silver Keys Gold Keys Gnomes Flowers
Rare Book
Rare Book
Rare Book
Rare Books
1-10 11-20 21-30
Page 187 of 244IGN.com | Fable III Guide
© 2010 IGN Entertainment, Inc.
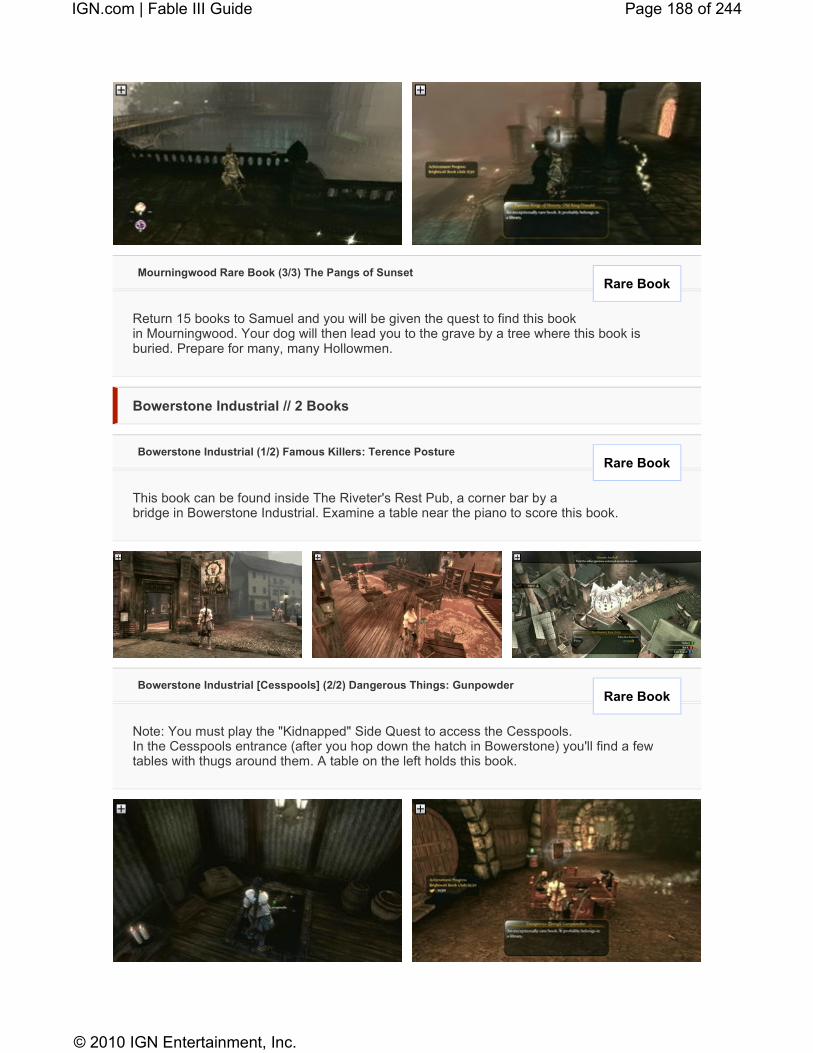
Mourningwood Rare Book (3/3) The Pangs of Sunset
Return 15 books to Samuel and you will be given the quest to find this book in Mourningwood. Your dog will then lead you to the grave by a tree where this book is buried. Prepare for many, many Hollowmen.
Bowerstone Industrial // 2 Books
Bowerstone Industrial (1/2) Famous Killers: Terence Posture
This book can be found inside The Riveter's Rest Pub, a corner bar by a bridge in Bowerstone Industrial. Examine a table near the piano to score this book.
Bowerstone Industrial [Cesspools] (2/2) Dangerous Things: Gunpowder
Note: You must play the "Kidnapped" Side Quest to access the Cesspools. In the Cesspools entrance (after you hop down the hatch in Bowerstone) you'll find a few tables with thugs around them. A table on the left holds this book.
Rare Book
Rare Book
Rare Book
Page 188 of 244IGN.com | Fable III Guide
© 2010 IGN Entertainment, Inc.

Millfields // 3 Books
Millfields Rare Book (1/3) AdventureQuest: A Select Your own Endeavor Book
During the Side Quest "Bored To Death," Sam and Max will send you to the graveyard in Millfields to recover a book. After the Hollow Men are taken care of, search the small crypt where the large Hollow Man appeared to find this book.
Millfields [Reaver's Manor] Rare Book (2/3) Dangerous Things: Lightning
Enter Reaver's Manor by either purchasing it, completing the game as an evil ally of Reaver or as part of the "Reaver's Unmentionables" Side Quest. Turn left as you enter and, in the room with the statue and fireplace, search the table by the windows.
Millfields Rare Book (3/3) [Dankwater Cavern] Liver of Darkness
You can only access this key after accepting the "Hobnobbing with Hobbes" Side Quest after you fight the Darkness at the end of the game. Even after completing this quest you won't be able to access the lower portion of the cave until after you return later on. Enter the door to the Hobbes quarters that's now open and run down into the pool of pater. Swim to the left until you come to a shore with a table and this book under the cave entrance.
Rare Book
Rare Book
Rare Book
Page 189 of 244IGN.com | Fable III Guide
© 2010 IGN Entertainment, Inc.

Bowerstone Market // 2 Books
Bowerstone Market Rare Book (1/2) Tyranny of Tyrants
Enter the Cock and the Crown pub and run up to the second level to find this on a table along the balcony.
Fable 3 Rare Books
Bowerstone Market Rare Book (2/2) Grasping Avarice of Kings and Their Lackeys
Enter the Dollhouse, the last house before exiting to Millfields via the main gate, either by purchasing it or breaking in. Enter the top floor using the external staircase. This book is on the bed in the rear of the upper floor, although it is hard to interact with due to the SLEEP command you get. Stand at the foot of the bed to pick it up.
Bowerstone Old Quarter // 2 Books
Bowerstone Old Quarter Rare Book (1/2) Dangerous Things: Industrial Machinery
At the top of the Old Quarter is a small park with a fence around it. In this park is a massive tree and a statue of a man with a telescope. On the base of the telescope is a rare book.
Rare Book
= Silver Keys Gold Keys Gnomes Flowers
Rare Book
Rare Book
Rare Books
1-10 11-20 21-30
Page 190 of 244IGN.com | Fable III Guide
© 2010 IGN Entertainment, Inc.

Bowerstone Old Quarter Rare Book (2/2) The Invocation of the Watchers
After returning 10 Rare Books to the library for Samuel, he will give you the Trapdoor Key which can be used in Bowerstone Old Quarter (before it is destroyed!). Follow the gold path to Throckbibble Mansion and enter the trap door in the basement. You must shoot a Flit Switch on one of the pedestals in the "collection" of rare items. Hit it twice and then kill the Hobbes. Use the correct attacks to hit the Flit Switch three more times. Some bookshelves will move to reveal this book.
Bowerstone Castle // 1 Book
Bowerstone Castle Rare Book (1/1) Alchemy and Immortality
Enter the castle from Bowerstone Market and head up the red carpeted stairs in the main foyer. Turn left and head into the door and up more stairs at the top to find the bedroom. A side room here has bookshelves and three little beds. This book is on one of the little beds.
Rare Book
Rare Book
Page 191 of 244IGN.com | Fable III Guide
© 2010 IGN Entertainment, Inc.

Silverpines // 1 Book
Silverpines Rare Book (1/1) The Very Unsafe Book for Boys Vol. 3: Boxing
Starting from the Millfields entrance, run through the area. In the village, run around the side of the very first house you come to on your left. On the side of the house is a crate with this book on it.
Driftwood // 1 Book
Driftwood (1/1) Dangerous Things: Stargazing in Remote Areas
Driftwood is an area that you can access after completing the "Restoration" Side Quest in Millfields (pay 750 Gold to repair the bridge at the Stonehenge-like blocks). Now you'll need kill all the Hobbes in Driftwood for a Side Quest and then complete "Giftwood for Driftwood" to turn the area into a mining facility. In Driftwood, run through the Gypsy camp and dive into the water. On the island to the left, enter the mine with an entrance facing the camp to find this book. It's on a crate to your left in the entrance.
Rare Book
Rare Book
Page 192 of 244IGN.com | Fable III Guide
© 2010 IGN Entertainment, Inc.
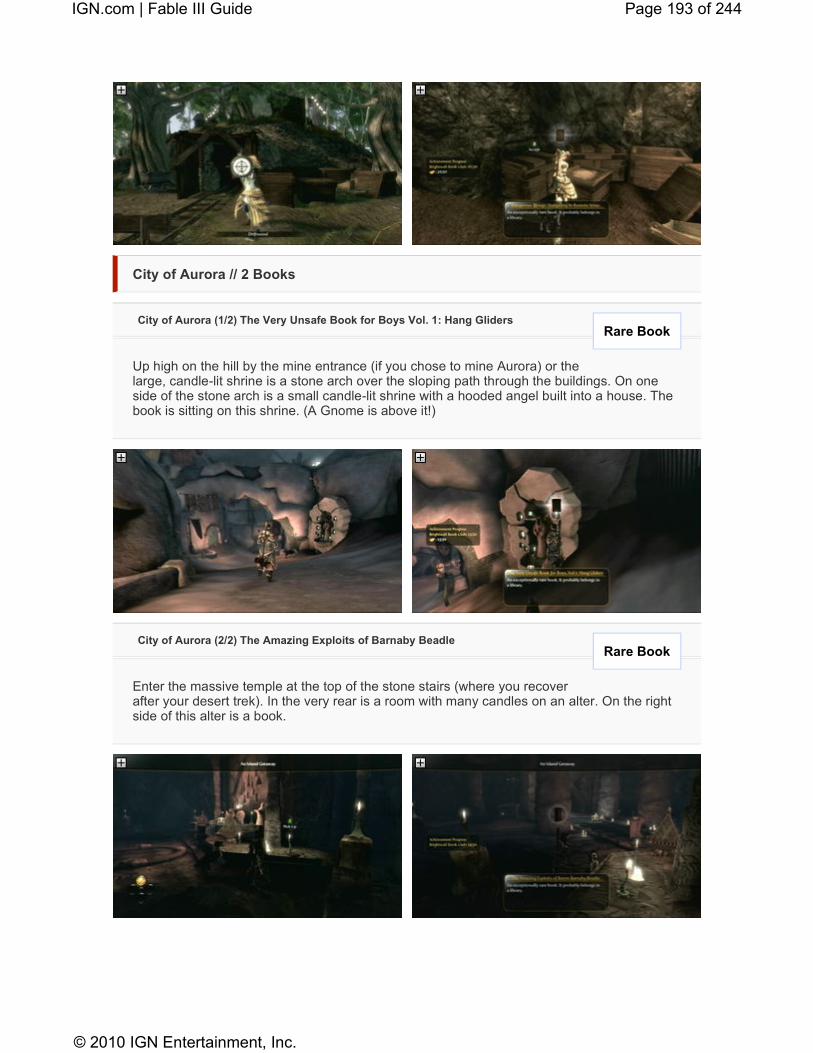
City of Aurora // 2 Books
City of Aurora (1/2) The Very Unsafe Book for Boys Vol. 1: Hang Gliders
Up high on the hill by the mine entrance (if you chose to mine Aurora) or the large, candle-lit shrine is a stone arch over the sloping path through the buildings. On one side of the stone arch is a small candle-lit shrine with a hooded angel built into a house. The book is sitting on this shrine. (A Gnome is above it!)
City of Aurora (2/2) The Amazing Exploits of Barnaby Beadle
Enter the massive temple at the top of the stone stairs (where you recover after your desert trek). In the very rear is a room with many candles on an alter. On the right side of this alter is a book.
Rare Book
Rare Book
Page 193 of 244IGN.com | Fable III Guide
© 2010 IGN Entertainment, Inc.

Shifting Sands // 2 Books
Shifting Sands [Sandfall Palace] (1/2) Dangerous Things: Ladders
Cross the bridge over the first massive pool you come to. On the far side, don't enter the door. Turn right at the door and go down the short staircase to find this Rare Book. It's under the upper, inaccessible bridge.
Shifting Sands (2/2) Reaver on Reaver
You'll have to return 20 books to Samuel in the Library to get the quest to find this book. It will not appear otherwise. The best way to get to this book is to let you dog sniff it out as part of the Side Quest. It is in the middle of the Shifting Sands by some crates and a shovel.
Fable 3 Gnomes
Brightwall Village // 5 Gnomes
Brightwall Village (1/5)
Before collecting Gnomes you'll have to complete a two Side Quests, "Gnomes are Great" and "Gnomes are Evil" in Brightwall Village. After that, the 50 Gnomes hidden in Albion will come to life. You must shoot the loudmouthed Gnomes to collect them. Jonathon, in Brightwall Village, will then reward you for your efforts as part of the Gnomes are Evil Side Quest.
Talk to Jonathon in the Gnome-filled grotto by the Brightwall Academy/Library after you complete Gnomes are Great and he'll tell you the Gnomes have escaped. Follow the path to the first Gnome in the Misgnomer House. Here you will find the first Gnome (Brightwall Village 1/5). Stop just inside the door and pull out your gun. Press the LEFT TRIGGER to entire first-person aiming mode and look up.
Rare Book
Rare Book
= Silver Keys Gold Keys Rare Books Flowers
Gnome
Gnomes
1-10 11-20 21-30 31-40 41-50
Page 194 of 244IGN.com | Fable III Guide
© 2010 IGN Entertainment, Inc.

A Brightwall Village (1/5) is suspended across from the door in the corner of the house. Shoot it. Now, return to Jonathon. It turns out there are 49 more of these awful creatures scattered about Albion. You need to shoot every one of them to complete this Side Quest! .
For better or worse, Gnomes won't sit in silence. You can hear them vocally insulting you wherever they are. Listen for the distinctive voice while you explore!
Brightwall Village (2/5)
On chimney of the House of Slats -- a large house to the left after you cross the small, stone bridge near the main gate.
Gnome
Page 195 of 244IGN.com | Fable III Guide
© 2010 IGN Entertainment, Inc.

Brightwall Village (3/5)
Behind Bumbler's Gruff in the center of the village is a path between some stones. The Gnome is standing on one of these stones.
Brightwall Village [The Reliquary] (4/5)
Run down to the room with the moving/appearing platforms with blue arrows. Take the stairs down on the far side of the platforms. Instead of vaulting down, run counterclockwise around the building and search the dark corner for this Gnome.
Brightwall Village [The Reliquary] (5/5)
Run down to the room with the moving/appearing platforms with blue arrows. Take the stairs down on the far side of the platforms. Vault down and then off the broken bridge into the water below. Run up a few flights of stairs until you reach the area with the torches, the skeleton with a note and a large, circular column. Just before the skeleton, look off into the abyss to the right to see this Gnome.
Gnome
Gnome
Gnome
Page 196 of 244IGN.com | Fable III Guide
© 2010 IGN Entertainment, Inc.

Dweller Camp // 1 Gnome
Dweller Camp (1/1)
If you run down the hill a bit from sabine's gate and hang a left at a fire pit you'll find a small path up to a 5 Silver Key Chest. Look up in the hills from here to spot the Gnome by a fence.
Mistpeak Valley // 7 Gnomes
Mistpeak Valley (1/7)
Run up the hill from the Monorail station and you'll come to an overlook (with a Silver Key). Just to the right of the key is a Gnome.
Mistpeak Valley (2/7)
The snowy valley that leads to the Demon Door, terminates in a dead end with a frozen waterfall and the door. The Gnome is atop the waterfall.
Gnome
Gnome
Gnome
Page 197 of 244IGN.com | Fable III Guide
© 2010 IGN Entertainment, Inc.

Mistpeak Valley (3/7)
In the snowy mountains, a path a few bridges up from the entrance to Brightwall leads to some ruins with a skeleton in a pit. The Gnome is hanging on the cliff wall just on the other side of a short fence. The ruins are on the Brightwall side of the valley.
Mistpeak Valley [Chillbreath Caverns] (4/7)
Enter the caverns via entrance across the first, short bridge over the valley (the entrance that leads to the Silver Key). As soon as you enter, look up. This Gnome is hanging from the stalactites on the roof.
Fable 3 Gnomes
Mistpeak Valley [Chillbreath Caverns] (5/7)
Enter the Gold Key cavern entrance -- it's brown, not frozen and just up from the Monorail Station, before you reach the snow line. Run downhill in the cave until you get to the large, frozen lake with a dock. In the middle of the lake, atop a spire of rock, stands this Gnome.
Gnome
Gnome
= Silver Keys Gold Keys Gnomes Flowers
Gnome
Rare Books
1-10 11-20 21-30 31-40 41-50
Page 198 of 244IGN.com | Fable III Guide
© 2010 IGN Entertainment, Inc.

Mistpeak Valley [The Hole] (6/7)
At the entrance to The Hole via the Mistpeak Monorail Station elevator, run down towards the burning wreckage of the Monorail. A post on the far side of the wreckage has a Gnome sticking to it.
Mistpeak Valley [The Hole] (7/7)
After fighting Hobbes in the subterranean castle/arena, you can shoot this Gnome off of the castle wall above the entrance on the inner side.
Mercenary Camp // 1 Gnome
Mercenary Camp (1/1)
In the Mercenary Camp, run up the path through the first gate and look for the
Gnome
Gnome
Gnome
Page 199 of 244IGN.com | Fable III Guide
© 2010 IGN Entertainment, Inc.

first watchtower with a treasure chest on its platform. It's at a switchback in the road. Nearby is a water tower with a Gnome perched atop it.
Mourningwood // 3 Gnomes
Mourningwood (1/3)
Starting at the fort, run up the hill you defended with the mortar cannon and stick to the right side. Before you get to the grave yard, explore the ruins at the top of the hill. Run under the archway here and turn around to find a Gnome stuck to it.
Mourningwood (2/3)
Before you leave Mourningwood via the Bowerstone Industrial sewers, check between the two sewer arches for a Gnome on some boulders.
Mourningwood [Ossuary] (3/3)
You'll need to finish the "Bored to Death" Side Quest with Sam and Max in Mourningwood to get the "Gone but not Forgotten" Side Quest that allows you to enter The
Gnome
Gnome
Gnome
Page 200 of 244IGN.com | Fable III Guide
© 2010 IGN Entertainment, Inc.

Ossuary. Pass through the Ossuary until you come to the large tree in a circular pit. Past the tree are some stairs leading down to a large area with a massive doorway and tombs on either side. Above this area and to the left is a balcony with a treasure chest and a row of tombs. Between the third and fourth tomb on the balcony is a Gnome.
Sunset House // 1 Gnome
Sunset House (1/1)
Facing Sunset House, examine the corner of the house to your right. This Gnome is on some boulders above a small pool.
Bowerstone Industrial // 5 Gnomes
Bowerstone Industrial (1/5)
This Gnome can be found under the bridge by The Riveter's Rest Pub. It's directly under the bridge on the side where Revear shot the protester.
Bowerstone Industrial [Sewers] (2/5)
In Bowerstone Industrial you'll find a crane alongside the river just across the
Gnome
Gnome
Gnome
Page 201 of 244IGN.com | Fable III Guide
© 2010 IGN Entertainment, Inc.

bridge from The Riveter's Rest -- it's right where Reaver executed the protester. Run down the stairs under the crane and enter the door here to find a section of the Sewers separate from the Resistance HQ. Turn left upon entering and the Gnome will be directly ahead of you, just past the T-intersection. Cross the small channel of water by using some stairs around the side and head into the room with the Gnome on the ceiling.
Fable 3 Gnomes
Bowerstone Industrial (3/5)
This Gnome can be found high on a building near the bridge nearest to the shipyard. It's on the wall of the building right at the end of the bridge above a poster with a skull and crossbones on it.
Bowerstone Industrial [Cesspools], (4/5)
In the Cesspools, vault down into the abyss and follow the path up. At one point the path will veer to the right but this Gnome is hanging out in front of you before you turn. It's hanging on the wall just past a skylight.
= Silver Keys Gold Keys Gnomes Flowers
Gnome
Gnome
Rare Books
1-10 11-20 21-30 31-40 41-50
Page 202 of 244IGN.com | Fable III Guide
© 2010 IGN Entertainment, Inc.

Bowerstone Industrial (5/5)
You can get the key to the pie factory in by accepting the "Animal Liberation" Side Quest. Inside the factory, look for a cage with this Gnome inside. It's under the rear, upper-level door.
Millfields // 5 Gnomes
Millfields (1/5)
Running towards the lake from the entrance to Bowerstone Market, you'll pass the entrance to Pepperpot cave on your right. Past the cave entrance on your right is a pile of lumber and this Gnome is just beyond it on the cliff wall.
Millfields (2/5)
Provided you don't drain the lake, this Gnome is on some arched ruins under the bridge leading out to the center of the lake. It's under one of the statues with a telescope by the bridge. The bridge may be gone if you've drained the lake but the Gnome is still there.
Gnome
Gnome
Gnome
Page 203 of 244IGN.com | Fable III Guide
© 2010 IGN Entertainment, Inc.

Millfields (3/5)
This Gnome is in the front yard of Reaver's Manor. Walk down the steps to the lower yard and turn around to face the house. The Gnome will be on the wall on your left behind a tree.
Millfields [Dankwater Cavern] (4/5)
Note: you do not need to complete Hobnobbing with Hobbes for this Gnome. Enter the cavern and follow the path until you come to a hole in the wall by some waterfalls. The Gnome is hanging out to your left by the waterfalls.
Millfields [Dankwater Cavern] (5/5)
Note: you do not need to complete Hobnobbing with Hobbes for this Gnome. Enter the cavern and follow the path until you come to a hole in the wall by some waterfalls. Enter the hole and you'll come to a room with a large natural column in the middle and a treasure chest. Run to the other side of the room and look for the Gnome in a nook in the corner. You may have to listen carefully for this one.
Gnome
Gnome
Gnome
Page 204 of 244IGN.com | Fable III Guide
© 2010 IGN Entertainment, Inc.

Bowerstone Market // 3 Gnomes
Bowerstone Market (1/3)
Next to the Cock and the Crown is a house called The Doghouse. Enter it and exit the back door. Turn around in the back yard and shoot the Gnome above the door.
Bowerstone Market (2/3)
This Gnome is in one of the round towers on the market wall. Enter from Millfields and turn left just past the main gate. Look for the stairs at We've Got Wood and use them to access the wall. Run down the wall until you get to the second round tower and look for the Gnome on its interior.
Gnome
Gnome
Page 205 of 244IGN.com | Fable III Guide
© 2010 IGN Entertainment, Inc.

Fable 3 Keys and Collectibles
Bowerstone Market (3/3)
Enter the area via Bowerstone Industrial and look for stairs leading up to the castle wall on your left. A dark indentation in the wall at the base of these stairs holds a Gnome.
Bowerstone Old Quarter // 3 Gnomes
Bowerstone Old Quarter (1/2)
In the plaza with the pig statue, this Gnome is on the side of the building called House of Stains. Facing the building, it's on the right side. This building is to your right as you enter the plaza from the water.
Bowerstone Old Quarter (2/2)
From the pig statue, pass under the stone archway and veer right down the street. This Gnome is in the window of a house on your right. Look for a gate and a green yard off the side of the steps leading to the upper area and you'll be able to find it there. It's still there if Bowerstone is destroyed, just a bit lower to the ground.
= Silver Keys Gold Keys Gnomes Flowers
Gnome
Gnome
Gnome
Rare Books
1-10 11-20 21-30 31-40 41-50
Page 206 of 244IGN.com | Fable III Guide
© 2010 IGN Entertainment, Inc.

Bowerstone Castle // 3 Gnomes
Bowerstone Castle (1/3)
Find the kitchen in Bowerstone Castle by entering the castle from the yard in front. Run up from the catacombs entrance past the statue and enter the door on the right. The Gnome is high in one corner of the kitchen.
Bowerstone Castle (2/3)
In Bowerstone Castle's garden, look for a birdbath near the entrance to the Catacombs with this Gnome perched atop it.
Gnome
Gnome
Page 207 of 244IGN.com | Fable III Guide
© 2010 IGN Entertainment, Inc.

Bowerstone Castle [Catacombs] (3/3)
Enter the Catacombs and run down into the larger cave area, past the Sarcophagi. Turn around as you come to the cave and examine the entrance tunnel. The Gnome is on the lower left.
Silverpines // 2 Gnomes
Silverpines (1/2)
This Gnome is hanging just to the right of the entrance to the mine in the middle of the village.
Silverpines (2/2)
Starting from the Millfields entrance, run through the area. After you pass through the village, turn right just past the gate as you leave. You should find a graveyard at the end of the path. Follow a secret path behind the crypt in the graveyard to a mining tower. On the tower is a Gnome.
Gnome
Gnome
Gnome
Page 208 of 244IGN.com | Fable III Guide
© 2010 IGN Entertainment, Inc.

Driftwood // 2 Gnomes
Driftwood (1/2)
Run through the village to the coast. Turn left at the shore and run up the green path to this Gnome which is sitting in a small house.
Driftwood (2/2)
Swim out to the small, sandy island beyond the giant central island. The Gnome is on a small boulder here.
Gnome
Gnome
Page 209 of 244IGN.com | Fable III Guide
© 2010 IGN Entertainment, Inc.

Fable 3 Keys and Collectibles
City of Aurora // 2 Gnomes
City of Aurora (1/2)
From the coast, turn left at the front gate instead of entering the city. One house with a turquoise door can be found built into the cliff wall here. Look for a Gnome high on the cliff wall to the left to this house.
City of Aurora (2/2)
Up high on the hill by the mine entrance (if you chose to mine Aurora) or the large, candle-lit shrine is a stone arch over the sloping path through the buildings. On one side of the stone arch is a small candle-lit shrine with a hooded angel built into a house. Shoot the Gnome above it. (A Rare Book is on the shrine!)
= Silver Keys Gold Keys Gnomes Flowers
Gnome
Gnome
Rare Books
1-10 11-20 21-30 31-40 41-50
Page 210 of 244IGN.com | Fable III Guide
© 2010 IGN Entertainment, Inc.

Shifting Sands // 4 Gnomes
Shifting Sands (1/4)
Just as you exit Aurora City and enter the Shifting Sands, look to the left to find this Gnome on a column on the massive steps.
Shifting Sands (2/4)
Run down the path that leads to the cave entrance to Sandfall Palace. Standing in front of the cave entrance, facing it, turn left and you should see this Gnome on the cliff wall.
Shifting Sands [Sandfall Palace] (3/4)
You can only access Sandfall Palace one you are tasked with tracking down the massive diamond as Ruler of Albion. Right before the room with the diamond is a large raised walkway. You'll find this Gnome just outside the door to the diamond room by a torch.
Gnome
Gnome
Gnome
Page 211 of 244IGN.com | Fable III Guide
© 2010 IGN Entertainment, Inc.

Shifting Sands (4/4)
Head to the right after leaving the stairs from the City of Aurora and make your way towards the stone arch. You'll pass through a high-walled canyon. The Gnome is on a wall to your left as you approach the stone arch. This one may take some hunting.
Veiled Path // 4 Gnomes
The Veiled Path (1/4)
Just as you enter The Veiled Path from The Shifting Sands, turn right and you should see this Gnome on the cliff face. It's actually kind of hard to spot but it's there!
The Veiled Path (2/4)
At the very bottom of the long stairs at the end of the Veiled Path (you'll know
Gnome
Gnome
Gnome
Page 212 of 244IGN.com | Fable III Guide
© 2010 IGN Entertainment, Inc.

them when you see them) is a Gnome on some rubble.
The Veiled Path (3/4)
About halfway up the long stairs at the end of the Veiled Path (you'll know them when you see them) is a Gnome on the top of a column.
The Veiled Path (4/4)
At the staircase at the far end of The Veiled Path is the entrance to an area called The Enigma. Don't let the small area fool you, there's more to The Enigma -- look for a Flit Switch at the end of the room. It's above the door. Use the Fireball gauntlet (alone) to light the torches in the next area. Run into the room directly across from the door you used to enter the area to shoot this Gnome. It's on a platform just as you enter the door -- but you can't go any further since there's rubble in the way.
Gnome
Gnome
Page 213 of 244IGN.com | Fable III Guide
© 2010 IGN Entertainment, Inc.

Page 214 of 244IGN.com | Fable III Guide
© 2010 IGN Entertainment, Inc.

Fable 3 Flowers
In the Auroran Temple, atop the massive staircase in the City of Aurora, you can accept the "Temple's Treasure" Side Quest by walking to the alter and turning right. Here a priestess will tell you of six different variety of flower in Aurora: Green, Blue, Yellow, Red, Orange and Purple. Returning five of each flower type to the priestess will get you 10 Guild Seals and a new tattoo dye which you can use in the Priestess's room. Return all 30 for an additional 10 Guild Seals and the Flower Power Achievement.
City of Aurora // 5 Flowers
City of Aurora (Yellow, 1/5)
Leave the temple via the long staircase and turn right on the first street. Turn right at the first stone bridge and you'll run up a short path terminating at an open door. Inside the house with the open door is a bloom.
City of Aurora (Orange, 2/5)
This flower is by the entrance to the mine (if you chose to mine Aurora) or the shrine with all the candles up at the top of the hill.
= Silver Keys Gold Keys Rare Books Gnomes
Flower
Flower
Flowers
1-10 11-20 21-30
Page 215 of 244IGN.com | Fable III Guide
© 2010 IGN Entertainment, Inc.

City of Aurora (Green, 3/5)
Take the path up towards Shifting Sands. This flower is across from the Demon Door on the path.
City of Aurora (Purple, 4/5)
At the entrance to the city is a pair of giant tone hands. Search behind the hand on the right as you enter the village for a tall shrine with this flower behind it. You'll have to hop a short wall.
City of Aurora (Blue, 5/5)
Jump into the water at the shore and swim left. You should find a small beach you can run onto and score this flower.
Flower
Flower
Flower
Page 216 of 244IGN.com | Fable III Guide
© 2010 IGN Entertainment, Inc.

Shifting Sands // 12 Flowers
Shifting Sands (Yellow, 1/12)
This flower is at the bottom of the stairs leading out from the City of Aurora. It is at the base of a column in the sand directly in front of the stairs.
Shifting Sands (Orange, 2/12)
As you enter from the City of Aurora, turn left and run towards the Veiled Path. Before the canyon path starts, examine the sandy hill to your left.
Shifting Sands (Purple, 3/12)
Head right from the City of Auroran entrance and head towards the rock arch. Halfway there you should come across this flower at the base of a lone pillar.
Flower
Flower
Flower
Page 217 of 244IGN.com | Fable III Guide
© 2010 IGN Entertainment, Inc.

Shifting Sands (Yellow, 4/12)
Head towards the rock arch from City of Aurora entrance. Before passing under it, search the left side. You should find this flower at the base of the arch.
Shifting Sands (Purple, 5/12)
Head towards the rock arch from City of Aurora entrance. On the far side of the arch, hang a right. In a dune depression not too far from the arch is a purple flower.
Flower
Flower
Page 218 of 244IGN.com | Fable III Guide
© 2010 IGN Entertainment, Inc.

Fable 3 Flowers
Shifting Sands (Orange, 6/12)
Head towards the rock arch from City of Aurora entrance. Walk straight under the arch and into the open desert. This flower is at nearly the center of the desert at the very tip of a buried column.
Shifting Sands (Blue, 7/12)
Head towards the rock arch from City of Aurora entrance. Follow the perimeter of the level around clockwise after passing under the arch. This blossom is on a hill with a boulder along the edge of the level over the valley of ruins leading to the Crossroads of Passing entrance.
Shifting Sands [Sandfall Palace] (Green, 8/12)
As soon as you get to the first pool of water, run down the leftmost stairs to the beach and search the palm trees for this bloom.
= Silver Keys Gold Keys Rare Books Gnomes
Flower
Flower
Flower
Flowers
1-10 11-20 21-30
Page 219 of 244IGN.com | Fable III Guide
© 2010 IGN Entertainment, Inc.

Shifting Sands [Sandfall Palace] (Red, 9/12)
When you come to the first pool, search the landing above the platform with the palm tree. A small sandy recess here holds this bloom.
Shifting Sands [Sandfall Palace] (Blue, 10/12)
In the second room with shallow water, search under the staircase leading to the second level. A shrine on the wall holds this flower.
Shifting Sands [Sandfall Palace] (Green, 11/12)
In the second room with shallow water, take a left at the stairs and cross the semi-deep pool. In the corner you'll find lots of rubble, a chest and a green flower by a palm tree.
Flower
Flower
Flower
Page 220 of 244IGN.com | Fable III Guide
© 2010 IGN Entertainment, Inc.

Shifting Sands [Sandfall Palace] (Red, 12/12)
When you get to the diamond room, take the door to the right. As you enter the adjacent hallway, this flower will be just to your left.
Veiled Path // 13 Flowers
Veiled Path (Blue, 1/13)
As soon as you enter The Veiled Path, look to the right to find this bloom.
Veiled Path (Orange, 2/13)
Search the right side of the path just up the first set of stairs. This bloom is by a spire of rock on the edge of the cliff.
Flower
Flower
Flower
Page 221 of 244IGN.com | Fable III Guide
© 2010 IGN Entertainment, Inc.

Veiled Path (Purple, 3/13)
Just before the stairs on the left with three statues against the cliff wall, look for a sandy ramp up to a triangular door. Before the door is a purple bloom.
Fable 3 Flowers
Veiled Path (Purple, 4/13)
As you run up the path you'll come to three statues on some steps to your left, then three statues between columns on your right. Across from the latter group is this blossom by a pair of statues.
Flower
= Silver Keys Gold Keys Rare Books Gnomes
Flower
Flowers
1-10 11-20 21-30
Page 222 of 244IGN.com | Fable III Guide
© 2010 IGN Entertainment, Inc.

Veiled Path (Orange, 5/13)
Just past the statues mentioned previously are some stairs leading up to a platform along the cliff wall. At the top of the stairs you'll find this flower. These side stairs lead to the first giant tomb entrance you come to.
Veiled Path (Purple, 6/13)
This bloom is located near the wide stairs to the first giant tomb entrance you come to in the cliff wall.
Veiled Path (Yellow, 7/13)
At the very bottom of the long stairs at the end of the Veiled Path you'll find this flower. It's on the right side of the path by some rubble.
Flower
Flower
Flower
Page 223 of 244IGN.com | Fable III Guide
© 2010 IGN Entertainment, Inc.

Veiled Path (Yellow, 8/13)
This flower is right next to the entrance to The Engma about halfway up the stairs.
Veiled Path (Blue, 9/13)
As you run up the long stairs past the Enigma, this blue blossom is on your left just past two statues in the middle of the stairs.
Veiled Path (Red, 10/13)
On the left side of the long stairs near the very end of the level is a red bloom.
Flower
Flower
Flower
Page 224 of 244IGN.com | Fable III Guide
© 2010 IGN Entertainment, Inc.

Veiled Path (Green, 11/13)
This bloom is just to the right of the massive doors at the end of the Veiled Path.
Veiled Path [Enigma] (Green, 12/13)
You'll find a green bloom in the center of the second room of the Enigma. You'll have to shoot the Flit Switch above the door in the first room to get here if you haven't opened the Enigma yet.
Veiled Path [Enigma] (Red, 13/13)
You'll find this bloom in the center of a large room in the Enigma. In the room with the torches you must light, take the left door to find a large room with this flower.
Flower
Flower
Flower
Page 225 of 244IGN.com | Fable III Guide
© 2010 IGN Entertainment, Inc.

Fable 3 Demon Doors
There are six Demon Doors in the game. You must perform certain actions to convince them to open and reveal a secret area with some awesome treasure; here's how:
Mistpeak Valley Demon Door
Brightwall Village Demon Door
Sunset House Demon Door
Mourningwood Demon Door
Millfields Demon Door
City of Aurora Demon Door
Fable 3 Demon Doors
Mistpeak Valley Demon Door
This stone edifice seeks inspiration for a tale of Heroes.
Note: This door requires a cooperative second player in an on or offline/splitscreen game. In Mistpeak Valley, head uphill from the lake towards the snowy area with bridges crisscrossing the frozen valley. Following the path under the first bridge that leads into the valley. This path terminates at the Mistpeak Valley Demon Door.
This Demon Door requires you to Hug, Kiss and possibly Propose, so you and your co-op partner must have the Lover Expression Pack from the Road to Rule. Perform these actions in front of the door by holding A until the contorller vibrates. If this doesn't work, you'll need to propose. When one character proposes to the other, go through the motions and marry each other and the door will open.
»
»
»
»
»
»
= Brightwall Sunset House Mourningwood Millfields City of Aurora
Demon Door 1
Mistpeak
Page 226 of 244IGN.com | Fable III Guide
© 2010 IGN Entertainment, Inc.

The "Demon Door Retirement Home" features many strange Demon Doors to listen to and a Legendary Weapon in the lone chest. Only the host will get the Legendary Weapon (we received the "Very Sharp Scissors" melee weapon). You should be gracious and give it as a gift to your new spouse!
Fable 3 Demon Doors
Brightwall Village Demon Door
This ancient doorway is feeling rather broody.
You need only show up in front of this Demon Door with a child -- sounds easy right? Well, there's a catch: it has to be your OWN child. This is because your child is the only child you can hold hands with and, consequently, drag to the Demon Door for the Door's approval. To have a child, you must have the Family and Lover Expression Packs from the Road to Rule. Propose to a potential mate (of the opposite sex -- since you need to make a child), fulfill he or she's marriage requirements, purchase a house and have "Unsafe" sex by activating the Sleep icon at the bed your house and choosing to do so. After this you will have an infant child. Wait a bit for the child to become a toddler and you can then take it to the Demon Door.
Alternately, you may adopt a child from the Bowerstone Orphanage, which is MUCH FASTER, but you can only do this after discovering Bowerstone Industrial (and you cannot do it if you turn the
= Mistpeak Sunset House Mourningwood Millfields City of Aurora
Demon Door 2
Brightwall
Page 227 of 244IGN.com | Fable III Guide
© 2010 IGN Entertainment, Inc.

orphanage into a brothel as Ruler of Albion). The orphanage is in the same building where the "Kidnapped" Side Quest began. Walk all the way to the rear of the orphanage and make a right. Here you'll find a room full of kids in front of beds. You can adopt one for 500G. Choose a home in Brightwall and you can grab your new kid and drag him or her to the door easily.
You MUST interact with your child using Hug or another expression in front of the door to get it to open. Inside the Demon Door you'll find 25 Guild Seals and 3 Summon Creature Potions in the "Last Orders" area.
Fable 3 Demon Doors
Sunset House Demon Door
An ancient and sentient door near Sunset House wants to meet a monarch.
Return as Queen (or King) of Albion to access this Demon Door -- this will happen as part of the main quest you progress through the game. You can just walk right in and claim your 1,000,000 Gold prize in the "Pools of Sorrow" area.
= Mistpeak Brightwall Mourningwood Millfields City of Aurora
Demon Door 3
Sunset House
Page 228 of 244IGN.com | Fable III Guide
© 2010 IGN Entertainment, Inc.

Fable 3 Demon Doors
Mourningwood Demon Door
This ancient and war-weary edifice is quite interested in weaponry.
You must max out your Melee or Ranged weapon skills (purchase Level 5 on the Road to Rule) AND get all three upgrades for a Legendary Weapon to access this Demon Door (UPDATE: You may only need to purchase Level 5 to open this door -- try it!). While you can purchase Level 5 for 100 Guild Seals on the Road to Rule, you'll have to do some work to upgrade your Legendary Weapon of choice. Any Legendary Weapon (NOT your Hero weapons) has three upgrades that you can read about by pressing Y in the Sanctuary while examing the weapon.
After getting your weapon levelled up, you need only to pull it out in front of the Demon Door for it to open. Inside is an awesome space-scape called Planet One. Here you can get the Military Costume and a Summon Creatures Potion.
= Mistpeak Brightwall Sunset House Millfields City of Aurora
Demon Door 4
Mourningwood
Page 229 of 244IGN.com | Fable III Guide
© 2010 IGN Entertainment, Inc.

Fable 3 Demon Doors
Millfields Demon Door
This stone portal questions the value of traditionally held notions of aesthetics
This door requires you to be fat and ugly -- impossible, right? Well, to impress this picky door you need only slap on an outfit (your pajamas or night clothes from the very beginning of the game are ideal) and color each item in the outfit a different hue. You can do this in the Sanctuary. There's still the matter of corpulence, however.
Check out your Hero Status in the Sanctuary to see your weight. You need to get this meter all the way to the right. To gain weight you can eat pies and meat bought from vendors in Bowerstone OR drink beer at the pub. After you are fat, multicolored and dressed to unimpress, the Demon Door will give way to "Twitcher's Curtains," where you can find a chest with 40 Guild Seals.
= Mistpeak Brightwall Sunset House Mourningwood City of Aurora
Demon Door 5
Millfields
Page 230 of 244IGN.com | Fable III Guide
© 2010 IGN Entertainment, Inc.

Fable 3 Demon Doors
City of Aurora Demon Door
Note: You can only access this Demon Door after the Revolution due to rubble blocking it. It's just to the left of the main gate -- you can't miss it as you head to the Shifting Sands. For this door to open you'll have to max out your morality and be totally evil or completely good.
This takes an entire game to accomplish, since moral choices to kill, rob, break promises and do other bad things occur often. At the end of the game you can give to the Treasury or rob it to help tilt your morality meter the proper direction. You do NOT need to have your evil red wings or good white wings to enter the door, you just need to have your morality meter tilted fully to one side. In the Moral View you'll see a different scene depending on your choice, but the reward will be the same: a Legendary Weapon.
Fable 3 Achievements
There are 50 Achievements you can win in Fable 3 worth a total of 1000 points. Click on the Achievements below for a hint or mini guide!
Adopt Or Die
Adopt a child.
IGN GUIDES SAYS...
The orphanage is in the same building where the "Kidnapped" Side Quest begins in Bowerstone Industrial's side streets. Walk all the way to the rear of the orphanage and make a right. Here you'll find a room full of kids in front of beds. You can adopt one for 500G.
And So It Begins
= Mistpeak Brightwall Sunset House Mourningwood Millfields
Demon Door 6
↓5 G
↓20 G
City of Aurora
Page 231 of 244IGN.com | Fable III Guide
© 2010 IGN Entertainment, Inc.

Win the support of the Dwellers.
Got a tip for this Achievement / Trophy? Drop us a line with your tip and we'll post it with your name!
Archmage
Cast all 15 possible spell combinations.
Got a tip for this Achievement / Trophy? Drop us a line with your tip and we'll post it with your name!
Barrel of Laughs
Kill 30 enemies with explosive barrels.
Got a tip for this Achievement / Trophy? Drop us a line with your tip and we'll post it with your name!
Brightwall Book Club
Collect all 30 rare books for the Brightwall Academy.
IGN GUIDES SAYS...
We cover all the Rare Book locations in our Keys and Collectibles section.
Chest Grandmaster
Unlock all of the chests on the Road To Rule.
IGN GUIDES SAYS...
Save up for the higher level packs and higher rank upgrades and you'll spen less Guild Seals overall.
Coronation Chicken
Perform a royal judgement while dressed as a chicken.
ISAAC SAYS...
You get the chicken outfit by completing the "Chicken Chaser" Side Quest. When you
↓20 G
↓10 G
↓30 G
↓40 G
↓10 G
Page 232 of 244IGN.com | Fable III Guide
© 2010 IGN Entertainment, Inc.

become Ruler of Albion, wear this in your royal court while making a judgement.
Crime Spree
Get a 15,000 gold bounty placed on your head.
Got a tip for this Achievement / Trophy? Drop us a line with your tip and we'll post it with your name!
Cross-Dimensional Conception
Have a child with another Xbox LIVE player.
Got a tip for this Achievement / Trophy? Drop us a line with your tip and we'll post it with your name!
Digger
Dig up 50 items.
Got a tip for this Achievement / Trophy? Drop us a line with your tip and we'll post it with your name!
Distant Friends
Win the support of Aurora.
Got a tip for this Achievement / Trophy? Drop us a line with your tip and we'll post it with your name!
Dye Hippie, Dye
Dye each part of an outfit you're wearing a different colour and have long hair.
Got a tip for this Achievement / Trophy? Drop us a line with your tip and we'll post it with your name!
Fashion Victim
Collect every item of clothing.
↓10 G
↓10 G
↓15 G
↓20 G
↓5 G
↓20 G
Page 233 of 244IGN.com | Fable III Guide
© 2010 IGN Entertainment, Inc.

Got a tip for this Achievement / Trophy? Drop us a line with your tip and we'll post it with your name!
Flower Power
Collect all 30 Auroran flowers.
IGN GUIDES SAYS...
We cover all the Flower Locations in our Keys and Collectibles section.
For Albion!
This is where you *spoiler* the great, big *spoiler* and then it all *spoiler*.
Got a tip for this Achievement / Trophy? Drop us a line with your tip and we'll post it with your name!
Ghost Brothers
Make sure Max and Sam get home in time for tea.
Got a tip for this Achievement / Trophy? Drop us a line with your tip and we'll post it with your name!
Gnome Invasion
Destroy all 50 gnomes.
IGN GUIDES SAYS...
We cover all the Gnomes in our Keys and Collectibles section.
Gunning For Glory
Kill 500 enemies using firearms.
Got a tip for this Achievement / Trophy? Drop us a line with your tip and we'll post it with your name!
Hand in Hand
↓30 G
↓80 G
↓10 G
↓30 G
↓20 G
↓5 G
Page 234 of 244IGN.com | Fable III Guide
© 2010 IGN Entertainment, Inc.

Hold hands with someone.
Got a tip for this Achievement / Trophy? Drop us a line with your tip and we'll post it with your name!
He's a Woman. She's a Man
Wear a full set of clothing intended for the opposite sex.
IGN GUIDES SAYS...
This should happen pretty early in the game if you put on the Mercenary clothes as a woman. You'll also get this for wearing the Masquerade clothes in Reaver's Manor as a male later in the game, although you can purchase opposite-sex clothes any time.
Henry VIII
As ruler of Albion, get married 6 times and kill 2 of your spouses.
Got a tip for this Achievement / Trophy? Drop us a line with your tip and we'll post it with your name!
I Am The Keymaster
Collect all 50 Silver Keys and 4 Gold Keys.
IGN GUIDES SAYS...
We cover all the Gold and Silver Keys in ourKeys and Collectibles section.
If It Bleeds, We Can Kill It
Kill 500 enemies using melee weapons.
Got a tip for this Achievement / Trophy? Drop us a line with your tip and we'll post it with your name!
Island Paradise
Establish the island of Driftwood.
Got a tip for this Achievement / Trophy? Drop us a line with your tip and we'll post it with
↓5 G
↓10 G
↓30 G
↓20 G
↓10 G
Page 235 of 244IGN.com | Fable III Guide
© 2010 IGN Entertainment, Inc.

your name!
Kaboom!
Score 2000 on the Mourningwood Fort mortar game.
NICK SAYS...
For this game you'll need to purchase the fort in Mourningwood. Head up to the cannon and you can play a minigame. Getting 2000 may take a few tries on your own, but you can do this with a friend to double your score and make it much easier.
Knight Jumps Chesty
Defeat Chesty at his own game.
IGN GUIDES SAYS...
Win Chesty's game in Sunset House to get this Achievement. You can find a full Sunset House Walkthrough here.
Long Distance Relationship
Get married to another Xbox LIVE player.
Got a tip for this Achievement / Trophy? Drop us a line with your tip and we'll post it with your name!
Lute Hero Tour
Play in each town as a 5 star lute player.
Got a tip for this Achievement / Trophy? Drop us a line with your tip and we'll post it with your name!
Magnate Personality
Build a property empire worth 2,000,000 gold.
Got a tip for this Achievement / Trophy? Drop us a line with your tip and we'll post it with your name!
My Weapon's Better Than Yours
↓10 G
↓10 G
↓10 G
↓10 G
↓50 G
↓25 G
Page 236 of 244IGN.com | Fable III Guide
© 2010 IGN Entertainment, Inc.

Complete 3 unique upgrades on one of the legendary weapons found around Albion.
Got a tip for this Achievement / Trophy? Drop us a line with your tip and we'll post it with your name!
Online Merger
Enter into a business partnership with another Xbox LIVE player.
Got a tip for this Achievement / Trophy? Drop us a line with your tip and we'll post it with your name!
Popularity Contest
Make 20 Friends.
Got a tip for this Achievement / Trophy? Drop us a line with your tip and we'll post it with your name!
Pull!
Send an enemy flying into the air and kill him while he's airborne.
ISAAC SAYS...
Find a place with high-health opponents and cliffs, like Mistpeak Valley. Lure the foes to the cliff, and use a ranged attack to knock them over, then shoot them while they fall. The bonus damage from falling, and a decent weapon, will easily cause the foe to die in mid air if you are quick enough. bandits have low enough health in the beginnign of the game, so that if you use a slow time potion, and zoom in on them in free-aiming mode, you can in two shots kill them. The main problem is avoiding a one-shot kill.
Remodelling
Remodel 5 different houses by changing the furniture.
Got a tip for this Achievement / Trophy? Drop us a line with your tip and we'll post it with your name!
Save The Princess!
↓10 G
↓15 G
↓10 G
↓10 G
↓10 G
Page 237 of 244IGN.com | Fable III Guide
© 2010 IGN Entertainment, Inc.

Rescue the princess from the evil Baron.
Got a tip for this Achievement / Trophy? Drop us a line with your tip and we'll post it with your name!
Spellweaver
Combine two gauntlets to cast a "woven" spell.
Got a tip for this Achievement / Trophy? Drop us a line with your tip and we'll post it with your name!
Super Hero
Fully upgrade your Melee, Ranged, and Magic abilities on the Road to Rule.
ISSAC SAYS...
An efficient way to become a superhero is to only use one type of combat until you become king. The biggest bang for your buck is magic. Purchase Level 5 on the Road to Rule for this Achievement.
Swift Justice
Win the support of the Swift Brigade.
Got a tip for this Achievement / Trophy? Drop us a line with your tip and we'll post it with your name!
The Dark Sanctum
Reinstate an ancient, evil temple.
Got a tip for this Achievement / Trophy? Drop us a line with your tip and we'll post it with your name!
The Guild Seal
Unleash your heroic potential.
Got a tip for this Achievement / Trophy? Drop us a line with your tip and we'll post it with
↓5 G
↓50 G
↓20 G
↓10 G
↓10 G
Page 238 of 244IGN.com | Fable III Guide
© 2010 IGN Entertainment, Inc.

your name!
The Resistance
Win the support of Bowerstone.
Got a tip for this Achievement / Trophy? Drop us a line with your tip and we'll post it with your name!
The Ruler of Albion
Become the ruler of Albion.
Got a tip for this Achievement / Trophy? Drop us a line with your tip and we'll post it with your name!
Total Warrior
Kill enemies with melee, ranged and spell attacks.
Got a tip for this Achievement / Trophy? Drop us a line with your tip and we'll post it with your name!
Touched By A Hero
Use touch expressions to interact with 20 different people.
Got a tip for this Achievement / Trophy? Drop us a line with your tip and we'll post it with your name!
Tough Love
Save the maximum amount of Albion citizens.
AGUIRRE SAYS...
You need, 6,500,000 Gold to save everybody. To get this money the "good" way, buy every house and bussiness starting at the beggining of the game. otherwise you can steal all the money and make evil decision to line your pockets, but be sure to put all the money back in the Treasury before you make the final judgement "The Fate of Mistpeak." Have 6,500,000 Gold in the final sequence and you'll get the Achievement.
↓50 G
↓80 G
↓10 G
↓10 G
↓10 G
↓10 G
Page 239 of 244IGN.com | Fable III Guide
© 2010 IGN Entertainment, Inc.

Tragical-Comical-Historical
Help the celebrated thespians Lambert and Pinch put on the world's greatest play.
Got a tip for this Achievement / Trophy? Drop us a line with your tip and we'll post it with your name!
We Can Be Heroes
Earn 1,000 gold in henchman wages in another Hero's world.
Got a tip for this Achievement / Trophy? Drop us a line with your tip and we'll post it with your name!
We Need Guns, Lots Of Guns
Collect all 50 legendary weapons. They won't all appear in your world, so trade with other Heroes!
IGN GUIDES SAYS...
There are 50 Legendary Weapons in Fable 3, but you will only have access to half of them randomly in your game, with the exception of a few you get for quests and in chests. The few weapons with static locations are listed below and those that can be purchased. The remaining weapons will have to be obtained by trading online or with another profile on your own system -- this requires a middleman or some "creative saving." Here is a full list of weapons and their locations (if not randomly found in chests or rewarded).
Swords
� Avo's Lamenation � Beadle's Cutlass � The Casanova (Available in shops) � The Love Sword � The Merchant's Bodyguard (Available in shops) � Mr. Stabby (Available in shops) � Really Sharp Pair of Scissors � Slimquick (Available in shops) � Souldrinker � The Splade (Available in shops) � The Swinging Sword � Thunderblade
Hammers
� Aurora's Shield (Available in shops) � Dragonbone Hammer (Available in shops) � Faerie Hammer of the Moon King (Available in shops) � Hammer of Wilmageddon � Jack's Hammer
↓10 G
↓20 G
Page 240 of 244IGN.com | Fable III Guide
© 2010 IGN Entertainment, Inc.

� Lunarium Pounder (Available in shops) � Mallet's Mallet (Available in shops) � Scythe's Warhammer � Sorrow's Fist � Tannar's Glory � The Tenderiser (Available in shops) � Trollblight (Available in shops) � The TYPO
Pistols
� The Barnumificator (Available in shops) � Bloodcraver � The Bonesmasher (Chest outside the Mourningwood Fort) � Briar's Blaster � Chickenbane � Desert Fury (Available in shops) � Dragonstomper .48 � Gnomewrecker (Shoot all 50 Gnomes) � Holy Vengeance (Available in shops) � The Ice Maiden � Mirian's Mutilator (Available in shops) � Reaver Industries Perforator (Available in shops) � Tee Killer Shooter
Rifles
� Arkwright's Flintlock � Defender of the Faith (Available in shops) � Facemelter (Available in shops) � The Hero's Companion (Available in shops) � Marksman 500 � Ol' Malice (Available in shops) � The Sandgoose � Scattershot (Available in shops) � The Shrieking Pilgrim � Simmon's Shotgun � Skorm's Justice � Swift Irregular (Available in shops)
Wizard's Revenge
Kill 500 enemies using magic.
Got a tip for this Achievement / Trophy? Drop us a line with your tip and we'll post it with your name!
You Can't Bring Me Down
Complete Fable III without being knocked out in combat.
↓20 G
↓50 G
Page 241 of 244IGN.com | Fable III Guide
© 2010 IGN Entertainment, Inc.

Got a tip for this Achievement / Trophy? Drop us a line with your tip and we'll post it with your name!
Fable 3 Questions & Answers
You've got questions, we've got answers. If you need help with something you didn't find in our guide, we can still help you. We publish the best and most common questions we get here—take a look to see if your question has already been answered. If your problem isn't addressed, feel free to shoot us an e-mail via the link at the bottom of this page.
Common Questions & Answers
How can I find all 50 Legendary Weapons?
There are 50 Legendary Weapons in Fable 3, but you will only have access to half of them randomly in your game, with the exception of a few you get for quests and in chests. The few weapons with static locations are listed below and those that can be purchased. The remaining weapons will have to be obtained by trading online or with another profile on your own system -- this requires a middleman or some "creative saving." Here is a full list of weapons and their locations (if not randomly found in chests or rewarded).
Swords
� Avo's Lamenation � Beadle's Cutlass � The Casanova (Available in shops) � The Love Sword � The Merchant's Bodyguard (Available in shops) � Mr. Stabby (Available in shops) � Really Sharp Pair of Scissors � Slimquick (Available in shops) � Souldrinker � The Splade (Available in shops) � The Swinging Sword � Thunderblade
Hammers
� Aurora's Shield (Available in shops) � Dragonbone Hammer (Available in shops) � Faerie Hammer of the Moon King (Available in shops) � Hammer of Wilmageddon � Jack's Hammer � Lunarium Pounder (Available in shops) � Mallet's Mallet (Available in shops) � Scythe's Warhammer � Sorrow's Fist � Tannar's Glory � The Tenderiser (Available in shops) � Trollblight (Available in shops) � The TYPO
Pistols
↓
Page 242 of 244IGN.com | Fable III Guide
© 2010 IGN Entertainment, Inc.

� The Barnumificator (Available in shops) � Bloodcraver � The Bonesmasher (Chest outside the Mourningwood Fort) � Briar's Blaster � Chickenbane � Desert Fury (Available in shops) � Dragonstomper .48 � Gnomewrecker (Shoot all 50 Gnomes) � Holy Vengeance (Available in shops) � The Ice Maiden � Mirian's Mutilator (Available in shops) � Reaver Industries Perforator (Available in shops) � Tee Killer Shooter
Rifles
� Arkwright's Flintlock � Defender of the Faith (Available in shops) � Facemelter (Available in shops) � The Hero's Companion (Available in shops) � Marksman 500 � Ol' Malice (Available in shops) � The Sandgoose � Scattershot (Available in shops) � The Shrieking Pilgrim � Simmon's Shotgun � Skorm's Justice � Swift Irregular (Available in shops)
Why the crap is transferring money to the Treasury so slow?
Transferring money can be a bit buggy. Although you can transfer at great speeds, sometimes the pace of the transfer will remain slow despite holding the Analog Stick firmly to the right. Try using the D-pad to adjust the funds instead of the Analog Stick. You should be able to get the counter up to 1,000,000 Gold in about 10 seconds at the fastest pace.
How do I open the locked door in the castle?
You may also notice a locked door in the library of Bowerstone Castle. It's your castle now, so what's up this locked door? Well, four statues in the room with the locked door form a puzzle that will unlock this door. You need to read the statues' incriptions in order. They talk about three heroes. First read the description on the statue to the left of the locked door. Now, read the statue to the right of the locked door. A door leading out of the room also has two statues on either side of it. Read the statue on the right of this door, and finally read the last statue's description to the left of this door. As the story completes, the door will open to reveal a chest with a gem inside.
What carries over from my Fable 2 save?
In Fable 3, you are the direct descendant of your Fable 2 character, which means that if you have a Fable 2 save, you'll hear about your father OR mother, which corresponds to the sex of your previous character. We're on the lookout for more connections between the games,
↓
↓
↓
Page 243 of 244IGN.com | Fable III Guide
© 2010 IGN Entertainment, Inc.

so please let us know if you find anything!
Page 244 of 244IGN.com | Fable III Guide
© 2010 IGN Entertainment, Inc.


