Embed Size (px)
Citation preview
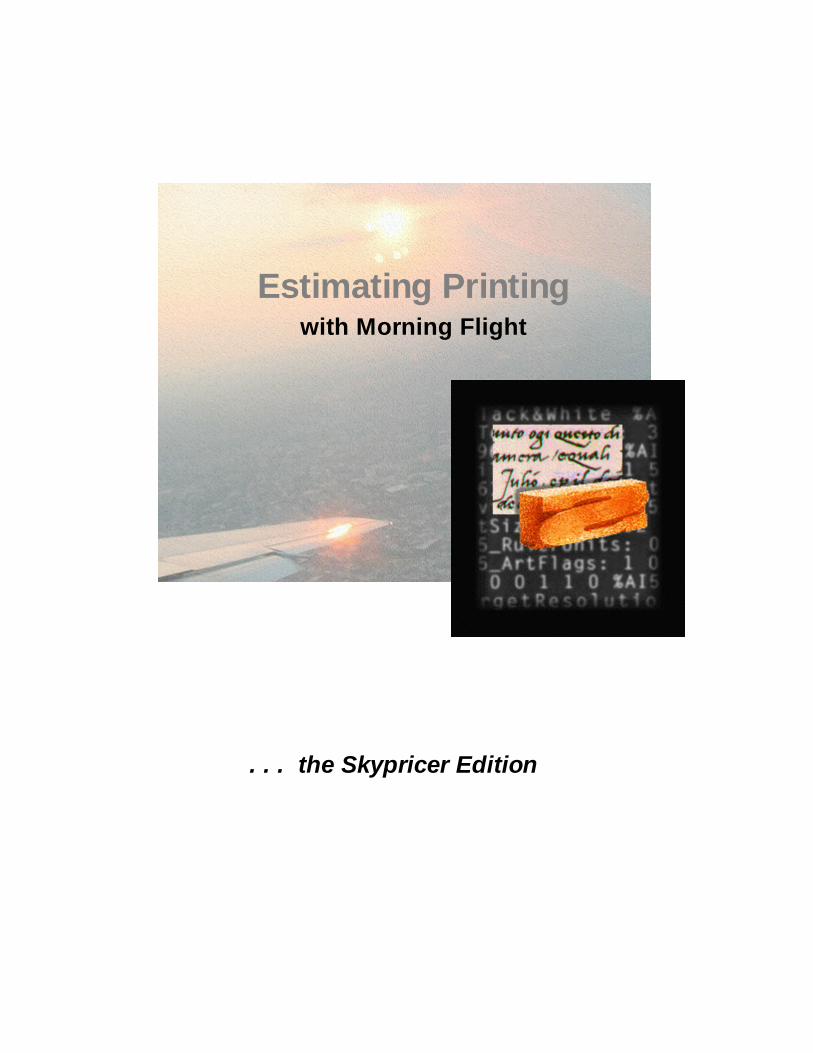
Estimating Printing
. . . the Skypricer Edition
with Morning Flight

Estimating Printing with Morning Flight
. . . the Skypricer Edition
The Morning Flight Skypricer is an innovative, easy to use estimating andweb2print program for digital and wide format print shops.
It's a tool you can master quickly. But don't let its easy demeanor fool you.Hidden beneath the streamlined exterior runs a highly advanced pricingengine, the same engine that powers all Morning Flight software, from theno-cost FreeRide Edition to our most powerful Print Management System.
Enjoy!
All rights reserved. Products that are referred to in this document may be either trademarks and/or registeredtrademarks of the respective owners. The publisher and the author make no claim to these trademarks.
While every precaution has been taken in the preparation of this document, the publisher and the author assume noresponsibility for errors or omissions, or for damages resulting from the use of information contained in thisdocument or from the use of programs and source code that may accompany it. In no event shall the publisher andthe author be liable for any loss of profit or any other commercial damage caused or alleged to have been causeddirectly or indirectly by this document.
Printed: March 2018 in the United States
© 2018 Helmut Heindel
5Contents
5
© 2018 Helmut Heindel
Table of Contents
Part I Welcome 10
Part II Getting Started 13
................................................................................................................................... 131 Installing the Skypricer
................................................................................................................................... 162 Updating and Upgrading
................................................................................................................................... 233 Backing up your Data
................................................................................................................................... 284 Running on a Network
................................................................................................................................... 315 Prelaunch Questions
................................................................................................................................... 346 Your First Offset Quote
Part III Preflight 40
................................................................................................................................... 401 Workspaces
................................................................................................................................... 422 My World
................................................................................................................................... 453 My Shop
................................................................................................................................... 464 My Store
................................................................................................................................... 485 Before you dive in
................................................................................................................................... 496 Price Levels
................................................................................................................................... 527 Press-based Pricing
................................................................................................................................... 558 Adding more Presses
................................................................................................................................... 599 The Virtual Press
Part IV Getting Around 63
................................................................................................................................... 631 Buttons and Navigation
................................................................................................................................... 672 Browsing and Updating
................................................................................................................................... 703 Viewing and Printing
................................................................................................................................... 764 Exploring Cursors
................................................................................................................................... 775 Formatting Text
................................................................................................................................... 786 Validating Data
................................................................................................................................... 797 Entering Sheet Sizes
Part V Making Quotes 81
................................................................................................................................... 811 Quoting Offset
................................................................................................................................... 822 Quoting Digital
................................................................................................................................... 853 Quoting RISO
................................................................................................................................... 894 Quoting Copies
................................................................................................................................... 915 Quoting Wide Format
Morning Flight Skypricer6
© 2018 Helmut Heindel
................................................................................................................................... 956 Quoting Merchandise
................................................................................................................................... 987 Quoting Custom Offset
................................................................................................................................... 1018 Quoting Custom Digital
................................................................................................................................... 1059 Quoting Custom Copies
................................................................................................................................... 11010 Quoting Custom Wide Format
................................................................................................................................... 11411 Quoting Custom Paper
................................................................................................................................... 11912 Quoting Booklets
................................................................................................................................... 12713 Quoting Custom Booklets
................................................................................................................................... 13114 Quoting Carbonless
................................................................................................................................... 13315 Quoting Custom Carbonless
................................................................................................................................... 13616 Quoting x-Up
................................................................................................................................... 13817 Quoting Work and Turn
................................................................................................................................... 14118 Adding Ink Colors
................................................................................................................................... 14419 Adding Prepress
................................................................................................................................... 14620 Adding Prepress to Booklets
................................................................................................................................... 14821 Adding Custom Prepress
................................................................................................................................... 14922 Adding Postpress
................................................................................................................................... 15223 Adding Postpress to Booklets
................................................................................................................................... 15524 Adding Custom Postpress
................................................................................................................................... 15625 Adding a Note or Keyword
................................................................................................................................... 15826 Changing a Quote
................................................................................................................................... 16127 Viewing Quotes
................................................................................................................................... 16528 Printing Quotes
................................................................................................................................... 16829 Identifying Quotes
Part VI Making Estimates 170
................................................................................................................................... 1701 Creating the Estimate
................................................................................................................................... 1742 Spelling out Conditions
................................................................................................................................... 1773 Adjusting Prices
................................................................................................................................... 1844 e-Mailing an Estimate
................................................................................................................................... 1865 Changing the Language
................................................................................................................................... 1906 Making old Quotes new again
Part VII Working with Wide Format 192
................................................................................................................................... 1921 The Big Picture - in a Nutshell
................................................................................................................................... 1982 Creating Options for Wide Format
Part VIII Working with the Skypricer 201
................................................................................................................................... 2011 The Big Picture - in a Nutshell
................................................................................................................................... 2082 Creating Sky Items
7Contents
7
© 2018 Helmut Heindel
................................................................................................................................... 2143 Creating Custom Options
................................................................................................................................... 2184 Setting up Categories
................................................................................................................................... 2215 Managing Quantity Sets
Part IX Working with QuickBooks 224
................................................................................................................................... 2241 Preparing QuickBooks
................................................................................................................................... 2252 Importing Customers from
Part X Managing your Prices 230
................................................................................................................................... 2301 Matching your Offset Prices
................................................................................................................................... 2322 Matching your Digital Prices
................................................................................................................................... 2343 Pricing Products
................................................................................................................................... 2384 Pricing Paper
................................................................................................................................... 2415 Setting Paper Markups
................................................................................................................................... 2456 Pricing Ink
................................................................................................................................... 2477 Pricing Prepress
................................................................................................................................... 2508 Pricing Custom Prepress
................................................................................................................................... 2529 Pricing Custom Proofs
................................................................................................................................... 25410 Pricing Postpress
................................................................................................................................... 25811 Pricing Custom Postpress
................................................................................................................................... 26112 Pricing Bookbinding
................................................................................................................................... 26313 Pricing Packaging
................................................................................................................................... 26414 Pricing Custom Packaging
................................................................................................................................... 26615 Pricing Merchandise
Part XI My Way Pricing 270
................................................................................................................................... 2701 Quoting it My Way
................................................................................................................................... 2742 Quoting Carbonless My Way
Part XII Managing your Presses 276
................................................................................................................................... 2761 Setting up for Offset
................................................................................................................................... 2812 Setting up for Digital
................................................................................................................................... 2843 Setting up for RISO Duplicators
................................................................................................................................... 2884 Setting up for RISO Inkjets
................................................................................................................................... 2915 Setting up for Xante
................................................................................................................................... 2956 Setting up for Copies
Part XIII Managing your Products 297
................................................................................................................................... 2971 Product Categories
................................................................................................................................... 2992 Your Primary Product
................................................................................................................................... 3003 Updating Offset Products
Morning Flight Skypricer8
© 2018 Helmut Heindel
................................................................................................................................... 3044 Updating Digital Products
................................................................................................................................... 3075 Updating Copy Products
................................................................................................................................... 3106 Updating Wide Format Products
................................................................................................................................... 3137 Updating Merchandise
Part XIV Managing your Paper 316
................................................................................................................................... 3161 Paper Categories
................................................................................................................................... 3202 Updating in-Stock Paper
................................................................................................................................... 3243 Updating Buy-it Paper
................................................................................................................................... 3274 Fastpricing Buy-it Paper
................................................................................................................................... 3295 Saving Custom Paper
................................................................................................................................... 3306 Changing Carbonless Colors
................................................................................................................................... 3327 The Case for Inventory
Part XV Managing your Inks 335
................................................................................................................................... 3351 Updating Inks
Part XVI Managing your Customers 338
................................................................................................................................... 3381 Adding New Customers
................................................................................................................................... 3402 Updating a Customer
................................................................................................................................... 3453 Updating Taxes
Part XVII Managing your Contacts 347
................................................................................................................................... 3471 Updating a Contact
................................................................................................................................... 3502 Changing the Salutation
................................................................................................................................... 3513 Adding Notes
Part XVIII Writing Memos 355
................................................................................................................................... 3551 Writing a Memo
................................................................................................................................... 3612 Adding your Logo
................................................................................................................................... 3623 e-Mailing a Memo
................................................................................................................................... 3644 Making Memo Clips
Part XIX International 366
................................................................................................................................... 3661 Translating the Program
................................................................................................................................... 3682 Translating Content
................................................................................................................................... 3723 Money and Numbers
................................................................................................................................... 3734 Adding a Country
Part XX Our Store 376
Part XXI Our Flagship Products 377
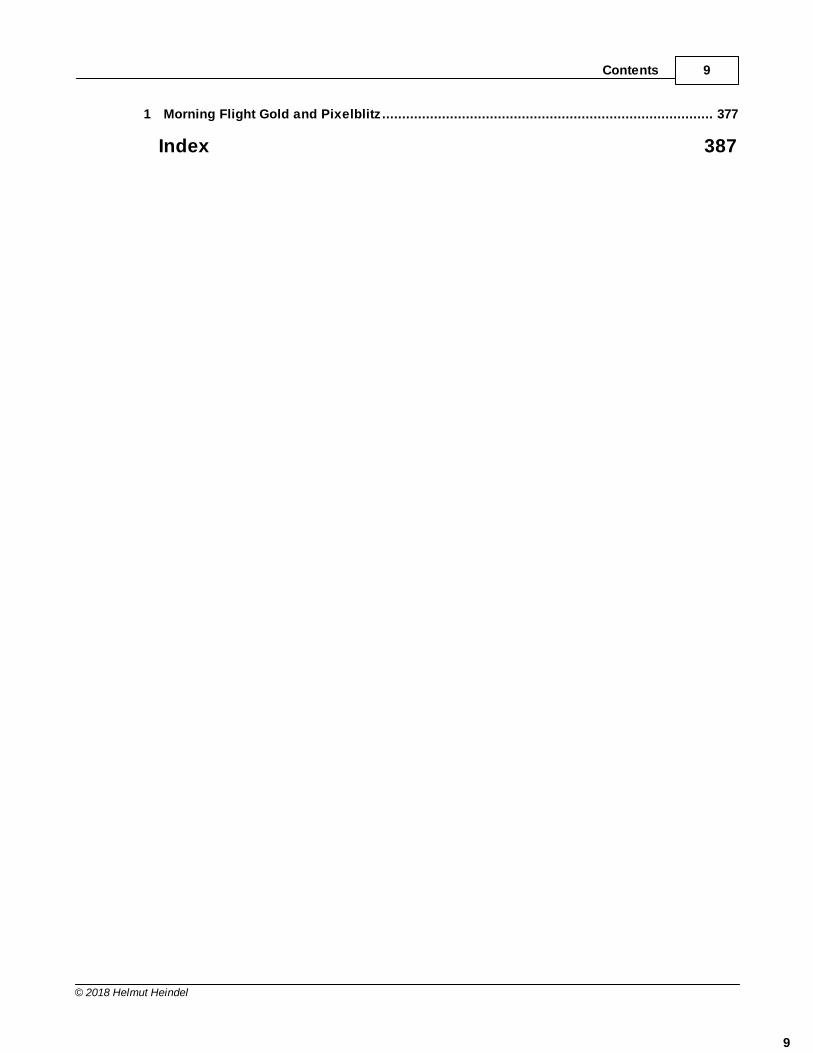
9Contents
9
© 2018 Helmut Heindel
................................................................................................................................... 3771 Morning Flight Gold and Pixelblitz
Index 387
Morning Flight Skypricer10
© 2018 Helmut Heindel
1 Welcome
Introduction
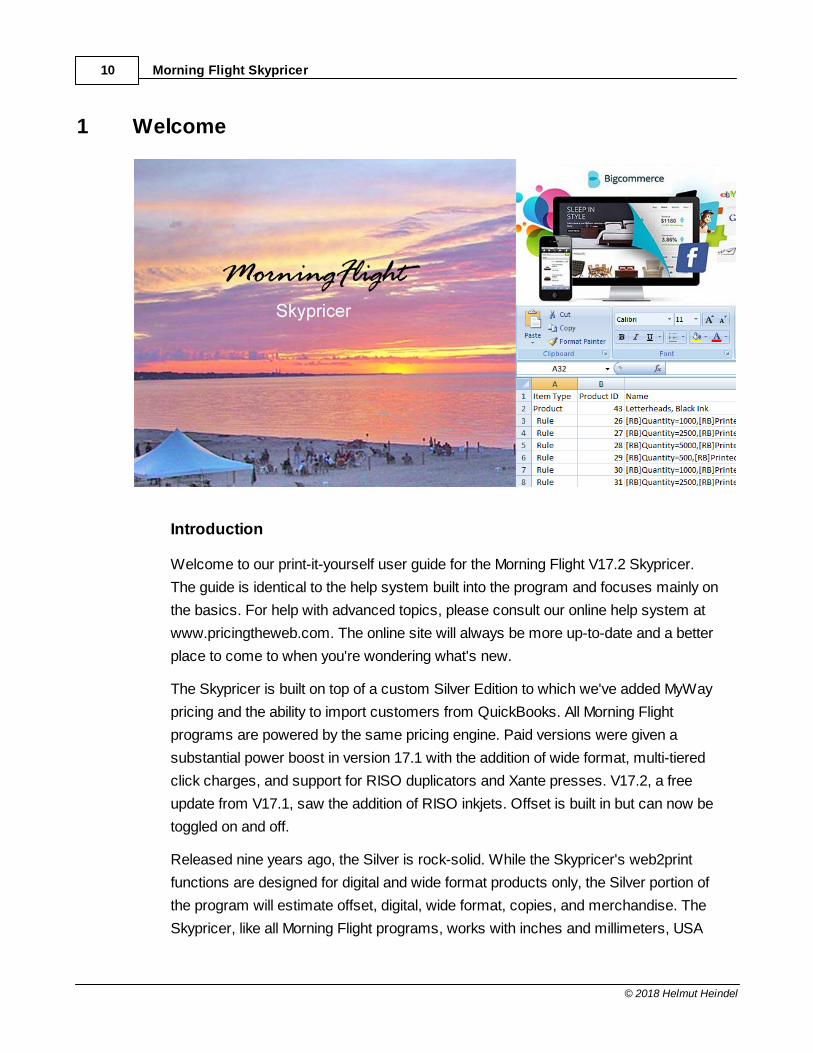
Welcome to our print-it-yourself user guide for the Morning Flight V17.2 Skypricer.
The guide is identical to the help system built into the program and focuses mainly on
the basics. For help with advanced topics, please consult our online help system at
www.pricingtheweb.com. The online site will always be more up-to-date and a better
place to come to when you're wondering what's new.
The Skypricer is built on top of a custom Silver Edition to which we've added MyWay
pricing and the ability to import customers from QuickBooks. All Morning Flight
programs are powered by the same pricing engine. Paid versions were given a
substantial power boost in version 17.1 with the addition of wide format, multi-tiered
click charges, and support for RISO duplicators and Xante presses. V17.2, a free
update from V17.1, saw the addition of RISO inkjets. Offset is built in but can now be
toggled on and off.
Released nine years ago, the Silver is rock-solid. While the Skypricer's web2print
functions are designed for digital and wide format products only, the Silver portion of
the program will estimate offset, digital, wide format, copies, and merchandise. The
Skypricer, like all Morning Flight programs, works with inches and millimeters, USA
Welcome 11
© 2018 Helmut Heindel
and ISO paper sizes. All paid Morning Flight programs are sold with a perpetual use
license, free support, and no annual fees.
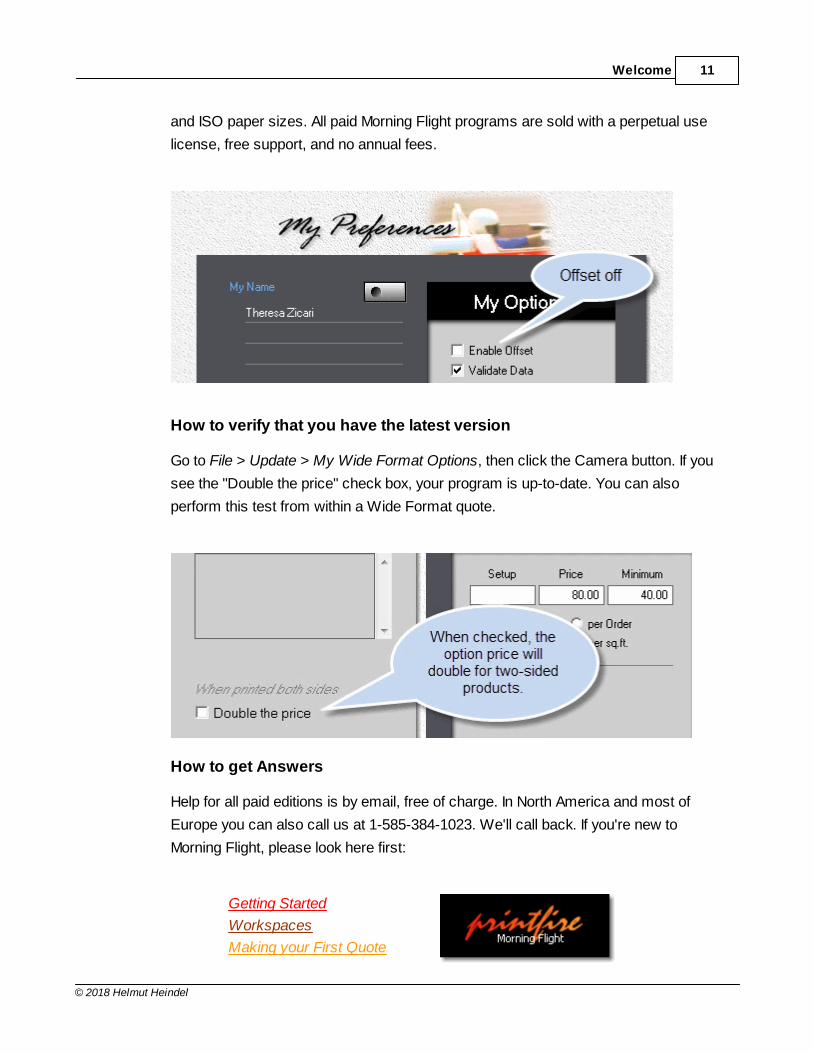
How to verify that you have the latest version
Go to File > Update > My Wide Format Options, then click the Camera button. If you
see the "Double the price" check box, your program is up-to-date. You can also
perform this test from within a Wide Format quote.
How to get Answers
Help for all paid editions is by email, free of charge. In North America and most of
Europe you can also call us at 1-585-384-1023. We'll call back. If you're new to
Morning Flight, please look here first:
Getting Started
Workspaces
Making your First Quote
Morning Flight Skypricer12
© 2018 Helmut Heindel
Getting Started 13
© 2018 Helmut Heindel
2 Getting Started
2.1 Installing the Skypricer
System Requirements
CPU: Pentium III or later
Memory: 128 MB
Available Disk Space: 60 MB
Operating System: MS Windows XP, 2000, Vista, 7, 8, 10
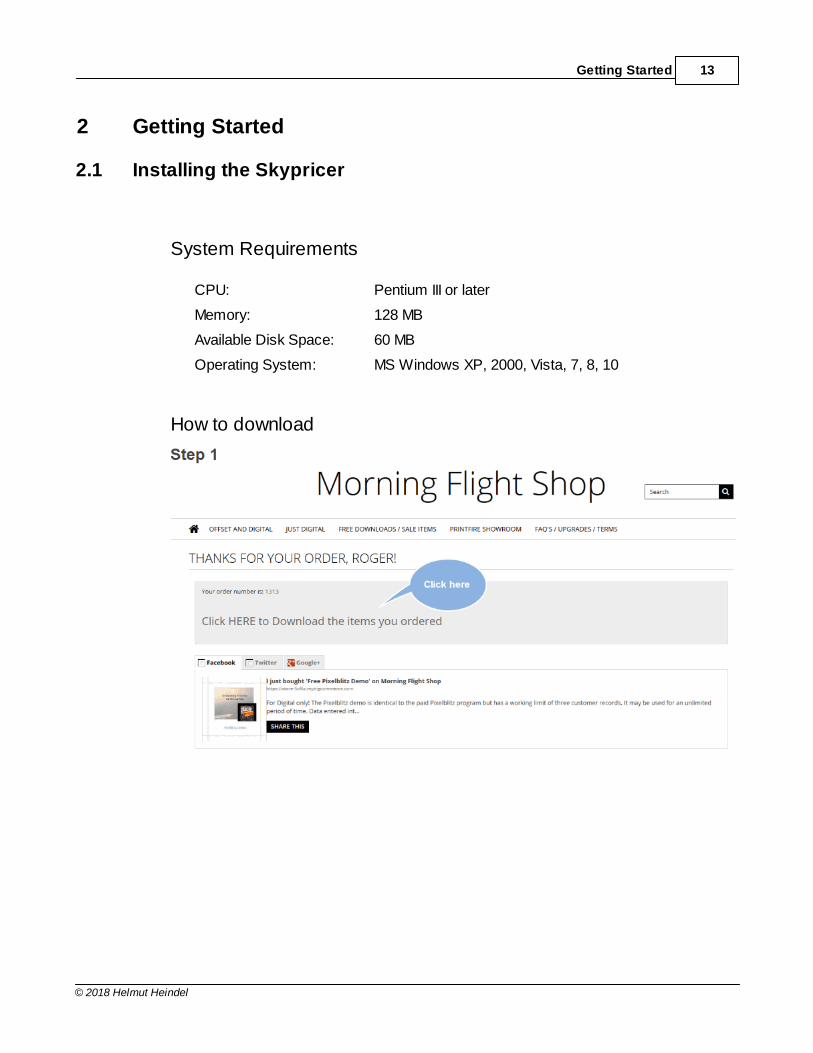
How to download

Morning Flight Skypricer14
© 2018 Helmut Heindel
Installing the Skypricer
If you're currently using the Morning Flight FreeRide starter or a paid Morning Flight
program, you can preserve your quotes and shop data by installing the Skypricer into
the same directory into which you've previously installed the FreeRide starter or paid
program (C:\Program Files\PrintFire\MorningFlight by default). However, before you
do that, please read the chapter on Updating and Upgrading.
If you elected to save rather than run the setup file, go to the directory into which you
saved the Skypricer download. Look for an application called SPSetup.exe. Double-
click it, then follow the instructions on the screen. An uninstall option is added to the
Control Panel, but no files are changed in your Windows System directory. All
Morning Flight programs use the same data files, so the transition will be seamless.
As always, be sure to back up your data files beforehand.
Getting Started 15
© 2018 Helmut Heindel
Installing a Skypricer Demo
If you're currently using the Morning Flight FreeRide starter edition or a paid Morning
Flight program, we strongly advise against installing a demo into the same directory.
The default path for the demo is C:\Program Files\PrintFire\DemoV17. The default for
live programs is C:\Program Files\PrintFire\MorningFlight. Keeping the two
programs separate will allow you to evaluate the demo without endangering your live
setup.
If you elected to save rather than run the setup file, go to the directory into which you
saved the Skypricer Demo download. Look for an application called SPSetupD.exe.
Double-click it, then follow the instructions on the screen.
Launching the Program
Double-click the MFlight Skypricer shortcut on your computer's desktop. When
Morning Flight loads for the first time, it will take a few minutes to create the data files.
Please be patient. Subsequent program loads will take just seconds.
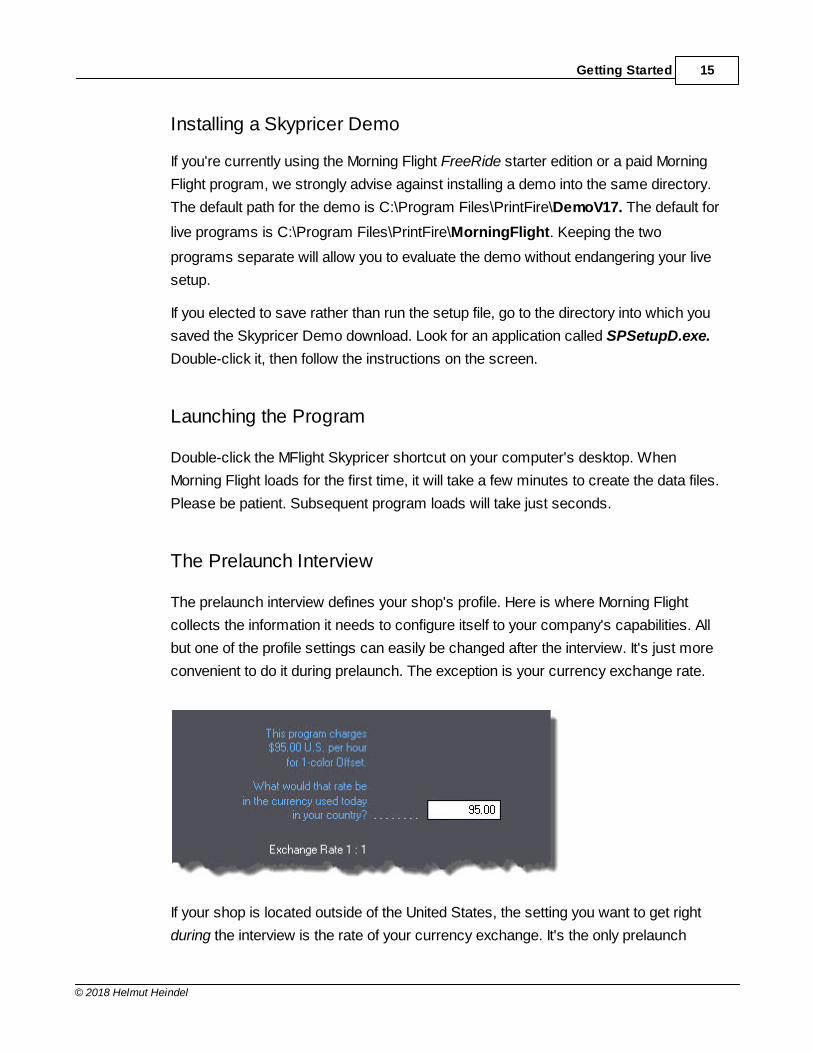
The Prelaunch Interview
The prelaunch interview defines your shop's profile. Here is where Morning Flight
collects the information it needs to configure itself to your company's capabilities. All
but one of the profile settings can easily be changed after the interview. It's just more
convenient to do it during prelaunch. The exception is your currency exchange rate.
If your shop is located outside of the United States, the setting you want to get right
during the interview is the rate of your currency exchange. It's the only prelaunch
Morning Flight Skypricer16
© 2018 Helmut Heindel
setting that can't be reset in a few simple steps. To revert back to U.S. Dollar prices
you'll need to later adjust all paper prices and hourly rates.
Uninstalling
Use the "Add Or Remove Program" utility in the Control Panel of MS Windows to
uninstall the program.
All Morning Flight editions use a common set of data files. Consequently,
uninstalling one of the editions will remove only the program itself from the
installation directory, not the generated data files. This also serves to protect
your data in case of an accidental uninstall. To remove all traces of the
Skypricer from your computer, delete the sub-directory "PrintFire\DemoV17"
from your "Program Files" directory after you've uninstalled the program.
Caution: Deletion of the sub-directory is irreversible once the Windows
Recycle Bin has been emptied.
2.2 Updating and Upgrading
In the fall of 2016 when we had the new Skypricer pretty much in the can - with five
click charges instead of one - we felt we had to offer tiered click charges in all other
paid editions as well. That single price point was no longer tenable. How long could it
take to code the update? Not long, maybe a month. So we announced it. The
response, predictably, was "Outstanding! So will it include wide format?" Well, why
not. I mean, we had the pricing engine apart anyway, and industry surveys told us that
half of all small print shops now offered wide format.
This is where the train went off the track. First and foremost, we should have kept
quiet about wide format and released V17.1 as soon as those versions had the tiered
click charges. Second, it would have been quicker to develop wide format as a
separate entity instead of trying to shoehorn it into the existing data structures. Less
stress, and definitely more revenue than the $50 to which we now limit all inline
Getting Started 17
© 2018 Helmut Heindel
updates. We even debated about that, seeing we've never charged for updates in our
13-year history.
In the end, it wasn't much of a debate. The new Morning Flight had taken a year and a
half to produce and had grown to nearly twice its original size and usefulness. I knew
none of that would amount to a hill of beans in the debate about whether to update.
Nor, in all honesty, should it. The real question is value. Is the update worth $50? I ask
myself that every time I order a $49.95 computer book from Amazon. Was it worth
burning the midnight oil to integrate wide format into the existing data structures?
Totally. It keeps everything together and is so much simpler:
Updating to Version 17.2
If you have already updated to Version 17.1 and now want to update to 17.2 (you
should, it's free and you get two more digital presses, among other things):
· Back up your Morning Flight data files (files with the extension TPS). The
location of those files will depend on your operating system and whether you
have disabled Windows UAC Virtualization.
· Install the update into your active Morning Flight directory (C:\Program
Files\PrintFire\MorningFlight by default).
If you're updating from any Morning Flight version older than V17.1 and have not yet
updated to V17.1, install the V17.2 update as you would V17.1. In other words, follow
the steps below:
Updating to Version 17.1
Version 17.1 is more than an update, it's a new program. Some of the screens still
look and work the same, but there are countless new ones to support the added
capabilities now found in all paid editions. To name just a few: Wide format, five-tier
click charges, support for RISO and Xante presses, and market pricing. Except for
the tiered click charges (without which there would be no market pricing), updates are
still managed hands-off by the setup file. However, reverse-engineering five click
rates from just one is too much to ask of the robots. Getting it wrong could decimate
your sales if the new pricing is too high, or wipe out your profits if it's too low.
Morning Flight Skypricer18
© 2018 Helmut Heindel
Converting that single click rate to five has been a huge challenge from day one. New
users are easy because there's nothing to convert. We're entering virgin territory.
Existing installations are more like a vegetable garden. Here we could easily be
trampling all over somebody's carefully cultivated pricing structure. This one kept me
up at night. I knew we couldn't make drastic changes regardless of the cautionary
"But First" link in the Read Me file. Nobody ever reads those things anyway until the
carnage is well underway.
Late in 2017 we found the solution, a fairly elegant one at that. New installations would
continue to emerge with market prices. But updates would extract the press factors
from the earlier version and import those values into the update. Nothing new about
that, it's common practice. What's unusual is that the single click rate from the earlier
version is being loaded into all five V17.1 tiers, keeping the update essentially a one-
tier program. That hardly looks like progress, more like a step back. And it would be if
we hadn't added our 'Aha' ingredient - the ability to go online and look up the press
factors at www.printfire.com/priceguide.html that will give you market pricing.
You now have a choice: Stay with Cost-Plus; forget about market pricing altogether
and keep Morning Flight a one-tier program. That's likely to still hurt your sales (orders
you're already not getting because some of your quotes are overpriced), and lower
your profits (orders you are getting but at too low a price which most customers are
savvy enough to not be telling you).
Or, move ahead slow and measured, one step at a time. Where you feel comfortable,
gradually inch your press rates to what we publish on our website. That's the path I
would take if I still owned the Unitac print shop. One of the unseen benefits of version
17.1 is the built-in market price guide for digital and wide format. We've spent a lot of
time and money to bring you that, and it would be a shame to not take advantage of it.
The Fast Track
· Take a picture or a screen capture, or write on a slip of paper your digital press
rates in the old version, the one you're using now. Hourly rates (front and back)
and click charges (1C and 4C) are the values you want to preserve. If you added
presses, save the rates for those presses, too.
· Take a picture or a screen capture, or write on a slip of paper your paper
markups as displayed in My Store.
Getting Started 19
© 2018 Helmut Heindel
· Make sure you have printouts of estimates and job tickets for your most
common digital work, priced with the old version.
· Back up your Morning Flight data files (files with the extension TPS). The
location of those files will depend on your operating system and whether you
have disabled Windows UAC Virtualization.
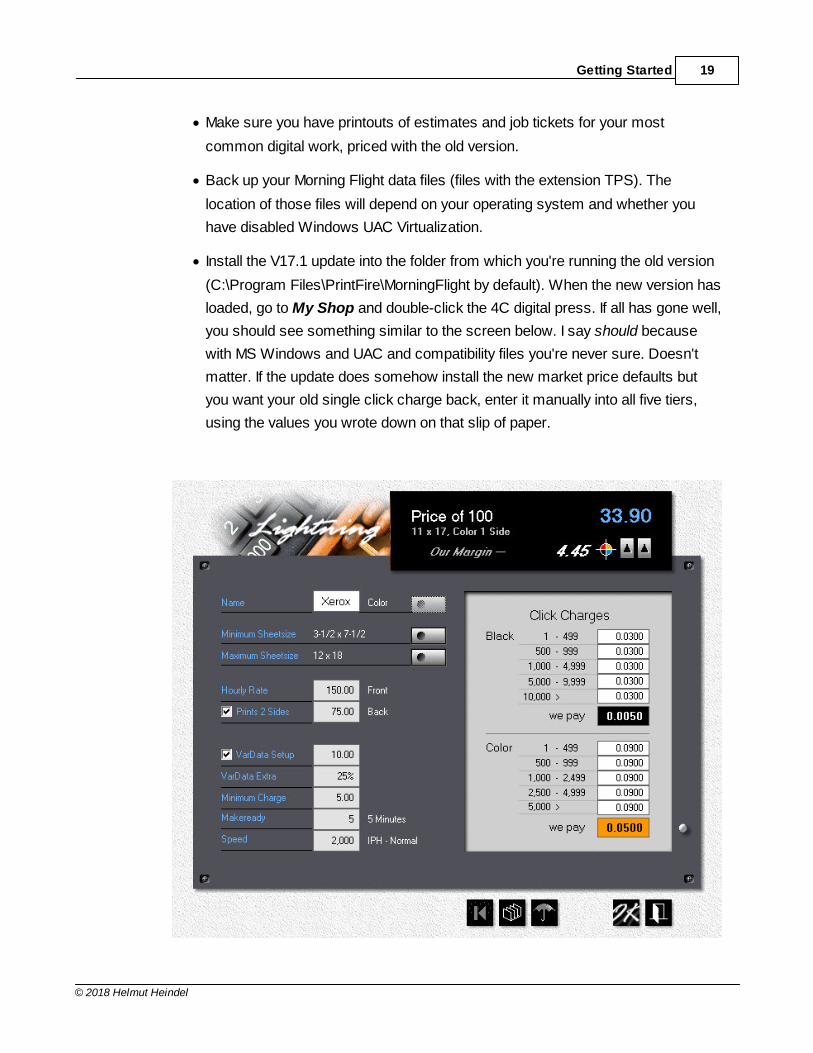
· Install the V17.1 update into the folder from which you're running the old version
(C:\Program Files\PrintFire\MorningFlight by default). When the new version has
loaded, go to My Shop and double-click the 4C digital press. If all has gone well,
you should see something similar to the screen below. I say should because
with MS Windows and UAC and compatibility files you're never sure. Doesn't
matter. If the update does somehow install the new market price defaults but
you want your old single click charge back, enter it manually into all five tiers,
using the values you wrote down on that slip of paper.
Morning Flight Skypricer20
© 2018 Helmut Heindel
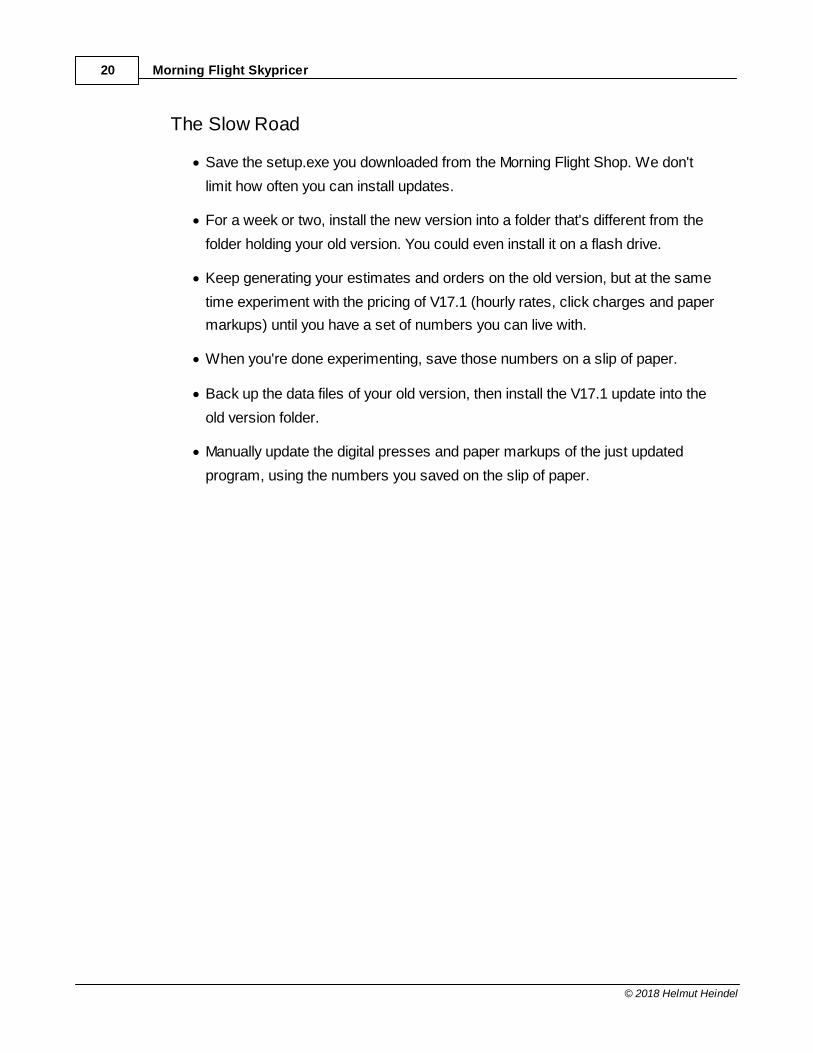
The Slow Road
· Save the setup.exe you downloaded from the Morning Flight Shop. We don't
limit how often you can install updates.
· For a week or two, install the new version into a folder that's different from the
folder holding your old version. You could even install it on a flash drive.
· Keep generating your estimates and orders on the old version, but at the same
time experiment with the pricing of V17.1 (hourly rates, click charges and paper
markups) until you have a set of numbers you can live with.
· When you're done experimenting, save those numbers on a slip of paper.
· Back up the data files of your old version, then install the V17.1 update into the
old version folder.
· Manually update the digital presses and paper markups of the just updated
program, using the numbers you saved on the slip of paper.

Getting Started 21
© 2018 Helmut Heindel
Hourly Rate and Tiered Click Charge Defaults.
January 2018
Morning Flight Skypricer22
© 2018 Helmut Heindel
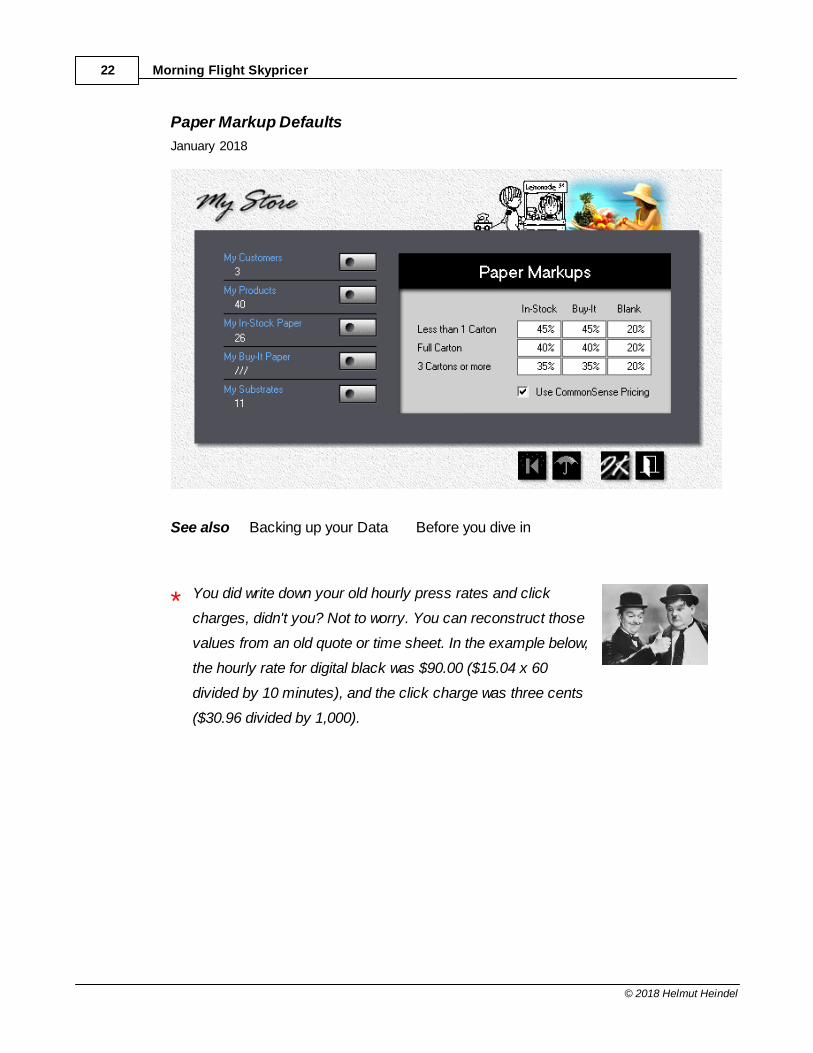
Paper Markup Defaults
January 2018
See also Backing up your Data Before you dive in
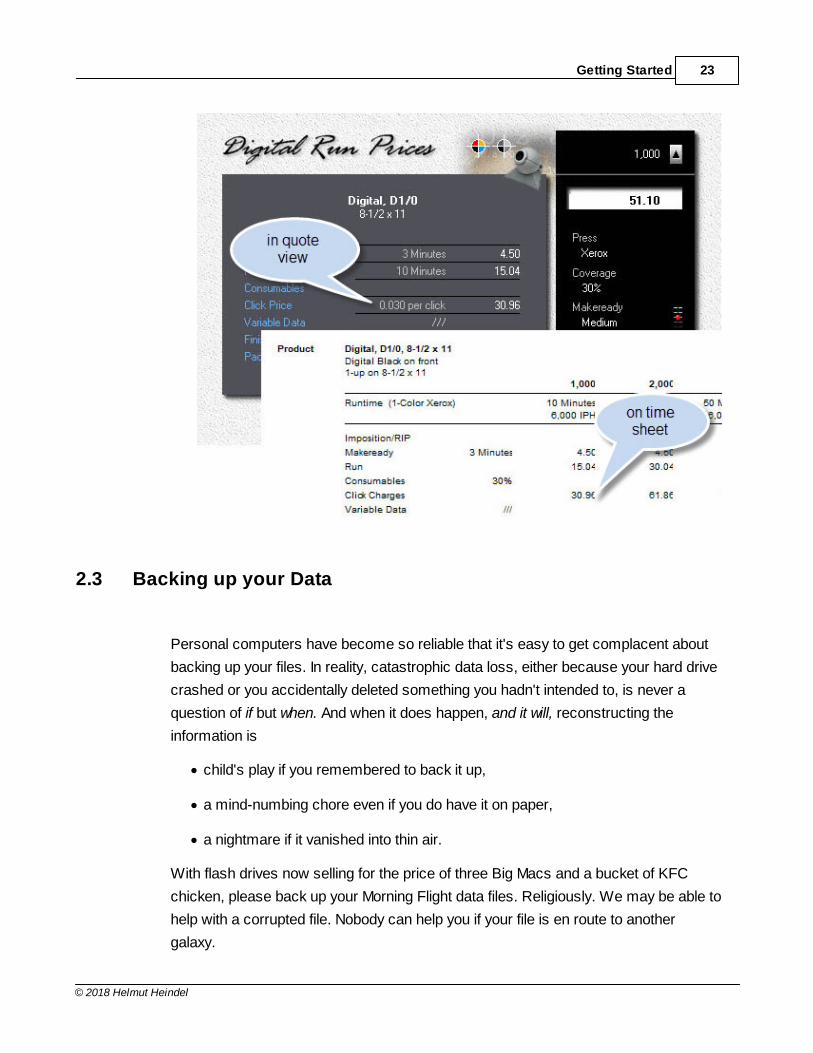
* You did write down your old hourly press rates and click
charges, didn't you? Not to worry. You can reconstruct those
values from an old quote or time sheet. In the example below,
the hourly rate for digital black was $90.00 ($15.04 x 60
divided by 10 minutes), and the click charge was three cents
($30.96 divided by 1,000).
Getting Started 23
© 2018 Helmut Heindel
2.3 Backing up your Data
Personal computers have become so reliable that it's easy to get complacent about
backing up your files. In reality, catastrophic data loss, either because your hard drive
crashed or you accidentally deleted something you hadn't intended to, is never a
question of if but when. And when it does happen, and it will, reconstructing the
information is
· child's play if you remembered to back it up,
· a mind-numbing chore even if you do have it on paper,
· a nightmare if it vanished into thin air.
With flash drives now selling for the price of three Big Macs and a bucket of KFC
chicken, please back up your Morning Flight data files. Religiously. We may be able to
help with a corrupted file. Nobody can help you if your file is en route to another
galaxy.
Morning Flight Skypricer24
© 2018 Helmut Heindel
How to back up
Let's start with how not to. Backing up to a drive on the same computer is like trying to
protect your good china from earthquakes by moving the cabinet into the next room.
Backing up to an external drive is a step in the right direction but also not far enough.
Your irreplaceable data is still in the same house, at risk from fires, floods,
meteorites.
A better solution is to keep one flash drive off-site, and another plugged into the
computer. Keep it one-button easy, or else you're not going to back up often enough.
Now and then, archive everything to DVD. When disaster strikes, even a month-old
backup is better than no backup at all.
What to back up under XP
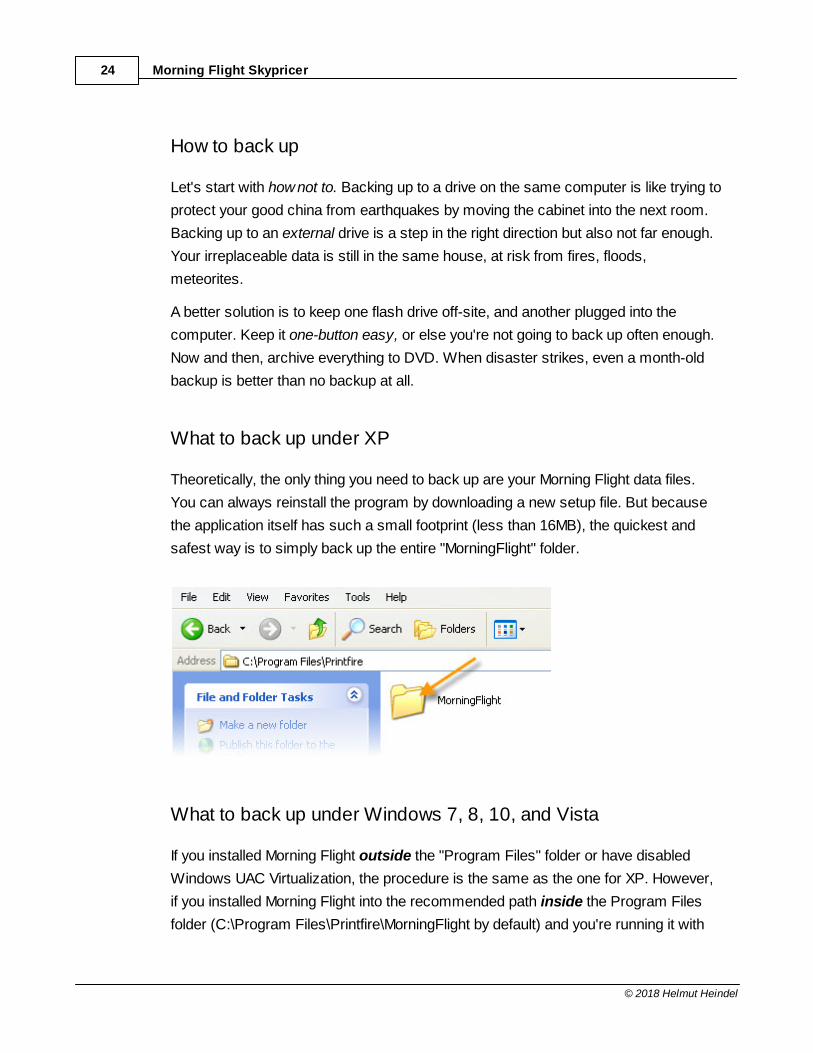
Theoretically, the only thing you need to back up are your Morning Flight data files.
You can always reinstall the program by downloading a new setup file. But because
the application itself has such a small footprint (less than 16MB), the quickest and
safest way is to simply back up the entire "MorningFlight" folder.
What to back up under Windows 7, 8, 10, and Vista
If you installed Morning Flight outside the "Program Files" folder or have disabled
Windows UAC Virtualization, the procedure is the same as the one for XP. However,
if you installed Morning Flight into the recommended path inside the Program Files
folder (C:\Program Files\Printfire\MorningFlight by default) and you're running it with
Getting Started 25
© 2018 Helmut Heindel
UAC enabled, backing up the Morning Flight folder would be pointless. That's because
the files that need backing up aren't there. The operating system has taken it upon
itself to relocate them all to the Compatibility Files folder.
Some Background
There is a fair amount of confusion over UAC, which has gained notoriety for
annoying the user with constant permission prompts. That's something we'll learn to
live with. Security usually comes with a price tag. Look no further than the long check-
in lines at airports.
More insidious is a new UAC feature called Virtualization. The idea is to
accommodate applications that write to files in protected directories. "C:/Program
Files" is such a directory. This is so common that Microsoft felt it necessary to devise
a mechanism that redirects the write operation to a user-specific location. The
application thinks it's writing to the main Program Files directory, but in reality a file
gets written to a second Program Files directory in each user's Virtual Store.
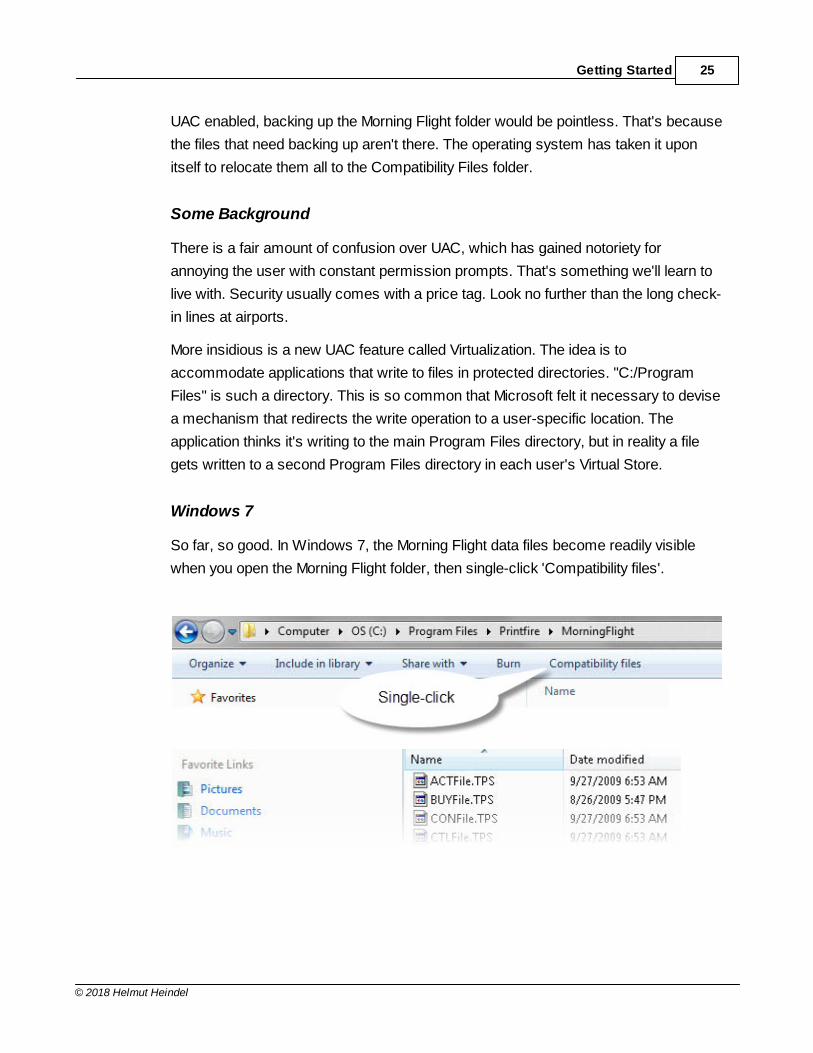
Windows 7
So far, so good. In Windows 7, the Morning Flight data files become readily visible
when you open the Morning Flight folder, then single-click 'Compatibility files'.
Morning Flight Skypricer26
© 2018 Helmut Heindel
Windows 8 and 10
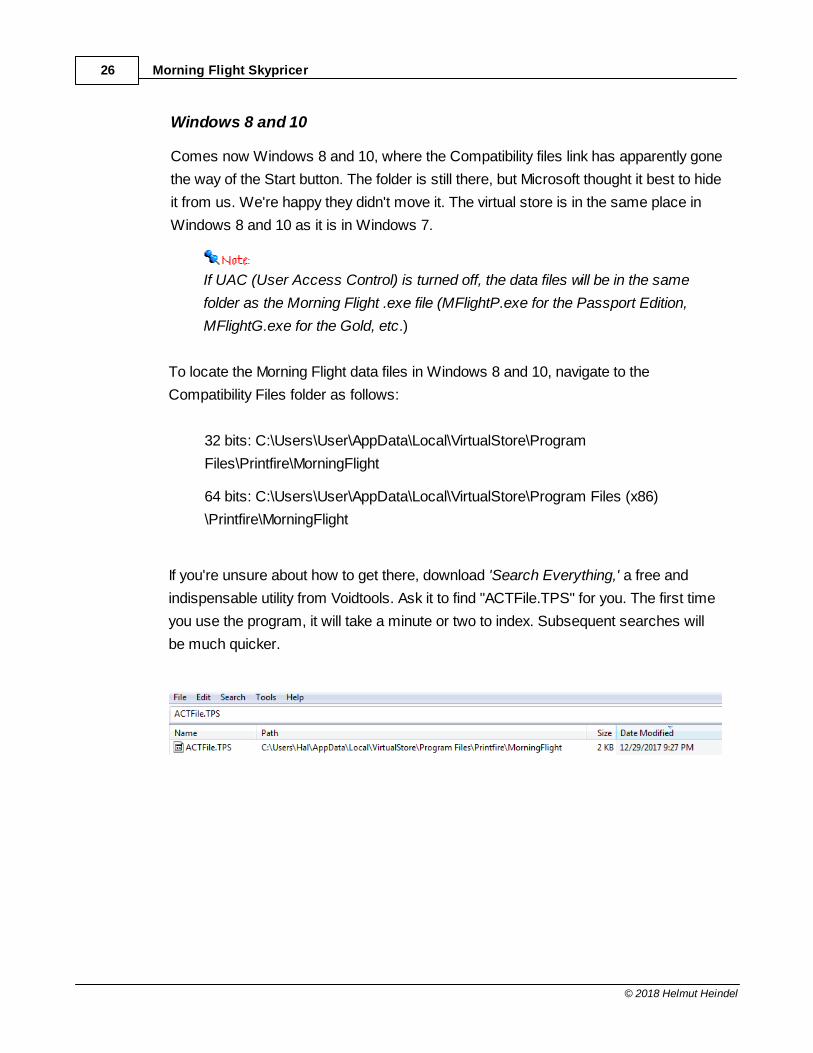
Comes now Windows 8 and 10, where the Compatibility files link has apparently gone
the way of the Start button. The folder is still there, but Microsoft thought it best to hide
it from us. We're happy they didn't move it. The virtual store is in the same place in
Windows 8 and 10 as it is in Windows 7.
If UAC (User Access Control) is turned off, the data files will be in the same
folder as the Morning Flight .exe file (MFlightP.exe for the Passport Edition,
MFlightG.exe for the Gold, etc.)
To locate the Morning Flight data files in Windows 8 and 10, navigate to the
Compatibility Files folder as follows:
32 bits: C:\Users\User\AppData\Local\VirtualStore\Program
Files\Printfire\MorningFlight
64 bits: C:\Users\User\AppData\Local\VirtualStore\Program Files (x86)
\Printfire\MorningFlight
If you're unsure about how to get there, download 'Search Everything,' a free and
indispensable utility from Voidtools. Ask it to find "ACTFile.TPS" for you. The first time
you use the program, it will take a minute or two to index. Subsequent searches will
be much quicker.
Getting Started 27
© 2018 Helmut Heindel
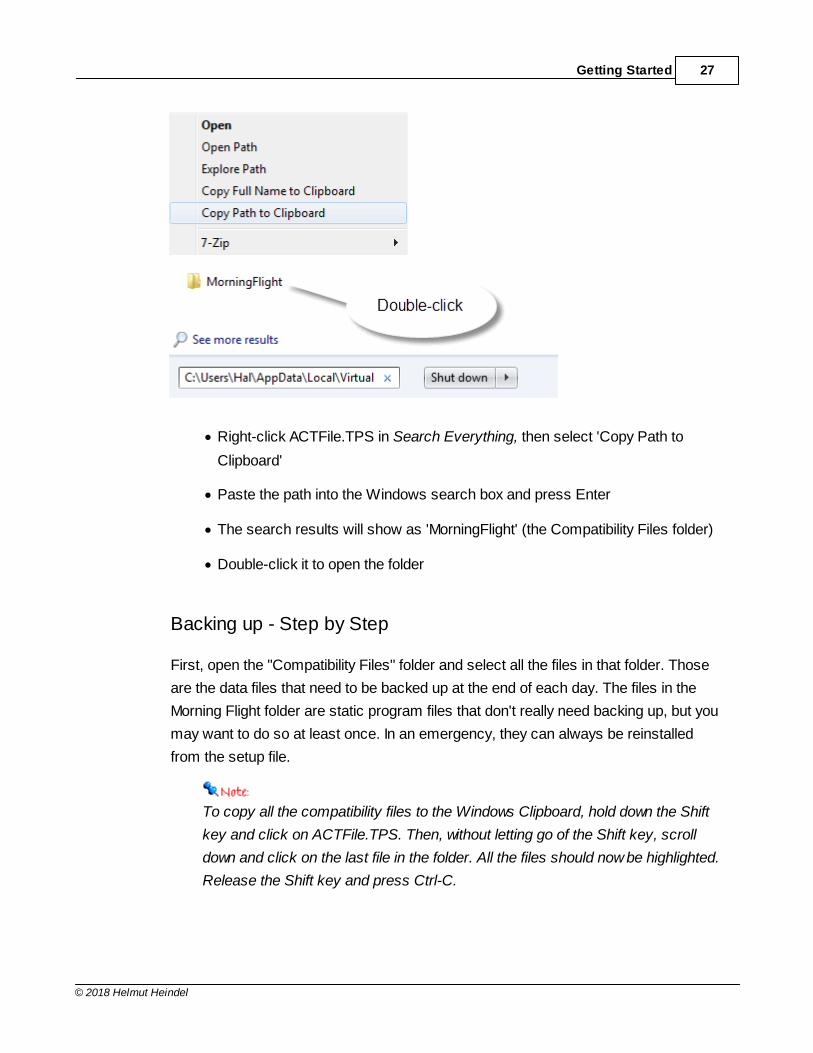
· Right-click ACTFile.TPS in Search Everything, then select 'Copy Path to
Clipboard'
· Paste the path into the Windows search box and press Enter
· The search results will show as 'MorningFlight' (the Compatibility Files folder)
· Double-click it to open the folder
Backing up - Step by Step
First, open the "Compatibility Files" folder and select all the files in that folder. Those
are the data files that need to be backed up at the end of each day. The files in the
Morning Flight folder are static program files that don't really need backing up, but you
may want to do so at least once. In an emergency, they can always be reinstalled
from the setup file.
To copy all the compatibility files to the Windows Clipboard, hold down the Shift
key and click on ACTFile.TPS. Then, without letting go of the Shift key, scroll
down and click on the last file in the folder. All the files should now be highlighted.
Release the Shift key and press Ctrl-C.
Morning Flight Skypricer28
© 2018 Helmut Heindel
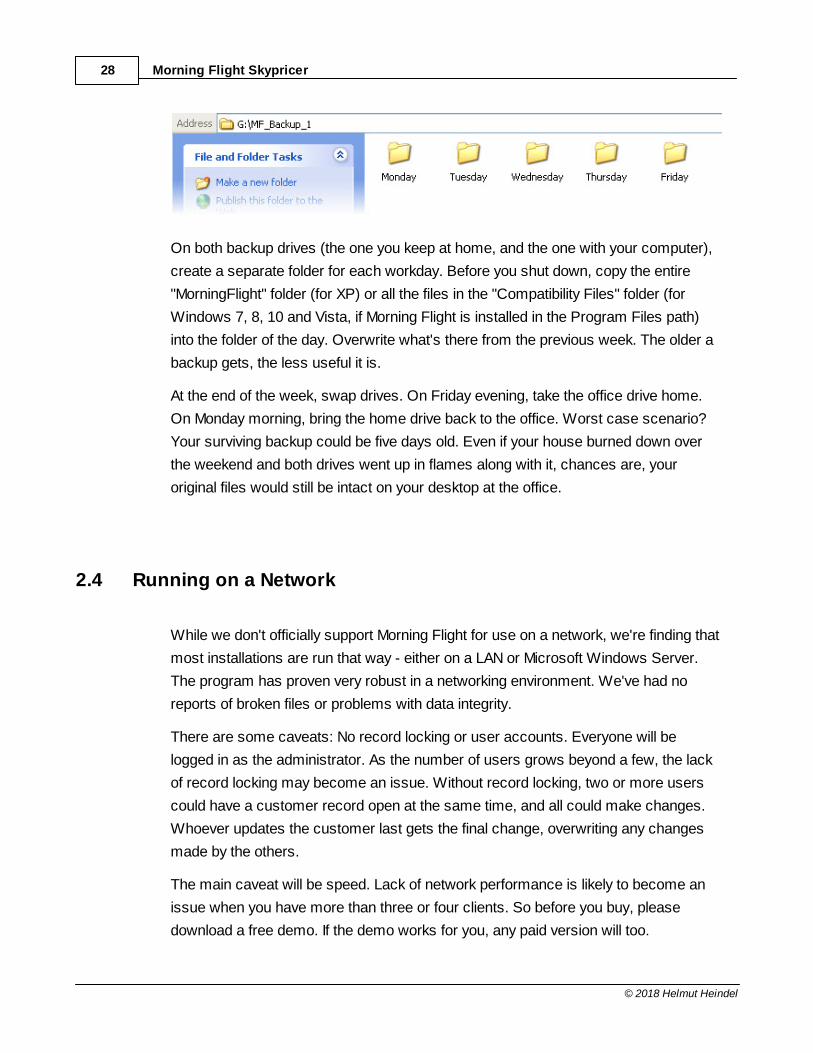
On both backup drives (the one you keep at home, and the one with your computer),
create a separate folder for each workday. Before you shut down, copy the entire
"MorningFlight" folder (for XP) or all the files in the "Compatibility Files" folder (for
Windows 7, 8, 10 and Vista, if Morning Flight is installed in the Program Files path)
into the folder of the day. Overwrite what's there from the previous week. The older a
backup gets, the less useful it is.
At the end of the week, swap drives. On Friday evening, take the office drive home.
On Monday morning, bring the home drive back to the office. Worst case scenario?
Your surviving backup could be five days old. Even if your house burned down over
the weekend and both drives went up in flames along with it, chances are, your
original files would still be intact on your desktop at the office.
2.4 Running on a Network
While we don't officially support Morning Flight for use on a network, we're finding that
most installations are run that way - either on a LAN or Microsoft Windows Server.
The program has proven very robust in a networking environment. We've had no
reports of broken files or problems with data integrity.
There are some caveats: No record locking or user accounts. Everyone will be
logged in as the administrator. As the number of users grows beyond a few, the lack
of record locking may become an issue. Without record locking, two or more users
could have a customer record open at the same time, and all could make changes.
Whoever updates the customer last gets the final change, overwriting any changes
made by the others.
The main caveat will be speed. Lack of network performance is likely to become an
issue when you have more than three or four clients. So before you buy, please
download a free demo. If the demo works for you, any paid version will too.
Getting Started 29
© 2018 Helmut Heindel
Setting Morning Flight up in a networking environment is a simple process. All that
needs to be done are the following steps:
1. Install Morning Flight on a server or on a peer PC. It will default to C:\Program
Files\PrintFire\MorningFlight. Make sure the program runs properly on that
server.
2. Share the directory (folder) that Morning Flight is installed in.
3. Create a shortcut, on the client PC's desktop, to the executable. For instance, if
you install the Silver Edition on Server-7 the shortcut would look like:
"\\Server-7\c$\Program Files\Printfire\MorningFlight\MFlightS.exe" (include the
quotes)
It would be preferable (but not necessary) to set up My World, My Shop, etc. on the
server before running Morning Flight on the clients. Also, run Morning Flight on each
client at least once to ensure that the administrator is not automatically logged in.
An alternate method is to share the MorningFlight folder and map a drive letter to it.
For instance, if you map C:\Program Files\PrintFire\MorningFlight to G, the shortcut
would be G:\MFPixel.exe for the Pixelblitz Edition, G:\MFlightG.exe for the Gold, G:
\MFlightS.exe for the Silver, and so on.
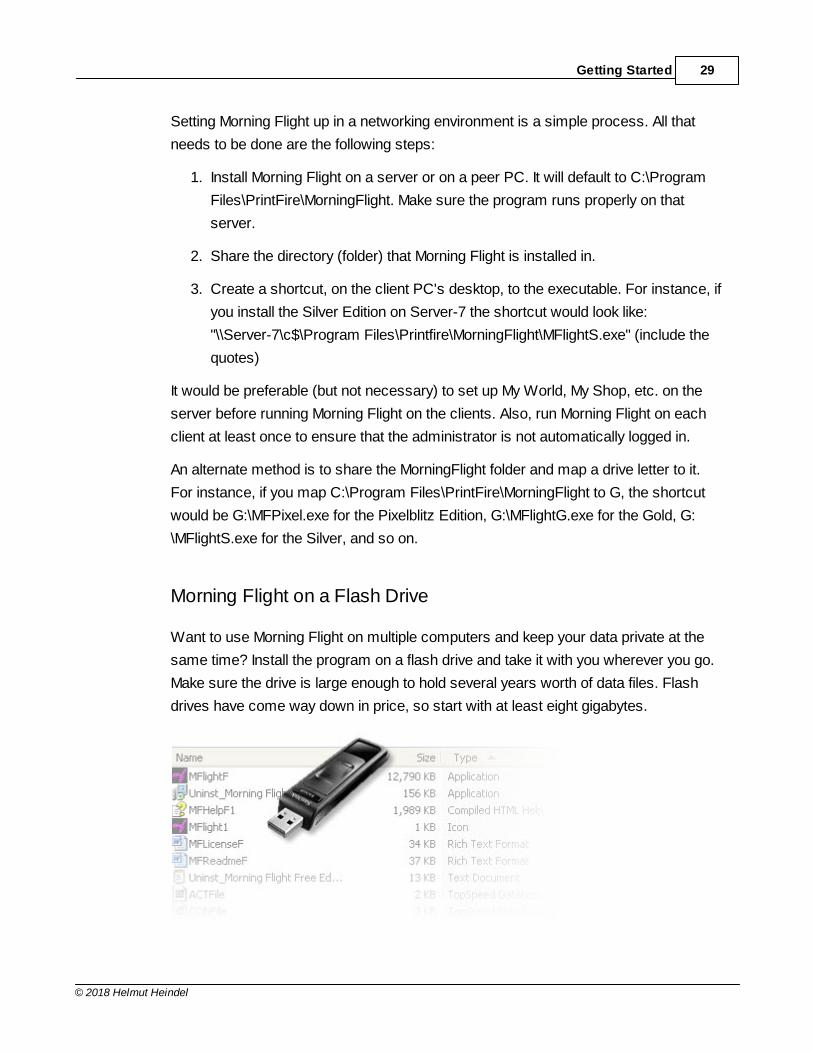
Morning Flight on a Flash Drive
Want to use Morning Flight on multiple computers and keep your data private at the
same time? Install the program on a flash drive and take it with you wherever you go.
Make sure the drive is large enough to hold several years worth of data files. Flash
drives have come way down in price, so start with at least eight gigabytes.

Morning Flight Skypricer30
© 2018 Helmut Heindel
The reason flash drives work is because all Morning Flight programs are entirely self-
contained. No dynamic link libraries (aka .dll Hell), no registry entries, no external
black boxes of any kind. Even the data files generated by the program encapsulate all
their dependent key and index files in a single .TPS file.
How to Install on a Flash Drive
· Install Morning Flight directly to a USB flash drive (not your C:\ drive).
· After the installation, create a shortcut to the application on your desktop.
· Remove the flash drive and plug it into the second computer.
· Create a shortcut on that computer's desktop as well.
Getting Started 31
© 2018 Helmut Heindel
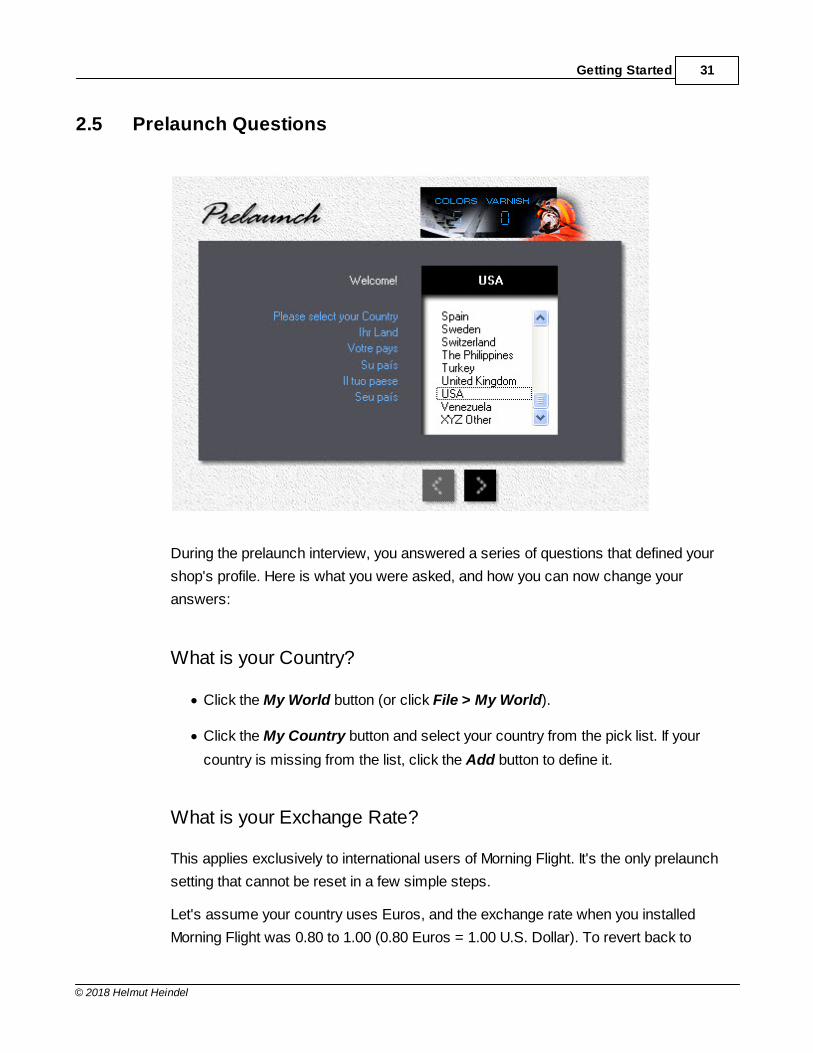
2.5 Prelaunch Questions
During the prelaunch interview, you answered a series of questions that defined your
shop's profile. Here is what you were asked, and how you can now change your
answers:
What is your Country?
· Click the My World button (or click File > My World).
· Click the My Country button and select your country from the pick list. If your
country is missing from the list, click the Add button to define it.
What is your Exchange Rate?
This applies exclusively to international users of Morning Flight. It's the only prelaunch
setting that cannot be reset in a few simple steps.
Let's assume your country uses Euros, and the exchange rate when you installed
Morning Flight was 0.80 to 1.00 (0.80 Euros = 1.00 U.S. Dollar). To revert back to
Morning Flight Skypricer32
© 2018 Helmut Heindel
U.S. Dollar prices you'll need to multiply every price and hourly rate you find in My
Shop, and every paper price in My Store, by 1.25. Why 1.25? It's what you get when
you divide one Dollar by your local currency, in this case 1:00 divided by 0.80.
Do you have an ...
Imagesetter
Camera
· Click the My Shop button (or click File > My Shop).
· Click the Prepress button.
· Click the Film tab, then check Imagesetter if you have one, uncheck it if you
don't.
· Do the same for Camera.
Do you have a ...
2-Color Press
4-Color Press
Digital Press
B&W Copier
Color Copier
· Click the My Shop button (or click File > My Shop).
· Check or uncheck presses and copiers, as appropriate.
Getting Started 33
© 2018 Helmut Heindel
The One-Color offset press can't be unchecked. Morning Flight assumes that
virtually every offset shop either has such a press, or at least offers one-color
printing. "Digital Only" shops will happily ignore offset altogether.
When you uncheck the four-color offset press, you'll still be able to quote four-
color. Unchecking the press merely takes it off-line and assigns all four-color
runs to the two-color press, twice through. Unchecking a digital press or a
copier, on the other hand, will prevent you from quoting the type of work
associated with it. For one thing, you can't produce color copies on a black
copier. And while there is often a good reason to run a one-color offset job on a
two-color press (one-color press too small, too much ink coverage), making
black copies on a color copier is almost always cost-prohibitive.
Describe your Offset Presses
· Click the My Shop button (or click File > My Shop).
· Click the Presses button and select the press you want to work on from the pick
list.
· Set the minimum and maximum sheet sizes.
· Check or uncheck the types of plates available for this press.
Who will administer Morning Flight?
· Click the My World button (or click File > My World).
· Click the My Preferences button.
· Click the My Name button and enter the name and initials of the Program
Administrator.
Morning Flight Skypricer34
© 2018 Helmut Heindel
2.6 Your First Offset Quote
Time to jump in and get your feet wet. This topic describes how to quote a basic
stationery package, printed by offset in two colors, using out-of-the-box Morning Flight
prices.
Print Quote Window
Browse Customers(in black panel on top) F11
Paste Ink Colors(bottom row) F9
Import Quote for editing(bottom row) F10
Set Quantities(bottom row) F12
Getting Started 35
© 2018 Helmut Heindel
Making the Letterhead Quote
From the main menu, click the Quote button, then click the F2 button or
press F2.
· Double-click Letterheads.
· Back in the print quote window, click the F3 button.
· Place the highlight bar over 24 lb. Classic Laid, Avon Brilliant White, then
click OK.
· Back in the print quote window, click the F4 button.
· Select Black plus Color, then click OK.
· In the window that opens, enter PMS "109", then click OK.
Back in the print quote window, click the Quantities button or press F12.
· Enter 500, 1,000, and 3,000, then click OK.
No refresh button! All prices are instantly updated as you enter new data or
make changes.
Saving the Quote
When you make a quote, Morning Flight doesn't ask who the customer is because all
you may want is a price. But to save a quote, you'll need a tag of some sort to help
you retrieve it. The customer's name will do, for now.
· While the print quote window is still open, click the Rolodex button in the black
panel on top.
· Provided you haven't entered any customers yet, the window that opens will
come up empty. Click the Add button, second from the left.
Morning Flight Skypricer36
© 2018 Helmut Heindel
First click the Text button to allow upper case entry, then enter "ACME
Automotive" in the Company field and click OK.
· Click OK in the print quote window to save the quote.
To keep "John Smith" from being entered as "john smith" one day and as
"JOHN SMITH" the next, Morning Flight converts all customer names and
addresses to initial caps. If text formatting is ON, you can turn it off by clicking
the text button before you enter a name or address.
See also: Formatting Text
Making the Envelope Quote
Assuming that the ink colors for the envelope are the same as the colors we've used
for the letterhead, it's quicker and safer to copy them from the previous job than to re-
enter them from scratch.
Getting Started 37
© 2018 Helmut Heindel
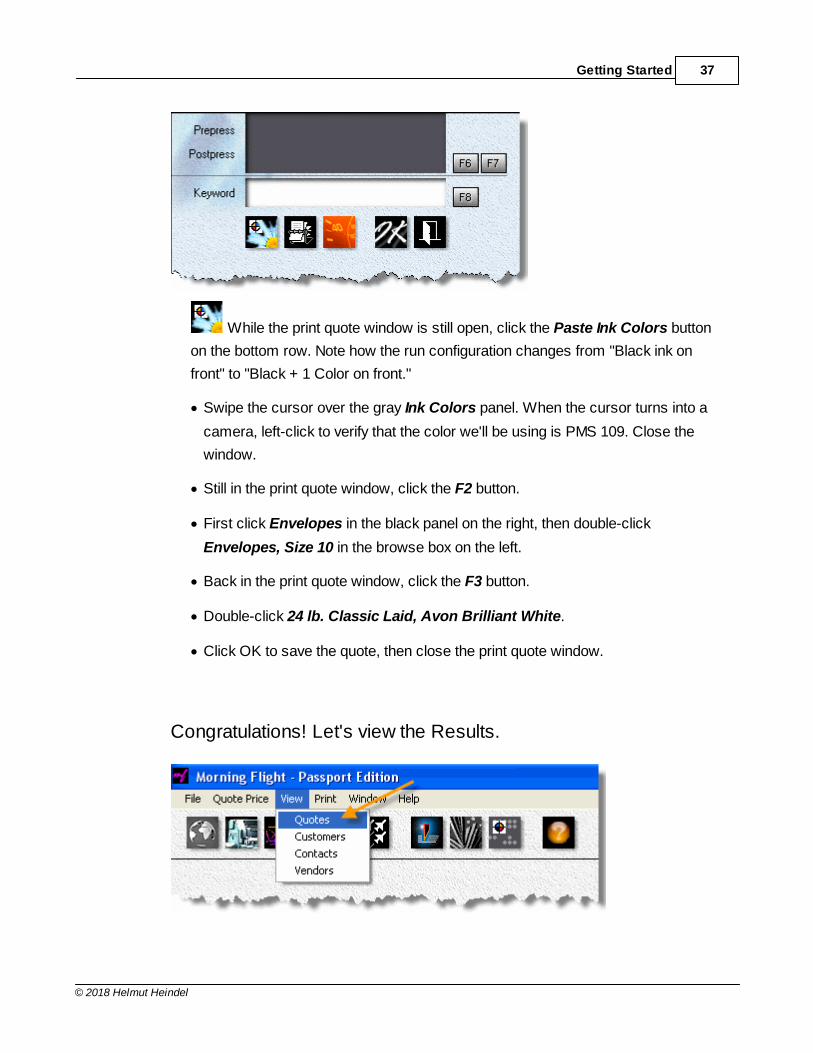
While the print quote window is still open, click the Paste Ink Colors button
on the bottom row. Note how the run configuration changes from "Black ink on
front" to "Black + 1 Color on front."
· Swipe the cursor over the gray Ink Colors panel. When the cursor turns into a
camera, left-click to verify that the color we'll be using is PMS 109. Close the
window.
· Still in the print quote window, click the F2 button.
· First click Envelopes in the black panel on the right, then double-click
Envelopes, Size 10 in the browse box on the left.
· Back in the print quote window, click the F3 button.
· Double-click 24 lb. Classic Laid, Avon Brilliant White.
· Click OK to save the quote, then close the print quote window.
Congratulations! Let's view the Results.
Morning Flight Skypricer38
© 2018 Helmut Heindel
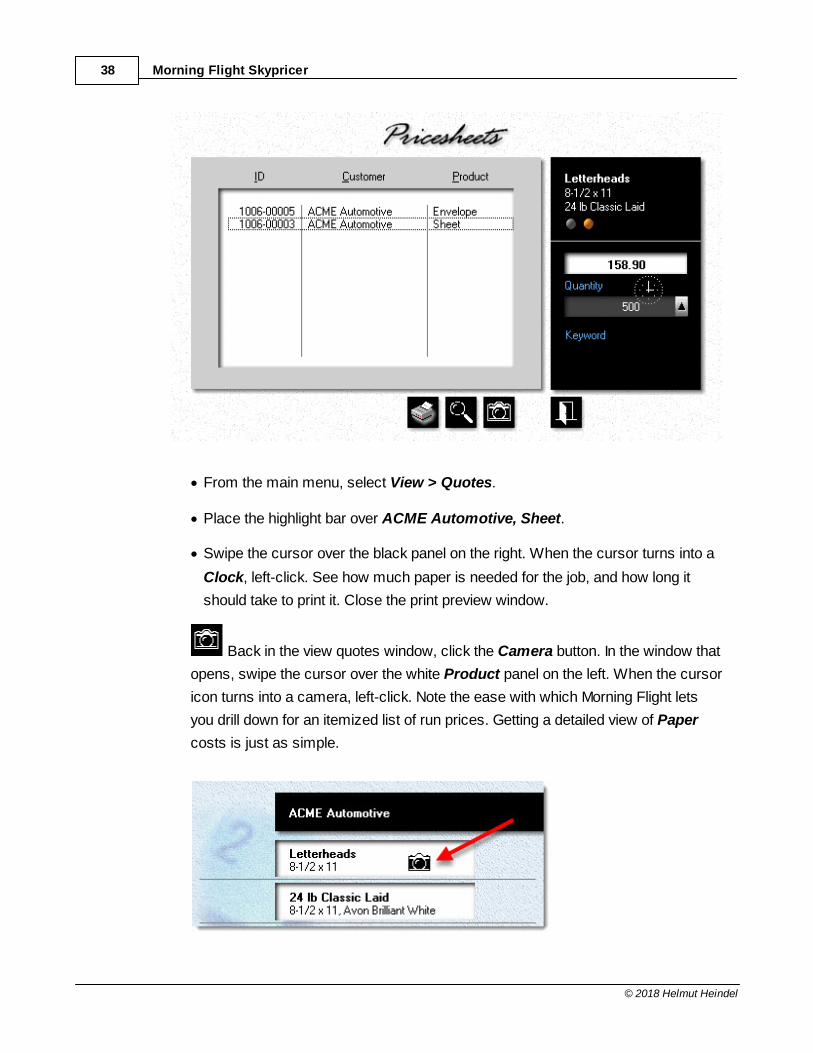
· From the main menu, select View > Quotes.
· Place the highlight bar over ACME Automotive, Sheet.
· Swipe the cursor over the black panel on the right. When the cursor turns into a
Clock, left-click. See how much paper is needed for the job, and how long it
should take to print it. Close the print preview window.
Back in the view quotes window, click the Camera button. In the window that
opens, swipe the cursor over the white Product panel on the left. When the cursor
icon turns into a camera, left-click. Note the ease with which Morning Flight lets
you drill down for an itemized list of run prices. Getting a detailed view of Paper
costs is just as simple.
Getting Started 39
© 2018 Helmut Heindel
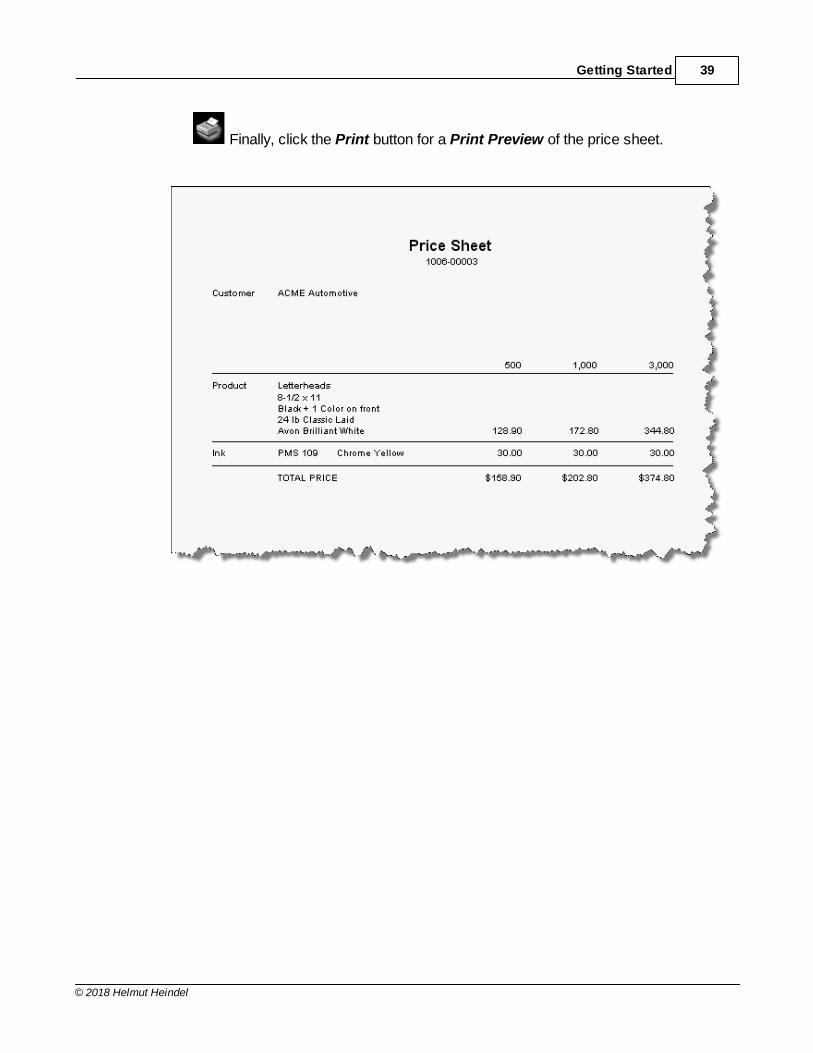
Finally, click the Print button for a Print Preview of the price sheet.
Morning Flight Skypricer40
© 2018 Helmut Heindel
3 Preflight
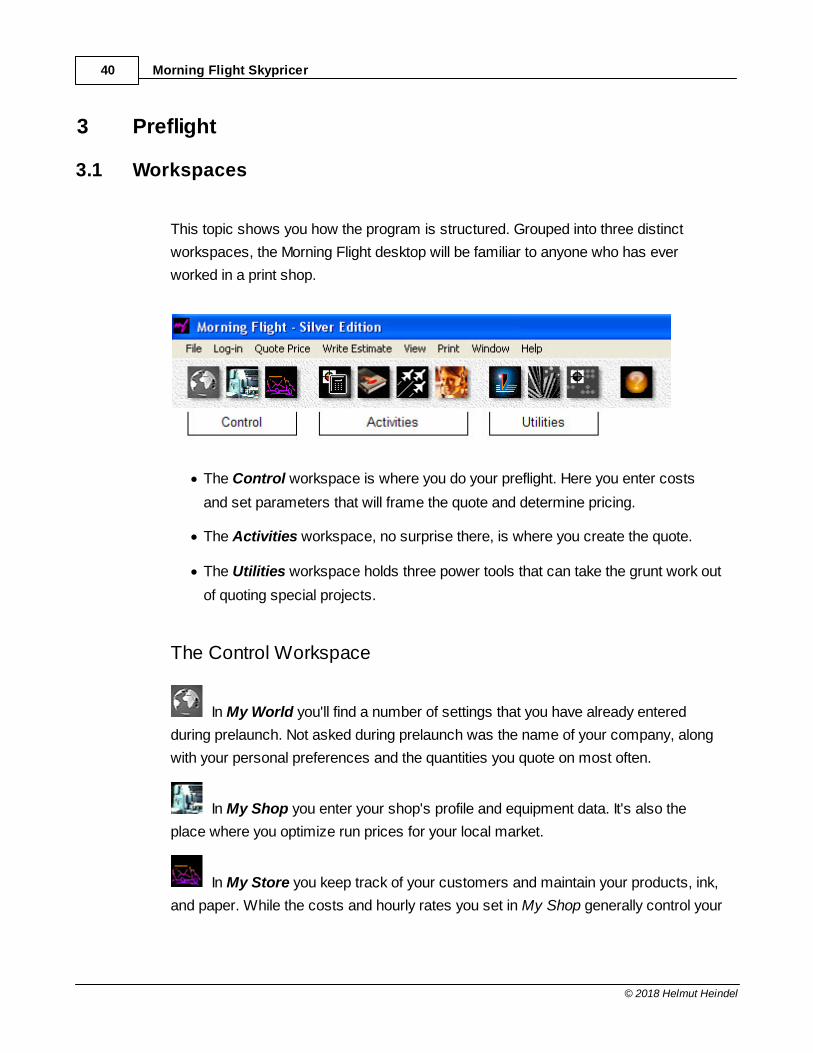
3.1 Workspaces
This topic shows you how the program is structured. Grouped into three distinct
workspaces, the Morning Flight desktop will be familiar to anyone who has ever
worked in a print shop.
· The Control workspace is where you do your preflight. Here you enter costs
and set parameters that will frame the quote and determine pricing.
· The Activities workspace, no surprise there, is where you create the quote.
· The Utilities workspace holds three power tools that can take the grunt work out
of quoting special projects.
The Control Workspace
In My World you'll find a number of settings that you have already entered
during prelaunch. Not asked during prelaunch was the name of your company, along
with your personal preferences and the quantities you quote on most often.
In My Shop you enter your shop's profile and equipment data. It's also the
place where you optimize run prices for your local market.
In My Store you keep track of your customers and maintain your products, ink,
and paper. While the costs and hourly rates you set in My Shop generally control your
Preflight 41
© 2018 Helmut Heindel
run prices, costs and markups set in My Store will determine how much you charge
for paper.
In My SkyStore you create and maintain your webstore products, your 'Sky
Items.'
The Activities Workspace
Your general Quote workspace, the button you'll use more than any other.
Your Booklet Quote workspace, for quoting booklets.
Jet-Entry Quotes, for working up prices while your customer is still on the
phone.
The Estimate Writer, for consolidating quotes into written estimates.
The Utilities Workspace
Morning Flight wouldn't be much of an estimating program if it didn't have run pricing,
paper pricing, and paper cutting components built in. Those components form an
integral part of its pricing engine and are tucked away under the hood, doing their
work transparently.
In the Utilities workspace, you'll find stand-alone versions of all three to help you with
special projects, quotes you just have to massage by hand and work out on paper.
What makes these tools unique is that each can be converted from U.S.A. to ISO
paper sizes, and from inches to millimeters, independent of the settings you're using
for the main program.
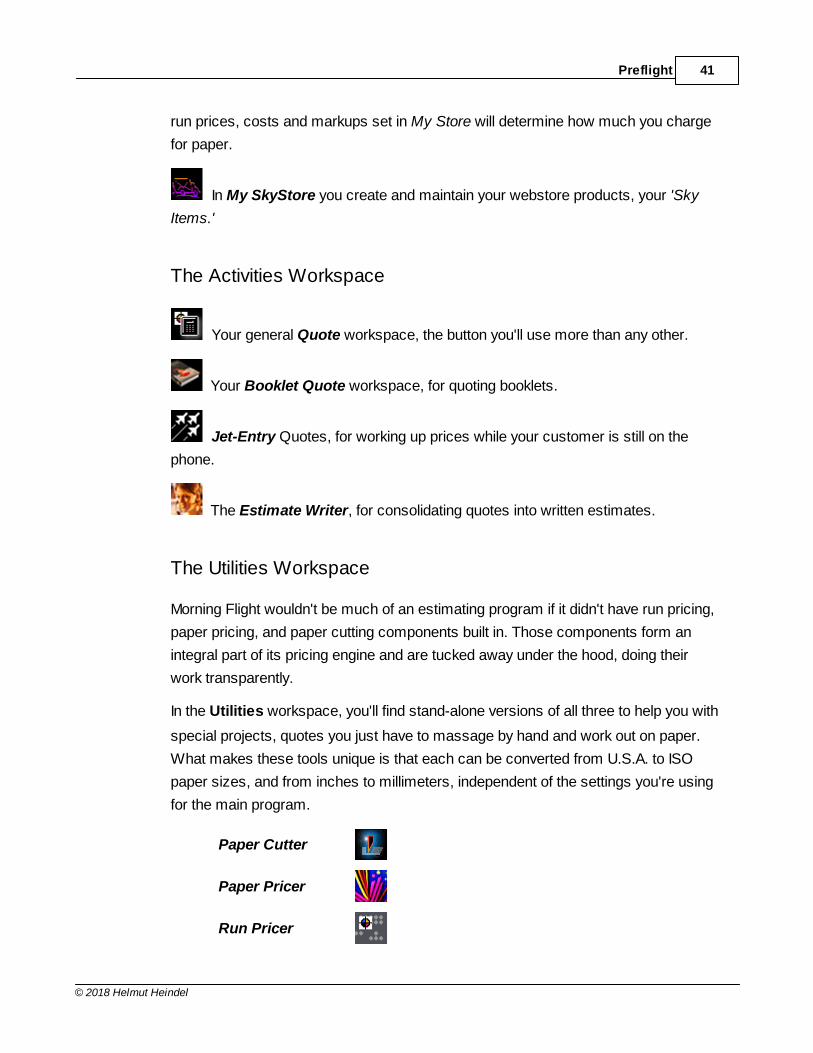
Paper Cutter
Paper Pricer
Run Pricer
Morning Flight Skypricer42
© 2018 Helmut Heindel
3.2 My World
Enabling Morning Flight to work abroad was never an afterthought - never a maybe,
someday kind of thing. Global usefulness was embedded into its framework from the
beginning. And it shows. It's why all Morning Flight products speak more than one
language, and why even the Free Edition comes with a do-it-yourself translator.
But being able to understand and make yourself understood is only the most basic
requirement. The program could be fluent in French and still be useless in France if it
didn't know millimeters and ISO sizes and how to count Euros.
My World is that rarely visited cubicle in Morning Flight where you set the stage and
define your environment.

Preflight 43
© 2018 Helmut Heindel
My Country
· To change your country, click the My Country button, then select from the list of
available countries.
· If your country isn't listed, see International > Adding a Country on how to add
your country.
My Company
· To enter your company's name, address, and contact information, press the My
Company button.
My Preferences
· To change how you want the program to interact with you, press the My
Preferences button and set your personal options.
Morning Flight Skypricer44
© 2018 Helmut Heindel
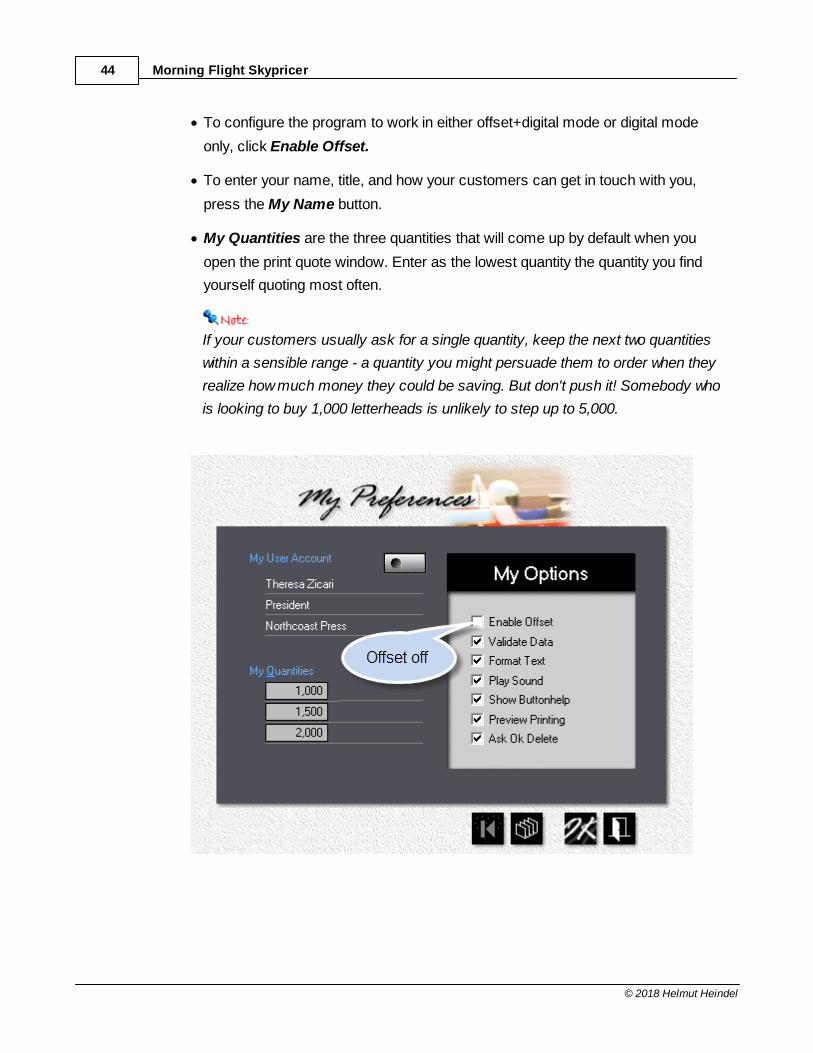
· To configure the program to work in either offset+digital mode or digital mode
only, click Enable Offset.
· To enter your name, title, and how your customers can get in touch with you,
press the My Name button.
· My Quantities are the three quantities that will come up by default when you
open the print quote window. Enter as the lowest quantity the quantity you find
yourself quoting most often.
If your customers usually ask for a single quantity, keep the next two quantities
within a sensible range - a quantity you might persuade them to order when they
realize how much money they could be saving. But don't push it! Somebody who
is looking to buy 1,000 letterheads is unlikely to step up to 5,000.
Preflight 45
© 2018 Helmut Heindel
3.3 My Shop
I think it was Winston Churchill who once admonished a member of Parliament to
"get up, say what you have to say, and when you come to a sentence with a
grammatical ending, sit down." Because much of the audience reading this topic will
have ink running through their veins, I will gladly follow his advice:
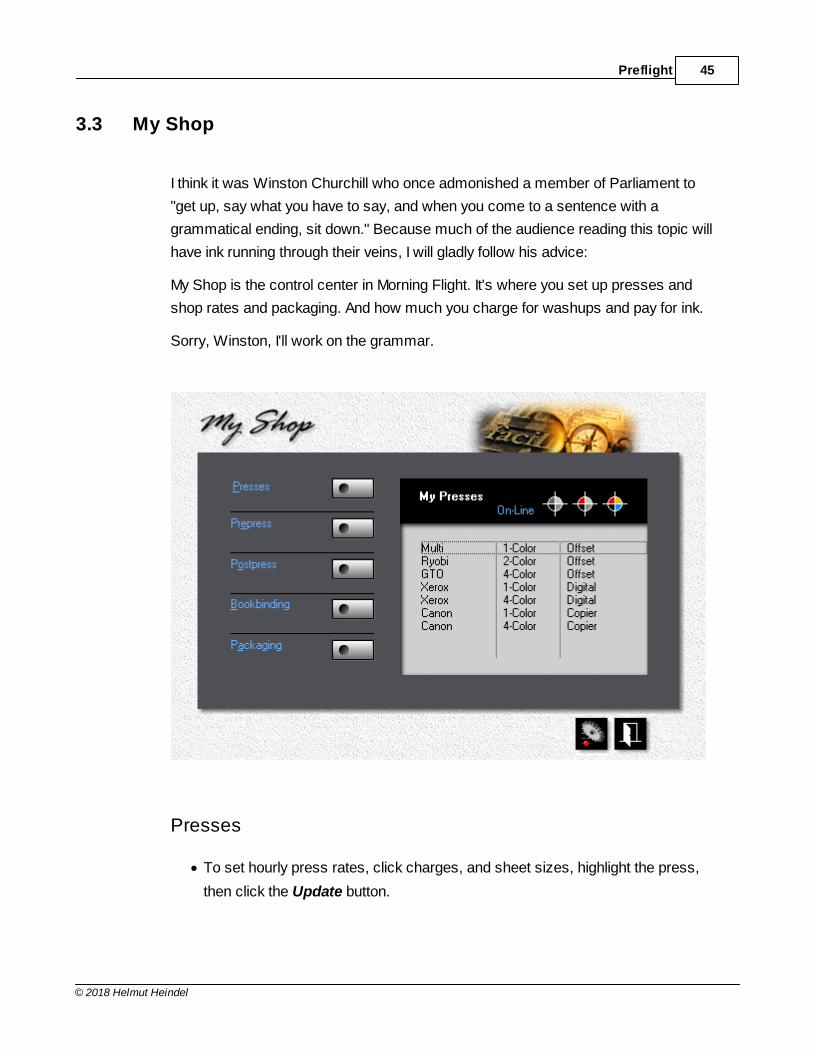
My Shop is the control center in Morning Flight. It's where you set up presses and
shop rates and packaging. And how much you charge for washups and pay for ink.
Sorry, Winston, I'll work on the grammar.
Presses
· To set hourly press rates, click charges, and sheet sizes, highlight the press,
then click the Update button.
Morning Flight Skypricer46
© 2018 Helmut Heindel
· To take a press off-line, click the Presses button, highlight the press, then click
the Delete button.
The one-color offset press can't be unchecked. Morning Flight assumes that
virtually every offset shop either has such a press, or at least offers one-color
printing.
When you uncheck the four-color offset press, you'll still be able to quote four-
color. Unchecking the press merely takes it off-line and assigns all four-color
runs to the two-color press, twice through.
Unchecking a digital press or copier, on the other hand, will prevent you from
quoting the type of work associated with that machine (color copies don't look
very colorful coming off a black copier).
3.4 My Store
Mention "Print Store" to printers and they'll tell you that printing is a service, not a
product. And they work in a print shop, not a print store. That response, while
predictable, is mildly ironic when you consider that the first mass-produced "product"
on the planet was the Gutenberg Bible.
Historical footnotes aside, printing really is, for the most part, a service business.
Books can legitimately be called products, but few printers publish books. They sell
letterheads and catalog sheets and other made-to-order items. And a carton of flyers
for ACME Construction is of no use whatsoever to ACME Builders, a point not lost on
shop-lifters. Not many print jobs sneak out the door after midnight.
Since we already have My Shop, we'll call this My Store in Morning Flight. Not the
brick and mortar kind, but a store in name only. My Store is where you keep track of
your customers and manage your products, your paper, your inks.
Preflight 47
© 2018 Helmut Heindel
My Customers
· To add or update a customer, click the My Customers button.
When you need to add several customers all at once, go to File > Add
Customers. There you'll find a bulk entry window that will make the process
much quicker.
My Products
· To change a product or create a new one, click the My Products button.
When you add a new product, place the highlight bar over a product with
properties similar to the one you're creating, before you click the Add button.
That way the new product will inherit what's under the highlight bar.
Morning Flight Skypricer48
© 2018 Helmut Heindel
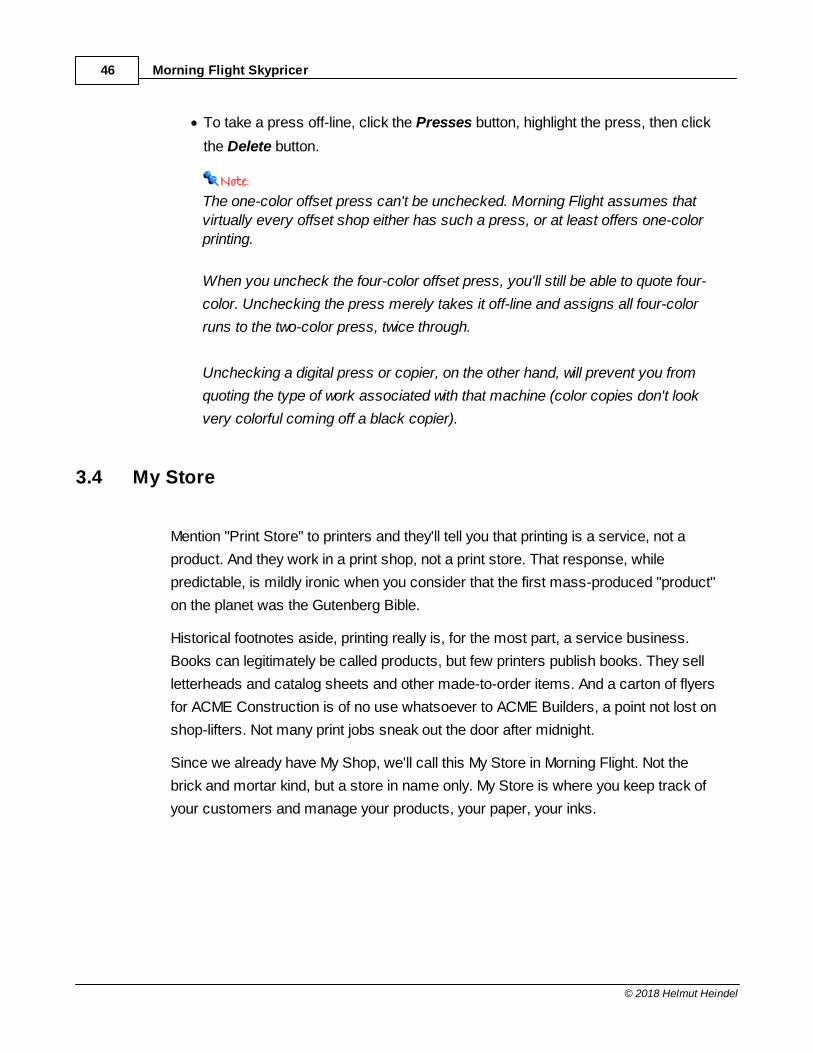
Paper Markups
· Paper markups are divided into quantity bracket rows and category columns. If
you're estimating for an in-plant shop and want to eliminate markups altogether,
click on the umbrella, then enter zero in all nine markup fields.
· What happens when you check CommonSense Pricing, the little box at the
bottom of the My Store window? The program will jump quantity brackets
whenever it makes sense to do so.
Say a customer orders 4,500 letterheads. You're charging $18.00 per 1,000
sheets in the less than 5,000 sheet bracket, and $15.00 per 1,000 if the
customer orders 5,000 sheets or more. With the box unchecked, the paper bill
comes to $81.00 for 4,500 sheets. Had the customer ordered 5,000 letterheads,
the bill would have been just $75.00. Turn on CommonSense Pricing, and
Morning Flight will charge $75.00 instead of $81.00. The order quantity, of
course, will still read 4,500.
3.5 Before you dive in
Oh, really!
Some estimating systems claim to know your market's sweet spot, the exact point at
which your prices are low enough to keep and attract customers, yet still high enough
to earn you a profit. Their manufacturers suggest you use these miracle systems
straight out of the box, abandon the prices your customers have gotten used to, and
step boldly into a more lucrative unknown. What works in Brooklyn, they say, will work
in every state and hamlet in the country.
There's a bridge in Brooklyn you may want to keep an eye on, because what you'll be
stepping into is not where, under the rosiest of circumstances, I would want to take
bold steps.

Preflight 49
© 2018 Helmut Heindel
If you're just starting out
If your new shop is located in the United States, there's no reason not to start with
out-of-the-box Morning Flight prices. They've been developed under real world
conditions, have proven competitive as well as profitable, and are generally in line with
the national average.
If you're already established
Here the rules change. Once you've built up a customer base and your business is
well established, relying on someone else's pricing formula can just as easily break
your company as make it. You've carved out a niche, mapped out your own playing
field. That means your existing customers expect their next bill to be in the same
ballpark. If you lower your prices you'll lower your profits, and it may or may not get
you more business from your established base. Raise prices significantly all at once
and you'll strain customer loyalties and jeopardize sales.
The only safe way to install a new estimating system in a running business is to first
synchronize the prices generated by the software with the prices you're charging
now, then make incremental fine adjustments, one at a time, until you're satisfied
you've reached the best sales/profit ratio your market can give you.
What if you raised the prices of only those products that are noticeably out of step
with the national average? No reason not to, especially if they're marginal items and
not part of your bread and butter. But here, too, avoid sticker shock. Give your
customers a chance to get acclimated.
3.6 Price Levels
Say Ollie ...*
... why don't we offer different price levels in Morning Flight, like those found in the
Crouser Guides?
Fair question. The short answer would be that I disagree with it on strategic grounds.
That would be true, but the reasons go much deeper than that.
Morning Flight Skypricer50
© 2018 Helmut Heindel
However, let's start with why it isn't good pricing strategy. One of the quickest ways to
lose a customer is to price 1,000 of that customer's letterheads at $50 last month
(level three), at $40 today (level two), and at $60 next month (level four). If a
temporary slowdown forces a price reduction (or a sudden influx of orders lets you
raise your prices to make up for those reductions), there is an easy way to do that in
Morning Flight: Adjust hourly press rates.
The problem with price levels is that they're too broad, too much of a shotgun-type
remedy. On some jobs, switching from level three to level two may merely lower your
profits. On others, it will mean you're selling below cost. Adjusting hourly press rates
is just as broad and no better that way. That's why Morning Flight offers a more
targeted approach. Here, price adjustments are linked to individual customers.
More reasons against
· Ease of Use. Morning Flight is designed to let office staff handle the low end
quotes, freeing the shop's owner to tend to the heavy lifting. Price levels would
put that at risk. Rolling the dice by picking a level at random is probably not the
sort of thing you'd want to entrust to cousin Mel. Customer-by-Customer
adjustments, on the other hand, can be preset to good effect by the
owner/manager.
· The Internet. Somewhere down the road, you'll have a web site that offers your
customers unattended, 24/7 pricing. When that happens, price levels - and most
price adjustments - will become untenable and go flying out the window.
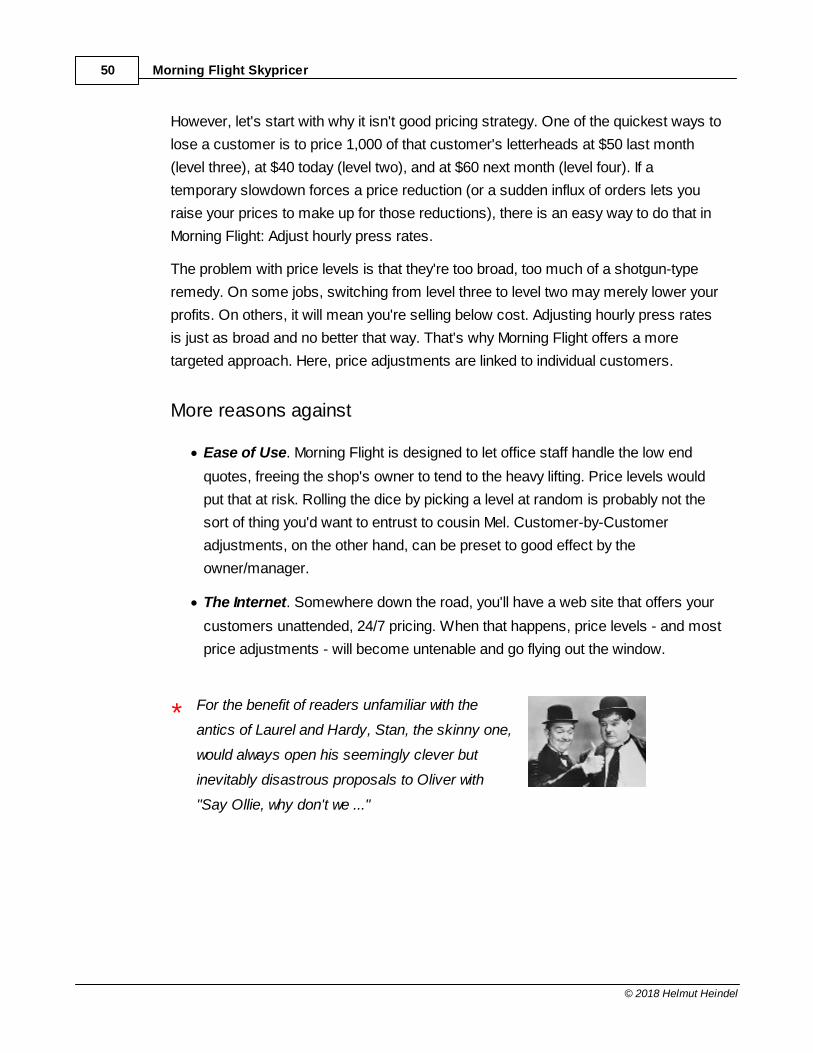
* For the benefit of readers unfamiliar with the
antics of Laurel and Hardy, Stan, the skinny one,
would always open his seemingly clever but
inevitably disastrous proposals to Oliver with
"Say Ollie, why don't we ..."
Preflight 51
© 2018 Helmut Heindel
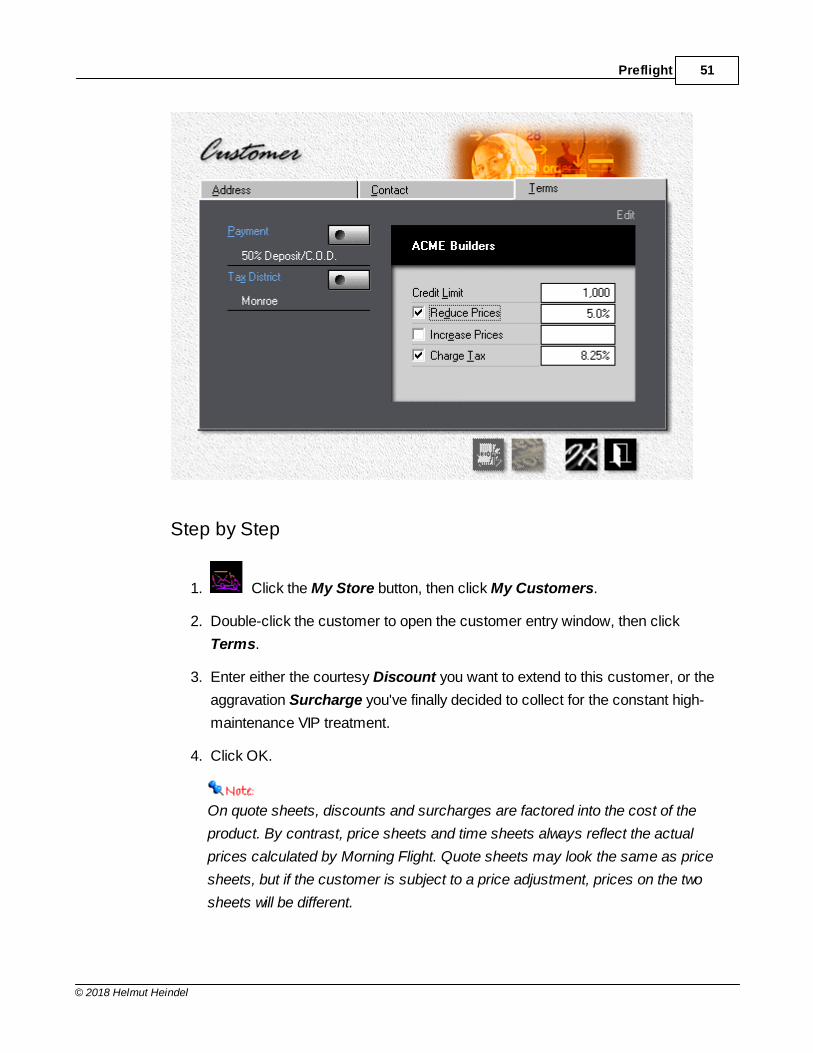
Step by Step
1. Click the My Store button, then click My Customers.
2. Double-click the customer to open the customer entry window, then click
Terms.
3. Enter either the courtesy Discount you want to extend to this customer, or the
aggravation Surcharge you've finally decided to collect for the constant high-
maintenance VIP treatment.
4. Click OK.
On quote sheets, discounts and surcharges are factored into the cost of the
product. By contrast, price sheets and time sheets always reflect the actual
prices calculated by Morning Flight. Quote sheets may look the same as price
sheets, but if the customer is subject to a price adjustment, prices on the two
sheets will be different.
Morning Flight Skypricer52
© 2018 Helmut Heindel
3.7 Press-based Pricing
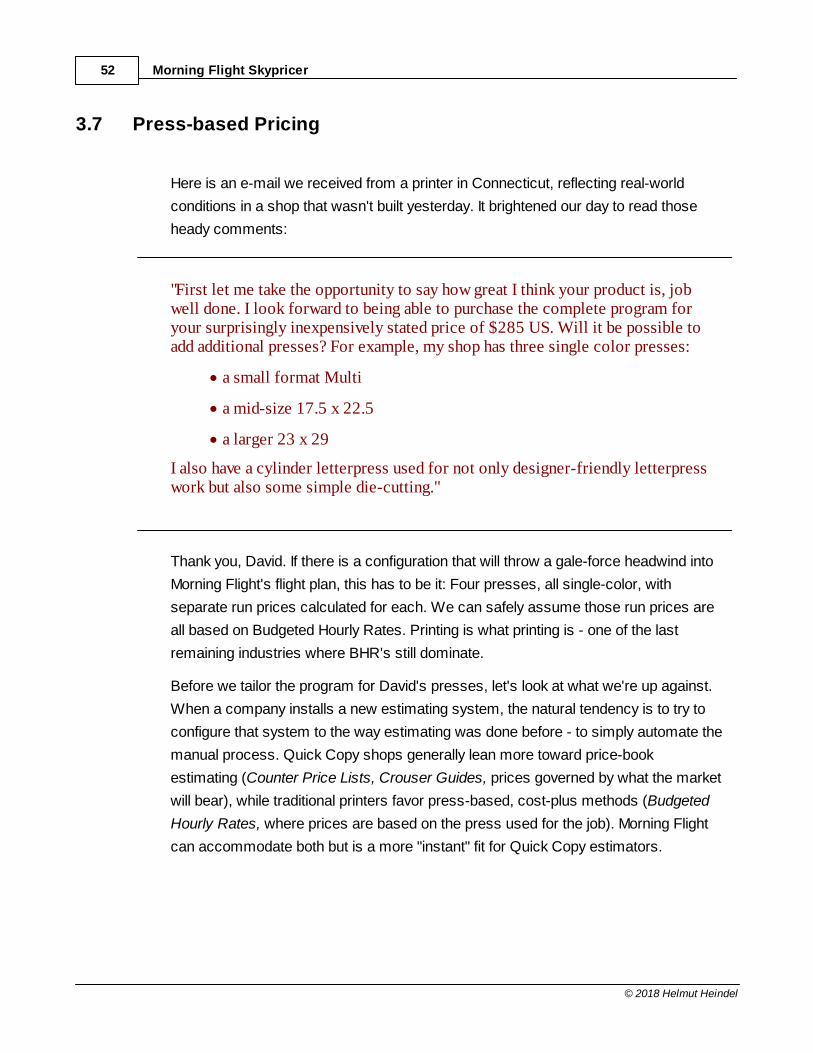
Here is an e-mail we received from a printer in Connecticut, reflecting real-world
conditions in a shop that wasn't built yesterday. It brightened our day to read those
heady comments:
"First let me take the opportunity to say how great I think your product is, jobwell done. I look forward to being able to purchase the complete program foryour surprisingly inexpensively stated price of $285 US. Will it be possible toadd additional presses? For example, my shop has three single color presses:
· a small format Multi
· a mid-size 17.5 x 22.5
· a larger 23 x 29
I also have a cylinder letterpress used for not only designer-friendly letterpresswork but also some simple die-cutting."
Thank you, David. If there is a configuration that will throw a gale-force headwind into
Morning Flight's flight plan, this has to be it: Four presses, all single-color, with
separate run prices calculated for each. We can safely assume those run prices are
all based on Budgeted Hourly Rates. Printing is what printing is - one of the last
remaining industries where BHR's still dominate.
Before we tailor the program for David's presses, let's look at what we're up against.
When a company installs a new estimating system, the natural tendency is to try to
configure that system to the way estimating was done before - to simply automate the
manual process. Quick Copy shops generally lean more toward price-book
estimating (Counter Price Lists, Crouser Guides, prices governed by what the market
will bear), while traditional printers favor press-based, cost-plus methods (Budgeted
Hourly Rates, where prices are based on the press used for the job). Morning Flight
can accommodate both but is a more "instant" fit for Quick Copy estimators.
Preflight 53
© 2018 Helmut Heindel
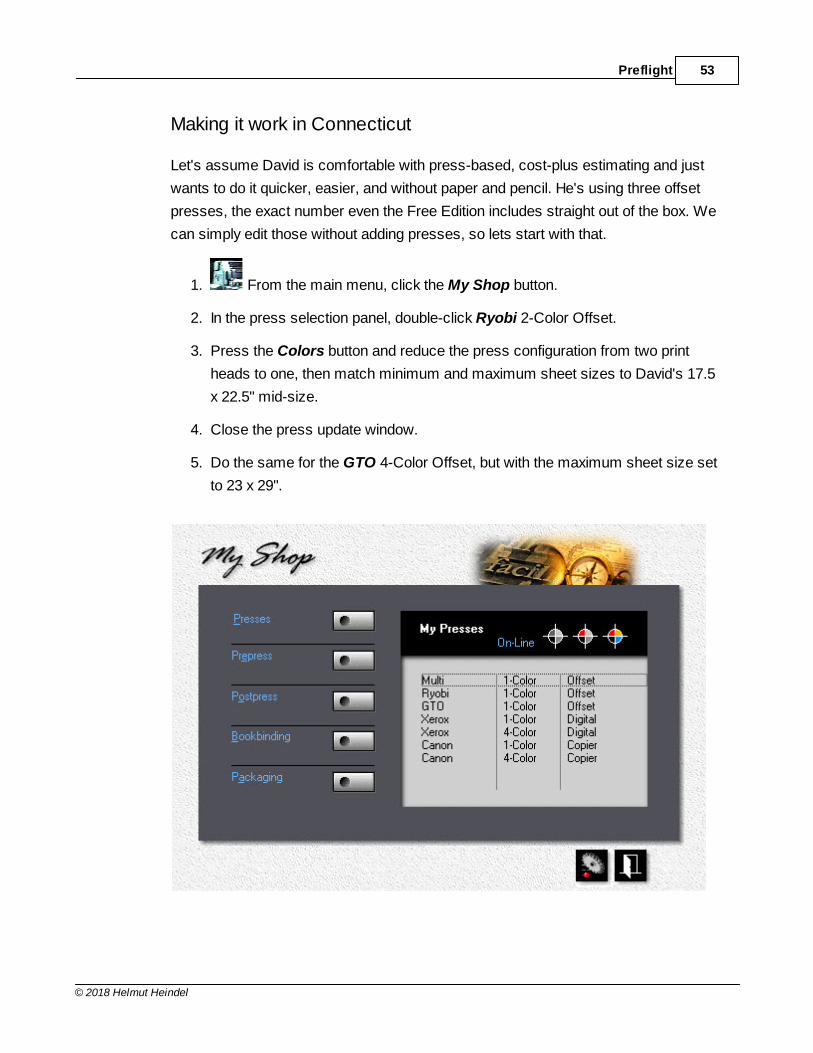
Making it work in Connecticut
Let's assume David is comfortable with press-based, cost-plus estimating and just
wants to do it quicker, easier, and without paper and pencil. He's using three offset
presses, the exact number even the Free Edition includes straight out of the box. We
can simply edit those without adding presses, so lets start with that.
1. From the main menu, click the My Shop button.
2. In the press selection panel, double-click Ryobi 2-Color Offset.
3. Press the Colors button and reduce the press configuration from two print
heads to one, then match minimum and maximum sheet sizes to David's 17.5
x 22.5" mid-size.
4. Close the press update window.
5. Do the same for the GTO 4-Color Offset, but with the maximum sheet size set
to 23 x 29".
Morning Flight Skypricer54
© 2018 Helmut Heindel
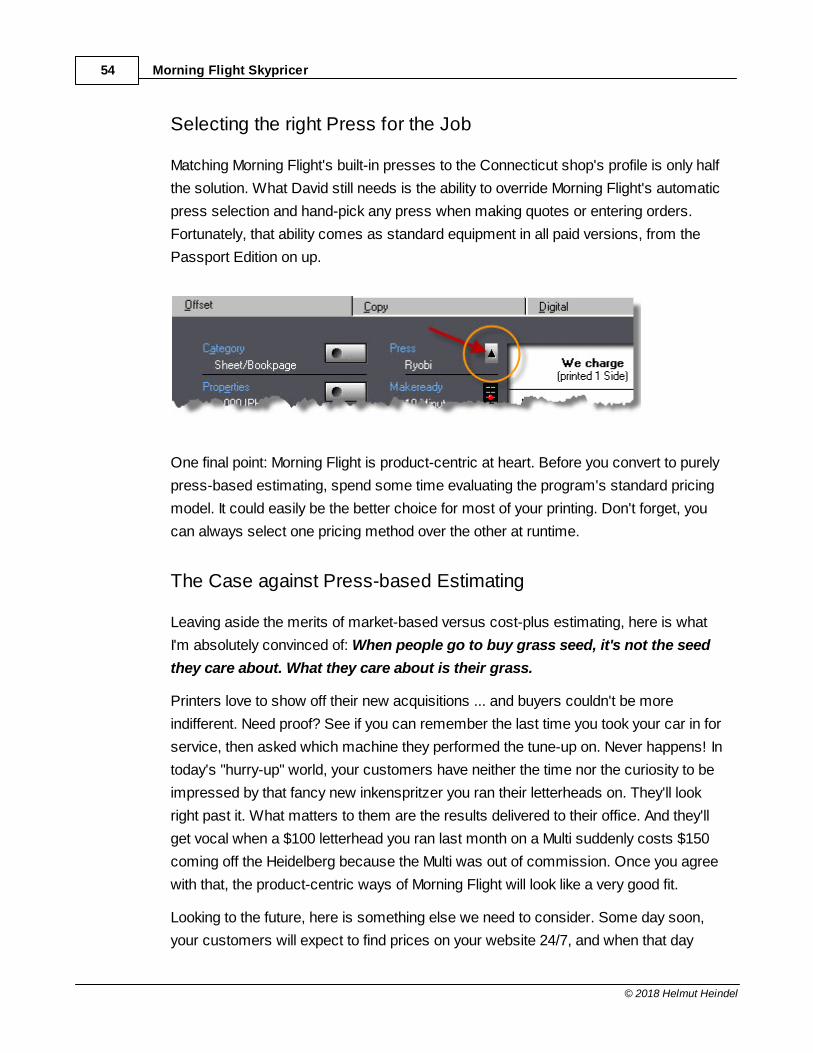
Selecting the right Press for the Job
Matching Morning Flight's built-in presses to the Connecticut shop's profile is only half
the solution. What David still needs is the ability to override Morning Flight's automatic
press selection and hand-pick any press when making quotes or entering orders.
Fortunately, that ability comes as standard equipment in all paid versions, from the
Passport Edition on up.
One final point: Morning Flight is product-centric at heart. Before you convert to purely
press-based estimating, spend some time evaluating the program's standard pricing
model. It could easily be the better choice for most of your printing. Don't forget, you
can always select one pricing method over the other at runtime.
The Case against Press-based Estimating
Leaving aside the merits of market-based versus cost-plus estimating, here is what
I'm absolutely convinced of: When people go to buy grass seed, it's not the seed
they care about. What they care about is their grass.
Printers love to show off their new acquisitions ... and buyers couldn't be more
indifferent. Need proof? See if you can remember the last time you took your car in for
service, then asked which machine they performed the tune-up on. Never happens! In
today's "hurry-up" world, your customers have neither the time nor the curiosity to be
impressed by that fancy new inkenspritzer you ran their letterheads on. They'll look
right past it. What matters to them are the results delivered to their office. And they'll
get vocal when a $100 letterhead you ran last month on a Multi suddenly costs $150
coming off the Heidelberg because the Multi was out of commission. Once you agree
with that, the product-centric ways of Morning Flight will look like a very good fit.
Looking to the future, here is something else we need to consider. Some day soon,
your customers will expect to find prices on your website 24/7, and when that day
Preflight 55
© 2018 Helmut Heindel
arrives, the press you ultimately run the job on is no longer a factor. That will leave the
product, not the press, as the price maker. Estimates coming off the internet will by
nature revolve around the product, and Morning Flight is just ahead of the curve.
Custom, case-by-case pricing will always have a place in large printing firms. No one
with any sense would use a price list, or even a pushbutton computer estimating
program like Morning Flight, to quote a million+ run. But in smaller shops, consistent
pricing is the key to keeping customers (and shop owners) happy, and that's where
Morning Flight's product-based pricing strategy excels.
What about the Letterpress ...
Ah, yes, the letterpress. We still need to find a corner for that "cylinder letterpress
used for designer-friendly letterpress work." In the Silver, Pixelblitz, and Gold Editions
(as well as the new Skypricer), letterpress can be quoted as merchandise. The die-
cutting part, of course, can be treated as postpress.
3.8 Adding more Presses
Morning Flight already has three built-in offset presses, one each for 1-color, 2-color,
and 4-color. With that in mind, do you really need more presses? It depends. If you
think it's Ok to sell 500 flyers you printed for ACME Electric at the same price as 500
same-spec flyers you printed for the Garden Factory, then no, you don't need more
presses. Not for estimating. For production, maybe, but not for estimating.
On the other hand, if all of the following conditions are true:
· You actually have more than three presses,
· You price each job based on the press you'll run it on,
· You use a different hourly rate for every press you have,
then yes, you will need more presses in your estimating program, one for each press
sitting on your shop floor. You'll also need one of the paid editions of Morning Flight.
Any edition will do, even the $85.00 Passport. Having a press in the program for each
press in the shop is the nature of the game for Cost-Plus estimating with Budgeted
Hourly Rates (BHRs).
Morning Flight Skypricer56
© 2018 Helmut Heindel
The mechanics of adding a new press are simple enough. Just click a few buttons
and match the specs. And, once you've figured out the Budgeted Hourly Rate, so is
integrating the new press into your estimating. The only real chore is calculating that
BHR.
The Pushing a Button Part
Here is how to add a new offset press in Morning Flight:
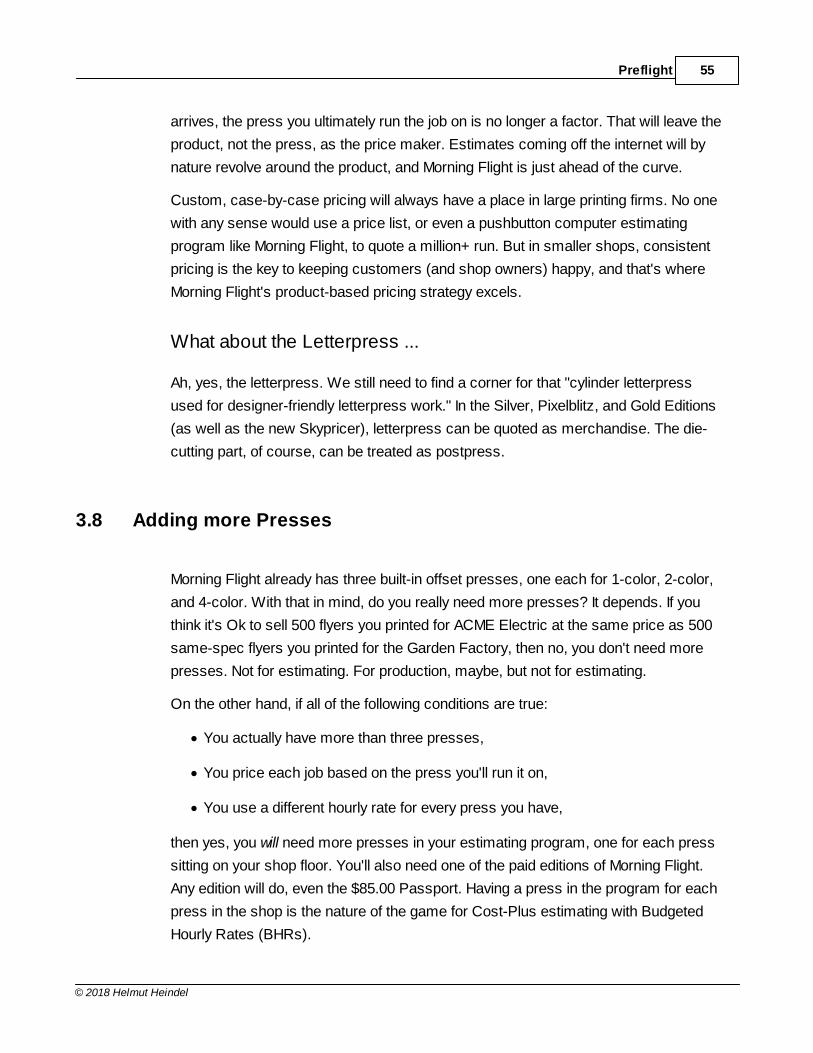
1. From the main menu, click the My Shop button.
2. Click the Presses button, then highlight the fourth press (Litho-4).
3. Click the Check button to activate it.
4. With the press still highlighted, double-click Litho-4, then enter the press
specs and hourly rate.
Setting up a Cost Center
Once you've added the press, the first thing you'll need to do is set up a separate cost
center for it.
Because Budgeted Hourly Rates include a profit percentage (as opposed to
Budgeted Hourly Costs which do not), it's tempting to think of the new press as
a profit center. It isn't. Peter Drucker originally coined that term around 1945 but
Preflight 57
© 2018 Helmut Heindel
quickly recanted, calling it "one of the biggest mistakes I've made." He now
says there are only cost centers within a business, and “the only profit center is
a customer whose check hasn’t bounced.” Tongue-in-cheek but close enough
to the truth nonetheless.
Within that cost center you'll have to calculate four different elements:
1. Total annual equipment costs.
2. Total direct and indirect labor costs.
3. Allocated overhead costs.
4. A markup percentage for profit.
If you're unfamiliar with BHRs and how to develop them, find an early edition of
"Printing Estimating" by Philip K. Ruggles. Current editions are pricey, but older
versions are still available at Amazon and other booksellers at a fraction of the cover
price. The chapter on calculating BHRs hasn't gotten shorter over the years. It still
spans 50-plus pages!
The new Press in Practice
Let's say the new press is a 25 x 38" 1-color Komori and you've kept the three built-in
presses as your primaries. Three things are now immediately available to you without
further action on your part:
1. You can enter a 25 x 38" press sheet, previously blocked because you didn't
have a press big enough. The program will automatically select the Komori
since it's the only press able to accommodate 25 x 38".
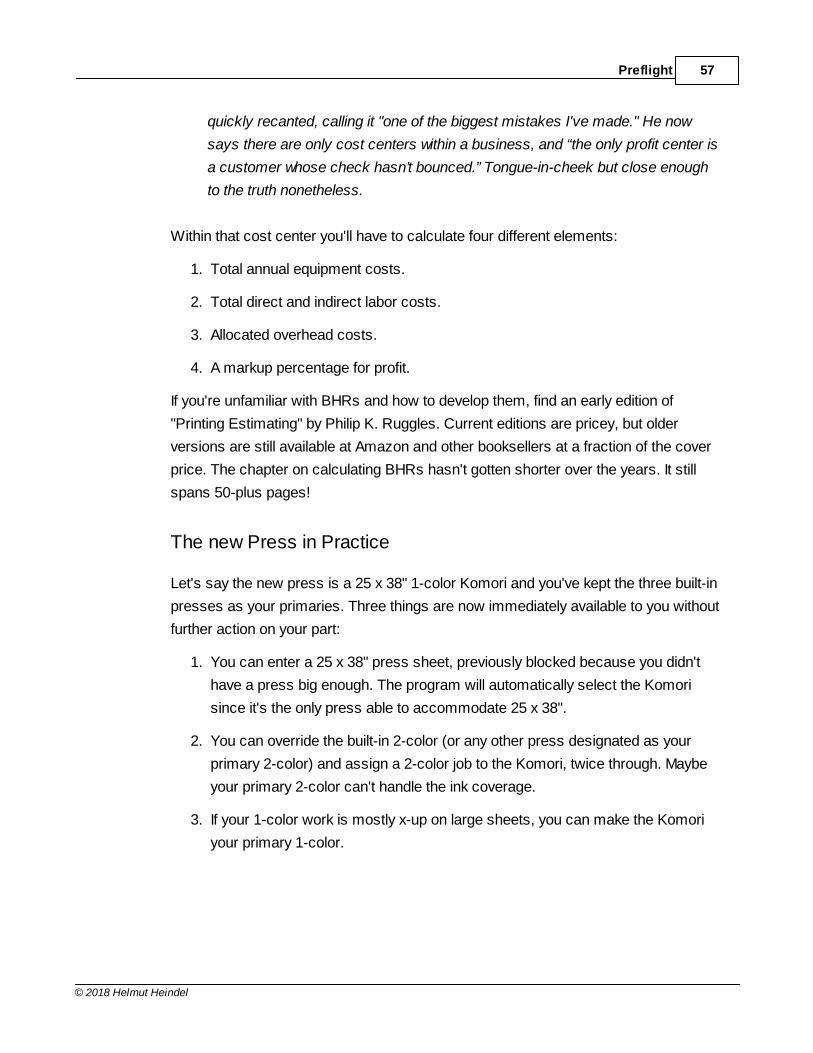
2. You can override the built-in 2-color (or any other press designated as your
primary 2-color) and assign a 2-color job to the Komori, twice through. Maybe
your primary 2-color can't handle the ink coverage.
3. If your 1-color work is mostly x-up on large sheets, you can make the Komori
your primary 1-color.
Morning Flight Skypricer58
© 2018 Helmut Heindel
What's a Primary?
A primary press is what the program selects by default when you create a quote or
enter an order. In that sense, a primary press behaves much like a primary product.
You can designate any offset press as your primary for 1-color, 2-color, or 4-color.
Or, designate a single press as your primary for all three.
Say you add a new press and make that press your primary for 1-color, replacing the
built-in Multi. Morning Flight will now select the new press instead of the Multi for all 1-
color work. You can still hand-pick the Multi, but your new press will come up as the
default.
Preflight 59
© 2018 Helmut Heindel
Things you can't do
Just a couple. First, you can't add a new press, then deactivate a built-in press with
the same number of print heads. The three built-in presses always take precedence.
That shouldn't be a problem. Customize the built-in press before trying to define a
new one. Second, you can't deactivate a press you've designated as a primary. Easy
solution: First undesignate the old press, then take it off line.
I probably shouldn't have to answer the next question, but somebody is bound to ask.
How do you undesignate a 2-color primary? By making another press your 2-color
primary.
3.9 The Virtual Press
In Morning Flight's magical kingdom of make-believe, all offset printers are given three
presses: a one-color, a two-color, and a four-color. Three presses exactly. No more,
no less.
Quick show of hands, how many small offset shops fit that mold and have that range
of equipment? A one-color press with a T-head, usually. A two-color press drafted
into service for the occasional four-color run, maybe. In the real world, few small
shops can afford a million-dollar Heidelberg.
So what is a virtual press, and why do you need one? In a nutshell, a virtual press is
an imaginary clone of a real press you have in your shop. The two share physical
characteristics, but on the virtual press you use a different hourly rate. And often,
different plates as well. That's the main reason for having it. Same press, different
type of work, different pricing.
Case in Point
Say you operate a single, solitary press in your shop, a two-color Ryobi. Your full-time
employee prints one-color and two-color work during the day. Now and then, a more
qualified (and higher-salaried) moonlighter comes in after hours to run four-color
process. Again, same Ryobi, different hourly rate, different pricing.
Morning Flight Skypricer60
© 2018 Helmut Heindel
Of course, if do you have the three presses Morning Flight wants you to have, then
virtual presses never enter the picture. All of your presses will be real. On the flip side,
if you're a broker and outsource all your work, all three of your presses will be virtual.
This isn't rocket science. Just a business model, a logical way to help you structure
your pricing.
How to set up a Virtual Press
Using the example above, let's assume you accepted the defaults and had Morning
Flight set up a one-color Multi, a two-color Ryobi, and a four-color GTO during the
prelaunch interview. You don't actually own a GTO, the interview was weeks ago, and
today you decide to set up a four-color virtual version of your "real" two-color Ryobi in
place of the nonexistent, phantom GTO.
Preflight 61
© 2018 Helmut Heindel
Step by Step
Click the My Shop button, then the Presses button. Double-click Ryobi 2-
Color Offset. Write down the sheet sizes, plate prices, makeready, and maximum
speed you see in the press update window. Close the window.
· Back in the press selection window, double-click GTO 4-Color Offset.
· Change the Name to Ryobi-4CV.
· Press the Color button and select "2-Color" to reduce the press configuration
from four print heads to two.
· Change sheet sizes, plate prices, and maximum speed to what you wrote down
in step 1. Uncheck any plates that can't be used for four-color process.
· Cut the Makeready you used for the four-head GTO in half. You're now setting
up two print heads at a time instead of four. The program will automatically
compensate, depending on whether you're printing a 2-color job once through, or
a 4-color job through twice.
· Adjust the Hourly Rate until the prices displayed in the black panel are what you
want to charge for 4-color process. When you're done, click OK.
Run prices shown in the black panel are different for the three base presses
predefined by the program than they are for the rest. The base 2-color press
always displays 2-color prices, and the base 4-color press always 4-color
process, regardless of whether the press is real or virtual, or whether a 4-color
job has to be run through twice because the press has only two print heads.
That's to make it easier to match up your run prices to what you want to charge
your customers.
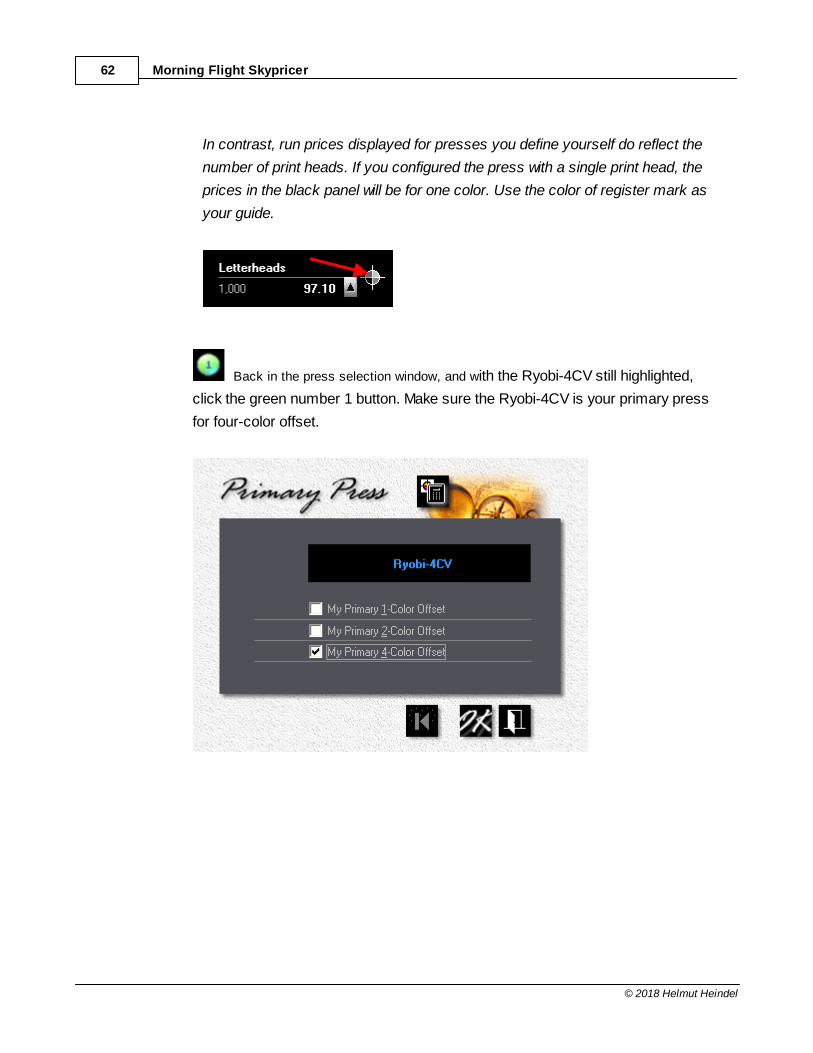
Morning Flight Skypricer62
© 2018 Helmut Heindel
In contrast, run prices displayed for presses you define yourself do reflect the
number of print heads. If you configured the press with a single print head, the
prices in the black panel will be for one color. Use the color of register mark as
your guide.
Back in the press selection window, and with the Ryobi-4CV still highlighted,
click the green number 1 button. Make sure the Ryobi-4CV is your primary press
for four-color offset.
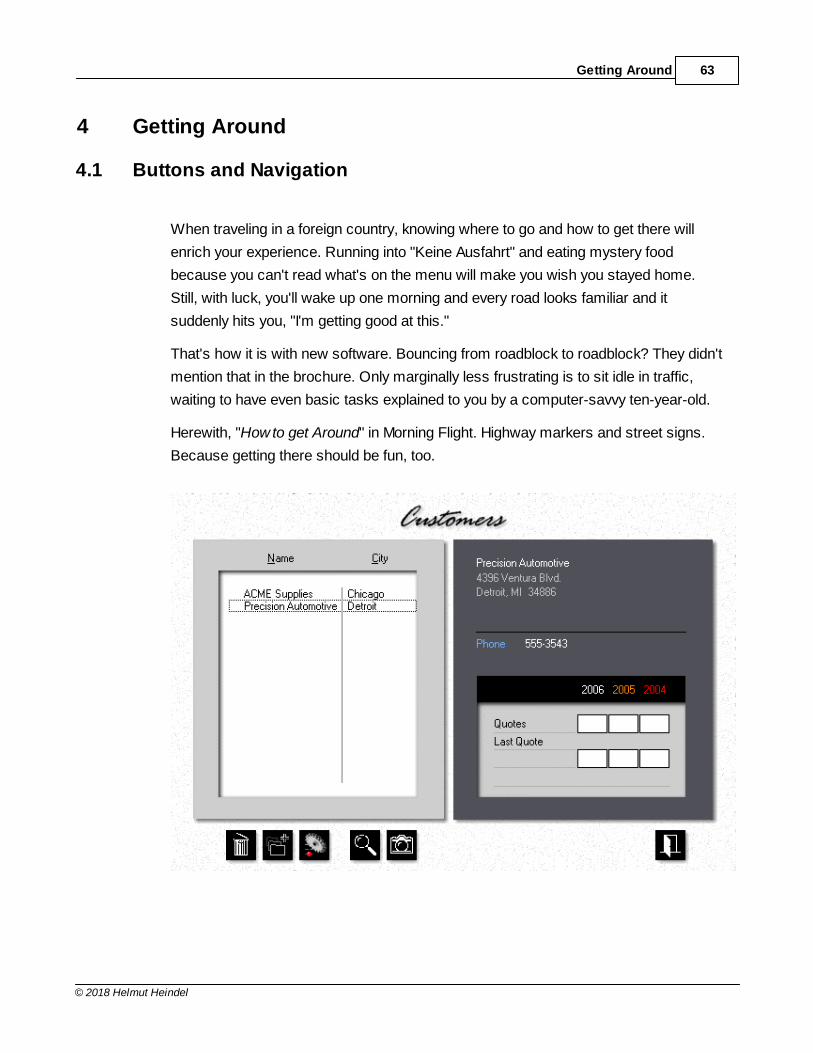
Getting Around 63
© 2018 Helmut Heindel
4 Getting Around
4.1 Buttons and Navigation
When traveling in a foreign country, knowing where to go and how to get there will
enrich your experience. Running into "Keine Ausfahrt" and eating mystery food
because you can't read what's on the menu will make you wish you stayed home.
Still, with luck, you'll wake up one morning and every road looks familiar and it
suddenly hits you, "I'm getting good at this."
That's how it is with new software. Bouncing from roadblock to roadblock? They didn't
mention that in the brochure. Only marginally less frustrating is to sit idle in traffic,
waiting to have even basic tasks explained to you by a computer-savvy ten-year-old.
Herewith, "How to get Around" in Morning Flight. Highway markers and street signs.
Because getting there should be fun, too.
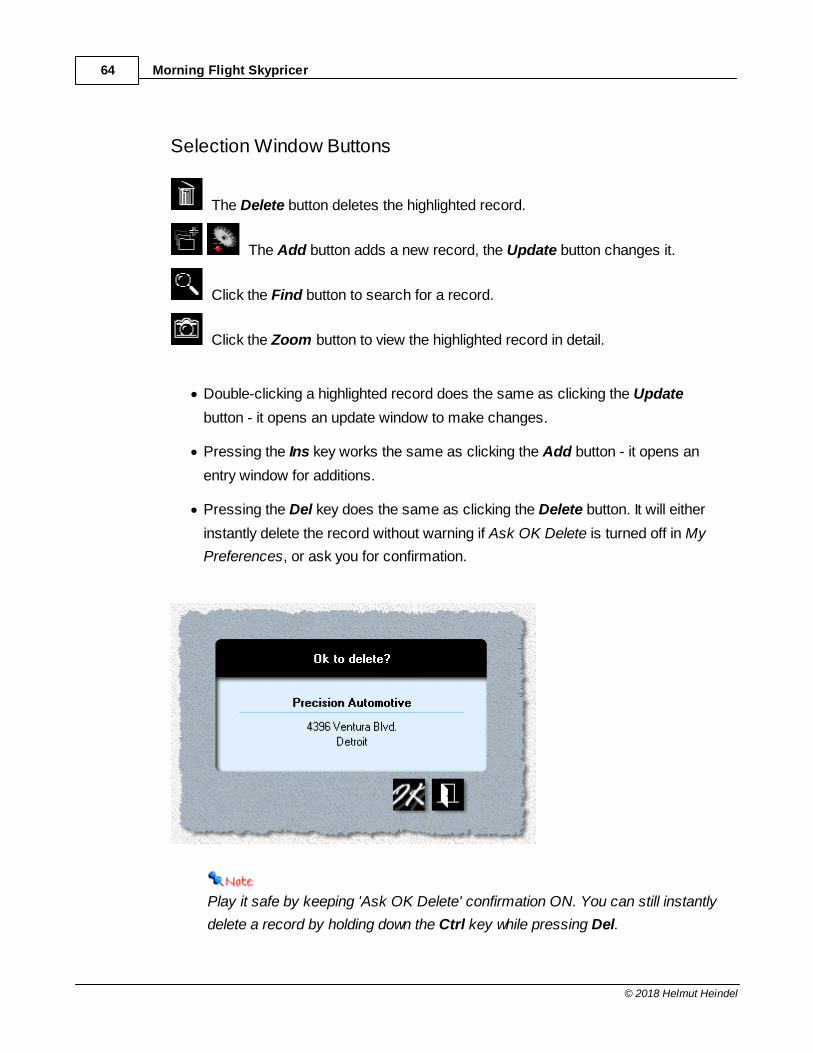
Morning Flight Skypricer64
© 2018 Helmut Heindel
Selection Window Buttons
The Delete button deletes the highlighted record.
The Add button adds a new record, the Update button changes it.
Click the Find button to search for a record.
Click the Zoom button to view the highlighted record in detail.
· Double-clicking a highlighted record does the same as clicking the Update
button - it opens an update window to make changes.
· Pressing the Ins key works the same as clicking the Add button - it opens an
entry window for additions.
· Pressing the Del key does the same as clicking the Delete button. It will either
instantly delete the record without warning if Ask OK Delete is turned off in My
Preferences, or ask you for confirmation.
Play it safe by keeping 'Ask OK Delete' confirmation ON. You can still instantly
delete a record by holding down the Ctrl key while pressing Del.
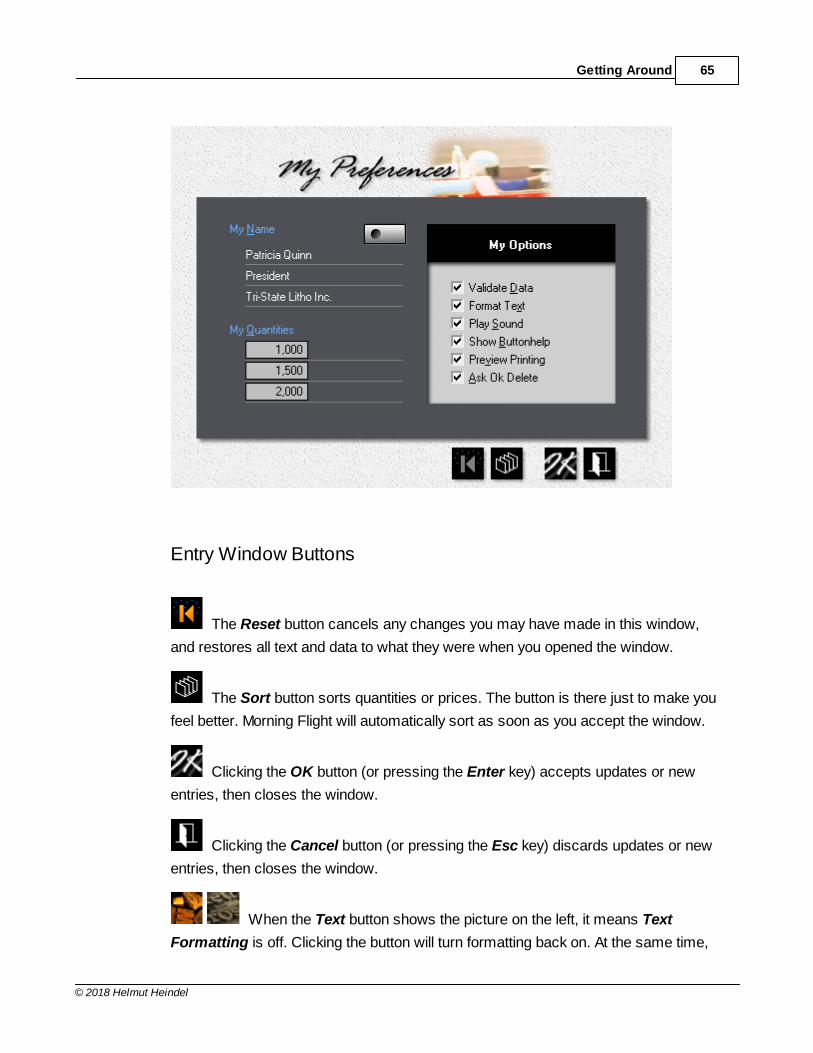
Getting Around 65
© 2018 Helmut Heindel
Entry Window Buttons
The Reset button cancels any changes you may have made in this window,
and restores all text and data to what they were when you opened the window.
The Sort button sorts quantities or prices. The button is there just to make you
feel better. Morning Flight will automatically sort as soon as you accept the window.
Clicking the OK button (or pressing the Enter key) accepts updates or new
entries, then closes the window.
Clicking the Cancel button (or pressing the Esc key) discards updates or new
entries, then closes the window.
When the Text button shows the picture on the left, it means Text
Formatting is off. Clicking the button will turn formatting back on. At the same time,
Morning Flight Skypricer66
© 2018 Helmut Heindel
all text in the open window will be formatted with initial caps. When the button shows
the picture on the right, it means text formatting is on. To make a free-form entry
(exactly the way you type it in), click the right button to turn off formatting before you
make that entry.
When the Data button shows "Goofy," it means Data Validation is off.
Clicking the button will change the picture to an umbrella and turn validation back on.
At the same time, Morning Flight will check (and change, if necessary) all numerical
data in the open window to make sure they're within reasonable limits. When the data
button shows the umbrella and you want to make a numerical entry either above or
below the normal limits, click the right button to turn validation off before you make
that entry.
Text formatting and data validation states are persistent. Each window initially
inherits its states from 'My Preferences', but then preserves its own formatting
and validation settings. When you accept a window with data validation off, it will
stay off (for that window only) until you turn it back on. For the record, when a
window opens with "Goofy" on the data button, there's a good chance somebody
made an entry that may not make sense in the real world!
Other Buttons you'll run into:
The Save button saves paper to the Buy-it paper file.
The Rolodex button generally opens a selection window to retrieve a customer
or contact. When used with paper, it retrieves a paper item from the Buy-it paper file.
Used with paper, the button locks in the same cost for all quantity brackets.
That's when the vendor charges you the same price no matter how much paper
you're ordering.
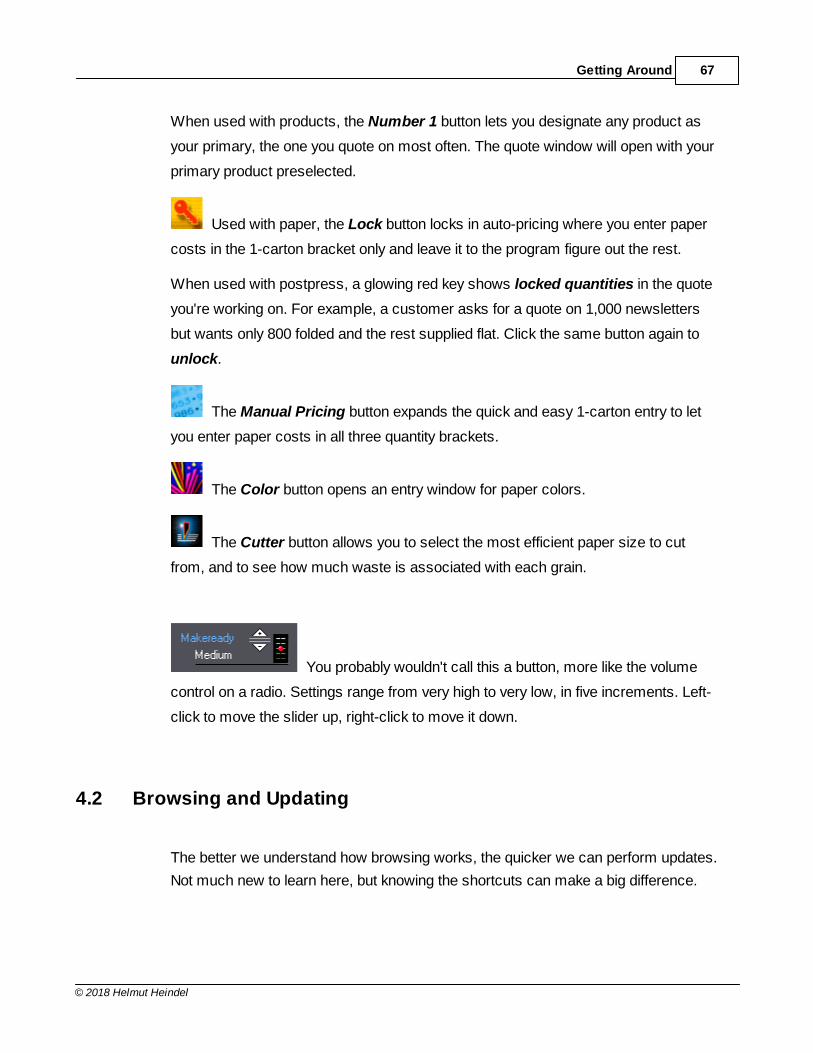
Getting Around 67
© 2018 Helmut Heindel
When used with products, the Number 1 button lets you designate any product as
your primary, the one you quote on most often. The quote window will open with your
primary product preselected.
Used with paper, the Lock button locks in auto-pricing where you enter paper
costs in the 1-carton bracket only and leave it to the program figure out the rest.
When used with postpress, a glowing red key shows locked quantities in the quote
you're working on. For example, a customer asks for a quote on 1,000 newsletters
but wants only 800 folded and the rest supplied flat. Click the same button again to
unlock.
The Manual Pricing button expands the quick and easy 1-carton entry to let
you enter paper costs in all three quantity brackets.
The Color button opens an entry window for paper colors.
The Cutter button allows you to select the most efficient paper size to cut
from, and to see how much waste is associated with each grain.
You probably wouldn't call this a button, more like the volume
control on a radio. Settings range from very high to very low, in five increments. Left-
click to move the slider up, right-click to move it down.
4.2 Browsing and Updating
The better we understand how browsing works, the quicker we can perform updates.
Not much new to learn here, but knowing the shortcuts can make a big difference.

Morning Flight Skypricer68
© 2018 Helmut Heindel
· To sort the browse box
Click on the headings.
· To locate the first product that begins with a "D"
Make sure the highlight bar is in the browse box and not in the black panel, then
press the letter D.
· To page through the browse box
Press the PgUp and PgDn keys.
Getting Around 69
© 2018 Helmut Heindel
Click the Delete button to delete the highlighted record. Keyboard: Press Del.
To suppress the "Ask OK to Delete" window from popping up, hold down the Ctrl key
and press Del.
Click the Add button to add a new record. Keyboard: Press Ins.
Click the Update button to edit the highlighted record. Keyboard: Hold down
the Ctrl key and press Enter.
When used with products, the Number 1 button lets you designate any product
as your primary, the one you quote on most often. The quote window will open with
your primary product preselected.
Used with paper, the button locks in the same cost for all quantity brackets. In other
words, when the vendor charges you the same price no matter how much paper
you're ordering.
Click the Find button to search for a record. Keyboard: Press F4.
Click the Zoom button to view the highlighted record in detail. Keyboard:
Press F5.
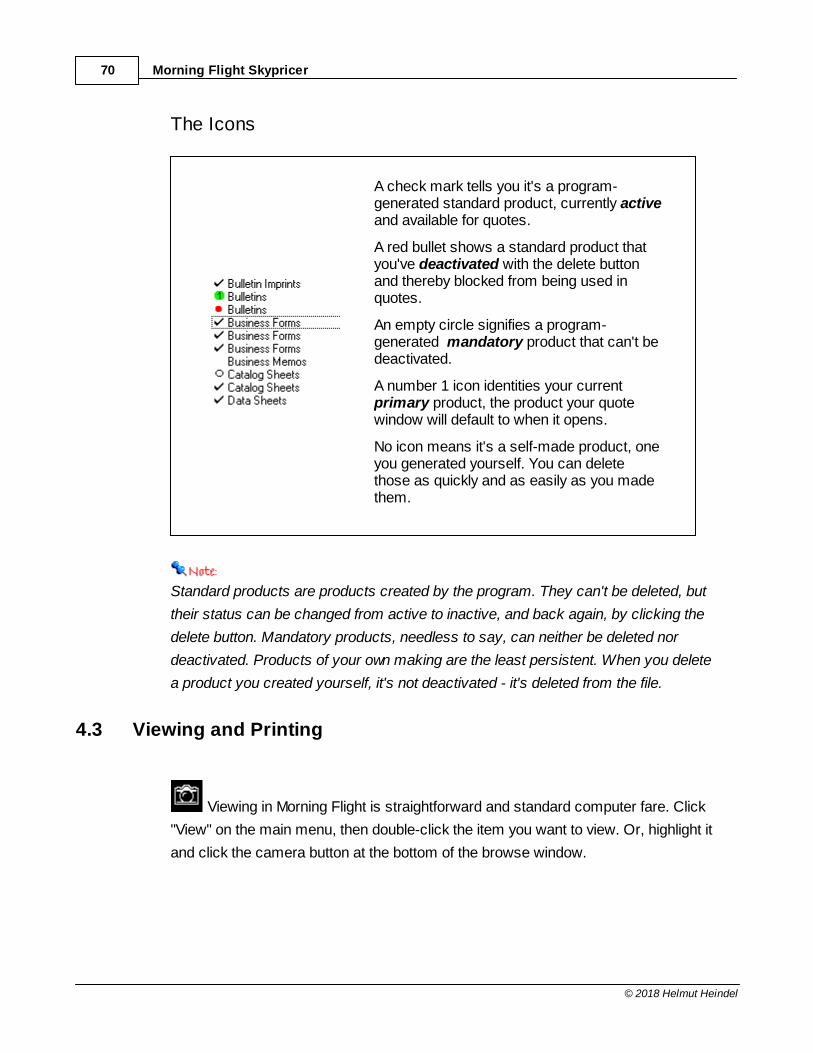
Morning Flight Skypricer70
© 2018 Helmut Heindel
The Icons
A check mark tells you it's a program-generated standard product, currently activeand available for quotes.
A red bullet shows a standard product thatyou've deactivated with the delete buttonand thereby blocked from being used inquotes.
An empty circle signifies a program-generated mandatory product that can't bedeactivated.
A number 1 icon identities your current primary product, the product your quotewindow will default to when it opens.
No icon means it's a self-made product, oneyou generated yourself. You can deletethose as quickly and as easily as you madethem.
Standard products are products created by the program. They can't be deleted, but
their status can be changed from active to inactive, and back again, by clicking the
delete button. Mandatory products, needless to say, can neither be deleted nor
deactivated. Products of your own making are the least persistent. When you delete
a product you created yourself, it's not deactivated - it's deleted from the file.
4.3 Viewing and Printing
Viewing in Morning Flight is straightforward and standard computer fare. Click
"View" on the main menu, then double-click the item you want to view. Or, highlight it
and click the camera button at the bottom of the browse window.
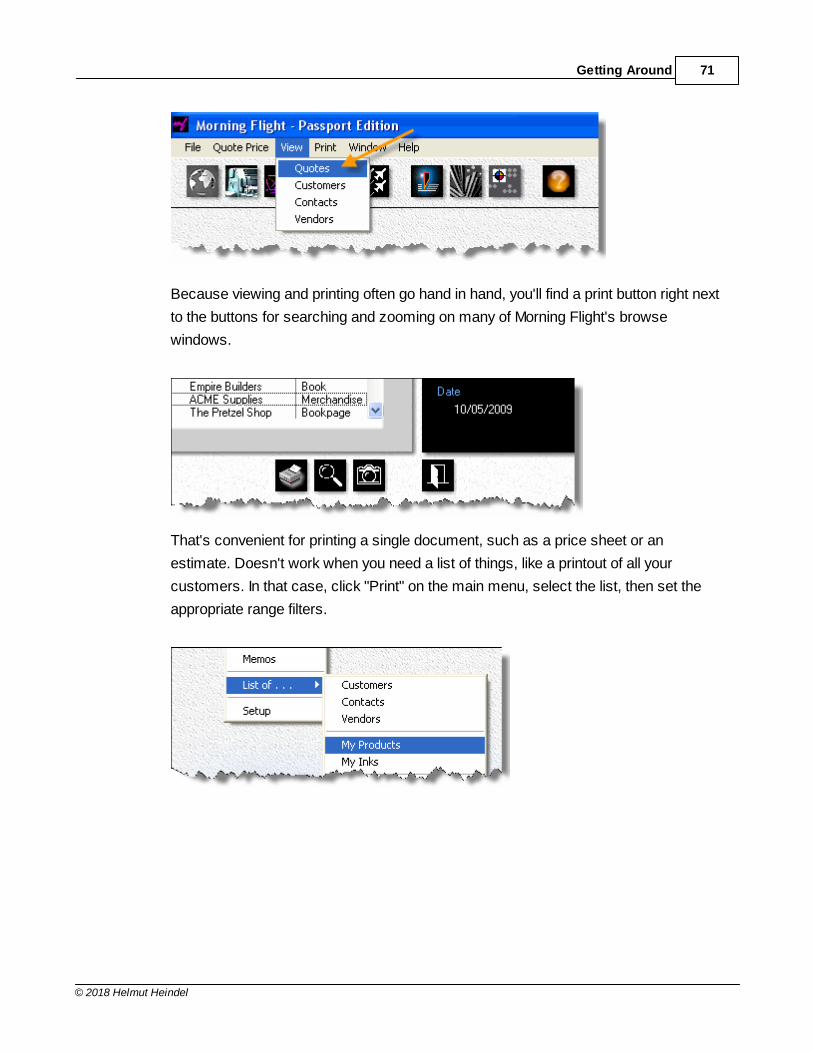
Getting Around 71
© 2018 Helmut Heindel
Because viewing and printing often go hand in hand, you'll find a print button right next
to the buttons for searching and zooming on many of Morning Flight's browse
windows.
That's convenient for printing a single document, such as a price sheet or an
estimate. Doesn't work when you need a list of things, like a printout of all your
customers. In that case, click "Print" on the main menu, select the list, then set the
appropriate range filters.
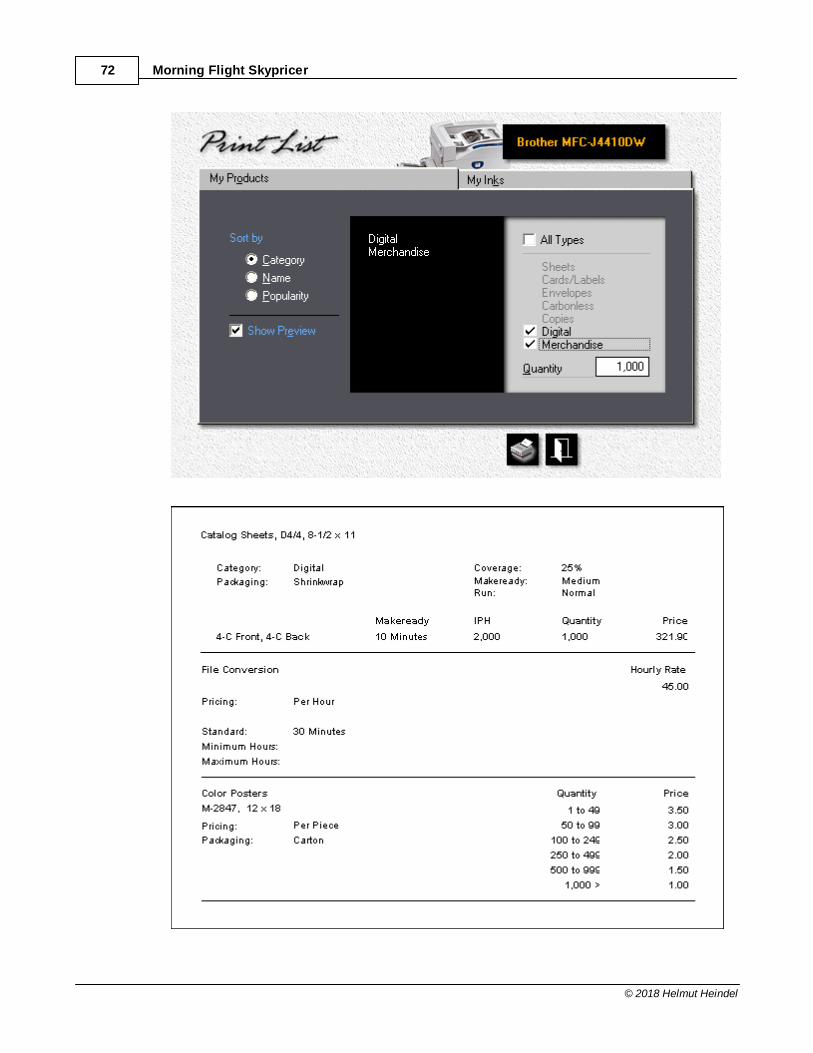
Morning Flight Skypricer72
© 2018 Helmut Heindel
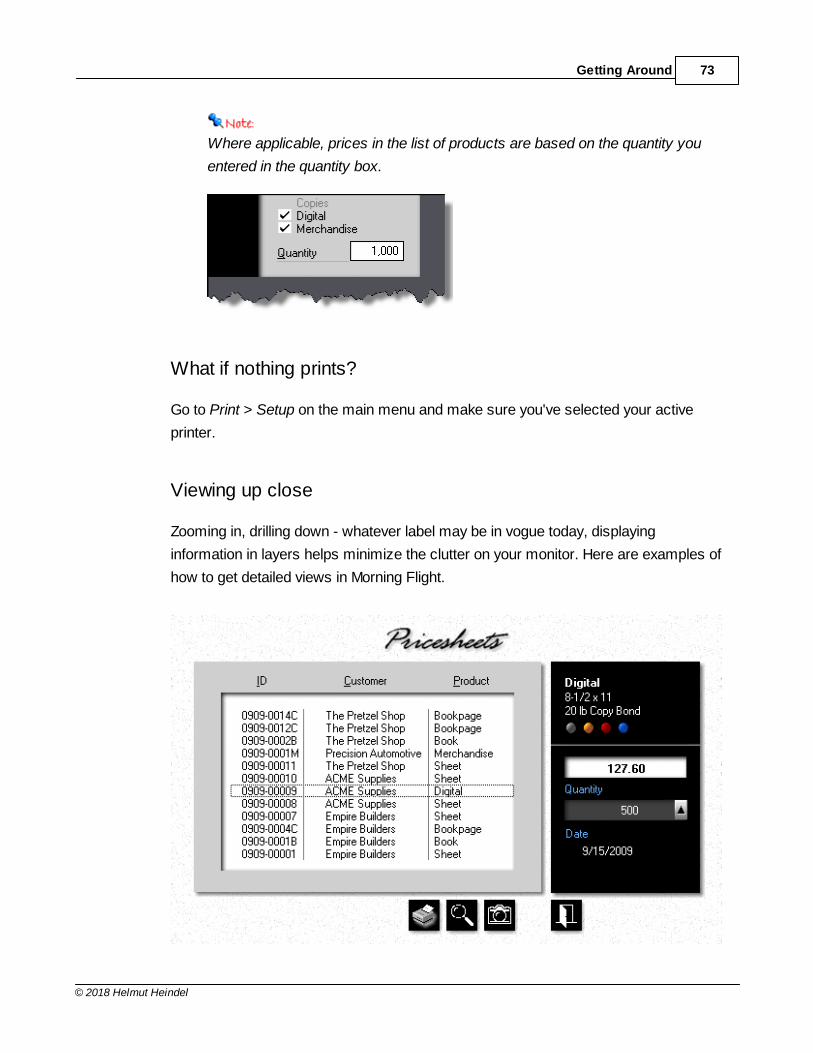
Getting Around 73
© 2018 Helmut Heindel
Where applicable, prices in the list of products are based on the quantity you
entered in the quantity box.
What if nothing prints?
Go to Print > Setup on the main menu and make sure you've selected your active
printer.
Viewing up close
Zooming in, drilling down - whatever label may be in vogue today, displaying
information in layers helps minimize the clutter on your monitor. Here are examples of
how to get detailed views in Morning Flight.
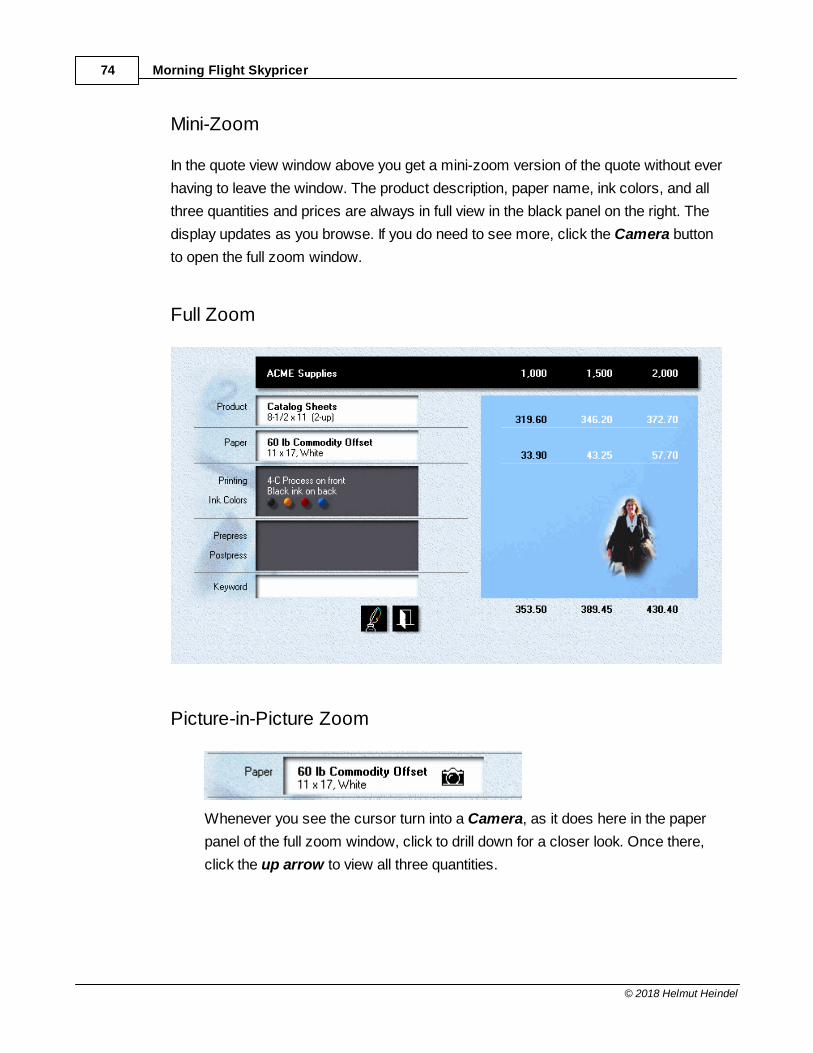
Morning Flight Skypricer74
© 2018 Helmut Heindel
Mini-Zoom
In the quote view window above you get a mini-zoom version of the quote without ever
having to leave the window. The product description, paper name, ink colors, and all
three quantities and prices are always in full view in the black panel on the right. The
display updates as you browse. If you do need to see more, click the Camera button
to open the full zoom window.
Full Zoom
Picture-in-Picture Zoom
Whenever you see the cursor turn into a Camera, as it does here in the paper
panel of the full zoom window, click to drill down for a closer look. Once there,
click the up arrow to view all three quantities.
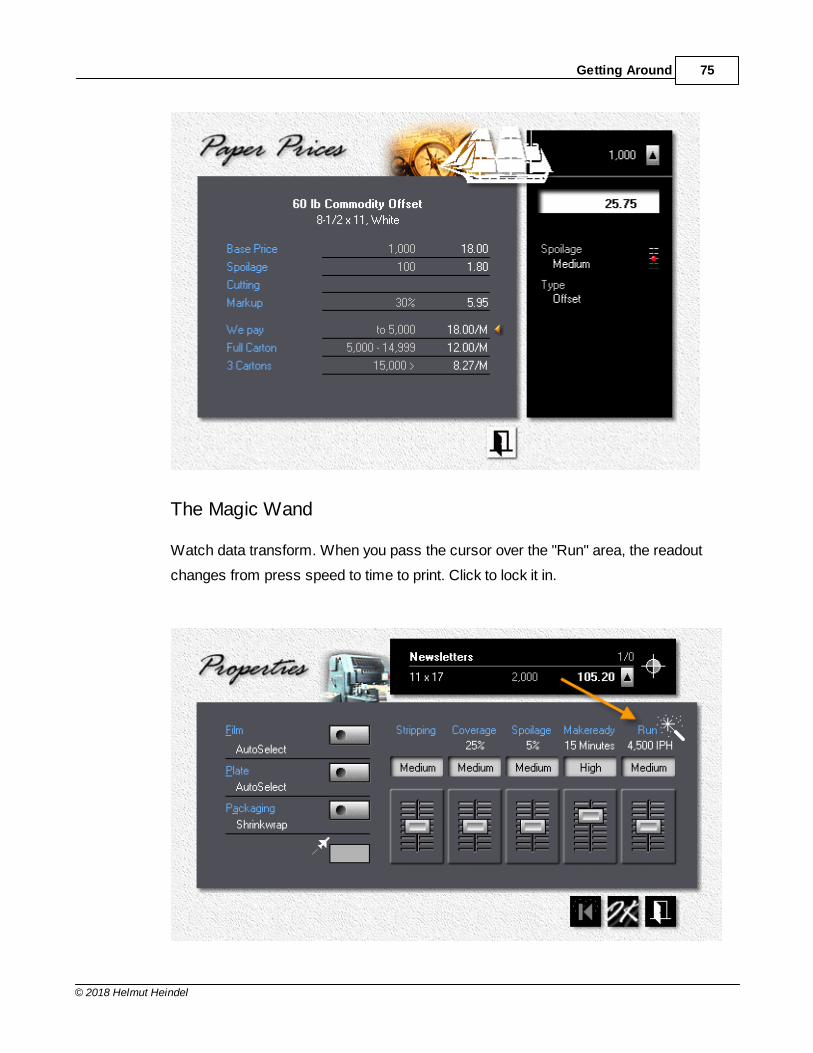
Getting Around 75
© 2018 Helmut Heindel
The Magic Wand
Watch data transform. When you pass the cursor over the "Run" area, the readout
changes from press speed to time to print. Click to lock it in.
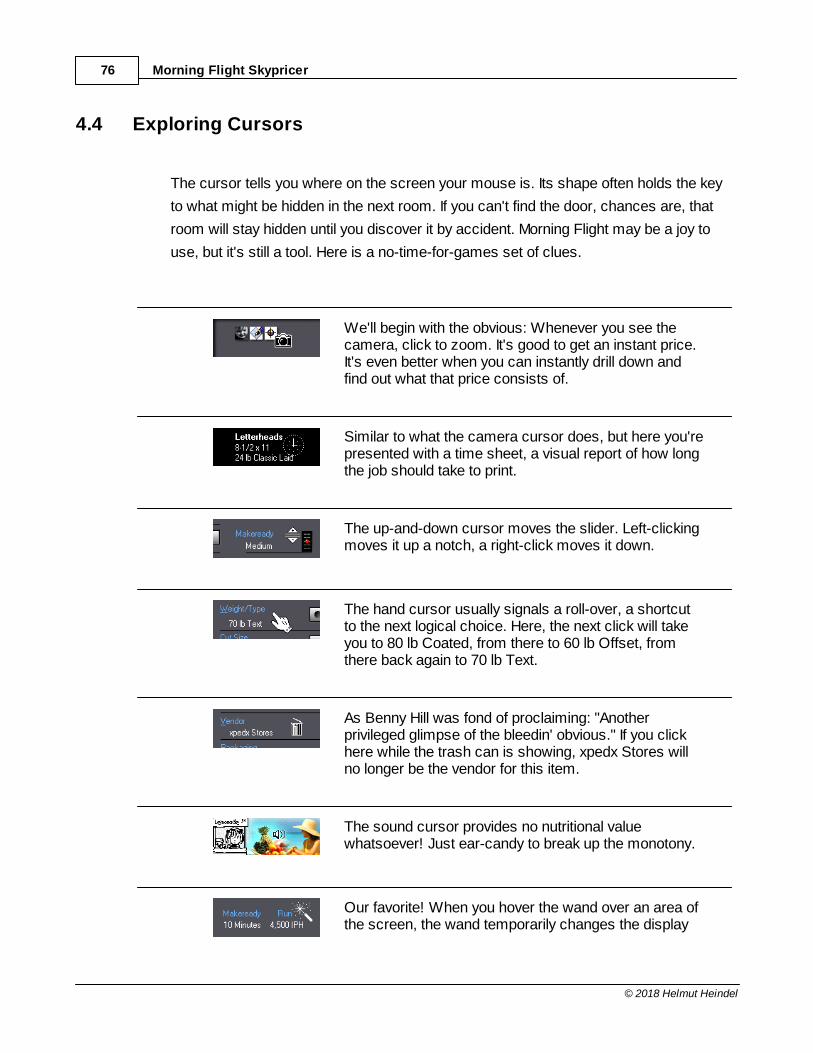
Morning Flight Skypricer76
© 2018 Helmut Heindel
4.4 Exploring Cursors
The cursor tells you where on the screen your mouse is. Its shape often holds the key
to what might be hidden in the next room. If you can't find the door, chances are, that
room will stay hidden until you discover it by accident. Morning Flight may be a joy to
use, but it's still a tool. Here is a no-time-for-games set of clues.
We'll begin with the obvious: Whenever you see thecamera, click to zoom. It's good to get an instant price.It's even better when you can instantly drill down andfind out what that price consists of.
Similar to what the camera cursor does, but here you'represented with a time sheet, a visual report of how longthe job should take to print.
The up-and-down cursor moves the slider. Left-clickingmoves it up a notch, a right-click moves it down.
The hand cursor usually signals a roll-over, a shortcutto the next logical choice. Here, the next click will takeyou to 80 lb Coated, from there to 60 lb Offset, fromthere back again to 70 lb Text.
As Benny Hill was fond of proclaiming: "Anotherprivileged glimpse of the bleedin' obvious." If you clickhere while the trash can is showing, xpedx Stores willno longer be the vendor for this item.
The sound cursor provides no nutritional valuewhatsoever! Just ear-candy to break up the monotony.
Our favorite! When you hover the wand over an area ofthe screen, the wand temporarily changes the display
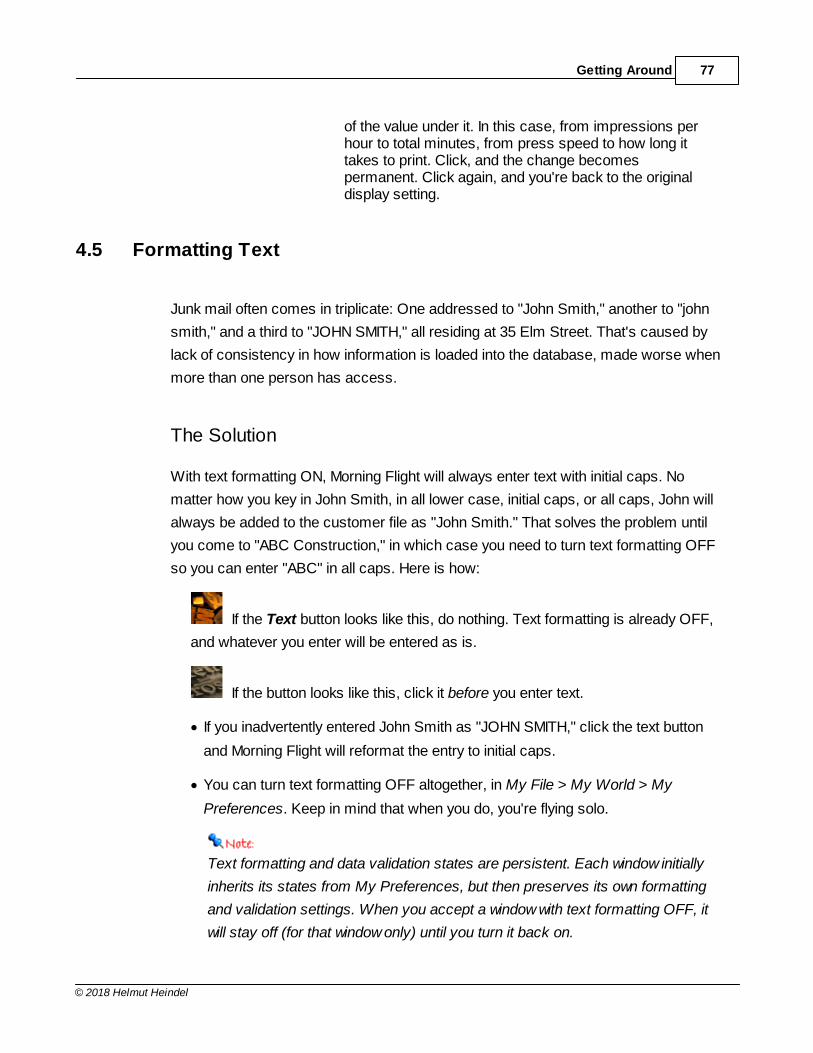
Getting Around 77
© 2018 Helmut Heindel
of the value under it. In this case, from impressions perhour to total minutes, from press speed to how long ittakes to print. Click, and the change becomespermanent. Click again, and you're back to the originaldisplay setting.
4.5 Formatting Text
Junk mail often comes in triplicate: One addressed to "John Smith," another to "john
smith," and a third to "JOHN SMITH," all residing at 35 Elm Street. That's caused by
lack of consistency in how information is loaded into the database, made worse when
more than one person has access.
The Solution
With text formatting ON, Morning Flight will always enter text with initial caps. No
matter how you key in John Smith, in all lower case, initial caps, or all caps, John will
always be added to the customer file as "John Smith." That solves the problem until
you come to "ABC Construction," in which case you need to turn text formatting OFF
so you can enter "ABC" in all caps. Here is how:
If the Text button looks like this, do nothing. Text formatting is already OFF,
and whatever you enter will be entered as is.
If the button looks like this, click it before you enter text.
· If you inadvertently entered John Smith as "JOHN SMITH," click the text button
and Morning Flight will reformat the entry to initial caps.
· You can turn text formatting OFF altogether, in My File > My World > My
Preferences. Keep in mind that when you do, you're flying solo.
Text formatting and data validation states are persistent. Each window initially
inherits its states from My Preferences, but then preserves its own formatting
and validation settings. When you accept a window with text formatting OFF, it
will stay off (for that window only) until you turn it back on.
Morning Flight Skypricer78
© 2018 Helmut Heindel
4.6 Validating Data
If computer applications could be made fool-proof, there'd be fewer shelves with
books for "Dummies." But they can be made fail-safe. Well-thought-out programs can
incorporate a mechanism found mostly in machinery that guarantees that if the
contraption should blow up, it will blow the other way.
In Morning Flight, that mechanism is called Data Validation. Its purpose is to keep
small errors small and not let them turn into catastrophes. Whenever you enter
numerical data, Morning Flight imposes minimum and maximum "validated" values.
With validation ON, the program can safely be used by office staff with limited
estimating experience. Cousin Mel can handle the low-end stuff, freeing the shop
owner or manager to focus on big-dollar projects.
With validation OFF, the sky still isn't the limit, but the range extends well beyond the
reasonable.
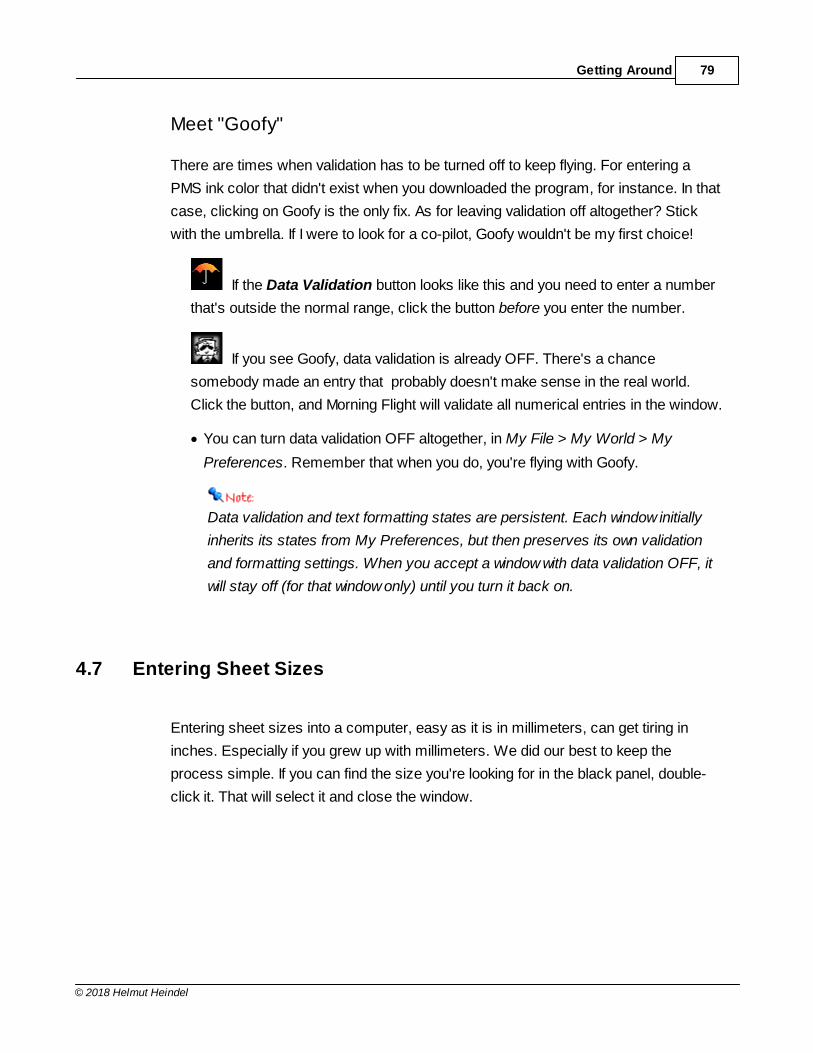
Getting Around 79
© 2018 Helmut Heindel
Meet "Goofy"
There are times when validation has to be turned off to keep flying. For entering a
PMS ink color that didn't exist when you downloaded the program, for instance. In that
case, clicking on Goofy is the only fix. As for leaving validation off altogether? Stick
with the umbrella. If I were to look for a co-pilot, Goofy wouldn't be my first choice!
If the Data Validation button looks like this and you need to enter a number
that's outside the normal range, click the button before you enter the number.
If you see Goofy, data validation is already OFF. There's a chance
somebody made an entry that probably doesn't make sense in the real world.
Click the button, and Morning Flight will validate all numerical entries in the window.
· You can turn data validation OFF altogether, in My File > My World > My
Preferences. Remember that when you do, you're flying with Goofy.
Data validation and text formatting states are persistent. Each window initially
inherits its states from My Preferences, but then preserves its own validation
and formatting settings. When you accept a window with data validation OFF, it
will stay off (for that window only) until you turn it back on.
4.7 Entering Sheet Sizes
Entering sheet sizes into a computer, easy as it is in millimeters, can get tiring in
inches. Especially if you grew up with millimeters. We did our best to keep the
process simple. If you can find the size you're looking for in the black panel, double-
click it. That will select it and close the window.
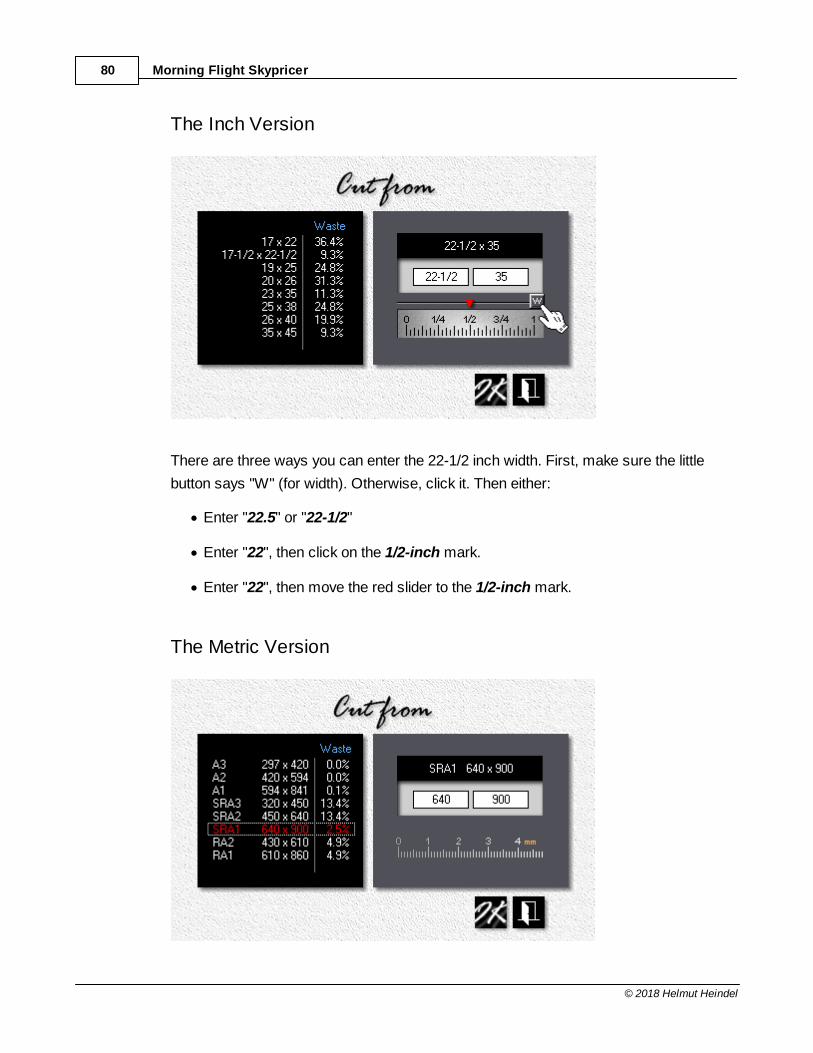
Morning Flight Skypricer80
© 2018 Helmut Heindel
The Inch Version
There are three ways you can enter the 22-1/2 inch width. First, make sure the little
button says "W" (for width). Otherwise, click it. Then either:
· Enter "22.5" or "22-1/2"
· Enter "22", then click on the 1/2-inch mark.
· Enter "22", then move the red slider to the 1/2-inch mark.
The Metric Version
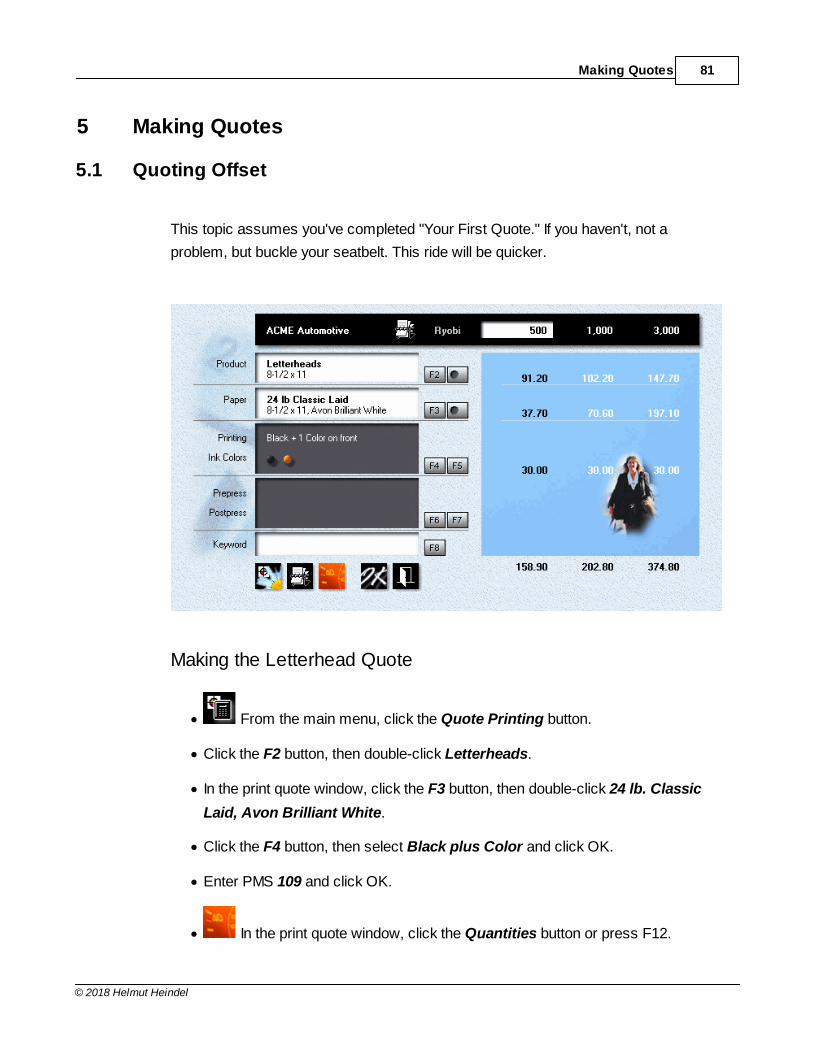
Making Quotes 81
© 2018 Helmut Heindel
5 Making Quotes
5.1 Quoting Offset
This topic assumes you've completed "Your First Quote." If you haven't, not a
problem, but buckle your seatbelt. This ride will be quicker.
Making the Letterhead Quote
· From the main menu, click the Quote Printing button.
· Click the F2 button, then double-click Letterheads.
· In the print quote window, click the F3 button, then double-click 24 lb. Classic
Laid, Avon Brilliant White.
· Click the F4 button, then select Black plus Color and click OK.
· Enter PMS 109 and click OK.
· In the print quote window, click the Quantities button or press F12.
Morning Flight Skypricer82
© 2018 Helmut Heindel
· Enter the quantities and click OK.
Saving the Quote
· In the print quote window, click the Rolodex button (the one on top, inside
the black panel).
· If you've completed "Your First Quote," you will have at least one customer
to double-click on. Pick anyone. If you haven't, the window will come up empty.
Click the Add button, then enter any name in the Company field and click OK.
· Click OK in the print quote window to save the quote.
Making the Envelope Quote
· While the print quote window is still open, click the Paste Ink Colors
button.
· Click the F2 button.
· Click Envelopes in the black panel on the right, then double-click Envelopes,
Size 10.
· Click the F3 button, then double-click 24 lb. Classic Laid, Avon Brilliant White.
· Click OK to save the quote, then close the print quote window.
5.2 Quoting Digital
This topic describes how to quote a standard digital product. For the sake of variety,
we'll assume the bulk of your work is digital. You'll want the quote window to open
with a digital product, not offset, so our first step will be to designate a digital product
as your primary product.
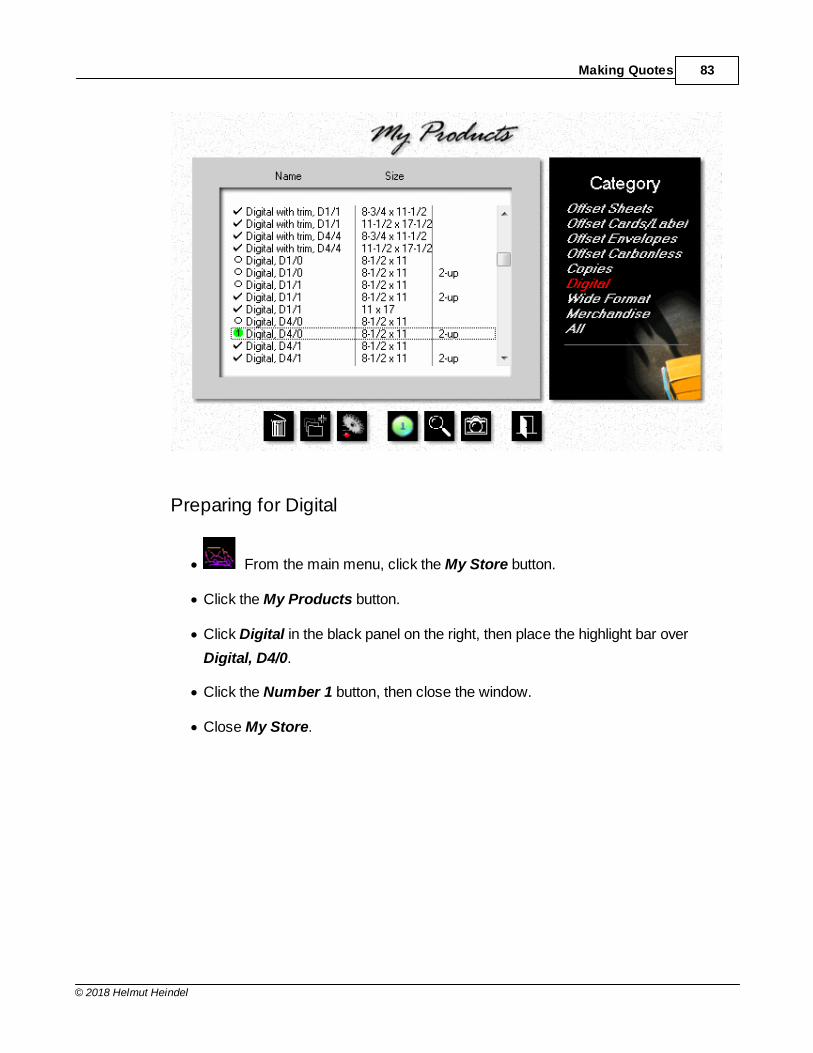
Making Quotes 83
© 2018 Helmut Heindel
Preparing for Digital
· From the main menu, click the My Store button.
· Click the My Products button.
· Click Digital in the black panel on the right, then place the highlight bar over
Digital, D4/0.
· Click the Number 1 button, then close the window.
· Close My Store.

Morning Flight Skypricer84
© 2018 Helmut Heindel
Making the Quote
· From the main menu, click the Quote Printing button.
· Click the F2 button, then double-click Digital, D4/1.
· Back in the print quote window, click the F3 button.
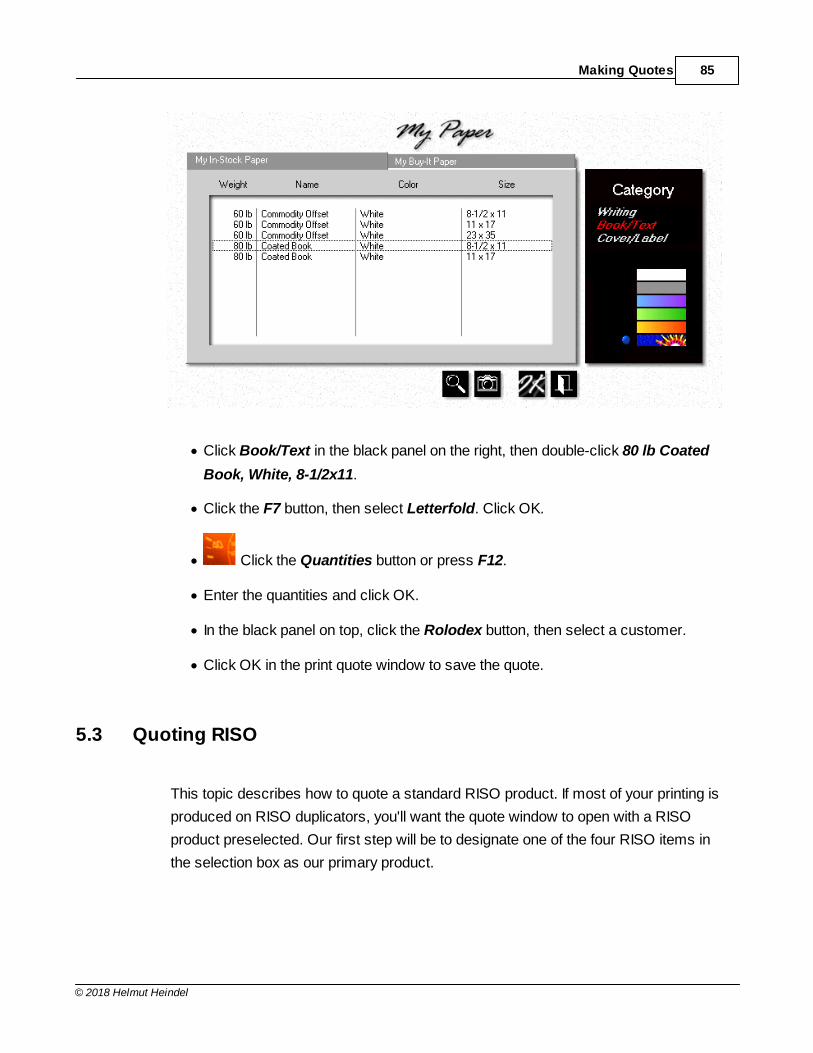
Making Quotes 85
© 2018 Helmut Heindel
· Click Book/Text in the black panel on the right, then double-click 80 lb Coated
Book, White, 8-1/2x11.
· Click the F7 button, then select Letterfold. Click OK.
· Click the Quantities button or press F12.
· Enter the quantities and click OK.
· In the black panel on top, click the Rolodex button, then select a customer.
· Click OK in the print quote window to save the quote.
5.3 Quoting RISO
This topic describes how to quote a standard RISO product. If most of your printing is
produced on RISO duplicators, you'll want the quote window to open with a RISO
product preselected. Our first step will be to designate one of the four RISO items in
the selection box as our primary product.
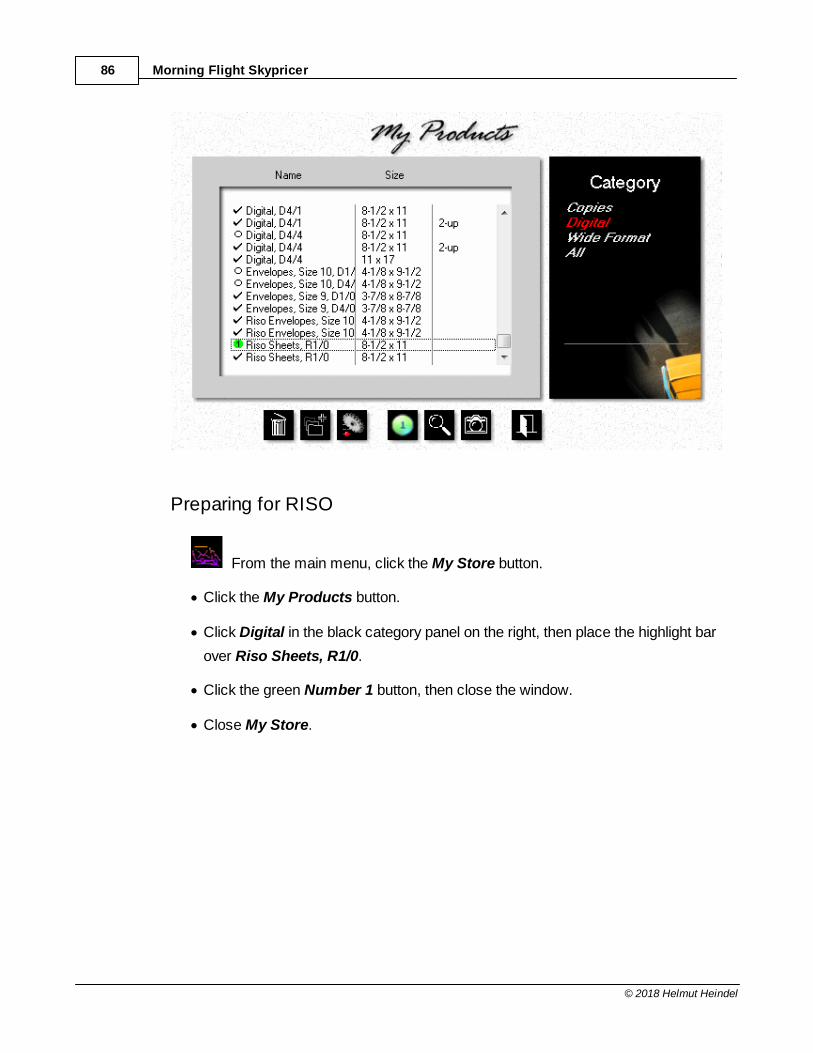
Morning Flight Skypricer86
© 2018 Helmut Heindel
Preparing for RISO
From the main menu, click the My Store button.
· Click the My Products button.
· Click Digital in the black category panel on the right, then place the highlight bar
over Riso Sheets, R1/0.
· Click the green Number 1 button, then close the window.
· Close My Store.
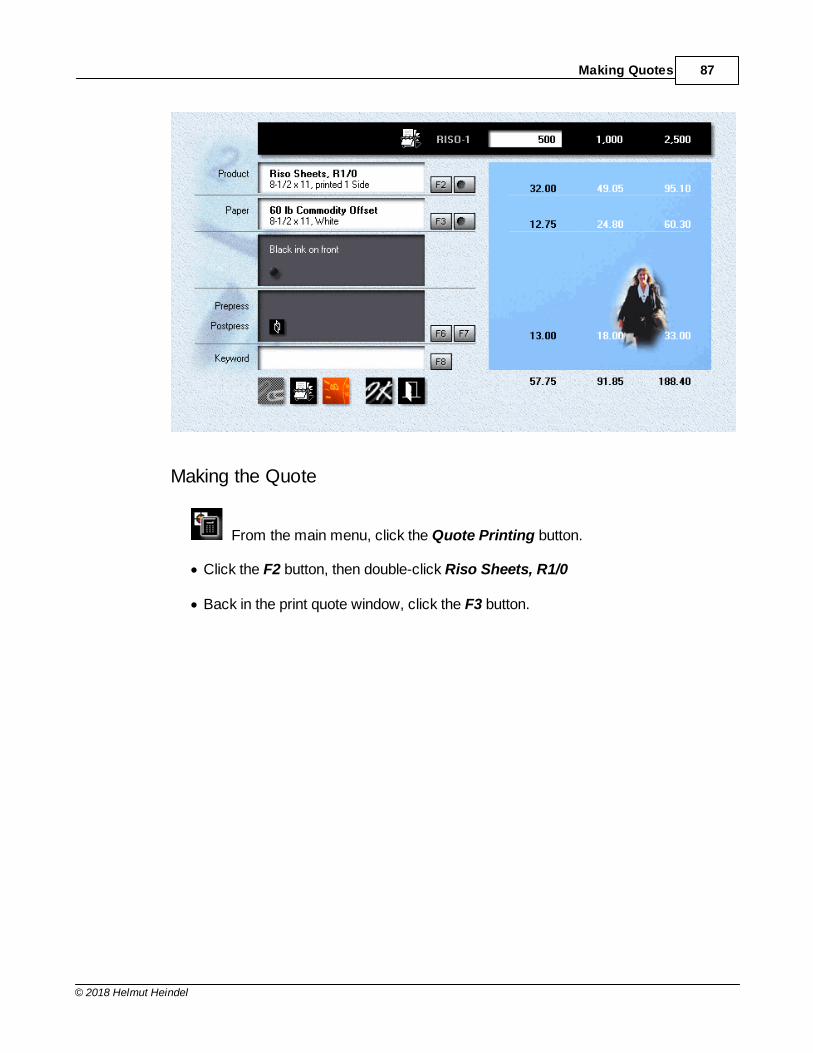
Making Quotes 87
© 2018 Helmut Heindel
Making the Quote
From the main menu, click the Quote Printing button.
· Click the F2 button, then double-click Riso Sheets, R1/0
· Back in the print quote window, click the F3 button.
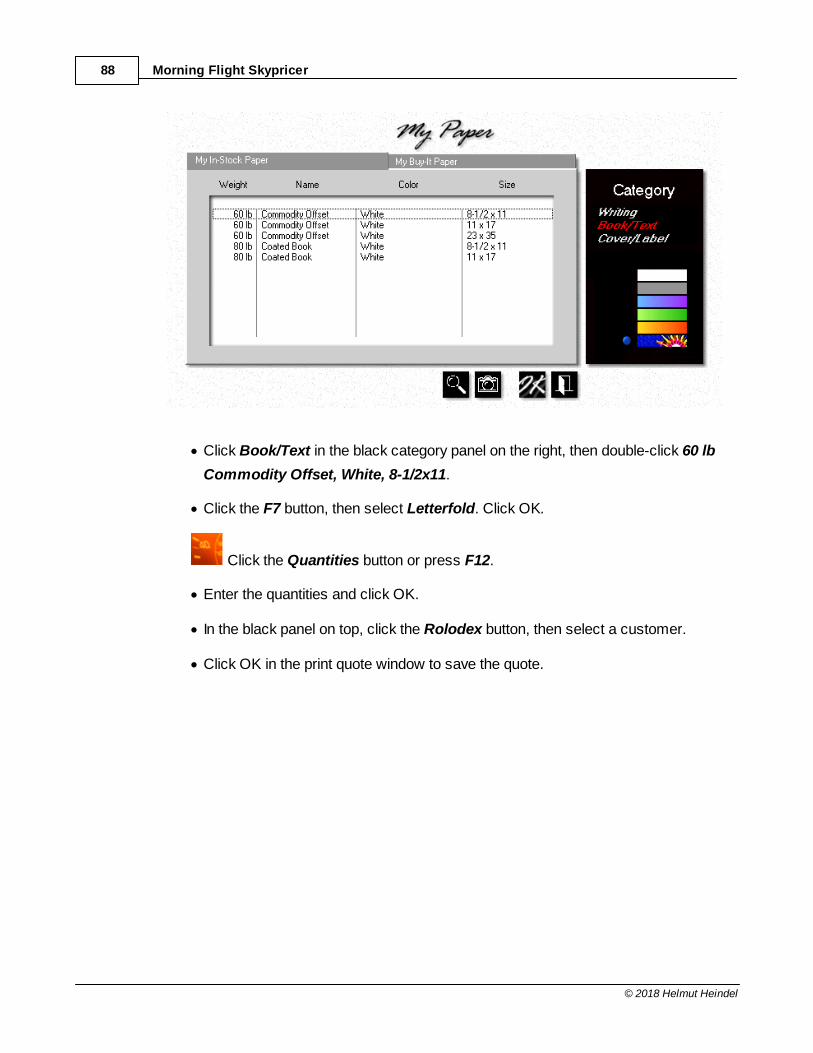
Morning Flight Skypricer88
© 2018 Helmut Heindel
· Click Book/Text in the black category panel on the right, then double-click 60 lb
Commodity Offset, White, 8-1/2x11.
· Click the F7 button, then select Letterfold. Click OK.
Click the Quantities button or press F12.
· Enter the quantities and click OK.
· In the black panel on top, click the Rolodex button, then select a customer.
· Click OK in the print quote window to save the quote.
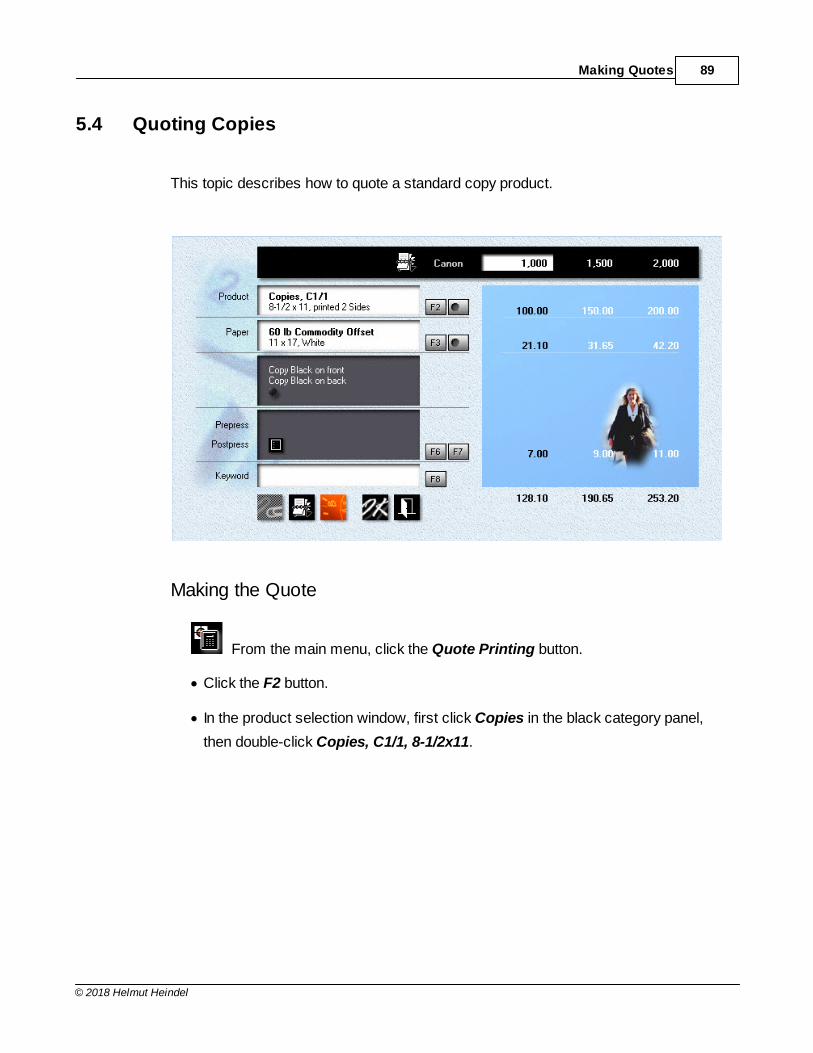
Making Quotes 89
© 2018 Helmut Heindel
5.4 Quoting Copies
This topic describes how to quote a standard copy product.
Making the Quote
From the main menu, click the Quote Printing button.
· Click the F2 button.
· In the product selection window, first click Copies in the black category panel,
then double-click Copies, C1/1, 8-1/2x11.
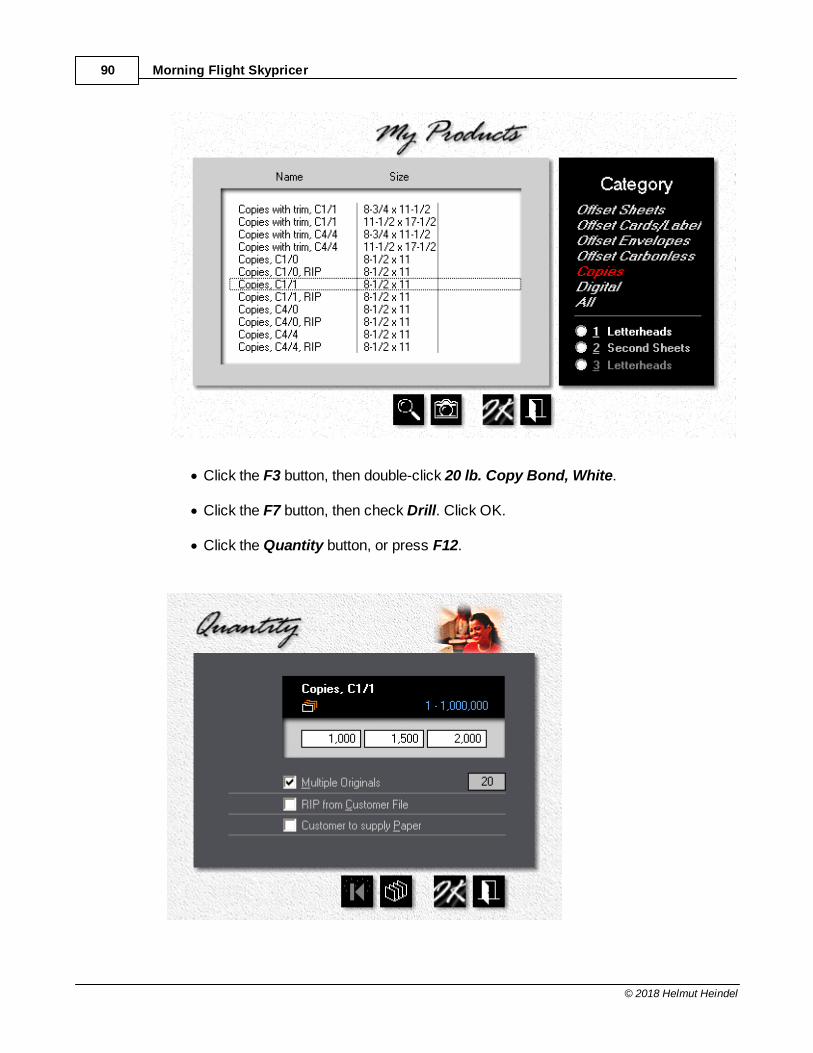
Morning Flight Skypricer90
© 2018 Helmut Heindel
· Click the F3 button, then double-click 20 lb. Copy Bond, White.
· Click the F7 button, then check Drill. Click OK.
· Click the Quantity button, or press F12.
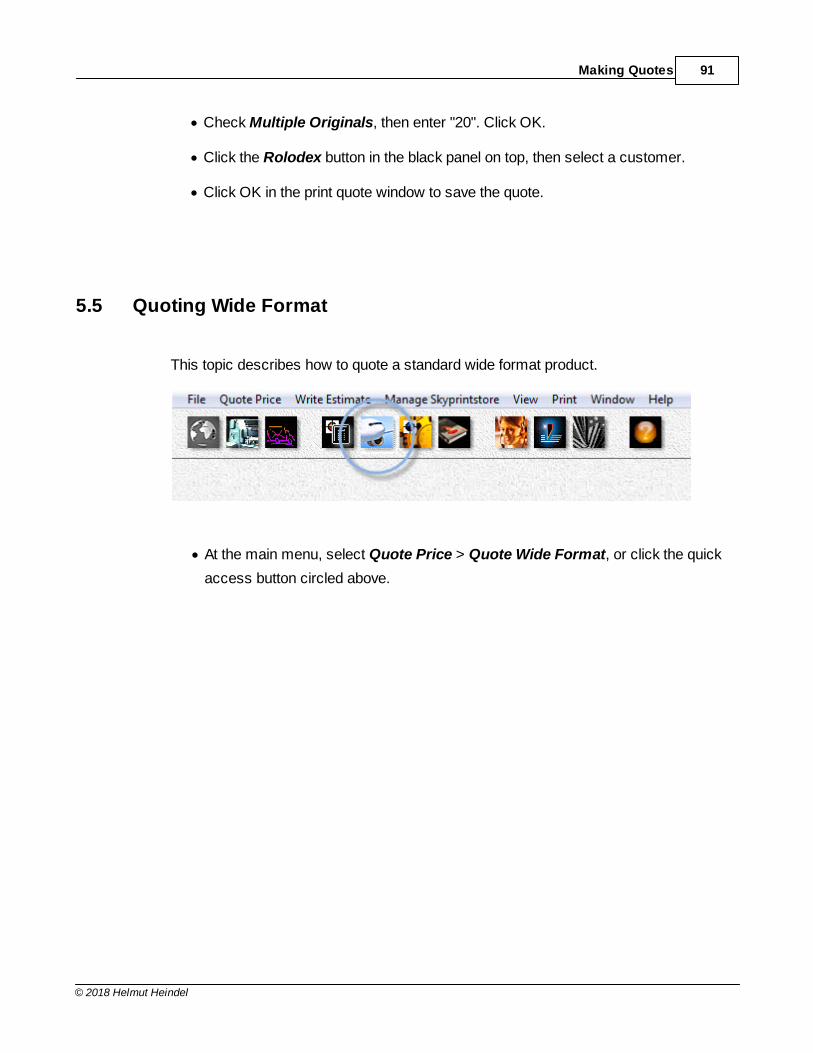
Making Quotes 91
© 2018 Helmut Heindel
· Check Multiple Originals, then enter "20". Click OK.
· Click the Rolodex button in the black panel on top, then select a customer.
· Click OK in the print quote window to save the quote.
5.5 Quoting Wide Format
This topic describes how to quote a standard wide format product.
· At the main menu, select Quote Price > Quote Wide Format, or click the quick
access button circled above.
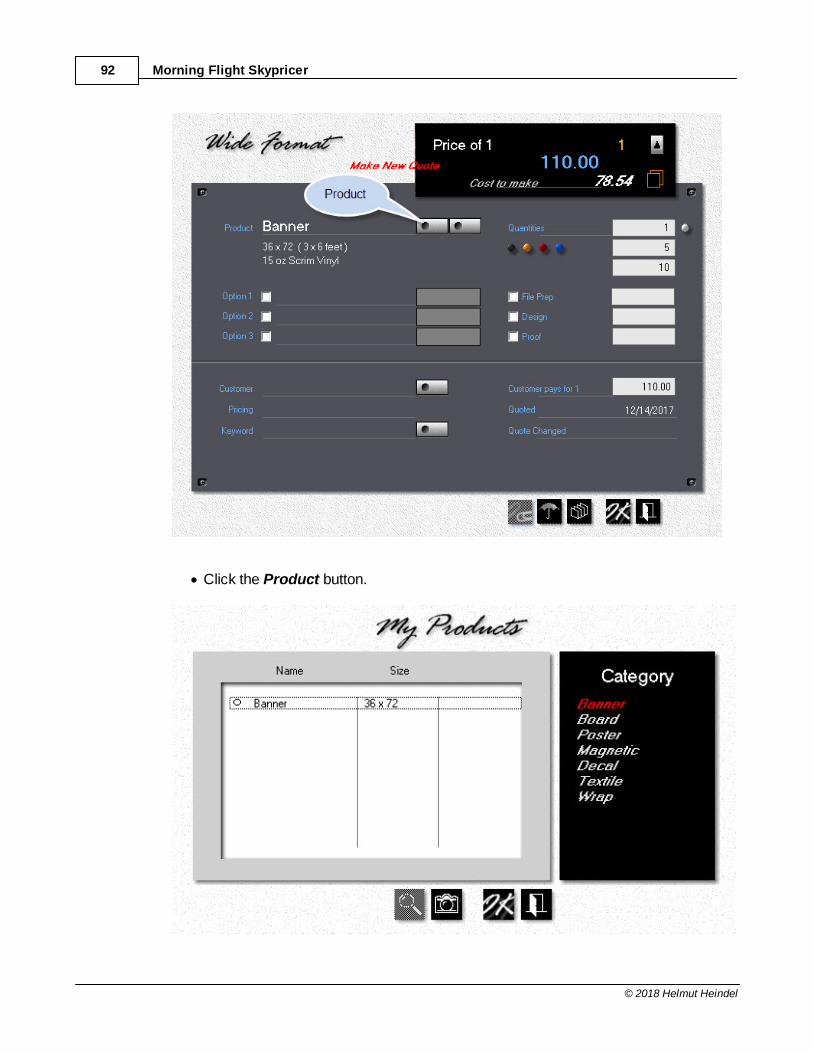
Morning Flight Skypricer92
© 2018 Helmut Heindel
· Click the Product button.
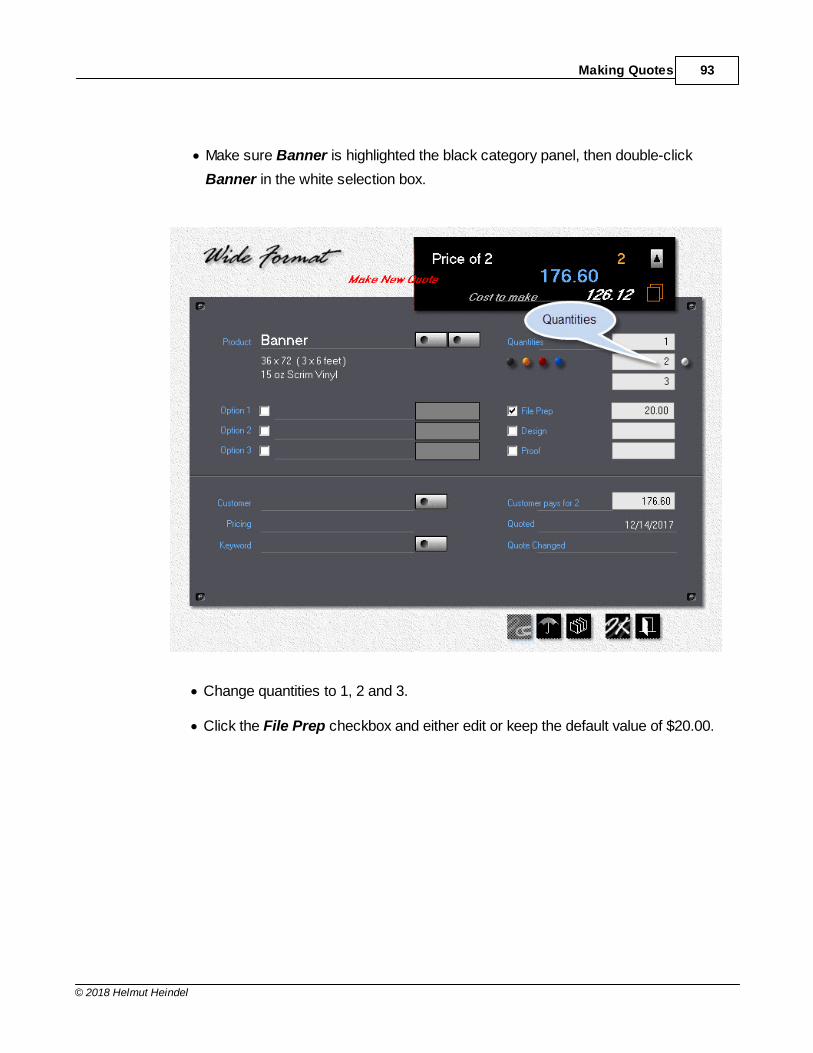
Making Quotes 93
© 2018 Helmut Heindel
· Make sure Banner is highlighted the black category panel, then double-click
Banner in the white selection box.
· Change quantities to 1, 2 and 3.
· Click the File Prep checkbox and either edit or keep the default value of $20.00.
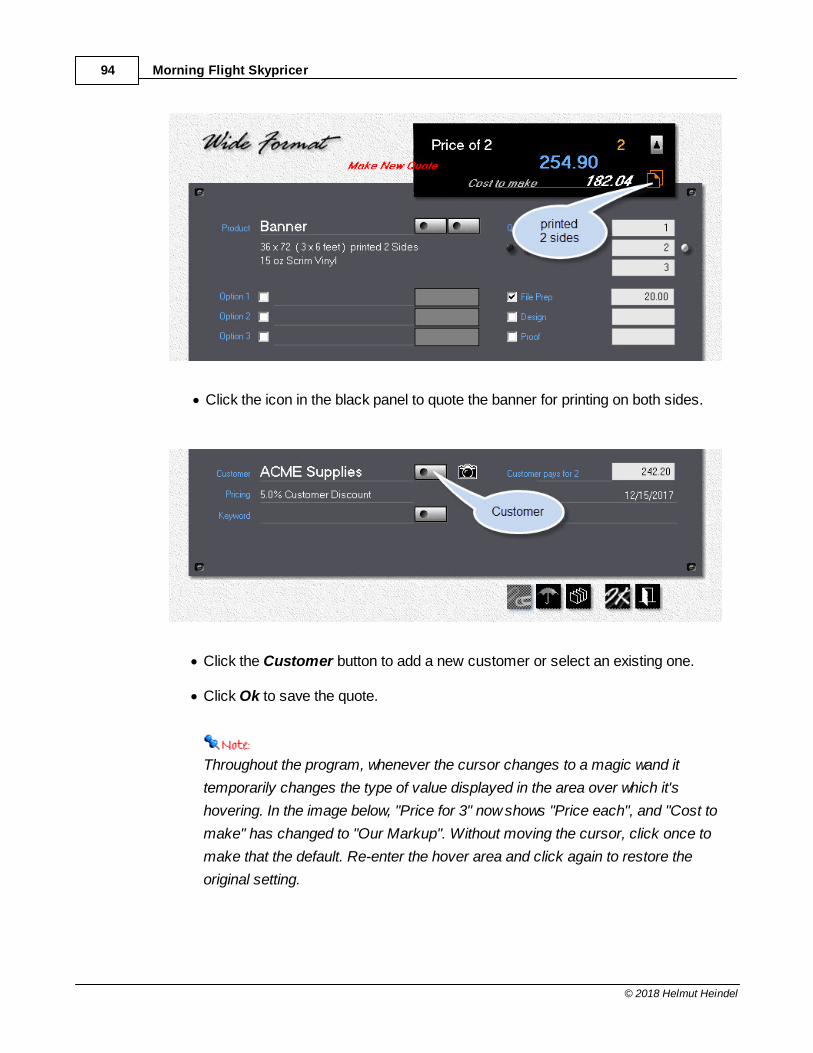
Morning Flight Skypricer94
© 2018 Helmut Heindel
· Click the icon in the black panel to quote the banner for printing on both sides.
· Click the Customer button to add a new customer or select an existing one.
· Click Ok to save the quote.
Throughout the program, whenever the cursor changes to a magic wand it
temporarily changes the type of value displayed in the area over which it's
hovering. In the image below, "Price for 3" now shows "Price each", and "Cost to
make" has changed to "Our Markup". Without moving the cursor, click once to
make that the default. Re-enter the hover area and click again to restore the
original setting.
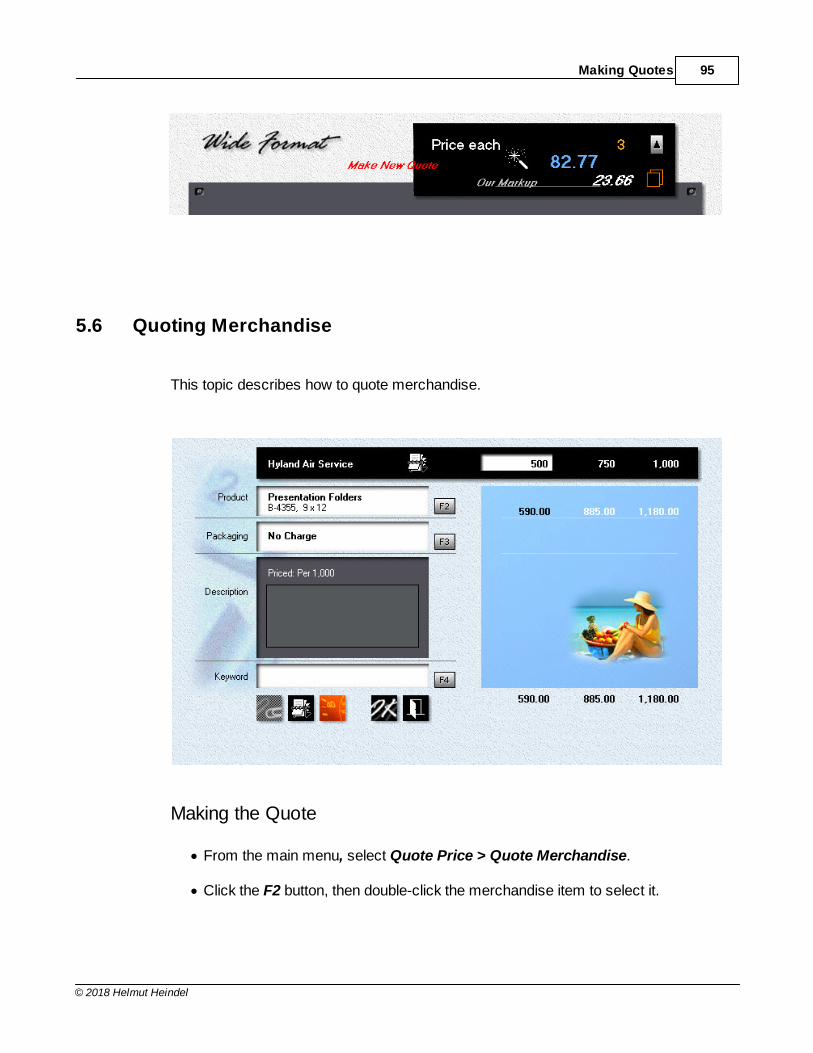
Making Quotes 95
© 2018 Helmut Heindel
5.6 Quoting Merchandise
This topic describes how to quote merchandise.
Making the Quote
· From the main menu, select Quote Price > Quote Merchandise.
· Click the F2 button, then double-click the merchandise item to select it.
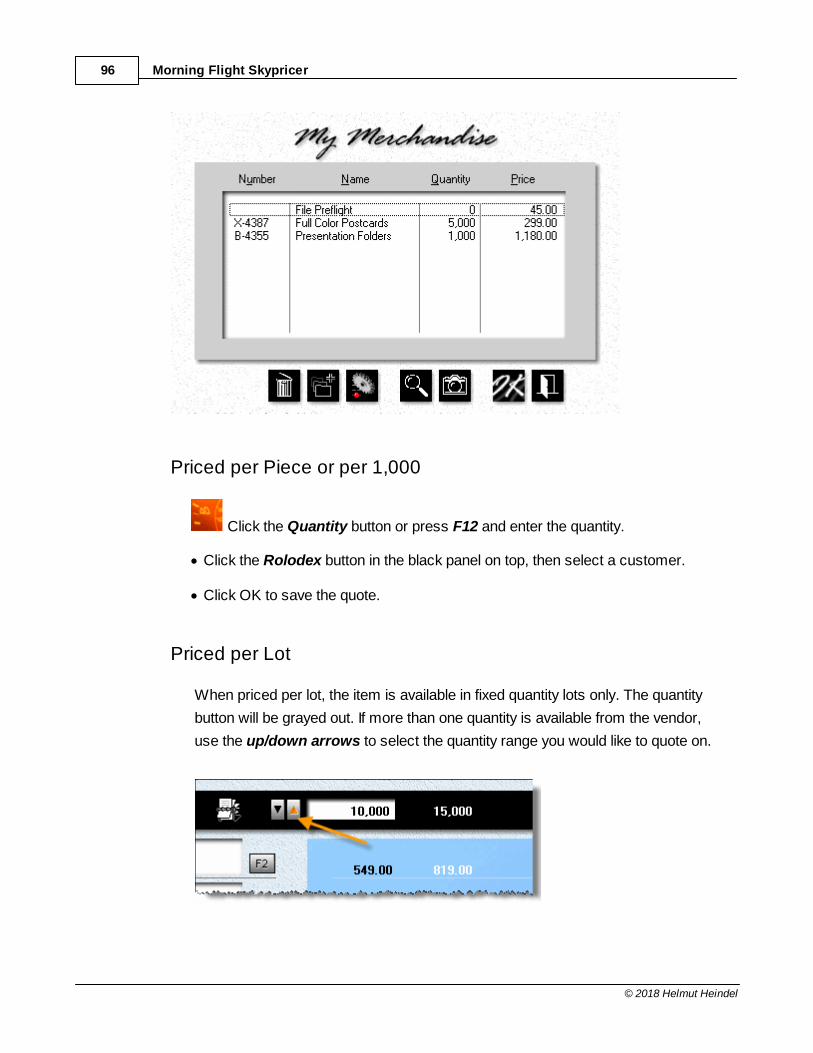
Morning Flight Skypricer96
© 2018 Helmut Heindel
Priced per Piece or per 1,000
Click the Quantity button or press F12 and enter the quantity.
· Click the Rolodex button in the black panel on top, then select a customer.
· Click OK to save the quote.
Priced per Lot
When priced per lot, the item is available in fixed quantity lots only. The quantity
button will be grayed out. If more than one quantity is available from the vendor,
use the up/down arrows to select the quantity range you would like to quote on.
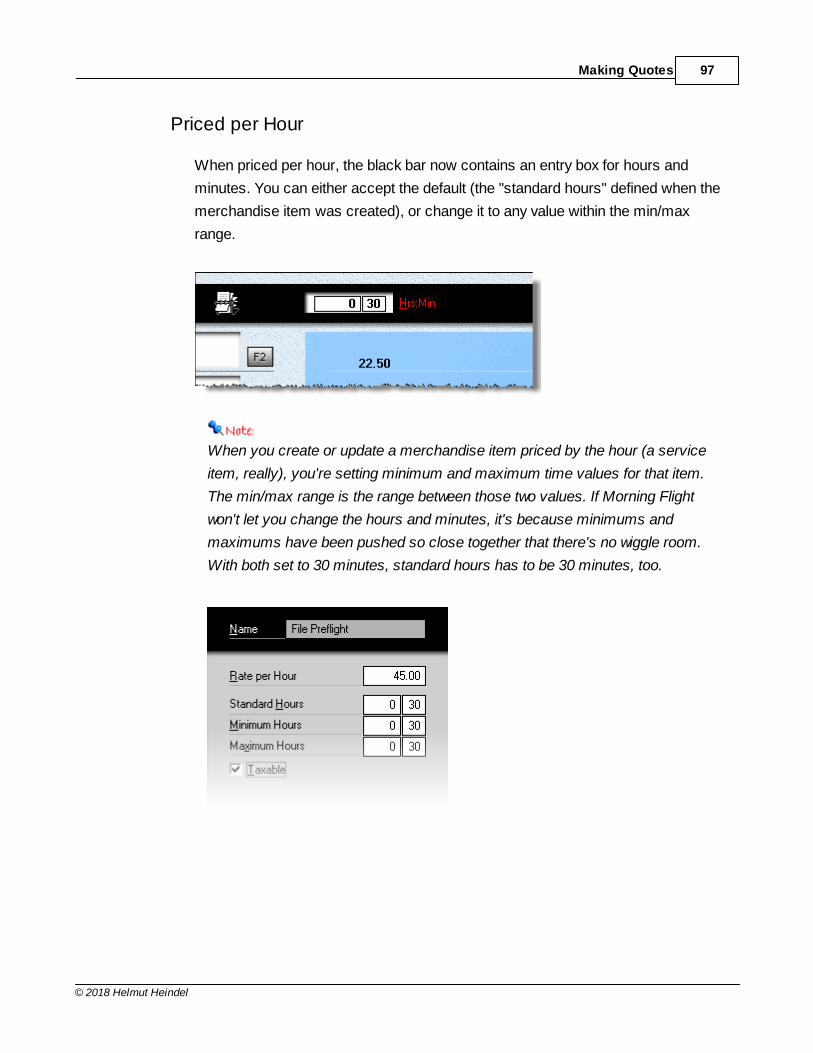
Making Quotes 97
© 2018 Helmut Heindel
Priced per Hour
When priced per hour, the black bar now contains an entry box for hours and
minutes. You can either accept the default (the "standard hours" defined when the
merchandise item was created), or change it to any value within the min/max
range.
When you create or update a merchandise item priced by the hour (a service
item, really), you're setting minimum and maximum time values for that item.
The min/max range is the range between those two values. If Morning Flight
won't let you change the hours and minutes, it's because minimums and
maximums have been pushed so close together that there's no wiggle room.
With both set to 30 minutes, standard hours has to be 30 minutes, too.
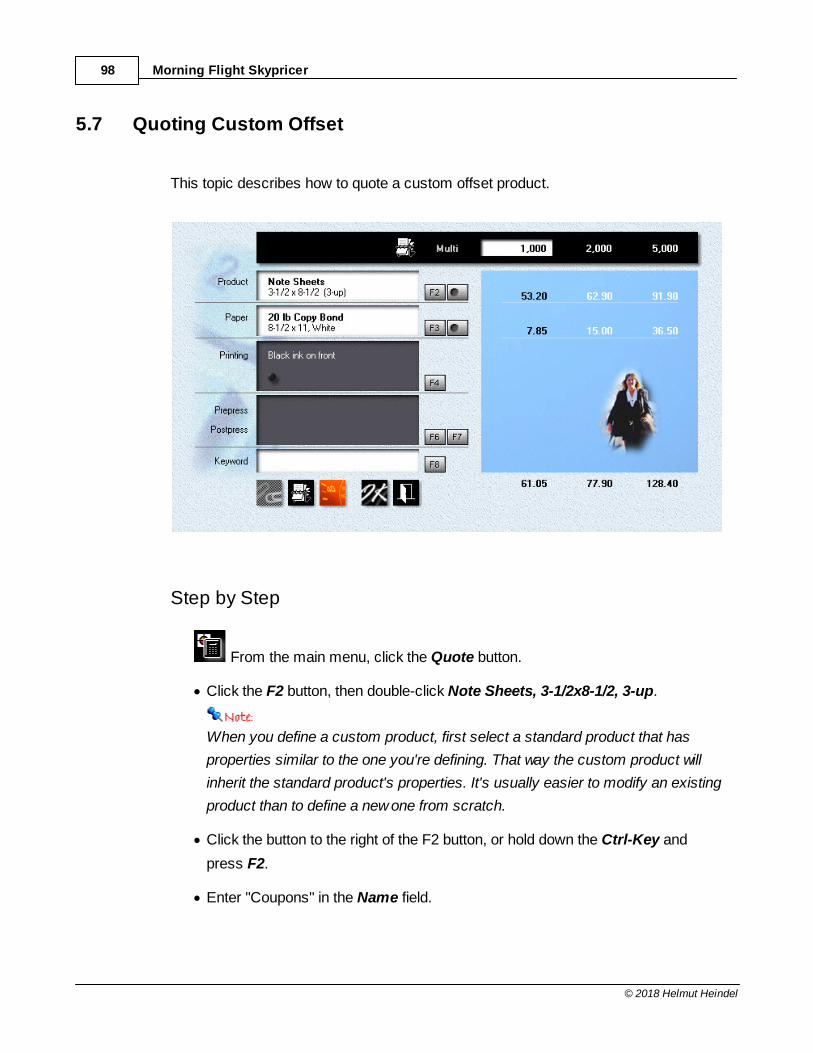
Morning Flight Skypricer98
© 2018 Helmut Heindel
5.7 Quoting Custom Offset
This topic describes how to quote a custom offset product.
Step by Step
From the main menu, click the Quote button.
· Click the F2 button, then double-click Note Sheets, 3-1/2x8-1/2, 3-up.
When you define a custom product, first select a standard product that has
properties similar to the one you're defining. That way the custom product will
inherit the standard product's properties. It's usually easier to modify an existing
product than to define a new one from scratch.
· Click the button to the right of the F2 button, or hold down the Ctrl-Key and
press F2.
· Enter "Coupons" in the Name field.
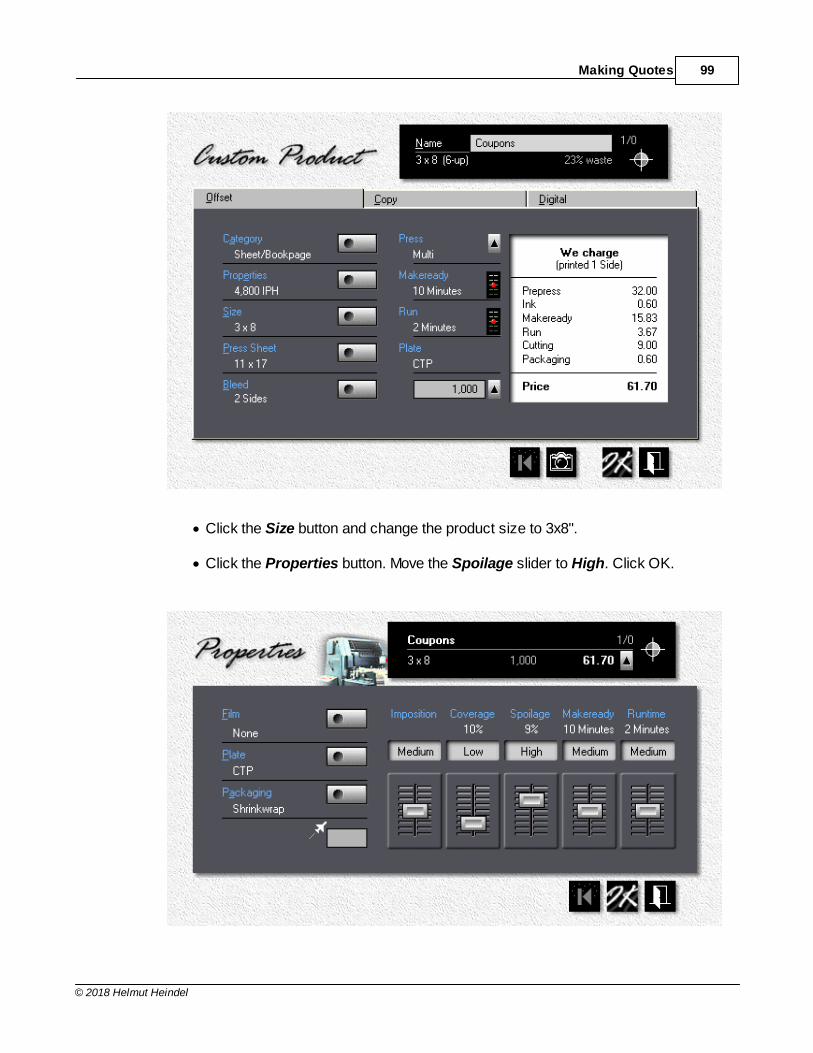
Making Quotes 99
© 2018 Helmut Heindel
· Click the Size button and change the product size to 3x8".
· Click the Properties button. Move the Spoilage slider to High. Click OK.
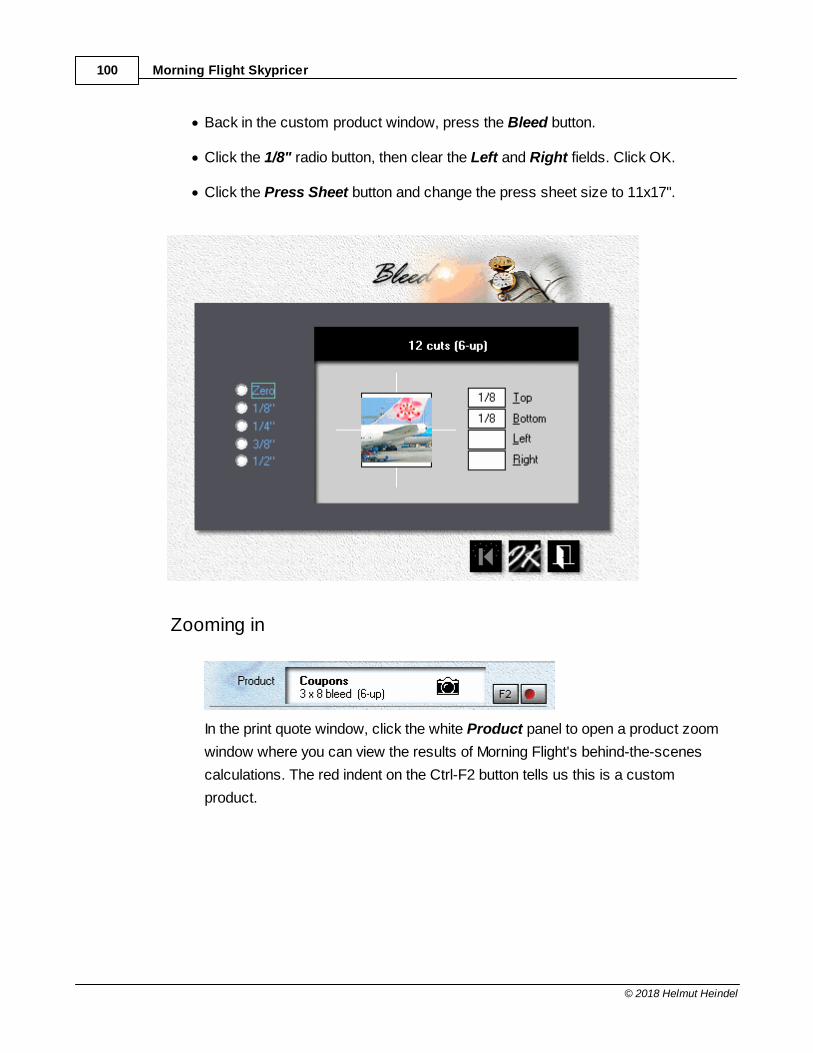
Morning Flight Skypricer100
© 2018 Helmut Heindel
· Back in the custom product window, press the Bleed button.
· Click the 1/8" radio button, then clear the Left and Right fields. Click OK.
· Click the Press Sheet button and change the press sheet size to 11x17".
Zooming in
In the print quote window, click the white Product panel to open a product zoom
window where you can view the results of Morning Flight's behind-the-scenes
calculations. The red indent on the Ctrl-F2 button tells us this is a custom
product.
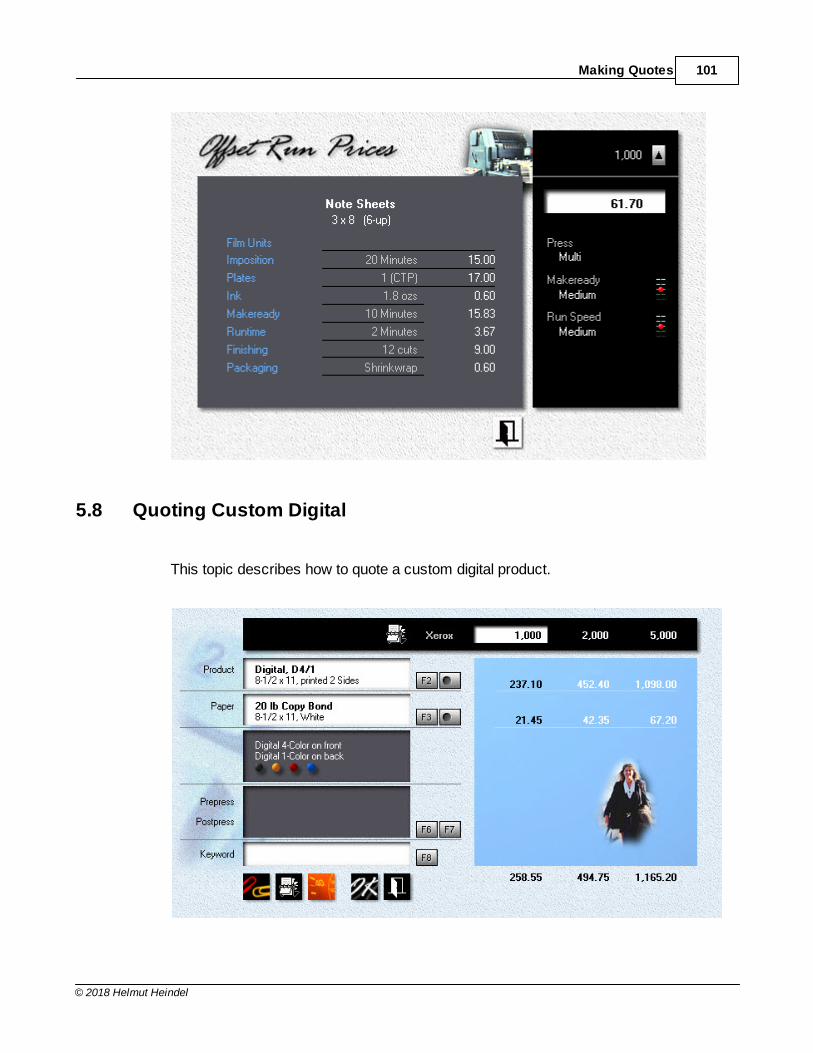
Making Quotes 101
© 2018 Helmut Heindel
5.8 Quoting Custom Digital
This topic describes how to quote a custom digital product.

Morning Flight Skypricer102
© 2018 Helmut Heindel
Step by Step
From the main menu, click the Quote button.
· Click the F2 button.
· Click Digital in the black panel on the right, then double-click Digital, D4/1, 8-
1/2x11.
· Click the button to the right of the F2 button, or hold down the Ctrl-Key and
press F2.
· Enter "Bestbuy Mailers" in the Name field.
· Click the small button in the black panel (pointed to by the arrow) to change the
run configuration from 4/1 to 4/4, from four-color on the front, black on the back,
to four-color front and back.
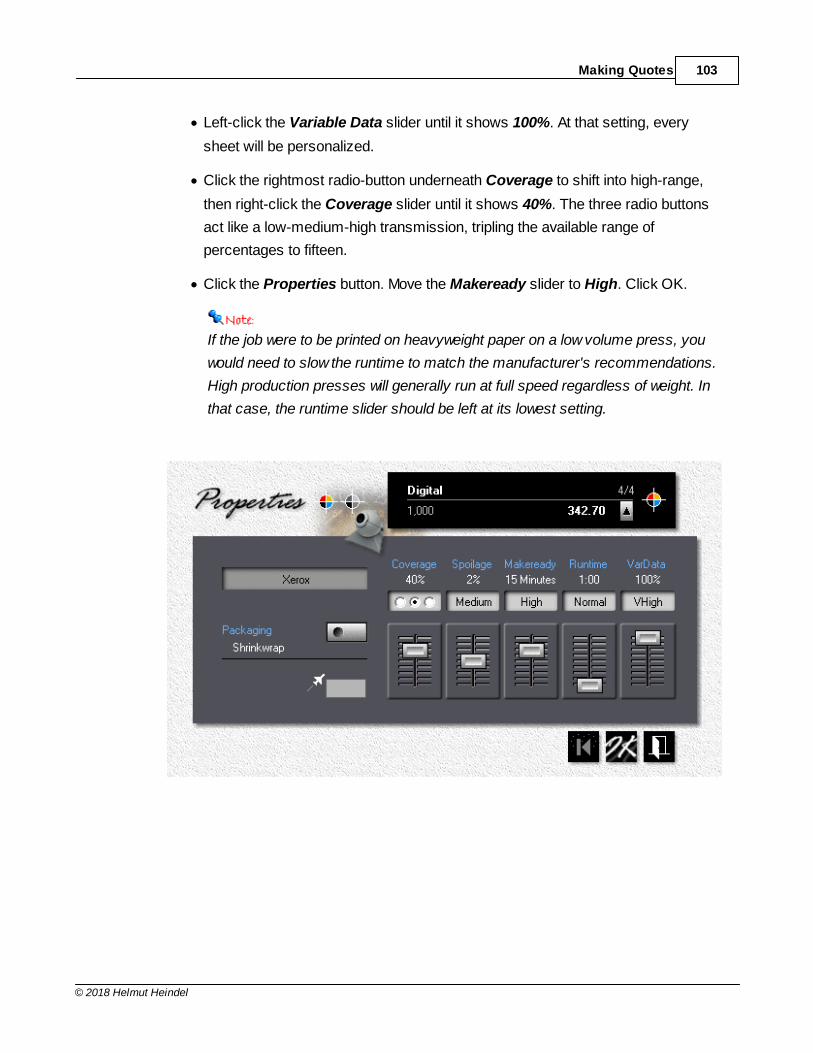
Making Quotes 103
© 2018 Helmut Heindel
· Left-click the Variable Data slider until it shows 100%. At that setting, every
sheet will be personalized.
· Click the rightmost radio-button underneath Coverage to shift into high-range,
then right-click the Coverage slider until it shows 40%. The three radio buttons
act like a low-medium-high transmission, tripling the available range of
percentages to fifteen.
· Click the Properties button. Move the Makeready slider to High. Click OK.
If the job were to be printed on heavyweight paper on a low volume press, you
would need to slow the runtime to match the manufacturer's recommendations.
High production presses will generally run at full speed regardless of weight. In
that case, the runtime slider should be left at its lowest setting.
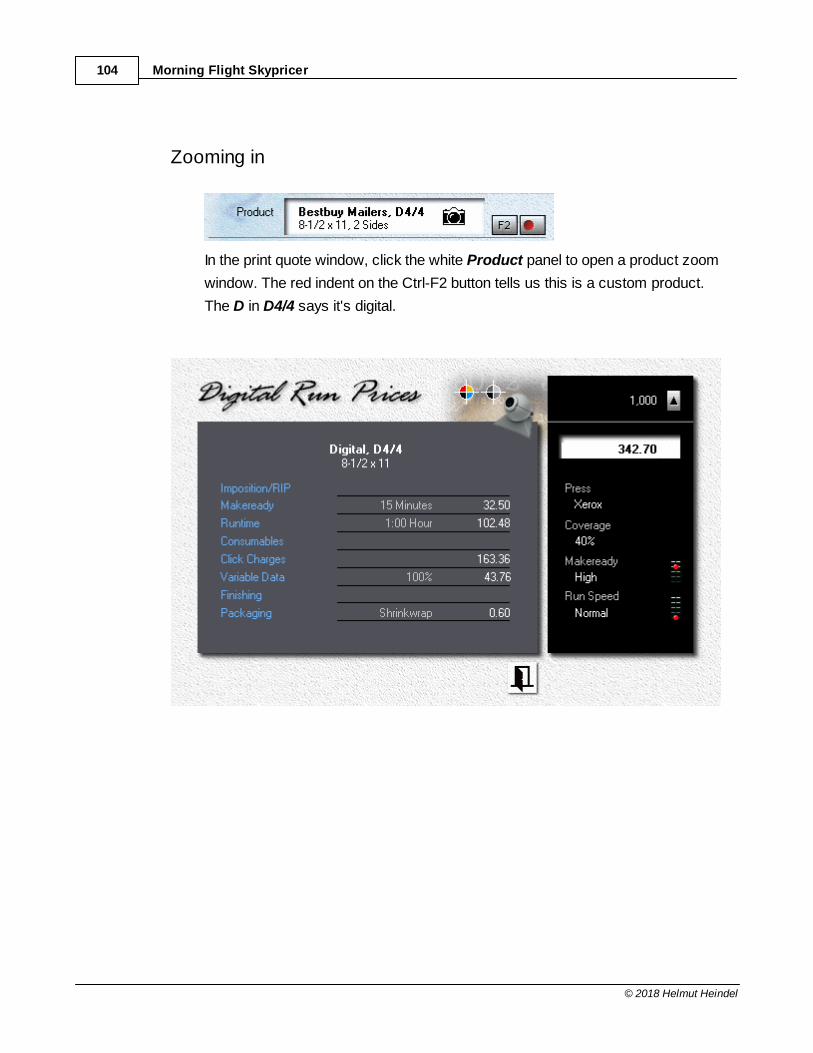
Morning Flight Skypricer104
© 2018 Helmut Heindel
Zooming in
In the print quote window, click the white Product panel to open a product zoom
window. The red indent on the Ctrl-F2 button tells us this is a custom product.
The D in D4/4 says it's digital.
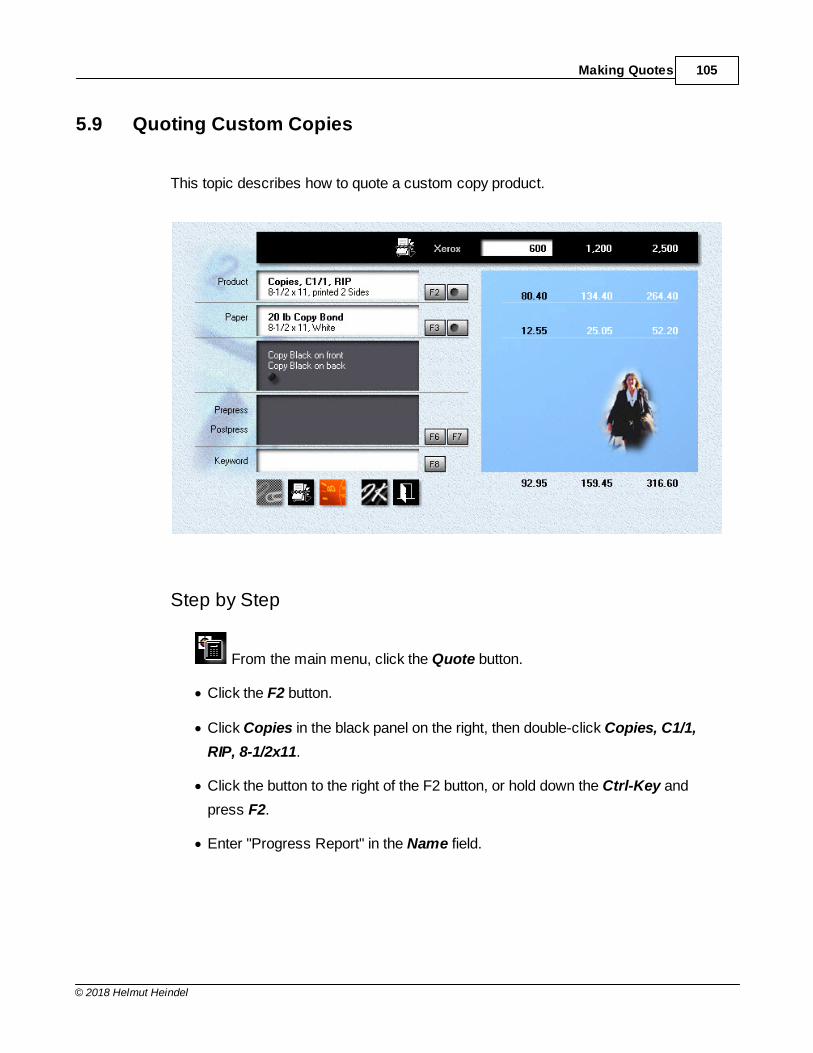
Making Quotes 105
© 2018 Helmut Heindel
5.9 Quoting Custom Copies
This topic describes how to quote a custom copy product.
Step by Step
From the main menu, click the Quote button.
· Click the F2 button.
· Click Copies in the black panel on the right, then double-click Copies, C1/1,
RIP, 8-1/2x11.
· Click the button to the right of the F2 button, or hold down the Ctrl-Key and
press F2.
· Enter "Progress Report" in the Name field.
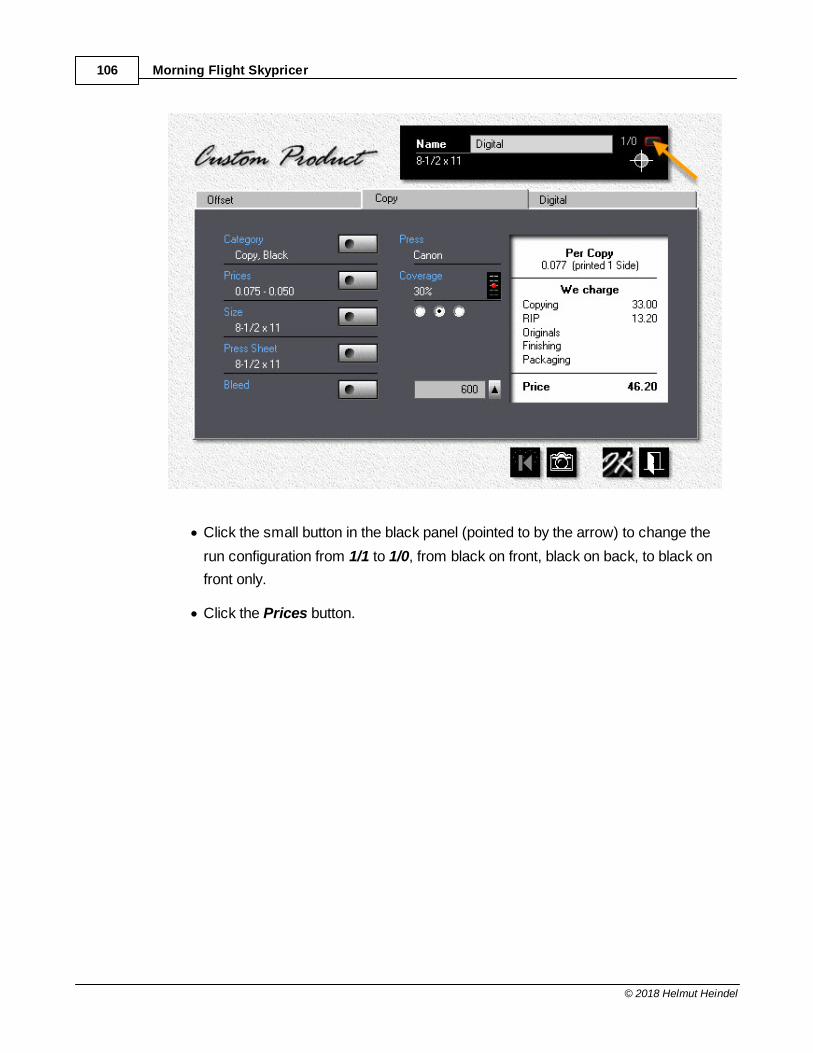
Morning Flight Skypricer106
© 2018 Helmut Heindel
· Click the small button in the black panel (pointed to by the arrow) to change the
run configuration from 1/1 to 1/0, from black on front, black on back, to black on
front only.
· Click the Prices button.
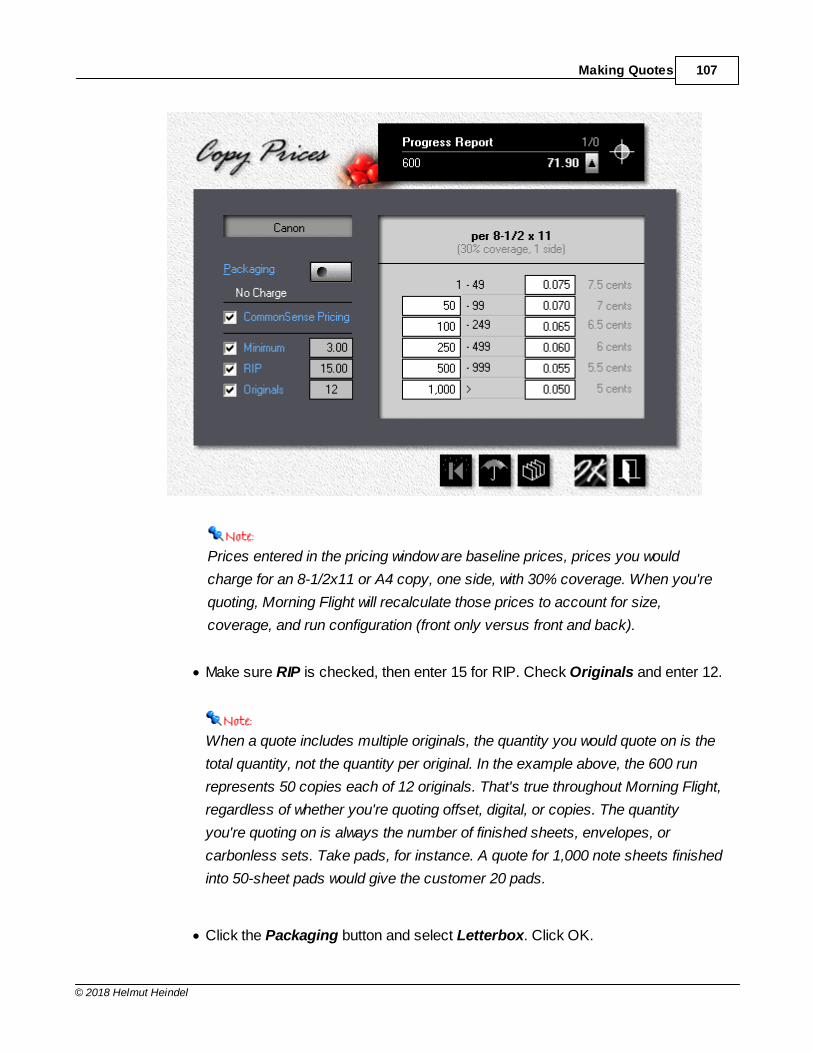
Making Quotes 107
© 2018 Helmut Heindel
Prices entered in the pricing window are baseline prices, prices you would
charge for an 8-1/2x11 or A4 copy, one side, with 30% coverage. When you're
quoting, Morning Flight will recalculate those prices to account for size,
coverage, and run configuration (front only versus front and back).
· Make sure RIP is checked, then enter 15 for RIP. Check Originals and enter 12.
When a quote includes multiple originals, the quantity you would quote on is the
total quantity, not the quantity per original. In the example above, the 600 run
represents 50 copies each of 12 originals. That's true throughout Morning Flight,
regardless of whether you're quoting offset, digital, or copies. The quantity
you're quoting on is always the number of finished sheets, envelopes, or
carbonless sets. Take pads, for instance. A quote for 1,000 note sheets finished
into 50-sheet pads would give the customer 20 pads.
· Click the Packaging button and select Letterbox. Click OK.
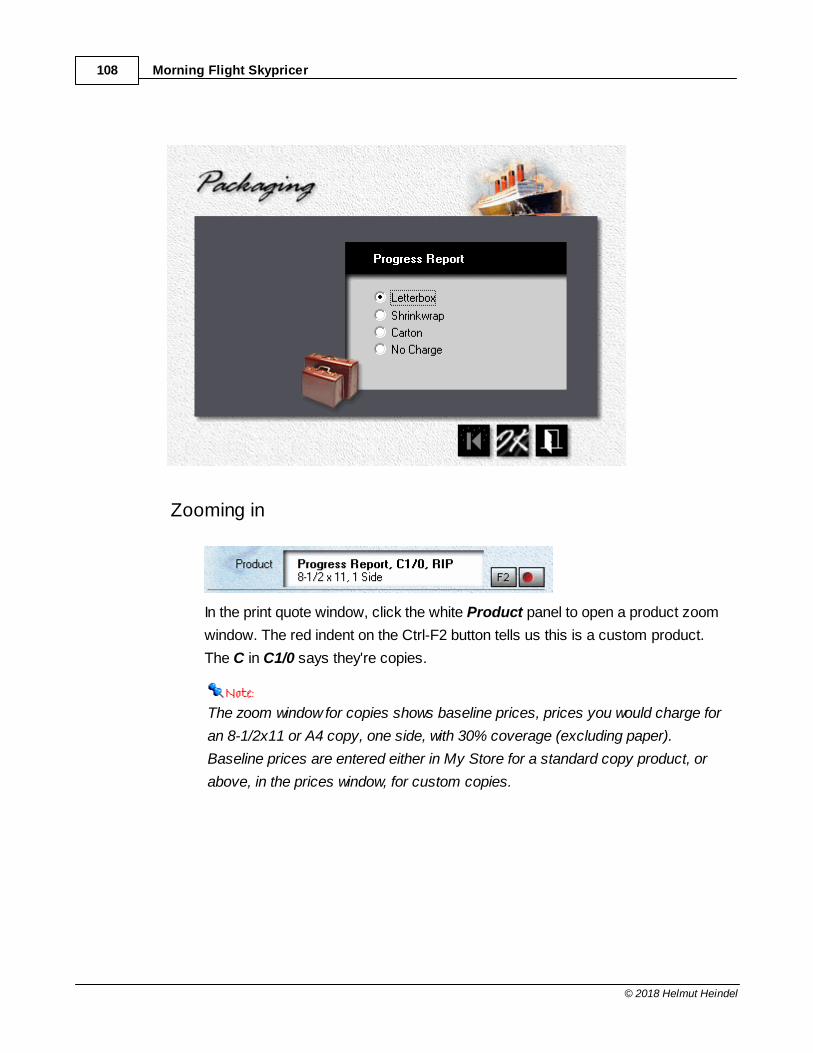
Morning Flight Skypricer108
© 2018 Helmut Heindel
Zooming in
In the print quote window, click the white Product panel to open a product zoom
window. The red indent on the Ctrl-F2 button tells us this is a custom product.
The C in C1/0 says they're copies.
The zoom window for copies shows baseline prices, prices you would charge for
an 8-1/2x11 or A4 copy, one side, with 30% coverage (excluding paper).
Baseline prices are entered either in My Store for a standard copy product, or
above, in the prices window, for custom copies.
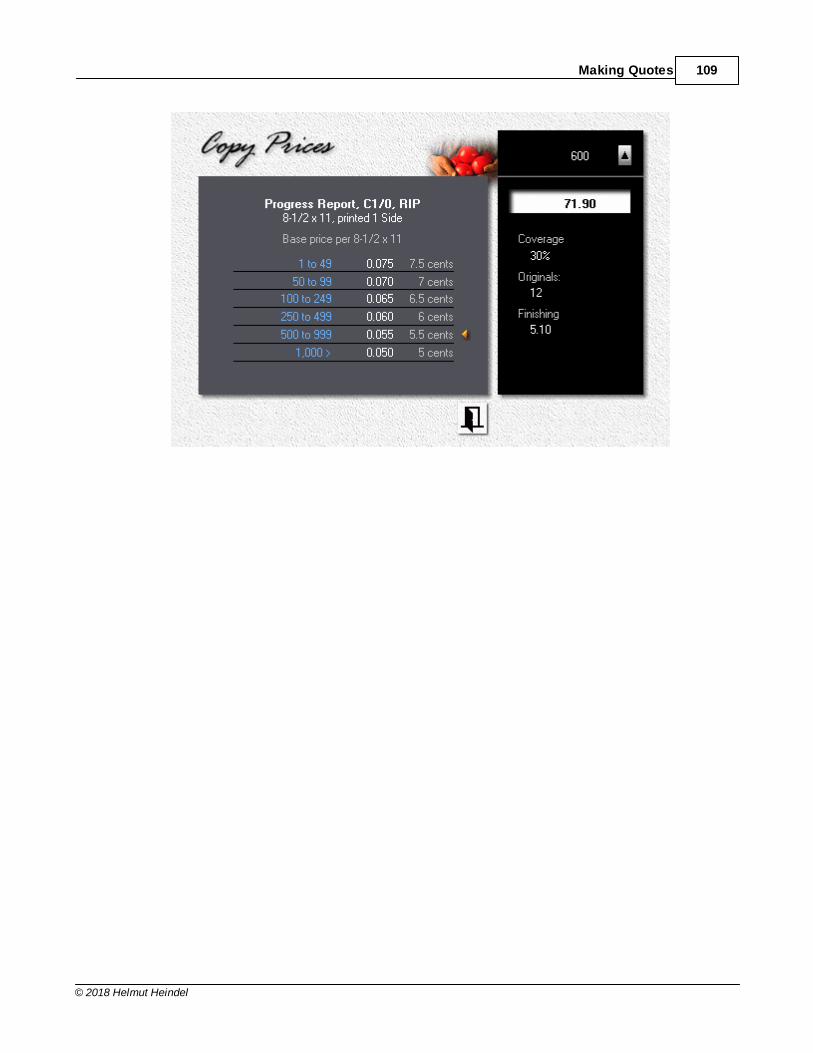
Making Quotes 109
© 2018 Helmut Heindel
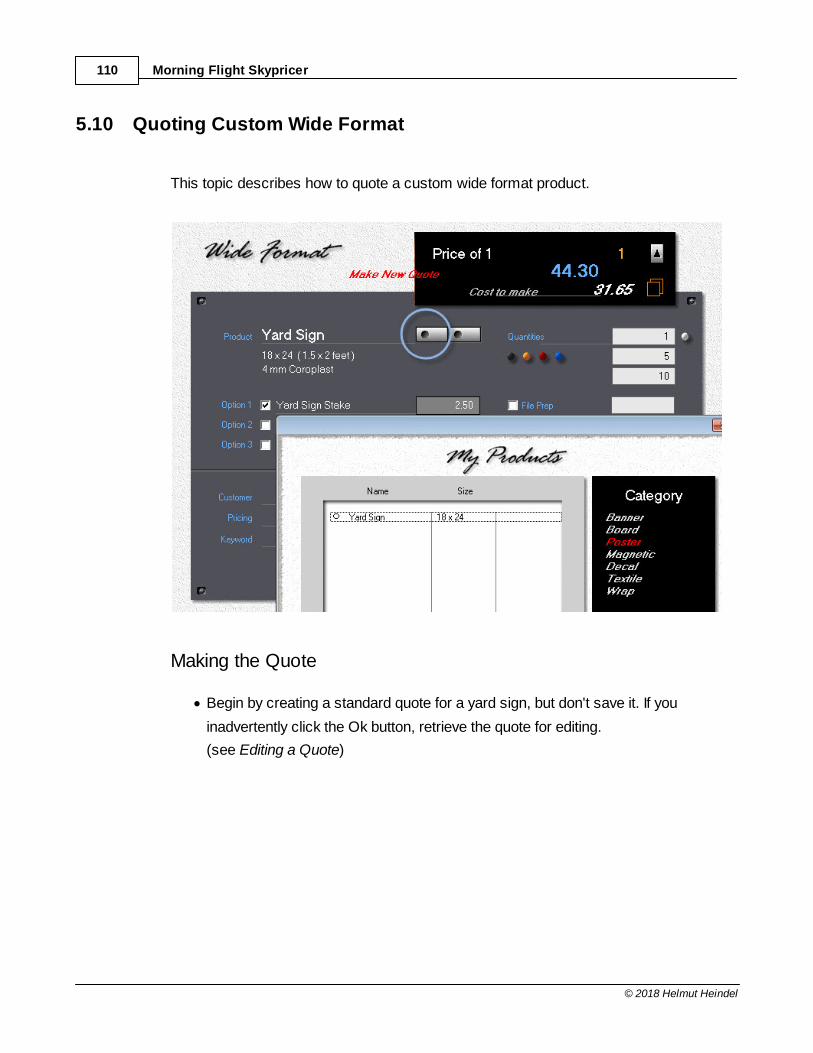
Morning Flight Skypricer110
© 2018 Helmut Heindel
5.10 Quoting Custom Wide Format
This topic describes how to quote a custom wide format product.
Making the Quote
· Begin by creating a standard quote for a yard sign, but don't save it. If you
inadvertently click the Ok button, retrieve the quote for editing.
(see Editing a Quote)
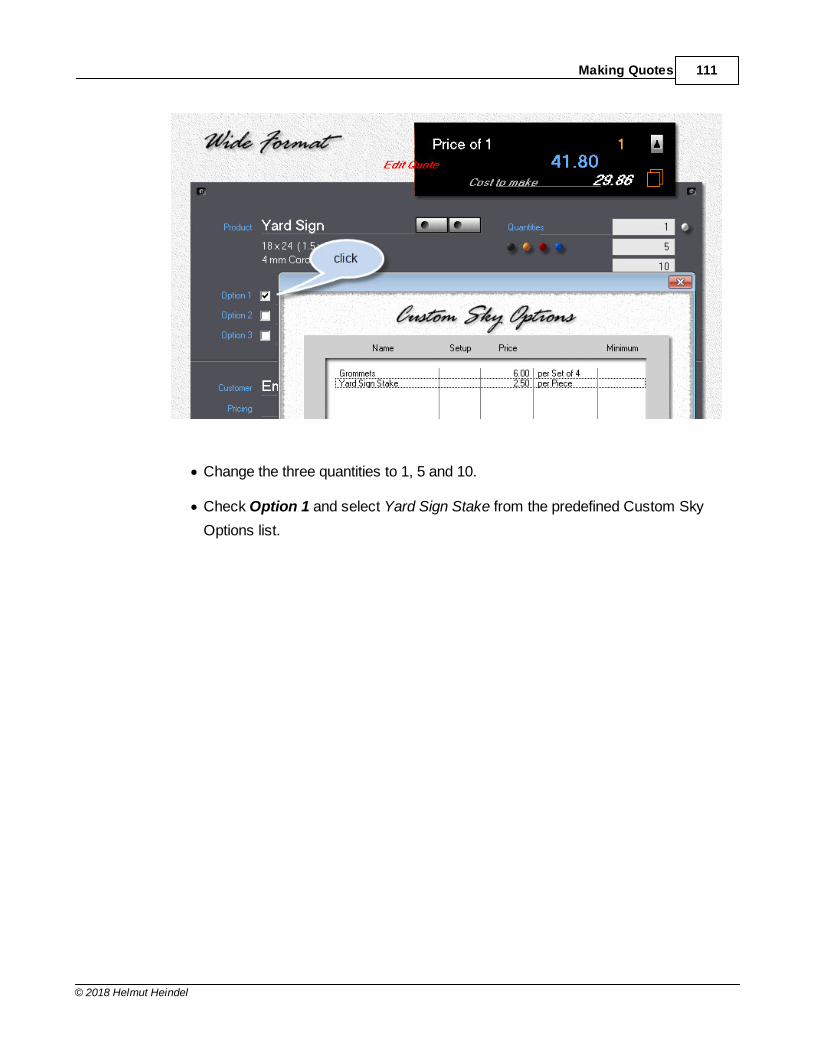
Making Quotes 111
© 2018 Helmut Heindel
· Change the three quantities to 1, 5 and 10.
· Check Option 1 and select Yard Sign Stake from the predefined Custom Sky
Options list.
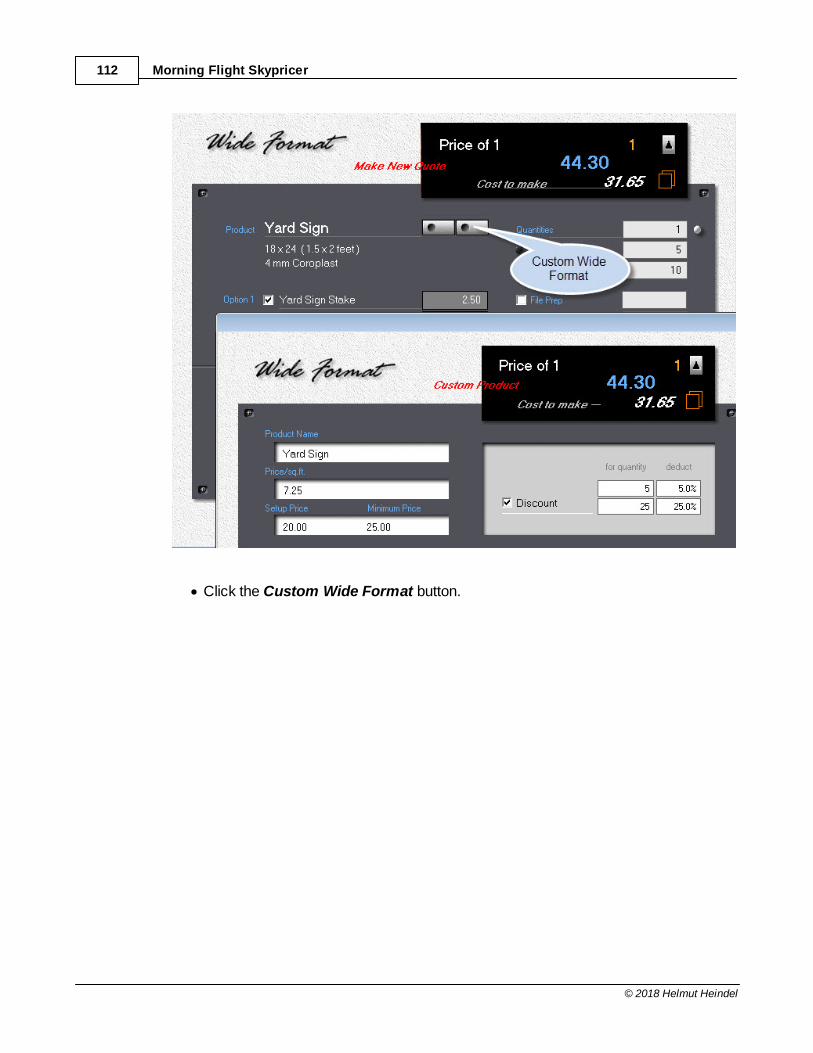
Morning Flight Skypricer112
© 2018 Helmut Heindel
· Click the Custom Wide Format button.
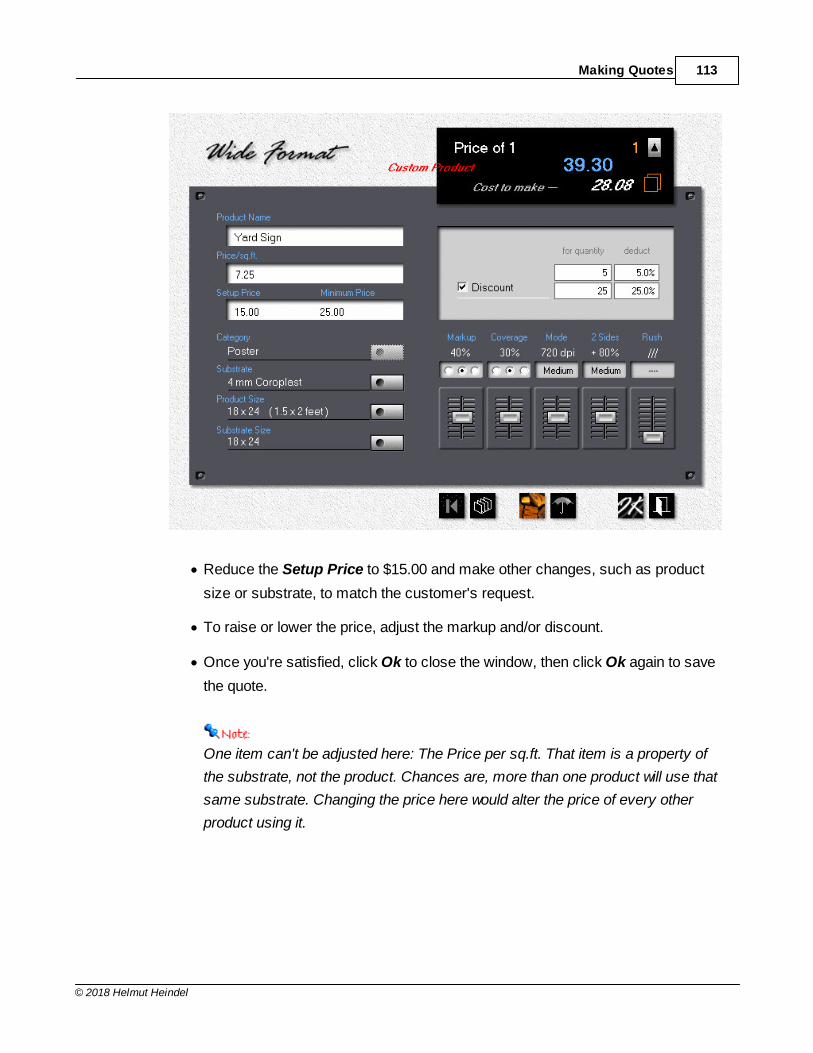
Making Quotes 113
© 2018 Helmut Heindel
· Reduce the Setup Price to $15.00 and make other changes, such as product
size or substrate, to match the customer's request.
· To raise or lower the price, adjust the markup and/or discount.
· Once you're satisfied, click Ok to close the window, then click Ok again to save
the quote.
One item can't be adjusted here: The Price per sq.ft. That item is a property of
the substrate, not the product. Chances are, more than one product will use that
same substrate. Changing the price here would alter the price of every other
product using it.
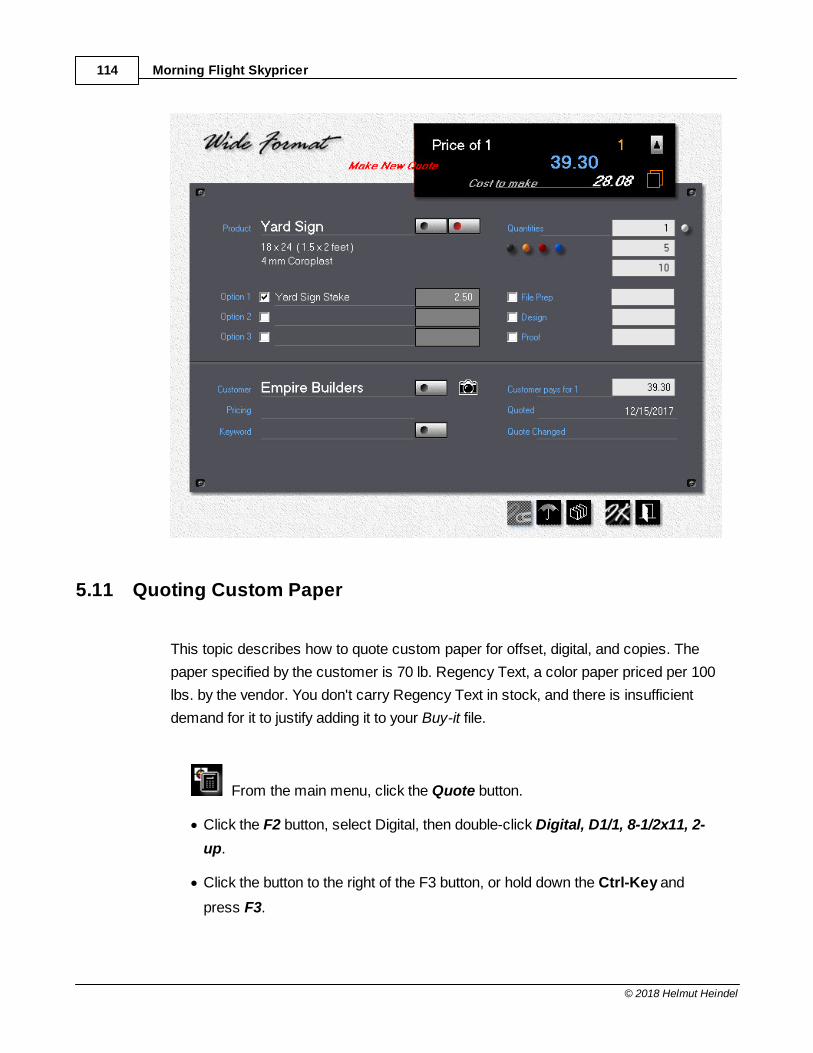
Morning Flight Skypricer114
© 2018 Helmut Heindel
5.11 Quoting Custom Paper
This topic describes how to quote custom paper for offset, digital, and copies. The
paper specified by the customer is 70 lb. Regency Text, a color paper priced per 100
lbs. by the vendor. You don't carry Regency Text in stock, and there is insufficient
demand for it to justify adding it to your Buy-it file.
From the main menu, click the Quote button.
· Click the F2 button, select Digital, then double-click Digital, D1/1, 8-1/2x11, 2-
up.
· Click the button to the right of the F3 button, or hold down the Ctrl-Key and
press F3.

Making Quotes 115
© 2018 Helmut Heindel
· Enter "Regency Text" in the Name field.
· Click the small button in the black panel (the one pointed to by the arrow) to
change per 1,000 to per 100 lbs. Or, click on "We pay per ..." in the light gray
panel.
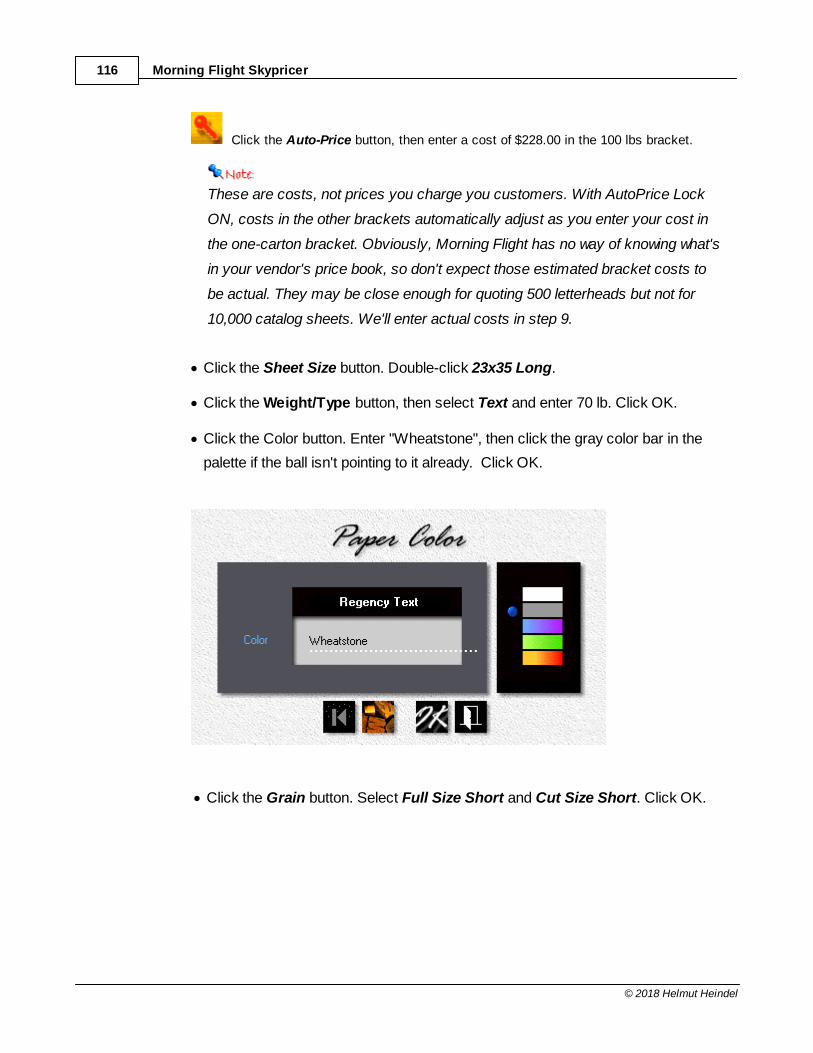
Morning Flight Skypricer116
© 2018 Helmut Heindel
Click the Auto-Price button, then enter a cost of $228.00 in the 100 lbs bracket.
These are costs, not prices you charge you customers. With AutoPrice Lock
ON, costs in the other brackets automatically adjust as you enter your cost in
the one-carton bracket. Obviously, Morning Flight has no way of knowing what's
in your vendor's price book, so don't expect those estimated bracket costs to
be actual. They may be close enough for quoting 500 letterheads but not for
10,000 catalog sheets. We'll enter actual costs in step 9.
· Click the Sheet Size button. Double-click 23x35 Long.
· Click the Weight/Type button, then select Text and enter 70 lb. Click OK.
· Click the Color button. Enter "Wheatstone", then click the gray color bar in the
palette if the ball isn't pointing to it already. Click OK.
· Click the Grain button. Select Full Size Short and Cut Size Short. Click OK.
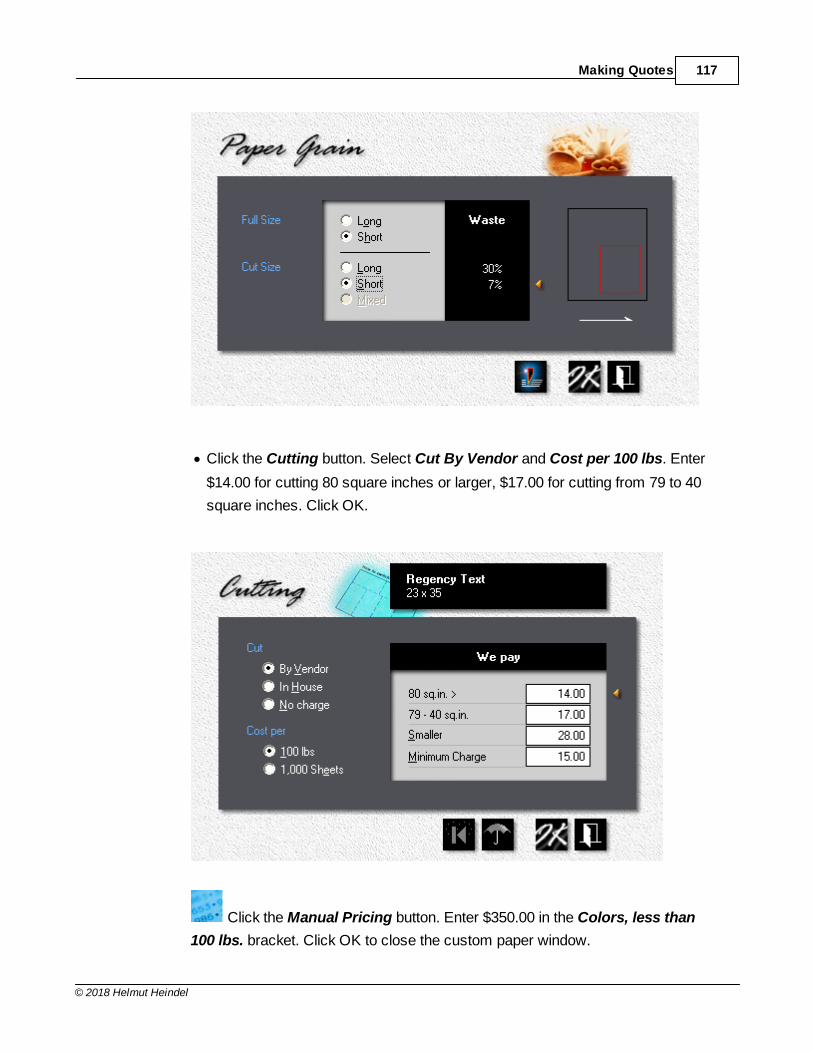
Making Quotes 117
© 2018 Helmut Heindel
· Click the Cutting button. Select Cut By Vendor and Cost per 100 lbs. Enter
$14.00 for cutting 80 square inches or larger, $17.00 for cutting from 79 to 40
square inches. Click OK.
Click the Manual Pricing button. Enter $350.00 in the Colors, less than
100 lbs. bracket. Click OK to close the custom paper window.
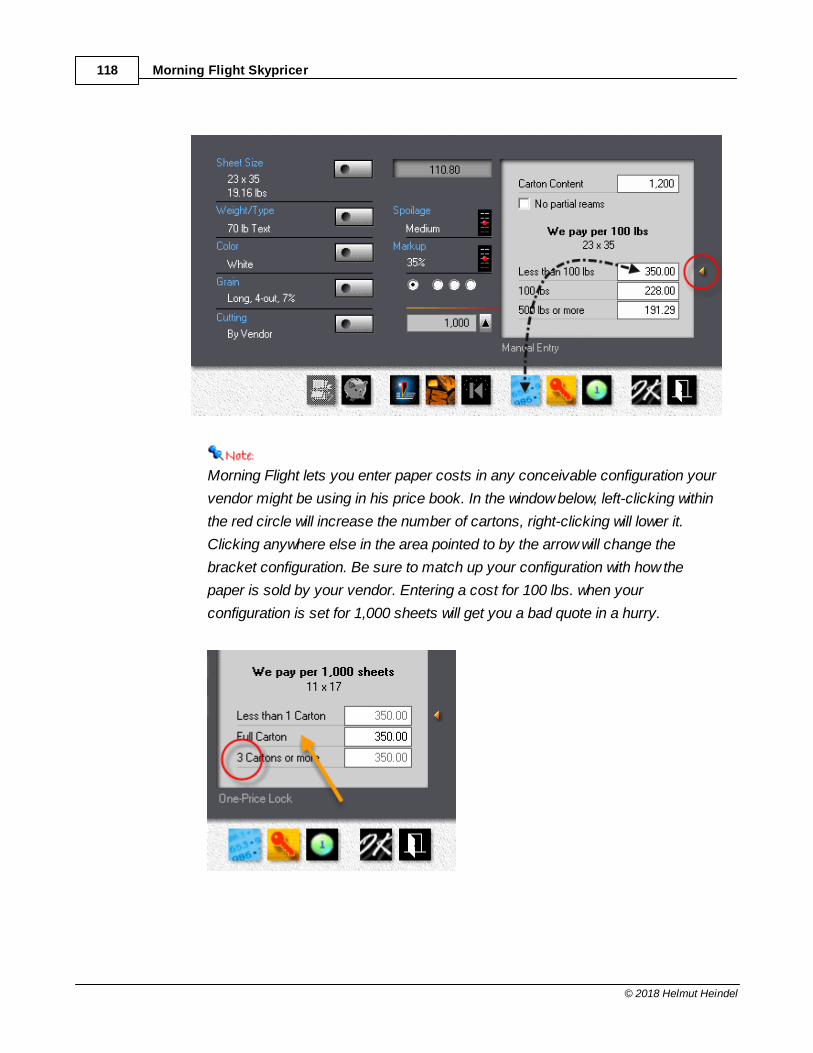
Morning Flight Skypricer118
© 2018 Helmut Heindel
Morning Flight lets you enter paper costs in any conceivable configuration your
vendor might be using in his price book. In the window below, left-clicking within
the red circle will increase the number of cartons, right-clicking will lower it.
Clicking anywhere else in the area pointed to by the arrow will change the
bracket configuration. Be sure to match up your configuration with how the
paper is sold by your vendor. Entering a cost for 100 lbs. when your
configuration is set for 1,000 sheets will get you a bad quote in a hurry.
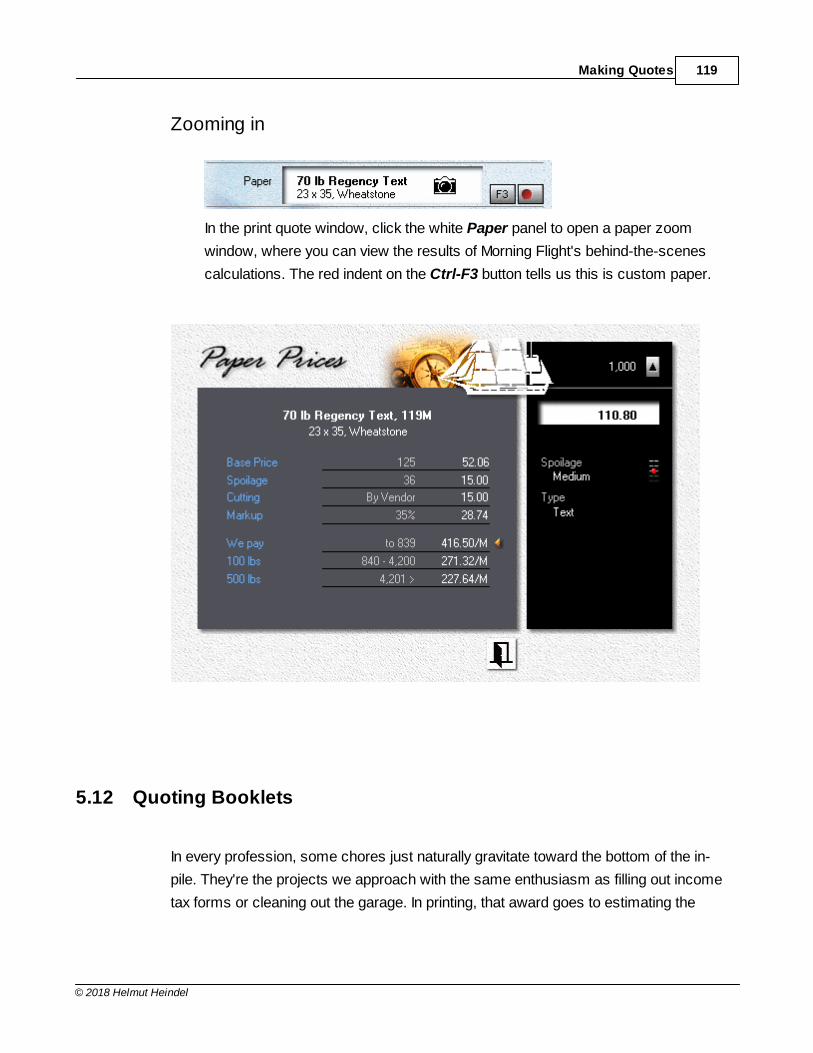
Making Quotes 119
© 2018 Helmut Heindel
Zooming in
In the print quote window, click the white Paper panel to open a paper zoom
window, where you can view the results of Morning Flight's behind-the-scenes
calculations. The red indent on the Ctrl-F3 button tells us this is custom paper.
5.12 Quoting Booklets
In every profession, some chores just naturally gravitate toward the bottom of the in-
pile. They're the projects we approach with the same enthusiasm as filling out income
tax forms or cleaning out the garage. In printing, that award goes to estimating the
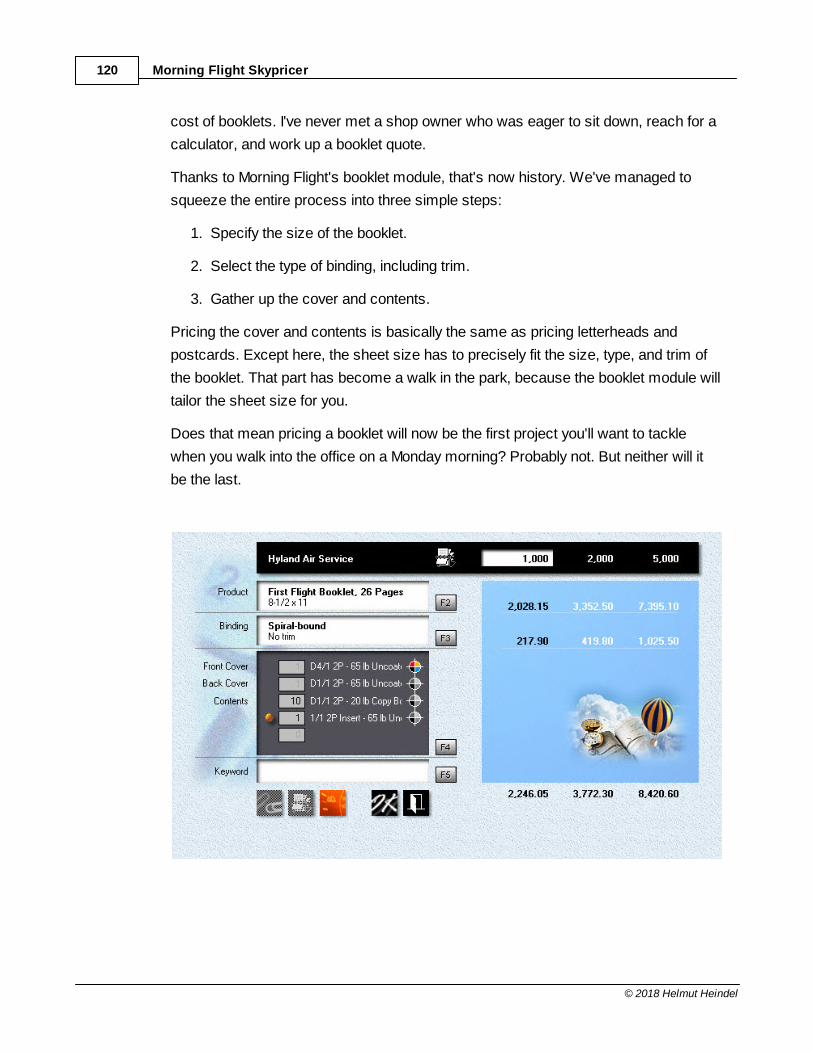
Morning Flight Skypricer120
© 2018 Helmut Heindel
cost of booklets. I've never met a shop owner who was eager to sit down, reach for a
calculator, and work up a booklet quote.
Thanks to Morning Flight's booklet module, that's now history. We've managed to
squeeze the entire process into three simple steps:
1. Specify the size of the booklet.
2. Select the type of binding, including trim.
3. Gather up the cover and contents.
Pricing the cover and contents is basically the same as pricing letterheads and
postcards. Except here, the sheet size has to precisely fit the size, type, and trim of
the booklet. That part has become a walk in the park, because the booklet module will
tailor the sheet size for you.
Does that mean pricing a booklet will now be the first project you'll want to tackle
when you walk into the office on a Monday morning? Probably not. But neither will it
be the last.
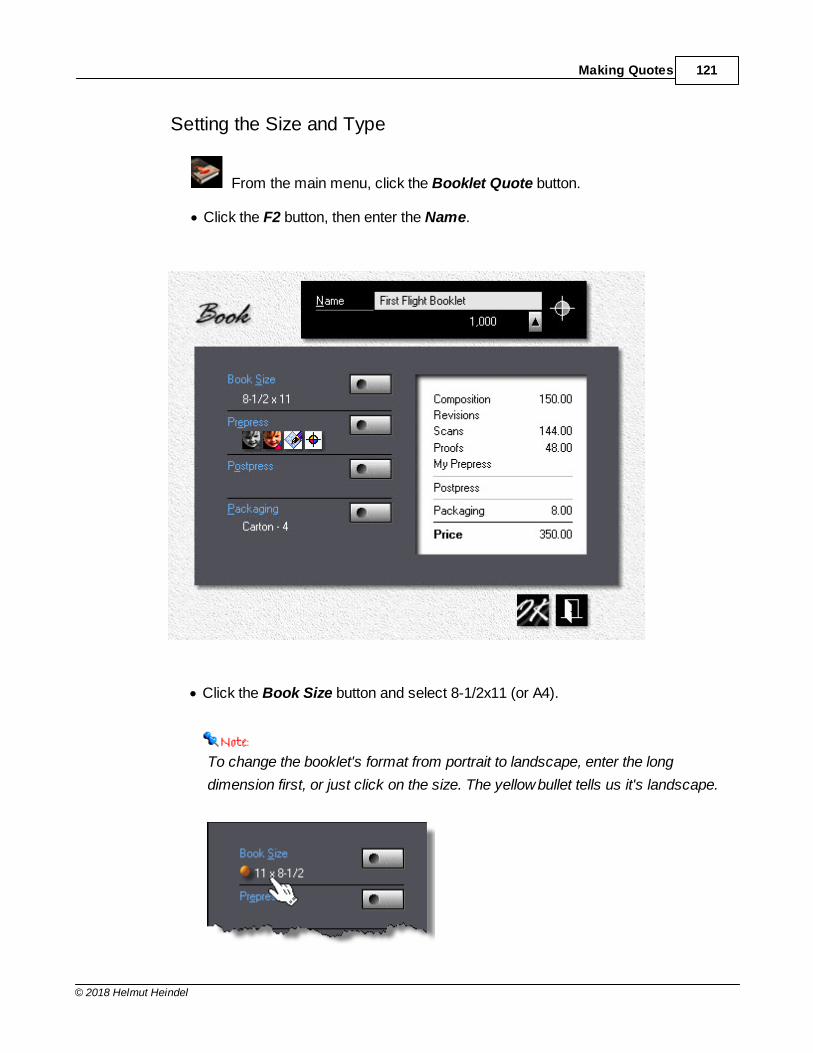
Making Quotes 121
© 2018 Helmut Heindel
Setting the Size and Type
From the main menu, click the Booklet Quote button.
· Click the F2 button, then enter the Name.
· Click the Book Size button and select 8-1/2x11 (or A4).
To change the booklet's format from portrait to landscape, enter the long
dimension first, or just click on the size. The yellow bullet tells us it's landscape.
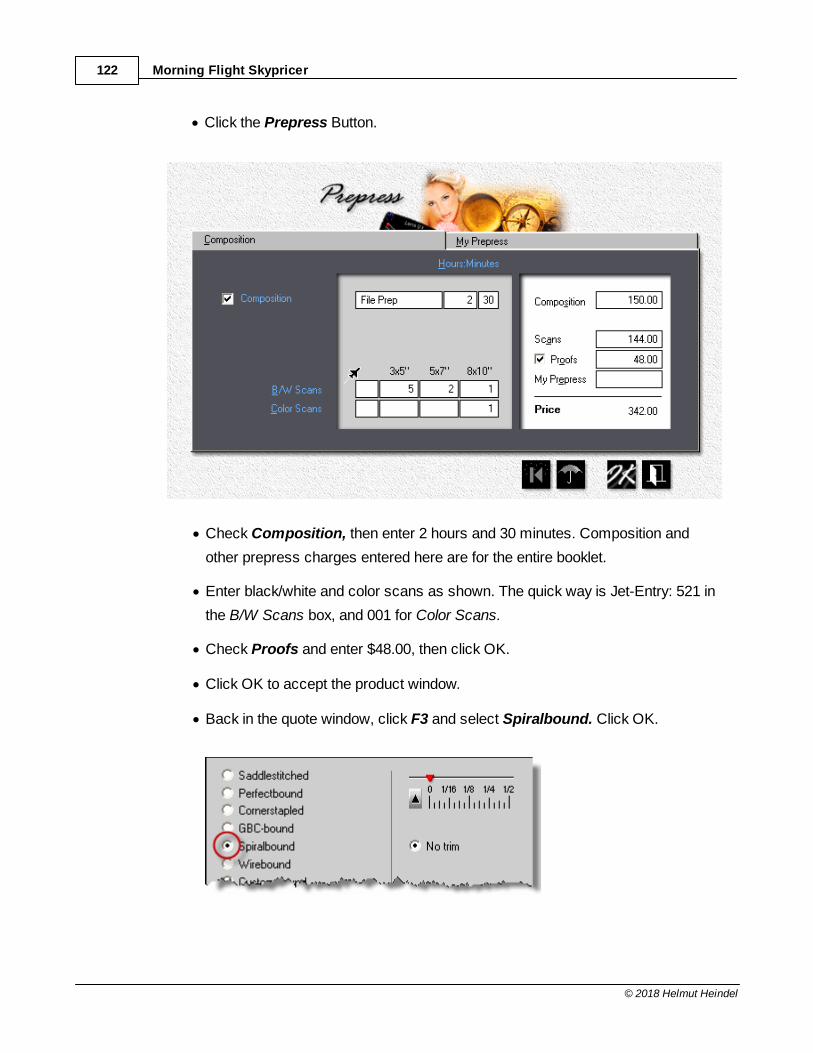
Morning Flight Skypricer122
© 2018 Helmut Heindel
· Click the Prepress Button.
· Check Composition, then enter 2 hours and 30 minutes. Composition and
other prepress charges entered here are for the entire booklet.
· Enter black/white and color scans as shown. The quick way is Jet-Entry: 521 in
the B/W Scans box, and 001 for Color Scans.
· Check Proofs and enter $48.00, then click OK.
· Click OK to accept the product window.
· Back in the quote window, click F3 and select Spiralbound. Click OK.
Making Quotes 123
© 2018 Helmut Heindel
Entering the Covers
Booklet covers fall into two categories: Folded covers for staddlestitched and perfect
bound booklets, and flat covers for everything else. Regardless of type, the size of the
cover is tied to the size of the booklet, so that's not something the program will let you
change. What you can do, with folded covers, is print them 2-up by enlarging the
press sheet. That will affect the price and press run, though not the page count. It's
unlikely you'd want to wrap any booklet into more than one set of covers.
Flat covers, the type used for spiral, wire, and GBC bound booklets, are different.
Here, when you make the press sheet big enough for a 2-up run, the program
assumes you're going to cut the front and back covers out of the same press sheet.
Consequently, the entry box for the back cover goes away, along with any back cover
specs you may have entered.
· In the quote window, click F4.
· Check Front Cover, then enter any configuration suitable for a booklet cover.
· Check Back Cover, and enter the configuration for that.
Assembling the Contents
Each booklet can have up to three different containers for book pages. Let's assume
most of the pages are printed in black ink. Those pages will all go into our first
container. Color pages go into the second. And a reply card, an insert, gets dropped
into the third. Just so you know, the sequence doesn't really matter.
· Check Contents 1, then enter the configuration for inside pages printed in black
ink.
· Check Contents 2, and enter the configuration for inside pages printed in color.
Let's make the press sheet size twice the size of the product so the signature
will print 2-up.
· Click OK to close the window.
· Back in the quote window, you'll find entry boxes for each container. Enter 10 in
the first box for Contents, 2 in the second. Those numbers tell the program how
many signatures we're putting into each container. More specifically, how many
Morning Flight Skypricer124
© 2018 Helmut Heindel
1-up, 2-up, or 4-up signatures with the same ink colors, and on the same paper,
we need to print.
Adding an Insert
What's an insert, and how do we enter it? Inserts are reply cards, carbonless forms,
things that don't meet the criteria for a standard book page. You can designate any
container as an insert by checking the white bullet box. Two things happen when you
do that. First, you're now free to pick any size. Second, you're locking in the page
contribution: Four pages for saddlestitched and perfect bound inserts, two pages for
spiral, wire, and GBC. That's different from signatures. There, when you double the
size of the press sheet, you double the page contribution.
Let's assume you're quoting 1,000 saddlestitched booklets, 8-1/2x11. If "Contents 2"
contained 11x17 signatures, those signatures would each contribute four pages.
Increase the signature size to 17x22, and the page contribution for Contents 2
becomes eight (shown as 8P below). Morning Flight will maintain the press-run count
for those signatures at 1,000. Had they been entered as a 2-up insert, the program
would have reduced the press-run count to 500. At 2-up, that would still have given us
1,000 inserts.
· In the quote window, click F4.
· First check a box next to a white bullet, then click the adjacent button.
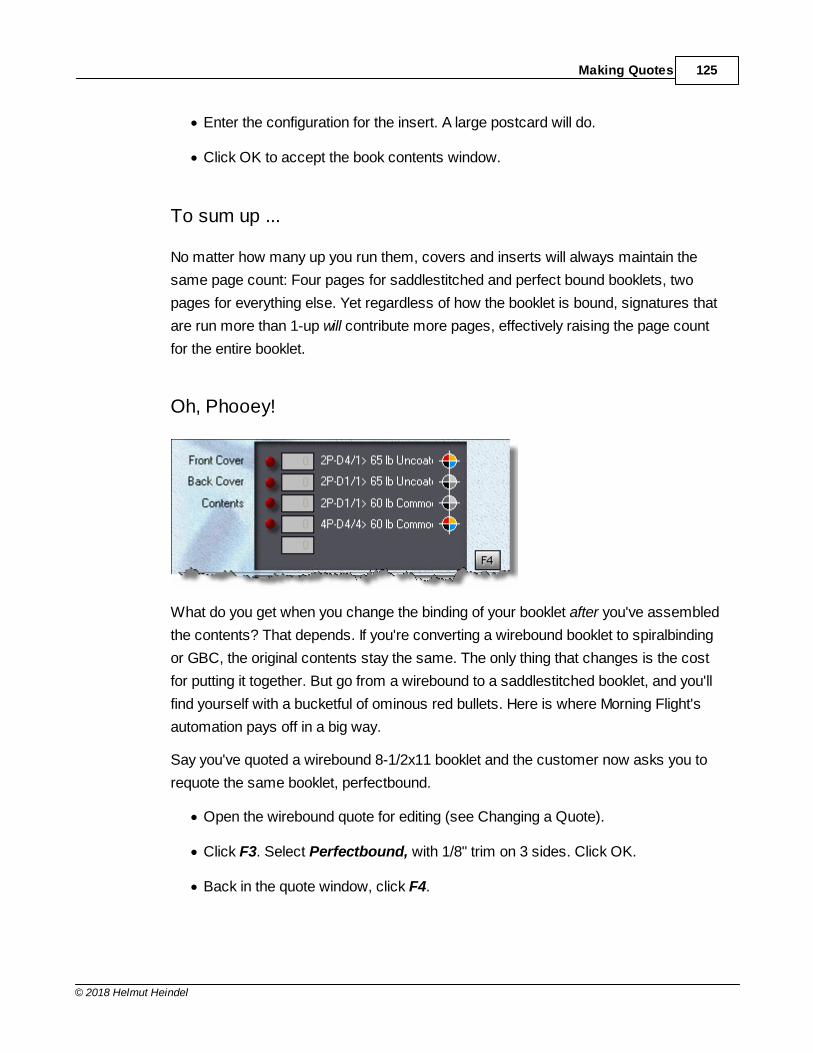
Making Quotes 125
© 2018 Helmut Heindel
· Enter the configuration for the insert. A large postcard will do.
· Click OK to accept the book contents window.
To sum up ...
No matter how many up you run them, covers and inserts will always maintain the
same page count: Four pages for saddlestitched and perfect bound booklets, two
pages for everything else. Yet regardless of how the booklet is bound, signatures that
are run more than 1-up will contribute more pages, effectively raising the page count
for the entire booklet.
Oh, Phooey!
What do you get when you change the binding of your booklet after you've assembled
the contents? That depends. If you're converting a wirebound booklet to spiralbinding
or GBC, the original contents stay the same. The only thing that changes is the cost
for putting it together. But go from a wirebound to a saddlestitched booklet, and you'll
find yourself with a bucketful of ominous red bullets. Here is where Morning Flight's
automation pays off in a big way.
Say you've quoted a wirebound 8-1/2x11 booklet and the customer now asks you to
requote the same booklet, perfectbound.
· Open the wirebound quote for editing (see Changing a Quote).
· Click F3. Select Perfectbound, with 1/8" trim on 3 sides. Click OK.
· Back in the quote window, click F4.
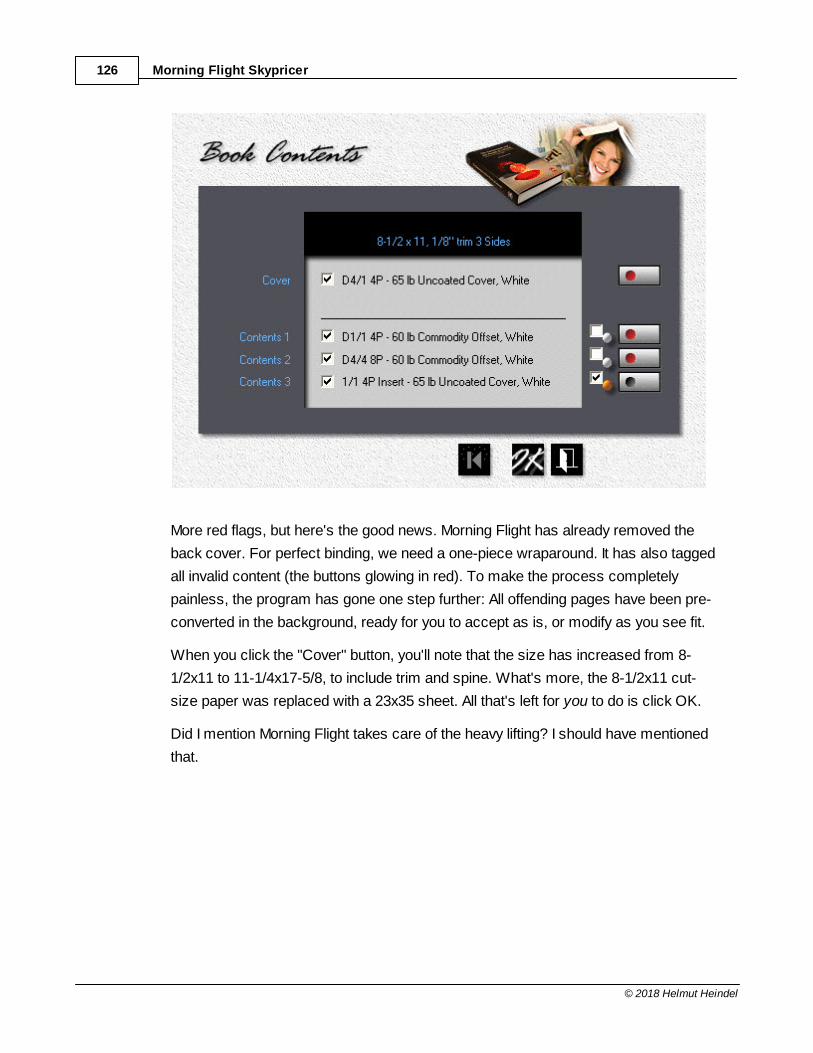
Morning Flight Skypricer126
© 2018 Helmut Heindel
More red flags, but here's the good news. Morning Flight has already removed the
back cover. For perfect binding, we need a one-piece wraparound. It has also tagged
all invalid content (the buttons glowing in red). To make the process completely
painless, the program has gone one step further: All offending pages have been pre-
converted in the background, ready for you to accept as is, or modify as you see fit.
When you click the "Cover" button, you'll note that the size has increased from 8-
1/2x11 to 11-1/4x17-5/8, to include trim and spine. What's more, the 8-1/2x11 cut-
size paper was replaced with a 23x35 sheet. All that's left for you to do is click OK.
Did I mention Morning Flight takes care of the heavy lifting? I should have mentioned
that.
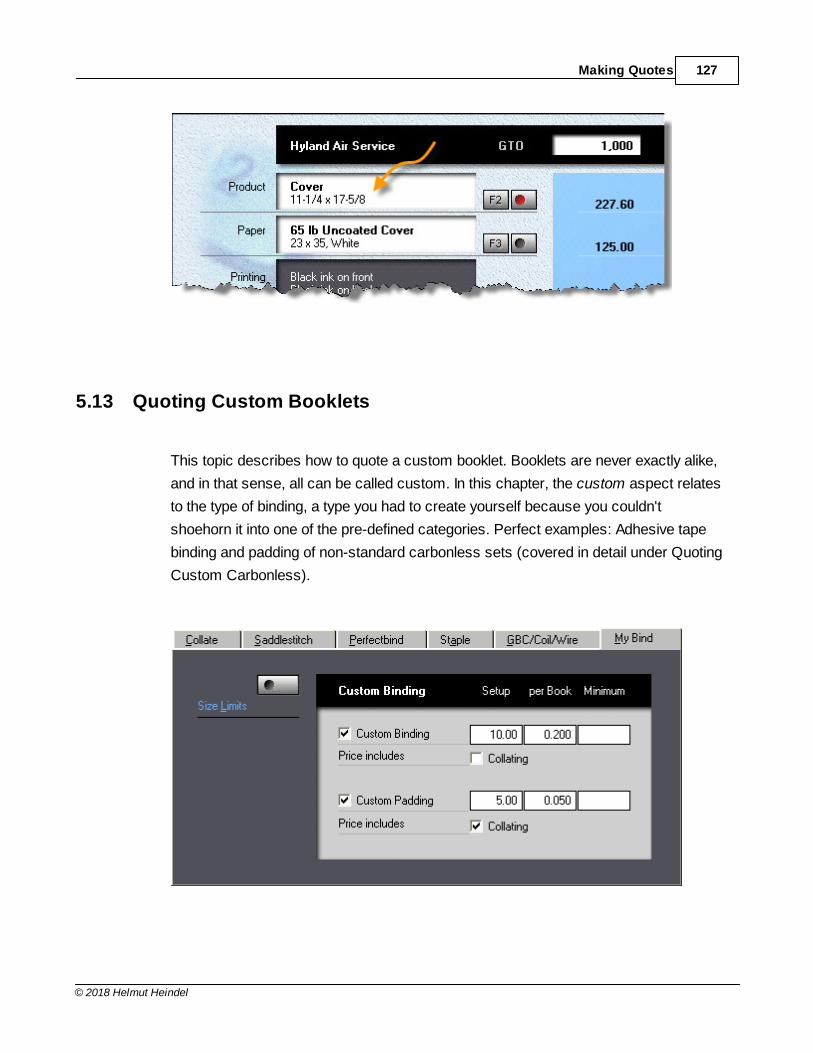
Making Quotes 127
© 2018 Helmut Heindel
5.13 Quoting Custom Booklets
This topic describes how to quote a custom booklet. Booklets are never exactly alike,
and in that sense, all can be called custom. In this chapter, the custom aspect relates
to the type of binding, a type you had to create yourself because you couldn't
shoehorn it into one of the pre-defined categories. Perfect examples: Adhesive tape
binding and padding of non-standard carbonless sets (covered in detail under Quoting
Custom Carbonless).
Morning Flight Skypricer128
© 2018 Helmut Heindel
Enabling Custom Binding
From the main menu, click the My Shop button.
· In My Shop, click the Bookbinding button.
· Click the My Bind tab.
· Check Custom Binding and enter the binding price per book. Setup and
minimum cost are optional.
· Check Custom Padding and enter the padding price per set. If that price
includes collating, don't forget to check the Collating box.
Quoting Custom Binding
From the main menu, click the Booklet Quote button.
· Click the F3 button, then select either Custom-bound, Custom-padded or
Unbound.
Trimming is available for saddlestitched and perfect bound booklets only.
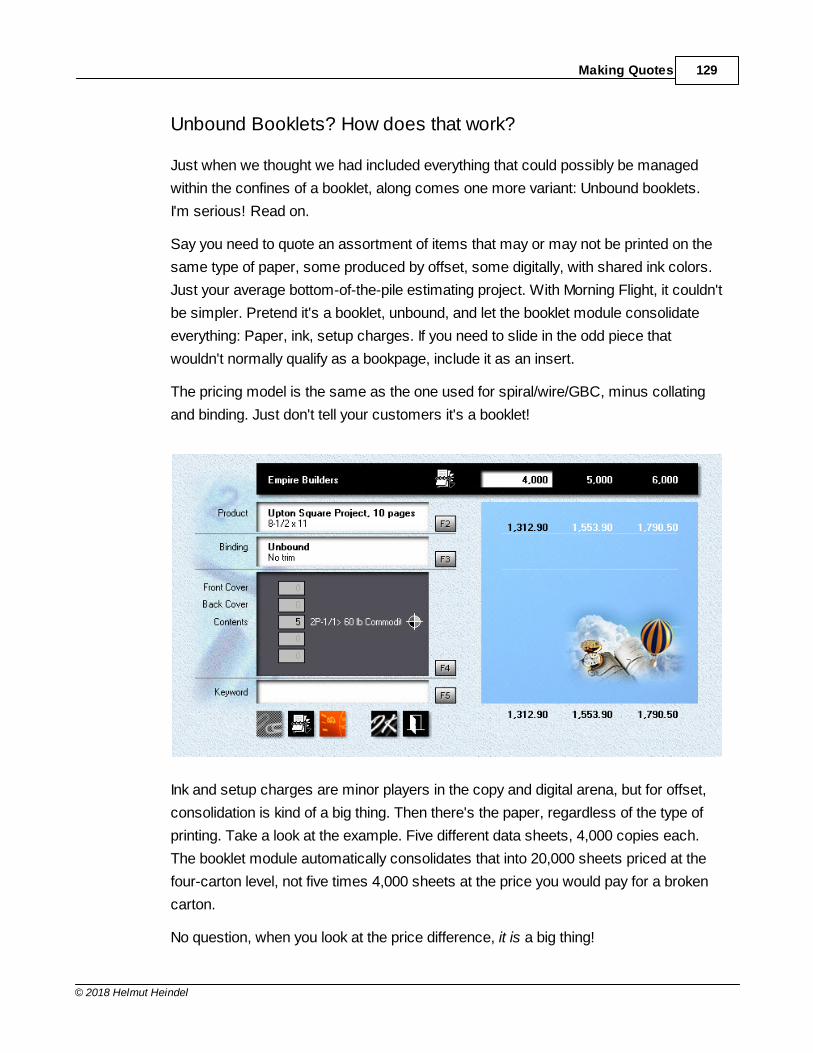
Making Quotes 129
© 2018 Helmut Heindel
Unbound Booklets? How does that work?
Just when we thought we had included everything that could possibly be managed
within the confines of a booklet, along comes one more variant: Unbound booklets.
I'm serious! Read on.
Say you need to quote an assortment of items that may or may not be printed on the
same type of paper, some produced by offset, some digitally, with shared ink colors.
Just your average bottom-of-the-pile estimating project. With Morning Flight, it couldn't
be simpler. Pretend it's a booklet, unbound, and let the booklet module consolidate
everything: Paper, ink, setup charges. If you need to slide in the odd piece that
wouldn't normally qualify as a bookpage, include it as an insert.
The pricing model is the same as the one used for spiral/wire/GBC, minus collating
and binding. Just don't tell your customers it's a booklet!
Ink and setup charges are minor players in the copy and digital arena, but for offset,
consolidation is kind of a big thing. Then there's the paper, regardless of the type of
printing. Take a look at the example. Five different data sheets, 4,000 copies each.
The booklet module automatically consolidates that into 20,000 sheets priced at the
four-carton level, not five times 4,000 sheets at the price you would pay for a broken
carton.
No question, when you look at the price difference, it is a big thing!
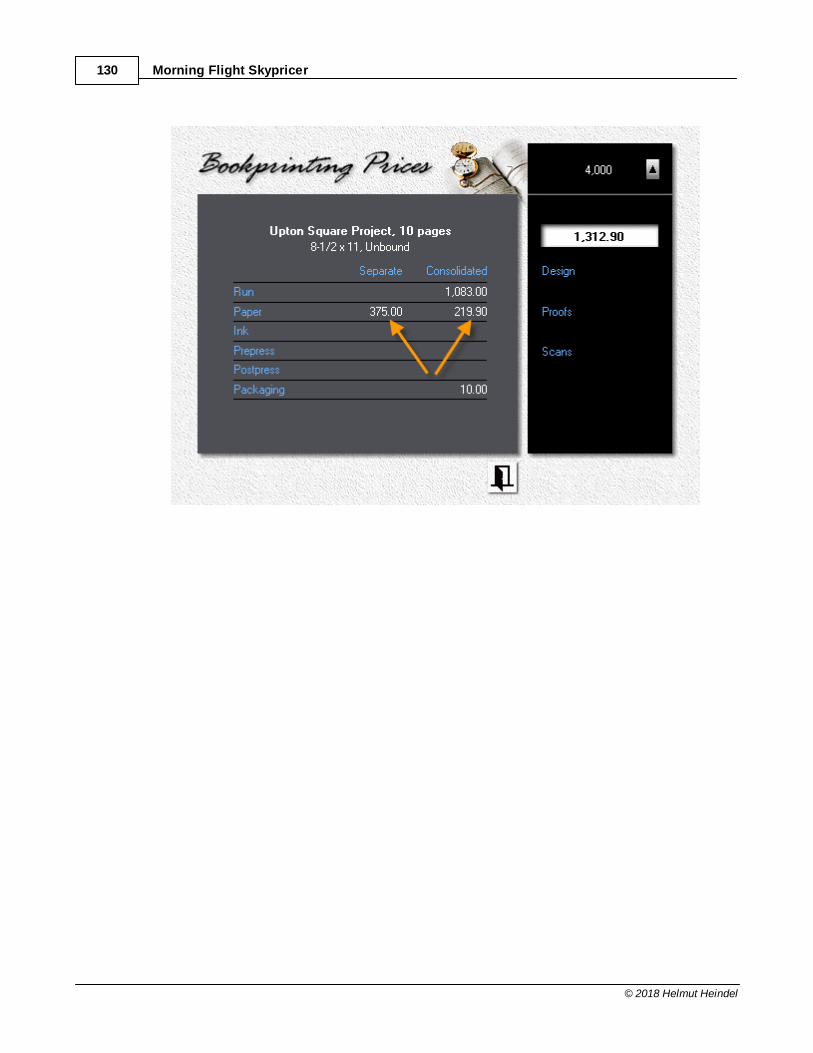
Morning Flight Skypricer130
© 2018 Helmut Heindel
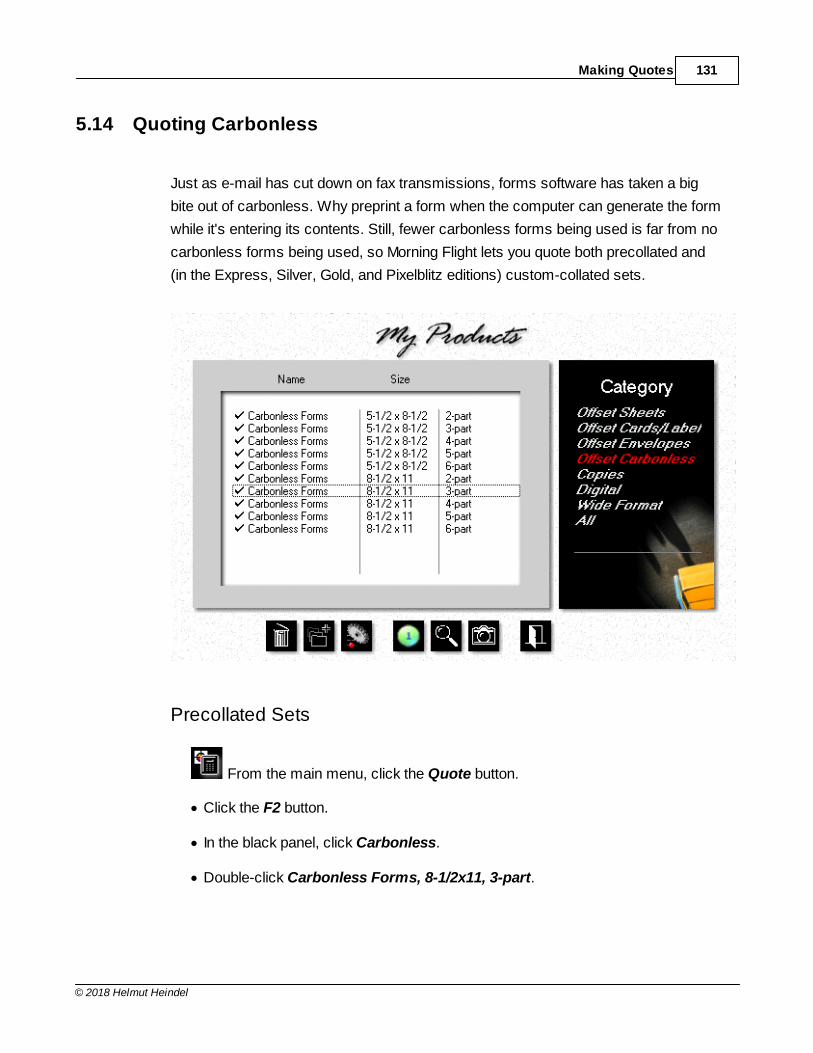
Making Quotes 131
© 2018 Helmut Heindel
5.14 Quoting Carbonless
Just as e-mail has cut down on fax transmissions, forms software has taken a big
bite out of carbonless. Why preprint a form when the computer can generate the form
while it's entering its contents. Still, fewer carbonless forms being used is far from no
carbonless forms being used, so Morning Flight lets you quote both precollated and
(in the Express, Silver, Gold, and Pixelblitz editions) custom-collated sets.
Precollated Sets
From the main menu, click the Quote button.
· Click the F2 button.
· In the black panel, click Carbonless.
· Double-click Carbonless Forms, 8-1/2x11, 3-part.
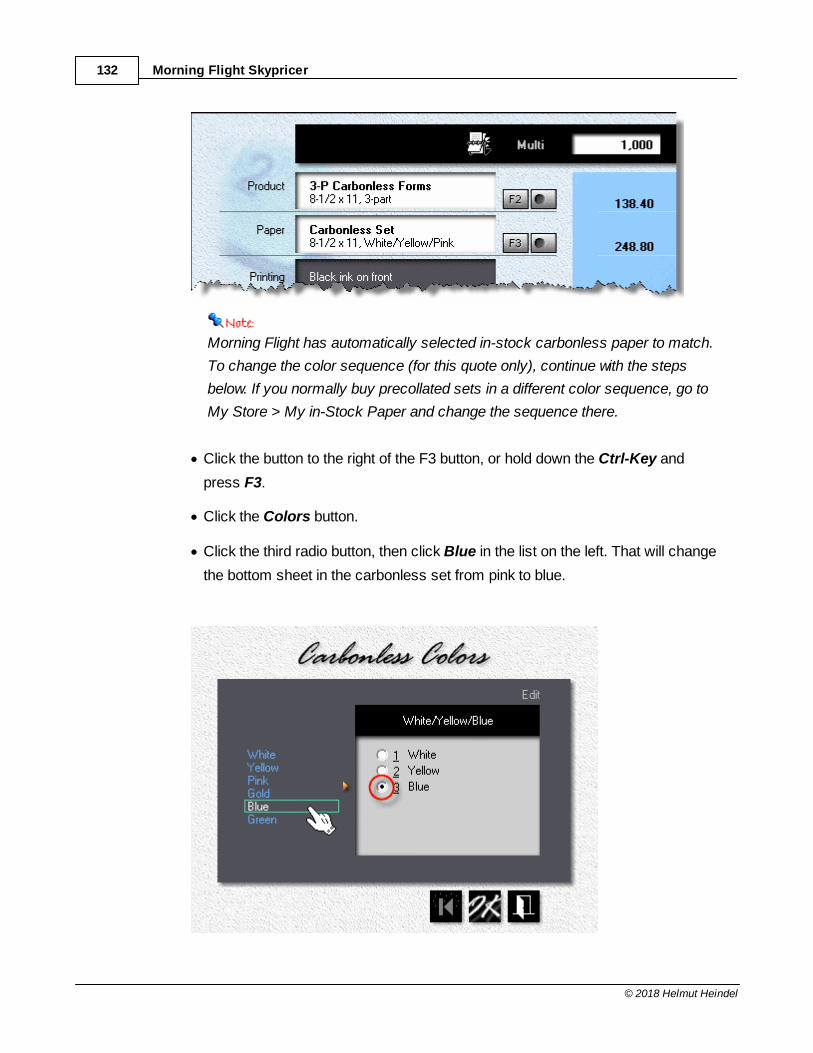
Morning Flight Skypricer132
© 2018 Helmut Heindel
Morning Flight has automatically selected in-stock carbonless paper to match.
To change the color sequence (for this quote only), continue with the steps
below. If you normally buy precollated sets in a different color sequence, go to
My Store > My in-Stock Paper and change the sequence there.
· Click the button to the right of the F3 button, or hold down the Ctrl-Key and
press F3.
· Click the Colors button.
· Click the third radio button, then click Blue in the list on the left. That will change
the bottom sheet in the carbonless set from pink to blue.
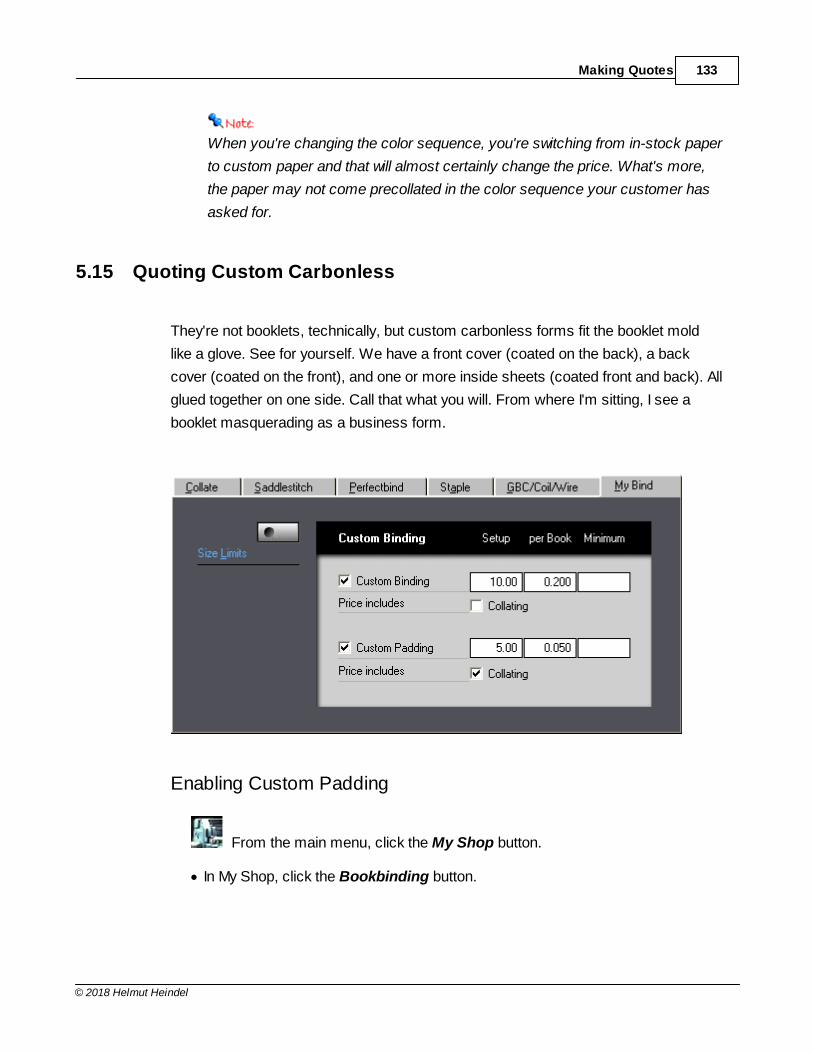
Making Quotes 133
© 2018 Helmut Heindel
When you're changing the color sequence, you're switching from in-stock paper
to custom paper and that will almost certainly change the price. What's more,
the paper may not come precollated in the color sequence your customer has
asked for.
5.15 Quoting Custom Carbonless
They're not booklets, technically, but custom carbonless forms fit the booklet mold
like a glove. See for yourself. We have a front cover (coated on the back), a back
cover (coated on the front), and one or more inside sheets (coated front and back). All
glued together on one side. Call that what you will. From where I'm sitting, I see a
booklet masquerading as a business form.
Enabling Custom Padding
From the main menu, click the My Shop button.
· In My Shop, click the Bookbinding button.
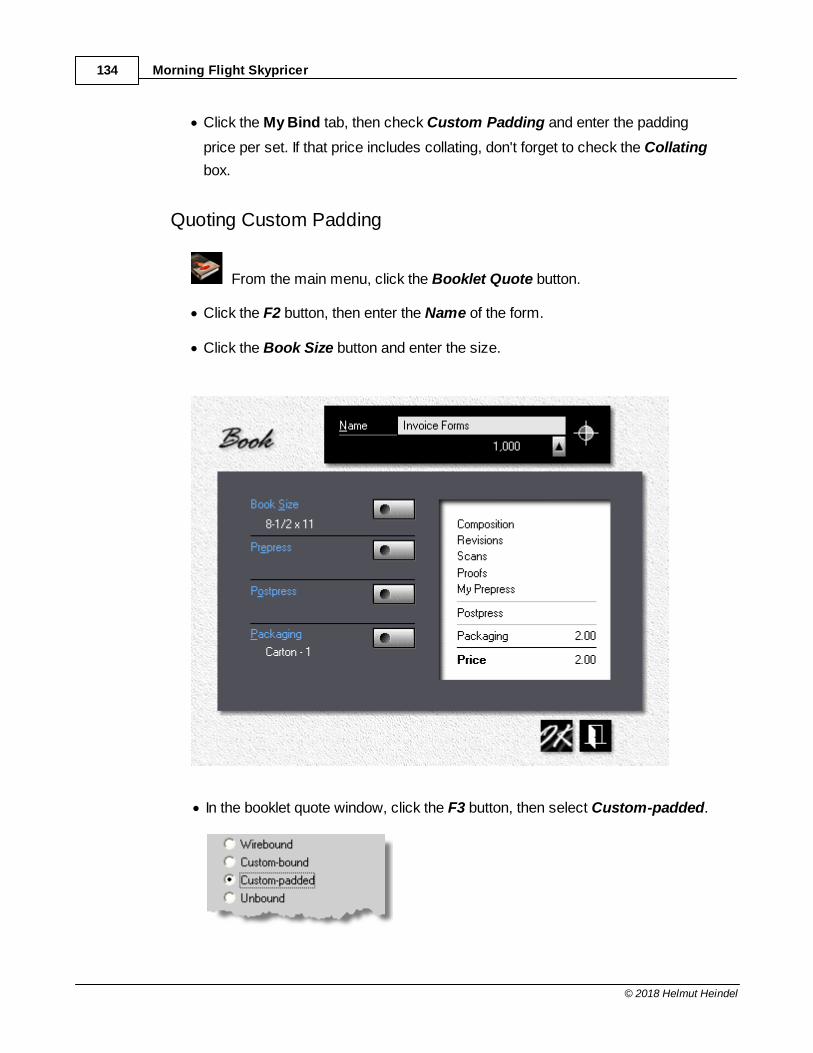
Morning Flight Skypricer134
© 2018 Helmut Heindel
· Click the My Bind tab, then check Custom Padding and enter the padding
price per set. If that price includes collating, don't forget to check the Collating
box.
Quoting Custom Padding
From the main menu, click the Booklet Quote button.
· Click the F2 button, then enter the Name of the form.
· Click the Book Size button and enter the size.
· In the booklet quote window, click the F3 button, then select Custom-padded.
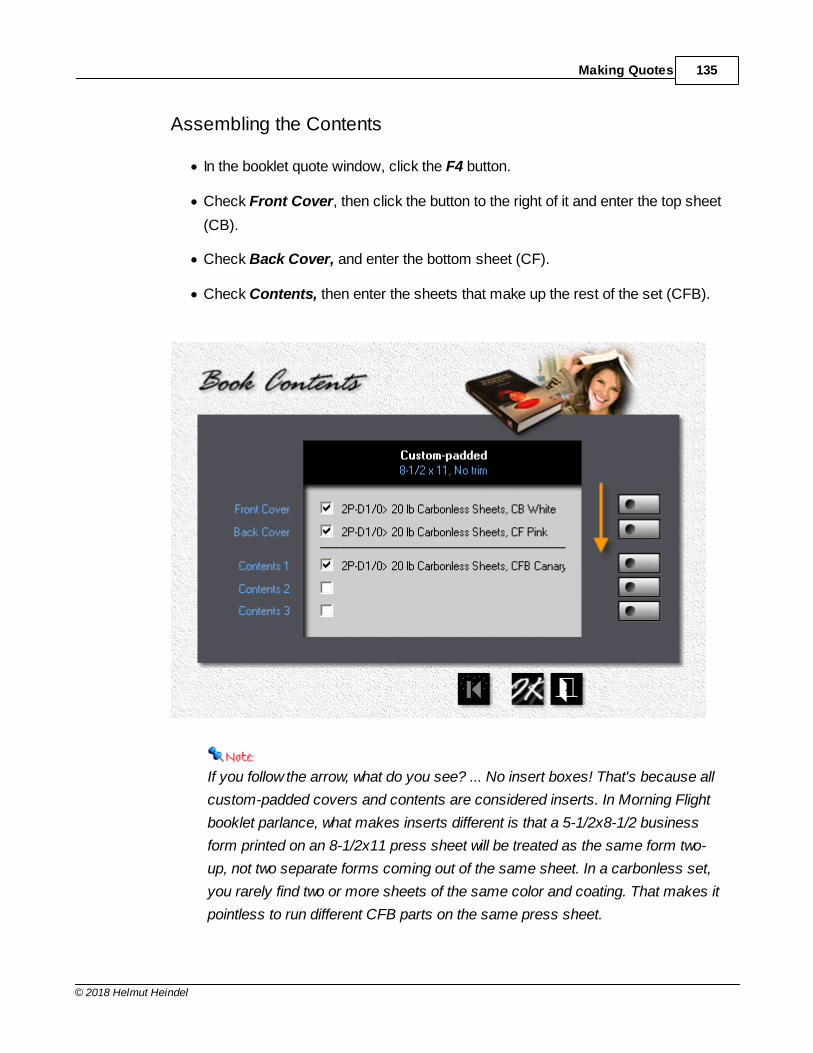
Making Quotes 135
© 2018 Helmut Heindel
Assembling the Contents
· In the booklet quote window, click the F4 button.
· Check Front Cover, then click the button to the right of it and enter the top sheet
(CB).
· Check Back Cover, and enter the bottom sheet (CF).
· Check Contents, then enter the sheets that make up the rest of the set (CFB).
If you follow the arrow, what do you see? ... No insert boxes! That's because all
custom-padded covers and contents are considered inserts. In Morning Flight
booklet parlance, what makes inserts different is that a 5-1/2x8-1/2 business
form printed on an 8-1/2x11 press sheet will be treated as the same form two-
up, not two separate forms coming out of the same sheet. In a carbonless set,
you rarely find two or more sheets of the same color and coating. That makes it
pointless to run different CFB parts on the same press sheet.
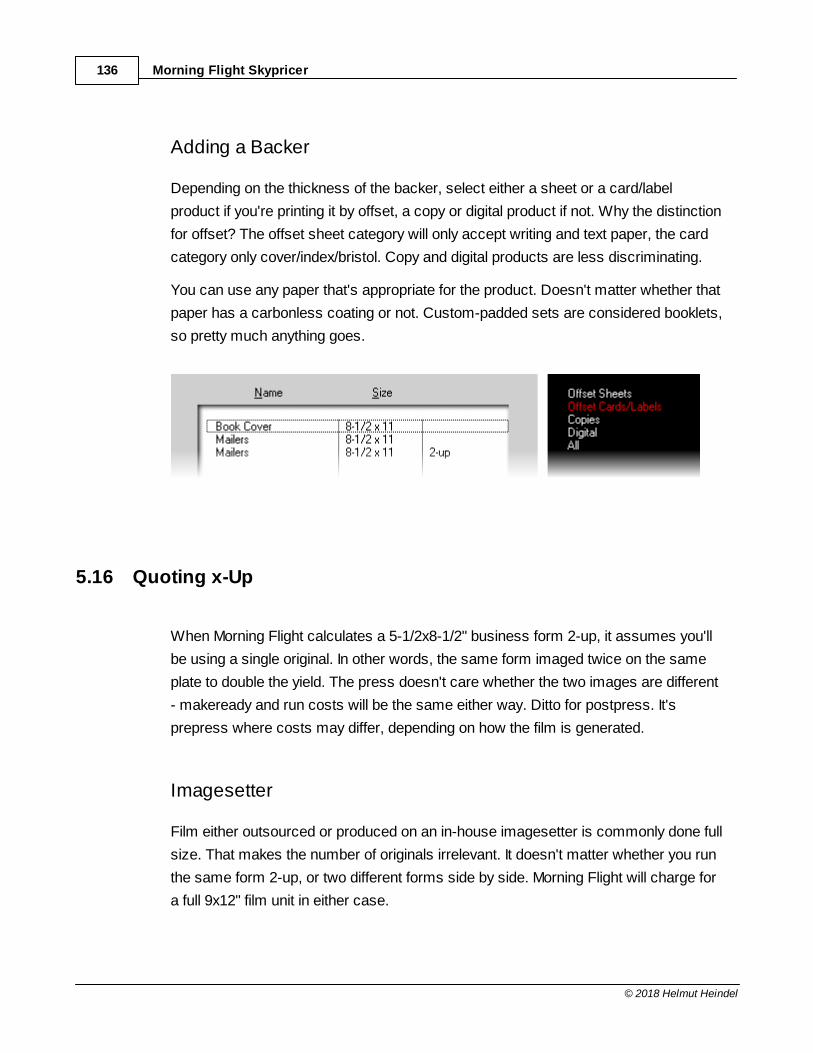
Morning Flight Skypricer136
© 2018 Helmut Heindel
Adding a Backer
Depending on the thickness of the backer, select either a sheet or a card/label
product if you're printing it by offset, a copy or digital product if not. Why the distinction
for offset? The offset sheet category will only accept writing and text paper, the card
category only cover/index/bristol. Copy and digital products are less discriminating.
You can use any paper that's appropriate for the product. Doesn't matter whether that
paper has a carbonless coating or not. Custom-padded sets are considered booklets,
so pretty much anything goes.
5.16 Quoting x-Up
When Morning Flight calculates a 5-1/2x8-1/2" business form 2-up, it assumes you'll
be using a single original. In other words, the same form imaged twice on the same
plate to double the yield. The press doesn't care whether the two images are different
- makeready and run costs will be the same either way. Ditto for postpress. It's
prepress where costs may differ, depending on how the film is generated.
Imagesetter
Film either outsourced or produced on an in-house imagesetter is commonly done full
size. That makes the number of originals irrelevant. It doesn't matter whether you run
the same form 2-up, or two different forms side by side. Morning Flight will charge for
a full 9x12" film unit in either case.
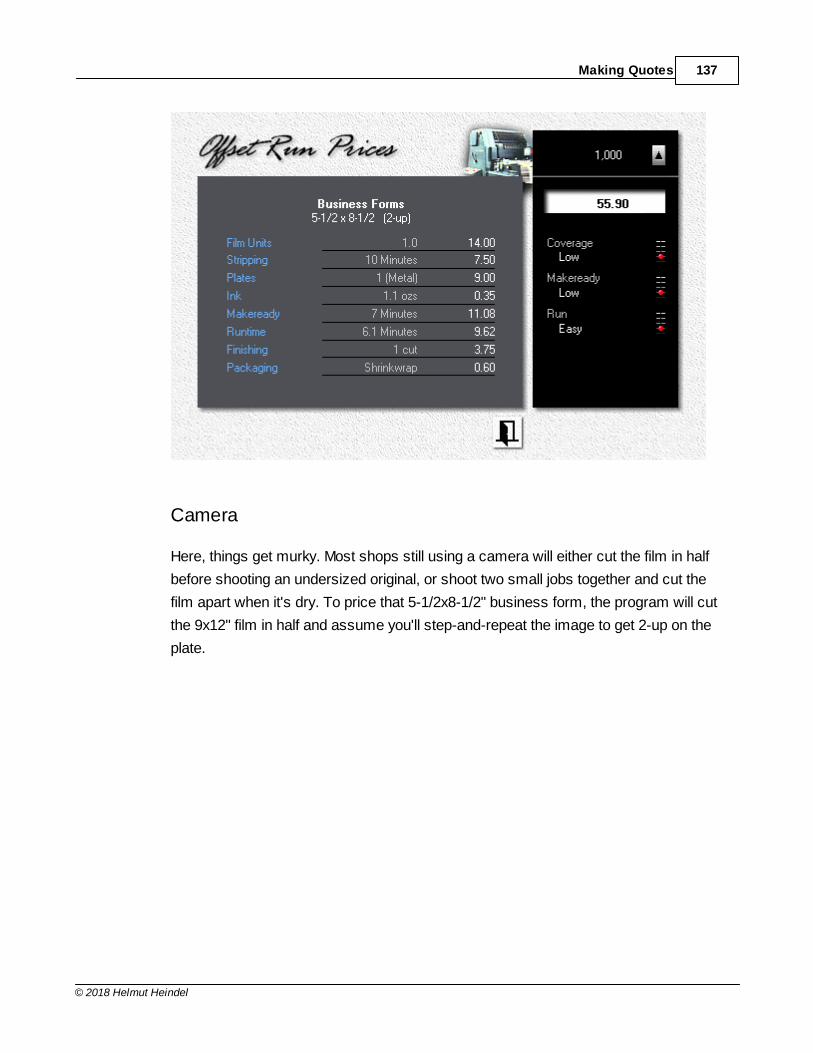
Making Quotes 137
© 2018 Helmut Heindel
Camera
Here, things get murky. Most shops still using a camera will either cut the film in half
before shooting an undersized original, or shoot two small jobs together and cut the
film apart when it's dry. To price that 5-1/2x8-1/2" business form, the program will cut
the 9x12" film in half and assume you'll step-and-repeat the image to get 2-up on the
plate.
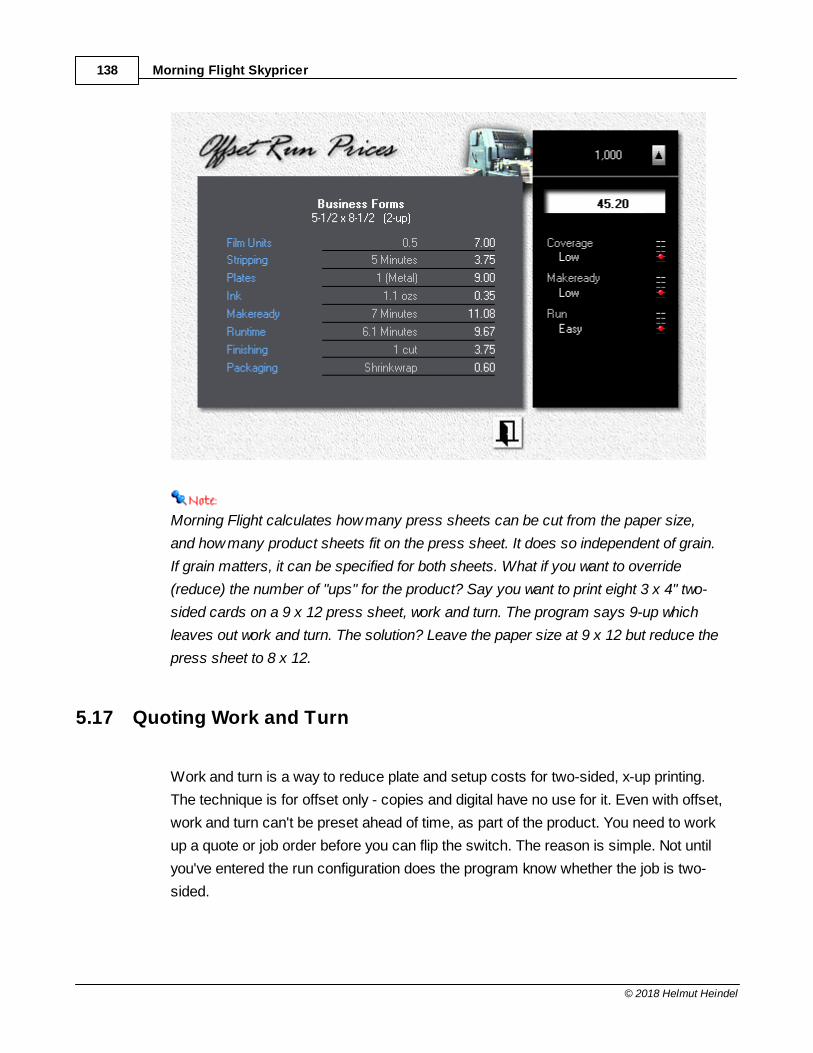
Morning Flight Skypricer138
© 2018 Helmut Heindel
Morning Flight calculates how many press sheets can be cut from the paper size,
and how many product sheets fit on the press sheet. It does so independent of grain.
If grain matters, it can be specified for both sheets. What if you want to override
(reduce) the number of "ups" for the product? Say you want to print eight 3 x 4" two-
sided cards on a 9 x 12 press sheet, work and turn. The program says 9-up which
leaves out work and turn. The solution? Leave the paper size at 9 x 12 but reduce the
press sheet to 8 x 12.
5.17 Quoting Work and Turn
Work and turn is a way to reduce plate and setup costs for two-sided, x-up printing.
The technique is for offset only - copies and digital have no use for it. Even with offset,
work and turn can't be preset ahead of time, as part of the product. You need to work
up a quote or job order before you can flip the switch. The reason is simple. Not until
you've entered the run configuration does the program know whether the job is two-
sided.
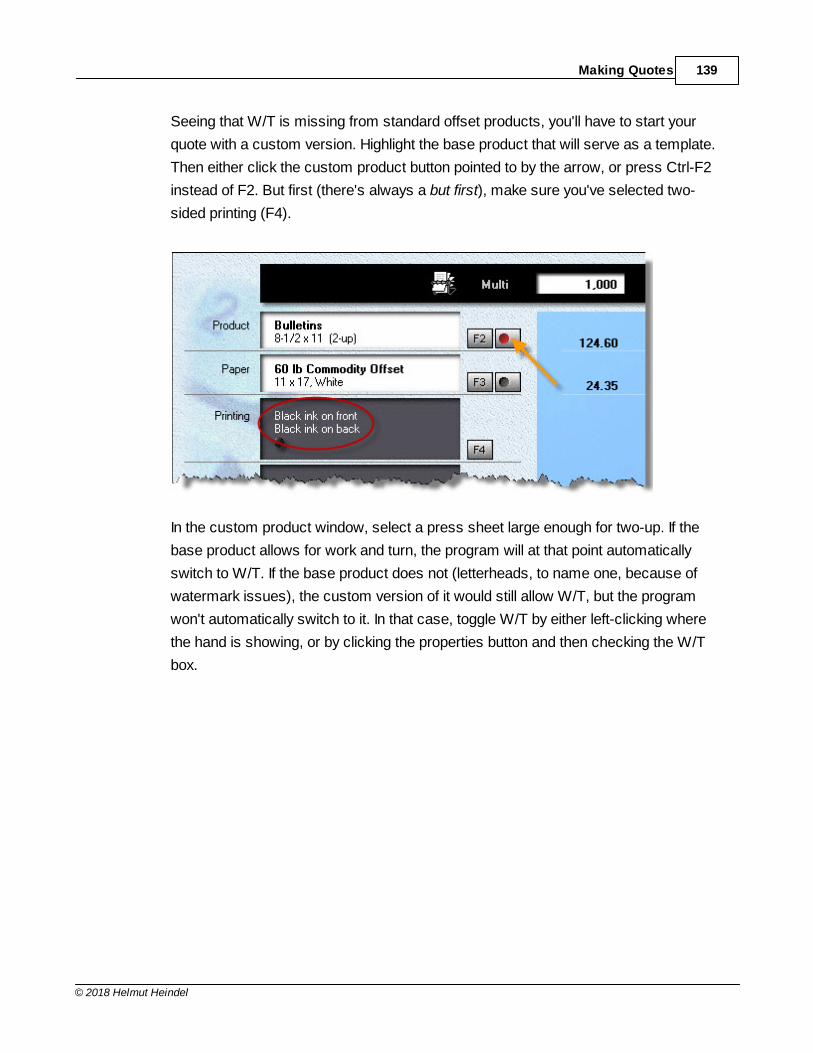
Making Quotes 139
© 2018 Helmut Heindel
Seeing that W/T is missing from standard offset products, you'll have to start your
quote with a custom version. Highlight the base product that will serve as a template.
Then either click the custom product button pointed to by the arrow, or press Ctrl-F2
instead of F2. But first (there's always a but first), make sure you've selected two-
sided printing (F4).
In the custom product window, select a press sheet large enough for two-up. If the
base product allows for work and turn, the program will at that point automatically
switch to W/T. If the base product does not (letterheads, to name one, because of
watermark issues), the custom version of it would still allow W/T, but the program
won't automatically switch to it. In that case, toggle W/T by either left-clicking where
the hand is showing, or by clicking the properties button and then checking the W/T
box.
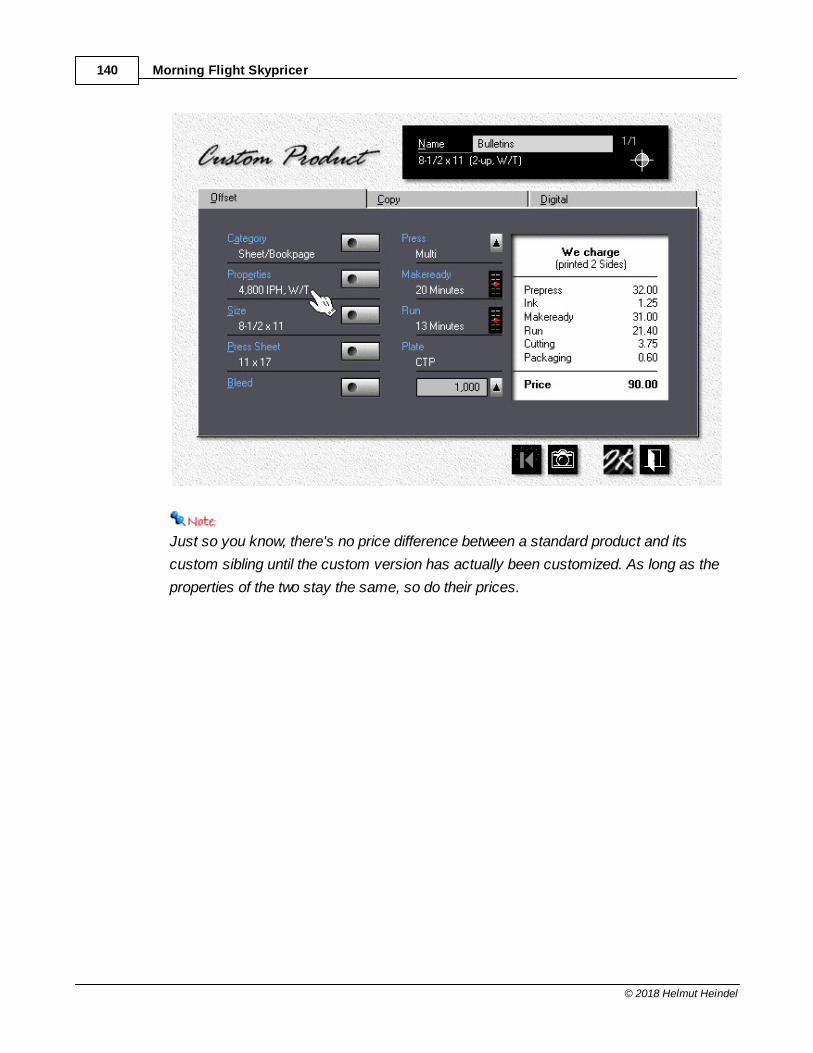
Morning Flight Skypricer140
© 2018 Helmut Heindel
Just so you know, there's no price difference between a standard product and its
custom sibling until the custom version has actually been customized. As long as the
properties of the two stay the same, so do their prices.
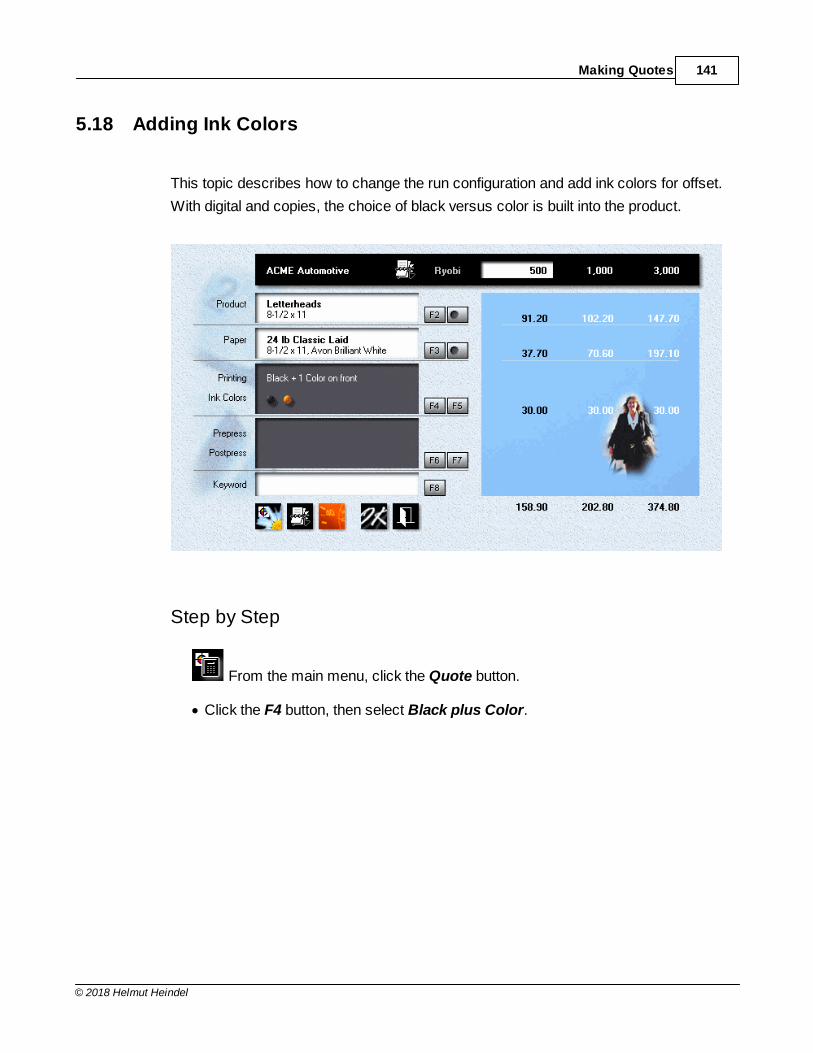
Making Quotes 141
© 2018 Helmut Heindel
5.18 Adding Ink Colors
This topic describes how to change the run configuration and add ink colors for offset.
With digital and copies, the choice of black versus color is built into the product.
Step by Step
From the main menu, click the Quote button.
· Click the F4 button, then select Black plus Color.
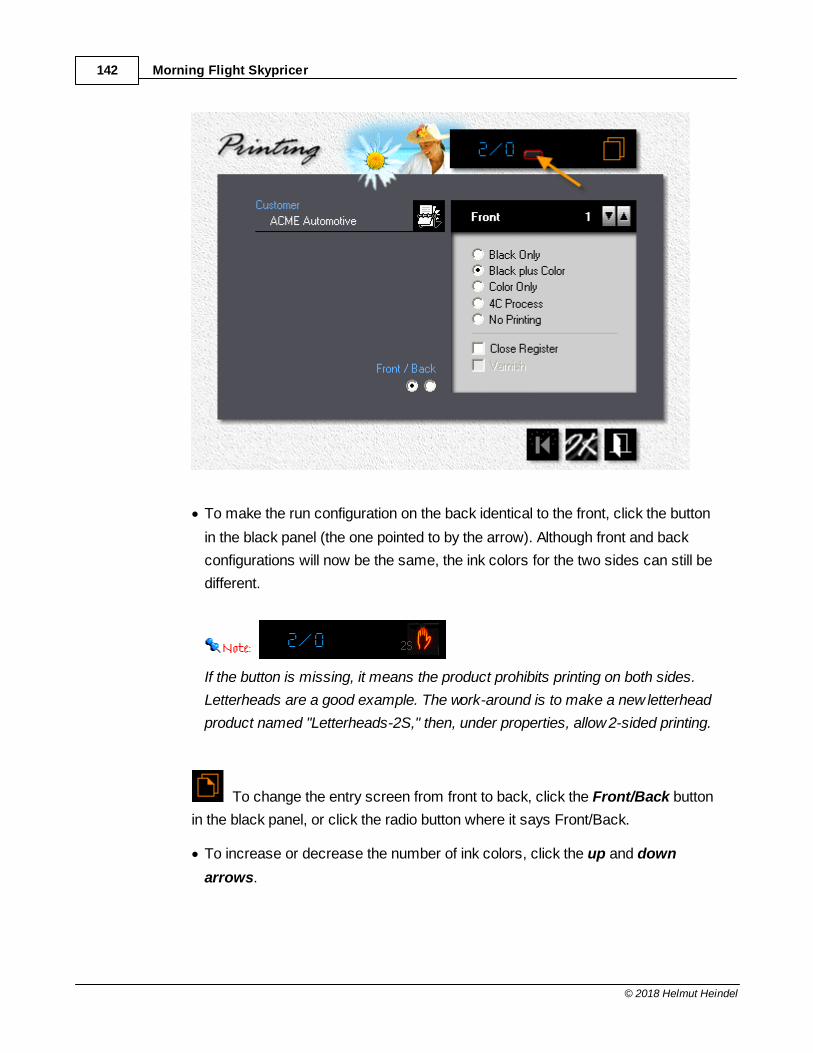
Morning Flight Skypricer142
© 2018 Helmut Heindel
· To make the run configuration on the back identical to the front, click the button
in the black panel (the one pointed to by the arrow). Although front and back
configurations will now be the same, the ink colors for the two sides can still be
different.
If the button is missing, it means the product prohibits printing on both sides.
Letterheads are a good example. The work-around is to make a new letterhead
product named "Letterheads-2S," then, under properties, allow 2-sided printing.
To change the entry screen from front to back, click the Front/Back button
in the black panel, or click the radio button where it says Front/Back.
· To increase or decrease the number of ink colors, click the up and down
arrows.
Making Quotes 143
© 2018 Helmut Heindel
· What happens when you click OK will depend on whether you're making a new
quote and have yet to select ink colors, or have selected them but now want to
change them. If no colors have been selected, the ink entry window will appear
automatically. If you're editing, it probably won't, but you can make it appear by
clicking the F5 button in the quote window. I say probably, because the window
will appear automatically even during editing if you've changed the run
configuration and now there are too few ink colors.
· To enter a color, enter the PMS number (or HKS or FCS number depending on
the color system you have in place), or click one of the silver buttons to pick the
color from an ink selection window.
· To delete a color, place the cursor in the entry field for that color, then click the
Trash Can.
· To change the Color System for individual colors from PMS to HKS or FCS,
click where the hand is showing.
Morning Flight Skypricer144
© 2018 Helmut Heindel
The Min number tells you how many colors you need. The Max number
represents how many colors you can have. In this example, the quote could be for
either black + one color, or just a one-color run, printed both sides.
5.19 Adding Prepress
This topic describes how to add prepress charges to offset, digital, and copy quotes
and orders.
Step by Step
· In the print quote window, click the F6 button.
· Check Composition, then set the Comp Factor to heavy with the slider. Left-
clicking moves the slider up, right-clicking moves it down.
· Enter 30 in the Minutes field to override the default of 15.
Making Quotes 145
© 2018 Helmut Heindel
· Enter one 3x5" and one 5x7" black and white scan. The quick way to do that is
to enter "110" in the Jet-Entry field (1 x 3x5, 1 x 5x7, and 0 x 8x10).
· Click the Proofs tab, then click Colorcopy. If colorcopy proofs are unavailable,
it means the job is printed in black ink.
Colorcopy and matchprint proofs are available only if checked in My Shop, and
then only for color printing. For black, lasercopies are the only option. Proofs are
not available for copies, where they're rarely called for.
Zooming in
To double-check your entries, click the Prepress row in the gray panel when the
cursor turns into a camera.
Morning Flight Skypricer146
© 2018 Helmut Heindel
5.20 Adding Prepress to Booklets
This topic describes how to add prepress to booklets. Prepress charges are for the
whole booklet, not for individual pages.
From the main menu, click the Booklet Quote button.
· Click the F2 button, then click the Prepress Button.
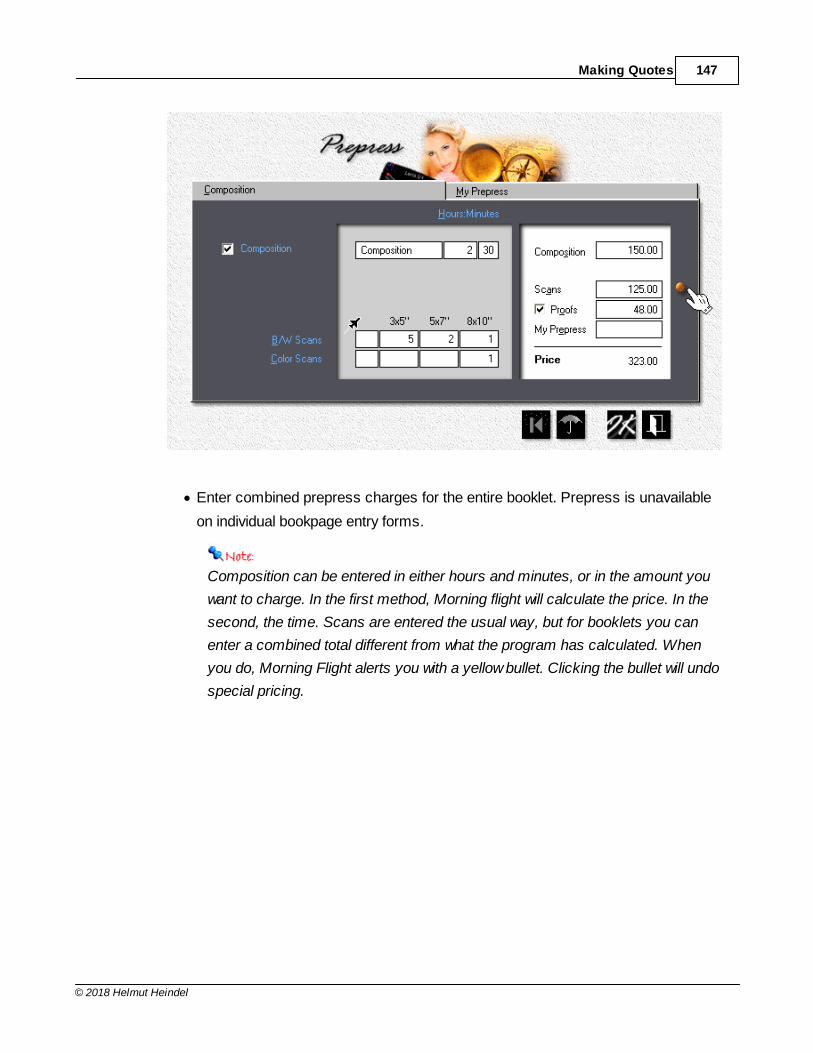
Making Quotes 147
© 2018 Helmut Heindel
· Enter combined prepress charges for the entire booklet. Prepress is unavailable
on individual bookpage entry forms.
Composition can be entered in either hours and minutes, or in the amount you
want to charge. In the first method, Morning flight will calculate the price. In the
second, the time. Scans are entered the usual way, but for booklets you can
enter a combined total different from what the program has calculated. When
you do, Morning Flight alerts you with a yellow bullet. Clicking the bullet will undo
special pricing.
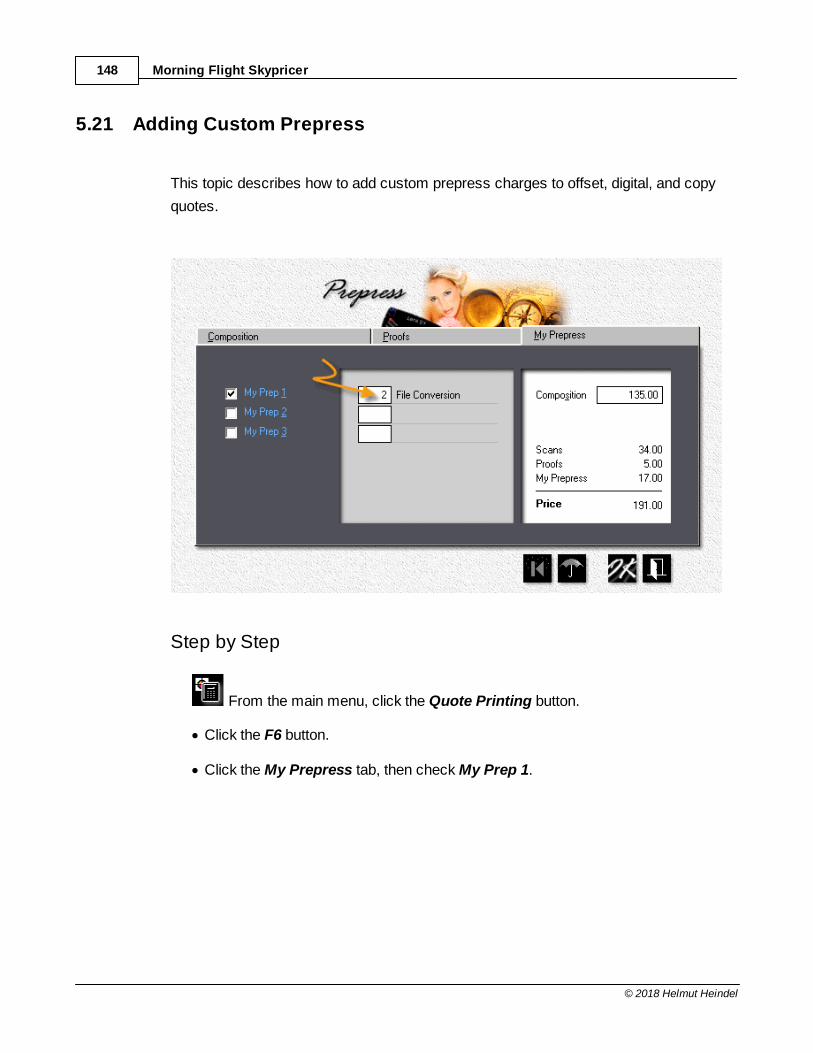
Morning Flight Skypricer148
© 2018 Helmut Heindel
5.21 Adding Custom Prepress
This topic describes how to add custom prepress charges to offset, digital, and copy
quotes.
Step by Step
From the main menu, click the Quote Printing button.
· Click the F6 button.
· Click the My Prepress tab, then check My Prep 1.
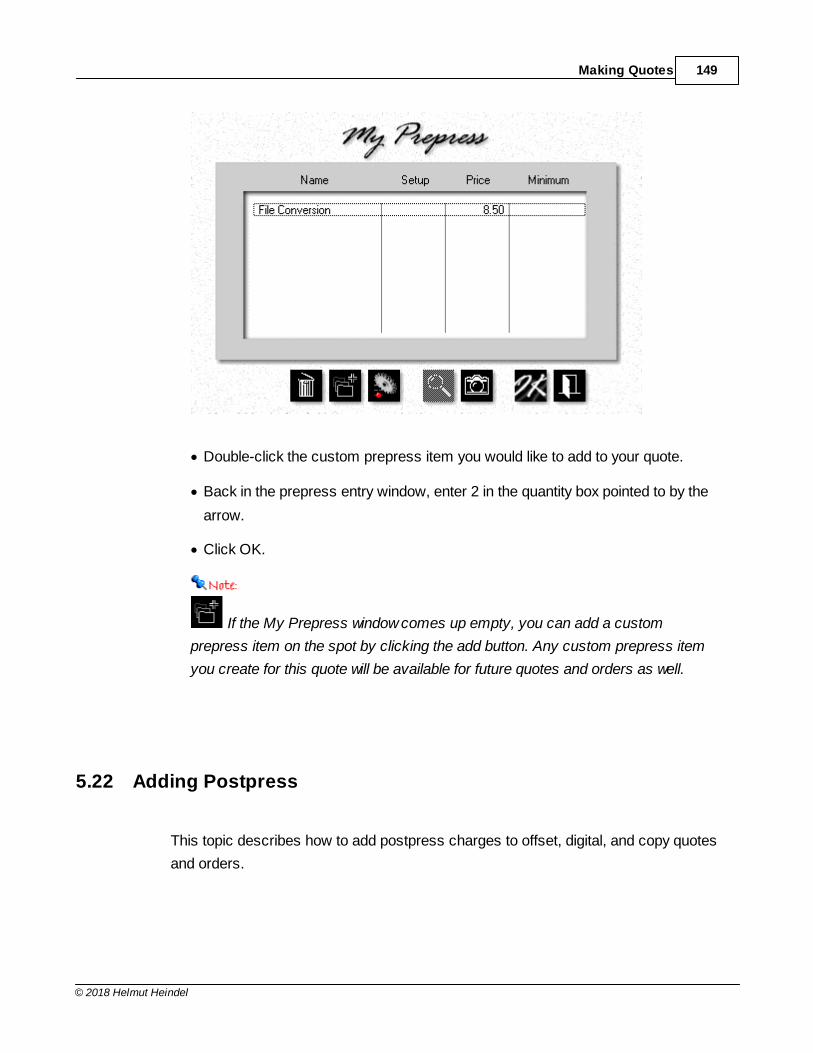
Making Quotes 149
© 2018 Helmut Heindel
· Double-click the custom prepress item you would like to add to your quote.
· Back in the prepress entry window, enter 2 in the quantity box pointed to by the
arrow.
· Click OK.
If the My Prepress window comes up empty, you can add a custom
prepress item on the spot by clicking the add button. Any custom prepress item
you create for this quote will be available for future quotes and orders as well.
5.22 Adding Postpress
This topic describes how to add postpress charges to offset, digital, and copy quotes
and orders.
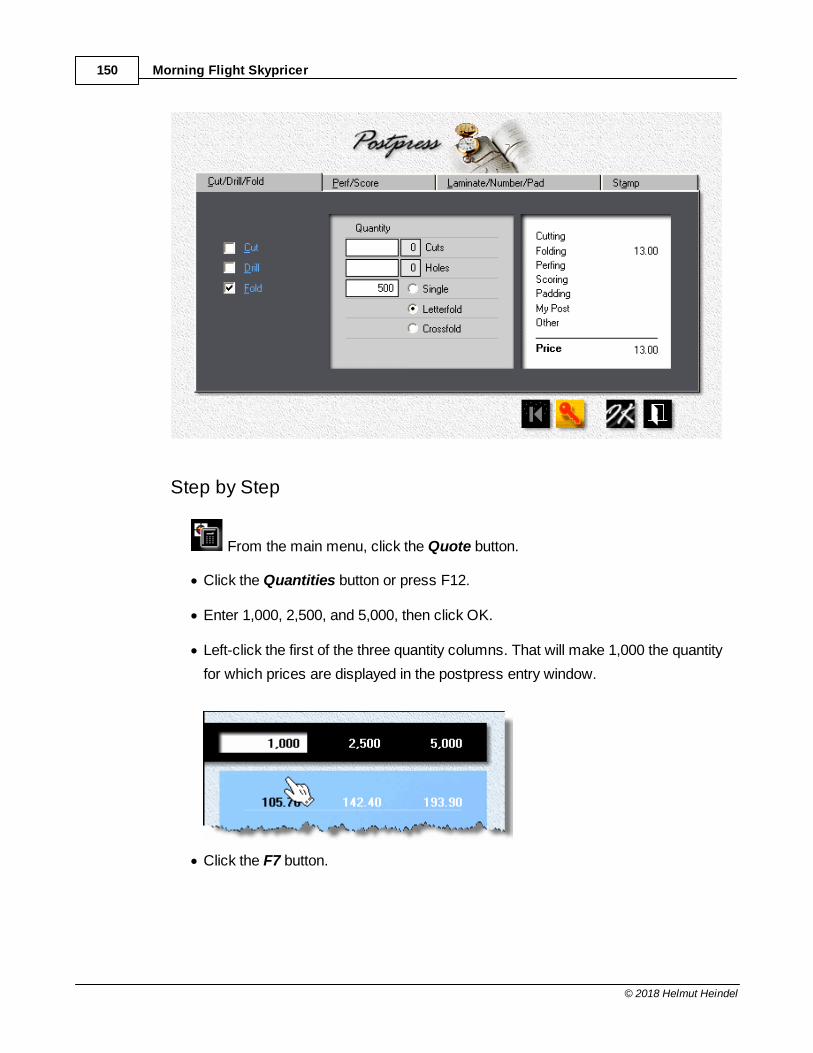
Morning Flight Skypricer150
© 2018 Helmut Heindel
Step by Step
From the main menu, click the Quote button.
· Click the Quantities button or press F12.
· Enter 1,000, 2,500, and 5,000, then click OK.
· Left-click the first of the three quantity columns. That will make 1,000 the quantity
for which prices are displayed in the postpress entry window.
· Click the F7 button.
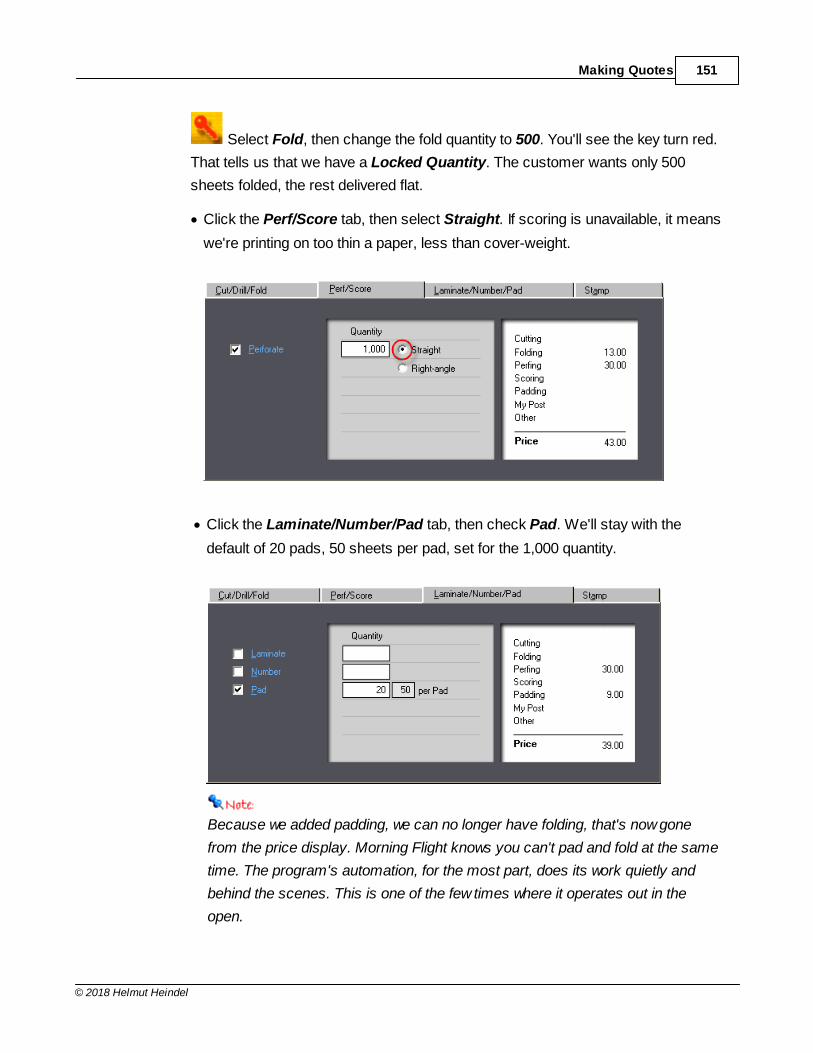
Making Quotes 151
© 2018 Helmut Heindel
Select Fold, then change the fold quantity to 500. You'll see the key turn red.
That tells us that we have a Locked Quantity. The customer wants only 500
sheets folded, the rest delivered flat.
· Click the Perf/Score tab, then select Straight. If scoring is unavailable, it means
we're printing on too thin a paper, less than cover-weight.
· Click the Laminate/Number/Pad tab, then check Pad. We'll stay with the
default of 20 pads, 50 sheets per pad, set for the 1,000 quantity.
Because we added padding, we can no longer have folding, that's now gone
from the price display. Morning Flight knows you can't pad and fold at the same
time. The program's automation, for the most part, does its work quietly and
behind the scenes. This is one of the few times where it operates out in the
open.
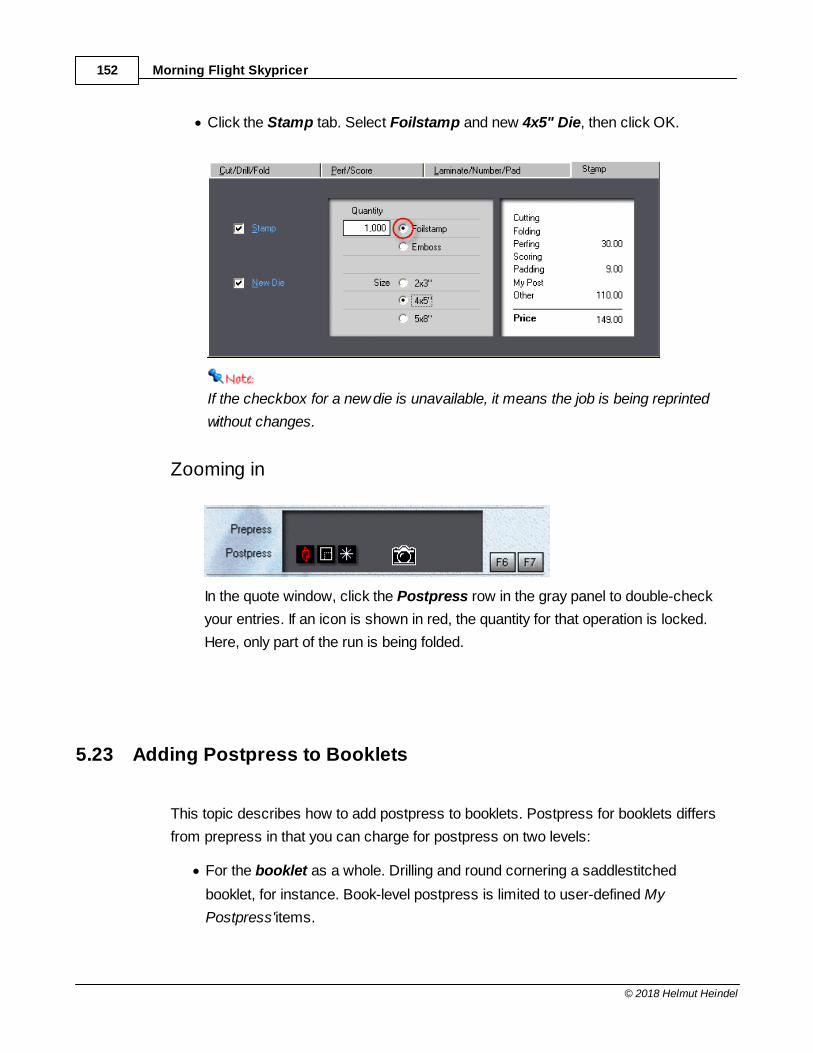
Morning Flight Skypricer152
© 2018 Helmut Heindel
· Click the Stamp tab. Select Foilstamp and new 4x5" Die, then click OK.
If the checkbox for a new die is unavailable, it means the job is being reprinted
without changes.
Zooming in
In the quote window, click the Postpress row in the gray panel to double-check
your entries. If an icon is shown in red, the quantity for that operation is locked.
Here, only part of the run is being folded.
5.23 Adding Postpress to Booklets
This topic describes how to add postpress to booklets. Postpress for booklets differs
from prepress in that you can charge for postpress on two levels:
· For the booklet as a whole. Drilling and round cornering a saddlestitched
booklet, for instance. Book-level postpress is limited to user-defined My
Postpress'items.
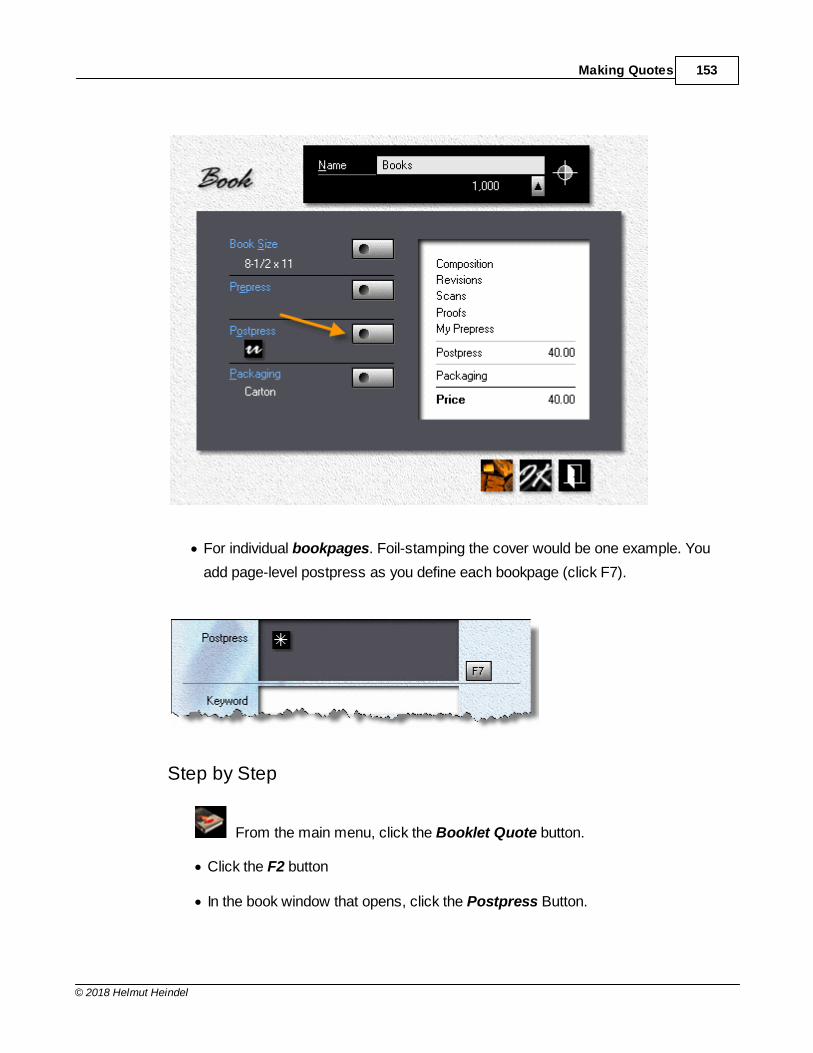
Making Quotes 153
© 2018 Helmut Heindel
· For individual bookpages. Foil-stamping the cover would be one example. You
add page-level postpress as you define each bookpage (click F7).
Step by Step
From the main menu, click the Booklet Quote button.
· Click the F2 button
· In the book window that opens, click the Postpress Button.
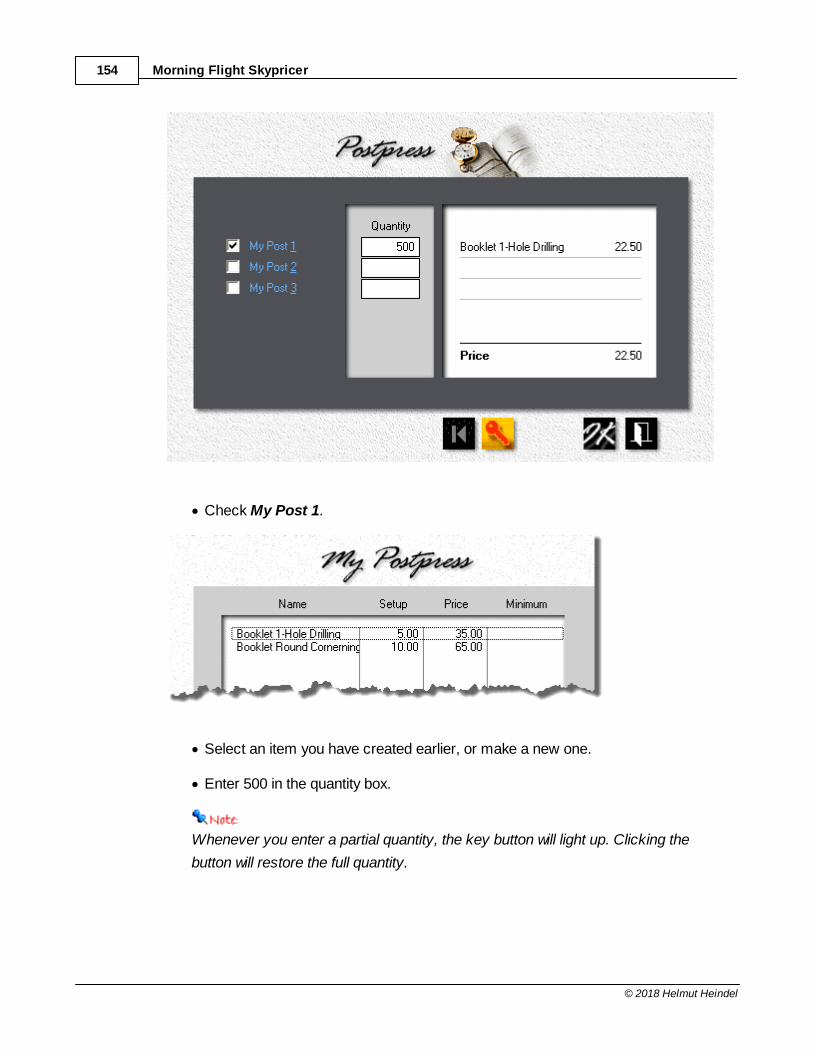
Morning Flight Skypricer154
© 2018 Helmut Heindel
· Check My Post 1.
· Select an item you have created earlier, or make a new one.
· Enter 500 in the quantity box.
Whenever you enter a partial quantity, the key button will light up. Clicking the
button will restore the full quantity.
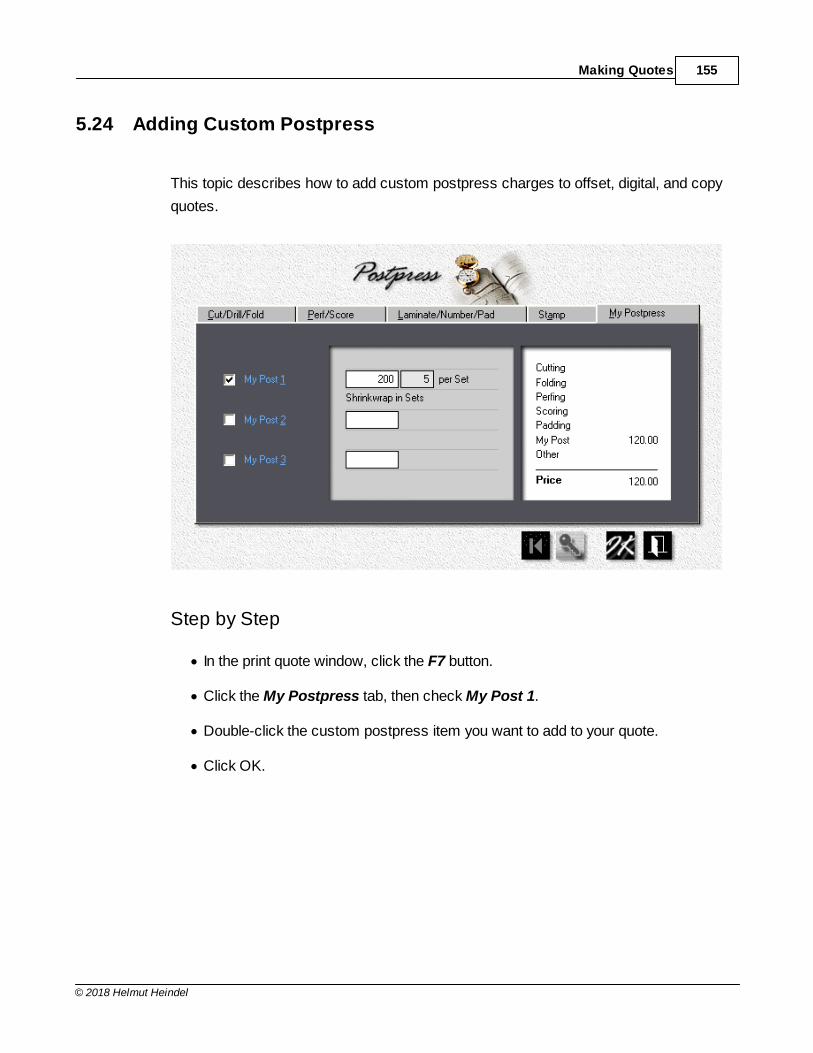
Making Quotes 155
© 2018 Helmut Heindel
5.24 Adding Custom Postpress
This topic describes how to add custom postpress charges to offset, digital, and copy
quotes.
Step by Step
· In the print quote window, click the F7 button.
· Click the My Postpress tab, then check My Post 1.
· Double-click the custom postpress item you want to add to your quote.
· Click OK.
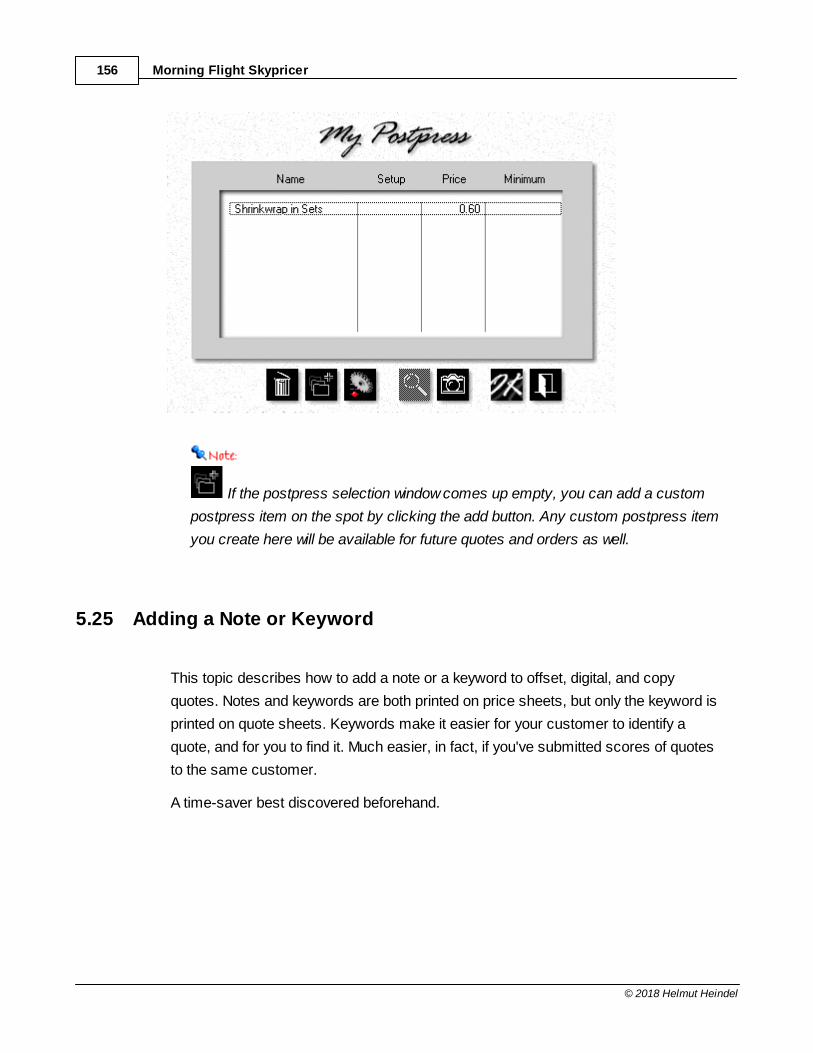
Morning Flight Skypricer156
© 2018 Helmut Heindel
If the postpress selection window comes up empty, you can add a custom
postpress item on the spot by clicking the add button. Any custom postpress item
you create here will be available for future quotes and orders as well.
5.25 Adding a Note or Keyword
This topic describes how to add a note or a keyword to offset, digital, and copy
quotes. Notes and keywords are both printed on price sheets, but only the keyword is
printed on quote sheets. Keywords make it easier for your customer to identify a
quote, and for you to find it. Much easier, in fact, if you've submitted scores of quotes
to the same customer.
A time-saver best discovered beforehand.
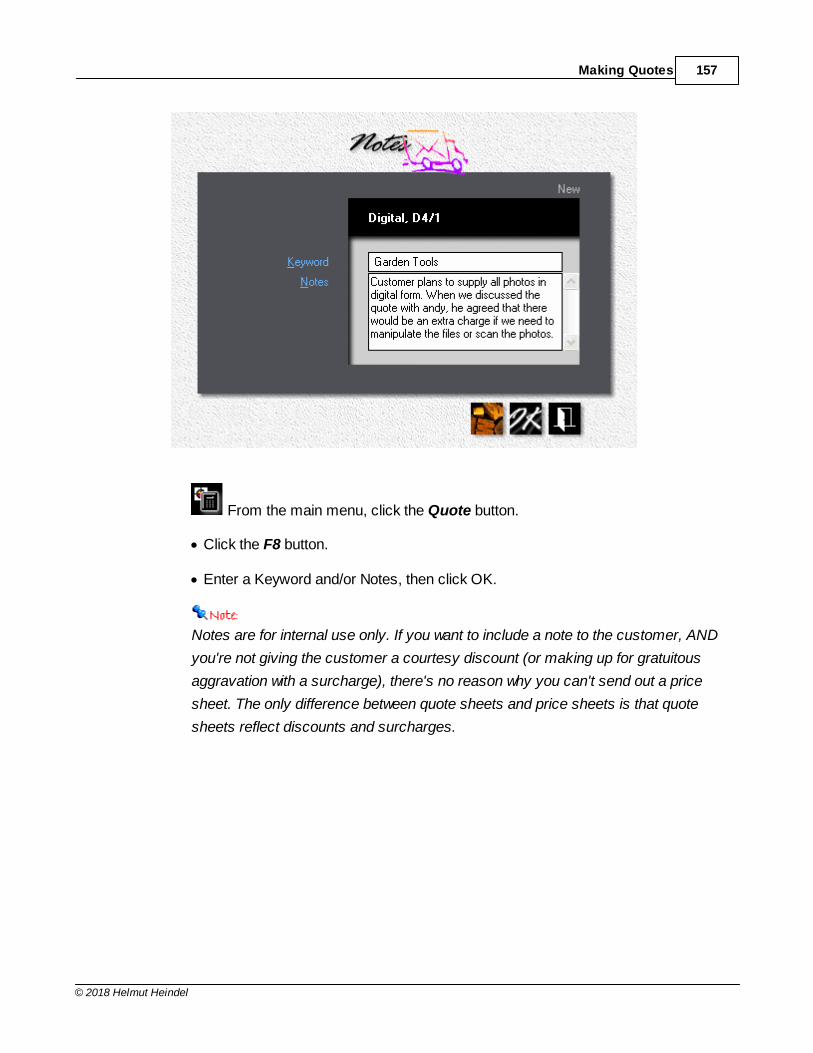
Making Quotes 157
© 2018 Helmut Heindel
From the main menu, click the Quote button.
· Click the F8 button.
· Enter a Keyword and/or Notes, then click OK.
Notes are for internal use only. If you want to include a note to the customer, AND
you're not giving the customer a courtesy discount (or making up for gratuitous
aggravation with a surcharge), there's no reason why you can't send out a price
sheet. The only difference between quote sheets and price sheets is that quote
sheets reflect discounts and surcharges.
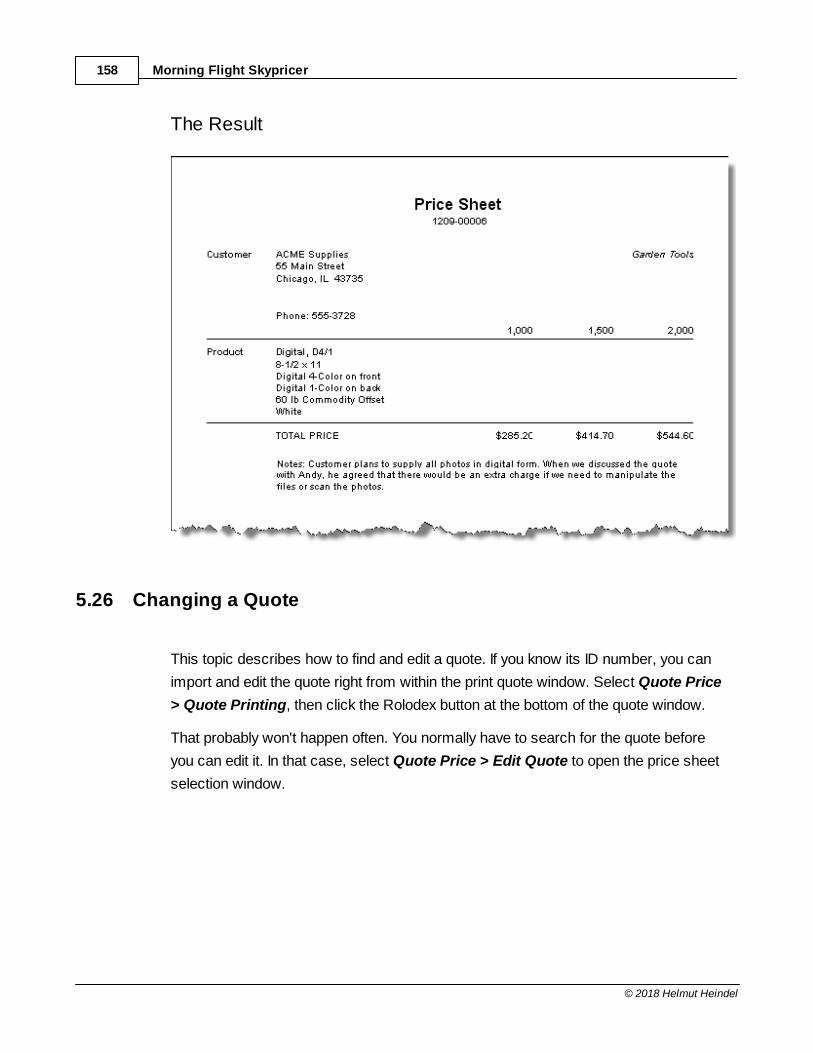
Morning Flight Skypricer158
© 2018 Helmut Heindel
The Result
5.26 Changing a Quote
This topic describes how to find and edit a quote. If you know its ID number, you can
import and edit the quote right from within the print quote window. Select Quote Price
> Quote Printing, then click the Rolodex button at the bottom of the quote window.
That probably won't happen often. You normally have to search for the quote before
you can edit it. In that case, select Quote Price > Edit Quote to open the price sheet
selection window.
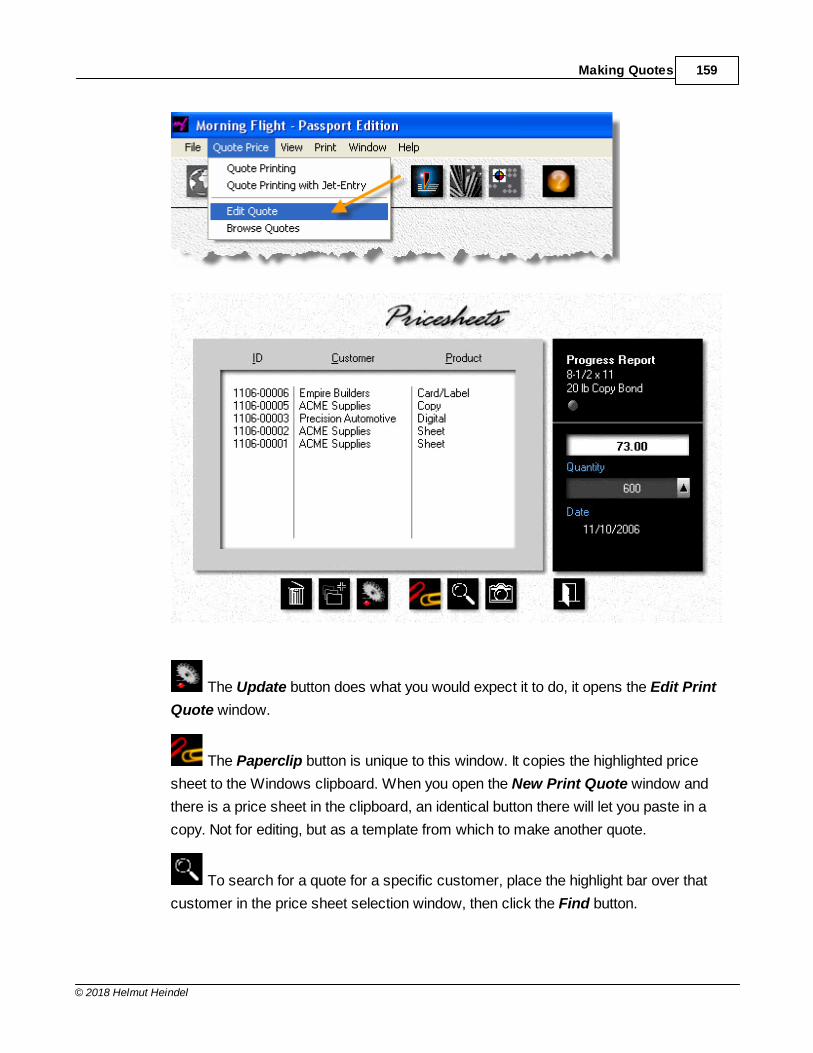
Making Quotes 159
© 2018 Helmut Heindel
The Update button does what you would expect it to do, it opens the Edit Print
Quote window.
The Paperclip button is unique to this window. It copies the highlighted price
sheet to the Windows clipboard. When you open the New Print Quote window and
there is a price sheet in the clipboard, an identical button there will let you paste in a
copy. Not for editing, but as a template from which to make another quote.
To search for a quote for a specific customer, place the highlight bar over that
customer in the price sheet selection window, then click the Find button.
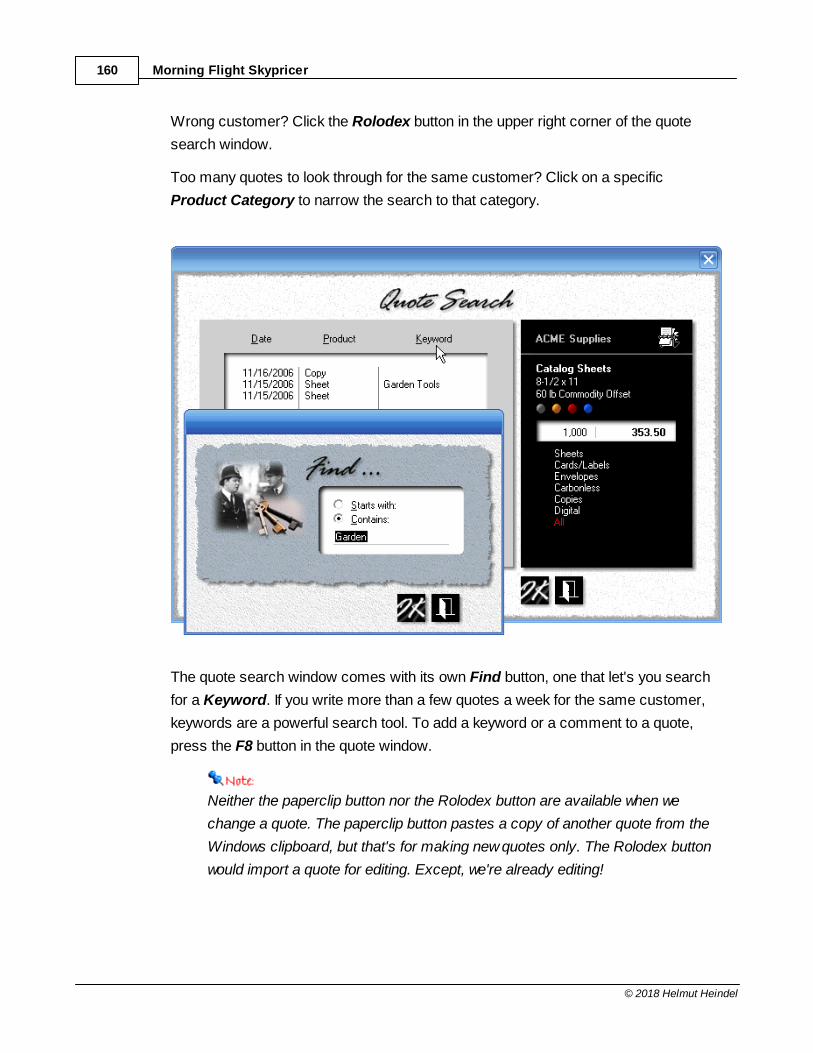
Morning Flight Skypricer160
© 2018 Helmut Heindel
Wrong customer? Click the Rolodex button in the upper right corner of the quote
search window.
Too many quotes to look through for the same customer? Click on a specific
Product Category to narrow the search to that category.
The quote search window comes with its own Find button, one that let's you search
for a Keyword. If you write more than a few quotes a week for the same customer,
keywords are a powerful search tool. To add a keyword or a comment to a quote,
press the F8 button in the quote window.
Neither the paperclip button nor the Rolodex button are available when we
change a quote. The paperclip button pastes a copy of another quote from the
Windows clipboard, but that's for making new quotes only. The Rolodex button
would import a quote for editing. Except, we're already editing!
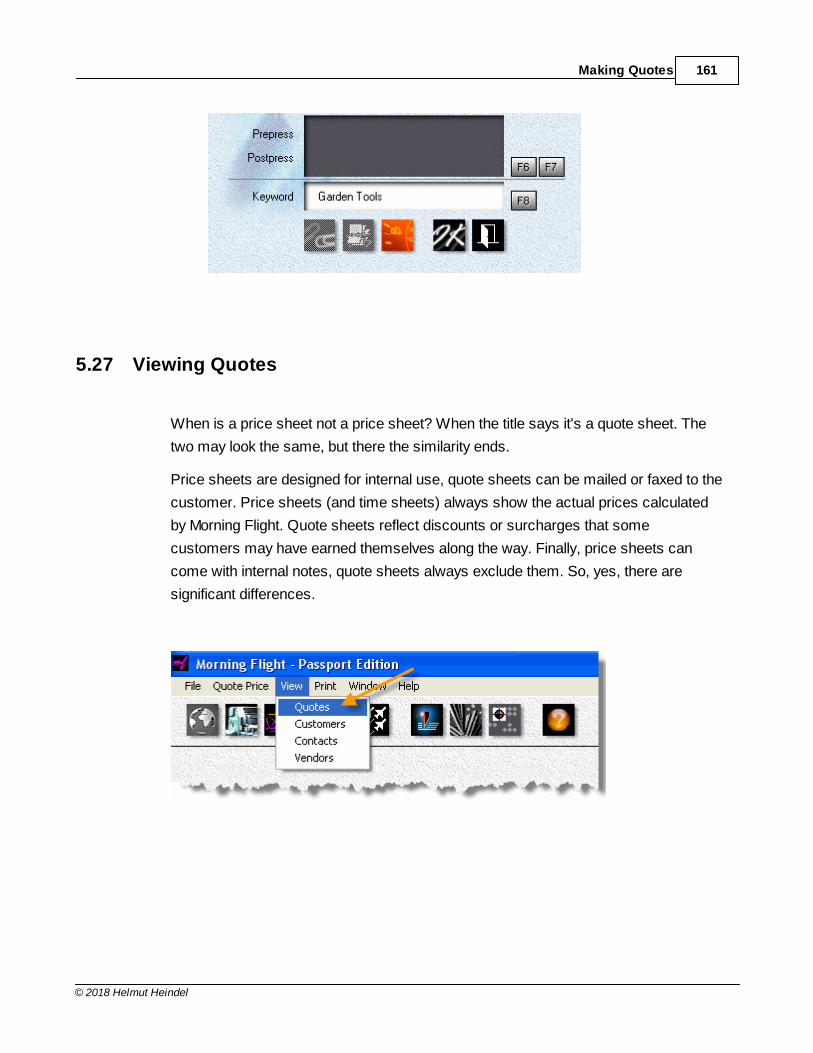
Making Quotes 161
© 2018 Helmut Heindel
5.27 Viewing Quotes
When is a price sheet not a price sheet? When the title says it's a quote sheet. The
two may look the same, but there the similarity ends.
Price sheets are designed for internal use, quote sheets can be mailed or faxed to the
customer. Price sheets (and time sheets) always show the actual prices calculated
by Morning Flight. Quote sheets reflect discounts or surcharges that some
customers may have earned themselves along the way. Finally, price sheets can
come with internal notes, quote sheets always exclude them. So, yes, there are
significant differences.
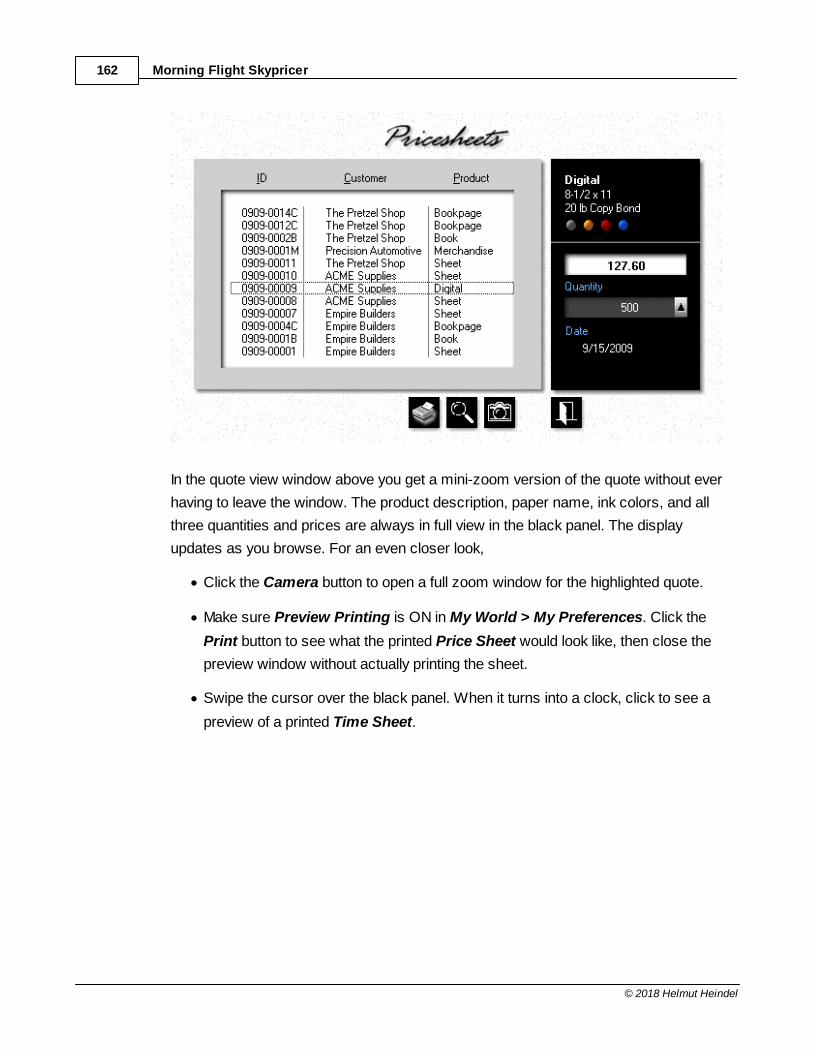
Morning Flight Skypricer162
© 2018 Helmut Heindel
In the quote view window above you get a mini-zoom version of the quote without ever
having to leave the window. The product description, paper name, ink colors, and all
three quantities and prices are always in full view in the black panel. The display
updates as you browse. For an even closer look,
· Click the Camera button to open a full zoom window for the highlighted quote.
· Make sure Preview Printing is ON in My World > My Preferences. Click the
Print button to see what the printed Price Sheet would look like, then close the
preview window without actually printing the sheet.
· Swipe the cursor over the black panel. When it turns into a clock, click to see a
preview of a printed Time Sheet.
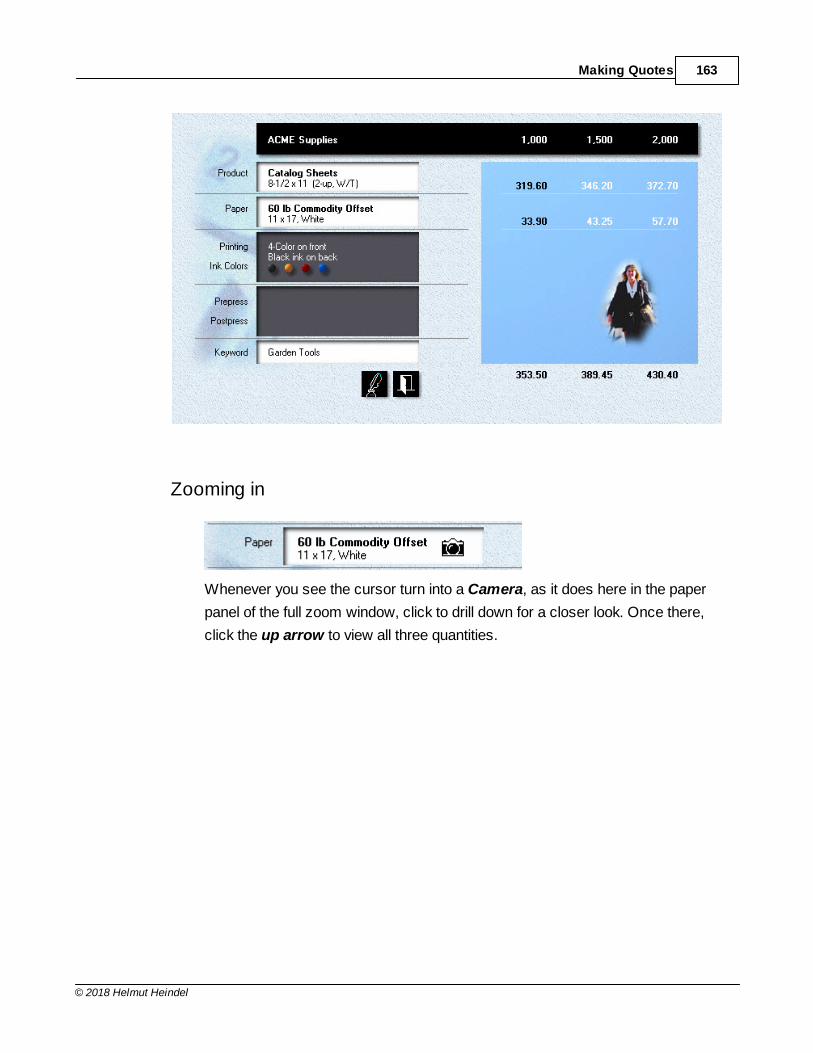
Making Quotes 163
© 2018 Helmut Heindel
Zooming in
Whenever you see the cursor turn into a Camera, as it does here in the paper
panel of the full zoom window, click to drill down for a closer look. Once there,
click the up arrow to view all three quantities.
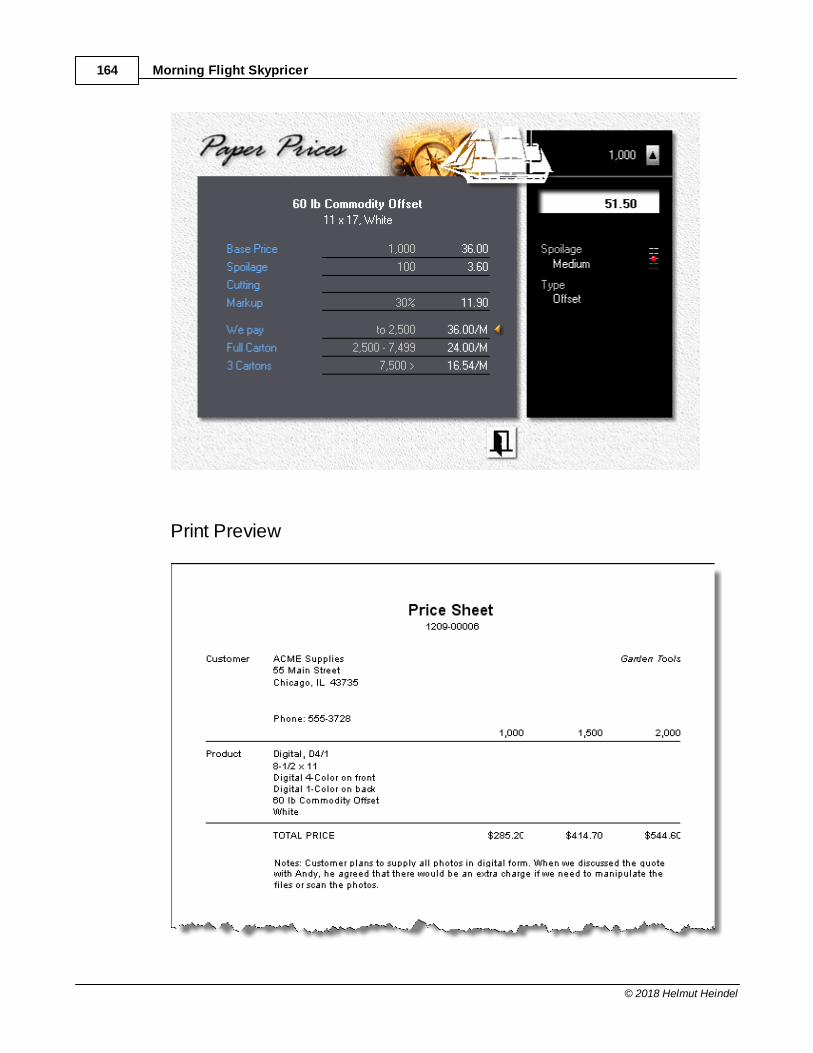
Morning Flight Skypricer164
© 2018 Helmut Heindel
Print Preview
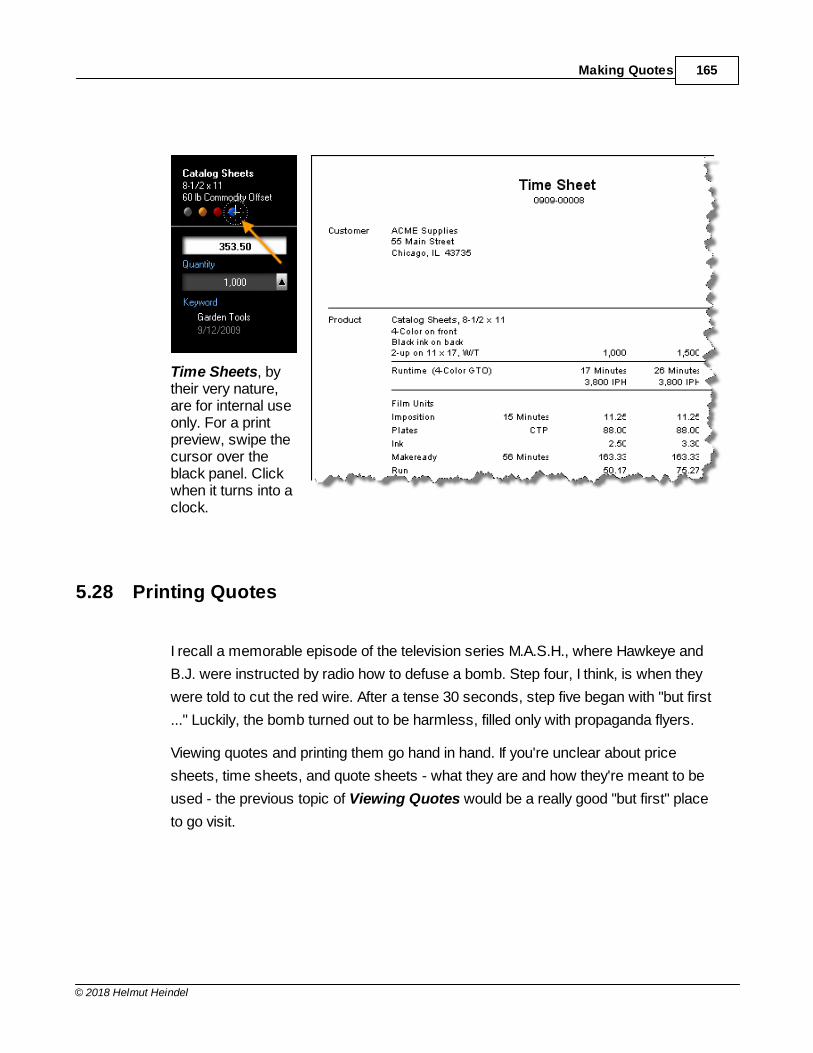
Making Quotes 165
© 2018 Helmut Heindel
Time Sheets, bytheir very nature,are for internal useonly. For a printpreview, swipe thecursor over theblack panel. Clickwhen it turns into aclock.
5.28 Printing Quotes
I recall a memorable episode of the television series M.A.S.H., where Hawkeye and
B.J. were instructed by radio how to defuse a bomb. Step four, I think, is when they
were told to cut the red wire. After a tense 30 seconds, step five began with "but first
..." Luckily, the bomb turned out to be harmless, filled only with propaganda flyers.
Viewing quotes and printing them go hand in hand. If you're unclear about price
sheets, time sheets, and quote sheets - what they are and how they're meant to be
used - the previous topic of Viewing Quotes would be a really good "but first" place
to go visit.
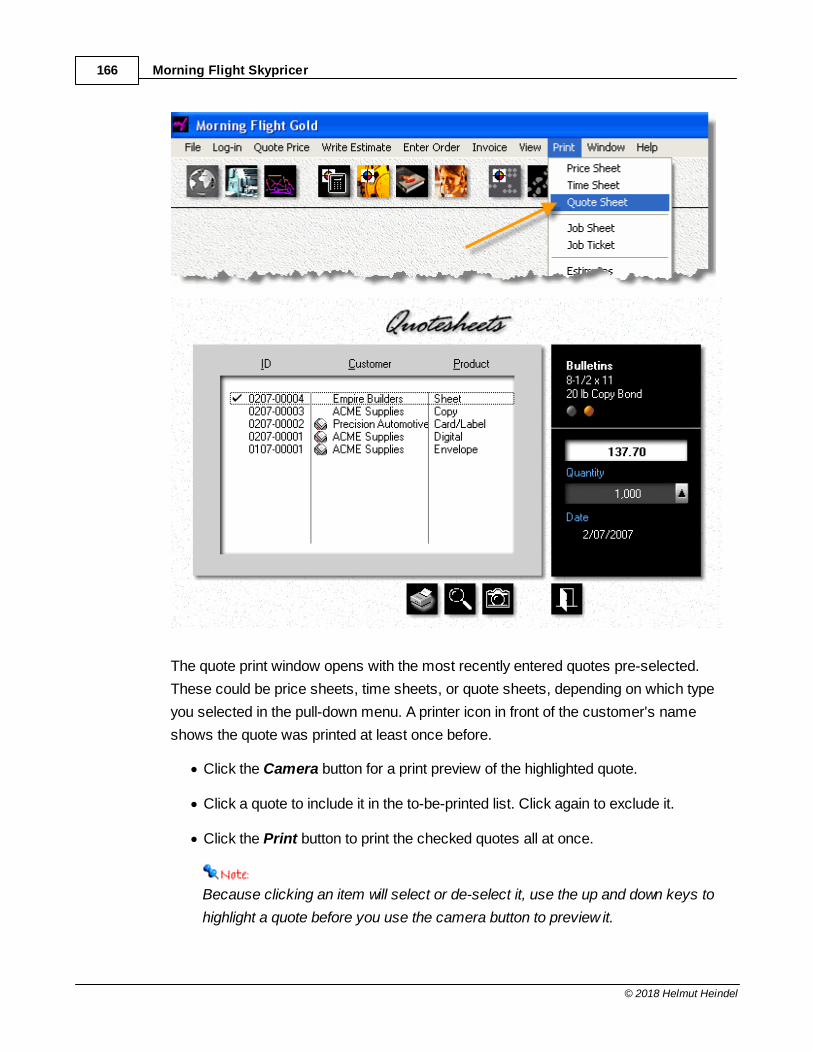
Morning Flight Skypricer166
© 2018 Helmut Heindel
The quote print window opens with the most recently entered quotes pre-selected.
These could be price sheets, time sheets, or quote sheets, depending on which type
you selected in the pull-down menu. A printer icon in front of the customer's name
shows the quote was printed at least once before.
· Click the Camera button for a print preview of the highlighted quote.
· Click a quote to include it in the to-be-printed list. Click again to exclude it.
· Click the Print button to print the checked quotes all at once.
Because clicking an item will select or de-select it, use the up and down keys to
highlight a quote before you use the camera button to preview it.
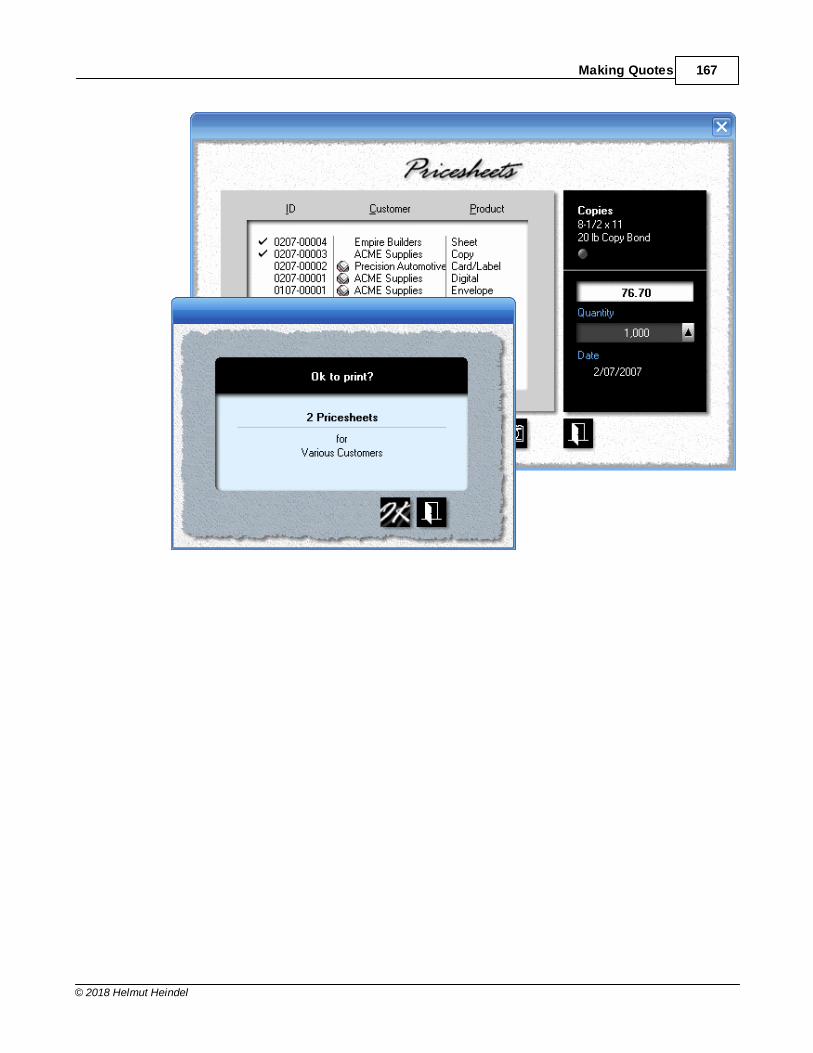
Making Quotes 167
© 2018 Helmut Heindel
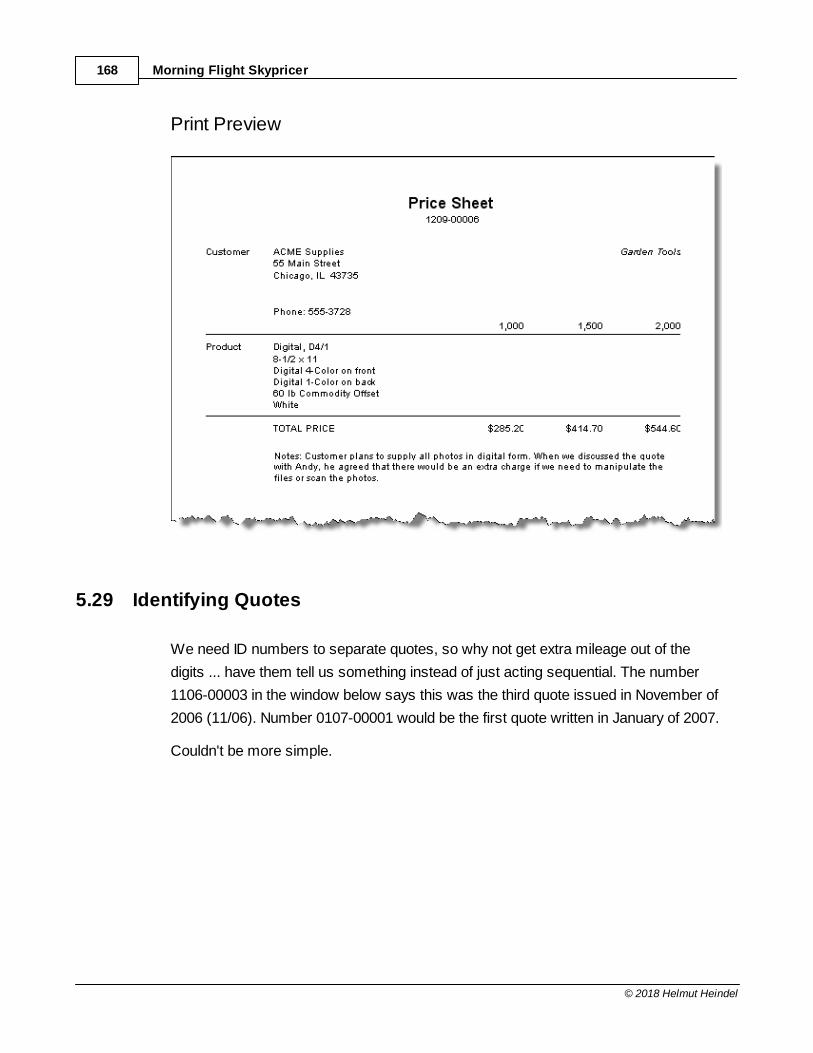
Morning Flight Skypricer168
© 2018 Helmut Heindel
Print Preview
5.29 Identifying Quotes
We need ID numbers to separate quotes, so why not get extra mileage out of the
digits ... have them tell us something instead of just acting sequential. The number
1106-00003 in the window below says this was the third quote issued in November of
2006 (11/06). Number 0107-00001 would be the first quote written in January of 2007.
Couldn't be more simple.
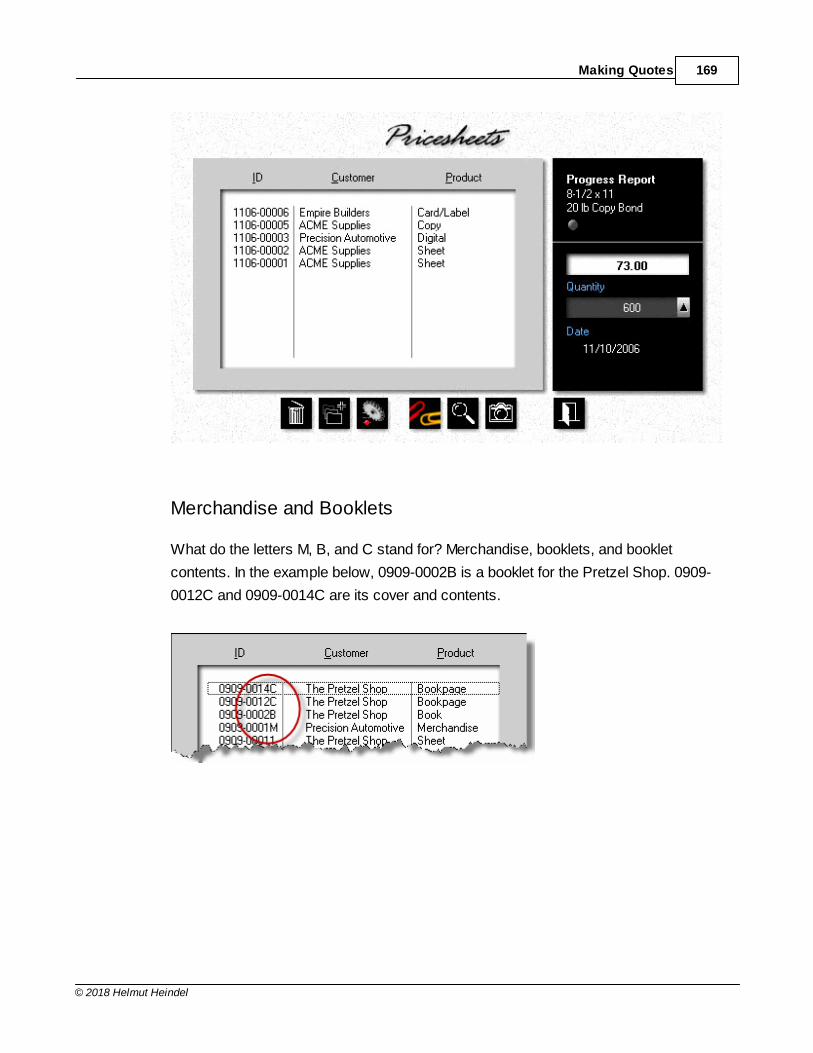
Making Quotes 169
© 2018 Helmut Heindel
Merchandise and Booklets
What do the letters M, B, and C stand for? Merchandise, booklets, and booklet
contents. In the example below, 0909-0002B is a booklet for the Pretzel Shop. 0909-
0012C and 0909-0014C are its cover and contents.
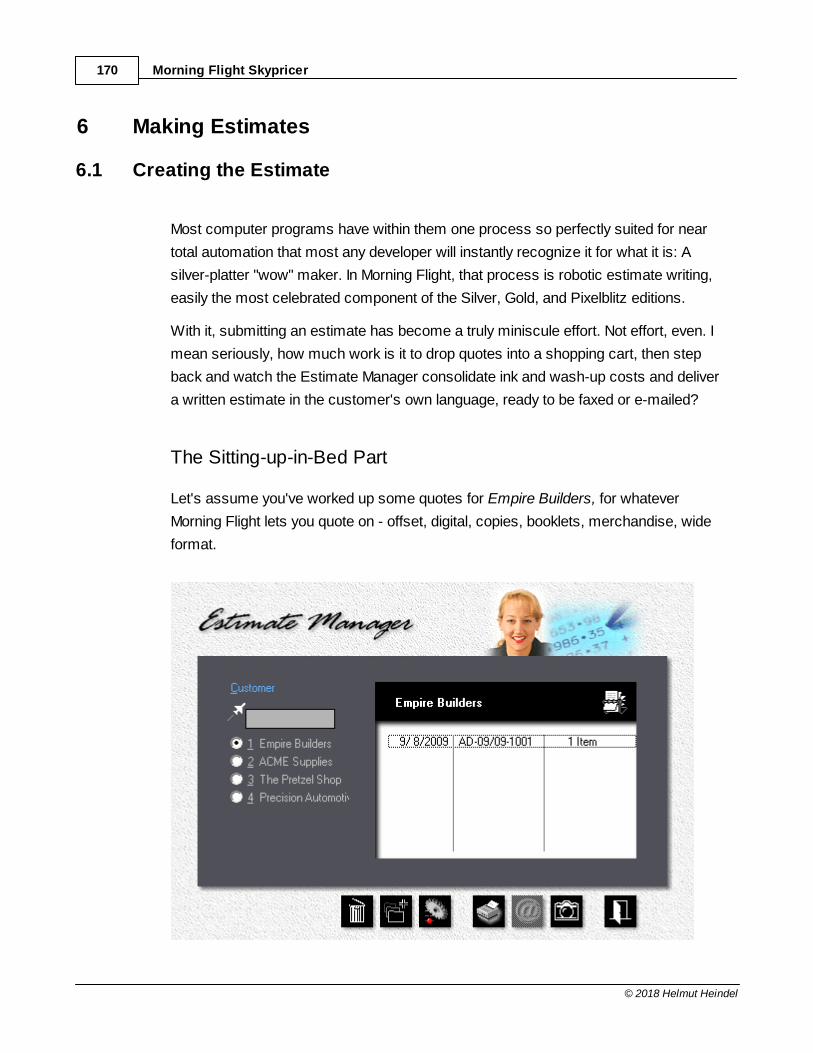
Morning Flight Skypricer170
© 2018 Helmut Heindel
6 Making Estimates
6.1 Creating the Estimate
Most computer programs have within them one process so perfectly suited for near
total automation that most any developer will instantly recognize it for what it is: A
silver-platter "wow" maker. In Morning Flight, that process is robotic estimate writing,
easily the most celebrated component of the Silver, Gold, and Pixelblitz editions.
With it, submitting an estimate has become a truly miniscule effort. Not effort, even. I
mean seriously, how much work is it to drop quotes into a shopping cart, then step
back and watch the Estimate Manager consolidate ink and wash-up costs and deliver
a written estimate in the customer's own language, ready to be faxed or e-mailed?
The Sitting-up-in-Bed Part
Let's assume you've worked up some quotes for Empire Builders, for whatever
Morning Flight lets you quote on - offset, digital, copies, booklets, merchandise, wide
format.
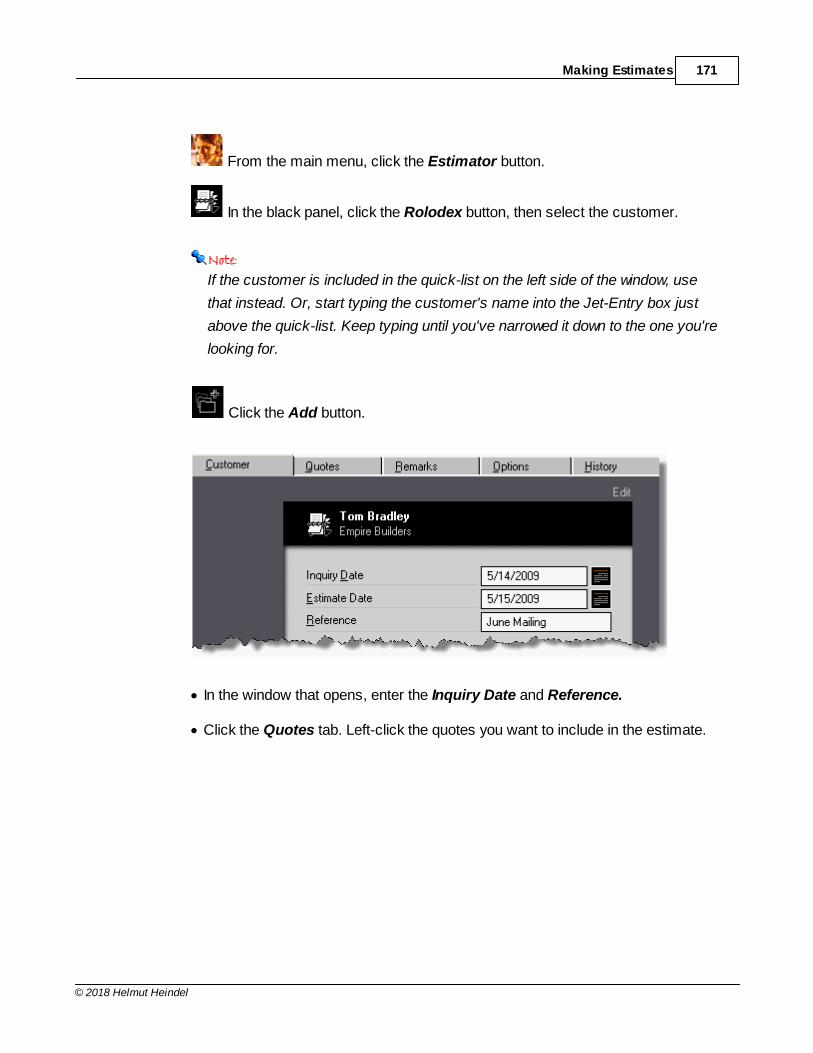
Making Estimates 171
© 2018 Helmut Heindel
From the main menu, click the Estimator button.
In the black panel, click the Rolodex button, then select the customer.
If the customer is included in the quick-list on the left side of the window, use
that instead. Or, start typing the customer's name into the Jet-Entry box just
above the quick-list. Keep typing until you've narrowed it down to the one you're
looking for.
Click the Add button.
· In the window that opens, enter the Inquiry Date and Reference.
· Click the Quotes tab. Left-click the quotes you want to include in the estimate.
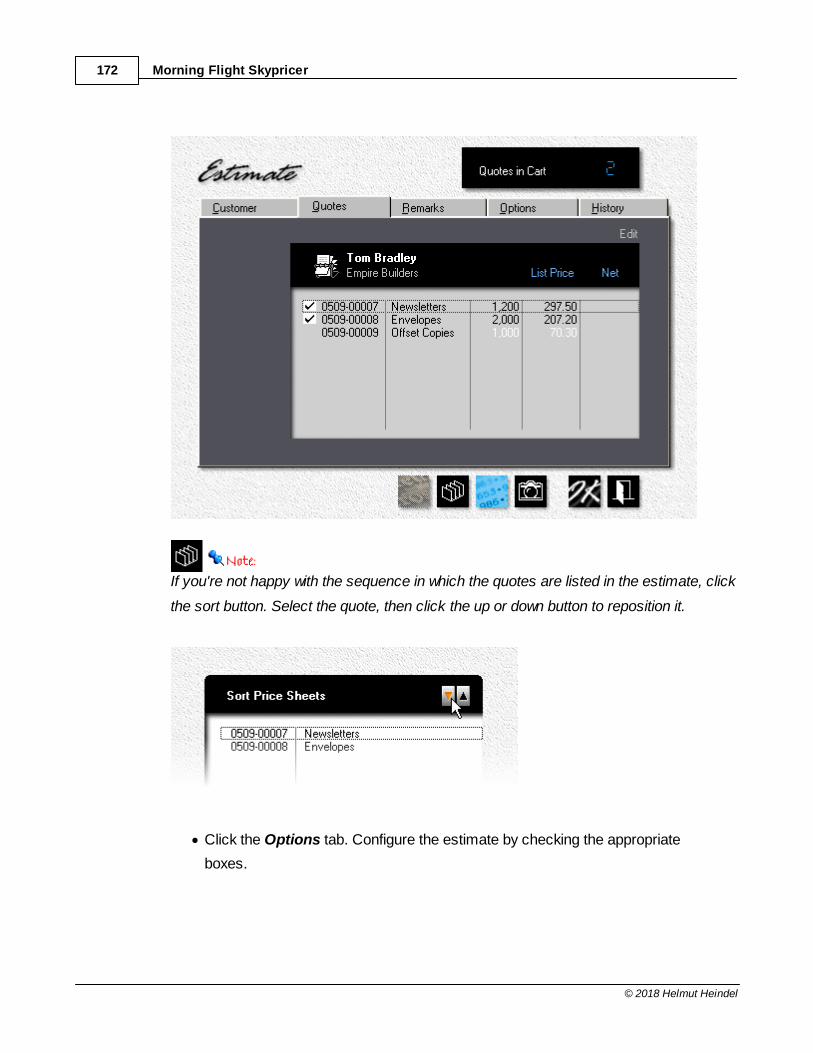
Morning Flight Skypricer172
© 2018 Helmut Heindel
If you're not happy with the sequence in which the quotes are listed in the estimate, click
the sort button. Select the quote, then click the up or down button to reposition it.
· Click the Options tab. Configure the estimate by checking the appropriate
boxes.
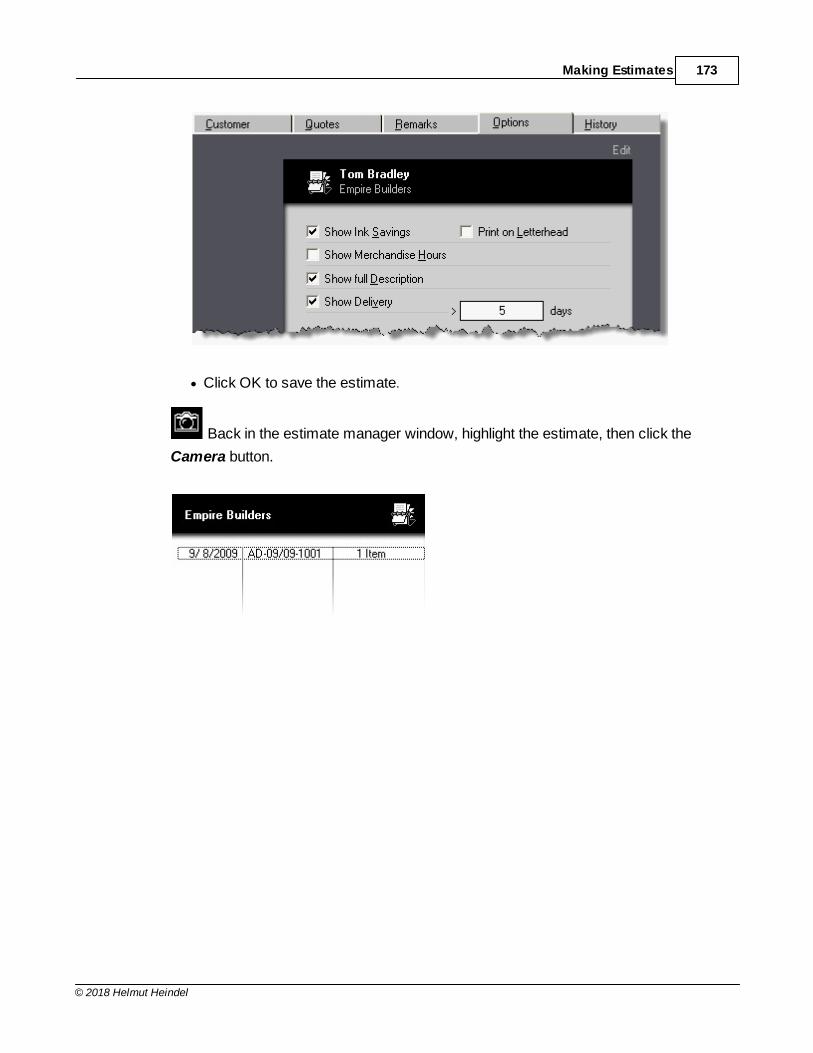
Making Estimates 173
© 2018 Helmut Heindel
· Click OK to save the estimate.
Back in the estimate manager window, highlight the estimate, then click the
Camera button.
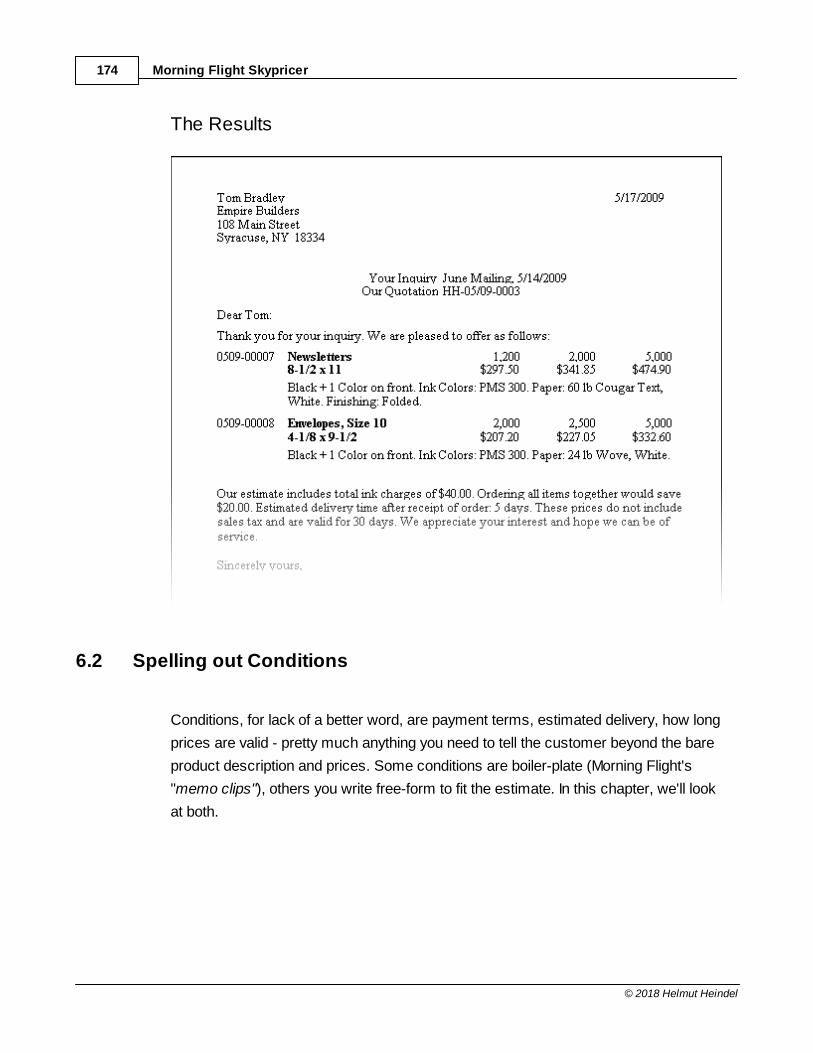
Morning Flight Skypricer174
© 2018 Helmut Heindel
The Results
6.2 Spelling out Conditions
Conditions, for lack of a better word, are payment terms, estimated delivery, how long
prices are valid - pretty much anything you need to tell the customer beyond the bare
product description and prices. Some conditions are boiler-plate (Morning Flight's
"memo clips"), others you write free-form to fit the estimate. In this chapter, we'll look
at both.
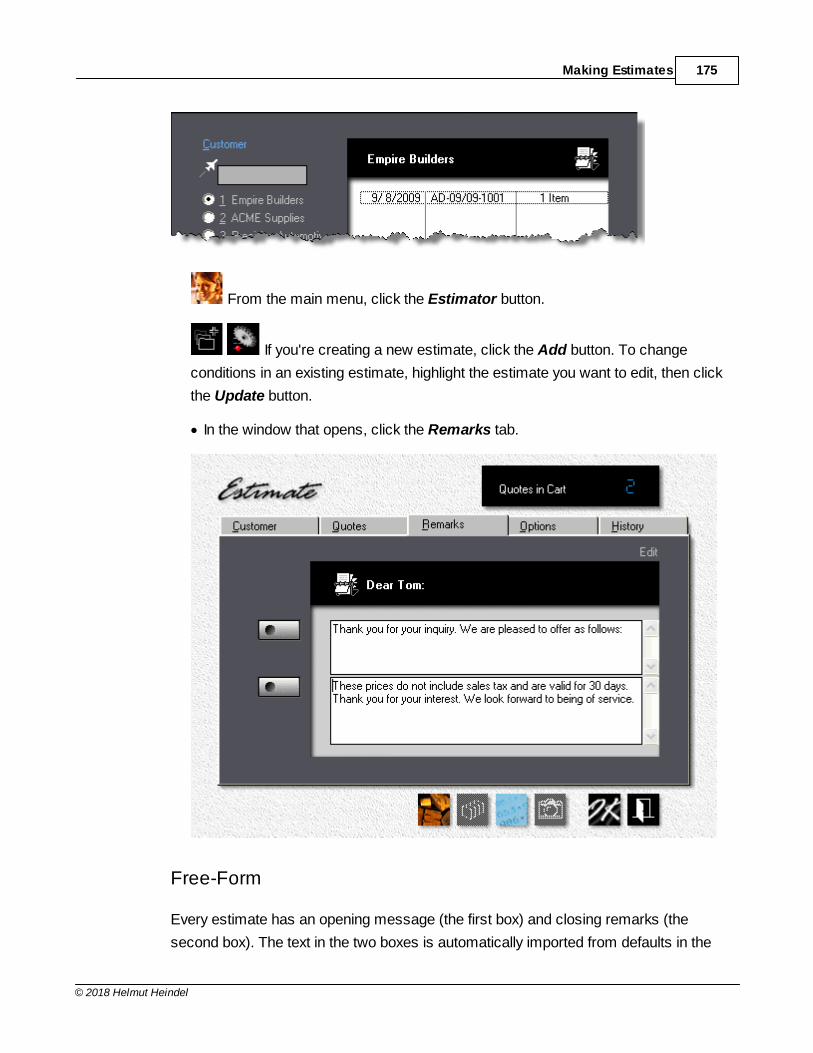
Making Estimates 175
© 2018 Helmut Heindel
From the main menu, click the Estimator button.
If you're creating a new estimate, click the Add button. To change
conditions in an existing estimate, highlight the estimate you want to edit, then click
the Update button.
· In the window that opens, click the Remarks tab.
Free-Form
Every estimate has an opening message (the first box) and closing remarks (the
second box). The text in the two boxes is automatically imported from defaults in the
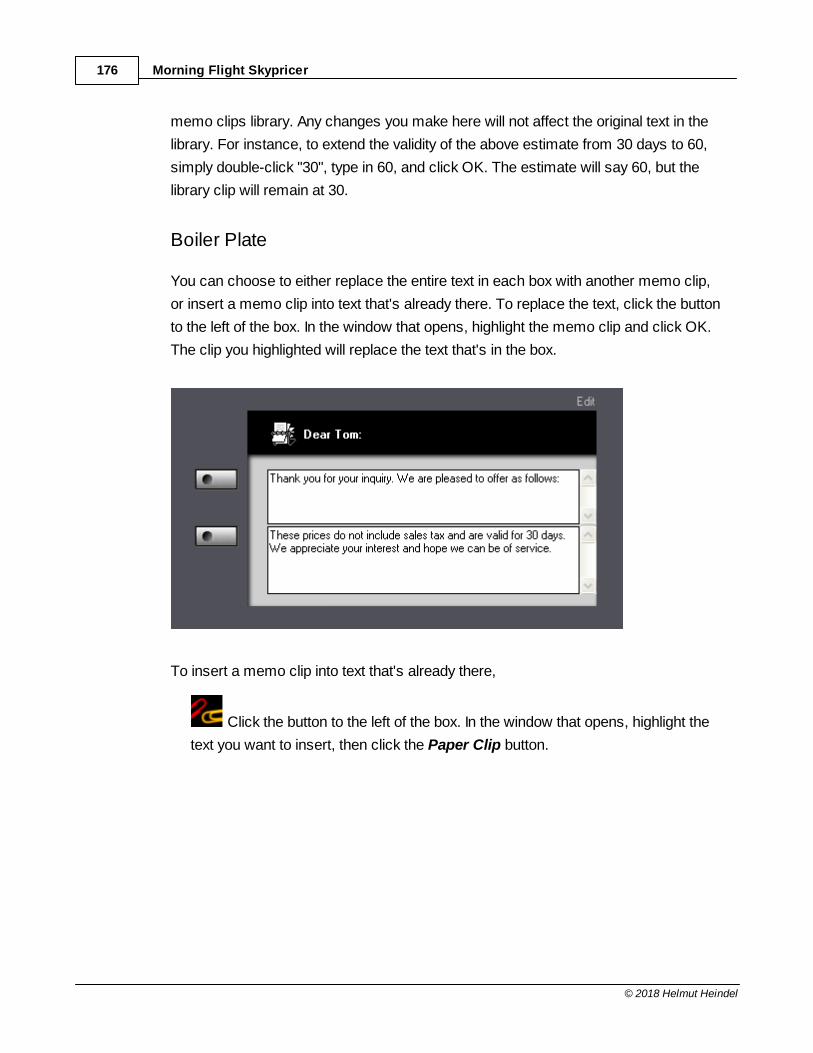
Morning Flight Skypricer176
© 2018 Helmut Heindel
memo clips library. Any changes you make here will not affect the original text in the
library. For instance, to extend the validity of the above estimate from 30 days to 60,
simply double-click "30", type in 60, and click OK. The estimate will say 60, but the
library clip will remain at 30.
Boiler Plate
You can choose to either replace the entire text in each box with another memo clip,
or insert a memo clip into text that's already there. To replace the text, click the button
to the left of the box. In the window that opens, highlight the memo clip and click OK.
The clip you highlighted will replace the text that's in the box.
To insert a memo clip into text that's already there,
Click the button to the left of the box. In the window that opens, highlight the
text you want to insert, then click the Paper Clip button.
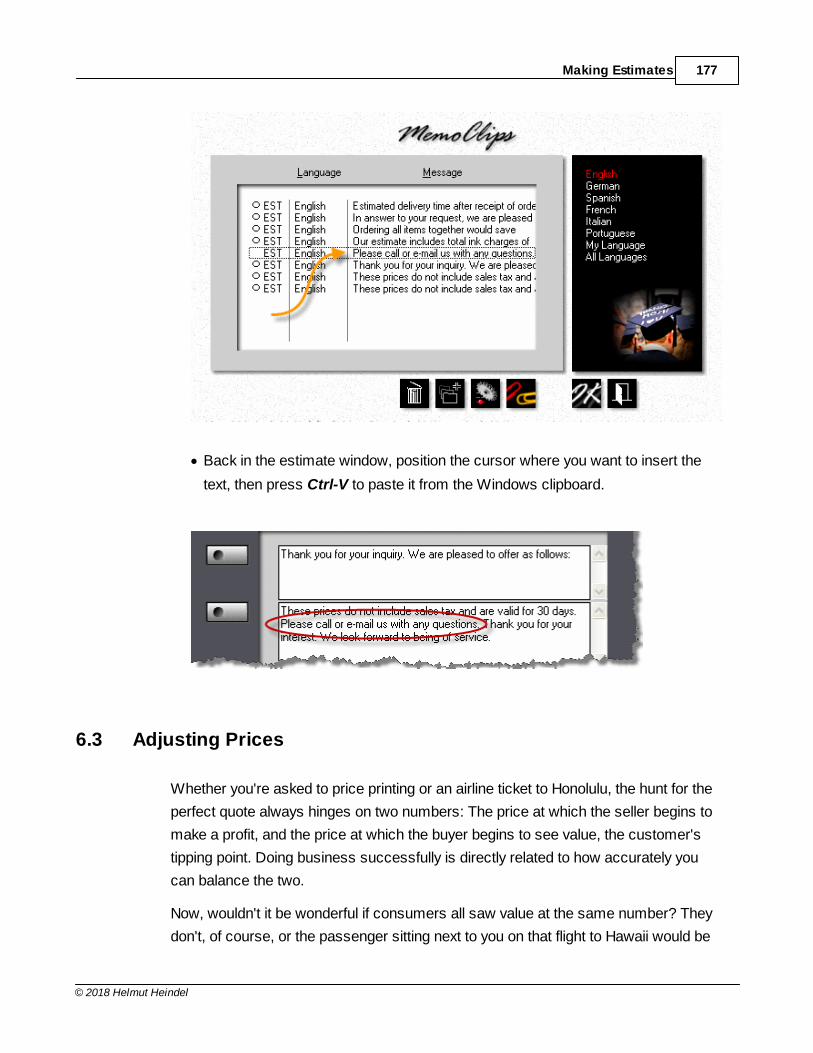
Making Estimates 177
© 2018 Helmut Heindel
· Back in the estimate window, position the cursor where you want to insert the
text, then press Ctrl-V to paste it from the Windows clipboard.
6.3 Adjusting Prices
Whether you're asked to price printing or an airline ticket to Honolulu, the hunt for the
perfect quote always hinges on two numbers: The price at which the seller begins to
make a profit, and the price at which the buyer begins to see value, the customer's
tipping point. Doing business successfully is directly related to how accurately you
can balance the two.
Now, wouldn't it be wonderful if consumers all saw value at the same number? They
don't, of course, or the passenger sitting next to you on that flight to Hawaii would be
Morning Flight Skypricer178
© 2018 Helmut Heindel
paying the same fare you do. Airlines have long been at the leading edge of pricing by
value. Ticket costs for each flight are recalculated every 15 minutes, based on how
far ahead of departure the ticket price is quoted, the number of seats still available,
and a myriad other factors. Any seat on any given flight can cost four times as much
as the seat next to it. The flying public knows it and has learned to accept it.
Given that variable pricing works for the airlines, should you now rush out and adopt
their business model? Bad idea, the name Morning Flight notwithstanding. A
Heidelberg or Xerox DocuTech is no Boeing 737. Jumbo-sized price disparities won't
fly with a box of envelopes or letterheads.
So the scale is wrong. That's not to say variable pricing has no place in printing. At a
minimum, it should keep you from leaving money on the table. Think about it. How
smart is it to always quote everyone the same price, regardless of much hand-
holding you have to do, of "Fast Freddie" needing every job yesterday, and "Ms.
Persnickety" throwing a tantrum whenever the ink colors on her monthly flyer don't
perfectly match her faded swatch book? On the flip side, can you afford to not
sharpen your pencil when you've been staring at idle presses all month, a printer's
equivalent of empty seats?
Morning Flight lets you implement variable pricing at two levels. The first is an always-
applied price adjustment (a discount or surcharge) for a specific customer, the
second a one-time adjustment applied to a single estimate. In this chapter, we'll look
at both.
At the Customer Level
Click the My Store button, then click My Customers.
Click the Update button.
· Click the Terms tab and check one of the boxes to reduce or increase prices,
then enter a percentage.
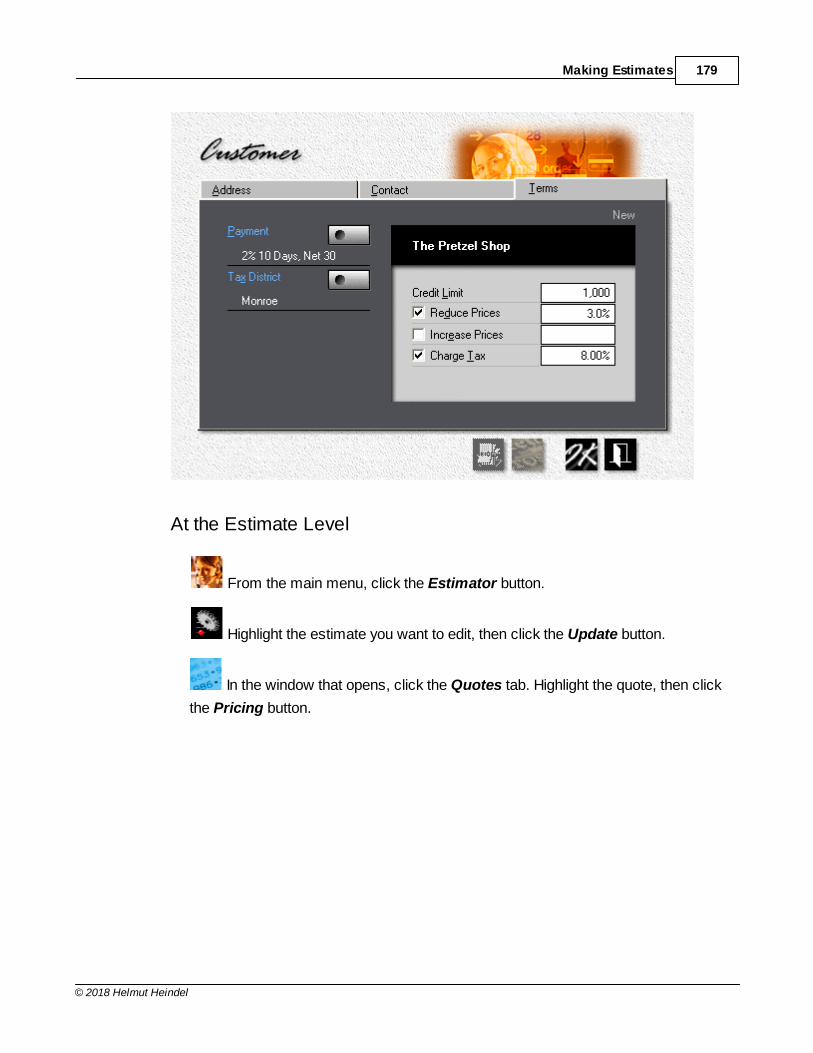
Making Estimates 179
© 2018 Helmut Heindel
At the Estimate Level
From the main menu, click the Estimator button.
Highlight the estimate you want to edit, then click the Update button.
In the window that opens, click the Quotes tab. Highlight the quote, then click
the Pricing button.

Morning Flight Skypricer180
© 2018 Helmut Heindel
If you check the list and net prices above, you'll note that the Pretzel Shop's
customary 3% discount has already been applied to every item in the estimate.
You don't have to do anything to simply maintain that discount. However,
should you change your mind and click the blue Pricing button, that 3% will
merely come up as the default, ready for you to adjust up or down.
Making the Price Adjustment
There are two ways you can adjust the final price: Enter a percentage and let the
program come up with the new prices. Or, enter a price and have Morning Flight work
out the percentage. Either way, the same percentage is linked to all three quantities.
There's a reason for that. With a uniform percentage, when you change any of the
three quantities, the program can recalculate the price you normally charge for the
new quantity, factor in the percentage, then re-apply the price adjustment -
automatically. Keeps you from forgetting to raise a fixed, lower than customary price
after increasing the quantity.
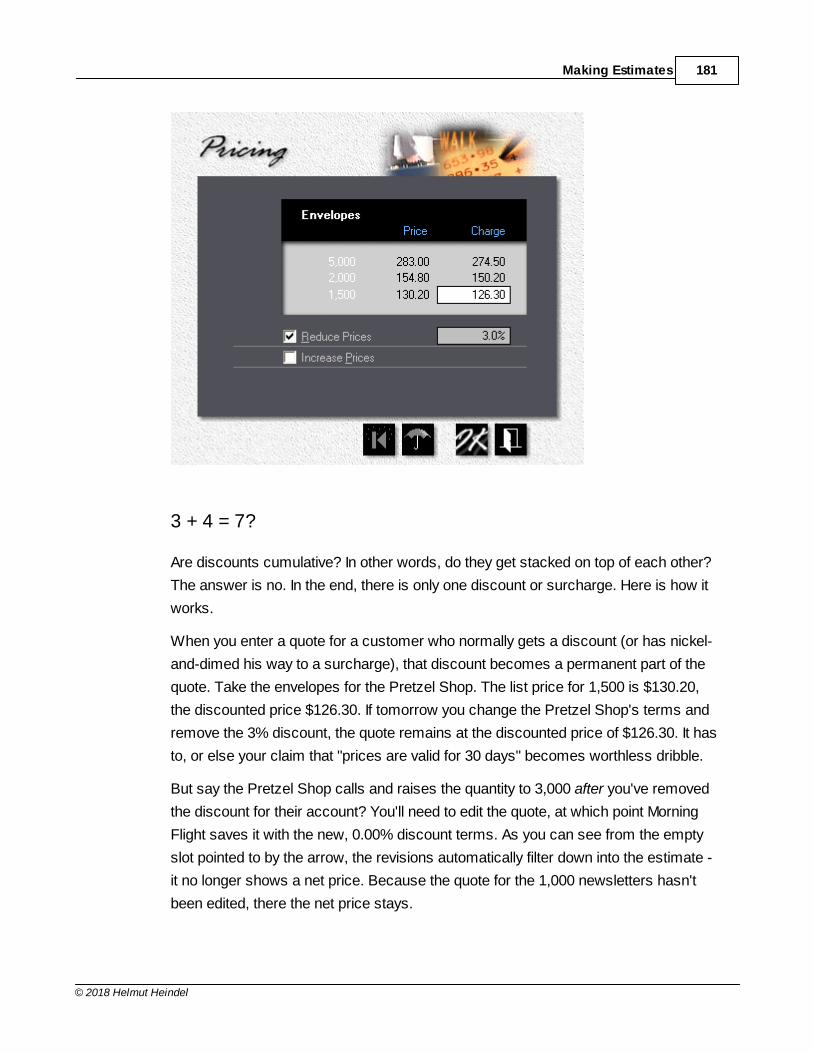
Making Estimates 181
© 2018 Helmut Heindel
3 + 4 = 7?
Are discounts cumulative? In other words, do they get stacked on top of each other?
The answer is no. In the end, there is only one discount or surcharge. Here is how it
works.
When you enter a quote for a customer who normally gets a discount (or has nickel-
and-dimed his way to a surcharge), that discount becomes a permanent part of the
quote. Take the envelopes for the Pretzel Shop. The list price for 1,500 is $130.20,
the discounted price $126.30. If tomorrow you change the Pretzel Shop's terms and
remove the 3% discount, the quote remains at the discounted price of $126.30. It has
to, or else your claim that "prices are valid for 30 days" becomes worthless dribble.
But say the Pretzel Shop calls and raises the quantity to 3,000 after you've removed
the discount for their account? You'll need to edit the quote, at which point Morning
Flight saves it with the new, 0.00% discount terms. As you can see from the empty
slot pointed to by the arrow, the revisions automatically filter down into the estimate -
it no longer shows a net price. Because the quote for the 1,000 newsletters hasn't
been edited, there the net price stays.
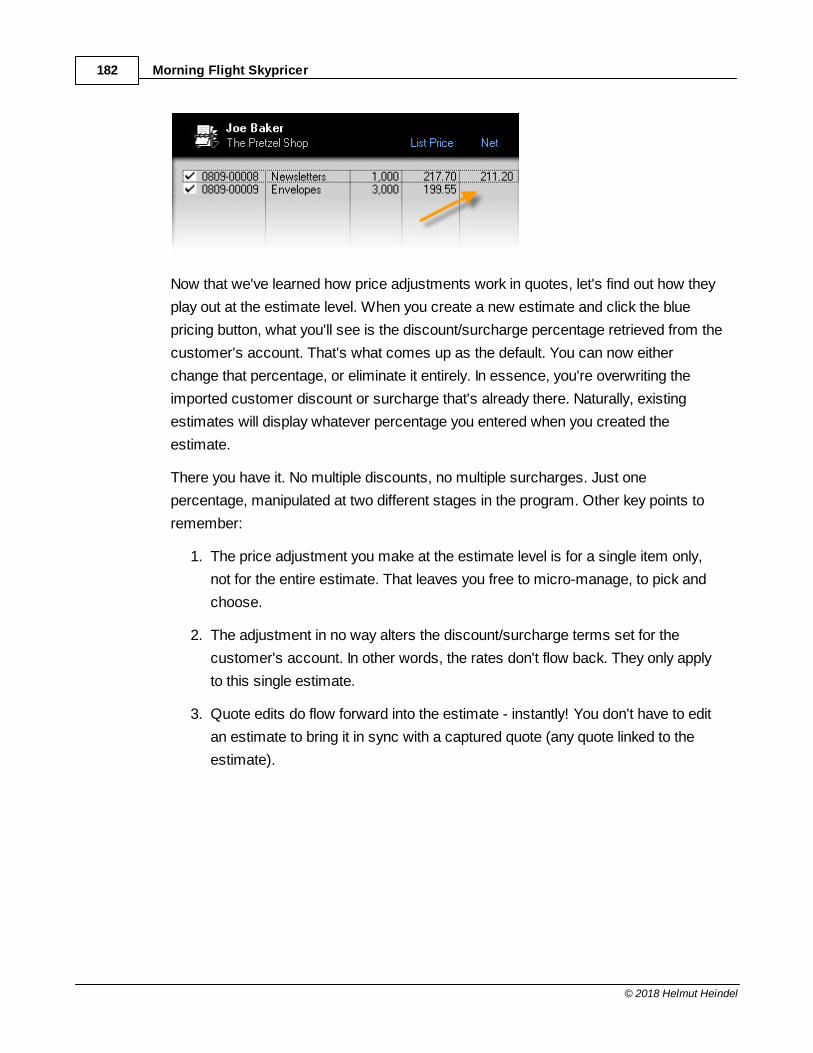
Morning Flight Skypricer182
© 2018 Helmut Heindel
Now that we've learned how price adjustments work in quotes, let's find out how they
play out at the estimate level. When you create a new estimate and click the blue
pricing button, what you'll see is the discount/surcharge percentage retrieved from the
customer's account. That's what comes up as the default. You can now either
change that percentage, or eliminate it entirely. In essence, you're overwriting the
imported customer discount or surcharge that's already there. Naturally, existing
estimates will display whatever percentage you entered when you created the
estimate.
There you have it. No multiple discounts, no multiple surcharges. Just one
percentage, manipulated at two different stages in the program. Other key points to
remember:
1. The price adjustment you make at the estimate level is for a single item only,
not for the entire estimate. That leaves you free to micro-manage, to pick and
choose.
2. The adjustment in no way alters the discount/surcharge terms set for the
customer's account. In other words, the rates don't flow back. They only apply
to this single estimate.
3. Quote edits do flow forward into the estimate - instantly! You don't have to edit
an estimate to bring it in sync with a captured quote (any quote linked to the
estimate).
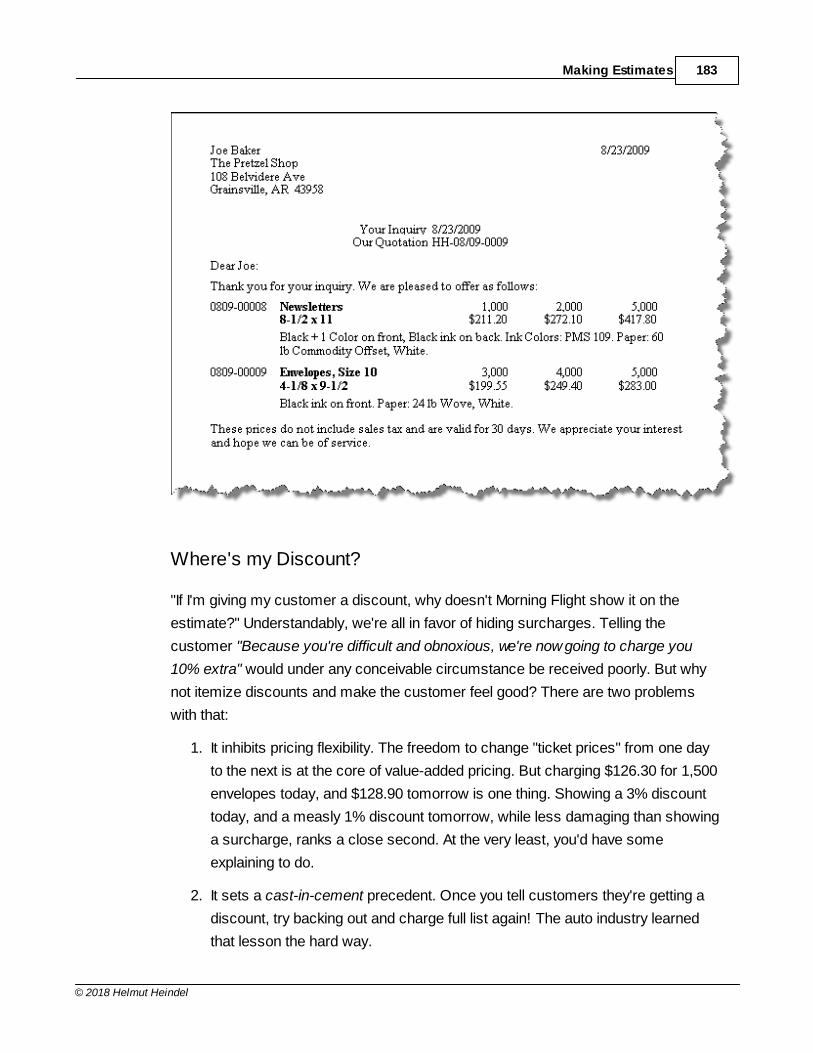
Making Estimates 183
© 2018 Helmut Heindel
Where's my Discount?
"If I'm giving my customer a discount, why doesn't Morning Flight show it on the
estimate?" Understandably, we're all in favor of hiding surcharges. Telling the
customer "Because you're difficult and obnoxious, we're now going to charge you
10% extra" would under any conceivable circumstance be received poorly. But why
not itemize discounts and make the customer feel good? There are two problems
with that:
1. It inhibits pricing flexibility. The freedom to change "ticket prices" from one day
to the next is at the core of value-added pricing. But charging $126.30 for 1,500
envelopes today, and $128.90 tomorrow is one thing. Showing a 3% discount
today, and a measly 1% discount tomorrow, while less damaging than showing
a surcharge, ranks a close second. At the very least, you'd have some
explaining to do.
2. It sets a cast-in-cement precedent. Once you tell customers they're getting a
discount, try backing out and charge full list again! The auto industry learned
that lesson the hard way.
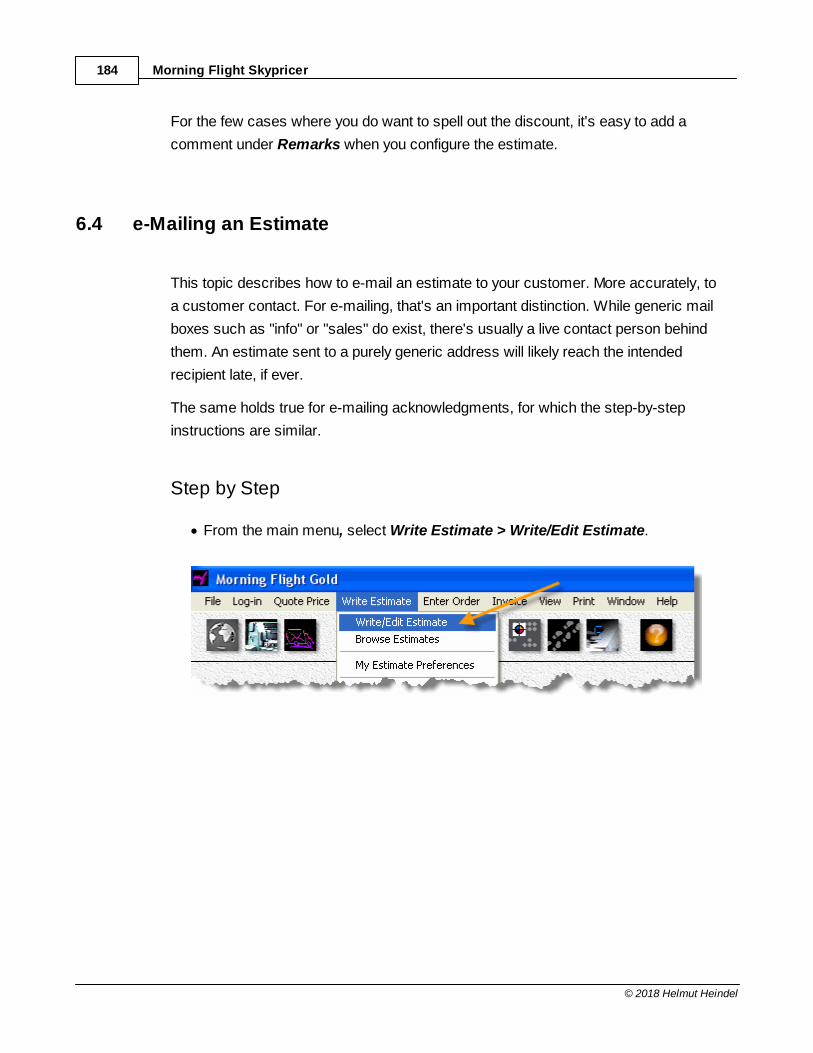
Morning Flight Skypricer184
© 2018 Helmut Heindel
For the few cases where you do want to spell out the discount, it's easy to add a
comment under Remarks when you configure the estimate.
6.4 e-Mailing an Estimate
This topic describes how to e-mail an estimate to your customer. More accurately, to
a customer contact. For e-mailing, that's an important distinction. While generic mail
boxes such as "info" or "sales" do exist, there's usually a live contact person behind
them. An estimate sent to a purely generic address will likely reach the intended
recipient late, if ever.
The same holds true for e-mailing acknowledgments, for which the step-by-step
instructions are similar.
Step by Step
· From the main menu, select Write Estimate > Write/Edit Estimate.
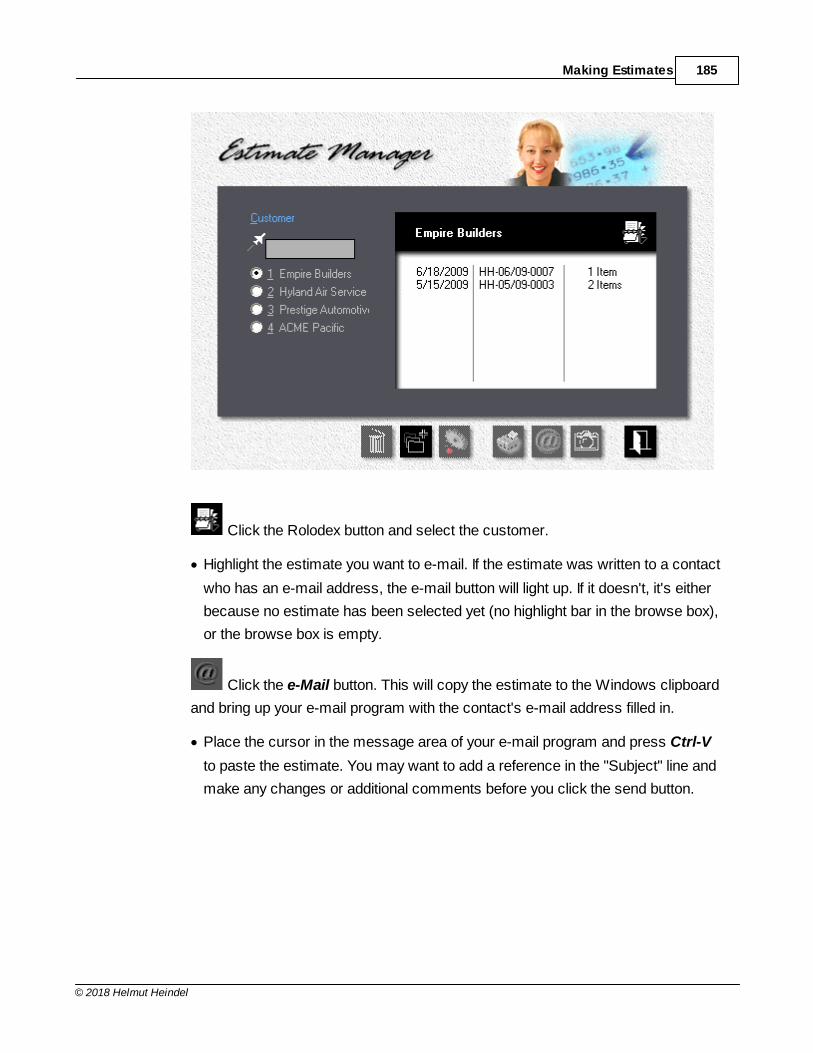
Making Estimates 185
© 2018 Helmut Heindel
Click the Rolodex button and select the customer.
· Highlight the estimate you want to e-mail. If the estimate was written to a contact
who has an e-mail address, the e-mail button will light up. If it doesn't, it's either
because no estimate has been selected yet (no highlight bar in the browse box),
or the browse box is empty.
Click the e-Mail button. This will copy the estimate to the Windows clipboard
and bring up your e-mail program with the contact's e-mail address filled in.
· Place the cursor in the message area of your e-mail program and press Ctrl-V
to paste the estimate. You may want to add a reference in the "Subject" line and
make any changes or additional comments before you click the send button.
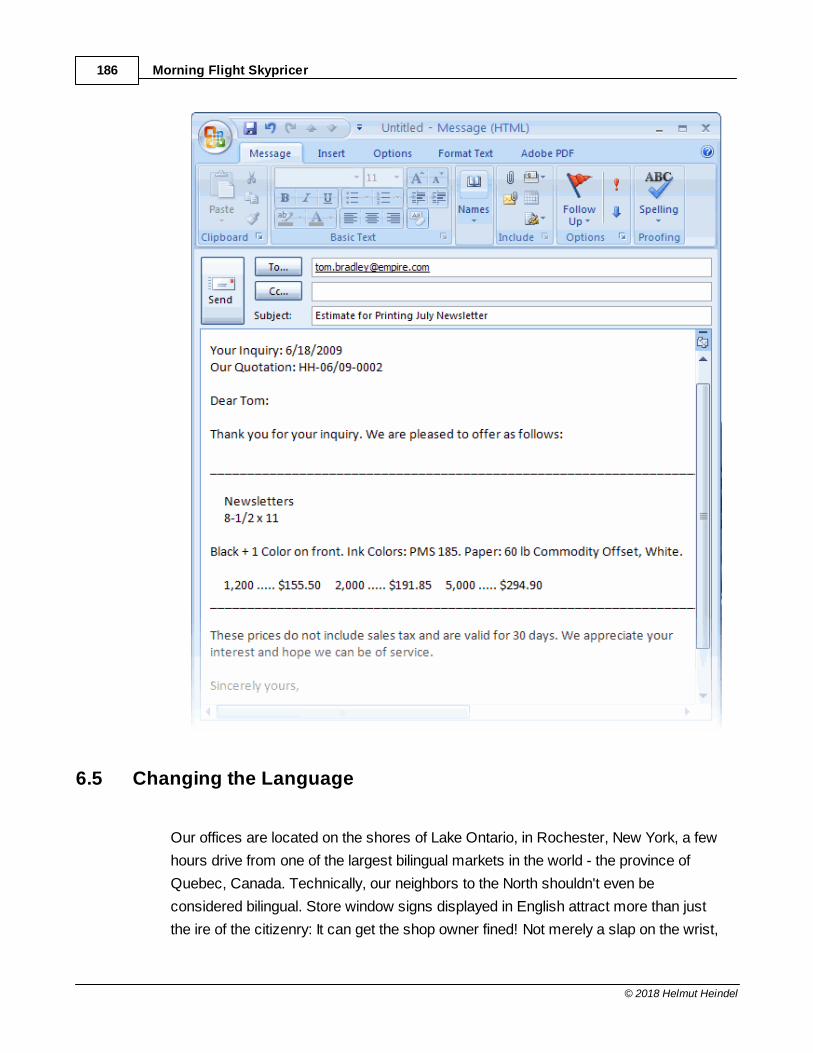
Morning Flight Skypricer186
© 2018 Helmut Heindel
6.5 Changing the Language
Our offices are located on the shores of Lake Ontario, in Rochester, New York, a few
hours drive from one of the largest bilingual markets in the world - the province of
Quebec, Canada. Technically, our neighbors to the North shouldn't even be
considered bilingual. Store window signs displayed in English attract more than just
the ire of the citizenry: It can get the shop owner fined! Not merely a slap on the wrist,
Making Estimates 187
© 2018 Helmut Heindel
either ... up to $1,500 Canadian. Compliance is enforced by the Quebec language
police, the Office québécois de la langue française.
With that as a backdrop, is it any wonder that Morning Flight speaks both English and
French? For our just-across-the-lake Canadian friends, absolutely, but why stop
there. The program also speaks German, Spanish, Italian, and Portuguese. English
and German are the only two languages that have so far been implemented fully, but
estimates are translated by the program in all five.
So what does this bilingual talent do for estimates? Say you're a printer in Toronto,
Canada, and you have customers in both English-speaking Toronto and
predominantly French-speaking Montreal. You create the estimate in your native
language, select the customer, then sit back and watch Morning Flight compose the
estimate in English for International Publishing, Ltd. in Toronto, and in French for
Éditions ABC Ltée. in Montreal.
Translating Estimates, Step One
From the main menu, click the My Store button, then click My Customers.
Click the Add button, then enter the name and address of the customer in
Toronto.

Morning Flight Skypricer188
© 2018 Helmut Heindel
· Click the Country button, then select Canada (English). Save the customer.
· Do the same for the customer in Montreal, but select Canada (French).
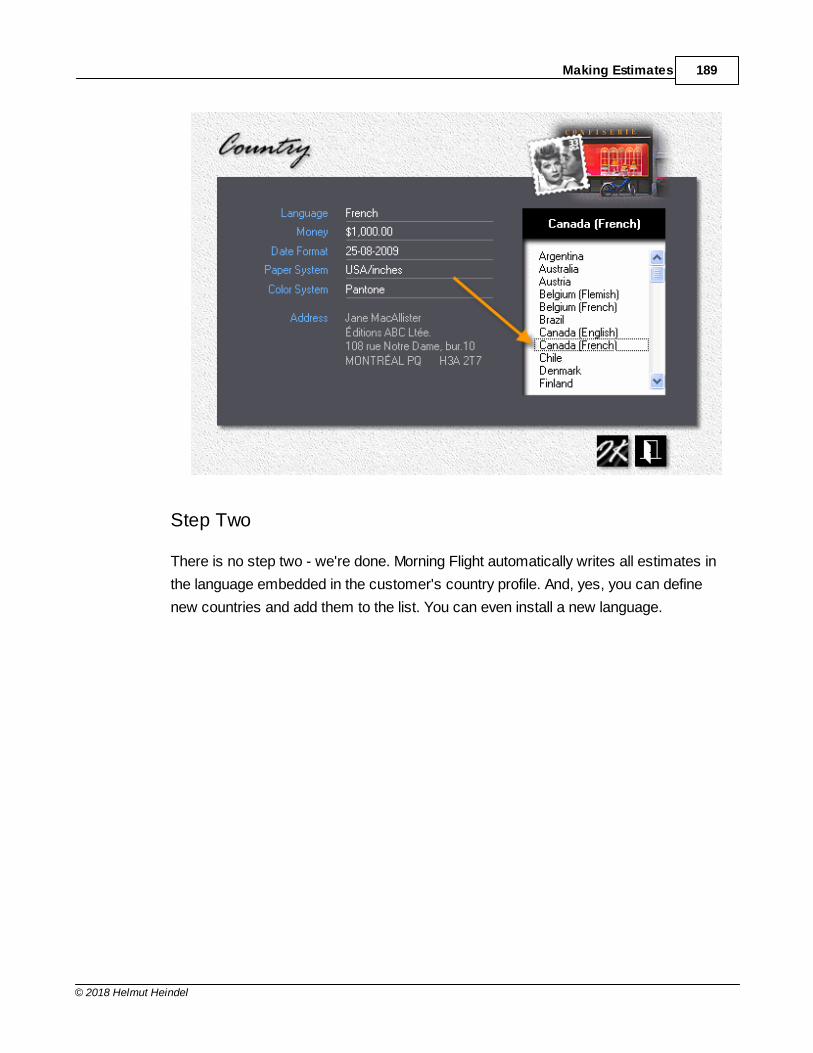
Making Estimates 189
© 2018 Helmut Heindel
Step Two
There is no step two - we're done. Morning Flight automatically writes all estimates in
the language embedded in the customer's country profile. And, yes, you can define
new countries and add them to the list. You can even install a new language.
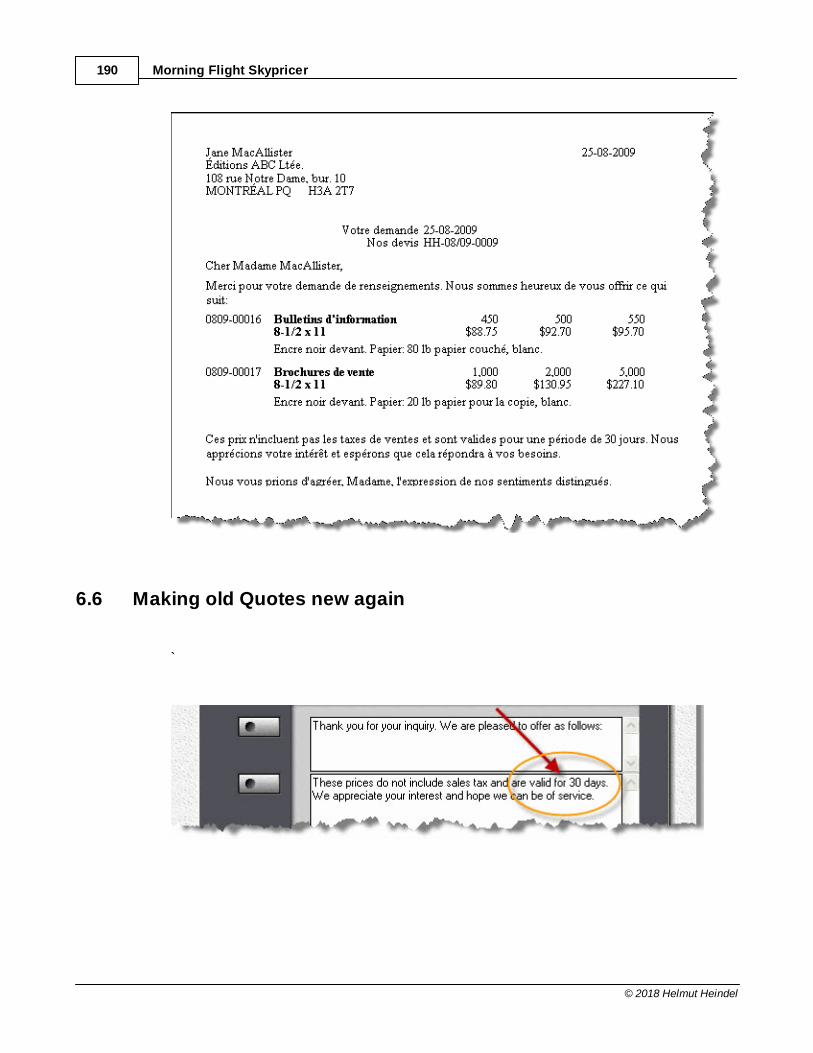
Morning Flight Skypricer190
© 2018 Helmut Heindel
6.6 Making old Quotes new again
`
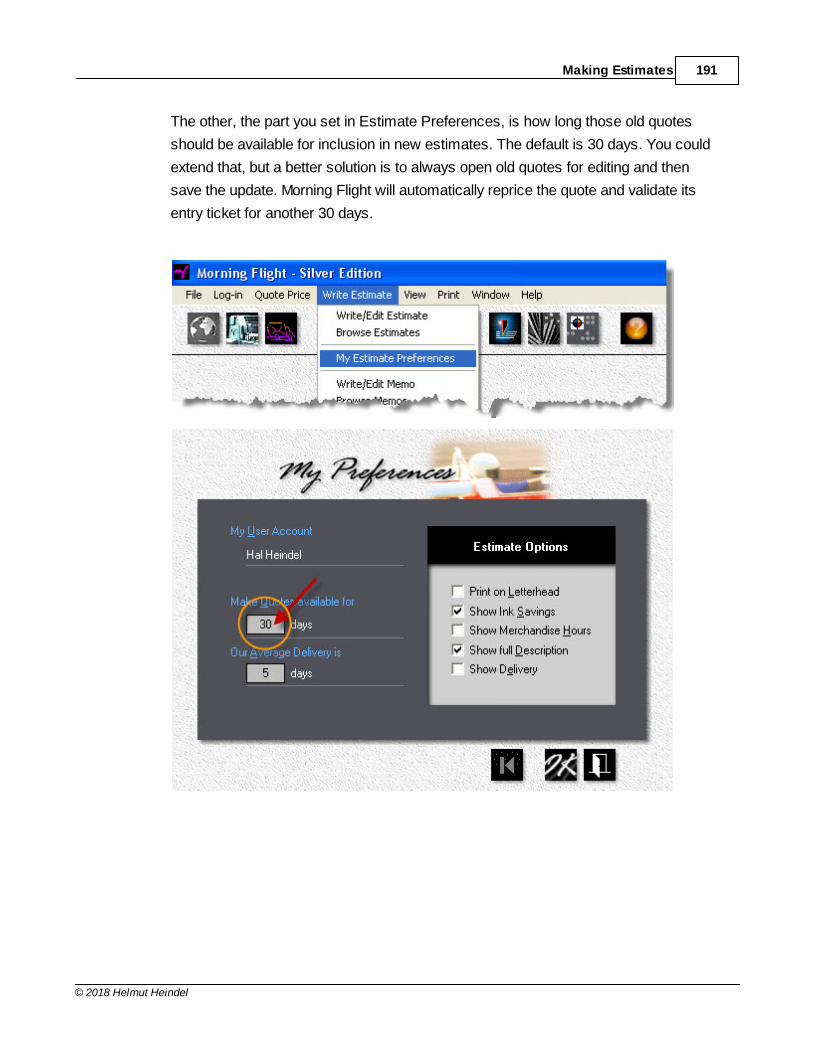
Making Estimates 191
© 2018 Helmut Heindel
The other, the part you set in Estimate Preferences, is how long those old quotes
should be available for inclusion in new estimates. The default is 30 days. You could
extend that, but a better solution is to always open old quotes for editing and then
save the update. Morning Flight will automatically reprice the quote and validate its
entry ticket for another 30 days.
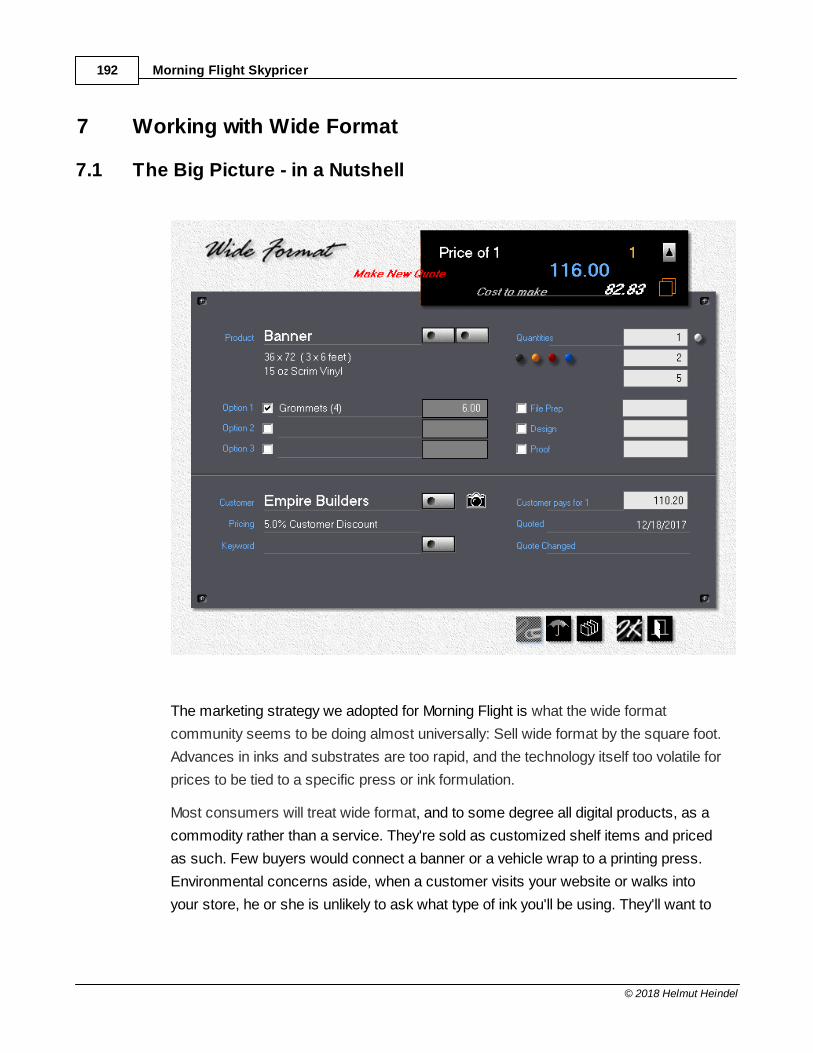
Morning Flight Skypricer192
© 2018 Helmut Heindel
7 Working with Wide Format
7.1 The Big Picture - in a Nutshell
The marketing strategy we adopted for Morning Flight is what the wide format
community seems to be doing almost universally: Sell wide format by the square foot.
Advances in inks and substrates are too rapid, and the technology itself too volatile for
prices to be tied to a specific press or ink formulation.
Most consumers will treat wide format, and to some degree all digital products, as a
commodity rather than a service. They're sold as customized shelf items and priced
as such. Few buyers would connect a banner or a vehicle wrap to a printing press.
Environmental concerns aside, when a customer visits your website or walks into
your store, he or she is unlikely to ask what type of ink you'll be using. They'll want to
Working with Wide Format 193
© 2018 Helmut Heindel
know attention-getting their sign will look, how well their banner will stand up to the
weather. And, of course, the price.
Always the price. Starting with Morning Flight V17.1, you now have instant access to
market pricing, how much American printers generally charge for digital and wide
format printing. Those figures didn't come out of thin air. They're an amalgam of
published surveys (such as the highly regarded NPOA pricing study for signage and
wide format), and the pricing some of our more than 6,500 users have shared with
us.
What we've learned ...
· Banners account for a third of all wide format sales, with an average retail price of
$110.00 for a 3x6 foot banner.
· Most printers in the U.S. automatically offer a 5% discount on digital and wide
format to repeat customers.
· While the variation in price for identical digital products is rarely more than 5%
between different regions of the country, it often climbs to a much higher
percentage within the regions themselves. In other words, the greatest variations
are found not between Long Beach and Brooklyn, but within the two.
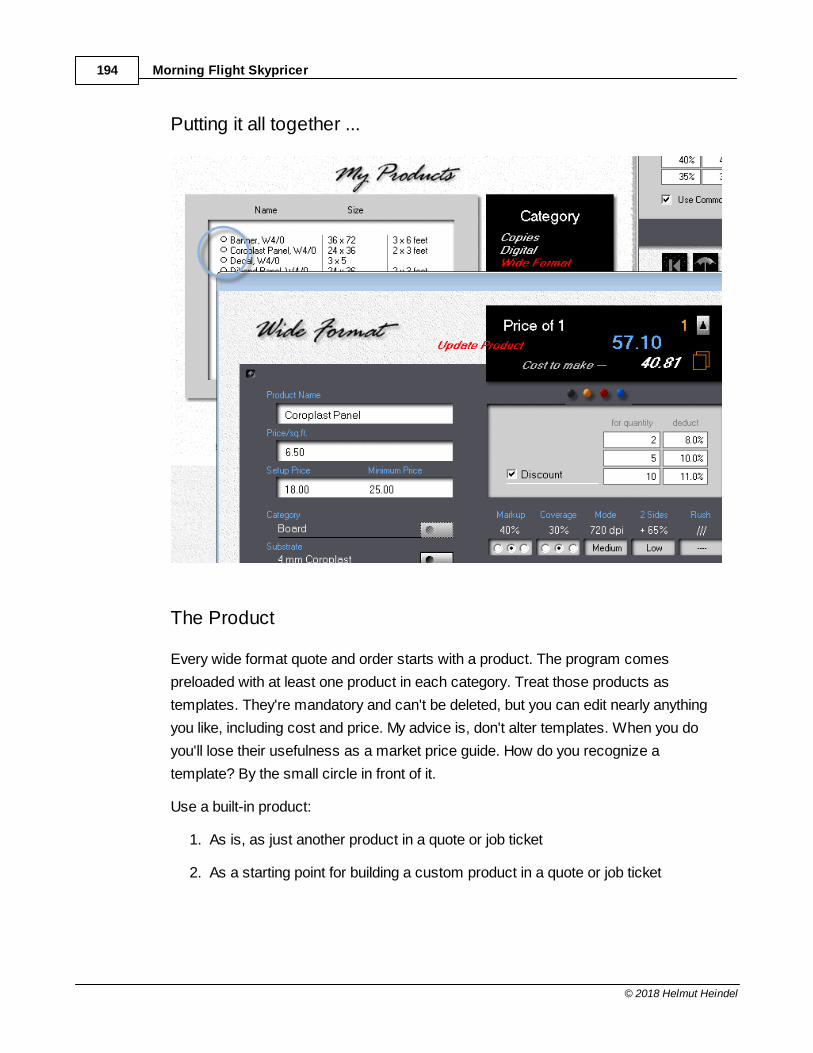
Morning Flight Skypricer194
© 2018 Helmut Heindel
Putting it all together ...
The Product
Every wide format quote and order starts with a product. The program comes
preloaded with at least one product in each category. Treat those products as
templates. They're mandatory and can't be deleted, but you can edit nearly anything
you like, including cost and price. My advice is, don't alter templates. When you do
you'll lose their usefulness as a market price guide. How do you recognize a
template? By the small circle in front of it.
Use a built-in product:
1. As is, as just another product in a quote or job ticket
2. As a starting point for building a custom product in a quote or job ticket
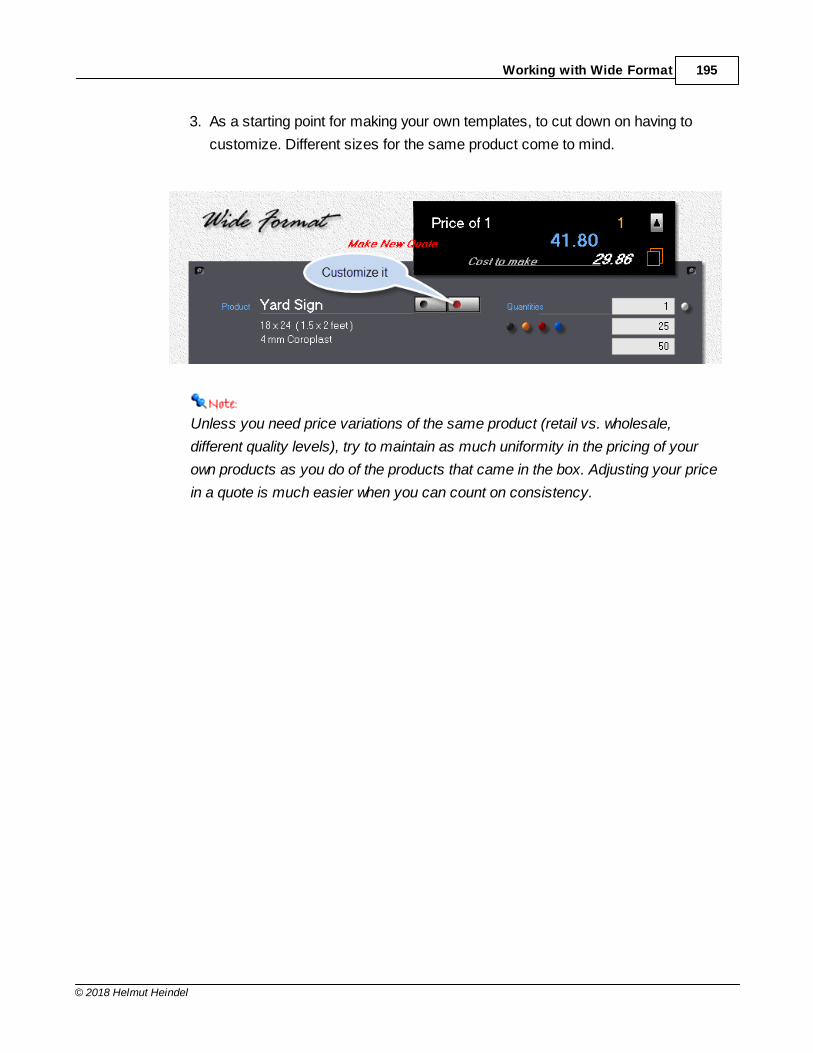
Working with Wide Format 195
© 2018 Helmut Heindel
3. As a starting point for making your own templates, to cut down on having to
customize. Different sizes for the same product come to mind.
Unless you need price variations of the same product (retail vs. wholesale,
different quality levels), try to maintain as much uniformity in the pricing of your
own products as you do of the products that came in the box. Adjusting your price
in a quote is much easier when you can count on consistency.
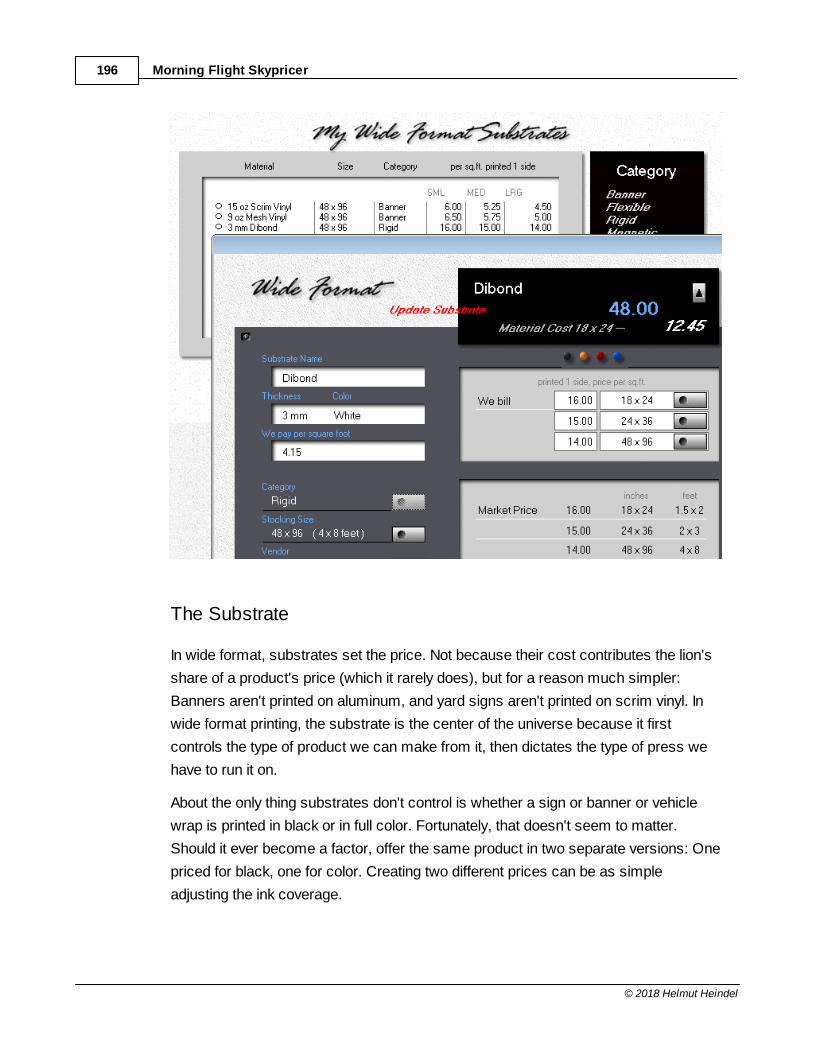
Morning Flight Skypricer196
© 2018 Helmut Heindel
The Substrate
In wide format, substrates set the price. Not because their cost contributes the lion's
share of a product's price (which it rarely does), but for a reason much simpler:
Banners aren't printed on aluminum, and yard signs aren't printed on scrim vinyl. In
wide format printing, the substrate is the center of the universe because it first
controls the type of product we can make from it, then dictates the type of press we
have to run it on.
About the only thing substrates don't control is whether a sign or banner or vehicle
wrap is printed in black or in full color. Fortunately, that doesn't seem to matter.
Should it ever become a factor, offer the same product in two separate versions: One
priced for black, one for color. Creating two different prices can be as simple
adjusting the ink coverage.
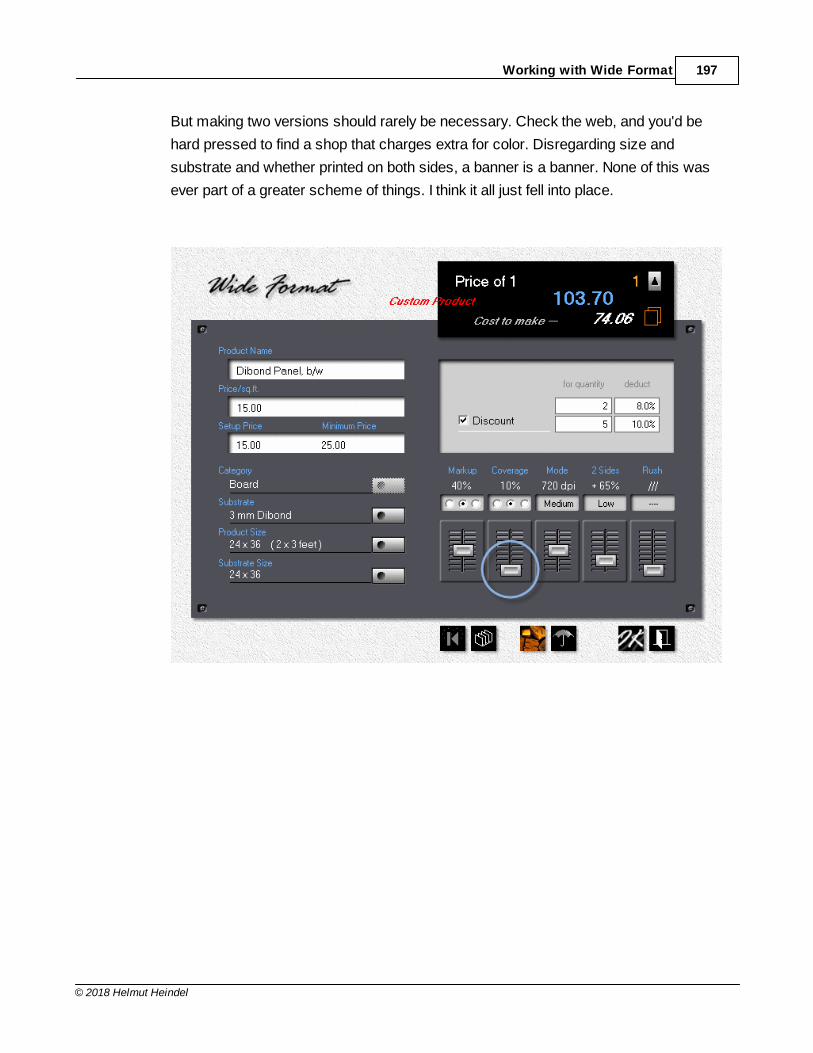
Working with Wide Format 197
© 2018 Helmut Heindel
But making two versions should rarely be necessary. Check the web, and you'd be
hard pressed to find a shop that charges extra for color. Disregarding size and
substrate and whether printed on both sides, a banner is a banner. None of this was
ever part of a greater scheme of things. I think it all just fell into place.
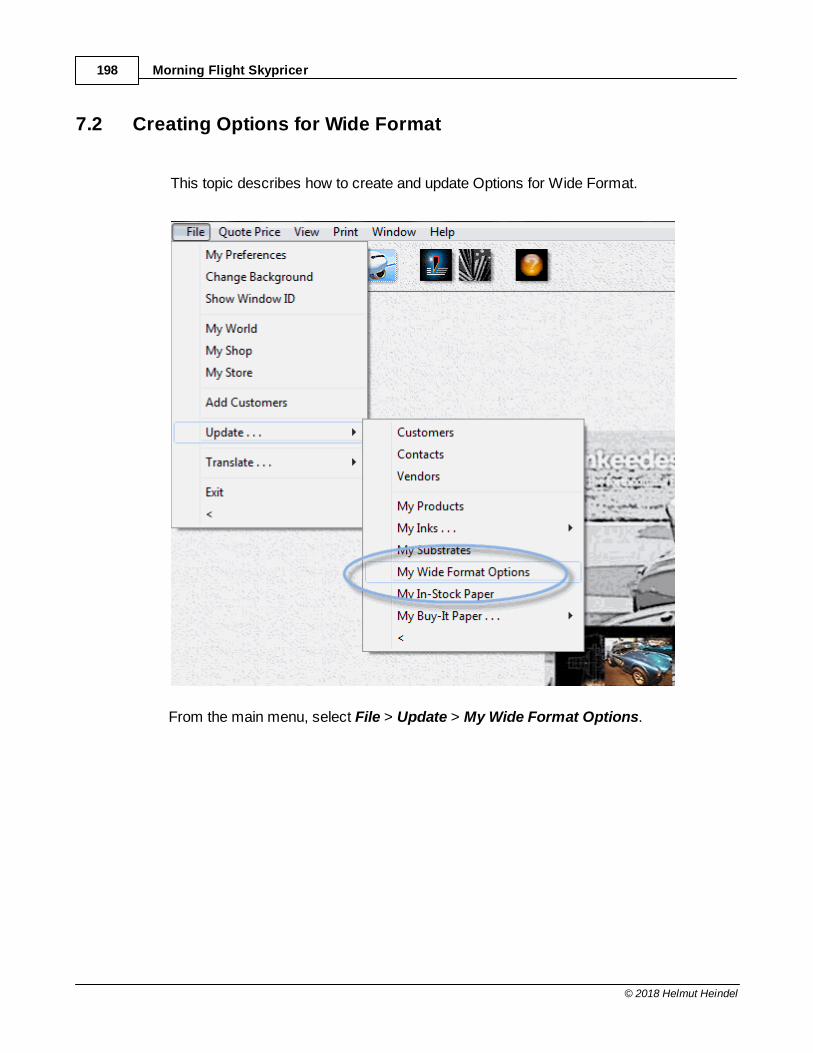
Morning Flight Skypricer198
© 2018 Helmut Heindel
7.2 Creating Options for Wide Format
This topic describes how to create and update Options for Wide Format.
From the main menu, select File > Update > My Wide Format Options.
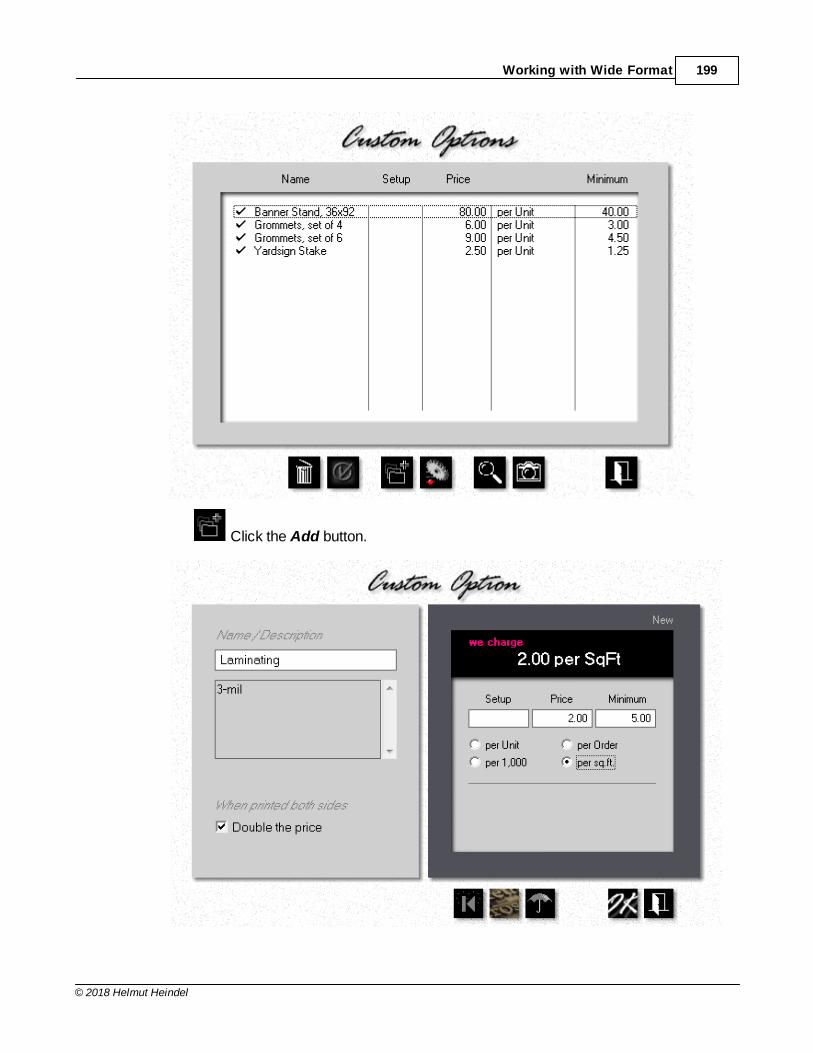
Working with Wide Format 199
© 2018 Helmut Heindel
Click the Add button.
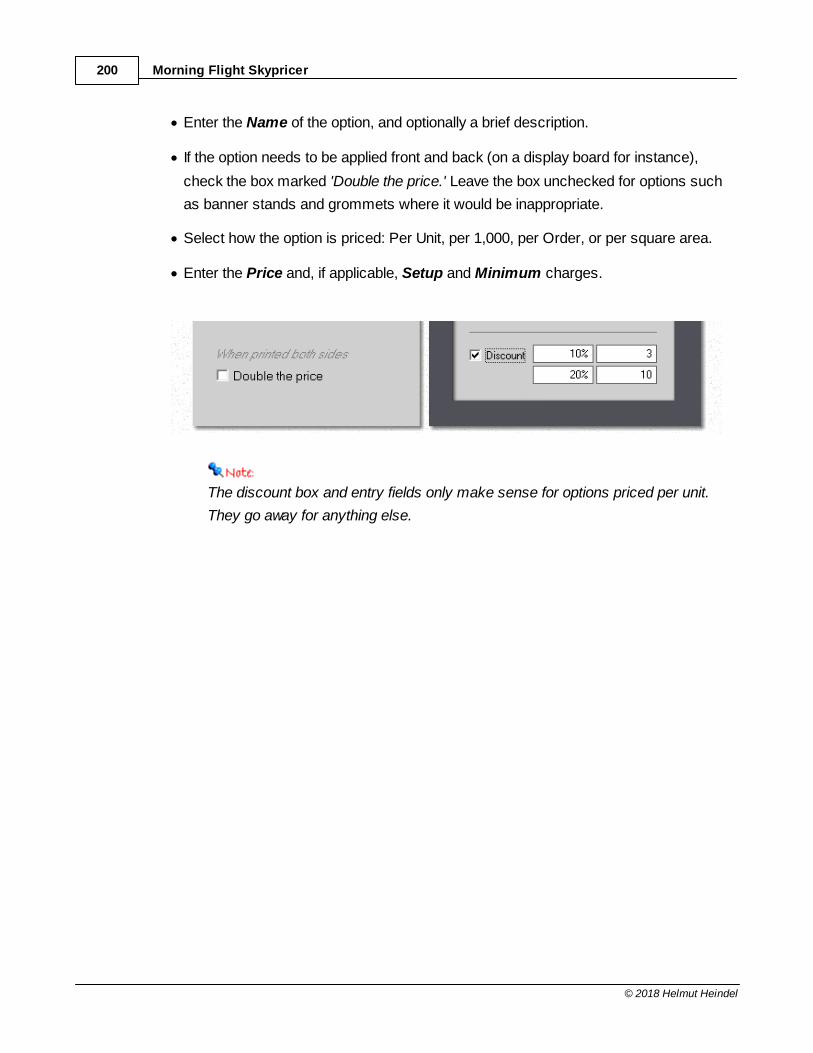
Morning Flight Skypricer200
© 2018 Helmut Heindel
· Enter the Name of the option, and optionally a brief description.
· If the option needs to be applied front and back (on a display board for instance),
check the box marked 'Double the price.' Leave the box unchecked for options such
as banner stands and grommets where it would be inappropriate.
· Select how the option is priced: Per Unit, per 1,000, per Order, or per square area.
· Enter the Price and, if applicable, Setup and Minimum charges.
The discount box and entry fields only make sense for options priced per unit.
They go away for anything else.
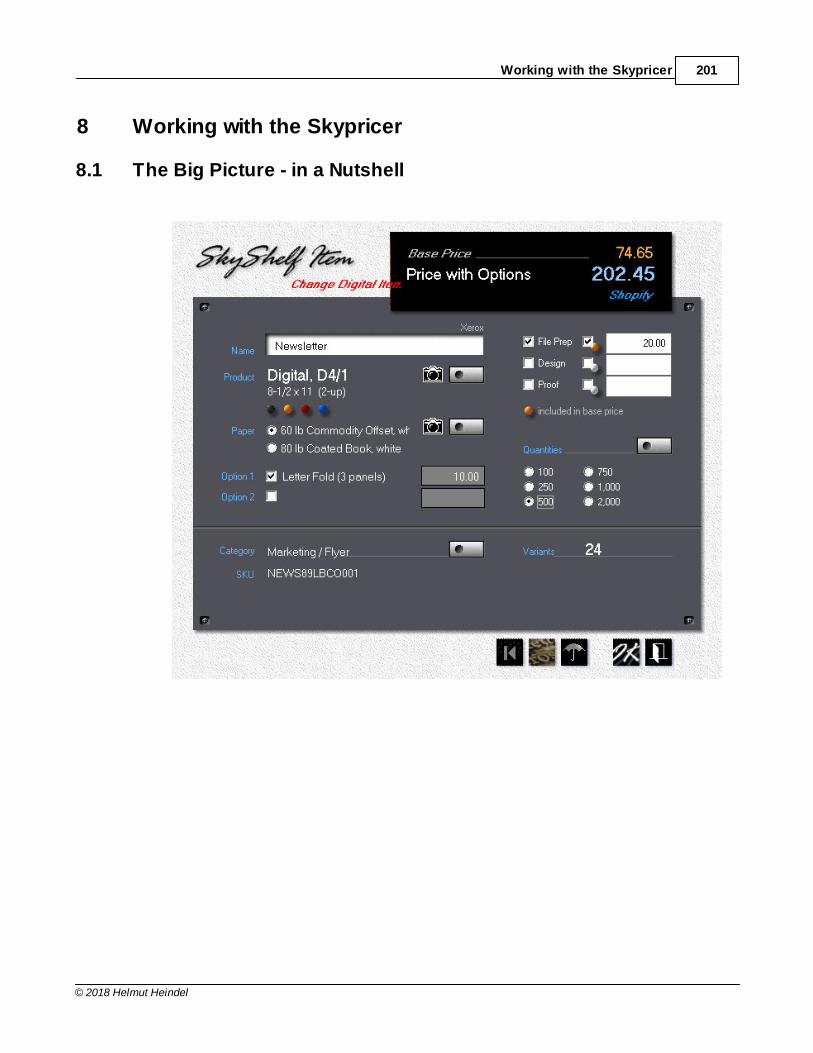
Working with the Skypricer 201
© 2018 Helmut Heindel
8 Working with the Skypricer
8.1 The Big Picture - in a Nutshell
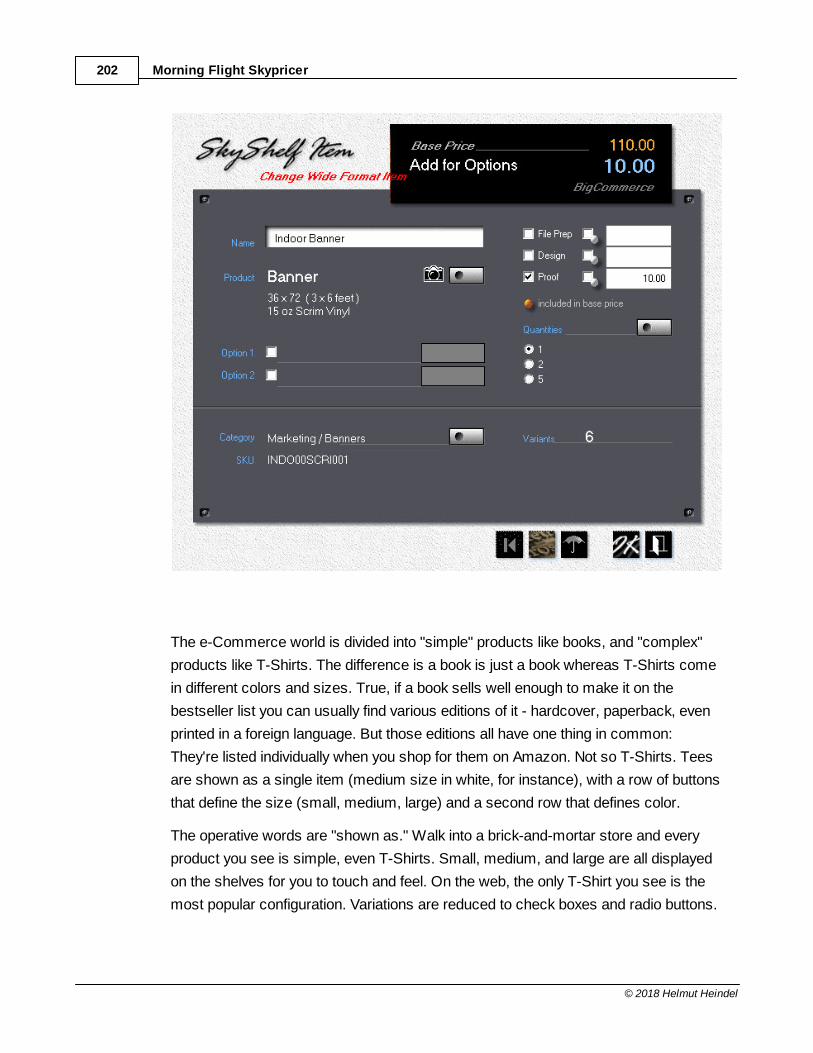
Morning Flight Skypricer202
© 2018 Helmut Heindel
The e-Commerce world is divided into "simple" products like books, and "complex"
products like T-Shirts. The difference is a book is just a book whereas T-Shirts come
in different colors and sizes. True, if a book sells well enough to make it on the
bestseller list you can usually find various editions of it - hardcover, paperback, even
printed in a foreign language. But those editions all have one thing in common:
They're listed individually when you shop for them on Amazon. Not so T-Shirts. Tees
are shown as a single item (medium size in white, for instance), with a row of buttons
that define the size (small, medium, large) and a second row that defines color.
The operative words are "shown as." Walk into a brick-and-mortar store and every
product you see is simple, even T-Shirts. Small, medium, and large are all displayed
on the shelves for you to touch and feel. On the web, the only T-Shirt you see is the
most popular configuration. Variations are reduced to check boxes and radio buttons.
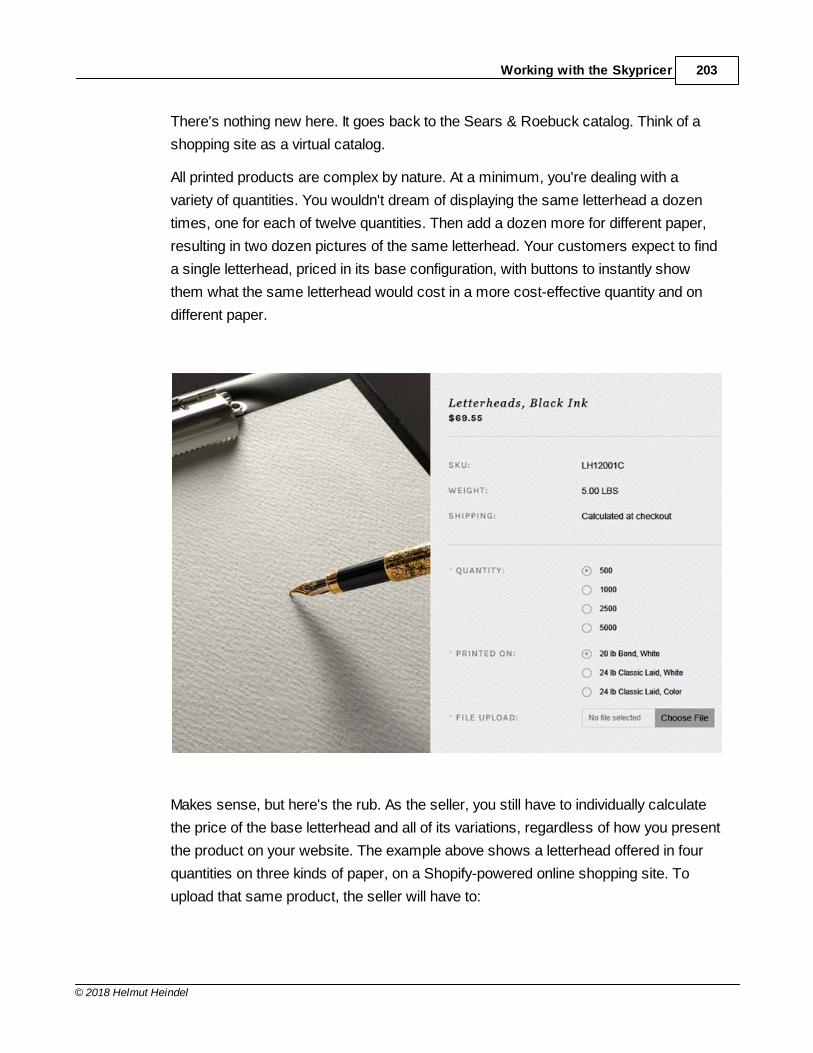
Working with the Skypricer 203
© 2018 Helmut Heindel
There's nothing new here. It goes back to the Sears & Roebuck catalog. Think of a
shopping site as a virtual catalog.
All printed products are complex by nature. At a minimum, you're dealing with a
variety of quantities. You wouldn't dream of displaying the same letterhead a dozen
times, one for each of twelve quantities. Then add a dozen more for different paper,
resulting in two dozen pictures of the same letterhead. Your customers expect to find
a single letterhead, priced in its base configuration, with buttons to instantly show
them what the same letterhead would cost in a more cost-effective quantity and on
different paper.
Makes sense, but here's the rub. As the seller, you still have to individually calculate
the price of the base letterhead and all of its variations, regardless of how you present
the product on your website. The example above shows a letterhead offered in four
quantities on three kinds of paper, on a Shopify-powered online shopping site. To
upload that same product, the seller will have to:
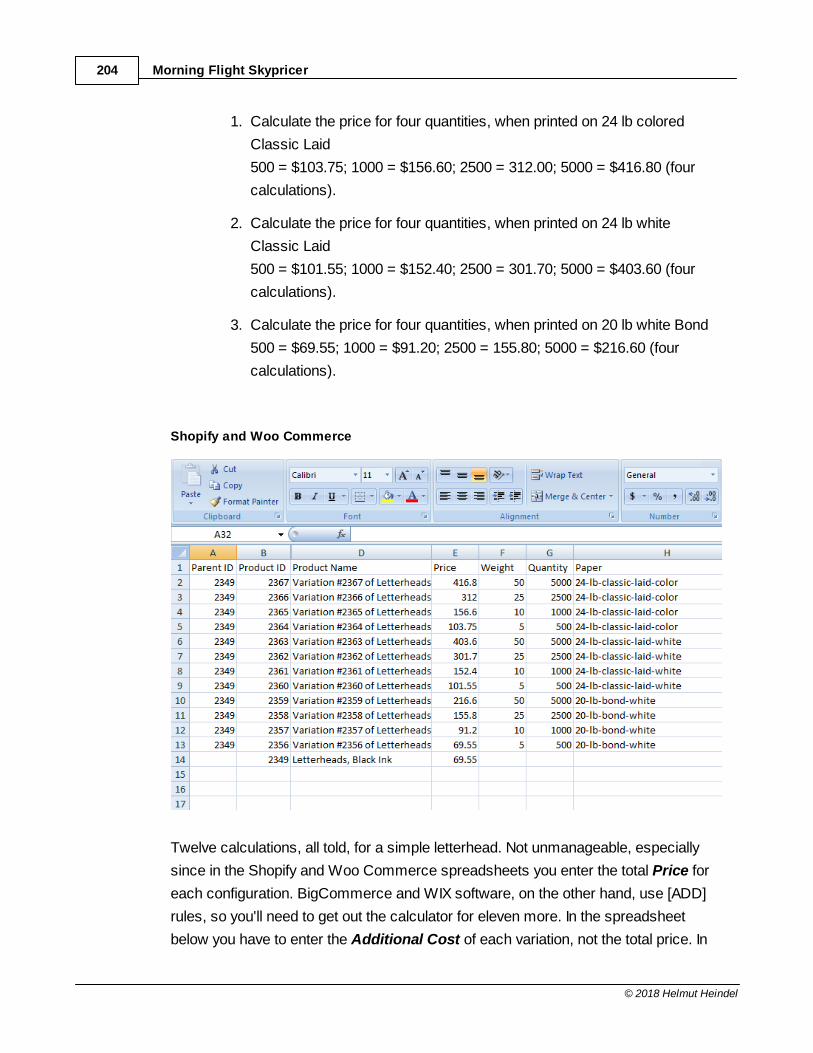
Morning Flight Skypricer204
© 2018 Helmut Heindel
1. Calculate the price for four quantities, when printed on 24 lb colored
Classic Laid
500 = $103.75; 1000 = $156.60; 2500 = 312.00; 5000 = $416.80 (four
calculations).
2. Calculate the price for four quantities, when printed on 24 lb white
Classic Laid
500 = $101.55; 1000 = $152.40; 2500 = 301.70; 5000 = $403.60 (four
calculations).
3. Calculate the price for four quantities, when printed on 20 lb white Bond
500 = $69.55; 1000 = $91.20; 2500 = 155.80; 5000 = $216.60 (four
calculations).
Shopify and Woo Commerce
Twelve calculations, all told, for a simple letterhead. Not unmanageable, especially
since in the Shopify and Woo Commerce spreadsheets you enter the total Price for
each configuration. BigCommerce and WIX software, on the other hand, use [ADD]
rules, so you'll need to get out the calculator for eleven more. In the spreadsheet
below you have to enter the Additional Cost of each variation, not the total price. In
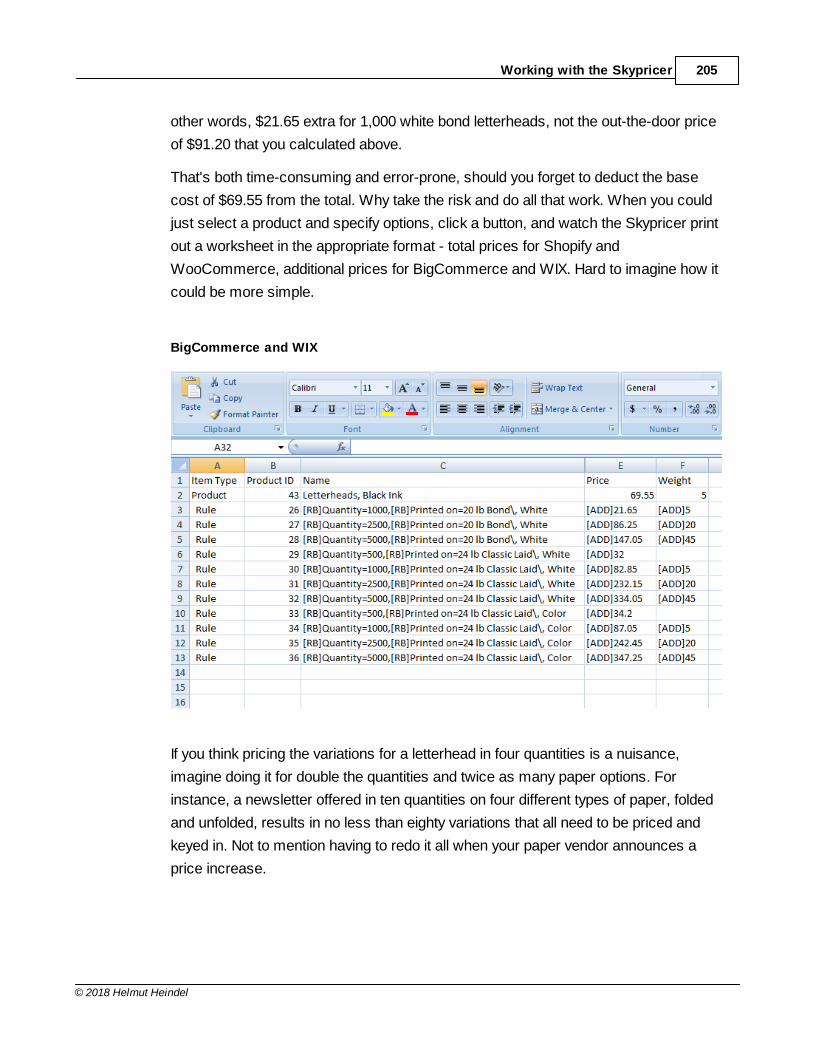
Working with the Skypricer 205
© 2018 Helmut Heindel
other words, $21.65 extra for 1,000 white bond letterheads, not the out-the-door price
of $91.20 that you calculated above.
That's both time-consuming and error-prone, should you forget to deduct the base
cost of $69.55 from the total. Why take the risk and do all that work. When you could
just select a product and specify options, click a button, and watch the Skypricer print
out a worksheet in the appropriate format - total prices for Shopify and
WooCommerce, additional prices for BigCommerce and WIX. Hard to imagine how it
could be more simple.
BigCommerce and WIX
If you think pricing the variations for a letterhead in four quantities is a nuisance,
imagine doing it for double the quantities and twice as many paper options. For
instance, a newsletter offered in ten quantities on four different types of paper, folded
and unfolded, results in no less than eighty variations that all need to be priced and
keyed in. Not to mention having to redo it all when your paper vendor announces a
price increase.
Morning Flight Skypricer206
© 2018 Helmut Heindel
The Skypricer does a number of things, but will do three of them really well:
1. Calculate the price of every variation of a printed product, then hand you an
itemized worksheet for uploading those prices into your shopping cart software. All
in the blink of an eye, using the shop rates and paper prices of the built-in
estimating program for digital and wide format. They're the same shop rates and
paper prices you're using to make quotes because the built-in program is a
turbocharged version of the Silver Edition, working with standard Morning Flight
data files.
2. Keep the prices you quote on the phone in sync with the prices you show on your
website. Say your paper vendor announces a price increase for a paper item that's
included with product Z and X on your website. You update the paper price in your
estimating program but forget that the paper is also optional for one or more
products on your shopping site. That's cool. As soon as you update your paper
price, the Skypricer will automatically scan its web products database, alert you
about the discrepancy, and suggest you print new worksheets for product Z and X.
Nothing else has changed, so no other web products need to be updated. The
Skypricer is telling you that.
3. Reconfigure the pricing formula of all your online products, should the need arise
to host your site with a different vendor. It happens. Sometimes you just outgrow
your current vendor. Other times their hosting fees go through the roof, or their
software becomes dated or is discontinued altogether. Here, too, the Skypricer will
relieve the pain. Remember, you didn't construct your product database in the
vendor's software, you had the Skypricer build it on your desktop or network, or in
cloud space under your control. Creating a revised set of worksheets that will work
for the new vendor is just a mouse click away.
Now nobody can hold you hostage.

Working with the Skypricer 207
© 2018 Helmut Heindel
With that as a Backdrop ...
Nobody could blame you for being tempted to sign up for one of the canned web2print
subscriptions in the hope all this goes away. And it actually does, provided you can
live with their recommended one-buyer-fits-all market prices. If you can't, that
web2print solution is no different than any other shopping cart provider. You're back
with your calculator at square one.
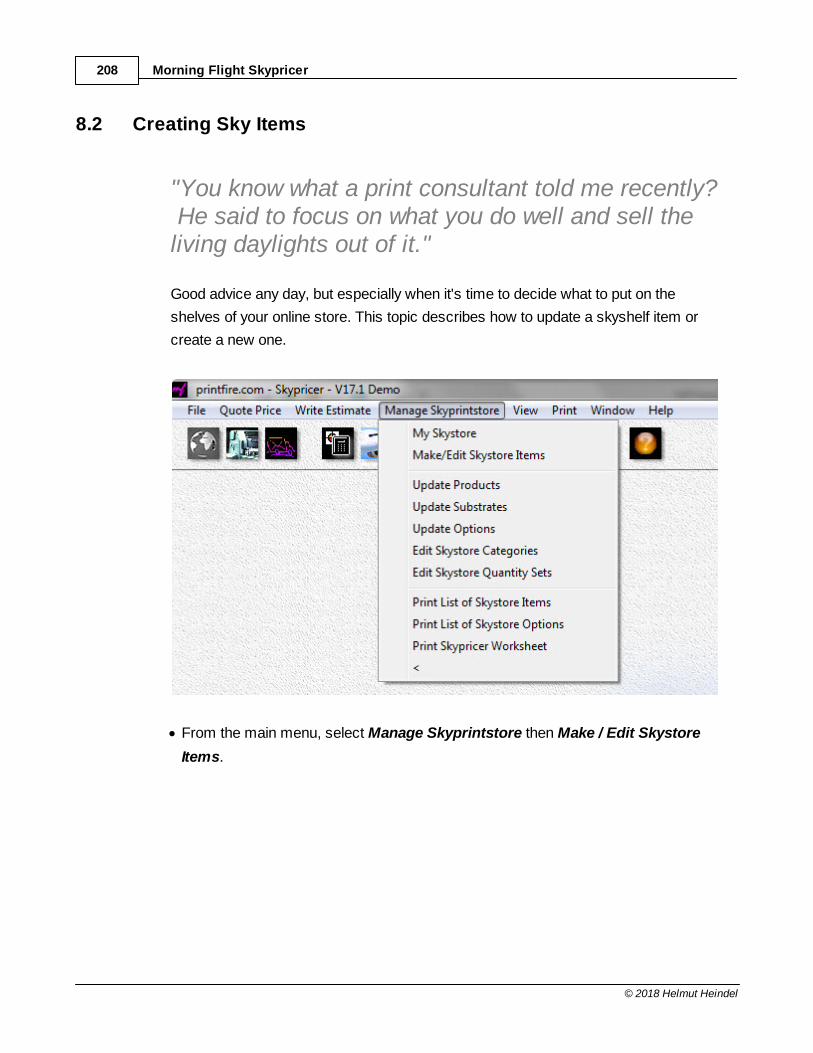
Morning Flight Skypricer208
© 2018 Helmut Heindel
8.2 Creating Sky Items
"You know what a print consultant told me recently? He said to focus on what you do well and sell theliving daylights out of it."
Good advice any day, but especially when it's time to decide what to put on the
shelves of your online store. This topic describes how to update a skyshelf item or
create a new one.
· From the main menu, select Manage Skyprintstore then Make / Edit Skystore
Items.
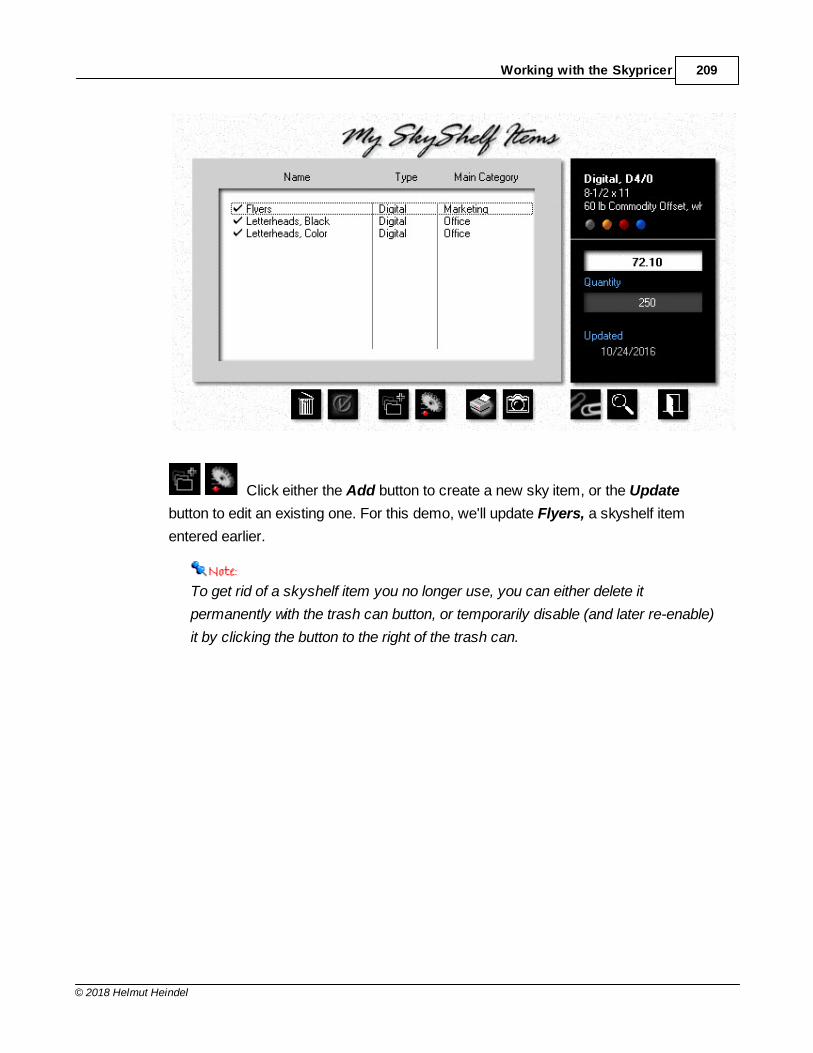
Working with the Skypricer 209
© 2018 Helmut Heindel
Click either the Add button to create a new sky item, or the Update
button to edit an existing one. For this demo, we'll update Flyers, a skyshelf item
entered earlier.
To get rid of a skyshelf item you no longer use, you can either delete it
permanently with the trash can button, or temporarily disable (and later re-enable)
it by clicking the button to the right of the trash can.
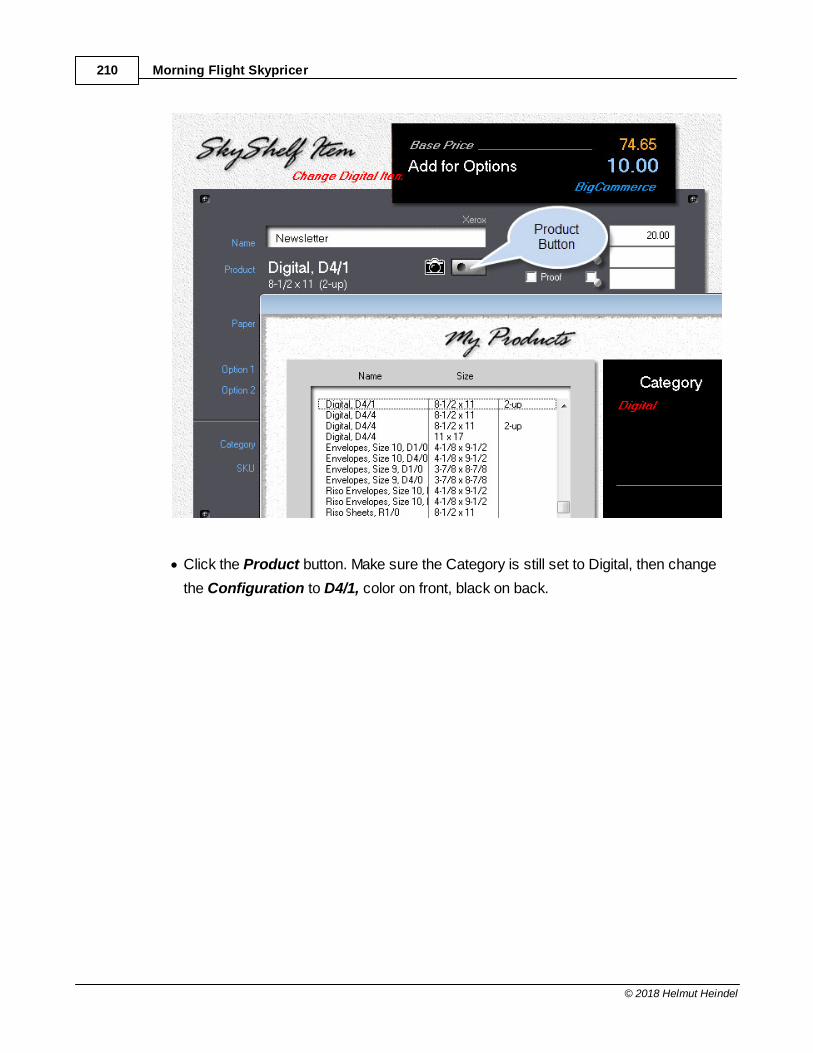
Morning Flight Skypricer210
© 2018 Helmut Heindel
· Click the Product button. Make sure the Category is still set to Digital, then change
the Configuration to D4/1, color on front, black on back.
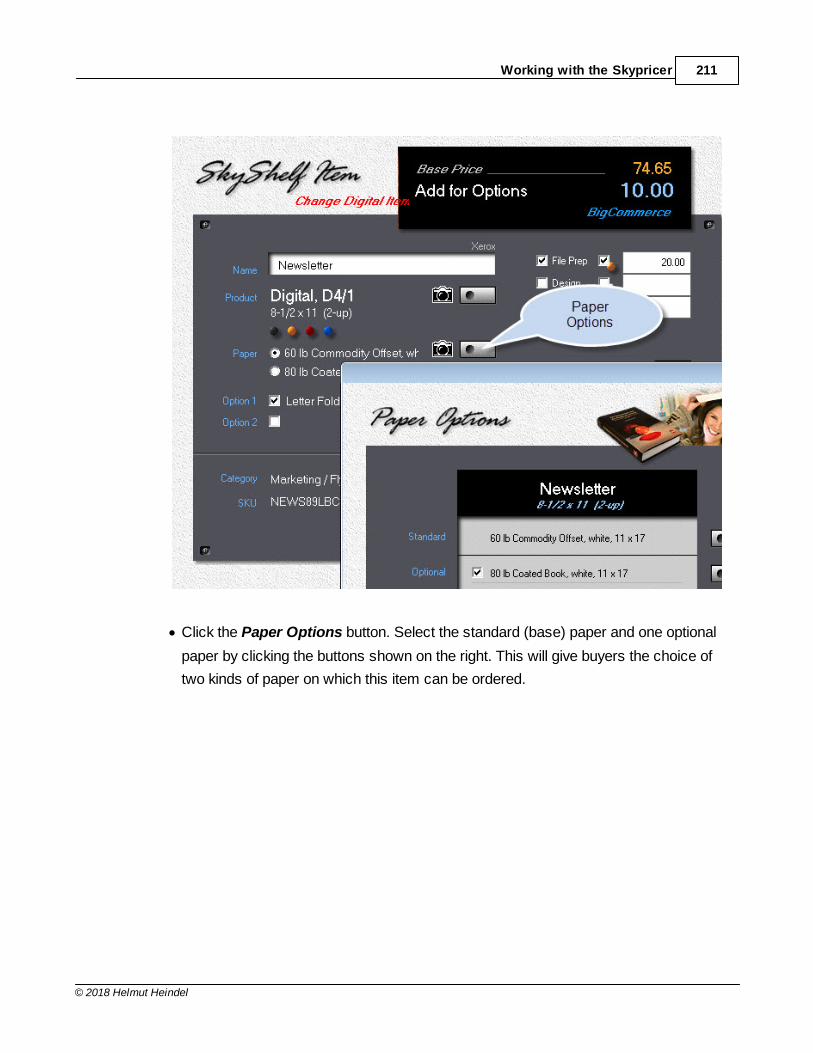
Working with the Skypricer 211
© 2018 Helmut Heindel
· Click the Paper Options button. Select the standard (base) paper and one optional
paper by clicking the buttons shown on the right. This will give buyers the choice of
two kinds of paper on which this item can be ordered.
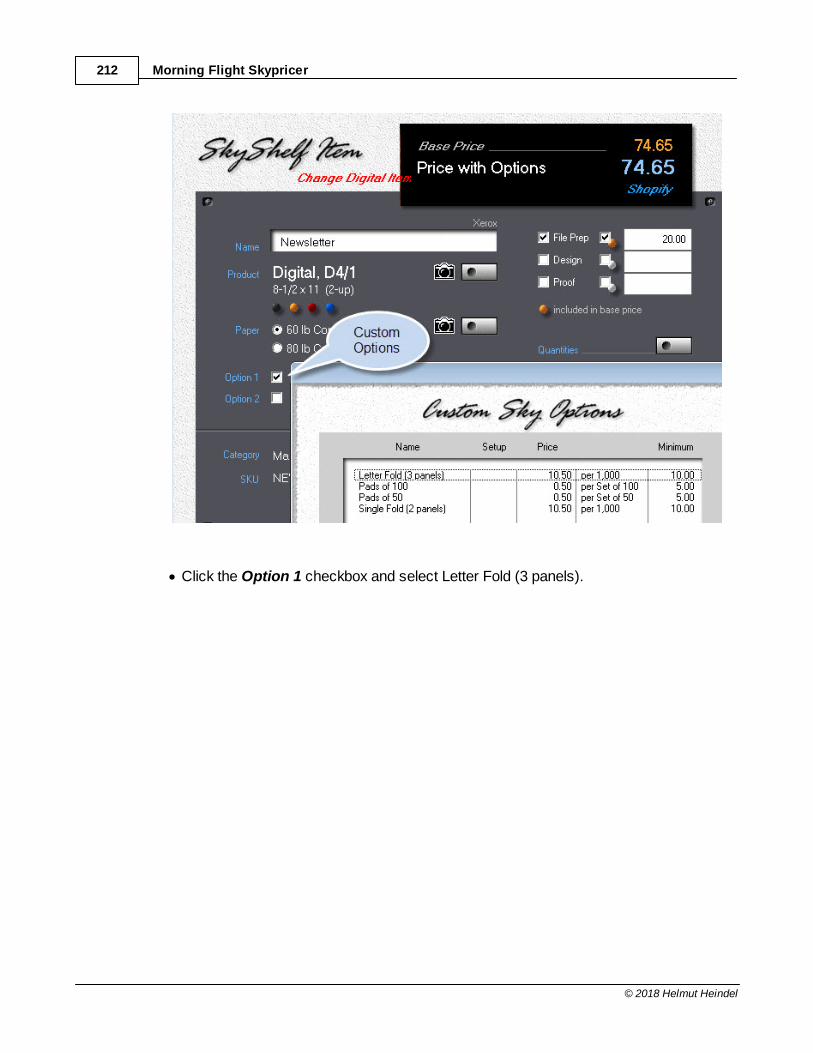
Morning Flight Skypricer212
© 2018 Helmut Heindel
· Click the Option 1 checkbox and select Letter Fold (3 panels).
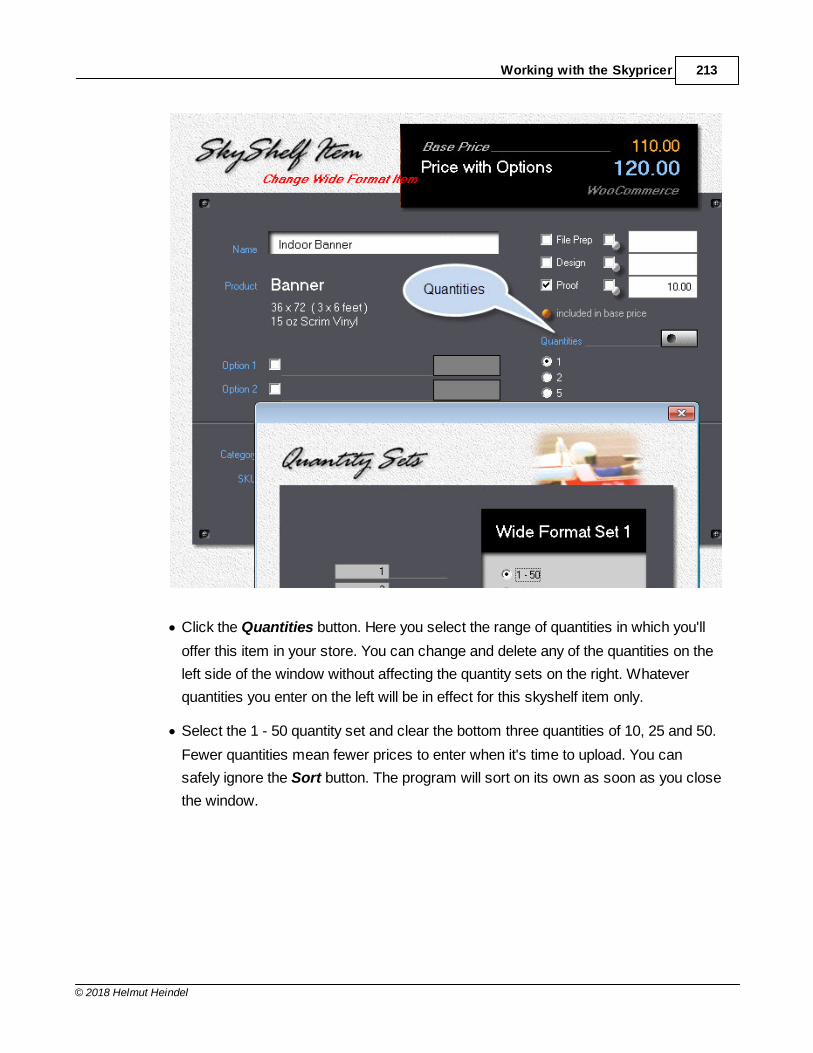
Working with the Skypricer 213
© 2018 Helmut Heindel
· Click the Quantities button. Here you select the range of quantities in which you'll
offer this item in your store. You can change and delete any of the quantities on the
left side of the window without affecting the quantity sets on the right. Whatever
quantities you enter on the left will be in effect for this skyshelf item only.
· Select the 1 - 50 quantity set and clear the bottom three quantities of 10, 25 and 50.
Fewer quantities mean fewer prices to enter when it's time to upload. You can
safely ignore the Sort button. The program will sort on its own as soon as you close
the window.
Morning Flight Skypricer214
© 2018 Helmut Heindel
The final entries we'll make are for File Prep, Design, and Proofs. All three fields are
free form - you can enter any value you like. Clicking the left checkbox when the field
is blank will import the defaults you set earlier in My SkyStore.
Clicking the right checkbox will include the option price in the base price of the item,
reducing the number of variants you have to enter. The downside is that the option
then becomes mandatory - it's no longer selectable. Proofs should probably stay
optional in any event, as we did in the example. On the other hand, when File Prep is
checked in the left box, the right box is checked automatically, making file preparation
an integral part of the skyshelf item.
8.3 Creating Custom Options
This topic describes how to create and update Custom Options for skyshelf items.
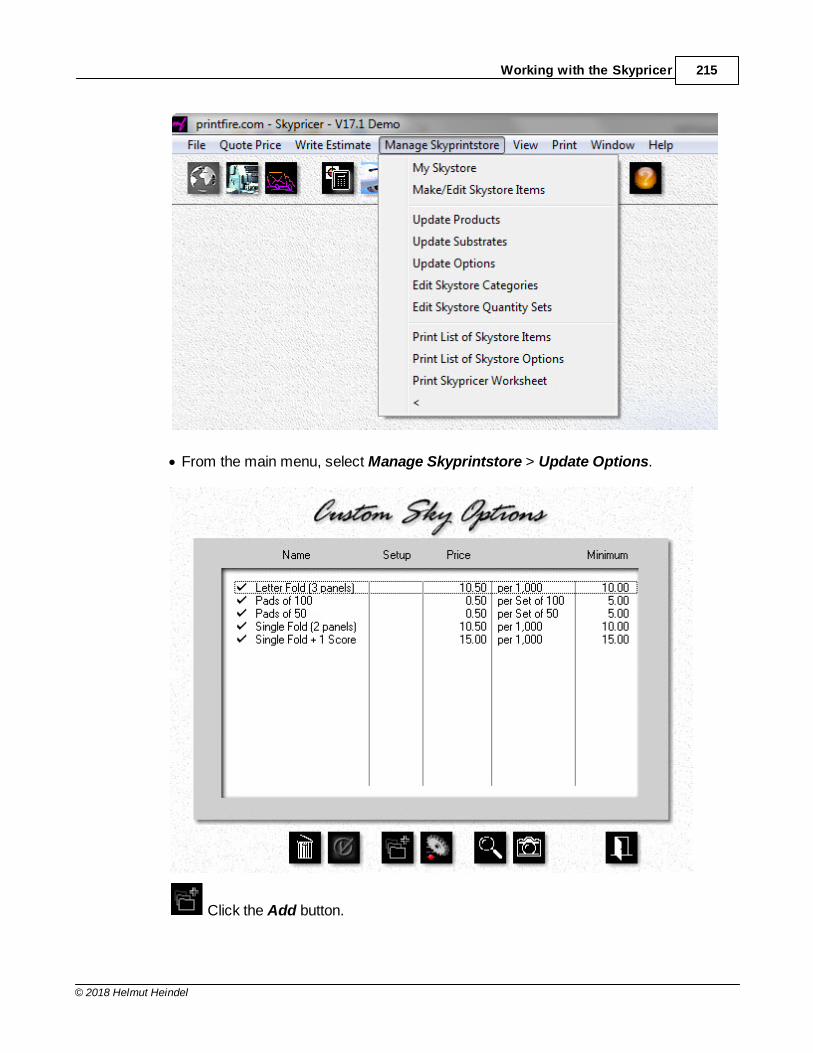
Working with the Skypricer 215
© 2018 Helmut Heindel
· From the main menu, select Manage Skyprintstore > Update Options.
Click the Add button.
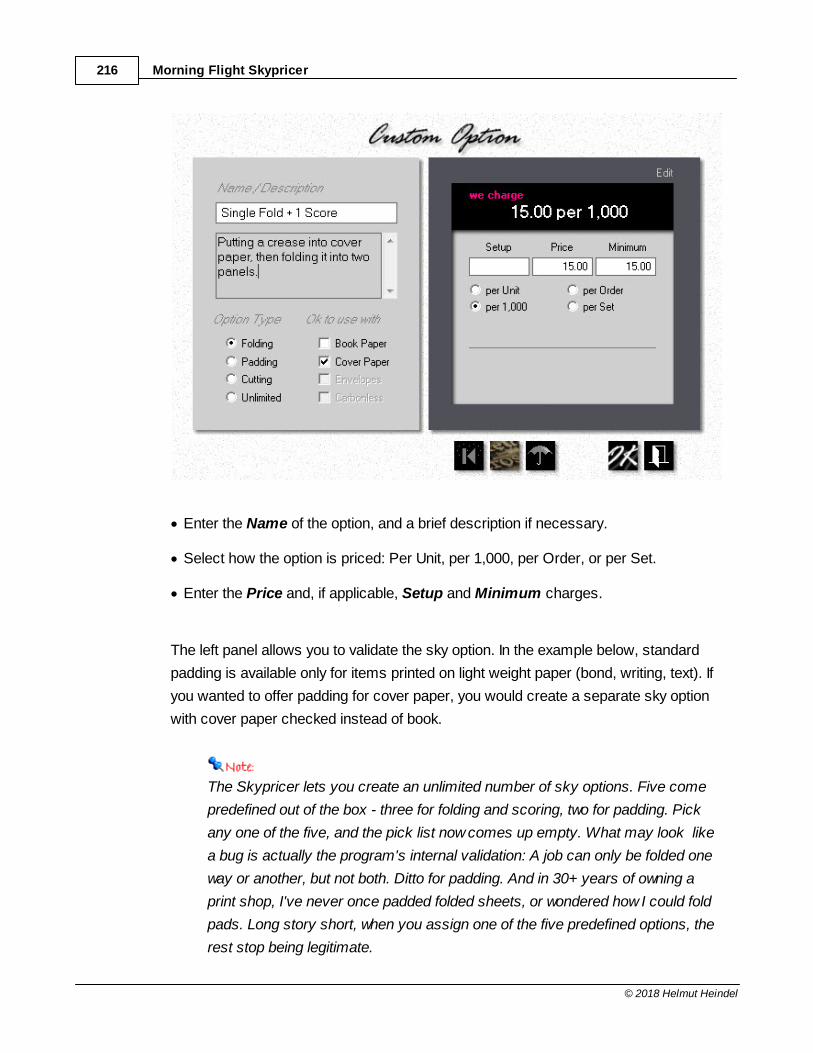
Morning Flight Skypricer216
© 2018 Helmut Heindel
· Enter the Name of the option, and a brief description if necessary.
· Select how the option is priced: Per Unit, per 1,000, per Order, or per Set.
· Enter the Price and, if applicable, Setup and Minimum charges.
The left panel allows you to validate the sky option. In the example below, standard
padding is available only for items printed on light weight paper (bond, writing, text). If
you wanted to offer padding for cover paper, you would create a separate sky option
with cover paper checked instead of book.
The Skypricer lets you create an unlimited number of sky options. Five come
predefined out of the box - three for folding and scoring, two for padding. Pick
any one of the five, and the pick list now comes up empty. What may look like
a bug is actually the program's internal validation: A job can only be folded one
way or another, but not both. Ditto for padding. And in 30+ years of owning a
print shop, I've never once padded folded sheets, or wondered how I could fold
pads. Long story short, when you assign one of the five predefined options, the
rest stop being legitimate.
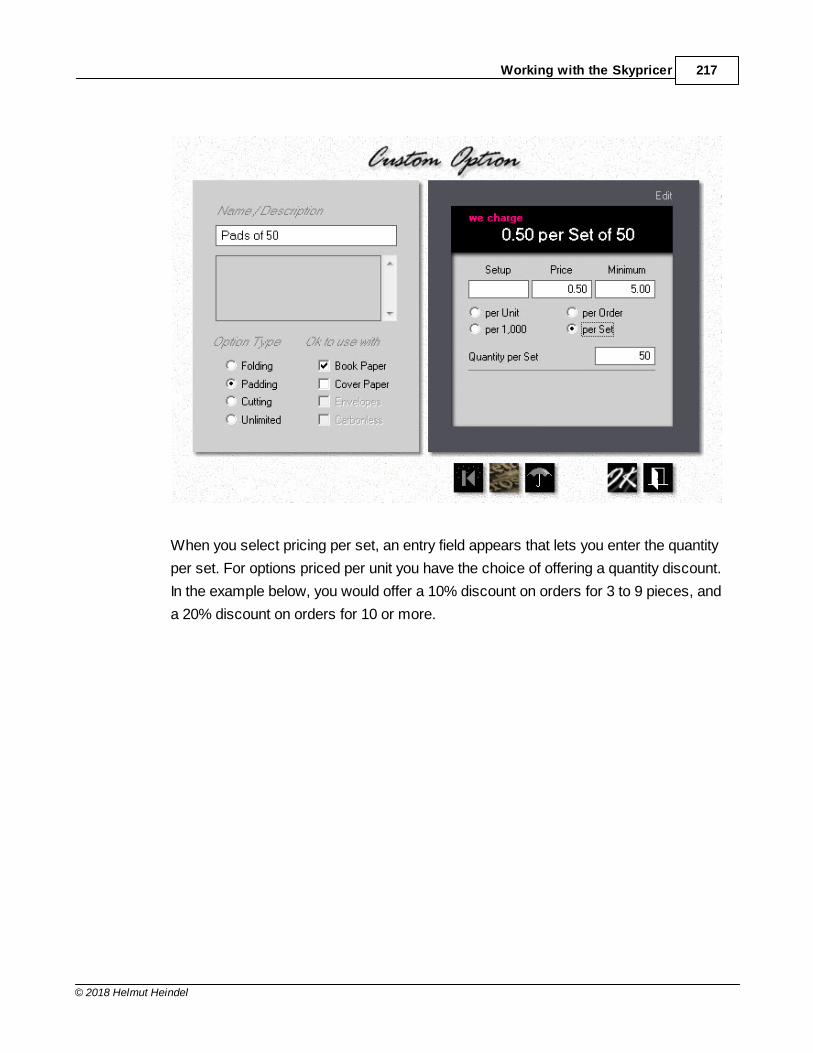
Working with the Skypricer 217
© 2018 Helmut Heindel
When you select pricing per set, an entry field appears that lets you enter the quantity
per set. For options priced per unit you have the choice of offering a quantity discount.
In the example below, you would offer a 10% discount on orders for 3 to 9 pieces, and
a 20% discount on orders for 10 or more.
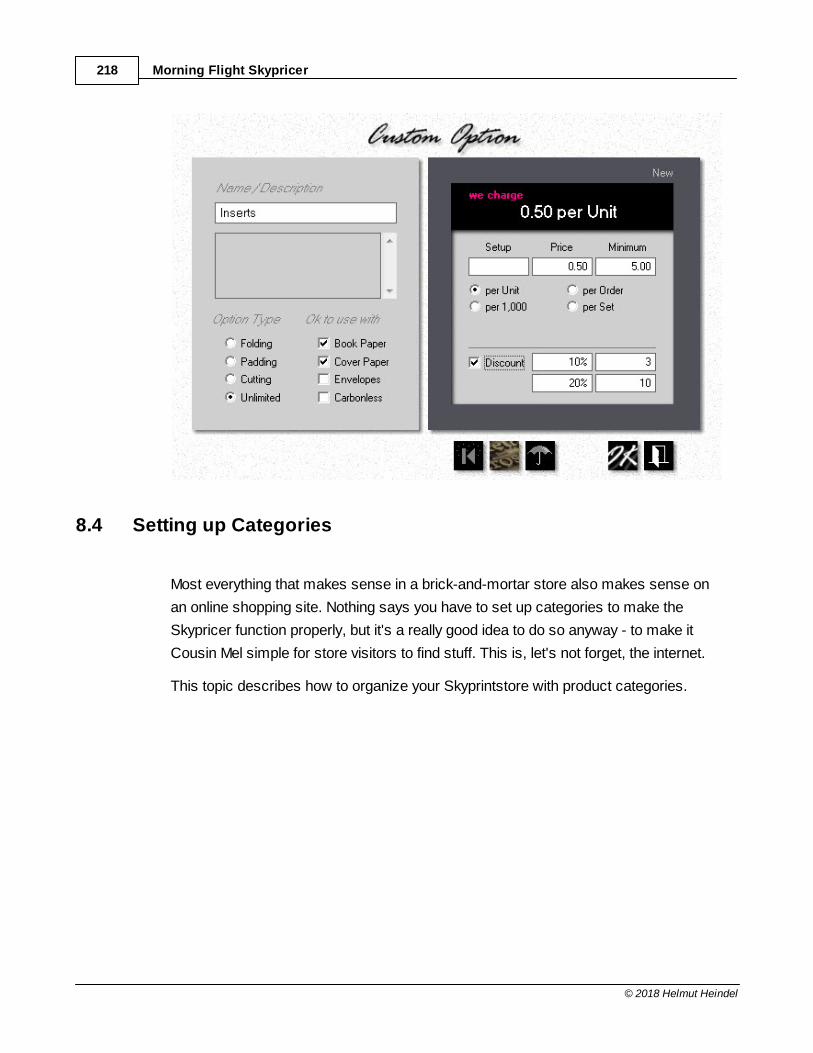
Morning Flight Skypricer218
© 2018 Helmut Heindel
8.4 Setting up Categories
Most everything that makes sense in a brick-and-mortar store also makes sense on
an online shopping site. Nothing says you have to set up categories to make the
Skypricer function properly, but it's a really good idea to do so anyway - to make it
Cousin Mel simple for store visitors to find stuff. This is, let's not forget, the internet.
This topic describes how to organize your Skyprintstore with product categories.
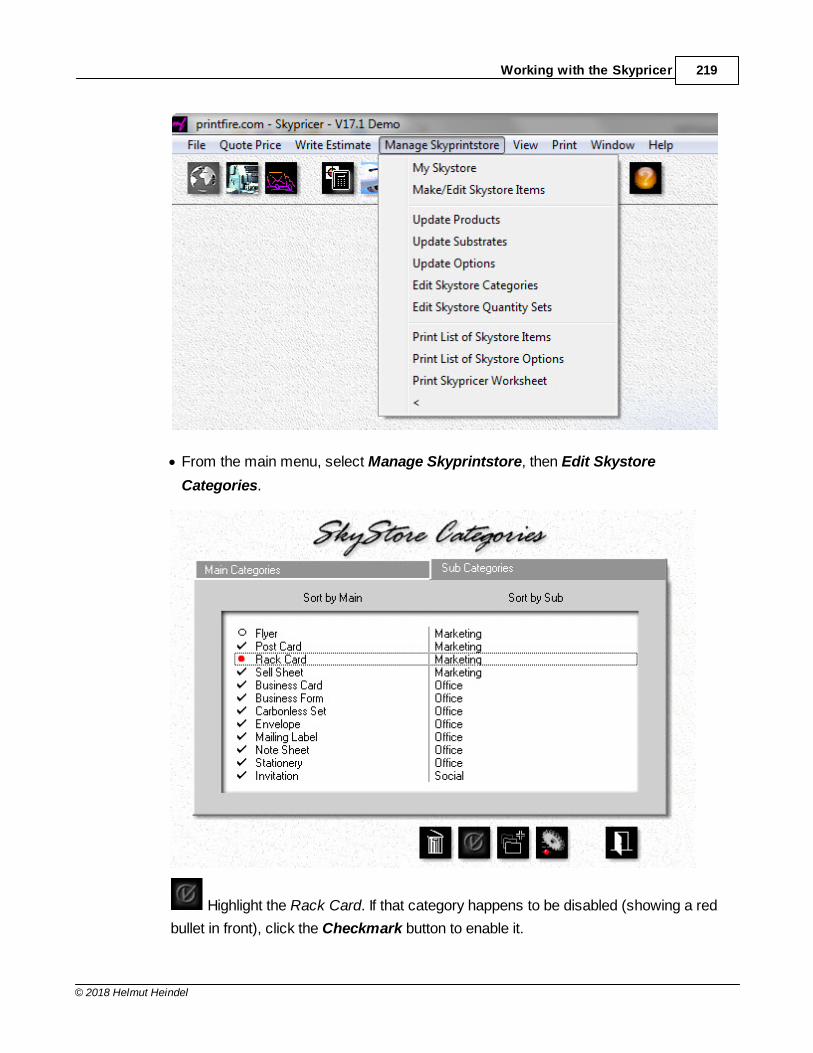
Working with the Skypricer 219
© 2018 Helmut Heindel
· From the main menu, select Manage Skyprintstore, then Edit Skystore
Categories.
Highlight the Rack Card. If that category happens to be disabled (showing a red
bullet in front), click the Checkmark button to enable it.
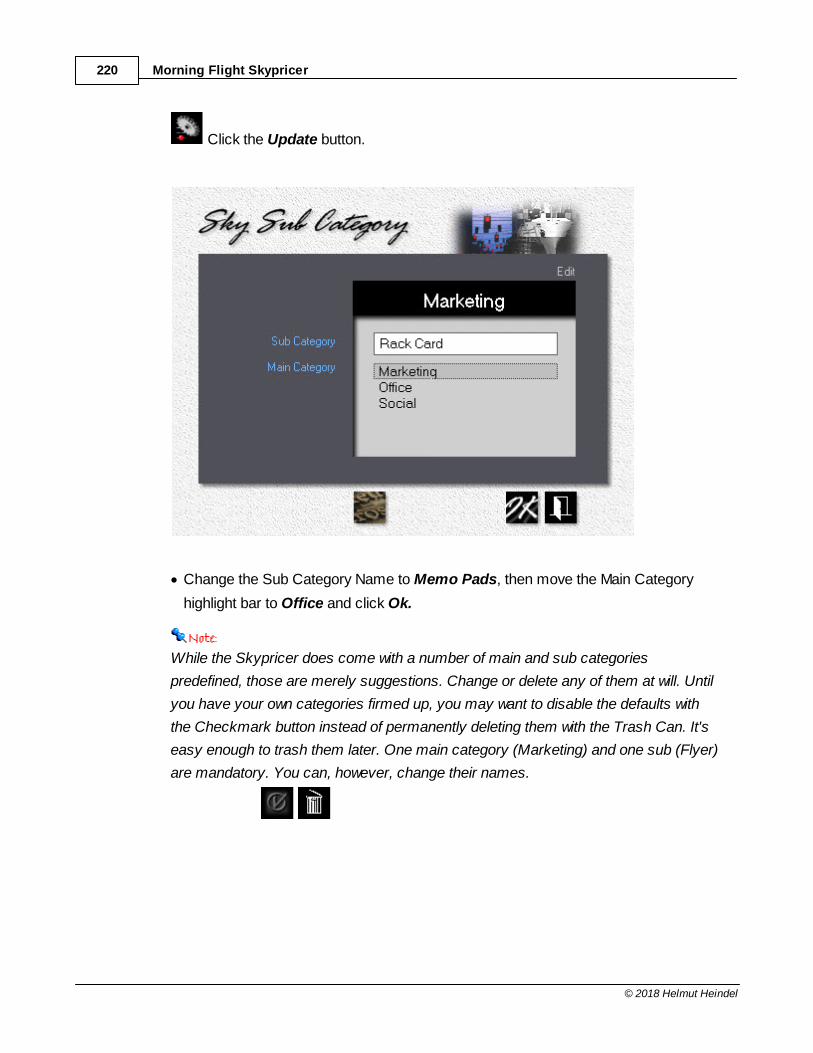
Morning Flight Skypricer220
© 2018 Helmut Heindel
Click the Update button.
· Change the Sub Category Name to Memo Pads, then move the Main Category
highlight bar to Office and click Ok.
While the Skypricer does come with a number of main and sub categories
predefined, those are merely suggestions. Change or delete any of them at will. Until
you have your own categories firmed up, you may want to disable the defaults with
the Checkmark button instead of permanently deleting them with the Trash Can. It's
easy enough to trash them later. One main category (Marketing) and one sub (Flyer)
are mandatory. You can, however, change their names.
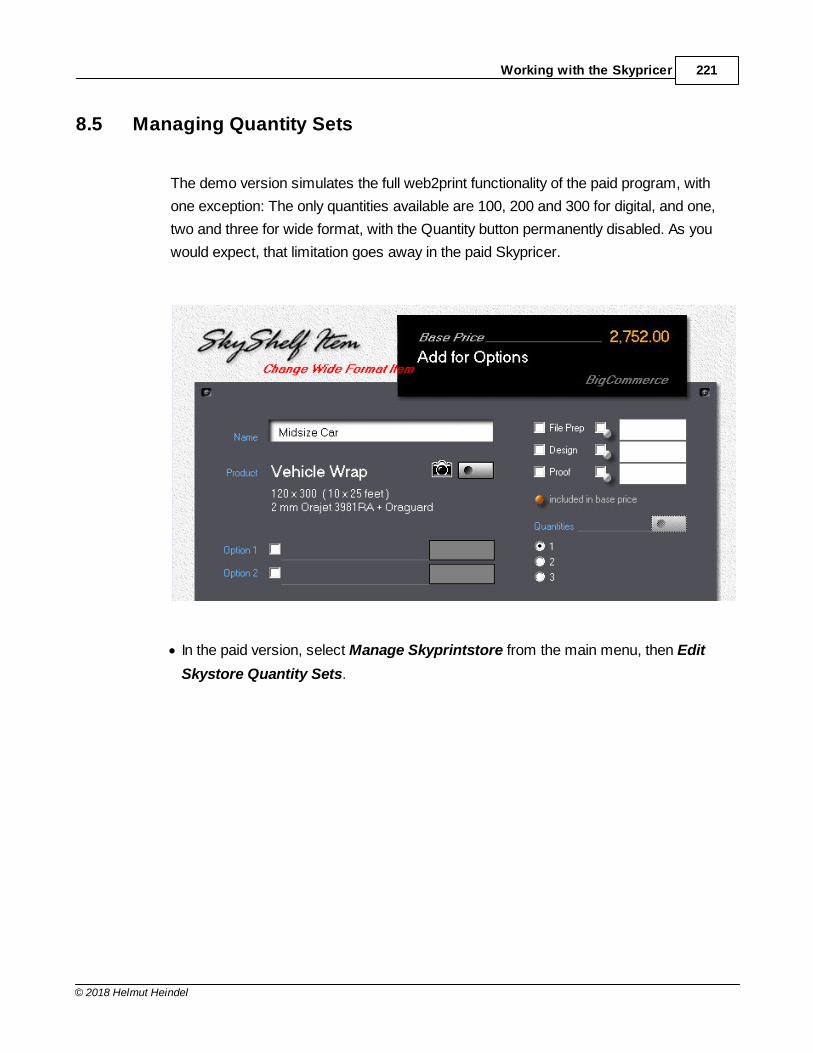
Working with the Skypricer 221
© 2018 Helmut Heindel
8.5 Managing Quantity Sets
The demo version simulates the full web2print functionality of the paid program, with
one exception: The only quantities available are 100, 200 and 300 for digital, and one,
two and three for wide format, with the Quantity button permanently disabled. As you
would expect, that limitation goes away in the paid Skypricer.
· In the paid version, select Manage Skyprintstore from the main menu, then Edit
Skystore Quantity Sets.
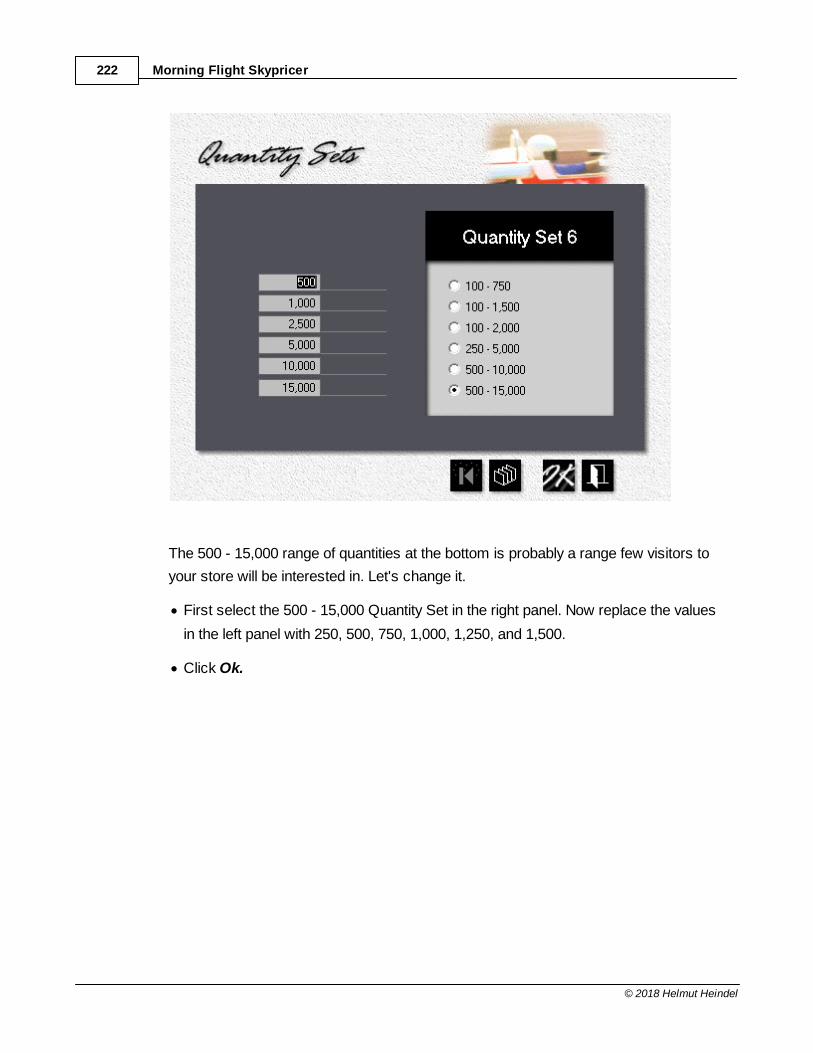
Morning Flight Skypricer222
© 2018 Helmut Heindel
The 500 - 15,000 range of quantities at the bottom is probably a range few visitors to
your store will be interested in. Let's change it.
· First select the 500 - 15,000 Quantity Set in the right panel. Now replace the values
in the left panel with 250, 500, 750, 1,000, 1,250, and 1,500.
· Click Ok.
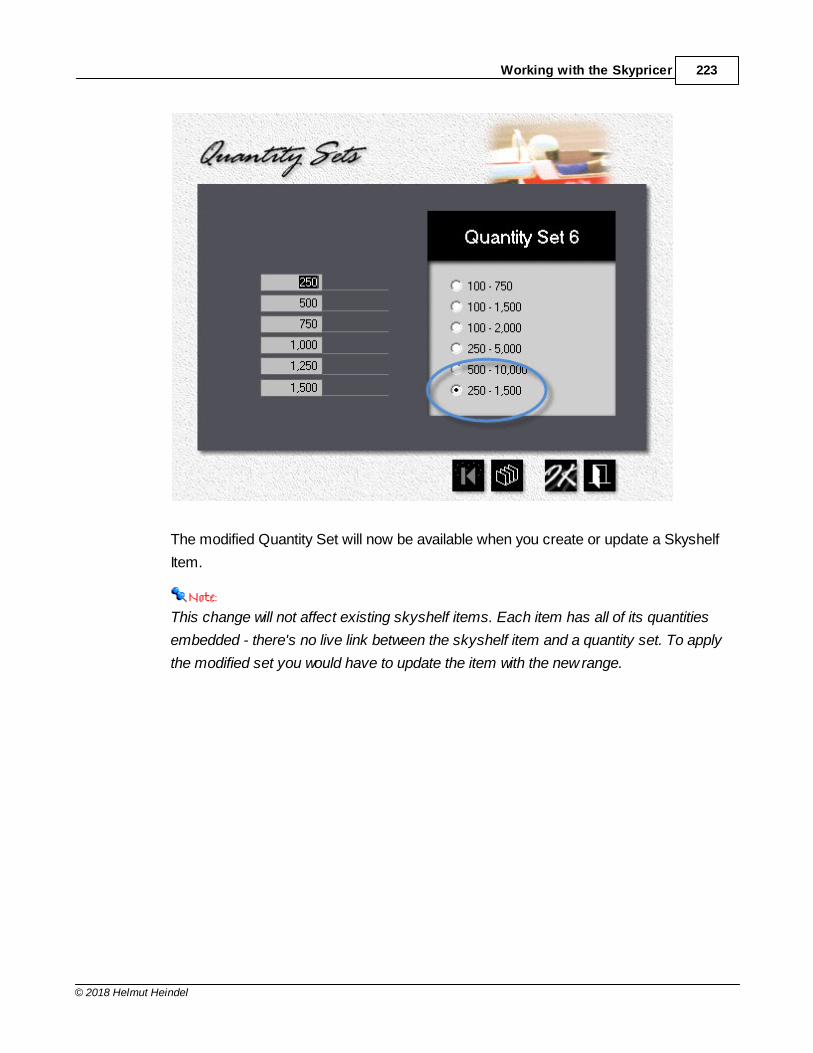
Working with the Skypricer 223
© 2018 Helmut Heindel
The modified Quantity Set will now be available when you create or update a Skyshelf
Item.
This change will not affect existing skyshelf items. Each item has all of its quantities
embedded - there's no live link between the skyshelf item and a quantity set. To apply
the modified set you would have to update the item with the new range.
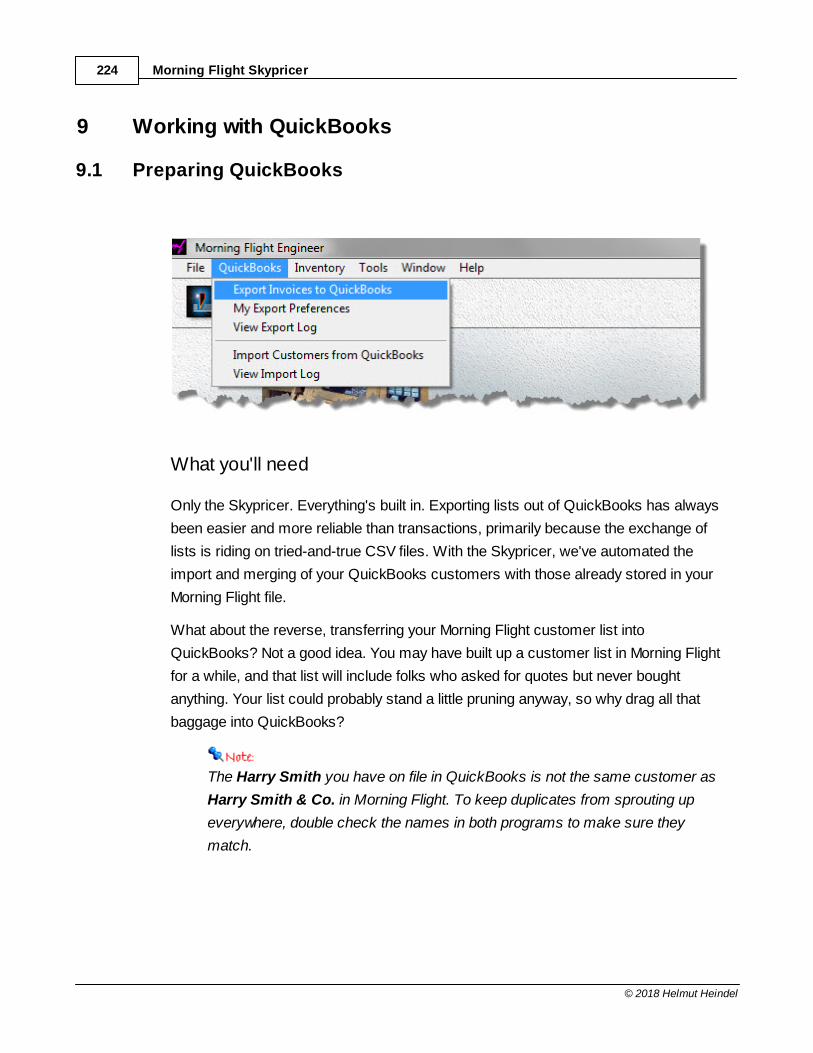
Morning Flight Skypricer224
© 2018 Helmut Heindel
9 Working with QuickBooks
9.1 Preparing QuickBooks
What you'll need
Only the Skypricer. Everything's built in. Exporting lists out of QuickBooks has always
been easier and more reliable than transactions, primarily because the exchange of
lists is riding on tried-and-true CSV files. With the Skypricer, we've automated the
import and merging of your QuickBooks customers with those already stored in your
Morning Flight file.
What about the reverse, transferring your Morning Flight customer list into
QuickBooks? Not a good idea. You may have built up a customer list in Morning Flight
for a while, and that list will include folks who asked for quotes but never bought
anything. Your list could probably stand a little pruning anyway, so why drag all that
baggage into QuickBooks?
The Harry Smith you have on file in QuickBooks is not the same customer as
Harry Smith & Co. in Morning Flight. To keep duplicates from sprouting up
everywhere, double check the names in both programs to make sure they
match.
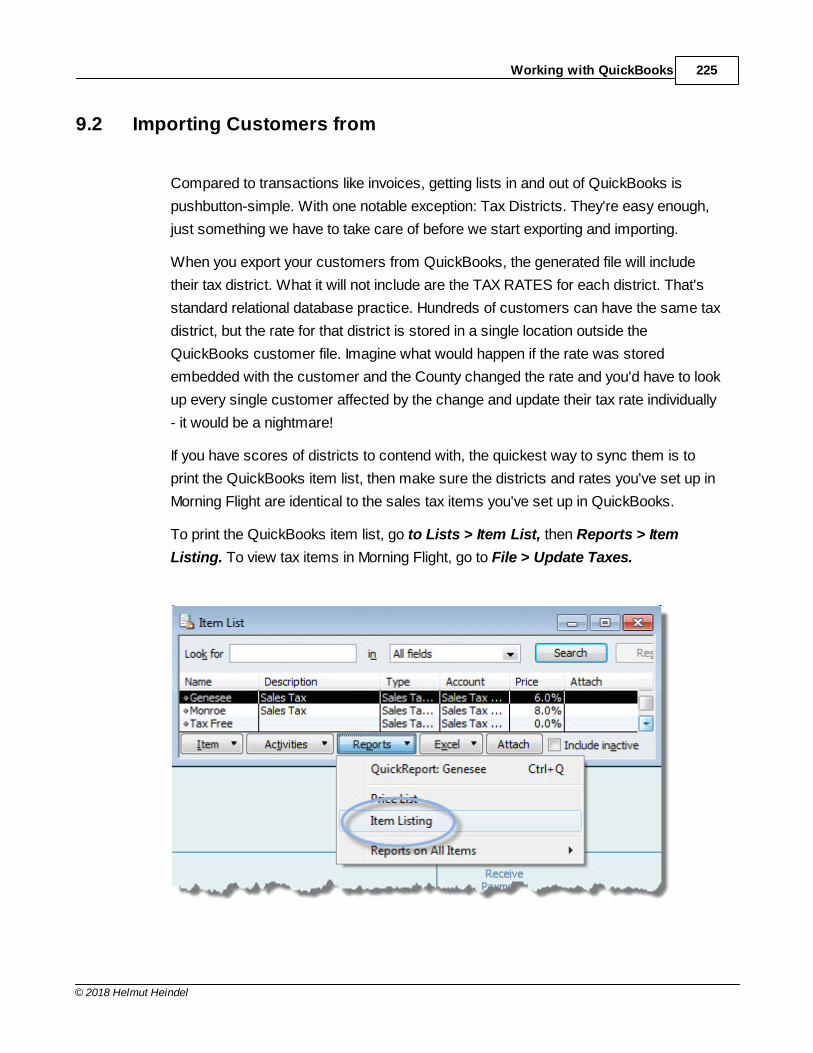
Working with QuickBooks 225
© 2018 Helmut Heindel
9.2 Importing Customers from
Compared to transactions like invoices, getting lists in and out of QuickBooks is
pushbutton-simple. With one notable exception: Tax Districts. They're easy enough,
just something we have to take care of before we start exporting and importing.
When you export your customers from QuickBooks, the generated file will include
their tax district. What it will not include are the TAX RATES for each district. That's
standard relational database practice. Hundreds of customers can have the same tax
district, but the rate for that district is stored in a single location outside the
QuickBooks customer file. Imagine what would happen if the rate was stored
embedded with the customer and the County changed the rate and you'd have to look
up every single customer affected by the change and update their tax rate individually
- it would be a nightmare!
If you have scores of districts to contend with, the quickest way to sync them is to
print the QuickBooks item list, then make sure the districts and rates you've set up in
Morning Flight are identical to the sales tax items you've set up in QuickBooks.
To print the QuickBooks item list, go to Lists > Item List, then Reports > Item
Listing. To view tax items in Morning Flight, go to File > Update Taxes.
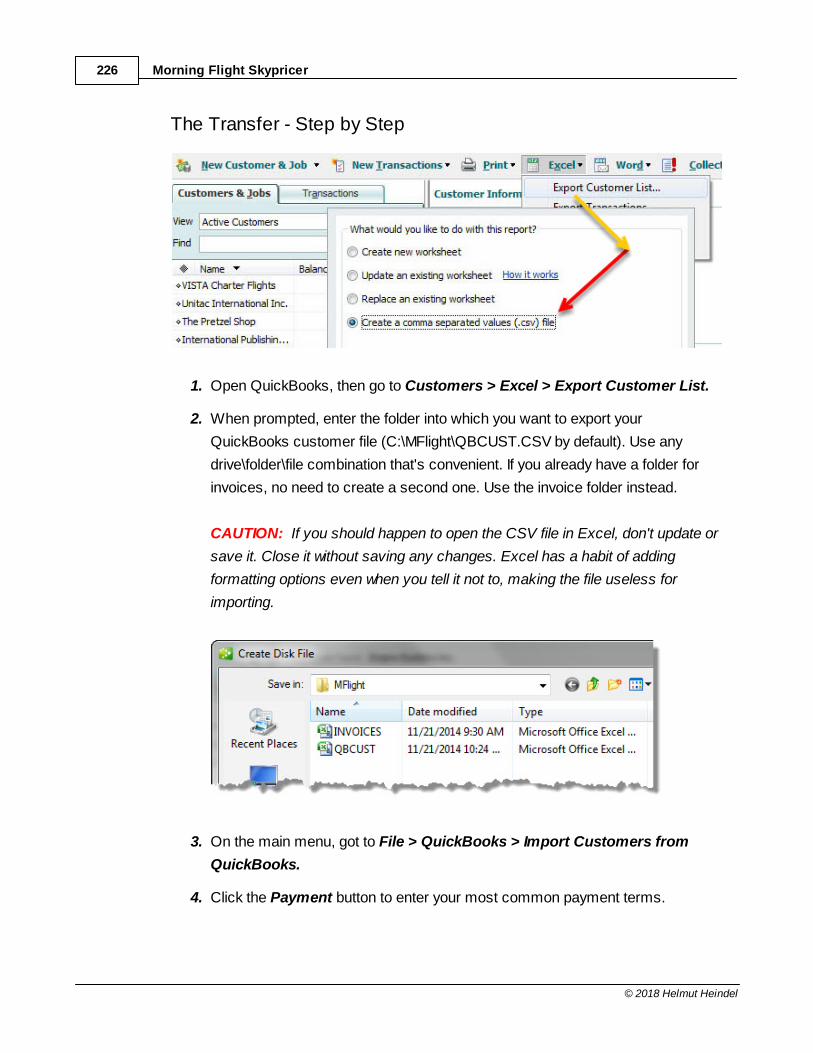
Morning Flight Skypricer226
© 2018 Helmut Heindel
The Transfer - Step by Step
1. Open QuickBooks, then go to Customers > Excel > Export Customer List.
2. When prompted, enter the folder into which you want to export your
QuickBooks customer file (C:\MFlight\QBCUST.CSV by default). Use any
drive\folder\file combination that's convenient. If you already have a folder for
invoices, no need to create a second one. Use the invoice folder instead.
CAUTION: If you should happen to open the CSV file in Excel, don't update or
save it. Close it without saving any changes. Excel has a habit of adding
formatting options even when you tell it not to, making the file useless for
importing.
3. On the main menu, got to File > QuickBooks > Import Customers from
QuickBooks.
4. Click the Payment button to enter your most common payment terms.
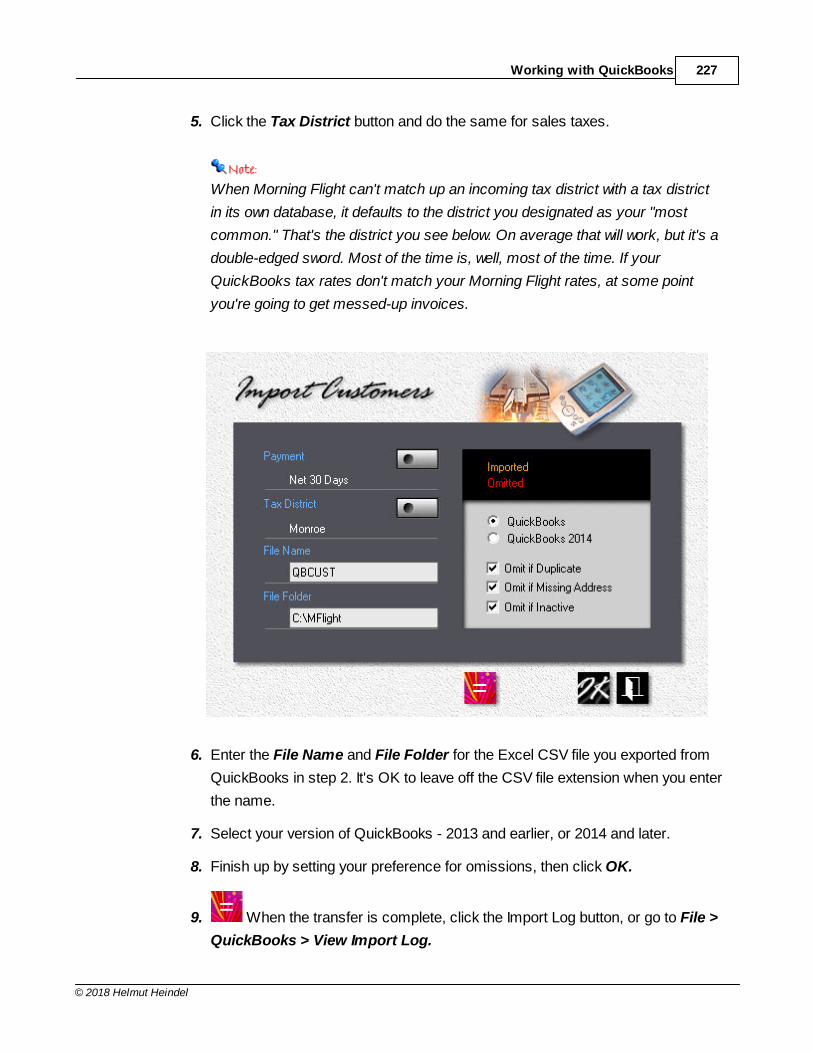
Working with QuickBooks 227
© 2018 Helmut Heindel
5. Click the Tax District button and do the same for sales taxes.
When Morning Flight can't match up an incoming tax district with a tax district
in its own database, it defaults to the district you designated as your "most
common." That's the district you see below. On average that will work, but it's a
double-edged sword. Most of the time is, well, most of the time. If your
QuickBooks tax rates don't match your Morning Flight rates, at some point
you're going to get messed-up invoices.
6. Enter the File Name and File Folder for the Excel CSV file you exported from
QuickBooks in step 2. It's OK to leave off the CSV file extension when you enter
the name.
7. Select your version of QuickBooks - 2013 and earlier, or 2014 and later.
8. Finish up by setting your preference for omissions, then click OK.
9. When the transfer is complete, click the Import Log button, or go to File >
QuickBooks > View Import Log.
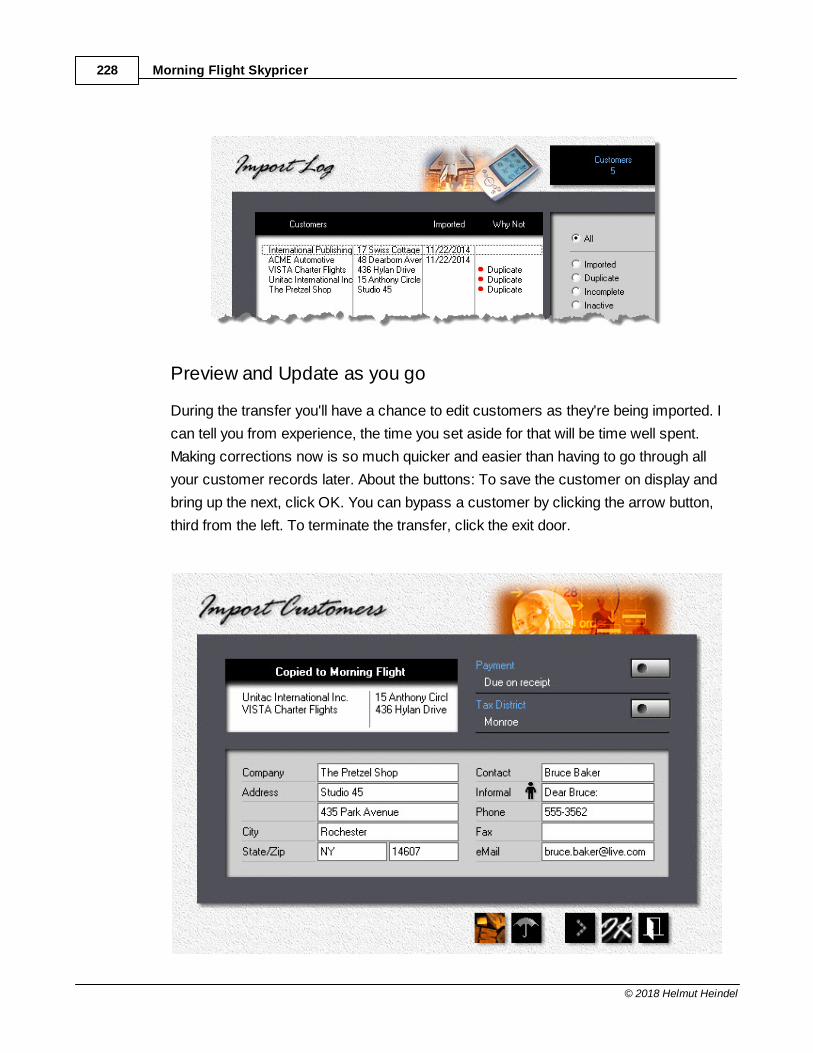
Morning Flight Skypricer228
© 2018 Helmut Heindel
Preview and Update as you go
During the transfer you'll have a chance to edit customers as they're being imported. I
can tell you from experience, the time you set aside for that will be time well spent.
Making corrections now is so much quicker and easier than having to go through all
your customer records later. About the buttons: To save the customer on display and
bring up the next, click OK. You can bypass a customer by clicking the arrow button,
third from the left. To terminate the transfer, click the exit door.
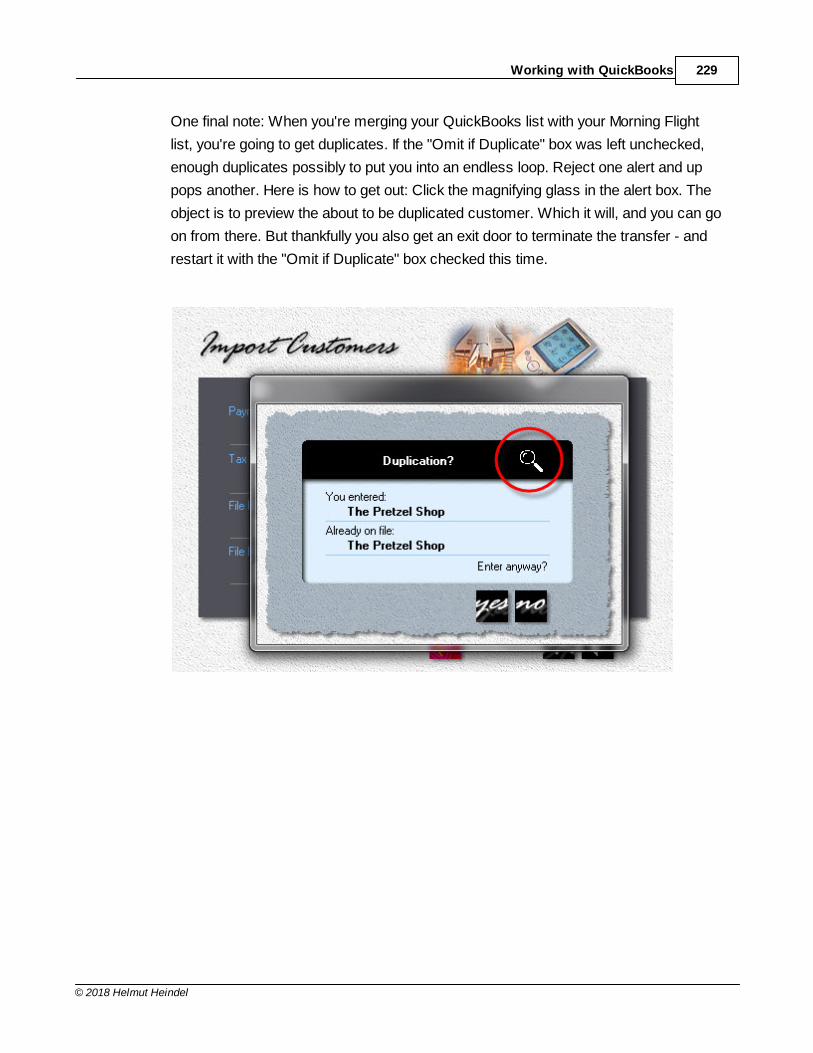
Working with QuickBooks 229
© 2018 Helmut Heindel
One final note: When you're merging your QuickBooks list with your Morning Flight
list, you're going to get duplicates. If the "Omit if Duplicate" box was left unchecked,
enough duplicates possibly to put you into an endless loop. Reject one alert and up
pops another. Here is how to get out: Click the magnifying glass in the alert box. The
object is to preview the about to be duplicated customer. Which it will, and you can go
on from there. But thankfully you also get an exit door to terminate the transfer - and
restart it with the "Omit if Duplicate" box checked this time.
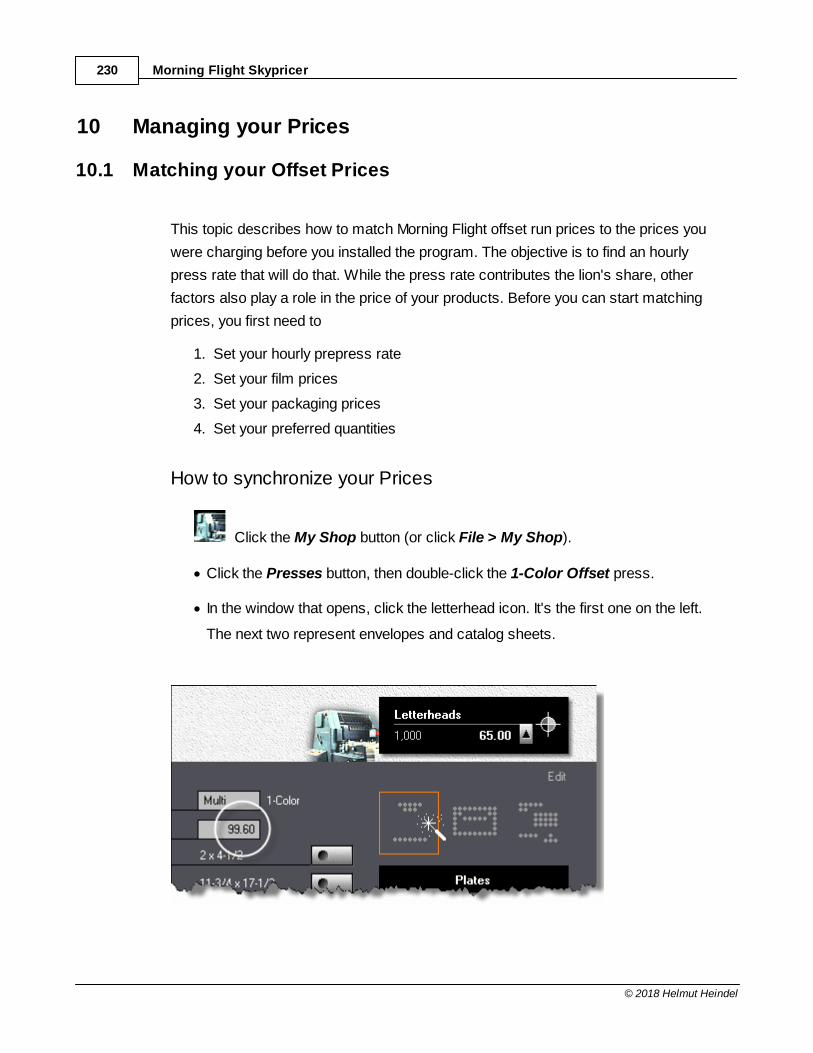
Morning Flight Skypricer230
© 2018 Helmut Heindel
10 Managing your Prices
10.1 Matching your Offset Prices
This topic describes how to match Morning Flight offset run prices to the prices you
were charging before you installed the program. The objective is to find an hourly
press rate that will do that. While the press rate contributes the lion's share, other
factors also play a role in the price of your products. Before you can start matching
prices, you first need to
1. Set your hourly prepress rate
2. Set your film prices
3. Set your packaging prices
4. Set your preferred quantities
How to synchronize your Prices
Click the My Shop button (or click File > My Shop).
· Click the Presses button, then double-click the 1-Color Offset press.
· In the window that opens, click the letterhead icon. It's the first one on the left.
The next two represent envelopes and catalog sheets.
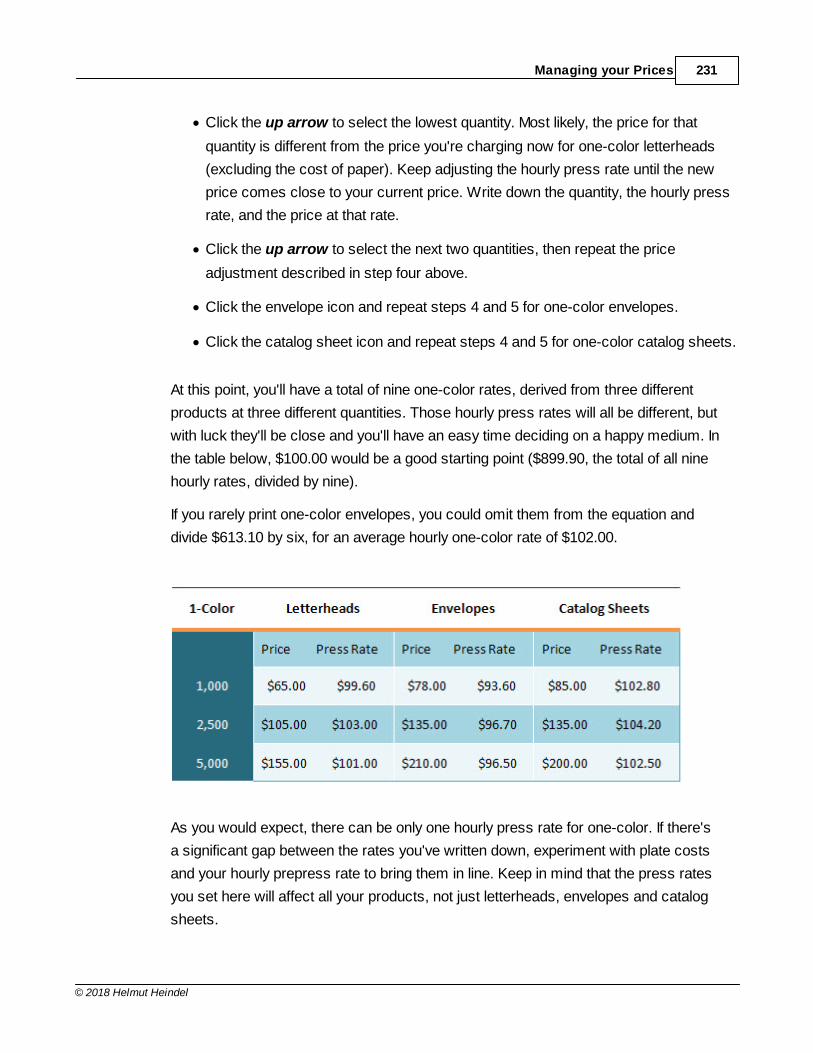
Managing your Prices 231
© 2018 Helmut Heindel
· Click the up arrow to select the lowest quantity. Most likely, the price for that
quantity is different from the price you're charging now for one-color letterheads
(excluding the cost of paper). Keep adjusting the hourly press rate until the new
price comes close to your current price. Write down the quantity, the hourly press
rate, and the price at that rate.
· Click the up arrow to select the next two quantities, then repeat the price
adjustment described in step four above.
· Click the envelope icon and repeat steps 4 and 5 for one-color envelopes.
· Click the catalog sheet icon and repeat steps 4 and 5 for one-color catalog sheets.
At this point, you'll have a total of nine one-color rates, derived from three different
products at three different quantities. Those hourly press rates will all be different, but
with luck they'll be close and you'll have an easy time deciding on a happy medium. In
the table below, $100.00 would be a good starting point ($899.90, the total of all nine
hourly rates, divided by nine).
If you rarely print one-color envelopes, you could omit them from the equation and
divide $613.10 by six, for an average hourly one-color rate of $102.00.
As you would expect, there can be only one hourly press rate for one-color. If there's
a significant gap between the rates you've written down, experiment with plate costs
and your hourly prepress rate to bring them in line. Keep in mind that the press rates
you set here will affect all your products, not just letterheads, envelopes and catalog
sheets.
Morning Flight Skypricer232
© 2018 Helmut Heindel
Once you're satisfied with your one-color offset prices, repeat the process for two-
color and four-color.
10.2 Matching your Digital Prices
This topic describes how to match Morning Flight digital run prices to the prices you
were charging before you installed the program. The objective is to find press rates
and click charges that will do that. Before we start, you'll first need to
1. Set your packaging prices
2. Set your preferred quantities
How to synchronize your Prices
Click the My Shop button (or click File > My Shop).
· Click the Presses button, then double-click the 1-Color Digital press.
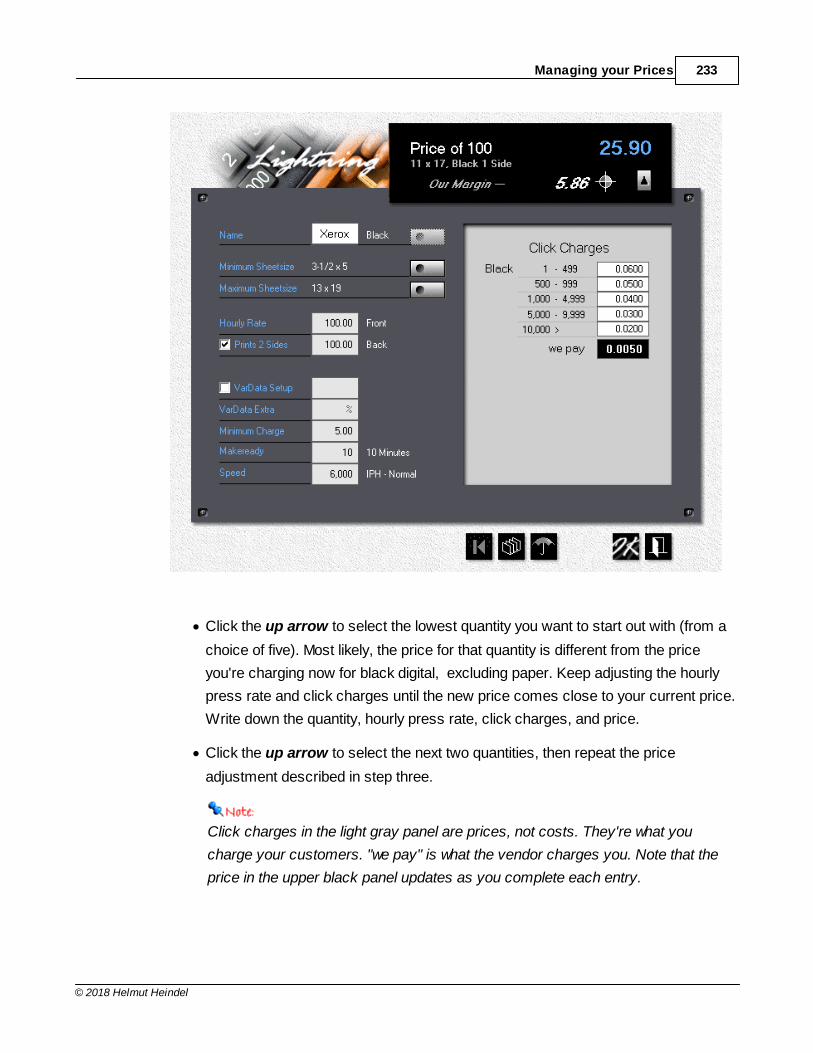
Managing your Prices 233
© 2018 Helmut Heindel
· Click the up arrow to select the lowest quantity you want to start out with (from a
choice of five). Most likely, the price for that quantity is different from the price
you're charging now for black digital, excluding paper. Keep adjusting the hourly
press rate and click charges until the new price comes close to your current price.
Write down the quantity, hourly press rate, click charges, and price.
· Click the up arrow to select the next two quantities, then repeat the price
adjustment described in step three.
Click charges in the light gray panel are prices, not costs. They're what you
charge your customers. "we pay" is what the vendor charges you. Note that the
price in the upper black panel updates as you complete each entry.
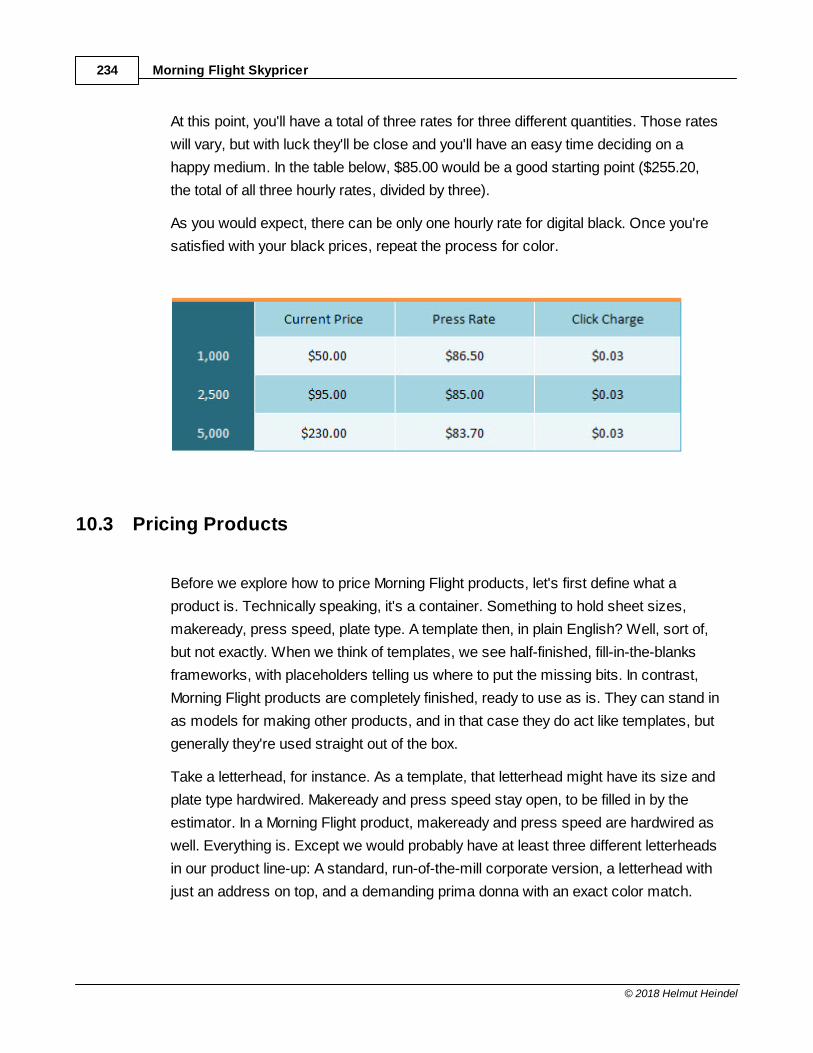
Morning Flight Skypricer234
© 2018 Helmut Heindel
At this point, you'll have a total of three rates for three different quantities. Those rates
will vary, but with luck they'll be close and you'll have an easy time deciding on a
happy medium. In the table below, $85.00 would be a good starting point ($255.20,
the total of all three hourly rates, divided by three).
As you would expect, there can be only one hourly rate for digital black. Once you're
satisfied with your black prices, repeat the process for color.
10.3 Pricing Products
Before we explore how to price Morning Flight products, let's first define what a
product is. Technically speaking, it's a container. Something to hold sheet sizes,
makeready, press speed, plate type. A template then, in plain English? Well, sort of,
but not exactly. When we think of templates, we see half-finished, fill-in-the-blanks
frameworks, with placeholders telling us where to put the missing bits. In contrast,
Morning Flight products are completely finished, ready to use as is. They can stand in
as models for making other products, and in that case they do act like templates, but
generally they're used straight out of the box.
Take a letterhead, for instance. As a template, that letterhead might have its size and
plate type hardwired. Makeready and press speed stay open, to be filled in by the
estimator. In a Morning Flight product, makeready and press speed are hardwired as
well. Everything is. Except we would probably have at least three different letterheads
in our product line-up: A standard, run-of-the-mill corporate version, a letterhead with
just an address on top, and a demanding prima donna with an exact color match.
Managing your Prices 235
© 2018 Helmut Heindel
The Benefits
Ok, so what can a product do that a template can't? First and foremost, a mockup of
the job that needs to be quoted can be compared to some predefined products. Even
buyers unfamiliar with printing can match their mockup to one of your samples. Your
estimator does his job once, attaching makeready and press speed and other factors
when creating each product. Few buyers would have the skills to do that. If you want
to sell printing on line at different price levels, you can show pictures that reflect each
level.
Along similar lines, cousin Mel can now be entrusted to do most of the low-end
quoting, leaving complex and more important projects to a professional estimator. In
the smaller shops that's likely to be the owner or manager. Between helping with
production and pacifying customers and filling in for employees out with the flu, she's
hardly the person who should estimate ten-dollar jobs that rarely materialize anyway.
Cousin Mel, on the other hand . . .
Finally, products open the door to automation. Few consumer products are more
automated than digital cameras. How automated would those cameras be if they had
to work with templates, if exposure and focus had to be dialed in for each picture?
With Morning Flight products, parameters are inherent. That allows the program to
intelligently increase press speeds as run lengths go up, make sure letterheads don't
get printed on card stock, calculate ink consumption based on coverage, keep
envelopes from being folded ... the list goes on. Products just generally make life
easier.
How do we price Products?
Actually, we don't, not directly. Copy products and wide format are notable
exceptions. On offset products, Morning Flight integrates the properties of the product
with the hourly rate of the assigned press, reads the quantity, and comes up with a
price. On digital products, it's the size and ink coverage of the product that combines
with the properties of the press (hourly rate, run speed, consumables and click
charges) to determine the outcome. It's a little more complicated than that - a host of
other factors get pulled into the mix - but in principal that's how it works.

Morning Flight Skypricer236
© 2018 Helmut Heindel
What separates Wide Format
In a word, technology. And to a lesser extend, the internet. Evolution in this field is so
rapid that press-based pricing just isn't practical. What keeps pulling the rug out from
under us isn't just the onrush of new inks and hardware, but where and how wide
format products are being used. Think fabrics for interior decorating, and contour-cut
decals that hardly anyone associates with 'wide'. When you factor in the internet,
prices driven by costs go out the window as well. Think Vistaprint.
What's left are value-driven prices based on size, substrate, and what our regional
market says they should be. If we can't produce wide format for that, we probably
shouldn't be in the wide format business. And if we're planing to sell wide format
online, we really do need to look at Vistaprint and other high volume vendors selling
banners on the internet. Not to get our prices down to their level necessarily, but to
see whether a snazzier banner is the knife we want to bring to the gunfight.
It took nearly a hundred years for print marketing to catch up to how Henry Ford
priced the 'Tin Lizzy', his revolutionary model T automobile. In "My Life and Work"
published in 1922, he writes:
"We have never considered any costs as fixed. We first reduce the price to the point
where we believe more sales will result. Then we go ahead and try to make the
prices. We do not bother about the costs. The new price forces the costs down."
That's a shining example of value-driven marketing, far beyond giving people what
they want. Henry also wrote: "If I had asked people what they wanted, they would have
said a faster horse." Ahead of his time, old Henry was.
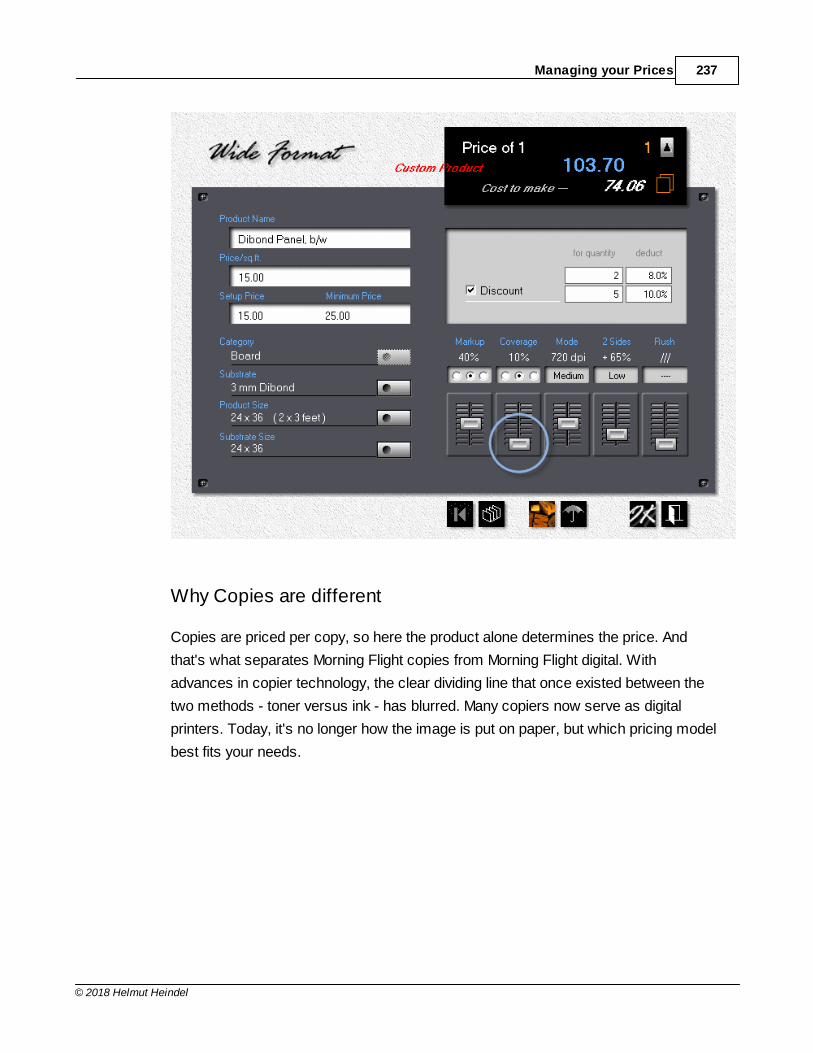
Managing your Prices 237
© 2018 Helmut Heindel
Why Copies are different
Copies are priced per copy, so here the product alone determines the price. And
that's what separates Morning Flight copies from Morning Flight digital. With
advances in copier technology, the clear dividing line that once existed between the
two methods - toner versus ink - has blurred. Many copiers now serve as digital
printers. Today, it's no longer how the image is put on paper, but which pricing model
best fits your needs.
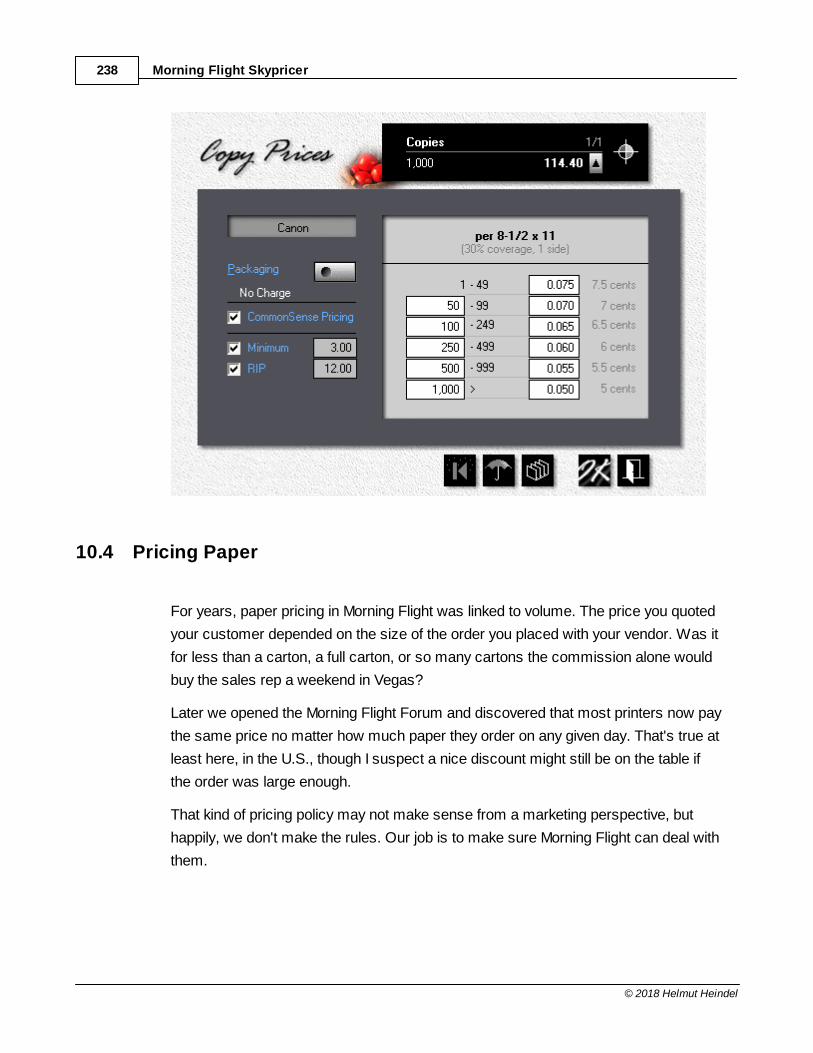
Morning Flight Skypricer238
© 2018 Helmut Heindel
10.4 Pricing Paper
For years, paper pricing in Morning Flight was linked to volume. The price you quoted
your customer depended on the size of the order you placed with your vendor. Was it
for less than a carton, a full carton, or so many cartons the commission alone would
buy the sales rep a weekend in Vegas?
Later we opened the Morning Flight Forum and discovered that most printers now pay
the same price no matter how much paper they order on any given day. That's true at
least here, in the U.S., though I suspect a nice discount might still be on the table if
the order was large enough.
That kind of pricing policy may not make sense from a marketing perspective, but
happily, we don't make the rules. Our job is to make sure Morning Flight can deal with
them.
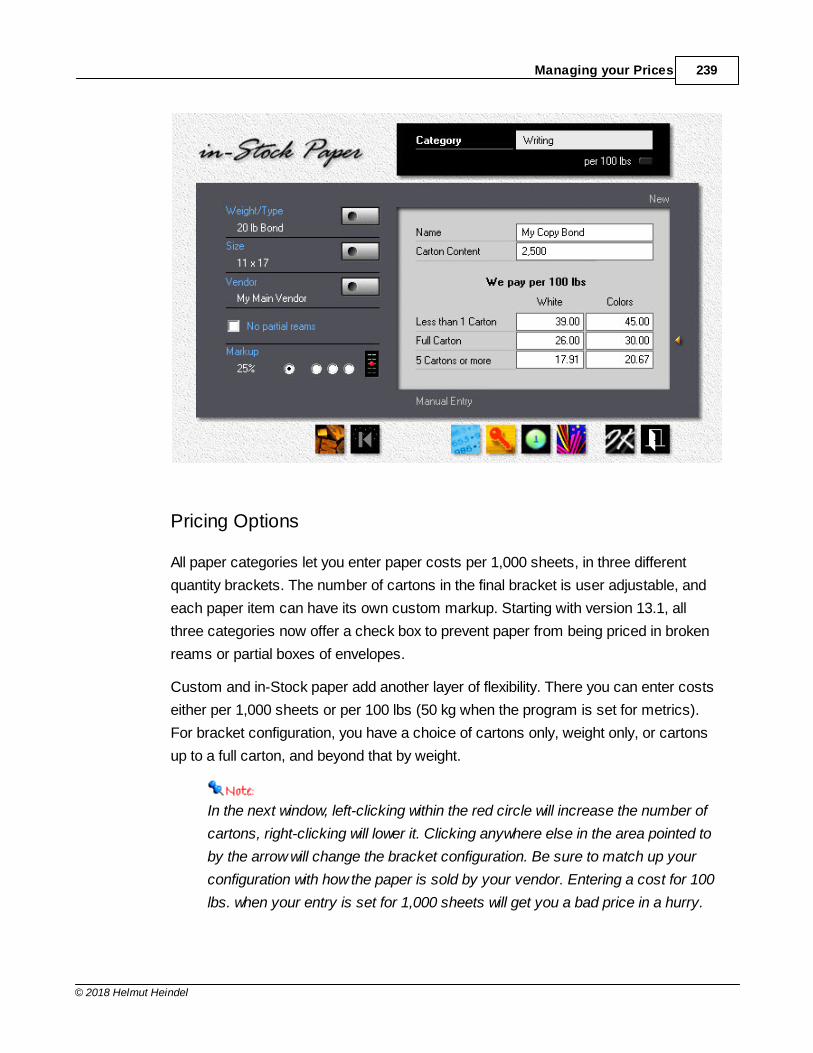
Managing your Prices 239
© 2018 Helmut Heindel
Pricing Options
All paper categories let you enter paper costs per 1,000 sheets, in three different
quantity brackets. The number of cartons in the final bracket is user adjustable, and
each paper item can have its own custom markup. Starting with version 13.1, all
three categories now offer a check box to prevent paper from being priced in broken
reams or partial boxes of envelopes.
Custom and in-Stock paper add another layer of flexibility. There you can enter costs
either per 1,000 sheets or per 100 lbs (50 kg when the program is set for metrics).
For bracket configuration, you have a choice of cartons only, weight only, or cartons
up to a full carton, and beyond that by weight.
In the next window, left-clicking within the red circle will increase the number of
cartons, right-clicking will lower it. Clicking anywhere else in the area pointed to
by the arrow will change the bracket configuration. Be sure to match up your
configuration with how the paper is sold by your vendor. Entering a cost for 100
lbs. when your entry is set for 1,000 sheets will get you a bad price in a hurry.
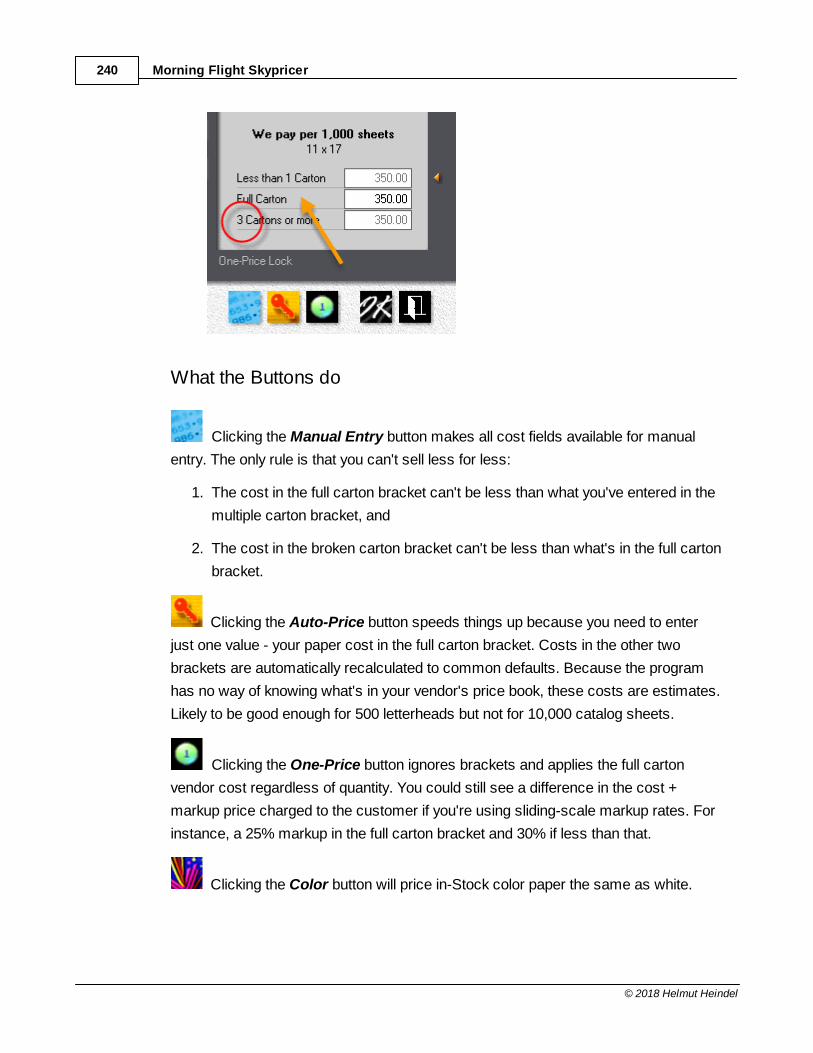
Morning Flight Skypricer240
© 2018 Helmut Heindel
What the Buttons do
Clicking the Manual Entry button makes all cost fields available for manual
entry. The only rule is that you can't sell less for less:
1. The cost in the full carton bracket can't be less than what you've entered in the
multiple carton bracket, and
2. The cost in the broken carton bracket can't be less than what's in the full carton
bracket.
Clicking the Auto-Price button speeds things up because you need to enter
just one value - your paper cost in the full carton bracket. Costs in the other two
brackets are automatically recalculated to common defaults. Because the program
has no way of knowing what's in your vendor's price book, these costs are estimates.
Likely to be good enough for 500 letterheads but not for 10,000 catalog sheets.
Clicking the One-Price button ignores brackets and applies the full carton
vendor cost regardless of quantity. You could still see a difference in the cost +
markup price charged to the customer if you're using sliding-scale markup rates. For
instance, a 25% markup in the full carton bracket and 30% if less than that.
Clicking the Color button will price in-Stock color paper the same as white.
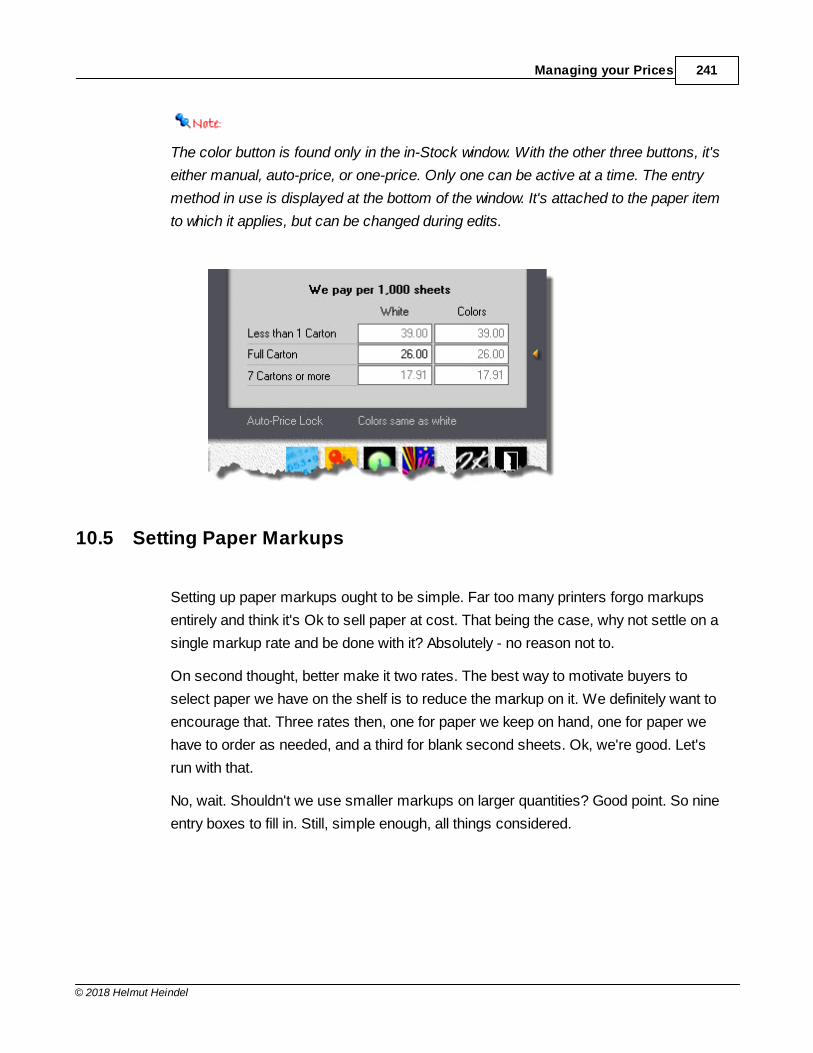
Managing your Prices 241
© 2018 Helmut Heindel
The color button is found only in the in-Stock window. With the other three buttons, it's
either manual, auto-price, or one-price. Only one can be active at a time. The entry
method in use is displayed at the bottom of the window. It's attached to the paper item
to which it applies, but can be changed during edits.
10.5 Setting Paper Markups
Setting up paper markups ought to be simple. Far too many printers forgo markups
entirely and think it's Ok to sell paper at cost. That being the case, why not settle on a
single markup rate and be done with it? Absolutely - no reason not to.
On second thought, better make it two rates. The best way to motivate buyers to
select paper we have on the shelf is to reduce the markup on it. We definitely want to
encourage that. Three rates then, one for paper we keep on hand, one for paper we
have to order as needed, and a third for blank second sheets. Ok, we're good. Let's
run with that.
No, wait. Shouldn't we use smaller markups on larger quantities? Good point. So nine
entry boxes to fill in. Still, simple enough, all things considered.
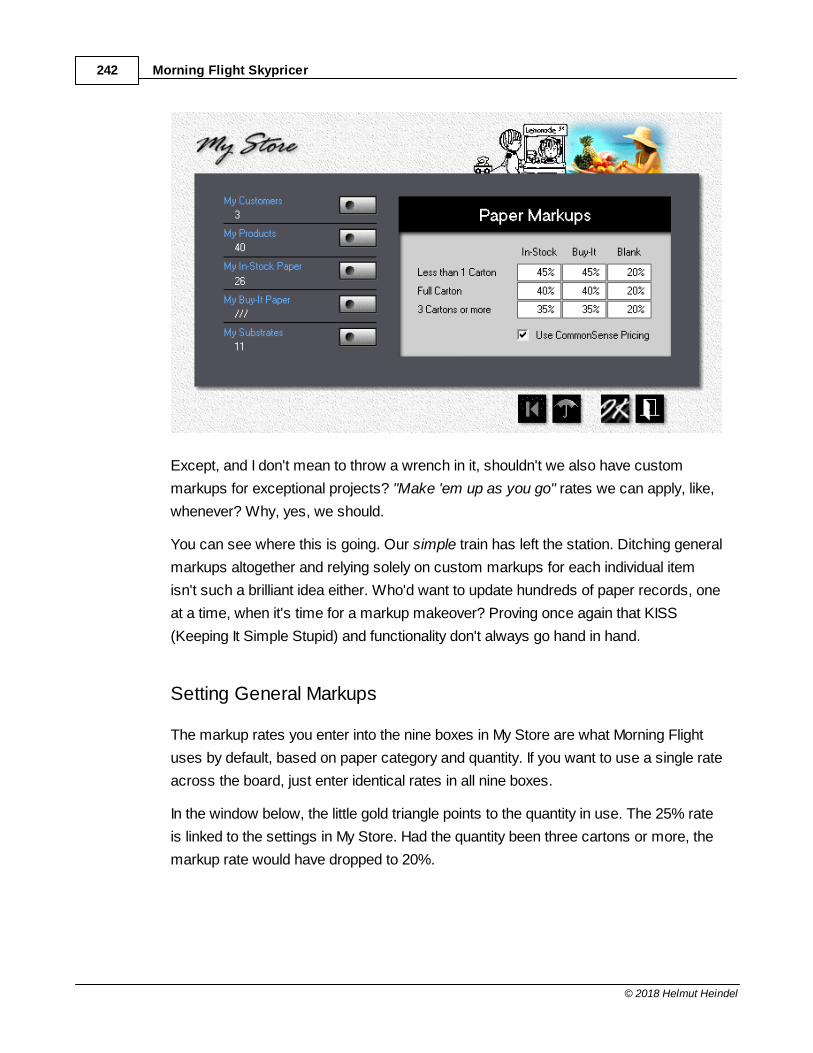
Morning Flight Skypricer242
© 2018 Helmut Heindel
Except, and I don't mean to throw a wrench in it, shouldn't we also have custom
markups for exceptional projects? "Make 'em up as you go" rates we can apply, like,
whenever? Why, yes, we should.
You can see where this is going. Our simple train has left the station. Ditching general
markups altogether and relying solely on custom markups for each individual item
isn't such a brilliant idea either. Who'd want to update hundreds of paper records, one
at a time, when it's time for a markup makeover? Proving once again that KISS
(Keeping It Simple Stupid) and functionality don't always go hand in hand.
Setting General Markups
The markup rates you enter into the nine boxes in My Store are what Morning Flight
uses by default, based on paper category and quantity. If you want to use a single rate
across the board, just enter identical rates in all nine boxes.
In the window below, the little gold triangle points to the quantity in use. The 25% rate
is linked to the settings in My Store. Had the quantity been three cartons or more, the
markup rate would have dropped to 20%.
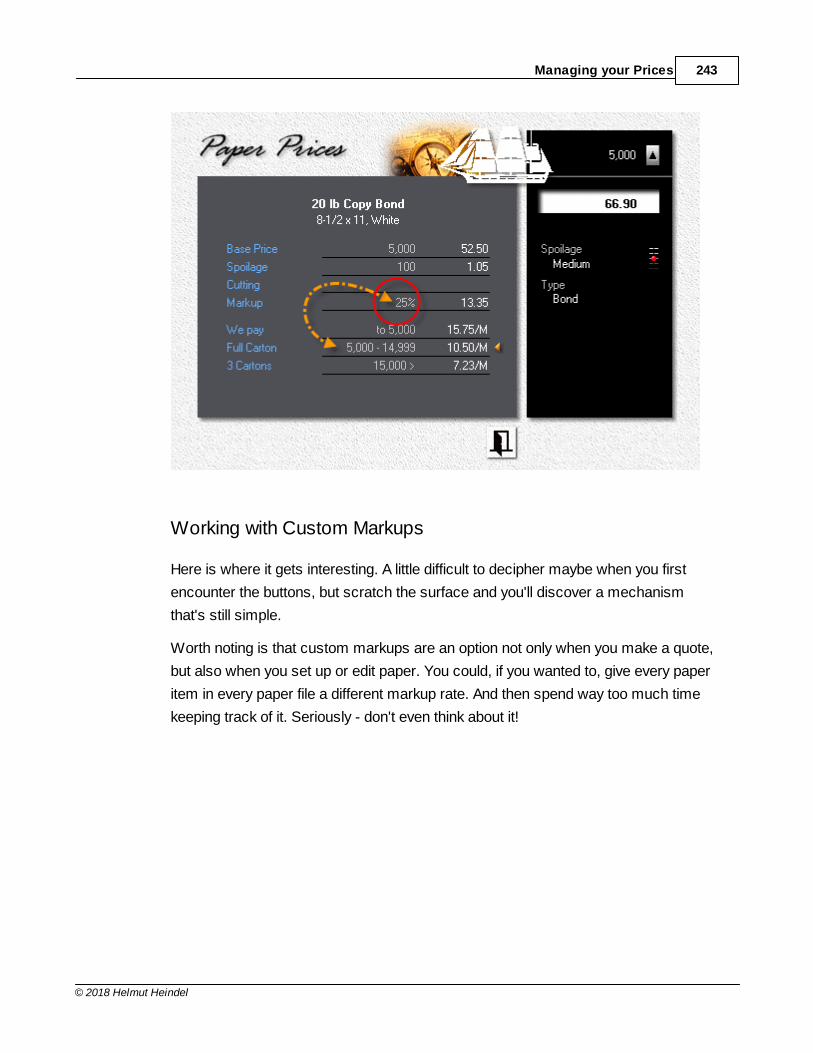
Managing your Prices 243
© 2018 Helmut Heindel
Working with Custom Markups
Here is where it gets interesting. A little difficult to decipher maybe when you first
encounter the buttons, but scratch the surface and you'll discover a mechanism
that's still simple.
Worth noting is that custom markups are an option not only when you make a quote,
but also when you set up or edit paper. You could, if you wanted to, give every paper
item in every paper file a different markup rate. And then spend way too much time
keeping track of it. Seriously - don't even think about it!
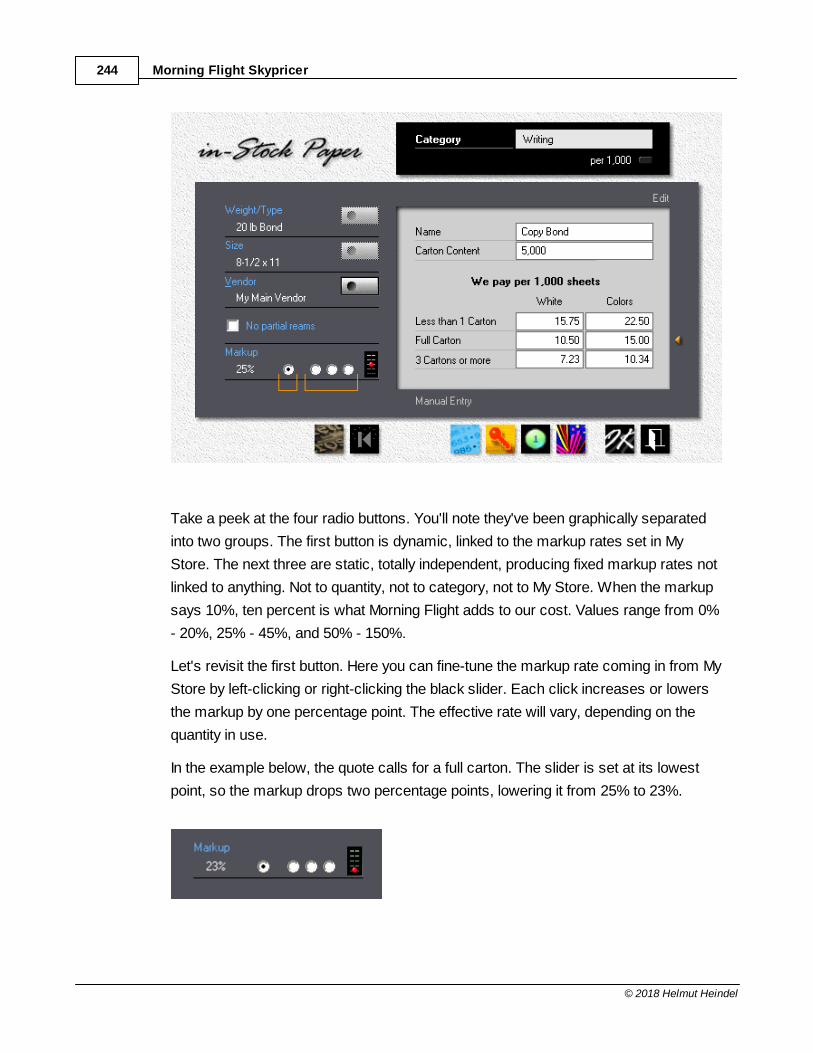
Morning Flight Skypricer244
© 2018 Helmut Heindel
Take a peek at the four radio buttons. You'll note they've been graphically separated
into two groups. The first button is dynamic, linked to the markup rates set in My
Store. The next three are static, totally independent, producing fixed markup rates not
linked to anything. Not to quantity, not to category, not to My Store. When the markup
says 10%, ten percent is what Morning Flight adds to our cost. Values range from 0%
- 20%, 25% - 45%, and 50% - 150%.
Let's revisit the first button. Here you can fine-tune the markup rate coming in from My
Store by left-clicking or right-clicking the black slider. Each click increases or lowers
the markup by one percentage point. The effective rate will vary, depending on the
quantity in use.
In the example below, the quote calls for a full carton. The slider is set at its lowest
point, so the markup drops two percentage points, lowering it from 25% to 23%.
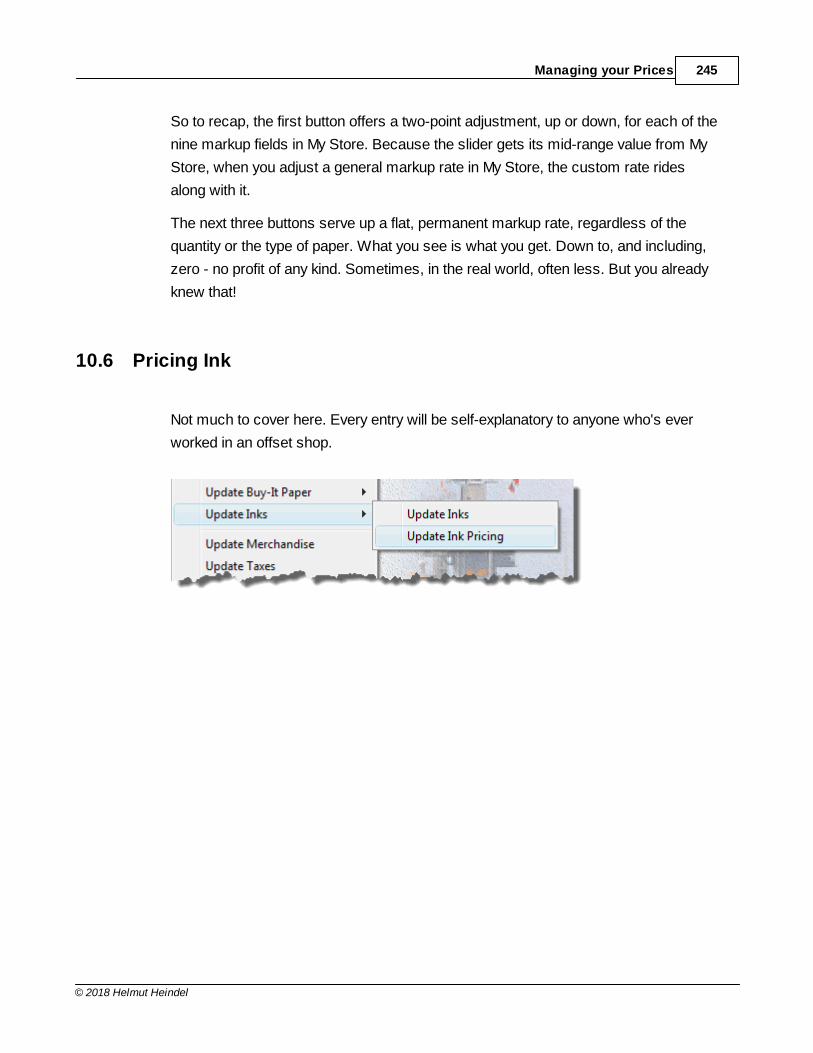
Managing your Prices 245
© 2018 Helmut Heindel
So to recap, the first button offers a two-point adjustment, up or down, for each of the
nine markup fields in My Store. Because the slider gets its mid-range value from My
Store, when you adjust a general markup rate in My Store, the custom rate rides
along with it.
The next three buttons serve up a flat, permanent markup rate, regardless of the
quantity or the type of paper. What you see is what you get. Down to, and including,
zero - no profit of any kind. Sometimes, in the real world, often less. But you already
knew that!
10.6 Pricing Ink
Not much to cover here. Every entry will be self-explanatory to anyone who's ever
worked in an offset shop.
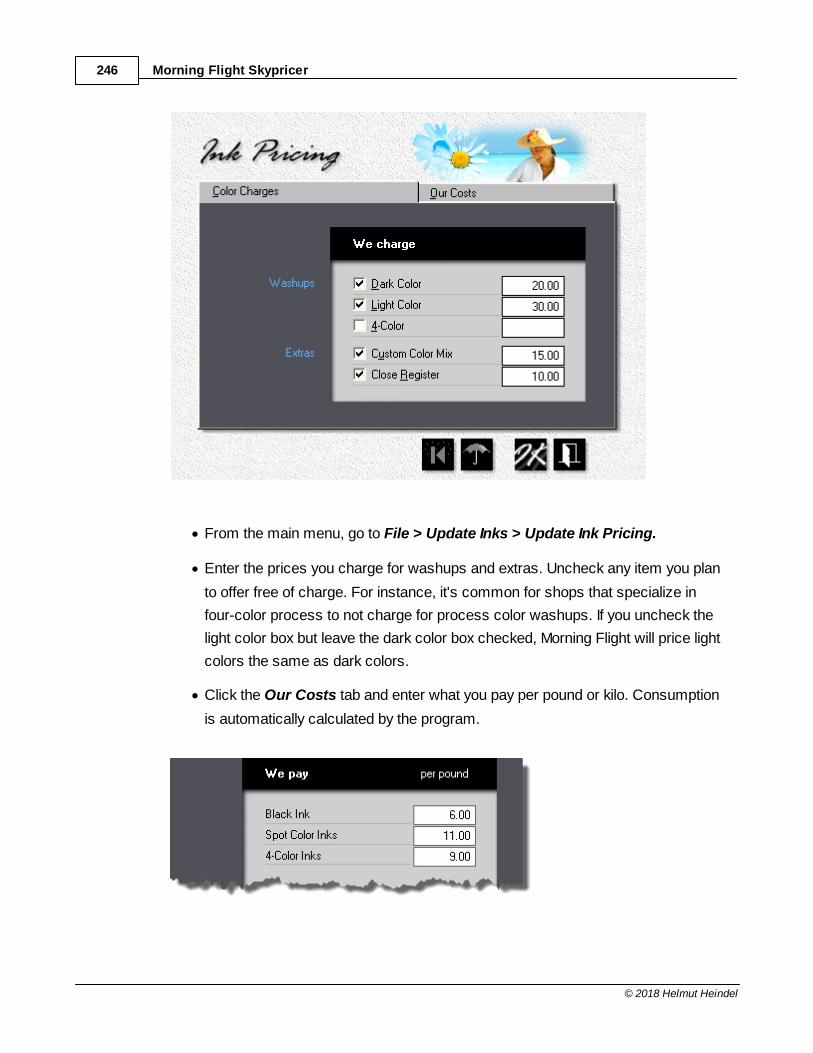
Morning Flight Skypricer246
© 2018 Helmut Heindel
· From the main menu, go to File > Update Inks > Update Ink Pricing.
· Enter the prices you charge for washups and extras. Uncheck any item you plan
to offer free of charge. For instance, it's common for shops that specialize in
four-color process to not charge for process color washups. If you uncheck the
light color box but leave the dark color box checked, Morning Flight will price light
colors the same as dark colors.
· Click the Our Costs tab and enter what you pay per pound or kilo. Consumption
is automatically calculated by the program.
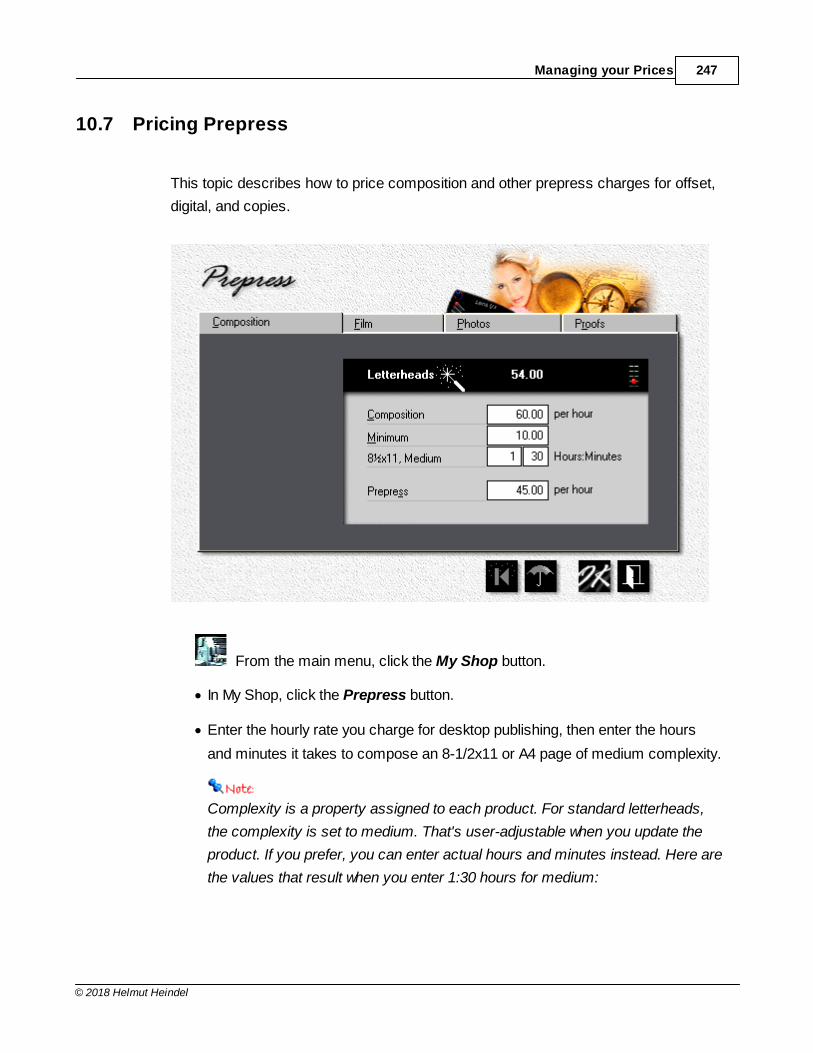
Managing your Prices 247
© 2018 Helmut Heindel
10.7 Pricing Prepress
This topic describes how to price composition and other prepress charges for offset,
digital, and copies.
From the main menu, click the My Shop button.
· In My Shop, click the Prepress button.
· Enter the hourly rate you charge for desktop publishing, then enter the hours
and minutes it takes to compose an 8-1/2x11 or A4 page of medium complexity.
Complexity is a property assigned to each product. For standard letterheads,
the complexity is set to medium. That's user-adjustable when you update the
product. If you prefer, you can enter actual hours and minutes instead. Here are
the values that result when you enter 1:30 hours for medium:
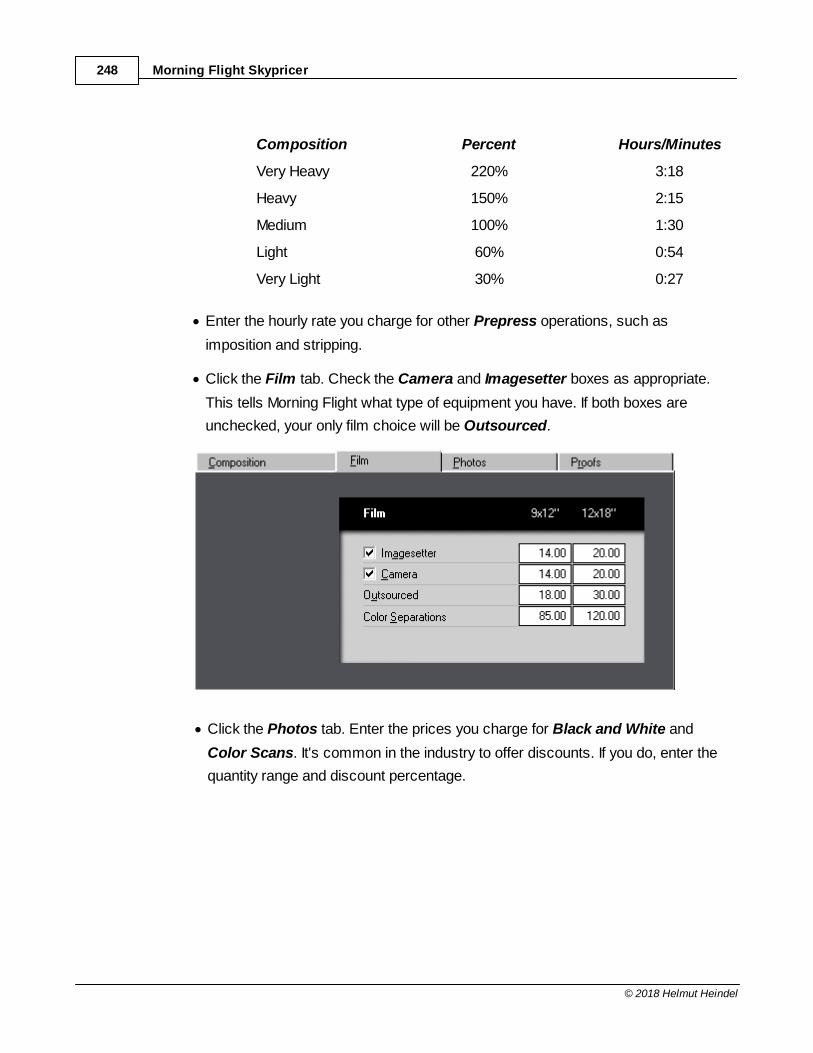
Morning Flight Skypricer248
© 2018 Helmut Heindel
Composition Percent Hours/Minutes
Very Heavy 220% 3:18
Heavy 150% 2:15
Medium 100% 1:30
Light 60% 0:54
Very Light 30% 0:27
· Enter the hourly rate you charge for other Prepress operations, such as
imposition and stripping.
· Click the Film tab. Check the Camera and Imagesetter boxes as appropriate.
This tells Morning Flight what type of equipment you have. If both boxes are
unchecked, your only film choice will be Outsourced.
· Click the Photos tab. Enter the prices you charge for Black and White and
Color Scans. It's common in the industry to offer discounts. If you do, enter the
quantity range and discount percentage.
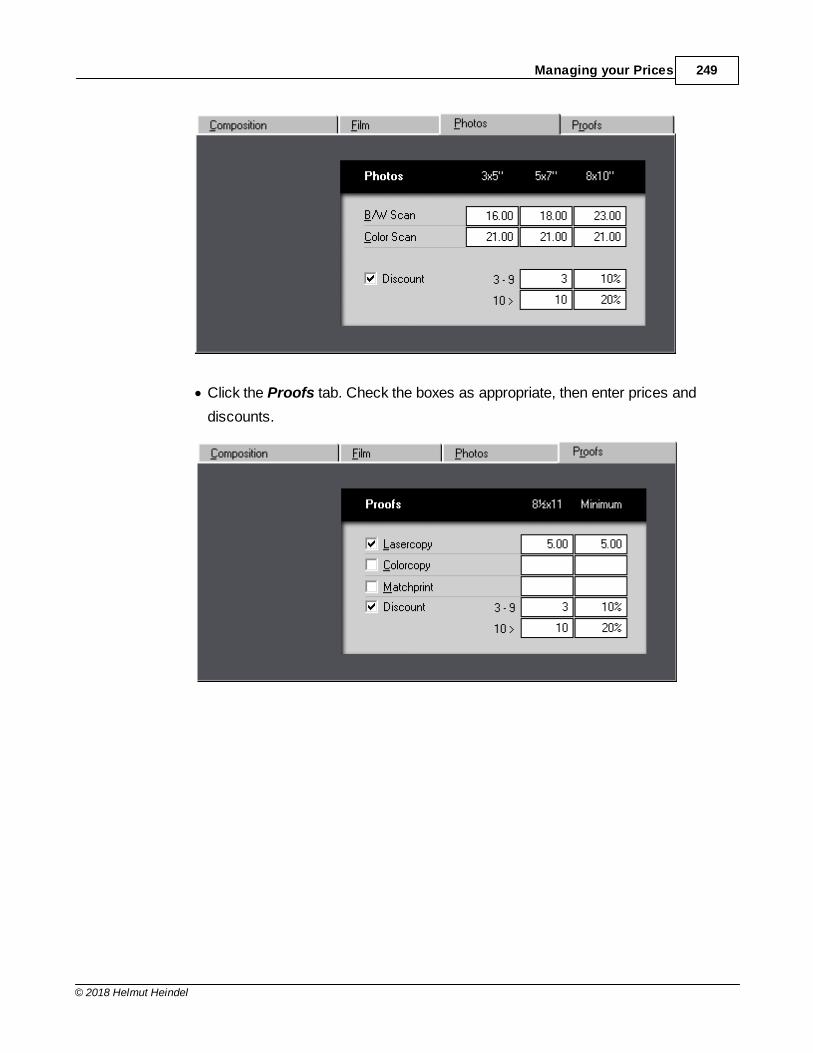
Managing your Prices 249
© 2018 Helmut Heindel
· Click the Proofs tab. Check the boxes as appropriate, then enter prices and
discounts.
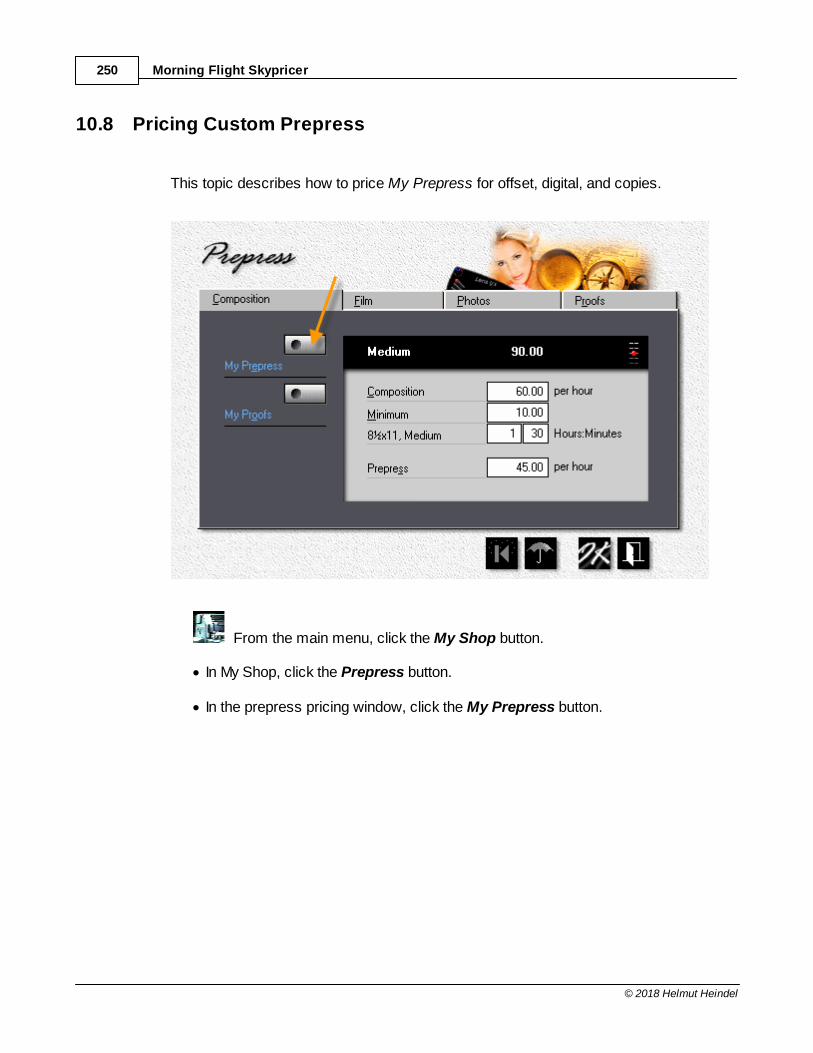
Morning Flight Skypricer250
© 2018 Helmut Heindel
10.8 Pricing Custom Prepress
This topic describes how to price My Prepress for offset, digital, and copies.
From the main menu, click the My Shop button.
· In My Shop, click the Prepress button.
· In the prepress pricing window, click the My Prepress button.
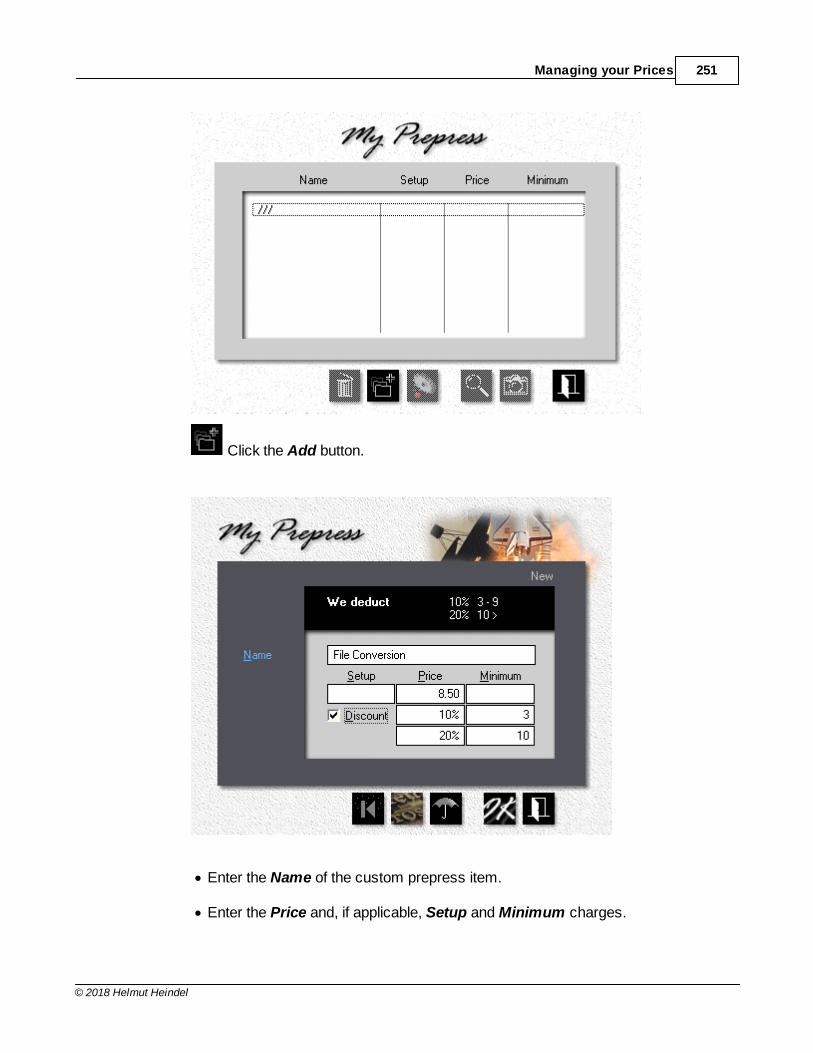
Managing your Prices 251
© 2018 Helmut Heindel
Click the Add button.
· Enter the Name of the custom prepress item.
· Enter the Price and, if applicable, Setup and Minimum charges.
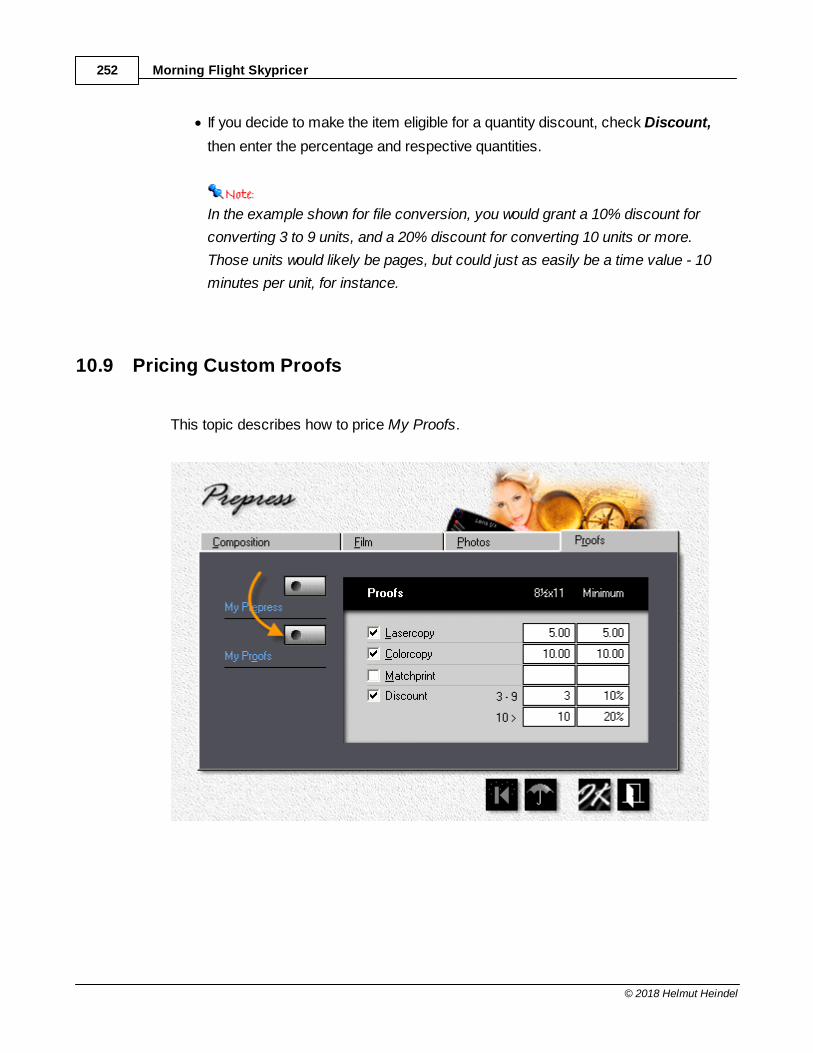
Morning Flight Skypricer252
© 2018 Helmut Heindel
· If you decide to make the item eligible for a quantity discount, check Discount,
then enter the percentage and respective quantities.
In the example shown for file conversion, you would grant a 10% discount for
converting 3 to 9 units, and a 20% discount for converting 10 units or more.
Those units would likely be pages, but could just as easily be a time value - 10
minutes per unit, for instance.
10.9 Pricing Custom Proofs
This topic describes how to price My Proofs.

Managing your Prices 253
© 2018 Helmut Heindel
From the main menu, click the My Shop button.
· In My Shop, click the Prepress button.
· In the prepress pricing window, click the My Proofs button.
· Check the 1-color and 4-color boxes, as appropriate, then enter the Name,
Price, and Minimum Charge for custom proofs.
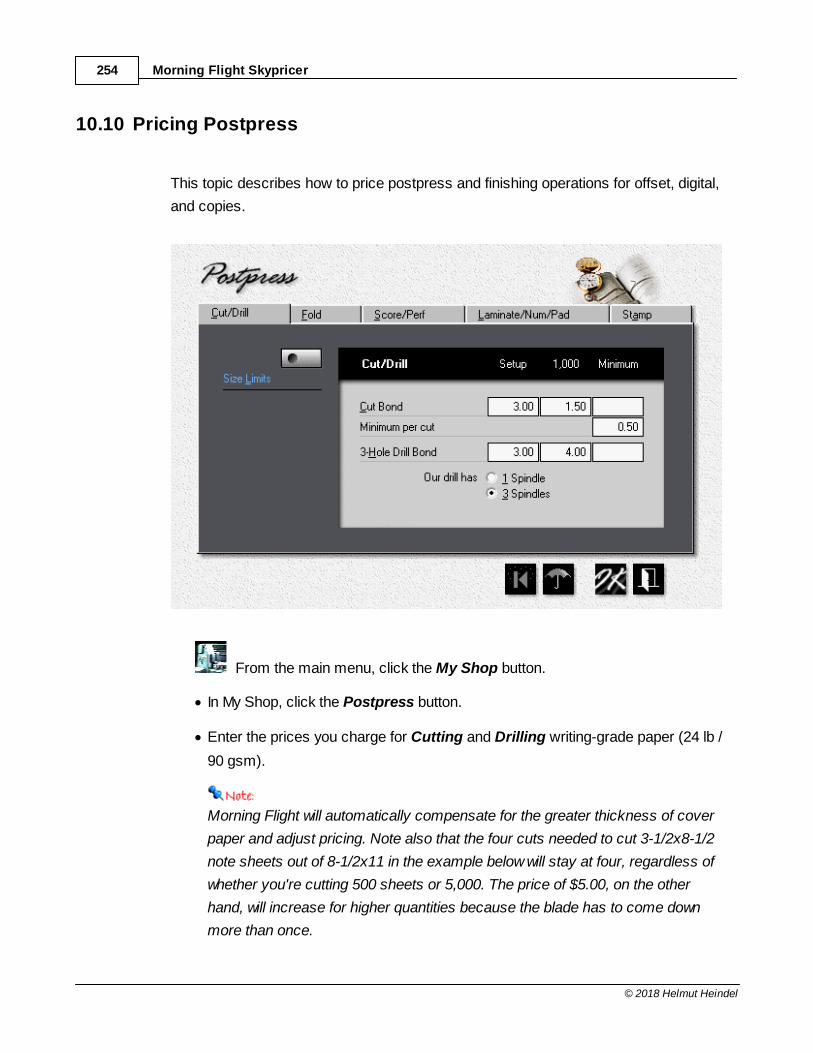
Morning Flight Skypricer254
© 2018 Helmut Heindel
10.10 Pricing Postpress
This topic describes how to price postpress and finishing operations for offset, digital,
and copies.
From the main menu, click the My Shop button.
· In My Shop, click the Postpress button.
· Enter the prices you charge for Cutting and Drilling writing-grade paper (24 lb /
90 gsm).
Morning Flight will automatically compensate for the greater thickness of cover
paper and adjust pricing. Note also that the four cuts needed to cut 3-1/2x8-1/2
note sheets out of 8-1/2x11 in the example below will stay at four, regardless of
whether you're cutting 500 sheets or 5,000. The price of $5.00, on the other
hand, will increase for higher quantities because the blade has to come down
more than once.
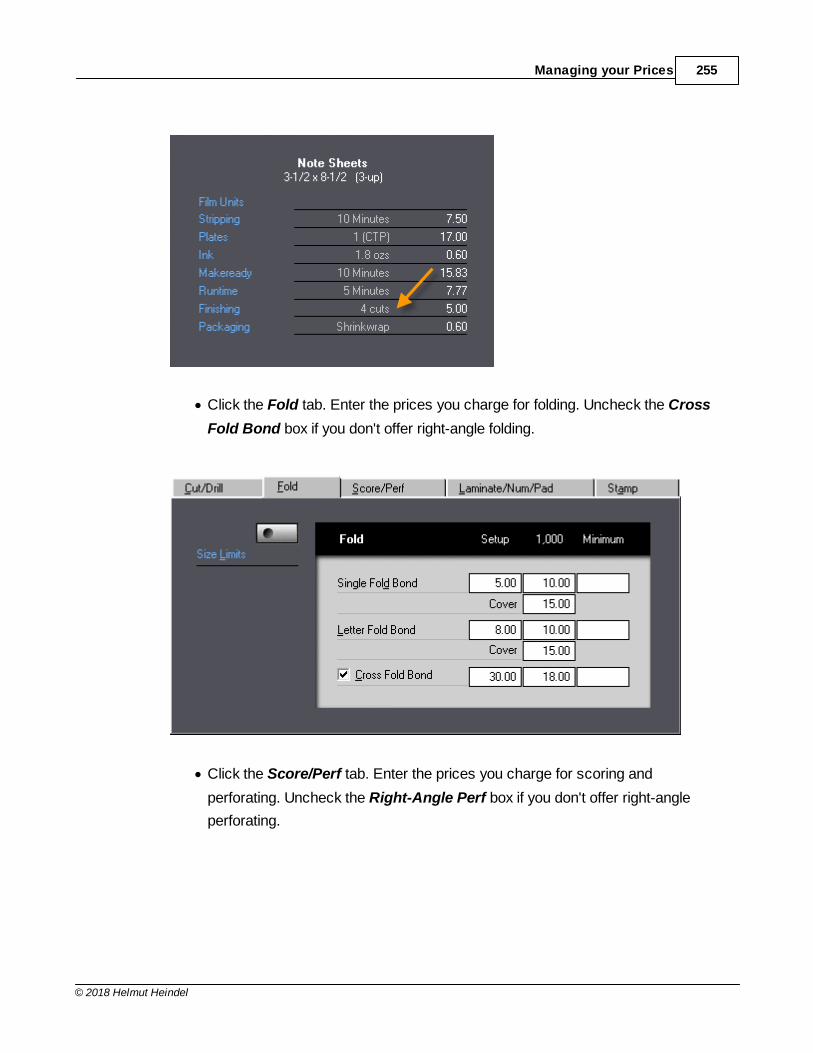
Managing your Prices 255
© 2018 Helmut Heindel
· Click the Fold tab. Enter the prices you charge for folding. Uncheck the Cross
Fold Bond box if you don't offer right-angle folding.
· Click the Score/Perf tab. Enter the prices you charge for scoring and
perforating. Uncheck the Right-Angle Perf box if you don't offer right-angle
perforating.
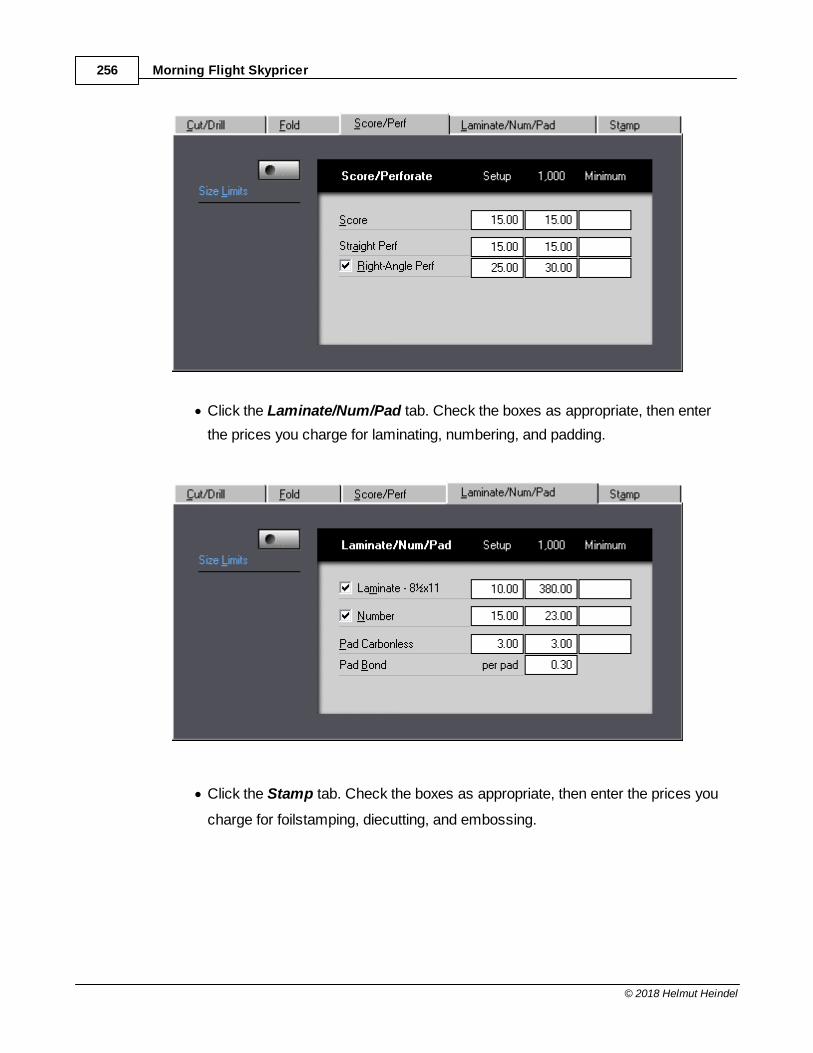
Morning Flight Skypricer256
© 2018 Helmut Heindel
· Click the Laminate/Num/Pad tab. Check the boxes as appropriate, then enter
the prices you charge for laminating, numbering, and padding.
· Click the Stamp tab. Check the boxes as appropriate, then enter the prices you
charge for foilstamping, diecutting, and embossing.
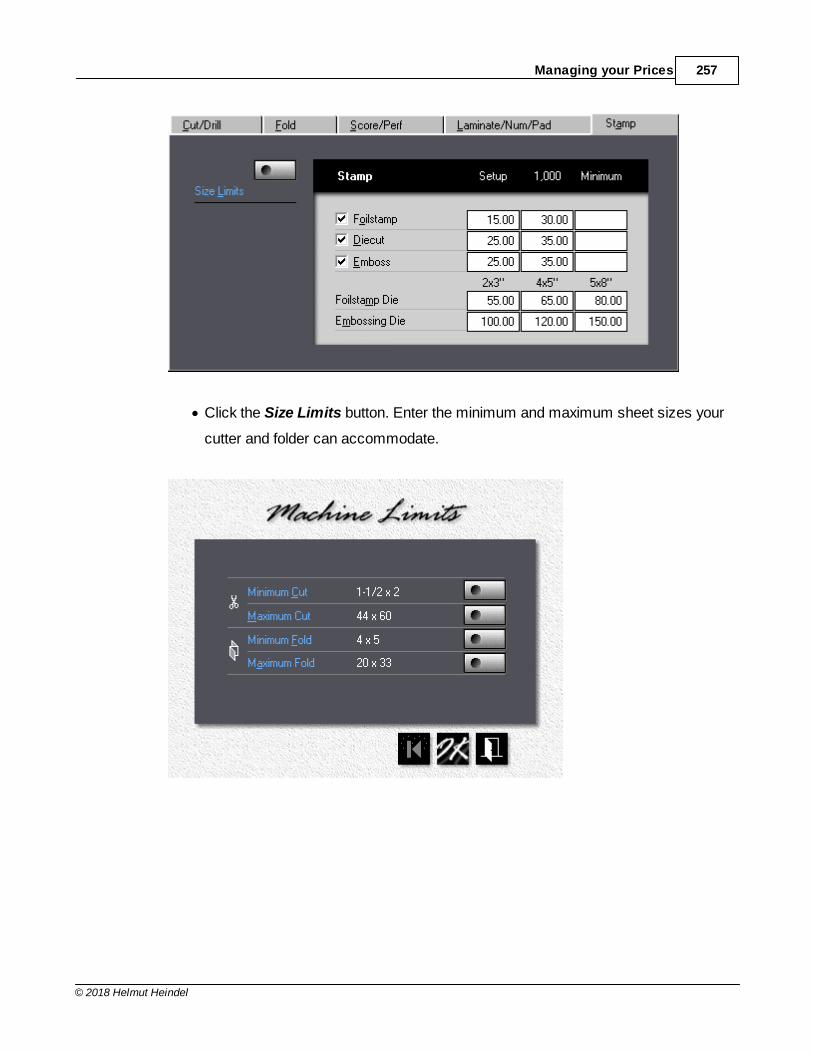
Managing your Prices 257
© 2018 Helmut Heindel
· Click the Size Limits button. Enter the minimum and maximum sheet sizes your
cutter and folder can accommodate.
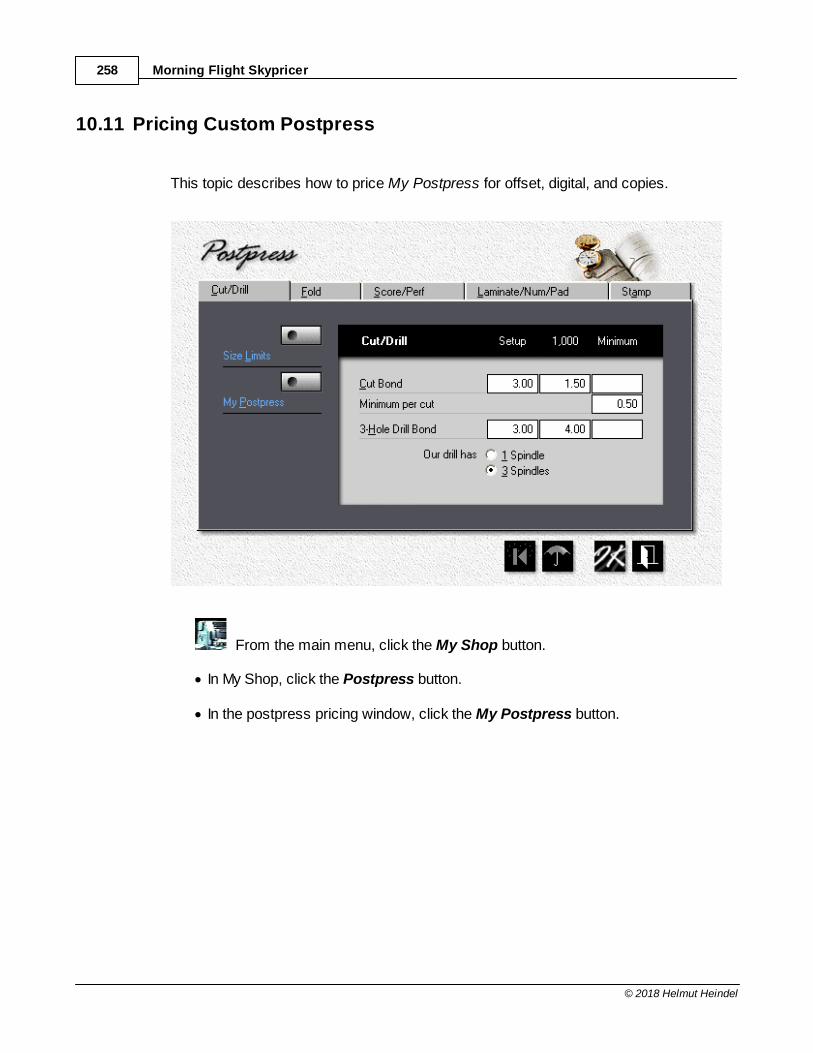
Morning Flight Skypricer258
© 2018 Helmut Heindel
10.11 Pricing Custom Postpress
This topic describes how to price My Postpress for offset, digital, and copies.
From the main menu, click the My Shop button.
· In My Shop, click the Postpress button.
· In the postpress pricing window, click the My Postpress button.
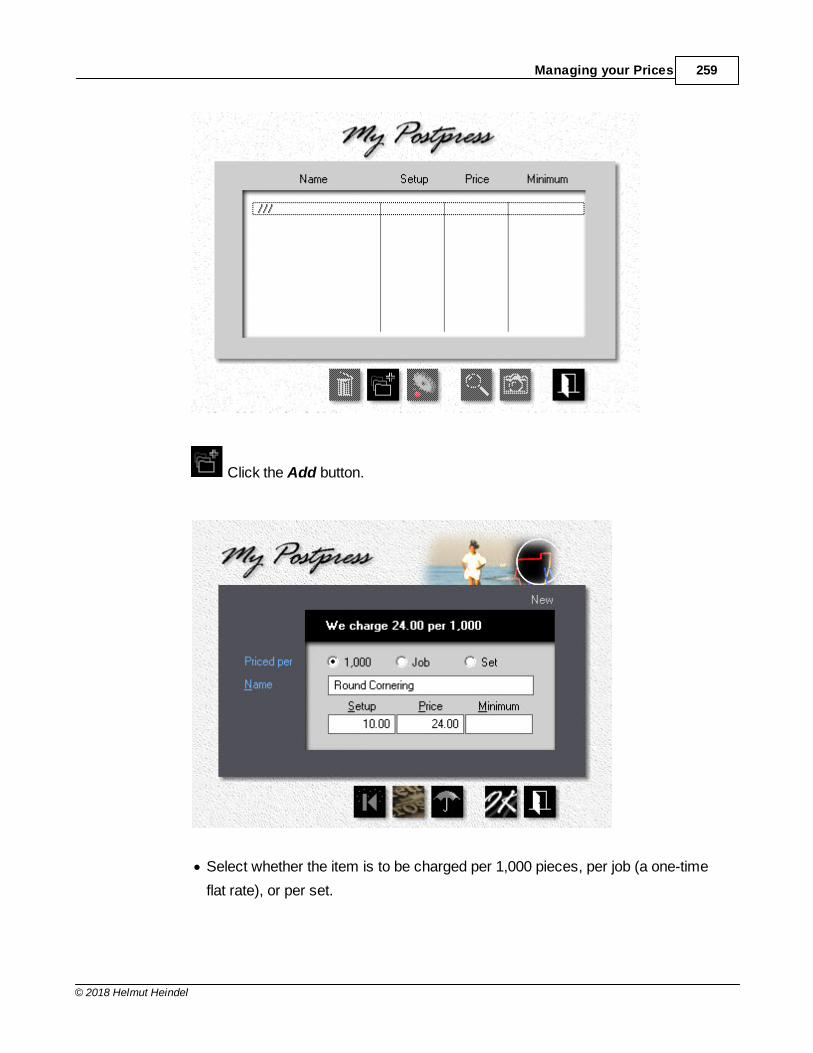
Managing your Prices 259
© 2018 Helmut Heindel
Click the Add button.
· Select whether the item is to be charged per 1,000 pieces, per job (a one-time
flat rate), or per set.
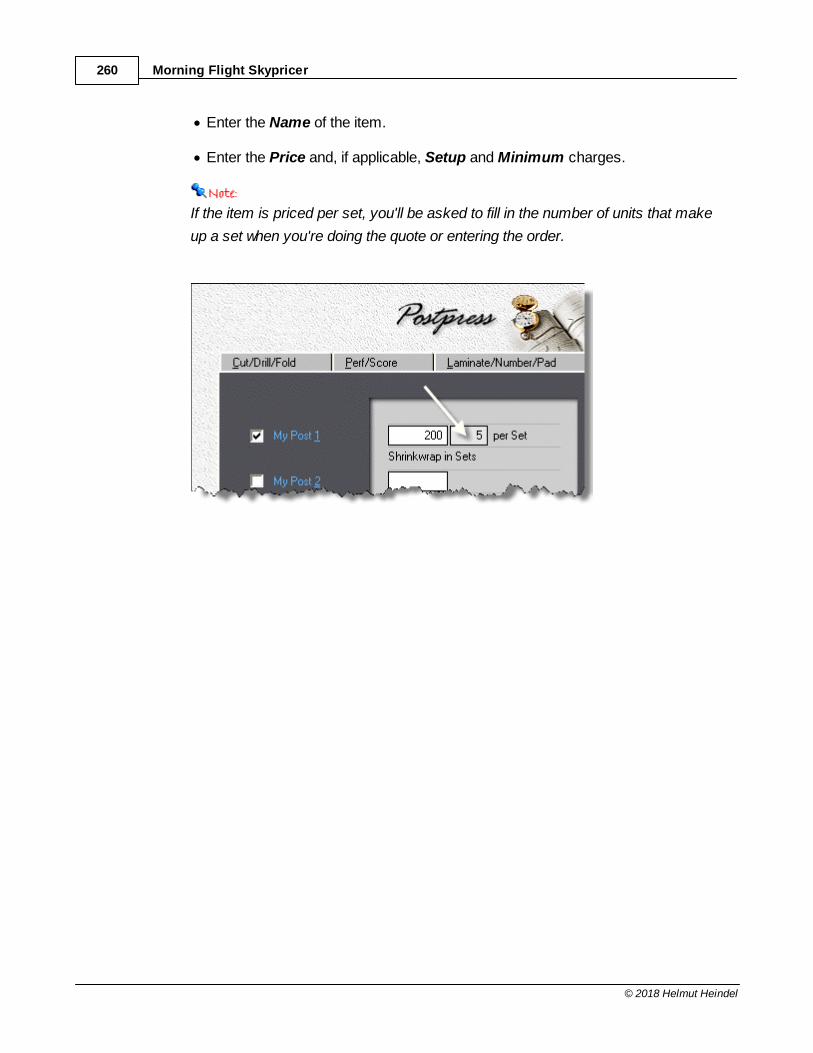
Morning Flight Skypricer260
© 2018 Helmut Heindel
· Enter the Name of the item.
· Enter the Price and, if applicable, Setup and Minimum charges.
If the item is priced per set, you'll be asked to fill in the number of units that make
up a set when you're doing the quote or entering the order.
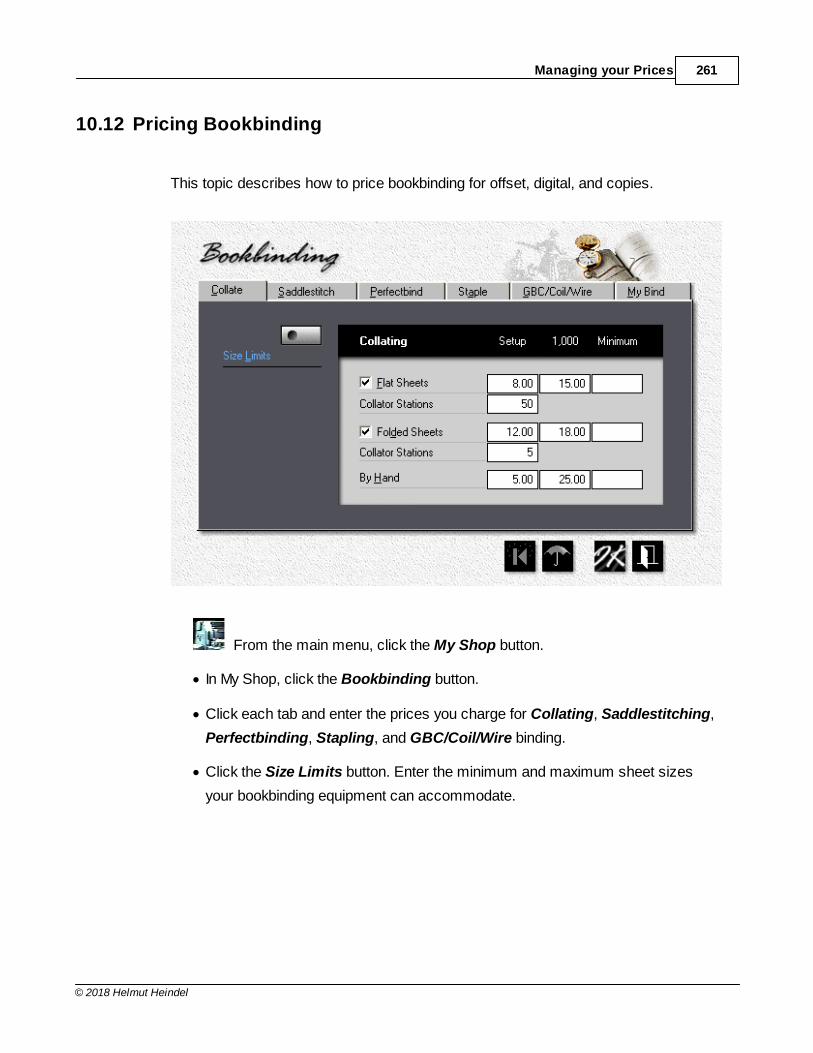
Managing your Prices 261
© 2018 Helmut Heindel
10.12 Pricing Bookbinding
This topic describes how to price bookbinding for offset, digital, and copies.
From the main menu, click the My Shop button.
· In My Shop, click the Bookbinding button.
· Click each tab and enter the prices you charge for Collating, Saddlestitching,
Perfectbinding, Stapling, and GBC/Coil/Wire binding.
· Click the Size Limits button. Enter the minimum and maximum sheet sizes
your bookbinding equipment can accommodate.
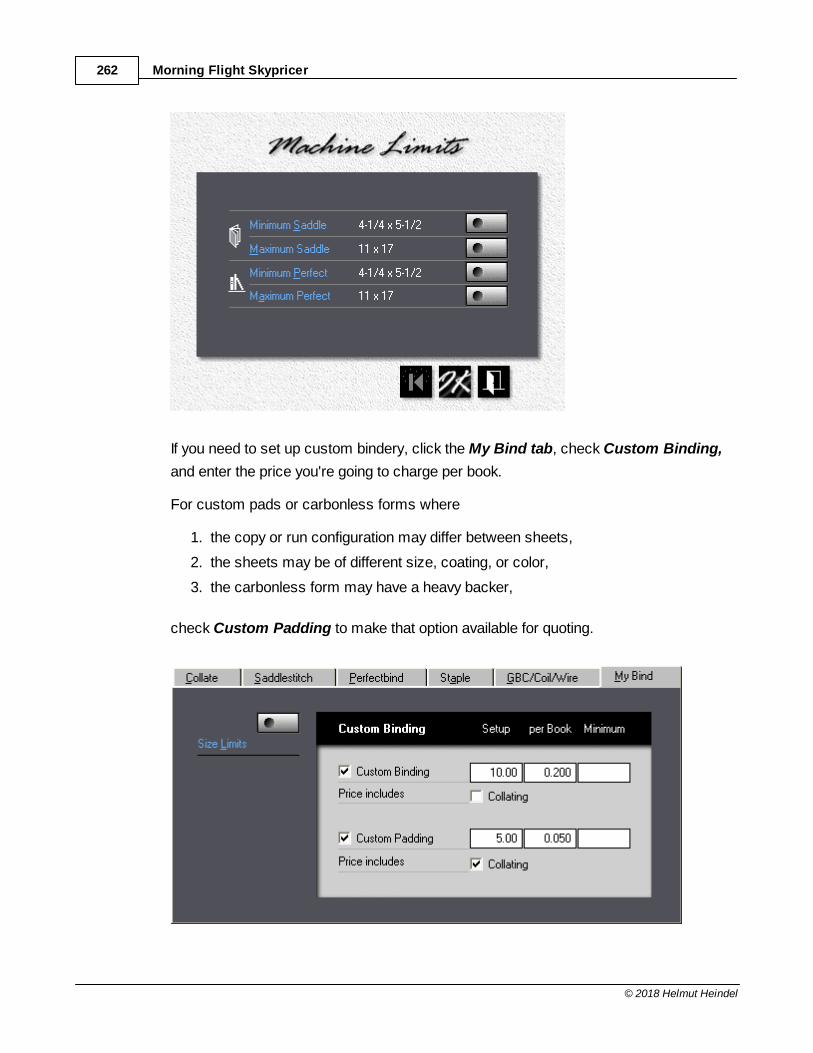
Morning Flight Skypricer262
© 2018 Helmut Heindel
If you need to set up custom bindery, click the My Bind tab, check Custom Binding,
and enter the price you're going to charge per book.
For custom pads or carbonless forms where
1. the copy or run configuration may differ between sheets,
2. the sheets may be of different size, coating, or color,
3. the carbonless form may have a heavy backer,
check Custom Padding to make that option available for quoting.
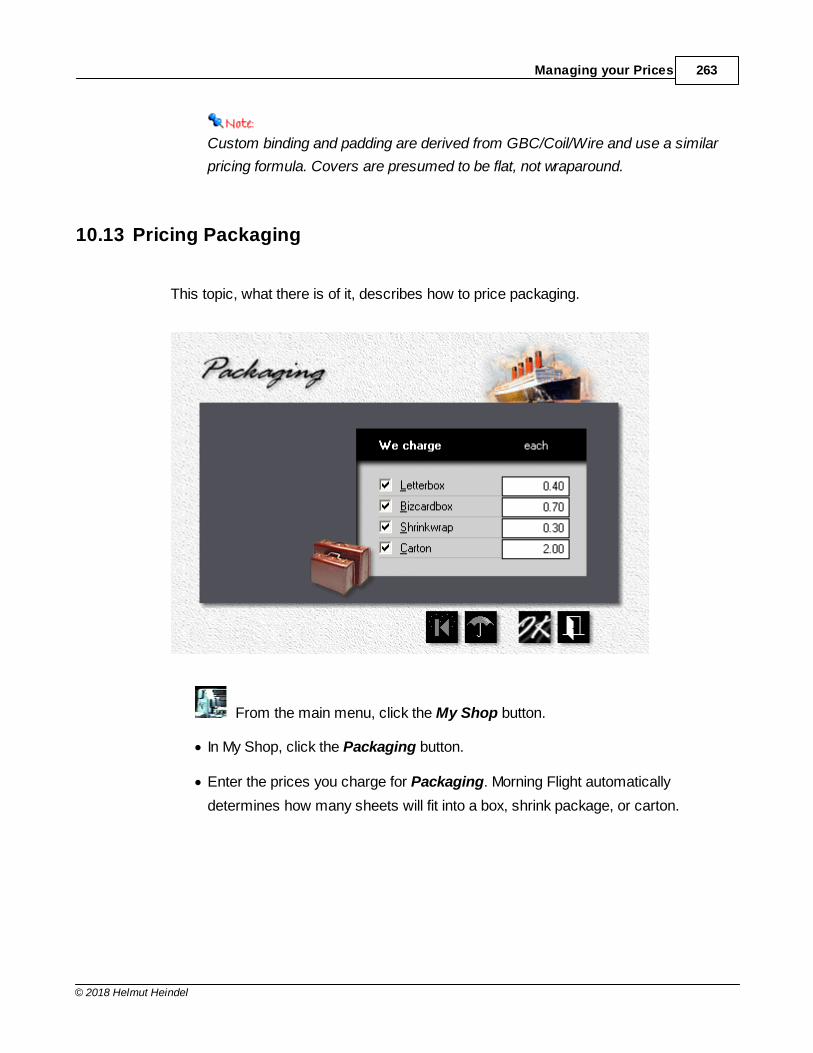
Managing your Prices 263
© 2018 Helmut Heindel
Custom binding and padding are derived from GBC/Coil/Wire and use a similar
pricing formula. Covers are presumed to be flat, not wraparound.
10.13 Pricing Packaging
This topic, what there is of it, describes how to price packaging.
From the main menu, click the My Shop button.
· In My Shop, click the Packaging button.
· Enter the prices you charge for Packaging. Morning Flight automatically
determines how many sheets will fit into a box, shrink package, or carton.
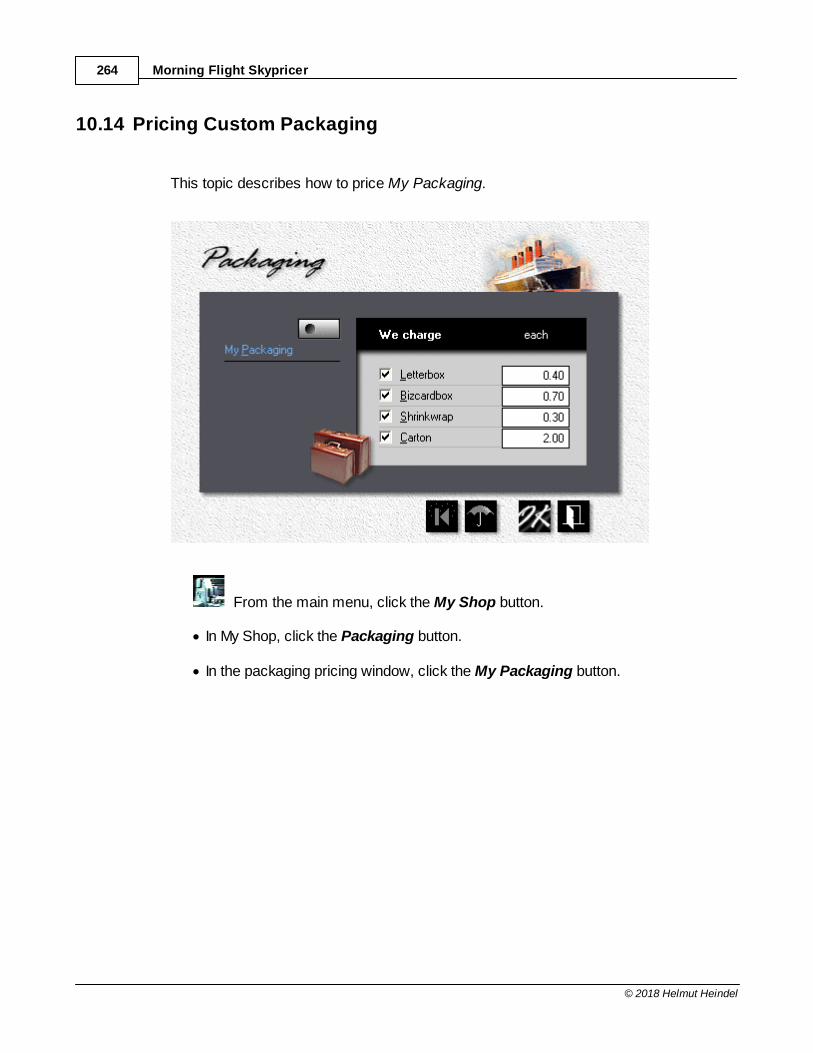
Morning Flight Skypricer264
© 2018 Helmut Heindel
10.14 Pricing Custom Packaging
This topic describes how to price My Packaging.
From the main menu, click the My Shop button.
· In My Shop, click the Packaging button.
· In the packaging pricing window, click the My Packaging button.
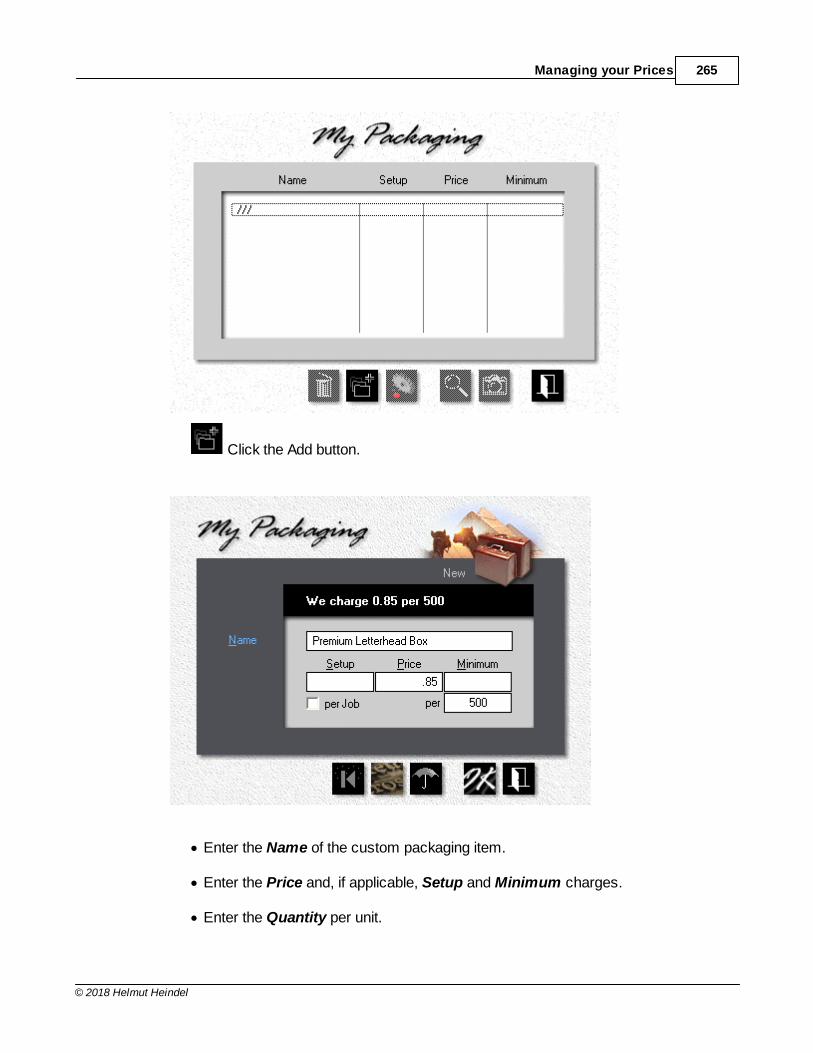
Managing your Prices 265
© 2018 Helmut Heindel
Click the Add button.
· Enter the Name of the custom packaging item.
· Enter the Price and, if applicable, Setup and Minimum charges.
· Enter the Quantity per unit.
Morning Flight Skypricer266
© 2018 Helmut Heindel
In the previous example, the program would allocate one box for every 500
letterheads. If custom packaging is to be charged as a single item regardless
of quantity, check per job.
10.15 Pricing Merchandise
This topic describes how to price merchandise. Originally intended for brokered
products - mugs, T-shirts, wedding invitations - this catch-all category is being used
more and more for items that don't fit the conventional printing mold. The cool thing is
you're not limited to working with physical objects. You can also put a merchandise
wrapper around time-based activities charged for by the hour.
By the hour? Merchandise, by definition, implies tangible goods, things we can see
and touch and stuff into a box. We don't envision it as something we bill by the clock.
Morning Flight sees merchandise as a blank canvass, just a convenient way of
producing price tags. Doesn't matter whether those tags hang off physical goods or
are for services rendered. As long as the price is right, your customers will never
question your billing method.
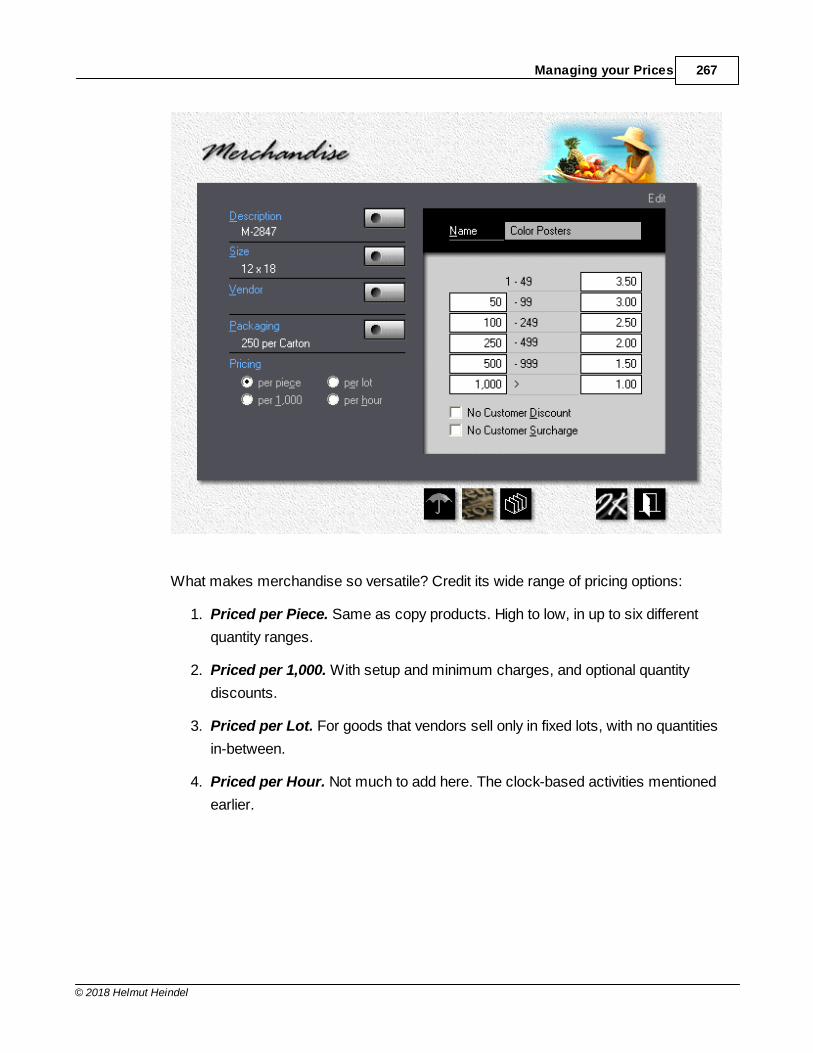
Managing your Prices 267
© 2018 Helmut Heindel
What makes merchandise so versatile? Credit its wide range of pricing options:
1. Priced per Piece. Same as copy products. High to low, in up to six different
quantity ranges.
2. Priced per 1,000. With setup and minimum charges, and optional quantity
discounts.
3. Priced per Lot. For goods that vendors sell only in fixed lots, with no quantities
in-between.
4. Priced per Hour. Not much to add here. The clock-based activities mentioned
earlier.
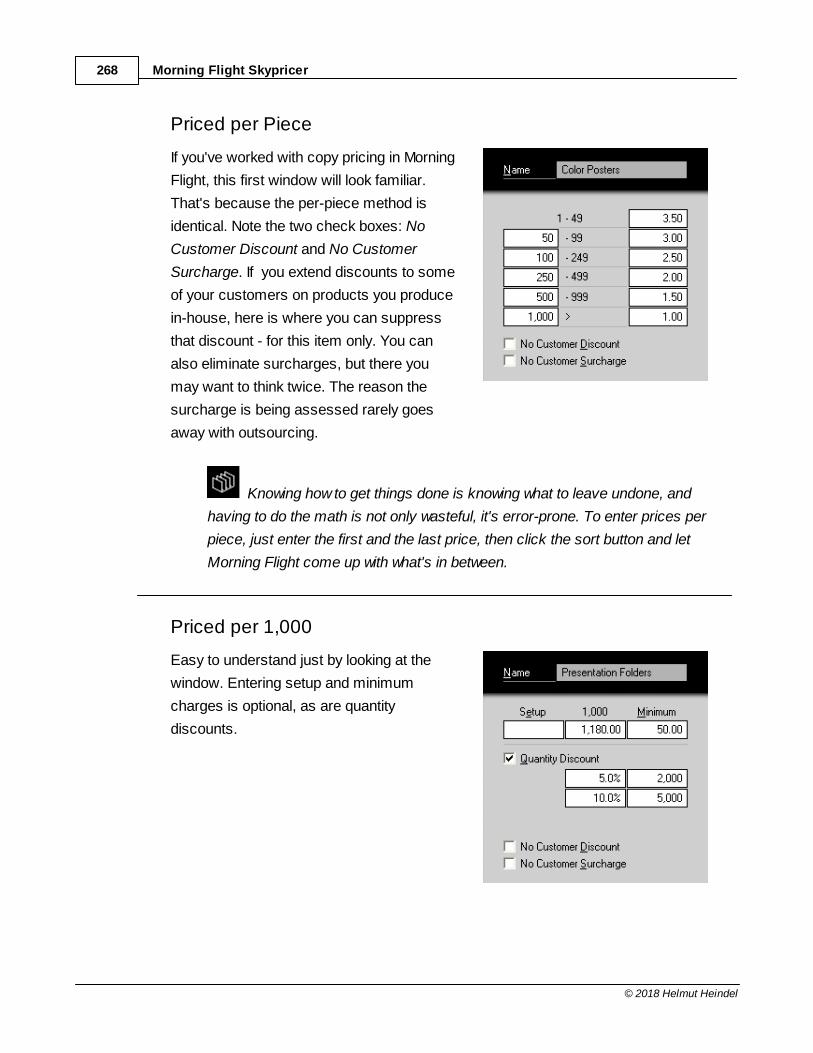
Morning Flight Skypricer268
© 2018 Helmut Heindel
Priced per Piece
If you've worked with copy pricing in Morning
Flight, this first window will look familiar.
That's because the per-piece method is
identical. Note the two check boxes: No
Customer Discount and No Customer
Surcharge. If you extend discounts to some
of your customers on products you produce
in-house, here is where you can suppress
that discount - for this item only. You can
also eliminate surcharges, but there you
may want to think twice. The reason the
surcharge is being assessed rarely goes
away with outsourcing.
Knowing how to get things done is knowing what to leave undone, and
having to do the math is not only wasteful, it's error-prone. To enter prices per
piece, just enter the first and the last price, then click the sort button and let
Morning Flight come up with what's in between.
Priced per 1,000
Easy to understand just by looking at the
window. Entering setup and minimum
charges is optional, as are quantity
discounts.
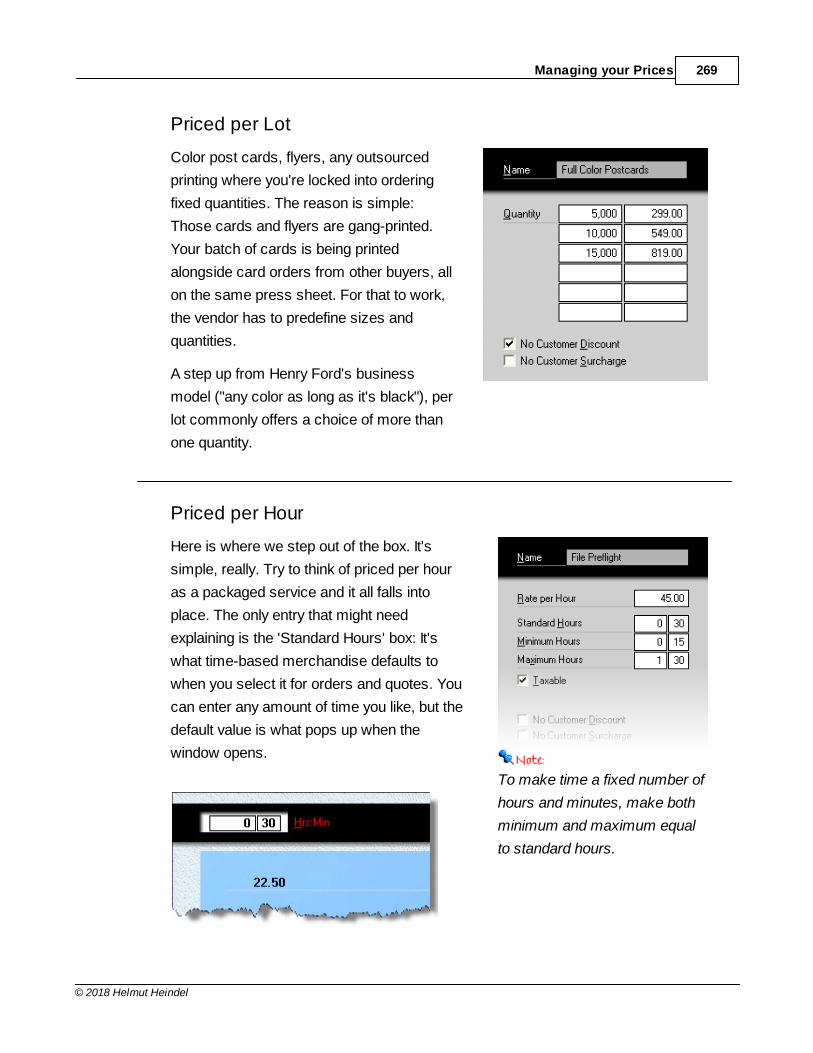
Managing your Prices 269
© 2018 Helmut Heindel
Priced per Lot
Color post cards, flyers, any outsourced
printing where you're locked into ordering
fixed quantities. The reason is simple:
Those cards and flyers are gang-printed.
Your batch of cards is being printed
alongside card orders from other buyers, all
on the same press sheet. For that to work,
the vendor has to predefine sizes and
quantities.
A step up from Henry Ford's business
model ("any color as long as it's black"), per
lot commonly offers a choice of more than
one quantity.
Priced per Hour
Here is where we step out of the box. It's
simple, really. Try to think of priced per hour
as a packaged service and it all falls into
place. The only entry that might need
explaining is the 'Standard Hours' box: It's
what time-based merchandise defaults to
when you select it for orders and quotes. You
can enter any amount of time you like, but the
default value is what pops up when the
window opens.
To make time a fixed number of
hours and minutes, make both
minimum and maximum equal
to standard hours.
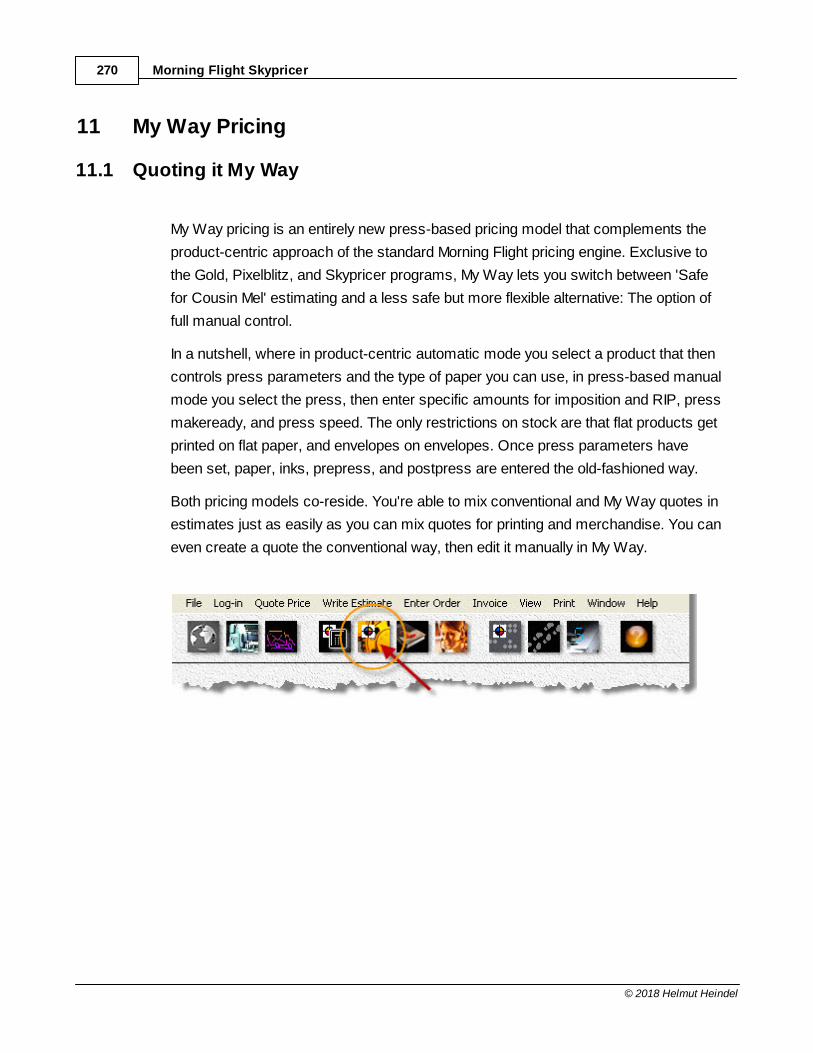
Morning Flight Skypricer270
© 2018 Helmut Heindel
11 My Way Pricing
11.1 Quoting it My Way
My Way pricing is an entirely new press-based pricing model that complements the
product-centric approach of the standard Morning Flight pricing engine. Exclusive to
the Gold, Pixelblitz, and Skypricer programs, My Way lets you switch between 'Safe
for Cousin Mel' estimating and a less safe but more flexible alternative: The option of
full manual control.
In a nutshell, where in product-centric automatic mode you select a product that then
controls press parameters and the type of paper you can use, in press-based manual
mode you select the press, then enter specific amounts for imposition and RIP, press
makeready, and press speed. The only restrictions on stock are that flat products get
printed on flat paper, and envelopes on envelopes. Once press parameters have
been set, paper, inks, prepress, and postpress are entered the old-fashioned way.
Both pricing models co-reside. You're able to mix conventional and My Way quotes in
estimates just as easily as you can mix quotes for printing and merchandise. You can
even create a quote the conventional way, then edit it manually in My Way.
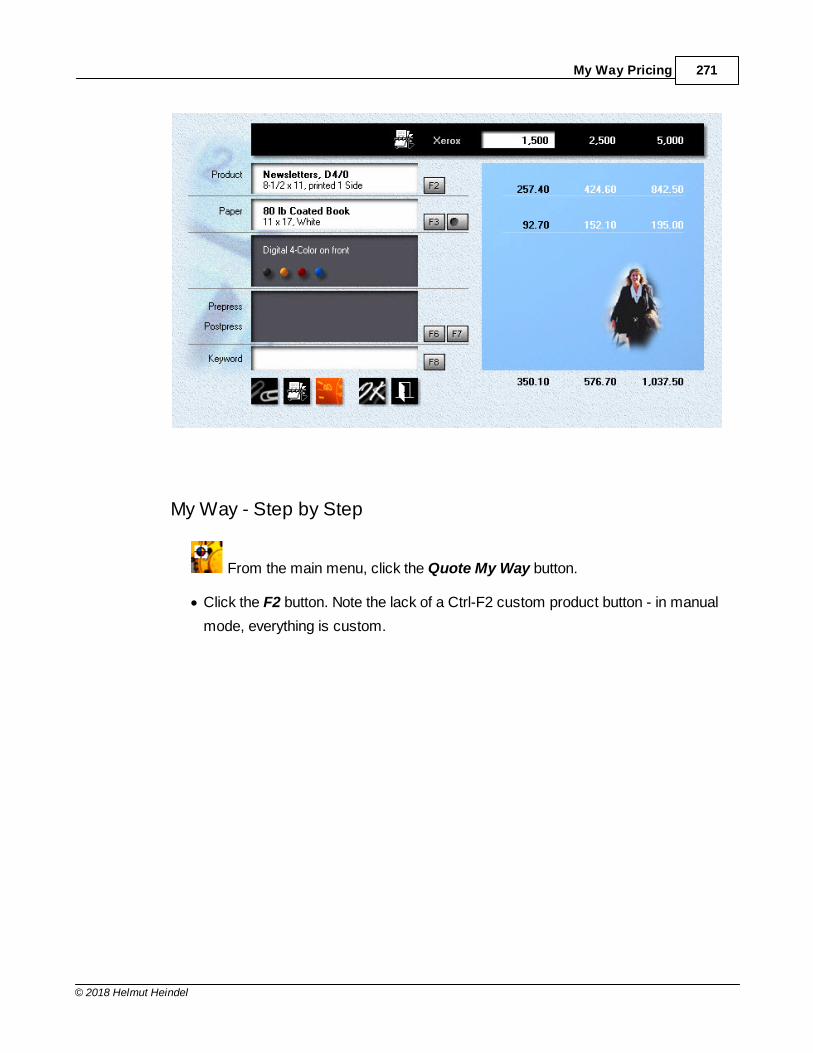
My Way Pricing 271
© 2018 Helmut Heindel
My Way - Step by Step
From the main menu, click the Quote My Way button.
· Click the F2 button. Note the lack of a Ctrl-F2 custom product button - in manual
mode, everything is custom.
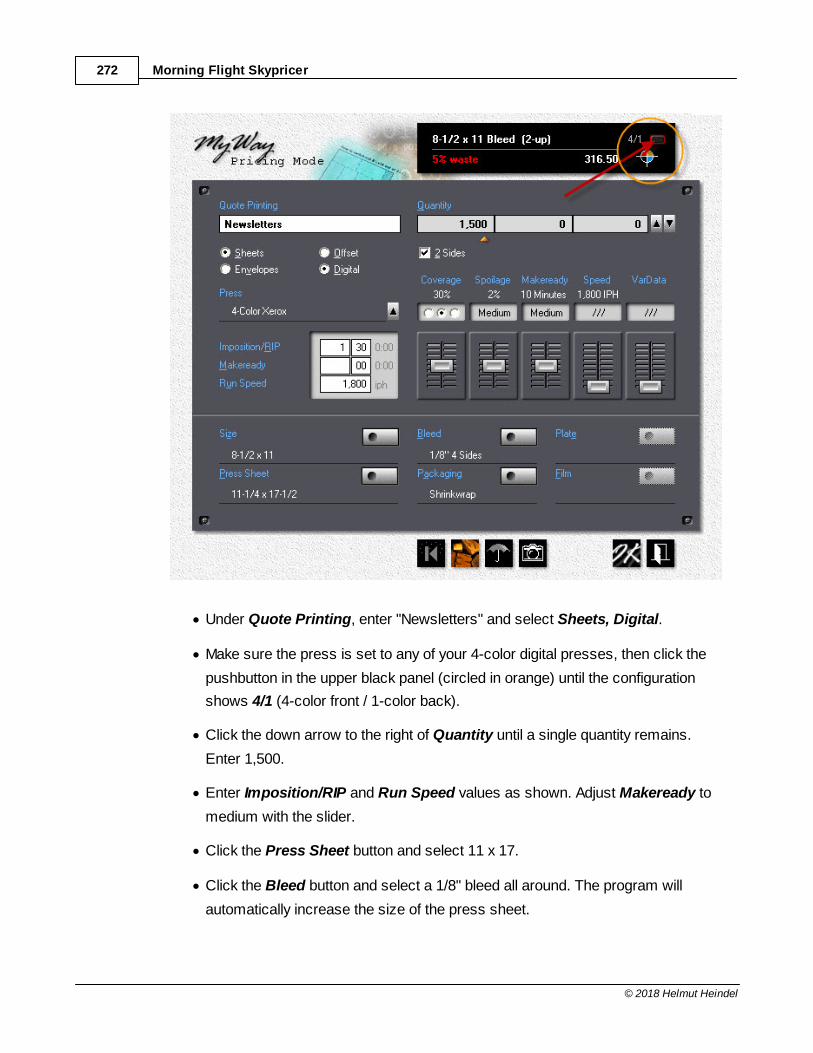
Morning Flight Skypricer272
© 2018 Helmut Heindel
· Under Quote Printing, enter "Newsletters" and select Sheets, Digital.
· Make sure the press is set to any of your 4-color digital presses, then click the
pushbutton in the upper black panel (circled in orange) until the configuration
shows 4/1 (4-color front / 1-color back).
· Click the down arrow to the right of Quantity until a single quantity remains.
Enter 1,500.
· Enter Imposition/RIP and Run Speed values as shown. Adjust Makeready to
medium with the slider.
· Click the Press Sheet button and select 11 x 17.
· Click the Bleed button and select a 1/8" bleed all around. The program will
automatically increase the size of the press sheet.
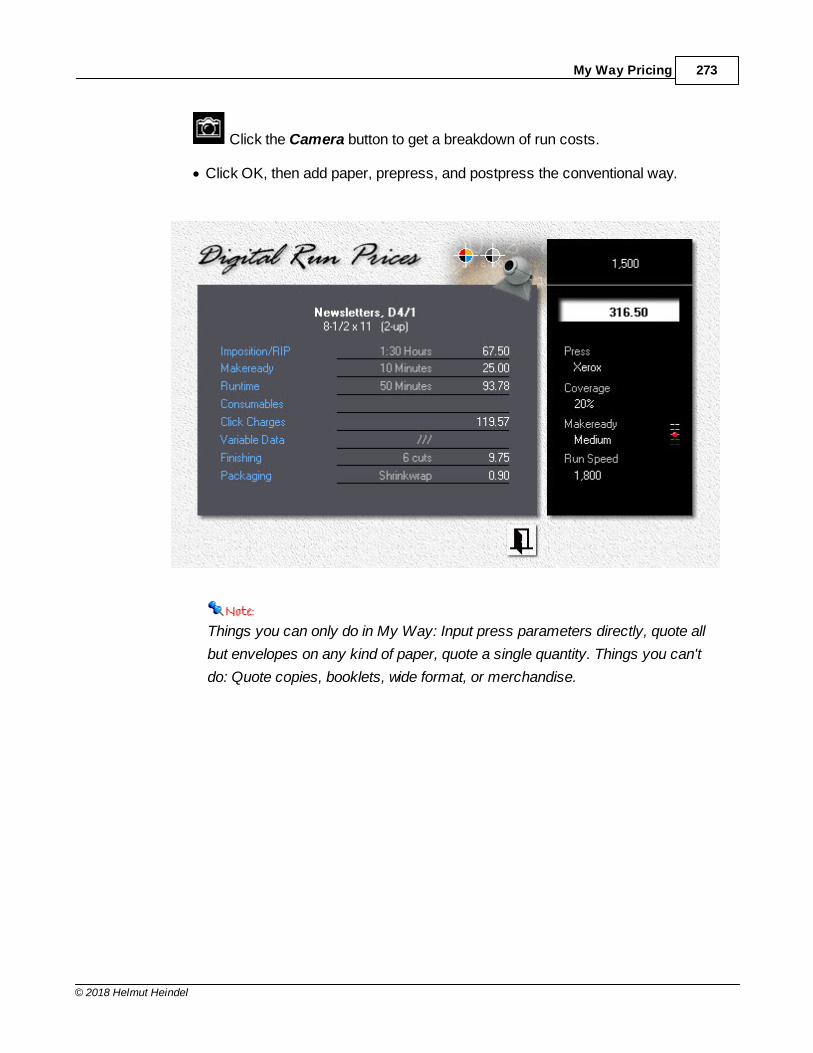
My Way Pricing 273
© 2018 Helmut Heindel
Click the Camera button to get a breakdown of run costs.
· Click OK, then add paper, prepress, and postpress the conventional way.
Things you can only do in My Way: Input press parameters directly, quote all
but envelopes on any kind of paper, quote a single quantity. Things you can't
do: Quote copies, booklets, wide format, or merchandise.
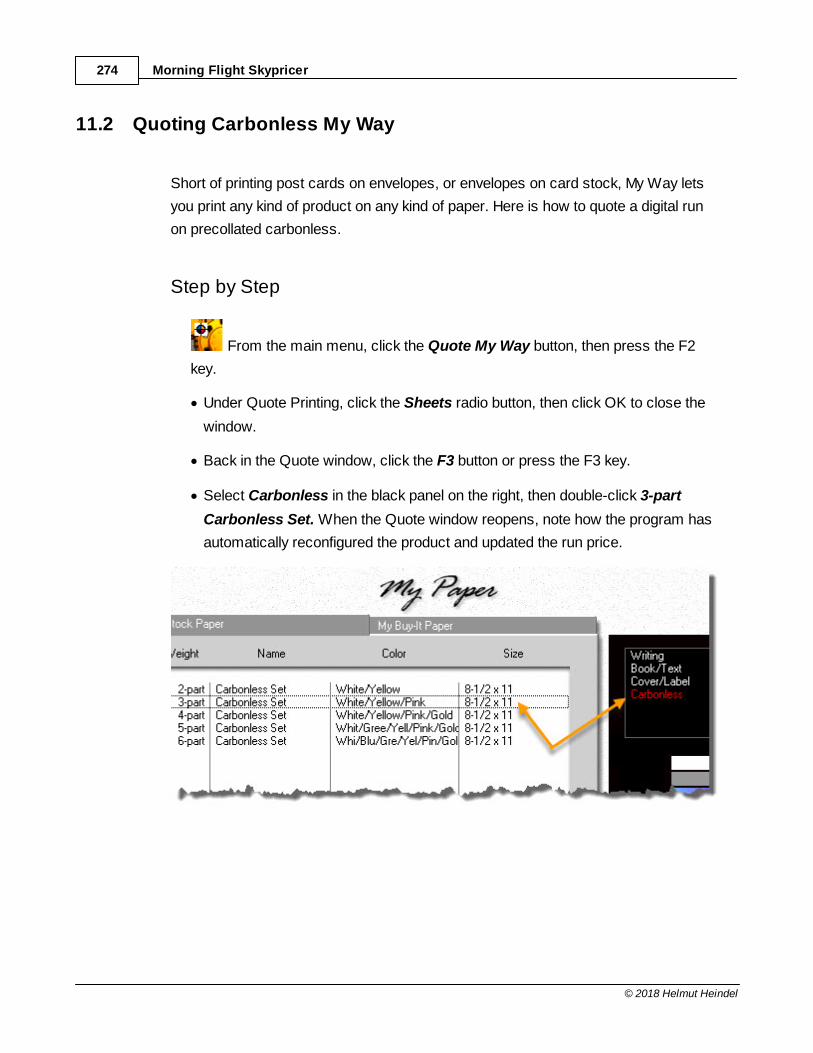
Morning Flight Skypricer274
© 2018 Helmut Heindel
11.2 Quoting Carbonless My Way
Short of printing post cards on envelopes, or envelopes on card stock, My Way lets
you print any kind of product on any kind of paper. Here is how to quote a digital run
on precollated carbonless.
Step by Step
From the main menu, click the Quote My Way button, then press the F2
key.
· Under Quote Printing, click the Sheets radio button, then click OK to close the
window.
· Back in the Quote window, click the F3 button or press the F3 key.
· Select Carbonless in the black panel on the right, then double-click 3-part
Carbonless Set. When the Quote window reopens, note how the program has
automatically reconfigured the product and updated the run price.
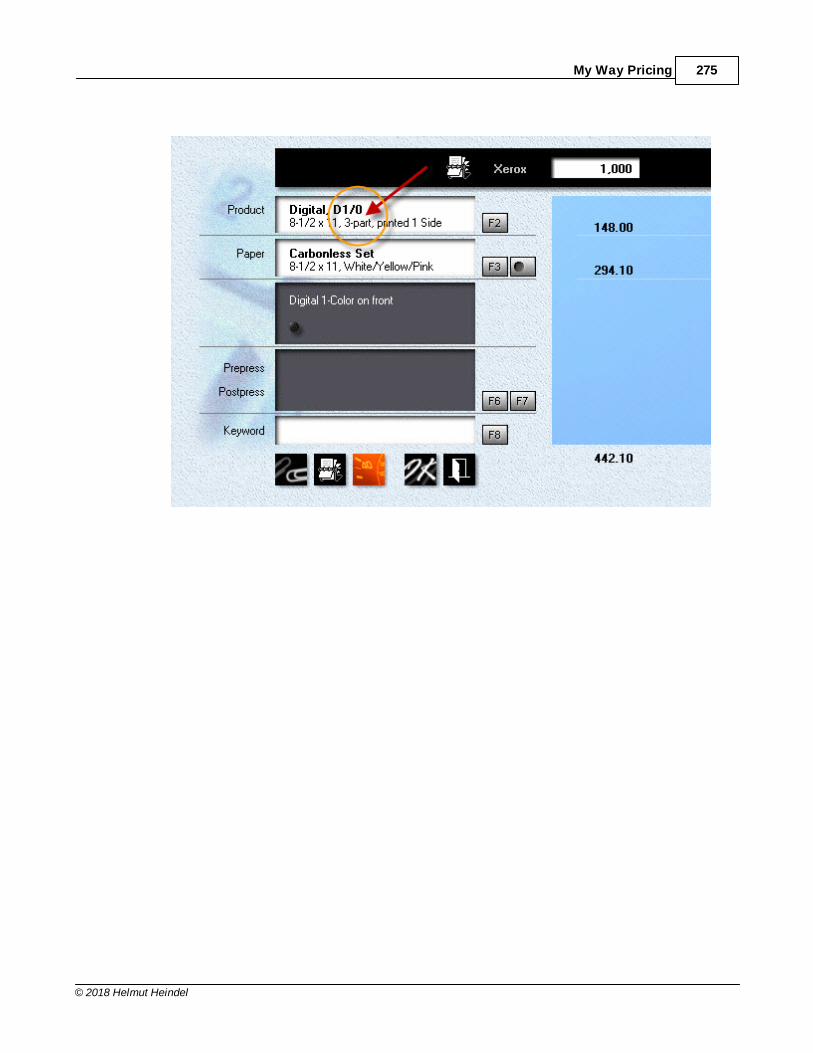
My Way Pricing 275
© 2018 Helmut Heindel
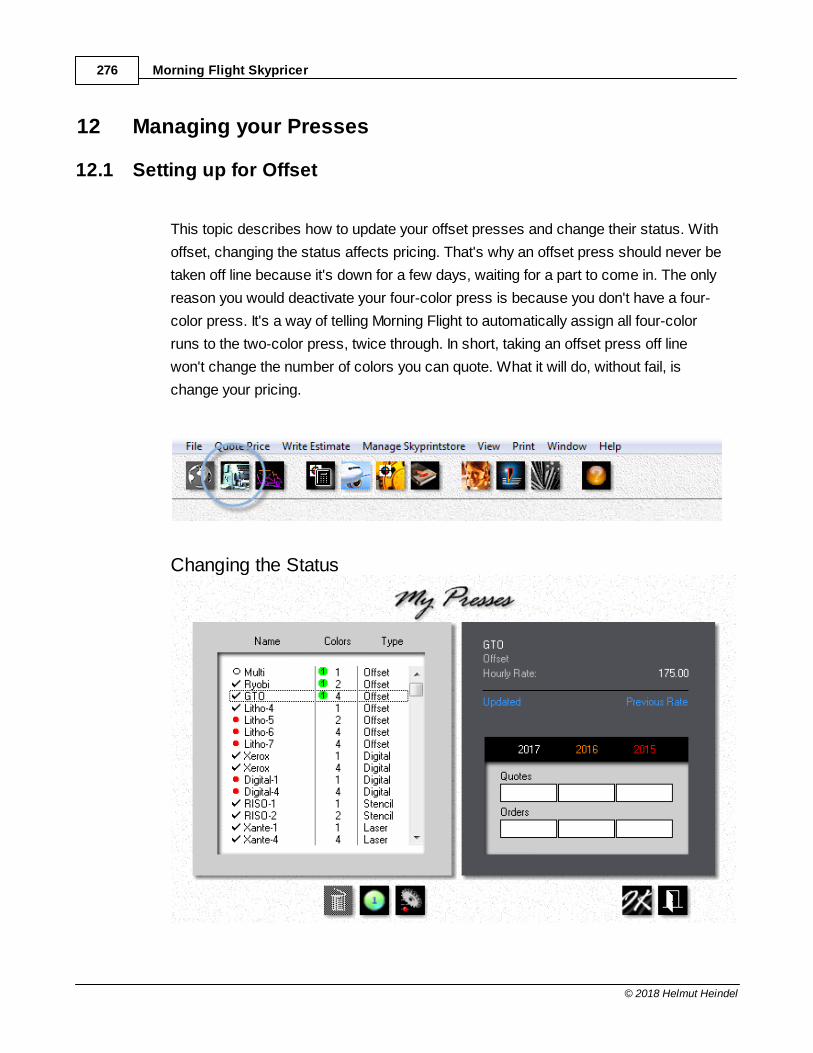
Morning Flight Skypricer276
© 2018 Helmut Heindel
12 Managing your Presses
12.1 Setting up for Offset
This topic describes how to update your offset presses and change their status. With
offset, changing the status affects pricing. That's why an offset press should never be
taken off line because it's down for a few days, waiting for a part to come in. The only
reason you would deactivate your four-color press is because you don't have a four-
color press. It's a way of telling Morning Flight to automatically assign all four-color
runs to the two-color press, twice through. In short, taking an offset press off line
won't change the number of colors you can quote. What it will do, without fail, is
change your pricing.
Changing the Status
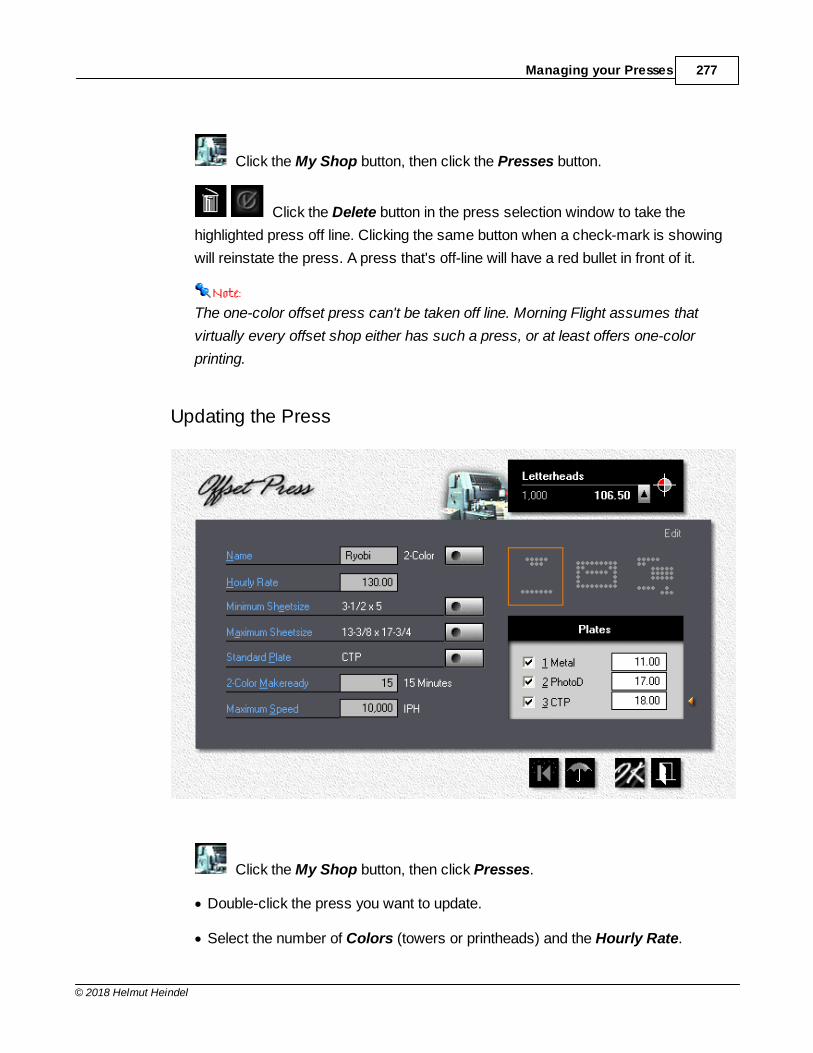
Managing your Presses 277
© 2018 Helmut Heindel
Click the My Shop button, then click the Presses button.
Click the Delete button in the press selection window to take the
highlighted press off line. Clicking the same button when a check-mark is showing
will reinstate the press. A press that's off-line will have a red bullet in front of it.
The one-color offset press can't be taken off line. Morning Flight assumes that
virtually every offset shop either has such a press, or at least offers one-color
printing.
Updating the Press
Click the My Shop button, then click Presses.
· Double-click the press you want to update.
· Select the number of Colors (towers or printheads) and the Hourly Rate.
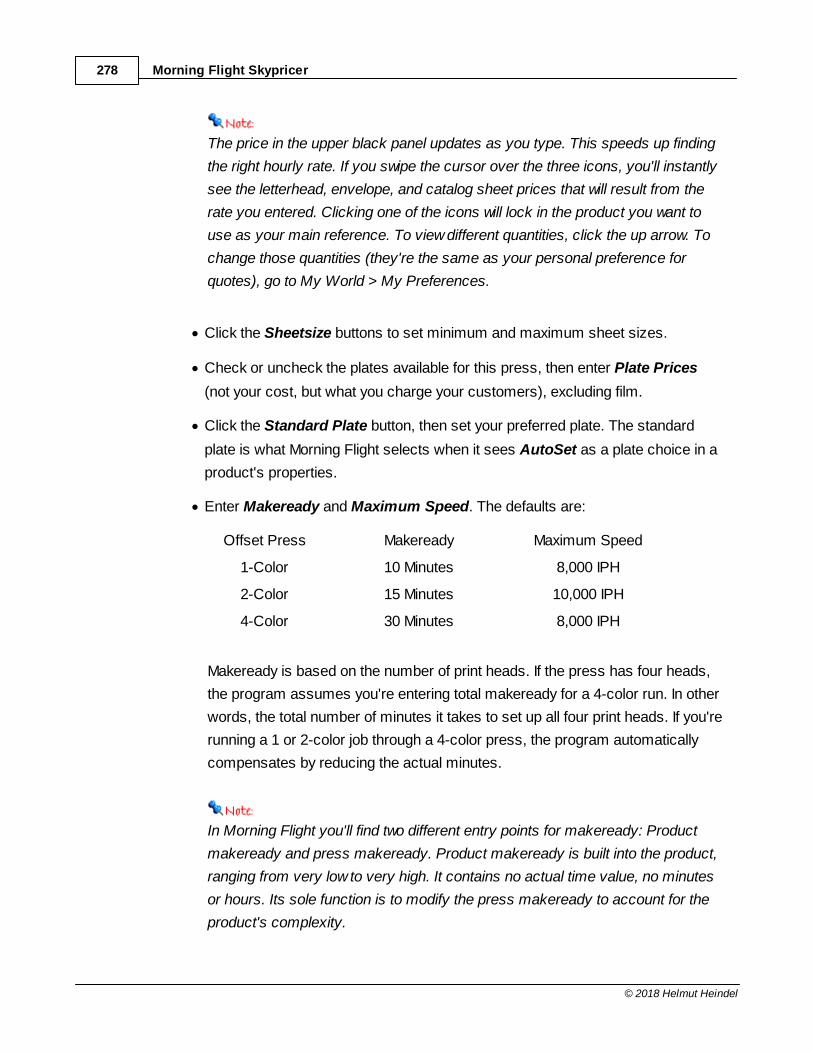
Morning Flight Skypricer278
© 2018 Helmut Heindel
The price in the upper black panel updates as you type. This speeds up finding
the right hourly rate. If you swipe the cursor over the three icons, you'll instantly
see the letterhead, envelope, and catalog sheet prices that will result from the
rate you entered. Clicking one of the icons will lock in the product you want to
use as your main reference. To view different quantities, click the up arrow. To
change those quantities (they're the same as your personal preference for
quotes), go to My World > My Preferences.
· Click the Sheetsize buttons to set minimum and maximum sheet sizes.
· Check or uncheck the plates available for this press, then enter Plate Prices
(not your cost, but what you charge your customers), excluding film.
· Click the Standard Plate button, then set your preferred plate. The standard
plate is what Morning Flight selects when it sees AutoSet as a plate choice in a
product's properties.
· Enter Makeready and Maximum Speed. The defaults are:
Offset Press Makeready Maximum Speed
1-Color 10 Minutes 8,000 IPH
2-Color 15 Minutes 10,000 IPH
4-Color 30 Minutes 8,000 IPH
Makeready is based on the number of print heads. If the press has four heads,
the program assumes you're entering total makeready for a 4-color run. In other
words, the total number of minutes it takes to set up all four print heads. If you're
running a 1 or 2-color job through a 4-color press, the program automatically
compensates by reducing the actual minutes.
In Morning Flight you'll find two different entry points for makeready: Product
makeready and press makeready. Product makeready is built into the product,
ranging from very low to very high. It contains no actual time value, no minutes
or hours. Its sole function is to modify the press makeready to account for the
product's complexity.
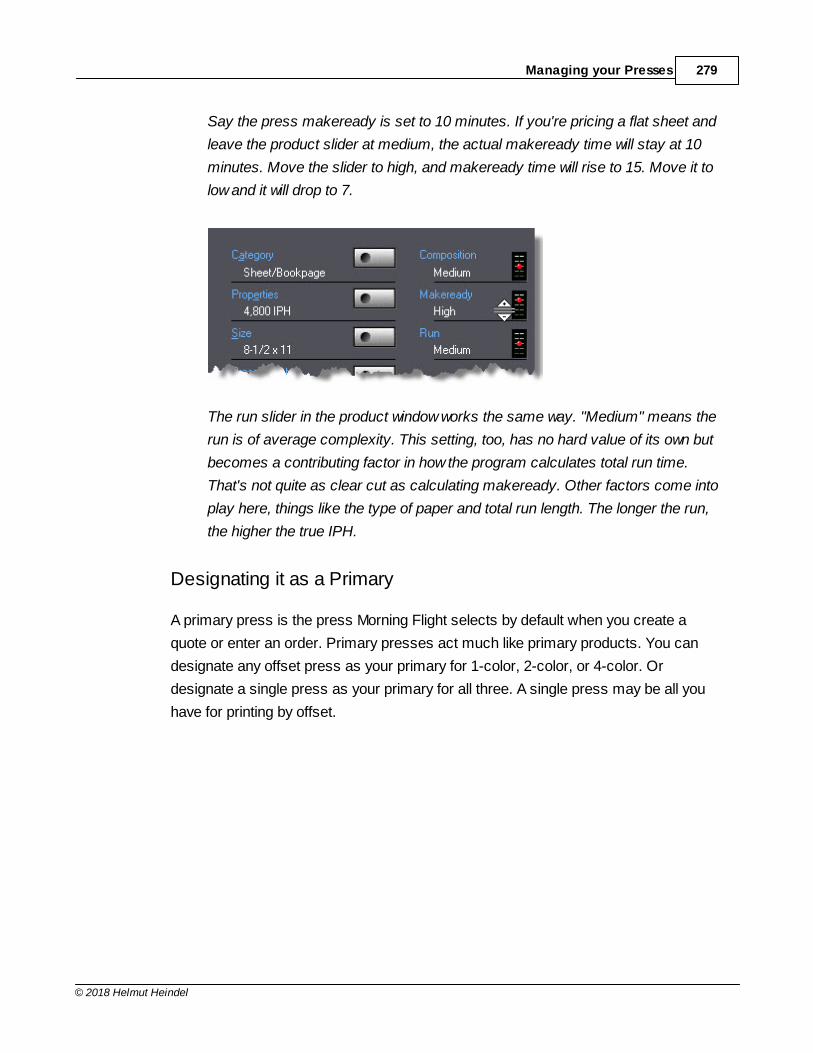
Managing your Presses 279
© 2018 Helmut Heindel
Say the press makeready is set to 10 minutes. If you're pricing a flat sheet and
leave the product slider at medium, the actual makeready time will stay at 10
minutes. Move the slider to high, and makeready time will rise to 15. Move it to
low and it will drop to 7.
The run slider in the product window works the same way. "Medium" means the
run is of average complexity. This setting, too, has no hard value of its own but
becomes a contributing factor in how the program calculates total run time.
That's not quite as clear cut as calculating makeready. Other factors come into
play here, things like the type of paper and total run length. The longer the run,
the higher the true IPH.
Designating it as a Primary
A primary press is the press Morning Flight selects by default when you create a
quote or enter an order. Primary presses act much like primary products. You can
designate any offset press as your primary for 1-color, 2-color, or 4-color. Or
designate a single press as your primary for all three. A single press may be all you
have for printing by offset.

Morning Flight Skypricer280
© 2018 Helmut Heindel
Say you add a new press and make that press your primary for 1-color, replacing the
built-in Multi. Morning Flight will now select the new press instead of the Multi for all 1-
color work. You can still hand-pick the Multi, but your new press will come up as the
default.
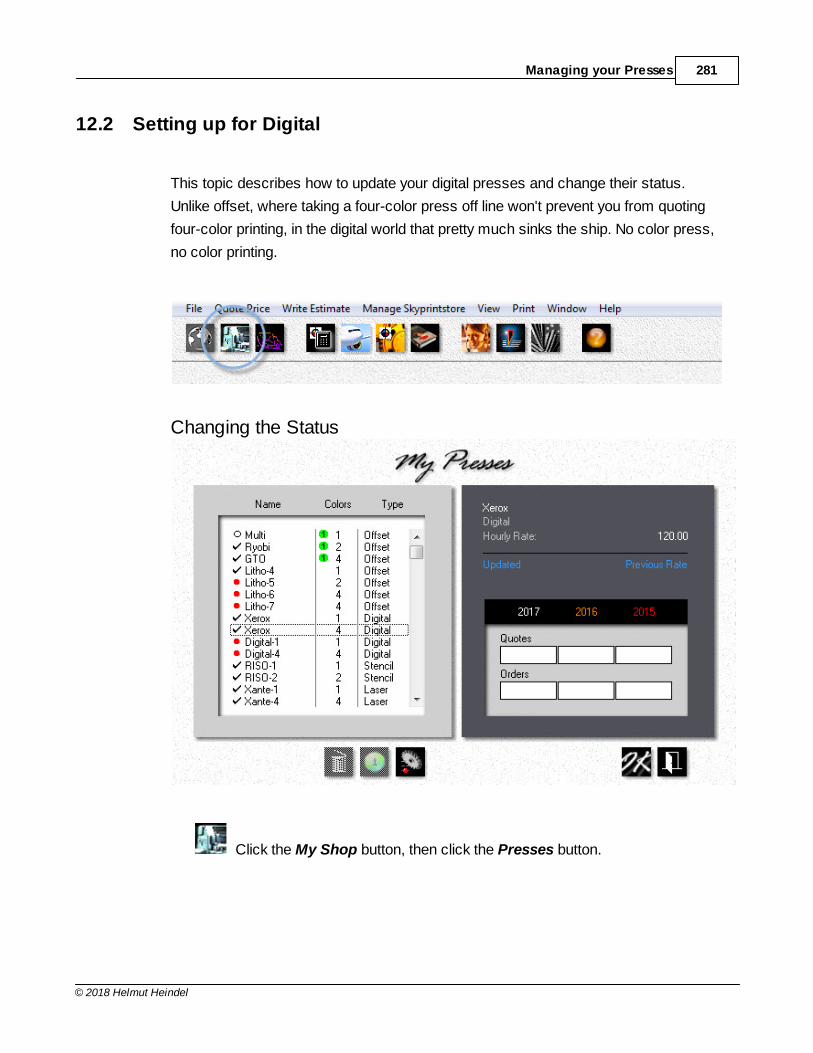
Managing your Presses 281
© 2018 Helmut Heindel
12.2 Setting up for Digital
This topic describes how to update your digital presses and change their status.
Unlike offset, where taking a four-color press off line won't prevent you from quoting
four-color printing, in the digital world that pretty much sinks the ship. No color press,
no color printing.
Changing the Status
Click the My Shop button, then click the Presses button.
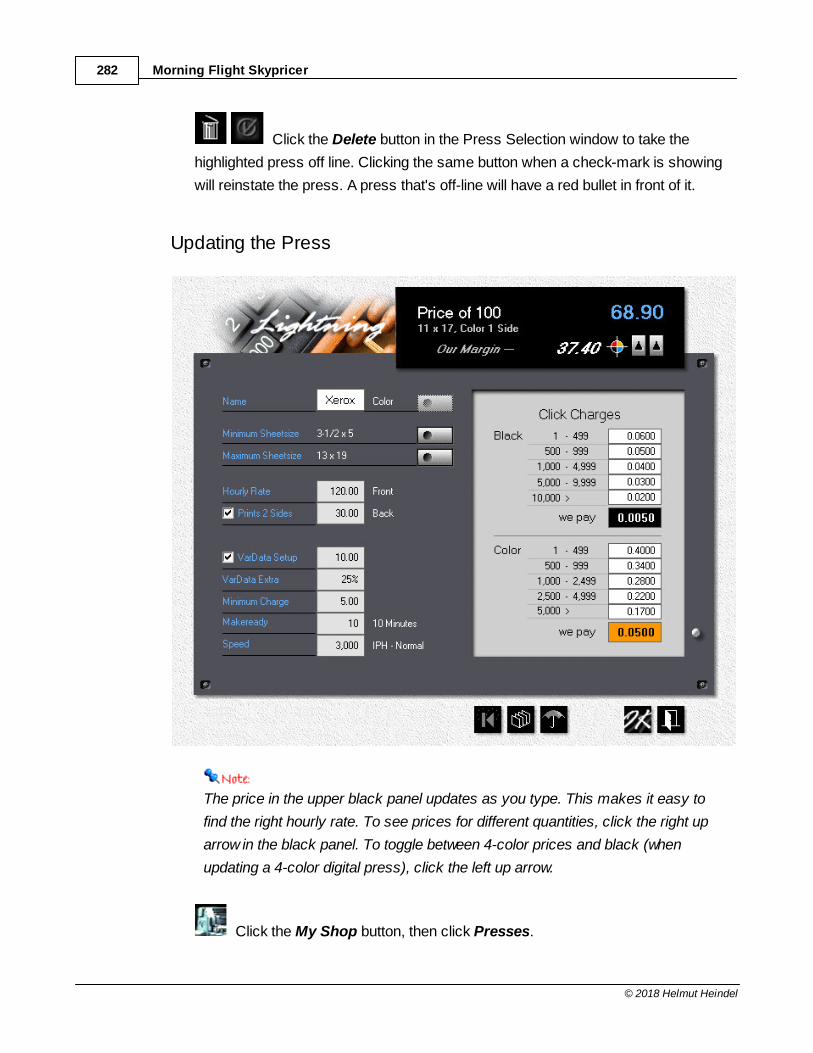
Morning Flight Skypricer282
© 2018 Helmut Heindel
Click the Delete button in the Press Selection window to take the
highlighted press off line. Clicking the same button when a check-mark is showing
will reinstate the press. A press that's off-line will have a red bullet in front of it.
Updating the Press
The price in the upper black panel updates as you type. This makes it easy to
find the right hourly rate. To see prices for different quantities, click the right up
arrow in the black panel. To toggle between 4-color prices and black (when
updating a 4-color digital press), click the left up arrow.
Click the My Shop button, then click Presses.
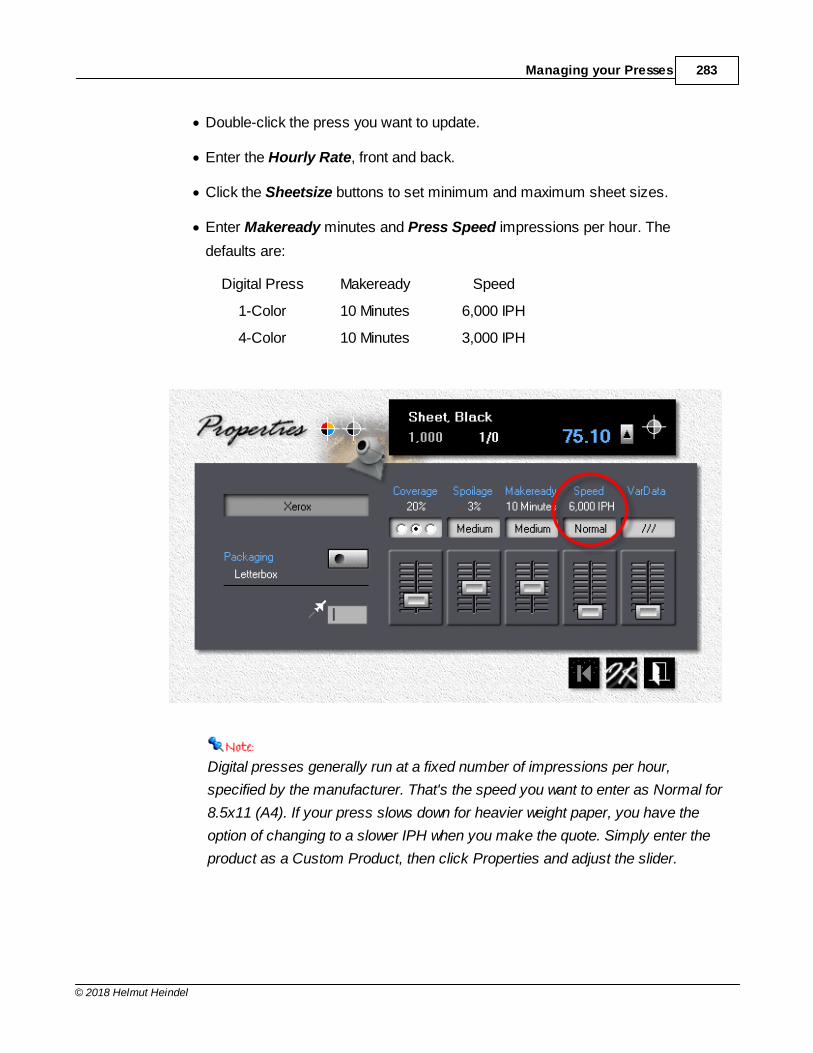
Managing your Presses 283
© 2018 Helmut Heindel
· Double-click the press you want to update.
· Enter the Hourly Rate, front and back.
· Click the Sheetsize buttons to set minimum and maximum sheet sizes.
· Enter Makeready minutes and Press Speed impressions per hour. The
defaults are:
Digital Press Makeready Speed
1-Color 10 Minutes 6,000 IPH
4-Color 10 Minutes 3,000 IPH
Digital presses generally run at a fixed number of impressions per hour,
specified by the manufacturer. That's the speed you want to enter as Normal for
8.5x11 (A4). If your press slows down for heavier weight paper, you have the
option of changing to a slower IPH when you make the quote. Simply enter the
product as a Custom Product, then click Properties and adjust the slider.
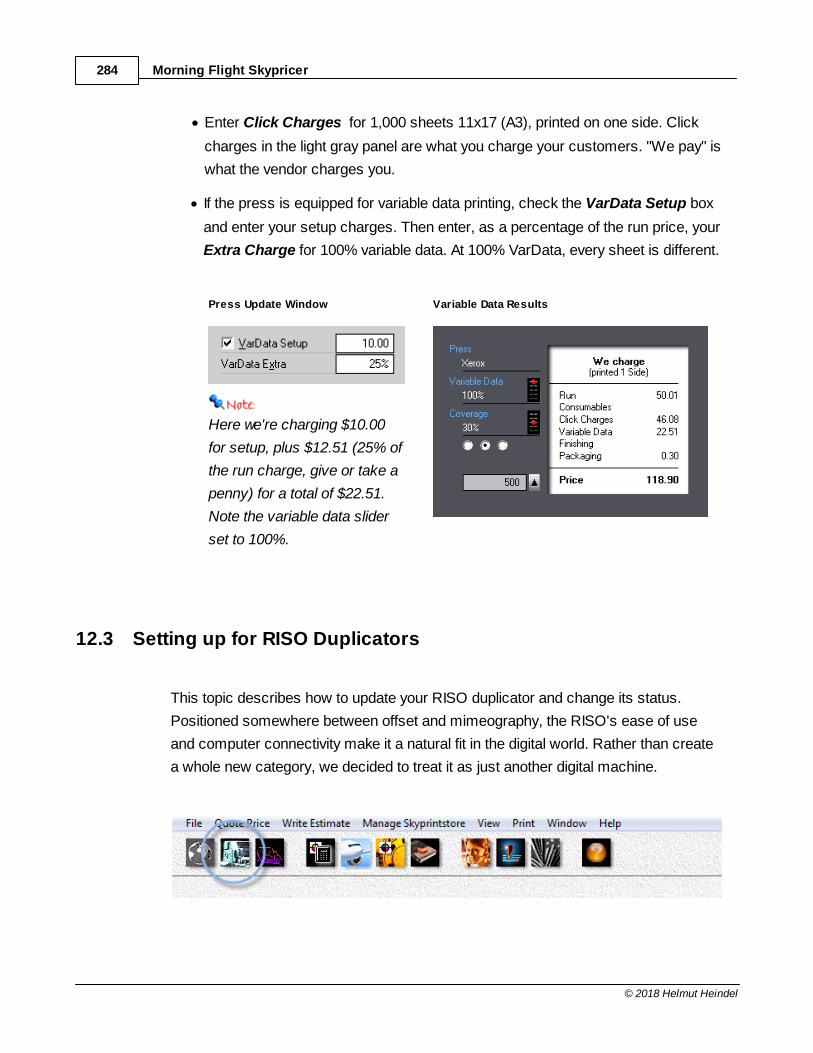
Morning Flight Skypricer284
© 2018 Helmut Heindel
· Enter Click Charges for 1,000 sheets 11x17 (A3), printed on one side. Click
charges in the light gray panel are what you charge your customers. "We pay" is
what the vendor charges you.
· If the press is equipped for variable data printing, check the VarData Setup box
and enter your setup charges. Then enter, as a percentage of the run price, your
Extra Charge for 100% variable data. At 100% VarData, every sheet is different.
Press Update Window
Here we're charging $10.00
for setup, plus $12.51 (25% of
the run charge, give or take a
penny) for a total of $22.51.
Note the variable data slider
set to 100%.
Variable Data Results
12.3 Setting up for RISO Duplicators
This topic describes how to update your RISO duplicator and change its status.
Positioned somewhere between offset and mimeography, the RISO's ease of use
and computer connectivity make it a natural fit in the digital world. Rather than create
a whole new category, we decided to treat it as just another digital machine.

Managing your Presses 285
© 2018 Helmut Heindel
Changing the Status
Click the My Shop button, then click the Presses button.
Click the Delete button in the Press Selection window to take the
highlighted press off line. Clicking the same button when a check-mark is showing
will reinstate the press. A press that's off-line will have a red bullet in front of it.
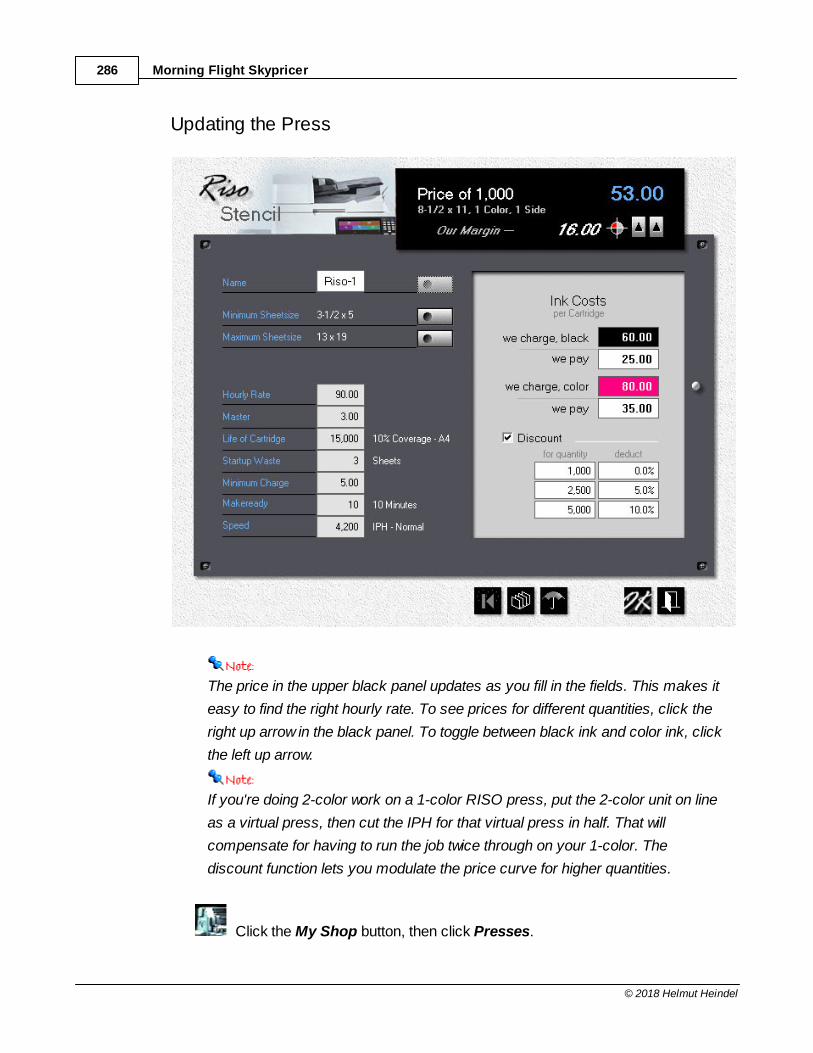
Morning Flight Skypricer286
© 2018 Helmut Heindel
Updating the Press
The price in the upper black panel updates as you fill in the fields. This makes it
easy to find the right hourly rate. To see prices for different quantities, click the
right up arrow in the black panel. To toggle between black ink and color ink, click
the left up arrow.
If you're doing 2-color work on a 1-color RISO press, put the 2-color unit on line
as a virtual press, then cut the IPH for that virtual press in half. That will
compensate for having to run the job twice through on your 1-color. The
discount function lets you modulate the price curve for higher quantities.
Click the My Shop button, then click Presses.
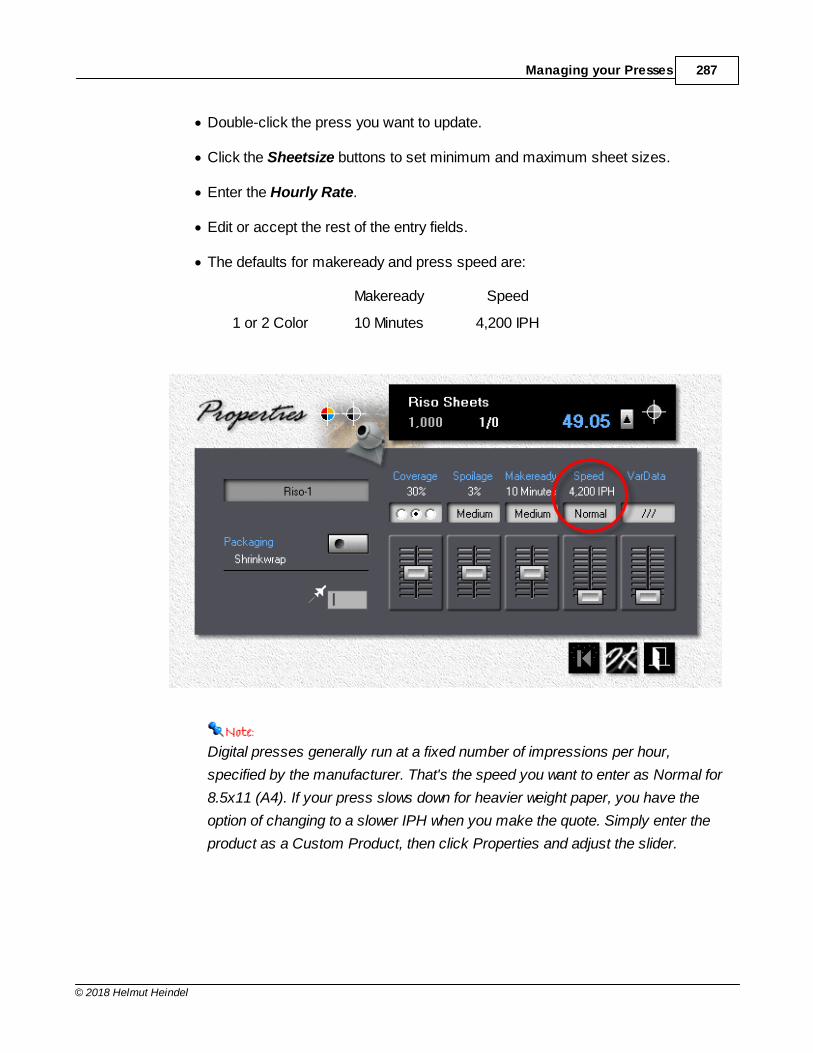
Managing your Presses 287
© 2018 Helmut Heindel
· Double-click the press you want to update.
· Click the Sheetsize buttons to set minimum and maximum sheet sizes.
· Enter the Hourly Rate.
· Edit or accept the rest of the entry fields.
· The defaults for makeready and press speed are:
Makeready Speed
1 or 2 Color 10 Minutes 4,200 IPH
Digital presses generally run at a fixed number of impressions per hour,
specified by the manufacturer. That's the speed you want to enter as Normal for
8.5x11 (A4). If your press slows down for heavier weight paper, you have the
option of changing to a slower IPH when you make the quote. Simply enter the
product as a Custom Product, then click Properties and adjust the slider.
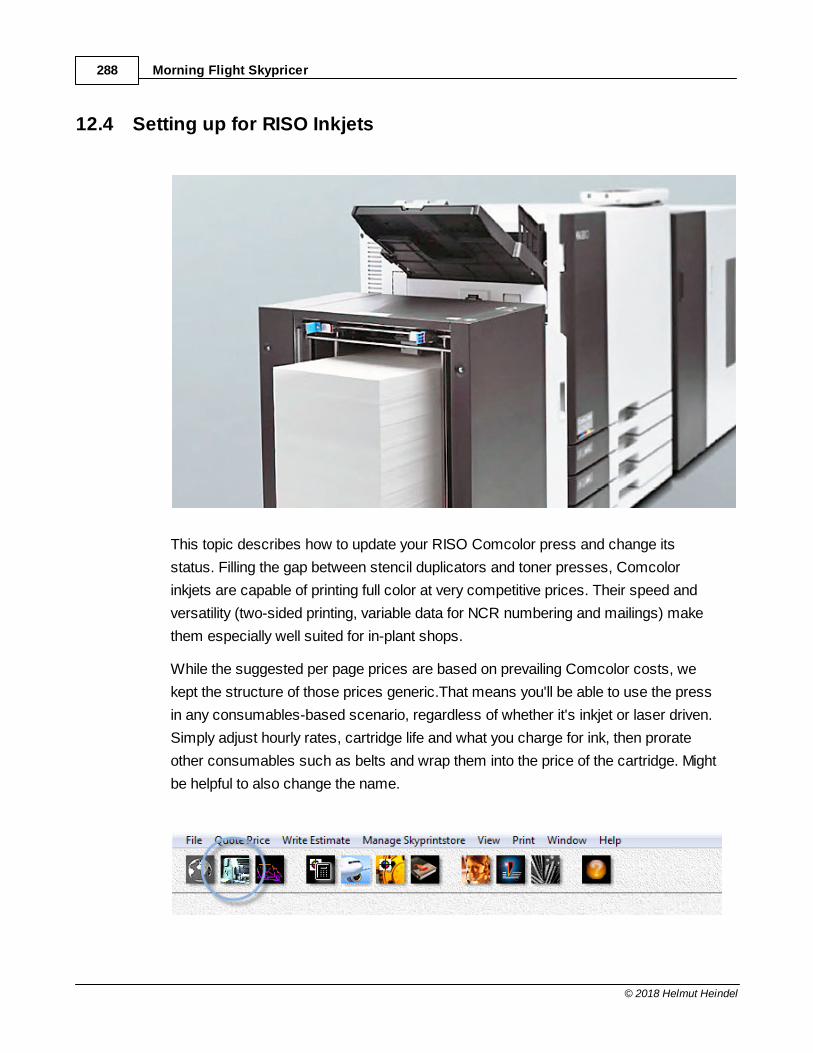
Morning Flight Skypricer288
© 2018 Helmut Heindel
12.4 Setting up for RISO Inkjets
This topic describes how to update your RISO Comcolor press and change its
status. Filling the gap between stencil duplicators and toner presses, Comcolor
inkjets are capable of printing full color at very competitive prices. Their speed and
versatility (two-sided printing, variable data for NCR numbering and mailings) make
them especially well suited for in-plant shops.
While the suggested per page prices are based on prevailing Comcolor costs, we
kept the structure of those prices generic.That means you'll be able to use the press
in any consumables-based scenario, regardless of whether it's inkjet or laser driven.
Simply adjust hourly rates, cartridge life and what you charge for ink, then prorate
other consumables such as belts and wrap them into the price of the cartridge. Might
be helpful to also change the name.
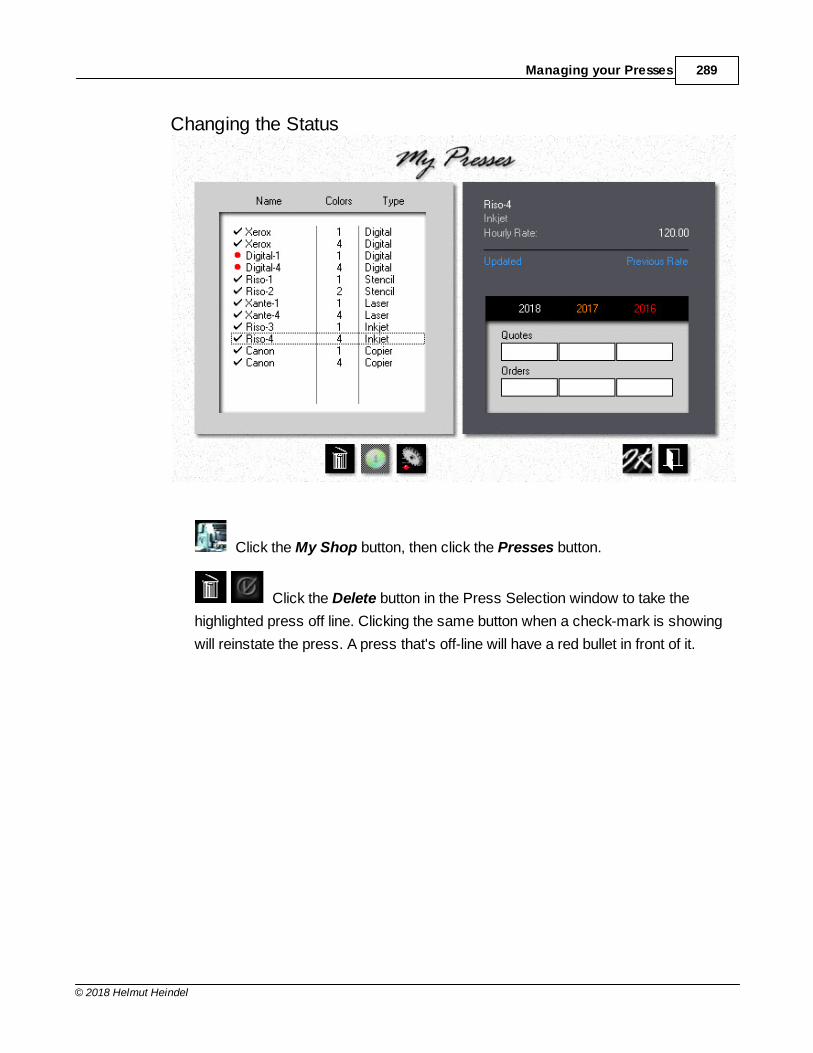
Managing your Presses 289
© 2018 Helmut Heindel
Changing the Status
Click the My Shop button, then click the Presses button.
Click the Delete button in the Press Selection window to take the
highlighted press off line. Clicking the same button when a check-mark is showing
will reinstate the press. A press that's off-line will have a red bullet in front of it.
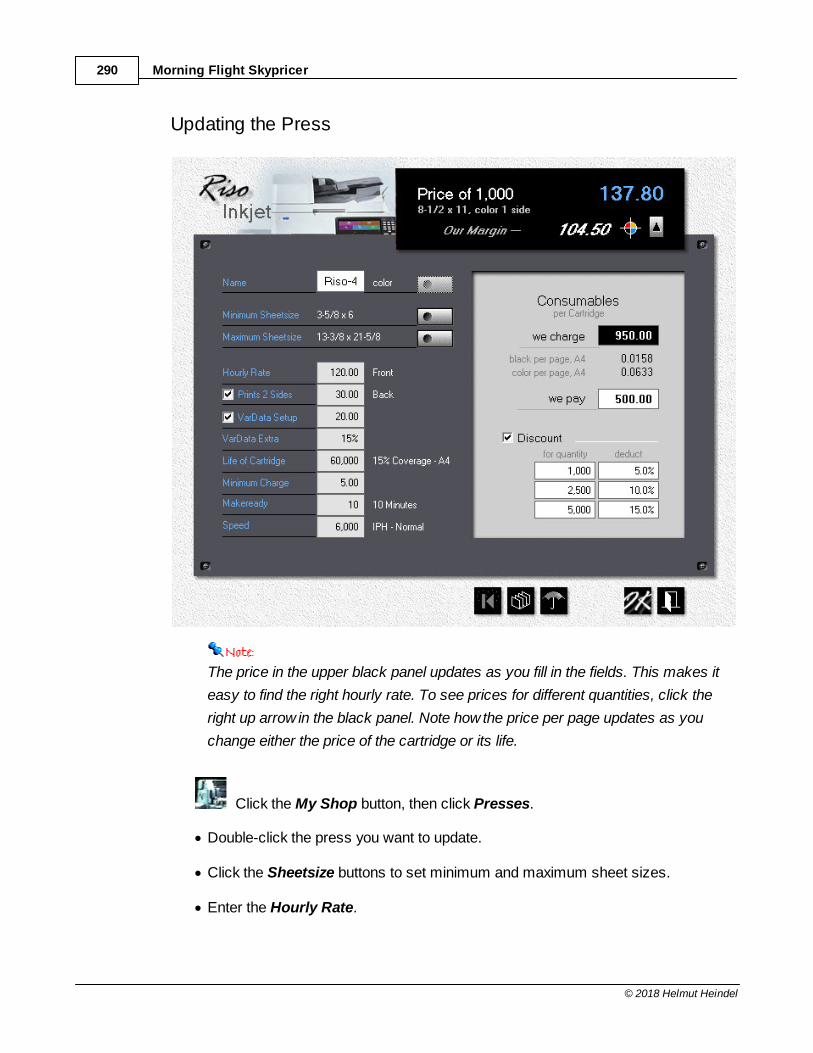
Morning Flight Skypricer290
© 2018 Helmut Heindel
Updating the Press
The price in the upper black panel updates as you fill in the fields. This makes it
easy to find the right hourly rate. To see prices for different quantities, click the
right up arrow in the black panel. Note how the price per page updates as you
change either the price of the cartridge or its life.
Click the My Shop button, then click Presses.
· Double-click the press you want to update.
· Click the Sheetsize buttons to set minimum and maximum sheet sizes.
· Enter the Hourly Rate.
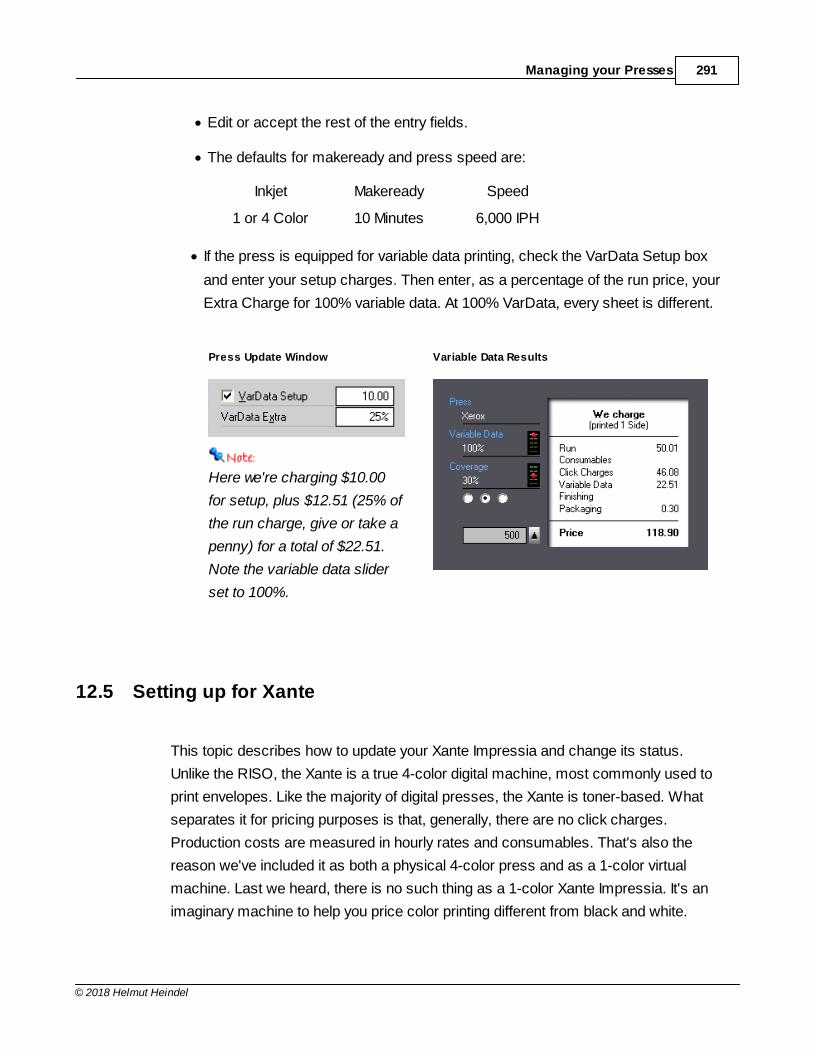
Managing your Presses 291
© 2018 Helmut Heindel
· Edit or accept the rest of the entry fields.
· The defaults for makeready and press speed are:
Inkjet Makeready Speed
1 or 4 Color 10 Minutes 6,000 IPH
· If the press is equipped for variable data printing, check the VarData Setup box
and enter your setup charges. Then enter, as a percentage of the run price, your
Extra Charge for 100% variable data. At 100% VarData, every sheet is different.
Press Update Window
Here we're charging $10.00
for setup, plus $12.51 (25% of
the run charge, give or take a
penny) for a total of $22.51.
Note the variable data slider
set to 100%.
Variable Data Results
12.5 Setting up for Xante
This topic describes how to update your Xante Impressia and change its status.
Unlike the RISO, the Xante is a true 4-color digital machine, most commonly used to
print envelopes. Like the majority of digital presses, the Xante is toner-based. What
separates it for pricing purposes is that, generally, there are no click charges.
Production costs are measured in hourly rates and consumables. That's also the
reason we've included it as both a physical 4-color press and as a 1-color virtual
machine. Last we heard, there is no such thing as a 1-color Xante Impressia. It's an
imaginary machine to help you price color printing different from black and white.
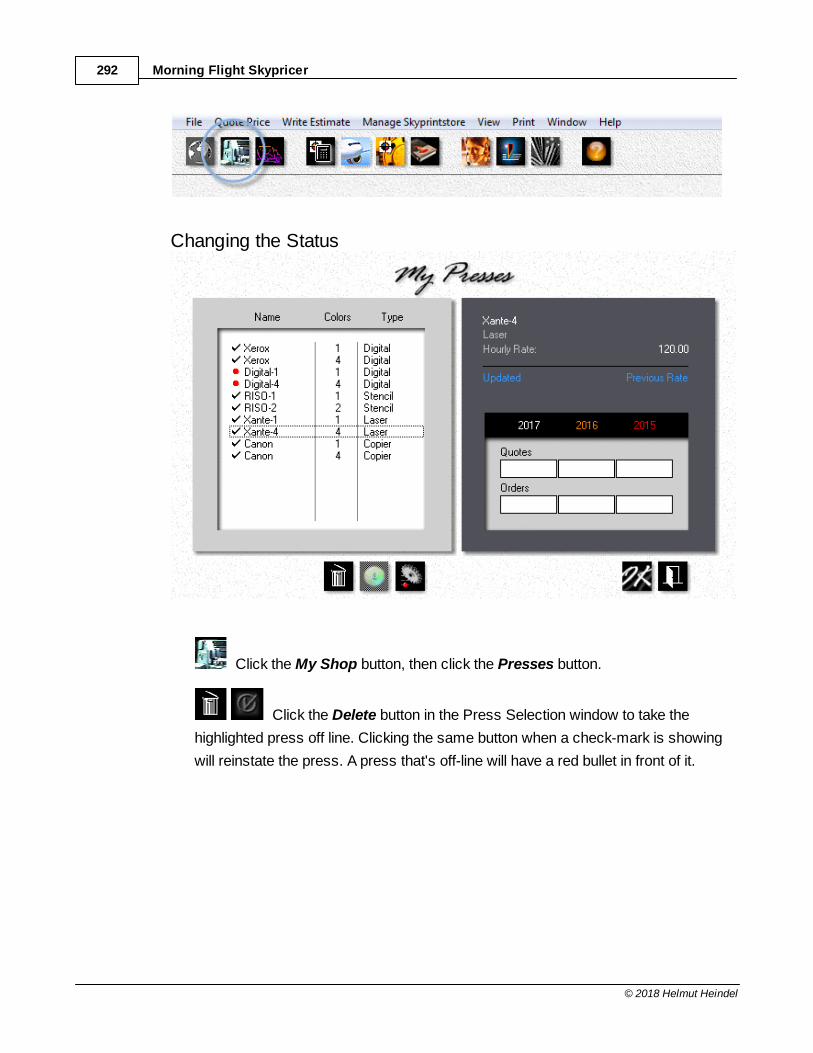
Morning Flight Skypricer292
© 2018 Helmut Heindel
Changing the Status
Click the My Shop button, then click the Presses button.
Click the Delete button in the Press Selection window to take the
highlighted press off line. Clicking the same button when a check-mark is showing
will reinstate the press. A press that's off-line will have a red bullet in front of it.
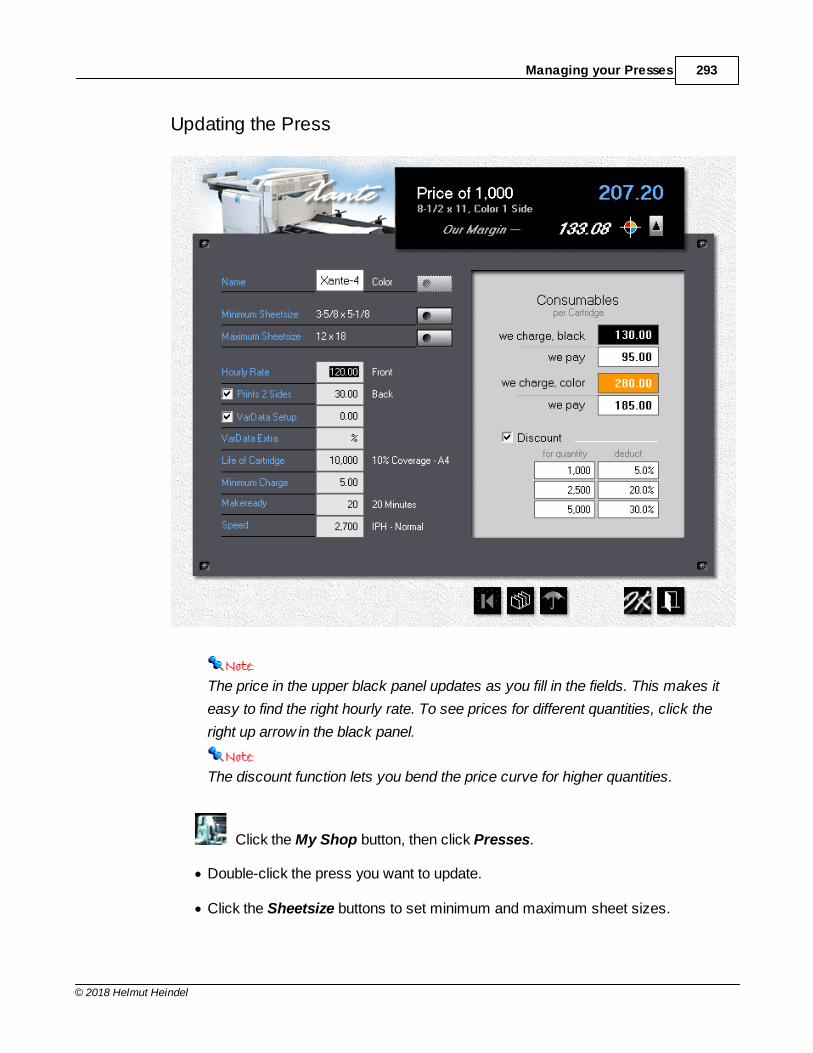
Managing your Presses 293
© 2018 Helmut Heindel
Updating the Press
The price in the upper black panel updates as you fill in the fields. This makes it
easy to find the right hourly rate. To see prices for different quantities, click the
right up arrow in the black panel.
The discount function lets you bend the price curve for higher quantities.
Click the My Shop button, then click Presses.
· Double-click the press you want to update.
· Click the Sheetsize buttons to set minimum and maximum sheet sizes.
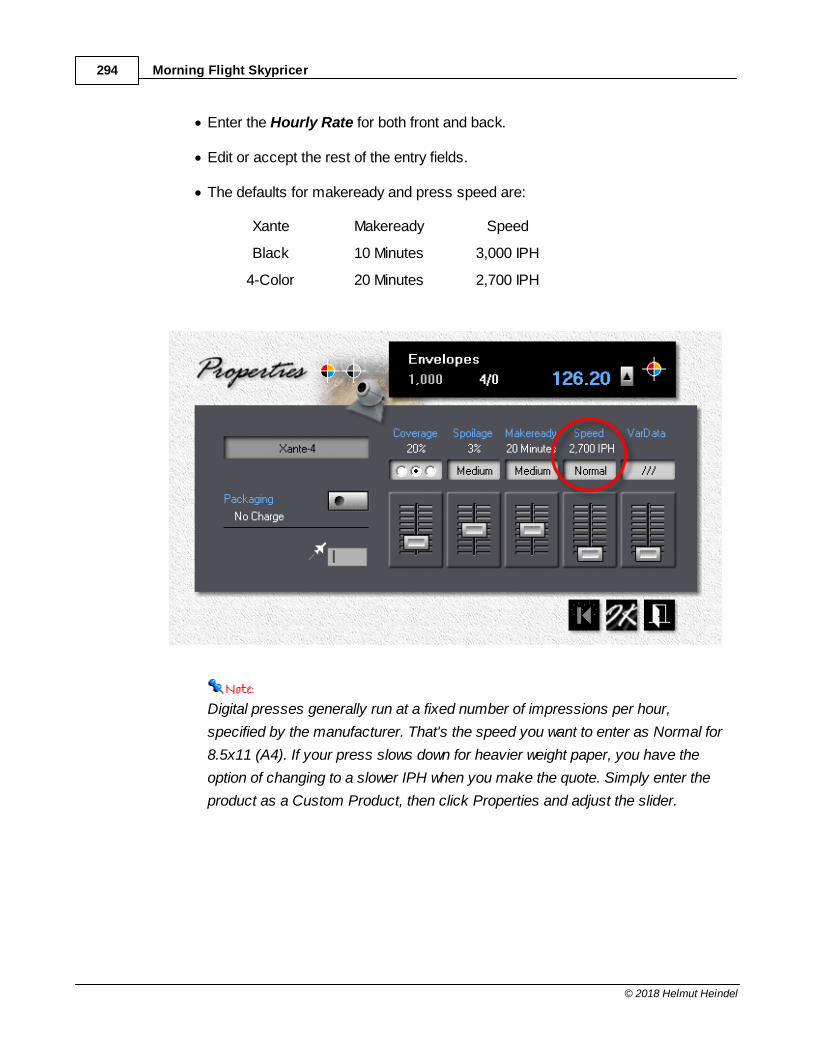
Morning Flight Skypricer294
© 2018 Helmut Heindel
· Enter the Hourly Rate for both front and back.
· Edit or accept the rest of the entry fields.
· The defaults for makeready and press speed are:
Xante Makeready Speed
Black 10 Minutes 3,000 IPH
4-Color 20 Minutes 2,700 IPH
Digital presses generally run at a fixed number of impressions per hour,
specified by the manufacturer. That's the speed you want to enter as Normal for
8.5x11 (A4). If your press slows down for heavier weight paper, you have the
option of changing to a slower IPH when you make the quote. Simply enter the
product as a Custom Product, then click Properties and adjust the slider.
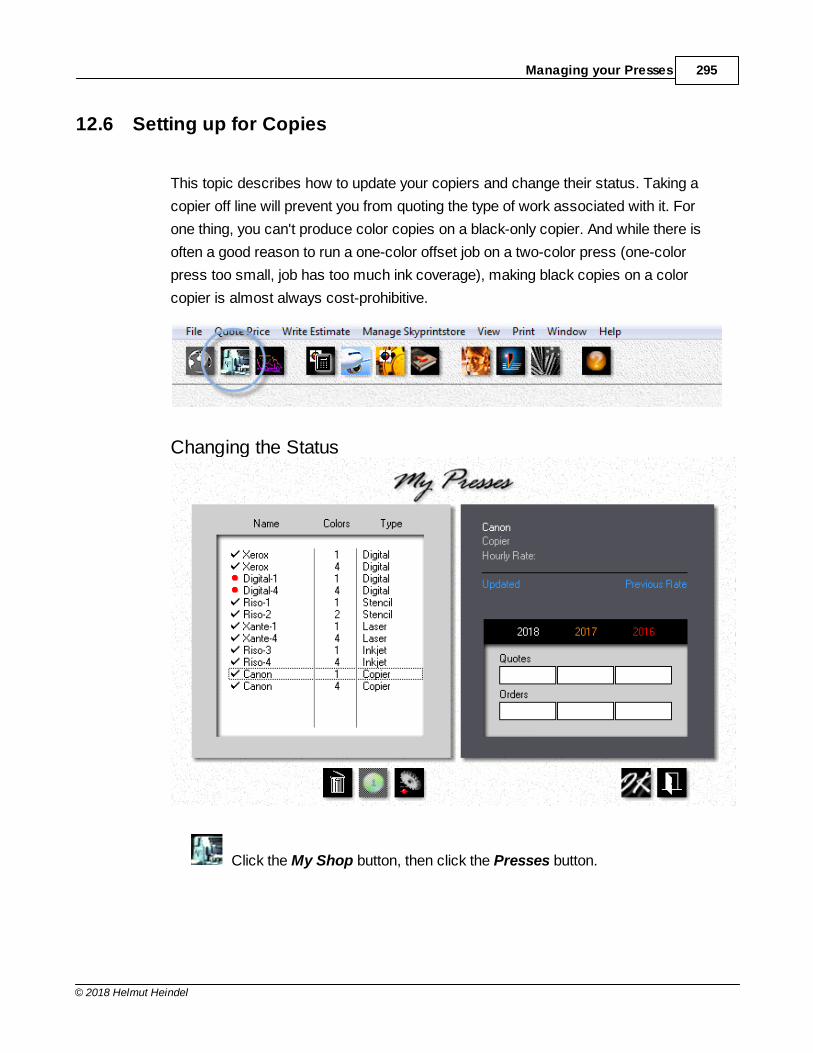
Managing your Presses 295
© 2018 Helmut Heindel
12.6 Setting up for Copies
This topic describes how to update your copiers and change their status. Taking a
copier off line will prevent you from quoting the type of work associated with it. For
one thing, you can't produce color copies on a black-only copier. And while there is
often a good reason to run a one-color offset job on a two-color press (one-color
press too small, job has too much ink coverage), making black copies on a color
copier is almost always cost-prohibitive.
Changing the Status
Click the My Shop button, then click the Presses button.
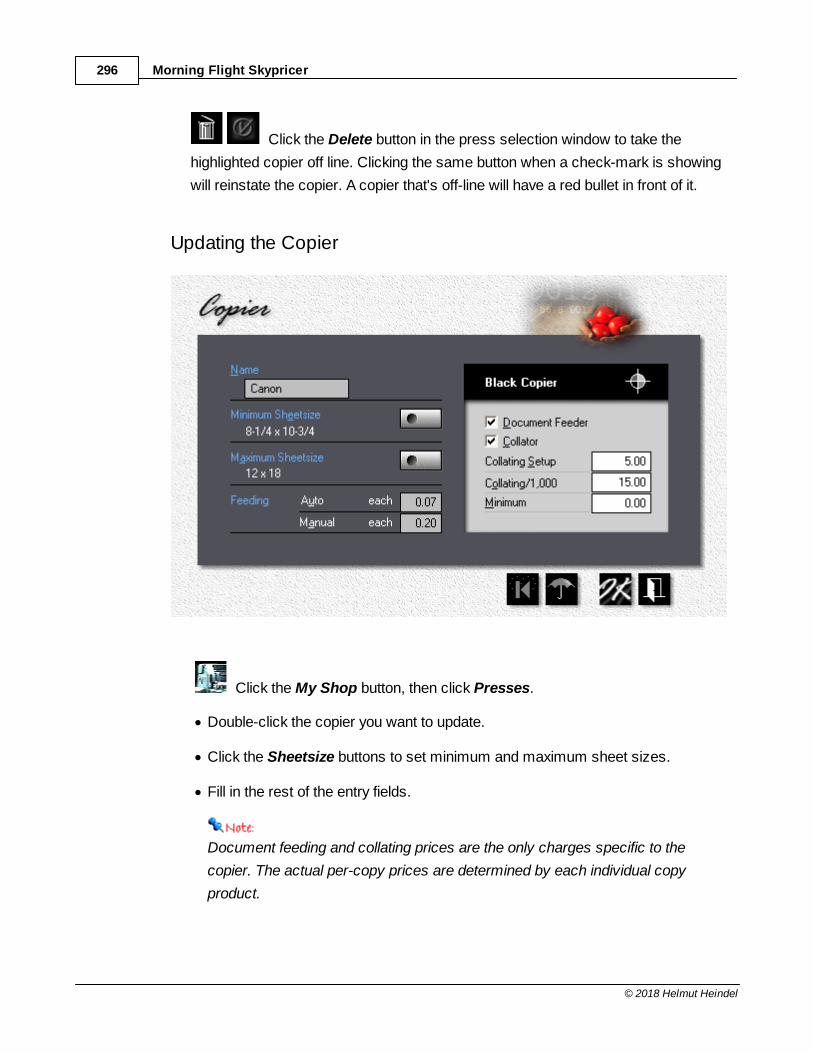
Morning Flight Skypricer296
© 2018 Helmut Heindel
Click the Delete button in the press selection window to take the
highlighted copier off line. Clicking the same button when a check-mark is showing
will reinstate the copier. A copier that's off-line will have a red bullet in front of it.
Updating the Copier
Click the My Shop button, then click Presses.
· Double-click the copier you want to update.
· Click the Sheetsize buttons to set minimum and maximum sheet sizes.
· Fill in the rest of the entry fields.
Document feeding and collating prices are the only charges specific to the
copier. The actual per-copy prices are determined by each individual copy
product.
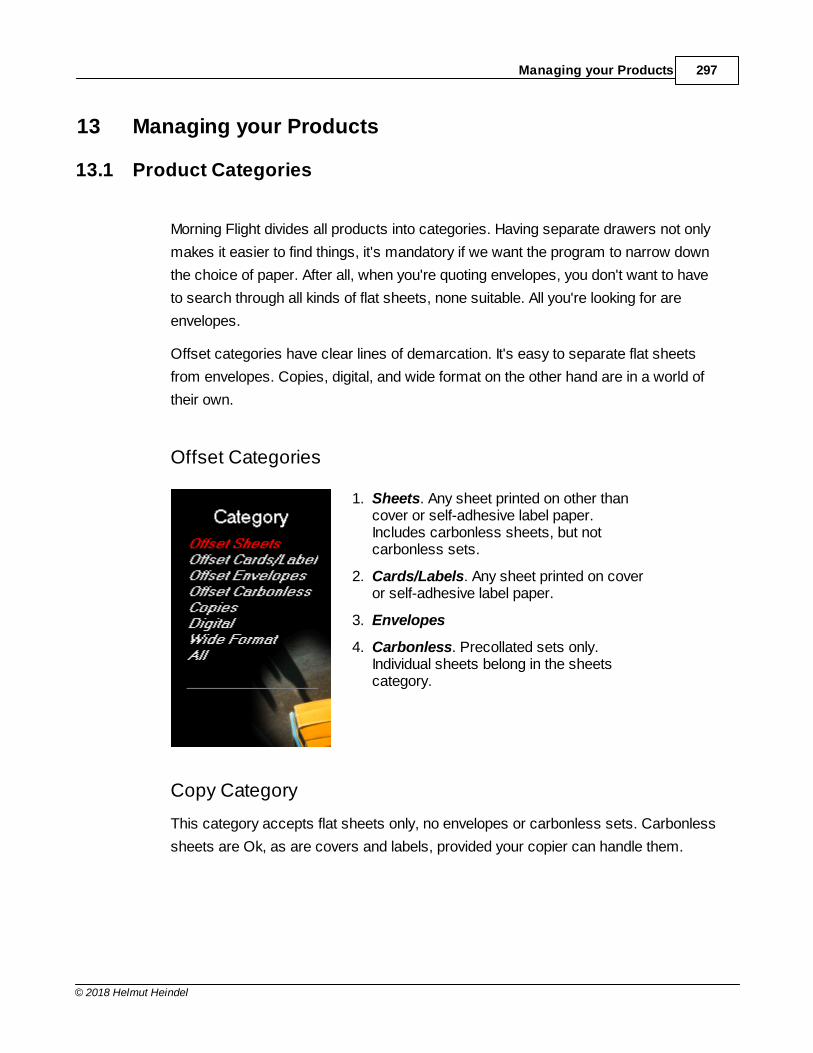
Managing your Products 297
© 2018 Helmut Heindel
13 Managing your Products
13.1 Product Categories
Morning Flight divides all products into categories. Having separate drawers not only
makes it easier to find things, it's mandatory if we want the program to narrow down
the choice of paper. After all, when you're quoting envelopes, you don't want to have
to search through all kinds of flat sheets, none suitable. All you're looking for are
envelopes.
Offset categories have clear lines of demarcation. It's easy to separate flat sheets
from envelopes. Copies, digital, and wide format on the other hand are in a world of
their own.
Offset Categories
1. Sheets. Any sheet printed on other thancover or self-adhesive label paper.Includes carbonless sheets, but notcarbonless sets.
2. Cards/Labels. Any sheet printed on coveror self-adhesive label paper.
3. Envelopes
4. Carbonless. Precollated sets only.Individual sheets belong in the sheetscategory.
Copy Category
This category accepts flat sheets only, no envelopes or carbonless sets. Carbonless
sheets are Ok, as are covers and labels, provided your copier can handle them.
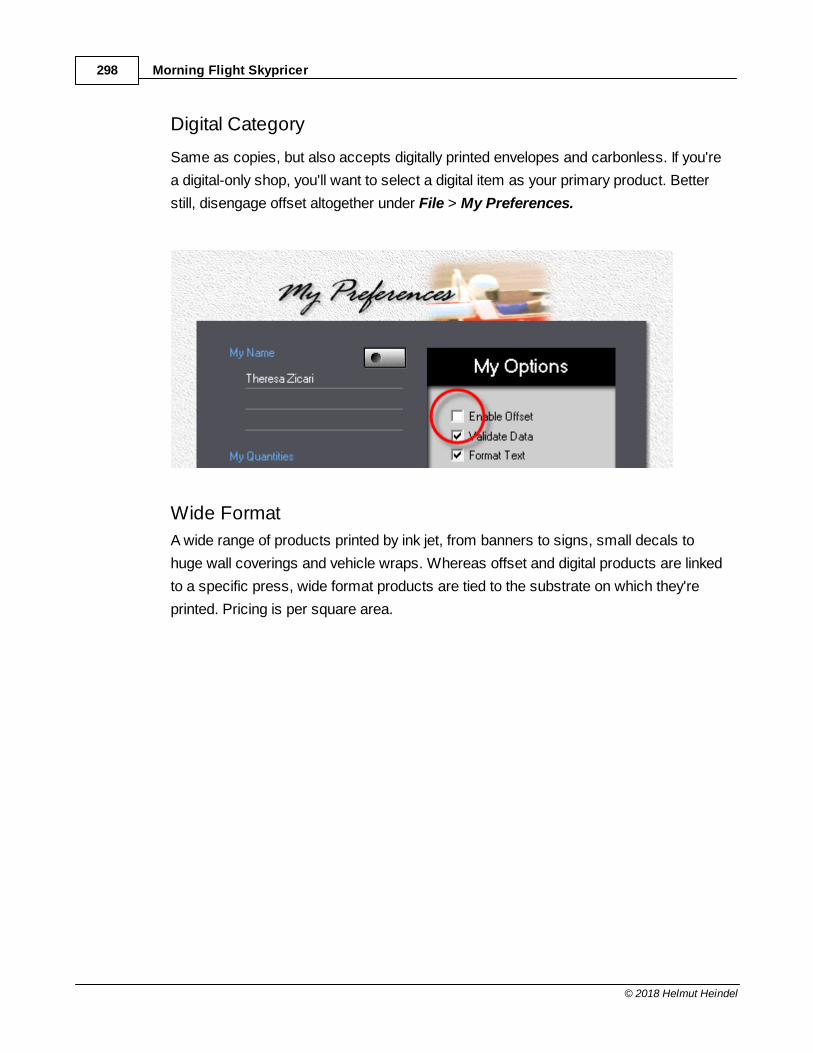
Morning Flight Skypricer298
© 2018 Helmut Heindel
Digital Category
Same as copies, but also accepts digitally printed envelopes and carbonless. If you're
a digital-only shop, you'll want to select a digital item as your primary product. Better
still, disengage offset altogether under File > My Preferences.
Wide Format
A wide range of products printed by ink jet, from banners to signs, small decals to
huge wall coverings and vehicle wraps. Whereas offset and digital products are linked
to a specific press, wide format products are tied to the substrate on which they're
printed. Pricing is per square area.
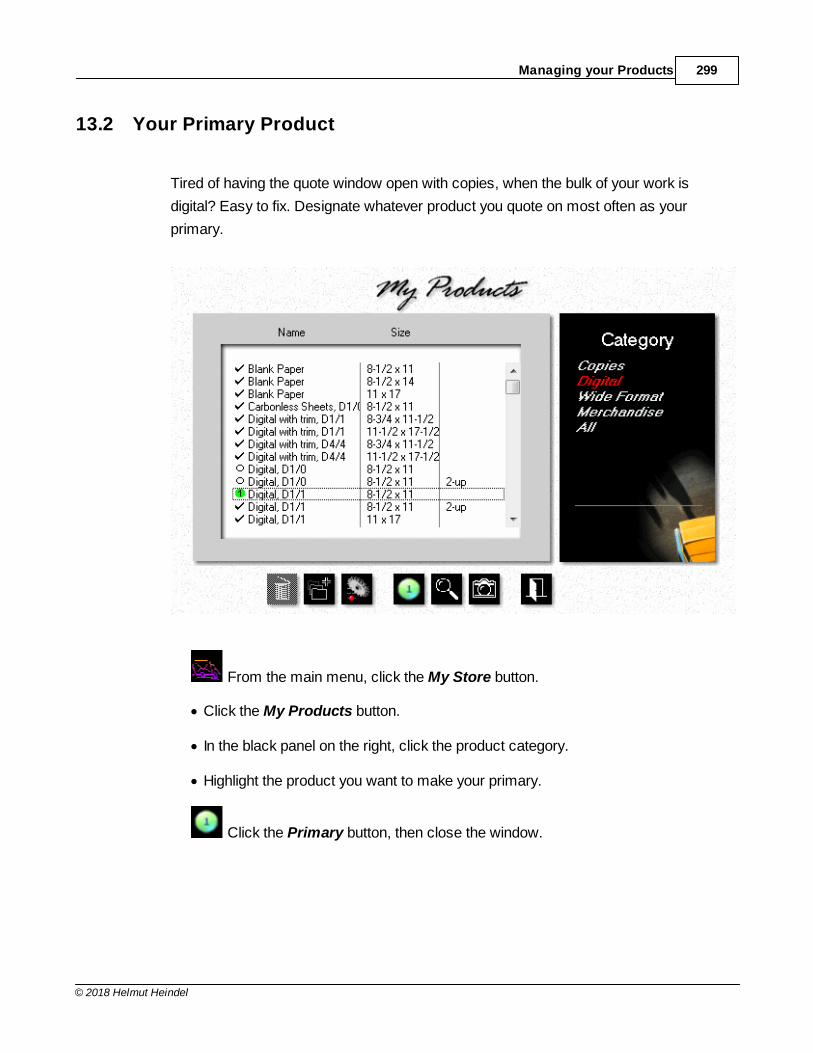
Managing your Products 299
© 2018 Helmut Heindel
13.2 Your Primary Product
Tired of having the quote window open with copies, when the bulk of your work is
digital? Easy to fix. Designate whatever product you quote on most often as your
primary.
From the main menu, click the My Store button.
· Click the My Products button.
· In the black panel on the right, click the product category.
· Highlight the product you want to make your primary.
Click the Primary button, then close the window.
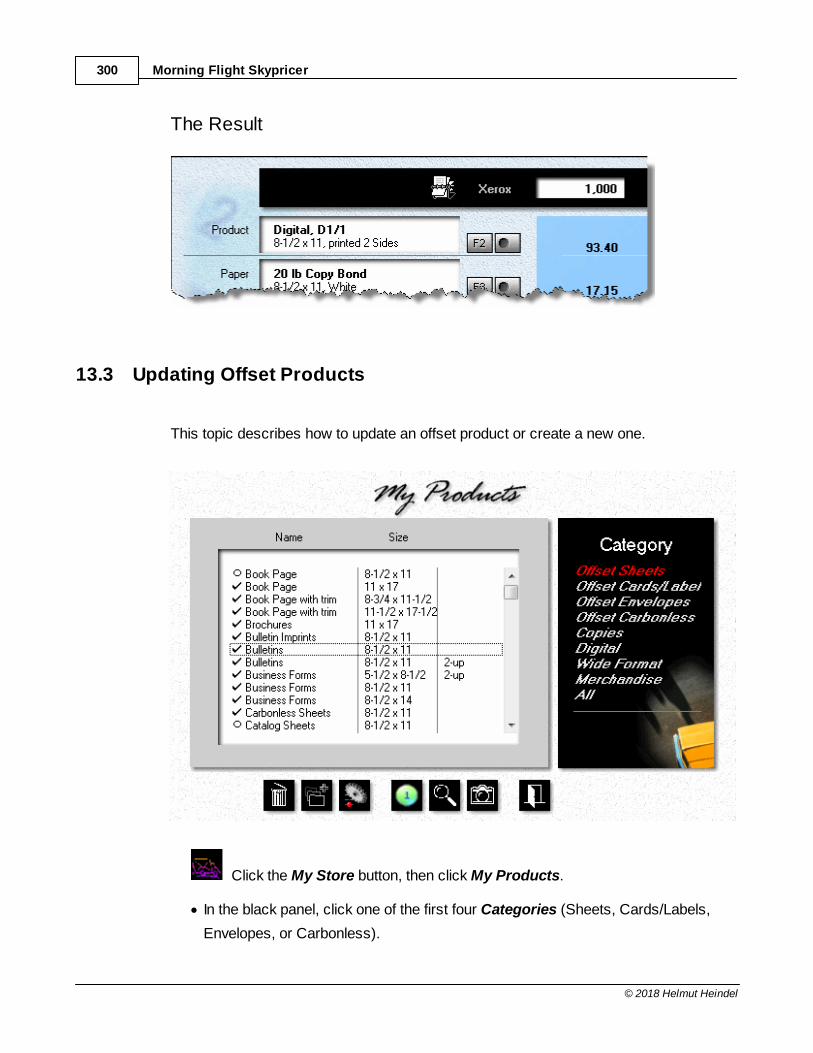
Morning Flight Skypricer300
© 2018 Helmut Heindel
The Result
13.3 Updating Offset Products
This topic describes how to update an offset product or create a new one.
Click the My Store button, then click My Products.
· In the black panel, click one of the first four Categories (Sheets, Cards/Labels,
Envelopes, or Carbonless).
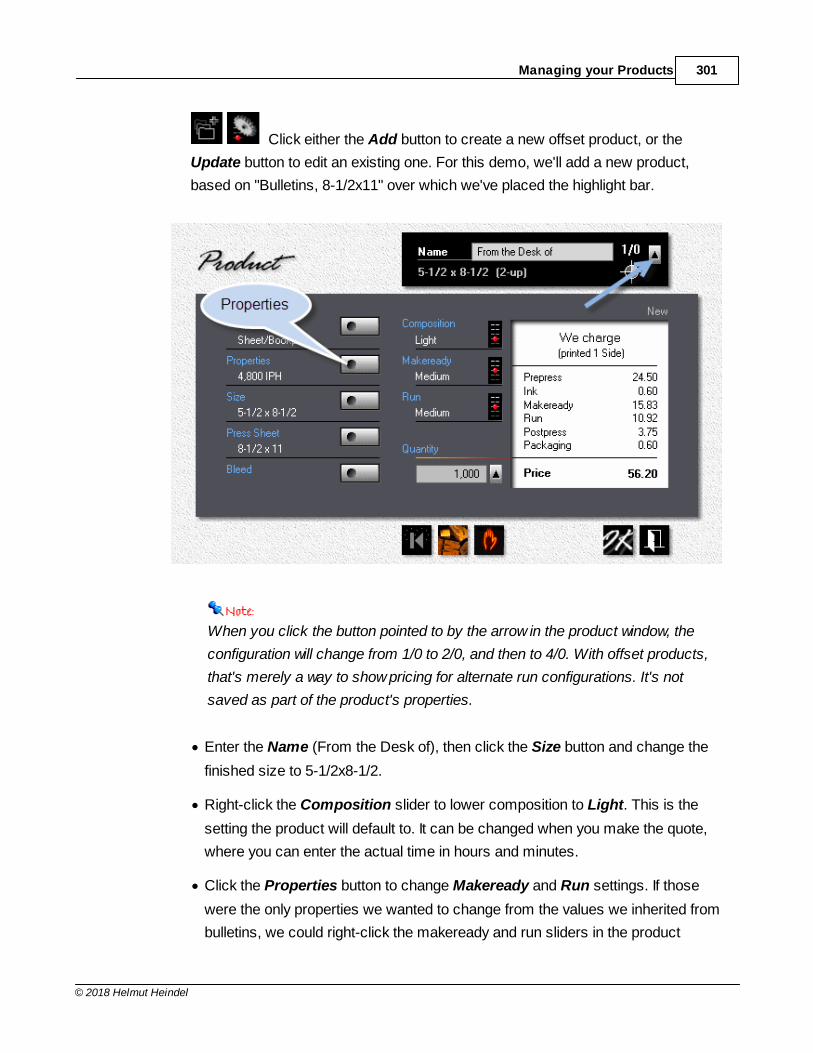
Managing your Products 301
© 2018 Helmut Heindel
Click either the Add button to create a new offset product, or the
Update button to edit an existing one. For this demo, we'll add a new product,
based on "Bulletins, 8-1/2x11" over which we've placed the highlight bar.
When you click the button pointed to by the arrow in the product window, the
configuration will change from 1/0 to 2/0, and then to 4/0. With offset products,
that's merely a way to show pricing for alternate run configurations. It's not
saved as part of the product's properties.
· Enter the Name (From the Desk of), then click the Size button and change the
finished size to 5-1/2x8-1/2.
· Right-click the Composition slider to lower composition to Light. This is the
setting the product will default to. It can be changed when you make the quote,
where you can enter the actual time in hours and minutes.
· Click the Properties button to change Makeready and Run settings. If those
were the only properties we wanted to change from the values we inherited from
bulletins, we could right-click the makeready and run sliders in the product
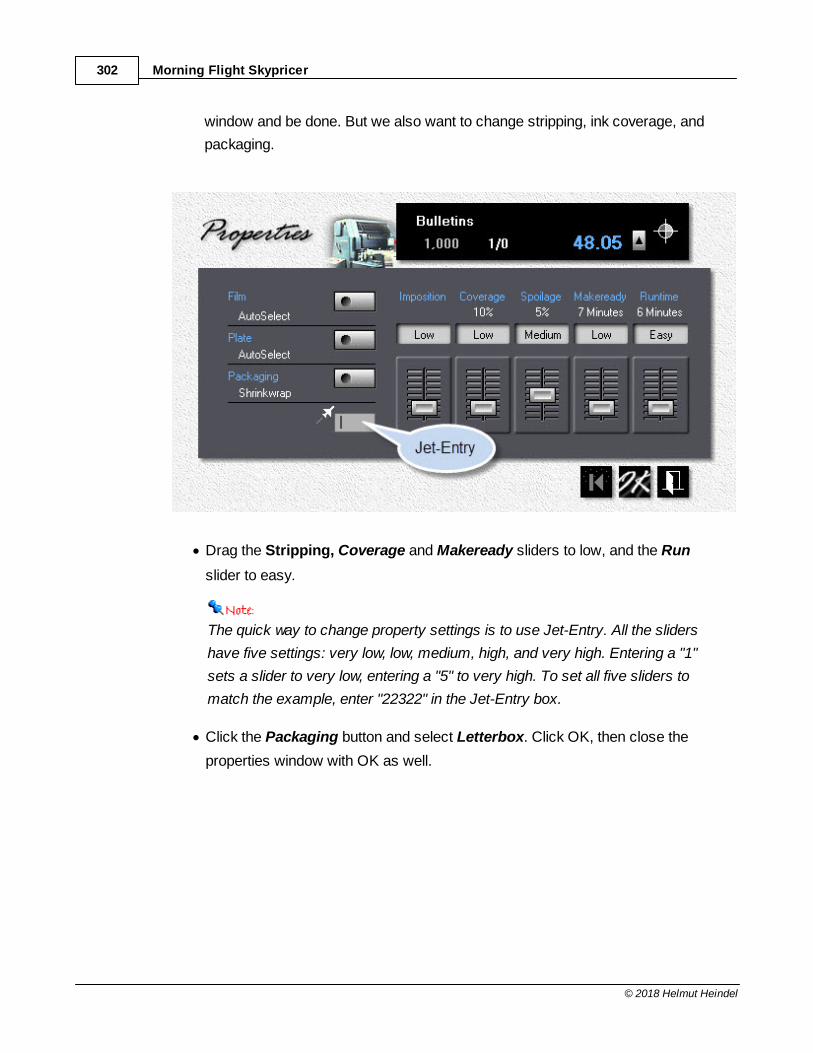
Morning Flight Skypricer302
© 2018 Helmut Heindel
window and be done. But we also want to change stripping, ink coverage, and
packaging.
· Drag the Stripping, Coverage and Makeready sliders to low, and the Run
slider to easy.
The quick way to change property settings is to use Jet-Entry. All the sliders
have five settings: very low, low, medium, high, and very high. Entering a "1"
sets a slider to very low, entering a "5" to very high. To set all five sliders to
match the example, enter "22322" in the Jet-Entry box.
· Click the Packaging button and select Letterbox. Click OK, then close the
properties window with OK as well.
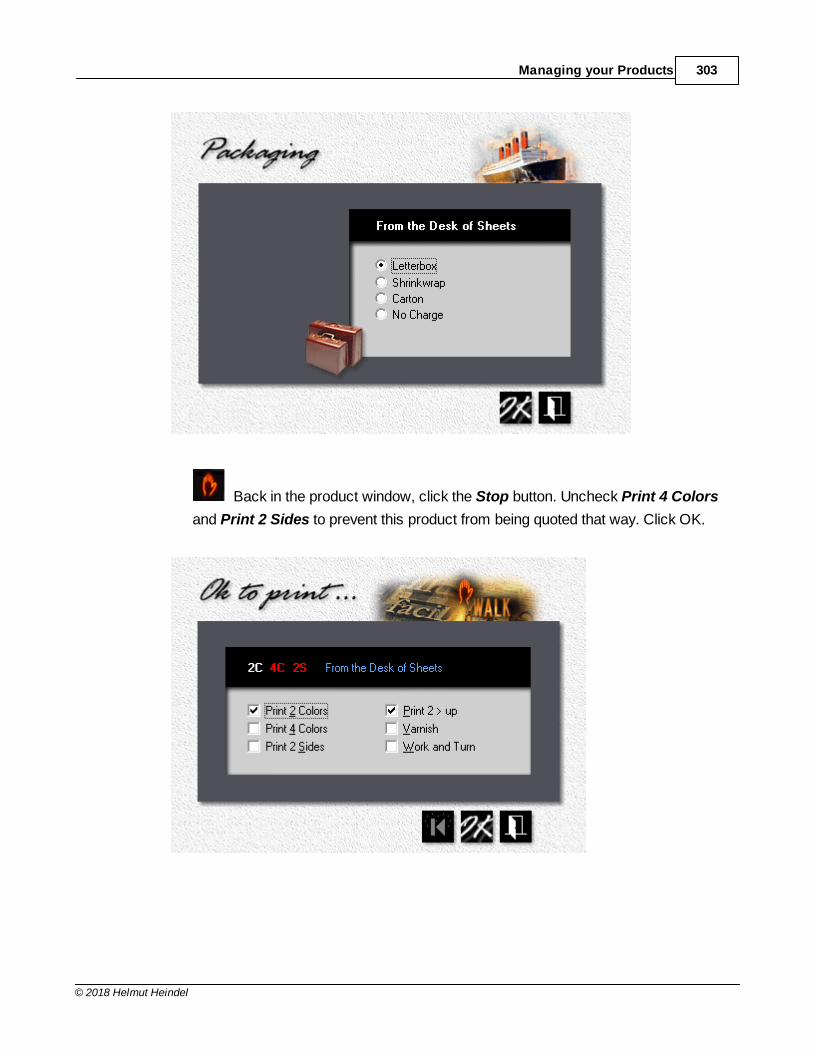
Managing your Products 303
© 2018 Helmut Heindel
Back in the product window, click the Stop button. Uncheck Print 4 Colors
and Print 2 Sides to prevent this product from being quoted that way. Click OK.
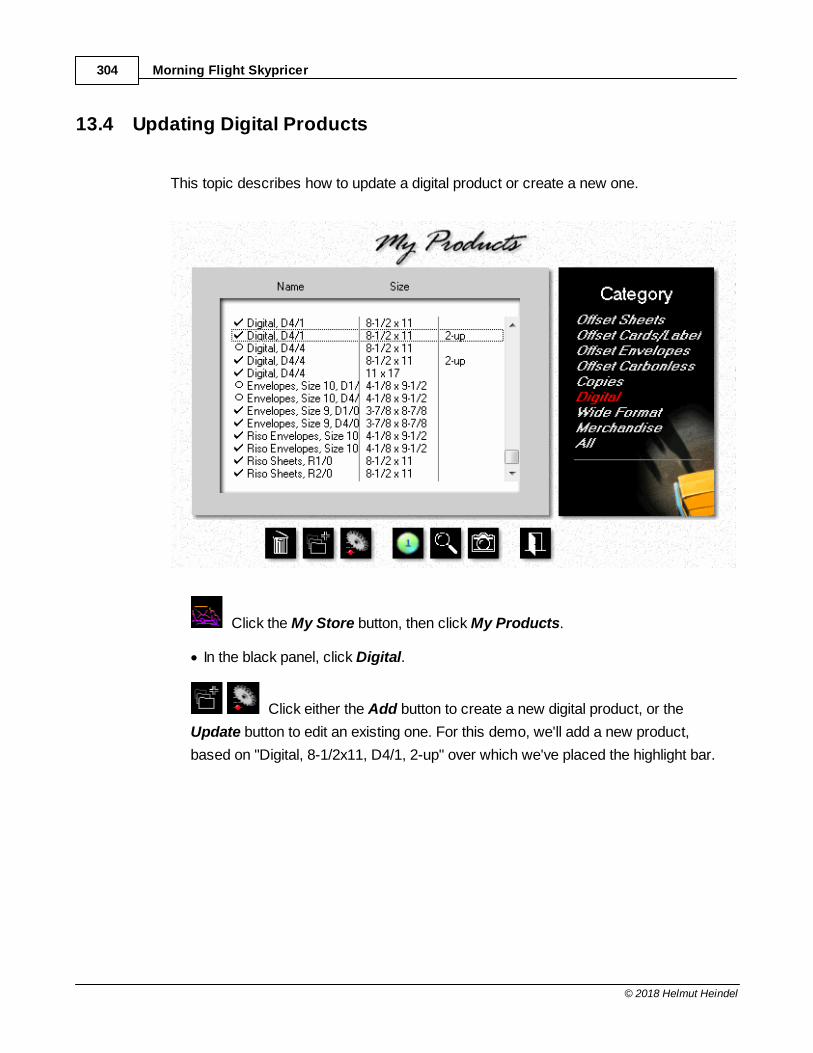
Morning Flight Skypricer304
© 2018 Helmut Heindel
13.4 Updating Digital Products
This topic describes how to update a digital product or create a new one.
Click the My Store button, then click My Products.
· In the black panel, click Digital.
Click either the Add button to create a new digital product, or the
Update button to edit an existing one. For this demo, we'll add a new product,
based on "Digital, 8-1/2x11, D4/1, 2-up" over which we've placed the highlight bar.
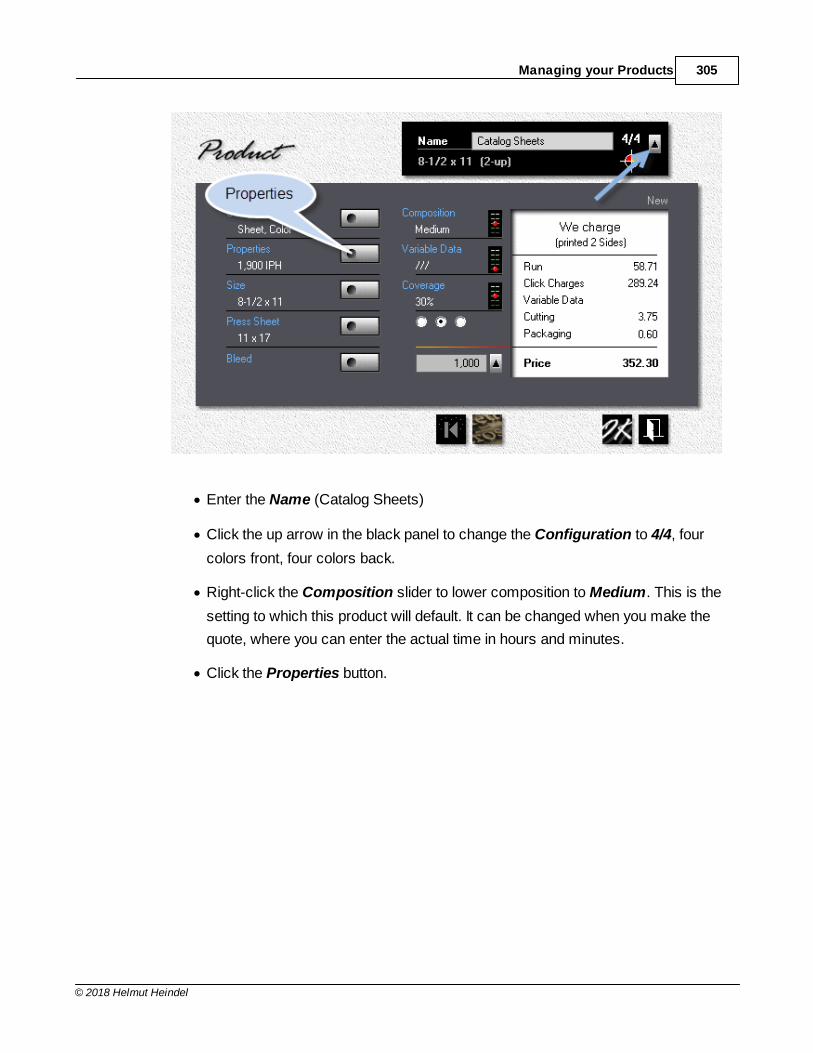
Managing your Products 305
© 2018 Helmut Heindel
· Enter the Name (Catalog Sheets)
· Click the up arrow in the black panel to change the Configuration to 4/4, four
colors front, four colors back.
· Right-click the Composition slider to lower composition to Medium. This is the
setting to which this product will default. It can be changed when you make the
quote, where you can enter the actual time in hours and minutes.
· Click the Properties button.
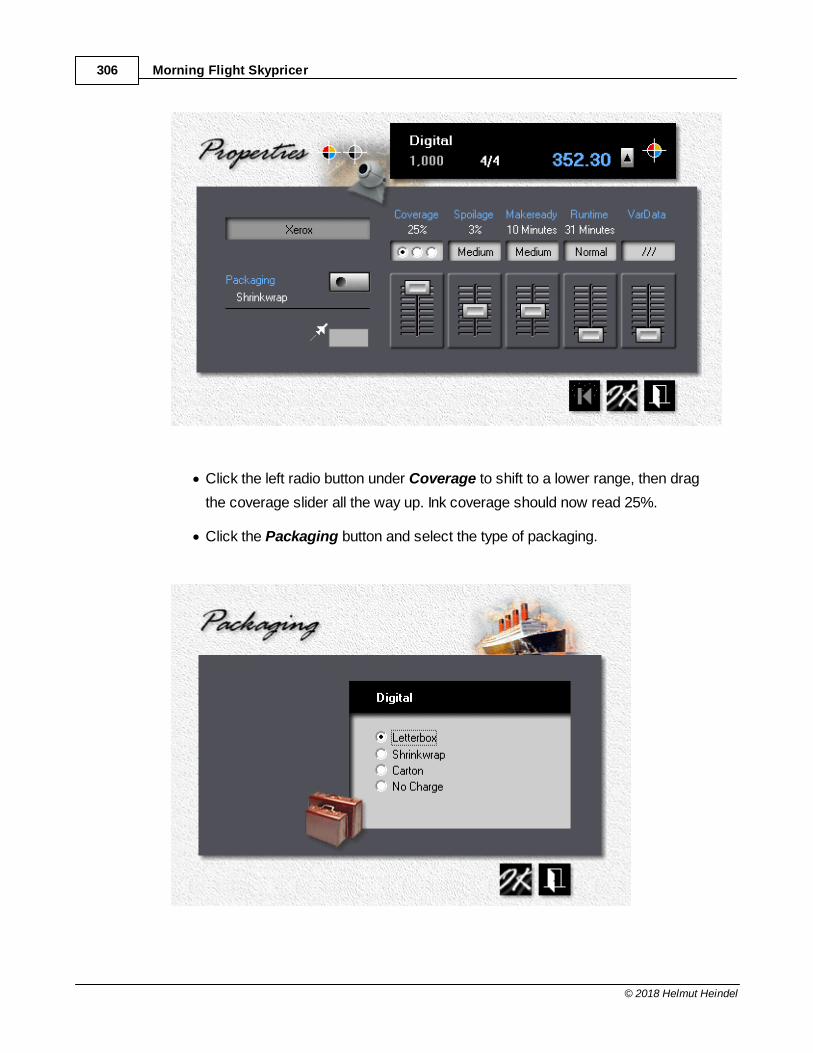
Morning Flight Skypricer306
© 2018 Helmut Heindel
· Click the left radio button under Coverage to shift to a lower range, then drag
the coverage slider all the way up. Ink coverage should now read 25%.
· Click the Packaging button and select the type of packaging.
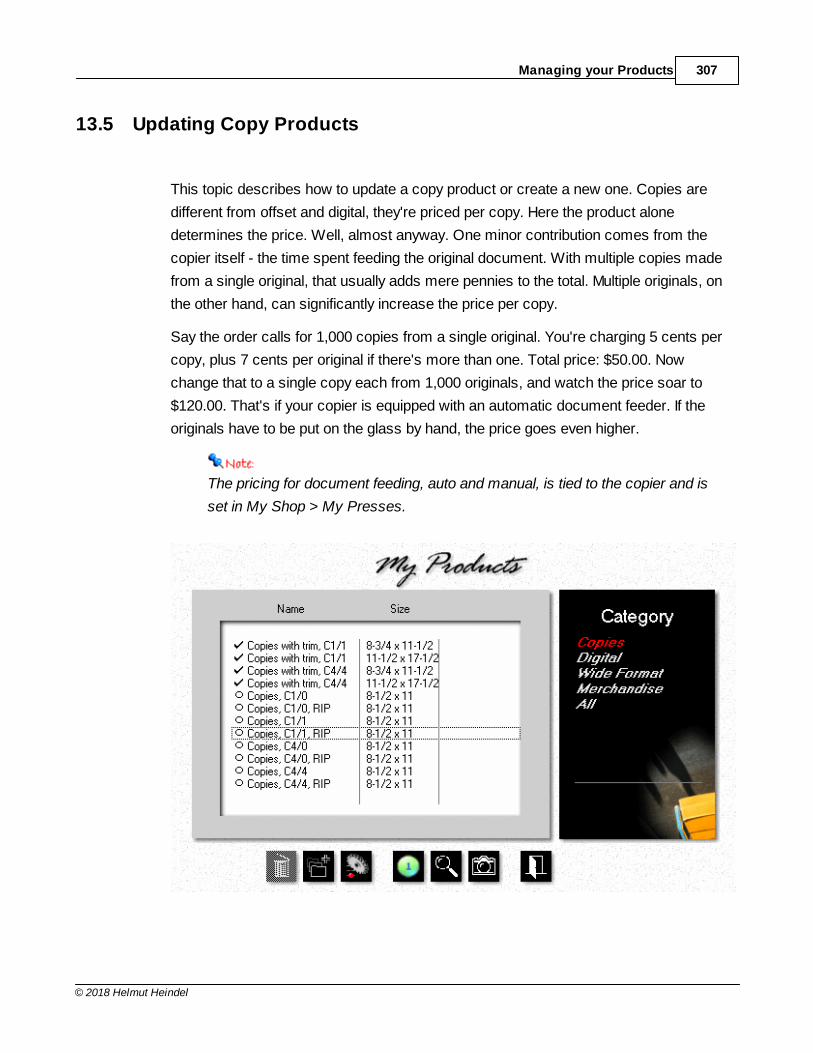
Managing your Products 307
© 2018 Helmut Heindel
13.5 Updating Copy Products
This topic describes how to update a copy product or create a new one. Copies are
different from offset and digital, they're priced per copy. Here the product alone
determines the price. Well, almost anyway. One minor contribution comes from the
copier itself - the time spent feeding the original document. With multiple copies made
from a single original, that usually adds mere pennies to the total. Multiple originals, on
the other hand, can significantly increase the price per copy.
Say the order calls for 1,000 copies from a single original. You're charging 5 cents per
copy, plus 7 cents per original if there's more than one. Total price: $50.00. Now
change that to a single copy each from 1,000 originals, and watch the price soar to
$120.00. That's if your copier is equipped with an automatic document feeder. If the
originals have to be put on the glass by hand, the price goes even higher.
The pricing for document feeding, auto and manual, is tied to the copier and is
set in My Shop > My Presses.
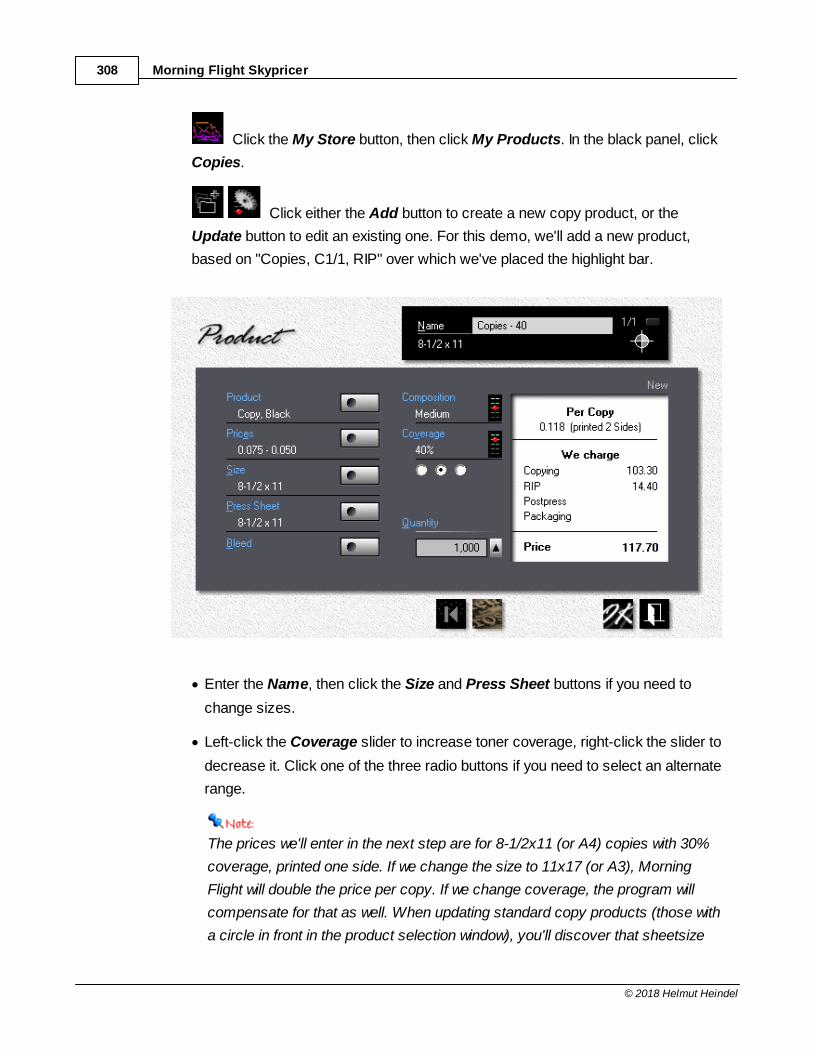
Morning Flight Skypricer308
© 2018 Helmut Heindel
Click the My Store button, then click My Products. In the black panel, click
Copies.
Click either the Add button to create a new copy product, or the
Update button to edit an existing one. For this demo, we'll add a new product,
based on "Copies, C1/1, RIP" over which we've placed the highlight bar.
· Enter the Name, then click the Size and Press Sheet buttons if you need to
change sizes.
· Left-click the Coverage slider to increase toner coverage, right-click the slider to
decrease it. Click one of the three radio buttons if you need to select an alternate
range.
The prices we'll enter in the next step are for 8-1/2x11 (or A4) copies with 30%
coverage, printed one side. If we change the size to 11x17 (or A3), Morning
Flight will double the price per copy. If we change coverage, the program will
compensate for that as well. When updating standard copy products (those with
a circle in front in the product selection window), you'll discover that sheetsize
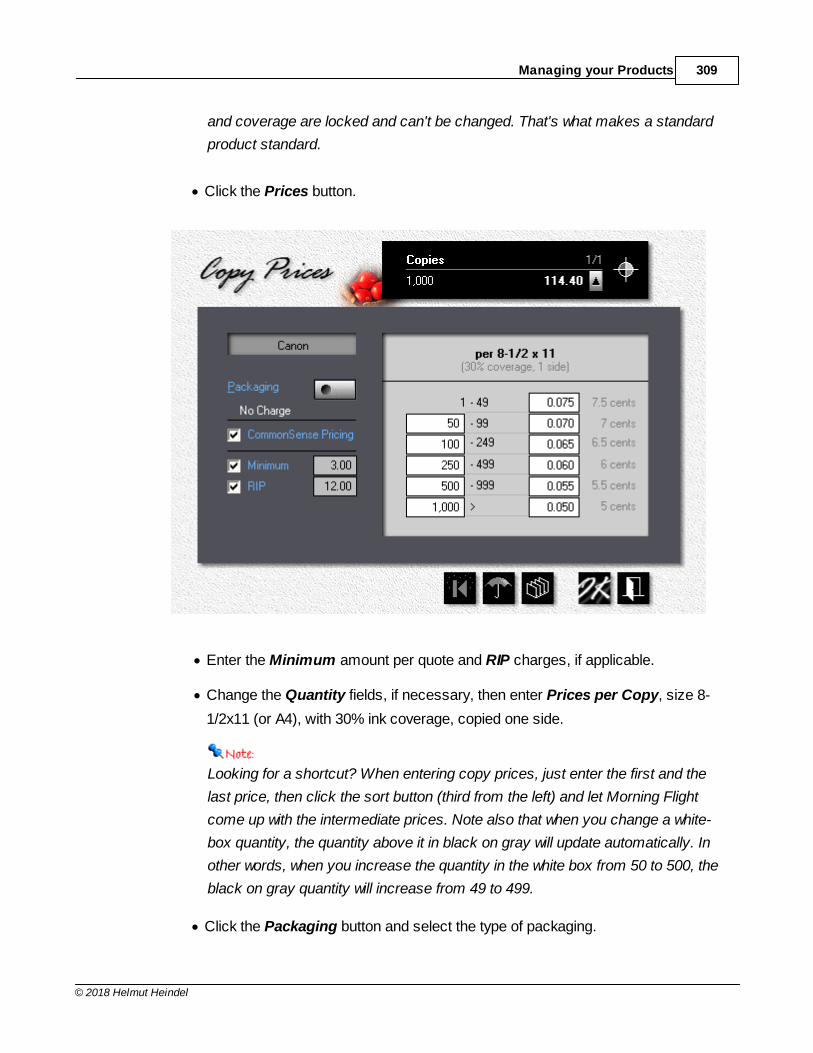
Managing your Products 309
© 2018 Helmut Heindel
and coverage are locked and can't be changed. That's what makes a standard
product standard.
· Click the Prices button.
· Enter the Minimum amount per quote and RIP charges, if applicable.
· Change the Quantity fields, if necessary, then enter Prices per Copy, size 8-
1/2x11 (or A4), with 30% ink coverage, copied one side.
Looking for a shortcut? When entering copy prices, just enter the first and the
last price, then click the sort button (third from the left) and let Morning Flight
come up with the intermediate prices. Note also that when you change a white-
box quantity, the quantity above it in black on gray will update automatically. In
other words, when you increase the quantity in the white box from 50 to 500, the
black on gray quantity will increase from 49 to 499.
· Click the Packaging button and select the type of packaging.
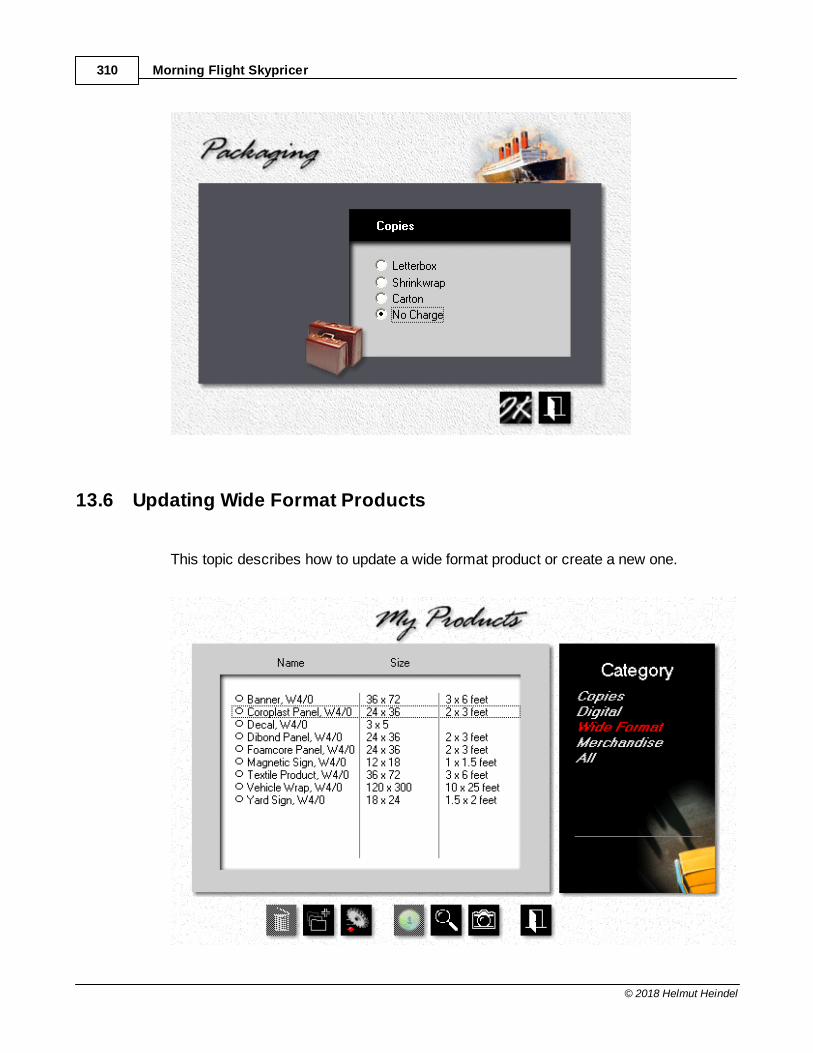
Morning Flight Skypricer310
© 2018 Helmut Heindel
13.6 Updating Wide Format Products
This topic describes how to update a wide format product or create a new one.
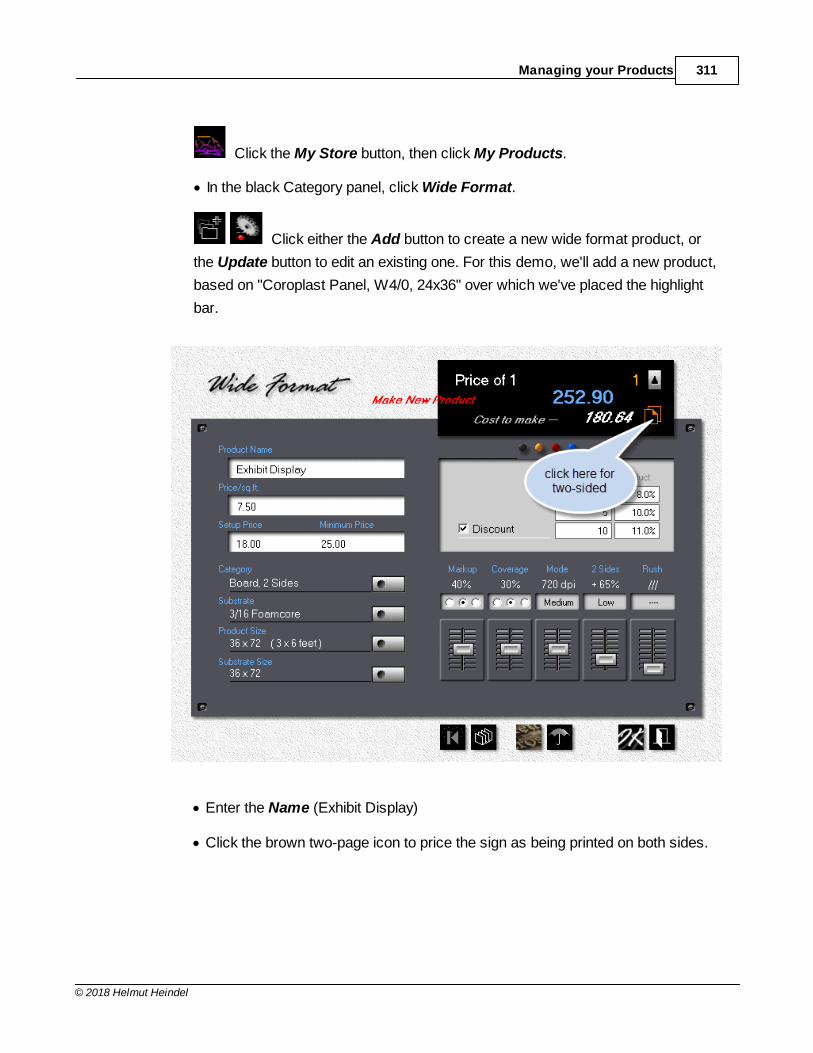
Managing your Products 311
© 2018 Helmut Heindel
Click the My Store button, then click My Products.
· In the black Category panel, click Wide Format.
Click either the Add button to create a new wide format product, or
the Update button to edit an existing one. For this demo, we'll add a new product,
based on "Coroplast Panel, W4/0, 24x36" over which we've placed the highlight
bar.
· Enter the Name (Exhibit Display)
· Click the brown two-page icon to price the sign as being printed on both sides.
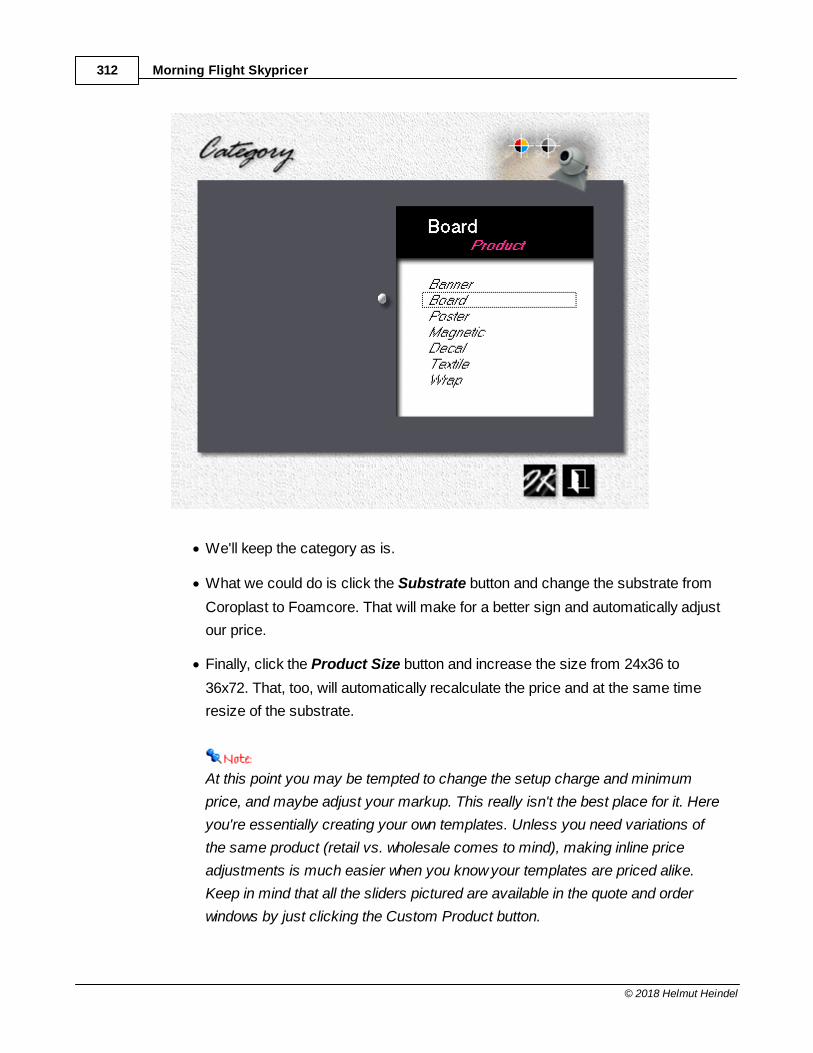
Morning Flight Skypricer312
© 2018 Helmut Heindel
· We'll keep the category as is.
· What we could do is click the Substrate button and change the substrate from
Coroplast to Foamcore. That will make for a better sign and automatically adjust
our price.
· Finally, click the Product Size button and increase the size from 24x36 to
36x72. That, too, will automatically recalculate the price and at the same time
resize of the substrate.
At this point you may be tempted to change the setup charge and minimum
price, and maybe adjust your markup. This really isn't the best place for it. Here
you're essentially creating your own templates. Unless you need variations of
the same product (retail vs. wholesale comes to mind), making inline price
adjustments is much easier when you know your templates are priced alike.
Keep in mind that all the sliders pictured are available in the quote and order
windows by just clicking the Custom Product button.
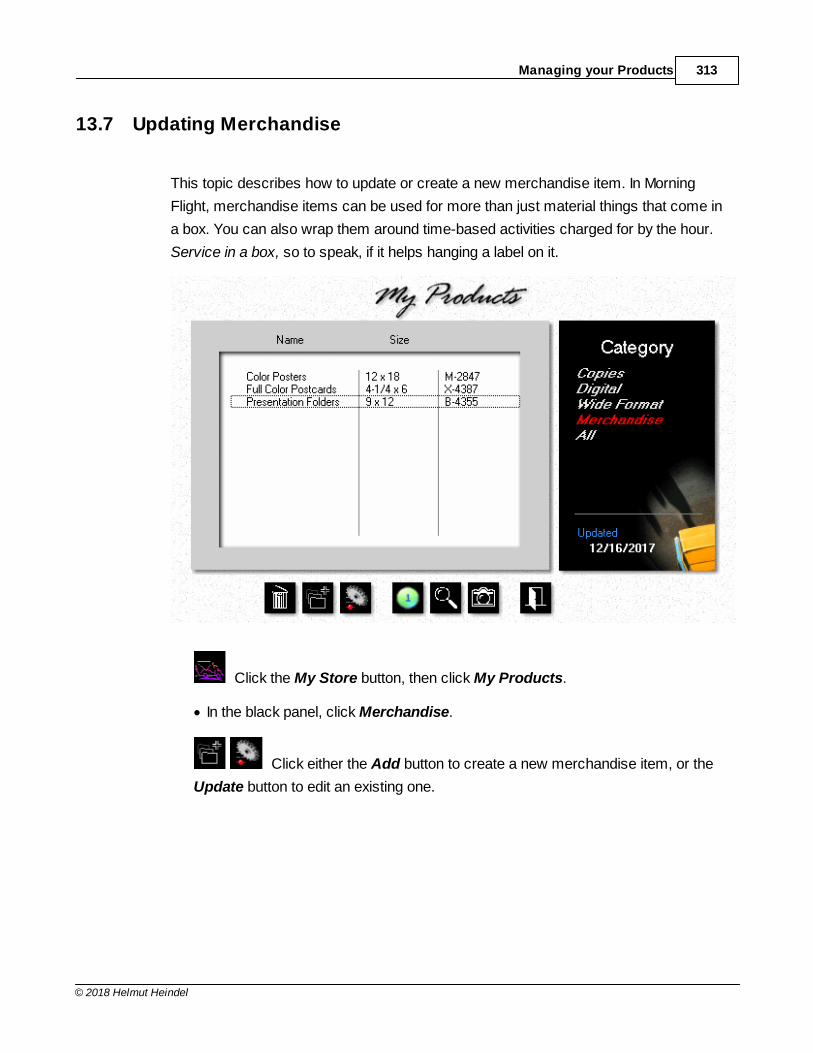
Managing your Products 313
© 2018 Helmut Heindel
13.7 Updating Merchandise
This topic describes how to update or create a new merchandise item. In Morning
Flight, merchandise items can be used for more than just material things that come in
a box. You can also wrap them around time-based activities charged for by the hour.
Service in a box, so to speak, if it helps hanging a label on it.
Click the My Store button, then click My Products.
· In the black panel, click Merchandise.
Click either the Add button to create a new merchandise item, or the
Update button to edit an existing one.
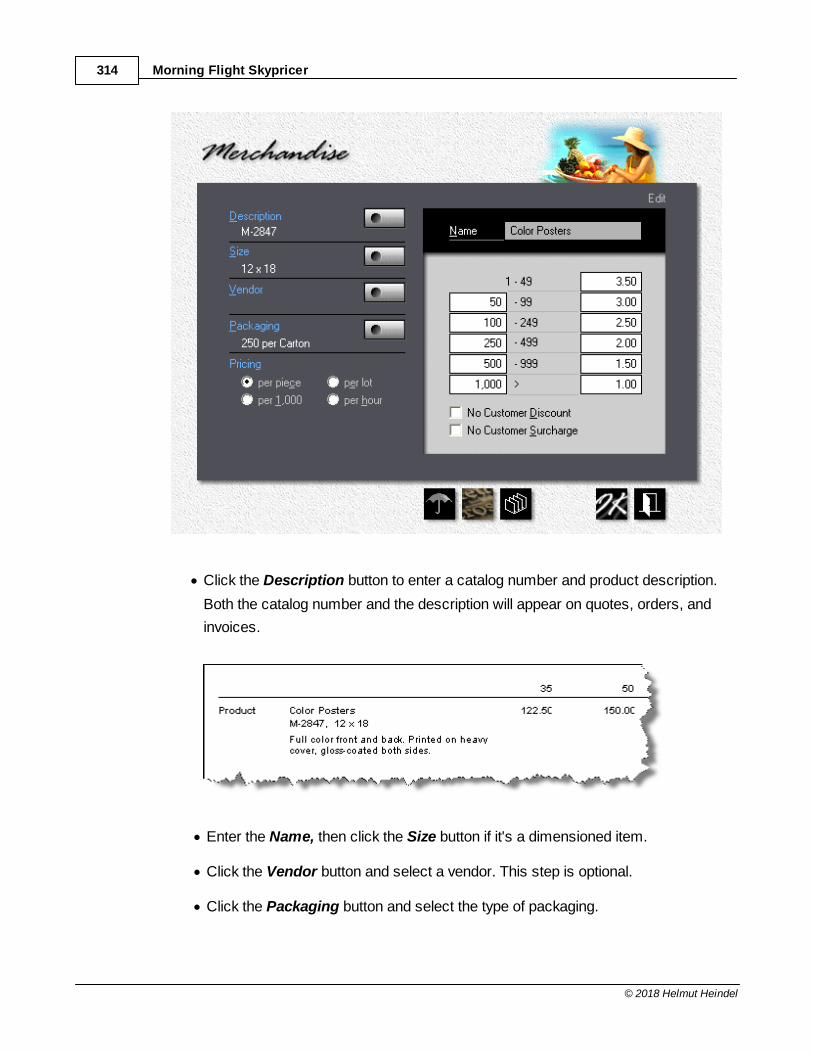
Morning Flight Skypricer314
© 2018 Helmut Heindel
· Click the Description button to enter a catalog number and product description.
Both the catalog number and the description will appear on quotes, orders, and
invoices.
· Enter the Name, then click the Size button if it's a dimensioned item.
· Click the Vendor button and select a vendor. This step is optional.
· Click the Packaging button and select the type of packaging.
Managing your Products 315
© 2018 Helmut Heindel
· Select the Pricing method: per piece, per 1,000 units, per lot, or by the hour.
See Pricing Merchandise for definitions.
· If you extend a discount to some customers on your in-house printing and you
want to withhold that discount for this particular item, check No Customer
Discount.
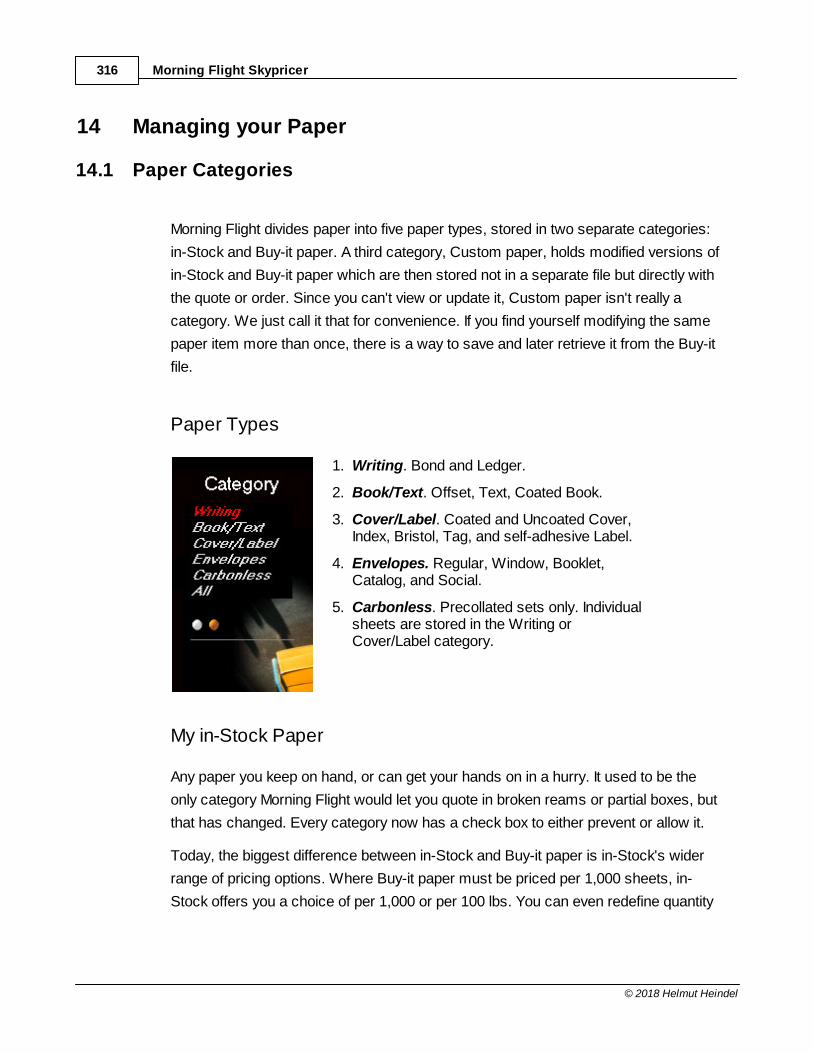
Morning Flight Skypricer316
© 2018 Helmut Heindel
14 Managing your Paper
14.1 Paper Categories
Morning Flight divides paper into five paper types, stored in two separate categories:
in-Stock and Buy-it paper. A third category, Custom paper, holds modified versions of
in-Stock and Buy-it paper which are then stored not in a separate file but directly with
the quote or order. Since you can't view or update it, Custom paper isn't really a
category. We just call it that for convenience. If you find yourself modifying the same
paper item more than once, there is a way to save and later retrieve it from the Buy-it
file.
Paper Types
1. Writing. Bond and Ledger.
2. Book/Text. Offset, Text, Coated Book.
3. Cover/Label. Coated and Uncoated Cover,Index, Bristol, Tag, and self-adhesive Label.
4. Envelopes. Regular, Window, Booklet,Catalog, and Social.
5. Carbonless. Precollated sets only. Individualsheets are stored in the Writing orCover/Label category.
My in-Stock Paper
Any paper you keep on hand, or can get your hands on in a hurry. It used to be the
only category Morning Flight would let you quote in broken reams or partial boxes, but
that has changed. Every category now has a check box to either prevent or allow it.
Today, the biggest difference between in-Stock and Buy-it paper is in-Stock's wider
range of pricing options. Where Buy-it paper must be priced per 1,000 sheets, in-
Stock offers you a choice of per 1,000 or per 100 lbs. You can even redefine quantity
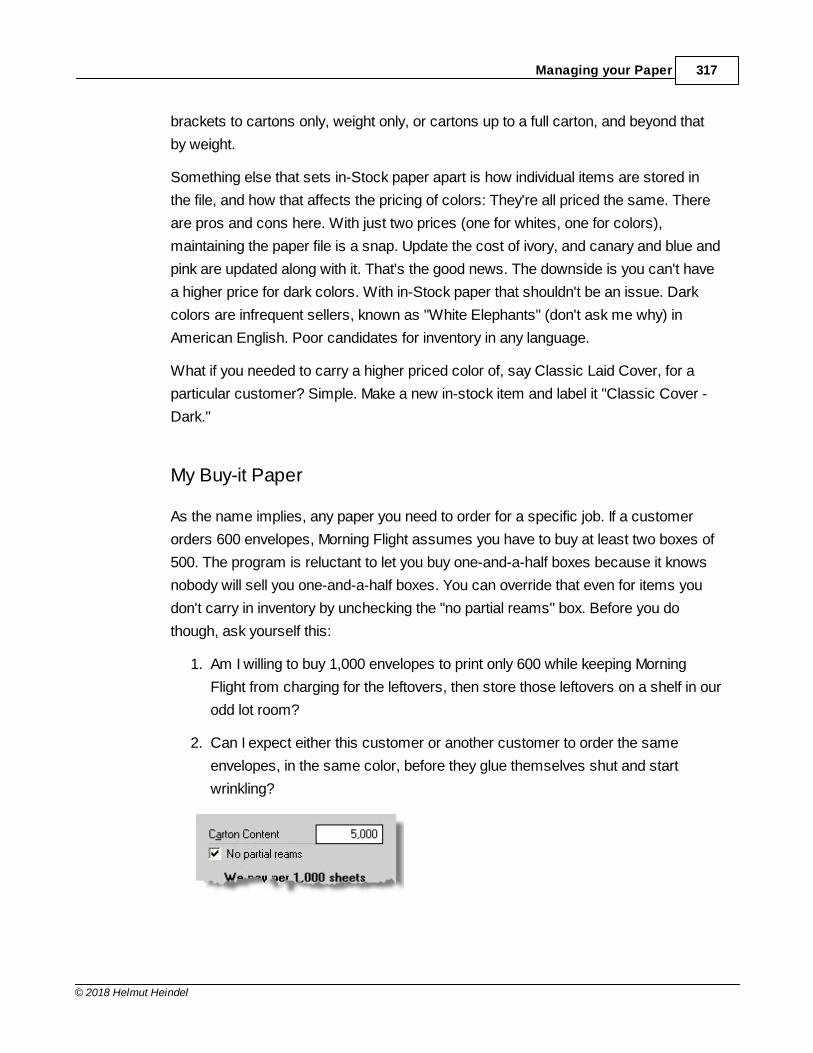
Managing your Paper 317
© 2018 Helmut Heindel
brackets to cartons only, weight only, or cartons up to a full carton, and beyond that
by weight.
Something else that sets in-Stock paper apart is how individual items are stored in
the file, and how that affects the pricing of colors: They're all priced the same. There
are pros and cons here. With just two prices (one for whites, one for colors),
maintaining the paper file is a snap. Update the cost of ivory, and canary and blue and
pink are updated along with it. That's the good news. The downside is you can't have
a higher price for dark colors. With in-Stock paper that shouldn't be an issue. Dark
colors are infrequent sellers, known as "White Elephants" (don't ask me why) in
American English. Poor candidates for inventory in any language.
What if you needed to carry a higher priced color of, say Classic Laid Cover, for a
particular customer? Simple. Make a new in-stock item and label it "Classic Cover -
Dark."
My Buy-it Paper
As the name implies, any paper you need to order for a specific job. If a customer
orders 600 envelopes, Morning Flight assumes you have to buy at least two boxes of
500. The program is reluctant to let you buy one-and-a-half boxes because it knows
nobody will sell you one-and-a-half boxes. You can override that even for items you
don't carry in inventory by unchecking the "no partial reams" box. Before you do
though, ask yourself this:
1. Am I willing to buy 1,000 envelopes to print only 600 while keeping Morning
Flight from charging for the leftovers, then store those leftovers on a shelf in our
odd lot room?
2. Can I expect either this customer or another customer to order the same
envelopes, in the same color, before they glue themselves shut and start
wrinkling?
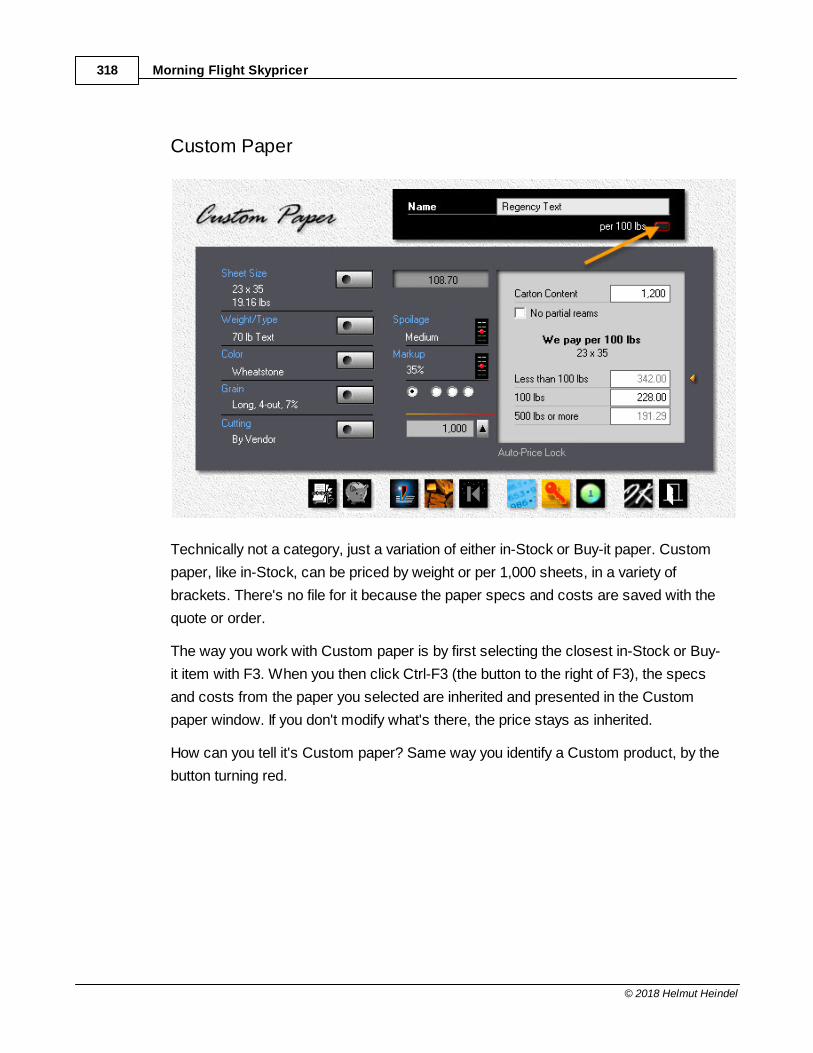
Morning Flight Skypricer318
© 2018 Helmut Heindel
Custom Paper
Technically not a category, just a variation of either in-Stock or Buy-it paper. Custom
paper, like in-Stock, can be priced by weight or per 1,000 sheets, in a variety of
brackets. There's no file for it because the paper specs and costs are saved with the
quote or order.
The way you work with Custom paper is by first selecting the closest in-Stock or Buy-
it item with F3. When you then click Ctrl-F3 (the button to the right of F3), the specs
and costs from the paper you selected are inherited and presented in the Custom
paper window. If you don't modify what's there, the price stays as inherited.
How can you tell it's Custom paper? Same way you identify a Custom product, by the
button turning red.
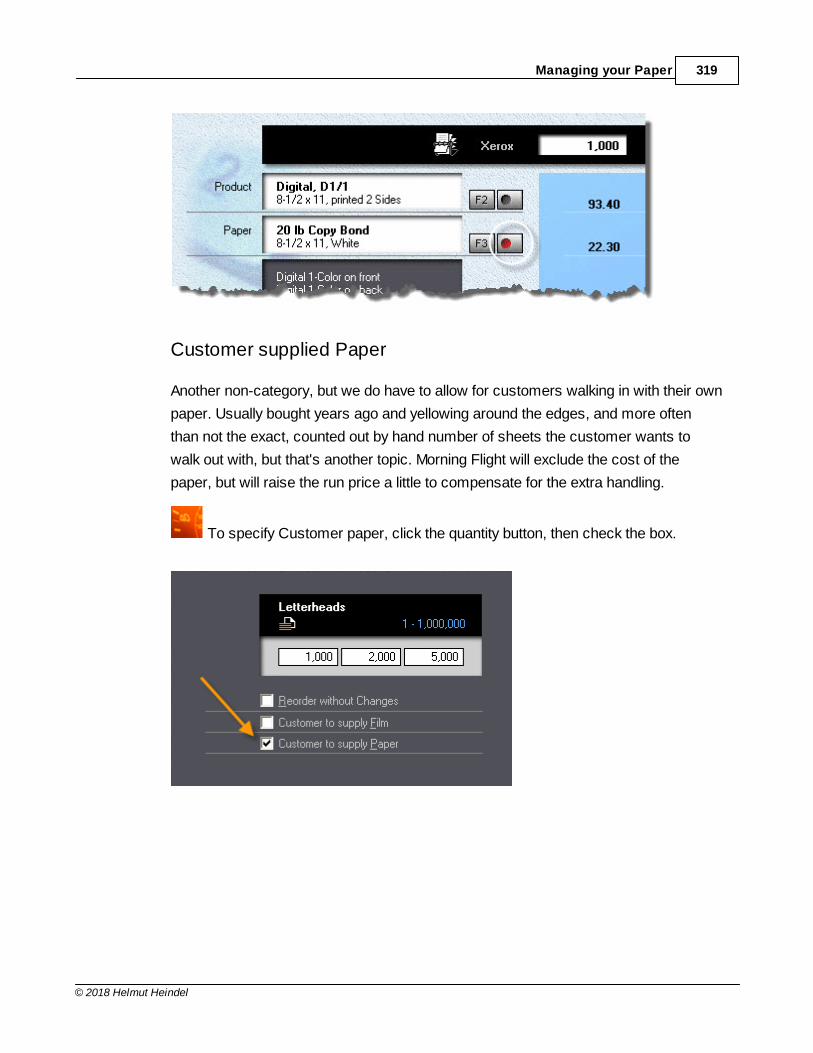
Managing your Paper 319
© 2018 Helmut Heindel
Customer supplied Paper
Another non-category, but we do have to allow for customers walking in with their own
paper. Usually bought years ago and yellowing around the edges, and more often
than not the exact, counted out by hand number of sheets the customer wants to
walk out with, but that's another topic. Morning Flight will exclude the cost of the
paper, but will raise the run price a little to compensate for the extra handling.
To specify Customer paper, click the quantity button, then check the box.
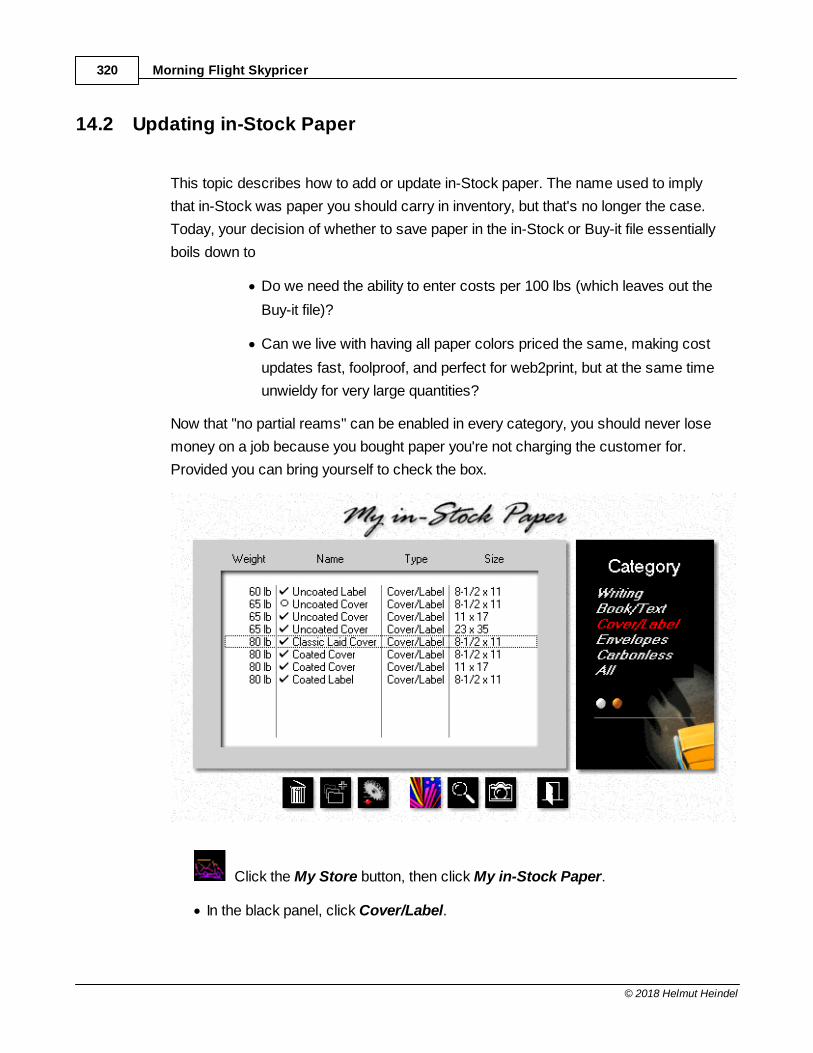
Morning Flight Skypricer320
© 2018 Helmut Heindel
14.2 Updating in-Stock Paper
This topic describes how to add or update in-Stock paper. The name used to imply
that in-Stock was paper you should carry in inventory, but that's no longer the case.
Today, your decision of whether to save paper in the in-Stock or Buy-it file essentially
boils down to
· Do we need the ability to enter costs per 100 lbs (which leaves out the
Buy-it file)?
· Can we live with having all paper colors priced the same, making cost
updates fast, foolproof, and perfect for web2print, but at the same time
unwieldy for very large quantities?
Now that "no partial reams" can be enabled in every category, you should never lose
money on a job because you bought paper you're not charging the customer for.
Provided you can bring yourself to check the box.
Click the My Store button, then click My in-Stock Paper.
· In the black panel, click Cover/Label.
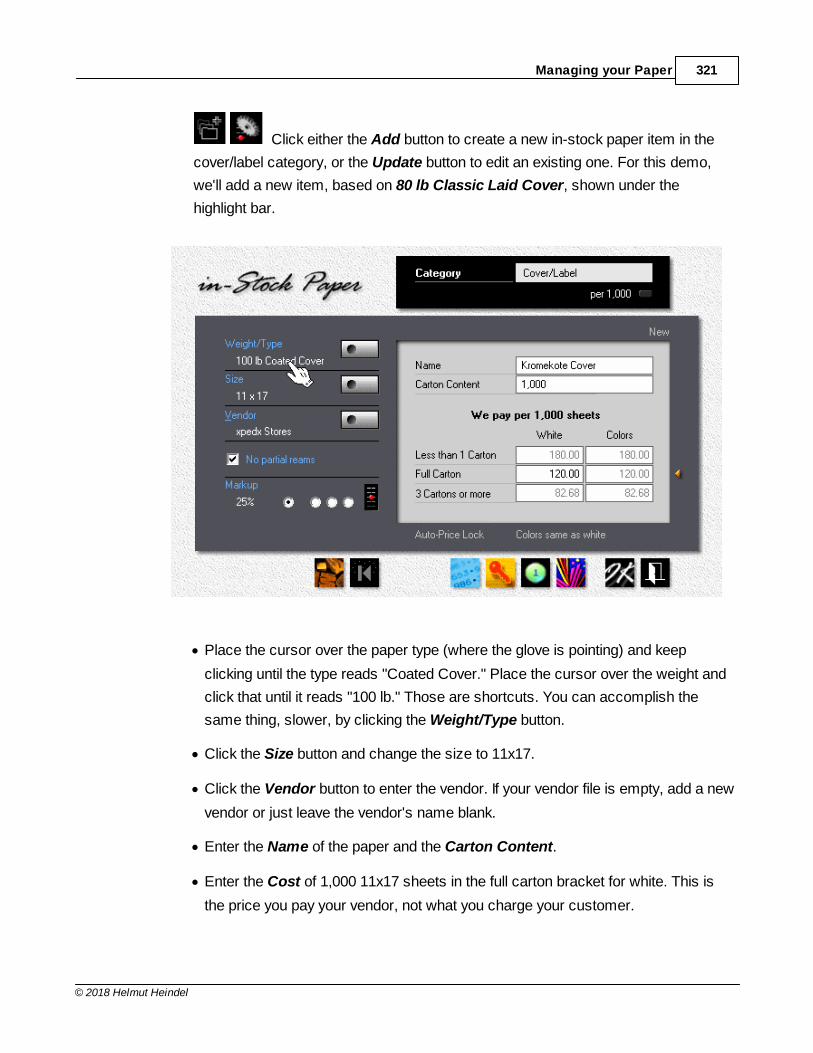
Managing your Paper 321
© 2018 Helmut Heindel
Click either the Add button to create a new in-stock paper item in the
cover/label category, or the Update button to edit an existing one. For this demo,
we'll add a new item, based on 80 lb Classic Laid Cover, shown under the
highlight bar.
· Place the cursor over the paper type (where the glove is pointing) and keep
clicking until the type reads "Coated Cover." Place the cursor over the weight and
click that until it reads "100 lb." Those are shortcuts. You can accomplish the
same thing, slower, by clicking the Weight/Type button.
· Click the Size button and change the size to 11x17.
· Click the Vendor button to enter the vendor. If your vendor file is empty, add a new
vendor or just leave the vendor's name blank.
· Enter the Name of the paper and the Carton Content.
· Enter the Cost of 1,000 11x17 sheets in the full carton bracket for white. This is
the price you pay your vendor, not what you charge your customer.
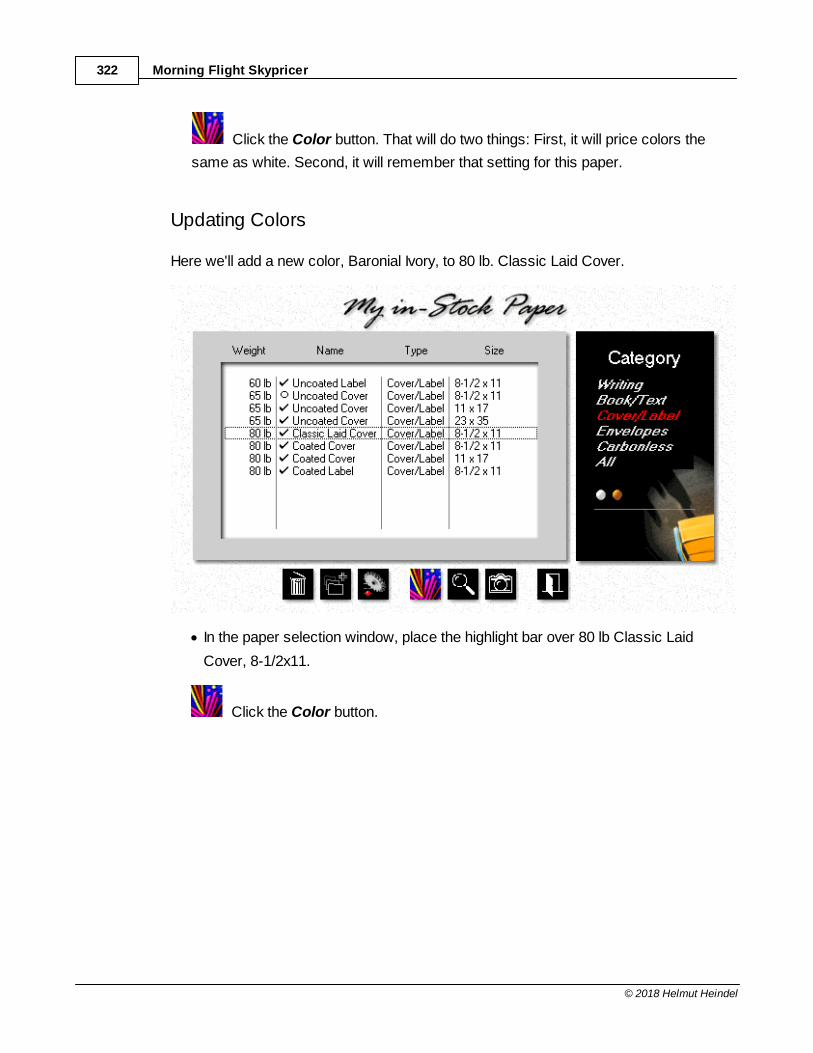
Morning Flight Skypricer322
© 2018 Helmut Heindel
Click the Color button. That will do two things: First, it will price colors the
same as white. Second, it will remember that setting for this paper.
Updating Colors
Here we'll add a new color, Baronial Ivory, to 80 lb. Classic Laid Cover.
· In the paper selection window, place the highlight bar over 80 lb Classic Laid
Cover, 8-1/2x11.
Click the Color button.
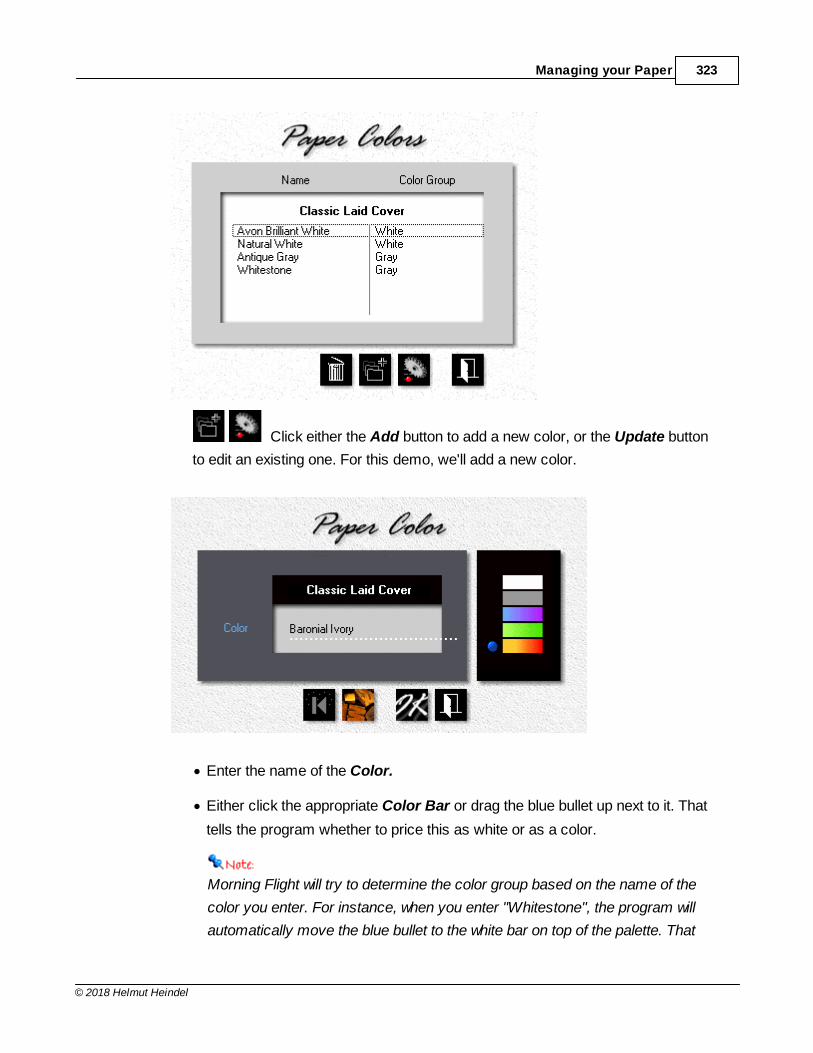
Managing your Paper 323
© 2018 Helmut Heindel
Click either the Add button to add a new color, or the Update button
to edit an existing one. For this demo, we'll add a new color.
· Enter the name of the Color.
· Either click the appropriate Color Bar or drag the blue bullet up next to it. That
tells the program whether to price this as white or as a color.
Morning Flight will try to determine the color group based on the name of the
color you enter. For instance, when you enter "Whitestone", the program will
automatically move the blue bullet to the white bar on top of the palette. That
Morning Flight Skypricer324
© 2018 Helmut Heindel
works sometimes but not always, and since it affects the price it's kind of
important, so be sure to check it before you click OK.
14.3 Updating Buy-it Paper
This topic describes how to add or update Buy-it paper. As the name suggests, that's
any paper you order on a case-by-case basis, with just enough extras to run the job.
So why save it in a file? Convenience. It's handier to have prices accessible from
within Morning Flight than to always have to look them up in a price book. But files
have to be maintained and updated. Which is why you'll want to keep this file small
and easy to manage. Save only paper and colors that tend to repeat, items you don't
mind updating.
Envelopes are a prime candidate for the Buy-it category. If your shop isn't air-
conditioned and the humidity feels like 150% for days on end, they tend to glue
themselves shut just sitting there. On the other hand, not stocking them also means
having to buy extras for each job, just in case. When a run comes up short because
you can't stop the wrinkling, the press will likely sit idle with ink on the rollers, waiting
for another box of envelopes to come in.
With in-Stock you could have grabbed another box off the shelf, took out what you
needed, and put the rest back. Still, the economics usually tilt in your favor if you treat
all but your fast-moving envelope items as Buy-it paper.
That's the theory. In reality, none of this matters if the envelopes have already been
collecting dust on your vendor's shelf and have glued themselves shut there.
1. Click the My Store button, then click Buy-it Paper.
2. In the black Category panel, click Book/Text.
3. Click either the Add button to create a new
Buy-it item in the book/text category, or the Update button
to edit an existing one. For this demo, we'll add a new item,
60 lb Springhill Offset.
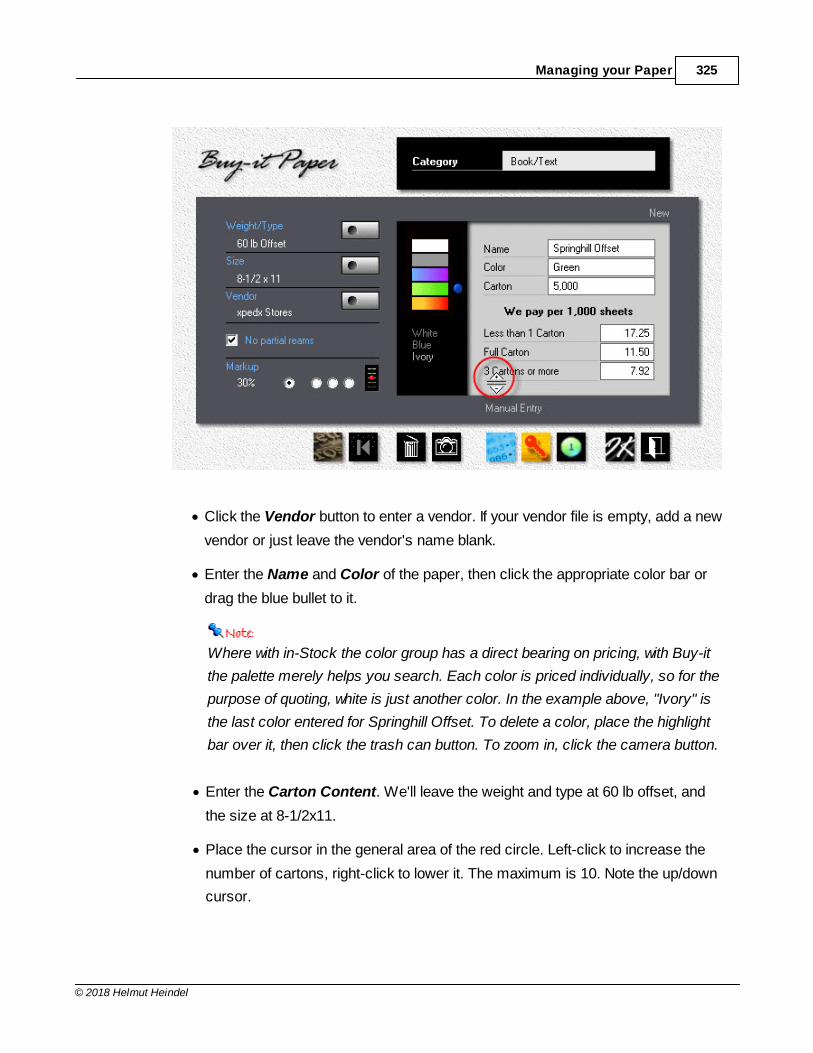
Managing your Paper 325
© 2018 Helmut Heindel
· Click the Vendor button to enter a vendor. If your vendor file is empty, add a new
vendor or just leave the vendor's name blank.
· Enter the Name and Color of the paper, then click the appropriate color bar or
drag the blue bullet to it.
Where with in-Stock the color group has a direct bearing on pricing, with Buy-it
the palette merely helps you search. Each color is priced individually, so for the
purpose of quoting, white is just another color. In the example above, "Ivory" is
the last color entered for Springhill Offset. To delete a color, place the highlight
bar over it, then click the trash can button. To zoom in, click the camera button.
· Enter the Carton Content. We'll leave the weight and type at 60 lb offset, and
the size at 8-1/2x11.
· Place the cursor in the general area of the red circle. Left-click to increase the
number of cartons, right-click to lower it. The maximum is 10. Note the up/down
cursor.
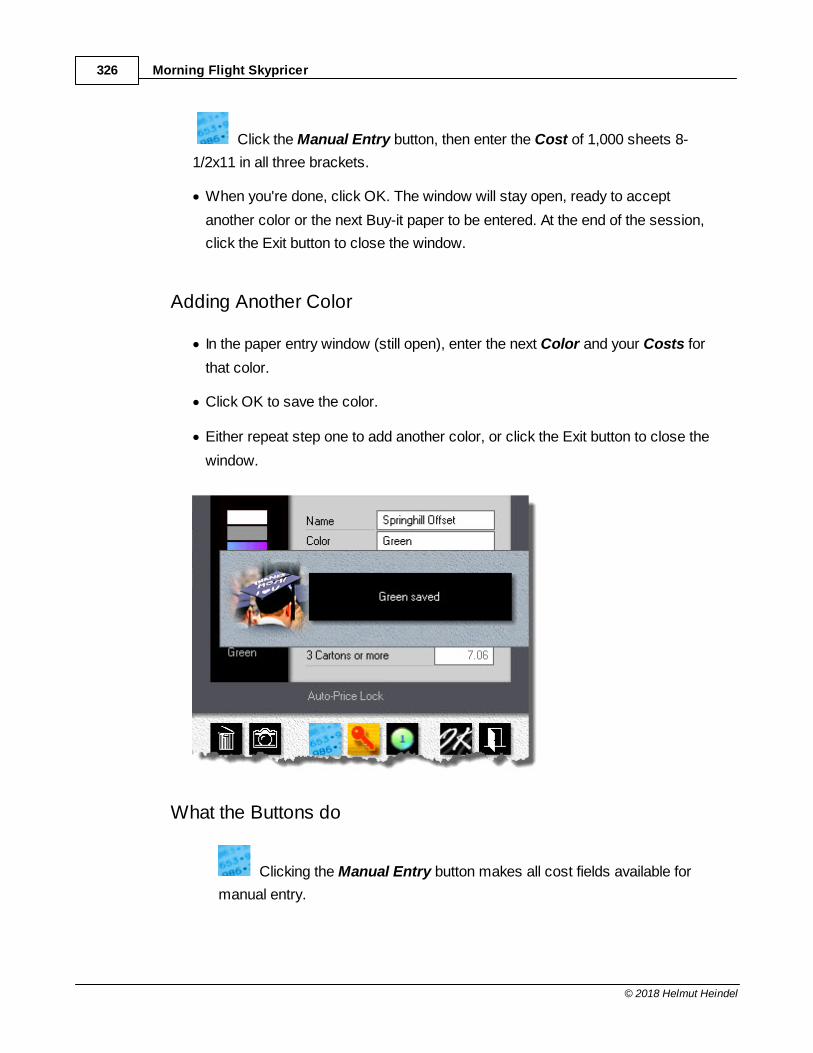
Morning Flight Skypricer326
© 2018 Helmut Heindel
Click the Manual Entry button, then enter the Cost of 1,000 sheets 8-
1/2x11 in all three brackets.
· When you're done, click OK. The window will stay open, ready to accept
another color or the next Buy-it paper to be entered. At the end of the session,
click the Exit button to close the window.
Adding Another Color
· In the paper entry window (still open), enter the next Color and your Costs for
that color.
· Click OK to save the color.
· Either repeat step one to add another color, or click the Exit button to close the
window.
What the Buttons do
Clicking the Manual Entry button makes all cost fields available for
manual entry.
Managing your Paper 327
© 2018 Helmut Heindel
Clicking the Auto-Price button speeds things up because you need to
enter just one value - your paper cost in the full carton bracket. Costs in the
other two brackets are automatically recalculated to common defaults.
Because the program has no way of knowing what's in your vendor's price
book, these costs are estimates. Likely to be good enough for 500 letterheads
but not for 10,000 catalog sheets.
Clicking the One-Price button ignores brackets and applies the full
carton price regardless of quantity. There could still be a price difference, but if
there is, it's due to sliding-scale markups in My Store. For instance, a 25%
markup for a full carton and 30% for less than that.
Clicking the Delete button will delete the item highlighted in the
black panel. Clicking the Zoom button will display it.
14.4 Fastpricing Buy-it Paper
Keeping your paper prices up-to-date is, well, housecleaning - tidying up and getting
rid of cobwebs. Not something we look forward to when we get up in the morning. But
with paper playing such a large role in most printing projects, unavoidably necessary.
It's almost fun with in-Stock. Here all colors are priced the same, confining the update
to just two entries, one for white, one for color. Done in no time.
In the Buy-it paper file, different approach. There each color gets its own price tag to
accommodate separate price levels the mill might be using (and usually does use) for
light and dark colors. Those tags all need to be updated one at a time. It makes your
pricing more granular, but price updates more time-consuming.
We can help with that. Here is how you can make short thrift of updating your Buy-it
paper prices:

Morning Flight Skypricer328
© 2018 Helmut Heindel
· From the main menu, go to File > Update Buy-It Paper > Bulk-Update Pricing.
· Click the Paper Type button to select what you want to update.
· Enter your new costs, then click OK. This will save your entry and advance the
highlight bar.
In the next window, the only entries you can change are costs, pricing method
(manual, auto-price, one-price), and whether to allow partial reams. To edit other
Buy-it properties, go to My Store.
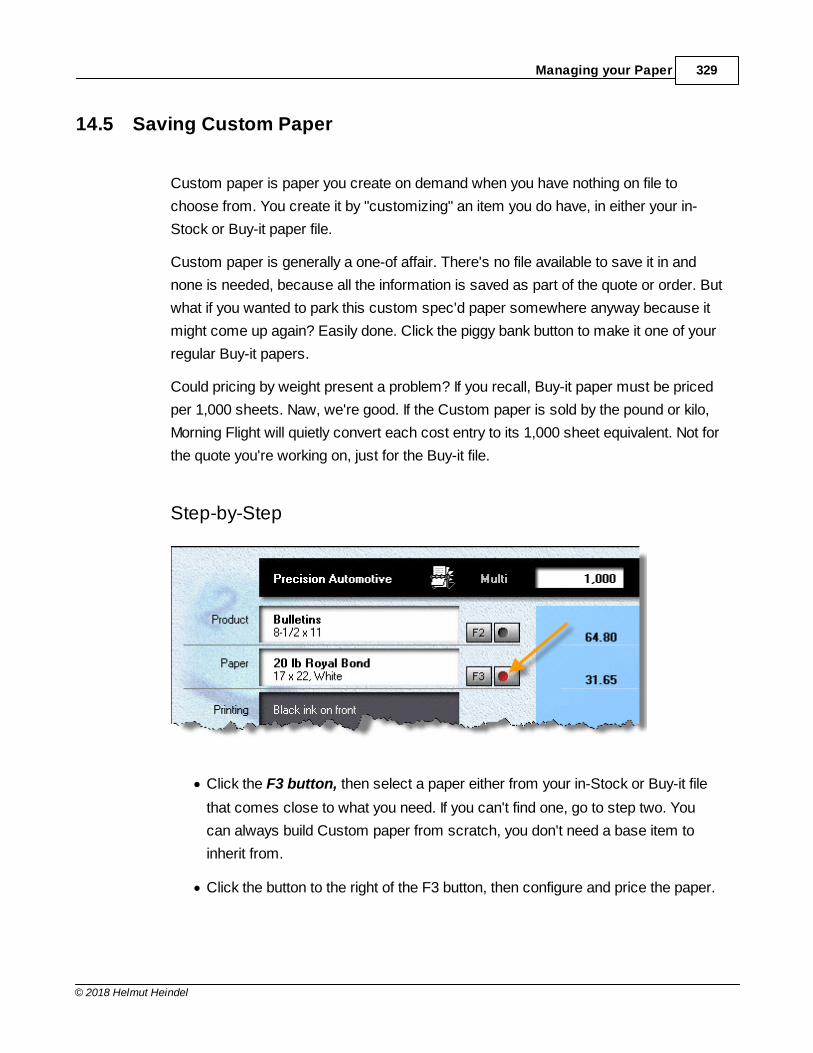
Managing your Paper 329
© 2018 Helmut Heindel
14.5 Saving Custom Paper
Custom paper is paper you create on demand when you have nothing on file to
choose from. You create it by "customizing" an item you do have, in either your in-
Stock or Buy-it paper file.
Custom paper is generally a one-of affair. There's no file available to save it in and
none is needed, because all the information is saved as part of the quote or order. But
what if you wanted to park this custom spec'd paper somewhere anyway because it
might come up again? Easily done. Click the piggy bank button to make it one of your
regular Buy-it papers.
Could pricing by weight present a problem? If you recall, Buy-it paper must be priced
per 1,000 sheets. Naw, we're good. If the Custom paper is sold by the pound or kilo,
Morning Flight will quietly convert each cost entry to its 1,000 sheet equivalent. Not for
the quote you're working on, just for the Buy-it file.
Step-by-Step
· Click the F3 button, then select a paper either from your in-Stock or Buy-it file
that comes close to what you need. If you can't find one, go to step two. You
can always build Custom paper from scratch, you don't need a base item to
inherit from.
· Click the button to the right of the F3 button, then configure and price the paper.
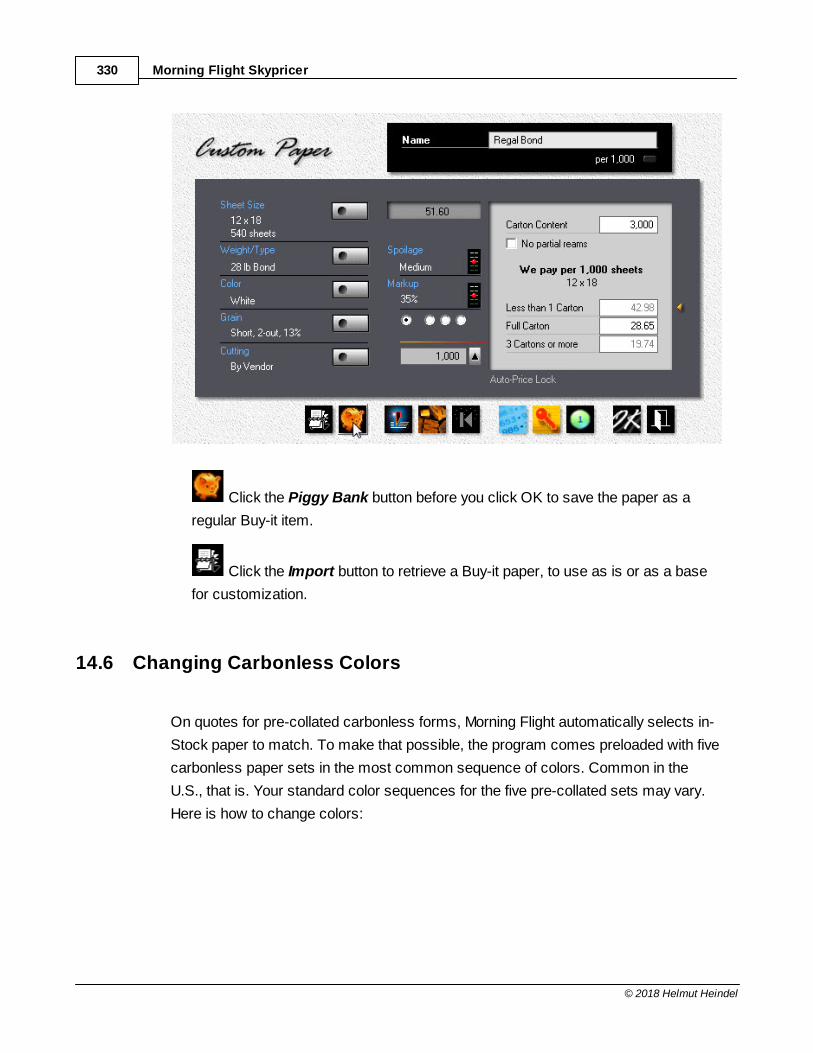
Morning Flight Skypricer330
© 2018 Helmut Heindel
Click the Piggy Bank button before you click OK to save the paper as a
regular Buy-it item.
Click the Import button to retrieve a Buy-it paper, to use as is or as a base
for customization.
14.6 Changing Carbonless Colors
On quotes for pre-collated carbonless forms, Morning Flight automatically selects in-
Stock paper to match. To make that possible, the program comes preloaded with five
carbonless paper sets in the most common sequence of colors. Common in the
U.S., that is. Your standard color sequences for the five pre-collated sets may vary.
Here is how to change colors:
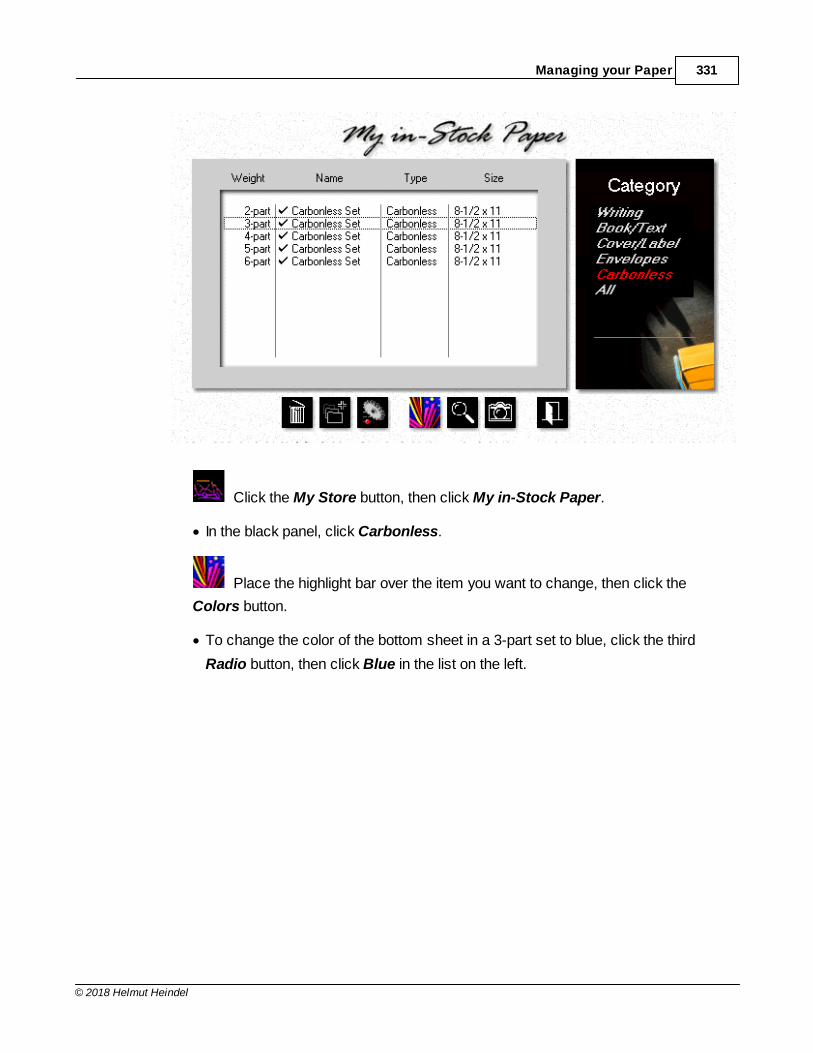
Managing your Paper 331
© 2018 Helmut Heindel
Click the My Store button, then click My in-Stock Paper.
· In the black panel, click Carbonless.
Place the highlight bar over the item you want to change, then click the
Colors button.
· To change the color of the bottom sheet in a 3-part set to blue, click the third
Radio button, then click Blue in the list on the left.
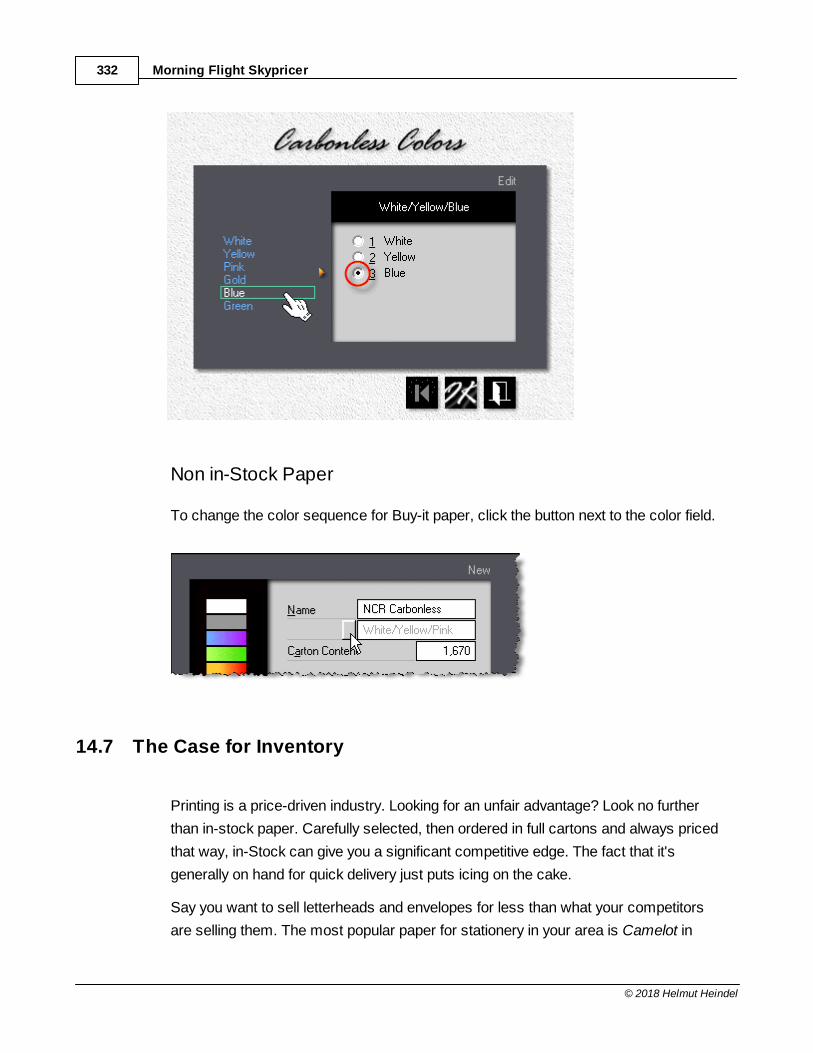
Morning Flight Skypricer332
© 2018 Helmut Heindel
Non in-Stock Paper
To change the color sequence for Buy-it paper, click the button next to the color field.
14.7 The Case for Inventory
Printing is a price-driven industry. Looking for an unfair advantage? Look no further
than in-stock paper. Carefully selected, then ordered in full cartons and always priced
that way, in-Stock can give you a significant competitive edge. The fact that it's
generally on hand for quick delivery just puts icing on the cake.
Say you want to sell letterheads and envelopes for less than what your competitors
are selling them. The most popular paper for stationery in your area is Camelot in
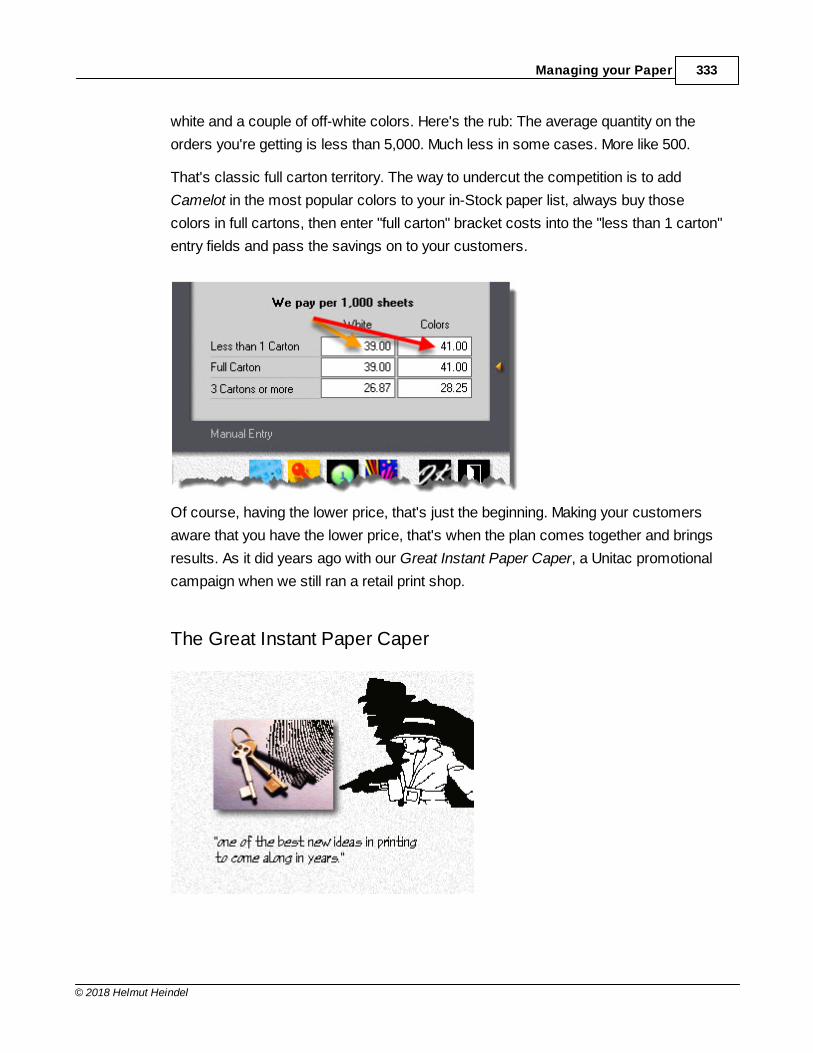
Managing your Paper 333
© 2018 Helmut Heindel
white and a couple of off-white colors. Here's the rub: The average quantity on the
orders you're getting is less than 5,000. Much less in some cases. More like 500.
That's classic full carton territory. The way to undercut the competition is to add
Camelot in the most popular colors to your in-Stock paper list, always buy those
colors in full cartons, then enter "full carton" bracket costs into the "less than 1 carton"
entry fields and pass the savings on to your customers.
Of course, having the lower price, that's just the beginning. Making your customers
aware that you have the lower price, that's when the plan comes together and brings
results. As it did years ago with our Great Instant Paper Caper, a Unitac promotional
campaign when we still ran a retail print shop.
The Great Instant Paper Caper
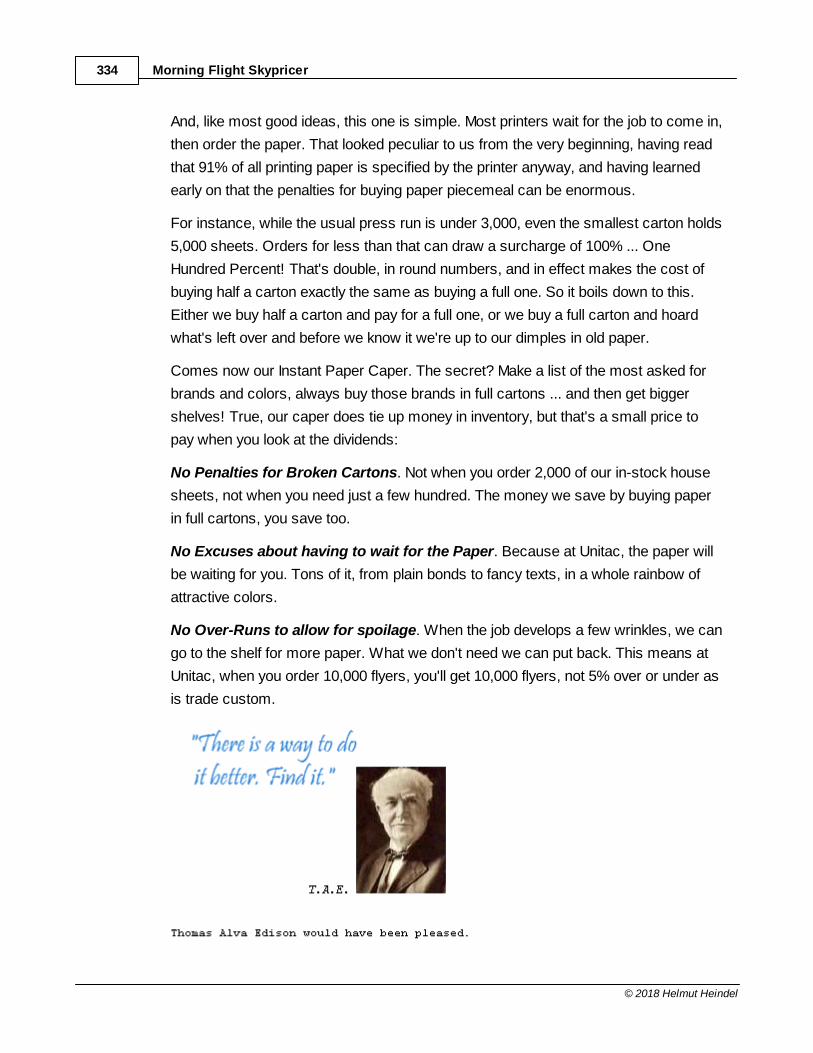
Morning Flight Skypricer334
© 2018 Helmut Heindel
And, like most good ideas, this one is simple. Most printers wait for the job to come in,
then order the paper. That looked peculiar to us from the very beginning, having read
that 91% of all printing paper is specified by the printer anyway, and having learned
early on that the penalties for buying paper piecemeal can be enormous.
For instance, while the usual press run is under 3,000, even the smallest carton holds
5,000 sheets. Orders for less than that can draw a surcharge of 100% ... One
Hundred Percent! That's double, in round numbers, and in effect makes the cost of
buying half a carton exactly the same as buying a full one. So it boils down to this.
Either we buy half a carton and pay for a full one, or we buy a full carton and hoard
what's left over and before we know it we're up to our dimples in old paper.
Comes now our Instant Paper Caper. The secret? Make a list of the most asked for
brands and colors, always buy those brands in full cartons ... and then get bigger
shelves! True, our caper does tie up money in inventory, but that's a small price to
pay when you look at the dividends:
No Penalties for Broken Cartons. Not when you order 2,000 of our in-stock house
sheets, not when you need just a few hundred. The money we save by buying paper
in full cartons, you save too.
No Excuses about having to wait for the Paper. Because at Unitac, the paper will
be waiting for you. Tons of it, from plain bonds to fancy texts, in a whole rainbow of
attractive colors.
No Over-Runs to allow for spoilage. When the job develops a few wrinkles, we can
go to the shelf for more paper. What we don't need we can put back. This means at
Unitac, when you order 10,000 flyers, you'll get 10,000 flyers, not 5% over or under as
is trade custom.
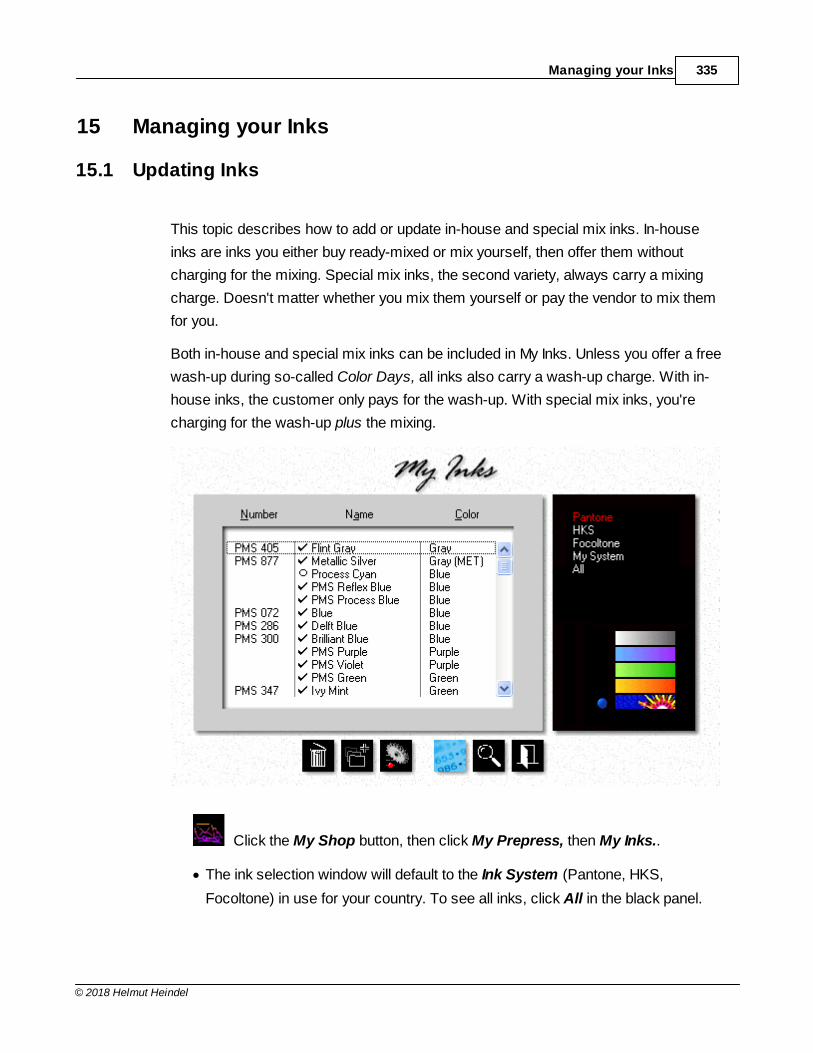
Managing your Inks 335
© 2018 Helmut Heindel
15 Managing your Inks
15.1 Updating Inks
This topic describes how to add or update in-house and special mix inks. In-house
inks are inks you either buy ready-mixed or mix yourself, then offer them without
charging for the mixing. Special mix inks, the second variety, always carry a mixing
charge. Doesn't matter whether you mix them yourself or pay the vendor to mix them
for you.
Both in-house and special mix inks can be included in My Inks. Unless you offer a free
wash-up during so-called Color Days, all inks also carry a wash-up charge. With in-
house inks, the customer only pays for the wash-up. With special mix inks, you're
charging for the wash-up plus the mixing.
Click the My Shop button, then click My Prepress, then My Inks..
· The ink selection window will default to the Ink System (Pantone, HKS,
Focoltone) in use for your country. To see all inks, click All in the black panel.
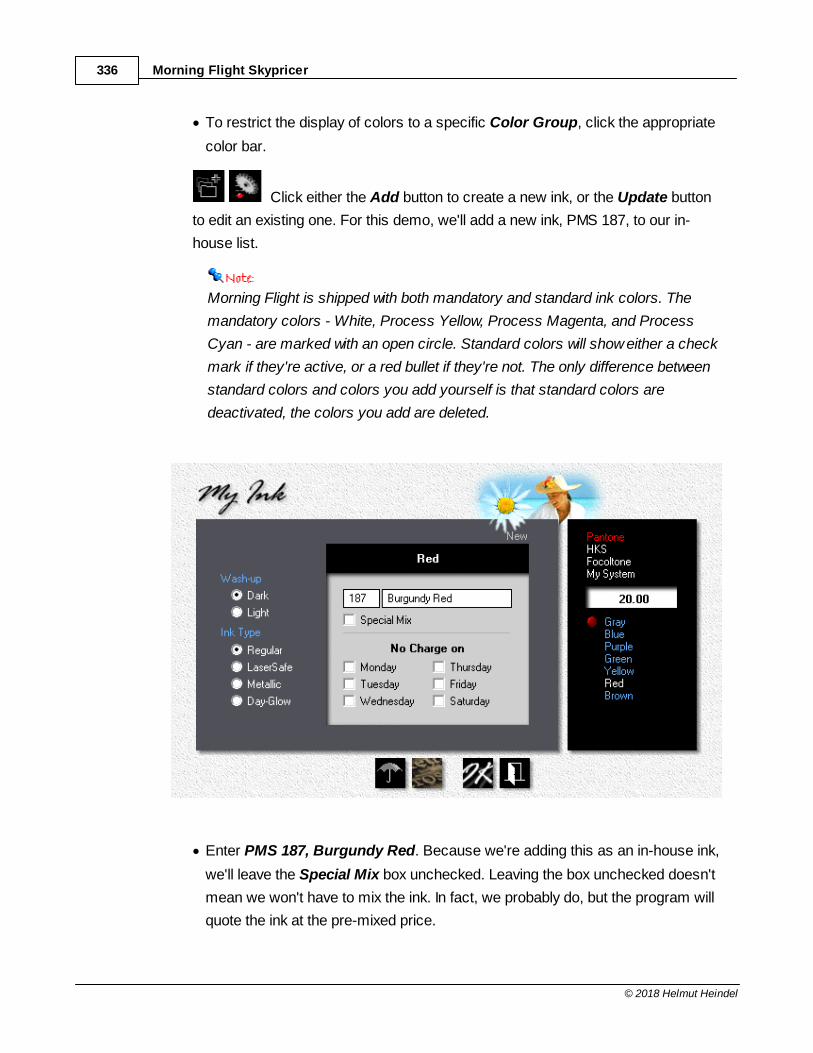
Morning Flight Skypricer336
© 2018 Helmut Heindel
· To restrict the display of colors to a specific Color Group, click the appropriate
color bar.
Click either the Add button to create a new ink, or the Update button
to edit an existing one. For this demo, we'll add a new ink, PMS 187, to our in-
house list.
Morning Flight is shipped with both mandatory and standard ink colors. The
mandatory colors - White, Process Yellow, Process Magenta, and Process
Cyan - are marked with an open circle. Standard colors will show either a check
mark if they're active, or a red bullet if they're not. The only difference between
standard colors and colors you add yourself is that standard colors are
deactivated, the colors you add are deleted.
· Enter PMS 187, Burgundy Red. Because we're adding this as an in-house ink,
we'll leave the Special Mix box unchecked. Leaving the box unchecked doesn't
mean we won't have to mix the ink. In fact, we probably do, but the program will
quote the ink at the pre-mixed price.
Managing your Inks 337
© 2018 Helmut Heindel
Although both the ink number and the ink name are optional, you'll need one of
them to identify the ink. To illustrate, "PMS Reflex Blue" is Ok without a number,
and PMS 187 is Ok without the name "Burgundy Red."
· Select Wash-up, Ink Type, and the appropriate Color Group. With the
Pantone system, Morning Flight generally knows what the color is from the PMS
number, and whether it requires a light or a dark wash-up. Still, check to make
sure.
· Some printers have "Color Days" (if it's Tuesday, it must be PMS 300). This
doesn't affect quoting, because you rarely know in advance on which day the
order will be placed. But it will affect job entry in Morning Flight Gold. If you
advertise color days and want to plan ahead, check the appropriate boxes. With
all six boxes checked, there is no charge for that ink, ever. Not in orders, not in
estimates.
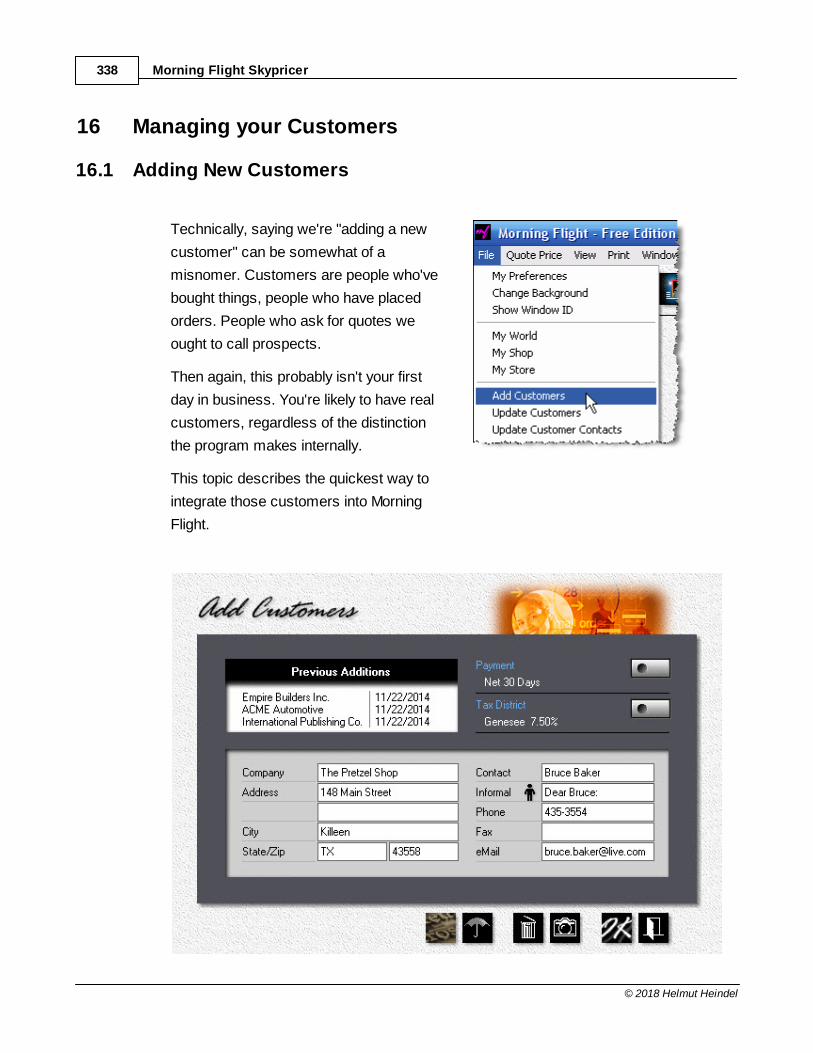
Morning Flight Skypricer338
© 2018 Helmut Heindel
16 Managing your Customers
16.1 Adding New Customers
Technically, saying we're "adding a new
customer" can be somewhat of a
misnomer. Customers are people who've
bought things, people who have placed
orders. People who ask for quotes we
ought to call prospects.
Then again, this probably isn't your first
day in business. You're likely to have real
customers, regardless of the distinction
the program makes internally.
This topic describes the quickest way to
integrate those customers into Morning
Flight.
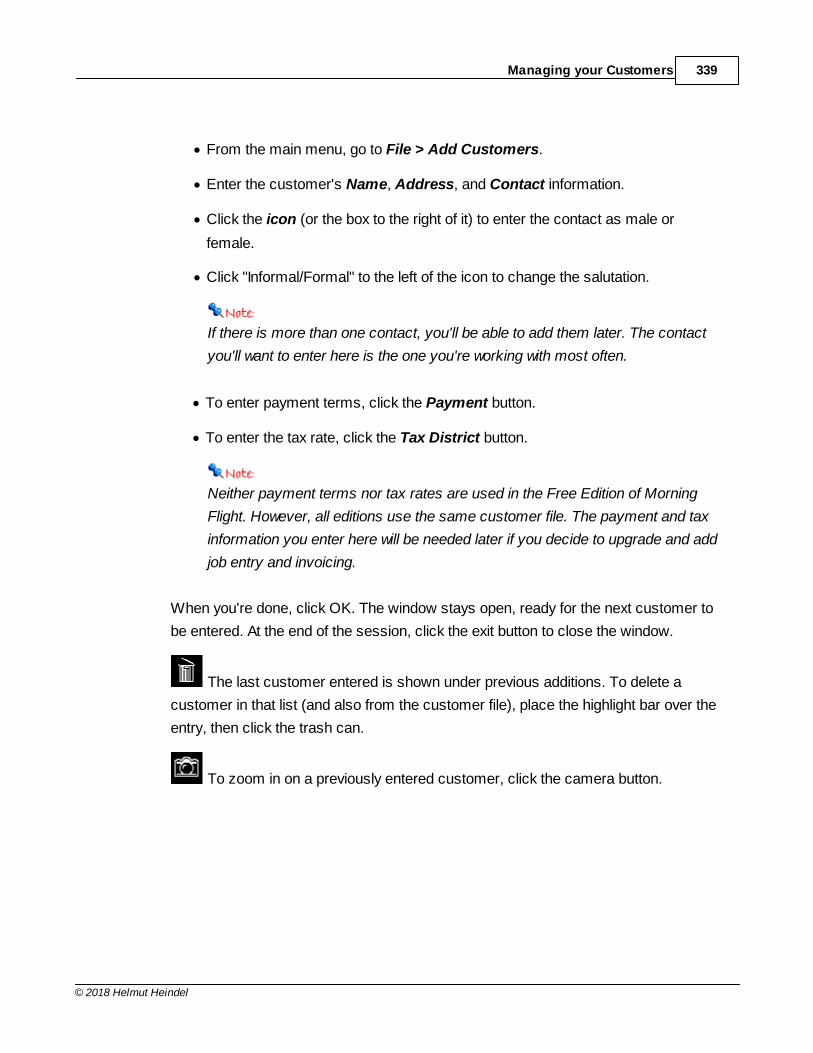
Managing your Customers 339
© 2018 Helmut Heindel
· From the main menu, go to File > Add Customers.
· Enter the customer's Name, Address, and Contact information.
· Click the icon (or the box to the right of it) to enter the contact as male or
female.
· Click "Informal/Formal" to the left of the icon to change the salutation.
If there is more than one contact, you'll be able to add them later. The contact
you'll want to enter here is the one you're working with most often.
· To enter payment terms, click the Payment button.
· To enter the tax rate, click the Tax District button.
Neither payment terms nor tax rates are used in the Free Edition of Morning
Flight. However, all editions use the same customer file. The payment and tax
information you enter here will be needed later if you decide to upgrade and add
job entry and invoicing.
When you're done, click OK. The window stays open, ready for the next customer to
be entered. At the end of the session, click the exit button to close the window.
The last customer entered is shown under previous additions. To delete a
customer in that list (and also from the customer file), place the highlight bar over the
entry, then click the trash can.
To zoom in on a previously entered customer, click the camera button.
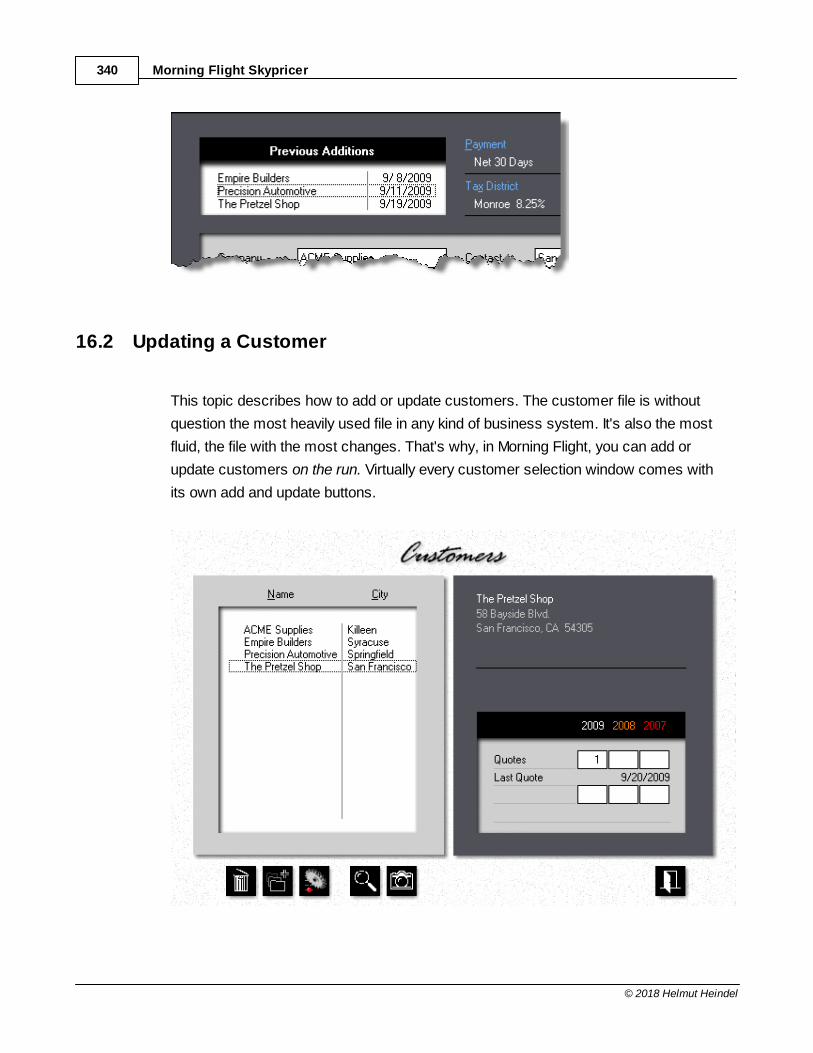
Morning Flight Skypricer340
© 2018 Helmut Heindel
16.2 Updating a Customer
This topic describes how to add or update customers. The customer file is without
question the most heavily used file in any kind of business system. It's also the most
fluid, the file with the most changes. That's why, in Morning Flight, you can add or
update customers on the run. Virtually every customer selection window comes with
its own add and update buttons.
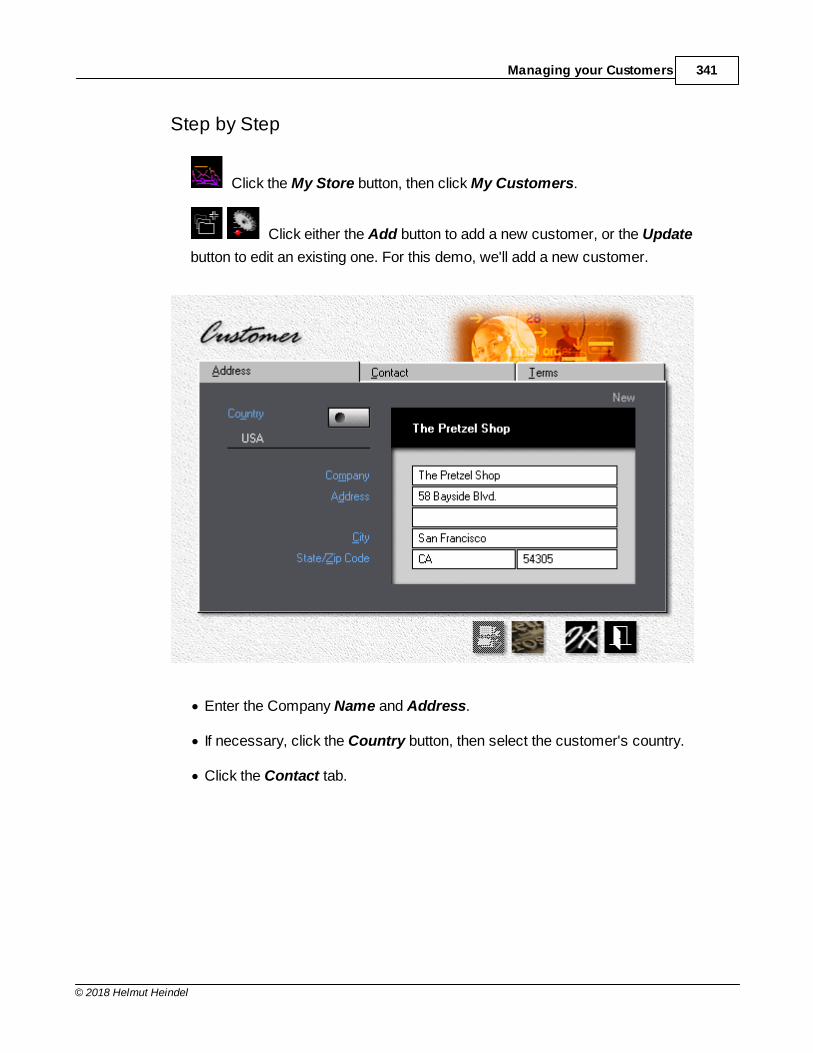
Managing your Customers 341
© 2018 Helmut Heindel
Step by Step
Click the My Store button, then click My Customers.
Click either the Add button to add a new customer, or the Update
button to edit an existing one. For this demo, we'll add a new customer.
· Enter the Company Name and Address.
· If necessary, click the Country button, then select the customer's country.
· Click the Contact tab.
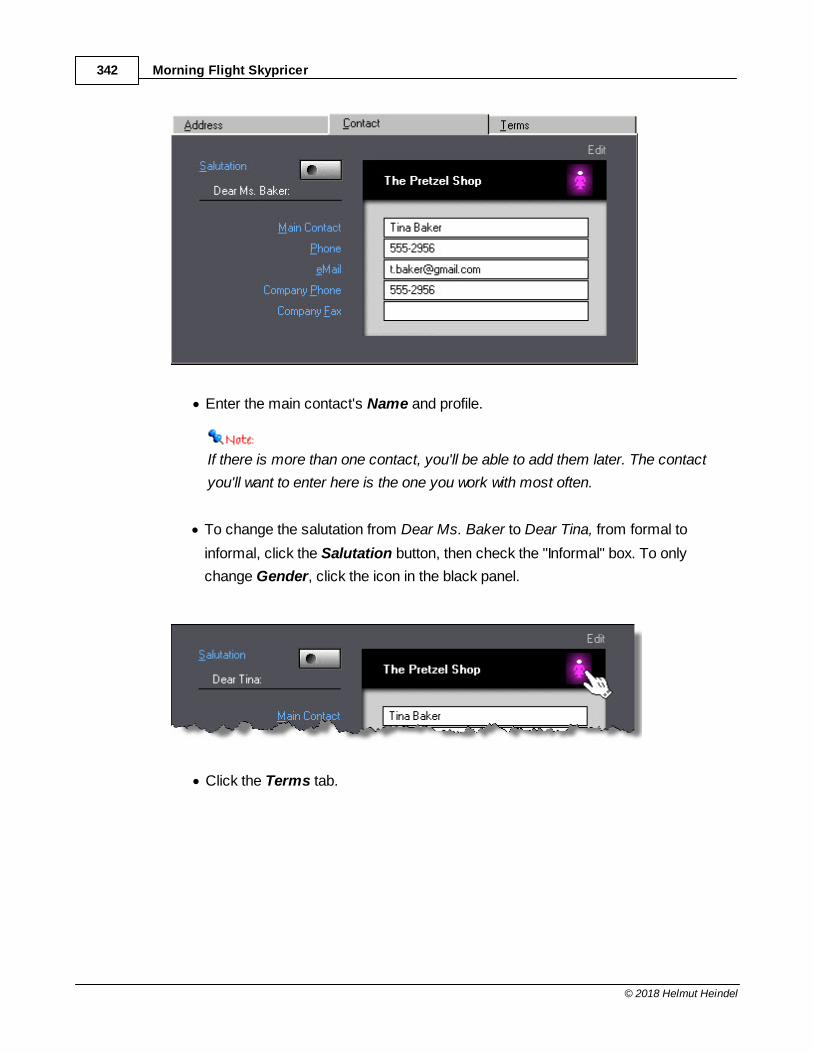
Morning Flight Skypricer342
© 2018 Helmut Heindel
· Enter the main contact's Name and profile.
If there is more than one contact, you'll be able to add them later. The contact
you'll want to enter here is the one you work with most often.
· To change the salutation from Dear Ms. Baker to Dear Tina, from formal to
informal, click the Salutation button, then check the "Informal" box. To only
change Gender, click the icon in the black panel.
· Click the Terms tab.
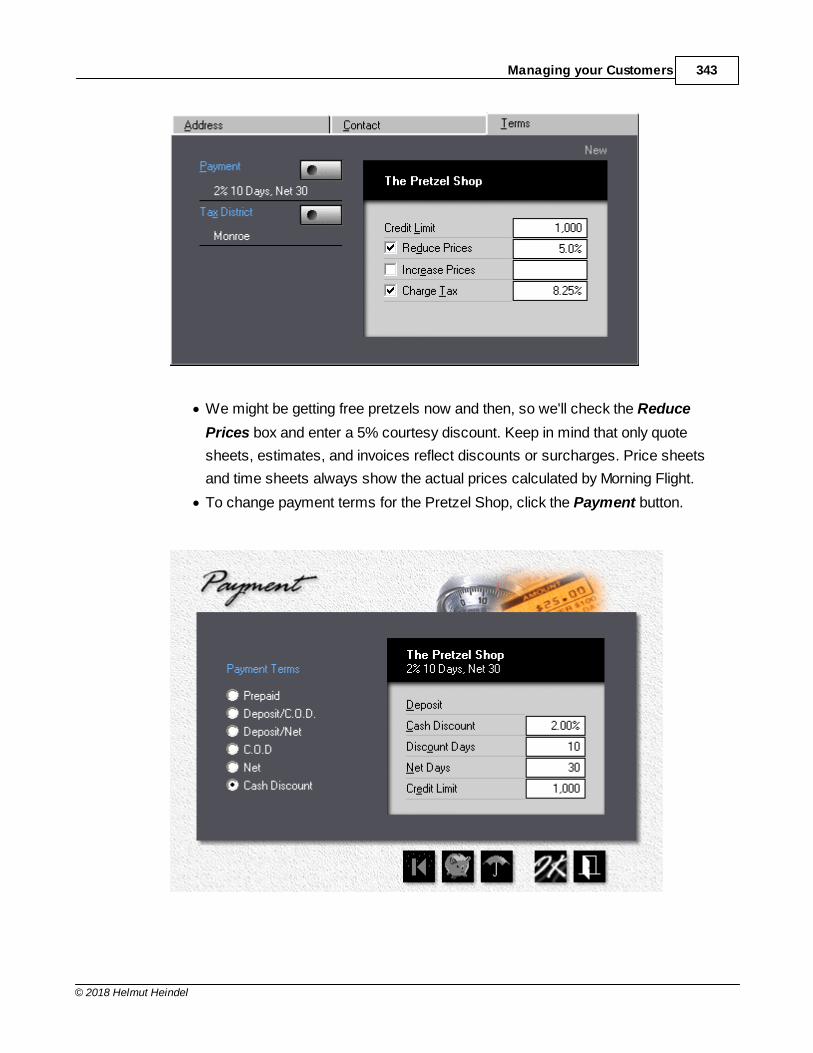
Managing your Customers 343
© 2018 Helmut Heindel
· We might be getting free pretzels now and then, so we'll check the Reduce
Prices box and enter a 5% courtesy discount. Keep in mind that only quote
sheets, estimates, and invoices reflect discounts or surcharges. Price sheets
and time sheets always show the actual prices calculated by Morning Flight.
· To change payment terms for the Pretzel Shop, click the Payment button.
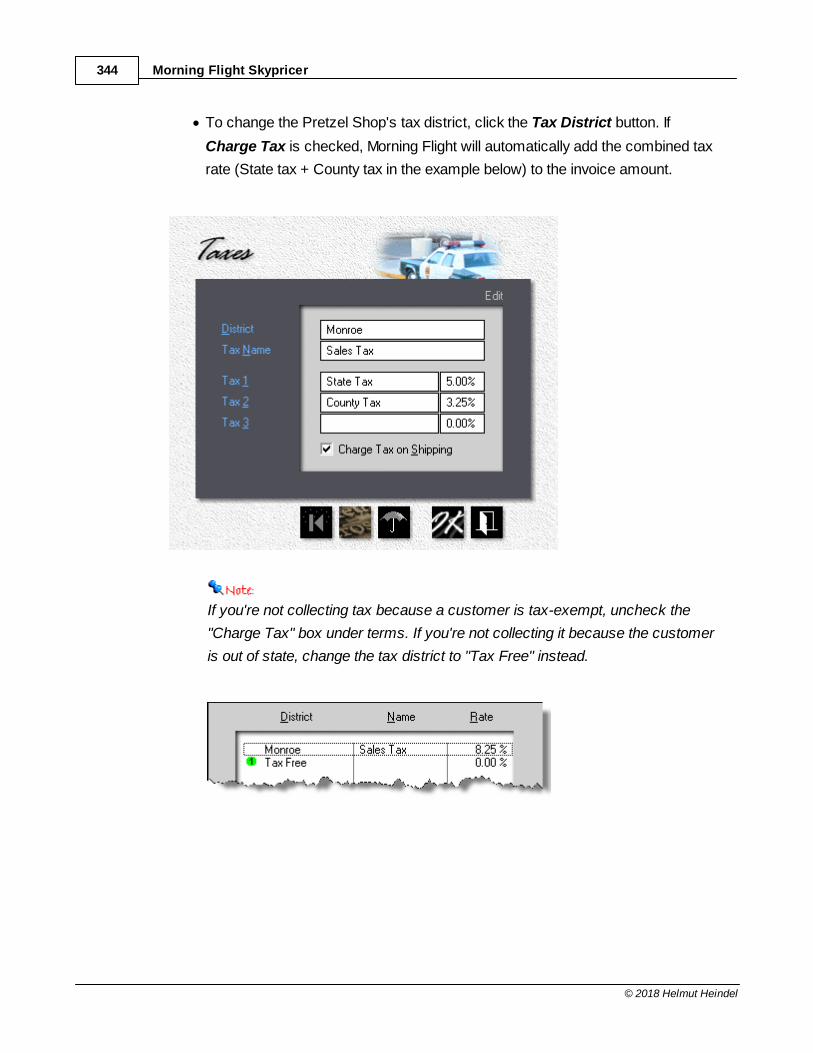
Morning Flight Skypricer344
© 2018 Helmut Heindel
· To change the Pretzel Shop's tax district, click the Tax District button. If
Charge Tax is checked, Morning Flight will automatically add the combined tax
rate (State tax + County tax in the example below) to the invoice amount.
If you're not collecting tax because a customer is tax-exempt, uncheck the
"Charge Tax" box under terms. If you're not collecting it because the customer
is out of state, change the tax district to "Tax Free" instead.
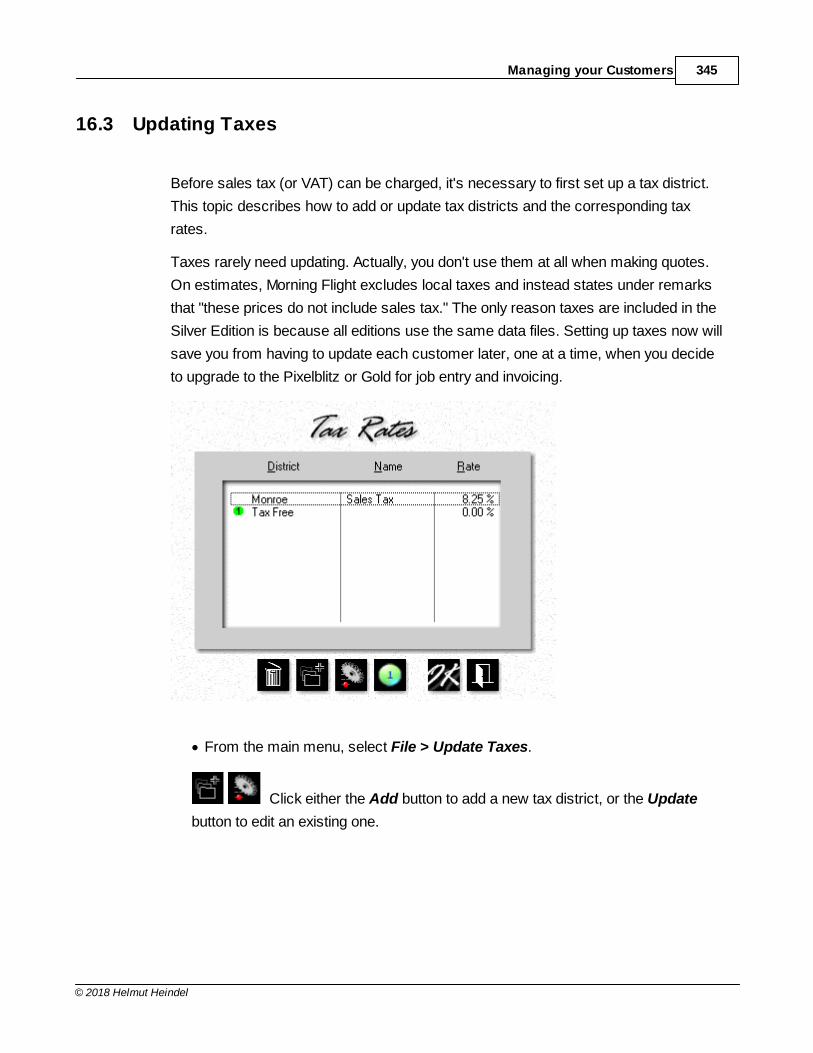
Managing your Customers 345
© 2018 Helmut Heindel
16.3 Updating Taxes
Before sales tax (or VAT) can be charged, it's necessary to first set up a tax district.
This topic describes how to add or update tax districts and the corresponding tax
rates.
Taxes rarely need updating. Actually, you don't use them at all when making quotes.
On estimates, Morning Flight excludes local taxes and instead states under remarks
that "these prices do not include sales tax." The only reason taxes are included in the
Silver Edition is because all editions use the same data files. Setting up taxes now will
save you from having to update each customer later, one at a time, when you decide
to upgrade to the Pixelblitz or Gold for job entry and invoicing.
· From the main menu, select File > Update Taxes.
Click either the Add button to add a new tax district, or the Update
button to edit an existing one.
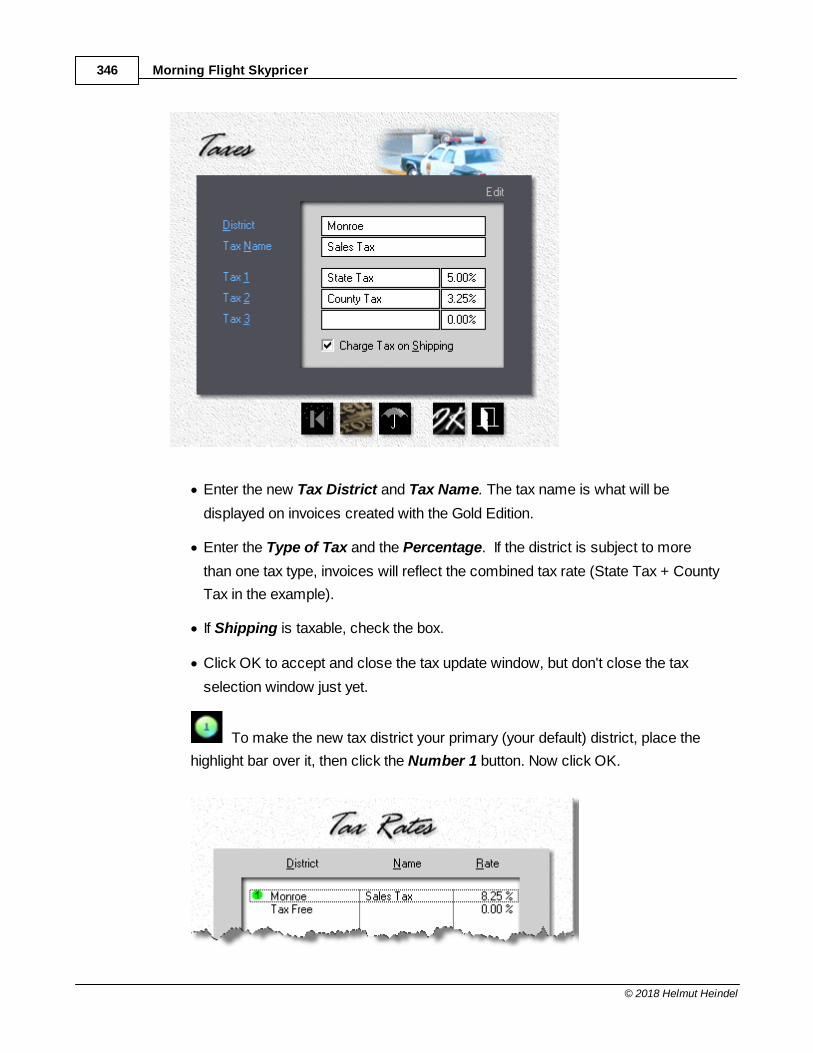
Morning Flight Skypricer346
© 2018 Helmut Heindel
· Enter the new Tax District and Tax Name. The tax name is what will be
displayed on invoices created with the Gold Edition.
· Enter the Type of Tax and the Percentage. If the district is subject to more
than one tax type, invoices will reflect the combined tax rate (State Tax + County
Tax in the example).
· If Shipping is taxable, check the box.
· Click OK to accept and close the tax update window, but don't close the tax
selection window just yet.
To make the new tax district your primary (your default) district, place the
highlight bar over it, then click the Number 1 button. Now click OK.
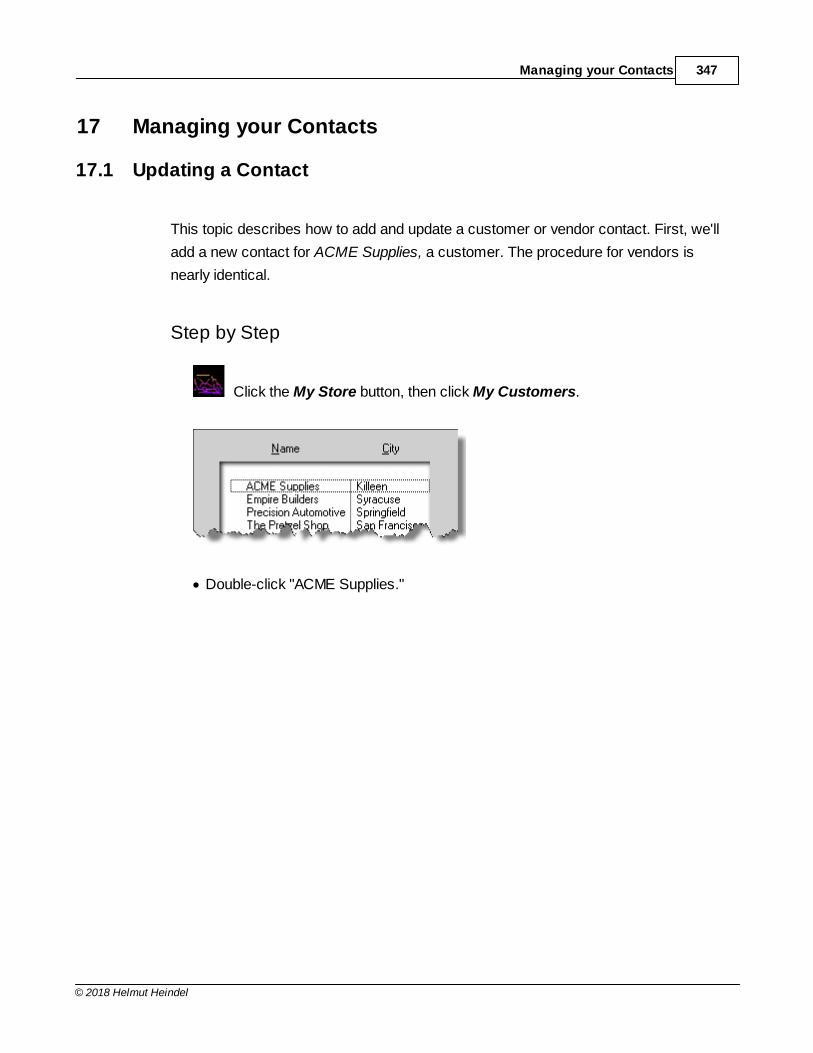
Managing your Contacts 347
© 2018 Helmut Heindel
17 Managing your Contacts
17.1 Updating a Contact
This topic describes how to add and update a customer or vendor contact. First, we'll
add a new contact for ACME Supplies, a customer. The procedure for vendors is
nearly identical.
Step by Step
Click the My Store button, then click My Customers.
· Double-click "ACME Supplies."
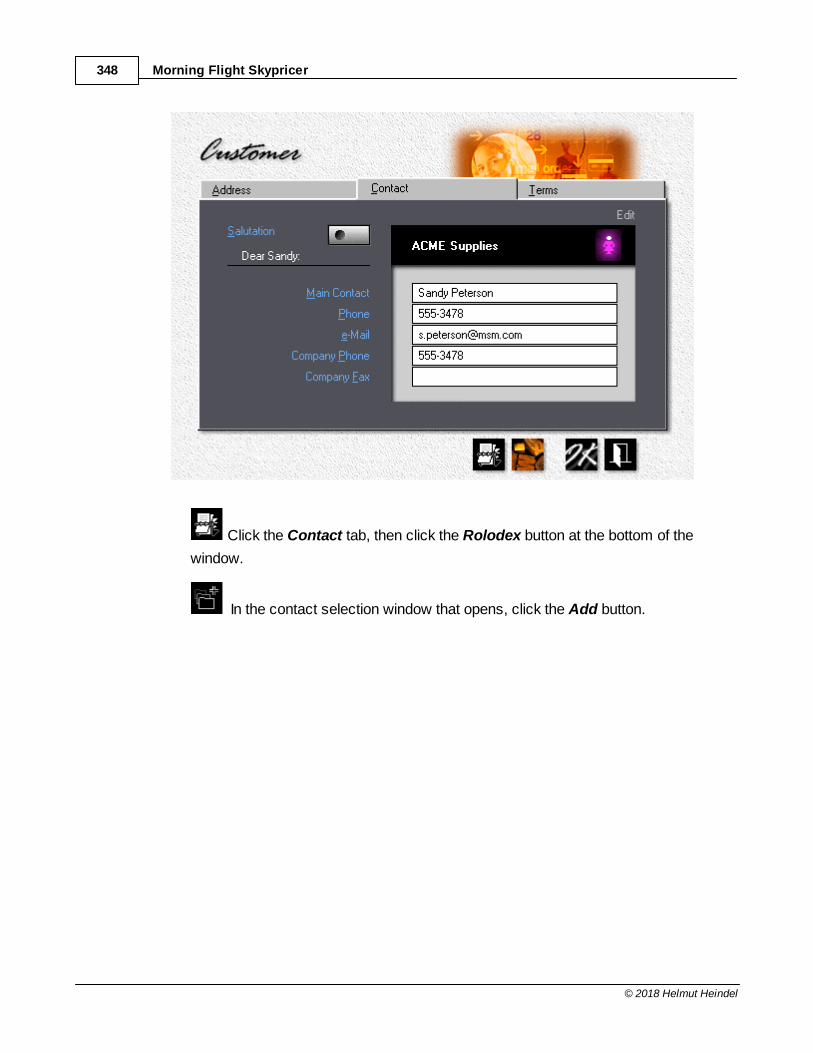
Morning Flight Skypricer348
© 2018 Helmut Heindel
Click the Contact tab, then click the Rolodex button at the bottom of the
window.
In the contact selection window that opens, click the Add button.
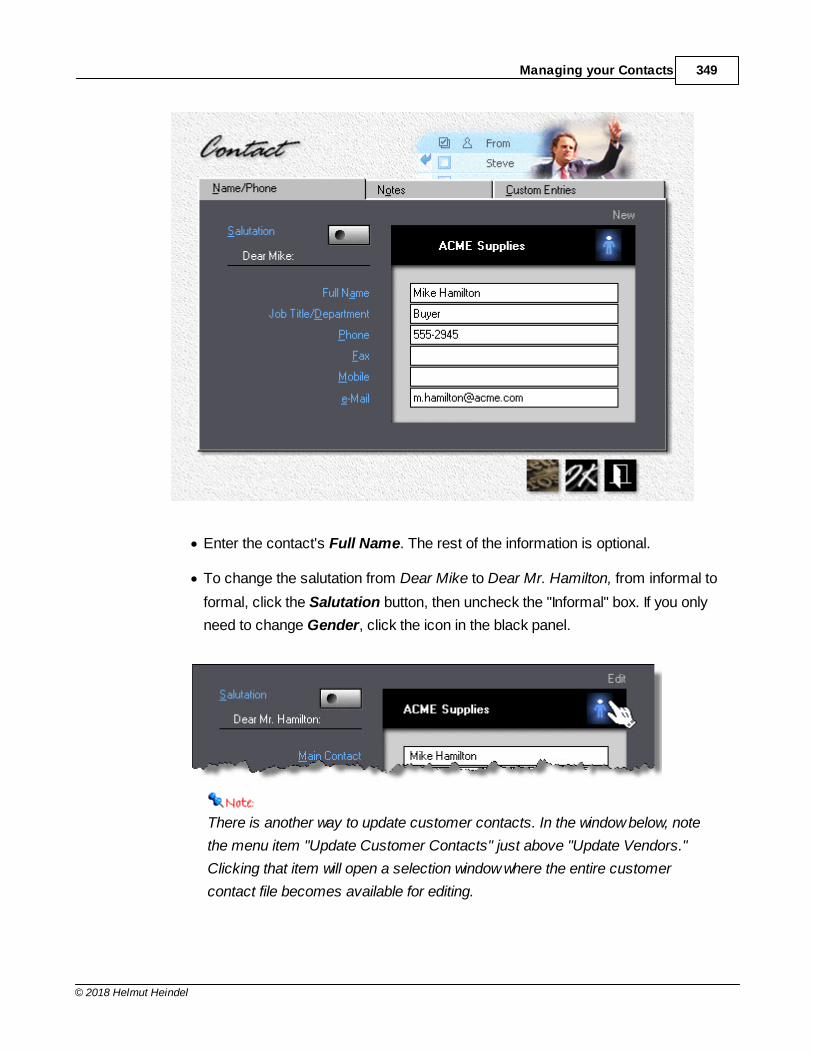
Managing your Contacts 349
© 2018 Helmut Heindel
· Enter the contact's Full Name. The rest of the information is optional.
· To change the salutation from Dear Mike to Dear Mr. Hamilton, from informal to
formal, click the Salutation button, then uncheck the "Informal" box. If you only
need to change Gender, click the icon in the black panel.
There is another way to update customer contacts. In the window below, note
the menu item "Update Customer Contacts" just above "Update Vendors."
Clicking that item will open a selection window where the entire customer
contact file becomes available for editing.

Morning Flight Skypricer350
© 2018 Helmut Heindel
Updating a Vendor Contact
1. From the main menu, click Update
Vendors.
2. In the selection window that opens, double-
click to select the vendor.
3. When the contact window opens, follow
the steps outlined earlier for customer
contacts.
17.2 Changing the Salutation
This topic describes how to change the title (Ms., Mr.) and salutation (Dear John) of
customer contacts.
Step by Step
· From the main menu, select File > Update Customer Contacts.
· In the window that opens, double-click the contact you wish to update.
· In the contact update window, click the Salutation button.
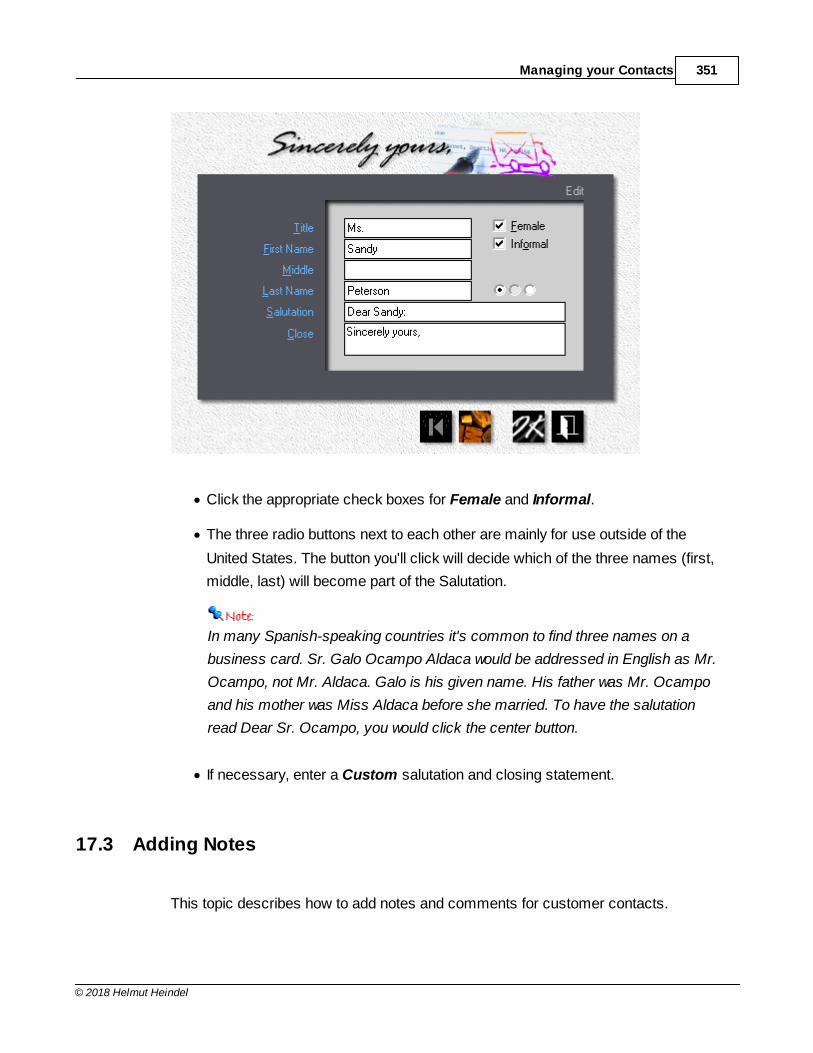
Managing your Contacts 351
© 2018 Helmut Heindel
· Click the appropriate check boxes for Female and Informal.
· The three radio buttons next to each other are mainly for use outside of the
United States. The button you'll click will decide which of the three names (first,
middle, last) will become part of the Salutation.
In many Spanish-speaking countries it's common to find three names on a
business card. Sr. Galo Ocampo Aldaca would be addressed in English as Mr.
Ocampo, not Mr. Aldaca. Galo is his given name. His father was Mr. Ocampo
and his mother was Miss Aldaca before she married. To have the salutation
read Dear Sr. Ocampo, you would click the center button.
· If necessary, enter a Custom salutation and closing statement.
17.3 Adding Notes
This topic describes how to add notes and comments for customer contacts.
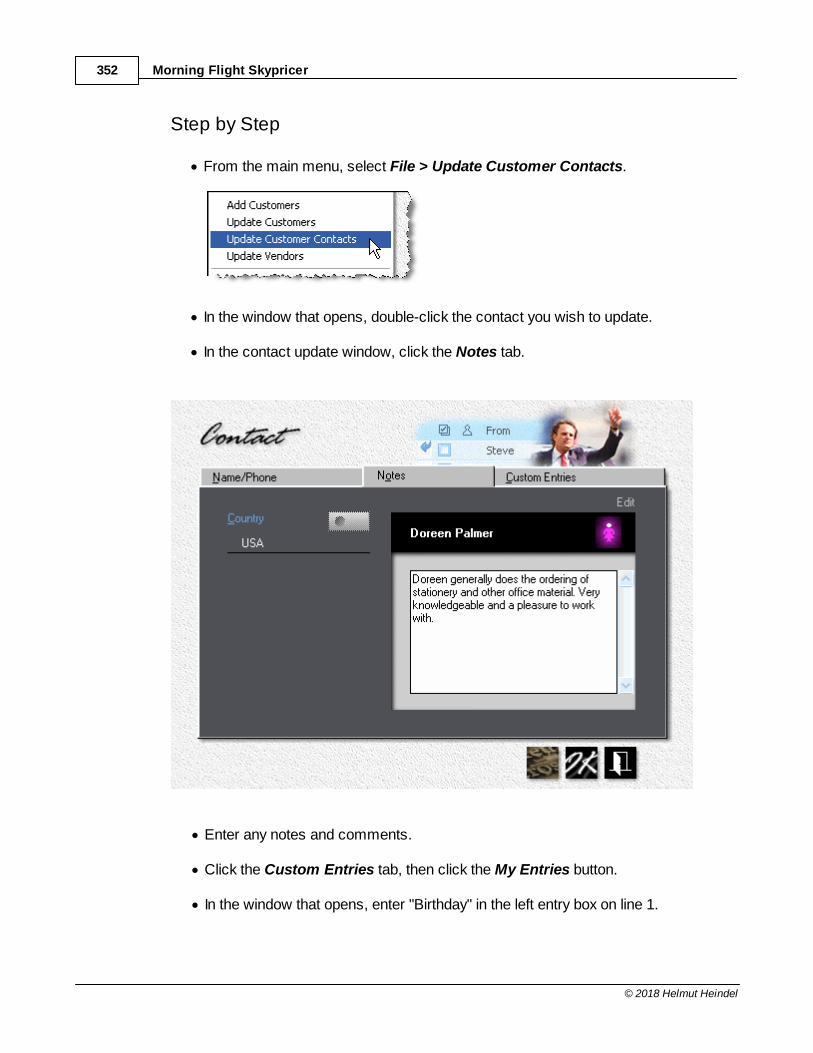
Morning Flight Skypricer352
© 2018 Helmut Heindel
Step by Step
· From the main menu, select File > Update Customer Contacts.
· In the window that opens, double-click the contact you wish to update.
· In the contact update window, click the Notes tab.
· Enter any notes and comments.
· Click the Custom Entries tab, then click the My Entries button.
· In the window that opens, enter "Birthday" in the left entry box on line 1.
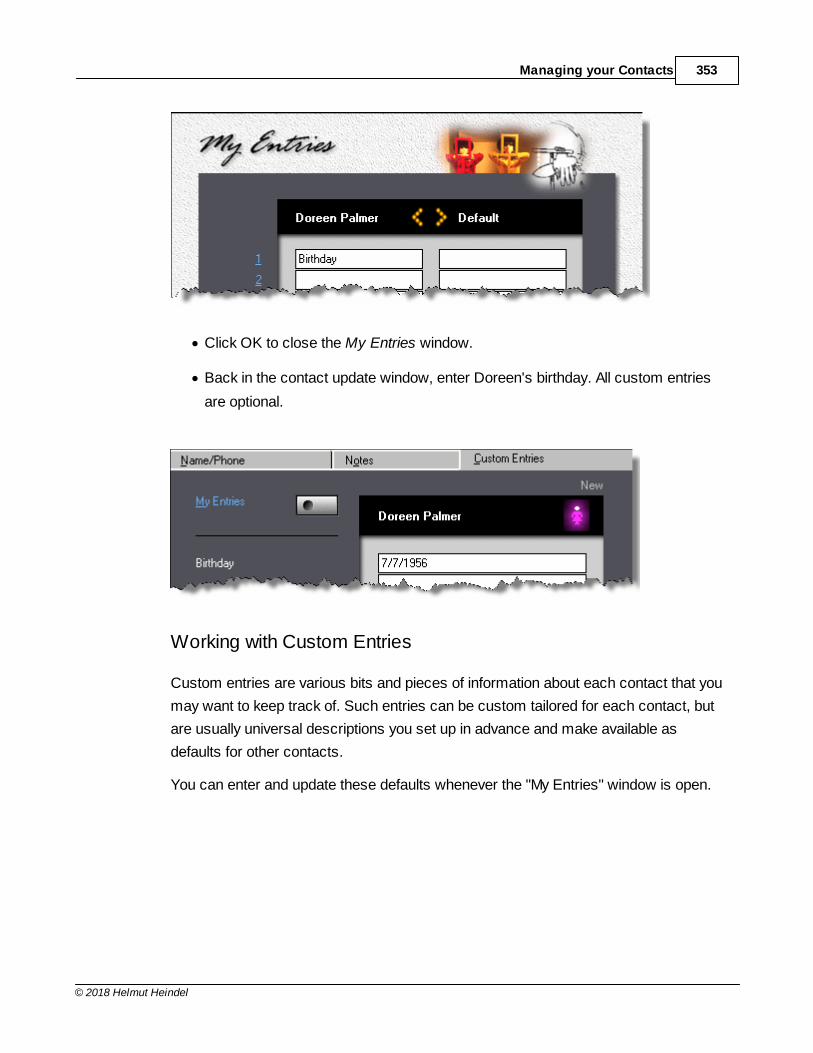
Managing your Contacts 353
© 2018 Helmut Heindel
· Click OK to close the My Entries window.
· Back in the contact update window, enter Doreen's birthday. All custom entries
are optional.
Working with Custom Entries
Custom entries are various bits and pieces of information about each contact that you
may want to keep track of. Such entries can be custom tailored for each contact, but
are usually universal descriptions you set up in advance and make available as
defaults for other contacts.
You can enter and update these defaults whenever the "My Entries" window is open.
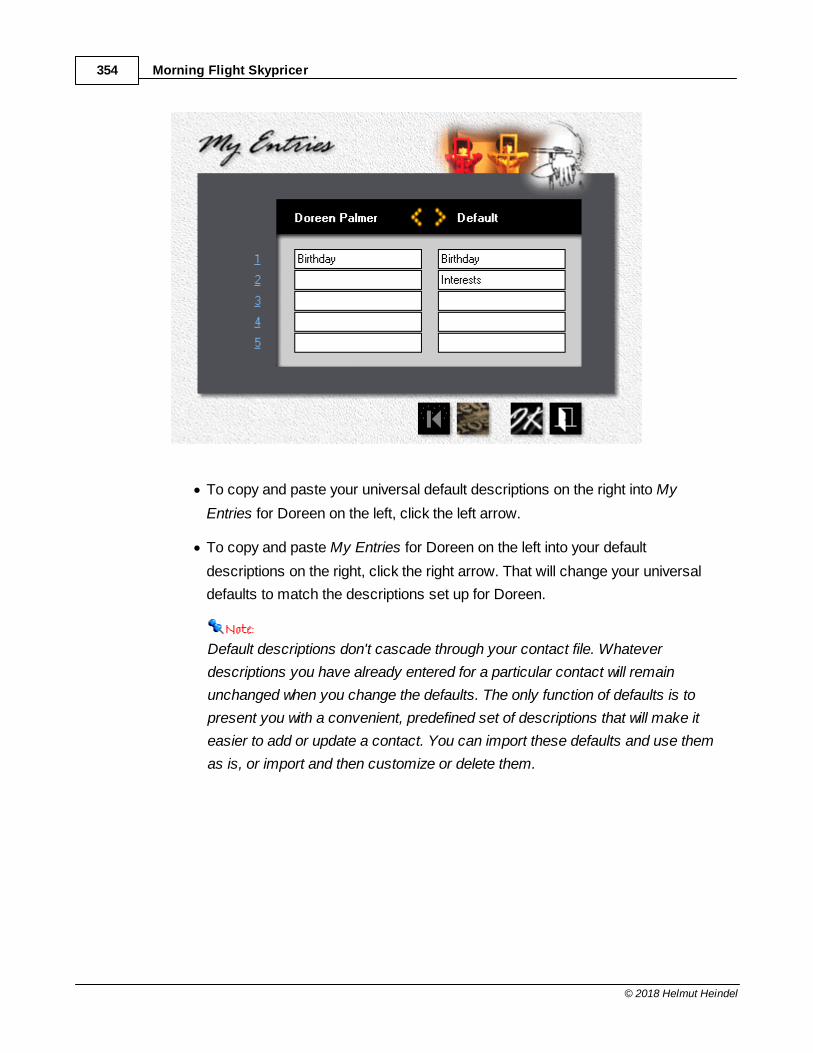
Morning Flight Skypricer354
© 2018 Helmut Heindel
· To copy and paste your universal default descriptions on the right into My
Entries for Doreen on the left, click the left arrow.
· To copy and paste My Entries for Doreen on the left into your default
descriptions on the right, click the right arrow. That will change your universal
defaults to match the descriptions set up for Doreen.
Default descriptions don't cascade through your contact file. Whatever
descriptions you have already entered for a particular contact will remain
unchanged when you change the defaults. The only function of defaults is to
present you with a convenient, predefined set of descriptions that will make it
easier to add or update a contact. You can import these defaults and use them
as is, or import and then customize or delete them.
Writing Memos 355
© 2018 Helmut Heindel
18 Writing Memos
18.1 Writing a Memo
What can the Morning Flight memo writer do that your word processor can't? For
openers, it can access your customer and contact file. That means you can
compose, fax and e-mail a memo from within the program ... in under a minute. "Dear
Jennifer, Thank you for your inquiry. Our quotation is attached. Please call me with
questions," or something along those lines.
Often though, that's enough. A short but quick response is almost always better than
no response. And even a canned, boiler-plate note will get you more customer
satisfaction than all those meticulously crafted e-mails you meant to send but never
got around to.
Step One
Before you can write a memo to someone, that someone has to be in your contact
list. Already have contacts on file? Skip step one and go to step two. Otherwise, let's
add a fictitious Jennifer Jones at an equally fictitious ACME Supplies company.
Remember to delete both after we're done writing this memo.
From the main menu, click the My Store button.
· Click the My Customers button.
Click the Add button and enter "ACME Supplies" as the customer.
· Click the Contact tab and copy the information from the screen below. Make
sure the salutation is "Dear Jennifer" and that Jennifer is listed as female.
Otherwise, click the salutations button and make the corrections. For help, see
"Changing the Salutation".
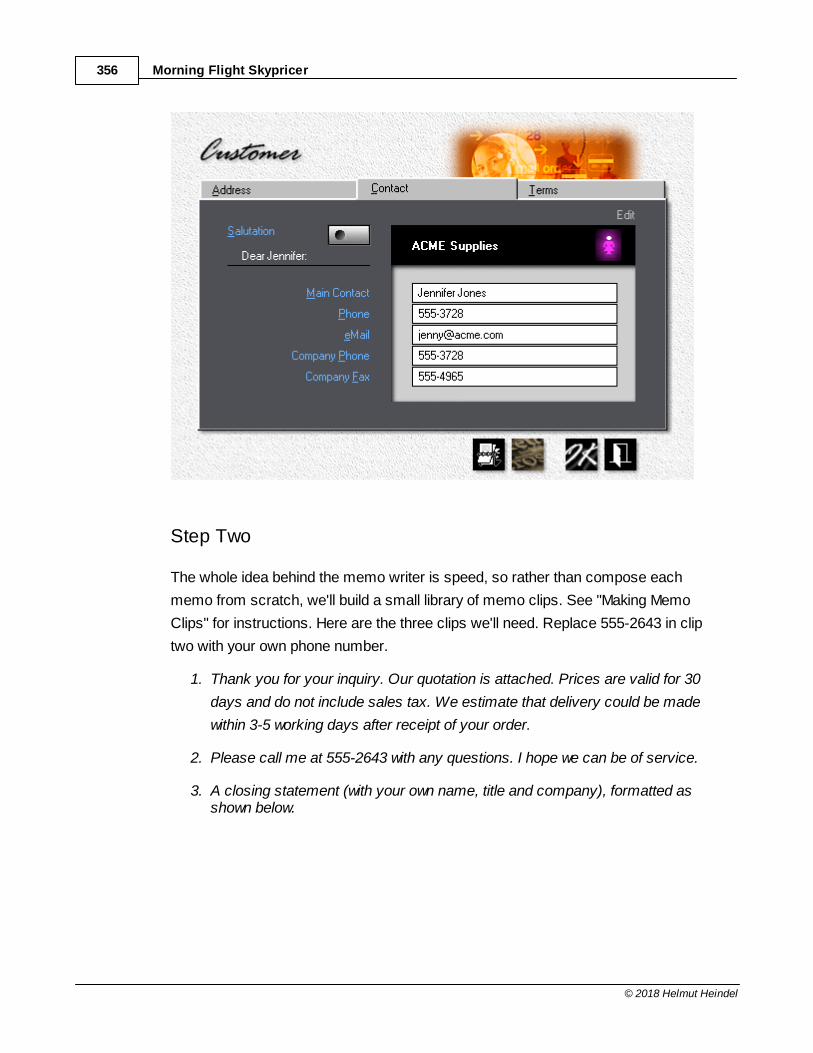
Morning Flight Skypricer356
© 2018 Helmut Heindel
Step Two
The whole idea behind the memo writer is speed, so rather than compose each
memo from scratch, we'll build a small library of memo clips. See "Making Memo
Clips" for instructions. Here are the three clips we'll need. Replace 555-2643 in clip
two with your own phone number.
1. Thank you for your inquiry. Our quotation is attached. Prices are valid for 30
days and do not include sales tax. We estimate that delivery could be made
within 3-5 working days after receipt of your order.
2. Please call me at 555-2643 with any questions. I hope we can be of service.
3. A closing statement (with your own name, title and company), formatted asshown below.
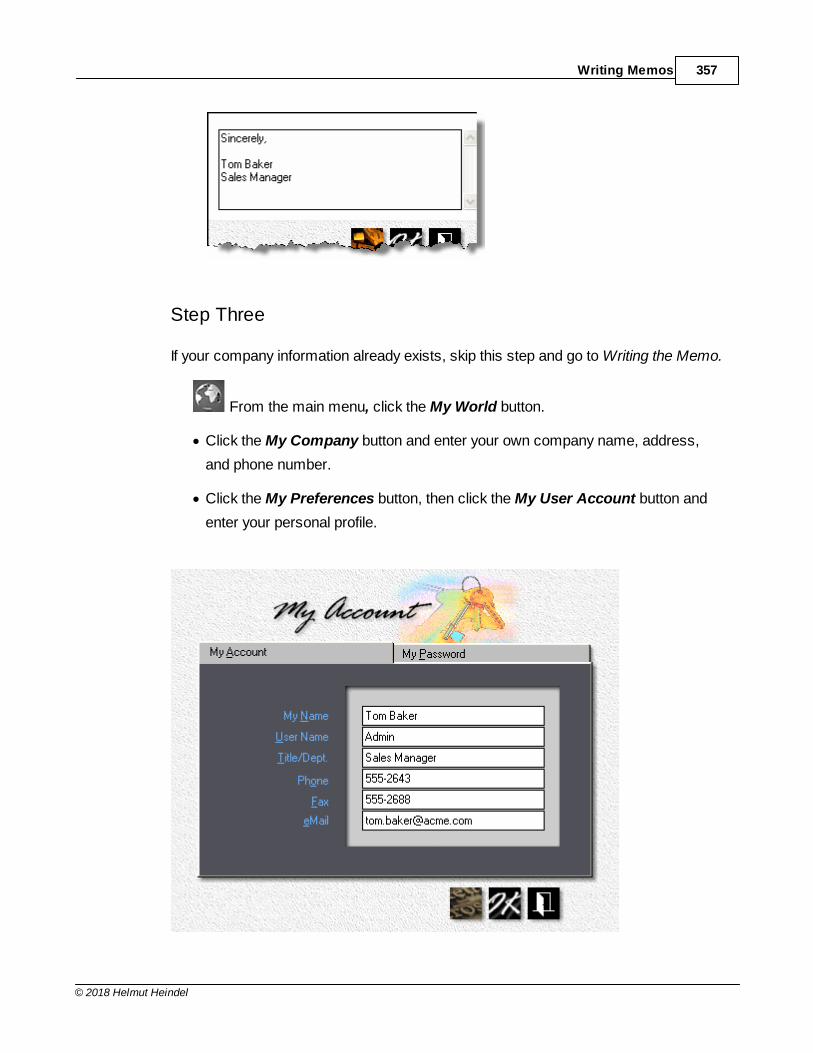
Writing Memos 357
© 2018 Helmut Heindel
Step Three
If your company information already exists, skip this step and go to Writing the Memo.
From the main menu, click the My World button.
· Click the My Company button and enter your own company name, address,
and phone number.
· Click the My Preferences button, then click the My User Account button and
enter your personal profile.
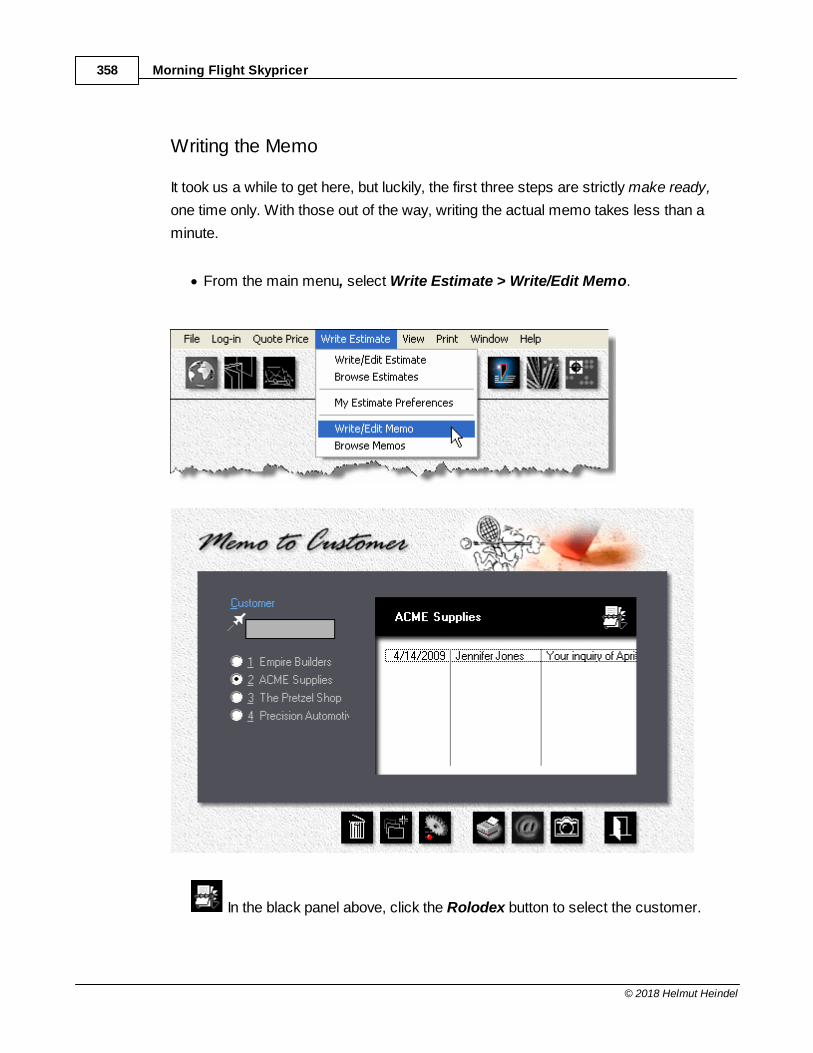
Morning Flight Skypricer358
© 2018 Helmut Heindel
Writing the Memo
It took us a while to get here, but luckily, the first three steps are strictly make ready,
one time only. With those out of the way, writing the actual memo takes less than a
minute.
· From the main menu, select Write Estimate > Write/Edit Memo.
In the black panel above, click the Rolodex button to select the customer.
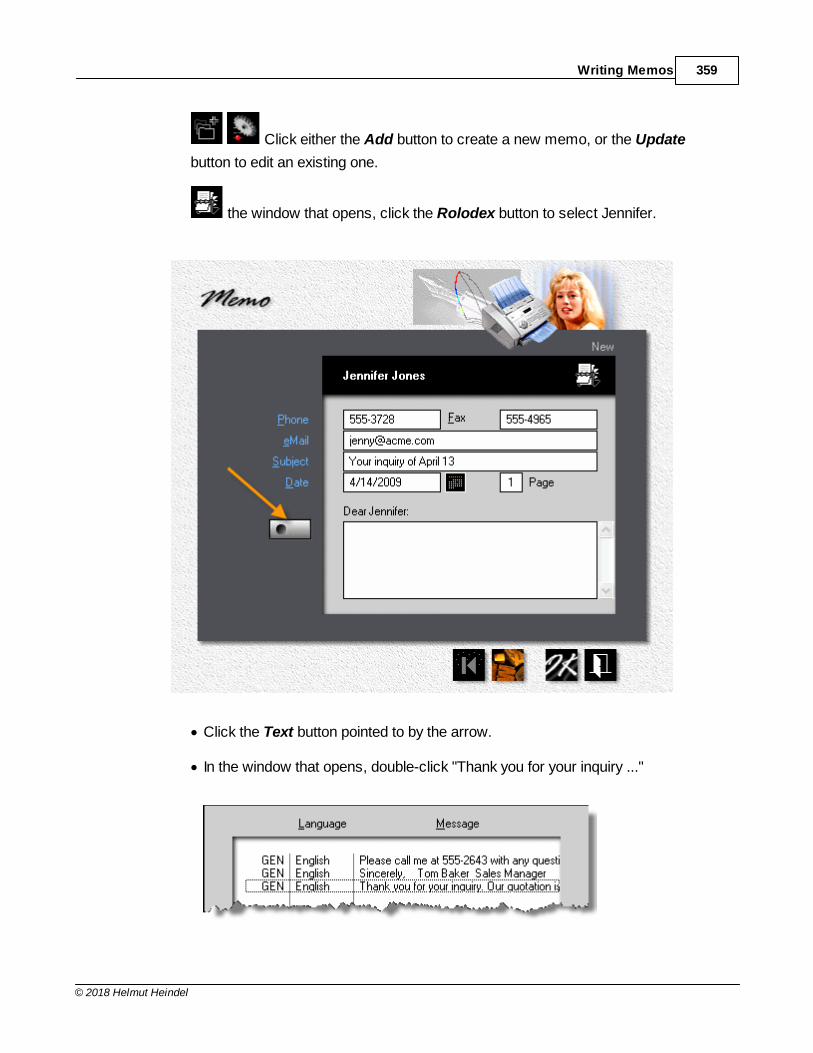
Writing Memos 359
© 2018 Helmut Heindel
Click either the Add button to create a new memo, or the Update
button to edit an existing one.
the window that opens, click the Rolodex button to select Jennifer.
· Click the Text button pointed to by the arrow.
· In the window that opens, double-click "Thank you for your inquiry ..."
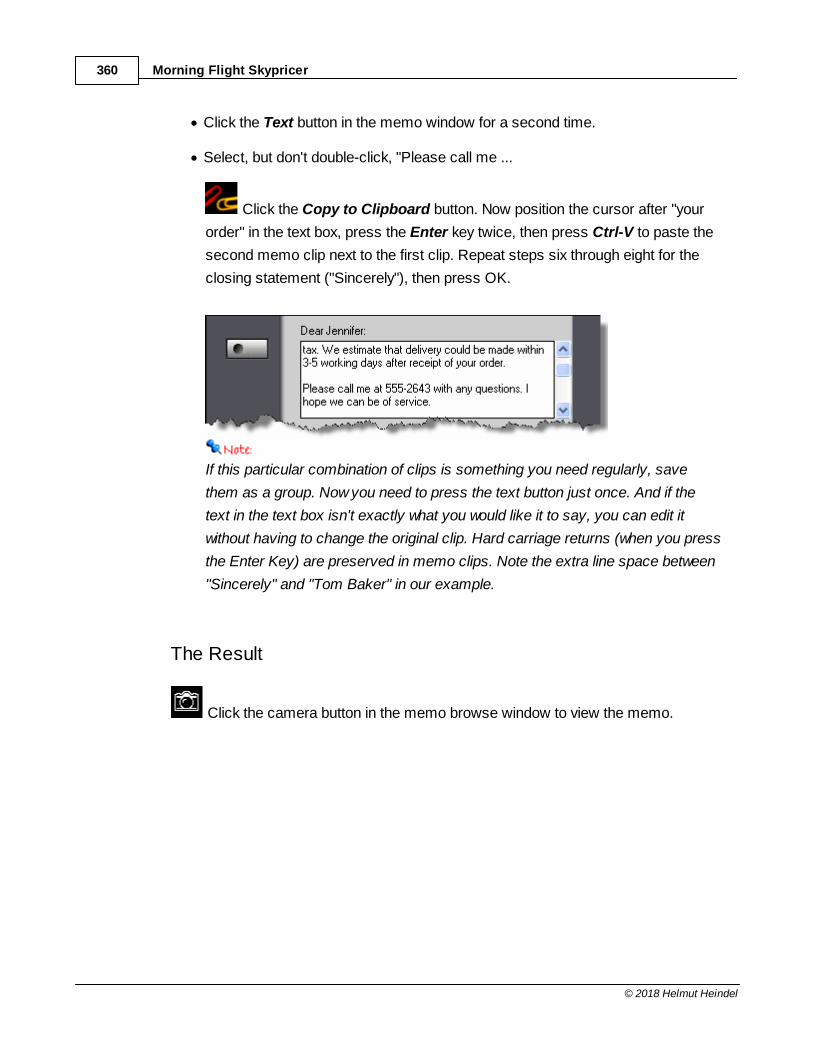
Morning Flight Skypricer360
© 2018 Helmut Heindel
· Click the Text button in the memo window for a second time.
· Select, but don't double-click, "Please call me ...
Click the Copy to Clipboard button. Now position the cursor after "your
order" in the text box, press the Enter key twice, then press Ctrl-V to paste the
second memo clip next to the first clip. Repeat steps six through eight for the
closing statement ("Sincerely"), then press OK.
If this particular combination of clips is something you need regularly, save
them as a group. Now you need to press the text button just once. And if the
text in the text box isn't exactly what you would like it to say, you can edit it
without having to change the original clip. Hard carriage returns (when you press
the Enter Key) are preserved in memo clips. Note the extra line space between
"Sincerely" and "Tom Baker" in our example.
The Result
Click the camera button in the memo browse window to view the memo.
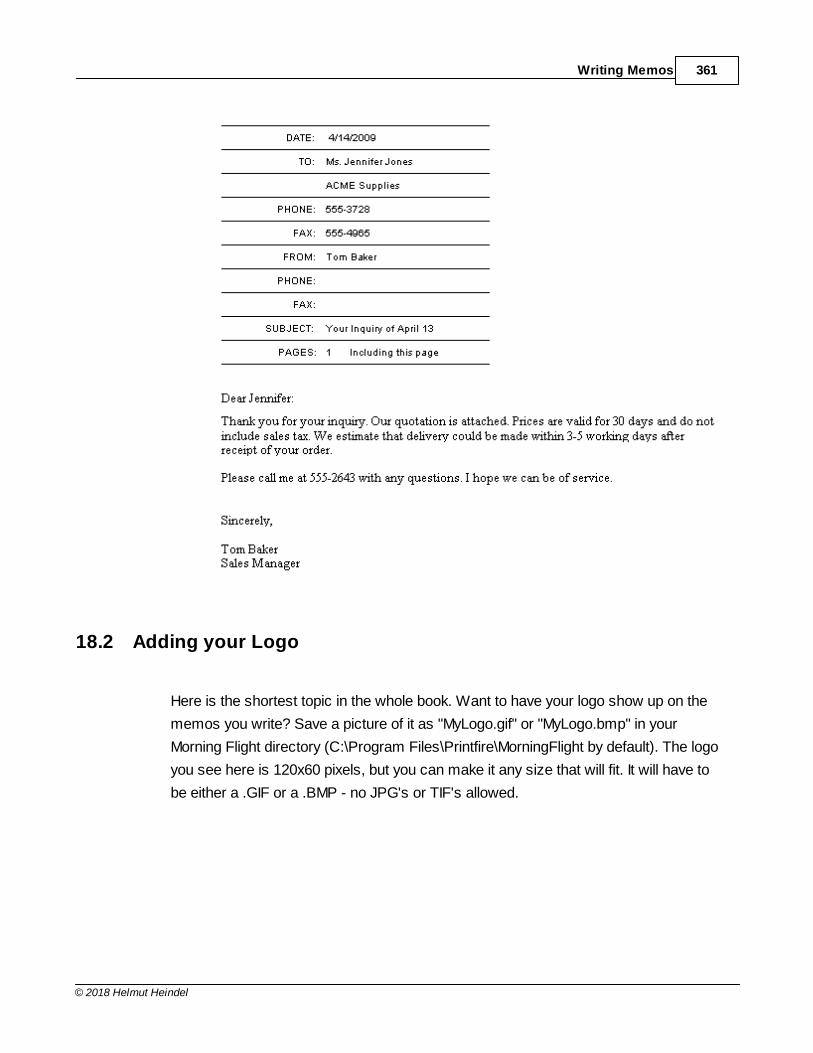
Writing Memos 361
© 2018 Helmut Heindel
18.2 Adding your Logo
Here is the shortest topic in the whole book. Want to have your logo show up on the
memos you write? Save a picture of it as "MyLogo.gif" or "MyLogo.bmp" in your
Morning Flight directory (C:\Program Files\Printfire\MorningFlight by default). The logo
you see here is 120x60 pixels, but you can make it any size that will fit. It will have to
be either a .GIF or a .BMP - no JPG's or TIF's allowed.
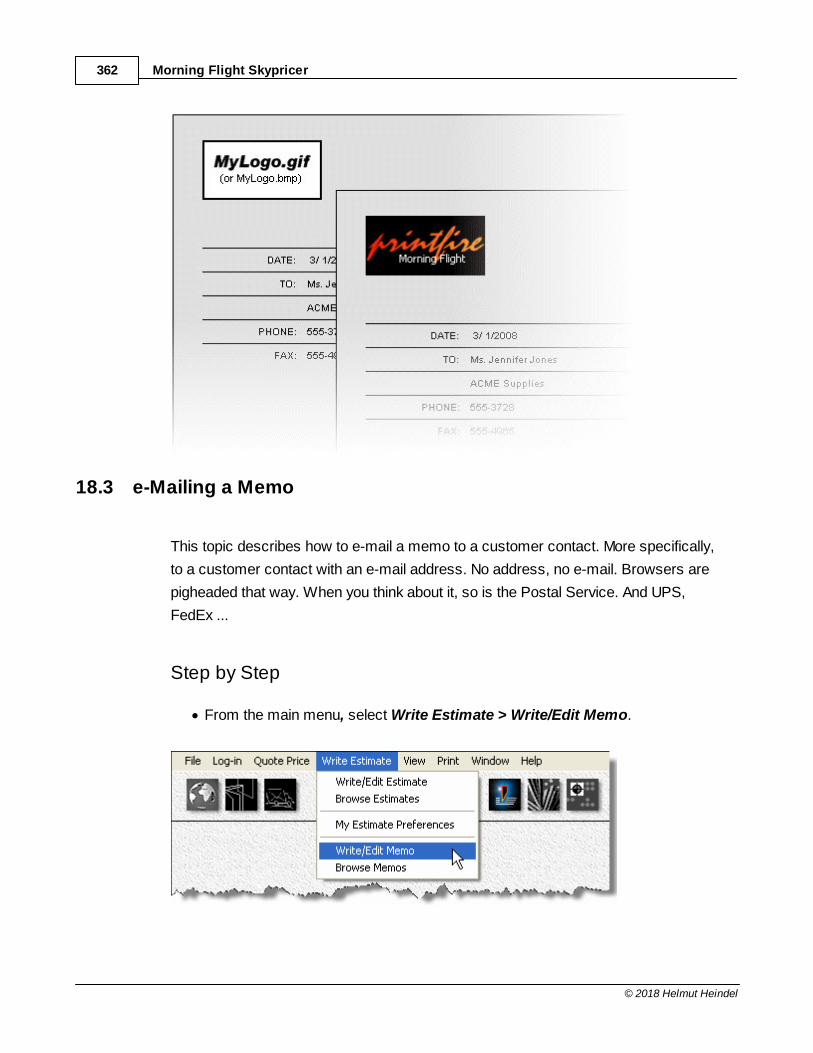
Morning Flight Skypricer362
© 2018 Helmut Heindel
18.3 e-Mailing a Memo
This topic describes how to e-mail a memo to a customer contact. More specifically,
to a customer contact with an e-mail address. No address, no e-mail. Browsers are
pigheaded that way. When you think about it, so is the Postal Service. And UPS,
FedEx ...
Step by Step
· From the main menu, select Write Estimate > Write/Edit Memo.
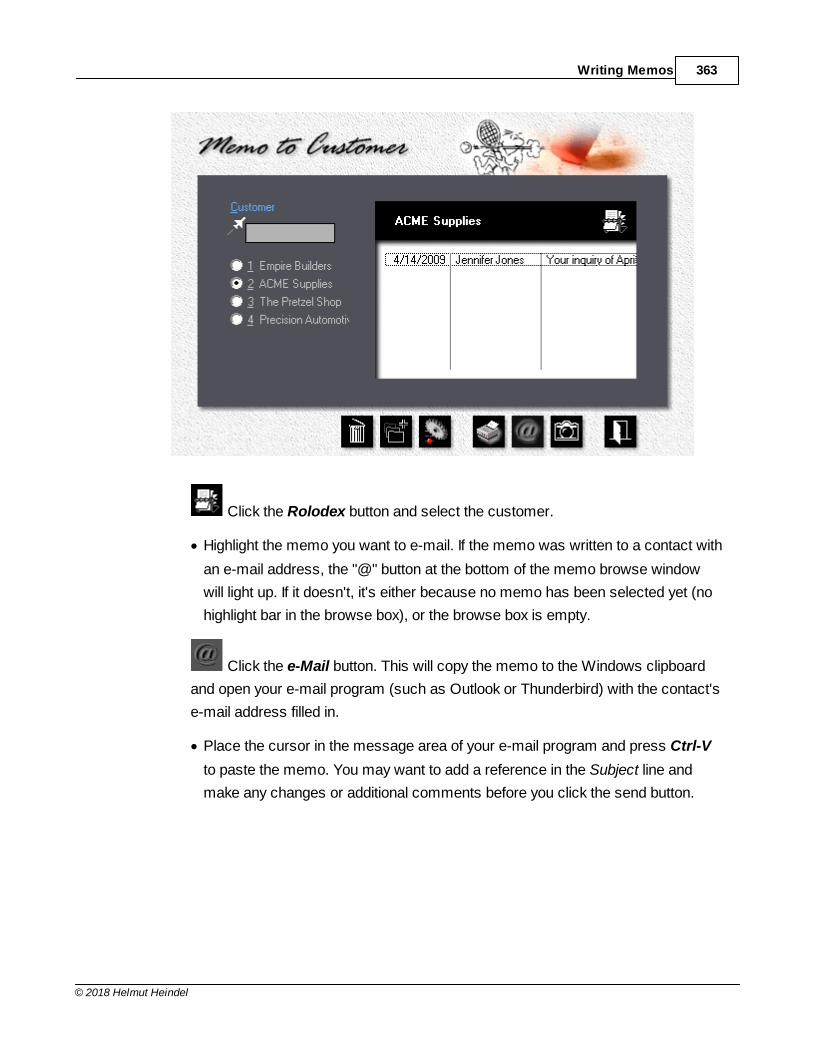
Writing Memos 363
© 2018 Helmut Heindel
Click the Rolodex button and select the customer.
· Highlight the memo you want to e-mail. If the memo was written to a contact with
an e-mail address, the "@" button at the bottom of the memo browse window
will light up. If it doesn't, it's either because no memo has been selected yet (no
highlight bar in the browse box), or the browse box is empty.
Click the e-Mail button. This will copy the memo to the Windows clipboard
and open your e-mail program (such as Outlook or Thunderbird) with the contact's
e-mail address filled in.
· Place the cursor in the message area of your e-mail program and press Ctrl-V
to paste the memo. You may want to add a reference in the Subject line and
make any changes or additional comments before you click the send button.
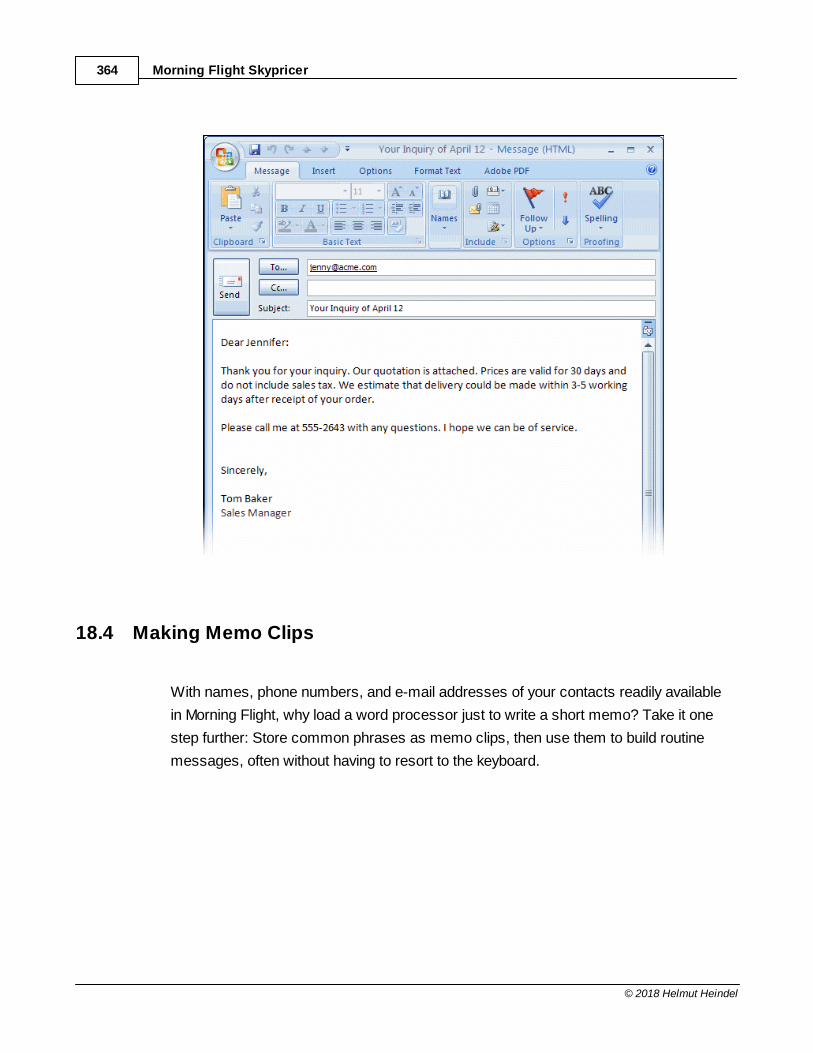
Morning Flight Skypricer364
© 2018 Helmut Heindel
18.4 Making Memo Clips
With names, phone numbers, and e-mail addresses of your contacts readily available
in Morning Flight, why load a word processor just to write a short memo? Take it one
step further: Store common phrases as memo clips, then use them to build routine
messages, often without having to resort to the keyboard.
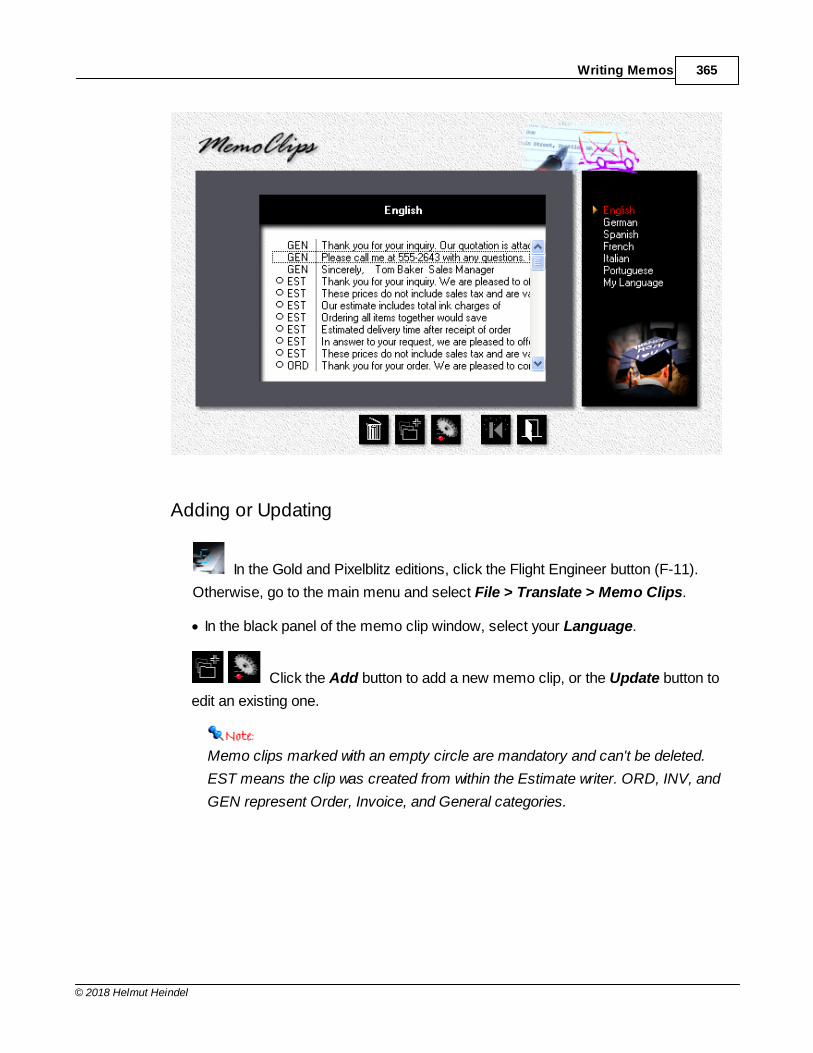
Writing Memos 365
© 2018 Helmut Heindel
Adding or Updating
In the Gold and Pixelblitz editions, click the Flight Engineer button (F-11).
Otherwise, go to the main menu and select File > Translate > Memo Clips.
· In the black panel of the memo clip window, select your Language.
Click the Add button to add a new memo clip, or the Update button to
edit an existing one.
Memo clips marked with an empty circle are mandatory and can't be deleted.
EST means the clip was created from within the Estimate writer. ORD, INV, and
GEN represent Order, Invoice, and General categories.
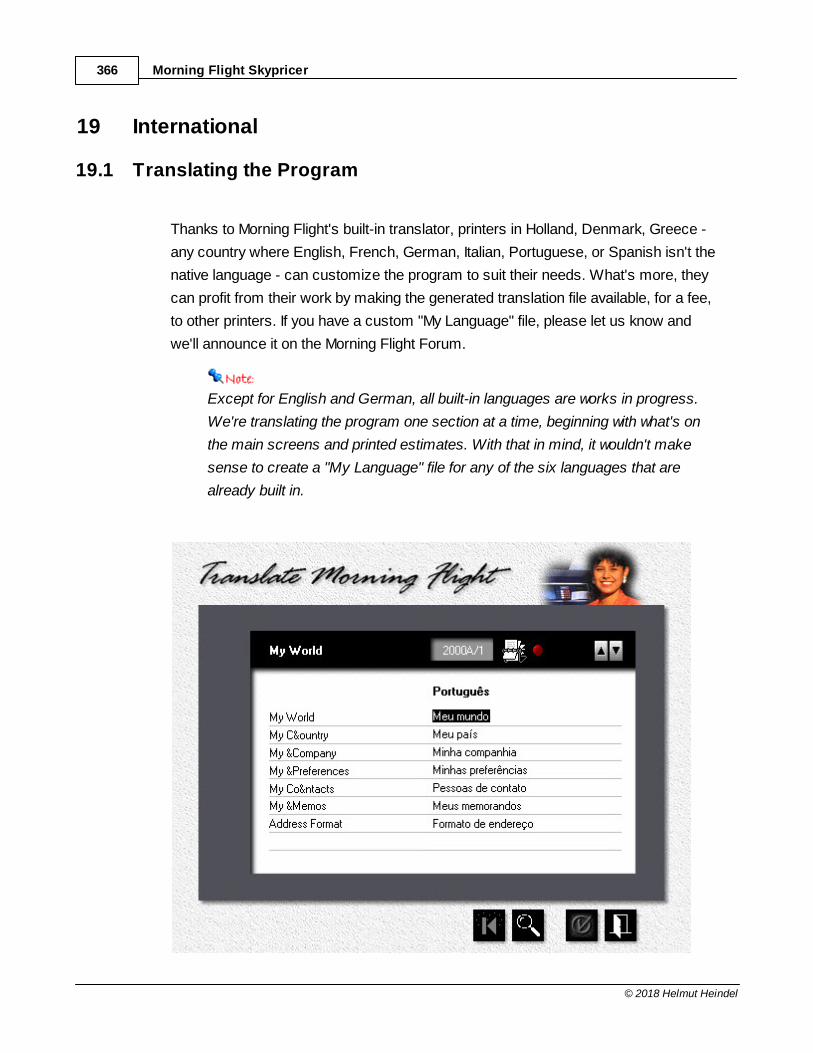
Morning Flight Skypricer366
© 2018 Helmut Heindel
19 International
19.1 Translating the Program
Thanks to Morning Flight's built-in translator, printers in Holland, Denmark, Greece -
any country where English, French, German, Italian, Portuguese, or Spanish isn't the
native language - can customize the program to suit their needs. What's more, they
can profit from their work by making the generated translation file available, for a fee,
to other printers. If you have a custom "My Language" file, please let us know and
we'll announce it on the Morning Flight Forum.
Except for English and German, all built-in languages are works in progress.
We're translating the program one section at a time, beginning with what's on
the main screens and printed estimates. With that in mind, it wouldn't make
sense to create a "My Language" file for any of the six languages that are
already built in.
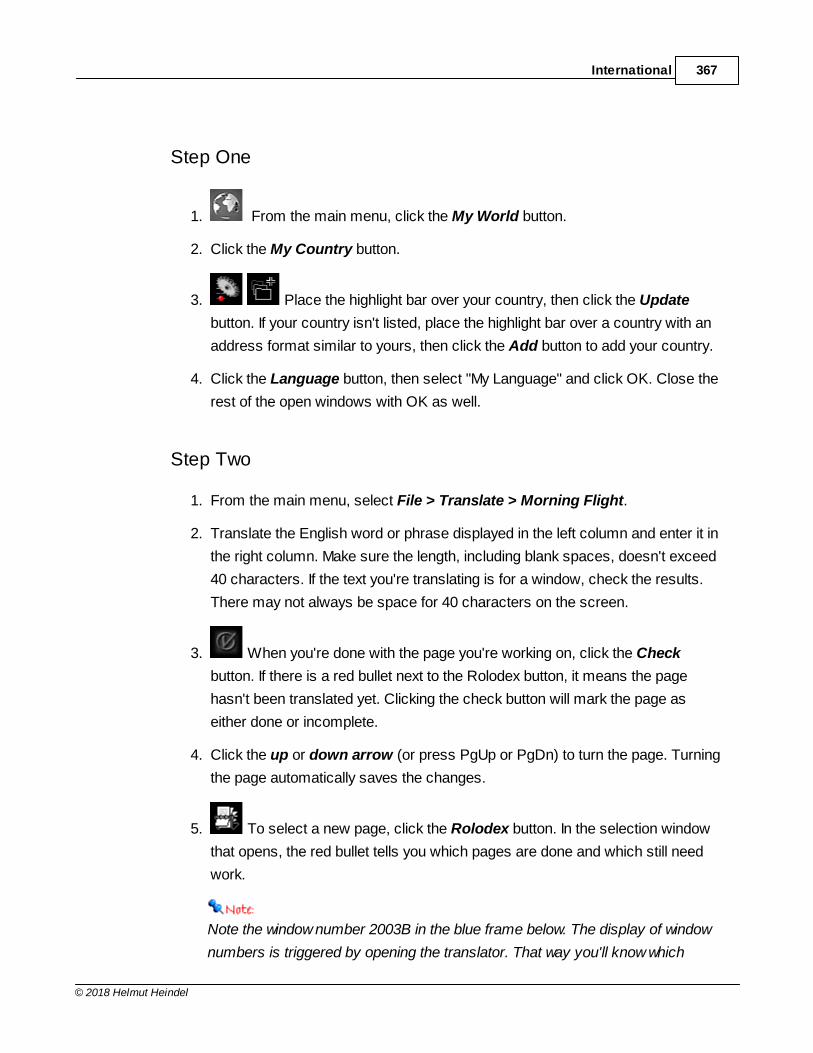
International 367
© 2018 Helmut Heindel
Step One
1. From the main menu, click the My World button.
2. Click the My Country button.
3. Place the highlight bar over your country, then click the Update
button. If your country isn't listed, place the highlight bar over a country with an
address format similar to yours, then click the Add button to add your country.
4. Click the Language button, then select "My Language" and click OK. Close the
rest of the open windows with OK as well.
Step Two
1. From the main menu, select File > Translate > Morning Flight.
2. Translate the English word or phrase displayed in the left column and enter it in
the right column. Make sure the length, including blank spaces, doesn't exceed
40 characters. If the text you're translating is for a window, check the results.
There may not always be space for 40 characters on the screen.
3. When you're done with the page you're working on, click the Check
button. If there is a red bullet next to the Rolodex button, it means the page
hasn't been translated yet. Clicking the check button will mark the page as
either done or incomplete.
4. Click the up or down arrow (or press PgUp or PgDn) to turn the page. Turning
the page automatically saves the changes.
5. To select a new page, click the Rolodex button. In the selection window
that opens, the red bullet tells you which pages are done and which still need
work.
Note the window number 2003B in the blue frame below. The display of window
numbers is triggered by opening the translator. That way you'll know which
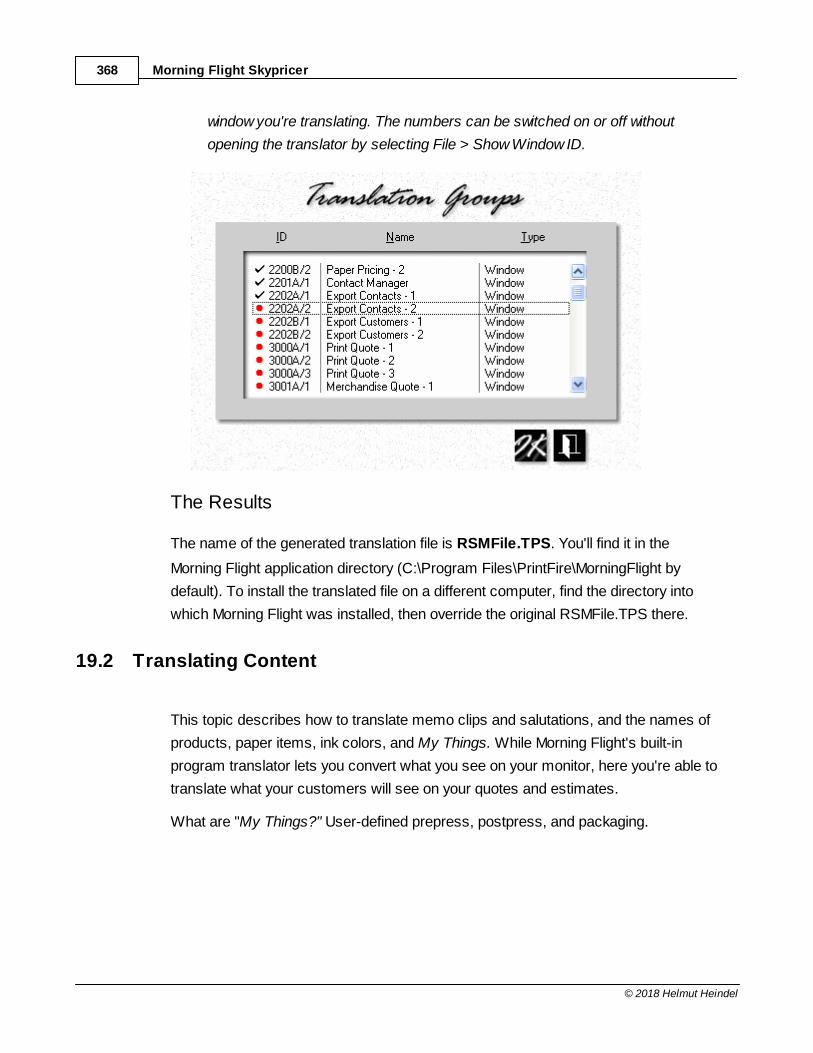
Morning Flight Skypricer368
© 2018 Helmut Heindel
window you're translating. The numbers can be switched on or off without
opening the translator by selecting File > Show Window ID.
The Results
The name of the generated translation file is RSMFile.TPS. You'll find it in the
Morning Flight application directory (C:\Program Files\PrintFire\MorningFlight by
default). To install the translated file on a different computer, find the directory into
which Morning Flight was installed, then override the original RSMFile.TPS there.
19.2 Translating Content
This topic describes how to translate memo clips and salutations, and the names of
products, paper items, ink colors, and My Things. While Morning Flight's built-in
program translator lets you convert what you see on your monitor, here you're able to
translate what your customers will see on your quotes and estimates.
What are "My Things?" User-defined prepress, postpress, and packaging.
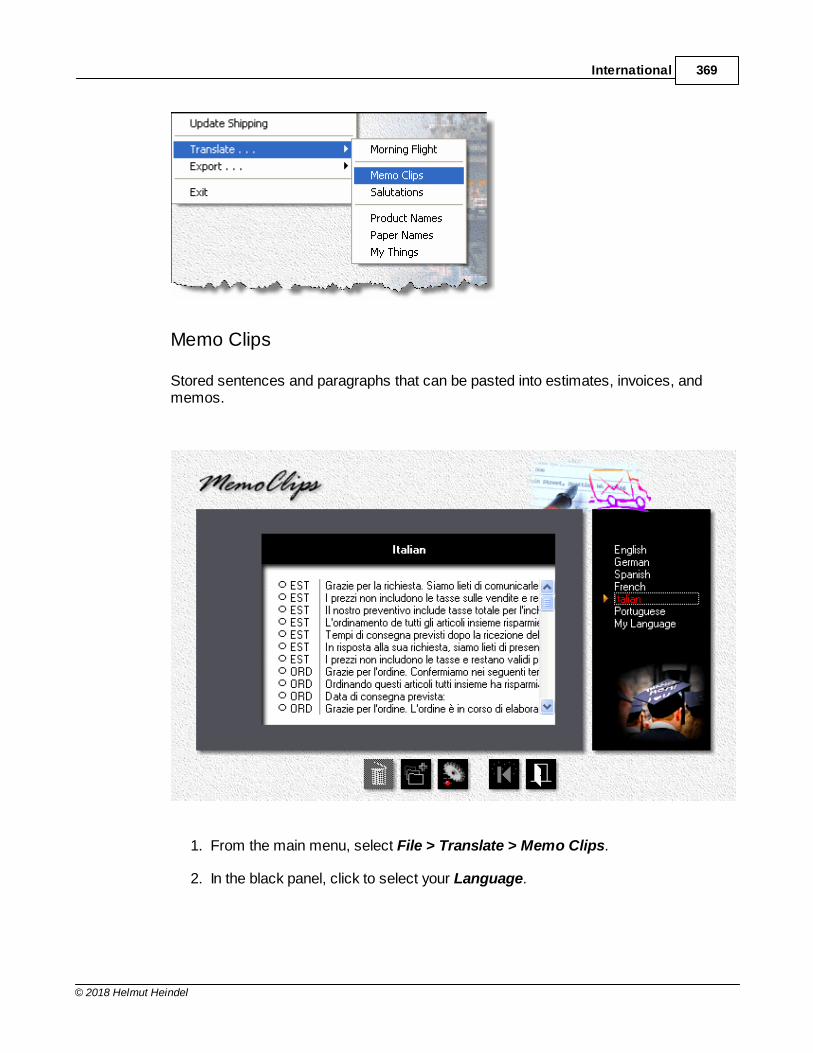
International 369
© 2018 Helmut Heindel
Memo Clips
Stored sentences and paragraphs that can be pasted into estimates, invoices, andmemos.
1. From the main menu, select File > Translate > Memo Clips.
2. In the black panel, click to select your Language.
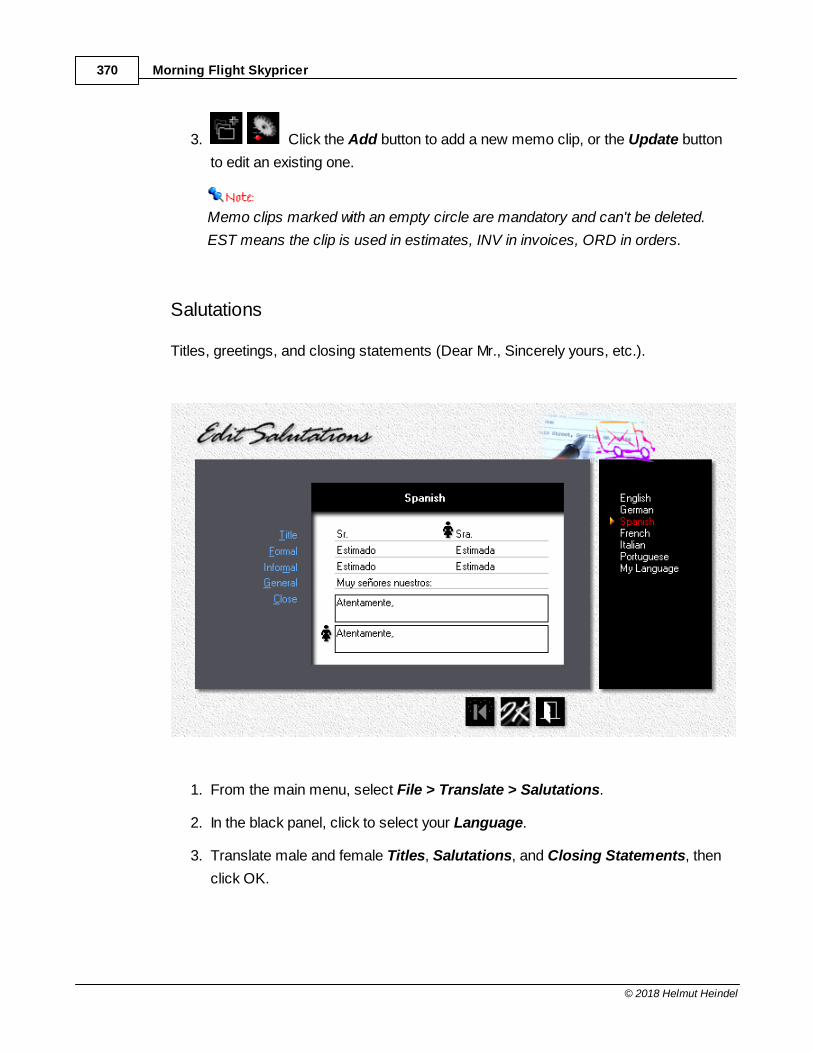
Morning Flight Skypricer370
© 2018 Helmut Heindel
3. Click the Add button to add a new memo clip, or the Update button
to edit an existing one.
Memo clips marked with an empty circle are mandatory and can't be deleted.
EST means the clip is used in estimates, INV in invoices, ORD in orders.
Salutations
Titles, greetings, and closing statements (Dear Mr., Sincerely yours, etc.).
1. From the main menu, select File > Translate > Salutations.
2. In the black panel, click to select your Language.
3. Translate male and female Titles, Salutations, and Closing Statements, then
click OK.
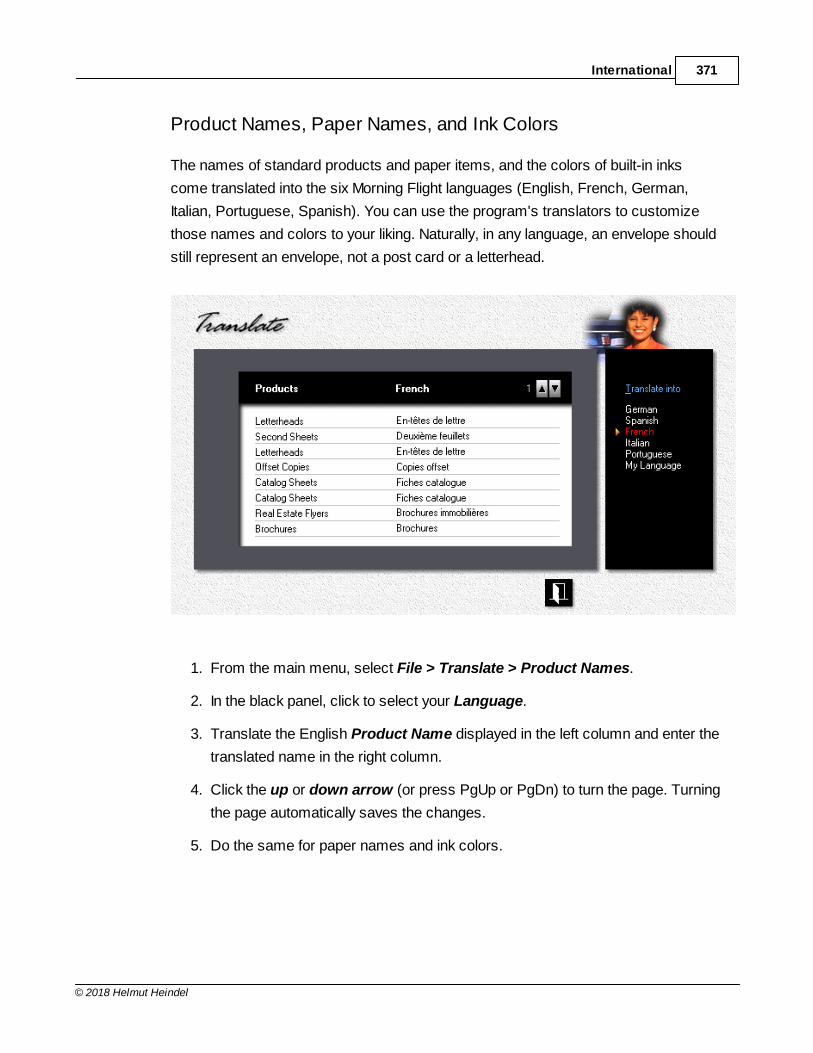
International 371
© 2018 Helmut Heindel
Product Names, Paper Names, and Ink Colors
The names of standard products and paper items, and the colors of built-in inks
come translated into the six Morning Flight languages (English, French, German,
Italian, Portuguese, Spanish). You can use the program's translators to customize
those names and colors to your liking. Naturally, in any language, an envelope should
still represent an envelope, not a post card or a letterhead.
1. From the main menu, select File > Translate > Product Names.
2. In the black panel, click to select your Language.
3. Translate the English Product Name displayed in the left column and enter the
translated name in the right column.
4. Click the up or down arrow (or press PgUp or PgDn) to turn the page. Turning
the page automatically saves the changes.
5. Do the same for paper names and ink colors.
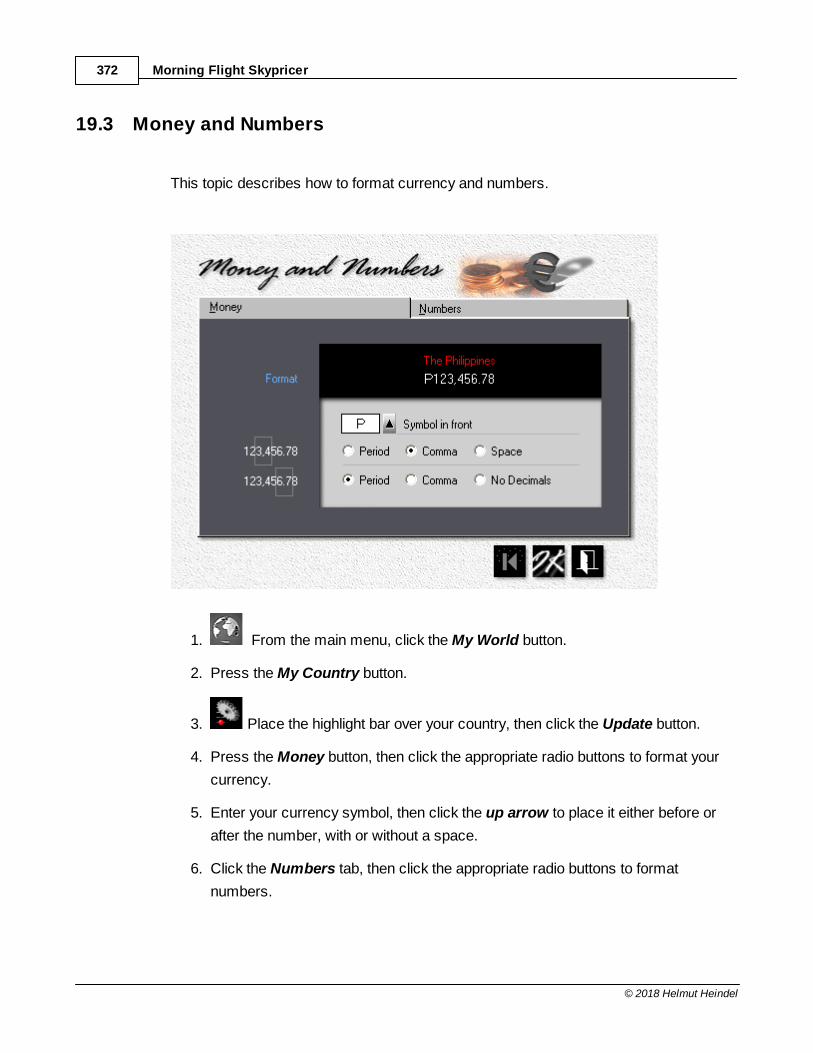
Morning Flight Skypricer372
© 2018 Helmut Heindel
19.3 Money and Numbers
This topic describes how to format currency and numbers.
1. From the main menu, click the My World button.
2. Press the My Country button.
3. Place the highlight bar over your country, then click the Update button.
4. Press the Money button, then click the appropriate radio buttons to format your
currency.
5. Enter your currency symbol, then click the up arrow to place it either before or
after the number, with or without a space.
6. Click the Numbers tab, then click the appropriate radio buttons to format
numbers.
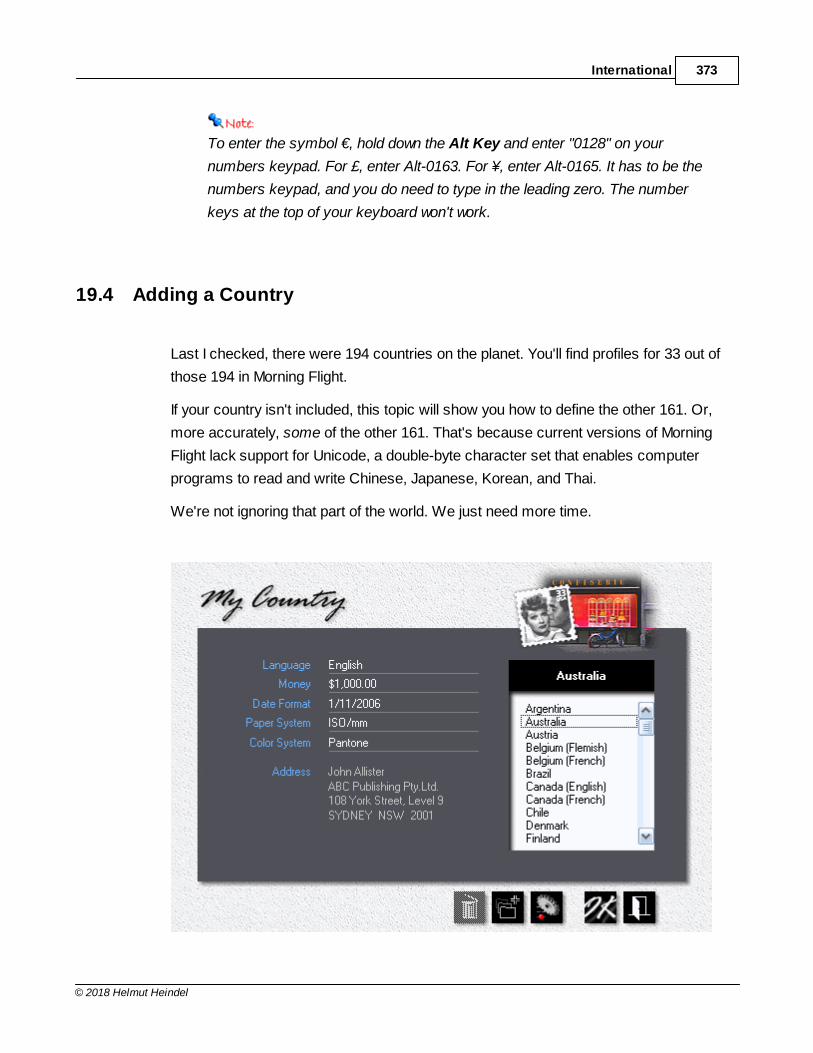
International 373
© 2018 Helmut Heindel
To enter the symbol €, hold down the Alt Key and enter "0128" on your
numbers keypad. For £, enter Alt-0163. For ¥, enter Alt-0165. It has to be the
numbers keypad, and you do need to type in the leading zero. The number
keys at the top of your keyboard won't work.
19.4 Adding a Country
Last I checked, there were 194 countries on the planet. You'll find profiles for 33 out of
those 194 in Morning Flight.
If your country isn't included, this topic will show you how to define the other 161. Or,
more accurately, some of the other 161. That's because current versions of Morning
Flight lack support for Unicode, a double-byte character set that enables computer
programs to read and write Chinese, Japanese, Korean, and Thai.
We're not ignoring that part of the world. We just need more time.
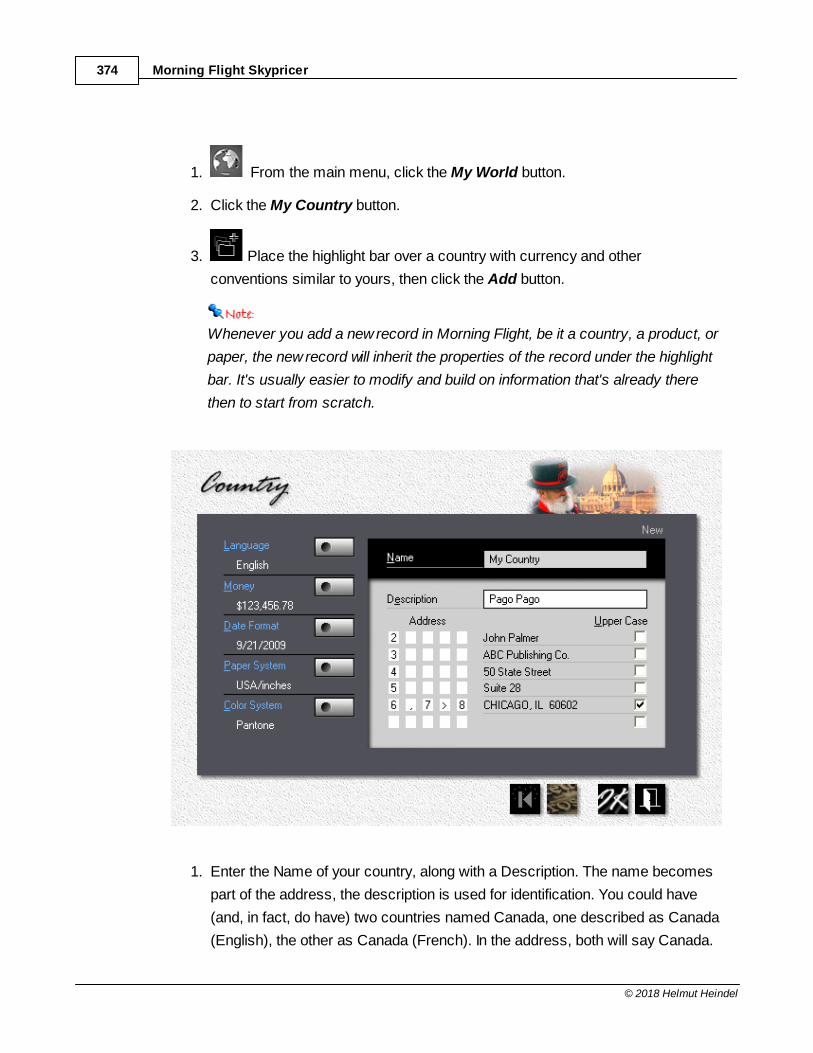
Morning Flight Skypricer374
© 2018 Helmut Heindel
1. From the main menu, click the My World button.
2. Click the My Country button.
3. Place the highlight bar over a country with currency and other
conventions similar to yours, then click the Add button.
Whenever you add a new record in Morning Flight, be it a country, a product, or
paper, the new record will inherit the properties of the record under the highlight
bar. It's usually easier to modify and build on information that's already there
then to start from scratch.
1. Enter the Name of your country, along with a Description. The name becomes
part of the address, the description is used for identification. You could have
(and, in fact, do have) two countries named Canada, one described as Canada
(English), the other as Canada (French). In the address, both will say Canada.
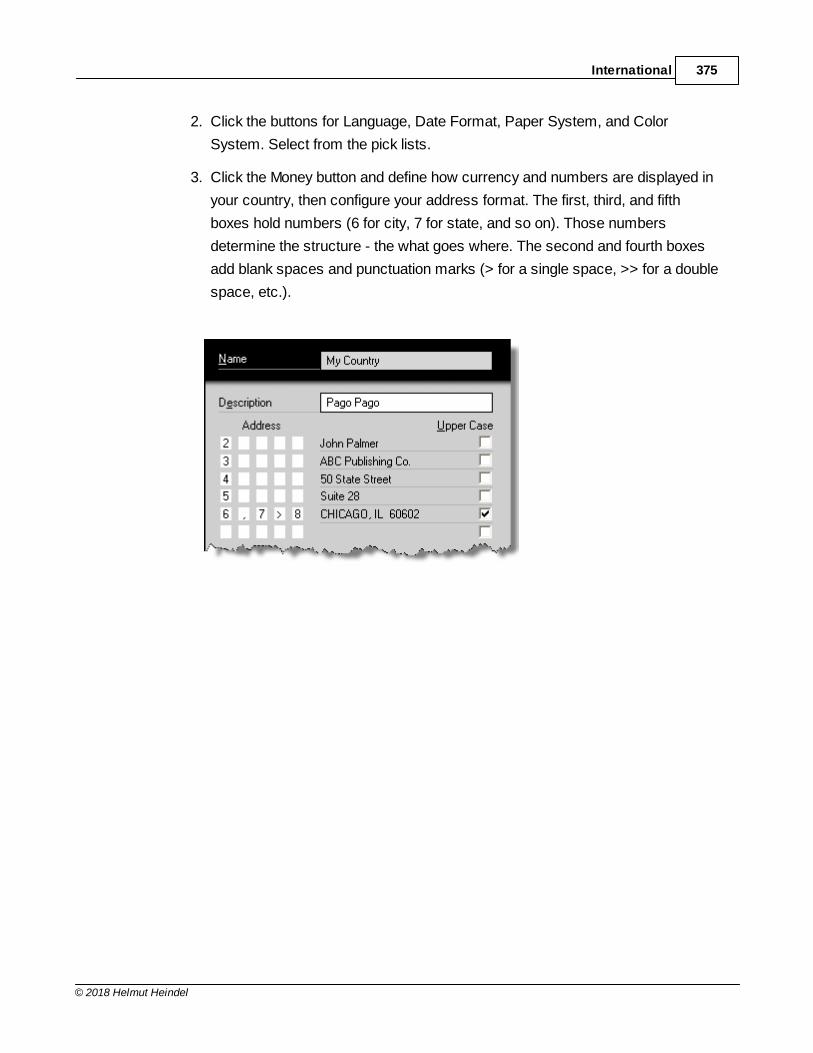
International 375
© 2018 Helmut Heindel
2. Click the buttons for Language, Date Format, Paper System, and Color
System. Select from the pick lists.
3. Click the Money button and define how currency and numbers are displayed in
your country, then configure your address format. The first, third, and fifth
boxes hold numbers (6 for city, 7 for state, and so on). Those numbers
determine the structure - the what goes where. The second and fourth boxes
add blank spaces and punctuation marks (> for a single space, >> for a double
space, etc.).
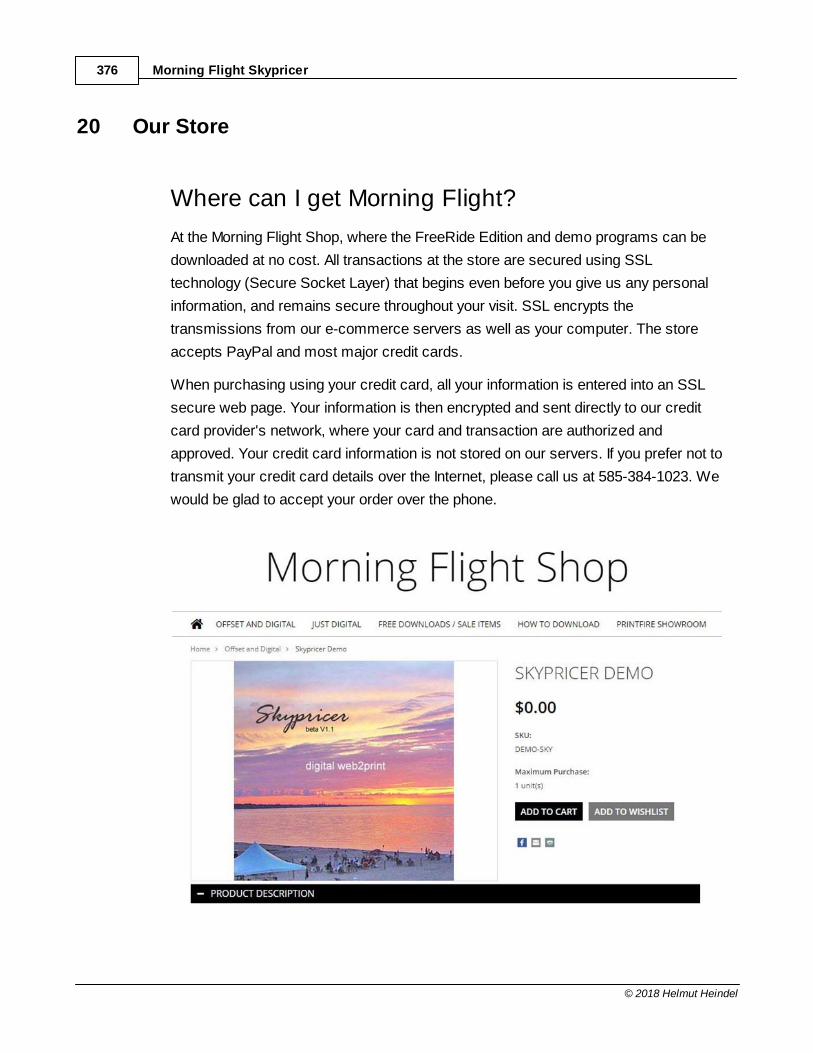
Morning Flight Skypricer376
© 2018 Helmut Heindel
20 Our Store
Where can I get Morning Flight?
At the Morning Flight Shop, where the FreeRide Edition and demo programs can be
downloaded at no cost. All transactions at the store are secured using SSL
technology (Secure Socket Layer) that begins even before you give us any personal
information, and remains secure throughout your visit. SSL encrypts the
transmissions from our e-commerce servers as well as your computer. The store
accepts PayPal and most major credit cards.
When purchasing using your credit card, all your information is entered into an SSL
secure web page. Your information is then encrypted and sent directly to our credit
card provider's network, where your card and transaction are authorized and
approved. Your credit card information is not stored on our servers. If you prefer not to
transmit your credit card details over the Internet, please call us at 585-384-1023. We
would be glad to accept your order over the phone.
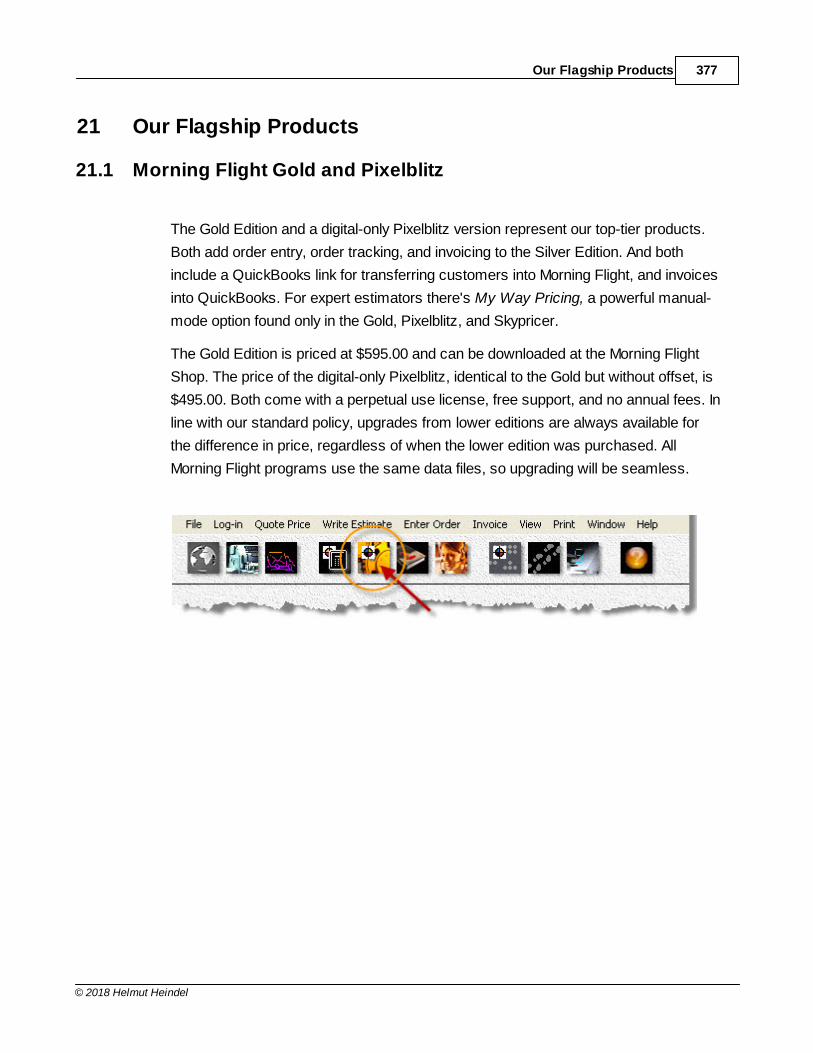
Our Flagship Products 377
© 2018 Helmut Heindel
21 Our Flagship Products
21.1 Morning Flight Gold and Pixelblitz
The Gold Edition and a digital-only Pixelblitz version represent our top-tier products.
Both add order entry, order tracking, and invoicing to the Silver Edition. And both
include a QuickBooks link for transferring customers into Morning Flight, and invoices
into QuickBooks. For expert estimators there's My Way Pricing, a powerful manual-
mode option found only in the Gold, Pixelblitz, and Skypricer.
The Gold Edition is priced at $595.00 and can be downloaded at the Morning Flight
Shop. The price of the digital-only Pixelblitz, identical to the Gold but without offset, is
$495.00. Both come with a perpetual use license, free support, and no annual fees. In
line with our standard policy, upgrades from lower editions are always available for
the difference in price, regardless of when the lower edition was purchased. All
Morning Flight programs use the same data files, so upgrading will be seamless.
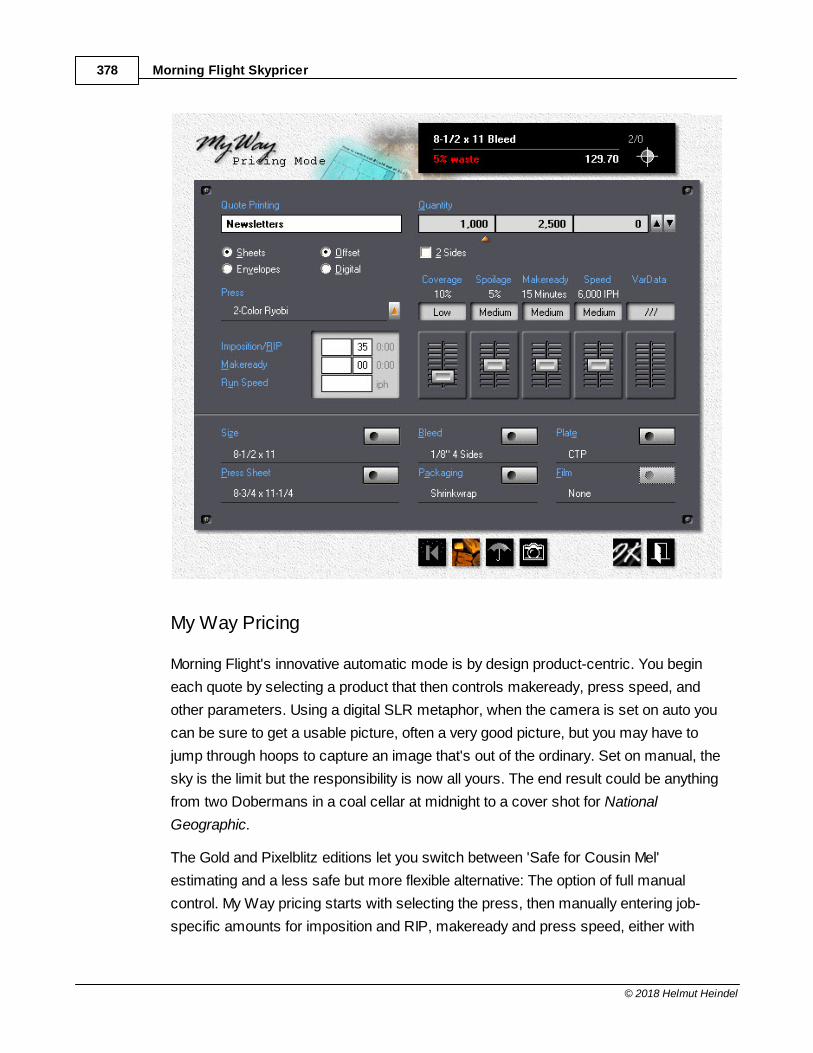
Morning Flight Skypricer378
© 2018 Helmut Heindel
My Way Pricing
Morning Flight's innovative automatic mode is by design product-centric. You begin
each quote by selecting a product that then controls makeready, press speed, and
other parameters. Using a digital SLR metaphor, when the camera is set on auto you
can be sure to get a usable picture, often a very good picture, but you may have to
jump through hoops to capture an image that's out of the ordinary. Set on manual, the
sky is the limit but the responsibility is now all yours. The end result could be anything
from two Dobermans in a coal cellar at midnight to a cover shot for National
Geographic.
The Gold and Pixelblitz editions let you switch between 'Safe for Cousin Mel'
estimating and a less safe but more flexible alternative: The option of full manual
control. My Way pricing starts with selecting the press, then manually entering job-
specific amounts for imposition and RIP, makeready and press speed, either with

Our Flagship Products 379
© 2018 Helmut Heindel
sliders or via custom entry fields. You can even create quotes the automatic way,
then edit them manually in My Way.
Order Entry
The Order Entry window looks and acts just like the window you're familiar with when
making quotes - no learning curve. The only difference is the blue panel on the right
that can be flipped through like a book by either clicking the radio buttons or pressing
the PgUp/PgDn keys. And, of course, just a single quantity, down from the three for
quotes.
Converting a Quote
In Morning Flight, that's as easy as highlighting the quote in a selection window and
choosing the quantity ordered.
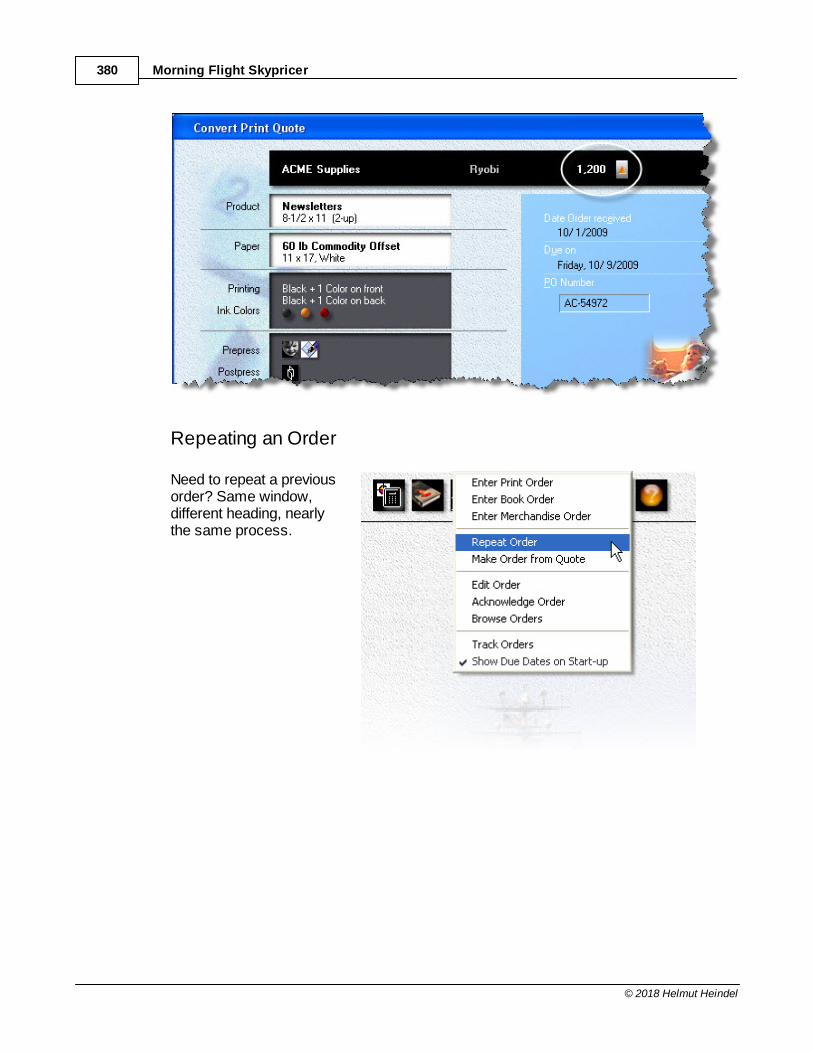
Morning Flight Skypricer380
© 2018 Helmut Heindel
Repeating an Order
Need to repeat a previousorder? Same window,different heading, nearlythe same process.
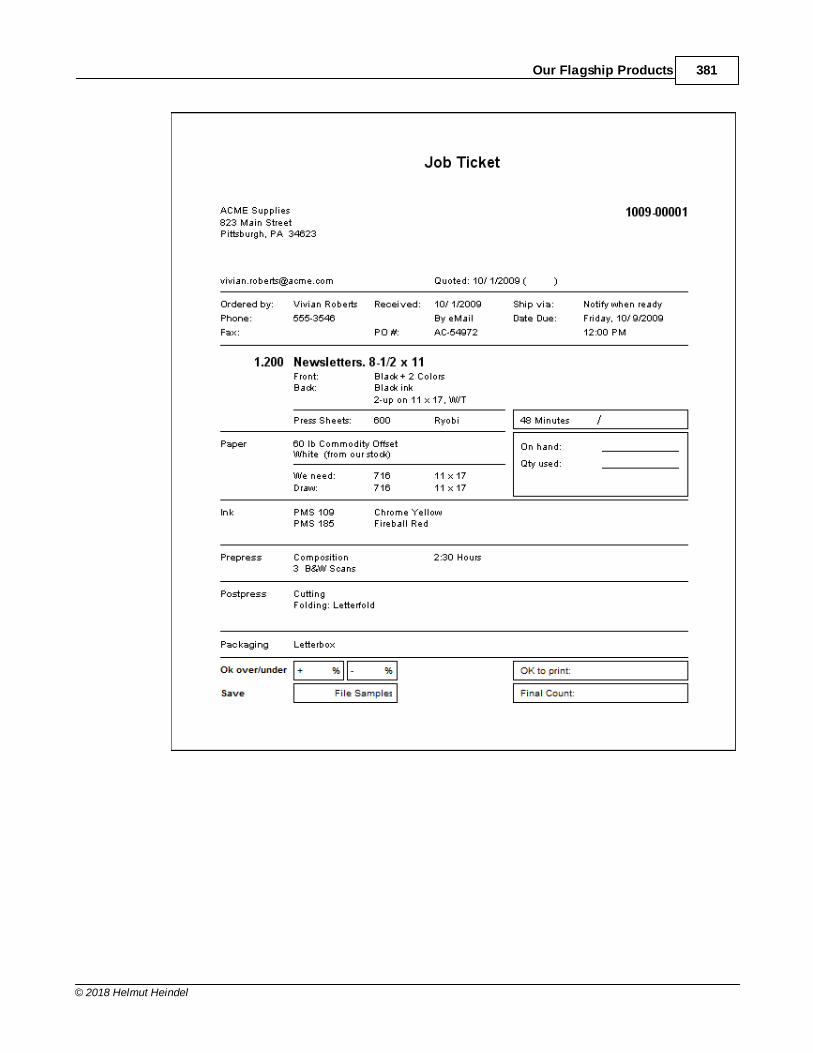
Our Flagship Products 381
© 2018 Helmut Heindel
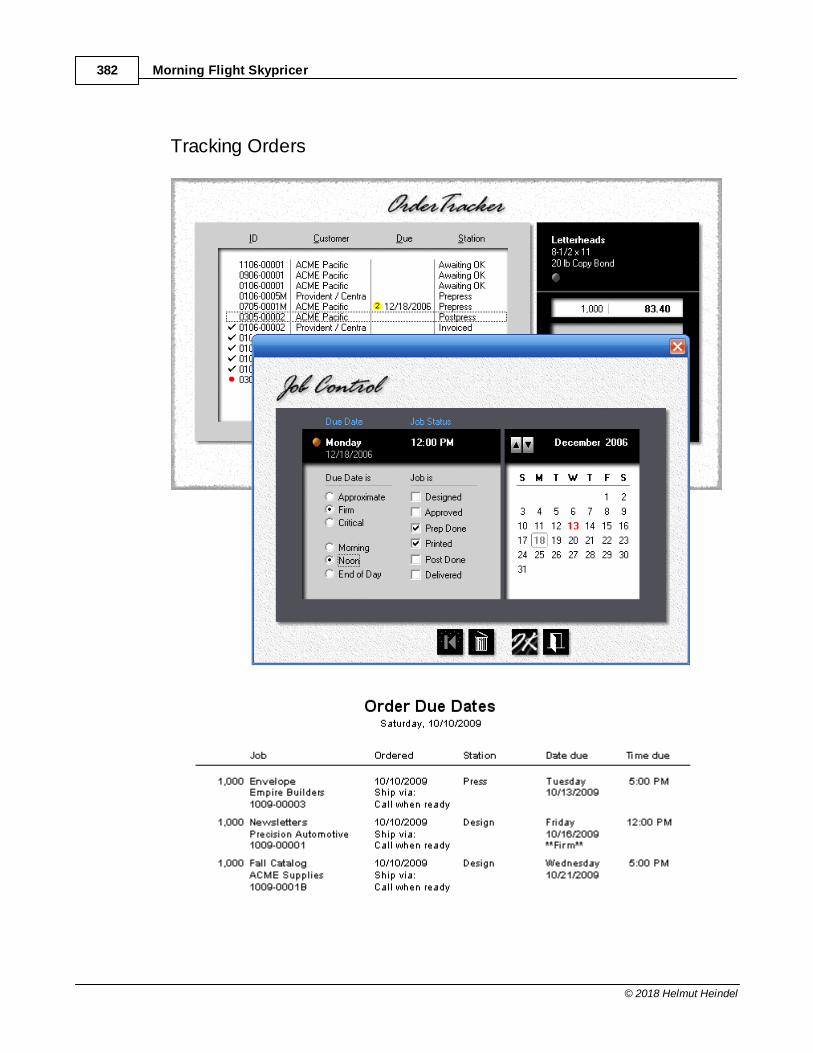
Morning Flight Skypricer382
© 2018 Helmut Heindel
Tracking Orders
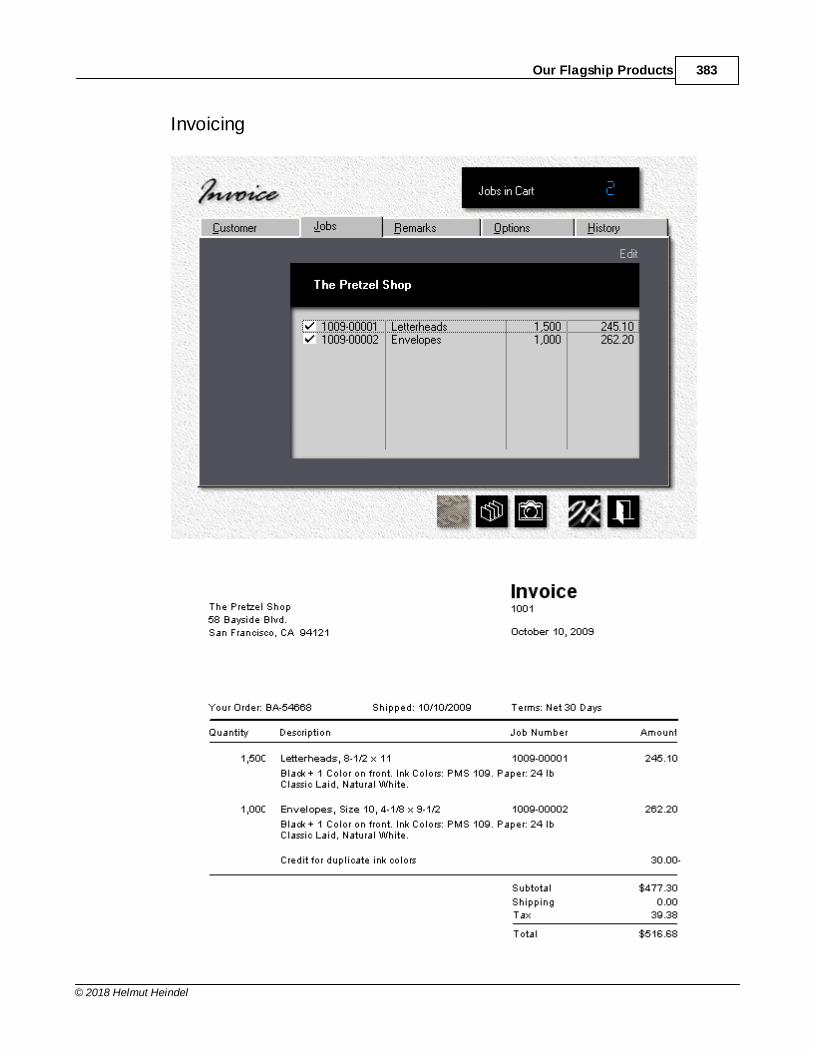
Our Flagship Products 383
© 2018 Helmut Heindel
Invoicing

Morning Flight Skypricer384
© 2018 Helmut Heindel
Exporting Invoices into QuickBooks
The Gold and Pixelblitz editions generate invoices but don't accept payments or track
receivables. For that you need a full-blown accounting system. In much of the world
that's likely to be QuickBooks. With Version 14.1 and the Transaction Pro 5 Importer
from Baystate you can eliminate the nuisance of having to key in a stack of invoices
into QuickBooks every night.
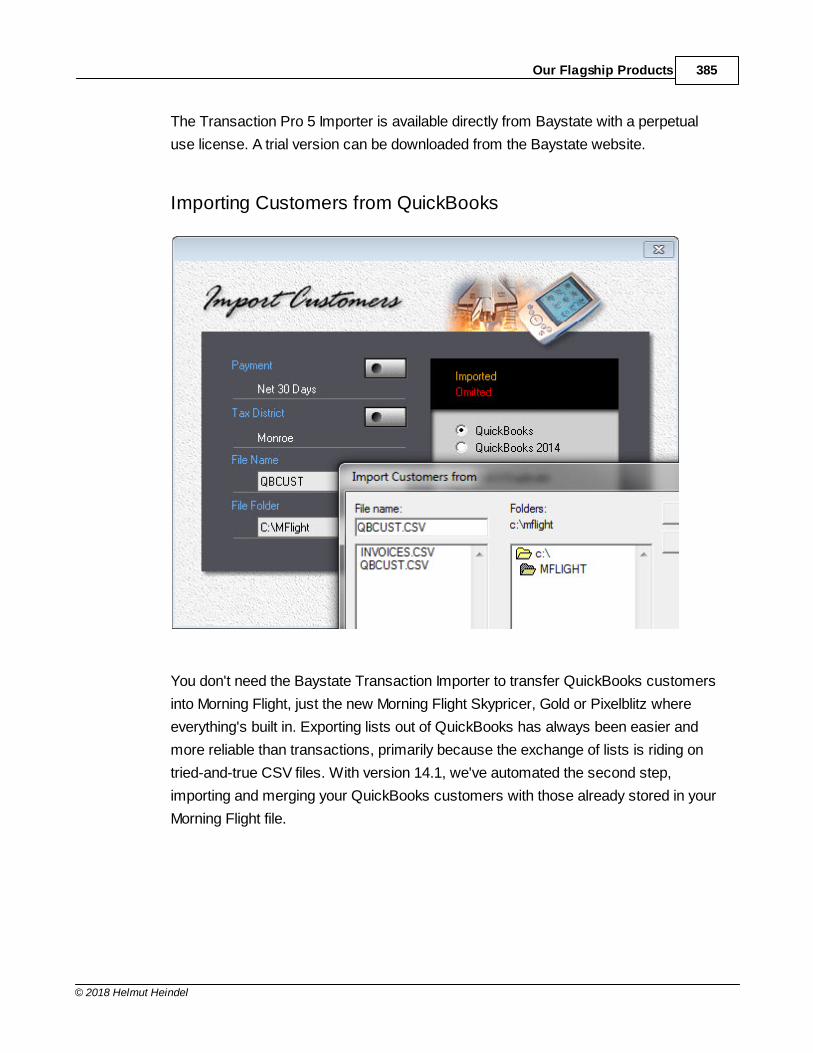
Our Flagship Products 385
© 2018 Helmut Heindel
The Transaction Pro 5 Importer is available directly from Baystate with a perpetual
use license. A trial version can be downloaded from the Baystate website.
Importing Customers from QuickBooks
You don't need the Baystate Transaction Importer to transfer QuickBooks customers
into Morning Flight, just the new Morning Flight Skypricer, Gold or Pixelblitz where
everything's built in. Exporting lists out of QuickBooks has always been easier and
more reliable than transactions, primarily because the exchange of lists is riding on
tried-and-true CSV files. With version 14.1, we've automated the second step,
importing and merging your QuickBooks customers with those already stored in your
Morning Flight file.

Index 387
© 2018 Helmut Heindel
Index
- B -Backing up your Data 23
Booklets
adding postpress 152
adding prepress 146
pricing bookbinding 261
quoting booklets 119
quoting custom booklets 127
Browsing and Updating 67
Buttons and Navigation 63
- C -Carbonless
changing colors 330
quoting custom forms 133
quoting precollated forms 131, 274
Contacts
updating a contact 347
writing a memo 355
Copies
quoting copies 89
quoting custom copies 105
setting up for copies 295
updating copy products 307
Cursors 76
Custom Booklets 127
Customers
adding contacts 347
adding customers 338
changing the salutation 350
changing the tax district 342
importing from QuickBooks 225, 338
payment terms 342
tax rates and districts 345
updating customers 340
- D -Detail, how to view 70
Digital
quoting custom digital 101
quoting digital 82
selecting digital as primary 299
setting up for digital 281
setting up for RISO 284, 288
setting up for Xante 291
updating digital products 304
updating wide format products 310
Digital Prices, how to match 232
- E -e-Mailing
an acknowledgment 184
an estimate 184
Estimates
adjusting prices 177
changing the language 186
creating an estimate 170
e-mailing an estimate 184
renewing old quotes 190
terms and conditions 174
using memo clips 174
Exchange Rate 31
- F -Flash Drive
installing Morning Flight on 28
Formatting Text 77
- I -Identifying Quotes 168
Importing
customers from QuickBooks 225
Ink
adding ink colors 141
pricing ink 245
updating inks 335
Installing
on a network or flash drive 28
Installing Morning Flight 13
International
adding a country 373
exchange rate 31
money formats 372
number formats 372
salutations 370
translating content 368
translating the program 366
- K -Keyword 156
Morning Flight Skypricer388
© 2018 Helmut Heindel
- M -Markups 47
general markups 241
job-specific markups 241
setting paper markups 241
Memo Clips
creating memo clips 364
translating memo clips 368
using in a memo 355
using in an estimate 174
Memos
adding your logo 361
creating memo clips 364
e-mailing a memo 362
writing a memo 355
Merchandise
pricing 266
quoting merchandise 95
updating merchandise products 313
Money
exchange rate 31
format 372
Morning Flight Gold 377
Morning Flight Pixelblitz 377
Multiple Computers
using Morning Flight on 28
Multiples x-Up 136
My Shop 45
My Store 46
My Way
quoting 270
My Way pricing
carbonless 274
My World 42
- N -Network
using Morning Flight on 28
Notes
adding to contacts 351
adding to quotes 156
Number Formats 372
- O -Offset
disengage 297
quoting custom offset 98
quoting offset 81
setting up for offset 276
updating offset products 300
Offset Prices, how to match 230
- P -Packaging
creating custom packaging 264
pricing packaging 263
Paper
buy-it paper 324, 327
categories 316
entering sizes 79
in-Stock 332
in-stock paper 320
inventory 332
markups 47
pricing 238, 332
quoting custom paper 114
setting markups 241
special paper 329
Pixelblitz 377
Postpress
adding custom postpress 155
adding postpress 149
adding postpress to booklets 152
creating custom postpress 258
pricing postpress 254
Preferences 43
Pre-Launch Interview 31
Prepress
adding custom prepress 148
adding prepress 144
adding prepress to booklets 146
pricing custom prepress 250
pricing prepress 247
Presses
adding more presses 55
designating as primary 276
press-based pricing 52
setting up for copies 295
setting up for digital 281
setting up for offset 276
setting up for RISO 284, 288
setting up for Xante 291
virtual presses 59
Pricing
Index 389
© 2018 Helmut Heindel
Pricing
adjusting estimate prices 177
matching your prices 230, 232
merchandise 266
out-of-the-box pricing 48
price levels 49
setting bookbinding prices 261
setting custom packaging prices 264
setting custom postpress prices 258
setting custom prepress prices 250
setting custom proofs prices 252
setting ink prices 245
setting packaging prices 263
setting paper prices 238, 332
setting postpress prices 254
setting prepress prices 247
setting product prices 234
Primary
presses 276
Primary Product 299
Printfire Store 376
Printing
quotes 165
Products
categories 297
pricing 234
primary 297
selecting as primary 299
updating copy products 307
updating digital products 304
updating offset products 300
updating wide format products 310
Proofs
pricing custom proofs 252
- Q -QuickBooks
importing customers from 225
preparing QuickBooks 224
Quotes
available for estimates 190
Quoting 351
adding a keyword 156
adding custom postpress 155
adding custom prepress 148
adding notes 156
adding postpress 149
adding postpress to booklets 152
adding prepress 144
adding prepress to booklets 146
changing a quote 158
charging for ink 141
finding a quote 158
making your first quote 34
printing a quote 165
quoting booklets 119
quoting copies 89
quoting custom booklets 127
quoting custom copies 105
quoting custom digital 101
quoting custom offset 98
quoting custom paper 114
quoting custom wide format 110
quoting digital 82, 85
quoting it My Way 270
quoting merchandise 95
quoting multiples x-up 136
quoting offset 81
quoting wide format 91
quoting work and turn 138
quoting Xante 85
setting ink colors 141
viewing quotes 161
- R -RISO
setting up 284, 288
- S -Sizes, how to enter 79
Skypricer
creating a Sky Item 208
creating Custom Options 214
managing Quantity Sets 221
setting up Skystore Categories 218
The Invention 201
- T -Taxes
setting tax districts 342
updating taxes 345
Transferring
customers from QuickBooks 225
Translating
content 368
Morning Flight Skypricer390
© 2018 Helmut Heindel
Translating
the program 366
Tutorials
making your first quote 34
- U -Upgrading
to another version 13
- V -Validating Data 78
Virtual Presses 59
Vista
installing for 13
- W -Where to Buy 376
Wide Format
creating Custom Options 198
In a Nutshell 192
pricing 234
quoting custom wide format 110
quoting wide format 91
updating wide format products 310
Windows 7
installing for 13
Work and Turn 138
Workspaces 40
- X -Xante
quoting Xante 85
setting up 291
- Z -Zooming in 70


