Embed Size (px)
Citation preview

Foreword
Our country’s future lies in the education of our children. The Government of Sierra Leone is
committed to doing whatever it takes to secure this future.
As Minister of Education, Science and Technology since 2007, I have worked every day to improve
our country’s education. We have faced challenges, not least the Ebola epidemic which as we all
know hit our sector hard. The Government’s response to this crisis – led by our President – showed
first-hand how we acted decisively in the face of those challenges, to make things better than they
were in the first place.
One great success in our response was the publication of the Accelerated Teaching Syllabi in August
2015. This gave teachers the tools they needed to make up for lost time whilst ensuring pupils
received an adequate level of knowledge across each part of the curriculum. The Accelerated
Teaching syllabi also provided the pedagogical resource and impetus for the successful national
radio and TV teaching programs during the Ebola epidemic.
It is now time to build on this success. I am pleased to issue new lesson plans across all primary and
JSS school grades in Language Arts and Mathematics. These plans give teachers the support they
need to cover each element of the national curriculum. In total, we are producing 2,700 lesson plans
– one for each lesson, in each term, in each year for each class. This is a remarkable achievement in a
matter of months.
These plans have been written by experienced Sierra Leonean educators together with international
experts. They have been reviewed by officials of my Ministry to ensure they meet the specific needs
of the Sierra Leonean population. They provide step-by-step guidance for each learning outcome,
using a range of recognised techniques to deliver the best teaching.
I call on all teachers and heads of schools across the country to make best use of these materials. We
are supporting our teachers through a detailed training programme designed specifically for these
new plans. It is really important that these Lesson Plans are used, together with any other materials
you may have.
This is just the start of education transformation in Sierra Leone. I am committed to continue to
strive for the changes that will make our country stronger.
I want to thank our partners for their continued support. Finally, I also want to thank you – the
teachers of our country – for your hard work in securing our future.
Dr. Minkailu Bah
Minister of Education, Science and Technology
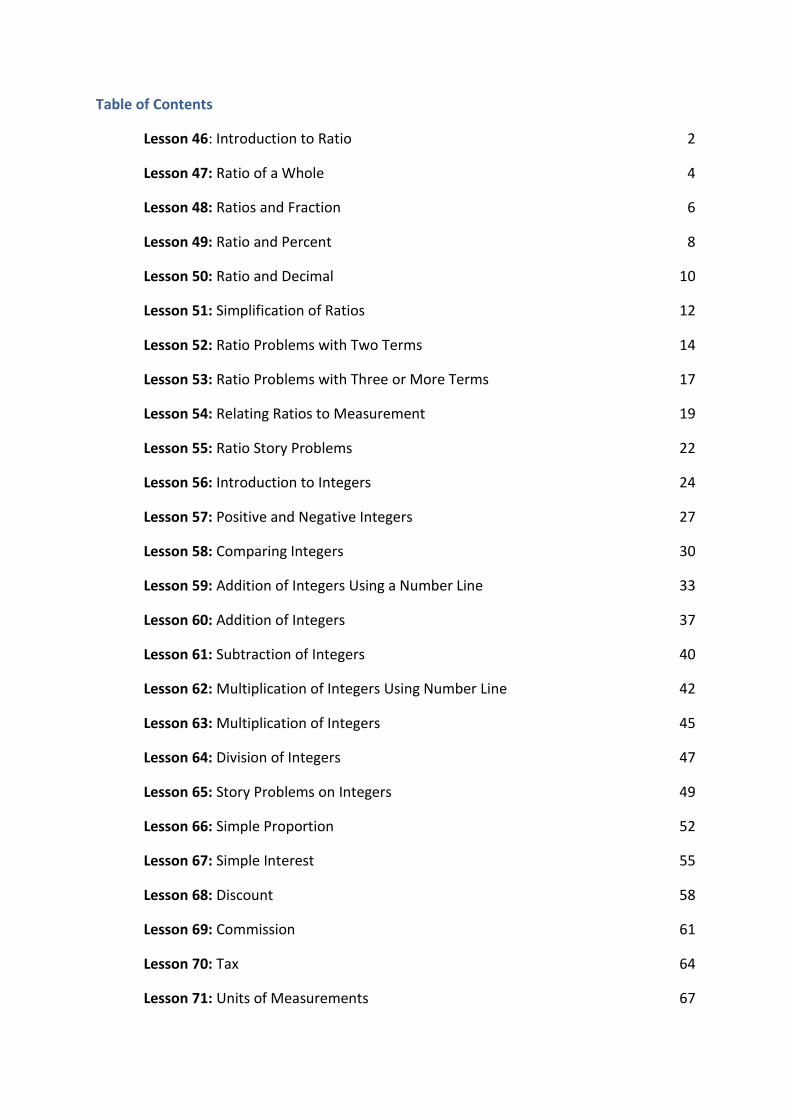
Table of Contents
Lesson 46: Introduction to Ratio 2
Lesson 47: Ratio of a Whole 4
Lesson 48: Ratios and Fraction 6
Lesson 49: Ratio and Percent 8
Lesson 50: Ratio and Decimal 10
Lesson 51: Simplification of Ratios 12
Lesson 52: Ratio Problems with Two Terms 14
Lesson 53: Ratio Problems with Three or More Terms 17
Lesson 54: Relating Ratios to Measurement 19
Lesson 55: Ratio Story Problems 22
Lesson 56: Introduction to Integers 24
Lesson 57: Positive and Negative Integers 27
Lesson 58: Comparing Integers 30
Lesson 59: Addition of Integers Using a Number Line 33
Lesson 60: Addition of Integers 37
Lesson 61: Subtraction of Integers 40
Lesson 62: Multiplication of Integers Using Number Line 42
Lesson 63: Multiplication of Integers 45
Lesson 64: Division of Integers 47
Lesson 65: Story Problems on Integers 49
Lesson 66: Simple Proportion 52
Lesson 67: Simple Interest 55
Lesson 68: Discount 58
Lesson 69: Commission 61
Lesson 70: Tax 64
Lesson 71: Units of Measurements 67
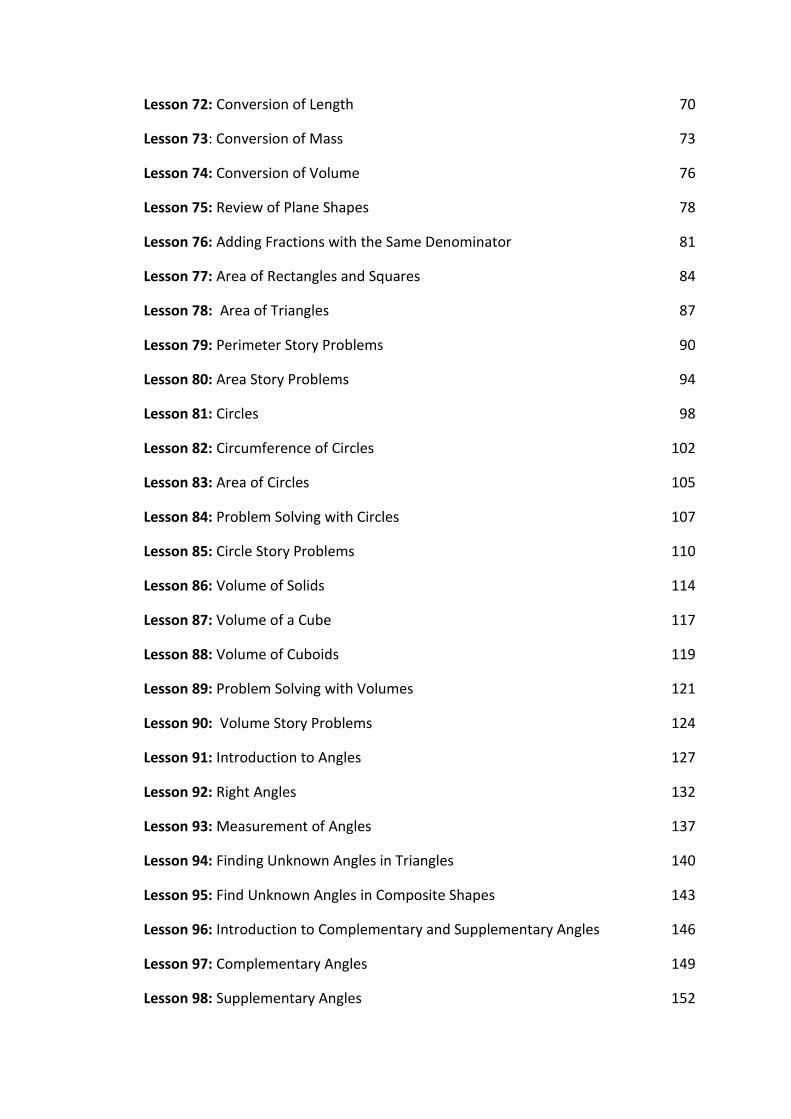
Lesson 72: Conversion of Length 70
Lesson 73: Conversion of Mass 73
Lesson 74: Conversion of Volume 76
Lesson 75: Review of Plane Shapes 78
Lesson 76: Adding Fractions with the Same Denominator 81
Lesson 77: Area of Rectangles and Squares 84
Lesson 78: Area of Triangles 87
Lesson 79: Perimeter Story Problems 90
Lesson 80: Area Story Problems 94
Lesson 81: Circles 98
Lesson 82: Circumference of Circles 102
Lesson 83: Area of Circles 105
Lesson 84: Problem Solving with Circles 107
Lesson 85: Circle Story Problems 110
Lesson 86: Volume of Solids 114
Lesson 87: Volume of a Cube 117
Lesson 88: Volume of Cuboids 119
Lesson 89: Problem Solving with Volumes 121
Lesson 90: Volume Story Problems 124
Lesson 91: Introduction to Angles 127
Lesson 92: Right Angles 132
Lesson 93: Measurement of Angles 137
Lesson 94: Finding Unknown Angles in Triangles 140
Lesson 95: Find Unknown Angles in Composite Shapes 143
Lesson 96: Introduction to Complementary and Supplementary Angles 146
Lesson 97: Complementary Angles 149
Lesson 98: Supplementary Angles 152
Lesson 99: Intersecting Lines 155
Lesson 100: Transversal of Parallel Lines 158
Lesson 101: Construction of Circles 161
Lesson 102: Construction of Triangles 165
Lesson 103: Construction of Parallel Lines 168
Lesson 104: Construction of Perpendicular Lines 170
Lesson 105: Construction Practice 173
1
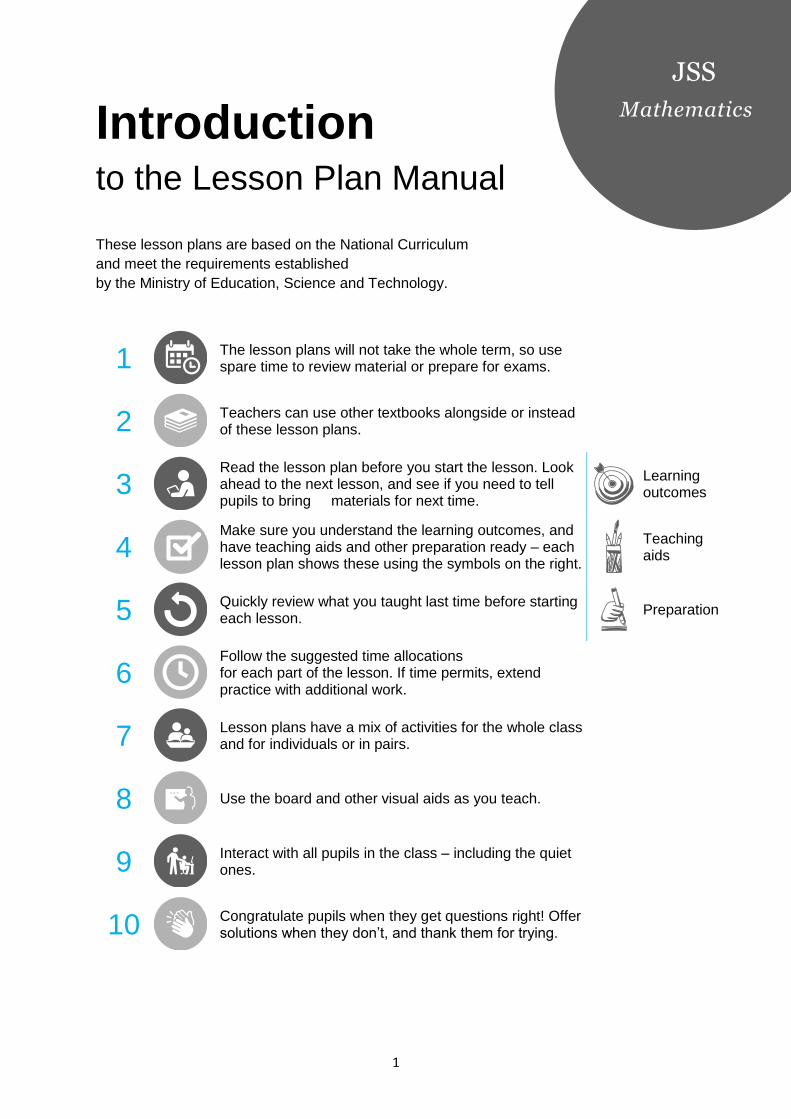
Introduction to the Lesson Plan Manual
These lesson plans are based on the National Curriculum
and meet the requirements established
by the Ministry of Education, Science and Technology.
1
The lesson plans will not take the whole term, so use spare time to review material or prepare for exams.
2
Teachers can use other textbooks alongside or instead of these lesson plans.
3
Read the lesson plan before you start the lesson. Look ahead to the next lesson, and see if you need to tell pupils to bring materials for next time.
Learning outcomes
4 Make sure you understand the learning outcomes, and
have teaching aids and other preparation ready – each lesson plan shows these using the symbols on the right.
Teaching aids
5
Quickly review what you taught last time before starting each lesson.
Preparation
6
Follow the suggested time allocations for each part of the lesson. If time permits, extend practice with additional work.
7
Lesson plans have a mix of activities for the whole class and for individuals or in pairs.
8
Use the board and other visual aids as you teach.
9
Interact with all pupils in the class – including the quiet ones.
10
Congratulate pupils when they get questions right! Offer solutions when they don’t, and thank them for trying.
Mathematics
JSS
2
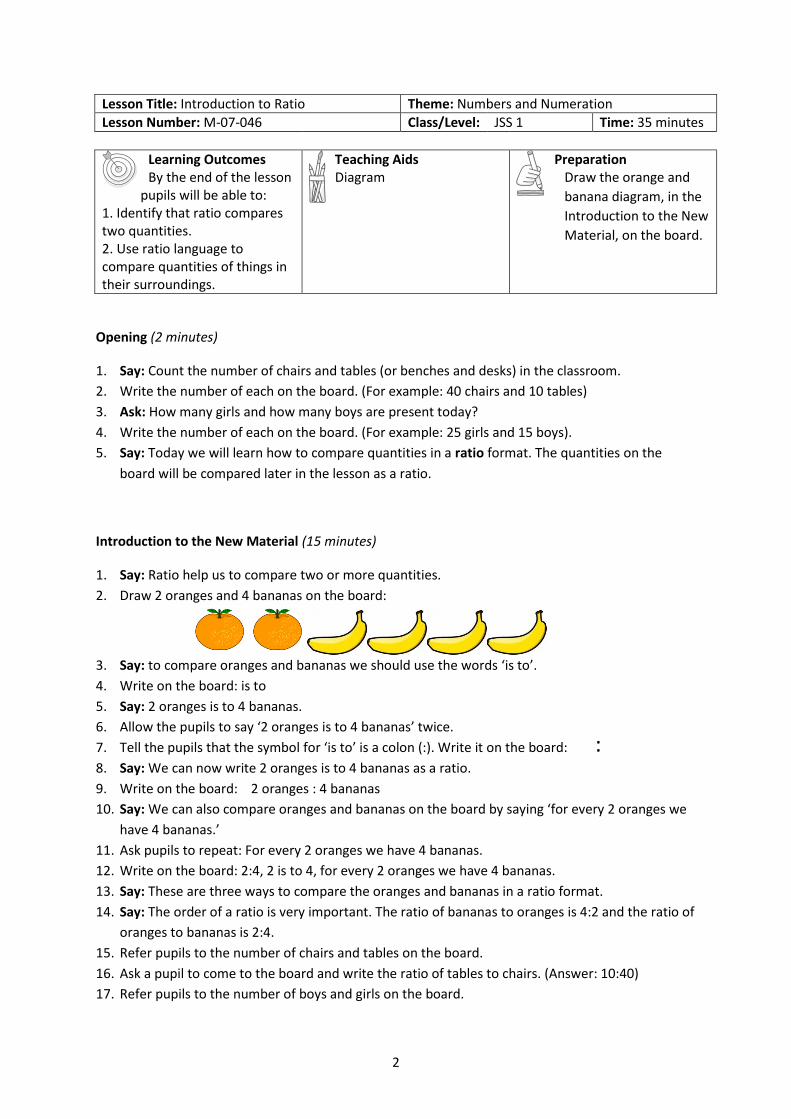
Lesson Title: Introduction to Ratio Theme: Numbers and Numeration
Lesson Number: M-07-046 Class/Level: JSS 1 Time: 35 minutes
Learning Outcomes By the end of the lesson
pupils will be able to: 1. Identify that ratio compares two quantities. 2. Use ratio language to compare quantities of things in their surroundings.
Teaching Aids Diagram
Preparation Draw the orange and
banana diagram, in the
Introduction to the New
Material, on the board.
Opening (2 minutes)
1. Say: Count the number of chairs and tables (or benches and desks) in the classroom.
2. Write the number of each on the board. (For example: 40 chairs and 10 tables)
3. Ask: How many girls and how many boys are present today?
4. Write the number of each on the board. (For example: 25 girls and 15 boys).
5. Say: Today we will learn how to compare quantities in a ratio format. The quantities on the
board will be compared later in the lesson as a ratio.
Introduction to the New Material (15 minutes)
1. Say: Ratio help us to compare two or more quantities.
2. Draw 2 oranges and 4 bananas on the board:
3. Say: to compare oranges and bananas we should use the words ‘is to’.
4. Write on the board: is to
5. Say: 2 oranges is to 4 bananas.
6. Allow the pupils to say ‘2 oranges is to 4 bananas’ twice.
7. Tell the pupils that the symbol for ‘is to’ is a colon (:). Write it on the board:
8. Say: We can now write 2 oranges is to 4 bananas as a ratio.
9. Write on the board: 2 oranges : 4 bananas
10. Say: We can also compare oranges and bananas on the board by saying ‘for every 2 oranges we
have 4 bananas.’
11. Ask pupils to repeat: For every 2 oranges we have 4 bananas.
12. Write on the board: 2:4, 2 is to 4, for every 2 oranges we have 4 bananas.
13. Say: These are three ways to compare the oranges and bananas in a ratio format.
14. Say: The order of a ratio is very important. The ratio of bananas to oranges is 4:2 and the ratio of
oranges to bananas is 2:4.
15. Refer pupils to the number of chairs and tables on the board.
16. Ask a pupil to come to the board and write the ratio of tables to chairs. (Answer: 10:40)
17. Refer pupils to the number of boys and girls on the board.
:
3
18. Ask one pupil to say the ratio of boys to girls (Answer: ‘15 boys to 25 girls’, or ‘15 to 25’, or ‘for
every 15 boys we have 25 girls’)
19. Ask another pupil to write the ratio of boys to girls on the board (Answer: 15:25)
Guided Practice (5 minutes)
1. Allow the pupils to work in pairs
2. Write on the board:
Mr Kabba is a farmer. He has 15 sheep, 20 goats, 10 pigs and 12 cows on his farm.
What is the ratio of:
i. Goats to sheep?
ii. Pigs to cows?
iii. Cows to sheep?
iv. Pigs to goats?
3. Ask pupils to write the answers to each question in their exercise books.
4. Move round to check for understanding and clear misconceptions.
5. Make corrections where necessary. (Answers: i. 20:15, ii. 10:12, iii. 12:15, iv. 10:20)
Independent Practice (10 minutes)
1. Write on the board: Amadu has 5 pencils and 3 markers.
2. Ask the pupils to solve the following in their exercise books:
i. The ratio of pencils to markers in three forms.
ii. The ratio of markers to pencils in three forms.
3. Allow the pupils to discuss their answers with the next pupil.
4. Move round to check for understanding and clear misconceptions.
5. Ask some pupils to call out their answers. (Answers: (i) 5 is to 3, 5:3, for every 5 pencils we have
3 markers. (ii) 3 is to 5, 3:5, for every 3 markers we have 5 pencils.)
Closing (3 minutes)
1. Ask three pupils each to compare quantities in their immediate environment in ratio format.
They should say the ratio out loud. (Examples: ratio of teachers to pupils, ratio of male teachers
to female teachers in the school, ratio of windows to doors).
2. Allow other pupils to discuss their answers.
4
Lesson Title: Ratio of a Whole Theme: Numbers and Numeration
Lesson Number: M-07-047 Class/Level: JSS 1 Time: 35 minutes
Learning Outcomes By the end of the lesson
pupils will be able to: 1. Identify that ratio can compare parts of a whole. 2. Use ratio language to compare parts to the whole in their surroundings.
Teaching Aids Diagrams
Preparation Draw the mango and
pineapple diagrams, in
the Introduction to the New
Material, on the board.
Opening (2 minutes)
1. Ask a pupil to explain ratio in his/her own words. (Example answer: ratio is a way of comparing
two or more quantities).
2. Ask another pupil to compare any two quantities in the class in a ratio format. (Example: ratio of
benches to tables is 15:20).
Introduction to the New Material (15 minutes)
1. Say: We can also use ratios to compare a part of something to the whole. In the last class we
discussed ‘part-to-part’ ratios. Today we will discuss ‘part-to-whole’ ratios.
2. Say: Ali is carrying a basket of fruits. He has 10 mangoes and 8 pineapples.
3. Ask a pupil to come to the board and write the ratio of pineapples to mangoes. (Answer: 8:10)
4. Say: The ratio of pineapples to mangoes is a part-to-part ratio. We can also write part-to-whole
ratios for Ali’s fruit.
5. Write on the board:
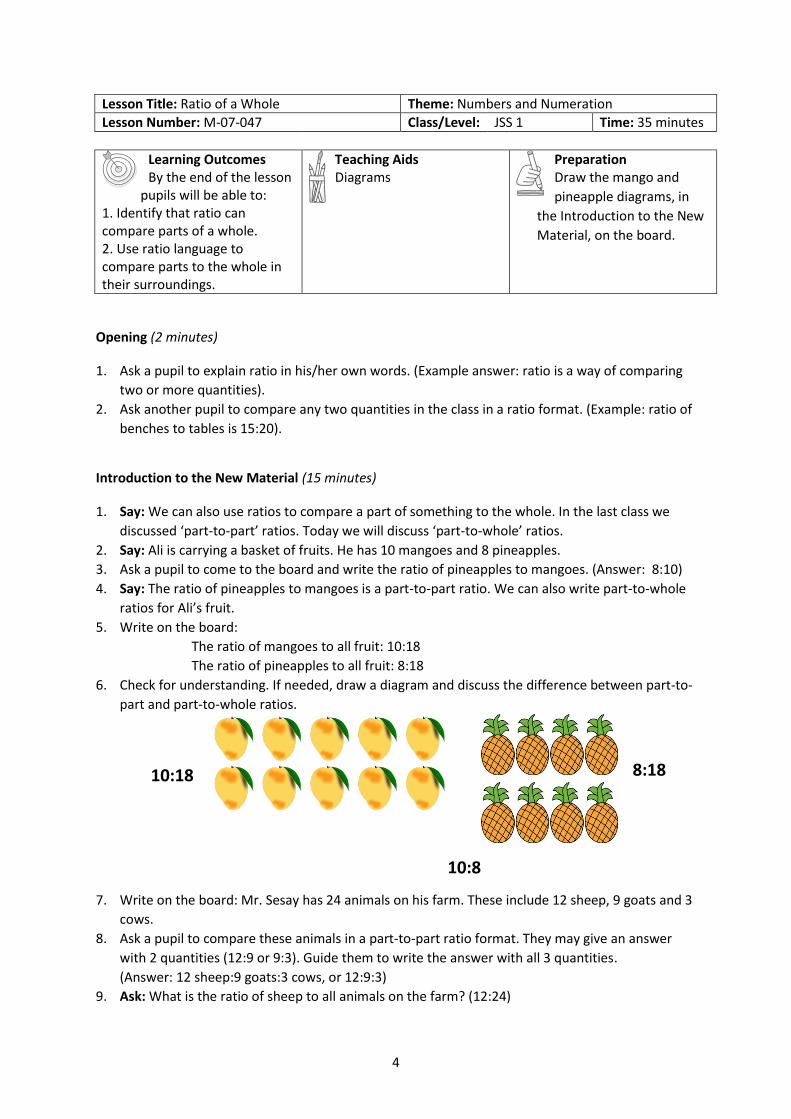
The ratio of mangoes to all fruit: 10:18
The ratio of pineapples to all fruit: 8:18
6. Check for understanding. If needed, draw a diagram and discuss the difference between part-to-
part and part-to-whole ratios.
10:18
8:18
10:8
7. Write on the board: Mr. Sesay has 24 animals on his farm. These include 12 sheep, 9 goats and 3
cows.
8. Ask a pupil to compare these animals in a part-to-part ratio format. They may give an answer
with 2 quantities (12:9 or 9:3). Guide them to write the answer with all 3 quantities.
(Answer: 12 sheep:9 goats:3 cows, or 12:9:3)
9. Ask: What is the ratio of sheep to all animals on the farm? (12:24)
5
10. Ask: What is the ratio of goats to all animals on the farm? (9:24)
11. Ask: What is the ratio of cows to all animals on the farm? (3:24)
12. Write on the board: Kadie bought 15 fish of two types, bonga and snapper from the market. She
had 7 bonga, and the rest were snapper.
13. Ask: What is the ratio of bonga to snapper? What is the ratio of snapper to all of Kadie’s fish?
14. Allow the pupils to discuss their answers. Give two minutes.
15. Ask a pupil to come to the board and write the answer (Answers: the ratio of bongas to snapper
is 7:8, the ratio of snapper to all fish is 8:15).
Guided Practice (5 minutes)
1. Allow the pupils to work in pairs.
2. Write on the board:
Hawa went to her garden and picked 30 fruits. She counted 10 mangoes, 13 pears and the rest
were oranges. Write:
i. The ratio of mangoes to pears to oranges
ii. The ratio of mangoes to all fruit
iii. The ratio of pears to all fruit
iv. The ratio of oranges to all fruit
3. Move round and observe their work. (Answers: i. 10:13:7 ii. 10:30 iii. 13:30 iv. 7:30)
Independent Practice (10 minutes)
1. Ask the pupils to take out a piece of paper and write their name.
2. Write on the board: A farmer has 50 animals on his farm. These include 15 chickens, 17 goats, 10
cows and the rest are sheep. Write:
i. The ratio of sheep to cows to goats to chickens
ii. The ratio of goats to sheep to cows to chickens
iii. The ratio of chickens to all animals
iv. The ratio of sheep to all animals
3. Walk around to check for understanding and clear misconceptions.
4. Ask the pupils to exchange their papers and mark.
5. Ask pupils to read out the answers for each question to the class.
(Answers: i. 8:10:17:15 ii. 17:8:10:15 iii. 15:50, iv. 8:50)
Closing (2 minutes)
1. Do a brainstorm as a whole class.
2. Say: I have Le5000 and I gave Le2000 to Musa.
3. Ask: What is the ratio of what is left with me and what I gave to Musa?
4. Allow pupils to think for 1 minute, and then ask a pupil to stand and give the answer. (Answer:
Le 3000: Le2000)
5. Say: This is a part-to-part ratio.
6
Lesson Title: Ratios and Fraction Theme: Numbers and Numeration
Lesson Number: M-07-048 Class/Level: JSS-1 Time: 35 minutes
Learning Outcomes
By the end of the lesson pupils will be able to express ratios as fractions.
Teaching Aids
Diagram
Preparation
Draw the diagram in the Introduction to the New
Material on the board.
Opening (3 minutes)
1. Write 2 fractions on the board: 𝑖) 18
20 𝑖𝑖)
25
30
2. Ask pupils to write the fractions in their simplest form. (Answer: 𝑖) 18
20=
9
10 𝑖𝑖)
25
30=
5
6)
3. Say: Today we will learn how to write ratios as fractions in their simplest form.
Introduction to the New Material (13 minutes)
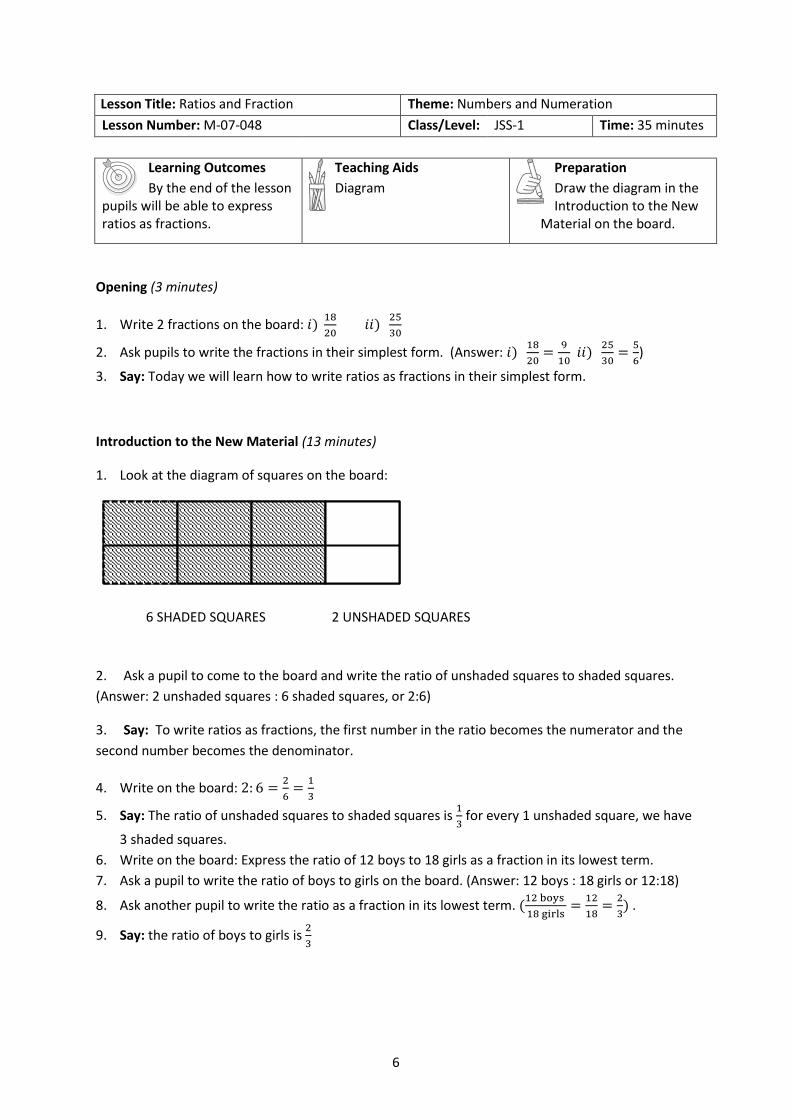
1. Look at the diagram of squares on the board:
2. Ask a pupil to come to the board and write the ratio of unshaded squares to shaded squares.
(Answer: 2 unshaded squares : 6 shaded squares, or 2:6)
3. Say: To write ratios as fractions, the first number in the ratio becomes the numerator and the
second number becomes the denominator.
4. Write on the board: 2: 6 =2
6=
1
3
5. Say: The ratio of unshaded squares to shaded squares is 1
3 for every 1 unshaded square, we have
3 shaded squares.
6. Write on the board: Express the ratio of 12 boys to 18 girls as a fraction in its lowest term.
7. Ask a pupil to write the ratio of boys to girls on the board. (Answer: 12 boys : 18 girls or 12:18)
8. Ask another pupil to write the ratio as a fraction in its lowest term. (12 boys
18 girls=
12
18=
2
3) .
9. Say: the ratio of boys to girls is 2
3
6 SHADED SQUARES 2 UNSHADED SQUARES

7
Guided Practice (7 minutes)
1. Let the pupils work in pairs.
2. Write on the board:
Mabinty bought 100 fruits from the market. 75 are oranges and the rest are pears. Write the
following as fractions and simplify:
i. the ratio of pears to oranges
ii. the ratio of pears to all of Mabinty’s fruit
iii. the ratio of oranges to all of Mabinty’s fruit
3. Move round and observe the pupils as they work.
4. Ask 1 boy and 2 girls to come in front of the class and present their answers. (Answers:
(i) 25 pears
75 oranges =
1
3 (ii)
25 pears
100 fruits=
1
4 (iii)
75 oranges
100 fruits=
3
4).
5. Do corrections where necessary.
Independent Practice (10 minutes)
1. Put 2 questions on the board.
a. A class has 35 pupils of which there are 15 boys and 20 girls. Write the ratio of boys to girls
as fraction in its lowest term.
b. Mr. Bundu has 48 animals on his farm. 18 are goats and the rest are cows. Write the ratio of
goats to cows as a fraction in its simplest form.
2. Allow the pupils to discuss their answers with their neighbours.
c. Ask two pupils to stand and read their answers to the class. They should explain their
reason. (Answers: (a) 15 boys
20 girls =
3
4 (b)
18 goats
30 cows =
3
5)
Closing (2 minutes)
1. Give an exit ticket exercise.
2. Write on the board: Express 25 dogs to 150 cats as a fraction in its lowest term.
3. Do a quick check on their answers before leaving the class. (Answer: 25: 150 =25
150=
1
6)
8
Lesson Title: Ratio and Percent Theme: Numbers and Numeration
Lesson Number: M-07-049 Class/Level: JSS 1 Time: 35 minutes
Learning Outcomes
By the end of the lesson pupils will be able to: 1. Identify that a percent is a ratio that compares a number to 100. 2. Express ratios as percent.
Teaching Aids
None
Preparation
Write the questions, in the Introduction to the
New Material, Guided Practice, and Independent Practice, on the board.
Opening (3 minutes)
1. Ask a pupil to explain percent in his/her own words. (Example answer: percent means out of a
total of 100)
2. Narrate a short story problem: I gave 30% of my lunch to M’balu, what percentage of my lunch is
left with me?
3. Ask a pupil to answer the question posed in the story. They should explain their answer.
(Answer: 100% − 30% = 70%)
4. Say: Today we will learn how to express ratios as percent. This will help us, for instance, to
compare our test marks to 100.
Introduction to the New Material (12 minutes)
1. Write on the board: 15%
2. Ask a pupil to express it as a fraction. (𝐴𝑛𝑠𝑤𝑒𝑟: 15
100)
3. Say: When we talk about percent, we compare a number to 100.
4. Say: 15 compared to 100 is called 15%.
5. Ask a pupil to compare 15 to 100 in a ratio format (Answer: 15:100)
6. Look at the question on the board: Kadie got 85% in the last mathematics test.
7. Ask a pupil to say Kadie’s mark in a ratio format. (Answer: 85: 100)
8. Say: In the last lesson, we learnt how to write ratios as fractions in their simplest form.
9. Ask a pupil to express Kadie’s mark as a fraction in its lowest term. (Answer: 85
100=
17
20)
10. Say: we can also express ratios as percent.
11. Write a ratio on the board: 2: 5.
12. Say: To express a ratio as a percent, first express the ratio as a fraction and then you multiply the
fraction by 100.
13. Ask a pupil to express 2:5 as a fraction. (Answer: 2
5 )
14. Write on the board: 2: 5 =2
5→
2
5× 100 = 40%
15. Write another ratio on the board. 13: 20
16. Ask a pupil to come to the board and express the ratio as percent. (Answer: 13: 20 →13
20×
100 = 65%)
9
Guided Practice (8 minutes)
1. Let the pupils work in pairs.
2. Read these questions on the board. Sahr got these marks in the following subject in the last
examination: Mathematics 75%, Science 54% and Language Arts 60%.
a. Express Sahr’s mark for each subject as a ratio.
b. Change the ratios for Sahr’s marks to fractions in their lowest terms.
3. Move around the room and check for any misconception.
4. Ask pupils to call out the answers. (Answers: (i) Mathematics 75:100, Science 54:100, Language
Arts 60:100, (ii) Mathematics 75
100=
3
4 Science
27
50 Language Arts
60
100=
3
5)
Independent Practice (10 minutes)
1. Read these questions on the board:
a. Express these percent as ratios: i. 35% ii. 90% iii. 50%
b. Express these ratios as percent: i. 3:25 ii. 9:20
2. Allow the pupils to discuss their answers with the next pupil.
3. Ask a pupil to stand, and read the answers for (a). (Answers: i. 35:100, ii. 90:100, iii. 50:100)
4. Ask another pupil to read out the answers for (b). (Answers: i. 3
25× 100 = 12%
9
20× 100 =
45%)
Closing (2 minutes)
1. Discuss and review ratio and percent.
2. Say: Can anybody explain how we can express ratios as percent? (Example answer: We first
express the ratio as a fraction, then multiply the fraction by 100 and simplify.)
10
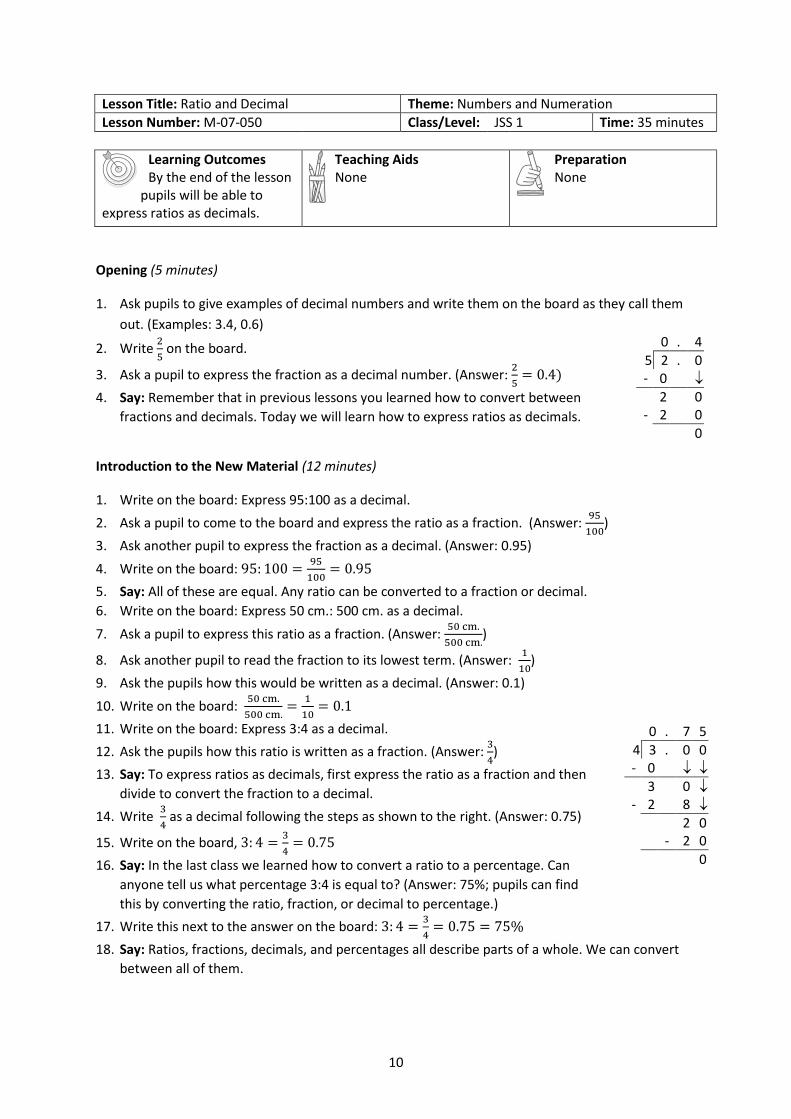
Lesson Title: Ratio and Decimal Theme: Numbers and Numeration
Lesson Number: M-07-050 Class/Level: JSS 1 Time: 35 minutes
Learning Outcomes By the end of the lesson
pupils will be able to express ratios as decimals.
Teaching Aids None
Preparation None
Opening (5 minutes)
1. Ask pupils to give examples of decimal numbers and write them on the board as they call them
out. (Examples: 3.4, 0.6)
2. Write 2
5 on the board.
3. Ask a pupil to express the fraction as a decimal number. (Answer: 2
5= 0.4)
4. Say: Remember that in previous lessons you learned how to convert between
fractions and decimals. Today we will learn how to express ratios as decimals.
Introduction to the New Material (12 minutes)
1. Write on the board: Express 95:100 as a decimal.
2. Ask a pupil to come to the board and express the ratio as a fraction. (Answer: 95
100)
3. Ask another pupil to express the fraction as a decimal. (Answer: 0.95)
4. Write on the board: 95: 100 =95
100= 0.95
5. Say: All of these are equal. Any ratio can be converted to a fraction or decimal.
6. Write on the board: Express 50 cm.: 500 cm. as a decimal.
7. Ask a pupil to express this ratio as a fraction. (Answer: 50 cm.
500 cm.)
8. Ask another pupil to read the fraction to its lowest term. (Answer: 1
10)
9. Ask the pupils how this would be written as a decimal. (Answer: 0.1)
10. Write on the board: 50 cm.
500 cm.=
1
10= 0.1
11. Write on the board: Express 3:4 as a decimal.
12. Ask the pupils how this ratio is written as a fraction. (Answer: 3
4)
13. Say: To express ratios as decimals, first express the ratio as a fraction and then
divide to convert the fraction to a decimal.
14. Write 3
4 as a decimal following the steps as shown to the right. (Answer: 0.75)
15. Write on the board, 3: 4 =3
4= 0.75
16. Say: In the last class we learned how to convert a ratio to a percentage. Can
anyone tell us what percentage 3:4 is equal to? (Answer: 75%; pupils can find
this by converting the ratio, fraction, or decimal to percentage.)
17. Write this next to the answer on the board: 3: 4 =3
4= 0.75 = 75%
18. Say: Ratios, fractions, decimals, and percentages all describe parts of a whole. We can convert
between all of them.
0 . 4
5 2 . 0 - 0 2 0 - 2 0
0
0 . 7 5
4 3 . 0 0 - 0 3 0 - 2 8 2 0 - 2 0
0
11
Guided Practice (6 minutes)
1. Ask pupils to work in pairs.
2. Write 2 questions on the board:
a. Express 450cm: 600 cm as a decimal.
b. Express 30:120 as a decimal.
3. Move around the class to observe pupils work. Make sure that every pupil participates in their
pair’s work.
4. Check for any misconception and understandings.
5. Do corrections together. (Answers: a. 450 cm.
600 cm.=
3
4= 0.75; b.
30
120=
1
4= 0.25)
Independent Practice (10 minutes)
1. Write 2 questions on the board:
a. Express 400 cm: 1000 cm. as a fraction, decimal, and percentage.
b. Express 45 minutes: 180 minutes as a fraction, decimal, and percentage.
2. Ask pupils to work independently.
3. Walk around to check for understanding and clear misconceptions.
4. Ask a pupil to write answer to (a) on the board. (Answer: 400 cm
1000 cm =
2
5 = 0.4 = 40%)
5. Call another pupil to write answer to (b) on the board. (Answer: 45 min
180 min =
1
4 = 0.25 = 25%)
Closing (2 minutes)
1. Give an exit exercise.
2. Write 1 question on the board: Express 10 days: 50 days as a decimal.
3. Move round to check on pupils work.
4. Ask pupils to exchange their exercise books for marking.
5. Read the answer to the class before leaving. (Answer: 10
50= 0.2)
12
Lesson Title: Simplification of Ratios Theme: Numbers and Numeration
Lesson Number: M-07-051 Class/Level: JSS 1 Time: 35 minutes
Learning Outcomes By the end of the lesson pupils will be able to:
1. Identify equivalent ratios. 2. Simplify a ratio to its lowest terms.
Teaching Aids Questions
Preparation Write the questions, in the Independent Practice,
on the board.
Opening (3 minutes)
1. Write two sets of numbers on the board:
a. 12 and 30
b. 45 and 60
2. Say: Find the highest common factor of each set.
3. Allow the pupils to discuss their answers.
4. Ask a boy to give the HCF of 12 and 30. (Answer: 6)
5. Ask a girl to give the HCF of 45 and 60. (Answer: 15)
6. Say: Today we will learn how to write ratios in their lowest form.
Introduction to the New Material (15 minutes)
1. Rewrite the two sets of numbers on the board in a ratio format. 𝑎. 12: 30 𝑏. 45: 60
2. Say: To write ratio to its simplest form, we must divide the numbers in the ratio by their HCF.
3. Say: We already know the HCF of 12 and 30 to be 6
4. Write on the board: 12
6:
30
6= 2: 5
5. Say: 12: 30 = 2: 5
6. Say: The ratio on the left hand side 12:30 is equal to the ratio on the right hand side 2:5
7. Write on the board: 45: 60
8. Ask a pupil to come to the board and divide 45 and 60 by their HCF. (Answer: 45
15:
60
15= 3: 4)
9. Write on the board. 45: 60 = 3: 4
10. Say: We can also get equal ratios when we multiply the numbers in the ratio by the same
amount. Two ratios that are equal to one another are called equivalent ratios.
11. Write 2:5 on the board.
12. Say: Let us multiply both numbers by 6. (2 × 6: 5 × 6 = 12: 30)
13. Say: 2: 5 = 12: 30
14. Write on the board: Find an equivalent ratio for 5:7
15. Say: If we multiply any number by both terms of the ratio, we will get an equivalent ratio. Let’s
multiply both sides by 3
16. Write on the board: 5: 7 = 5 × 3: 7 × 3 = 15: 21
17. Say: 5:7 and 15:21 are equivalent ratios.
18. Write on the board. 4: 10 = 8:
13
19. Say: There is a missing number. We can find it because we know that these two ratios are
equivalent.
20. Ask: What do we multiply by 4 to get 8? (Answer: 2)
21. Say: We should also multiply 10 by 2 to get the unknown value.
22. Write on the board: 4: 10 = 4 × 2: 10 × 2 = 8: 20
23. Say: The unknown value is 20.
Guided Practice (5 minutes)
1. Write these questions on the board:
a. Reduce 25:100 to its lowest terms.
b. Find the missing number: 5:9 = 20:
2. Allow the pupils to work in pairs.
3. Move round and check on their work. See if there is any misconception and clarify it.
4. Point two pupils one after the other to read out their answers.
(Answers: a) 25:100 = 1:4 b) 5:9 = 20:36)
Independent Practice (10 minutes)
1. Let the pupils work individually.
2. Read these questions on the board:
a. Reduce 60:180 to its lowest terms.
b. Find the missing number: 13:15 = 26:
c. Find the missing number: :12 = 3:4
3. Move around and check for proper understanding. Assist pupils where necessary.
For example, pupils might have difficulty with question c. Encourage them to use problem
solving skills. Remind them that this is the same: 3:4 = :12. We can see that the second
term is multiplied by 3, so we multiply the first term by the same number (3 × 3 = 9).
4. Ask 3 pupils to write their answers on the board. (Answers: a. 60:180 = 1:3; b. 30; c. 9)
Closing (2 minutes)
1. Narrate a short story.
2. Say: Mr. Sorie, a taxi driver, has 2 gallons of fuel in his car and he travelled for 36 miles.
3. Ask: Who can give me the ratio of gallons to miles in its simplest form? (Answer: 1:18)
4. Ask: Can someone state this answer with ‘for every’?
5. (Answer: For every 1 gallon, he travelled 18 miles.)
14
Lesson Title: Ratio Problems with Two Terms Theme: Numbers and Numeration
Lesson Number: M-07-052 Class/Level: JSS 1 Time: 35 minutes
Learning Outcomes By the end of the
lesson, pupils will be able to share a given quantity among a ratio with two terms (m:n)
Teaching Aids None
Preparation None
Opening (2 minutes)
1. Say: Sallay and Fanta have between them Le15,000. If Fanta gets Le7000, how much will be
Sallay’s share?
2. Give pupils a moment to work the problem in their exercise books.
3. Call on a pupil to answer the question. (Answer: 𝐿𝑒8000)
4. Say: We subtracted 𝐿𝑒7000 from 𝐿𝑒15,000 to get 𝐿𝑒8,000. Here we use subtraction to share an
amount between Sallay and Fanta.
5. Say: Today we will learn how to share a given quantity in a given ratio.
Introduction to the New Material (15 minutes)
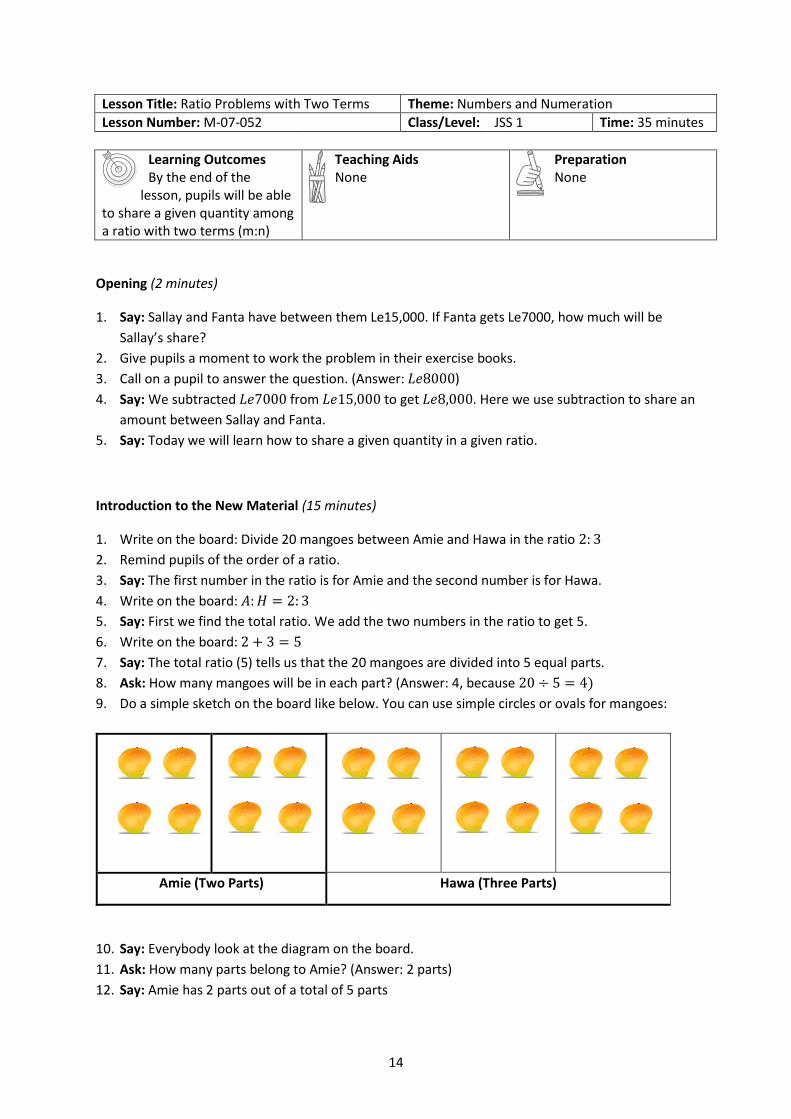
1. Write on the board: Divide 20 mangoes between Amie and Hawa in the ratio 2: 3
2. Remind pupils of the order of a ratio.
3. Say: The first number in the ratio is for Amie and the second number is for Hawa.
4. Write on the board: 𝐴: 𝐻 = 2: 3
5. Say: First we find the total ratio. We add the two numbers in the ratio to get 5.
6. Write on the board: 2 + 3 = 5
7. Say: The total ratio (5) tells us that the 20 mangoes are divided into 5 equal parts.
8. Ask: How many mangoes will be in each part? (Answer: 4, because 20 ÷ 5 = 4)
9. Do a simple sketch on the board like below. You can use simple circles or ovals for mangoes:
Amie (Two Parts) Hawa (Three Parts)
10. Say: Everybody look at the diagram on the board.
11. Ask: How many parts belong to Amie? (Answer: 2 parts)
12. Say: Amie has 2 parts out of a total of 5 parts
15
13. Ask a pupil to count how many mangoes Amie gets in the 2 parts. (Answer: Amie gets 8
mangoes)
14. Ask: How many parts belong to Hawa? (Answer: 3 parts)
15. Ask a pupil to count how many mangoes Hawa gets in the 3 parts. (Answer: Hawa gets 12
mangoes)
16. Say: We can also write their shares as fractions.
17. Say: Amie get 2 parts out of 5 parts, which is 2
5 of 20 mangoes
18. Write on the board: Amie’s share =2
5× 20 mangoes = 8 mangoes
19. Ask a pupil to give the fraction for Hawa’s share. (Answer: 3
5)
20. Write on the board: Hawa’s share = 3
5 of 20 mangoes =
3
5× 20 = 12 mangoes
21. Say: Amie’s share is 8 mangoes, and Hawa’s share is 12 mangoes.
22. Write another question on the board: Share 𝐿𝑒50,000 between Jane and Mike in the ratio 6:4.
23. Ask: How many parts does Jane get? (Answer: 6)
24. Ask: How many parts does Mike get? (Answer: 4)
25. Ask pupils to find the total ratio. (Answer: 6 + 4 = 10)
26. Write on the board: Jane’s share =6
10× 50,000 = 𝐿30,000
27. Ask a pupil to come to the board and calculate Mike’s share. Ask all other pupils to do the
calculation in their exercise books. (Answer: Mike’s share =4
10× 50,000 = 𝐿𝑒20,000)
28. Say: Jane’s share is 𝐿𝑒30,000 and Mike’s share is 𝐿𝑒20,000.
Guided Practice (5 minutes)
1. Ask pupils to work in pairs.
2. Write a question on the board: Share 120 sweets between Sia and Mariama in the ratio 7: 5
3. Move round and check on pupils work. Clear any misconceptions you notice.
4. Ask one pair to write the solution on the board. (Answer: Sia’s share =7
12× 120 = 70 sweets,
Mariama’s share =5
12× 120 = 50 sweets.)
Independent Practice (10 minutes)
1. Write 2 questions on the board.
a. Share 64 bananas between Christiana and Princess in the ratio 5: 3
b. Divide 𝐿𝑒250,000 between John and Thomas in the ratio 2: 8
2. Ask pupils to solve the questions in their exercise books.
3. Move round and check on pupils work. Clear any misconceptions you notice.
4. Ask pupils to exchange their books with the next pupil to check their answers during correction.
5. Do correction together with pupils on the board. (Answers: (a.) Christiana’s share =5
8× 64 = 40
bananas; Princess’ share =3
8× 64 = 24 bananas. (b.) John’s share =
2
10× 250,000 = 𝐿𝑒50,000
Thomas’ share =8
10× 250,000 = 𝐿𝑒200,000)
16
Closing (3 minutes)
1. Give an exit ticket problem.
2. Write on the board: Share 75 pears between your siblings Anita and Joseph in the ratio 7:8.
3. Ask a pupil to read out his/her answer to the class.
(Answer: Anita’s share =7
15× 75 = 35 pears, Joseph’s share =
8
15× 75 = 40 pears.)
17
Lesson Title: Ratio Problems with Three or More Terms
Theme: Numbers and Numeration
Lesson Number: M-07-053 Class/Level: JSS 1 Time: 35 minutes
Learning Outcomes By the end of the
lesson, pupils will be able to share quantities among given ratios with three or more terms.
Teaching Aids Questions
Preparation Write the questions, in the Opening, Introduction
to the New Material, Guided Practice, and Independent Practice, on the board.
Opening (3 minutes)
1. Read the question on the board: Divide 18 oranges between Tom and Alie in the ratio 2:1.
2. Give pupils 1 minute to find the answer.
3. Ask a pupil to give Tom’s share. (Answer: 2
3× 18 = 12 oranges)
4. Ask another pupil to give Alie’s share. (Answer: 1
3× 18 = 6 oranges)
5. Say: Today we will learn how to share a quantity among a given ratio with three or more terms.
Introduction to the New Material (15 minutes)
1. Look at the question on the board: 3 sisters divided 30 pineapples between them in the ratio
3:1:2.
2. Ask pupils to find the total ratio. (Answer: 3 + 1 + 2 = 6)
3. Say: The first sister received 3 parts.
4. Calculate the number of pineapples in the first share on the board: 3
6 of 30 Pineapples =
3
6×
30 = 15 Pineapples
5. Ask pupils to work in pairs to calculate the number of pineapples in the second and third sisters’
shares in their exercise books.
6. Ask two pupils to come to the board and write the two answers, while other pupils check their
answers. (Answers: 2nd share =1
6× 30 = 5 pineapples; 3rd share =
2
6× 30 = 10 pineapples)
7. Read another question on the board: Share 𝐿𝑒 20,000 among 4 boys, Alfred, Tejan, Jimmy and
Frank in the ratio 3:8:5:4.
8. Ask a pupil to give the total ratio. (Answer: 3 + 8 + 5 + 4 = 20)
9. Write the initials of the boys with their respective ratios on the board:
𝐴: 𝑇: 𝐽: 𝐹
3: 8: 5: 4
10. Calculate Alfred’s share on the board: 3
20× 𝐿𝑒20,000 = 𝐿𝑒3000
11. Ask pupils to work in pairs to find the shares of the other 3 boys.
12. Ask 3 pupils to stand and give the 3 answers. Write their answers on the board for pupils to
check their own work. (Answers: Tejan’s share =8
20× 𝐿𝑒20,000 = 𝐿𝑒8000 Jimmy’s share =
5
20× 𝐿𝑒20,000 = 𝐿𝑒5000 Frank’s share =
4
20= 𝐿𝑒20,000 = 𝐿𝑒4000)
18
Guided Practice (5 minutes)
1. Read the question on the board: Divide 90 oranges among 4 friends in the ratio 3:4:2:6.
2. Ask pupils to work in pairs.
3. Make sure that each pupil participates in the pair work.
4. Move around and check for any misconceptions and clarify it.
5. Ask a pupil to stand and read out the answers for the first and second shares. (Answers: First
share =3
15× 90 = 18 oranges; Second share=
4
15× 90 = 24 oranges)
6. Ask another pupil to stand and read out the answers for the third and fourth shares. (Answers:
Third share =2
15× 90 = 12 oranges; Fourth share=
6
15× 90 = 36 oranges)
Independent Practice (10 minutes)
1. Read the question on the board: Share 𝐿𝑒 60,000 among four girls: Isata, M’balu, Fatu and Hawa
in the ratio 4:1:2:5.
2. Ask pupils to solve the problems individually in their exercise books.
3. Allow pupils to discuss their answers with the next pupil.
4. Move around and check on pupils’ work.
5. Ask four pupils to come to the board at once and write the solutions for the shares of the four
girls (Answer: Isata’s share =4
12× 𝐿𝑒60,000 = 𝐿𝑒20,000 M’balu’s share =
1
12× 𝐿𝑒60,000 =
𝐿𝑒5000; Fatu’s share =2
12× 𝐿𝑒60,000 = 𝐿𝑒10,000; Hawa’s share =
5
12× 𝐿𝑒60,000 =
𝐿𝑒25,000)
Closing (2 minutes)
1. Ask pupils to describe in their own words the importance of ratio in everyday life. Allow them to
discuss. (Example answers: it helps in sharing, it shows fairness and transparency in sharing, and
it shows unbiased.)
19
Lesson Title: Relating Ratios to Measurement
Theme: Numbers and Numeration
Lesson Number: M-07-054 Class/Level: JSS 1 Time: 35 minutes
Learning Outcomes By the end of the
lesson, pupils will be able to solve ratio problems involving measurement.
Teaching Aids None
Preparation None
Opening (2 minutes)
1. Ask pupils to explain what the total ratio means in sharing a given quantity in a given
ratio. (Example answer: total ratio tells us into how many parts the quantity to be
shared has been divided)
2. Say: Today, we will relate ratios to measurement. This helps us to compare lengths or
distances, in a ratio format.
Introduction to the New Material (15 minutes)
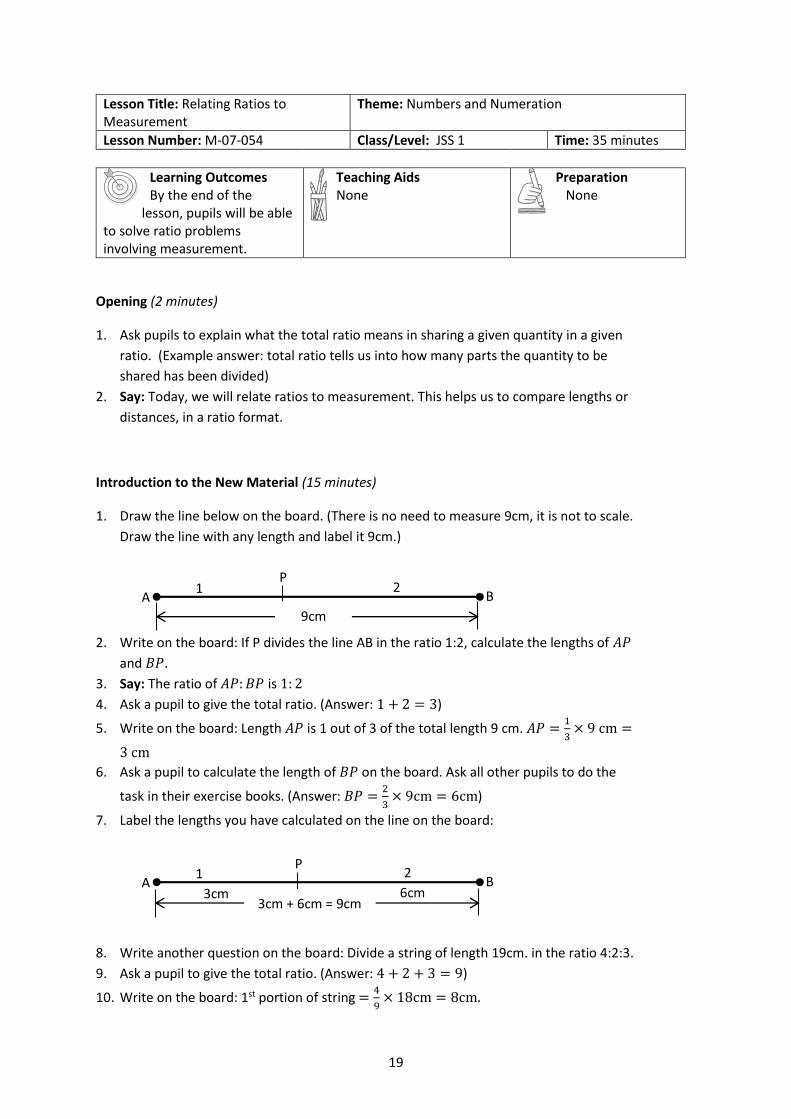
1. Draw the line below on the board. (There is no need to measure 9cm, it is not to scale.
Draw the line with any length and label it 9cm.)
2. Write on the board: If P divides the line AB in the ratio 1:2, calculate the lengths of 𝐴𝑃
and 𝐵𝑃.
3. Say: The ratio of 𝐴𝑃: 𝐵𝑃 is 1: 2
4. Ask a pupil to give the total ratio. (Answer: 1 + 2 = 3)
5. Write on the board: Length 𝐴𝑃 is 1 out of 3 of the total length 9 cm. 𝐴𝑃 =1
3× 9 cm =
3 cm
6. Ask a pupil to calculate the length of 𝐵𝑃 on the board. Ask all other pupils to do the
task in their exercise books. (Answer: 𝐵𝑃 =2
3× 9cm = 6cm)
7. Label the lengths you have calculated on the line on the board:
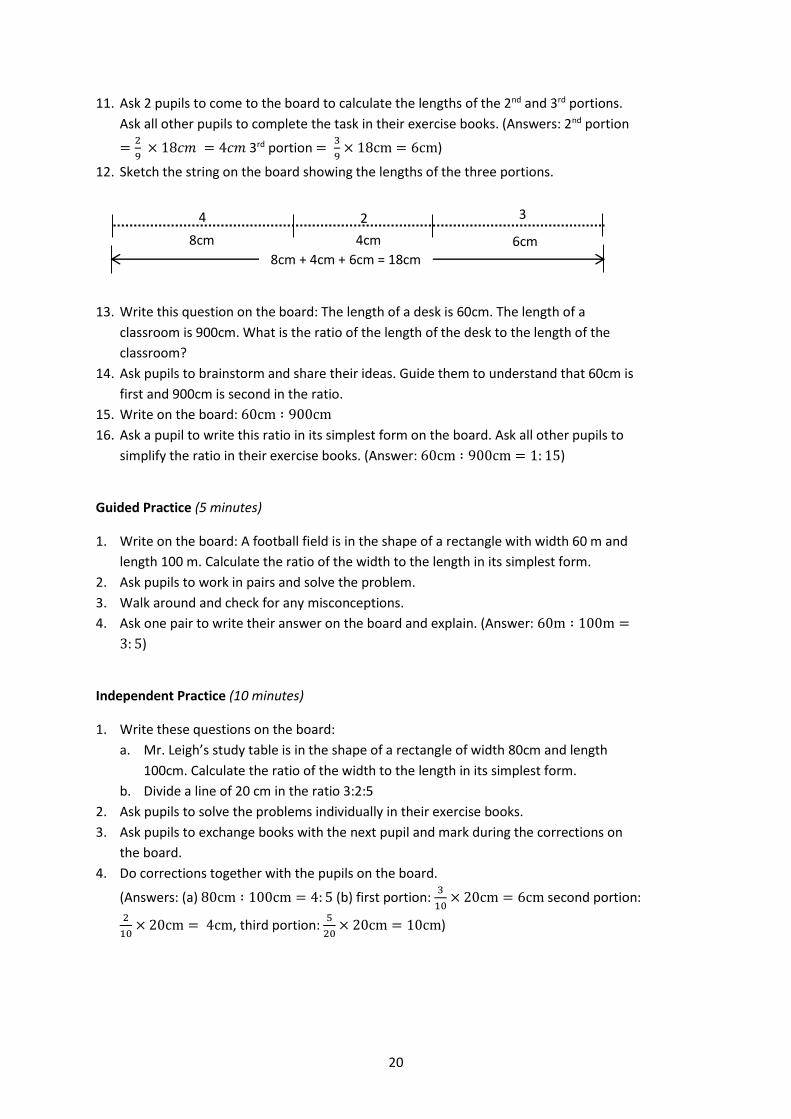
8. Write another question on the board: Divide a string of length 19cm. in the ratio 4:2:3.
9. Ask a pupil to give the total ratio. (Answer: 4 + 2 + 3 = 9)
10. Write on the board: 1st portion of string =4
9× 18cm = 8cm.
A B
P 2 1
9cm
A B 3cm 6cm
P 2 1
3cm + 6cm = 9cm
20
11. Ask 2 pupils to come to the board to calculate the lengths of the 2nd and 3rd portions.
Ask all other pupils to complete the task in their exercise books. (Answers: 2nd portion
=2
9 × 18𝑐𝑚 = 4𝑐𝑚 3rd portion =
3
9× 18cm = 6cm)
12. Sketch the string on the board showing the lengths of the three portions.
13. Write this question on the board: The length of a desk is 60cm. The length of a
classroom is 900cm. What is the ratio of the length of the desk to the length of the
classroom?
14. Ask pupils to brainstorm and share their ideas. Guide them to understand that 60cm is
first and 900cm is second in the ratio.
15. Write on the board: 60cm ∶ 900cm
16. Ask a pupil to write this ratio in its simplest form on the board. Ask all other pupils to
simplify the ratio in their exercise books. (Answer: 60cm ∶ 900cm = 1: 15)
Guided Practice (5 minutes)
1. Write on the board: A football field is in the shape of a rectangle with width 60 m and
length 100 m. Calculate the ratio of the width to the length in its simplest form.
2. Ask pupils to work in pairs and solve the problem.
3. Walk around and check for any misconceptions.
4. Ask one pair to write their answer on the board and explain. (Answer: 60m ∶ 100m =
3: 5)
Independent Practice (10 minutes)
1. Write these questions on the board:
a. Mr. Leigh’s study table is in the shape of a rectangle of width 80cm and length
100cm. Calculate the ratio of the width to the length in its simplest form.
b. Divide a line of 20 cm in the ratio 3:2:5
2. Ask pupils to solve the problems individually in their exercise books.
3. Ask pupils to exchange books with the next pupil and mark during the corrections on
the board.
4. Do corrections together with the pupils on the board.
(Answers: (a) 80cm ∶ 100cm = 4: 5 (b) first portion: 3
10× 20cm = 6cm second portion:
2
10× 20cm = 4cm, third portion:
5
20× 20cm = 10cm)
8cm
2
4cm 6cm
4 3
8cm + 4cm + 6cm = 18cm
21
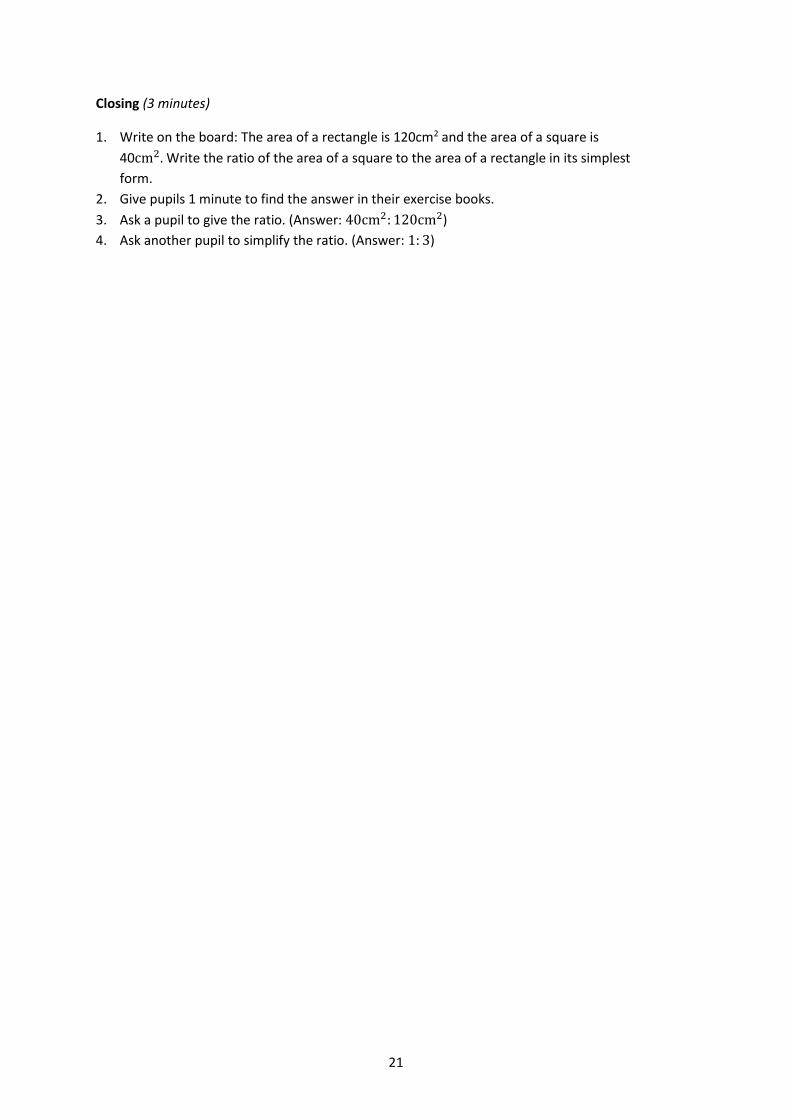
Closing (3 minutes)
1. Write on the board: The area of a rectangle is 120cm2 and the area of a square is
40cm2. Write the ratio of the area of a square to the area of a rectangle in its simplest
form.
2. Give pupils 1 minute to find the answer in their exercise books.
3. Ask a pupil to give the ratio. (Answer: 40cm2: 120cm2)
4. Ask another pupil to simplify the ratio. (Answer: 1: 3)
22
Lesson Title: Ratio Story Problems Theme: Numbers and Numeration
Lesson Number: M-07-055 Class/Level: JSS 1 Time: 35 minutes
Learning Outcomes By the end of the
lesson, pupils will be able to solve story problems involving ratios.
Teaching Aids Questions
Preparation Write the questions, in the Opening, Introduction
to the New Material, Guided Practice, and Independent Practice, on the board.
Opening (3 minutes)
1. Read this question on the board: Divide a line of 35 cm in the ratio 2:5
2. Give pupils 1 minute to do the calculations in their exercise books.
3. Ask 2 pupils to come to the board and calculate the 2 portions. (Answer: first portion: 2
7×
35cm = 10cm second portion: 5
7× 35cm = 25cm)
4. Say: Today, we will learn how to solve story problems involving ratios.
Introduction to the New Material (13 minutes)
1. Read this story problem on the board:
Mrs. Lebbie has three boys. Sahr 8 years old, Tamba 6 years old and Aiah 4 years old. She shared
54 oranges among them in the ratio of their ages. Find how many oranges each boy gets.
2. Say: We should write their ages in a ratio format.
3. Ask a pupil to come to the board and write the ages in a ratio format. Ask all other pupils to
complete the task in their exercise books. (Answer: 8: 6: 4)
4. Say: What is the first thing to do in order to find the share of each boy?
5. Allow pupils to share answers, and guide them to understand that we need to find the total
ratio.
6. Write on the board: 8 + 6 + 4 = 18
7. Ask a pupil to come to the board and find the eldest boys’ share. Ask all other pupils to complete
the task in their exercise books. (Answer: Sahr’s share=8
18× 54 = 24 oranges)
8. Ask 2 more pupils to come to the board to find Tamba’s share and Aiah’s share. Ask all other
pupils to complete the task in their exercise books. (Answers: Tamba’s share =6
18 × 54 =
18 oranges; Aiah’s share =4
18× 54 = 12 oranges)
9. Read another story problem on the board:
What is the result of sharing 𝐿𝑒14, 000 so that Adama has 3 parts and Marie has 4 parts?
10. Say: The ‘parts’ give the ratio of their shares.
11. Ask pupils to write the parts in a ratio format and give the total ratio. (Answer: 3:4, 3+4=7)
23
12. Ask pupils to work with a partner to calculate the shares of Adama and Marie. Ask 2 pairs to
each work one portion on the board. (Answers: Adama’s share =3
7× 𝐿𝑒14,000 = 𝐿𝑒6000, Marie’s
share=4
7× 𝐿𝑒14,000 = 𝐿 8000)
Guided Practice (5 minutes)
1. Read this story problem on the board:
Pa Amadu Sesay was given 𝐿𝑒150,000 as his retirement benefit. He decided to share this
amount among his four children such that Lamin gets 4 parts, Esther gets 3 parts, Kona gets 2
parts and Sorie gets 1 part. Find the share of each child.
2. Ask pupils to work in pairs and solve the problem on the board.
3. Walk around and check for any misconception and clarify it.
4. Ask two pupils from different pairs each to present answers for two shares. (Answer: Lamin’s
share =4
10× 𝐿𝑒150,000 = 𝐿𝑒60,000 Esther’s share =
3
10× 𝐿𝑒150,000 = 𝐿𝑒45,000 Kona’s share =
2
10×
𝐿𝑒150,000 = 𝐿𝑒30,000 Sorie’s share =1
10× 150,000 = 𝐿𝑒15,000)
Independent Practice (10 minutes)
1. Read this problem on the board:
The ages of three girls Mabel, Alice and Finda are 12, 15 and 11 respectively. Mr. Kamara wants
to share 76 exercise books among them in the ratio of their ages. Find how many exercise books
each girl will get.
2. Ask pupils to solve the problem on the board in their exercise books.
3. Allow pupils to discuss their answers with the next pupil.
4. As some pupils finish, ask them to come work part of the problem on the board. Ask all other
pupils to check their answers when they finish working.
5. Ask a pupil to give the total ratio. (Answer: 12 + 15 + 11 = 38)
6. Ask another pupil to calculate Mabel’s share. (Answer: 12
38× 76 = 24 exercise books)
7. Ask another pupil to calculate Alice’s share. (Answer: 15
38× 76 = 30 exercise books)
8. Ask another pupil to calculate Finda’s share. (Answer: 11
38× 76 = 22 exercise books)
Closing (4 minutes)
1. Give an exit ticket.
2. Write this question on the board: The total age of a man and his son is 40 years. If the ratio of
their ages is 7:1, find their ages.
3. Ask pupils to solve the problem on a paper and exchange with the next pupil for marking.
4. Write the answer on the board. Ask the pupils to check their partner’s answers and clarify any
misconceptions. (Answer: Fathers age =7
8× 40 = 35 years; Son’s age=
1
8× 40 = 5 years)
24
Lesson Title: Introduction to Integers Theme: Numbers and Numeration
Lesson Number: M-07-056 Class/Level: JSS 1
Time: 35 minutes
Learning Outcomes By the end of the lesson pupils
will be able to recognise and count positive and negative numbers, and zero.
Teaching Aids None
Preparation None
Opening (3 minutes)
1. Ask pupils at random to give examples of whole numbers. (Example answers: 38, 7, 29, 45)
2. Say: All of these whole numbers are greater than 0.
3. Ask: Is it possible for numbers to be less than 0?
4. Allow pupils to share their answers and discuss. (Example answers: no, numbers must be greater
than zero; yes, numbers can be less than 0)
5. Say: It is possible for numbers to be less than zero! We call these negative numbers, and they
are our topic for today.
Introduction to the New Material (15 minutes)
1. Say: All numbers greater than zero are positive numbers and all numbers less than zero are
negative numbers.
2. Say: Most of the numbers that you have been using in math are positive numbers. To
understand negative numbers, please listen to a story.
3. Say: Issa owes his brother Le10,000. He doesn’t have any money right now, and he needs to
work before he can pay his brother back. We can say that Issa has zero Leones. However, we can
also talk about the money he owes with negative numbers. Issa has negative Le10,000. Even if
he works and earns Le10,000 he will still have zero Leones because he needs to pay his brother.
4. Ask questions about the story to check for understanding:
a. How much money does Issa owe his brother? (Answer: 10,000 Leones)
b. How much money does Issa have, in a negative number? (Answer: negative 10,000
Leones)
5. Ask a pupil to come stand in front of the class. Ask him or her to take 2 steps forward, and then 3
steps backward.
6. Ask: Where is he/she now, compared to where he/she started?
7. Allow pupils to share their ideas.
8. Say: Imagine that steps forward are positive, and steps backward are negative. He/she is 1 step
behind where he/she started, at negative 1.
If pupils have difficulty understanding, do another example: 3 forward steps (positive) and 5
backward steps (negative). The pupil will stop at 2.
9. Ask: What are some other times when talking about negative numbers makes sense?
10. Encourage pupils to share their own ideas. Guide them to some examples if needed (see below
for ideas).
25
a. When we talk about temperature, very cold temperatures are negative. The temperature of
anything frozen, such as ice, is negative degrees Celsius. Hot temperatures are positive.
b. When we talk about elevation, we measure height above or below sea level in metres. The
highest point in Sierra Leone is Bintimani, which is 1,948 metres above sea level. If we enter
the ocean and touch the bottom, we are below sea level. Below sea level, we talk about
elevation in negative numbers. The Atlantic Ocean next to Sierra Leone is 8605 metres deep
at its deepest point. That is an elevation of negative 8605 metres.
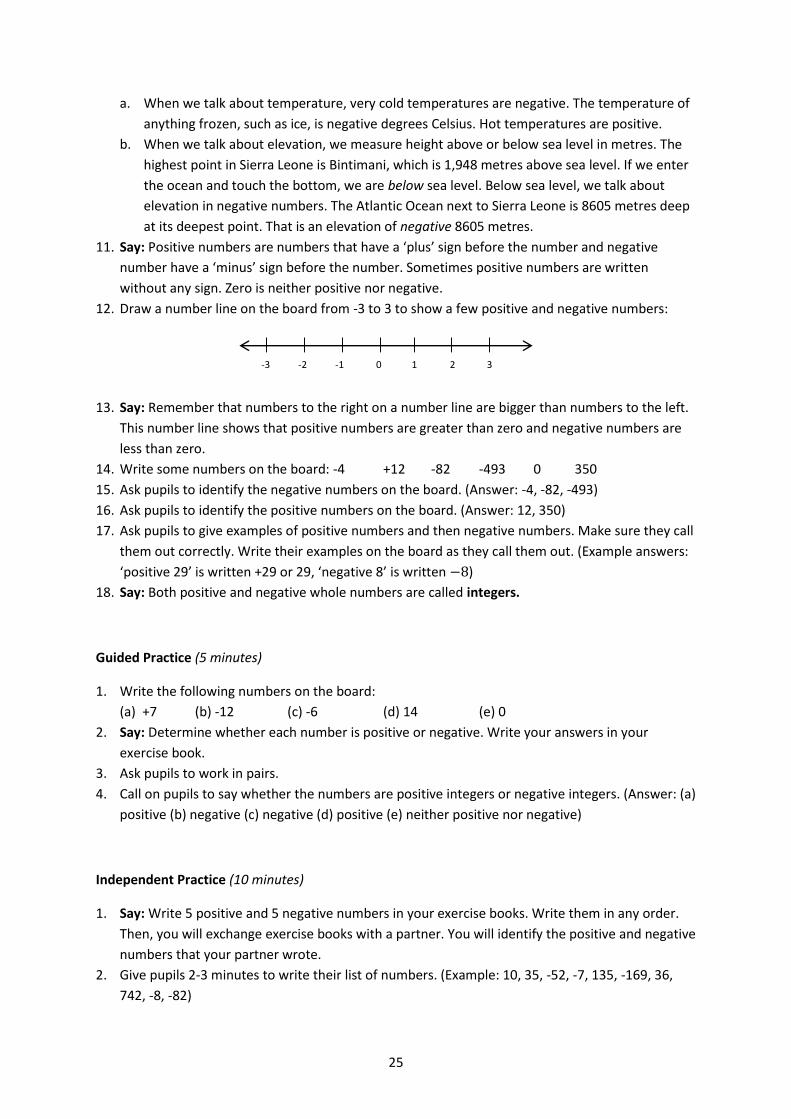
11. Say: Positive numbers are numbers that have a ‘plus’ sign before the number and negative
number have a ‘minus’ sign before the number. Sometimes positive numbers are written
without any sign. Zero is neither positive nor negative.
12. Draw a number line on the board from -3 to 3 to show a few positive and negative numbers:
13. Say: Remember that numbers to the right on a number line are bigger than numbers to the left.
This number line shows that positive numbers are greater than zero and negative numbers are
less than zero.
14. Write some numbers on the board: -4 +12 -82 -493 0 350
15. Ask pupils to identify the negative numbers on the board. (Answer: -4, -82, -493)
16. Ask pupils to identify the positive numbers on the board. (Answer: 12, 350)
17. Ask pupils to give examples of positive numbers and then negative numbers. Make sure they call
them out correctly. Write their examples on the board as they call them out. (Example answers:
‘positive 29’ is written +29 or 29, ‘negative 8’ is written −8)
18. Say: Both positive and negative whole numbers are called integers.
Guided Practice (5 minutes)
1. Write the following numbers on the board:
(a) +7 (b) -12 (c) -6 (d) 14 (e) 0
2. Say: Determine whether each number is positive or negative. Write your answers in your
exercise book.
3. Ask pupils to work in pairs.
4. Call on pupils to say whether the numbers are positive integers or negative integers. (Answer: (a)
positive (b) negative (c) negative (d) positive (e) neither positive nor negative)
Independent Practice (10 minutes)
1. Say: Write 5 positive and 5 negative numbers in your exercise books. Write them in any order.
Then, you will exchange exercise books with a partner. You will identify the positive and negative
numbers that your partner wrote.
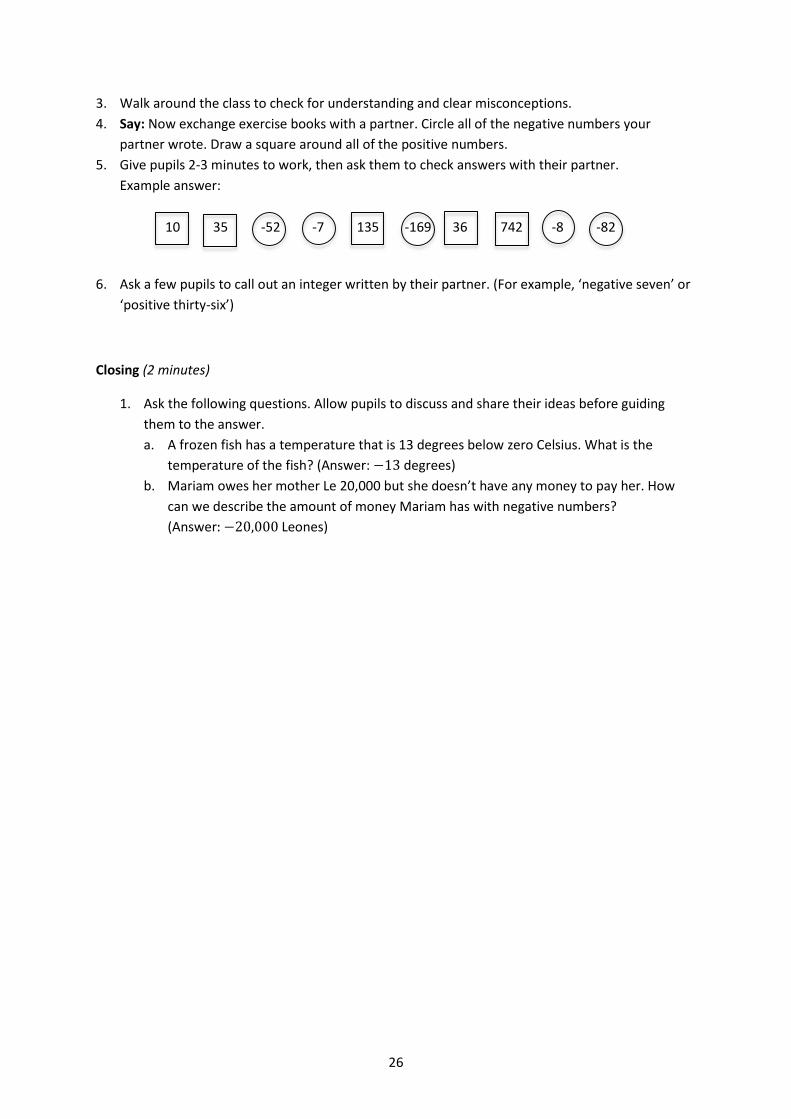
2. Give pupils 2-3 minutes to write their list of numbers. (Example: 10, 35, -52, -7, 135, -169, 36,
742, -8, -82)
-3 -2 -1 0 1 2 3
26
3. Walk around the class to check for understanding and clear misconceptions.
4. Say: Now exchange exercise books with a partner. Circle all of the negative numbers your
partner wrote. Draw a square around all of the positive numbers.
5. Give pupils 2-3 minutes to work, then ask them to check answers with their partner.
Example answer:
6. Ask a few pupils to call out an integer written by their partner. (For example, ‘negative seven’ or
‘positive thirty-six’)
Closing (2 minutes)
1. Ask the following questions. Allow pupils to discuss and share their ideas before guiding
them to the answer.
a. A frozen fish has a temperature that is 13 degrees below zero Celsius. What is the
temperature of the fish? (Answer: −13 degrees)
b. Mariam owes her mother Le 20,000 but she doesn’t have any money to pay her. How
can we describe the amount of money Mariam has with negative numbers?
(Answer: −20,000 Leones)
10 35 -52 -7 135 -169 36 742 -8 -82
27
Lesson Title: Positive and Negative Integers Theme: Numbers and Numeration
Lesson Number: M-07-057 Class/Level: JSS 1 Time: 35 minutes
Learning Outcomes By the end of the lesson pupils
will be able to locate positive and negative integers on a number line.
Teaching Aids Number lines
Preparation Draw the number line, in the Introduction to
the New Material, on the board.
Opening (3 minutes)
1. Ask pupils to give examples of positive and negative integers. As they call them out, write them
on the board. (Examples: ‘negative 8’: 8, ‘positive 25’: +25)
2. Ask: Which direction do we find positive integers from zero? (Answer: The right).
3. Ask: Which direction do we fine the negative integers from zero? (Answer: The left).
4. Ask: Is zero a positive or negative integer? (Answer: It is neither a positive nor a negative
integer).
5. Say: Today we are going to locate positive and negative integers on a number line.
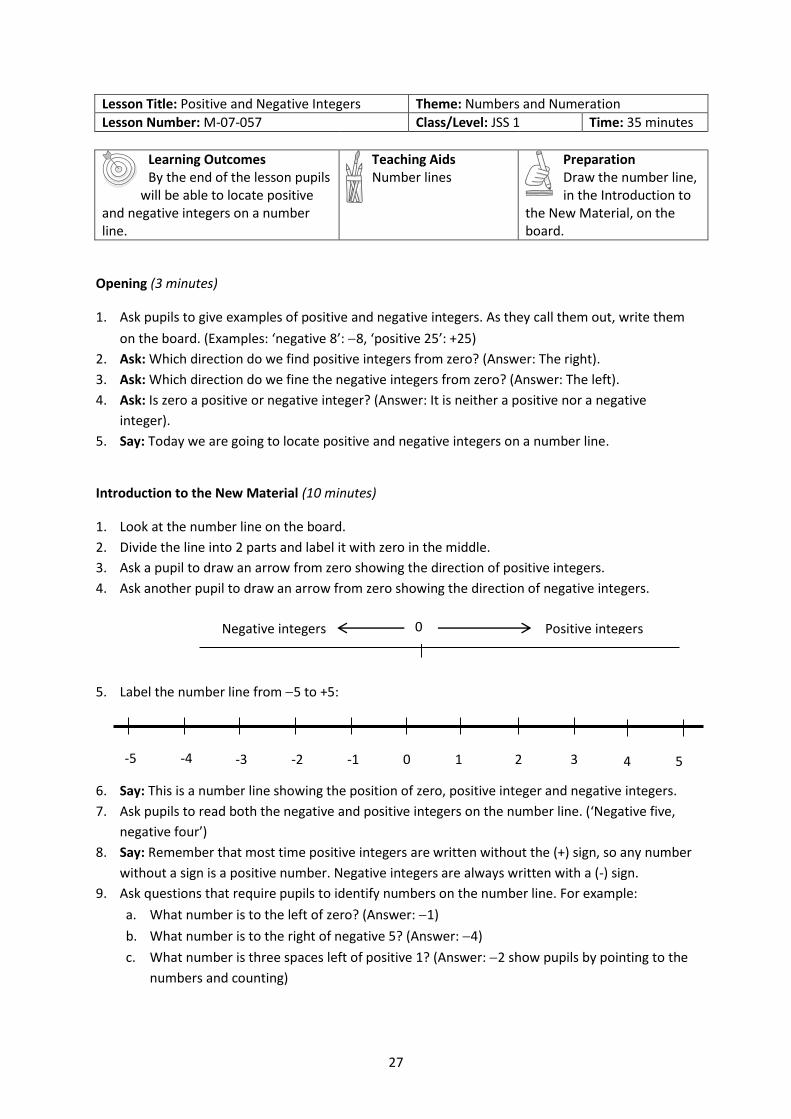
Introduction to the New Material (10 minutes)
1. Look at the number line on the board.
2. Divide the line into 2 parts and label it with zero in the middle.
3. Ask a pupil to draw an arrow from zero showing the direction of positive integers.
4. Ask another pupil to draw an arrow from zero showing the direction of negative integers.
5. Label the number line from 5 to +5:
6. Say: This is a number line showing the position of zero, positive integer and negative integers.
7. Ask pupils to read both the negative and positive integers on the number line. (‘Negative five,
negative four’)
8. Say: Remember that most time positive integers are written without the (+) sign, so any number
without a sign is a positive number. Negative integers are always written with a (-) sign.
9. Ask questions that require pupils to identify numbers on the number line. For example:
a. What number is to the left of zero? (Answer: 1)
b. What number is to the right of negative 5? (Answer: 4)
c. What number is three spaces left of positive 1? (Answer: 2 show pupils by pointing to the
numbers and counting)
Negative integers 0 Positive integers
-3 -2 -1 0 1 2 3 -5 -4 4 5
28
d. What number is 5 spaces to the right of 2? (Answer: 3, show pupils by pointing to the
numbers and counting)
Guided Practice (10 minutes)
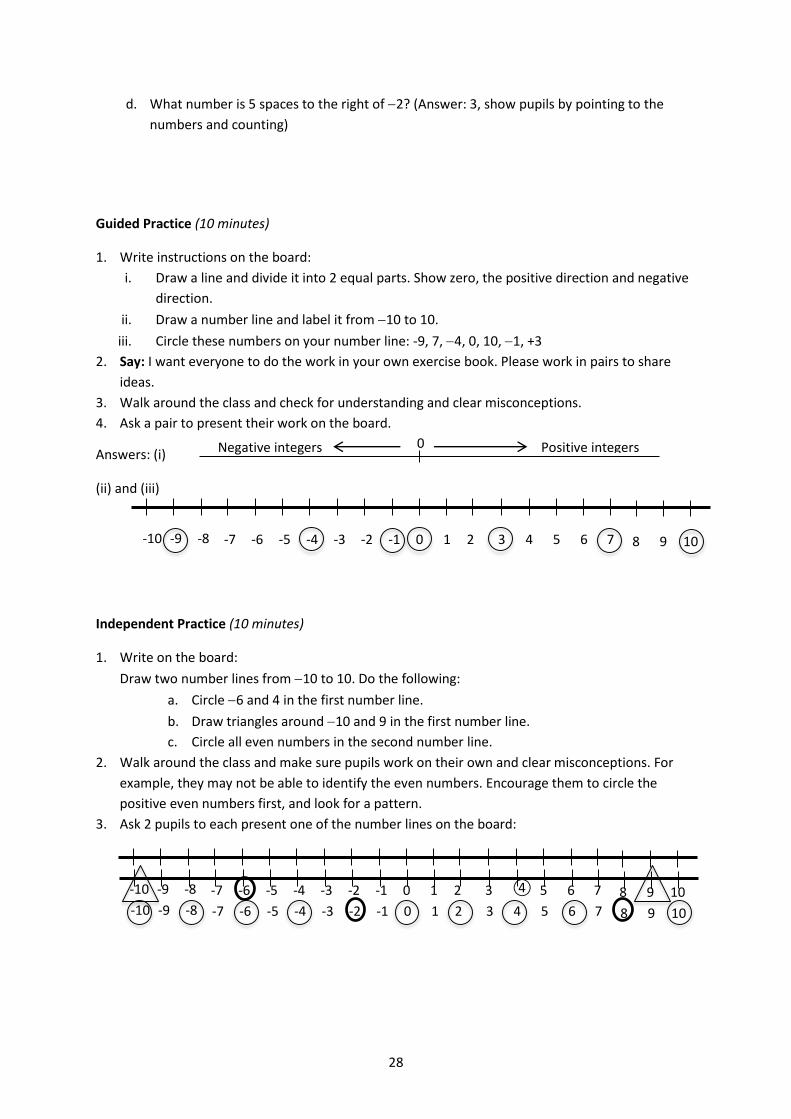
1. Write instructions on the board:
i. Draw a line and divide it into 2 equal parts. Show zero, the positive direction and negative
direction.
ii. Draw a number line and label it from 10 to 10.
iii. Circle these numbers on your number line: -9, 7, 4, 0, 10, 1, +3
2. Say: I want everyone to do the work in your own exercise book. Please work in pairs to share
ideas.
3. Walk around the class and check for understanding and clear misconceptions.
4. Ask a pair to present their work on the board.
Answers: (i)
(ii) and (iii)
Independent Practice (10 minutes)
1. Write on the board:
Draw two number lines from 10 to 10. Do the following:
a. Circle 6 and 4 in the first number line.
b. Draw triangles around 10 and 9 in the first number line.
c. Circle all even numbers in the second number line.
2. Walk around the class and make sure pupils work on their own and clear misconceptions. For
example, they may not be able to identify the even numbers. Encourage them to circle the
positive even numbers first, and look for a pattern.
3. Ask 2 pupils to each present one of the number lines on the board:
Negative integers Positive integers0
-7 -6 -5 -4 -2 -1 -3 0 1 2 3 ④ 5 6 7 -10 -9 -8 8 9 10 v -7 -6 -5 -4 -2 -1 -3 0 1 2 3 4 5 6 7 -10 -9 -8 8 9 10
-7 -6 -5 -4 -2 -1 -3 0 1 2 3 4 5 6 7 -10 -9 -8 8 9 10
29
4. Ask pupils to compare the answers on the board with the answers they got.
Closing (2 minutes)
1. Draw a number line from 10 to 10 on the board.
2. Ask pupils at random to come to the board and circle given numbers (7, 9, 2, 4, 7, 1). Make
sure pupils are able to identify positive and negative numbers.
30
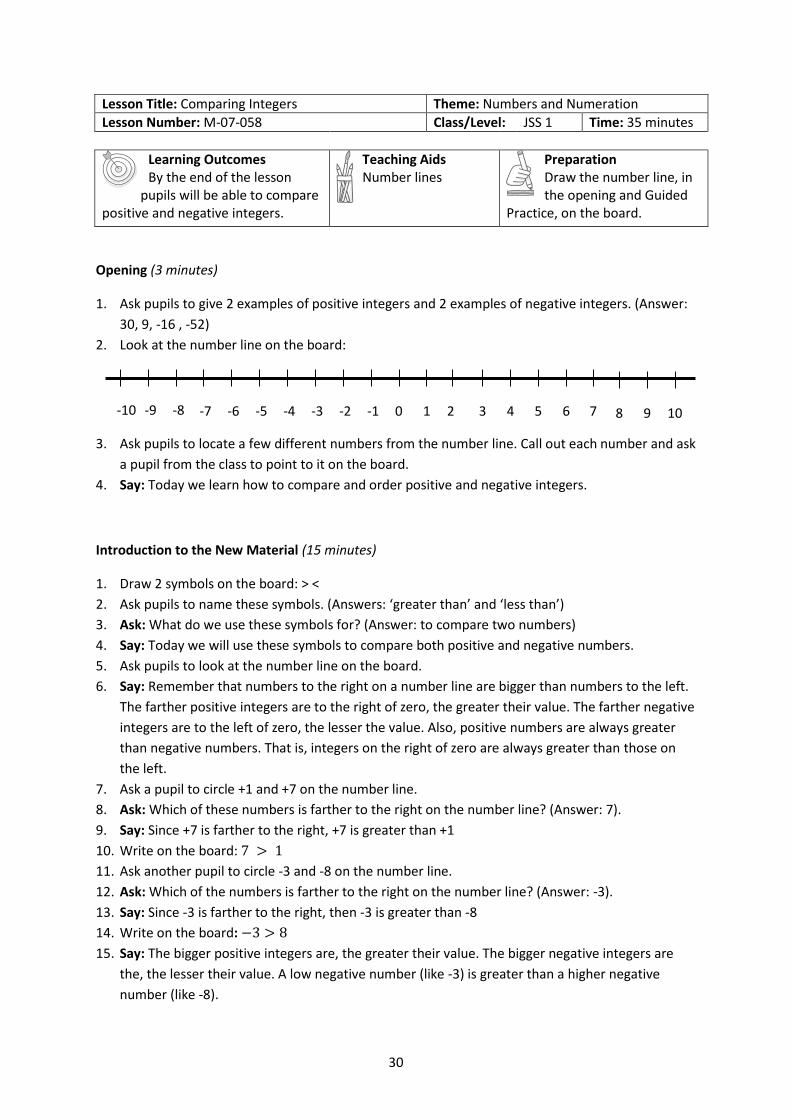
Lesson Title: Comparing Integers Theme: Numbers and Numeration
Lesson Number: M-07-058 Class/Level: JSS 1 Time: 35 minutes
Learning Outcomes By the end of the lesson
pupils will be able to compare positive and negative integers.
Teaching Aids Number lines
Preparation Draw the number line, in the opening and Guided
Practice, on the board.
Opening (3 minutes)
1. Ask pupils to give 2 examples of positive integers and 2 examples of negative integers. (Answer:
30, 9, -16 , -52)
2. Look at the number line on the board:
3. Ask pupils to locate a few different numbers from the number line. Call out each number and ask
a pupil from the class to point to it on the board.
4. Say: Today we learn how to compare and order positive and negative integers.
Introduction to the New Material (15 minutes)
1. Draw 2 symbols on the board: > <
2. Ask pupils to name these symbols. (Answers: ‘greater than’ and ‘less than’)
3. Ask: What do we use these symbols for? (Answer: to compare two numbers)
4. Say: Today we will use these symbols to compare both positive and negative numbers.
5. Ask pupils to look at the number line on the board.
6. Say: Remember that numbers to the right on a number line are bigger than numbers to the left.
The farther positive integers are to the right of zero, the greater their value. The farther negative
integers are to the left of zero, the lesser the value. Also, positive numbers are always greater
than negative numbers. That is, integers on the right of zero are always greater than those on
the left.
7. Ask a pupil to circle +1 and +7 on the number line.
8. Ask: Which of these numbers is farther to the right on the number line? (Answer: 7).
9. Say: Since +7 is farther to the right, +7 is greater than +1
10. Write on the board: 7 > 1
11. Ask another pupil to circle -3 and -8 on the number line.
12. Ask: Which of the numbers is farther to the right on the number line? (Answer: -3).
13. Say: Since -3 is farther to the right, then -3 is greater than -8
14. Write on the board: −3 > 8
15. Say: The bigger positive integers are, the greater their value. The bigger negative integers are
the, the lesser their value. A low negative number (like -3) is greater than a higher negative
number (like -8).
-7 -6 -5 -4 -2 -1 -3 0 1 2 3 4 5 6 7 -10 -9 -8 8 9 10
31
16. Compare zero to negative integers and positive integers.
17. Say: Look at zero and -5 on the number line.
18. Ask: Which is farther to the right? (Answer: 0)
19. Ask: What does that mean? (Answer: That zero is greater in value than -5)
20. Write on the board: 0 > −5
21. Compare zero with other integers and write them on the board. (Examples: 0 < 4, 0 > −8)
22. Write on the board: 4, -2 , -5 , 3, -1
23. Say: Let’s look at the integers on the number line and arrange these in order from the least to
greatest (or from the left of zero to the right).
24. Ask pupils to call out the numbers in order as you write them on the board. (Answer: -5, -2, -1, 3,
4)
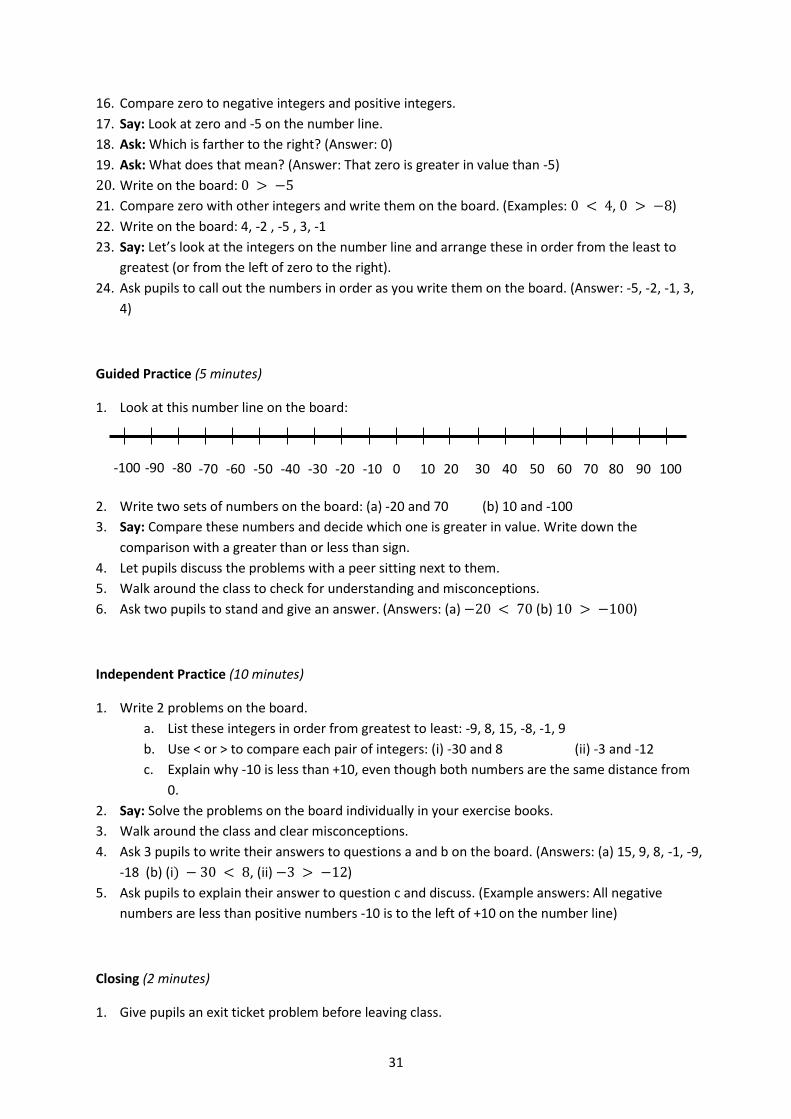
Guided Practice (5 minutes)
1. Look at this number line on the board:
2. Write two sets of numbers on the board: (a) -20 and 70 (b) 10 and -100
3. Say: Compare these numbers and decide which one is greater in value. Write down the
comparison with a greater than or less than sign.
4. Let pupils discuss the problems with a peer sitting next to them.
5. Walk around the class to check for understanding and misconceptions.
6. Ask two pupils to stand and give an answer. (Answers: (a) −20 < 70 (b) 10 > −100)
Independent Practice (10 minutes)
1. Write 2 problems on the board.
a. List these integers in order from greatest to least: -9, 8, 15, -8, -1, 9
b. Use < or > to compare each pair of integers: (i) -30 and 8 (ii) -3 and -12
c. Explain why -10 is less than +10, even though both numbers are the same distance from
0.
2. Say: Solve the problems on the board individually in your exercise books.
3. Walk around the class and clear misconceptions.
4. Ask 3 pupils to write their answers to questions a and b on the board. (Answers: (a) 15, 9, 8, -1, -9,
-18 (b) (i) − 30 < 8, (ii) −3 > −12)
5. Ask pupils to explain their answer to question c and discuss. (Example answers: All negative
numbers are less than positive numbers -10 is to the left of +10 on the number line)
Closing (2 minutes)
1. Give pupils an exit ticket problem before leaving class.
-70 -60 -50 -40 -20 -10 -30 0 10 20 30 40 50 60 70 -100 -90 -80 80 90 100
32
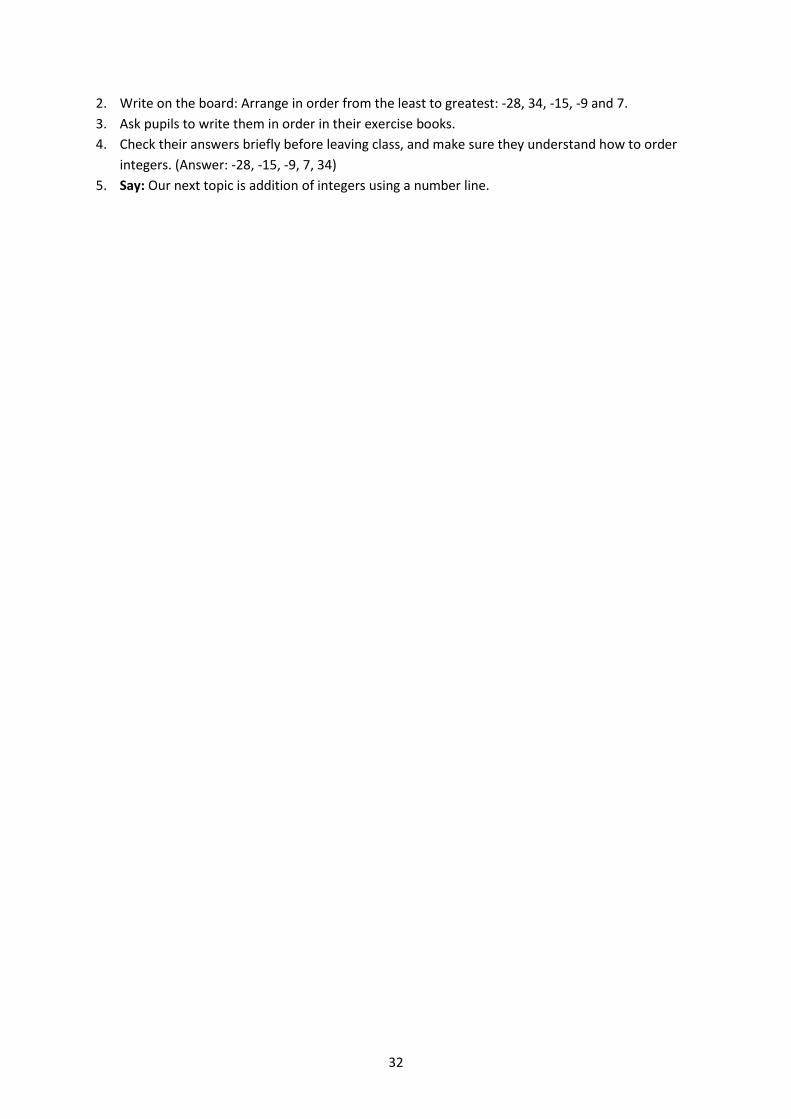
2. Write on the board: Arrange in order from the least to greatest: -28, 34, -15, -9 and 7.
3. Ask pupils to write them in order in their exercise books.
4. Check their answers briefly before leaving class, and make sure they understand how to order
integers. (Answer: -28, -15, -9, 7, 34)
5. Say: Our next topic is addition of integers using a number line.
33
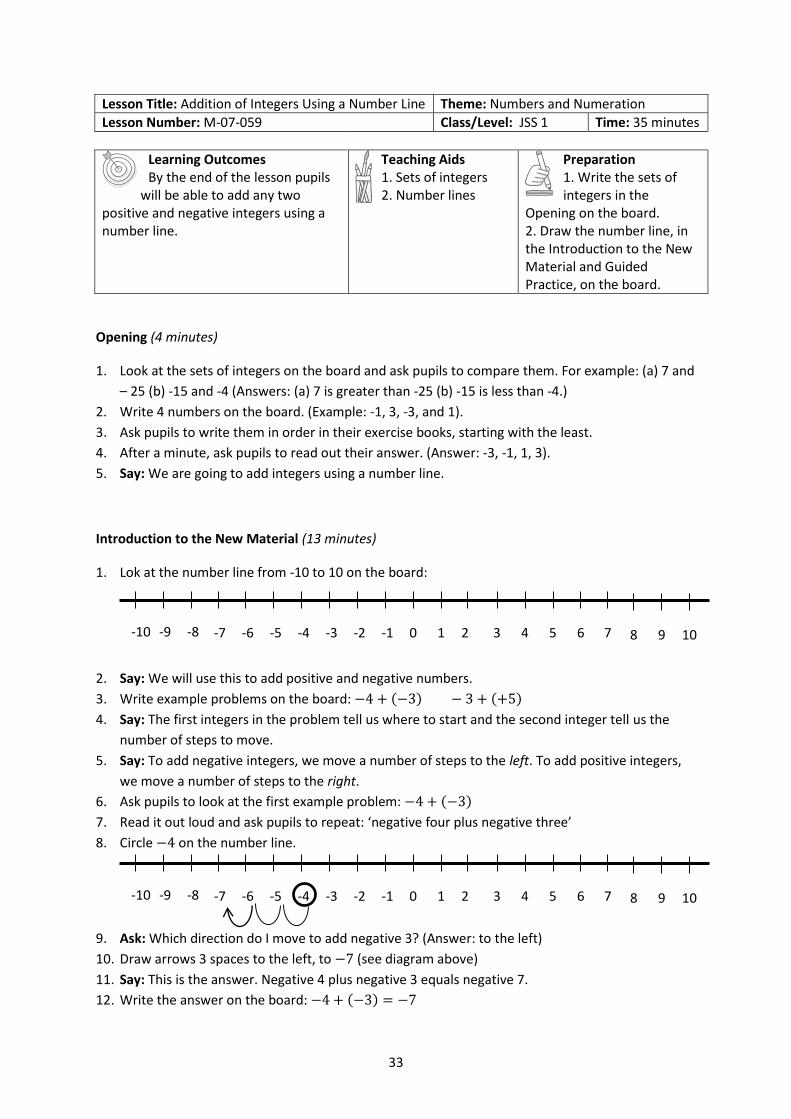
Lesson Title: Addition of Integers Using a Number Line Theme: Numbers and Numeration
Lesson Number: M-07-059 Class/Level: JSS 1 Time: 35 minutes
Learning Outcomes By the end of the lesson pupils
will be able to add any two positive and negative integers using a number line.
Teaching Aids 1. Sets of integers 2. Number lines
Preparation 1. Write the sets of integers in the
Opening on the board. 2. Draw the number line, in the Introduction to the New Material and Guided Practice, on the board.
Opening (4 minutes)
1. Look at the sets of integers on the board and ask pupils to compare them. For example: (a) 7 and
– 25 (b) -15 and -4 (Answers: (a) 7 is greater than -25 (b) -15 is less than -4.)
2. Write 4 numbers on the board. (Example: -1, 3, -3, and 1).
3. Ask pupils to write them in order in their exercise books, starting with the least.
4. After a minute, ask pupils to read out their answer. (Answer: -3, -1, 1, 3).
5. Say: We are going to add integers using a number line.
Introduction to the New Material (13 minutes)
1. Lok at the number line from -10 to 10 on the board:
2. Say: We will use this to add positive and negative numbers.
3. Write example problems on the board: −4 + (−3) − 3 + (+5)
4. Say: The first integers in the problem tell us where to start and the second integer tell us the
number of steps to move.
5. Say: To add negative integers, we move a number of steps to the left. To add positive integers,
we move a number of steps to the right.
6. Ask pupils to look at the first example problem: −4 + (−3)
7. Read it out loud and ask pupils to repeat: ‘negative four plus negative three’
8. Circle −4 on the number line.
9. Ask: Which direction do I move to add negative 3? (Answer: to the left)
10. Draw arrows 3 spaces to the left, to −7 (see diagram above)
11. Say: This is the answer. Negative 4 plus negative 3 equals negative 7.
12. Write the answer on the board: −4 + (−3) = −7
-7 -6 -5 -4 -2 -1 -3 0 1 2 3 4 5 6 7 -10 -9 -8 8 9 10
-7 -6 -5 -4 -2 -1 -3 0 1 2 3 4 5 6 7 -10 -9 -8 8 9 10
34
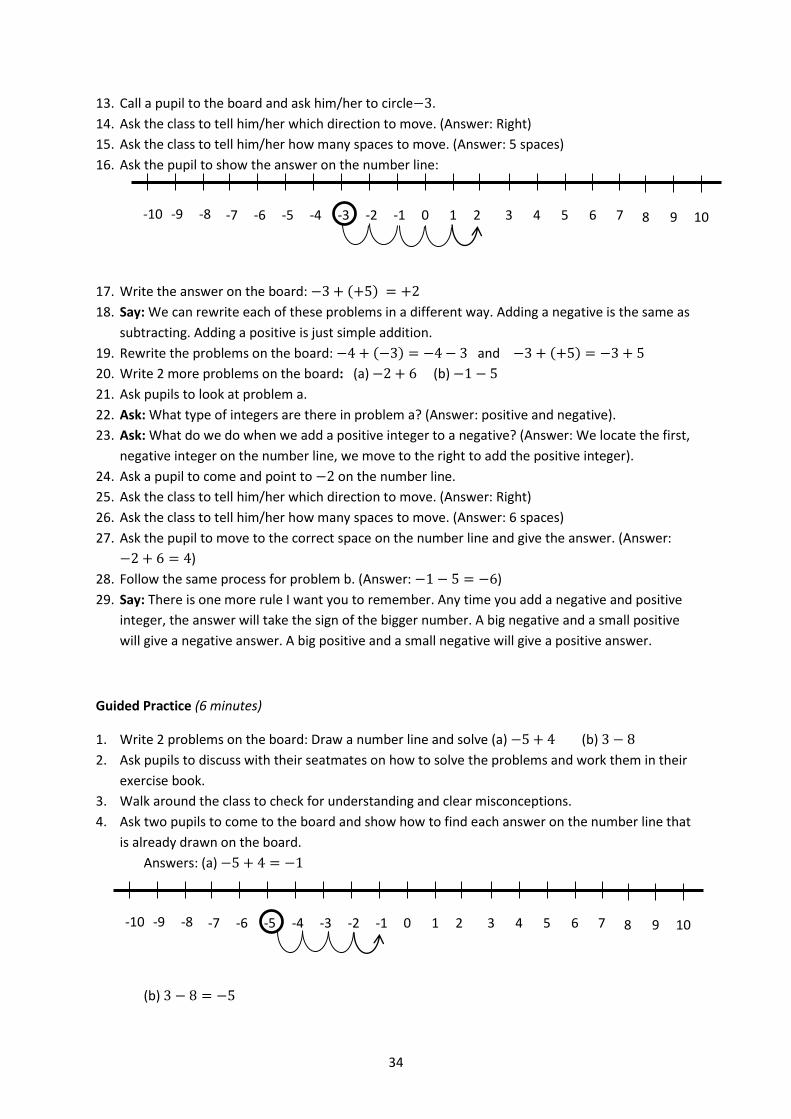
13. Call a pupil to the board and ask him/her to circle−3.
14. Ask the class to tell him/her which direction to move. (Answer: Right)
15. Ask the class to tell him/her how many spaces to move. (Answer: 5 spaces)
16. Ask the pupil to show the answer on the number line:
17. Write the answer on the board: −3 + (+5) = +2
18. Say: We can rewrite each of these problems in a different way. Adding a negative is the same as
subtracting. Adding a positive is just simple addition.
19. Rewrite the problems on the board: −4 + (−3) = −4 − 3 and −3 + (+5) = −3 + 5
20. Write 2 more problems on the board: (a) −2 + 6 (b) −1 − 5
21. Ask pupils to look at problem a.
22. Ask: What type of integers are there in problem a? (Answer: positive and negative).
23. Ask: What do we do when we add a positive integer to a negative? (Answer: We locate the first,
negative integer on the number line, we move to the right to add the positive integer).
24. Ask a pupil to come and point to −2 on the number line.
25. Ask the class to tell him/her which direction to move. (Answer: Right)
26. Ask the class to tell him/her how many spaces to move. (Answer: 6 spaces)
27. Ask the pupil to move to the correct space on the number line and give the answer. (Answer:
−2 + 6 = 4)
28. Follow the same process for problem b. (Answer: −1 − 5 = −6)
29. Say: There is one more rule I want you to remember. Any time you add a negative and positive
integer, the answer will take the sign of the bigger number. A big negative and a small positive
will give a negative answer. A big positive and a small negative will give a positive answer.
Guided Practice (6 minutes)
1. Write 2 problems on the board: Draw a number line and solve (a) −5 + 4 (b) 3 − 8
2. Ask pupils to discuss with their seatmates on how to solve the problems and work them in their
exercise book.
3. Walk around the class to check for understanding and clear misconceptions.
4. Ask two pupils to come to the board and show how to find each answer on the number line that
is already drawn on the board.
Answers: (a) −5 + 4 = −1
(b) 3 − 8 = −5
-7 -6 -5 -4 -2 -1 -3 0 1 2 3 4 5 6 7 -10 -9 -8 8 9 10
-7 -6 -5 -4 -2 -1 -3 0 1 2 3 4 5 6 7 -10 -9 -8 8 9 10

35
5. Say: Compare the answer you got to the answer on the board.
Independent Practice (10 minutes)
1. Write on the board: Draw a number line and solve (a) −1 − 7 (b) 4 + 6 (c) −3 + 9
2. Say: Do the problems in your exercise books.
3. Walk around the class to check pupils’ work and help where necessary.
4. Ask 3 pupils each to present a problem on the number line on the board one at a time.
Answer: (a)−1 − 7 = −8
(b)4 + 6 = 10
(b)−3 + 9 = 6
Ask pupils to compare their answers to the ones on the board.
-7 -6 -5 -4 -2 -1 -3 0 1 2 3 4 5 6 7 -10 -9 -8 8 9 10
-7 -6 -5 -4 -2 -1 -3 0 1 2 3 4 5 6 7 -10 -9 -8 8 9 10
-7 -6 -5 -4 -2 -1 -3 0 1 2 3 4 5 6 7 -10 -9 -8 8 9 10
-7 -6 -5 -4 -2 -1 -3 0 1 2 3 4 5 6 7 -10 -9 -8 8 9 10

36
Closing (2 minutes)
1. Write on the board: Solve 2 − 7.
2. Ask: Will the answer be positive or negative? (Answer: negative because the negative number
(7) is bigger than the positive number (2))
3. Ask pupils to find the answer in their exercise books as quickly as they can.
4. Ask a pupil to give the answer and explain.
(Answer: 2 − 7 = −5 if we start at +2 and count 7 spaces to the left, we end at −5)
-7 -6 -5 -4 -2 -1 -3 0 1 2 3 4 5 6 7 -10 -9 -8 8 9 10
37
Lesson Title: Addition of Integers Theme: Numbers and Numeration
Lesson Number: M-07-060 Class/Level: JSS 1 Time: 35 minutes
Learning Outcomes By the end of the lesson pupils
will be able to apply rules for adding integers to 2 positive or negative integers.
Teaching Aids Questions
Preparation Write the questions, in the Guided Practice and
Independent Practice, on the board.
Opening (4 minutes)
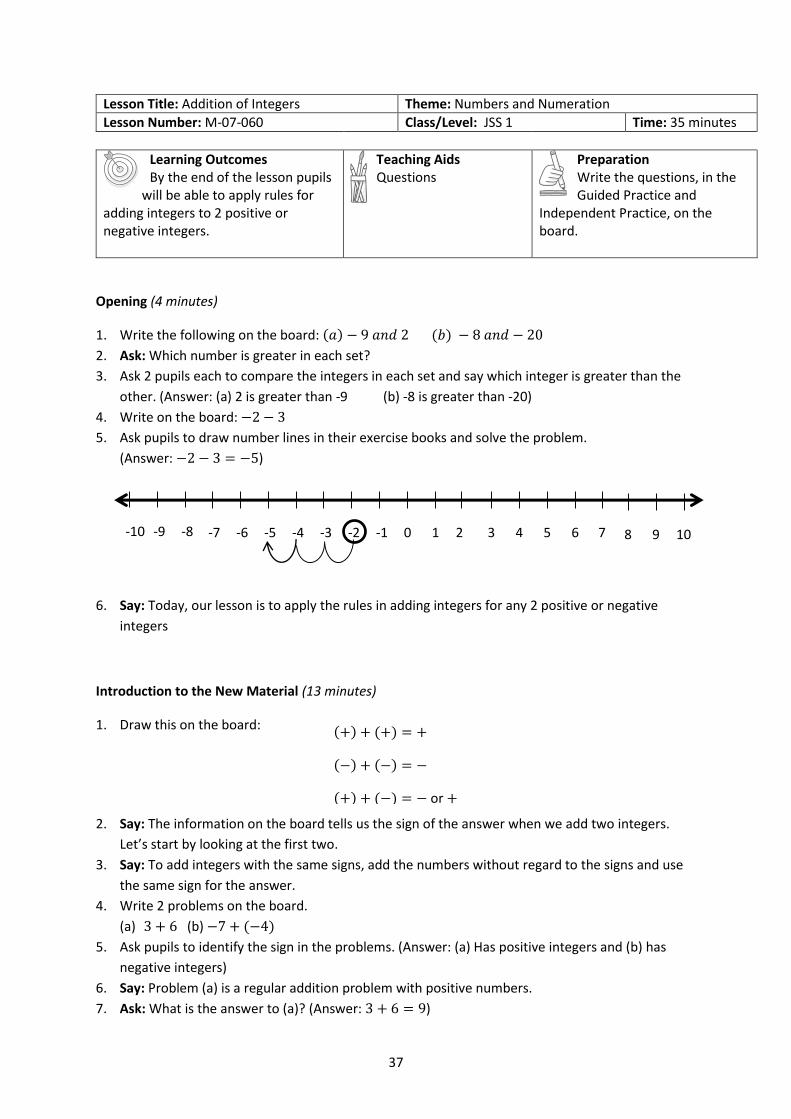
1. Write the following on the board: (𝑎) − 9 𝑎𝑛𝑑 2 (𝑏) − 8 𝑎𝑛𝑑 − 20
2. Ask: Which number is greater in each set?
3. Ask 2 pupils each to compare the integers in each set and say which integer is greater than the
other. (Answer: (a) 2 is greater than -9 (b) -8 is greater than -20)
4. Write on the board: −2 − 3
5. Ask pupils to draw number lines in their exercise books and solve the problem.
(Answer: −2 − 3 = −5)
6. Say: Today, our lesson is to apply the rules in adding integers for any 2 positive or negative
integers
Introduction to the New Material (13 minutes)
1. Draw this on the board:
2. Say: The information on the board tells us the sign of the answer when we add two integers.
Let’s start by looking at the first two.
3. Say: To add integers with the same signs, add the numbers without regard to the signs and use
the same sign for the answer.
4. Write 2 problems on the board.
(a) 3 + 6 (b) −7 + (−4)
5. Ask pupils to identify the sign in the problems. (Answer: (a) Has positive integers and (b) has
negative integers)
6. Say: Problem (a) is a regular addition problem with positive numbers.
7. Ask: What is the answer to (a)? (Answer: 3 + 6 = 9)
(+) + (+) = +
(−) + (−) = −
(+) + (−) = − or +
-7 -6 -5 -4 -2 -1 -3 0 1 2 3 4 5 6 7 -10 -9 -8 8 9 10
38
8. Say: Now look at b. Can anyone think of a way to rewrite this problem? (Answer: −7 + (−4) =
−7 − 4)
9. Say: Let’s solve this problem. Remember that when two numbers have the same sign, we first
add them.
10. Ask: What is 7 plus 4? (Answer: 11)
11. Say: Because this 7 and 4 are negative, the answer will also be negative.
12. Write on the board: −7 − 4 = −11
13. Write another example on the board: (−13) + (−8)
14. Ask pupils to find the answer in their exercise books. After a moment, ask a pupil to give their
answer and explain. (Answer: −13 − 8 = −21; this is because 13 + 8 = 21, and we change the
sign to negative because the numbers being added are negative)
15. Say: Now let’s look at adding positive and negative numbers together. When we add integers
with different signs, the answer can be positive or negative. Recall from the last lesson that the
answer will take the sign of the bigger number.
16. Say: To add integers with different signs, we subtract the numbers. Subtract the smaller number
from the bigger number and put the correct sign on the answer.
17. Write two problems on the board: (a) −3 + 4 (b) −15 + 8
18. Ask pupils to look at problem (a).
19. Ask: Will the answer be positive or negative? Why? (Answer: The answer will be positive
because the number 4 is bigger than the number 23.)
20. Say: We can simply subtract these two numbers and give the answer as a positive number.
21. Write on the board: −3 + 4 → 4 − 3
22. Ask pupils to give the answer for 4 − 3. (Answer: 1)
23. Write the answer on the board: −3 + 4 = 1
24. Ask pupils to look at problem (b).
25. Write on the board: −15 + 8 → 15 − 8
26. Ask pupils to give the answer for 15 − 8. (Answer: 7)
27. Ask: Will the answer be positive or negative? Why?
(Answer: The answer will be negative because the number 15 is bigger than the number 8.)
28. Write the answer on the board: −15 + 8 = −7
29. Say: Remember to write the negative sign before the 7 in the answer.
Guided Practice (5 minutes)
1. Read these 2 problems on the board: (a) 25 + (−6) (b) −15 + 13
2. Say: Follow the rules of adding integers with same signs and with different signs.
3. Ask pupils to discuss and solve each of the problems with their seatmates.
4. Walk around the class and clear any misconceptions. For example, remind pupils that adding a
negative number is the same as subtraction (from the previous lesson).
5. Ask 2 pupils to each solve 1 problem on the board
(Answer: (a) 25 + (−6) = 25 − 6 = 19 (b) −15 + 13 → 15 − 13 = 2 → −15 + 13 = −2)
6. Say: Compare the answers you got to the answer on the board.
39
Independent Practice (10 minutes)
1. Read these 3 problems on the board:
(a) (−5) + (−12) (b) (+17) + (−24) (c) (−31) + (+15)
2. Ask pupils to solve the problems individually.
3. Say: You can share ideas with your neighbours.
4. Move round the class and check for understanding and clear misconceptions.
5. Ask 3 pupils to each solve one of the problems on the board.
(Answer: (a) (−5) + (−12) = −17 (b) 17 + (−24) = 17 − 24 = −7 (c) −31 + 15 = −16)
6. Ask pupils to compare their answers with the answers on the board.
Closing (3 minutes)
1. Write these problems on the board:
2. Ask pupils to fill in the blanks with the correct sign.
3. Ask pupils to compare their answers with their seatmates. (Answers: (a) (b) + (c) + or )
(−) + (−) = (a.) (+) + (+) = (b.) (+) + (−) = (c.)
40
Lesson Title: Subtraction of Integers Theme: Numbers and Numeration
Lesson Number: M-07-061 Class/Level: JSS 1 Time: 35 minutes
Learning Outcomes By the end of the lesson pupils
will be able to subtract any two positive or negative integers.
Teaching Aids None
Preparation None
Opening (3minutes)
1. Write this on the board: −3 + (−3)
2. Ask : which sign do we use when + and – are together (Answer: −)
3. Ask a pupil to rewrite the problem on the board. Ask all other pupils to do the task in their
exercise books. (Answer: (−3) + (−3) = −3 − 3)
4. Ask pupils to solve the problem in their exercise books. Ask one pupil to call out the answer.
(Answer: −6)
Introduction to the New Material (13 minutes)
1. Write this on the board: (+4) − (+6)
2. Say: We apply the same rule as in the example in the opening. Remember that adding a negative
number is the same as subtraction. We use the same idea here.
3. Ask: Which 2 signs are together? (Answer: − 𝑎𝑛𝑑+).
4. Say: Putting a minus sign before a number in brackets means we should change the sign on that
number. When there is a minus sign in front of a positive number, remove the bracket and give
the number a minus sign.
5. Rewrite the problem using 1 sign: +4 − (+6) = +4 − 6
6. Ask: How do you think we will solve this?
7. Allow pupils to share their ideas.
8. Say: It is same process we used in the last class to add a negative number. When the signs are
not the same, subtract the numbers and the bigger number carries the sign.
9. Ask: What sign will the answer have? Why? (Answer: It will have a negative sign because 6 is
bigger than 4, and the 6 has a minus sign.)
10. Solve on the board: +4 − 6 6 − 4 = 2 +4 − 6 = −2
11. Write another problem on the board: −12 − (+6)
12. Ask: How can we rewrite this? (Answer: −12 − 6)
13. Say: This looks like some of the addition problems we did in the last class. Can anyone tell me
what to do? (Answer: Add the two numbers and give the answer a negative sign)
14. Write the answer on the board: −12 − 6 12 + 6 = 18 −12 − 6 = −18
15. Write another problem on the board: −8 − (−9)
16. Ask a pupil to identify the 2 signs that are together. (Answer:−𝑎𝑛𝑑−)
17. Say: Remember that putting a minus sign before a number in brackets means we should change
the sign on that number. When there is a minus sign in front of a negative number, remove the
bracket and give the number a plus sign.
41
18. Rewrite the problem: (−8) − (−9) = −8 + 9
19. Ask pupils to explain how to solve this problem. (For example: subtract 8 from 9 and let the
answer be positive because +9 is bigger than -8)
20. Solve the problem on the board: −8 + 9 = 9 − 8 = 1
Guided Practice (6 minutes)
1. Write 2 problems on the board: (a) 5 − (+5 ) (b) −15 − (+12)
2. Ask pupils to discuss and solve the problem in pairs.
3. Walk around and help pupils with misconceptions. For example, in question (b) you may need to
remind them that when the signs on the two numbers are the same, we add the numbers and
use the same sign for the answer.
4. Ask two pairs to come to the board and work out the two problems.
(Answers: (a) 5 − (+5) = 5 − 5 = 0 (b) −15 − (+12) = −15 − 12 = −27)
5. Ask pupils to compare the answers on the board with the answers they got.
Independent Practice (10 minutes)
1. Write 3 problems on the board. Example: (a) −6 − (−9) (b) 8 − (+12) (c)
3 − (−8)
2. Ask pupils to work out the problems individually in their exercise books.
3. Walk around the class and help where required.
4. Ask pupils to share ideas with the person sitting next to them.
5. Ask 3 pupils to each solve 1 problem on the board.
(Answers: (a) −6 − (−9) = −6 + 9 = 3 (b) 8 − (+12) = 8 − 12 = −4
(c) 3 − (−8) = 3 + 8 = 11)
6. Ask pupils to compare their answers with the answers on the board.
Closing (3 minutes)
1. Write an exit ticket problem on the board. −18 − (+7)
2. Ask pupils to quickly solve the problem in their exercise books.
3. Walk around to briefly check their answers and make sure they understood the topic. (Answer:
−18 − (+7) = −18 − 7 = −25)
4. Ask pupils to call out the answer. (Answer: −25)
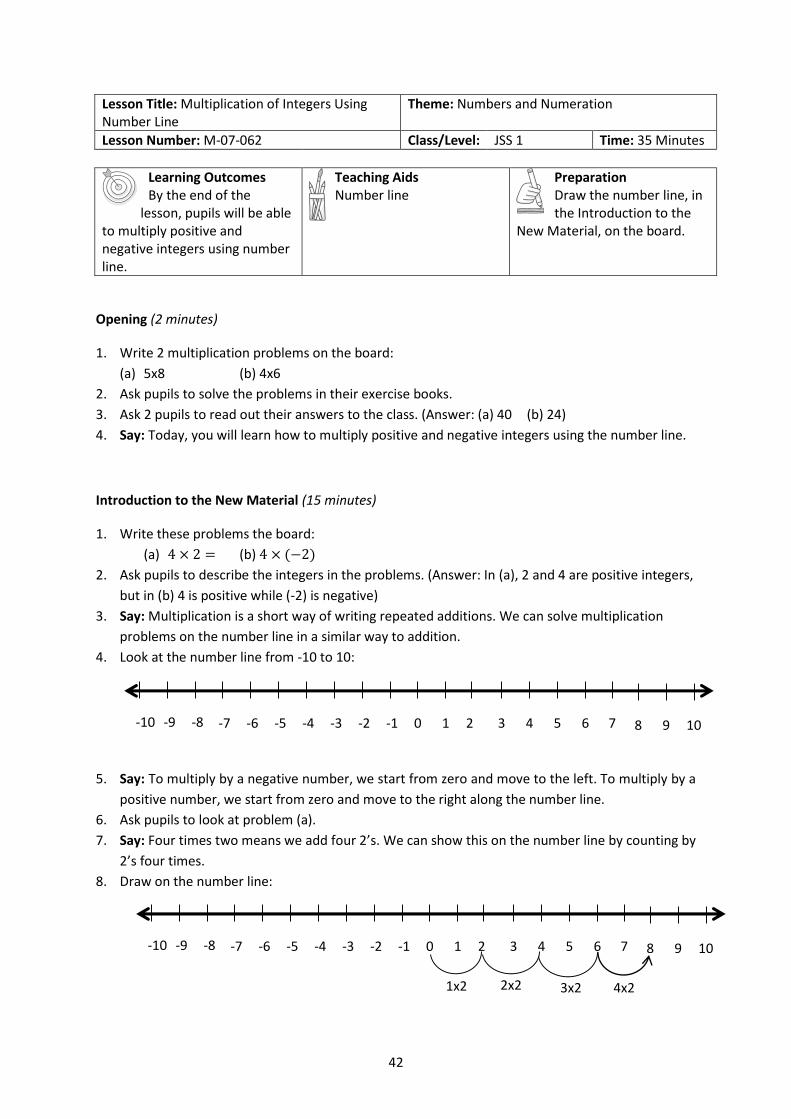
42
Lesson Title: Multiplication of Integers Using Number Line
Theme: Numbers and Numeration
Lesson Number: M-07-062 Class/Level: JSS 1 Time: 35 Minutes
Learning Outcomes By the end of the
lesson, pupils will be able to multiply positive and negative integers using number line.
Teaching Aids Number line
Preparation Draw the number line, in the Introduction to the
New Material, on the board.
Opening (2 minutes)
1. Write 2 multiplication problems on the board:
(a) 5x8 (b) 4x6
2. Ask pupils to solve the problems in their exercise books.
3. Ask 2 pupils to read out their answers to the class. (Answer: (a) 40 (b) 24)
4. Say: Today, you will learn how to multiply positive and negative integers using the number line.
Introduction to the New Material (15 minutes)
1. Write these problems the board:
(a) 4 × 2 = (b) 4 × (−2)
2. Ask pupils to describe the integers in the problems. (Answer: In (a), 2 and 4 are positive integers,
but in (b) 4 is positive while (-2) is negative)
3. Say: Multiplication is a short way of writing repeated additions. We can solve multiplication
problems on the number line in a similar way to addition.
4. Look at the number line from -10 to 10:
5. Say: To multiply by a negative number, we start from zero and move to the left. To multiply by a
positive number, we start from zero and move to the right along the number line.
6. Ask pupils to look at problem (a).
7. Say: Four times two means we add four 2’s. We can show this on the number line by counting by
2’s four times.
8. Draw on the number line:
-7 -6 -5 -4 -2 -1 -3 0 1 2 3 4 5 6 7 -10 -9 -8 8 9 10
-7 -6 -5 -4 -2 -1 -3 0 1 2 3 4 5 6 7 -10 -9 -8 8 9 10
1x2 2x2 3x2 4x2
43
9. Write the answer on the board: (a) 4 × 2 = 8
10. Follow the same process to show pupils problem (b) 4 × (−2).
11. Say: A positive times a negative is a negative. To solve this problem, we move along the number
line in the negative direction.
12. Say: We count by 2’s four times in the negative direction (left).
13. Draw on the number line:
14. Write the answer on the board: (b) 4 × (−2) = −8
15. Write another problem on the board: (−4) × (−2)
16. Say: A negative times a negative is a positive. To solve this problem, we move along the number
line in the positive direction. Remember that we moved in a negative direction to multiply a
negative by a positive. Two negatives makes us go in the opposite, positive direction.
17. Write the answer on the board: (−4) × (−2) = 8
18. Say: If the two integers have the same sign, their product is positive. If the two integers have
different signs, their product is negative.
Guided Practice (6 minutes)
1. Ask pupils to work in pairs to solve the following problems.
2. Write on the board: Use the number line to solve: (a) 3 × 3 (b) 3 × (−3)
-7 -6 -5 -4 -2 -1 -3 0 1 2 3 4 5 6 7 -10 -9 -8 8 9 10
1x-2 2x-2 3x-2 4x-2
-7 -6 -5 -4 -2 -1 -3 0 1 2 3 4 5 6 7 -10 -9 -8 8 9 10
-1x-2 -2x-2 -3x-2 -4x-2
44
3. Walk around the class to check pupils work, make sure they are drawing the number lines
correctly, labelling with the correct multiples and taking the steps along the number line in the
correct directions.
4. Ask two pairs to present their answers on the board.
(Answers: (a) 3 × 3 = 9 (b) 3 × (−3) = −9, see diagrams below)
Independent Practice (10 minutes)
1. Ask pupils to work individually and solve these problems.
2. Write on the board: Use the number line to solve: (a) 2 × 3 (b) 2 × (−3) (c) (−2) × (−3)
3. Walk around the class to check for understanding and clear misconceptions.
4. Ask pupils to turn to their neighbour and compare their answers.
5. Ask three different pupils to stand and say their answers. (Answers: (a) 2 × 3 = 6; (b) 2 × (−3) =
−6; (c) (−2) × (−3) = 6)
6. Ask pupils to draw the number lines on the board to show their answers if there is enough time.
Closing (2 minutes)
1. Write some multiplication problems on the board. For example:
(a) 5 × (−8) (b) (−15) × (−15) (c) (−20) × (40)
2. Ask pupils to tell whether each product will be positive or negative. (Answers: (a) negative, (b)
positive, (c) negative)
3. Say: Remember that the product is positive when two integers have the same sign. The product
is negative when two integers had different signs.
-7 -6 -5 -4 -2 -1 -3 0 1 2 3 4 5 6 7 -10 -9 -8 8 9 10
1x3 2x3 3x3
-7 -6 -5 -4 -2 -1 -3 0 1 2 3 4 5 6 7 -10 -9 -8 8 9 10
1x-3 2x-3 3x-3
45
Lesson Title: Multiplication of Integers Theme: Numbers and Numeration
Lesson Number: M-07-063 Class/Level: JSS 1 Time: 35 minutes
Learning Outcomes By the end of the
lesson, pupils will be able to apply rules for multiplying integers to multiply any two positive or negative integers.
Teaching Aids 1. Number line 2. Problems
Preparation 1. Draw the number line, in the Opening, on the
board. 2. Write the problems Introduction to the New Material and Guide Practice, on the board.
Opening (4 minutes)
1. Write a multiplication problem on the board: 5 × (−2)
2. Ask pupils to solve the problem using a number line in their exercise books.
3. Ask a pupil to solve the problem using the number line on the board. (Answer: 5 × (−2) = −10)
4. Say: Today, you will learn to apply rules for multiplying integers to multiply any two positive or
negative integers.
Introduction to the New Material (10 minutes)
1. Write on the board:
positive positive = __________ negative negative = __________
positive negative = __________ negative positive = __________
2. Ask pupils what they think the answer to each will be (What is a positive times a positive?).
Encourage them to recall what they learnt in the previous lesson.
3. Write the correct answers in the spaces on the board:
positive positive = positive negative negative = positive
positive negative = negative negative positive = negative
4. Say: If the two integers have the same sign, their product will carry a positive sign. If the two
integers have different signs, their product will carry a negative sign.
5. Say: We can use the same multiplication table when multiplying negative numbers. We just
need to make sure we use the correct sign on the product.
6. Read the following problems on the board:
(a) (+3) × (+8) (b) (+4) × (-6) (c) (-9) × (-2)
7. Ask pupils to solve (a) in their exercise books.
-7 -6 -5 -4 -2 -1 -3 0 1 2 3 4 5 6 7 -10 -9 -8 8 9 10
1x-2 2x-2 3x-2 4x-2 5x-2
46
8. Ask one pupil to give their answer. (Answer: 24)
9. Ask: Why is the answer positive? (Answer: because the two numbers multiplied are positive)
10. Ask pupils to solve (b) in their exercise books.
11. Ask one pupil to give their answer. (Answer: -24)
12. Ask: Why is the answer negative? (Answer: because one of the factors is negative)
13. Ask pupils to solve (c) in their exercise books.
14. Ask one pupil to give their answer. (Answer: 18)
15. Ask: Why is the answer positive? (Answer: because the two numbers being multiplied are both
negative)
Guided Practice (9 minutes)
1. Ask pupils to work in pairs to solve the following problems, applying the rules for multiplying
integers.
2. Read these problems on the board:
(a) (-4) × (+3) (b) (-100) × (-3) (c) (+92) × (-3)
3. Remind pupils to apply the usual rules for multiplying two numbers.
4. Walk around the room to check for understanding. Check whether they are applying the rules
and writing the correct signs on the products.
5. Ask three pupils to present their answers on the board.
(Answers: (a) -12 (b) 300 (c) -276)
Independent Practice (10 minutes)
1. Ask pupils to work with a partner. Each pupil will write problems for their partner to solve.
2. Say: Please write down 2 multiplication problems with integers. Let some of the integers be
positive and some of them be negative.
3. Say: After you write the problems, find the answers and write them on the back of your sheet of
paper (or the next page of an exercise book).
4. Say: After you have found the answers, exchange your paper (or exercise book) with your partner.
Solve the problems written by your partner.
5. Say: When you are both finished, check your answers with each other.
Example: Pupil A writes: (−2) × 30 and (−10) × (−5); He/she writes the answers on the back
(−60 and 50). He/she then exchanges papers with Pupil B. Pupil B finds the same answers (−60
and 50). They compare answers. Pupil B also writes 2 problems for Pupil A to solve.
6. Ask a pair of pupils to write their problems and answers on the board if there is enough time.
Closing (2 minutes)
1. Ask questions to review the rules for multiplying integers. For example:
a. When we multiply two negative integers, what sign will the answer have? (Answer:
positive)
b. When we multiply two positive integers, what sign will the answer have? (Answer:
positive)
c. When we multiply a negative integer by a positive integer, what sign will the answer
have? (Answer: negative)
47
Lesson Title: Division of Integers Theme: Everyday Arithmetic
Lesson Number: M-07-064 Class/Level: JSS 1 Time: 35 minutes
Learning Outcomes By the end of the lesson pupils
will be able to divide any two positive or negative integers.
Teaching Aids Problems
Preparation Write the problems, in the Guided Practice
Independent Practice on the board.
Opening (4 minutes)
1. Ask: What product do we get when we multiply integers of the same sign?
(Answer: a positive product)
2. Ask: What product do we get when we multiply a positive and negative integer?
(Answer: a negative product)
3. Write 2 problems on the board: (𝑎) − 6 × (−4) (𝑏)8 × (−3)
4. Ask pupils to solve the problems in their exercise books.
5. Ask 2 other pupils to each say the answer of the problems 1 at a time. (Answers: (a) 24 (b) −24)
6. Say: Today, we are going to learn how to divide positive and negative integers.
Introduction to the New Material (10 minutes)
1. Say: The rules in dividing integers are the same as in multiply integers.
2. Say: When we divide integers with the same sign we get a positive quotient. When we divide
integers with different sign we get a negative quotient.
3. Write 2 problems on the board: (𝑎) (−36) ÷ (−4) (𝑏) (−36) ÷ (4)
4. Ask a pupil to identify the integers in the first problem.
(Answer: Negative integers or integers with the same sign).
5. Ask: What did I explain earlier about dividing integers with the same sign? (Answer: We get a
positive quotient).
6. Ask: What do you notice about the 2 problems? (Answer: they have the same numbers; the first
problem has 2 negative integers; the second problem has 1 negative integer and 1 positive
integer).
7. Ask: What happens when we divide integers with different signs? (Answer: the quotient is
always a negative integer.)
8. Ask pupils to find the answers in their exercise books.
9. Ask 2 different pupils to say the answers. (Answers: (a) 9 (b) −9)
10. Write a problem on the board: −42
6
11. Remind pupils that the line between the 2 integers represents division.
12. Ask a pupil to identify the integers in the problem on the board.
(Answer: A positive and a negative integer or integers with different signs).
13. Ask: What sign will the quotient have? (Answer: negative)
14. Ask pupils to find the answer in their exercise books.
15. Ask a pupil to say the answer to the problem. (Answer: = −7)
16. Write the rules on the board and tell pupils to remember these:
positive ÷ positive = positive negative ÷ negative = positive
48
positive ÷ negative = negative negative ÷ positive = negative
Guided Practice (5 minutes)
1. Read these problems on the board: (𝑎) (−20) ÷ (+4) (𝑏) 350 ÷ (−7)
2. Ask pupils to discuss the problem in pairs and solve them.
3. Walk around the class and check for understanding and clear any misconception. Remind pupils
to follow the usual division rules, and just write the correct sign on the quotient. They can use
long division to solve question (b).
4. Ask 2 pupils to each solve the problems on the board 1 at a time. (Answers: (a) -5 (b) -50)
5. Ask pupils to compare the answers on the board with the answers they got.
Independent Practice (10 minutes)
1. Read these problems on the board:
2. (a) (+28) ÷ (+4) (b) (−49) ÷ 7 (c) (−1500) ÷ (−10) (d) (+550) ÷ (−11)
3. Ask pupils to solve the problem on the board individually in their exercise books.
4. Ask 4 different pupils to come write the answers on the board.
5. (Answers: (a) 7; (b) -7 (c) 150 (d) -50)
6. Ask pupils to compare the answers on the board with the answers in their exercise books.
Closing (2 minutes)
1. Ask questions to revise the rules in adding, subtracting, multiplying and dividing integers with
same sign and different signs. For example:
a. What do we do to add integers with negative signs? (Answer: Add the numbers and use a
negative sign on the sum)
b. What do we do to multiply a negative and positive integer? (Answer: Multiply the numbers
and use a negative sign on the product)
c. What do we do to divide two negative integers? (Answer: Divide the numbers and let the
product be positive)
49
Lesson Title: Story Problems on Integers Theme: Everyday Arithmetic
Lesson Number: M-07-065 Class/Level: JSS 1 Time: 35 minutes
Learning Outcomes By the end of the lesson pupils will be able to:
1. Solve story problems involving positive and negative integers. 2. Apply the correct order of operation (BODMAS) to problems involving positive and negative integers.
Teaching Aids Story problems
Preparation Write the story problems, in the Opening,
Introduction to the New Material, Guided Practice and Independent Practice on the board.
Opening (4 minutes)
1. Read these 2 story problems on the board:
(they are simple addition and subtraction problems, without negative integers):
(a) James has 28 mangos. If Mary has 10 mangos more than James, how many mangoes does
Mary have?
(b) Tommy has 20 coins. If his brother has 4 fewer coins, how many coins does the brother
have?
2. Ask: What should we do in the first problem? (Answer: we should add).
3. Ask: How do we know to add? (Answer: because of the word ‘more)
4. Ask: What are we to do in the second problem? (Answer: we subtract)
5. Ask: How do we know to subtract? (Answer: because of the word ‘fewer’)
6. Ask 2 pupils to each solve a problem on the board. Ask all other pupils to solve the problems in
their exercise books. (Answers: (a) 28 + 10 = 38 mangoes; (b) 20 − 4 = 16 coins)
7. Say: Today, we are going to solve story problems involving positive and negative integers.
Introduction to the New Material (14 minutes)
1. Say: To solve story problems with negative integers, we use the same process as we use for
other numbers.
2. Say: The first step is to identify the operations needed (addition, subtraction, multiplication, or
division), and write the numbers in a maths equation.
3. Ask pupils to give words that tell them to add, and write them on the board.
(Example: Add: more, plus, total, additional)
4. Ask pupils to give words that tell them to subtract, and write them on the board.
(Example: Subtract: less, fewer, difference, remain, left, owe)
5. Read this on the board:
If it is 32C in Freetown and -5C in London, what is the temperature difference between the
two cities?
6. Ask pupils to read the problem on the board.
7. Say: We are asked to find the difference between 2 temperatures, but one of them is negative.
Remember that negative temperatures are very cold.
8. Ask: When you find a difference, what operation do you use? (Answer: subtraction)
9. Write on the board: 32℃ − (−5℃) =
10. Ask pupils to solve the problem in their exercise books.
50
11. Ask pupils to explain the process they used, and solve the problem on the board: 32℃ −
(−5℃) = 32℃ + 5℃ = 37℃
12. Say: There is a 37-degree difference between the two cities. Freetown is 37 degrees warmer
than London.
13. Read this problem on the board:
David didn’t have money, but he earned 50,000 Leones. However, he owes 2 different people
35,000 Leones each and needs to pay them. What is the balance of Alex’s money?
14. Ask: Does anyone have an idea of how we can write this question using numbers and
operations?
15. Allow pupils to share their ideas. (Example answer: Start with 50,000 and subtract 35,000 twice)
16. Say: We know how much money David has, which is 50,000. So to find the balance, we can
subtract the amount he owes each person (35,000) times 2 (for the 2 people).
17. Write on the board: 50,000 − 2 × 35,000 =
18. Ask: How will we solve this problem? (Answer: According to BODMAS, we should multiply before
subtracting)
19. Solve the problem on the board: 50,000 − 2 × 35,000 = 50,000 − 70,000 = −20,000 Leones
20. Say: The balance of David’s money is −20,000 Leones. It’s a negative number, so it means he
owes more money than he has. If he works again, he will still need to pay 20,000 Leones.
Guided Practice (5 minutes)
1. Read the problem on the board:
a. Abass has 100,000 Leones. He has 4 children. He went to the tailor and ordered each of his
children a 35,000 Leone school uniform. What is the balance of his money?
2. Ask pupils to work in pairs to solve the problem.
3. Ask one pair to solve the problem on the board. (Answer: 100,000 − 4 × 35,000 = 100,000 −
140,000 = −40,000 Leones)
4. Say: Compare your answers to the answers on the board.
5. Say: The balance of Abass’ money is −40,000 Leones. This means that even when he gives the
tailor all of his money, he will still owe the tailor 40,000 Leones.
Independent Practice (10 minutes)
1. Read these problems on the board:
a. A bird is flying 8m. above the sea and a fish is directly below the bird. If the fish is −12m.
under the sea, what is the distance between the bird and fish?
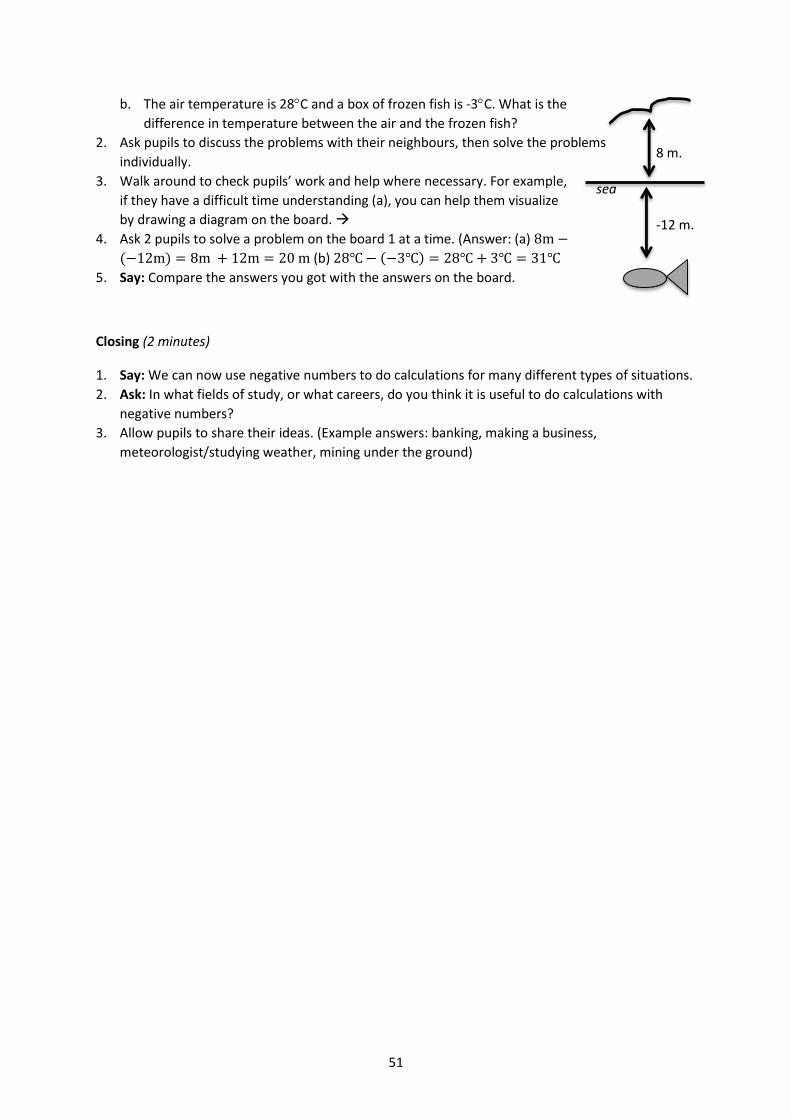
51
b. The air temperature is 28C and a box of frozen fish is -3C. What is the
difference in temperature between the air and the frozen fish?
2. Ask pupils to discuss the problems with their neighbours, then solve the problems
individually.
3. Walk around to check pupils’ work and help where necessary. For example,
if they have a difficult time understanding (a), you can help them visualize
by drawing a diagram on the board.
4. Ask 2 pupils to solve a problem on the board 1 at a time. (Answer: (a) 8m −
(−12m) = 8m + 12m = 20 m (b) 28℃ − (−3℃) = 28℃ + 3℃ = 31℃
5. Say: Compare the answers you got with the answers on the board.
Closing (2 minutes)
1. Say: We can now use negative numbers to do calculations for many different types of situations.
2. Ask: In what fields of study, or what careers, do you think it is useful to do calculations with
negative numbers?
3. Allow pupils to share their ideas. (Example answers: banking, making a business,
meteorologist/studying weather, mining under the ground)
8 m.
sea
-12 m.
52
Lesson Title: Simple Proportion Theme: Everyday Arithmetic
Lesson Number: M-07-066 Class/Level: JSS 1 Time: 35 minutes
Learning Outcomes By the end of the lesson
pupils will be able to solve simple proportion problems.
Teaching Aids Problems
Preparation Write the problems, in the Opening,
Introduction to the New Material, Guided Practice and Independent Practice on the board.
Opening (2 minutes)
1. Read the problem on the board on equivalent fractions: If 2
5=
𝑚
30, find the value of m.
2. Ask pupils to solve the problem in their exercise books.
3. Ask pupils to call out their answers. (Answer: 2
5=
2×6
5×6=
12
30→ 𝑚 = 12).
4. Say: Today our lesson is about solving simple proportion problems.
Introduction to the New Material (15 minutes)
1. Write on the board: 1
2=
5
10
2. Ask pupils what type of fractions are these? (Answer: Equivalent fractions)
3. Say: A proportion is just two ratios that are equivalent or equal.
4. Write on the board: 1 book
2 days=
5 books
10 days
5. Say: It is a proportion because the units used on the numerators and denominators are the
same.
6. Say: I read 1 book per 2 days, and I read 5 books per 10 days.
7. Write on the board: 1 𝑏𝑜𝑜𝑘
2 𝑑𝑎𝑦𝑠=
5 𝑑𝑎𝑦𝑠
10 𝑏𝑜𝑜𝑘𝑠
8. Say: It is not a proportion because the units used on the numerators are not the same, and the
units on the denominators are not the same.
9. Ask a pupil to read the proportion on the board.
10. Say: I read 1 book per 2 days, and I read 5 days per 10 books. That doesn’t make sense!
11. Say: Proportion is a pair of equivalent ratios in which the units must be the same.
12. Ask: What are proportions good for?
13. Say: Proportions are really good for figuring out something that you don’t know from something
you know.
14. Read the problem on the board: The cost of 10 chairs is Le80. Find the cost of 15 chairs.
15. Say: Let y represent the unknown cost of 15 chairs.
16. Write on the board: 10 chairs
Le 80=
15 chairs
Le 𝐲
17. Say: We can treat these as equivalent fractions, and find the missing value.
18. Ask: What do we multiply by 10 to get 15? (Answer: 1.5).
19. Say: We should also multiply 80 by 1.5 to get the unknown value y.
20. Ask pupils to multiply 80 by 1.5 in their exercise books and give the answer.
21. Write on the board: 80 × 1.5 = 120
53
22. Say: The unknown value y is 120.
23. Say: The cost of the 15 chairs is Le 120.
24. Say: Another way to solve proportion problems is by cross multiplication.
25. Refer pupils again to the proportion on the board. Draw arrows to show which numbers to
multiply:
26. Say: If we multiply the numbers diagonally across from each other, the two products will be
equal.
27. Write on the board: 15 × 80 = 10 × 𝑦
28. Say: Multiply the numbers on the left, and then divide by 10 to find y.
29. Solve the problem: 𝑦 =15×80
10= 120
30. Say: This is the same answer we got when we used equivalent fractions. Cross multiplication
makes it easier to solve problems involving big numbers.
Guided Practice (5 minutes)
1. Read the problem on the board:
Two packets of candle cost Le280. How many packets can be bought with Le3360?
2. Ask pupils to work in pairs.
3. Say: You will need to write it as an equivalent fraction. Use ‘p’ as an unknown. You may use
equivalent fractions or cross multiplication.
4. Ask pupils to solve the problem.
5. Walk around and check pupils’ work.
6. Ask one pupil from the class to write the answer on the board.
(Answer: 2
280=
𝑝
3360→ 𝑝 =
2×3360
280= 24)
7. Say: 24 packets of candles can be bought with Le3360.
Independent Practice (10 minutes)
1. Read this problem on the board: Jane ran 9 meters in 5 seconds.
a. How long will she take to run 27 meters?
b. How many meters will she cover in 10 seconds?
2. Ask pupils to solve the problem individually.
3. Say: You will need to write two different sets of equivalent fractions, one for a and one for b.
Use ‘y’ as an unknown for question a and ‘m’ as an unknown for question b.
4. Ask pupils to write their answers in the exercise books.
5. Ask one pupil to come to the board and write his/her answer to question (a).
(Answer: 9
5=
27
𝑦→ 𝑦 =
27×5
9= 15. She will take 15 seconds.)
6. Ask another pupil to come to the board and write the answer to question (b).
(Answer: 9
5=
𝑚
10→ 𝑚 =
9×10
5= 18. She will cover 18 meters)
7. Check for understanding and clear any misconceptions.
10 chairs
Le 80=
15 chairs
Le 𝐲

54
Closing (3 minutes)
1. Give pupils an exit ticket problem: A car travels 120 miles in 5 hours. How far would it travel in
20 hours?
2. Ask pupils to solve the problem using ‘b’ as an unknown value.
3. Check for understanding and clear any misconceptions.
(Answer: 120
5=
𝑏
20→ 𝑏 =
120×20
5= 480 It will travel 480 miles)
55
Lesson Title: Simple Interest Theme: Everyday Arithmetic
Lesson Number: M-07-067 Class/Level: JSS 1 Time: 35 minutes
Learning Outcomes By the end of this
lesson, pupils will be able to solve problems involving simple interest.
Teaching Aids Problems
Preparation Write the problems, in the Opening,
Introduction to the New Material, Guided Practice and Independent Practice on the board.
Opening (4 minutes)
1. Read these 2 problems on the board:
a. Express 5% as a fraction in its lowest term.
b. What is 2% of 500?
2. Ask two pupils to come and write the answers on the board. Ask all other pupils to complete the
task in their exercise books. (Answers: (a) 5% =5
100=
1
20 (𝑏)
2
100× 500 =
1000
100= 10)
3. Say: Today our lesson topic is to solve problems involving simple interest.
Introduction to the New Material (14 minutes)
1. Read this problem on the board:
Abu deposited 𝐿𝑒200 in an account at his bank. The interest rate is 6% per annum. How much
interest will he earn in 3 years?
2. Say: This is a simple interest problem. Interest is extra money that is charged or paid. For
example, banks sometimes add interest to the amount of money in a savings account. They also
add interest to the amount of money a person owes for a loan. Interest is paid regularly at a
certain rate, given as a percentage.
3. Say: Principal is the amount of money borrowed, lent, or invested.
4. Say: We consider time in simple interest problems, and it should be in years. We often see ‘per
annum’ in interest problems, which means yearly or annually.
5. Say: To find simple interest, we multiply the principal, rate, and time.
6. Write on the board: 𝐼 = 𝑃 × 𝑅 × 𝑇 = 𝑃𝑅𝑇, where 𝑃 =principal, 𝑅 =rate, and 𝑇 =time in years.
7. Ask one pupil front the front row to identify the principal in the story problem. (Answer: Le200)
8. Ask another pupil from the left to identify the rate. (Answer: 6%)
9. Ask another pupil at the back to identify the time. (Answer: 3 years)
10. Say: To use this formula, we must rewrite the interest as a fraction.
11. Ask a pupil from the middle row to express 6% as a fraction. (6% =6
100)
12. Substitute the values into the formula on the board: 𝐼 = 200 ×6
100× 3
13. Solve the multiplication problem: 𝐼 =200×6×3
100=
3600
100= 𝐿𝑒 36
14. Say: Abu will earn 𝐿𝑒 36 interest in 3 years. Interest is money that his bank gives him simply for
keeping his money in an account there.
15. Write another problem on the board:
56
Susan borrows Le900 to fix her car. The bank charges 7% interest for two years. Find the interest
she will pay the bank.
16. Ask pupils to identify the principal, rate and time. (Answer: 𝑃 = 𝐿𝑒 900, 𝑅 = 7%, 𝑇 = 2)
17. Ask: What is 7% as a fraction? (Answer: 7
100)
18. Ask a different pupil to explain each step while you solve the problem on the board:
𝐼 = 𝑃 × 𝑅 × 𝑇 state the formula
𝐼 = 900 ×7
100× 2 substitute the values
𝐼 =900×7×2
100 simplify the values
𝐼 = 𝐿𝑒126 solve 19. Say: Susan had to pay Le 126 in interest to borrow money from the bank.
Guided Practice (5 minutes)
1. Read the problem on the board:
Mohamed lends Abass Le2000 at an interest rate of 5% per year. Find how much interest Abass
pays after a. 2 years b. 5 years
2. Ask pupils to work in pairs.
3. Go round and see how the pupils are solving the problems. Clear any misconceptions.
4. Ask one pair to write the correct answer on the board for (a). (Answer: 𝐼 = 2000 ×5
100× 2 =
𝐿𝑒200)
5. Ask another pair to write the correct answer on the board for (b). (Answer: 𝐼 = 2000 ×5
100×
5 = 𝐿𝑒500)
6. Say: If Abass pays back the loan in 2 years, he will pay Le200 in interest. If he pays back the loan
in 5 years, he will pay Le500 in interest.
Independent Practice (10 minutes)
1. Read the two problems on the board.
a. What is the interest paid on Le2500 borrowed for 3 years at a rate of 5% per annum?
b. Mary invested Le22,500 for 4 years at a rate of 7% per annum. What interest did she earn?
2. Ask pupils what ‘invest’ means, and allow them to briefly share their ideas.
3. Say: Investment is something purchased with the idea that it will gain value or provide income in
the future. For example, buying a farm is an investment because you can make farm income in
the future.
4. Ask pupils to solve the problems individually.
5. Walk around the class and see how pupils are solving the problems. Clear any misconceptions.
6. Ask two pupils to write the correct answers on the board. (Answers: (𝑎) 𝐼 = 2500 ×5
100× 3 =
𝐿𝑒 375. (𝑏) 𝐼 = 22,500 ×7
100× 4 = 𝐿𝑒6,300).
Closing (2 minutes)
1. Ask: What are some careers in which people might use simple interest?
57
2. Ask pupils to brainstorm.
3. Ask pupils to call out their answers before leaving the class. (Example answers: bankers, sales
representatives, retail managers, sales people)
58
Lesson Title: Discount Theme: Everyday Arithmetic
Lesson Number: M-07-068 Class/Level: JSS 1 Time: 35 minutes
Learning Outcomes By the end of this
lesson, pupils will be able to calculate discount on a given sum of money.
Teaching Aids Problems
Preparation Write the problems, in the Opening,
Introduction to the New Material, Guided Practice and Independent Practice, on the board.
Opening (3 minutes)
1. Read the problem on the board:
What is the simple interest on $400 at a rate of 8% in 2 years?
2. Ask pupils to solve the problem in their exercise books.
3. Ask a pupil to write their solution on the board. (Answer: (a) 𝐼 = 𝑃𝑅𝑇 = 400 ×8
100× 2 =
6400
100=
$64. There is an interest of $64).
4. Say: Today our lesson topic is to calculate discount on a given sum of money.
Introduction to the New Material (15 minutes)
1. Read the problem on the board:
In a video shop, a DVD that sells for $150 is marked, ‘10% off’. What is the discount? What is the
sale price of the DVD?
2. Say: This is a discount problem. Discount is an amount that is subtracted from the original price.
3. Say: Marked price is the amount written on the price ticket for the item. Also known as original
price, or the normal price, or the non-discounted price, or the price tag price.
4. Say: We consider selling price in discount, which is the actual price for the item after it has been
discounted.
5. Say: To calculate discount, multiply the rate by the original price.
6. Write on the board: 𝐷𝑖𝑠𝑐𝑜𝑢𝑛𝑡 = 𝑅𝑎𝑡𝑒 × 𝑂𝑟𝑖𝑔𝑖𝑛𝑎𝑙 𝑝𝑟𝑖𝑐𝑒
7. Ask one pupil front the front row to identify the original price in the story problem. (Answer:
$150)
8. Ask another pupil from the left to identify the rate. (Answer: 10%)
9. Say: To use this formula, we must rewrite the discount as a fraction.
10. Ask a pupil from the middle row to express 10% as a fraction. (10% =10
100)
11. Substitute the values into the formula on the board: 𝐷 =10
100× 150
12. Solve the multiplication problem: 𝐷 =10×150
100=
1500
100= $15
13. Say: The discount for the DVD will be $15 Discount is the amount that is subtracted from the
original price of an item.
14. Say: To find the sale price, subtract the discount from the original price.
15. Write on the board: 𝑆𝑎𝑙𝑒 𝑝𝑟𝑖𝑐𝑒 = 𝑜𝑟𝑖𝑔𝑖𝑛𝑎𝑙 𝑝𝑟𝑖𝑐𝑒 – 𝑑𝑖𝑠𝑐𝑜𝑢𝑛𝑡.
16. Ask pupils to calculate the sale price in their exercise books.
17. Ask a pupil to give their answer. (Answer: 150 − 15 = $135)
59
18. Say: The selling price of the DVD is $135. Selling price is the reduced cost of an item.
19. Read another problem on the board:
In a boutique, a Le40 dress is marked, ‘save 25%.’ What is the discount?
20. Ask pupils to identify the original price and the rate. (Answer: 𝑝𝑟𝑖𝑐𝑒 = $ 40, 𝑅 = 25%)
21. Ask: What is 25% as a fraction? (Answer: 25
100)
22. Ask a different pupil to explain each step while you solve the problem on the board:
𝐷 = 𝑂𝑟𝑖𝑔𝑖𝑛𝑎𝑙 𝑝𝑟𝑖𝑐𝑒 × 𝑅𝑎𝑡𝑒 state the formula
𝐷 = 40 ×25
100 substitute the values
𝐷 =1000
100 simplify the values
𝐷 = 𝐿𝑒10 solve 23. Say: The discount price for the dress is $10
Guided Practice (5 minutes)
1. Read the problem on the board:
In a supermarket, a $120 perfume is labelled, ‘Get a 20% discount.’ What is the discount? What
is the sale price of the perfume?
2. Ask pupils to work in pairs.
3. Go round and see how the pupils are solving the problems. Clear any misconceptions.
4. Ask one pupil from a pair to write the correct answer on the board for discount. (Answer: 𝐷 =
120 ×20
100=
2400
100= $24).
5. Ask another pair to write the correct answer on the board for sale price. (Answer: 𝑠𝑎𝑙𝑒 𝑝𝑟𝑖𝑐𝑒 =
𝑜𝑟𝑖𝑔𝑖𝑛𝑎𝑙 𝑝𝑟𝑖𝑐𝑒 − 𝑑𝑖𝑠𝑐𝑜𝑢𝑛𝑡 = 120 − 24 = $96).
6. Say: The actual price of the perfume at the supermarket is $96.
Independent Practice (10 minutes)
1. Read the two problems on the board:
c. Find the sale price for an item that has a price tag of Le100 and a discount rate of 25%.
d. A baker has a coupon that reads, ‘Get 1
3 off Le900 bread.’ What is the discount? What is the
sale price of the bread?
2. Ask pupils what is meant by the phrase ‘1
3 off’, and allow them to briefly share their ideas.
3. Say: The phrase ‘1
3 off’ refers to the rate. It is already expressed as a fraction.
4. Ask pupils to solve the problems individually.
5. Go round and see how pupils are solving the problems. Clear any misconceptions.
6. Ask two pupils to write the correct answers on the board.
(Answers: (𝑎) 𝐷 =25
100× 100 = 𝐿𝑒25 Sale price = 100 − 25 = 𝐿𝑒75 (𝑏) 𝐷 =
1
3× 900 =
𝐿𝑒300, the sale price of bread is 900 − 300 = 𝐿𝑒600)
Closing (2 minutes)
1. Ask: What are some of the phrases used for discounted items?

60
2. Ask pupils to brainstorm.
3. Ask pupils to call out their answers before leaving the class. (Example answers: ‘1
3off’, ‘Get a 20%
discount’, ‘save 25%’, ‘10% off’).
61
Lesson Title: Commission Theme: Everyday Arithmetic
Lesson Number: M-07-069 Class/Level: JSS 1 Time: 35 minutes
Learning Outcomes By the end of this
lesson, pupils will be able to calculate commission on a given sum of money.
Teaching Aids Problems
Preparation Write the story problems, in the Opening,
Introduction to the New Material, Guided Practice and Independent Practice, on the board.
Opening (3 minutes)
1. Read this problem on the board:
A guitar has an original sales price of Le160, and the store is offering a 25% discount off of
everything. What is the sales price?
2. Ask pupils to find the solution in their exercise books.
3. Ask a pupil to come and write the answer on the board. (Answers: (a) 𝐷 = 𝑅 × 𝑇 =25
100× 160 =
4000
100= 𝐿𝑒40 Sales price = 𝐿𝑒160 − 𝐿𝑒40 = 𝐿𝑒120).
4. Say: Today our lesson topic is to calculate commission on a given sum of money.
Introduction to the New Material (15 minutes)
1. Read this problem on the board:
Luseni works as a real estate agent. He has just sold a house that was Le2,300,000. If Luseni
makes a 3% commission, how much money did he make when he sold the house?
2. Say: This is a commission problem. Commission is an amount of money that someone receives
when they sell something.
3. Say: It is usually a percent of the sale that has been made.
4. Say: The rate of commission is given as a percent, which can be rewritten as a fraction.
5. Say: To calculate commission it is the selling price multiplied by the rate of commission.
6. Write on the board: 𝐶𝑜𝑚𝑚𝑖𝑠𝑠𝑖𝑜𝑛 = 𝑆𝑒𝑙𝑙𝑖𝑛𝑔 𝑝𝑟𝑖𝑐𝑒 × 𝑅𝑎𝑡𝑒 𝑜𝑓 𝑐𝑜𝑚𝑚𝑖𝑠𝑠𝑖𝑜𝑛.
7. Ask one pupil front the front row to identify the Selling price in the story problem. (Answer: Le
2300).
8. Ask another pupil from the right to identify the rate. (Answer: 3%)
9. Say: To use this formula, we must rewrite the commission as a fraction.
10. Ask a pupil from the middle row to express 3% as a fraction. (𝐴𝑛𝑠𝑤𝑒𝑟: 3% =3
100)
11. Substitute the values into the formula on the board: (Answer: 𝐶 =3
100× 2,300,000)
12. Solve the multiplication problem: (𝐴𝑛𝑠𝑤𝑒𝑟: 𝐶 =3×2,300,000
100=
6,900,000
100= 𝐿𝑒 69,000).
13. Say: The commission for the house was 𝐿𝑒69,000. Luseni receives 𝐿𝑒69,000 as his commission.
14. Read another problem on the board:
Juliet is a salesperson at an electronics shop. She earns 5% commission on her total sales. What
would be her commission if she sold a Le 2,000,000 plasma television set?
62
15. Ask pupils to identify the selling price and the rate.
(Answer: 𝑠𝑒𝑙𝑙𝑖𝑛𝑔 𝑝𝑟𝑖𝑐𝑒 = 𝐿𝑒2,000,000, 𝑅 = 5%).
16. Ask: What is 5% as a fraction? (Answer: 5
100)
17. Ask a different pupil to explain each step while you solve the problem on the board:
𝐶 = 𝑆𝑒𝑙𝑙𝑖𝑛𝑔 𝑝𝑟𝑖𝑐𝑒 × 𝑅𝑎𝑡𝑒 state the formula
𝐶 = 2,000,000 ×5
100 substitute the values
𝐶 =10,000,000
100 simplify the values
𝐶 = 𝐿𝑒 100,000 solve
18. Say: Juliet earns Le100,000 commission after the sales of the plasma television.
Guided Practice (5 minutes)
1. Read the problem on the board:
Yayah is a used car salesman who earns 4% commission on every vehicle he sells. One day he
sold a car for Le 8,000,000. What was the amount of his commission?
2. Ask pupils to work in pairs.
3. Ask one pupil from a pair to write the correct answer on the board for commission.
(Answer: 𝐶 = 8,000,000 ×4
100=
32,000,000
100= 𝐿𝑒 320,000).
4. Say: The commission of the vehicle is Le 320,000.
Independent Practice (10 minutes)
1. Read the problem on the board:
Abass works as a salesperson in a jewellery shop. He is paid on 5% commissions on his sales. One
very busy day he made the following four sales; a ladies watch for Le200,000, a diamond
necklace for Le500,000, a pair of cufflinks for Le120,000 and a gold bracelet for Le300,000. What
was Abass’ commission on his total sales?
2. Ask pupils to add all the four different sales of items before calculating the commission.
3. Ask pupils to solve the problems individually.
4. Walk around the class and see how pupils are solving the problems. Clear any misconceptions.
5. Ask a pupil to write the correct answer on the board.
(Answer: Total sales= 200,000 + 500,000 + 120,000 + 300,000 = 𝐿𝑒1,120,000;
Commission=5
100× 1,120,000 =
5,600,000
100= 𝐿𝑒 56,000)
Closing (2 minutes)
1. Ask: What is the difference between discount and commission on sales?
2. Ask pupils to brainstorm.
3. Ask pupils to call out their answers before leaving the class.
Example answers:
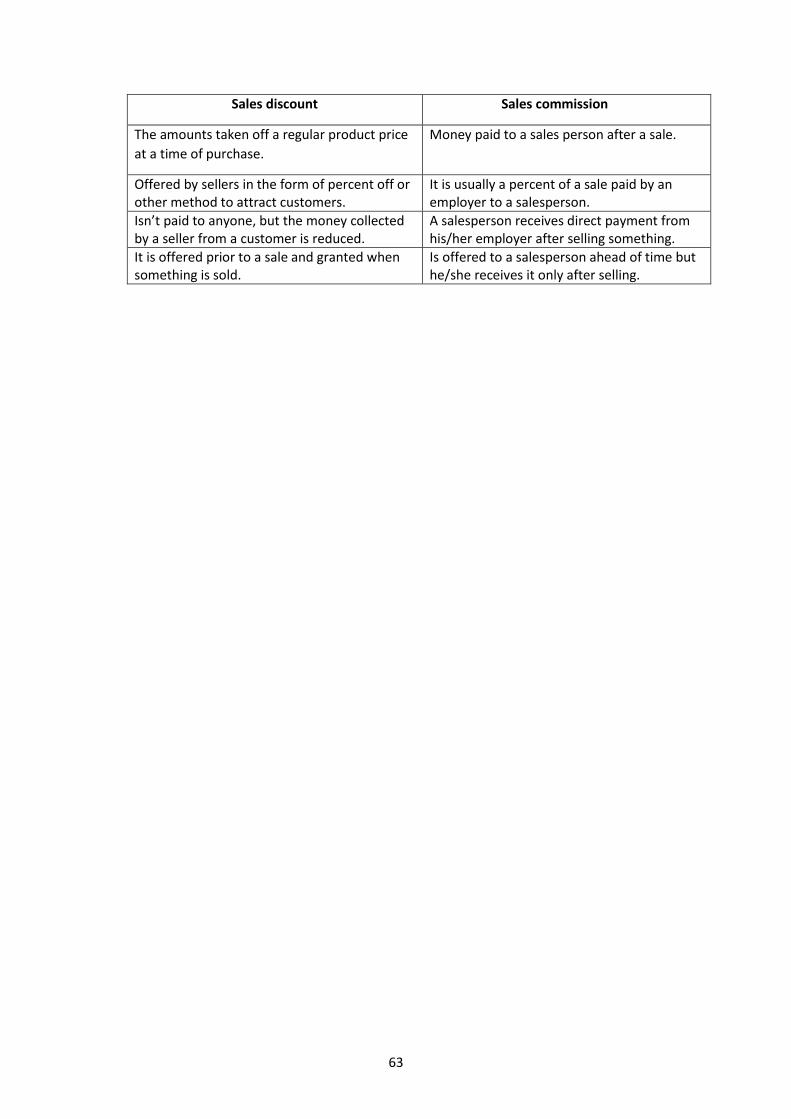
63
Sales discount Sales commission
The amounts taken off a regular product price
at a time of purchase.
Money paid to a sales person after a sale.
Offered by sellers in the form of percent off or other method to attract customers.
It is usually a percent of a sale paid by an employer to a salesperson.
Isn’t paid to anyone, but the money collected by a seller from a customer is reduced.
A salesperson receives direct payment from his/her employer after selling something.
It is offered prior to a sale and granted when something is sold.
Is offered to a salesperson ahead of time but he/she receives it only after selling.
64
Lesson Title: Tax Theme: Everyday Arithmetic
Lesson Number: M-07-070 Class/Level: JSS 1 Time: 35 minutes
Learning Outcomes By the end of this
lesson, pupils will be able to calculate tax on a given sum of money.
Teaching Aids Problems
Preparation Write the problems, in the Opening,
Introduction to the New Material, Guided Practice and Independent Practice, on the board.
Opening (3 minutes)
1. Read the problem on the board:
If you made Le3000 worth of sales and your commission rate is 5 percent, what is your
commission?
2. Ask a pupil to come and write the answers on the board. Ask all other pupils to complete the
task in their exercise books. (Answer: 𝐶 = 𝑜𝑟𝑖𝑔𝑖𝑛𝑎𝑙 𝑝𝑟𝑖𝑐𝑒 × 𝑟𝑎𝑡𝑒 𝑐𝑜𝑚𝑚𝑖𝑠𝑠𝑖𝑜𝑛 = 3000 ×5
100=
15000
100= 𝐿𝑒150.).
3. Say: You earned a commission of Le150
4. Say: Today our lesson topic is to calculate tax on a given sum of money.
Introduction to the New Material (13 minutes)
1. Read the problem on the board:
John is buying a new football from the local sporting goods shop. The football costs Le20, 000. If
the sales tax rate is 5%, what is the sales tax?
2. Say: This is a tax problem.
3. Ask: When was the last time you visited a football playing ground or a Hospital?
4. Ask: Did you know how much money it costs to maintain a hospital, play grounds or even
schools?
5. Write the word ‘taxes’ on the board. Work as a class to define the term.
6. Write on the board: Taxes are how a government raises money to cover these public costs.
7. Say: We don’t always pay sales tax at every small shop. However, more and more shops are
adding sales tax to the cost of items. This money goes to the government to help Sierra Leone
pay for things we need.
8. Write on the board: 𝑆𝑎𝑙𝑒𝑠 𝑡𝑎𝑥 = 𝑡ℎ𝑒 𝑐𝑜𝑠𝑡 𝑜𝑓 𝑡ℎ𝑒 𝑖𝑡𝑒𝑚 × 𝑡𝑎𝑥 𝑟𝑎𝑡𝑒.
9. Ask one pupil front the front row to identify the cost of the item. (Answer: Le20,000).
10. Ask another pupil from the left to identify the tax rate. (Answer: 5%)
11. Say: To use this formula, we must rewrite the tax rate as a fraction.
12. Ask a pupil from the middle row to express 5% as a fraction. (𝐴𝑛𝑠𝑤𝑒𝑟: 5% =5
100)
13. Substitute the values into the formula on the board: 𝑠𝑎𝑙𝑒𝑠 𝑡𝑎𝑥 =5
100× 20,000
14. Solve the multiplication problem: 𝑆𝑎𝑙𝑒𝑠 𝑡𝑎𝑥 =5×20,000
100=
10,0000
100= 𝐿𝑒1000.
65
15. Say: The sales tax for the football is 𝐿𝑒1000. John will pay 1000 Leones more for sales tax. This
means he pays 21,000 Leones in total to get the football.
16. Read another problem on the board:
Abu is buying some items that cost Le5000 altogether. If there is a 7% sales tax rate, what is the
total cost of the items?
17. Ask pupils to identify the cost of the item and the tax rate. (Answer: 𝑐𝑜𝑠𝑡 = 𝐿𝑒5000, 𝑅 = 7%)
18. Ask: What is 7% as a fraction? (Answer: 7
100)
19. Ask a different pupil to explain each step while you solve the problem on the board:
𝑆𝑎𝑙𝑒𝑠 𝑡𝑎𝑥 = 𝑐𝑜𝑠𝑡 𝑜𝑓 𝑡ℎ𝑒 𝑖𝑡𝑒𝑚 × 𝑡𝑎𝑥 𝑟𝑎𝑡𝑒 state the formula
𝑆𝑎𝑙𝑒𝑠 𝑡𝑎𝑥 = 5000 ×7
100 substitute the values
𝑆𝑎𝑙𝑒𝑠 𝑡𝑎𝑥 =35000
100 simplify the values
𝑆𝑎𝑙𝑒𝑠 𝑡𝑎𝑥 = 𝐿𝑒350 solve
20. Say: The sales tax for the items is Le350.
21. Say: To find the total cost, add cost of the item and the sales tax together.
22. Ask pupils to calculate the total cost in their exercise books.
23. Ask them to share their answers. (Answer: Total cost = 𝐿𝑒5350)
24. Write on the board: Total cost= 𝐿𝑒5000 + 𝐿𝑒350 = 𝐿𝑒5350.
25. Say: The total cost of the items is Le5350.
Guided Practice (5 minutes)
1. Read this problem on the board:
At the bike shop, Foday is buying a new bike that costs Le500, 000. If the sales tax rate is 4%,
what will be the total cost of the bike?
2. Ask pupils to work in pairs.
3. Go round and see how the pupils are solving the problems. Clear any misconceptions.
4. Ask one pupil from a pair to write the correct answer on the board for the amount of tax paid.
(Answer: 𝑠𝑎𝑙𝑒𝑠 𝑡𝑎𝑥 = 500,000 ×4
100=
2,000,000
100= 𝐿𝑒20,000).
5. Ask another pupil to write the correct answer for the total cost of the bike on the board.
(Answer: 𝑇𝑜𝑡𝑎𝑙 𝑐𝑜𝑠𝑡 = 𝑐𝑜𝑠𝑡 𝑜𝑓 𝑡ℎ𝑒 𝑏𝑖𝑘𝑒 + 𝑡𝑎𝑥 𝑟𝑎𝑡𝑒 = 500,000 + 20,000 = 𝐿𝑒520,000).
6. Say: The total cost of the bike at the shop is Le520, 000.
Independent Practice (10 minutes)
1. Read these two problems on the board:
e. Joe is buying shoes at a boutique, where the sales tax is 3%. The shoes cost Le30, 000. How
much is the tax?
f. Moses buys a house for Le4, 000,000 and pays a tax of 6%. What is the total cost of the
house?
2. Ask pupils to solve the problems individually.
3. Go round and see how pupils are solving the problems. Clear any misconceptions.
66
4. Ask two pupils to write the correct answers on the board. (Answers: (𝑎) 𝑡𝑎𝑥 =3
100× 30,000 =
𝐿𝑒900. (𝑏) 𝑡𝑎𝑥 =6
100× 4,000,000 = 𝐿𝑒240,000; the total cost of the house is 4,000,000 +
240,000 = 𝐿𝑒4,240,000)
Closing (4 minutes)
1. Ask: What is the similarity and difference between a discount and a sales tax?
2. Ask pupils to brainstorm.
3. Ask pupils to call out their answers before leaving the class.
(Suggested answers: Similarities: both are percentages and they are calculated the same way (by
multiplying a fraction by the given amount of money). Differences: A discount is subtracted from
the original price whiles a sales tax is added to the original price).

67
Lesson Title: Units of Measurements Theme: Measurement and Estimation
Lesson Number: M-07-071 Class/Level: JSS 1 Time: 35 minutes
Learning Outcomes By the end of the lesson pupils will be able to:
1. Identify the units of measurement for length, mass and volume. 2. Compare mass and volume.
Teaching Aids 1. Metric system 2. Questions
3. List and table
Preparation 1. Write the Metric System, in the
Introduction to the New Material, on the board. 2. Write the questions, in the Guided Practice, on the board. 3. Write the list and table, in the Independent Practice, on the board.
Opening (4 minutes)
1. Write on the board: Length, Weight, Volume
2. Discuss each type of measurement by asking questions:
a. When might we need to measure length? (Example answers: tailors take our
measurements to make clothes, we measure our height, shoe size)
b. When might we need to measure mass, or weight? (Example answers: to measure our
own body mass, the mass of rice, the mass of gold being mined)
c. When might we need to measure volume? (Example answers: when buying petrol,
buying or selling water)
3. Say: You learnt measurement of length, weight, and volume in primary school. They are also
used in everyday life. Today we will review the units of measurement that we use.
Introduction to the New Material (12 minutes)
1. Can anyone give me an example of a unit used to measure length?
2. Allow pupils to give examples. If they have difficulty, list 1-2 and ask them to give more.
(Example answers: centimetres, metres, kilometres, feet, miles)
3. Follow the same process for mass (kilograms, grams, pounds) and volume (litres, millilitres,
gallons).
4. Say: We have different systems of measurement in the world. The metric system of
measurement is the internationally agreed system of measuring quantities. It is the system that
we will discuss today.
5. Look at the Metric System on the board:
Metric System
Length: Millimetre (mm), Centimetre (cm), Metre (m), Kilometre(km).
Mass: Milligram (mg), Gram (g), Kilogramme (kg), Tonne (t).
Volume: Millilitre (ml), Decilitre (dl), Litre (l), Kilolitre (kl).
6. Say: After each unit of measurement is its abbreviation. The abbreviation is the short way of
writing each one.
7. Ask: What is mass?
68
8. Allow pupils to think and share ideas about mass. (Example answer: Mass is the quantity of
matter an object contains. It is related to the weight of the object)
9. Ask: What is volume?
10. Allow pupils to think and share ideas. (Example answer: Volume is the capacity or space a
substance occupies, we measure liquids in volume)
11. From their ideas, discuss with pupils the relationship between mass and volume.
12. Ask pupils to give examples of instrument used for measuring volume. (Answer: cups, pints,
gallons, tanks, measuring cylinder)
13. Ask pupils to name some instruments used for measuring mass. (Answer: measuring scale,
balance)
14. Say: Mass refers to quantity, while volume refers to capacity.
Guided Practice (7 minutes)
1. Ask pupils to work in pairs.
2. Read these 3 questions on the board:
(i) List 3 items whose length can be measured.
(ii) List 3 items whose mass can be measured.
(iii) List 3 items whose volume can be measured.
3. Walk around the class, check for understanding and clear misconceptions.
4. Ask pupils from different pairs to go to the board and present their answers in lists.
(Example answers: (i) Length – road, a person’s height, football field; (ii) Mass – bag of rice,
humans, gold, (iii) Volume – water, kerosene, petrol)
5. Allow pupils to discuss their answers with the class.
Independent Practice (10 minutes)
1. Look at the list, and the empty table, on the board.
(i) A bag of cement (kg)
(ii) Amount of syrup in a bottle (ml)
(iii) A pebble (g)
(iv) A baby’s weight (kg)
(v) Tablets of medicine (mg)
(vi) Drip in hospital (l)
(vii) Water flowing over Guma dam (l)
(viii) A pile of books (g)
(ix) Juice in a carton (ml)
(x) A bottle of petrol (l)
2. Say: From the list of items, choose the items that we
can measure the mass and the items that we can
measure the volume. Write your answers in the table. When you finish writing these things,
write your own ideas in the table. Add as many rows as you need.
Mass Volume

69
3. Ask pupils to work independently in their exercise books.
4. Work around the class, check for understanding and clear misconceptions.
5. Ask pupils to come one at a time to the board to present answers for each.
6. Allow pupils to discuss any additional answers that they wrote themselves.
Answers:
Mass Volume
A bag of rice (kg) Amount of syrup in a bottle (ml)
A pebble (g) Drip in hospital (l)
Tablets of medicine (mg) Water flowing over Guma dam (l)
Pile of books (g) Juice in a carton (ml)
A baby’s weight (kg) A bottle of petrol (l)
Closing (2 minutes)
1. Ask pupils the following questions to review:
(i) Name 2 units for measuring lengths.
(Example answers: metres, centimetres, kilometres, inches, yards)
(ii) Name 2 units for measuring mass. (Example answers: gram, kilogramme, pound)
(iii) Name 2 units for measuring volume. (Example answers: millilitres, litres)
70
Lesson Title: Conversion of Length Theme: Measurement and Estimation
Lesson Number: M-07-072 Class/Level: JSS 1 Time: 35 minutes
Learning Outcomes By the end of the
lesson, pupils will be able to convert between units of length within the same system.
Teaching Aids 1. Units of measurement 2. Word problems
Preparation 1. Write the Units of measurement in the
Introduction to the New Material, on the board. 2. Write the word problems, in the Independent Practice, on the board.
Opening (3 minutes)
1. Ask pupils to list units for measuring length in the Metric system. (Answers: millimetre,
centimetre, metre, kilometre)
2. Ask questions to check pupils’ current understanding of measurement:
a. Which is longer: 1 metre or 1 kilometre? (Answer: 1 kilometre)
b. Which is longer: 1 centimetre or 1 metre? (Answer: 1 metre)
3. Say: Today, we will learn how to convert the units of length from one to the other.
Introduction to the New Material (15 minutes)
1. Look at the relationships among the units of measurement of length on the board:
10mm = 1cm
100cm = 1m
1000mm = 1m
1000m = 1km
2. Say: These relationships are what we use to convert units in the measurement of length.
3. Say: Of these 4 units, kilometre is longest. We use kilometre to measure distance, such as the
difference between two villages.
4. Say: Metre is the next longest.
5. Ask a pupil to come to the front of the class and hold their arms out to their sides.
6. Say: The distance between your finger tips and the centre of your body is about one metre.
There are 100 metres in one kilometre.
7. Ask pupils to give examples of things that are approximately one centimetre. (Examples: the
width of a pen; width of a fingernail; corn seed).
8. Say: Centimetres are small, like a piece of corn seed. There are 100 centimetres in one metre.
9. Ask pupils to give examples of things that are approximately one millimetre. (Examples: The tip
of a pen; a needle)
10. Say: Millimetres are even smaller than centimetres. There are 10 millimetres in one centimetre,
and 1000 millimetres in one metre.
11. Say: Now we will solve problems with these measurements.
12. Write on the board: Change 692km to metres.
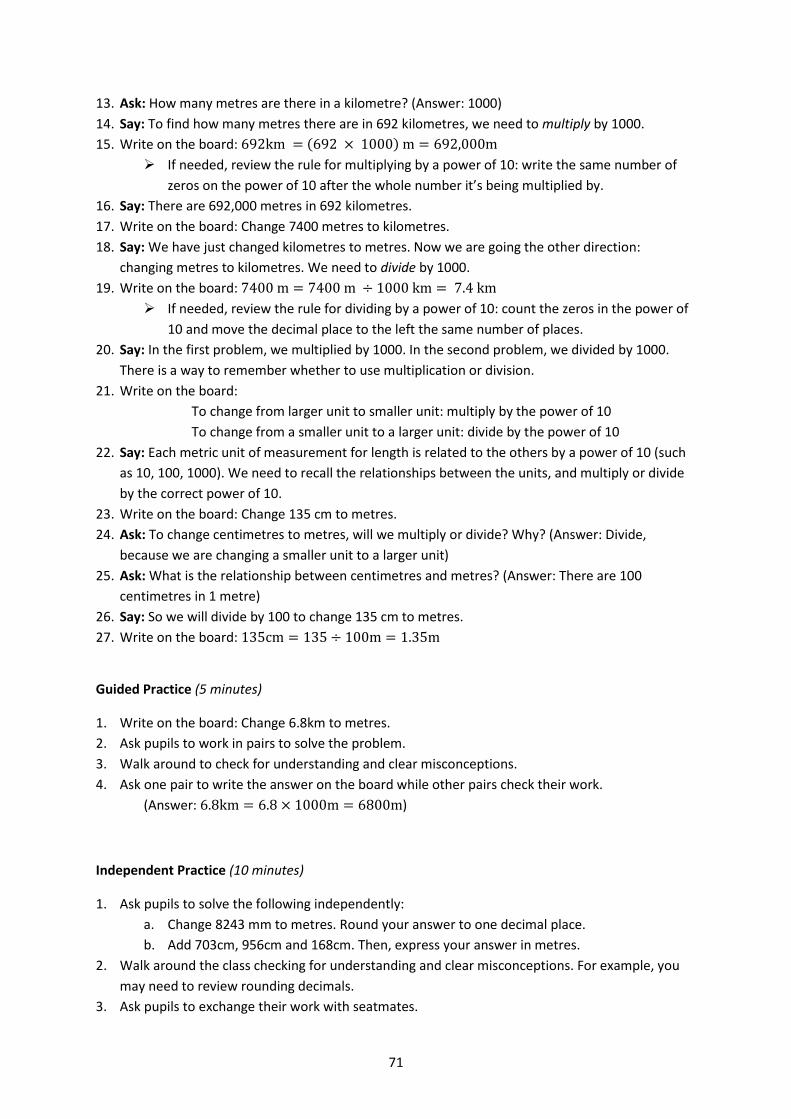
71
13. Ask: How many metres are there in a kilometre? (Answer: 1000)
14. Say: To find how many metres there are in 692 kilometres, we need to multiply by 1000.
15. Write on the board: 692km = (692 × 1000) m = 692,000m
If needed, review the rule for multiplying by a power of 10: write the same number of
zeros on the power of 10 after the whole number it’s being multiplied by.
16. Say: There are 692,000 metres in 692 kilometres.
17. Write on the board: Change 7400 metres to kilometres.
18. Say: We have just changed kilometres to metres. Now we are going the other direction:
changing metres to kilometres. We need to divide by 1000.
19. Write on the board: 7400 m = 7400 m ÷ 1000 km = 7.4 km
If needed, review the rule for dividing by a power of 10: count the zeros in the power of
10 and move the decimal place to the left the same number of places.
20. Say: In the first problem, we multiplied by 1000. In the second problem, we divided by 1000.
There is a way to remember whether to use multiplication or division.
21. Write on the board:
To change from larger unit to smaller unit: multiply by the power of 10
To change from a smaller unit to a larger unit: divide by the power of 10
22. Say: Each metric unit of measurement for length is related to the others by a power of 10 (such
as 10, 100, 1000). We need to recall the relationships between the units, and multiply or divide
by the correct power of 10.
23. Write on the board: Change 135 cm to metres.
24. Ask: To change centimetres to metres, will we multiply or divide? Why? (Answer: Divide,
because we are changing a smaller unit to a larger unit)
25. Ask: What is the relationship between centimetres and metres? (Answer: There are 100
centimetres in 1 metre)
26. Say: So we will divide by 100 to change 135 cm to metres.
27. Write on the board: 135cm = 135 ÷ 100m = 1.35m
Guided Practice (5 minutes)
1. Write on the board: Change 6.8km to metres.
2. Ask pupils to work in pairs to solve the problem.
3. Walk around to check for understanding and clear misconceptions.
4. Ask one pair to write the answer on the board while other pairs check their work.
(Answer: 6.8km = 6.8 × 1000m = 6800m)
Independent Practice (10 minutes)
1. Ask pupils to solve the following independently:
a. Change 8243 mm to metres. Round your answer to one decimal place.
b. Add 703cm, 956cm and 168cm. Then, express your answer in metres.
2. Walk around the class checking for understanding and clear misconceptions. For example, you
may need to review rounding decimals.
3. Ask pupils to exchange their work with seatmates.
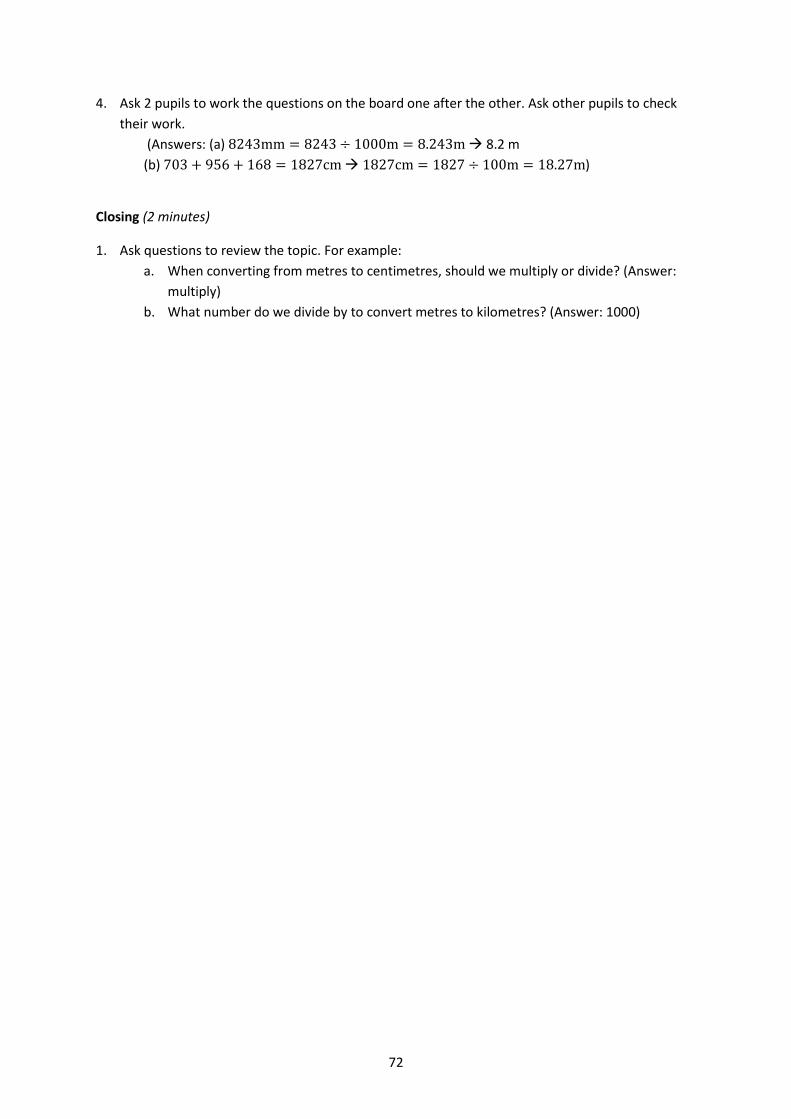
72
4. Ask 2 pupils to work the questions on the board one after the other. Ask other pupils to check
their work.
(Answers: (a) 8243mm = 8243 ÷ 1000m = 8.243m 8.2 m
(b) 703 + 956 + 168 = 1827cm 1827cm = 1827 ÷ 100m = 18.27m)
Closing (2 minutes)
1. Ask questions to review the topic. For example:
a. When converting from metres to centimetres, should we multiply or divide? (Answer:
multiply)
b. What number do we divide by to convert metres to kilometres? (Answer: 1000)

73
Lesson Title: Conversion of Mass Theme: Measurement and Estimation
Lesson Number: M-07-073 Class/Level: JSS 1 Time: 35 minutes
Learning Outcomes By the end of the
lesson, pupils will be able to convert between units of mass within the same system.
Teaching Aids None
Preparation None
Opening (3 minutes)
1. Ask pupils questions to review length measurement and allow them to answer verbally. For
example:
a. How many millimetres in 1 centimetre? (Answer: 10mm)
b. What is 1km in metres? (Answer: 1000m)
c. How many centimetres in a metre? (Answer: 100cm)
2. Say: Today, we will learn how to convert between units of mass within the Metric system.
Introduction to the New Material (15 minutes)
1. Ask: What is mass?
2. Allow pupils to share their ideas with the class and discuss. (Example answers: Mass is the
quantity of matter an object contains. It is related to the weight of the object)
3. Ask pupils to list units for measuring mass in the Metric system. If they don’t come out with
some of the answers, tell them.
(Answers: milligram (mg), gram (g) kilogram (kg) and tonne (t))
4. Ask questions to check pupils’ current understanding of mass:
a. Which is bigger: 1 gram or 1 kilogram? (Answer: 1 kilogram)
b. Which is smaller: 1 tonne or 1 milligram? (Answer: 1 milligram)
5. Write on the board:
1000mg= 1g
1000g = 1kg
1000kg = 1 tonne (t)
6. Say: These relationships are what we use to convert units in the measurement of mass.
7. Say: Of these 4 units, tonne is the largest. We use tonne to measure very large things, such as
lorries or shipping containers.
8. Say: Kilogram is the next largest.
9. Ask: What are some things we measure with kilograms? (Example answers: our bodies, bags of
rice, bags of cement)
10. Ask pupils to give examples of things that can be measured with grams. (Example answers: cups
or small amounts of rice, sugar, meat)
11. Say: Grams are smaller than kilograms and can measure smaller amounts of things. There are
1000 grams in one kilogram.
12. Ask pupils to give examples of things that can be measured with milligrams. (Example answers:
medicine tablets, small amounts of gold)
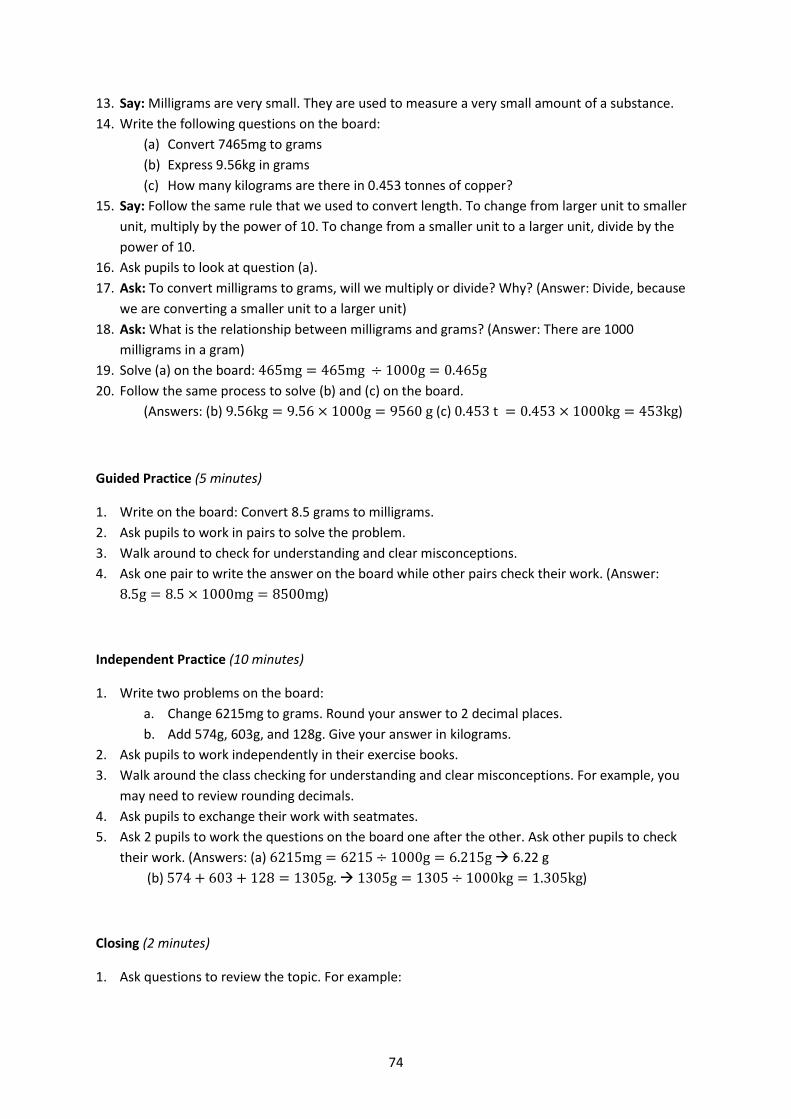
74
13. Say: Milligrams are very small. They are used to measure a very small amount of a substance.
14. Write the following questions on the board:
(a) Convert 7465mg to grams
(b) Express 9.56kg in grams
(c) How many kilograms are there in 0.453 tonnes of copper?
15. Say: Follow the same rule that we used to convert length. To change from larger unit to smaller
unit, multiply by the power of 10. To change from a smaller unit to a larger unit, divide by the
power of 10.
16. Ask pupils to look at question (a).
17. Ask: To convert milligrams to grams, will we multiply or divide? Why? (Answer: Divide, because
we are converting a smaller unit to a larger unit)
18. Ask: What is the relationship between milligrams and grams? (Answer: There are 1000
milligrams in a gram)
19. Solve (a) on the board: 465mg = 465mg ÷ 1000g = 0.465g
20. Follow the same process to solve (b) and (c) on the board.
(Answers: (b) 9.56kg = 9.56 × 1000g = 9560 g (c) 0.453 t = 0.453 × 1000kg = 453kg)
Guided Practice (5 minutes)
1. Write on the board: Convert 8.5 grams to milligrams.
2. Ask pupils to work in pairs to solve the problem.
3. Walk around to check for understanding and clear misconceptions.
4. Ask one pair to write the answer on the board while other pairs check their work. (Answer:
8.5g = 8.5 × 1000mg = 8500mg)
Independent Practice (10 minutes)
1. Write two problems on the board:
a. Change 6215mg to grams. Round your answer to 2 decimal places.
b. Add 574g, 603g, and 128g. Give your answer in kilograms.
2. Ask pupils to work independently in their exercise books.
3. Walk around the class checking for understanding and clear misconceptions. For example, you
may need to review rounding decimals.
4. Ask pupils to exchange their work with seatmates.
5. Ask 2 pupils to work the questions on the board one after the other. Ask other pupils to check
their work. (Answers: (a) 6215mg = 6215 ÷ 1000g = 6.215g 6.22 g
(b) 574 + 603 + 128 = 1305g. 1305g = 1305 ÷ 1000kg = 1.305kg)
Closing (2 minutes)
1. Ask questions to review the topic. For example:
75
a. When converting from grams to milligrams, should we multiply or divide? (Answer:
multiply)
b. What number to we divide by to convert grams to kilograms? (Answer: 1000)
76
Opening (3 minutes)
1. Ask pupils questions to review length measurement. For example:
i. How many milligrams in 1 gram? (Answer: 1000 mg)
ii. What is 1 kilogram in grams? (Answer: 1000 g)
iii. How many kilograms in a tonne? (Answer: 1000 kg)
2. Say: Today, we will learn how to convert between the units of volume within the Metric system.
Introduction to the New Material (15 minutes)
1. Ask: What is volume?
2. Allow pupils to share their ideas with the class and discuss. (Example answers: The amount of
space taken up by something. It is related to capacity)
3. Ask pupils to list units for measuring volume in the Metric system. If they don’t come out with
some of the answers, tell them. (Answers: millilitre, centilitre, decilitre, litre, kilolitre)
4. Ask: Which is bigger: 1 litre or 1 millilitre? (Answer: 1 litre)
5. Write on the board:
1000 millilitres (ml) = 1 litre (l)
100 centilitres (cl) = 1 litre (l)
10 decilitres (dl) = 1 litre (l)
1 kilolitre (kl) = 1000 litres (l)
6. Say: These relationships are what we use to convert units in the measurement of mass.
7. Say: The most common are litre and millilitre. You will not see centilitre or decilitre as often.
8. Say: Litre is the standard unit used to measure volume.
9. Ask: What are some things we measure with litres? (Example answers: petrol, kerosene, water)
10. Say: Kilolitres are bigger than litres. There are 1000 litres in one kilolitre. The volume of very
large things such as water tanks or petrol trucks can be measured in kilolitres.
11. Say: Centilitres and millilitres are small. Millilitres are the smallest, and you will see them used
frequently.
12. Ask pupils to give examples of things that can be measured with millilitres. (Example answers:
liquid medicine; drip in a hospital; small drinks (small bags and bottles of water are 500 ml))
13. Write the following questions on the board:
(d) Convert 500 millilitres to litres.
(e) Convert 1659 litres to kilolitres.
(f) Change 257 decilitres to litres.
Lesson Title: Conversion of Volume Theme: Mensuration and Evaluation
Lesson Number: M-07-074 Class/Level: JSS 1 Time: 35 minutes
Learning Outcomes By the end of the lesson,
pupils will be able to convert between units of volume within the same system.
Teaching Aids None
Preparation None
77
14. Say: Follow the same rule that we used to convert length and . To change from larger unit to
smaller unit, multiply by the power of 10. To change from a smaller unit to a larger unit, divide
by the power of 10.
15. Ask pupils to look at question (a).
16. Ask: To convert milligrams to litres, will we multiply or divide? Why? (Answer: Divide, because
we are converting a smaller unit to a larger unit)
17. Ask: What is the relationship between millilitres and litres?
(Answer: There are 1000 millilitres in a litre)
18. Solve (a) on the board: 500ml = 500 ÷ 1000l = 0.5l
19. Follow the same process to solve (b) and (c) on the board.
(Answers: (b) 1659l = 1659 ÷ 1000kl = 1.659 kl (c) 257 dl = 257 ÷ 10l = 25.7l)
Guided Practice (5 minutes)
1. Write on the board: 4287 millilitres to litres. Round your answer to one decimal place.
2. Ask pupils to work in pairs to solve the problem.
3. Walk around to check for understanding and clear misconceptions.
4. Ask one pair to write the answer on the board while other pairs check their work.
(Answer: 4287ml = 4287 ÷ 1000l = 4.287l 4.3l)
Independent Practice (10 minutes)
1. Write two problems on the board:
a. Change 419 decilitres to litres.
b. Add 34ml, 1,240ml, and 829ml. Give your answer in litres. Round to the nearest litre.
2. Ask pupils to work independently in their exercise books.
3. Walk around the class checking for understanding and clear misconceptions.
4. Ask 2 pupils to work the questions on the board one after the other. Ask other pupils to check
their work. (Answers: (a) 419dl = 419 ÷ 10l = 41.9l (b) 34 + 1240 + 829 = 2103ml.
2103ml = 2103 ÷ 1000l = 2.103l 2 litres)
Closing (5 minutes)
1. Ask questions to review the topic. For example:
a. When converting from millilitres to litres, should we multiply or divide? (Answer: divide)
b. What number do we multiply by to convert litres to decilitres? (Answer: 10)
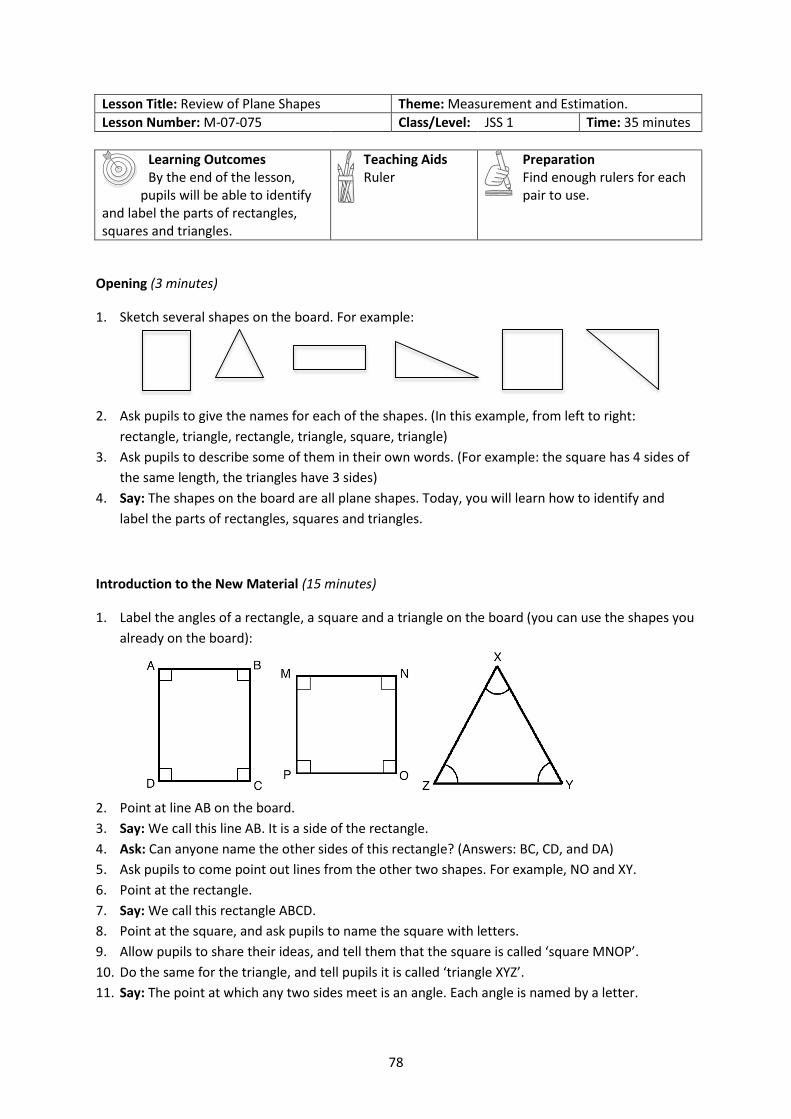
78
Lesson Title: Review of Plane Shapes Theme: Measurement and Estimation.
Lesson Number: M-07-075 Class/Level: JSS 1 Time: 35 minutes
Learning Outcomes By the end of the lesson,
pupils will be able to identify and label the parts of rectangles, squares and triangles.
Teaching Aids Ruler
Preparation Find enough rulers for each pair to use.
Opening (3 minutes)
1. Sketch several shapes on the board. For example:
2. Ask pupils to give the names for each of the shapes. (In this example, from left to right:
rectangle, triangle, rectangle, triangle, square, triangle)
3. Ask pupils to describe some of them in their own words. (For example: the square has 4 sides of
the same length, the triangles have 3 sides)
4. Say: The shapes on the board are all plane shapes. Today, you will learn how to identify and
label the parts of rectangles, squares and triangles.
Introduction to the New Material (15 minutes)
1. Label the angles of a rectangle, a square and a triangle on the board (you can use the shapes you
already on the board):
2. Point at line AB on the board.
3. Say: We call this line AB. It is a side of the rectangle.
4. Ask: Can anyone name the other sides of this rectangle? (Answers: BC, CD, and DA)
5. Ask pupils to come point out lines from the other two shapes. For example, NO and XY.
6. Point at the rectangle.
7. Say: We call this rectangle ABCD.
8. Point at the square, and ask pupils to name the square with letters.
9. Allow pupils to share their ideas, and tell them that the square is called ‘square MNOP’.
10. Do the same for the triangle, and tell pupils it is called ‘triangle XYZ’.
11. Say: The point at which any two sides meet is an angle. Each angle is named by a letter.
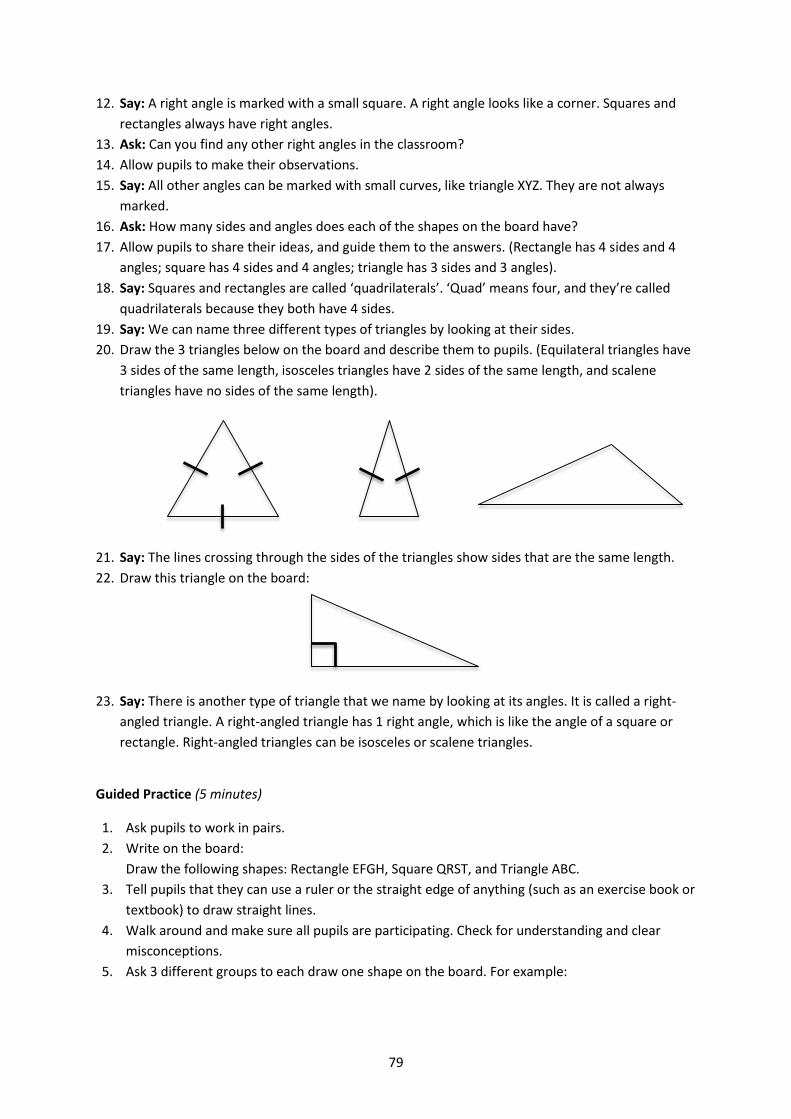
79
12. Say: A right angle is marked with a small square. A right angle looks like a corner. Squares and
rectangles always have right angles.
13. Ask: Can you find any other right angles in the classroom?
14. Allow pupils to make their observations.
15. Say: All other angles can be marked with small curves, like triangle XYZ. They are not always
marked.
16. Ask: How many sides and angles does each of the shapes on the board have?
17. Allow pupils to share their ideas, and guide them to the answers. (Rectangle has 4 sides and 4
angles; square has 4 sides and 4 angles; triangle has 3 sides and 3 angles).
18. Say: Squares and rectangles are called ‘quadrilaterals’. ‘Quad’ means four, and they’re called
quadrilaterals because they both have 4 sides.
19. Say: We can name three different types of triangles by looking at their sides.
20. Draw the 3 triangles below on the board and describe them to pupils. (Equilateral triangles have
3 sides of the same length, isosceles triangles have 2 sides of the same length, and scalene
triangles have no sides of the same length).
21. Say: The lines crossing through the sides of the triangles show sides that are the same length.
22. Draw this triangle on the board:
23. Say: There is another type of triangle that we name by looking at its angles. It is called a right-
angled triangle. A right-angled triangle has 1 right angle, which is like the angle of a square or
rectangle. Right-angled triangles can be isosceles or scalene triangles.
Guided Practice (5 minutes)
1. Ask pupils to work in pairs.
2. Write on the board:
Draw the following shapes: Rectangle EFGH, Square QRST, and Triangle ABC.
3. Tell pupils that they can use a ruler or the straight edge of anything (such as an exercise book or
textbook) to draw straight lines.
4. Walk around and make sure all pupils are participating. Check for understanding and clear
misconceptions.
5. Ask 3 different groups to each draw one shape on the board. For example:
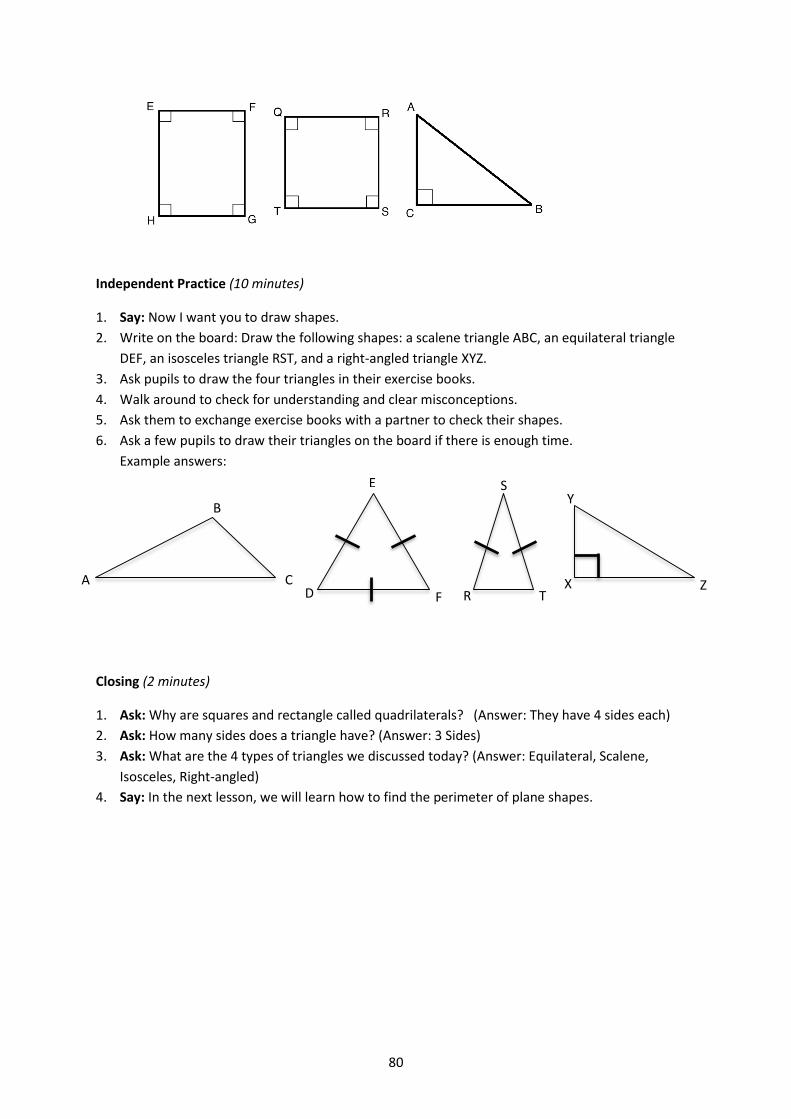
80
Independent Practice (10 minutes)
1. Say: Now I want you to draw shapes.
2. Write on the board: Draw the following shapes: a scalene triangle ABC, an equilateral triangle
DEF, an isosceles triangle RST, and a right-angled triangle XYZ.
3. Ask pupils to draw the four triangles in their exercise books.
4. Walk around to check for understanding and clear misconceptions.
5. Ask them to exchange exercise books with a partner to check their shapes.
6. Ask a few pupils to draw their triangles on the board if there is enough time.
Example answers:
Closing (2 minutes)
1. Ask: Why are squares and rectangle called quadrilaterals? (Answer: They have 4 sides each)
2. Ask: How many sides does a triangle have? (Answer: 3 Sides)
3. Ask: What are the 4 types of triangles we discussed today? (Answer: Equilateral, Scalene,
Isosceles, Right-angled)
4. Say: In the next lesson, we will learn how to find the perimeter of plane shapes.
A
B
C D
E
F R
S
T X
Y
Z
81
Lesson Title: Adding Fractions with the Same Denominator
Theme: Numbers and Numeration
Lesson Number: M-07-076 Class/Level: JSS 1 Time: 35 minutes
Learning Outcomes
By the end of the lesson pupils will be able to add fractions with the same denominator.
Teaching Aids
None
Preparation
None
Opening (2 minutes)
1. Ask one pupil to come to the board and write a fraction.
2. Ask pupils to tell the type of fraction that has been written on the board (e.g. Proper fraction,
Improper fraction or Mixed Fraction).
3. Ask pupils to give reasons for their answers (e.g. the numerator is smaller or bigger than the
denominator, or fraction is mixed with a whole number).
4. Say: Today, you will learn how to add fractions with the same denominator.
Introduction to the New Material (14 minutes)
1. Write an addition problem on the board: 𝟒
𝟏𝟑+
𝟐
𝟏𝟑
2. Ask pupils to observe the problem carefully, to note the same denominator but different
numerators.
3. Ask: How do you think we can add these fractions?
4. Allow pupils to share their ideas.
5. Say: Addition of fractions can be done in two ways depending on whether the denominators are
different or the same.
6. Say: When the fractions have the same denominator, we add the numerators and write the sum
all over the same denominator.
7. Say: for 𝟒
𝟏𝟑+
𝟐
𝟏𝟑 add the numerators and keep the same denominator.
8. Write on the board: 𝟒
𝟏𝟑+
𝟐
𝟏𝟑 =
𝟒+𝟐
𝟏𝟑=
𝟔
𝟏𝟑
9. Say: A fraction in which the numerator is bigger than denominator is a proper fraction.
10. Write two more examples on the board: (i) 𝟗
𝟏𝟓 +
𝟔
𝟏𝟓 (ii)
𝟒
𝟓 +
𝟑
𝟓
11. Ask a pupil to explain how to work the first problem. (Example answer: add 9 and 6 in the
numerator, and keep the same 15 in the denominator)
12. Write the solution on the board: 9
15 +
6
15 =
9+6
15 =
15
15 = 1
13. Say: When the numerator and the denominator are the same, the denominator divides the
numerator to get 1 whole. Therefore, 15
15 = 1.
14. Ask a pupil to explain how to work the second problem. (Example answer: add 4 and 3 in the
numerator, and keep 5 in the denominator)
15. Write the solution on the board: 𝟒
𝟓 +
𝟑
𝟓 =
𝟒+𝟑
𝟓 =
𝟕
𝟓
82
16. Say: When the denominator is smaller than the numerator, the fraction is called an improper
fraction.
17. Say: An Improper fraction can be simplified to get a mixed fraction by dividing the numerator by
the denominator.
18. Make sure pupils understand how to convert an improper fraction to a mixed fraction (if
needed):
Say: 𝟕
𝟓 can be converted (or simplified) by dividing 7 by 5. This gives 1 remainder 2,
which is written as 12
5 Write the remainder in the numerator of the mixed fraction.
Write on the board: 7
5= 7 ÷ 5 = 1 r 2 = 1
2
5
Say: A mixed fraction has a whole number ‘Mixed up’ or written together with a
fraction.
19. Say: Answers to addition problems in fractions are often improper fractions, and we must
convert them to mixed fractions.
20. Complete the solution on the board: 4
5 +
3
5 =
4+3
5 =
7
5= 1
2
5
Guided Practice (7 minutes)
1. Ask pupils to work in pairs.
2. Write two problems on the board: i. 7
8 +
2
8 ii.
7
13 +
3
13+
2
13
3. Ask each pair to solve the problems in their exercise books.
4. Say: when adding 3 fractions, you can simply add the 3 numbers in the numerator together, and
write them all over the same denominator.
5. Move around to check pupils as they work. Check for understanding and clear misconceptions.
6. Call two pupils to present their answers.
(Answers: (i) 7
8 +
2
8 =
7+2
8 =
9
8 = 1
1
8 (ii)
7
13 +
3
13+
2
13 =
7 +3+2
13 =
12
13)
Independent Practice (10 minutes)
1. Write the following problems on the board:
(i) 2
7 +
5
7 (ii)
2
9 +
2
9 (iii)
4
5 +
3
5+
2
5
2. Ask pupils to work independently to solve the problems above.
3. Move around to check pupils as they work.
4. Call on pupils randomly to read their answers orally. (Answer: (i) 2
7 +
5
7 =
2+5
7 =
7
7 = 1
(ii) 2
9+
2
9 =
2+2
9 =
4
9 (iii)
4
5+
3
5+
2
5=
4+3+2
5=
9
5= 1
4
5)
Closing (2 minutes)
1. Write this problem on the board: 𝟏
𝟑+
𝟐
𝟑
2. Say: Solve this problem quickly. Put your hand up to tell the answer when you are finished.
83
3. After half of the pupils raise their hands, call on one of them to give their answer and explain
(Answer: 1
3+
2
3=
1+2
3=
3
3= 1).
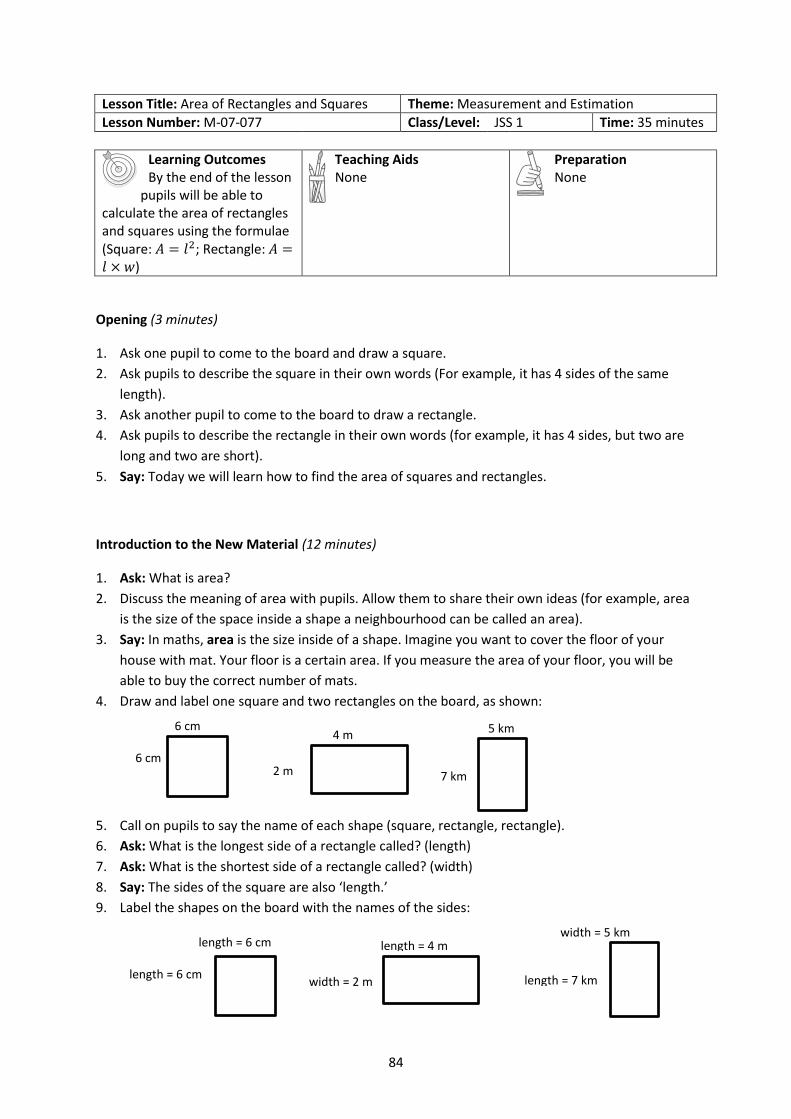
84
Lesson Title: Area of Rectangles and Squares Theme: Measurement and Estimation
Lesson Number: M-07-077 Class/Level: JSS 1 Time: 35 minutes
Learning Outcomes By the end of the lesson
pupils will be able to calculate the area of rectangles and squares using the formulae (Square: 𝐴 = 𝑙2; Rectangle: 𝐴 =𝑙 × 𝑤)
Teaching Aids None
Preparation None
Opening (3 minutes)
1. Ask one pupil to come to the board and draw a square.
2. Ask pupils to describe the square in their own words (For example, it has 4 sides of the same
length).
3. Ask another pupil to come to the board to draw a rectangle.
4. Ask pupils to describe the rectangle in their own words (for example, it has 4 sides, but two are
long and two are short).
5. Say: Today we will learn how to find the area of squares and rectangles.
Introduction to the New Material (12 minutes)
1. Ask: What is area?
2. Discuss the meaning of area with pupils. Allow them to share their own ideas (for example, area
is the size of the space inside a shape a neighbourhood can be called an area).
3. Say: In maths, area is the size inside of a shape. Imagine you want to cover the floor of your
house with mat. Your floor is a certain area. If you measure the area of your floor, you will be
able to buy the correct number of mats.
4. Draw and label one square and two rectangles on the board, as shown:
5. Call on pupils to say the name of each shape (square, rectangle, rectangle).
6. Ask: What is the longest side of a rectangle called? (length)
7. Ask: What is the shortest side of a rectangle called? (width)
8. Say: The sides of the square are also ‘length.’
9. Label the shapes on the board with the names of the sides:
6 cm
6 cm 2 m
4 m 5 km
7 km
length = 6 cm
length = 6 cm width = 2 m
length = 4 m width = 5 km
length = 7 km

85
10. Draw a grid in one of the rectangles, as shown:
11. Say: The area gives the number of squares inside of a shape. So if I ask you to find the area of
this rectangle, it means to find the number of square metres that fit inside. Let’s count them.
12. Count the 8 squares inside the shape.
13. Ask: How do we calculate the area of a square or rectangle?
14. Allow pupils to share their ideas for 1 minute.
15. Say: To find the area of a square or rectangle, multiply the lengths of the two sides.
16. Write the formulae for area of a square and rectangle on the board:
Square: 𝐴 = 𝑙𝑒𝑛𝑔𝑡ℎ × 𝑙𝑒𝑛𝑔𝑡ℎ = 𝑙 × 𝑙 = 𝑙2 Rectangle: 𝐴 = 𝑙𝑒𝑛𝑔𝑡ℎ × 𝑤𝑖𝑑𝑡ℎ = 𝑙 × 𝑤
17. Calculate the area of the rectangle from the grid shown above:
𝐴𝑟𝑒𝑎 = 𝑙 × 𝑤 = 4 m × 2 m = 8 m2
18. Say: Area is always written in units squared.
19. Find the area of the square on the board. Remind pupils that the sides of a square are all the
same length: 𝐴𝑟𝑒𝑎 = 𝑙 × 𝑙 = 6 cm.× 6 cm. = 36 cm.2
Guided Practice (8 minutes)
1. Ask pupils to work in pairs.
2. Label the square and one of the rectangles on the board with the measurements below.
3. Ask pupils to calculate the area of the two shapes.
4. Move around the room to check for understanding and clear misconceptions. Check that their
answers are in cm2 and m2
5. Ask 2 different pairs to give their answers to the 2 problems (answers: 𝐴 = 𝑙 × 𝑙 = 4 cm ×
4 cm = 16 cm.2 and 𝐴 = 𝑙 × 𝑤 = 8 m × 3m = 24 m2).
Independent Practice (10 minutes)
1. Write one story problem on the board from the list at the end of the lesson.
2. Ask pupils to work independently to solve the problem.
3. Move around to check for understanding and clear misconceptions.
4. Ask pupils to turn to their neighbour and compare answers for 2 minutes.
5. Ask one pupil from the back of the class to stand and say her answer.
4 cm
4 cm
3 m
8 m
4 m
2 m
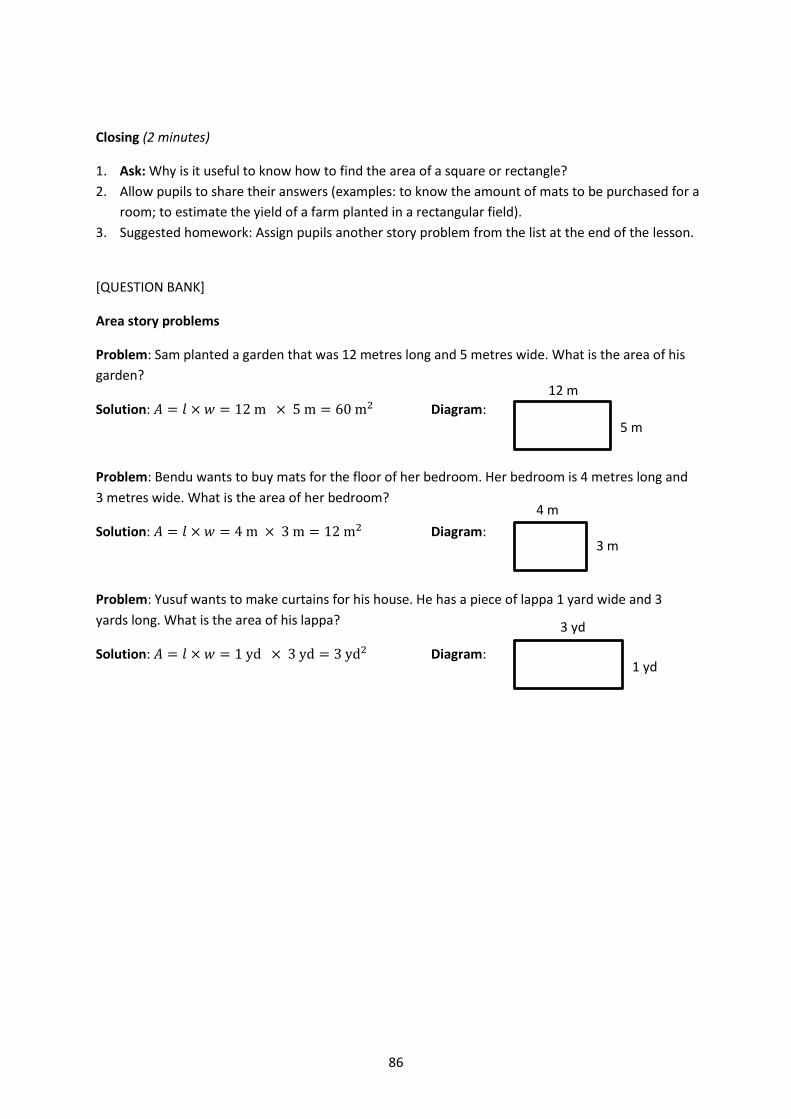
86
Closing (2 minutes)
1. Ask: Why is it useful to know how to find the area of a square or rectangle?
2. Allow pupils to share their answers (examples: to know the amount of mats to be purchased for a
room; to estimate the yield of a farm planted in a rectangular field).
3. Suggested homework: Assign pupils another story problem from the list at the end of the lesson.
[QUESTION BANK]
Area story problems
Problem: Sam planted a garden that was 12 metres long and 5 metres wide. What is the area of his
garden?
Solution: 𝐴 = 𝑙 × 𝑤 = 12 m × 5 m = 60 m2 Diagram:
Problem: Bendu wants to buy mats for the floor of her bedroom. Her bedroom is 4 metres long and
3 metres wide. What is the area of her bedroom?
Solution: 𝐴 = 𝑙 × 𝑤 = 4 m × 3 m = 12 m2 Diagram:
Problem: Yusuf wants to make curtains for his house. He has a piece of lappa 1 yard wide and 3
yards long. What is the area of his lappa?
Solution: 𝐴 = 𝑙 × 𝑤 = 1 yd × 3 yd = 3 yd2 Diagram:
12 m
5 m
4 m
3 m
3 yd
1 yd
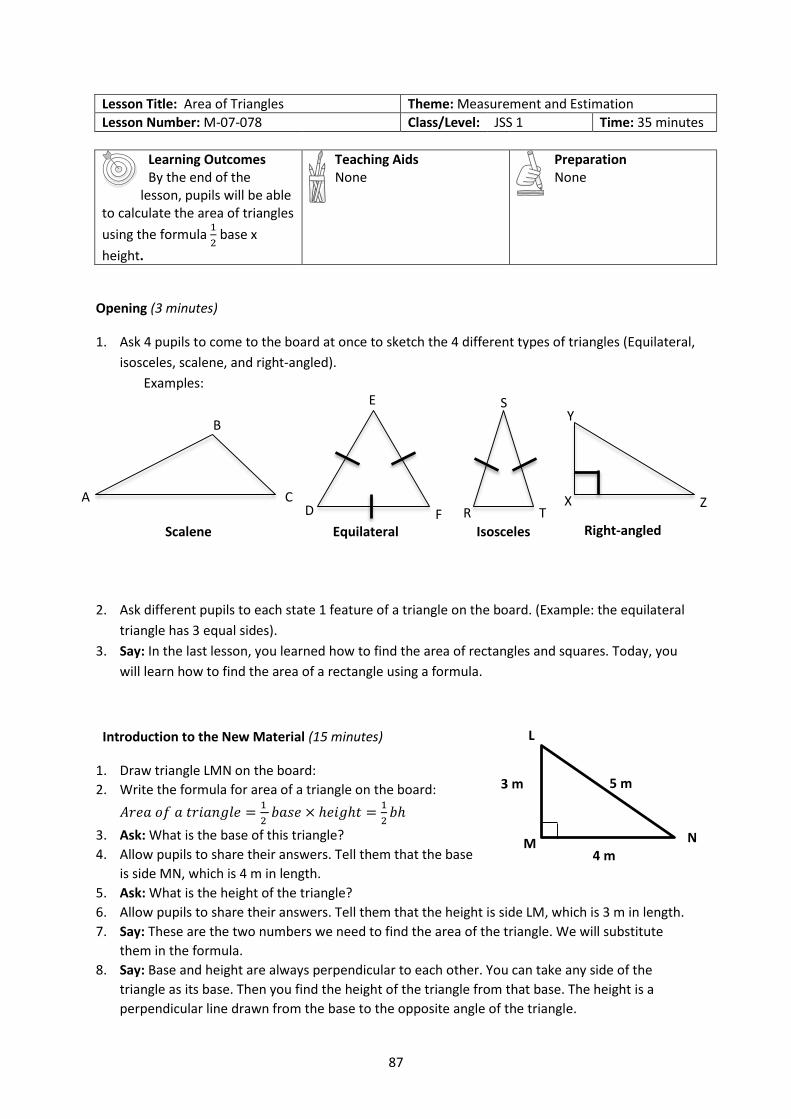
87
Lesson Title: Area of Triangles Theme: Measurement and Estimation
Lesson Number: M-07-078 Class/Level: JSS 1 Time: 35 minutes
Learning Outcomes By the end of the
lesson, pupils will be able to calculate the area of triangles
using the formula 1
2 base x
height.
Teaching Aids None
Preparation None
Opening (3 minutes)
1. Ask 4 pupils to come to the board at once to sketch the 4 different types of triangles (Equilateral,
isosceles, scalene, and right-angled).
Examples:
2. Ask different pupils to each state 1 feature of a triangle on the board. (Example: the equilateral
triangle has 3 equal sides).
3. Say: In the last lesson, you learned how to find the area of rectangles and squares. Today, you
will learn how to find the area of a rectangle using a formula.
Introduction to the New Material (15 minutes)
1. Draw triangle LMN on the board:
2. Write the formula for area of a triangle on the board:
𝐴𝑟𝑒𝑎 𝑜𝑓 𝑎 𝑡𝑟𝑖𝑎𝑛𝑔𝑙𝑒 =1
2 𝑏𝑎𝑠𝑒 × ℎ𝑒𝑖𝑔ℎ𝑡 =
1
2𝑏ℎ
3. Ask: What is the base of this triangle?
4. Allow pupils to share their answers. Tell them that the base
is side MN, which is 4 m in length.
5. Ask: What is the height of the triangle?
6. Allow pupils to share their answers. Tell them that the height is side LM, which is 3 m in length.
7. Say: These are the two numbers we need to find the area of the triangle. We will substitute
them in the formula.
8. Say: Base and height are always perpendicular to each other. You can take any side of the
triangle as its base. Then you find the height of the triangle from that base. The height is a
perpendicular line drawn from the base to the opposite angle of the triangle.
A
B
C D
E
F R
S
T X
Y
Z
Scalene Equilateral Isosceles Right-angled
3 m
4 m M N
L
5 m
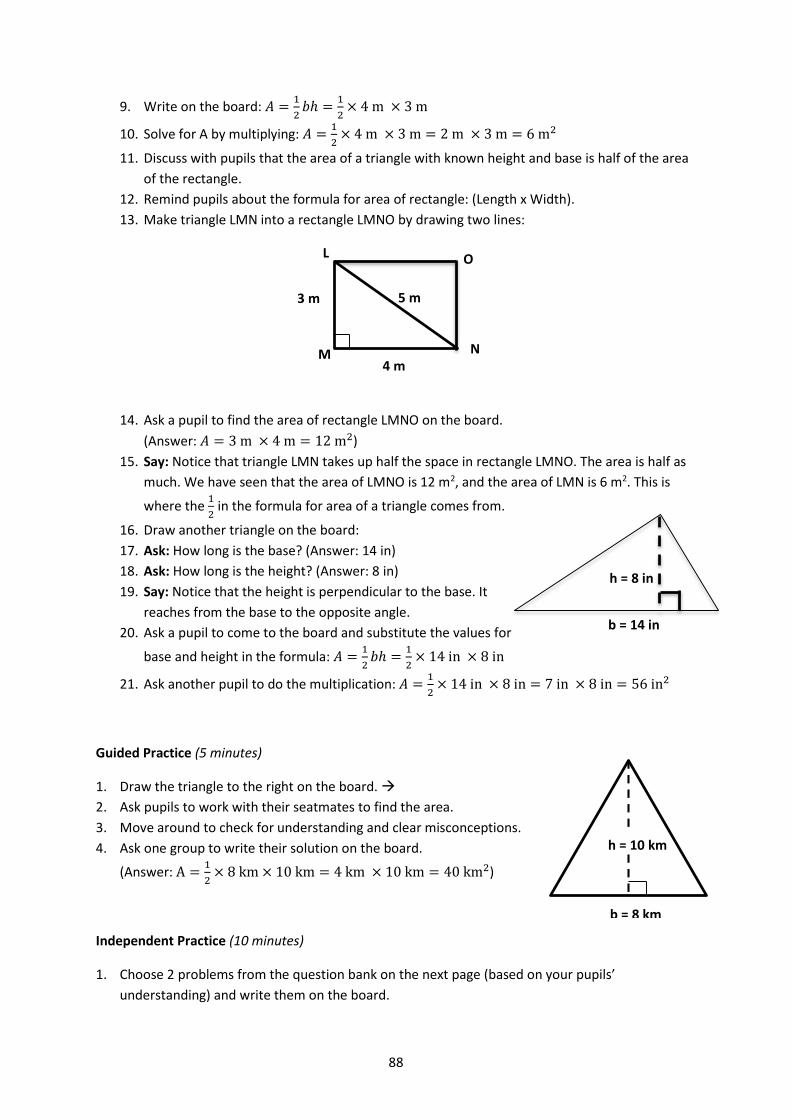
88
9. Write on the board: 𝐴 =1
2𝑏ℎ =
1
2× 4 m × 3 m
10. Solve for A by multiplying: 𝐴 =1
2× 4 m × 3 m = 2 m × 3 m = 6 m2
11. Discuss with pupils that the area of a triangle with known height and base is half of the area
of the rectangle.
12. Remind pupils about the formula for area of rectangle: (Length x Width).
13. Make triangle LMN into a rectangle LMNO by drawing two lines:
14. Ask a pupil to find the area of rectangle LMNO on the board.
(Answer: 𝐴 = 3 m × 4 m = 12 m2)
15. Say: Notice that triangle LMN takes up half the space in rectangle LMNO. The area is half as
much. We have seen that the area of LMNO is 12 m2, and the area of LMN is 6 m2. This is
where the 1
2 in the formula for area of a triangle comes from.
16. Draw another triangle on the board:
17. Ask: How long is the base? (Answer: 14 in)
18. Ask: How long is the height? (Answer: 8 in)
19. Say: Notice that the height is perpendicular to the base. It
reaches from the base to the opposite angle.
20. Ask a pupil to come to the board and substitute the values for
base and height in the formula: 𝐴 =1
2𝑏ℎ =
1
2× 14 in × 8 in
21. Ask another pupil to do the multiplication: 𝐴 =1
2× 14 in × 8 in = 7 in × 8 in = 56 in2
Guided Practice (5 minutes)
1. Draw the triangle to the right on the board.
2. Ask pupils to work with their seatmates to find the area.
3. Move around to check for understanding and clear misconceptions.
4. Ask one group to write their solution on the board.
(Answer: A =1
2× 8 km × 10 km = 4 km × 10 km = 40 km2)
Independent Practice (10 minutes)
1. Choose 2 problems from the question bank on the next page (based on your pupils’
understanding) and write them on the board.
h = 10 km
b = 8 km
3 m
4 m M N
L
5 m
O
b = 14 in
h = 8 in
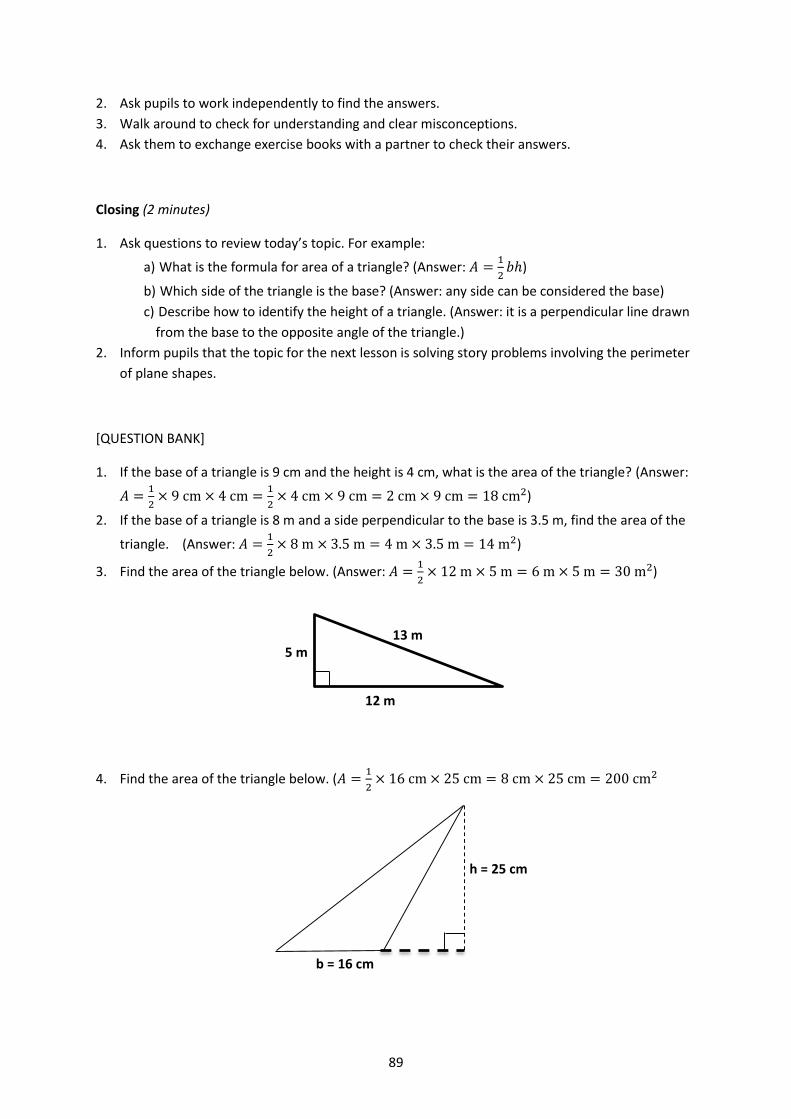
89
2. Ask pupils to work independently to find the answers.
3. Walk around to check for understanding and clear misconceptions.
4. Ask them to exchange exercise books with a partner to check their answers.
Closing (2 minutes)
1. Ask questions to review today’s topic. For example:
a) What is the formula for area of a triangle? (Answer: 𝐴 =1
2𝑏ℎ)
b) Which side of the triangle is the base? (Answer: any side can be considered the base)
c) Describe how to identify the height of a triangle. (Answer: it is a perpendicular line drawn
from the base to the opposite angle of the triangle.)
2. Inform pupils that the topic for the next lesson is solving story problems involving the perimeter
of plane shapes.
[QUESTION BANK]
1. If the base of a triangle is 9 cm and the height is 4 cm, what is the area of the triangle? (Answer:
𝐴 =1
2× 9 cm × 4 cm =
1
2× 4 cm × 9 cm = 2 cm × 9 cm = 18 cm2)
2. If the base of a triangle is 8 m and a side perpendicular to the base is 3.5 m, find the area of the
triangle. (Answer: 𝐴 =1
2× 8 m × 3.5 m = 4 m × 3.5 m = 14 m2)
3. Find the area of the triangle below. (Answer: 𝐴 =1
2× 12 m × 5 m = 6 m × 5 m = 30 m2)
4. Find the area of the triangle below. (𝐴 =1
2× 16 cm × 25 cm = 8 cm × 25 cm = 200 cm2
12 m
5 m 13 m
h = 25 cm
b = 16 cm
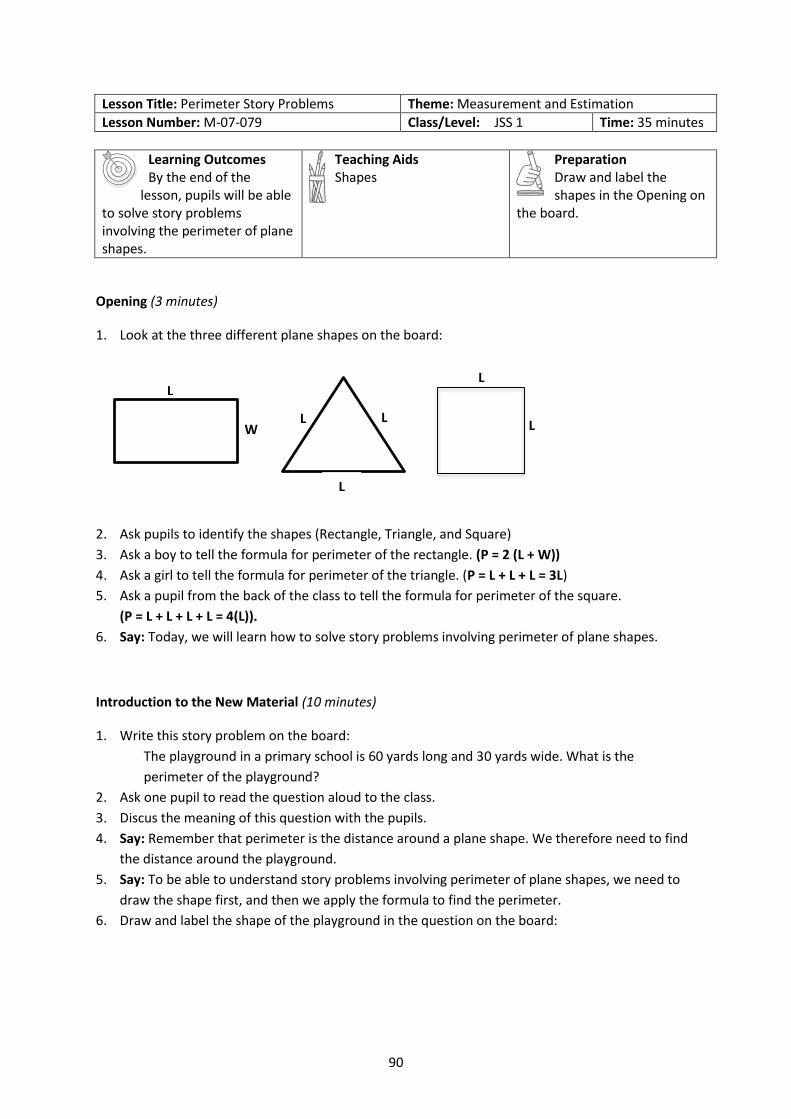
90
Lesson Title: Perimeter Story Problems Theme: Measurement and Estimation
Lesson Number: M-07-079 Class/Level: JSS 1 Time: 35 minutes
Learning Outcomes By the end of the
lesson, pupils will be able to solve story problems involving the perimeter of plane shapes.
Teaching Aids Shapes
Preparation Draw and label the shapes in the Opening on
the board.
Opening (3 minutes)
1. Look at the three different plane shapes on the board:
2. Ask pupils to identify the shapes (Rectangle, Triangle, and Square)
3. Ask a boy to tell the formula for perimeter of the rectangle. (P = 2 (L + W))
4. Ask a girl to tell the formula for perimeter of the triangle. (P = L + L + L = 3L)
5. Ask a pupil from the back of the class to tell the formula for perimeter of the square.
(P = L + L + L + L = 4(L)).
6. Say: Today, we will learn how to solve story problems involving perimeter of plane shapes.
Introduction to the New Material (10 minutes)
1. Write this story problem on the board:
The playground in a primary school is 60 yards long and 30 yards wide. What is the
perimeter of the playground?
2. Ask one pupil to read the question aloud to the class.
3. Discus the meaning of this question with the pupils.
4. Say: Remember that perimeter is the distance around a plane shape. We therefore need to find
the distance around the playground.
5. Say: To be able to understand story problems involving perimeter of plane shapes, we need to
draw the shape first, and then we apply the formula to find the perimeter.
6. Draw and label the shape of the playground in the question on the board:
L
W L
L
L
L L
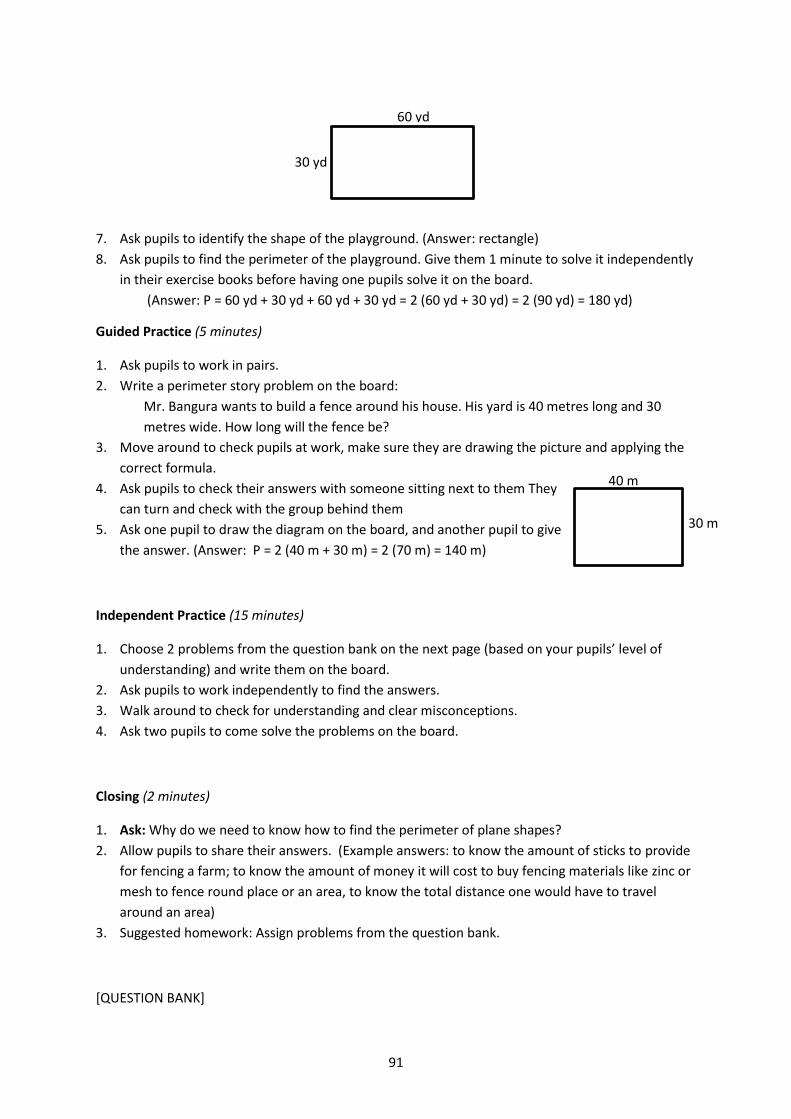
91
7. Ask pupils to identify the shape of the playground. (Answer: rectangle)
8. Ask pupils to find the perimeter of the playground. Give them 1 minute to solve it independently
in their exercise books before having one pupils solve it on the board.
(Answer: P = 60 yd + 30 yd + 60 yd + 30 yd = 2 (60 yd + 30 yd) = 2 (90 yd) = 180 yd)
Guided Practice (5 minutes)
1. Ask pupils to work in pairs.
2. Write a perimeter story problem on the board:
Mr. Bangura wants to build a fence around his house. His yard is 40 metres long and 30
metres wide. How long will the fence be?
3. Move around to check pupils at work, make sure they are drawing the picture and applying the
correct formula.
4. Ask pupils to check their answers with someone sitting next to them They
can turn and check with the group behind them
5. Ask one pupil to draw the diagram on the board, and another pupil to give
the answer. (Answer: P = 2 (40 m + 30 m) = 2 (70 m) = 140 m)
Independent Practice (15 minutes)
1. Choose 2 problems from the question bank on the next page (based on your pupils’ level of
understanding) and write them on the board.
2. Ask pupils to work independently to find the answers.
3. Walk around to check for understanding and clear misconceptions.
4. Ask two pupils to come solve the problems on the board.
Closing (2 minutes)
1. Ask: Why do we need to know how to find the perimeter of plane shapes?
2. Allow pupils to share their answers. (Example answers: to know the amount of sticks to provide
for fencing a farm; to know the amount of money it will cost to buy fencing materials like zinc or
mesh to fence round place or an area, to know the total distance one would have to travel
around an area)
3. Suggested homework: Assign problems from the question bank.
[QUESTION BANK]
30 m
40 m
60 yd
30 yd
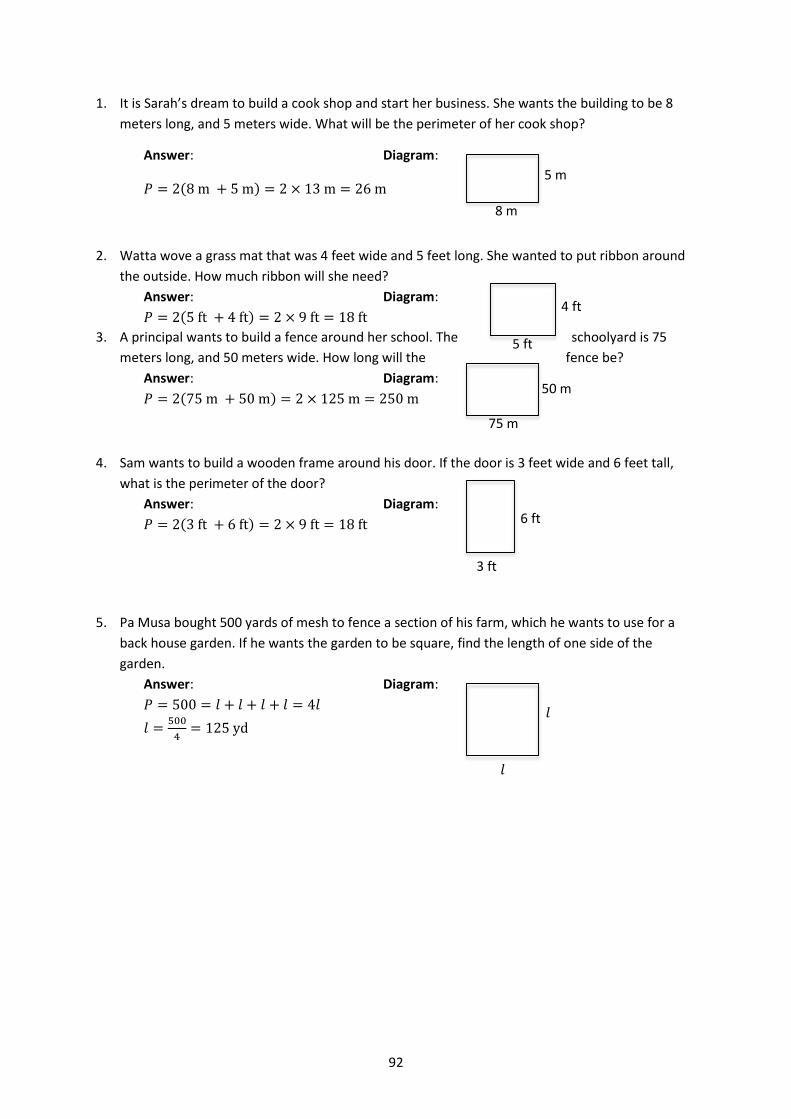
92
1. It is Sarah’s dream to build a cook shop and start her business. She wants the building to be 8
meters long, and 5 meters wide. What will be the perimeter of her cook shop?
Answer: Diagram:
𝑃 = 2(8 m + 5 m) = 2 × 13 m = 26 m
2. Watta wove a grass mat that was 4 feet wide and 5 feet long. She wanted to put ribbon around
the outside. How much ribbon will she need?
Answer: Diagram:
𝑃 = 2(5 ft + 4 ft) = 2 × 9 ft = 18 ft
3. A principal wants to build a fence around her school. The schoolyard is 75
meters long, and 50 meters wide. How long will the fence be?
Answer: Diagram:
𝑃 = 2(75 m + 50 m) = 2 × 125 m = 250 m
4. Sam wants to build a wooden frame around his door. If the door is 3 feet wide and 6 feet tall,
what is the perimeter of the door?
Answer: Diagram:
𝑃 = 2(3 ft + 6 ft) = 2 × 9 ft = 18 ft
5. Pa Musa bought 500 yards of mesh to fence a section of his farm, which he wants to use for a
back house garden. If he wants the garden to be square, find the length of one side of the
garden.
Answer: Diagram:
𝑃 = 500 = 𝑙 + 𝑙 + 𝑙 + 𝑙 = 4𝑙
𝑙 =500
4= 125 yd
5 m
8 m
4 ft
5 ft
50 m
75 m
6 ft
3 ft
𝑙
𝑙
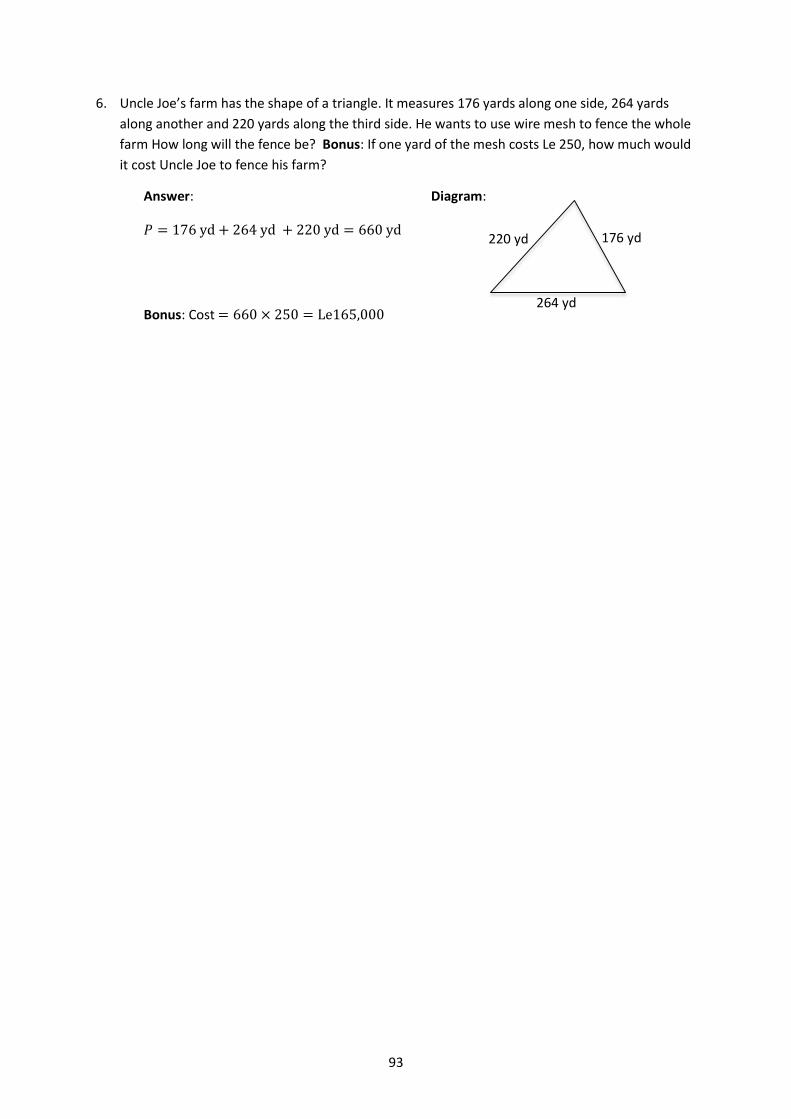
93
6. Uncle Joe’s farm has the shape of a triangle. It measures 176 yards along one side, 264 yards
along another and 220 yards along the third side. He wants to use wire mesh to fence the whole
farm How long will the fence be? Bonus: If one yard of the mesh costs Le 250, how much would
it cost Uncle Joe to fence his farm?
Answer: Diagram:
𝑃 = 176 yd + 264 yd + 220 yd = 660 yd
Bonus: Cost = 660 × 250 = Le165,000
176 yd
264 yd
220 yd
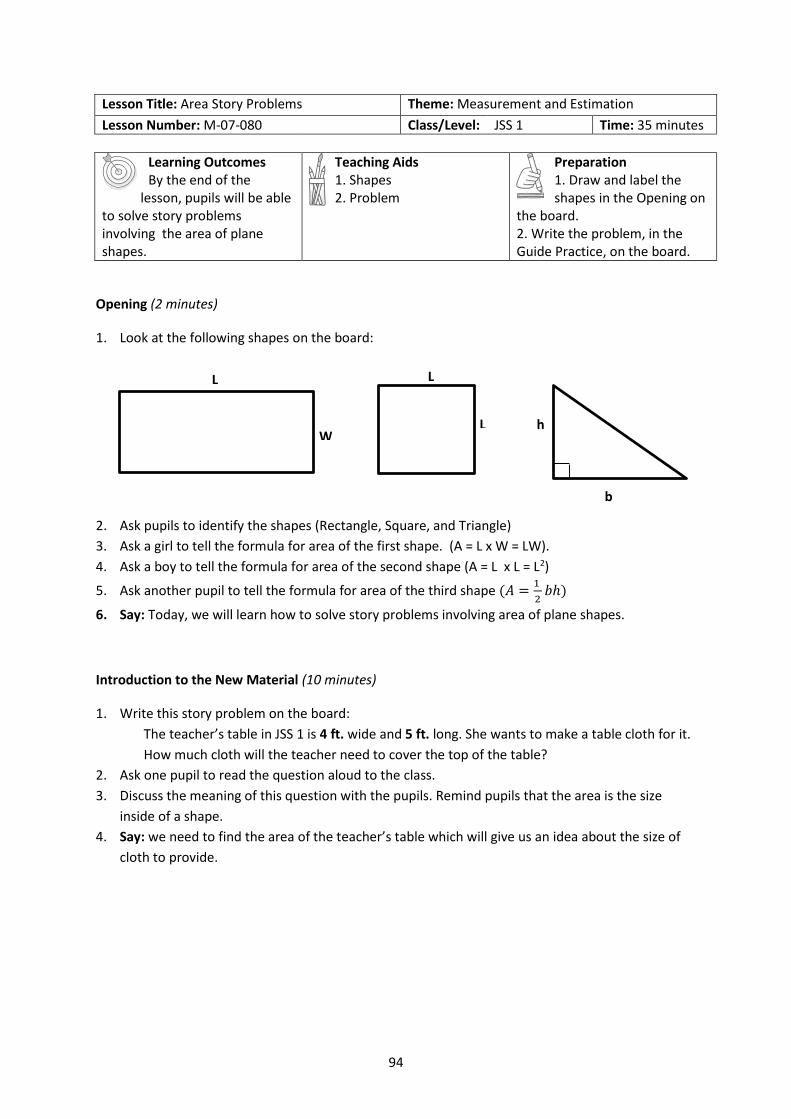
94
Lesson Title: Area Story Problems Theme: Measurement and Estimation
Lesson Number: M-07-080 Class/Level: JSS 1 Time: 35 minutes
Learning Outcomes By the end of the
lesson, pupils will be able to solve story problems involving the area of plane shapes.
Teaching Aids 1. Shapes 2. Problem
Preparation 1. Draw and label the shapes in the Opening on
the board. 2. Write the problem, in the Guide Practice, on the board.
Opening (2 minutes)
1. Look at the following shapes on the board:
2. Ask pupils to identify the shapes (Rectangle, Square, and Triangle)
3. Ask a girl to tell the formula for area of the first shape. (A = L x W = LW).
4. Ask a boy to tell the formula for area of the second shape (A = L x L = L2)
5. Ask another pupil to tell the formula for area of the third shape (𝐴 =1
2𝑏ℎ)
6. Say: Today, we will learn how to solve story problems involving area of plane shapes.
Introduction to the New Material (10 minutes)
1. Write this story problem on the board:
The teacher’s table in JSS 1 is 4 ft. wide and 5 ft. long. She wants to make a table cloth for it.
How much cloth will the teacher need to cover the top of the table?
2. Ask one pupil to read the question aloud to the class.
3. Discuss the meaning of this question with the pupils. Remind pupils that the area is the size
inside of a shape.
4. Say: we need to find the area of the teacher’s table which will give us an idea about the size of
cloth to provide.
L
W
L
L h
b
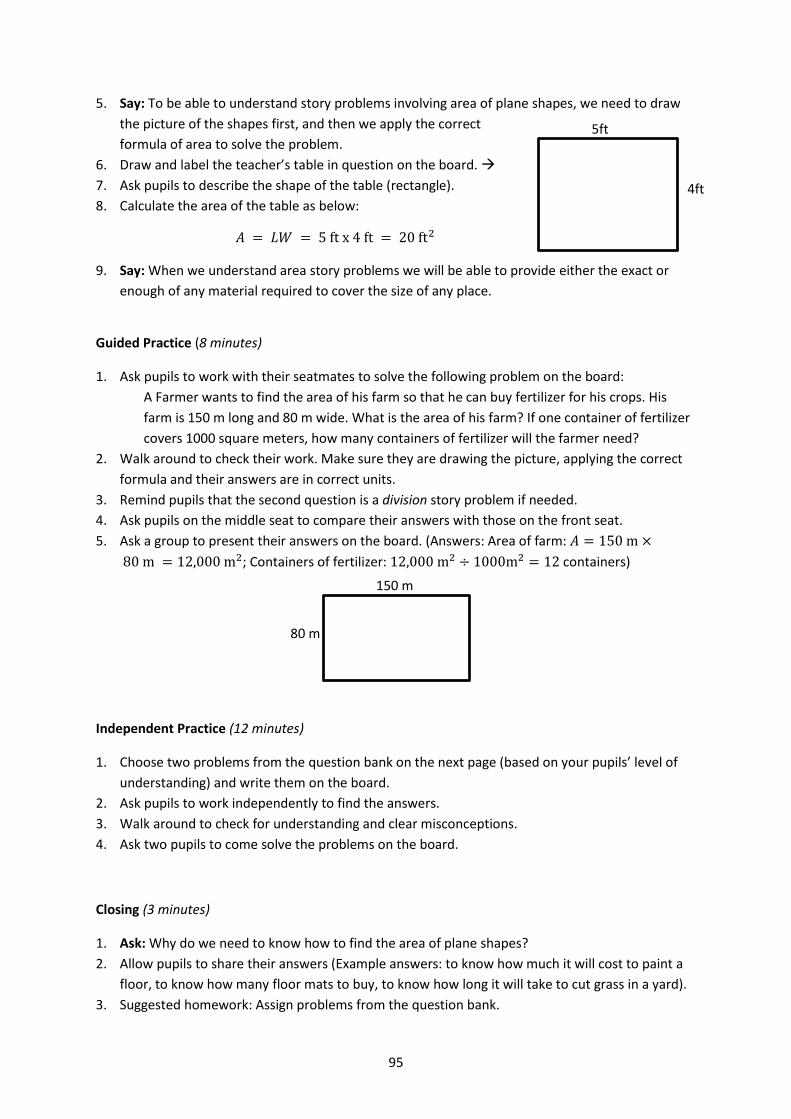
95
5. Say: To be able to understand story problems involving area of plane shapes, we need to draw
the picture of the shapes first, and then we apply the correct
formula of area to solve the problem.
6. Draw and label the teacher’s table in question on the board.
7. Ask pupils to describe the shape of the table (rectangle).
8. Calculate the area of the table as below:
𝐴 = 𝐿𝑊 = 5 ft x 4 ft = 20 ft2
9. Say: When we understand area story problems we will be able to provide either the exact or
enough of any material required to cover the size of any place.
Guided Practice (8 minutes)
1. Ask pupils to work with their seatmates to solve the following problem on the board:
A Farmer wants to find the area of his farm so that he can buy fertilizer for his crops. His
farm is 150 m long and 80 m wide. What is the area of his farm? If one container of fertilizer
covers 1000 square meters, how many containers of fertilizer will the farmer need?
2. Walk around to check their work. Make sure they are drawing the picture, applying the correct
formula and their answers are in correct units.
3. Remind pupils that the second question is a division story problem if needed.
4. Ask pupils on the middle seat to compare their answers with those on the front seat.
5. Ask a group to present their answers on the board. (Answers: Area of farm: 𝐴 = 150 m ×
80 m = 12,000 m2; Containers of fertilizer: 12,000 m2 ÷ 1000m2 = 12 containers)
Independent Practice (12 minutes)
1. Choose two problems from the question bank on the next page (based on your pupils’ level of
understanding) and write them on the board.
2. Ask pupils to work independently to find the answers.
3. Walk around to check for understanding and clear misconceptions.
4. Ask two pupils to come solve the problems on the board.
Closing (3 minutes)
1. Ask: Why do we need to know how to find the area of plane shapes?
2. Allow pupils to share their answers (Example answers: to know how much it will cost to paint a
floor, to know how many floor mats to buy, to know how long it will take to cut grass in a yard).
3. Suggested homework: Assign problems from the question bank.
5ft
4ft
150 m
80 m
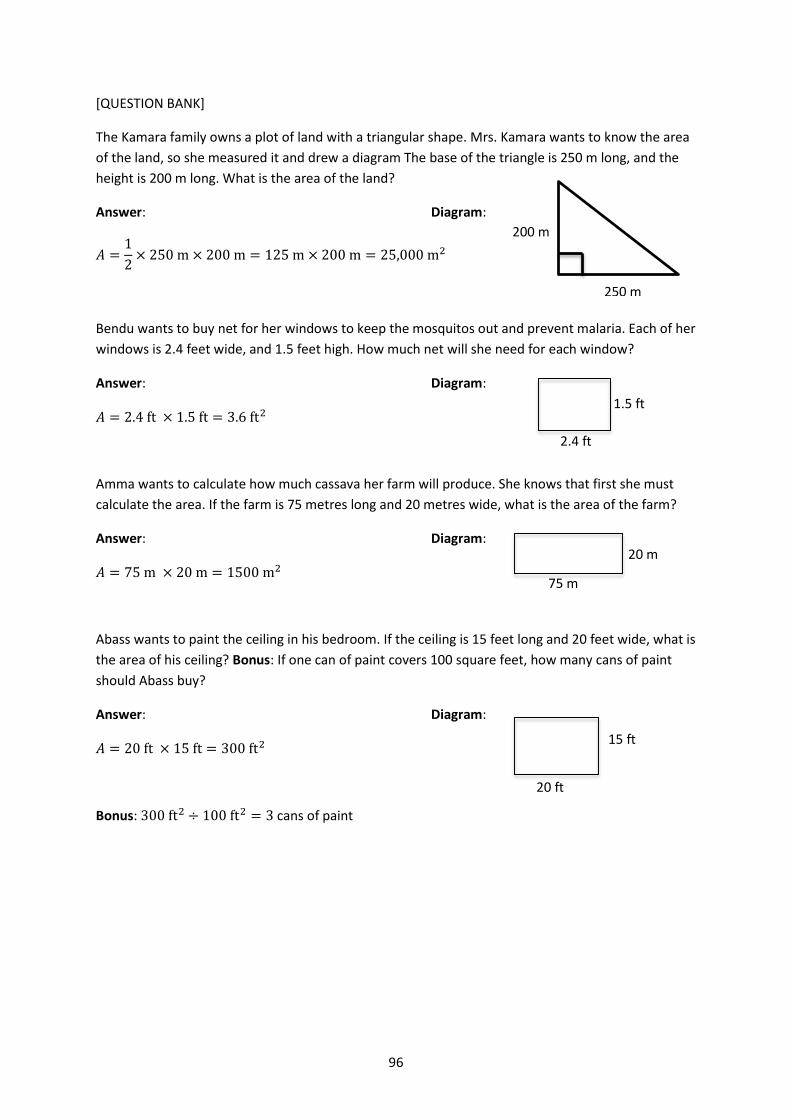
96
[QUESTION BANK]
The Kamara family owns a plot of land with a triangular shape. Mrs. Kamara wants to know the area
of the land, so she measured it and drew a diagram The base of the triangle is 250 m long, and the
height is 200 m long. What is the area of the land?
Answer: Diagram:
𝐴 =1
2× 250 m × 200 m = 125 m × 200 m = 25,000 m2
Bendu wants to buy net for her windows to keep the mosquitos out and prevent malaria. Each of her
windows is 2.4 feet wide, and 1.5 feet high. How much net will she need for each window?
Answer: Diagram:
𝐴 = 2.4 ft × 1.5 ft = 3.6 ft2
Amma wants to calculate how much cassava her farm will produce. She knows that first she must
calculate the area. If the farm is 75 metres long and 20 metres wide, what is the area of the farm?
Answer: Diagram:
𝐴 = 75 m × 20 m = 1500 m2
Abass wants to paint the ceiling in his bedroom. If the ceiling is 15 feet long and 20 feet wide, what is
the area of his ceiling? Bonus: If one can of paint covers 100 square feet, how many cans of paint
should Abass buy?
Answer: Diagram:
𝐴 = 20 ft × 15 ft = 300 ft2
Bonus: 300 ft2 ÷ 100 ft2 = 3 cans of paint
250 m
200 m
1.5 ft
2.4 ft
20 m
75 m
15 ft
20 ft
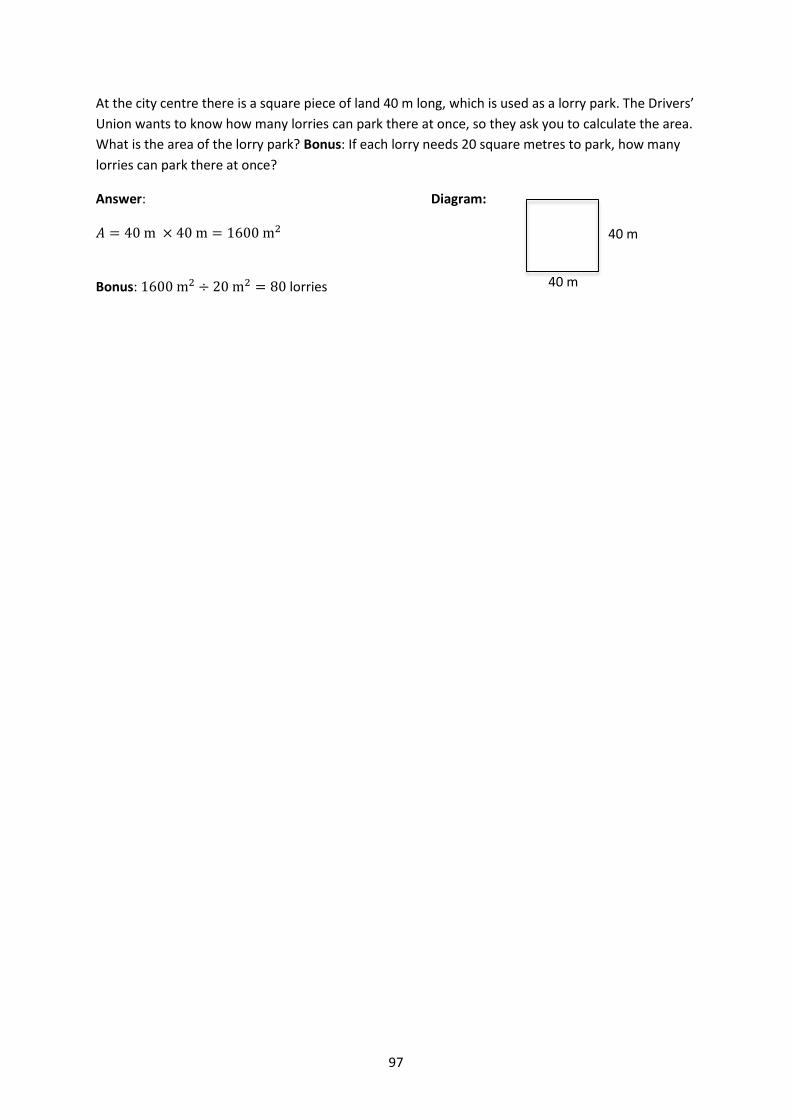
97
At the city centre there is a square piece of land 40 m long, which is used as a lorry park. The Drivers’
Union wants to know how many lorries can park there at once, so they ask you to calculate the area.
What is the area of the lorry park? Bonus: If each lorry needs 20 square metres to park, how many
lorries can park there at once?
Answer: Diagram:
𝐴 = 40 m × 40 m = 1600 m2
Bonus: 1600 m2 ÷ 20 m2 = 80 lorries
40 m
40 m
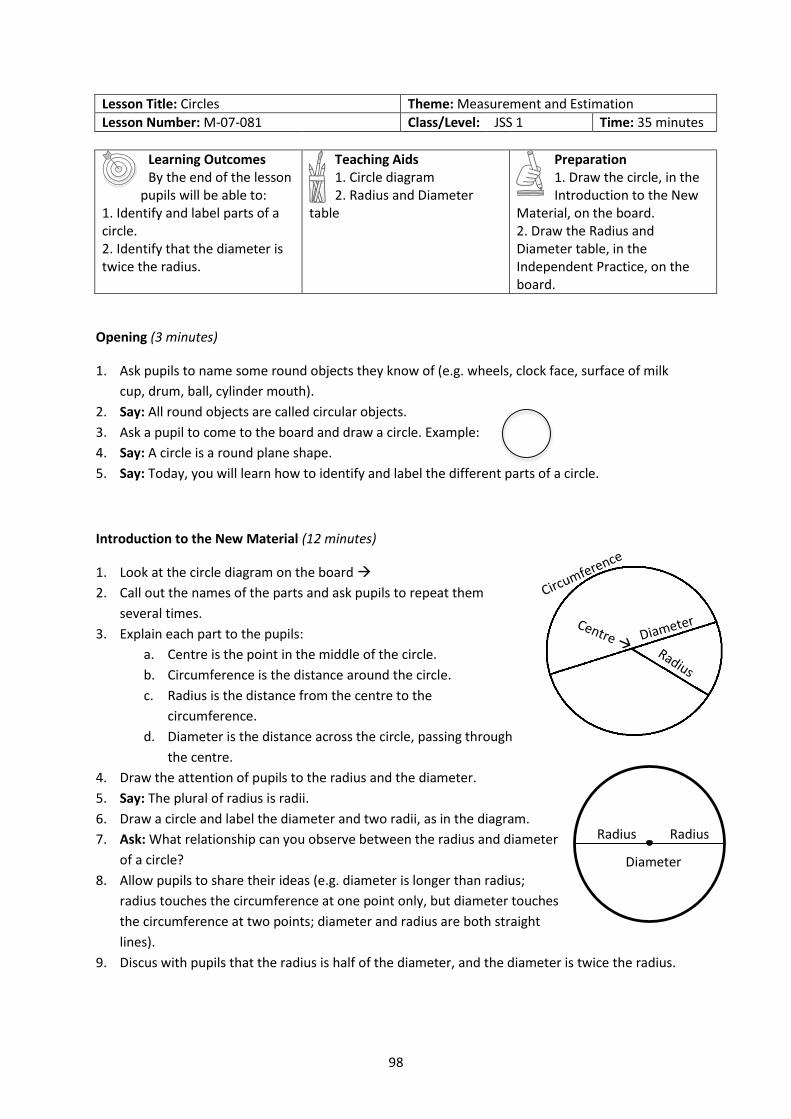
98
Lesson Title: Circles Theme: Measurement and Estimation
Lesson Number: M-07-081 Class/Level: JSS 1 Time: 35 minutes
Learning Outcomes By the end of the lesson
pupils will be able to: 1. Identify and label parts of a circle. 2. Identify that the diameter is twice the radius.
Teaching Aids 1. Circle diagram 2. Radius and Diameter
table
Preparation 1. Draw the circle, in the Introduction to the New
Material, on the board. 2. Draw the Radius and Diameter table, in the Independent Practice, on the board.
Opening (3 minutes)
1. Ask pupils to name some round objects they know of (e.g. wheels, clock face, surface of milk
cup, drum, ball, cylinder mouth).
2. Say: All round objects are called circular objects.
3. Ask a pupil to come to the board and draw a circle. Example:
4. Say: A circle is a round plane shape.
5. Say: Today, you will learn how to identify and label the different parts of a circle.
Introduction to the New Material (12 minutes)
1. Look at the circle diagram on the board
2. Call out the names of the parts and ask pupils to repeat them
several times.
3. Explain each part to the pupils:
a. Centre is the point in the middle of the circle.
b. Circumference is the distance around the circle.
c. Radius is the distance from the centre to the
circumference.
d. Diameter is the distance across the circle, passing through
the centre.
4. Draw the attention of pupils to the radius and the diameter.
5. Say: The plural of radius is radii.
6. Draw a circle and label the diameter and two radii, as in the diagram.
7. Ask: What relationship can you observe between the radius and diameter
of a circle?
8. Allow pupils to share their ideas (e.g. diameter is longer than radius;
radius touches the circumference at one point only, but diameter touches
the circumference at two points; diameter and radius are both straight
lines).
9. Discus with pupils that the radius is half of the diameter, and the diameter is twice the radius.
Radius Radius
Diameter
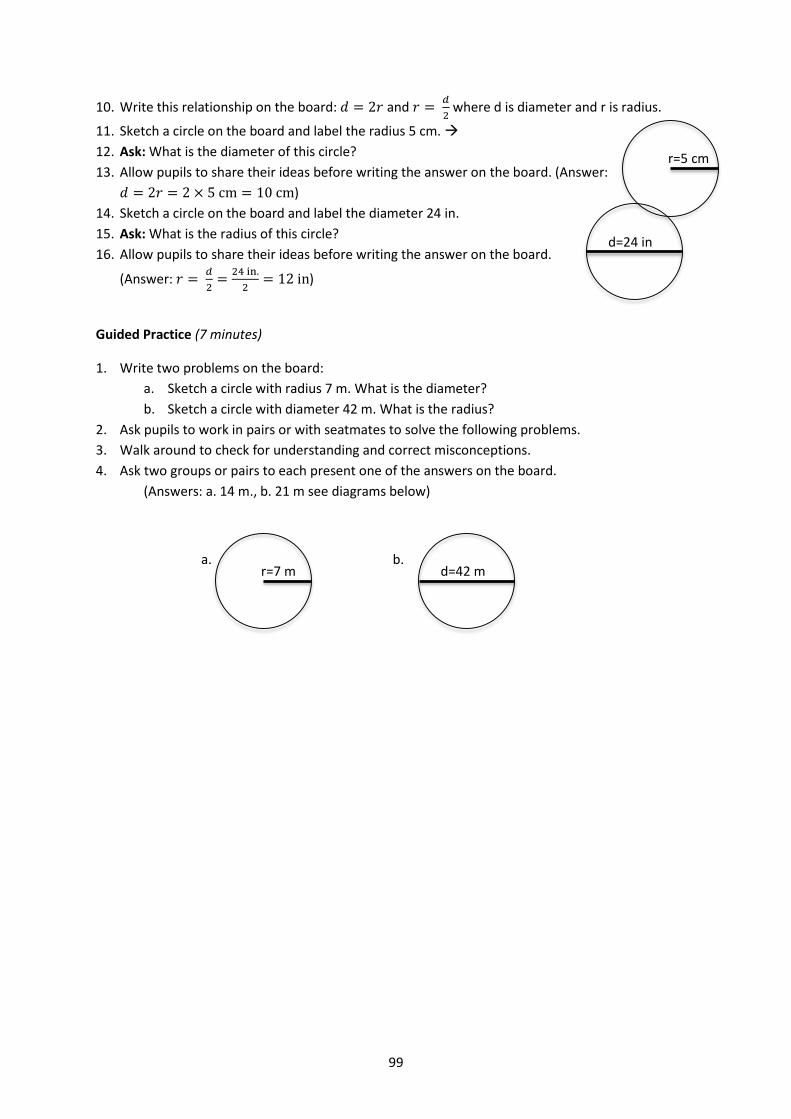
99
10. Write this relationship on the board: 𝑑 = 2𝑟 and 𝑟 = 𝑑
2 where d is diameter and r is radius.
11. Sketch a circle on the board and label the radius 5 cm.
12. Ask: What is the diameter of this circle?
13. Allow pupils to share their ideas before writing the answer on the board. (Answer:
𝑑 = 2𝑟 = 2 × 5 cm = 10 cm)
14. Sketch a circle on the board and label the diameter 24 in.
15. Ask: What is the radius of this circle?
16. Allow pupils to share their ideas before writing the answer on the board.
(Answer: 𝑟 = 𝑑
2=
24 in.
2= 12 in)
Guided Practice (7 minutes)
1. Write two problems on the board:
a. Sketch a circle with radius 7 m. What is the diameter?
b. Sketch a circle with diameter 42 m. What is the radius?
2. Ask pupils to work in pairs or with seatmates to solve the following problems.
3. Walk around to check for understanding and correct misconceptions.
4. Ask two groups or pairs to each present one of the answers on the board.
(Answers: a. 14 m., b. 21 m see diagrams below)
r=5 cm
d=24 in
r=7 m a.
d=42 m b.
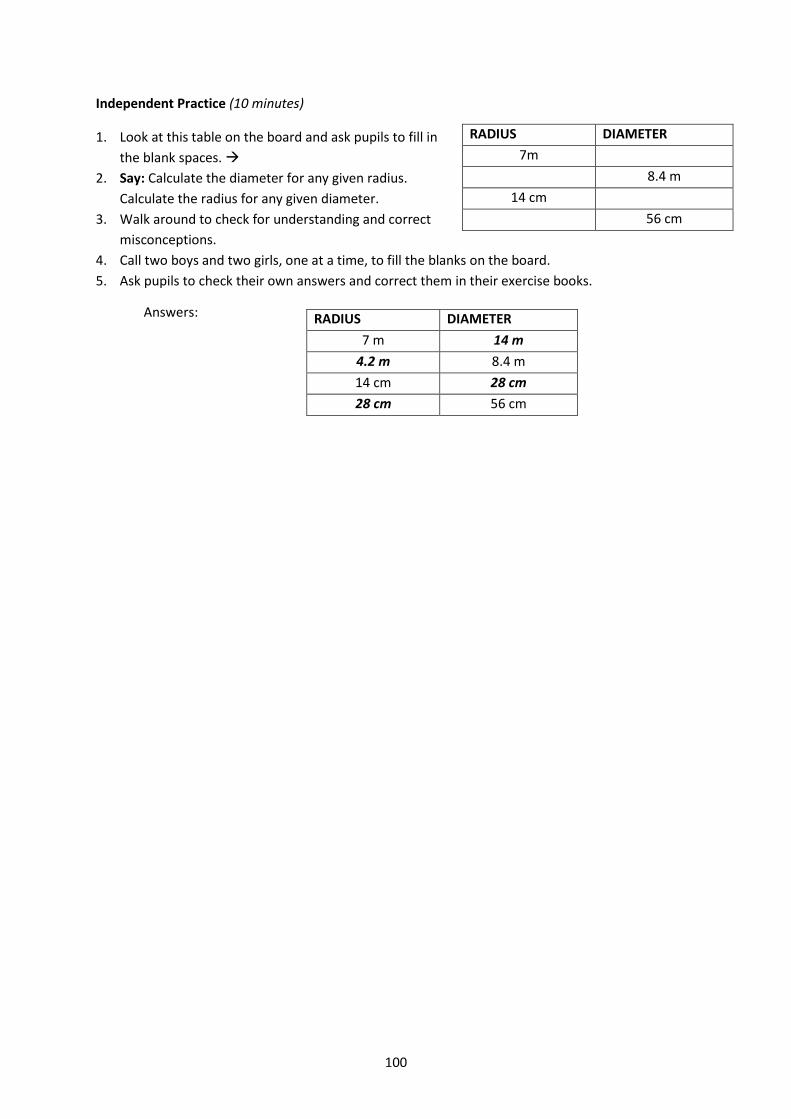
100
Independent Practice (10 minutes)
1. Look at this table on the board and ask pupils to fill in
the blank spaces.
2. Say: Calculate the diameter for any given radius.
Calculate the radius for any given diameter.
3. Walk around to check for understanding and correct
misconceptions.
4. Call two boys and two girls, one at a time, to fill the blanks on the board.
5. Ask pupils to check their own answers and correct them in their exercise books.
Answers:
RADIUS DIAMETER
7m
8.4 m
14 cm
56 cm
RADIUS DIAMETER
7 m 14 m
4.2 m 8.4 m
14 cm 28 cm
28 cm 56 cm
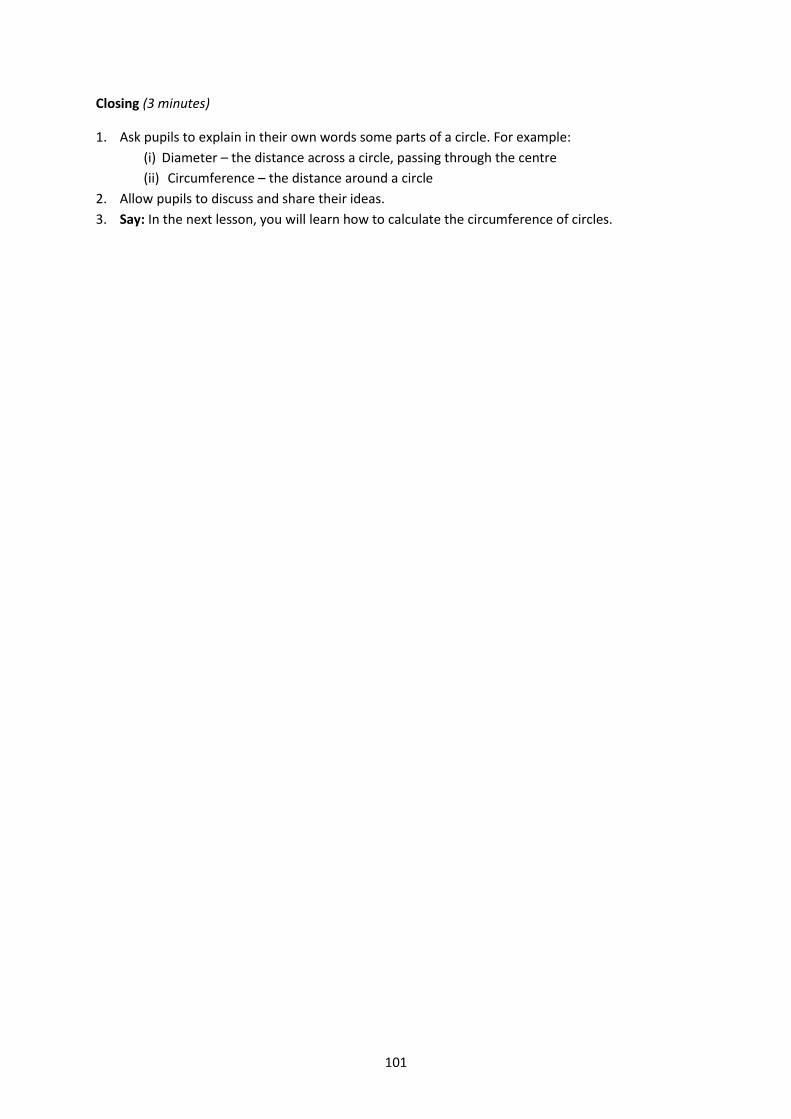
101
Closing (3 minutes)
1. Ask pupils to explain in their own words some parts of a circle. For example:
(i) Diameter – the distance across a circle, passing through the centre
(ii) Circumference – the distance around a circle
2. Allow pupils to discuss and share their ideas.
3. Say: In the next lesson, you will learn how to calculate the circumference of circles.

102
Lesson Title: Circumference of Circles Theme: Measurement and estimation
Lesson Number: M-07-082 Class/Level: JSS 1 Time: 35 minutes
Learning Outcomes By the end of the
lesson, pupils will be able to calculate the circumference of a circle using the formula (𝐶 = 2𝜋𝑟).
Teaching Aids A circle
Preparation Draw a circle on the board.
Opening (3 minutes)
1. Look at the circle on the board. Ask pupils to come up to draw
and identify the following: circumference, centre, diameter, and
radius.
2. Ask all pupils to do the task in their exercise books.
3. Ask: What is the relationship between diameter and radius?
(Answer: Diameter is twice the radius; 𝑑 = 2𝑟)
4. Say: Today, you will learn how to calculate the circumference of
a circle.
Introduction to the New Material (14 minutes)
1. Ask pupils to describe circumference in their own words. (Example answers: The circumference
of a circle is the same as the perimeter of the circle, it is the distance around a circle)
2. Remind pupils about the perimeter of plane shapes as the total distance right around the edges
of the shape.
3. Sketch a circle of radius 7cm on the board.
4. Say: There is a formula that we can use to find the circumference.
5. Write on the board: 𝐶 = 2𝜋𝑟
6. Read the formula out loud and ask pupils to repeat: ‘C equals two pie r’
7. Say: The C in this formula is circumference, and r is radius. These numbers
change for each circle. The other symbol in the formula is called ‘pi’ and it is a constant number
that never changes.
8. Say: If we write pi as a decimal, it will be very long. We won’t find the end of it. We have a
fraction and a rounded off decimal that we use in this formula to give us an approximate value
for pi.
9. Write on the board: 𝑝𝑖 = 𝜋 ≈22
7≈ 3.140020
10. Say: Now, let’s calculate the circumference of the circle on the board.
11. Ask: What is the value for r? (Answer: 7 cm)
12. Do the calculation on the board (use 22
7 for 𝜋): 𝐶 = 2𝜋𝑟 = 2 ×
22
7× 7 cm = 44 cm
7 cm
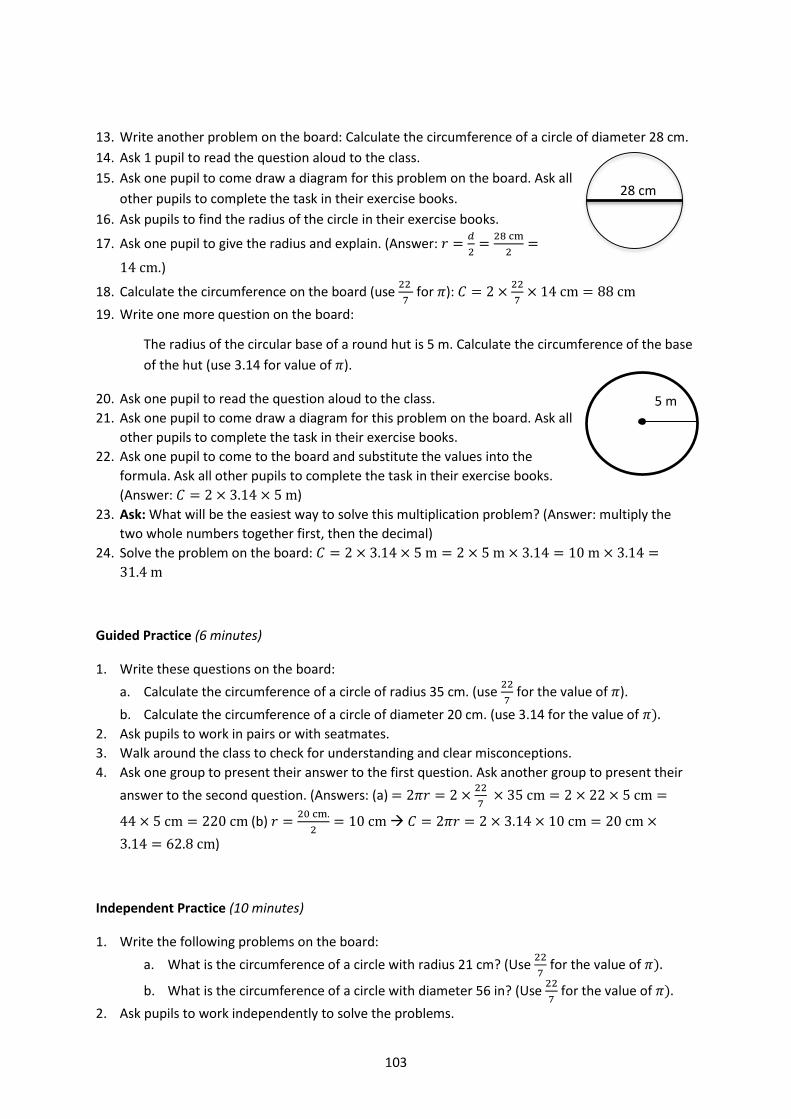
103
13. Write another problem on the board: Calculate the circumference of a circle of diameter 28 cm.
14. Ask 1 pupil to read the question aloud to the class.
15. Ask one pupil to come draw a diagram for this problem on the board. Ask all
other pupils to complete the task in their exercise books.
16. Ask pupils to find the radius of the circle in their exercise books.
17. Ask one pupil to give the radius and explain. (Answer: 𝑟 =𝑑
2=
28 cm
2=
14 cm.)
18. Calculate the circumference on the board (use 22
7 for 𝜋): 𝐶 = 2 ×
22
7× 14 cm = 88 cm
19. Write one more question on the board:
The radius of the circular base of a round hut is 5 m. Calculate the circumference of the base
of the hut (use 3.14 for value of 𝜋).
20. Ask one pupil to read the question aloud to the class.
21. Ask one pupil to come draw a diagram for this problem on the board. Ask all
other pupils to complete the task in their exercise books.
22. Ask one pupil to come to the board and substitute the values into the
formula. Ask all other pupils to complete the task in their exercise books.
(Answer: 𝐶 = 2 × 3.14 × 5 m)
23. Ask: What will be the easiest way to solve this multiplication problem? (Answer: multiply the
two whole numbers together first, then the decimal)
24. Solve the problem on the board: 𝐶 = 2 × 3.14 × 5 m = 2 × 5 m × 3.14 = 10 m × 3.14 =
31.4 m
Guided Practice (6 minutes)
1. Write these questions on the board:
a. Calculate the circumference of a circle of radius 35 cm. (use 22
7 for the value of 𝜋).
b. Calculate the circumference of a circle of diameter 20 cm. (use 3.14 for the value of 𝜋).
2. Ask pupils to work in pairs or with seatmates.
3. Walk around the class to check for understanding and clear misconceptions.
4. Ask one group to present their answer to the first question. Ask another group to present their
answer to the second question. (Answers: (a) = 2𝜋𝑟 = 2 ×22
7 × 35 cm = 2 × 22 × 5 cm =
44 × 5 cm = 220 cm (b) 𝑟 =20 cm.
2= 10 cm 𝐶 = 2𝜋𝑟 = 2 × 3.14 × 10 cm = 20 cm ×
3.14 = 62.8 cm)
Independent Practice (10 minutes)
1. Write the following problems on the board:
a. What is the circumference of a circle with radius 21 cm? (Use 22
7 for the value of 𝜋).
b. What is the circumference of a circle with diameter 56 in? (Use 22
7 for the value of 𝜋).
2. Ask pupils to work independently to solve the problems.
28 cm
5 m
104
3. Walk around the class to check for understanding and clear misconceptions.
4. Ask 2 pupils to come write the answers on the board. Ask other pupils to check their answers
against these. (Answers: (a.) 𝐶 = 2𝜋𝑟 = 2 ×22
7× 21 cm = 132 cm (b.) =
56 in.
2= 28 in 𝐶 =
2𝜋𝑟 = 2 ×22
7× 28 in = 2 × 22 × 4 in = 44 × 4 in = 176 in)
Closing (2 minutes)
1. Ask pupils questions to review circles. For example:
a. What is the relationship between diameter and radius? (Example answers: radius is half
diameter; diameter is twice radius)
b. What is the formula for circumference? (Answer: 𝐶 = 2𝜋𝑟)
c. Describe circumference in your own words. (Example answer: the distance around a
circle)
d. What are two different estimates we use for pi? (Answer: 3.14 and 22
7)
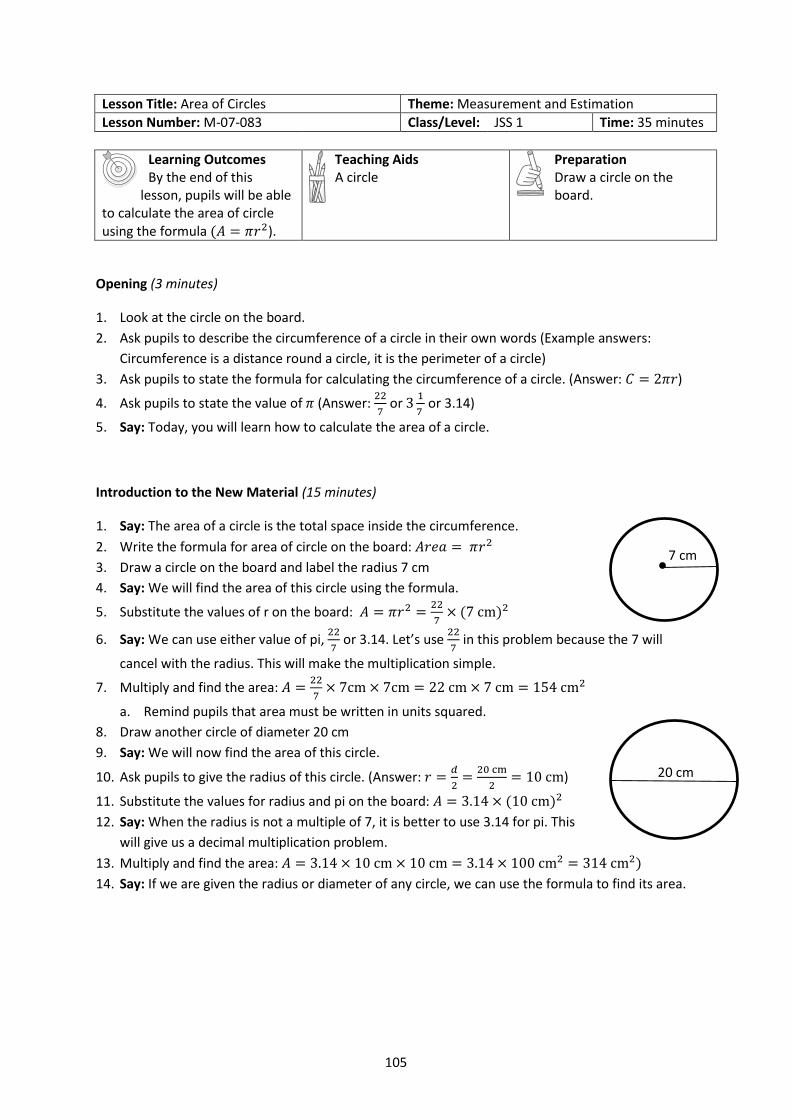
105
Lesson Title: Area of Circles Theme: Measurement and Estimation
Lesson Number: M-07-083 Class/Level: JSS 1 Time: 35 minutes
Learning Outcomes By the end of this
lesson, pupils will be able to calculate the area of circle using the formula (𝐴 = 𝜋𝑟2).
Teaching Aids A circle
Preparation Draw a circle on the board.
Opening (3 minutes)
1. Look at the circle on the board.
2. Ask pupils to describe the circumference of a circle in their own words (Example answers:
Circumference is a distance round a circle, it is the perimeter of a circle)
3. Ask pupils to state the formula for calculating the circumference of a circle. (Answer: 𝐶 = 2𝜋𝑟)
4. Ask pupils to state the value of 𝜋 (Answer: 22
7 or 3
1
7 or 3.14)
5. Say: Today, you will learn how to calculate the area of a circle.
Introduction to the New Material (15 minutes)
1. Say: The area of a circle is the total space inside the circumference.
2. Write the formula for area of circle on the board: 𝐴𝑟𝑒𝑎 = 𝜋𝑟2
3. Draw a circle on the board and label the radius 7 cm
4. Say: We will find the area of this circle using the formula.
5. Substitute the values of r on the board: 𝐴 = 𝜋𝑟2 =22
7× (7 cm)2
6. Say: We can use either value of pi, 22
7 or 3.14. Let’s use
22
7 in this problem because the 7 will
cancel with the radius. This will make the multiplication simple.
7. Multiply and find the area: 𝐴 =22
7× 7cm × 7cm = 22 cm × 7 cm = 154 cm2
a. Remind pupils that area must be written in units squared.
8. Draw another circle of diameter 20 cm
9. Say: We will now find the area of this circle.
10. Ask pupils to give the radius of this circle. (Answer: 𝑟 =𝑑
2=
20 cm
2= 10 cm)
11. Substitute the values for radius and pi on the board: 𝐴 = 3.14 × (10 cm)2
12. Say: When the radius is not a multiple of 7, it is better to use 3.14 for pi. This
will give us a decimal multiplication problem.
13. Multiply and find the area: 𝐴 = 3.14 × 10 cm × 10 cm = 3.14 × 100 cm2 = 314 cm2)
14. Say: If we are given the radius or diameter of any circle, we can use the formula to find its area.
20 cm
7 cm
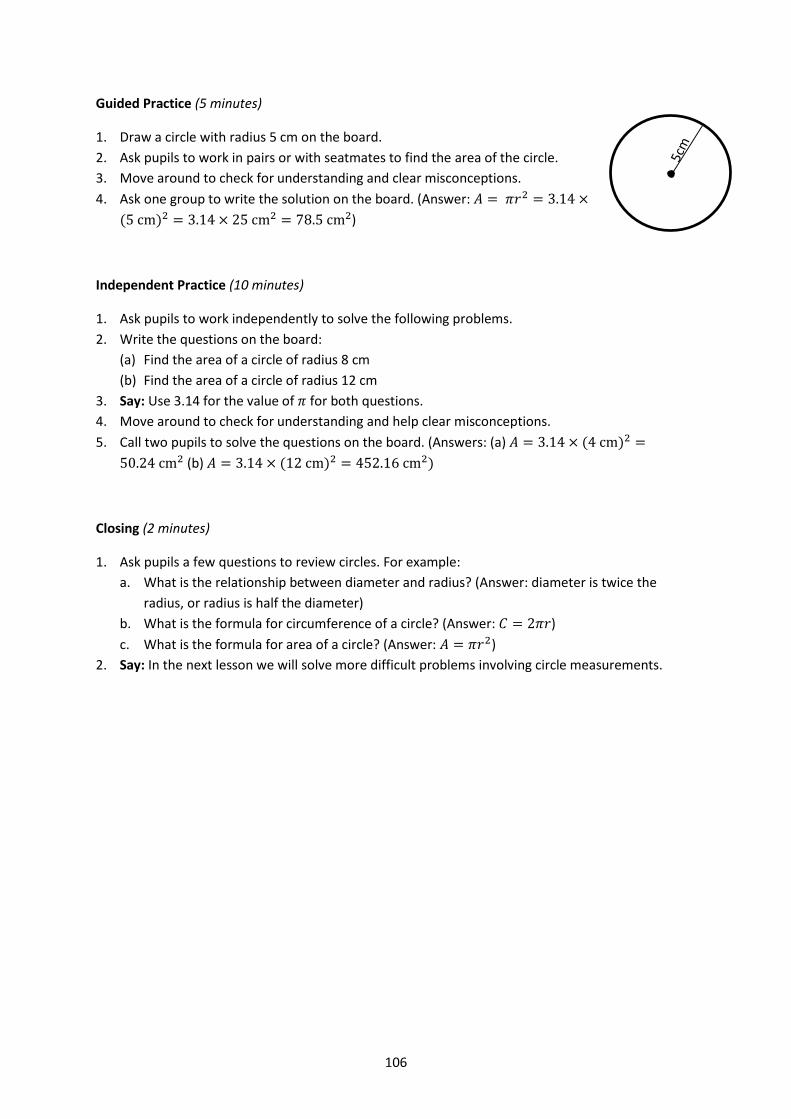
106
Guided Practice (5 minutes)
1. Draw a circle with radius 5 cm on the board.
2. Ask pupils to work in pairs or with seatmates to find the area of the circle.
3. Move around to check for understanding and clear misconceptions.
4. Ask one group to write the solution on the board. (Answer: 𝐴 = 𝜋𝑟2 = 3.14 ×
(5 cm)2 = 3.14 × 25 cm2 = 78.5 cm2)
Independent Practice (10 minutes)
1. Ask pupils to work independently to solve the following problems.
2. Write the questions on the board:
(a) Find the area of a circle of radius 8 cm
(b) Find the area of a circle of radius 12 cm
3. Say: Use 3.14 for the value of 𝜋 for both questions.
4. Move around to check for understanding and help clear misconceptions.
5. Call two pupils to solve the questions on the board. (Answers: (a) 𝐴 = 3.14 × (4 cm)2 =
50.24 cm2 (b) 𝐴 = 3.14 × (12 cm)2 = 452.16 cm2)
Closing (2 minutes)
1. Ask pupils a few questions to review circles. For example:
a. What is the relationship between diameter and radius? (Answer: diameter is twice the
radius, or radius is half the diameter)
b. What is the formula for circumference of a circle? (Answer: 𝐶 = 2𝜋𝑟)
c. What is the formula for area of a circle? (Answer: 𝐴 = 𝜋𝑟2)
2. Say: In the next lesson we will solve more difficult problems involving circle measurements.

107
Lesson Title: Problem Solving with Circles Theme: Measurement and Estimation
Lesson Number: M-07-084 Class/Level: JSS 1 Time: 35 minutes
Learning Outcomes By the end of the
lesson, pupils will be able to solve multi-step problems involving circle measurements, including radius, diameter, circumference, and area.
Teaching Aids None
Preparation None
Opening (2 minutes)
1. Ask: What is a semi-circle?
2. Allow pupils to explain in their own words. (Example answer: half of a circle)
3. Say: A semi-circle is exactly half of a full circle, because ‘semi’ means half.
4. Ask pupils to draw a semicircle in their exercise books.
5. Draw a semicircle on the board and ask them to check it against their own.
6. Say: Today, you will learn how to solve multi-step problems involving circle
measurements.
Introduction to the New Material (13 minutes)
1. Ask: What is circumference? (Answer: The distance around a circle)
2. Ask pupils to look at the semicircle on the board.
3. Ask: How do you think we can find the circumference, or perimeter, of a semicircle?
4. Allow them to share their ideas.
5. Say: The curved line is exactly half of the circumference of the full circle. The straight line is
exactly the diameter. So to find the perimeter of this semicircle, we need to add half of the
circumference, plus the diameter.
6. Write on the board: 1
2𝐶 + 𝑑
7. Ask a pupil to state the formula for circumference of a circle. (𝐴𝑛𝑠𝑤𝑒𝑟: 𝐶 =
2𝜋𝑟)
8. Rewrite the formula on the board: 1
22𝜋𝑟 + 𝑑 = 𝜋𝑟 + 𝑑
9. Label the diameter of the semicircle 14 m
10. Ask: What is the radius of this semicircle? (Answer: 𝑟 =14 m.
2= 7 m)
11. Substitute the values for diameter, radius, and pi (22
7) into the formula on the board: 𝜋𝑟 + 𝑑 =
22
7× 7 m. +14 m
12. Solve the problem: 22
7× 7 . +14 m = 22 m + 14m = 36 m
13. Say: The perimeter of this semicircle is 36 metres.
14. Ask: Now how do you think we can find the area of this semicircle?
15. Allow pupils to share their ideas.
16. Say: The area inside this semicircle is exactly half the area inside the full circle. So to find the
area of this semicircle, we need to multiply the area by one half.
d=14 m
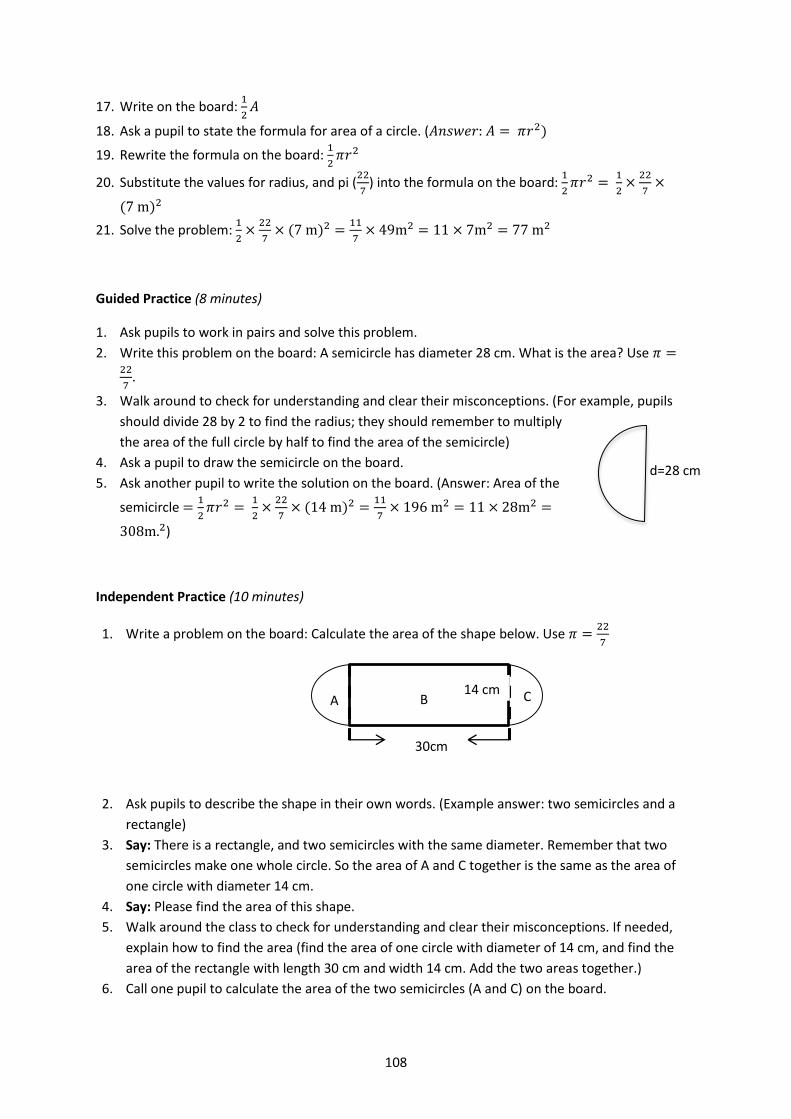
108
17. Write on the board: 1
2𝐴
18. Ask a pupil to state the formula for area of a circle. (𝐴𝑛𝑠𝑤𝑒𝑟: 𝐴 = 𝜋𝑟2)
19. Rewrite the formula on the board: 1
2𝜋𝑟2
20. Substitute the values for radius, and pi (22
7) into the formula on the board:
1
2𝜋𝑟2 =
1
2×
22
7×
(7 m)2
21. Solve the problem: 1
2×
22
7× (7 m)2 =
11
7× 49m2 = 11 × 7m2 = 77 m2
Guided Practice (8 minutes)
1. Ask pupils to work in pairs and solve this problem.
2. Write this problem on the board: A semicircle has diameter 28 cm. What is the area? Use 𝜋 =22
7.
3. Walk around to check for understanding and clear their misconceptions. (For example, pupils
should divide 28 by 2 to find the radius; they should remember to multiply
the area of the full circle by half to find the area of the semicircle)
4. Ask a pupil to draw the semicircle on the board.
5. Ask another pupil to write the solution on the board. (Answer: Area of the
semicircle =1
2𝜋𝑟2 =
1
2×
22
7× (14 m)2 =
11
7× 196 m2 = 11 × 28m2 =
308m.2)
Independent Practice (10 minutes)
1. Write a problem on the board: Calculate the area of the shape below. Use 𝜋 =22
7
2. Ask pupils to describe the shape in their own words. (Example answer: two semicircles and a
rectangle)
3. Say: There is a rectangle, and two semicircles with the same diameter. Remember that two
semicircles make one whole circle. So the area of A and C together is the same as the area of
one circle with diameter 14 cm.
4. Say: Please find the area of this shape.
5. Walk around the class to check for understanding and clear their misconceptions. If needed,
explain how to find the area (find the area of one circle with diameter of 14 cm, and find the
area of the rectangle with length 30 cm and width 14 cm. Add the two areas together.)
6. Call one pupil to calculate the area of the two semicircles (A and C) on the board.
d=28 cm
30cm
A B C 14 cm
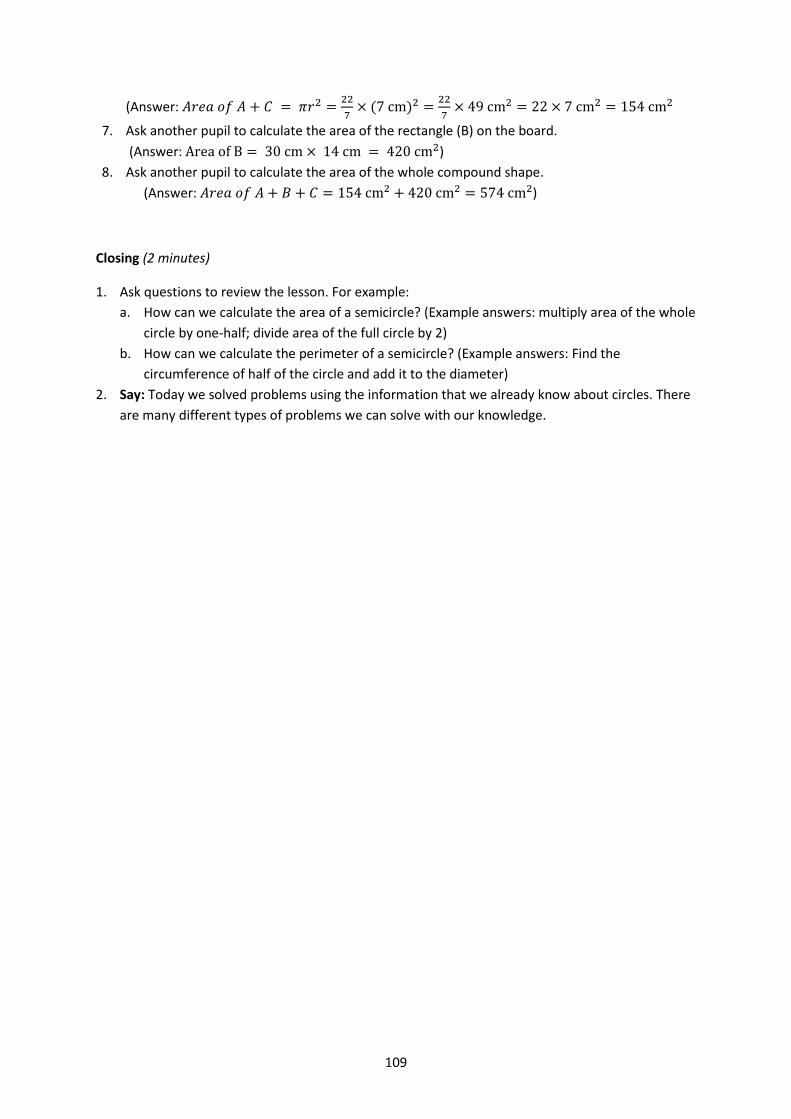
109
(Answer: 𝐴𝑟𝑒𝑎 𝑜𝑓 𝐴 + 𝐶 = 𝜋𝑟2 =22
7× (7 cm)2 =
22
7× 49 cm2 = 22 × 7 cm2 = 154 cm2
7. Ask another pupil to calculate the area of the rectangle (B) on the board.
(Answer: Area of B = 30 cm × 14 cm = 420 cm2)
8. Ask another pupil to calculate the area of the whole compound shape.
(Answer: 𝐴𝑟𝑒𝑎 𝑜𝑓 𝐴 + 𝐵 + 𝐶 = 154 cm2 + 420 cm2 = 574 cm2)
Closing (2 minutes)
1. Ask questions to review the lesson. For example:
a. How can we calculate the area of a semicircle? (Example answers: multiply area of the whole
circle by one-half; divide area of the full circle by 2)
b. How can we calculate the perimeter of a semicircle? (Example answers: Find the
circumference of half of the circle and add it to the diameter)
2. Say: Today we solved problems using the information that we already know about circles. There
are many different types of problems we can solve with our knowledge.

110
Lesson Title: Circle Story Problems Theme: Measurement and Estimation.
Lesson Number: M-07-085 Class/Level: JSS 1 Time: 35 minutes
Learning Outcomes By the end of the
lesson, pupils will be able to solve story problems involving the circumference and area of circles.
Teaching Aids Word problem
Preparation Write the word problem, in the Introduction to the
New Material, on the board.
Opening (3 minutes)
1. Ask pupils to describe the circumference and area of a circle in their own words. (E.g.
Circumference is the same as the perimeter of a circle, or the total distance around the edges of
a circle, and area of a circle is the total space within the circumference).
2. Ask two pupils to state the formulae for calculating the circumference and area of a circle.
(Answers: 𝐶 = 2𝜋𝑟; 𝐴 = 𝜋 𝑟2)
3. Say: Today, we will practise solving story problems involving the circumference and area of
circles.
Introduction to the New Material (10 minutes)
1. Read this problem on the board:
The floor of a round hut is 10 m. in diameter. A weaver charges Le2000 per square metre to
make a mat to fit the floor. Find the following (use 𝜋 = 3.14):
a) The area of the floor.
b) The cost of the mat for the floor.
2. Ask a pupil to read the question aloud to the whole class.
3. Discuss the meaning of the question with pupils.
4. Say: In solving this problem, we first sketch the floor of the round hut, find the area of the floor,
and then relate it to the cost of the mat to cover it.
5. Sketch the floor and label its diameter on the board.
6. Ask: What is the radius of this hut? (Answer: r =20 m.
2= 10 m)
7. Ask pupils to calculate the area of the floor in their exercise books.
8. Ask one pupil to write the solution on the board while all other pupils
check their own. (Answer: 𝐴 = 𝜋𝑟2 = 3.14 × (10 m)2 = 3.14 ×
100 m2 = 314 m2)
9. Ask: How will we calculate the cost of making the mat?
10. Allow pupils to share their ideas.
11. Say: We know the area inside the hut is 314 square metres, and the cost is 2000 per square
metre. We can multiply these two numbers together to find the total cost.
12. Write on the board: Cost of mats = 314 m.2 × 2,000Leones
m2 = 628,000 Leones
13. Say: It will cost 628,000 Leones to ask the weaver to make mats for the floor.
20 m.
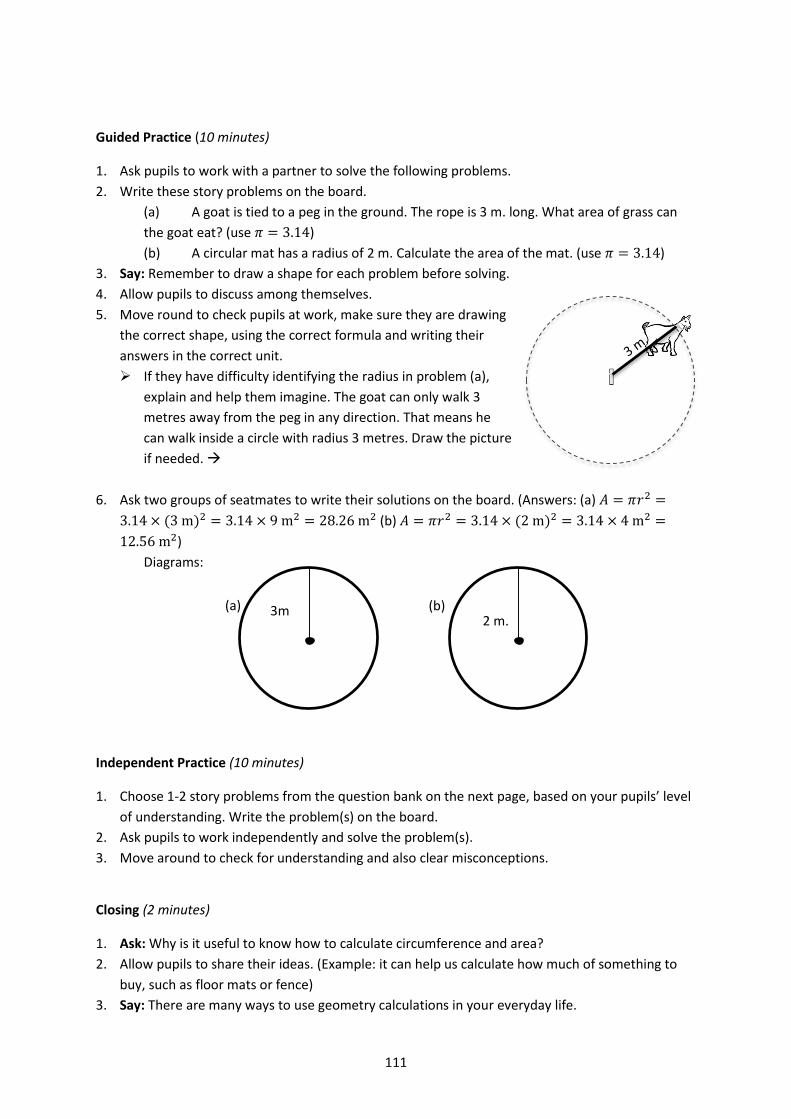
111
Guided Practice (10 minutes)
1. Ask pupils to work with a partner to solve the following problems.
2. Write these story problems on the board.
(a) A goat is tied to a peg in the ground. The rope is 3 m. long. What area of grass can
the goat eat? (use 𝜋 = 3.14)
(b) A circular mat has a radius of 2 m. Calculate the area of the mat. (use 𝜋 = 3.14)
3. Say: Remember to draw a shape for each problem before solving.
4. Allow pupils to discuss among themselves.
5. Move round to check pupils at work, make sure they are drawing
the correct shape, using the correct formula and writing their
answers in the correct unit.
If they have difficulty identifying the radius in problem (a),
explain and help them imagine. The goat can only walk 3
metres away from the peg in any direction. That means he
can walk inside a circle with radius 3 metres. Draw the picture
if needed.
6. Ask two groups of seatmates to write their solutions on the board. (Answers: (a) 𝐴 = 𝜋𝑟2 =
3.14 × (3 m)2 = 3.14 × 9 m2 = 28.26 m2 (b) 𝐴 = 𝜋𝑟2 = 3.14 × (2 m)2 = 3.14 × 4 m2 =
12.56 m2)
Diagrams:
Independent Practice (10 minutes)
1. Choose 1-2 story problems from the question bank on the next page, based on your pupils’ level
of understanding. Write the problem(s) on the board.
2. Ask pupils to work independently and solve the problem(s).
3. Move around to check for understanding and also clear misconceptions.
Closing (2 minutes)
1. Ask: Why is it useful to know how to calculate circumference and area?
2. Allow pupils to share their ideas. (Example: it can help us calculate how much of something to
buy, such as floor mats or fence)
3. Say: There are many ways to use geometry calculations in your everyday life.
3m (a) 2 m.
(b)
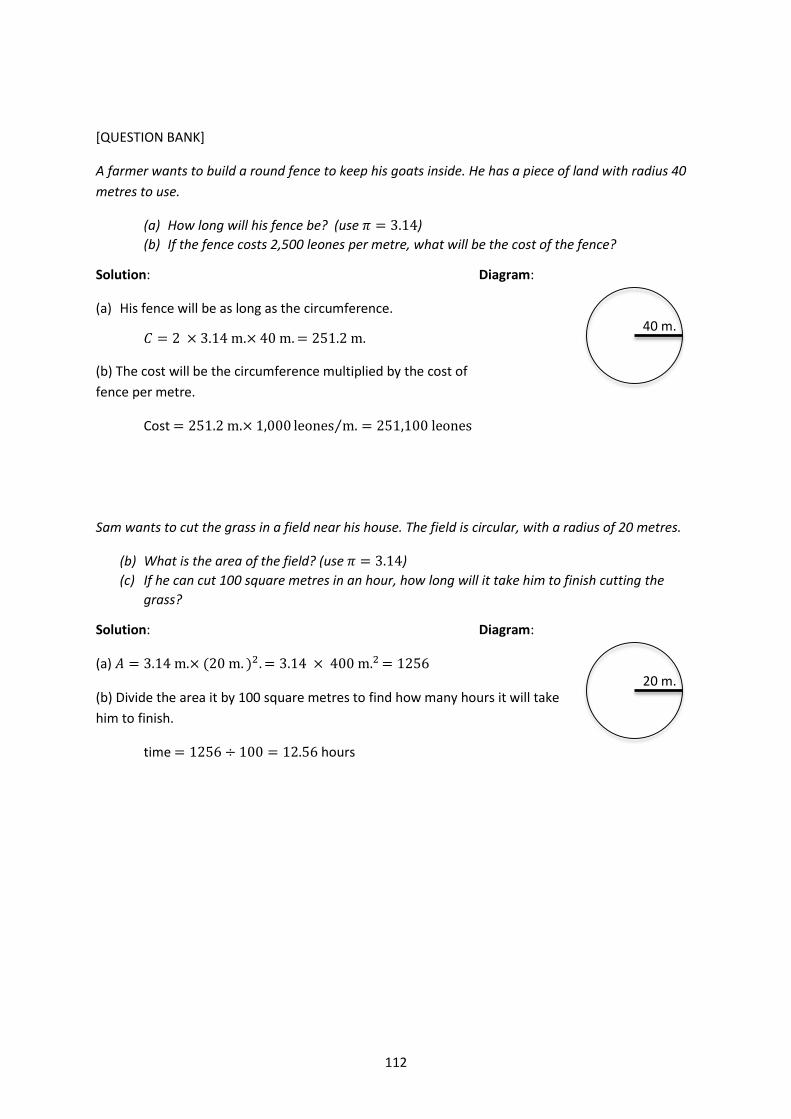
112
[QUESTION BANK]
A farmer wants to build a round fence to keep his goats inside. He has a piece of land with radius 40
metres to use.
(a) How long will his fence be? (use 𝜋 = 3.14)
(b) If the fence costs 2,500 leones per metre, what will be the cost of the fence?
Solution: Diagram:
(a) His fence will be as long as the circumference.
𝐶 = 2 × 3.14 m.× 40 m. = 251.2 m.
(b) The cost will be the circumference multiplied by the cost of
fence per metre.
Cost = 251.2 m.× 1,000 leones m.⁄ = 251,100 leones
Sam wants to cut the grass in a field near his house. The field is circular, with a radius of 20 metres.
(b) What is the area of the field? (use 𝜋 = 3.14)
(c) If he can cut 100 square metres in an hour, how long will it take him to finish cutting the
grass?
Solution: Diagram:
(a) 𝐴 = 3.14 m.× (20 m. )2. = 3.14 × 400 m.2 = 1256
(b) Divide the area it by 100 square metres to find how many hours it will take
him to finish.
time = 1256 ÷ 100 = 12.56 hours
40 m.
20 m.
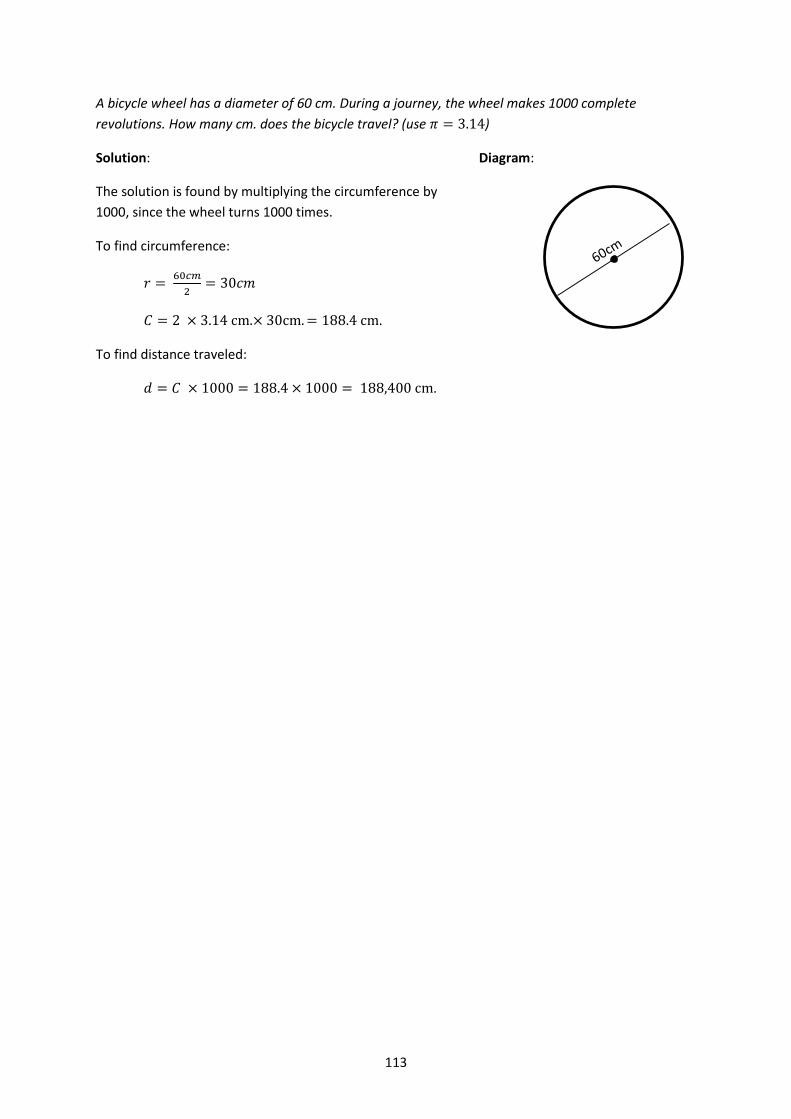
113
A bicycle wheel has a diameter of 60 cm. During a journey, the wheel makes 1000 complete
revolutions. How many cm. does the bicycle travel? (use 𝜋 = 3.14)
Solution: Diagram:
The solution is found by multiplying the circumference by
1000, since the wheel turns 1000 times.
To find circumference:
𝑟 = 60𝑐𝑚
2= 30𝑐𝑚
𝐶 = 2 × 3.14 cm.× 30cm. = 188.4 cm.
To find distance traveled:
𝑑 = 𝐶 × 1000 = 188.4 × 1000 = 188,400 cm.
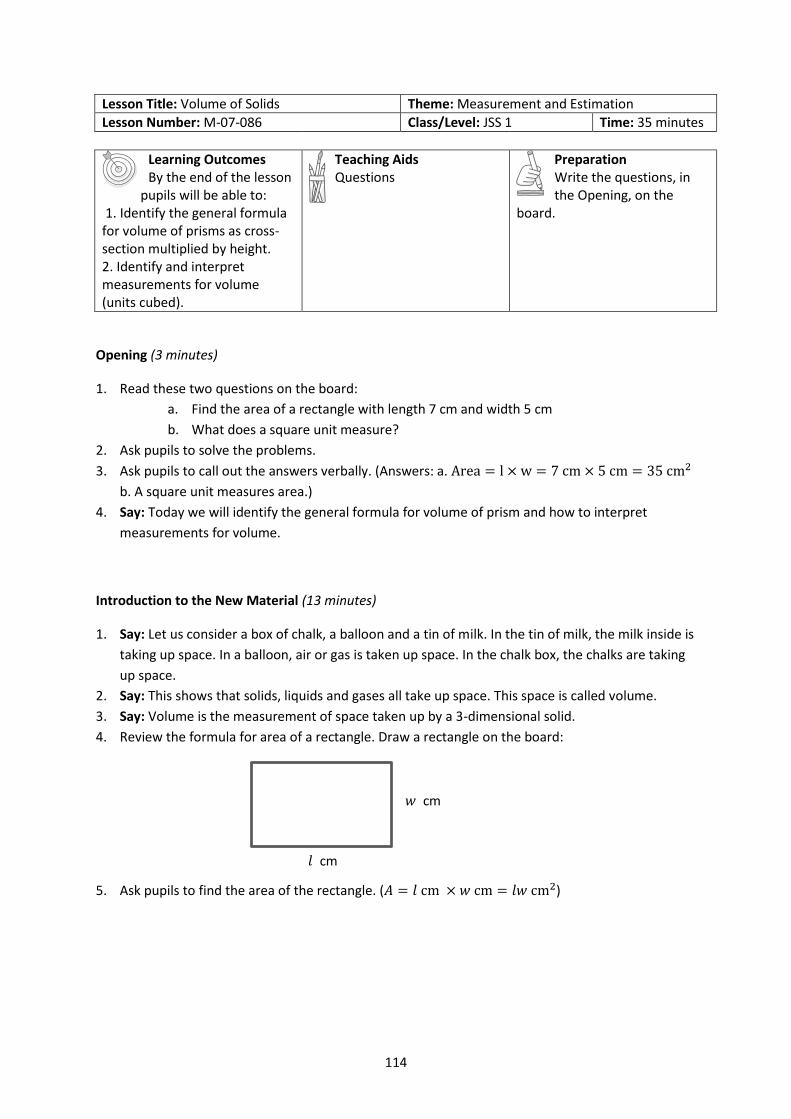
114
Lesson Title: Volume of Solids Theme: Measurement and Estimation
Lesson Number: M-07-086 Class/Level: JSS 1 Time: 35 minutes
Learning Outcomes By the end of the lesson
pupils will be able to: 1. Identify the general formula for volume of prisms as cross-section multiplied by height. 2. Identify and interpret measurements for volume (units cubed).
Teaching Aids Questions
Preparation Write the questions, in the Opening, on the
board.
Opening (3 minutes)
1. Read these two questions on the board:
a. Find the area of a rectangle with length 7 cm and width 5 cm
b. What does a square unit measure?
2. Ask pupils to solve the problems.
3. Ask pupils to call out the answers verbally. (Answers: a. Area = l × w = 7 cm × 5 cm = 35 cm2
b. A square unit measures area.)
4. Say: Today we will identify the general formula for volume of prism and how to interpret
measurements for volume.
Introduction to the New Material (13 minutes)
1. Say: Let us consider a box of chalk, a balloon and a tin of milk. In the tin of milk, the milk inside is
taking up space. In a balloon, air or gas is taken up space. In the chalk box, the chalks are taking
up space.
2. Say: This shows that solids, liquids and gases all take up space. This space is called volume.
3. Say: Volume is the measurement of space taken up by a 3-dimensional solid.
4. Review the formula for area of a rectangle. Draw a rectangle on the board:
5. Ask pupils to find the area of the rectangle. (𝐴 = 𝑙 cm × 𝑤 cm = 𝑙𝑤 cm2)
𝑙 cm
𝑤 cm
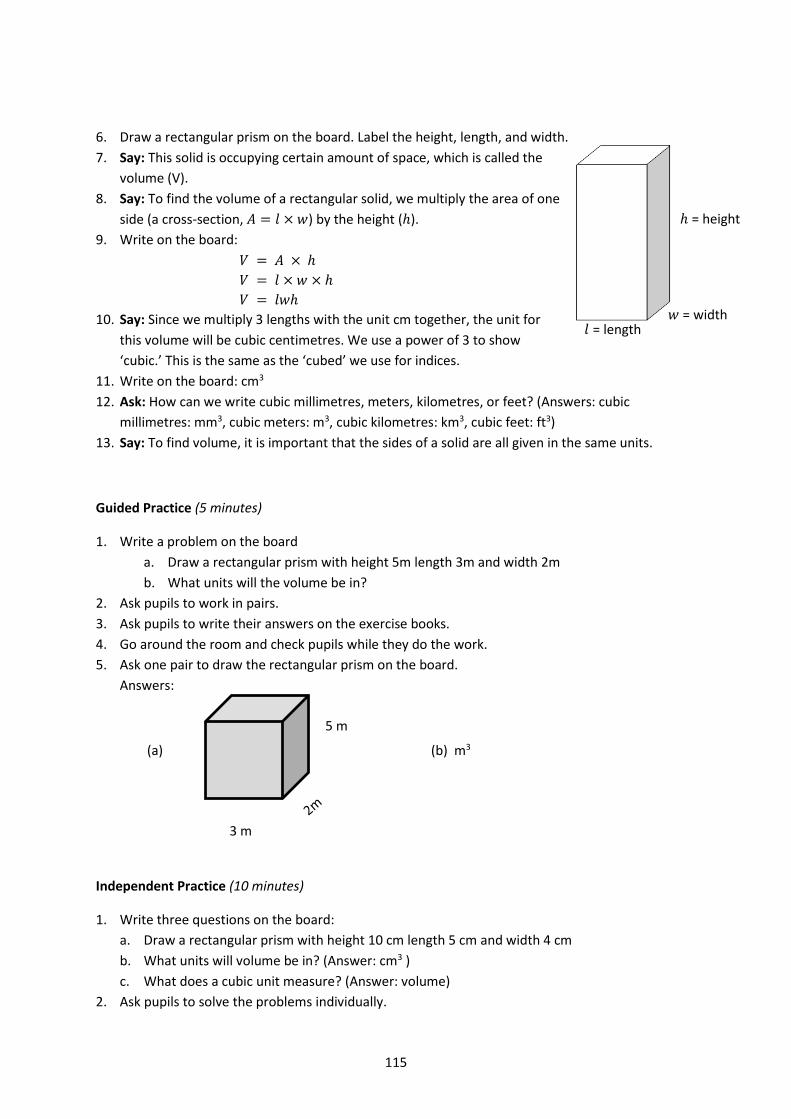
115
6. Draw a rectangular prism on the board. Label the height, length, and width.
7. Say: This solid is occupying certain amount of space, which is called the
volume (V).
8. Say: To find the volume of a rectangular solid, we multiply the area of one
side (a cross-section, 𝐴 = 𝑙 × 𝑤) by the height (ℎ).
9. Write on the board:
𝑉 = 𝐴 × ℎ
𝑉 = 𝑙 × 𝑤 × ℎ
𝑉 = 𝑙𝑤ℎ
10. Say: Since we multiply 3 lengths with the unit cm together, the unit for
this volume will be cubic centimetres. We use a power of 3 to show
‘cubic.’ This is the same as the ‘cubed’ we use for indices.
11. Write on the board: cm3
12. Ask: How can we write cubic millimetres, meters, kilometres, or feet? (Answers: cubic
millimetres: mm3, cubic meters: m3, cubic kilometres: km3, cubic feet: ft3)
13. Say: To find volume, it is important that the sides of a solid are all given in the same units.
Guided Practice (5 minutes)
1. Write a problem on the board
a. Draw a rectangular prism with height 5m length 3m and width 2m
b. What units will the volume be in?
2. Ask pupils to work in pairs.
3. Ask pupils to write their answers on the exercise books.
4. Go around the room and check pupils while they do the work.
5. Ask one pair to draw the rectangular prism on the board.
Answers:
(a) (b) m3
Independent Practice (10 minutes)
1. Write three questions on the board:
a. Draw a rectangular prism with height 10 cm length 5 cm and width 4 cm
b. What units will volume be in? (Answer: cm3 )
c. What does a cubic unit measure? (Answer: volume)
2. Ask pupils to solve the problems individually.
5 m
3 m
ℎ = height
𝑤 = width 𝑙 = length
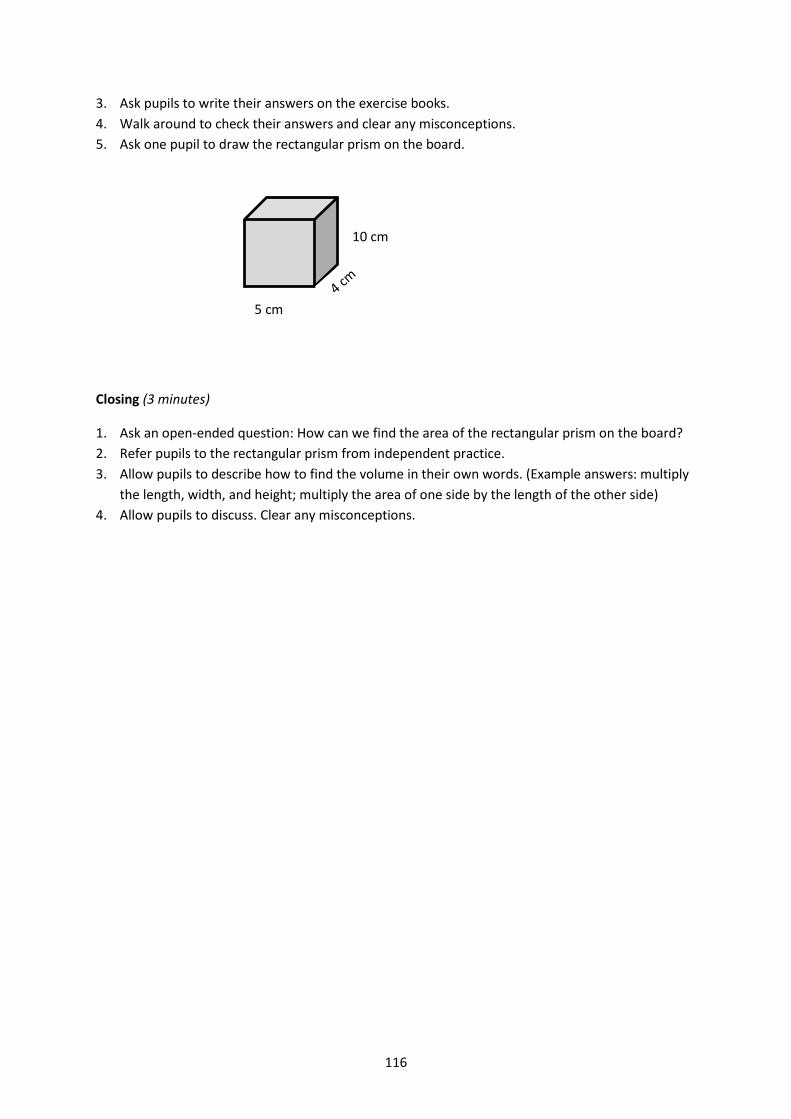
116
3. Ask pupils to write their answers on the exercise books.
4. Walk around to check their answers and clear any misconceptions.
5. Ask one pupil to draw the rectangular prism on the board.
Closing (3 minutes)
1. Ask an open-ended question: How can we find the area of the rectangular prism on the board?
2. Refer pupils to the rectangular prism from independent practice.
3. Allow pupils to describe how to find the volume in their own words. (Example answers: multiply
the length, width, and height; multiply the area of one side by the length of the other side)
4. Allow pupils to discuss. Clear any misconceptions.
10 cm
5 cm
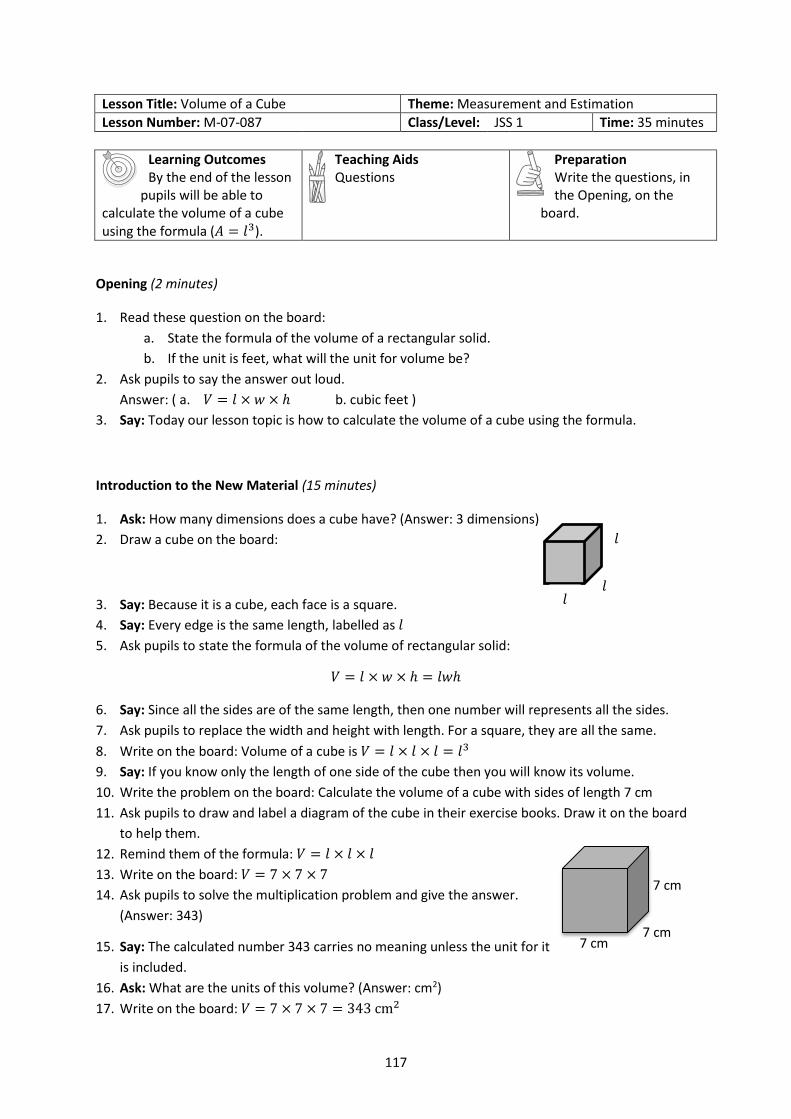
117
Lesson Title: Volume of a Cube Theme: Measurement and Estimation
Lesson Number: M-07-087 Class/Level: JSS 1 Time: 35 minutes
Learning Outcomes By the end of the lesson
pupils will be able to calculate the volume of a cube using the formula (𝐴 = 𝑙3).
Teaching Aids Questions
Preparation Write the questions, in the Opening, on the
board.
Opening (2 minutes)
1. Read these question on the board:
a. State the formula of the volume of a rectangular solid.
b. If the unit is feet, what will the unit for volume be?
2. Ask pupils to say the answer out loud.
Answer: ( a. 𝑉 = 𝑙 × 𝑤 × ℎ b. cubic feet )
3. Say: Today our lesson topic is how to calculate the volume of a cube using the formula.
Introduction to the New Material (15 minutes)
1. Ask: How many dimensions does a cube have? (Answer: 3 dimensions)
2. Draw a cube on the board:
3. Say: Because it is a cube, each face is a square.
4. Say: Every edge is the same length, labelled as 𝑙
5. Ask pupils to state the formula of the volume of rectangular solid:
𝑉 = 𝑙 × 𝑤 × ℎ = 𝑙𝑤ℎ
6. Say: Since all the sides are of the same length, then one number will represents all the sides.
7. Ask pupils to replace the width and height with length. For a square, they are all the same.
8. Write on the board: Volume of a cube is 𝑉 = 𝑙 × 𝑙 × 𝑙 = 𝑙3
9. Say: If you know only the length of one side of the cube then you will know its volume.
10. Write the problem on the board: Calculate the volume of a cube with sides of length 7 cm
11. Ask pupils to draw and label a diagram of the cube in their exercise books. Draw it on the board
to help them.
12. Remind them of the formula: 𝑉 = 𝑙 × 𝑙 × 𝑙
13. Write on the board: 𝑉 = 7 × 7 × 7
14. Ask pupils to solve the multiplication problem and give the answer.
(Answer: 343)
15. Say: The calculated number 343 carries no meaning unless the unit for it
is included.
16. Ask: What are the units of this volume? (Answer: cm2)
17. Write on the board: 𝑉 = 7 × 7 × 7 = 343 cm2
7 cm
7 cm 7 cm
𝑙
𝑙 𝑙

118
18. Write another problem on the board: Calculate the volume of a square with sides of length 3 cm.
19. Ask pupils to draw the cube in their exercise books.
20. Ask pupils to state the formula and substitute the value of 3 cm to find the answer. (Answer:
𝑉 = 𝑙3 = 33 = 27𝑐𝑚3)
Guided Practice (6 minutes)
1. Write a problem on the board: Draw a cube of sides 5 cm and calculate its volume.
2. Ask pupils to work in pairs.
3. Ask one or two pairs to write their answers on the board
4. Go round and check their answers. (Answer: 𝑉 = 5 × 5 × 5 =
125 cm3)
Independent Practice (10 minutes)
1. Write two problems on the board:
a. Calculate the volume of a cube with sides 10 ft.
b. Calculate the volume of a cube with side 6 m
2. Ask pupils to solve the problems independently.
3. Ask pupils to write their answers in their exercise books.
4. Go around the room and check their answers and clear any misconceptions. (For example, make
sure pupils write the units for volume correctly: ft.3 and m3)
5. Ask two pupils to call out their answers.
(Answers: (a.) 𝑉 = 103 = 1000𝑓𝑡3 (b.) 𝑉 = 63 = 216𝑚3)
Closing (3 minutes)
1. Write a problem on the board.
Fill in the blank spaces to show volume of a cube with sides of length 15 feet:
V= _______ ______________ = _______ft3
2. Ask pupils to solve the problem on the exercise books.
3. Ask pupils to call out the answer verbally.
4. Write the correct answer on the board. (Answer: 𝑉 = 15 × 15 × 15 = 3375 ft3)
5 cm
5 cm 5 cm
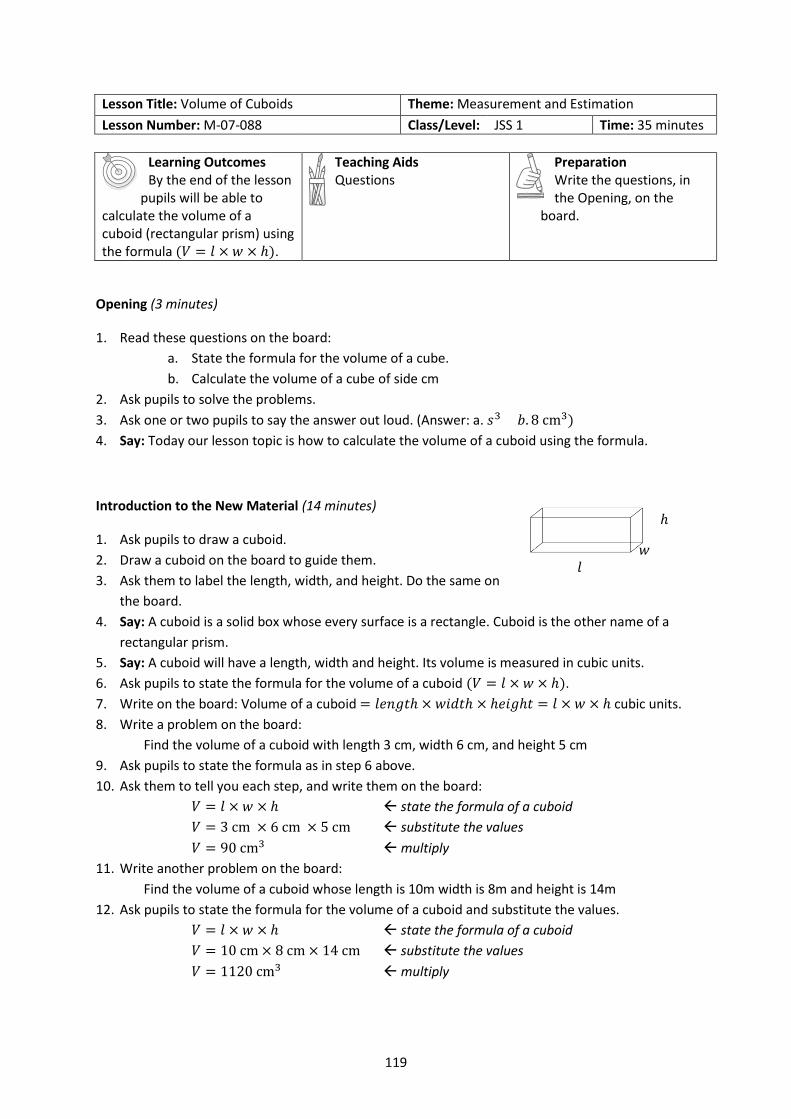
119
Lesson Title: Volume of Cuboids Theme: Measurement and Estimation
Lesson Number: M-07-088 Class/Level: JSS 1 Time: 35 minutes
Learning Outcomes By the end of the lesson
pupils will be able to calculate the volume of a cuboid (rectangular prism) using the formula (𝑉 = 𝑙 × 𝑤 × ℎ).
Teaching Aids Questions
Preparation Write the questions, in the Opening, on the
board.
Opening (3 minutes)
1. Read these questions on the board:
a. State the formula for the volume of a cube.
b. Calculate the volume of a cube of side cm
2. Ask pupils to solve the problems.
3. Ask one or two pupils to say the answer out loud. (Answer: a. 𝑠3 𝑏. 8 cm3)
4. Say: Today our lesson topic is how to calculate the volume of a cuboid using the formula.
Introduction to the New Material (14 minutes)
1. Ask pupils to draw a cuboid.
2. Draw a cuboid on the board to guide them.
3. Ask them to label the length, width, and height. Do the same on
the board.
4. Say: A cuboid is a solid box whose every surface is a rectangle. Cuboid is the other name of a
rectangular prism.
5. Say: A cuboid will have a length, width and height. Its volume is measured in cubic units.
6. Ask pupils to state the formula for the volume of a cuboid (𝑉 = 𝑙 × 𝑤 × ℎ).
7. Write on the board: Volume of a cuboid = 𝑙𝑒𝑛𝑔𝑡ℎ × 𝑤𝑖𝑑𝑡ℎ × ℎ𝑒𝑖𝑔ℎ𝑡 = 𝑙 × 𝑤 × ℎ cubic units.
8. Write a problem on the board:
Find the volume of a cuboid with length 3 cm, width 6 cm, and height 5 cm
9. Ask pupils to state the formula as in step 6 above.
10. Ask them to tell you each step, and write them on the board:
𝑉 = 𝑙 × 𝑤 × ℎ state the formula of a cuboid
𝑉 = 3 cm × 6 cm × 5 cm substitute the values
𝑉 = 90 cm3 multiply
11. Write another problem on the board:
Find the volume of a cuboid whose length is 10m width is 8m and height is 14m
12. Ask pupils to state the formula for the volume of a cuboid and substitute the values.
𝑉 = 𝑙 × 𝑤 × ℎ state the formula of a cuboid
𝑉 = 10 cm × 8 cm × 14 cm substitute the values
𝑉 = 1120 cm3 multiply
𝑙
ℎ
𝑤

120
Guided Practice (5 minutes)
1. Write this problem on the board:
Find the volume of the cuboid below
2. Ask pupils to work in pairs.
3. Ask pupils to write their answers on the exercise books.
4. Walk around the room and check pupils while they do the work.
5. Ask one pair to write the correct answer on the board. (Answer: 𝑉 = 7cm × 3cm × 6cm =
126cm3)
Independent Practice (10 minutes)
1. Write this problem on the board:
a. Calculate the volume of the cuboid below
b. A cuboid measures 4mm by 3mm by 6mm Find the volume of the cuboid.
2. Ask pupils to solve the problems individually.
3. Ask pupils to write their answers on the exercise books.
4. Walk around the room to check their answers and clear any misconceptions.
(Answers: a. 𝑉 = 9 ft × 2 ft × 5 ft = 90 ft3 b. 𝑉 = 4 mm × 3 mm × 6 mm =
72 mm3)
Closing (3 minutes)
1. Write these questions on the board:
a. What is the difference between a cube and a cuboid?
b. The formula to find the cuboid is 𝑣 = 𝑙 × 𝑙 × 𝑙 = 𝑙3 True or False?
2. Ask pupils to solve the problem on the exercise books.
3. Ask pupils to call out the answers. (Answers: a. A cube has square faces of the same size, and a
cuboid has rectangular faces. b. False)
5 ft
9 ft
6 cm
7cm
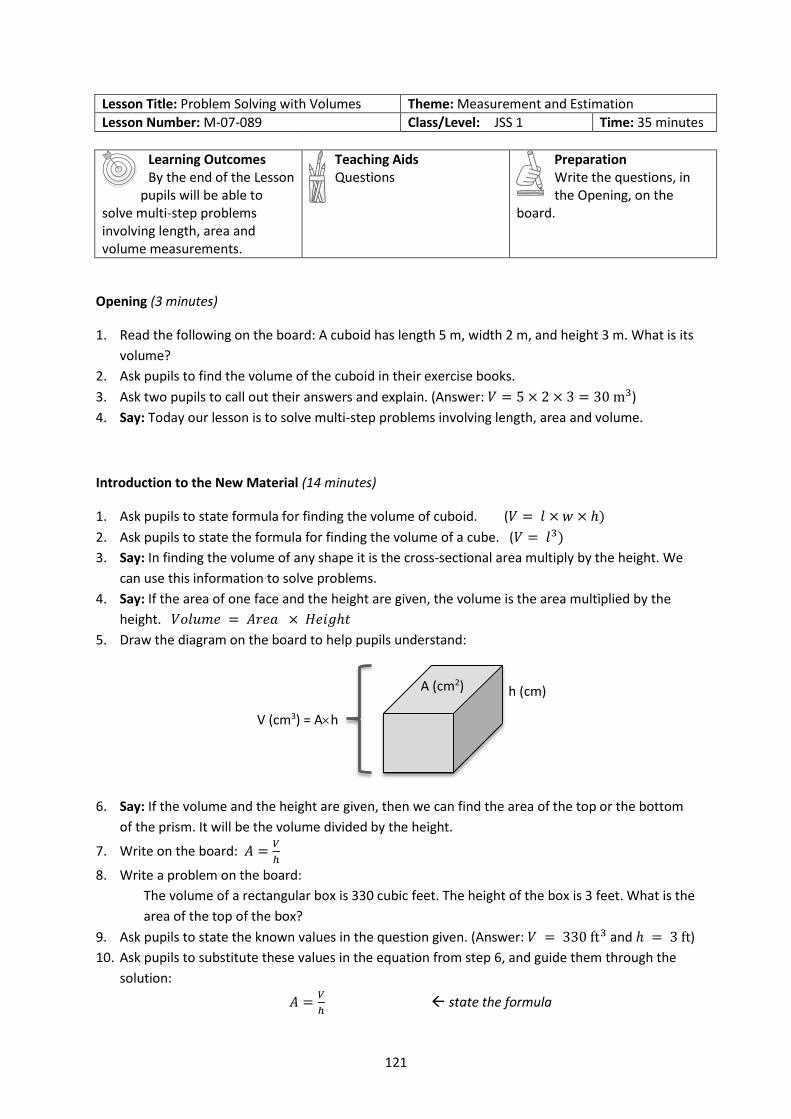
121
Lesson Title: Problem Solving with Volumes Theme: Measurement and Estimation
Lesson Number: M-07-089 Class/Level: JSS 1 Time: 35 minutes
Learning Outcomes By the end of the Lesson
pupils will be able to solve multi-step problems involving length, area and volume measurements.
Teaching Aids Questions
Preparation Write the questions, in the Opening, on the
board.
Opening (3 minutes)
1. Read the following on the board: A cuboid has length 5 m, width 2 m, and height 3 m. What is its
volume?
2. Ask pupils to find the volume of the cuboid in their exercise books.
3. Ask two pupils to call out their answers and explain. (Answer: 𝑉 = 5 × 2 × 3 = 30 m3)
4. Say: Today our lesson is to solve multi-step problems involving length, area and volume.
Introduction to the New Material (14 minutes)
1. Ask pupils to state formula for finding the volume of cuboid. (𝑉 = 𝑙 × 𝑤 × ℎ)
2. Ask pupils to state the formula for finding the volume of a cube. (𝑉 = 𝑙3)
3. Say: In finding the volume of any shape it is the cross-sectional area multiply by the height. We
can use this information to solve problems.
4. Say: If the area of one face and the height are given, the volume is the area multiplied by the
height. 𝑉𝑜𝑙𝑢𝑚𝑒 = 𝐴𝑟𝑒𝑎 × 𝐻𝑒𝑖𝑔ℎ𝑡
5. Draw the diagram on the board to help pupils understand:
6. Say: If the volume and the height are given, then we can find the area of the top or the bottom
of the prism. It will be the volume divided by the height.
7. Write on the board: 𝐴 =𝑉
ℎ
8. Write a problem on the board:
The volume of a rectangular box is 330 cubic feet. The height of the box is 3 feet. What is the
area of the top of the box?
9. Ask pupils to state the known values in the question given. (Answer: 𝑉 = 330 ft3 and ℎ = 3 ft)
10. Ask pupils to substitute these values in the equation from step 6, and guide them through the
solution:
𝐴 =𝑉
ℎ state the formula
A (cm2) h (cm)
V (cm3) = Ah
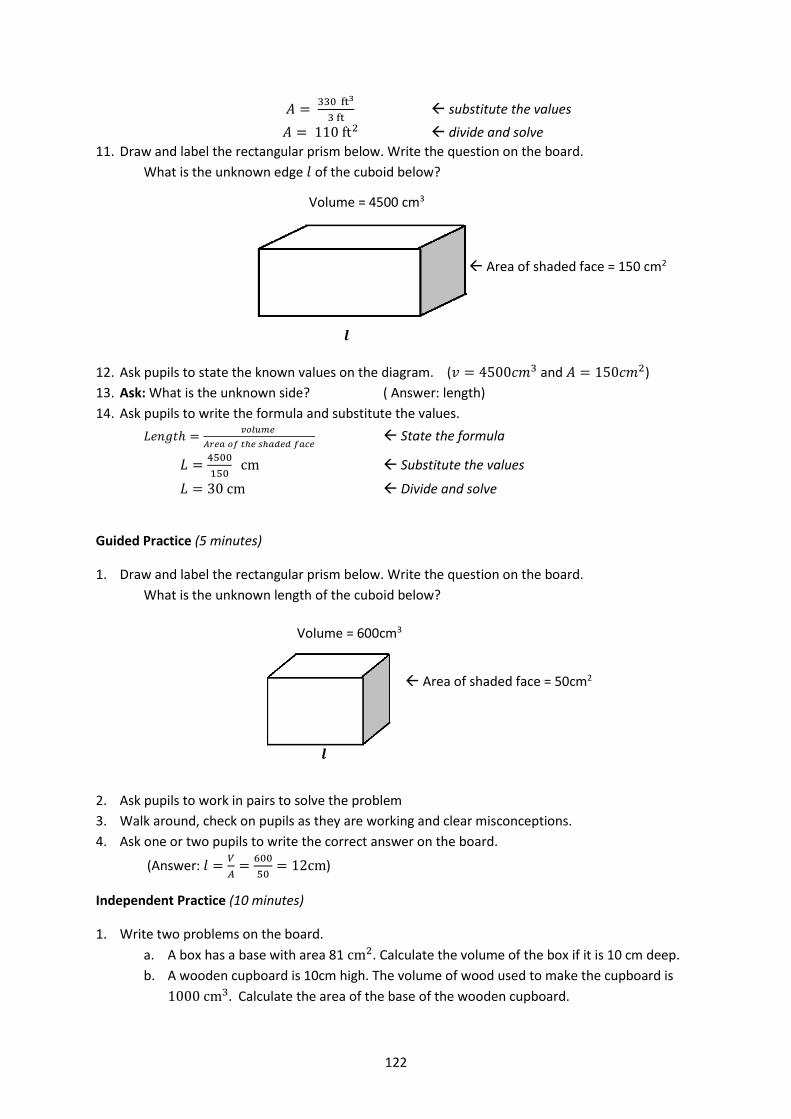
122
𝐴 = 330 ft3
3 ft substitute the values
𝐴 = 110 ft2 divide and solve
11. Draw and label the rectangular prism below. Write the question on the board.
What is the unknown edge 𝑙 of the cuboid below?
12. Ask pupils to state the known values on the diagram. (𝑣 = 4500𝑐𝑚3 and 𝐴 = 150𝑐𝑚2)
13. Ask: What is the unknown side? ( Answer: length)
14. Ask pupils to write the formula and substitute the values.
𝐿𝑒𝑛𝑔𝑡ℎ =𝑣𝑜𝑙𝑢𝑚𝑒
𝐴𝑟𝑒𝑎 𝑜𝑓 𝑡ℎ𝑒 𝑠ℎ𝑎𝑑𝑒𝑑 𝑓𝑎𝑐𝑒 State the formula
𝐿 =4500
150 cm Substitute the values
𝐿 = 30 cm Divide and solve
Guided Practice (5 minutes)
1. Draw and label the rectangular prism below. Write the question on the board.
What is the unknown length of the cuboid below?
2. Ask pupils to work in pairs to solve the problem
3. Walk around, check on pupils as they are working and clear misconceptions.
4. Ask one or two pupils to write the correct answer on the board.
(Answer: 𝑙 =𝑉
𝐴=
600
50= 12cm)
Independent Practice (10 minutes)
1. Write two problems on the board.
a. A box has a base with area 81 cm2. Calculate the volume of the box if it is 10 cm deep.
b. A wooden cupboard is 10cm high. The volume of wood used to make the cupboard is
1000 cm3. Calculate the area of the base of the wooden cupboard.
Volume = 4500 cm3
Area of shaded face = 150 cm2
𝒍
𝒍
Area of shaded face = 50cm2
Volume = 600cm3
123
2. Ask pupils to solve the problems individually.
3. Ask pupils to do the work in their exercise books.
4. Go around and check how they solve the problems and clear any misconceptions. Encourage
them to draw a diagram for each story problem
5. Ask one or two pupils to write the correct answers on the board. (Answers: (𝑎) 𝑉 = 𝐴 ×
ℎ = 81 × 10 = 810cm3 (𝑏) 𝐴 =𝑣
𝑙=
1000
10= 100cm2)
Closing (3 minutes)
1. Write a problem on the board.
A room is 3m high and has a volume of 60m3. Calculate the area of the floor of the room.
2. Ask pupils to solve the problem
3. Ask them to say the answer verbally before you leave the class.
4. Write the answer on the board. (Answer: 𝐴 =𝑉
𝐻=
60
3= 20m2).
124
Lesson Title: Volume Story Problems Theme: Measurement and Estimation
Lesson Number: M-07-090 Class/Level: JSS 1 Time: 35 minutes
Learning Outcomes By the end of the lesson
pupils will be able to solve story problems involving the volumes of cubes and cuboids.
Teaching Aids Questions 2. Word problems
Preparation Write the questions, in the Opening, on the
board. 2. Write the word problem, in the Introduction to the New Material and Guide Practice, on the board.
Opening (2 minutes)
1. Read these questions on the board:
c. What is 1 cubic unit?
d. What is volume?
2. Ask pupils to share ideas among themselves.
3. Ask one or two pupils to say the answers verbally. (Example answers: a. 1 cubic unit is a
measurement for volume. b. Volume is the amount of space taken up by an object.)
4. Say: Today’s topic is how to solve story problems involving the volumes of cubes and cuboids.
Introduction to the New Material (13 minutes)
1. Ask a pupil to write the formula for the volume of a cuboid on the board. (Answer: 𝑉 = 𝑙 × 𝑤 ×
ℎ)
2. Say: Today we will use this formula to solve story problems.
3. Read this problem on the board:
A water tank is in the shape of a rectangular prism 12m high, 5m long and 9m wide. A solid
metal box 7m high, 4m long and 8m wide is sitting at the bottom of the tank. The tank is filled
with water. What is the volume of the water in the tank?
4. Ask: What is the shape of the water tank and the solid metal? (Answer: rectangular prism)
5. Ask: How do you think we will solve this problem?
6. Allow pupils to share their ideas.
7. Say: In finding the volume of the water in the tank, you calculate the volume of the water tank
and subtract it from the volume of the metal box inside. This will give the volume of the water
inside the water tank, but outside of the metal box.
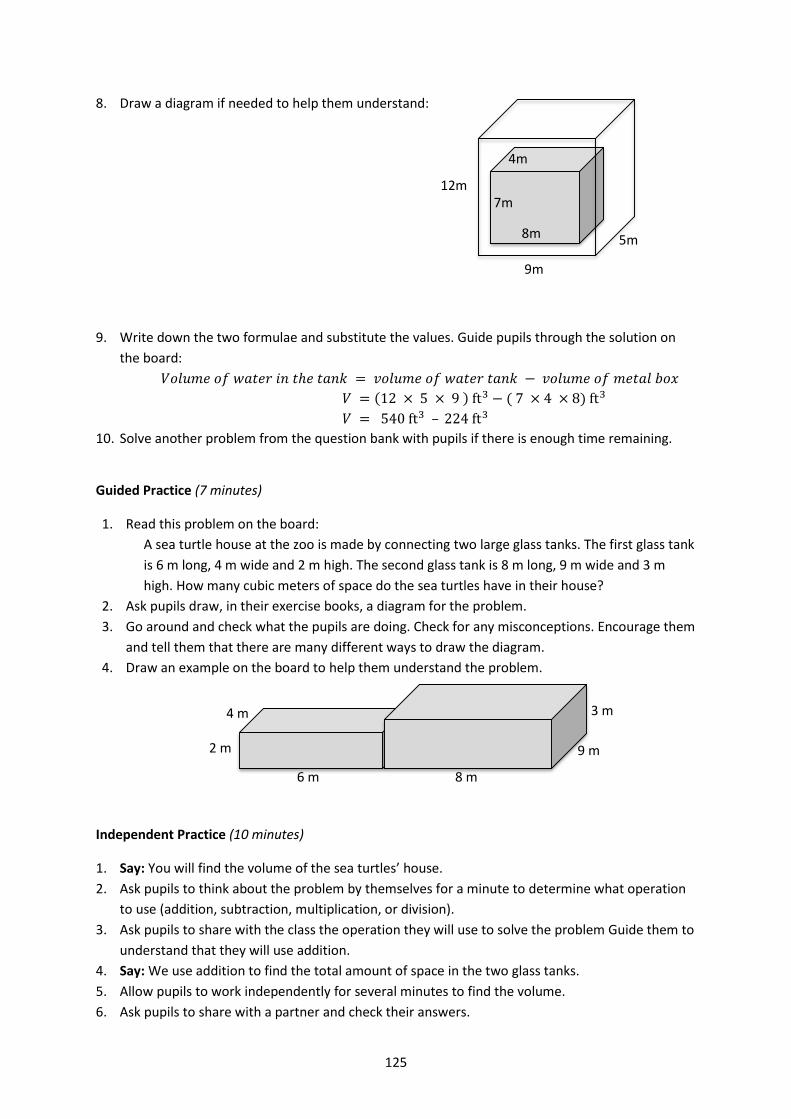
125
8. Draw a diagram if needed to help them understand:
9. Write down the two formulae and substitute the values. Guide pupils through the solution on
the board:
𝑉𝑜𝑙𝑢𝑚𝑒 𝑜𝑓 𝑤𝑎𝑡𝑒𝑟 𝑖𝑛 𝑡ℎ𝑒 𝑡𝑎𝑛𝑘 = 𝑣𝑜𝑙𝑢𝑚𝑒 𝑜𝑓 𝑤𝑎𝑡𝑒𝑟 𝑡𝑎𝑛𝑘 − 𝑣𝑜𝑙𝑢𝑚𝑒 𝑜𝑓 𝑚𝑒𝑡𝑎𝑙 𝑏𝑜𝑥
𝑉 = (12 × 5 × 9 ) ft3 − ( 7 × 4 × 8) ft3
𝑉 = 540 ft3 – 224 ft3
10. Solve another problem from the question bank with pupils if there is enough time remaining.
Guided Practice (7 minutes)
1. Read this problem on the board:
A sea turtle house at the zoo is made by connecting two large glass tanks. The first glass tank
is 6 m long, 4 m wide and 2 m high. The second glass tank is 8 m long, 9 m wide and 3 m
high. How many cubic meters of space do the sea turtles have in their house?
2. Ask pupils draw, in their exercise books, a diagram for the problem.
3. Go around and check what the pupils are doing. Check for any misconceptions. Encourage them
and tell them that there are many different ways to draw the diagram.
4. Draw an example on the board to help them understand the problem.
Independent Practice (10 minutes)
1. Say: You will find the volume of the sea turtles’ house.
2. Ask pupils to think about the problem by themselves for a minute to determine what operation
to use (addition, subtraction, multiplication, or division).
3. Ask pupils to share with the class the operation they will use to solve the problem Guide them to
understand that they will use addition.
4. Say: We use addition to find the total amount of space in the two glass tanks.
5. Allow pupils to work independently for several minutes to find the volume.
6. Ask pupils to share with a partner and check their answers.
6 m 8 m
4 m
9 m
3 m
2 m
12m 7m
9m
5m
4m
8m
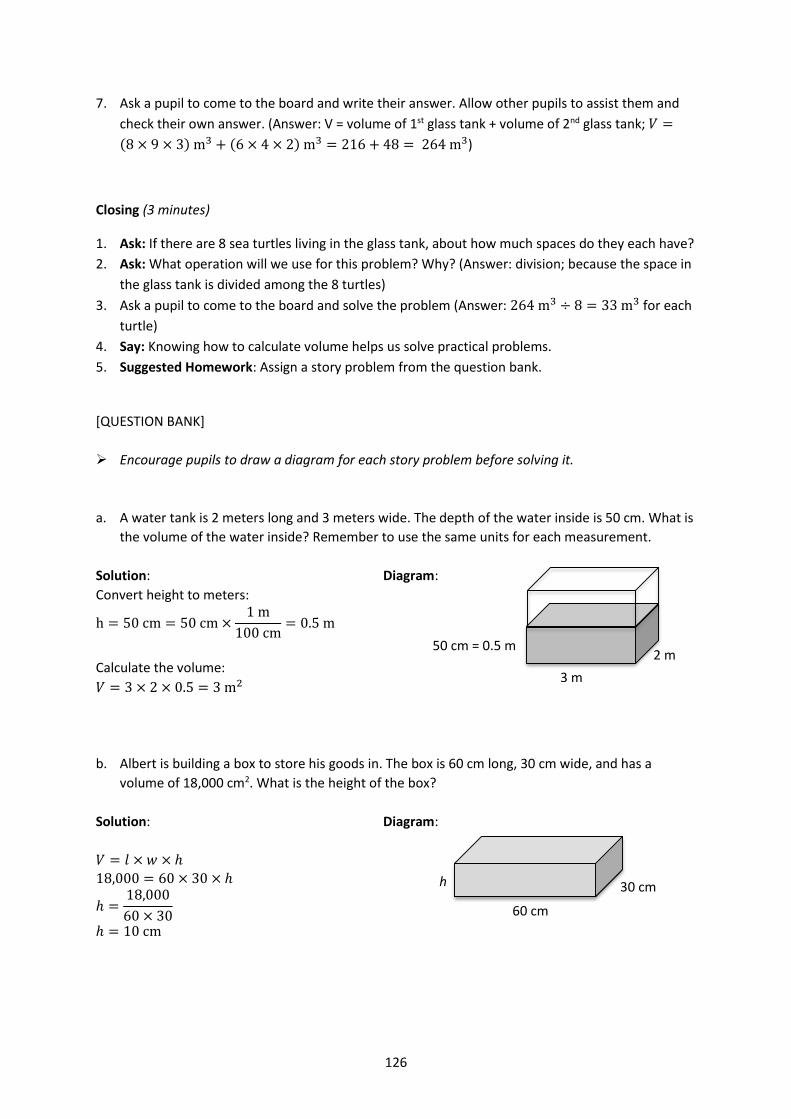
126
7. Ask a pupil to come to the board and write their answer. Allow other pupils to assist them and
check their own answer. (Answer: V = volume of 1st glass tank + volume of 2nd glass tank; 𝑉 =
(8 × 9 × 3) m3 + (6 × 4 × 2) m3 = 216 + 48 = 264 m3)
Closing (3 minutes)
1. Ask: If there are 8 sea turtles living in the glass tank, about how much spaces do they each have?
2. Ask: What operation will we use for this problem? Why? (Answer: division; because the space in
the glass tank is divided among the 8 turtles)
3. Ask a pupil to come to the board and solve the problem (Answer: 264 m3 ÷ 8 = 33 m3 for each
turtle)
4. Say: Knowing how to calculate volume helps us solve practical problems.
5. Suggested Homework: Assign a story problem from the question bank.
[QUESTION BANK]
Encourage pupils to draw a diagram for each story problem before solving it.
a. A water tank is 2 meters long and 3 meters wide. The depth of the water inside is 50 cm. What is
the volume of the water inside? Remember to use the same units for each measurement.
Solution: Diagram:
Convert height to meters:
h = 50 cm = 50 cm ×1 m
100 cm= 0.5 m
Calculate the volume:
𝑉 = 3 × 2 × 0.5 = 3 m2
b. Albert is building a box to store his goods in. The box is 60 cm long, 30 cm wide, and has a
volume of 18,000 cm2. What is the height of the box?
Solution: Diagram:
𝑉 = 𝑙 × 𝑤 × ℎ
18,000 = 60 × 30 × ℎ
ℎ =18,000
60 × 30
ℎ = 10 cm
50 cm = 0.5 m
3 m
2 m
30 cm
60 cm
h
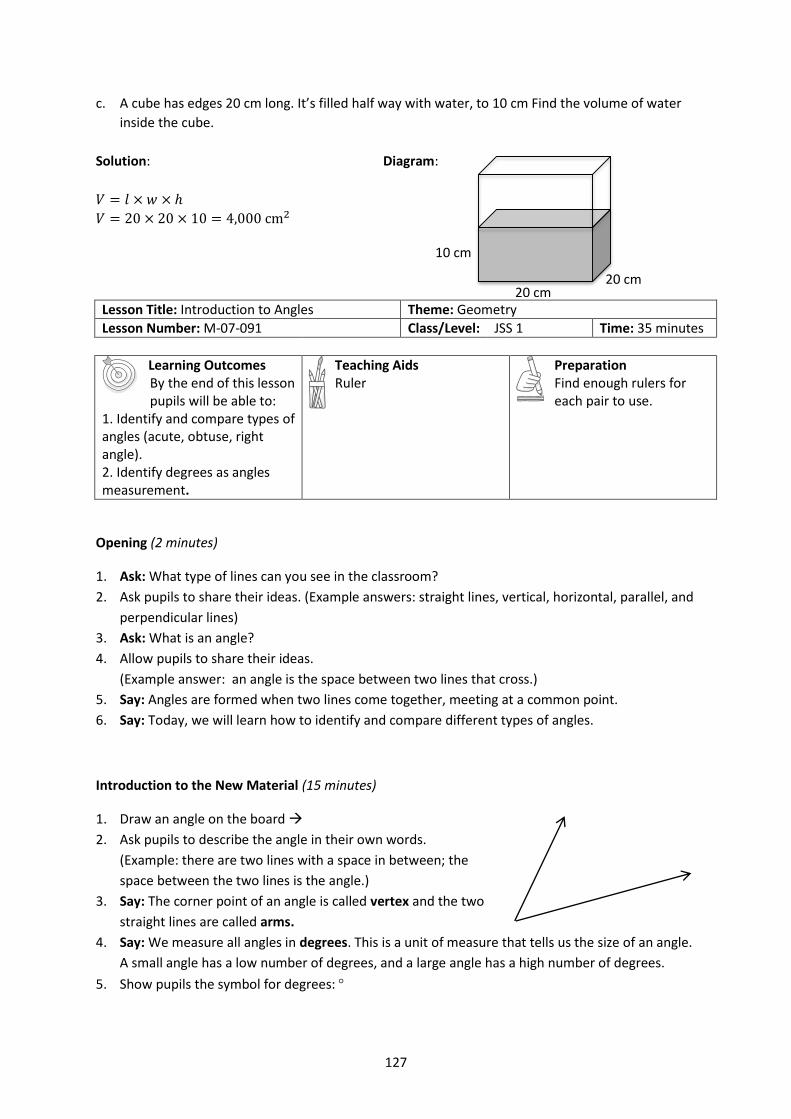
127
c. A cube has edges 20 cm long. It’s filled half way with water, to 10 cm Find the volume of water
inside the cube.
Solution: Diagram:
𝑉 = 𝑙 × 𝑤 × ℎ
𝑉 = 20 × 20 × 10 = 4,000 cm2
Lesson Title: Introduction to Angles Theme: Geometry
Lesson Number: M-07-091 Class/Level: JSS 1 Time: 35 minutes
Learning Outcomes By the end of this lesson pupils will be able to:
1. Identify and compare types of angles (acute, obtuse, right angle). 2. Identify degrees as angles measurement.
Teaching Aids Ruler
Preparation Find enough rulers for each pair to use.
Opening (2 minutes)
1. Ask: What type of lines can you see in the classroom?
2. Ask pupils to share their ideas. (Example answers: straight lines, vertical, horizontal, parallel, and
perpendicular lines)
3. Ask: What is an angle?
4. Allow pupils to share their ideas.
(Example answer: an angle is the space between two lines that cross.)
5. Say: Angles are formed when two lines come together, meeting at a common point.
6. Say: Today, we will learn how to identify and compare different types of angles.
Introduction to the New Material (15 minutes)
1. Draw an angle on the board
2. Ask pupils to describe the angle in their own words.
(Example: there are two lines with a space in between; the
space between the two lines is the angle.)
3. Say: The corner point of an angle is called vertex and the two
straight lines are called arms.
4. Say: We measure all angles in degrees. This is a unit of measure that tells us the size of an angle.
A small angle has a low number of degrees, and a large angle has a high number of degrees.
5. Show pupils the symbol for degrees:
20 cm 20 cm
10 cm
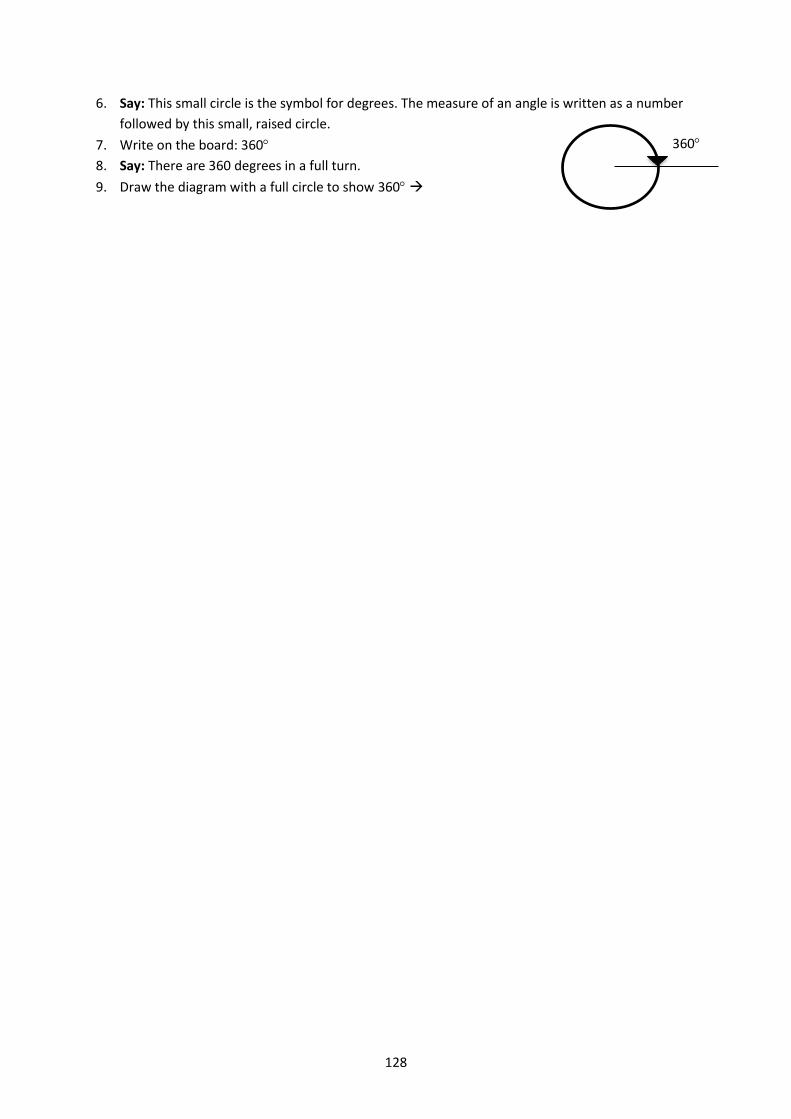
128
6. Say: This small circle is the symbol for degrees. The measure of an angle is written as a number
followed by this small, raised circle.
7. Write on the board: 360
8. Say: There are 360 degrees in a full turn.
9. Draw the diagram with a full circle to show 360
360
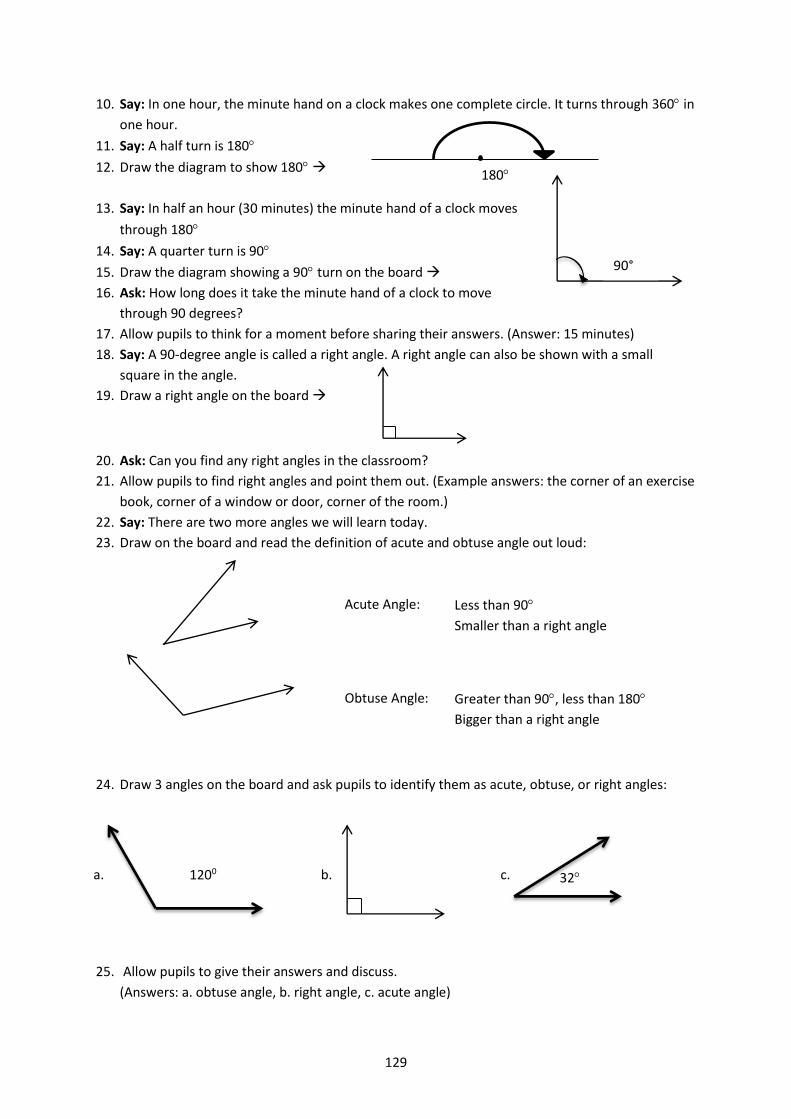
129
10. Say: In one hour, the minute hand on a clock makes one complete circle. It turns through 360 in
one hour.
11. Say: A half turn is 180
12. Draw the diagram to show 180
13. Say: In half an hour (30 minutes) the minute hand of a clock moves
through 180
14. Say: A quarter turn is 90
15. Draw the diagram showing a 90 turn on the board
16. Ask: How long does it take the minute hand of a clock to move
through 90 degrees?
17. Allow pupils to think for a moment before sharing their answers. (Answer: 15 minutes)
18. Say: A 90-degree angle is called a right angle. A right angle can also be shown with a small
square in the angle.
19. Draw a right angle on the board
20. Ask: Can you find any right angles in the classroom?
21. Allow pupils to find right angles and point them out. (Example answers: the corner of an exercise
book, corner of a window or door, corner of the room.)
22. Say: There are two more angles we will learn today.
23. Draw on the board and read the definition of acute and obtuse angle out loud:
Acute Angle:
Less than 90
Smaller than a right angle
Obtuse Angle:
Greater than 90, less than 180
Bigger than a right angle
24. Draw 3 angles on the board and ask pupils to identify them as acute, obtuse, or right angles:
25. Allow pupils to give their answers and discuss.
(Answers: a. obtuse angle, b. right angle, c. acute angle)
180
90°
32 1200 a. b. c.
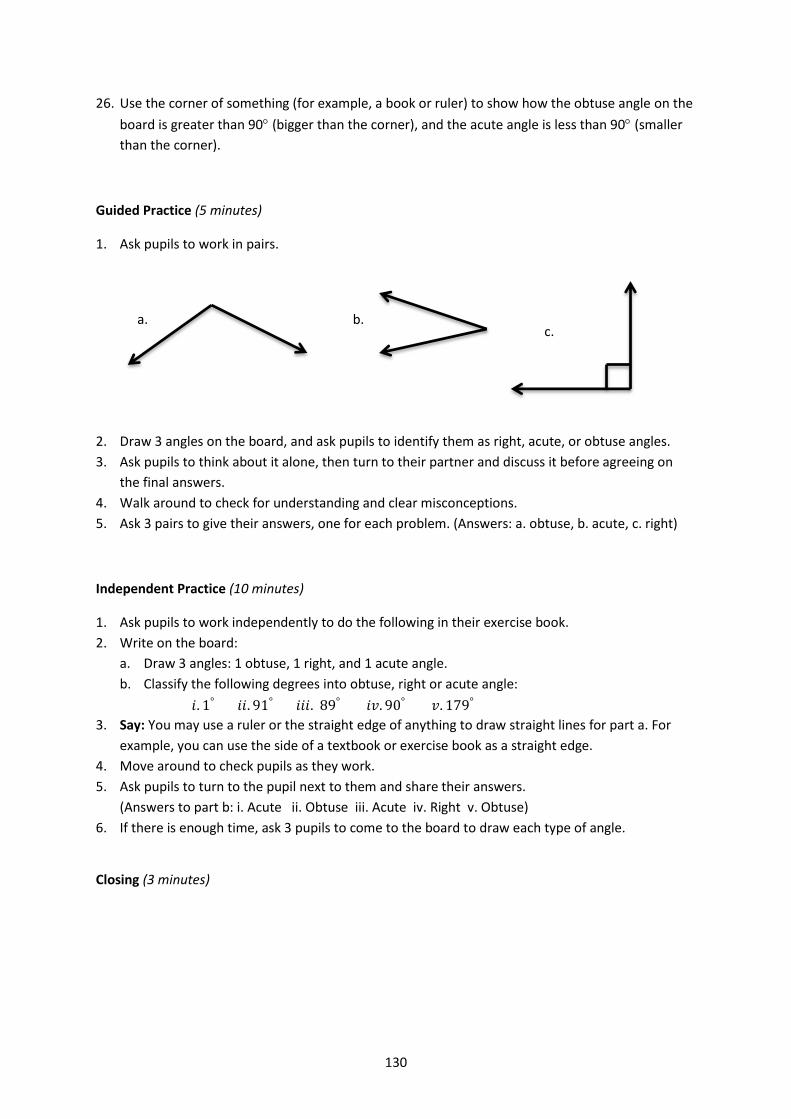
130
26. Use the corner of something (for example, a book or ruler) to show how the obtuse angle on the
board is greater than 90 (bigger than the corner), and the acute angle is less than 90 (smaller
than the corner).
Guided Practice (5 minutes)
1. Ask pupils to work in pairs.
2. Draw 3 angles on the board, and ask pupils to identify them as right, acute, or obtuse angles.
3. Ask pupils to think about it alone, then turn to their partner and discuss it before agreeing on
the final answers.
4. Walk around to check for understanding and clear misconceptions.
5. Ask 3 pairs to give their answers, one for each problem. (Answers: a. obtuse, b. acute, c. right)
Independent Practice (10 minutes)
1. Ask pupils to work independently to do the following in their exercise book.
2. Write on the board:
a. Draw 3 angles: 1 obtuse, 1 right, and 1 acute angle.
b. Classify the following degrees into obtuse, right or acute angle:
𝑖. 1° 𝑖𝑖. 91° 𝑖𝑖𝑖. 89° 𝑖𝑣. 90° 𝑣. 179°
3. Say: You may use a ruler or the straight edge of anything to draw straight lines for part a. For
example, you can use the side of a textbook or exercise book as a straight edge.
4. Move around to check pupils as they work.
5. Ask pupils to turn to the pupil next to them and share their answers.
(Answers to part b: i. Acute ii. Obtuse iii. Acute iv. Right v. Obtuse)
6. If there is enough time, ask 3 pupils to come to the board to draw each type of angle.
Closing (3 minutes)
a. b. c.
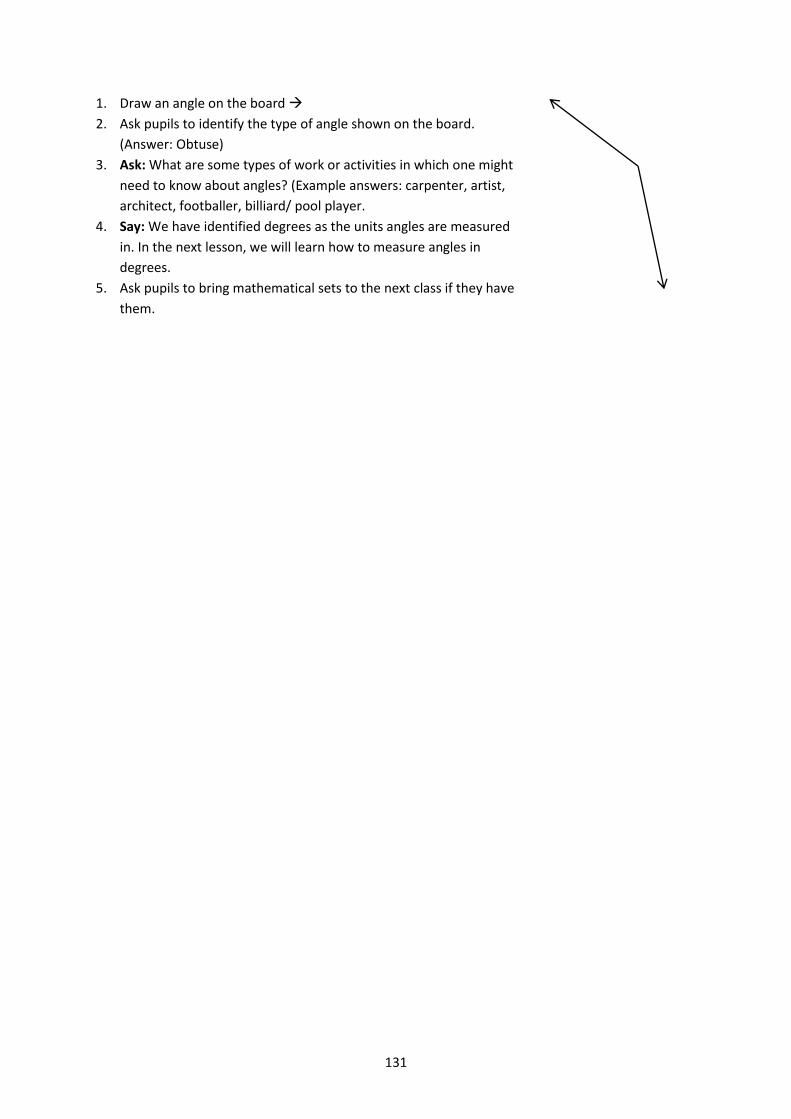
131
1. Draw an angle on the board
2. Ask pupils to identify the type of angle shown on the board.
(Answer: Obtuse)
3. Ask: What are some types of work or activities in which one might
need to know about angles? (Example answers: carpenter, artist,
architect, footballer, billiard/ pool player.
4. Say: We have identified degrees as the units angles are measured
in. In the next lesson, we will learn how to measure angles in
degrees.
5. Ask pupils to bring mathematical sets to the next class if they have
them.
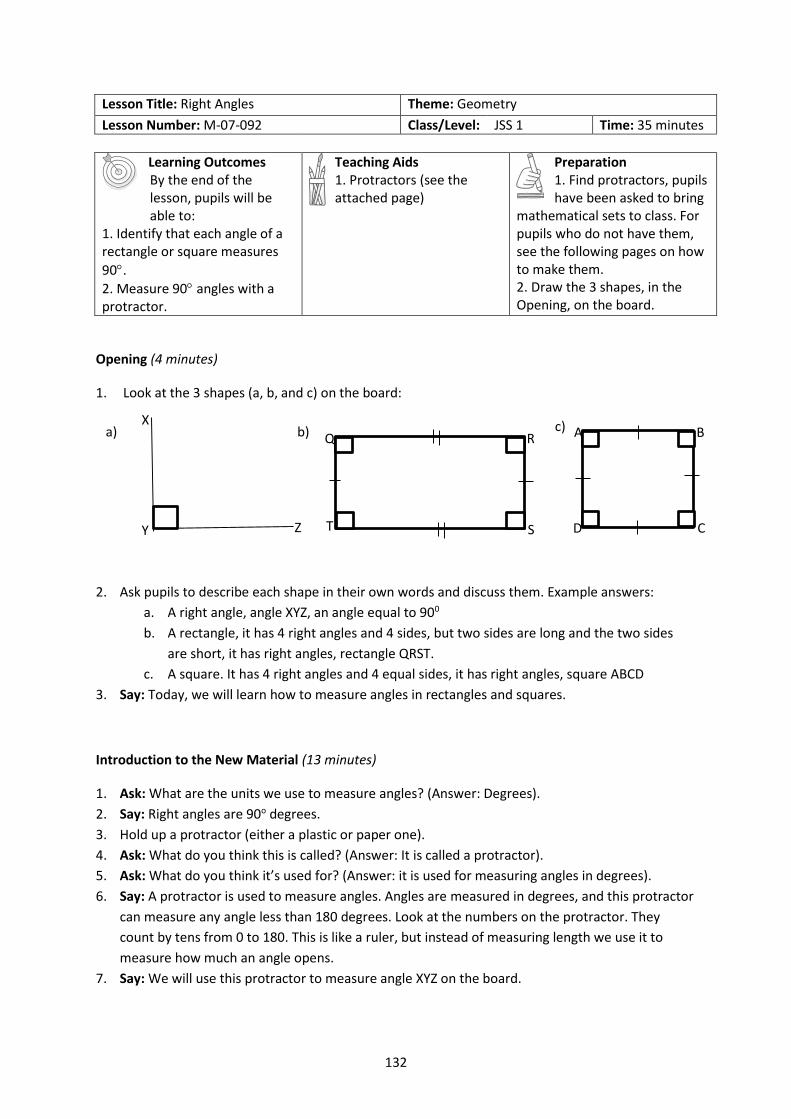
132
Lesson Title: Right Angles Theme: Geometry
Lesson Number: M-07-092 Class/Level: JSS 1 Time: 35 minutes
Learning Outcomes By the end of the lesson, pupils will be able to:
1. Identify that each angle of a rectangle or square measures
90.
2. Measure 90 angles with a protractor.
Teaching Aids 1. Protractors (see the attached page)
Preparation 1. Find protractors, pupils have been asked to bring
mathematical sets to class. For pupils who do not have them, see the following pages on how to make them. 2. Draw the 3 shapes, in the Opening, on the board.
Opening (4 minutes)
1. Look at the 3 shapes (a, b, and c) on the board:
2. Ask pupils to describe each shape in their own words and discuss them. Example answers:
a. A right angle, angle XYZ, an angle equal to 900
b. A rectangle, it has 4 right angles and 4 sides, but two sides are long and the two sides
are short, it has right angles, rectangle QRST.
c. A square. It has 4 right angles and 4 equal sides, it has right angles, square ABCD
3. Say: Today, we will learn how to measure angles in rectangles and squares.
Introduction to the New Material (13 minutes)
1. Ask: What are the units we use to measure angles? (Answer: Degrees).
2. Say: Right angles are 90o degrees.
3. Hold up a protractor (either a plastic or paper one).
4. Ask: What do you think this is called? (Answer: It is called a protractor).
5. Ask: What do you think it’s used for? (Answer: it is used for measuring angles in degrees).
6. Say: A protractor is used to measure angles. Angles are measured in degrees, and this protractor
can measure any angle less than 180 degrees. Look at the numbers on the protractor. They
count by tens from 0 to 180. This is like a ruler, but instead of measuring length we use it to
measure how much an angle opens.
7. Say: We will use this protractor to measure angle XYZ on the board.
X
Y Z
a) b) c) Q
T S
R A
D C
B
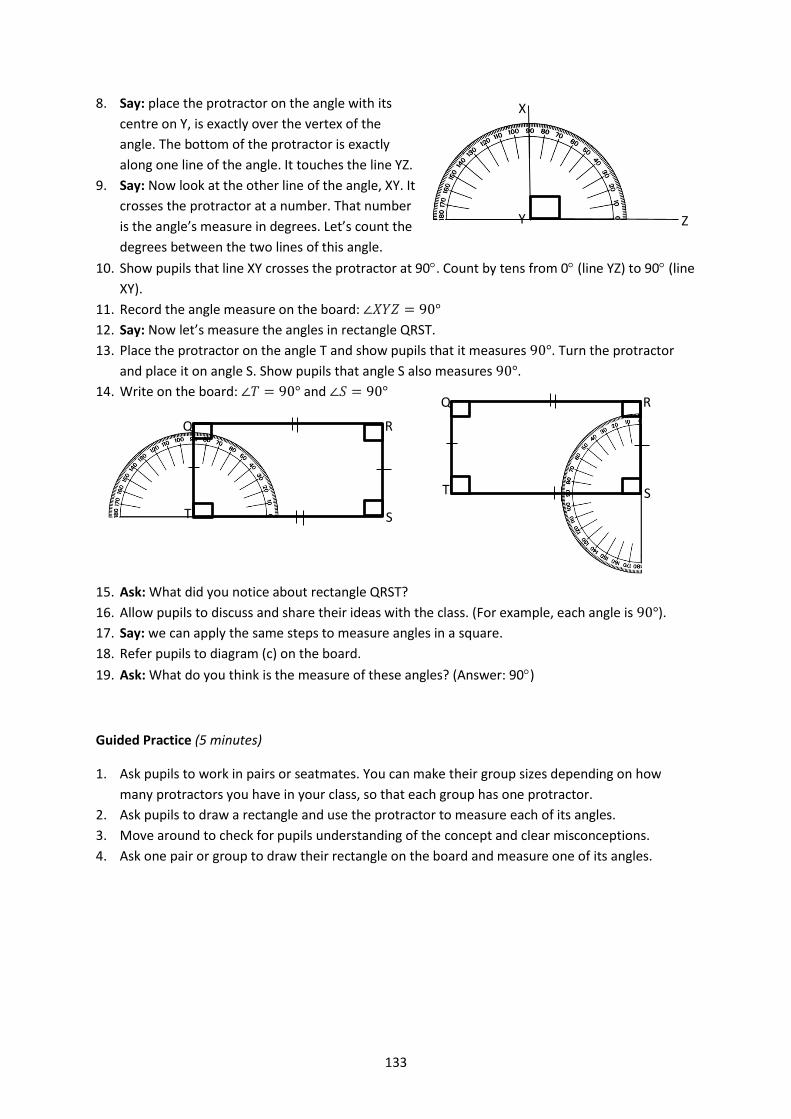
133
8. Say: place the protractor on the angle with its
centre on Y, is exactly over the vertex of the
angle. The bottom of the protractor is exactly
along one line of the angle. It touches the line YZ.
9. Say: Now look at the other line of the angle, XY. It
crosses the protractor at a number. That number
is the angle’s measure in degrees. Let’s count the
degrees between the two lines of this angle.
10. Show pupils that line XY crosses the protractor at 90. Count by tens from 0 (line YZ) to 90 (line
XY).
11. Record the angle measure on the board: ∠𝑋𝑌𝑍 = 90°
12. Say: Now let’s measure the angles in rectangle QRST.
13. Place the protractor on the angle T and show pupils that it measures 90°. Turn the protractor
and place it on angle S. Show pupils that angle S also measures 90°.
14. Write on the board: ∠𝑇 = 90° and ∠𝑆 = 90°
15. Ask: What did you notice about rectangle QRST?
16. Allow pupils to discuss and share their ideas with the class. (For example, each angle is 90°).
17. Say: we can apply the same steps to measure angles in a square.
18. Refer pupils to diagram (c) on the board.
19. Ask: What do you think is the measure of these angles? (Answer: 90)
Guided Practice (5 minutes)
1. Ask pupils to work in pairs or seatmates. You can make their group sizes depending on how
many protractors you have in your class, so that each group has one protractor.
2. Ask pupils to draw a rectangle and use the protractor to measure each of its angles.
3. Move around to check for pupils understanding of the concept and clear misconceptions.
4. Ask one pair or group to draw their rectangle on the board and measure one of its angles.
Q
T S
R
X
Y Z
Q
T S
R
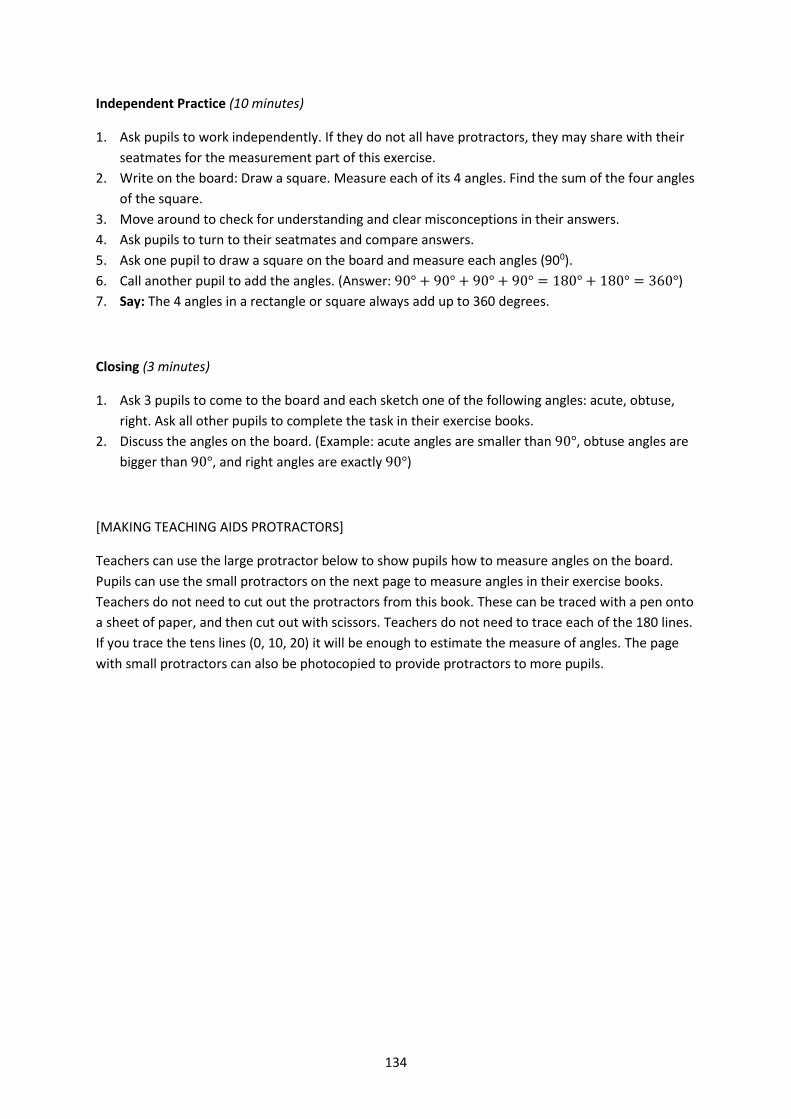
134
Independent Practice (10 minutes)
1. Ask pupils to work independently. If they do not all have protractors, they may share with their
seatmates for the measurement part of this exercise.
2. Write on the board: Draw a square. Measure each of its 4 angles. Find the sum of the four angles
of the square.
3. Move around to check for understanding and clear misconceptions in their answers.
4. Ask pupils to turn to their seatmates and compare answers.
5. Ask one pupil to draw a square on the board and measure each angles (900).
6. Call another pupil to add the angles. (Answer: 90° + 90° + 90° + 90° = 180° + 180° = 360°)
7. Say: The 4 angles in a rectangle or square always add up to 360 degrees.
Closing (3 minutes)
1. Ask 3 pupils to come to the board and each sketch one of the following angles: acute, obtuse,
right. Ask all other pupils to complete the task in their exercise books.
2. Discuss the angles on the board. (Example: acute angles are smaller than 90°, obtuse angles are
bigger than 90°, and right angles are exactly 90°)
[MAKING TEACHING AIDS PROTRACTORS]
Teachers can use the large protractor below to show pupils how to measure angles on the board.
Pupils can use the small protractors on the next page to measure angles in their exercise books.
Teachers do not need to cut out the protractors from this book. These can be traced with a pen onto
a sheet of paper, and then cut out with scissors. Teachers do not need to trace each of the 180 lines.
If you trace the tens lines (0, 10, 20) it will be enough to estimate the measure of angles. The page
with small protractors can also be photocopied to provide protractors to more pupils.
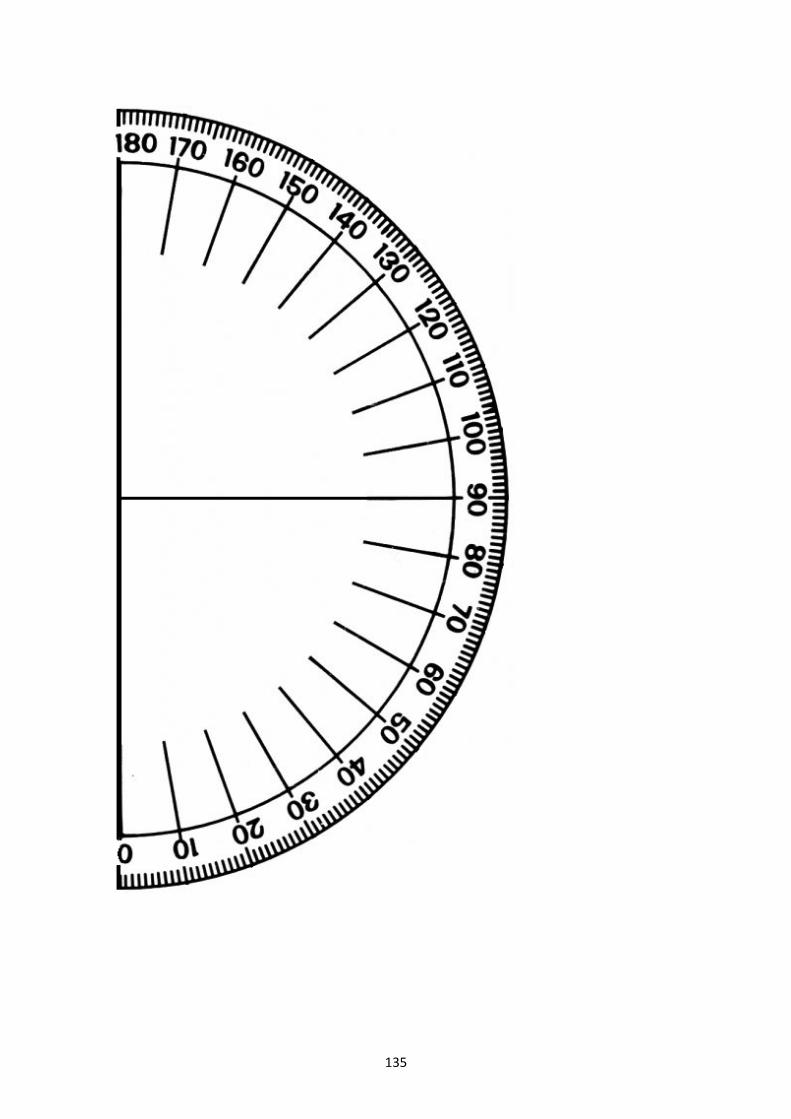
135

136
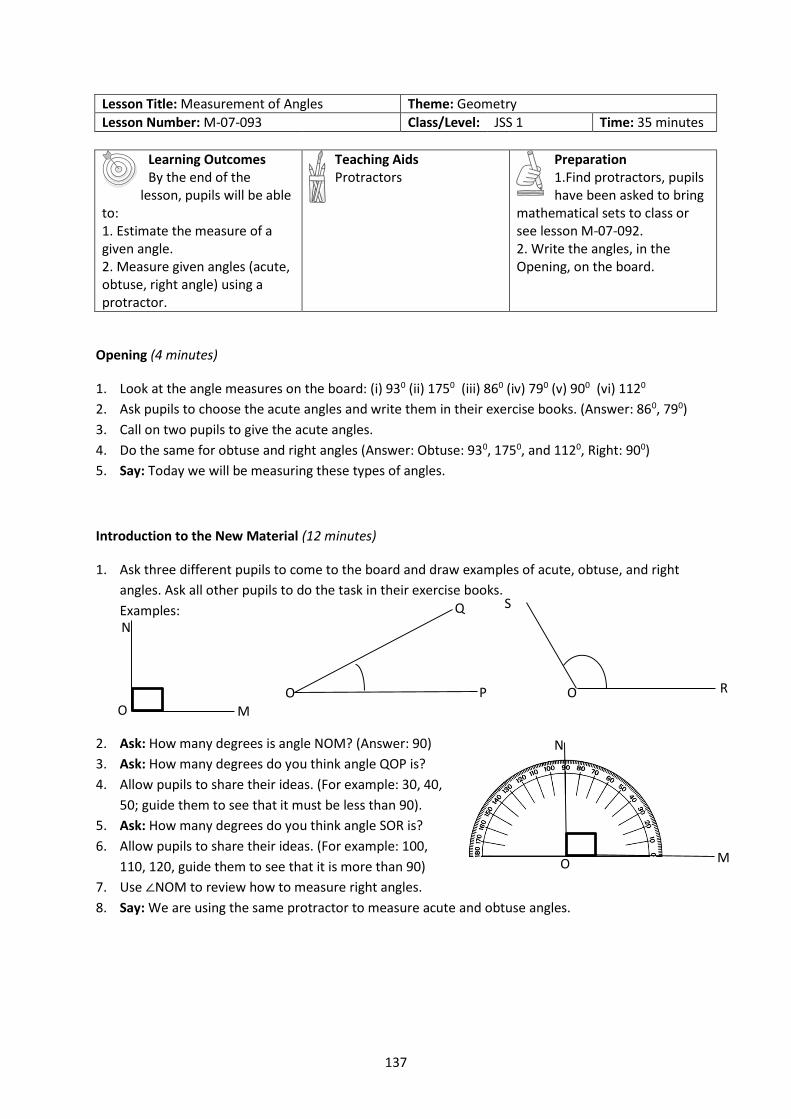
137
Lesson Title: Measurement of Angles Theme: Geometry
Lesson Number: M-07-093 Class/Level: JSS 1 Time: 35 minutes
Learning Outcomes By the end of the
lesson, pupils will be able to: 1. Estimate the measure of a given angle. 2. Measure given angles (acute, obtuse, right angle) using a protractor.
Teaching Aids Protractors
Preparation 1.Find protractors, pupils have been asked to bring
mathematical sets to class or see lesson M-07-092. 2. Write the angles, in the Opening, on the board.
Opening (4 minutes)
1. Look at the angle measures on the board: (i) 930 (ii) 1750 (iii) 860 (iv) 790 (v) 900 (vi) 1120
2. Ask pupils to choose the acute angles and write them in their exercise books. (Answer: 860, 790)
3. Call on two pupils to give the acute angles.
4. Do the same for obtuse and right angles (Answer: Obtuse: 930, 1750, and 1120, Right: 900)
5. Say: Today we will be measuring these types of angles.
Introduction to the New Material (12 minutes)
1. Ask three different pupils to come to the board and draw examples of acute, obtuse, and right
angles. Ask all other pupils to do the task in their exercise books.
Examples:
2. Ask: How many degrees is angle NOM? (Answer: 90)
3. Ask: How many degrees do you think angle QOP is?
4. Allow pupils to share their ideas. (For example: 30, 40,
50; guide them to see that it must be less than 90).
5. Ask: How many degrees do you think angle SOR is?
6. Allow pupils to share their ideas. (For example: 100,
110, 120, guide them to see that it is more than 90)
7. Use ∠NOM to review how to measure right angles.
8. Say: We are using the same protractor to measure acute and obtuse angles.
Q
P O O
S
R
N
O M
N
O M
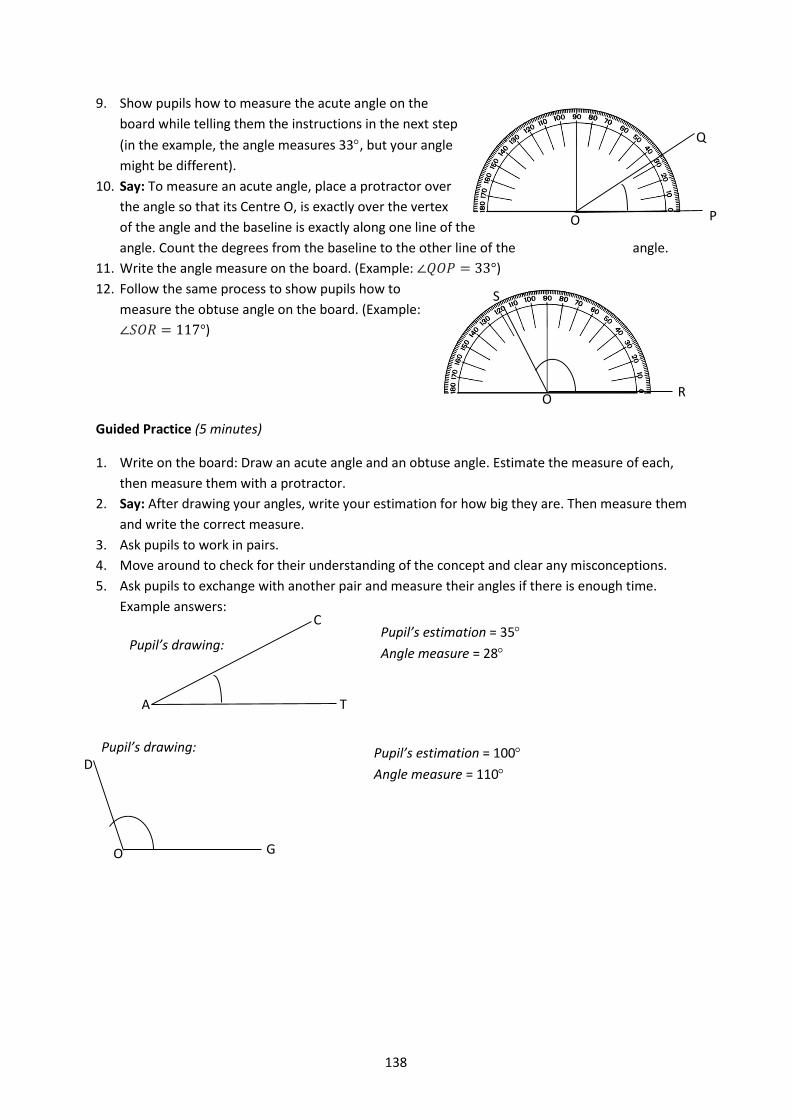
138
9. Show pupils how to measure the acute angle on the
board while telling them the instructions in the next step
(in the example, the angle measures 33, but your angle
might be different).
10. Say: To measure an acute angle, place a protractor over
the angle so that its Centre O, is exactly over the vertex
of the angle and the baseline is exactly along one line of the
angle. Count the degrees from the baseline to the other line of the angle.
11. Write the angle measure on the board. (Example: ∠𝑄𝑂𝑃 = 33°)
12. Follow the same process to show pupils how to
measure the obtuse angle on the board. (Example:
∠𝑆𝑂𝑅 = 117°)
Guided Practice (5 minutes)
1. Write on the board: Draw an acute angle and an obtuse angle. Estimate the measure of each,
then measure them with a protractor.
2. Say: After drawing your angles, write your estimation for how big they are. Then measure them
and write the correct measure.
3. Ask pupils to work in pairs.
4. Move around to check for their understanding of the concept and clear any misconceptions.
5. Ask pupils to exchange with another pair and measure their angles if there is enough time.
Example answers:
Q
P O
C
T A
O
D
G
O
S
R
Pupil’s drawing: Pupil’s estimation = 35
Angle measure = 28
Pupil’s drawing: Pupil’s estimation = 100
Angle measure = 110
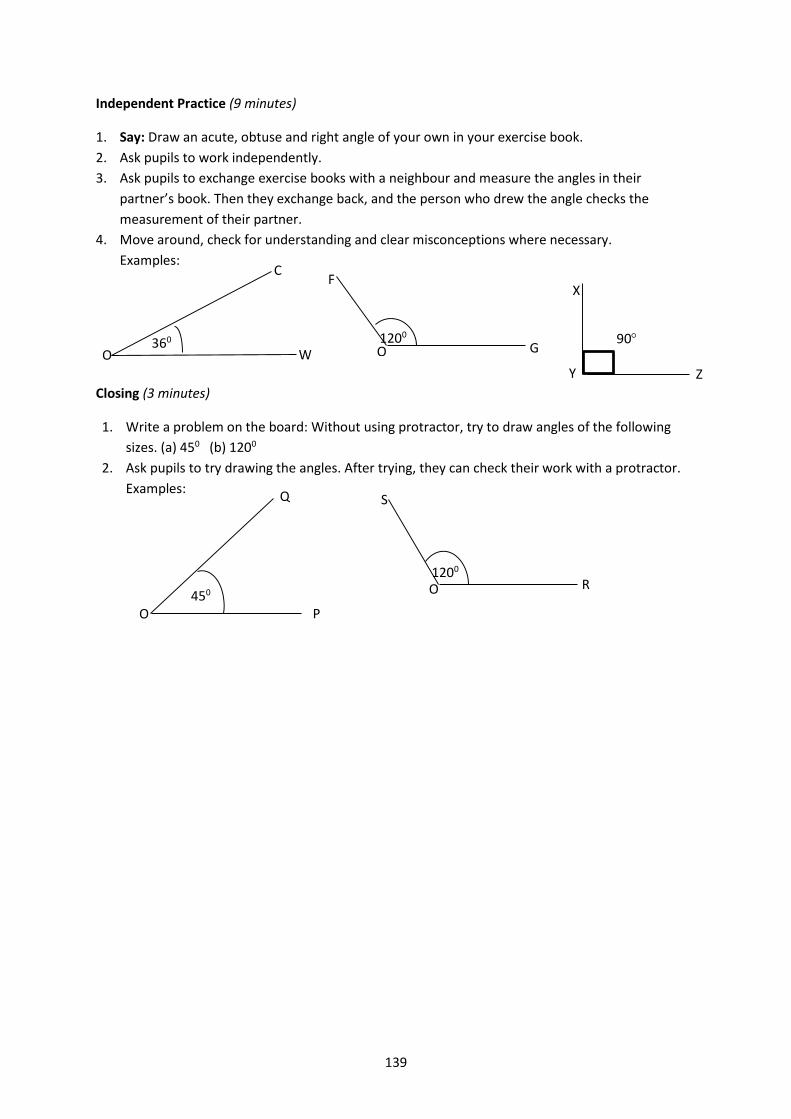
139
Independent Practice (9 minutes)
1. Say: Draw an acute, obtuse and right angle of your own in your exercise book.
2. Ask pupils to work independently.
3. Ask pupils to exchange exercise books with a neighbour and measure the angles in their
partner’s book. Then they exchange back, and the person who drew the angle checks the
measurement of their partner.
4. Move around, check for understanding and clear misconceptions where necessary.
Examples:
Closing (3 minutes)
1. Write a problem on the board: Without using protractor, try to draw angles of the following
sizes. (a) 450 (b) 1200
2. Ask pupils to try drawing the angles. After trying, they can check their work with a protractor.
Examples:
450
Q
P O
O
S
R 1200
O
F
G 1200
360
C
W O
X
Y Z
90
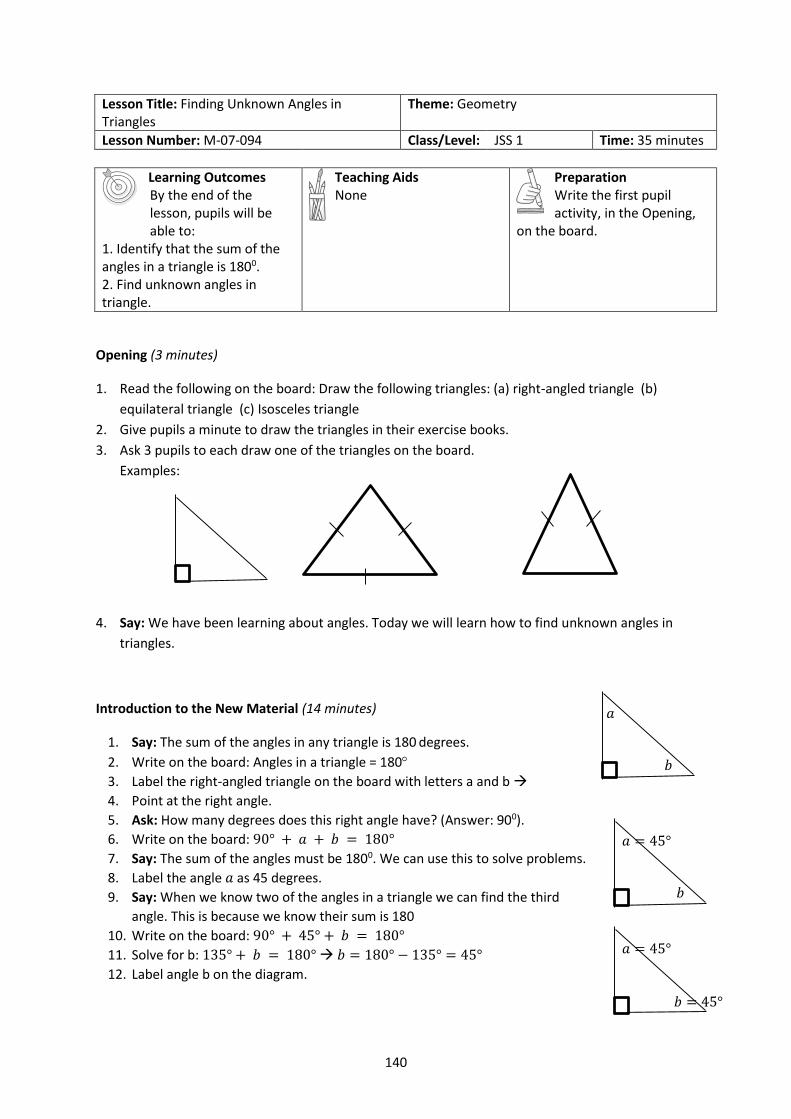
140
Lesson Title: Finding Unknown Angles in Triangles
Theme: Geometry
Lesson Number: M-07-094 Class/Level: JSS 1 Time: 35 minutes
Learning Outcomes By the end of the lesson, pupils will be able to:
1. Identify that the sum of the angles in a triangle is 1800. 2. Find unknown angles in triangle.
Teaching Aids None
Preparation Write the first pupil activity, in the Opening,
on the board.
Opening (3 minutes)
1. Read the following on the board: Draw the following triangles: (a) right-angled triangle (b)
equilateral triangle (c) Isosceles triangle
2. Give pupils a minute to draw the triangles in their exercise books.
3. Ask 3 pupils to each draw one of the triangles on the board.
Examples:
4. Say: We have been learning about angles. Today we will learn how to find unknown angles in
triangles.
Introduction to the New Material (14 minutes)
1. Say: The sum of the angles in any triangle is 180 degrees.
2. Write on the board: Angles in a triangle = 180
3. Label the right-angled triangle on the board with letters a and b
4. Point at the right angle.
5. Ask: How many degrees does this right angle have? (Answer: 900).
6. Write on the board: 90° + 𝑎 + 𝑏 = 180°
7. Say: The sum of the angles must be 1800. We can use this to solve problems.
8. Label the angle 𝑎 as 45 degrees.
9. Say: When we know two of the angles in a triangle we can find the third
angle. This is because we know their sum is 180
10. Write on the board: 90° + 45° + 𝑏 = 180°
11. Solve for b: 135° + 𝑏 = 180° 𝑏 = 180° − 135° = 45°
12. Label angle b on the diagram.
𝑎
𝑏
𝑎 = 45°
𝑏
𝑎 = 45°
𝑏 = 45°
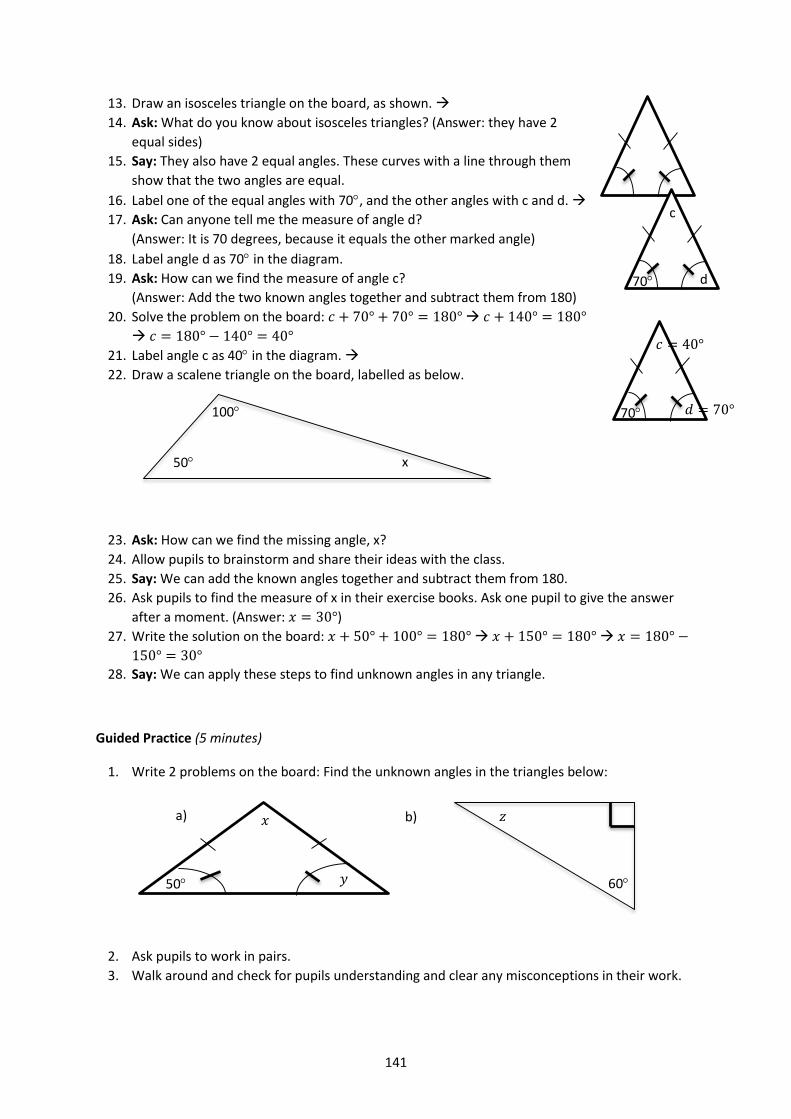
141
13. Draw an isosceles triangle on the board, as shown.
14. Ask: What do you know about isosceles triangles? (Answer: they have 2
equal sides)
15. Say: They also have 2 equal angles. These curves with a line through them
show that the two angles are equal.
16. Label one of the equal angles with 70, and the other angles with c and d.
17. Ask: Can anyone tell me the measure of angle d?
(Answer: It is 70 degrees, because it equals the other marked angle)
18. Label angle d as 70 in the diagram.
19. Ask: How can we find the measure of angle c?
(Answer: Add the two known angles together and subtract them from 180)
20. Solve the problem on the board: 𝑐 + 70° + 70° = 180° 𝑐 + 140° = 180°
𝑐 = 180° − 140° = 40°
21. Label angle c as 40 in the diagram.
22. Draw a scalene triangle on the board, labelled as below.
23. Ask: How can we find the missing angle, x?
24. Allow pupils to brainstorm and share their ideas with the class.
25. Say: We can add the known angles together and subtract them from 180.
26. Ask pupils to find the measure of x in their exercise books. Ask one pupil to give the answer
after a moment. (Answer: 𝑥 = 30°)
27. Write the solution on the board: 𝑥 + 50° + 100° = 180° 𝑥 + 150° = 180° 𝑥 = 180° −
150° = 30°
28. Say: We can apply these steps to find unknown angles in any triangle.
Guided Practice (5 minutes)
1. Write 2 problems on the board: Find the unknown angles in the triangles below:
2. Ask pupils to work in pairs.
3. Walk around and check for pupils understanding and clear any misconceptions in their work.
a)
70
c
d
70
𝑐 = 40°
𝑑 = 70° 100
50 x
50
𝑥
𝑦
b)
60
𝑧
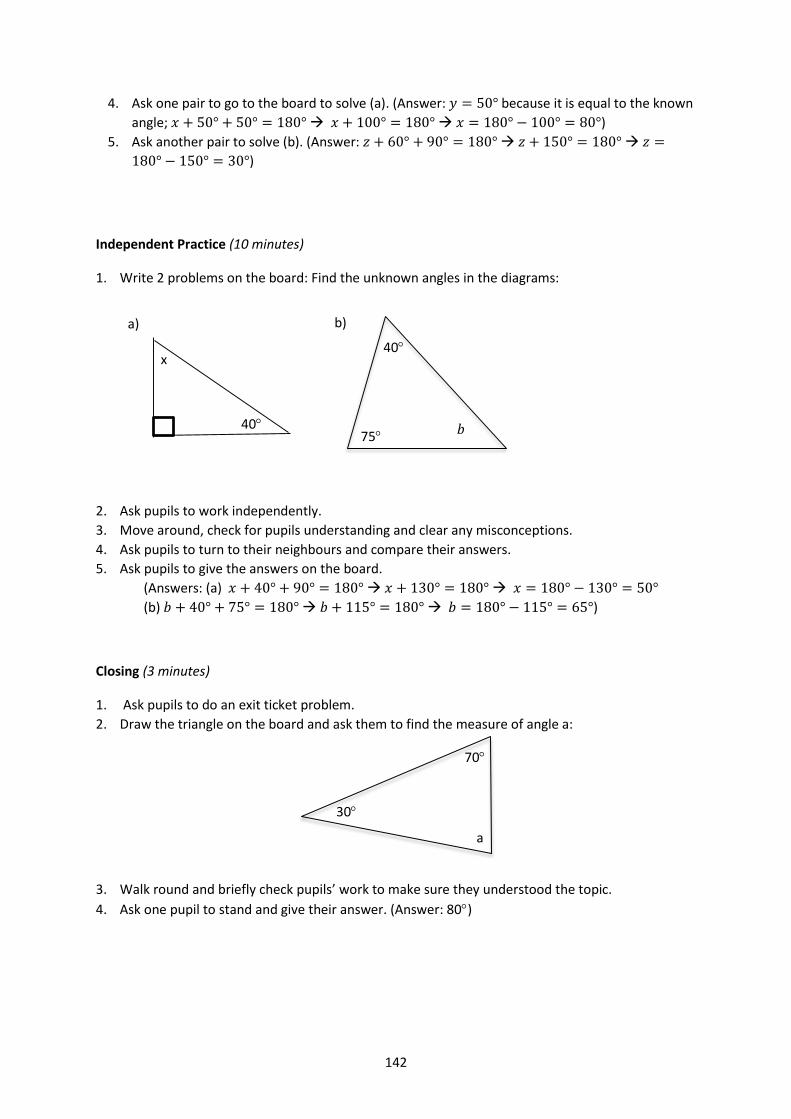
142
4. Ask one pair to go to the board to solve (a). (Answer: 𝑦 = 50° because it is equal to the known
angle; 𝑥 + 50° + 50° = 180° 𝑥 + 100° = 180° 𝑥 = 180° − 100° = 80°)
5. Ask another pair to solve (b). (Answer: 𝑧 + 60° + 90° = 180° 𝑧 + 150° = 180° 𝑧 =
180° − 150° = 30°)
Independent Practice (10 minutes)
1. Write 2 problems on the board: Find the unknown angles in the diagrams:
2. Ask pupils to work independently.
3. Move around, check for pupils understanding and clear any misconceptions.
4. Ask pupils to turn to their neighbours and compare their answers.
5. Ask pupils to give the answers on the board.
(Answers: (a) 𝑥 + 40° + 90° = 180° 𝑥 + 130° = 180° 𝑥 = 180° − 130° = 50°
(b) 𝑏 + 40° + 75° = 180° 𝑏 + 115° = 180° 𝑏 = 180° − 115° = 65°)
Closing (3 minutes)
1. Ask pupils to do an exit ticket problem.
2. Draw the triangle on the board and ask them to find the measure of angle a:
3. Walk round and briefly check pupils’ work to make sure they understood the topic.
4. Ask one pupil to stand and give their answer. (Answer: 80)
x
40
a) b)
75
40
𝑏
70
30
a
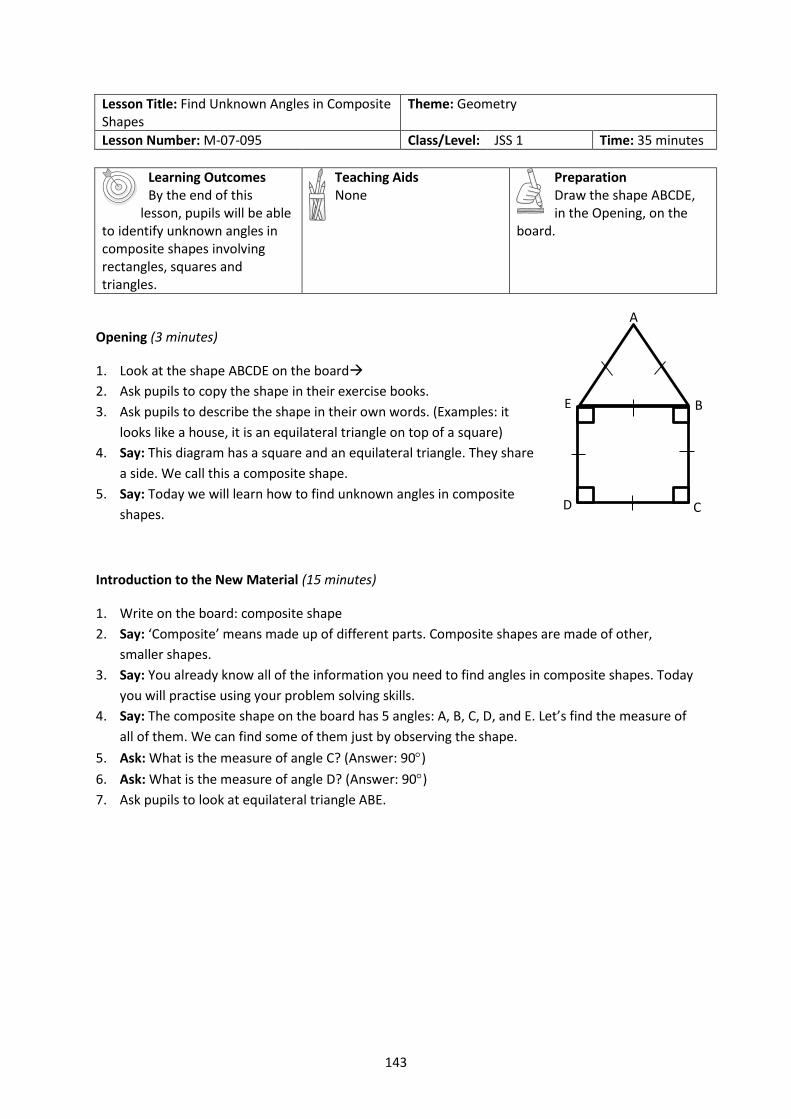
143
Lesson Title: Find Unknown Angles in Composite Shapes
Theme: Geometry
Lesson Number: M-07-095 Class/Level: JSS 1 Time: 35 minutes
Learning Outcomes By the end of this
lesson, pupils will be able to identify unknown angles in composite shapes involving rectangles, squares and triangles.
Teaching Aids None
Preparation Draw the shape ABCDE, in the Opening, on the
board.
Opening (3 minutes)
1. Look at the shape ABCDE on the board
2. Ask pupils to copy the shape in their exercise books.
3. Ask pupils to describe the shape in their own words. (Examples: it
looks like a house, it is an equilateral triangle on top of a square)
4. Say: This diagram has a square and an equilateral triangle. They share
a side. We call this a composite shape.
5. Say: Today we will learn how to find unknown angles in composite
shapes.
Introduction to the New Material (15 minutes)
1. Write on the board: composite shape
2. Say: ‘Composite’ means made up of different parts. Composite shapes are made of other,
smaller shapes.
3. Say: You already know all of the information you need to find angles in composite shapes. Today
you will practise using your problem solving skills.
4. Say: The composite shape on the board has 5 angles: A, B, C, D, and E. Let’s find the measure of
all of them. We can find some of them just by observing the shape.
5. Ask: What is the measure of angle C? (Answer: 90)
6. Ask: What is the measure of angle D? (Answer: 90)
7. Ask pupils to look at equilateral triangle ABE.
A
B
C D
E
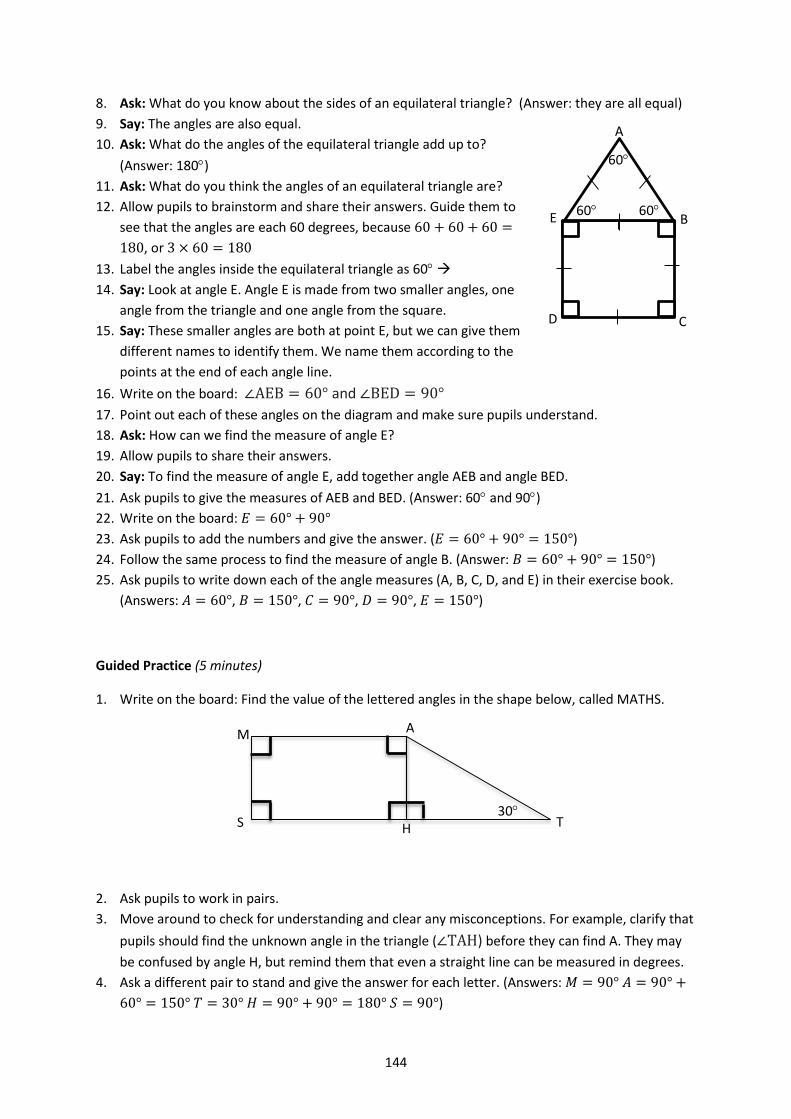
144
8. Ask: What do you know about the sides of an equilateral triangle? (Answer: they are all equal)
9. Say: The angles are also equal.
10. Ask: What do the angles of the equilateral triangle add up to?
(Answer: 180)
11. Ask: What do you think the angles of an equilateral triangle are?
12. Allow pupils to brainstorm and share their answers. Guide them to
see that the angles are each 60 degrees, because 60 + 60 + 60 =
180, or 3 × 60 = 180
13. Label the angles inside the equilateral triangle as 60
14. Say: Look at angle E. Angle E is made from two smaller angles, one
angle from the triangle and one angle from the square.
15. Say: These smaller angles are both at point E, but we can give them
different names to identify them. We name them according to the
points at the end of each angle line.
16. Write on the board: ∠AEB = 60° and ∠BED = 90°
17. Point out each of these angles on the diagram and make sure pupils understand.
18. Ask: How can we find the measure of angle E?
19. Allow pupils to share their answers.
20. Say: To find the measure of angle E, add together angle AEB and angle BED.
21. Ask pupils to give the measures of AEB and BED. (Answer: 60 and 90)
22. Write on the board: 𝐸 = 60° + 90°
23. Ask pupils to add the numbers and give the answer. (𝐸 = 60° + 90° = 150°)
24. Follow the same process to find the measure of angle B. (Answer: 𝐵 = 60° + 90° = 150°)
25. Ask pupils to write down each of the angle measures (A, B, C, D, and E) in their exercise book.
(Answers: 𝐴 = 60°, 𝐵 = 150°, 𝐶 = 90°, 𝐷 = 90°, 𝐸 = 150°)
Guided Practice (5 minutes)
1. Write on the board: Find the value of the lettered angles in the shape below, called MATHS.
2. Ask pupils to work in pairs.
3. Move around to check for understanding and clear any misconceptions. For example, clarify that
pupils should find the unknown angle in the triangle (∠TAH) before they can find A. They may
be confused by angle H, but remind them that even a straight line can be measured in degrees.
4. Ask a different pair to stand and give the answer for each letter. (Answers: 𝑀 = 90° 𝐴 = 90° +
60° = 150° 𝑇 = 30° 𝐻 = 90° + 90° = 180° 𝑆 = 90°)
A
B
C D
E 60 60
60
30 S
M A
H T
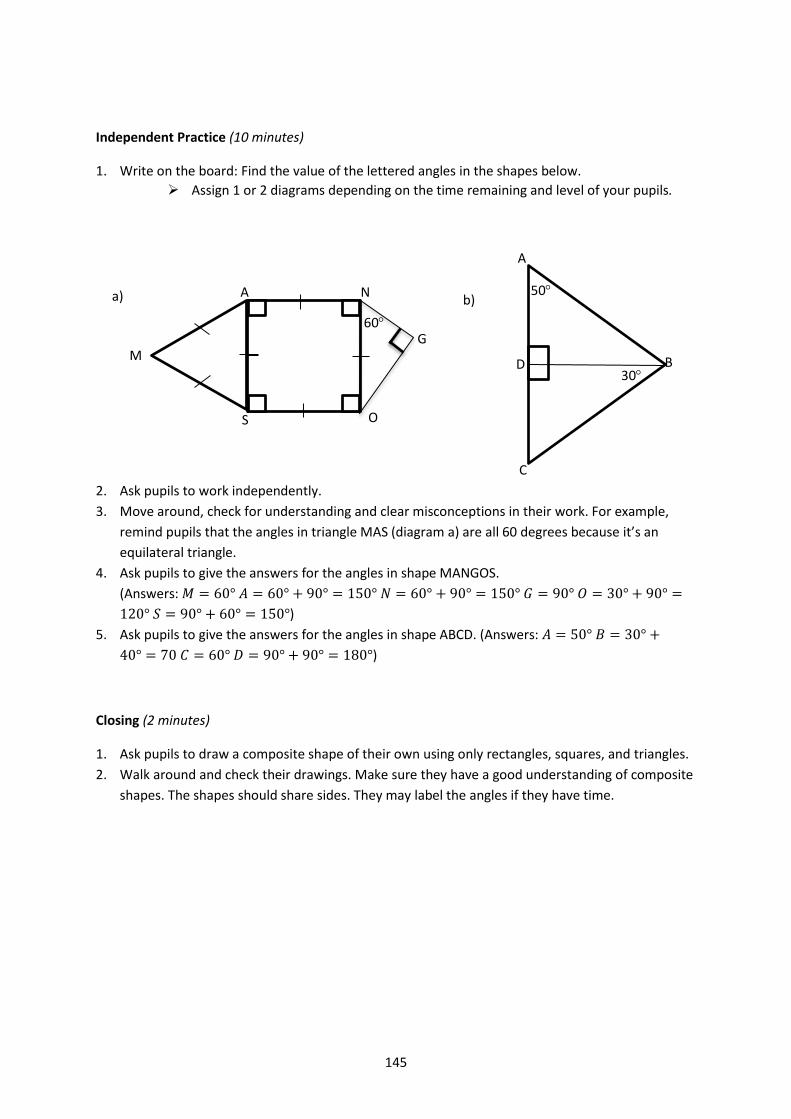
145
Independent Practice (10 minutes)
1. Write on the board: Find the value of the lettered angles in the shapes below.
Assign 1 or 2 diagrams depending on the time remaining and level of your pupils.
2. Ask pupils to work independently.
3. Move around, check for understanding and clear misconceptions in their work. For example,
remind pupils that the angles in triangle MAS (diagram a) are all 60 degrees because it’s an
equilateral triangle.
4. Ask pupils to give the answers for the angles in shape MANGOS.
(Answers: 𝑀 = 60° 𝐴 = 60° + 90° = 150° 𝑁 = 60° + 90° = 150° 𝐺 = 90° 𝑂 = 30° + 90° =
120° 𝑆 = 90° + 60° = 150°)
5. Ask pupils to give the answers for the angles in shape ABCD. (Answers: 𝐴 = 50° 𝐵 = 30° +
40° = 70 𝐶 = 60° 𝐷 = 90° + 90° = 180°)
Closing (2 minutes)
1. Ask pupils to draw a composite shape of their own using only rectangles, squares, and triangles.
2. Walk around and check their drawings. Make sure they have a good understanding of composite
shapes. The shapes should share sides. They may label the angles if they have time.
b)
A
B
C
30
50
D
a)
60
M
A N
G
O S
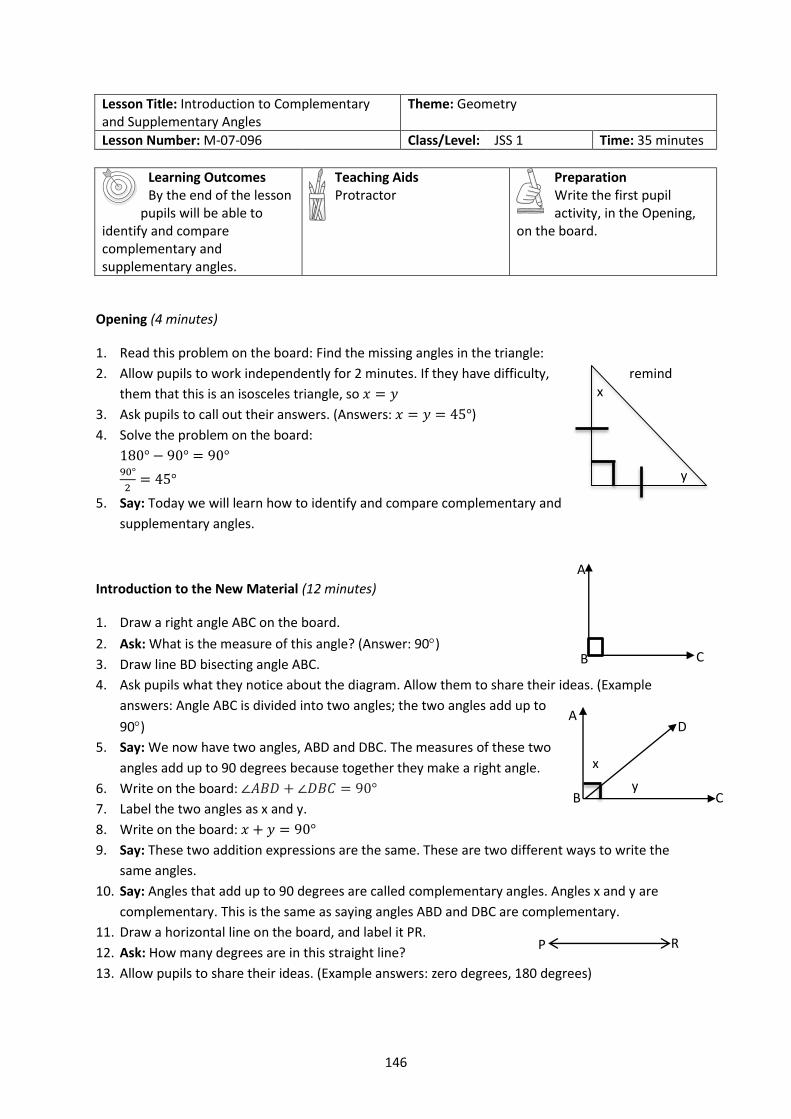
146
Lesson Title: Introduction to Complementary and Supplementary Angles
Theme: Geometry
Lesson Number: M-07-096 Class/Level: JSS 1 Time: 35 minutes
Learning Outcomes By the end of the lesson
pupils will be able to identify and compare complementary and supplementary angles.
Teaching Aids Protractor
Preparation Write the first pupil activity, in the Opening,
on the board.
Opening (4 minutes)
1. Read this problem on the board: Find the missing angles in the triangle:
2. Allow pupils to work independently for 2 minutes. If they have difficulty, remind
them that this is an isosceles triangle, so 𝑥 = 𝑦
3. Ask pupils to call out their answers. (Answers: 𝑥 = 𝑦 = 45°)
4. Solve the problem on the board:
180° − 90° = 90° 90°
2= 45°
5. Say: Today we will learn how to identify and compare complementary and
supplementary angles.
Introduction to the New Material (12 minutes)
1. Draw a right angle ABC on the board.
2. Ask: What is the measure of this angle? (Answer: 90)
3. Draw line BD bisecting angle ABC.
4. Ask pupils what they notice about the diagram. Allow them to share their ideas. (Example
answers: Angle ABC is divided into two angles; the two angles add up to
90)
5. Say: We now have two angles, ABD and DBC. The measures of these two
angles add up to 90 degrees because together they make a right angle.
6. Write on the board: ∠𝐴𝐵𝐷 + ∠𝐷𝐵𝐶 = 90°
7. Label the two angles as x and y.
8. Write on the board: 𝑥 + 𝑦 = 90°
9. Say: These two addition expressions are the same. These are two different ways to write the
same angles.
10. Say: Angles that add up to 90 degrees are called complementary angles. Angles x and y are
complementary. This is the same as saying angles ABD and DBC are complementary.
11. Draw a horizontal line on the board, and label it PR.
12. Ask: How many degrees are in this straight line?
13. Allow pupils to share their ideas. (Example answers: zero degrees, 180 degrees)
A
C B
x
y
P R
A D
x
y C B
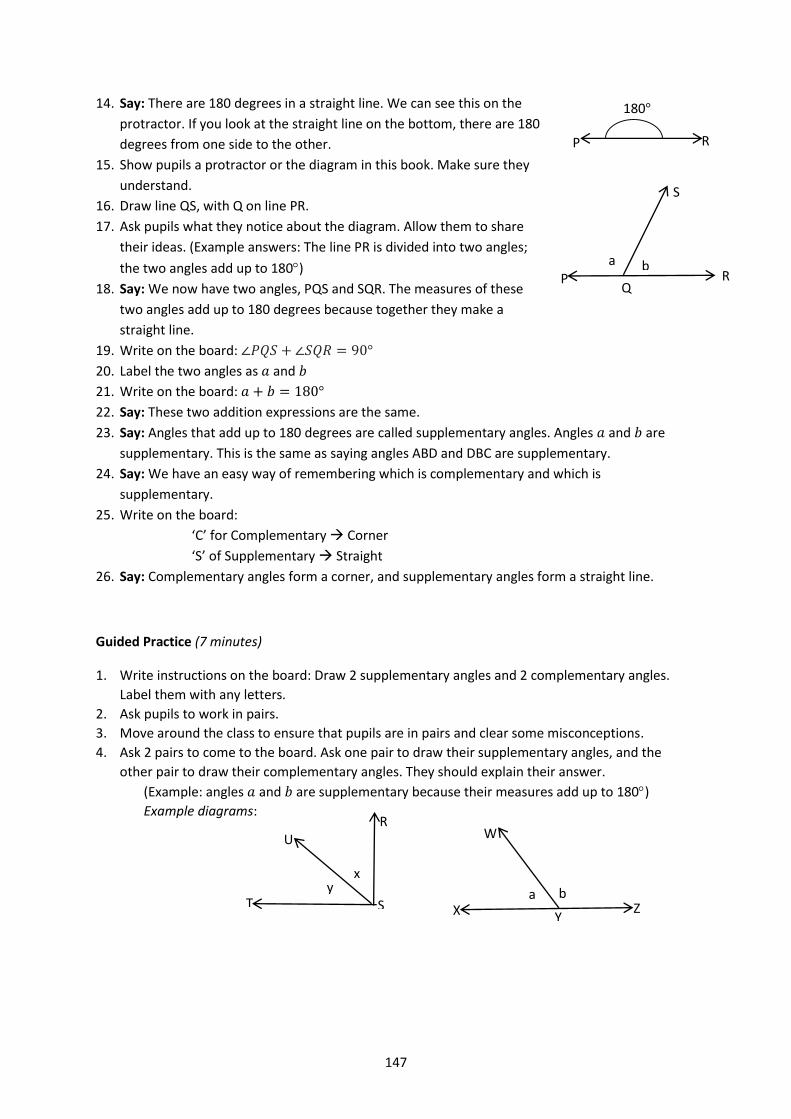
147
14. Say: There are 180 degrees in a straight line. We can see this on the
protractor. If you look at the straight line on the bottom, there are 180
degrees from one side to the other.
15. Show pupils a protractor or the diagram in this book. Make sure they
understand.
16. Draw line QS, with Q on line PR.
17. Ask pupils what they notice about the diagram. Allow them to share
their ideas. (Example answers: The line PR is divided into two angles;
the two angles add up to 180)
18. Say: We now have two angles, PQS and SQR. The measures of these
two angles add up to 180 degrees because together they make a
straight line.
19. Write on the board: ∠𝑃𝑄𝑆 + ∠𝑆𝑄𝑅 = 90°
20. Label the two angles as 𝑎 and 𝑏
21. Write on the board: 𝑎 + 𝑏 = 180°
22. Say: These two addition expressions are the same.
23. Say: Angles that add up to 180 degrees are called supplementary angles. Angles 𝑎 and 𝑏 are
supplementary. This is the same as saying angles ABD and DBC are supplementary.
24. Say: We have an easy way of remembering which is complementary and which is
supplementary.
25. Write on the board:
‘C’ for Complementary Corner
‘S’ of Supplementary Straight
26. Say: Complementary angles form a corner, and supplementary angles form a straight line.
Guided Practice (7 minutes)
1. Write instructions on the board: Draw 2 supplementary angles and 2 complementary angles.
Label them with any letters.
2. Ask pupils to work in pairs.
3. Move around the class to ensure that pupils are in pairs and clear some misconceptions.
4. Ask 2 pairs to come to the board. Ask one pair to draw their supplementary angles, and the
other pair to draw their complementary angles. They should explain their answer.
(Example: angles 𝑎 and 𝑏 are supplementary because their measures add up to 180)
Example diagrams:
R U
T S y
x
W
X Z Y
a b
180°
P R
S
RP
Q
a b
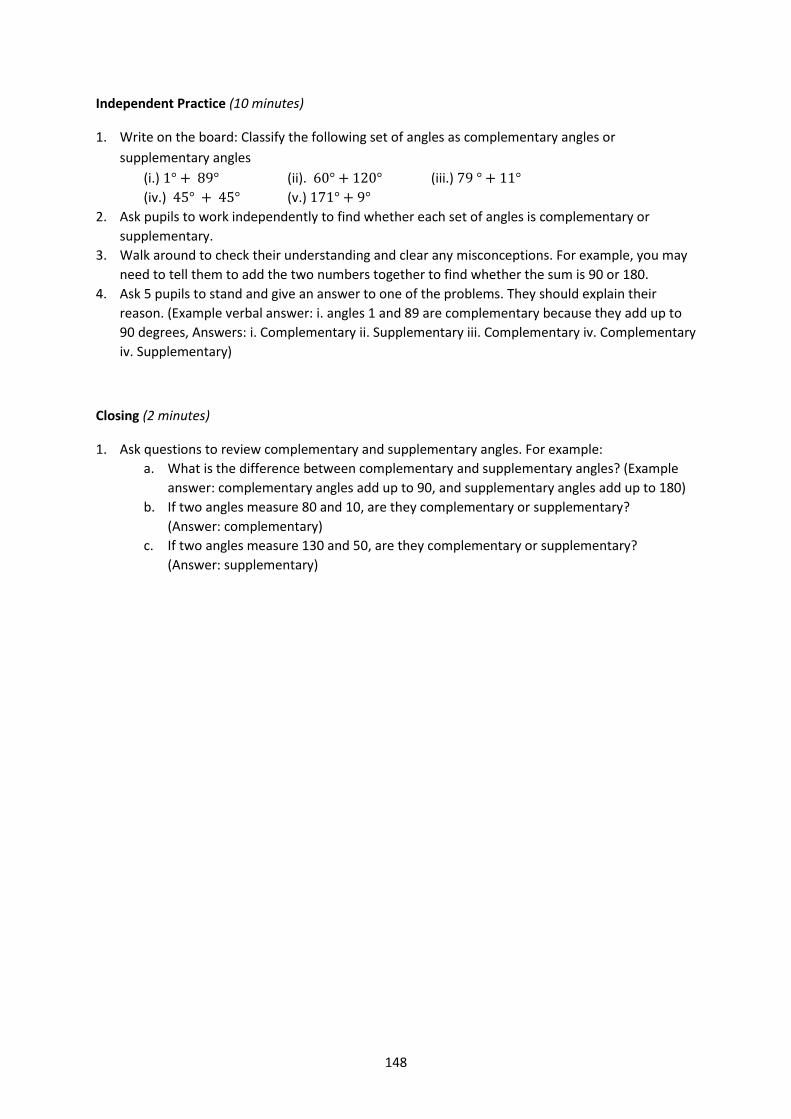
148
Independent Practice (10 minutes)
1. Write on the board: Classify the following set of angles as complementary angles or
supplementary angles
(i.) 1° + 89° (ii). 60° + 120° (iii.) 79 ° + 11°
(iv.) 45° + 45° (v.) 171° + 9°
2. Ask pupils to work independently to find whether each set of angles is complementary or
supplementary.
3. Walk around to check their understanding and clear any misconceptions. For example, you may
need to tell them to add the two numbers together to find whether the sum is 90 or 180.
4. Ask 5 pupils to stand and give an answer to one of the problems. They should explain their
reason. (Example verbal answer: i. angles 1 and 89 are complementary because they add up to
90 degrees, Answers: i. Complementary ii. Supplementary iii. Complementary iv. Complementary
iv. Supplementary)
Closing (2 minutes)
1. Ask questions to review complementary and supplementary angles. For example:
a. What is the difference between complementary and supplementary angles? (Example
answer: complementary angles add up to 90, and supplementary angles add up to 180)
b. If two angles measure 80 and 10, are they complementary or supplementary?
(Answer: complementary)
c. If two angles measure 130 and 50, are they complementary or supplementary?
(Answer: supplementary)
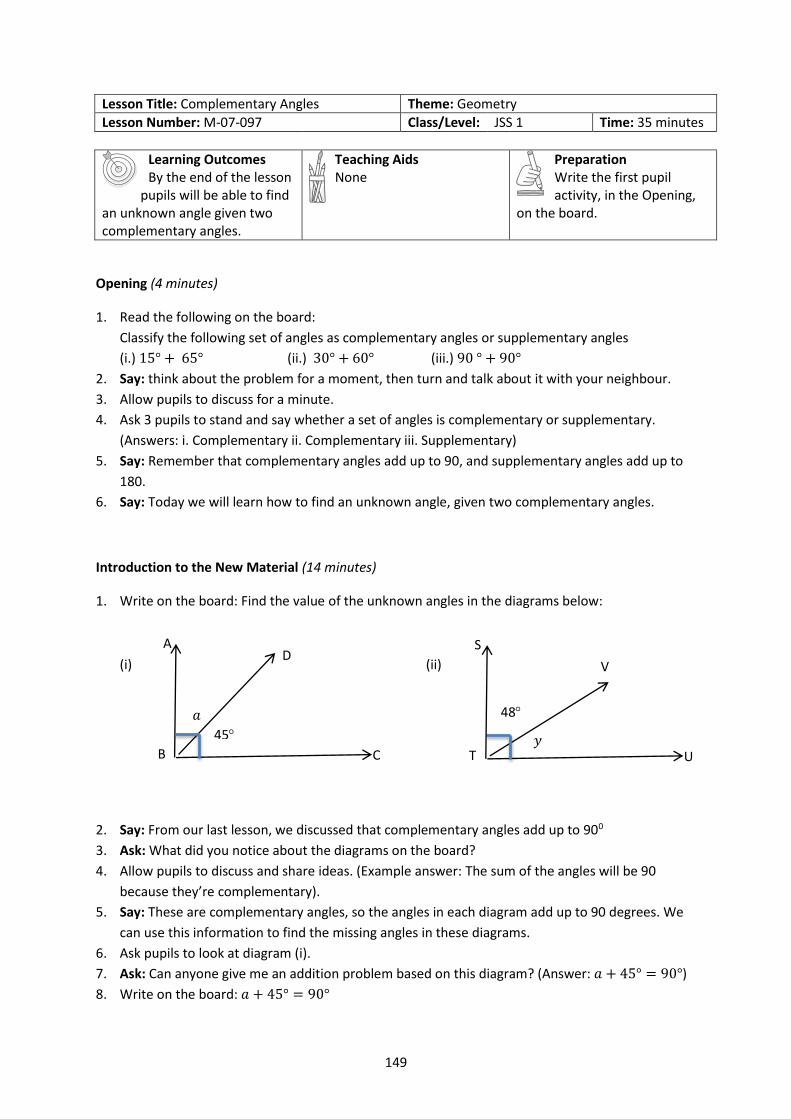
149
Lesson Title: Complementary Angles Theme: Geometry
Lesson Number: M-07-097 Class/Level: JSS 1 Time: 35 minutes
Learning Outcomes By the end of the lesson
pupils will be able to find an unknown angle given two complementary angles.
Teaching Aids None
Preparation Write the first pupil activity, in the Opening,
on the board.
Opening (4 minutes)
1. Read the following on the board:
Classify the following set of angles as complementary angles or supplementary angles
(i.) 15° + 65° (ii.) 30° + 60° (iii.) 90 ° + 90°
2. Say: think about the problem for a moment, then turn and talk about it with your neighbour.
3. Allow pupils to discuss for a minute.
4. Ask 3 pupils to stand and say whether a set of angles is complementary or supplementary.
(Answers: i. Complementary ii. Complementary iii. Supplementary)
5. Say: Remember that complementary angles add up to 90, and supplementary angles add up to
180.
6. Say: Today we will learn how to find an unknown angle, given two complementary angles.
Introduction to the New Material (14 minutes)
1. Write on the board: Find the value of the unknown angles in the diagrams below:
(i) (ii)
2. Say: From our last lesson, we discussed that complementary angles add up to 900
3. Ask: What did you notice about the diagrams on the board?
4. Allow pupils to discuss and share ideas. (Example answer: The sum of the angles will be 90
because they’re complementary).
5. Say: These are complementary angles, so the angles in each diagram add up to 90 degrees. We
can use this information to find the missing angles in these diagrams.
6. Ask pupils to look at diagram (i).
7. Ask: Can anyone give me an addition problem based on this diagram? (Answer: 𝑎 + 45° = 90°)
8. Write on the board: 𝑎 + 45° = 90°
A
B
B
D
C
𝑎
45
S
T
V
U
48
𝑦
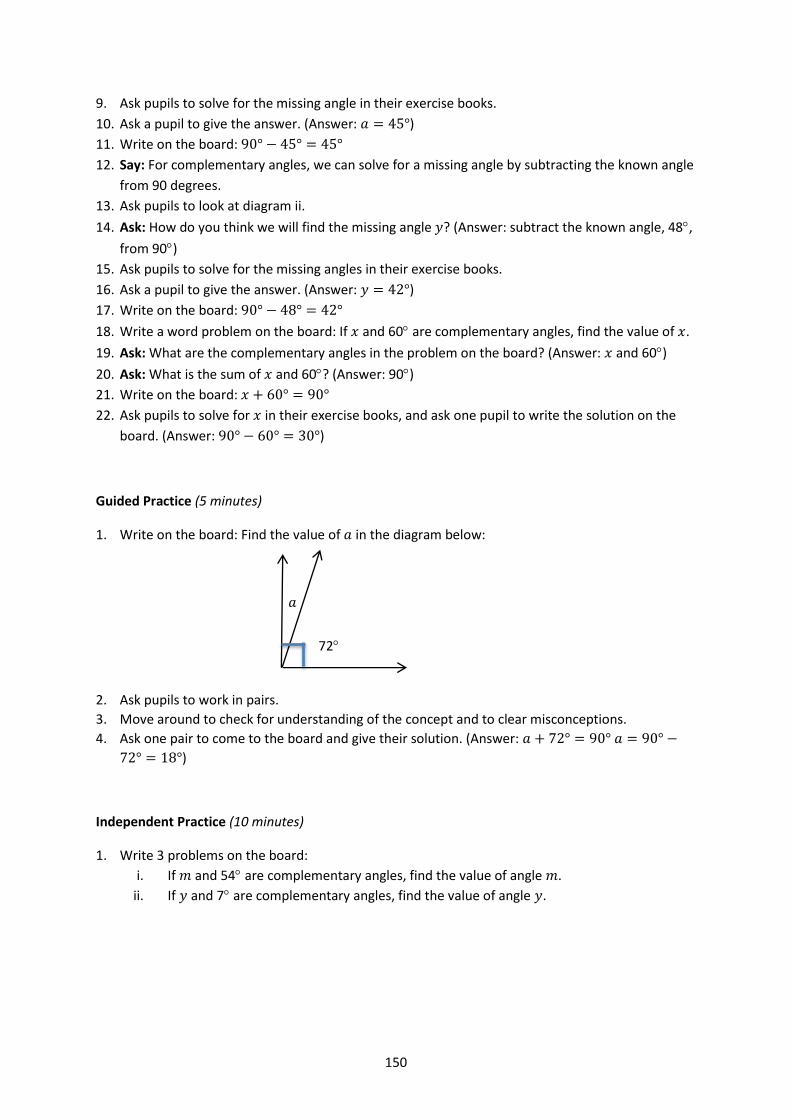
150
9. Ask pupils to solve for the missing angle in their exercise books.
10. Ask a pupil to give the answer. (Answer: 𝑎 = 45°)
11. Write on the board: 90° − 45° = 45°
12. Say: For complementary angles, we can solve for a missing angle by subtracting the known angle
from 90 degrees.
13. Ask pupils to look at diagram ii.
14. Ask: How do you think we will find the missing angle 𝑦? (Answer: subtract the known angle, 48,
from 90)
15. Ask pupils to solve for the missing angles in their exercise books.
16. Ask a pupil to give the answer. (Answer: 𝑦 = 42°)
17. Write on the board: 90° − 48° = 42°
18. Write a word problem on the board: If 𝑥 and 60 are complementary angles, find the value of 𝑥.
19. Ask: What are the complementary angles in the problem on the board? (Answer: 𝑥 and 60)
20. Ask: What is the sum of 𝑥 and 60? (Answer: 90)
21. Write on the board: 𝑥 + 60° = 90°
22. Ask pupils to solve for 𝑥 in their exercise books, and ask one pupil to write the solution on the
board. (Answer: 90° − 60° = 30°)
Guided Practice (5 minutes)
1. Write on the board: Find the value of 𝑎 in the diagram below:
2. Ask pupils to work in pairs.
3. Move around to check for understanding of the concept and to clear misconceptions.
4. Ask one pair to come to the board and give their solution. (Answer: 𝑎 + 72° = 90° 𝑎 = 90° −
72° = 18°)
Independent Practice (10 minutes)
1. Write 3 problems on the board:
i. If 𝑚 and 54 are complementary angles, find the value of angle 𝑚.
ii. If 𝑦 and 7 are complementary angles, find the value of angle 𝑦.
72
𝑎
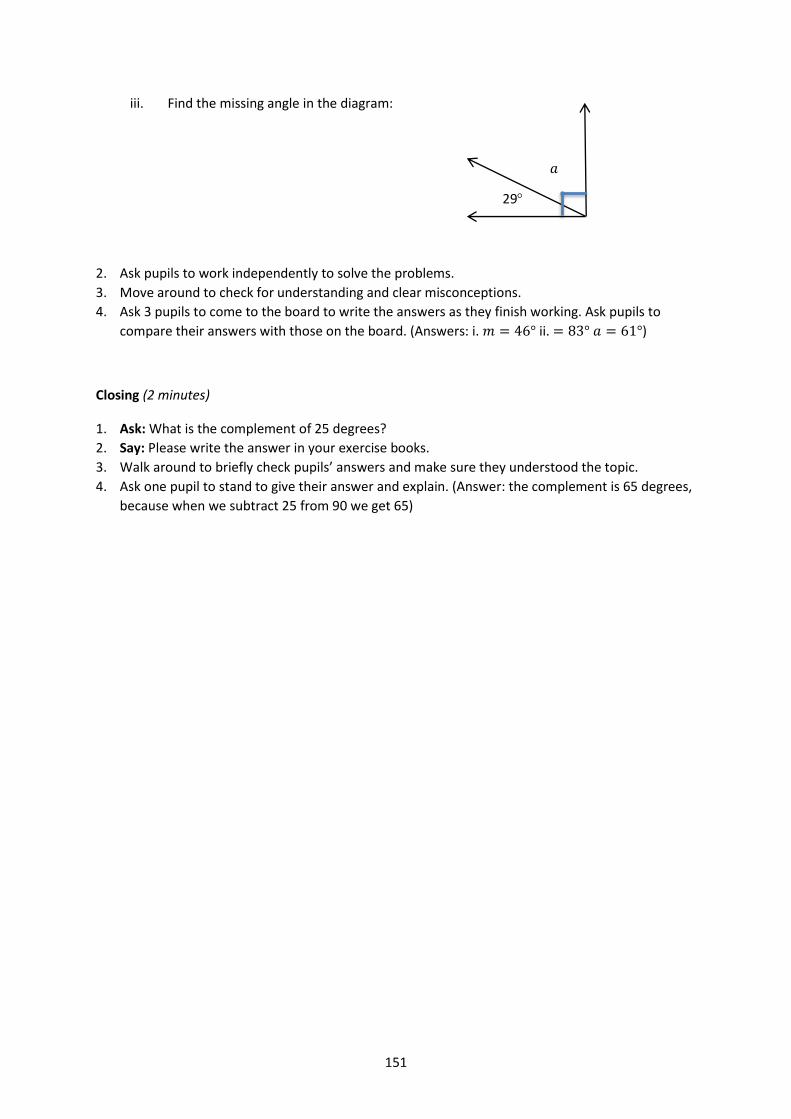
151
iii. Find the missing angle in the diagram:
2. Ask pupils to work independently to solve the problems.
3. Move around to check for understanding and clear misconceptions.
4. Ask 3 pupils to come to the board to write the answers as they finish working. Ask pupils to
compare their answers with those on the board. (Answers: i. 𝑚 = 46° ii. = 83° 𝑎 = 61°)
Closing (2 minutes)
1. Ask: What is the complement of 25 degrees?
2. Say: Please write the answer in your exercise books.
3. Walk around to briefly check pupils’ answers and make sure they understood the topic.
4. Ask one pupil to stand to give their answer and explain. (Answer: the complement is 65 degrees,
because when we subtract 25 from 90 we get 65)
29
𝑎
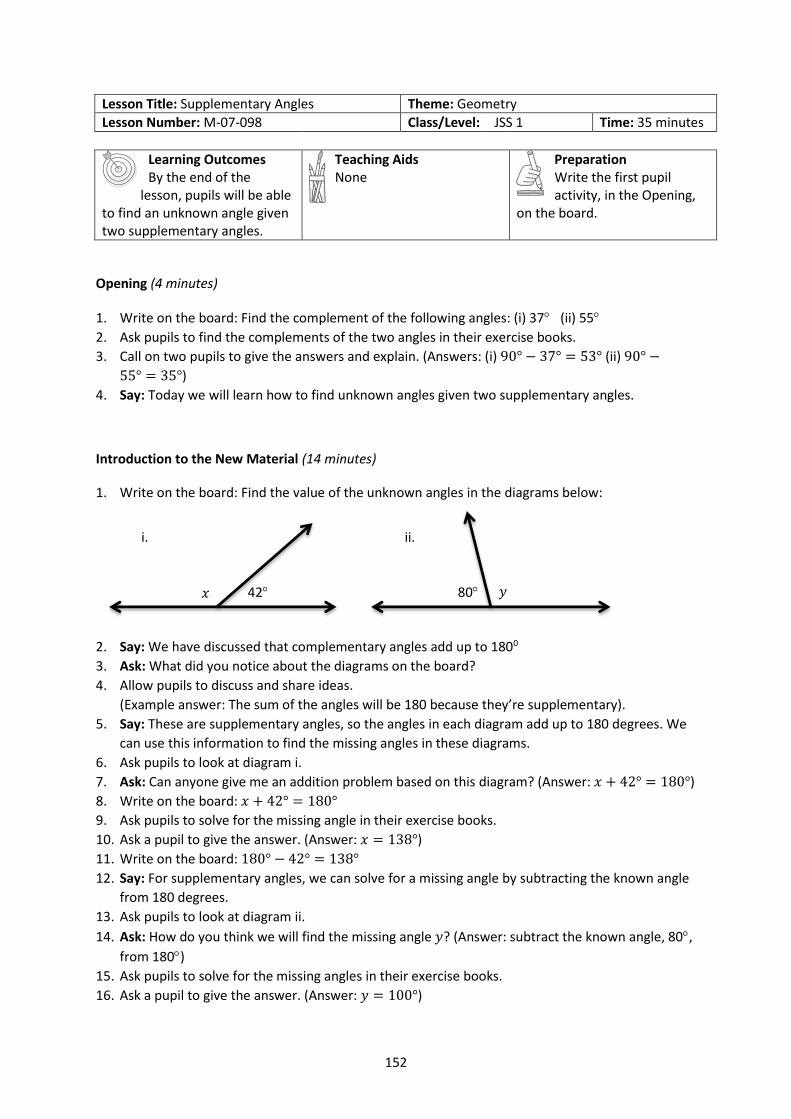
152
Lesson Title: Supplementary Angles Theme: Geometry
Lesson Number: M-07-098 Class/Level: JSS 1 Time: 35 minutes
Learning Outcomes By the end of the
lesson, pupils will be able to find an unknown angle given two supplementary angles.
Teaching Aids None
Preparation Write the first pupil activity, in the Opening,
on the board.
Opening (4 minutes)
1. Write on the board: Find the complement of the following angles: (i) 37 (ii) 55
2. Ask pupils to find the complements of the two angles in their exercise books.
3. Call on two pupils to give the answers and explain. (Answers: (i) 90° − 37° = 53° (ii) 90° −
55° = 35°)
4. Say: Today we will learn how to find unknown angles given two supplementary angles.
Introduction to the New Material (14 minutes)
1. Write on the board: Find the value of the unknown angles in the diagrams below:
2. Say: We have discussed that complementary angles add up to 1800
3. Ask: What did you notice about the diagrams on the board?
4. Allow pupils to discuss and share ideas.
(Example answer: The sum of the angles will be 180 because they’re supplementary).
5. Say: These are supplementary angles, so the angles in each diagram add up to 180 degrees. We
can use this information to find the missing angles in these diagrams.
6. Ask pupils to look at diagram i.
7. Ask: Can anyone give me an addition problem based on this diagram? (Answer: 𝑥 + 42° = 180°)
8. Write on the board: 𝑥 + 42° = 180°
9. Ask pupils to solve for the missing angle in their exercise books.
10. Ask a pupil to give the answer. (Answer: 𝑥 = 138°)
11. Write on the board: 180° − 42° = 138°
12. Say: For supplementary angles, we can solve for a missing angle by subtracting the known angle
from 180 degrees.
13. Ask pupils to look at diagram ii.
14. Ask: How do you think we will find the missing angle 𝑦? (Answer: subtract the known angle, 80,
from 180)
15. Ask pupils to solve for the missing angles in their exercise books.
16. Ask a pupil to give the answer. (Answer: 𝑦 = 100°)
42 𝑥
i.
80 𝑦
ii.
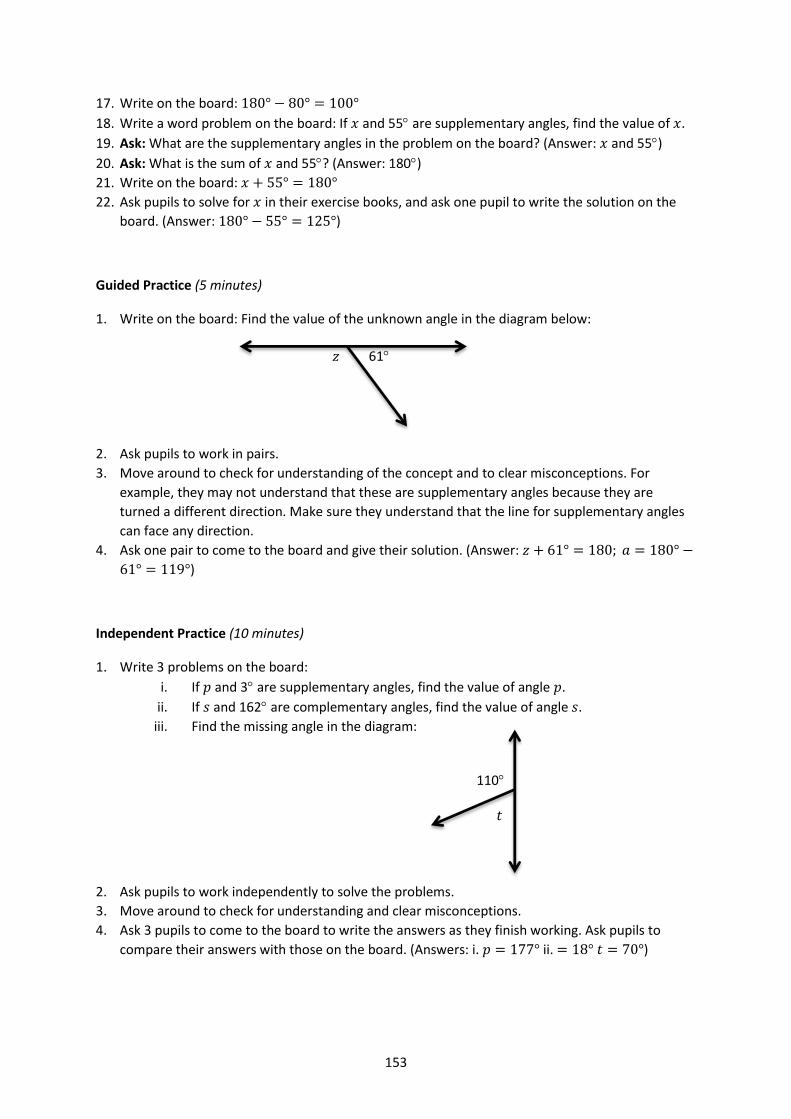
153
17. Write on the board: 180° − 80° = 100°
18. Write a word problem on the board: If 𝑥 and 55 are supplementary angles, find the value of 𝑥.
19. Ask: What are the supplementary angles in the problem on the board? (Answer: 𝑥 and 55)
20. Ask: What is the sum of 𝑥 and 55? (Answer: 180)
21. Write on the board: 𝑥 + 55° = 180°
22. Ask pupils to solve for 𝑥 in their exercise books, and ask one pupil to write the solution on the
board. (Answer: 180° − 55° = 125°)
Guided Practice (5 minutes)
1. Write on the board: Find the value of the unknown angle in the diagram below:
2. Ask pupils to work in pairs.
3. Move around to check for understanding of the concept and to clear misconceptions. For
example, they may not understand that these are supplementary angles because they are
turned a different direction. Make sure they understand that the line for supplementary angles
can face any direction.
4. Ask one pair to come to the board and give their solution. (Answer: 𝑧 + 61° = 180; 𝑎 = 180° −
61° = 119°)
Independent Practice (10 minutes)
1. Write 3 problems on the board:
i. If 𝑝 and 3 are supplementary angles, find the value of angle 𝑝.
ii. If 𝑠 and 162 are complementary angles, find the value of angle 𝑠.
iii. Find the missing angle in the diagram:
2. Ask pupils to work independently to solve the problems.
3. Move around to check for understanding and clear misconceptions.
4. Ask 3 pupils to come to the board to write the answers as they finish working. Ask pupils to
compare their answers with those on the board. (Answers: i. 𝑝 = 177° ii. = 18° 𝑡 = 70°)
61 𝑧
110
𝑡
154
Closing (3 minutes)
1. Ask: What is the supplement of 52 degrees?
2. Say: Please find the answer in your exercise books.
3. Walk around to briefly check pupils’ answers and make sure they understood the topic.
4. Ask one pupil to stand to give their answer and explain. (Answer: the supplement is 128 degrees,
because when we subtract 52 from 180 we get 128)
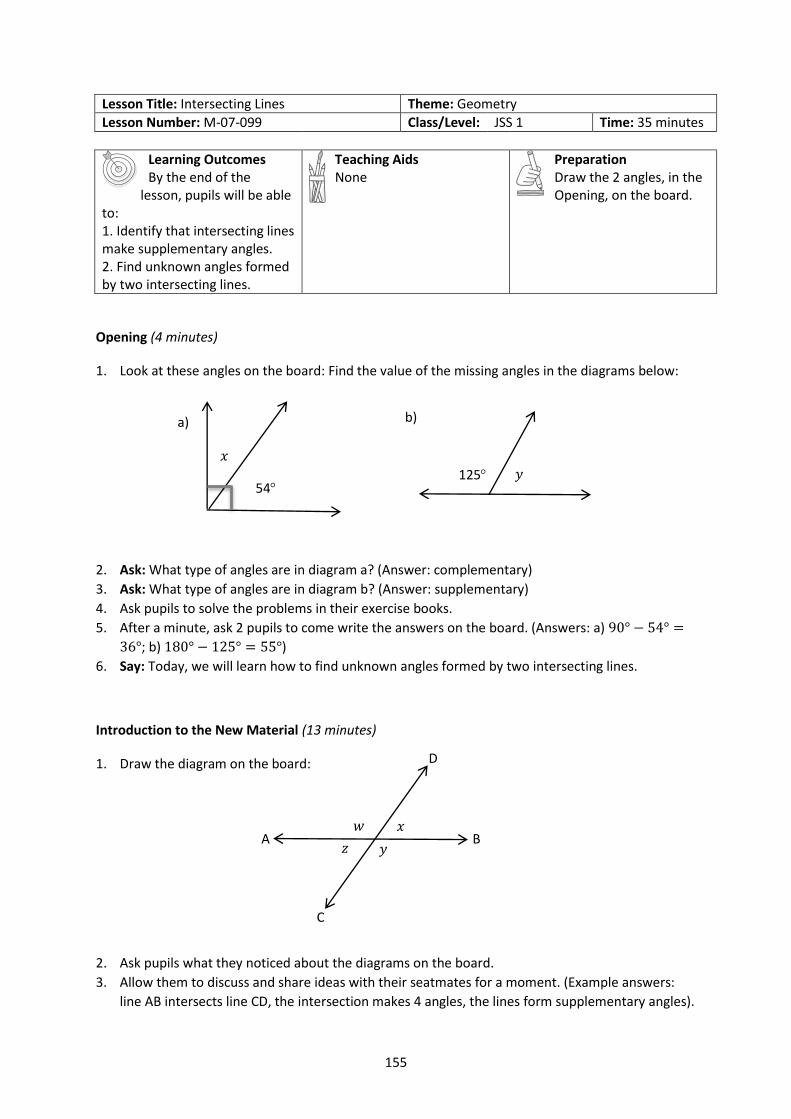
155
Lesson Title: Intersecting Lines Theme: Geometry
Lesson Number: M-07-099 Class/Level: JSS 1 Time: 35 minutes
Learning Outcomes By the end of the
lesson, pupils will be able to: 1. Identify that intersecting lines make supplementary angles. 2. Find unknown angles formed by two intersecting lines.
Teaching Aids None
Preparation Draw the 2 angles, in the Opening, on the board.
Opening (4 minutes)
1. Look at these angles on the board: Find the value of the missing angles in the diagrams below:
2. Ask: What type of angles are in diagram a? (Answer: complementary)
3. Ask: What type of angles are in diagram b? (Answer: supplementary)
4. Ask pupils to solve the problems in their exercise books.
5. After a minute, ask 2 pupils to come write the answers on the board. (Answers: a) 90° − 54° =
36°; b) 180° − 125° = 55°)
6. Say: Today, we will learn how to find unknown angles formed by two intersecting lines.
Introduction to the New Material (13 minutes)
1. Draw the diagram on the board:
2. Ask pupils what they noticed about the diagrams on the board.
3. Allow them to discuss and share ideas with their seatmates for a moment. (Example answers:
line AB intersects line CD, the intersection makes 4 angles, the lines form supplementary angles).
A
D
B
C
𝑧 𝑦
𝑤 𝑥
𝑦 125
b)
54
𝑥
a)
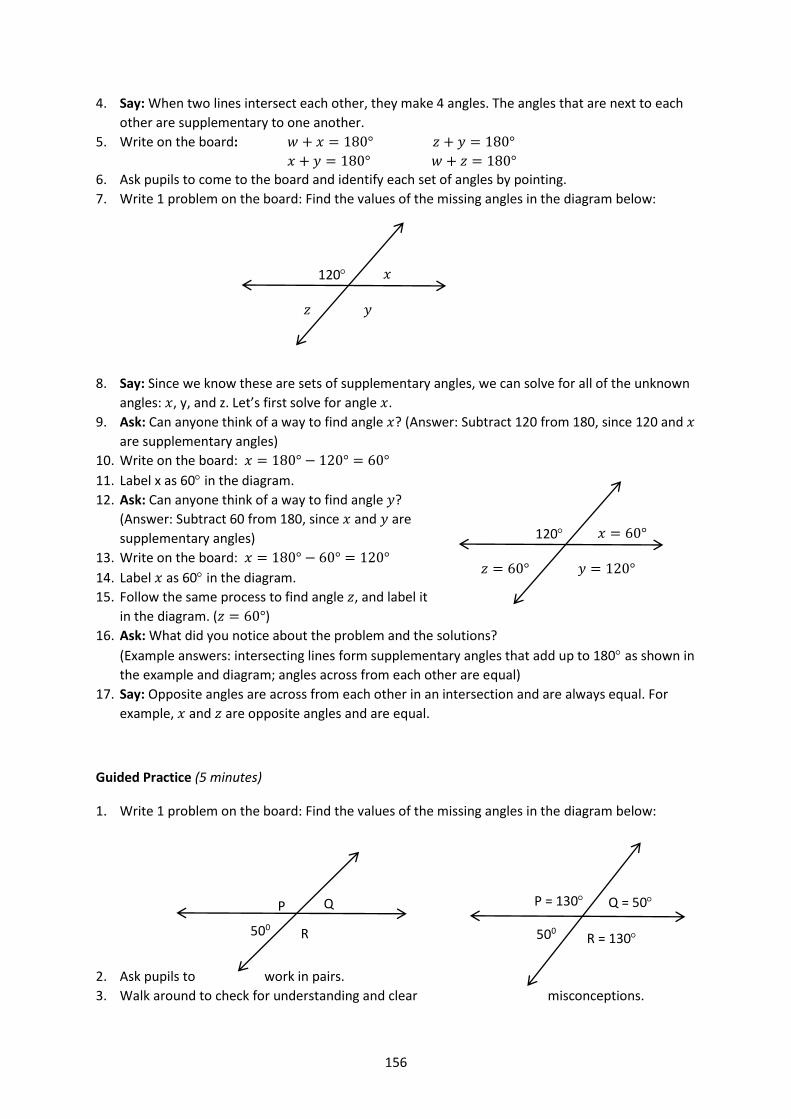
156
4. Say: When two lines intersect each other, they make 4 angles. The angles that are next to each
other are supplementary to one another.
5. Write on the board: 𝑤 + 𝑥 = 180° 𝑧 + 𝑦 = 180°
𝑥 + 𝑦 = 180° 𝑤 + 𝑧 = 180°
6. Ask pupils to come to the board and identify each set of angles by pointing.
7. Write 1 problem on the board: Find the values of the missing angles in the diagram below:
8. Say: Since we know these are sets of supplementary angles, we can solve for all of the unknown
angles: 𝑥, y, and z. Let’s first solve for angle 𝑥.
9. Ask: Can anyone think of a way to find angle 𝑥? (Answer: Subtract 120 from 180, since 120 and 𝑥
are supplementary angles)
10. Write on the board: 𝑥 = 180° − 120° = 60°
11. Label x as 60 in the diagram.
12. Ask: Can anyone think of a way to find angle 𝑦?
(Answer: Subtract 60 from 180, since 𝑥 and 𝑦 are
supplementary angles)
13. Write on the board: 𝑥 = 180° − 60° = 120°
14. Label 𝑥 as 60 in the diagram.
15. Follow the same process to find angle 𝑧, and label it
in the diagram. (𝑧 = 60°)
16. Ask: What did you notice about the problem and the solutions?
(Example answers: intersecting lines form supplementary angles that add up to 180 as shown in
the example and diagram; angles across from each other are equal)
17. Say: Opposite angles are across from each other in an intersection and are always equal. For
example, 𝑥 and 𝑧 are opposite angles and are equal.
Guided Practice (5 minutes)
1. Write 1 problem on the board: Find the values of the missing angles in the diagram below:
2. Ask pupils to work in pairs.
3. Walk around to check for understanding and clear misconceptions.
𝑧 𝑦
120 𝑥
𝑧 = 60° 𝑦 = 120°
120 𝑥 = 60°
500
P Q
R 500
P = 130 Q = 50
R = 130
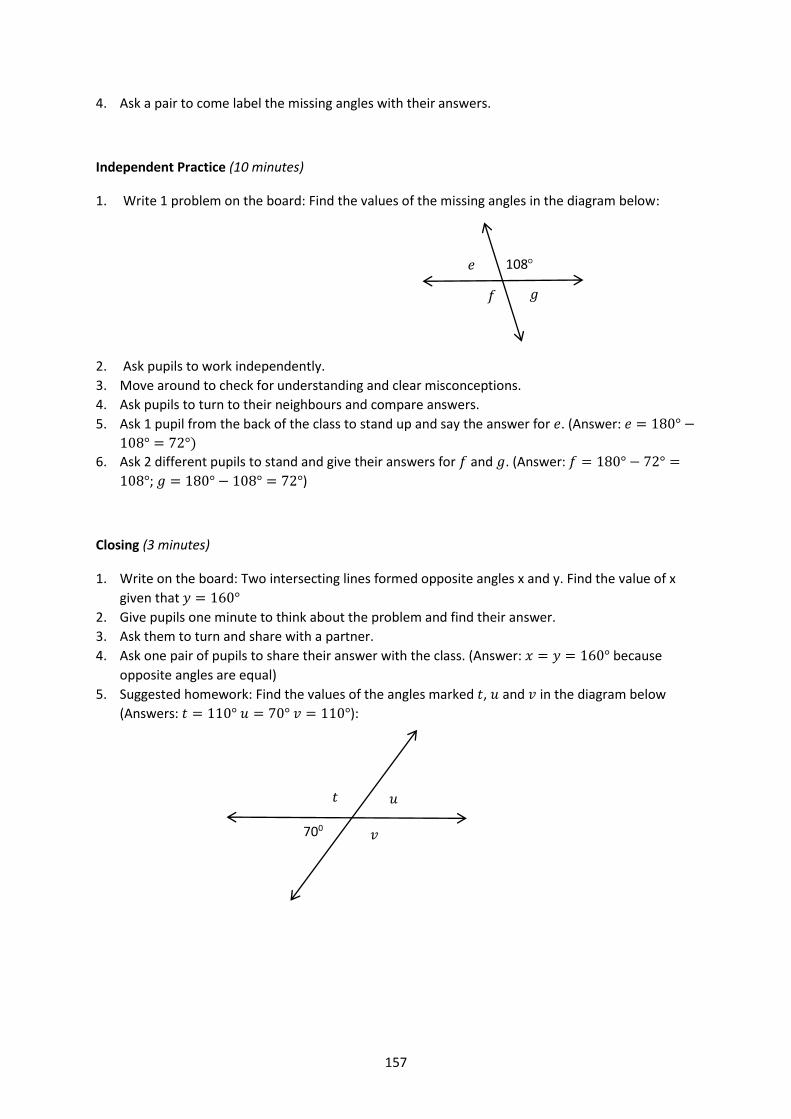
157
4. Ask a pair to come label the missing angles with their answers.
Independent Practice (10 minutes)
1. Write 1 problem on the board: Find the values of the missing angles in the diagram below:
2. Ask pupils to work independently.
3. Move around to check for understanding and clear misconceptions.
4. Ask pupils to turn to their neighbours and compare answers.
5. Ask 1 pupil from the back of the class to stand up and say the answer for 𝑒. (Answer: 𝑒 = 180° −
108° = 72°)
6. Ask 2 different pupils to stand and give their answers for 𝑓 and 𝑔. (Answer: 𝑓 = 180° − 72° =
108°; 𝑔 = 180° − 108° = 72°)
Closing (3 minutes)
1. Write on the board: Two intersecting lines formed opposite angles x and y. Find the value of x
given that 𝑦 = 160°
2. Give pupils one minute to think about the problem and find their answer.
3. Ask them to turn and share with a partner.
4. Ask one pair of pupils to share their answer with the class. (Answer: 𝑥 = 𝑦 = 160° because
opposite angles are equal)
5. Suggested homework: Find the values of the angles marked 𝑡, 𝑢 and 𝑣 in the diagram below
(Answers: 𝑡 = 110° 𝑢 = 70° 𝑣 = 110°):
700
𝑡 𝑢
𝑣
𝑓
108 𝑒
𝑔
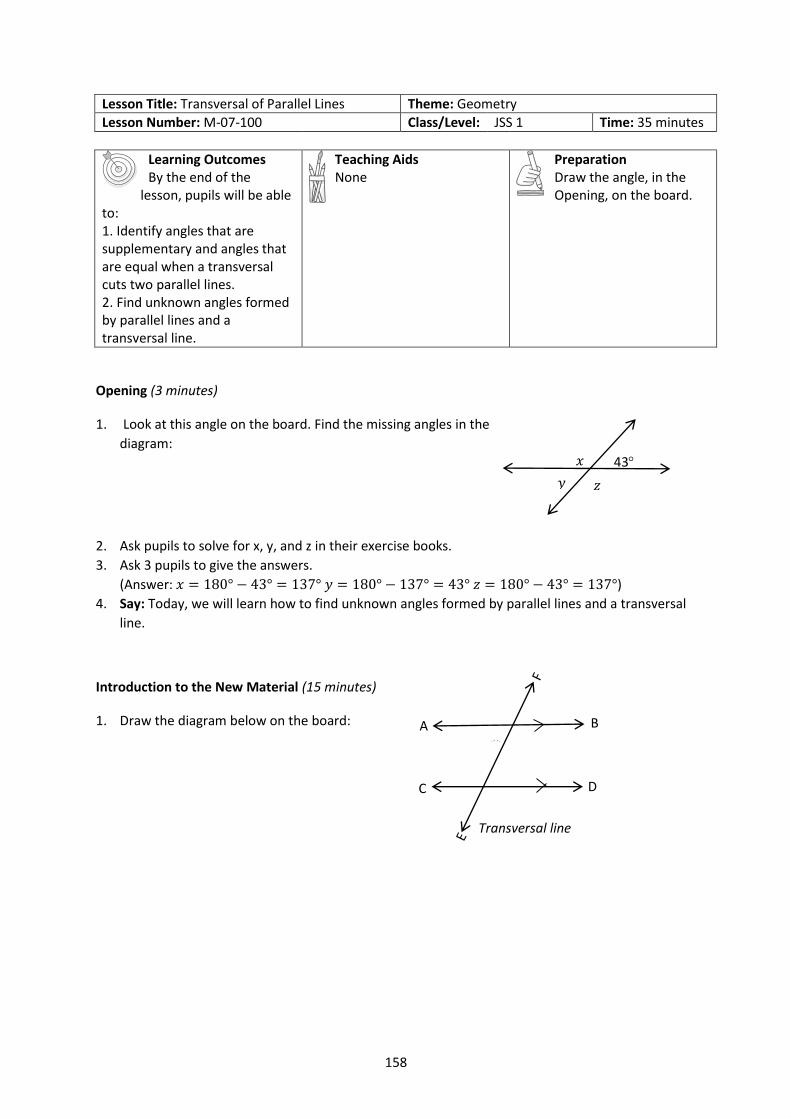
158
Lesson Title: Transversal of Parallel Lines Theme: Geometry
Lesson Number: M-07-100 Class/Level: JSS 1 Time: 35 minutes
Learning Outcomes By the end of the
lesson, pupils will be able to: 1. Identify angles that are supplementary and angles that are equal when a transversal cuts two parallel lines. 2. Find unknown angles formed by parallel lines and a transversal line.
Teaching Aids None
Preparation Draw the angle, in the Opening, on the board.
Opening (3 minutes)
1. Look at this angle on the board. Find the missing angles in the
diagram:
2. Ask pupils to solve for x, y, and z in their exercise books.
3. Ask 3 pupils to give the answers.
(Answer: 𝑥 = 180° − 43° = 137° 𝑦 = 180° − 137° = 43° 𝑧 = 180° − 43° = 137°)
4. Say: Today, we will learn how to find unknown angles formed by parallel lines and a transversal
line.
Introduction to the New Material (15 minutes)
1. Draw the diagram below on the board:
A B
C D
Transversal line
𝑦
𝑥 43
𝑧
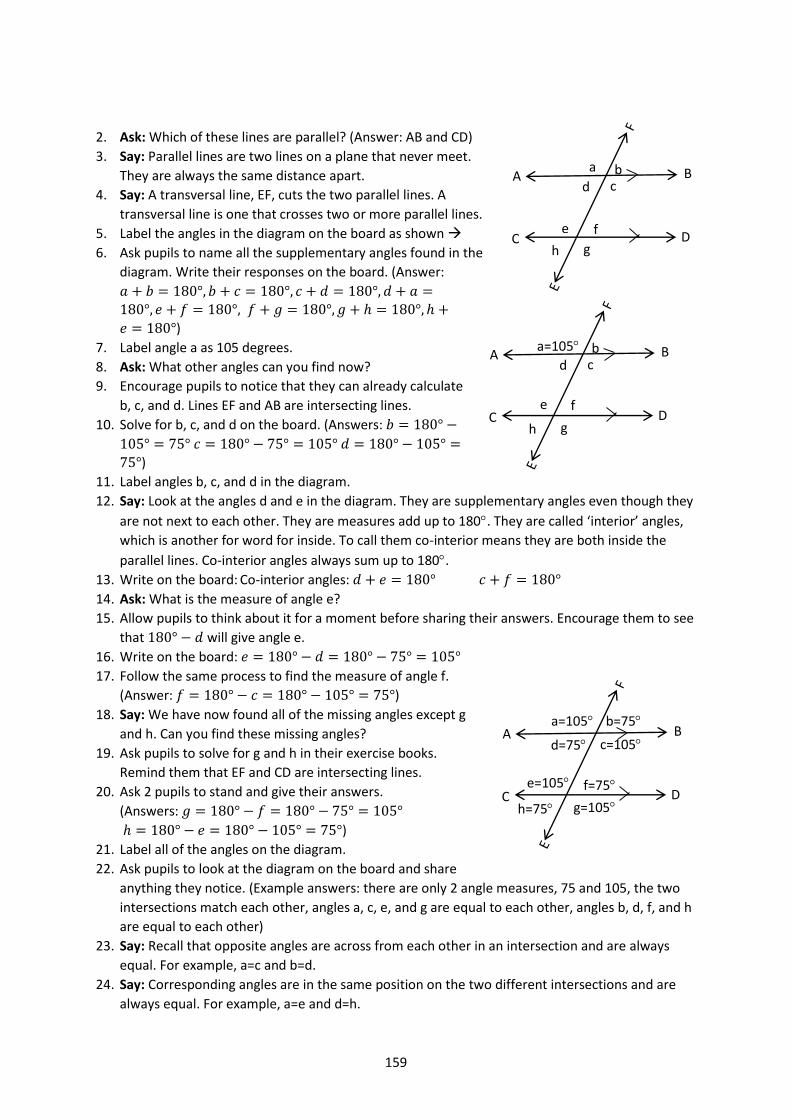
159
2. Ask: Which of these lines are parallel? (Answer: AB and CD)
3. Say: Parallel lines are two lines on a plane that never meet.
They are always the same distance apart.
4. Say: A transversal line, EF, cuts the two parallel lines. A
transversal line is one that crosses two or more parallel lines.
5. Label the angles in the diagram on the board as shown
6. Ask pupils to name all the supplementary angles found in the
diagram. Write their responses on the board. (Answer:
𝑎 + 𝑏 = 180°, 𝑏 + 𝑐 = 180°, 𝑐 + 𝑑 = 180°, 𝑑 + 𝑎 =180°, 𝑒 + 𝑓 = 180°, 𝑓 + 𝑔 = 180°, 𝑔 + ℎ = 180°, ℎ +
𝑒 = 180°)
7. Label angle a as 105 degrees.
8. Ask: What other angles can you find now?
9. Encourage pupils to notice that they can already calculate
b, c, and d. Lines EF and AB are intersecting lines.
10. Solve for b, c, and d on the board. (Answers: 𝑏 = 180° −
105° = 75° 𝑐 = 180° − 75° = 105° 𝑑 = 180° − 105° =
75°)
11. Label angles b, c, and d in the diagram.
12. Say: Look at the angles d and e in the diagram. They are supplementary angles even though they
are not next to each other. They are measures add up to 180. They are called ‘interior’ angles,
which is another for word for inside. To call them co-interior means they are both inside the
parallel lines. Co-interior angles always sum up to 180.
13. Write on the board: Co-interior angles: 𝑑 + 𝑒 = 180° 𝑐 + 𝑓 = 180°
14. Ask: What is the measure of angle e?
15. Allow pupils to think about it for a moment before sharing their answers. Encourage them to see
that 180° − 𝑑 will give angle e.
16. Write on the board: 𝑒 = 180° − 𝑑 = 180° − 75° = 105°
17. Follow the same process to find the measure of angle f.
(Answer: 𝑓 = 180° − 𝑐 = 180° − 105° = 75°)
18. Say: We have now found all of the missing angles except g
and h. Can you find these missing angles?
19. Ask pupils to solve for g and h in their exercise books.
Remind them that EF and CD are intersecting lines.
20. Ask 2 pupils to stand and give their answers.
(Answers: 𝑔 = 180° − 𝑓 = 180° − 75° = 105°
ℎ = 180° − 𝑒 = 180° − 105° = 75°)
21. Label all of the angles on the diagram.
22. Ask pupils to look at the diagram on the board and share
anything they notice. (Example answers: there are only 2 angle measures, 75 and 105, the two
intersections match each other, angles a, c, e, and g are equal to each other, angles b, d, f, and h
are equal to each other)
23. Say: Recall that opposite angles are across from each other in an intersection and are always
equal. For example, a=c and b=d.
24. Say: Corresponding angles are in the same position on the two different intersections and are
always equal. For example, a=e and d=h.
c d
a A B
C D g h
b
e f
c d
a=105 A B
C D g h
b
e f
c=105 d=75
a=105 A B
C D g=105 h=75
b=75
e=105 f=75
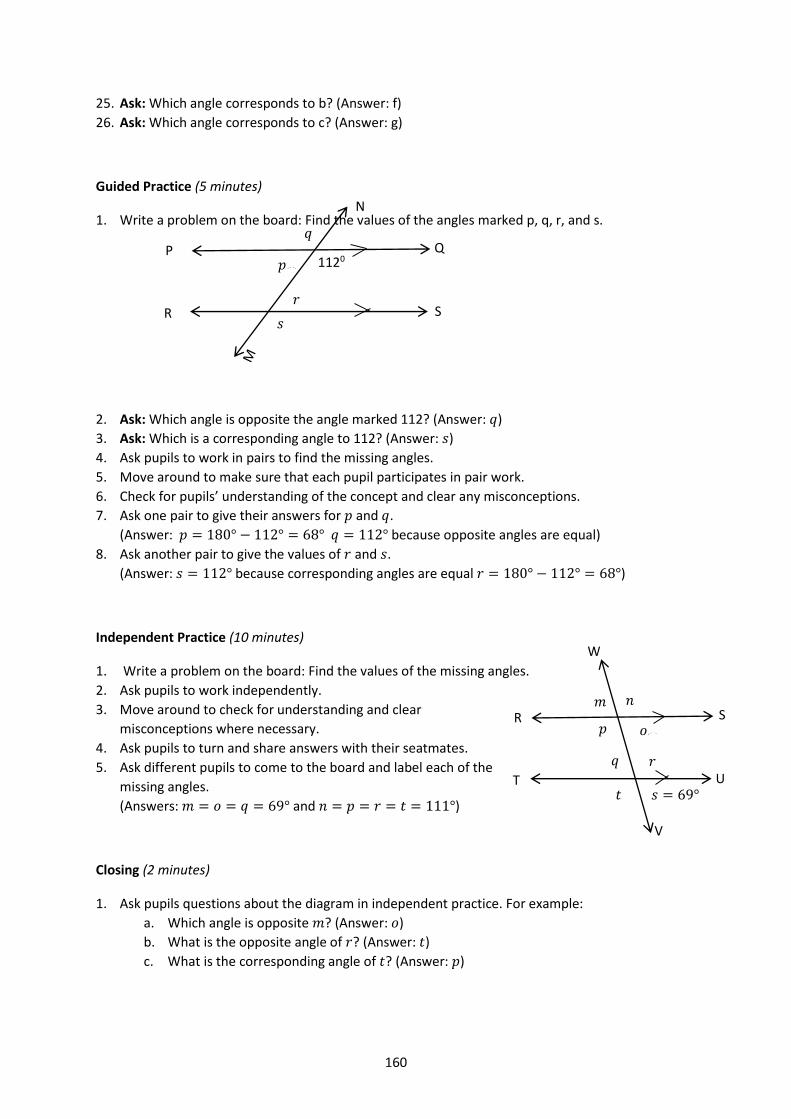
160
25. Ask: Which angle corresponds to b? (Answer: f)
26. Ask: Which angle corresponds to c? (Answer: g)
Guided Practice (5 minutes)
1. Write a problem on the board: Find the values of the angles marked p, q, r, and s.
2. Ask: Which angle is opposite the angle marked 112? (Answer: 𝑞)
3. Ask: Which is a corresponding angle to 112? (Answer: 𝑠)
4. Ask pupils to work in pairs to find the missing angles.
5. Move around to make sure that each pupil participates in pair work.
6. Check for pupils’ understanding of the concept and clear any misconceptions.
7. Ask one pair to give their answers for 𝑝 and 𝑞.
(Answer: 𝑝 = 180° − 112° = 68° 𝑞 = 112° because opposite angles are equal)
8. Ask another pair to give the values of 𝑟 and 𝑠.
(Answer: 𝑠 = 112° because corresponding angles are equal 𝑟 = 180° − 112° = 68°)
Independent Practice (10 minutes)
1. Write a problem on the board: Find the values of the missing angles.
2. Ask pupils to work independently.
3. Move around to check for understanding and clear
misconceptions where necessary.
4. Ask pupils to turn and share answers with their seatmates.
5. Ask different pupils to come to the board and label each of the
missing angles.
(Answers: 𝑚 = 𝑜 = 𝑞 = 69° and 𝑛 = 𝑝 = 𝑟 = 𝑡 = 111°)
Closing (2 minutes)
1. Ask pupils questions about the diagram in independent practice. For example:
a. Which angle is opposite 𝑚? (Answer: 𝑜)
b. What is the opposite angle of 𝑟? (Answer: 𝑡)
c. What is the corresponding angle of 𝑡? (Answer: 𝑝)
𝑞 P Q
R S
1120𝑝
𝑟
𝑠
N
𝑚 𝑛 R S
T
s
U
𝑜 𝑝
𝑞
𝑠 = 69°
W
V
𝑟
𝑡
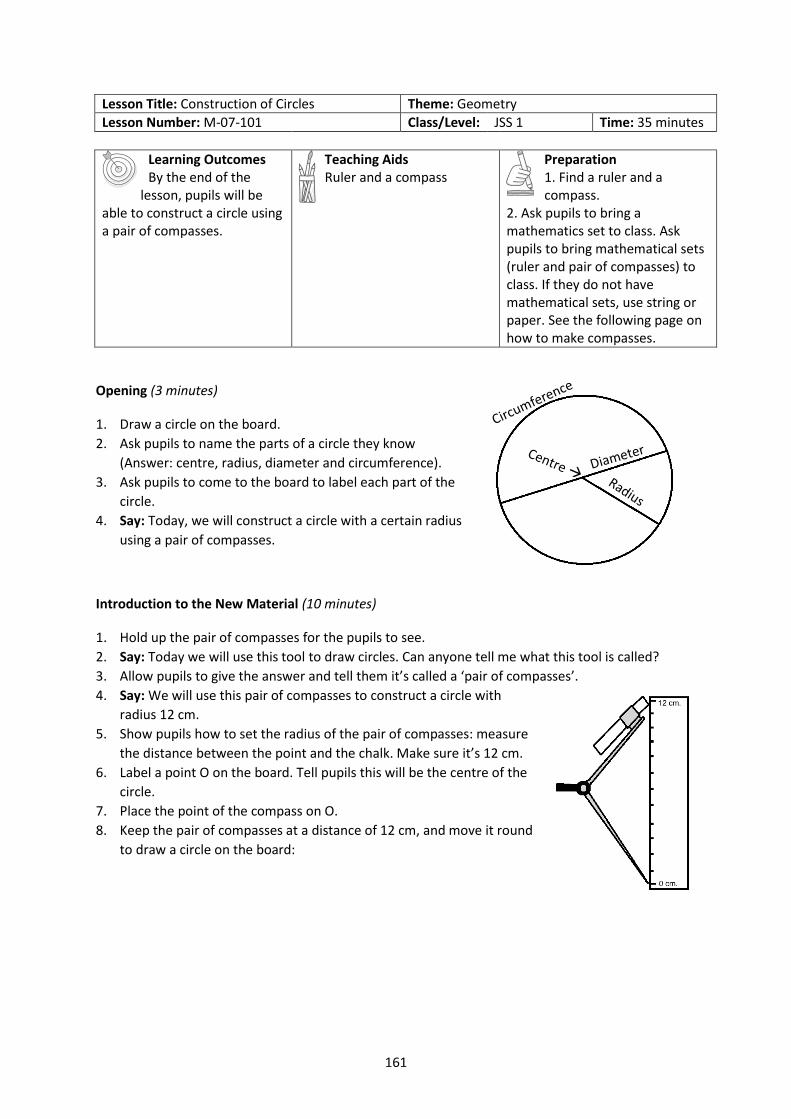
161
Lesson Title: Construction of Circles Theme: Geometry
Lesson Number: M-07-101 Class/Level: JSS 1 Time: 35 minutes
Learning Outcomes By the end of the
lesson, pupils will be able to construct a circle using a pair of compasses.
Teaching Aids Ruler and a compass
Preparation 1. Find a ruler and a compass.
2. Ask pupils to bring a mathematics set to class. Ask pupils to bring mathematical sets (ruler and pair of compasses) to class. If they do not have mathematical sets, use string or paper. See the following page on how to make compasses.
Opening (3 minutes)
1. Draw a circle on the board.
2. Ask pupils to name the parts of a circle they know
(Answer: centre, radius, diameter and circumference).
3. Ask pupils to come to the board to label each part of the
circle.
4. Say: Today, we will construct a circle with a certain radius
using a pair of compasses.
Introduction to the New Material (10 minutes)
1. Hold up the pair of compasses for the pupils to see.
2. Say: Today we will use this tool to draw circles. Can anyone tell me what this tool is called?
3. Allow pupils to give the answer and tell them it’s called a ‘pair of compasses’.
4. Say: We will use this pair of compasses to construct a circle with
radius 12 cm.
5. Show pupils how to set the radius of the pair of compasses: measure
the distance between the point and the chalk. Make sure it’s 12 cm.
6. Label a point O on the board. Tell pupils this will be the centre of the
circle.
7. Place the point of the compass on O.
8. Keep the pair of compasses at a distance of 12 cm, and move it round
to draw a circle on the board:
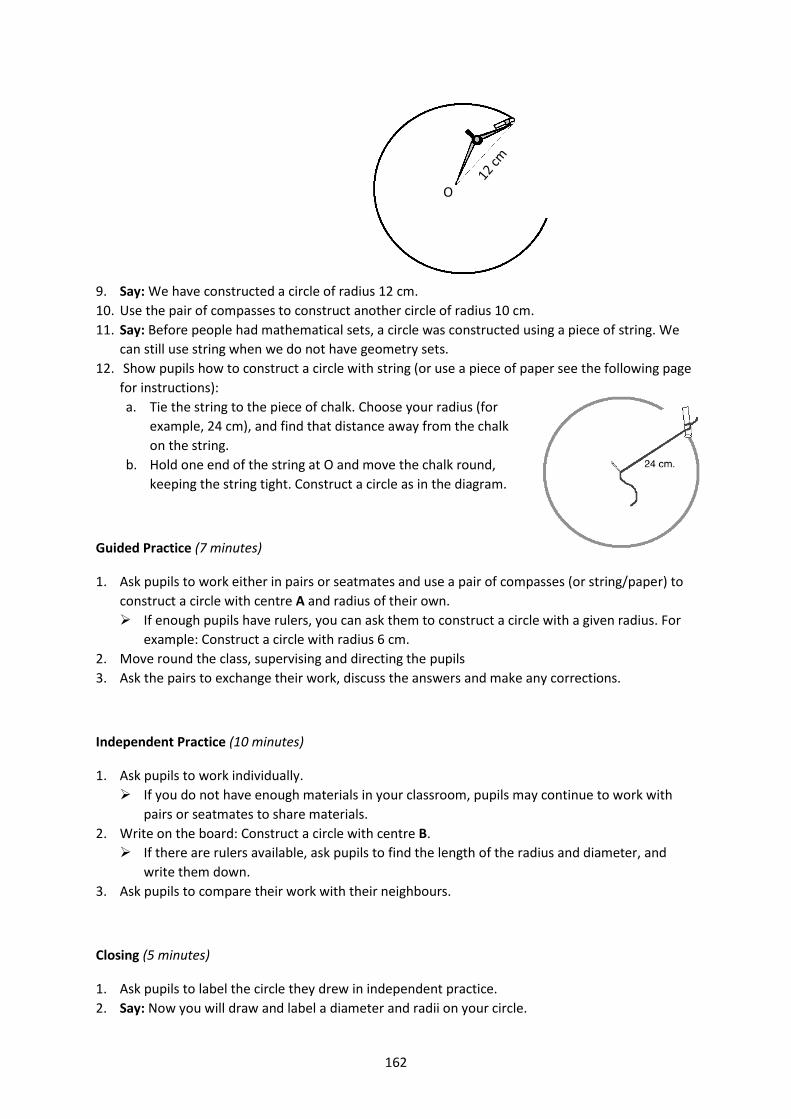
162
9. Say: We have constructed a circle of radius 12 cm.
10. Use the pair of compasses to construct another circle of radius 10 cm.
11. Say: Before people had mathematical sets, a circle was constructed using a piece of string. We
can still use string when we do not have geometry sets.
12. Show pupils how to construct a circle with string (or use a piece of paper see the following page
for instructions):
a. Tie the string to the piece of chalk. Choose your radius (for
example, 24 cm), and find that distance away from the chalk
on the string.
b. Hold one end of the string at O and move the chalk round,
keeping the string tight. Construct a circle as in the diagram.
Guided Practice (7 minutes)
1. Ask pupils to work either in pairs or seatmates and use a pair of compasses (or string/paper) to
construct a circle with centre A and radius of their own.
If enough pupils have rulers, you can ask them to construct a circle with a given radius. For
example: Construct a circle with radius 6 cm.
2. Move round the class, supervising and directing the pupils
3. Ask the pairs to exchange their work, discuss the answers and make any corrections.
Independent Practice (10 minutes)
1. Ask pupils to work individually.
If you do not have enough materials in your classroom, pupils may continue to work with
pairs or seatmates to share materials.
2. Write on the board: Construct a circle with centre B.
If there are rulers available, ask pupils to find the length of the radius and diameter, and
write them down.
3. Ask pupils to compare their work with their neighbours.
Closing (5 minutes)
1. Ask pupils to label the circle they drew in independent practice.
2. Say: Now you will draw and label a diameter and radii on your circle.
O
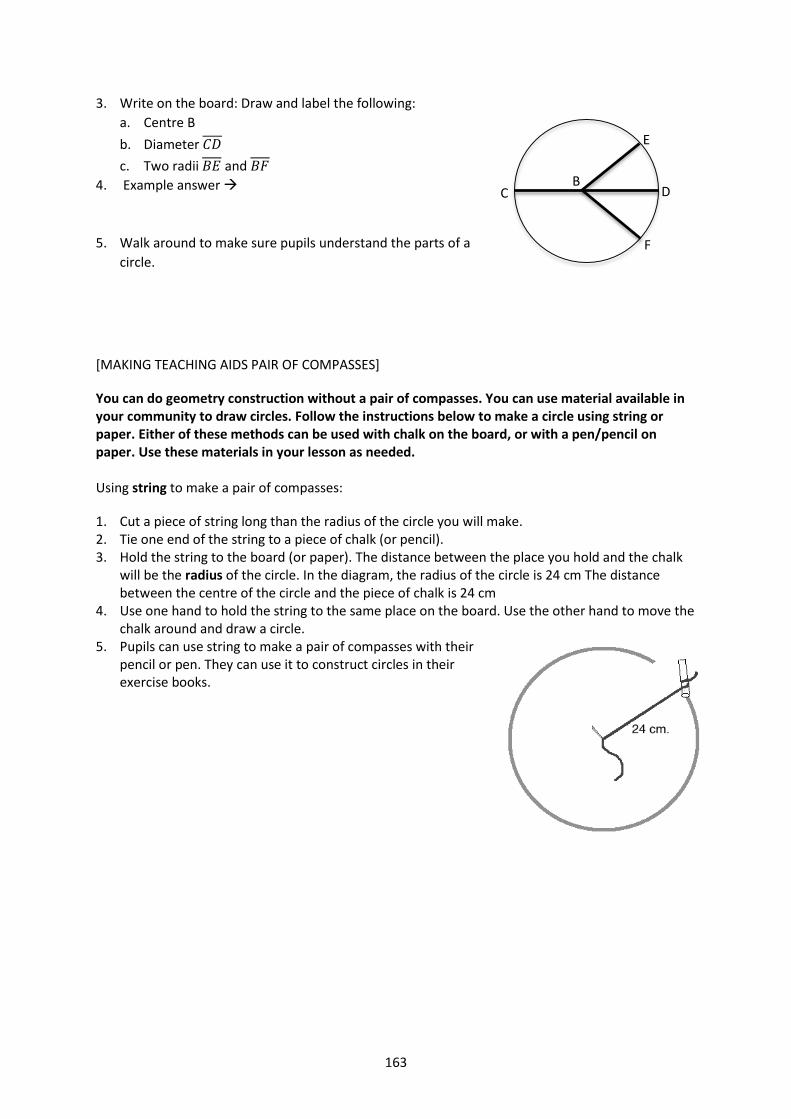
163
3. Write on the board: Draw and label the following:
a. Centre B
b. Diameter 𝐶𝐷
c. Two radii 𝐵𝐸 and 𝐵𝐹
4. Example answer
5. Walk around to make sure pupils understand the parts of a
circle.
[MAKING TEACHING AIDS PAIR OF COMPASSES]
You can do geometry construction without a pair of compasses. You can use material available in your community to draw circles. Follow the instructions below to make a circle using string or paper. Either of these methods can be used with chalk on the board, or with a pen/pencil on paper. Use these materials in your lesson as needed. Using string to make a pair of compasses:
1. Cut a piece of string long than the radius of the circle you will make. 2. Tie one end of the string to a piece of chalk (or pencil). 3. Hold the string to the board (or paper). The distance between the place you hold and the chalk
will be the radius of the circle. In the diagram, the radius of the circle is 24 cm The distance between the centre of the circle and the piece of chalk is 24 cm
4. Use one hand to hold the string to the same place on the board. Use the other hand to move the chalk around and draw a circle.
5. Pupils can use string to make a pair of compasses with their pencil or pen. They can use it to construct circles in their exercise books.
B C D
E
F
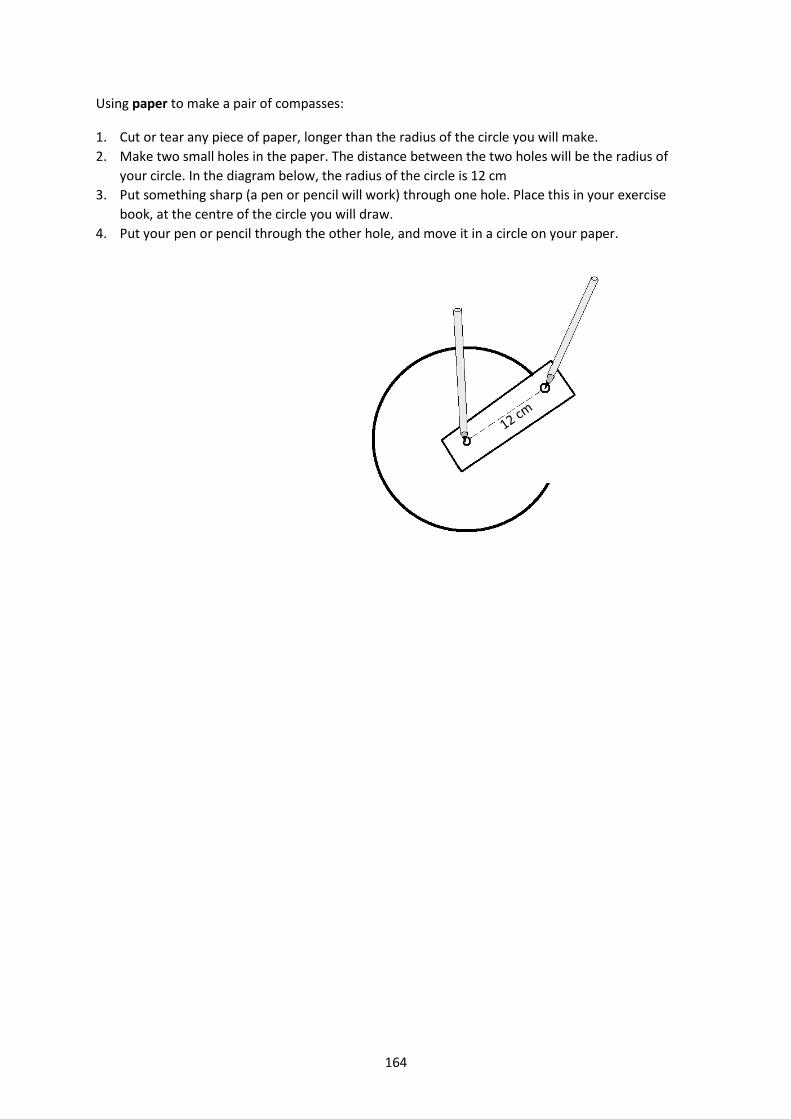
164
Using paper to make a pair of compasses:
1. Cut or tear any piece of paper, longer than the radius of the circle you will make.
2. Make two small holes in the paper. The distance between the two holes will be the radius of
your circle. In the diagram below, the radius of the circle is 12 cm
3. Put something sharp (a pen or pencil will work) through one hole. Place this in your exercise
book, at the centre of the circle you will draw.
4. Put your pen or pencil through the other hole, and move it in a circle on your paper.
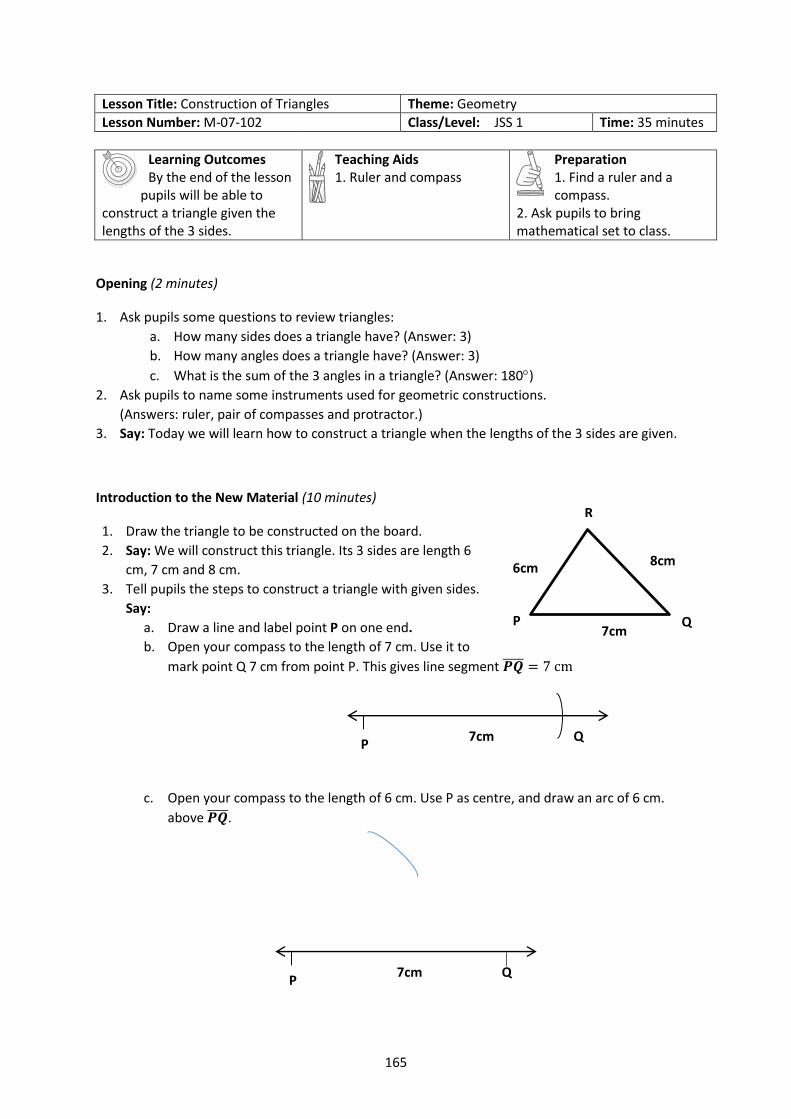
165
Lesson Title: Construction of Triangles Theme: Geometry
Lesson Number: M-07-102 Class/Level: JSS 1 Time: 35 minutes
Learning Outcomes By the end of the lesson
pupils will be able to construct a triangle given the lengths of the 3 sides.
Teaching Aids 1. Ruler and compass
Preparation 1. Find a ruler and a compass.
2. Ask pupils to bring mathematical set to class.
Opening (2 minutes)
1. Ask pupils some questions to review triangles:
a. How many sides does a triangle have? (Answer: 3)
b. How many angles does a triangle have? (Answer: 3)
c. What is the sum of the 3 angles in a triangle? (Answer: 180)
2. Ask pupils to name some instruments used for geometric constructions.
(Answers: ruler, pair of compasses and protractor.)
3. Say: Today we will learn how to construct a triangle when the lengths of the 3 sides are given.
Introduction to the New Material (10 minutes)
1. Draw the triangle to be constructed on the board.
2. Say: We will construct this triangle. Its 3 sides are length 6
cm, 7 cm and 8 cm.
3. Tell pupils the steps to construct a triangle with given sides.
Say:
a. Draw a line and label point P on one end.
b. Open your compass to the length of 7 cm. Use it to
mark point Q 7 cm from point P. This gives line segment 𝑷𝑸̅̅ ̅̅ = 7 cm
c. Open your compass to the length of 6 cm. Use P as centre, and draw an arc of 6 cm.
above 𝑷𝑸̅̅ ̅̅ .
6cm
R
8cm
Q 7cm
P
P 7cm Q
P 7cm Q
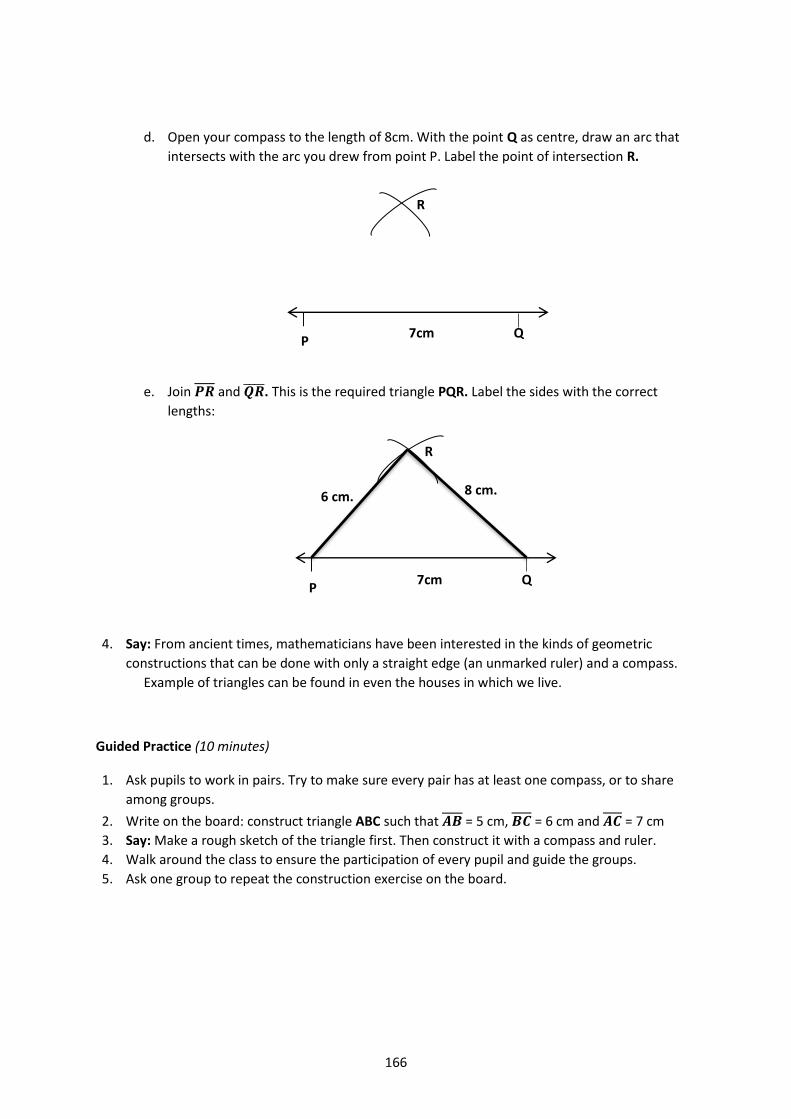
166
d. Open your compass to the length of 8cm. With the point Q as centre, draw an arc that
intersects with the arc you drew from point P. Label the point of intersection R.
e. Join 𝑷𝑹 and 𝑸𝑹̅̅ ̅̅ . This is the required triangle PQR. Label the sides with the correct
lengths:
4. Say: From ancient times, mathematicians have been interested in the kinds of geometric
constructions that can be done with only a straight edge (an unmarked ruler) and a compass.
Example of triangles can be found in even the houses in which we live.
Guided Practice (10 minutes)
1. Ask pupils to work in pairs. Try to make sure every pair has at least one compass, or to share
among groups.
2. Write on the board: construct triangle ABC such that 𝑨𝑩 = 5 cm, 𝑩𝑪 = 6 cm and 𝑨𝑪 = 7 cm
3. Say: Make a rough sketch of the triangle first. Then construct it with a compass and ruler.
4. Walk around the class to ensure the participation of every pupil and guide the groups.
5. Ask one group to repeat the construction exercise on the board.
P 7cm Q
R
P 7cm Q
R
8 cm. 6 cm.
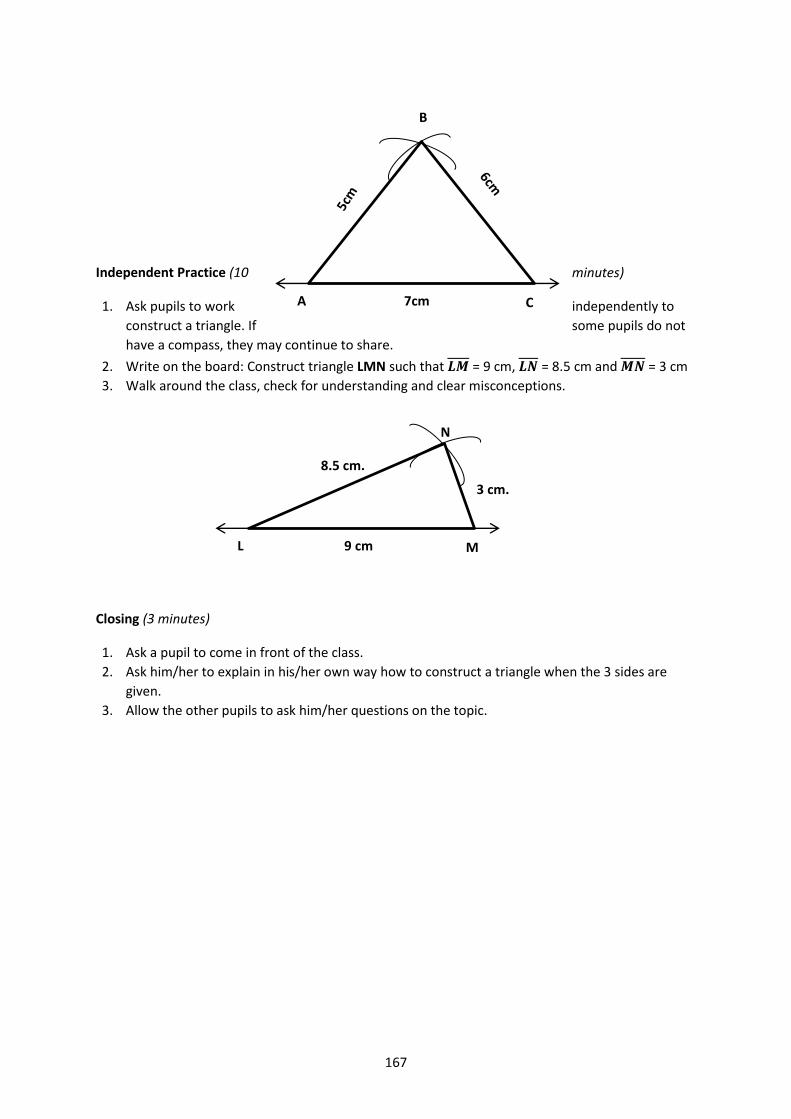
167
Independent Practice (10 minutes)
1. Ask pupils to work independently to
construct a triangle. If some pupils do not
have a compass, they may continue to share.
2. Write on the board: Construct triangle LMN such that 𝑳𝑴 = 9 cm, 𝑳𝑵 = 8.5 cm and 𝑴𝑵 = 3 cm
3. Walk around the class, check for understanding and clear misconceptions.
Closing (3 minutes)
1. Ask a pupil to come in front of the class.
2. Ask him/her to explain in his/her own way how to construct a triangle when the 3 sides are
given.
3. Allow the other pupils to ask him/her questions on the topic.
B
7cm A C
9 cm L M
N
8.5 cm.
3 cm.
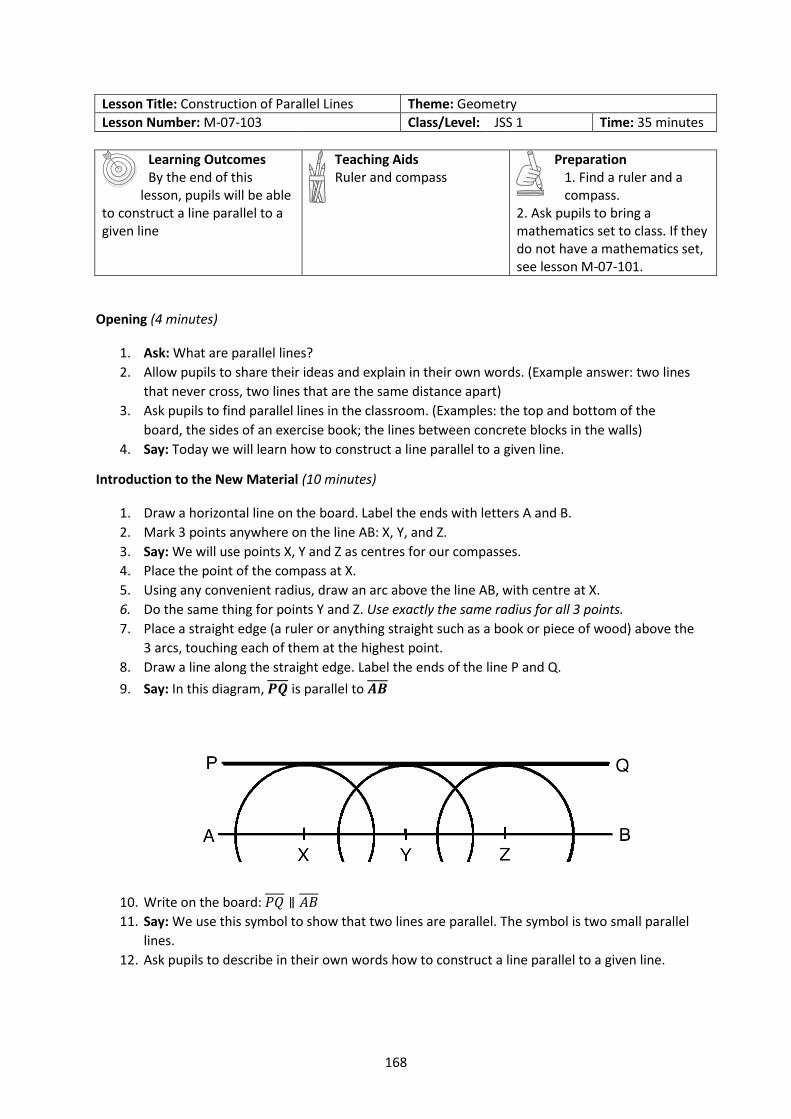
168
Lesson Title: Construction of Parallel Lines Theme: Geometry
Lesson Number: M-07-103 Class/Level: JSS 1 Time: 35 minutes
Learning Outcomes By the end of this
lesson, pupils will be able to construct a line parallel to a given line
Teaching Aids Ruler and compass
Preparation 1. Find a ruler and a compass.
2. Ask pupils to bring a mathematics set to class. If they do not have a mathematics set, see lesson M-07-101.
Opening (4 minutes)
1. Ask: What are parallel lines?
2. Allow pupils to share their ideas and explain in their own words. (Example answer: two lines
that never cross, two lines that are the same distance apart)
3. Ask pupils to find parallel lines in the classroom. (Examples: the top and bottom of the
board, the sides of an exercise book; the lines between concrete blocks in the walls)
4. Say: Today we will learn how to construct a line parallel to a given line.
Introduction to the New Material (10 minutes)
1. Draw a horizontal line on the board. Label the ends with letters A and B.
2. Mark 3 points anywhere on the line AB: X, Y, and Z.
3. Say: We will use points X, Y and Z as centres for our compasses.
4. Place the point of the compass at X.
5. Using any convenient radius, draw an arc above the line AB, with centre at X.
6. Do the same thing for points Y and Z. Use exactly the same radius for all 3 points.
7. Place a straight edge (a ruler or anything straight such as a book or piece of wood) above the
3 arcs, touching each of them at the highest point.
8. Draw a line along the straight edge. Label the ends of the line P and Q.
9. Say: In this diagram, 𝑷𝑸 is parallel to 𝑨𝑩
10. Write on the board: 𝑃𝑄 ∥ 𝐴𝐵
11. Say: We use this symbol to show that two lines are parallel. The symbol is two small parallel
lines.
12. Ask pupils to describe in their own words how to construct a line parallel to a given line.
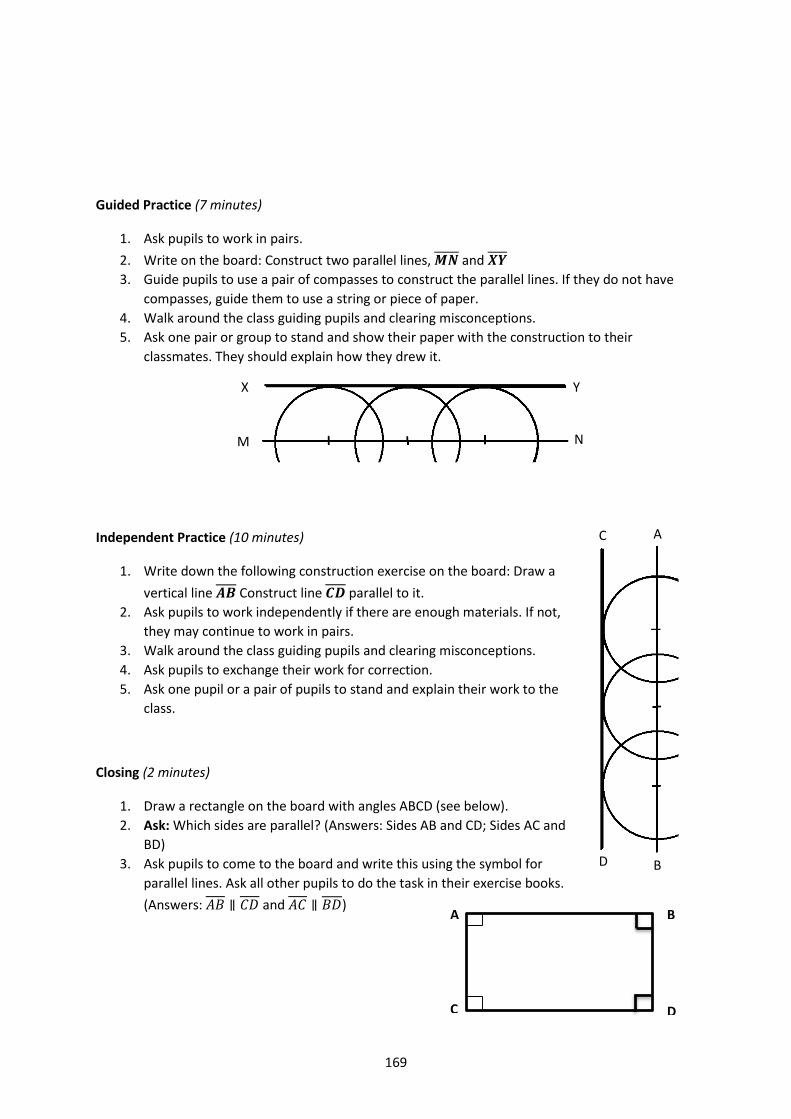
169
Guided Practice (7 minutes)
1. Ask pupils to work in pairs.
2. Write on the board: Construct two parallel lines, 𝑴𝑵 and 𝑿𝒀
3. Guide pupils to use a pair of compasses to construct the parallel lines. If they do not have
compasses, guide them to use a string or piece of paper.
4. Walk around the class guiding pupils and clearing misconceptions.
5. Ask one pair or group to stand and show their paper with the construction to their
classmates. They should explain how they drew it.
Independent Practice (10 minutes)
1. Write down the following construction exercise on the board: Draw a
vertical line 𝑨𝑩 Construct line 𝑪𝑫 parallel to it.
2. Ask pupils to work independently if there are enough materials. If not,
they may continue to work in pairs.
3. Walk around the class guiding pupils and clearing misconceptions.
4. Ask pupils to exchange their work for correction.
5. Ask one pupil or a pair of pupils to stand and explain their work to the
class.
Closing (2 minutes)
1. Draw a rectangle on the board with angles ABCD (see below).
2. Ask: Which sides are parallel? (Answers: Sides AB and CD; Sides AC and
BD)
3. Ask pupils to come to the board and write this using the symbol for
parallel lines. Ask all other pupils to do the task in their exercise books.
(Answers: 𝐴𝐵 ∥ 𝐶𝐷 and 𝐴𝐶 ∥ 𝐵𝐷)
A
B
C
D
A B
D C
N M
Y X
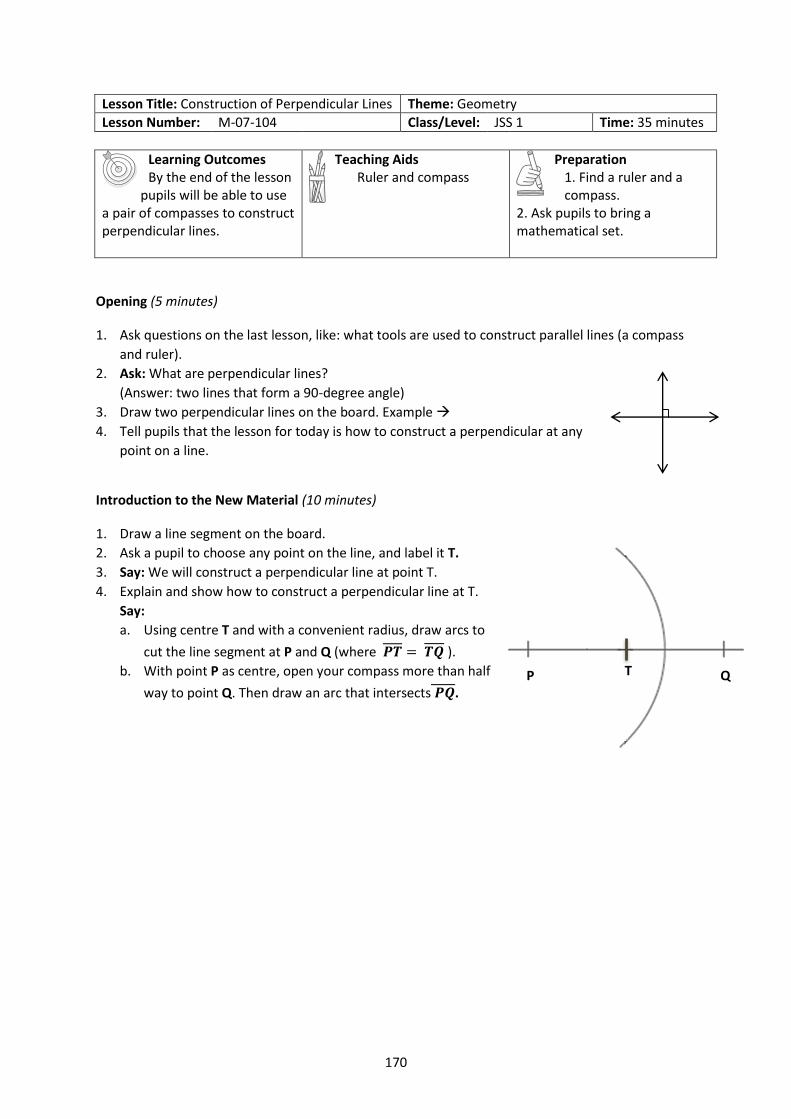
170
Lesson Title: Construction of Perpendicular Lines Theme: Geometry
Lesson Number: M-07-104 Class/Level: JSS 1 Time: 35 minutes
Learning Outcomes By the end of the lesson
pupils will be able to use a pair of compasses to construct perpendicular lines.
Teaching Aids Ruler and compass
Preparation 1. Find a ruler and a compass.
2. Ask pupils to bring a mathematical set.
Opening (5 minutes)
1. Ask questions on the last lesson, like: what tools are used to construct parallel lines (a compass
and ruler).
2. Ask: What are perpendicular lines?
(Answer: two lines that form a 90-degree angle)
3. Draw two perpendicular lines on the board. Example
4. Tell pupils that the lesson for today is how to construct a perpendicular at any
point on a line.
Introduction to the New Material (10 minutes)
1. Draw a line segment on the board.
2. Ask a pupil to choose any point on the line, and label it T.
3. Say: We will construct a perpendicular line at point T.
4. Explain and show how to construct a perpendicular line at T.
Say:
a. Using centre T and with a convenient radius, draw arcs to
cut the line segment at P and Q (where 𝑷𝑻 = 𝑻𝑸 ).
b. With point P as centre, open your compass more than half
way to point Q. Then draw an arc that intersects 𝑷𝑸.
P Q T
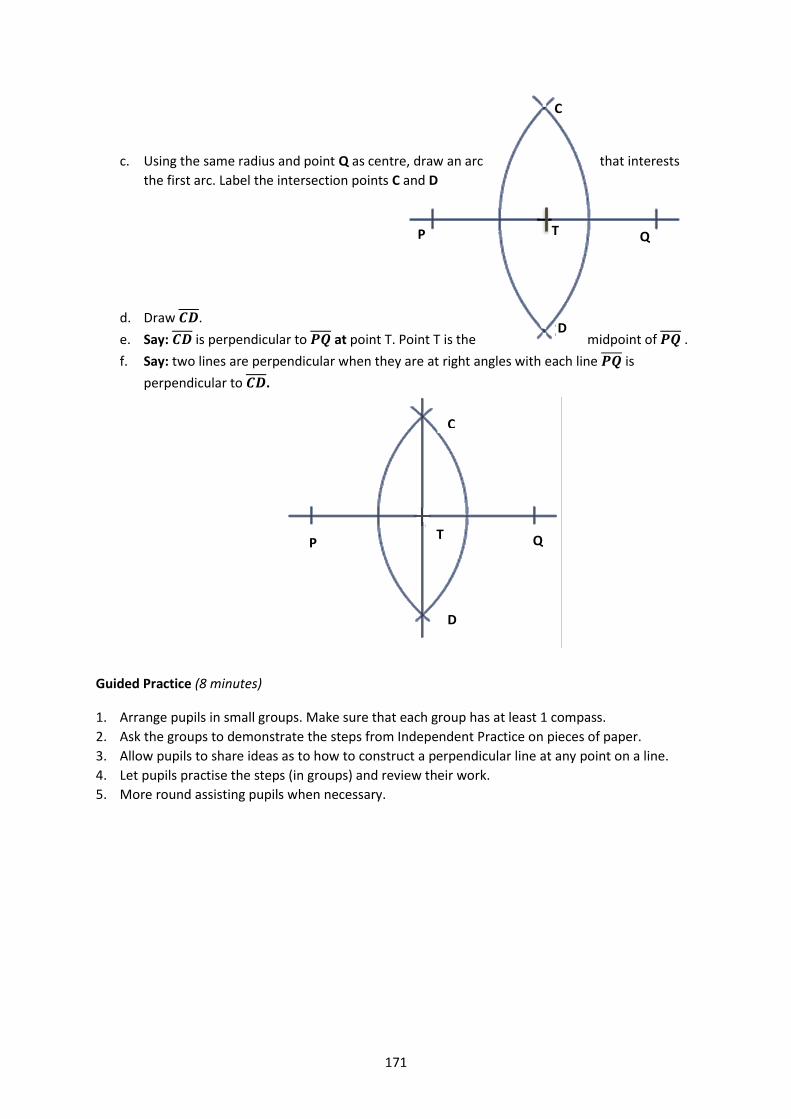
171
c. Using the same radius and point Q as centre, draw an arc that interests
the first arc. Label the intersection points C and D
d. Draw 𝑪𝑫.
e. Say: 𝑪𝑫 is perpendicular to 𝑷𝑸 at point T. Point T is the midpoint of 𝑷𝑸 .
f. Say: two lines are perpendicular when they are at right angles with each line 𝑷𝑸 is
perpendicular to 𝑪𝑫.
Guided Practice (8 minutes)
1. Arrange pupils in small groups. Make sure that each group has at least 1 compass.
2. Ask the groups to demonstrate the steps from Independent Practice on pieces of paper.
3. Allow pupils to share ideas as to how to construct a perpendicular line at any point on a line.
4. Let pupils practise the steps (in groups) and review their work.
5. More round assisting pupils when necessary.
C
T Q P
D
C
P Q
D
T
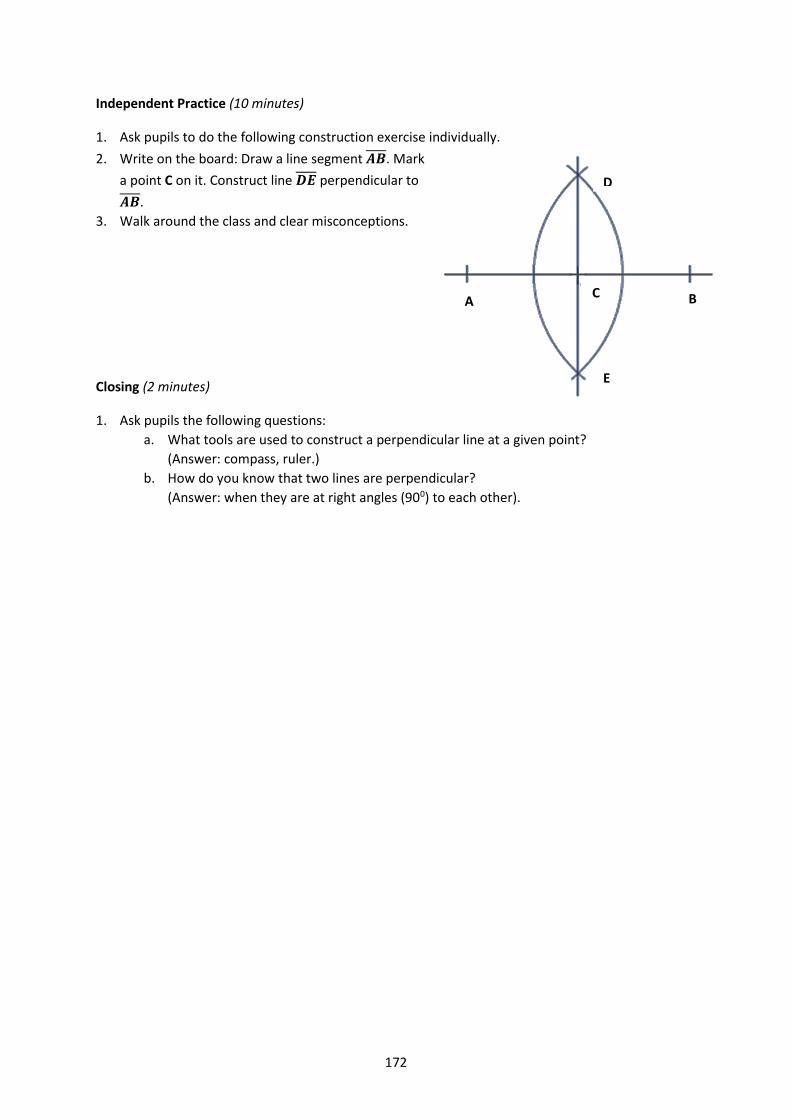
172
Independent Practice (10 minutes)
1. Ask pupils to do the following construction exercise individually.
2. Write on the board: Draw a line segment 𝑨𝑩. Mark
a point C on it. Construct line 𝑫𝑬 perpendicular to
𝑨𝑩.
3. Walk around the class and clear misconceptions.
Closing (2 minutes)
1. Ask pupils the following questions:
a. What tools are used to construct a perpendicular line at a given point?
(Answer: compass, ruler.)
b. How do you know that two lines are perpendicular?
(Answer: when they are at right angles (900) to each other).
D
C B A
E
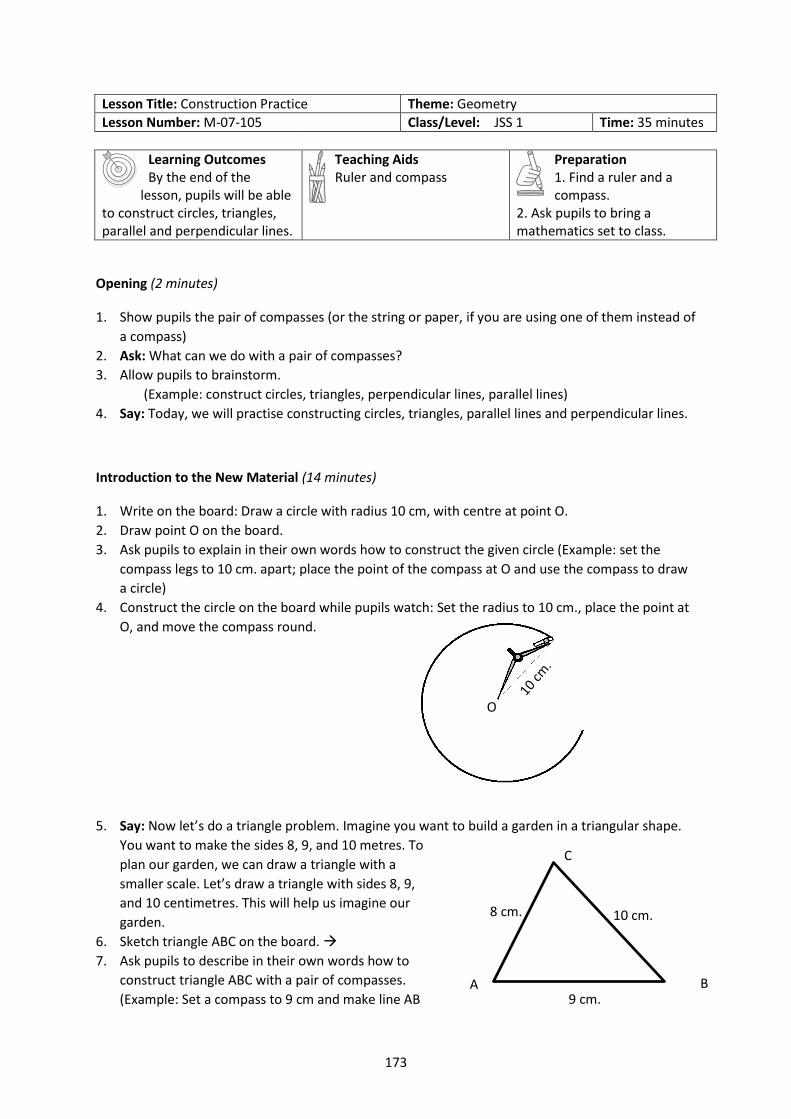
173
Lesson Title: Construction Practice Theme: Geometry
Lesson Number: M-07-105 Class/Level: JSS 1 Time: 35 minutes
Learning Outcomes By the end of the
lesson, pupils will be able to construct circles, triangles, parallel and perpendicular lines.
Teaching Aids Ruler and compass
Preparation 1. Find a ruler and a compass.
2. Ask pupils to bring a mathematics set to class.
Opening (2 minutes)
1. Show pupils the pair of compasses (or the string or paper, if you are using one of them instead of
a compass)
2. Ask: What can we do with a pair of compasses?
3. Allow pupils to brainstorm.
(Example: construct circles, triangles, perpendicular lines, parallel lines)
4. Say: Today, we will practise constructing circles, triangles, parallel lines and perpendicular lines.
Introduction to the New Material (14 minutes)
1. Write on the board: Draw a circle with radius 10 cm, with centre at point O.
2. Draw point O on the board.
3. Ask pupils to explain in their own words how to construct the given circle (Example: set the
compass legs to 10 cm. apart; place the point of the compass at O and use the compass to draw
a circle)
4. Construct the circle on the board while pupils watch: Set the radius to 10 cm., place the point at
O, and move the compass round.
5. Say: Now let’s do a triangle problem. Imagine you want to build a garden in a triangular shape.
You want to make the sides 8, 9, and 10 metres. To
plan our garden, we can draw a triangle with a
smaller scale. Let’s draw a triangle with sides 8, 9,
and 10 centimetres. This will help us imagine our
garden.
6. Sketch triangle ABC on the board.
7. Ask pupils to describe in their own words how to
construct triangle ABC with a pair of compasses.
(Example: Set a compass to 9 cm and make line AB
O
C
10 cm. 8 cm.
A B 9 cm.
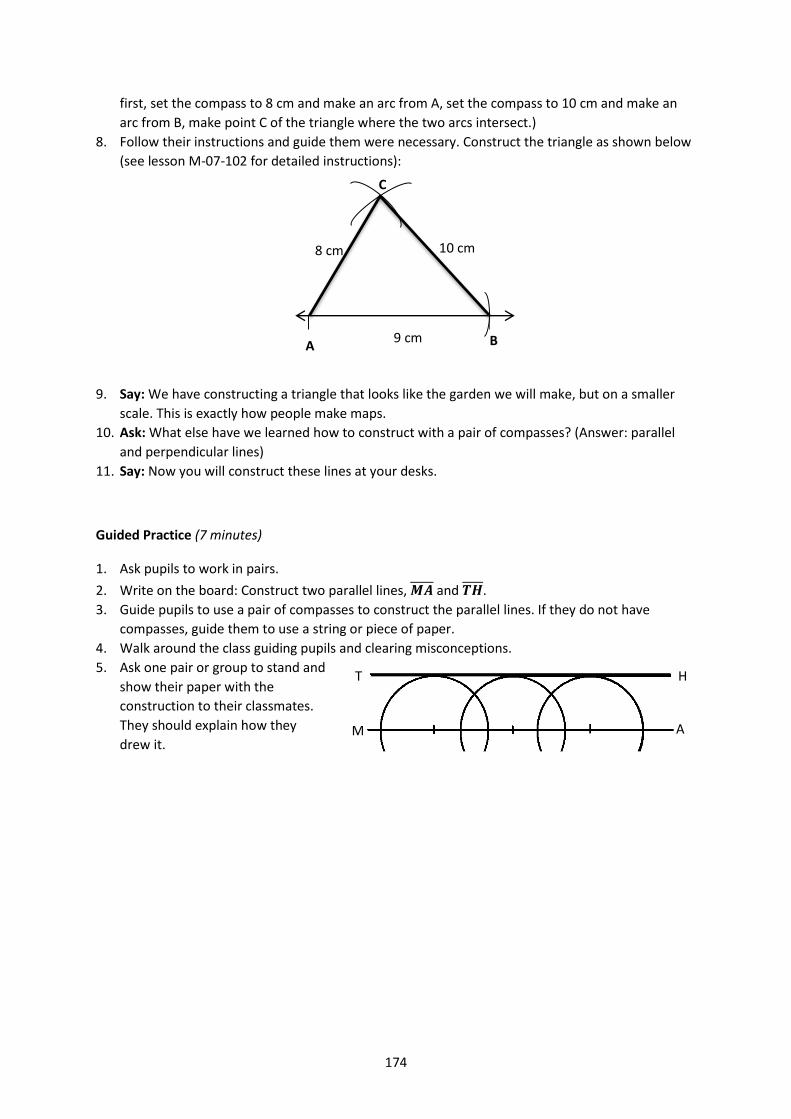
174
first, set the compass to 8 cm and make an arc from A, set the compass to 10 cm and make an
arc from B, make point C of the triangle where the two arcs intersect.)
8. Follow their instructions and guide them were necessary. Construct the triangle as shown below
(see lesson M-07-102 for detailed instructions):
9. Say: We have constructing a triangle that looks like the garden we will make, but on a smaller
scale. This is exactly how people make maps.
10. Ask: What else have we learned how to construct with a pair of compasses? (Answer: parallel
and perpendicular lines)
11. Say: Now you will construct these lines at your desks.
Guided Practice (7 minutes)
1. Ask pupils to work in pairs.
2. Write on the board: Construct two parallel lines, 𝑴𝑨 and 𝑻𝑯.
3. Guide pupils to use a pair of compasses to construct the parallel lines. If they do not have
compasses, guide them to use a string or piece of paper.
4. Walk around the class guiding pupils and clearing misconceptions.
5. Ask one pair or group to stand and
show their paper with the
construction to their classmates.
They should explain how they
drew it.
A 9 cm B
C
10 cm 8 cm
A M
H T
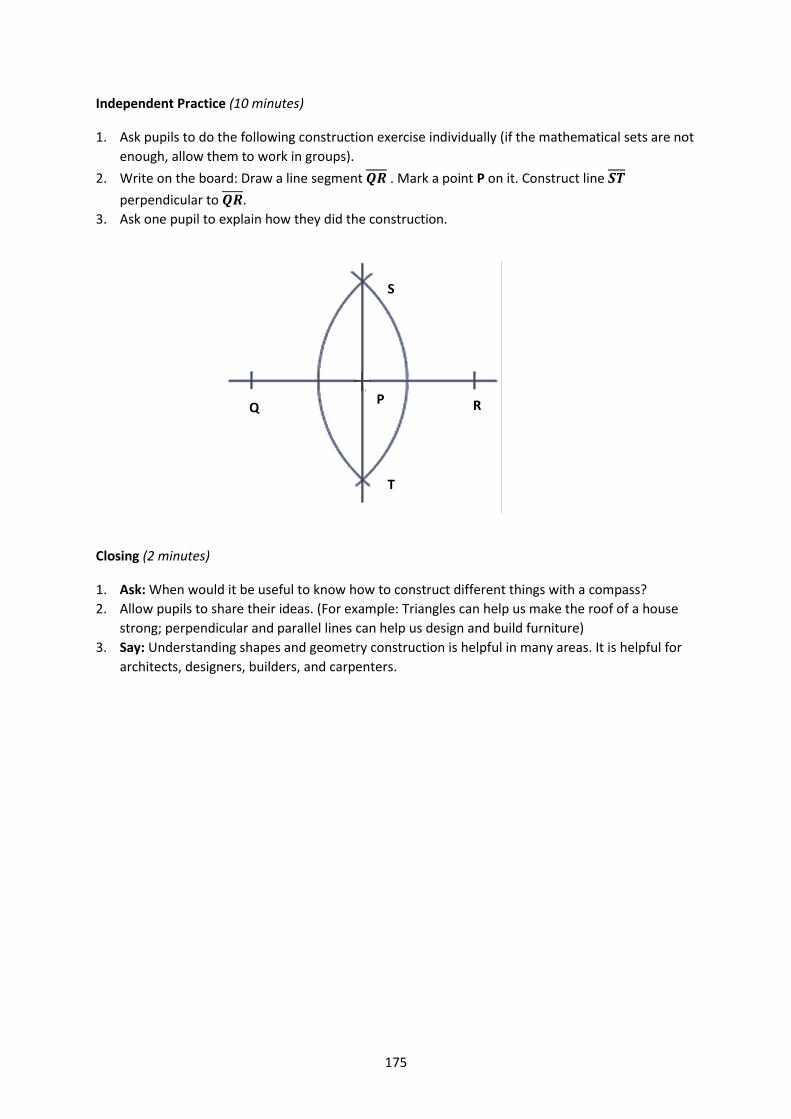
175
Independent Practice (10 minutes)
1. Ask pupils to do the following construction exercise individually (if the mathematical sets are not
enough, allow them to work in groups).
2. Write on the board: Draw a line segment 𝑸𝑹 . Mark a point P on it. Construct line 𝑺𝑻
perpendicular to 𝑸𝑹.
3. Ask one pupil to explain how they did the construction.
Closing (2 minutes)
1. Ask: When would it be useful to know how to construct different things with a compass?
2. Allow pupils to share their ideas. (For example: Triangles can help us make the roof of a house
strong; perpendicular and parallel lines can help us design and build furniture)
3. Say: Understanding shapes and geometry construction is helpful in many areas. It is helpful for
architects, designers, builders, and carpenters.
S
P R Q
T