Embed Size (px)
Citation preview

Managing Configuration FilesConfiguration Guide, Cisco IOS Release12.2SX
Americas HeadquartersCisco Systems, Inc.170 West Tasman DriveSan Jose, CA 95134-1706USAhttp://www.cisco.comTel: 408 526-4000 800 553-NETS (6387)Fax: 408 527-0883

C O N T E N T S
Managing Configuration Files 1
Finding Feature Information 1
Prerequisites for Managing Configuration Files 1
Restrictions for Managing Configuration Files 1
Information About Managing Configuration Files 2
Types of Configuration Files 2
Configuration Mode and Selecting a Configuration Source 2
Configuration File Changes Using the CLI 3
Location of Configuration Files 3
Copy Configuration Files from a Network Server to the Router 3
Copy a Configuration File from the Router to a TFTP Server 4
Copy a Configuration File from the Router to an rcp Server 4
Restrictions 5
Requirements for the rcp Username 5
Copy a Configuration File from the Router to an FTP Server 6
Understanding the FTP Username and Password 6
Configuration Files Larger than NVRAM 6
Compressing the Configuration File 6
Storing the Configuration in Flash Memory on Class A Flash File Systems 7
Loading the Configuration Commands from the Network 7
Control of the Parser Cache 7
Configure the Router to Download Configuration Files 8
Network Versus Host Configuration Files 8
How to Manage Configuration File Information 8
Displaying Configuration File Information 9
Modifying the Configuration File at the CLI 10
Copying a Configuration File from the Router to a TFTP Server 12
What to Do Next 13
Copying a Configuration File from the Router to an rcp Server 13
Managing Configuration Files Configuration Guide, Cisco IOS Release 12.2SX ii

Examples 14
Storing a Running Configuration File on an rcp Server 14
Storing a Startup Configuration File on an rcp Server 14
What to Do Next 15
Copying a Configuration File from the Router to the FTP Server 15
Examples 16
Storing a Running Configuration File on an FTP Server 16
Storing a Startup Configuration File on an FTP Server 17
What to Do Next 17
Copying a Configuration File from a TFTP Server to the Router 17
What to Do Next 18
Copying a Configuration File from the rcp Server to the Router 18
Examples 20
Copy rcp Running-Config 20
Copy rcp Startup-Config 20
What to Do Next 21
Copying a Configuration File from an FTP Server to the Router 21
Examples 22
Copy FTP Running-Config 23
Copy FTP Startup-Config 23
What to Do Next 23
Maintaining Configuration Files Larger than NVRAM 23
Compressing the Configuration File 23
Storing the Configuration in Flash Memory on Class A Flash File Systems 25
Loading the Configuration Commands from the Network 27
Managing the Parser Cache 28
Clearing the Parser Cache 29
Disabling the Parser Cache 29
Reenabling the Parser Cache 30
What to Do Next 30
Copying Configuration Files from Flash Memory to the Startup or Running Configuration 31
Copying Configuration Files Between Flash Memory File Systems 31
Copying a Configuration File from an FTP Server to Flash Memory Devices 33
What to Do Next 34
Copying a Configuration File from an rcp Server to Flash Memory Devices 34
Contents
Managing Configuration Files Configuration Guide, Cisco IOS Release 12.2SX iii

Copying a Configuration File from a TFTP Server to Flash Memory Devices 36
Reexecuting the Configuration Commands in the Startup Configuration File 36
Clearing the Startup Configuration 37
Deleting a Specified Configuration File 38
Specifying the CONFIG_FILE Environment Variable on Class A Flash File Systems 38
What to Do Next 40
Configuring the Router to Download Configuration Files 40
Configuring the Router to Download the Network Configuration File 41
Configuring the Router to Download the Host Configuration File 42
Additional References 44
Exclusive Configuration Change Access and Access Session Locking 47
Finding Feature Information 47
Information About Locking the Configuration 47
Exclusive Configuration Change Access and Access Session Locking 48
Access Session Locking 48
Parser Concurrency and Locking Improvements 48
How to Configure Configuration Exclusive Confguration Change-Access and Access Session
Locking 49
Enabling Exclusive Configuration Change Access and Access Session Locking 49
Obtaining Exclusive Configuration Change Access 50
Enabling Parser Concurrency and Locking Improvements 52
Monitoring and Troubleshooting Configuration Locking 53
Configuration Examples for Locking the Configuration 54
Configuring an Exclusive Lock in Auto Mode Example 54
Configuring an Exclusive Lock in Manual Mode Example 55
Configuring Parser Concurrency and Locking Improvements Example 55
Additional References 55
Feature Information for Exclusive Configuration Change Access and Access Session Locking 56
Configuration Replace and Configuration Rollback 61
Finding Feature Information 61
Prerequisites for Configuration Replace and Configuration Rollback 61
Restrictions for Configuration Replace and Configuration Rollback 62
Information About Configuration Replace and Configuration Rollback 62
Configuration Archive 62
Configuration Replace 63
Contents
Managing Configuration Files Configuration Guide, Cisco IOS Release 12.2SXiv

Configuration Rollback 64
Configuration Rollback Confirmed Change 64
Benefits of Configuration Replace and Configuration Rollback 65
How to Use Configuration Replace and Configuration Rollback 65
Creating a Configuration Archive 65
Performing a Configuration Replace or Configuration Rollback Operation 67
Monitoring and Troubleshooting the Feature 69
Configuration Examples for Configuration Replace and Configuration Rollback 71
Creating a Configuration Archive Example 71
Replacing the Current Running Configuration with a Saved Cisco IOS Configuration File
Example 72
Reverting to the Startup Configuration File Example 72
Performing a Configuration Replace Operation with the configure confirm Command Example 72
Performing a Configuration Rollback Operation Example 73
Additional References 74
Feature Information for Configuration Replace and Configuration Rollback 75
Contextual Configuration Diff Utility 79
Finding Feature Information 79
Prerequisites for Contextual Configuration Diff Utility 79
Restrictions for Contextual Configuration Diff Utility 80
Information About Contextual Configuration Diff Utility 80
Benefits of the Contextual Configuration Diff Utility 80
Contextual Configuration Diff Utility Output Format 80
How to Use the Contextual Configuration Diff Utility 81
Using the Contextual Configuration Diff Utility 81
Configuration Examples for the Contextual Configuration Diff Utility 82
Diff Operation Example 82
Incremental Diff Operation Example 84
Additional References 86
Feature Information for Contextual Configuration Diff Utility 87
Configuration Change Notification and Logging 89
Finding Feature Information 89
Restrictions for Configuration Change Notification and Logging 89
Information About Configuration Change Notification and Logging 90
Configuration Log 90
Contents
Managing Configuration Files Configuration Guide, Cisco IOS Release 12.2SX v

Configuration Change Notifications and Config Change Logging 90
Config Logger Enhancements for EAL4+ Certification 90
How to Configure the Configuration Change Notification and Logging Feature 91
Configuring the Configuration Change Notification and Logging Feature 91
Displaying Configuration Log Entries and Statistics 93
Clearing Configuration Log Entries 95
Clearing the Configuration Log by Reducing the Log Size 95
Clearing the Configuration Log by Disabling the Configuration Log 96
Configuration Examples for the Configuration Change Notification and Logging Feature 98
Configuring the Configuration Change Notification and Logging Feature Example 98
Additional References 99
Feature Information for Configuration Change Notification and Logging 100
Configuration Logger Persistency 103
Finding Feature Information 103
Prerequisites for Configuration Logger Persistency 103
Information About Configuration Logger Persistency 103
Use of Configuration Logger Persistency to Save Configuration Files 104
Persisted Commands 104
How to Configure the Configuration Logger Persistency Feature 105
Enabling the Configuration Logger Persistency Feature 105
Verifying and Troubleshooting the Configuration Logger Persistency Feature 106
Configuration Examples for the Configuration Logger Persistency Feature 108
Configuration Logger Persistency Configuration on a Cisco 7200 Series Router Example 108
Additional References 108
Feature Information for Configuration Logger Persistency 109
Glossary 110
Configuration Partitioning 113
Finding Feature Information 113
Information About Configuration Partitioning 113
System Running Configurations 114
Retrieving the Running Configuration for Display or Copy Operations 114
Benefits of Partitioning the Running Configuration 114
How to Use the Configuration Partitioning Feature 115
Displaying Configuration Partitions 115
Disabling the Configuration Partitioning Feature 117
Contents
Managing Configuration Files Configuration Guide, Cisco IOS Release 12.2SXvi

What to Do Next 117
Configuration Examples for Configuration Partitioning 118
Displaying Configuration Partitions Example 118
Additional References 126
Feature Information for Configuration Partitioning 128
Contents
Managing Configuration Files Configuration Guide, Cisco IOS Release 12.2SX vii

Managing Configuration Files
Creating, loading, and maintaining configuration files enable you to generate a set of user-configuredcommands to customize the functionality of your Cisco routing device. For a complete description of theconfiguration file management commands, refer to the Cisco IOS Configuration Fundamentals CommandReference.
• Finding Feature Information, page 1• Prerequisites for Managing Configuration Files, page 1• Restrictions for Managing Configuration Files, page 1• Information About Managing Configuration Files, page 2• How to Manage Configuration File Information, page 8• Additional References, page 44
Finding Feature InformationYour software release may not support all the features documented in this module. For the latest featureinformation and caveats, see the release notes for your platform and software release. To find informationabout the features documented in this module, and to see a list of the releases in which each feature issupported, see the Feature Information Table at the end of this document.
Use Cisco Feature Navigator to find information about platform support and Cisco software image support.To access Cisco Feature Navigator, go to www.cisco.com/go/cfn. An account on Cisco.com is not required.
Prerequisites for Managing Configuration Files• You should have at least a basic familiarity with the Cisco IOS environment and the command-line
interface.• You should have at least a minimal configuration running on your system. You can create a basic
configuration file using the setup command (see Using Setup Mode to Configure a Cisco NetworkingDevice for details).
Restrictions for Managing Configuration Files• Many of the Cisco IOS commands described in this document are available and function only in
certain configuration modes on the router.
Managing Configuration Files Configuration Guide, Cisco IOS Release 12.2SX 1

• Some of the Cisco IOS configuration commands are only available on certain router platforms, and thecommand syntax may vary on different platforms.
Information About Managing Configuration Files• Types of Configuration Files, page 2
• Configuration Mode and Selecting a Configuration Source, page 2
• Configuration File Changes Using the CLI, page 3
• Location of Configuration Files, page 3
• Copy Configuration Files from a Network Server to the Router, page 3
• Configuration Files Larger than NVRAM, page 6
• Control of the Parser Cache, page 7
• Configure the Router to Download Configuration Files, page 8
Types of Configuration FilesConfiguration files contain the Cisco IOS software commands used to customize the functionality of yourCisco routing device (router, access server, switch, and so on). Commands are parsed (translated andexecuted) by the Cisco IOS software when the system is booted (from the startup-config file) or when youenter commands at the CLI in a configuration mode.
Startup configuration files (startup-config) are used during system startup to configure the software.Running configuration files (running-config) contain the current configuration of the software. The twoconfiguration files can be different. For example, you may want to change the configuration for a short timeperiod rather than permanently. In this case, you would change the running configuration using theconfigureterminal EXEC command but not save the configuration using the copyrunning-configstartup-config EXEC command.
To change the running configuration, use the configureterminal command, as described in the “Modifyingthe Configuration File at the CLI ” section. As you use the Cisco IOS configuration modes, commandsgenerally are executed immediately and are saved to the running configuration file either immediately afteryou enter them or when you exit a configuration mode.
To change the startup configuration file, you can either save the running configuration file to the startupconfiguration using the copyrunning-configstartup-config EXEC command or copy a configuration filefrom a file server to the startup configuration (see the “Copying a Configuration File from a TFTP Serverto the Router ” section for more information).
Configuration Mode and Selecting a Configuration SourceTo enter configuration mode on the router, enter the configurecommand at the privileged EXEC prompt.The Cisco IOS software responds with the following prompt asking you to specify the terminal, memory,or a file stored on a network server (network) as the source of configuration commands:
Configuring from terminal, memory, or network [terminal]?
Configuring from the terminal allows you to enter configuration commands at the command line, asdescribed in the following section. Configuring from memory loads the startup configuration file. See the“Reexecuting the Configuration Commands in the Startup Configuration File ” section for moreinformation. Configuring from the network allows you to load and execute configuration commands over
Types of Configuration Files Information About Managing Configuration Files
Managing Configuration Files Configuration Guide, Cisco IOS Release 12.2SX2

the network. See the “Copying a Configuration File from a TFTP Server to the Router ” section for moreinformation.
Configuration File Changes Using the CLIThe Cisco IOS software accepts one configuration command per line. You can enter as many configurationcommands as you want. You can add comments to a configuration file describing the commands you haveentered. Precede a comment with an exclamation point ( !). Because comments are not stored in NVRAMor in the active copy of the configuration file, comments do not appear when you list the activeconfiguration with theshowrunning-configormoresystem:running-config EXEC command. Commentsdo not display when you list the startup configuration with the showstartup-config ormorenvram:startup-config EXEC mode command. Comments are stripped out of the configuration filewhen it is loaded onto the router. However, you can list the comments in configuration files stored on a FileTransfer Protocol (FTP), remote copy protocol (rcp), or Trivial File Transfer Protocol (TFTP) server. Whenyou configure the software using the CLI, the software executes the commands as you enter them.
Location of Configuration FilesConfiguration files are stored in the following locations:
• The running configuration is stored in RAM.• On all platforms except the Class A Flash file system platforms, the startup configuration is stored in
nonvolatile random-access memory (NVRAM).• On Class A Flash file system platforms, the startup configuration is stored in the location specified by
the CONFIG_FILE environment variable (see the “Specifying the CONFIG_FILE EnvironmentVariable on Class A Flash File Systems” section). The CONFIG_FILE variable defaults to NVRAMand can be a file in the following file systems:
◦ nvram: (NVRAM)◦ bootflash: (internal Flash memory)◦ slot0: (first PCMCIA slot)◦ slot1: (second PCMCIA slot)
Copy Configuration Files from a Network Server to the RouterYou can copy configuration files from a TFTP, rcp, or FTP server to the running configuration or startupconfiguration of the router. You may want to perform this function for one of the following reasons:
• To restore a backed-up configuration file.• To use the configuration file for another router. For example, you may add another router to your
network and want it to have a similar configuration to the original router. By copying the file to thenew router, you can change the relevant parts rather than re-creating the whole file.
• To load the same configuration commands on to all the routers in your network so that all the routershave similar configurations.
The copy{ftp: | rcp: | tftp:system:running-configEXECcommand loads the configuration files into therouter as if you were typing the commands in at the command line. The router does not erase the existingrunning configuration before adding the commands. If a command in the copied configuration file replacesa command in the existing configuration file, the existing command will be erased. For example, if thecopied configuration file contains a different IP address in a particular command than the existingconfiguration, the IP address in the copied configuration will be used. However, some commands in theexisting configuration may not be replaced or negated. In this case, the resulting configuration file will be a
Configuration File Changes Using the CLIInformation About Managing Configuration Files
Managing Configuration Files Configuration Guide, Cisco IOS Release 12.2SX 3

mixture of the existing configuration file and the copied configuration file, with the copied configurationfile having precedence.
In order to restore a configuration file to an exact copy of a file stored on a server, you need to copy theconfiguration file directly to the startup configuration (using the copyftp:| rcp:| tftp:} nvram:startup-configcommand) and reload the router.
To copy configuration files from a server to a router, perform the tasks described in the following sections:
The protocol you use depends on which type of server you are using. The FTP and rcp transportmechanisms provide faster performance and more reliable delivery of data than TFTP. Theseimprovements are possible because the FTP and rcp transport mechanisms are built on and use the TCP/IPstack, which is connection-oriented.
• Copy a Configuration File from the Router to a TFTP Server, page 4
• Copy a Configuration File from the Router to an rcp Server, page 4
• Copy a Configuration File from the Router to an FTP Server, page 6
Copy a Configuration File from the Router to a TFTP ServerIn some implementations of TFTP, you must create a dummy file on the TFTP server and give it read,write, and execute permissions before copying a file over it. Refer to your TFTP documentation for moreinformation.
Copy a Configuration File from the Router to an rcp ServerYou can copy configuration file from the router to an rcp server.
One of the first attempts to use the network as a resource in the UNIX community resulted in the designand implementation of the remote shell protocol, which included the remote shell (rsh) and remote copy(rcp) functions. Rsh and rcp give users the ability to execute commands remotely and copy files to andfrom a file system residing on a remote host or server on the network. The Cisco implementation of rsh andrcp interoperates with standard implementations.
The rcp copy commands rely on the rsh server (or daemon) on the remote system. To copy files using rcp,you need not create a server for file distribution, as you do with TFTP. You need only to have access to aserver that supports the remote shell (rsh). (Most UNIX systems support rsh.) Because you are copying afile from one place to another, you must have read permission on the source file and write permission onthe destination file. If the destination file does not exist, rcp creates it for you.
Although the Cisco rcp implementation emulates the functions of the UNIX rcp implementation--copyingfiles among systems on the network--the Cisco command syntax differs from the UNIX rcp commandsyntax. The Cisco rcp support offers a set of copy commands that use rcp as the transport mechanism.These rcp copy commands are similar in style to the Cisco TFTP copy commands, but they offer analternative that provides faster performance and reliable delivery of data. These improvements are possiblebecause the rcp transport mechanism is built on and uses the TCP/IP stack, which is connection-oriented.You can use rcp commands to copy system images and configuration files from the router to a networkserver and vice versa.
You also can enable rcp support to allow users on remote systems to copy files to and from the router.
To configure the Cisco IOS software to allow remote users to copy files to and from the router, use theiprcmdrcp-enable global configuration command.
• Restrictions, page 5
• Requirements for the rcp Username, page 5
Managing Configuration Files Copy a Configuration File from the Router to a TFTP Server
Managing Configuration Files Configuration Guide, Cisco IOS Release 12.2SX4

Restrictions
The rcp protocol requires a client to send a remote username on each rcp request to a server. When youcopy a configuration file from the router to a server using rcp, the Cisco IOS software sends the first validusername it encounters in the following sequence:
1 The username specified in the copy EXEC command, if a username is specified.2 The username set by the iprcmdremote-username global configuration command, if the command is
configured.3 The remote username associated with the current tty (terminal) process. For example, if the user is
connected to the router through Telnet and was authenticated through the username command, therouter software sends the Telnet username as the remote username.
4 The router host name.
For the rcp copy request to execute successfully, an account must be defined on the network server for theremote username. If the server has a directory structure, the configuration file or image is written to orcopied from the directory associated with the remote username on the server. For example, if the systemimage resides in the home directory of a user on the server, you can specify that user name as the remoteusername.
Use the iprcmdremote-username command to specify a username for all copies. (Rcmd is a UNIX routineused at the super-user level to execute commands on a remote machine using an authentication schemebased on reserved port numbers. Rcmd stands for “remote command”). Include the username in the copycommand if you want to specify a username for that copy operation only.
If you are writing to the server, the rcp server must be properly configured to accept the rcp write requestfrom the user on the router. For UNIX systems, you must add an entry to the .rhosts file for the remote useron the rcp server. For example, suppose the router contains the following configuration lines:
hostname Rtr1ip rcmd remote-username User0
If the router IP address translates to Router1.company.com, then the .rhosts file for User0 on the rcp servershould contain the following line:
Router1.company.com Rtr1
Requirements for the rcp Username
The rcp protocol requires a client to send a remote username on each rcp request to a server. When youcopy a configuration file from the router to a server using rcp, the Cisco IOS software sends the first validusername it encounters in the following sequence:
1 The username specified in the copy EXEC command, if a username is specified.2 The username set by the iprcmdremote-username global configuration command, if the command is
configured.3 The remote username associated with the current tty (terminal) process. For example, if the user is
connected to the router through Telnet and was authenticated through the username command, therouter software sends the Telnet username as the remote username.
4 The router host name.
For the rcp copy request to execute, an account must be defined on the network server for the remoteusername. If the server has a directory structure, the configuration file or image is written to or copied fromthe directory associated with the remote username on the server. For example, if the system image residesin the home directory of a user on the server, specify that user name as the remote username.
Managing Configuration FilesRestrictions
Managing Configuration Files Configuration Guide, Cisco IOS Release 12.2SX 5

Refer to the documentation for your rcp server for more information.
Copy a Configuration File from the Router to an FTP ServerYou can copy a configuration file from the router to an FTP server.
• Understanding the FTP Username and Password, page 6
Understanding the FTP Username and Password
The FTP protocol requires a client to send a remote username and password on each FTP request to aserver. When you copy a configuration file from the router to a server using FTP, the Cisco IOS softwaresends the first valid username it encounters in the following sequence:
1 The username specified in the copy EXEC command, if a username is specified.2 The username set by the ipftpusername global configuration command, if the command is configured.3 Anonymous.
The router sends the first valid password it encounters in the following sequence:
1 The password specified in the copy command, if a password is specified.2 The password set by the ipftppassword command, if the command is configured.3 The router forms a password username @routername .domain . The variable username is the username
associated with the current session, routername is the configured host name, and domain is the domainof the router.
The username and password must be associated with an account on the FTP server. If you are writing to theserver, the FTP server must be properly configured to accept the FTP write request from the user on therouter.
If the server has a directory structure, the configuration file or image is written to or copied from thedirectory associated with the username on the server. For example, if the system image resides in the homedirectory of a user on the server, specify that user name as the remote username.
Refer to the documentation for your FTP server for more information.
Use the ipftpusername and ipftppassword global configuration commands to specify a username andpassword for all copies. Include the username in the copy EXEC command if you want to specify ausername for that copy operation only.
Configuration Files Larger than NVRAMTo maintain a configuration file that exceeds size of NVRAM, you should be aware of the information inthe following sections:
• Compressing the Configuration File, page 6
• Storing the Configuration in Flash Memory on Class A Flash File Systems, page 7
• Loading the Configuration Commands from the Network, page 7
Compressing the Configuration FileThe servicecompress-config global configuration command specifies that the configuration file be storedcompressed in NVRAM. Once the configuration file has been compressed, the router functions normally.When the system is booted, it recognizes that the configuration file is compressed, expands it, and proceeds
Configuration Files Larger than NVRAM Copy a Configuration File from the Router to an FTP Server
Managing Configuration Files Configuration Guide, Cisco IOS Release 12.2SX6

normally. The morenvram:startup-config EXEC command expands the configuration before displayingit.
Before you compress configuration files, refer to the appropriate hardware installation and maintenancepublication. Verify that your system’s ROMs support file compression. If not, you can install new ROMsthat support file compression.
The size of the configuration must not exceed three times the NVRAM size. For a 128-KB size NVRAM,the largest expanded configuration file size is 384 KB.
The servicecompress-configglobal configurationcommand works only if you have Cisco IOS softwareRelease 10 or later release boot ROMs. Installing new ROMs is a one-time operation and is necessary onlyif you do not already have Cisco IOS Release 10 in ROM. If the boot ROMs do not recognize a compressedconfiguration, the following message is displayed:
Boot ROMs do not support NVRAM compression Config NOT written to NVRAM
Storing the Configuration in Flash Memory on Class A Flash File SystemsOn Class A Flash file system routers, you can store the startup configuration in Flash memory by settingthe CONFIG_FILE environment variable to a file in internal Flash memory or Flash memory in a PCMCIAslot.
See the “Specifying the CONFIG_FILE Environment Variable on Class A Flash File Systems ” section formore information.
Care must be taken when editing or changing a large configuration. Flash memory space is used every timea copysystem:running-confignvram:startup-config EXEC command is issued. Because file managementfor Flash memory, such as optimizing free space, is not done automatically, you must pay close attention toavailable Flash memory. Use the squeeze command to reclaim used space. We recommend that you use alarge-capacity Flash card of at least 20 MB.
Loading the Configuration Commands from the NetworkYou can also store large configurations on FTP, rcp, or TFTP servers and download them at system startup.To use a network server to store large configura tions, see the “Copying a Configuration File from theRouter to a TFTP Server” and “Configure the Router to Download Configuration Files” sections for moreinformation on these commands.
Control of the Parser CacheThe Cisco IOS command-line parser in the Cisco IOS software performs the translation and execution(parsing) of command lines. The Parser Cache feature was developed to rapidly process large configurationfiles, thereby dramatically improving load time.
The Parser Cache feature allows the rapid recognition and translation of configuration lines in aconfiguration file that differ slightly from previously used configuration lines (for example, pvc 0/100, pvc0/101, and so on) by dynamically creating, caching, and reusing simplified parse graphs. This improvementis useful primarily for configuration files that repeat similar commands hundreds or thousands of times,such as cases in which thousands of virtual circuits must be configured for subinterfaces, or hundreds ofaccess lists must be configured. Performance will improve the most for those files in which the samecommands are used repeatedly but the numerical arguments change from command to command.
The Parser Cache is enabled by default on all platforms using Cisco IOS Release 12.1(5)T and laterreleases. However, users with Cisco devices that do not require large configuration files may want to
Control of the Parser CacheStoring the Configuration in Flash Memory on Class A Flash File Systems
Managing Configuration Files Configuration Guide, Cisco IOS Release 12.2SX 7

disable the Parser Cache to free the resources used by this feature. (Memory used by this feature dependson the size of the configuration files parsed, but is generally less than 512 KB.)
There are several ways to control the parser cache (these are all optional):
• Clearing the Parser Cache--To free resources or to reset the parser cache memory, you may wish toclear the parse entries and hit/miss statistics stored by the Parser Cache feature
• Disabling the Parser Cache--The Parser Cache feature is enabled by default. To disable the ParserCache feature, use the no parser cache command in global configuration mode. When the parser cacheis disabled, the noparsercache command line is written to the running configuration file. If you wishto disable the parser cache to free system resources, you should clear the parser cache before issuingthe noparsercache command. You will not be able to clear the parser cache after disabling it.
• Reenabling the Parser Cache--To reenable the Parser Cache feature after disabling it, use theparsercache command in global configuration mode
• Monitoring the Parser--Statistics about the last configuration file parsed are kept in the systemmemory, along with hit/miss statistics on the commands parsed by the Parser Cache feature. “Hits”and “misses” refer to the matches that the parser cache was able to make to similar commands usedpreviously in the configuration session. Those commands that are matched (“hits”) be parsed moreefficiently. The parser cache cannot improve the parse time for those commands it was unable tomatch (“misses”).
Configure the Router to Download Configuration FilesYou can configure the router to load one or two configuration files at system startup. The configurationfiles are loaded into memory and read in as if you were typing the commands at the command line. Thus,the configuration for the router will be a mixture of the original startup configuration and the one or twodownloaded configuration files.
• Network Versus Host Configuration Files, page 8
Network Versus Host Configuration FilesFor historical reasons, the first file the router downloads is called the network configuration file. Thesecond file the router downloads is called the host configuration file. Two configuration files can be usedwhen all of the routers on a network use many of the same commands. The network configuration filecontains the standard commands used to configure all of the routers. The host configuration files containthe commands specific to one particular host. If you are loading two configuration files, the hostconfiguration file should be the configuration file you want to have precedence over the other file. Both thenetwork and host configuration files must reside on a network server reachable via TFTP, rcp, or FTP, andmust be readable.
How to Manage Configuration File Information• Displaying Configuration File Information, page 9• Modifying the Configuration File at the CLI, page 10• Copying a Configuration File from the Router to a TFTP Server, page 12• Copying a Configuration File from the Router to an rcp Server, page 13• Copying a Configuration File from the Router to the FTP Server, page 15• Copying a Configuration File from a TFTP Server to the Router, page 17• Copying a Configuration File from the rcp Server to the Router, page 18
Configure the Router to Download Configuration Files Network Versus Host Configuration Files
Managing Configuration Files Configuration Guide, Cisco IOS Release 12.2SX8

• Copying a Configuration File from an FTP Server to the Router, page 21
• Maintaining Configuration Files Larger than NVRAM, page 23
• Managing the Parser Cache, page 28
• Copying Configuration Files from Flash Memory to the Startup or Running Configuration, page 31
• Copying Configuration Files Between Flash Memory File Systems, page 31
• Copying a Configuration File from an FTP Server to Flash Memory Devices, page 33
• Copying a Configuration File from an rcp Server to Flash Memory Devices, page 34
• Copying a Configuration File from a TFTP Server to Flash Memory Devices, page 36
• Reexecuting the Configuration Commands in the Startup Configuration File, page 36
• Clearing the Startup Configuration, page 37
• Deleting a Specified Configuration File, page 38
• Specifying the CONFIG_FILE Environment Variable on Class A Flash File Systems, page 38
• Configuring the Router to Download Configuration Files, page 40
Displaying Configuration File InformationTo display information about configuration files, complete the tasks in this section:
SUMMARY STEPS
1. enable
2. show bootvar
3. more file-url
4. show running-config
5. show startup-config
DETAILED STEPS
Command or Action Purpose
Step 1 enable
Example:
Router> enable
Enables privileged EXEC mode.
• Enter your password if prompted.
Step 2 show bootvar
Example:
Router# show bootvar
Lists the contents of the BOOT environment variable, the name of the configuration filepointed to by the CONFIG_FILE environment variable, and the contents of theBOOTLDR environment variable.
Step 3 more file-url
Example:
Router# more 10.1.1.1
Displays the contents of a specified file.
Displaying Configuration File InformationHow to Manage Configuration File Information
Managing Configuration Files Configuration Guide, Cisco IOS Release 12.2SX 9

Command or Action Purpose
Step 4 show running-config
Example:
Router# show running-config
Displays the contents of the running configuration file. (Command alias forthemoresystem:running-config command.)
Step 5 show startup-config
Example:
Router# show startup-config
Displays the contents of the startup configuration file. (Command alias for themorenvram:startup-config command.)
On all platforms except the Class A Flash file system platforms, the default startup-config file usually is stored in NVRAM. On the Class A Flash file system platforms, theCONFIG_FILE environment variable points to the default startup-config file. TheCONFIG_FILE variable defaults to NVRAM.
Modifying the Configuration File at the CLIThe Cisco IOS software accepts one configuration command per line. You can enter as many configurationcommands as you want. You can add comments to a configuration file describing the commands you haveentered. Precede a comment with an exclamation point ( !). Because comments are not stored in NVRAMor in the active copy of the configuration file, comments do not appear when you list the activeconfiguration with theshowrunning-configormoresystem:running-config EXEC command. Commentsdo not display when you list the startup configuration with the showstartup-config ormorenvram:startup-config EXEC mode command. Comments are stripped out of the configuration filewhen it is loaded onto the router. However, you can list the comments in configuration files stored on a FileTransfer Protocol (FTP), remote copy protocol (rcp), or Trivial File Transfer Protocol (TFTP) server. Whenyou configure the software using the CLI, the software executes the commands as you enter them. Toconfigure the software using the CLI, use the following commands beginning in privileged EXEC mode:
SUMMARY STEPS
1. enable
2. configure terminal
3. configuration command
4. Do one of the following:
• end• ^Z
5. copy system:running-config nvram:startup-config
Modifying the Configuration File at the CLI How to Manage Configuration File Information
Managing Configuration Files Configuration Guide, Cisco IOS Release 12.2SX10

DETAILED STEPS
Command or Action Purpose
Step 1 enable
Example:
Router> enable
Enables privileged EXEC mode.
• Enter your password if prompted.
Step 2 configure terminal
Example:
Router# configure terminal
Enters global configuration mode.
Step 3 configuration command
Example:
Router(config)# configuration command
Enter the necessary configuration commands. The Cisco IOS documentationset describes configuration commands organized by technology.
Step 4 Do one of the following:
• end• ^Z
Example:
Router(config)# end
Ends the configuration session and exits to EXEC mode.
Note When you press the Ctrl and Z keys simultaneously, ^Z is displayed tothe screen.
Step 5 copy system:running-confignvram:startup-config
Example:
Router# copy system:running-config nvram:startup-config
Saves the running configuration file as the startup configuration file.
You may also use the copyrunning-configstartup-config command alias,but you should be aware that this command is less precise. On mostplatforms, this command saves the configuration to NVRAM. On the Class AFlash file system platforms, this step saves the configuration to the locationspecified by the CONFIG_FILE environment variable (the defaultCONFIG_FILE variable specifies that the file should be saved to NVRAM).
Examples
In the following example, the router prompt name of the router is configured. The comment line, indicatedby the exclamation mark (!), does not execute any command. The hostname command is used to changethe router name from Router to new_name. By pressing Ctrl-Z (^Z) or entering the endcommand, the userquits configuration mode. The copysystem:running-confignvram:startup-config command saves thecurrent configuration to the startup configuration.
Router# configure terminalRouter(config)# !The following command provides the router host name.Router(config)# hostname new_name
Managing Configuration FilesHow to Manage Configuration File Information
Managing Configuration Files Configuration Guide, Cisco IOS Release 12.2SX 11

new_name(config)# endnew_name# copy system:running-config nvram:startup-config
When the startup configuration is NVRAM, it stores the current configuration information in text format asconfiguration commands, recording only nondefault settings. The memory is checksummed to guardagainst corrupted data.
Note Some specific commands might not get saved to NVRAM. You will need to enter these commands again ifyou reboot the machine. These commands are noted in the documentation. We recommend that you keep alist of these settings so that you can quickly reconfigure your router after rebooting.
Copying a Configuration File from the Router to a TFTP ServerTo copy configuration information on a TFTP network server, complete the tasks in this section:
SUMMARY STEPS
1. enable
2. copy system:running-config tftp: [[[//location ]/directory ]/filename ]
3. copy nvram:startup-config tftp: [[[//location ]/directory ]/filename ]
DETAILED STEPS
Command or Action Purpose
Step 1 enable
Example:
Router> enable
Enables privileged EXEC mode.
• Enter your password if prompted.
Step 2 copy system:running-config tftp: [[[//location ]/directory ]/filename ]
Example:
Router# copy system:running-config tftp: //server1/topdir/file10
Copies the running configuration file to a TFTPserver.
Step 3 copy nvram:startup-config tftp: [[[//location ]/directory ]/filename ]
Example:
Router# copy nvram:startup-config tftp: //server1/1stdir/file10
Copies the startup configuration file to a TFTPserver.
Examples
The following example copies a configuration file from a router to a TFTP server:
Tokyo# copy system:running-config tftp://172.16.2.155/tokyo-confg
Copying a Configuration File from the Router to a TFTP Server How to Manage Configuration File Information
Managing Configuration Files Configuration Guide, Cisco IOS Release 12.2SX12

Write file tokyo-confg on host 172.16.2.155? [confirm] yWriting tokyo-confg!!! [OK]
• What to Do Next, page 13
What to Do NextAfter you have issued the copy command, you may be prompted for additional information or forconfirmation of the action. The prompting will depend on how much information you provide in the copycommand and the current setting of the fileprompt global configuration command.
Copying a Configuration File from the Router to an rcp ServerTo copy a startup configuration file or a running configuration file from the router to an rcp server, use thefollowing commands beginning in privileged EXEC mode:
SUMMARY STEPS
1. enable
2. configure terminal
3. ip rcmd remote-username username
4. end
5. Do one of the following:
• copy system:running-config rcp: [[[//[username@]location ]/directory ]/filename ]• copy nvram:sta rtup-config rcp :[[[//[username@]location ]/directory ]/filename ]
DETAILED STEPS
Command or Action Purpose
Step 1 enable
Example:
Router> enable
Enables privileged EXEC mode.
• Enter your password if prompted.
Step 2 configure terminal
Example:
Router# configure terminal
Enters global configuration mode.
Step 3 ip rcmd remote-username username
Example:
Router(config)# ip rcmd remote-username user1
(Optional) Changes the default remoteusername.
Copying a Configuration File from the Router to an rcp ServerWhat to Do Next
Managing Configuration Files Configuration Guide, Cisco IOS Release 12.2SX 13

Command or Action Purpose
Step 4 end
Example:
Router(config)# end
(Optional) Exits global configuration mode.
Step 5 Do one of the following:
• copy system:running-config rcp: [[[//[username@]location ]/directory ]/filename ]
• copy nvram:sta rtup-config rcp :[[[//[username@]location ]/directory ]/filename ]
Example:
Router# copy system:running-config rcp: //[email protected]/dir-files/file1
Specifies that the router running configurationfile be stored on an rcp server.
or
Specifies that the router startup configurationfile be stored on an rcp server.
• Examples, page 14• What to Do Next, page 15
Examples
• Storing a Running Configuration File on an rcp Server, page 14• Storing a Startup Configuration File on an rcp Server, page 14
Storing a Running Configuration File on an rcp Server
The following example copies the running configuration file named rtr2-confg to the netadmin1 directoryon the remote host with an IP address of 172.16.101.101:
Router# copy system:running-config rcp://[email protected]/Rtr2-confgWrite file rtr2-confg on host 172.16.101.101?[confirm]Building configuration...[OK]Connected to 172.16.101.101Router#
Storing a Startup Configuration File on an rcp Server
The following example shows how to store a startup configuration file on a server by using rcp to copy thefile:
Rtr2# configure terminal Rtr2(config)# ip rcmd remote-username netadmin2 Rtr2(config)# end Rtr2# copy nvram:startup-config rcp: Remote host[]? 172.16.101.101
Managing Configuration Files Examples
Managing Configuration Files Configuration Guide, Cisco IOS Release 12.2SX14

Name of configuration file to write [rtr2-confg]?Write file rtr2-confg on host 172.16.101.101?[confirm]![OK]
What to Do NextAfter you have issued the copy EXEC command, you may be prompted for additional information or forconfirmation of the action. The prompting will depend on how much information you provide in the copycommand and the current setting of the fileprompt global configuration command.
Copying a Configuration File from the Router to the FTP ServerTo copy a startup configuration file or a running configuration file from the router to an FTP server,complete the following tasks:
SUMMARY STEPS
1. enable
2. configure terminal
3. ip ftp username username
4. ip ftp password password
5. end
6. Do one of the following:
• copy system:running-config ftp: [[[//[username [:password ]@]location/directory ]/filename ]••• copy nvram:sta rtup-config ftp: [[[//[username [:password ]@]location/directory ]/filename ]
DETAILED STEPS
Command or Action Purpose
Step 1 enable
Example:
Router> enable
Enables privileged EXEC mode.
• Enter your password if prompted.
Step 2 configure terminal
Example:
Router# configure terminal
Enters global configuration mode.
Copying a Configuration File from the Router to the FTP ServerWhat to Do Next
Managing Configuration Files Configuration Guide, Cisco IOS Release 12.2SX 15

Command or Action Purpose
Step 3 ip ftp username username
Example:
Router(config)# ip ftp username user1
(Optional) Specifies the default remoteusername.
Step 4 ip ftp password password
Example:
Router(config)# ip ftp username guessme
(Optional) Specifies the default password.
Step 5 end
Example:
Router(config)# end
(Optional) Exits global configuration mode.This step is required only if you override thedefault remote username or password (seeSteps 2 and 3).
Step 6 Do one of the following:
• copy system:running-config ftp: [[[//[username[:password ]@]location/directory ]/filename ]
••• copy nvram:sta rtup-config ftp: [[[//[username
[:password ]@]location/directory ]/filename ]
Example:
Router# copy system:running-config ftp: //user1:[email protected] /dir10/file1
Copies the running configuration or startupconfiguration file to an FTP server.
• Examples, page 16
• What to Do Next, page 17
Examples
• Storing a Running Configuration File on an FTP Server, page 16
• Storing a Startup Configuration File on an FTP Server, page 17
Storing a Running Configuration File on an FTP Server
The following example copies the running configuration file named rtr2-confg to the netadmin1 directoryon the remote host with an IP address of 172.16.101.101:
Router# copy system:running-config ftp://netadmin1:[email protected]/Rtr2-confg
Managing Configuration Files Examples
Managing Configuration Files Configuration Guide, Cisco IOS Release 12.2SX16

Write file rtr2-confg on host 172.16.101.101?[confirm]Building configuration...[OK]Connected to 172.16.101.101Router#
Storing a Startup Configuration File on an FTP Server
The following example shows how to store a startup configuration file on a server by using FTP to copy thefile:
Rtr2# configure terminal Rtr2(config)# ip ftp username netadmin2 Rtr2(config)# ip ftp password mypass Rtr2(config)# end Rtr2# copy nvram:startup-config ftp: Remote host[]? 172.16.101.101 Name of configuration file to write [rtr2-confg]?Write file rtr2-confg on host 172.16.101.101?[confirm]![OK]
What to Do NextAfter you have issued the copy EXEC command, you may be prompted for additional information or forconfirmation of the action. The prompting will depend on how much information you provide in the copycommand and the current setting of the fileprompt global configuration command.
Copying a Configuration File from a TFTP Server to the RouterTo copy a configuration file from a TFTP server to the router, complete the tasks in this section:
SUMMARY STEPS
1. enable
2. copy tftp: [[[//location ]/directory ]/filename ] system:running-config
3. copy tftp: [[[//location ]/directory ]/filename ] nvram:startup-config
DETAILED STEPS
Command or Action Purpose
Step 1 enable
Example:
Router> enable
Enables privileged EXEC mode.
• Enter your password if prompted.
Copying a Configuration File from a TFTP Server to the RouterStoring a Startup Configuration File on an FTP Server
Managing Configuration Files Configuration Guide, Cisco IOS Release 12.2SX 17

Command or Action Purpose
Step 2 copy tftp: [[[//location ]/directory ]/filename ] system:running-config
Example:
Router# copy tftp://server1/dir10/datasource system:running-config
Copies a configuration file from a TFTP server to therunning configuration.
Step 3 copy tftp: [[[//location ]/directory ]/filename ] nvram:startup-config
Example:
Router# copy tftp://server1/dir10/datasource nvram:startup-config
Copies a configuration file from a TFTP server to thestartup configuration.
Examples
In the following example, the software is configured from the file named tokyo-config at IP address172.16.2.155:
Router1# copy tftp://172.16.2.155/tokyo-confg system:running-config Configure using tokyo-confg from 172.16.2.155? [confirm] y Booting tokyo-confg from 172.16.2.155:!!! [OK - 874/16000 bytes]
• What to Do Next, page 18
What to Do NextAfter you have issued the copy EXEC command, you may be prompted for additional information or forconfirmation of the action. The prompting will depend on how much information you provide in the copycommand and the current setting of the fileprompt global configuration command.
Copying a Configuration File from the rcp Server to the RouterTo copy a configuration file from an rcp server to the running configuration or startup configuration,complete the following tasks:
SUMMARY STEPS
1. enable
2. configure terminal
3. ip rcmd remote-username username
4. end
5. copy rcp: [[[//[username@]location ]/directory ]/filename ]system:running-config
Copying a Configuration File from the rcp Server to the Router What to Do Next
Managing Configuration Files Configuration Guide, Cisco IOS Release 12.2SX18

DETAILED STEPS
Command or Action Purpose
Step 1 enable
Example:
Router> enable
Enables privileged EXEC mode.
• Enter your password if prompted.
Step 2 configure terminal
Example:
Router# configure terminal
(Optional) Enters configuration mode from theterminal. This step is required only if you override thedefault remote username (see Step 3).
Step 3 ip rcmd remote-username username
Example:
Router(config)# ip rcmd remote-username user1
(Optional) Specifies the remote username.
Step 4 end
Example:
Router(config)# end
(Optional) Exits global configuration mode. This stepis required only if you override the default remoteusername (see Step 2).
Managing Configuration FilesWhat to Do Next
Managing Configuration Files Configuration Guide, Cisco IOS Release 12.2SX 19

Command or Action Purpose
Step 5 copy rcp: [[[//[username@]location ]/directory ]/filename ]system:running-config
Example:
Example:
or
Example:
copy rcp:[[[//[username@]location
]/directory]/filename] nvram:startup-config
Example:
Router# copy rcp://[[email protected]/dir10/fileone] nvram:startup-config
Copies the configuration file from a rcp server to therunning configuration or startup configuration.
• Examples, page 20
• What to Do Next, page 21
Examples
• Copy rcp Running-Config, page 20
• Copy rcp Startup-Config, page 20
Copy rcp Running-Config
The following example copies a configuration file named host1-confg from the netadmin1 directory on theremote server with an IP address of 172.16.101.101, and loads and runs those commands on the router:
Router# copy rcp://[email protected]/host1-confg system:running-configConfigure using host1-confg from 172.16.101.101? [confirm]Connected to 172.16.101.101Loading 1112 byte file host1-confg:![OK]Router#%SYS-5-CONFIG: Configured from host1-config by rcp from 172.16.101.101
Copy rcp Startup-Config
Managing Configuration Files Examples
Managing Configuration Files Configuration Guide, Cisco IOS Release 12.2SX20

The following example specifies a remote username of netadmin1. Then it copies the configuration filenamed host2-confg from the netadmin1 directory on the remote server with an IP address of172.16.101.101 to the startup configuration.
Rtr2# configure terminalRtr2(config)# ip rcmd remote-username netadmin1Rtr2(config)# endRtr2# copy rcp: nvram:startup-configAddress of remote host [255.255.255.255]? 172.16.101.101Name of configuration file[rtr2-confg]? host2-confgConfigure using host2-confg from 172.16.101.101?[confirm]Connected to 172.16.101.101Loading 1112 byte file host2-confg:![OK][OK]Rtr2#%SYS-5-CONFIG_NV:Non-volatile store configured from host2-config by rcp from 172.16.101.101
What to Do NextAfter you have issued the copy EXEC command, you may be prompted for additional information or forconfirmation of the action. The prompting will depend on how much information you provide in the copycommand and the current setting of the fileprompt global configuration command.
Copying a Configuration File from an FTP Server to the RouterTo copy a configuration file from an F TP server to the running configuration or startup configuration,complete the tasks in this section:
SUMMARY STEPS
1. enable
2. configure terminal
3. ip ftp username username
4. ip ftp password password
5. end
6. copy ftp: [[[//[username [:password ]@]location ]/directory ]/filename ]system:running-config
DETAILED STEPS
Command or Action Purpose
Step 1 enable
Example:
Router> enable
Enables privileged EXEC mode.
• Enter your password if prompted.
Step 2 configure terminal
Example:
Router# configure terminal
(Optional) Allows you to enter global configurationmode. This step is required only if you want tooverride the default remote username or password(see Steps 2 and 3).
Copying a Configuration File from an FTP Server to the RouterWhat to Do Next
Managing Configuration Files Configuration Guide, Cisco IOS Release 12.2SX 21

Command or Action Purpose
Step 3 ip ftp username username
Example:
Router(config)# ip ftp username user1
(Optional) Specifies the default remote username.
Step 4 ip ftp password password
Example:
Router(config)# ip ftp password guessme
(Optional) Specifies the default password.
Step 5 end
Example:
Router(config)# end
(Optional) Exits global configuration mode. Thisstep is required only if you override the defaultremote username or password (see Steps 2 and 3).
Step 6 copy ftp: [[[//[username [:password ]@]location ]/directory ]/filename ]system:running-config
Example:
Example:
or
Example:copy ftp:[[[//[username[:password]@]location/directory]/filename] nvram:startup-config
Example:
Router# copy ftp://user1:[email protected] /dir10/datasource nvram:startup-config
Using FTP, copies the configuration file from anetwork server to running memory or the startupconfiguration.
• Examples, page 22
• What to Do Next, page 23
Examples
Managing Configuration Files Examples
Managing Configuration Files Configuration Guide, Cisco IOS Release 12.2SX22

• Copy FTP Running-Config, page 23
• Copy FTP Startup-Config, page 23
Copy FTP Running-Config
The following example copies a host configuration file named host1-confg from the netadmin1 directory onthe remote server with an IP address of 172.16.101.101, and loads and runs those commands on the router:
Router# copy rcp://netadmin1:[email protected]/host1-confg system:running-config Configure using host1-confg from 172.16.101.101? [confirm]Connected to 172.16.101.101Loading 1112 byte file host1-confg:![OK]Router#%SYS-5-CONFIG: Configured from host1-config by ftp from 172.16.101.101
Copy FTP Startup-Config
The following example specifies a remote username of netadmin1. Then it copies the configuration filenamed host2-confg from the netadmin1 directory on the remote server with an IP address of172.16.101.101 to the startup configuration.
Rtr2# configure terminalRtr2(config)# ip ftp username netadmin1Rtr2(config)# ip ftp password mypassRtr2(config)# endRtr2# copy ftp: nvram:startup-config Address of remote host [255.255.255.255]? 172.16.101.101Name of configuration file[rtr2-confg]? host2-confgConfigure using host2-confg from 172.16.101.101?[confirm]Connected to 172.16.101.101Loading 1112 byte file host2-confg:![OK][OK]Rtr2#%SYS-5-CONFIG_NV:Non-volatile store configured from host2-config by ftp from 172.16.101.101
What to Do NextAfter you have issued the copy EXEC command, you may be prompted for additional information or forconfirmation of the action. The prompting will depend on how much information you provide in the copycommand and the current setting of the fileprompt global configuration command.
Maintaining Configuration Files Larger than NVRAMTo maintain a configuration file that exceeds size of NVRAM, perform the tasks described in the followingsections:
• Compressing the Configuration File, page 23
• Storing the Configuration in Flash Memory on Class A Flash File Systems, page 25
• Loading the Configuration Commands from the Network, page 27
Compressing the Configuration FileTo compress configuration files, complete the tasks in this section:
Maintaining Configuration Files Larger than NVRAMCopy FTP Running-Config
Managing Configuration Files Configuration Guide, Cisco IOS Release 12.2SX 23

SUMMARY STEPS
1. enable
2. configure terminal
3. service compress-config
4. end
5. Do one of the following:
• Use FTP, rcp, or TFTP to copy the new configuration.• configure terminal
6. copy system:running-config nvram:startup-config
DETAILED STEPS
Command or Action Purpose
Step 1 enable
Example:
Router> enable
Enables privileged EXEC mode.
• Enter your password if prompted.
Step 2 configure terminal
Example:
Router# configure terminal
Enters global configuration mode.
Step 3 service compress-config
Example:
Router(config)# service compress-config
Specifies that the configuration file be compressed.
Step 4 end
Example:
Router(config)# end
Exits global configuration mode.
Step 5 Do one of the following:
• Use FTP, rcp, or TFTP to copy the new configuration.• configure terminal
Example:
Router# configure terminal
Enters the new configuration:
• If you try to load a configuration that is more than threetimes larger than the NVRAM size, the following errormessage is displayed:
“[buffer overflow - file-size /buffer-size bytes].”
Managing Configuration Files Compressing the Configuration File
Managing Configuration Files Configuration Guide, Cisco IOS Release 12.2SX24

Command or Action Purpose
Step 6 copy system:running-config nvram:startup-config
Example:
Router(config)# copy system:running-config nvram:startup-config
When you have finished changing the running-configuration,saves the new configuration.
Examples
The following example compresses a 129-KB configuration file to 11 KB:
Router# configure terminal Router(config)# service compress-config Router(config)# end Router# copy tftp://172.16.2.15/tokyo-confg system:running-config Configure using tokyo-confg from 172.16.2.155? [confirm] y Booting tokyo-confg from 172.16.2.155:!!! [OK - 874/16000 bytes]Router# copy system:running-config nvram:startup-config Building configuration...Compressing configuration from 129648 bytes to 11077 bytes[OK]
Storing the Configuration in Flash Memory on Class A Flash File SystemsTo store the startup configuration in Flash memory, complete the tasks in this section:
SUMMARY STEPS
1. enable
2. copy nvram:startup-config flash-filesystem:filename
3. configure terminal
4. boot config flash-filesystem: filename
5. end
6. Do one of the following:
• Use FTP, rcp, or TFTP to copy the new configuration. If you try to load a configuration that ismore than three times larger than the NVRAM size, the following error message is displayed:
• “[buffer overflow - file-size /buffer-size bytes] . ”• configure terminal
7. copy system:running-config nvram:startup-config
Managing Configuration FilesStoring the Configuration in Flash Memory on Class A Flash File Systems
Managing Configuration Files Configuration Guide, Cisco IOS Release 12.2SX 25

DETAILED STEPS
Command or Action Purpose
Step 1 enable
Example:
Router> enable
Enables privileged EXEC mode.
• Enter your password if prompted.
Step 2 copy nvram:startup-config flash-filesystem:filename
Example:
Router# copy nvram:startup-config slot0:router-config
Copies the current startup configuration to thenew location to create the configuration file.
Step 3 configure terminal
Example:
Router# configure terminal
Enters global configuration mode.
Step 4 boot config flash-filesystem: filename
Example:
Router(config)# boot config slot0:router-config
Specifies that the startup configuration file bestored in Flash memory by setting theCONFIG_FILE variable.
Step 5 end
Example:
Router(config)# end
Exits global configuration mode.
Step 6 Do one of the following:
• Use FTP, rcp, or TFTP to copy the new configuration. If you try toload a configuration that is more than three times larger than theNVRAM size, the following error message is displayed:
• “[buffer overflow - file-size /buffer-size bytes] . ”• configure terminal
Example:
Router# configure terminal
Enters the new configuration.
Managing Configuration Files Storing the Configuration in Flash Memory on Class A Flash File Systems
Managing Configuration Files Configuration Guide, Cisco IOS Release 12.2SX26

Command or Action Purpose
Step 7 copy system:running-config nvram:startup-config
Example:
Router(config)# copy system:running-config nvram:startup-config
When you have finished changing therunning-configuration, saves the newconfiguration.
Examples
The following example stores the configuration file in slot 0:
Router# copy nvram:startup-config slot0:router-config Router# configure terminal Router(config)# boot config slot0:router-config Router(config)# end Router# copy system:running-config nvram:startup-config
Loading the Configuration Commands from the NetworkTo use a network server to store large configura tions, complete the tasks in this section:
SUMMARY STEPS
1. enable
2. copy system:running-config {ftp: | rcp: |tftp:}
3. configure terminal
4. boot network {ftp:[[[//[username [:password ]@]location ]/directory ]/filename ] | rcp:[[[//[username@]location ]/directory ]/filename ] | tftp:[[[//location ]/directory ]/filename ]}
5. service config
6. end
7. copy system:running-config nvram:startup-config
DETAILED STEPS
Command or Action Purpose
Step 1 enable
Example:
Router> enable
Enables privileged EXEC mode.
• Enter your password if prompted.
Managing Configuration FilesLoading the Configuration Commands from the Network
Managing Configuration Files Configuration Guide, Cisco IOS Release 12.2SX 27

Command or Action Purpose
Step 2 copy system:running-config {ftp: | rcp: |tftp:}
Example:
Router# copy system:running-config ftp:
Saves the running configuration to an FTP,rcp, or TFTP server.
Step 3 configure terminal
Example:
Router# configure terminal
Enters global configuration mode.
Step 4 boot network {ftp:[[[//[username [:password ]@]location ]/directory ]/filename ] | rcp:[[[//[username@]location ]/directory ]/filename ] | tftp:[[[//location ]/directory ]/filename ]}
Example:
Router(config)# boot network ftp://user1:[email protected]/dir10/file1
Specifies that the startup configuration filebe loaded from the network server atstartup.
Step 5 service config
Example:
Router(config)# service config
Enables the router to downloadconfiguration files at system startup.
Step 6 end
Example:
Router(config)# end
Exits global configuration mode.
Step 7 copy system:running-config nvram:startup-config
Example:
Router# copy system:running-config nvram:startup-config
Saves the configuration.
Managing the Parser CacheTo control the Parser Cache feature, perform the tasks described in the following sections. All of thesetasks are optional:
• Clearing the Parser Cache, page 29• Disabling the Parser Cache, page 29• Reenabling the Parser Cache, page 30
Managing the Parser Cache Loading the Configuration Commands from the Network
Managing Configuration Files Configuration Guide, Cisco IOS Release 12.2SX28

• What to Do Next, page 30
Clearing the Parser CacheTo clear the information stored by the Parser Cache feature, complete the task in this section:
SUMMARY STEPS
1. enable
2. clear parser cache
DETAILED STEPS
Command or Action Purpose
Step 1 enable
Example:
Router> enable
Enables privileged EXEC mode.
• Enter your password if prompted.
Step 2 clear parser cache
Example:
Router# clear parser cache
Clears the parse cache entries and hit/miss statistics stored for the Parser Cache feature.
Disabling the Parser CacheThe Parser Cache feature is enabled by default. To disable the Parser Cache feature, complete the task inthis section:
SUMMARY STEPS
1. enable
2. no parser cache
DETAILED STEPS
Command or Action Purpose
Step 1 enable
Example:
Router> enable
Enables privileged EXEC mode.
• Enter your password if prompted.
Managing Configuration FilesClearing the Parser Cache
Managing Configuration Files Configuration Guide, Cisco IOS Release 12.2SX 29

Command or Action Purpose
Step 2 no parser cache
Example:
Router# no parser cache
Disables the Parser Cache feature:
• When the parser cache is disabled, the noparsercache command line is written to therunning configuration file.
• If you wish to disable the parser cache to free system resources, you should clear theparser cache before issuing the noparsercache command. You will not be able to clearthe parser cache after disabling it.
Reenabling the Parser CacheTo reenable the Parser Cache feature after disabling it, complete the task in this section:
SUMMARY STEPS
1. enable
2. parser cache
DETAILED STEPS
Command or Action Purpose
Step 1 enable
Example:
Router> enable
Enables privileged EXEC mode.
• Enter your password if prompted.
Step 2 parser cache
Example:
Router# parser cache
Enables the Parser Cache feature.
What to Do NextTheshowparserstatistics command displays two sets of data, as follows:
• The number of commands in the configuration file that was last copied into the running configuration,and the time it took for the system to parse them (a configuration file can be loaded into the runningconfiguration at system startup, or by issuing commands such as the copysourcerunning-configEXEC command).
• The status of the parser cache (enabled or disabled) and the number of command matches (hits ormisses) since the system was started or since the parser cache was cleared.
Managing Configuration Files Reenabling the Parser Cache
Managing Configuration Files Configuration Guide, Cisco IOS Release 12.2SX30

Copying Configuration Files from Flash Memory to the Startup or RunningConfiguration
To copy a configuration file from Flash memory directly to your startup configuration in NVRAM or yourrunning configuration, enter one of the commands in Step 2:
SUMMARY STEPS
1. enable
2. Do one of the following:
• copy filesystem : [partition-number:][filename ] nvram:startup-config• copy filesystem : [partition-number:][filename ] system:running-config
DETAILED STEPS
Command or Action Purpose
Step 1 enable
Example:
Router> enable
Enables privileged EXEC mode.
• Enter your password if prompted.
Step 2 Do one of the following:
• copy filesystem : [partition-number:][filename ] nvram:startup-config
• copy filesystem : [partition-number:][filename ] system:running-config
Example:
Router# copy slot0:4:ios-upgrade-1 nvram:startup-config
Loads a configuration file directly into NVRAM.
or
Copies a configuration file to your runningconfiguration.
Examples
The following example copies the file named ios-upgrade-1 from partition 4 of the Flash memory PC Cardin slot 0 to the router startup configurations:
Router# copy slot0:4:ios-upgrade-1 nvram:startup-config Copy 'ios-upgrade-1' from flash device as 'startup-config' ? [yes/no] yes [OK]
Copying Configuration Files Between Flash Memory File SystemsOn platforms with multiple Flash memory file systems, you can copy files from one Flash memory filesystem, such as internal Flash memory or a Flash memory card in a PCMCIA slot, to another Flash
Copying Configuration Files from Flash Memory to the Startup or Running ConfigurationWhat to Do Next
Managing Configuration Files Configuration Guide, Cisco IOS Release 12.2SX 31

memory file system. Copying files to different Flash memory file systems lets you create backup copies ofworking configurations and duplicate configurations for other routers. To copy a configuration file betweenFlash memory file systems, use the following commands in EXEC mode:
SUMMARY STEPS
1. enable
2. show source-filesystem :
3. copy source-filesystem : [partition-number:][filename ] dest-filesystem:[partition-number:][filename ]
4. verify dest-filesystem : [partition-number:][filename ]
DETAILED STEPS
Command or Action Purpose
Step 1 enable
Example:
Router> enable
Enables privileged EXEC mode.
• Enter your password if prompted.
Step 2 show source-filesystem :
Example:
Router# copy slot0:4:ios-upgrade-1 nvram:startup-config
Displays the layout and contents of Flash memory to verify thefilename.
Step 3 copy source-filesystem : [partition-number:][filename ]dest-filesystem:[partition-number:][filename ]
Example:
Router# copy flash: slot1:
Copies a configuration file between Flash memory devices.
• The source device and the destination device cannot be thesame. For example, the copyslot1:slot1: command isinvalid.
Step 4 verify dest-filesystem : [partition-number:][filename ]
Example:
Router# verify flash: slot1:
Verifies the checksum of the file you copied.
Example
The following example copies the file named running-config from partition 1 of internal Flash memory topartition 1 of slot 1 on a Cisco 3600 series router. In this example, the source partition is not specified, sothe router prompts for the partition number.
Router# copy flash: slot1: System flashPartition Size Used Free Bank-Size State Copy Mode 1 4096K 3070K 1025K 4096K Read/Write Direct
Managing Configuration Files What to Do Next
Managing Configuration Files Configuration Guide, Cisco IOS Release 12.2SX32

2 16384K 1671K 14712K 8192K Read/Write Direct[Type ?<no> for partition directory; ? for full directory; q to abort]Which partition? [default = 1] System flash directory, partition 1:File Length Name/status 1 3142748 dirt/network/mars-test/c3600-j-mz.latest 2 850 running-config [3143728 bytes used, 1050576 available, 4194304 total]PCMCIA Slot1 flash directory:File Length Name/status 1 1711088 dirt/gate/c3600-i-mz 2 850 running-config [1712068 bytes used, 2482236 available, 4194304 total]Source file name? running-config Destination file name [running-config]? Verifying checksum for 'running-config' (file # 2)... OKErase flash device before writing? [confirm]Flash contains files. Are you sure you want to erase? [confirm]Copy 'running-config' from flash: device as 'running-config' into slot1: device WITH erase? [yes/no] yes Erasing device... eeeeeeeeeeeeeeeeeeeeeeeeeeeeeeeeeeeeeeeeeeeeeeeeeeeeeeeeeeeeeeee ...erased! [OK - 850/4194304 bytes]Flash device copy took 00:00:30 [hh:mm:ss]Verifying checksum... OK (0x16)
Copying a Configuration File from an FTP Server to Flash Memory DevicesTo copy a configuration file from an FTP server to a Flash memory device, complete the task in thissection:
SUMMARY STEPS
1. enable
2. configure terminal
3. ip ftp username username
4. ip ftp password password
5. end
6. copy ftp: [[[//[username:password@]location ]/directory ]/filename ] flash-filesystem:[partition-number:][filename ]
DETAILED STEPS
Command or Action Purpose
Step 1 enable
Example:
Router> enable
Enables privileged EXEC mode.
• Enter your password if prompted.
Copying a Configuration File from an FTP Server to Flash Memory DevicesWhat to Do Next
Managing Configuration Files Configuration Guide, Cisco IOS Release 12.2SX 33

Command or Action Purpose
Step 2 configure terminal
Example:
Router# configure terminal
(Optional) Enters global configuration mode. Thisstep is required only if you override the defaultremote username or password (see Steps 3 and 4).
Step 3 ip ftp username username
Example:
Router(config)# ip ftp username user1
(Optional) Specifies the remote username.
Step 4 ip ftp password password
Example:
Router(config)# ip ftp password guessme
(Optional) Specifies the remote password.
Step 5 end
Example:
Router(config)# end
(Optional) Exits configuration mode. This step isrequired only if you override the default remoteusername (see Steps 3 and 4).
Step 6 copy ftp: [[[//[username:password@]location ]/directory ]/filename ] flash-filesystem:[partition-number:][filename ]
Example:
Router> copy ftp:router-config slot0:new-config
Copies the configuration file from a network server tothe Flash memory device using FTP.
• What to Do Next, page 34
What to Do NextAfter you have issued the copy EXEC command, you may be prompted for additional information or forconfirmation of the action. The prompting will depend on how much information you provide in the copycommand and the current setting of the fileprompt global configuration command.
Copying a Configuration File from an rcp Server to Flash Memory DevicesTo copy a configuration file from an rcp server to a Flash memory device, complete the tasks in thissection:
Copying a Configuration File from an rcp Server to Flash Memory Devices What to Do Next
Managing Configuration Files Configuration Guide, Cisco IOS Release 12.2SX34

SUMMARY STEPS
1. enable
2. configure terminal
3. ip rcmd remote-username username
4. end
5. copy rcp: [[[//[username@]location ]/directory ]/filename ] flash-filesystem:[partition-number:][filename ]
DETAILED STEPS
Command or Action Purpose
Step 1 enable
Example:
Router> enable
Enables privileged EXEC mode.
• Enter your password if prompted.
Step 2 configure terminal
Example:
Router# configure terminal
(Optional) Enters global configuration mode.This step is requiredonly if you override the default remote username or password (seeSteps 3 and 4).
Step 3 ip rcmd remote-username username
Example:
Router(config)# ip rcmd remote-username user1
(Optional) Specifies the remote username.
Step 4 end
Example:
Router(config)# end
(Optional) Exits configuration mode.This step is required only ifyou override the default remote username or password (see Steps 3and 4).
Step 5 copy rcp: [[[//[username@]location ]/directory ]/filename ] flash-filesystem:[partition-number:][filename ]
Example:
Router# copy rcp:router-config slot0:new-config
Copies the configuration file from a network server to the Flashmemory device using rcp. Reply to any router prompts foradditional information or confirmation. The prompting willdepending on how much information you provide in the copycommand and the current setting of the fileprompt command.
Managing Configuration FilesWhat to Do Next
Managing Configuration Files Configuration Guide, Cisco IOS Release 12.2SX 35

Copying a Configuration File from a TFTP Server to Flash Memory DevicesTo copy a configuration file from a TFTP server to a Flash memory device, complete the task in thissection:
SUMMARY STEPS
1. enable
2. copy tftp: [[[//location ]/directory ]/filename ] flash-filesystem:[partition-number:][filename ]
DETAILED STEPS
Command or Action Purpose
Step 1 enable
Example:
Router> enable
Enables privileged EXEC mode.
• Enter your password if prompted.
Step 2 copy tftp: [[[//location ]/directory ]/filename ] flash-filesystem:[partition-number:][filename ]
Example:
Router# copy tftp:router-config slot0:new-config
Copies the file from a TFTP server to the Flash memory device. Reply toany router prompts for additional information or confirmation. Theprompting will depending on how much information you provide in thecopy command and the current setting of the fileprompt command.
Examples
The following example shows the copying of the configuration file named router-config from a TFTPserver to the Flash memory card inserted in slot 0 of the Network Processing Engine (NPE) or RouteSwitch Processor (RSP) card of a Cisco 7500 series router. The copied file is renamed new-config.
Router# copy tftp:router-config slot0:new-config
Reexecuting the Configuration Commands in the Startup Configuration FileTo reexecute the commands located in the startup configuration file, complete the task in this section:
SUMMARY STEPS
1. enable
2. configure memory
Copying a Configuration File from a TFTP Server to Flash Memory Devices What to Do Next
Managing Configuration Files Configuration Guide, Cisco IOS Release 12.2SX36

DETAILED STEPS
Command or Action Purpose
Step 1 enable
Example:
Router> enable
Enables privileged EXEC mode.
• Enter your password if prompted.
Step 2 configure memory
Example:
Router# configure memory
Reexecutes the configuration commands located in the startup configuration file .
Clearing the Startup ConfigurationYou can clear the configuration information from the startup configuration. If you reboot the router with nostartup configuration, the router will enter the Setup command facility so that you can configure the routerfrom scratch.To clear the contents of your startup configuration, complete the task in this section:
SUMMARY STEPS
1. enable
2. erase nvram
DETAILED STEPS
Command or Action Purpose
Step 1 enable
Example:
Router> enable
Enables privileged EXEC mode.
• Enter your password if prompted.
Step 2 erase nvram
Example:
Router# erase nvram
Clears the contents of your startup configuration.
Note For all platforms except the Class A Flash file system platforms, this command erasesNVRAM. The startup configuration file cannot be restored once it has been deleted. OnClass A Flash file system platforms, when you use the erasestartup-configEXECcommand, the router erases or deletes the configuration pointed to byCONFIG_FILE environment variable. If this variable points to NVRAM, the router erasesNVRAM. If the CONFIG_FILE environment variable specifies a Flash memory deviceand configuration filename, the router deletes the configuration file. That is, the routermarks the file as “deleted,” rather than erasing it. This feature allows you to recover adeleted file.
Clearing the Startup ConfigurationWhat to Do Next
Managing Configuration Files Configuration Guide, Cisco IOS Release 12.2SX 37

Deleting a Specified Configuration FileTo delete a specifi ed configuration on a specific Flash device, complete the task in this section:
SUMMARY STEPS
1. enable
2. delete flash-filesystem : filename
DETAILED STEPS
Command or Action Purpose
Step 1 enable
Example:
Router> enable
Enables privileged EXEC mode.
• Enter your password if prompted.
Step 2 delete flash-filesystem : filename
Example:
Router# delete slot0:myconfig
Deletes a specified configuration file on a specified Flash device.
Note On Class A and B Flash file systems, when you delete a specific file in Flashmemory, the system marks the file as deleted, allowing you to later recover adeleted file using the undelete EXEC command. Erased files cannot berecovered. To permanently erase the configuration file, use the squeeze EXECcommand. On Class C Flash file systems, you cannot recover a file that hasbeen deleted. If you attempt to erase or delete the configuration file specifiedby the CONFIG_FILE environment variable, the system prompts you toconfirm the deletion.
Specifying the CONFIG_FILE Environment Variable on Class A Flash FileSystems
On Class A Flash file systems, you can configure the Cisco IOS software to load the startup configurationfile specified by the CONFIG_FILE environment variable. The CONFIG_FILE variable defaults toNVRAM. To change the CONFIG_FILE environment variable, complete the tasks in this section:
SUMMARY STEPS
1. enable
2. copy [flash-url| ftp-url | rcp-url| tftp-url | system:running-config | nvram:startup-config] dest-flash-url
3. configure terminal
4. boot config dest-flash-url
5. end
6. copy system:running-config nvram:startup-config
7. show bootvar
Deleting a Specified Configuration File What to Do Next
Managing Configuration Files Configuration Guide, Cisco IOS Release 12.2SX38

DETAILED STEPS
Command or Action Purpose
Step 1 enable
Example:
enable
Enables privileged EXEC mode.
• Enter your password if prompted.
Step 2 copy [flash-url| ftp-url | rcp-url| tftp-url | system:running-config| nvram:startup-config] dest-flash-url
Example:
Router# copy system:running-config nvram:startup-config
Copies the configuration file to the Flash file systemfrom which the router will load the file upon restart.
Step 3 configure terminal
Example:
Router# configure terminal
Enters global configuration mode.
Step 4 boot config dest-flash-url
Example:
Router(config)# boot config 172.16.1.1
Sets the CONFIG_FILE environment variable. Thisstep modifies the runtime CONFIG_FILE environmentvariable.
Step 5 end
Example:
Router(config)# end
Exits global configuration mode.
Step 6 copy system:running-config nvram:startup-config
Example:
Router# copy system:running-config nvram:startup-config
Saves the configuration performed in Step 3 to thestartup configuration.
Step 7 show bootvar
Example:
Router# show bootvar
(Optional) Allows you to verify the contents of theCONFIG_FILE environment variable.
Managing Configuration FilesWhat to Do Next
Managing Configuration Files Configuration Guide, Cisco IOS Release 12.2SX 39

Examples
The following example copies the running configuration file to the first PCMCIA slot of the RSP card in aCisco 7500 series router. This configuration is then used as the startup configuration when the system isrestarted.
Router# copy system:running-config slot0:config2Router# configure terminalRouter(config)# boot config slot0:config2Router(config)# endRouter# copy system:running-config nvram:startup-config[ok]Router# show bootvarBOOT variable = slot0:rsp-boot-mCONFIG_FILE variable = nvram:Current CONFIG_FILE variable = slot0:config2Configuration register is 0x010F
• What to Do Next, page 40
What to Do NextAfter you specify a location for the startup configuration file, the nvram:startup-config command isaliased to the new location of the startup configuration file. The morenvram:startup-config EXECcommand will display the startup configuration, regardless of its location. The erasenvram:startup-configEXEC command will erase the contents of NVRAM and delete the file pointed to by the CONFIG_FILEenvironment variable.
When you save the configuration using the copysystem:running-confignvram:startup-config command,the router saves a complete version of the configuration file to the location specified by the CONFIG_FILEenvironment variable and a distilled version to NVRAM. A distilled version is one that does not containaccess list information. If NVRAM contains a complete configuration file, the router prompts you toconfirm your overwrite of the complete version with the distilled version. If NVRAM contains a distilledconfiguration, the router does not prompt you for confirmation and proceeds with overwriting the existingdistilled configuration file in NVRAM.
Note If you specify a file in a Flash device as the CONFIG_FILE environment variable, every time you saveyour configuration file with the copysystem:running-confignvram:startup-config command, the oldconfiguration file is marked as “deleted,” and the new configuration file is saved to that device. Eventually,Flash memory will be full, because the old configuration files still take up memory. Use the squeeze EXECcommand to permanently delete the old configuration files and reclaim the space.
Configuring the Router to Download Configuration FilesYou can specify an ordered list of network configuration and host configuration filenames. The Cisco IOSXE software scans this list until it loads the appropriate network or host configuration file.
To configure the router to download configuration files at system startup, perform at least one of the tasksdescribed in the following sections:
• "Configuring the Router to Download the Network Configuration File"• "Configuring the Router to Download the Host Configuration File"
Configuring the Router to Download Configuration Files What to Do Next
Managing Configuration Files Configuration Guide, Cisco IOS Release 12.2SX40

If the router fails to load a configuration file during startup, it tries again every 10 minutes (the defaultsetting) until a host provides the requested files. With each failed attempt, the router displays the followingmessage on the console terminal:
Booting host-confg... [timed out]
If there are any problems with the startup configuration file, or if the configuration register is set to ignoreNVRAM, the router enters the Setup command facility.
• Configuring the Router to Download the Network Configuration File, page 41
• Configuring the Router to Download the Host Configuration File, page 42
Configuring the Router to Download the Network Configuration FileTo configure the Cisco IOS software to download a network configuration file from a server at startup,complete the tasks in this section:
SUMMARY STEPS
1. enable
2. configure terminal
3. boot network {ftp:[[[//[username [:password ]@]location ]/directory ]/filename ] | rcp:[[[//[username@]location ]/directory ]/filename ] | tftp:[[[//location ]/directory ]/filename ]}
4. service config
5. end
6. Router#copysystem:running-confignvram:startup-config
DETAILED STEPS
Command or Action Purpose
Step 1 enable
Example:
Router> enable
Enables privileged EXEC mode.
• Enter your password if prompted.
Step 2 configure terminal
Example:
Router# configure terminal
Enters global configuration mode.
Managing Configuration FilesConfiguring the Router to Download the Network Configuration File
Managing Configuration Files Configuration Guide, Cisco IOS Release 12.2SX 41

Command or Action Purpose
Step 3 boot network {ftp:[[[//[username[:password ]@]location ]/directory ]/filename ] | rcp:[[[//[username@]location ]/directory ]/filename ] |tftp:[[[//location ]/directory ]/filename ]}
Example:
Router(config)# boot network tftp:hostfile1
Specifies the network configuration file to download at startup,and the protocol to be used (TFTP, rcp, or FTP).
• If you do not specify a network configuration filename, theCisco IOS software uses the default filename network-confg.If you omit the address, the router uses the broadcast address.
• You can specify more than one network configuration file.The software tries them in order entered until it loads one.This procedure can be useful for keeping files with differentconfiguration information loaded on a network server.
Step 4 service config
Example:
Router(config)# service config
Enables the system to automatically load the network file uponrestart.
Step 5 end
Example:
Router(config)# end
Exits global configuration mode.
Step 6 Router#copysystem:running-confignvram:startup-config
Example:
Router# copy system:running-config nvram:startup-config
Saves the running configuration to the startup configuration file.
Configuring the Router to Download the Host Configuration FileTo configure the Cisco IOS software to download a host configuration file from a server at startup,complete the tasks in this section:
SUMMARY STEPS
1. enable
2. configure terminal
3. boot host {ftp:[[[//[username [:password ]@]location ]/directory ]/filename ] | rcp:[[[//[username@]location ]/directory ]/filename ] | tftp:[[[//location ]/directory ]/filename ] }
4. service config
5. end
6. copy system:running-config nvram:startup-config
Managing Configuration Files Configuring the Router to Download the Host Configuration File
Managing Configuration Files Configuration Guide, Cisco IOS Release 12.2SX42

DETAILED STEPS
Command or Action Purpose
Step 1 enable
Example:
Router> enable
Enables privileged EXEC mode.
• Enter your password if prompted.
Step 2 configure terminal
Example:
Router# configure terminal
Enters global configuration mode.
Step 3 boot host {ftp:[[[//[username[:password ]@]location ]/directory ]/filename ] |rcp:[[[//[username@]location ]/directory ]/filename ] | tftp:[[[//location ]/directory ]/filename ] }
Example:
Router(config)# boot host tftp:hostfile1
Specifies the host configuration file to download at startup, and theprotocol to be used (FTP, rcp, or TFTP):
• If you do not specify a host configuration filename, the routeruses its own name to form a host configuration filename byconverting the name to all lowercase letters, removing all domaininformation, and appending “-confg.” If no host nameinformation is available, the software uses the default hostconfiguration filename router-confg. If you omit the address, therouter uses the broadcast address.
• You can specify more than one host configuration file. The CiscoIOS software tries them in order entered until it loads one. Thisprocedure can be useful for keeping files with differentconfiguration information loaded on a network server.
Step 4 service config
Example:
Router(config)# service config
Enables the system to automatically load the host file upon restart.
Step 5 end
Example:
Router(config)# end
Exits global configuration mode.
Managing Configuration FilesConfiguring the Router to Download the Host Configuration File
Managing Configuration Files Configuration Guide, Cisco IOS Release 12.2SX 43

Command or Action Purpose
Step 6 copy system:running-config nvram:startup-config
Example:
Router# copy system:running-config nvram:startup-config
Saves the running configuration to the startup configuration file.
Examples
In the following example, a router is configured to download the host configuration file named hostfile1and the network configuration file named networkfile1. The router uses TFTP and the broadcast address toobtain the file.
Router# configure terminalRouter(config)# boot host tftp:hostfile1Router(config)# boot network tftp:networkfile1Router(config)# service configRouter(config)# endRouter# copy system:running-config nvram:startup-config
Additional ReferencesRelated Documents
Related Topic Document Title
Cisco IOS commands Cisco IOS Master Commands List, All Releases
Cisco IOS configuration commands Cisco IOS Configuration Fundamentals CommandReference
Standards
Standard Title
No new or modified standards are supported, andsupport for existing standards has not beenmodified
--
Managing Configuration Files Additional References
Managing Configuration Files Configuration Guide, Cisco IOS Release 12.2SX44

MIBs
MIB MIBs Link
• No new or modified MIBs are supported, andsupport for existing MIBs has not beenmodified.
To locate and download MIBs for selectedplatforms, Cisco software releases, and feature sets,use Cisco MIB Locator found at the followingURL:
http://www.cisco.com/go/mibs
RFCs
RFC Title
No new or modified RFCs are supported, andsupport for existing RFCs has not been modified.
--
Technical Assistance
Description Link
The Cisco Support and Documentation websiteprovides online resources to downloaddocumentation, software, and tools. Use theseresources to install and configure the software andto troubleshoot and resolve technical issues withCisco products and technologies. Access to mosttools on the Cisco Support and Documentationwebsite requires a Cisco.com user ID andpassword.
http://www.cisco.com/cisco/web/support/index.html
Cisco and the Cisco Logo are trademarks of Cisco Systems, Inc. and/or its affiliates in the U.S. and othercountries. A listing of Cisco's trademarks can be found at www.cisco.com/go/trademarks. Third partytrademarks mentioned are the property of their respective owners. The use of the word partner does notimply a partnership relationship between Cisco and any other company. (1005R)
Cisco and the Cisco logo are trademarks or registered trademarks of Cisco and/or its affiliates in the U.S.and other countries. To view a list of Cisco trademarks, go to this URL: www.cisco.com/go/trademarks.Third-party trademarks mentioned are the property of their respective owners. The use of the word partnerdoes not imply a partnership relationship between Cisco and any other company. (1110R)
Any Internet Protocol (IP) addresses and phone numbers used in this document are not intended to beactual addresses and phone numbers. Any examples, command display output, network topology diagrams,and other figures included in the document are shown for illustrative purposes only. Any use of actual IPaddresses or phone numbers in illustrative content is unintentional and coincidental.
Managing Configuration Files
Managing Configuration Files Configuration Guide, Cisco IOS Release 12.2SX 45

Configuring the Router to Download Configuration Files
Managing Configuration Files Configuration Guide, Cisco IOS Release 12.2SX46

Exclusive Configuration Change Access andAccess Session Locking
Exclusive Configuration Change Access (also called the “Configuration Lock” feature) allows you to haveexclusive change access to the Cisco IOS XE running configuration, preventing multiple users frommaking concurrent configuration changes.
The Access Session Locking addition to this feature extends the Exclusive Configuration Change Accessfeature such that show and debug commands entered by the user holding the configuration lock alwayshave execution priority; show and debug commands entered by other users are only allowed to run afterthe processes initiated by the configuration lock owner have finished.
The Exclusive Configuration Change Access feature (“exposed lock”) is complementary with the lockingmechanism in the Configuration Replace and Configuration Rollback feature (“rollback lock”).
• Finding Feature Information, page 47• Information About Locking the Configuration, page 47• How to Configure Configuration Exclusive Confguration Change-Access and Access Session
Locking, page 49• Configuration Examples for Locking the Configuration, page 54• Additional References, page 55• Feature Information for Exclusive Configuration Change Access and Access Session Locking, page
56
Finding Feature InformationYour software release may not support all the features documented in this module. For the latest featureinformation and caveats, see the release notes for your platform and software release. To find informationabout the features documented in this module, and to see a list of the releases in which each feature issupported, see the Feature Information Table at the end of this document.
Use Cisco Feature Navigator to find information about platform support and Cisco software image support.To access Cisco Feature Navigator, go to www.cisco.com/go/cfn. An account on Cisco.com is not required.
Information About Locking the Configuration• Exclusive Configuration Change Access and Access Session Locking, page 48• Access Session Locking, page 48• Parser Concurrency and Locking Improvements, page 48
Managing Configuration Files Configuration Guide, Cisco IOS Release 12.2SX 47

Exclusive Configuration Change Access and Access Session LockingDevices running Cisco IOS software maintain a running configuration that determines the configurationstate of the device. Changes to the running configuration alter the behavior of the device. Because CiscoIOS software allows multiple users to change the running configuration via the device CLI (including thedevice console and telnet Secure Shell (SSH)), in some operating environments it would be beneficial toprevent multiple users from making concurrent changes to the Cisco IOS running configuration.Temporarily limiting access to the Cisco IOS running configuration prevents inadvertent conflicts or caseswhere two users attempt to configure the same portion of the running configuration.
The Exclusive Configuration Change Access feature (also called the “Configuration Lock” feature) allowsyou to have exclusive change access to the Cisco IOS running configuration, preventing multiple usersfrom making concurrent configuration changes.
This feature provides exclusive change access to the Cisco IOS running configuration from the time youenter global configuration mode by using the configureterminal command. This gives the effect of a“configuration lock,” preventing other users from changing the Cisco IOS running configuration. Theconfiguration lock is automatically released when the user exits Cisco IOS configuration mode.
The Exclusive Configuration Change Access feature is enabled using the configurationmodeexclusivecommand in global configuration mode. Exclusive configuration change access can be set to auto, so thatthe Cisco IOS configuration mode is locked whenever anyone uses the configureterminal command, or itcan be set to manual, so that the Cisco IOS configuration mode is locked only when theconfigureterminallock command is issued.
The Exclusive Configuration Change Access feature is complementary with the locking mechanism for theConfiguration Replace and Configuration Rollback feature introduced in Cisco IOS Release 12.2(25)S and12.3(7)T.
Access Session LockingThe Access Session Locking feature extends the Exclusive Configuration Change Access feature such thatshow and debug commands entered by the user holding the configuration lock always have executionpriority. This feature prevents concurrent configuration access and also provides an option to preventsimultaneous processes, such as a show command entered by another user, from executing while otherconfiguration commands are being executed. When this feature is enabled, the commands entered by theuser with the configuration lock (such as configuration commands) always have priority over commandsentered by other users.
Parser Concurrency and Locking ImprovementsIn order to overcome the following limitations posed by the Exclusive Configuration Change Accessfeature, the Parser Concurrency and Locking Improvements feature was introduced in Cisco IOS Release12.2(33)SRE:
• The Exclusive Configuration Change Access feature locks the configuration to other users. The lock isautomatically released when the lock holder exits from the configuration mode. Any other user in theconfiguration mode will be returned to the EXEC mode when the lock is acquired. Also, any user canexecute the clearconfigurationlock command and forcibly remove the lock and allow normal accessto all users.
• The router can reload when multiple write processes belonging to the same client simultaneouslyaccess the Cisco IOS configurations in a shared mode.
• The router can reload when EXEC commands concurrently access the data structure.
Exclusive Configuration Change Access and Access Session Locking Information About Locking the Configuration
Managing Configuration Files Configuration Guide, Cisco IOS Release 12.2SX48

Effective from Cisco IOS Release 12.2(33)SRE, the Concurrency and Locking Improvements feature is theprimary locking mechanism used to prevent concurrent configuration of Cisco IOS software by multipleusers.
The Parser Concurrency and Locking Improvements feature provides a common interface that ensures thatexclusive access is granted to the requested process and prevents others from concurrently accessing theCisco IOS configuration. It allows access only to the user holding the lock and prevents other clients fromaccessing the configuration.
Effective from Cisco IOS Release 12.2(33)SRE, the configurationmodeexclusive {auto | manual}command will not be available to enable single-user access functionality for the Cisco IOS CLI. Use theparsercommandserializer command to enable configuration access only to the users holding the lock andprevent other clients from accessing the configuration.
How to Configure Configuration Exclusive ConfgurationChange-Access and Access Session Locking
• Enabling Exclusive Configuration Change Access and Access Session Locking, page 49
• Obtaining Exclusive Configuration Change Access, page 50
• Enabling Parser Concurrency and Locking Improvements, page 52
• Monitoring and Troubleshooting Configuration Locking, page 53
Enabling Exclusive Configuration Change Access and Access SessionLocking
Note Effective with Cisco IOS Release 12.2(33)SRE, the Exclusive Configuration Change Access and AccessSession Locking feature is not available in Cisco IOS software. Use the Parser Concurrency and LockingImprovements feature instead of this feature. See the “Enabling Parser Concurrency and LockingImprovements” section for more information.
Perform this task to enable the Exclusive Configuration Change Access and Access Session Lockingfeature.
SUMMARY STEPS
1. enable
2. configure terminal
3. configuration mode exclusive {auto|manual}
4. end
Enabling Exclusive Configuration Change Access and Access Session LockingHow to Configure Configuration Exclusive Confguration Change-Access and Access Session Locking
Managing Configuration Files Configuration Guide, Cisco IOS Release 12.2SX 49

DETAILED STEPS
Command or Action Purpose
Step 1 enable
Example:
Router> enable
Enables privileged EXEC mode.
• Enter your password if prompted.
Step 2 configure terminal
Example:
Router# configure terminal
Enters global configuration mode.
Step 3 configuration mode exclusive {auto|manual}
Example:
Router(config)# configuration mode exclusive auto
Enables exclusive configuration change access (configuration lock feature).
• When the command is enabled, configuration sessions are performed insingle-user (exclusive) mode.
• The auto keyword automatically locks the configuration session wheneverthe configureterminal command is used. This is the default.
• The manual keyword allows you to choose to lock the configurationsession manually or leave it unlocked. If you use the manual keyword, youmust perform the task described in the “Obtaining Exclusive ConfigurationChange Access” section.
Step 4 end
Example:
Router(config)# end
Ends your configuration session and returns the CLI to privileged EXEC mode.
Obtaining Exclusive Configuration Change AccessPerform this task to obtain exclusive configuration change access for the duration of your configurationsession. Use of the lock keyword with the configureterminal command is necessary only if the exclusiveconfiguration mode has been set to manual (see the “Enabling Exclusive Configuration Change Accessand Access Session Locking ” section).
Obtaining Exclusive Configuration Change Access How to Configure Configuration Exclusive Confguration Change-Access and Access Session Locking
Managing Configuration Files Configuration Guide, Cisco IOS Release 12.2SX50

SUMMARY STEPS
1. enable
2. configure terminal
3. configure terminal lock
4. Configure the system by entering your changes to the running configuration.
5. Do one of the following:
• end• or• exit
DETAILED STEPS
Command or Action Purpose
Step 1 enable
Example:
Router> enable
Enables privileged EXEC mode.
• Enter your password if prompted.
Step 2 configure terminal
Example:
Router# configure terminal
Enters global configuration mode.
Step 3 configure terminal lock
Example:
Router(config)# configure terminal lock
(Optional) Locks the Cisco IOS software in exclusive (single-user) mode.
• This command can be used only if you have previously enabledconfiguration locking by using the configurationmodeexclusivecommand.
• This command is available in Cisco IOS Release 12.3(14)T or laterreleases.
Step 4 Configure the system by entering yourchanges to the running configuration.
--
Exclusive Configuration Change Access and Access Session LockingHow to Configure Configuration Exclusive Confguration Change-Access and Access Session Locking
Managing Configuration Files Configuration Guide, Cisco IOS Release 12.2SX 51

Command or Action Purpose
Step 5 Do one of the following:
• end• or• exit
Example:
Router(config)# end
Example:
Example:
Router(config)# exit
Ends your configuration session, automatically releases the session lockobtained in Step 1, and exits to privileged EXEC mode.
Note Either the end command, the exit command, or the Ctrl-Z keycombination releases the configuration lock. Use of the endcommand is recommended.
Enabling Parser Concurrency and Locking ImprovementsPerform this task to enable configuration access only to the users holding a configuration lock and toprevent other clients from accessing the running configuration.
Note The Parser Cconcurrency and Locking Improvements feature does not allow two or more processes to existsimultaneously within the critical section of Cisco IOS configurations.
This feature flags a command to prevent its serialization if an excessive amount of time is required togenerate its output or if its use produces more than 10 kilobytes of output. Examples of commands thatwould not be serialized are the showterminal and showrunning-config commands.
SUMMARY STEPS
1. enable
2. configure terminal
3. parser command serializer
4. exit
Enabling Parser Concurrency and Locking Improvements How to Configure Configuration Exclusive Confguration Change-Access and Access Session Locking
Managing Configuration Files Configuration Guide, Cisco IOS Release 12.2SX52

DETAILED STEPS
Command or Action Purpose
Step 1 enable
Example:
Router> enable
Enables privileged EXEC mode.
• Enter your password if prompted.
Step 2 configure terminal
Example:
Router# configure terminal
Enters global configuration mode.
Step 3 parser command serializer
Example:
Router(config)# parser command serializer
Introduces an exclusive lock to serialize access to Cisco IOSconfigurations.
Step 4 exit
Example:
Router(config)# exit
(Optional) Exits global configuration mode.
Monitoring and Troubleshooting Configuration LockingPerform either or both steps in this task to monitor or troubleshoot the Exclusive Configuration ChangeAccess and Access Session Locking feature.
SUMMARY STEPS
1. show configuration lock
2. debug configuration lock
DETAILED STEPS
Step 1 show configuration lockUse this command to display the status and details of any current configuration locks, including the owner, user,terminal, lock state, and lock class.
If you cannot enter global configuration mode, you can use this command to determine if the configuration session islocked by another user, and who that user is.
Monitoring and Troubleshooting Configuration LockingHow to Configure Configuration Exclusive Confguration Change-Access and Access Session Locking
Managing Configuration Files Configuration Guide, Cisco IOS Release 12.2SX 53

Example:
Router# show configuration lockParser Configure Lock------------------------------------------------------Owner PID : 3User : unknownTTY : 0Type : EXCLUSIVEState : LOCKEDClass : EXPOSEDCount : 1Pending Requests : 0User debug info : configure terminal Session idle state : TRUENo of exec cmds getting executed : 0No of exec cmds blocked : 0Config wait for show completion : FALSERemote ip address : UnknownLock active time (in Sec) : 6Lock Expiration timer (in Sec) : 593Router(config)#
Step 2 debug configuration lockUse this command to enable debugging of Cisco IOS configuration locks (exposed class locks or rollback class locks):
Example:
Router# debug configuration lock Session1 from console==========================Router# configure terminal lock Configuration mode locked exclusively. The lock will be cleared once you exit out of configuration mode using end/exitEnter configuration commands, one per line. End with CNTL/Z.Router(config)#Parser : LOCK REQUEST in EXCLUSIVE modeParser: <configure terminal lock> - Config. Lock requested by process <3> client <PARSER Client>Parser: <configure terminal lock> - Config. Lock acquired successfully !Router(config)#
Configuration Examples for Locking the Configuration• Configuring an Exclusive Lock in Auto Mode Example, page 54• Configuring an Exclusive Lock in Manual Mode Example, page 55• Configuring Parser Concurrency and Locking Improvements Example, page 55
Configuring an Exclusive Lock in Auto Mode ExampleThe following example shows how to enable the exclusive lock in auto mode for single-user autoconfiguration mode using the configurationmodeexclusiveauto command. Once the Cisco IOSconfiguration file is locked exclusively, you can verify this configuration by using theshowconfigurationlockcommand.
Router# configure terminal
Configuring an Exclusive Lock in Auto Mode Example Configuration Examples for Locking the Configuration
Managing Configuration Files Configuration Guide, Cisco IOS Release 12.2SX54

Router(config)# configuration mode exclusive auto Router(config)# exit Router# configure terminal ! Locks configuration mode exclusively.Router# show configuration lockParser Configure LockOwner PID : 10User : User1TTY : 3Type : EXCLUSIVEState : LOCKEDClass : Exposed Count : 0 Pending Requests : 0 User debug info : 0
Configuring an Exclusive Lock in Manual Mode ExampleThe following example shows how to enable the exclusive locking feature in manual mode by using theconfigurationmodeexclusivemanual command. Once you have configured manual exclusive mode, youcan lock the configuration mode by using the configureterminallock command. In this mode, theconfigureterminal command will not automatically lock the parser configuration mode.
Router# configure terminalRouter(config)# configuration mode exclusive manualRouter(config)# exitRouter# configure terminal lockEnter configuration commands, one per line. End with CNTL/Z.*Mar 25 17:02:45.928: Configuration mode locked exclusively. The lock will be cleared once you exit out of configuration mode using end/exit
Configuring Parser Concurrency and Locking Improvements ExampleThe following example shows how to enable the Parser Concurrency and Locking Improvements feature byusing the parsercommandserializer command:
Router# configure terminalRouter(config)# parser command serializerRouter(config)# exit
Additional ReferencesThe following sections provide references related to locking the configuration.
Related Documents
Related Topic Document Title
Commands for managing configuration files Cisco IOS Configuration Management CommandReference
Information about managing configuration files Managing Configuration Files
Configuring an Exclusive Lock in Manual Mode ExampleAdditional References
Managing Configuration Files Configuration Guide, Cisco IOS Release 12.2SX 55

Standards
Standard Title
No new or modified standards are supported by thisfeature, and support for existing standards has notbeen modified by this feature.
--
MIBs
MIB MIBs Link
No new or modified MIBs are supported by thisfeature, and support for existing MIBs has not beenmodified by this feature.
To locate and download MIBs for selectedplatforms, Cisco IOS releases, and feature sets, useCisco MIB Locator found at the following URL:
http://www.cisco.com/go/mibs
RFCs
RFC Title
No new or modified RFCs are supported by thisfeature, and support for existing RFCs has not beenmodified by this feature.
--
Technical Assistance
Description Link
The Cisco Support website provides extensiveonline resources, including documentation and toolsfor troubleshooting and resolving technical issueswith Cisco products and technologies.
To receive security and technical information aboutyour products, you can subscribe to variousservices, such as the Product Alert Tool (accessedfrom Field Notices), the Cisco Technical ServicesNewsletter, and Really Simple Syndication (RSS)Feeds.
Access to most tools on the Cisco Support websiterequires a Cisco.com user ID and password.
http://www.cisco.com/techsupport
Feature Information for Exclusive Configuration ChangeAccess and Access Session Locking
The following table provides release information about the feature or features described in this module.This table lists only the software release that introduced support for a given feature in a given software
Exclusive Configuration Change Access and Access Session Locking Feature Information for Exclusive Configuration Change Access and Access Session Locking
Managing Configuration Files Configuration Guide, Cisco IOS Release 12.2SX56

release train. Unless noted otherwise, subsequent releases of that software release train also support thatfeature.
Use Cisco Feature Navigator to find information about platform support and Cisco software image support.To access Cisco Feature Navigator, go to www.cisco.com/go/cfn. An account on Cisco.com is not required.
Exclusive Configuration Change Access and Access Session LockingFeature Information for Exclusive Configuration Change Access and Access Session Locking
Managing Configuration Files Configuration Guide, Cisco IOS Release 12.2SX 57

Table 1 Feature Information for Exclusive Configuration Change Access and Access Session Locking
Feature Name Releases Feature Information
Exclusive Configuration ChangeAccess and Access SessionLocking
12.3(14)T 12.0(31)S12.2(33)SRA 12.4(11)T12.2(33)SXH 12.2(33)SB
The Exclusive ConfigurationChange Access feature (alsocalled the “Configuration Lock”feature) allows you to haveexclusive change access to theCisco IOS running configuration,preventing multiple users frommaking concurrent configurationchanges.
The Access Session Lockingaddition to this feature extendsthe Exclusive ConfigurationChange Access feature such thatshow and debug commandsentered by the user holding theconfiguration lock always haveexecution priority;show anddebug commands entered byother users are allowed to runonly after the processes initiatedby the configuration lock ownerhave finished.
The Exclusive ConfigurationChange Access feature iscomplementary with the lockingmechanism for the ConfigurationReplace and ConfigurationRollback feature (“rollbacklock”).
The Configuration Lock featurefeature was integrated intoRelease 12.0S, and the AccessSession Locking featureextension was implemented. Theconfiguration modeexclusivecommand was extendedto include the following keywordoptions: config_wait, expire,interleave, lock-show,retry_wait, and terminate. Theoutput of the show configurationlockcommand was improved.
The extended feature wasintegrated into Releases12.2(33)SRA, 12.4(11)T,12.2(33)SXH, and 12.2(33)SB.
Exclusive Configuration Change Access and Access Session Locking Feature Information for Exclusive Configuration Change Access and Access Session Locking
Managing Configuration Files Configuration Guide, Cisco IOS Release 12.2SX58

Feature Name Releases Feature Information
The following sections provideinformation about this feature:
• Information About Lockingthe Configuration
• How to ConfigureConfiguration Lock
The following commands wereintroduced or modified: clearconfiguration lock,configuration mode exclusive,and configure terminal lock.
Parser Concurrency and LockingImprovements
12.2(33)SRE
15.1(1)T
The Parser Concurrency andLocking Improvements featureprovides a common interface thatensures that exclusive access isgranted to the requested processand prevents others fromconcurrently accessing the CiscoIOS configuration. It allowsaccess only to the user holdingthe lock and prevents other clientsfrom accessing the configuration.
The following sections provideinformation about this feature:
• Parser Concurrency andLocking Improvements
• Enabling Parser Concurrencyand Locking Improvements
The following commands wereintroduced or modified: parsercommand serializer and testparser session-lock.
Cisco and the Cisco logo are trademarks or registered trademarks of Cisco and/or its affiliates in the U.S.and other countries. To view a list of Cisco trademarks, go to this URL: www.cisco.com/go/trademarks.Third-party trademarks mentioned are the property of their respective owners. The use of the word partnerdoes not imply a partnership relationship between Cisco and any other company. (1110R)
Any Internet Protocol (IP) addresses and phone numbers used in this document are not intended to beactual addresses and phone numbers. Any examples, command display output, network topology diagrams,and other figures included in the document are shown for illustrative purposes only. Any use of actual IPaddresses or phone numbers in illustrative content is unintentional and coincidental.
Exclusive Configuration Change Access and Access Session Locking
Managing Configuration Files Configuration Guide, Cisco IOS Release 12.2SX 59

Exclusive Configuration Change Access and Access Session Locking
Managing Configuration Files Configuration Guide, Cisco IOS Release 12.2SX60

Configuration Replace and ConfigurationRollback
The Configuration Replace and Configuration Rollback feature provides the capability to replace thecurrent running configuration with any saved Cisco IOS configuration file. This functionality can be usedto revert to a previous configuration state, effectively rolling back any configuration changes that weremade since that configuration file was saved.
• Finding Feature Information, page 61• Prerequisites for Configuration Replace and Configuration Rollback, page 61• Restrictions for Configuration Replace and Configuration Rollback, page 62• Information About Configuration Replace and Configuration Rollback, page 62• How to Use Configuration Replace and Configuration Rollback, page 65• Configuration Examples for Configuration Replace and Configuration Rollback, page 71• Additional References, page 74• Feature Information for Configuration Replace and Configuration Rollback, page 75
Finding Feature InformationYour software release may not support all the features documented in this module. For the latest featureinformation and caveats, see the release notes for your platform and software release. To find informationabout the features documented in this module, and to see a list of the releases in which each feature issupported, see the Feature Information Table at the end of this document.
Use Cisco Feature Navigator to find information about platform support and Cisco software image support.To access Cisco Feature Navigator, go to www.cisco.com/go/cfn. An account on Cisco.com is not required.
Prerequisites for Configuration Replace and ConfigurationRollback
• The format of the configuration files used as input by the Configuration Replace and ConfigurationRollback feature must comply with standard Cisco IOS software configuration file indentation rules asfollows:
◦ Start all commands on a new line with no indentation, unless the command is within aconfiguration submode.
◦ Indent commands within a first-level configuration submode one space.
Managing Configuration Files Configuration Guide, Cisco IOS Release 12.2SX 61

◦ Indent commands within a second-level configuration submode two spaces.◦ Indent commands within subsequent submodes accordingly.
These indentation rules describe how Cisco IOS software creates configuration files for such Cisco IOScommands as show running-config or copy running-configdestination-url . Any configuration filegenerated on a Cisco IOS device complies with these rules.
• Free memory larger than the combined size of the two configuration files (the current runningconfiguration and the saved replacement configuration) is required.
Restrictions for Configuration Replace and ConfigurationRollback
• If the router does not have free memory larger than the combined size of the two configuration files(the current running configuration and the saved replacement configuration), the configuration replaceoperation is not performed.
• Certain Cisco IOS configuration commands such as those pertaining to physical components of anetworking device (for example, physical interfaces) cannot be added or removed from the runningconfiguration. To illustrate, a configuration replace operation cannot remove the interface ethernet 0command line from the current running configuration if that interface is physically present on thedevice. Similarly, the interface ethernet 1 command line cannot be added to the runningconfiguration if no such interface is physically present on the device. A configuration replaceoperation that attempts to perform these types of changes results in error messages indicating thatthese specific command lines failed.
• In very rare cases, certain Cisco IOS configuration commands cannot be removed from the Cisco IOSrunning configuration without reloading the router. A configuration replace operation that attempts toremove this type of command results in error messages indicating that these specific command linesfailed.
Information About Configuration Replace and ConfigurationRollback
• Configuration Archive, page 62• Configuration Replace, page 63• Configuration Rollback, page 64• Benefits of Configuration Replace and Configuration Rollback, page 65
Configuration ArchiveThe Cisco IOS configuration archive is intended to provide a mechanism to store, organize, and manage anarchive of Cisco IOS configuration files to enhance the configuration rollback capability provided by theconfigurereplace command. Before this feature was introduced, you could save copies of the runningconfiguration using the copyrunning-configdestination-url command, storing the replacement file eitherlocally or remotely. However, this method lacked any automated file management. On the other hand, theConfiguration Replace and Configuration Rollback feature provides the capability to automatically save
Configuration Archive Restrictions for Configuration Replace and Configuration Rollback
Managing Configuration Files Configuration Guide, Cisco IOS Release 12.2SX62

copies of the running configuration to the Cisco IOS configuration archive. These archived files serve ascheckpoint configuration references and can be used by the configurereplace command to revert toprevious configuration states.
The archiveconfig command allows you to save Cisco IOS configurations in the configuration archiveusing a standard location and filename prefix that is automatically appended with an incremental versionnumber (and optional timestamp) as each consecutive file is saved. This functionality provides a means forconsistent identification of saved Cisco IOS configuration files. You can specify how many versions of therunning configuration are kept in the archive. After the maximum number of files are saved in the archive,the oldest file is automatically deleted when the next, most recent file is saved. The showarchive commanddisplays information for all configuration files saved in the Cisco IOS configuration archive.
The Cisco IOS configuration archive, in which the configuration files are stored and available for use withthe configurereplace command, can be located on the following file systems:
• If your platform has disk0--disk0:, disk1:, ftp:, pram:, rcp:, slavedisk0:, slavedisk1:, or tftp:• If your platform does not have disk0--ftp:, http:, pram:, rcp:, or tftp:
Configuration ReplaceThe configurereplace command provides the capability to replace the current running configuration withany saved Cisco IOS configuration file. This functionality can be used to revert to a previous configurationstate, effectively rolling back any configuration changes that were made since the previous configurationstate was saved.
When using the configurereplace command, you must specify a saved Cisco IOS configuration as thereplacement configuration file for the current running configuration. The replacement file must be acomplete configuration generated by a Cisco IOS device (for example, a configuration generated by thecopyrunning-configdestination-url command), or, if generated externally, the replacement file mustcomply with the format of files generated by Cisco IOS devices. When the configurereplace command isentered, the current running configuration is compared with the specified replacement configuration and aset of diffs is generated. The algorithm used to compare the two files is the same as that employed by theshowarchiveconfigdifferences command. The resulting diffs are then applied by the Cisco IOS parser toachieve the replacement configuration state. Only the diffs are applied, avoiding potential servicedisruption from reapplying configuration commands that already exist in the current running configuration.This algorithm effectively handles configuration changes to order-dependent commands (such as accesslists) through a multiple pass process. Under normal circumstances, no more than three passes are neededto complete a configuration replace operation, and a limit of five passes is performed to preclude anylooping behavior.
The Cisco IOS copysource-urlrunning-config command is often used to copy a stored Cisco IOSconfiguration file to the running configuration. When using the copysource-urlrunning-configcommand asan alternative to the configurereplacetarget-urlcommand, the following major differences should be noted:
• The copysource-urlrunning-config command is a merge operation and preserves all the commandsfrom both the source file and the current running configuration. This command does not removecommands from the current running configuration that are not present in the source file. In contrast,the configurereplacetarget-url command removes commands from the current running configurationthat are not present in the replacement file and adds commands to the current running configurationthat need to be added.
• The copysource-urlrunning-config command applies every command in the source file, whether ornot the command is already present in the current running configuration. This algorithm is inefficientand, in some cases, can result in service outages. In contrast, the configurereplacetarget-url commandonly applies the commands that need to be applied--no existing commands in the current runningconfiguration are reapplied.
Configuration ReplaceInformation About Configuration Replace and Configuration Rollback
Managing Configuration Files Configuration Guide, Cisco IOS Release 12.2SX 63

• A partial configuration file may be used as the source file for the copysource-urlrunning-configcommand, whereas a complete Cisco IOS configuration file must be used as the replacement file forthe configurereplacetarget-url command.
In Cisco IOS Release 12.2(25)S and 12.3(14)T, a locking feature for the configuration replace operationwas introduced. When the configurereplace command is used, the running configuration file is locked bydefault for the duration of the configuration replace operation. This locking mechanism prevents other usersfrom changing the running configuration while the replacement operation is taking place, which mightotherwise cause the replacement operation to terminate unsuccessfully. You can disable the locking of therunning configuration by using the nolock keyword when issuing the configurereplacecommand.
The running configuration lock is automatically cleared at the end of the configuration replace operation.You can display any locks that may be currently applied to the running configuration using theshowconfigurationlock command.
Configuration RollbackThe concept of rollback comes from the transactional processing model common to database operations. Ina database transaction, you might make a set of changes to a given database table. You then must choosewhether to commit the changes (apply the changes permanently) or to roll back the changes (discard thechanges and revert to the previous state of the table). In this context, rollback means that a journal filecontaining a log of the changes is discarded, and no changes are applied. The result of the rollbackoperation is to revert to the previous state, before any changes were applied.
The configurereplace command allows you to revert to a previous configuration state, effectively rollingback changes that were made since the previous configuration state was saved. Instead of basing therollback operation on a specific set of changes that were applied, the Cisco IOS configuration rollbackcapability uses the concept of reverting to a specific configuration state based on a saved Cisco IOSconfiguration file. This concept is similar to the database idea of saving a checkpoint (a saved version ofthe database) to preserve a specific state.
If the configuration rollback capability is desired, you must save the Cisco IOS running configurationbefore making any configuration changes. Then, after entering configuration changes, you can use thatsaved configuration file to roll back the changes (using the configurereplacetarget-url command).Furthermore, since you can specify any saved Cisco IOS configuration file as the replacementconfiguration, you are not limited to a fixed number of rollbacks, as is the case in some rollback modelsbased on a journal file.
• Configuration Rollback Confirmed Change, page 64
Configuration Rollback Confirmed ChangeThe Configuration Rollback Confirmed Change feature enables an added criteria of a confirmation toconfiguration changes. This functionality enables a rollback to occur if a confirmation of the requestedchanges is not received in a configured time frame. Command failures can also be configured to trigger aconfiguration rollback.
The following steps outline how this process is achieved:
1 When entering configuration mode, this new option allows you to request confirmation (a confirmationtime limit must be supplied) of the configuration changes.
2 After exiting configuration mode, you must enter the confirmation command. If no confirmation isentered within the requested time limit, the configuration will revert to its previous state.
Configuration Rollback Configuration Rollback Confirmed Change
Managing Configuration Files Configuration Guide, Cisco IOS Release 12.2SX64

Benefits of Configuration Replace and Configuration Rollback• Allows you to revert to a previous configuration state, effectively rolling back configuration changes.• Allows you to replace the current running configuration file with the startup configuration file without
having to reload the router or manually undo CLI changes to the running configuration file, thereforereducing system downtime.
• Allows you to revert to any saved Cisco IOS configuration state.• Simplifies configuration changes by allowing you to apply a complete configuration file to the router,
where only the commands that need to be added or removed are affected.• When using the configure replace command as an alternative to the copy source-url running-config
command, increases efficiency and prevents risk of service outages by not reapplying existingcommands in the current running configuration.
How to Use Configuration Replace and ConfigurationRollback
• Creating a Configuration Archive, page 65
• Performing a Configuration Replace or Configuration Rollback Operation, page 67
• Monitoring and Troubleshooting the Feature, page 69
Creating a Configuration ArchiveNo prerequisite configuration is needed to use the configurereplace command. Using theconfigurereplace command in conjunction with the Cisco IOS configuration archive and thearchiveconfig command is optional but offers significant benefit for configuration rollback scenarios.Before using the archiveconfig command, the configuration archive must be configured. Perform this taskto configure the characteristics of the configuration archive.
SUMMARY STEPS
1. enable
2. configure terminal
3. archive
4. path url
5. maximum number
6. time-period minutes
7. end
8. archive config
Benefits of Configuration Replace and Configuration RollbackHow to Use Configuration Replace and Configuration Rollback
Managing Configuration Files Configuration Guide, Cisco IOS Release 12.2SX 65

DETAILED STEPS
Command or Action Purpose
Step 1 enable
Example:
Router> enable
Enables privileged EXEC mode.
• Enter your password if prompted.
Step 2 configure terminal
Example:
Router# configure terminal
Enters global configuration mode.
Step 3 archive
Example:
Router(config)# archive
Enters archive configuration mode.
Step 4 path url
Example:
Router(config-archive)# path disk0:myconfig
Specifies the location and filename prefix for the files in the Cisco IOSconfiguration archive.
Note If a directory is specified in the path instead of file, the directory namemust be followed by a forward slash as follows: path flash:/directory/. Theforward slash is not necessary after a filename; it is only necessary whenspecifying a directory.
Step 5 maximum number
Example:
Router(config-archive)# maximum 14
(Optional) Sets the maximum number of archive files of the running configurationto be saved in the Cisco IOS configuration archive.
• The number argument is the maximum number of archive files of the runningconfiguration to be saved in the Cisco IOS configuration archive. Validvalues are from 1 to 14. The default is 10.
Note Before using this command, you must configure the path command tospecify the location and filename prefix for the files in the Cisco IOSconfiguration archive.
Step 6 time-period minutes
Example:
Router(config-archive)# time-period 10
(Optional) Sets the time increment for automatically saving an archive file of thecurrent running configuration in the Cisco IOS configuration archive.
• The minutes argument specifies how often, in minutes, to automatically savean archive file of the current running configuration in the Cisco IOSconfiguration archive.
Note Before using this command, you must configure the path command tospecify the location and filename prefix for the files in the Cisco IOSconfiguration archive.
Configuration Replace and Configuration Rollback How to Use Configuration Replace and Configuration Rollback
Managing Configuration Files Configuration Guide, Cisco IOS Release 12.2SX66

Command or Action Purpose
Step 7 end
Example:
Router(config-archive)# end
Exits to privileged EXEC mode.
Step 8 archive config
Example:
Router# archive config
Saves the current running configuration file to the configuration archive.
Note The path command must be configured before using this command.
Performing a Configuration Replace or Configuration Rollback OperationPerform this task to replace the current running configuration file with a saved Cisco IOS configurationfile.
Note You must create a configuration archive before performing this procedure. See Creating a ConfigurationArchive for detailed steps. The following procedure details how to return to that archived configuration inthe event of a problem with the current running configuration.
SUMMARY STEPS
1. enable
2. configure replace target-url [nolock] [list] [force] [ignorecase] [reverttrigger[error][timerminutes]|timeminutes]
3. configure revert {now |timer{minutes|idleminutes}}
4. configure confirm
5. exit
DETAILED STEPS
Command or Action Purpose
Step 1 enable
Example:
Router> enable
Enables privileged EXEC mode.
• Enter your password if prompted.
Performing a Configuration Replace or Configuration Rollback OperationHow to Use Configuration Replace and Configuration Rollback
Managing Configuration Files Configuration Guide, Cisco IOS Release 12.2SX 67

Command or Action Purpose
Step 2 configure replace target-url[nolock] [list] [force] [ignorecase][reverttrigger[error][timerminutes]|timeminutes]
Example:
Router# configure replace disk0:myconfig-1 list time 30
Replaces the current running configuration file with a saved Cisco IOSconfiguration file.
• The target -url argument is a URL (accessible by the Cisco IOS file system) ofthe saved Cisco IOS configuration file that is to replace the current runningconfiguration, such as the configuration file created using the archiveconfigcommand.
• The list keyword displays a list of the command lines applied by the Cisco IOSsoftware parser during each pass of the configuration replace operation. Thetotal number of passes performed is also displayed.
• The forcekeyword replaces the current running configuration file with thespecified saved Cisco IOS configuration file without prompting you forconfirmation.
• The timeminuteskeyword and argument specify the time (in minutes) withinwhich you must enter the configureconfirm command to confirm replacementof the current running configuration file. If the configureconfirm command isnot entered within the specified time limit, the configuration replace operationis automatically reversed (in other words, the current running configuration fileis restored to the configuration state that existed prior to entering theconfigurereplace command).
• The nolock keyword disables the locking of the running configuration file thatprevents other users from changing the running configuration during aconfiguration replace operation.
• The reverttrigger keywords set the following triggers for reverting to theoriginal configuration:
◦ error--Reverts to the original configuration upon error.◦ timerminutes--Reverts to the original configuration if specified time
elapses.• The ignorecase keyword allows the configuration to ignore the case of the
confirmation command.
Step 3 configure revert {now |timer{minutes|idleminutes}}
Example:
Router# configure revert now
Example:
(Optional) To cancel the timed rollback and trigger the rollback immediately, or toreset parameters for the timed rollback, use the configurerevertcommand inprivileged EXEC mode.
• now --Triggers the rollback immediately.• timer --Resets the configuration revert timer.
◦ Use the minutes argument with the timer keyword to specify a new reverttime in minutes.
◦ Use the idle keyword along with a time in minutes to set the maximumallowable time period of no activity before reverting to the savedconfiguration.
Configuration Replace and Configuration Rollback How to Use Configuration Replace and Configuration Rollback
Managing Configuration Files Configuration Guide, Cisco IOS Release 12.2SX68

Command or Action Purpose
Step 4 configure confirm
Example:
Router# configure confirm
(Optional) Confirms replacement of the current running configuration file with asaved Cisco IOS configuration file.
Note Use this command only if the timeseconds keyword and argument of theconfigurereplace command are specified.
Step 5 exit
Example:
Router# exit
Exits to user EXEC mode.
Monitoring and Troubleshooting the FeaturePerform this task to monitor and troubleshoot the Configuration Replace and Configuration Rollbackfeature.
SUMMARY STEPS
1. enable
2. show archive
3. debug archive versioning
4. debug archive config timestamp
5. exit
DETAILED STEPS
Step 1 enableUse this command to enable privileged EXEC mode. Enter your password if prompted. For example:
Example:
Router> enableRouter#
Step 2 show archiveUse this command to display information about the files saved in the Cisco IOS configuration archive. For example:
Example:
Router# show archiveThere are currently 1 archive configurations saved.The next archive file will be named disk0:myconfig-2 Archive # Name 0 1 disk0:myconfig-1 <- Most Recent 2
Monitoring and Troubleshooting the FeatureHow to Use Configuration Replace and Configuration Rollback
Managing Configuration Files Configuration Guide, Cisco IOS Release 12.2SX 69

3 4 5 6 7 8 9 10 11 12 13 14
The following is sample output from the showarchive command after several archive files of the runningconfiguration have been saved. In this example, the maximum number of archive files to be saved is set to three.
Example:
Router# show archiveThere are currently 3 archive configurations saved.The next archive file will be named disk0:myconfig-8 Archive # Name 0 1 :Deleted 2 :Deleted 3 :Deleted 4 :Deleted 5 disk0:myconfig-5 6 disk0:myconfig-6 7 disk0:myconfig-7 <- Most Recent 8 9 10 11 12 13 14
Step 3 debug archive versioningUse this command to enable debugging of the Cisco IOS configuration archive activities to help monitor andtroubleshoot configuration replace and rollback. For example:
Example:
Router# debug archive versioningJan 9 06:46:28.419:backup_running_configJan 9 06:46:28.419:Current = 7Jan 9 06:46:28.443:Writing backup file disk0:myconfig-7Jan 9 06:46:29.547: backup worked
Step 4 debug archive config timestampUse this command to enable debugging of the processing time for each integral step of a configuration replaceoperation and the size of the configuration files being handled. For example:
Example:
Router# debug archive config timestampRouter# configure replace disk0:myconfig forceTiming Debug Statistics for IOS Config Replace operation: Time to read file slot0:sample_2.cfg = 0 msec (0 sec) Number of lines read:55 Size of file :1054Starting Pass 1
Configuration Replace and Configuration Rollback How to Use Configuration Replace and Configuration Rollback
Managing Configuration Files Configuration Guide, Cisco IOS Release 12.2SX70

Time to read file system:running-config = 0 msec (0 sec) Number of lines read:93 Size of file :2539 Time taken for positive rollback pass = 320 msec (0 sec) Time taken for negative rollback pass = 0 msec (0 sec) Time taken for negative incremental diffs pass = 59 msec (0 sec) Time taken by PI to apply changes = 0 msec (0 sec) Time taken for Pass 1 = 380 msec (0 sec)Starting Pass 2 Time to read file system:running-config = 0 msec (0 sec) Number of lines read:55 Size of file :1054 Time taken for positive rollback pass = 0 msec (0 sec) Time taken for negative rollback pass = 0 msec (0 sec) Time taken for Pass 2 = 0 msec (0 sec)Total number of passes:1Rollback Done
Step 5 exitUse this command to exit to user EXEC mode. For example:
Example:
Router# exitRouter>
Configuration Examples for Configuration Replace andConfiguration Rollback
• Creating a Configuration Archive Example, page 71
• Replacing the Current Running Configuration with a Saved Cisco IOS Configuration File Example, page 72
• Reverting to the Startup Configuration File Example, page 72
• Performing a Configuration Replace Operation with the configure confirm Command Example, page72
• Performing a Configuration Rollback Operation Example, page 73
Creating a Configuration Archive ExampleThe following example shows how to perform the initial configuration of the Cisco IOS configurationarchive. In this example, disk0:myconfig is specified as the location and filename prefix for the files in theconfiguration archive and a value of 10 is set as the maximum number of archive files to be saved.
configure terminal!archive path disk0:myconfig maximum 10 end
Creating a Configuration Archive ExampleConfiguration Examples for Configuration Replace and Configuration Rollback
Managing Configuration Files Configuration Guide, Cisco IOS Release 12.2SX 71

Replacing the Current Running Configuration with a Saved Cisco IOSConfiguration File Example
The following example shows how to replace the current running configuration with a saved Cisco IOSconfiguration file named disk0:myconfig. The configurereplace command interactively prompts you toconfirm the operation.
Router# configure replace disk0:myconfigThis will apply all necessary additions and deletionsto replace the current running configuration with thecontents of the specified configuration file, which isassumed to be a complete configuration, not a partialconfiguration. Enter Y if you are sure you want to proceed. ? [no]: YTotal number of passes: 1Rollback Done
In the following example, the list keyword is specified in order to display the command lines that wereapplied during the configuration replace operation:
Router# configure replace disk0:myconfig listThis will apply all necessary additions and deletionsto replace the current running configuration with thecontents of the specified configuration file, which isassumed to be a complete configuration, not a partialconfiguration. Enter Y if you are sure you want to proceed. ? [no]: Y!Pass 1!List of Commands:no snmp-server community public rosnmp-server community mystring ro endTotal number of passes: 1Rollback Done
Reverting to the Startup Configuration File ExampleThe following example shows how to revert to the Cisco IOS startup configuration file using theconfigurereplace command. This example also shows the use of the optional force keyword to overridethe interactive user prompt.
Router# configure replace nvram:startup-config forceTotal number of passes: 1Rollback Done
Performing a Configuration Replace Operation with the configure confirmCommand Example
The following example shows the use of the configurereplace command with the timeseconds keywordand argument. You must enter the configureconfirm command within the specified time limit to confirmreplacement of the current running configuration file. If the configureconfirm command is not enteredwithin the specified time limit, the configuration replace operation is automatically reversed (in otherwords, the current running configuration file is restored back to the configuration state that existed prior toentering the configurereplace command).
Router# configure replace nvram:startup-config time 120This will apply all necessary additions and deletionsto replace the current running configuration with the
Replacing the Current Running Configuration with a Saved Cisco IOS Configuration File Example Configuration Examples for Configuration Replace and Configuration Rollback
Managing Configuration Files Configuration Guide, Cisco IOS Release 12.2SX72

contents of the specified configuration file, which isassumed to be a complete configuration, not a partialconfiguration. Enter Y if you are sure you want to proceed. ? [no]: YTotal number of passes: 1Rollback DoneRouter# configure confirm
The following example shows the use of the configurerevert command with the time keyword. You mustenter the configurerevert command to cancel the timed rollback and trigger the rollback immediately, or toreset parameters for the timed rollback.
Router# configurereverttimer100
Performing a Configuration Rollback Operation ExampleThe following example shows how to make changes to the current running configuration and then roll backthe changes. As part of the configuration rollback operation, you must save the current runningconfiguration before making changes to the file. In this example, the archiveconfig command is used tosave the current running configuration. The generated output of the configurereplace command indicatesthat only one pass was performed to complete the rollback operation.
Note Before using the archiveconfig command, you must configure the path command to specify the locationand filename prefix for the files in the Cisco IOS configuration archive.
You first save the current running configuration in the configuration archive as follows:
archive config
You then enter configuration changes as shown in the following example:
configure terminal!user netops2 password rainuser netops3 password snowexit
After having made changes to the running configuration file, assume you now want to roll back thesechanges and revert to the configuration that existed before the changes were made. The showarchivecommand is used to verify the version of the configuration to be used as a replacement file. Theconfigurereplace command is then used to revert to the replacement configuration file as shown in thefollowing example:
Router# show archiveThere are currently 1 archive configurations saved.The next archive file will be named disk0:myconfig-2 Archive # Name 0 1 disk0:myconfig-1 <- Most Recent 2 3 4 5 6 7 8 9 10Router# configure replace disk0:myconfig-1Total number of passes: 1Rollback Done
Performing a Configuration Rollback Operation ExampleConfiguration Examples for Configuration Replace and Configuration Rollback
Managing Configuration Files Configuration Guide, Cisco IOS Release 12.2SX 73

Additional ReferencesThe following sections provide references related to the Configuration Replace and Configuration Rollbackfeature.
Related Documents
Related Topic Document Title
Configuration Locking Exclusive Configuration Change Access and AccessSession Locking
Commands for managing configuration files Cisco IOS Configuration Fundamentals CommandReference
Information about managing configuration files Managing Configuration Files
Using the Contextual Configuration Diff Utilityfeature
Contextual Configuration Diff Utility
Standards
Standards Title
No new or modified standards are supported by thisfeature, and support for existing standards has notbeen modified by this feature.
--
MIBs
MIBs MIBs Link
No new or modified MIBs are supported by thisfeature, and support for existing MIBs has not beenmodified by this feature.
To locate and download MIBs for selectedplatforms, Cisco IOS releases, and feature sets, useCisco MIB Locator found at the following URL:
http://www.cisco.com/go/mibs
RFCs
RFCs Title
No new or modified RFCs are supported by thisfeature, and support for existing RFCs has not beenmodified by this feature.
--
Configuration Replace and Configuration Rollback Additional References
Managing Configuration Files Configuration Guide, Cisco IOS Release 12.2SX74

Technical Assistance
Description Link
The Cisco Support website provides extensiveonline resources, including documentation and toolsfor troubleshooting and resolving technical issueswith Cisco products and technologies.
To receive security and technical information aboutyour products, you can subscribe to variousservices, such as the Product Alert Tool (accessedfrom Field Notices), the Cisco Technical ServicesNewsletter, and Really Simple Syndication (RSS)Feeds.
Access to most tools on the Cisco Support websiterequires a Cisco.com user ID and password.
http://www.cisco.com/cisco/web/support/index.html
Feature Information for Configuration Replace andConfiguration Rollback
The following table provides release information about the feature or features described in this module.This table lists only the software release that introduced support for a given feature in a given softwarerelease train. Unless noted otherwise, subsequent releases of that software release train also support thatfeature.
Use Cisco Feature Navigator to find information about platform support and Cisco software image support.To access Cisco Feature Navigator, go to www.cisco.com/go/cfn. An account on Cisco.com is not required.
Configuration Replace and Configuration RollbackFeature Information for Configuration Replace and Configuration Rollback
Managing Configuration Files Configuration Guide, Cisco IOS Release 12.2SX 75

Table 2 Feature Information for Configuration Replace and Configuration Rollback
Feature Name Releases Feature Information
Configuration Replace andConfiguration Rollback
12.3(7)T 12.2(25)S 12.3(14)T12.2(27)SBC 12.2(31)SB212.2(33)SRA 12.2(33)SXH12.2(33)SB
The Configuration Replace andConfiguration Rollback featureprovides the capability to replacethe current running configurationwith any saved Cisco IOSconfiguration file. Thisfunctionality can be used to revertto a previous configuration state,rolling back any configurationchanges that were made since thatconfiguration file was saved.
In 12.3(7)T, this feature wasintroduced.
In 12.2(25)S, support was addedfor a Cisco IOS 12.2S release. Alocking mechanism forconfiguration replace (theExclusive Configuration ChangeAccess feature) was introduced.
In 12.3(14)T, support for alocking mechanism forconfiguration replace (theExclusive Configuration ChangeAccess feature) was added for aCisco IOS 12.3T release.
In 12.2(27)SBC, support wasadded for a Cisco IOS 12.2SBrelease.
In 12.2(33)SRA, support wasadded for a Cisco IOS 12.2SRrelease.
In 12.2(31)SB2, this feature wasimplemented on the Cisco 10000series.
In 12.2(33)SXH, theConfiguration Rollback featurewas implemented in Release12.2SX.
In 12.2(33)SB, this feature wasimplemented on the Cisco 10000series.
The following sections providefeature information:
The following commands weremodified by this feature: archive
Configuration Replace and Configuration Rollback Feature Information for Configuration Replace and Configuration Rollback
Managing Configuration Files Configuration Guide, Cisco IOS Release 12.2SX76

Feature Name Releases Feature Information
config, configure confirm,configure replace, debugarchive config timestamp,debug archive versioning,maximum, path (archiveconfiguration), show archive,show configuration lock, time-period.
Configuration Versioning 12.3(7)T 12.2(25)S 12.2(33)SRA The Configuration Versioningfeature allows you to maintainand manage backup copies of theCisco IOS running configurationon or off the device. TheConfiguration Replace featureuses the ConfigurationVersioning feature to provide arollback to a saved copy of therunning configuration.
Exclusive Configuration ChangeAccess
12.3(14)T 12.0(31)S12.2(33)SRA 12.4(11)T12.2(33)SXH 12.2(33)SB
The Exclusive ConfigurationChange Access feature (alsocalled the Configuration Lockfeature) allows you to haveexclusive change access to theCisco IOS running configuration,preventing multiple users frommaking concurrent configurationchanges.
The following command wasmodified by this feature andapplies to the ConfigurationReplace and ConfigurationRollback feature: showconfiguration lock.
Refer to the separate module,Exclusive Configuration ChangeAccess and Access SessionLocking, for details
Configuration Replace and Configuration RollbackFeature Information for Configuration Replace and Configuration Rollback
Managing Configuration Files Configuration Guide, Cisco IOS Release 12.2SX 77

Feature Name Releases Feature Information
Configuration RollbackConfirmed Change
12.2(33)SRC 12.2(33)SB12.4(20)T 12.2(33)SXI
The Configuration RollbackConfirmed Change feature allowsconfiguration changes to beperformed with an optionalrequirement that they beconfirmed.
If this confirmation is notreceived, the configuration isreturned to the state prior to thechanges being applied.
This mechanism provides asafeguard against inadvertent lossof connectivity between anetwork device and the user ormanagement application due toconfiguration changes.
In 12.2(33)SB, this feature wasimplemented on the Cisco 10000series.
The following sections provideinformation about this feature:
The following commands weremodified by this feature:configure confirm,configurereplace,configurerevert,configure terminal
Cisco and the Cisco logo are trademarks or registered trademarks of Cisco and/or its affiliates in the U.S.and other countries. To view a list of Cisco trademarks, go to this URL: www.cisco.com/go/trademarks.Third-party trademarks mentioned are the property of their respective owners. The use of the word partnerdoes not imply a partnership relationship between Cisco and any other company. (1110R)
Any Internet Protocol (IP) addresses and phone numbers used in this document are not intended to beactual addresses and phone numbers. Any examples, command display output, network topology diagrams,and other figures included in the document are shown for illustrative purposes only. Any use of actual IPaddresses or phone numbers in illustrative content is unintentional and coincidental.
Configuration Replace and Configuration Rollback
Managing Configuration Files Configuration Guide, Cisco IOS Release 12.2SX78

Contextual Configuration Diff Utility
The Contextual Configuration Diff Utility feature provides the ability to perform a line-by-linecomparison of any two configuration files (accessible through the Cisco IOS Integrated File System [IFS])and generate a list of the differences between them. The generated output includes information regardingconfiguration lines that have been added, modified, or deleted, and the configuration modes within whicha changed configuration line exists.
• Finding Feature Information, page 79• Prerequisites for Contextual Configuration Diff Utility, page 79• Restrictions for Contextual Configuration Diff Utility, page 80• Information About Contextual Configuration Diff Utility, page 80• How to Use the Contextual Configuration Diff Utility, page 81• Configuration Examples for the Contextual Configuration Diff Utility, page 82• Additional References, page 86• Feature Information for Contextual Configuration Diff Utility, page 87
Finding Feature InformationYour software release may not support all the features documented in this module. For the latest featureinformation and caveats, see the release notes for your platform and software release. To find informationabout the features documented in this module, and to see a list of the releases in which each feature issupported, see the Feature Information Table at the end of this document.
Use Cisco Feature Navigator to find information about platform support and Cisco software image support.To access Cisco Feature Navigator, go to www.cisco.com/go/cfn. An account on Cisco.com is not required.
Prerequisites for Contextual Configuration Diff UtilityThe format of the configuration files used for the Contextual Configuration Diff Utility feature mustcomply with standard Cisco IOS configuration file indentation rules as follows:
• Start all commands on a new line with no indentation, unless the command is within a configurationsubmode.
• Indent commands within a first-level configuration submode one space.• Indent commands within a second-level configuration submode two spaces.• Indent commands within subsequent submodes accordingly.
The router must have a contiguous block of memory larger than the combined size of the two configurationfiles being compared.
Managing Configuration Files Configuration Guide, Cisco IOS Release 12.2SX 79

Restrictions for Contextual Configuration Diff UtilityIf the router does not have a contiguous block of memory larger than the combined size of the twoconfiguration files being compared, the diff operation fails.
Information About Contextual Configuration Diff Utility• Benefits of the Contextual Configuration Diff Utility, page 80• Contextual Configuration Diff Utility Output Format, page 80
Benefits of the Contextual Configuration Diff UtilityThe Contextual Configuration Diff Utility feature provides the ability to perform a line-by-line comparisonof any two configuration files (accessible through the Cisco IOS File System [IFS]) and generate a list ofthe differences between them. The generated output includes information regarding the following items:
• Configuration lines that have been added, modified, or deleted.• Configuration modes within which a changed configuration line exists.• Location changes of configuration lines that are order-sensitive. For example, the ipaccess-list and
community-lists commands are order-sensitive commands dependent on where they are listed withina configuration file in relation to other Cisco IOS commands of similar type.
Contextual Configuration Diff Utility Output Format
Diff Operation
The Contextual Configuration Diff Utility feature uses the filenames of two configuration files as input. Adiff operation is performed on the specified files and a list of differences between the two files is generatedas output. Interpreting the output is dependent on the order in which the two files are configured(showarchiveconfigdifferencescommand). In this section, we assume that the filename of the file enteredfirst is file1 and the filename of the file entered second is file2. Each entry in the generated output list isprefixed with a unique text symbol to indicate the type of difference found. The text symbols and theirmeanings are as follows:
• A minus symbol (-) indicates that the configuration line exists in file1 but not in file2.• A plus symbol (+) indicates that the configuration line exists in file2 but not in file1.• An exclamation point (!) with descriptive comments is used to identify order-sensitive configuration
lines whose location is different in file1 than in file2.
Incremental Diff Operation
Some applications require that the generated output of a diff operation contain configuration lines that areunmodified (in other words, without the minus and plus symbols). For these applications, an incrementaldiff operation can be performed, which compares a specified configuration file to the running configurationfile (showarchiveconfigincremental-diffs command).
When an incremental diff operation is performed, a list of the configuration lines that do not appear in therunning configuration file (in other words, configuration lines that only appear in the specified file that is
Benefits of the Contextual Configuration Diff Utility Restrictions for Contextual Configuration Diff Utility
Managing Configuration Files Configuration Guide, Cisco IOS Release 12.2SX80

being compared to the running configuration file) is generated as output. An exclamation point (!) withdescriptive comments is used to identify order-sensitive configuration lines whose location is different inthe specified configuration file than in the running configuration file.
How to Use the Contextual Configuration Diff Utility• Using the Contextual Configuration Diff Utility, page 81
Using the Contextual Configuration Diff UtilityThis task describes how to use the Contextual Configuration Diff Utility feature.
SUMMARY STEPS
1. enable
2. Do one of the following:
• show archive config differenc es [file1 [file2]]• or• show archive config incremental- diff s file
3. exit
DETAILED STEPS
Command or Action Purpose
Step 1 enable
Example:
Router> enable
Enables privileged EXEC mode.
• Enter your password if prompted.
Using the Contextual Configuration Diff UtilityHow to Use the Contextual Configuration Diff Utility
Managing Configuration Files Configuration Guide, Cisco IOS Release 12.2SX 81

Command or Action Purpose
Step 2 Do one of the following:
• show archive config differenc es [file1 [file2]]• or• show archive config incremental- diff s file
Example:
Router# show archive config differences running-config startup-config
Example:
Example:
Router# show archive config incremental-diffs nvram:startup-config
Performs a line-by-line comparison of any two configurationfiles (accessible through the IFS) and generates a list of thedifferences between them.
or
Performs a line-by-line comparison of a specifiedconfiguration file to the running configuration file andgenerates a list of the configuration lines that do not appear inthe running configuration file.
Step 3 exit
Example:
Router# exit
Exits to user EXEC mode.
Configuration Examples for the Contextual Configuration DiffUtility
• Diff Operation Example, page 82
• Incremental Diff Operation Example, page 84
Diff Operation ExampleIn this example, a diff operation is performed on the running and startup configuration files. The tablebelow shows the configuration files used for this example.
Diff Operation Example Configuration Examples for the Contextual Configuration Diff Utility
Managing Configuration Files Configuration Guide, Cisco IOS Release 12.2SX82

Table 3 Configuration Files Used for the Diff Operation Example
Running Configuration File Startup Configuration File
no ip subnet-zero
ip cef
interface Ethernet1/0
ip address 10.7.7.7 255.0.0.0
no ip route-cache
no ip mroute-cache
duplex half
no ip classless
snmp-server community public RO
ip subnet-zero
ip cef
ip name-server 10.4.4.4
voice dnis-map 1
dnis 111
interface Ethernet1/0
no ip address
no ip route-cache
no ip mroute-cache
shutdown
duplex half
ip default-gateway 10.5.5.5
ip classless
access-list 110 deny ip any host 10.1.1.1
access-list 110 deny ip any host 10.1.1.2
access-list 110 deny ip any host 10.1.1.3
snmp-server community private RW
Contextual Configuration Diff UtilityConfiguration Examples for the Contextual Configuration Diff Utility
Managing Configuration Files Configuration Guide, Cisco IOS Release 12.2SX 83

The following is sample output from the showarchiveconfigdifferencescommand. This sample outputdisplays the results of the diff operation performed on the configuration files in the table below.
Router# show archive config differences running-config startup-config
+ip subnet-zero
+ip name-server 10.4.4.4
+voice dnis-map 1
+dnis 111
interface Ethernet1/0
+no ip address
+shutdown
+ip default-gateway 10.5.5.5
+ip classless
+access-list 110 deny ip any host 10.1.1.1
+access-list 110 deny ip any host 10.1.1.2
+access-list 110 deny ip any host 10.1.1.3
+snmp-server community private RW
-no ip subnet-zero
interface Ethernet1/0
-ip address 10.7.7.7 255.0.0.0
-no ip classless
-snmp-server community public RO
Incremental Diff Operation ExampleIn this example, an incremental diff operation is performed on the startup and running configuration files.The table below shows the configuration files used for this example.
Incremental Diff Operation Example Configuration Examples for the Contextual Configuration Diff Utility
Managing Configuration Files Configuration Guide, Cisco IOS Release 12.2SX84

Table 4 Configuration Files Used for the Incremental Diff Operation Example
Startup Configuration File Running Configuration File
ip subnet-zero
ip cef
ip name-server 10.4.4.4
voice dnis-map 1
dnis 111
interface Ethernet1/0
no ip address
no ip route-cache
no ip mroute-cache
shutdown
duplex half
ip default-gateway 10.5.5.5
ip classless
access-list 110 deny ip any host 10.1.1.1
access-list 110 deny ip any host 10.1.1.2
access-list 110 deny ip any host 10.1.1.3
snmp-server community private RW
no ip subnet-zero
ip cef
interface Ethernet1/0
ip address 10.7.7.7 255.0.0.0
no ip route-cache
no ip mroute-cache
duplex half
no ip classless
snmp-server community public RO
Contextual Configuration Diff UtilityConfiguration Examples for the Contextual Configuration Diff Utility
Managing Configuration Files Configuration Guide, Cisco IOS Release 12.2SX 85

The following is sample output from the showarchiveconfigincremental-diffscommand. This sampleoutput displays the results of the incremental diff operation performed on the configuration files in the tablebelow.
Router# show archive config incremental-diffs startup-config
ip subnet-zero
ip name-server 10.4.4.4
voice dnis-map 1
dnis 111
interface Ethernet1/0
no ip address
shutdown
ip default-gateway 10.5.5.5
ip classless
access-list 110 deny ip any host 10.1.1.1
access-list 110 deny ip any host 10.1.1.2
access-list 110 deny ip any host 10.1.1.3
snmp-server community private RW
Additional ReferencesThis section provides references related to the Contextual Configuration Diff Utility feature.
Related Documents
Related Topic Document Title
Information about managing configuration files Managing Configuration Files
Commands for managing configuration files The Cisco IOS Configuration FundamentalsCommand Reference
Standards
Standards Title
No new or modified standards are supported by thisfeature, and support for existing standards has notbeen modified by this feature.
--
Contextual Configuration Diff Utility Additional References
Managing Configuration Files Configuration Guide, Cisco IOS Release 12.2SX86

MIBs
MIBs MIBs Link
No new or modified MIBs are supported by thisfeature, and support for existing MIBs has not beenmodified by this feature.
To locate and download MIBs for selectedplatforms, Cisco IOS releases, and feature sets, useCisco MIB Locator found at the following URL:
http://www.cisco.com/go/mibs
RFCs
RFCs Title
No new or modified RFCs are supported by thisfeature, and support for existing RFCs has not beenmodified by this feature.
--
Technical Assistance
Description Link
The Cisco Support website provides extensiveonline resources, including documentation and toolsfor troubleshooting and resolving technical issueswith Cisco products and technologies.
To receive security and technical information aboutyour products, you can subscribe to variousservices, such as the Product Alert Tool (accessedfrom Field Notices), the Cisco Technical ServicesNewsletter, and Really Simple Syndication (RSS)Feeds.
Access to most tools on the Cisco Support websiterequires a Cisco.com user ID and password.
http://www.cisco.com/techsupport
Feature Information for Contextual Configuration Diff UtilityThe following table provides release information about the feature or features described in this module.This table lists only the software release that introduced support for a given feature in a given softwarerelease train. Unless noted otherwise, subsequent releases of that software release train also support thatfeature.
Use Cisco Feature Navigator to find information about platform support and Cisco software image support.To access Cisco Feature Navigator, go to www.cisco.com/go/cfn. An account on Cisco.com is not required.
Contextual Configuration Diff UtilityFeature Information for Contextual Configuration Diff Utility
Managing Configuration Files Configuration Guide, Cisco IOS Release 12.2SX 87

Table 5 Feature Information for Contextual Configuration Diff Utility
Feature Name Releases Feature Information
Contextual Configuration DiffUtility
12.3(4)T 12.2(25)S 12.2(27)SBC12.2(33)SRA 12.2(33)SXH12.2(33)SB
The Contextual ConfigurationDiff Utility feature provides theability to perform a line-by-linecomparison of any twoconfiguration files and generate alist of the differences betweenthem. The generated outputincludes information regardingconfiguration lines that have beenadded, modified, or deleted, andthe configuration modes withinwhich a changed configurationline exists.
In 12.3(4)T, this feature wasintroduced.
In 12.2(33)SB, this feature wasimplemented on the Cisco 10000series.
The following sections provideinformation about this feature:
The following commands weremodified by this feature: showarchive config differences, showarchive config incremental-diffs.
Cisco and the Cisco logo are trademarks or registered trademarks of Cisco and/or its affiliates in the U.S.and other countries. To view a list of Cisco trademarks, go to this URL: www.cisco.com/go/trademarks.Third-party trademarks mentioned are the property of their respective owners. The use of the word partnerdoes not imply a partnership relationship between Cisco and any other company. (1110R)
Any Internet Protocol (IP) addresses and phone numbers used in this document are not intended to beactual addresses and phone numbers. Any examples, command display output, network topology diagrams,and other figures included in the document are shown for illustrative purposes only. Any use of actual IPaddresses or phone numbers in illustrative content is unintentional and coincidental.
Contextual Configuration Diff Utility
Managing Configuration Files Configuration Guide, Cisco IOS Release 12.2SX88

Configuration Change Notification and Logging
Prior to the introduction of this feature, the only way to determine if the Cisco IOS software configurationhad changed was to save a copy of the running and startup configurations to a local computer and do aline-by-line comparison. This comparison method can identify changes that occurred, but does not specifythe sequence in which the changes occurred, or the person responsible for the changes.
The Configuration Change Notification and Logging (Config Log Archive) feature allows the tracking ofconfiguration changes entered on a per-session and per-user basis by implementing an archive function.This archive saves ‘configuration logs’ that track each configuration command that is applied, whoapplied the command, the parser return code (PRC) for the command, and the time the command wasapplied. This feature also adds a notification mechanism that sends asynchronous notifications toregistered applications whenever the configuration log changes.
• Finding Feature Information, page 89• Restrictions for Configuration Change Notification and Logging, page 89• Information About Configuration Change Notification and Logging, page 90• How to Configure the Configuration Change Notification and Logging Feature, page 91• Configuration Examples for the Configuration Change Notification and Logging Feature, page 98• Additional References, page 99• Feature Information for Configuration Change Notification and Logging, page 100
Finding Feature InformationYour software release may not support all the features documented in this module. For the latest featureinformation and caveats, see the release notes for your platform and software release. To find informationabout the features documented in this module, and to see a list of the releases in which each feature issupported, see the Feature Information Table at the end of this document.
Use Cisco Feature Navigator to find information about platform support and Cisco software image support.To access Cisco Feature Navigator, go to www.cisco.com/go/cfn. An account on Cisco.com is not required.
Restrictions for Configuration Change Notification andLogging
• Only complete commands input in a configuration mode are logged.• Commands that are part of a configuration file applied with the copy command are not logged.
Managing Configuration Files Configuration Guide, Cisco IOS Release 12.2SX 89

Information About Configuration Change Notification andLogging
• Configuration Log, page 90
• Configuration Change Notifications and Config Change Logging, page 90
Configuration LogThe Configuration Change Notification and Logging feature tracks changes made to the Cisco IOSsoftware running configuration by maintaining a configuration log. This configuration log tracks changesinitiated only through the command-line interface (CLI) or HTTP. Only complete commands that result inthe invocation of action routines are logged. The following types of entries are not logged:
• Commands that result in a syntax error message• Partial commands that invoke the router help system
For each configuration command that is executed, the following information is logged:
• The command that was executed• The name of the user that executed the command• A configuration change sequence number• Parser return codes for the command
Note In some environments the configuration mode and the time of the executed command may also be logged.
You can display information from the configuration log through the use of the showarchivelogconfigcommand, with the exception of the parser return codes, which are for use by internal Cisco IOSapplications only.
Configuration Change Notifications and Config Change LoggingYou can configure the Configuration Change and Notification Logging feature to send notification ofconfiguration changes to the Cisco IOS software system logging (syslog) process. Syslog notificationsallow monitoring of the configuration log information without performing polling and informationgathering tasks.
The Configuration Change Notification and Logging feature allows the tracking of configuration changesentered by users on a per-session and per-user basis. This tool allows administrators to track anyconfiguration change made to the Cisco IOS software running configuration, and identify the user thatmade that change.
• Config Logger Enhancements for EAL4+ Certification, page 90
Config Logger Enhancements for EAL4+ CertificationFurther enhancements to the Configuration Change Logging process were implemented in Cisco IOSRelease 12.3(14)T. These enhancements support an effort to ensure the logging process meets the
Configuration Log Information About Configuration Change Notification and Logging
Managing Configuration Files Configuration Guide, Cisco IOS Release 12.2SX90

requirements set forth in the Conformance to Common Criteria, Evaluation Assurance Level 4+ (EAL4+)Firewall Protection Profiles. These enhancements include changes to meet the following requirements:
• If you change any logging parameters, those changes are logged. This is effected by the sending of asyslog message for each change to the running-config from a copy operation (for example, oncopysourcerunning-config).
• Modifications to the Group of Administrative Users are logged; failure attempts for access toprivileged EXEC mode (“enable” mode) are logged.
Note EAL Certification is not claimed by Cisco for Cisco IOS Release 12.3(14)T. These enhancements providethe groundwork for future Certification.
The above logging actions are disabled by default. To enable these logging characteristics, perform the taskdescribed in the “Configuring the Configuration Change Notification and Logging Feature” section.
How to Configure the Configuration Change Notification andLogging Feature
• Configuring the Configuration Change Notification and Logging Feature, page 91
• Displaying Configuration Log Entries and Statistics, page 93
• Clearing Configuration Log Entries, page 95
Configuring the Configuration Change Notification and Logging FeaturePerform this task to enable the Configuration Change Notification and Logging feature.
SUMMARY STEPS
1. enable
2. configure terminal
3. archive
4. log config
5. logging enable
6. logging size entries
7. hidekeys
8. notify syslog
9. end
Configuring the Configuration Change Notification and Logging FeatureHow to Configure the Configuration Change Notification and Logging Feature
Managing Configuration Files Configuration Guide, Cisco IOS Release 12.2SX 91

DETAILED STEPS
Command or Action Purpose
Step 1 enable
Example:
Router> enable
Enables privileged EXEC mode.
• Enter your password if prompted.
Step 2 configure terminal
Example:
Router# configure terminal
Enters global configuration mode.
Step 3 archive
Example:
Router(config)# archive
Enters archive configuration mode.
Step 4 log config
Example:
Router(config-archive)# log config
Enters configuration change logger configuration mode.
Step 5 logging enable
Example:
Router(config-archive-log-config)# logging enable
Enables the logging of configuration changes.
• Logging of configuration changes is disabled by default.
Step 6 logging size entries
Example:
Router(config-archive-log-config)# logging size 200
(Optional) Specifies the maximum number of entries retained in theconfiguration log.
• Valid values for the entries argument range from 1 to 1000. Thedefault value is 100 entries.
• When the configuration log is full, the oldest entry is deleted everytime a new entry is added.
Note If a new log size is specified that is smaller than the current logsize, the oldest log entries is immediately purged until the newlog size is satisfied, regardless of the age of the log entries.
Configuration Change Notification and Logging How to Configure the Configuration Change Notification and Logging Feature
Managing Configuration Files Configuration Guide, Cisco IOS Release 12.2SX92

Command or Action Purpose
Step 7 hidekeys
Example:
Router(config-archive-log-config)# hidekeys
(Optional) Suppresses the display of password information inconfiguration log files.
Note Enabling the hidekeys command increases security bypreventing password information from being displayed inconfiguration log files.
Step 8 notify syslog
Example:
Router(config-archive-log-config)# notify syslog
(Optional) Enables the sending of notifications of configurationchanges to a remote syslog.
Step 9 end
Example:
Router(config-archive-log-config)# end
Exits to privileged EXEC mode.
Displaying Configuration Log Entries and StatisticsPerform this task to display entries from the configuration log or statistics about the memory usage of theconfiguration log.
To display configuration log entries and to monitor the memory usage of the configuration log, theConfiguration Change Notification and Logging feature provides the showarchivelogconfig command.
SUMMARY STEPS
1. enable
2. show archive log config number [end-number]
3. show archive log config provisioning
4. show archive log config statistics
5. exit
DETAILED STEPS
Step 1 enableUse this command to enable privileged EXEC mode. Enter your password if prompted. For example”
Example:
Router> enable
Step 2 show archive log config number [end-number]
Displaying Configuration Log Entries and StatisticsHow to Configure the Configuration Change Notification and Logging Feature
Managing Configuration Files Configuration Guide, Cisco IOS Release 12.2SX 93

Use this command to display configuration log entries by record numbers. If you specify a record number for theoptional end-number argument, all log entries with record numbers between the values entered for the number andend-number arguments are displayed. For example:
Router# show archive log config 1 2
Example:
idx sess user@line Logged command 1 1 user1@console logging enable 2 1 user1@console logging size 200
This example displays configuration log entry numbers 1 and 2. Valid values for the number and end-numberargument range from 1 to 2147483647.
Step 3 show archive log config provisioningUse this command to display all configuration log files as they would appear in a configuration file rather than intabular format. For example:
Example:
Router# show archive log config all provisioningarchive log config logging enable logging size 200
This display also shows the commands used to change configuration modes, which are required to correctly apply thelogged commands.
Step 4 show archive log config statisticsUse this command to display memory usage information for the configuration. For example:
Example:
Router# show archive log config statisticsConfig Log Session Info: Number of sessions being tracked: 1 Memory being held: 3910 bytes Total memory allocated for session tracking: 3910 bytes Total memory freed from session tracking: 0 bytesConfig Log log-queue Info: Number of entries in the log-queue: 3 Memory being held in the log-queue: 671 bytes Total memory allocated for log entries: 671 bytes Total memory freed from log entries:: 0 bytes
Step 5 exitUse this command to exit to user EXEC mode. For example:
Example:
Router# exitRouter>
Configuration Change Notification and Logging How to Configure the Configuration Change Notification and Logging Feature
Managing Configuration Files Configuration Guide, Cisco IOS Release 12.2SX94

Clearing Configuration Log EntriesEntries from the configuration log can be cleared in one of two ways. The size of the configuration log canbe reduced using the loggingsize command, or the configuration log can be disabled and then re-enabledwith the loggingenablecommand.
• Clearing the Configuration Log by Reducing the Log Size, page 95
• Clearing the Configuration Log by Disabling the Configuration Log, page 96
Clearing the Configuration Log by Reducing the Log SizePerform this task to clear entries from the configuration log using the loggingsizecommand.
SUMMARY STEPS
1. enable
2. configure terminal
3. archive
4. log config
5. logging size entries
6. logging size entries
7. end
DETAILED STEPS
Command or Action Purpose
Step 1 enable
Example:
Router> enable
Enables privileged EXEC mode.
• Enter your password if prompted.
Step 2 configure terminal
Example:
Router# configure terminal
Enters global configuration mode.
Step 3 archive
Example:
Router(config)# archive
Enters archive configuration mode.
Clearing Configuration Log EntriesClearing the Configuration Log by Reducing the Log Size
Managing Configuration Files Configuration Guide, Cisco IOS Release 12.2SX 95
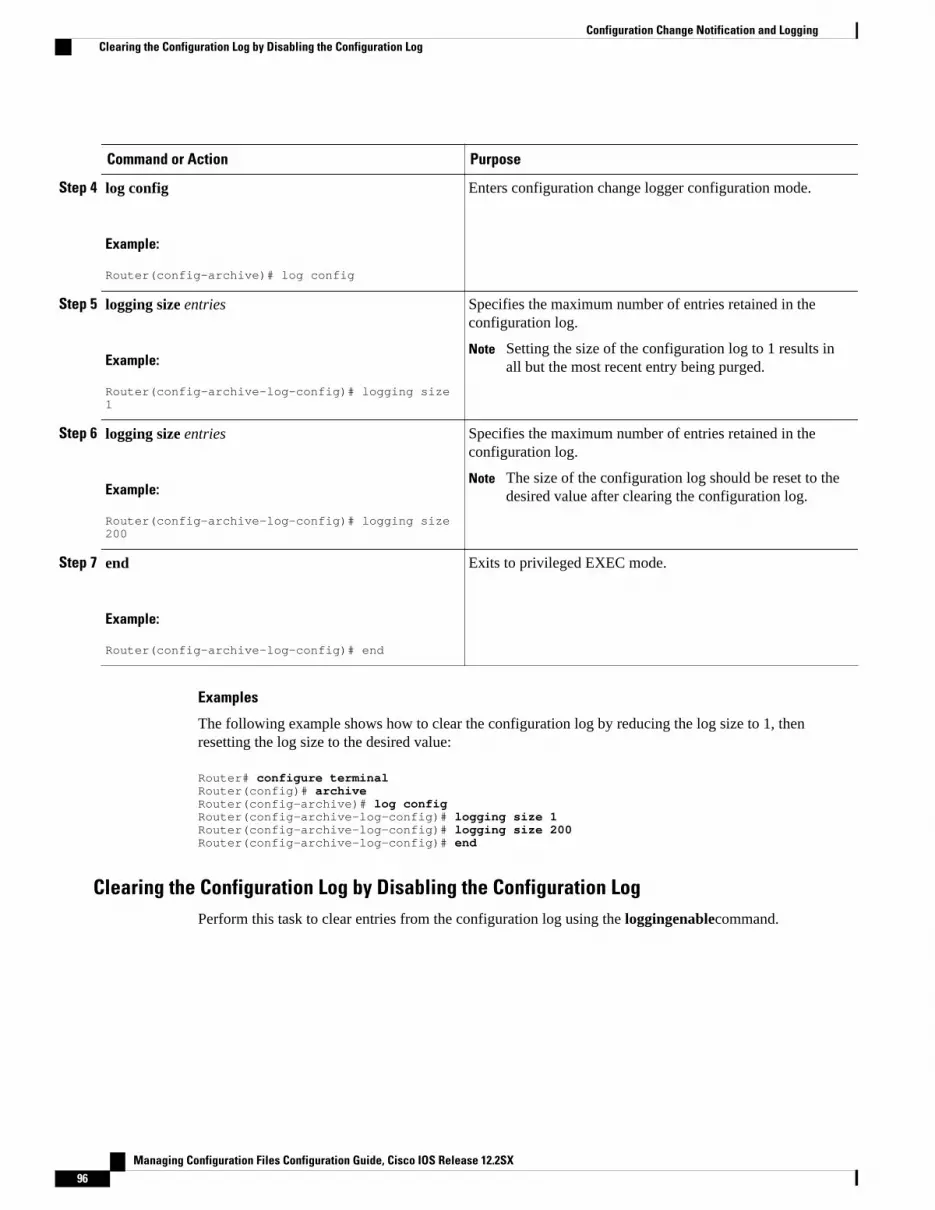
Command or Action Purpose
Step 4 log config
Example:
Router(config-archive)# log config
Enters configuration change logger configuration mode.
Step 5 logging size entries
Example:
Router(config-archive-log-config)# logging size 1
Specifies the maximum number of entries retained in theconfiguration log.
Note Setting the size of the configuration log to 1 results inall but the most recent entry being purged.
Step 6 logging size entries
Example:
Router(config-archive-log-config)# logging size 200
Specifies the maximum number of entries retained in theconfiguration log.
Note The size of the configuration log should be reset to thedesired value after clearing the configuration log.
Step 7 end
Example:
Router(config-archive-log-config)# end
Exits to privileged EXEC mode.
Examples
The following example shows how to clear the configuration log by reducing the log size to 1, thenresetting the log size to the desired value:
Router# configure terminalRouter(config)# archiveRouter(config-archive)# log configRouter(config-archive-log-config)# logging size 1Router(config-archive-log-config)# logging size 200Router(config-archive-log-config)# end
Clearing the Configuration Log by Disabling the Configuration LogPerform this task to clear entries from the configuration log using the loggingenablecommand.
Configuration Change Notification and Logging Clearing the Configuration Log by Disabling the Configuration Log
Managing Configuration Files Configuration Guide, Cisco IOS Release 12.2SX96

SUMMARY STEPS
1. enable
2. configure terminal
3. archive
4. log config
5. no logging enable
6. logging enable
7. end
DETAILED STEPS
Command or Action Purpose
Step 1 enable
Example:
Router> enable
Enables privileged EXEC mode.
• Enter your password if prompted.
Step 2 configure terminal
Example:
Router# configure terminal
Enters global configuration mode.
Step 3 archive
Example:
Router(config)# archive
Enters archive configuration mode.
Step 4 log config
Example:
Router(config-archive)# log config
Enters configuration change logger configuration mode.
Step 5 no logging enable
Example:
Router(config-archive-log-config)# no logging enable
Disables the logging of configuration changes.
Note Disabling the configuration log results in all recordsbeing purged.
Configuration Change Notification and LoggingClearing the Configuration Log by Disabling the Configuration Log
Managing Configuration Files Configuration Guide, Cisco IOS Release 12.2SX 97

Command or Action Purpose
Step 6 logging enable
Example:
Router(config-archive-log-config)# logging enable
Enables the logging of configuration changes.
Step 7 end
Example:
Router(config-archive-log-config)# end
Exits to privileged EXEC mode.
Examples
The following example clears the configuration log by disabling and then re-enabling the configuration log:
Router(config)# archive
Router(config-archive)# log config
Router(config-archive-log-config)# no logging enable
Router(config-archive-log-config)# logging enable
Router(config-archive-log-config)# end
Configuration Examples for the Configuration ChangeNotification and Logging Feature
• Configuring the Configuration Change Notification and Logging Feature Example, page 98
Configuring the Configuration Change Notification and Logging FeatureExample
The following example shows how to enable configuration logging with a maximum of 200 entries in theconfiguration log. In the example, security is increased by suppressing the display of password informationin configuration log records, and syslog notifications are turned on.
configure terminalarchive log config logging enable logging size 200 hidekeys notify syslog
Configuring the Configuration Change Notification and Logging Feature Example Configuration Examples for the Configuration Change Notification and Logging Feature
Managing Configuration Files Configuration Guide, Cisco IOS Release 12.2SX98

Additional ReferencesThe following sections provide references related to the Configuration Change Notification and Logging.feature:
Related Documents
Related Topic Document Title
Information about managing configuration files Managing Configuration Files
Commands for managing configuration files Cisco IOS Configuration Fundamentals CommandReference
Standards
Standards Title
No new or modified standards are supported by thisfeature, and support for existing standards has notbeen modified by this feature.
--
MIBs
MIBs MIBs Link
No new or modified MIBs are supported by thisfeature, and support for existing MIBs has not beenmodified by this feature.
To locate and download MIBs for selectedplatforms, Cisco IOS releases, and feature sets, useCisco MIB Locator found at the following URL:
http://www.cisco.com/go/mibs
RFCs
RFCs Title
No new or modified RFCs are supported by thisfeature, and support for existing RFCs has not beenmodified by this feature.
--
Configuration Change Notification and LoggingAdditional References
Managing Configuration Files Configuration Guide, Cisco IOS Release 12.2SX 99

Technical Assistance
Description Link
The Cisco Support website provides extensiveonline resources, including documentation and toolsfor troubleshooting and resolving technical issueswith Cisco products and technologies.
To receive security and technical information aboutyour products, you can subscribe to variousservices, such as the Product Alert Tool (accessedfrom Field Notices), the Cisco Technical ServicesNewsletter, and Really Simple Syndication (RSS)Feeds.
Access to most tools on the Cisco Support websiterequires a Cisco.com user ID and password.
http://www.cisco.com/techsupport
Feature Information for Configuration Change Notificationand Logging
The following table provides release information about the feature or features described in this module.This table lists only the software release that introduced support for a given feature in a given softwarerelease train. Unless noted otherwise, subsequent releases of that software release train also support thatfeature.
Use Cisco Feature Navigator to find information about platform support and Cisco software image support.To access Cisco Feature Navigator, go to www.cisco.com/go/cfn. An account on Cisco.com is not required.
Configuration Change Notification and Logging Feature Information for Configuration Change Notification and Logging
Managing Configuration Files Configuration Guide, Cisco IOS Release 12.2SX100

Table 6 Feature Information for Configuration Change Notification and Logging
Feature Name Releases Feature Information
Configuration ChangeNotification and Logging
12.3(4)T 12.2(25)S 12.2(27)SBC12.2(33)SRA 12.2(33)SXH12.2(33)SB
The Configuration ChangeNotification and Logging(Configuration Logging) featureallows the tracking ofconfiguration changes entered ona per-session and per-user basisby implementing a configurationlog. The configuration log trackseach configuration command thatis applied, who applied thecommand, the parser return codefor the command, and the timethe command was applied. Thisfeature also adds a notificationmechanism that sendsasynchronous notifications toregistered applications wheneverthe configuration log changes.
In 12.2(33)SB, this feature wasimplemented on the Cisco 10000series.
The following sections provideinformation about this feature:
The following commands weremodified by this feature: archive,hidekeys, log config, loggingenable, logging size, notifysyslog, show archive log config.
Config Logger Enhancements forEAL4+ Certification
12.3(14)T 12.2(27)SBC Further enhancements to theConfiguration Change Loggingprocess were implemented inCisco IOS Release 12.3(14)T and12.2(27)SBC. Theseenhancements support an effort toensure the logging process meetsthe requirements set forth in theConformance to CommonCriteria, Evaluation AssuranceLevel 4+ (EAL4+) FirewallProtection Profiles.
The following section providesinformation about this feature:
Configuration Change Notification and LoggingFeature Information for Configuration Change Notification and Logging
Managing Configuration Files Configuration Guide, Cisco IOS Release 12.2SX 101

Cisco and the Cisco logo are trademarks or registered trademarks of Cisco and/or its affiliates in the U.S.and other countries. To view a list of Cisco trademarks, go to this URL: www.cisco.com/go/trademarks.Third-party trademarks mentioned are the property of their respective owners. The use of the word partnerdoes not imply a partnership relationship between Cisco and any other company. (1110R)
Any Internet Protocol (IP) addresses and phone numbers used in this document are not intended to beactual addresses and phone numbers. Any examples, command display output, network topology diagrams,and other figures included in the document are shown for illustrative purposes only. Any use of actual IPaddresses or phone numbers in illustrative content is unintentional and coincidental.
Configuration Change Notification and Logging
Managing Configuration Files Configuration Guide, Cisco IOS Release 12.2SX102

Configuration Logger Persistency
The Configuration Logger Persistency feature increases the operational robustness of Cisco IOSconfiguration and provisioning actions by implementing a “quick-save” functionality. When theConfiguration Logger Persistency feature is configured, Cisco IOS software saves just the commandsentered since the last startup-config file was generated, rather than saving the entire startup configuration.
• Finding Feature Information, page 103• Prerequisites for Configuration Logger Persistency, page 103• Information About Configuration Logger Persistency, page 103• How to Configure the Configuration Logger Persistency Feature, page 105• Configuration Examples for the Configuration Logger Persistency Feature, page 108• Additional References, page 108• Feature Information for Configuration Logger Persistency, page 109• Glossary, page 110
Finding Feature InformationYour software release may not support all the features documented in this module. For the latest featureinformation and caveats, see the release notes for your platform and software release. To find informationabout the features documented in this module, and to see a list of the releases in which each feature issupported, see the Feature Information Table at the end of this document.
Use Cisco Feature Navigator to find information about platform support and Cisco software image support.To access Cisco Feature Navigator, go to www.cisco.com/go/cfn. An account on Cisco.com is not required.
Prerequisites for Configuration Logger PersistencyTo enable the Configuration Logger Persistency feature, you must have disk0: configured and an externalflash card inserted on the router.
To achieve optimum results from the Configuration Logger Persistency feature, you must have Cisco IOSRelease 12.2(33)SRA, Release 12.4(11)T, Release 12.2(33)SXH, or Release 12.2(33)SB installed on yoursystem.
Information About Configuration Logger Persistency• Use of Configuration Logger Persistency to Save Configuration Files, page 104• Persisted Commands, page 104
Managing Configuration Files Configuration Guide, Cisco IOS Release 12.2SX 103

Use of Configuration Logger Persistency to Save Configuration FilesCisco IOS software uses the startup-config file to save router configuration commands across reloads. Thissingle file contains all the commands that need to be applied when the router reboots. The startup-configfile gets updated every time a writememory command or copyurl startup-config command is entered. Asthe size of the running-config file grows, the time to save the startup-config file to the NVRAM file systemincreases as well. Startup-config files can be 1 MB and larger. For files of this size, making a single-linechange to the startup-config file requires that the entire startup-config file is saved again even though mostof the configuration has not changed.
The Configuration Logger Persistency feature implements a “quick-save” functionality. The aim is toprovide a “configuration save” mechanism where the time to save changes from the startup-config file isproportional to the size of the incremental changes (with respect to the startup-config file) that need to besaved.
The Cisco IOS configuration logger logs all changes that are manually entered at the command-lineprompt. This feature also notifies the registered clients when changes to the log occur. The contents of theconfiguration log are stored in the run-time memory--the contents of the log are not persisted after reboots.
The Configuration Logger Persistency feature provides a mechanism to persist the configuration commandsentered by users across reloads. Only the commands entered at the command-line interface (CLI) (that is,the commands entered in configuration mode) are persisted across reload. This feature uses the Cisco IOSsecure file system to persist the configuration commands that are generated.
Note The Cisco IOS configuration logger is different from the system message logging (syslog) facility. Syslogis a general logging facility for tracking system messages. The configuration logger tracks informationabout configuration commands entered at the CLI.
Persisted CommandsThe persisted commands from the Cisco IOS configuration logger are used as an extension to the startupconfiguration. These saved commands provide a quick-save capability. Rather than saving the entirestartup-config file, Cisco IOS software saves just the commands entered since the last startup-config filewas generated.
Only the logged commands are persisted. The following additional data from the configuration logger arenot persisted:
• User who logged the command• IP address from which the user logged in• Session and log indexes for the logged command• Time when the command was entered• Pre- and post-NVGEN output associated with the entered command• Parser return code output for the entered command
The persisted commands’ primary purpose is for use as a quick-save extension to the startup-config file.The additional information associated with a configuration command is not useful for quick-save purposes.If you need the additional information to be persisted across reboots (for auditing purposes), complete thefollowing steps:
1 Enable configuration logger notification to syslog2 Enable the syslog persistence feature
Use of Configuration Logger Persistency to Save Configuration Files Information About Configuration Logger Persistency
Managing Configuration Files Configuration Guide, Cisco IOS Release 12.2SX104

Alternatively, Cisco Networking Services, CiscoView, or other Network Management systems that manageCisco IOS devices to keep track of configuration changes in an off-the-box storage solution can be used.
By default, upon reload, the persisted commands are appended to the startup-config file. These commandsare applied only when you explicitly configure this behavior using a CLI configuration command.
How to Configure the Configuration Logger PersistencyFeature
• Enabling the Configuration Logger Persistency Feature, page 105
• Verifying and Troubleshooting the Configuration Logger Persistency Feature, page 106
Enabling the Configuration Logger Persistency FeatureThe Configuration Logger Persistency feature implements a quick-save mechanism so that the time to savechanges from the startup configuration is proportional to the size of the incremental changes (with respectto the startup configuration) that need to be saved. The persisted commands from the Cisco IOSconfiguration logger will be used as an extension to the startup configuration. The saved commands, whichare used as an extension to the startup configuration, provide a quick-save ability. Rather than saving theentire startup-config file, Cisco IOS software saves just the commands entered since the last startup-configfile was generated.
To enable the Configuration Logger Persistency feature, perform the following task.
SUMMARY STEPS
1. enable
2. configure terminal
3. archive
4. log config
5. logging persistent auto manual
6. logging persistent reload
7. logging size entries
DETAILED STEPS
Command or Action Purpose
Step 1 enable
Example:
Router> enable
Enables privileged EXEC mode.
• Enter your password if prompted.
Enabling the Configuration Logger Persistency FeatureHow to Configure the Configuration Logger Persistency Feature
Managing Configuration Files Configuration Guide, Cisco IOS Release 12.2SX 105

Command or Action Purpose
Step 2 configure terminal
Example:
Router# configure terminal
Enters global configuration mode.
Step 3 archive
Example:
Router(config)# archive
Enters archive configuration mode.
Step 4 log config
Example:
Router(config-archive)# log config
Enters archive configuration-log configuration mode.
Step 5 logging persistent auto manual
Example:
Router(config-archive-log-cfg)# logging persistent auto
Enables the Configuration Logger Persistency feature:
• The auto keyword specifies that each configuration command will besaved automatically to the Cisco IOS secure file system.
• The manual keyword specifies that you can save the configurationcommands to the Cisco IOS secure file system on-demand. To do this,you must use the archivelogconfigpersistentsave command.
Note To enable the loggingpersistentauto command, you must have disk0:configured and an external flash card inserted on the router.
Step 6 logging persistent reload
Example:
Router(config-archive-log-cfg)# logging persistent reload
Sequentially applies the configuration commands saved in the configurationlogger database (since the last writememorycommand) to the running-configfile after a reload.
Step 7 logging size entries
Example:
Router(config-archive-log-cfg)# logging size 10
Specifies the maximum number of entries retained in the configuration log.
• Valid values range from 1 to 1000.• The default value is 100 entries.
Verifying and Troubleshooting the Configuration Logger Persistency FeatureThree commands can be used to verify, archive, and clear the contents of the configuration log. Fortroubleshooting purposes, the command in Step 4 turns on debugging.
Verifying and Troubleshooting the Configuration Logger Persistency Feature How to Configure the Configuration Logger Persistency Feature
Managing Configuration Files Configuration Guide, Cisco IOS Release 12.2SX106

SUMMARY STEPS
1. show archive log config persistent
2. clear archive log config persistent
3. archive log config persistent save
4. debug archive log config persistent
DETAILED STEPS
Step 1 show archive log config persistentThis command displays the persisted commands in the configuration log. The commands appear in a configlet format.The following is sample output from this command:
Example:
Router# show archive log config persistent!Configuration logger persistentarchive log config logging persistent auto logging persistent reload archive log config logging size 10logging console interface loop 101 ip address 10.1.1.1 255.255.255.0 ip address 10.2.2.2 255.255.255.0 no shutdown
Step 2 clear archive log config persistentThis command clears the configuration logging persistent database entries. Only the entries in the configurationlogging database file are deleted. The file itself is not deleted because it will be used to log new entries. After thiscommand is entered, a message is returned to indicate that the archive log is cleared.
Example:
Router# clear archive log config persistent Purged the config log persist database entries successfully Router#
Step 3 archive log config persistent saveThis command saves the configuration log to the Cisco IOS secure file system. For this command to work, thearchivelogconfigpersistentsavecommand must be configured.
Step 4 debug archive log config persistentThis command turns on the debugging function. A message is returned to indicate that debugging is turned on.
Example:
Router# debug archive log config persistent debug archive log config persistent debugging is on
Configuration Logger PersistencyHow to Configure the Configuration Logger Persistency Feature
Managing Configuration Files Configuration Guide, Cisco IOS Release 12.2SX 107

Configuration Examples for the Configuration LoggerPersistency Feature
• Configuration Logger Persistency Configuration on a Cisco 7200 Series Router Example, page 108
Configuration Logger Persistency Configuration on a Cisco 7200 SeriesRouter Example
In this example, each configuration command is saved automatically to the Cisco IOS secure file system,configuration commands saved in the configuration logger database (since the last writememorycommand)are applied sequentially to the running-config file, and the maximum number of entries retained in theconfiguration log is set to 10:
Router> enableRouter# configure terminalEnter configuration commands, one per line. End with CNTL/Z. Router(config)# archiveRouter(config-archive)# log configRouter(config-archive-log-config)# logging persistent autoconfiguration log persistency feature enabled. Building configuration... [OK] Router(config-archive-log-config)# logging persistent reloadRouter(config-archive-log-config)# logging size 10Router(config-archive-log-config)# archive log config persistent saveRouter(config-archive-log-config)# endRouter#
Additional ReferencesThe following sections provide references related to the Configuration Logger Persistency feature.
Related Documents
Related Topic Document Title
Comprehensive command-reference information Cisco IOS Configuration Fundamentals CommandReference
Standards
Standard Title
No new or modified standards are supported by thisfeature.
--
Configuration Logger Persistency Configuration on a Cisco 7200 Series Router Example Configuration Examples for the Configuration Logger Persistency Feature
Managing Configuration Files Configuration Guide, Cisco IOS Release 12.2SX108

MIBs
MIB MIBs Link
No new or modified MIBs are supported by thisfeature.
To locate and download MIBs for selectedplatforms, Cisco IOS releases, and feature sets, useCisco MIB Locator found at the following URL:
http://www.cisco.com/go/mibs
RFCs
RFC Title
No new or modified RFCs are supported by thisfeature.
--
Technical Assistance
Description Link
The Cisco Support website provides extensiveonline resources, including documentation and toolsfor troubleshooting and resolving technical issueswith Cisco products and technologies.
To receive security and technical information aboutyour products, you can subscribe to variousservices, such as the Product Alert Tool (accessedfrom Field Notices), the Cisco Technical ServicesNewsletter, and Really Simple Syndication (RSS)Feeds.
Access to most tools on the Cisco Support websiterequires a Cisco.com user ID and password.
http://www.cisco.com/techsupport
Feature Information for Configuration Logger PersistencyThe following table provides release information about the feature or features described in this module.This table lists only the software release that introduced support for a given feature in a given softwarerelease train. Unless noted otherwise, subsequent releases of that software release train also support thatfeature.
Use Cisco Feature Navigator to find information about platform support and Cisco software image support.To access Cisco Feature Navigator, go to www.cisco.com/go/cfn. An account on Cisco.com is not required.
Configuration Logger PersistencyFeature Information for Configuration Logger Persistency
Managing Configuration Files Configuration Guide, Cisco IOS Release 12.2SX 109

Table 7 Feature Information for Configuration Logger Persistency
Feature Name Releases Feature Information
Configuration Logger Persistency 12.2(33)SRA 12.4(11)T12.2(33)SXH 12.2(33)SB
The Configuration LoggerPersistency feature increases theoperational robustness of CiscoIOS configuration andprovisioning actions byimplementing a “quick-save”functionality. Effective withCisco IOS Release 12.2(33)SRA,Release 12.4(11)T, Release12.2(33)SXH, and Release12.2(33)SB, Cisco IOS softwaresaves just the commands enteredsince the last startup-config filewas generated, rather than savingthe entire startup configuration.
The following sections provideinformation about this feature:
GlossaryAPI --application programming interface.
CAF --command action function.
CDP --Cisco Discovery Protocol.
CSB --Command Status Block.
HA --high-availability architecture.
MIB --Management Information Base.
NAF --NVGEN action function.
NVGEN --nonvolatile generation.
NVRAM --nonvolatile Random Access Memory.
parse chain --A sequence of C language macros defining the syntax of a Cisco IOS command.
RP --Route Processor.
SNMP --Simple Network Management Protocol.
XML --eXtensible Markup Language.
Cisco and the Cisco logo are trademarks or registered trademarks of Cisco and/or its affiliates in the U.S.and other countries. To view a list of Cisco trademarks, go to this URL: www.cisco.com/go/trademarks.
Configuration Logger Persistency Glossary
Managing Configuration Files Configuration Guide, Cisco IOS Release 12.2SX110

Third-party trademarks mentioned are the property of their respective owners. The use of the word partnerdoes not imply a partnership relationship between Cisco and any other company. (1110R)
Any Internet Protocol (IP) addresses and phone numbers used in this document are not intended to beactual addresses and phone numbers. Any examples, command display output, network topology diagrams,and other figures included in the document are shown for illustrative purposes only. Any use of actual IPaddresses or phone numbers in illustrative content is unintentional and coincidental.
Configuration Logger Persistency
Managing Configuration Files Configuration Guide, Cisco IOS Release 12.2SX 111

Configuration Logger Persistency Configuration on a Cisco 7200 Series Router Example
Managing Configuration Files Configuration Guide, Cisco IOS Release 12.2SX112

Configuration Partitioning
The Configuration Partitioning feature provides modularization (“partitioning”) of the runningconfiguration state to provide granular access to the running configuration in Cisco IOS software.
This feature is enabled by default in Cisco IOS software images that include this feature.
The configuration state of a device is retrieved dynamically whenever a user issues the showrunning-config command. When the Configuration Partitioning feature is enabled, the system groups theconfiguration state of the device into parts (called “partitions”) so that only the configuration state the userwishes to review is retrieved when generating a displayed list of commands in the running configuration.This feature improves performance for high-end systems with complex configurations because only a partof the running configuration state is processed when generating the running configuration command list,as opposed to the existing method of processing the entire system configuration state.
Default configuration partitions are provided by the introduction of this feature; other Cisco IOS softwarefeatures may define their own command partitions in later releases.
• Finding Feature Information, page 113• Information About Configuration Partitioning, page 113• How to Use the Configuration Partitioning Feature, page 115• Configuration Examples for Configuration Partitioning, page 118• Additional References, page 126• Feature Information for Configuration Partitioning, page 128
Finding Feature InformationYour software release may not support all the features documented in this module. For the latest featureinformation and caveats, see the release notes for your platform and software release. To find informationabout the features documented in this module, and to see a list of the releases in which each feature issupported, see the Feature Information Table at the end of this document.
Use Cisco Feature Navigator to find information about platform support and Cisco software image support.To access Cisco Feature Navigator, go to www.cisco.com/go/cfn. An account on Cisco.com is not required.
Information About Configuration Partitioning• System Running Configurations, page 114
• Retrieving the Running Configuration for Display or Copy Operations, page 114
• Benefits of Partitioning the Running Configuration, page 114
Managing Configuration Files Configuration Guide, Cisco IOS Release 12.2SX 113

System Running ConfigurationsManaging the configuration of any Cisco IOS software-based device involves managing the startupconfiguration (startup-config), which is a file stored in nonvolatile memory, and the running configuration(running-config), which is the set of all configuration options currently in effect on the system. Typically,the startup configuration file is loaded when the system boots, and changes to the system’s runningconfiguration, applied using the command-line interface (CLI), are saved by copying the runningconfiguration to a configuration file (either locally or on the network), which can then be used to configurethe device at startup, or used to configure other devices.
Retrieving the Running Configuration for Display or Copy OperationsIn the Cisco IOS software configuration model, the configuration state is maintained in a distributedmanner, with each component storing its own configuration state. To retrieve global configurationinformation, the software must poll every component to collect the distributed information. Thisconfiguration state retrieval operation is performed by a process known as nonvolatile generation(NVGEN), and it is invoked by commands such as showrunning-config, which is used to display thecurrent configuration state, and copysystem:running-configuration, which is used to save the runningconfiguration by copying it to a file. When invoked, the NVGEN process queries each system component,each interface instance, and all other configured component objects in a standard sequence. A runningconfiguration file is constructed as NVGEN traverses the system performing these queries, and it is this“virtual file” that is displayed or copied.
Benefits of Partitioning the Running ConfigurationThe Configuration Partitioning feature is the latest in a series of Configuration Generation PerformanceEnhancement Features for Cisco IOS software. (See the “Related Documents” section for related features.)This feature improves the system’s response time by providing a method for querying only the systemcomponent you wish to review when issuing the showrunning-config command.
When the Configuration Partitioning feature is enabled, the system groups the configuration state of thedevice into parts (called “partitions”) for the purpose of generating the virtual running configuration file(the list of configuration commands). A new command, showrunning-configpartition, allows you todisplay only the part of the running configuration that you want to examine, rather than having to displaythe entire running configuration at once, or displaying only lines that match a certain string.
The key benefit of this feature is that it increases system performance by allowing the system to run theNVGEN process for only the collection of system components (such as specific interfaces) that you need todisplay. This is in contrast to other existing extensions to the showrunning-config command, which onlyfilter the generated list after all system components have been processed.
The selective processing of the system’s configuration state for the purpose of generating a partial runningconfiguration is called “configuration partitioning.”
More granular access to configuration information offers important performance benefits for high-endrouting platforms with very large configuration files, while also enhancing configuration management byallowing advanced configuration features to be implemented at a more granular level. Advancedconfiguration options include Cisco IOS software support for provisioning of customer services, ConfigRollback, Config Locking, and configuration access control.
System Running Configurations Information About Configuration Partitioning
Managing Configuration Files Configuration Guide, Cisco IOS Release 12.2SX114

How to Use the Configuration Partitioning Feature• Displaying Configuration Partitions, page 115
• Disabling the Configuration Partitioning Feature, page 117
Displaying Configuration PartitionsThe main method of taking advantage of this feature is by using the showrunning-configpartitionpartcommand in priveledge exec mode, which is a specialized extension to theshowrunning-configcommand.
Note The partitionpart command extension is not available for the more:systemrunning-config command.
Because this feature offers improved performance for existing commands, this feature is enabled by defaultin Cisco IOS software images that support this feature. To quickly determine if this feature is supported andrunning on your system, issue the showrunning-configpartition? command in privileged EXEC mode.
SUMMARY STEPS
1. show running-config partition ?
2. show running-config partition part
DETAILED STEPS
Step 1 show running-config partition ?Issuing this command will show you the list of running configuration parts available for display on your system.
If the Configuration Partitioning feature is supported on your system and is enabled, you will see the string “ configpartition is TRUE ” as the first line of help output.
If you receive an error message when entering the command syntax shown here, this feature is not supported on yoursystem. See the command documentation for the showrunning-config command for existing extensions of thatcommand in other releases that allow you to show only part of the running configuration.
Note The list of available configuration parts may vary by software image and is dependent on what features arecurrently configured.
Example:
Router# show running-config partition ? config partition is TRUE access-list All access-list configurations boot All boot configurations class-map All class-map configurations common All remaining unregistered configurations global-cdp All global cdp configurations interface All Interface specific Configurations ip-as-path All IP as-path configurations ip-community All IP community list configurations ip-domain-list All ip domain list configurations ip-prefix-list All ip prefix-list configurations
Displaying Configuration PartitionsHow to Use the Configuration Partitioning Feature
Managing Configuration Files Configuration Guide, Cisco IOS Release 12.2SX 115

ip-static-routes All IP static configurations line All line mode configurations policy-map All policy-map configurations route-map All route-map configurations router All routing configurations snmp All SNMP configurations tacacs All TACACS configurations
Choose the part of the running configuration you want to display, and use the associated keyword as the partargument in Step 2.
Step 2 show running-config partition partAs an example, to have the system perform the NVGEN process on only the components associated with the access-list parts of the running configuration state, and display only the access-list related configurations, you would enter theshowrunning-configpartitionaccess-list command:
Example:
Router# show running-config partition access-list Building configuration...Current configuration : 127 bytes!Configuration of Partition access-list !!!access-list 90 permit 0.0.0.0 1.2.3.5access-list 100 permit 10 any any!end
Note This command also allows you to run the NVGEN process and display the resulting output for specificinterfaces. This is a key capability of this feature, as it was designed for systems with numerous activeinterfaces.
In the following example, the main configuration partition is the interface configuration, and the specific part of theconfiguration to be generated is the configuration for Fast Ethernet interface 0/0.
Example:
Router# show running-config partition interface fastethernet0/0Building configuration... Current configuration : 213 bytes!Configuration of Partition interface FastEthernet0/0!!interface FastEthernet0/0 ip address 10.4.2.39 255.255.255.0 no ip route-cache cef no ip route-cache duplex half ipv6 enable no cdp enable!!end
Configuration Partitioning How to Use the Configuration Partitioning Feature
Managing Configuration Files Configuration Guide, Cisco IOS Release 12.2SX116

Disabling the Configuration Partitioning FeatureBecause this feature offers improved performance for existing commands, this feature is enabled by defaultfor Cisco IOS software images that support this feature. However, you may want to disable this feature ifyou determine that it is not needed, as this feature does use a small amount of system resources (memoryand CPU utilization). To disable configuration partitioning, perform the following task, which assumes youare starting in user EXEC mode.
SUMMARY STEPS
1. enable
2. configure terminal
3. no parser config partition
DETAILED STEPS
Command or Action Purpose
Step 1 enable
Example:
Router> enable
Enables privileged EXEC mode.
• Enter your password if prompted.
Step 2 configure terminal
Example:
Router# configure terminal
Enters global configuration mode.
Step 3 no parser config partition
Example:
Router(config)# no parser config partition
Example:
Disabling config partitioning
Example:
Router(config)#
Disables the configuration partitioning feature.
• What to Do Next, page 117
What to Do Next
Disabling the Configuration Partitioning FeatureWhat to Do Next
Managing Configuration Files Configuration Guide, Cisco IOS Release 12.2SX 117

To reenable the feature after it has been disabled, use the parserconfigpartition command in globalconfiguration mode.
Note As this feature is enabled by default, only the no form will appear in the running configuration file, or willbe written to the startup configuration file when you issue the copyrunning-configstartup-configcommand.
Configuration Examples for Configuration PartitioningThis section provides examples of displaying configuration partitions with the show running-configpartition command:
• Displaying Configuration Partitions Example, page 118
Displaying Configuration Partitions ExampleIn this example, the showrunning-configpartitioncommand is used with related commands in a series ofsteps an administrator might take to check the status of a specific interface and the current configuration ofsome of the system’s other components. Comparable filtered output from the standard showrunning-configcommand (for example, showrunning-config|includeaccess-list) is included for demonstrationpurposes.
Note The part argument can consist of multiple partition name keywords, as in showrunning-configpartroutereigrp1.
gt3-7200-3# show running-config partition ? access-list All access-list configurations boot All boot configurations class-map All class-map configurations global-cdp All global cdp configurations interface All Interface specific Configurations ip-as-path All IP as-path configurations ip-community All IP community list configurations ip-domain-list All ip domain list configurations ip-static-routes All IP static configurations line All line mode configurations policy-map All policy-map configurations route-map All route-map configurations router All routing configurations service All service configurations snmp All SNMP configurationsgt3-7200-3# show running-config partition access-list Building configuration...Current configuration : 87 bytes!!!!access-list 90 permit 0.0.0.0 1.2.3.5access-list 100 permit 10 any any!endgt3-7200-3# show running-config | include access-list
Displaying Configuration Partitions Example Configuration Examples for Configuration Partitioning
Managing Configuration Files Configuration Guide, Cisco IOS Release 12.2SX118

access-list 90 permit 0.0.0.0 1.2.3.5access-list 100 permit 10 any anygt3-7200-3#gt3-7200-3# show running-config partition boot Building configuration...Current configuration : 51 bytes!boot network tftp:/service_config.txt!!!endgt3-7200-3# show running-config partition class-map Building configuration...Current configuration : 78 bytes!!!class-map match-all abc match any class-map match-all xyz!!!endgt3-7200-3# show running-config | begin class-map class-map match-all abc match any class-map match-all xyz!!gt3-7200-3# show running-config partition global-cdp Building configuration...Current configuration : 43 bytes!!!cdp timer 20cdp holdtime 100!endgt3-7200-3# show running-config | include global-cdp cdp timer 20cdp holdtime 100gt3-7200-3#gt3-7200-3# show ip interface briefInterface IP-Address OK? Method Status ProtocolFastEthernet0/0 unassigned YES NVRAM administratively down down Ethernet2/0 10.4.2.32 YES NVRAM up up Ethernet2/1 unassigned YES NVRAM administratively down down Ethernet2/2 unassigned YES NVRAM administratively down down Ethernet2/3 unassigned YES NVRAM administratively down down Serial3/0 unassigned YES NVRAM administratively down down Serial3/1 unassigned YES NVRAM administratively down down Serial3/2 unassigned YES NVRAM administratively down down Serial3/3 unassigned YES NVRAM administratively down down Loopback0 unassigned YES NVRAM administratively down down Loopback234 unassigned YES NVRAM administratively down down gt3-7200-3# show running-config partition interface fastethernet0/0Building configuration...Current configuration : 98 bytes!!!interface FastEthernet0/0 no ip address
Configuration PartitioningConfiguration Examples for Configuration Partitioning
Managing Configuration Files Configuration Guide, Cisco IOS Release 12.2SX 119

no ip route-cache shutdown duplex half!!endgt3-7200-3# show running-config partition interface ethernet2/0 Building configuration...Current configuration : 122 bytes!!!interface Ethernet2/0 ip address 10.4.2.32 255.255.255.0 no ip proxy-arp no ip route-cache duplex half!!endgt3-7200-3# show running-config partition interface ethernet2/1Building configuration...Current configuration : 94 bytes!!!interface Ethernet2/1 no ip address no ip route-cache shutdown duplex half!!endgt3-7200-3# show running-config partition interface ethernet2/2 Building configuration...Current configuration : 94 bytes!!!interface Ethernet2/2 no ip address no ip route-cache shutdown duplex half!!endgt3-7200-3# show running-config partition interface ethernet2/3Building configuration...Current configuration : 94 bytes!!!interface Ethernet2/3 no ip address no ip route-cache shutdown duplex half!!endgt3-7200-3# show running-config partition interface serial3/0Building configuration...Current configuration : 103 bytes!!!interface Serial3/0 no ip address no ip route-cache
Configuration Partitioning Configuration Examples for Configuration Partitioning
Managing Configuration Files Configuration Guide, Cisco IOS Release 12.2SX120

shutdown serial restart-delay 0!!endgt3-7200-3# show running-config partition interface serial3/1Building configuration...Current configuration : 103 bytes!!!interface Serial3/1 no ip address no ip route-cache shutdown serial restart-delay 0!!endgt3-7200-3# show running-config partition interface serial3/2Building configuration...Current configuration : 103 bytes!!!interface Serial3/2 no ip address no ip route-cache shutdown serial restart-delay 0!!endgt3-7200-3# show running-config partition interface serial3/3Building configuration...Current configuration : 103 bytes!!!interface Serial3/3 no ip address no ip route-cache shutdown serial restart-delay 0!!endgt3-7200-3# show running-config partition interface loopback0Building configuration...Current configuration : 79 bytes!!!interface Loopback0 no ip address no ip route-cache shutdown!!endgt3-7200-3# show running-config partition interface loopback1 ^% Invalid input detected at '^' marker.gt3-7200-3# show running-config partition interface loopback234Building configuration...Current configuration : 81 bytes!!!interface Loopback234 no ip address no ip route-cache shutdown
Configuration PartitioningConfiguration Examples for Configuration Partitioning
Managing Configuration Files Configuration Guide, Cisco IOS Release 12.2SX 121

!!endgt3-7200-3# configure terminal Enter configuration commands, one per line. End with CNTL/Z.gt3-7200-3(config)# interface ethernet 2/0.1gt3-7200-3(config-subif)# exitgt3-7200-3(config)# exitgt3-7200-3#00:13:05: %SYS-5-CONFIG_I: Configured from console by consolegt3-7200-3# show running-config partition interface ethernet2/0.1Building configuration...Current configuration : 58 bytes!!!interface Ethernet2/0.1 no ip route-cache!!endgt3-7200-3# show run partition ip?ip-as-path ip-community ip-domain-list ip-static-routes gt3-7200-3#sh run part ip-asgt3-7200-3#sh run part ip-as-path Building configuration...Current configuration : 125 bytes!!!ip as-path access-list 2 permit $ABCip as-path access-list 2 permit $xyz*ip as-path access-list 2 permit qwe*!endgt3-7200-3# show running-config partition ip-community Building configuration...Current configuration : 92 bytes!!!ip community-list standard asd permitip community-list expanded qwe deny uio*!endgt3-7200-3# show running-config | include ip communityip community-list standard asd permitip community-list expanded qwe deny uio*gt3-7200-3#gt3-7200-3# show running-config partition ip-domain-list Building configuration...Current configuration : 70 bytes!ip domain-list iopip domain-list tyuip domain-list jkl!!!endgt3-7200-3# show running-config partition ip-static-routes Building configuration...Current configuration : 98 bytes!!!ip route 0.0.0.0 0.0.0.0 Ethernet2/0
Configuration Partitioning Configuration Examples for Configuration Partitioning
Managing Configuration Files Configuration Guide, Cisco IOS Release 12.2SX122

ip route 171.69.1.129 255.255.255.255 10.4.29.1!endgt3-7200-3# show running-config partition lineBuilding configuration...Current configuration : 489 bytes!!!!line con 0 exec-timeout 0 0 transport output lat pad v120 mop telnet rlogin udptn nasi stopbits 1line aux 0 transport output lat pad v120 mop telnet rlogin udptn nasi stopbits 1line vty 0 password lab login transport input lat pad v120 mop telnet rlogin udptn nasi transport output lat pad v120 mop telnet rlogin udptn nasiline vty 1 4 login transport input lat pad v120 mop telnet rlogin udptn nasi transport output lat pad v120 mop telnet rlogin udptn nasi!end gt3-7200-3# show running-config partition policy-mapBuilding configuration...Current configuration : 162 bytes!!!policy-map qwer description policy-map qwer. class xyz shape peak 8000 32 32policy-map p1policy-map sdf class abc set precedence 4!!!endgt3-7200-3# show running-config partition route-mapBuilding configuration...Current configuration : 65 bytes!!!route-map iop permit 10!route-map rty permit 10!!endgt3-7200-3#sh run part router bgp 1Building configuration...Current configuration : 111 bytes!!!router bgp 1 no synchronization bgp log-neighbor-changes distance bgp 2 2 2 no auto-summary!!endgt3-7200-3#sh run part router egp ?
Configuration PartitioningConfiguration Examples for Configuration Partitioning
Managing Configuration Files Configuration Guide, Cisco IOS Release 12.2SX 123

<0-65535> Remote autonomous system numbergt3-7200-3#sh run part router egp 1Building configuration...Current configuration : 46 bytes!!!router egp 1 timers egp 20 20!!endgt3-7200-3# show running-config partition router ? bgp Border Gateway Protocol (BGP) egp Exterior Gateway Protocol (EGP) eigrp Enhanced Interior Gateway Routing Protocol (EIGRP) isis ISO IS-IS iso-igrp IGRP for OSI networks mobile Mobile routes odr On Demand stub Routes ospf Open Shortest Path First (OSPF) rip Routing Information Protocol (RIP)gt3-7200-3# show running-config partition router eigrp ?<1-65535> Autonomous system numbergt3-7200-3# show running-config partition router eigrp 1Building configuration...Current configuration : 13 bytes!!!!endgt3-7200-3#gt3-7200-3# sh run part router eigrp 2 Building configuration...Current configuration : 57 bytes!!!router eigrp 2 variance 10 auto-summary!!endgt3-7200-3# show running-config partition router ? bgp Border Gateway Protocol (BGP) egp Exterior Gateway Protocol (EGP) eigrp Enhanced Interior Gateway Routing Protocol (EIGRP) isis ISO IS-IS iso-igrp IGRP for OSI networks mobile Mobile routes odr On Demand stub Routes ospf Open Shortest Path First (OSPF) rip Routing Information Protocol (RIP)gt3-7200-3# show running-config partition router isis ? WORD ISO routing area tag | Output modifiers <cr>gt3-7200-3# show running-config partition router isis qweBuilding configuration...Current configuration : 86 bytes!!!router isis qwe set-attached-bit route-map qwer use external-metrics!!endgt3-7200-3# show running-config partition router isis ?
Configuration Partitioning Configuration Examples for Configuration Partitioning
Managing Configuration Files Configuration Guide, Cisco IOS Release 12.2SX124

WORD ISO routing area tag | Output modifiers <cr>gt3-7200-3# show running-config partition router isogt3-7200-3# show running-config partition router iso-igrp ? WORD ISO routing area tag | Output modifiers <cr>gt3-7200-3# show running-config partition router iso-igrp Building configuration...Current configuration : 31 bytes!!!router iso-igrp!!endgt3-7200-3# show running-config | begin isorouter iso-igrp!router isis qwe set-attached-bit route-map qwer use external-metrics!router egp 1 timers egp 20 20!router bgp 1 no synchronization bgp log-neighbor-changes distance bgp 2 2 2 no auto-summary! gt3-7200-3# show running-config partition router ? bgp Border Gateway Protocol (BGP) egp Exterior Gateway Protocol (EGP) eigrp Enhanced Interior Gateway Routing Protocol (EIGRP) isis ISO IS-IS iso-igrp IGRP for OSI networks mobile Mobile routes odr On Demand stub Routes ospf Open Shortest Path First (OSPF) rip Routing Information Protocol (RIP)gt3-7200-3# show running-config partition router mobile ? | Output modifiers <cr>gt3-7200-3# show running-config partition router mobile Building configuration...Current configuration : 42 bytes!!!router mobile distance 20!!endgt3-7200-3# sh run | include router router mobilerouter odrrouter eigrp 2router ospf 4router iso-igrprouter isis qwerouter egp 1router bgp 1gt3-7200-3# show running-config partition router ? bgp Border Gateway Protocol (BGP)
Configuration PartitioningConfiguration Examples for Configuration Partitioning
Managing Configuration Files Configuration Guide, Cisco IOS Release 12.2SX 125

egp Exterior Gateway Protocol (EGP) eigrp Enhanced Interior Gateway Routing Protocol (EIGRP) isis ISO IS-IS iso-igrp IGRP for OSI networks mobile Mobile routes odr On Demand stub Routes ospf Open Shortest Path First (OSPF) rip Routing Information Protocol (RIP)gt3-7200-3# show running-config partition router ospf ? <1-65535> Process IDgt3-7200-3# show running-config partition router ospf 4Building configuration...Current configuration : 64 bytes!!!router ospf 4 log-adjacency-changes distance 4!!endgt3-7200-3# sh run part service Building configuration...Current configuration : 190 bytes!no service padservice timestamps debug uptimeservice timestamps log uptimeno service password-encryptionservice internalservice udp-small-serversservice tcp-small-servers!!!endgt3-7200-3# sh run part snmp Building configuration...Current configuration : 84 bytes!!!snmp-server community user101 RWsnmp mib target list qwe host 0.0.0.0!end
Additional ReferencesThe following sections provide references related to the Configuration Partitioning feature.
Related Documents
Related Topic Document Title
Running configuration performance enhancement--parserconfigcache for interfaces.
Configuration Generation PerformanceEnhancement
Provisioning of customer services, ConfigRollback, Config Locking, and configuration accesscontrol
Contextual Configuration Diff Utility
Configuration Partitioning Additional References
Managing Configuration Files Configuration Guide, Cisco IOS Release 12.2SX126

Related Topic Document Title
Configuration management--Config changelogging.
Configuration Change Notification and Logging
Configuration management --Quick-save for configchange logging1.
Configuration Logger Persistency
Cisco IOS software configuration access controland config session locking (“Config Lock”).
Exclusive Configuration Change Access andAccess Session Locking
Standards
Standard Title
No standards are associated with this feature. --
MIBs
MIB MIBs Link
No new or modified MIBs are supported by thisfeature, and support for existing MIBs has not beenmodified by this feature.
--
RFCs
RFC Title
No new or modified RFCs are supported by thisfeature, and support for existing RFCs has not beenmodified by this feature.
--
1 The “Configuration Logger Persistency” feature allows saving just the commands entered since the last startup-config file was generated, rather than savingthe entire startup configuration.
Configuration PartitioningAdditional References
Managing Configuration Files Configuration Guide, Cisco IOS Release 12.2SX 127

Technical Assistance
Description Link
The Cisco Support website provides extensiveonline resources, including documentation and toolsfor troubleshooting and resolving technical issueswith Cisco products and technologies.
To receive security and technical information aboutyour products, you can subscribe to variousservices, such as the Product Alert Tool (accessedfrom Field Notices), the Cisco Technical ServicesNewsletter, and Really Simple Syndication (RSS)Feeds.
Access to most tools on the Cisco Support websiterequires a Cisco.com user ID and password..
http://www.cisco.com/techsupport
Feature Information for Configuration PartitioningThe following table provides release information about the feature or features described in this module.This table lists only the software release that introduced support for a given feature in a given softwarerelease train. Unless noted otherwise, subsequent releases of that software release train also support thatfeature.
Use Cisco Feature Navigator to find information about platform support and Cisco software image support.To access Cisco Feature Navigator, go to www.cisco.com/go/cfn. An account on Cisco.com is not required.
Configuration Partitioning Feature Information for Configuration Partitioning
Managing Configuration Files Configuration Guide, Cisco IOS Release 12.2SX128

Table 8 Feature Information for Configuration Partitioning
Feature Name Releases Feature Information
Configuration Partitioning 12.2(33)SRB 12.2(33)SB12.2(33)SXI
The Configuration Partitioningfeature provides modularization(“partitioning”) of the runningconfiguration state to providegranular access to the runningconfiguration in Cisco IOSsoftware. This feature is enabledby default in Cisco IOS softwareimages that include this feature.
In 12.2(33)SB, this feature wasimplemented on the Cisco 10000series.
The following sections provideinformation about this feature:
• Information AboutConfiguration Partitioning
• How to Use theConfiguration PartitioningFeature
Cisco and the Cisco logo are trademarks or registered trademarks of Cisco and/or its affiliates in the U.S.and other countries. To view a list of Cisco trademarks, go to this URL: www.cisco.com/go/trademarks.Third-party trademarks mentioned are the property of their respective owners. The use of the word partnerdoes not imply a partnership relationship between Cisco and any other company. (1110R)
Any Internet Protocol (IP) addresses and phone numbers used in this document are not intended to beactual addresses and phone numbers. Any examples, command display output, network topology diagrams,and other figures included in the document are shown for illustrative purposes only. Any use of actual IPaddresses or phone numbers in illustrative content is unintentional and coincidental.
Configuration Partitioning
Managing Configuration Files Configuration Guide, Cisco IOS Release 12.2SX 129

Displaying Configuration Partitions Example
Managing Configuration Files Configuration Guide, Cisco IOS Release 12.2SX130


