Embed Size (px)
Citation preview
–Rafael SerranoOwner of Rafael Serrano Photography & 17hats Member
Make your business work for you.
Visit 17hats.com
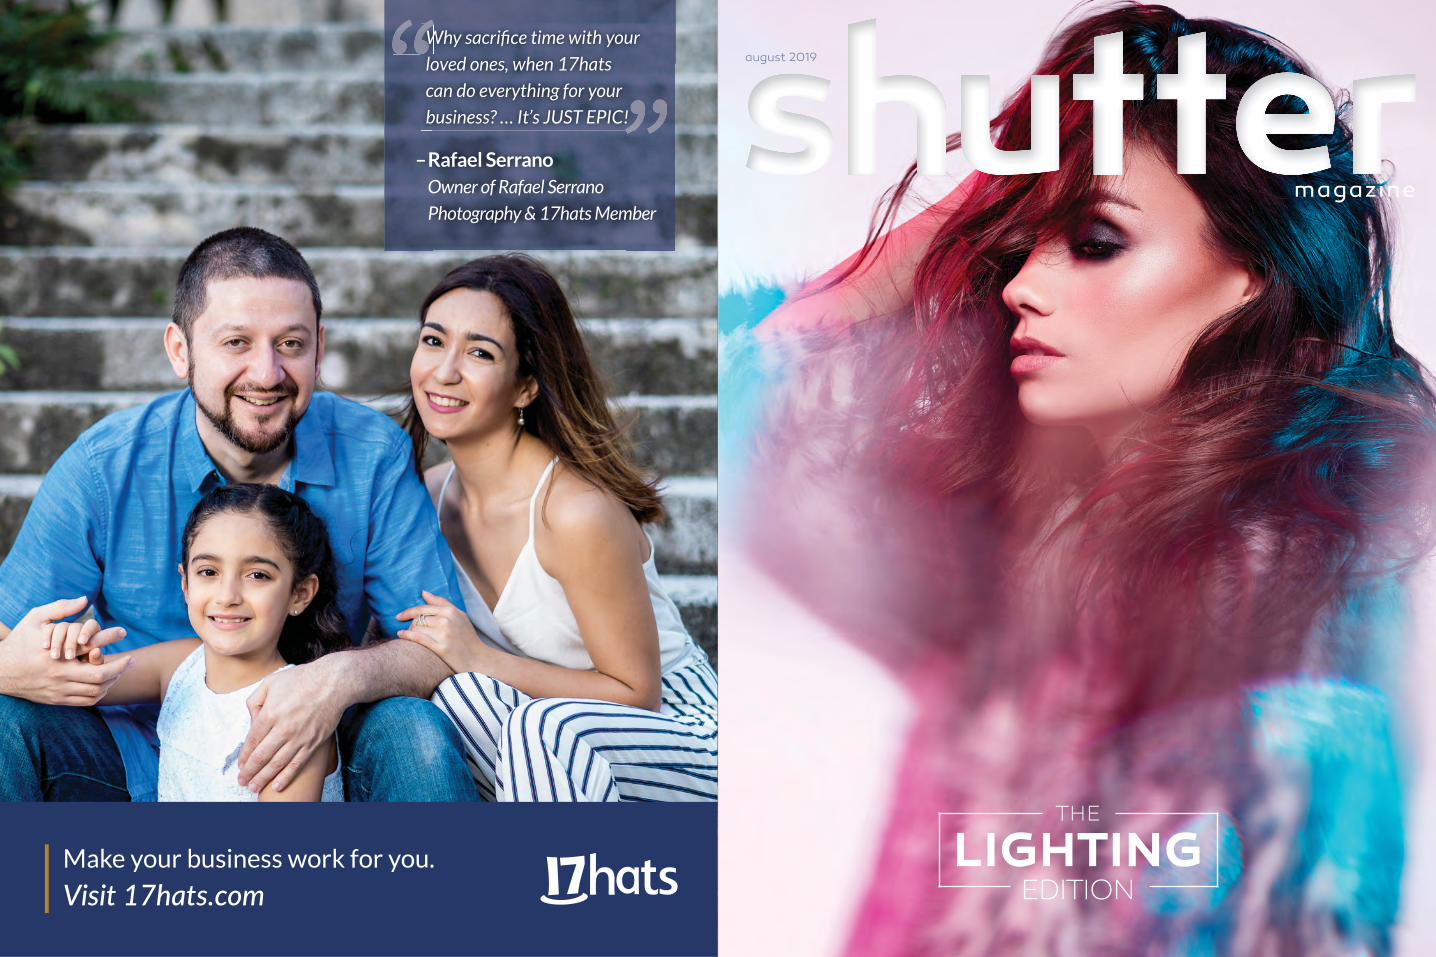
loved ones, when 17hats august 2019
magazine
THE
EDITIONLIGHTING

Quality. Service. Innovation.We’re here for you!
New customers get 25% off your first order with Bay Photo Lab! For instructions on how to redeem this special offer,
create a free account at bayphoto.com.
Images by: Nicole Sepulveda, Joe and Mirta
Showcase Your Storywith Quick Design & Page Turning Quality
Holding true to Bay Photo’s tradition of innovation, we are pleased to introduce easy online ordering
for BayBooks, Pacific Albums, and Sunrise Albums! This new workflow features intuitive and powerful
design tools that allow you to build your visual narrative with even more ease and efficiency. Drag-
and-drop your images into our pre-designed templates with the creative freedom to make quick
adjustments, or create your own unique designs easily. Start creating your project online today!
The path to gorgeous Albums is smoother than ever!
Learn more at bayphoto.com/albums
25%OFF
Your First Order
Full Wrap Photo Covers
Metal, Acrylic, or Wood Photo Covers
Seamless or Micro Gutter Spreads
50%OFF
Studio Samples
NEW! Design & Order Online
50 Mix-and-Match Cover Materials
5 Premium Page Surfaces
So many customization options!

For a short time, this breakthrough course costs just $250 – a $149 savings!
It practically pays for itself, as you level up your business using 17hats!
Learn Build ImplementStep-by-step video tutorials
guide each lesson.You’ll build your
key systems and experiences.Actionable advice to
get your business moving.
End the busywork, and get busy improving
your business.
Your step-by-step journey to business transformation• Your Dream – and how we can make it your reality
• Your Ideal Client
• Your Client Journey
• Your Marketing Funnel
• What You’re Selling – both the tangible and the intangible
• Your Average Sale and how to make even more per client
• Onboarding– Delivering an experience without having to do the work
Start immediately and learn at your own pace through online workbooks and videos.
Amanda Rae, 17hats COO and your TBM guide
from 17hats University
Learn more and enroll at
17hatsUniversity.com
Already rocking your business with 17hats? Perfect. The Business Makeover will still help you reach greater heights.
Use code SHUTTER at checkout and save $149 on The Business Makeover. Purchase it today for $250.
University
AUGUST 2019 | ISSUE 083
1 2 In Living Color: Getting Tones Right for Timeless Images with Phillip Blume
Blogging: You’re Doing it Wrong with Jeff & Lori Poole
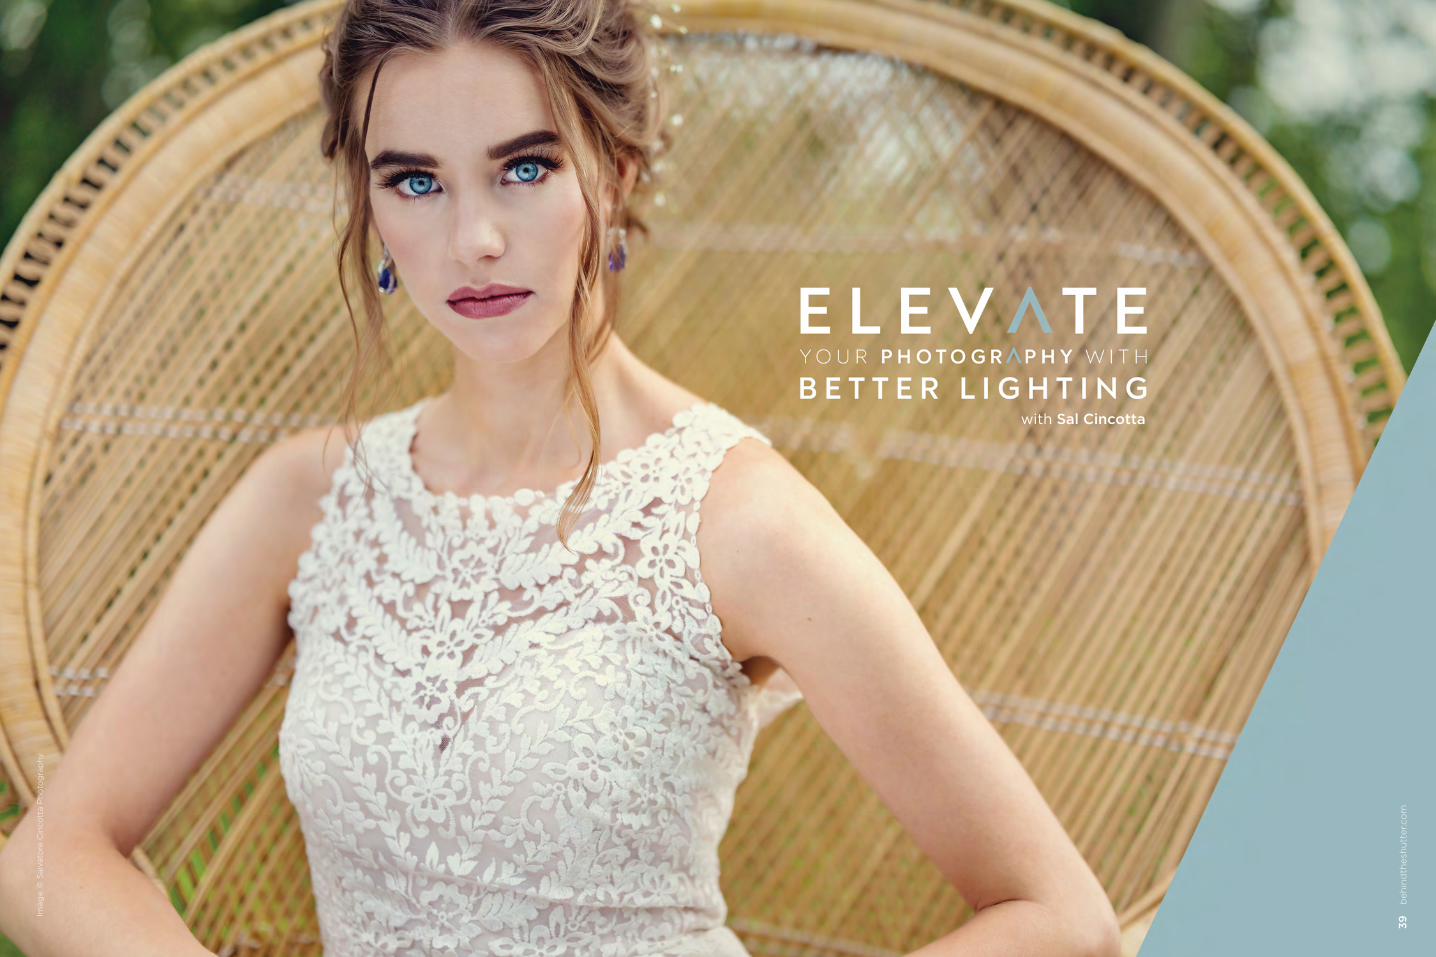
Elevate Your Photography With Better Lighting with Sal Cincotta
Product Spotlight with Profoto
Step up Your Lightroom Game - Part 3 Cull & Sort Your Files with Dustin Lucas
Three Different Light Setups That Work Anywhere with Michael Anthony
Turning Bad Light Into Great Light with Michael Corsentino
Product Spotlight with Westcott
Storytelling with Light with Jessica Robertson
Lighting for Conceptual Photography – 7 Tips to Shake Things Up with Jess Hess
5 Tips For Mastering Portrait Lighting with Miguel Quiles
Laws of Light: 5 Tips for Shooting in Direct with Jay P. Morgan
How to Embrace the Magic of Golden Hour with Ashley Behrle
38
50
52
66
80
92
94
104
1 1 8
130
140
12 66
104
80
140
94
118
24
Environmental Portraits with Dan Brouillette150
Inspirations from our readers160
Product Spotlight with Bay Photo192
6 Ways to Make Your Bride Look Like a Total Knockout with Vanessa Joy194

FOR SPECIAL OFFERS & BEHIND THE SCENES ACTION
FACEBOOK.COM/BTSHUTTER
PINTEREST.COM/BTSHUTTER
TWITTER.COM/SHUTTERMAG
BEHINDTHESHUTTER.COM
INSTAGRAM.COM/BTSHUTTER
TO WATCH EDUCATIONAL VIDEOS THROUGHOUT THE MAGAZINE
BEHINDTHESHUTTER.COM
VISIT US ON OUR WEBSITE
P U B L I S H E RS a l C i n c o t t a
E D I T O R - I N - C H I E FA l i s s a Z i m m e r m a n
L E A D D E S I G N E RA l i c i a S i m p s o n
D E S I G N E RE l l i e P l o t k i n
C O P Y E D I T O RD y l a n G a r i t y
C O N T R I B U T I N G W R I T E R S Va n e s s a J o yM i c h a e l A n t h o n yS a l C i n c o t t aA s h l e y B e h r l eJ e f f & L o r i P o o l e M i q u e l Q u i l e sM i c h a e l C o r s e n t i n o J e s s H e s sJ a y P. M o r g a nD u s t i n L u c a sP h i l l i p B l u m eJ e s s i c a R o b e r t s o nD a n B r o u i l l e t t e
M I S S I O N S T A T E M E N T
SHUTTER MAGAZINE | BEHIND THE SHUTTER 226 WEST STATE STREET - O’FALLON, ILLINOIS - 62269
FOR MORE INFORMATION, VISIT BEHINDTHESHUTTER.COM
Lighting is a lifetime of learning.
Commit to being a student of light and your
images will change more than you could
ever imagine.
- Sal Cincotta
,
,
Shutter Magazine’s focus is on photography education.Our goal is to provide current
insightful and in-depth educational content for today’s professional wedding
and portrait photographer. Shutter uses the latest technologies to deliver
information in a way that is relevant to our audience.
Our experienced contributors help uscreate a sense of community
and have established the magazine as one of the leading photography publications in the world.
Shutter Magazine: By photographers, for photographers.
Ima
ge
© J
aso
n K
eev
en
Ph
oto
os
PH
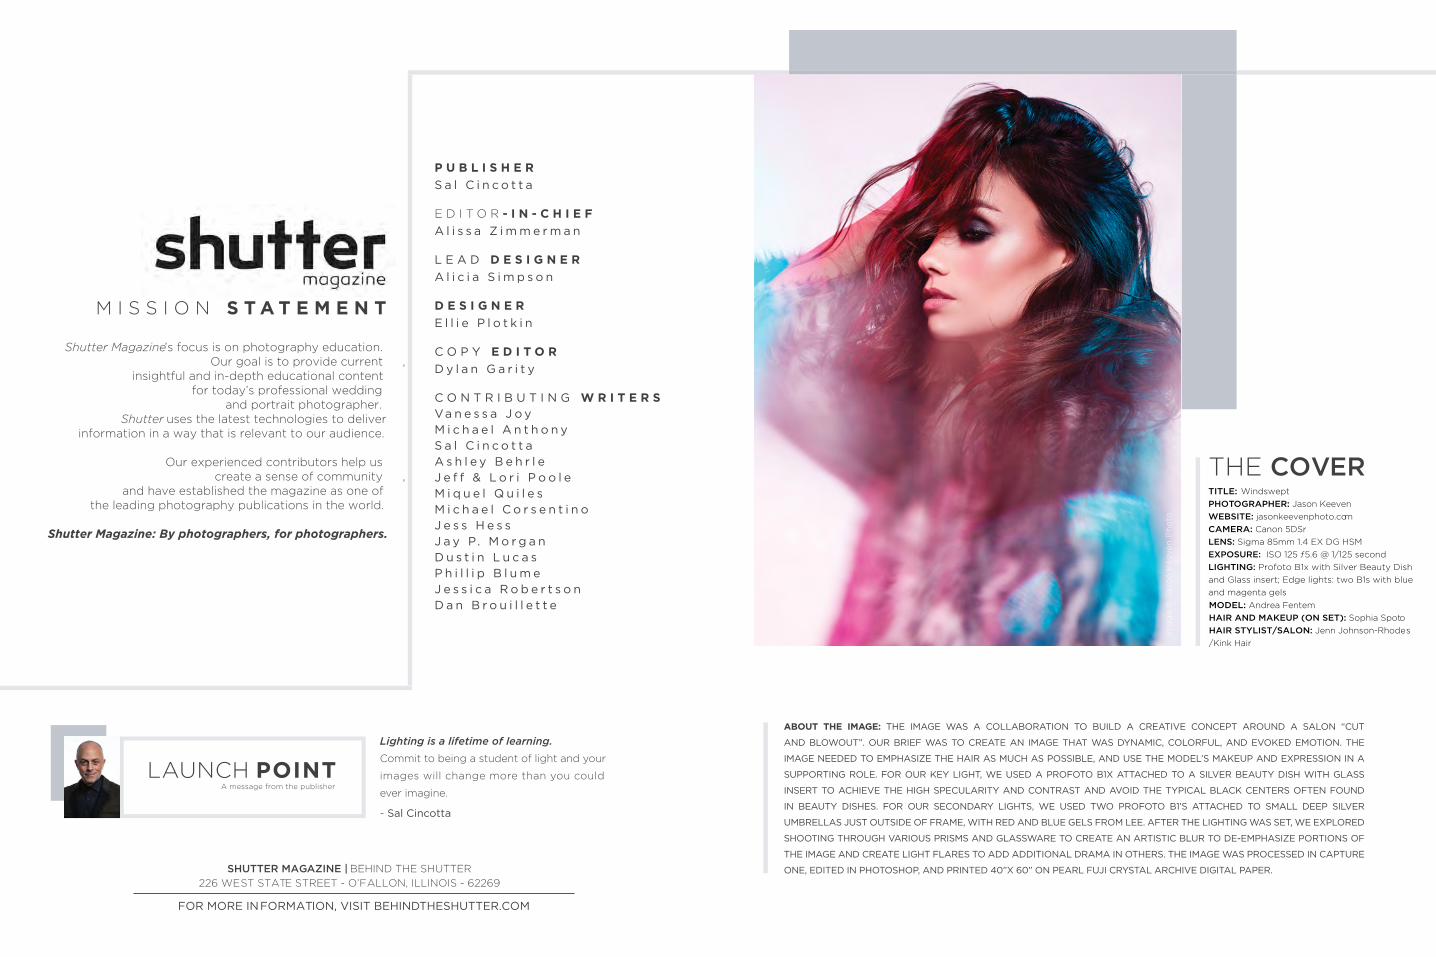
“Windswept
: Sophia Spot Jenn Johnson-Rhode
THE COVEROTOGRAPHER: Jason Keeven
WEBSITE: jasonkeevenphoto.comCAMERA: Canon 5DSrLENS: Sigma 85mm 1.4 EX DG HSMEXPOSURE: ISO 125 ƒ5.6 @ 1/125 secondLIGHTING: Profoto B1x with Silver Beauty Dish and Glass insert; Edge lights: two B1s with blueand magenta gelsMODEL: Andrea FentemHAIR AND MAKEUP (ON SET)HAIR STYLIST/SALON:/Kink Hair
TITLE:
ABOUT THE IMAGE: THE IMAGE WAS A COLLABORATION TO BUILD A CREATIVE CONCEPT AROUND A SALON “CUT
AND BLOWOUT”. OUR BRIEF WAS TO CREATE AN IMAGE THAT WAS DYNAMIC, COLORFUL, AND EVOKED EMOTION. THE
IMAGE NEEDED TO EMPHASIZE THE HAIR AS MUCH AS POSSIBLE, AND USE THE MODEL’S MAKEUP AND EXPRESSION IN A
SUPPORTING ROLE. FOR OUR KEY LIGHT, WE USED A PROFOTO B1X ATTACHED TO A SILVER BEAUTY DISH WITH GLASS
INSERT TO ACHIEVE THE HIGH SPECULARITY AND CONTRAST AND AVOID THE TYPICAL BLACK CENTERS OFTEN FOUND
IN BEAUTY DISHES. FOR OUR SECONDARY LIGHTS, WE USED TWO PROFOTO B1’S ATTACHED TO SMALL DEEP SILVER
UMBRELLAS JUST OUTSIDE OF FRAME, WITH RED AND BLUE GELS FROM LEE. AFTER THE LIGHTING WAS SET, WE EXPLORED
SHOOTING THROUGH VARIOUS PRISMS AND GLASSWARE TO CREATE AN ARTISTIC BLUR TO DE-EMPHASIZE PORTIONS OF
THE IMAGE AND CREATE LIGHT FLARES TO ADD ADDITIONAL DRAMA IN OTHERS. THE IMAGE WAS PROCESSED IN CAPTURE
ONE, EDITED IN PHOTOSHOP, AND PRINTED 40”X 60” ON PEARL FUJI CRYSTAL ARCHIVE DIGITAL PAPER.
13
beh
ind
thes
hu
tter
.co
m
In Living Color: Getting Tones Right for Timeless Images | Phillip Blume
Ima
ge
© B
lum
e P
ho
tog
rap
hy
12
Sh
utt
er M
agaz
ine
. Au
gu
st 2
019

14
Sh
utt
er M
agaz
ine
. Au
gu
st 2
019
15
beh
ind
thes
hu
tter
.co
m
In Living Color: Getting Tones Right for Timeless Images | Phillip Blume
Ima
ge
© B
lum
e P
ho
tog
rap
hy
Ima
ge
s ©
Blu
me
Ph
oto
gra
ph
y
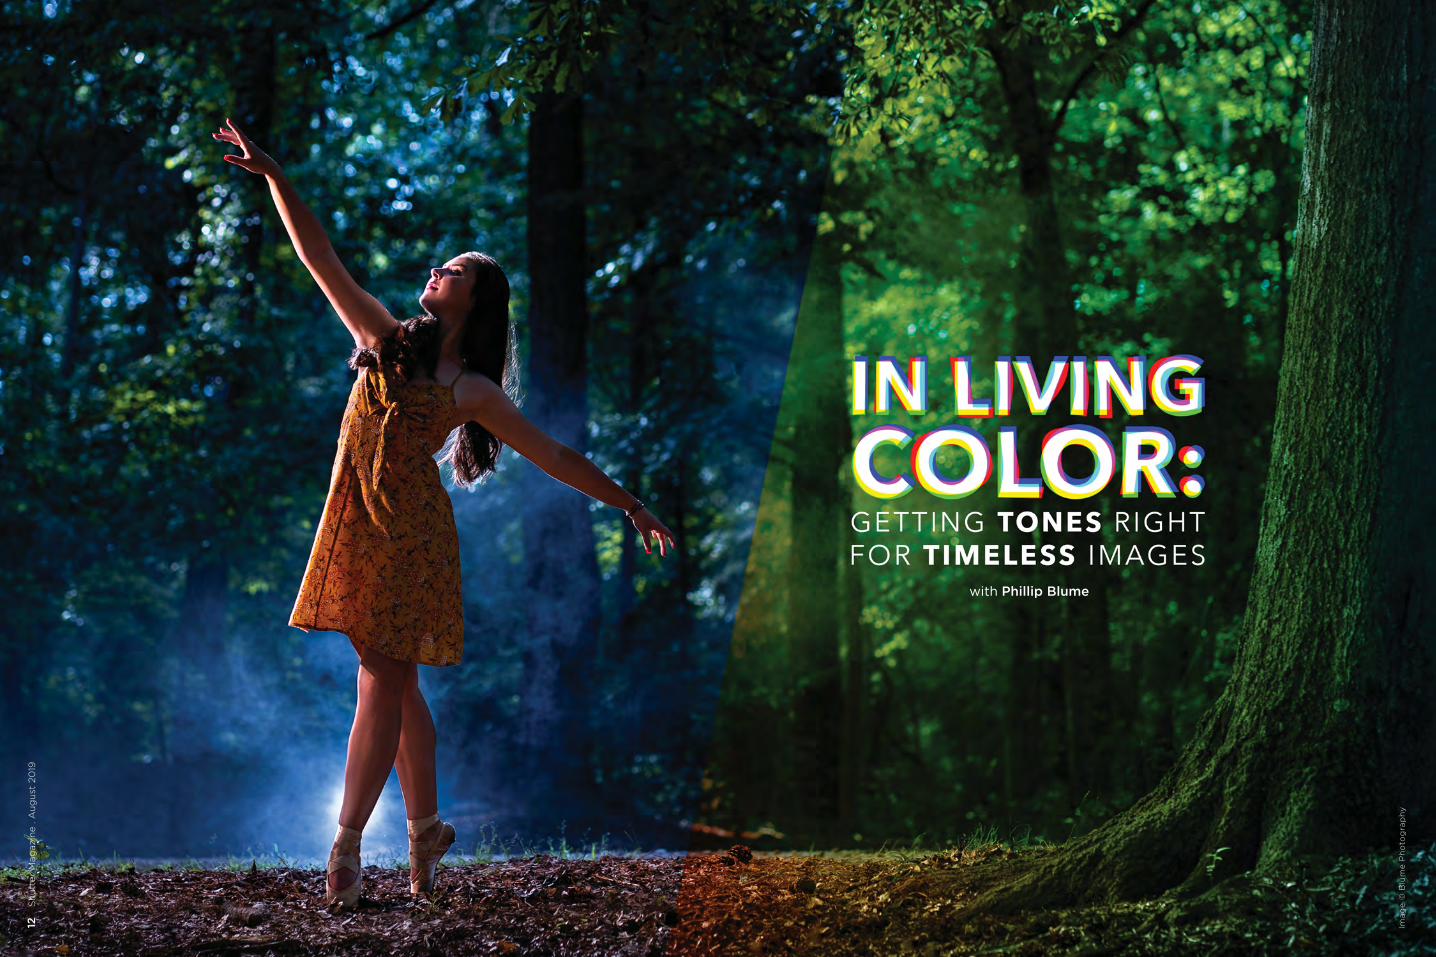
In my career as a photographer and educator, I’ve noticed one unique personality trait shared among the most talented artists: They obsess over details, yet somehow manage to obsess without becoming “perfectionists.”
What’s wrong with being perfect? Well, nothing, except the fact that “perfect” doesn’t exist within the subjective world of art. So perfectionism actually becomes a stone-cold killer to your creativity.
I want you to keep that in mind now, as we approach a topic many consider challenging—lighting for color. Like many
quality, direction) and avoid color. That’s because you really can make quantum leaps in your technique by simply learning to “shape” light, and color kinda falls into a separate category.
But if you want your work to rise to the top, it’s time you started obsessing over color. You can use it to set a mood,
16
Sh
utt
er M
agaz
ine
. Au
gu
st 2
019
17
beh
ind
thes
hu
tter
.co
m
In Living Color: Getting Tones Right for Timeless Images | Phillip Blume
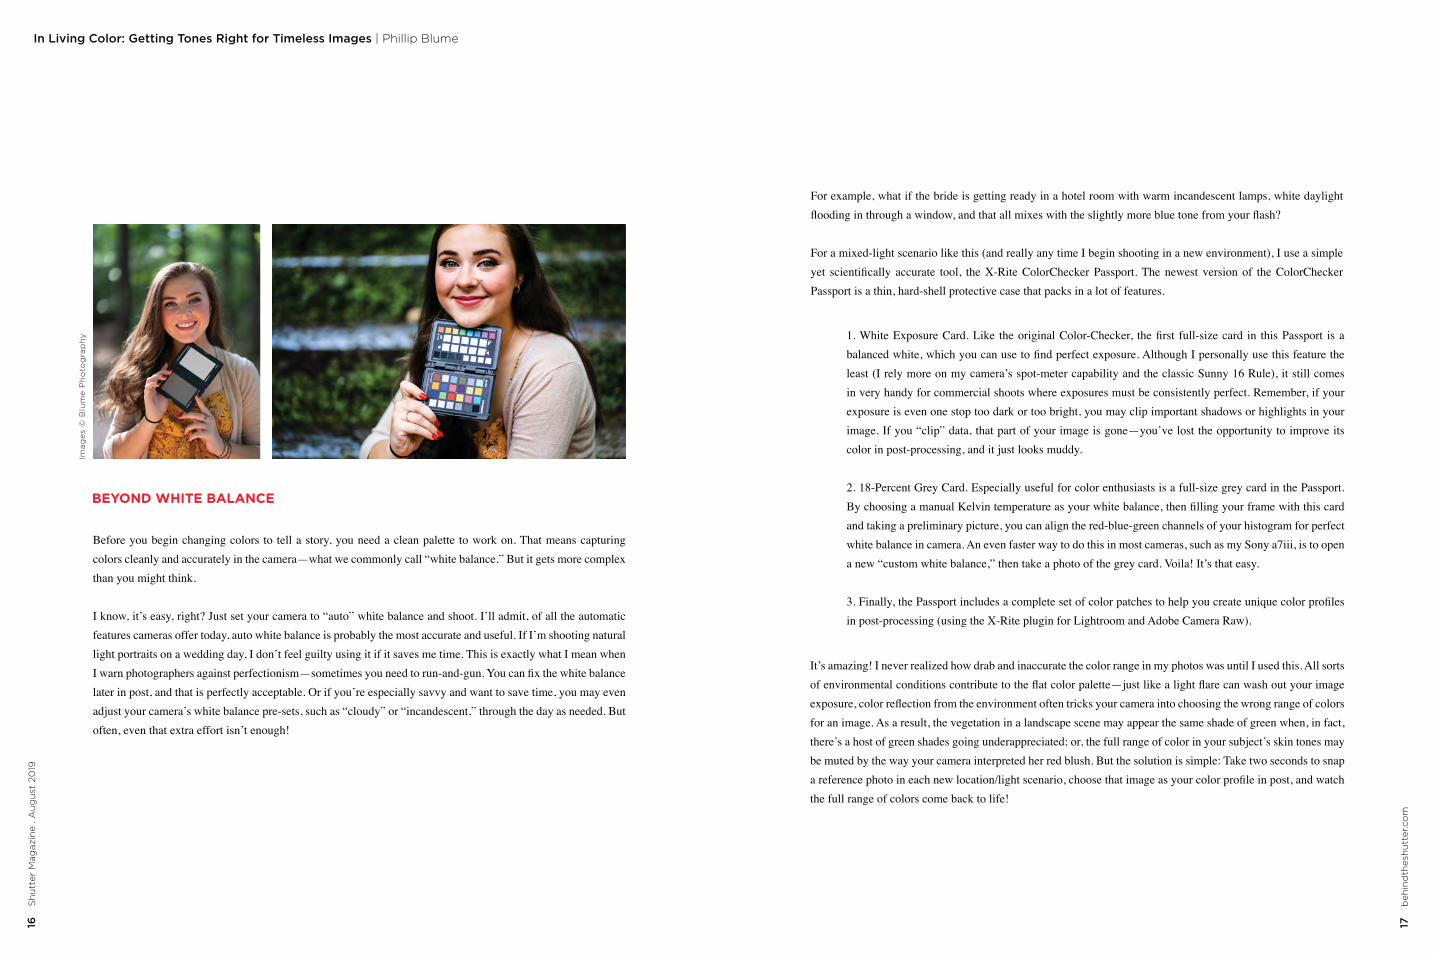
BEYOND WHITE BALANCE
Before you begin changing colors to tell a story, you need a clean palette to work on. That means capturing colors cleanly and accurately in the camera—what we commonly call “white balance.” But it gets more complex than you might think.
I know, it’s easy, right? Just set your camera to “auto” white balance and shoot. I’ll admit, of all the automatic features cameras offer today, auto white balance is probably the most accurate and useful. If I’m shooting natural light portraits on a wedding day, I don’t feel guilty using it if it saves me time. This is exactly what I mean when
later in post, and that is perfectly acceptable. Or if you’re especially savvy and want to save time, you may even adjust your camera’s white balance pre-sets, such as “cloudy” or “incandescent,” through the day as needed. But
For example, what if the bride is getting ready in a hotel room with warm incandescent lamps, white daylight
exposure is even one stop too dark or too bright, you may clip important shadows or highlights in your image. If you “clip” data, that part of your image is gone—you’ve lost the opportunity to improve its color in post-processing, and it just looks muddy.
and taking a preliminary picture, you can align the red-blue-green channels of your histogram for perfect
there’s a host of green shades going underappreciated; or, the full range of color in your subject’s skin tones may be muted by the way your camera interpreted her red blush. But the solution is simple: Take two seconds to snap
Ima
ge
s ©
Blu
me
Ph
oto
gra
ph
y
18
Sh
utt
er M
agaz
ine
. Au
gu
st 2
019
19
beh
ind
thes
hu
tter
.co
m
In Living Color: Getting Tones Right for Timeless Images | Phillip Blume
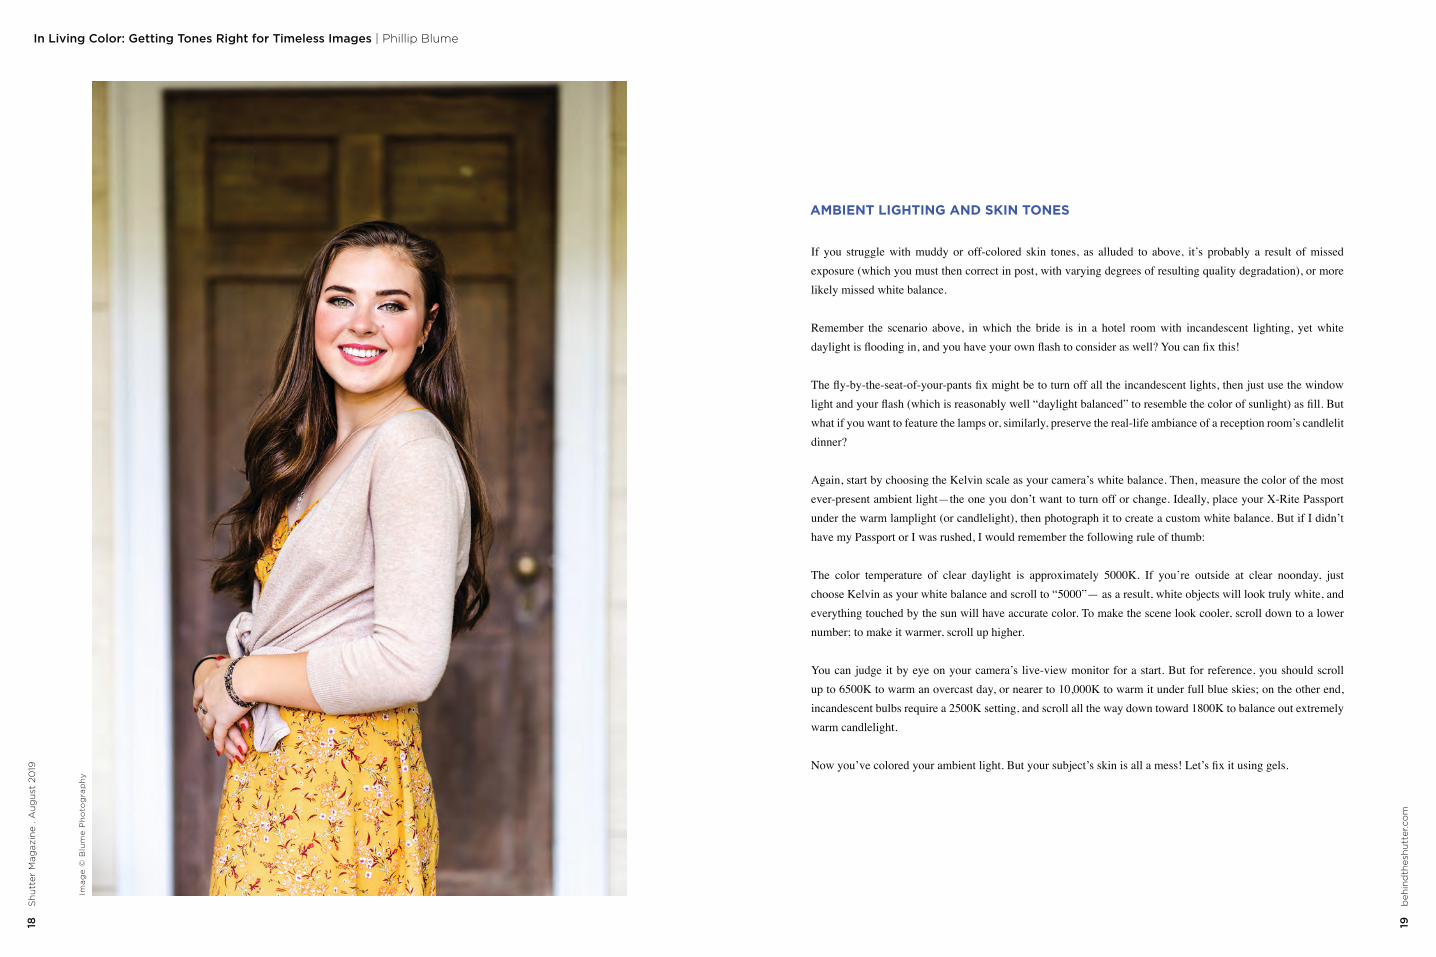
AMBIENT LIGHTING AND SKIN TONES
If you struggle with muddy or off-colored skin tones, as alluded to above, it’s probably a result of missed
likely missed white balance.
what if you want to feature the lamps or, similarly, preserve the real-life ambiance of a reception room’s candlelit dinner?
The color temperature of clear daylight is approximately 5000K. If you’re outside at clear noonday, just choose Kelvin as your white balance and scroll to “5000”— as a result, white objects will look truly white, and everything touched by the sun will have accurate color. To make the scene look cooler, scroll down to a lower number; to make it warmer, scroll up higher.
You can judge it by eye on your camera’s live-view monitor for a start. But for reference, you should scroll
incandescent bulbs require a 2500K setting, and scroll all the way down toward 1800K to balance out extremely warm candlelight.
Ima
ge
© B
lum
e P
ho
tog
rap
hy
20
Sh
utt
er M
agaz
ine
. Au
gu
st 2
019
21
beh
ind
thes
hu
tter
.co
m
In Living Color: Getting Tones Right for Timeless Images | Phillip Blume
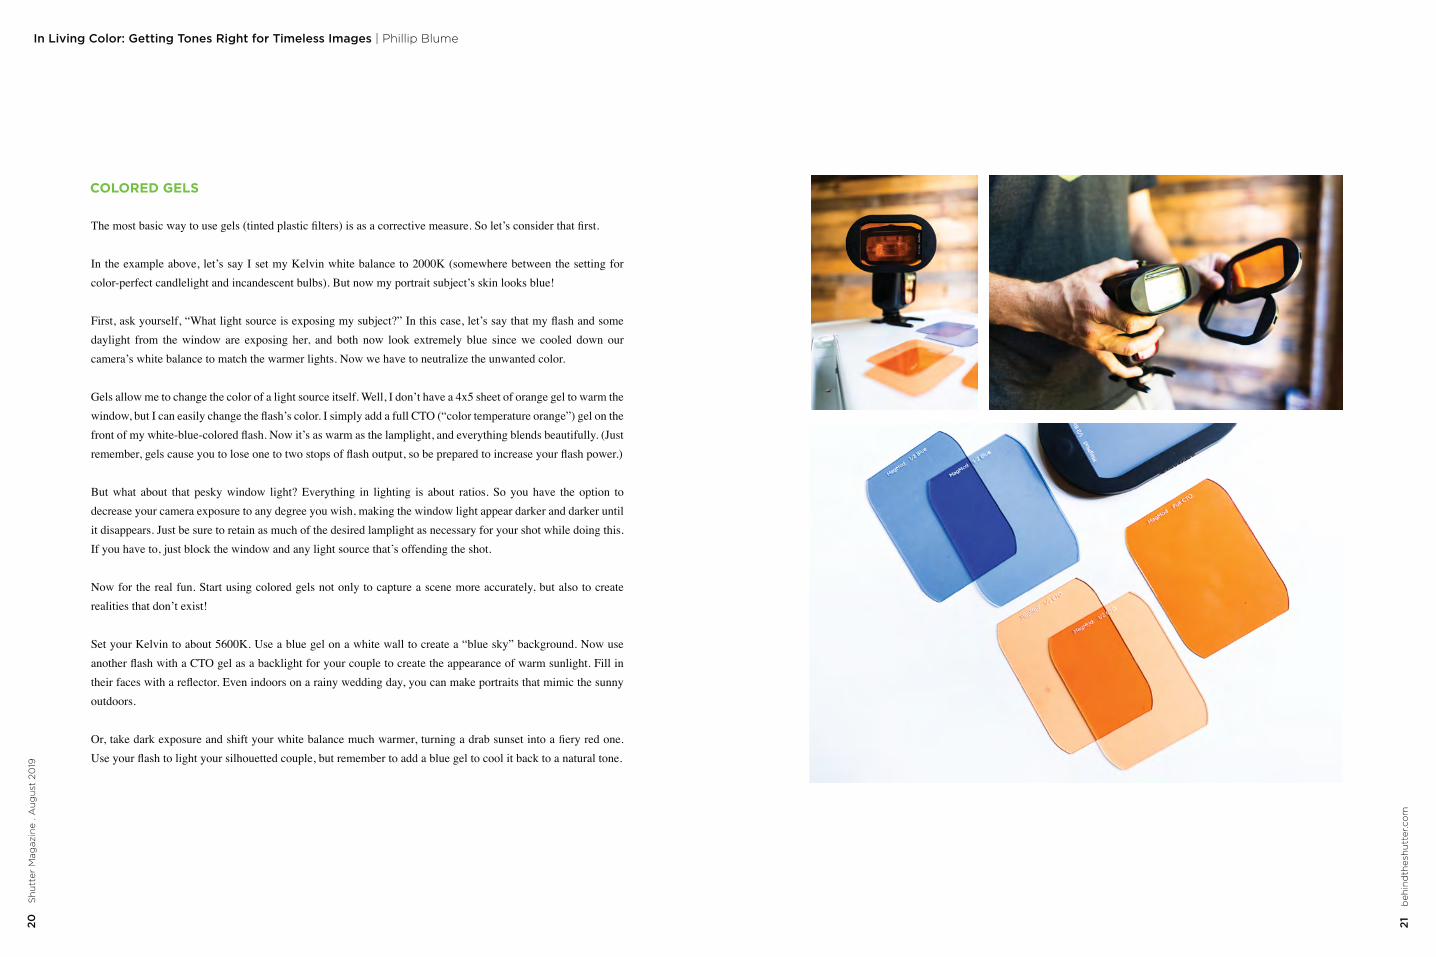
COLORED GELS
daylight from the window are exposing her, and both now look extremely blue since we cooled down our
But what about that pesky window light? Everything in lighting is about ratios. So you have the option to decrease your camera exposure to any degree you wish, making the window light appear darker and darker until it disappears. Just be sure to retain as much of the desired lamplight as necessary for your shot while doing this. If you have to, just block the window and any light source that’s offending the shot.
Now for the real fun. Start using colored gels not only to capture a scene more accurately, but also to create
outdoors.
22
Sh
utt
er M
agaz
ine
. Au
gu
st 2
019
23
beh
ind
thes
hu
tter
.co
m
In Living Color: Getting Tones Right for Timeless Images | Phillip Blume
Phillip and Eileen Blume are award-winning photographers just crazy enough to believe art can change the world. Having transformed their small-town home studio into a top brand, they now work with clients worldwide. The Blumes specialize in wedding and fashion photography, and continue to focus on what matters most to them: charitable projects that include adoption advocacy and documentary filmmaking to benefit children living in extreme poverty. Phillip is a monthly contributor to Shutter Magazine, and together the Blumes speak at numerous top industry events, have appeared on CreativeLIVE and have shared their inspiring vision of more meaningful photography from the TEDx stage. They are owners of three photography brands, including a newborn studio, and are the proud founders of ComeUnity Workshops for photographers who seek balance. They live with their children in rural Georgia.
theblumes.com
LEARN MORE.youtube.com/btsShutterMagazineClick here or check us out at
CONCLUSION
You can use color powerfully to set a mood, alter the time of day, and create consistency across large commercial shoots. With so many options, it can get overwhelming.
“soul.” On the opposite side, I’ve judged hundreds of images that were probably created by artistic individuals who had a story to tell, but the images fell apart because the artist simply lacked the technical knowledge to create what they envisioned.
CRI, LEDS AND FLUORESCENTS
understand it, imagine a white beam of sunlight passing through a prism, then all the colors of the rainbow
how far you slide your white balance tool in Lightroom, there’s no changing it—everyone’s face is pure purple forever.
When people discuss the huge price difference among certain lighting brands, I often hear them say “light is light. There’s no reason to pay more.” While it’s partly true that you pay for the status of some name brands,
photos.
Imag
e ©
Sal
vato
re C
inco
tta
Ph
oto
gra
ph
y
WIN TH IS BACKDROP :
Erika
This gorgeous wildflower-inspired
backdrop is perfect for senior
portraits. The colors are soft and
welcoming for any portrait.
FROM I NTU IT ION BACKGROUNDS
bit.ly/30vgLqiENTER NOW!

Blogging: You’re Doing It Wrong | Jeff & Lori Poole
25
beh
ind
thes
hu
tter
.co
m
24
Sh
utt
er M
agaz
ine
. Au
gu
st 2
019

27
beh
ind
thes
hu
tter
.co
m
IT CREATES NEW CONTENT ON YOUR WEBSITE
YOU ACTUALLY OWN YOUR CONTENT
IT INCREASES WEB TRAFFIC
IT BUILDS TRUST IN YOUR BRAND
DUDE. IT’S FREE MARKETING
Blogging: You’re Doing It Wrong | Jeff & Lori Poole26
S
hu
tter
Mag
azin
e . A
ug
ust
20
19
29
beh
ind
thes
hu
tter
.co
m
28
Sh
utt
er M
agaz
ine
. Au
gu
st 2
019
Blogging: You’re Doing It Wrong | Jeff & Lori Poole
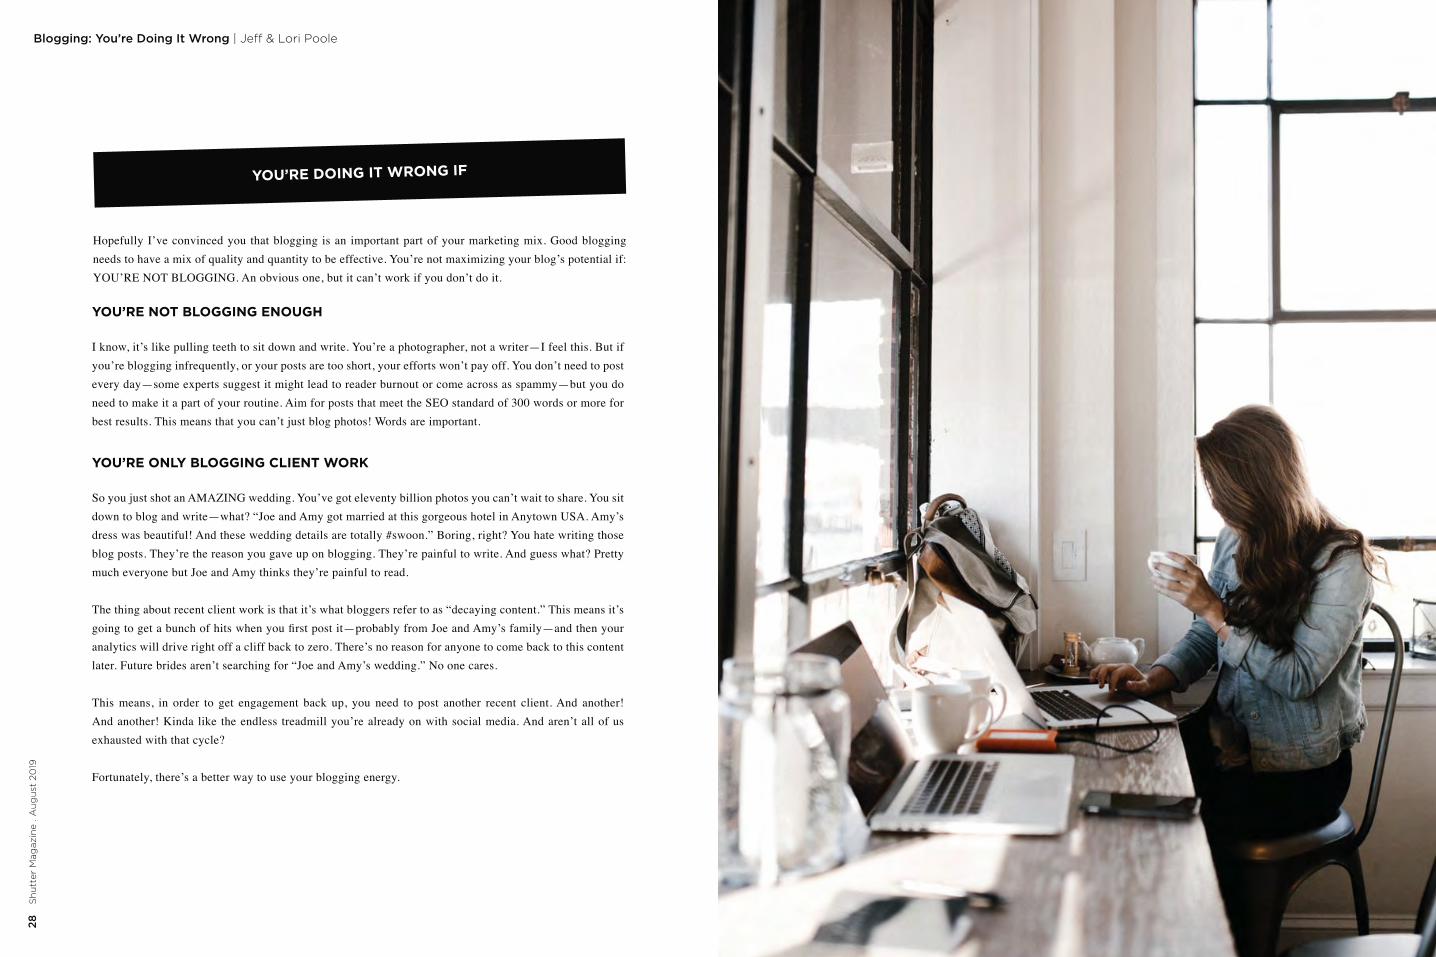
YOU’RE NOT BLOGGING ENOUGH
YOU’RE ONLY BLOGGING CLIENT WORK
31
beh
ind
thes
hu
tter
.co
m
IT’S ABOUT THEM, NOT YOU
FOCUS ON EVERGREEN CONTENT
HELP LEADS KNOW, LIKE, AND TRUST YOU
Blogging: You’re Doing It Wrong | Jeff & Lori Poole30
S
hu
tter
Mag
azin
e . A
ug
ust
20
19
33
beh
ind
thes
hu
tter
.co
m
32
Sh
utt
er M
agaz
ine
. Au
gu
st 2
019
Blogging: You’re Doing It Wrong | Jeff & Lori Poole
PRO TIP #1: BUILD YOUR LINKS
PRO TIP #2: ADD READ TIMES TO INCREASE LINK CLICK THROUGH
PRO TIP #3: KEEP ‘EM CLICKING
34
Sh
utt
er M
agaz
ine
. Au
gu
st 2
019
35
beh
ind
thes
hu
tter
.co
m
Blogging: You’re Doing It Wrong | Jeff & Lori Poole
Just a few years after Jeff and Lori found themselves struggling to survive while living in the basement of their studio, back in 2012, they are the proud owners of a brand-new home on the coast of North Carolina. The owners of Wilmington’s Indigosilver Studio offer boutique boudoir portraiture and wedding photography. They are also the founders of The Shoot Space, their educational resource for photographers. Their Shutter Magazine column, The Business Corner, is dedicated to helping you grow your photography business.
indigosilverstudio.com
LEARN MORE.youtube.com/btsShutterMagazineClick here or check us out at
3535355535553555355535355355553553535555535535355553535555533333
beh
beh
beh
beh
beh
beheh
beh
behehehhhh
behh
beeeeeeeee
beeee
bbbbbbbbd
nd
nd
ind
ind
nnnnnninininininith
eth
eth
eth
eth
ethtt
shu
shu
shu
shu
shu
tte
tte
tte
ttttr.cr.cr.cr
om
om
om
o
The A1X is every inch a Profoto light – just smaller. Its round head delivers light that’s both natural and beautiful. And it’s incredibly easy and to use, with superfast recycling and a long-lasting battery, so you’ll never miss a shot. On the move, shooting on-camera or off, this is light shaping excellence everywhere.
Discover more at profoto.com
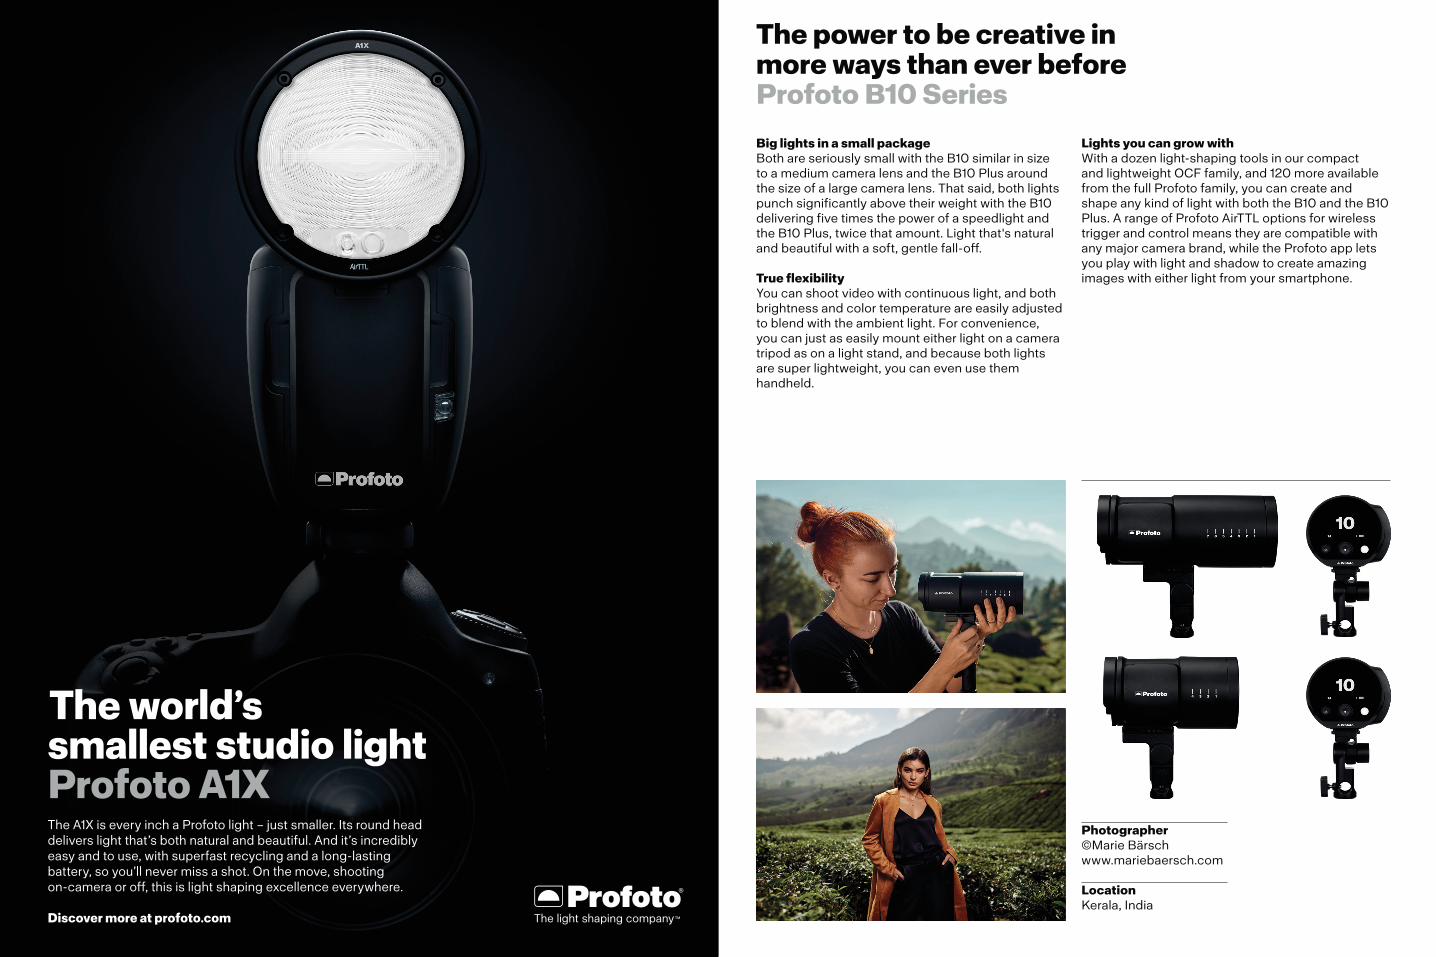
The world’s smallest studio lightProfoto A1X
The power to be creative in more ways than ever beforeProfoto B10 Series
Photographer©Marie Bärschwww.mariebaersch.com
LocationKerala, India
Big lights in a small package Both are seriously small with the B10 similar in size to a medium camera lens and the B10 Plus around the size of a large camera lens. That said, both lights punch significantly above their weight with the B10 delivering five times the power of a speedlight and the B10 Plus, twice that amount. Light that's natural and beautiful with a soft, gentle fall-off.
True flexibilityYou can shoot video with continuous light, and both brightness and color temperature are easily adjusted to blend with the ambient light. For convenience, you can just as easily mount either light on a camera tripod as on a light stand, and because both lights are super lightweight, you can even use them handheld.
Lights you can grow withWith a dozen light-shaping tools in our compact and lightweight OCF family, and 120 more available from the full Profoto family, you can create and shape any kind of light with both the B10 and the B10 Plus. A range of Profoto AirTTL options for wireless trigger and control means they are compatible with any major camera brand, while the Profoto app lets you play with light and shadow to create amazing images with either light from your smartphone.
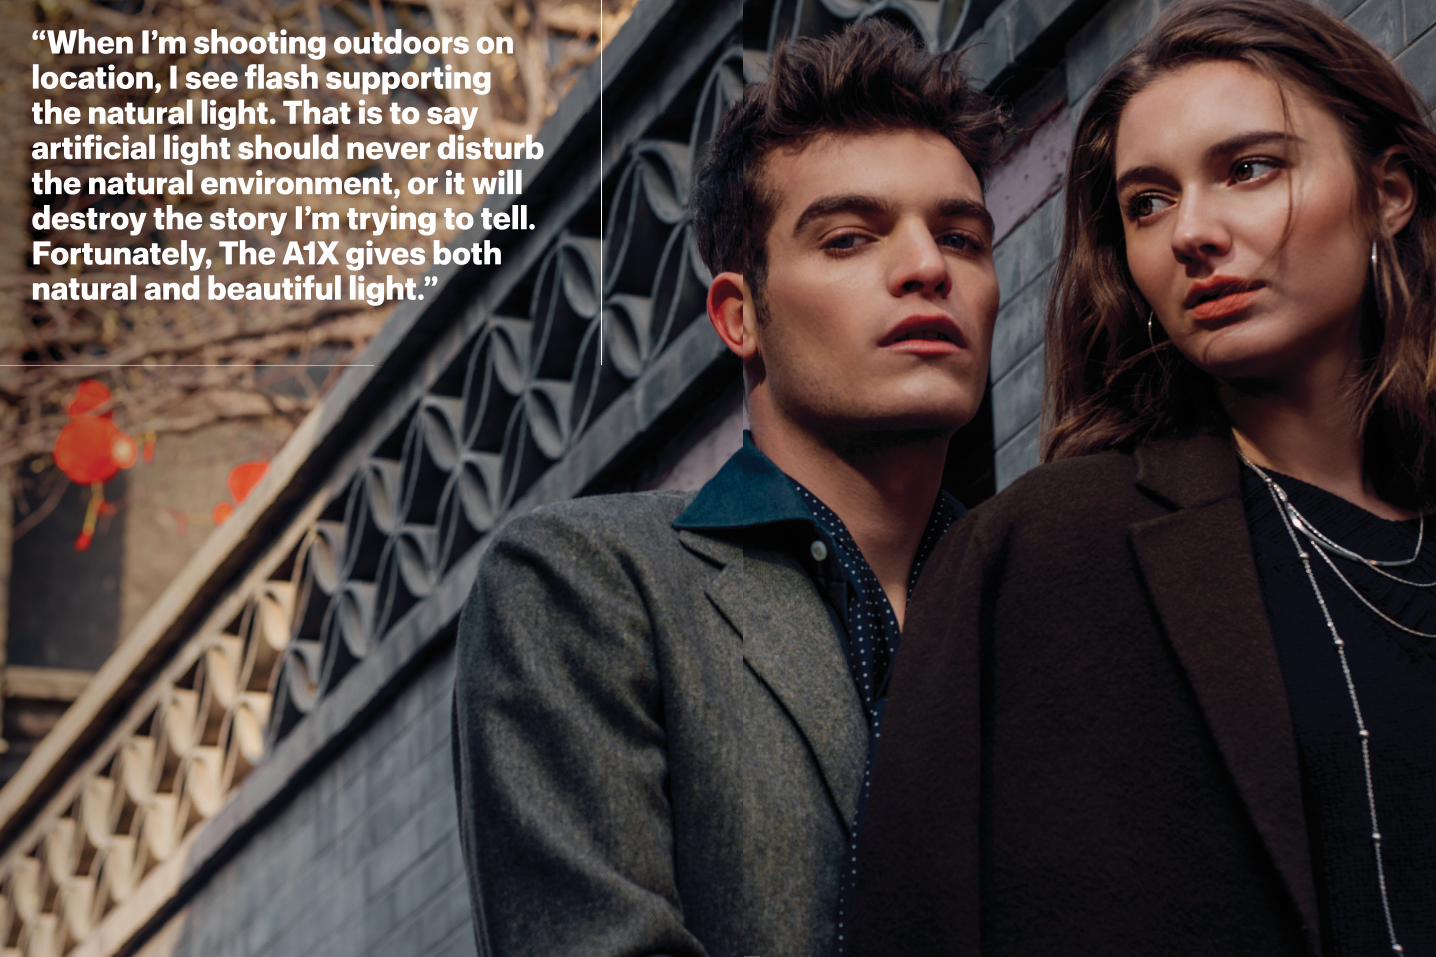
“When I’m shooting outdoors on location, I see flash supporting the natural light. That is to say artificial light should never disturb the natural environment, or it will destroy the story I’m trying to tell. Fortunately, The A1X gives both natural and beautiful light.”
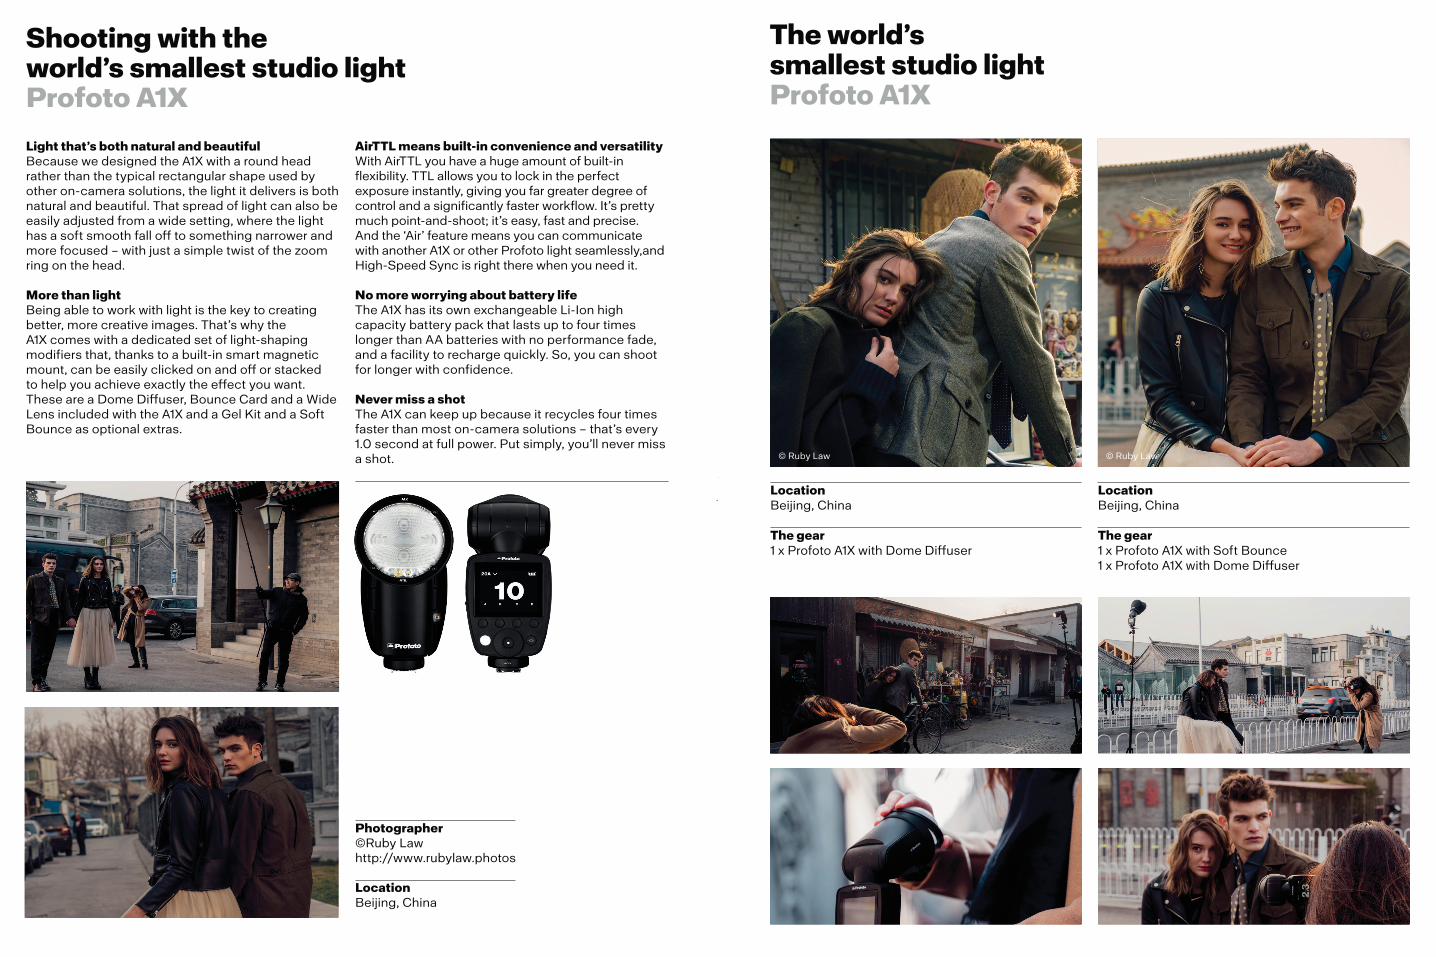
Shooting with the world’s smallest studio lightProfoto A1X
Light that’s both natural and beautiful Because we designed the A1X with a round head rather than the typical rectangular shape used by other on-camera solutions, the light it delivers is both natural and beautiful. That spread of light can also be easily adjusted from a wide setting, where the light has a soft smooth fall off to something narrower and more focused – with just a simple twist of the zoom ring on the head.
More than lightBeing able to work with light is the key to creating better, more creative images. That’s why the A1X comes with a dedicated set of light-shaping modifiers that, thanks to a built-in smart magnetic mount, can be easily clicked on and off or stacked to help you achieve exactly the effect you want. These are a Dome Diffuser, Bounce Card and a Wide Lens included with the A1X and a Gel Kit and a Soft Bounce as optional extras.
AirTTL means built-in convenience and versatility With AirTTL you have a huge amount of built-in flexibility. TTL allows you to lock in the perfect exposure instantly, giving you far greater degree of control and a significantly faster workflow. It’s pretty much point-and-shoot; it’s easy, fast and precise. And the ‘Air’ feature means you can communicate with another A1X or other Profoto light seamlessly,and High-Speed Sync is right there when you need it.
No more worrying about battery lifeThe A1X has its own exchangeable Li-Ion high capacity battery pack that lasts up to four times longer than AA batteries with no performance fade, and a facility to recharge quickly. So, you can shoot for longer with confidence.
Never miss a shotThe A1X can keep up because it recycles four times faster than most on-camera solutions – that’s every 1.0 second at full power. Put simply, you’ll never miss a shot.
Photographer©Ruby Lawhttp://www.rubylaw.photos
LocationBeijing, China
LocationBeijing, China
The gear1 x Profoto A1X with Dome Diffuser
LocationBeijing, China
The gear1 x Profoto A1X with Soft Bounce1 x Profoto A1X with Dome Diffuser
© Ruby Law© Ruby Law
The world’s smallest studio lightProfoto A1X
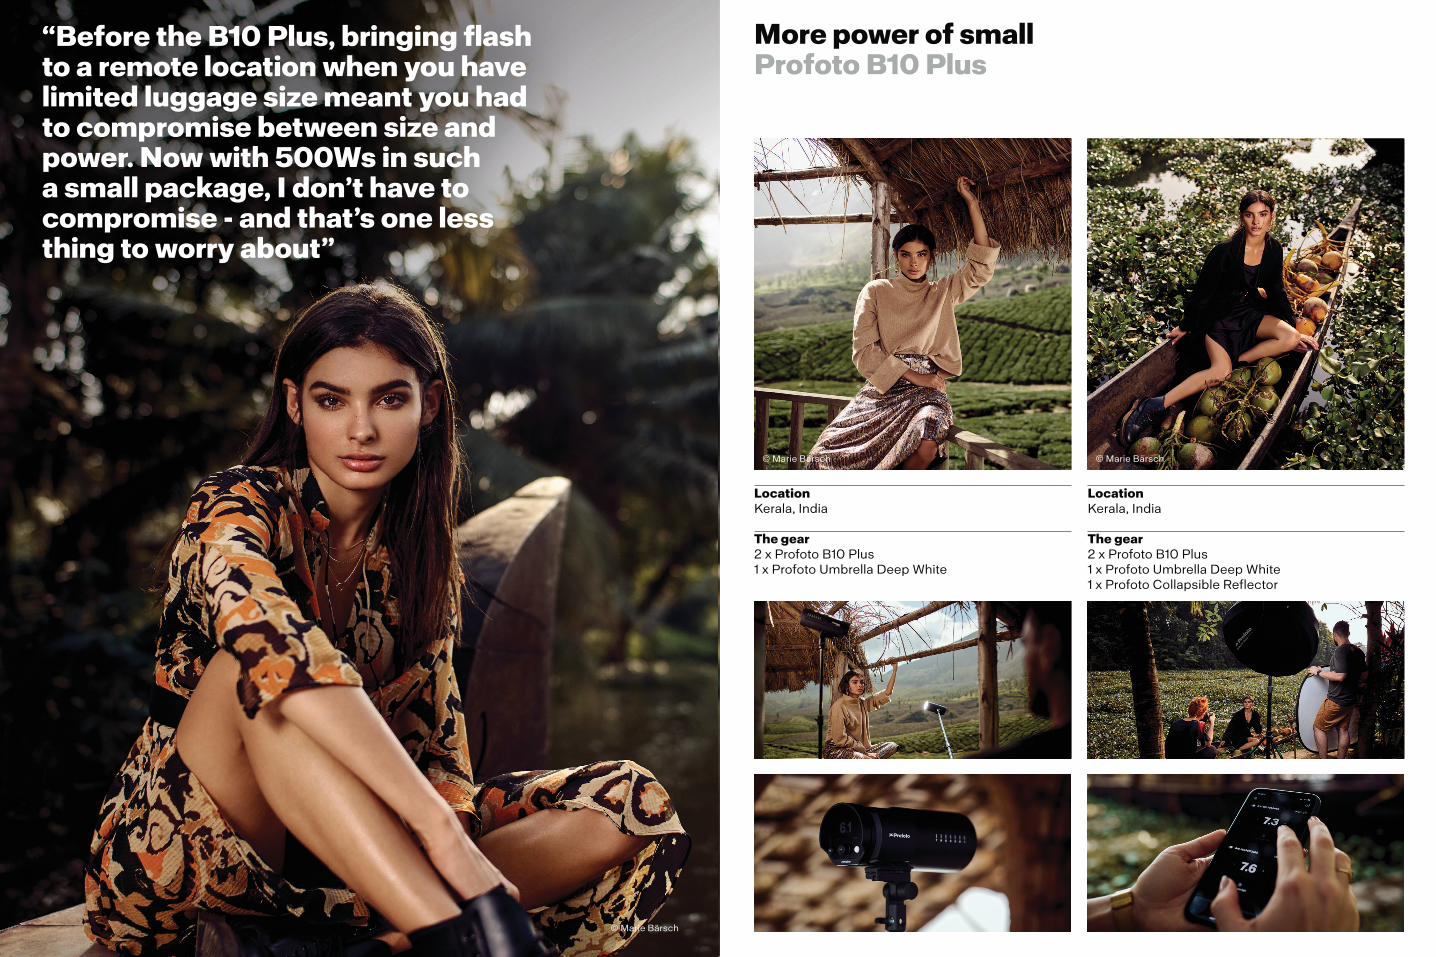
“Before the B10 Plus, bringing flash to a remote location when you have limited luggage size meant you had to compromise between size and power. Now with 500Ws in such a small package, I don’t have to compromise - and that’s one less thing to worry about”
© Marie Bärsch
More power of small Profoto B10 Plus
LocationKerala, India
The gear2 x Profoto B10 Plus 1 x Profoto Umbrella Deep White
LocationKerala, India
The gear2 x Profoto B10 Plus 1 x Profoto Umbrella Deep White 1 x Profoto Collapsible Reflector
© Marie Bärsch© Marie Bärsch

SIGN UP levelupsal.com/sign-up
The actionable items that Sal gave us
put our studio on the path to cross the 1 million dollar mark just a few years later.
-Michael Anthony
WHAT’S ON DECK
PRICING CRITIQUESAUGUST 1
DIRECT MAIL BEST PRACTICESAUGUST 7
Ima
ge
© S
alva
tore
Cin
cott
a P
ho
tog
rap
hy
39
beh
ind
thes
hu
tter
.co
m
with Sal Cincotta

Elevate Your Photography With Better Lighting | Sal Cincotta4
0
Sh
utt
er M
agaz
ine
. Au
gu
st 2
019
41
beh
ind
thes
hu
tter
.co
m
Photography is so much more than "what camera do you own?" If you understand lighting, you are well on your
HARD LIGHT
Ima
ge
s ©
Sal
vato
re C
inco
tta
Ph
oto
gra
phy
Elevate Your Photography With Better Lighting | Sal Cincotta4
2 S
hu
tter
Mag
azin
e . A
ug
ust
20
19
43
beh
ind
thes
hu
tter
.co
m
Ima
ge
© S
alva
tore
Cin
cott
a P
ho
tog
rap
hy
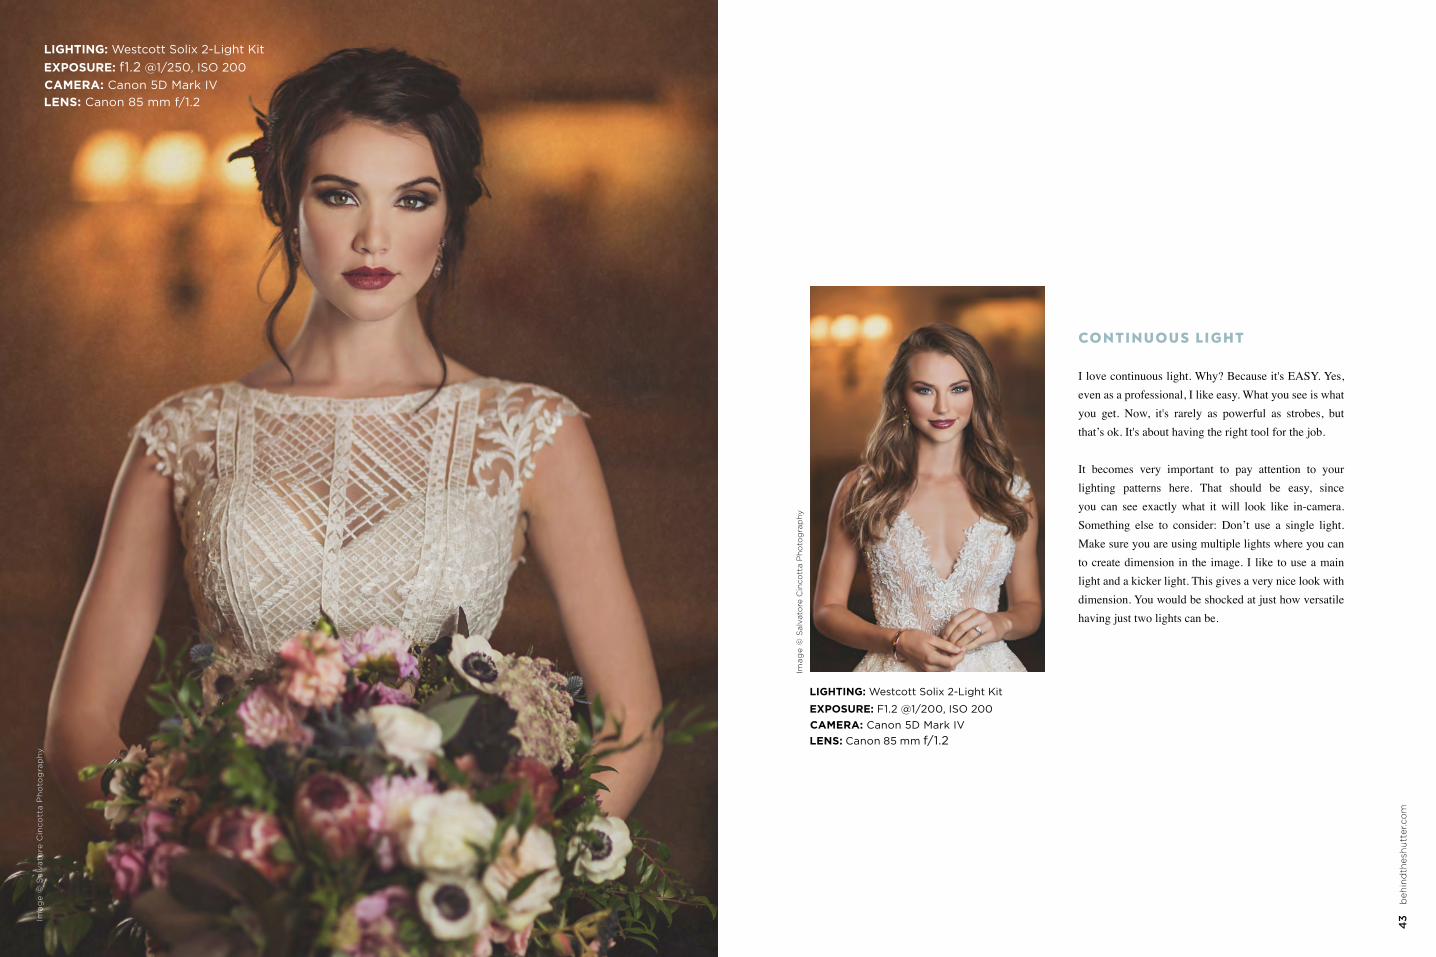
CONTINUOUS LIGHT
Ima
ge
© S
alv
ato
re C
inco
tta
Ph
oto
gra
ph
y
Elevate Your Photography With Better Lighting | Sal Cincotta4
4
Sh
utt
er M
agaz
ine
. Au
gu
st 2
019
45
beh
ind
thes
hu
tter
.co
m
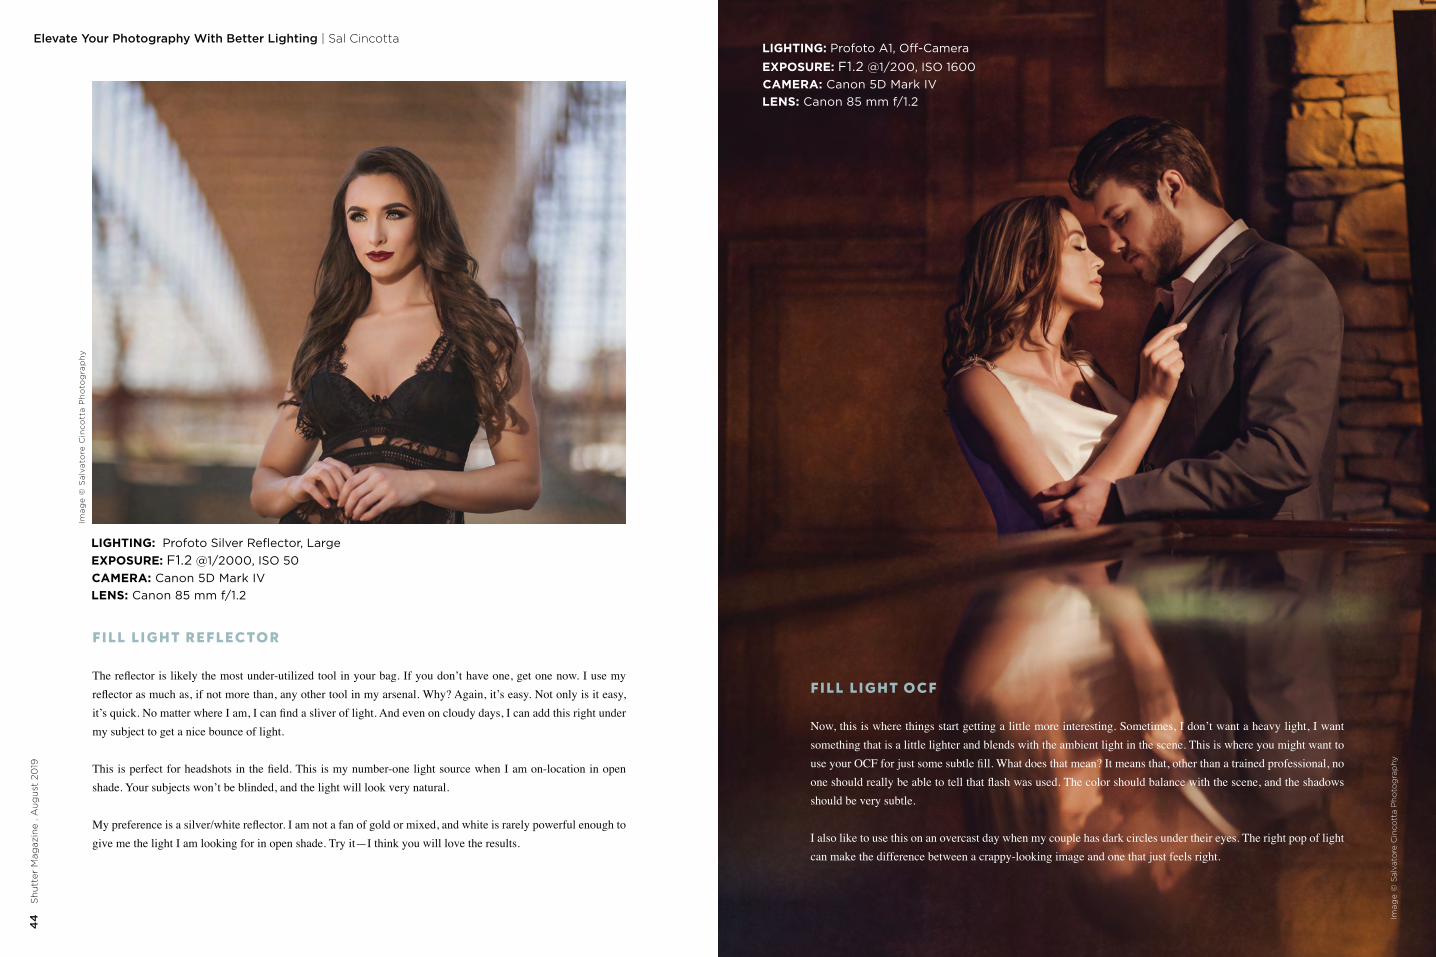
FILL LIGHT REFLECTOR
FILL LIGHT OCF
Ima
ge
© S
alva
tore
Cin
cott
a P
ho
tog
rap
hy
Ima
ge
© S
alv
ato
re C
inco
tta
Ph
oto
gra
ph
y
Elevate Your Photography With Better Lighting | Sal Cincotta4
6
Sh
utt
er M
agaz
ine
. Au
gu
st 2
019
47
beh
ind
thes
hu
tter
.co
m
DR AMATIC LIGHTING
Ima
ge
© S
alv
ato
re C
inco
tta
Ph
oto
gra
ph
y
Ima
ge
s ©
Sa
lva
tore
Cin
cott
a P
ho
tog
rap
hy
Elevate Your Photography With Better Lighting | Sal Cincotta4
8 S
hu
tter
Mag
azin
e . A
ug
ust
20
19
Sal Cincotta is an international award-winning photographer, educator, and author, and the publisher of Shutter Magazine. Sal’s success is directly tied to the education he received in business school. He graduated from Binghamton University, a Top 20 business school, and has worked for Fortune 50 companies like Procter & Gamble and Microsoft. After spending 10 years in corporate America, Sal left to pursue a career in photography and has never looked back.
salcincotta.com
Ima
ge
s ©
Sal
vato
re C
inco
tta
Ph
oto
gra
phy
Shutter Magazine readers save $400 on a full conference pass. Use promo code P19MSM when you register.
Learn more at adobe. com/go/maxshutter
Photographer Annie Leibovitz is coming to MAX! Leibovitz’s photos include some of the most well-known portraits of our time and her work
has appeared in museums and galleries all over the world. Join us to hear her story, and see how it can inspire your own creative life.
Superstar. Keynote speaker.
Adobe MAX—The Creativity ConferenceNovember 4–6, Los Angeles, CA
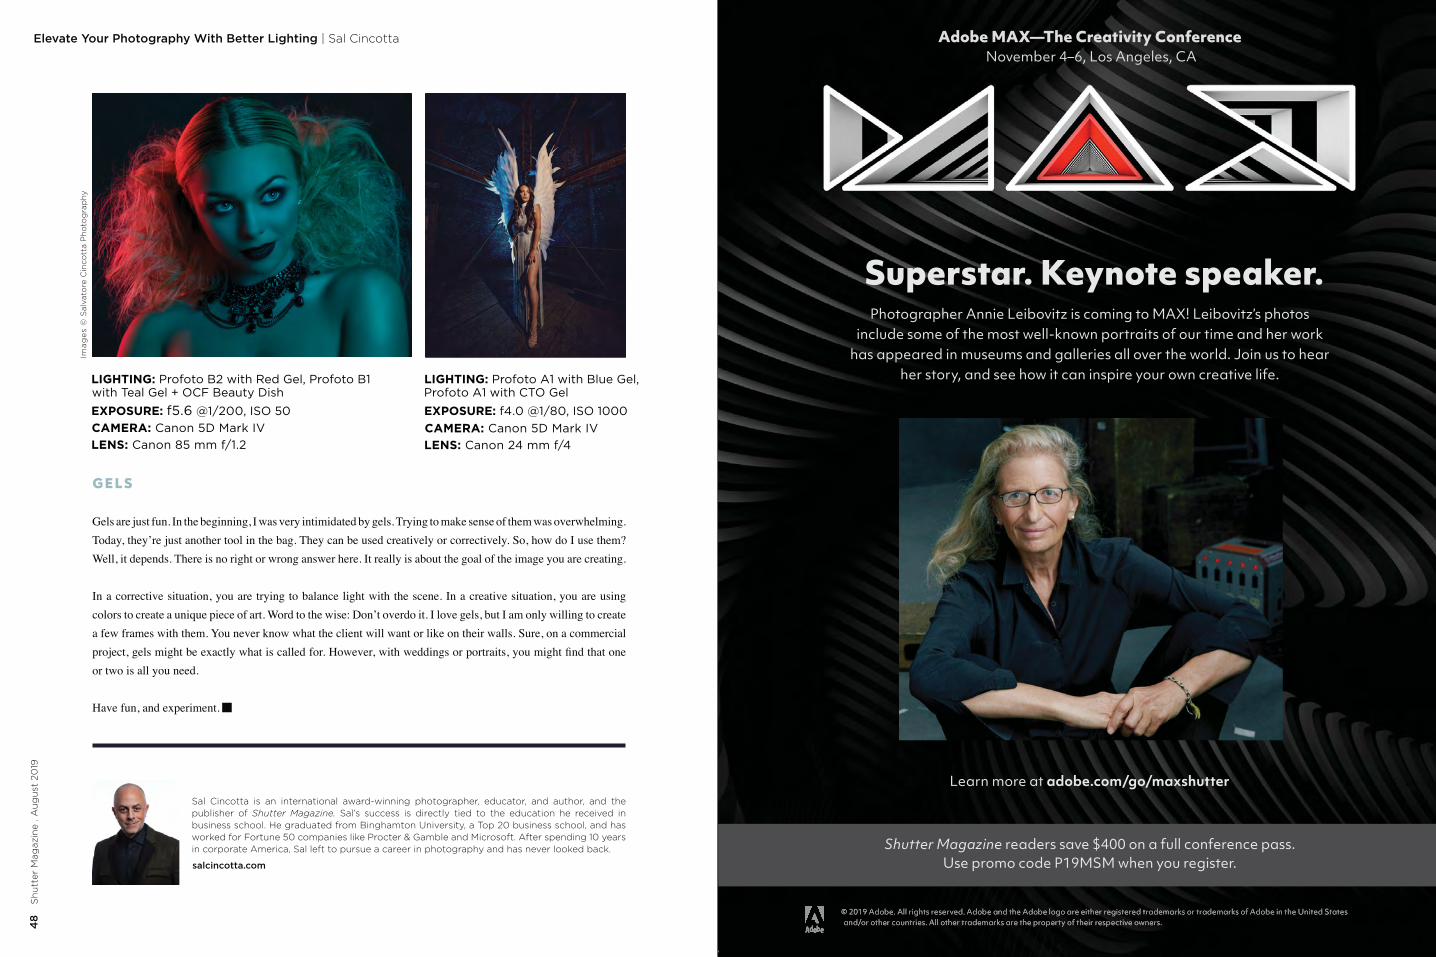
GELS
50
Sh
utt
er M
agaz
ine
. Au
gu
st 2
019
Product Spotlight | Profoto A1X and Connect
LEARN MORE.youtube.com/btsShutterMagazineClick here or check us out at
Why the Profoto A1X and Connect?
51
beh
ind
thes
hu
tter
.co
m
For more information, visit profoto.com/in/a1x
with
productspotlight
Portable power that’s easy to use? The Profoto A1X adds just that to their already incredible lineup.
It’s no secret, I am both a fan and avid user of the Profoto A1—I own six of them. This is one of the most versatile lights I have ever owned.
alone love?
The Profoto A1X allows me to create natural and beautiful light anywhere, anytime.
And for those of you wanting a more simplistic approach to trigger control, the new Profoto Connect is the answer.
Check out the new Profoto A1X. You will not regret it.
or profoto.com/us/connect
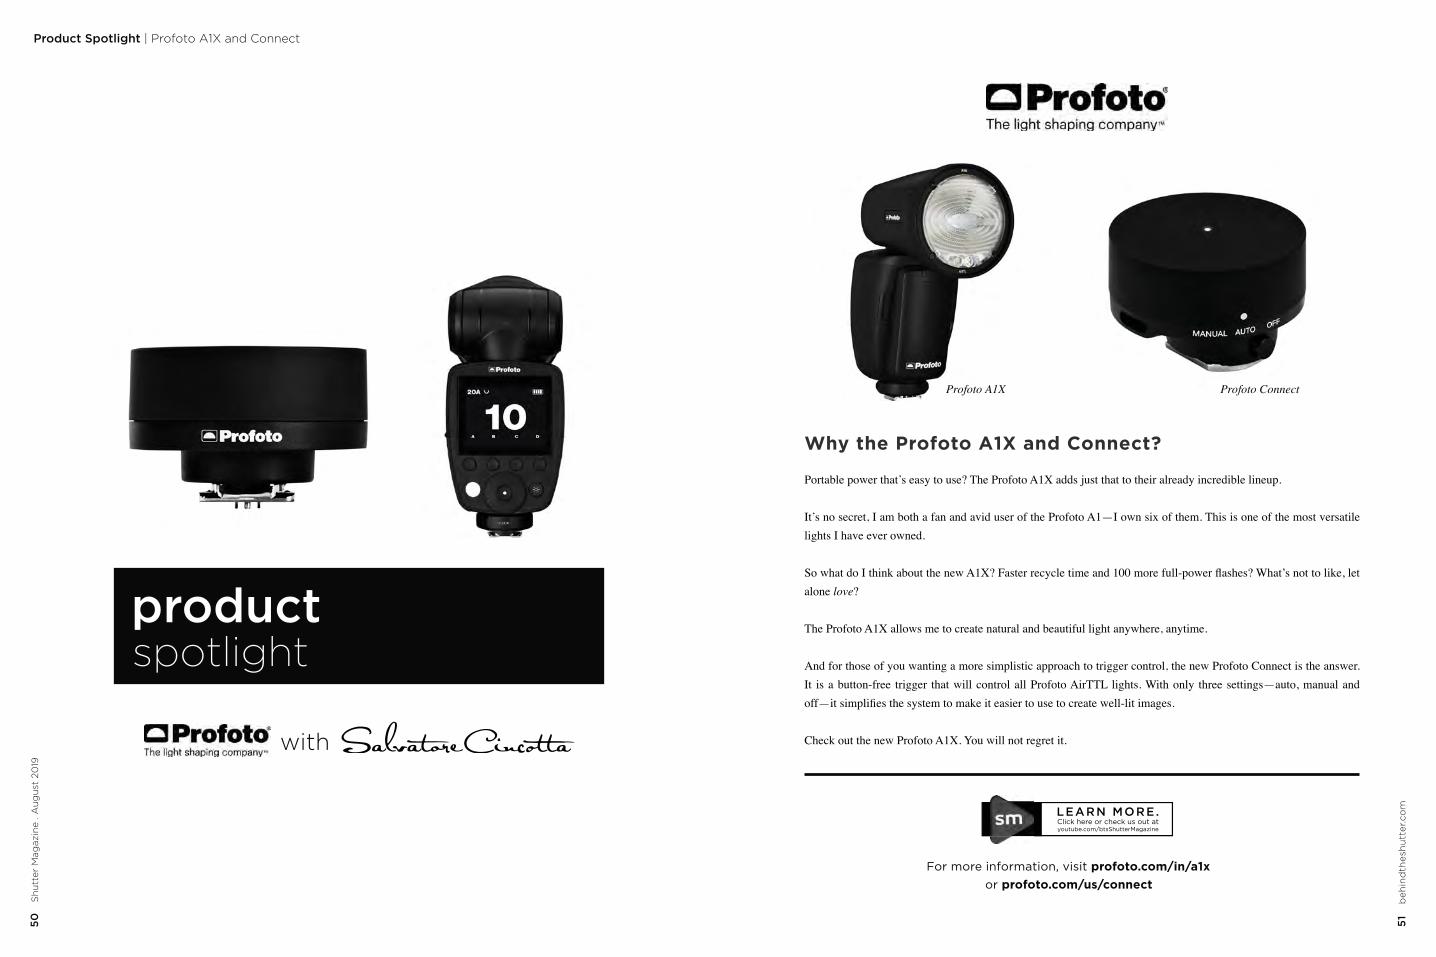
Profoto A1X Profoto Connect

7-Part Series to Step up Your Lightroom Game: Part 3 Cull & Sort Your Files | Dustin Lucas52
S
hu
tter
Mag
azin
e A
ug
ust
20
19
53
beh
ind
thes
hu
tter
.co
m
7-Part Series to Step up Your Lightroom Game: Part 3 Cull & Sort Your Files | Dustin Lucas54
S
hu
tter
Mag
azin
e A
ug
ust
20
19
55
beh
ind
thes
hu
tter
.co
m
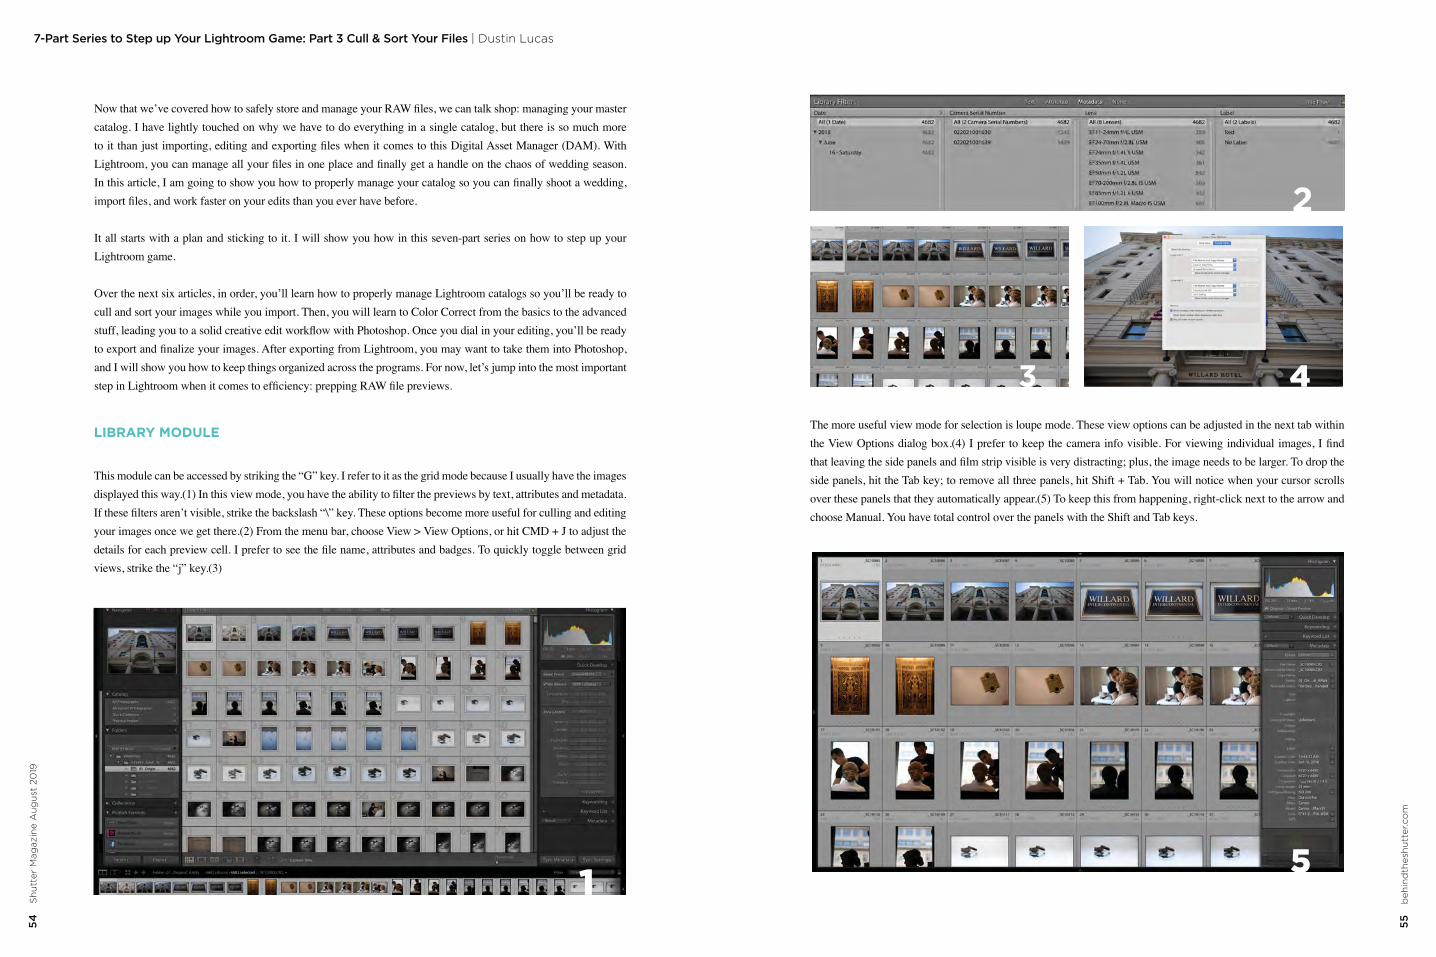
LIBRARY MODULE
56
Sh
utt
er M
agaz
ine
Au
gu
st 2
019
57
beh
ind
thes
hu
tter
.co
m
7-Part Series to Step up Your Lightroom Game: Part 3 Cull & Sort Your Files | Dustin Lucas
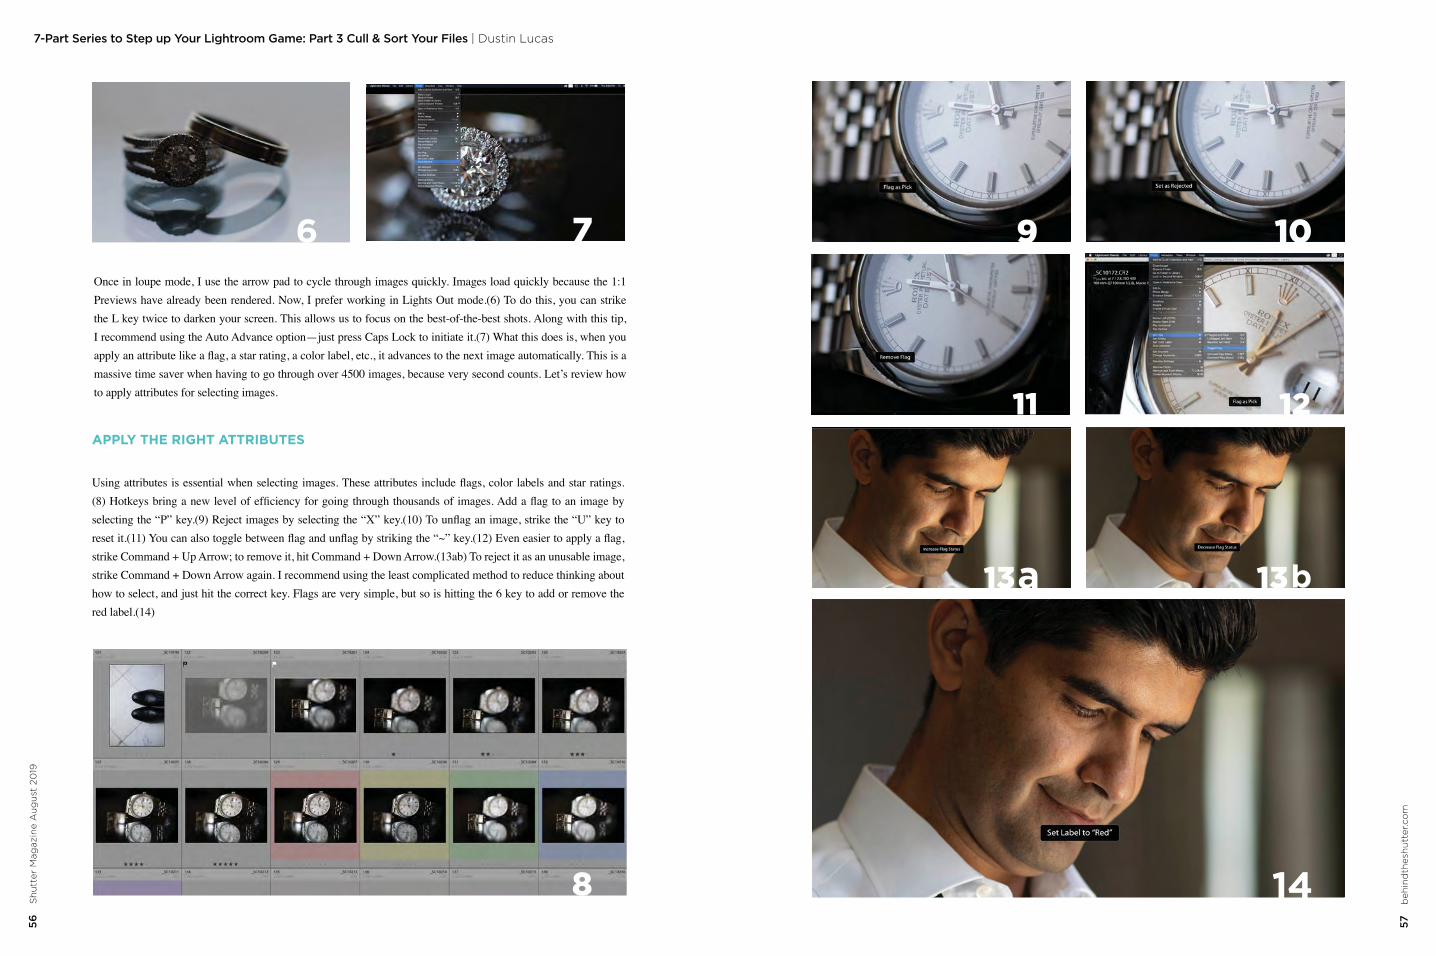
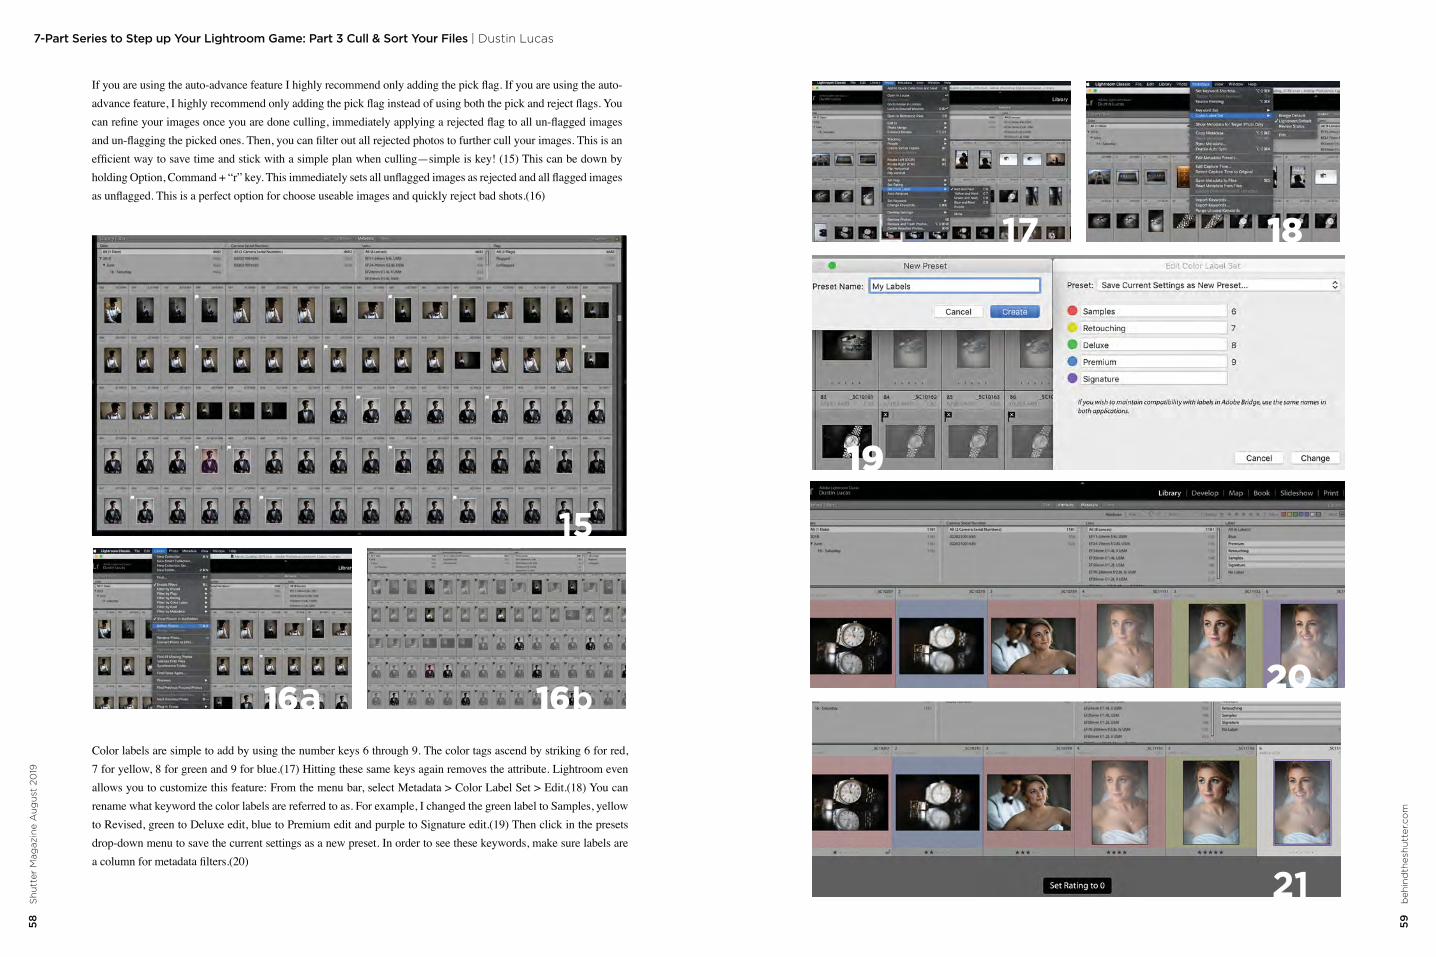
APPLY THE RIGHT ATTRIBUTES
58
Sh
utt
er M
agaz
ine
Au
gu
st 2
019
59
beh
ind
thes
hu
tter
.co
m
7-Part Series to Step up Your Lightroom Game: Part 3 Cull & Sort Your Files | Dustin Lucas
60
S
hu
tter
Mag
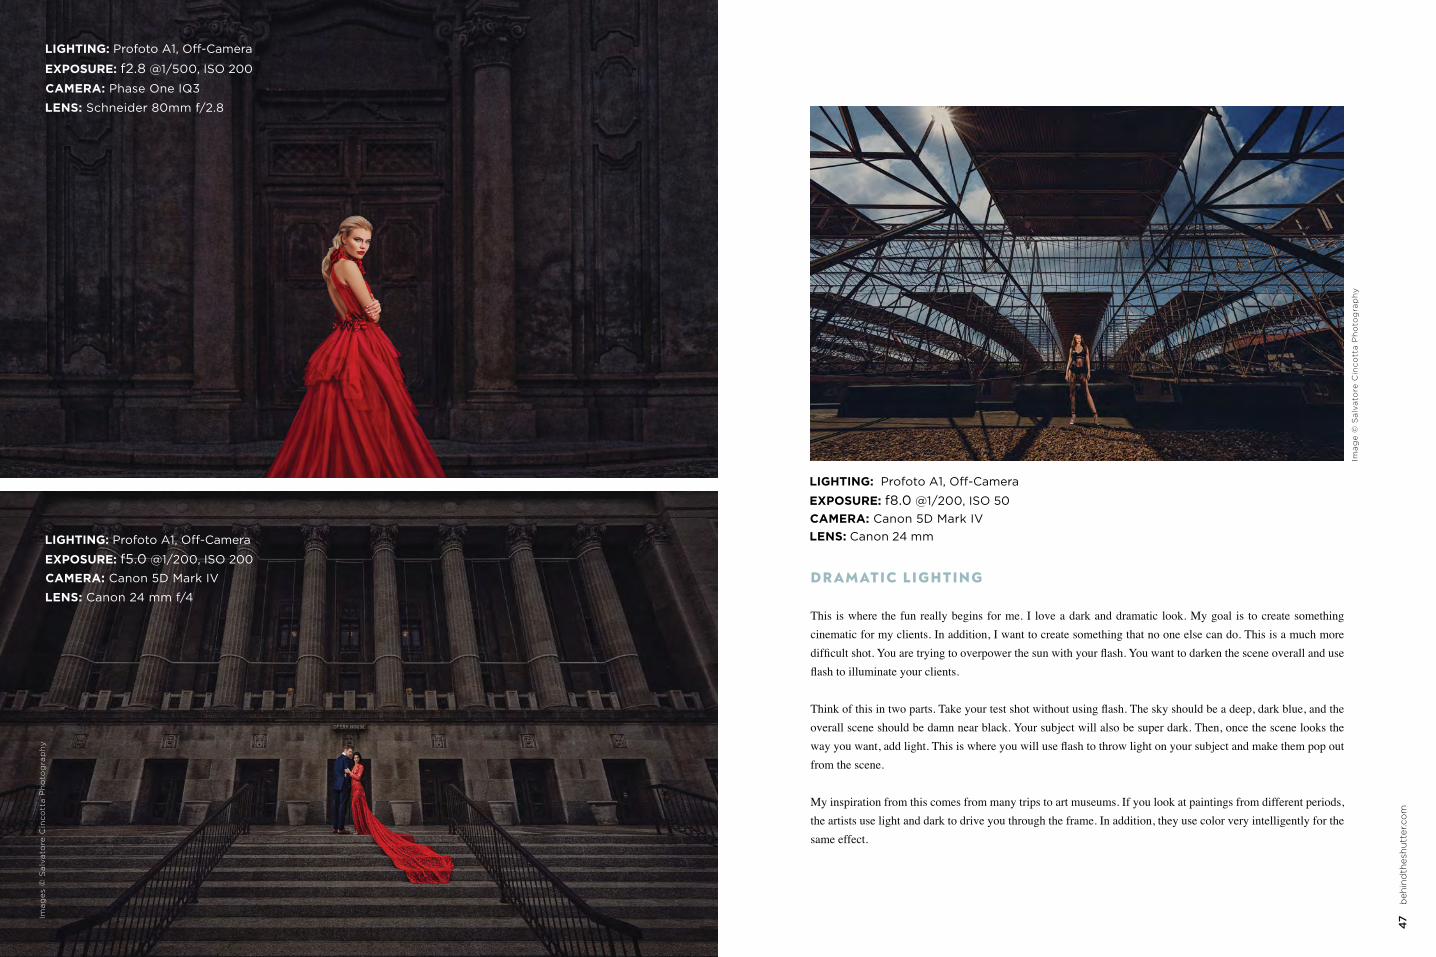
azin
e A
ug
ust
20
19
61
beh
ind
thes
hu
tter
.co
m
7-Part Series to Step up Your Lightroom Game: Part 3 Cull & Sort Your Files | Dustin Lucas
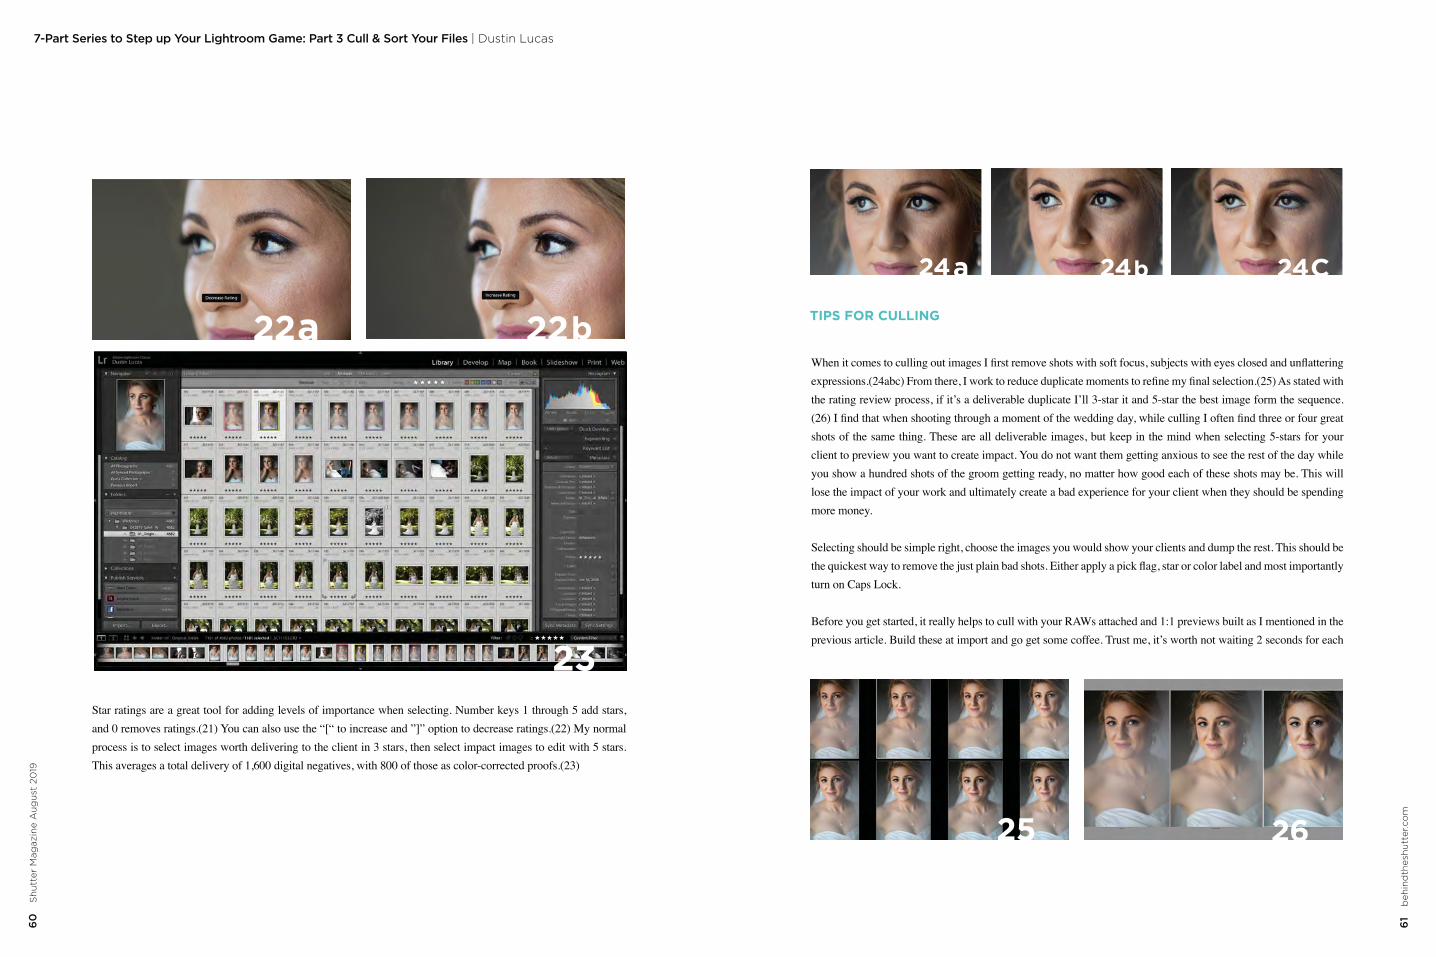
TIPS FOR CULLING
more money.
62
Sh
utt
er M
agaz
ine
Au
gu
st 2
019
63
beh
ind
thes
hu
tter
.co
m
7-Part Series to Step up Your Lightroom Game: Part 3 Cull & Sort Your Files | Dustin Lucas
Dustin Lucas is a full-time photographer and educator focused on the wedding industry and the academic world. After achieving his master of fine arts degree, a career opportunity opened once he began working with Evolve Edits. Through teaching photography classes and writing about photography, Dustin continues to expand his influence on art and business throughout the industry.
evolveedits.com
LEARN MORE.youtube.com/btsShutterMagazineClick here or check us out at
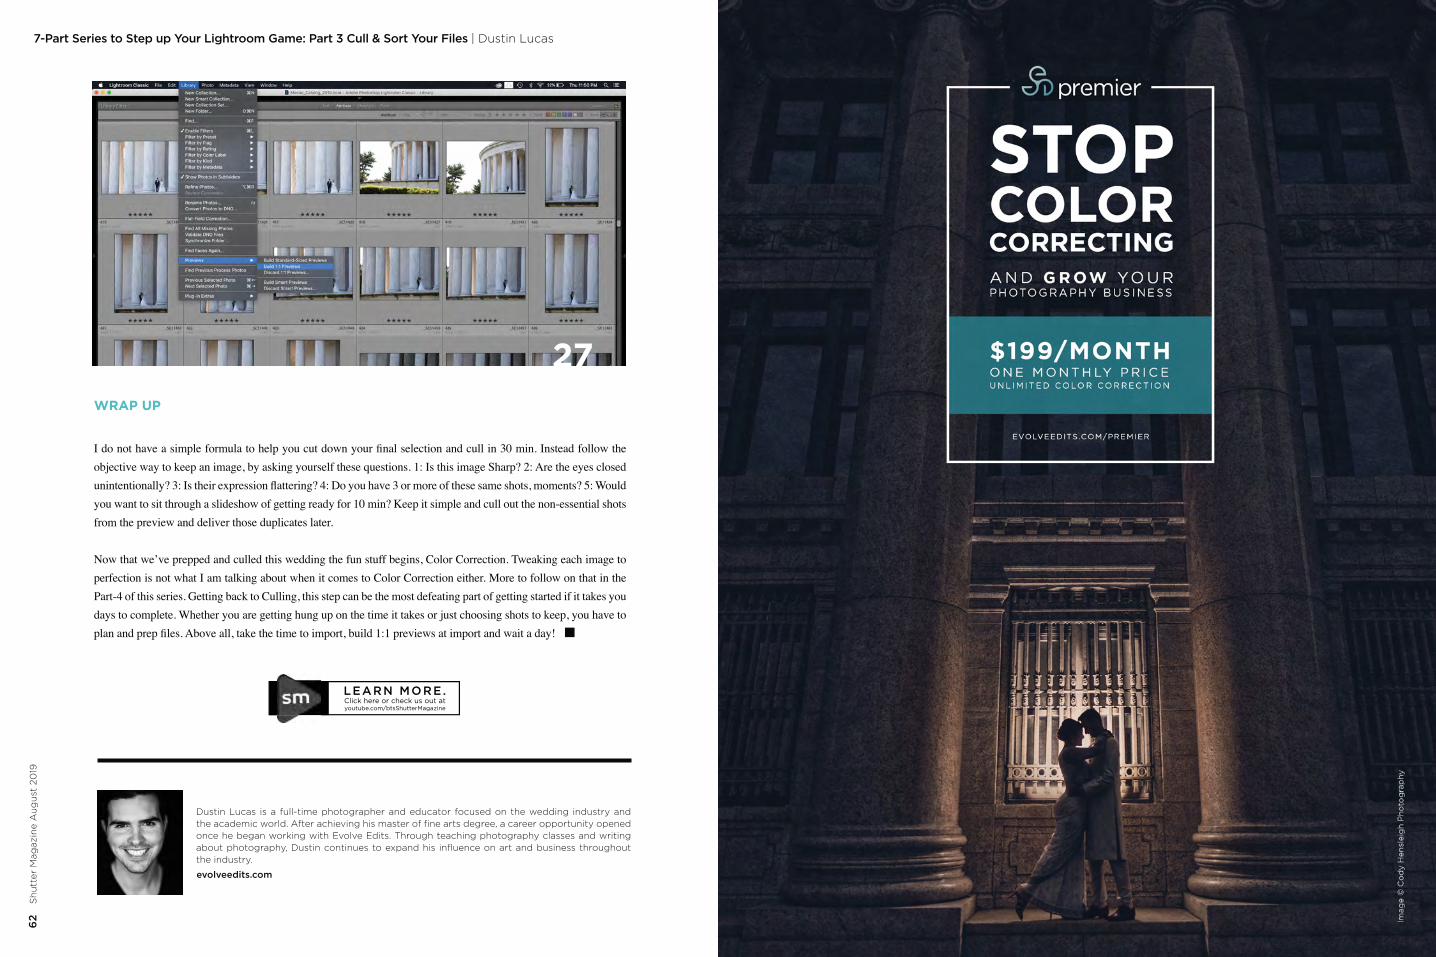
WRAP UP
65
beh
ind
thes
hu
tter
.co
m
Featuring
66
80
94
104
1 1 8
130
140
150
160
| Three Different Light Setups That Work Anywhere with Michael Anthony
| Turning Bad Light Into Great Light with Michael Corsentino
| Storytelling with Light with Jessica Robertson
| Lighting for Conceptual Photography– 7 Tips to Shake Things Up with Jess Hess
| 5 Tips For Mastering Portrait Lighting with Miquel Quiles
| Laws of Light: 5 Tips for Shooting in Direct Sun with Jay P. Morgan
| How to Embrace the Magic of Golden Hour with Ashley Behrle
| Environmental Portraits with Dan Brouillette
| Inspirations from Our Readers
THE
EDITIONLIGHTING
Ima
ge
© S
am
Ou
n P
ho
tog
rap
hy
Creating Vendor Partnerships That Will Last a Lifetime | Michael Anthony6
6
Sh
utt
er M
agaz
ine
. Ju
ly 2
019
DIFFERENT LIGHT SETUPS THAT WORK
Ima
ge
© M
ich
ae
l A
nth
on
y P
ho
tog
rap
hy
67 b
ehin
dth
esh
utt
er.c
om
3 Different Light Setups That Work Anywhere | Michael Anthony
69 b
ehin
dth
esh
utt
er.c
om
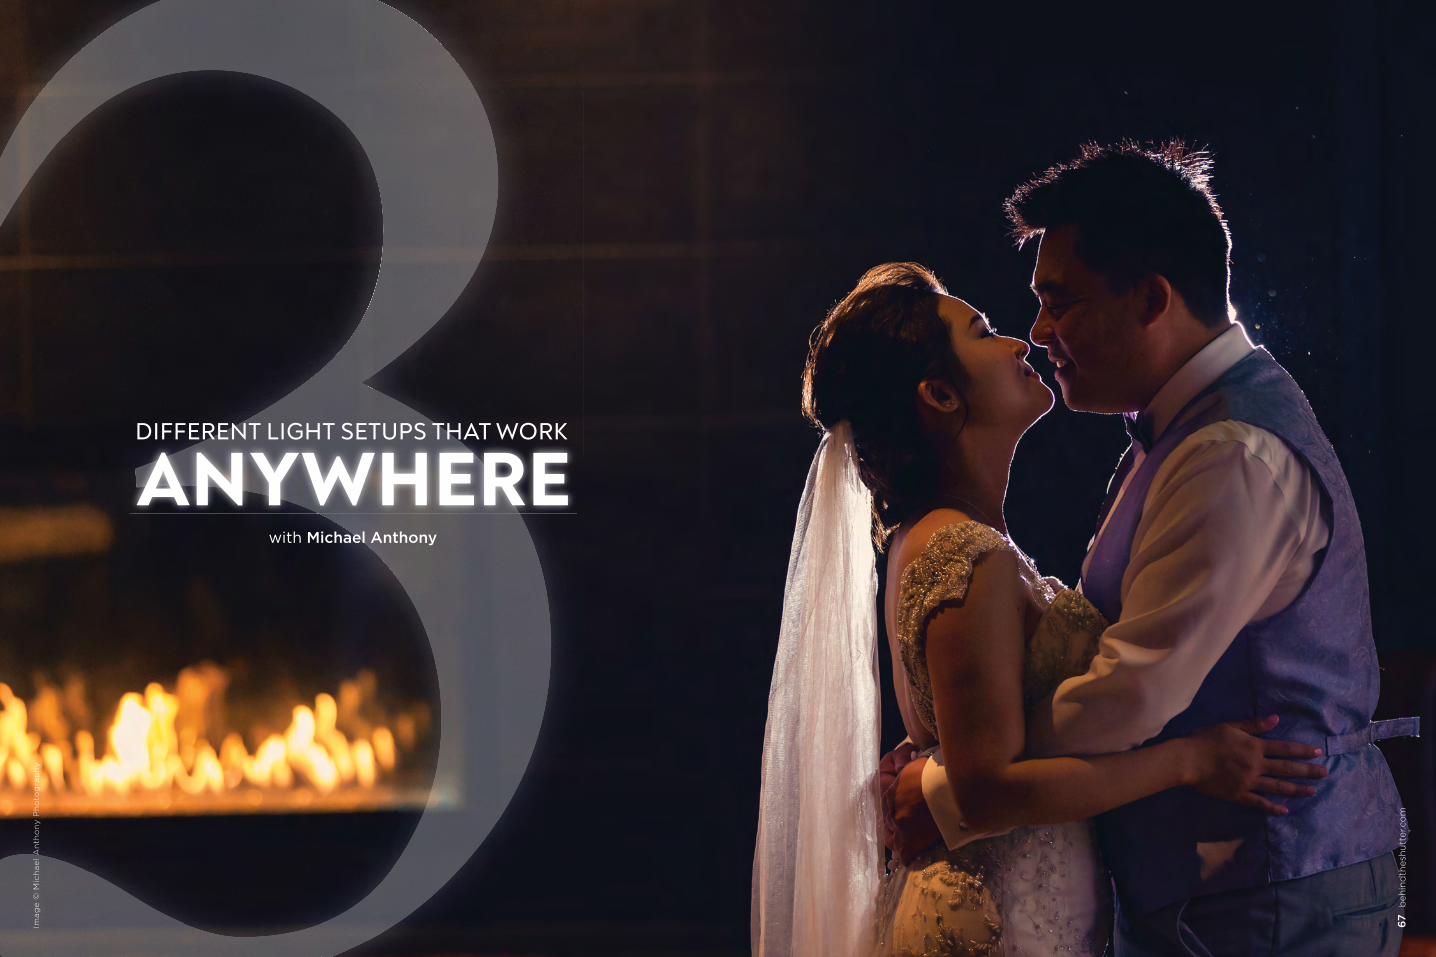
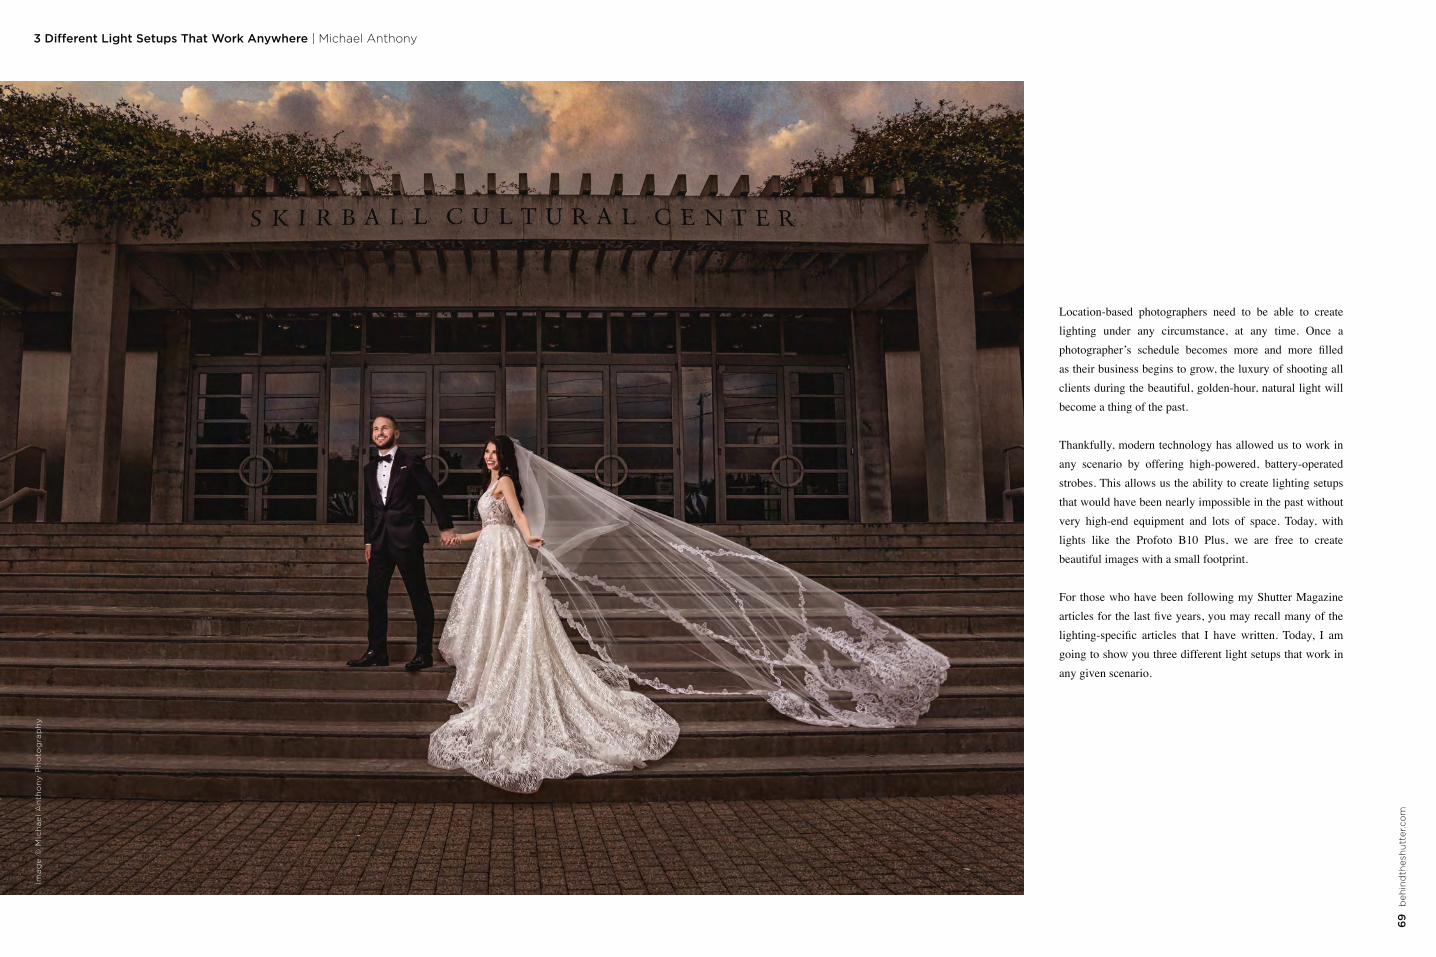
Location-based photographers need to be able to create lighting under any circumstance, at any time. Once a
as their business begins to grow, the luxury of shooting all clients during the beautiful, golden-hour, natural light will become a thing of the past.
Thankfully, modern technology has allowed us to work in any scenario by offering high-powered, battery-operated strobes. This allows us the ability to create lighting setups that would have been nearly impossible in the past without very high-end equipment and lots of space. Today, with lights like the Profoto B10 Plus, we are free to create beautiful images with a small footprint.
For those who have been following my Shutter Magazine
going to show you three different light setups that work in any given scenario.
Ima
ge
© M
ich
ae
l A
nth
on
y P
ho
tog
rap
hy
3 Different Light Setups That Work Anywhere | Michael Anthony70
S
hu
tter
Mag
azin
e . A
ug
ust
20
19
71 b
ehin
dth
esh
utt
er.c
om
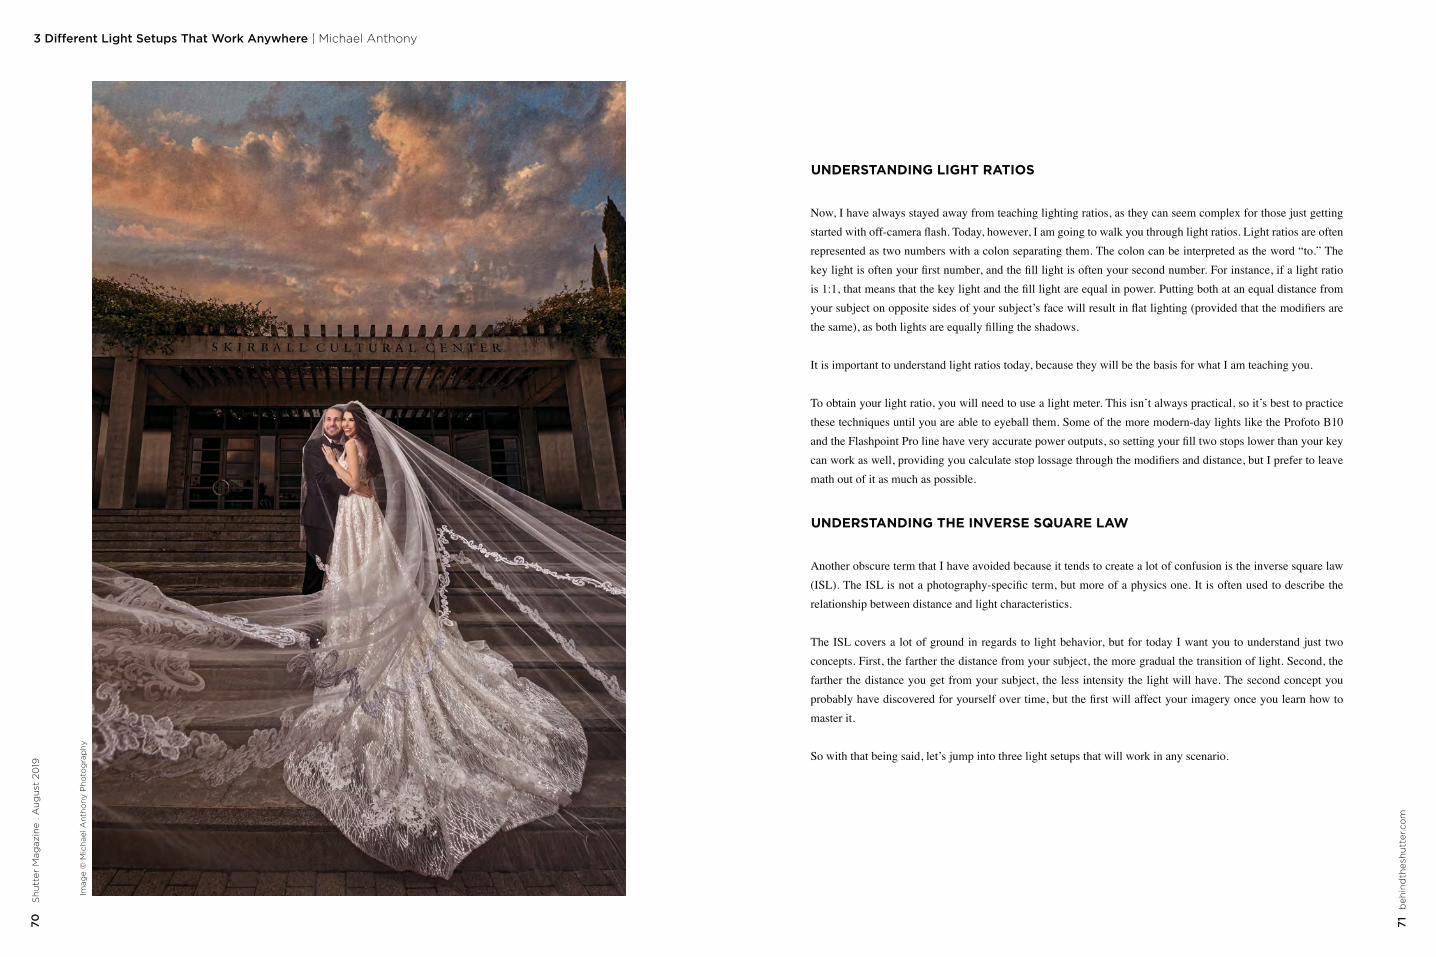
UNDERSTANDING LIGHT RATIOS
represented as two numbers with a colon separating them. The colon can be interpreted as the word “to.” The
To obtain your light ratio, you will need to use a light meter. This isn’t always practical, so it’s best to practice these techniques until you are able to eyeball them. Some of the more modern-day lights like the Profoto B10
math out of it as much as possible.
UNDERSTANDING THE INVERSE SQUARE LAW
relationship between distance and light characteristics.
master it.
Imag
e ©
Mic
hae
l An
tho
ny P
ho
tog
rap
hy
3 Different Light Setups That Work Anywhere | Michael Anthony
73 b
ehin
dth
esh
utt
er.c
om
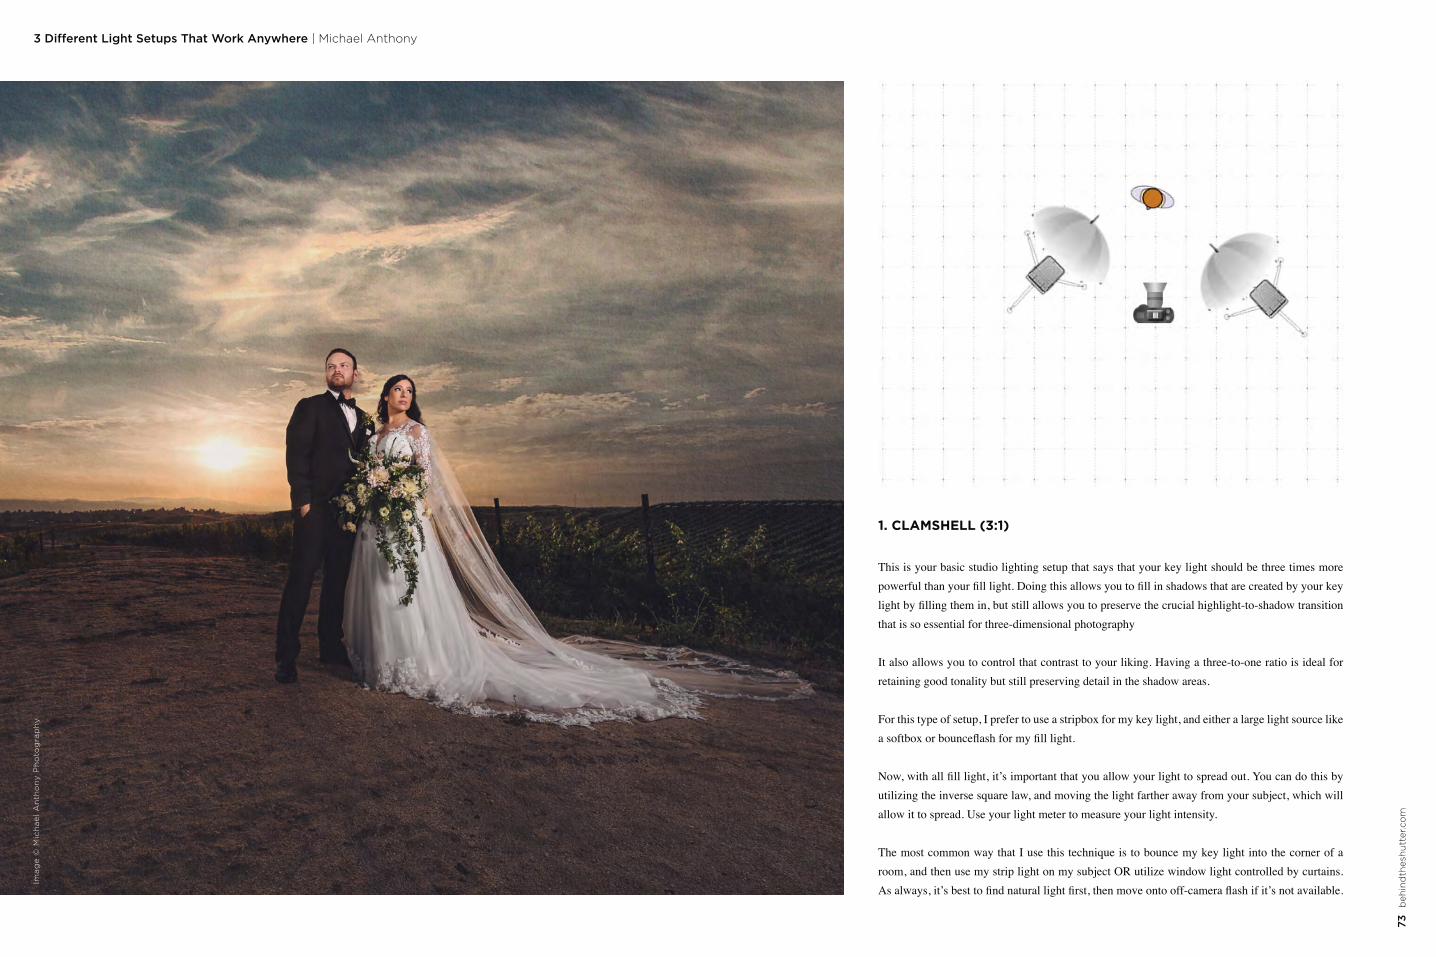
This is your basic studio lighting setup that says that your key light should be three times more
that is so essential for three-dimensional photography
retaining good tonality but still preserving detail in the shadow areas.
allow it to spread. Use your light meter to measure your light intensity.
1. CLAMSHELL (3:1)
Ima
ge
© M
ich
ae
l A
nth
on
y P
ho
tog
rap
hy
3 Different Light Setups That Work Anywhere | Michael Anthony74
S
hu
tter
Mag
azin
e . A
ug
ust
20
19
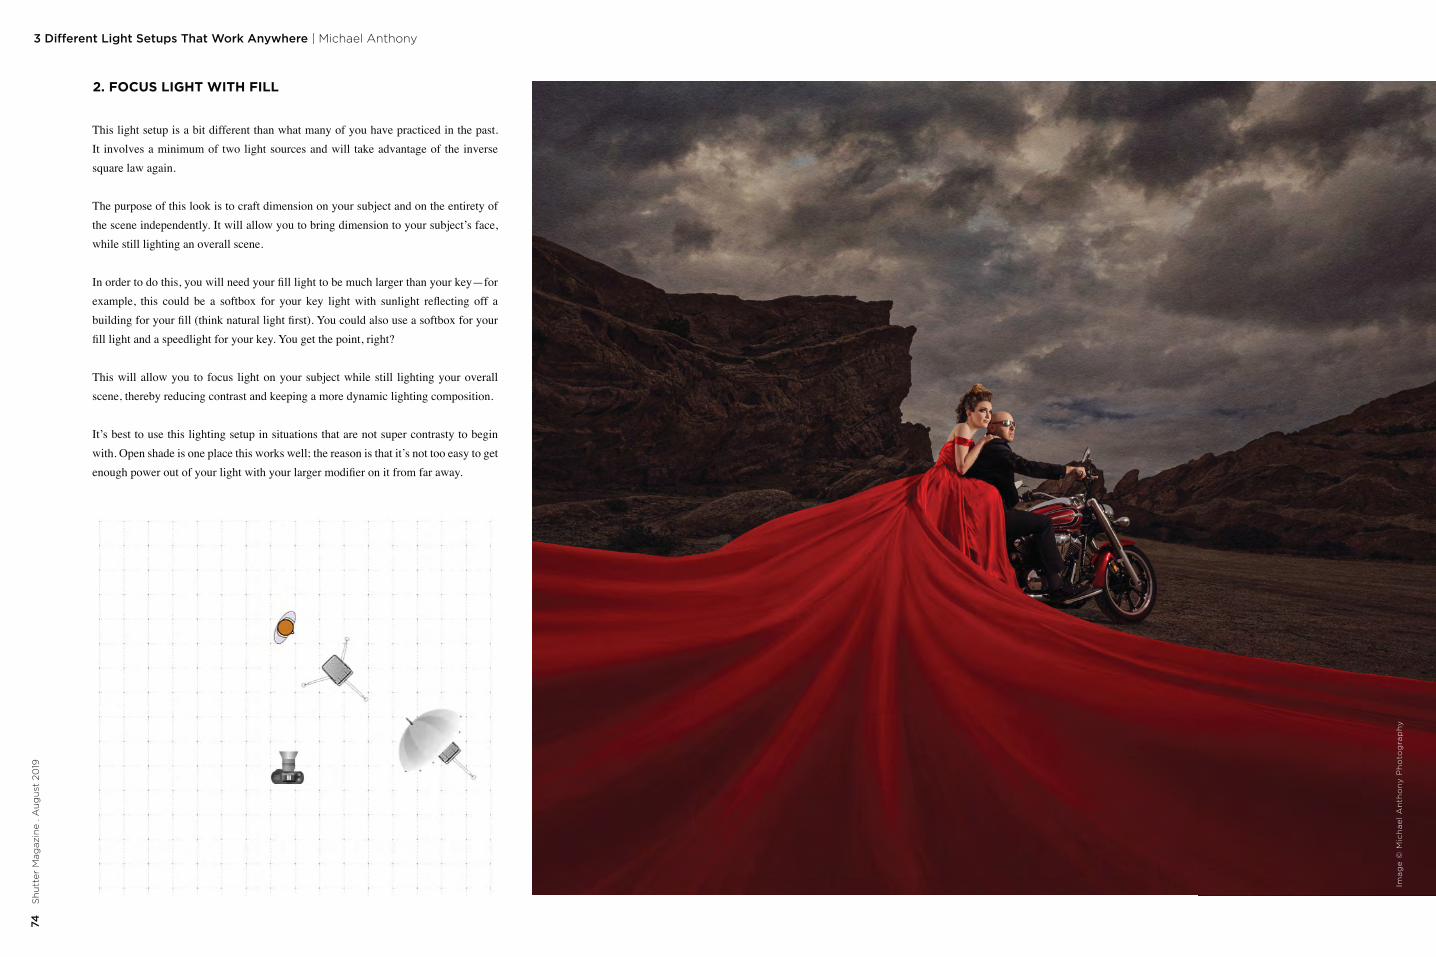
2. FOCUS LIGHT WITH FILL
This light setup is a bit different than what many of you have practiced in the past.
square law again.
while still lighting an overall scene.
scene, thereby reducing contrast and keeping a more dynamic lighting composition.
with. Open shade is one place this works well; the reason is that it’s not too easy to get
Ima
ge
© M
ich
ae
l A
nth
on
y P
ho
tog
rap
hy
3 Different Light Setups That Work Anywhere | Michael Anthony
77 b
ehin
dth
esh
utt
er.c
om
76
Sh
utt
er M
agaz
ine
. Au
gu
st 2
019
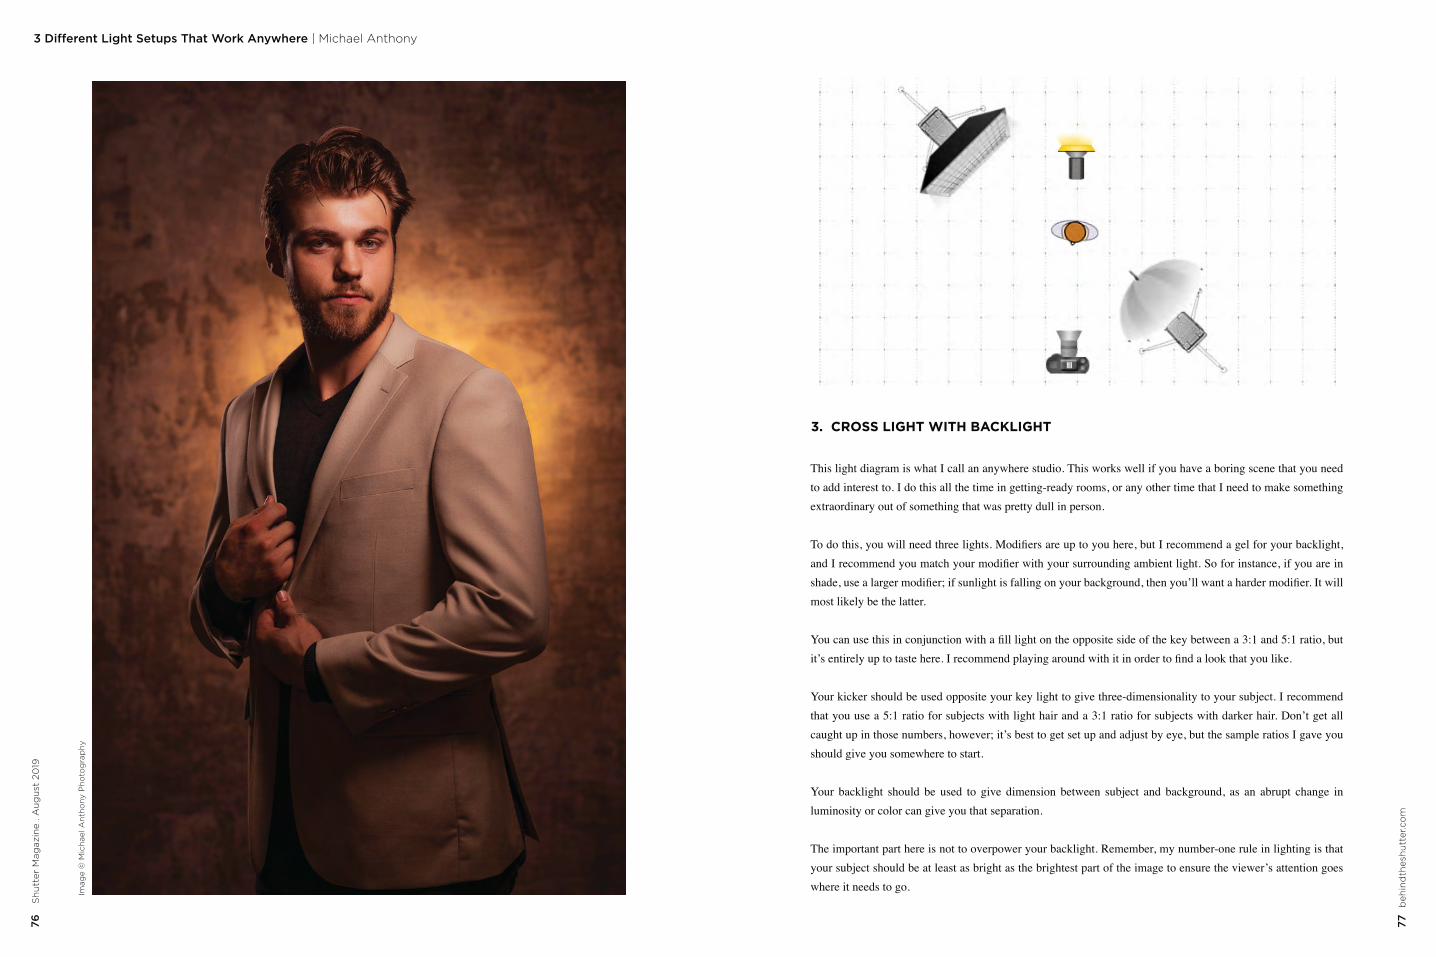
3. CROSS LIGHT WITH BACKLIGHT
extraordinary out of something that was pretty dull in person.
most likely be the latter.
should give you somewhere to start.
luminosity or color can give you that separation.
where it needs to go.
Imag
e ©
Mic
hae
l An
tho
ny P
ho
tog
rap
hy
3 Different Light Setups That Work Anywhere | Michael Anthony78
S
hu
tter
Mag
azin
e . A
ug
ust
20
19 Michael Anthony is the owner of Michael Anthony Studios, a wedding photography studio based in Los Angeles. He has won multiple awards in international image competition for his creative use of light, storytelling and environmental portraiture. The five-member team at Michael Anthony Studios photographs around 60 weddings and over 200 portrait sessions a year.
michaelanthonyphotography.com
LEARN MORE.youtube.com/btsShutterMagazineClick here or check us out at
LIGHTING DOESN’T HAVE TO BE COMPLICATED
Imag
e ©
Mic
hae
l An
tho
ny P
ho
tog
rap
hy
80
Sh
utt
er M
agaz
ine
. Au
gu
st 2
019
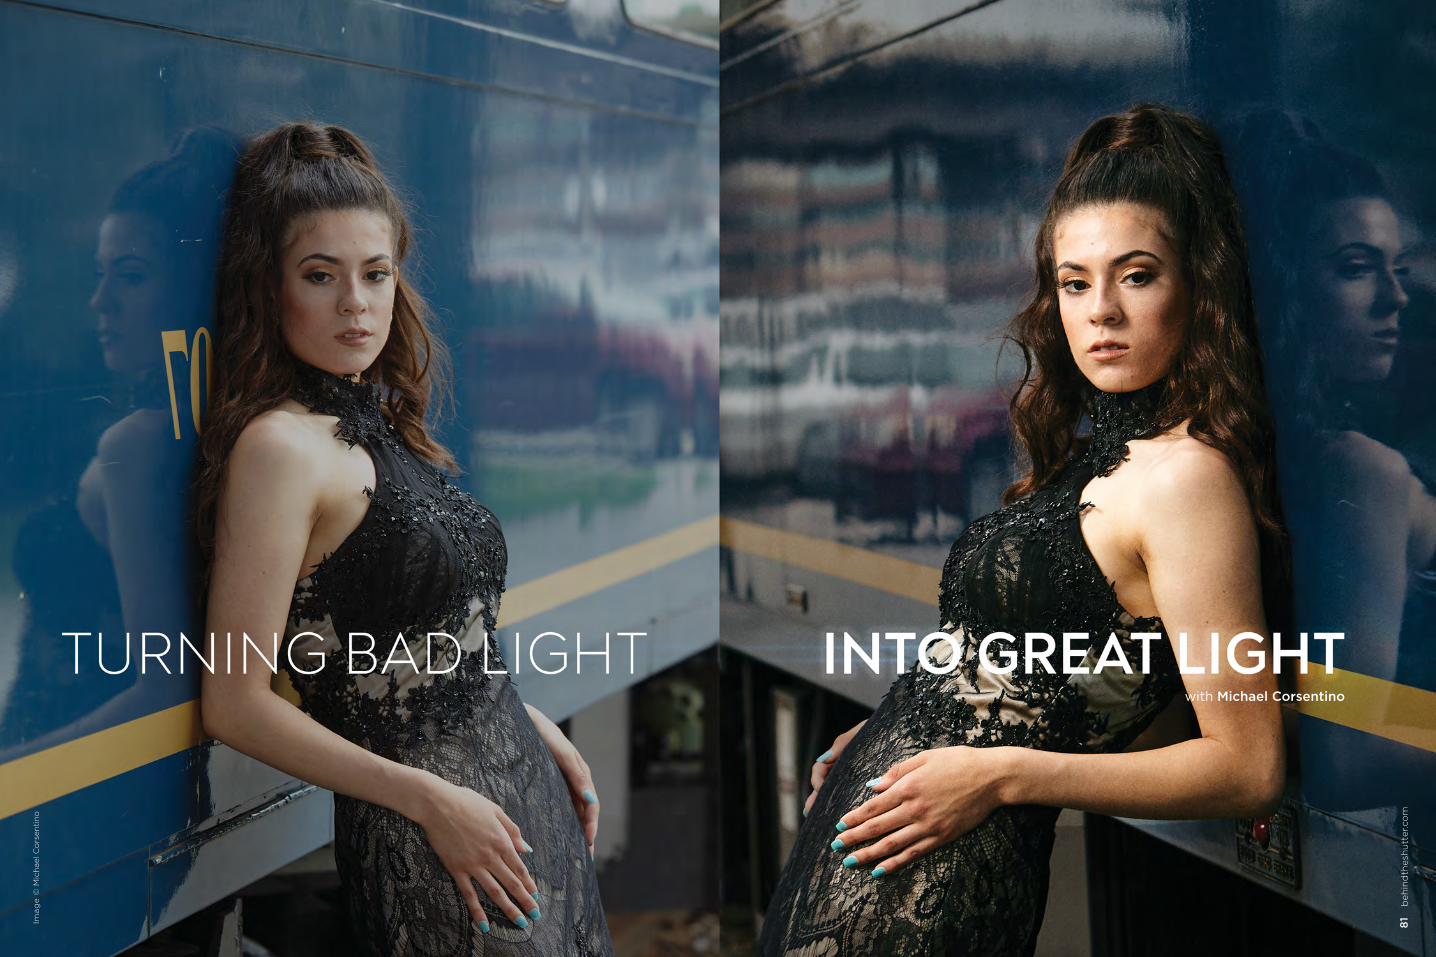
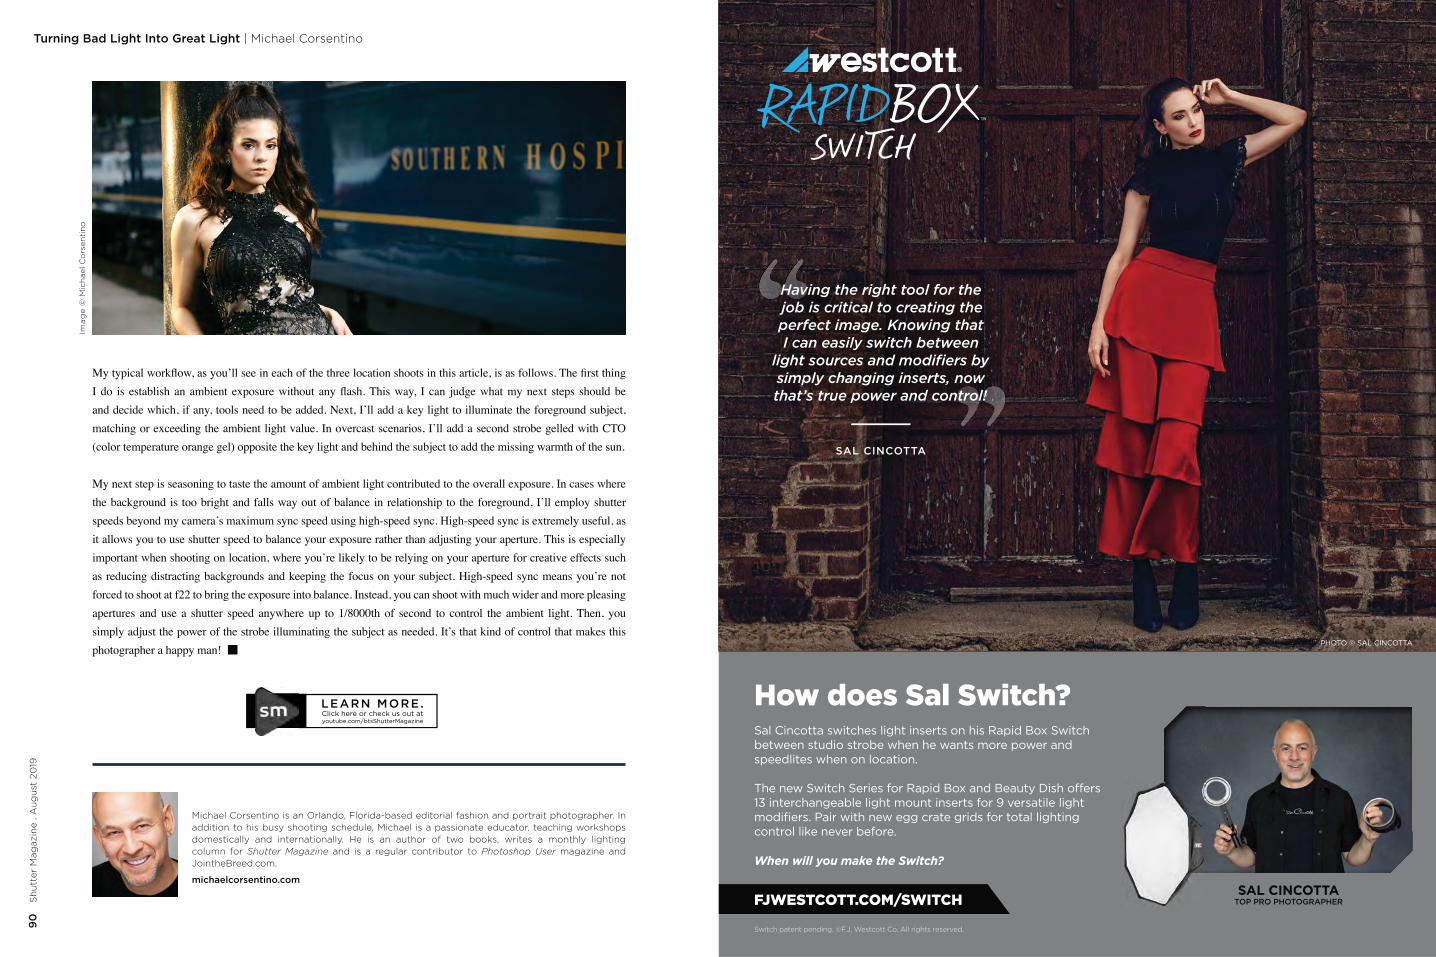
Turning Bad Light Into Great Light | Michael Corsentino
YS
Ima
ge
© M
ich
ael C
ors
enti
no
Ima
ge
© M
ich
ael C
ors
enti
no
81
beh
ind
thes
hu
tter
.co
m
with Michael Corsentino
82
Sh
utt
er M
agaz
ine
. Au
gu
st 2
019
83
beh
ind
thes
hu
tter
.co
m
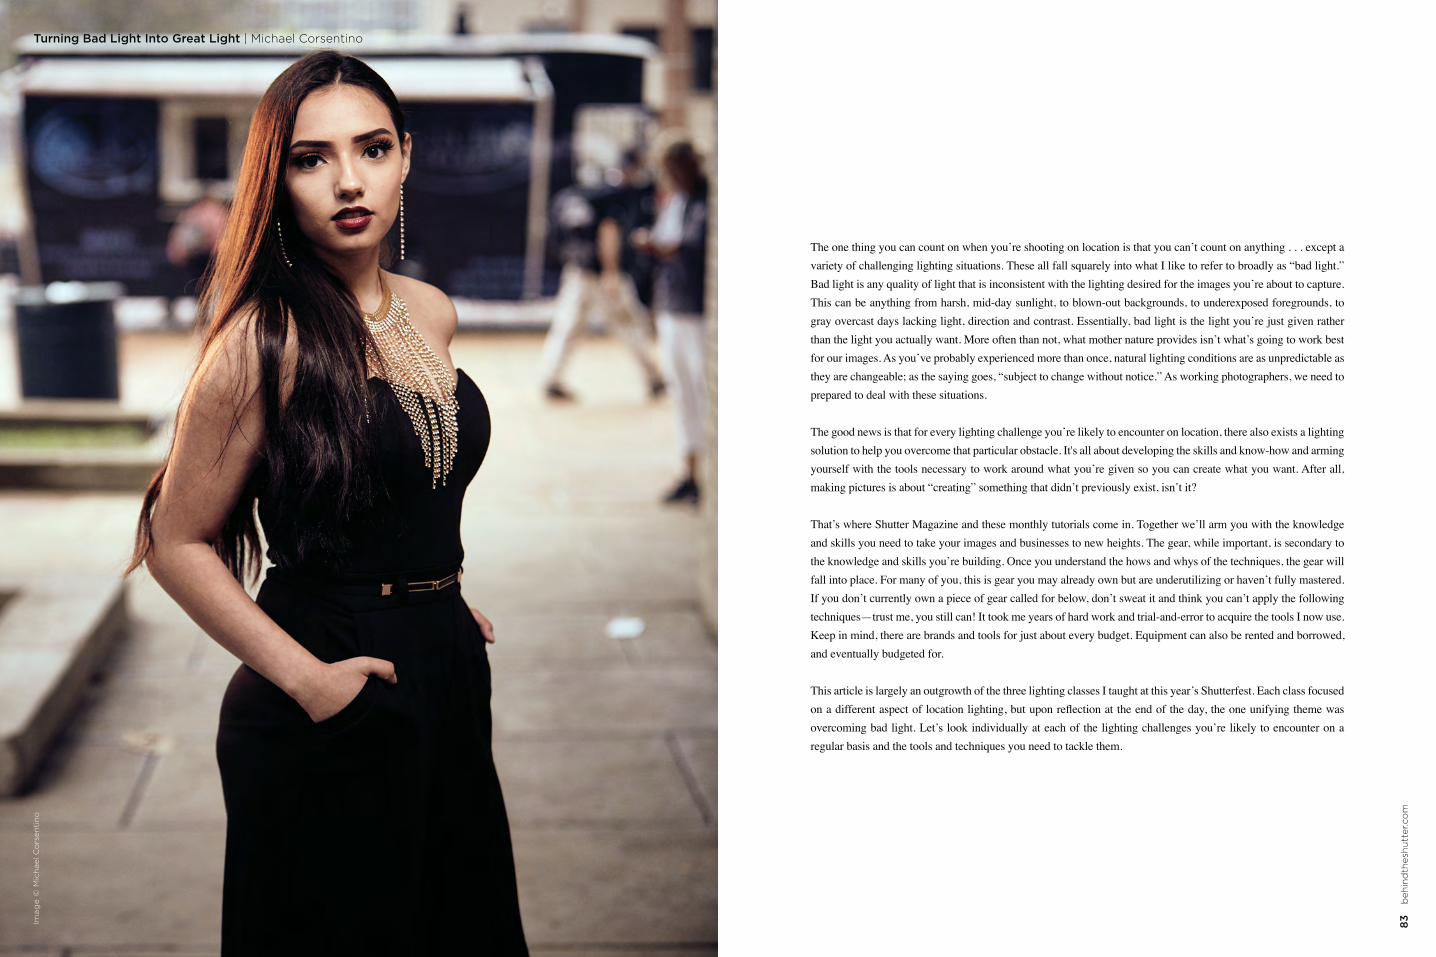
The one thing you can count on when you’re shooting on location is that you can’t count on anything . . . except a variety of challenging lighting situations. These all fall squarely into what I like to refer to broadly as “bad light.” Bad light is any quality of light that is inconsistent with the lighting desired for the images you’re about to capture. This can be anything from harsh, mid-day sunlight, to blown-out backgrounds, to underexposed foregrounds, to gray overcast days lacking light, direction and contrast. Essentially, bad light is the light you’re just given rather than the light you actually want. More often than not, what mother nature provides isn’t what’s going to work best for our images. As you’ve probably experienced more than once, natural lighting conditions are as unpredictable as they are changeable; as the saying goes, “subject to change without notice.” As working photographers, we need to prepared to deal with these situations.
The good news is that for every lighting challenge you’re likely to encounter on location, there also exists a lighting solution to help you overcome that particular obstacle. It's all about developing the skills and know-how and arming yourself with the tools necessary to work around what you’re given so you can create what you want. After all, making pictures is about “creating” something that didn’t previously exist, isn’t it?
That’s where Shutter Magazine and these monthly tutorials come in. Together we’ll arm you with the knowledge and skills you need to take your images and businesses to new heights. The gear, while important, is secondary to the knowledge and skills you’re building. Once you understand the hows and whys of the techniques, the gear will fall into place. For many of you, this is gear you may already own but are underutilizing or haven’t fully mastered. If you don’t currently own a piece of gear called for below, don’t sweat it and think you can’t apply the following techniques—trust me, you still can! It took me years of hard work and trial-and-error to acquire the tools I now use. Keep in mind, there are brands and tools for just about every budget. Equipment can also be rented and borrowed, and eventually budgeted for.
This article is largely an outgrowth of the three lighting classes I taught at this year’s Shutterfest. Each class focused
overcoming bad light. Let’s look individually at each of the lighting challenges you’re likely to encounter on a regular basis and the tools and techniques you need to tackle them.
Ima
ge
© M
ich
ael C
ors
enti
no
Turning Bad Light Into Great Light | Michael Corsentino
84
Sh
utt
er M
agaz
ine
. Au
gu
st 2
019
Turning Bad Light Into Great Light | Michael Corsentino
85
beh
ind
thes
hu
tter
.co
m
1 Light
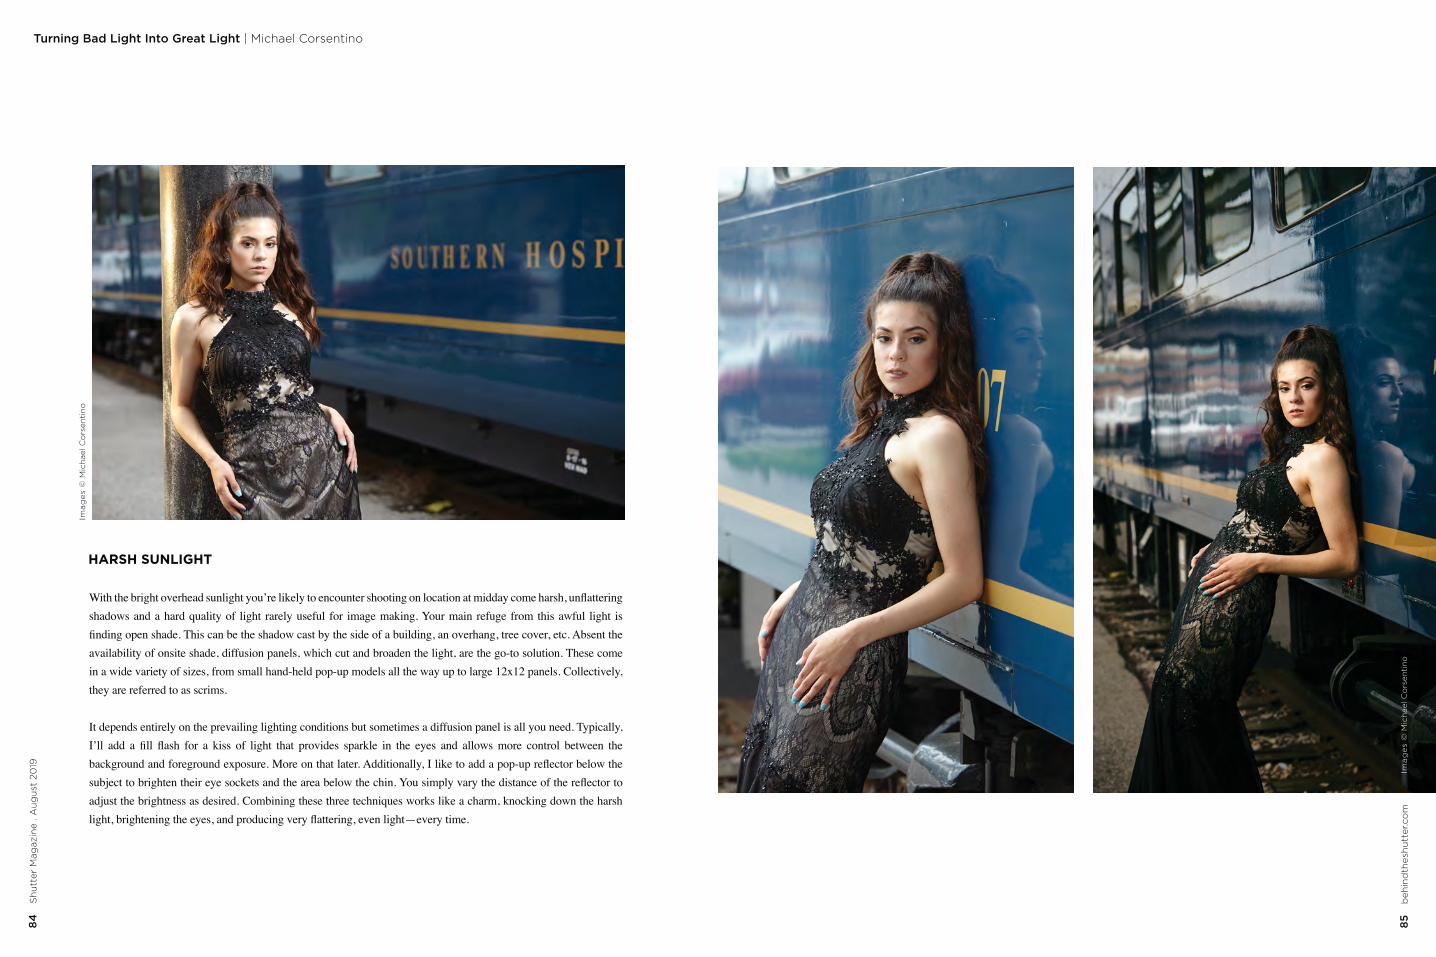
shadows and a hard quality of light rarely useful for image making. Your main refuge from this awful light is
availability of onsite shade, diffusion panels, which cut and broaden the light, are the go-to solution. These come in a wide variety of sizes, from small hand-held pop-up models all the way up to large 12x12 panels. Collectively, they are referred to as scrims.
It depends entirely on the prevailing lighting conditions but sometimes a diffusion panel is all you need. Typically,
adjust the brightness as desired. Combining these three techniques works like a charm, knocking down the harsh
HARSH SUNLIGHT
Ima
ge
s ©
Mic
hae
l Co
rsen
tin
o
Ima
ge
s ©
Mic
hae
l Co
rsen
tin
o
87
beh
ind
thes
hu
tter
.co
m
Turning Bad Light Into Great Light | Michael Corsentino
STEP 1
Ima
ge
s ©
Mic
hae
l Co
rsen
tin
o
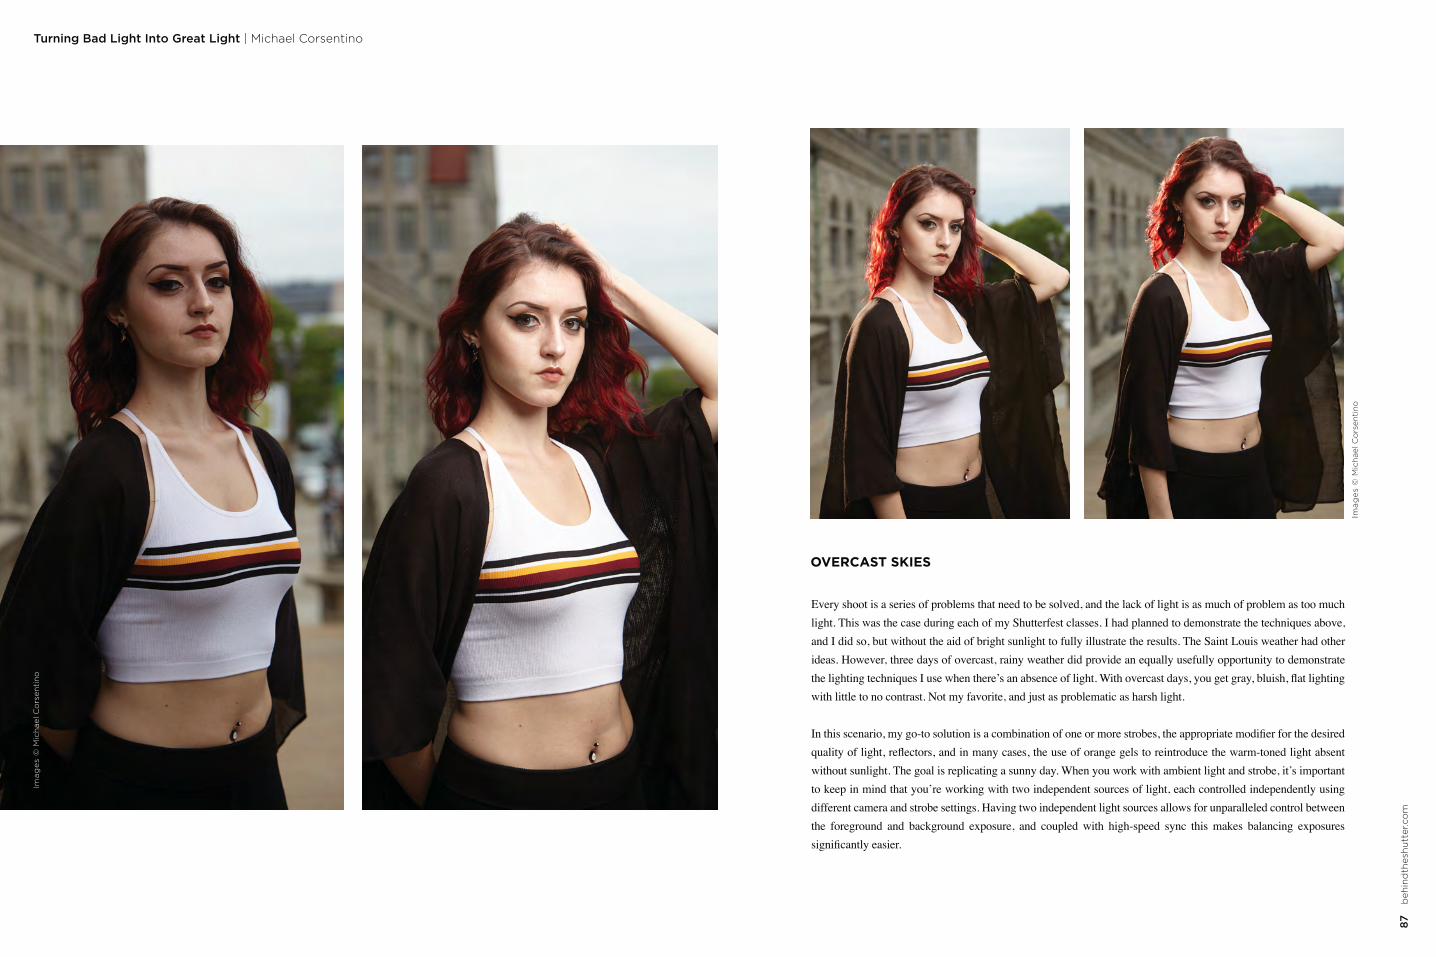
Every shoot is a series of problems that need to be solved, and the lack of light is as much of problem as too much light. This was the case during each of my Shutterfest classes. I had planned to demonstrate the techniques above, and I did so, but without the aid of bright sunlight to fully illustrate the results. The Saint Louis weather had other ideas. However, three days of overcast, rainy weather did provide an equally usefully opportunity to demonstrate
with little to no contrast. Not my favorite, and just as problematic as harsh light.
without sunlight. The goal is replicating a sunny day. When you work with ambient light and strobe, it’s important to keep in mind that you’re working with two independent sources of light, each controlled independently using different camera and strobe settings. Having two independent light sources allows for unparalleled control between the foreground and background exposure, and coupled with high-speed sync this makes balancing exposures
OVERCAST SKIES
Ima
ge
s ©
Mic
hae
l Co
rsen
tin
o
88
Sh
utt
er M
agaz
ine
. Au
gu
st 2
019
Turning Bad Light Into Great Light | Michael Corsentino
89
beh
ind
thes
hu
tter
.co
m
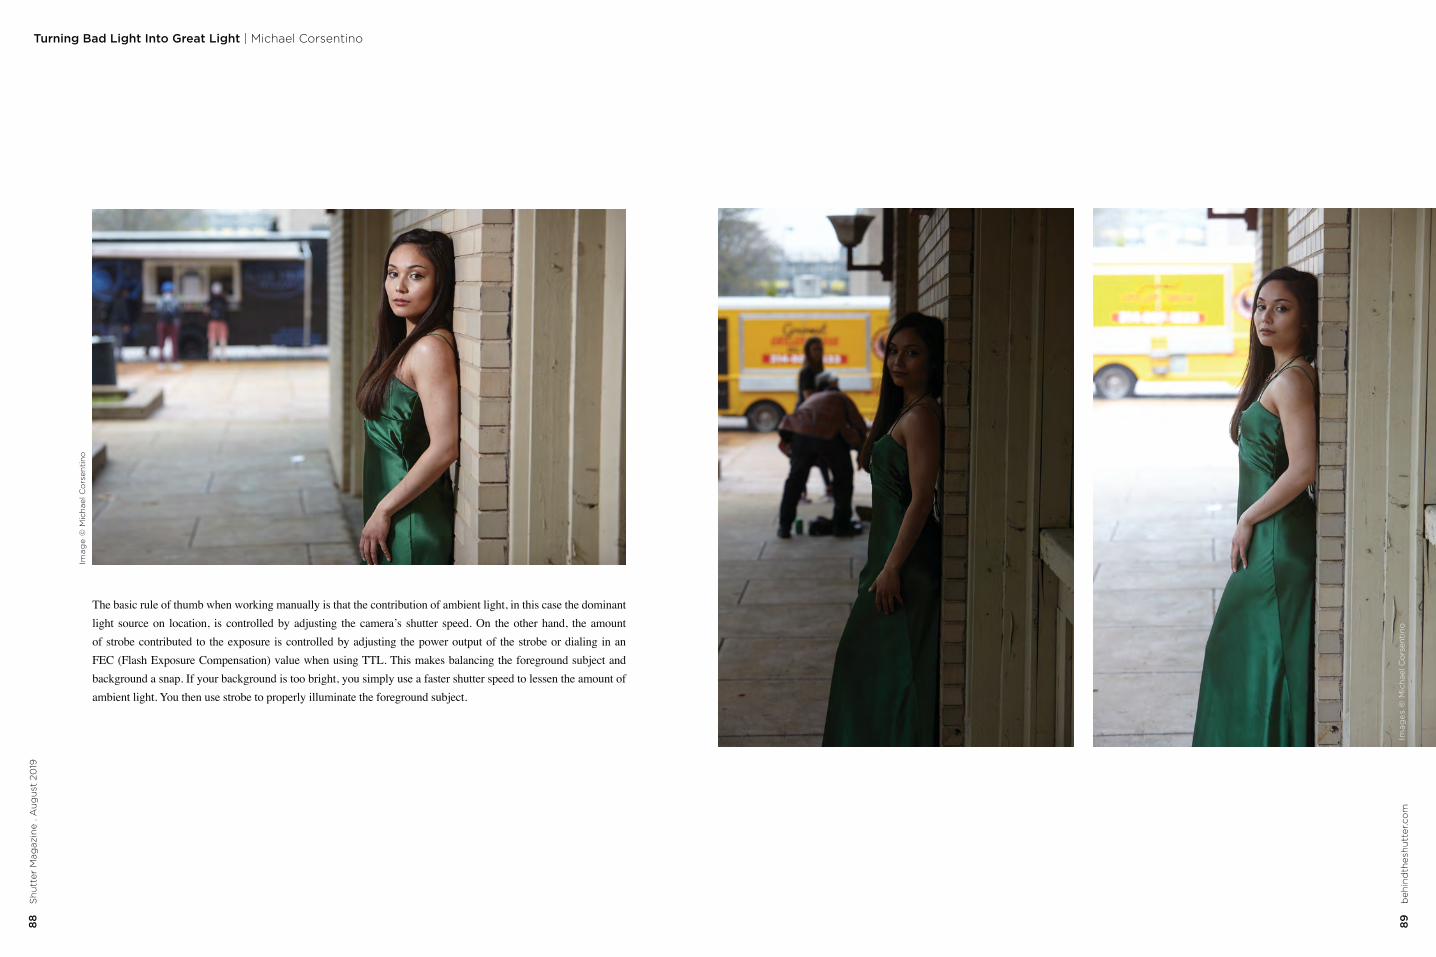
The basic rule of thumb when working manually is that the contribution of ambient light, in this case the dominant light source on location, is controlled by adjusting the camera’s shutter speed. On the other hand, the amount of strobe contributed to the exposure is controlled by adjusting the power output of the strobe or dialing in an FEC (Flash Exposure Compensation) value when using TTL. This makes balancing the foreground subject and background a snap. If your background is too bright, you simply use a faster shutter speed to lessen the amount of ambient light. You then use strobe to properly illuminate the foreground subject.
Ima
ge
s ©
Mic
hae
l Co
rsen
tin
o
Ima
ge
© M
ich
ael C
ors
enti
no
90
S
hu
tter
Mag
azin
e . A
ug
ust
20
19
91
beh
ind
thes
hu
tter
.co
m
Turning Bad Light Into Great Light | Michael Corsentino
4 LIGHTS
Michael Corsentino is an Orlando, Florida-based editorial fashion and portrait photographer. In addition to his busy shooting schedule, Michael is a passionate educator, teaching workshops domestically and internationally. He is an author of two books, writes a monthly lighting column for Shutter Magazine and is a regular contributor to Photoshop User magazine and JointheBreed.com.
michaelcorsentino.com
LEARN MORE.youtube.com/btsShutterMagazineClick here or check us out at
For the next and final step in creating the
color grade for these portraits, I added a cool
blue-tone color overlay. This color grade was
created using a combination of Capture One
Styles (like Lightroom Presets) from Phase One’s
new Editorial Style Packs.
Ima
ge
© M
ich
ael C
ors
enti
no
and decide which, if any, tools need to be added. Next, I’ll add a key light to illuminate the foreground subject, matching or exceeding the ambient light value. In overcast scenarios, I’ll add a second strobe gelled with CTO (color temperature orange gel) opposite the key light and behind the subject to add the missing warmth of the sun.
My next step is seasoning to taste the amount of ambient light contributed to the overall exposure. In cases where the background is too bright and falls way out of balance in relationship to the foreground, I’ll employ shutter speeds beyond my camera’s maximum sync speed using high-speed sync. High-speed sync is extremely useful, as it allows you to use shutter speed to balance your exposure rather than adjusting your aperture. This is especially important when shooting on location, where you’re likely to be relying on your aperture for creative effects such as reducing distracting backgrounds and keeping the focus on your subject. High-speed sync means you’re not forced to shoot at f22 to bring the exposure into balance. Instead, you can shoot with much wider and more pleasing apertures and use a shutter speed anywhere up to 1/8000th of second to control the ambient light. Then, you simply adjust the power of the strobe illuminating the subject as needed. It’s that kind of control that makes this photographer a happy man!
92
Sh
utt
er M
agaz
ine
. Au
gu
st 2
019
Product Spotlight | Westcott Flex Cine Lighting System
Why the Westcott Flex Cine Lighting System?
93
beh
ind
thes
hu
tter
.co
m
For more information, visit fjwestcott.com/flex
with
productspotlight
Any color. Anywhere. Anytime.
The Flex Cine is one of the most portable and versatile lights on the market. The mats have been redesigned from the ground up for the working professional. They are rugged and durable, and have an IP64 rating—they are dust-tight and splash-resistant.
These are built to bring new life and creativity to your photo and video projects.
Details
· Available in RGBW, bi-color or daylight, with sizes ranging from 1' x 1' to 2' x 2', these compact LED mats offer
· When utilizing the dimmer's onboard controls, users have access to a dynamic range of tools that control color and intensity, including 120+ pre-loaded color gel presets with daylight or tungsten backing, source-matching presets,
· The Flex Cine Wireless DMX Dimmer is designed with a built-in V-Lock Mount to accept AC or DC power. Pair with either the universal AC Adapter or 26V Lithium-Ion Battery to power Flex LED mats with more options than ever before. Users can also power a 1' x 1' bi-color or daylight LED mat via any compatible 14.4-14.8V V-mount battery.
LEARN MORE.youtube.com/btsShutterMagazineClick here or check us out at
94
S
hu
tter
Mag
azin
e . A
ug
ust
20
19Storytelling With Light | Jessica Robertson
with Jessica Robertson
Ima
ge
© J
ess
Jesss
ica
Ro
be
rtso
n P
ho
tog
ap
hra
ph
icA
ic A
rtis
rtiss
try
try
tt
95
beh
ind
thes
hu
tter
.co
m

96
Sh
utt
er M
agaz
ine
. Au
gu
st 2
019
Storytelling With Light | Jessica Robertson9
69
6
Sh
utt
er M
agaz
ine
. Au
gu
st 2
019
97
beh
ind
thes
hu
tter
.co
m
Countless songs, poems and even novels have been written about the Mona Lisa. It is not only the technical aspects that make this painting so alluring and timeless, it is the subject’s unknown story that has intrigued
and the light. With these tools, we can manipulate light to add impact and tell the story behind the image. A common industry practice today is to have a consultation with a client prior to photographing. Clothing options, locations and interests are among the customary items discussed. And while there are countless
deeper. Sometimes, the story is not one others will easily understand because it is softer, quieter and more subtle. It might be incorporating the subject’s favorite color or capturing an expression the parent has seen
grandmother’s front steps, which are a sentimental place with family history. At other times, the story is
athletic or academic interests, or another passion in their life.
Whether the story is very apparent visually or more subtle, I want to understand it so I am then able to start designing a lighting plan to represent that story. Should the lighting be harsh and dramatic because it’s for
angle emulate the stage lights of a theater for the thespian? By starting with their stories, I am inspired to visually tell a story with light.
As artists, we have the opportunity to explore various lighting styles and patterns. Here are four different subjects with four very different stories and lighting approaches.
Sometimes, the story is not initiated by the vision of the subject, but rather by the way their loved ones see them—that is the true story. Saxon’s mom described her as being “a light in people’s lives.”
With this description as inspiration, the concept we came up with was to use battery-powered twinkle lights in conjunction with white icicle lights and regular strands of holiday lights. Because very little actual light comes from this type of light source, we used a BUNCH, and we layered them. We used a background stand to drape the holiday lights and positioned them about six feet behind her. We then positioned icicle lights below and
areas. For the third layer of lights, we used the small twinkle lights between the camera and the subject to
Once we were all set up and ready to photograph,
direction by using the modeling light in a 4x6 softbox. Mom also helped out by holding an additional string of lights close to Saxon’s face. And then we were able to play with expression and different angles. So fun!
S a x o n : A L T E R N A T I V E L I G H T I N G
EXPOSURE: F3.2 @ 1/125, ISO 6400 Im
ag
e ©
Je
ssic
a R
ob
ert
son
Ph
oto
gra
ph
ic A
rtis
try
LENS: 95MM
98
Sh
utt
er M
agaz
ine
. Au
gu
st 2
019
99
beh
ind
thes
hu
tter
.co
m
Storytelling With Light | Jessica Robertson9
8 S
hu
tter
Mag
azin
e . A
ug
ust
20
19
Ima
ge
© J
ess
ica
Ro
be
rtso
n P
ho
tog
rap
hic
Art
istr
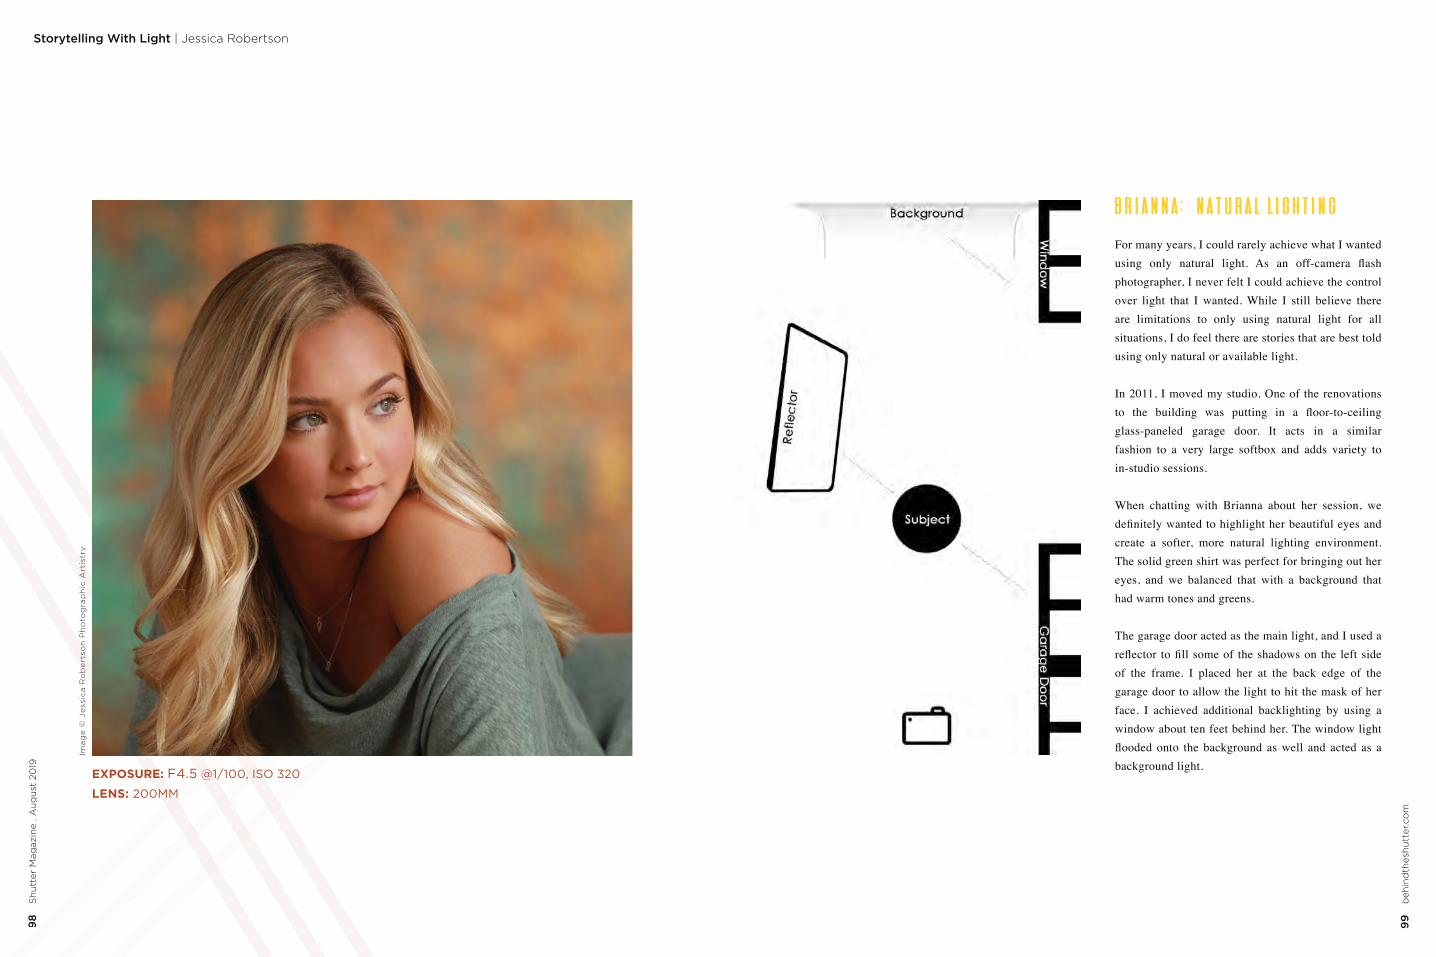
y
For many years, I could rarely achieve what I wanted
photographer, I never felt I could achieve the control over light that I wanted. While I still believe there are limitations to only using natural light for all situations, I do feel there are stories that are best told using only natural or available light.
In 2011, I moved my studio. One of the renovations
glass-paneled garage door. It acts in a similar fashion to a very large softbox and adds variety to in-studio sessions.
When chatting with Brianna about her session, we
create a softer, more natural lighting environment.
eyes, and we balanced that with a background that had warm tones and greens.
of the frame. I placed her at the back edge of the garage door to allow the light to hit the mask of her face. I achieved additional backlighting by using a
background light.
B R I A N N A : N A T U R A L L I G H T I N G
EXPOSURE: F4.5 @1/100, ISO 320
LENS: 200MM
100
S
hu
tter
Mag
azin
e . A
ug
ust
20
19Storytelling With Light | Jessica Robertson
100
S
hu
tter
Mag
azin
e . A
ug
ust
20
19
101
beh
ind
thes
hu
tter
.co
m
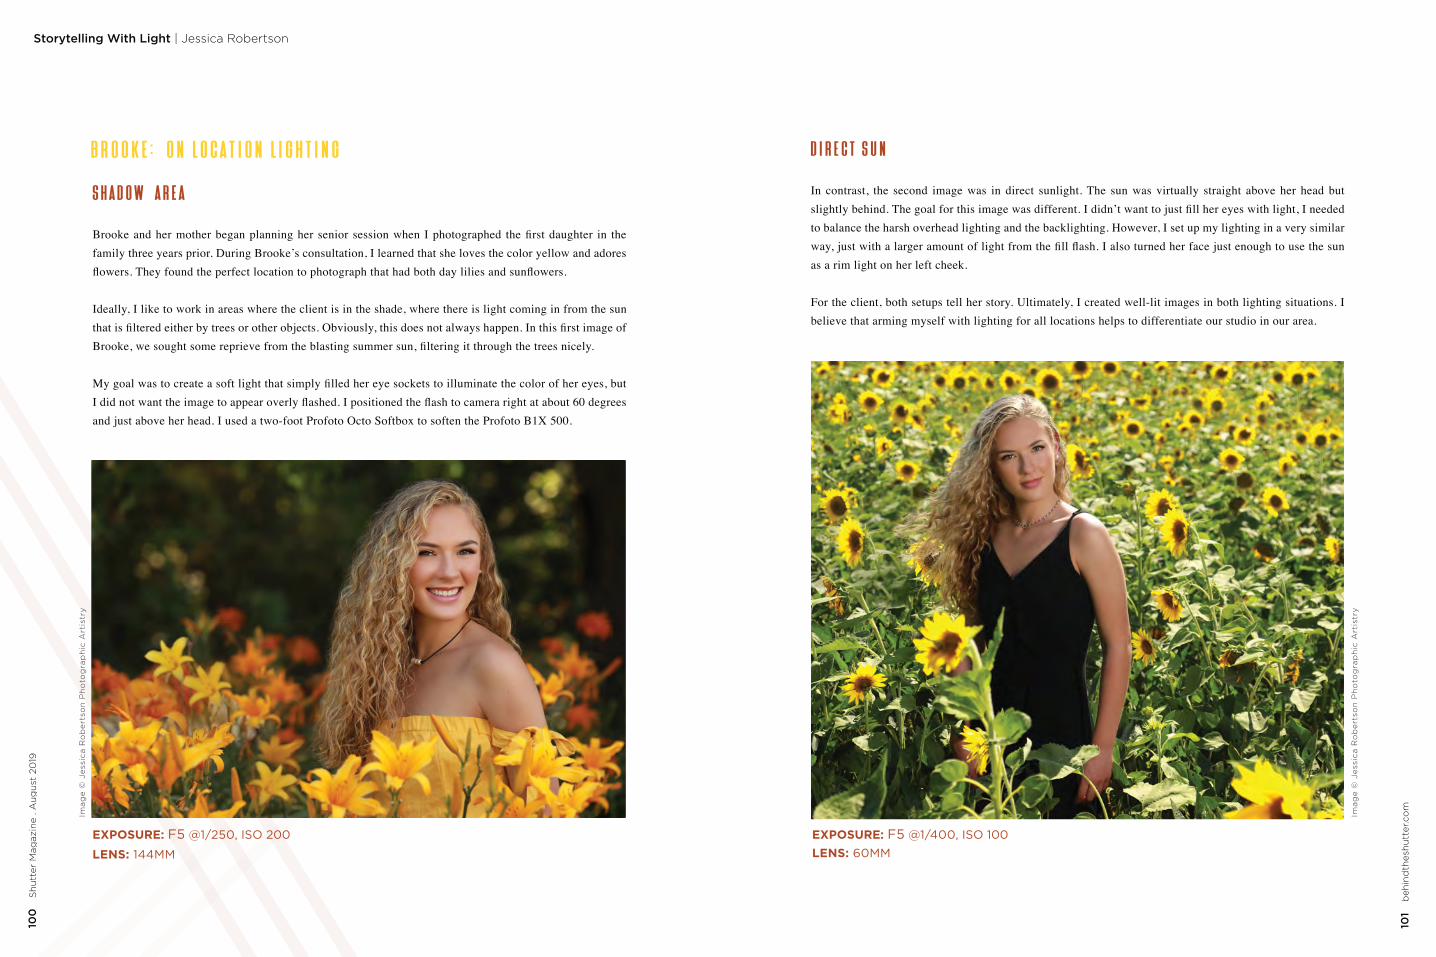
family three years prior. During Brooke’s consultation, I learned that she loves the color yellow and adores
Ideally, I like to work in areas where the client is in the shade, where there is light coming in from the sun
and just above her head. I used a two-foot Profoto Octo Softbox to soften the Profoto B1X 500.
B R O O K E : O N L O C A T I O N L I G H T I N G
S H A D O W A R E A
to balance the harsh overhead lighting and the backlighting. However, I set up my lighting in a very similar
as a rim light on her left cheek.
For the client, both setups tell her story. Ultimately, I created well-lit images in both lighting situations. I believe that arming myself with lighting for all locations helps to differentiate our studio in our area.
D I R E C T S U N
Ima
ge
© J
ess
ica
Ro
be
rtso
n P
ho
tog
rap
hic
Art
istr
y
Ima
ge
© J
ess
ica
Ro
be
rtso
n P
ho
tog
rap
hic
Art
istr
y
EXPOSURE: F5 @1/250, ISO 200
LENS: 144MM
EXPOSURE: F5 @1/400, ISO 100 LENS: 60MM
102
Sh
utt
er M
agaz
ine
. Au
gu
st 2
019
Storytelling With Light | Jessica Robertson10
2 S
hu
tter
Mag
azin
e . A
ug
ust
20
19
103
beh
ind
thes
hu
tter
.co
m
Jessica Robertson is an award-winning photographer, educator, and business coach. She owns and operates Jessica Robertson Photographic Artistry in Ashland, Virginia. She started her photography career professionally in 2000 after graduating Guilford College with a degree in Art with a Concentration in Photography. She personally photographs over 200 seniors a year. You can find out more about Jessica through her Facebook group, Shoot it Straight with Jessica Robertson and her Instagram: JessicaRobertsonPhoto.
jessicarobertson.com
light, I have seen my lights as paintbrushes. Where do I want the light? Where do I want the shadows? What
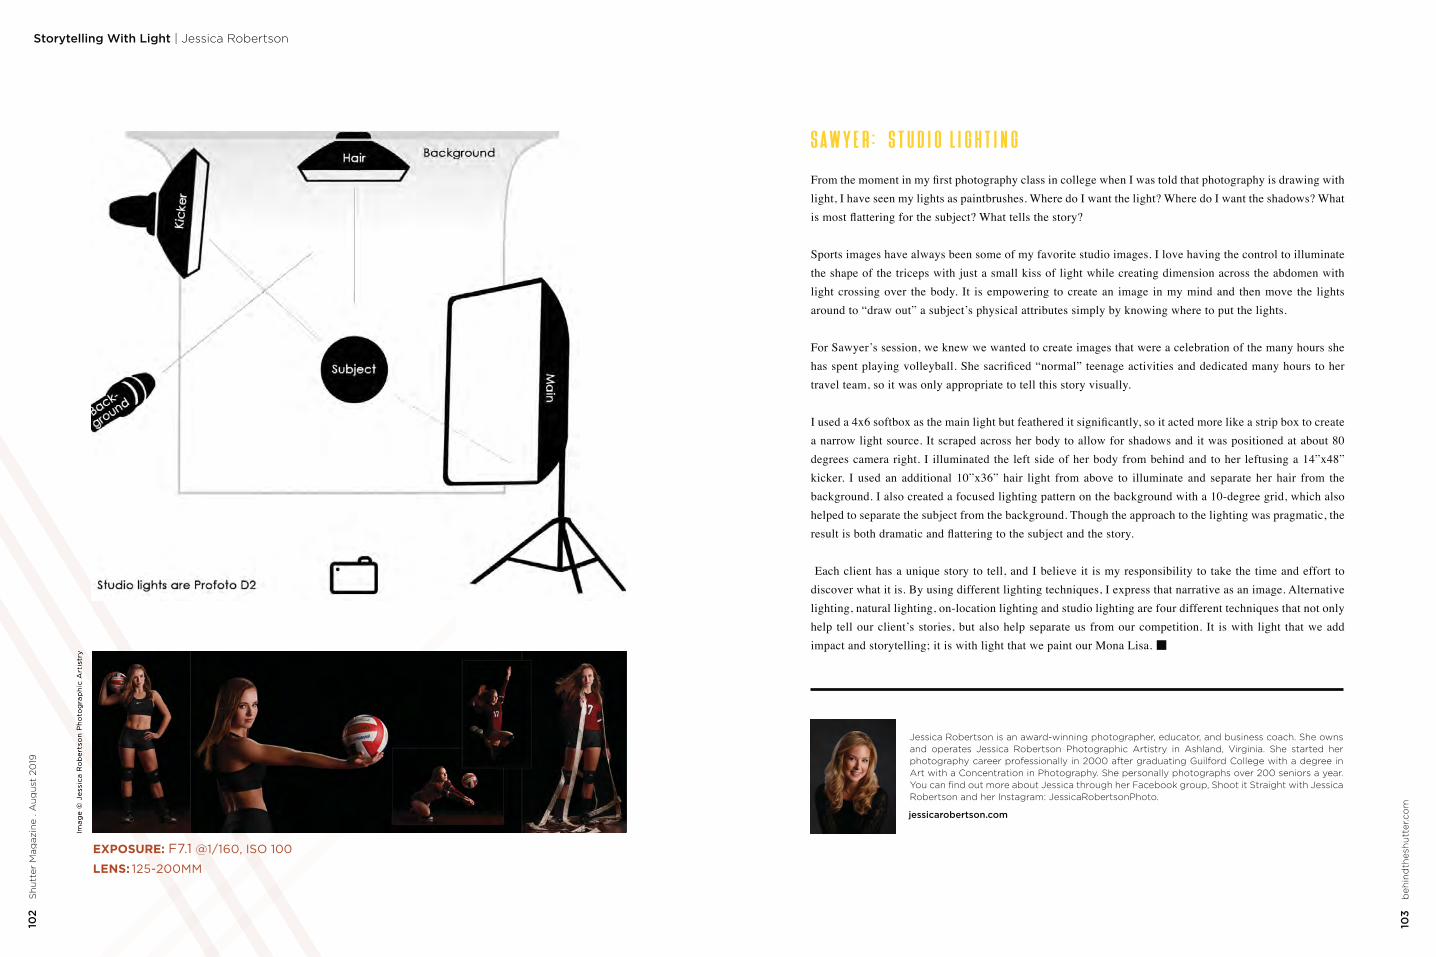
Sports images have always been some of my favorite studio images. I love having the control to illuminate the shape of the triceps with just a small kiss of light while creating dimension across the abdomen with light crossing over the body. It is empowering to create an image in my mind and then move the lights around to “draw out” a subject’s physical attributes simply by knowing where to put the lights.
For Sawyer’s session, we knew we wanted to create images that were a celebration of the many hours she
travel team, so it was only appropriate to tell this story visually.
a narrow light source. It scraped across her body to allow for shadows and it was positioned at about 80 degrees camera right. I illuminated the left side of her body from behind and to her leftusing a 14”x48” kicker. I used an additional 10”x36” hair light from above to illuminate and separate her hair from the background. I also created a focused lighting pattern on the background with a 10-degree grid, which also
Each client has a unique story to tell, and I believe it is my responsibility to take the time and effort to discover what it is. By using different lighting techniques, I express that narrative as an image. Alternative lighting, natural lighting, on-location lighting and studio lighting are four different techniques that not only help tell our client’s stories, but also help separate us from our competition. It is with light that we add impact and storytelling; it is with light that we paint our Mona Lisa.
S A W Y E R : S T U D I O L I G H T I N G
EXPOSURE: F7.1 @1/160, ISO 100
LENS: 125-200MM

104
S
hu
tter
Mag
azin
e . A
ug
ust
20
19Lighting for Conceptual Photography – 7 Tips to Shake Things Up | Jess Hess
with Jess Hess
105
beh
ind
thes
hu
tter
.co
m
Ima
ge
© W
urm
wo
od
Ph
oto
gra
ph
y
106
Sh
utt
er M
agaz
ine
. Au
gu
st 2
019
107
beh
ind
thes
hu
tter
.co
m
Lighting for Conceptual Photography | Jess Hess
Ima
ge
© W
urm
wo
od
Ph
oto
gra
ph
y
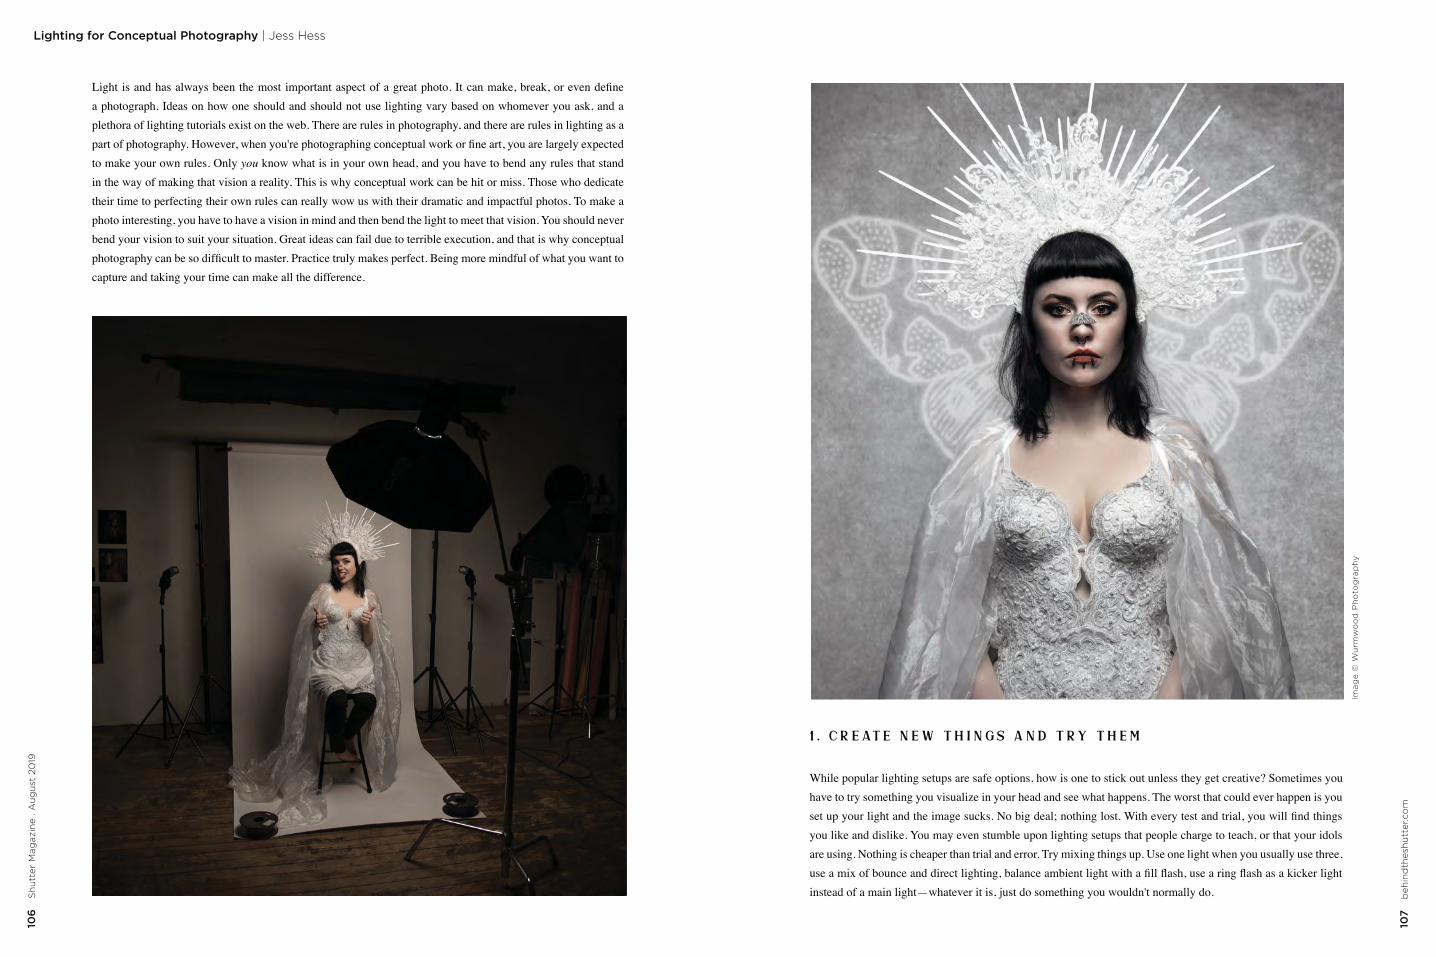
a photograph. Ideas on how one should and should not use lighting vary based on whomever you ask, and a plethora of lighting tutorials exist on the web. There are rules in photography, and there are rules in lighting as a
to make your own rules. Only you know what is in your own head, and you have to bend any rules that stand in the way of making that vision a reality. This is why conceptual work can be hit or miss. Those who dedicate their time to perfecting their own rules can really wow us with their dramatic and impactful photos. To make a photo interesting, you have to have a vision in mind and then bend the light to meet that vision. You should never bend your vision to suit your situation. Great ideas can fail due to terrible execution, and that is why conceptual
capture and taking your time can make all the difference.
1 . C R E AT E N E W T H I N G S A N D T R Y T H E M
While popular lighting setups are safe options, how is one to stick out unless they get creative? Sometimes you have to try something you visualize in your head and see what happens. The worst that could ever happen is you
you like and dislike. You may even stumble upon lighting setups that people charge to teach, or that your idols are using. Nothing is cheaper than trial and error. Try mixing things up. Use one light when you usually use three,
instead of a main light—whatever it is, just do something you wouldn't normally do.
108
Sh
utt
er M
agaz
ine
. Au
gu
st 2
019
109
beh
ind
thes
hu
tter
.co
m
Lighting for Conceptual Photography | Jess Hess
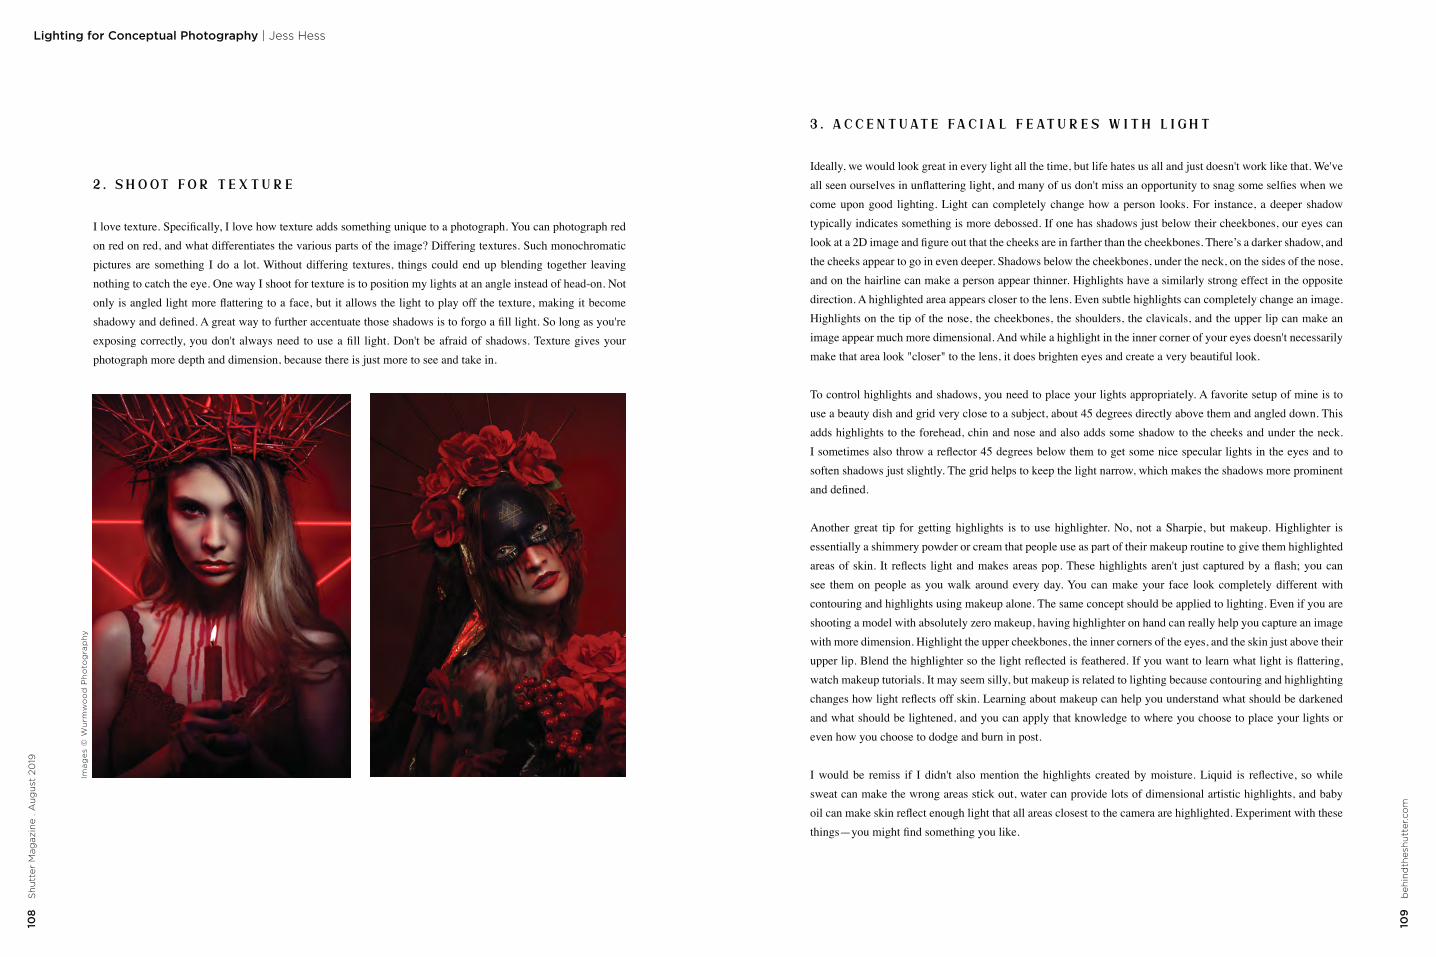
2 . S H O OT F O R T E X T U R E
on red on red, and what differentiates the various parts of the image? Differing textures. Such monochromatic pictures are something I do a lot. Without differing textures, things could end up blending together leaving nothing to catch the eye. One way I shoot for texture is to position my lights at an angle instead of head-on. Not
photograph more depth and dimension, because there is just more to see and take in.
3 . A C C E N T UAT E FA C I A L F E AT U R E S W I T H L I G H T
Ideally, we would look great in every light all the time, but life hates us all and just doesn't work like that. We've
come upon good lighting. Light can completely change how a person looks. For instance, a deeper shadow typically indicates something is more debossed. If one has shadows just below their cheekbones, our eyes can
the cheeks appear to go in even deeper. Shadows below the cheekbones, under the neck, on the sides of the nose, and on the hairline can make a person appear thinner. Highlights have a similarly strong effect in the opposite
Highlights on the tip of the nose, the cheekbones, the shoulders, the clavicals, and the upper lip can make an
make that area look "closer" to the lens, it does brighten eyes and create a very beautiful look.
use a beauty dish and grid very close to a subject, about 45 degrees directly above them and angled down. This adds highlights to the forehead, chin and nose and also adds some shadow to the cheeks and under the neck.
soften shadows just slightly. The grid helps to keep the light narrow, which makes the shadows more prominent
essentially a shimmery powder or cream that people use as part of their makeup routine to give them highlighted
see them on people as you walk around every day. You can make your face look completely different with
shooting a model with absolutely zero makeup, having highlighter on hand can really help you capture an image with more dimension. Highlight the upper cheekbones, the inner corners of the eyes, and the skin just above their
watch makeup tutorials. It may seem silly, but makeup is related to lighting because contouring and highlighting
and what should be lightened, and you can apply that knowledge to where you choose to place your lights or even how you choose to dodge and burn in post.
sweat can make the wrong areas stick out, water can provide lots of dimensional artistic highlights, and baby
Ima
ge
s ©
Wu
rmw
oo
d P
ho
tog
rap
hy
110
S
hu
tter
Mag
azin
e . A
ug
ust
20
19
111
beh
ind
thes
hu
tter
.co
m
Lighting for Conceptual Photography | Jess Hess
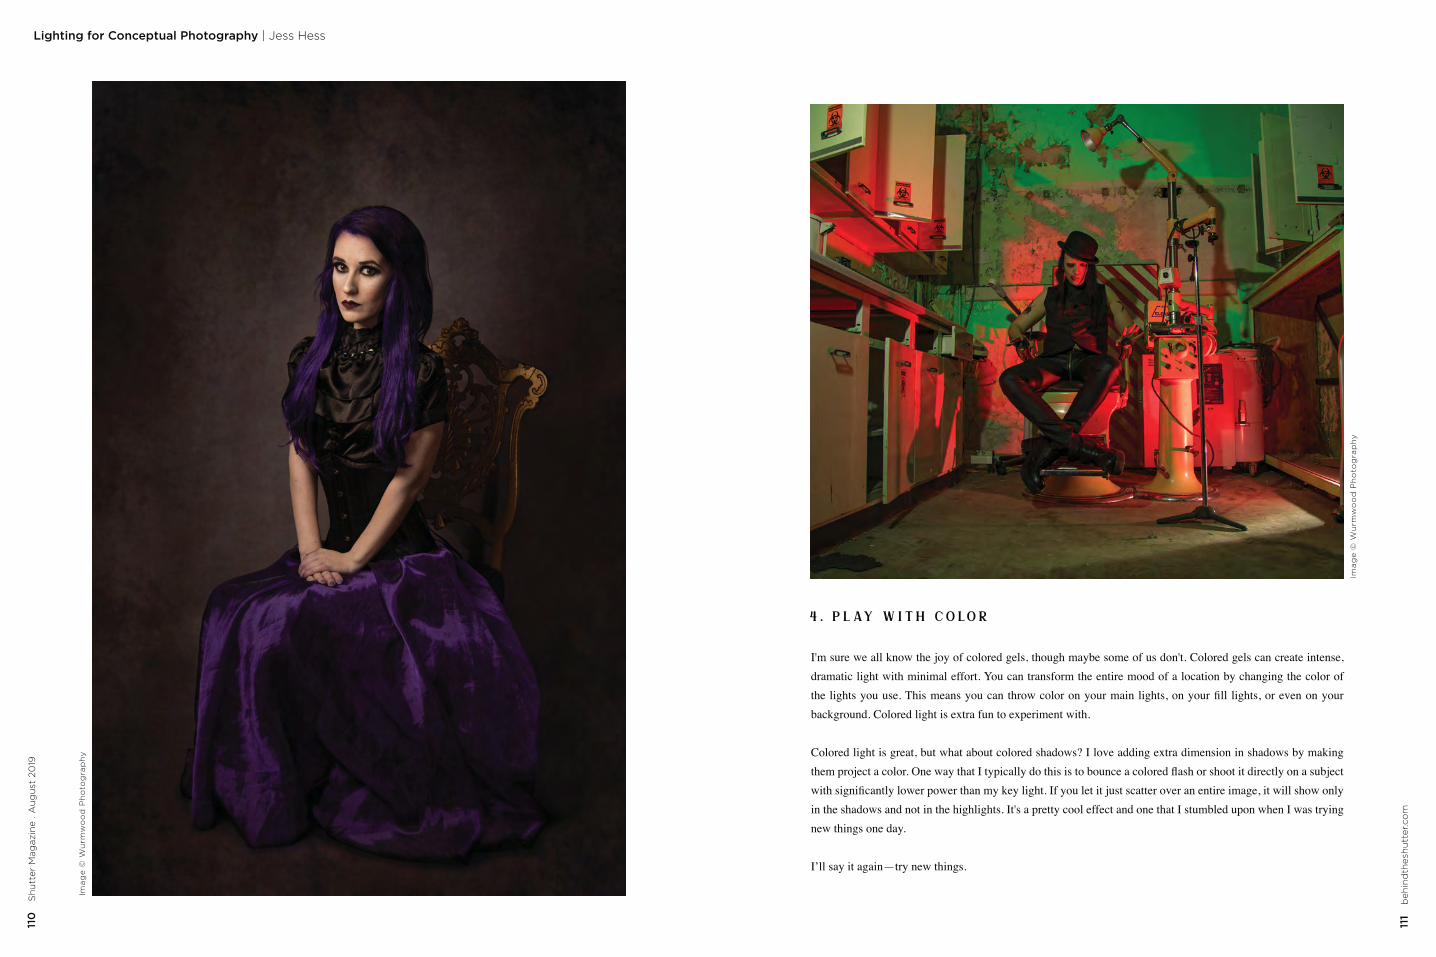
4 . P L AY W I T H C O LO R
I'm sure we all know the joy of colored gels, though maybe some of us don't. Colored gels can create intense, dramatic light with minimal effort. You can transform the entire mood of a location by changing the color of
background. Colored light is extra fun to experiment with.
Colored light is great, but what about colored shadows? I love adding extra dimension in shadows by making
in the shadows and not in the highlights. It's a pretty cool effect and one that I stumbled upon when I was trying new things one day.
Ima
ge
© W
urm
wo
od
Ph
oto
gra
ph
y
Ima
ge
© W
urm
wo
od
Ph
oto
gra
ph
y
112
Sh
utt
er M
agaz
ine
. Au
gu
st 2
019
113
beh
ind
thes
hu
tter
.co
m
Lighting for Conceptual Photography | Jess Hess
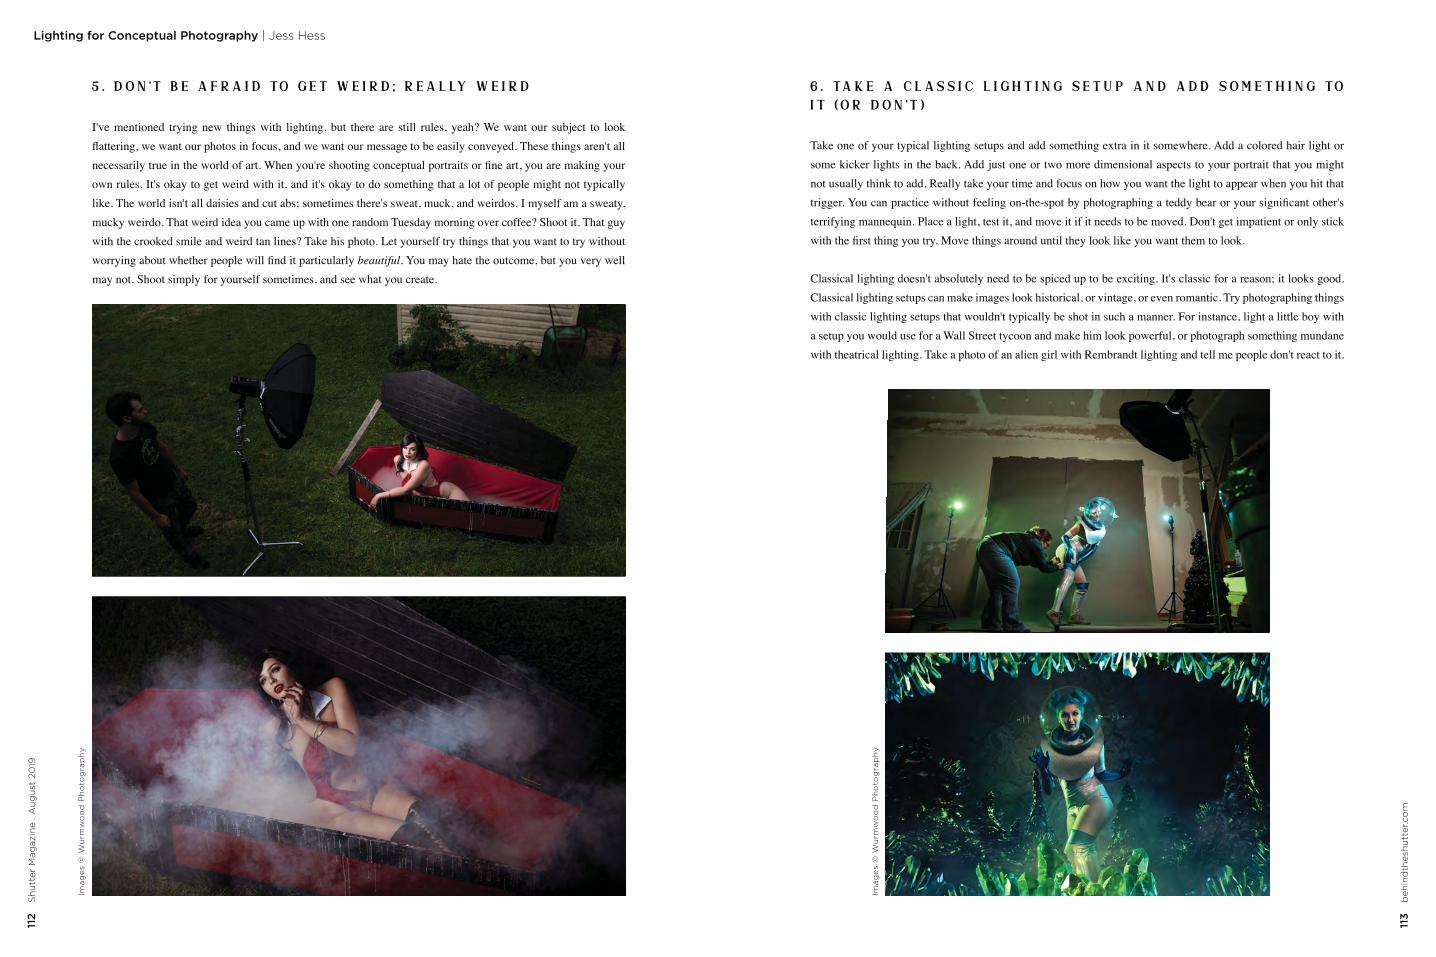
5 . D O N ' T B E A F R A I D TO G E T W E I R D ; R E A L LY W E I R D
I've mentioned trying new things with lighting, but there are still rules, yeah? We want our subject to look
own rules. It's okay to get weird with it, and it's okay to do something that a lot of people might not typically like. The world isn't all daisies and cut abs; sometimes there's sweat, muck, and weirdos. I myself am a sweaty, mucky weirdo. That weird idea you came up with one random Tuesday morning over coffee? Shoot it. That guy with the crooked smile and weird tan lines? Take his photo. Let yourself try things that you want to try without
beautiful. You may hate the outcome, but you very well may not. Shoot simply for yourself sometimes, and see what you create.
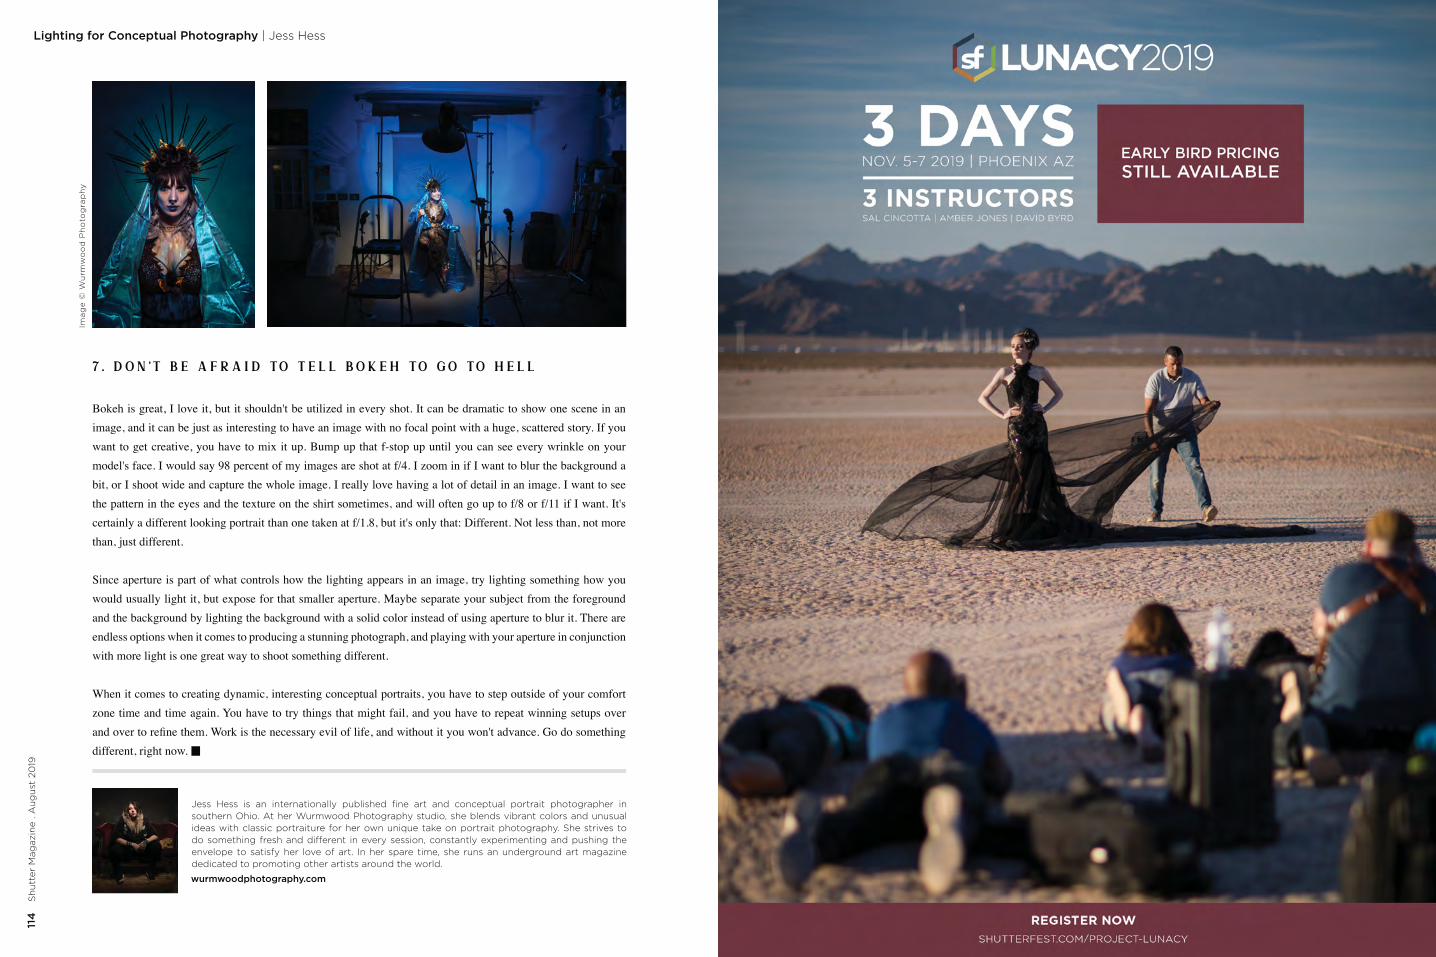
6 . TA K E A C L A S S I C L I G H T I N G S E T U P A N D A D D S O M E T H I N G TO I T ( O R D O N ' T )
not usually think to add. Really take your time and focus on how you want the light to appear when you hit that
Classical lighting doesn't absolutely need to be spiced up to be exciting. It's classic for a reason; it looks good. Classical lighting setups can make images look historical, or vintage, or even romantic. Try photographing things with classic lighting setups that wouldn't typically be shot in such a manner. For instance, light a little boy with a setup you would use for a Wall Street tycoon and make him look powerful, or photograph something mundane with theatrical lighting. Take a photo of an alien girl with Rembrandt lighting and tell me people don't react to it.
Ima
ge
s ©
Wu
rmw
oo
d P
ho
tog
rap
hy
Ima
ge
s ©
Wu
rmw
oo
d P
ho
tog
rap
hy
114
S
hu
tter
Mag
azin
e . A
ug
ust
20
19Lighting for Conceptual Photography | Jess Hess
115
beh
ind
thes
hu
tter
.co
mJess Hess is an internationally published fine art and conceptual portrait photographer in southern Ohio. At her Wurmwood Photography studio, she blends vibrant colors and unusual ideas with classic portraiture for her own unique take on portrait photography. She strives to do something fresh and different in every session, constantly experimenting and pushing the envelope to satisfy her love of art. In her spare time, she runs an underground art magazine dedicated to promoting other artists around the world.
wurmwoodphotography.com
7 . D O N ' T B E A F R A I D TO T E L L B O K E H TO G O TO H E L L
image, and it can be just as interesting to have an image with no focal point with a huge, scattered story. If you
model's face. I would say 98 percent of my images are shot at f/4. I zoom in if I want to blur the background a bit, or I shoot wide and capture the whole image. I really love having a lot of detail in an image. I want to see the pattern in the eyes and the texture on the shirt sometimes, and will often go up to f/8 or f/11 if I want. It's certainly a different looking portrait than one taken at f/1.8, but it's only that: Different. Not less than, not more than, just different.
Since aperture is part of what controls how the lighting appears in an image, try lighting something how you
and the background by lighting the background with a solid color instead of using aperture to blur it. There are endless options when it comes to producing a stunning photograph, and playing with your aperture in conjunction with more light is one great way to shoot something different.
When it comes to creating dynamic, interesting conceptual portraits, you have to step outside of your comfort zone time and time again. You have to try things that might fail, and you have to repeat winning setups over
different, right now.
Ima
ge
© W
urm
wo
od
Ph
oto
gra
ph
y
Ima
ge
© W
urm
wo
od
Ph
oto
gra
ph
y
Ima
ge
© W
urm
wo
od
Ph
oto
gra
ph
y
| Advertisment
It’s not just a light. It’s a lighting system. This is the part people just don’t understand. We make these investments in different equipment without ever wondering if or how it will work together. As you grow your lighting kit, your lights will need to work together. Not all jobs are created equal. I don’t always need huge, powerful lights. Sometimes, I need a small kicker. Having a smaller light work seamlessly with my studio strobes is priceless. It’s about having the right tool at the right time to create epic images.
Here are some thoughts and examples on how I use the Profoto system to create epic images.
of these lights are battery-powered. This is a true gamechanger. In the past, I had one set of strobes for in-studio and one set for on-location. It was a giant pain in the you-know-what. Today, that is no longer an issue. I use the same lights no matter where I am at. This gives me tremendous
Profoto has given photographers an incredible arsenal of lights and light-shaping tools to allow us to create awe-inspiring images anywhere in the world, making the world our studio.
B10 Plus // 500Ws // 4.2lbs // 200 Full Power Flashes
This is a workhorse of a light. With 500Ws of light and a fast recycle time, this gives me the power I need in most circumstances. I can use this both indoors and on-location on bright sunny days.
If you plan on working in multiple locations and environments, this is the light I would recommend adding to your kit. It will give you all the power and recycle time you need. Now, this is a little heavier to carry around with you, but trust me, when you need that extra stop of light to overpower the sun, you will wish you had this in your bag.
In the studio, this is my go-to light. With 500 Ws, the B10Plus gives me all the power I could ever need on almost every studio shoot.
Ima
ge
© S
alva
tore
Cin
cott
a P
ho
tog
rap
hy
B10 // 250Ws // 3.3lbs // 400 Full Power Flashes
Think of the B10 as the baby sister to the B10 Plus. Everything I said about the Plus holds true for the B10. The difference? You have one stop less of power, but with that comes a more portable form factor.
Something we haven’t had a chance to talk about yet is recycle time. The B10 will give you a two-second recycle time at full power. And the B10 Plus will give you two-and-a-half. This is extremely important when you are trying to make sure you don’t miss a shot. No one has time to wait for a strobe to recycle. You are going to miss a lot of shots.
Pro Tip: Always order an extra battery for your lights. When you are shooting away, you will lose count of how many images you are creating, and the last thing you want is a dead battery to abruptly end your fun.
A1X // 76Ws // 1.2lbs // 450 Full Power Flashes
lineup. Small, versatile and powerful. Don’t let the 76Ws fool you—this light offers more than enough power to get even the most epic
Pro Tip: Invest in the gels. Profoto offers a CTO gel kit that you will absolutely need if you are going to use the lights in a mixed
to match the light in the room. The gel kit will do the trick.
Pro Tip: Pick up a monopod for use on-location. I will typically have this light mounted on a monopod, allowing my assistant to hold it at a higher angle, mimicking that of the sun to create a more realistic lighting pattern on my subject.
Imag
e ©
Sal
vato
re C
inco
tta
Ph
oto
gra
phy
with Miguel Quiles
Ima
ge
© M
iqu
el
Qu
iles
Ph
oto
gra
ph
y
119
beh
ind
thes
hu
tter
.co
m

120
S
hu
tter
Mag
azin
e . A
ug
ust
20
19
121
beh
ind
thes
hu
tter
.co
m
5 Tips For Mastering Portrait Lighting | Miguel Quiles12
0S
hu
tter
Mag
azin
e . A
ug
ust
20
190
190
1919
TIP #1-BE AWARE OF “EVERY DAY LIGHT”
The single most important element of a photograph isn’t bokeh, or what kind of camera or lens was used to take it—it’s light! Great lighting is what separates the good images from the bad, as well as the good from the great. It’s literally and technically what your camera sensors capture every time you press your shutter. As a photographer, our number-one goal should be to chase down great lighting, maybe even learn how to create it if called for, and then place our subjects within that scene to bask in its brilliance. There are some useful strategies that I’ve learned and implemented in the last few years that have dramatically improved my portrait-lighting ability, and I believe these tips will help you as well!
Before I became known for my lighting style, I was a curious hobbyist who studied beautiful images from all of
• What was the light source? • Where was the light coming from in relation to the subject?
• What was the color temperature (was it golden or cool in color)?
As I began to wire my brain to identify and try to answer these questions, I started to try to become aware of “Everyday Light,” meaning the light that we see all around us throughout any given day. So how exactly does that work, and how do you utilize it?
One simple way of doing that is to pause at three or four moments throughout your day and answer those questions above. If you’re at a coffee shop, sitting by a window, talking to a friend, pay close attention to how they are being lit. Is it a combination of daylight mixed with some ambient light coming from within the shop? If so, do you see a different color of light on the store-lit side of the face versus the window side? Are items on the
seem random, but in those situations, think of what it might take to get the everyday light that’s available around you to look better. Then, when you’re in a situation where you’re attempting to capture a great image, you’ll start to be aware of whether or not the spot that you’re in is the most conducive to taking a good shot, or if you might need to look elsewhere or maybe even create your own light. It’s a fun exercise that will fundamentally change how and when you take a photo.
Ima
ge
s ©
Miq
ue
l Q
uile
s P
ho
tog
rap
hy
122
Sh
utt
er M
agaz
ine
. Au
gu
st 2
019
123
beh
ind
thes
hu
tter
.co
m
5 Tips For Mastering Portrait Lighting | Miguel Quiles12
2S
hu
tter
Mag
azin
e . A
ug
ust
20
19
TIP #2-TAKE PHOTOS AT DIFFERENT TIMES OF DAY
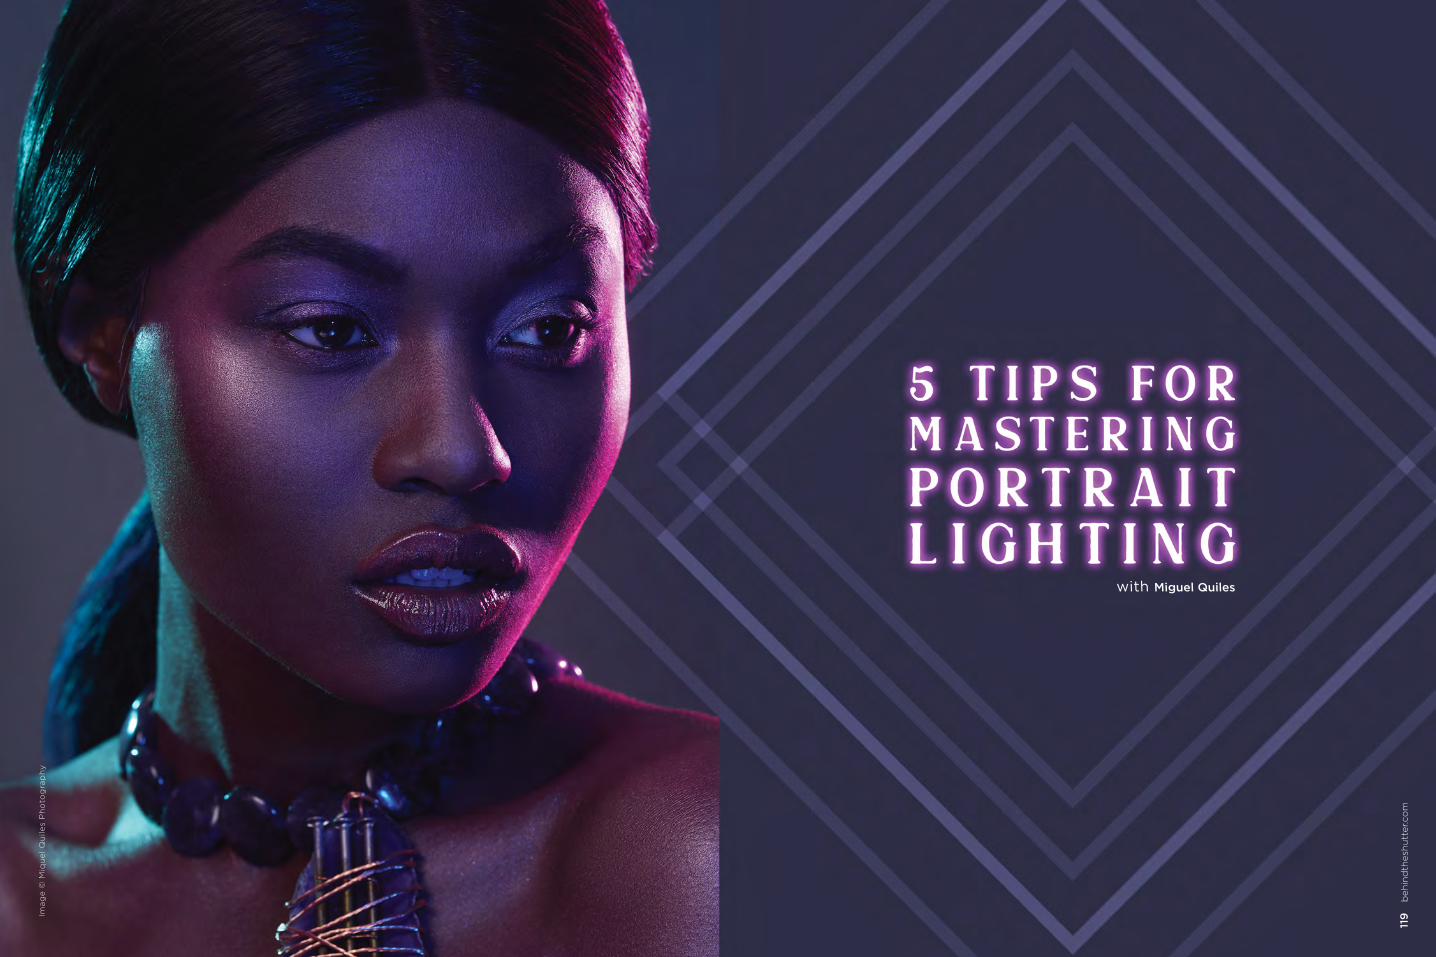
One of the most basic ideas that you’ll hear about is to take photos during “golden hour,” which generally occurs an hour after sunrise or an hour before sunset. While it is a perfect time to try to capture a nice image, it’s what I’ve come to learn as the “low-hanging fruit” of portrait photography. Nearly everyone can take a great image in these conditions, and it makes a great photo taken in this time a bit more—generic, for lack of a better word. Look through the portfolios of your favorite portrait photographers, and you’ll likely see this trend for yourself.
Rather than following the pack all the time, try breaking away from the commonly held times that one should take a portrait and practice shooting at all hours of the day. It’ll make you far more versatile and better equipped to handle anything that mother nature can throw at you lighting-wise.
Ima
ge
© M
iqu
el
Qu
iles
Ph
oto
gra
ph
y
Ima
ge
s ©
Miq
ue
l Q
uile
s P
ho
tog
rap
hy
124
S
hu
tter
Mag
azin
e . A
ug
ust
20
19
125
beh
ind
thes
hu
tter
.co
m
5 Tips For Mastering Portrait Lighting | Miguel Quiles
125
beh
ind
thes
hu
tter
.co
m
TIP #3-NATURAL LIGHT CHALLENGE
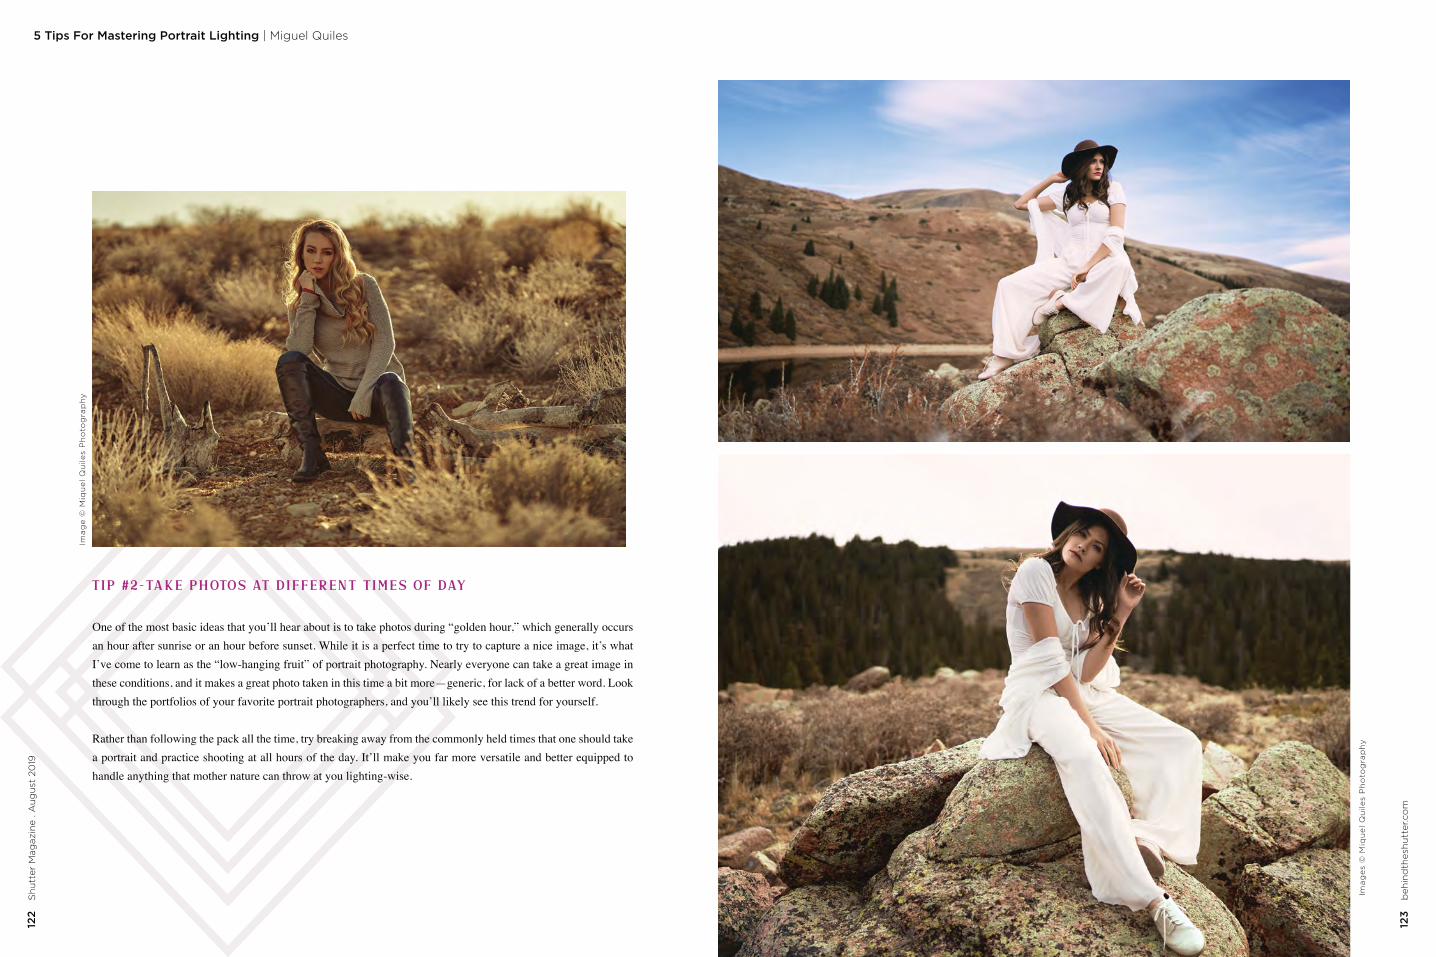
The idea behind this tip is quite simple. If you’ve taken some images using natural, available light,
from speedlites, strobes and constant sources. You’ll
lighting scenarios relatively easily using lights that you are fully in control of. To give you an example of how I utilized this tip, I set up a black background in a shaded area outside of my studio and took a portrait of my subject for the day, Julie Dawson. After taking a few images I was happy with, I went into the studio and attempted to create a similar look using my studio strobes. I knew that the lighting that was illuminating her outside wasn’t actually hitting her directly, so I used that as a starting point for my lighting. I took two strobes, one on either side of her, and instead of pointing them directly at her, I bounced them forward into a white wall in front of her. This light bounced off the white wall and illuminated her in a way that was similar to what I was seeing outside. While the results you’re seeing here are from a few years ago, the technique is pretty close to what I would do today if faced with a similar exercise.
Ima
ge
© M
iqu
el
Qu
iles
Ph
oto
gra
ph
y
Ima
ge
© M
iqu
el
Qu
iles
Ph
oto
gra
ph
y
126
Sh
utt
er M
agaz
ine
. Au
gu
st 2
019
5 Tips For Mastering Portrait Lighting | Miguel Quiles
Ima
ge
s ©
Miq
ue
l Q
uile
s P
ho
tog
rap
hy
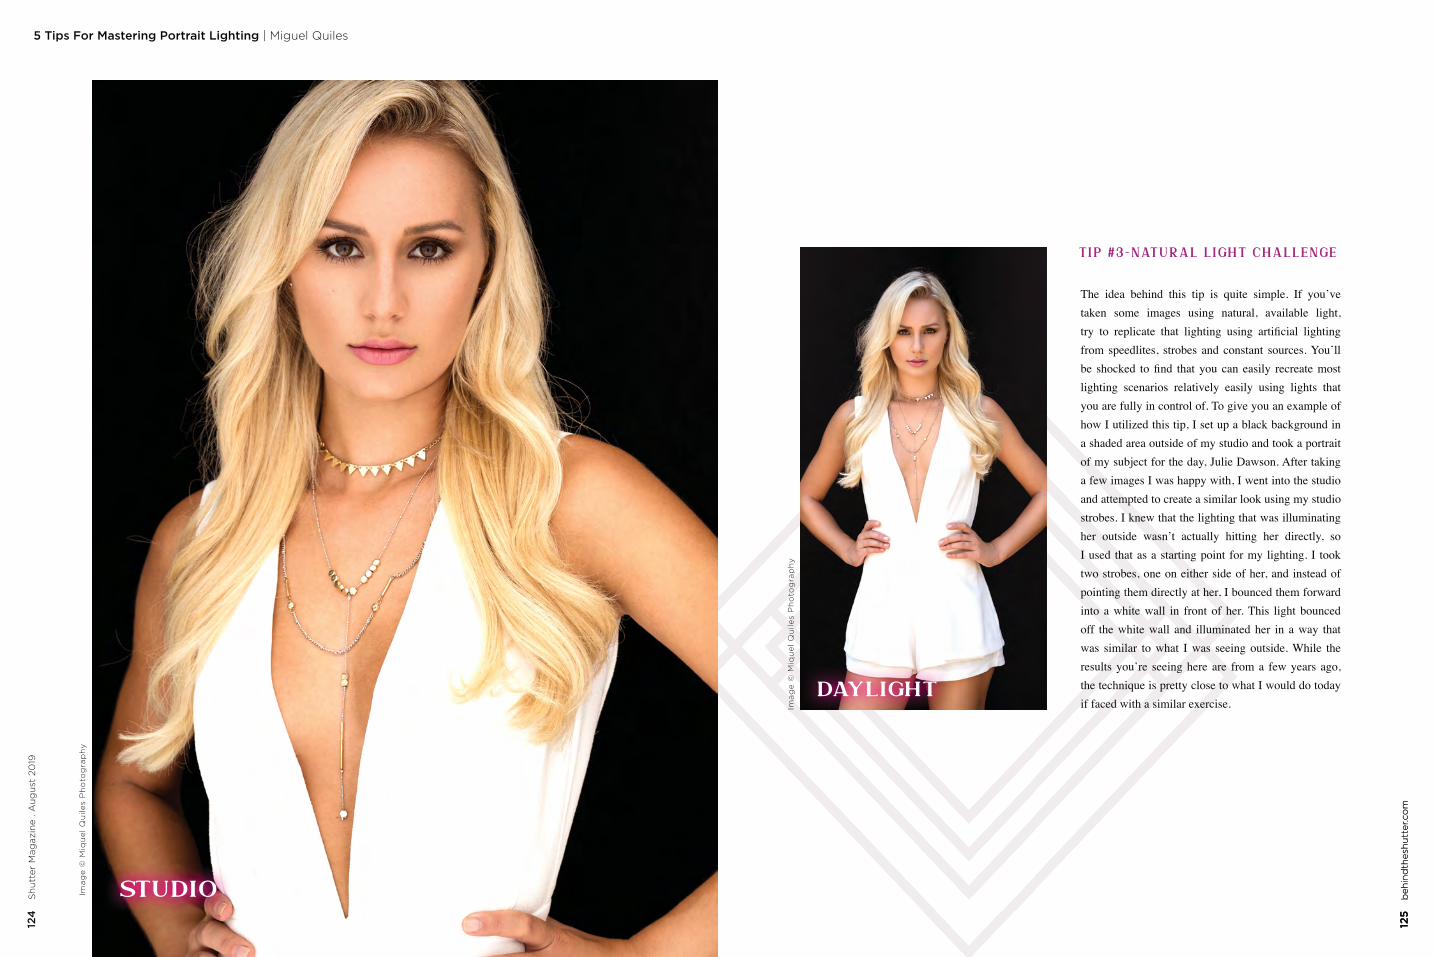
TIP #4-LIGHT SHAPING ROUND ROBIN
Ever wonder what the differences are between, say, a beauty dish and an umbrella? Or maybe a softbox and a Fresnel? Every light-shaper out there will create a different type of light effect on your subject, and it’s important to be able to identify which ones you’ll need for your given application. It’s a light study that will raise your IQ when it comes to identifying and creating great lighting, and it’s crazy simple. To start, you can
the silver side, white side, gold side, black side and diffusion
to see how that throws light onto your subject. If you have the
quickly over time what each light is doing. For example, in my case, I learned that I personally preferred the light that I would get from a large octabox versus a similarly sized umbrella.
128
Sh
utt
er M
agaz
ine
. Au
gu
st 2
019
129
beh
ind
thes
hu
tter
.co
m
5 Tips For Mastering Portrait Lighting | Miguel Quiles12
8 S
hu
tter
Mag
azin
e . A
ug
ust
20
190
19
Miguel Quiles is a New Jersey-based portrait & headshot photographer. He's proud to be a recognized as a Sony "Artisan of Imagery" and Profoto "Legend Of Light". Miguel has spoken on plaIorms around the world, including major conferences such as ShuLerfest, WPPI, & Photo Plus. You can catch Miguel teaching lighAng weekly on his YouTube channel along with other topics aimed at helping photographers reach their goals.
miguelquiles.com
TIP #5-PRACTICE DAILY
would simply break out a soda bottle, place it on a counter, and snap away! Don’t ever make the excuse that you don’t have models to help you practice. Make the best of what you have and try these tips out every single day. Who knows, maybe you too will see yourself make huge strides in your mastery over lighting!
Ima
ge
s ©
Miq
ue
l Q
uile
s P
ho
tog
rap
hy

Laws of Light: 5 Tips for Shooting in Direct Sun | Jay P. Morgan
with Jay P. Morgan, The Slanted Lens
Ima
ge
© J
ay P
. M
org
an
, T
he
Sla
nte
d L
en
s
130
S
hu
tter
Mag
azin
e . A
ug
ust
20
19
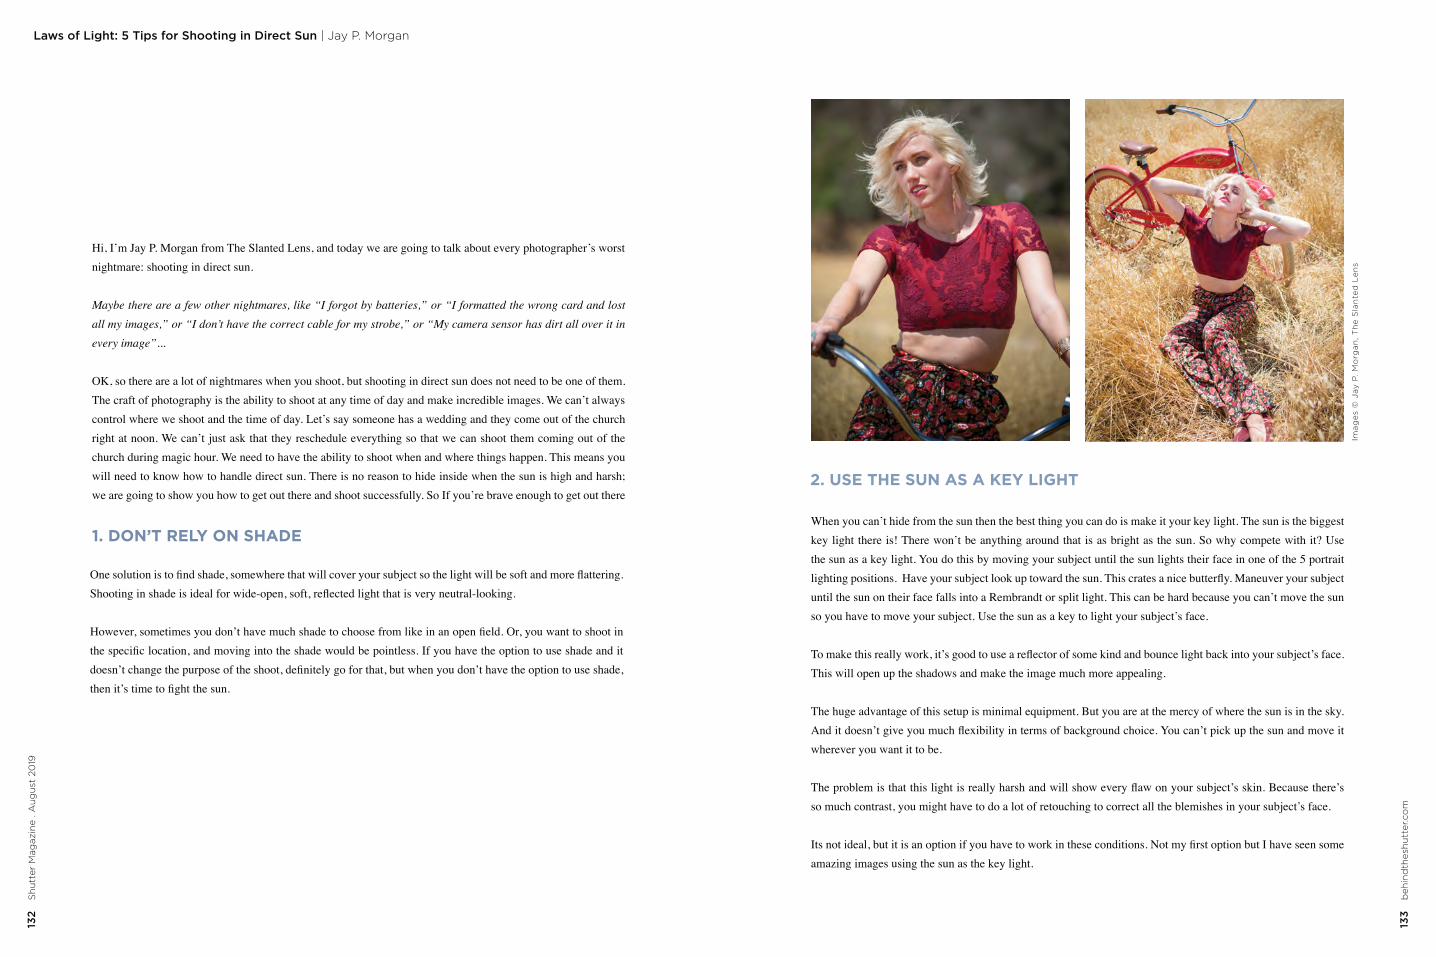
132
Sh
utt
er M
agaz
ine
. Au
gu
st 2
019
133
beh
ind
thes
hu
tter
.co
m
Laws of Light: 5 Tips for Shooting in Direct Sun | Jay P. Morgan
1. DON’T RELY ON SHADE
Hi, I’m Jay P. Morgan from The Slanted Lens, and today we are going to talk about every photographer’s worst nightmare: shooting in direct sun.
Maybe there are a few other nightmares, like “I forgot by batteries,” or “I formatted the wrong card and lost all my images,” or “I don’t have the correct cable for my strobe,” or “My camera sensor has dirt all over it in every image”...
OK, so there are a lot of nightmares when you shoot, but shooting in direct sun does not need to be one of them. The craft of photography is the ability to shoot at any time of day and make incredible images. We can’t always control where we shoot and the time of day. Let’s say someone has a wedding and they come out of the church right at noon. We can’t just ask that they reschedule everything so that we can shoot them coming out of the church during magic hour. We need to have the ability to shoot when and where things happen. This means you will need to know how to handle direct sun. There is no reason to hide inside when the sun is high and harsh; we are going to show you how to get out there and shoot successfully. So If you’re brave enough to get out there
2. USE THE SUN AS A KEY LIGHT
When you can’t hide from the sun then the best thing you can do is make it your key light. The sun is the biggest key light there is! There won’t be anything around that is as bright as the sun. So why compete with it? Use the sun as a key light. You do this by moving your subject until the sun lights their face in one of the 5 portrait
until the sun on their face falls into a Rembrandt or split light. This can be hard because you can’t move the sun so you have to move your subject. Use the sun as a key to light your subject’s face.
This will open up the shadows and make the image much more appealing.
The huge advantage of this setup is minimal equipment. But you are at the mercy of where the sun is in the sky.
wherever you want it to be.
so much contrast, you might have to do a lot of retouching to correct all the blemishes in your subject’s face.
amazing images using the sun as the key light.
Ima
ge
s ©
Jay
P.
Mo
rga
n,
Th
e S
lan
ted
Le
ns
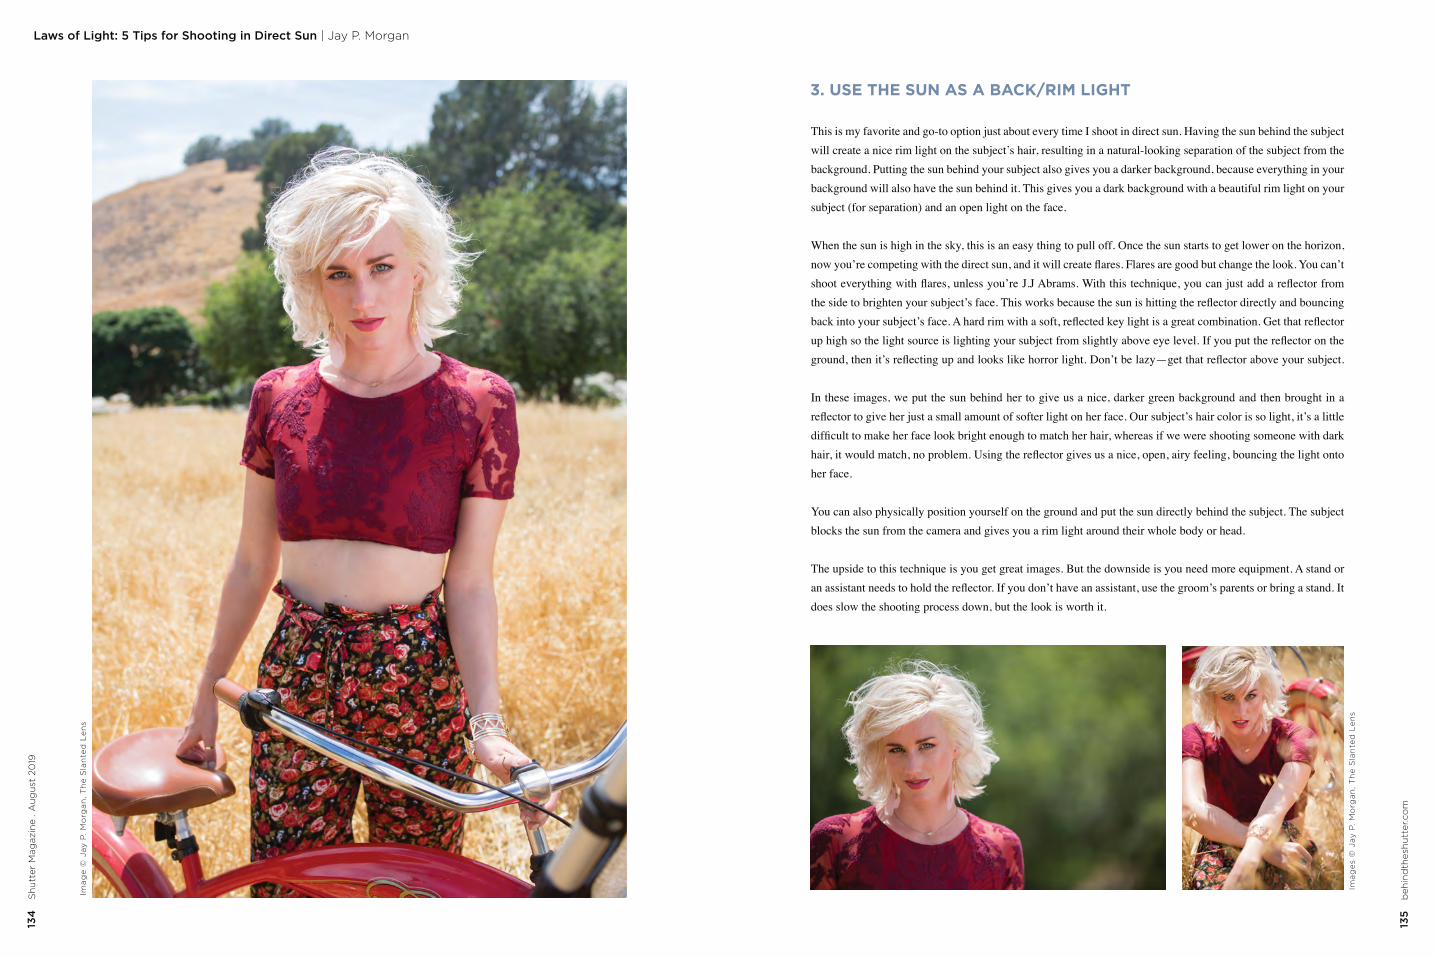
134
S
hu
tter
Mag
azin
e . A
ug
ust
20
19
135
beh
ind
thes
hu
tter
.co
m
Laws of Light: 5 Tips for Shooting in Direct Sun | Jay P. Morgan
3. USE THE SUN AS A BACK/RIM LIGHT
This is my favorite and go-to option just about every time I shoot in direct sun. Having the sun behind the subject will create a nice rim light on the subject’s hair, resulting in a natural-looking separation of the subject from the background. Putting the sun behind your subject also gives you a darker background, because everything in your background will also have the sun behind it. This gives you a dark background with a beautiful rim light on your subject (for separation) and an open light on the face.
When the sun is high in the sky, this is an easy thing to pull off. Once the sun starts to get lower on the horizon,
In these images, we put the sun behind her to give us a nice, darker green background and then brought in a
her face.
You can also physically position yourself on the ground and put the sun directly behind the subject. The subject blocks the sun from the camera and gives you a rim light around their whole body or head.
The upside to this technique is you get great images. But the downside is you need more equipment. A stand or
does slow the shooting process down, but the look is worth it.
Ima
ge
© J
ay P
. M
org
an
, T
he
Sla
nte
d L
en
s
Ima
ge
s ©
Jay
P.
Mo
rga
n,
Th
e S
lan
ted
Le
ns
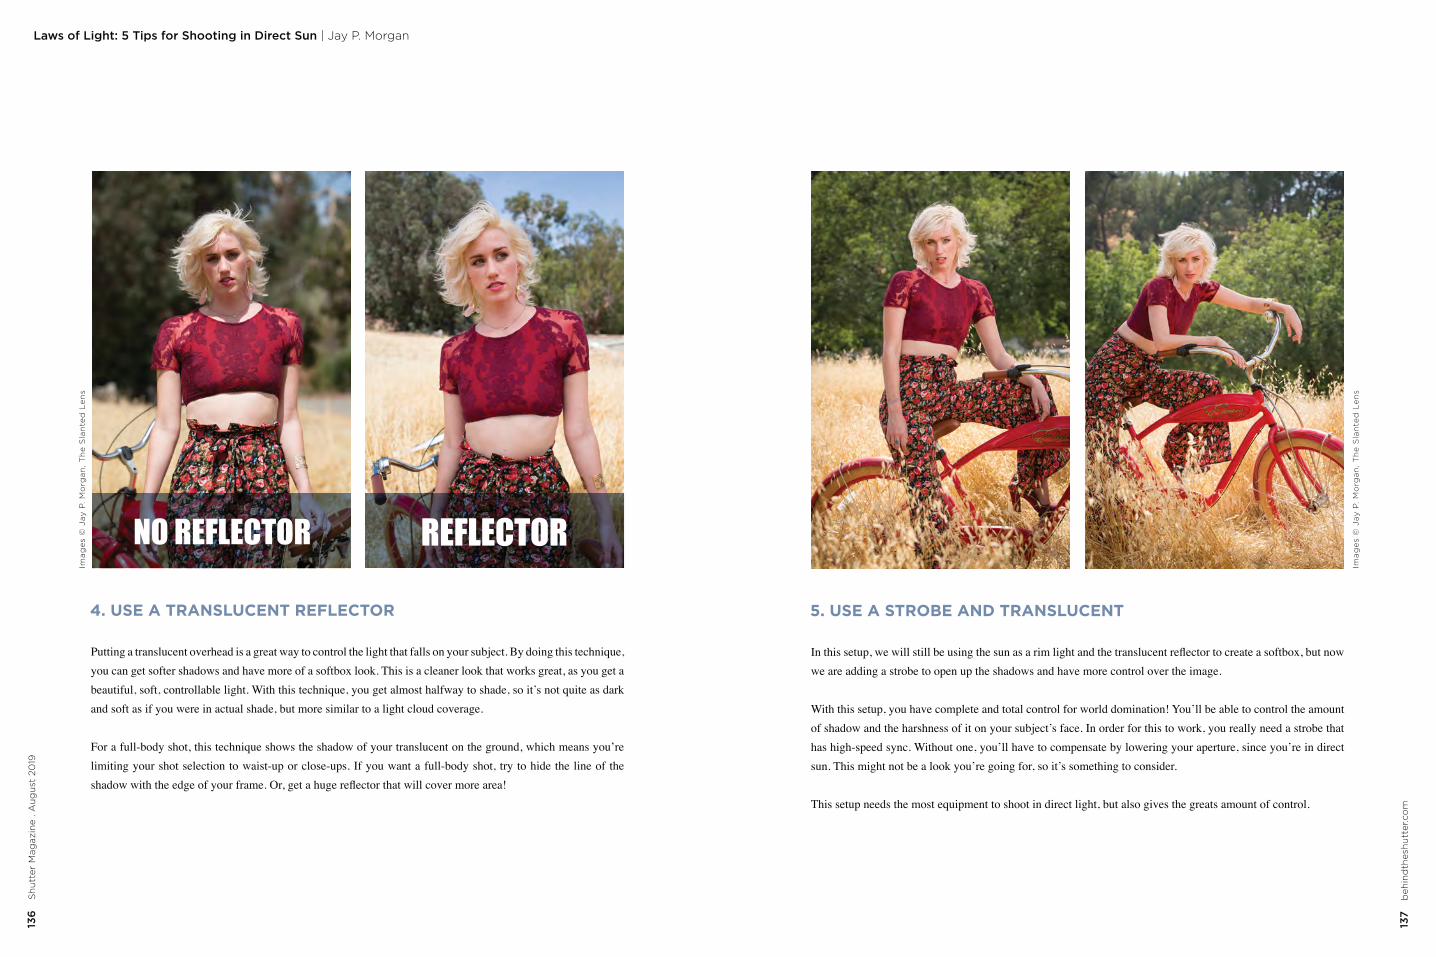
136
Sh
utt
er M
agaz
ine
. Au
gu
st 2
019
137
beh
ind
thes
hu
tter
.co
m
Laws of Light: 5 Tips for Shooting in Direct Sun | Jay P. Morgan
4. USE A TRANSLUCENT REFLECTOR
Putting a translucent overhead is a great way to control the light that falls on your subject. By doing this technique,
beautiful, soft, controllable light. With this technique, you get almost halfway to shade, so it’s not quite as dark and soft as if you were in actual shade, but more similar to a light cloud coverage.
limiting your shot selection to waist-up or close-ups. If you want a full-body shot, try to hide the line of the
5. USE A STROBE AND TRANSLUCENT
we are adding a strobe to open up the shadows and have more control over the image.
With this setup, you have complete and total control for world domination! You’ll be able to control the amount of shadow and the harshness of it on your subject’s face. In order for this to work, you really need a strobe that has high-speed sync. Without one, you’ll have to compensate by lowering your aperture, since you’re in direct sun. This might not be a look you’re going for, so it’s something to consider.
This setup needs the most equipment to shoot in direct light, but also gives the greats amount of control.
Ima
ge
s ©
Jay
P.
Mo
rga
n,
Th
e S
lan
ted
Le
ns
Ima
ge
s ©
Jay
P.
Mo
rga
n,
Th
e S
lan
ted
Le
ns
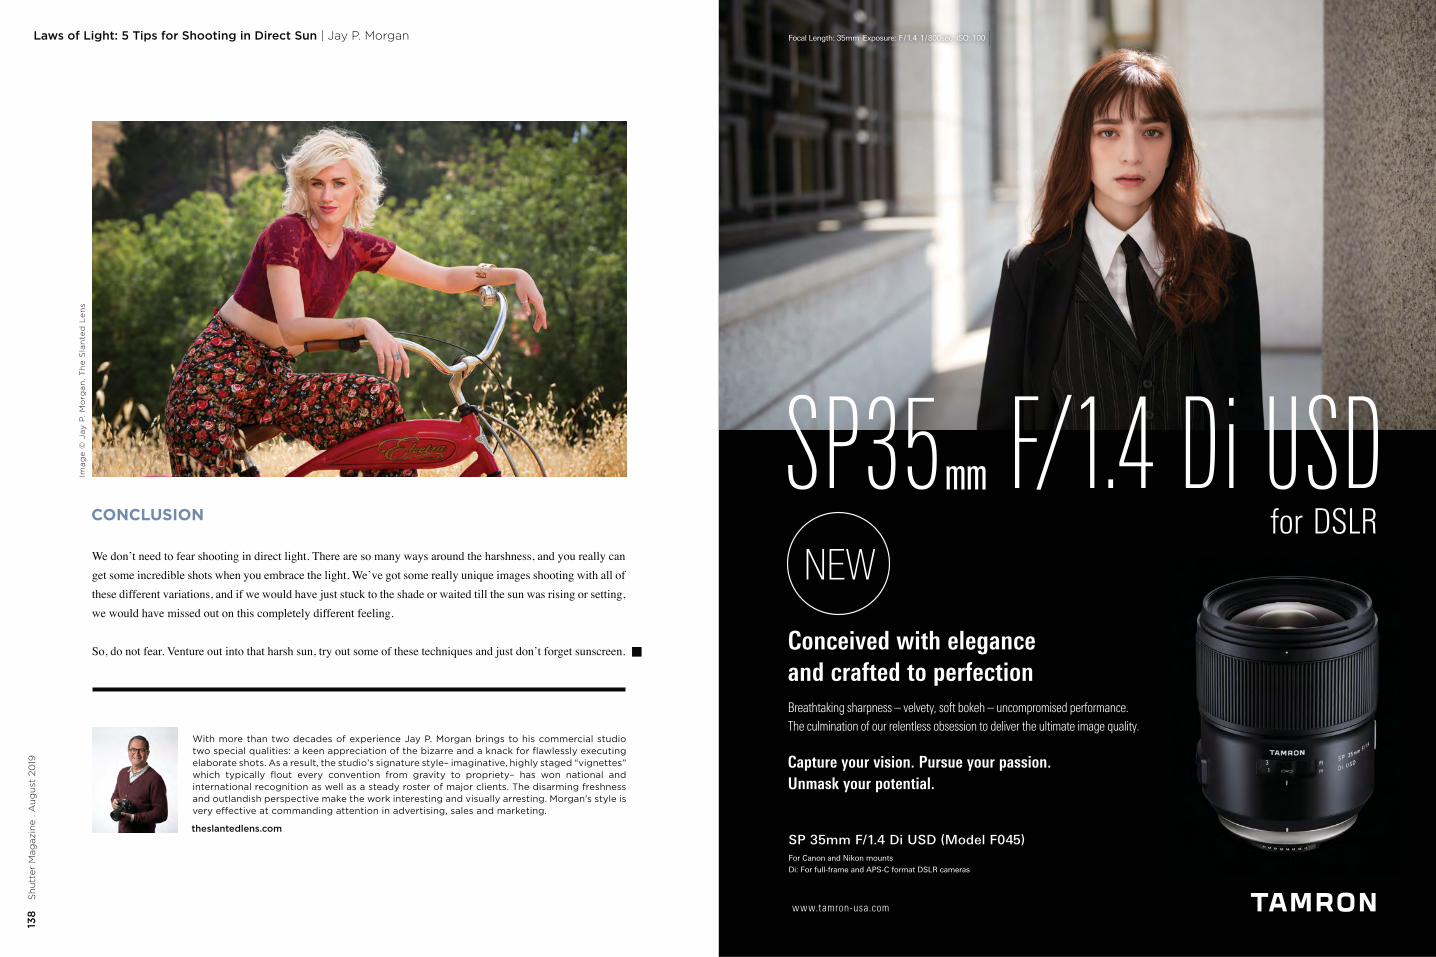
138
Sh
utt
er M
agaz
ine
. Au
gu
st 2
019
139
beh
ind
thes
hu
tter
.co
m
Laws of Light: 5 Tips for Shooting in Direct Sun | Jay P. Morgan
theslantedlens.com
With more than two decades of experience Jay P. Morgan brings to his commercial studio two special qualities: a keen appreciation of the bizarre and a knack for flawlessly executing elaborate shots. As a result, the studio’s signature style– imaginative, highly staged “vignettes” which typically flout every convention from gravity to propriety– has won national and international recognition as well as a steady roster of major clients. The disarming freshness and outlandish perspective make the work interesting and visually arresting. Morgan’s style is very effective at commanding attention in advertising, sales and marketing.
Focal Length: 35mm Exposure: F/1.4 1/800sec ISO: 100
www.tamron-usa.com
For Canon and Nikon mounts
Di: For full-frame and APS-C format DSLR cameras
SP 35mm F/1.4 Di USD (Model F045)
Conceived with elegance and crafted to perfectionBreathtaking sharpness – velvety, soft bokeh – uncompromised performance. The culmination of our relentless obsession to deliver the ultimate image quality.
Capture your vision. Pursue your passion. Unmask your potential.
CONCLUSION
We don’t need to fear shooting in direct light. There are so many ways around the harshness, and you really can get some incredible shots when you embrace the light. We’ve got some really unique images shooting with all of these different variations, and if we would have just stuck to the shade or waited till the sun was rising or setting, we would have missed out on this completely different feeling.
So, do not fear. Venture out into that harsh sun, try out some of these techniques and just don’t forget sunscreen.
Ima
ge
© J
ay P
. M
org
an
, T
he
Sla
nte
d L
en
s
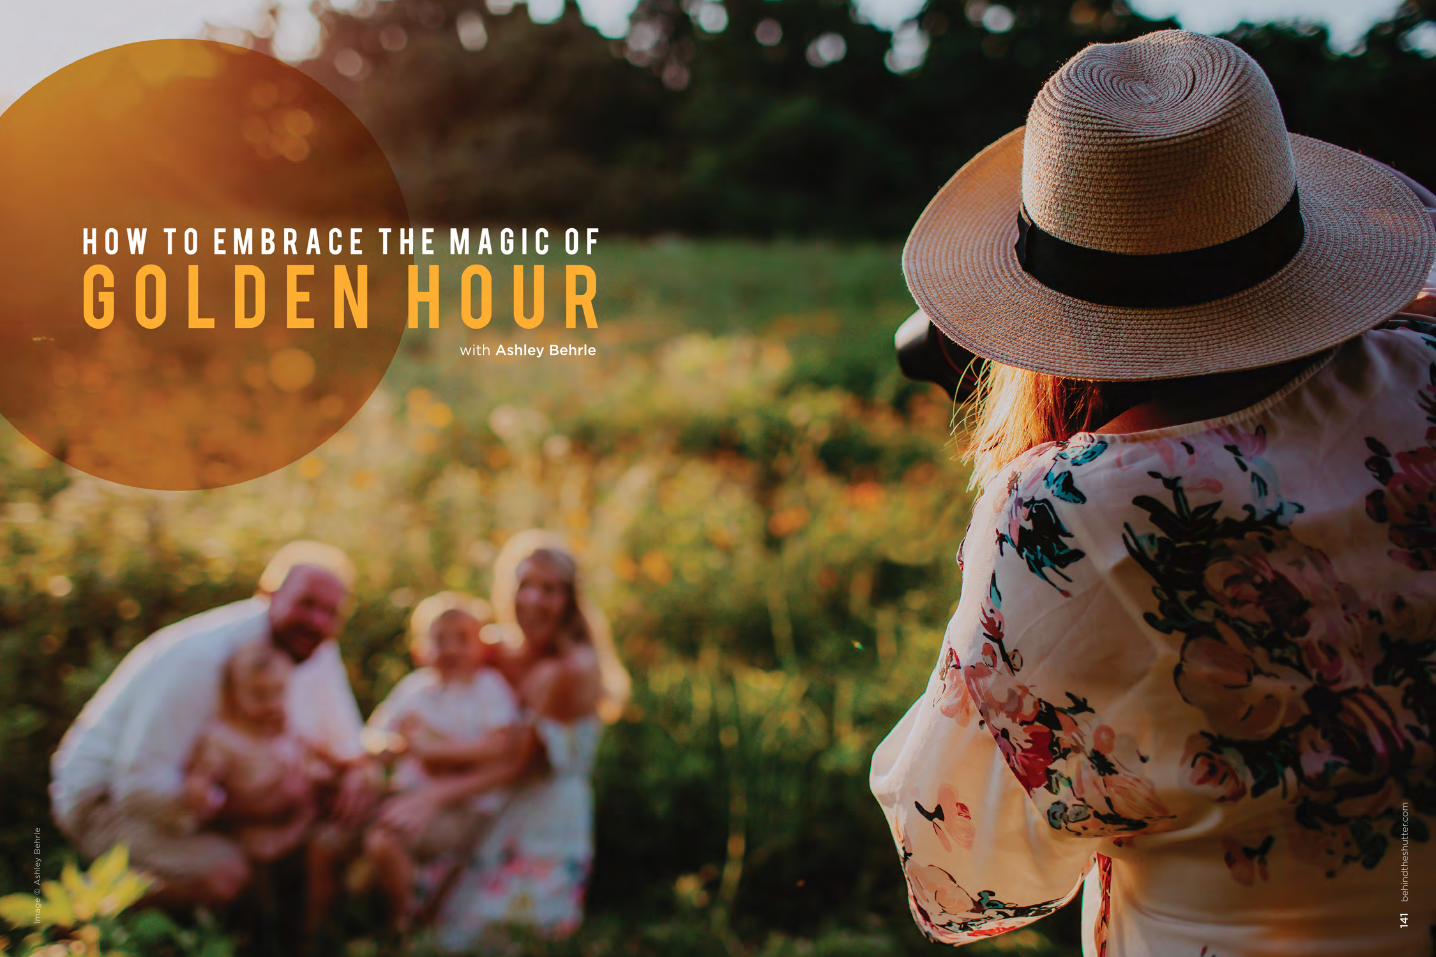
140
S
hu
tter
Mag
azin
e . A
ug
ust
20
19Im
ag
e ©
Ash
ley
Be
hrl
e
141
beh
ind
thes
hu
tter
.co
m
with Ashley Behrle
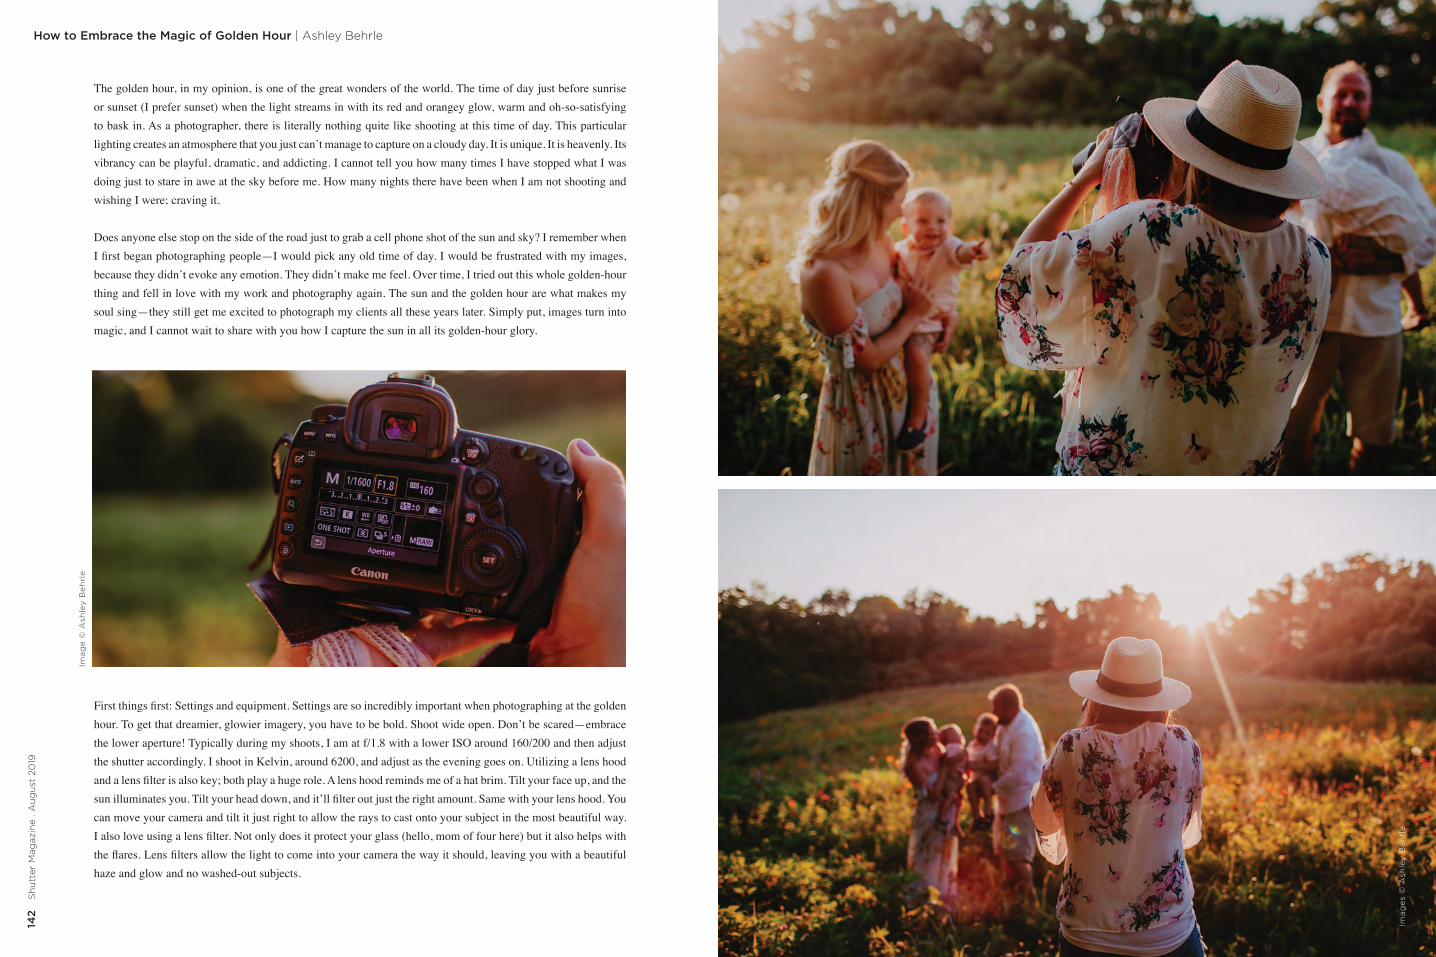
142
Sh
utt
er M
agaz
ine
. Au
gu
st 2
019
143
beh
ind
thes
hu
tter
.co
m
How to Embrace the Magic of Golden Hour | Ashley Behrle
The golden hour, in my opinion, is one of the great wonders of the world. The time of day just before sunrise or sunset (I prefer sunset) when the light streams in with its red and orangey glow, warm and oh-so-satisfying to bask in. As a photographer, there is literally nothing quite like shooting at this time of day. This particular lighting creates an atmosphere that you just can’t manage to capture on a cloudy day. It is unique. It is heavenly. Its vibrancy can be playful, dramatic, and addicting. I cannot tell you how many times I have stopped what I was doing just to stare in awe at the sky before me. How many nights there have been when I am not shooting and wishing I were; craving it.
Does anyone else stop on the side of the road just to grab a cell phone shot of the sun and sky? I remember when
because they didn’t evoke any emotion. They didn’t make me feel. Over time, I tried out this whole golden-hour thing and fell in love with my work and photography again. The sun and the golden hour are what makes my
magic, and I cannot wait to share with you how I capture the sun in all its golden-hour glory.
can move your camera and tilt it just right to allow the rays to cast onto your subject in the most beautiful way.
Ima
ge
s ©
Ash
ley
Be
hrl
e
Ima
ge
© A
shle
y B
eh
rle
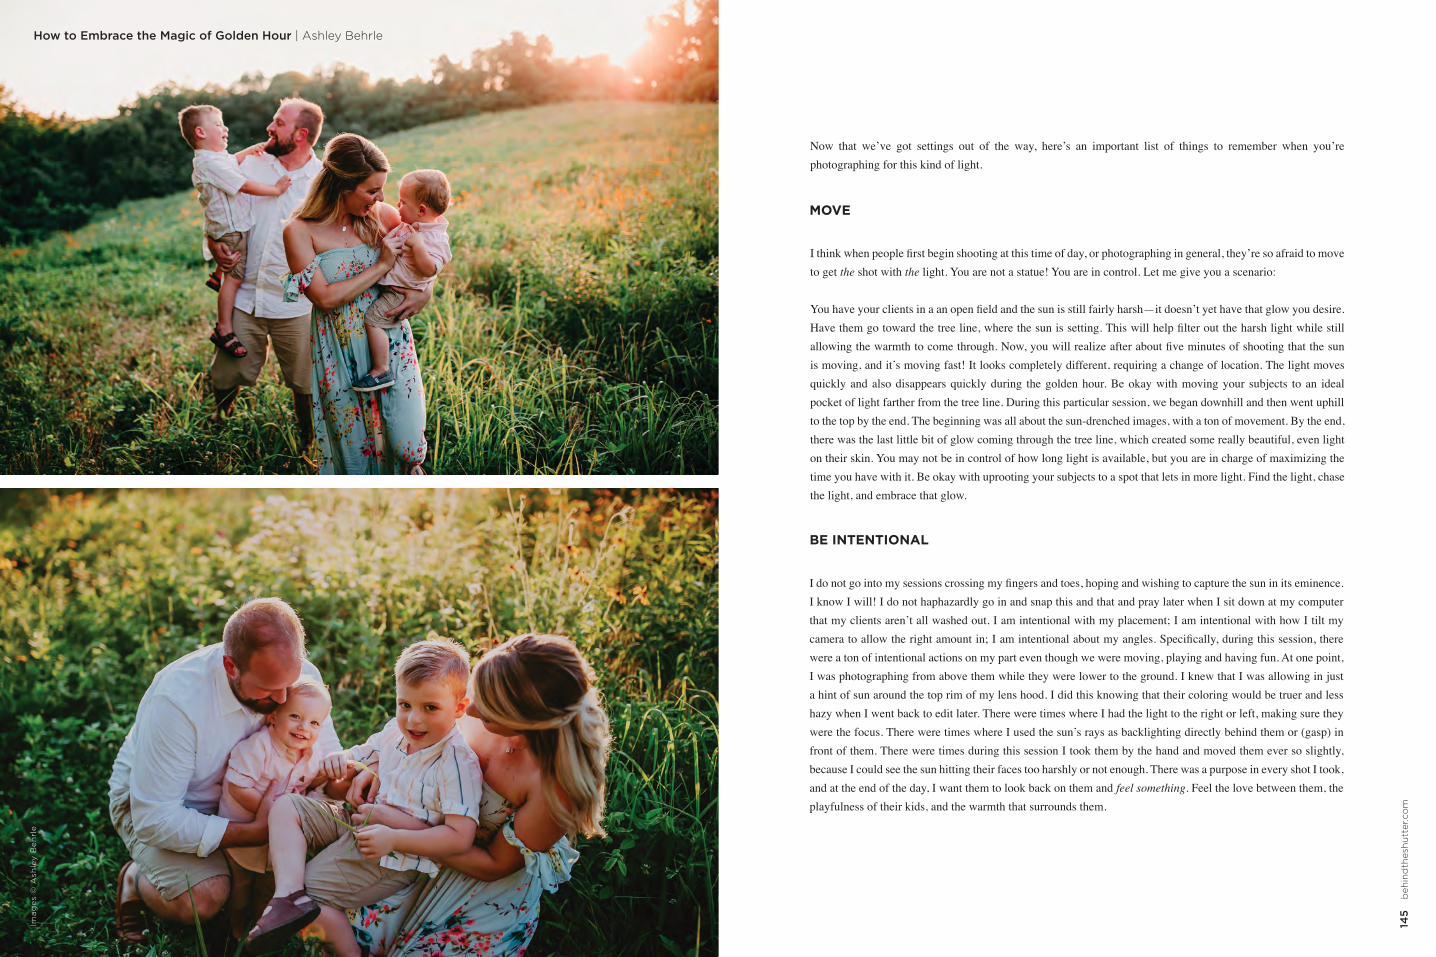
144
S
hu
tter
Mag
azin
e . A
ug
ust
20
19
145
beh
ind
thes
hu
tter
.co
m
photographing for this kind of light.
MOVE
to get the shot with the
is moving, and it’s moving fast! It looks completely different, requiring a change of location. The light moves quickly and also disappears quickly during the golden hour. Be okay with moving your subjects to an ideal pocket of light farther from the tree line. During this particular session, we began downhill and then went uphill to the top by the end. The beginning was all about the sun-drenched images, with a ton of movement. By the end, there was the last little bit of glow coming through the tree line, which created some really beautiful, even light
time you have with it. Be okay with uprooting your subjects to a spot that lets in more light. Find the light, chase the light, and embrace that glow.
BE INTENTIONAL
that my clients aren’t all washed out. I am intentional with my placement; I am intentional with how I tilt my
were a ton of intentional actions on my part even though we were moving, playing and having fun. At one point, I was photographing from above them while they were lower to the ground. I knew that I was allowing in just a hint of sun around the top rim of my lens hood. I did this knowing that their coloring would be truer and less
were the focus. There were times where I used the sun’s rays as backlighting directly behind them or (gasp) in front of them. There were times during this session I took them by the hand and moved them ever so slightly, because I could see the sun hitting their faces too harshly or not enough. There was a purpose in every shot I took, and at the end of the day, I want them to look back on them and feel something. Feel the love between them, the playfulness of their kids, and the warmth that surrounds them.
Ima
ge
s ©
Ash
ley
Be
hrl
eHow to Embrace the Magic of Golden Hour | Ashley Behrle
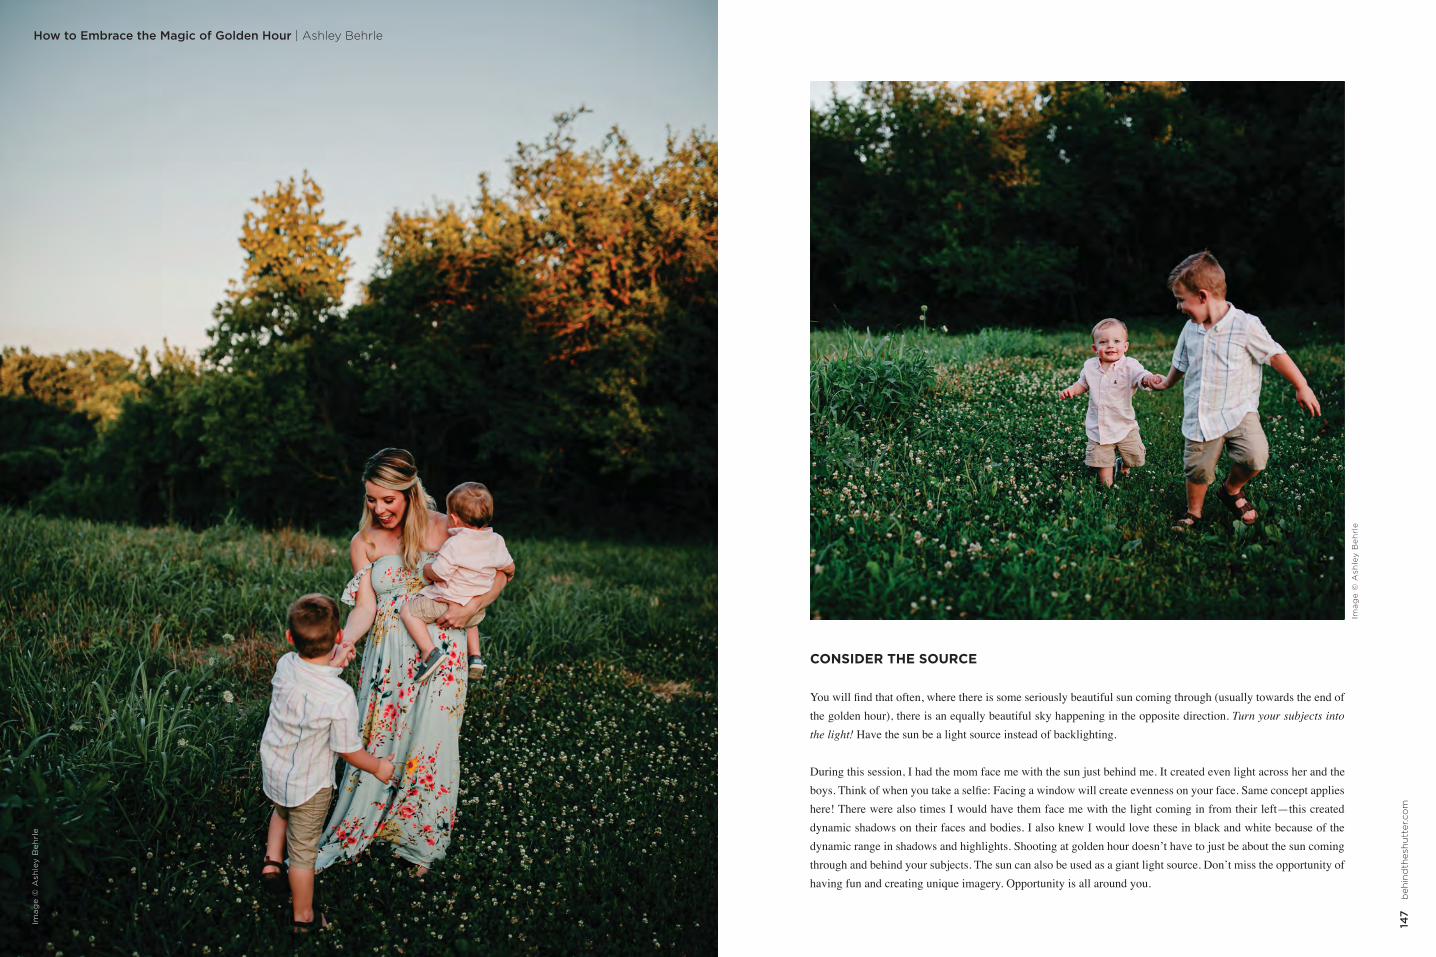
146
Sh
utt
er M
agaz
ine
. Au
gu
st 2
019
147
beh
ind
thes
hu
tter
.co
m
CONSIDER THE SOURCE
the golden hour), there is an equally beautiful sky happening in the opposite direction. Turn your subjects into the light! Have the sun be a light source instead of backlighting.
During this session, I had the mom face me with the sun just behind me. It created even light across her and the
dynamic shadows on their faces and bodies. I also knew I would love these in black and white because of the
through and behind your subjects. The sun can also be used as a giant light source. Don’t miss the opportunity of having fun and creating unique imagery. Opportunity is all around you.
Ima
ge
© A
shle
y B
eh
rle
Ima
ge
© A
shle
y B
eh
rle
How to Embrace the Magic of Golden Hour | Ashley Behrle
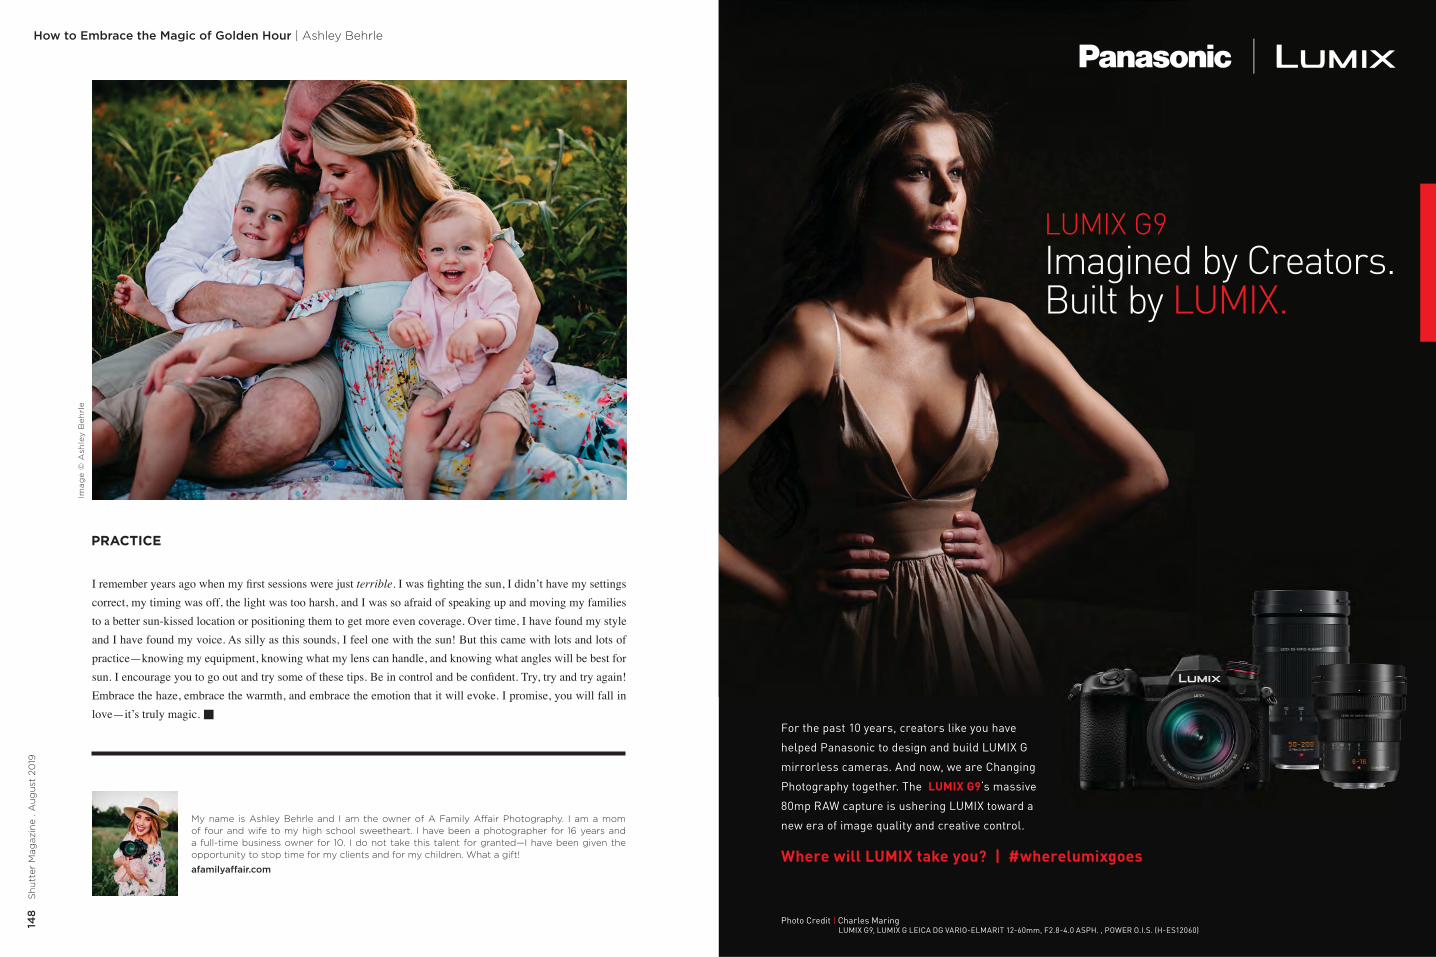
148
Sh
utt
er M
agaz
ine
. Au
gu
st 2
019
149
beh
ind
thes
hu
tter
.co
m
How to Embrace the Magic of Golden Hour | Ashley Behrle
My name is Ashley Behrle and I am the owner of A Family Affair Photography. I am a mom of four and wife to my high school sweetheart. I have been a photographer for 16 years and a full-time business owner for 10. I do not take this talent for granted—I have been given the opportunity to stop time for my clients and for my children. What a gift!
afamilyaffair.com
Ima
ge
© A
shle
y B
eh
rle
PRACTICE
terriblecorrect, my timing was off, the light was too harsh, and I was so afraid of speaking up and moving my families to a better sun-kissed location or positioning them to get more even coverage. Over time, I have found my style and I have found my voice. As silly as this sounds, I feel one with the sun! But this came with lots and lots of
For the past 10 years, creators like you have
helped Panasonic to design and build LUMIX G
mirrorless cameras. And now, we are Changing
Photography together. The LUMIX G9‘s massive
80mp RAW capture is ushering LUMIX toward a
new era of image quality and creative control.
Where will LUMIX take you? | #wherelumixgoes
Photo Credit | Charles Maring LUMIX G9, LUMIX G LEICA DG VARIO-ELMARIT 12-60mm, F2.8-4.0 ASPH. , POWER O.I.S. (H-ES12060)
LUMIX G9Imagined by Creators.Built by LUMIX.
Environmental Portraits | Dan Brouillette
with Dan Brouillette
150
S
hu
tter
Mag
azin
e . A
ug
ust
20
19
Ima
ge
© D
an B
rou
illet
te
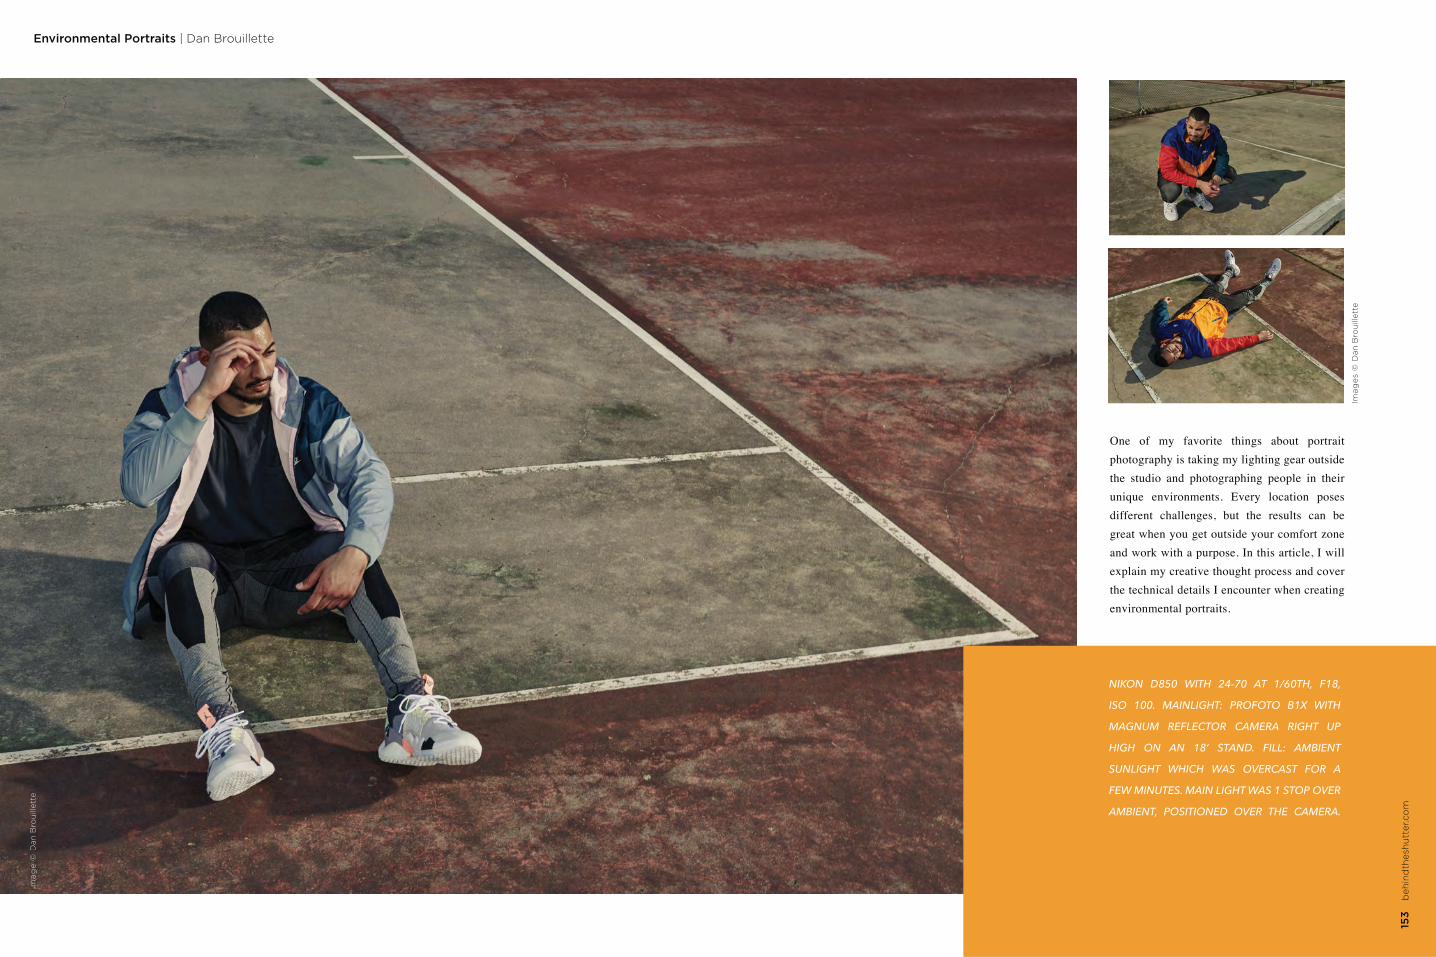
Environmental Portraits | Dan Brouillette
One of my favorite things about portrait photography is taking my lighting gear outside the studio and photographing people in their unique environments. Every location poses different challenges, but the results can be great when you get outside your comfort zone and work with a purpose. In this article, I will explain my creative thought process and cover the technical details I encounter when creating environmental portraits.
NIKON D850 WITH 24-70 AT 1/60TH, F18,
ISO 100. MAINLIGHT: PROFOTO B1X WITH
MAGNUM REFLECTOR CAMERA RIGHT UP
HIGH ON AN 18’ STAND. FILL: AMBIENT
SUNLIGHT WHICH WAS OVERCAST FOR A
FEW MINUTES. MAIN LIGHT WAS 1 STOP OVER
AMBIENT, POSITIONED OVER THE CAMERA.
153
beh
ind
thes
hu
tter
.co
m
Ima
gIm
ag
Ima
gIm
ag
Ima
ge
©e
©e
©e
©e
Dan
Dan
Bro
uB
rou
Bro
uB
rill
eill
elleilleet
tette
tte
tte
Ima
ge
s ©
Dan
Bro
uill
ette
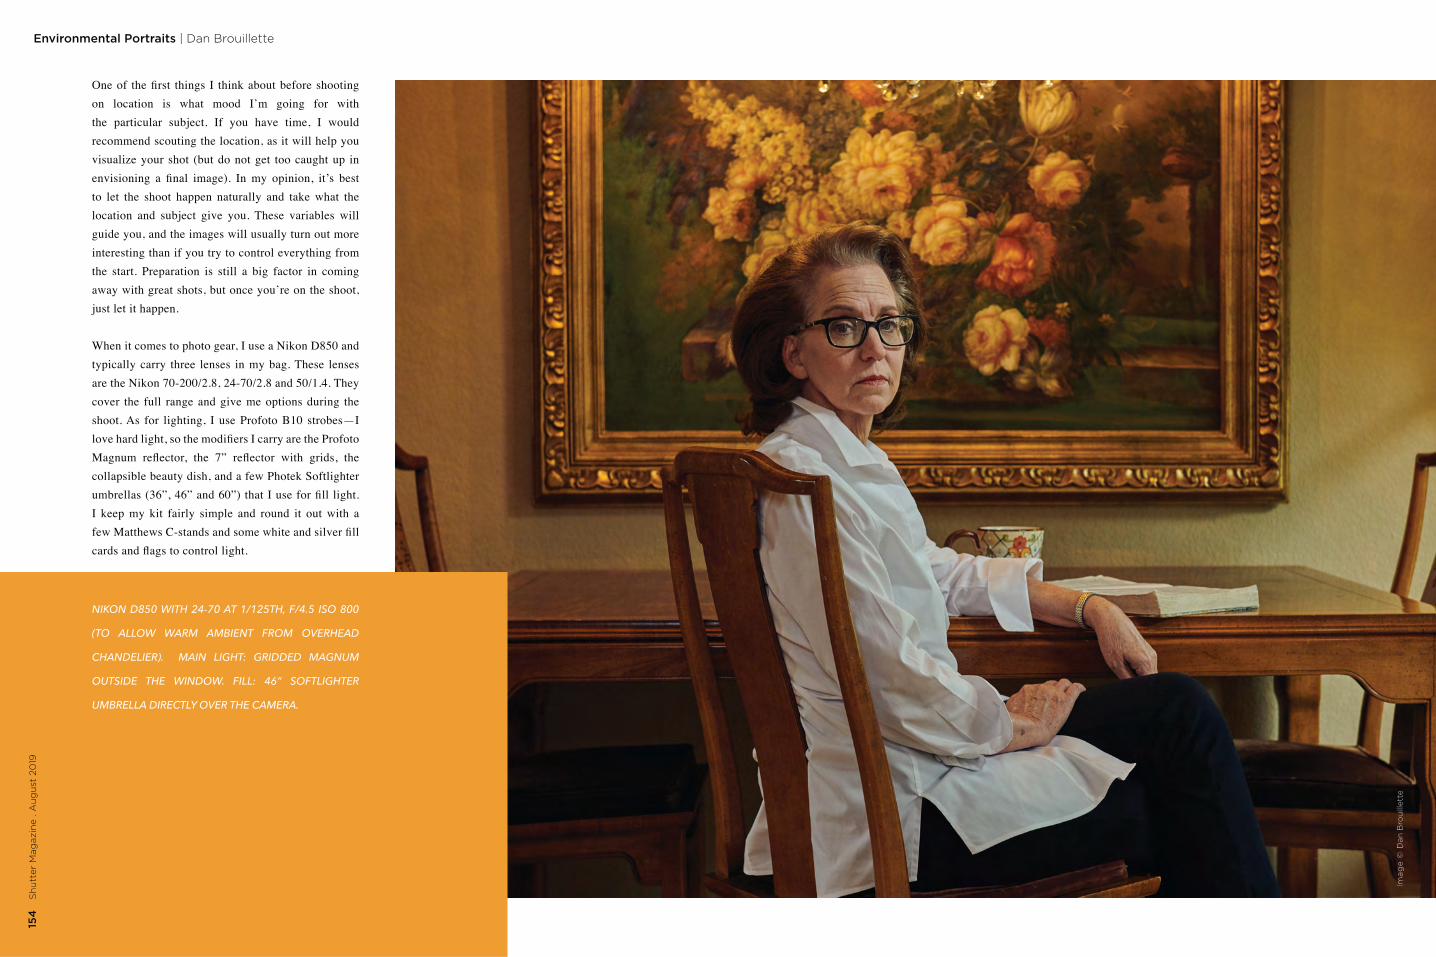
Environmental Portraits | Dan Brouillette
on location is what mood I’m going for with the particular subject. If you have time, I would recommend scouting the location, as it will help you visualize your shot (but do not get too caught up in
to let the shoot happen naturally and take what the location and subject give you. These variables will guide you, and the images will usually turn out more interesting than if you try to control everything from the start. Preparation is still a big factor in coming away with great shots, but once you’re on the shoot, just let it happen.
When it comes to photo gear, I use a Nikon D850 and typically carry three lenses in my bag. These lenses are the Nikon 70-200/2.8, 24-70/2.8 and 50/1.4. They cover the full range and give me options during the shoot. As for lighting, I use Profoto B10 strobes—I
collapsible beauty dish, and a few Photek Softlighter
I keep my kit fairly simple and round it out with a
NIKON D850 WITH 24-70 AT 1/125TH, F/4.5 ISO 800
(TO ALLOW WARM AMBIENT FROM OVERHEAD
CHANDELIER). MAIN LIGHT: GRIDDED MAGNUM
OUTSIDE THE WINDOW. FILL: 46” SOFTLIGHTER
UMBRELLA DIRECTLY OVER THE CAMERA.
154
S
hu
tter
Mag
azin
e . A
ug
ust
20
19
Ima
ge
© D
an B
rou
illet
te
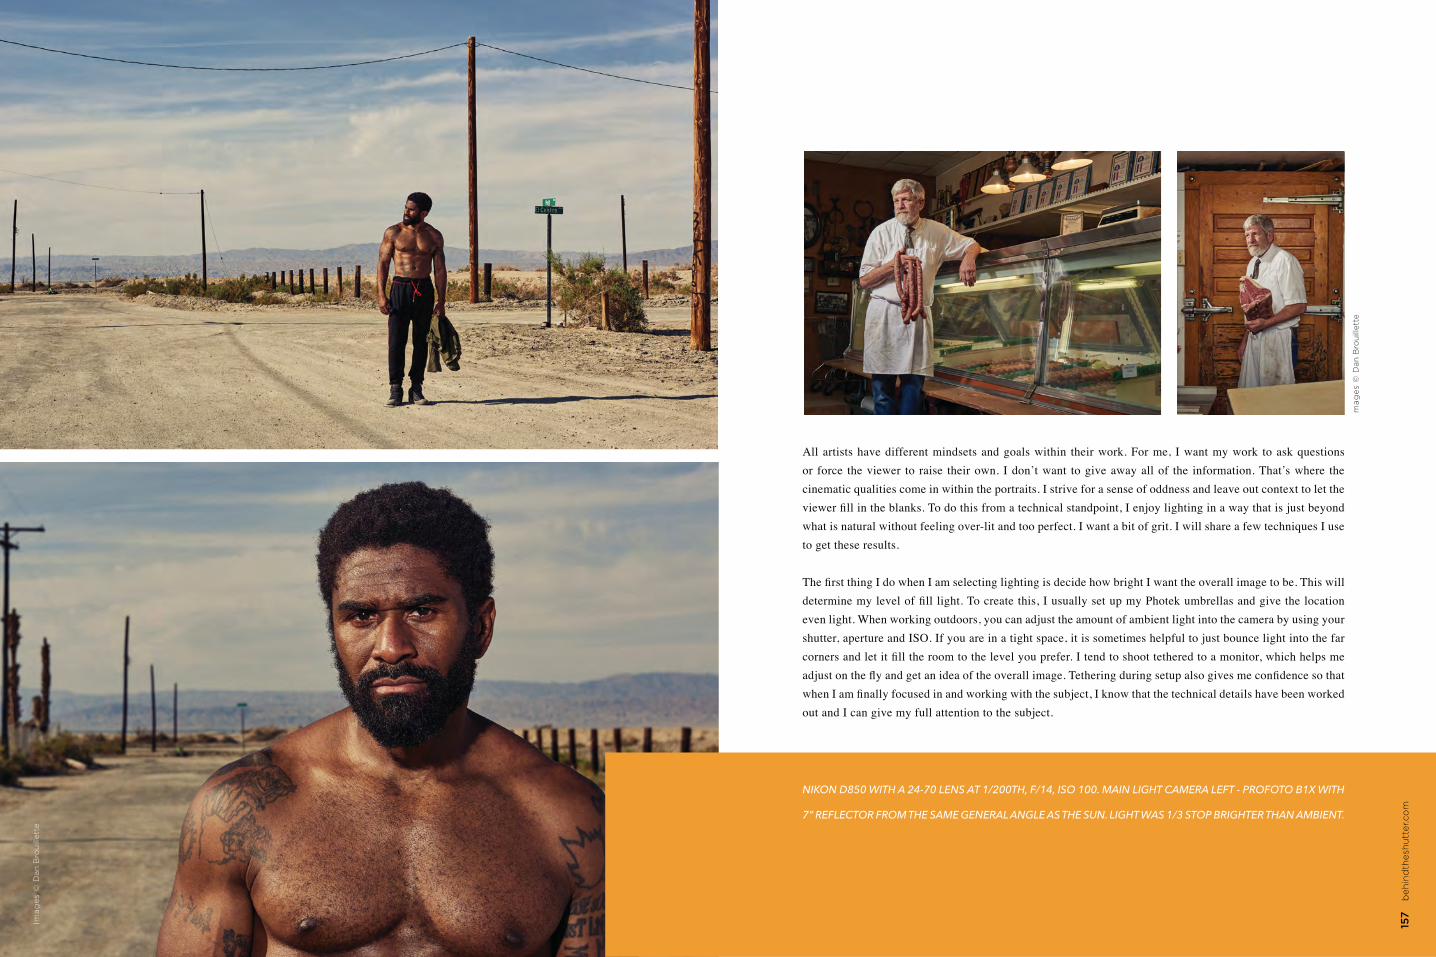
156
Sh
utt
er M
agaz
ine
. Au
gu
st 2
019
Environmental Portraits | Dan Brouillette
All artists have different mindsets and goals within their work. For me, I want my work to ask questions or force the viewer to raise their own. I don’t want to give away all of the information. That’s where the cinematic qualities come in within the portraits. I strive for a sense of oddness and leave out context to let the
what is natural without feeling over-lit and too perfect. I want a bit of grit. I will share a few techniques I use to get these results.
even light. When working outdoors, you can adjust the amount of ambient light into the camera by using your shutter, aperture and ISO. If you are in a tight space, it is sometimes helpful to just bounce light into the far
out and I can give my full attention to the subject.
NIKON D850 WITH A 24-70 LENS AT 1/200TH, F/14, ISO 100. MAIN LIGHT CAMERA LEFT - PROFOTO B1X WITH
7” REFLECTOR FROM THE SAME GENERAL ANGLE AS THE SUN. LIGHT WAS 1/3 STOP BRIGHTER THAN AMBIENT.
157
beh
ind
thes
hu
tter
.co
m
Ima
ge
s ©
Dan
Bro
uill
ette
Ima
ge
s ©
Dan
Bro
uill
ette

158
Sh
utt
er M
agaz
ine
. Au
gu
st 2
019
159
beh
ind
thes
hu
tter
.co
m
Dan Brouillette is a commercial and editorial photographer based out of Omaha, Nebraska. He specializes in environmental portraiture capturing everyday people in their natural surroundings. Utilizing unique lighting techniques, his images evoke a cinematic feel in a still image. Recently, Dan has worked with clients such as Chevy, Dell, ESPN Magazine, TIME, Men’s Health and many more.
danbrouillette.com
Next, I select my main light source. I worked with Dan Winters a couple years ago and he used the phrase,
lens choice, etc. This is how you generate your look. Sensibility, on the other hand, is how you adapt your vision to any situation. When selecting a main light, I consider the subject (age, gender, activity, clothing,
which would call for hard light that is placed far from the subject. If I am photographing an older woman
the yard. These are just a couple examples of my thought process.
how I use them. I have been using studio strobes for over 15 years, and while I used to just blast the light directly at the subject, I now use a much more nuanced approach. I tend to consider where I don’t want light as much as where I do. I rarely aim my lights directly at the subject but rather feather lighting up or away so they are just getting brushed with it in more subtle ways. I also place my lights far away from the subject. This helps prevent the light from falling off too quickly and provides more even lighting.
When it comes to lighting on location, the basic things to remember are: Slow down, allow your resources
Environmental Portraits | Dan Brouillette
Ima
ge
© D
an B
rou
illet
te
Inspirations | Our Readers16
0
Sh
utt
er M
agaz
ine
. Au
gu
st 2
019
Inspiration can come when you least expect
it. As photographers, we are visual artists.
We express ourselves through our camera
and the images we create. Inspirations
represents a sampling of our industry and the
vision of professional photographers from
around the world.
Congratulations to all our featured artists. Be
inspired and create something that is you.
Sal Cincotta, Publisher
INSPIRATIONS
BE
ST L
IGH
TIN
G IM
AG
E
Ima
ge
© P
amel
a D
utt
on
Ph
oto
gra
phy
161
beh
ind
thes
hu
tter
.co
m

Inspirations | Our Readers
Ima
ge
© K
im D
un
g H
o
Ima
ge
© S
op
hia
Jo
ël P
ho
tog
rap
hy
Ima
ge
© C
hri
stin
e C
ham
ber
s Im
ages
Ima
ge
© G
ilda
Be
rna
rde
s P
ho
tog
rap
hy
Ima
ge
© M
ateu
sz J
agie
llo o
f S
ilk a
nd
Sal
t P
ho
tog
rap
hy
163
beh
ind
thes
hu
tter
.co
m
162
Sh
utt
er M
agaz
ine
. Au
gu
st 2
019
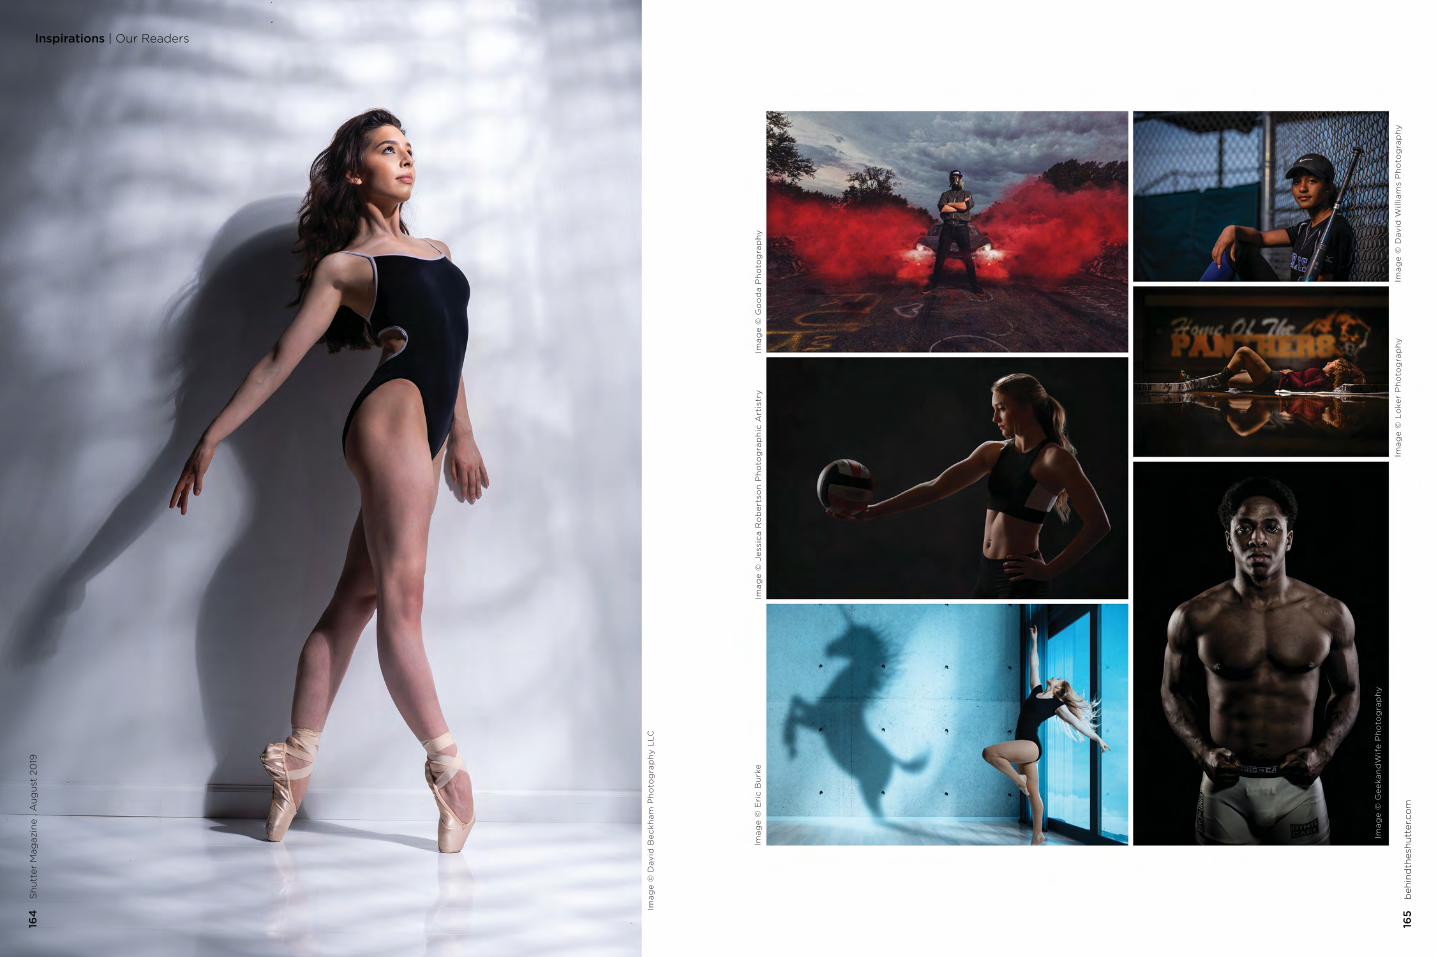
Ima
ge
© L
oke
r P
ho
tog
rap
hy
Ima
ge
© D
avid
Will
iam
s P
ho
tog
rap
hy
Ima
ge
© G
ee
kan
dW
ife
Ph
oto
gra
ph
y
Ima
ge
© E
ric
Bu
rke
Ima
ge
© J
ess
ica
Ro
be
rtso
n P
ho
tog
rap
hic
Art
istr
yIm
ag
e ©
Go
od
a P
ho
tog
rap
hy
Ima
ge
© D
avid
Be
ckh
am
Ph
oto
gra
ph
y L
LC
165
beh
ind
thes
hu
tter
.co
m
164
S
hu
tter
Mag
azin
e . A
ug
ust
20
19Inspirations | Our Readers

Ima
ge
© J
aso
n B
uff
Ima
ge
© I
ma
ge
s b
y K
err
i Je
an
Ima
ge
© E
dw
ard
va
nV
ee
n /
Ed
wa
rd V
Ph
oto
gra
ph
y l
lc
Ima
ge
© D
eiv
is A
rch
bo
ld P
ho
tog
rap
hy
Ima
ge
© L
isse
t P
erri
er A
rtis
try
167
beh
ind
thes
hu
tter
.co
m
166
Sh
utt
er M
agaz
ine
. Au
gu
st 2
019
Inspirations | Our Readers

Inspirations | Our Readers16
8 S
hu
tter
Mag
azin
e . A
ug
ust
20
19
169
beh
ind
thes
hu
tter
.co
m
Ima
ge
© L
ora
& Is
aac
Ima
ge
© R
afae
l Ser
ran
o P
ho
tog
rap
hy
Ima
ge
© S
alv
ato
re C
inco
tta
Ph
oto
gra
ph
y
Ima
ge
© D
eivi
s A
rch
bo
ld P
ho
tog
rap
hy
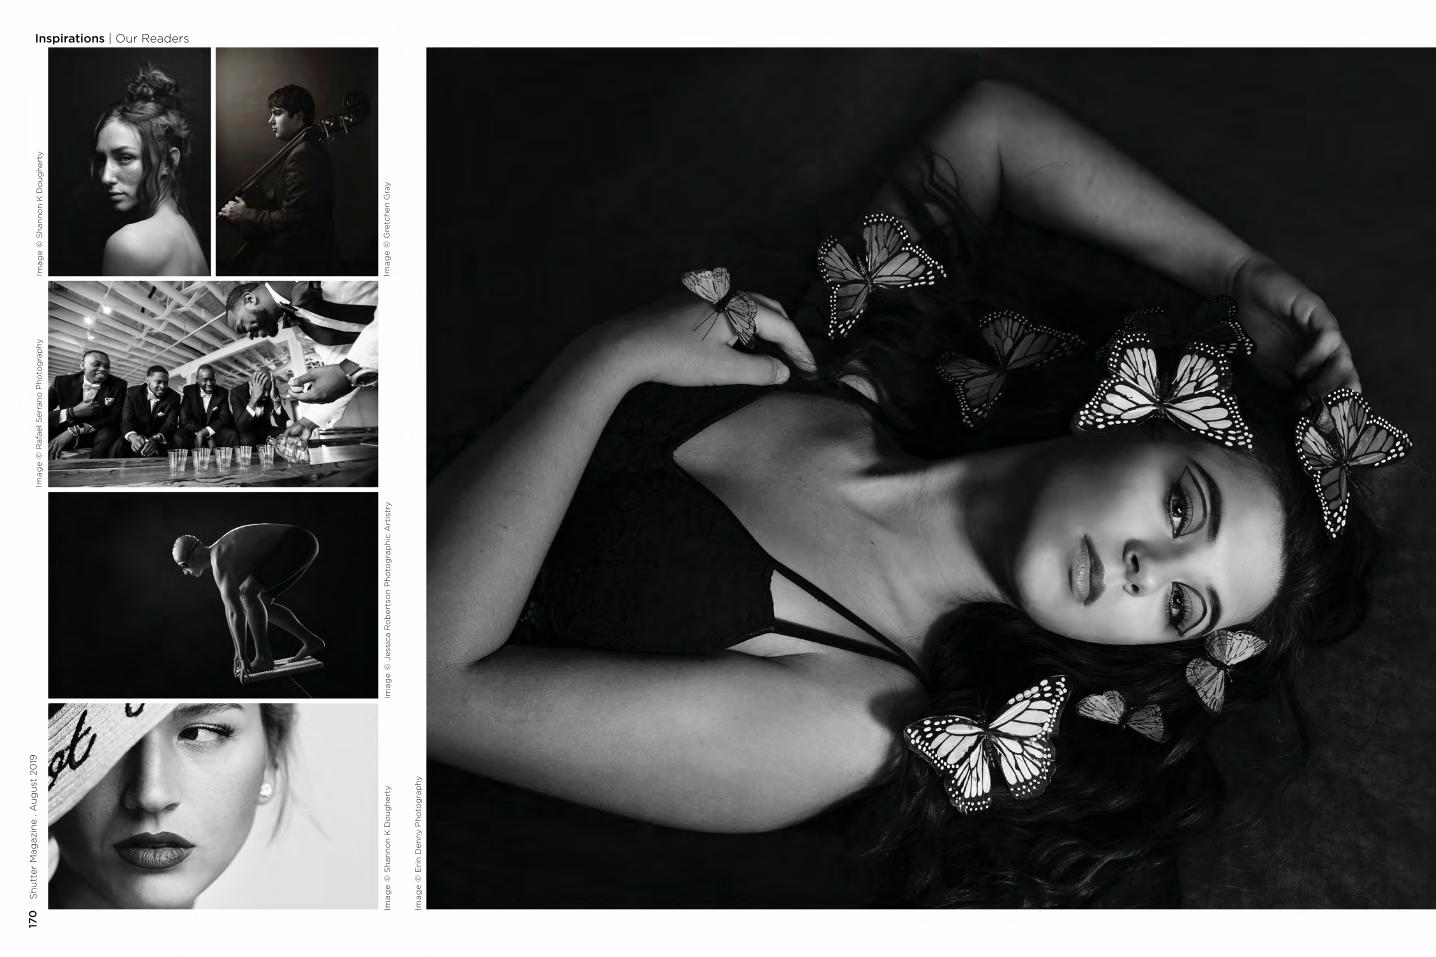
Inspirations | Our Readers17
0
Sh
utt
er M
agaz
ine
. Au
gu
st 2
019
Ima
ge
© J
essi
ca R
ob
erts
on
Ph
oto
gra
ph
ic A
rtis
try
Ima
ge
© R
afae
l Ser
ran
o P
ho
tog
rap
hy
Ima
ge
© G
retc
hen
Gra
y
Ima
ge
© S
han
no
n K
Do
ug
her
ty
Ima
ge
© E
rin
Den
ny P
ho
tog
rap
hy
Ima
ge
© S
han
no
n K
Do
ug
her
ty
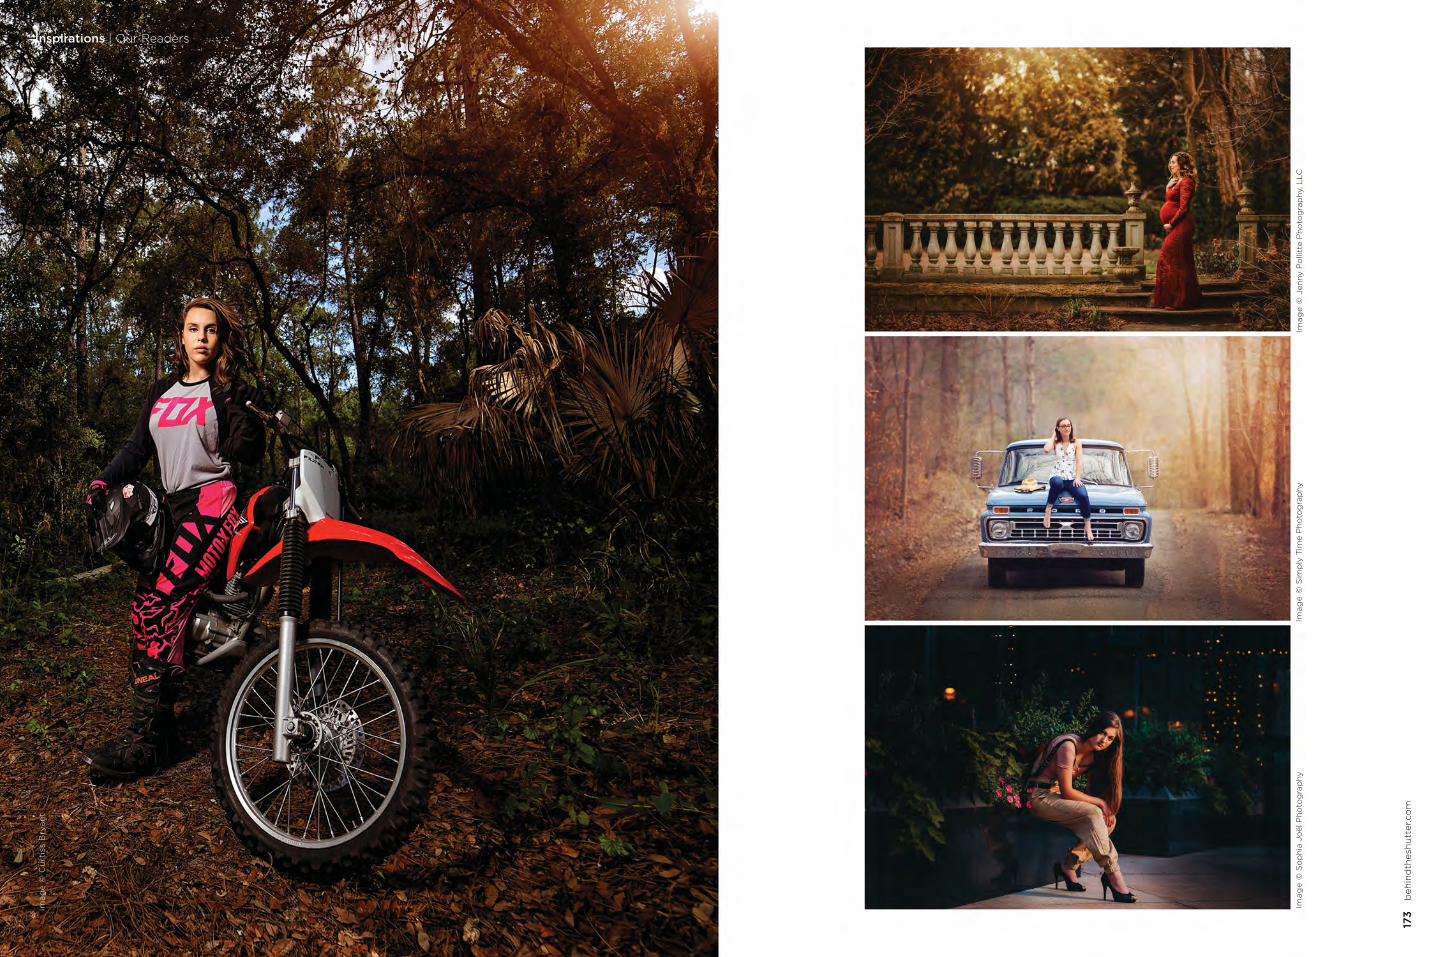
172
Sh
utt
er M
agaz
ine
. Au
gu
st 2
019
173
beh
ind
thes
hu
tter
.co
m
Ima
ge
© C
urt
iss
Bry
an
t
Ima
ge
© J
enny
Po
llitt
e P
ho
tog
rap
hy, L
LCIm
ag
e ©
Sim
ply
Tim
e P
ho
tog
rap
hyIm
ag
e ©
So
ph
ia J
oël
Ph
oto
gra
phy
Inspirations | Our Readers

175
beh
ind
thes
hu
tter
.co
m
Inspirations | Our Readers17
4
Sh
utt
er M
agaz
ine
. Au
gu
st 2
019
Ima
ge
© K
im D
un
g H
oIm
ag
e ©
Imag
es b
y K
erri
Jea
n
Ima
ge
© J
aso
n B
uff
Ima
ge
© D
amal
y S
hep
her
d P
ort
rait
s
Ima
ge
© M
ate
usz
Ja
gie
llo o
f S
ilk a
nd
Sa
lt P
ho
tog
rap
hy
Ima
ge
© G
ilda
Ber
nar
des
Ph
oto
gra
phy
Ima
ge
© J
aco
b F
ine
Art
Po
rtra
its
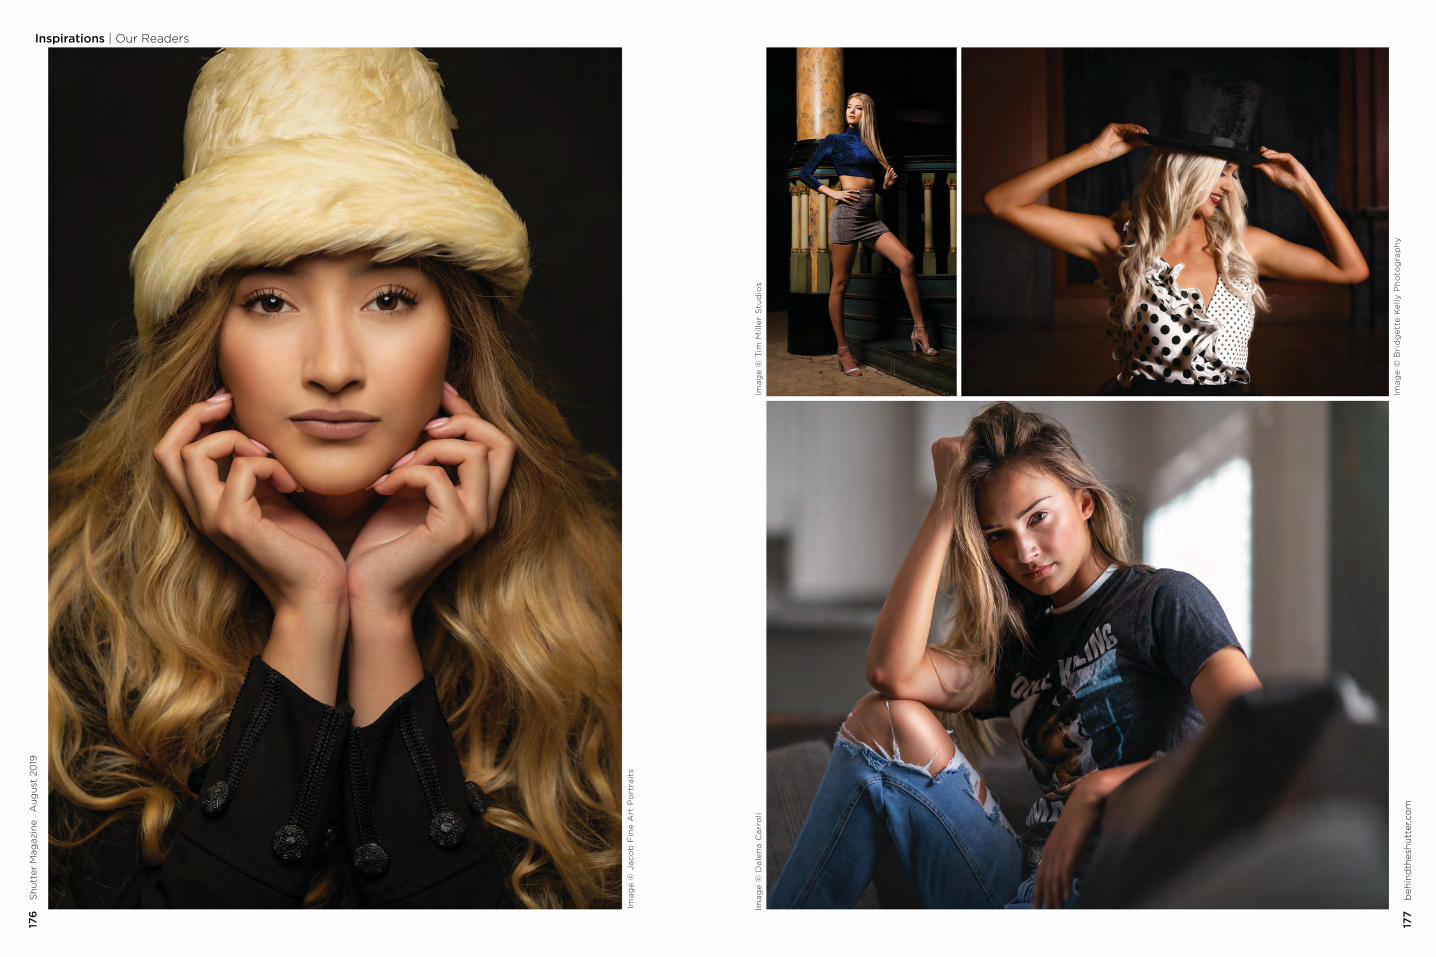
177
beh
ind
thes
hu
tter
.co
m
Inspirations | Our Readers17
6
Sh
utt
er M
agaz
ine
. Au
gu
st 2
019
Ima
ge
© T
im M
ille
r S
tud
ios
Ima
ge
© B
rid
ge
tte
Ke
lly P
ho
tog
rap
hy
Ima
ge
© D
ale
na
Ca
rro
ll
Ima
ge
© J
aco
b F
ine
Art
Po
rtra
its
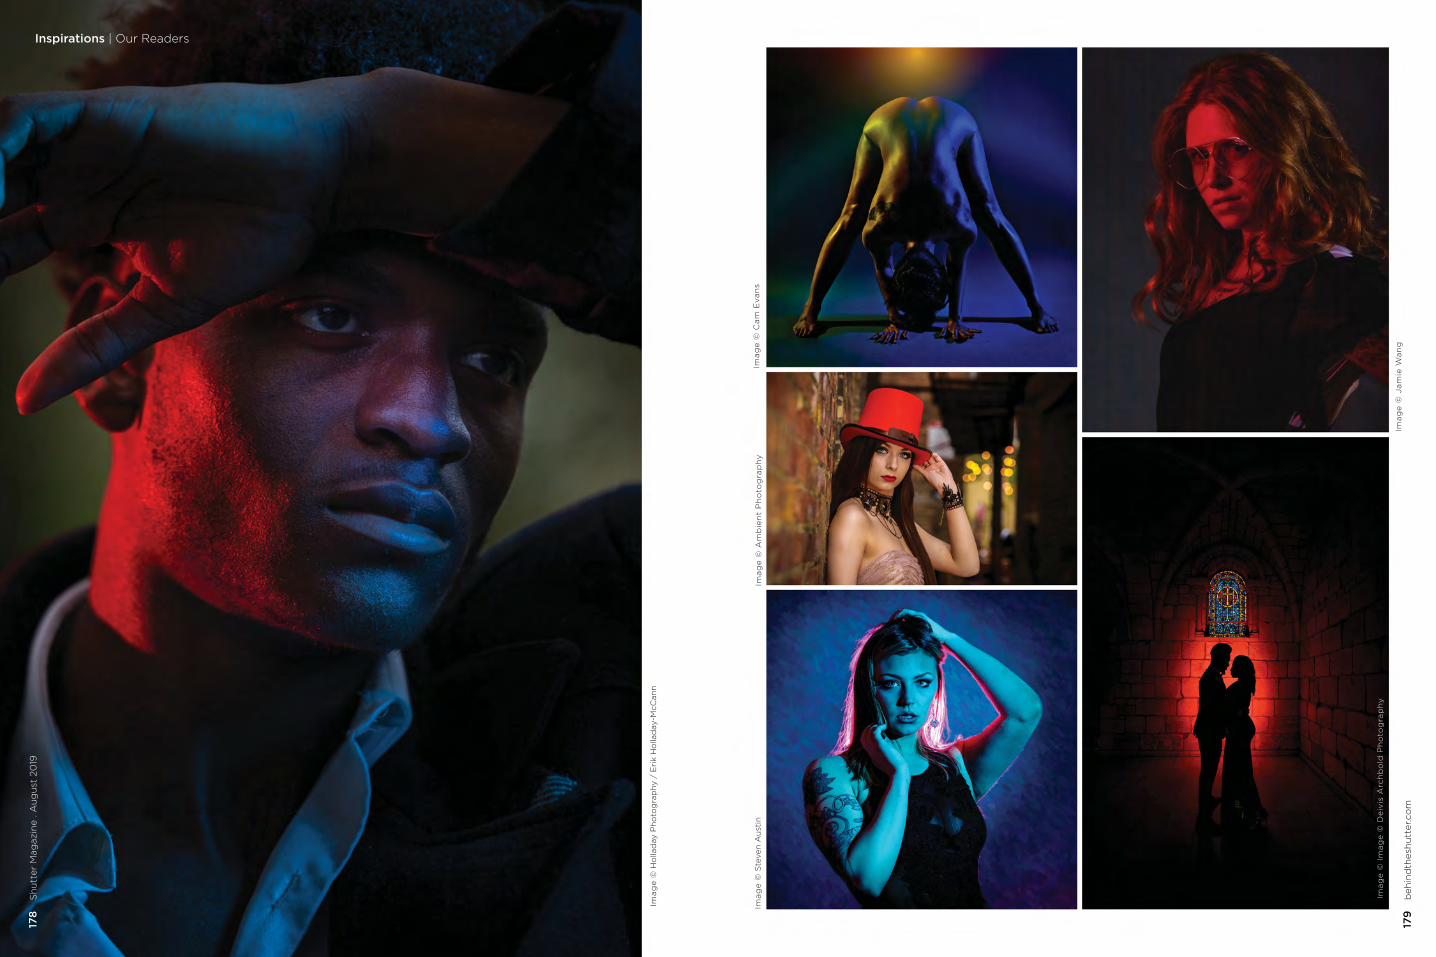
179
beh
ind
thes
hu
tter
.co
m
Ima
ge
© C
am
Eva
ns
Ima
ge
© J
am
ie W
an
g
Ima
ge
© S
teve
n A
ust
in
Ima
ge
© H
olla
day
Ph
oto
gra
phy
/ E
rik
Ho
llad
ay-M
cCan
n
Ima
ge
© A
mb
ien
t P
ho
tog
rap
hy
Ima
ge
© I
ma
ge
© D
eiv
is A
rch
bo
ld P
ho
tog
rap
hy
Inspirations | Our Readers17
8 S
hu
tter
Mag
azin
e . A
ug
ust
20
19
181
beh
ind
thes
hu
tter
.co
m
Inspirations | Our Readers18
0
Sh
utt
er M
agaz
ine
. Au
gu
st 2
019
Ima
ge
© L
isse
t P
err
ier
Art
istr
y
Ima
ge
© M
art
ha
Fe
lix P
ho
tog
rap
hy
Ima
ge
© J
en
ny
Po
llitt
e P
ho
tog
rap
hy,
LL
C
Ima
ge
© J
aco
b F
ine
Art
Po
rtra
its
Ima
ge
© R
ick
Law
Ph
oto
gra
ph
y
Ima
ge
© N
ich
ole
Ko
lb -
Will
ow
& M
oss
Ph
oto
gra
ph
y
183
beh
ind
thes
hu
tter
.co
mIm
ag
e ©
Eri
n D
en
ny
Ph
oto
gra
ph
y
Ima
ge
© M
ari
a M
arc
ha
l P
ho
tog
rap
hy
Ima
ge
© R
afa
el
Se
rra
no
Ph
oto
gra
ph
y
Ima
ge
© S
am
Ou
n P
ho
tog
rap
hy
Inspirations | Our Readers18
2 S
hu
tter
Mag
azin
e . A
ug
ust
20
19
Inspirations | Our Readers18
4
Sh
utt
er M
agaz
ine
. Au
gu
st 2
019
185
beh
ind
thes
hu
tter
.co
m
Ima
ge
© B
ill M
cC
art
y S
ho
efl
y S
tud
ios
Ima
ge
© N
ich
ole
Ko
lb -
Will
ow
& M
oss
Ph
oto
gra
ph
y
Ima
ge
© L
isa
Jo
ne
s P
ho
tog
rap
hy
Ima
ge
© L
ora
& I
saa
c
Ima
ge
© L
isa
Jo
ne
s P
ho
tog
rap
hy
Ima
ge
© P
ho
tog
rap
hy
By
Jo
shu
a D
avid
187
beh
ind
thes
hu
tter
.co
m
Inspirations | Our Readers18
6
Sh
utt
er M
agaz
ine
. Au
gu
st 2
019
Ima
ge
© M
art
ha
Fe
lix P
ho
tog
rap
hy
Ima
ge
© L
eo
na
rd A
nd
ers
on
Ph
oto
gra
ph
y, L
LC
Ima
ge
© M
ich
ae
l B
otk
in
Ima
ge
© L
isse
t P
err
ier
Art
istr
y
Ima
ge
© S
ha
nn
on
K D
ou
gh
ert
y
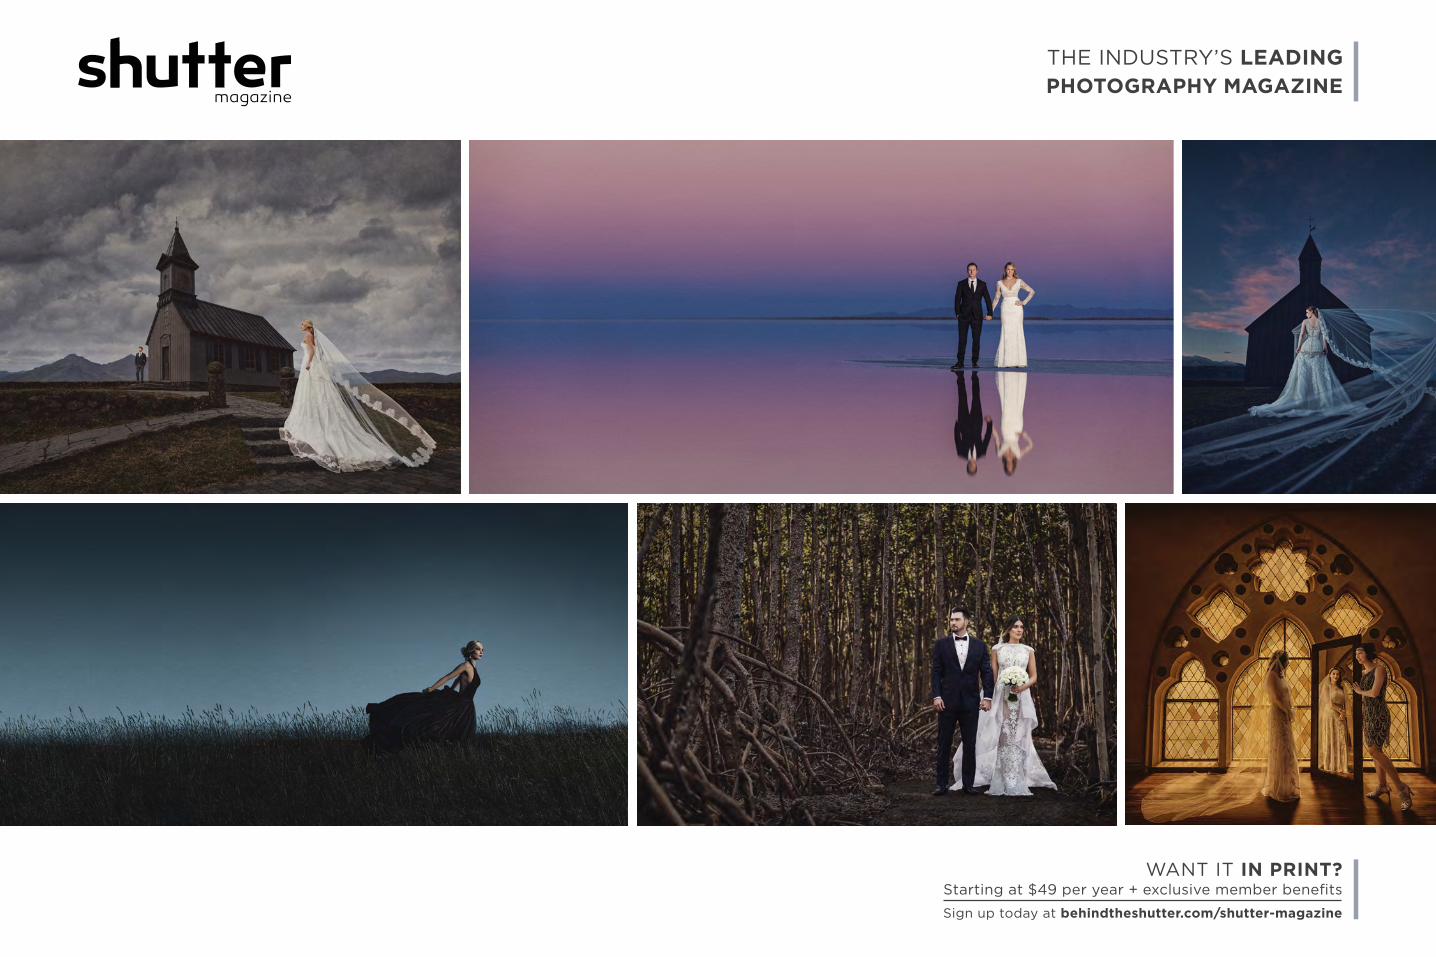
WANT IT IN PRINT?Starting at $49 per year + exclusive member benefits
Sign up today at behindtheshutter.com/shutter-magazine
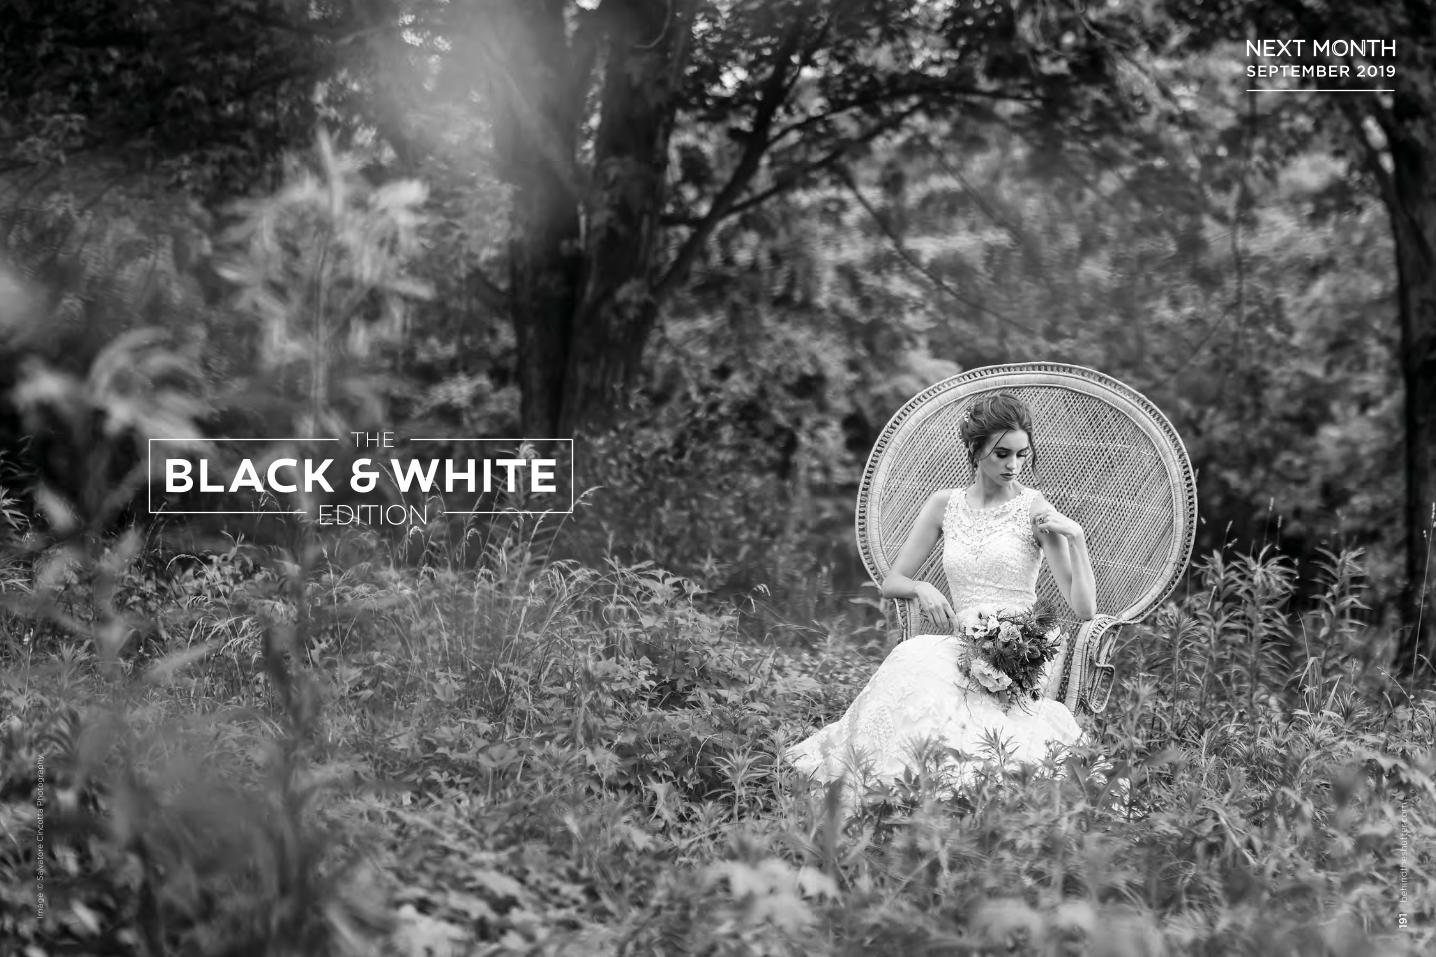
Ima
ge
© S
alva
tore
Cin
cott
a P
ho
tog
rap
hy
191
beh
ind
thes
hu
tter
.co
m
THE
EDITIONBLACK & WHITE
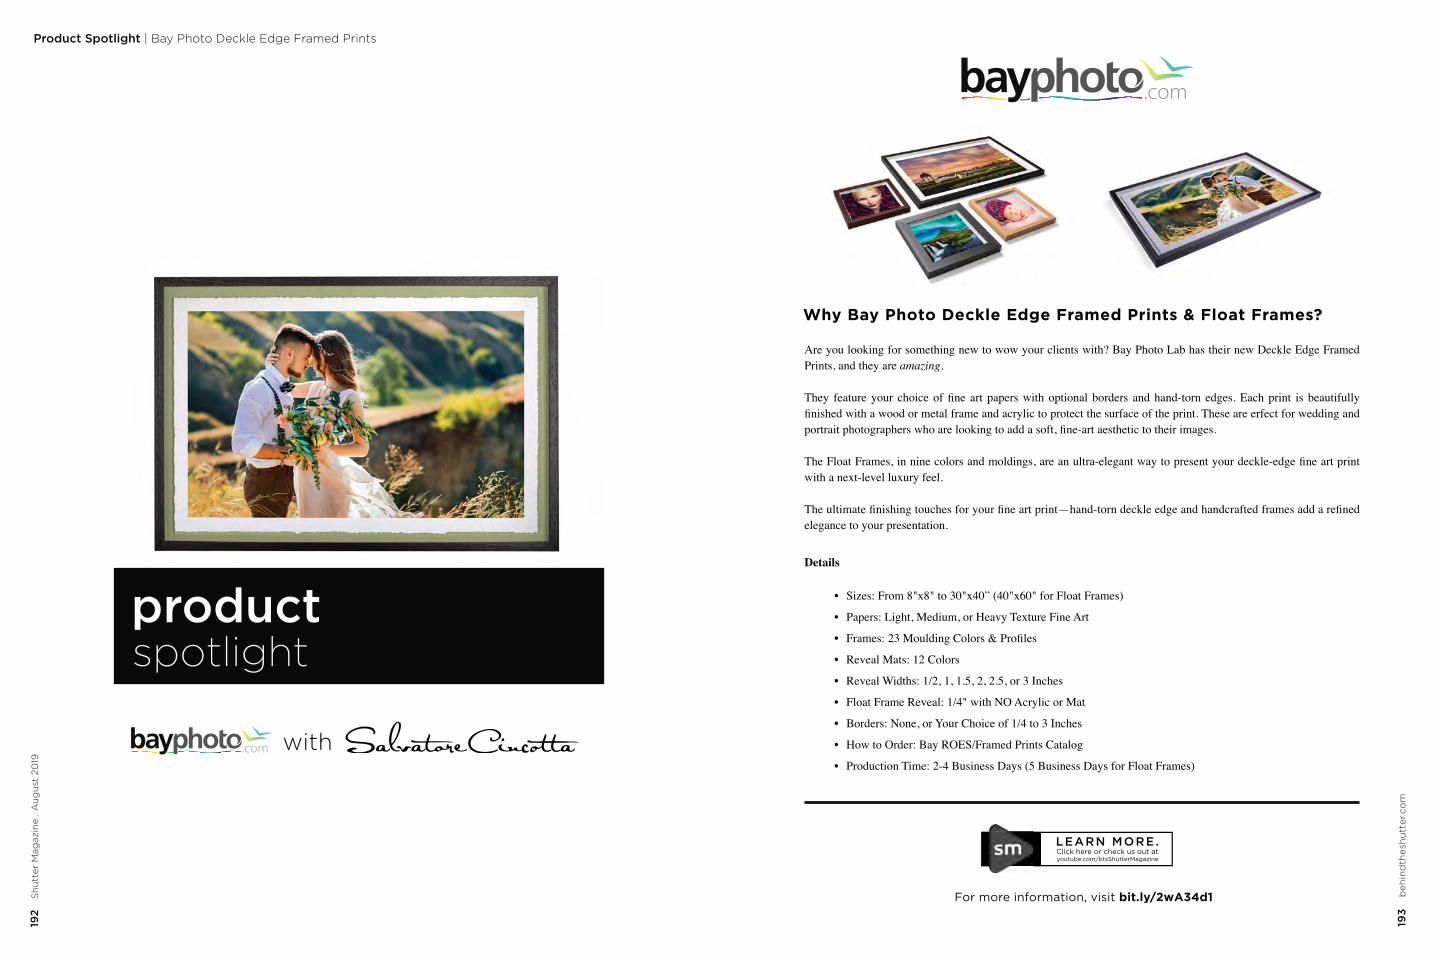
192
Sh
utt
er M
agaz
ine
. Au
gu
st 2
019
Product Spotlight | Bay Photo Deckle Edge Framed Prints
Why Bay Photo Deckle Edge Framed Prints & Float Frames?
193
beh
ind
thes
hu
tter
.co
m
For more information, visit bit.ly/2wA34d1
with
productspotlight
Are you looking for something new to wow your clients with? Bay Photo Lab has their new Deckle Edge Framed Prints, and they are amazing.
Details
• Sizes: From 8"x8" to 30"x40” (40"x60" for Float Frames)• • • • • • • •
LEARN MORE.youtube.com/btsShutterMagazineClick here or check us out at

195
beh
ind
thes
hu
tter
.co
m
6 Ways to Make Your Bride Look Like a Total Knockout | Vanessa Joy
Ima
ge
©
Va
ne
ssa
Jo
y
194
S
hu
tter
Mag
azin
e . A
ug
ust
20
19
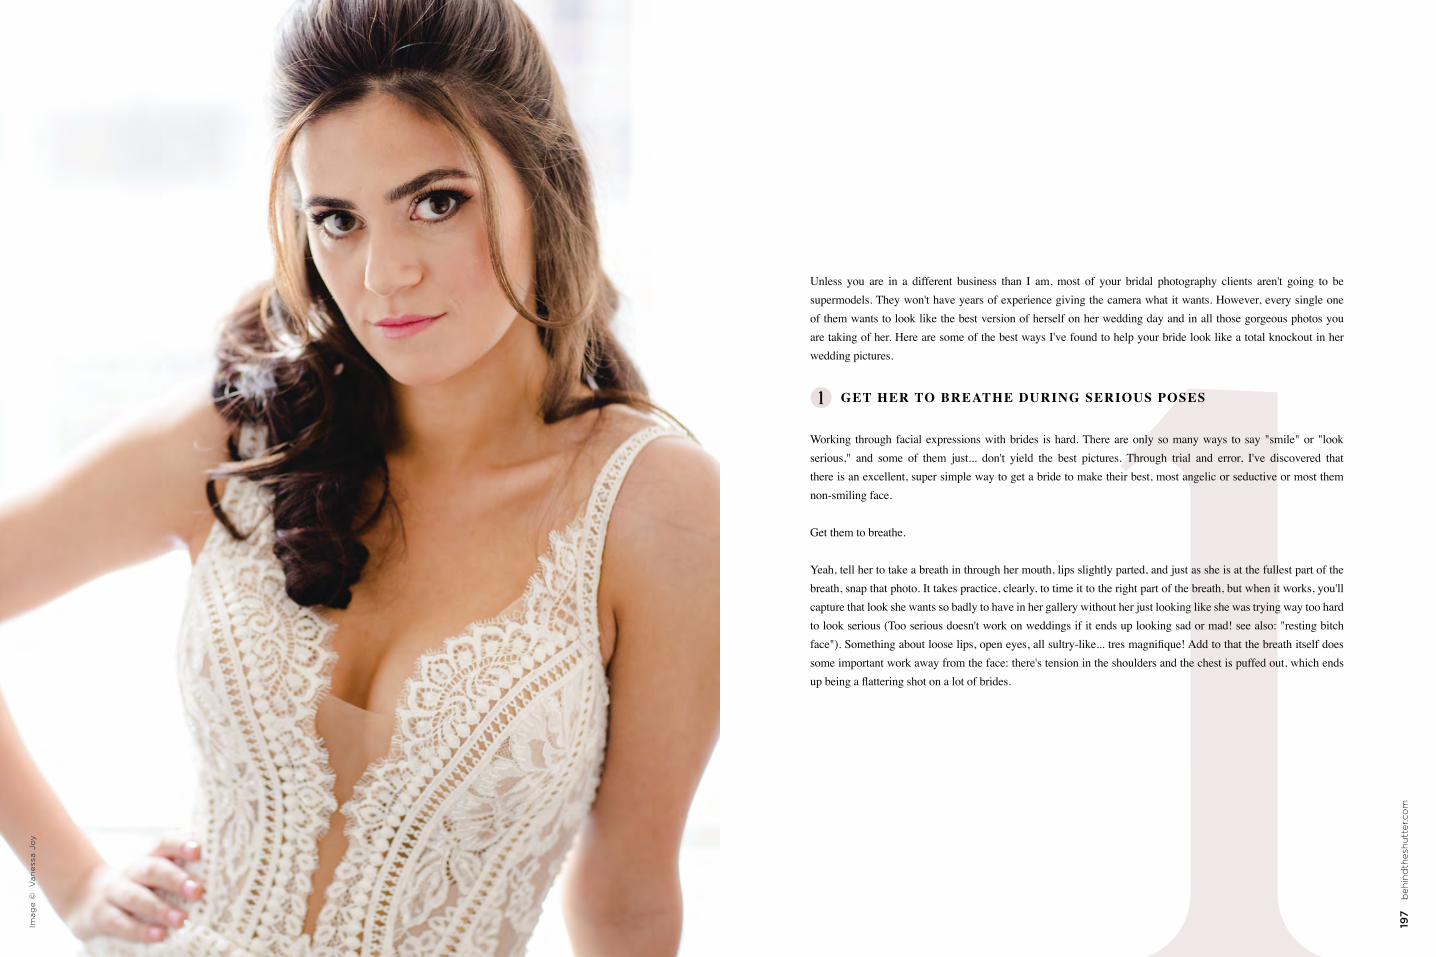
196
Sh
utt
er M
agaz
ine
. Au
gu
st 2
019
197
beh
ind
thes
hu
tter
.co
m
Ima
ge
©
Va
ne
ssa
Jo
y
Unless you are in a different business than I am, most of your bridal photography clients aren't going to be supermodels. They won't have years of experience giving the camera what it wants. However, every single one of them wants to look like the best version of herself on her wedding day and in all those gorgeous photos you are taking of her. Here are some of the best ways I've found to help your bride look like a total knockout in her wedding pictures.
Working through facial expressions with brides is hard. There are only so many ways to say "smile" or "look serious," and some of them just... don't yield the best pictures. Through trial and error, I've discovered that there is an excellent, super simple way to get a bride to make their best, most angelic or seductive or most them non-smiling face.
Get them to breathe.
Yeah, tell her to take a breath in through her mouth, lips slightly parted, and just as she is at the fullest part of the breath, snap that photo. It takes practice, clearly, to time it to the right part of the breath, but when it works, you'll capture that look she wants so badly to have in her gallery without her just looking like she was trying way too hard to look serious (Too serious doesn't work on weddings if it ends up looking sad or mad! see also: "resting bitch
some important work away from the face: there's tension in the shoulders and the chest is puffed out, which ends
GET HER TO BREATHE DURING SERIOUS POSES
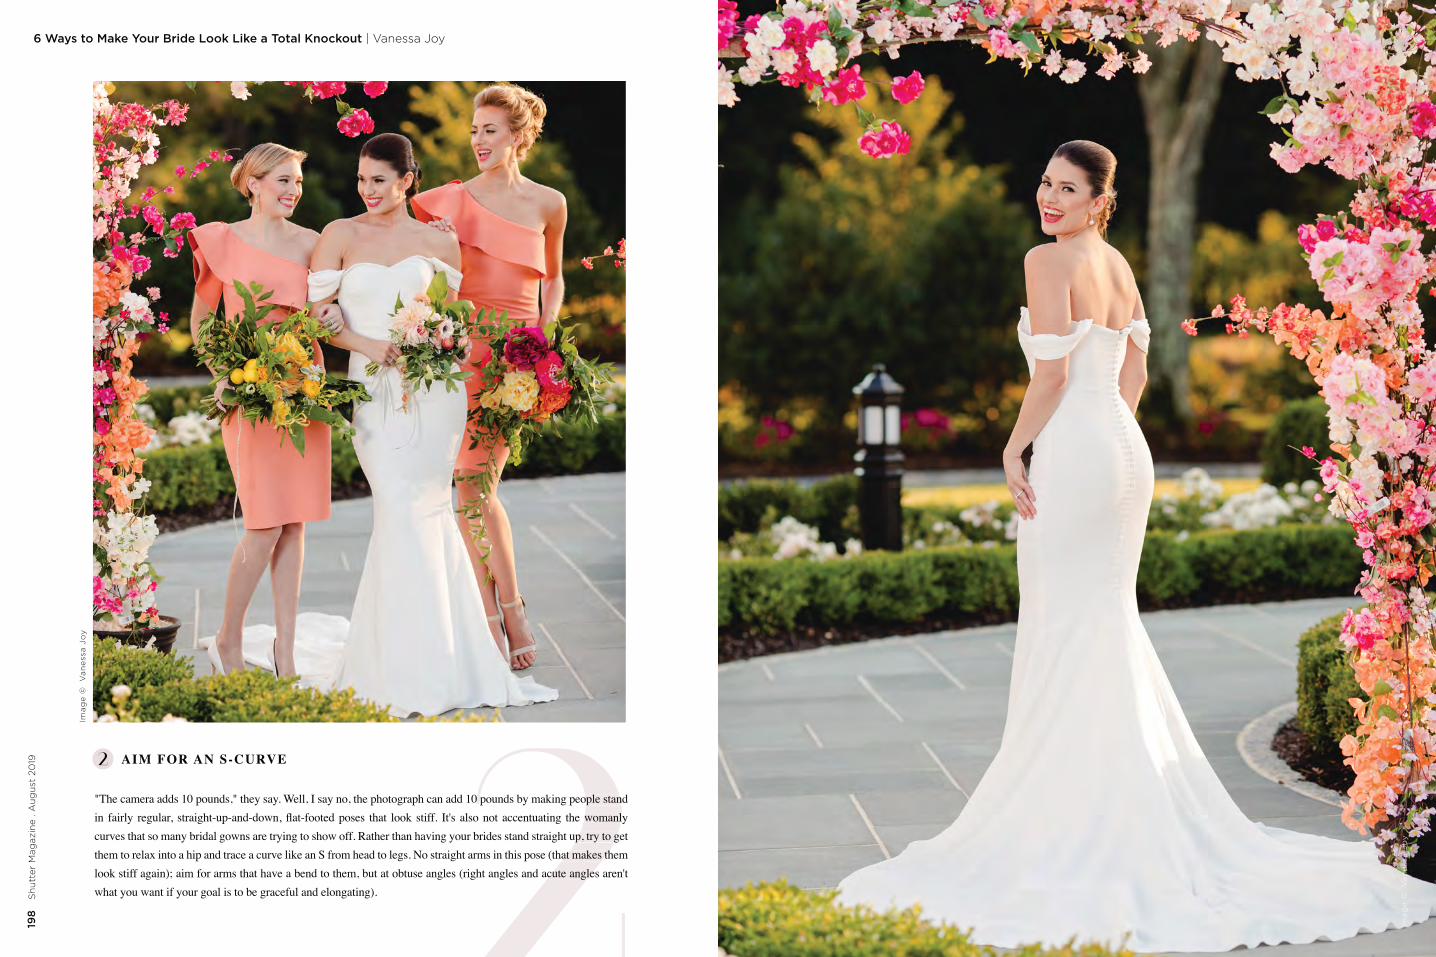
199
beh
ind
thes
hu
tter
.co
m
198
Sh
utt
er M
agaz
ine
. Au
gu
st 2
019
6 Ways to Make Your Bride Look Like a Total Knockout | Vanessa Joy
Ima
ge
©
Va
ne
ssa
Jo
y
Ima
ge
©
Va
ne
ssa
Jo
y
AIM FOR AN S-CURVE
"The camera adds 10 pounds," they say. Well, I say no, the photograph can add 10 pounds by making people stand
curves that so many bridal gowns are trying to show off. Rather than having your brides stand straight up, try to get them to relax into a hip and trace a curve like an S from head to legs. No straight arms in this pose (that makes them look stiff again); aim for arms that have a bend to them, but at obtuse angles (right angles and acute angles aren't what you want if your goal is to be graceful and elongating).
0 pounds by making people stan
p, try to gat makes th
acute angles
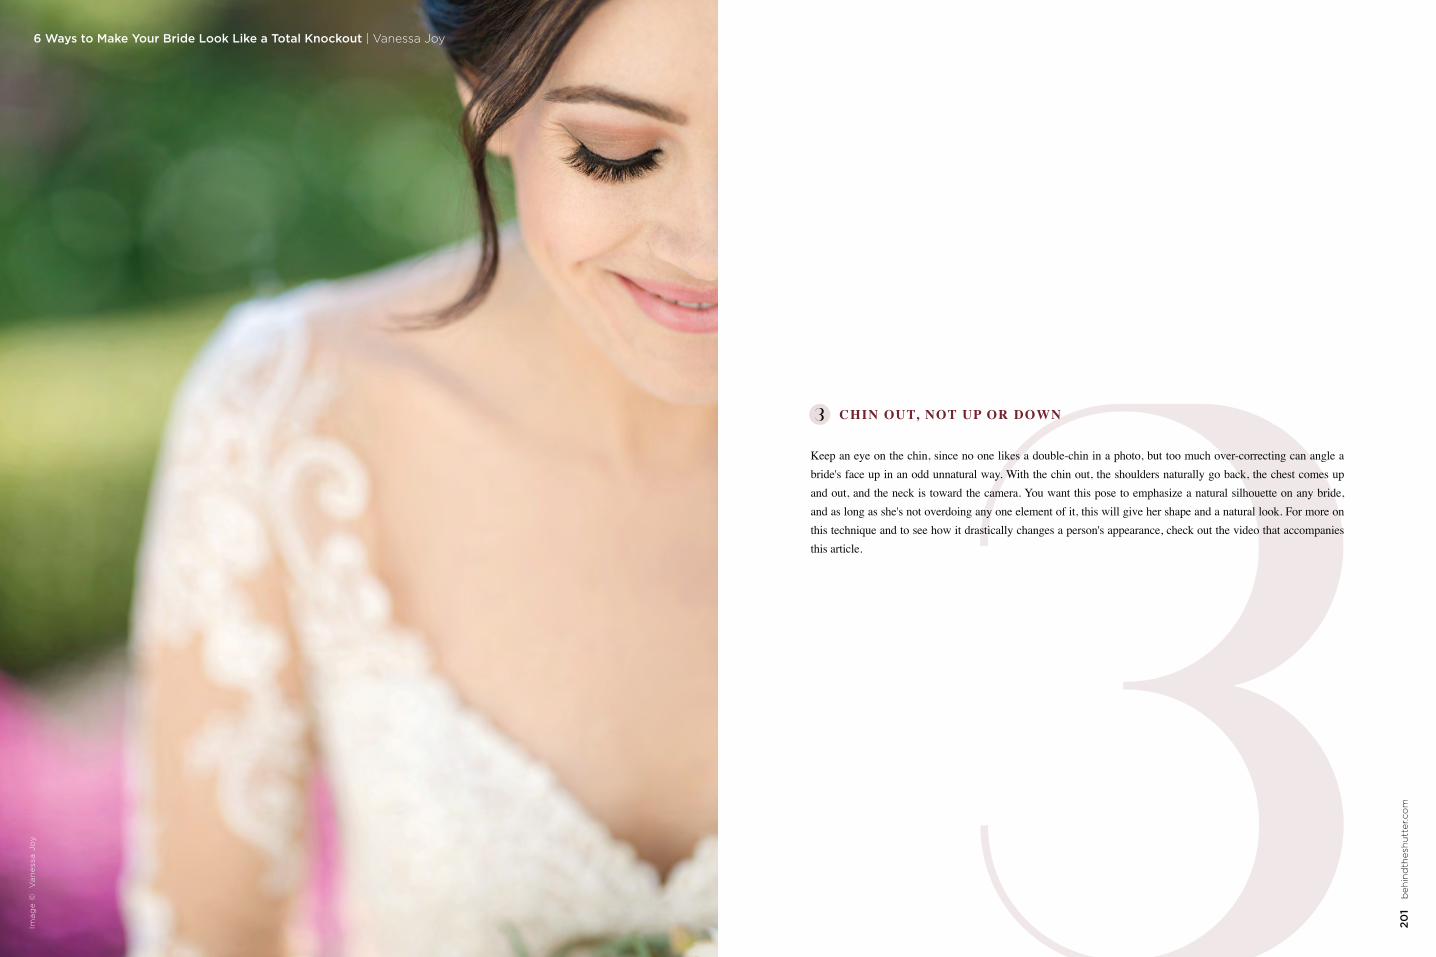
200
S
hu
tter
Mag
azin
e . A
ug
ust
20
19
201
beh
ind
thes
hu
tter
.co
m
Ima
ge
©
Va
ne
ssa
Jo
y6 Ways to Make Your Bride Look Like a Total Knockout | Vanessa Joy
Keep an eye on the chin, since no one likes a double-chin in a photo, but too much over-correcting can angle a bride's face up in an odd unnatural way. With the chin out, the shoulders naturally go back, the chest comes up and out, and the neck is toward the camera. You want this pose to emphasize a natural silhouette on any bride, and as long as she's not overdoing any one element of it, this will give her shape and a natural look. For more on
this article.
CHIN OUT, NOT UP OR DOWN
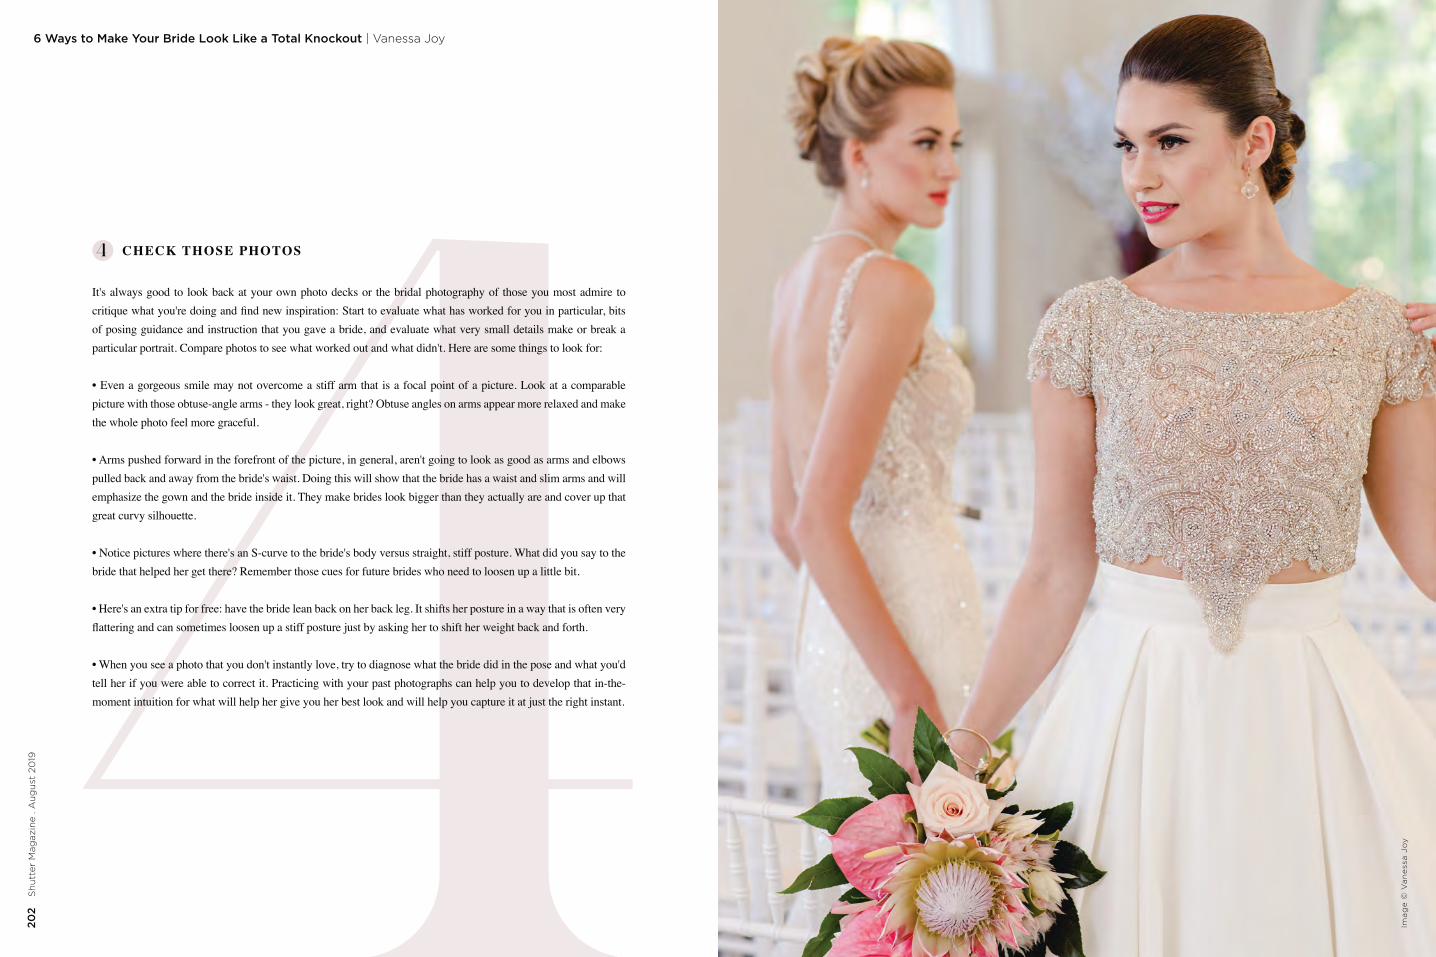
202
Sh
utt
er M
agaz
ine
. Au
gu
st 2
019
203
beh
ind
thes
hu
tter
.co
m
6 Ways to Make Your Bride Look Like a Total Knockout | Vanessa Joy
Ima
ge
© V
an
ess
a J
oy
It's always good to look back at your own photo decks or the bridal photography of those you most admire to
of posing guidance and instruction that you gave a bride, and evaluate what very small details make or break a particular portrait. Compare photos to see what worked out and what didn't. Here are some things to look for:
• Even a gorgeous smile may not overcome a stiff arm that is a focal point of a picture. Look at a comparable picture with those obtuse-angle arms - they look great, right? Obtuse angles on arms appear more relaxed and make the whole photo feel more graceful.
pulled back and away from the bride's waist. Doing this will show that the bride has a waist and slim arms and will emphasize the gown and the bride inside it. They make brides look bigger than they actually are and cover up that great curvy silhouette.
• Notice pictures where there's an S-curve to the bride's body versus straight, stiff posture. What did you say to the bride that helped her get there? Remember those cues for future brides who need to loosen up a little bit.
• Here's an extra tip for free: have the bride lean back on her back leg. It shifts her posture in a way that is often very
• When you see a photo that you don't instantly love, try to diagnose what the bride did in the pose and what you'd tell her if you were able to correct it. Practicing with your past photographs can help you to develop that in-the-moment intuition for what will help her give you her best look and will help you capture it at just the right instant.
CHECK THOSE PHOTOS
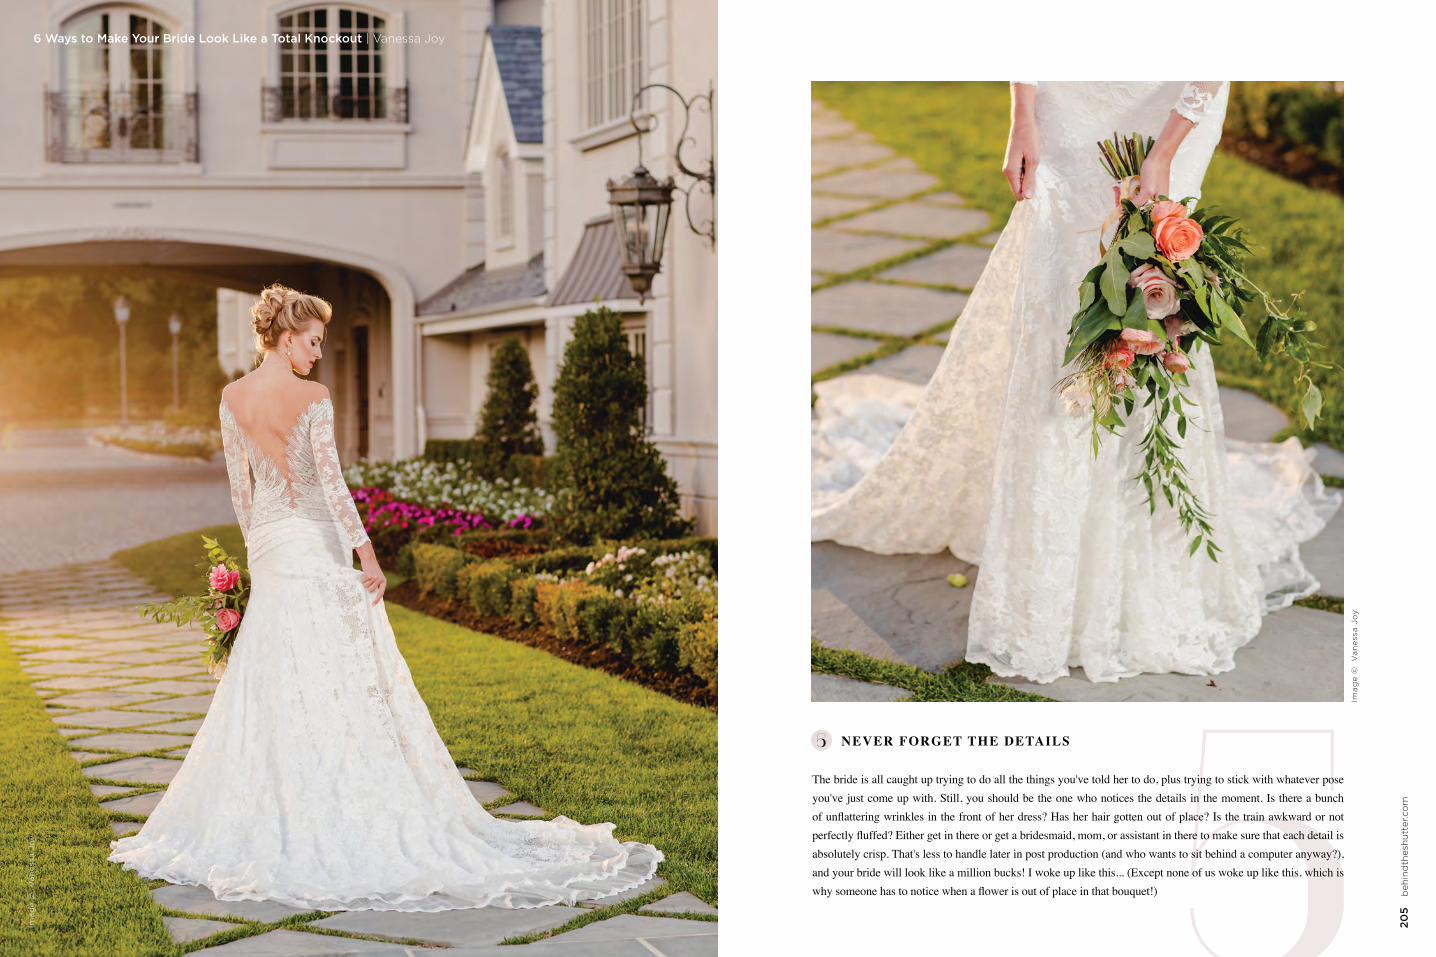
204
S
hu
tter
Mag
azin
e . A
ug
ust
20
19
205
beh
ind
thes
hu
tter
.co
m
Ima
ge
©
Va
ne
ssa
Jo
y
Ima
ge
©
Va
ne
ssa
Jo
y
6 Ways to Make Your Bride Look Like a Total Knockout | Vanessa Joy
NEVER FORGET THE DETAILS
The bride is all caught up trying to do all the things you've told her to do, plus trying to stick with whatever pose you've just come up with. Still, you should be the one who notices the details in the moment. Is there a bunch
absolutely crisp. That's less to handle later in post production (and who wants to sit behind a computer anyway?), and your bride will look like a million bucks! I woke up like this... (Except none of us woke up like this, which is
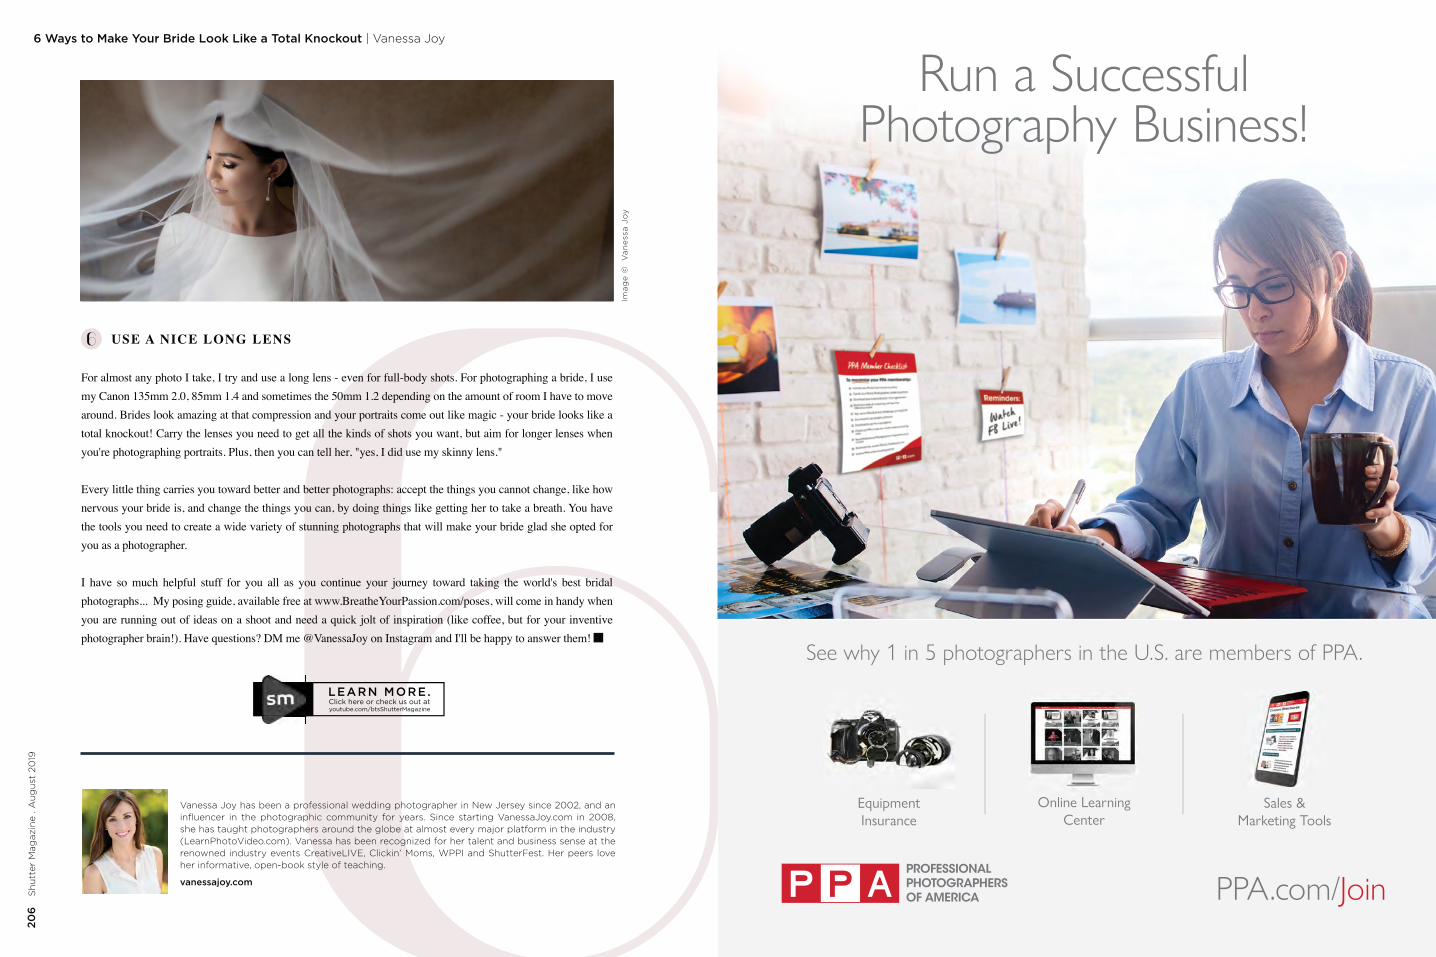
206
Sh
utt
er M
agaz
ine
. Au
gu
st 2
019
207
beh
ind
thes
hu
tter
.co
m
6 Ways to Make Your Bride Look Like a Total Knockout | Vanessa Joy
Ima
ge
©
Va
ne
ssa
Jo
y
USE A NICE LONG LENS
For almost any photo I take, I try and use a long lens - even for full-body shots. For photographing a bride, I use my Canon 135mm 2.0, 85mm 1.4 and sometimes the 50mm 1.2 depending on the amount of room I have to move around. Brides look amazing at that compression and your portraits come out like magic - your bride looks like a total knockout! Carry the lenses you need to get all the kinds of shots you want, but aim for longer lenses when you're photographing portraits. Plus, then you can tell her, "yes, I did use my skinny lens." Every little thing carries you toward better and better photographs: accept the things you cannot change, like how nervous your bride is, and change the things you can, by doing things like getting her to take a breath. You have the tools you need to create a wide variety of stunning photographs that will make your bride glad she opted for you as a photographer.
I have so much helpful stuff for you all as you continue your journey toward taking the world's best bridal photographs... My posing guide, available free at www.BreatheYourPassion.com/poses, will come in handy when
LEARN MORE.youtube.com/btsShutterMagazineClick here or check us out at
vanessajoy.com
Vanessa Joy has been a professional wedding photographer in New Jersey since 2002, and an influencer in the photographic community for years. Since starting VanessaJoy.com in 2008, she has taught photographers around the globe at almost every major platform in the industry (LearnPhotoVideo.com). Vanessa has been recognized for her talent and business sense at the renowned industry events CreativeLIVE, Clickin’ Moms, WPPI and ShutterFest. Her peers love her informative, open-book style of teaching.
Run a SuccessfulPhotography Business!
PPA.com/Join
EquipmentInsurance
Sales &Marketing Tools
Online Learning Center
See why 1 in 5 photographers in the U.S. are members of PPA.
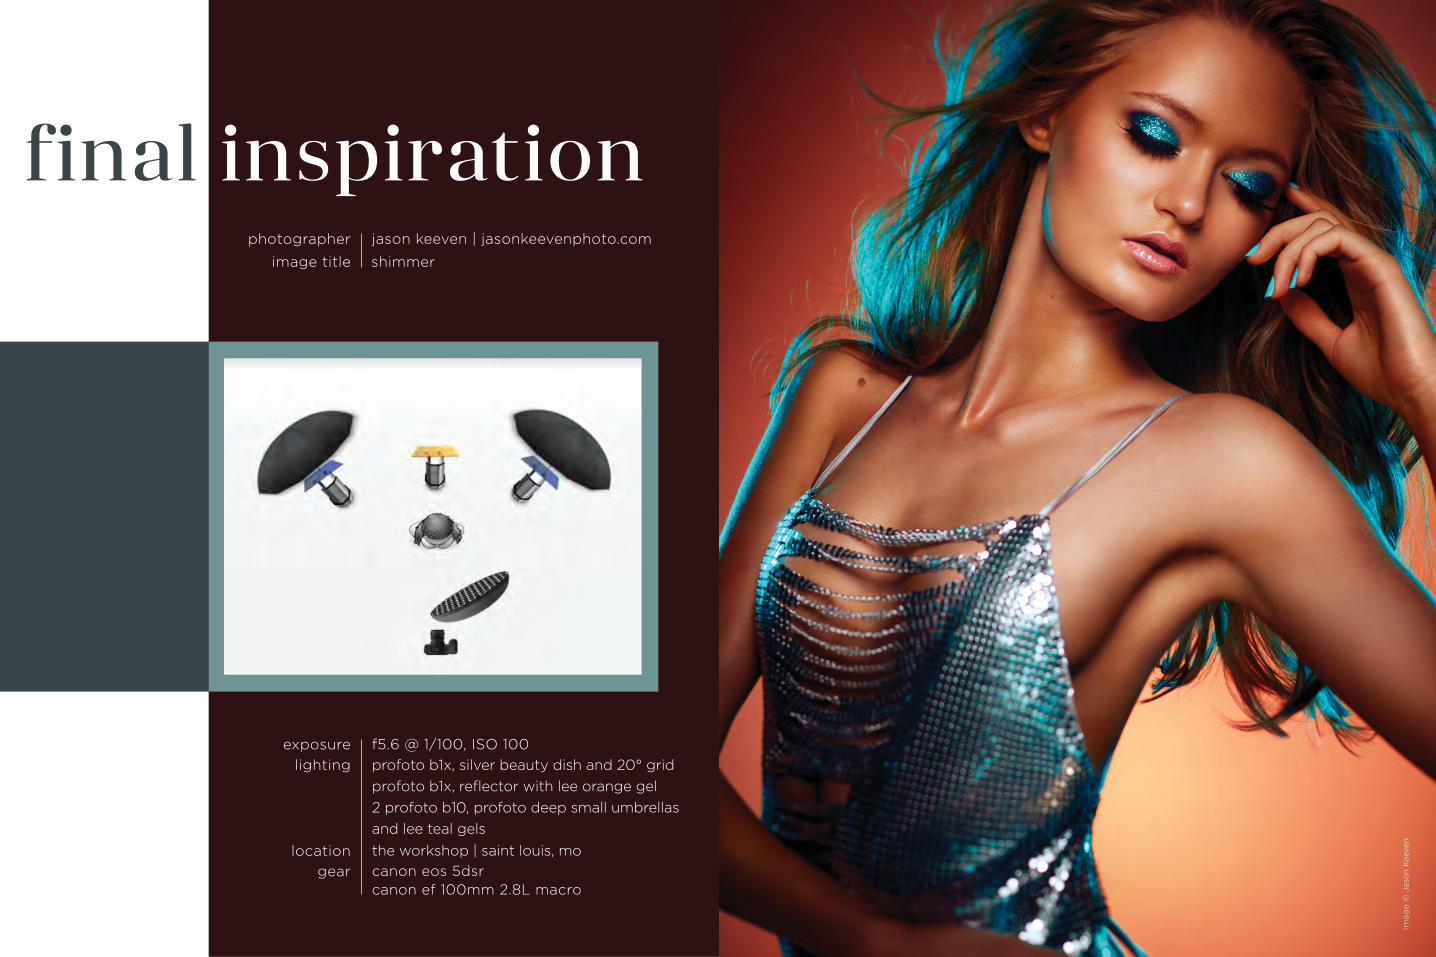
photographer jason keeven | jasonkeevenphoto.com
gear canon eos 5dsr canon ef 100mm 2.8L macro
exposurelighting
location
image title shimmer
f5.6 @ 1/100, ISO 100profoto b1x, silver beauty dish and 20° gridprofoto b1x, reflector with lee orange gel2 profoto b10, profoto deep small umbrellasand lee teal gelsthe workshop | saint louis, mo
208
Sh
utt
er M
agaz
ine
. Jan
uar
y 20
18
Im
ag
e ©
Jas
on
Kee
ven
final inspiration
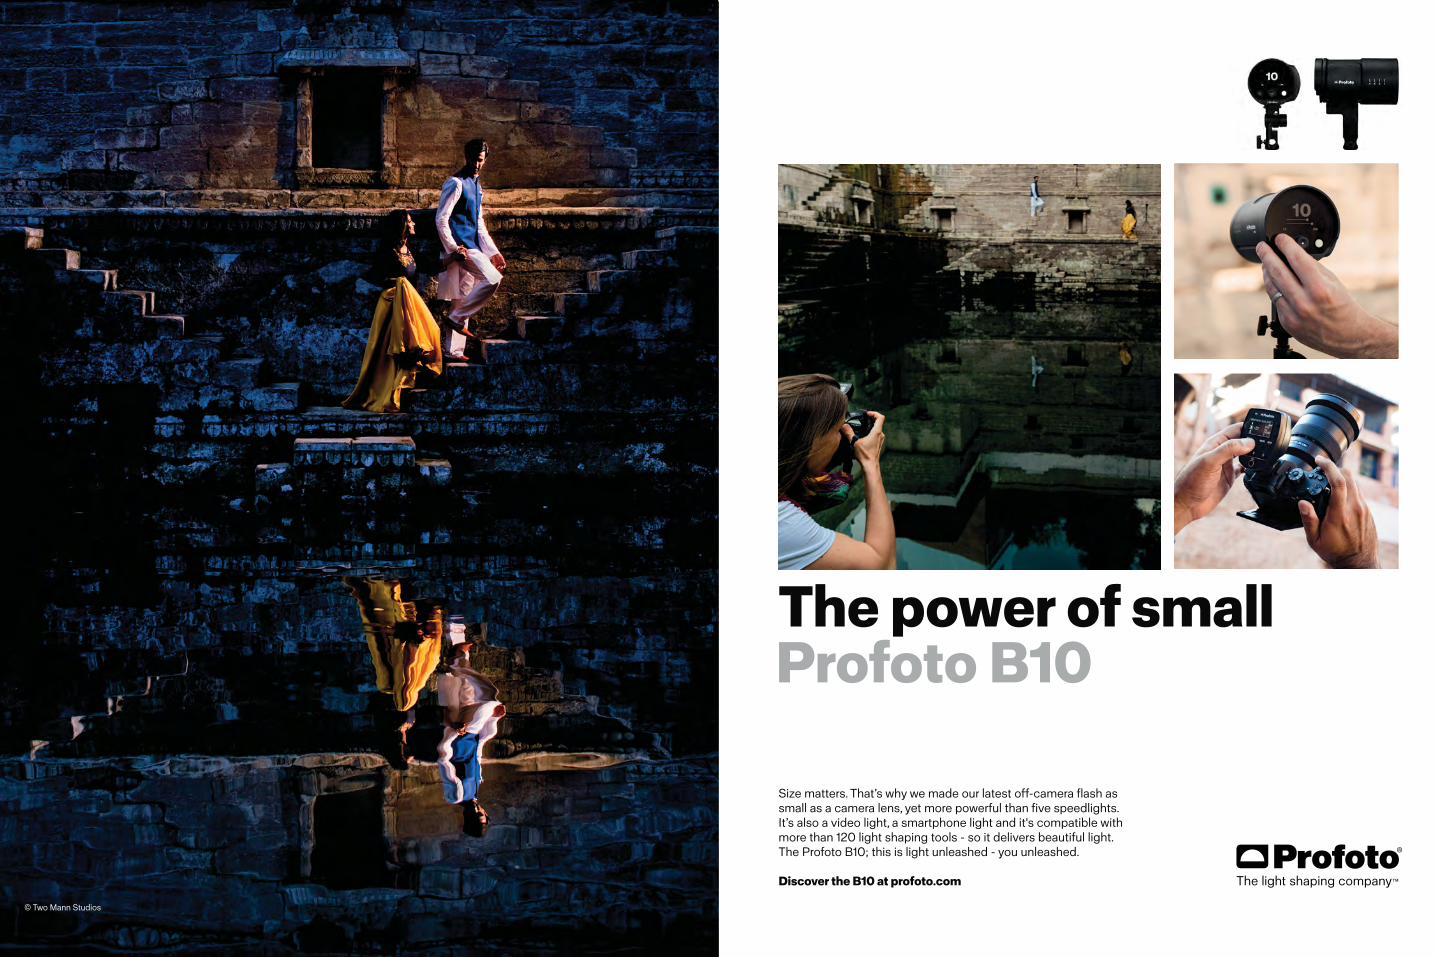
© Two Mann Studios
Size matters. That’s why we made our latest off-camera flash as small as a camera lens, yet more powerful than five speedlights. It’s also a video light, a smartphone light and it's compatible with more than 120 light shaping tools - so it delivers beautiful light. The Profoto B10; this is light unleashed - you unleashed.
Discover the B10 at profoto.com
The power of smallProfoto B10


