Embed Size (px)
Citation preview
Cloud User GuideJive Extensions:Tiles

NoticesFor details, see the following topics:
• Notices
• Third-party acknowledgments
NoticesCopyright © 2000–2021. Aurea Software, Inc. (“Aurea”). All Rights Reserved. Thesematerials and all Aurea products are copyrighted and all r ights are reserved by Aurea.
This document is proprietary and confidential to Aurea and is available only undera valid non-disclosure agreement. No part of this document may be disclosed inany manner to a third par ty without the prior written consent of Aurea. The informationin these materials is for informational purposes only and Aurea assumes no respon-sibility for any errors that may appear therein. Aurea reserves the right to revisethis information and to make changes from time to time to the content hereof withoutobligation of Aurea to notify any person of such revisions or changes.
You are hereby placed on notice that the software, its related technology and servicesmay be covered by one or more United States (“US”) and non-US patents. A listingthat associates patented and patent-pending products included in the software,software updates, their related technology and services with one or more patentnumbers is available for you and the general public’s access at https://markings.ip-dynamics.ai/esw/ (the “Patent Notice”) without charge. The association of products-to-patent numbers at the Patent Notice may not be an exclusive listing of associa-tions, and other unlisted patents or pending patents may also be associated withthe products. Likewise, the patents or pending patents may also be associated withunlisted products. You agree to regularly review the products-to-patent number(s)association at the Patent Notice to check for updates.
Aurea and Aurea Software are registered trademarks of Aurea Software, Inc. in theUnited States and/or other countries. Additional Aurea trademarks, including regis-tered trademarks, are available at: https://www.aurea.com/legal/trademarks/. Jiveis a registered trademark of Jive Software, Inc. in the United States and/or othercountries. Additional Jive trademarks, including registered trademarks, are availableat: https://www.jivesoftware.com/legal/.
Notices

Third-party acknowledgmentsThe following third-party trademarks may appear in one or more Jive guides:
• Amazon is a registered trademark of Amazon Technologies, Inc.
• Apache and Derby is a trademark of Apache Software Foundation.
• Chrome is a trademark of Google Inc.
• Eclipse is a registered trademark of the Eclipse Foundation, Inc.
• HP-UX is a registered trademark of Hewlett-Packard Development Company, L.P.
• IBM, AIX, DB2, and WebSphere are registered trademarks of International BusinessMachines Corporation.
• Intel and Pentium are registered trademarks of Intel Corporation in the U.S. and/orother countries.
• JBoss is a registered trademark, and CentOS is a trademark, of Red Hat, Inc. inthe U.S. and other countries.
• Linux is a registered trademark of Linus Torvalds.
• Microsoft, Active Directory, Internet Explorer, SharePoint, SQL Server, VisualStudio, and Windows are registered trademarks or trademarks of MicrosoftCorporation in the United States and/or other countries.
• Mozilla and Firefox are registered trademarks of the Mozilla Foundation.
• Oracle and Java are registered trademarks of Oracle and/or its affiliates.
• Progress and OpenEdge are registered trademarks of Progress SoftwareCorporation or one of its subsidiaries or affiliates in the U.S. and other countries.
• Red Hat and Red Hat Enterprise Linux are registered trademarks of Red Hat, Inc.in the U.S. and other countries.
• SAP and SAP NetWeaver are registered trademarks of SAP SE in Germany andin several other countries.
• SUSE is a registered trademark of SUSE, LLC.
• Ubuntu is a registered trademark of Canonical Limited in the United States and/orother countries.
• UNIX is a registered trademark of The Open Group in the United States and othercountries.
All other marks contained herein are for informational purposes only and may betrademarks of their respective owners.
Notices

Table of Contents
Aurea global support........................................................................................................8
Chapter 1: Advanced Document Viewer tile..............................................9Creating Advanced Document Viewer tiles.......................................................................................10
Adding Advanced Document Viewer tile ................................................................................10
Configuring General Settings..................................................................................................12
Configuring Visibility Rules......................................................................................................12
Configuring Advanced Document Viewer Settings................................................................13
Copying settings from another tile.....................................................................................................14
Chapter 2: Advanced HTML tile................................................................15Creating Advanced HTML tiles...........................................................................................................16
Adding Advanced HTML tile ...................................................................................................16
Configuring General Settings..................................................................................................17
Configuring Visibility Rules......................................................................................................17
Configuring Advanced HTML Settings....................................................................................18
Copying settings from another tile.....................................................................................................20
An example of Advanced HTML tile...................................................................................................21
Chapter 3: Advanced Search tile..............................................................23Creating Advanced Search tiles.........................................................................................................24
Adding Advanced Search tile .................................................................................................24
Configuring General Settings..................................................................................................25
Configuring Advanced Search Settings..................................................................................25
Copying settings from another tile.....................................................................................................29
An example of Advanced Search tile.................................................................................................30
Chapter 4: Audio tile...................................................................................32Creating Audio tiles.............................................................................................................................33
Adding Audio tile ......................................................................................................................33
Configuring General Settings..................................................................................................35
Configuring Audio tile-specific settings..................................................................................35
Copying settings from another tile.....................................................................................................39
Chapter 5: Calendar tile.............................................................................40Creating Calendar tiles.......................................................................................................................43
Adding Calendar tile ................................................................................................................43

Configuring General Settings..................................................................................................44
Configuring Visibility Rules......................................................................................................44
Configuring Calendar tile-specific settings.............................................................................45
Copying settings from another tile.....................................................................................................47
An example of Calendar tile...............................................................................................................47
Chapter 6: Content Filter tile.....................................................................49Creating Content Filter tiles................................................................................................................50
Adding Content Filter tile ........................................................................................................50
Configuring General Settings..................................................................................................52
Configuring Content Filter tile-specific settings.....................................................................53
Copying settings from another tile.....................................................................................................60
An example of Content Filter tile........................................................................................................60
Chapter 7: Countdown tile.........................................................................64Creating Countdown tiles....................................................................................................................66
Adding Countdown tile ............................................................................................................66
Configuring General Settings..................................................................................................67
Configuring Countdown tile-specific settings.........................................................................67
Copying settings from another tile.....................................................................................................69
An example of Countdown tile............................................................................................................70
Chapter 8: Create a Post tile......................................................................72Creating Create a Post tiles...............................................................................................................74
Adding Create a Post tile ........................................................................................................74
Configuring General Settings..................................................................................................76
Configuring Create a Post tile-specific settings.....................................................................76
Copying settings from another tile.....................................................................................................77
An example of Create a Post tile.......................................................................................................78
Chapter 9: Formatted Text tile...................................................................80Creating Formatted Text tiles.............................................................................................................82
Adding Formatted Text tile ......................................................................................................82
Configuring General Settings..................................................................................................83
Configuring Visibility Rules......................................................................................................83
Configuring Formatted Text tile-specific settings...................................................................83
Copying settings from another tile.....................................................................................................84
An example of Formatted Text tile......................................................................................................85
Chapter 10: Grid Layout tile......................................................................87Creating Grid Layout tiles...................................................................................................................88

Adding Grid Layout tile ............................................................................................................88
Configuring General Settings..................................................................................................90
Configuring Grid Layout tile-specific settings........................................................................90
Copying settings from another tile.....................................................................................................93
An example of Grid Layout tile...........................................................................................................93
Chapter 11: Jive Poll tile............................................................................96Creating Jive Poll tiles.........................................................................................................................99
Adding Jive Poll tile .................................................................................................................99
Configuring General Settings................................................................................................101
Configuring Visibility Rules....................................................................................................101
Configuring Jive Poll tile-specific settings............................................................................102
Copying settings from another tile...................................................................................................103
An example of Grid Layout tile.........................................................................................................104
Chapter 12: News Stream tile..................................................................107
Chapter 13: Recent Content tile..............................................................109Creating Recent Content tiles..........................................................................................................112
Adding Recent Content tile ...................................................................................................112
Configuring General Settings................................................................................................114
Configuring Recent Content tile-specific settings...............................................................115
Copying settings from another tile...................................................................................................117
An example of Recent Content tile..................................................................................................118
Chapter 14: RSS tile..................................................................................122Creating RSS tiles.............................................................................................................................125
Adding RSS tile .....................................................................................................................125
Configuring General Settings................................................................................................127
Configuring RSS tile-specific settings..................................................................................127
Copying settings from another tile...................................................................................................128
An example of RSS tile.....................................................................................................................129
Chapter 15: Slideshow tile.......................................................................131Creating Slideshow tiles...................................................................................................................132
Adding Slideshow tile ............................................................................................................132
Configuring General Settings................................................................................................133
Configuring Visibility Rules....................................................................................................133
Configuring Slideshow tile-specific settings.........................................................................133
Copying settings from another tile...................................................................................................137
An example of Slideshow tile...........................................................................................................138

Chapter 16: Social Media tile...................................................................140Creating Social Media tiles...............................................................................................................143
Adding Social Media tile .......................................................................................................143
Configuring General Settings................................................................................................144
Configuring Social Media tile-specific settings....................................................................144
Copying settings from another tile...................................................................................................149
An example of Social Media tile.......................................................................................................150
Chapter 17: Visibility Rules of JEP tiles................................................157
Chapter 18: General Settings of JEP tiles.............................................162

Aurea global supportIf you encounter a problem while using an Aurea product or require assistance with downloadingthe software or upgrading a product release, please, try to:
• Search the articles on the Aurea Knowledge Base for solutions to your issues.
• Search the product documentation and other product-related information that are also availableon Support Central.
If you still cannot find a solution, open a ticket on Aurea Support Central. Information about thesupport organization is available on Support Portal as well.
You can also find the setup files on Support Portal.
For information about purchasing an upgrade or professional services, contact your accountexecutive. If you do not know who your account executive is, or for other queries, contact usthrough our website.
8AUREA CONFIDENTIAL
Chapter 1: Aurea global support

1Advanced Document Viewer tileDocument attributes to display are configurable – author details, shares, comments,likes, and also structured outcomes (Final, Outdated, and Official). This tile:
• Shows a document on any tile page
• Allows configure document attributes
• Supports visibility rules
9AUREA CONFIDENTIAL

This is a user-friendly tile to display any document within the tile.
For details, see the following topics:
• Creating Advanced Document Viewer tiles
• Copying settings from another tile
Creating Advanced Document Viewer tilesHere you can find details on adding and configuring Advanced Document Viewertiles.
Adding Advanced Document Viewer tileTo add the tile to the page:
1. Go to the place where you want to add a new tile.
2. Open the relevant Activity or Custom page and edit it.
3. Click Add a tile.
4. Under Categories, select External Add-ons, then select JEP: AdvancedDocument Viewer Tile under Tiles.
10AUREA CONFIDENTIAL
Chapter 1: Advanced Document Viewer tile

The tile is added to the page and you need to configure it. You can configure thetile anew or, if you already have similar tiles, copy the settings from another tile.
11AUREA CONFIDENTIAL
Creating Advanced Document Viewer tiles

Configuring General SettingsTo set up general tile settings:
1. Select Gear Icon > General settings .
2. Configure the general settings. For the detailed instructions, see General Settingsof JEP tiles on page 162.
3. Click Save Tile Settings.
Configuring Visibility RulesTo set up general tile settings:
1. Select Gear Icon > Visibility Rules .
2. Configure a new visibility rule or select an existing one. For the detailedinstructions on creating new rules, see Visibility Rules of JEP tiles on page 157.
3. Click Save Tile Settings.
12AUREA CONFIDENTIAL
Chapter 1: Advanced Document Viewer tile

Configuring Advanced Document Viewer SettingsTo configure settings specific to Advanced Document Viewer tiles:
1. Click the gear icon > Document Viewer Settings .
2. Under Search Document, select the document you want to be displayed in thetile.
3. Select display options:
DescriptionOptions
When selected, hides the title andauthor information.
Suppress document title and authorinformation
When selected, hides share, like, andcomments links.
Suppress "Share", "Like", and"Comments" links
When selected, hides the outcomebadge.
Suppress content badges (e.g.Official, Final, Outdated)
13AUREA CONFIDENTIAL
Creating Advanced Document Viewer tiles
Hiding the document details may be useful, for example, for using a single docu-ment as a 'table of contents' of a place. Or for reusing a list of useful links betweenseveral places.
4. Click Save Tile Settings.
Advanced Document Viewer is configured successfully.
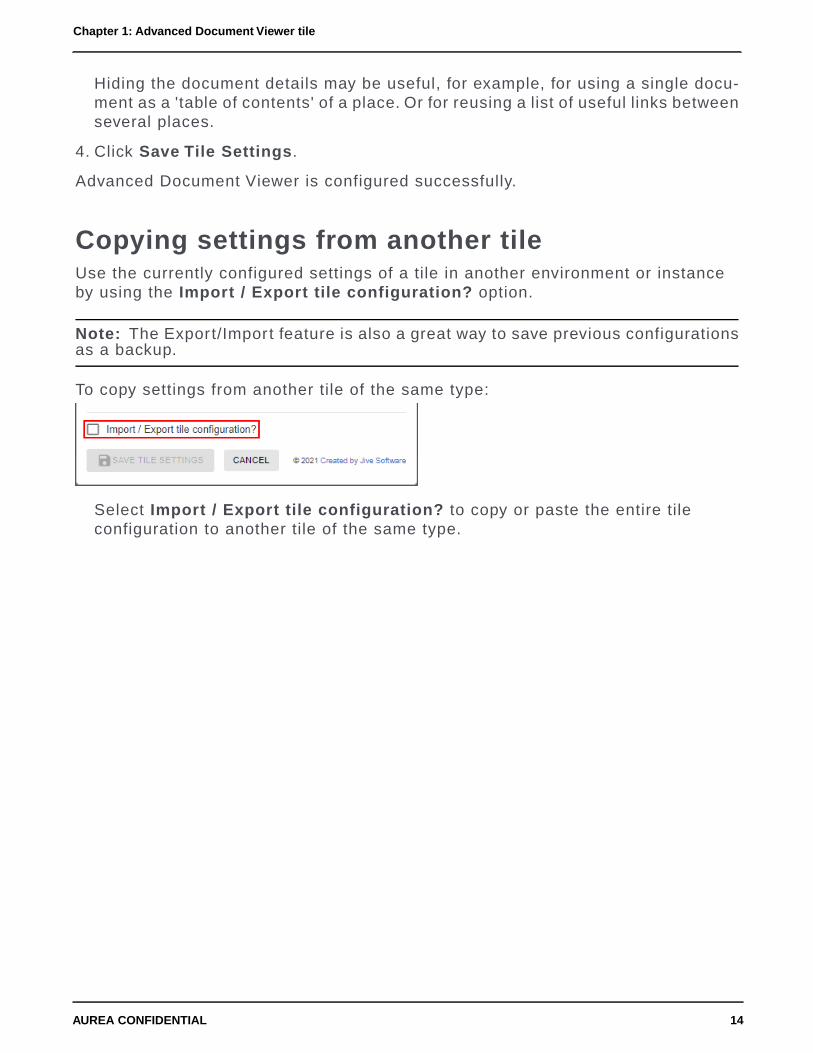
Copying settings from another tileUse the currently configured settings of a tile in another environment or instanceby using the Import / Export tile configuration? option.
Note: The Export/Import feature is also a great way to save previous configurationsas a backup.
To copy settings from another tile of the same type:
Select Import / Export tile configuration? to copy or paste the entire tileconfiguration to another tile of the same type.
14AUREA CONFIDENTIAL
Chapter 1: Advanced Document Viewer tile

2Advanced HTML tileAdvanced HTML tiles:
• Support HTML and JavaScript
• Adjust height automatically to content
• Are permission-based for high security
15AUREA CONFIDENTIAL

Flexible HTML tile that allows you to inser t HTML and JavaScript to improve thelook and feel of your community.
For details, see the following topics:
• Creating Advanced HTML tiles
• Copying settings from another tile
• An example of Advanced HTML tile
Creating Advanced HTML tilesHere you can find details on adding and configuring Advanced HTML tiles.
Adding Advanced HTML tileTo add the tile to the page:
1. Go to the place where you want to add a new tile.
2. Open the relevant Activity or Custom page and edit it.
3. Click Add a tile.
4. Under Categories, select External Add-ons, then select JEP: Advanced HTMLunder Tiles.
The tile is added to the page and you need to configure it. You can configure thetile anew or, if you already have similar tiles, copy the settings from another tile.
16AUREA CONFIDENTIAL
Chapter 2: Advanced HTML tile
Configuring General SettingsTo set up general tile settings:
1. Select Gear Icon > General settings .
2. Configure the general settings. For the detailed instructions, see General Settingsof JEP tiles on page 162.
3. Click Save Tile Settings.
Configuring Visibility RulesTo set up general tile settings:
1. Select Gear Icon > Visibility Rules .
2. Configure a new visibility rule or select an existing one. For the detailedinstructions on creating new rules, see Visibility Rules of JEP tiles on page 157.
3. Click Save Tile Settings.
17AUREA CONFIDENTIAL
Creating Advanced HTML tiles

Configuring Advanced HTML SettingsTo configure settings specific to Advanced HTML tiles:
1. Click the gear icon > HTML .
2. Define HTML code with or without Java script.
18AUREA CONFIDENTIAL
Chapter 2: Advanced HTML tile

Inser t the HTML code within <div> ... </div> to wrap the content, as the tilealready provides the html, head, and body tags.
Caution: All JavaScript is stripped out from the HTML configurations for userswho are not added to the defined Security Group. For more information, see Al-lowing JavaScript usage for specific users in the Jive 9.x Community ManagerHelp.
3. Click Save Tile Settings.
On saving the settings, the message confirming the Advanced HTML configurationsappears.
4. Save tile settings.
Advanced HTML is configured successfully.
19AUREA CONFIDENTIAL
Creating Advanced HTML tiles

Copying settings from another tileUse the currently configured settings of a tile in another environment or instanceby using the Import / Export tile configuration? option.
Note: The Export/Import feature is also a great way to save previous configurationsas a backup.
To copy settings from another tile of the same type:
20AUREA CONFIDENTIAL
Chapter 2: Advanced HTML tile

Select Import / Export tile configuration? to copy or paste the entire tileconfiguration to another tile of the same type.
An example of Advanced HTML tileAn Advanced HTML may look like this.
• General Settings:
• Title: Sample Title: Advanced HTML
• Display Tile Title: Selected
21AUREA CONFIDENTIAL
An example of Advanced HTML tile

• Headline: Headline (center aligned)
• Description: Describe the use case for this tile here in one or two lines. Thissetting is left aligned.
• Description Alignment: Left
• Background Image URL
• Padding: 20px (all around)
• Action label + URL: AureaWorks and a link provided
• HTML: Code with JavaScript provided<div>
<h4>Here is a sample HTML code. </h4><p id="demo">This part of the text will be automatically considered as the
body of the page. No need to declare the tags < html >, < head >, or < body >tags.</p>
<div><div id="demo_text"></div><br/><div id="demo_image"></div>
</div><button type="button" onclick="buttonClick()" id="more">More Info</button>
</div><script>function buttonClick(){...}</script>
22AUREA CONFIDENTIAL
Chapter 2: Advanced HTML tile

3Advanced Search tileAdvanced Search tile:
• Allows piking multiple places
• Allows all content types, people, places
• Has configurable front-end filters
23AUREA CONFIDENTIAL

Highly configurable search tile featuring a hero image, type-ahead results, andcontent type filtering that can be used to query content from multiple places orcommunity-wide.
For details, see the following topics:
• Creating Advanced Search tiles
• Copying settings from another tile
• An example of Advanced Search tile
Creating Advanced Search tilesHere you can find details on adding and configuring Advanced Search tiles.
Adding Advanced Search tileTo add the tile to the page:
1. Go to the place where you want to add a new tile.
2. Open the relevant Activity or Custom page and edit it.
3. Click Add a tile.
4. Under Categories, select External Add-ons, then select JEP: Advanced SearchTile under Tiles.
The tile is added to the page and you need to configure it. You can configure thetile anew or, if you already have similar tiles, copy the settings from another tile.
24AUREA CONFIDENTIAL
Chapter 3: Advanced Search tile

Configuring General SettingsTo set up general tile settings:
1. Select Gear Icon > General settings .
2. Configure the general settings. For the detailed instructions, see General Settingsof JEP tiles on page 162.
3. Click Save Tile Settings.
Configuring Advanced Search SettingsTo configure settings specific to Advanced Search tiles:
1. Click the gear icon > Search Options .
2. Specify the Design Options settings:
25AUREA CONFIDENTIAL
Creating Advanced Search tiles

DescriptionOptions
The text that is displayed as default text to guide the user,for example, Start Typing.
Placeholder text
The text that is displayed on the Tile to screen readers.Label text
The style used to display the Search feature with Spotlightor Hero effect.
Style
26AUREA CONFIDENTIAL
Chapter 3: Advanced Search tile

DescriptionOptions
The link color. You can use the color picker to select one.Link color
The number of search results to be displayed.Number of results
The number of columns to be displayed.
In the multi-column layout, the results are displayed row-wise, that is, from left to right.
Columns
3. Select the desired Content types for the search results.
4. Enable the Show search filters? to display the various content types to use.
27AUREA CONFIDENTIAL
Creating Advanced Search tiles

5. In the Places filter screen, select the places to search content from or enable tosearch in the entire community.
6. Set an external site for search purposes in the Jive Community by providing Linktext and Link URL.
28AUREA CONFIDENTIAL
Chapter 3: Advanced Search tile

7. Click Save Search Settings at the bottom of the screen to save the specifiedconfigurations for the Tile Search options configured.
8. Click Continue to configure the Tile fur ther.
9. Click Save Tile Settings.
Advanced Search is configured successfully.
Copying settings from another tileUse the currently configured settings of a tile in another environment or instanceby using the Import / Export tile configuration? option.
Note: The Export/Import feature is also a great way to save previous configurationsas a backup.
To copy settings from another tile of the same type:
29AUREA CONFIDENTIAL
Copying settings from another tile

Select Import / Export tile configuration? to copy or paste the entire tileconfiguration to another tile of the same type.
An example of Advanced Search tileAn Advanced Search may look like this.
Example 1
• General Settings:
• Tile Title: Title for JEP Advanced Search Tile
• Display Tile Title: <Enabled>
• Headline: Headline of Tile can be mentioned here (centrally aligned)
• Description: Description of Tile (this is left aligned)
• Background Image URL
• Search Settings:
• Design Options Placeholder Text: Enter search text here
• Style: Spotlight
30AUREA CONFIDENTIAL
Chapter 3: Advanced Search tile

Example 2
• General Settings:
• Headline: Quick search in our Community!
• Background Image URL
• Search Settings:
• Design Options > Placeholder Text : Looking for ...
• Style: Hero
31AUREA CONFIDENTIAL
An example of Advanced Search tile

4Audio tileUseful in playing audio files, like corporate podcasts, on any place page, the Audiotile allows for various user-defined audio files to be configured. The tile also:
• Aides sequencing of audio tracks, besides allowing playback control – loopingthe tracks continuously.
• Enables users to configure a list of audio files or podcasts to be played on a placepage.
• Comes with two layouts (Player and Player with Playlist) and has configurablebranding settings to adjust to your corporate design.
• Allows for your configurations to be saved for reuse.
Note: Supported audio file formats: mp3, wav (not Edge or Internet Explorer), ogg(not Edge or Internet Explorer).
A soundboard with highly customizable player controls.
32AUREA CONFIDENTIAL
Chapter 4: Audio tile

For details, see the following topics:
• Creating Audio tiles
• Copying settings from another tile
Creating Audio tilesHere you can find details on adding and configuring Audio tiles.
Adding Audio tileTo add the tile to the page:
1. Go to the place where you want to add a new tile.
2. Open the relevant Activity or Custom page and edit it.
3. Click Add a tile.
4. Under Categories, select External Add-ons, then select JEP: Audio Tile underTiles.
The tile is added to the page and you need to configure it. You can configure thetile anew or, if you already have similar tiles, copy the settings from another tile.
33AUREA CONFIDENTIAL
Creating Audio tiles

34AUREA CONFIDENTIAL
Chapter 4: Audio tile

Configuring General SettingsTo set up general tile settings:
1. Select Gear Icon > General settings .
2. Configure the general settings. For the detailed instructions, see General Settingsof JEP tiles on page 162.
3. Click Save Tile Settings.
Configuring Audio tile-specific settingsTo configure settings specific to Audio tiles:
Configuring Player Settings of Audio tile
1. Click the gear icon > Player Settings .
2. Enter a Title as headline of playlist.
3. Choose a Layout from the options:
DescriptionOptions
Displays the Player buttons.Player
Displays the Audio list along with the Player buttons.Player List
4. If Player List is selected, select the options for displaying the Player Settings:
35AUREA CONFIDENTIAL
Creating Audio tiles

DescriptionOptions
(Mandatory) Displaying the toggle button.Play/Pause
Moving to the Previous/Next track.Next/Previous
Controlling the audio volume.Volume
Providing the user an option to download the track.Download
Tracking the active audio which also aids easypause/resume feature.
Progress bar
Displaying the name of the audio tracks.Audio Title
When displayed, toggle to:
Play Mode
• Play in order: Playing the tracks in sequence.
• List in loop: After all tracks are played, repeatingplaying the tracks, star ting from the first track.
• Single loop: Playing all tracks in sequence once andthereafter stop.
• Shuffle Playback: Playing all tracks by shuffling thesequence.
On a tile, the controls are displayed as follows:
5. Select the Branding colors as required, for:
36AUREA CONFIDENTIAL
Chapter 4: Audio tile

• (Player) Controls Color and (Player) Controls Hover Color• Text Color of the audio track name• (Playlist) Header Text Color
• (Audio track) Row Hover Color
6. Click Continue to save the Audio Settings.
Configuring Audio Items of Audio tile
7. Add, update, and delete audio tracks in the tile. To add an audio track, selectCreate Item.
8. Provide the track details as appropriate:
37AUREA CONFIDENTIAL
Creating Audio tiles

Note: Supported audio file formats: mp3, wav (not Edge or Internet Explorer),ogg (not Edge or Internet Explorer).
DescriptionOptions
(Mandatory) Track title.Title
Track description.Description
Track icon. Use the icon picker to select an icon.Icon
(Mandatory) URL of the track file.Audio File URL
9. To edit the audio tracks, use the pencil icon to edit it, trashcan-icon to delete itand drag the tracks configured to move them up/down the playlist.
38AUREA CONFIDENTIAL
Chapter 4: Audio tile

10.Click Continue to save the Audio Settings.
11.Click Save Tile Settings.
Audio tile is configured successfully.
Copying settings from another tileUse the currently configured settings of a tile in another environment or instanceby using the Import / Export tile configuration? option.
Note: The Export/Import feature is also a great way to save previous configurationsas a backup.
To copy settings from another tile of the same type:
1. Open the tile from which you want to copy the settings.
2. Select Import / Export tile configuration? to copy the entire tile configuration.
3. On the instance where the tile is to be recreated, add a new tile of the same typeand click Import / Export tile configuration?.
4. Delete the code displayed and paste the configuration data copied.
5. Click Update configuration data to save the settings.
6. Click Save Tile Settings to save all the configured settings.
39AUREA CONFIDENTIAL
Copying settings from another tile

5Calendar tileThe Calendar tile can be configured to present events of one or more places. Apartfrom the standard events attributes (Title, Time, Organizer), other attributes can bedisplayed, such as Likes count, View count, and Comment count. The tile also offersdifferent layout options, such as events to be displayed for current day, week, ormonth.
Calendar tile:
• Displays events in various layouts.
• Allows configuring meta data of events.
• Allows creating new events from the tile.
40AUREA CONFIDENTIAL
Chapter 5: Calendar tile

41AUREA CONFIDENTIAL

A user-friendly tile that displays Jive native events in various calendar layouts.
42AUREA CONFIDENTIAL
Chapter 5: Calendar tile

For details, see the following topics:
• Creating Calendar tiles
• Copying settings from another tile
• An example of Calendar tile
Creating Calendar tilesHere you can find details on adding and configuring Calendar tiles.
Adding Calendar tileTo add the tile to the page:
1. Go to the place where you want to add a new tile.
2. Open the relevant Activity or Custom page and edit it.
3. Click Add a tile.
4. Under Categories, select External Add-ons, then select JEP: Calendar Tileunder Tiles.
The tile is added to the page and you need to configure it. You can configure thetile anew or, if you already have similar tiles, copy the settings from another tile.
43AUREA CONFIDENTIAL
Creating Calendar tiles

Configuring General SettingsTo set up general tile settings:
1. Select Gear Icon > General settings .
2. Configure the general settings. For the detailed instructions, see General Settingsof JEP tiles on page 162.
3. Click Save Tile Settings.
Configuring Visibility RulesTo set up general tile settings:
1. Select Gear Icon > Visibility Rules .
2. Configure a new visibility rule or select an existing one. For the detailedinstructions on creating new rules, see Visibility Rules of JEP tiles on page 157.
3. Click Save Tile Settings.
44AUREA CONFIDENTIAL
Chapter 5: Calendar tile

Configuring Calendar tile-specific settingsTo configure settings specific to Calendar tiles:
1. Click the gear icon > Calendar Tile Settings .
2. Enter the Place(s) to set the events.
3. Select the Event attributes to be displayed for an event:
An event can be distinguished by the following attributes: Title, Time, Author,Location, Likes Count, View Count, and Comment Count.
4. Describe the Layout to be displayed when the configuration of the tile is rendered:
45AUREA CONFIDENTIAL
Creating Calendar tiles

• Agenda: Select the maximum number of events to be displayed from thedropdown values - 1, 3, 5, 10, 25
• 1 Day (Today), with event star t/end times• 3 Days (Today + 2 days), with event star t/end times• Week (Monday to Friday), with event star t/end times• Month
To set the display hours, select the Day start time and Day end time using thetime picker.
5. Select Continue to save the settings.
6. Click Save Tile Settings.
Calendar tile is configured successfully.
After the tile is rendered, you can use the options on the upper right to browseevents: Create Event, display events for Today, browse events for days previouslyor in future < >.
46AUREA CONFIDENTIAL
Chapter 5: Calendar tile

Copying settings from another tileUse the currently configured settings of a tile in another environment or instanceby using the Import / Export tile configuration? option.
Note: The Export/Import feature is also a great way to save previous configurationsas a backup.
To copy settings from another tile of the same type:
Select Import / Export tile configuration? to copy or paste the entire tileconfiguration to another tile of the same type.
An example of Calendar tileAn Calendar may look like this.
Example of Calendar tile with 3 Days layout
Calendar Settings:
• Select various places with text color Black and different background colors
• Event: All attributes selected
• Layout: 3 Days
47AUREA CONFIDENTIAL
Copying settings from another tile

Example of Calendar tile with Agenda layout
Calendar Settings:
• Select various places with text color Black and different background colors
• Event: All attributes selected
• Layout: Agenda
48AUREA CONFIDENTIAL
Chapter 5: Calendar tile

6Content Filter tileEach value corresponds to on or more tags, based on which the search results aredisplayed. Moreover, the search feature can be configured for specific places orglobally in the entire community and the results can be chronologically displayedin different sor ting sequences.
Content Filter tile:
• Has fully adaptable sections and drop-downs (multi-select)
• Allows assigning of each value to one or more tags
• Returns results that are searched based on drop-down value (tag) selection
49AUREA CONFIDENTIAL

This tile enhances search functionality via a multi-select feature that enables youto customize multiple sections each having various drop-down (search) values.
For details, see the following topics:
• Creating Content Filter tiles
• Copying settings from another tile
• An example of Content Filter tile
Creating Content Filter tilesHere you can find details on adding and configuring Content Filter tiles.
Adding Content Filter tileTo add the tile to the page:
1. Go to the place where you want to add a new tile.
2. Open the relevant Activity or Custom page and edit it.
3. Click Add a tile.
4. Under Categories, select External Add-ons, then select JEP: Content FilterTile under Tiles.
50AUREA CONFIDENTIAL
Chapter 6: Content Filter tile

The tile is added to the page and you need to configure it. You can configure thetile anew or, if you already have similar tiles, copy the settings from another tile.
51AUREA CONFIDENTIAL
Creating Content Filter tiles

Configuring General SettingsTo set up general tile settings:
1. Select Gear Icon > General settings .
2. Configure the general settings. For the detailed instructions, see General Settingsof JEP tiles on page 162.
3. Click Save Tile Settings.
52AUREA CONFIDENTIAL
Chapter 6: Content Filter tile

Configuring Content Filter tile-specific settingsTo configure settings specific to Content Filter tiles:
Configuring Filter Settings of Content Filter tile
1. Click the gear icon > Filter Settings .
2. Enable Search in the Entire Community; else the search will default to thecurrent place.
3. Enable or disable the Text Filter.
4. Enable the Sort feature - Show 'Sort' by.
5. Select the Default Sort - sor t by Date, Activity, or Title.
53AUREA CONFIDENTIAL
Creating Content Filter tiles

6. Select the Column Count to be displayed in the search results (1-3).
7. Specifying the Item Count, that is, the number of search items to be displayedin the search results.
8. Click Continue to move to the next screen.
Configuring Manage Sections of Content Filter tile
9.
10.Click the gear icon > Manage Sections .
11.Click Create Section to create multiple sections to group the respective drop-downfilters.
12.In the Create Section screen, do the following:
54AUREA CONFIDENTIAL
Chapter 6: Content Filter tile

a) Enter the section Title.b) Click Add Dropdown to add the list of drop-down values.c) Use the ^ and v drop-down values to rearrange the drop-down values within a
defined section.
55AUREA CONFIDENTIAL
Creating Content Filter tiles

d) Repeat these steps to add as many section titles with their drop-down valuesas required.
e) Click Save, which is enabled after at least one section is configured, to savethe section settings.
13.In the next screen, the sections configured can be managed as follows:
56AUREA CONFIDENTIAL
Chapter 6: Content Filter tile

a) Edit the section configurations using the pencil icon.b) Delete the section configuration using the trash can icon.c) Rearrange the sections along with the dropdowns by dragging the items
appropriately.
14.Click on the 3-horizontal-lines-icon beside the dropdown row to fur ther configurethe Dropdowns.
57AUREA CONFIDENTIAL
Creating Content Filter tiles

58AUREA CONFIDENTIAL
Chapter 6: Content Filter tile

a) The Edit option is displayed, where the options and tag values for dropdownscan be added by selecting Add New Option.
b) Provide the description for Option 1, along with the Tag 1 value in thesubsequent screen.
c) Continue to create as many Options with Tags as required.d) Click Save, which is enabled after at least one option is configured, to save
the options settings.
15.Verify the Content Filter Tile screen to ensure that the configurations are completedsuccessfully.
16.Click Save Tile Settings.
Content Filter tile is configured successfully.
59AUREA CONFIDENTIAL
Creating Content Filter tiles

Copying settings from another tileUse the currently configured settings of a tile in another environment or instanceby using the Import / Export tile configuration? option.
Note: The Export/Import feature is also a great way to save previous configurationsas a backup.
To copy settings from another tile of the same type:
Select Import / Export tile configuration? to copy or paste the entire tileconfiguration to another tile of the same type.
An example of Content Filter tileAn Content Filter may look like this.
Example 1
1. Sections configured are: SBUs, Projects, Places, Plans
2. In (Section) Places: Groups and Spaces are configured as dropdownvalues
3. (Dropdown) Spaces is configured with Trainee Space, Test Space, andSME Space configured as Option value
60AUREA CONFIDENTIAL
Chapter 6: Content Filter tile

Example 2
1. Sections configured are: Financial Institutions, Location Filters, ContentFilters
2. In (Section) Location Filters: Americas, Asia, EMEA are configured asdropdown values
3. In the Dropdown EMEA: Germany, Middle East, Africa, and France areconfigured as Option values
4. Search is filtered by text "poll", and the results are shown in three columns.
• Column Count = 3
• Item Count = 6
61AUREA CONFIDENTIAL
An example of Content Filter tile

In this case, the search results are additionally rearranged by: Sort Contentoption: Sort by Title.
62AUREA CONFIDENTIAL
Chapter 6: Content Filter tile

Example 3
The Tag Filter here displays search results based on multi-select dropdownvalues in each section (Location, Topics, Ar tifacts and People).
In the Filter Settings, the following were disabled:
• Search in Entire Community (so the tag-related search is restricted tocurrent Place)
• Search by Text (so the tag-related search is subject to the tags matchingthe Sections > Dropdowns > Options > Tag value )
• Show 'Sort by' (so search results are not auto-sor ted)
The results are shown in three columns:
• Column Count = 3
• Item Count = 6
Note: Multi-select values are connected with the AND operator.
63AUREA CONFIDENTIAL
An example of Content Filter tile

7Countdown tileCountdown tile:
• Comes in three different styles
• Has various configurations
• Is easy to use
64AUREA CONFIDENTIAL
Chapter 7: Countdown tile

Simple Tile that displays a configurable countdown in various styles.
65AUREA CONFIDENTIAL

For details, see the following topics:
• Creating Countdown tiles
• Copying settings from another tile
• An example of Countdown tile
Creating Countdown tilesHere you can find details on adding and configuring Countdown tiles.
Adding Countdown tileTo add the tile to the page:
1. Go to the place where you want to add a new tile.
2. Open the relevant Activity or Custom page and edit it.
3. Click Add a tile.
4. Under Categories, select External Add-ons, then select JEP: Countdown underTiles.
The tile is added to the page and you need to configure it. You can configure thetile anew or, if you already have similar tiles, copy the settings from another tile.
66AUREA CONFIDENTIAL
Chapter 7: Countdown tile

Configuring General SettingsTo set up general tile settings:
1. Select Gear Icon > General settings .
2. Configure the general settings. For the detailed instructions, see General Settingsof JEP tiles on page 162.
3. Click Save Tile Settings.
Configuring Countdown tile-specific settingsTo configure settings specific to Countdown tiles:
1. Click the gear icon > Countdown Settings .
2. In Countdown Settings, specify the following details:
67AUREA CONFIDENTIAL
Creating Countdown tiles

DescriptionOptions
Enter a valid date.Date
Enter valid time.Time
Select a timezone from the provided list.Timezone
3. In Display Settings, configure the display settings.
4. In Display Style, select the display style.
5. Verify the Countdown Tile screen to ensure that the configurations are completedsuccessfully.
6. Click Save Tile Settings.
Countdown tile is configured successfully.
68AUREA CONFIDENTIAL
Chapter 7: Countdown tile

Copying settings from another tileUse the currently configured settings of a tile in another environment or instanceby using the Import / Export tile configuration? option.
Note: The Export/Import feature is also a great way to save previous configurationsas a backup.
To copy settings from another tile of the same type:
69AUREA CONFIDENTIAL
Copying settings from another tile

Select Import / Export tile configuration? to copy or paste the entire tileconfiguration to another tile of the same type.
An example of Countdown tileAn Countdown may look like this.
The tile can look like this with different display styles:
Figure 1: Countdown display style: Flip
Figure 2: Countdown display style: Digital
Figure 3: Countdown display style: Default
70AUREA CONFIDENTIAL
Chapter 7: Countdown tile

• General Settings:
• Title: JEP Countdown Tile Launch
• Display tile title?: Enabled
• Headline: Welcome to JEP - Countdown Tile (centrally aligned)
• Headline Alignment: Center
• Description: Describe the customized Countdown Tile here in oneor two lines
• Background Image URL
• Background position: Top center
• Padding: 20px (all around)
• Action label with Action URL: AureaWorks News with link URL
• Open link in new window?: Enabled
• Action Alignment: Center
• Countdown Settings:
• Date: 2019-09-14
• Time: 6:17:41
• Timezone: GMT + 5:00
• Display Settings: Enabled all options
• Display Style: See the three illustrated images based on different styles
71AUREA CONFIDENTIAL
An example of Countdown tile

8Create a Post tileAll or selected content can be configured on a specific page. The tile provides dif-ferent presentation styles: displays only the content type icons, if configured in acolumn with minimum width, for example, in the center column. Or displays thecontent types as a list, if configured in the left or right side bar columns.
Create a Post tile:
• Creates Jive native content type intuitively on any page.
• Supports all column layouts.
• Supports views as icons, text, or as a list of posts.
72AUREA CONFIDENTIAL
Chapter 8: Create a Post tile

Helps users to easily create content on any page similar to the Activity pageexperience.
73AUREA CONFIDENTIAL

For details, see the following topics:
• Creating Create a Post tiles
• Copying settings from another tile
• An example of Create a Post tile
Creating Create a Post tilesHere you can find details on adding and configuring Create a Post tiles.
Adding Create a Post tileTo add the tile to the page:
1. Go to the place where you want to add a new tile.
2. Open the relevant Activity or Custom page and edit it.
3. Click Add a tile.
4. Under Categories, select External Add-ons, then select JEP: Create a Postunder Tiles.
The tile is added to the page and you need to configure it. You can configure thetile anew or, if you already have similar tiles, copy the settings from another tile.
74AUREA CONFIDENTIAL
Chapter 8: Create a Post tile

75AUREA CONFIDENTIAL
Creating Create a Post tiles

Configuring General SettingsTo set up general tile settings:
1. Select Gear Icon > General settings .
2. Configure the general settings. For the detailed instructions, see General Settingsof JEP tiles on page 162.
3. Click Save Tile Settings.
Configuring Create a Post tile-specific settingsTo configure settings specific to Create a Post tiles:
76AUREA CONFIDENTIAL
Chapter 8: Create a Post tile

1. Click the gear icon > Create a Post Options .
2. Select the required Content types to be created.
3. Click Continue.
4. Verify the tile settings to ensure that the configurations are completed successfully.
5. Click Save Tile Settings.
Create a Post tile is configured successfully.
Copying settings from another tileUse the currently configured settings of a tile in another environment or instanceby using the Import / Export tile configuration? option.
Note: The Export/Import feature is also a great way to save previous configurationsas a backup.
77AUREA CONFIDENTIAL
Copying settings from another tile

To copy settings from another tile of the same type:
Select Import / Export tile configuration? to copy or paste the entire tileconfiguration to another tile of the same type.
An example of Create a Post tileAn Create a Post may look like this.
Example 1
• General Settings:
• Title: JEP Create a Post Tile Launch
• Display tile title?: Enabled
• Headline: Welcome to JEP - Create a Post Tile (centrallyaligned)
• Headline Alignment: Center
• Description: Describe the customized Create a Post Tilehere in one or two lines.
• Background Image URL
• Background position: Top center
• Padding: 20px (all around)
• Action label with Action URL: AureaWorks News with link URL
78AUREA CONFIDENTIAL
Chapter 8: Create a Post tile

• Open link in new window?: Enabled
• Action Alignment: Center
• Create a Post Options:
• Content Type: Enabled all
Example 2
• General Settings:
• Title: JEP Create a Post Tile
• Display tile title?: Enabled
• Headline: Content Creator
• Headline Alignment: Center
• Create a Post Options:
• Content Type: Blog Post, Document, and Discussion enabled
Example 3
• General Settings:
• Title: JEP Create a Post Tile
• Create a Post Options:
• Content Type: Enabled all
If configured in center column, where the column width is not broad enough,only the content icons are displayed.
79AUREA CONFIDENTIAL
An example of Create a Post tile

9Formatted Text tileTile height automatically adjusts to content height. Visibility of tile can be enabledor disabled via Visibility Rules. Formatted Text tile:
• Supports content creation using RTE features
• Is responsive
• Supports visibility rules
80AUREA CONFIDENTIAL
Chapter 9: Formatted Text tile

This tile provides a simplified of adding text to a tile page similar to the widely usedFormatted Text widget.
81AUREA CONFIDENTIAL

For details, see the following topics:
• Creating Formatted Text tiles
• Copying settings from another tile
• An example of Formatted Text tile
Creating Formatted Text tilesHere you can find details on adding and configuring Formatted Text tiles.
Adding Formatted Text tileTo add the tile to the page:
1. Go to the place where you want to add a new tile.
2. Open the relevant Activity or Custom page and edit it.
3. Click Add a tile.
4. Under Categories, select External Add-ons, then select JEP: Formatted TextTile under Tiles.
The tile is added to the page and you need to configure it. You can configure thetile anew or, if you already have similar tiles, copy the settings from another tile.
82AUREA CONFIDENTIAL
Chapter 9: Formatted Text tile

Configuring General SettingsTo set up general tile settings:
1. Select Gear Icon > General settings .
2. Configure the general settings. For the detailed instructions, see General Settingsof JEP tiles on page 162.
3. Click Save Tile Settings.
Configuring Visibility RulesTo set up general tile settings:
1. Select Gear Icon > Visibility Rules .
2. Configure a new visibility rule or select an existing one. For the detailedinstructions on creating new rules, see Visibility Rules of JEP tiles on page 157.
3. Click Save Tile Settings.
Configuring Formatted Text tile-specific settingsTo configure settings specific to Formatted Text tiles:
1. Click the gear icon > Formatted Text Settings .
2. Add text to be displayed in the tile when the tile settings are saved and rendered.
You can use the various RTE features available to enhance the UI effects of thetext.
83AUREA CONFIDENTIAL
Creating Formatted Text tiles

3. Click Save Tile Settings.
Formatted Text tile is configured successfully.
Copying settings from another tileUse the currently configured settings of a tile in another environment or instanceby using the Import / Export tile configuration? option.
Note: The Export/Import feature is also a great way to save previous configurationsas a backup.
To copy settings from another tile of the same type:
84AUREA CONFIDENTIAL
Chapter 9: Formatted Text tile

Select Import / Export tile configuration? to copy or paste the entire tileconfiguration to another tile of the same type.
An example of Formatted Text tileAn Formatted Text may look like this.
85AUREA CONFIDENTIAL
An example of Formatted Text tile

86AUREA CONFIDENTIAL
Chapter 9: Formatted Text tile

10Grid Layout tileGrid Layout tile:
• Provides flexible grid layout
• Is fully responsive
• Has an icon library
87AUREA CONFIDENTIAL

Highly configurable and flexible tile to enhance your community. Teaser internaland external stories, build visual navigation and highlight whats important.
For details, see the following topics:
• Creating Grid Layout tiles
• Copying settings from another tile
• An example of Grid Layout tile
Creating Grid Layout tilesHere you can find details on adding and configuring Grid Layout tiles.
Adding Grid Layout tileTo add the tile to the page:
1. Go to the place where you want to add a new tile.
2. Open the relevant Activity or Custom page and edit it.
3. Click Add a tile.
4. Under Categories, select External Add-ons, then select JEP: Grid Layout underTiles.
88AUREA CONFIDENTIAL
Chapter 10: Grid Layout tile

The tile is added to the page and you need to configure it. You can configure thetile anew or, if you already have similar tiles, copy the settings from another tile.
89AUREA CONFIDENTIAL
Creating Grid Layout tiles

Configuring General SettingsTo set up general tile settings:
1. Select Gear Icon > General settings .
2. Configure the general settings. For the detailed instructions, see General Settingsof JEP tiles on page 162.
3. Click Save Tile Settings.
Configuring Grid Layout tile-specific settingsTo configure settings specific to Grid Layout tiles:
1. Click the gear icon > Items .
2. Create grid items using Manage Items > Create Item .
3. For each Grid Item, specify the following:
• Item Title• Title Size: H1, H2, H3, or H4• Brief Description
90AUREA CONFIDENTIAL
Chapter 10: Grid Layout tile

• Add a Link, with the relevant option to Open link in new window?
4. The Background type for a grid Item can be provided as:
• an Image Url along with the Background Position. The Background Positiondisplays the part of the image, as specified:
• left top/center/bottom
• right top/center/bottom
• center top/center/bottom
• a Background Color. Additionally, here a suitable icon can be selected fromthose available in the Icon Picker, along with an Icon Style (either Light orDark).
5. Select one of the following options to configure the grid Item Size:
91AUREA CONFIDENTIAL
Creating Grid Layout tiles

• Square-shaped: occupying: 2 columns/2 rows or 1 column/1 row• Rectangular: occupying: 2 columns/1 row or 1 column/2 rows
Example:
6. Choose an Item Style for displaying the grid item.
The Item details can also be displayed only on Hovering, if Show Overlay onHover is configured.
7. Specify the Background Color, Background Opacity (0.1 to 1.0) and Text Colorper Grid Item.
8. Create as many Items as required with similar configurations.
9. Click Save Tile Settings.
Grid Layout tile is configured successfully.
92AUREA CONFIDENTIAL
Chapter 10: Grid Layout tile

Copying settings from another tileUse the currently configured settings of a tile in another environment or instanceby using the Import / Export tile configuration? option.
Note: The Export/Import feature is also a great way to save previous configurationsas a backup.
To copy settings from another tile of the same type:
Select Import / Export tile configuration? to copy or paste the entire tileconfiguration to another tile of the same type.
An example of Grid Layout tileAn Grid Layout may look like this.
For this example, we used the following configuration:{"generalsettings": {"gridSpacing": "small","footer": {"actionAlign": "center","actionExternal": false,"actionUrl": "","actionLabel": ""
},"header": {"headlineAlign": "center","descriptionAlign": "center","headline": ""
},
93AUREA CONFIDENTIAL
Copying settings from another tile

"customTitle": "What's happening on Jive - Our Collaborative Hub","columnCount": "6","body": {"backgroundPosition": "top center","textColor": "#000000"
}},"gridSpacing": "small","saved": true,"options": {},"columnCount": "6","items": [{"itemStyle": "imageTextOverlay","backgroundOpacity": "0.3","description": "Connect, Collaborate, and Share - Get Started","mediaType": "imageUrl","titleSize": "h1","title": "Welcome to Your Jive Community","textColor": "#ffffff","overlayColor": "#5F9EA0","iconStyle": "light","url": "https://jep-qa.jiveon.com/places","imageUrl":
"https://jep-qa.jiveon.com/resources/statics/1003/skyline%252Bbanner.jpg","showOverlayOnHover": false,"itemSize": "scuare2X2","backgroundPosition": "left_top","id": 1
},{"itemStyle": "imageTextOverlay","backgroundOpacity": "0.3","description": "Read the Security Blog","mediaType": "imageUrl","titleSize": "h2","title": "Security Updates","textColor": "#ffffff","overlayColor": "#5F9EA0","iconStyle": "light","url":
"https://jep-qa.jiveon.com/community/information-technology-it/blog/2019/12/04/december-security-blog-industry-thoughts?sr=stream",
"imageUrl":"https://jep-qa.jiveon.com/resources/statics/1003/map%252Bbanner.jpg",
"showOverlayOnHover": false,"itemSize": "rectangle2X1","backgroundPosition": "center_center","id": 2
},{"itemStyle": "imageTextOverlay","backgroundOpacity": "0.3","description": "Watch Now","mediaType": "imageUrl","titleSize": "h2","title": "Latest All Hands Recording","textColor": "#ffffff","overlayColor": "#5F9EA0","iconStyle": "light","url": "https://jep-qa.jiveon.com/content","imageUrl":
"https://jep-qa.jiveon.com/resources/statics/1003/people%252Bbanner%2B%25281%2529.jpg",
"showOverlayOnHover": false,"itemSize": "rectangle2X1","backgroundPosition": "center_center","id": 3
},{"itemStyle": "imageTextOverlay",
94AUREA CONFIDENTIAL
Chapter 10: Grid Layout tile

"backgroundOpacity": "0.4","description": "Take Tour Now","mediaType": "imageUrl","titleSize": "h2","title": "Tour The New Offices","textColor": "#ffffff","overlayColor": "#5F9EA0","iconStyle": "light","url": "https://jep-qa.jiveon.com/content","imageUrl":
"https://jep-qa.jiveon.com/resources/statics/1003/office%252Bbanner%2B%25281%2529.jpg",
"showOverlayOnHover": false,"itemSize": "scuare1X1","backgroundPosition": "center_bottom","id": 4
},{"itemStyle": "imageTextOverlay","backgroundOpacity": "0.3","description": "Access the Experts here!","mediaType": "imageUrl","titleSize": "h2","title": "Travel & Expense Policy Changes","textColor": "#ffffff","overlayColor": "#5F9EA0","iconStyle": "light","url": "https://jep-qa.jiveon.com",
"imageUrl": "https://jep-qa.jiveon.com/resources/statics/1003/planelanding.jpg",
"showOverlayOnHover": false,"itemSize": "rectangle2X1","backgroundPosition": "right_bottom","id": 5
},{"itemStyle": "imageTextOverlay","backgroundOpacity": "0.1","description": "New Blog Available","mediaType": "imageUrl","titleSize": "h2","title": "CEO Blog","textColor": "#ffffff","overlayColor": "#5F9EA0","iconStyle": "light","url": "https://jep-qa.jiveon.com","imageUrl":
"https://jep-qa.jiveon.com/resources/statics/1003/Blog-Banner-1024x469.png","showOverlayOnHover": false,"itemSize": "scuare1X1","backgroundPosition": "center_bottom","id": 6
}]
}
95AUREA CONFIDENTIAL
An example of Grid Layout tile

11Jive Poll tileTile view can be restricted to selected Users or User Groups by configuring Visibil-ity Rules. Tile supports two layouts for display – Simplified and Jive Native vote.Different graphical presentations of Poll results include: Bar Graph, Pie Chart, andJive Native Graph.
96AUREA CONFIDENTIAL
Chapter 11: Jive Poll tile

Jive Poll tile:
• Displays Jive Native Poll in a Tile
• Uses configurable Visibility Rules
• Includes various graphical illustrations of Poll results
Figure 4: Jive Poll tile in narrow column
Figure 5: Jive Poll tile in wide column
Figure 6: Jive Poll tile in hero column
97AUREA CONFIDENTIAL

Figure 7: Jive Poll tile configuration options
Figure 8:
98AUREA CONFIDENTIAL
Chapter 11: Jive Poll tile

User-friendly tile that presents the Jive Native Poll in a tile.
For details, see the following topics:
• Creating Jive Poll ti les
• Copying settings from another tile
• An example of Grid Layout tile
Creating Jive Poll tilesHere you can find details on adding and configuring Jive Poll tiles.
Adding Jive Poll tileTo add the tile to the page:
1. Go to the place where you want to add a new tile.
2. Open the relevant Activity or Custom page and edit it.
3. Click Add a tile.
4. Under Categories, select External Add-ons, then select Jive Poll under Tiles.
99AUREA CONFIDENTIAL
Creating Jive Poll tiles

The tile is added to the page and you need to configure it. You can configure thetile anew or, if you already have similar tiles, copy the settings from another tile.
100AUREA CONFIDENTIAL
Chapter 11: Jive Poll tile

Configuring General SettingsTo set up general tile settings:
1. Select Gear Icon > General settings .
2. Configure the general settings. For the detailed instructions, see General Settingsof JEP tiles on page 162.
3. Click Save Tile Settings.
Configuring Visibility RulesTo set up general tile settings:
1. Select Gear Icon > Visibility Rules .
2. Configure a new visibility rule or select an existing one. For the detailedinstructions on creating new rules, see Visibility Rules of JEP tiles on page 157.
3. Click Save Tile Settings.
101AUREA CONFIDENTIAL
Creating Jive Poll tiles

Configuring Jive Poll tile-specific settingsTo configure settings specific to Jive Poll tiles:
1. Click the gear icon > Select a Poll for Voting .
2. Choose a poll from any Jive place for displaying in the tile.
3. Select a poll layout:
DescriptionOptions
Displays Choices as Radio buttonsSimplified Vote
Displays Choices similar to the out-of-the-box behaviorJive Native Vote
102AUREA CONFIDENTIAL
Chapter 11: Jive Poll tile

4. In Display Result Layout, select an options to display the poll result layout from:Bar Graph, Pie Chart, and Jive Native layout.
Note: When the tile is rendered, the labels in the graph along with vote countsare displayed on hovering over the graph details.
5. Click Continue to save the selected poll settings.
6. Click Save Tile Settings.
Jive Poll tile is configured successfully.
Copying settings from another tileUse the currently configured settings of a tile in another environment or instanceby using the Import / Export tile configuration? option.
Note: The Export/Import feature is also a great way to save previous configurationsas a backup.
To copy settings from another tile of the same type:
103AUREA CONFIDENTIAL
Copying settings from another tile

Select Import / Export tile configuration? to copy or paste the entire tileconfiguration to another tile of the same type.
An example of Grid Layout tileAn Jive Poll may look like this.
Figure 9: Jive Polltile with Poll Layout: Simplified Vote
Figure 10: Jive Polltile with Poll Layout: Jive Native Vote
104AUREA CONFIDENTIAL
Chapter 11: Jive Poll tile

Figure 11: Jive Polltile with Display Result Layout: Bar Graph
Figure 12: Jive Polltile with Display Result Layout: Pie Chart
105AUREA CONFIDENTIAL
An example of Grid Layout tile

Figure 13: Jive Polltile with Display Result Layout: Jive Native
106AUREA CONFIDENTIAL
Chapter 11: Jive Poll tile

12News Stream tileNews Stream tile allows:
• Pushing streams anywhere
• Pushing custom streams anywhere
107AUREA CONFIDENTIAL

The tile displays the push and custom streams configured on the News Page withinthe tile. This enables you to bring the same dynamic content as on the Home pageto any other page in your community, like Department, Country, and Business Unithome pages.
108AUREA CONFIDENTIAL
Chapter 12: News Stream tile

13Recent Content tileThis tile allows users to filter by content type, search text string, tags, content actions(for example, Structured Outcomes). Additionally, it provides various layout optionsto display the content and its attributes, like showing or hiding author, title, and datedetails, number of comments and likes, content icons.
Recent Content tile:
• Displays recent content of one or multiple places
• Has configurable layouts and metadata
• Includes large amount of filters
Restriction: Shared Content cannot be displayed due to an API limitation.
109AUREA CONFIDENTIAL

110AUREA CONFIDENTIAL
Chapter 13: Recent Content tile

111AUREA CONFIDENTIAL

User-friendly and easy to configure tile that displays recent content from one ormultiple places.
For details, see the following topics:
• Creating Recent Content tiles
• Copying settings from another tile
• An example of Recent Content tile
Creating Recent Content tilesHere you can find details on adding and configuring Recent Content tiles.
Adding Recent Content tileTo add the tile to the page:
1. Go to the place where you want to add a new tile.
2. Open the relevant Activity or Custom page and edit it.
3. Click Add a tile.
4. Under Categories, select External Add-ons, then select JEP: Recent ContentTile under Tiles.
112AUREA CONFIDENTIAL
Chapter 13: Recent Content tile

The tile is added to the page and you need to configure it. You can configure thetile anew or, if you already have similar tiles, copy the settings from another tile.
113AUREA CONFIDENTIAL
Creating Recent Content tiles

Configuring General SettingsTo set up general tile settings:
1. Select Gear Icon > General settings .
2. Configure the general settings. For the detailed instructions, see General Settingsof JEP tiles on page 162.
3. Click Save Tile Settings.
114AUREA CONFIDENTIAL
Chapter 13: Recent Content tile

Configuring Recent Content tile-specific settingsTo configure settings specific to Recent Content tiles:
115AUREA CONFIDENTIAL
Creating Recent Content tiles

1. Click the gear icon > Content Settings .
2. Content Layout: Content can be displayed in two layouts:
• Display as a List:
• Content Alignment:
• Standard (all images left)
Inver ted (images alternating left/right)
• Display in Grid (Card) style:
• Grid Item Type:
• Dynamic (each card has its own height according to content).
• Fixed (each card has the same fixed height).
• Specify the number of Grid Columns.
3. Image Size:
• Select Cover to fill the image area completely. Note the image may be croppedin the process.
• Select Contain to shrink or expand the image to fit the within image area.
In both cases the image aspect ratio is maintained.
4. Select Place: Next specify the Place(s) from where the results are to be searched.
116AUREA CONFIDENTIAL
Chapter 13: Recent Content tile

5. Content Count: Provide the number of results to be displayed with/without theLoad More option.
6. Layout: Choose the colors for displaying the results – contents, background, andborder.
7. Filters: Select the relevant Filter(s) for displaying the results – by Text string,Tag, or Action.
8. Sort: Specify the order of results to be sor ted.
9. Content Types: Choose the Jive content types to be searched and displayed.
10.Display Settings: Select the content attributes to be displayed in the results.
11.Click Continue.
Recent Content tile is saved successfully.
12.Click Save Tile Settings.
Recent Content tile is configured successfully.
Copying settings from another tileUse the currently configured settings of a tile in another environment or instanceby using the Import / Export tile configuration? option.
Note: The Export/Import feature is also a great way to save previous configurationsas a backup.
To copy settings from another tile of the same type:
117AUREA CONFIDENTIAL
Copying settings from another tile

Select Import / Export tile configuration? to copy or paste the entire tileconfiguration to another tile of the same type.
An example of Recent Content tileAn Recent Content may look like this.
Recent Content in the grid layoutFigure 14: Recent Content in grid layout
• General Settings:
• Tile Title: JEP Recent Content Tile
• Display Tile Title: Enabled
• Headline: Latest on Test-related Topics (centrally aligned)
118AUREA CONFIDENTIAL
Chapter 13: Recent Content tile

• Description: Quick look at the updated Test contents
• Action button More details with link enabled
• Content Settings
• Displayed in Fixed Grid style
• Column count: 4 with the Load More option enabled
• Content Types: All are enabled
The configuration example is attached: Recent Content – Sample1.txt
119AUREA CONFIDENTIAL
An example of Recent Content tile

Recent Content in the list layoutFigure 15: Recent Content in the list layout
• General Settings:
• Tile Title: JEP Recent Content Tile
• Display Tile Title: Enabled
• Headline: Latest on Test-related Topics (centrally aligned)
120AUREA CONFIDENTIAL
Chapter 13: Recent Content tile

• Description: Quick look at the updated Test contents
• Action button More details with link enabled
• Content Settings:
• Displayed in List - Standard style
• Column count: 4 with the Load More option enabled
• Content Types: All are enabled
The configuration example is attached: Recent Content – Sample2.txt
121AUREA CONFIDENTIAL
An example of Recent Content tile

14
122AUREA CONFIDENTIAL
Chapter 14: RSS tile

RSS tileRSS tile:
• Has two layouts to choose from with Various settings
• Supports for feed images
Figure 16: RSS tile in hero column
Figure 17: RSS tile in wide column
123AUREA CONFIDENTIAL

Figure 18: RSS tile in narrow column
Simple, easy-to-configure tile used to display unauthenticated (public) RSS feedsto your community pages.
124AUREA CONFIDENTIAL
Chapter 14: RSS tile

For details, see the following topics:
• Creating RSS tiles
• Copying settings from another tile
• An example of RSS tile
Creating RSS tilesHere you can find details on adding and configuring RSS tiles.
Adding RSS tileTo add the tile to the page:
1. Go to the place where you want to add a new tile.
2. Open the relevant Activity or Custom page and edit it.
3. Click Add a tile.
4. Under Categories, select External Add-ons, then select JEP: RSS Tile underTiles.
The tile is added to the page and you need to configure it. You can configure thetile anew or, if you already have similar tiles, copy the settings from another tile.
125AUREA CONFIDENTIAL
Creating RSS tiles

126AUREA CONFIDENTIAL
Chapter 14: RSS tile

Configuring General SettingsTo set up general tile settings:
1. Select Gear Icon > General settings .
2. Configure the general settings. For the detailed instructions, see General Settingsof JEP tiles on page 162.
3. Click Save Tile Settings.
Configuring RSS tile-specific settingsTo configure settings specific to RSS tiles:
1. Click the gear icon > RSS Settings .
2. Provide the following details:
DescriptionOptions
Provide a valid RSS feed URL.RSS url
Select any of the feed display options as required:Headlines only / Full content / News Carousel.
Style
Specify the number of items to be displayed for the RSSfeed.
Item count
Enable to display the date of the items in feed.Show Date
Enable (if provided by RSS) to display the images, if any,for the items in the feed.
Show Image
127AUREA CONFIDENTIAL
Creating RSS tiles

DescriptionOptions
Enable to view the item details in a new window when theitem link is selected.
Open in a NewWindow
3. Verify the RSS Tile screen to ensure that the configurations are completedsuccessfully.
4. Click Save Tile Settings.
RSS tile is configured successfully.
Copying settings from another tileUse the currently configured settings of a tile in another environment or instanceby using the Import / Export tile configuration? option.
Note: The Export/Import feature is also a great way to save previous configurationsas a backup.
To copy settings from another tile of the same type:
128AUREA CONFIDENTIAL
Chapter 14: RSS tile

Select Import / Export tile configuration? to copy or paste the entire tileconfiguration to another tile of the same type.
An example of RSS tileAn RSS may look like this.
Figure 19: RSS tile example
• General Settings:
• Title: Main Title for the RSS Tile
• Display tile title?: Enabled
• Headline: Welcome to JEP - RSS Tile (centrally aligned)
• Headline Alignment: Center
• Description: Describe the customized RSS Tile here in one ortwo lines.
129AUREA CONFIDENTIAL
An example of RSS tile

• Background Image URL
• Background position: Top center
• Padding: 25px (all around)
• Action label with Action URL: AureaWorks News with link URL
• Open link in new window?: Enabled
• Action Alignment: Center
• RSS Settings:
• RSS url: https://www.nasa.gov/rss/dyn/lg_image_of_the_day.rss
• Style: Full content
• Item count: 3
• Show Date: Enabled
• Show image: Enabled
• Open in New Window: Enabled
130AUREA CONFIDENTIAL
Chapter 14: RSS tile

15Slideshow tileSlideshow tile has:
• Beautiful layout
• Various designs
• Flexible configuration
Beautiful and versatile tile that makes it easy to highlight information in yourcommunity. The tile provides a variety of layouts and configurations to ensuremaximum configurability for your needs.
131AUREA CONFIDENTIAL

For details, see the following topics:
• Creating Slideshow tiles
• Copying settings from another tile
• An example of Slideshow tile
Creating Slideshow tilesHere you can find details on adding and configuring Slideshow tiles.
Adding Slideshow tileTo add the tile to the page:
1. Go to the place where you want to add a new tile.
2. Open the relevant Activity or Custom page and edit it.
3. Click Add a tile.
4. Under Categories, select External Add-ons, then select JEP: Slideshow underTiles.
The tile is added to the page and you need to configure it. You can configure thetile anew or, if you already have similar tiles, copy the settings from another tile.
132AUREA CONFIDENTIAL
Chapter 15: Slideshow tile

Configuring General SettingsTo set up general tile settings:
1. Select Gear Icon > General settings .
2. Configure the general settings. For the detailed instructions, see General Settingsof JEP tiles on page 162.
3. Click Save Tile Settings.
Configuring Visibility RulesTo set up general tile settings:
1. Select Gear Icon > Visibility Rules .
2. Configure a new visibility rule or select an existing one. For the detailedinstructions on creating new rules, see Visibility Rules of JEP tiles on page 157.
3. Click Save Tile Settings.
Configuring Slideshow tile-specific settingsTo configure settings specific to Slideshow tiles:
Configuring Slideshow Settings of Slideshow tile
1. Click the gear icon > Slideshow Settings .
2. Specify Image Overlay settings: Select Title size, Link style (Button, Text, Slide).
133AUREA CONFIDENTIAL
Creating Slideshow tiles

3. Set Animation settings using different options available:
• Animation type: Slide / Fade• Autoplay speed and Animation Speed• Slider Height• Choose Loop or Autoplay
4. Set Navigation Settings of the slides:
134AUREA CONFIDENTIAL
Chapter 15: Slideshow tile

• Navigation Style: None, Dots, Thumbnails• Navigation Alignment: Left, Center, Right, Justify• Select Arrow Types to display• Choose Arrow Color: Light or Dark
Configuring Manage Slides settings of Slideshow tile
5. Click the gear icon > Manage Slides .
6. Select Create Slide to star t creating slides.
135AUREA CONFIDENTIAL
Creating Slideshow tiles

7. Select Content to Create Item: Provide the Content information or Search forexisting Content in the community to pre-fill details of element, such as title,description, link, image.
8. Specify the slide details, such as Title, Description, Text Color, Image URL, URL(that is, Action URL) and URL Label Action URL, Action Label.
9. In the Overlay Settings, provide the following:
• Image Overlay Position (Left, Right, Center, Top, Bottom, None)• Select Background color using the Color picker
136AUREA CONFIDENTIAL
Chapter 15: Slideshow tile

• Specify the Background color opacity
10.Click Save to save the slide settings.
11.Repeat Steps Step 6 on page 135-Step 10 on page 137 to create as many slides asrequired.
12.Use the pencil icon to Edit Slide and Trash Can icon to delete slide.
13.Select Continue after saving the slide information.
14.Click Save Tile Settings.
Slideshow tile is configured successfully.
Copying settings from another tileUse the currently configured settings of a tile in another environment or instanceby using the Import / Export tile configuration? option.
Note: The Export/Import feature is also a great way to save previous configurationsas a backup.
To copy settings from another tile of the same type:
137AUREA CONFIDENTIAL
Copying settings from another tile

Select Import / Export tile configuration? to copy or paste the entire tileconfiguration to another tile of the same type.
An example of Slideshow tileAn Slideshow may look like this.
• General Settings:
• Tile Title: Tile Title
• Display Tile Title: Enabled
• Headline Center
• Description Center
• Background Image URL
138AUREA CONFIDENTIAL
Chapter 15: Slideshow tile

• Padding: 120px
• Action label + URL
• Slideshow Settings:
• Center Aligned
• Headline H1
• Navigation Style: Dots
• Navigation alignment: Center
• Slidenav pos: default
• Arrow color: white
• Link Style: Button
• Background: #000000
• Opacity: 0.7
• Size: 400px
• Slide:
• Slide Title
• Slide Description
• URL + URL Label
139AUREA CONFIDENTIAL
An example of Slideshow tile

16Social Media tileSocial Media tile supports thew following social media out-of-the-box:
• Facebook Page
140AUREA CONFIDENTIAL
Chapter 16: Social Media tile

141AUREA CONFIDENTIAL

Integrate Twitter, Facebook, and Instagram posts with ease into your communitypages. Tile requires no HTML knowledge and is easy to configure.
142AUREA CONFIDENTIAL
Chapter 16: Social Media tile

For details, see the following topics:
• Creating Social Media tiles
• Copying settings from another tile
• An example of Social Media tile
Creating Social Media tilesHere you can find details on adding and configuring Social Media tiles.
Adding Social Media tileTo add the tile to the page:
1. Go to the place where you want to add a new tile.
2. Open the relevant Activity or Custom page and edit it.
3. Click Add a tile.
4. Under Categories, select External Add-ons, then select JEP: Social Media Tileunder Tiles.
The tile is added to the page and you need to configure it. You can configure thetile anew or, if you already have similar tiles, copy the settings from another tile.
143AUREA CONFIDENTIAL
Creating Social Media tiles
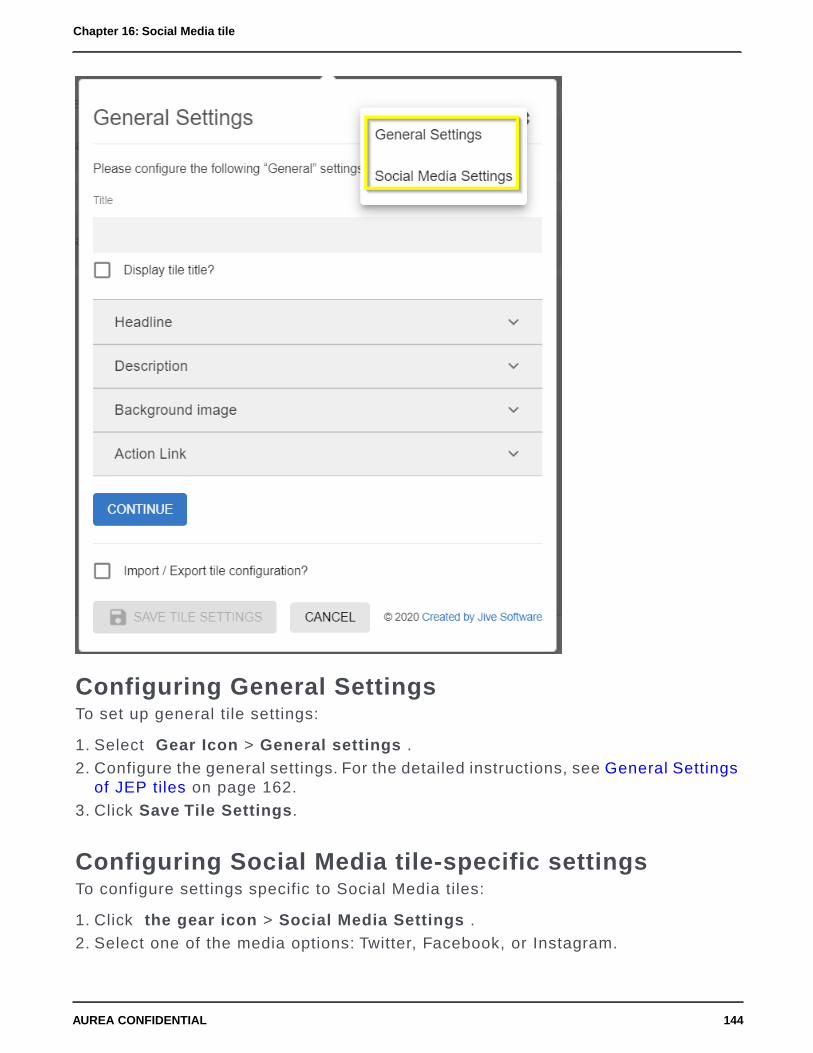
Configuring General SettingsTo set up general tile settings:
1. Select Gear Icon > General settings .
2. Configure the general settings. For the detailed instructions, see General Settingsof JEP tiles on page 162.
3. Click Save Tile Settings.
Configuring Social Media tile-specific settingsTo configure settings specific to Social Media tiles:
1. Click the gear icon > Social Media Settings .
2. Select one of the media options: Twitter, Facebook, or Instagram.
144AUREA CONFIDENTIAL
Chapter 16: Social Media tile

3. If you selected Twitter, configure the following settings:
145AUREA CONFIDENTIAL
Creating Social Media tiles

DescriptionOptions
(Mandatory) Select any of the standard Twitter feed typefrom the available options:
Twitter feed type
• Profile Timeline: Displays public Tweets from any useron Twitter.
• List Timeline: Shows Tweets from public Lists that youown and/or subscribe to.
• Collection: Shows Tweets from a curated collection.
• Moment: Shows Tweets from a public moment.
146AUREA CONFIDENTIAL
Chapter 16: Social Media tile

DescriptionOptions
Twitter username prefixed by the handle.Twitter Username
Number of posts (maximum 20) to be displayed within thetile.
Number of posts
Maximum height to be displayed within the tile.Max Height
Enable to display the responses to the Twitter post.Show Replies
Select the light or dark theme.Theme
Aria Profile as defined in Twitter post.Aria Polite
Used to pick the display settings provided in thedropdown:
Chrome
• noheader
• nofooter
• noborders
• transparent
• no scrollbars
4. If you selected Facebook, configure the following settings:
147AUREA CONFIDENTIAL
Creating Social Media tiles

DescriptionOptions
A valid Facebook Page URL.Facebook Page Url
Height of display.Height
One or more the Facebook Tabs: Timeline, Events, andMessages.
Facebook Tabs
Small Header to be used or the default Header inFacebook.
Use Small Header
Enabling display or hiding the Cover Photo.Hide Cover Photo
Enabling display or hiding Friend's Faces.
Attention: User must be logged into Facebook to enabledisplay of Friend's Faces.
Show Friend's Faces
Enable or hide the custom call to action button.Hide the custom callto action button (ifavailable)
148AUREA CONFIDENTIAL
Chapter 16: Social Media tile

5. If you selected Instagram, include the Embed code from the relevant InstagramPost.
To embed code from Instagram:
1. Log in to Instagram.
2. Search or select the relevant post and then select the Details (three dots) iconon top right.
3. Select Embed and copy the code.
4. In Instagram Post Embed Code of the tile, paste the code.
6. Verify the Social Media Tile screen to ensure that the configurations are completedsuccessfully.
7. Click Save Tile Settings.
Social Media tile is configured successfully.
Copying settings from another tileUse the currently configured settings of a tile in another environment or instanceby using the Import / Export tile configuration? option.
Note: The Export/Import feature is also a great way to save previous configurationsas a backup.
To copy settings from another tile of the same type:
149AUREA CONFIDENTIAL
Copying settings from another tile

Select Import / Export tile configuration? to copy or paste the entire tileconfiguration to another tile of the same type.
An example of Social Media tileAn Social Media may look like this.
Social Media tile connected to TwitterFigure 20: Social Media tile connected to Twitter
150AUREA CONFIDENTIAL
Chapter 16: Social Media tile

• General Settings:
• Title: Title for Social Media Tile - Example
• Display tile title?: Enabled
• Headline: Welcome to JEP - Social Media Tile (centeraligned)
• Description: Describe this sample Social Media Tile inone or two lines.
• Background Image URL
• Background position: Top center
• Padding: 20px all around
• Text color: 030203
151AUREA CONFIDENTIAL
An example of Social Media tile

• Action label + URL: AureaWorks News and link provided
• Action Alignment: Center
• Social Media Settings:
• Social Media: Facebook
• Facebook Page Url: https://www.facebook.com/fans.of.jive
• Facebook Tabs: Timeline, Events, Messages enabled
• Use Small Header: Enabled
Social Media tile connected to FacebookFigure 21: Social Media tile connected to Facebook
• General Settings:
• Title: Title for Social Media Tile - Example
• Display tile title?: Enabled
• Headline: Welcome to JEP - Social Media Tile (centeraligned)
152AUREA CONFIDENTIAL
Chapter 16: Social Media tile

• Description: Describe this sample Social Media Tile inone or two lines.
• Background Image URL
• Background position: Top center
• Padding: 20px all around
• Text color: 030203
• Action label + URL: AureaWorks News and link provided
• Action Alignment: Center
• Social Media Settings:
• Social Media: Twitter
• Twitter Username: @TheBorisBecker
• Number of posts: 2
• Max Height: 500
• Theme: dark
153AUREA CONFIDENTIAL
An example of Social Media tile

Social Media tile connected to InstagramFigure 22: Social Media tile connected to Instagram
• General Settings:
• Title: Title for Social Media Tile - Example
• Display tile title?: Enabled
• Headline: Welcome to JEP - Social Media Tile (centeraligned)
• Description: Describe this sample Social Media Tile inone or two lines.
• Background Image URL
• Background position: Top center
• Padding: 20px all around
154AUREA CONFIDENTIAL
Chapter 16: Social Media tile

• Text color: 030203
• Action label + URL: AureaWorks News and link provided
• Action Alignment: Center
• Social Media Settings:
• Social Media: Instagram
• Instagram post embed code:<blockquote class="instagram-media" data-instgrm-captioneddata-instgrm-permalink="https://www.instagram.com/p/tsxp1hhQTG/?utm_source=ig_embed&utm_campaign=loading"data-instgrm-version="13" style=" background:#FFF; border:0;
border-radius:3px; box-shadow:0 0 1px 0 rgba(0,0,0,0.5),0 1px 10px 0rgba(0,0,0,0.15); margin: 1px; max-width:540px; min-width:326px;padding:0; width:99.375%; width:-webkit-calc(100% - 2px);width:calc(100% - 2px);"><div style="padding:16px;"> <ahref="https://www.instagram.com/p/tsxp1hhQTG/?utm_source=ig_embed&utm_campaign=loading"style=" background:#FFFFFF; line-height:0; padding:0 0;
text-align:center; text-decoration:none; width:100%;" target="_blank"><div style=" display: flex; flex-direction: row; align-items: center;"><div style="background-color: #F4F4F4; border-radius: 50%; flex-grow:0; height: 40px; margin-right: 14px; width: 40px;"></div> <div
style="display: flex; flex-direction: column; flex-grow: 1;justify-content: center;"> <div style=" background-color: #F4F4F4;border-radius: 4px; flex-grow: 0; height: 14px; margin-bottom: 6px;width: 100px;"></div> <div style=" background-color: #F4F4F4;border-radius: 4px; flex-grow: 0; height: 14px; width:60px;"></div></div></div><div style="padding: 19% 0;"></div> <divstyle="display:block; height:50px; margin:0 auto 12px; width:50px;"><svgwidth="50px" height="50px" viewBox="0 0 60 60" version="1.1"
xmlns="https://www.w3.org/2000/svg"xmlns:xlink="https://www.w3.org/1999/xlink"><g stroke="none"stroke-width="1" fill="none" fill-rule="evenodd"><gtransform="translate(-511.000000, -20.000000)" fill="#000000"><g><pathd="M556.869,30.41 C554.814,30.41 553.148,32.076 553.148,34.131
C553.148,36.186 554.814,37.852 556.869,37.852 C558.924,37.852560.59,36.186 560.59,34.131 C560.59,32.076 558.924,30.41 556.869,30.41M541,60.657 C535.114,60.657 530.342,55.887 530.342,50 C530.342,44.114535.114,39.342 541,39.342 C546.887,39.342 551.658,44.114 551.658,50
C551.658,55.887 546.887,60.657 541,60.657 M541,33.886 C532.1,33.886524.886,41.1 524.886,50 C524.886,58.899 532.1,66.113 541,66.113C549.9,66.113 557.115,58.899 557.115,50 C557.115,41.1 549.9,33.886541,33.886 M565.378,62.101 C565.244,65.022 564.756,66.606 564.346,67.663C563.803,69.06 563.154,70.057 562.106,71.106 C561.058,72.155
560.06,72.803 558.662,73.347 C557.607,73.757 556.021,74.244553.102,74.378 C549.944,74.521 548.997,74.552 541,74.552 C533.003,74.552532.056,74.521 528.898,74.378 C525.979,74.244 524.393,73.757
523.338,73.347 C521.94,72.803 520.942,72.155 519.894,71.106C518.846,70.057 518.197,69.06 517.654,67.663 C517.244,66.606516.755,65.022 516.623,62.101 C516.479,58.943 516.448,57.996 516.448,50C516.448,42.003 516.479,41.056 516.623,37.899 C516.755,34.978
517.244,33.391 517.654,32.338 C518.197,30.938 518.846,29.942519.894,28.894 C520.942,27.846 521.94,27.196 523.338,26.654C524.393,26.244 525.979,25.756 528.898,25.623 C532.057,25.479533.004,25.448 541,25.448 C548.997,25.448 549.943,25.479 553.102,25.623C556.021,25.756 557.607,26.244 558.662,26.654 C560.06,27.196
561.058,27.846 562.106,28.894 C563.154,29.942 563.803,30.938564.346,32.338 C564.756,33.391 565.244,34.978 565.378,37.899C565.522,41.056 565.552,42.003 565.552,50 C565.552,57.996 565.522,58.943565.378,62.101 M570.82,37.631 C570.674,34.438 570.167,32.258
569.425,30.349 C568.659,28.377 567.633,26.702 565.965,25.035C564.297,23.368 562.623,22.342 560.652,21.575 C558.743,20.834556.562,20.326 553.369,20.18 C550.169,20.033 549.148,20 541,20C532.853,20 531.831,20.033 528.631,20.18 C525.438,20.326 523.257,20.834521.349,21.575 C519.376,22.342 517.703,23.368 516.035,25.035
C514.368,26.702 513.342,28.377 512.574,30.349 C511.834,32.258511.326,34.438 511.181,37.631 C511.035,40.831 511,41.851 511,50
155AUREA CONFIDENTIAL
An example of Social Media tile

C511,58.147 511.035,59.17 511.181,62.369 C511.326,65.562 511.834,67.743512.574,69.651 C513.342,71.625 514.368,73.296 516.035,74.965
C517.703,76.634 519.376,77.658 521.349,78.425 C523.257,79.167525.438,79.673 528.631,79.82 C531.831,79.965 532.853,80.001 541,80.001C549.148,80.001 550.169,79.965 553.369,79.82 C556.562,79.673
558.743,79.167 560.652,78.425 C562.623,77.658 564.297,76.634565.965,74.965 C567.633,73.296 568.659,71.625 569.425,69.651C570.167,67.743 570.674,65.562 570.82,62.369 C570.966,59.17 571,58.147571,50 C571,41.851 570.966,40.831
570.82,37.631"></path></g></g></g></svg></div><divstyle="padding-top:8px;"> <div style=" color:#3897f0; font-family:Arial,sans-serif;
font-size:14px; font-style:normal; font-weight:550; line-height:18px;">View this post on Instagram</div></div><div style="padding: 12.5%
0;"></div> <div style="display: flex; flex-direction: row;margin-bottom: 14px; align-items: center;"><div> <divstyle="background-color: #F4F4F4; border-radius: 50%; height: 12.5px;width: 12.5px; transform: translateX(0px) translateY(7px);"></div>
<div style="background-color: #F4F4F4; height: 12.5px; transform:rotate(-45deg) translateX(3px) translateY(1px); width: 12.5px;flex-grow: 0; margin-right: 14px; margin-left: 2px;"></div> <divstyle="background-color: #F4F4F4; border-radius: 50%; height: 12.5px;width: 12.5px; transform: translateX(9px)
translateY(-18px);"></div></div><div style="margin-left: 8px;"> <divstyle=" background-color: #F4F4F4; border-radius: 50%; flex-grow: 0;height: 20px; width: 20px;"></div> <div style=" width: 0; height: 0;border-top: 2px solid transparent; border-left: 6px solid #f4f4f4;border-bottom: 2px solid transparent; transform: translateX(16px)translateY(-4px) rotate(30deg)"></div></div><div style="margin-left:auto;"> <div style=" width: 0px; border-top: 8px solid #F4F4F4;border-right: 8px solid transparent; transform:translateY(16px);"></div> <div style=" background-color: #F4F4F4;flex-grow: 0; height: 12px; width: 16px; transform:translateY(-4px);"></div> <div style=" width: 0; height: 0; border-top:8px solid #F4F4F4; border-left: 8px solid transparent; transform:
translateY(-4px) translateX(8px);"></div></div></div> <divstyle="display: flex; flex-direction: column; flex-grow: 1;justify-content: center; margin-bottom: 24px;"> <div style="background-color: #F4F4F4; border-radius: 4px; flex-grow: 0; height:14px; margin-bottom: 6px; width: 224px;"></div> <div style="background-color: #F4F4F4; border-radius: 4px; flex-grow: 0; height:14px; width: 144px;"></div></div></a><p style=" color:#c9c8cd;font-family:Arial,sans-serif; font-size:14px; line-height:17px;margin-bottom:0; margin-top:8px; overflow:hidden; padding:8px 0 7px;text-align:center; text-overflow:ellipsis; white-space:nowrap;"><ahref="https://www.instagram.com/p/tsxp1hhQTG/?utm_source=ig_embed&utm_campaign=loading"style=" color:#c9c8cd; font-family:Arial,sans-serif; font-size:14px;font-style:normal; font-weight:normal; line-height:17px;
text-decoration:none;" target="_blank">A post shared by Instagram(@instagram)</a></p></div></blockquote> <script asyncsrc="//www.instagram.com/embed.js"></script>
156AUREA CONFIDENTIAL
Chapter 16: Social Media tile

17Visibility Rules of JEP tilesThese optional settings are available for most of the JEP Tiles.
A visibility rule determines the users, to whom the content in the tile is displayed.
• Select Create Visibility Rule to configure who should be able to view the tile.
• Select Continue w/o Visibility Rules to proceed with configuring other settingsof the tile.
157AUREA CONFIDENTIAL

Creating visibility rules
158AUREA CONFIDENTIAL
Chapter 17: Visibility Rules of JEP tiles
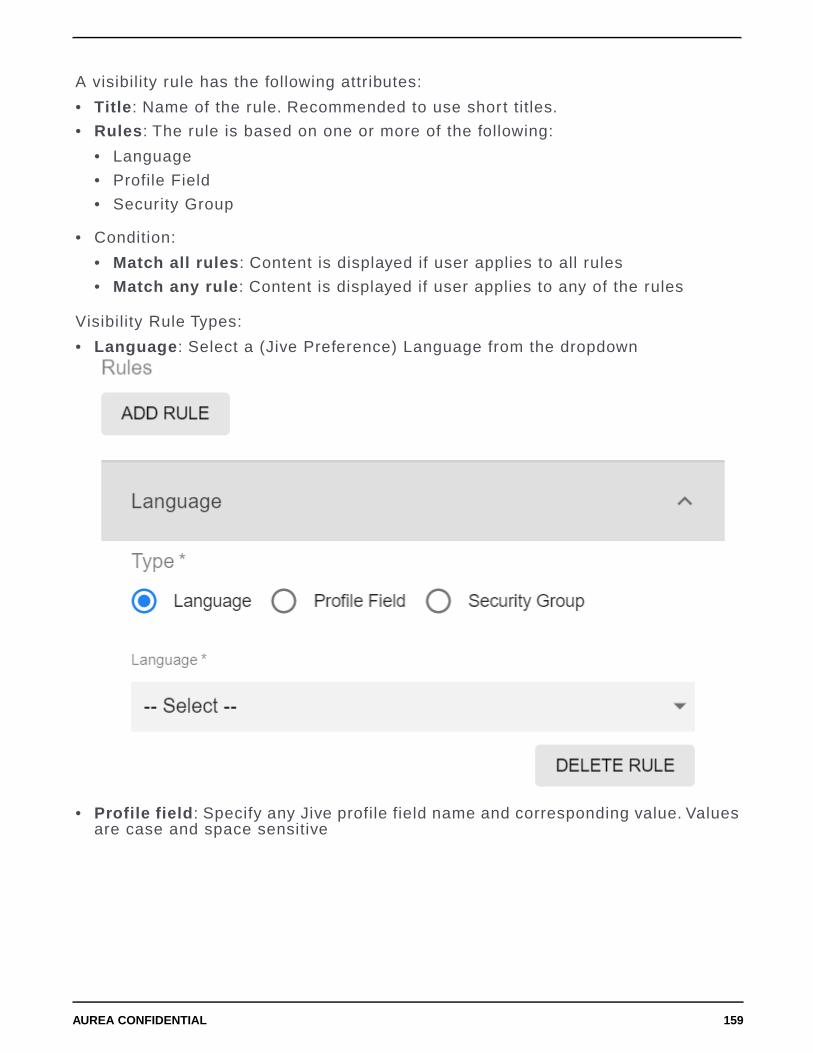
A visibility rule has the following attributes:
• Title: Name of the rule. Recommended to use short titles.
• Rules: The rule is based on one or more of the following:
• Language
• Profile Field
• Security Group
• Condition:
• Match all rules: Content is displayed if user applies to all rules
• Match any rule: Content is displayed if user applies to any of the rules
Visibility Rule Types:
• Language: Select a (Jive Preference) Language from the dropdown
• Profile field: Specify any Jive profile field name and corresponding value. Valuesare case and space sensitive
159AUREA CONFIDENTIAL

• Security / User groups: Provide one or multiple user group names (ORcorrelation). User Group Names are case and space sensitive
160AUREA CONFIDENTIAL
Chapter 17: Visibility Rules of JEP tiles

Visibility Rules allow you to target content of a tile to a specific audience based onprofile field information, language, and user group membership.
161AUREA CONFIDENTIAL

18General Settings of JEP tiles1. Specify the Title of the tile.
2. Enable Display tile title? to make the tile title visible.
3. Define Headline, set Headline Alignment (Left, Right, Center, or Justify) and acorresponding Text Color.
162AUREA CONFIDENTIAL
Chapter 18: General Settings of JEP tiles

4. Provide Description and set the Description Alignment (Left, Right, Center, orJustify).
5. Set the Background image, Background position, Text Color, and Padding.
6. Define action link as follows:
163AUREA CONFIDENTIAL

a) Define the Action label and Action URL, enable Open link in new window?to open the Action URL in a new window.
b) Set the Action Alignment and Action Colors to display the button on hover.c) Select Use a flatter button to display the Action button as a flat/elevated button
respectively.
7. Define HTML code with or without Java script.
164AUREA CONFIDENTIAL
Chapter 18: General Settings of JEP tiles

Inser t the HTML code within <div> ... </div> to wrap the content, as the tilealready provides the html, head, and body tags.
Caution: All JavaScript is stripped out from the HTML configurations for userswho are not added to the defined Security Group. For more information, see Al-lowing JavaScript usage for specific users in the Jive 9.x Community ManagerHelp.
8. Select a font from Google Font Library.
165AUREA CONFIDENTIAL

General Settings contain the main tile settings.
166AUREA CONFIDENTIAL
Chapter 18: General Settings of JEP tiles


