Embed Size (px)
Citation preview

Table of Contents
Review of Course 1 – Introduction to GIS Fundamentals
Define GIS
Discuss the Geospatial, Informational and System Components of GIS
Review common enterprise geodatabase locations, features used, etc. in
creating an ArcGIS Map
Brief tour of ArcGIS Pro Start Page
Review the differences between ArcGIS Pro and ArcGIS Desktop
Parts of an ArcGIS Pro Startup window
Configuring ArcGIS Pro settings, portal connections, etc.
Connecting to ArcGIS Portal
Accessing ArcGIS Pro Help topics

Table of Contents
Overview of ArcGIS Pro
y Creating a new ArcGIS Project
y Differences between how ArcMap and ArcGIS Pro save their projects and documents
y Overview and brief tour of ArcGIS Pro Project workspace
✓ Top Tool Ribbons
✓ Contents Window
✓ Central Window or Workspace
✓ Catalog Window
y Overview of key topics associated with pro such as:
✓ Creating a map or scene
✓ Connecting to a folder
✓ Performing a query
✓ Tools
Creating a map from start to finish

Disclaimer
This course is entirely hands-on learning, and it is advised that you use
two monitors – one for reading and one for doing the exercises.
It is also advised to follow along with the instructor as this is an emersion
course, and you will better understand the material when:
y We go through the exercises
y And afterward, when you use the skills taught in this course.
I will try to accommodate your individual needs. If you need help,
please feel free to tell the instructor to slow down.

Connecting to the Course 2 Directory
If you haven’t mapped a network drive to the course directory, go to:
\\dotb6gisrh01\WVDOT_Training\Course2
To map to a network drive, open a file browser
On the left-hand side is the quick access toolbar which lists all the files and folders and
mapped drives located on ‘This PC’.
Search for a button called ‘This PC’ and right click on it
Then select ‘Map network drive’
This will bring up an interactive window where you can connect to a drive

Connecting to the Course 2 Directory
In this window, follow these steps:
Drive Box:
✓ Select a letter, A through Z, that corresponds to a mapped network location or hard disk drive on the computer.
✓ If it isn’t mapped already, choose Q drive.
Folder Box
✓ Identifies the location of the network this file or file share is located at
✓ Every Share has the same format:
\\server\share
✓ The Server is the physical location on the network where the shared folder is being hosted from
✓ Share refers to shared directory where the geographical data is stored
✓ For us,
✓ The server is : dotb6gisrh01
✓ The shared directory is: WVDOT_Training\Course2
✓ Copy \\dotb6gisrh01\WVDOT_Training\Course2 in the Folder Box.

Connecting to the Course 2 Directory
y For the next two boxes, leave the default as:
✓ Check ‘Reconnect at sign in’ – means the drive will reconnect every time the user logs onto the
computer
✓ Leave unchecked ‘Connect using different credentials’ – this means that the drive will use special
credentials to access the drive.
The window should look like this.
Click finish.

Connecting to the Course 2 Directory

Introduction to ArcGIS Pro
Section 1: GIS Recap

GIS Recap
Stands for Geographical Information Systems
Every feature on earth has a geographical location that is defined by a set of two or more points called coordinates.
These are based on lines running North and South (Latitude) and East and West (Longitude) that are part of the coordinates.
There is a series of strategically placed disks with known Lat and Long coordinate points and heights called geodetic markers, and highly accurate GPS receivers that continuously transmit Lat, Long, and Height coordinates called Continuously Operating System (CORS) network.
These form an interwoven network (grid) called a spatial reference system.
There are two types of spatial references that locate data:
y Geographic: Which provides the precise coordinate location on earth
y Projection: Which provides measurements such as length, area, and scalability

GIS Recap
There are a set of constraints that specify and define these coordinates called
datum. These include:
y Horizontal – measures distances from the equator and prime meridian
y Vertical – measures height
y Geodetic – measures both distance and height as well as time using satellites
GIS also consists of an Informational component used for:
y Identifying Characteristics such as feature name, feature type, and facts and figures
y Measurements such as distance and beginning and ending points
y Figures and features that:
✓Aide in decision making
✓ Illustrate a feature or theme
✓ Provide reference for navigation

GIS Recap
Information is assembled from data or a collection of raw, unorganized
facts, figures, symbols, descriptions, etc.
Data we use are called Geospatial data because they have a
geographical component associated with them
Geospatial data are housed in tables, spreadsheets, or databases.
These are made up of:
y Fields or columns which are shared attributes (characteristics) of
multiple features
y Rows which are the individual records of each feature and consist of
many fields
When found in Geospatial Datasets, these are called Attribute Tables

GIS Recap
Geospatial data can be found in the following formats:
y Vector
y Raster
y Triangular Irregular Network (TIN)
Geospatial Data are stored in:
y Shapefiles
y Feature classes
y Various raster formats
Data can reside in folders (stand alone shapefiles and rasters), personal
geodatabases, file geodatabases, or in enterprise geodatabases (feature
classes and rasters)

GIS Recap
GIS is an Information System which is used to collect, maintain, organize and distribute geographical data.
GIS converts the raw materials (geographical and informational components into a finished product.
The GIS system consists of:
y The Geographical Information: such as shapefiles and geodatabases containing tables, feature classes, and raster data
y The Infrastructure used to convert the Geographical information into finished products including:
✓ Software used directly and indirectly for creating, maintaining, organizing and sharing the geographical information and the finished product.
✓ Hardware used to house the GIS software, finished products, and raw data.
✓ Network: the organized interconnected system of the software and hardware components.
y The Organization develops the information, shares the finished products, and maintains the network.
y Finished products such as maps and informational products and applications.

GIS Recap
WVDOT’s GIS network consist of two networks:
y Production
✓ https://gis.transportation.wv.gov/portal
✓ https://gis.transportation.wv.gov/server
✓DOTB6GISDB01
y Staging
✓ https://gisdev.transportation.wv.gov/portal
✓ https://gisdev.transportation.wv.gov/server
✓DOTB6GISDBST01
These networks are composed of four components:
y Enterprise Geodatabase Server
y ArcGIS Portal
y ArcGIS Server
y ArcGIS Datastore

GIS Recap For the production network, the database server, DOTB6GISDB01, is composed of two
enterprise geodatabases:
GTI_PUB_UTM
RIL_LRS_PUB
GTI_PUB_UTM contains the following datasets:
y Boundaries
✓ Counties: West Virginia Counties
✓ Incorporated _Places_20XX: Location of all incorporated municipalities, towns, and cities within WV
✓ WVDOH_Districts: Polygon feature of all WVDOH Districts
y Economic
✓ Parcels_20XX: Statewide parcel layer used for right of way
✓ WVDOT_Parcels: Location of all WVDOT owned parcels
y Hydrology
✓ Major_Rivers_Other_NHD: polygon feature of all major rivers in WV
✓ Rives_Streams_NHD: Polyline feature of all rivers and streams in WV
✓ Lakes_Oter_Waterbodies_NHD: All lakes, ponds and other waterbodies in WV

GIS Recapy Routes
✓ Dominant_Routes: feature class derived from the county mile point showing the primary(dominant route) on centerline feature in WV.
✓ Dominant routes is used primarily for displaying routes and eventing tables to the route network.
y Transportation
✓ Bridges: Shows all bridges within West Virginia
✓ Lane_Info_RH: Shows AADT Traffic Counts, Roadway Surface Type and Lane Width
✓ WV_Railroads: WV Railroad Layer
✓ WV_DOT_Facilities: Location of WVDOT Facilities
✓ WV_Airports: WV Airports
✓ WV_Fuel_Sites: Location of all WVDOH Fuel Sites
RIL_LRS_PUB
y County_Milepoint: Dataset showing both primary routes (Dominant) and the secondary route(Subordinate) on a centerline
y Use similar to Dominant Routes for mapping routes and eventing route information
y LRSE_Bridges: Shows slimmed down version of the bridge feature class in GTI_PUB_UTM
y Street_Name_Sams: Has the street names of every route in WV

Introduction to ArcGIS
Section 2: ArcGIS Pro Start Page

Questions
How many of you use some sort of GIS
software currently?
Show of hands, how many use ArcMap?
Show of hands, how many use ArcGIS
Pro?
How many of you have created a map in
ArcMap before?
How many of you have created a map in
ArcGIS Pro before ?

GIS Software
As we learned earlier, GIS Software refers to a single suite of programs
used to create, manipulate, manage, analyze, and share geospatial
information.
It includes:
y ArcGIS Pro
y ArcGIS Desktop
y Quantum GIS
y MicroStation
The majority of GIS work in WVDOT is done in ArcMap in ArcGIS Desktop and
in ArcGIS Pro.
However, starting in 2026, ESRI will no longer support ArcMap making ArcGIS
Pro the only way create, edit, manage and maintain geospatial data

ArcGIS Pro
We will continue to support both in the
foreseeable future; however, we will slowly move
to ArcGIS Pro exclusively.
So, let’s explore ArcGIS Pro.
Go to the start folder → ArcGIS →ArcGIS Pro
The ArcGIS Start Screen will pop up
If the software has not been used before, a
licensing screen pops up.
Go to \\dotb6gisrh01\WVDOT_Training\materials
It includes a document on how to configure ArcGIS
Pro. It is a step-by-step tutorial on configuring
ArcGIS Pro.

ArcMap ArcGIS Pro

Differences between Pro and Desktop
For those who have used ArcMap before, ArcGIS Pro is fundamentally different when it comes to layout.
There are several major differences between ArcGIS Pro and ArcGIS Desktop.
Pro combines all the components of ArcGIS Desktop (ArcMap, ArcCatalog, ArcScene, ArcGlobe) into a single piece of software.
In Pro, maps, scenes, catalogs, etc. are housed in Projects instead of a document like in ArcMap.
ArcGIS Pro Projects can contain multiple maps, scenes, etc. whereas an ArcMap Document can contain only one of each.
Toolbars in ArcMap have been replaced by tool ribbons
Editing of data and features are done automatically in Pro, whereas in ArcMap it is done in an editing session.
https://www.cloudpointgeo.com/blog/2018/2/15/top-5-differences-between-arcmap-and-arcgis-pro

Introduction to ArcGIS Pro
Let’s compare the start page for both.
y In ArcMap, the start page:
✓ Is known as the Getting Started Screen.
✓Has basic functionality. Using it, you can:
Open map documents
Create new map documents using several standard templates
Change the default geodatabase for the map
y In ArcGIS Pro, the start page is the central hub used to:
✓Access
Existing map projects
Map templates
Help resources
ArcGIS Portals

Introduction to ArcGIS Pro
✓Create new projects such as:
Maps
Catalogs
Scenes
Blank projects
✓Configure settings for the ArcGIS Pro software and map
For our needs, we will focus on configuring settings, accessing help
documents, and creating new projects
https://www.esri.com/about/newsroom/arcuser/why-you-should-move-to-arcgis-
pro/#:~:text=ArcGIS%20Pro%20features%20innovations%20that,in%20any%20other%20desktop%20GIS.&text=ArcGIS%20Pro%20uses%20a%20project,scenes%20and%20editing%20in%
203D

ArcGIS Pro Start Page

Settings
Click on settings.
Here the user can:
y Configure projects and ArcGIS Pro application settings and
options
y Add and connect to Existing ArcGIS Portal and ArcGIS Online
sites
y Configure and view ArcGIS Licensing options and check out
the license.
y Add, configure, manage and remove ESRI Service Extensions
y Add, configure, update, and view Python scripting packages
y Add in external widgets and programs
y Update ArcGIS Pro

Adding Portals
On the Settings page, click on the Portal tab in the settings menu.
As described on the previous slide, this is where the user can add and connect to the existing ArcGIS Portal and ArcGIS Online sites.
This is important to configure when you start because with Portal and ArcGIS Online one can:
y Access pre-produced mapping products and services
y Participate in certain mapping and data management activities that are part of a job including editing:
y Certain feature datasets that have been branch versioned
y Web applications for verification and editing
y Publish and share interactive maps with other users
Additionally, the portal screen is where the user switches between the portals.
ArcGIS Online is added by default.

Connecting ArcGIS Portal
Click on add portal.
As you remember, we have a staging and
production network in WVDOT, each with
their own ArcGIS Portal.
Add the production portal. Its web address
is: https://gis.transportation.wv.gov/portal
Click Ok
Repeat the above 3 steps this time for the
staging portal. Its web address is:
https://gisdev.transportation.wv.gov/portal
The final screen should look like this:

Connecting ArcGIS Portal

Connecting ArcGIS Portal
Now, set the default portals.
By default, it is set to ArcGIS Online.
The two that are most frequently use are:
WVDOT Production Portal
ArcGIS Online
Right click on https://gis.transportation.wv.gov/portal and select ‘Set As Active Portal’.
Return out of the portal screen and go back to the ArcGIS Pro home screen.
The portal screen in the top right corner of the home screen should change to reflect the new portal.

Connecting ArcGIS Portal
Click on the ‘Sign in’.
There are two ways to access the Portal.
Username: EXECUTIVE\A, B, E number
Password: Password used to log onto your computer
Or
Username: A, B, E number@EXECUTIVE
Password: Password used to log onto your computer
Using one of these methods, log into portal to access it.
Please refer to the next slide to see how to sign in.

Sign Ins

Resources
Directly after the portal ‘sign in’ page is the Resources page.
Resources is beneficial to the ArcGIS Pro user after this course because
it provides:
y ArcGIS Pro help resources
y Free ESRI training course opportunities through Learn ArcGIS and ESRI
Academy
y Access to other ArcGIS professionals through ESRI Community and Blog
y Learning paths to further cultivate your skills with ArcGIS Pro
y Access to what’s new and coming down the path
y We’re going to focus on Help, Learn ArcGIS, ESRI Academy, ESRI
Community, and the Learn the Basics Discovery Path

Resources

ESRI Help
Click on the help button, this brings you to the ESRI ArcGIS Pro’s Knowledge Base.
https://pro.arcgis.com/en/pro-app/latest/get-started/get-started.htm
It consists of:
y Information and walk throughs on utilizing different tools
y Descriptions and walk arounds for errors encountered
y Access to different ESRI resources such as:
✓ Features
✓ Courses
✓ Blog
✓ News
✓ New software features
y Access to downloadable software and extensions
Any time inside ArcGIS Pro, ESRI Help can also be accessed by hitting the F1 key.

ESRI Help

ESRI Help Topic Tutorial
To search by a topic go to Search ArcGIS Pro Help box. We will type in “how to create a geodatabase”
Select the first entry
This is a typical help article.
It consists of:
y An overview of the topic
y Hyperlinks to related help topics
y If a tool is involved, an overview of the tool includes:
✓A description and use of the tool
✓An overview of each field corresponding to the tool
✓Sample python scripts
Explore this Help Topic screen. Once you are done, close out of it and return to ArcGIS Pro Start Screen.

ESRI Help Topic Tutorial

Learn ArcGIS – ArcGIS Lesson Gallery
Click on the Learn ArcGIS button, this brings you to the ArcGIS Lesson Gallery. https://learn.arcgis.com/en/gallery/?rsource=https%3A%2F%2Flinks.esri.com%2Farcgis-learn-pro-lesson-gallery#?p=arcgispro
The Gallery is a collection of self-paced courses developed by ESRI for all its software packages.
These packages:
y Get users accustomed to new software (our case)
y Teach users new skills or techniques
y Teach users how to perform different types of analysis
y Are informal
Courses are found on a variety of skill levels from beginner to expert.
Now search for Getting Started with ArcGIS Pro, something we’ll use later.
Minimize this this screen and return to ArcGIS Pro.

Learn ArcGIS – ArcGIS Lesson Gallery

ESRI Academy
Click on the Esri Academy button. This brings you to the ESRI training site:
https://www.esri.com/training/catalog/search/
This is ESRI’s formal training site where the user can:
y Explore and take both free and paid courses from ESRI
y View, create, and access learning plans
y Track progress and achievement
y Take online courses to get certified in ESRI
In ‘Search Courses’, type in “Introduction to ArcGIS Pro” and select Free.
This gives additional courses that will supplement this course.
Minimize this screen and return to ArcGIS Pro.

ESRI Academy

ESRI Community
Click on the Esri Community button. This brings you to the ESRI
Community.
https://community.esri.com/t5/arcgis-pro/ct-p/arcgis-
pro?rmedium=links_esri_com_e_i&rsource=https%3A%2F%2Flinks.esri.com%2F
geonet-arcgispro
This is a hosted site from ESRI for the user community and ESRI
employees to:
y Post questions about a problem they are having
y Provide assistance and solutions to other users
Covers all ESRI Software products and solutions
Minimize this scree.

ESRI Community

Learn The Basics
Click on the Learn the Basics button. This brings you to the ESRI
Community.
https://learn.arcgis.com/en/paths/try-arcgis-
pro/?rmedium=links_esri_com_j_r&rsource=https%3A%2F%2Flinks.esri.com%2Fl
earn-try-arcgis-pro
Learn the Basics provides a prescribed curriculum for learning
ArcGIS Pro to supplement this course.
Courses in the Lesson Gallery include Get started with ArcGIS Pro
which is good segway into the next section utilizing ArcGIS Project.
Minimize this screen and return to ArcGIS Pro.

Learn the Basics

Introduction to ArcGIS Pro
Section 3: Utilizing ArcGIS Pro

Section 3: Utilizing ArcGIS Pro This section introduces the following elements of ArcGIS Pro. In the next
section 4, we will cover how to use these elements in making a map.
Creating a new map document
Tool Ribbon and its tabs
Share Tab and the Sharing Ribbon
Save as Tab and Saving a Project
Project Tab
Map Tab
The Selection Group in the Map Tab
Insert Tab and the Insert Tool Ribbon
The New Map Tab on the Insert Tool Ribbon
Map Panes
Analysis Tab and Analysis Tool Ribbon
The View Tab and View Tool Ribbon
Edit Tab and Edit Tool Ribbon

Creating a New Map Document
Go to the new map screen. Here one can create:
y Map
y Catalog
y Global or Local Scene
With these three you must save the project as well
Click on Start without a template to access the ArcGIS Pro project
This will create a blank project without a template.
Compare the blank ArcGIS Pro project to an ArcMap document. Do
you notice any differences?
https://pro.arcgis.com/en/pro-app/latest/help/projects/what-is-a-
project.htm

ArcMap Document

ArcGIS Pro Project

Toolbar vs Ribbon
The most noticeable difference is how to access different tools.
In ArcMap, every tool was housed in neatly grouped like tools called toolbars.
With toolbars the user could:
y Customize these toolbars to have access to the tools he or she used the most.
y Turn on and off toolbars as needed.
y Access almost every tool with one or two clicks.
The primary layout in ArcMap consisted of:
y Menu bar – File, Edit, View, etc.
y Standard toolbar with the most commonly accessed tools such as save, add, undo, redo, add toolbars, etc.
y The Tools Toolbar which were all navigational tools.

Toolbar vs Ribbon The Tool Ribbon replaces the toolbar. It is a horizontal ribbon at the top of the
application window.
The Tool Ribbon is the primary interface for working in ArcGIS Pro.
Hundreds of essential GIS commands and tools (buttons)are located in contextual tabs that are organized in the tool ribbon and are associated with whatever view you have active.
The ribbon consists of 8 to12 different tabs that correspond with the different menu bar options.
Each tab consists of multiple toolbars with the most frequently used tools from each toolbar.
Also consists of a quick access toolbar above the tool ribbon which has the most frequently accessed tools including:
Creating New Projects
Opening, Saving Projects
Any other customizable features

Toolbar vs Tool Ribbon Default tabs on a tool ribbon are:
Project
Map
Insert
Analysis
View
Edit
Imagery
Share
Additional tabs that are added to the tool ribbon can be:
Appearance
Labeling
Data

Tool Ribbon

Sharing Ribbon
Click on the Share tab to bring up the Sharing Ribbon.
The Sharing Ribbon is a tool ribbon for sharing information.
In addition to publishing information products, it can also:
Overwrite existing web services
View existing results
View datastores
Create project templates, map files, and layers
Print and export static maps
We will come back to this later on in this course.

Saving a Project
One of the holdover toolbars from ArcMap is Saving a Project.
The Saving a Project tool bar is accessed by selecting the Save As tab in the Sharing Ribbon.
This tool bar consists of the most frequently used commands in ArcGIS Pro including:
Creating a new document
Open an existing document
Saving changes
Undo and Redo actions
Click on save.
The following screen should pop up. Navigate to the classroom folder under Course 2.
It should look something like this.

Saving a Project

Saving a Project Save it as Intro_yourinitials
IE: Intro_AJD
There are several unwritten rules for saving material being worked on:
y Save often, usually for me, is after an hour of work.
y When saving and creating a map document or project, name it something that is:
y Easy to remember
y Descriptive of what it is being used for, for example with the intro_yourinitials.
y When saving documents or projects with the same name, always add something to differentiate. This could include such terms as _old, _production, etc.
y Always keep similar projects/documents together.
y Make sure not to save ArcGIS Work to any folders that frequently get modified such as temp, downloads, etc.
y Also, you may want to try to store it to a personal drive. It can reduce the risk of having features lost.

Project Tab
The Project Tab on the Tool Ribbon is a combination of the Start Screen of ArcGIS Pro and the Options tab.
With it the user can:
Create and save a new project
Open and save an existing project
Access ArcGIS Pro Project templates stored on:
Local Computer
ArcGIS Portal
And elsewhere
Add, connect to, and customize ArcGIS Portal connections
Add, configure, remove, and view ArcGIS Pro Licenses and ESRI Extensions
Rename your ArcGIS Pro Workstation Alias
Check in and out licenses

Project Tab
Configure Project and Application settings and options
Add, view, and update Python packages
Add-in widgets or other non-Esri tools
Access the Help Menu
View Current Version of ArcGIS Pro and Update ArcGIS Pro

Map Tab Click on the Map Tab of the Tool Ribbon. This will bring up the Map tab ribbon.
The Map tab is a combination of the Standard and Layout toolbar in ArcMap as well as the edit map menu.
Here one can:
Cut, Copy, Paste, and copy the path of features, feature classes, etc. in Map Project (Clipboard)
Navigate, Zoom In and Out, zoom to full extent, navigate to other views, and create bookmarks (Navigate)
Add and remove data, presets, and add graphics layer(Layer)
Change the basemap (Layer)
Select by attributes, location, and by drawing type. View attributes and clear selection (Selection)
Measure distance, locate features by XY coordinates, etc. (Inquiry)
Pause, lock, view unplaced labels, convert labels, etc. (Labeling)
Download Maps, Sync, and remove offline (Offline)
We will go into Navigation and Layer in the ‘Creating a Map Section’.

Map Tab

Selection Group
Let’s take a brief tour of the Selection group in the Map tab.
It is an important tool suite used to:
y Filter out features within a feature class that meet specific criteria or set of
criterion including:
✓ Specific characteristics of the feature such as sign system, measurements, etc.
(Select by Attributes)
✓Features that meet the characteristics of a specific location such as intersecting,
falls within, is near, etc. (Select by Location)
✓Features that are selected from a shape drawn by a user (Select)
y View the attributes of the selected features in an attribute table
y Clear a selected feature

Selection Group
Used in combination with additional tools to:
y Create new feature classes or shapefiles
y Display the features that only meet specific criteria in a map (for example,
we can use query to filter out selected route types)
y Perform analysis or update records on only specific features within a feature
class (for example, road surface type)
Used in combination with each other (IE. Select by Attributes with Select
by Location)to create a master combination

Selection Tool
The Selection Tool is the simplest of the three selection tools in the Selection Group.
Here the user selects all features regardless of what feature class they belong to in a geometrically shaped area defined (drawn) by the user.
This includes:
2 Dimensional
Rectangle shaped boxes
Defined polygons
Circles
Lasso or freeform selection
Line
3 Dimensional
Cube
Sphere
Cylinder

Selection Tool
Pros
y Simplest to use as it uses dragging and drawing
y Does not require the user to set up any parameters before using it, such as
defining field and attribute, geographical area, etc.
y Selects all attributes that other selection tools miss
Cons
y Does not discriminate on which feature class the feature itself lies in.
Selects the feature selected across every feature class.
y Cannot define geographical area of interest. Frequently gets records from
outside the area of interest.
https://pro.arcgis.com/en/pro-app/latest/help/mapping/navigation/select-features-using-
attributes.htm


Select by Attributes
It is the most frequently used of the three selection tools.
It is used for filtering out features whose attributes (characteristics) meet a single characteristic or specific set of predefined characteristics (IE County = “20”).
Based on SQL queries
Uses Boolean logic like:
y And/or when combing queries:
✓And means “All”. The criteria must be met (IE County = “20” and Sign_System = 1 meaning that I am only concerned with routes in County 20 and have a sign system of 1)
✓Or means “Either”. Either of the criteria may be met (County = “20” or Sign_System= 1 meaning that I am looking for routes in County 20 or routes that have a sign system of 1)
y Must have quotes (“”) around any text feature being queried

Select by Attributes
Includes Operators such as:
Equal/Not Equal to a specific characteristic
Begins with/Ends With/Includes the Values/Contains the Text: The feature must
begin or end with or contain a specific character, value, or a string of specific
characters or values
Does Not Begin With/Ends With/Includes the Values/Contains the Text: The
feature does not begin or end with or contains a specific character, value, or
a string of characters or values
Greater than/Greater than or Equal to: The value is more than or at least the
specified value
Less than/Less than or Equal to: The value is less than or at most the specified value
Is Null/Is Not Null: The feature has/does not have a value assigned to it

Select by Attributes
y Can use statements
✓ If
✓Elif (else if)
✓Else
Pros:
y Provides exact results for the user
y Easy to follow widget in setting up the query
Cons:
y Runs as an all or nothing. You cannot have any errors in writing the query.
y Error checking can be quite cumbersome especially in large queries.
y Cannot set up distance parameters.

Select by Attributes
Setting a selection by ‘Select by Attributes’ consists of a four step process.
y Click on Select by Attributes.
y Select Import Rows: This parameter determines the attribute table from the feature class that you are interested in.
y Make Selection: Determines whether this query:
✓ Is part of a New Query (new)
✓ Needs to be Added to or Removed from an existing query (add/remove)
✓ Is part of a subset (select subset)
✓ Has criteria that is the opposite of the query you already created (Switch)
✓ Clears the query (Clear)
y Expression: The actual code for looking up and filtering the requested features.

1
2
3

Navigating to the Area of Interest
On the bottom of the attribute table, there is a button that allows
the user to toggle between the full view and selection view. Click
on it.
This will bring up the selection table. As you can see, it is blank.
That’s ok. It is supposed to be blank as we do not have anything
selected yet.
This also gives us an opportunity to view the different columns
(fields) and sort through the tables to find one that might fit our
needs. Is there any one that stands out?
Good. Now that we’ve located a field to use, go ahead and click
on the ‘select by attributes’ on this field.

Select by Location
It is the final way to query data.
It involves querying data in a specific dataset(s) by predefined polygonal geographic area.
There are several commands to query data by geographical area:
y Intersecting a feature
y Within a distance of
y Is contained in that feature or completely contains these features
y Within or completely within
y Are Identical To
y Touches
y Share Line Segment
y Have Center in

Select by Location
Usually done after a select by attributes query performed on the
geographical area
Input feature(s) and selecting feature must have a spatial relationship
to work.
Pros
Can set up a search distance around the area of interest
Cons
Does not always get every feature defined
Can be cumbersome to setup
This completes the information on the “Selection Group”.

Select by Location

Attribute Table Recap
An Attribute Table is a table storing the records (locations) and the characteristics (fields/columns) associated with a geospatial feature.
For queries, this is where the user can view and access the results of the query. This is done with a toggle button on the bottom of the table.
In addition to viewing results, the user can:
Add Fields
Calculate Records
Select by Attribute
Zoom to selected features
Switch Selections
Clear Selections
Delete Rows
Copy rows/Switch views
We will cover this in further detail in the map making section.

Attribute Table Tools: Add, Calculate, Select By Attribute, Zoom To, Switch, Clear,
Delete, and Copy.
Attribute Table: A table that shows the data in a layer.

Insert Tab
Return to the Tool Ribbon and click on the Insert Tab. This brings up the Insert Tool Ribbon.
The Insert Tool Ribbon does not have any comparable toolbars in ArcMap.
It is used for:
X Creating any of the projects that reside in ArcGIS including: Maps, Scenes, Stereo Map, Basemap, Map Layout, Reports, Jupiter Notebooks, Tools
X Creating Import Maps, Layouts, and Tasks (Project)
X Creating connections to databases: Big Data, ArcGIS Server Services, Cloud and Cloud Stores, data reviewer, workflow manager, geolocator and folders
X Importing Layer templates and notes (Layer Analysis)
X Adding favorite items including databases, servers, toolbox, etc.
Let’s take a more in-depth look at the Insert Tool Ribbon.

Insert Tool Ribbon

Adding New Map
The first step of any project is defining what the project is going to be about and what will be contained in the document.
While the first part is up to the cartographer making the map, the second part is handled by the New Map tool.
The New Map tool is accessed by clicking on the New Map Tab on the Insert Tool Ribbon.
It is used for:
y Adding any map (regular or stereo) or scene (global or local)
y Creating a new customizable basemap that can be used locally or user-wide
Click on New Map Tab and select New Map

Adding New Map
Let’s also add in a new basemap using the drop down menu.
This highlights one of the major differences between ArcGIS Pro and ArcMap. ArcGIS Pro can hold multiple maps, scenes, etc. in different formats whereas ArcMap in ArcGIS Desktop can hold only one item in the same format.
In addition, one can also import already existing maps, layouts, and designs through the Import Feature tool on the Insert Tool Ribbon.
This includes:
y ArcGIS Desktop products such as map documents (MXD), Globes and scenes
y Map Packages/Map Files
y Pre-defined layouts and layout templates
y Report Files
y Used mostly for moving ArcMap documents into Pro


Introduction to Contents View
When a new map is created, two additional panes become active:
y Workspace
y Contents
Along with the catalog pane, which we’ll learn about later, these three panes make up the core components in producing a map or scene.
Other key components in producing a map or scene are:
y Creating, managing, editing and viewing geospatial data
y Performing spatial and non-spatial analysis
y Sharing features with others
Let’s take a quick look at each of these panes and how they are used..

Components for creating a Map or Scene

Workspace Pane
Central screen of the ArcGIS Pro Project
Used to:
1. Display the features in the Contents pane
2. Show and toggle between the different maps, scenes, layouts, etc.
3. Change the scale (zooming in and out)
4. Configure Snapping tools which allows features to snap together in the edit tab
5. Toggle on and off grids, grid corrections, exploration constraints and inferences
6. Set the Mapping units to:
✓ Meters
✓ Feet
✓ Decimal Degrees
7. Set projection to:
✓ US Grid
✓ UTM
8. Pause and refresh the view

Workspace Pane

Contents Pane
Similar function as the table of contents pane in ArcMap
Manages, configures and organizes the geospatial and non-geospatial features being used in the map, scene, etc. Including:
y Setting the drawing (display order within the map, scene, etc.)
y Accessing and configuring properties within the feature such as:
✓Attribute table
✓ Symbology
✓Annotation/Labels
✓General Properties of the feature
✓Groupings
✓Popups
✓Metadata
✓Domains and fields

Contents Pane
y Adding reports and charts
y Joining and relating features to tables, other features, etc.
y Copying features
y Changing feature’s name
y Changing the feature’s data source
y Toggling on and off on features including:
y Select
y Edit
y Snapping
y Labeling
https://pro.arcgis.com/en/pro-app/2.7/help/mapping/map-authoring/contents-pane.htm

Contents Pane

Catalog Pane or View
Similar function as the Table of Contents pane in ArcMap and ArcCatalog
Provides access to all tools, information, and maps needed for the project including:
y Maps
y Custom Toolboxes and Tools
y Geodatabases (Enterprise, Mobile, File)
y Shared Directories
y Geolocator or Geocaching Tools
Found on
y Within the Project
y Local Computers
y Shared Directories
y Enterprise Geodatabase
y Internal and External ArcGIS Enterprise Sites
https://pro.arcgis.com/en/pro-app/latest/help/projects/the-project-pane.htm

Catalog Pane

Connecting to Folder The logical next step for creating a map or scene is adding the geospatial
content that the map is trying to represent.
In ArcGIS Pro, this consists of a two-step process.
y First step: connecting to the container housing the geospatial data such as:
✓ Shared Directory or Folder
✓ Local Directory
✓ Enterprise Geodatabase
✓Hosted ArcGIS or Imagery Service
y Second step: adding the geospatial data to the map or scene
The first step can be done in one of two ways.
y Using Connections/Add Folder/Add Items on the Insert Tool Ribbon
y Using the Catalog pane
We’ll explore these two steps later in the map creation section.

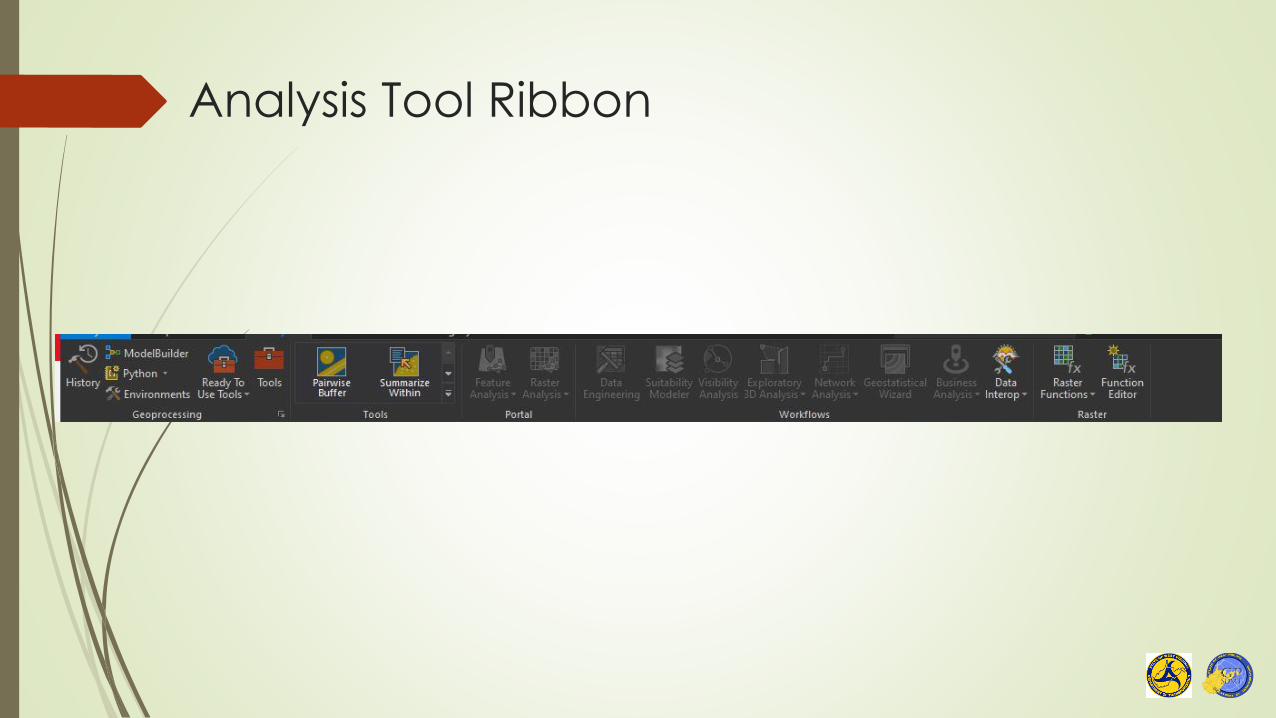
Analysis Tool Ribbon Return to the Tool Ribbon and click on the Analysis Tab. This will bring up the Analysis
Ribbon.
This corresponds to the geoprocessing menu bar and back part of the standard toolbar in ArcMap.
The Analysis Tool Ribbon is used for:
y Creating ArcGIS Python scripts, models, etc. (Geoprocessing)
y Accessing and viewing ready to use Tools, toolboxes, history (Geoprocessing)
y Accessing predefined built-in tools that buffer, summarize data, overlay features, determine proximity, analyze patterns, analyze terrain, etc. (Tools)
y Performing additional analysis through the ArcGIS Portal including analyzing patterns, analyzing terrain, creating features through deep learning, creating buffers, managing and summarizing data, creating hydrology features, etc. (Portal Tools)
y Performing customized analysis such as sustainability, visibility, 3D, network, etc. (workflows)
Let’s look at the tools.
Analysis Tool Ribbon

Tools Also called Geoprocessing Tools.
Tools are a set of commands or instructions used to create, extract, define manipulate, and analyze geospatial features in GIS Software.
They are stored in toolboxes or groups of different tools that have like functionality and uses.
Each Tool consists of the following:
y Inputs: The feature(s) being used in performing the procedures
y Parameters: Set of controlling factors used in running a tool
y Environments: Set of additional controlling factors that define where and how the tool will be run
y Outputs: The results created when the tool is run
https://pro.arcgis.com/en/pro-app/latest/help/analysis/geoprocessing/basics/geoprocessing-vocabulary.htm

Tools The more commonly used tools in GIS are:
Append Management
Make Route Events Layer
Calculate Field
Spatial Join
Click on the Tools tab. This is a collection where the user can access and view all preloaded tools and toolboxes within ArcGIS Pro.
On the favorites screen, type in Make Route Event Layer and select the top result.
This will bring up the tool screen. Does it look different than ArcMap?
One of the main differences between tools in ArcMap and those in ArcGIS Pro is that Pro does not have the tool pop up but instead it will appear on the docked tab on the side (if that is where you have it docked).


Tools

View Tool Ribbon Return to the Tool Ribbon and click on the View tab. This will bring up the View Tool
Ribbon.
The View Tool Ribbon is a combination of the geoprocessing, customize, and windows menu bars and the standard toolbar in ArcMap.
It is used for customizing the ArcGIS Pro workspace by:
y Turning on and off different panes within ArcGIS Pro (Windows)
y Converting between the different project types and views(View)
y Linking views and cursors (Link)
y Creating and importing thumbnails for metadata (Thumbnail)
y Creating map animation (Animation)
y Customizing scenes (Scene)
y Setting up location referencing of the device (Device Location)
y Clipping (View Clipping)
y Setting up navigation and camera (Navigation)
y Let’s look at the Windows tab.

View Tool Ribbon

Windows Tab
Most frequently used of all the tabs on the View Tool Ribbon
Primarily used for:
Resetting and Recovering different windows such as the Catalog and
Content pane if they are accidentally turned off
Adding additional panes such as the Python Window to test a python script
Viewing geoprocessing results or the results of when a tool runs
Diagnosing any issues in the results or that prevent it from running
Accessing and configuring different extensions such as Workflow Manager,
Aviation Manager, etc.

Edit Tool Ribbon
Return to the top Tool Ribbon and select the Edit tab. This will bring up the
Edit Tool Ribbon.
The Edit Tool Ribbon is a combination of all the general editing and data
review toolbars.
It is used primarily for creating, editing, modifying, and deleting features
and their corresponding attributes.
This ribbon will be explored further in a later course.

Editing Tool Ribbon

Imagery Tool Ribbon
Return to the top Tool Ribbon and select the Imagery Tab. This will bring up the Imagery Tool Ribbon.
The Imagery Tool Ribbon is a combination of the Imagery Classification and Spatial Analyst in ArcMap.
It is used primarily for the creation, classification, analysis, editing, and sharing of Ortho Imagery and Raster Data.
Not frequently used within ArcGIS Pro in WVDOT.

Sharing Ribbon
Return to the top Tool Ribbon and select the Sharing tab. This will bring up the Sharing Ribbon.
The Sharing Ribbon is a combination of the File Menu Bar and the Publisher Toolbar in ArcMAP.
It focuses primarily on creating and publishing shared information products to internal users and to ArcGIS Enterprise including:
Map Packages
Layer packages
Web services including:
Web Maps/Features /Hosted Feature Layers/Tiles/Map Images
Styles
Geolocators
Web tools

Sharing Ribbon
In addition to publishing information products, one can also:
Overwrite existing web services
View existing results
View datastores
Create project templates, map files, and layers
Print and export static maps
We will come back to parts of this later on in this course.

Exercise: Review of First Lesson
Remember the item I had you keep open (Getting Started with ArcGIS
Pro), we’re finally going to use it by doing the exercise.
Additionally, we’re going to also do the Explore Data and Symbolize Map
Layers exercises.
All of these can be found at:
https://learn.arcgis.com/en/paths/try-arcgis-
pro/?rmedium=links_esri_com_j_r&rsource=https%3A%2F%2Flinks.esri.com%
2Flearn-try-arcgis-pro
These three sections will help you get ready for the next and final section
of this course, Creating a Map.

Any Questions? Thanks


