Embed Size (px)
Citation preview

THIS ITS DOCUMENT SHOULD BE RETAINED AND REFERED TO FOR FUTURE MAINTENANCE UNTIL THE NEW FLYER PARTS AND/OR SERVICE MANUAL IS UPDATED TO REFLECT WORK DONE AS A RESULT OF THIS DOCUMENT. ENSURE THAT THIS DOCUMENT IS AVAILABLE FOR PARTS AND MAINTENANCE STAFF GOING FORWARD.
THIS DOCUMENT AND THE CONTENTS DISCUSSED HEREIN ARE THE CONFIDENTIAL AND PROPRIETARY INFORMATION OF NEW FLYER INDUSTRIES CANADA ULC AND NEW FLYER OF AMERICA INC. AND ARE DISCLOSED BY NEW FLYER IN CONFIDENCE. THIS DOCUMENT AND THE CONTENTS HEREIN ARE NOT TO BE DISCLOSED BY THE INTENDED RECIPIENT WITHOUT THE PRIOR WRITTEN AUTHORIZATION OF NEW FLYER. ANY UNAUTHOIZED DISCLOSURE, REPRODUCTION OR OTHER DISTRIBUTION OF THIS DOCUMENT OR INFORMATION IS STRICTLY PROHIBITED AND MAY RESULT IN ACTION BEING TAKEN AGAINST THE PARTY MAKING THE UNAUTHORIZED DISCLOSURE. THIS DOCUMENT AND ALL COPIES HEREOF MUST BE RETURNED TO NEW FLYER UPON REQUEST.
INSTRUCTION TO SERVICE
ITS: 6628
SECTION: 526 Seating & Stanchions
WRITTEN BY: James Ashdown
SUBJECT:
Part A – RECARO Seatbelt Inspection Part B – RECARO Seatbelt Replacement
Section I - Applicable to Ergo M AM80
Section II - Applicable to Ergo M and MCII AM71/72 (TETHER BAR MOUNTED)
ITS6628
_________________________________________________________________________________________________________________ ITS: 6628 Page 2 of 13
Issue: RECARO seatbelt buckles may be locked in a latched position which does not allow the latch plate (tongue) to engage. This prevents the driver from securing the seatbelt. Solution: Remove and replace buckles with new from supplier. Part A – RECARO Seatbelt Inspection
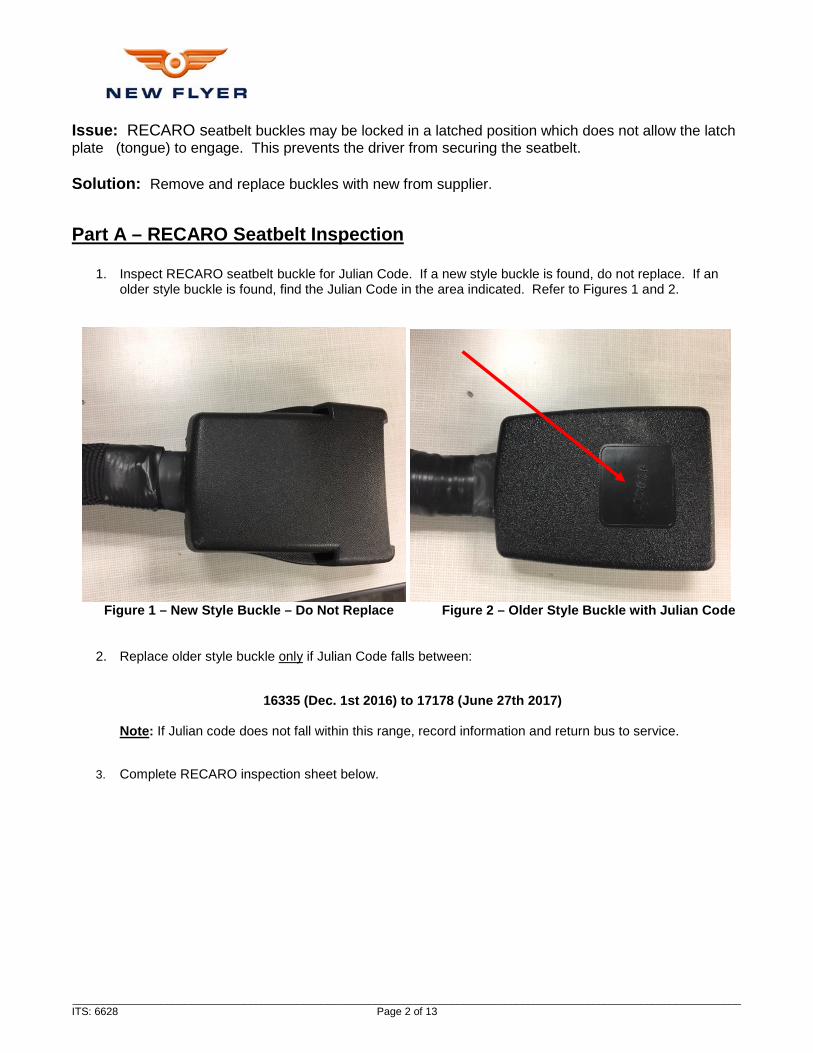
1. Inspect RECARO seatbelt buckle for Julian Code. If a new style buckle is found, do not replace. If an older style buckle is found, find the Julian Code in the area indicated. Refer to Figures 1 and 2.
Figure 1 – New Style Buckle – Do Not Replace Figure 2 – Older Style Buckle with Julian Code
2. Replace older style buckle only if Julian Code falls between:
16335 (Dec. 1st 2016) to 17178 (June 27th 2017)
Note: If Julian code does not fall within this range, record information and return bus to service.
3. Complete RECARO inspection sheet below.

_________________________________________________________________________________________________________________ ITS: 6628 Page 3 of 13
RECARO Inspection Sheet
Property:
Julian Code 16335 (Dec. 1st 2016) to 17178 (June 27th 2017)
Date of Inspection
Person / Company Inspecting:
Seat Serial # Bus # Replace
(Y/N) Julian Code
(Y/N) 1 2 3 4 5 6 7 8 9
10 11 12 13 14 15 16 17 18 19 20 21 22 23 24 25 26
_________________________________________________________________________________________________________________ ITS: 6628 Page 4 of 13
Part B – RECARO Seatbelt Replacement Section I - Applicable to Ergo M AM80 PROCEDURE:
1. Turn the main battery disconnect switch to the “OFF” position.
2. Refer to APPENDIX A - ERGO M AM80 REPLACEMENT INSTRUCTIONS. Follow field replacement instructions for RECARO Ergo M AM80 seat buckles.
3. Remove all tools and debris and return the bus to service condition.
4. Turn the main battery disconnect switch to the “ON” position.
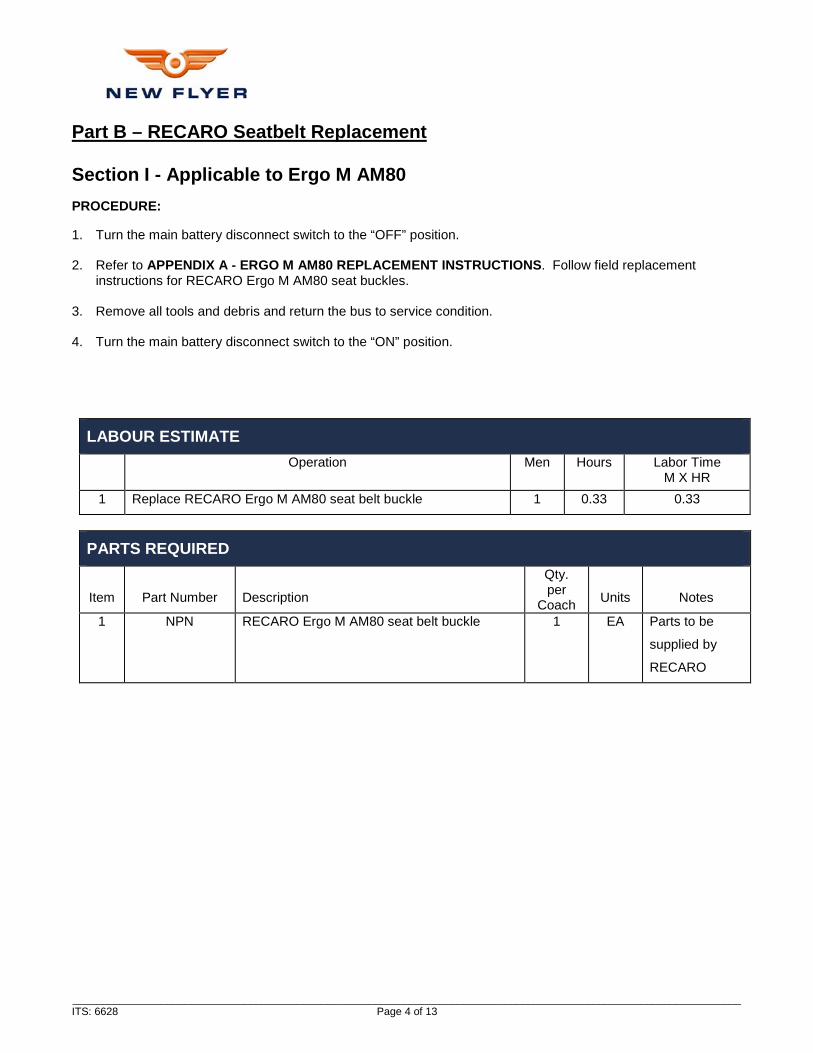
LABOUR ESTIMATE Operation Men Hours Labor Time
M X HR 1 Replace RECARO Ergo M AM80 seat belt buckle 1 0.33 0.33
PARTS REQUIRED
Item
Part Number
Description
Qty. per
Coach
Units
Notes
1 NPN RECARO Ergo M AM80 seat belt buckle 1 EA Parts to be
supplied by
RECARO

_________________________________________________________________________________________________________________ ITS: 6628 Page 5 of 13
Section II – Applicable to Ergo M and MCII AM71/72 (TETHER BAR MOUNTED) PROCEDURE
1. Turn the main battery disconnect switch to the “OFF” position.
2. Refer to APPENDIX B - ERGO M and MCII AM71/72 (TETHER BAR MOUNTED) REPLACEMENT INSTRUCTIONS. Follow field replacement instructions for RECARO Ergo M and MCII AM71/72 (TETHER BAR MOUNTED) seat buckles.
3. Remove all tools and debris and return the bus to service condition.
4. Turn the main battery disconnect switch to the “ON” position.
LABOUR ESTIMATE Operation Men Hours Labor Time
M X HR 1 Replace RECARO Ergo M and MCII AM71/72 seat belt buckle 1 0.33 0.33
PARTS REQUIRED
Item
Part Number
Description
Qty. per
Coach
Units
Notes
1 NPN RECARO Ergo M and MCII AM71/72 seat belt
buckle
1 EA Parts to be
supplied by
RECARO

_________________________________________________________________________________________________________________ ITS: 6628 Page 6 of 13
APPENDIX A - ERGO M AM80 REPLACEMENT INSTRUCTIONS Before ordering buckles, please inspect the buckles to see if the Julian Date on the buckle falls within the time frame needed for replacement. Tools Needed:
• Phillips #2 screwdriver • Large Flat head screwdriver • Side cutters • Small pick • 5/8” hex wrench/socket • Torque wrench
1. Remove hole plugs from lower rear trim panel using small pick. Save for re-use. Remove rear lower trim
panel using Phillips #2 screwdriver. Set aside caps, screws, and panel.
2. Remove hand wheel from the recliner on the same side as the buckle by prying gently with a large flat head
screwdriver. Remove rear side trim panel using Phillips #2 screwdriver. Move to the side to gain access to the seat belt buckle bolt.

_________________________________________________________________________________________________________________ ITS: 6628 Page 7 of 13
3. Disconnect the electrical connector from the seat belt buckle to the jumper harness, if the seat is equipped with a seat belt alarm. Cut the small zip tie with side cutters, ensuring the wire harness is not damaged.
4. Using a 5/8“ socket, remove the seat belt buckle bolt from the J bracket. (Option shown below is on the left
hand side, the buckle can be installed on the left or right side.)
5. Remove the buckle and hardware from the seat. Set aside to return to RECARO. Record to serial number of
the seat to tag the buckle. The serial number is located on the white 4X1 sticker located on the top rear plate of the suspension.

_________________________________________________________________________________________________________________ ITS: 6628 Page 8 of 13
6. Obtain the new buckle and route the end of the buckle through the opening in the side rear trim panel. Place
large washer & buckle on J bracket and hand start bolt. If the seat does not require a seat belt alarm, cut the wire off as close the base of the heat shrink tubing as possible. If it does require an alarm, ensure the washer does not pinch the wire harness. Torque to 50 +/- 4 Nm.
7. Connect the seat belt alarm on the buckle to the jumper harness on the seat. Loop the small zip tie around
the cushion frame to ensure the wire harness is routed the same as it was previously.

_________________________________________________________________________________________________________________ ITS: 6628 Page 9 of 13
8. Replace the side trim panel and secure the screw to the cushion frame with the Phillips #2 screwdriver. Replace the recliner knob on the recliner shaft, ensuring it is symmetrically installed with the opposite side. Replace the rear trim panel and secure all 4 screws and replace the hole plugs.
Do not throw out the old buckles. RECARO requires all replaced buckles returned.

_________________________________________________________________________________________________________________ ITS: 6628 Page 10 of 13
APPENDIX B - ERGO M and MCII AM71/72 (TETHER BAR MOUNTED) REPLACEMENT INSTRUCTIONS Before ordering buckles, please inspect the buckles to see if the Julian Date on the buckle falls within the time frame needed for replacement.
Tools Needed: • Small pick • Side cutters • 5/8” hex wrench/socket • Torque wrench
1. Using a small pick, remove the cap from the seat belt buckle bolt on the side of the tether bar.
2. If the seat is equipped with a seat belt alarm, cut the small zip tie with side cutters, ensuring the wire harness is not damaged. Raise the seat to full up to ensure access is maintained to the seat belt wire harness, in the back of the suspension. Disconnect the seat belt buckle from the jumper on the seat.
3. Using a 5/8“ socket, remove the seat belt buckle bolt from the tether bar. (Option shown below is on the left hand side, the buckle can be installed on the left or right side.)

_________________________________________________________________________________________________________________ ITS: 6628 Page 11 of 13
4. Remove the buckle and hardware from the seat. Set aside to return to RECARO. Record to serial number of
the seat to tag the buckle. The serial number is located on the white 4X1 sticker located on the top rear plate of the suspension.
5. Install seatbelt buckle (N/C standard-30822807E-01, N/O-30987307E) with bolt (30819307) and washer (30822707) under the head of the bolt and one of the following (ensuring the wire harness does not get pinched between any of the washers):
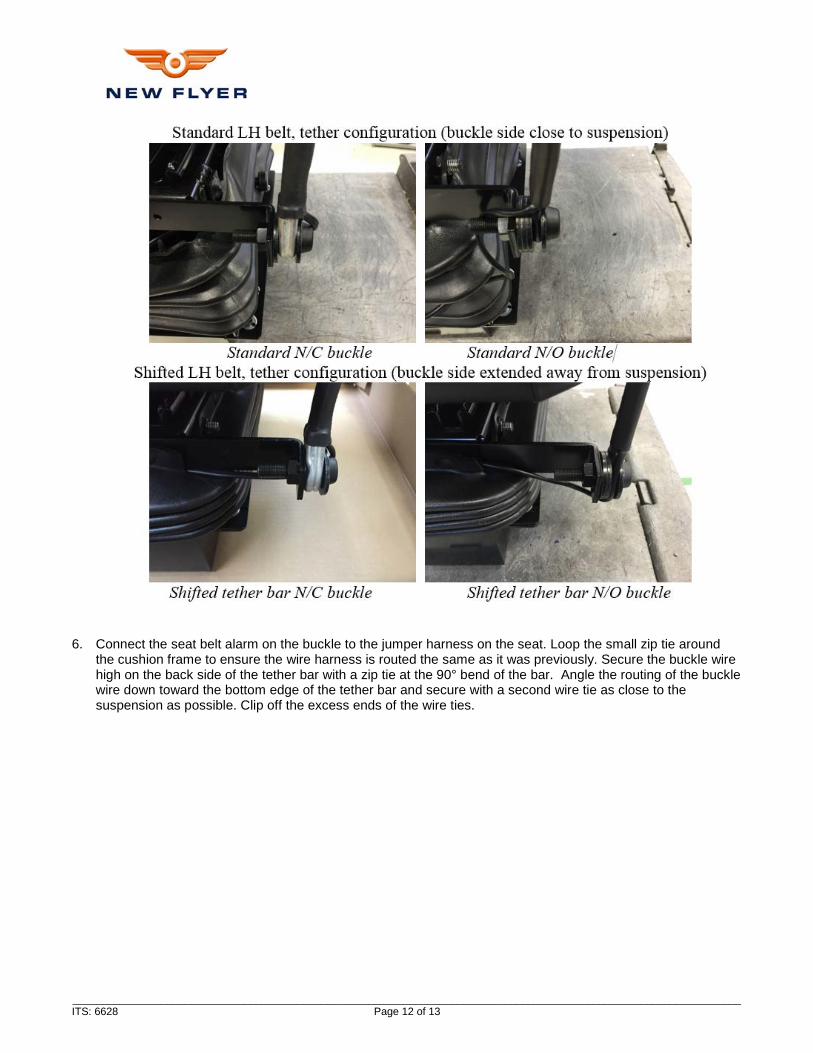
Washer stack between buckle and tether bar N/C buckle (normally closed) N/O buckle (normally open) Standard tether bar config. 1 3 Shifted tether bar config. 0 2
_________________________________________________________________________________________________________________ ITS: 6628 Page 12 of 13
6. Connect the seat belt alarm on the buckle to the jumper harness on the seat. Loop the small zip tie around the cushion frame to ensure the wire harness is routed the same as it was previously. Secure the buckle wire high on the back side of the tether bar with a zip tie at the 90° bend of the bar. Angle the routing of the buckle wire down toward the bottom edge of the tether bar and secure with a second wire tie as close to the suspension as possible. Clip off the excess ends of the wire ties.
_________________________________________________________________________________________________________________ ITS: 6628 Page 13 of 13
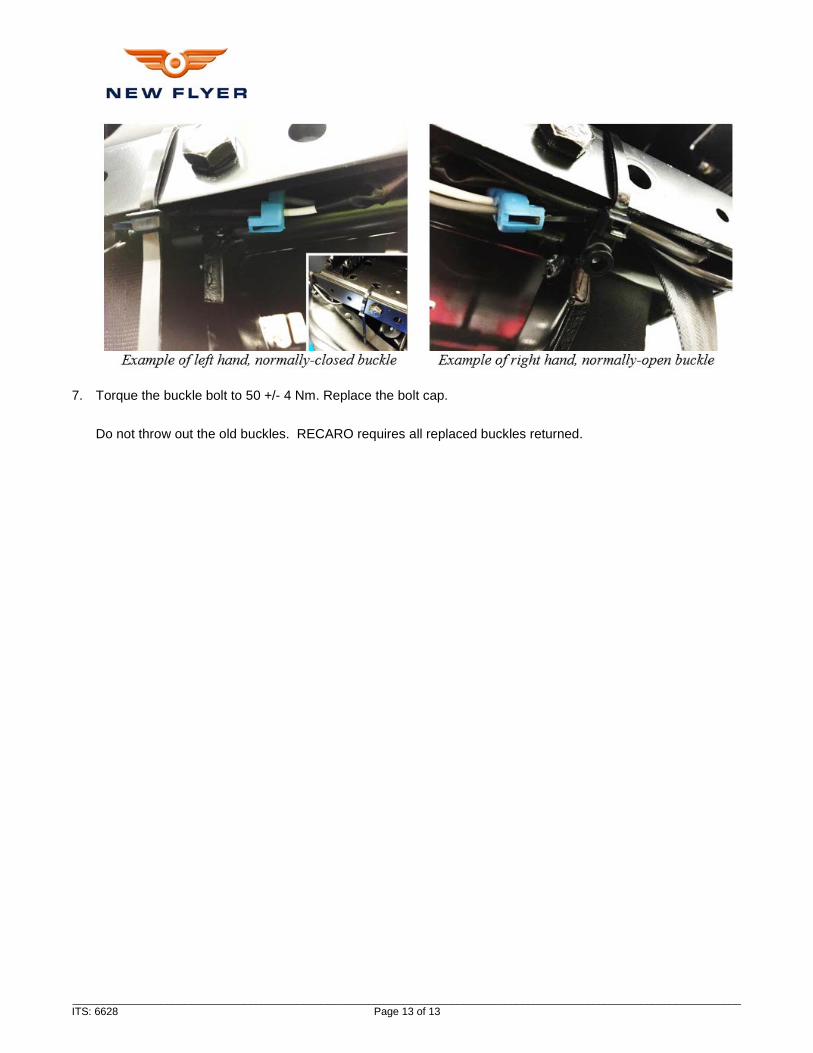
7. Torque the buckle bolt to 50 +/- 4 Nm. Replace the bolt cap.
Do not throw out the old buckles. RECARO requires all replaced buckles returned.


