Embed Size (px)
Citation preview

INSTALLATION GUIDE – SQL SERVER
Infor10 Financials Business (SunSystems)

Infor10 Financials Business (SunSystems) – Installation Guide - SQL Server Based on software version 6.1 Patch Set 19 onwards – document version 616B, April 2013 Copyright © 2013 Infor. All rights reserved. The word and design marks set forth herein are trademarks and/or registered trademarks of Infor and/or related affiliates and subsidiaries. All rights reserved. All other trademarks listed herein are the property of their respective owners. www.infor.com. Infor 1 Lakeside Road Aerospace Centre Farnborough Hampshire GU14 6XP United Kingdom Phone: +44 (0) 1252 556000
Info
r
Infor10 Financials Business (SunSystems)

Installation Guide - SQL Server Page 3 of 95.
Con
tent
s
Infor10 Financials Business (SunSystems)
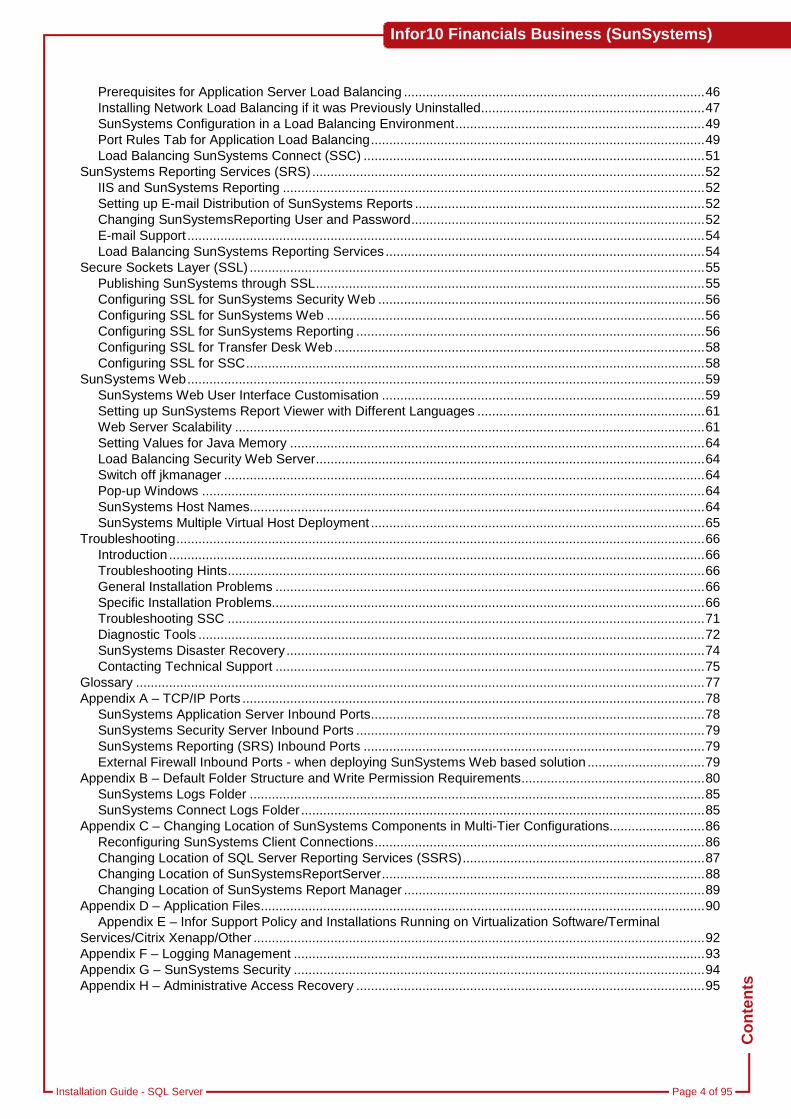
Contents Part 1 – Installation ................................................................................................................................................. 5
What’s New in SunSystems v6.1 ....................................................................................................................... 6 Installing v6 SunSystems ................................................................................................................................... 6 Standalone Installations ..................................................................................................................................... 7
Prerequisites .................................................................................................................................................. 7 Installing Standalone SunSystems ................................................................................................................ 8
Multi-tier Installations ........................................................................................................................................ 10 Prerequisites ................................................................................................................................................ 10 Installing the Prerequisites .......................................................................................................................... 11 SunSystems Installer Features ................................................................................................................... 15 Installing SunSystems in a Two-tier Installation .......................................................................................... 16 Installing SunSystems Client in a Two-tier Configuration ........................................................................... 17 Installing the Database and Security Servers in a Multi-tier Configuration ................................................. 17 Installing SunSystems Application Server in a Multi-tier Configuration ...................................................... 19 Installing SunSystems Reporting Server in a Multi-tier Configuration ........................................................ 20 Installing SunSystems Web in a Multi-tier Configuration ............................................................................ 21 Installing SunSystems Client in a Multi-tier Configuration ........................................................................... 22
Installing the Infor10 Workspace SunSystems Plug-in .................................................................................... 23 Post-Installation Configuration ......................................................................................................................... 24
Part 2 – Installation Reference ............................................................................................................................. 26 Requirements and Planning ............................................................................................................................. 27
Introduction .................................................................................................................................................. 27 Software Requirements ............................................................................................................................... 27
Creating a Secure SunSystems Installation ..................................................................................................... 29 Introduction .................................................................................................................................................. 29 Security Model ............................................................................................................................................. 29 SunSystems Connect Security .................................................................................................................... 29 Microsoft SQL Server .................................................................................................................................. 29 Citrix XenApp ............................................................................................................................................... 30
Database Administration .................................................................................................................................. 33 Introduction .................................................................................................................................................. 33 Creating a New SunSystems Domain Database......................................................................................... 33 Creating a New SunSystems Data Database ............................................................................................. 33 Importing a Preconfigured SunSystems Data Database ............................................................................. 34 Modifying Languages on a SunSystems Data Database ............................................................................ 34 Database Utilities ......................................................................................................................................... 34 SunSystems Domain Database Utilities ...................................................................................................... 35 SunSystems Database Migration ................................................................................................................ 36 Changing the Port Number .......................................................................................................................... 36
SQL Server Clustering ..................................................................................................................................... 37 Introduction .................................................................................................................................................. 37 Configuring the Windows Domain Controller .............................................................................................. 37 Configuring the Database Server ................................................................................................................ 38 Configuring the Linked Server Connections ................................................................................................ 38 Troubleshooting the Linked Server Configuration ....................................................................................... 41 SQL Server Clustering Installation .............................................................................................................. 42 Database Replication .................................................................................................................................. 43
SunSystems Connect (SSC) ............................................................................................................................ 44 Introduction .................................................................................................................................................. 44 Software requirements ................................................................................................................................ 44 Installing SSC .............................................................................................................................................. 44 SSC Layout ................................................................................................................................................. 44
Scalability – Application Servers and SunSystems Connect ........................................................................... 45 Introduction .................................................................................................................................................. 45 Static Load Balancing .................................................................................................................................. 45 Hardware-Based Dynamic Load Balancing................................................................................................. 45 Software-Based Dynamic Load Balancing .................................................................................................. 45
Installation Guide - SQL Server Page 4 of 95.
Con
tent
s
Infor10 Financials Business (SunSystems)
Prerequisites for Application Server Load Balancing .................................................................................. 46 Installing Network Load Balancing if it was Previously Uninstalled............................................................. 47 SunSystems Configuration in a Load Balancing Environment .................................................................... 49 Port Rules Tab for Application Load Balancing ........................................................................................... 49 Load Balancing SunSystems Connect (SSC) ............................................................................................. 51
SunSystems Reporting Services (SRS) ........................................................................................................... 52 IIS and SunSystems Reporting ................................................................................................................... 52 Setting up E-mail Distribution of SunSystems Reports ............................................................................... 52 Changing SunSystemsReporting User and Password ................................................................................ 52 E-mail Support ............................................................................................................................................. 54 Load Balancing SunSystems Reporting Services ....................................................................................... 54
Secure Sockets Layer (SSL) ............................................................................................................................ 55 Publishing SunSystems through SSL .......................................................................................................... 55 Configuring SSL for SunSystems Security Web ......................................................................................... 56 Configuring SSL for SunSystems Web ....................................................................................................... 56 Configuring SSL for SunSystems Reporting ............................................................................................... 56 Configuring SSL for Transfer Desk Web ..................................................................................................... 58 Configuring SSL for SSC ............................................................................................................................. 58
SunSystems Web ............................................................................................................................................. 59 SunSystems Web User Interface Customisation ........................................................................................ 59 Setting up SunSystems Report Viewer with Different Languages .............................................................. 61 Web Server Scalability ................................................................................................................................ 61 Setting Values for Java Memory ................................................................................................................. 64 Load Balancing Security Web Server .......................................................................................................... 64 Switch off jkmanager ................................................................................................................................... 64 Pop-up Windows ......................................................................................................................................... 64 SunSystems Host Names ............................................................................................................................ 64 SunSystems Multiple Virtual Host Deployment ........................................................................................... 65
Troubleshooting ................................................................................................................................................ 66 Introduction .................................................................................................................................................. 66 Troubleshooting Hints .................................................................................................................................. 66 General Installation Problems ..................................................................................................................... 66 Specific Installation Problems...................................................................................................................... 66 Troubleshooting SSC .................................................................................................................................. 71 Diagnostic Tools .......................................................................................................................................... 72 SunSystems Disaster Recovery .................................................................................................................. 74 Contacting Technical Support ..................................................................................................................... 75
Glossary ........................................................................................................................................................... 77 Appendix A – TCP/IP Ports .............................................................................................................................. 78
SunSystems Application Server Inbound Ports........................................................................................... 78 SunSystems Security Server Inbound Ports ............................................................................................... 79 SunSystems Reporting (SRS) Inbound Ports ............................................................................................. 79 External Firewall Inbound Ports - when deploying SunSystems Web based solution ................................ 79
Appendix B – Default Folder Structure and Write Permission Requirements .................................................. 80 SunSystems Logs Folder ............................................................................................................................ 85 SunSystems Connect Logs Folder .............................................................................................................. 85
Appendix C – Changing Location of SunSystems Components in Multi-Tier Configurations.......................... 86 Reconfiguring SunSystems Client Connections .......................................................................................... 86 Changing Location of SQL Server Reporting Services (SSRS) .................................................................. 87 Changing Location of SunSystemsReportServer ........................................................................................ 88 Changing Location of SunSystems Report Manager .................................................................................. 89
Appendix D – Application Files ......................................................................................................................... 90 Appendix E – Infor Support Policy and Installations Running on Virtualization Software/Terminal
Services/Citrix Xenapp/Other ........................................................................................................................... 92 Appendix F – Logging Management ................................................................................................................ 93 Appendix G – SunSystems Security ................................................................................................................ 94 Appendix H – Administrative Access Recovery ............................................................................................... 95
Installation Guide - SQL Server Page 5 of 95.
Part
1 –
Inst
alla
tion
Infor10 Financials Business (SunSystems)
Part 1 – Installation

Installation Guide - SQL Server Page 6 of 95.
Inst
allin
g Su
nSys
tem
s
Infor10 Financials Business (SunSystems)
What’s New in SunSystems v6.1 This version of SunSystems integrates with Microsoft SharePoint through Infor10 Workspace and is web browser enabled for most SunSystems functions. SQL Server Reporting based SunSystems Reporting Services (SRS) replaces the old SunSystems v5 reporting solution. SunSystems Security installation is now integrated into the SunSystems application installer. Full details of SunSystems v6.1 enhancements are described in the SunSystems Upgrade Guide.
Installing v6 SunSystems If you are upgrading from SunSystems v5, you must refer to the SunSystems Upgrade Guide.
If you already have an installation of SunSystems v6.1, and are updating it to the latest Patch Set, refer to the SunSystems v6.1 Patch Set Installation Note available with the Patch Set. The Installation Note contains important instructions for updating, which are not documented in this Installation Guide.
If you are installing SunSystems for the first time, note that the servers on which Infor applications are installed should be member servers in a domain, and dedicated to Infor applications. If not, the performance may be affected detrimentally. In particular, the servers should not: Be a primary or back-up domain controller running Active Directory Be a mail server running Exchange, Lotus cc:Mail or other mail Be a file or print server other than for SunSystems Be a virtualisation host server running Hyper-V, VMware ESXi, or Citrix XenServer Be an intranet or Internet server running Internet Information Server, Lotus Notes, Apache or similar,
other than for SunSystems Be a Small Business Server.
Note: When deploying on Microsoft Small Business Server, Infor software must be installed in dedicated virtual images and not on the host operating system. This is subject to the supporting software environment meeting the minimum software requirements. If performance issues arise, separation onto dedicated hardware may be necessary.
If any SunSystems component is installed on a computer (physical or virtual) with any of the above, the installation cannot be supported. If you are unsure, check with your local support region for further clarification before deploying the configuration.
Important Note: Computer names should follow Microsoft naming conventions. In addition, you should not include the ‘_’ underscore character in computer names as this causes problems in SunSystems Report Manager.
The latest service pack should be applied to your Windows operating system before installing SunSystems components.

Installation Guide - SQL Server Page 7 of 95.
Stan
dalo
ne In
stal
latio
ns
Infor10 Financials Business (SunSystems)
Standalone Installations Prerequisites Users and Groups 1. Log in to your standalone computer as a user that is member of the local Windows Administrator group. 2. Create groups SunSystemsServices and SunSystemsClients in Control Panel >> Administrative Tools >>
Computer Management >> Local Users and Groups >> Groups. Create user SunSystemsReporting with the password Vision1 (if you are intending to do the express installation), and select Password never expires. Add the SunSystemsReporting user to the SunSystemsServices group.
3. Ensure the SunSystemsReporting user has local security policy Log on as a service right. Run secpol.msc to launch Local Security Policy. In Local Policies >> User Rights Assignment, right-click Log on as a service and select Properties. Click Add User or Group >> Locations and specify your local computer. Click OK, and specify SunSystemsReporting in the Enter the object names to select box.
Microsoft Internet Information Services (IIS) Check that the following features are added to the Internet Information Services installation. (Windows 8 features are listed here). Go to Control Panel >> Programs >> Programs and Features >> Turn Windows features on or off, and click ‘+’ to expand the individual features: Web Management Tools: IIS 6 Management Console, IIS 6 Scripting Tools, IIS 6 WMI Compatibility, IIS
6 Metabase and IIS 6 configuration compatibility, and IIS Management Console. World Wide Web Services:
– Application Development Features: .NET Extensibility 3.5, .NET Extensibility 4.5, ASP.NET 3.5, ASP.NET 4.5, ISAPI Extensions, and ISAPI Filters.
– Common HTTP Features: Default Document, Directory Browsing, HTTP Errors, HTTP Redirection, and Static Content.
– Health and Diagnostics: Custom Logging, HTTP Logging, Logging Tools, Request Monitor, and Tracing.
– Performance: Static Content Compression. – Security: Basic Authentication, Digest Authentication, Request Filtering, and Windows Authentication.
Microsoft Message Queue (MSMQ) Server Ensure that MSMQ has been installed, by going to Control Panel >> Programs >> Programs and Features >> Turn Windows Features on or off, and select Microsoft Message Queue (MSMQ) Server.
Web Services Enhancements 3.0 (WSE) http://www.microsoft.com/en-us/download/details.aspx?displaylang=en&id=14089
Download from the Microsoft Web site and install in Setup Type: Install Runtime
Microsoft SQL Server and Configuring Reporting Services 1. Install a default instance of SQL Server. Install Database Engine Services, Management Tools, and
Reporting Services. 2. In Reporting Services Configuration Manager, click Web Service URL, and Report Manager URL links to
check they do not display errors in the browser window. On the Database tab, check ReportServer database has been created. Stay in Reporting Services Configuration Manager for next step.
3. In Service Account, select Use another account and enter <localmachine>\SunSystemsReporting and password Vision1 to enable Reporting Services access to the SunSystems Data databases. You must specify a file name for a backup encryption key.
Note: An Execution Account is not required, so leave this option unselected.
SQL Server 2012 SQL Server 2012 does not give sysadmin role to NT AUTHORITY\SYSTEM (Local System). You must add this role to SYSTEM login in SQL Server for a standalone SunSystems install. Launch SQL Server Management Studio and connect to your server. Go to Security >> Logins >> NT Authority\SYSTEM >> Properties >> Server Roles. Tick sysadmin, and click OK.
Microsoft ReportViewer 2010 SP1

Installation Guide - SQL Server Page 8 of 95.
Stan
dalo
ne In
stal
latio
ns
Infor10 Financials Business (SunSystems)
Note: Microsoft ReportViewer 2012 is not supported with this SunSystems Reporting release.
The redistributable is available from the following link:
http://www.microsoft.com/downloads/en/details.aspx?FamilyID=3eb83c28-a79e-45ee-96d0-41bc42c70d5d
Adobe Reader 10+ This is available from the Adobe Web site.
SunSystems Prerequisites Check List
Check list for Prerequisites
Windows Server 2012, Windows Server 2008 R2, Windows 8, or Windows 7
SunSystemsReporting local Windows user
SunSystemsServices and SunSystemsClients local Windows groups
Internet Information Services 7+ (IIS)
Web Services Enhancements 3.0 (WSE)
Microsoft Message Queue (MSMQ)
Microsoft .NET Framework 3.5.1 (ensure this is enabled in features)
SQL Server 2008 R2 or 2012 Database Server, and Reporting Services
Microsoft ReportViewer 2010 SP1
Adobe Reader 10+
Download the latest SunSystems 6.1 Patch Set from www.inforxtreme.com
Obtain SunSystems serialisation file
Installing Standalone SunSystems SunSystems Installer If you are installing SunSystems with SQL Server 2012 you must use the latest re-issue SunSystems 6.1.1 DVD iso available from the Infor download centre https://infor.subscribenet.com. Run a Product Search for SunSystems 6.1.1.106 and download Infor10_Financials_Business_SunSystems_6_1_1_106.iso.
The installation is a two-step process: 1. Server and Client components 2. Reporting Services.
Run the Infor SunSystems installer. Select New installation >> Server & Client Components, and select Express, which installs a standalone installation.
Do not apply SunSystems Patch Sets until you have installed SunSystems Reporting Services.
SunSystems Reporting Services On completion of the SunSystems installation, return to the Install Products menu to install the SunSystems Reporting Services. From the Install Products menu, select Reporting Services and select Express installation.
SunSystems Patch Sets SunSystems Patch Sets are available from www.inforxtreme.com. You must apply at least Patch Set 11 for use with SQL 2012, and at least Patch Set 16 for use with Windows 8. Read the Patch Set installation note included in the zip file for instructions. After installation you cannot rollback these mandatory Patch Sets.
You can check which Patch Sets are installed in Control Panel >> Programs >> Programs and Features >> View Installed Updates.
Restart the SunSystems services or shut down and restart your computer.

Installation Guide - SQL Server Page 9 of 95.
Stan
dalo
ne In
stal
latio
ns
Infor10 Financials Business (SunSystems)
Serialization In File Explorer, run your serialisation file to serialize SunSystems.
Migrating SunSystems Users and User Manager Permissions Run User Migration to import the preconfigured PK1 users and groups. Log in as admin. If a three digit SunSystems login is required, set user name to Operator ID.
Add SunSystems Reporting Service Group Membership to SunSystems Users Only SunSystems Reporting Service Administrators require SRS group membership. Normal SunSystems users do not require this membership to run ordinary reports. 1. Sign in to User Manager as admin. 2. Select the Groups tab. Edit group PK1. Select Function Permissions, twice click Select All and click
Apply. 3. Select Action Permissions, Add PK1 and click Apply. 4. Select the Users tab. Right-click a user that requires SRS group membership (PK1 for example), and
select Edit User. 5. Click Change (next to Group Membership). Expand SunSystems Reporting Users, and select
SunSystems Reporting functions required for this user. 6. Click OK to submit the changed group membership.
Make a note of which users you have given SunSystems Data Access Managers role, and Report Administrator role, because these are required for the following steps.
Configuring SunSystems Data Models in Data Access Manager 1. Run Login Monitor to log out admin user. 2. Run Data Access Manager. Sign in as the user you enabled for this function in the previous step. 3. Select Define SunSystems Connection in the task tree, then right-click and select Run Task. 4. Select Configure business unit data models in the task tree, then right-click and select Run Task. Check
the PK1 Business Unit and click OK. Wait until the configuration is complete. 5. Click Save before you exit Data Access Manager. You must use Data Access Manager to configure data
models first before using any reporting functions such as Report Administrator.
Running SunSystems for the First Time 1. Log in to SunSystems with your PK1 user. Click Yes to create a default menu. 2. Read the Patch Set installation note as you may be required to run Data Dictionary Filter Regeneration
and Form Compiler. You might also be required to migrate your reports in Report Administrator.

Installation Guide - SQL Server Page 10 of 95.
Mul
ti-tie
r Sun
Syst
ems
Inst
alla
tion
Infor10 Financials Business (SunSystems)
Multi-tier Installations Prerequisites SharePoint Installation to host Infor10 Workspace and SunSystems Plug-in Refer to the Infor10 Workspace documentation on InforXtreme.
Database Server Windows Server 2012, Windows 2008 R2, or Windows 2008 SP2+ SQL Server 2008 R2, SQL Server 2008, or SQL Server 2012 Database Server Web Services Enhancements 3.0 (WSE) if SQL Server Reporting Services is installed here SunSystemsServices and SunSystemsClients local Windows groups.
SunSystems Security Server Windows Server 2012, Windows 2008 R2, or Windows 2008 SP2+ .NET Framework 3.5.1 Features.
SunSystems Security Web Service Windows Server 2012, Windows 2008 R2, or Windows 2008 SP2+ .NET Framework 3.5.1 Features Internet Information Services 7 (IIS) or above Web Services Enhancements 3.0 (WSE).
SunSystems Application Server Windows Server 2012, Windows 2008 R2, or Windows 2008 SP2+ .NET Framework 3.5.1 Features Internet Information Services 7+ (IIS) if Security Server is to be installed. SQL Server Command Line Utilities SqlCmdLnUtils.msi – bcp required for SunSystems Patch Sets.
Note: On Windows Server 2012 and SQL Server 2012: Server Native Client is required. On Windows Server 2008 R2 and SQL Server 2012 you may also require Windows Installer 4.5.
SQL Server Reporting Services Windows Server 2012, Windows 2008 R2, or Windows 2008 SP2+ .NET Framework 3.5.1 Features SQL Server 2008 R2 or SQL Server 2012 Database Server Reporting Services and configure using
Reporting Services Configuration Manager Web Services Enhancements 3.0 (WSE).
SRS Report Server Windows Server 2012, Windows 2008 R2, or Windows 2008 SP2+ .NET Framework 3.5.1 Features SunSystemsReporting Windows Domain user Internet Information Services 7 (IIS) or above Web Services Enhancements 3.0 (WSE).
SRS Report Manager Windows Server 2012, Windows 2008 R2, or Windows 2008 SP2+ .NET Framework 3.5.1 Features SunSystemsReporting Windows Domain user Internet Information Services 7 (IIS) or above Web Services Enhancements 3.0 (WSE) Microsoft Message Queue (MSMQ) Microsoft ReportViewer 2010 SP1.
SunSystems Web Server Windows Server 2012, Windows 2008 R2, or Windows 2008 SP2+ .NET Framework 3.5.1 Features.

Installation Guide - SQL Server Page 11 of 95.
Mul
ti-tie
r Sun
Syst
ems
Inst
alla
tion
Infor10 Financials Business (SunSystems)
Note: SunSystems Security Web Server is required for all browser based access, including SunSystems Reporting, SunSystems Web, Transfer Desk Web and the SSC Demo Web Page.
Client Computers Windows 8, Windows 7, or Windows XP SP3 .NET Framework 3.5.1 Features Adobe Reader 10+.
Browser Clients Adobe Reader web application.
64-bit Operating System Prerequisite
When installing SunSystems on a 64-bit Operating System you must ensure that ASP.NET is correctly registered, otherwise the installation will fail.
To do this, run a command prompt as administrator. Change directory to:
Windows\Microsoft.NET\Framework64\v2.0.50727.
Ascertain if ASP.NET is already registered by entering the command:
aspnet_regiis –lv
If not already registered, you must register it by entering:
aspnet_regiis –ir
Installing the Prerequisites Ensure that you have uninstalled any previous installation of SunSystems and SunSystems Reporting Services.
Users and Groups In a Multi-tier environment, the installing user is required to log in with a Windows domain account, added to the local Windows administrator group. On the database server, create local groups SunSystemsServices and SunSystemsClients. The domain users running services, for example, svc-sssessionman, and performing installations on each tier, should be added to the SunSystemsServices group on the database server(s), and this group should be added to SQL Server security with public role. Domain groups can be used as an alternative to local groups but in this case SunSystems service accounts and SunSystemsReporting user must be manually added to the SunSystemsServices domain group in Active Directory Users and Computers.
Note: You must use a domain account for SunSystemsReporting, except when performing a standalone installation.
Important Note: Before you start the installation on each tier with a SunSystems Windows service, you should ensure that the domain service account has local security policy log on as a service rights in Local Policies, User Rights Assignment.
Service Example User Name Example Group Name Access Required to
SunSystems Security Server
Dom\svc-sssec Dom\SunSystemsServices Security Database, Domain Database
IIS AppPool Security WebService
Dom\svc-sssecweb Modify permissions for Program Files (x86)\Infor\SunSystems\SecurityWeb.
Read permissions for Windows\System32\inetsrv\config
SunSystems Service Account
(SunSystems Session Manager service)
Dom\svc-sssessionman
Dom\SunSystemsServices Domain Database, SunSystems Databases via Windows authentication

Installation Guide - SQL Server Page 12 of 95.
Mul
ti-tie
r Sun
Syst
ems
Inst
alla
tion
Infor10 Financials Business (SunSystems)
Service Example User Name Example Group Name Access Required to
SunSystems Connect Dom\svc-ssconnect Dom\SunSystemsServices
SunSystems Web Service
Dom\svc-ssweb
SRS Reporting Print Service
Dom\svc-srsprint
SRS Report Server AppPool
Dom\svc-srsapppool Dom\SunSystemsServices Domain Database, SunSystems Databases and ReportServer Databases
SRS Report Manager AppPool
Dom\svc-srsapppool
SQL Server Reporting
Dom\SunSystemsReporting
Domain Database, SunSystems Databases and ReportServer Databases
SQL Server Database Instance
Dom\svc-ssdatabase
Folder Permissions The minimum requirements for the service accounts are Full control for the folder ProgramData\Infor and Read & Execute permission for Program Files(x86)\Infor.
The SunSystems Connect service account, for example, svc-ssconnect, requires Modify permission for Program Files(x86)\Infor\SunSystems\SSSystem.dat during SunSystems Serialization.
Microsoft Internet Information Services (IIS) On Windows Server 2012
If you are installing IIS on Windows Server 2012 in Server Manager, go to Add Roles and Features >> Server Roles >> Web Server (IIS). In Add Features, accept the defaults required for Web Server (IIS). Select the following Features: .NET Framework 3.5 Features Message Queuing: Message Queuing Services.
In Role Services, select the following Role services: Common HTTP Features: Default Document, Directory Browsing, HTTP Errors, Static Content, and
HTTP Redirection. Health and Diagnostics: HTTP Logging, Custom Logging, Logging Tools, Request Monitor and Tracing. Performance: Static Content Compression. Security: Request Filtering, Basic Authentication, Digest Authentication, and Windows Authentication. Application Development: .NET Extensibility 3.5, .NET Extensibility 4.5, ASP.NET 3.5, ASP.NET 4.5,
ISAPI Extensions, and ISAPI Filters. Management tools: IIS Management Console, IIS 6 Metabase Compatibility, IIS 6 Management Console,
IIS 6 Scripting Tools, and IIS 6 WMI Compatibility.
Note: During this process you must specify an alternative path to the installation, as the features are not installed as part of the Windows Server 2012 installation or upgrade. After mounting the Windows Server 2012 installation media, specify the alternative path as d:\sources\SxS, where d: is the mounted drive.
On Windows Server 2008/2008 R2
If you are installing on Windows Server 2008 R2, go to Server Manager >> Add Role >> Web Server (IIS). Check the following Role Services are added to the IIS install: Common HTTP Features: Static Content, Default Document, Directory Browsing, HTTP Errors and HTTP
Redirection. Application Development: ASP.NET, .NET Extensibility, ISAPI Extensions, and ISAPI Filters.

Installation Guide - SQL Server Page 13 of 95.
Mul
ti-tie
r Sun
Syst
ems
Inst
alla
tion
Infor10 Financials Business (SunSystems)
Health and Diagnostics: HTTP Logging, Logging Tools, Request Monitor, Tracing and Custom Logging. Security: Basic Authentication, Windows Authentication, Digest Authentication, Request Filtering. Performance: Static Content Compression. Management tools: IIS Management Console, IIS 6 Metabase Compatibility, IIS 6 WMI Compatibility, IIS
6 Scripting Tools, and IIS 6 Management Console On Windows 7
If you are installing on Windows 7, go to Control Panel >> Programs and Features >> Turn Windows Features on or off. Check that these features are added to the Internet Information Services installation. Click ‘+’ plus to expand to individual features: Web Management Tools: IIS 6 Management Console, IIS 6 Scripting Tools, IIS 6 WMI Compatibility, IIS
6 Metabase and IIS 6 configuration compatibility, and IIS Management Console. World Wide Web Services:
– Application Development Features: .NET Extensibility, ASP.NET, ISAPI Extensions, and ISAPI Filters.
– Common HTTP Features: Default Document, Directory Browsing, HTTP Errors, HTTP Redirection and Static Content.
– Health and Diagnostics: Custom Logging, HTTP Logging, Logging Tools, Request Monitor and Tracing.
– Performance: Static Content Compression. – Security: Basic Authentication, Windows Authentication, Digest Authentication, Request Filtering.
On Windows 8
If you are installing on Windows 8, go to Control Panel >> Programs and Features >> Turn Windows Features on or off. Check that these features are added to the Internet Information Services installation. Click ‘+’ plus to expand to individual features: Web Management Tools: IIS 6 Management Console, IIS 6 Scripting Tools, IIS 6 WMI Compatibility, IIS
6 Metabase and IIS 6 configuration compatibility, and IIS Management Console. World Wide Web Services:
– Application Development Features: .NET Extensibility 3.5, .NET Extensibility 4.5, ASP.NET 3.5, ASP.NET 4.5, ISAPI Extensions, and ISAPI Filters.
– Common HTTP Features: Default Document, Directory Browsing, HTTP Errors, HTTP Redirection, and Static Content
– Health and Diagnostics: Custom Logging, HTTP Logging, Logging Tools, Request Monitor, and Tracing.
– Performance: Static Content Compression. – Security: Basic Authentication, Digest Authentication, Request Filtering, and Windows Authentication.
Microsoft Message Queue (MSMQ) Ensure that MSMQ has been installed.
In Windows Server 2008 R2, go to Server Manager >> Features >> Add Features and select Message Queuing Server.
In Windows 7, go to Control Panel >> Programs and Features >> Turn Windows features on or off >> Microsoft Message Queue (MSMQ) Server >> Microsoft Message Queue (MSMQ) Server Core.
Note: For Windows Server 2012, MSMQ is part of the IIS installation. See the section Installing Microsoft Internet Information Services >> On Windows Server 2012, in this guide.
Installing Web Services Enhancements 3.0 (WSE) Download from the Microsoft Web site and install in the following mode:
Setup Type: Install Runtime
Installing Microsoft SQL Server SunSystems v6.1 is now Microsoft SQL Server 2012 compliant from Patch Set 11, and the DVD has been recut. Any database installation, upgrade, or utility processes carried out on SQL Server 2012 should be done using this recut DVD. After any databases have been installed using this DVD, they and their corresponding client\applications should be patched up to at least Patch Set 11 level, which will ensure that your SunSystems functionality is SQL Server 2012 compliant. After installation you cannot roll back these

Installation Guide - SQL Server Page 14 of 95.
Mul
ti-tie
r Sun
Syst
ems
Inst
alla
tion
Infor10 Financials Business (SunSystems)
mandatory Patch Sets.
Note: The Patch Sets are not included on the SunSystems installation DVD, but are available on Infor Xtreme.
Microsoft SQL Server 2012 does not support the restoring of database backups made on versions of SQL Server prior to SQL Server 2005. To do this, you must take the intermediate step of restoring to SQL Server 2005/2008, before SQL Server 2012.
The SQL Server can be installed with mixed mode, or Windows authentication. SunSystems always uses Windows authentication when connecting to the database.
If a SQL Server named instance is used, the SQL Server Browser Service must be started as it is required to make a connection to the server. If using a default SQL Server instance you must use the default port 1433, as the browser service cannot be used to connect to a default instance.
Note: The SQL Server Aliases feature is not supported with this SunSystems Reporting release.
If installing a named instance, the 'data access' option is disabled by default. In this case it is important to enable the data access option by executing the following SQL query:
USE master;
EXEC sp_serveroption ‘<server-name>\<instancename>’, 'data access', ‘true';
If you are manually creating your own SunSystems Data database (Business Unit Group), note that Binary Sort Order is mandatory. You must also select the appropriate database collation for the language characters you wish to store.
If installing a fresh installation of SQL Server you must install Database Engine Services and Management Tools as a minimum, and Reporting Services on the machine you are running SSRS.
If SQL Server is already installed, you must select Microsoft SQL Server, Configuration Tools, SQL Server Installation Center, and add to your existing instance Reporting Services.
In SQL Server Configuration Manager >> SQL Server Network Configuration >> Protocols for MSSQLSERVER, ensure that TCP/IP is enabled. Check that TCP/IP is also enabled for SQL Native Client 10.0 Configuration >> Client Protocols.
SQL Server 2012 For security reasons, the Microsoft SQL Server 2012 installation does not, by default, give sysadmin role to NT AUTHORITY\SYSTEM (Local System). You must create a Windows service account and use this account to run your SunSystems services. Make sure the account has security policy Log on as a service right in Local Security Policy >> Local Policies >> User Rights Assignment.
Installing SQL Server Reporting Services If you already have SQL Server installed and need to add Reporting Services, run the SQL Server installer and go to SQL Server Feature Installation >> Instance Features. Select Reporting Services (Native) and click Next to proceed with the installation of Reporting Services.
On completion of the installation of SQL Server Reporting Services, it is essential for this to be configured in the next step.
Microsoft Report Viewer 2010 SP1
Note: Microsoft ReportViewer 2012 is not supported with this SunSystems Reporting release.
Microsoft ReportViewer 2010 SP1 is a prerequisite for the installation of SunSystems Reporting. The redistributable must be installed on the machine hosting the SunSystems Report Manager. A warning message is displayed if this has not been installed.
The redistributable and set of language packs are available from the following links:
http://www.microsoft.com/downloads/en/details.aspx?FamilyID=3eb83c28-a79e-45ee-96d0-41bc42c70d5d
http://www.microsoft.com/downloads/en/details.aspx?FamilyID=CC14EFF2-D47B-43A5-A139-FBB01E5F2836&displaylang=en
If the SunSystems Report Manager Web application has already been installed, then it must be restarted

Installation Guide - SQL Server Page 15 of 95.
Mul
ti-tie
r Sun
Syst
ems
Inst
alla
tion
Infor10 Financials Business (SunSystems)
after installing ReportViewer 2010 SP1. If you install ReportViewer 2010 SP1 before installing Reporting, then no restart is required.
Configuring SQL Server Reporting Services using Reporting Services Configuration Manager 1. Ensure the SunSystemsReporting (local or domain) Windows user is given appropriate permissions to
the ReportServer and ReportServerTempDB databases. Ensure you are logged on as a user with sysadmin role for the database server to enable these permissions to be set.
2. From the Start menu, run SQL Server >> Configuration Tools >> Reporting Services Configuration Manager. Select the reporting services server and instance name.
3. Enter Server Name and Report Server Instance and click Connect. 4. Select Service Account. Report Server Service Account select Use another account. Enter account
details for the SunSystems Reporting Services Windows user, for example, SunSystemsReporting, and password. Click Apply. You may be required to enter a backup encryption key file name and password; make a note of this file name and location.
5. SQL Server Connection dialog box is displayed. For Credentials Type select Current User – Integrated Security (ensure that you have sysadmin role or db_owner access to the ReportServer and ReportServerTempDB databases). Click OK. Alternatively, the SQL Server sa account may be used.
6. Check the Results panel does not contain any errors, and if apply button is disabled, click enter. 7. In the Database tab, ensure that the ReportServer database has been created.
Checklist for SQL Server Reporting
SQL Server ReportServer and ReportServerTempDB databases have been created
Reporting Services Configuration Manager check Report Manager URL link is working
Reporting Services Configuration Manager check Web Manager URL link is working
Adobe Reader 10+ This is available from the Adobe Web site.
Windows Identity Foundation In SunSystems Security User Manager, there is now an option to authenticate using Infor Federation Services (IFS). If this option is required, then you must install Windows Identity Foundation.
Download the x86 or x64 runtime package appropriate for the Server, where SunSystems Security Web application is running in IIS: For Windows Vista and Windows Server 2008, select the msu file with name starting Windows6.0. For Windows 7 and Windows Server 2008 R2, select the msu file with name starting Windows6.1. http://www.microsoft.com/downloads/en/details.aspx?FamilyID=eb9c345f-e830-40b8-a5fe-ae7a864c4d76
SunSystems Installer Features The SunSystems installer is based on Microsoft Installer (MSI) technology, which supports multiple installation options. The following options are supported with SunSystems installer: Silent Installation: The SunSystems installer supports express installation, which runs as silent
installation. All required parameters are saved in a parameter file created by the installer, and are not used during the installation. For example, at a command prompt, enter: setup /v“ /qn”. This uses SQLExpress.xml for parameters. See SQLTemplate.xml for an explanation of parameters.
Administrative Installation: Using this feature, SunSystems installation files can be ‘unzipped‘ on a shared location. All the installation parameters that are given during the administrative install will be used as defaults for subsequent installations on client computers. During this unzip process, a new MSI installer file will be generated, which should be passed to client computers for further installation. The newly created MSI will take all the defaults from the network location, and software will be installed on demand.
Installation through command prompt: This feature enables SunSystems installation through a command prompt, which enables the installer to work with scripts or as a scheduled job.
Product Advertisement and Installation through group policy: Using this option, SunSystems can be installed on multiple computers on the network.
Installation using management application, such as Microsoft SMS: SunSystems installer supports

Installation Guide - SQL Server Page 16 of 95.
Mul
ti-tie
r Sun
Syst
ems
Inst
alla
tion
Infor10 Financials Business (SunSystems)
installation through Microsoft Systems Management Server (SMS). When installing SunSystems v6.1 PS2, you are presented with two options:
– New Installations & SunSystems v5 upgrades. – Updates for existing SunSystems Enterprise installations – for updating v6.1.0 or v6.1 PS1. Selecting
this option uses the Database Utilities to update the databases. Features that were selected during the v6.1.0 installation will be carried forward, together with user settings, where possible. The sequence which follows will be mainly pre-populated with the correct carried forward values.
If you select the second option to update your existing v6.1 installation, you must still ensure all of the relevant prerequisites are fulfilled.
Installing SunSystems in a Two-tier Installation This configuration is for a system with a small number of SunSystems users. A single combined application and database server is installed. SunSystems client installations connect to this server.
Before you start, ensure that you have all of the prerequisite software installed, and you are logged in as a user who is a member of the local Windows administrator group.
If a SQL Server default instance is installed and pre-configured SunSystems data is required, an express installation can be done instead of a complete install. 1. From the installer menu, select Server & Client Components, then Complete installation. 2. If preconfigured SunSystems PK1 data is required, select the check box to install a SunSystems schema
in the next dialog box. 3. SunSystems Security: Select the local database instance where the security database will be created,
and tick to select new Security Database. Accept the default database name and location of database files.
4. SunSystems Domain: Enter Domain Datasource name, for example, DOMAINDSN, and accept local SQL Server instance and default domain database name. Accept the option to create a new Domain Database.
5. Accept the location of the database files and select database collation Latin1_General_BIN for English language.
6. SunSystems Database Business Group name details: Accept default settings BUGROUP, local SQL server instance, and database name SunSystemsData.
7. SunSystems security settings: Enter a security admin password and accept default English language and port 55000.
8. Security Server account: As database and application is on the same machine, you can use local system account.
9. SunSystems Service Account: As database and application is on the same machine, you can use local system account.
10. Security Groups: Ensure that you have created SunSystemsServices and SunSystemsClients local groups in Windows on the database server as described in prerequisites.
11. Security database server language selection: Select any addition languages you require. 12. Do not apply SunSystems Patch Sets before you have installed SunSystems Reporting Services. 13. Select Reporting Services: Specify your local machine for SunSystems Report Server name and the
SunSystems Report Manager. 14. To start the installation, click the Install button. If a dialog box is displayed stating, ‘Could not find stored
procedure sp_dboption’, click OK to continue the installation. You can ignore the sp_dboption procedure because it is deprecated in SQL 2012.
15. SRS Installation: Select Reporting Services. 16. Select complete installation. 17. SunSystems domain type: Select the local SQL Server instance. 18. Domain database: Enter the name of the domain database. 19. SunSystems Reporting Services: Enter user ID password and other details. 20. Report server instance: Select the Microsoft SQL Server Reporting Services instance. 21. Security server details: Enter security admin password. 22. Report Manager SMTP Server:
SMTP Server: mail.<web domain> Port: 25 (for example) Sender address: <e-mail address for report distribution>

Installation Guide - SQL Server Page 17 of 95.
Mul
ti-tie
r Sun
Syst
ems
Inst
alla
tion
Infor10 Financials Business (SunSystems)
Note: You must enter port number to continue, even if you do not want emailed reports.
23. Complete the installation.
Infor10 Workspace A server hosting Microsoft SharePoint 2010 can be added to this configuration to host SunSystems in Infor10 Workspace. See the Installing the Infor10 Workspace SunSystems Plug-in section within this guide.
Installing SunSystems Client in a Two-tier Configuration 1. Select SunSystems Application Client (SQL Server). Choose Custom installation. 2. Selecting Components: From the installation component tree select SunSystems Client by de-selecting
application server and security server. (SunSystems Client automatically includes Security client and SRS client).
3. Enter the server name where you have installed the SunSystems Application for Security and for the SunSystems Application Server.
4. Specify the SunSystems Report Server name and the SunSystems Report Manager name 5. Proceed with the installation until completed.
Now go to the Post-Installation Configuration section.
Installing the Database and Security Servers in a Multi-tier Configuration Refer to the SunSystems Architecture and Planning Guide to plan which servers you require. Specific prerequisites are required for each machine. If you are deploying a multi-tier installation, you must create the SunSystems Domain database first, followed by Security server. Subsequent components do not require installation in a strict order.
Multi-tier server example names (given in brackets):
ServerDBSEC Database and Security Server
ServerAPP SunSystems Application Server
ServerWEB SunSystems Web Server
ServerSSRS SQL Server Reporting Services Server
ServerRS SunSystems Report Server
ServerRM SunSystems Report Manager
SharePointServer Infor10 Workspace hosted in SharePoint
Client1 SunSystems Client computer
Note: After you finish using an installer option you may have to wait a few seconds before selecting another option. The installer is tidying up temporary files in the background.
SQL Server Permissions
The minimum requirement for the user performing the installation is Create Database, Add login, and Create sysviews in master database. The first stage is to create the Domain database, then the SunSystems Security Database, then the SunSystems Data database (Business Unit Group). Then install SunSystems Security Server, which contains a Windows Service component and an IIS component. Detailed instructions are as follows:
Create a new SunSystems Domain Database 1. On your Database Server (ServerDBSEC), launch the installer and select Database Utilities (SQL
Server). 2. Select Create a new SunSystems Domain Database. 3. Enter a domain data source name, for example, DOMAINDSN; local database server/instance; and
domain database name, for example, SunSystemsDomain. 4. Select the location for data and log files, and the database collation you require for the languages used. 5. Enter Groups: for example, SunSystemsServices and SunSystemsClients. 6. Proceed with the installation, and when processing is complete return to the database utilities menu.

Installation Guide - SQL Server Page 18 of 95.
Mul
ti-tie
r Sun
Syst
ems
Inst
alla
tion
Infor10 Financials Business (SunSystems)
Create a new Security Database 1. From the installer in the Database Utilities menu, select Create a new Security database. 2. Enter the database server\instance and database name (SunSystemsSecurity). 3. Proceed with the installation, and when processing is complete, exit to the main installer menu.
Create a new SunSystems Data Database (Business Unit Group) 1. If preconfigured data (PK1) is required, choose from Database Utilities. Import a pre-configured
SunSystems Data Database, otherwise select Create a new SunSystems Data Database. 2. Accept the domain data source details created in the domain database installation. 3. Enter the Business Unit Group name, for example, BUGROUP, local database instance, and the
database name, for example, SunSystemsData. 4. Select the data and log file locations and database collation required to support languages used for this
Business Unit Group. 5. Enter Windows Groups, for example, SunSystemsServices and SunSystemsClients. 6. Select base language and additional languages to be used with this Business Unit Group. 7. Proceed with the installation, and when processing is complete return to the installer main menu.
Installing SunSystems Security
When installing SunSystems Security Web on a 64-bit Operating System without SQL Server already installed, check ASP.NET is registered. If not already registered, you must register it. For details see the section 64-bit Operating System Prerequisite within this guide. 1. From the installation menu select Server & Client Components, Custom install. 2. From the features tree select Security Service and Security Web Server only. 3. Accept the local database server/instance. 4. Select the existing database created in the previous step. 5. Specify the security administrator name (admin) password, language, and listening port. 6. Enter the security service account, which must be a Windows domain account. This user must be part of
the SunSystemsServices group. Ensure this account has Modify permissions for the Program Files (x86)\Infor\SunSystems\SecurityWeb folder, and Read permissions for the \Windows\System32\inetsrv\config folder.
7. Enter security groups. 8. Proceed with the installation until complete. 9. Alternatively, there is the option to independently install SunSystems Security Service and Security Web
Server on different servers. In this case SunSystems Security Service must be the first to be installed. 10. IIS application SecurityWebServer requires modify permissions to web.config. In File Manager,
navigate to Program Files (x86)\Infor\SunSystems. Select SecurityWeb folder >> Properties >> Security tab. Click Edit >> Add >> Locations. Select your local machine and click OK. Enter IIS AppPool\SecurityWebServer >> Check Names and click OK. In Permissions, select Modify and click OK.
11. IIS application SecurityWebServer requires read permissions to redirection.config. In File Manager, navigate to \Windows\System32\inetsrv. Config folder >> Properties >> Security tab. Click Edit >> Add >> Locations. Select your local machine and click OK. Enter IIS AppPool\SecurityWebServer >> Check Names and click OK. In Permissions, select Read & Execute and click OK.
Note: On Windows Server 2012 or Windows 8, use the command line tool, icacls.exe, to apply these permissions. For example:
C:\>ICACLS c:\windows\system32\inetsrv\config /grant:r "IIS AppPool\SecurityWebserver:(OI)(CI)RX”
Post-Installation Checklist for Database/Security Server
In IIS Manager check that SecurityWebServer is running. http://localhost:81/SecurityWebServer
Check Windows SunSystems Security Service is running.
Add domain service accounts to SunSystemsServices Group.

Installation Guide - SQL Server Page 19 of 95.
Mul
ti-tie
r Sun
Syst
ems
Inst
alla
tion
Infor10 Financials Business (SunSystems)
Installing SunSystems Application Server in a Multi-tier Configuration 1. Ensure the Domain Service Accounts you intend to use have local security policy Log on as a service
rights. Run secpol.msc to launch Local Security Policy. In Local Policies >> User Rights Assignment, right-click Log on as a service and select Properties. Click Add User or Group >> Locations and specify your Windows domain. Click OK, and specify the service accounts in the Enter the object names to select box.
2. On the application server (ServerAPP), select Server & Client Components and then Custom install. 3. From features, select SunSystems Application (and SunSystems Client) only. 4. Enter Database/Security server (ServerDBSEC) for SunSystems security. 5. Do not install a SunSystems schema. 6. Enter domain datasource details for SunSystems Domain. 7. Enter a Windows domain account for SunSystems services. 8. Specify Report Server (ServerRS), Report Manager (ServerRM) and SQL Server Reporting Services
Server (ServerRS). 9. Complete the installation.
Do not apply SunSystems Patch Sets before you have installed SunSystems Reporting Services.
Add SunSystems Reporting Service Group Membership to SunSystems Users Only SunSystems Reporting Service Administrators require SRS group membership. Normal SunSystems users do not require this membership to run ordinary reports. 1. If preconfigured data (PK1) has been installed, sign into User Manager as admin. Select Groups tab. 2. Edit Group PK1. 3. Select SunSystems Function Permission. Click Select all. Click Apply. 4. Select SunSystems Action Permissions. Add PK1. Click Apply. Click OK. 5. Go to the Users tab. 6. Right-click a user that requires SRS group membership (PK1 for example), and select Edit User. 7. Click Change (next to Group Membership). 8. Expand SunSystems Reporting, and select SunSystems Reporting functions required for this user. 9. Click OK to submit the changed group membership.
Serialization At this stage of the installation, SunSystems can be serialized.
Note: If you serialize from within SunSystems using Serialization (ZZS), the SessionManager service login user must be a member of the Administrator group.
Post-Installation Checklist for SunSystems Application Server
Check Windows Service SunSystems Session Manager is running.
Check Windows Service SunSystems Connect is running.
You can access the SSC web page at http://localhost:8080/ssc

Installation Guide - SQL Server Page 20 of 95.
Mul
ti-tie
r Sun
Syst
ems
Inst
alla
tion
Infor10 Financials Business (SunSystems)
Installing SunSystems Reporting Server in a Multi-tier Configuration SunSystems Reporting can be installed all on one server together with SQL Server Reporting Services. Alternatively, it can be split into three reporting components, each installed on a separate server. In this case, you must install in the following order: 1. SQL Server Reporting Services extension 2. SunSystems Report Server 3. SunSystems Report Manager.
SQL Server Reporting Services Extensions 1. Check that you have installed the appropriate prerequisites for the SQL Server Reporting Services
Server (ServerSSRS). 2. Run the installer as a domain user with local administrator rights. From the installation menu, select
Reporting Services, and then custom installation. 3. Choose only SQL Server Reporting Services extensions by deselecting the other components on the
tree. 4. Enter the name of the SunSystems Security server (ServerDBSEC), and then Report Server (ServerRS)
and Report Manager (ServerRM). 5. Enter the domain SunSystemsReporting user account, password and SunSystemsServices group. 6. Select the local SQL Server instance where Reporting Services is installed. 7. Click install. 8. If you have any problems with the installation, check ConfigureReporting.log found in
ProgramData\infor\SunSystems\Logs.
Perform these checks if not completed at a previous step
Reporting Services Configuration Manager, check Report Manager URL link is working.
Reporting Services Configuration Manager, check Web Manager URL link is working.
SunSystems Report Server 1. Run installer as a domain user with local administrator rights, and from the installation menu select
Reporting Services, and then custom installation. 2. Choose only Report Server, by deselecting the other components on the tree. 3. Enter the name of the SunSystems Security server (ServerDBSEC), and then Report Manager
(ServerRM). Refer to SQL Server, Reporting Services Configuration Manager, Web Service URL, and Report Server Web Service URL, to ensure you enter the correct URL.
4. Enter the server\instance location of the domain database and the domain database name. 5. Enter the domain SunSystemsReporting account to run the Report Server service, password and
SunSystemsServices group 6. Ensure the SunSystemsReporting user has local security policy Log on as a service right. Run
secpol.msc to launch Local Security Policy. In Local Policies >> User Rights Assignment, right-click Log on as a service and select Properties. Click Add User or Group >> Locations and specify your local machine. Click OK, and specify SunSystemsReporting in the Enter the object names to select box.
7. Select the local SQL Server instance where Reporting Services is installed. 8. Complete the installation.
In IIS Manager, check Application Pool SunSystemReportingServices is started.
Check SunSystemsReportingPrintService Windows Service is started
SunSystems Report Manager 1. Run installer as a domain user with local administrator rights, and from the installation menu select
Reporting Services, and then custom installation. 2. Select only Report Manager and Sample Reports by deselecting the other components on the tree. 3. Enter the name of the SunSystems Security server (ServerDBSEC) and then Report Server (ServerRS).
Refer to SQL Server, Reporting Services Configuration Manager, Web Service URL, Report Server Web Service URL to ensure you enter the correct URL.
4. Enter the server\instance location of the domain database and the domain database name.

Installation Guide - SQL Server Page 21 of 95.
Mul
ti-tie
r Sun
Syst
ems
Inst
alla
tion
Infor10 Financials Business (SunSystems)
5. Enter the domain SunSystemsReporting account, password and SunSystemsServices group. 6. Ensure the SunSystemsReporting user has local security policy ‘Log on as a service’ rights. Run
secpol.msc to launch Local Security Policy. In Local Policies, User Rights Assignment, right-click Log on as a service and select Properties. Click Add User or Group >> Locations and specify your local computer. Click OK, and specify SunSystemsReporting in the Enter the object names to select box.
7. Report Manager SMTP Server: SMTP Server: mail.<web domain> Port: 25 (for example) Sender address: <e-mail address for report distribution>
Note: You must enter port number to continue, even if you do not want emailed reports.
8. Proceed with the installation. Loading sample reports may take up to 30 minutes.
Installing SunSystems Web in a Multi-tier Configuration
Important Note: Before installing SunSystems Web, check ASP.NET is registered. If not already registered, you must register it. For details, see the 64-bit Operating System Prerequisites section.
SunSystems Web runs within Apache tomcat. For this installation it is essential to install SunSystems Client: 1. Run the installer on the web server (ServerWEB). 2. Select Server & Client Components and then Custom installation. 3. From the feature tree, select SunSystems Client and SunSystems Web. 4. Enter server locations of SunSystems Security, SunSystems Application, Report Server and Report
Manager. 5. Enter a Windows Domain Service Account for SunSystems Web. For example, svc-ssweb. 6. Ensure SunSystems Web Service Account has local security policy ‘log on as a service’ rights. Run
secpol.msc to launch Local Security Policy. In Local Policies >> User Rights Assignment, right-click Log on as a service and select Properties. Click Add User or Group >> Locations and specify your Windows Domain. Click OK, and specify your Windows Domain Service account in the Enter the object names to select box.
7. Proceed with the installation until it is complete. Internet Explorer 8 Settings
To access SunSystems Web in Internet Explorer 8 go to Tools >> Compatibility View Settings, and remove the check from Display intranet sites in compatibility view.
To display SunSystems reports in a new tab, change the default setting in Internet Explorer. From the menu bar, select Tools >> Internet Options >> General >> Tabs >> Settings. When a pop-up is encountered, click Always open pop-ups in a new tab.
Override User Logged In
For SunSystems Web Users, you can set the override user logged in feature. Login to User Manager as administrator, select Groups >> SunSystems Users Group >> Operator Group, and select Enable Clear Operator at login.
Silverlight 4
When first accessing SunSystems Web you may be prompted to follow instructions to install Silverlight 4.
Post-Installation Checklist – SunSystems Web
Ensure SunSystems Web Service Windows service is started
http://localhost:9080/SunSystems gives you access to browser based SunSystems interface
Infor10 Workspace A server hosting Microsoft SharePoint 2010 can be added to this configuration to host SunSystems in Infor10 Workspace. See the Installing the Infor10 Workspace SunSystems Plug-in section within this guide.

Installation Guide - SQL Server Page 22 of 95.
Mul
ti-tie
r Sun
Syst
ems
Inst
alla
tion
Infor10 Financials Business (SunSystems)
Installing SunSystems Client in a Multi-tier Configuration 1. On the client computer, for example, Client1, select Server & Client Components >> Custom installation. 2. In the component tree, deselect the other components leaving SunSystems Client only. (SunSystems
client includes Security client and SRS client). 3. Specify the Security server name and port number. 4. Select the SunSystems Application server name and port number. 5. Enter the server where SunSystems Report Server is installed, and the server where SunSystems
Report Manager is installed. 6. Proceed with the installation until it is complete.
Accessing SunSystems when Logged in to Windows as a Local User If SunSystems is to be accessed from client computers when users are not logged on as Windows Domain users, you must set standard authentication globally in User Manager. Log into User Manager as administrator, select Settings >> Security Policy, and remove the check from Enable Windows Authentication.

Installation Guide - SQL Server Page 23 of 95.
Inst
allin
g th
e In
for1
0 W
orks
pace
Sun
Syst
ems
Plug
-in
Infor10 Financials Business (SunSystems)
Installing the Infor10 Workspace SunSystems Plug-in
Note: We do not recommend installing SunSystems on the SharePoint server, for system resource reasons. You should configure the SunSystems plug-in to point to another server hosting SunSystems Web.
The SunSystems plug-in is now included in the Workspace 10.1 installer, so it is now a one-step installation. Obtain the Infor10 Workspace 10.1 installer DVD image from the Infor and Lawson Product Download Center (In www.inforxtreme.com, select Downloads >> Products).
Ensure SharePoint Foundation 2010 is installed and configured. Refer to the Infor10 Workspace Installation Guide on InforXtreme.
Ensure the SharePoint 2010 Timer Service is running, otherwise components will be listed as deploying. Log in to SharePoint Foundation 2010 with the SPInstall account. 1. Run (as Administrator) Infor10 Workspace 10.1 setup.exe to install Workspace. 2. Select Features: Tick Infor10 Workspace Core. Expand Plug-ins, and tick Generic Product Plug-in, and
SunSystems. Start the SharePoint 2010 Administration Windows Service if required. 3. Complete installation. 4. It may take up to five minutes for the installed solutions to be deployed in SharePoint.
Verifying the Infor10 Workspace Deployment If you use standalone mode, to deploy you must carry out the following steps: 1. Open a command prompt run in administrator mode. 2. Change directory to:
Program Files\Common Files\Microsoft Shared\Web Server Extensions\14\bin 3. Run this command:
stsadm -o execadmsvcjobs 4. Wait two minutes. 5. In SharePoint 2010 Central Administration, select System Settings >> Manage Farm Solutions >>
Solutions Management page. Verify that both Infor10 Workspace and Infor10 Workspace SunSystems plug-in are listed as deployed.
The Infor10 Workspace Configuration Tool is available from the Start menu, and enables the user to add plug-ins. Detailed documentation is available; see the Infor10 Workspace Installation and Configuration Guide (for version 10.1) on InforXtreme.

Installation Guide - SQL Server Page 24 of 95.
Post
Inst
alla
tion
Con
figur
atio
n
Infor10 Financials Business (SunSystems)
Post-Installation Configuration SunSystems Patch Sets SunSystems Patch Sets are available from www.inforxtreme.com. They need to be applied to all tiers in a multi-tier installation. You must apply at least Patch Set 11 for use with SQL 2012, and at least Patch Set 16 for use with Windows 8. Read the Patch Set installation note included in the zip file for instructions. After installation you cannot roll back these mandatory Patch Sets.
You can check which Patch Sets are installed in Control Panel >> Programs >> Programs and Features >> View Installed Updates.
After applying Patch Sets either restart the SunSystems services or shut down and restart your computer.
Serialization At this stage of the installation, SunSystems should be serialized.
Note: If you serialize from within SunSystems using Serialization (ZZS), the SessionManager service login user must be a member of the Administrator group.
Migrating SunSystems Users and User Manager Permissions If preconfigured data (PK1) has been installed, use SunSystems User Migration Wizard to import the preconfigured users and groups. Select this from Start, Infor Financials Business SunSystems, SunSystems tools, Migration, SunSystems User Migration. If a three digit SunSystems login is required select Operator ID.
Alternatively, refer to the User Manager Help to create your own Users and Groups.
Add SunSystems Reporting Service Group Membership to SunSystems Users Only SunSystems Reporting Service Administrators require SRS group membership. Normal SunSystems users do not require this membership to run ordinary reports.
If preconfigured data (PK1) has been installed, sign into User Manager as admin. Select Groups tab. Edit Group PK1. Select Function Permissions, click Select All, Apply. Select Action Permissions, Add PK1, Apply.
Now go to Users tab. Right-click a user that requires SRS group membership (PK1 for example), and select Edit User. Click Change (next to Group Membership). Expand SunSystems Reporting Users, and select SunSystems Reporting functions required for this user. Click OK to submit the changed group membership. Note which users you have given SunSystems Data Access Managers role, and Report Administrator role because these are required for the following steps.
Configuring SunSystems Reporting Service in Data Access Manager From the Start menu, sign into Infor Financials Business SunSystems, SunSystems, Data Access Manager. If you have difficulties, use alt-tab to check that a hidden dialog box is not being displayed. Select Define SunSystems Connection in the task tree, then right-click, Run Task. Enter connection details to the SQL Server instance that contains the SunSystems Domain database and click OK. Select Configure business unit data models in the task tree, then right-click, Run Task. Check the Business Unit(s) that will be reported against and click OK. Save the changes before you exit Data Access Manager. You must use Data Access Manager to configure data models first before using any reporting functions such as Report Administrator.
Note that if you create new business units you must add these to Configure Business Unit Data Models in Data Access Manager. Should you make any changes to an existing business unit, for example, modify languages, you must uncheck the Business Unit, click OK, Save, then redo the configuration.
Internet Explorer Compatibility Mode To access SunSystems Web in Internet Explorer 8 go to Tools, Compatibility View Settings, and un-tick display intranet sites in compatibility view.
Log File Locations Log files can be found in standard location ProgramData\Infor\Logs\SunSystems. If you cannot see this location in Windows explorer, select in Folder Options >> View and select Show hidden files, folders, and drives. Installer msi log files are found in the %TEMP% folder, or the folder above this location.

Installation Guide - SQL Server Page 25 of 95.
Post
Inst
alla
tion
Con
figur
atio
n
Infor10 Financials Business (SunSystems)
Security Web Server Permissions During the installation, the access permissions to the SecurityWeb folder are full rights for Everyone. After the installation is complete, you should manually restrict access as follows:
Note: For Windows Server 2012, bypass step 1 and step 2 and go to step 3.
1. In IIS Security, switch the Anonymous User setting for the Security Web site to the App Role account. 2. Restrict the permissions to the SecurityWeb folder to Full control for the Security App Role account, and
apply any other restrictions appropriate to your installation. In a typical Windows 7 installation, this folder is located in Program Files\Infor\SunSystems\SecurityWeb.
3. Grant Modify folder permissions to the SecurityWeb folder for local account ‘IIS apppool\SecurityWebServer’.

Installation Guide - SQL Server Page 26 of 95.
Part
2 –
Inst
alla
tion
Ref
eren
ce
Infor10 Financials Business (SunSystems)
Part 2 – Installation Reference

Installation Guide - SQL Server Page 27 of 95.
Req
uire
men
ts a
nd P
lann
ing
Infor10 Financials Business (SunSystems)
Requirements and Planning Introduction The hardware and software requirements for running SunSystems vary depending on the type of deployment that you choose, that is, stand-alone, two-tier installation, or three-tier installation.
For an overview of the architecture and planning considerations for the deployment of the software, refer to the SunSystems Architecture and Planning Guide.
The requirements in this section should be regarded as the minimum for the type of deployment that you choose. If you are installing other software on the same computer(s) as SunSystems, you might need to increase the minimum requirements. Careful consideration must be given to your current requirements and hardware capacity. The following factors are key areas to consider: Transaction and event volume The number of primary system users The number of secondary users, that is, those who might find the information on the system useful as a
source of information The number of computers currently on the network The location of the application users The volume of the local area network and whether it is related to the application.
If other applications share the network, any performance improvements to other application could affect the network.
Projections should be made to predict your future requirements. Expansion in any of the previously listed factors might have a detrimental effect on the performance of the system. For sizing advice, contact your regional office.
Software Requirements The following tables show the recommended operating systems to use.
Installation Type Layers Version of Windows recommended
Stand-alone All Windows 8, Windows 7, MS-SQL Server 2008 R2, MS-SQL Server 2012
Two-Tier
Client Windows 8, Windows 7, Vista, Windows XP
Application and Database
Windows Server 2012 (Standard or Datacenter), Windows 2008 Server R2 (Standard or Enterprise), MS-SQL Server 2008 R2, MS-SQL Server 2012
Three-Tier
Client Windows 8, Windows 7, Vista, Windows XP
Application Windows Server 2012 (Standard or Datacenter), Windows 2008 Server R2 (Standard or Enterprise) R2
Database
Windows Server 2012 (Standard or Datacenter), Windows 2008 Server R2 (Standard or Enterprise), MS-SQL Server 2008 R2, MS-SQL Server 2012
Note: Physical databases must be in the collation of the data that is being stored.
RDBMS Support SunSystems version 6.1 is supported with the following relational database systems: Microsoft SQL Server 2012. Microsoft SQL Server 2008 R2 (Standard, Enterprise and Workgroup editions), 32-bit and 64-bit
versions. Before you upgrade to a new Microsoft SQL Server service pack, contact your regional support representative to ascertain the support status.

Installation Guide - SQL Server Page 28 of 95.
Req
uire
men
ts a
nd P
lann
ing
Infor10 Financials Business (SunSystems)
When you create your Business Unit Group (SunSystems Data database), you must select the appropriate collation for the language you use for that Business Unit Group, for example: Use Japanese_BIN with Japanese versions of SunSystems Use Chinese_PRC_BIN with Chinese Simplified versions of SunSystems Use Cyrillic_BIN with Russian versions of SunSystems.
Note: You cannot store code page X data in a code page Y SQL Server database; for example, you cannot store code page 932 data (Japanese) in a code page 1252 database (Western European). While this was sometimes possible with previous versions of SQL Server, it has always been unsupported. To a 1252 SQL database, anything but a 1252 character is not valid character data.
Binary Sort Order is mandatory. Binary Sort Code sets the database selection criteria to match the ASCII sort order A-Z a-z etc., which is compatible with the SunSystems program logic. SunSystems internal COBOL programming and business logic demands that dictionary sorts, such as Aaâäàå, must not be used.
Clustered Databases If you intend to use database server clustering, check that the shared disk array installation, configuration and verification steps have been completed before you attempt to install SunSystems.
Check that Windows Cluster Services has been installed and configured on each database server or nodes.
Note: Although SunSystems can be configured to operate against a clustered database server configuration, the application is not cluster-aware. In the event of a fail-over, application services should be restarted, and clients should be logged out and then logged back in.
Networking Microsoft TCP/IP is the recommended protocol for use with SunSystems. Appropriate IP addressing and name resolution must be in place for SunSystems to function correctly.
If the SunSystems application is behind a firewall, refer to the rest of this guide about how you can configure the SunSystems settings.
All ODBC components and MDAC components that are required by SunSystems are installed and configured as part of the installation process.

Installation Guide - SQL Server Page 29 of 95.
Cre
atin
g a
Secu
re S
unSy
stem
s In
stal
latio
n
Infor10 Financials Business (SunSystems)
Creating a Secure SunSystems Installation Introduction This section details the security requirements for configuring and running SunSystems, and describes the security issues in terms of database security and SunSystems application security. Recommendations are given on security settings for all Windows operating systems and database servers; issues such as file system and registry security are also covered.
Security Model SunSystems can be configured to use two different authentication methods. The simplest requires the user to enter their credentials upon accessing SunSystems, which are held encrypted in the database and validated to authenticate the user. If Windows authentication is required, with the correct configuration SunSystems obtains the Windows account credentials and uses these to log the user on to SunSystems. To define the ID of the user while using the application, mapping is required, but no further login requests are made.
SunSystems Connect Security SunSystems Connect provides web services that are accessible from anywhere using standard SOAP messaging. Historically, credentials were provided in the SOAP message itself, a relatively insecure way of submission because they could be intercepted.
To submit a SOAP request, the SunSystems security service issues vouchers to authenticated users. These vouchers are exchanged using industry standard public/private key exchange algorithms using the highest level of encryption available on the operating systems negotiating transfer. A client-side library is required to make these requests, and is provided for the Java programming environments and Microsoft programming environments.
For more information, refer to the SunSystems Connect Help and the SunSystems Integration Group.
Permissions and Ownership Users must have 'read' permissions and 'execute' permissions on the SunSystems program folder, and full permissions on the following folders:
Folders Usage
C:\Temp Temporary folder used for server context information and by Reporting
_back Used by SunSystems at runtime
_print Used by SunSystems at runtime
_work Temporary working directory
Ssc Used by SunSystems Connect
%ALLUSERSPROFILE%\Infor\
(Including all subfolders.)
Used by SunSystems at runtime, Logging and storing temporary files.
With regards to the operating system, the following permissions should be set: 'Read' and 'execute' to the SunSystems service accounts in \Winnt\System32.
Microsoft SQL Server SQL Server can operate in one of two security or authentication modes, depending on the chosen installation: Windows Authentication Mode (Windows Authentication). Mixed Mode (Windows Authentication and SQL Server Authentication).
Mixed Mode allows users to connect using Windows Authentication or SQL Server Authentication. Users who connect through a Windows user account can make use of trusted connections, that is, connections that are validated by Windows, in either Windows Authentication Mode or Mixed Mode. After successful connection to SQL Server, the security mechanism is the same for both modes.
Security systems that are based on SQL Server logins and passwords (SQL Server Authentication) might be easier to manage than security systems that are based on Windows user and group accounts. This is

Installation Guide - SQL Server Page 30 of 95.
Cre
atin
g a
Secu
re S
unSy
stem
s In
stal
latio
n
Infor10 Financials Business (SunSystems)
especially true for databases that are not mission critical and applications without sensitive and confidential information.
For example, a single SQL Server login and password can be created for all users of an application, rather than creating all the necessary Windows user and group accounts. However, this removes the ability to track and control the activities of individual users and is therefore not recommended for SunSystems applications.
Windows Authentication has certain benefits over SQL Server Authentication, primarily because of its integration with the Windows security system. Windows security provides more features, such as secure validation and encryption of passwords, auditing, password expiration, minimum password length, and account lockout after multiple invalid login requests.
SQL Server Services Accounts Depending on the Microsoft SQL Server components that you choose to install, SQL Server installs a variety of services. For the purpose of SunSystems security, the key service is the SQL Server Database service called MSSQLSERVER or MSSQL$<instancename> if it is a named instance.
Because many server-to-server activities can be performed only with a domain user account, you should use a domain user account on this service.
All domain user accounts must have permission to do the following: Access and change the SQL Server directory (\Mssql). Access and change the .mdf, .ndf, and .ldf database files, regardless of location. Log on as a service right. Read and write registry keys at and under the following locations:
– HKEY_LOCAL_MACHINE\Software\Microsoft\MSSQLServer
– HKEY_LOCAL_MACHINE\System\CurrentControlSet\Services\MSSQLServer
– HKEY_LOCAL_MACHINE\Software\Microsoft\WindowsNT\CurrentVersion\Perflib
For more information about other specific functionality, refer to your SQL Server documentation, in particular Books Online.
Citrix XenApp The SunSystems Windows services should not be set up to run under a local system account, because the system account performs network operations and has privileges that are not applicable for every user.
To secure the file system, use the SUBINACL utility, which is provided by Microsoft, to ‘lock down’ the file system. You can then grant permissions to the SunSystems directories that are specified in the File Permissions and Ownership subsection.
In addition to using standard Windows security features and practices, access to Citrix servers can be restricted in several ways: SunSystems is supported to work as a Published Application. This implies that all users on a specific
connection type can be restricted to running published applications. Published Application Manager allows you to restrict an application to specified users or groups of users (explicit user access only).
Citrix XenApp supports Internet firewalls that can be used to restrict Internet access to the Citrix XenApp server.
Users can be required to enter a user name and password to run an application (explicit user access only).
Citrix and most web professionals recommend that you either disassociate your Web site from your production system, or rigorously restrict external access. Any system accessible through the Internet is by definition a security risk and might give anyone unauthorized access to your production site through the web. Therefore, unless you have robust security and plan to use this with an Intranet, you should keep your web server on a separate network loop outside the firewall, if you have one.
SunSystems does not support anonymous user access by Citrix. SunSystems allows only the domain users to log on to SunSystems who are members of the clients group, for example, SunSystemsClients.
Publishing Applications SunSystems does not support anonymous user access. This ensures that access to SunSystems is restricted to domain users only.
To use SunSystems as a published application, domain users should be members of the SunSystemsClients group.

Installation Guide - SQL Server Page 31 of 95.
Cre
atin
g a
Secu
re S
unSy
stem
s In
stal
latio
n
Infor10 Financials Business (SunSystems)
Note: SunSystems supports different Hot Keys. For information about using the published application Hot Keys, refer to Citrix documentation.
Configuring Folder and Registry Permissions SunSystems downloads forms on a per user basis in the multipleclientfile folder. It is important that the users who download these forms have the correct privileges in the multipleclientfile folder.
In SunSystems, everyone has full control of the following folders: In Windows 2008, Vista, and Windows 7: ProgramData\Infor\SunSystems.
If SunSystems on Citrix XenApp is published with domain user access, complete the following steps: 1. Give write access to SunSystemsClients group on the location where reports are located, if they are
outside of SunSystems folder hierarchy. 2. Transfer desk creates files when running export. Systems administrator should configure write access to
SunSystemsClients group for this location.
Deployment Suggestions Consider having a separate partition for user data. If users are allowed to store data in the same partition as the system files and print queues, when the partition is full, they lose the ability to print, and the SunSystems application might become unstable. By keeping the data in a separate directory, an out-of-space error is generated instead.
Control Access through Groups
The administrator should create local applications groups or global applications groups, assign those groups the rights necessary to run the SunSystems application, and add global groups to them that contain the users who require access to the application.
Registry Security
You should set up a policy to be assigned to the SunSystems Group. Audit the system to ensure that SunSystems users have the minimum access permissions required to run the software.
CPU Optimization and SunSystems
CPU Optimization normalizes the usage of server resources by each user by smoothing out the normal CPU peaks that most applications have. CPU optimization is based on Citrix XenApp reserving approximately 20 percent of the CPUs for automatic optimization. Therefore, no single session controls the majority of CPU processing. When CPU power is borrowed from idle sessions or inactive sessions, it can be reallocated when that session becomes active again. Invoking CPU optimization is typically beneficial, and should not have any noticeable negative effect.
CPU optimization is recommended for a SunSystems deployment on Citrix XenApp.
Memory Optimization and SunSystems
Application memory is not a primary bottleneck in SunSystems, but on a different hardware platform with more processing power, the bottleneck could shift from CPU to application memory.
Memory optimization is recommended to turn on in SunSystems deployment on Citrix XenApp.
SpeedScreen and SunSystems
SpeedScreen technology is designed to optimise the graphics-based applications on Citrix, such as 3D graphics. However, this technology also helps to use the network bandwidth in a better way. We recommend that you turn on the SpeedScreen setting on the SunSystems deployment on Citrix XenApp.
Additional Scalability Recommendations 1. Disable Virtual Channels in the Citrix ICA session. 2. Profile Considerations: Roaming profiles with folder redirection could lead to performance loss if not
implemented with care. 3. Logically group servers and applications in the farm into two or more Load Managed Groups (LMG). 4. Network Performance: Match speed and duplex settings for 10/100 Mbps connection. Autosense for
1000 Mbps connection. Hardware and Configuration Recommendations 1. Dual processor computers provide the best results. For 32-bit systems, more than two processors
provide diminished returns.

Installation Guide - SQL Server Page 32 of 95.
Cre
atin
g a
Secu
re S
unSy
stem
s In
stal
latio
n
Infor10 Financials Business (SunSystems)
2. At least 4 GB of RAM are required. Memory extension with /PAE option may help, but too much memory with /PAE option might cause performance loss.
3. Set Static page file size. To prevent resizing, minimum and maximum settings should be constant. Citrix Web Client and SunSystems
Citrix XenApp 6.5 uses Citrix Web Interface to connect to published applications, so Citrix client is not required. SunSystems can be used with the Citrix Web Interface client. To do this, point your browser to the Web Interface URL of your Citrix server, for example:
http(s)://<servername>:<port number>/Citrix/AccessPlatform/site/default.aspx.

Installation Guide - SQL Server Page 33 of 95.
Dat
abas
e A
dmin
istr
atio
n
Infor10 Financials Business (SunSystems)
Database Administration Introduction SunSystems Installation DVD allows you to carry out database administration tasks on an existing installation.
The database processing procedure should start when the SunSystems Database Server link is invoked from the SunSystems installation screen. The SunSystems installation screen is displayed automatically when the DVD is inserted into the machine. If the SunSystems installation screen does not start automatically, either locate the DVD drive in Windows Explorer and double-click Setup.hta, or run D:\Setup.hta from a command prompt, where D:\ is your DVD drive.
After you start the database installation, you must select the database operation required.
Creating a New SunSystems Domain Database Use the Create a SunSystems Domain Database option to create a SunSystems Domain database on the local machine.
All SunSystems databases must be registered in a SunSystems domain. Therefore, the SunSystems Domain database must be created together with, or before, SunSystems databases in the same SunSystems domain.
This option is used if the SunSystems Domain database is to be on a separate database server to the database that is used for the SunSystems database(s) in the same SunSystems domain.
Note: All servers that host the SunSystems Domain database and SunSystems databases must reside in the same Windows domain. Cross-domain environments are not supported in this release.
A subset of the steps for a full installation is used for this operation. Although a subset of steps is required, the layout of dialog boxes that are displayed and the information that is required in each dialog box is the same as for a full installation. For instructions about the full installation procedure, refer to the Installing SunSystems section of this installation guide.
Creating a New SunSystems Data Database
Note: If you need to run this utility remotely, first ensure that your local machine has the SQL Server Tools installed. The utility uses SQL Server client connectivity components (specifically bcp.exe) to connect to the SQL Server instance on the remote machine, and will fail if these have not been installed.
The Create a SunSystems Database option uses scripts to create a SunSystems database on the local machine and registers this as follows: In a new SunSystems domain, by creating a new SunSystems Domain database on the local machine.
This happens if the domain database does not already exist. In an existing SunSystems domain through an existing SunSystems Domain database.
This option is used, as an alternative to creation during an Application Server installation, if the SunSystems database is to be created as follows: On a server remote from the Application Servers in the SunSystems domain. As an addition to those that were created/attached during Application Server installations for the
SunSystems Domain.
Note: All servers that host the SunSystems Domain database and SunSystems databases must reside in the same Windows domain. Cross-domain environments are not supported in this release.
Registering a second SunSystems database automatically converts the SunSystems domain to a multiple SunSystems database environment.
A subset of the steps for a full installation is used for this operation. Although a subset of steps is required, the layout of dialog boxes that are displayed and the information that is required in each dialog box is the same as for a full installation. For instructions about the full installation procedure, refer to the Installing SunSystems section of this installation guide.

Installation Guide - SQL Server Page 34 of 95.
Dat
abas
e A
dmin
istr
atio
n
Infor10 Financials Business (SunSystems)
Importing a Preconfigured SunSystems Data Database Do not attempt to run this function to create a database on a remote machine. Import a preconfigured SunSystems Data Database only works on the local machine and registers this as follows: In a new SunSystems domain by creating a new SunSystems Domain database on the local machine. In an existing SunSystems domain through an existing SunSystems Domain database.
This option is used, as an alternative to attaching during an Application Server installation, if the preconfigured SunSystems database is to be attached/installed as one of the following: On a server remote from the Application Servers in the SunSystems Domain. As an addition to those created/attached during Application Server installations for the Domain.
Note: All servers that host the SunSystems Domain database and SunSystems databases must reside in the same Windows domain. Cross-domain environments are not supported in this release.
Registration of a SunSystems database is prevented if the database contains a Business Unit that is already registered in the SunSystems domain. Business Units in a SunSystems domain must be unique.
Registering a second SunSystems database automatically converts the SunSystems domain to a multiple SunSystems database environment.
A subset of the steps for a full installation is used for this operation. Although a subset of steps is required, the layout of dialog boxes that are displayed and the information that is required in each dialog box is the same as for a full installation. For instructions about the full installation procedure, refer to the Installing SunSystems section of this installation guide.
Modifying Languages on a SunSystems Data Database The Modify Languages on a SunSystems Database option applies and removes Language Packs to and from SunSystems databases. It must be run on a machine that provides a SunSystems Domain database DSN connection and a SQL Server installation, such as the SunSystems Database Server, and must be rerun for each of the SunSystems databases in the SunSystems domain that require the adjustment.
To modify a language on a SunSystems Data database: 1. Uninstall the database Patch Sets using the DB Deployer tool. 2. Complete the Modify Languages on a SunSystems Database option in Database Utilities. 3. Reapply the database Patch Sets using the DB Deployer tool.
Note that if you make changes to existing business units you must update Configure Business Unit Data Models in Data Access Manager. Clear the Business Unit box, click OK, Save, and redo the configuration.
Note: Client and Application Server installations now include all standard SunSystems languages by default. It is only necessary to add languages to each SunSystems Data Database.
Database Utilities The Database Utilities option gives access to the utilities that are available for use against a SunSystems database. After you select this option, you can choose from the following options.
Structural Integrity Check This option checks the structural integrity of SunSystems database against a master template for that database version.
You have the option to run further database utilities.
Referential Integrity Check, SunSystems Data Only This option checks the integrity of a SunSystems database against a master template for that database version. You must specify the SQL Server Instance Name and the SunSystems database.
The integrity check is run and any errors or warnings are displayed.
Note: Database Integrity Check should be run before you upgrade so that any errors can be identified before a full upgrade.
You have the option to run further database utilities.

Installation Guide - SQL Server Page 35 of 95.
Dat
abas
e A
dmin
istr
atio
n
Infor10 Financials Business (SunSystems)
Referential Integrity Check, SunSystems Data Referenced to Domain Database This option carries out a referential integrity check of a SunSystems database. You must specify the SQL Server Instance Name and the SunSystems database.
The integrity check is run and any errors or warnings are recorded in the RI_ERR table.
You have the option to run further database utilities.
Load Differential Tables This option reloads the difference table in a specified SunSystems database with the data dictionary differences from a previous version of SunSystems. This information is required for a Custom Upgrade and allows you to create a SunSystems database, either from scripts or by attaching a preconfigured database, and to upload the difference tables for the version that you are upgrading from. You must specify the log file folder location and the domain database information. A list of SunSystems databases that are in the domain database is displayed. Select the required database and the version of the data to be loaded in the difference tables.
You have the option to run further database utilities.
Pre-Upgrade Outstanding Transactions Check This check should be run before you perform an upgrade. This check runs as part of the upgrade process and prevents the upgrade from progressing if it returns existing entries of outstanding transactions.
The checks that it performs are as follows: Checks for the existence of any Held Journals Checks for the existence on any entries in the Recover Failed Postings function (RFP) Checks for any entries in the ledger import queue Checks for the existence of any entries in the data audit.
SunSystems Domain Database Utilities Removing a SunSystems Data Database from a SunSystems Domain The Remove a SunSystems Database option removes a SunSystems database from a SunSystems domain and optionally deletes the database if it is held on the local machine.
Note: Removing a SunSystems database from a SunSystems domain deletes the Server files.
If removal from the SunSystems domain leaves only one registered SunSystems database, the domain automatically reverts to a single SunSystems database environment.
Note: Removal of the only remaining SunSystems database in a SunSystems domain renders the domain incomplete and in an unsupported state.
After you select the Remove a SunSystems Database option, carry out the following: Specify whether the database should be removed from the SunSystems domain, or removed and
deleted. Specify the location for log files. Select the datasource name used for the SunSystems Domain database for the SunSystems domain in
which the database to be removed is registered, and specify whether this uses integrated security. Select the datasource name used for the SunSystems database to be removed and optionally deleted. Confirm that the database and server instance details are correct. Confirm that the SunSystems domain and SunSystems database details are correct.
Re-link SunSystems Data Database to SunSystems Domain The Re-Link SunSystems Database option re-links the existing SunSystems database to existing SunSystems Domain database. This utility allows you to move SunSystems domain database and SunSystems data database from one server to another.
Recovering BU links This option runs the stored procedure SSP_REFRESH_BULINKS, which removes the existing Business Unit link entries and recreates them based on the current DB_DEFN entries on the SunSystems database.

Installation Guide - SQL Server Page 36 of 95.
Dat
abas
e A
dmin
istr
atio
n
Infor10 Financials Business (SunSystems)
Business Unit Group Parameter Maintenance The Business Unit Group Parameter Maintenance option provides facilities for the maintenance of parameters on existing SunSystems Domain databases and SunSystems databases.
The following options are then available.
Changing the Business Unit Group Name The Change Business Unit Group Name option is used to change the business unit group name that is used for the SunSystems database previously selected.
Enter a new Business Unit Group name.
Changing Double Byte Processing This setting is used on Double Byte Character Set (DBCS) operating systems or emulators, to validate your data for truncated or split characters during data entry, data importing, and posting.
Note: Null is used to signify that Single Byte Character Set (SBCS) processing is required.
SunSystems Database Migration SunSystems databases can be migrated from one database server to another. This process requires database administrator privileges and there are some prerequisites as well. The database migration process requires downtime of SunSystems.
The prerequisites are as follows: Source and destination SQL Server version should be same. Source and destination Windows version, service pack level and operating system language should be
same. The user performing the database migration should have Windows and database administrator
privileges. All the SunSystems users should log off and all the SunSystems windows services should be stopped. Create SQL Server Login for SunSystemsServices and SunSystemsClients groups on the target
database server. The windows group names should be same as used in the source SQL Server. Follow the database upgrade procedure detailed in the SunSystems Upgrade Guide - SQL. This procedure gives detailed steps required to migrate the database from one server to another.
Changing the Port Number If the TCP port in SQL Server has been changed, for example, from 1443 to 8030: 1. Open the Global.config file in ProgramData\Infor\SunSystems\Security. 2. Change the <port> number in the <sql-store> section to 8030. Save and close the file. 3. Change the database port to 8030 in DOMN_DSRCE_CONFIG. 4. Ensure that the ODBC SUNDOMAIN DSN is using port 8030. 5. Restart the SunSystems Security service. 6. Run Property Editor (PPE). 7. Change the system/jdbc/ url from
jdbc:jtds:sqlserver://{0}/{1};appName=Connect to jdbc:jtds:sqlserver://ACSUN:8030/{1};appName=Connect (The argument {1} should stay as it is.)
8. Restart the SunSystems Connect Server service. 9. Login to SunSystems, and check that Transfer Desk (TRD) is working.

Installation Guide - SQL Server Page 37 of 95.
SQL
Serv
er C
lust
erin
g
Infor10 Financials Business (SunSystems)
SQL Server Clustering Introduction In Microsoft SQL Server, database scalability is achieved through linked servers.
Important: SunSystems does not support cross-domain connections, therefore all client machines and server machines must be in the same Windows domain. Before you start, you should ensure that you have administrator access to the SQL Server machines and Domain Controller machine to configure, or to verify, the linked server environment.
Important: We do not recommend installing SunSystems components on the Active Directory Domain Controller. In addition, Microsoft advise against installing SQL Server on the Domain Controller.
Note: SunSystems does not support stand-alone or 2-tier setup in a linked server environment.
Note: When you create a new Linked Server, in the Server Options, set RPC=True and RPC Out=True; otherwise error messages are displayed when you set the Application Role in User Manager.
To configure the linked server environment, complete the following steps: 1. Configure the Windows Domain Controller. 2. Configure the local database server. 3. Configure the remote database server. 4. Verify the linked server connection. 5. Install SunSystems on the local database server. 6. Attach the remote database. 7. Install SunSystems Security on the local database. 8. Install SunSystems on the application server. 9. Serialize SunSystems on the application server. 10. Verify the linked server connection in SunSystems.
Configuring the Windows Domain Controller Log on as an Administrator and complete the following steps.
Adding Computers to the Active Directory To add the client, application server, and the database server computers to the Active Directory: 1. From the Windows Start menu, select Programs >> Administrative Tools >> Active Directory Users and
Computers. 2. In the console tree, double-click the domain node, and then click Computers. 3. Right-click in the details pane, and from the resultant context menu, click New >> Computer. 4. Enter the details of the computer to be added and click OK.
Adding Accounts to the Active Directory
Note: Before you complete the next step, you should plan which accounts are to be used as service accounts, such as accounts for SQL Server, Session Manager, SunSystems and SunSystems Security, and which accounts are to be used for users. You should also decide on the names and membership of the SunSystems account groups, one for Administration, such as SunSystemsServices, the other for Users, such as SunSystemsClients.
1. Add the service accounts, user accounts, and group accounts to the Active Directory. In this section, a single service account, called ADMIN, is used for SQL Server and all SunSystems application services; two user accounts, called SunUser1 and SunUser2, are also used. These accounts are added to SunSystems account groups, SunSystemsServices and SunSystemsClients. The SunSystemsServices group is used to hold the service account and the SunSystemsClients group used to hold the user accounts.
2. Create the SunSystemsServices group in the Microsoft Active Directory. 3. Create the SunSystemsClients group in Microsoft Active Directory.

Installation Guide - SQL Server Page 38 of 95.
SQL
Serv
er C
lust
erin
g
Infor10 Financials Business (SunSystems)
4. Create a user to be used as a service account. Provide a name, such as ADMIN. Select the Password never expires setting. Add the user to SunSystemsServices group.
5. Create user accounts, such as SunUser1 & SunUser2, and add them to SunSystemsClients group.
Configuring the Database Server Joining the Database Server to the Windows Domain If the database server is not in the domain, it must be joined. On the database server, log on as an Administrator and complete the following steps: 1. Open the Windows Control Panel and double-click System. 2. On the Computer Name tab of the System Properties dialog box, click Change. 3. Click the Domain option button, enter the name of the domain of which the local database server is to be
a member, and click OK. 4. Enter the name and password of an account that has permissions to join the domain, and click OK. 5. Reboot and log on as an Administrator.
Note: For ease of post-configuration troubleshooting, you should enable the Remote Desktop. To do this, open the Windows Control Panel and double-click System. On the Remote tab in the System Properties dialog box, select the Enable Remote Desktop check box. If required, click Change then click Add to add remote users.
Reconfigure the SQL Server Services If SQL Server 2008 R2 is already installed, the SQL Server services must be reconfigured to run under the domain service account, such as infor\ADMIN: 1. From the Windows Start menu, select Run. 2. In the Run dialog box, specify Services.msc, and click OK. 3. In the Services window, locate and double-click the SQL Server (<instance name>) service under Name
in the right-hand pane. 4. On the Log On tab, select This account and enter the domain service account name and password. 5. Stop and restart the service.
Note: If a SQL Server named instance is used, SQL Server Browser Service is required to connect to the server.
Reconfiguring SQL Server Properties SQL Server must be reconfigured to allow distributed transactions to run: 1. From the Windows Start menu click Programs >> Microsoft SQL Server 2008 R2 >> SQL Server
Management Studio. 2. Expand the SQL Servers node, and right-click the SQL Server instance that either already holds the
SunSystems Domain database, or, if not yet installed, the one that you intend to use. 3. Click Properties and then click the Connections panel. 4. Select the Allow remote connections to this server check box and the Require distributed transactions for
server-to-server communication check box. 5. If not already selected, select Configured values.
Configuring the Linked Server Connections To allow SunSystems to correctly run distributed transactions, such as the SunSystems applications software Installer, SunSystems Business Unit Create, Setup, and Copy, a linked server connection must be created on the database servers.
The Configuring the Distributed Transaction Coordinator Service section describes the diagnostic tests that should be run, and the actions to be carried out to verify that the initial configuration is correctly working. A later section describes the diagnostic tests and actions that should be run to verify the linked server connection in SunSystems applications.
Configuring the Linked Server Connection on the Database Server 1. Log on to SQL Server Management Studio using an administrator account (sysadmin rights on SQL
Server) 2. Expand the SQL Server instance node and click the Server Objects node. Right-click Linked Servers,

Installation Guide - SQL Server Page 39 of 95.
SQL
Serv
er C
lust
erin
g
Infor10 Financials Business (SunSystems)
and from the resultant shortcut menu, click New Linked Server. 3. Click General, set Linked Server to the other database server name, and click SQL Server in the Server
type section. 4. Click Security, click Be made using this security context, and provide a SQL Server administrator account
(sysadmin role on SQL Server). This account will be used to link to the other SQL Server. 5. To verify the linked server configuration, run the system stored procedure sp_linkedservers using
the master database. Two rows will be returned: one for the local server and the other for the remote server.
6. To verify the linked server login configuration, run the system stored procedure. sp_helplinkedsrvlogin. Two rows will be returned: one for the local server and the other for the remote server.
Configuring the Distributed Transaction Coordinator Service To allow distributed transactions to run, the Distributed Transaction Coordinator service must be configured on both database servers.
Note: If the operating system on database servers is restored from a single image, DTC will require reinstallation on all database servers involved in linked servers. To do so, follow Microsoft Windows online Help. If the operating system on database servers was installed from installation CD, DTC reinstallation is not required.
On the database server, complete the following steps: 1. From the Windows Start menu, click Control Panel >> Administrative Tools >> Component Services. 2. In Component Services, expand Component Services and double-click Computers. 3. Right-click My Computer, and from the resultant shortcut menu, click Properties. 4. Click the MSDTC tab. Verify that Use Local Coordinator is selected and that Default Protocol
Configuration is set to TCP/IP, and then click Security Configuration. Expand Distributed Transaction Coordinator. Local DTC, right-click, Properties.
5. In the Security Configuration Local DTC Properties dialog box >>Security tab, ensure that the following check boxes are selected: – Network DTC Access – Allow Remote Clients – Allow Inbound – Allow Outbound – No Authentication Required – Enable Transaction Internet Protocol (TIP) XA and SNA LU 6.2 Transactions.
6. Ensure that DTC Logon Account is set to NT Authority\NetworkService and click OK. 7. In the MSDTC service message box, if displayed, click Yes to restart the service. 8. In the DTC Console Message dialog box, click OK. 9. In the System Properties dialog box, click OK.
Note: Sometimes you must start the DTC service before you start the SQL Server service so that the linked server distributed queries work.
10. Repeat these steps for the other database server.
Verifying the Linked Server Connections For complete verification, you should test connections on the local database servers and the remote database servers. Early indication of configuration issues can be found by first running the diagnostic tests on the local database server.
Because SunSystems does not support stand-alone or 2-tier setup in linked server environment, all the linked servers testing should be performed from the machine proposed for SunSystems Application Server. This testing will require SQL server client installed on the machine.
The following tests assume that the SQL Server instances on both database servers are working correctly. For detailed problem solving strategies, refer to the Troubleshooting Linked Server Configuration section for more details.
Verify that a Local Query for Remote Database Server Data Runs Successfully 1. Start SQL Server Management Studio having logged into Windows as the ADMIN account (set up
above).

Installation Guide - SQL Server Page 40 of 95.
SQL
Serv
er C
lust
erin
g
Infor10 Financials Business (SunSystems)
2. In SQL Server Management Studio, login to local database server. Enter the server name as local database server, select authentication as Windows Authentication and click OK.
3. Open New Query. 4. Run the following statements to create a table and a view on SQL Server. This test checks the double-
hop login to SQL Server. Change the <sql instance n>.<database_name> according to your server name and database name. Create a database called test on each server and run the following:
-- Sql Instance 1 create table dbo.DOUBLE_HOPA (COL1 varchar(25)) go insert into dbo.DOUBLE_HOPA values ('Hop Works A') go -- Sql Instance 2 create table dbo.DOUBLE_HOPB (COL1 varchar(25)) go insert into dbo.DOUBLE_HOPB values ('Hop Works B') go -- Sql Instance 1 create view dbo.V_DOUBLE_HOP_A as select * from <sql Instance 2>.test.dbo.DOUBLE_HOPB go -- Sql Instance 2 create view dbo.V_DOUBLE_HOP_B as select * from <sql Instance 1>.test.dbo.DOUBLE_HOPA go
5. Log on to the proposed SunSystems Application server computer, with the ADMIN account. 6. Start SQL Server Management Studio, which is included with SQL Server client. 7. On the Login screen, click Windows Authentication and specify the SQL Server of SQL Instance 1. 8. Run the following query, changing the <sql Instance 2> to your SQL Server name:
select * from <sql Instance 2>.test.dbo.V_DOUBLE_HOP_B If the results are returned, the linked server connection from SQL Instance 2 is working.
9. Open another instance of SQL Server Management Studio. 10. On the Login screen, click Windows Authentication and specify the SQL Server of SQL Instance 2. 11. Run the following query, changing the <sql Instance 1> to your SQL Server name:
Select * from <sql Instance 1>.test.dbo.V_DOUBLE_HOP_A
If the results are returned, the linked server connection from SQL Instance 1 is working. If these verification steps pass then the linked server configuration is working.
Installing SunSystems on the Local Database Server Install SunSystems using the domain service account, and configure Session Manager to run under this account.
Attaching the Remote Database Run the SunSystems database installation. Choose the Upgrade/Add to Domain installation option and follow the prompts.
Your remote database will be added to the domain.
Installing SunSystems Security on the Local Database Following the addition of the remote database, you should run the SunSystems User Migration utility. This utility adds the relevant SunSystems operator and operator groups into the SunSystems Domain database.
Installing SunSystems on the Application Server Install SunSystems application server, and serialize for the Business Unit Group(s) on the local database server. Repeat the serialization for Business Unit Group(s) on the remote database server.

Installation Guide - SQL Server Page 41 of 95.
SQL
Serv
er C
lust
erin
g
Infor10 Financials Business (SunSystems)
Verifying the Linked Server Connection The linked server connection verification for SunSystems consists of running the following SunSystems functions: Business Unit Setup (BUS) Business Unit Copy (BUP) Business Unit Backup and Restore (BUB) SunSystems Connect (SSC), from within Transfer Desk SunSystems Connect (SSC), from web page Portal.
Ideally, all the above should be run; however, as a minimum, run the Business Unit Setup and Copy, and both SSC functions.
Business Unit Setup (BUS) Carry out the following steps to set up and create a Business Unit in SunSystems: 1. Log in to SunSystems. 2. Open Business Unit Setup (BUS), choose a Business Unit Group on the remote server, and create
Business Unit AAA. Provide all the required parameters for a business unit. 3. On the Business Unit Table Creation screen, click OK to start table creation.
Business Unit Copy (BUP) Copy the Business Units as follows: 1. Verify the copying of a business unit from a Business Unit Group on the local database server, to a
business unit in a Business Unit Group on the remote database server. To do this: – Open Business Unit Copy (BUP), and copy business unit PK1 from the local database server to BU
AAA on the remote server. Close Business Unit Copy. 2. Verify the copying in the other direction, from a business unit in a Business Unit Group on the remote
database server, to a business unit in a Business Unit Group on the local database server. To do this: – Open Business Unit Copy (BUCPY), and copy business unit AAA from the remote database server to
BBB on the local server. Close Business Unit Copy.
SunSystems Connect (SSC) from within Transfer Desk To verify SunSystems Connect from within Transfer Desk, complete the following steps: 1. Create a Transfer Desk Profile for an Accounts Export. Set Business Unit and file name to overridable.
Save and exit. 2. In Transfer Desk, run the Accounts Export profile setting the Business Unit to one in a Business Unit
Group on the local database server. 3. Run the profile again, setting the Business Unit to one in a Business Unit Group on the remote database
server.
SunSystems Connect (SSC) from Web Page Portal To verify SunSystems Connect from Web Page Portal, complete the following steps: 1. Open an Accounts Query to return all accounts; set the Business Unit to one in a Business Unit Group on
the local database server. 2. Run the query again, setting the Business Unit to one in a Business Unit Group on the remote database
server.
Troubleshooting the Linked Server Configuration The failing query can be identified by re-running the failing function/action again after having started a SQL Server Profiler trace on the local database servers and the remote database servers. You should set both traces to include Errors and Warnings and Security Audit events. Rerun the failing query or action again. When the error has occurred, stop both traces and examine the trace for errors, which are highlighted in red.
Typically, problems fall into one of the following categories: Establishing connections Distributed transactions Distributed transactions looping back.

Installation Guide - SQL Server Page 42 of 95.
SQL
Serv
er C
lust
erin
g
Infor10 Financials Business (SunSystems)
Establishing Connections Verify that your network name resolution works. Check that the servers can ping to one another by name, not just by IP address. Check in both directions: server A to server B, and server B to server A.
Ensure that you use ping /a to compare results. Any name resolution problems on the network must be resolved before your distributed query will work; this might involve updating/adding WINS, DNS, or LMHost file entries.
Check that @@servername on both servers matches the machine name of each server. If it does not, you must rename the server.
Ensure that the linked servers can be dtc pinged. If dtc ping fails (and depending upon the failure), ensure that the firewall's RPC ports are properly opened.
Distributed Transactions Start the Distributed Transaction Coordinator (DTC) service on all involved servers. If it cannot be started, troubleshoot or reinstall.
If the database server operating system is restored from an image, the unique identifier for DTC will be the same on different database servers; this prevents DTC from being used in transactions. To solve this problem, you must reinstall DTC. For information about how to do this, refer to Microsoft Windows online Help.
You should verify that the Distributed Transaction Coordinator service is configured, as described in the Configuring the Distributed Transaction Coordinator Service section.
If any of the SQL Servers are on a cluster, the DTC on the cluster must have its own IP address. You must check for correct name resolution for the DTC service on each clustered server. The IP address of a clustered DTC must be defined in your name resolution system (WINS, DNS, LMHost).
Set the remote proc_transaction configuration setting off for the server, or before you run any distributed query, issue SET REMOTE_PROC_TRANSACTIONS OFF.
Before you run your query, run the statement SET XACT_ABORT ON.
Distributed Transactions Looping Back Check the object that you referenced on the remote server. If it is a view or stored procedure, or causes a trigger to be run, does it implicitly/explicitly reference yet another server? If so, the third server could be the source of the problems. Can you run the query directly on the remote server?
Does the object on the remote server refer back to the local server? If so, this is a loopback situation. As documented in SQL Server Books Online, this is not supported. If you are not sure that a distributed transaction is required, you can limit the code in the transaction that involves a distributed query to the code that is necessary for transactional integrity. In many cases, you can separate locally run steps from the remote steps to achieve this goal.
SQL Server Clustering Installation Clustering refers to a group of two or more servers, or nodes that work together and represent themselves as a single virtual server to a network. When a client machine connects to clustered SQL servers, they are recognised as a single SQL server. If one of the nodes fails, its responsibilities are taken over by another server in the cluster. The end-user notices few, if any, differences before, during, and after the failover.
When you install SunSystems in a SQL clustered environment for the first time, complete the following steps during the installation setup: 1. Select the option to Create a SunSystems Database. If a Domain Database does not already exist, this
option creates one for you. 2. In the Domain Database Settings dialog box, enter the name of the clustered SQL Server (also known as
Virtual Server) in the DataSource Name field. In the Instance Name field, enter the instance name, such as SQLCLUSTER1\SERVER1. In the Database Name field, enter the Virtual SQL Server name.
3. In the SunSystems Domain Database Creation dialog box, change the Data File Location and Log File Location onto the shared disk array. In the event of a failure, this change ensures that the secondary node has access to all relevant SunSystems files to continue with operations.
4. After SunSystems has been installed, you must edit a table in the Domain Database for the ServerFiles and Example Reports location to reference the SQL Virtual Server, therefore allowing these files to be available during a failover.

Installation Guide - SQL Server Page 43 of 95.
SQL
Serv
er C
lust
erin
g
Infor10 Financials Business (SunSystems)
5. From the SunSystems Installation DVD, run the Database Installation Setup, click Next. 6. In the Important Information dialog box, click Confirm. 7. In the Database Processing dialog box, click Parameter Maintenance. To continue, click Next. 8. In the Domain Database Datasource Selection dialog box, click Datasource for the Domain Database. To
continue, click Next. 9. In the Parameter Maintenance dialog box, click Datasource Specific Options and then click Next. 10. Select the Datasource Name for the SunSystems Database and confirm the Password. Click Next. 11. To confirm the changes being applied, click Yes. 12. In the Parameter Maintenance (SUNDSN) dialog box, click Update Shared Folder Location and click
Next. 13. Confirm the warning and click Next. 14. Enter the new value for the Server Files and ExampleReports. These are the same, except you must
substitute the SQLServer name with the Virtual SQL Server, such as the following: SQL Server = RDSQLSERVER Virtual SQL Server = RDSQLCLUSTER New Value \\RDSQLCLUSTER\SharedFiles\ServerFiles Current Value \\RDSQLSERVER\SharedFiles\ServerFiles
Note: If a SQL Server named instance is used, as is usual when implementing a SQL Server failover cluster, the SQL Server Client Utilities must be installed on the application server for SunSystems Connect, Transfer Desk, and certain reports to operate correctly.
Note: The following steps must only be completed if Application Server Load balancing and SQL Clustering is being used.
15. To ensure that the RptParams directory is available during a failover, it must be integrated into the Cluster. Complete the following steps from a cluster node that has access to the shared disk array and the Cluster Administrator tool: a) Launch Cluster Administrator. b) Select the Disk-Group that contains the installation of the virtual SQL server, such as SQLCLUSTER1. c) Click File >> New >> Resource. d) Enter the Resource Name and Description, and change the Resource Type to File Share. Click Next. e) Select the SQL server owners of the File Share. Click Next. f) Select the Dependencies that the File Share should reply upon, which should be the resource that is
brought online by the cluster service first. Click Next. g) Enter RptParams as the share name. h) Enter O:\Program Files\SunSystems\RptParams for the path name, where O is the drive
letter of the disc array. Click Finish. i) To manually bring the new Cluster entry online, right-click the entry and click Bring Online.
Database Replication Database replication is not supported by SunSystems with either SQL Server or Oracle.

Installation Guide - SQL Server Page 44 of 95.
SunS
yste
ms
Con
nect
(SSC
)
Infor10 Financials Business (SunSystems)
SunSystems Connect (SSC) Introduction SunSystems Connect (SSC) provides an Extensible Markup Language (XML) and Simple Object Access Protocol (SOAP) interface through which developers can access SunSystems data and core functionality.
Software requirements Microsoft Windows 2008 R2 or 2008 (Standard or Enterprise) is required for the SunSystems Connect and Automation Desk installation.
Where a third party application is written that makes a SOAP call to SSC, the machines on which it is run must have the correct version of all the necessary supporting software installed, for example, the correct Microsoft SOAP Toolkit.
Installing SSC When you install SunSystems Application Server, the Connect Server is automatically installed.
Note: SunSystems Connect functionality consists of Property Editor (PED) and Component Manager (CM). Component Manager can be run only on a server with the client installed on it. Therefore, Component Manager (CM) cannot be run on the client machine, in a client-only installation. Property Editor can be run on a client machine; however, several properties are not applicable.
Note: The SSC service account must be a valid domain user account and should be the same as that nominated for the SunSystems Session Manager service. A valid set of print drivers should be installed and must be the printer that is set in Document Format Setup.
SSC Layout SSC is installed into the subdirectory ssc in the SunSystems program directory. The default folder structure and requirements for Write Permissions are listed in Appendix B.
Changing SSC TCP port value By default, SSC is configured on TCP port 8080. To change this value, use the Switch server utility that is provided with SunSystems.

Installation Guide - SQL Server Page 45 of 95.
Scal
abili
ty –
App
licat
ion
Serv
ers
and
SunS
yste
ms
Con
nect
Infor10 Financials Business (SunSystems)
Scalability – Application Servers and SunSystems Connect Introduction SunSystems can be implemented in several configurations and therefore offers the flexibility to plan and deploy the product in a variety of scenarios that are tailored to meet specific requirements. For the more complex or demanding implementations of SunSystems, several options are available to allow further growth of the infrastructure.
This section outlines some of these options, by introducing the concept of multiple application servers. However, this is not to be confused with clustering for failover that is limited to the database server tier and is supported for SQL Server by Microsoft. Clustering for failover is documented at the end of this section.
Note: Planning a scalable infrastructure for SunSystems is a task suited to experienced consultants who understand the dynamics of the software. SunSystems is a sophisticated application and the way it is used can affect the way it should be deployed. You should consult your SunSystems software provider for such implementations.
Static Load Balancing The simplest way to achieve scalability is the addition of another server to act as an application server. In this scenario, an additional server is installed with the SunSystems application software and a selected number of clients moved from pointing to their original server to the new server.
The benefits of static load balancing are as follows: It is easy to set up No additional hardware or software required.
However, you should be aware of the following before you begin with this type of implementation: It takes no account of comparative server load If a server fails, client must be manually redirected to an active server.
Hardware-Based Dynamic Load Balancing This uses dedicated hardware, such as a router, that can be configured to share IP traffic between servers. Hardware capabilities will vary, but the key requirement is the ability to set server affinity for the duration of session activity.
The benefits of hardware-based dynamic load balancing are as follows: It shares the requests between servers You can add and remove servers with no server configuration No client reconfiguration is required Offers more sophisticated load distribution models to choose from.
You should be aware that additional hardware is required.
Important Note: Because of the complexity of this configuration, before you start to implement hardware load balancing, seek advice from your SunSystems software provider.
Software-Based Dynamic Load Balancing This uses third party software, such as the Windows Network Load Balancing (NLB) available with the 2008 Enterprise Server products. Using such software, you can configure multiple servers to be seen as a single IP address by the rest of the network. Clients must only point to this ‘virtual’ IP address and the NLB decides which server processes the request.
The benefits of software-based dynamic load balancing are as follows: No additional hardware is required. It shares the requests between servers. You can add and remove servers with minimal effect on service. No client reconfiguration is required.
However, you should be aware of the following: Licensing costs can be expensive.

Installation Guide - SQL Server Page 46 of 95.
Scal
abili
ty –
App
licat
ion
Serv
ers
and
SunS
yste
ms
Con
nect
Infor10 Financials Business (SunSystems)
A basic load distribution algorithm is used. It can be difficult to set up. Two Network cards (NICs) are required for each server.
Prerequisites for Application Server Load Balancing Before you start load balancing configuration on SunSystems application server, check the following prerequisites: The application machines are running Windows 2008 or Windows 2008 R2. Windows Network Load Balancing component is installed on every application server that will be part of
the cluster. If you are configuring load balancing using Unicast, then every application server machine must have 2
Network Interface Cards (NIC). Static IP addresses are available for each machine, as given in the following section. There is a DNS server available on the network. Each application server name can be resolved by DNS. The client machines are running Windows 7 or Windows 8.
Configuring Software-Based Load Balancing with Windows Server 2008, Windows Server 2008 R2 or Windows Server 2012 This section provides details for configuring SunSystems with load balancing. For the steps involved in Network Load Balancing Manager configuration, refer to relevant Microsoft Windows documentation.
Note: Microsoft have advised that although the Network Load Balancing (NLB) functionality in Windows Server 2012 is mostly the same as Windows Server 2008 R2, some task details have been changed in Windows Server 2012.
For network load balancing configuration, refer to the “Port Rules Tab for Application Load Balancing” section.
Setup Environment The environment is shown below and in more detail in the table.
Note: For brevity, in this scenario only two Clients and two Servers are used.

Installation Guide - SQL Server Page 47 of 95.
Scal
abili
ty –
App
licat
ion
Serv
ers
and
SunS
yste
ms
Con
nect
Infor10 Financials Business (SunSystems)
Test Environment Operating System Computer Name
IP Address
DATABASE SERVER Windows 2008 R2 Server/ SQL Server 2008
DB 10.10.10.30
APPLICATION SERVER 1
Windows 2008 R2 Server
AD1
1st NIC 10.10.10.31
2nd NIC 10.10.10.40
Load Balance IP 10.10.10.36
APPLICATION SERVER 2
Windows 2008 R2 Server
AD2
1st NIC 10.10.10.32
2nd NIC 10.10.10.41
Load Balance IP 10.10.10.36
CLIENT 1 Windows 7 CL1 10.10.10.33
CLIENT 2 Windows 7 CL2 10.10.10.34
The dedicated IP address for the machines and the Load Balanced IP addresses must be static IP addresses, not DHCP addresses. TCP/IP is the only network protocol that should be present on the cluster adapter. Do not add any other protocols, such as IPX, to this adapter.
Each of the two Application Server NICs is defined with a unique IP address. The NIC dedicated for Load Balancing is defined with two IP addresses: one for the card, such as 10.10.10.40; and one for the Load Balance Cluster, such as 10.10.10.36. This Cluster IP address exists on both Application Servers.
Installing Network Load Balancing if it was Previously Uninstalled Cluster Parameters Tab Primary IP address
This is a virtual IP address and must be set identically for all hosts in the cluster. This IP address is used to address the cluster as a whole, such as 10.10.10.36.
Subnet mask
This denotes the subnet mask for the IP address specified, such as 255.0.0.0.
Full Internet name
This specifies a full Internet name for the Network Load Balancing cluster. The name should be resolvable to the cluster's primary IP address through the DNS server or Hosts file; for example, cluster.rddomain.rd.com.
Network address
This specifies the network address (MAC address) for the network adapter to be used for handling client-to-cluster traffic. Network Load Balancing automatically generates the network address based on the cluster's primary IP address.
Multicast support
This check box should be selected if you are using a single net adapter. However, because this topic covers the use of two network adapters, this check box must not be selected.

Installation Guide - SQL Server Page 48 of 95.
Scal
abili
ty –
App
licat
ion
Serv
ers
and
SunS
yste
ms
Con
nect
Infor10 Financials Business (SunSystems)
Remote password
This specifies a password to be used for restricting access to the cluster from remote, networked computers running Windows 2008 using the Wlbs.exe cluster control program.
Remote control
This specifies whether remote control operations are enabled. This check box must remain cleared.
Host Parameters Tab Priority (Unique host ID)
This ID is for handling default network traffic that is not otherwise specified on the Port Rules tab. The ID is used in case a host in the cluster goes offline, and determines which host in the cluster takes over handling this traffic, if required. On each application server, this number should be unique, such as AD=1, AD2=2.
Initial cluster state
This check box should be selected so that Network Load Balancing can start and join the cluster when the Advance Server is started.
Dedicated IP address
This is the unique IP address for the application server used for network traffic that is not associated with the cluster. This IP address is the original IP address assigned to the Application Server, such as 10.10.10.40 or 10.10.10.41.
Subnet mask
This denotes the subnet mask for the IP address specified, such as 255.0.0.0.
Port Rules Tab
Note: The following setting should be identical on all Application Servers in the Load Balancing Cluster. If you are implementing Application Load Balancing in a Citrix environment, skip this section and refer to the Port Rules Tab for Citrix section.
Port range
This specifies the TCP/UDP port range that a port rule should cover. Port numbers in a range of 0 to 65,535 are currently supported. This can be left as the default.
Protocols
This allows you to choose the specific TCP/IP protocol that a port rule should cover: TCP, UDP, or both. The default is Both.
Filtering mode
Select Multiple hosts for both Application Servers to handle SunSystems traffic. This specifies that multiple hosts in the cluster handle network traffic for the associated port rule.
Affinity
Select Single. This option specifies that Network Load Balancing directs multiple requests from the same client IP address to the same cluster host. This is the default setting for affinity.
Load weight
Set the load weight to Equal so that both Application Servers equally distribute SunSystems traffic.
Handling priority
This option is not used when the Filtering mode is set to Multiple hosts.
Network Load Balancing Configuration Test in Windows Server 2008, Windows Server 2008 R2 and Windows Server 2012 After you complete the Network Load Balancing Manager configuration, complete the following steps to verify the configuration: 1. To check whether the Load Balancing Cluster IP address is accessible by the network, a ping test can
be performed from within a command prompt screen. On a client machine, do the following: a) Click the Windows Start button and click the Run icon.

Installation Guide - SQL Server Page 49 of 95.
Scal
abili
ty –
App
licat
ion
Serv
ers
and
SunS
yste
ms
Con
nect
Infor10 Financials Business (SunSystems)
b) Type CMD in the Run dialog box and click OK. c) When the screen is loaded, type PING followed by the cluster IP address. For example, PING
10.10.10.36. One of the following messages is displayed: Successful Reply from 10.10.10.36 Unsuccessful Request Time Out.
2. If communication is unsuccessful, recheck Load Balancing Setup and try the test again. 3. Repeat the Network Load Balancing configuration steps on each Application Server to be used in the
Network Load Balancing cluster. 4. You can check that each Application Server joins the Load Balance cluster:
a) On an Application Server, open Event Viewer. This is located in the Control Panel >> Administrative Tools.
b) An entry should exist where the Source tab indicates WLBS (2008 / 2008 R2) or NLB (2012). Double-click the entry. Any errors produced by Load Balancing are shown. If the Application Server has joined the Load Balance group, it shows that server 1 has converged with server 2.
c) If the convergence entry does not exist and only one server is mentioned, recheck Load Balancing Setup and recheck Event Viewer.
5. To resolve the Load Balancing Cluster name, such as cluster.rddomain.rd.com, to the cluster IP address, such as 10.10.10.36, a DNS entry must be manually created on the DNS Server by a Server Administrator. This creation allows IP and name resolution.
6. After this DNS entry has been created, perform a ping test from within a command prompt screen. On a client machine, do the following: a) Click the Windows Start button and click the Run icon. b) Type CMD in the Run dialog box and click OK. c) When the screen is loaded, type PING and the cluster DNS name. For example, PING cluster. One of
the following messages is displayed: Successful Reply from 10.10.10.36 Unsuccessful Request Time Out.
d) If communication is unsuccessful, recheck Load Balancing Setup and try the test again.
SunSystems Configuration in a Load Balancing Environment
Note: The following sections are applicable to all Implementation Methods: Static Load Balancing, Hardware-Based Dynamic Load Balancing, and Software-Based Dynamic Load Balancing.
If SunSystems software is installed on multiple Application Servers, the data elements not held in the database, such as the report parameters (RptParams) directory, are duplicated and can cause version inconsistencies. To prevent this, a shared and centralized location for this directory is required, which can be achieved by the following manual configuration.
Note: In a load balancing environment, the server that holds the installation of the SunSystems application files is referred to as the Application Server; a potential server or workstation that will contain the RptParams directory is referred to as the Central Data Server – you should use the database server for this task.
Port Rules Tab for Application Load Balancing To remove affinity from a single Citrix/application server, the following port rules are recommended to enhance load balancing ratios.
Note: The following table is a guide that covers modifying port rules for four load balanced application servers. The same scenario exists for fewer or more application servers, although the port ranges vary depending on customer requirements.
By using the following port range, each server in the cluster reflects the same port ranges, but the servers are configured with a cascading port range, and varied load priority. Each server must have the following port rules:
Listener port (50000) specified as Affinity = None.
The following port ranges are specified as Single server and Equal distribution.

Installation Guide - SQL Server Page 50 of 95.
Scal
abili
ty –
App
licat
ion
Serv
ers
and
SunS
yste
ms
Con
nect
Infor10 Financials Business (SunSystems)
Example AppSrv1 Start End Mode Load/Priority Affinity
8080 8080 Multiple Equal None
50000 50000 Multiple Equal None
50001 50002 Multiple Equal Single
50005 50006 Multiple Equal Single
50008 50008 Multiple Equal Single
55001 55001 Multiple Equal Single
55000 55000 Multiple Equal Single
40100 40199 Single 1 Not Applicable
40200 40299 Single 2 Not Applicable
40300 40399 Single 3 Not Applicable
40400 40499 Single 4 Not Applicable
Example AppSrv2 Start End Mode Load/Priority Affinity
8080 8080 Multiple Equal None
50000 50000 Multiple Equal None
50001 50002 Multiple Equal Single
50005 50006 Multiple Equal Single
50008 50008 Multiple Equal Single
55001 55001 Multiple Equal Single
55000 55000 Multiple Equal Single
40100 40199 Single 4 Not Applicable
40200 40299 Single 1 Not Applicable
40300 40399 Single 2 Not Applicable
40400 40499 Single 3 Not Applicable
Example AppSrv3 Start End Mode Load/Priority Affinity
8080 8080 Multiple Equal None
50000 50000 Multiple Equal None
50001 50002 Multiple Equal Single
50005 50006 Multiple Equal Single
50008 50008 Multiple Equal Single
55001 55001 Multiple Equal Single
55000 55000 Multiple Equal Single
40100 40199 Single 3 Not Applicable
40200 40299 Single 4 Not Applicable
40300 40399 Single 1 Not Applicable
40400 40499 Single 2 Not Applicable

Installation Guide - SQL Server Page 51 of 95.
Scal
abili
ty –
App
licat
ion
Serv
ers
and
SunS
yste
ms
Con
nect
Infor10 Financials Business (SunSystems)
Example AppSrv4 Start End Mode Load/Priority Affinity
8080 8080 Multiple Equal None
50000 50000 Multiple Equal None
50001 50002 Multiple Equal Single
50005 50006 Multiple Equal Single
50008 50008 Multiple Equal Single
55001 55001 Multiple Equal Single
55000 55000 Multiple Equal Single
40100 40199 Single 2 Not Applicable
40200 40299 Single 3 Not Applicable
40300 40399 Single 4 Not Applicable
40400 40499 Single 1 Not Applicable
Warning: The following section contains information about modifying the registry. Before you modify the registry, you must create a backup of the registry and ensure that you understand how to restore the registry if a problem occurs.
After the changes have been made on the Load Balanced network card, you must modify the port range in the registry on each application server as follows: 1. Run Regedit. 2. Find the following registry location:
HKEY_LOCAL_MACHINE\SOFTWARE\Wow6432Node\SunSystems\Core\5.1\SessionManager. 3. Within this registry key, make the following changes to the PortRange1_Max and PortRange1_Min
to reflect the changes in the table for each Application Server: AppSrv 1 Max = 40199 Min = 40100 AppSrv 2 Max = 40299 Min = 40200 AppSrv 3 Max = 40399 Min = 40300
AppSrv 4 Max = 40499 Min = 40400.
Load Balancing SunSystems Connect (SSC) By default, SSC refers to the local host when running. To enable SSC to function in a load balanced environment, you must make the following changes on each Load Balanced Application Server: 1. Run Property Editor (PPE). 2. Select Tomcat. 3. Select additional_hosts and enter the Load Balanced IP address. Save the changes and log out. 4. For the change to take effect, stop and start the SunSystems Connect Service. 5. Repeat steps 1-4 for each remaining application server.
You can now run SSC.

Installation Guide - SQL Server Page 52 of 95.
Secu
re S
ocke
ts L
ayer
(SSL
)
Infor10 Financials Business (SunSystems)
SunSystems Reporting Services (SRS) IIS and SunSystems Reporting Reporting uses its own Web site rather than the default Web site. The SRS Web site must be configured to use a port number other than the default port number.
During installation you are asked to specify two port numbers because on complex multi-tier installations, where Report Manager and Report Server are installed on different machines, a different port number may be used on each machine.
Setting up E-mail Distribution of SunSystems Reports To configure SQL Server Reporting Services for sending e-mails using a simple SMTP server:
Note: More complex scenarios, such as SSL access to the SMTP server, require more complex configuration.
1. Run Reporting Services Configuration Manager. 2. Select E-mail Settings. 3. Enter Sender Address and SMTP Server. 4. Edit rsreportserver.config found in the Reporting Services\Report Server\ folder in your SQL
Server Reporting Services installation. <UrlRoot>http://SERVERNAME:80/ReportServer_INSTANCENAME</UrlRoot>
<SendEmailToUserAlias>False</SendEmailToUserAlias>.
For non-standard SMTP configurations you may also need to update tags:
<SMTPServerPort>
<SMTPUseSSL>
<SMTPAuthenticate>
These are documented at http://msdn.microsoft.com/en-us/library/ms157273.aspx. 5. Add Generate events to the System Administrator’s System Roles. 6. Run SQL Server Management Studio 7. Connect to Reporting Services and login in as SunSystemsReporting user (or a user with SSRS
administrators rights) 8. Expand Security >> System Roles >> System Administrator. 9. Right-click and select Properties. 10. Ensure Generate events is selected 11. Run an e-mail report in SunSystems by entering the e-mail recipient on the report output tab before you
run the report.
Changing SunSystemsReporting User and Password The installation process sets the SunSystems Reporting user as the user for both the SSRS and IIS. If after installation it is necessary to change the user or the password you must follow these steps.
Step 1: Update the credentials used by SQL Server Reporting Services 1. On the server hosting SQL Server Reporting Services, run Reporting Services Configuration Manager
from the Start Menu. 2. Select the instance of SQL Server Reporting Services used by SRS. 3. Select Service Account. 4. Select Use another account. 5. Enter the account name and password for the new SunSystems Reporting user. 6. Click Apply. 7. If required, back up your new encryption key to the local file system. 8. Check for any errors in the Results panel.
Step 2: Update the credentials used by the SRS web applications

Installation Guide - SQL Server Page 53 of 95.
Secu
re S
ocke
ts L
ayer
(SSL
)
Infor10 Financials Business (SunSystems)
Note: For x86 machines, substitute all occurrences of %ProgramFiles(x86)% with %ProgramFiles%.
1. From an Administrator command prompt on the SRS Server, run the following commands: cd C:\windows\Microsoft.Net\Framework\v2.0.50727\ aspnet_regiis.exe –pdf "system.web/identity" "%ProgramFiles(x86)%\Infor\SunSystems Reporting Services\web\SunSystemsReportServer" aspnet_regiis.exe –pdf "system.web/identity" "%ProgramFiles(x86)%\Infor\SunSystems Reporting Services\web\SunSystemsReportManager"
2. Using Notepad, open web.config in %ProgramFiles(x86)\Infor\SunSystems Reporting Services\web\SunSystemsReportServer.
3. Change the userName and password values of the identity element in the file, to the new SunSystems Reporting user: <identity impersonate="true" userName="domain\newuserid" password="password@123456" />
4. Using Notepad, open web.config in %ProgramFiles(x86)%\Infor\SunSystems Reporting Services\web\SunSystemsReportManager.
5. Change the userName and password values of the identity element in the file, to the new SunSystems Reporting user: <identity impersonate="true" userName="domain\newuserid" password="password@123456" />
6. Update IIS to use the new SunSystems Reporting user.
Step 3: Update IIS to use the new SunSystems Reporting user 1. Logon to the SRS server and open the SRS installation log file, SRS_Install.log. Typically this is
C:\ProgramData\Infor\Logs\SunSystems\Install. 2. Find the first log entry for ConfigureReporting.exe and copy the line into Notepad. 3. Delete all text before “ConfigureReporting.exe”. Delete the closing bracket at the end of the line. Change
the user and password parameter values. 4. From an Administrator command prompt on the SRS server, run the following command:
cd %ProgramFiles(x86)%\Infor\SunSystems
Note: If you are running a dedicated SRS server, you must run this command instead:
cd %ProgramFiles%\Infor\SunSystems Reporting Services\apps
5. Copy and paste the command line text from Notepad into the command prompt and run the command. 6. Any other services that use the Reporting Services User are required to be changed such as the
SunSystemsReportingPrintService. 7. When moving from a domain account to a local account (or vice versa) you may need to add/remove
RSWindowsNegotiate to the AuthenticationTypes in the rsreportserver.config of SSRS.
<Authentication> <AuthenticationTypes> <RSWindowsNegotiate /> <RSWindowsNTLM /> </AuthenticationTypes> <RSWindowsExtendedProtectionLevel>Off</RSWindowsExtendedProtectionLevel> <RSWindowsExtendedProtectionScenario>Proxy</RSWindowsExtendedProtectionSc
enario> <EnableAuthPersistence>true</EnableAuthPersistence>
</Authentication>
Ensure that the new account has Read and Execute permissions to the Microsoft Reporting Services RSTempFiles folder, and all sub-folders. The path of the RSTempFiles folder is typically %ProgramFiles%\Microsoft SQL Server\<instance name>\Reporting Services\RSTempFiles.

Installation Guide - SQL Server Page 54 of 95.
Secu
re S
ocke
ts L
ayer
(SSL
)
Infor10 Financials Business (SunSystems)
E-mail Support The support for emailing reports has been improved and no longer uses the inbuilt Microsoft Reporting Services E-mail facility. The administrator now defines the e-mail server and default ‘from’ address when installing this version. In addition, a log is now written to the report server detailing the recipients emailed and the attachments sent.
Load Balancing SunSystems Reporting Services Note: SRS Report Server load balancing is not currently supported.
You can load balance the SRS Report Manager: 1. While installing the SunSystems Reporting components, specify the load balanced server address for
Report Manager. 2. In the SunSystems Domain database, edit the DOMN_VRTL_HOST table. 3. Select the row where DFLT_PATH=’SunSystemsReportManager’. 4. Update ACTUAL_HOST_NAME to the load balanced server name for SRS Report Manager.

Installation Guide - SQL Server Page 55 of 95.
Secu
re S
ocke
ts L
ayer
(SSL
)
Infor10 Financials Business (SunSystems)
Secure Sockets Layer (SSL) Publishing SunSystems through SSL Introduction The instructions below assume that you have SunSystems Security Web, SunSystems Web and SunSystems Reporting Services on the same server.
For SunSystems Web, be careful of case sensitivity when editing server.xml. For example, keystorePass= must be exactly right.
The following table shows suggested ports and certificate names. We recommend you update the table with the details of your installation.
http https Certificate and path Certificate password
Security Web
81 82 IIS: SunWeb Certificate
SunSystems web
9080 9443 SunWeb.jks
SunSystems Reporting
94 83 IIS: SunWeb Certificate
Transfer Desk Web
9090 9091 IIS: SunWeb Certificate
SSC 8080 8443 SunWeb.jks
Prerequisites For the following steps you must install java jre 1.6 latest version, and set environment variable JAVA_HOME. Add ;%JAVA_HOME% to the end of your PATH environment variable.
Obtaining a Domain Certificate from Certificate Authority through IIS and Exporting The certificate we are about to obtain is computer name specific, but can be used more than once, and can be converted from IIS to java format to be used for SunSystems Web and SSC which both run in tomcat.
Obtain Certificate: In IIS Manager, left hand panel: click server machine; middle panel: double-click - Server Certificates; Action panel: Create Domain Certificate. Use FQDN servername.domain.com for common name. Enter SunWeb Certificate as a friendly name.
Export the certificate from IIS to create the file SunWeb.pfx. Make a note of the destination folder and the password you entered.
Converting your Certificate from IIS format to Java format using Jetty 1. Download Jetty from:
http://dist.codehaus.org/jetty/jetty-6.1.x/jetty-6.1.1.zip. 2. Extract this zip file into a folder. For example, \ProgramData\Infor\SunSystems\Jetty. The only
file required is jetty-6.1.1.jar. 3. In a command prompt, go to the lib subfolder containing jetty-6.1.1.jar, then run the following
command to check java environment variables are set up correctly: java -classpath jetty-6.1.1.jar org.mortbay.jetty.security.PKCS12Import
A message is displayed: usage: java PKCS12Import {pkcs12file} [newjksfile] 4. Place your SunWeb.pfx file in this working directory and run the following command to create java
format keystore: java -cp jetty-6.1.1.jar org.mortbay.jetty.security.PKCS12Import SunWeb.pfx SunWeb.jks
5. You must enter the password that was set for the .pfx file, and provide a new password for the Java keystore.

Installation Guide - SQL Server Page 56 of 95.
Secu
re S
ocke
ts L
ayer
(SSL
)
Infor10 Financials Business (SunSystems)
Configuring SSL for SunSystems Security Web 1. In IIS Manager, open Sites >> SunSystems Security, and in the Actions panel click Bindings. Ensure you
change the port number when you add the site binding as follows: Type: https IP Address: All unassigned Port: 82
2. Select your SSL certificate from the dropdown list. 3. Edit the server-custom.properties file, which can be found in Program
Files(x86)\Infor\SunSystems\SunSystemsWeb\tomcat\webapps\SunSystems\WEB-INF. Add the following URLs, exactly as they are shown here: security.loginserver.url=https://sunsystems-security/Login.aspx security.logoutserver.url=https://sunsystems-security/Logout.aspx
4. In the SunSystems Domain database, edit table DOMN_VRTL_HOST; add secure_port value (82) for SunSystems-security and change ACTUAL_HOST_NAME to the full FQDN of the security web server. Set PORT_NUM to 0.
5. In IIS Manager restart SecurityWebServer. In Services, restart SunSystems Web Service.
Check SecurityWebServer and authentication for SunSystems Web.
http://<servername.domain.com>:9080/SunSystems
https://<servername.domain.com>:82/SecurityWebServer
Configuring SSL for SunSystems Web 1. Right-click Notepad, run as administrator and edit server.xml to use this keystore file. 2. Edit server.xml (Program Files (x86)\Infor\SunSystems\SunSystemsWeb\tomcat\conf)
and specify the keystore location and password for HTTPS port 9443. 3. Remove comment markers if required ‘<!—’ from the start, and ‘->’ from the end, of this block of text, and
add the line starting with keystoreFile for your certificate .jks file name and location. <Connector port="9443" protocol="HTTP/1.1" SSLEnabled="true" maxThreads="150" scheme="https" secure="true" clientAuth="false" sslProtocol="TLS" keystoreFile="C:\ProgramData\Infor\jetty\lib\SunWeb.jks" keystorePass="change"/>
Note: Take care to enter the text correctly. The syntax is case sensitive, for example, keystorePass.
4. Restart SunSystems Web service and log in to SunSystems using https://<servername.domain.com>:9443/SunSystems. You are redirected to the secure port for security and maintain a secure connection accessing SunSystems. In the case of problems, check the log files in ProgramData\Infor\SunSystems\Logs.
Check you can log into SunSystems through a secure connection
https://<servername.domain.com>:9443/SunSystems
In Browser: check your certificate path from the lock symbol
Configuring SSL for SunSystems Reporting 1. In IIS Manager, open Sites >> SunSystems Reporting, and in the Actions panel click Bindings. Add a site
binding as follows: Type: https IP Address: All unassigned Port: 83
2. Select the SunWeb certificate from the dropdown menu, and click View to check your certificate is valid. 3. In the SunSystems Domain database, edit table DOMN_VRTL_HOST; in the row for infor-app-srs, set
Port Number = 0, and Secure Port Number = 83 and change ACTUAL_HOST_NAME to the FQDN of the SunSystems Report Manager server.
4. Change the following configuration files in a text editor, replacing all occurrences of http://<SERVERNAME>:94 with https://<SERVERNAME.domain.com>:83 See examples of additional text where https, port 83, and

Installation Guide - SQL Server Page 57 of 95.
Secu
re S
ocke
ts L
ayer
(SSL
)
Infor10 Financials Business (SunSystems)
<SERVERNAME.domain.com> updates are required.
• Program Files (x86)\Infor\SunSystems\DataAccessManager.exe.config
• Program Files (x86)\Infor\SunSystems\ReportAdministrator.exe.config
• Program Files (x86)\Infor\SunSystems\ReportDesigner.exe.config
• ProgramFiles(x86)\Infor\SunSystemsReportingServices\web\SunSystemsReportManager\web.config
<appSettings>
<!-- Meta Data Service Configuration -->
<add key="SystemsUnion.Core.Configuration.ConfigurationWebServiceURL"
value="https://<SERVERNAME.domain.com>:83/SunSystemsReportServer/Configuration.asmx" />
• Program Files\Microsoft SQL Server\MSRS<version> .MSSQLSERVER\Reporting Services\ReportServer\web.config
<add key="SunSystems.ReportManager.Protocol" value="https" />
<add key="SunSystems.ReportManager.Server" value="<SERVERNAME.domain.com>" />
<add key="SunSystems.ReportManager.Port" value="83" />
<VisionReportingClient>
<add key="WS_ENDPOINT_URL_REPORT_MANAGEMENT_SERVICE" value="https://INFORBC-
SUN01.cloudsunsystems.com:83/SunSystemsReportManager/ReportManagementService.asmx" />
<add key="WS_ENDPOINT_URL_RENDER_SERVICE" value="https://INFORBC-
SUN01.cloudsunsystems.com:83/SunSystemsReportManager/RenderQueueService.asmx" />
<add key="WS_ENDPOINT_URL_LOOKUP_SERVICE" value="https://INFORBC-
SUN01.cloudsunsystems.com:83/SunSystemsReportManager/LookupService.asmx" />
<add key="REPORT_MANAGER_PORT" value="83" />
</VisionReportingClient>
• Program Files\Microsoft SQL Server\MSRS<version>.MSSQLSERVER\Reporting Services\ReportServer\bin\ReportingServiceService.exe.config
<add key="SunSystems.ReportManager.Protocol" value="https" />
<add key="SunSystems.ReportManager.Server" value="<SERVERNAME.domain.com>" />
<add key="SunSystems.ReportManager.Port" value="83" />
</appSettings>
<add key="REPORT_MANAGER_PORT" value="83" />
</VisionReportingClient>
• Program Files\Microsoft SQL Server\MSRS<version> .MSSQLSERVER\Reporting Services\ReportManager\web.config
<appSettings>
<!-- Meta Data Service Configuration -->
<add key="SystemsUnion.Core.Configuration.ConfigurationWebServiceURL"
value="https://<SERVERNAME.domain.com>:83/SunSystemsReportServer/Configuration.asmx" /> 5. Restart application pool SunSystems Reporting Services in IIS, and Windows Services: SQL Server
Reporting Services and SunSystemsReportingPrintService.
Check you can access the SunSystems Reporting Web site.
The following links should give a folder listing:
https://<servername.domain.com>:83/SunSystemsReportManager
https://<servername.domain.com>:83/SunSystemsReportServer
Data Access Manager: check it is working
Report Administrator: check it is working
Report Designer: check it is working
In SunSystems Web, run RMA and TBL

Installation Guide - SQL Server Page 58 of 95.
Secu
re S
ocke
ts L
ayer
(SSL
)
Infor10 Financials Business (SunSystems)
Check you can access the SunSystems Reporting Web site.
The following links should give a folder listing:
In SunSystems windows client, run RMA and TBL to check reporting is working from the windows client
Configuring SSL for Transfer Desk Web 1. In IIS Manager, open Sites >> SunSystems Transfer Desk, and in the Actions panel click Bindings. Add a
site binding as follows: Type: https IP Address: All unassigned Port: 9091
2. Select the SunWeb certificate from the dropdown menu, and click View to check your certificate is valid. 3. In the SunSystems Domain database, edit table DOMN_VRTL_HOST; in the row for
TransferDeskWebServer, set Secure Port Number = 9091 and change ACTUAL_HOST_NAME to the FQDN of the SunSystems Transfer Desk Web server.
4. In the SunSystems Domain database, edit table DOMN_VRTL_HOST; in the row for TransferDeskWebServer, set Secure Port Number = 9091 and change ACTUAL_HOST_NAME to the FQDN of the SunSystems Transfer Desk Web server.
Test URL for Transfer Desk Web
https://<servername.domain.com>:9091/TransferDeskWebServer
Configuring SSL for SSC Earlier in this section, using jetty, you created SunWeb.jks. This certificate file can also be used for SSC.
From the SunSystems menu, select Property Editor (or run PropertyEditor.exe).
From Properties, crypto, keystore, click Modify. Enter the keystore filename and path, and click OK. For example: C:\ProgramData\Infor\jetty\lib\SunWeb.jks
Modify storepasswd by entering the certificate file password. Click OK, Save, and exit Property Editor.
In Services, restart SunSystems Connect Server.
SSC has another keystore called “SSC.keystore”. Do not change settings for this keystore which is for internal use within SSC.
SSC demo page and SOAP connection
https://<servername>.domain.com:8443/ssc
https:// <servername>.domain.com:8443/connect/wsdl/ComponentExecutor

Installation Guide - SQL Server Page 59 of 95.
SunS
yste
ms
Web
Infor10 Financials Business (SunSystems)
SunSystems Web SunSystems Web User Interface Customisation The SunSystems Web user interface can be customized by adding settings to the file server-custom.properties. For example, you can change the font, colour, or how the session navigation menu is displayed in Infor10 Workspace. 1. Using notepad, open server-custom.properties in Program Files
(x86)\Infor\SunSystems\SunSystemsWeb\tomcat\webapps\SunSystems\WEB-INF. 2. Add the new settings to the file, and save. No setting is mandatory, and they can be applied in any order. 3. Restart the SunSystems Web Service then restart the browser. This ensures that any temporary cookies
are removed.
SunSystems Web Display Properties The following table shows the complete list of properties that can be used:
Property Description Values
client.rendermode Sets default values for specific properties from this table.
client.rendermode=standalone
client.rendermode=workspace
client.rendermode=mobile
client.menuStyle Controls the main menu navigation style.
If workspace is selected, the SunSystems tabbed menu is switched off.
client.menuStyle=legacy
client.menuStyle=workspace
client.menuStyle=mobile
client.showAppHeader Show the top level Infor Application Header.
client.showAppHeader=true
client.showAppHeader=false
client.showAppNavBar Show the session navigation menu and dropdown navigation menu.
client.showAppNavBar=true
client.showAppNavBar=false
client.showAppNavBarMenu
Show the dropdown navigation menu.
client.showAppNavBarMenu=true
client.showAppNavBarMenu=false
client.showVsgFontsOnly
Show the Visual Style Guide fonts only (font-family only), ignoring Form Designer.
client.showVsgFontsOnly=true
client.showVsgFontsOnly=false
client.showVsgColoursOnly
Show the Visual Style Guide colours only (background / foreground) ignoring Form Designer.
client.showVsgColoursOnly=true
client.showVsgColoursOnly=false
ui.forceVsgVersion Controls the UX version used. 2 presents the default Blue 2.0 style and 3 presents the new UX 3.0 style. This is a system wide setting regardless of the render mode selected.
ui.forceVsgVersion=2
ui.forceVsgVersion=3
client.logicalId Non UI-specific. Used for IBC and drillback messaging in Workspace / ION. Replacement for hostPage.logicalId.
client.menuStyle=infor.sunsystems.1

Installation Guide - SQL Server Page 60 of 95.
SunS
yste
ms
Web
Infor10 Financials Business (SunSystems)
Property Description Values
client.embeddedSessionLimit
Non UI-specific. Defines how many embedded sessions can run in web mode. Default is 4. Replacement for hostpage.embeddedSssionLimit.
client.embeddedSessionLimit=5
These properties use the format client.<property name>=value which sets the same value for all rendering modes. For example, client.menuStyle=workspace displays SunSystems Web using Infor10 WorkSpace-style menus, whether it is run from within Infor10 Workspace, Infor Motion SunSystems iOS or in Standalone mode.
User Interface Visual Style By default, SunSystems Web is presented using a blue user interface. To display the new, white user interface, add the setting ui.forceVsgVersion=3 to server-custom.properties.
Note: Infor10 Workspace 10.3 and above displays the white user interface by default.
Render Modes SunSystems Web is presented using one of three display configurations, or ‘render modes’, that define the navigation options displayed in each environment: standalone: running SunSystems Web outside of any application workspace: running SunSystems Web from within Infor10 Workspace mobile: running SunSystems Web from within Infor Motion SunSystems iOS.
Specifying a render mode automatically sets default values for a group of properties:
Render mode Default values
client.rendermode=standalone
client.standalone.menuStyle=standalone
client.standalone.showAppHeader=true
client.standalone.showAppNavBar=true
client.standalone.showAppNavBarMenu=false
client.rendermode=workspace client.workspace.menuStyle=workspace
client.workspace.showAppHeader=false
client.workspace.showAppNavBar=true
client.workspace.showAppNavBarMenu=true
client.rendermode=mobile
client.mobile.menuStyle=mobile
client.mobile.showAppHeader=false
client.mobile.showAppNavBar=false
client.mobile.showAppNavBarMenu=false
These properties use the format client.<render mode>.<property name>, which you can use to set a property value for a specific render mode. For example, you can specify these settings to display the SunSystems tabbed menu, whether running SunSystems Web from within Infor10 Workspace, or in Standalone mode:
client.workspace.menuStyle=legacy
client.standalone.menuStyle=legacy
You can also use this format to override the default values for the render modes. For example, client.rendermode=workspace automatically sets showAppHeader to false, but if you follow it with client.workspace.showAppHeader=true, then the workspace render mode will display the Infor Application Header.

Installation Guide - SQL Server Page 61 of 95.
SunS
yste
ms
Web
Infor10 Financials Business (SunSystems)
Setting up SunSystems Report Viewer with Different Languages To enable additional language users to see the report viewer header in their own language, individual Microsoft Report Viewer language packs must be installed. From the Microsoft Web site, download Report Viewer Redistributable 2010 SP1 and install on your SSRS Server. Afterwards download and install the Microsoft Report Viewer 2010 SP1 Language Pack for each required language. Following installation check each has been installed successfully in Control Panel, Programs and Features. In IIS Manager restart SunSystemsReporting Services application pool.
Web Server Scalability Prerequisites SunSystems Web is installed on each WebServer machine. IIS is installed on each WebServer machine.
Check SunSystems Web (in tomcat) is working on all Web Server machines
http://WebServer1:9080/SunSystems
http://WebServer2:9080/SunSystems
Apache Tomcat Configuration Carry out the following steps on each web server machine: 1. Stop the SunSystems Web service. 2. Open the server.xml configuration file of the Apache Tomcat SunSystems Web is running within. This
is usually found in: Program Files (x86)\Infor\SunSystems\SunSystemsWeb\tomcat\conf
3. Make the following modifications: should be made to each Tomcat Node to uniquely identify them and ensure that AJP ports are open. Modify the tomcat engine definition to include the jvmRoute name chosen for that node. Note that the jvmRoute should be set to the host name of the web server machine. Change <Engine name="Catalina" defaultHost="localhost"> to <Engine name="Catalina" defaultHost="localhost" jvmRoute="WebServer1">
4. Ensure the AJP/1.3 connector is enabled (not commented out) and note the port number (default 9009): <Connector port="9009" protocol="AJP/1.3" redirectPort="8443" />
5. Ensure the AJP port is open.
IIS Configuration 1. The steps below outline the configuration that is required to get IIS communicating with Apache Tomcat
using the Apache Tomcat Connector. These steps must be carried out on each web server machine. Create a directory to hold the configuration files. For example: ProgramData\Infor\IIS-tomcat_connector-conf. From this point forward this directory will be referred to as <IIS-tomcat_connector-conf>.
2. Download the latest pre-built ISAPI redirector IIS server plugin, for example, tomcat-connectors-1.2.37-windows-x86 64-iis.zip from http://apache.org/dist/tomcat/tomcat-connectors/jk/binaries/windows/.Unzip, and save isapi_redirect.dll to the <IIS-tomcat_connector-conf> directory. Create a file under the <IIS-tomcat_connector-conf> called workers.properties. The file should contain information for each web server machine. This file will be the same across all the web server machines as long as the <IIS-tomcat_connector-conf> directory on each machine has the same folder path structure. WebServer1 is the jvmRoute value specified in the tomcat server.xml for the SunSystems Web server. The contents will be similar to the following:
workers.properties
# Define list of workers
worker.list=loadbalancer,jkstatus
# Status worker

Installation Guide - SQL Server Page 62 of 95.
SunS
yste
ms
Web
Infor10 Financials Business (SunSystems)
worker.jkstatus.type=status
# AJP13 worker for web server 1
worker.WebServer1.type=ajp13
worker.WebServer1.host=WebServer1
worker.WebServer1.port=ajpPortWebServer1
worker.WebServer1.lbfactor=1
# AJP13 worker for web server 2
worker.WebServer2.type=ajp13
worker.WebServer2.host=WebServer2
worker.WebServer2.port=ajpPortWebServer2
worker.WebServer2.lbfactor=1
# AJP13 worker for web server N – add web server 3, and so on.
# worker.WebServerN.type=ajp13
# worker.WebServerN.host=WebServerN
# worker.WebServerN.port=ajpPortWebServerN
# worker.WebServerN.lbfactor=1
# Define the LB worker
worker.loadbalancer.type=lb
worker.loadbalancer.sticky_session=1
worker.loadbalancer.session_cookie=SUNSYSTEMS_LB
worker.loadbalancer.balance_workers=WebServer1,WebServer2
3. Create a file under the <IIS-tomcat_connector-conf> directory called uriworkermap.properties. This file will be the same across all the web server machines as long as the <IIS-tomcat_connector-conf> directory on each machine has the same structure. The contents as a minimum should be:
uriworkermap.properties
# Mapping the URI /jkmanager and everything under /jkmanager/:
# This is optional for production but if enabled in production it is highly recommended that you secure access to the /jkmanager offset
/jkmanager|/*=jkstatus
# Mapping the URI /SunSystems and everything under /SunSystems/:
/SunSystems|/*=loadbalancer
4. Create a properties file under the <IIS-tomcat_connector-conf> directory with the same name as the DLL file but with the .properties extension. This file will be the same across all the web server machines as long as the <IIS-tomcat_connector-conf> directory on each machine has the same structure. The contents as a minimum should be:
isapi_redirect.properties
# The path to the ISAPI Redirector Extension, relative to the website
# This must be in a virtual directory with execute privileges
extension_uri=/sunsystems/isapi_redirect.dll
# Full path to the log file for the ISAPI Redirector
log_file=<IIS-tomcat_connector-conf>\logs\isapi.log
# Log level (debug, info, warn, error or trace)
log_level=error
# Full path to the workers.properties file

Installation Guide - SQL Server Page 63 of 95.
SunS
yste
ms
Web
Infor10 Financials Business (SunSystems)
worker_file=<IIS-tomcat_connector-conf>\workers.properties
# Full path to the uriworkermap.properties file
worker_mount_file=<IIS-tomcat_connector-conf>\uriworkermap.properties
# Log file size in megabytes.
# The value can have an optional M suffix, i.e. both 5 and 5M will rotate the log file when it grows to 5MB
log_filesize=100
5. Open IIS Manager, select the root node (the server), and select option ISAPI and CGI Restrictions. From the Actions, select Add. Select the path to the DLL, that is, in this example <IIS-tomcat_connector-conf>\isapi-redirect.dll, enter a suitable description and check the
Allow extension path to execute check box. 6. Open the Default Web site where you want to activate the redirect and open the option 'ISAPI Filters'. 7. From the 'Actions', select 'Add'. Enter a filter name SunSystems, and select the path to the DLL for the
executable, that is, <IIS-tomcat_connector-conf>\isapi-redirect.dll.
8. Right-click the Web site selected in step 8 and select 'Add Virtual Directory...'. You must enter sunsystems for the alias, and select the path to the DLL for the physical path, that is <IIS-tomcat_connector-conf>\isapi-redirect.dll.
9. Select the virtual directory just created SunSystems and open the option 'Handler Mappings'. 10. In the disabled list select the mapping 'ISAPI-dll' and from the 'Actions' select 'Remove'. 11. From the 'Actions', select 'Add Module Mapping...'. 12. Enter the following, but do not click OK:
Request Path: *.dll
Module: IsapiModule (this can be selected from the drop down list)
Executable: <IIS-tomcat_connector-conf>\isapi-redirect.dll
Name: ISAPI_REDIRECT-dll
13. Click 'Request Restrictions' button. a) Select the 'Mapping' tab and check the 'Invoke handler only if request is mapped to' check box, and
select 'File'. b) Select 'Verbs' tab and select 'All verbs'. c) Select 'Access' tab and select 'Execute'. d) Click OK to close the 'Request Restrictions' dialog box.
14. Click OK to close the 'Edit Module Mapping' dialog box. 15. Message is displayed. Do you want to allow this ISAPI extension? Yes. 16. From the 'Actions', select 'Edit Feature Permissions'. 17. Check the 'Execute' check box. 18. Locate the <IIS-tomcat_connector-conf> directory and open the web.config file in a text editor
such as notepad. 19. Add the following attribute to the end of the ISAPI_REDIRECT-dll entry: responseBufferLimit="0" 20. Save and close the file. 21. Restart IIS.
Check SunSystems Web redirection through IIS is working on all Web Server machines
http://WebServer1/SunSystems
http://WebServer2/SunSystems
http://WebServer1/jkmanager (debugging tool)
User Manager, Settings, SunSystems, Operator Activity. For each user logged into a SunSystems function you can scroll right to see application server name and web server name.

Installation Guide - SQL Server Page 64 of 95.
SunS
yste
ms
Web
Infor10 Financials Business (SunSystems)
Setting Values for Java Memory Initial and maximum heap sizes should not be specified, as this enables default values, specific to your computer, to be set automatically. In most cases, an initial value of 16Mb and a maximum value of 256Mb are set.
To remove the preconfigured values for initial and maximum heap sizes: 1. Type CMD in the Run dialog box and click OK. 2. Navigate to Program Files(x86)\Infor\SunSystems\SunSystemsWeb\tomcat\bin 3. Run SunSystemsWebw //ES//SunSystemsWeb 4. Select the Java tab in the SunSystems Web Service Properties dialog box. 5. Specify Initial memory pool as Nothing. 6. Specify Maximum memory pool as Nothing. 7. Click OK to save the changes.
SunSystems Web WAR Configuration The SunSystems web application must be configured to operate in a Load Balanced environment. In this state it provides assistance to the load balancing infrastructure to redirect initial requests to the correct web server.
The following steps should be carried out on each web server machine. 1. Open the server-custom.properties file located in the war of SunSystems Web. This is usually
found under: Program Files (x86)\Infor\SunSystems\SunSystemsWeb\tomcat\webapps\SunSystems
\WEB-INF
2. Remove the # from the following line: #loadbalancer.enableLoadBalancer=true
3. Restart the SunSystems Web service.
Load Balancing Security Web Server You can load balance the Security Web Server, by entering the load balanced server name in the SunSystems Domain database: 1. Edit the DOMN_VRTL_HOST table. 2. Select the row where DFLT_PATH=’SecurityWebServer’. 3. Update ACTUAL_HOST_NAME to the load balanced server name for Security Web Server.
Switch off jkmanager When the debugging tool is no longer required it is advised to deactivate for security reasons. For all Web Servers edit the uriworkermap.properties file to deactivate the jkmanager debugging tool. Type # preceding line /jkmanager|/*=jkstatus
Pop-up Windows If you have blocked pop-up windows in your web browser, you must add the SunSystems web server host as an exception to run reports correctly.
SunSystems Host Names Host names in your SunSystems deployment must not contain ‘_’ underscore, which is widely accepted to be an invalid character for host names, even though Windows allows it. Use of an underscore in a host name will cause SunSystems Web to fail. Host names must consist of alphanumeric characters (a-z, 0-9) and can include a ‘-‘ hyphen, as long as the hyphen is not the first or last character of the name.

Installation Guide - SQL Server Page 65 of 95.
SunS
yste
ms
Web
Infor10 Financials Business (SunSystems)
SunSystems Multiple Virtual Host Deployment
Multiple virtual host deployments are not supported. Deployments must be either: Internal only Fully, externally visible, on a single virtual host.
Internal browser clients must access the system on the external address when required. If you require separate internal and external addresses for deployment, this must be considered by your IT department, with particular regard towards DNS mapping within your network systems.

Installation Guide - SQL Server Page 66 of 95.
Trou
bles
hoot
ing
Infor10 Financials Business (SunSystems)
Troubleshooting Introduction The information in this section is to help system administrators resolve problems that are encountered during the installation process or when attempting to start up SunSystems.
If the problem you are experiencing is not detailed below, refer to the subsection Before Contacting Technical Support, which details the information you must collate, before you call for technical assistance.
Troubleshooting Hints Listed below are some troubleshooting hints that might assist you when trying to analyze a problem: Pay attention to error messages. Error messages contain important information to solve a problem and
are required by the technical support staff. Do not assume too much about the possible cause of the problem, or you might overlook any evidence
presented. Work carefully through the problem, ensure that you can duplicate the problem and assemble all the
evidence, because you might need to pass it on to a member of the technical support staff. Affirm whether the problem happens in other applications on other user’s machines, or only on one
machine. Be aware of security barriers (firewalls) because these can block communications between client and
server machines Do not overlook the obvious; check plugs, connections and cables.
General Installation Problems Problems can be in the form of an error message or unanticipated behaviour of the software. The problems described here are those that are most likely to occur because of the following: Incorrect installation settings. Incompatible data for installation settings and serialization. Access control – network settings, folder permissions. Incorrectly set IP addresses. Network Library not set to TCP/IP. Changes made to registry settings used by SunSystems. Database Access – Account Permissions. Services – Account Permissions.
The setup program configures all of the background settings that are required for your chosen installation type using the information you supply during installation. The setup program also validates the data that you enter; if the details that you enter are incompatible, an error message is displayed.
However, certain settings are inadvertently changed during or after the installation process, which renders them to be invalid and causes errors to be displayed.
If an unexpected event occurs in SunSystems, a SunSystems error message is displayed, which describes the error condition or unexpected response to a request. To save the error text, click the Save button to save the details to a file and location of your choice. A member of technical support can then analyze the contents of the file. You are given an option to either continue or abort SunSystems. If you choose to continue, SunSystems operates normally as far as possible; if the error is too severe, it automatically aborts.
Specific Installation Problems Refer to the subsections below to resolve issues that can be encountered during the installation process and when running a new installation of SunSystems. Each problem is presented as a Symptom, usually as a message. The message text is presented here in bold. Possible causes and solutions then follow this.
Problems Encountered During Installation The installation process fails
Possible Cause(s)
The SQL Server Autoshrink process is switched on (likely on a stand-alone installation).

Installation Guide - SQL Server Page 67 of 95.
Trou
bles
hoot
ing
Infor10 Financials Business (SunSystems)
Solution(s)
Before you start your SunSystems installation, ensure that the SQL Server Autoshrink process is switched off; failure to do so might cause contention that will make the installation process fail. You should switch off the Autoshrink facility for running SunSystems because it can affect performance.
Message displayed: [Microsoft][ODBC SQL Server Driver][Named Pipes] Specified SQL Server not found
Possible Cause(s)
The target machine that is selected to be used as the Database Server has not been located and therefore might not be connected to the network.
Solution(s)
Minimise the setup program dialog box and ensure that all machines that are designated to be included in either a two-tier installation or three-tier installation can communicate through the network.
Message displayed: [Microsoft][ODBC SQL Server Driver][Named Pipes] Unable to validate the login – error: A required privilege is not held by the client.
[Microsoft][ODBC SQL Server Driver][Named Pipes] Do you want to continue with this set to Local Account?
Note: The account under which SessionManager runs must have permissions to access the ServerFiles folder. Depending on your configuration, the Local System Account might not have such permissions; if so, after the installation is complete, you must change the account that SessionManager is running under.
Possible Cause(s)
The target machine that is selected as the Database Server has been located, but the user on the client machine has not been set up as a user on the server.
Solution(s)
Minimise the setup program dialog box and ensure that the client machine has the correct access rights to the server.
Message displayed: [Microsoft][ODBC SQL Server Driver][Named Pipes] Access denied
Possible Cause(s)
The target machine that is selected as the Database Server has been located, but the user on the client machine has not been set up as a user on the server.
Solution(s)
Minimise the setup program dialog box and ensure that the client machine has the correct access rights to the server.
Server Error in Application: “SunSystems SECURITY/SECURITYWEBSERVER HTTP” Error 404.3 – not found
Possible Cause
ASP.NET is not registered.
Solution
Check ASP.NET is registered. Run a command prompt as administrator. Change directory to Windows\Microsoft.NET\Framework64\v2.0.50727. Enter the command aspnet_regiis –lv to ascertain if ASP.NET is already registered. If not already registered, enter: aspnet_regiis –ir to register.
Message displayed: Cannot start the Server-side process. Check the server is switched on
Possible Cause(s)
There is a problem with the connection from the client machine to the server that is running the Application Layer.
Solution(s)
This particular problem could be caused by numerous oversights; check the following: The client is connected to the network. The SunSystems Session Manager service is running.
Installation Guide - SQL Server Page 68 of 95.
Trou
bles
hoot
ing
Infor10 Financials Business (SunSystems)
SQL Server is running on the database server. The client machine can ping the computer name used in the set up – run SwitchServer.exe to check
what this is. The IP address that is returned to the server by the client ping is the IP address displayed when
IPCONFIG is run on the server. Windows 2003 allocates more than one IP address. Stop and restart the SunSystems Session Manager service on the application server. The name of the server is correct in the client registry:
HKEY_LOCAL_MACHINE\SOFTWARE\SunSystems\Core\5.1\Comms\SessionManagerServerLocation
Note: The server location/name might be overridden with the server location/name in:
HKEY_CURRENT_USER\Software\SunSystems\Core\5.1\Comms\SessionManagerServerLocation.
When you are troubleshooting client/server connections, check that the server name is correct.
The Listener port set up on the applications server matches the port set up on the client. On the server, this is held in the registry setting: HKEY_LOCAL_MACHINE\SOFTWARE\SunSystems\Core\5.1\SessionManager\ListenerPort
On the client, this is held in the registry setting: HKEY_LOCAL_MACHINE\SOFTWARE\SunSystems\Core\5.1\Comms\Session ManagerListenerPort
Note: The listener port might be overridden with the listener port in:
HKEY_CURRENT_USER\SOFTWARE\SunSystems\Core\5.1\Comms\SessionManagerListenerPort
When you are troubleshooting client/server connections, check that the listener port is correct.
Message displayed: Unable to create the environment to view report instances. Please contact your environment administrator
Possible Cause(s)
This issue is caused by the changed path not being picked up by the application until reboot occurs.
Solution(s)
Reboot
Installer rolls back after attempting the installation. No message is displayed.
Look in %TEMP% or the folder above this for the msi log. This log is not easy to interpret but contains the reason for the rollback.
Also check InstallLog.txt in ProgramData\Infor\Logs\SunSystems\Install
Causes could include SunSystems applications still existing in IIS after uninstalling them. Check in IIS Manager.
Problems Encountered when Uninstalling Message displayed: Locked File detected when trying to uninstall <file name>
Possible Cause(s)
SunSystems or a session is still active.
Solution(s)
Before you attempt to uninstall SunSystems, ensure that SunSystems has been closed.
Problems Encountered when Running SunSystems Message displayed: Integrity Failure 001. Please contact your maintenance supplier
Possible Cause(s)
Serialization has not been performed. SunSystems is licensed specifically for several users and language combinations. Only the components with valid serialization information are operable in the production environment.

Installation Guide - SQL Server Page 69 of 95.
Trou
bles
hoot
ing
Infor10 Financials Business (SunSystems)
Solution(s)
To input the supplied license details, run System Serialization (ZZS).
Note: If you serialize from within SunSystems using Serialization (ZZS), the SessionManager service login user must be a member of the Administrator group.
Message displayed: Number of Licensed Users Exceeded
Possible Cause(s)
The supplied serialization details are configured to allow an explicit number of users to connect to the system at any one time. This does not prevent the definition of additional users in the system, but does inhibit the number of concurrent users from exceeding the licensed number.
Solution(s)
If this imposed limit does not allow all required users to connect to the system, contact your SunSystems supplier to arrange new licenses.
Message displayed after completing the serialization form: System Parameters Amendment Failure
Possible Cause(s)
The serialization details that you entered do not match those for the required software component. Either the supplied license values have been typed incorrectly in the serialization form (missed digits result in invalid licenses), or the zero prefix has been omitted.
Solution(s)
Recreate serialization information with the relevant options: Initiate SunSystems Run System Serialization (ZZS) Reinsert the values again as supplied on your SunSystems serialization document Restart SunSystems.
Users experience missing installation options
Possible Cause(s)
For example, documentation is now required but was not initially selected during the installation.
Solution(s)
Run the setup program from the SunSystems installation media. Select the documentation option, or any other options to install the required components.
Selections of ranges may be subject to abnormal truncation and apparently miss or lose data if the binary sort order is not used.
Possible Cause(s)
During database installation/creation, there are specific data storage options that must be selected. Binary Sort Order is mandatory. Binary Sort Order sets the database selection criteria to match the ASCII sort order A-Z a-z etc. which is compatible with the SunSystems program logic. SunSystems internal COBOL programming and business logic demands that dictionary sorts such as Aaâäàå, should not be used.
Database Transport (ODBC drivers).
Solution(s)
Select Binary Sort Order during database installation/creation.
SunSystems fails to connect to a remote server that is located on the secure side of a firewall mechanism.
Possible Cause(s)
The specific port numbers that are available to the software to successfully traverse the security zone of a firewall system must be programmed into the file sun5.ini as follows:
Port numbers that are specified by a default install do not match the configuration of the security firewall. The default behaviour of the system is to randomly allocate a transmission port through negotiation between the client and the server components. This method is rejected by firewall security mechanisms, and attempts to use the software through such a secure system, without modification, will fail.

Installation Guide - SQL Server Page 70 of 95.
Trou
bles
hoot
ing
Infor10 Financials Business (SunSystems)
Solution(s)
Change the direct connection port settings in Sun5.ini, as follows:
sun5.ini setting – Direct-Connect-Port, Direct-Connect-Port-Range.
For more information about configuring firewall enabled SunSystems configuration, refer to technical support.
For more information about SunSystems port settings, refer to Appendix A – TCP/IP Ports Used by SunSystems.
Note: Microsoft domain logins are case sensitive; caching is done at server level and this cache occasionally deletes its contents. For example, if a user name is created using mixed cases as UserName, users must log in as ‘UserName’ and not ‘username’. Failure to do so causes an error when the user attempts to log in to SunSystems. The workaround involves the SQL Server database administrator (DBA) installing SQL Server 2008 in a different collation order to Latin1_General_BIN, which is case sensitive. If the master database is not case sensitive, this problem is not encountered.
Apologies - but your browser isn’t currently supported
Possible Cause(s)
Browser is displaying in compatibility view mode.
Solution(s)
Internet Explorer 8 >> Tools >> Compatibility View Settings. Uncheck Display intranet sites in Compatibility View.
Log into SunSystems but there is nothing on the menu
Possible Cause(s)
Operator Group not set up in User Manager
Solution(s)
Log into User Manager as administrator, edit Group, add Function Permission and Action Permission settings. If there are required functions not showing on the menu you can recreate the menu in User Group Menu Designer UGM.
Accessing SunSystems when logged in to Windows as a local user
If SunSystems is to be accessed from client machines when users are not logged on as Windows Domain users, you must set standard authentication globally in User Manager. Log into User Manager as administrator, select Settings >> Security Policy and clear Enable Windows Authentication.
Cannot find SunSystems Data Source in ODBC Data Source Administrator
On a 64 bit OS, to access the dialog box you must run odbcad32.exe in C:\Windows\SysWOW64
To login as a different SunSystems User
If you are set up in User Manager as a Windows authenticated user, you will automatically be logged into SunSystems. Contact your SunSystems administrator to change your user to standard authentication.
If you are a standard authenticated user, check the SunSystems user icon in the sys tray, right-click and select Exit Login Monitor to enable you to log in each time you open SunSystems.
Unable to load client print control
This message displayed when clicking the printer icon in a viewed report on a machine with SunSystems client installed.
On the server containing SQL Server Reporting Services (SSRS):
Install Microsoft Report Viewer Redistributable 2010 SP1 (Full Installation), and restart Windows.
On the client machine upon clicking the printer icon in a viewed report you will be prompted to install a SQL Server Reporting Services 2008 R2 component. This component will enable you to print from the viewed report.
Cannot create a connection to data source ‘EvoReportDataSource’
Check that you have run Data Access Manager for all Business Units and ensure that WSE 3.0 has been installed on the SQL Server Reporting Services Server.

Installation Guide - SQL Server Page 71 of 95.
Trou
bles
hoot
ing
Infor10 Financials Business (SunSystems)
The SunSystems connection is invalid (reason: Login failed. The login is from an untrusted domain
Ensure the account running SunSystems reporting service has been added to the SunSystemsServices group on the database server if using local groups on a multi-tier configuration.
Could not find stored procedure sp_dboption
This procedure is deprecated in SQL Server 2012. Ignore this error, and click OK to continue with the installation.
Message displayed: Operation failed with 0x8007000B
Check that all the correct IIS role services have been installed, and ASP.NET has been registered.
Refer to the Prerequisites section for details.
Troubleshooting SSC Unable to display the SSC demonstration web page
Cause
The SunSystems Connect Server service might not be running. To check this on your server, open the Services folder (In Windows 2008, this is in Control Panel >> Administrative Tools). There should be a SunSystems Connect Server service marked as Started.
Solution
If the service is marked as Started, try stopping and restarting.
If the service is not marked as Started, click the Start button to manually start it.
If the service does not exist, try reinstalling it as follows:
From a command prompt, run the following:
"SunSystems root directory\ssc\bin\connect server.exe" -i "SunSystems Connect Server"
"SunSystems root directory\ssc\bin\connect_start.txt" "SunSystems root directory\ssc\bin\connect_stop.txt"
Where SunSystems root directory is the location of SunSystems, such as c:\Program Files\SunSystems.
If the problem persists, contact Technical Support.
Attempting to start Transfer Desk fails with the error message ‘Cannot contact Transfer Desk server’
Cause
The SunSystems Connect server might not be running. To check this on your server, open the Services folder (this is in Control Panel >> Administrative Tools). There should be a SunSystems Connect server, marked as Started.
Solution
If the service is marked as Started, try stopping and restarting it.
If the service is not marked as Started, click the Start button to manually start it.
If the service does not exist, try reinstalling it as follows:
From a command prompt, run the following:
"<SunSystems root directory>\ssc\bin\connect server.exe" -i "SunSystems Connect Server"
"<SunSystems root directory>\ssc\bin\connect_start.txt" "SunSystems root directory\ssc\bin\connect_stop.txt"
Where SunSystems root directory is the location of SunSystems, such as c:\Program Files\SunSystems.
If the problem persists, restart your machine or uninstall and reinstall the SunSystems Connect server as follows:
From the Windows 2000 Control Panel, launch the services option and stop the SunSystems Connect server.

Installation Guide - SQL Server Page 72 of 95.
Trou
bles
hoot
ing
Infor10 Financials Business (SunSystems)
From a command prompt, run the following:
"<SunSystems root directory>\ssc\bin\connect server.exe" -u "SunSystems Connect Server"
"<SunSystems root directory>\ssc\bin\connect server.exe" -i "SunSystems Connect Server"
"<SunSystems root directory>\ssc\bin\connect_start.txt" "SunSystems root directory\ssc\bin\connect_stop.txt"
Where SunSystems root directory is the location of SunSystems, such as c:\Program Files\SunSystems.
When trying to perform an SSC export the following message is displayed:
Invalid SQL is generated.
The SQL statement can be found in the Message Log (if the Log Server is running).
There is insufficient system memory to run this query.
Possible Causes
Microsoft SQL Server/Oracle is running out of memory whilst executing a SQL Query.
Solution
Increase the memory available to Microsoft SQL Server/Oracle by increasing the physical memory that is installed on the server machine, or adjust SQL Server/Oracle's memory configuration, or both. Memory configuration can be modified through the SQL Server Properties dialog box.
If you still experience memory problems, reduce the number of selected table columns in your SSC export. To do this, from Component Manager click the Definitions tab and then edit the payload definition. For more information, refer to the SSC online documentation.
The SSC installation may not deploy successfully on a two-tiered or three-tiered environment
Solution(s)
Reinstall SSC. If further assistance is required, contact your local support help desk.
Diagnostic Tools In certain circumstances, it is useful to determine the environment and programs that are running if SunSystems is functioning incorrectly. It might be necessary, under the direction of technical support, to use the internal tools available, namely: Server Monitor, SunDebug, SSC logging or Transfer Desk logging, or all of them. These tools are designed to display and log the SunSystems program behaviour and allow quick resolution of any system failures that are not identifiable by just the error messages alone. This feature should be used only under the direction of a SunSystems administrator or technical support.
Database Test Program The database test program is intended as an investigative tool that diagnoses database connection problems.
The program is called databasetest.exe and is installed in the <sun5>\ssc\bin folder.
You should run the program from the command prompt. The databasetest.exe program has two modes of operation:
If it is run with no parameters, the program runs the complete suite of database tests, as follows: Low level domain database connection test. Low level locator service connection test. Request domain database information for the locator service. Request list of data sources from the domain database. Request database information for each data source. Low level database connection test for each data source.
If it is run with a single parameter that contains a JDBC URL, the program tests that connection. The format of the URL depends on the type of runtime driver that is being used.

Installation Guide - SQL Server Page 73 of 95.
Trou
bles
hoot
ing
Infor10 Financials Business (SunSystems)
Diagnostics: Changing Logging Level SunSystems Application Log
SunSystems COBOL application logging is controlled by SUN5.ini located in Program Files (x86)\Infor\SunSystems. There is a setting for Sun5 log as Sun5-Log=1. To produce detailed COBOL log files set this flag as:
Sun5-Log=5
After setting this flag, save the Sun5.ini file and restart SunSystems Windows services (Security, Connect, and Session Manager). Log files will be generated in:
ProgramData\Infor\logs\SunSystems\Cobol
The Log level 5 in Sun5.ini will generate detailed COBOL log. Please use this setting for diagnostic/testing purpose only and revert this level to 1 after the diagnosis/testing is over.
SunSystems Connect Log
SSC is a Java and .NET based product. SSC server side log file Server.log is located in ProgramData\Infor\logs\SunSystems\SSC folder. In SunSystems, Property Editor, go to Logging >> Simple >> Server >> Enabled. Click Modify and specify true/false.
To increase logging level, Select the Logging >> Simple >> Server >> Level and click Modify. Select ALL from the popup dialog box and click OK. Save the changes in Property Editor and click Exit. To make these settings work, SunSystems Connect service must be restarted. Please revert after diagnostics/testing.
User Manager Log
The User Manager log file is produced in the ProgramData\Infor\Logs\SunSystems\SSC folder on the SunSystems Client machine. The logging level of this file can be changed on the client machine by setting the log level in AutomationDesk.su.config, in Program Files (x86)\Infor\SunSystems\SSC\bin. Open this file in Notepad and set the value as follows:
<application name="AutomationDesk" level="ALL"
advfilename="AutomationDesk.Adv.SU.Config.xml" />
Save UserManager.log.
Level=ALL is the most detailed setting in UserManager.log. Please revert after you complete testing.
Transfer Desk Web Log
Create two configuration files, TransferDeskWebServer.SU.Config and TransferDeskWebServer.Adv.SU.Config.xml
Program Files (x86)\Infor\SunSystems\TransferDeskWeb\TransferDeskWebServer.SU.Config
<?xml version="1.0" encoding="utf-8"?>
<application name="TransferDeskWeb" level="ADV" advfilename="TransferDeskWebServer.adv.SU.Config.xml" />
Program Files (x86)\Infor\SunSystems\TransferDeskWeb\TransferDeskWebServer.Adv.SU.Config.xml
<?xml version="1.0" encoding="utf-8" ?>
<log4net>
<appender name="Console" type="log4net.Appender.ConsoleAppender">
<layout type="log4net.Layout.PatternLayout">
<!-- Pattern to output the caller's file name and line number -->
<!--
<conversionPattern value="%5p [%t] (%F:%L) - %m%n" />
-->
<!-- Print the date in ISO 8601 format -->
<conversionPattern value="%-7p %d{ABSOLUTE} [%t] %-50.50c %m%n" />

Installation Guide - SQL Server Page 74 of 95.
Trou
bles
hoot
ing
Infor10 Financials Business (SunSystems)
</layout>
</appender>
<appender name="RollingFile" type="log4net.Appender.RollingFileAppender">
<file value="c:/ProgramData/infor/logs/TransferDeskWebServer.log" />
<appendToFile value="true" />
<maximumFileSize value="2000KB" />
<maxSizeRollBackups value="5" />
<layout type="log4net.Layout.PatternLayout">
<!-- <conversionPattern value="%p %t %c - %m%n" /> -->
<!-- Print the date in ISO 8601 format -->
<conversionPattern value="%-7p %d{ABSOLUTE} [%t] %-50.50c %m%n" />
</layout>
</appender>
<!-- ALL ,DEBUG ,INFO ,WARN ,ERROR ,FATAL ,OFF -->
<!-- Set root logger level to DEBUG -->
<root>
<level value="DEBUG" />
<appender-ref ref="Console" />
<appender-ref ref="RollingFile" />
</root>
</log4net>
The logging level changes INFO in the following line to ALL, DEBUG, INFO, WARN, ERROR, FATAL, OFF.
<level value="INFO" />
You must restart the SunSystems Transfer Desk Web Service. Change to INFO after you have completed testing.
SunSystems Disaster Recovery SunSystems is a client/server application which is designed to run on multiple tiers. In case of disaster recovery, all the tiers should be checked for possible error. To resolve common issues, refer to the Troubleshooting section.
Database Recovery and Integrity If any of the SunSystems databases require recovery, you must restore Security, Domain and all SunSystems Data databases from the same backup set. This should be done using the tools provided with the database, by a Database Administrator (DBA).
After successfully recovering the database, check the integrity of SunSystems database. The utilities provided with database setup include a database integrity check.
During the recovery process, if the database machine has been replaced, follow the steps below to use the new database server machine with SunSystems application server. Restore SunSystems databases (SunSystems data database, domain database and security database)
on the new machine. Run the SunSystems database setup and choose the option to re-link the SunSystems data database
and domain database. Check the database integrity using the database installer option. Update the DOMN_DSRCE_CONFIG table in the SunSystems domain database, to reflect the new
database server details. If the database server is also the SunSystems security server, install the SunSystems Security server by
using the previous SunSystems security database. Refer to the SunSystems Security Server Recovery section for details.

Installation Guide - SQL Server Page 75 of 95.
Trou
bles
hoot
ing
Infor10 Financials Business (SunSystems)
If the SunSystems Security server is installed on the database server machine and SunSystems Security requires recovery, reinstall SunSystems Security server again after uninstall. Select the already existing SunSystems security database.
After following the above steps, the SunSystems database is ready to be used with application server.
SunSystems Application Server Recovery There may be three situations that may arise with the application server: 1. Case 1: The SunSystems application server is working. Database server machine has been replaced
and the previous database recovered on the new machine. 2. Case 2: The SunSystems application server has crashed. Database is working without problem. 3. Case 3: Application server has crashed and needs to be replaced with another application server
machine. Case 1
If the database server has been replaced, update the SunSystems domain database details in User Manager >> Settings >> SunSystems >> Configure.
Case 2
If the application server requires recovery, restore the server backup from the backup media.
If the database server has been replaced, the application server must be updated to point to the new database server as follows: 1. Run User Manager and update the SunSystems domain database details. 2. If the SunSystems Security database was also installed on the replaced database server, update the
SunSystems Security Global.config file, in ProgramData\Infor\security. 3. Update the server name according to the new security server name.
Case 3
If the application server machine crashes and needs to be replaced: 1. Re-install all the SunSystems application components. That is, application server, security client/server,
etc. as on the previous application server. 2. During the installation, provide the existing SunSystems database server details. 3. Start the SunSystems Services on application server. These services are:
– SunSystems Security Service – SunSystems Session Manager service – SunSystems Connect Server service.
4. After you start these services, check the central log repository for any possible error in the log files, for these services. Report any errors to SunSystems Technical Support.
Security Server Recovery If the machine hosting the Security Server has been replaced, you must edit the global.config file used by SunSystems Reporting to reference the new machine. On the machine hosting the SunSystems Reporting Service, edit global.config found in ProgramData\Infor\SunSystems\Security and change the value of the <host> parameter to the new security server machine name.
Check the SunSystems Client Connectivity When all the SunSystems services are running smoothly, try to log in to the SunSystems client. Any problems will be logged in the log files in the central log repository on the client machine. Check whether the SSC Web site is working.
If the issues persist in SunSystems Client, contact SunSystems Technical Support.
Contacting Technical Support If you still experience problems, contact your designated Support Centre as outlined in your Software Maintenance Agreement. If you are supported directly by Infor, please log an incident at www.InforXtreme.com. There is also a facility in InforXtreme to search the knowledgebase solutions for known issues. You could do this before logging an incident, as a known solution may provide the answer.
Please have ready the following details: SunSystems serial number and version number, which are displayed in SunSystems Help

Installation Guide - SQL Server Page 76 of 95.
Trou
bles
hoot
ing
Infor10 Financials Business (SunSystems)
Platform operating system version and service pack or patch level Database and version Briefly define circumstances that relate to the error or problem Detail steps taken, which are required to replicate the problem Saved error message files as appropriate.

Installation Guide - SQL Server Page 77 of 95.
Glo
ssar
y
Infor10 Financials Business (SunSystems)
Glossary Term Definition
Application server component Consists of all software elements and data elements that are installed on the designated application server, namely the application layer and database layers.
Business Unit Group A collection of SunSystems Business Units that are stored in a single SunSystems data database. In other words, a SunSystems data database is a Business Unit Group. However, business units must be unique; for example, you cannot have Business Unit AAA present in more than one Business Unit Group.
Central logs repository A directory on SunSystems application server and client machine, which contains all the log files that are generated by SunSystems. Files are created in relevant folders under the central logs repository.
For example: ProgramData\Infor\SunSystems\logs
Client component Consists of all software elements that are installed on the client PC. Includes Security Client, SunSystems Client, and Reporting Client.
Collation A collective term for the character set, code page, and sort order used for languages. For example, Latin1_General_Bin is the Western European default.
Database server component For relational versions, the server hosting the RDBMS.
Domain database An independent database in the SunSystems Domain; a central repository that contains information to facilitate connections to multiple SunSystems databases of different code pages through a single application server or application server farm.
Firewall A protective channel through which all traffic between a secured network and an unsecured network must pass.
SunSystems Security A blanket term that covers the services, applications, and features that control access to SunSystems programs and data.
SunSystems domain A collective term for the one-to-many application server and SunSystems database installations, accessible through a client installation and managed through a central repository (Domain database). For example, a three-tier installation, or variations including an application server farm and access to multiple SunSystems databases.
SunSystems session An open SunSystems window. You can open up to nine sessions at a time.

Installation Guide - SQL Server Page 78 of 95.
App
endi
x A
– T
CP/
IP P
orts
Infor10 Financials Business (SunSystems)
Appendix A – TCP/IP Ports SunSystems Application Server Inbound Ports
Component Description
Configured Default Port
Location and Configuration Other Information
SunSystems Connect Service
8080
Property Editor:
tomcat, http_connector, port
HKEY_LOCAL_MACHINE\SOFTWARE\Wow6432Node\Sunsystems\Core\5.1\Comms\ConnectServicesListenerPort
SOAP interface and
HTTP port
Session Manager Port Range
40100 to 40999
HKEY_LOCAL_MACHINE\SOFTWARE\ Wow6432Node\Sunsystems\Core\5.1\SessionManager\PORTRANGE1_MIN
and PORTRANGE1_MAX
Multiple ranges can be added, for example, PORTRANGE2_MIN and PORTRANGE2_MAX
CDR uses first entry in range
MDMServices uses second port in range
Session Manager Listener Port
50000 HKEY_LOCAL_MACHINE\SOFTWARE\Wow6432Node\Sunsystems\Core\5.1\Comms\ SessionManagerListenerPort
SUN5.ini
SESSION-MANAGER-PORT=50000
RMI Registry 50001 Property Editor:
rmi, registry_port
SSC
Job Execution 50002 Property Editor:
job, server_port
SSC
CDR (Common Data Retrieval)
50005 HKEY_LOCAL_MACHINE\SOFTWARE\ Wow6432Node\SunSystems\Core\5.1\Comms\CDRListenerPort
Locator Service 50006 HKEY_LOCAL_MACHINE\SOFTWARE\Wow6432Node\SunSystems\Core\5.1\Comms\LocatorServiceListenerPort
Transfer Execution
50008 HKEY_LOCAL_MACHINE\SOFTWARE\Wow6432Node\SunSystems\Core\5.1\Comms\TransferExecutionListenerPort
Transfer Desk
Transaction Monitor RMI Port Ranges
50050 to
50099
Property Editor:
rmi, ports
SSC
Secure Job Execution
55001 Property Editor:
job, secure_server_port
SSC

Installation Guide - SQL Server Page 79 of 95.
App
endi
x A
– T
CP/
IP P
orts
Infor10 Financials Business (SunSystems)
SunSystems Security Server Inbound Ports Component Description
Configured Default Port
Location and Configuration Other Information
SunSystems Web Security
81 IIS SunSystems Security Web authentication
SunSystems Security 55000 global.config file located in:
ProgramData\Infor\SunSystems\Security
SunSystems Reporting (SRS) Inbound Ports Component Description
Configured Default Port
Location and Configuration Other Information
SQL Server Reporting Services
80 SQL Server Reporting Services
SRS 94 IIS SunSystems Report Manager and Report Server
ASP.NET State Server
42424 Relevant to Multiple Report Server configurations with server to hold state
External Firewall Inbound Ports - when deploying SunSystems Web based solution
Component Description
Configured Default Port
Suggested SSL Port – see Secure Sockets Layer (SSL) Section
Other Information
SunSystems Web Security
81 82
SunSystems Reporting Services
94 83
SSC 8080 8443
SunSystems Web
9080 9433
Transfer Desk Web
9090 9091
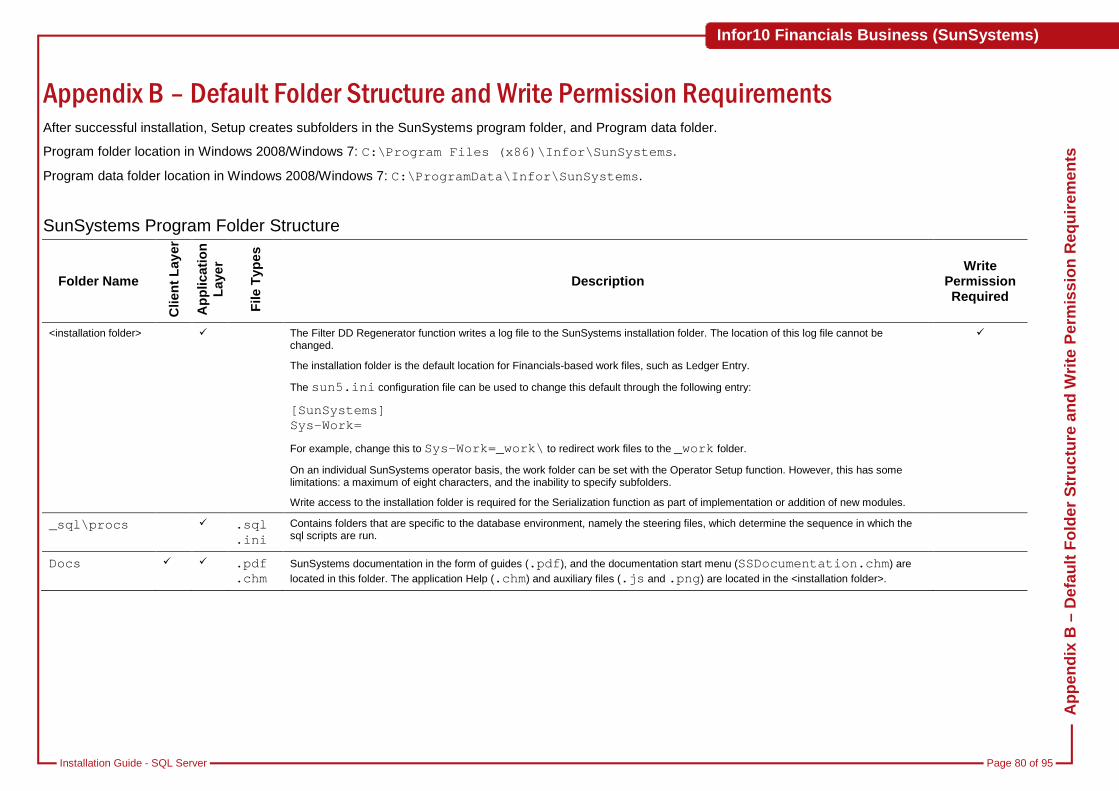
Installation Guide - SQL Server Page 80 of 95.
App
endi
x B
– D
efau
lt Fo
lder
Str
uctu
re a
nd W
rite
Perm
issi
on R
equi
rem
ents
Infor10 Financials Business (SunSystems)
Appendix B – Default Folder Structure and Write Permission Requirements After successful installation, Setup creates subfolders in the SunSystems program folder, and Program data folder.
Program folder location in Windows 2008/Windows 7: C:\Program Files (x86)\Infor\SunSystems.
Program data folder location in Windows 2008/Windows 7: C:\ProgramData\Infor\SunSystems.
SunSystems Program Folder Structure
Folder Name
Clie
nt L
ayer
App
licat
ion
L
ayer
File
Typ
es
Description Write
Permission Required
<installation folder> The Filter DD Regenerator function writes a log file to the SunSystems installation folder. The location of this log file cannot be changed.
The installation folder is the default location for Financials-based work files, such as Ledger Entry.
The sun5.ini configuration file can be used to change this default through the following entry:
[SunSystems] Sys-Work=
For example, change this to Sys-Work=_work\ to redirect work files to the _work folder.
On an individual SunSystems operator basis, the work folder can be set with the Operator Setup function. However, this has some limitations: a maximum of eight characters, and the inability to specify subfolders.
Write access to the installation folder is required for the Serialization function as part of implementation or addition of new modules.
_sql\procs
.sql .ini
Contains folders that are specific to the database environment, namely the steering files, which determine the sequence in which the sql scripts are run.
Docs .pdf .chm
SunSystems documentation in the form of guides (.pdf), and the documentation start menu (SSDocumentation.chm) are located in this folder. The application Help (.chm) and auxiliary files (.js and .png) are located in the <installation folder>.

Installation Guide - SQL Server Page 81 of 95.
App
endi
x B
– D
efau
lt Fo
lder
Str
uctu
re a
nd W
rite
Perm
issi
on R
equi
rem
ents
Infor10 Financials Business (SunSystems)
Folder Name
Clie
nt L
ayer
App
licat
ion
L
ayer
File
Typ
es
Description Write
Permission Required
ssc \bin
\components \docs \help \jre \lib
\localisation
\tomcat
.xml .txt .dat .slc .bat .dll .jar
The binary, support, and help files for SunSystems Connect are located in this folder.
Various subfolders under the SSC folder are written to by SunSystems Connect, Transfer Desks, Automation Desks, Component Manager, and Property Editor.
ssc\tomcat \conf \webapps
.conf .xml .dtd .jsp
The SSC server application. Subfolders contain Tomcat configuration and server application files.
ssc\lib\client
Deployment of SunSystems Connect and deployment of new SSC components causes files to be written to various folders under the ssc\lib\client root folder.
This location cannot be changed.
SunSystems Subfolders in Program Data Windows 7 and Windows 2008: C:\ProgramData\Infor\SunSystems.
Folder Name
Clie
nt L
ayer
App
licat
ion
L
ayer
File
Typ
es
Description Write
Permission Required
_back .bak Written to by various functions such as Business Unit Copy, Business Unit Delete, Ledger Conversion, and Data Migration.
Location is not configurable, that is, it must be underneath the SunSystems installation folder.
Default backup folder for default Business Unit. Files are restored from here.
_Data .idx .dat
Data dictionary files and tables and schemata required when a database is created using scripts.

Installation Guide - SQL Server Page 82 of 95.
App
endi
x B
– D
efau
lt Fo
lder
Str
uctu
re a
nd W
rite
Perm
issi
on R
equi
rem
ents
Infor10 Financials Business (SunSystems)
Folder Name
Clie
nt L
ayer
App
licat
ion
L
ayer
File
Typ
es
Description Write
Permission Required
_Data\01 .ctl .idx .dat
Written to by various functions such as Business Unit Copy, Business Unit Delete, Ledger Conversion, and Data Migration.
Location is not configurable, that is, it must be underneath the SunSystems installation folder.
Holds tables that are specific to the language that is selected during the installation process, that is, 01 is the folder for English.
CheckOut .sfl .dtd
This is the default client directory to hold Source Form Layout (SFL) files. Used by Form Designer, Filter Designer and Filter DD Regeneration to store local copies of SFL files. Form Designer stores checked out and newly created SFL files in this directory. When executing a local form compilation, the SFL file in this directory is compiled.
The directory location is established during installation to \CheckOut\, in the SunSystems root directory.
The location can be changed for SFL files respectively through the registry settings HKEY_LOCAL_MACHINE\SOFTWARE\SunSystems\Form Designer\5.1\Settings\SFLDir
The directory location can be overridden for a single form checkout through FormDesigner in the Check Out dialog box, the Open Form dialog box, the Local Compile dialog box, the Check In dialog box, and the Options dialog box on the General tab.
ClientFileDirectory
.dtd
.msg
.opx
.rfx
Cached report executables, message files, menu files, and form files are downloaded from the server into this folder on the client. If reports are instigated from clients but configured to run on a Report Server machine, any parameters are stored here in an XML file. The locations can be changed for the various file types using the registry settings.
Message files
HKEY_LOCAL_MACHINE\SOFTWARE\SunSystems\Navigation Manager\5.1\FileCache\MSG DIRECTORY
Form files
HKEY_LOCAL_MACHINE\SOFTWARE\SunSystems\Navigation Manager\5.1\FileCache\RFX DIRECTORY
The locations in the above two registry entries can be controlled using the FRREGEDIT function in its full mode, under the Client Settings\Client files directory entry.
Report executables and XML parameter file passed from client to Report Server
HKEY_LOCAL_MACHINE\SOFTWARE\SunSystems\ReportManager\5.1\Settings\CacheDirectory
Also FormRunner writes out an OPXDTD.DTD file to the ClientFileDirectory folder, which is an XML document type definition file used to verify the integrity of the OPX (menu) files. Whenever the menu file is accessed, this file is written out.

Installation Guide - SQL Server Page 83 of 95.
App
endi
x B
– D
efau
lt Fo
lder
Str
uctu
re a
nd W
rite
Perm
issi
on R
equi
rem
ents
Infor10 Financials Business (SunSystems)
Folder Name
Clie
nt L
ayer
App
licat
ion
L
ayer
File
Typ
es
Description Write
Permission Required
ClientFileDirectory\ LocalCompile
.msg The client directory holds run-time form (RFX) files for locally compiled SFL forms. Used by Form Designer to write the locally compiled RFX file to. Also writes *.rfx.log and *.sfl.log files in this directory if the local compilation fails.
It is set during installation to \ClientFileDirectory\LocalCompile\, in the SunSystems root directory.
The location can be changed using the registry setting:
HKEY_LOCAL_MACHINE\SOFTWARE\SunSystems\Navigation Manager\5.1\FileCache\Local Compile Directory
The location in this registry entry can be controlled using the FRREGEDIT function in full mode, under the Client Settings\Client files directory entry.
ServerFiles .rfx .sfl .opr .dat .idx .msg
The ServerFiles folder stores SFL (source form layout) files, RFX (run time forms) files, RFD (form definition) files (.dat and .idx) and menu files. Used by Form Designer, Filter Designer, Filter DD Regeneration, and Form Compiler.
Form Designer receives the server copy of SFL files from this directory and writes SFL files to it when checking them in.
When Form Designer creates a new filter function, it also writes RFD .dat and .idx files to this directory.
Form Compiler writes RFX files to this directory. If the form compilation fails, Form Compiler writes *.rfx.log and *.sfl.log files in this directory.
The folder location is set during installation to \ServerFiles, in the SunSystems root directory.
This location can be changed by using the Database Processing options on the installation media. For more information, refer to the Database Administration section of this installation guide.
If the ServerFiles location is on a different machine to the application server, the full path must be specified.
Note: Server file names must not contain spaces.
FormRunner writes out an OPXDTD.DTD file to the ServerFiles folder, which is an XML document type definition file that is used to verify the integrity of the OPX (menu) files. Whenever the menu file is accessed, this file is written here.
ServerInfoCache
Folder to hold the cached information that is obtained from the server by Common Services. Used by Form Designer and Filter Designer.
If ServerInformation Caching is switched on through the Server tab of the Options dialog box, the directory is created and is set to ServerInfoCache\ by the installation procedure.
The location of this directory cannot be changed.
Sstm\ transferlogs
This folder is written to by Transfer Desks and is used to store log files that detail transfer results.
The location of this directory cannot be changed.

Installation Guide - SQL Server Page 84 of 95.
App
endi
x B
– D
efau
lt Fo
lder
Str
uctu
re a
nd W
rite
Perm
issi
on R
equi
rem
ents
Infor10 Financials Business (SunSystems)
Folder Name
Clie
nt L
ayer
App
licat
ion
L
ayer
File
Typ
es
Description Write
Permission Required
Ssts \adm
.adm The layouts for the import files.
Upgrade \UpgradeTo51x \CustomPost
The upgrade routine to upgrade SFL (form source) files and SRD (data source) files writes the upgraded files to this directory.
The upgrade routine to upgrade OPX (menu) files writes the upgraded files to this directory.
The SFL conversion routine to convert SFL files writes the converted files to this directory.
The location is set by the installation routine.
It is used when upgrading SunSystems from one version to another.
The location of this directory cannot be changed.
Upgrade \UpgradeTo51x \log
The upgrade routine to upgrade SFL files and SRD files writes log files to this directory.
The upgrade routine to upgrade OPX files writes log files to this directory.
The SFL conversion routine to convert SFL files writes log files to this directory.
The location is set by the installation routine.
It is used when upgrading SunSystems from one version to another.
The location of this directory cannot be changed.
C:\Temp By default, the server context information (from RptParams) is downloaded to this folder. A temporary subfolder is created and the ROX file is copied there (from ClientFileDirectory), from where it is run. This is to avoid contention problems with multiple ReportManagers accessing the same file simultaneously. The location can be changed using a registry setting: (HKEY_CURRENT_USER\SOFTWARE\SunSystems\ReportManager\5.1\Settings\WorkDirectory).
Report Designer also writes temporary files to this location.
Temp Certain processes write temporary files to the location pointed to by the TEMP environment variable. Therefore, write permissions are required for this folder.
ssc \bin
\components \docs \help \jre \lib
\localisation
\tomcat
.xml .txt .dat .slc .bat .dll .jar
The binary, support, and help files for SunSystems Connect are located in this folder.
Various subfolders under the SSC folder are written to by SunSystems Connect, Transfer Desks, Automation Desks, Component Manager, and Property Editor.
SunSystems Connect and Transfer Desks require write permissions to ssc\lib\drivers\sasi\classes and ssc\lib\drivers\sasi\java as they compile classes at run-time in these locations.
Property Editor maintains numerous files in ssc\lib\properties.

Installation Guide - SQL Server Page 85 of 95.
App
endi
x B
– D
efau
lt Fo
lder
Str
uctu
re a
nd W
rite
Perm
issi
on R
equi
rem
ents
Infor10 Financials Business (SunSystems)
Folder Name
Clie
nt L
ayer
App
licat
ion
L
ayer
File
Typ
es
Description Write
Permission Required
SunSystems All the installer log files, such as InstallLog.log, InstalldatabaseLog.log go here.
SunSystems \FormCompiler
SunSystems \Navigator
All the log files that correspond to SunSystems user interface navigation go here.
SunSystems\ Cobol
SunSystems\ DataLoad
SunSystems\ FormCompiler
SunSystems\ SqlInstaller
SQL Installer log files
SunSystems\ SSC
All the SSC-related log files go here.
Note: Order Fulfilment modules do not write temporary files.
SunSystems Logs Folder \ProgramData\Infor\Logs.
SunSystems Connect Logs Folder The folder used for SunSystems Connect logging depends on your operating system, as follows:
\ProgramData\Infor\Logs\ssc\transferlogs

Installation Guide - SQL Server Page 86 of 95.
App
endi
x C
– C
hang
ing
Loca
tion
of C
ompo
nent
s in
Mul
ti-Ti
er C
onfig
urat
ions
Infor10 Financials Business (SunSystems)
Appendix C – Changing Location of SunSystems Components in Multi-Tier Configurations Reconfiguring SunSystems Client Connections Security Server, SunSystems Application Server and Connect Service From Start, Infor Financials Business SunSystems, Tools, Switch Server dialog box enables you to reconfigure SunSystems Client links to Security Server, SunSystems Application Server and Connect Service.
SunSystems Reporting Services Client Applications (installed by SunSystems Client or SRS Client) Using an editor in administrator mode, change the following config files substituting <SERVERNAME> with the name of your SRS Server.
DataAccessManager [Program Files (x86)\Infor\SunSystems\DataAccessManager.exe.config] <appSettings>
<add key="SystemsUnion.Tools.SunSystemsStudio.StudioWebServiceURL" value="http://<SERVERNAME>/SunSystemsReportServer/SunSystemsStudio.asmx" />
</appSettings>
<applicationSettings>
<Properties.Settings>
<setting name="DataAccessManager_SystemsUnion_Tools_SunSystemsStudio_SunSystemsStudio" serializeAs="String">
<value>http://< SERVERNAME >/SunSystemsReportServer/SunSystemsStudio.asmx</value>
</setting>
</Properties.Settings>
</applicationSettings>
Report Administrator [Program Files (x86)\Infor\SunSystems\ReportAdministrator.exe.config] <appSettings>
<add key="SystemsUnion.Core.Configuration.ConfigurationWebServiceURL" value=“http://< SERVERNAME >/SunSystemsReportServer/Configuration.asmx" />
<add key="SystemsUnion.Core.DataSource.Factory.DataSourceWebServiceURL" value=“http://< SERVERNAME >/SunSystemsReportServer/DataSource.asmx" />
<add key="SystemsUnion.Core.SunSystems5.SunSystemsInformationWebServiceURL" value=“http://< SERVERNAME >/SunSystemsReportServer/SunSystems.asmx" />
<add key="SystemsUnion.Services.Data.Dictionary.Service.ReportingDictionaryServiceURL" value="http://< SERVERNAME >/SunSystemsReportServer/Dictionary.asmx" />
<add key="SystemsUnion.Services.Data.SpecialFields.Service.SpecialFieldsWebServiceURL" value="http://< SERVERNAME >/SunSystemsReportServer/SpecialFields.asmx" />
<add key="SystemsUnion.Services.Data.Dictionary.Service.MetaDataDetailsWebServiceURL" value="http://< SERVERNAME >/SunSystemsReportServer/MetaDataDetails.asmx" />
<add key="SystemsUnion.Services.Data.MetaData.Service.ReportingMetaDataWebServiceURL" value="http://< SERVERNAME >/SunSystemsReportServer/MetaData.asmx" />
<add key="SystemsUnion.Services.Data.MetaData.Service.PanApplicationReportingMetaDataWebServiceURL" value="http://< SERVERNAME >/SunSystemsReportServer/PanApplicationMetaData.asmx" />

Installation Guide - SQL Server Page 87 of 95.
App
endi
x C
– C
hang
ing
Loca
tion
of C
ompo
nent
s in
Mul
ti-Ti
er C
onfig
urat
ions
Infor10 Financials Business (SunSystems)
</appSettings>
<VisionReportingClient>
<add key="WS_ENDPOINT_URL_REPORT_MANAGEMENT_SERVICE" value="http://<SERVERNAME>/SunSystemsReportManager/ReportManagementService.asmx" />
<add key="WS_ENDPOINT_URL_RENDER_SERVICE" value="http://<SERVERNAME>/SunSystemsReportManager/RenderQueueService.asmx" />
<add key="WS_ENDPOINT_URL_LOOKUP_SERVICE" value="http://<SERVERNAME>/SunSystemsReportManager/LookupService.asmx" />
</VisionReportingClient>
Report Designer [Program Files (x86)\Infor\SunSystems\ReportDesigner.exe.config] <add key="SystemsUnion.Core.DataSource.Factory.DataSourceWebServiceURL" value="http://<SERVERNAME>/SunSystemsReportServer/DataSource.asmx"/>
<add key="SystemsUnion.Core.SunSystems5.SunSystemsInformationWebServiceURL" value="http://<SERVERNAME>/SunSystemsReportServer/SunSystems.asmx"/>
<add key="SystemsUnion.Core.AppDictionary.Client.LocalisedObjectServiceURL" value="http://<SERVERNAME>/SunSystemsReportServer/LocalisedObjectWebService.asmx"/>
<add key="SystemsUnion.Services.Data.Dictionary.Service.ReportingDictionaryServiceURL" value="http://<SERVERNAME>/SunSystemsReportServer/Dictionary.asmx"/>
<add key="SystemsUnion.Services.Data.SpecialFields.Service.SpecialFieldsWebServiceURL" value="http://<SERVERNAME>/SunSystemsReportServer/SpecialFields.asmx"/>
<add key="SystemsUnion.Services.Data.Dictionary.Service.MetaDataDetailsWebServiceURL" value="http://<SERVERNAME>/SunSystemsReportServer/MetaDataDetails.asmx"/>
<add key="SystemsUnion.Services.Data.MetaData.Service.ReportingMetaDataWebServiceURL" value="http://<SERVERNAME>/SunSystemsReportServer/MetaData.asmx"/>
<add key="SystemsUnion.Services.Data.MetaData.Service.PanApplicationReportingMetaDataWebServiceURL" value="http://<SERVERNAME>/SunSystemsReportServer/PanApplicationMetaData.asmx"/>
<add key="PrintPreviewParameterEntryPage" value="http:// <SERVERNAME>//SunSystemsReportManager/secure/ParameterEntryForm.aspx?reportExecutable={0}&printPreviewParameters=1&
postId={1}"/>
<add key="PrintPreviewRenderPage" value="http:// <SERVERNAME>//SunSystemsReportManager/secure/PreviewReportRender.aspx?reportExecutable={0}&printPreviewRender=1&postId={1}"/>
<add key="WS_ENDPOINT_URL_REPORT_MANAGEMENT_SERVICE" value="http://<SERVERNAME>/SunSystemsReportManager/ReportManagementService.asmx"/>
<add key="WS_ENDPOINT_URL_RENDER_SERVICE" value="http://<SERVERNAME>/SunSystemsReportManager/RenderQueueService.asmx"/>
<add key="WS_ENDPOINT_URL_LOOKUP_SERVICE" value="http://<SERVERNAME>/SunSystemsReportManager/LookupService.asmx"/>
Changing Location of SQL Server Reporting Services (SSRS) On the SunSystems Report Manager Server, edit web.config in administrator mode, and substitute <SERVERNAME> with the name of the SSRS server.
SunSystemsReportManager [Infor\SunSystemsReportingServices\web\SunSystemsReportManager\web.config] <VisionReportManager>
<add key="MSRS_REPORT_SERVER_SERVICE" value="http://<SERVERNAME>/ReportServer /ReportService2010.asmx"/>
<add key="SSRS_REPORT_EXECUTION_SERVICE" value="http://< SERVERNAME >/ReportServer /ReportExecution2005.asmx"/>

Installation Guide - SQL Server Page 88 of 95.
App
endi
x C
– C
hang
ing
Loca
tion
of C
ompo
nent
s in
Mul
ti-Ti
er C
onfig
urat
ions
Infor10 Financials Business (SunSystems)
</VisionReportManager>
If you have multiple SunSystemsReportManager installations you must change all of them.
Changing Location of SunSystemsReportServer On the SunSystems Report Manager Server, edit web.config in administrator mode, and substitute <SERVERNAME> with the name of the SunSystems Report Server.
SunSystemsReportManager [Infor\SunSystemsReportingServices\web\SunSystemsReportManager\web.config] If you have multiple SunSystemsReportManager installations you must change all of them. <add key="SystemsUnion.Core.Configuration.ConfigurationWebServiceURL" value=“http://< SERVERNAME >/SunSystemsReportServer/Configuration.asmx"/>
<add key="SystemsUnion.Core.Repository.Manager.RepositoryWebServiceURL" value=“http://< SERVERNAME >/SunSystemsReportServer/Repository.asmx"/>
<add key="SystemsUnion.Core.DataSource.Factory.DataSourceWebServiceURL" value=“http://< SERVERNAME >/SunSystemsReportServer/DataSource.asmx"/>
<add key="SystemsUnion.Core.AppDictionary.Client.DictionaryServiceURL" value=“http://< SERVERNAME >/SunSystemsReportServer/DictionaryService.asmx"/>
<add key="SystemsUnion.Core.SunSystems5.SunSystemsInformationWebServiceURL" value=“http://< SERVERNAME >/SunSystemsReportServer/SunSystems.asmx"/>
<add key="SystemsUnion.Core.AppDictionary.Client.LocalisedObjectServiceURL" value=“http://< SERVERNAME >/SunSystemsReportServer/LocalisedObjectWebService.asmx"/>
<add key="SystemsUnion.Services.Data.MetaData.Service.PanApplicationReportingMetaDataWebServiceURL" value="http://< SERVERNAME >/SunSystemsReportServer/
PanApplicationReportingQueryService.asmx"/>
<add key="SystemsUnion.Services.Data.MetaData.Service.ReportingMetaDataWebServiceURL" value=“http://< SERVERNAME >/SunSystemsReportServer/MetaData.asmx"/>
<add key="SystemsUnion.Services.Data.Dictionary.Service.SpecialReportingDictionaryServiceURL" value=“http://< SERVERNAME >/SunSystemsReportServer/Dictionary.asmx"/>
<add key="SystemsUnion.Services.Data.Execution.Service.ExecutionWebServiceURL" value=“http://< SERVERNAME >/SunSystemsReportServer/Execution.asmx"/>
<add key="SystemsUnion.Services.Data.Dictionary.Service.ReportingDictionaryServiceURL" value=“http://< SERVERNAME >/SunSystemsReportServer/Dictionary.asmx"/>
<add key="SystemsUnion.Services.Data.SpecialFields.Service.SpecialFieldsWebServiceURL" value=“http://< SERVERNAME >/SunSystemsReportServer/SpecialFields.asmx"/>
<add key="SystemsUnion.Services.Data.MetaData.Service.PanApplicationReportingMetaDataWebServiceURL" value=“http://< SERVERNAME >/SunSystemsReportServer/PanApplicationMetaData.asmx"/>
On the SSRS server, edit web.config in administrator mode, and substitute <SERVERNAME> with the name of the SunSystems Report Server.
[Program Files\Microsoft SQL Server\MSRS10_50.MSSQLSERVER\Reporting Services\ReportServer\web.config] <add key="SystemsUnion.Core.UserInfo.Service.UserInfoWebServiceURL" value="http://< SERVERNAME>/SunSystemsReportServer/UserInfo.asmx" />
<add key="SystemsUnion.Core.Repository.Manager.RepositoryWebServiceURL" value="http://< SERVERNAME>/SunSystemsReportServer/Repository.asmx" />
<add key="SystemsUnion.Core.Configuration.ConfigurationWebServiceURL" value="http://< SERVERNAME>/SunSystemsReportServer/Configuration.asmx" />
<add key="SystemsUnion.Core.DataSource.Factory.DataSourceWebServiceURL" value="http://< SERVERNAME>/SunSystemsReportServer/DataSource.asmx" />
<add key="SystemsUnion.Core.AppDictionary.Client.DictionaryServiceURL" value="http://< SERVERNAME>/SunSystemsReportServer/DictionaryService.asmx" />
<add key="SystemsUnion.Core.SunSystems5.SunSystemsInformationWebServiceURL" value="http://< SERVERNAME>/SunSystemsReportServer/SunSystems.asmx" />
<add key="SystemsUnion.Services.Data.MetaData.Service.ReportingMetaDataWebServiceURL" value="http://< SERVERNAME>/SunSystemsReportServer/MetaData.asmx" />

Installation Guide - SQL Server Page 89 of 95.
App
endi
x C
– C
hang
ing
Loca
tion
of C
ompo
nent
s in
Mul
ti-Ti
er C
onfig
urat
ions
Infor10 Financials Business (SunSystems)
<add key="SystemsUnion.Services.Data.Execution.Service.ExecutionWebServiceURL" value="http://< SERVERNAME>/SunSystemsReportServer/Execution.asmx" />
<add key="SystemsUnion.Services.Data.Dictionary.Service.ReportingDictionaryServiceURL" value="http://< SERVERNAME>/SunSystemsReportServer/Dictionary.asmx" />
<add key="SystemsUnion.Services.Data.SpecialFields.Service.SpecialFieldsWebServiceURL" value="http://< SERVERNAME>/SunSystemsReportServer/SpecialFields.asmx" />
<add key="SystemsUnion.Services.Data.MetaData.Service.PanApplicationReportingMetaDataWebServiceURL" value="http://< SERVERNAME>/SunSystemsReportServer/PanApplicationMetaData.asmx" />
Changing Location of SunSystems Report Manager The SunSystems Domain database holds the location of SunSystems Report Manager. Edit DOMN_VRTL_HOST table. Select the row where DFLT_PATH = ‘SunSystemsReportManager’ and update ACTUAL_HOST_NAME to the new name of the SunSystems Report Manager server.

Installation Guide - SQL Server Page 90 of 95.
App
endi
x D
– A
pplic
atio
n Fi
les
Infor10 Financials Business (SunSystems)
Appendix D – Application Files The following table shows the list of file types that constitute SunSystems.
File Suffix File type Usage
.420 File Used to upgrade from ssformat to ssreport SunSystems
.cfg File Configuration files SunSystems
.dat File Data files SunSystems
.dll File Dynamic Linked Library. Validation routines. SunSystems
.gnt File Generated application code SunSystems
.idx File Index for .dat
.ini File Application initialization file SunSystems
.lib File Library files SunSystems
.MSG Program Messages System messages invoked by a program SunSystems
.ocx File Control files for ActiveX SunSystems
.sql File Set of stored procedures and database scripts that is supplied with SunSystems
SunSystems
.xml File XML data file SunSystems
.cmd File Command file, similar to a batch file but available only under Windows Transfer Desk
.css File Cascading style sheet that describes the formatting elements of a HTML page
Transfer Desk
.dat File Encrypted data file Transfer Desk
.dtd File Document type definition that is used to describe and validate the structure of an XML document
Transfer Desk
.hs File Helpset file, which describes how help files are grouped together Transfer Desk
.htm File Hyper-text Markup Language file, which contains help and other documentation
Transfer Desk

Installation Guide - SQL Server Page 91 of 95.
App
endi
x D
– A
pplic
atio
n Fi
les
Infor10 Financials Business (SunSystems)
File Suffix File type Usage
.jar
File Java archive file, which contains compiled Java code and compressed Java code that is executed at run-time
Transfer Desk
.jhm File JavaHelp information file Transfer Desk
.js File JavaScript file used in HTML files Transfer Desk
.jsp File Java Server Page, used to
generate web pages on a Java web server
Transfer Desk
.log File Text format log file Transfer Desk
.properties
File Configuration file, similar to a .ini file, that specifies parameters/settings, which are applied at run-time
Transfer Desk
.srdl File Report layout SunSystems
Reporting
.xsd File XML Schema Definition, which
describes the structure of an XML document
Transfer Desk
.xsl
File Extensible Style sheet Language file, which contains information that is used to transform the structure of an XML document
Transfer Desk

Installation Guide - SQL Server Page 92 of 95.
App
endi
x E
– In
for S
uppo
rt P
olic
y an
d In
stal
latio
ns R
unni
ng o
n Vi
rtua
lizat
ion
Softw
are
Infor10 Financials Business (SunSystems)
Appendix E – Infor Support Policy and Installations Running on Virtualization Software/Terminal Services/Citrix Xenapp/Other Because an implementation using virtualization software has been correctly sized to provide adequate system resources, we will fully support SunSystems deployed in this environment for test environments and production environments.
We will not directly support the virtualization technology used because that is the responsibility of the relevant vendor.
Reported support issues will be investigated in the normal way, but we reserve the right to ask a customer to reproduce the issue outside of a virtual environment if we believe that the issue might result from a failure of the abstraction layer, or its configuration, to provide a suitable application environment.

Installation Guide - SQL Server Page 93 of 95.
App
endi
x F
– Lo
ggin
g M
anag
emen
t
Infor10 Financials Business (SunSystems)
Appendix F – Logging Management SunSystems can also centralize all the log files into a single location, which facilitates finding and analyzing the log file. The following table contains all the log files and their control mechanism.
The location of these files is as follows:
\ProgramData\Infor\Logs\SunSystems\logs
Log File Name Description
InstallLog.txt Installation log file
InstallDatabaseLog.log Database Installation log
Navigator \ MenuImportexport.log
Navigator \ MenuMigrationV5.log
SunSystems.log
SunSystems.v5.log
SqlInstaller \ SQLxx_xxxx_xxxx.log SQL execution logs
SSC\memory-monitor.log
SSC\logging\
FormCompiler\ Form compilation log
DataLoad\Domain Domain Database uploading error log
Cobol\ Cobol application log files

Installation Guide - SQL Server Page 94 of 95.
App
endi
x G
– S
unSy
stem
s Se
curit
y
Infor10 Financials Business (SunSystems)
Appendix G – SunSystems Security Standard Single Sign On
When using Windows authentication, mapped users are not prompted to log in to SunSystems because the security client automatically identifies them as a valid user. This single sign on behaviour can also be achieved when using standard authentication, that is, user name and password, by utilising the login monitor tool.
This program displays a small icon in the system notification area, normally to the right or bottom of the Windows Task Bar. The Login Monitor controls access to the saved user credentials and gives them to any SunSystems Security-enabled application that requests authentication.
The Login Monitor program is automatically started when a Windows session begins. Under normal circumstances, the program continues to be active until the user logs out of Windows or closes the application by right-clicking the icon and clicking Exit on the shortcut menu. The administrator can opt to remove the program from start-up so it is never shown to the end user, or switch it off by right-clicking the icon and selecting Exit Login Monitor.
Logging Out
To open a status dialog box that displays the user name of the SunSystems user currently cached, double-click Login Monitor. To discard the saved user credentials, click Log Out so that the next SunSystems application that is started displays a new login dialog box, which allows the user to log in as a different SunSystems user. Any applications that are already running continue to run in the context of the original user.
If all applications are closed down, the login monitor will retain the last credentials used. As far as SunSystems is concerned, the user is not logged in to SunSystems, but the credentials are cached on the client so that the next login attempt does not need to prompt for a user name and password.
When you use this feature, note the following points: Closing an application logs you out of the application, but the login monitor still shows the current cached
user. Logging out of the Single Sign On session neither logs you out of any applications that are currently
running, nor does it close those applications. If you are in a high-security environment, you should log out of the Single Sign On session when away
from your desk for extended periods. This minimizes the risk of an unauthorised person using your machine in your absence.
Note: Single Sign On functionality is limited when deploying applications on Citrix as published applications. Credentials are not shared between publications and there is no Login Monitor. However, it is fully functional through a Citrix published desktop.

Installation Guide - SQL Server Page 95 of 95.
App
endi
x H
– A
dmin
istr
ativ
e A
cces
s R
ecov
ery
Infor10 Financials Business (SunSystems)
Appendix H – Administrative Access Recovery There are several scenarios when the Administrator may be unable to access User Manager. For example, because of incorrectly mapped Windows authentication credentials or the designated administrator leaving the company without handing over access to another user.
To overcome this, the following steps must be carried out by a local administrator of the server where the Security Service is running: 1. Ensure all users are logged out of the system. 2. Stop the SunSystems Security Service. 3. Edit the global.config file. Depending on operating system, this may be located in one of the
following folders: \Documents and Settings\All Users\Application Data\Infor\SunSystems\Security\ \Users\All Users\Infor\SunSystems\Security\ \ProgramData\Infor\SunSystems\Security\.
4. Change the property entry <serveradminaccess>0</serveradminaccess> to <serveradminaccess>1</serveradminaccess>.
5. Restart the service. 6. Right-click the User Manager executable and select Run as Administrator. 7. Correct the problem that was preventing the administrator from gaining access. 8. Reverse the above process, reverting the configured property back to 0. 9. Allow users to log in to the system.
Note: This feature should only be used when the Administrator is unable to access the system to correct problems in the configuration.
This feature is not available if User Manager is accessed remotely. The user must be on the specific server and be a local administrator in Windows.


![[MC-SQLR]: SQL Server Resolution Protocol - NET](https://img.dokumen.tips/doc/110x75/63318850ac2998afa709c52a/mc-sqlr-sql-server-resolution-protocol-net.jpg)


