Embed Size (px)
Citation preview
Informatica® B2B Data Exchange10.2
Developer Guide
Informatica B2B Data Exchange Developer Guide10.2April 2017
© Copyright Informatica LLC 2001, 2019
This software and documentation are provided only under a separate license agreement containing restrictions on use and disclosure. No part of this document may be reproduced or transmitted in any form, by any means (electronic, photocopying, recording or otherwise) without prior consent of Informatica LLC.
U.S. GOVERNMENT RIGHTS Programs, software, databases, and related documentation and technical data delivered to U.S. Government customers are "commercial computer software" or "commercial technical data" pursuant to the applicable Federal Acquisition Regulation and agency-specific supplemental regulations. As such, the use, duplication, disclosure, modification, and adaptation is subject to the restrictions and license terms set forth in the applicable Government contract, and, to the extent applicable by the terms of the Government contract, the additional rights set forth in FAR 52.227-19, Commercial Computer Software License.
Informatica, the Informatica logo, Informatica Cloud, PowerCenter, PowerExchange, and Big Data Management are trademarks or registered trademarks of Informatica LLC in the United States and many jurisdictions throughout the world. A current list of Informatica trademarks is available on the web at https://www.informatica.com/trademarks.html. Other company and product names may be trade names or trademarks of their respective owners.
Portions of this software and/or documentation are subject to copyright held by third parties. Required third party notices are included with the product.
See patents at https://www.informatica.com/legal/patents.html.
DISCLAIMER: Informatica LLC provides this documentation "as is" without warranty of any kind, either express or implied, including, but not limited to, the implied warranties of noninfringement, merchantability, or use for a particular purpose. Informatica LLC does not warrant that this software or documentation is error free. The information provided in this software or documentation may include technical inaccuracies or typographical errors. The information in this software and documentation is subject to change at any time without notice.
NOTICES
This Informatica product (the "Software") includes certain drivers (the "DataDirect Drivers") from DataDirect Technologies, an operating company of Progress Software Corporation ("DataDirect") which are subject to the following terms and conditions:
1. THE DATADIRECT DRIVERS ARE PROVIDED "AS IS" WITHOUT WARRANTY OF ANY KIND, EITHER EXPRESSED OR IMPLIED, INCLUDING BUT NOT LIMITED TO, THE IMPLIED WARRANTIES OF MERCHANTABILITY, FITNESS FOR A PARTICULAR PURPOSE AND NON-INFRINGEMENT.
2. IN NO EVENT WILL DATADIRECT OR ITS THIRD PARTY SUPPLIERS BE LIABLE TO THE END-USER CUSTOMER FOR ANY DIRECT, INDIRECT, INCIDENTAL, SPECIAL, CONSEQUENTIAL OR OTHER DAMAGES ARISING OUT OF THE USE OF THE ODBC DRIVERS, WHETHER OR NOT INFORMED OF THE POSSIBILITIES OF DAMAGES IN ADVANCE. THESE LIMITATIONS APPLY TO ALL CAUSES OF ACTION, INCLUDING, WITHOUT LIMITATION, BREACH OF CONTRACT, BREACH OF WARRANTY, NEGLIGENCE, STRICT LIABILITY, MISREPRESENTATION AND OTHER TORTS.
The information in this documentation is subject to change without notice. If you find any problems in this documentation, report them to us at [email protected].
Informatica products are warranted according to the terms and conditions of the agreements under which they are provided. INFORMATICA PROVIDES THE INFORMATION IN THIS DOCUMENT "AS IS" WITHOUT WARRANTY OF ANY KIND, EXPRESS OR IMPLIED, INCLUDING WITHOUT ANY WARRANTIES OF MERCHANTABILITY, FITNESS FOR A PARTICULAR PURPOSE AND ANY WARRANTY OR CONDITION OF NON-INFRINGEMENT.
Publication Date: 2019-10-10
Table of Contents
Preface . . . . . . . . . . . . . . . . . . . . . . . . . . . . . . . . . . . . . . . . . . . . . . . . . . . . . . . . . . . . . . . . . . . . . . 8Informatica Resources. . . . . . . . . . . . . . . . . . . . . . . . . . . . . . . . . . . . . . . . . . . . . . . . . . . 8
Informatica Network. . . . . . . . . . . . . . . . . . . . . . . . . . . . . . . . . . . . . . . . . . . . . . . . . 8
Informatica Knowledge Base. . . . . . . . . . . . . . . . . . . . . . . . . . . . . . . . . . . . . . . . . . . . 8
Informatica Documentation. . . . . . . . . . . . . . . . . . . . . . . . . . . . . . . . . . . . . . . . . . . . . 8
Informatica Product Availability Matrixes. . . . . . . . . . . . . . . . . . . . . . . . . . . . . . . . . . . . 9
Informatica Velocity. . . . . . . . . . . . . . . . . . . . . . . . . . . . . . . . . . . . . . . . . . . . . . . . . . 9
Informatica Marketplace. . . . . . . . . . . . . . . . . . . . . . . . . . . . . . . . . . . . . . . . . . . . . . . 9
Informatica Global Customer Support. . . . . . . . . . . . . . . . . . . . . . . . . . . . . . . . . . . . . . 9
Chapter 1: PowerCenter Mappings and Workflows. . . . . . . . . . . . . . . . . . . . . . . . . . . 10PowerCenter Mappings and Workflows Overview. . . . . . . . . . . . . . . . . . . . . . . . . . . . . . . . . 10
Sample Scenarios. . . . . . . . . . . . . . . . . . . . . . . . . . . . . . . . . . . . . . . . . . . . . . . . . . 10
Step 1. Install the B2B Data Exchange PowerCenter Plug-Ins. . . . . . . . . . . . . . . . . . . . . . . . . . 11
Server Plug-In. . . . . . . . . . . . . . . . . . . . . . . . . . . . . . . . . . . . . . . . . . . . . . . . . . . . . 11
Client Plug-In. . . . . . . . . . . . . . . . . . . . . . . . . . . . . . . . . . . . . . . . . . . . . . . . . . . . . 11
Step 2. Create Source and Target Definitions. . . . . . . . . . . . . . . . . . . . . . . . . . . . . . . . . . . . 11
Creating the Source Definition for a Subscription Workflow. . . . . . . . . . . . . . . . . . . . . . . . 11
Creating the Target Definition. . . . . . . . . . . . . . . . . . . . . . . . . . . . . . . . . . . . . . . . . . . 13
Step 32. Create the Mapping . . . . . . . . . . . . . . . . . . . . . . . . . . . . . . . . . . . . . . . . . . . . . . 15
Step 4. Configure the JMS and JNDI Connections. . . . . . . . . . . . . . . . . . . . . . . . . . . . . . . . . 16
JNDI Connection Attributes. . . . . . . . . . . . . . . . . . . . . . . . . . . . . . . . . . . . . . . . . . . . 16
JMS Connection Attributes. . . . . . . . . . . . . . . . . . . . . . . . . . . . . . . . . . . . . . . . . . . . 16
Step 53. Create the PowerCenter Workflow and Session. . . . . . . . . . . . . . . . . . . . . . . . . . . . . 17
Step 6. Export the PowerCenter Workflow and Mapping. . . . . . . . . . . . . . . . . . . . . . . . . . . . . 18
Updating the Workflow. . . . . . . . . . . . . . . . . . . . . . . . . . . . . . . . . . . . . . . . . . . . . . . 19
Chapter 2: B2B Data Exchange Transformations. . . . . . . . . . . . . . . . . . . . . . . . . . . . . 20B2B Data Exchange Transformations Overview. . . . . . . . . . . . . . . . . . . . . . . . . . . . . . . . . . . 20
Installing and Registering Transformations. . . . . . . . . . . . . . . . . . . . . . . . . . . . . . . . . . 21
Configuring Transformations. . . . . . . . . . . . . . . . . . . . . . . . . . . . . . . . . . . . . . . . . . . 22
Handling Transformation Errors. . . . . . . . . . . . . . . . . . . . . . . . . . . . . . . . . . . . . . . . . 22
B2B Data Exchange Transformations Rules and Guidelines. . . . . . . . . . . . . . . . . . . . . . . . 22
DX_Add_Document_To_Event Transformation. . . . . . . . . . . . . . . . . . . . . . . . . . . . . . . . . . . 23
Input Ports. . . . . . . . . . . . . . . . . . . . . . . . . . . . . . . . . . . . . . . . . . . . . . . . . . . . . . . 23
Input/Output Ports. . . . . . . . . . . . . . . . . . . . . . . . . . . . . . . . . . . . . . . . . . . . . . . . . . 24
B2B Data Exchange Properties. . . . . . . . . . . . . . . . . . . . . . . . . . . . . . . . . . . . . . . . . . 25
DX_Aggregate Transformation. . . . . . . . . . . . . . . . . . . . . . . . . . . . . . . . . . . . . . . . . . . . . 25
Input Ports. . . . . . . . . . . . . . . . . . . . . . . . . . . . . . . . . . . . . . . . . . . . . . . . . . . . . . . 26
Input/Output Ports. . . . . . . . . . . . . . . . . . . . . . . . . . . . . . . . . . . . . . . . . . . . . . . . . . 26
Table of Contents 3
B2B Data Exchange Properties. . . . . . . . . . . . . . . . . . . . . . . . . . . . . . . . . . . . . . . . . . 27
DX_Complete_Correlation Transformation. . . . . . . . . . . . . . . . . . . . . . . . . . . . . . . . . . . . . . 27
Input Ports. . . . . . . . . . . . . . . . . . . . . . . . . . . . . . . . . . . . . . . . . . . . . . . . . . . . . . . 27
Input/Output Ports. . . . . . . . . . . . . . . . . . . . . . . . . . . . . . . . . . . . . . . . . . . . . . . . . . 28
B2B Data Exchange Properties. . . . . . . . . . . . . . . . . . . . . . . . . . . . . . . . . . . . . . . . . . 28
DX_Create_Event Transformation. . . . . . . . . . . . . . . . . . . . . . . . . . . . . . . . . . . . . . . . . . . 28
Input Ports. . . . . . . . . . . . . . . . . . . . . . . . . . . . . . . . . . . . . . . . . . . . . . . . . . . . . . . 29
Input/Output Ports. . . . . . . . . . . . . . . . . . . . . . . . . . . . . . . . . . . . . . . . . . . . . . . . . . 29
B2B Data Exchange Properties. . . . . . . . . . . . . . . . . . . . . . . . . . . . . . . . . . . . . . . . . . 29
DX_Event_Attribute Transformation. . . . . . . . . . . . . . . . . . . . . . . . . . . . . . . . . . . . . . . . . . 30
Input/Output Ports. . . . . . . . . . . . . . . . . . . . . . . . . . . . . . . . . . . . . . . . . . . . . . . . . . 30
B2B Data Exchange Properties. . . . . . . . . . . . . . . . . . . . . . . . . . . . . . . . . . . . . . . . . . 31
DX_Event_Details Transformation. . . . . . . . . . . . . . . . . . . . . . . . . . . . . . . . . . . . . . . . . . . 31
Input/Output Ports. . . . . . . . . . . . . . . . . . . . . . . . . . . . . . . . . . . . . . . . . . . . . . . . . . 31
B2B Data Exchange Properties. . . . . . . . . . . . . . . . . . . . . . . . . . . . . . . . . . . . . . . . . . 32
DX_Generate_Temporary_File Transformation. . . . . . . . . . . . . . . . . . . . . . . . . . . . . . . . . . . 32
Input/Output Ports. . . . . . . . . . . . . . . . . . . . . . . . . . . . . . . . . . . . . . . . . . . . . . . . . . 32
B2B Data Exchange Properties. . . . . . . . . . . . . . . . . . . . . . . . . . . . . . . . . . . . . . . . . . 33
DX_Get_Document_File_Path Transformation. . . . . . . . . . . . . . . . . . . . . . . . . . . . . . . . . . . . 33
Input/Output Ports. . . . . . . . . . . . . . . . . . . . . . . . . . . . . . . . . . . . . . . . . . . . . . . . . . 33
B2B Data Exchange Properties. . . . . . . . . . . . . . . . . . . . . . . . . . . . . . . . . . . . . . . . . . 34
DX_Increment_Profile_Parameter Transformation. . . . . . . . . . . . . . . . . . . . . . . . . . . . . . . . . 34
Input/Output Ports. . . . . . . . . . . . . . . . . . . . . . . . . . . . . . . . . . . . . . . . . . . . . . . . . . 34
B2B Data Exchange Properties. . . . . . . . . . . . . . . . . . . . . . . . . . . . . . . . . . . . . . . . . . 35
DX_Initiate_Correlation Transformation. . . . . . . . . . . . . . . . . . . . . . . . . . . . . . . . . . . . . . . 35
Input Ports. . . . . . . . . . . . . . . . . . . . . . . . . . . . . . . . . . . . . . . . . . . . . . . . . . . . . . . 35
Input/Output Ports. . . . . . . . . . . . . . . . . . . . . . . . . . . . . . . . . . . . . . . . . . . . . . . . . . 36
B2B Data Exchange Properties. . . . . . . . . . . . . . . . . . . . . . . . . . . . . . . . . . . . . . . . . . 36
DX_Notification Transformation. . . . . . . . . . . . . . . . . . . . . . . . . . . . . . . . . . . . . . . . . . . . 36
Input/Output Ports. . . . . . . . . . . . . . . . . . . . . . . . . . . . . . . . . . . . . . . . . . . . . . . . . . 37
B2B Data Exchange Properties. . . . . . . . . . . . . . . . . . . . . . . . . . . . . . . . . . . . . . . . . . 37
DX_Profile_Parameters Transformation. . . . . . . . . . . . . . . . . . . . . . . . . . . . . . . . . . . . . . . 37
Input/Output Ports. . . . . . . . . . . . . . . . . . . . . . . . . . . . . . . . . . . . . . . . . . . . . . . . . . 38
DX_Publication_Parameters. . . . . . . . . . . . . . . . . . . . . . . . . . . . . . . . . . . . . . . . . . . . . . . 39
Input Ports. . . . . . . . . . . . . . . . . . . . . . . . . . . . . . . . . . . . . . . . . . . . . . . . . . . . . . . 39
Output Ports. . . . . . . . . . . . . . . . . . . . . . . . . . . . . . . . . . . . . . . . . . . . . . . . . . . . . . 39
DX_Release_Delayed_Events Transformation. . . . . . . . . . . . . . . . . . . . . . . . . . . . . . . . . . . . 39
Input/Output Ports. . . . . . . . . . . . . . . . . . . . . . . . . . . . . . . . . . . . . . . . . . . . . . . . . . 40
DX_Resolve_Profile. . . . . . . . . . . . . . . . . . . . . . . . . . . . . . . . . . . . . . . . . . . . . . . . . . . . 40
Input Ports. . . . . . . . . . . . . . . . . . . . . . . . . . . . . . . . . . . . . . . . . . . . . . . . . . . . . . . 40
Input/Output Ports. . . . . . . . . . . . . . . . . . . . . . . . . . . . . . . . . . . . . . . . . . . . . . . . . . 41
B2B Data Exchange Properties. . . . . . . . . . . . . . . . . . . . . . . . . . . . . . . . . . . . . . . . . . 41
4 Table of Contents
DX_Start_Publication Transformation. . . . . . . . . . . . . . . . . . . . . . . . . . . . . . . . . . . . . . . . . 41
Input/Output Ports. . . . . . . . . . . . . . . . . . . . . . . . . . . . . . . . . . . . . . . . . . . . . . . . . . 41
B2B Data Exchange Properties. . . . . . . . . . . . . . . . . . . . . . . . . . . . . . . . . . . . . . . . . . 42
DX_Throw_Error. . . . . . . . . . . . . . . . . . . . . . . . . . . . . . . . . . . . . . . . . . . . . . . . . . . . . . . 42
Input Ports. . . . . . . . . . . . . . . . . . . . . . . . . . . . . . . . . . . . . . . . . . . . . . . . . . . . . . . 43
Input/Output Ports. . . . . . . . . . . . . . . . . . . . . . . . . . . . . . . . . . . . . . . . . . . . . . . . . . 43
B2B Data Exchange Properties. . . . . . . . . . . . . . . . . . . . . . . . . . . . . . . . . . . . . . . . . . 44
Chapter 3: B2B Data Exchange Workflows. . . . . . . . . . . . . . . . . . . . . . . . . . . . . . . . . . . 45B2B Data Exchange Workflows Overview. . . . . . . . . . . . . . . . . . . . . . . . . . . . . . . . . . . . . . . 45
B2B Data Exchange Workflows Overview. . . . . . . . . . . . . . . . . . . . . . . . . . . . . . . . . . . . . . . 46
Managing B2B Data Exchange Workflows. . . . . . . . . . . . . . . . . . . . . . . . . . . . . . . . . . . . . . 46
B2B Data Exchange Workflow Properties. . . . . . . . . . . . . . . . . . . . . . . . . . . . . . . . . . . . . . . 47
B2B Data Exchange Workflow Properties. . . . . . . . . . . . . . . . . . . . . . . . . . . . . . . . . . . . . . . 48
Chapter 4: Dashboard and Reports. . . . . . . . . . . . . . . . . . . . . . . . . . . . . . . . . . . . . . . . . . . 50Dashboard and Reports Overview. . . . . . . . . . . . . . . . . . . . . . . . . . . . . . . . . . . . . . . . . . . 50
Key Performance Indicators. . . . . . . . . . . . . . . . . . . . . . . . . . . . . . . . . . . . . . . . . . . . . . . 51
Default KPIs. . . . . . . . . . . . . . . . . . . . . . . . . . . . . . . . . . . . . . . . . . . . . . . . . . . . . . 51
Dashboard and Reports Structure in Logi Info Studio. . . . . . . . . . . . . . . . . . . . . . . . . . . . . . . 52
Default Dashboard Filters. . . . . . . . . . . . . . . . . . . . . . . . . . . . . . . . . . . . . . . . . . . . . 52
Default Dashboard SQL Constants. . . . . . . . . . . . . . . . . . . . . . . . . . . . . . . . . . . . . . . . 52
Default Dashboard JavaScript Support Files. . . . . . . . . . . . . . . . . . . . . . . . . . . . . . . . . 54
Default Dashboard Theme Modifier. . . . . . . . . . . . . . . . . . . . . . . . . . . . . . . . . . . . . . . 54
Custom Dashboard Properties in the LogiXML Settings File. . . . . . . . . . . . . . . . . . . . . . . . 55
Customizing the Dashboard in Logi Info Studio. . . . . . . . . . . . . . . . . . . . . . . . . . . . . . . . . . . 56
Installing and Registering Logi Info Studio. . . . . . . . . . . . . . . . . . . . . . . . . . . . . . . . . . . 56
Setting Up the Custom Dashboard Application. . . . . . . . . . . . . . . . . . . . . . . . . . . . . . . . 57
Creating a Report in the Custom Dashboard. . . . . . . . . . . . . . . . . . . . . . . . . . . . . . . . . . 57
Adding a Dashboard Panel to the Custom Dashboard. . . . . . . . . . . . . . . . . . . . . . . . . . . . 57
Deploying and Testing the Custom Dashboard in B2B Data Exchange. . . . . . . . . . . . . . . . . 58
Chapter 5: Creating Workflows for Event Reconciliation. . . . . . . . . . . . . . . . . . . . . . 59Overview of Event Reconciliation. . . . . . . . . . . . . . . . . . . . . . . . . . . . . . . . . . . . . . . . . . . . 59
Initiating and Completing an Event Reconciliation. . . . . . . . . . . . . . . . . . . . . . . . . . . . . . . . . 60
Initiating an Event Reconciliation. . . . . . . . . . . . . . . . . . . . . . . . . . . . . . . . . . . . . . . . . 60
Completing an Event Reconciliation. . . . . . . . . . . . . . . . . . . . . . . . . . . . . . . . . . . . . . . 60
Reconciliation Status. . . . . . . . . . . . . . . . . . . . . . . . . . . . . . . . . . . . . . . . . . . . . . . . . . . 61
Chapter 6: Forms Designer. . . . . . . . . . . . . . . . . . . . . . . . . . . . . . . . . . . . . . . . . . . . . . . . . . 64Forms Designer Overview. . . . . . . . . . . . . . . . . . . . . . . . . . . . . . . . . . . . . . . . . . . . . . . . 64
Forms Designer User Interface. . . . . . . . . . . . . . . . . . . . . . . . . . . . . . . . . . . . . . . . . . . . . 64
Forms Designer Actions. . . . . . . . . . . . . . . . . . . . . . . . . . . . . . . . . . . . . . . . . . . . . . 65
Table of Contents 5
Element Properties. . . . . . . . . . . . . . . . . . . . . . . . . . . . . . . . . . . . . . . . . . . . . . . . . . . . . 66
Group Properties. . . . . . . . . . . . . . . . . . . . . . . . . . . . . . . . . . . . . . . . . . . . . . . . . . . . . . 67
Customizing B2B Data Exchange Workflow Parameters. . . . . . . . . . . . . . . . . . . . . . . . . . . . . 67
Chapter 7: Configuring Email for Monitor Notification. . . . . . . . . . . . . . . . . . . . . . . 69Overview of Email for Monitor Notification. . . . . . . . . . . . . . . . . . . . . . . . . . . . . . . . . . . . . 69
The Built-in Email Notification Message Format. . . . . . . . . . . . . . . . . . . . . . . . . . . . . . . . . . 69
Configuring the Email Notifications. . . . . . . . . . . . . . . . . . . . . . . . . . . . . . . . . . . . . . . . . . 70
Configuring Email Notifications Using System Properties. . . . . . . . . . . . . . . . . . . . . . . . . 70
Configuring Email Notifications Using Event Properties. . . . . . . . . . . . . . . . . . . . . . . . . . 70
Configuring the Body of an Email Notification. . . . . . . . . . . . . . . . . . . . . . . . . . . . . . . . 71
Chapter 8: Dashboard and Reports. . . . . . . . . . . . . . . . . . . . . . . . . . . . . . . . . . . . . . . . . . . 72Dashboard and Reports Overview. . . . . . . . . . . . . . . . . . . . . . . . . . . . . . . . . . . . . . . . . . . 72
Key Performance Indicators. . . . . . . . . . . . . . . . . . . . . . . . . . . . . . . . . . . . . . . . . . . . . . . 73
Default KPIs. . . . . . . . . . . . . . . . . . . . . . . . . . . . . . . . . . . . . . . . . . . . . . . . . . . . . . 73
Dashboard and Reports Structure in Logi Info Studio. . . . . . . . . . . . . . . . . . . . . . . . . . . . . . . 74
Default Dashboard Filters. . . . . . . . . . . . . . . . . . . . . . . . . . . . . . . . . . . . . . . . . . . . . 74
Default Dashboard SQL Constants. . . . . . . . . . . . . . . . . . . . . . . . . . . . . . . . . . . . . . . . 74
Default Dashboard JavaScript Support Files. . . . . . . . . . . . . . . . . . . . . . . . . . . . . . . . . 76
Default Dashboard Theme Modifier. . . . . . . . . . . . . . . . . . . . . . . . . . . . . . . . . . . . . . . 76
Custom Dashboard Properties in the LogiXML Settings File. . . . . . . . . . . . . . . . . . . . . . . . 77
Customizing the Dashboard in Logi Info Studio. . . . . . . . . . . . . . . . . . . . . . . . . . . . . . . . . . . 78
Installing and Registering Logi Info Studio. . . . . . . . . . . . . . . . . . . . . . . . . . . . . . . . . . . 78
Setting Up the Custom Dashboard Application. . . . . . . . . . . . . . . . . . . . . . . . . . . . . . . . 79
Creating a Report in the Custom Dashboard. . . . . . . . . . . . . . . . . . . . . . . . . . . . . . . . . . 79
Adding a Dashboard Panel to the Custom Dashboard. . . . . . . . . . . . . . . . . . . . . . . . . . . . 79
Deploying and Testing the Custom Dashboard in B2B Data Exchange. . . . . . . . . . . . . . . . . 80
Chapter 9: B2B Data Exchange Web Services API. . . . . . . . . . . . . . . . . . . . . . . . . . . . 81Data Exchange Web Services Overview. . . . . . . . . . . . . . . . . . . . . . . . . . . . . . . . . . . . . . . . 81
DX_TPM_Partner Web Service. . . . . . . . . . . . . . . . . . . . . . . . . . . . . . . . . . . . . . . . . . . . . . 82
DX_TPM_Partner Request. . . . . . . . . . . . . . . . . . . . . . . . . . . . . . . . . . . . . . . . . . . . . 82
DX_TPM_Partner Response. . . . . . . . . . . . . . . . . . . . . . . . . . . . . . . . . . . . . . . . . . . . 83
DX_TPM_Partner Create Operation. . . . . . . . . . . . . . . . . . . . . . . . . . . . . . . . . . . . . . . 83
DX_TPM_Partner Search Operation. . . . . . . . . . . . . . . . . . . . . . . . . . . . . . . . . . . . . . . 85
DX_TPM_Partner Update Operation. . . . . . . . . . . . . . . . . . . . . . . . . . . . . . . . . . . . . . . 85
DX_TPM_Partner Delete Operation. . . . . . . . . . . . . . . . . . . . . . . . . . . . . . . . . . . . . . . . 87
DX_TPM_Partner Count Operation. . . . . . . . . . . . . . . . . . . . . . . . . . . . . . . . . . . . . . . . 87
DX_TPM_Partner Get Operation. . . . . . . . . . . . . . . . . . . . . . . . . . . . . . . . . . . . . . . . . . 88
DX_TPM_Account Web Service. . . . . . . . . . . . . . . . . . . . . . . . . . . . . . . . . . . . . . . . . . . . . 89
DX_TPM_Account Request. . . . . . . . . . . . . . . . . . . . . . . . . . . . . . . . . . . . . . . . . . . . . 89
DX_TPM_Account Response. . . . . . . . . . . . . . . . . . . . . . . . . . . . . . . . . . . . . . . . . . . . 90
6 Table of Contents
DX_TPM_Account Create Operation. . . . . . . . . . . . . . . . . . . . . . . . . . . . . . . . . . . . . . . 90
DX_TPM_Account Search Operation. . . . . . . . . . . . . . . . . . . . . . . . . . . . . . . . . . . . . . . 92
DX_TPM_Account Update Operation. . . . . . . . . . . . . . . . . . . . . . . . . . . . . . . . . . . . . . 93
DX_TPM_Account Delete Operation. . . . . . . . . . . . . . . . . . . . . . . . . . . . . . . . . . . . . . . 94
DX_TPM_Account Count Operation. . . . . . . . . . . . . . . . . . . . . . . . . . . . . . . . . . . . . . . 94
DX_TPM_Account Get Operation. . . . . . . . . . . . . . . . . . . . . . . . . . . . . . . . . . . . . . . . . 95
DX_TPM_Profile Web Service. . . . . . . . . . . . . . . . . . . . . . . . . . . . . . . . . . . . . . . . . . . . . . 96
DX_TPM_Profile Request. . . . . . . . . . . . . . . . . . . . . . . . . . . . . . . . . . . . . . . . . . . . . . 97
DX_TPM_Profile Response. . . . . . . . . . . . . . . . . . . . . . . . . . . . . . . . . . . . . . . . . . . . . 97
DX_TPM_Profile Create Operation. . . . . . . . . . . . . . . . . . . . . . . . . . . . . . . . . . . . . . . . 98
DX_TPM_Profile Search Operation. . . . . . . . . . . . . . . . . . . . . . . . . . . . . . . . . . . . . . . . 99
DX_TPM_Profile Update Operation. . . . . . . . . . . . . . . . . . . . . . . . . . . . . . . . . . . . . . . 100
DX_TPM_Profile Delete Operation. . . . . . . . . . . . . . . . . . . . . . . . . . . . . . . . . . . . . . . 101
DX_TPM_Profile Count Operation. . . . . . . . . . . . . . . . . . . . . . . . . . . . . . . . . . . . . . . . 102
DX_TPM_Profile Get Operation. . . . . . . . . . . . . . . . . . . . . . . . . . . . . . . . . . . . . . . . . 102
DX_Endpoint Web Service. . . . . . . . . . . . . . . . . . . . . . . . . . . . . . . . . . . . . . . . . . . . . . . 103
DX_Endpoint Request. . . . . . . . . . . . . . . . . . . . . . . . . . . . . . . . . . . . . . . . . . . . . . . 103
DX_Endpoint Response. . . . . . . . . . . . . . . . . . . . . . . . . . . . . . . . . . . . . . . . . . . . . . 104
Complex Type Objects in the Data Exchange Web Services. . . . . . . . . . . . . . . . . . . . . . . . . . 104
DXPartner Object. . . . . . . . . . . . . . . . . . . . . . . . . . . . . . . . . . . . . . . . . . . . . . . . . . 104
DXAccount Object. . . . . . . . . . . . . . . . . . . . . . . . . . . . . . . . . . . . . . . . . . . . . . . . . 105
DXProfile Object. . . . . . . . . . . . . . . . . . . . . . . . . . . . . . . . . . . . . . . . . . . . . . . . . . 106
DXContactInformation Object. . . . . . . . . . . . . . . . . . . . . . . . . . . . . . . . . . . . . . . . . . 106
General B2B Data Exchange Web Service Behavior. . . . . . . . . . . . . . . . . . . . . . . . . . . . . . . 107
Run Publication SubscriptionB2B Data Exchange Web Service Security. . . . . . . . . . . . . . . . . . 107
User Authentication. . . . . . . . . . . . . . . . . . . . . . . . . . . . . . . . . . . . . . . . . . . . . . . . 107
User Access. . . . . . . . . . . . . . . . . . . . . . . . . . . . . . . . . . . . . . . . . . . . . . . . . . . . . 108
Chapter 10: B2B Data Exchange Run-time Java API. . . . . . . . . . . . . . . . . . . . . . . . . 109B2B Data Exchange Run-time Java API Overview. . . . . . . . . . . . . . . . . . . . . . . . . . . . . . . . . 109
B2B Data Exchange Run-time Java API Versions. . . . . . . . . . . . . . . . . . . . . . . . . . . . . . 109
API Reference. . . . . . . . . . . . . . . . . . . . . . . . . . . . . . . . . . . . . . . . . . . . . . . . . . . . . . . 110
Chapter 11: B2B Data Exchange Forms Designer Java API. . . . . . . . . . . . . . . . . . 114B2B Data Exchange Forms Designer Java API Overview. . . . . . . . . . . . . . . . . . . . . . . . . . . . 114
B2B Data Exchange Forms Designer Java API Reference. . . . . . . . . . . . . . . . . . . . . . . . . . . . 115
Index. . . . . . . . . . . . . . . . . . . . . . . . . . . . . . . . . . . . . . . . . . . . . . . . . . . . . . . . . . . 116
Table of Contents 7
PrefaceThe B2B Data Exchange Developer Guide provides information about the tasks required to develop workflows in PowerCenter to process B2B Data Exchange documents. It assumes that you have a working knowledge of PowerCenter and are familiar with the format and requirements of the documents processed in B2B Data Exchange. The Dashboard and Reports topics assume you have a working knowledge of Logi Info Studio and the process of creating and deploying custom Dashboard panels and reports.
Informatica Resources
Informatica NetworkInformatica Network hosts Informatica Global Customer Support, the Informatica Knowledge Base, and other product resources. To access Informatica Network, visit https://network.informatica.com.
As a member, you can:
• Access all of your Informatica resources in one place.
• Search the Knowledge Base for product resources, including documentation, FAQs, and best practices.
• View product availability information.
• Review your support cases.
• Find your local Informatica User Group Network and collaborate with your peers.
Informatica Knowledge BaseUse the Informatica Knowledge Base to search Informatica Network for product resources such as documentation, how-to articles, best practices, and PAMs.
To access the Knowledge Base, visit https://kb.informatica.com. If you have questions, comments, or ideas about the Knowledge Base, contact the Informatica Knowledge Base team at [email protected].
Informatica DocumentationTo get the latest documentation for your product, browse the Informatica Knowledge Base at https://kb.informatica.com/_layouts/ProductDocumentation/Page/ProductDocumentSearch.aspx.
If you have questions, comments, or ideas about this documentation, contact the Informatica Documentation team through email at [email protected].
8
Informatica Product Availability MatrixesProduct Availability Matrixes (PAMs) indicate the versions of operating systems, databases, and other types of data sources and targets that a product release supports. If you are an Informatica Network member, you can access PAMs at https://network.informatica.com/community/informatica-network/product-availability-matrices.
Informatica VelocityInformatica Velocity is a collection of tips and best practices developed by Informatica Professional Services. Developed from the real-world experience of hundreds of data management projects, Informatica Velocity represents the collective knowledge of our consultants who have worked with organizations from around the world to plan, develop, deploy, and maintain successful data management solutions.
If you are an Informatica Network member, you can access Informatica Velocity resources at http://velocity.informatica.com.
If you have questions, comments, or ideas about Informatica Velocity, contact Informatica Professional Services at [email protected].
Informatica MarketplaceThe Informatica Marketplace is a forum where you can find solutions that augment, extend, or enhance your Informatica implementations. By leveraging any of the hundreds of solutions from Informatica developers and partners, you can improve your productivity and speed up time to implementation on your projects. You can access Informatica Marketplace at https://marketplace.informatica.com.
Informatica Global Customer SupportYou can contact a Global Support Center by telephone or through Online Support on Informatica Network.
To find your local Informatica Global Customer Support telephone number, visit the Informatica website at the following link: http://www.informatica.com/us/services-and-training/support-services/global-support-centers.
If you are an Informatica Network member, you can use Online Support at http://network.informatica.com.
Preface 9
C h a p t e r 1
PowerCenter Mappings and Workflows
This chapter includes the following topics:
• PowerCenter Mappings and Workflows Overview, 10
• Step 1. Install the B2B Data Exchange PowerCenter Plug-Ins, 11
• Step 2. Create Source and Target Definitions, 11
• Step 32. Create the Mapping , 15
• Step 4. Configure the JMS and JNDI Connections, 16
• Step 53. Create the PowerCenter Workflow and Session, 17
• Step 6. Export the PowerCenter Workflow and Mapping, 18
PowerCenter Mappings and Workflows OverviewUse the PowerCenter Client tools to develop workflows to process documents for B2B Data Exchange. You create the mappings and workflows for B2B Data Exchange in the same way you create other PowerCenter workflows. B2B Data Exchange provides transformations specifically designed to perform the transformation tasks required to process Data Exchange documents. When you add the transformations to a mapping, you can set properties that are used by the corresponding workflow in B2B Data Exchange.
To develop a workflow in PowerCenter to process Data Exchange documents, complete the following steps:
1. Install and register the Data Exchange plug-in in a PowerCenter repository.
2. Create source (JMS, flat file, Data Transformation) and target definitions.
3. Create a mapping and use the B2B Data Exchange transformations, Unstructured Data transformations, and other PowerCenter transformations to process the documents.
4. Create the connection objects for the JMS queues.
5. Create the workflow and add the session to run the mapping.
6. Export the PowerCenter workflow, including mapping, to use as a workflow definition file in B2B Data Exchange.
Sample Scenarios
10

Step 1. Install the B2B Data Exchange PowerCenter Plug-Ins
Use the B2B Data Exchange installer to install the B2B Data Exchange PowerCenter server and client plug-ins.
Use the B2B Data Exchange installer to install the Data Exchange server and client plug-ins.
Server Plug-In
Client Plug-InWhen you install the Data Exchange client plug-in, the installer registers the plug-in file with the PowerCenter Client tools.
Step 2. Create Source and Target DefinitionsB2B Data Exchange uses JMS to send and receive documents to and from PowerCenter real-time workflows. The documents you send to JMS can be text or binary.
When using a real-time workflow, you must add a JMS source definition to a mapping designed to receive and process Data Exchange documents. If you send documents to B2B Data Exchange after processing, you must also define a JMS target. You create the JMS source and target definitions for Data Exchange mappings in the PowerCenter Designer in the same way you create JMS source and target definitions for other mappings. PowerCenter batch workflows can have a flat file source, or no source at all. For more information, see the PowerCenter Designer Guide.
The JMS source and target definitions require additional properties configured to work with B2B Data Exchange. These properties allow B2B Data Exchange to pass parameters from B2B Data Exchange to PowerCenter and from PowerCenter to B2B Data Exchange.
Batch workflows require additional mapping parameters to interact with B2B Data Exchange. These mapping parameters allow B2B Data Exchange to exchange information with PowerCenter. Batch workflows are invoked using the Web Services Hub.
Creating the Source Definition for a Subscription WorkflowIn the PowerCenter Designer, create the source and define the source properties of a subscription workflow. When you develop a publication workflow, you define the source based on the application from which you want to publish data.
The source definition process includes the following steps:
1. Create the source object. Set the source connection to DIH__STAGING. You create a source based on the topic structure from the publication repository. You can copy the source from the publication metadata folder in the PowerCenter repository.
2. Add ports to the source object. Add port information as properties in the JMS Message Property Columns tab of the source definition. By default, the port properties have the prefix Prop_.
Step 1. Install the B2B Data Exchange PowerCenter Plug-Ins 11
3. Add variables to filter the published data to consume. For example, you can select to consume data from a specific table in the publication repository.
4. Add the required fields that determine the data set to consume. You can define multiple data sets to consume, similar to an aggregated or a compound subscription with an automatic mapping.
The following table describes the fields to add to the source object of a subscription workflow:
Field Description
DIH__PUBLICATION_INSTANCE_ID Required. Identifiers of one or more published data sets in a comma-separated list. Each data set that an application publishes has a unique identifier. To filter the data to consume, use the value from the $$<topicName>__PublicationInstanceIDs workflow parameter.The parameter datatype must be number(19) if you write to an Oracle database target or number(19,0) if you write to a Microsoft SQL Server database target.
DIH__PUBLICATION_INSTANCE_DATE Date and time that each application started publishing the data sets, in a comma-separated list. If you use database partitions, you can filter the data to consume by using the value from the $$<topic_name>__PublicationInstanceDatesSQL workflow parameter. The value format depends on the publication repository database type.On an Oracle database, the datatype must be date and the value must be in the following format:
YYYY-MM-DD HH24:MI:SSOn a Microsoft SQL Server database, the datatype must be datetime and the value must be in the following format:
yyyy-mm-dd hh:mi:ss (24h)Note: If you want to filter the data to consume with a different transformation, you can use the $$<topic_name>__PublicationInstanceDates parameter instead.
You can filter data to consume in the Source Filter attribute of the Source Qualifier transformation in subscription workflow. The following example shows the field syntax to filter by ID and date range in a single line:
MY_TABLE.DIH__PUBLICATION_INSTANCE_ID in ($$myTopic__PublicationInstanceIDs)AND MY_TABLE.DIH__PUBLICATION_INSTANCE_DATE in ($$myTopic__PublicationInstanceDatesSQL)
The following table describes the B2B Data Exchange source properties:
Property Description
accountName Name of the account for which the B2B Data Exchange server sets the port that the workflow uses to process the event.Note: The property value can be null if you use a global profile.
accountNumber Number of the account for which the B2B Data Exchange server sets the port that the workflow uses to process the event. The property value must be a string.Note: The property value can be null if you use a global profile.
application Name of the application for which the B2B Data Exchange server sets the port that the workflow uses to process the event.
12 Chapter 1: PowerCenter Mappings and Workflows
Property Description
dataByReference Determines whether the JMS message that B2B Data Exchange sends to PowerCenter contains a document reference.Possible values:- True. The JMS message contains a reference to a document that is stored in the B2B Data
Exchange document store.- False. The JMS message contains the actual document data.
eventId Identifier of the associated event for the documents that the workflow processes.
isEventReprocessed Determines if the associated event is reprocessed.
partnerName Name of the partner for which the B2B Data Exchange server sets the port that the workflow uses to process the event.Note: The property value can be null if you use a global profile.
partnerId Identifier of the partner for which the B2B Data Exchange server sets the port that the workflow uses to process the event.Note: The property value can be null if you use a global profile.
profileId Identifier of the profile for which the B2B Data Exchange server sets the port that the workflow uses to process the event.
profileName Name of the profile for which the B2B Data Exchange server sets the port that the workflow uses to process the event.
DXSentEventId List of identifiers for the events that triggered the event monitor.Available when a regular delivery or a batch delivery event monitor triggers the workflow.
DXMonitorId Identifier for the event monitor that triggered the workflow.Available when a regular delivery or a batch delivery event monitor triggers the workflow.
DXMonitorName Name of the event monitor that triggered the workflow.Available when a regular delivery or a batch delivery event monitor triggers the workflow.
DXUser Name of the user that received the monitor notification.Available when a regular delivery event monitor triggers the workflow.
Creating the Target DefinitionIn the PowerCenter Designer, create the target and add ports to store properties for running the workflow. You can also add properties to store other B2B Data Exchange values that you want to send back from PowerCenter.
The target definition process includes the following steps:
1. Create the target object. If you develop a publication workflow, use the DIH__STAGING connection in the target definition. The database target type must match the publication repository database type.
2. Add ports to the target object. Add the port information as properties in the JMS Message Property Columns tab of the target definition. By default, the port properties have the prefix Prop_.
3. If you develop a publication workflow, add the required fields that determine the data set to publish.
Step 2. Create Source and Target Definitions 13
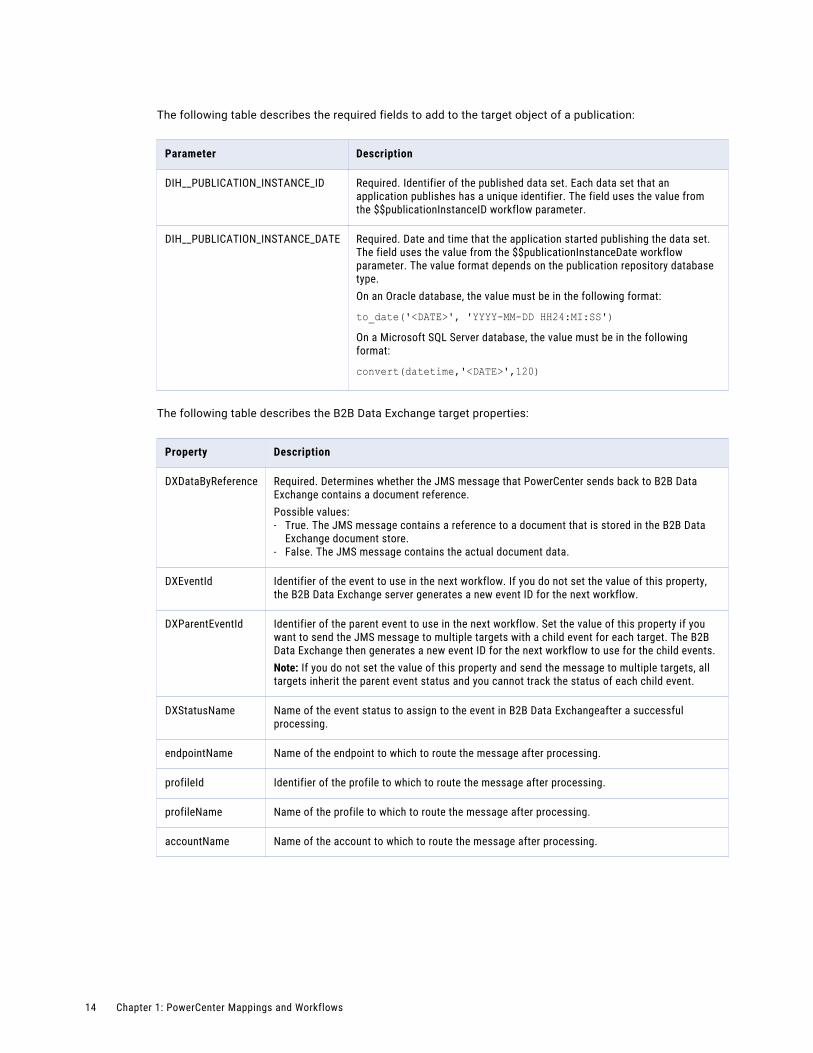
The following table describes the required fields to add to the target object of a publication:
Parameter Description
DIH__PUBLICATION_INSTANCE_ID Required. Identifier of the published data set. Each data set that an application publishes has a unique identifier. The field uses the value from the $$publicationInstanceID workflow parameter.
DIH__PUBLICATION_INSTANCE_DATE Required. Date and time that the application started publishing the data set. The field uses the value from the $$publicationInstanceDate workflow parameter. The value format depends on the publication repository database type.On an Oracle database, the value must be in the following format:
to_date('<DATE>', 'YYYY-MM-DD HH24:MI:SS')On a Microsoft SQL Server database, the value must be in the following format:
convert(datetime,'<DATE>',120)
The following table describes the B2B Data Exchange target properties:
Property Description
DXDataByReference Required. Determines whether the JMS message that PowerCenter sends back to B2B Data Exchange contains a document reference.Possible values:- True. The JMS message contains a reference to a document that is stored in the B2B Data
Exchange document store.- False. The JMS message contains the actual document data.
DXEventId Identifier of the event to use in the next workflow. If you do not set the value of this property, the B2B Data Exchange server generates a new event ID for the next workflow.
DXParentEventId Identifier of the parent event to use in the next workflow. Set the value of this property if you want to send the JMS message to multiple targets with a child event for each target. The B2B Data Exchange then generates a new event ID for the next workflow to use for the child events.Note: If you do not set the value of this property and send the message to multiple targets, all targets inherit the parent event status and you cannot track the status of each child event.
DXStatusName Name of the event status to assign to the event in B2B Data Exchangeafter a successful processing.
endpointName Name of the endpoint to which to route the message after processing.
profileId Identifier of the profile to which to route the message after processing.
profileName Name of the profile to which to route the message after processing.
accountName Name of the account to which to route the message after processing.
14 Chapter 1: PowerCenter Mappings and Workflows
Property Description
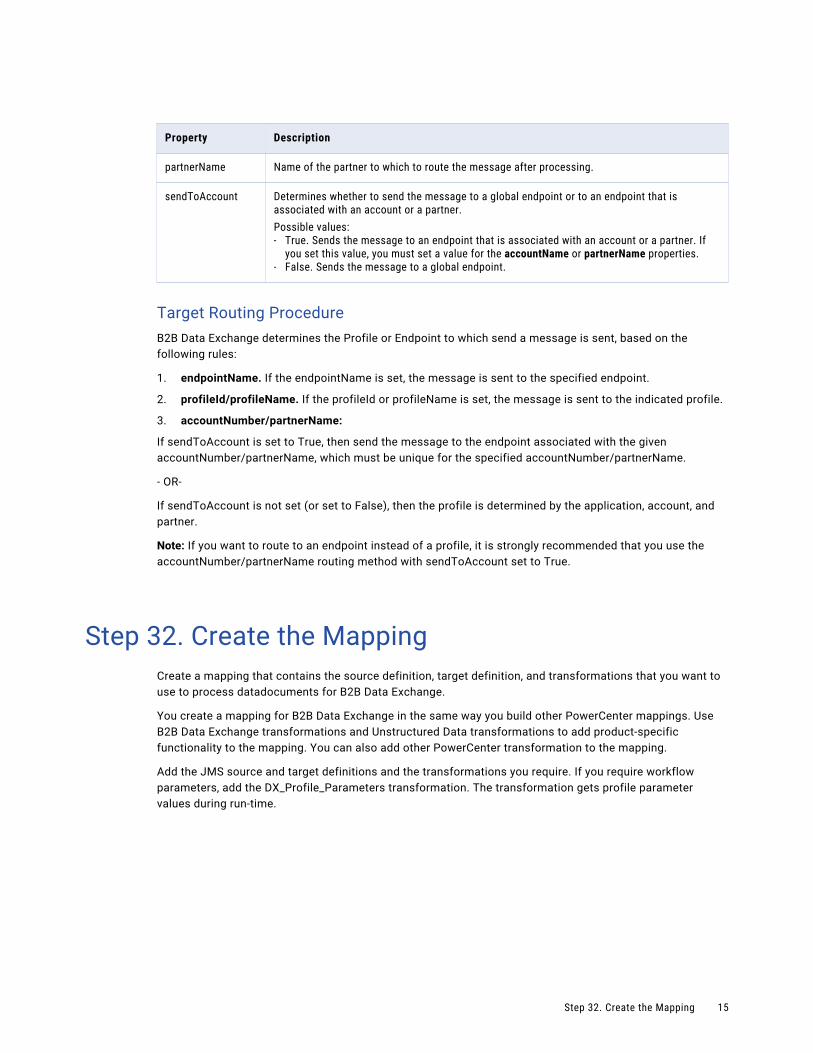
partnerName Name of the partner to which to route the message after processing.
sendToAccount Determines whether to send the message to a global endpoint or to an endpoint that is associated with an account or a partner.Possible values:- True. Sends the message to an endpoint that is associated with an account or a partner. If
you set this value, you must set a value for the accountName or partnerName properties.- False. Sends the message to a global endpoint.
Target Routing ProcedureB2B Data Exchange determines the Profile or Endpoint to which send a message is sent, based on the following rules:
1. endpointName. If the endpointName is set, the message is sent to the specified endpoint.
2. profileId/profileName. If the profileId or profileName is set, the message is sent to the indicated profile.
3. accountNumber/partnerName:
If sendToAccount is set to True, then send the message to the endpoint associated with the given accountNumber/partnerName, which must be unique for the specified accountNumber/partnerName.
- OR-
If sendToAccount is not set (or set to False), then the profile is determined by the application, account, and partner.
Note: If you want to route to an endpoint instead of a profile, it is strongly recommended that you use the accountNumber/partnerName routing method with sendToAccount set to True.
Step 32. Create the MappingCreate a mapping that contains the source definition, target definition, and transformations that you want to use to process datadocuments for B2B Data Exchange.
You create a mapping for B2B Data Exchange in the same way you build other PowerCenter mappings. Use B2B Data Exchange transformations and Unstructured Data transformations to add product-specific functionality to the mapping. You can also add other PowerCenter transformation to the mapping.
Add the JMS source and target definitions and the transformations you require. If you require workflow parameters, add the DX_Profile_Parameters transformation. The transformation gets profile parameter values during run-time.
Step 32. Create the Mapping 15
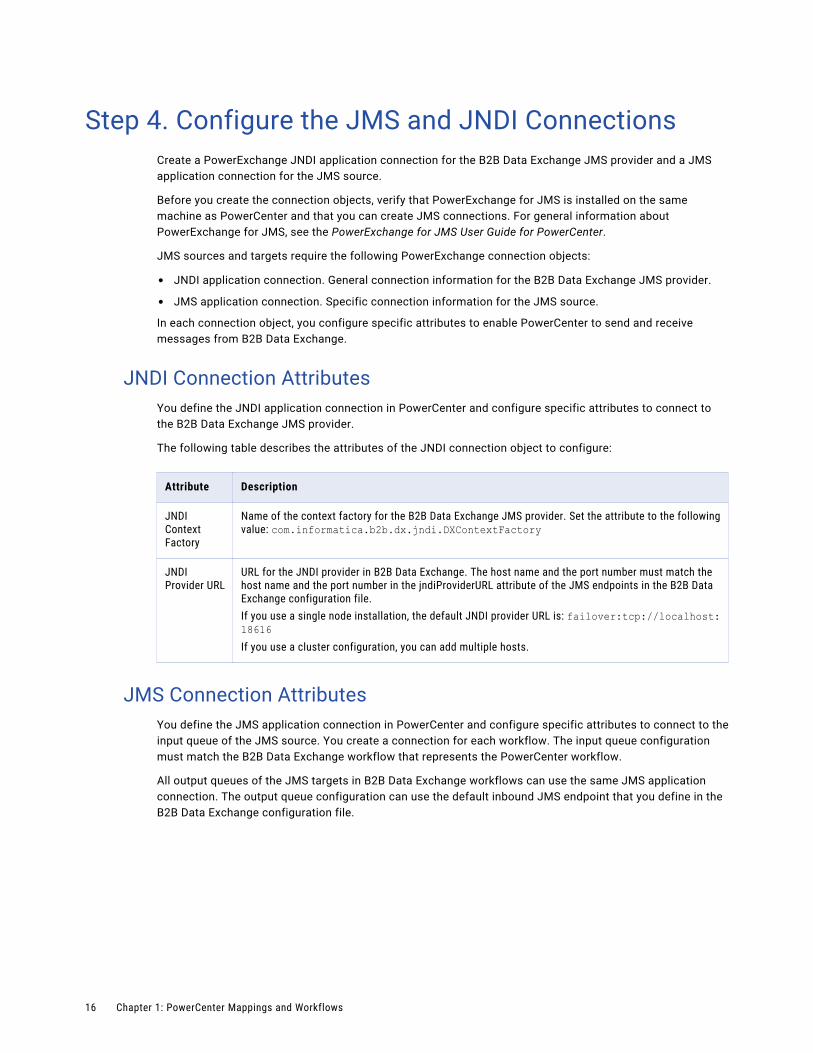
Step 4. Configure the JMS and JNDI ConnectionsCreate a PowerExchange JNDI application connection for the B2B Data Exchange JMS provider and a JMS application connection for the JMS source.
Before you create the connection objects, verify that PowerExchange for JMS is installed on the same machine as PowerCenter and that you can create JMS connections. For general information about PowerExchange for JMS, see the PowerExchange for JMS User Guide for PowerCenter.
JMS sources and targets require the following PowerExchange connection objects:
• JNDI application connection. General connection information for the B2B Data Exchange JMS provider.
• JMS application connection. Specific connection information for the JMS source.
In each connection object, you configure specific attributes to enable PowerCenter to send and receive messages from B2B Data Exchange.
JNDI Connection AttributesYou define the JNDI application connection in PowerCenter and configure specific attributes to connect to the B2B Data Exchange JMS provider.
The following table describes the attributes of the JNDI connection object to configure:
Attribute Description
JNDI Context Factory
Name of the context factory for the B2B Data Exchange JMS provider. Set the attribute to the following value: com.informatica.b2b.dx.jndi.DXContextFactory
JNDI Provider URL
URL for the JNDI provider in B2B Data Exchange. The host name and the port number must match the host name and the port number in the jndiProviderURL attribute of the JMS endpoints in the B2B Data Exchange configuration file.If you use a single node installation, the default JNDI provider URL is: failover:tcp://localhost:18616If you use a cluster configuration, you can add multiple hosts.
JMS Connection AttributesYou define the JMS application connection in PowerCenter and configure specific attributes to connect to the input queue of the JMS source. You create a connection for each workflow. The input queue configuration must match the B2B Data Exchange workflow that represents the PowerCenter workflow.
All output queues of the JMS targets in B2B Data Exchange workflows can use the same JMS application connection. The output queue configuration can use the default inbound JMS endpoint that you define in the B2B Data Exchange configuration file.
16 Chapter 1: PowerCenter Mappings and Workflows
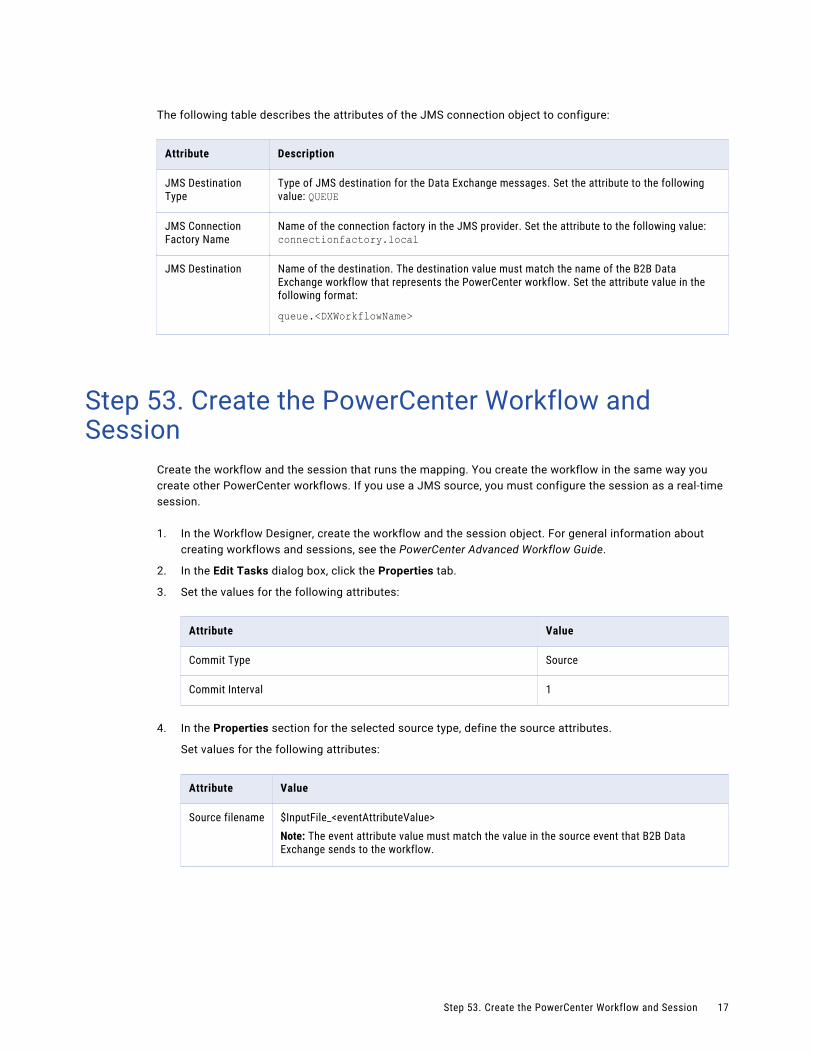
The following table describes the attributes of the JMS connection object to configure:
Attribute Description
JMS Destination Type
Type of JMS destination for the Data Exchange messages. Set the attribute to the following value: QUEUE
JMS Connection Factory Name
Name of the connection factory in the JMS provider. Set the attribute to the following value: connectionfactory.local
JMS Destination Name of the destination. The destination value must match the name of the B2B Data Exchange workflow that represents the PowerCenter workflow. Set the attribute value in the following format:
queue.<DXWorkflowName>
Step 53. Create the PowerCenter Workflow and Session
Create the workflow and the session that runs the mapping. You create the workflow in the same way you create other PowerCenter workflows. If you use a JMS source, you must configure the session as a real-time session.
1. In the Workflow Designer, create the workflow and the session object. For general information about creating workflows and sessions, see the PowerCenter Advanced Workflow Guide.
2. In the Edit Tasks dialog box, click the Properties tab.
3. Set the values for the following attributes:
Attribute Value
Commit Type Source
Commit Interval 1
4. In the Properties section for the selected source type, define the source attributes.
Set values for the following attributes:
Attribute Value
Source filename $InputFile_<eventAttributeValue>Note: The event attribute value must match the value in the source event that B2B Data Exchange sends to the workflow.
Step 53. Create the PowerCenter Workflow and Session 17
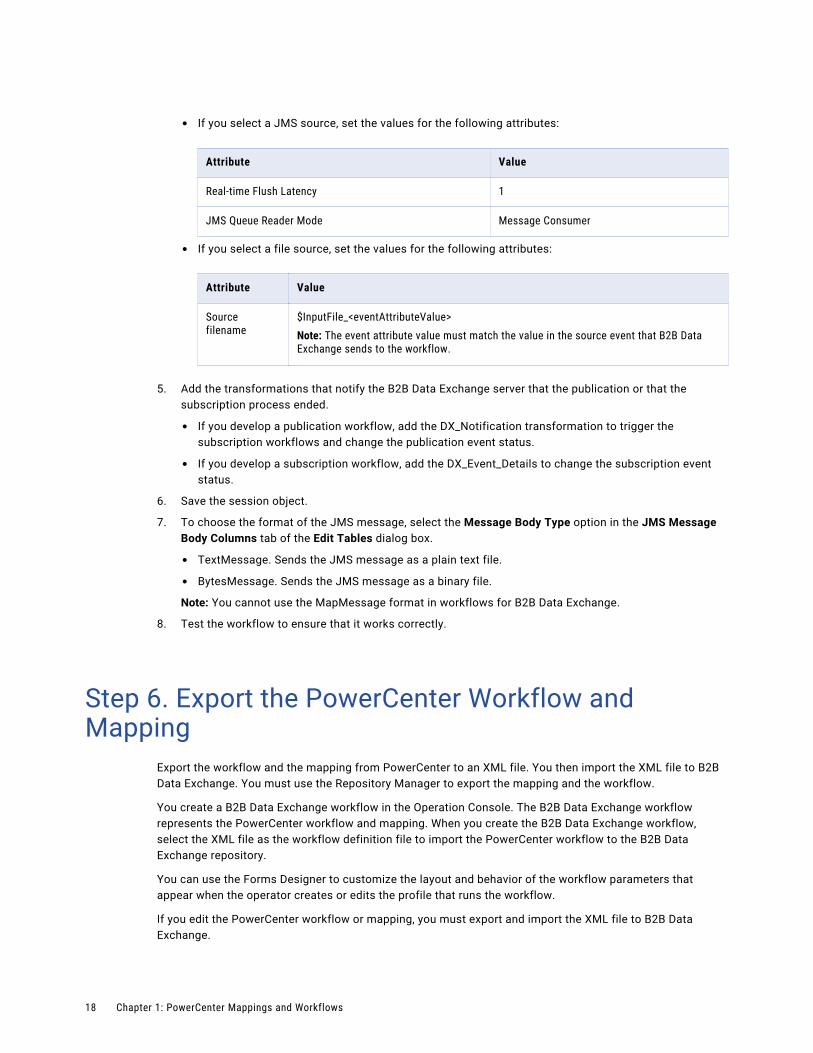
• If you select a JMS source, set the values for the following attributes:
Attribute Value
Real-time Flush Latency 1
JMS Queue Reader Mode Message Consumer
• If you select a file source, set the values for the following attributes:
Attribute Value
Source filename
$InputFile_<eventAttributeValue>Note: The event attribute value must match the value in the source event that B2B Data Exchange sends to the workflow.
5. Add the transformations that notify the B2B Data Exchange server that the publication or that the subscription process ended.
• If you develop a publication workflow, add the DX_Notification transformation to trigger the subscription workflows and change the publication event status.
• If you develop a subscription workflow, add the DX_Event_Details to change the subscription event status.
6. Save the session object.
7. To choose the format of the JMS message, select the Message Body Type option in the JMS Message Body Columns tab of the Edit Tables dialog box.
• TextMessage. Sends the JMS message as a plain text file.
• BytesMessage. Sends the JMS message as a binary file.
Note: You cannot use the MapMessage format in workflows for B2B Data Exchange.
8. Test the workflow to ensure that it works correctly.
Step 6. Export the PowerCenter Workflow and Mapping
Export the workflow and the mapping from PowerCenter to an XML file. You then import the XML file to B2B Data Exchange. You must use the Repository Manager to export the mapping and the workflow.
You create a B2B Data Exchange workflow in the Operation Console. The B2B Data Exchange workflow represents the PowerCenter workflow and mapping. When you create the B2B Data Exchange workflow, select the XML file as the workflow definition file to import the PowerCenter workflow to the B2B Data Exchange repository.
You can use the Forms Designer to customize the layout and behavior of the workflow parameters that appear when the operator creates or edits the profile that runs the workflow.
If you edit the PowerCenter workflow or mapping, you must export and import the XML file to B2B Data Exchange.
18 Chapter 1: PowerCenter Mappings and Workflows
After you test the PowerCenter workflow and confirm that it works correctly, export it. For batch workflows, you must export the workflow from the Repository Manager. For real-time workflows, you can export either the mapping or the workflow.
During the import process, you can resolve changes to workflow parameters and parameter types. When you change the type of a workflow parameter type, the import process deletes the values for the imported parameters and you must manually enter the parameter values.
When you import an updated workflow definition file, a list of dependent profiles appear. You can disable dependent profiles until the operator reviews the profiles.
Updating the WorkflowIf you make changes to the workflow, export it again and update the definition file in the B2B Data Exchange Operation Console.
Step 6. Export the PowerCenter Workflow and Mapping 19
C h a p t e r 2
B2B Data Exchange Transformations
This chapter includes the following topics:
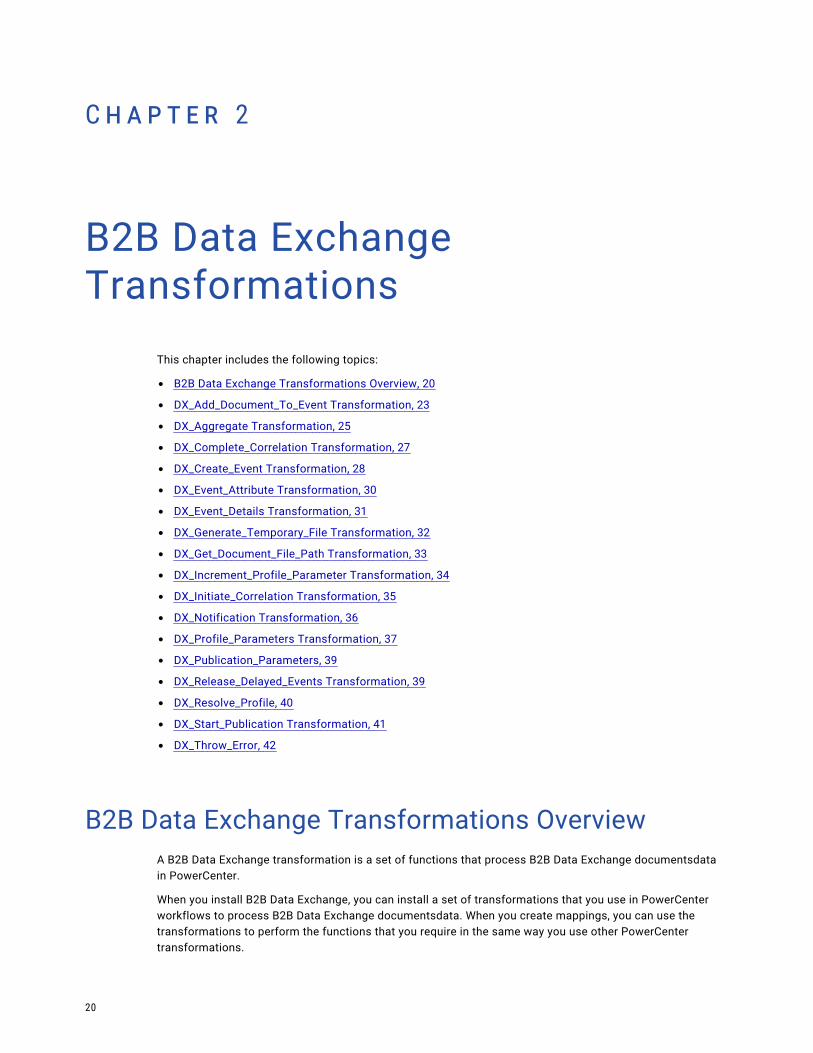
• B2B Data Exchange Transformations Overview, 20
• DX_Add_Document_To_Event Transformation, 23
• DX_Aggregate Transformation, 25
• DX_Complete_Correlation Transformation, 27
• DX_Create_Event Transformation, 28
• DX_Event_Attribute Transformation, 30
• DX_Event_Details Transformation, 31
• DX_Generate_Temporary_File Transformation, 32
• DX_Get_Document_File_Path Transformation, 33
• DX_Increment_Profile_Parameter Transformation, 34
• DX_Initiate_Correlation Transformation, 35
• DX_Notification Transformation, 36
• DX_Profile_Parameters Transformation, 37
• DX_Publication_Parameters, 39
• DX_Release_Delayed_Events Transformation, 39
• DX_Resolve_Profile, 40
• DX_Start_Publication Transformation, 41
• DX_Throw_Error, 42
B2B Data Exchange Transformations OverviewA B2B Data Exchange transformation is a set of functions that process B2B Data Exchange documentsdata in PowerCenter.
When you install B2B Data Exchange, you can install a set of transformations that you use in PowerCenter workflows to process B2B Data Exchange documentsdata. When you create mappings, you can use the transformations to perform the functions that you require in the same way you use other PowerCenter transformations.
20
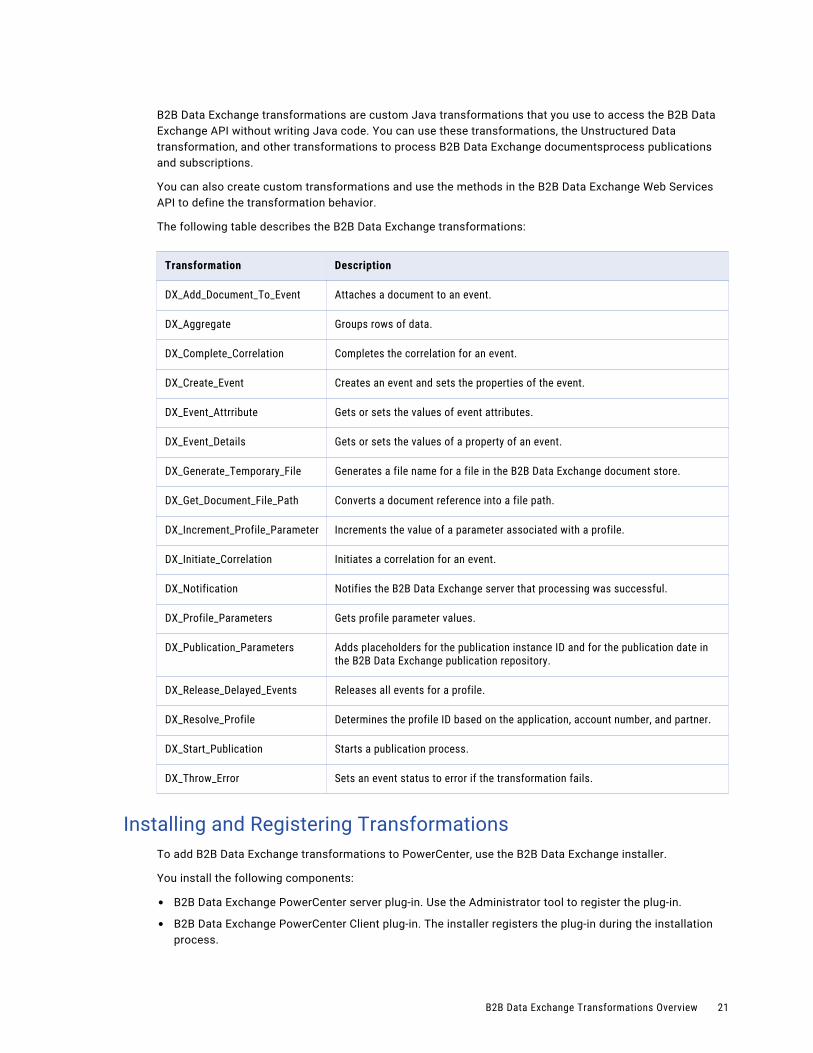
B2B Data Exchange transformations are custom Java transformations that you use to access the B2B Data Exchange API without writing Java code. You can use these transformations, the Unstructured Data transformation, and other transformations to process B2B Data Exchange documentsprocess publications and subscriptions.
You can also create custom transformations and use the methods in the B2B Data Exchange Web Services API to define the transformation behavior.
The following table describes the B2B Data Exchange transformations:
Transformation Description
DX_Add_Document_To_Event Attaches a document to an event.
DX_Aggregate Groups rows of data.
DX_Complete_Correlation Completes the correlation for an event.
DX_Create_Event Creates an event and sets the properties of the event.
DX_Event_Attrribute Gets or sets the values of event attributes.
DX_Event_Details Gets or sets the values of a property of an event.
DX_Generate_Temporary_File Generates a file name for a file in the B2B Data Exchange document store.
DX_Get_Document_File_Path Converts a document reference into a file path.
DX_Increment_Profile_Parameter Increments the value of a parameter associated with a profile.
DX_Initiate_Correlation Initiates a correlation for an event.
DX_Notification Notifies the B2B Data Exchange server that processing was successful.
DX_Profile_Parameters Gets profile parameter values.
DX_Publication_Parameters Adds placeholders for the publication instance ID and for the publication date in the B2B Data Exchange publication repository.
DX_Release_Delayed_Events Releases all events for a profile.
DX_Resolve_Profile Determines the profile ID based on the application, account number, and partner.
DX_Start_Publication Starts a publication process.
DX_Throw_Error Sets an event status to error if the transformation fails.
Installing and Registering TransformationsTo add B2B Data Exchange transformations to PowerCenter, use the B2B Data Exchange installer.
You install the following components:
• B2B Data Exchange PowerCenter server plug-in. Use the Administrator tool to register the plug-in.
• B2B Data Exchange PowerCenter Client plug-in. The installer registers the plug-in during the installation process.
B2B Data Exchange Transformations Overview 21
After you install and register the plug-ins, verify that the transformations are enabled in the PowerCenter Designer. For more information about installing and configuring the plug-ins, see the B2B Data Exchange Installation and Configuration Guide.
Configuring TransformationsAfter you add a B2B Data Exchange transformation to a mapping, you edit and configure the transformation based on your document processing requirements.
When you edit a B2B Data Exchange transformation, you can configure the transformation components on the following tabs:
• Transformation tab. Rename the transformation and add a description.
• Ports. Add, edit, or delete ports. You can also designate ports as input or output ports.
• Properties tab. Configure transformation properties, such as module and function identifiers, transaction properties, and the runtime location. The properties that appear on this tab are the same as the properties for other PowerCenter Custom transformations. For more information about the Properties tab, see the PowerCenter Transformation Guide.
• DX Properties tab. Set the default values for the ports in the transformation. You can also set the default values for other B2B Data Exchange transformation properties.
Handling Transformation ErrorsYou can use certain transformation ports to define how to handle errors that occur during a workflow run.
Each B2B Data Exchange transformation uses the following ports to handle errors:
• DXErrorCode. When a transformation fails, the transformation sets the DXErrorCode to a value greater than zero.
• DXErrorMessage. When a transformation fails, the transformation sends an error message that describes the failure to the DXErrorMessage port.
When a transformation generates an error, the transformation writes the error to the PowerCenter session log. The error log includes the exception class, description, cause, and stack trace. The logging level is based on the PowerCenter configuration. Up to 1K of the document associated with the error will be included in the log.
If the option to set the event status to error when a transformation fails is set to true, the transformation also sets the status of the event to error.
You can set the error handling ports as input ports to prevent the transformation from running if an input error occurs.
B2B Data Exchange Transformations Rules and GuidelinesWhen you work with B2B Data Exchange transformations in PowerCenter, follow rules and guidelines to optimize performance and prevent errors.
The following list describes rules and guidelines for working with B2B Data Exchange transformations:
• B2B Data Exchange transformations are based on the PowerCenter Custom transformation and they provide the same configuration options as other custom transformations. You can use them as you use other PowerCenter transformations.
• B2B Data Exchange transformations are connected transformations. Connected transformations pass data to or from other transformations.
22 Chapter 2: B2B Data Exchange Transformations
• B2B Data Exchange transformations are passive transformations except for the DX_Aggregate transformation.
• If a transformation port has a corresponding B2B Data Exchange property, the value of the port takes precedence over the value of the property during runtime. When the session runs, if the value of the port is not null, the PowerCenter Integration Service uses the value of the port for processing. If the value of the port is null, the PowerCenter Integration Service uses the value of the B2B Data Exchange property for processing.
• Port names are case insensitive and prefix insensitive. DXEventID, dxEVENTid, and eventid are all treated as the same port.
• You can process only one event ID with one transformation at a time. To simultaneously process an event with different transformations, use the DX_Create_Event transformation to create a child event for each additional transformation that you want to use.
• When you run a PowerCenter workflow that uses a B2B Data Exchange transformation, PowerCenter tries to connect to the B2B Data Exchange repository to get the list of event statuses and types to use in the transformation. An error message indicates a failed connection. If the connection fails, PowerCenter gets the event type values from the Client plug-in configuration file. To resolve connection errors, verify that the connection section in the dxplugin.ini file contains the following configuration:
[DX_REPOSITORY]; ODBC connection string to the DX repository; CONNECTION_STRING=DRIVER={DataDirect 7.0 Oracle Wire Protocol};UID=%1;PWD=%2;Host=localhost;Port=1521;SN=orcl; CUSTOM_CONNECTION_STRING; ODBC DSN to the DX repository; DSN_NAME=dxOdbcResourceNameUSER_NAME=DXUSER_PASSWD=DXEVENT_TYPE_NAME=SELECT event_type_name FROM dx_event_type ORDER BY 1EVENT_STATUS_NAME=SELECT event_status_name FROM dx_event_status ORDER BY 1
DX_Add_Document_To_Event TransformationThe DX_Add_Document_To_Event transformation attaches a document to an event.
You can use the transformation to add a document that you create in previous transformations. For example, you can use the transformation to attach a log file to an event.
Input PortsConfigure input ports for the DX_Add_Document_To_Event transformation on the Ports tab.
The following table describes the DX_Add_Document_To_Event input ports:
Port Type Description
DXDescription string Description of the document to attach to the event.
DXMIMEType string MIME type of the document to attach to the event.
DX_Add_Document_To_Event Transformation 23
Port Type Description
DXEncoding string Character encoding of the document to attach to the event. This is the character set to use to convert strings to byte arrays.
DXTemporaryFilePath string Optional. Path and file name generated by the DX_Generate_Temporary_File transformation where the workflow stores the new file. The DX_Add_Document_To_Event transformation saves the file as a new document reference in the document store and attaches the file reference to the event.You can set this port or set the DXData and DXDataByReference ports. If this port and the DXData and DXDataByReference ports are not set, the transformation creates an empty document and adds it to the event.
Input/Output PortsConfigure input/output ports for the DX_Add_Document_To_Event transformation on the Ports tab.
The following table describes the DX_Add_Document_To_Event input/output ports:
Port Type Description
DXEventId string Required. Identifier of the event to which to attach the document.
DXData stringbinarytext
Document to attach to the event. This port can contain the data of the document or a reference to the document. If this port is null, the transformation creates an empty document and adds the document to the event.To attach a document with text data, set the datatype of the port to string or text. To attach a document with binary data, set the datatype of the port to binary.
DXDataByReference string Indicates whether the DXData port contains the document data or a document reference. If the value is true, the DXData port contains a document reference. If the value is null or false, the DXData port contains the document data.
DXDocumentId string Identifier of the document to attach to the event.
DXErrorMessage string Error message generated by the transformation.
DXErrorCode string Error code generated by the transformation. If the transformation fails, the value of the DXErrorCode port is greater than zero.
24 Chapter 2: B2B Data Exchange Transformations
B2B Data Exchange PropertiesConfigure properties for the DX_Add_Document_To_Event transformation on the DX Properties tab.
The following table describes the B2B Data Exchange properties of the DX_Add_Document_To_Event transformation:
Property Description
Description Description of the document to attach to the event.
Document Role Role of the document when it is attached to an event. Select one of the following roles:- SOURCE. The document is attached to an event as a source document. When you view
the event in the Operation Console, you can view the attached document in the Input section.
- TARGET. The document is attached to an event as a target document. When you view the event in the Operation Console, you can view the attached document in the Output section.
- LOG. The document is attached to an event as a log document. When you view the event in the Operation Console, you can view the attached document in the Logging Information section.
Generate an error in case a failure occurs in this transformation
Indicates whether to set the status of the event to error when the transformation generates an error.Selected by default.
DX_Aggregate TransformationThe DX_Aggregate active transformation groups segments of data to process.
You can use the transformation to aggregate row sets that you previously split back into a single document
You set the DXParentEventId and the DXGroupByKey ports to sort the data that you want to aggregate.
The DX_Aggregate transformation groups rows in the following manner:
1. When the transformation reads the first row in the group, it creates a temporary file and writes the content of the DXData port to the file.
2. On each subsequent row, the transformation appends the DXDelimiter and the content of the DXData port to the file. It then increments the number of rows in the DXRowCount port.
3. When the transformation reads the last row in the group, it closes the temporary file and increments the number of groups in the DXGroupSequence port. It then passes the output to the pipeline.
4. If you use a pass-through port, the transformation sends the value from the last row of the group to the pipeline.
If a row contains an error or a null value in the DXData port, the transformation drops the row from the file and does not pass the output to the pipeline.
The DX_Aggregate transformation determines the end of the group in the following cases:
• There is no more data to aggregate.
• The value of the DXParentEventID port differs from the value in the previous row.
• The value of the DXGroupByKey port differs from the value in the previous row.
DX_Aggregate Transformation 25
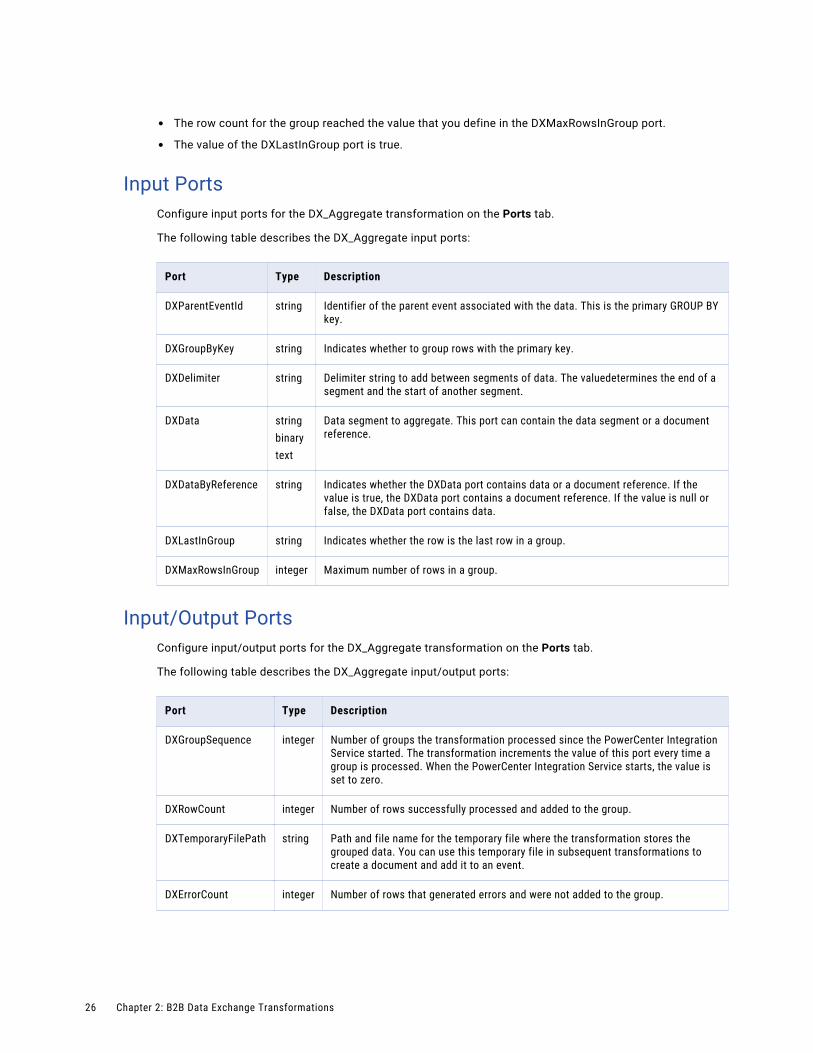
• The row count for the group reached the value that you define in the DXMaxRowsInGroup port.
• The value of the DXLastInGroup port is true.
Input PortsConfigure input ports for the DX_Aggregate transformation on the Ports tab.
The following table describes the DX_Aggregate input ports:
Port Type Description
DXParentEventId string Identifier of the parent event associated with the data. This is the primary GROUP BY key.
DXGroupByKey string Indicates whether to group rows with the primary key.
DXDelimiter string Delimiter string to add between segments of data. The valuedetermines the end of a segment and the start of another segment.
DXData stringbinarytext
Data segment to aggregate. This port can contain the data segment or a document reference.
DXDataByReference string Indicates whether the DXData port contains data or a document reference. If the value is true, the DXData port contains a document reference. If the value is null or false, the DXData port contains data.
DXLastInGroup string Indicates whether the row is the last row in a group.
DXMaxRowsInGroup integer Maximum number of rows in a group.
Input/Output PortsConfigure input/output ports for the DX_Aggregate transformation on the Ports tab.
The following table describes the DX_Aggregate input/output ports:
Port Type Description
DXGroupSequence integer Number of groups the transformation processed since the PowerCenter Integration Service started. The transformation increments the value of this port every time a group is processed. When the PowerCenter Integration Service starts, the value is set to zero.
DXRowCount integer Number of rows successfully processed and added to the group.
DXTemporaryFilePath string Path and file name for the temporary file where the transformation stores the grouped data. You can use this temporary file in subsequent transformations to create a document and add it to an event.
DXErrorCount integer Number of rows that generated errors and were not added to the group.
26 Chapter 2: B2B Data Exchange Transformations
Port Type Description
DXErrorMessage string Error message generated by the transformation.
DXErrorCode string Error code generated by the transformation. If the transformation fails, the value of the DXErrorCode port is greater than zero.
B2B Data Exchange PropertiesConfigure properties for the DX_Aggregate transformation on the DX Properties tab.
The following table describes the B2B Data Exchange properties of the DX_Aggregate transformation:
Property Description
Generate an error in case a failure occurs in this transformation
Indicates whether to set the status of the event to error when the transformation generates an error.Selected by default.
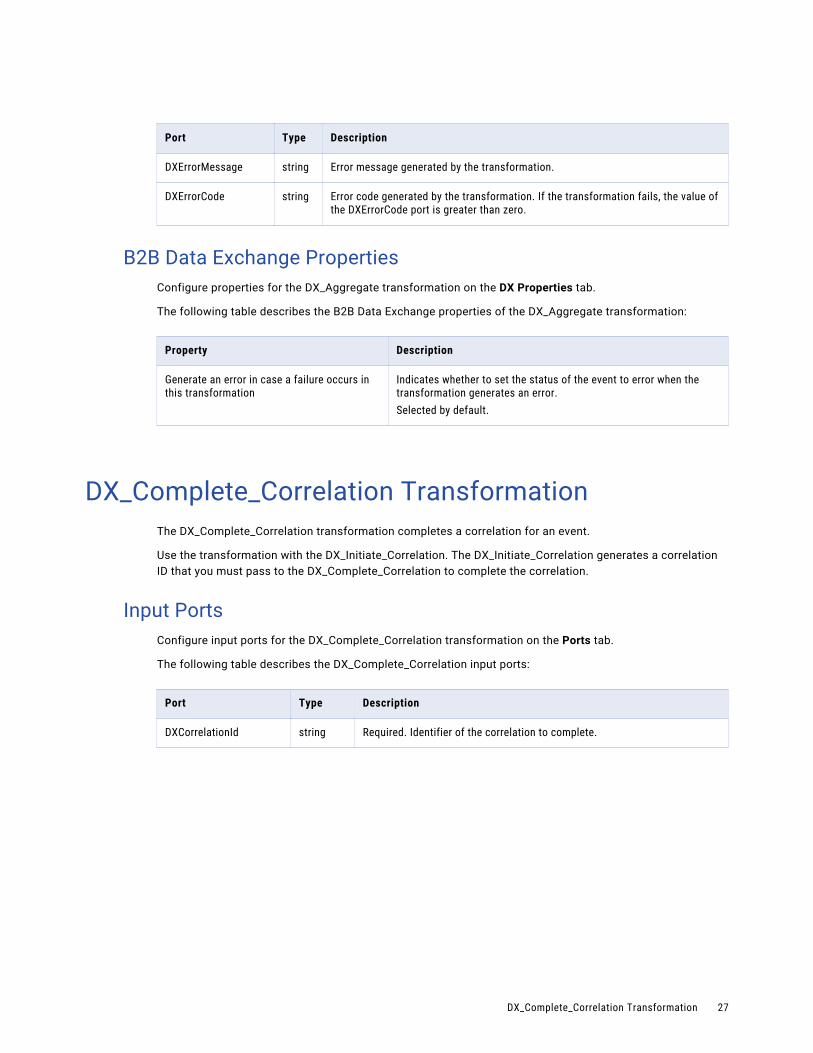
DX_Complete_Correlation TransformationThe DX_Complete_Correlation transformation completes a correlation for an event.
Use the transformation with the DX_Initiate_Correlation. The DX_Initiate_Correlation generates a correlation ID that you must pass to the DX_Complete_Correlation to complete the correlation.
Input PortsConfigure input ports for the DX_Complete_Correlation transformation on the Ports tab.
The following table describes the DX_Complete_Correlation input ports:
Port Type Description
DXCorrelationId string Required. Identifier of the correlation to complete.
DX_Complete_Correlation Transformation 27
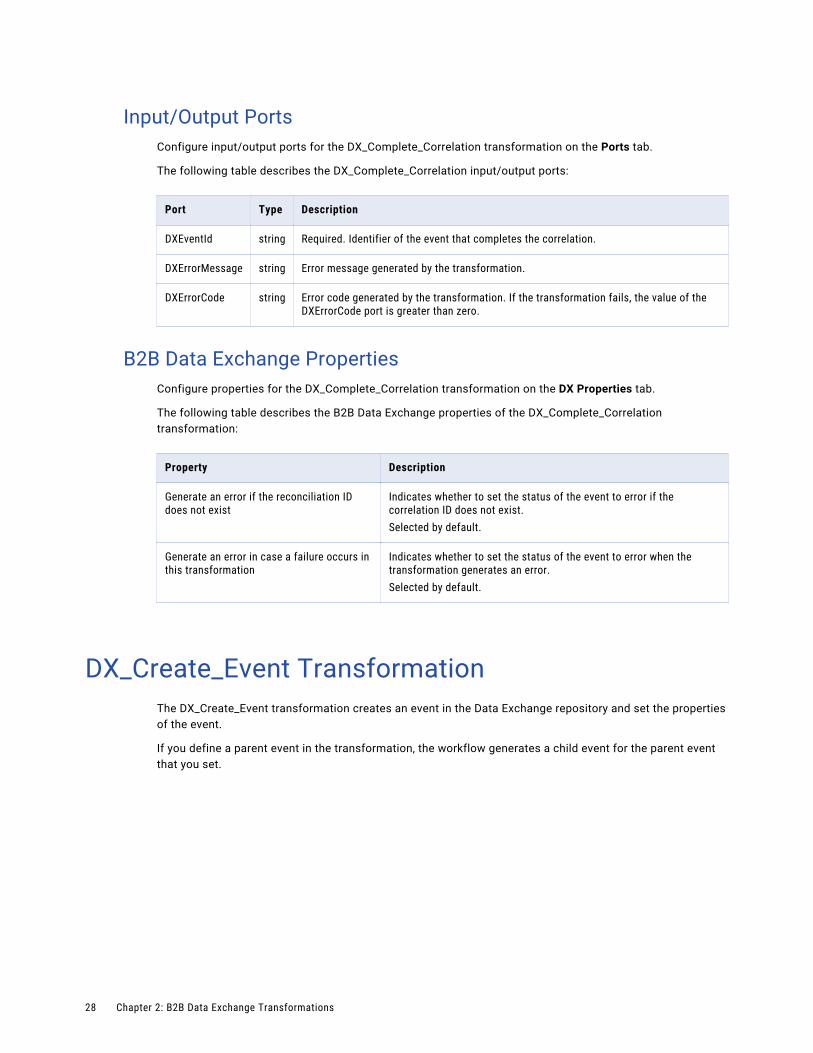
Input/Output PortsConfigure input/output ports for the DX_Complete_Correlation transformation on the Ports tab.
The following table describes the DX_Complete_Correlation input/output ports:
Port Type Description
DXEventId string Required. Identifier of the event that completes the correlation.
DXErrorMessage string Error message generated by the transformation.
DXErrorCode string Error code generated by the transformation. If the transformation fails, the value of the DXErrorCode port is greater than zero.
B2B Data Exchange PropertiesConfigure properties for the DX_Complete_Correlation transformation on the DX Properties tab.
The following table describes the B2B Data Exchange properties of the DX_Complete_Correlation transformation:
Property Description
Generate an error if the reconciliation ID does not exist
Indicates whether to set the status of the event to error if the correlation ID does not exist.Selected by default.
Generate an error in case a failure occurs in this transformation
Indicates whether to set the status of the event to error when the transformation generates an error.Selected by default.
DX_Create_Event TransformationThe DX_Create_Event transformation creates an event in the Data Exchange repository and set the properties of the event.
If you define a parent event in the transformation, the workflow generates a child event for the parent event that you set.
28 Chapter 2: B2B Data Exchange Transformations
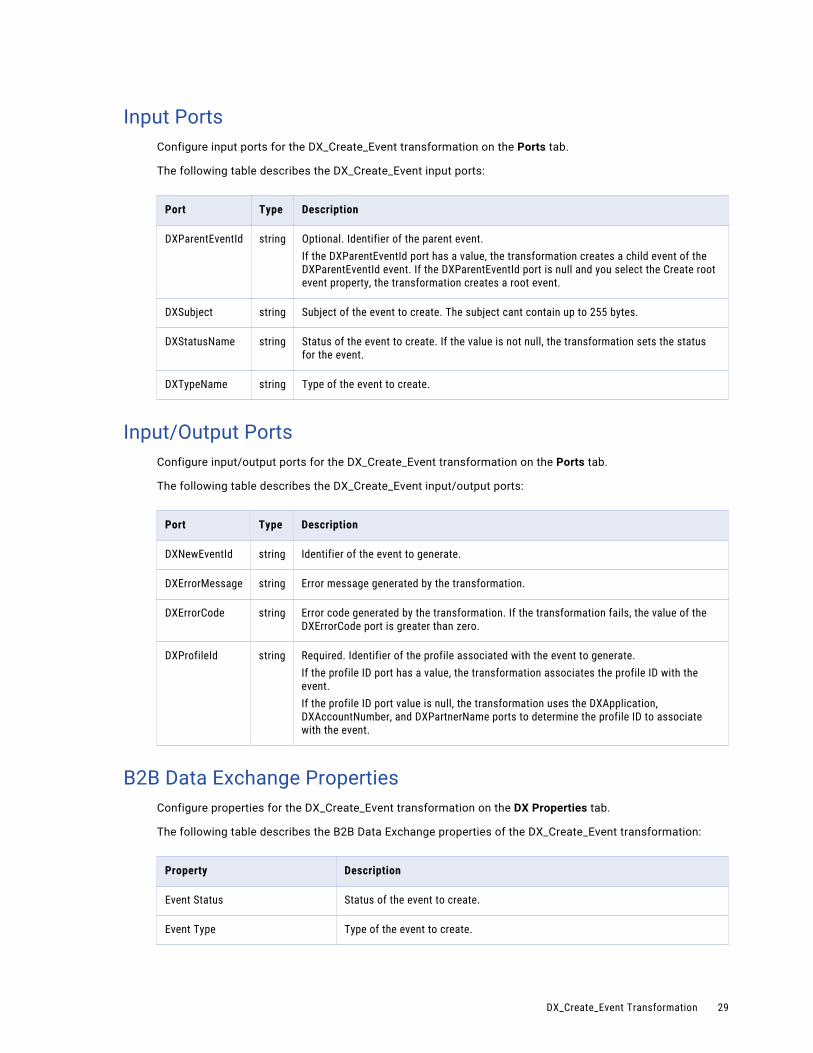
Input PortsConfigure input ports for the DX_Create_Event transformation on the Ports tab.
The following table describes the DX_Create_Event input ports:
Port Type Description
DXParentEventId string Optional. Identifier of the parent event.If the DXParentEventId port has a value, the transformation creates a child event of the DXParentEventId event. If the DXParentEventId port is null and you select the Create root event property, the transformation creates a root event.
DXSubject string Subject of the event to create. The subject cant contain up to 255 bytes.
DXStatusName string Status of the event to create. If the value is not null, the transformation sets the status for the event.
DXTypeName string Type of the event to create.
Input/Output PortsConfigure input/output ports for the DX_Create_Event transformation on the Ports tab.
The following table describes the DX_Create_Event input/output ports:
Port Type Description
DXNewEventId string Identifier of the event to generate.
DXErrorMessage string Error message generated by the transformation.
DXErrorCode string Error code generated by the transformation. If the transformation fails, the value of the DXErrorCode port is greater than zero.
DXProfileId string Required. Identifier of the profile associated with the event to generate.If the profile ID port has a value, the transformation associates the profile ID with the event.If the profile ID port value is null, the transformation uses the DXApplication, DXAccountNumber, and DXPartnerName ports to determine the profile ID to associate with the event.
B2B Data Exchange PropertiesConfigure properties for the DX_Create_Event transformation on the DX Properties tab.
The following table describes the B2B Data Exchange properties of the DX_Create_Event transformation:
Property Description
Event Status Status of the event to create.
Event Type Type of the event to create.
DX_Create_Event Transformation 29
Property Description
Event Subject Subject of the event to create.
Create root event Indicates whether to create a root event. If true, the transformation creates a root event. If false, the transformation creates a child event of the DXParentEventId.
Generate an error in case a failure occurs in this transformation
Indicates whether to set the status of the event to error when the transformation generates an error.Selected by default.
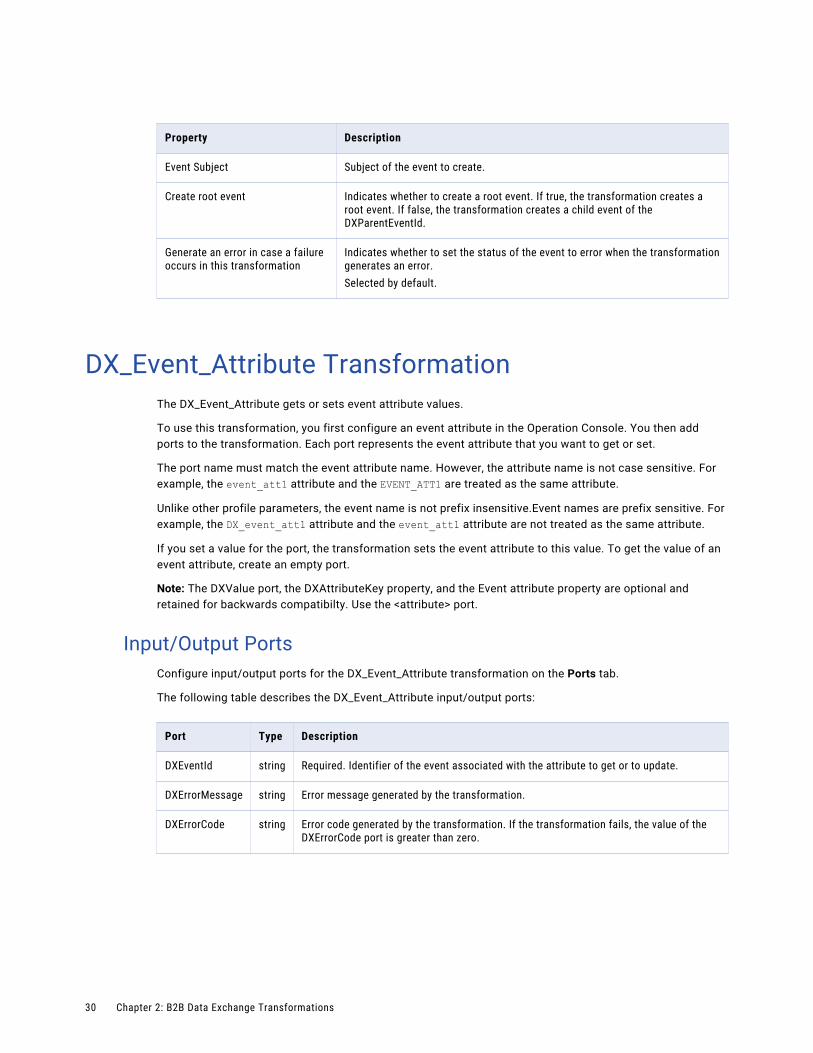
DX_Event_Attribute TransformationThe DX_Event_Attribute gets or sets event attribute values.
To use this transformation, you first configure an event attribute in the Operation Console. You then add ports to the transformation. Each port represents the event attribute that you want to get or set.
The port name must match the event attribute name. However, the attribute name is not case sensitive. For example, the event_att1 attribute and the EVENT_ATT1 are treated as the same attribute.
Unlike other profile parameters, the event name is not prefix insensitive.Event names are prefix sensitive. For example, the DX_event_att1 attribute and the event_att1 attribute are not treated as the same attribute.
If you set a value for the port, the transformation sets the event attribute to this value. To get the value of an event attribute, create an empty port.
Note: The DXValue port, the DXAttributeKey property, and the Event attribute property are optional and retained for backwards compatibilty. Use the <attribute> port.
Input/Output PortsConfigure input/output ports for the DX_Event_Attribute transformation on the Ports tab.
The following table describes the DX_Event_Attribute input/output ports:
Port Type Description
DXEventId string Required. Identifier of the event associated with the attribute to get or to update.
DXErrorMessage string Error message generated by the transformation.
DXErrorCode string Error code generated by the transformation. If the transformation fails, the value of the DXErrorCode port is greater than zero.
30 Chapter 2: B2B Data Exchange Transformations
B2B Data Exchange PropertiesConfigure properties for the DX_Event_Attribute transformation on the DX Properties tab.
The following table describes the B2B Data Exchange properties of the DX_Event_Attribute transformation:
Property Description
Event attribute name Name of the event attribute to update. You configure the property in the Operation Console. If the value is null, the transformation generates an error.Note: Optional property. It is recommended that you use the <Attribute> port instead. This property is retained for backward compatibility.
Generate an error in case a failure occurs in this transformation
Indicates whether to set the status of the event to error when the transformation generates an error.Selected by default.
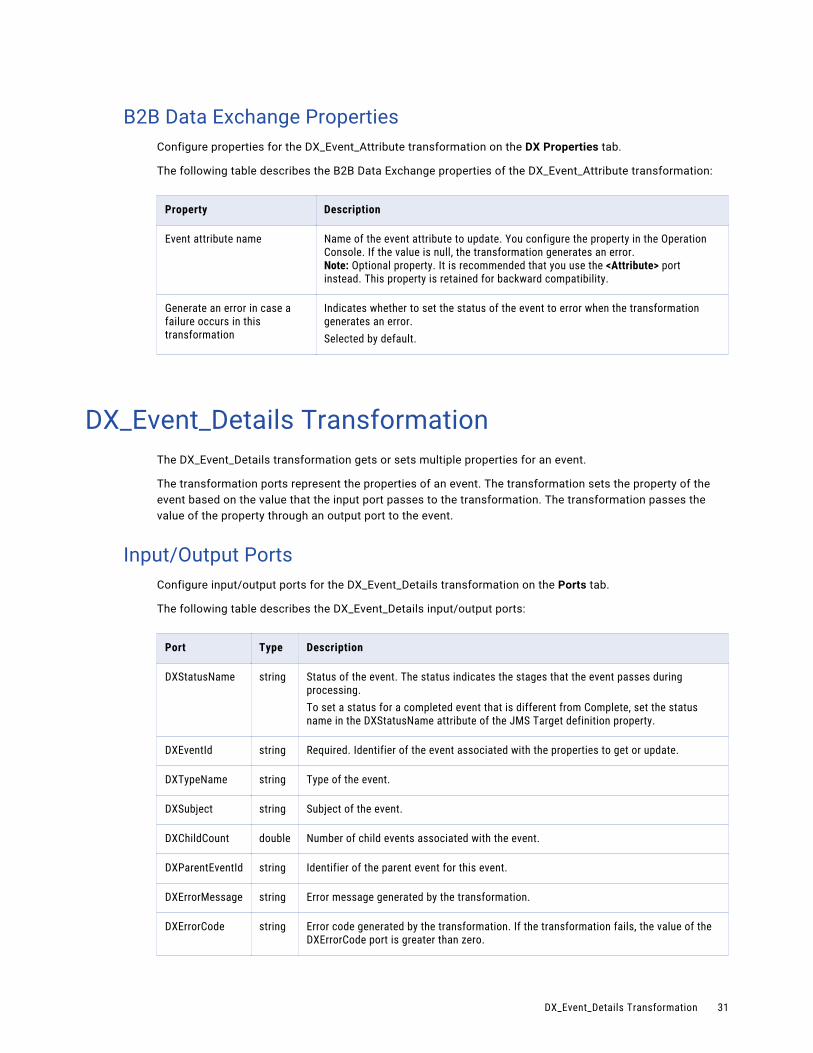
DX_Event_Details TransformationThe DX_Event_Details transformation gets or sets multiple properties for an event.
The transformation ports represent the properties of an event. The transformation sets the property of the event based on the value that the input port passes to the transformation. The transformation passes the value of the property through an output port to the event.
Input/Output PortsConfigure input/output ports for the DX_Event_Details transformation on the Ports tab.
The following table describes the DX_Event_Details input/output ports:
Port Type Description
DXStatusName string Status of the event. The status indicates the stages that the event passes during processing.To set a status for a completed event that is different from Complete, set the status name in the DXStatusName attribute of the JMS Target definition property.
DXEventId string Required. Identifier of the event associated with the properties to get or update.
DXTypeName string Type of the event.
DXSubject string Subject of the event.
DXChildCount double Number of child events associated with the event.
DXParentEventId string Identifier of the parent event for this event.
DXErrorMessage string Error message generated by the transformation.
DXErrorCode string Error code generated by the transformation. If the transformation fails, the value of the DXErrorCode port is greater than zero.
DX_Event_Details Transformation 31
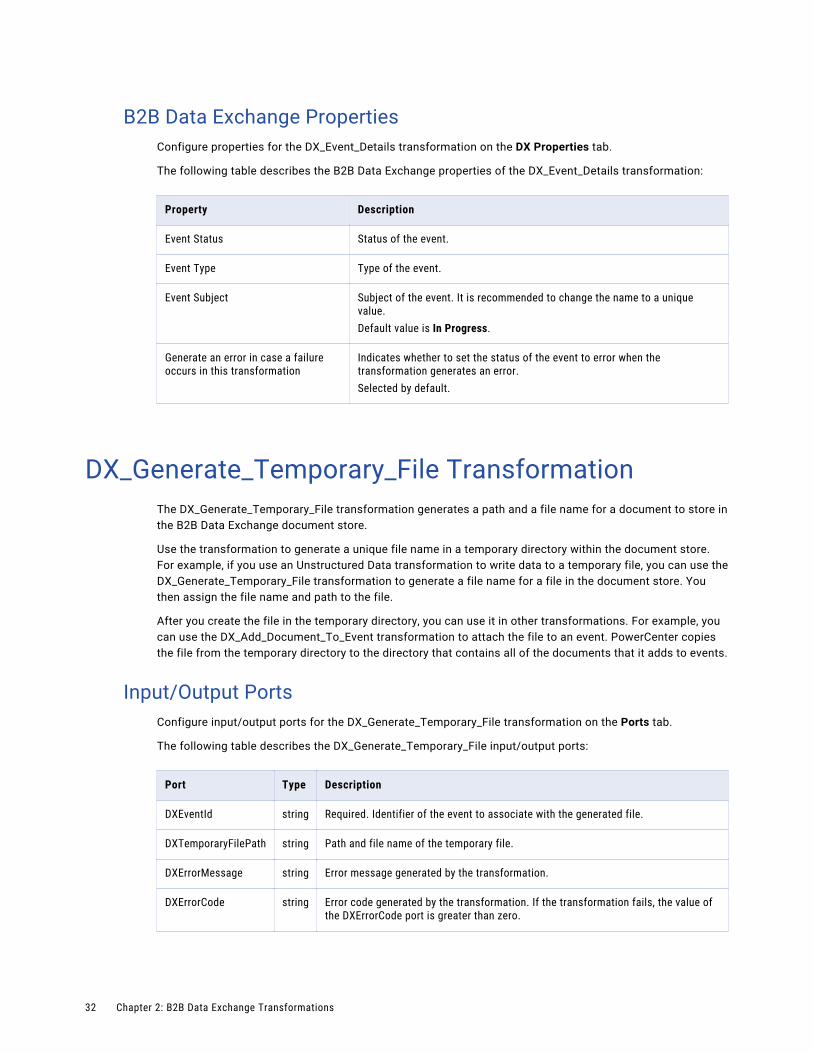
B2B Data Exchange PropertiesConfigure properties for the DX_Event_Details transformation on the DX Properties tab.
The following table describes the B2B Data Exchange properties of the DX_Event_Details transformation:
Property Description
Event Status Status of the event.
Event Type Type of the event.
Event Subject Subject of the event. It is recommended to change the name to a unique value.Default value is In Progress.
Generate an error in case a failure occurs in this transformation
Indicates whether to set the status of the event to error when the transformation generates an error.Selected by default.
DX_Generate_Temporary_File TransformationThe DX_Generate_Temporary_File transformation generates a path and a file name for a document to store in the B2B Data Exchange document store.
Use the transformation to generate a unique file name in a temporary directory within the document store. For example, if you use an Unstructured Data transformation to write data to a temporary file, you can use the DX_Generate_Temporary_File transformation to generate a file name for a file in the document store. You then assign the file name and path to the file.
After you create the file in the temporary directory, you can use it in other transformations. For example, you can use the DX_Add_Document_To_Event transformation to attach the file to an event. PowerCenter copies the file from the temporary directory to the directory that contains all of the documents that it adds to events.
Input/Output PortsConfigure input/output ports for the DX_Generate_Temporary_File transformation on the Ports tab.
The following table describes the DX_Generate_Temporary_File input/output ports:
Port Type Description
DXEventId string Required. Identifier of the event to associate with the generated file.
DXTemporaryFilePath string Path and file name of the temporary file.
DXErrorMessage string Error message generated by the transformation.
DXErrorCode string Error code generated by the transformation. If the transformation fails, the value of the DXErrorCode port is greater than zero.
32 Chapter 2: B2B Data Exchange Transformations
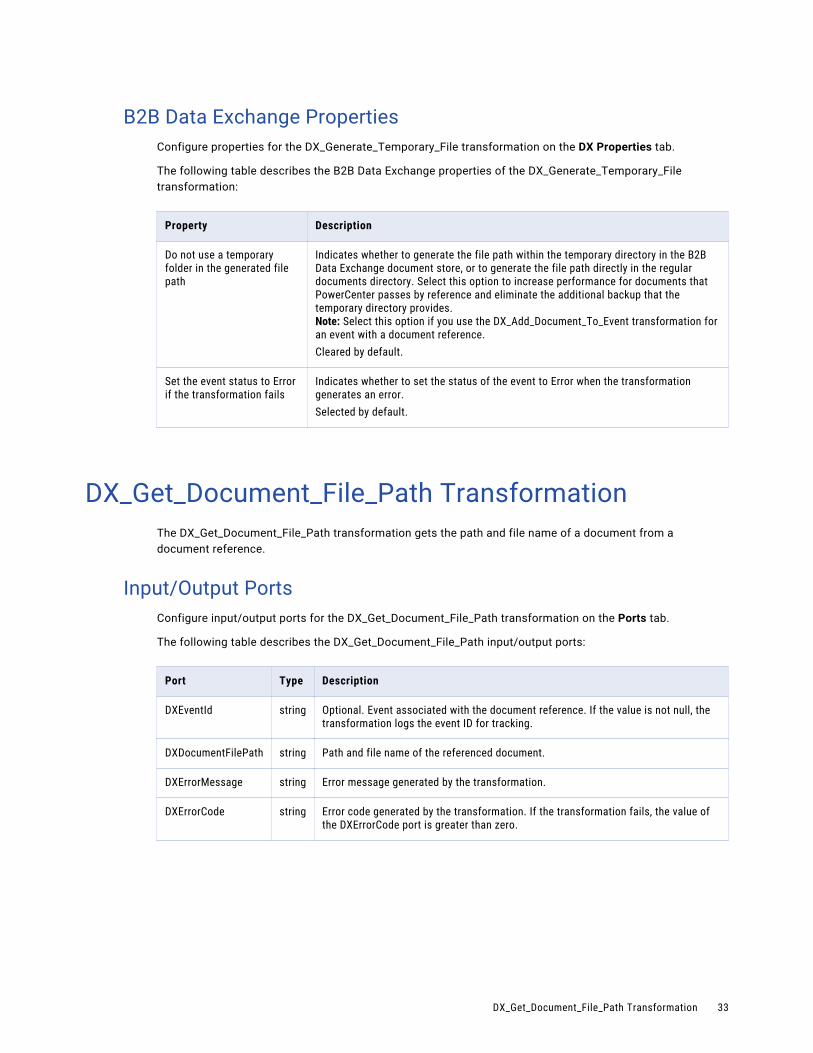
B2B Data Exchange PropertiesConfigure properties for the DX_Generate_Temporary_File transformation on the DX Properties tab.
The following table describes the B2B Data Exchange properties of the DX_Generate_Temporary_File transformation:
Property Description
Do not use a temporary folder in the generated file path
Indicates whether to generate the file path within the temporary directory in the B2B Data Exchange document store, or to generate the file path directly in the regular documents directory. Select this option to increase performance for documents that PowerCenter passes by reference and eliminate the additional backup that the temporary directory provides.Note: Select this option if you use the DX_Add_Document_To_Event transformation for an event with a document reference.Cleared by default.
Set the event status to Error if the transformation fails
Indicates whether to set the status of the event to Error when the transformation generates an error.Selected by default.
DX_Get_Document_File_Path TransformationThe DX_Get_Document_File_Path transformation gets the path and file name of a document from a document reference.
Input/Output PortsConfigure input/output ports for the DX_Get_Document_File_Path transformation on the Ports tab.
The following table describes the DX_Get_Document_File_Path input/output ports:
Port Type Description
DXEventId string Optional. Event associated with the document reference. If the value is not null, the transformation logs the event ID for tracking.
DXDocumentFilePath string Path and file name of the referenced document.
DXErrorMessage string Error message generated by the transformation.
DXErrorCode string Error code generated by the transformation. If the transformation fails, the value of the DXErrorCode port is greater than zero.
DX_Get_Document_File_Path Transformation 33
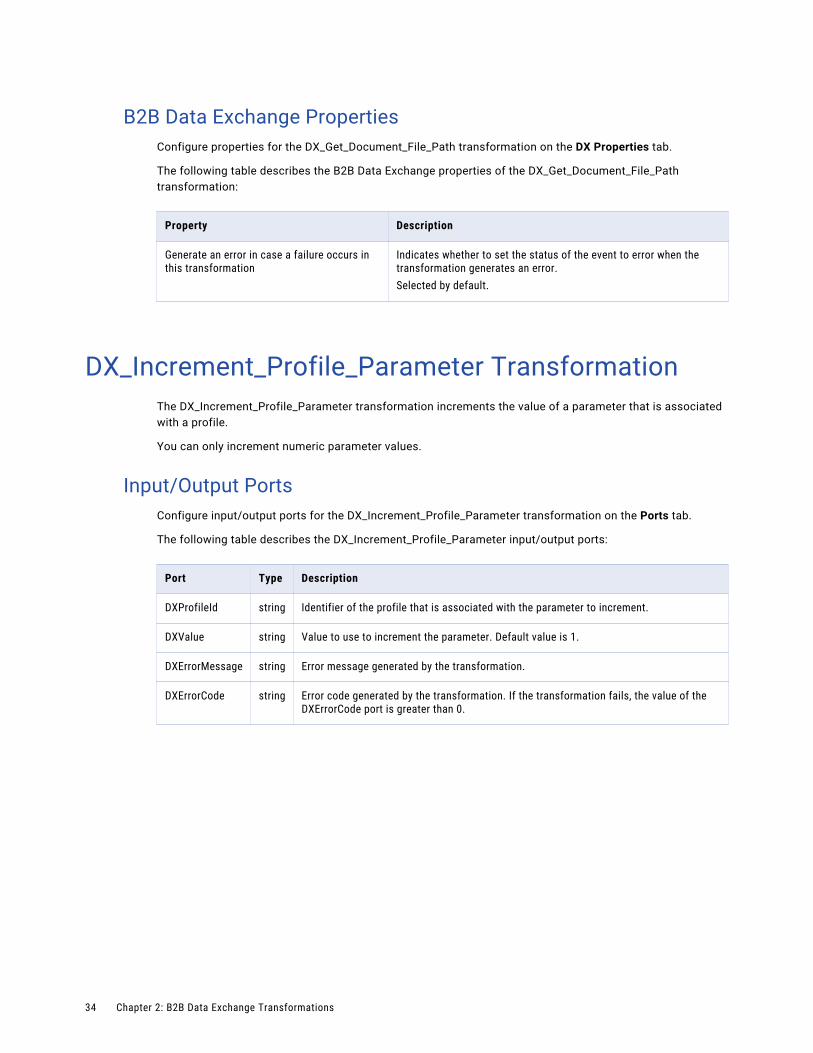
B2B Data Exchange PropertiesConfigure properties for the DX_Get_Document_File_Path transformation on the DX Properties tab.
The following table describes the B2B Data Exchange properties of the DX_Get_Document_File_Path transformation:
Property Description
Generate an error in case a failure occurs in this transformation
Indicates whether to set the status of the event to error when the transformation generates an error.Selected by default.
DX_Increment_Profile_Parameter TransformationThe DX_Increment_Profile_Parameter transformation increments the value of a parameter that is associated with a profile.
You can only increment numeric parameter values.
Input/Output PortsConfigure input/output ports for the DX_Increment_Profile_Parameter transformation on the Ports tab.
The following table describes the DX_Increment_Profile_Parameter input/output ports:
Port Type Description
DXProfileId string Identifier of the profile that is associated with the parameter to increment.
DXValue string Value to use to increment the parameter. Default value is 1.
DXErrorMessage string Error message generated by the transformation.
DXErrorCode string Error code generated by the transformation. If the transformation fails, the value of the DXErrorCode port is greater than 0.
34 Chapter 2: B2B Data Exchange Transformations

B2B Data Exchange PropertiesConfigure properties for the DX_Increment_Profile_Parameter transformation on the DX Properties tab.
The following table describes the B2B Data Exchange properties of the DX_Increment_Profile_Parameter transformation:
Property Description
Profile parameter name Name of the profile parameter to increment.
Generate an error in case a failure occurs in this transformation
Indicates whether to set the status of the event to error when the transformation generates an error.Selected by default.
DX_Initiate_Correlation TransformationThe DX_Initiate_Correlation transformation initiates a reconciliation for an event. Use this transformation in a workflow that processes a document that requires reconciliation.
Every reconciliation that you initiate needs to be completed. After you create the workflow with the DX_Initiate_Correlation transformation, use the DX_Complete_Correlation in another workflow to complete the reconciliation.
Input PortsConfigure input ports for the DX_Initiate_Correlation transformation on the Ports tab.
The following table describes the DX_Initiate_Correlation input ports:
Port Type Description
DXCorrelationType string Required. Description of the correlation type to initiate. The description can contain up to 255 bytes. You configure the correlation type in the transformation properties.
DXCorrelationId string Required. Identifier of the correlation to initiate.
DXTimeWindow integer The time interval in seconds to complete the correlation.
DX_Initiate_Correlation Transformation 35
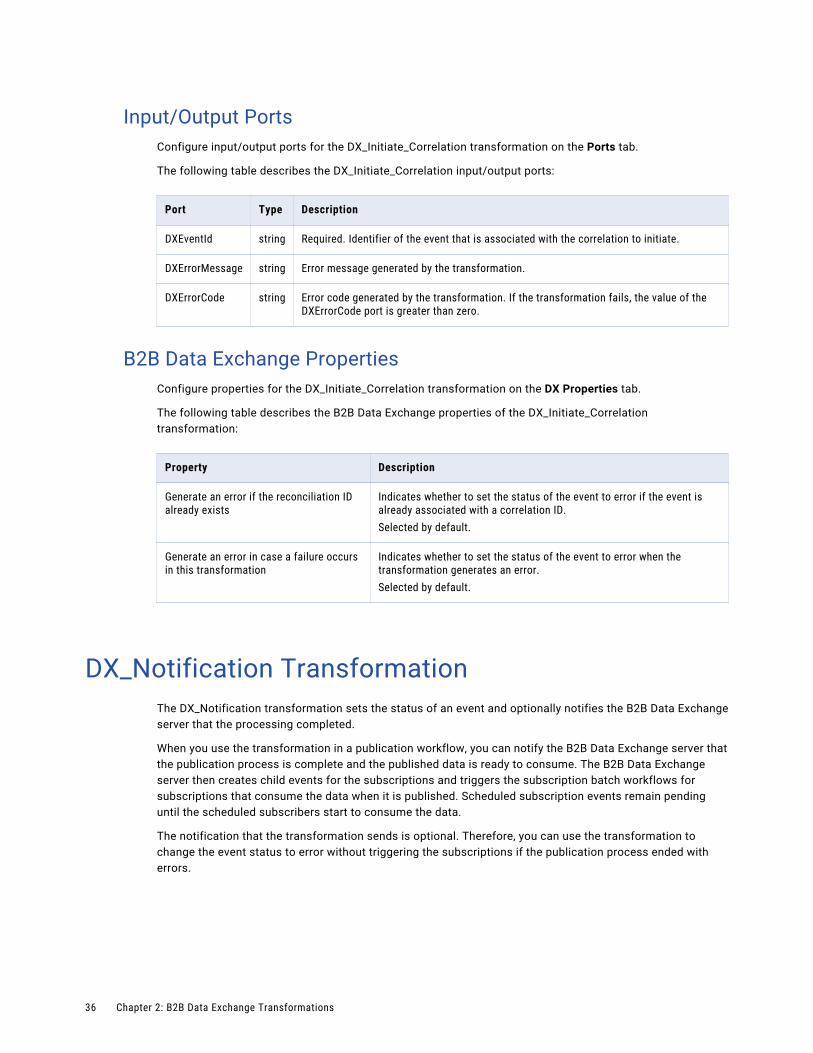
Input/Output PortsConfigure input/output ports for the DX_Initiate_Correlation transformation on the Ports tab.
The following table describes the DX_Initiate_Correlation input/output ports:
Port Type Description
DXEventId string Required. Identifier of the event that is associated with the correlation to initiate.
DXErrorMessage string Error message generated by the transformation.
DXErrorCode string Error code generated by the transformation. If the transformation fails, the value of the DXErrorCode port is greater than zero.
B2B Data Exchange PropertiesConfigure properties for the DX_Initiate_Correlation transformation on the DX Properties tab.
The following table describes the B2B Data Exchange properties of the DX_Initiate_Correlation transformation:
Property Description
Generate an error if the reconciliation ID already exists
Indicates whether to set the status of the event to error if the event is already associated with a correlation ID.Selected by default.
Generate an error in case a failure occurs in this transformation
Indicates whether to set the status of the event to error when the transformation generates an error.Selected by default.
DX_Notification TransformationThe DX_Notification transformation sets the status of an event and optionally notifies the B2B Data Exchange server that the processing completed.
When you use the transformation in a publication workflow, you can notify the B2B Data Exchange server that the publication process is complete and the published data is ready to consume. The B2B Data Exchange server then creates child events for the subscriptions and triggers the subscription batch workflows for subscriptions that consume the data when it is published. Scheduled subscription events remain pending until the scheduled subscribers start to consume the data.
The notification that the transformation sends is optional. Therefore, you can use the transformation to change the event status to error without triggering the subscriptions if the publication process ended with errors.
36 Chapter 2: B2B Data Exchange Transformations
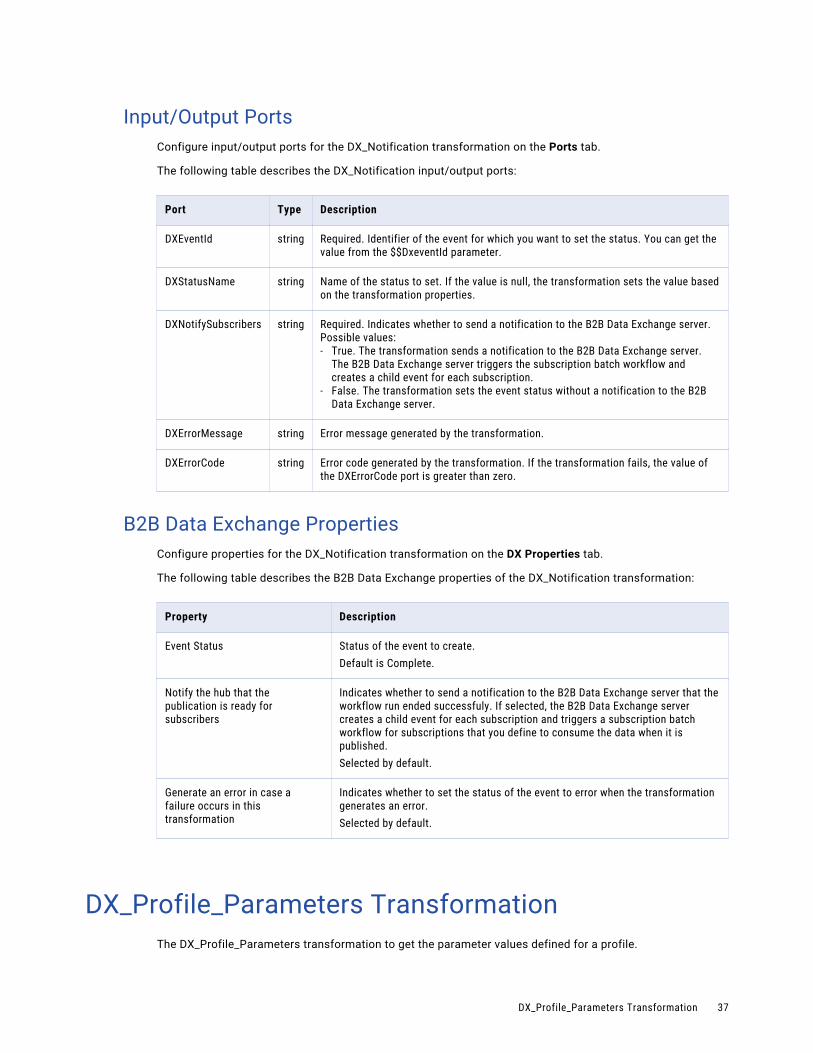
Input/Output PortsConfigure input/output ports for the DX_Notification transformation on the Ports tab.
The following table describes the DX_Notification input/output ports:
Port Type Description
DXEventId string Required. Identifier of the event for which you want to set the status. You can get the value from the $$DxeventId parameter.
DXStatusName string Name of the status to set. If the value is null, the transformation sets the value based on the transformation properties.
DXNotifySubscribers string Required. Indicates whether to send a notification to the B2B Data Exchange server. Possible values:- True. The transformation sends a notification to the B2B Data Exchange server.
The B2B Data Exchange server triggers the subscription batch workflow and creates a child event for each subscription.
- False. The transformation sets the event status without a notification to the B2B Data Exchange server.
DXErrorMessage string Error message generated by the transformation.
DXErrorCode string Error code generated by the transformation. If the transformation fails, the value of the DXErrorCode port is greater than zero.
B2B Data Exchange PropertiesConfigure properties for the DX_Notification transformation on the DX Properties tab.
The following table describes the B2B Data Exchange properties of the DX_Notification transformation:
Property Description
Event Status Status of the event to create.Default is Complete.
Notify the hub that the publication is ready for subscribers
Indicates whether to send a notification to the B2B Data Exchange server that the workflow run ended successfuly. If selected, the B2B Data Exchange server creates a child event for each subscription and triggers a subscription batch workflow for subscriptions that you define to consume the data when it is published.Selected by default.
Generate an error in case a failure occurs in this transformation
Indicates whether to set the status of the event to error when the transformation generates an error.Selected by default.
DX_Profile_Parameters TransformationThe DX_Profile_Parameters transformation to get the parameter values defined for a profile.
DX_Profile_Parameters Transformation 37
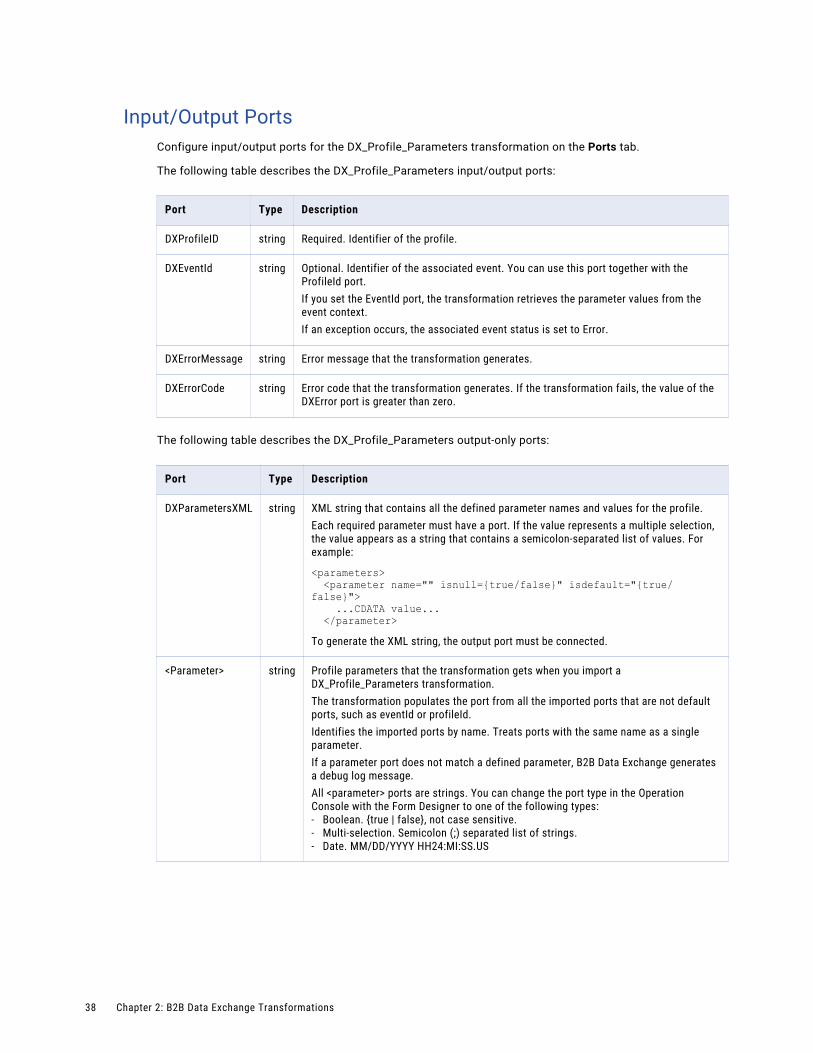
Input/Output PortsConfigure input/output ports for the DX_Profile_Parameters transformation on the Ports tab.
The following table describes the DX_Profile_Parameters input/output ports:
Port Type Description
DXProfileID string Required. Identifier of the profile.
DXEventId string Optional. Identifier of the associated event. You can use this port together with the ProfileId port.If you set the EventId port, the transformation retrieves the parameter values from the event context.If an exception occurs, the associated event status is set to Error.
DXErrorMessage string Error message that the transformation generates.
DXErrorCode string Error code that the transformation generates. If the transformation fails, the value of the DXError port is greater than zero.
The following table describes the DX_Profile_Parameters output-only ports:
Port Type Description
DXParametersXML string XML string that contains all the defined parameter names and values for the profile.Each required parameter must have a port. If the value represents a multiple selection, the value appears as a string that contains a semicolon-separated list of values. For example:
<parameters> <parameter name="" isnull={true/false}" isdefault="{true/false}"> ...CDATA value... </parameter>To generate the XML string, the output port must be connected.
<Parameter> string Profile parameters that the transformation gets when you import a DX_Profile_Parameters transformation.The transformation populates the port from all the imported ports that are not default ports, such as eventId or profileId.Identifies the imported ports by name. Treats ports with the same name as a single parameter.If a parameter port does not match a defined parameter, B2B Data Exchange generates a debug log message.All <parameter> ports are strings. You can change the port type in the Operation Console with the Form Designer to one of the following types:- Boolean. {true | false}, not case sensitive.- Multi-selection. Semicolon (;) separated list of strings.- Date. MM/DD/YYYY HH24:MI:SS.US
38 Chapter 2: B2B Data Exchange Transformations
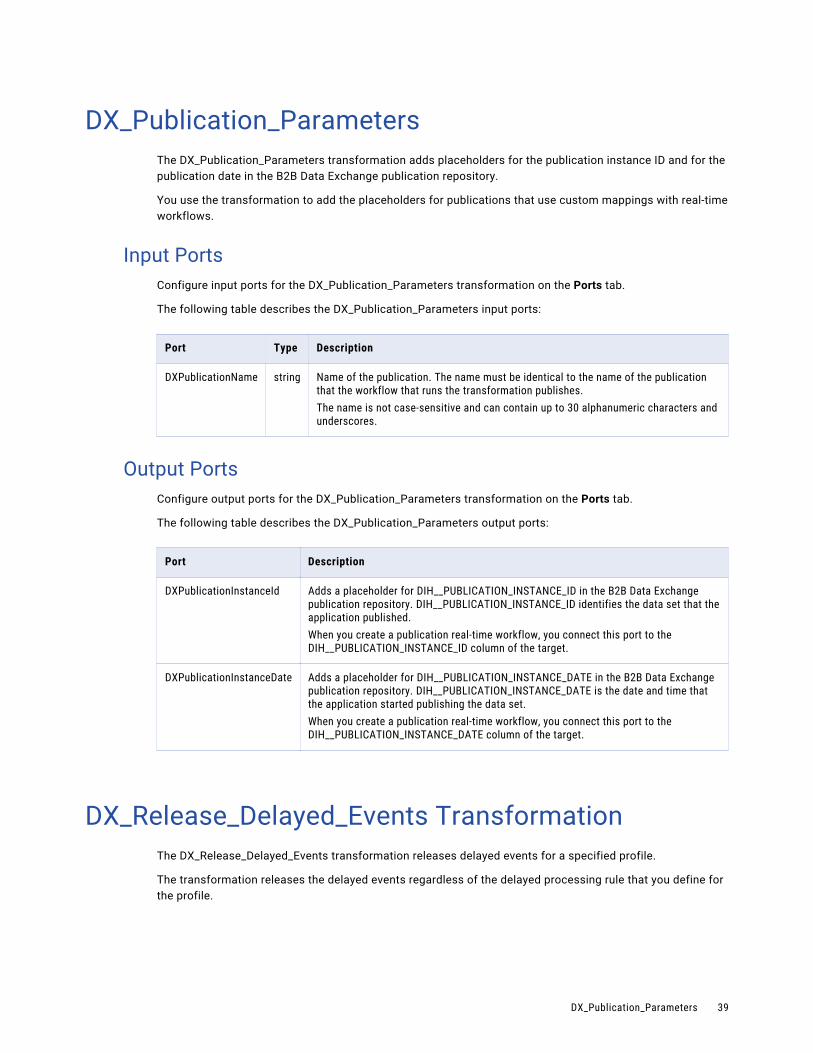
DX_Publication_ParametersThe DX_Publication_Parameters transformation adds placeholders for the publication instance ID and for the publication date in the B2B Data Exchange publication repository.
You use the transformation to add the placeholders for publications that use custom mappings with real-time workflows.
Input PortsConfigure input ports for the DX_Publication_Parameters transformation on the Ports tab.
The following table describes the DX_Publication_Parameters input ports:
Port Type Description
DXPublicationName string Name of the publication. The name must be identical to the name of the publication that the workflow that runs the transformation publishes.The name is not case-sensitive and can contain up to 30 alphanumeric characters and underscores.
Output PortsConfigure output ports for the DX_Publication_Parameters transformation on the Ports tab.
The following table describes the DX_Publication_Parameters output ports:
Port Description
DXPublicationInstanceId Adds a placeholder for DIH__PUBLICATION_INSTANCE_ID in the B2B Data Exchange publication repository. DIH__PUBLICATION_INSTANCE_ID identifies the data set that the application published.When you create a publication real-time workflow, you connect this port to the DIH__PUBLICATION_INSTANCE_ID column of the target.
DXPublicationInstanceDate Adds a placeholder for DIH__PUBLICATION_INSTANCE_DATE in the B2B Data Exchange publication repository. DIH__PUBLICATION_INSTANCE_DATE is the date and time that the application started publishing the data set.When you create a publication real-time workflow, you connect this port to the DIH__PUBLICATION_INSTANCE_DATE column of the target.
DX_Release_Delayed_Events TransformationThe DX_Release_Delayed_Events transformation releases delayed events for a specified profile.
The transformation releases the delayed events regardless of the delayed processing rule that you define for the profile.
DX_Publication_Parameters 39
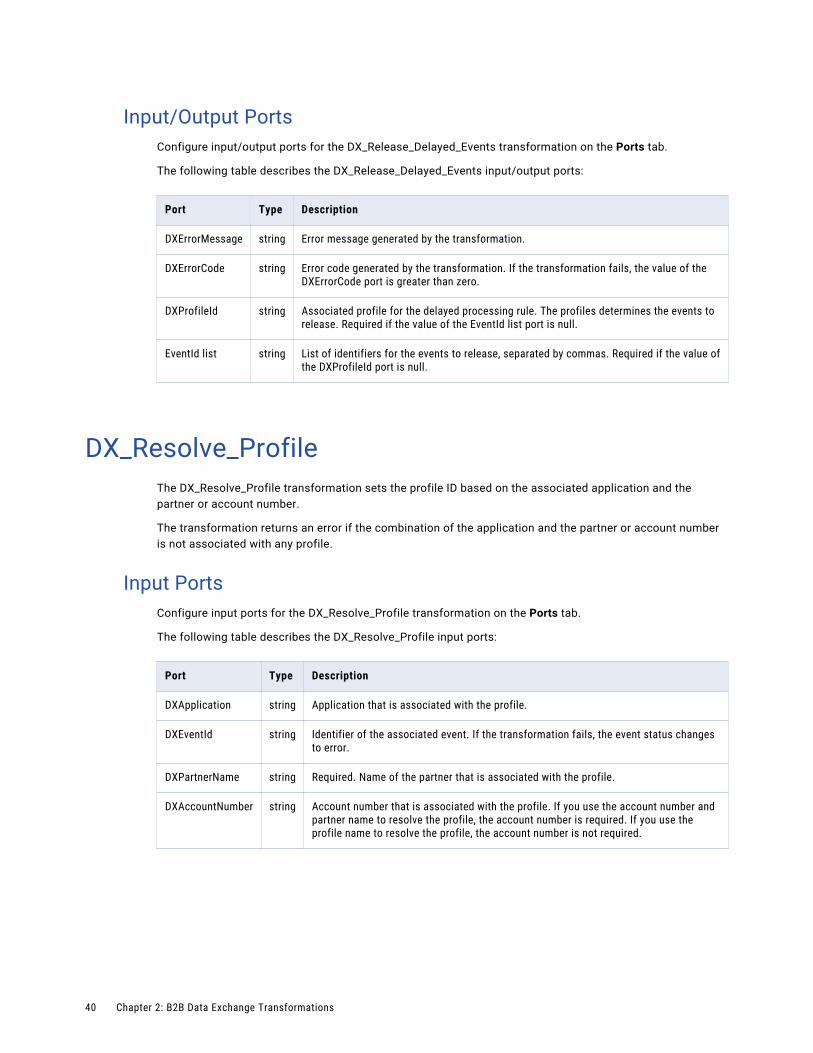
Input/Output PortsConfigure input/output ports for the DX_Release_Delayed_Events transformation on the Ports tab.
The following table describes the DX_Release_Delayed_Events input/output ports:
Port Type Description
DXErrorMessage string Error message generated by the transformation.
DXErrorCode string Error code generated by the transformation. If the transformation fails, the value of the DXErrorCode port is greater than zero.
DXProfileId string Associated profile for the delayed processing rule. The profiles determines the events to release. Required if the value of the EventId list port is null.
EventId list string List of identifiers for the events to release, separated by commas. Required if the value of the DXProfileId port is null.
DX_Resolve_ProfileThe DX_Resolve_Profile transformation sets the profile ID based on the associated application and the partner or account number.
The transformation returns an error if the combination of the application and the partner or account number is not associated with any profile.
Input PortsConfigure input ports for the DX_Resolve_Profile transformation on the Ports tab.
The following table describes the DX_Resolve_Profile input ports:
Port Type Description
DXApplication string Application that is associated with the profile.
DXEventId string Identifier of the associated event. If the transformation fails, the event status changes to error.
DXPartnerName string Required. Name of the partner that is associated with the profile.
DXAccountNumber string Account number that is associated with the profile. If you use the account number and partner name to resolve the profile, the account number is required. If you use the profile name to resolve the profile, the account number is not required.
40 Chapter 2: B2B Data Exchange Transformations
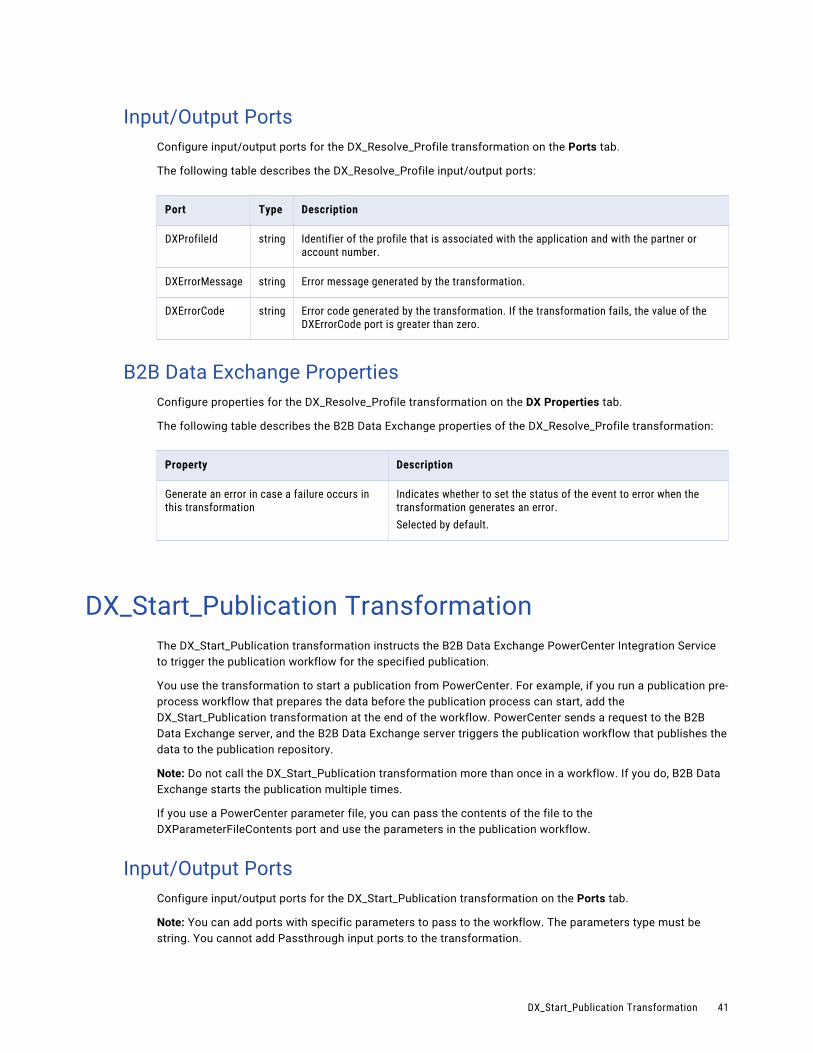
Input/Output PortsConfigure input/output ports for the DX_Resolve_Profile transformation on the Ports tab.
The following table describes the DX_Resolve_Profile input/output ports:
Port Type Description
DXProfileId string Identifier of the profile that is associated with the application and with the partner or account number.
DXErrorMessage string Error message generated by the transformation.
DXErrorCode string Error code generated by the transformation. If the transformation fails, the value of the DXErrorCode port is greater than zero.
B2B Data Exchange PropertiesConfigure properties for the DX_Resolve_Profile transformation on the DX Properties tab.
The following table describes the B2B Data Exchange properties of the DX_Resolve_Profile transformation:
Property Description
Generate an error in case a failure occurs in this transformation
Indicates whether to set the status of the event to error when the transformation generates an error.Selected by default.
DX_Start_Publication TransformationThe DX_Start_Publication transformation instructs the B2B Data Exchange PowerCenter Integration Service to trigger the publication workflow for the specified publication.
You use the transformation to start a publication from PowerCenter. For example, if you run a publication pre-process workflow that prepares the data before the publication process can start, add the DX_Start_Publication transformation at the end of the workflow. PowerCenter sends a request to the B2B Data Exchange server, and the B2B Data Exchange server triggers the publication workflow that publishes the data to the publication repository.
Note: Do not call the DX_Start_Publication transformation more than once in a workflow. If you do, B2B Data Exchange starts the publication multiple times.
If you use a PowerCenter parameter file, you can pass the contents of the file to the DXParameterFileContents port and use the parameters in the publication workflow.
Input/Output PortsConfigure input/output ports for the DX_Start_Publication transformation on the Ports tab.
Note: You can add ports with specific parameters to pass to the workflow. The parameters type must be string. You cannot add Passthrough input ports to the transformation.
DX_Start_Publication Transformation 41
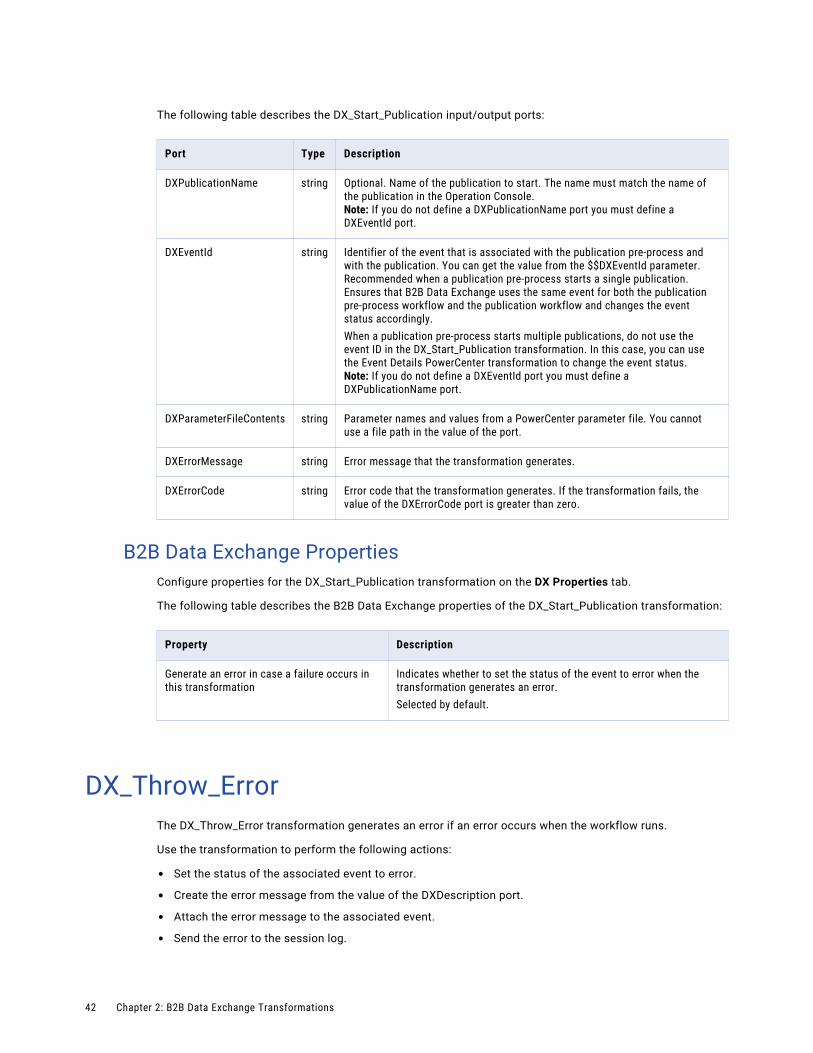
The following table describes the DX_Start_Publication input/output ports:
Port Type Description
DXPublicationName string Optional. Name of the publication to start. The name must match the name of the publication in the Operation Console.Note: If you do not define a DXPublicationName port you must define a DXEventId port.
DXEventId string Identifier of the event that is associated with the publication pre-process and with the publication. You can get the value from the $$DXEventId parameter.Recommended when a publication pre-process starts a single publication. Ensures that B2B Data Exchange uses the same event for both the publication pre-process workflow and the publication workflow and changes the event status accordingly.When a publication pre-process starts multiple publications, do not use the event ID in the DX_Start_Publication transformation. In this case, you can use the Event Details PowerCenter transformation to change the event status.Note: If you do not define a DXEventId port you must define a DXPublicationName port.
DXParameterFileContents string Parameter names and values from a PowerCenter parameter file. You cannot use a file path in the value of the port.
DXErrorMessage string Error message that the transformation generates.
DXErrorCode string Error code that the transformation generates. If the transformation fails, the value of the DXErrorCode port is greater than zero.
B2B Data Exchange PropertiesConfigure properties for the DX_Start_Publication transformation on the DX Properties tab.
The following table describes the B2B Data Exchange properties of the DX_Start_Publication transformation:
Property Description
Generate an error in case a failure occurs in this transformation
Indicates whether to set the status of the event to error when the transformation generates an error.Selected by default.
DX_Throw_ErrorThe DX_Throw_Error transformation generates an error if an error occurs when the workflow runs.
Use the transformation to perform the following actions:
• Set the status of the associated event to error.
• Create the error message from the value of the DXDescription port.
• Attach the error message to the associated event.
• Send the error to the session log.
42 Chapter 2: B2B Data Exchange Transformations
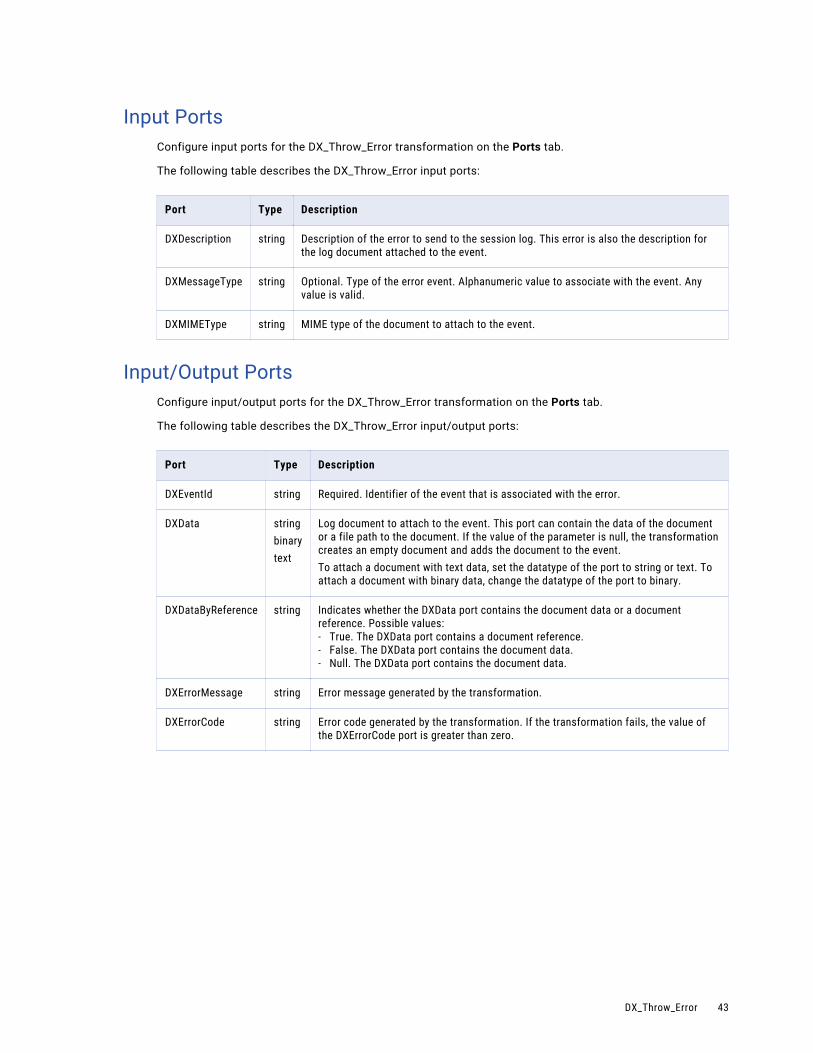
Input PortsConfigure input ports for the DX_Throw_Error transformation on the Ports tab.
The following table describes the DX_Throw_Error input ports:
Port Type Description
DXDescription string Description of the error to send to the session log. This error is also the description for the log document attached to the event.
DXMessageType string Optional. Type of the error event. Alphanumeric value to associate with the event. Any value is valid.
DXMIMEType string MIME type of the document to attach to the event.
Input/Output PortsConfigure input/output ports for the DX_Throw_Error transformation on the Ports tab.
The following table describes the DX_Throw_Error input/output ports:
Port Type Description
DXEventId string Required. Identifier of the event that is associated with the error.
DXData stringbinarytext
Log document to attach to the event. This port can contain the data of the document or a file path to the document. If the value of the parameter is null, the transformation creates an empty document and adds the document to the event.To attach a document with text data, set the datatype of the port to string or text. To attach a document with binary data, change the datatype of the port to binary.
DXDataByReference string Indicates whether the DXData port contains the document data or a document reference. Possible values:- True. The DXData port contains a document reference.- False. The DXData port contains the document data.- Null. The DXData port contains the document data.
DXErrorMessage string Error message generated by the transformation.
DXErrorCode string Error code generated by the transformation. If the transformation fails, the value of the DXErrorCode port is greater than zero.
DX_Throw_Error 43
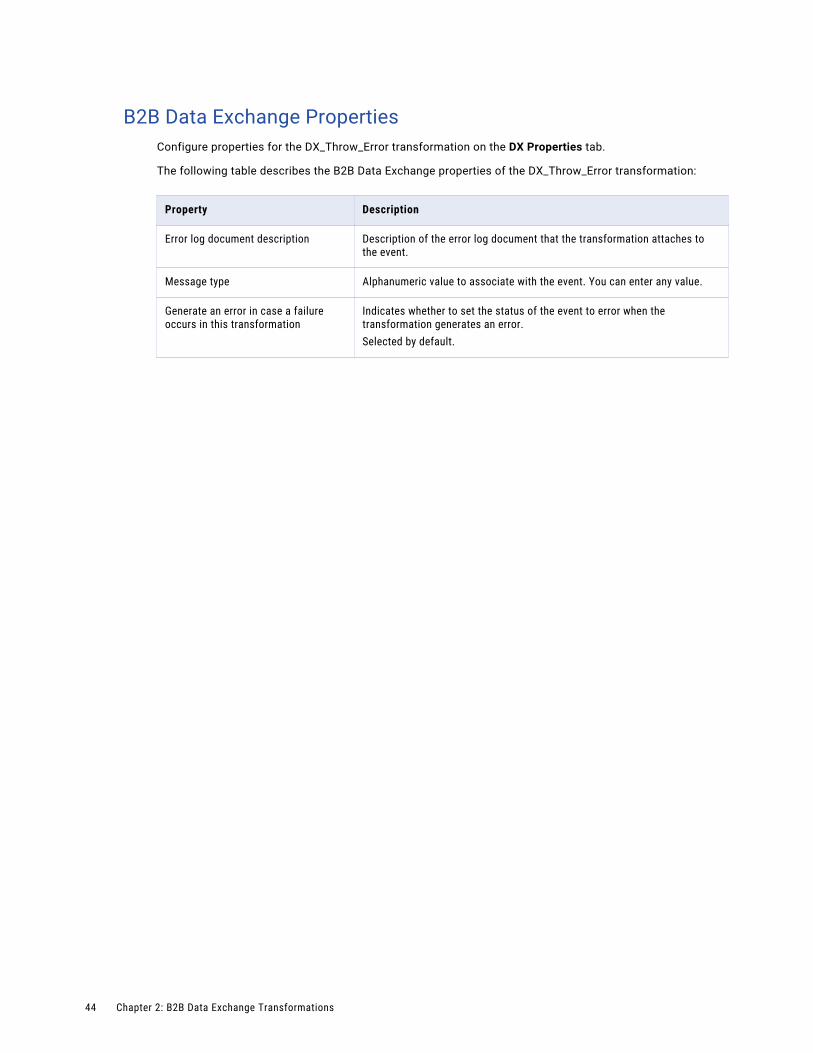
B2B Data Exchange PropertiesConfigure properties for the DX_Throw_Error transformation on the DX Properties tab.
The following table describes the B2B Data Exchange properties of the DX_Throw_Error transformation:
Property Description
Error log document description Description of the error log document that the transformation attaches to the event.
Message type Alphanumeric value to associate with the event. You can enter any value.
Generate an error in case a failure occurs in this transformation
Indicates whether to set the status of the event to error when the transformation generates an error.Selected by default.
44 Chapter 2: B2B Data Exchange Transformations
C h a p t e r 3
B2B Data Exchange WorkflowsThis chapter includes the following topics:
• B2B Data Exchange Workflows Overview, 45
• B2B Data Exchange Workflows Overview, 46
• Managing B2B Data Exchange Workflows, 46
• B2B Data Exchange Workflow Properties, 47
• B2B Data Exchange Workflow Properties, 48
B2B Data Exchange Workflows OverviewA B2B Data Exchange workflow is a set of instructions that define one of the following actions:
• How to process data that on-premises applications publish to and consume from the B2B Data Exchange publication repository with custom publications and subscriptions. A B2B Data Exchange workflow for custom publications and subscriptions can be based on a PowerCenter workflow, Big Data Management mapping, or Data Quality mapping.
• What action to take when publication or subscription events are in a defined status, as defined in event monitoring rules that invoke a PowerCenter workflow. A B2B Data Exchange workflow for monitoring rules must be based on a PowerCenter workflow.
Before you create a workflow in B2B Data Exchange, you must create the relevant PowerCenter workflow, Big Data Management mapping, or Data Quality mapping. For more information, see the following sections:
• Chapter 1, “PowerCenter Mappings and Workflows” on page 10
• GUID-12A0D163-D103-4F97-A416-8592D4716A67
• GUID-E8C67047-20F3-4FF2-A081-1663AAD925DF
You then select the PowerCenter workflow, Big Data Management mapping, or Data Quality mapping when you create the B2B Data Exchange workflow in the Operation Console. For more information, see “Managing B2B Data Exchange Workflows” on page 46.
When the operator creates an on-premises publication or subscription with a custom mapping, they select a B2B Data Exchange workflow to use for the custom mapping.
You do not need to create a B2B Data Exchange workflow for the following publication and subscription types:
• Publications and subscriptions that use an automatic mapping. B2B Data Exchange creates a PowerCenter workflow and mapping directly from the publication or subscription.
45
• Publications and subscriptions for cloud applications. The operator selects an Informatica Cloud task when they create the publication or the subscription.
When the operator creates a monitoring rule that invokes a workflow, they select the B2B Data Exchange workflow when they select the actions to take.
B2B Data Exchange Workflows OverviewA workflow is a set of instructions that define how to process documents that partners send to B2B Data Exchange. A B2B Data Exchange workflow represents a PowerCenter workflow and mapping.
You can create a workflow in B2B Data Exchange from a PowerCenter workflow by either of these methods:
• Select a workflow directly from the PowerCenter repository.
• Export the PowerCenter workflow to an XML file using the Repository Manager tool. You then select the XML file to import as the workflow definition file.
Along with the workflow definition file, you define basic workflow properties, and save the new workflow.
You can create multiple workflows and associate them with an application. You can associate one workflow with one or more profiles. Real-time workflows use the JMS queue to communicate with PowerCenter.
If you assign event attributes that the dashboard uses in reports to a workflow, the event attribute value must be numeric. An event attribute is numeric if the lexical syntax rules in the Java Language Specification define it as a FloatValue.
Managing B2B Data Exchange WorkflowsUse the Navigator to add, edit, and delete B2B Data Exchange workflows that you use for custom mappings. Each workflow represents a PowerCenter workflow.
1. In the Navigator, click Partner Management > WorkflowsHub Management > Workflows.
The Workflows page appears. You can sort the display by either the Workflow Name or the Last Modified column.
2. Choose to create, edit, or delete a workflow.
• To create a workflow, click New Workflow and define the workflow properties. For more information, see “B2B Data Exchange Workflow Properties” on page 48. For more information, see “B2B Data Exchange Workflow Properties” on page 47.
• To edit a workflow, click the Edit icon next to the workflow that you want to edit and change the workflow properties.
Note: If the workflow is associated with profiles, the Operation Console displays a list of the associated profiles. If the changes to the workflow might cause problems in processing documents for the partner defined in the profile, disable the profile and review the changes to the profile before you enable the profile again.
• To delete a workflow, click the Delete icon next to the workflow that you want to delete and confirm the deletion.
Note: If you delete the workflow, you also delete all of the dependent objects for that workflow.
46 Chapter 3: B2B Data Exchange Workflows
3. If the workflow contains parameters, you can add values to the parameters on the Workflow Parameters tab of the Create Workflow page. You can customize the layout and behavior of the parameters with the Forms Designer. For more information, see “Customizing B2B Data Exchange Workflow Parameters” on page 67.
Note: If the workflow contains session parameters, and you do not want the B2B Data Exchange operator to set the session parameters in the Publication wizard or the Subscription wizard, use the Forms Designer to hide the session parameters.
4. To associate event attributes with the workflow, add event attributes on the Event Attributes tab.
5. To manually run an outbound batch workflow, click Partner Management > Profiles and run the profile that is associated with the batch workflow.
6. To manually run a scheduled batch workflow, click Events > Event List and release the events for the batch workflow.
7. To associate a workflow with a publication or a subscription, use a custom publication or subscription wizard. To associate a workflow with a monitoring rule, use the monitoring rule wizard.
B2B Data Exchange Workflow PropertiesA B2B Data Exchange workflow contains the associated PowerCenter workflow, and other properties such as name and description. You define the properties when you create or edit a workflow.
A B2B Data Exchange workflow definition contains the following properties:Workflow Name
Name of the workflow. The name can contain up to 60 characters and can include spaces and special characters.
Description
Optional description of the workflow. The description appears as a tooltip when the operator selects a workflow in the Profiles and Monitors pages.
Application
Name of the application to which the workflow belongs. Select <none> to create a workflow without an application.
Flow Type
The flow type depends on the application that is used to process documents.
Consider the following guidelines when you select the flow type:
• Select PowerCenter Batch workflow to associate the workflow with a PowerCenter batch workflow. A PowerCenter batch workflow reads from a file, database, or another source. The workflow runs once and stops after completion. You can use the PowerCenter batch workflows to process documents from B2B Data Exchange. You can also use the workflows to generate documents for B2B Data Exchange, such as outbound reports. Use the PowerCenter workflow export file as the workflow definition file.
• Select PowerCenter Real-time workflow to associate the workflow with a real-time workflow. A PowerCenter real-time workflow runs continuously and reads from real-time sources. You can use these workflows to process documents from B2B Data Exchange. Use the PowerCenter mapping or workflow export file as the workflow definition file.
B2B Data Exchange Workflow Properties 47
• Select Java (advanced) to use Java classes as the flow engine in test mode or development mode. Use the Java class file as the workflow definition file.
Workflow
A PowerCenter workflow that you want to add to B2B Data Exchange. Select one of the following options:
• Select a workflow from the PowerCenter repository. Select a PowerCenter workflow that you saved in the PowerCenter repository. To show all workflows in the repository, click Show All. To search for a workflow by name, enter a string in the Folder Name text box and then click Search.
• Select a workflow definition file (XML). Select an XML PowerCenter workflow definition file that you exported from the PowerCenter repository. To select a file, click the browse button, browse to the location of the required file, select the file, and then click Upload.
B2B Data Exchange Workflow PropertiesA B2B Data Exchange workflow contains the associated PowerCenter workflow, Big Data Management mapping, or Data Quality mapping, and other properties such as name and description. You define the properties when you create or edit a workflow.
A B2B Data Exchange workflow definition contains the following properties:Workflow Name
Name of the workflow. The name can contain up to 60 characters and can include spaces and special characters.
Description
Optional description of the workflow.
Mapping Type
Consider the following guidelines when you select the mapping type:
• Select Big Data Management mapping to associate the B2B Data Exchange workflow with a Big Data Management mapping. The mapping runs once and stops after completion. You can assign Big Data Management mappings to custom publications that publish big data from on-premises applications to Hadoop-based topics and to custom subscriptions that consume big date from Hadoop-based topics into on-premises applications.
• Select Informatica Data Quality mapping to associate the B2B Data Exchange workflow with a Data Quality mapping. The mapping runs once and stops after completion. You can assign Data Quality mappings to custom publications that publish from on-premises applications to database- or file-based topics and to custom subscriptions that consume date from database- or file-based topics into on-premises applications.
• Select PowerCenter Batch workflow to associate the B2B Data Exchange workflow with a PowerCenter batch workflow. A PowerCenter batch workflow reads from a file, database, or another source. The workflow runs once and stops after completion. You can assign PowerCenter batch workflows to publication pre-processes, to custom publications that publish from on-premises applications to database- or file-based topics, to custom subscriptions that consume date from database- or file-based topics into on-premises applications, and to event monitoring rules that invoke a PowerCenter workflow.
48 Chapter 3: B2B Data Exchange Workflows
• Select PowerCenter Real-time workflow to associate the B2B Data Exchange workflow with a real-time workflow. A PowerCenter real-time workflow runs continuously and reads from real-time sources. You can assign PowerCenter real-time workflows to custom publications that publish from on-premises applications to database- or file-based topics. Use a real-time workflow to read data from real-time sources and write the data continuously to B2B Data Exchange. For example, use it for data that is published through web-service providers or Java Message Service (JMS) queues. When publishing through a real-time workflow, you can group the published data into single publications at predefined time intervals.
Usage
Type of process for which to use the B2B Data Exchange workflow. Select one of the following options:
• Publication Pre-Processing. Runs a publication pre-process.
• Publication. Runs a publication process.
• Subscription. Runs a subscription process.
• Monitoring rule. Runs the workflow when publication or subscription events are in a defined status, as defined in the event monitoring rule.
Mapping
A PowerCenter workflow, Big Data Management mapping, or Data Quality mapping that you want to add to B2B Data Exchange. The dialog box that shows depends on the type of mapping that you select in Mapping Type:
• When the mapping type is Big Data Management mapping, the Add a Big Data Management Mapping dialog box shows. To show all mappings that are deployed in the Data Integration Service for Hadoop environment, click Show All. To search for a mapping by application name, enter a string in the Application name text box and then click Search. Select a mapping and then click Add.
• When the mapping type is Informatica Data Quality mapping, the Add an Informatica Data Quality Mapping dialog box shows. To show all mappings that are deployed in the Data Integration Service for native environment, click Show All. To search for a mapping by application name, enter a string in the Application name text box and then click Search. Select a mapping and then click Add.
• When the mapping type is a PowerCenter workflow, either a batch workflow or a real-time workflow, the Add a PowerCenter Workflow dialog box shows. Select one of the following options:
- Select a workflow from the PowerCenter repository. Select a PowerCenter workflow that you saved in the PowerCenter repository and then click Add. To show all workflows in the repository, click Show All. To search for a workflow by name, enter a string in the Folder Name text box and then click Search.
- Select a workflow definition file (XML). Select an XML PowerCenter workflow definition file that you exported from the PowerCenter repository and then click Add. To select a file, click the browse button, browse to the location of the required file, select the file, and then click Upload.
B2B Data Exchange Workflow Properties 49
C h a p t e r 4
Dashboard and ReportsThis chapter includes the following topics:
• Dashboard and Reports Overview, 50
• Key Performance Indicators, 51
• Dashboard and Reports Structure in Logi Info Studio, 52
• Customizing the Dashboard in Logi Info Studio, 56
Dashboard and Reports OverviewThe Dashboard is a collection of panels that contain reports about information that B2B Data Exchange processes. Use the Dashboard to view personalized visual summary information about B2B Data Exchange event and document processing, such as the number of events for certain partners or the error rate for specific accounts.
Most of the reports in the Dashboard are based on key performance indicators (KPIs) that B2B Data Exchange retrieves from the operational data store, such as events, errors, transactions, and values. The operational data store is a repository that contains aggregated information solely for reporting purposes. The Dashboard retrieves the aggregated events from the operational data store and displays the information in the panels. In addition to the default KPIs, you can select event attributes in the Operation Console to load to the operational data store as custom KPIs.
You use Logi Info Studio to create custom reports based on default KPIs or custom KPIs. In Logi Info Studio, you set up the custom Dashboard and create custom Dashboard panels that include KPIs based on the information that you want to display. You deploy the custom Dashboard in B2B Data Exchange and modify the connection properties to retrieve the custom Dashboard panels that you created.
Note: For general information about working with Logi Info Studio, see the LogiXML documentation at http://devnet.logixml.com/rdPage.aspx?rdReport=DocsListingInfo.
The software available for download at the referenced links belongs to a third party or third parties, not Informatica LLC. The download links are subject to the possibility of errors, omissions or change. Informatica assumes no responsibility for such links and/or such software, disclaims all warranties, either express or implied, including but not limited to, implied warranties of merchantability, fitness for a particular purpose, title and non-infringement, and disclaims all liability relating thereto.
The B2B Data Exchange administrator installs the operational data store with the main B2B Data Exchange installation and modifies B2B Data Exchange system properties to determine certain aspects of the Dashboard behavior, such as whether to show the Dashboard when users log on to the Operation Console and the error rate range in the Error Rate Gauge panel. Operators can personalize the Dashboard page to display different panels and apply filters based on the information that the operators want to view.
50

After the B2B Data Exchange administrator installs the Dashboard and Reports component, they use PowerCenter Workflow Manager to configure the operational data store event loader. The operational data store event loader is a PowerCenter workflow that collects KPIs from the B2B Data Exchange repository according to specified parameters and loads aggregated events to the operational data store. In the operational data store event loader, the B2B Data Exchange administrator defines parameters such as the number of retry attempts for each event load process in case of failure or the number of minutes to wait between event load processes.
Key Performance IndicatorsUse key performance indicators (KPIs) to collect information about events that B2B Data Exchange generates. The operational data store event loader collects KPIs from the main B2B Data Exchange repository and transfers aggregated KPIs to the Dashboard.
The Dashboard displays most of the reports based on default KPIs that B2B Data Exchange retrieves from the operational data store. In addition to the default KPIs, you can select event attributes to load to the operational data store as custom KPIs. You use Logi Info Studio to create custom Dashboard panels based on the custom KPIs that you select. Use numeric event attributes in custom Dashboard panels.
In addition to reports from the operational data store, B2B Data Exchange retrieves unresolved error event information directly from the runtime B2B Data Exchange. To maintain performance, do not customize the unresolved error event panels or create custom Dashboard panels based on event information from the run-time B2B Data Exchange repository.
If you track service level agreement (SLA) requirements, you can create rules based on default KPIs or custom KPIs and view violations in the SLA Violations panel of the Dashboard.
Default KPIsThe operational data store uses default KPIs in reports. The operational data store event loader collects the KPIs and loads the KPIs to the operational data store.
Operation Console users can view the aggregated event information as reports in the Dashboard panels. You can create custom Dashboard panels in Logi Info Studio based on the default KPIs. When you create custom Dashboard panels, you can apply measurements on the default KPIs, such as sum, count, minimum, maximum, and average.
The following table describes the default KPIs that the Dashboard displays:
KPI Description
Message processing time Duration in minutes of the time it takes for the event to initially reach a final state.
Number of events Number of events that B2B Data Exchange processes.
Number of error events Number of error events that reached a final state.
Key Performance Indicators 51

Dashboard and Reports Structure in Logi Info StudioThe Dashboard displays event information based on aggregated data that it retrieves from the operational data store. Use Logi Info Studio to view the default Dashboard panels and create custom Dashboard panels based on default KPIs and custom KPIs that you retrieve from the operational data store.
The default Dashboard in Logi Info Studio includes the following global elements:
• Filters that the Dashboard can apply to each report.
• Theme modifier that controls the appearance of the Dashboard panels.
• SQL constants for common queries to run in the operational data store.
• JavaScript support files that B2B Data Exchange uses to process reports and display Dashboard panels.
Default Dashboard FiltersThe Dashboard uses filters for each report that you generate in Logi Info Studio. The filters correspond the global filters in the Dahsboard page of the Operation Console.
The following table describes the default Dashboard filters:
Filter Description
@Request.idBegin~ Start date of the date/time filter, in the format yyyy-mm-dd.
@Request.itBegin~ Start time of the date/time filter, in the format hh:mm.
@Request.idEnd~ End date of the date/time filter, in the format yyyy-mm-dd.
@Request.itEnd~ End time of the date/time filter, in the format hh:mm.
@Request.iPartnerId~ Partner database identifier for the selected partner.
@Request.iAccountId~ Account database identifier of the selected account.
@Request.eventTypeId~ Event type database identifier of the selected event type.
@Request.eventStatusId~ Event status database identifier of the selected event status.
Default Dashboard SQL ConstantsEach report in the default Dashboard uses SQL constants for common queries to the operational data store and query parameters. You can reuse these SQL constants when you create custom Dashboard panels based on KPIs that you load to the operational data store.
Note: For the SQL server, use the same constants with the addition of the suffix _SQLSERVER. For example, DX_ODS_FILTER_ACCOUNT would be DX_ODS_FILTER_ACCOUNT_SQLSERVER.
Note: You cannot create reports in Logi Info Studio with SQL queries to the run-time B2B Data Exchange repository.
52 Chapter 4: Dashboard and Reports
The following table describes the default Dashboard SQL constants:
SQL Constant Name Description
DX_ODS_FILTER_ACCOUNT Filters the database rows according to the related account.Includes the following query parameters:- requestAccountId
DX_ODS_FILTER_ERROR_STATE Filters the database rows to display only error events.
DX_ODS_FILTER_EVENT_STATUS Filters the database rows according to the event status.Includes the following query parameters:- requestEventStatusId
DX_ODS_FILTER_EVENT_STATUS_STATE Filters the database rows according to the event state. The following values are available:- 1. Show error events with a final state.- 2. Show non-error events with a final state.- -1. Show all events with a final state.Includes the following query parameters:- requestEventStatusState
DX_ODS_FILTER_EVENT_TYPE Filters the database rows according to the event type.Includes the following query parameters:- requestEventTypeId
DX_ODS_FILTER_PARTNER Filters the database rows according to the related partner.Includes the following query parameters:- requestPartnerId
DX_ODS_FILTER_TIME_ORACLE Filters the database rows according to a selected time frame.Includes the following query parameters:- requestDateBegin- requestTimeBegin- requestDateEnd- requestTimeEnd
DX_ODS_USER_RESTRICTION_BY_ACCESS_ID Filters the database rows according to the related user access identifier.Note: To maximize user access control, use DX_ODS_USER_RESTRICTION_BY_ACCESS_ID, DX_ODS_USER_RESTRICTION_BY_EVENT_TYPE, and DX_ODS_USER_RESTRICTION_BY_PARTNER in your custom Dashboard panels.Includes the following query parameters:- requestUserId
Dashboard and Reports Structure in Logi Info Studio 53

SQL Constant Name Description
DX_ODS_USER_RESTRICTION_BY_EVENT_TYPE Filters the database rows to display only event types for which the user has viewing privileges.Note: To maximize user access control, use DX_ODS_USER_RESTRICTION_BY_ACCESS_ID, DX_ODS_USER_RESTRICTION_BY_EVENT_TYPE, and DX_ODS_USER_RESTRICTION_BY_PARTNER in your custom Dashboard panels.Includes the following query parameters:- requestUserId
DX_ODS_USER_RESTRICTION_BY_PARTNER Filters the database rows to display only related partners for which the user has viewing privileges.Note: To maximize user access control, use DX_ODS_USER_RESTRICTION_BY_ACCESS_ID, DX_ODS_USER_RESTRICTION_BY_EVENT_TYPE, and DX_ODS_USER_RESTRICTION_BY_PARTNER in your custom Dashboard panels.Includes the following query parameters:- requestUserId
Default Dashboard JavaScript Support FilesB2B Data Exchange uses JavaScript files and jQuery files to process event information when you view the Dashboard in the Operation Console.
The files are located in the following location:
<DXInstallationDir>\DataExchangeDataIntegrationHub\tomcat\webapps\dx-dashboard\_SupportFiles
The following table describes the JavaScript files and jQuery files that the default Dashboard uses:
File Description
dx.js Functions that the B2B Data Exchange server uses when it processes reports with the LogiXML engine.
dxbrowser.js Functions that the browser client uses when you view the Dashboard in the Operation Console.
jquery-*.* Collection of jQuery files that enable dynamically-populating drop down lists in the global filter section, such as partner or account.
Default Dashboard Theme ModifierThe theme modifier controls the appearance of the Dashboard panels. B2B Data Exchange applies the style and appearance settings in the theme modifier to any custom Dashboard panel that you create.
The theme modifier files are located in the following location:
<DXInstallationDir>\DataExchangeDataIntegrationHub\tomcat\webapps\dx-dashboard\_Themes\DXDashboard\Informatica
54 Chapter 4: Dashboard and Reports
The following table describes the theme modifier components for the default dashboard:
File Description
Theme.css Cascading style sheet that determines the graphical and textual formatting of the Dashboard panels.
ThemeModifier.xml Global settings for the Dashboard panels behavior and the single sign-on mechanism that B2B Data Exchange uses when you log on to the Operation Console.
Custom Dashboard Properties in the LogiXML Settings FileYou modify certain properties in the LogiXML _Settings.lgx file when you create a custom Dashboard for B2B Data Exchange.
The following table describes the properties to modify:
Property Description
DX_CONSOLE_URL Location of the Operation Console, in the following format:
http://<DX host>:<DX port>/DX-console
DASHBOARD_SAVEFOLDER Location to store the personalized layout settings for each Dashboard user.Default is: @Function.AppPhysicalPath~\dx\saved_dashboards
DX_ODS_ORACLE_CONNECTION Connection string for the operational data store.
DX_ORACLE_CONNECTION Connection string for the main B2B Data Exchange repository.
LogonFailPage URL to display after the user logs out of the Operation Console.The default URL is the B2B Data Exchange Logout page: http://<DX host>:<DX port>/DX-console/logout.jsp
AuthenticationClientAddresses IP addresses for servers that can request authentication tokens from the LogiXML server, separated by semicolons. For each server, set IP4 and IP6 addresses.
caption Description of the custom Dashboard.
COOKIE_PATH Path to the cookie file for the custom Dashboard. Must match the value in the Cookie Path property.
WEBAPP_NAME Name of the folder which contains the custom Dashboard.Default is: dxdashboard
Redirect Error URL Link for the page to display if the Dashboard encounters an error.
Dashboard and Reports Structure in Logi Info Studio 55
Customizing the Dashboard in Logi Info StudioUse Logi Info Studio to create custom Dashboard panels based on default KPIs or custom KPIs.
In Logi Info Studio, you create a report and add SQL queries that retrieve numeric event attributes from the operational data store. You then configure a Dashboard panel to display the custom report and deploy the custom Dashboard in B2B Data Exchange.
You cannot create custom Dashboard panels based on the following reports:
• Unresolved Error Events by Partner (eventsbypartnerErrorRepository.lgx)
• Unresolved Error Events by Account (eventsbyaccountErrorRepository.lgx)
• Unresolved Error Events by Event Type (eventsbyeventstatusErrorRepository.lgx)
• Unresolved Error Events by Event Status (eventsbyeventstatusErrorRepository.lgx)
• Tasks (dxtasks.lgx)
When you create custom reports in Logi Info Studio, you can copy the SQL constants from the default Dashboard and modify them based on the KPIs that you want to display in the Dashboard panels.
You can use the SQL constants with the LogiXML constant token. When Logi Info Studio processes the custom reports, the constant token expands the SQL constants. For example, you use the following SQL query:
select facts.ACCOUNT_ID, sum(EVENT_COUNT) as SUM_COUNT from DX_ODS_EVENT_FACTS facts where @Constant.DX_ODS_FILTER_TIME_ORACLE~
The LogiXML constant token expands the SQL query to the following SQL query:
select facts.ACCOUNT_ID, sum(EVENT_COUNT) as SUM_COUNT from DX_ODS_EVENT_FACTS facts where to_timestamp(:requestDateBegin || :requestTimeBegin,'YYYY-MM-DD HH24:MI:SS') <= facts.TIMESLICE and facts.TIMESLICE <= to_timestamp(:requestDateEnd || :requestTimeEnd,'YYYY-MM-DD HH24:MI:SS')
If you create new parameters for your custom report, you must specify a unique name for each parameter. Otherwise, the Dashboard overrides the existing parameters with the same name or processes the parameter values incorrectly. If you create data layer links, you must specify a unique name for each data layer link in all of the reports. Otherwise, the Dashboard may display incorrect data in the Dashboard panel that you create, such as the wrong date or status.
Installing and Registering Logi Info StudioYou install Logi Info Studio to enhance and create Dashboard panels for B2B Data Exchange.
Before you install Logi Info Studio, verify that the B2B Data Exchange Dashboard and Reports component is installed on the B2B Data Exchange machine and that your system meets the minimum requirements for Logi Info Studio. For more information about the system requirements for Logi Info Studio, see the LogiXML documentation at http://devnet.logixml.com/rdPage.aspx?rdReport=DocsListingInfo.
1. In the Logi Info Studio installer, choose a custom installation and select to install only the Studio component.
2. Contact Informatica shipping to receive the Logi Info Studio license file.
3. Copy the Logi Info Studio license file to the following folder: <LogiXMLInstallationDir>\LogiStudio
56 Chapter 4: Dashboard and Reports

Setting Up the Custom Dashboard ApplicationYou create the custom Dashboard as an application in Logi Info Studio and import the default Dashboard files to Logi Info Studio.
1. In Logi Info Studio, create a Java application.
2. In the Prepare New Application wizard, configure the name and location for the Dashboard application:
• In the application name, enter the name for the custom Dashboard.
• In the deployment folder location, enter the following path:
<DXInstallationDir>\DataExchangeDataIntegrationHub\tomcat\webapps3. Skip the remaining Prepare a New Application wizard screens.
4. Copy the contents of the <DXInstallationDir>\DataExchangeDataIntegrationHub\tomcat\webapps\DX-dashboard folder to the newly created <DXInstallationDir>\DataExchangeDataIntegrationHub\tomcat\webapps\<custom_dashboard> folder.
5. Copy the LogiXML license file from the <DXInstallationDir>\DataExchangeDataIntegrationHub\tomcat\webapps\DX-dashboard folder to the <DXInstallationDir>\DataExchangeDataIntegrationHub\tomcat\webapps\<custom_dashboard> folder.
6. In the LogiXML _Settings.lgx file, modify the properties according to the name and location of the custom Dashboard.
7. In the B2B Data Exchange server, replace the value of the dx.dashboard.url system property with the value of the URL for the custom dashboard in the following format: http://<host>:<port>/<custom_dashboard>
Creating a Report in the Custom DashboardAfter you set up the custom Dashboard in Logi Info Studio, you create and configure a report to use in a custom Dashboard panel. You can copy an existing report and modify it as needed.
1. In Logi Info Studio, create a report definition.
2. Select the report filters that you want to provide to the users.
3. Define the SQL parameters for the SQL query to run in the operational data store. You must define the name and type of each parameter.
Adding a Dashboard Panel to the Custom DashboardAfter you create a report in Logi Info Studio, you add the custom Dashboard panel and its elements to the main Dashboard report file.
1. In Logi Info Studio, open the custom Dashboard report file.
2. In the dxdashboard element, add a new Panel element with a caption and a unique identifier.
3. In the Panel element, add a Panel Content element.
4. In the Panel Content element, add a SubReport element with a unique identifier and set the property Frame Border to false.
5. In the SubReport element, add a Target.Report element with a unique identifier and enter the name of the new report in the Report Definition File property.
6. Copy the Link Parameters element from an existing SubReport element to the new SubReport element.
7. Save the dxdashboard report file.
Customizing the Dashboard in Logi Info Studio 57

Deploying and Testing the Custom Dashboard in B2B Data Exchange
After you modify or create a custom Dashboard in Logi Info Studio, you copy the custom Dashboard application folder contents to B2B Data Exchange. You then test that the custom Dashboard appears correctly.
1. Copy the entire custom Dashboard application folder to the following location: <DXInstallationDir>\DataExchangeDataIntegrationHub\tomcat\webapps.
2. Back up the _Setting.lgx file and modify the following settings:
• Delete the value of the Redirect Error URL property to allow access to the LogiXML error report.
• Set the value of the Debugger Style property to DebuggerLinks to add links to the LogiXML progress report. The Dashboard panel layout may display differently.
3. Log on to the Operation Console and test that the new Dashboard panels open and populate correctly.
4. After you test the custom Dashboard, restore the properties in the _Setting.lgx file.
58 Chapter 4: Dashboard and Reports
C h a p t e r 5
Creating Workflows for Event Reconciliation
This chapter includes the following topics:
• Overview of Event Reconciliation, 59
• Initiating and Completing an Event Reconciliation, 60
• Reconciliation Status, 61
Overview of Event ReconciliationReconciliation is the process of correlating an event with another event. For example, you send a document file to a partner containing transactions such as payments or orders that require acknowledgment. When you send the file to the partner, you initiate a reconciliation. When you receive an acknowledgment from the partner, you complete the reconciliation. B2B Data Exchange uses a correlation ID to identify each reconciliation.
One document can require multiple acknowledgments. For example, you send a partner an EDI document containing 10 purchase orders. Depending on the business requirements, you can require one acknowledgment for 10 purchase orders, or one acknowledgment for each of the 10 purchase orders. If you require one acknowledgment, you initiate one reconciliation. If you require 10 acknowledgments, you must initiate 10 reconciliations.
Use PowerCenter workflows to reconcile events. Event reconciliation typically involves two workflows. One workflow processes the event that requires reconciliation and initiates the reconciliation. The second workflow processes the acknowledgment received from the partner and completes the reconciliation. The reconciliation process uses the correlation ID to associate a document with the acknowledgment.
The reconciliation process involves the following steps:
1. B2B Data Exchange receives a document file that requires an acknowledgment and sends it to PowerCenter for processing.
2. The workflow designed to process the document initiates a reconciliation.
If the document requires multiple acknowledgments, the workflow initiates multiple reconciliations.
3. B2B Data Exchange sets the status for each reconciliation and sets the reconciliation status for the associated event.
4. B2B Data Exchange receives an acknowledgment document and sends it to PowerCenter for processing.
59
5. The workflow designed to process the acknowledgment determines if the document completes a reconciliation.
6. B2B Data Exchange updates the reconciliation status.
Initiating and Completing an Event ReconciliationYou can use the following transformations to initiate and complete reconciliations in PowerCenter:
• DX_Initiate_Correlation. Initiates a reconciliation for an event. When you create the workflow to process a document that requires reconciliation, use this transformation to initiate the reconciliation.
• DX_Complete_Correlation. Completes the reconciliation for an event. In the workflow to process the acknowledgment document, use this transformation to complete the reconciliation. This transformation requires the correlation ID defined by the workflow that initiates the reconciliation.
The B2B Data Exchange API also provides methods to initiate and complete a reconciliation. In the workflow to process a document that requires an acknowledgment, call the initiateCorrelation method to initiate a reconciliation. In the workflow to process the acknowledgment document, call the completeCorrelation method to complete the reconciliation.
You must set a time limit within which the acknowledgment must be received. The Data Exchange Server sets the reconciliation status to indicate whether the acknowledgment was processed within the time limit.
You can create a reconciliation monitor for the Data Exchange Server to set the status and to notify you when a reconciliation does not complete or completes after the time limit. For more information, see B2B Data Exchange Operator Guide.
Initiating an Event ReconciliationIn the workflow to process a document that requires an acknowledgement, include the DX_Initiate_Correlation transformation to initiate a reconciliation. The DX_Initiate_Correlation transformation associates the reconciliation with an event ID and generates a correlation ID. It also sets the timeout window for the reconciliation to complete. For more information, see “DX_Initiate_Correlation Transformation” on page 35.
You can also call the initiateCorrelation method of the B2B Data Exchange API to initiate the reconciliation. The following example code shows how to call the initiateCorrelation method:
String openingEventId = this.eventid;String correlationId = doc.senderid + doc.receiverid + doc.transaction[i].id;String correlationType = “997”;long timeWindowSeconds = 60*10; // 10 minutesserver.initiateCorrelation (openingEventId, correlationId, correlationType, timeWindowSeconds);
Completing an Event ReconciliationIn the workflow that processes an acknowledgment document, include the DX_Complete_Correlation transformation to complete a reconciliation. The DX_Complete_Correlation transformation correlates the acknowledgment with the original document based on the correlation ID and completes the reconciliation. For more information, see “DX_Complete_Correlation Transformation” on page 27.
60 Chapter 5: Creating Workflows for Event Reconciliation
You can also call the completeCorrelation method of the B2B Data Exchange API to complete the reconciliation. The following example code shows how to call the completeCorrelation method:
String closingEventId = this.eventid;String correlationId = doc.receiverid + doc.senderid + doc.acknowledgment[i].transactionid;String openingEventId = server.completeCorrelation (closingEventId, correlationId);
Reconciliation StatusA reconciliation can have one of the following statuses:
• Pending reconciliation. No acknowledgment is received for a document and the timeout limit is not reached. When you initiate a reconciliation, the Data Exchange Server sets the reconciliation status to Pending reconciliation. When you change the timeout interval, the Data Exchange Server can reset the reconciliation status to Pending reconciliation.
• Timed out. Time limit for acknowledgment is reached and no acknowledgment is processed for the document.
• Reconciled after timeout. An acknowledgment for the document is processed after the time limit. When you complete a reconciliation after the time limit, the Data Exchange Server sets the reconciliation status to Reconciled after timeout.
• Reconciliation complete. An acknowledgment for the document is processed within the time limit. When you complete a reconciliation, the Data Exchange Server sets the reconciliation status to reconciliation complete. You can also manually set the reconciliation status to Reconciliation Complete on the Operation Console.
Reconciliation Status 61
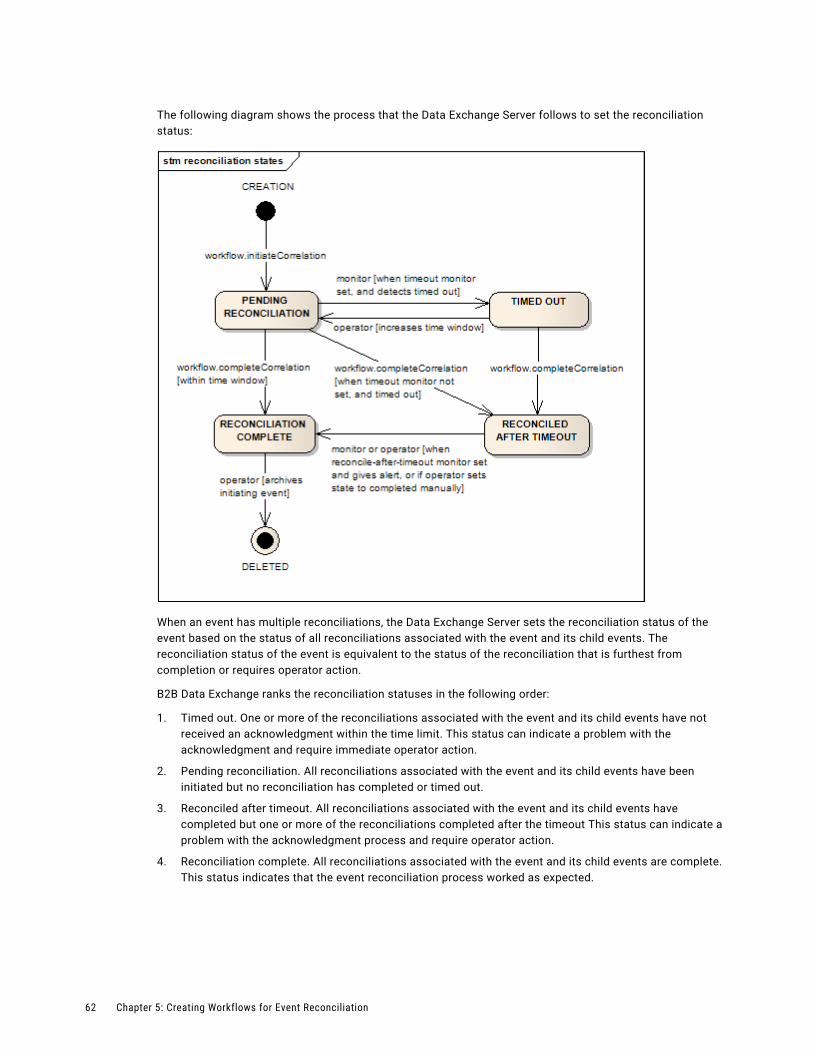
The following diagram shows the process that the Data Exchange Server follows to set the reconciliation status:
When an event has multiple reconciliations, the Data Exchange Server sets the reconciliation status of the event based on the status of all reconciliations associated with the event and its child events. The reconciliation status of the event is equivalent to the status of the reconciliation that is furthest from completion or requires operator action.
B2B Data Exchange ranks the reconciliation statuses in the following order:
1. Timed out. One or more of the reconciliations associated with the event and its child events have not received an acknowledgment within the time limit. This status can indicate a problem with the acknowledgment and require immediate operator action.
2. Pending reconciliation. All reconciliations associated with the event and its child events have been initiated but no reconciliation has completed or timed out.
3. Reconciled after timeout. All reconciliations associated with the event and its child events have completed but one or more of the reconciliations completed after the timeout This status can indicate a problem with the acknowledgment process and require operator action.
4. Reconciliation complete. All reconciliations associated with the event and its child events are complete. This status indicates that the event reconciliation process worked as expected.
62 Chapter 5: Creating Workflows for Event Reconciliation
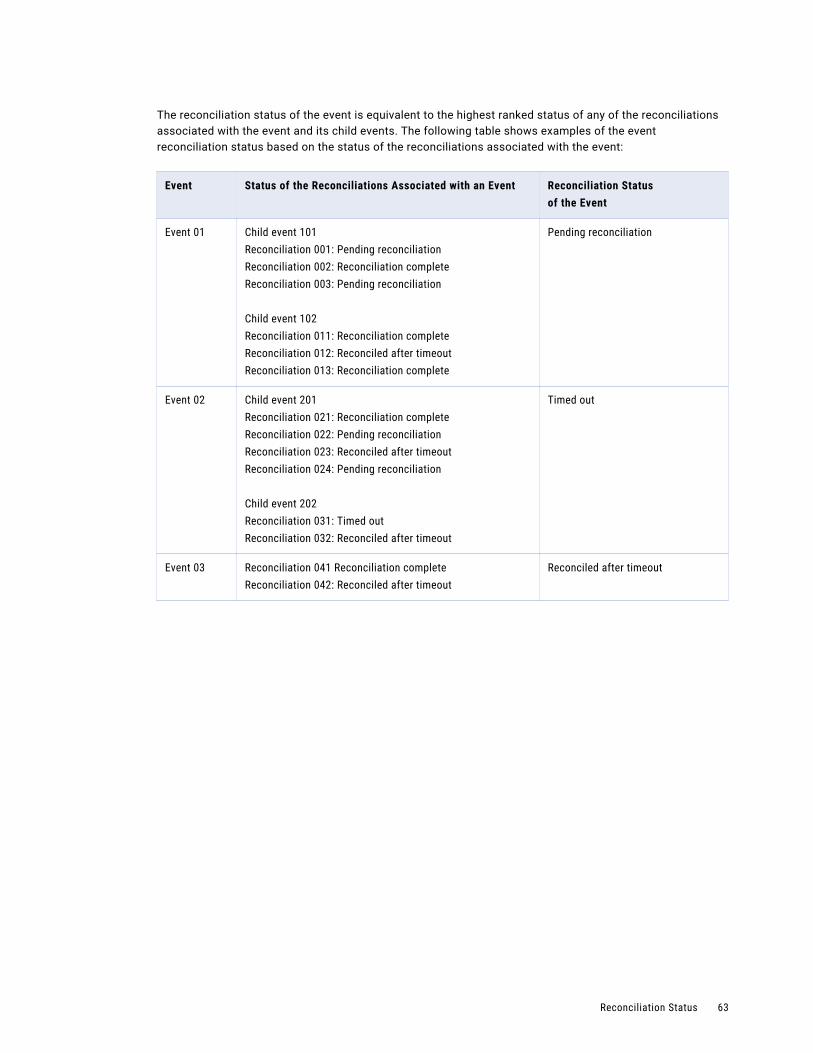
The reconciliation status of the event is equivalent to the highest ranked status of any of the reconciliations associated with the event and its child events. The following table shows examples of the event reconciliation status based on the status of the reconciliations associated with the event:
Event Status of the Reconciliations Associated with an Event Reconciliation Statusof the Event
Event 01 Child event 101Reconciliation 001: Pending reconciliationReconciliation 002: Reconciliation completeReconciliation 003: Pending reconciliation
Child event 102Reconciliation 011: Reconciliation completeReconciliation 012: Reconciled after timeoutReconciliation 013: Reconciliation complete
Pending reconciliation
Event 02 Child event 201Reconciliation 021: Reconciliation completeReconciliation 022: Pending reconciliationReconciliation 023: Reconciled after timeoutReconciliation 024: Pending reconciliation
Child event 202Reconciliation 031: Timed outReconciliation 032: Reconciled after timeout
Timed out
Event 03 Reconciliation 041 Reconciliation completeReconciliation 042: Reconciled after timeout
Reconciled after timeout
Reconciliation Status 63
C h a p t e r 6
Forms DesignerThis chapter includes the following topics:
• Forms Designer Overview, 64
• Forms Designer User Interface, 64
• Element Properties, 66
• Group Properties, 67
• Customizing B2B Data Exchange Workflow Parameters, 67
Forms Designer OverviewThe Forms Designer is a tool that developers and administrators can use to customize user interface and field behavior on Operations Console pages with a dynamic interface. You can use the Forms Designer to customize pages that display workflow parameters, partner attributes, and account attributes.
In the Forms Designer, you use the Designer tab to customize behavior and appearance of fields. For example, you can arrange large lists of workflow parameters in tabs or create dependencies between fields so that a specific parameter only appears if another parameter has a value. You can also mark fields as mandatory or read-only and determine the field type. For example, you can define a field as a text field or a number field. You can preview the customized layout on the Preview tab.
When you customize partner attributes, account attributes, or workflow parameters, you can import values from external lists with the B2B Data Exchange Forms Designer Java API. Use the API methods to configure the external list and set the default value for the list if needed. Each time you populate the list, the API overrides the values in the existing list. Therefore, if you manually modify any list value, the API deletes the value.
Forms Designer User InterfaceThe Designer tab displays the elements to customize, such as workflow parameters, partner attributes, or account attributes. You can use the Actions menu to add groups, such as tabs, columns, headers, or disclosures. You can also drag and drop elements to group and nest the fields in up to four levels.
The Designer tab displays information about the elements, such as label and type. The information appears in read-only mode.
64
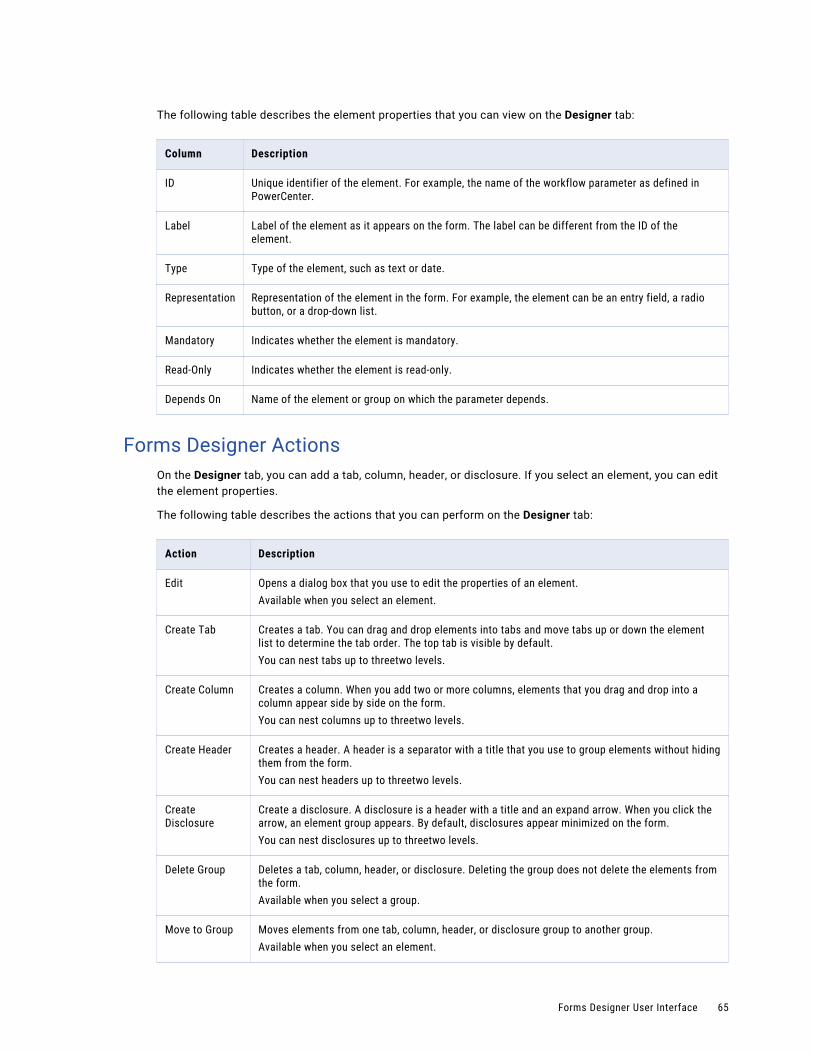
The following table describes the element properties that you can view on the Designer tab:
Column Description
ID Unique identifier of the element. For example, the name of the workflow parameter as defined in PowerCenter.
Label Label of the element as it appears on the form. The label can be different from the ID of the element.
Type Type of the element, such as text or date.
Representation Representation of the element in the form. For example, the element can be an entry field, a radio button, or a drop-down list.
Mandatory Indicates whether the element is mandatory.
Read-Only Indicates whether the element is read-only.
Depends On Name of the element or group on which the parameter depends.
Forms Designer ActionsOn the Designer tab, you can add a tab, column, header, or disclosure. If you select an element, you can edit the element properties.
The following table describes the actions that you can perform on the Designer tab:
Action Description
Edit Opens a dialog box that you use to edit the properties of an element.Available when you select an element.
Create Tab Creates a tab. You can drag and drop elements into tabs and move tabs up or down the element list to determine the tab order. The top tab is visible by default.You can nest tabs up to threetwo levels.
Create Column Creates a column. When you add two or more columns, elements that you drag and drop into a column appear side by side on the form.You can nest columns up to threetwo levels.
Create Header Creates a header. A header is a separator with a title that you use to group elements without hiding them from the form.You can nest headers up to threetwo levels.
Create Disclosure
Create a disclosure. A disclosure is a header with a title and an expand arrow. When you click the arrow, an element group appears. By default, disclosures appear minimized on the form.You can nest disclosures up to threetwo levels.
Delete Group Deletes a tab, column, header, or disclosure. Deleting the group does not delete the elements from the form.Available when you select a group.
Move to Group Moves elements from one tab, column, header, or disclosure group to another group.Available when you select an element.
Forms Designer User Interface 65
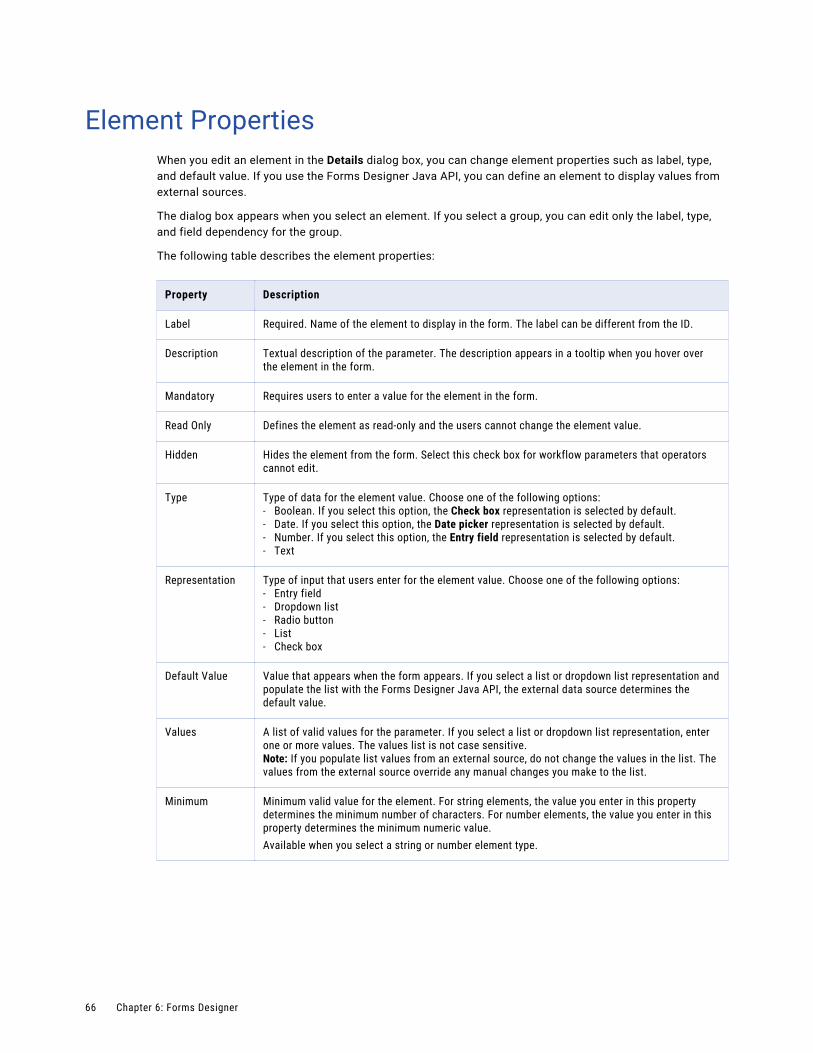
Element PropertiesWhen you edit an element in the Details dialog box, you can change element properties such as label, type, and default value. If you use the Forms Designer Java API, you can define an element to display values from external sources.
The dialog box appears when you select an element. If you select a group, you can edit only the label, type, and field dependency for the group.
The following table describes the element properties:
Property Description
Label Required. Name of the element to display in the form. The label can be different from the ID.
Description Textual description of the parameter. The description appears in a tooltip when you hover over the element in the form.
Mandatory Requires users to enter a value for the element in the form.
Read Only Defines the element as read-only and the users cannot change the element value.
Hidden Hides the element from the form. Select this check box for workflow parameters that operators cannot edit.
Type Type of data for the element value. Choose one of the following options:- Boolean. If you select this option, the Check box representation is selected by default.- Date. If you select this option, the Date picker representation is selected by default.- Number. If you select this option, the Entry field representation is selected by default.- Text
Representation Type of input that users enter for the element value. Choose one of the following options:- Entry field- Dropdown list- Radio button- List- Check box
Default Value Value that appears when the form appears. If you select a list or dropdown list representation and populate the list with the Forms Designer Java API, the external data source determines the default value.
Values A list of valid values for the parameter. If you select a list or dropdown list representation, enter one or more values. The values list is not case sensitive.Note: If you populate list values from an external source, do not change the values in the list. The values from the external source override any manual changes you make to the list.
Minimum Minimum valid value for the element. For string elements, the value you enter in this property determines the minimum number of characters. For number elements, the value you enter in this property determines the minimum numeric value.Available when you select a string or number element type.
66 Chapter 6: Forms Designer
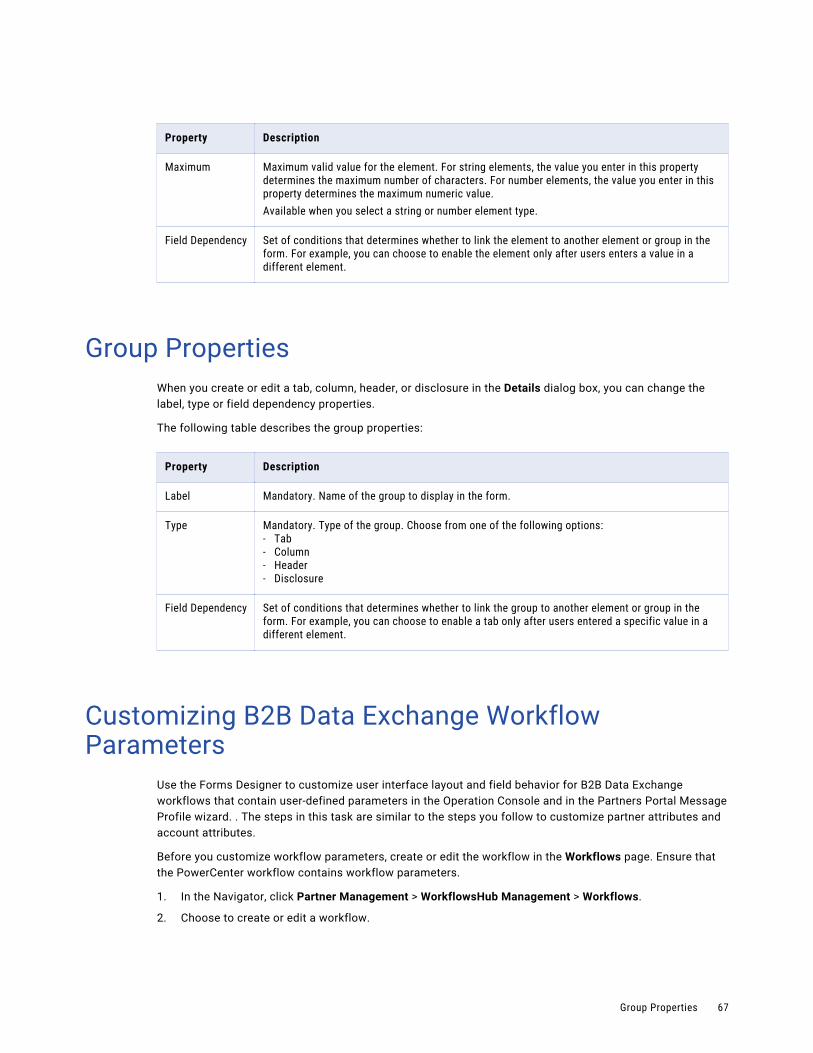
Property Description
Maximum Maximum valid value for the element. For string elements, the value you enter in this property determines the maximum number of characters. For number elements, the value you enter in this property determines the maximum numeric value.Available when you select a string or number element type.
Field Dependency Set of conditions that determines whether to link the element to another element or group in the form. For example, you can choose to enable the element only after users enters a value in a different element.
Group PropertiesWhen you create or edit a tab, column, header, or disclosure in the Details dialog box, you can change the label, type or field dependency properties.
The following table describes the group properties:
Property Description
Label Mandatory. Name of the group to display in the form.
Type Mandatory. Type of the group. Choose from one of the following options:- Tab- Column- Header- Disclosure
Field Dependency Set of conditions that determines whether to link the group to another element or group in the form. For example, you can choose to enable a tab only after users entered a specific value in a different element.
Customizing B2B Data Exchange Workflow Parameters
Use the Forms Designer to customize user interface layout and field behavior for B2B Data Exchange workflows that contain user-defined parameters in the Operation Console and in the Partners Portal Message Profile wizard. . The steps in this task are similar to the steps you follow to customize partner attributes and account attributes.
Before you customize workflow parameters, create or edit the workflow in the Workflows page. Ensure that the PowerCenter workflow contains workflow parameters.
1. In the Navigator, click Partner Management > WorkflowsHub Management > Workflows.
2. Choose to create or edit a workflow.
Group Properties 67
• To create a workflow, click New Workflow. For details, see “B2B Data Exchange Workflow Properties” on page 48“B2B Data Exchange Workflow Properties” on page 47.
• To edit a workflow, click Edit next to the workflow that you want to edit.
3. Click the Workflow Parameters tab.
If the PowerCenter workflow or the Big Data Management mapping that is associated with the B2B Data Exchange workflow contains user-defined parameters, theThe Preview pane displays the default view of the workflow parameter list. The Portal Parameters tab displays the list of workflow parameters that are shown and can be edited in the Message Profile wizard in the Partners Portal.
Note: The name of the Portal Parameters tab is configurable, and the tab might have another name.
4. Click Designer.
The Designer pane displays the parameter list in alphabetic order.
5. To arrange the parameters and groups, drag the element or group you want to arrange.
To create a list of workflow parameters to display for message profiles in the Partners Portal, drag the element or group you want to arrange under the Portal Parameters tab.
6. To change the behavior and appearance of a parameter element, click the parameter and click Actions > Edit.
The Details dialog box appears.
7. Change the properties for the parameter and click Save.
Note: The Label property is a required property.
8. To add a group, click the Actions menu and choose to add a tab, column, header, or disclosure.
9. To preview the customized form, click Preview and verify the appearance of the form and any field dependencies you defined.
10. Click Save to save the workflow.
The customized form appears when you create or edit a profilecustom publication or subscription and associate the workflow with the profilechoose the mapping for the publication or subscription..
68 Chapter 6: Forms Designer
C h a p t e r 7
Configuring Email for Monitor Notification
This chapter includes the following topics:
• Overview of Email for Monitor Notification, 69
• The Built-in Email Notification Message Format, 69
• Configuring the Email Notifications, 70
Overview of Email for Monitor NotificationB2B Data Exchange generates events as it processes documents. Managing objects in the Operation Console also creates events, called logging events.
Operators can track events by using event monitors. An event monitor can be created to track events for different profiles or to track different types of events. The creator of an event monitor can specify email notification when the monitor detects an event. For more information about event monitors, see the B2B Data Exchange Operator Guide.
B2B Data Exchange provides a built-in email notification message format. The developer can modify this format by setting certain system and event properties. The user can provide his own email message format.
The Built-in Email Notification Message FormatThe built-in format of the email notification message that monitors send contains the following information:
• General information. The message includes details such as the monitor that sent the message, partner and account details, and a link to the event. If you are logged on to the B2B Data Exchange console, clicking on the link displays event details.
• Log details. The message includes a list of all log entries for this event, including document attachments.
• Reconciliation details. Acknowledgment details received from the partner for this event.
69

You can use the built-in email format for event notifications, or you can customize it.
Configuring the Email NotificationsYou can use system properties and event properties to customize the email properties.
You can completely customize the body of the email message.
Configuring Email Notifications Using System PropertiesUse the dx_email_from_field system property to customize the email notification that monitors send.
For more information, see the B2B Data Exchange Administrator Guide.
Configuring Email Notifications Using Event PropertiesThe following table defines the event properties that you can use to modify built-in email notification messages. Use the DX_EVENT_ATTRIBUTE transformation to set the attributes for an event.
Event Property Description
dx_email_bcc_field A semicolon-separated list of recipient email addresses. These recipients are added to the addressees defined in the monitor.
dx_email_body_file The path to the file containing the custom body of the email. This file replaces the text of the body of the built-in email.
dx_email_body_field A character string that is used to replace the body text of the built-in email. Maximum length is 255 characters.
dx_email_from_field This string becomes the "from field" of the email.
70 Chapter 7: Configuring Email for Monitor Notification
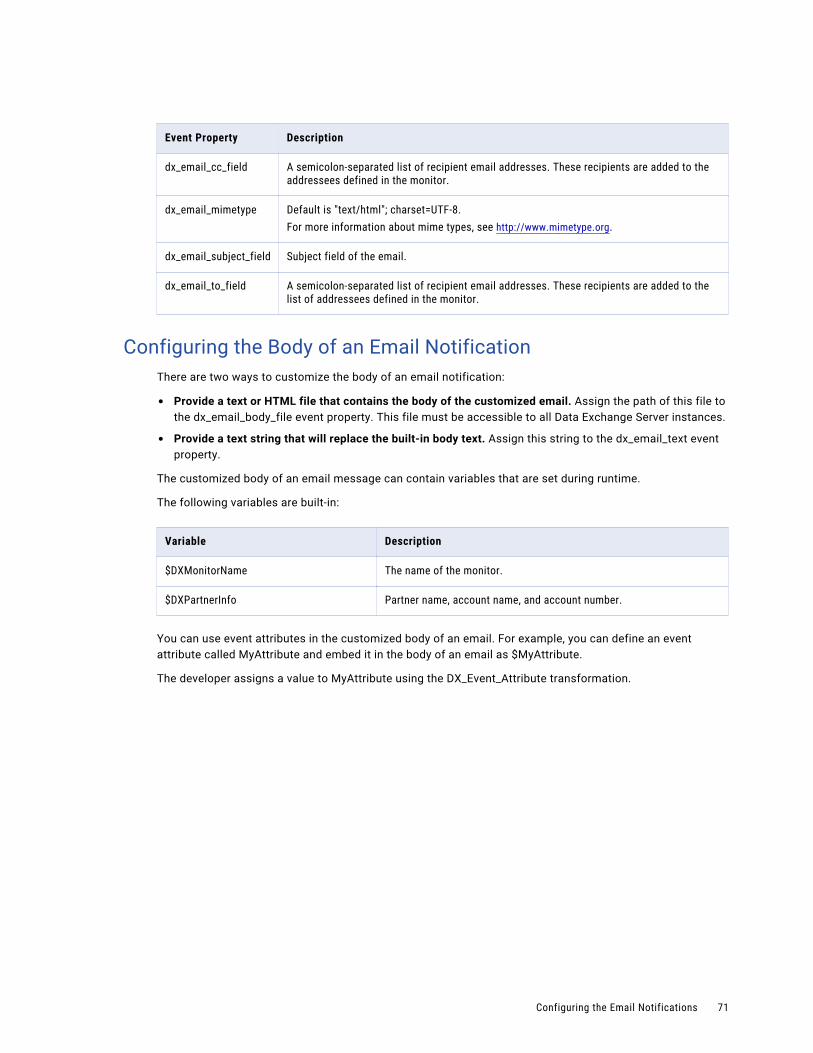
Event Property Description
dx_email_cc_field A semicolon-separated list of recipient email addresses. These recipients are added to the addressees defined in the monitor.
dx_email_mimetype Default is "text/html"; charset=UTF-8.For more information about mime types, see http://www.mimetype.org.
dx_email_subject_field Subject field of the email.
dx_email_to_field A semicolon-separated list of recipient email addresses. These recipients are added to the list of addressees defined in the monitor.
Configuring the Body of an Email NotificationThere are two ways to customize the body of an email notification:
• Provide a text or HTML file that contains the body of the customized email. Assign the path of this file to the dx_email_body_file event property. This file must be accessible to all Data Exchange Server instances.
• Provide a text string that will replace the built-in body text. Assign this string to the dx_email_text event property.
The customized body of an email message can contain variables that are set during runtime.
The following variables are built-in:
Variable Description
$DXMonitorName The name of the monitor.
$DXPartnerInfo Partner name, account name, and account number.
You can use event attributes in the customized body of an email. For example, you can define an event attribute called MyAttribute and embed it in the body of an email as $MyAttribute.
The developer assigns a value to MyAttribute using the DX_Event_Attribute transformation.
Configuring the Email Notifications 71

C h a p t e r 8
Dashboard and ReportsThis chapter includes the following topics:
• Dashboard and Reports Overview, 72
• Key Performance Indicators, 73
• Dashboard and Reports Structure in Logi Info Studio, 74
• Customizing the Dashboard in Logi Info Studio, 78
Dashboard and Reports OverviewThe Dashboard is a collection of panels that contain reports about information that B2B Data Exchange processes. Use the Dashboard to view personalized visual summary information about B2B Data Exchange event and document processing, such as the number of events for certain partners or the error rate for specific accounts.
Most of the reports in the Dashboard are based on key performance indicators (KPIs) that B2B Data Exchange retrieves from the operational data store, such as events, errors, transactions, and values. The operational data store is a repository that contains aggregated information solely for reporting purposes. The Dashboard retrieves the aggregated events from the operational data store and displays the information in the panels. In addition to the default KPIs, you can select event attributes in the Operation Console to load to the operational data store as custom KPIs.
You use Logi Info Studio to create custom reports based on default KPIs or custom KPIs. In Logi Info Studio, you set up the custom Dashboard and create custom Dashboard panels that include KPIs based on the information that you want to display. You deploy the custom Dashboard in B2B Data Exchange and modify the connection properties to retrieve the custom Dashboard panels that you created.
Note: For general information about working with Logi Info Studio, see the LogiXML documentation at http://devnet.logixml.com/rdPage.aspx?rdReport=DocsListingInfo.
The software available for download at the referenced links belongs to a third party or third parties, not Informatica LLC. The download links are subject to the possibility of errors, omissions or change. Informatica assumes no responsibility for such links and/or such software, disclaims all warranties, either express or implied, including but not limited to, implied warranties of merchantability, fitness for a particular purpose, title and non-infringement, and disclaims all liability relating thereto.
The B2B Data Exchange administrator installs the operational data store with the main B2B Data Exchange installation and modifies B2B Data Exchange system properties to determine certain aspects of the Dashboard behavior, such as whether to show the Dashboard when users log on to the Operation Console and the error rate range in the Error Rate Gauge panel. Operators can personalize the Dashboard page to display different panels and apply filters based on the information that the operators want to view.
72
After the B2B Data Exchange administrator installs the Dashboard and Reports component, they use PowerCenter Workflow Manager to configure the operational data store event loader. The operational data store event loader is a PowerCenter workflow that collects KPIs from the B2B Data Exchange repository according to specified parameters and loads aggregated events to the operational data store. In the operational data store event loader, the B2B Data Exchange administrator defines parameters such as the number of retry attempts for each event load process in case of failure or the number of minutes to wait between event load processes.
Key Performance IndicatorsUse key performance indicators (KPIs) to collect information about events that B2B Data Exchange generates. The operational data store event loader collects KPIs from the main B2B Data Exchange repository and transfers aggregated KPIs to the Dashboard.
The Dashboard displays most of the reports based on default KPIs that B2B Data Exchange retrieves from the operational data store. In addition to the default KPIs, you can select event attributes to load to the operational data store as custom KPIs. You use Logi Info Studio to create custom Dashboard panels based on the custom KPIs that you select. Use numeric event attributes in custom Dashboard panels.
In addition to reports from the operational data store, B2B Data Exchange retrieves unresolved error event information directly from the runtime B2B Data Exchange. To maintain performance, do not customize the unresolved error event panels or create custom Dashboard panels based on event information from the run-time B2B Data Exchange repository.
If you track service level agreement (SLA) requirements, you can create rules based on default KPIs or custom KPIs and view violations in the SLA Violations panel of the Dashboard.
Default KPIsThe operational data store uses default KPIs in reports. The operational data store event loader collects the KPIs and loads the KPIs to the operational data store.
Operation Console users can view the aggregated event information as reports in the Dashboard panels. You can create custom Dashboard panels in Logi Info Studio based on the default KPIs. When you create custom Dashboard panels, you can apply measurements on the default KPIs, such as sum, count, minimum, maximum, and average.
The following table describes the default KPIs that the Dashboard displays:
KPI Description
Message processing time Duration in minutes of the time it takes for the event to initially reach a final state.
Number of events Number of events that B2B Data Exchange processes.
Number of error events Number of error events that reached a final state.
Key Performance Indicators 73

Dashboard and Reports Structure in Logi Info StudioThe Dashboard displays event information based on aggregated data that it retrieves from the operational data store. Use Logi Info Studio to view the default Dashboard panels and create custom Dashboard panels based on default KPIs and custom KPIs that you retrieve from the operational data store.
The default Dashboard in Logi Info Studio includes the following global elements:
• Filters that the Dashboard can apply to each report.
• Theme modifier that controls the appearance of the Dashboard panels.
• SQL constants for common queries to run in the operational data store.
• JavaScript support files that B2B Data Exchange uses to process reports and display Dashboard panels.
Default Dashboard FiltersThe Dashboard uses filters for each report that you generate in Logi Info Studio. The filters correspond the global filters in the Dahsboard page of the Operation Console.
The following table describes the default Dashboard filters:
Filter Description
@Request.idBegin~ Start date of the date/time filter, in the format yyyy-mm-dd.
@Request.itBegin~ Start time of the date/time filter, in the format hh:mm.
@Request.idEnd~ End date of the date/time filter, in the format yyyy-mm-dd.
@Request.itEnd~ End time of the date/time filter, in the format hh:mm.
@Request.iPartnerId~ Partner database identifier for the selected partner.
@Request.iAccountId~ Account database identifier of the selected account.
@Request.eventTypeId~ Event type database identifier of the selected event type.
@Request.eventStatusId~ Event status database identifier of the selected event status.
Default Dashboard SQL ConstantsEach report in the default Dashboard uses SQL constants for common queries to the operational data store and query parameters. You can reuse these SQL constants when you create custom Dashboard panels based on KPIs that you load to the operational data store.
Note: For the SQL server, use the same constants with the addition of the suffix _SQLSERVER. For example, DX_ODS_FILTER_ACCOUNT would be DX_ODS_FILTER_ACCOUNT_SQLSERVER.
Note: You cannot create reports in Logi Info Studio with SQL queries to the run-time B2B Data Exchange repository.
74 Chapter 8: Dashboard and Reports

The following table describes the default Dashboard SQL constants:
SQL Constant Name Description
DX_ODS_FILTER_ACCOUNT Filters the database rows according to the related account.Includes the following query parameters:- requestAccountId
DX_ODS_FILTER_ERROR_STATE Filters the database rows to display only error events.
DX_ODS_FILTER_EVENT_STATUS Filters the database rows according to the event status.Includes the following query parameters:- requestEventStatusId
DX_ODS_FILTER_EVENT_STATUS_STATE Filters the database rows according to the event state. The following values are available:- 1. Show error events with a final state.- 2. Show non-error events with a final state.- -1. Show all events with a final state.Includes the following query parameters:- requestEventStatusState
DX_ODS_FILTER_EVENT_TYPE Filters the database rows according to the event type.Includes the following query parameters:- requestEventTypeId
DX_ODS_FILTER_PARTNER Filters the database rows according to the related partner.Includes the following query parameters:- requestPartnerId
DX_ODS_FILTER_TIME_ORACLE Filters the database rows according to a selected time frame.Includes the following query parameters:- requestDateBegin- requestTimeBegin- requestDateEnd- requestTimeEnd
DX_ODS_USER_RESTRICTION_BY_ACCESS_ID Filters the database rows according to the related user access identifier.Note: To maximize user access control, use DX_ODS_USER_RESTRICTION_BY_ACCESS_ID, DX_ODS_USER_RESTRICTION_BY_EVENT_TYPE, and DX_ODS_USER_RESTRICTION_BY_PARTNER in your custom Dashboard panels.Includes the following query parameters:- requestUserId
Dashboard and Reports Structure in Logi Info Studio 75
SQL Constant Name Description
DX_ODS_USER_RESTRICTION_BY_EVENT_TYPE Filters the database rows to display only event types for which the user has viewing privileges.Note: To maximize user access control, use DX_ODS_USER_RESTRICTION_BY_ACCESS_ID, DX_ODS_USER_RESTRICTION_BY_EVENT_TYPE, and DX_ODS_USER_RESTRICTION_BY_PARTNER in your custom Dashboard panels.Includes the following query parameters:- requestUserId
DX_ODS_USER_RESTRICTION_BY_PARTNER Filters the database rows to display only related partners for which the user has viewing privileges.Note: To maximize user access control, use DX_ODS_USER_RESTRICTION_BY_ACCESS_ID, DX_ODS_USER_RESTRICTION_BY_EVENT_TYPE, and DX_ODS_USER_RESTRICTION_BY_PARTNER in your custom Dashboard panels.Includes the following query parameters:- requestUserId
Default Dashboard JavaScript Support FilesB2B Data Exchange uses JavaScript files and jQuery files to process event information when you view the Dashboard in the Operation Console.
The files are located in the following location:
<DXInstallationDir>\DataExchangeDataIntegrationHub\tomcat\webapps\dx-dashboard\_SupportFiles
The following table describes the JavaScript files and jQuery files that the default Dashboard uses:
File Description
dx.js Functions that the B2B Data Exchange server uses when it processes reports with the LogiXML engine.
dxbrowser.js Functions that the browser client uses when you view the Dashboard in the Operation Console.
jquery-*.* Collection of jQuery files that enable dynamically-populating drop down lists in the global filter section, such as partner or account.
Default Dashboard Theme ModifierThe theme modifier controls the appearance of the Dashboard panels. B2B Data Exchange applies the style and appearance settings in the theme modifier to any custom Dashboard panel that you create.
The theme modifier files are located in the following location:
<DXInstallationDir>\DataExchangeDataIntegrationHub\tomcat\webapps\dx-dashboard\_Themes\DXDashboard\Informatica
76 Chapter 8: Dashboard and Reports

The following table describes the theme modifier components for the default dashboard:
File Description
Theme.css Cascading style sheet that determines the graphical and textual formatting of the Dashboard panels.
ThemeModifier.xml Global settings for the Dashboard panels behavior and the single sign-on mechanism that B2B Data Exchange uses when you log on to the Operation Console.
Custom Dashboard Properties in the LogiXML Settings FileYou modify certain properties in the LogiXML _Settings.lgx file when you create a custom Dashboard for B2B Data Exchange.
The following table describes the properties to modify:
Property Description
DX_CONSOLE_URL Location of the Operation Console, in the following format:
http://<DX host>:<DX port>/DX-console
DASHBOARD_SAVEFOLDER Location to store the personalized layout settings for each Dashboard user.Default is: @Function.AppPhysicalPath~\dx\saved_dashboards
DX_ODS_ORACLE_CONNECTION Connection string for the operational data store.
DX_ORACLE_CONNECTION Connection string for the main B2B Data Exchange repository.
LogonFailPage URL to display after the user logs out of the Operation Console.The default URL is the B2B Data Exchange Logout page: http://<DX host>:<DX port>/DX-console/logout.jsp
AuthenticationClientAddresses IP addresses for servers that can request authentication tokens from the LogiXML server, separated by semicolons. For each server, set IP4 and IP6 addresses.
caption Description of the custom Dashboard.
COOKIE_PATH Path to the cookie file for the custom Dashboard. Must match the value in the Cookie Path property.
WEBAPP_NAME Name of the folder which contains the custom Dashboard.Default is: dxdashboard
Redirect Error URL Link for the page to display if the Dashboard encounters an error.
Dashboard and Reports Structure in Logi Info Studio 77

Customizing the Dashboard in Logi Info StudioUse Logi Info Studio to create custom Dashboard panels based on default KPIs or custom KPIs.
In Logi Info Studio, you create a report and add SQL queries that retrieve numeric event attributes from the operational data store. You then configure a Dashboard panel to display the custom report and deploy the custom Dashboard in B2B Data Exchange.
You cannot create custom Dashboard panels based on the following reports:
• Unresolved Error Events by Partner (eventsbypartnerErrorRepository.lgx)
• Unresolved Error Events by Account (eventsbyaccountErrorRepository.lgx)
• Unresolved Error Events by Event Type (eventsbyeventstatusErrorRepository.lgx)
• Unresolved Error Events by Event Status (eventsbyeventstatusErrorRepository.lgx)
• Tasks (dxtasks.lgx)
When you create custom reports in Logi Info Studio, you can copy the SQL constants from the default Dashboard and modify them based on the KPIs that you want to display in the Dashboard panels.
You can use the SQL constants with the LogiXML constant token. When Logi Info Studio processes the custom reports, the constant token expands the SQL constants. For example, you use the following SQL query:
select facts.ACCOUNT_ID, sum(EVENT_COUNT) as SUM_COUNT from DX_ODS_EVENT_FACTS facts where @Constant.DX_ODS_FILTER_TIME_ORACLE~
The LogiXML constant token expands the SQL query to the following SQL query:
select facts.ACCOUNT_ID, sum(EVENT_COUNT) as SUM_COUNT from DX_ODS_EVENT_FACTS facts where to_timestamp(:requestDateBegin || :requestTimeBegin,'YYYY-MM-DD HH24:MI:SS') <= facts.TIMESLICE and facts.TIMESLICE <= to_timestamp(:requestDateEnd || :requestTimeEnd,'YYYY-MM-DD HH24:MI:SS')
If you create new parameters for your custom report, you must specify a unique name for each parameter. Otherwise, the Dashboard overrides the existing parameters with the same name or processes the parameter values incorrectly. If you create data layer links, you must specify a unique name for each data layer link in all of the reports. Otherwise, the Dashboard may display incorrect data in the Dashboard panel that you create, such as the wrong date or status.
Installing and Registering Logi Info StudioYou install Logi Info Studio to enhance and create Dashboard panels for B2B Data Exchange.
Before you install Logi Info Studio, verify that the B2B Data Exchange Dashboard and Reports component is installed on the B2B Data Exchange machine and that your system meets the minimum requirements for Logi Info Studio. For more information about the system requirements for Logi Info Studio, see the LogiXML documentation at http://devnet.logixml.com/rdPage.aspx?rdReport=DocsListingInfo.
1. In the Logi Info Studio installer, choose a custom installation and select to install only the Studio component.
2. Contact Informatica shipping to receive the Logi Info Studio license file.
3. Copy the Logi Info Studio license file to the following folder: <LogiXMLInstallationDir>\LogiStudio
78 Chapter 8: Dashboard and Reports
Setting Up the Custom Dashboard ApplicationYou create the custom Dashboard as an application in Logi Info Studio and import the default Dashboard files to Logi Info Studio.
1. In Logi Info Studio, create a Java application.
2. In the Prepare New Application wizard, configure the name and location for the Dashboard application:
• In the application name, enter the name for the custom Dashboard.
• In the deployment folder location, enter the following path:
<DXInstallationDir>\DataExchangeDataIntegrationHub\tomcat\webapps3. Skip the remaining Prepare a New Application wizard screens.
4. Copy the contents of the <DXInstallationDir>\DataExchangeDataIntegrationHub\tomcat\webapps\DX-dashboard folder to the newly created <DXInstallationDir>\DataExchangeDataIntegrationHub\tomcat\webapps\<custom_dashboard> folder.
5. Copy the LogiXML license file from the <DXInstallationDir>\DataExchangeDataIntegrationHub\tomcat\webapps\DX-dashboard folder to the <DXInstallationDir>\DataExchangeDataIntegrationHub\tomcat\webapps\<custom_dashboard> folder.
6. In the LogiXML _Settings.lgx file, modify the properties according to the name and location of the custom Dashboard.
7. In the B2B Data Exchange server, replace the value of the dx.dashboard.url system property with the value of the URL for the custom dashboard in the following format: http://<host>:<port>/<custom_dashboard>
Creating a Report in the Custom DashboardAfter you set up the custom Dashboard in Logi Info Studio, you create and configure a report to use in a custom Dashboard panel. You can copy an existing report and modify it as needed.
1. In Logi Info Studio, create a report definition.
2. Select the report filters that you want to provide to the users.
3. Define the SQL parameters for the SQL query to run in the operational data store. You must define the name and type of each parameter.
Adding a Dashboard Panel to the Custom DashboardAfter you create a report in Logi Info Studio, you add the custom Dashboard panel and its elements to the main Dashboard report file.
1. In Logi Info Studio, open the custom Dashboard report file.
2. In the dxdashboard element, add a new Panel element with a caption and a unique identifier.
3. In the Panel element, add a Panel Content element.
4. In the Panel Content element, add a SubReport element with a unique identifier and set the property Frame Border to false.
5. In the SubReport element, add a Target.Report element with a unique identifier and enter the name of the new report in the Report Definition File property.
6. Copy the Link Parameters element from an existing SubReport element to the new SubReport element.
7. Save the dxdashboard report file.
Customizing the Dashboard in Logi Info Studio 79
Deploying and Testing the Custom Dashboard in B2B Data Exchange
After you modify or create a custom Dashboard in Logi Info Studio, you copy the custom Dashboard application folder contents to B2B Data Exchange. You then test that the custom Dashboard appears correctly.
1. Copy the entire custom Dashboard application folder to the following location: <DXInstallationDir>\DataExchangeDataIntegrationHub\tomcat\webapps.
2. Back up the _Setting.lgx file and modify the following settings:
• Delete the value of the Redirect Error URL property to allow access to the LogiXML error report.
• Set the value of the Debugger Style property to DebuggerLinks to add links to the LogiXML progress report. The Dashboard panel layout may display differently.
3. Log on to the Operation Console and test that the new Dashboard panels open and populate correctly.
4. After you test the custom Dashboard, restore the properties in the _Setting.lgx file.
80 Chapter 8: Dashboard and Reports
C h a p t e r 9
B2B Data Exchange Web Services API
This chapter includes the following topics:
• Data Exchange Web Services Overview, 81
• DX_TPM_Partner Web Service, 82
• DX_TPM_Account Web Service, 89
• DX_TPM_Profile Web Service, 96
• DX_Endpoint Web Service, 103
• Complex Type Objects in the Data Exchange Web Services, 104
• General B2B Data Exchange Web Service Behavior, 107
• Run Publication SubscriptionB2B Data Exchange Web Service Security, 107
Data Exchange Web Services OverviewB2B Data Exchange provides a set of Web services that you can use to create and manage partners, accounts, and profiles from a client application. You can also use the Web services to send input documents to B2B Data Exchange.
When you install B2B Data Exchange, the Data Exchange Web services are installed as a set of XML files. The XML files are PowerCenter export files that contain Web service workflows. To use the Web services, import the XML files into PowerCenter and run the Web service workflows. Then you can call the Web service operations from any Web service client application.
B2B Data Exchange provides the following Web services:
• DX_TPM_Partner. Creates and manages trading partners.
• DX_TPM_Account. Creates and manages accounts.
• DX_TPM_Profile. Creates and manages profiles.
• DX_Endpoint. Sends documents to B2B Data Exchange.
81
DX_TPM_Partner Web ServiceThe DX_TPM_Partner web service creates, deletes, and manages trading partners in the B2B Data Exchange repository.
Use the DX_TPM_Partner web service to perform the following tasks:
• Create a partner.
• Delete a partner.
• Update the information for a partner.
• Search for a partner.
• Count of the number of partners in the repository.
• Get information for a partner by index.
Reserved System Partner
Do not use the name none when you create, update, or search for a partner. This name is reserved for a dedicated system partner. The web service returns a fault response if you try to assign this name to another partner.
DX_TPM_Partner RequestThe DX_TPM_Partner request defines the task performed by the DX_TPM_Partner web service.
The DX_TPM_Partner request message includes the following elements:
operation
Required. Type of operation the web service will perform. The web service can perform one of the following operations:
• create
• delete
• update
• search
• count
• get
partner
Complex type object DXPartner that includes elements that describe the trading partner to create. Required by the create and update operations and ignored by other operations.
account
Complex type object DXAccount that includes elements that describe the partner account to create or update. Required by the create operation and ignored by other operations.
partnerName
Name of the partner to search or delete. Required by the search and delete operations and ignored by other operations.
index
Index for the partner to get. The index number starts at zero. Required by the get operation and ignored by other operations.
82 Chapter 9: B2B Data Exchange Web Services API
DX_TPM_Partner ResponseThe DX_TPM_Partner response is the reply from the DX_TPM_Partner web service.
The DX_TPM_Partner response message includes the following elements:
partner
Complex type object DXPartner that includes elements that describe the trading partner to create or update. The partner element is included in the response message for the following operations:
• create
• update
• get
• search
count
Number of partners in the B2B Data Exchange repository. The count element is included in the response message for the count operation.
Note: The DX_TPM_Partner web service sends an empty response to the client when the web service requests a delete operation.
DX_TPM_Partner Create OperationThe DX_TPM_Partner create operation creates a partner and an associated account.
Guidelines
Use the following guidelines when you create a partner:
• The request must use the create operation.
Response
The web service returns a DXPartnerResponse object that includes the partner information in a DXPartner object.
The web service returns a fault response in the following situations:
• The DXPartner object has an element with an invalid value.
• The DXAccount object has an element with an invalid value.
• A partner in the Data Exchange repository has the same partner name specified in the DXPartner object.
• The name is already reserved for a dedicated system partner.
Create SOAP Message Example
The following SOAP message shows an example of a request to the DX_TPM_Partner web service to create a partner:
<soapenv:Envelope xmlns:soapenv="http://schemas.xmlsoap.org/soap/envelope/" xmlns:inf="http://www.informatica.com/" xmlns:sec="http://b2b.informatica.com/dx/security" xmlns:tpm="http://b2b.informatica.com/dx/tpm/"> <soapenv:Header> <inf:Security> <UsernameToken> <Username>Administrator</Username> <Password>Administrator</Password> </UsernameToken> </inf:Security> <sec:DXSecurity> <sec:DXUsernameToken>
DX_TPM_Partner Web Service 83
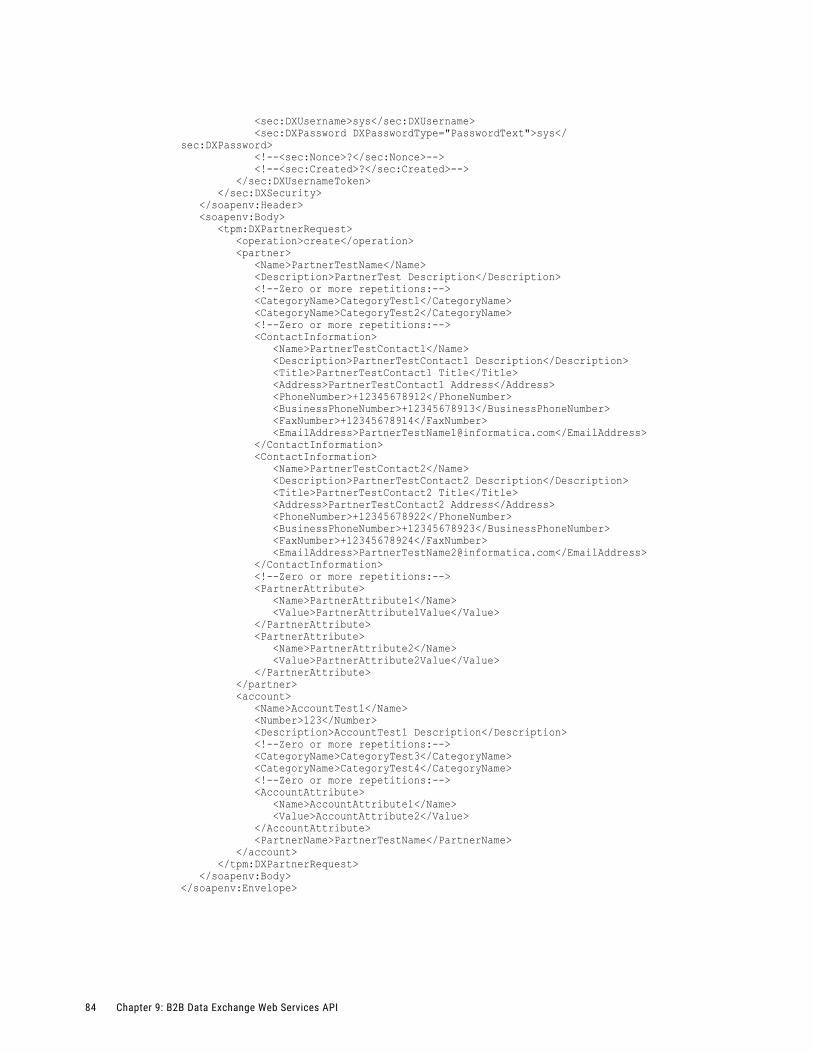
<sec:DXUsername>sys</sec:DXUsername> <sec:DXPassword DXPasswordType="PasswordText">sys</sec:DXPassword> <!--<sec:Nonce>?</sec:Nonce>--> <!--<sec:Created>?</sec:Created>--> </sec:DXUsernameToken> </sec:DXSecurity> </soapenv:Header> <soapenv:Body> <tpm:DXPartnerRequest> <operation>create</operation> <partner> <Name>PartnerTestName</Name> <Description>PartnerTest Description</Description> <!--Zero or more repetitions:--> <CategoryName>CategoryTest1</CategoryName> <CategoryName>CategoryTest2</CategoryName> <!--Zero or more repetitions:--> <ContactInformation> <Name>PartnerTestContact1</Name> <Description>PartnerTestContact1 Description</Description> <Title>PartnerTestContact1 Title</Title> <Address>PartnerTestContact1 Address</Address> <PhoneNumber>+12345678912</PhoneNumber> <BusinessPhoneNumber>+12345678913</BusinessPhoneNumber> <FaxNumber>+12345678914</FaxNumber> <EmailAddress>[email protected]</EmailAddress> </ContactInformation> <ContactInformation> <Name>PartnerTestContact2</Name> <Description>PartnerTestContact2 Description</Description> <Title>PartnerTestContact2 Title</Title> <Address>PartnerTestContact2 Address</Address> <PhoneNumber>+12345678922</PhoneNumber> <BusinessPhoneNumber>+12345678923</BusinessPhoneNumber> <FaxNumber>+12345678924</FaxNumber> <EmailAddress>[email protected]</EmailAddress> </ContactInformation> <!--Zero or more repetitions:--> <PartnerAttribute> <Name>PartnerAttribute1</Name> <Value>PartnerAttribute1Value</Value> </PartnerAttribute> <PartnerAttribute> <Name>PartnerAttribute2</Name> <Value>PartnerAttribute2Value</Value> </PartnerAttribute> </partner> <account> <Name>AccountTest1</Name> <Number>123</Number> <Description>AccountTest1 Description</Description> <!--Zero or more repetitions:--> <CategoryName>CategoryTest3</CategoryName> <CategoryName>CategoryTest4</CategoryName> <!--Zero or more repetitions:--> <AccountAttribute> <Name>AccountAttribute1</Name> <Value>AccountAttribute2</Value> </AccountAttribute> <PartnerName>PartnerTestName</PartnerName> </account> </tpm:DXPartnerRequest> </soapenv:Body></soapenv:Envelope>
84 Chapter 9: B2B Data Exchange Web Services API
DX_TPM_Partner Search OperationThe DX_TPM_Partner search operation searches the repository for a specified partner name.
Guidelines
Use the following guidelines when you search for a partner:
• The request must use the search operation.
• The search string must match the partner name exactly. For example, InformaticaCorp and Informa do not match the partner name Informatica. The partner name is not case sensitive.
Response
The web service returns a DXPartnerResponse object that includes the partner information in a DXPartner object.
DX_TPM_Partner Response
The DX_TPM_Partner web service returns NULL in the following situations:
• The partner name specified in the request does not exist in the repository.
• The partner name specified in the request is NULL or an empty string.
• The user account used to log in to the B2B Data Exchange Server is not authorized to view the partner.
• The name is already reserved for a dedicated system partner.
DX_TPM_Partner Update OperationThe DX_TPM_Partner update operation updates the information for a specified partner.
Guidelines
Use the following guidelines when you update a partner:
• The request must use the update operation.
• The search string must match the partner name exactly. For example, InformaticaCorp and Informa do not match the partner name Informatica. The partner name is not case sensitive.
Response
The web service returns a fault response in the following situations:
• The partner name specified in the request does not exist in the repository.
• The name is already reserved for a dedicated system partner.
Update SOAP Message Example
The following SOAP message shows an example of a request to the DX_TPM_Partner web service to update a partner:
<soapenv:Envelope xmlns:soapenv="http://schemas.xmlsoap.org/soap/envelope/" xmlns:inf="http://www.informatica.com/" xmlns:sec="http://b2b.informatica.com/dx/security" xmlns:tpm="http://b2b.informatica.com/dx/tpm/"> <soapenv:Header> <inf:Security> <UsernameToken> <Username>Administrator</Username> <Password>Administrator</Password> </UsernameToken> </inf:Security> <sec:DXSecurity> <sec:DXUsernameToken> <sec:DXUsername>sys</sec:DXUsername>
DX_TPM_Partner Web Service 85
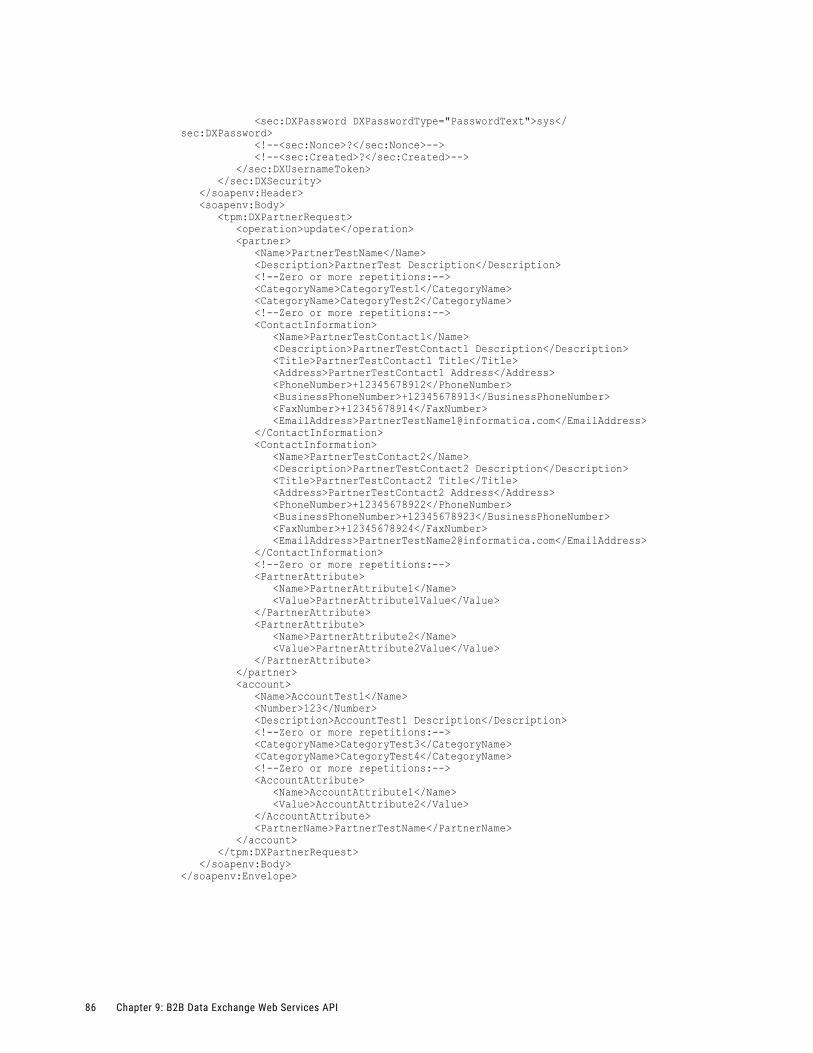
<sec:DXPassword DXPasswordType="PasswordText">sys</sec:DXPassword> <!--<sec:Nonce>?</sec:Nonce>--> <!--<sec:Created>?</sec:Created>--> </sec:DXUsernameToken> </sec:DXSecurity> </soapenv:Header> <soapenv:Body> <tpm:DXPartnerRequest> <operation>update</operation> <partner> <Name>PartnerTestName</Name> <Description>PartnerTest Description</Description> <!--Zero or more repetitions:--> <CategoryName>CategoryTest1</CategoryName> <CategoryName>CategoryTest2</CategoryName> <!--Zero or more repetitions:--> <ContactInformation> <Name>PartnerTestContact1</Name> <Description>PartnerTestContact1 Description</Description> <Title>PartnerTestContact1 Title</Title> <Address>PartnerTestContact1 Address</Address> <PhoneNumber>+12345678912</PhoneNumber> <BusinessPhoneNumber>+12345678913</BusinessPhoneNumber> <FaxNumber>+12345678914</FaxNumber> <EmailAddress>[email protected]</EmailAddress> </ContactInformation> <ContactInformation> <Name>PartnerTestContact2</Name> <Description>PartnerTestContact2 Description</Description> <Title>PartnerTestContact2 Title</Title> <Address>PartnerTestContact2 Address</Address> <PhoneNumber>+12345678922</PhoneNumber> <BusinessPhoneNumber>+12345678923</BusinessPhoneNumber> <FaxNumber>+12345678924</FaxNumber> <EmailAddress>[email protected]</EmailAddress> </ContactInformation> <!--Zero or more repetitions:--> <PartnerAttribute> <Name>PartnerAttribute1</Name> <Value>PartnerAttribute1Value</Value> </PartnerAttribute> <PartnerAttribute> <Name>PartnerAttribute2</Name> <Value>PartnerAttribute2Value</Value> </PartnerAttribute> </partner> <account> <Name>AccountTest1</Name> <Number>123</Number> <Description>AccountTest1 Description</Description> <!--Zero or more repetitions:--> <CategoryName>CategoryTest3</CategoryName> <CategoryName>CategoryTest4</CategoryName> <!--Zero or more repetitions:--> <AccountAttribute> <Name>AccountAttribute1</Name> <Value>AccountAttribute2</Value> </AccountAttribute> <PartnerName>PartnerTestName</PartnerName> </account> </tpm:DXPartnerRequest> </soapenv:Body></soapenv:Envelope>
86 Chapter 9: B2B Data Exchange Web Services API
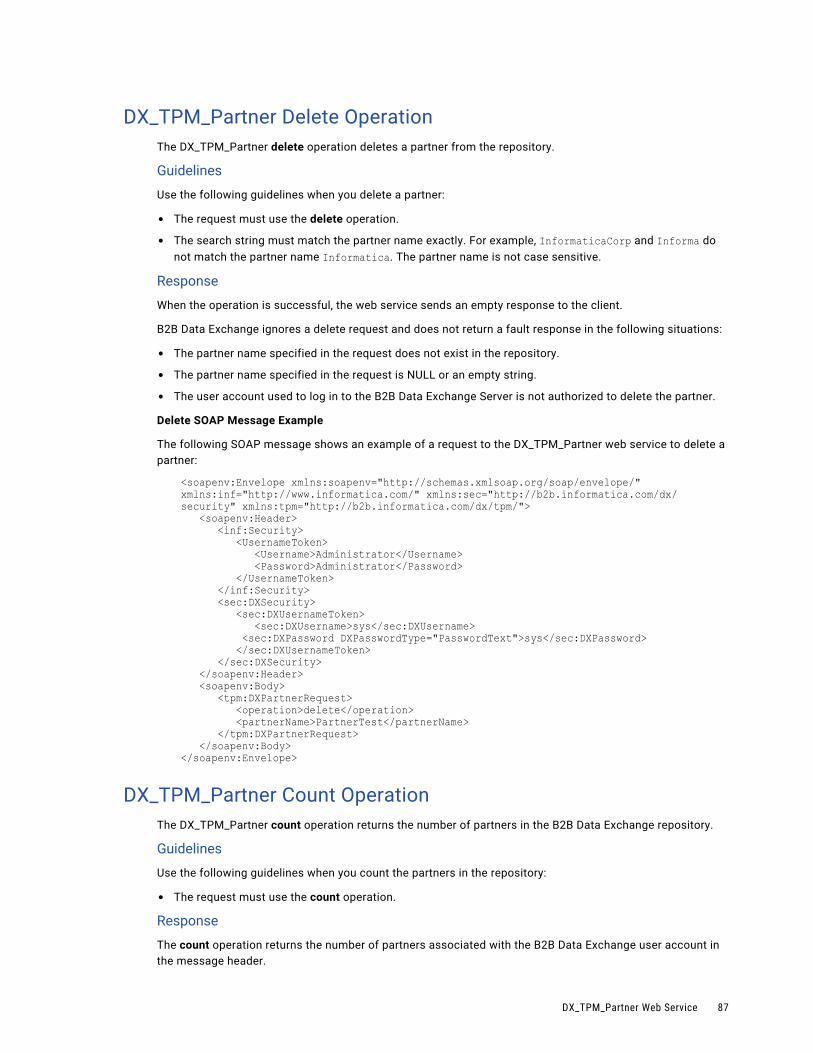
DX_TPM_Partner Delete OperationThe DX_TPM_Partner delete operation deletes a partner from the repository.
Guidelines
Use the following guidelines when you delete a partner:
• The request must use the delete operation.
• The search string must match the partner name exactly. For example, InformaticaCorp and Informa do not match the partner name Informatica. The partner name is not case sensitive.
Response
When the operation is successful, the web service sends an empty response to the client.
B2B Data Exchange ignores a delete request and does not return a fault response in the following situations:
• The partner name specified in the request does not exist in the repository.
• The partner name specified in the request is NULL or an empty string.
• The user account used to log in to the B2B Data Exchange Server is not authorized to delete the partner.
Delete SOAP Message Example
The following SOAP message shows an example of a request to the DX_TPM_Partner web service to delete a partner:
<soapenv:Envelope xmlns:soapenv="http://schemas.xmlsoap.org/soap/envelope/" xmlns:inf="http://www.informatica.com/" xmlns:sec="http://b2b.informatica.com/dx/security" xmlns:tpm="http://b2b.informatica.com/dx/tpm/"> <soapenv:Header> <inf:Security> <UsernameToken> <Username>Administrator</Username> <Password>Administrator</Password> </UsernameToken> </inf:Security> <sec:DXSecurity> <sec:DXUsernameToken> <sec:DXUsername>sys</sec:DXUsername> <sec:DXPassword DXPasswordType="PasswordText">sys</sec:DXPassword> </sec:DXUsernameToken> </sec:DXSecurity> </soapenv:Header> <soapenv:Body> <tpm:DXPartnerRequest> <operation>delete</operation> <partnerName>PartnerTest</partnerName> </tpm:DXPartnerRequest> </soapenv:Body></soapenv:Envelope>
DX_TPM_Partner Count OperationThe DX_TPM_Partner count operation returns the number of partners in the B2B Data Exchange repository.
Guidelines
Use the following guidelines when you count the partners in the repository:
• The request must use the count operation.
Response
The count operation returns the number of partners associated with the B2B Data Exchange user account in the message header.
DX_TPM_Partner Web Service 87
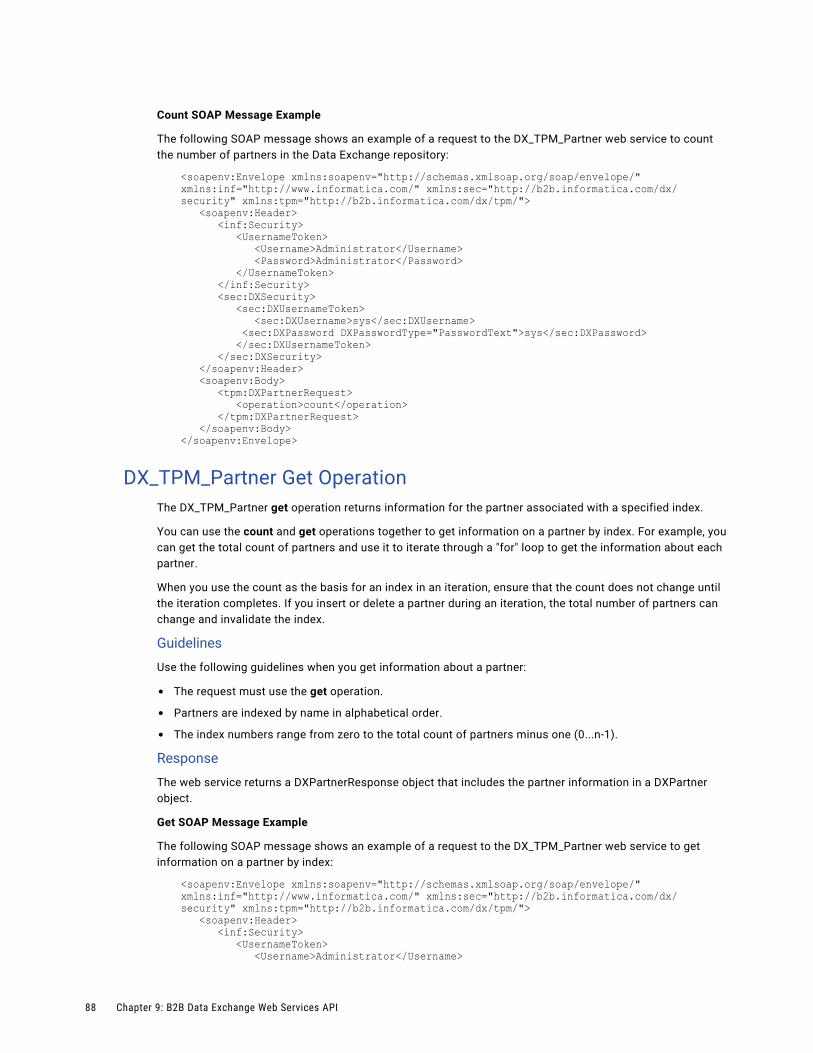
Count SOAP Message Example
The following SOAP message shows an example of a request to the DX_TPM_Partner web service to count the number of partners in the Data Exchange repository:
<soapenv:Envelope xmlns:soapenv="http://schemas.xmlsoap.org/soap/envelope/" xmlns:inf="http://www.informatica.com/" xmlns:sec="http://b2b.informatica.com/dx/security" xmlns:tpm="http://b2b.informatica.com/dx/tpm/"> <soapenv:Header> <inf:Security> <UsernameToken> <Username>Administrator</Username> <Password>Administrator</Password> </UsernameToken> </inf:Security> <sec:DXSecurity> <sec:DXUsernameToken> <sec:DXUsername>sys</sec:DXUsername> <sec:DXPassword DXPasswordType="PasswordText">sys</sec:DXPassword> </sec:DXUsernameToken> </sec:DXSecurity> </soapenv:Header> <soapenv:Body> <tpm:DXPartnerRequest> <operation>count</operation> </tpm:DXPartnerRequest> </soapenv:Body></soapenv:Envelope>
DX_TPM_Partner Get OperationThe DX_TPM_Partner get operation returns information for the partner associated with a specified index.
You can use the count and get operations together to get information on a partner by index. For example, you can get the total count of partners and use it to iterate through a "for" loop to get the information about each partner.
When you use the count as the basis for an index in an iteration, ensure that the count does not change until the iteration completes. If you insert or delete a partner during an iteration, the total number of partners can change and invalidate the index.
Guidelines
Use the following guidelines when you get information about a partner:
• The request must use the get operation.
• Partners are indexed by name in alphabetical order.
• The index numbers range from zero to the total count of partners minus one (0...n-1).
Response
The web service returns a DXPartnerResponse object that includes the partner information in a DXPartner object.
Get SOAP Message Example
The following SOAP message shows an example of a request to the DX_TPM_Partner web service to get information on a partner by index:
<soapenv:Envelope xmlns:soapenv="http://schemas.xmlsoap.org/soap/envelope/" xmlns:inf="http://www.informatica.com/" xmlns:sec="http://b2b.informatica.com/dx/security" xmlns:tpm="http://b2b.informatica.com/dx/tpm/"> <soapenv:Header> <inf:Security> <UsernameToken> <Username>Administrator</Username>
88 Chapter 9: B2B Data Exchange Web Services API
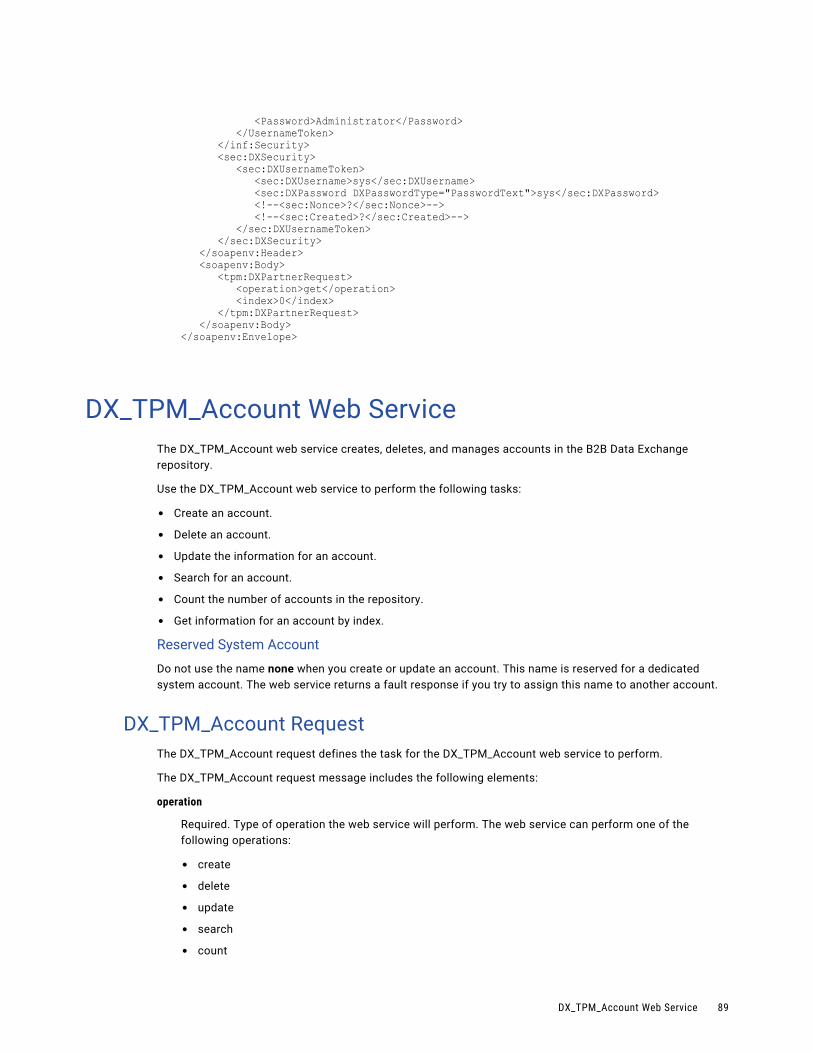
<Password>Administrator</Password> </UsernameToken> </inf:Security> <sec:DXSecurity> <sec:DXUsernameToken> <sec:DXUsername>sys</sec:DXUsername> <sec:DXPassword DXPasswordType="PasswordText">sys</sec:DXPassword> <!--<sec:Nonce>?</sec:Nonce>--> <!--<sec:Created>?</sec:Created>--> </sec:DXUsernameToken> </sec:DXSecurity> </soapenv:Header> <soapenv:Body> <tpm:DXPartnerRequest> <operation>get</operation> <index>0</index> </tpm:DXPartnerRequest> </soapenv:Body></soapenv:Envelope>
DX_TPM_Account Web ServiceThe DX_TPM_Account web service creates, deletes, and manages accounts in the B2B Data Exchange repository.
Use the DX_TPM_Account web service to perform the following tasks:
• Create an account.
• Delete an account.
• Update the information for an account.
• Search for an account.
• Count the number of accounts in the repository.
• Get information for an account by index.
Reserved System Account
Do not use the name none when you create or update an account. This name is reserved for a dedicated system account. The web service returns a fault response if you try to assign this name to another account.
DX_TPM_Account RequestThe DX_TPM_Account request defines the task for the DX_TPM_Account web service to perform.
The DX_TPM_Account request message includes the following elements:
operation
Required. Type of operation the web service will perform. The web service can perform one of the following operations:
• create
• delete
• update
• search
• count
DX_TPM_Account Web Service 89
• get
account
Complex type object DXAccount that describes the partner account to create or update. Required by the create and update operations and ignored by other operations.
accountNumber
Account number to search or delete. Required by the search and delete operations and ignored by other operations.
partnerName
Name of the partner associated with the account that will be counted. Required by the count, get, search, and delete operations and ignored by other operations.
index
Index for the account to get. The index number starts at zero. Required by the get operation and ignored by other operations.
DX_TPM_Account ResponseThe DX_TPM_Account response is the reply from the DX_TPM_Account web service.
The DX_TPM_Account response message includes the following elements:
account
Complex type object DXAccount that includes elements that describe the account to create or update. The account element is included in the response message for the following operations:
• create
• update
• get
• search
count
Number of accounts in the B2B Data Exchange repository. The count element is included in the response message for the count operation.
Note: When the web service request is a delete operation, the DX_TPM_Account web service sends an empty response to the client.
DX_TPM_Account Create OperationThe DX_TPM_Account create operation creates an account with a specified account name and number.
Guidelines
Use the following guidelines when you create an account:
• The request must use the create operation.
Response
The web service returns a DXAccountResponse object with the new account information in a DXAccount object.
90 Chapter 9: B2B Data Exchange Web Services API
The web service returns a fault response in the following situations:
• The DXAccount object has an element with an invalid value.
• The account already exists in the B2B Data Exchange repository.
• The account name or number identifies a dedicated system account.
• The partner for the account does not exist in the B2B Data Exchange repository.
• The associated partner name is reserved for a dedicated partner name or the account name is reserved for a dedicated system account.
Create SOAP Message Example
The following SOAP message shows an example of a request to the DX_TPM_Account web service to create an account:
<soapenv:Envelope xmlns:soapenv="http://schemas.xmlsoap.org/soap/envelope/" xmlns:inf="http://www.informatica.com/" xmlns:sec="http://b2b.informatica.com/dx/security" xmlns:tpm="http://b2b.informatica.com/dx/tpm/"> <soapenv:Header> <inf:Security> <UsernameToken> <Username>Administrator</Username> <Password>Administrator</Password> </UsernameToken> </inf:Security> <sec:DXSecurity> <sec:DXUsernameToken> <sec:DXUsername>sys</sec:DXUsername> <sec:DXPassword DXPasswordType="PasswordText">sys</sec:DXPassword> </sec:DXUsernameToken> </sec:DXSecurity> </soapenv:Header> <soapenv:Body> <tpm:DXAccountRequest> <operation>create</operation> <account> <Name>AccountTestName</Name> <Number>123</Number> <Description>AccountTest Description</Description> <!--Zero or more repetitions:--> <CategoryName>CategoryTest1</CategoryName> <CategoryName>CategoryTest2</CategoryName> <!--Zero or more repetitions:--> <AccountAttribute> <Name>AccountAttribute1</Name> <Value>AccountAttribute1Value</Value> </AccountAttribute> <AccountAttribute> <Name>AccountAttribute2</Name> <Value>AccountAttribute2Value</Value> </AccountAttribute> <PartnerName>PartnerTestName</PartnerName> </account> </tpm:DXAccountRequest> </soapenv:Body></soapenv:Envelope>
DX_TPM_Account Web Service 91
DX_TPM_Account Search OperationThe DX_TPM_Account search operation searches the repository for a specified partner name and account number.
Guidelines
Use the following guidelines when you search for an account:
• The request must use the search operation.
• The partner name and account number must exactly match the partner name and account number of the account to search for.
Response
The web service returns a DXAccountResponse object that includes the account information in a DXAccount object.
The web service returns NULL in the following situations:
• An account with the partner name and account number specified in the request does not exist in the repository.
• The partner name or account number specified in the request is NULL or an empty string.
• The user account used to log in to the B2B Data Exchange Server is not authorized to view the account.
• The partner name or account number identifies a reserved system partner or account.
Search SOAP Message Example
The following SOAP message shows an example of a request to the DX_TPM_Account web service to search for an account:
<soapenv:Envelope xmlns:soapenv="http://schemas.xmlsoap.org/soap/envelope/" xmlns:inf="http://www.informatica.com/" xmlns:sec="http://b2b.informatica.com/dx/security" xmlns:tpm="http://b2b.informatica.com/dx/tpm/"> <soapenv:Header> <inf:Security> <UsernameToken> <Username>Administrator</Username> <Password>Administrator</Password> </UsernameToken> </inf:Security> <sec:DXSecurity> <sec:DXUsernameToken> <sec:DXUsername>sys</sec:DXUsername> <sec:DXPassword DXPasswordType="PasswordText">sys</sec:DXPassword> </sec:DXUsernameToken> </sec:DXSecurity> </soapenv:Header> <soapenv:Body> <tpm:DXAccountRequest> <operation>search</operation> <partnerName>myPartner</partnerName> <accountNumber>myAccount</accountNumber> </tpm:DXAccountRequest> </soapenv:Body></soapenv:Envelope>
92 Chapter 9: B2B Data Exchange Web Services API

DX_TPM_Account Update OperationThe DX_TPM_Account update operation updates the information for a specified account number.
Guidelines
Use the following guidelines when you update an account:
• The request must use the update operation.
Response
The web service returns a fault response in the following situations:
• The account number specified in the request does not exist in the repository.
• The account number identifies a reserved system account.
Update SOAP Message Example
The following SOAP message shows an example of a request to the DX_TPM_Account web service to update an account:
<soapenv:Envelope xmlns:soapenv="http://schemas.xmlsoap.org/soap/envelope/" xmlns:inf="http://www.informatica.com/" xmlns:sec="http://b2b.informatica.com/dx/security" xmlns:tpm="http://b2b.informatica.com/dx/tpm/"> <soapenv:Header> <inf:Security> <UsernameToken> <Username>Administrator</Username> <Password>Administrator</Password> </UsernameToken> </inf:Security> <sec:DXSecurity> <sec:DXUsernameToken> <sec:DXUsername>sys</sec:DXUsername> <sec:DXPassword DXPasswordType="PasswordText">sys</sec:DXPassword> </sec:DXUsernameToken> </sec:DXSecurity> </soapenv:Header> <soapenv:Body> <tpm:DXAccountRequest> <operation>update</operation> <account> <Name>AccountTestName</Name> <Number>123</Number> <Description>AccountTest Description</Description> <!--Zero or more repetitions:--> <CategoryName>CategoryTest1</CategoryName> <CategoryName>CategoryTest2</CategoryName> <!--Zero or more repetitions:--> <AccountAttribute> <Name>AccountAttribute1</Name> <Value>AccountAttribute1Value</Value> </AccountAttribute> <AccountAttribute> <Name>AccountAttribute2</Name> <Value>AccountAttribute2Value</Value> </AccountAttribute> <PartnerName>PartnerTestName</PartnerName> </account> </tpm:DXAccountRequest> </soapenv:Body></soapenv:Envelope>
DX_TPM_Account Web Service 93
DX_TPM_Account Delete OperationThe DX_TPM_Account delete operation deletes an account from the repository.
Guidelines
Use the following guidelines when you delete an account:
• The request must use the delete operation.
• Specify a partner name and account number that exactly matches the partner name and account number of the account to delete.
Response
When the operation is successful, the web service sends an empty response to the client.
B2B Data Exchange ignores a delete request and does not return a fault response in the following situations:
• The partner name and account number of the account specified in the request does not exist in the repository.
• The partner name or account number specified in the request is NULL or an empty string.
• The user account used to log in to the B2B Data Exchange Server is not authorized to delete the account.
Delete SOAP Message Example
The following SOAP message shows an example of a request to the DX_TPM_Account web service to delete an account:
<soapenv:Envelope xmlns:soapenv="http://schemas.xmlsoap.org/soap/envelope/" xmlns:inf="http://www.informatica.com/" xmlns:sec="http://b2b.informatica.com/dx/security" xmlns:tpm="http://b2b.informatica.com/dx/tpm/"> <soapenv:Header> <inf:Security> <UsernameToken> <Username>Administrator</Username> <Password>Administrator</Password> </UsernameToken> </inf:Security> <sec:DXSecurity> <sec:DXUsernameToken> <sec:DXUsername>sys</sec:DXUsername> <sec:DXPassword DXPasswordType="PasswordText">sys</sec:DXPassword> </sec:DXUsernameToken> </sec:DXSecurity> </soapenv:Header> <soapenv:Body> <tpm:DXAccountRequest> <operation>delete</operation> <partnerName>myPartner</partnerName> <accountNumber>myAccount</accountNumber> </tpm:DXAccountRequest> </soapenv:Body></soapenv:Envelope>
DX_TPM_Account Count OperationThe DX_TPM_Account count operation returns the number of accounts associated with a specified partner.
Guidelines
Use the following guidelines when you count the accounts for a partner:
• The request must use the count operation.
94 Chapter 9: B2B Data Exchange Web Services API
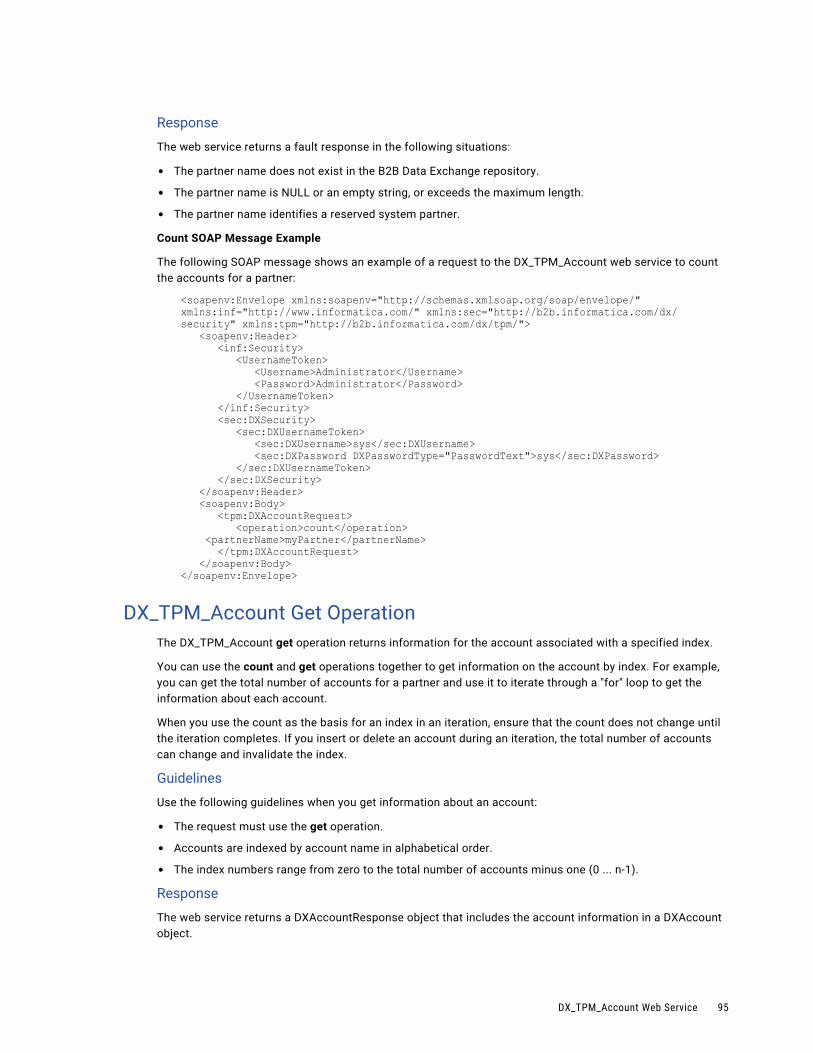
Response
The web service returns a fault response in the following situations:
• The partner name does not exist in the B2B Data Exchange repository.
• The partner name is NULL or an empty string, or exceeds the maximum length.
• The partner name identifies a reserved system partner.
Count SOAP Message Example
The following SOAP message shows an example of a request to the DX_TPM_Account web service to count the accounts for a partner:
<soapenv:Envelope xmlns:soapenv="http://schemas.xmlsoap.org/soap/envelope/" xmlns:inf="http://www.informatica.com/" xmlns:sec="http://b2b.informatica.com/dx/security" xmlns:tpm="http://b2b.informatica.com/dx/tpm/"> <soapenv:Header> <inf:Security> <UsernameToken> <Username>Administrator</Username> <Password>Administrator</Password> </UsernameToken> </inf:Security> <sec:DXSecurity> <sec:DXUsernameToken> <sec:DXUsername>sys</sec:DXUsername> <sec:DXPassword DXPasswordType="PasswordText">sys</sec:DXPassword> </sec:DXUsernameToken> </sec:DXSecurity> </soapenv:Header> <soapenv:Body> <tpm:DXAccountRequest> <operation>count</operation> <partnerName>myPartner</partnerName> </tpm:DXAccountRequest> </soapenv:Body></soapenv:Envelope>
DX_TPM_Account Get OperationThe DX_TPM_Account get operation returns information for the account associated with a specified index.
You can use the count and get operations together to get information on the account by index. For example, you can get the total number of accounts for a partner and use it to iterate through a "for" loop to get the information about each account.
When you use the count as the basis for an index in an iteration, ensure that the count does not change until the iteration completes. If you insert or delete an account during an iteration, the total number of accounts can change and invalidate the index.
Guidelines
Use the following guidelines when you get information about an account:
• The request must use the get operation.
• Accounts are indexed by account name in alphabetical order.
• The index numbers range from zero to the total number of accounts minus one (0 ... n-1).
Response
The web service returns a DXAccountResponse object that includes the account information in a DXAccount object.
DX_TPM_Account Web Service 95
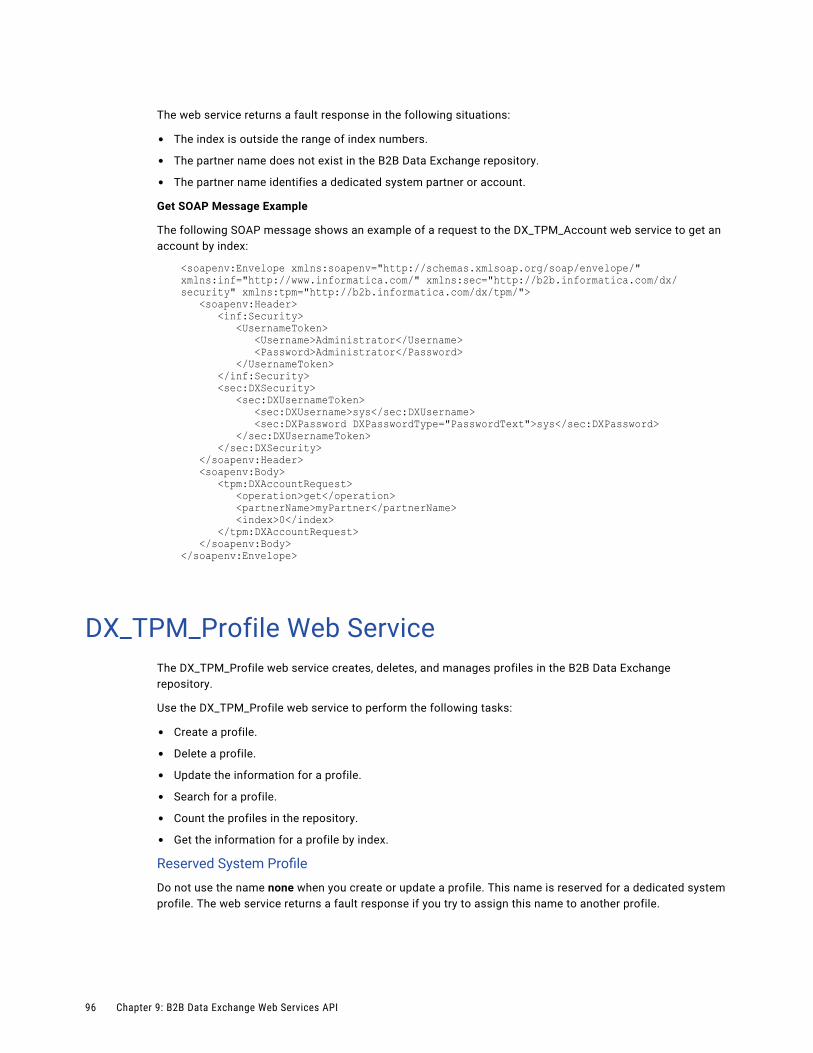
The web service returns a fault response in the following situations:
• The index is outside the range of index numbers.
• The partner name does not exist in the B2B Data Exchange repository.
• The partner name identifies a dedicated system partner or account.
Get SOAP Message Example
The following SOAP message shows an example of a request to the DX_TPM_Account web service to get an account by index:
<soapenv:Envelope xmlns:soapenv="http://schemas.xmlsoap.org/soap/envelope/" xmlns:inf="http://www.informatica.com/" xmlns:sec="http://b2b.informatica.com/dx/security" xmlns:tpm="http://b2b.informatica.com/dx/tpm/"> <soapenv:Header> <inf:Security> <UsernameToken> <Username>Administrator</Username> <Password>Administrator</Password> </UsernameToken> </inf:Security> <sec:DXSecurity> <sec:DXUsernameToken> <sec:DXUsername>sys</sec:DXUsername> <sec:DXPassword DXPasswordType="PasswordText">sys</sec:DXPassword> </sec:DXUsernameToken> </sec:DXSecurity> </soapenv:Header> <soapenv:Body> <tpm:DXAccountRequest> <operation>get</operation> <partnerName>myPartner</partnerName> <index>0</index> </tpm:DXAccountRequest> </soapenv:Body></soapenv:Envelope>
DX_TPM_Profile Web ServiceThe DX_TPM_Profile web service creates, deletes, and manages profiles in the B2B Data Exchange repository.
Use the DX_TPM_Profile web service to perform the following tasks:
• Create a profile.
• Delete a profile.
• Update the information for a profile.
• Search for a profile.
• Count the profiles in the repository.
• Get the information for a profile by index.
Reserved System Profile
Do not use the name none when you create or update a profile. This name is reserved for a dedicated system profile. The web service returns a fault response if you try to assign this name to another profile.
96 Chapter 9: B2B Data Exchange Web Services API
DX_TPM_Profile RequestThe DX_TPM_Profile request defines the task performed by the DX_TPM_Profile web service.
The DX_TPM_Profile request message includes the following elements:
operation
Required. Type of operation the web service will perform. The web service can perform one of the following operations:
• create
• delete
• update
• search
• count
• get
profile
Complex type object DXProfile that describes the profile to create or update. Required by the create and update operations and ignored by other operations.
profileName
Name of the profile to search or delete. Required by the search and delete operations.
index
Index of the profile to get. The index number starts at zero. Required by the get operation.
DX_TPM_Profile ResponseThe DX_TPM_Profile response message is the reply from the DX_TPM_Profile web service.
The DX_TPM_Profile response message includes the following elements:
profile
Complex type object DXProfile that describes the trading partner to create or update. The profile element is included in the response message for the following operations:
• create
• update
• get
• search
count
Number of profiles in the B2B Data Exchange repository. The count element is included in the response message for the count operation.
Note: When the web service request is a delete operation, the DX_TPM_Profile web service sends an empty response to the client.
DX_TPM_Profile Web Service 97
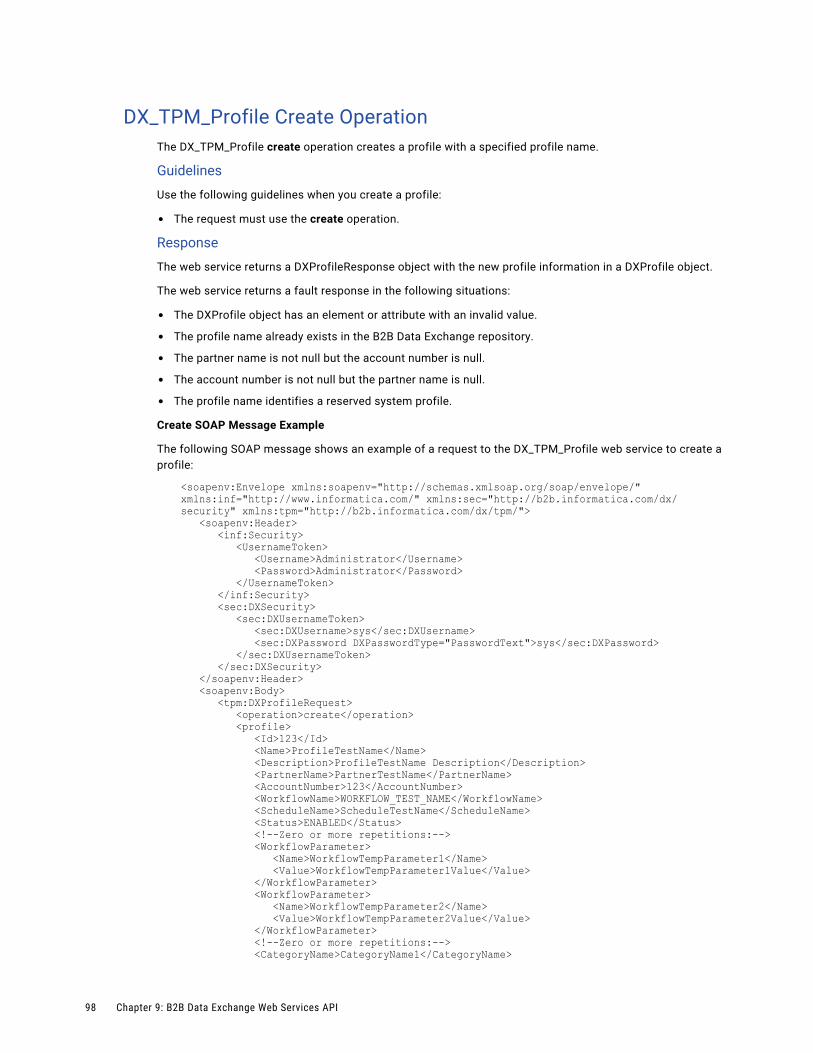
DX_TPM_Profile Create OperationThe DX_TPM_Profile create operation creates a profile with a specified profile name.
Guidelines
Use the following guidelines when you create a profile:
• The request must use the create operation.
Response
The web service returns a DXProfileResponse object with the new profile information in a DXProfile object.
The web service returns a fault response in the following situations:
• The DXProfile object has an element or attribute with an invalid value.
• The profile name already exists in the B2B Data Exchange repository.
• The partner name is not null but the account number is null.
• The account number is not null but the partner name is null.
• The profile name identifies a reserved system profile.
Create SOAP Message Example
The following SOAP message shows an example of a request to the DX_TPM_Profile web service to create a profile:
<soapenv:Envelope xmlns:soapenv="http://schemas.xmlsoap.org/soap/envelope/" xmlns:inf="http://www.informatica.com/" xmlns:sec="http://b2b.informatica.com/dx/security" xmlns:tpm="http://b2b.informatica.com/dx/tpm/"> <soapenv:Header> <inf:Security> <UsernameToken> <Username>Administrator</Username> <Password>Administrator</Password> </UsernameToken> </inf:Security> <sec:DXSecurity> <sec:DXUsernameToken> <sec:DXUsername>sys</sec:DXUsername> <sec:DXPassword DXPasswordType="PasswordText">sys</sec:DXPassword> </sec:DXUsernameToken> </sec:DXSecurity> </soapenv:Header> <soapenv:Body> <tpm:DXProfileRequest> <operation>create</operation> <profile> <Id>123</Id> <Name>ProfileTestName</Name> <Description>ProfileTestName Description</Description> <PartnerName>PartnerTestName</PartnerName> <AccountNumber>123</AccountNumber> <WorkflowName>WORKFLOW_TEST_NAME</WorkflowName> <ScheduleName>ScheduleTestName</ScheduleName> <Status>ENABLED</Status> <!--Zero or more repetitions:--> <WorkflowParameter> <Name>WorkflowTempParameter1</Name> <Value>WorkflowTempParameter1Value</Value> </WorkflowParameter> <WorkflowParameter> <Name>WorkflowTempParameter2</Name> <Value>WorkflowTempParameter2Value</Value> </WorkflowParameter> <!--Zero or more repetitions:--> <CategoryName>CategoryName1</CategoryName>
98 Chapter 9: B2B Data Exchange Web Services API
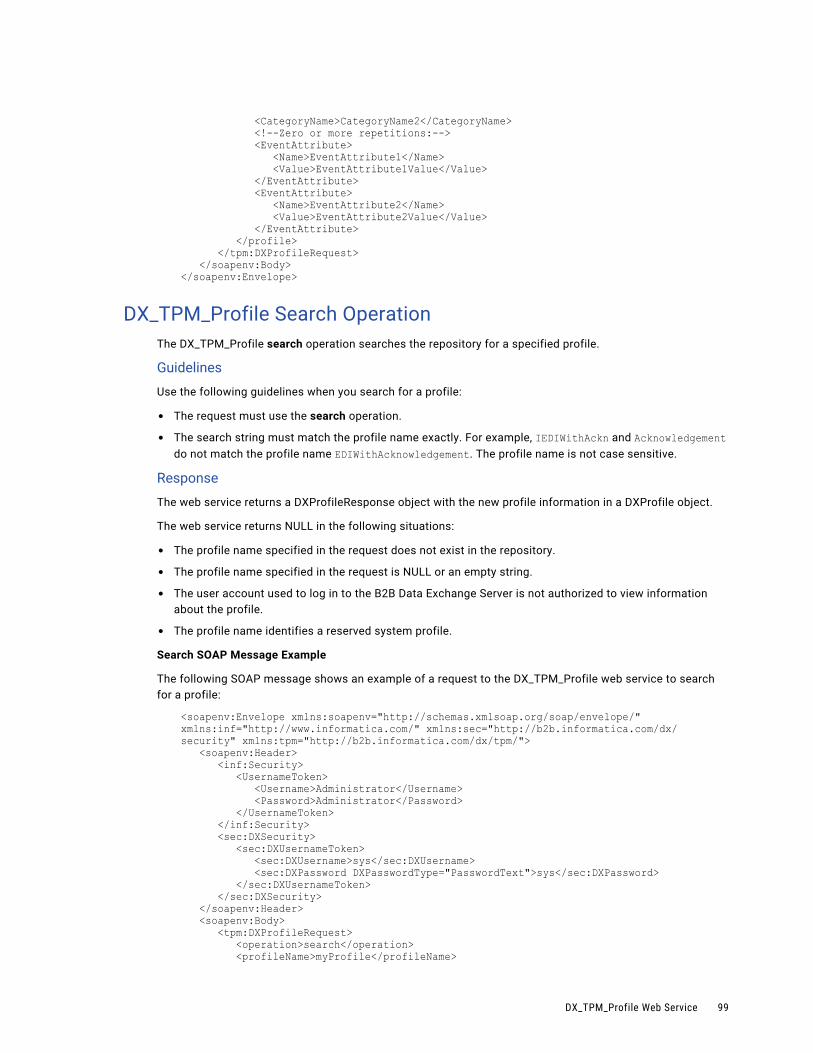
<CategoryName>CategoryName2</CategoryName> <!--Zero or more repetitions:--> <EventAttribute> <Name>EventAttribute1</Name> <Value>EventAttribute1Value</Value> </EventAttribute> <EventAttribute> <Name>EventAttribute2</Name> <Value>EventAttribute2Value</Value> </EventAttribute> </profile> </tpm:DXProfileRequest> </soapenv:Body></soapenv:Envelope>
DX_TPM_Profile Search OperationThe DX_TPM_Profile search operation searches the repository for a specified profile.
Guidelines
Use the following guidelines when you search for a profile:
• The request must use the search operation.
• The search string must match the profile name exactly. For example, IEDIWithAckn and Acknowledgement do not match the profile name EDIWithAcknowledgement. The profile name is not case sensitive.
Response
The web service returns a DXProfileResponse object with the new profile information in a DXProfile object.
The web service returns NULL in the following situations:
• The profile name specified in the request does not exist in the repository.
• The profile name specified in the request is NULL or an empty string.
• The user account used to log in to the B2B Data Exchange Server is not authorized to view information about the profile.
• The profile name identifies a reserved system profile.
Search SOAP Message Example
The following SOAP message shows an example of a request to the DX_TPM_Profile web service to search for a profile:
<soapenv:Envelope xmlns:soapenv="http://schemas.xmlsoap.org/soap/envelope/" xmlns:inf="http://www.informatica.com/" xmlns:sec="http://b2b.informatica.com/dx/security" xmlns:tpm="http://b2b.informatica.com/dx/tpm/"> <soapenv:Header> <inf:Security> <UsernameToken> <Username>Administrator</Username> <Password>Administrator</Password> </UsernameToken> </inf:Security> <sec:DXSecurity> <sec:DXUsernameToken> <sec:DXUsername>sys</sec:DXUsername> <sec:DXPassword DXPasswordType="PasswordText">sys</sec:DXPassword> </sec:DXUsernameToken> </sec:DXSecurity> </soapenv:Header> <soapenv:Body> <tpm:DXProfileRequest> <operation>search</operation> <profileName>myProfile</profileName>
DX_TPM_Profile Web Service 99
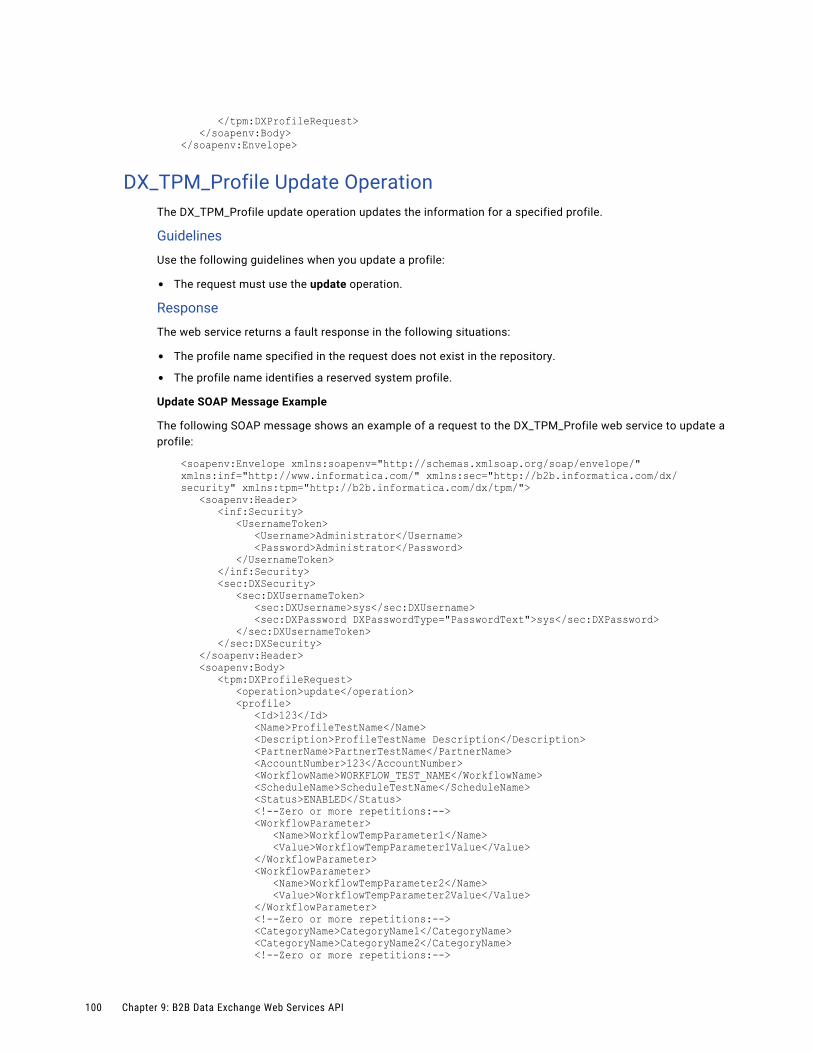
</tpm:DXProfileRequest> </soapenv:Body></soapenv:Envelope>
DX_TPM_Profile Update OperationThe DX_TPM_Profile update operation updates the information for a specified profile.
Guidelines
Use the following guidelines when you update a profile:
• The request must use the update operation.
Response
The web service returns a fault response in the following situations:
• The profile name specified in the request does not exist in the repository.
• The profile name identifies a reserved system profile.
Update SOAP Message Example
The following SOAP message shows an example of a request to the DX_TPM_Profile web service to update a profile:
<soapenv:Envelope xmlns:soapenv="http://schemas.xmlsoap.org/soap/envelope/" xmlns:inf="http://www.informatica.com/" xmlns:sec="http://b2b.informatica.com/dx/security" xmlns:tpm="http://b2b.informatica.com/dx/tpm/"> <soapenv:Header> <inf:Security> <UsernameToken> <Username>Administrator</Username> <Password>Administrator</Password> </UsernameToken> </inf:Security> <sec:DXSecurity> <sec:DXUsernameToken> <sec:DXUsername>sys</sec:DXUsername> <sec:DXPassword DXPasswordType="PasswordText">sys</sec:DXPassword> </sec:DXUsernameToken> </sec:DXSecurity> </soapenv:Header> <soapenv:Body> <tpm:DXProfileRequest> <operation>update</operation> <profile> <Id>123</Id> <Name>ProfileTestName</Name> <Description>ProfileTestName Description</Description> <PartnerName>PartnerTestName</PartnerName> <AccountNumber>123</AccountNumber> <WorkflowName>WORKFLOW_TEST_NAME</WorkflowName> <ScheduleName>ScheduleTestName</ScheduleName> <Status>ENABLED</Status> <!--Zero or more repetitions:--> <WorkflowParameter> <Name>WorkflowTempParameter1</Name> <Value>WorkflowTempParameter1Value</Value> </WorkflowParameter> <WorkflowParameter> <Name>WorkflowTempParameter2</Name> <Value>WorkflowTempParameter2Value</Value> </WorkflowParameter> <!--Zero or more repetitions:--> <CategoryName>CategoryName1</CategoryName> <CategoryName>CategoryName2</CategoryName> <!--Zero or more repetitions:-->
100 Chapter 9: B2B Data Exchange Web Services API
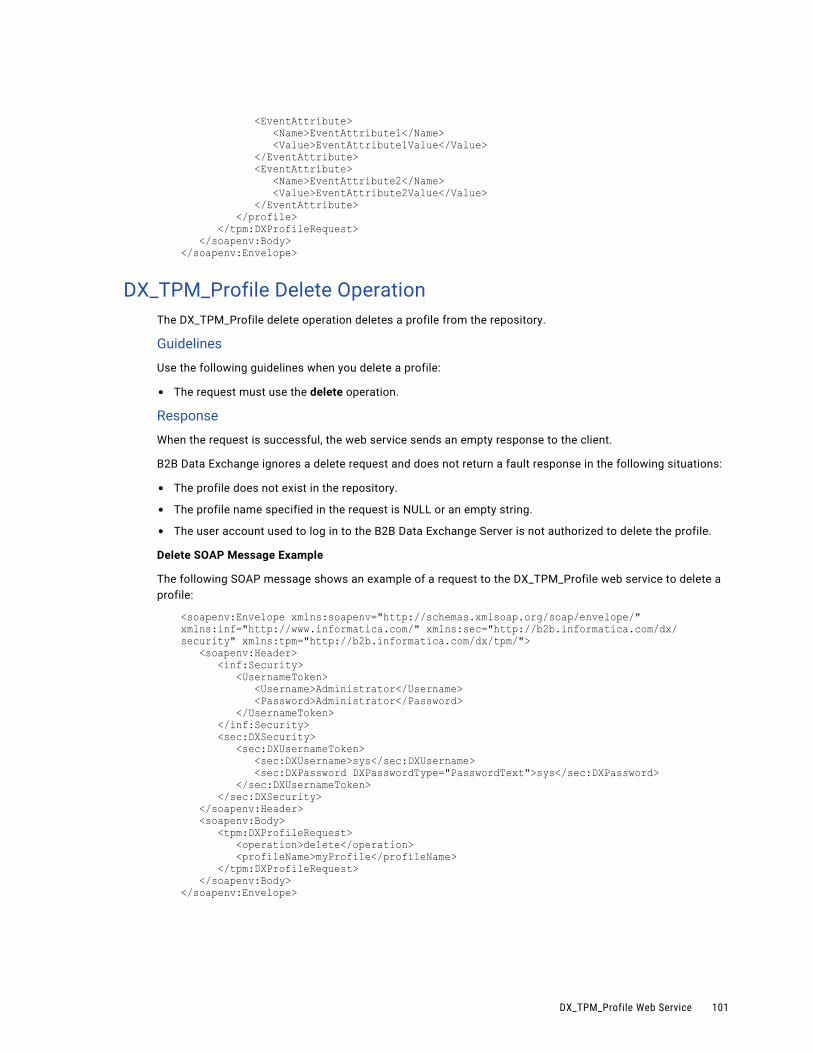
<EventAttribute> <Name>EventAttribute1</Name> <Value>EventAttribute1Value</Value> </EventAttribute> <EventAttribute> <Name>EventAttribute2</Name> <Value>EventAttribute2Value</Value> </EventAttribute> </profile> </tpm:DXProfileRequest> </soapenv:Body></soapenv:Envelope>
DX_TPM_Profile Delete OperationThe DX_TPM_Profile delete operation deletes a profile from the repository.
Guidelines
Use the following guidelines when you delete a profile:
• The request must use the delete operation.
Response
When the request is successful, the web service sends an empty response to the client.
B2B Data Exchange ignores a delete request and does not return a fault response in the following situations:
• The profile does not exist in the repository.
• The profile name specified in the request is NULL or an empty string.
• The user account used to log in to the B2B Data Exchange Server is not authorized to delete the profile.
Delete SOAP Message Example
The following SOAP message shows an example of a request to the DX_TPM_Profile web service to delete a profile:
<soapenv:Envelope xmlns:soapenv="http://schemas.xmlsoap.org/soap/envelope/" xmlns:inf="http://www.informatica.com/" xmlns:sec="http://b2b.informatica.com/dx/security" xmlns:tpm="http://b2b.informatica.com/dx/tpm/"> <soapenv:Header> <inf:Security> <UsernameToken> <Username>Administrator</Username> <Password>Administrator</Password> </UsernameToken> </inf:Security> <sec:DXSecurity> <sec:DXUsernameToken> <sec:DXUsername>sys</sec:DXUsername> <sec:DXPassword DXPasswordType="PasswordText">sys</sec:DXPassword> </sec:DXUsernameToken> </sec:DXSecurity> </soapenv:Header> <soapenv:Body> <tpm:DXProfileRequest> <operation>delete</operation> <profileName>myProfile</profileName> </tpm:DXProfileRequest> </soapenv:Body></soapenv:Envelope>
DX_TPM_Profile Web Service 101
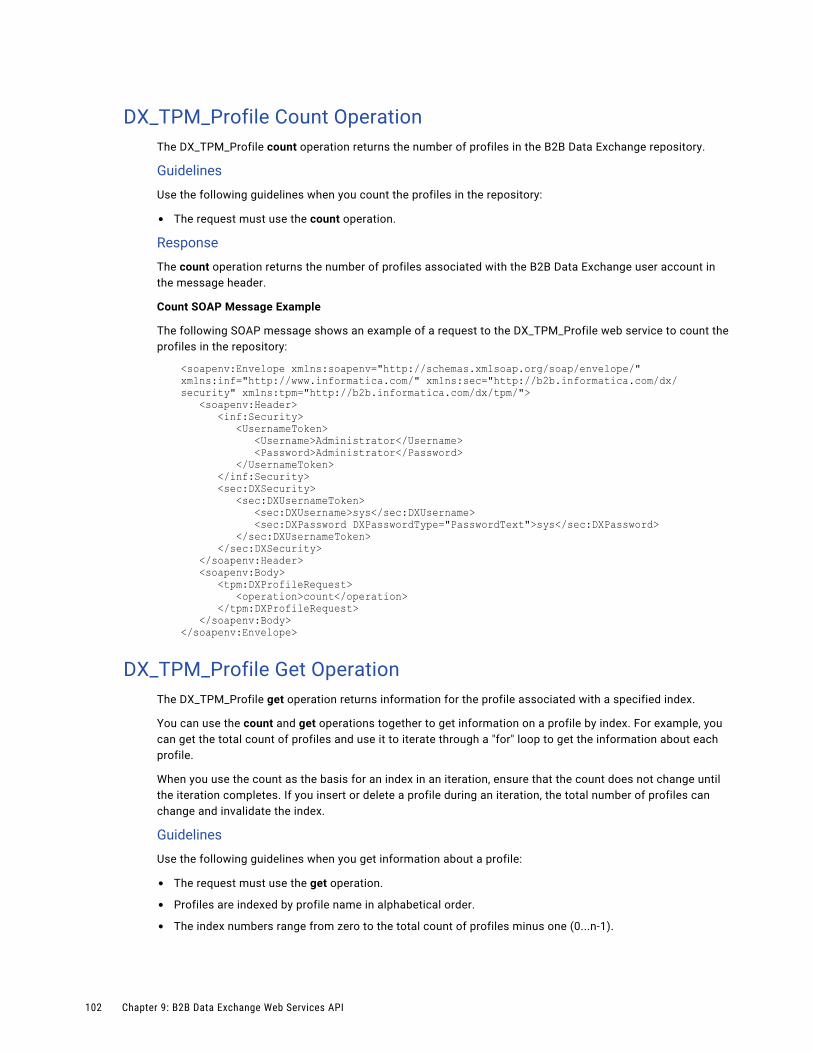
DX_TPM_Profile Count OperationThe DX_TPM_Profile count operation returns the number of profiles in the B2B Data Exchange repository.
Guidelines
Use the following guidelines when you count the profiles in the repository:
• The request must use the count operation.
Response
The count operation returns the number of profiles associated with the B2B Data Exchange user account in the message header.
Count SOAP Message Example
The following SOAP message shows an example of a request to the DX_TPM_Profile web service to count the profiles in the repository:
<soapenv:Envelope xmlns:soapenv="http://schemas.xmlsoap.org/soap/envelope/" xmlns:inf="http://www.informatica.com/" xmlns:sec="http://b2b.informatica.com/dx/security" xmlns:tpm="http://b2b.informatica.com/dx/tpm/"> <soapenv:Header> <inf:Security> <UsernameToken> <Username>Administrator</Username> <Password>Administrator</Password> </UsernameToken> </inf:Security> <sec:DXSecurity> <sec:DXUsernameToken> <sec:DXUsername>sys</sec:DXUsername> <sec:DXPassword DXPasswordType="PasswordText">sys</sec:DXPassword> </sec:DXUsernameToken> </sec:DXSecurity> </soapenv:Header> <soapenv:Body> <tpm:DXProfileRequest> <operation>count</operation> </tpm:DXProfileRequest> </soapenv:Body></soapenv:Envelope>
DX_TPM_Profile Get OperationThe DX_TPM_Profile get operation returns information for the profile associated with a specified index.
You can use the count and get operations together to get information on a profile by index. For example, you can get the total count of profiles and use it to iterate through a "for" loop to get the information about each profile.
When you use the count as the basis for an index in an iteration, ensure that the count does not change until the iteration completes. If you insert or delete a profile during an iteration, the total number of profiles can change and invalidate the index.
Guidelines
Use the following guidelines when you get information about a profile:
• The request must use the get operation.
• Profiles are indexed by profile name in alphabetical order.
• The index numbers range from zero to the total count of profiles minus one (0...n-1).
102 Chapter 9: B2B Data Exchange Web Services API
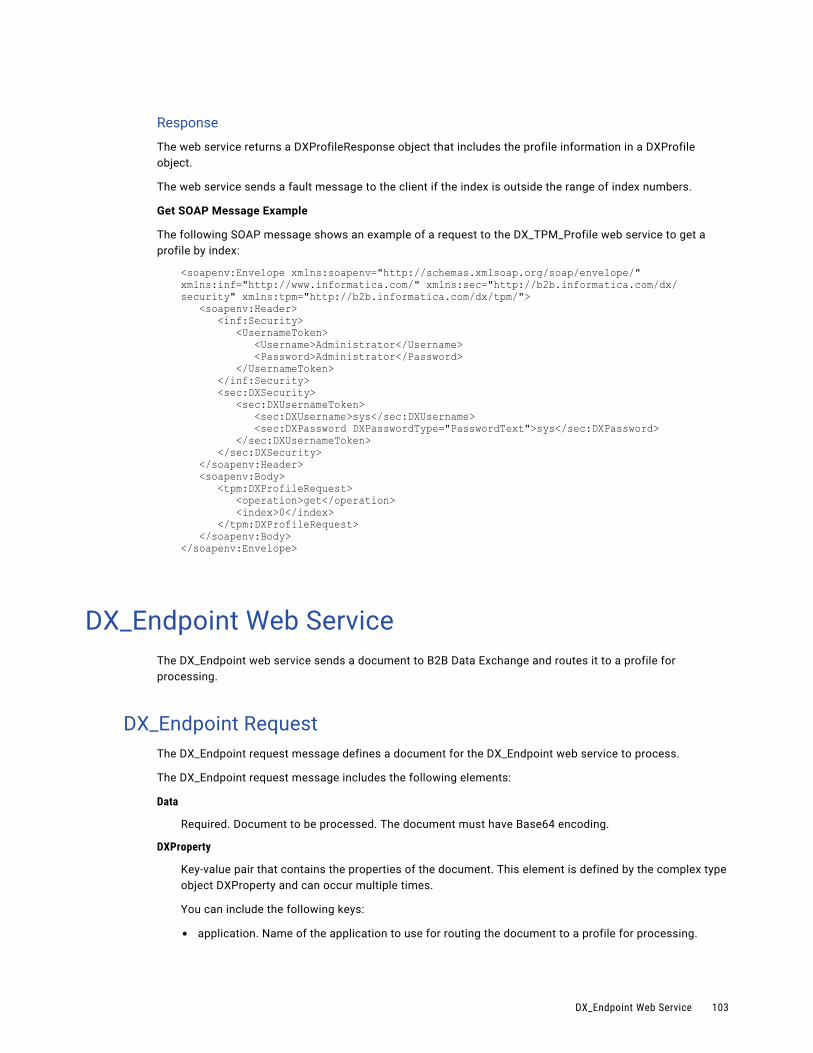
Response
The web service returns a DXProfileResponse object that includes the profile information in a DXProfile object.
The web service sends a fault message to the client if the index is outside the range of index numbers.
Get SOAP Message Example
The following SOAP message shows an example of a request to the DX_TPM_Profile web service to get a profile by index:
<soapenv:Envelope xmlns:soapenv="http://schemas.xmlsoap.org/soap/envelope/" xmlns:inf="http://www.informatica.com/" xmlns:sec="http://b2b.informatica.com/dx/security" xmlns:tpm="http://b2b.informatica.com/dx/tpm/"> <soapenv:Header> <inf:Security> <UsernameToken> <Username>Administrator</Username> <Password>Administrator</Password> </UsernameToken> </inf:Security> <sec:DXSecurity> <sec:DXUsernameToken> <sec:DXUsername>sys</sec:DXUsername> <sec:DXPassword DXPasswordType="PasswordText">sys</sec:DXPassword> </sec:DXUsernameToken> </sec:DXSecurity> </soapenv:Header> <soapenv:Body> <tpm:DXProfileRequest> <operation>get</operation> <index>0</index> </tpm:DXProfileRequest> </soapenv:Body></soapenv:Envelope>
DX_Endpoint Web ServiceThe DX_Endpoint web service sends a document to B2B Data Exchange and routes it to a profile for processing.
DX_Endpoint RequestThe DX_Endpoint request message defines a document for the DX_Endpoint web service to process.
The DX_Endpoint request message includes the following elements:
Data
Required. Document to be processed. The document must have Base64 encoding.
DXProperty
Key-value pair that contains the properties of the document. This element is defined by the complex type object DXProperty and can occur multiple times.
You can include the following keys:
• application. Name of the application to use for routing the document to a profile for processing.
DX_Endpoint Web Service 103
• profileName. Name of the profile to use for routing the document to a profile for processing.
• partnerName. Name of the partner to use for routing the document to a profile for processing.
• accountNumber. Account number to use for routing the document to a profile for processing.
• accountName. Name of the account to use for routing the document to a profile for processing.
• dataByReference. Indicates whether the request contains data or a reference to data. Set to true when the request contains a reference to the data. Set to false when the request contains the data.
• mimetype. The MIME type of the data, such as text/plain or text/html.
CustomProperty
Key-value pair that contains custom properties of the document. This element can occur multiple times.
DX_Endpoint ResponseThe DX_Endpoint response defines the reply from the DX_Endpoint web service.
The DX_Endpoint web service sends an empty response to the client when the request completes successfully.
Complex Type Objects in the Data Exchange Web Services
The WSDL for the Data Exchange web services include the following complex type objects:
• DXPartner. Defines a partner.
• DXAccount. Defines an account.
• DXProfile. Defines a profile.
• DXContactInformation. Defines the contact information for a partner.
The properties of the elements in the complex type objects must match the properties of the corresponding data in B2B Data Exchange. For example, the partner name element has the same maximum length as a partner in the B2B Data Exchange repository.
DXPartner ObjectThe DXPartner object defines a partner.
The following table describes the elements and attributes in the DXPartner object:
Element Description
Id Unique identifier for the partner. Generated by B2B Data Exchange when a partner is created.
Name Required. Name of the partner.
Description Description of the partner.
104 Chapter 9: B2B Data Exchange Web Services API
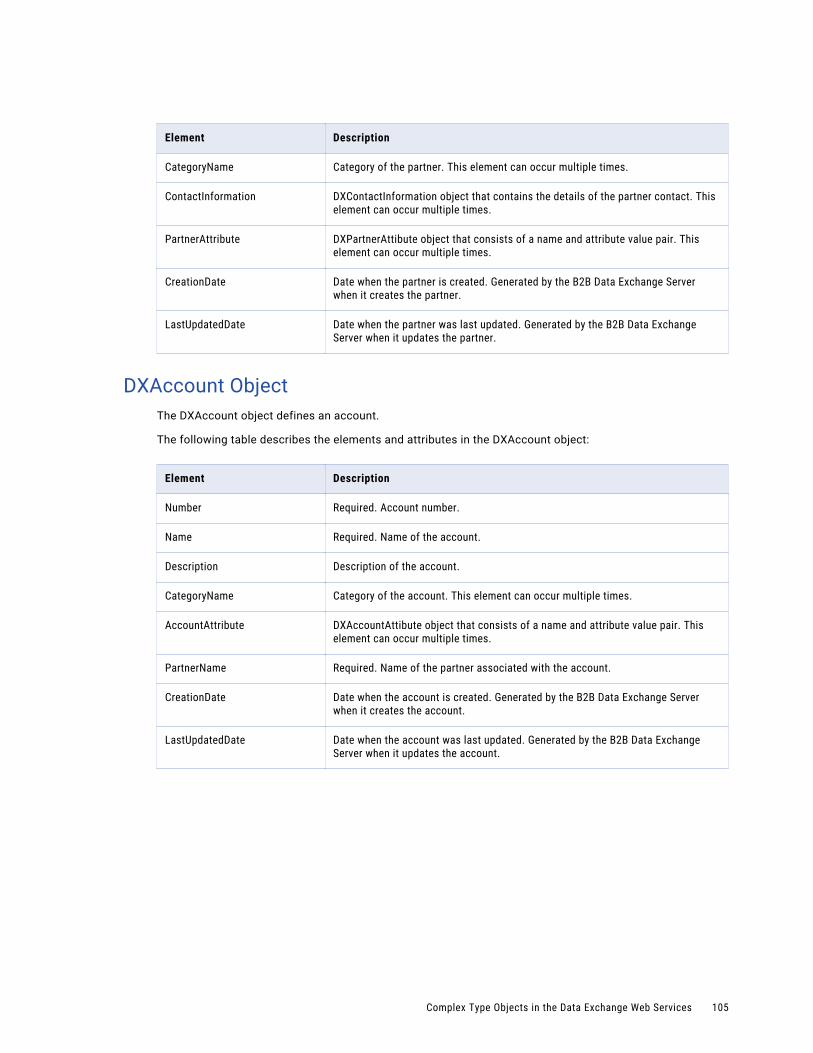
Element Description
CategoryName Category of the partner. This element can occur multiple times.
ContactInformation DXContactInformation object that contains the details of the partner contact. This element can occur multiple times.
PartnerAttribute DXPartnerAttibute object that consists of a name and attribute value pair. This element can occur multiple times.
CreationDate Date when the partner is created. Generated by the B2B Data Exchange Server when it creates the partner.
LastUpdatedDate Date when the partner was last updated. Generated by the B2B Data Exchange Server when it updates the partner.
DXAccount ObjectThe DXAccount object defines an account.
The following table describes the elements and attributes in the DXAccount object:
Element Description
Number Required. Account number.
Name Required. Name of the account.
Description Description of the account.
CategoryName Category of the account. This element can occur multiple times.
AccountAttribute DXAccountAttibute object that consists of a name and attribute value pair. This element can occur multiple times.
PartnerName Required. Name of the partner associated with the account.
CreationDate Date when the account is created. Generated by the B2B Data Exchange Server when it creates the account.
LastUpdatedDate Date when the account was last updated. Generated by the B2B Data Exchange Server when it updates the account.
Complex Type Objects in the Data Exchange Web Services 105
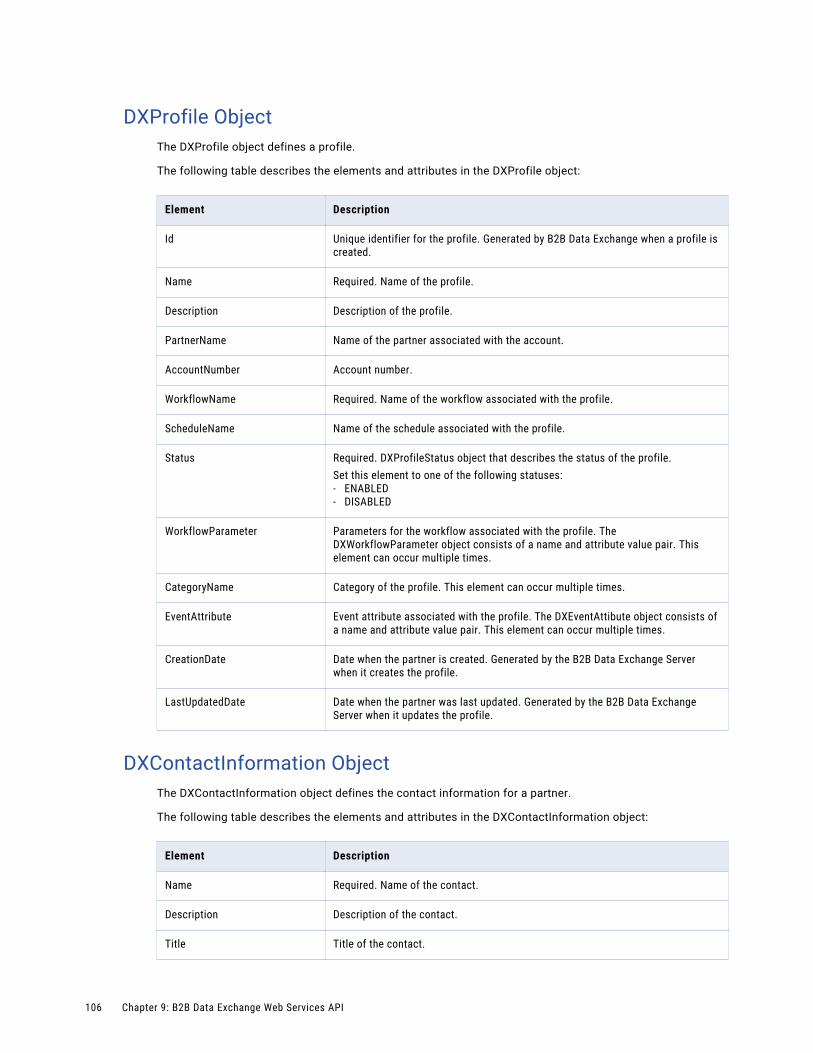
DXProfile ObjectThe DXProfile object defines a profile.
The following table describes the elements and attributes in the DXProfile object:
Element Description
Id Unique identifier for the profile. Generated by B2B Data Exchange when a profile is created.
Name Required. Name of the profile.
Description Description of the profile.
PartnerName Name of the partner associated with the account.
AccountNumber Account number.
WorkflowName Required. Name of the workflow associated with the profile.
ScheduleName Name of the schedule associated with the profile.
Status Required. DXProfileStatus object that describes the status of the profile.Set this element to one of the following statuses:- ENABLED- DISABLED
WorkflowParameter Parameters for the workflow associated with the profile. The DXWorkflowParameter object consists of a name and attribute value pair. This element can occur multiple times.
CategoryName Category of the profile. This element can occur multiple times.
EventAttribute Event attribute associated with the profile. The DXEventAttibute object consists of a name and attribute value pair. This element can occur multiple times.
CreationDate Date when the partner is created. Generated by the B2B Data Exchange Server when it creates the profile.
LastUpdatedDate Date when the partner was last updated. Generated by the B2B Data Exchange Server when it updates the profile.
DXContactInformation ObjectThe DXContactInformation object defines the contact information for a partner.
The following table describes the elements and attributes in the DXContactInformation object:
Element Description
Name Required. Name of the contact.
Description Description of the contact.
Title Title of the contact.
106 Chapter 9: B2B Data Exchange Web Services API
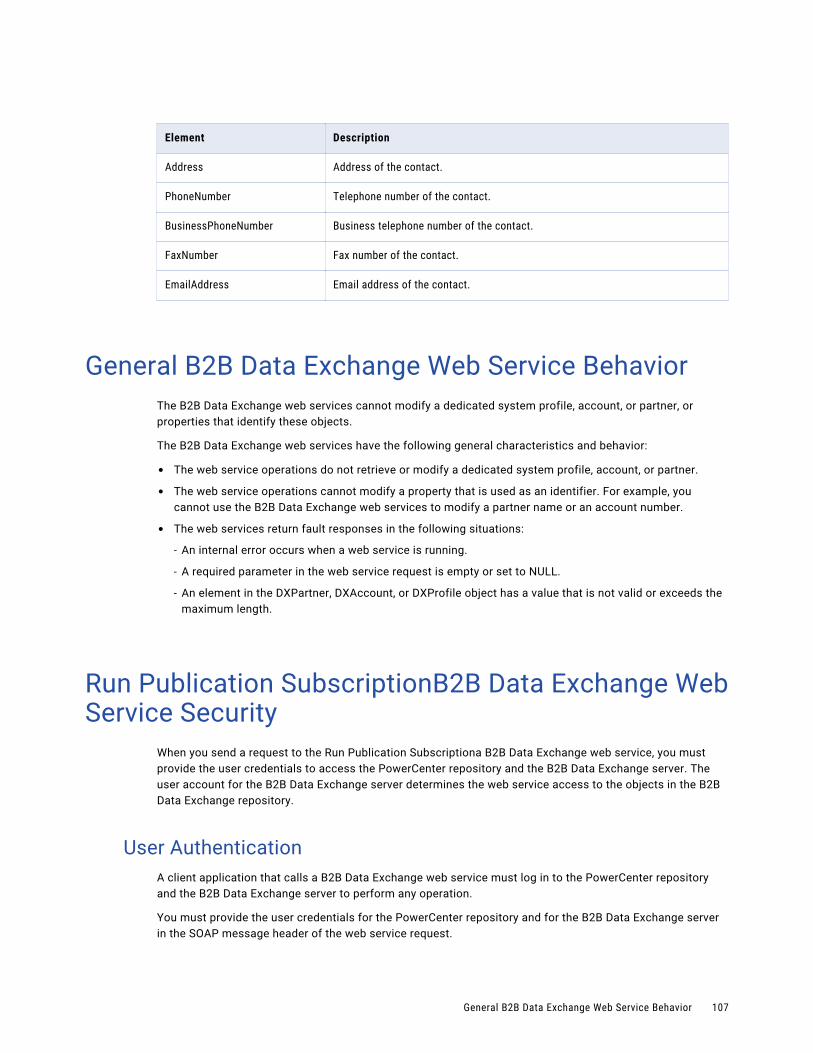
Element Description
Address Address of the contact.
PhoneNumber Telephone number of the contact.
BusinessPhoneNumber Business telephone number of the contact.
FaxNumber Fax number of the contact.
EmailAddress Email address of the contact.
General B2B Data Exchange Web Service BehaviorThe B2B Data Exchange web services cannot modify a dedicated system profile, account, or partner, or properties that identify these objects.
The B2B Data Exchange web services have the following general characteristics and behavior:
• The web service operations do not retrieve or modify a dedicated system profile, account, or partner.
• The web service operations cannot modify a property that is used as an identifier. For example, you cannot use the B2B Data Exchange web services to modify a partner name or an account number.
• The web services return fault responses in the following situations:
- An internal error occurs when a web service is running.
- A required parameter in the web service request is empty or set to NULL.
- An element in the DXPartner, DXAccount, or DXProfile object has a value that is not valid or exceeds the maximum length.
Run Publication SubscriptionB2B Data Exchange Web Service Security
When you send a request to the Run Publication Subscriptiona B2B Data Exchange web service, you must provide the user credentials to access the PowerCenter repository and the B2B Data Exchange server. The user account for the B2B Data Exchange server determines the web service access to the objects in the B2B Data Exchange repository.
User AuthenticationA client application that calls a B2B Data Exchange web service must log in to the PowerCenter repository and the B2B Data Exchange server to perform any operation.
You must provide the user credentials for the PowerCenter repository and for the B2B Data Exchange server in the SOAP message header of the web service request.
General B2B Data Exchange Web Service Behavior 107
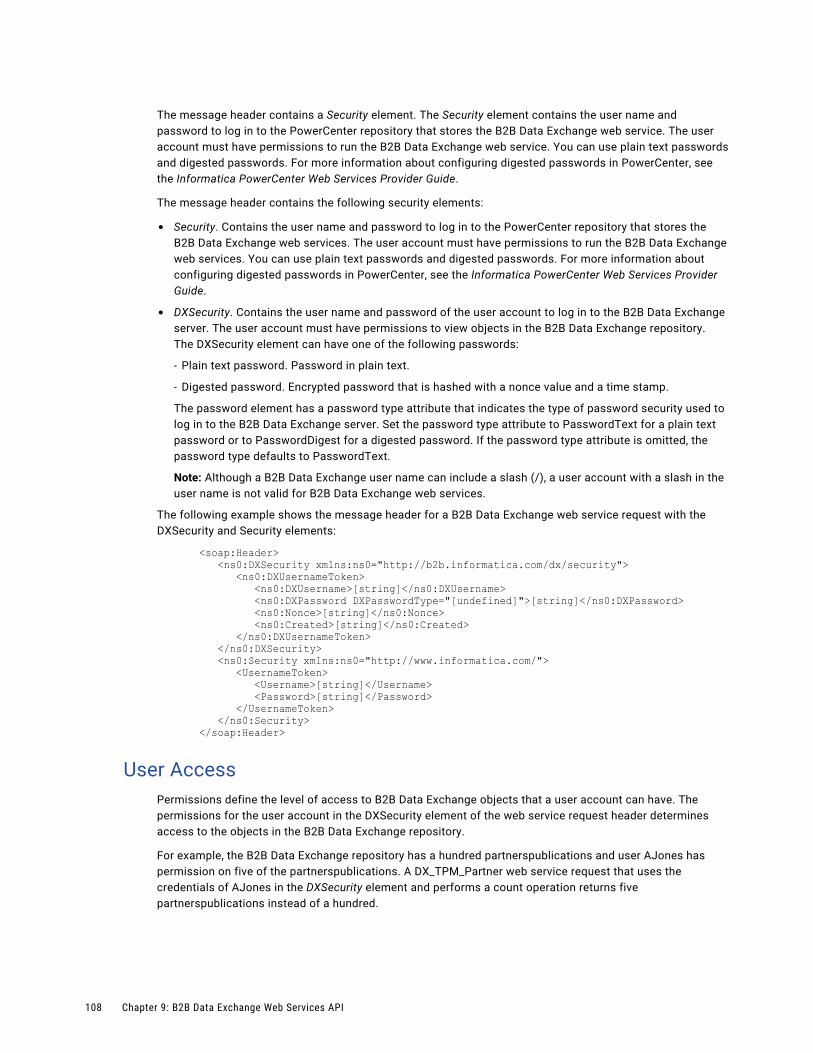
The message header contains a Security element. The Security element contains the user name and password to log in to the PowerCenter repository that stores the B2B Data Exchange web service. The user account must have permissions to run the B2B Data Exchange web service. You can use plain text passwords and digested passwords. For more information about configuring digested passwords in PowerCenter, see the Informatica PowerCenter Web Services Provider Guide.
The message header contains the following security elements:
• Security. Contains the user name and password to log in to the PowerCenter repository that stores the B2B Data Exchange web services. The user account must have permissions to run the B2B Data Exchange web services. You can use plain text passwords and digested passwords. For more information about configuring digested passwords in PowerCenter, see the Informatica PowerCenter Web Services Provider Guide.
• DXSecurity. Contains the user name and password of the user account to log in to the B2B Data Exchange server. The user account must have permissions to view objects in the B2B Data Exchange repository.The DXSecurity element can have one of the following passwords:
- Plain text password. Password in plain text.
- Digested password. Encrypted password that is hashed with a nonce value and a time stamp.
The password element has a password type attribute that indicates the type of password security used to log in to the B2B Data Exchange server. Set the password type attribute to PasswordText for a plain text password or to PasswordDigest for a digested password. If the password type attribute is omitted, the password type defaults to PasswordText.
Note: Although a B2B Data Exchange user name can include a slash (/), a user account with a slash in the user name is not valid for B2B Data Exchange web services.
The following example shows the message header for a B2B Data Exchange web service request with the DXSecurity and Security elements:
<soap:Header> <ns0:DXSecurity xmlns:ns0="http://b2b.informatica.com/dx/security"> <ns0:DXUsernameToken> <ns0:DXUsername>[string]</ns0:DXUsername> <ns0:DXPassword DXPasswordType="[undefined]">[string]</ns0:DXPassword> <ns0:Nonce>[string]</ns0:Nonce> <ns0:Created>[string]</ns0:Created> </ns0:DXUsernameToken> </ns0:DXSecurity> <ns0:Security xmlns:ns0="http://www.informatica.com/"> <UsernameToken> <Username>[string]</Username> <Password>[string]</Password> </UsernameToken> </ns0:Security> </soap:Header>
User AccessPermissions define the level of access to B2B Data Exchange objects that a user account can have. The permissions for the user account in the DXSecurity element of the web service request header determines access to the objects in the B2B Data Exchange repository.
For example, the B2B Data Exchange repository has a hundred partnerspublications and user AJones has permission on five of the partnerspublications. A DX_TPM_Partner web service request that uses the credentials of AJones in the DXSecurity element and performs a count operation returns five partnerspublications instead of a hundred.
108 Chapter 9: B2B Data Exchange Web Services API
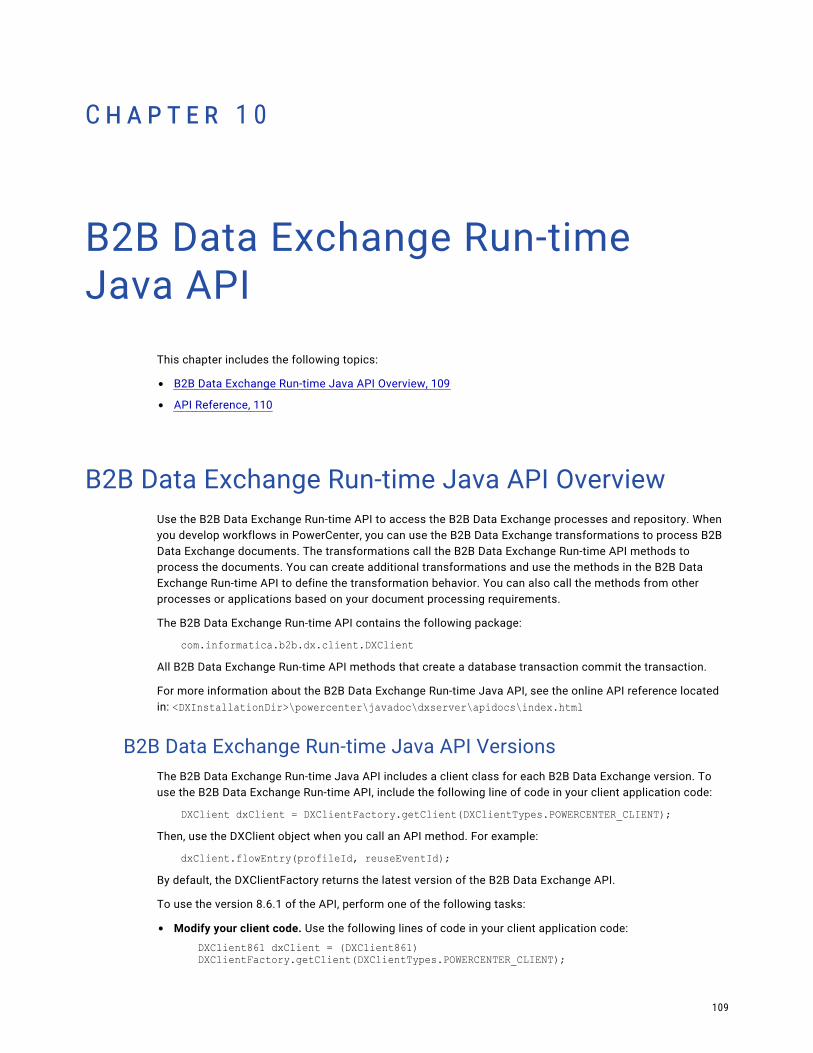
C h a p t e r 1 0
B2B Data Exchange Run-time Java API
This chapter includes the following topics:
• B2B Data Exchange Run-time Java API Overview, 109
• API Reference, 110
B2B Data Exchange Run-time Java API OverviewUse the B2B Data Exchange Run-time API to access the B2B Data Exchange processes and repository. When you develop workflows in PowerCenter, you can use the B2B Data Exchange transformations to process B2B Data Exchange documents. The transformations call the B2B Data Exchange Run-time API methods to process the documents. You can create additional transformations and use the methods in the B2B Data Exchange Run-time API to define the transformation behavior. You can also call the methods from other processes or applications based on your document processing requirements.
The B2B Data Exchange Run-time API contains the following package:
com.informatica.b2b.dx.client.DXClientAll B2B Data Exchange Run-time API methods that create a database transaction commit the transaction.
For more information about the B2B Data Exchange Run-time Java API, see the online API reference located in: <DXInstallationDir>\powercenter\javadoc\dxserver\apidocs\index.html
B2B Data Exchange Run-time Java API VersionsThe B2B Data Exchange Run-time Java API includes a client class for each B2B Data Exchange version. To use the B2B Data Exchange Run-time API, include the following line of code in your client application code:
DXClient dxClient = DXClientFactory.getClient(DXClientTypes.POWERCENTER_CLIENT);Then, use the DXClient object when you call an API method. For example:
dxClient.flowEntry(profileId, reuseEventId);By default, the DXClientFactory returns the latest version of the B2B Data Exchange API.
To use the version 8.6.1 of the API, perform one of the following tasks:
• Modify your client code. Use the following lines of code in your client application code:
DXClient861 dxClient = (DXClient861) DXClientFactory.getClient(DXClientTypes.POWERCENTER_CLIENT);
109
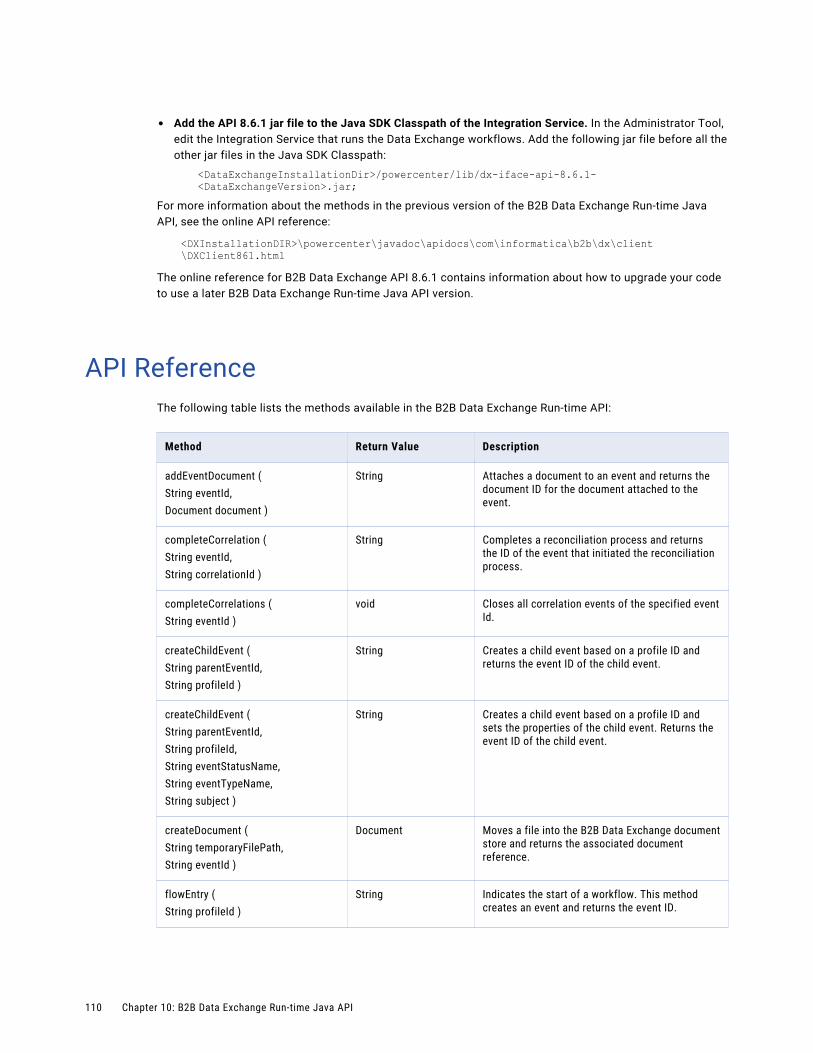
• Add the API 8.6.1 jar file to the Java SDK Classpath of the Integration Service. In the Administrator Tool, edit the Integration Service that runs the Data Exchange workflows. Add the following jar file before all the other jar files in the Java SDK Classpath:
<DataExchangeInstallationDir>/powercenter/lib/dx-iface-api-8.6.1-<DataExchangeVersion>.jar;
For more information about the methods in the previous version of the B2B Data Exchange Run-time Java API, see the online API reference:
<DXInstallationDIR>\powercenter\javadoc\apidocs\com\informatica\b2b\dx\client\DXClient861.html
The online reference for B2B Data Exchange API 8.6.1 contains information about how to upgrade your code to use a later B2B Data Exchange Run-time Java API version.
API ReferenceThe following table lists the methods available in the B2B Data Exchange Run-time API:
Method Return Value Description
addEventDocument (String eventId,Document document )
String Attaches a document to an event and returns the document ID for the document attached to the event.
completeCorrelation (String eventId,String correlationId )
String Completes a reconciliation process and returns the ID of the event that initiated the reconciliation process.
completeCorrelations (String eventId )
void Closes all correlation events of the specified event Id.
createChildEvent (String parentEventId,String profileId )
String Creates a child event based on a profile ID and returns the event ID of the child event.
createChildEvent (String parentEventId,String profileId,String eventStatusName,String eventTypeName,String subject )
String Creates a child event based on a profile ID and sets the properties of the child event. Returns the event ID of the child event.
createDocument (String temporaryFilePath,String eventId )
Document Moves a file into the B2B Data Exchange document store and returns the associated document reference.
flowEntry (String profileId )
String Indicates the start of a workflow. This method creates an event and returns the event ID.
110 Chapter 10: B2B Data Exchange Run-time Java API
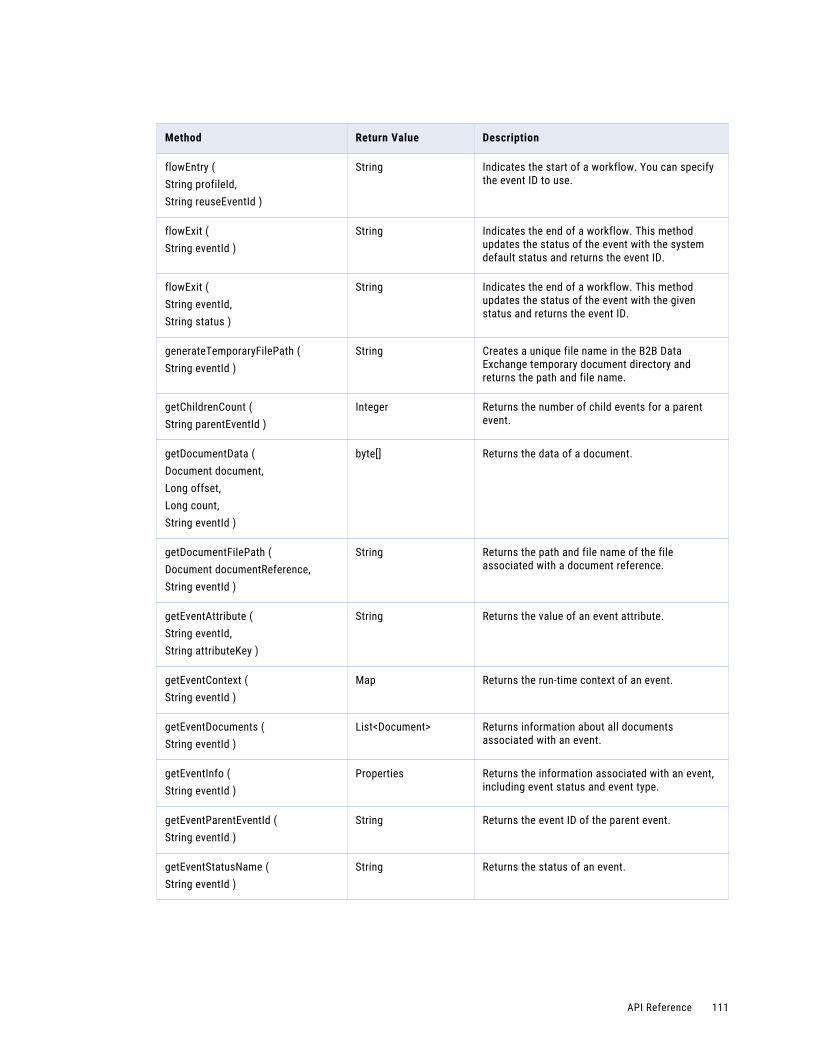
Method Return Value Description
flowEntry (String profileId,String reuseEventId )
String Indicates the start of a workflow. You can specify the event ID to use.
flowExit (String eventId )
String Indicates the end of a workflow. This method updates the status of the event with the system default status and returns the event ID.
flowExit (String eventId,String status )
String Indicates the end of a workflow. This method updates the status of the event with the given status and returns the event ID.
generateTemporaryFilePath (String eventId )
String Creates a unique file name in the B2B Data Exchange temporary document directory and returns the path and file name.
getChildrenCount (String parentEventId )
Integer Returns the number of child events for a parent event.
getDocumentData (Document document,Long offset,Long count,String eventId )
byte[] Returns the data of a document.
getDocumentFilePath (Document documentReference,String eventId )
String Returns the path and file name of the file associated with a document reference.
getEventAttribute (String eventId,String attributeKey )
String Returns the value of an event attribute.
getEventContext (String eventId )
Map Returns the run-time context of an event.
getEventDocuments (String eventId )
List<Document> Returns information about all documents associated with an event.
getEventInfo (String eventId )
Properties Returns the information associated with an event, including event status and event type.
getEventParentEventId (String eventId )
String Returns the event ID of the parent event.
getEventStatusName (String eventId )
String Returns the status of an event.
API Reference 111

Method Return Value Description
incrementProfileSequenceValue (String profileId,String parameterSequenceId )
String Increments by one the value of a sequence parameter associated with a profile.
incrementProfileSequenceValue (String profileId,String parameterSequenceId,String incrementBy )
String Increments by incrementBy the value of a sequence parameter associated with a profile.
initiateCorrelation (String eventId,String correlationId,String correlationType,long timeWindowSeconds )
void Initiates a reconciliation process.
releaseDelayedEvents (String profileId,List<String> eventIds )
void Releases delayed events.
resolveProfileId (String accountNumber,String application,String partnerName,String profileName )
String Returns the profile ID associated with an application and an account number or partner.
setEventAttribute (String eventId,String attributeKey,String attributeValue )
String Sets the value of the attribute associated with an event.
setEventStatus (String eventId,String eventStatus )
void Updates the status of an event.
setEventStatus (String eventId,String eventStatusId,String comments )
void Updates the status of an event.
setEventSubject (String eventId,String subject )
void Updates the subject of an event.
112 Chapter 10: B2B Data Exchange Run-time Java API
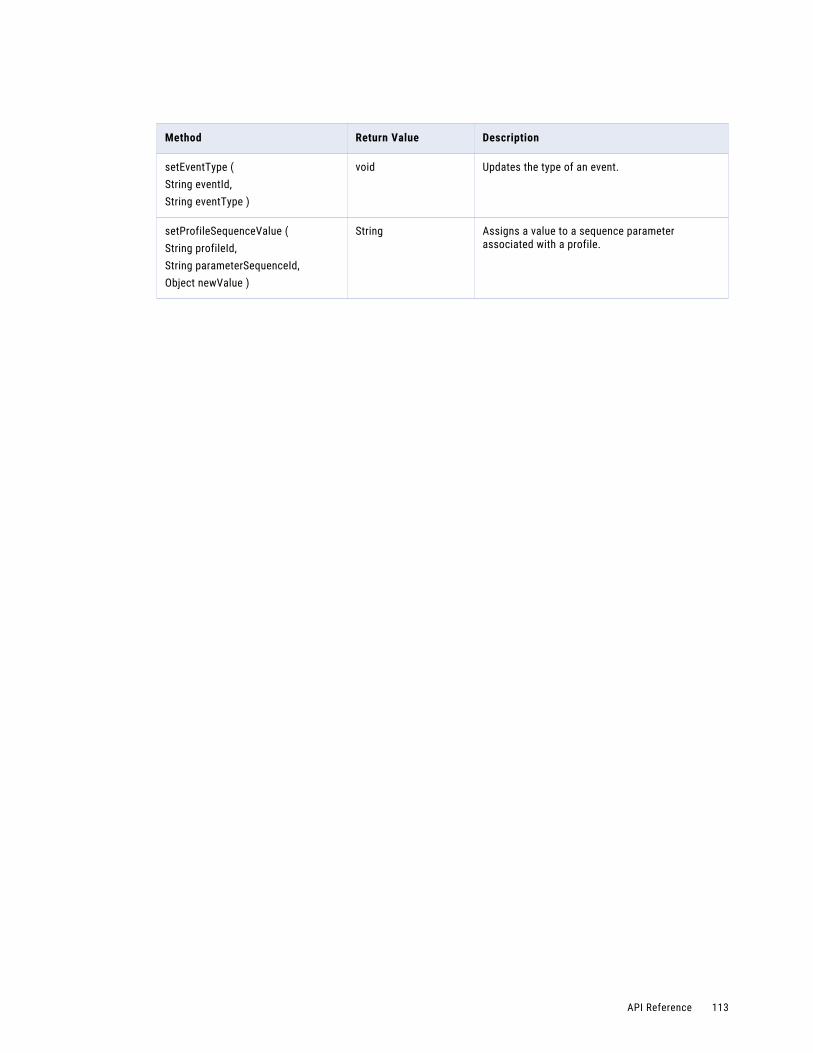
Method Return Value Description
setEventType (String eventId,String eventType )
void Updates the type of an event.
setProfileSequenceValue (String profileId,String parameterSequenceId,Object newValue )
String Assigns a value to a sequence parameter associated with a profile.
API Reference 113
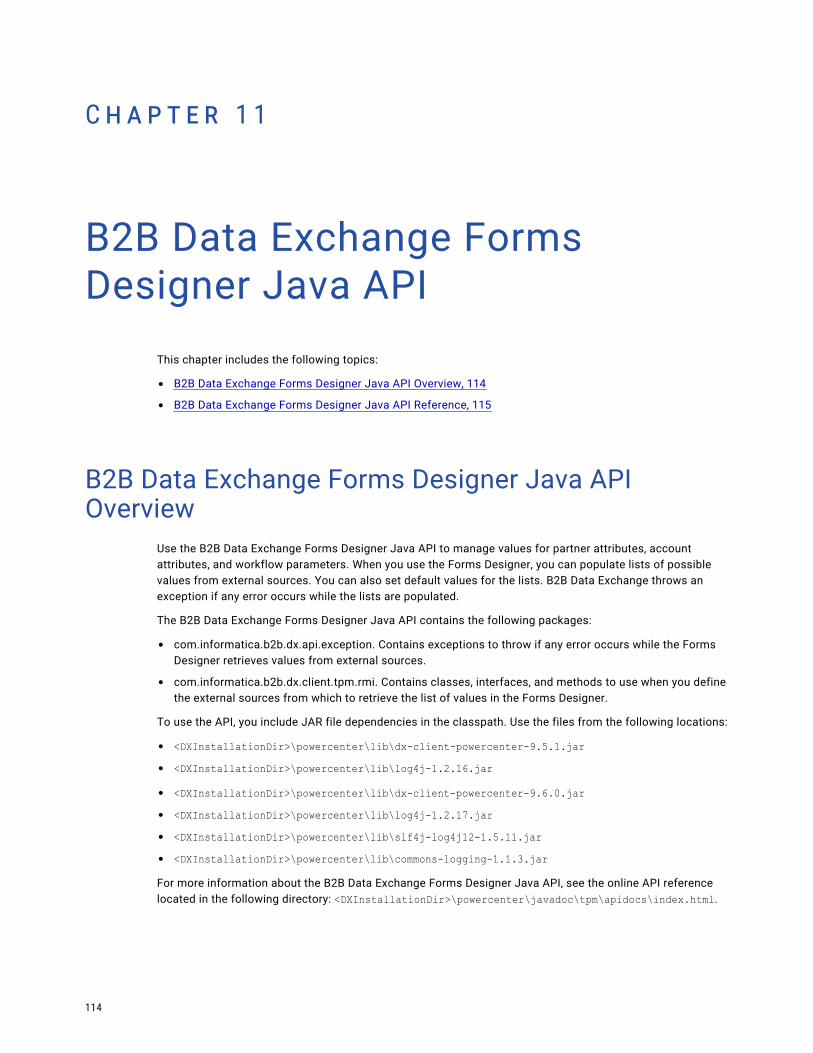
C h a p t e r 1 1
B2B Data Exchange Forms Designer Java API
This chapter includes the following topics:
• B2B Data Exchange Forms Designer Java API Overview, 114
• B2B Data Exchange Forms Designer Java API Reference, 115
B2B Data Exchange Forms Designer Java API Overview
Use the B2B Data Exchange Forms Designer Java API to manage values for partner attributes, account attributes, and workflow parameters. When you use the Forms Designer, you can populate lists of possible values from external sources. You can also set default values for the lists. B2B Data Exchange throws an exception if any error occurs while the lists are populated.
The B2B Data Exchange Forms Designer Java API contains the following packages:
• com.informatica.b2b.dx.api.exception. Contains exceptions to throw if any error occurs while the Forms Designer retrieves values from external sources.
• com.informatica.b2b.dx.client.tpm.rmi. Contains classes, interfaces, and methods to use when you define the external sources from which to retrieve the list of values in the Forms Designer.
To use the API, you include JAR file dependencies in the classpath. Use the files from the following locations:
• <DXInstallationDir>\powercenter\lib\dx-client-powercenter-9.5.1.jar• <DXInstallationDir>\powercenter\lib\log4j-1.2.16.jar
• <DXInstallationDir>\powercenter\lib\dx-client-powercenter-9.6.0.jar• <DXInstallationDir>\powercenter\lib\log4j-1.2.17.jar • <DXInstallationDir>\powercenter\lib\slf4j-log4j12-1.5.11.jar • <DXInstallationDir>\powercenter\lib\commons-logging-1.1.3.jar
For more information about the B2B Data Exchange Forms Designer Java API, see the online API reference located in the following directory: <DXInstallationDir>\powercenter\javadoc\tpm\apidocs\index.html.
114
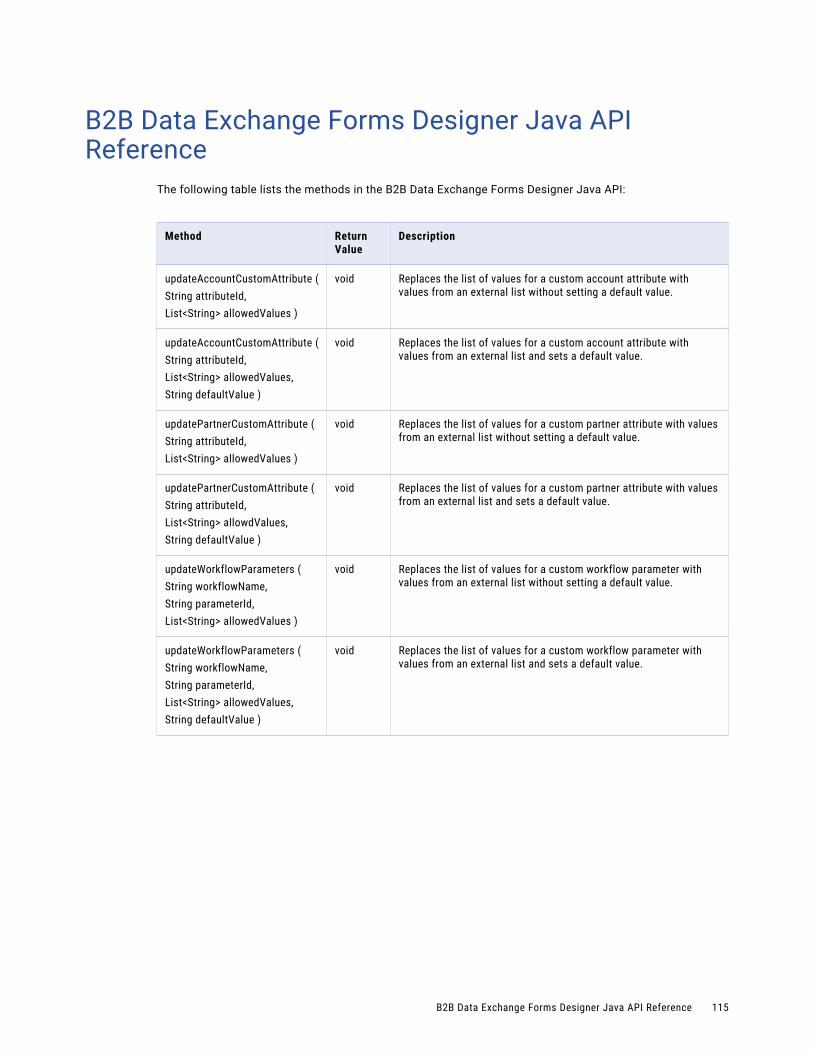
B2B Data Exchange Forms Designer Java API Reference
The following table lists the methods in the B2B Data Exchange Forms Designer Java API:
Method Return Value
Description
updateAccountCustomAttribute (String attributeId,List<String> allowedValues )
void Replaces the list of values for a custom account attribute with values from an external list without setting a default value.
updateAccountCustomAttribute (String attributeId,List<String> allowedValues,String defaultValue )
void Replaces the list of values for a custom account attribute with values from an external list and sets a default value.
updatePartnerCustomAttribute (String attributeId,List<String> allowedValues )
void Replaces the list of values for a custom partner attribute with values from an external list without setting a default value.
updatePartnerCustomAttribute (String attributeId,List<String> allowdValues,String defaultValue )
void Replaces the list of values for a custom partner attribute with values from an external list and sets a default value.
updateWorkflowParameters (String workflowName,String parameterId,List<String> allowedValues )
void Replaces the list of values for a custom workflow parameter with values from an external list without setting a default value.
updateWorkflowParameters (String workflowName,String parameterId,List<String> allowedValues,String defaultValue )
void Replaces the list of values for a custom workflow parameter with values from an external list and sets a default value.
B2B Data Exchange Forms Designer Java API Reference 115
I n d e x
BB2B Data Exchange workflow
definition 46
Cclient plug-in for PowerCenter
installing Data Exchange transformations 11
DDashboard and reports
adding custom panel 57, 79creating custom report 57, 79custom LogiXML properties 55, 77customizing in Logi Info Studio 56, 78default filters 52, 74default JavaScript support files 54, 76default KPIs 51, 73default SQL constants 52, 74default theme modifier 54, 76deploying and testing 58, 80installing Logi Info Studio 56, 78KPIs definition 51, 73overview 50, 72setting up custom application in Logi Info Studio 57, 79structure in Logi Info Studio 52, 74
Data Exchange plug-ins client plug-in for PowerCenter 11server plug-in for PowerCenter 11
Data Integration Hub workflow definition 45
Data Integration Hub workflows managing 46
DX_Add_Document_To_Event definition 23ports 23, 24properties 25
DX_Aggregate definition 25ports 26properties 27
DX_Complete_Correlation definition 27ports 27, 28properties 28
DX_Create_Event definition 28ports 29properties 29
DX_Event_Attribute definition 30ports 30
DX_Event_Attribute (continued)properties 31
DX_Event_Details definition 31ports 31properties 32
DX_Generate_Temporary_File definition 32ports 32properties 33
DX_Get_Document_File_Path definition 33ports 33properties 34
DX_Increment_Profile_Parameter definition 34ports 34properties 35
DX_Initiate_Correlation definition 35ports 35, 36properties 36
DX_Notification definition 36ports 37properties 37
DX_Profile_Parameters definition 37ports 38
DX_Publication_Parameters definition 39ports 39
DX_Release_Delayed_Events definition 39ports 40
DX_Resolve_Profile definition 40ports 40, 41properties 41
DX_Start_Publication definition 41ports 41properties 42
DX_Throw_Error definition 42ports 43properties 44
Eemail
monitor notification 69email for monitor notification
configuring 69
116
event reconciliation overview 59
Fforms designer
actions 65definition 64Designer tab 64element properties 66group properties 67using 67
Forms Designer Java API reference 115
Mmonitor notification
email 69
Ppending reconciliation
reconciliation status 61PowerCenter
create mapping 15creating source definition 11creating target definition 13creating the workflow 17export workflow 18installing plug-ins 11JMS connection 16JNDI connection 16sources and targets for B2B Data Exchange 11
Rreconciled after timeout
reconciliation status 61reconciliation complete
reconciliation status 61reconciliation status
ranking 61reconciled after timeout 61reconciliation complete 61reconciliation correlation 61timed out 61
reconciliations completing 60definition 59
reconciliations (continued)initiating 60
run publication subscription API web service 107
run publication subscription web service API security 107
Sserver plug-in for PowerCenter
installing Data Exchange transformations 11
Ttimed out
reconciliation status 61Transformation
DX_Add_Document_To_Event 23DX_Aggregate 25DX_Complete_Correlation 27DX_Create_Event 28DX_Event_Attribute 30DX_Event_Details 31DX_Generate_Temporary_File 32DX_Get_Document_File_Path 33DX_Increment_Profile_Parameter 34DX_Initiate_Correlation 35DX_Notification 36DX_Profile_Parameters 37DX_Publication_Parameters 39DX_Release_Delayed_Events 39DX_Resolve_Profile 40DX_Start_Publication 41DX_Throw_Error 42
Transformations configuring 22definition 20error handling 22guidelines 22installing plug-ins 21
Wworkflow
B2B Data Exchange 46Data Integration Hub 45
workflow parameters customizing 67
workflows properties 47, 48
Index 117


