Embed Size (px)
Citation preview
IBM Tivoli Monitoring Agent BuilderVersion 6.2.3.1
User's Guide
SC32-1921-13
���

IBM Tivoli Monitoring Agent BuilderVersion 6.2.3.1
User's Guide
SC32-1921-13
���

NoteBefore using this information and the product it supports, read the information in Appendix N, “Notices,” on page 647.
This edition applies to version 6.2.3.1 of Tivoli Monitoring Agent Builder and to all subsequent releases andmodifications until otherwise indicated in new editions.
© Copyright IBM Corporation 2007, 2012.US Government Users Restricted Rights – Use, duplication or disclosure restricted by GSA ADP Schedule Contractwith IBM Corp.
Contents
Figures . . . . . . . . . . . . . . . ix
Tables . . . . . . . . . . . . . . . xiii
Chapter 1. Introduction . . . . . . . . 1About Tivoli Monitoring Agent Builder . . . . . 1About Eclipse . . . . . . . . . . . . . . 2New in this release . . . . . . . . . . . . 2About this guide . . . . . . . . . . . . . 3
Chapter 2. Getting startedquick-reference guide . . . . . . . . . 5
Chapter 3. Installing the TivoliMonitoring Agent Builder . . . . . . . 7Requirements . . . . . . . . . . . . . . 7Authorization . . . . . . . . . . . . . . 8Builder installation procedure. . . . . . . . . 8After installing . . . . . . . . . . . . . 9Silent installation . . . . . . . . . . . . . 9Uninstalling Agent Builder . . . . . . . . . 10Silent uninstallation. . . . . . . . . . . . 11
Chapter 4. Starting the Agent Builder 13Planning and overview . . . . . . . . . . 13Starting the Agent Builder . . . . . . . . . 13
Chapter 5. Creating a basic agent . . . 15Operating system requirements . . . . . . . . 15Starting the new agent wizard . . . . . . . . 15
Using the icon to start the wizard . . . . . . 16Creating a new file to start the wizard . . . . 16
Creating and defining the agent . . . . . . . 20Naming your agent. . . . . . . . . . . 20Defining initial data source . . . . . . . . 25Data Sources . . . . . . . . . . . . . 26Selecting key attributes . . . . . . . . . 27Defining additional data sources . . . . . . 28Organizing the agent . . . . . . . . . . 30
Navigator groups . . . . . . . . . . 31Subnodes . . . . . . . . . . . . . 31Moving existing data sources . . . . . . 33
Preparing your agent for modifications or forregeneration . . . . . . . . . . . . . . 35
Chapter 6. Modifying your agent byusing the Tivoli Monitoring AgentEditor . . . . . . . . . . . . . . . 37Tivoli Monitoring Agent Editor . . . . . . . . 37
Agent Information page . . . . . . . . . 38General agent information . . . . . . . 39Default operating systems . . . . . . . 39Self-Describing Agent . . . . . . . . . 39
Environment variables. . . . . . . . . 40Watchdog information . . . . . . . . . 41Cognos information . . . . . . . . . 43Generate Agent Wizard link . . . . . . . 45Commit Agent Version link . . . . . . . 45
Data Source Definition page . . . . . . . . 45Runtime Configuration Information page . . . 47Agent XML Editor page . . . . . . . . . 48
Saving your edits and changes . . . . . . . . 49Committing a version of the agent. . . . . . . 49
Steps to commit the agent . . . . . . . . 50Changing a subsequent version of your agent . . 50Changing the product code . . . . . . . . 51
Chapter 7. Editing data source andattribute properties . . . . . . . . . 53Creating attributes . . . . . . . . . . . . 54
Fields and options for defining attributes . . . 55Attribute types . . . . . . . . . . . . 57
String attributes . . . . . . . . . . . 57Numeric . . . . . . . . . . . . . 58Time stamp . . . . . . . . . . . . 58
Numeric attribute options . . . . . . . . 58Specifying an enumeration for an attribute . . . 61
Copying attributes . . . . . . . . . . . . 61Editing attributes . . . . . . . . . . . . 62Removing attributes . . . . . . . . . . . 62Creating derived attributes . . . . . . . . . 62Editing derived attributes. . . . . . . . . . 66Filtering attribute groups . . . . . . . . . . 66Formula Editor . . . . . . . . . . . . . 66
Changing the component view . . . . . . . 69Component types . . . . . . . . . . . 69
Attribute component . . . . . . . . . 70Literal component . . . . . . . . . . 72Operator component . . . . . . . . . 73Conditional expression component . . . . 74Function component . . . . . . . . . 75
Common options . . . . . . . . . . . 77Insert . . . . . . . . . . . . . . 77Remove . . . . . . . . . . . . . 78Up one Level . . . . . . . . . . . . 79Edit . . . . . . . . . . . . . . . 79
Formula errors . . . . . . . . . . . . 79Formula operators and functions . . . . . . . 81
Examples . . . . . . . . . . . . . . 85Derived Attributes . . . . . . . . . . 85Filtering . . . . . . . . . . . . . 86
Specifying operating systems . . . . . . . . 86
Chapter 8. Monitoring a process. . . . 89Defining connections for process browsing . . . . 94
Chapter 9. Monitoring a Windowsservice. . . . . . . . . . . . . . . 97
© Copyright IBM Corp. 2007, 2012 iii
Defining connections for service browsing. . . . 101
Chapter 10. Monitoring data fromWindows ManagementInstrumentation (WMI) . . . . . . . 105Testing . . . . . . . . . . . . . . . 110
Chapter 11. Monitoring a WindowsPerformance Monitor (Perfmon) . . . 113Testing . . . . . . . . . . . . . . . 118
Chapter 12. Monitoring data from aSimple Network Management Protocol(SNMP) . . . . . . . . . . . . . . 121MIB errors . . . . . . . . . . . . . . 126SNMP MIB Parsing options . . . . . . . . 127Testing . . . . . . . . . . . . . . . 128
Chapter 13. Monitoring events from aSimple Network Management Protocolevent sender. . . . . . . . . . . . 131Configuration . . . . . . . . . . . . . 135Testing . . . . . . . . . . . . . . . 137
Chapter 14. Monitoring JavaManagement Extensions (JMX)MBeans . . . . . . . . . . . . . . 141JMX configuration . . . . . . . . . . . . 157JMX notifications, monitors, and operations . . . 160
JMX notifications . . . . . . . . . . . 160JMX monitors . . . . . . . . . . . . 161
Take Action commands for monitors . . . 162JMX Add String Metric Watcher . . . . 162JMX Add Gauge Metric Watcher . . . . 163JMX Add Counter Metric Watcher . . . 164JMX Delete Metric Watcher . . . . . . 165
Starting and stopping monitors . . . . . 165JMX operations . . . . . . . . . . . . 166
Take Action command syntax . . . . . . 166Example: Invoke an operation to reset acounter . . . . . . . . . . . . . 166Example: Invoke an action with an argument 166Running the JMX_INVOKE Take Actioncommand . . . . . . . . . . . . 167
Specific fields for Java Management Extensions(JMX) MBeans . . . . . . . . . . . . . 167Testing . . . . . . . . . . . . . . . 170
Chapter 15. Monitoring data from aCommon Information Model (CIM) . . 173Steps for monitoring data from a CIM . . . . . 173CIM configuration. . . . . . . . . . . . 176Testing . . . . . . . . . . . . . . . 177
Chapter 16. Monitoring a log file . . . 179Testing . . . . . . . . . . . . . . . 195
Chapter 17. Monitoring an AIX BinaryLog. . . . . . . . . . . . . . . . 197
Chapter 18. Monitoring a WindowsEvent Log . . . . . . . . . . . . . 201Filtering by event type . . . . . . . . . . 206Filtering by event source . . . . . . . . . 206Filtering by event identifier. . . . . . . . . 208
Chapter 19. Monitoring a commandreturn code . . . . . . . . . . . . 211Editing a command file definition . . . . . . 222
File Separation & Consolidation . . . . . . 223
Chapter 20. Monitoring output from ascript . . . . . . . . . . . . . . . 225Collecting data from a remote system . . . . . 225Script parsing and separators . . . . . . . . 225
Examples . . . . . . . . . . . . . . 226Simple script output . . . . . . . . . 226Complex script output . . . . . . . . 226
Steps for monitoring output from a script . . . . 227
Chapter 21. Monitoring data from JavaDatabase Connectivity (JDBC) . . . . 237Procedure . . . . . . . . . . . . . . 237JDBC configuration . . . . . . . . . . . 249Stored procedures . . . . . . . . . . . . 251
SQL Server Samples . . . . . . . . . . 251call sp_helpdb . . . . . . . . . . . 251call:2 sp_helpdb master . . . . . . . . 251
DB2 stored procedure . . . . . . . . . 251Oracle stored procedures . . . . . . . . 252
Testing . . . . . . . . . . . . . . . 252
Chapter 22. Monitoring systemavailability using Ping . . . . . . . 255Ping configuration files . . . . . . . . . . 255Procedure . . . . . . . . . . . . . . 256Configuration . . . . . . . . . . . . . 258Testing . . . . . . . . . . . . . . . 258
Chapter 23. Monitoring HTTPavailability and response time . . . . 261HTTP tables . . . . . . . . . . . . . . 263
Specific fields for HTTP attributes . . . . . 264Monitoring a URL . . . . . . . . . . . . 268
URLs file . . . . . . . . . . . . . . 268Take Action option . . . . . . . . . . 269
Monitoring https:// URLs . . . . . . . . . 269Proxy server. . . . . . . . . . . . . . 270HTTP configuration . . . . . . . . . . . 270
URL Monitoring configuration. . . . . . . 270Proxy Server configuration . . . . . . . . 270Java configuration . . . . . . . . . . . 270
Testing . . . . . . . . . . . . . . . 271
iv IBM Tivoli Monitoring Agent Builder: User's Guide
Chapter 24. Monitoring data usingSOAP. . . . . . . . . . . . . . . 273Specific fields for SOAP attributes . . . . . . 277XPath options . . . . . . . . . . . . . 280Proxy server. . . . . . . . . . . . . . 281SOAP configuration . . . . . . . . . . . 281
HTTP Server . . . . . . . . . . . . 281Testing . . . . . . . . . . . . . . . 281
Chapter 25. Monitoring data usingSocket . . . . . . . . . . . . . . 283Sending information to the agent . . . . . . . 288
Sending data . . . . . . . . . . . . 288Sending errors instead of data . . . . . . . 290Handling take actions . . . . . . . . . 290
Data encoding . . . . . . . . . . . . . 291Special characters . . . . . . . . . . . 291Character sets . . . . . . . . . . . . 292Numeric Data . . . . . . . . . . . . 292
Errors . . . . . . . . . . . . . . . . 292Limitations of the Socket data source . . . . . 293Socket configuration . . . . . . . . . . . 294Sample script for socket . . . . . . . . . . 295
Perl sample . . . . . . . . . . . . . 295Testing . . . . . . . . . . . . . . . 295
Chapter 26. Monitoring data usingJava API . . . . . . . . . . . . . 297Initializing the Java application . . . . . . . 303Dependencies . . . . . . . . . . . . . 303Generated sample Java application . . . . . . 304
Class structure . . . . . . . . . . . . 305Initialization and clean up . . . . . . . . 306Collecting sampled attribute group data . . . 307Collecting sampled data for a subnode . . . . 308Sending events . . . . . . . . . . . . 309Sending events in a subnode . . . . . . . 309Take actions . . . . . . . . . . . . . 310Handling exceptions . . . . . . . . . . 310Error codes . . . . . . . . . . . . . 311Changes to the agent . . . . . . . . . . 312Using the Java API . . . . . . . . . . 313
Java API configuration . . . . . . . . . . 314Testing . . . . . . . . . . . . . . . 314
Chapter 27. Creating attribute groupsfrom existing sources. . . . . . . . 317Joining two attribute groups . . . . . . . . 318Deleting an attribute group. . . . . . . . . 321Deleting an attribute . . . . . . . . . . . 322Adding an attribute . . . . . . . . . . . 322Reordering attributes . . . . . . . . . . . 322Removing availability filters . . . . . . . . 322Joined attributes . . . . . . . . . . . . 322Filtered Attribute Groups . . . . . . . . . 323
Creating a Filtered Attribute Group . . . . . 324
Chapter 28. Creating a navigatorgroup. . . . . . . . . . . . . . . 327
Chapter 29. Creating subnodes. . . . 331Monitoring the same data from different sources 331Monitoring multiple types of information . . . . 332Data Providers in subnodes . . . . . . . . 333Status of subnodes . . . . . . . . . . . 333Creating subnodes when creating an agent . . . 335
Creating a subnode as the first component of anagent from a Data Source Location page in theNew Agent Wizard . . . . . . . . . . 335Creating a subnode from the Data Sources treein the New Agent Wizard . . . . . . . . 339Creating a subnode in the Agent Editor . . . 343Subnode configuration . . . . . . . . . 344
Configuring a subnode . . . . . . . . 345Overriding custom configuration . . . . . 346Selecting subnode configuration properties 347Advanced subnode configuration. . . . . 347Configuring a subnode from the commandline. . . . . . . . . . . . . . . 350Windows data sources . . . . . . . . 356Script data sources . . . . . . . . . 357
Chapter 30. Configuring an agent. . . 359Customizing configuration . . . . . . . . . 359Changing configuration properties using the AgentEditor . . . . . . . . . . . . . . . . 367Configuring a Windows remote connection . . . 370Configuring a Secure Shell (SSH) remoteconnection . . . . . . . . . . . . . . 371
Chapter 31. Testing and debuggingyour agent . . . . . . . . . . . . 373Attribute group testing . . . . . . . . . . 373
Configuration prior to testing . . . . . . . 374Setting Java Information . . . . . . . . 376
Debugging . . . . . . . . . . . . . 376Installing and testing an agent. . . . . . . . 377
Installing the agent locally . . . . . . . . 377Creating the agent image . . . . . . . . 379Installing the package . . . . . . . . . 380
After you install the agent . . . . . . . . . 381Configuring and starting the agent . . . . . . 382Results after generating and installing the agentwith the Agent Builder . . . . . . . . . . 382
New files on your system . . . . . . . . 382Changes in the Manage Tivoli EnterpriseMonitoring Services window . . . . . . . 385Changes in the Tivoli Enterprise Portal . . . . 386
Uninstalling an agent. . . . . . . . . . . 389Removing an agent using the Tivoli EnterprisePortal . . . . . . . . . . . . . . . 389Removing an agent without using TivoliEnterprise Portal . . . . . . . . . . . 390
Windows systems . . . . . . . . . . 390Command . . . . . . . . . . . 390Uninstallation script . . . . . . . . 390
UNIX systems . . . . . . . . . . . 390Clearing the agent from the Tivoli Enterprise Portalafter removing the agent . . . . . . . . . 390
Contents v
Chapter 32. Creating workspaces,Take Action commands, andsituations . . . . . . . . . . . . . 391Creating situations, Take Action commands, andqueries . . . . . . . . . . . . . . . 391Creating workspaces . . . . . . . . . . . 391
Chapter 33. Importing applicationsupport files . . . . . . . . . . . . 397Exporting and importing server definitions . . . 397
Chapter 34. Event filtering andsummarization . . . . . . . . . . . 405Controlling duplicate events . . . . . . . . 406Viewing event filtering and summarization in theTivoli Enterprise Portal . . . . . . . . . . 407
Chapter 35. Troubleshooting . . . . . 413Gathering product information for IBM SoftwareSupport . . . . . . . . . . . . . . . 413Agent Builder trace logging . . . . . . . . 413
Agent Builder trace logging overview . . . . 414Trace log location . . . . . . . . . . . 414Trace log format . . . . . . . . . . . 414Trace log example . . . . . . . . . . . 415Logging configuration . . . . . . . . . 416
Configuration options . . . . . . . . 416IBM Java Logging Toolkit . . . . . . 416Output window . . . . . . . . . 417
Configuring and Tuning data collection . . . . 418Data types . . . . . . . . . . . . . 418
Sampled data . . . . . . . . . . . 418Environment variables . . . . . . . 420Attribute groups . . . . . . . . . 421
Event Data . . . . . . . . . . . . 422Examples and Advanced Tuning . . . . . 423
Example . . . . . . . . . . . . 423Environment variables . . . . . . . . . . 424Understanding informational, warning, and errormessages . . . . . . . . . . . . . . . 430
Product messages . . . . . . . . . . . 431Agent Builder messages . . . . . . . . . 431
Agent trace logging . . . . . . . . . . . 476Overview of log file management . . . . . 476Examples of trace logging . . . . . . . . 477Principal trace log files . . . . . . . . . 477Example for using trace logs . . . . . . . 479Setting RAS trace parameters . . . . . . . 480
Objective . . . . . . . . . . . . . 480Background Information. . . . . . . . 480Before you begin . . . . . . . . . . 481After you finish . . . . . . . . . . 481Procedure . . . . . . . . . . . . 481
Problem classification. . . . . . . . . . . 483Troubleshooting: Agent Builder . . . . . . 483Troubleshooting: Agents . . . . . . . . . 493Troubleshooting: Report Creation . . . . . . 513
Support information . . . . . . . . . . . 517
Appendix A. Sharing project files . . . 519
Appendix B. Command-line options 523List of commands . . . . . . . . . . . . 523generatelocal . . . . . . . . . . . . . 525generatemappingfile . . . . . . . . . . . 526generatezip . . . . . . . . . . . . . . 527
Appendix C. Attributes reference . . . 529Availability node . . . . . . . . . . . . 529Performance Object Status node . . . . . . . 534Thread Pool Status attribute group . . . . . . 540Event log attribute node . . . . . . . . . . 544Log File Summary. . . . . . . . . . . . 546AIX Binary Log attribute group . . . . . . . 548Monitor and Notification attribute groups . . . . 551Counter Notifications. . . . . . . . . . . 551Gauge Notifications . . . . . . . . . . . 554Registered Monitors . . . . . . . . . . . 557String Notifications . . . . . . . . . . . 558SNMP Event attribute groups . . . . . . . . 560JMX Event attribute groups. . . . . . . . . 562Ping attribute group . . . . . . . . . . . 563HTTP attribute groups . . . . . . . . . . 566
Managed URLs. . . . . . . . . . . . 566URL Objects . . . . . . . . . . . . . 569
Discovery attribute groups . . . . . . . . . 571Take Action Status attribute group . . . . . . 572Log File Status attribute group . . . . . . . 576Log File RegEx Statistics attribute group . . . . 580
Appendix D. Creating applicationsupport extensions for existingagents . . . . . . . . . . . . . . 585Creating a new Application Support Extensionproject. . . . . . . . . . . . . . . . 585Adding your support files to an ApplicationSupport Extension project . . . . . . . . . 587Generating the Application Support Extensioninstall image. . . . . . . . . . . . . . 593Installing your Application Support Extension . . 594Converting an existing Solution Install Project to anApplication Support Extension project . . . . . 595
Appendix E. Cognos data modelgeneration. . . . . . . . . . . . . 597Prerequisites. . . . . . . . . . . . . . 597
Tivoli Data Warehouse . . . . . . . . . 597Create tables and Procedures in the Tivoli DataWarehouse . . . . . . . . . . . . . 597
Create or alter the ManagedSystem Table andStored Procedure in the Tivoli DataWarehouse . . . . . . . . . . . . 597
DB2 . . . . . . . . . . . . . 598Oracle . . . . . . . . . . . . . 598SQL Server 2005 and 2008 . . . . . . 599
Tivoli Reporting and Analytics Model . . . 599
vi IBM Tivoli Monitoring Agent Builder: User's Guide
Populating the Tivoli Data Warehousewith the Tivoli Reporting and AnalyticsModel . . . . . . . . . . . . . 599
Tivoli Common Reporting . . . . . . . . 600Installing Tivoli Common Reporting. . . . 600Configuring Tivoli Common Reporting . . . 600
Framework Manager . . . . . . . . . . 600Installing Framework Manager . . . . . 600Configuring Framework Manager . . . . 601
Creating reports . . . . . . . . . . . . 601Prerequisites. . . . . . . . . . . . . 601Opening the Agent Data Model in FrameworkManager . . . . . . . . . . . . . . 601Populating the ManagedSystem Table . . . . 602
Running the stored procedure . . . . . . 604DB2 . . . . . . . . . . . . . 604Oracle . . . . . . . . . . . . . 604SQL Server 2005 and 2008 . . . . . . 604
Publishing the Agent Data Model to TivoliCommon Reporting . . . . . . . . . . 604Creating reports in Tivoli Common Reporting 605Exporting reports and data models from TivoliCommon Reporting . . . . . . . . . . 607Importing reports into Agent Builder . . . . 609Installing reports from an agent package intoTivoli Common Reporting . . . . . . . . 611
Appendix F. Upgrading custom IBMTivoli Monitoring v5.x resourcemodels to IBM Tivoli Monitoring v6.2agents . . . . . . . . . . . . . . 613
Appendix G. ICU regular expressions 615Replacement text . . . . . . . . . . . . 618Flag options . . . . . . . . . . . . . . 619
Appendix H. Non-agent bundles . . . 621Creating a file bundle . . . . . . . . . . 621
Remote Deploy Bundle Editor . . . . . . . 623Adding commands to the bundle. . . . . . . 625Adding prerequisites to the bundle . . . . . . 626Adding files to the bundle . . . . . . . . . 627
Generating the bundle . . . . . . . . . . 628Creating deployable bundles for TivoliNetcool/OMNIbus probes . . . . . . . . . 630
Appendix I. Dynamic file namesupport . . . . . . . . . . . . . . 631Regular expression file-name patterns . . . . . 631Dynamic file name syntax . . . . . . . . . 631
Appendix J. SNMP trap configuration 635SNMP trap configuration file, trapcnfg . . . . . 635
Using the HP OpenView trapd.conf file . . . 635Types of records . . . . . . . . . . . 635
Defaults for the trapcnfg file . . . . . . . . 636Supported categories . . . . . . . . . . 636Supported statuses . . . . . . . . . . 637Supported source IDs . . . . . . . . . 637
Appendix K. Take Action commandsreference . . . . . . . . . . . . . 639About Take Action commands. . . . . . . . 639More information about Take Action commands 639Special Take Action commands . . . . . . . 639
SSHEXEC action . . . . . . . . . . . 640
Appendix L. Documentation library 641Tivoli Monitoring library . . . . . . . . . 641
Documentation for the base agents . . . . . 642Related publications . . . . . . . . . . . 643Other sources of documentation . . . . . . . 643
Appendix M. Accessibility . . . . . . 645Using assistive technologies . . . . . . . . 645Magnifying what is displayed on the screen . . . 645Documentation in accessible formats . . . . . 645Using alternative text. . . . . . . . . . . 645
Appendix N. Notices . . . . . . . . 647Trademarks . . . . . . . . . . . . . . 649
Index . . . . . . . . . . . . . . . 651
Contents vii

viii IBM Tivoli Monitoring Agent Builder: User's Guide
Figures
1. Create New Agent icon . . . . . . . . 162. Starting the wizard with the File > New >
IBM Tivoli Monitoring Agent option. . . . 163. Starting the wizard with the File > New >
Other option . . . . . . . . . . . . 174. Select a wizard page . . . . . . . . . 185. Selecting the agent icon . . . . . . . . 196. Welcome window . . . . . . . . . . 207. Project page . . . . . . . . . . . . 218. General Information page . . . . . . . . 229. Agent Information page . . . . . . . . 23
10. Agent Initial Data Source page . . . . . . 2511. Select key attributes page . . . . . . . . 2812. Data Source Definition page: defining
additional monitors . . . . . . . . . . 2913. Data Source Location page . . . . . . . 3014. Subnodes in the Navigator tree . . . . . . 3315. Move existing data sources . . . . . . . 3416. Currently Defined Data Sources page . . . . 3517. Choosing Reset from the Tivoli Monitoring
perspective button . . . . . . . . . . 3718. Agent Information page . . . . . . . . 3819. Default Operating Systems page . . . . . 3920. Self-Describing Agent page . . . . . . . 4021. Environment Variables page . . . . . . . 4022. Environment Variable Information window 4123. Watchdog Information page . . . . . . . 4224. Cognos Information page . . . . . . . . 4425. Data Source Definition page for Cognos 4526. Data Source Definition page . . . . . . . 4727. Runtime Configuration Information page 4828. Agent XML Editor page . . . . . . . . 4929. Updating the agent version after commit 5130. Agent Product Code change . . . . . . . 5131. Agent support files invalidated . . . . . . 5232. Attribute Information page . . . . . . . 5533. String attribute type. . . . . . . . . . 5834. Numeric attribute type . . . . . . . . . 5835. Defining enumeration for an attribute . . . . 6136. Copy Attribute window . . . . . . . . 6237. Adding an attribute . . . . . . . . . . 6338. Attribute Information page . . . . . . . 6439. Attribute Information page with Derived
Attribute Details tab open. . . . . . . . 6540. Derived Formula Editor window (default) 6841. Derived Formula Editor view with formula
hierarchy tree view . . . . . . . . . . 6942. Edit the Selected Attribute page. . . . . . 7043. Edit the Selected Attribute page with error 7144. Edit the Selected Function page with warning 7245. Edit the Selected Literal page . . . . . . 7346. Edit the Selected Operator page . . . . . . 7447. Edit the Selected Operator page (for a
conditional operator) . . . . . . . . . 7548. Edit the Selected Function page . . . . . . 7649. Insert window example . . . . . . . . 77
50. Insert window example for getenv function 7851. Remove function and its Arguments page 7852. Empty formula example . . . . . . . . 7953. Parsing error example . . . . . . . . . 8054. Insert window for fixing a formula manually 8155. Operating systems where the agent is to run 8756. Adding a server process . . . . . . . . 8957. Process Monitor page . . . . . . . . . 9058. Browse the list of currently running processes 9159. Search for a process . . . . . . . . . . 9260. Process Monitor page example . . . . . . 9361. Select a connection type or connection
template for process browsing . . . . . . 9462. Edit connection properties for Tivoli Enterprise
Portal Server Managed System . . . . . . 9563. Adding a Windows service monitor . . . . 9764. Service Monitor page . . . . . . . . . 9865. Browse the list of all services defined in the
system . . . . . . . . . . . . . . 9966. Search for a service . . . . . . . . . 10067. Service information . . . . . . . . . 10168. Select a connection type or connection
template for service browsing . . . . . . 10269. Edit connection properties for Tivoli
Enterprise Portal Server Managed System . . 10370. Adding WMI data . . . . . . . . . . 10571. WMI Information page . . . . . . . . 10672. List of classes with their associated attributes 10773. Optionally specifying WMI search options 10774. WMI Information page completed . . . . 10875. WMI shown on Data Source Definition page
in the Agent Editor . . . . . . . . . 10976. Global Windows Data Source Options
window . . . . . . . . . . . . . 11077. WMI Test window . . . . . . . . . . 11178. Adding Perfmon data . . . . . . . . . 11379. Perfmon Information page . . . . . . . 11480. Browsing for Performance Monitor objects 11581. Performance Monitor Search window 11582. Perfmon Information page with Object Name 11683. Global Windows Data Source Options
window . . . . . . . . . . . . . 11684. Perfmon Data Source Definition . . . . . 11885. Perfmon Test window. . . . . . . . . 11986. Adding SNMP data . . . . . . . . . 12187. Simple Network Management Protocol
Information page . . . . . . . . . . 12288. List of objects . . . . . . . . . . . 12389. Selecting an object . . . . . . . . . . 12490. Simple Network Management Protocol
Information page . . . . . . . . . . 12591. SNMP Data Source Definition . . . . . . 12692. MIB Parsing window . . . . . . . . . 12793. SNMP Attribute Group Test selection 12894. SNMP Test settings window . . . . . . 12995. Create Connection Wizard . . . . . . . 129
© Copyright IBM Corp. 2007, 2012 ix
96. Adding SNMP events . . . . . . . . . 13197. Simple Network Management Protocol Event
Information window . . . . . . . . . 13298. SNMP MIB Browser window . . . . . . 13399. Select key attributes page . . . . . . . 135
100. Runtime Configuration page . . . . . . 136101. Test Event Settings window . . . . . . . 138102. Test Event Settings window showing
collected SNMP event data . . . . . . . 138103. Data Collection Status window . . . . . 139104. Adding JMX data . . . . . . . . . . 142105. JMX Information page . . . . . . . . 143106. JMX Agent-Wide options window. . . . . 144107. JMX Browser with no connection selected 145108. JMX Connection Selection page . . . . . 146109. JMX connection templates . . . . . . . 147110. JMX connection properties . . . . . . . 148111. Java Management Extensions (JMX) Browser
window . . . . . . . . . . . . . 150112. JMX Information page . . . . . . . . 153113. JMX Agent-Wide Options window . . . . 154114. New attribute group in Agent Editor 155115. JMX Agent-Wide Options window . . . . 156116. Runtime Configuration tab of the Agent
Editor . . . . . . . . . . . . . . 157117. JMX Agent-Wide Options page . . . . . 161118. Attribute Information page . . . . . . . 167119. JMX Test window . . . . . . . . . . 171120. Adding CIM data . . . . . . . . . . 173121. Common Information Model (CIM)
Information page . . . . . . . . . . 174122. Common Information Model (CIM) Class
Browser window . . . . . . . . . . 175123. CIM Test Settings window . . . . . . . 177124. Adding a log file . . . . . . . . . . 179125. Log File Information page . . . . . . . 180126. XML Browser window . . . . . . . . 181127. Advanced Data Source Properties page, File
Information tab . . . . . . . . . . . 182128. Advanced Data Source Properties page,
Record Identification tab . . . . . . . . 185129. Advanced Data Source Properties page, Filter
Expression tab . . . . . . . . . . . 186130. Advanced Data Source Properties page, Event
Information tab . . . . . . . . . . . 187131. Attribute Information page . . . . . . . 188132. Advanced Log File Attribute Information
page . . . . . . . . . . . . . . 190133. Add Filter window . . . . . . . . . 191134. Add Filter example 1 . . . . . . . . . 193135. Add Filter example 2 . . . . . . . . . 194136. Parse Log window . . . . . . . . . . 195137. Parse Log window showing parsed logfile
attribute values . . . . . . . . . . . 196138. Data Collection Status window . . . . . 196139. Adding an AIX Binary Log . . . . . . . 198140. Binary Log Information page . . . . . . 199141. Adding a Windows Event log . . . . . . 202142. Windows Event Log page . . . . . . . 203143. Windows Event Log Bookmark Settings
window . . . . . . . . . . . . . 204
144. Global Windows Data Source Optionswindow . . . . . . . . . . . . . 205
145. Windows Event Log page . . . . . . . 206146. Event Source window. . . . . . . . . 207147. Event Log Source Browser window . . . . 207148. Windows Event Log window . . . . . . 208149. Event Identifier window . . . . . . . . 209150. Windows Event Log window . . . . . . 210151. Adding data from a command . . . . . . 212152. Command Return Code page . . . . . . 213153. Command Information window . . . . . 214154. Return Code Definition window: Return code
type. . . . . . . . . . . . . . . 215155. Return Code Definition window: Return code
value . . . . . . . . . . . . . . 215156. Messages window . . . . . . . . . . 216157. Message Definition window . . . . . . 217158. Return Code Definition window completed 217159. Command Information window completed 218160. Return Code Definition window: Message
text . . . . . . . . . . . . . . . 220161. Messages window . . . . . . . . . . 220162. Return Code Definition window . . . . . 221163. Command Return Code page completed 222164. Import Command File window . . . . . 223165. Example attribute value output when Agent
parses complex script output. . . . . . . 227166. Adding data from a script . . . . . . . 228167. Command List page . . . . . . . . . 229168. Command Information window for a script 231169. Test Command window . . . . . . . . 232170. Attribute Information page . . . . . . . 234171. Agent Editor Data Source Definition page 235172. Adding JDBC data . . . . . . . . . . 238173. JDBC Information page . . . . . . . . 239174. JDBC Browser window . . . . . . . . 240175. Database Connection Wizard: JDBC
Connections page . . . . . . . . . . 241176. Database Connections Wizard: Connection
Properties page . . . . . . . . . . . 242177. Java Database Connectivity (JDBC) Browser
window . . . . . . . . . . . . . 244178. JDBC Information page . . . . . . . . 245179. Data Source Definition page Attribute Group
Information . . . . . . . . . . . . 246180. Runtime Configuration Information page,
Configuration for Java Virtual Machine (JVM) 247181. Attribute Information page . . . . . . . 248182. Test JDBC statement window . . . . . . 253183. Adding Ping data . . . . . . . . . . 256184. Ping Information window . . . . . . . 257185. Ping Test Settings window . . . . . . . 258186. Adding HTTP data . . . . . . . . . 262187. HTTP Information window . . . . . . . 263188. Attribute Information page . . . . . . . 265189. HTTP Test window . . . . . . . . . 271190. Adding HTTP data . . . . . . . . . 273191. SOAP Information page . . . . . . . . 274192. SOAP Browser window . . . . . . . . 275193. SOAP Browser window . . . . . . . . 276194. SOAP Browser window . . . . . . . . 277
x IBM Tivoli Monitoring Agent Builder: User's Guide
195. Attribute Information page . . . . . . . 278196. Test SOAP Collection window . . . . . . 282197. Monitoring data with Socket . . . . . . 283198. Socket Information window. . . . . . . 284199. Global Socket Data Source Information page 285200. Socket Error Code Definition window, 286201. Messages window . . . . . . . . . . 286202. Message Definition window . . . . . . 287203. Test Socket Client window . . . . . . . 296204. Monitoring data with Java API. . . . . . 298205. Java API Information window . . . . . . 299206. Global Java API Data Source Information
page . . . . . . . . . . . . . . 300207. Java API Error Code Definition window, 301208. Messages window . . . . . . . . . . 301209. Message Definition window . . . . . . 302210. Sample agent structure . . . . . . . . 305211. Test Java Client window . . . . . . . . 315212. Adding existing data sources . . . . . . 318213. Attribute Group Information window 321214. Locating source attribute information 323215. Adding existing data sources . . . . . . 324216. Filter Information window . . . . . . . 325217. Selecting the initial source of monitoring data
for a new agent . . . . . . . . . . . 327218. Providing the navigator group name and help
text . . . . . . . . . . . . . . . 328219. Selecting the first source of monitoring data 329220. Subnodes monitoring different systems 331221. Subnode types in Navigator tree . . . . . 332222. Monitoring multiple subnode instances of the
same subnode type . . . . . . . . . 334223. Example: data collection in a subnode 335224. Data Source Location page - Creating a
subnode . . . . . . . . . . . . . 336225. Subnode Information page . . . . . . . 337226. Initial Subnode Data Source page . . . . . 338227. Subnode Configuration Overrides page 339228. Data Source Definition page . . . . . . 340229. Defining a new subnode . . . . . . . . 341230. Initial Subnode Data Source page . . . . . 342231. Subnode Configuration Overrides page 343232. Agent Editor Data Source Definition page 344233. Subnode Configuration Overrides window 345234. Overriding custom configuration . . . . . 346235. Select Configuration Section window 347236. Override configuration drop-down lists 348237. Sections to override . . . . . . . . . 349238. SNMP Version 1 Properties expanded 350239. Configuration property definitions in the
Agent Builder . . . . . . . . . . . 351240. Top section with agent-level configuration for
the Agent Cfg property . . . . . . . . 352241. Main section with the agent-wide default
value for the Overridable Cfg property . . . 353242. Example Subnode section page with no
subnode . . . . . . . . . . . . . 354243. Example Subnode section page with two
subnode instances defined . . . . . . . 355244. Windows Management Instrumentation
(WMI) Information page . . . . . . . . 356
245. Global Windows Data Source Options 357246. Insert Configuration Property button on the
Log File Information page . . . . . . . 360247. Initial Configuration Properties window 361248. Runtime Configuration Property window 362249. Configuration Property Default Values
window . . . . . . . . . . . . . 364250. Adding a configuration property choice 364251. New configuration property displayed 365252. Adding a second property to an existing
section . . . . . . . . . . . . . . 366253. Property inserted into the log file name 367254. Runtime Configuration tab in the Agent
Editor . . . . . . . . . . . . . . 368255. Editing a configuration section in the Agent
Editor . . . . . . . . . . . . . . 369256. Editing a configuration property in the Agent
Editor . . . . . . . . . . . . . . 370257. WMI Test window . . . . . . . . . . 373258. Environment Variables window . . . . . 375259. Runtime Configuration window . . . . . 375260. Java Information window . . . . . . . 376261. WMI Test window showing test log location. 377262. Generate agent icon . . . . . . . . . 378263. Generate agent menu option . . . . . . 378264. Create an agent image . . . . . . . . 380265. Manage Tivoli Enterprise Monitoring Services
window . . . . . . . . . . . . . 386266. Nodes for attribute groups you defined 387267. Availability node . . . . . . . . . . 388268. Performance Object Status node . . . . . 388269. Event log node . . . . . . . . . . . 389270. Setting the sysadmin user ID . . . . . . 392271. Setting the sysadmin user ID (continued) 393272. Setting the sysadmin user ID (continued) 393273. Setting workspace properties . . . . . . 394274. Setting workspace properties (continued) 395275. Importing application support files . . . . 398276. Importing situations . . . . . . . . . 399277. Selecting situations. . . . . . . . . . 400278. Select Take Action commands . . . . . . 401279. Importing queries . . . . . . . . . . 402280. Advanced Log File Attribute Group
Information page, Event Information tab . . 407281. Historical view and cache view when event
filtering or summarization is not enabled . . 408282. Historical view and cache view when Only
send summary events is selected . . . . . 409283. Historical view and cache view when Send
all events is selected . . . . . . . . . 410284. Historical view and cache view when Send
first event is selected . . . . . . . . . 411285. Historical view and cache view when Event
threshold is selected . . . . . . . . . 412286. IBM Java Logging Toolkit . . . . . . . 417287. Importing files . . . . . . . . . . . 519288. Importing files (continued) . . . . . . . 520289. Importing files (continued) . . . . . . . 521290. IBM Tivoli Monitoring Application Support
Extension . . . . . . . . . . . . . 586291. Naming the project . . . . . . . . . 587
Figures xi
292. Importing support files . . . . . . . . 588293. Import Information . . . . . . . . . 589294. Affinities list . . . . . . . . . . . . 590295. Import Information complete . . . . . . 590296. Importing situations . . . . . . . . . 591297. Importing queries . . . . . . . . . . 592298. Import Take Action commands. . . . . . 592299. Agent support files . . . . . . . . . 593300. Application Support Extension Install Image
window . . . . . . . . . . . . . 594301. Selecting agent project file . . . . . . . 602302. Selecting Publish Packages . . . . . . . 605303. Selecting Common Reporting . . . . . . 606304. Selecting Report Studio . . . . . . . . 606305. Report Studio . . . . . . . . . . . 607306. Content Administration tab . . . . . . . 608307. Content Administration tab with agent
package listed . . . . . . . . . . . 609
308. Importing report packages . . . . . . . 610309. Import Report Package window . . . . . 610310. Select a wizard window . . . . . . . . 621311. New Remote Deploy Project window 622312. Remote Deploy Bundle Information window 623313. Remote Deploy Bundle Editor . . . . . . 624314. Command window . . . . . . . . . 625315. New Prerequisite window . . . . . . . 626316. Adding files to the bundle or generating a
bundle from the Navigator tree . . . . . 627317. Import Bundle Files window . . . . . . 628318. Generate Final Remote Deploy Bundle
window . . . . . . . . . . . . . 629319. Examples of configuration record types 2 and
3 . . . . . . . . . . . . . . . . 636
xii IBM Tivoli Monitoring Agent Builder: User's Guide
Tables
1. Quick-reference information for creating agents 52. Quick-reference information for other functions 63. Guidelines for installation and configuration 74. Minimum version of IBM Tivoli Monitoring
required by the agent . . . . . . . . . 245. Fields for editing data sources . . . . . . 536. Fields and options for defining attributes 567. Numeric attribute options. . . . . . . . 598. Valid format parameters for
StringToTivoliTimestamp . . . . . . . . 839. StringToTivoliTimestamp examples. . . . . 84
10. Fields on the Process Monitor page . . . . 9011. SNMP Events configuration properties 13612. Filter options . . . . . . . . . . . 24313. Supported SQL data types for use with a
monitoring agent . . . . . . . . . . 24814. Network Management configuration
properties . . . . . . . . . . . . . 25815. HTML elements searched for objects to
monitor . . . . . . . . . . . . . 26416. HTTP Attribute Information - Managed URLs 26617. HTTP Attribute Information - URL Objects 26818. URLs file entries . . . . . . . . . . 26819. URL Monitoring configuration properties 27020. Proxy Server configuration properties 27021. Java configuration properties . . . . . . 27122. SOAP Attribute Information . . . . . . 27923. HTTP Server configuration properties 28124. File types for supplemental files . . . . . 28725. Sample error code . . . . . . . . . . 29026. Characters to encode in attribute values 29227. Performance Object Status values . . . . . 29328. Socket configuration property . . . . . . 29429. File types for supplemental files . . . . . 30230. Java trace level options . . . . . . . . 30731. Attribute field types and their IBM Tivoli
Monitoring attribute type equivalents . . . 30732. Internal error codes for the agent . . . . . 31133. Changes to an agent requiring modifications
to the Java source . . . . . . . . . . 312
34. Java configuration properties . . . . . . 31435. source attribute group one (single row) 31936. source attribute group two (single row) 31937. Resulting join . . . . . . . . . . . 31938. source attribute group one (single row) 32039. source attribute group two (more than one
row) . . . . . . . . . . . . . . 32040. Resulting join . . . . . . . . . . . 32041. source attribute group one (more than one
row) . . . . . . . . . . . . . . 32042. source attribute group two (more than one
row) . . . . . . . . . . . . . . 32043. Resulting join (joining on Attribute3 and
Attribute7) . . . . . . . . . . . . 32044. Information to gather before contacting IBM
Software Support . . . . . . . . . . 41345. Environment variables . . . . . . . . 42446. Trace log files for troubleshooting agents 47847. Problems and solutions for installation and
use of the Agent Builder . . . . . . . . 48448. Problems and solutions for agents . . . . 49549. Problems and solutions for Report Creation 51450. Command quick-reference table . . . . . 52351. Required arguments . . . . . . . . . 60352. Optional arguments . . . . . . . . . 60353. Regular expression metacharacters . . . . 61554. Regular expression operators . . . . . . 61655. Replacement text characters . . . . . . . 61856. Flag options . . . . . . . . . . . . 61957. Predefined Variables for Commands . . . . 62658. Categories supported by the SNMP Data
Provider . . . . . . . . . . . . . 63659. Severities supported by the SNMP Data
Provider . . . . . . . . . . . . . 63760. Statuses supported by the SNMP Data
Provider . . . . . . . . . . . . . 63761. Source IDs supported by the SNMP Data
Provider . . . . . . . . . . . . . 637
© Copyright IBM Corp. 2007, 2012 xiii

xiv IBM Tivoli Monitoring Agent Builder: User's Guide
Chapter 1. Introduction
This chapter provides an overview of the IBM® Tivoli® Monitoring Agent Builder.
About Tivoli Monitoring Agent BuilderTivoli Monitoring Agent Builder is a set of tools used for creating agents,installation packages for the created agents, and application support extensions forexisting agents.
Creating agents
Using the Tivoli Monitoring Agent Builder, you can quickly create, modify, and testan agent. Agents collect and analyze data about the state and performance ofdifferent resources, such as disks, memory, CPU, or applications. The Buildercreates a data provider that you can use to monitor three types of data:
AvailabilityProcess and service availability and command return codes
Windows Event LogSpecific information from the Windows Event Log
External Data SourcesData from external sources such as Windows Management Instrumentation(WMI), Performance Monitor (Perfmon), Simple Network ManagementProtocol (SNMP), SNMP Events, Hypertext Transfer Protocol (HTTP),Simple Object Access Protocol (SOAP), Java Database Connectivity (JDBC),Java application programming interface (API), Internet Control MessageProtocol (ICMP) ping, Java Management Extensions (JMX), CommonInformation Model (CIM), external scripts, log files, Socket, and Javaapplication programming interface (API).
Creating installation packages for agents
You can package agents for easy distribution by using a compressed image, whichincludes install scripts to manage the installation of the agent and support files.
Creating custom support extensions for existing agents
Another feature of the builder is the ability to package and distribute customsupport extensions for existing agents. This provides the ability to develop newsituations, queries, workspaces, and take actions for an existing Tivoli MonitoringV6.x agent. For example, if you have insight into how the retail industry uses IBMDB2® for an in-store database, you can create customized workspaces andsituations that can then be given or sold to companies in this industry.
Creating reports for agents
You can use Agent Builder to generate a Cognos® data model which you can useto build Tivoli Common Reporting reports. These reports can be packaged as partof your agent image.
© Copyright IBM Corp. 2007, 2012 1
About EclipseThe Tivoli Monitoring Agent Builder is an Eclipse application for the Eclipse 3.6.2platform, an open source framework for the construction of powerful softwaredevelopment tools and rich desktop applications. Leveraging the Eclipse plug-inframework to integrate technology on the desktop can save technology providerstime and money for focusing effort on delivering differentiation and value for theirofferings. Eclipse is a multi-language, multi-platform, multi-vendor supportedenvironment that an open source community of developers built and providedroyalty-free by the Eclipse Foundation. Written in the Java language, Eclipseincludes extensive plug-in construction toolkits and examples, and can be extendedand run on a range of desktop operating systems including Windows, Linux, QNX,and Macintosh OS X. To see full details about Eclipse and the Eclipse Foundation,go to http://www.eclipse.org.
New in this releaseFor version 6.2.3.1 of the Tivoli Monitoring Agent Builder, the followingenhancements have been made since version 6.2.3:v You can test data sources in the Agent Builder without the need for a Tivoli
Monitoring infrastructure. The data displayed includes the data that wascollected and actual values for derived attributes. This feature is available for thefollowing data sources:– Windows Management Instrumentation (WMI)– Windows Performance Monitor (Perfmon)– Simple Network Management Protocol (SNMP)– Simple Network Management Protocol (SNMP) event sender– Java Management Extensions (JMX)– Common Information Model (CIM)– Log file– Script– Java Database Connectivity (JDBC)– Internet Control Message Protocol (ICMP) ping– Hypertext Transfer Protocol (HTTP) Availability– Simple Object Access Protocol (SOAP)– Transmission Control Protocol socket (TCP) socket– Java Application Programming Interface (API)
For more information, see “Attribute group testing” on page 373.v When you add an attribute using the Add data source wizard, you have an
option to add additional attributes before you exit the wizard. For moreinformation, see “Creating attributes” on page 54.
v When you create an agent to monitor script output, you can specify separatorson a per attribute basis to do the following tasks:– Separate one attribute from another with a custom separator that you define– Extract a fixed number of bytes from the script output– Delimit an attribute value with a string at the beginning and end of the value– Return the remainder of a line of text as the attribute value
For more information, see “Script parsing and separators” on page 225.
2 IBM Tivoli Monitoring Agent Builder: User's Guide
v You can now filter the data rows that are returned from attribute groups thatreturn sampled data. You use the formula editor to create and apply filters todetermine when to return a data row. For more information, see “Filteringattribute groups” on page 66.
v You can build a new data source by filtering on the data rows of existingattribute groups that return sampled data. You use the formula editor to createand apply filters to the existing attribute group. The result is a new attributegroup that contains data rows filtered from the existing attribute group. Formore information, see “Filtered Attribute Groups” on page 323.
v For information about how to configure and tune the data collection propertiesof your agents, see “Configuring and Tuning data collection” on page 418.
v By default, only a single copy of scripts, command files or supplemental files isembedded in the agent. These files in existing Agent Builder projects can also beconsolidated. For more information, see “File Separation & Consolidation” onpage 223.
For version 6.2.3 of the Tivoli Monitoring Agent Builder, the followingenhancements were made since version 6.2.2.7:v You can use self-describing agents to create agents that bundle support packages
with the agent. For more information about self-describing agents, see the IBMTivoli Monitoring Installation and Setup Guide and the IBM Tivoli MonitoringAdministrator's Guide.
v You can use Agent Builder to generate a Cognos data model to create TivoliCommon Reporting reports for your agent.
v If you monitor log files, a new attribute group, Log File RegEx Statistics, hasbeen added which contains information showing the statistics of the log fileregular expression processing.
About this guideThis guide describes how to use the Tivoli Monitoring Agent Builder software tocreate, modify, debug, and package agents for use with Tivoli Monitoring products.This book explains concepts that agent developers, system administrators, andapplication administrators must know to use the Tivoli Monitoring Agent Builderproduct and its integration into the Tivoli environment.
Chapter 1. Introduction 3

4 IBM Tivoli Monitoring Agent Builder: User's Guide
Chapter 2. Getting started quick-reference guide
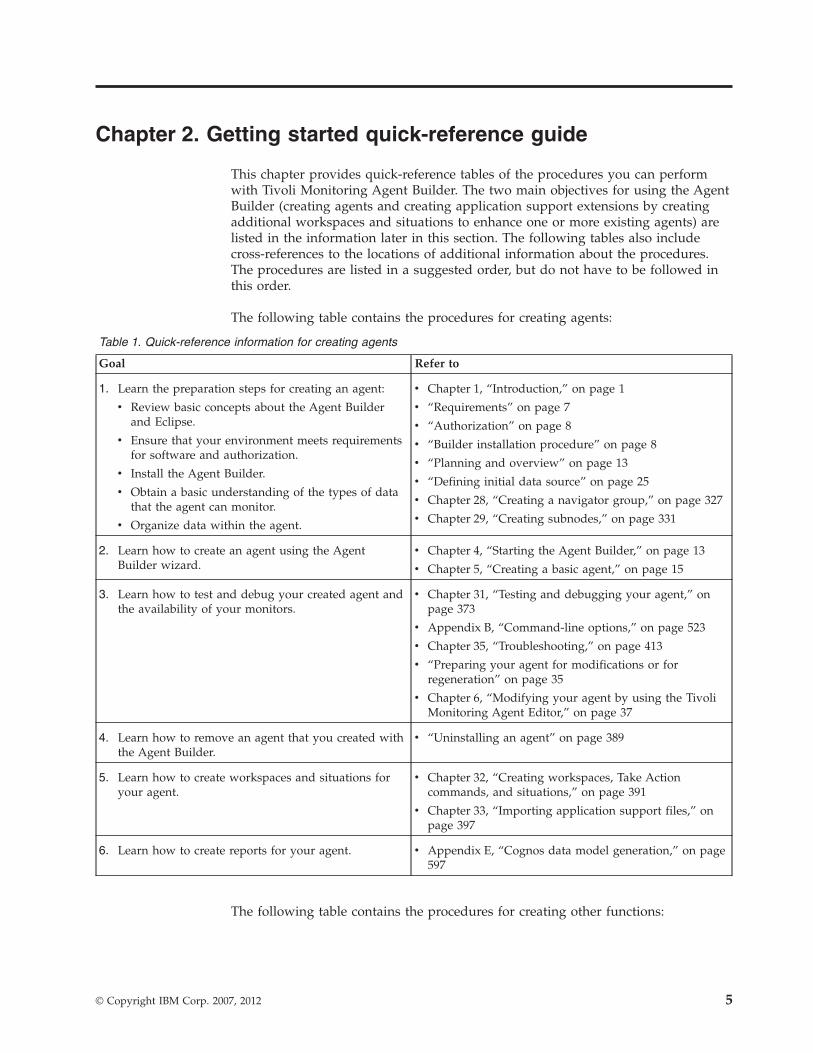
This chapter provides quick-reference tables of the procedures you can performwith Tivoli Monitoring Agent Builder. The two main objectives for using the AgentBuilder (creating agents and creating application support extensions by creatingadditional workspaces and situations to enhance one or more existing agents) arelisted in the information later in this section. The following tables also includecross-references to the locations of additional information about the procedures.The procedures are listed in a suggested order, but do not have to be followed inthis order.
The following table contains the procedures for creating agents:
Table 1. Quick-reference information for creating agents
Goal Refer to
1. Learn the preparation steps for creating an agent:
v Review basic concepts about the Agent Builderand Eclipse.
v Ensure that your environment meets requirementsfor software and authorization.
v Install the Agent Builder.
v Obtain a basic understanding of the types of datathat the agent can monitor.
v Organize data within the agent.
v Chapter 1, “Introduction,” on page 1
v “Requirements” on page 7
v “Authorization” on page 8
v “Builder installation procedure” on page 8
v “Planning and overview” on page 13
v “Defining initial data source” on page 25
v Chapter 28, “Creating a navigator group,” on page 327
v Chapter 29, “Creating subnodes,” on page 331
2. Learn how to create an agent using the AgentBuilder wizard.
v Chapter 4, “Starting the Agent Builder,” on page 13
v Chapter 5, “Creating a basic agent,” on page 15
3. Learn how to test and debug your created agent andthe availability of your monitors.
v Chapter 31, “Testing and debugging your agent,” onpage 373
v Appendix B, “Command-line options,” on page 523
v Chapter 35, “Troubleshooting,” on page 413
v “Preparing your agent for modifications or forregeneration” on page 35
v Chapter 6, “Modifying your agent by using the TivoliMonitoring Agent Editor,” on page 37
4. Learn how to remove an agent that you created withthe Agent Builder.
v “Uninstalling an agent” on page 389
5. Learn how to create workspaces and situations foryour agent.
v Chapter 32, “Creating workspaces, Take Actioncommands, and situations,” on page 391
v Chapter 33, “Importing application support files,” onpage 397
6. Learn how to create reports for your agent. v Appendix E, “Cognos data model generation,” on page597
The following table contains the procedures for creating other functions:
© Copyright IBM Corp. 2007, 2012 5

Table 2. Quick-reference information for other functions
Goal Refer to
1. Learn how to create custom workspaces, situations,and queries.
v Chapter 32, “Creating workspaces, Take Actioncommands, and situations,” on page 391
2. Learn how to package your application supportextension.
v Appendix D, “Creating application support extensionsfor existing agents,” on page 585
3. Learn how to build custom bundles. v Appendix H, “Non-agent bundles,” on page 621
6 IBM Tivoli Monitoring Agent Builder: User's Guide
Chapter 3. Installing the Tivoli Monitoring Agent Builder
Table 3 shows some guidelines for installation and running the Tivoli MonitoringAgent Builder.
Note: For information about installing or modifying an agent, see “Installing andtesting an agent” on page 377.
Table 3. Guidelines for installation and configuration
Goal Refer to
Verify that your environment meets therequirements.
“Requirements” on page 7
Ensure that you have appropriateauthorization.
“Authorization” on page 8
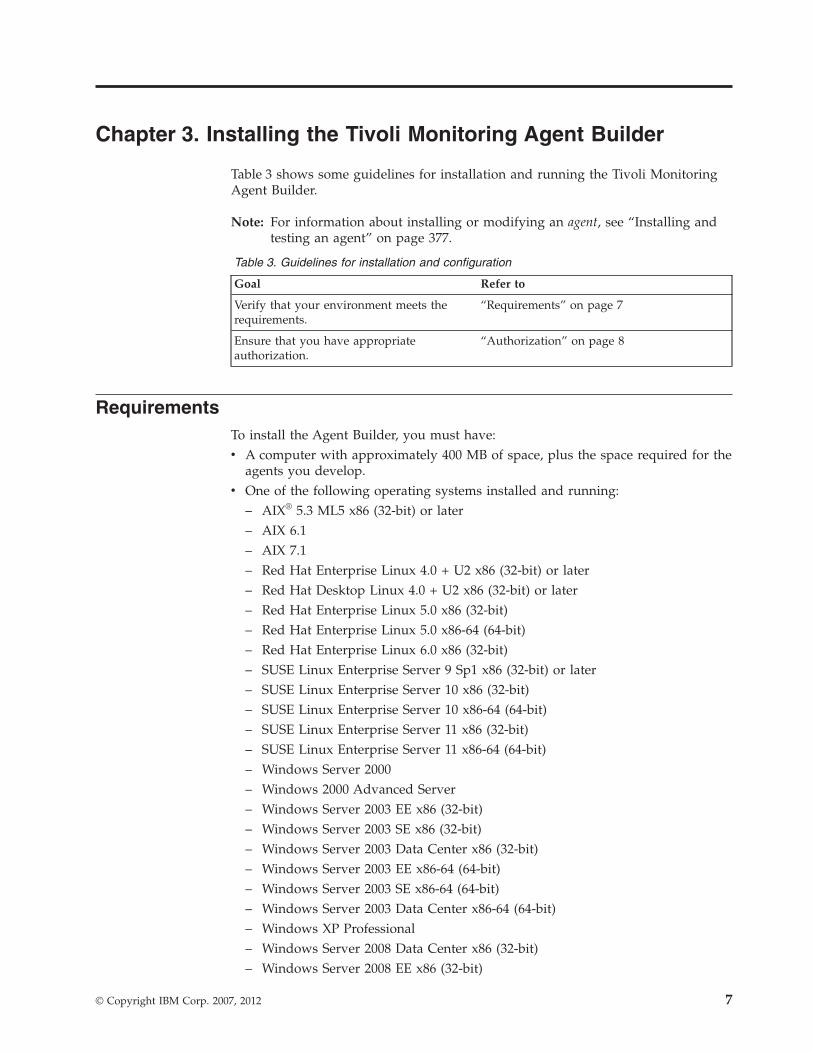
RequirementsTo install the Agent Builder, you must have:v A computer with approximately 400 MB of space, plus the space required for the
agents you develop.v One of the following operating systems installed and running:
– AIX® 5.3 ML5 x86 (32-bit) or later– AIX 6.1– AIX 7.1– Red Hat Enterprise Linux 4.0 + U2 x86 (32-bit) or later– Red Hat Desktop Linux 4.0 + U2 x86 (32-bit) or later– Red Hat Enterprise Linux 5.0 x86 (32-bit)– Red Hat Enterprise Linux 5.0 x86-64 (64-bit)– Red Hat Enterprise Linux 6.0 x86 (32-bit)– SUSE Linux Enterprise Server 9 Sp1 x86 (32-bit) or later– SUSE Linux Enterprise Server 10 x86 (32-bit)– SUSE Linux Enterprise Server 10 x86-64 (64-bit)– SUSE Linux Enterprise Server 11 x86 (32-bit)– SUSE Linux Enterprise Server 11 x86-64 (64-bit)– Windows Server 2000– Windows 2000 Advanced Server– Windows Server 2003 EE x86 (32-bit)– Windows Server 2003 SE x86 (32-bit)– Windows Server 2003 Data Center x86 (32-bit)– Windows Server 2003 EE x86-64 (64-bit)– Windows Server 2003 SE x86-64 (64-bit)– Windows Server 2003 Data Center x86-64 (64-bit)– Windows XP Professional– Windows Server 2008 Data Center x86 (32-bit)– Windows Server 2008 EE x86 (32-bit)
© Copyright IBM Corp. 2007, 2012 7

– Windows Server 2008 SE x86 (32-bit)– Windows Server 2008 Data Center x86-64 (64-bit)– Windows Server 2008 EE x86-64 (64-bit)– Windows Server 2008 SE x86-64 (64-bit)– Windows Server 2008 R2 Data Center x86-64 (64-bit)– Windows Server 2008 R2 EE x86-64 (64-bit)– Windows Server 2008 R2 SE x86-64 (64-bit)– Windows 7 x86 (32-bit)– Windows 7 x86-64 (64-bit)
See “Operating system requirements” on page 15 for information about theoperating systems supported by the agents created by the Agent Builder.
AuthorizationBefore you can run Tivoli Monitoring Agent Builder, you must have Administratorauthorization for the following reasons:v Ability to ensure a consistent running environment for the Agent Builder and
the agents designed with it.v Ability to access parts of the operating system, which requires Administrator
authorization. The Agent Builder is installed on a development system and isdesigned for developers who require this type of access.
Builder installation procedureBefore installing the Tivoli Monitoring Agent Builder, uninstall any previousversions. For more information about uninstalling, see “Uninstalling AgentBuilder” on page 10. None of your existing agent information is lost when youuninstall.
To install the Tivoli Monitoring Agent Builder:1. Download and unzip the Tivoli Monitoring Agent Builder V6.2.3 Fix Pack 1
image.2. Run the executable for your operating system to start the installation:
v setup.batv setup.sh
Note: Run the installation program from the same user ID from which youintend to run the Agent Builder.
3. When the Tivoli Monitoring Agent Builder window appears select yourlanguage, and click OK
4. On the Introduction page , click Next.5. On the Software License Agreement page, click I accept the terms in the
license agreement, and click Next.6. On the Choose Install Folder page, click one of the following options:
v Next to install the Agent Builder to the directory specified in the WhereWould You Like to Install? field
v Restore Default Folder to install the Agent Builder in a default directoryv Choose to select a different directory
8 IBM Tivoli Monitoring Agent Builder: User's Guide
Note: The directory name you choose for the Agent Builder should not containthe following characters, because having these characters in the directorypath prevents the agent builder from launching:
!#%;
7. On the Pre-Installation Summary page, click Install.8. On the Installing Tivoli Monitoring Agent Builder page, you can click Cancel if
you want to cancel the installation. If you want to continue installing, wait forthe Install Complete page to be displayed. And then, click Done.
After installingOn Windows systems, after the Agent Builder is installed, there is an option addedto the Start menu and an Agent Builder icon is added to your desktop.
On UNIX systems, after the Agent Builder is installed, the Agent Builderexecutable is named Install_Location/agentbuilder.
The log files for the Agent Builder installation are in the following locations:install_dir\IBM_Tivoli_Monitoring_Agent_Builder_InstallLog.xml (Windows)install_dir/IBM_Tivoli_Monitoring_Agent_Builder_InstallLog.xml (Linux,AIX)
The log is not written until you click Done, because the log file traces actualinstallation.
Silent installationYou can also install the product by using a silent installation method. The silentinstallation options file, installer.properties, is included on the installationmedia at the root of the installation directory. You must modify this file to meetyour needs.
Start the silent installation by running the following command:setup.[bat | sh] -i silent -f path/installer.properties
Where path is a fully qualified path to the installer.properties file (including thedrive letter or UNC path name on Windows). The value you choose for pathcannot contain spaces.
Example of an Options file:
# -------------------------------------------------------------------# IBM Tivoli Monitoring Agent Builder## (C) Copyright IBM Corporation 2009. All rights reserved.## Sample response file for silent install## To use this file, use the following command:## Windows:# setup.bat -i silent -f <path>\installer.properties## Linux and AIX:
Chapter 3. Installing the Tivoli Monitoring Agent Builder 9
# setup.sh -i silent -f <path>/installer.properties## Where# <path> is a fully-quailfied path to the installer.properties# file (including the drive letter or UNC path name on Windows).# <path> cannot contain spaces.# -------------------------------------------------------------------
# -------------------------------------------------------------------# This property indicates that the license has been accepted# -------------------------------------------------------------------# LICENSE_ACCEPTED=FALSE
# -------------------------------------------------------------------# This property specifies the install directory## On Windows, the default is:# C:\\Program Files\\IBM\\ITM\\AgentBuilder## On Linux and AIX, the default is:# /opt/IBM/ITM/AgentBuilder# -------------------------------------------------------------------#USER_INSTALL_DIR=C:\\Program Files\\IBM\\ITM\\AgentBuilder#USER_INSTALL_DIR=/opt/IBM/ITM/AgentBuilder
Uninstalling Agent BuilderUse the following steps to uninstall any earlier versions of Agent Builder:
On AIX and Linux systems
Run the following command:INSTALL_DIR/uninstall/uninstaller
where INSTALL_DIR is the name of the directory where Agent Builder isinstalled.On Windows systems
Perform the following steps:1. From the Control Panel, select Add/Remove Programs.2. Click IBM Tivoli Monitoring Agent Builder.3. Click Change/Remove.On Windows 7 and Windows Server 2008 R2
Perform the following steps:1. Open Programs and Features by clicking the Start button, clicking Control
Panel, clicking Programs, and then clicking Programs and Features.2. Select IBM Tivoli Monitoring Agent Builder from the list of installed
programs.3. Click Uninstall/Change.4. Click Uninstall on the Uninstall IBM Tivoli Monitoring Agent Builder page.5. Click Done on the Uninstall Complete page.
Note: You can also navigate to the Windows Programs and Features windowby clicking the Start button, clicking Computer and clicking Uninstall orchange a program. Then continue from step 2.
10 IBM Tivoli Monitoring Agent Builder: User's Guide

Silent uninstallationYou can also use the silent uninstallation method. Start the silent uninstallation byrunning the following command:INSTALL_DIR/uninstall/uninstaller[.exe] -i silent
Chapter 3. Installing the Tivoli Monitoring Agent Builder 11

12 IBM Tivoli Monitoring Agent Builder: User's Guide
Chapter 4. Starting the Agent Builder
This chapter helps you use the Agent Builder to start the wizards.
Planning and overviewThe Tivoli Monitoring Agent Builder provides a wizard that can help you create anagent. Before you run the wizard, ensure that you make the following planningdecisions:v The project name (see “Naming your agent” on page 20)v The types of monitoring data that you want your agent to collect (see “Defining
initial data source” on page 25)
Creating your agent involves several steps:1. Starting (launching) the Agent Builder2. Creating an agent3. Defining one or more types of data for your agent to monitor. When you
indicate the types of data (availability, log events, or external data sources) thatyou want the agent to collect, the wizard guides you through the process ofconfiguring each of the data collection methods.
4. Testing your agent (see Chapter 31, “Testing and debugging your agent,” onpage 373)
5. Optionally add workspaces, situations and queries (see Chapter 33, “Importingapplication support files,” on page 397)
Note: The Agent Builder does not build language packs, so the text that isdisplayed in the Tivoli Enterprise Portal is in the language you use whenbuilding the agent.
Starting the Agent BuilderStart (launch) the Agent Builder by typing the following information on thecommand line:
Windows: Install_Location\agentbuilder.exe. Or, go to either Start > AllPrograms > IBM Tivoli Monitoring > Agent Builder or click the Agent Builderdesktop icon.
All other supported operating systems: Install_Location/agentbuilder
Note: When you initially run the Agent Builder, you are prompted for the locationof your Workspace directory. The files that create your agents are saved inthat directory. You can designate any directory as your workspace.
© Copyright IBM Corp. 2007, 2012 13

14 IBM Tivoli Monitoring Agent Builder: User's Guide
Chapter 5. Creating a basic agent
This chapter helps you use the Agent Builder to create a basic agent. The followingtopics are covered:v “Operating system requirements”v “Starting the new agent wizard”v “Creating and defining the agent” on page 20
– “Naming your agent” on page 20– “Defining initial data source” on page 25– “Organizing the agent” on page 30
v “Preparing your agent for modifications or for regeneration” on page 35
Operating system requirementsThe agents created by the Agent Builder are supported on all of the operatingsystems supported by the OS monitoring agents, except z/OS® and i5/OS®, asfollows:v AIXv HP-UXv Linuxv Linux on System z®
v Solarisv Windows
For a more detailed list that includes version numbers, refer to the User's Guidesfor the Tivoli Monitoring Operating System agents (OS agents).
To run your monitoring agent, install the appropriate OS agent on the samecomputer where your monitoring agent will run. Install Tivoli Monitoring V6.2 orlater in your environment. Tivoli Monitoring does not have to be on the samecomputer as your monitoring agent.
Note: Agent Builder browsers operate on the data sources and informationaccessible from the system on which the Agent Builder is run. Ensure thatyou run the Agent Builder on either of the following types of systems:v A system that is running on the same level as the operating system and
monitored applications for which you are developing the agentv A system that connects to one that is running on the same level as the
operating system and monitored applications for which you aredeveloping the agent
Starting the new agent wizardTo start the wizard and create the agent, you can use either of the followingmethods:v Use the Create New Agent icon on the toolbar.v Use the File option on the top menu bar.
© Copyright IBM Corp. 2007, 2012 15
Note: You might not see the wizard from the new menu if you are not using theIBM Tivoli Monitoring perspective in Eclipse. The IBM Tivoli Monitoringperspective opens when you end the wizard, along with the Project Explorerview, the Outline view, and the Problems view.
Using the icon to start the wizardClick the Create New Agent icon (which resembles a pencil) on the top menu(Figure 1).
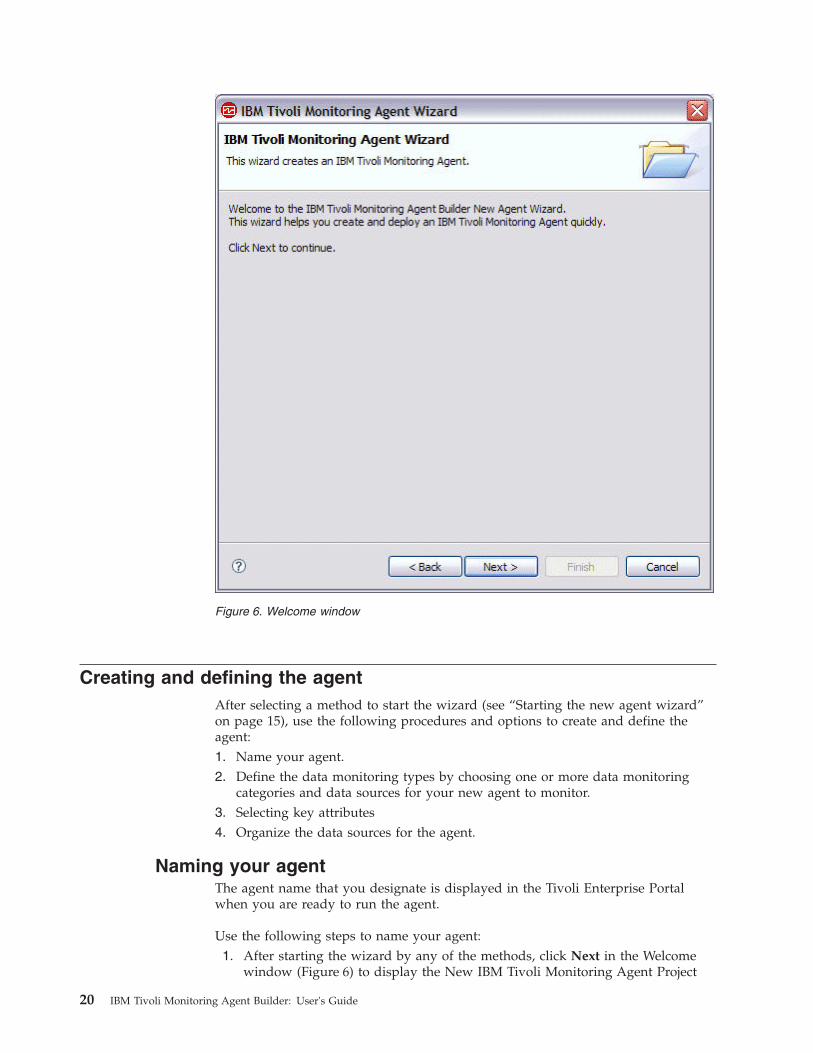
The Welcome window (Figure 6 on page 20) for creating an agent is displayed.
Creating a new file to start the wizardSelect one of the following ways to create a new file:v File > New > IBM Tivoli Monitoring Agent
v File > New > Other
Using File > New > IBM Tivoli Monitoring Agent to start thewizardFor the first of these methods, select File > New > IBM Tivoli Monitoring Agent(Figure 2). The Welcome window is displayed.
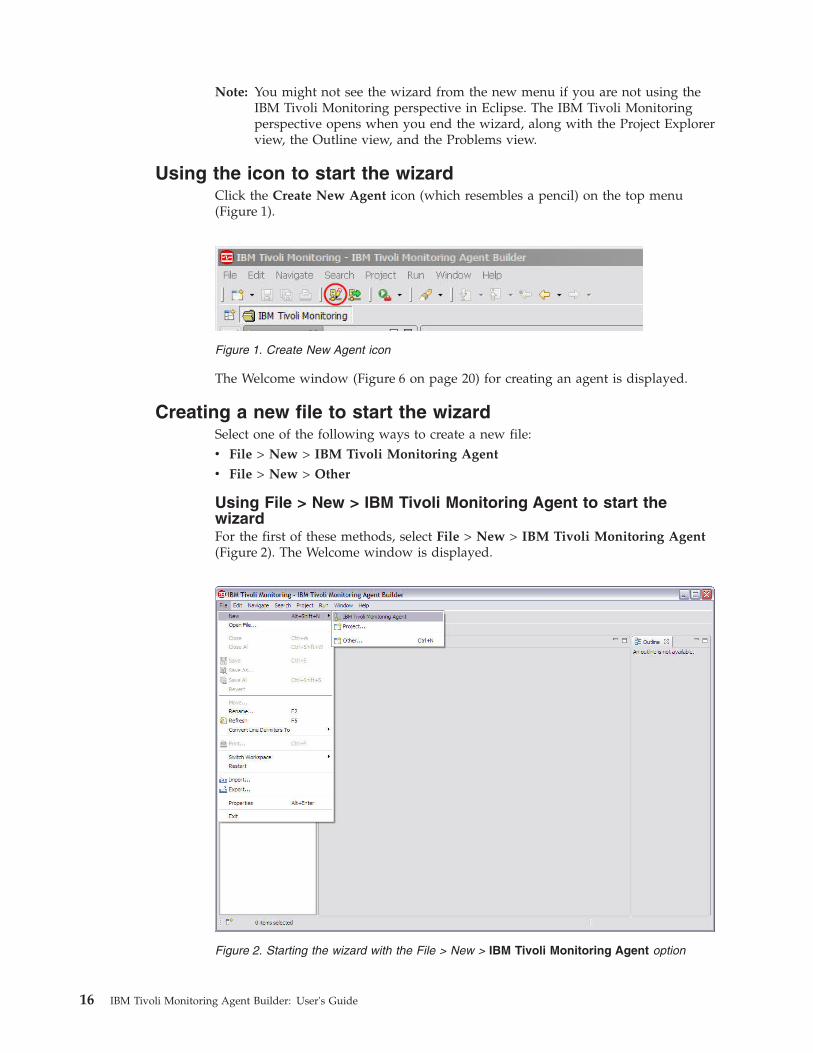
Figure 1. Create New Agent icon
Figure 2. Starting the wizard with the File > New > IBM Tivoli Monitoring Agent option
16 IBM Tivoli Monitoring Agent Builder: User's Guide
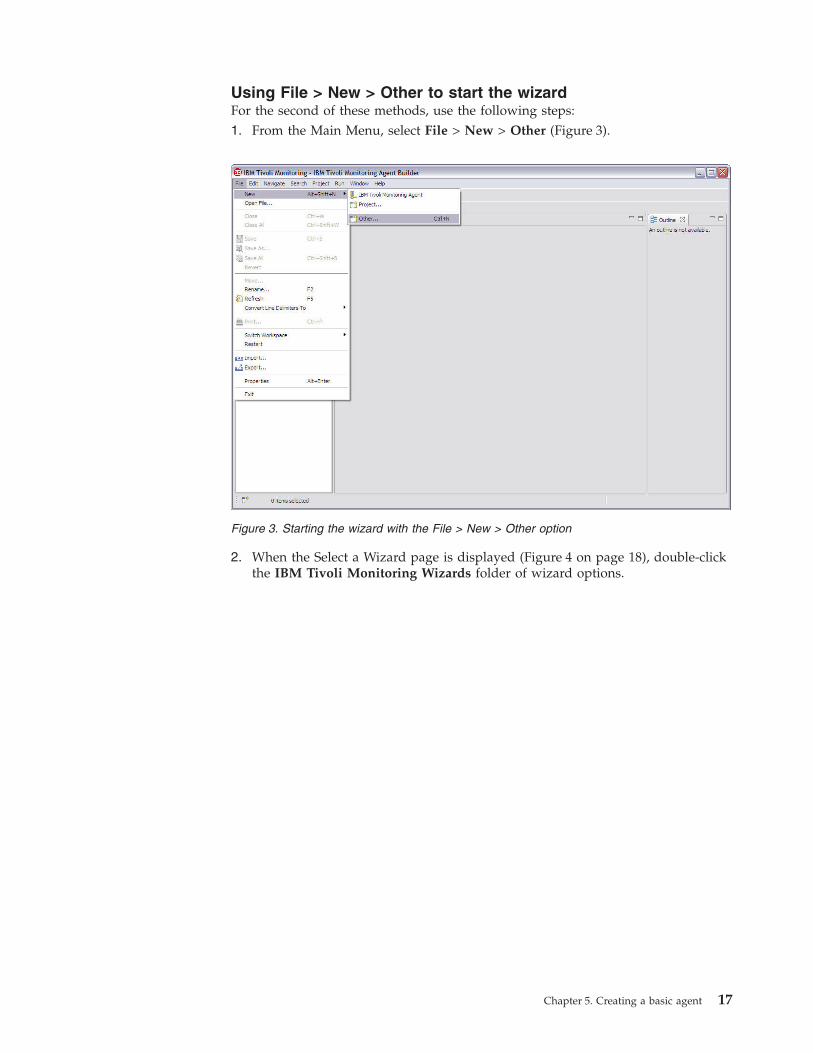
Using File > New > Other to start the wizardFor the second of these methods, use the following steps:1. From the Main Menu, select File > New > Other (Figure 3).
2. When the Select a Wizard page is displayed (Figure 4 on page 18), double-clickthe IBM Tivoli Monitoring Wizards folder of wizard options.
Figure 3. Starting the wizard with the File > New > Other option
Chapter 5. Creating a basic agent 17

3. When the IBM Tivoli Monitoring Agent icon is displayed (Figure 5 on page 19),double-click it.
Figure 4. Select a wizard page
18 IBM Tivoli Monitoring Agent Builder: User's Guide
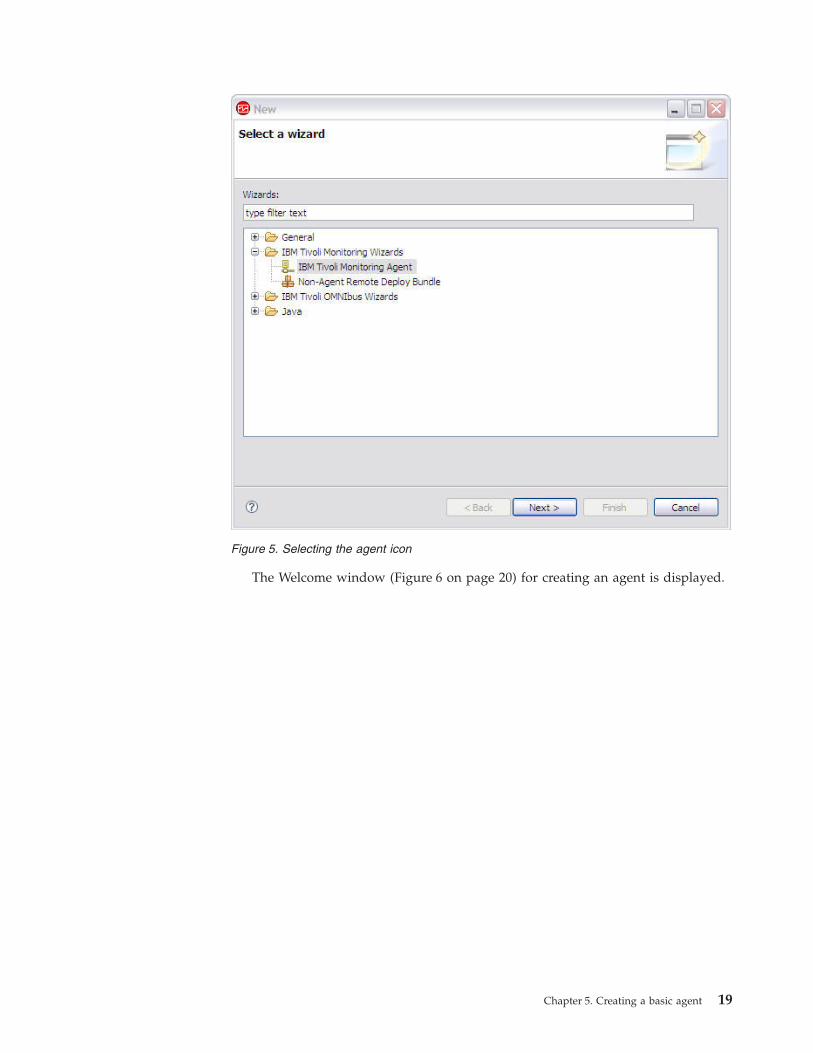
The Welcome window (Figure 6 on page 20) for creating an agent is displayed.
Figure 5. Selecting the agent icon
Chapter 5. Creating a basic agent 19
Creating and defining the agentAfter selecting a method to start the wizard (see “Starting the new agent wizard”on page 15), use the following procedures and options to create and define theagent:1. Name your agent.2. Define the data monitoring types by choosing one or more data monitoring
categories and data sources for your new agent to monitor.3. Selecting key attributes4. Organize the data sources for the agent.
Naming your agentThe agent name that you designate is displayed in the Tivoli Enterprise Portalwhen you are ready to run the agent.
Use the following steps to name your agent:1. After starting the wizard by any of the methods, click Next in the Welcome
window (Figure 6) to display the New IBM Tivoli Monitoring Agent Project
Figure 6. Welcome window
20 IBM Tivoli Monitoring Agent Builder: User's Guide
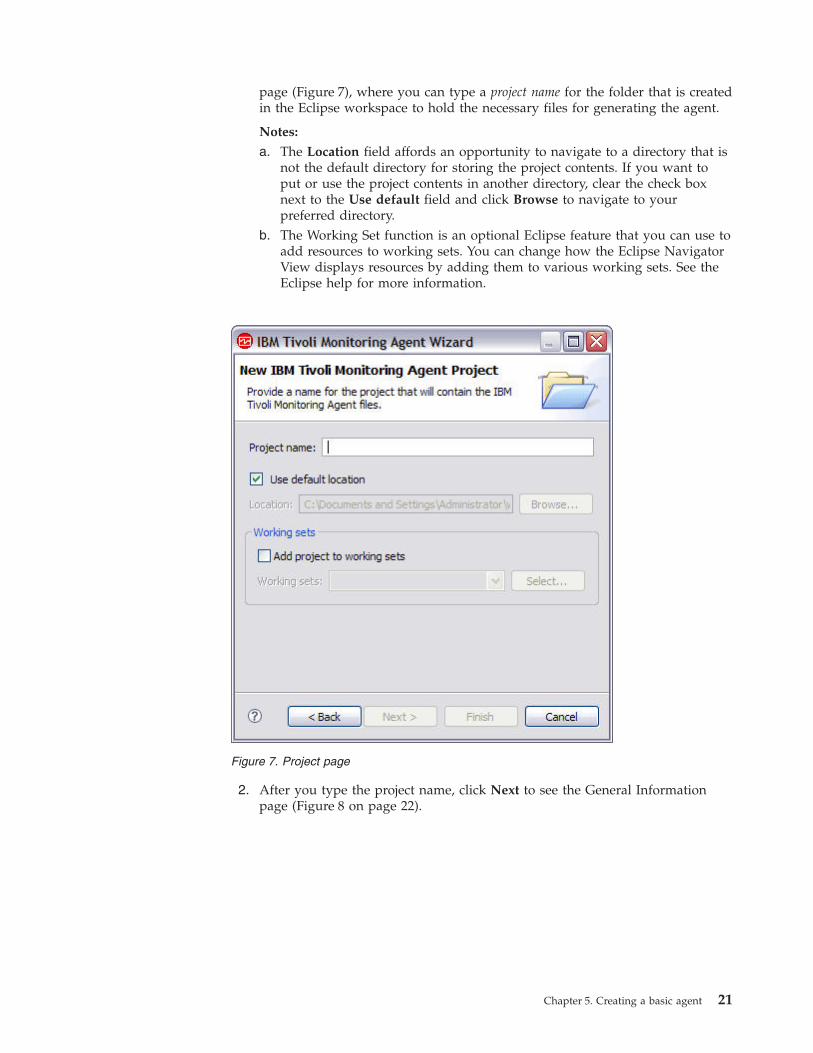
page (Figure 7), where you can type a project name for the folder that is createdin the Eclipse workspace to hold the necessary files for generating the agent.
Notes:
a. The Location field affords an opportunity to navigate to a directory that isnot the default directory for storing the project contents. If you want toput or use the project contents in another directory, clear the check boxnext to the Use default field and click Browse to navigate to yourpreferred directory.
b. The Working Set function is an optional Eclipse feature that you can use toadd resources to working sets. You can change how the Eclipse NavigatorView displays resources by adding them to various working sets. See theEclipse help for more information.
2. After you type the project name, click Next to see the General Informationpage (Figure 8 on page 22).
Figure 7. Project page
Chapter 5. Creating a basic agent 21
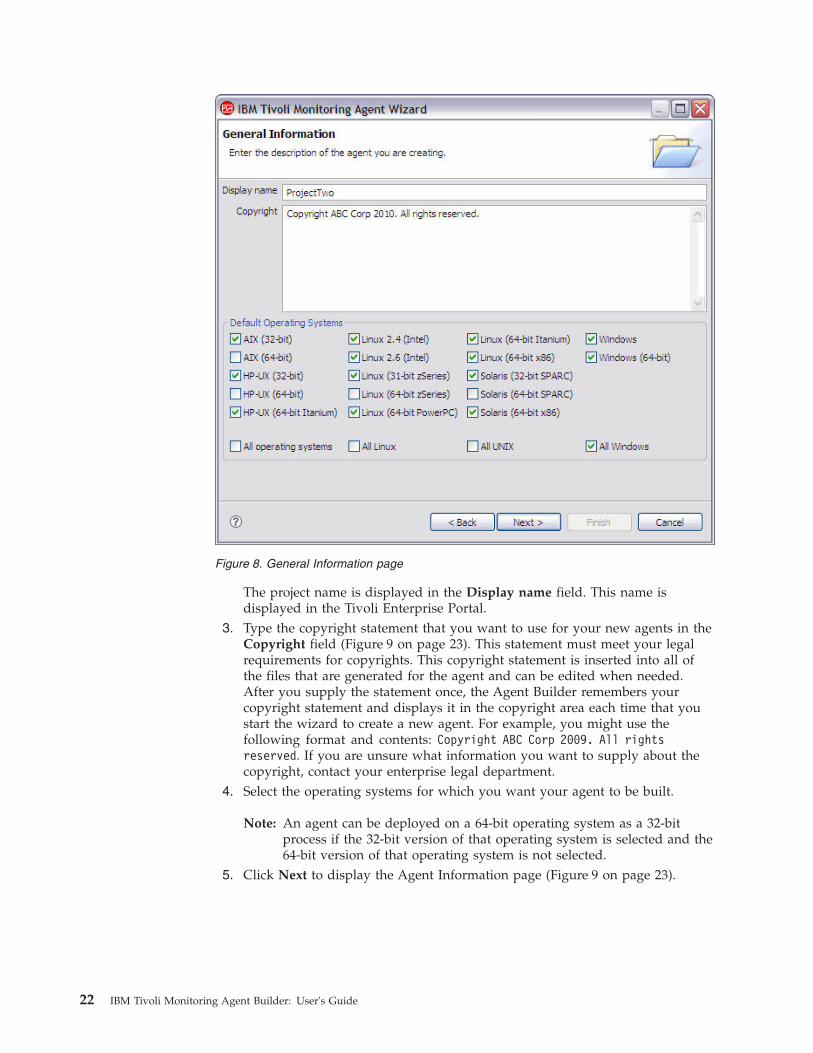
The project name is displayed in the Display name field. This name isdisplayed in the Tivoli Enterprise Portal.
3. Type the copyright statement that you want to use for your new agents in theCopyright field (Figure 9 on page 23). This statement must meet your legalrequirements for copyrights. This copyright statement is inserted into all ofthe files that are generated for the agent and can be edited when needed.After you supply the statement once, the Agent Builder remembers yourcopyright statement and displays it in the copyright area each time that youstart the wizard to create a new agent. For example, you might use thefollowing format and contents: Copyright ABC Corp 2009. All rightsreserved. If you are unsure what information you want to supply about thecopyright, contact your enterprise legal department.
4. Select the operating systems for which you want your agent to be built.
Note: An agent can be deployed on a 64-bit operating system as a 32-bitprocess if the 32-bit version of that operating system is selected and the64-bit version of that operating system is not selected.
5. Click Next to display the Agent Information page (Figure 9 on page 23).
Figure 8. General Information page
22 IBM Tivoli Monitoring Agent Builder: User's Guide
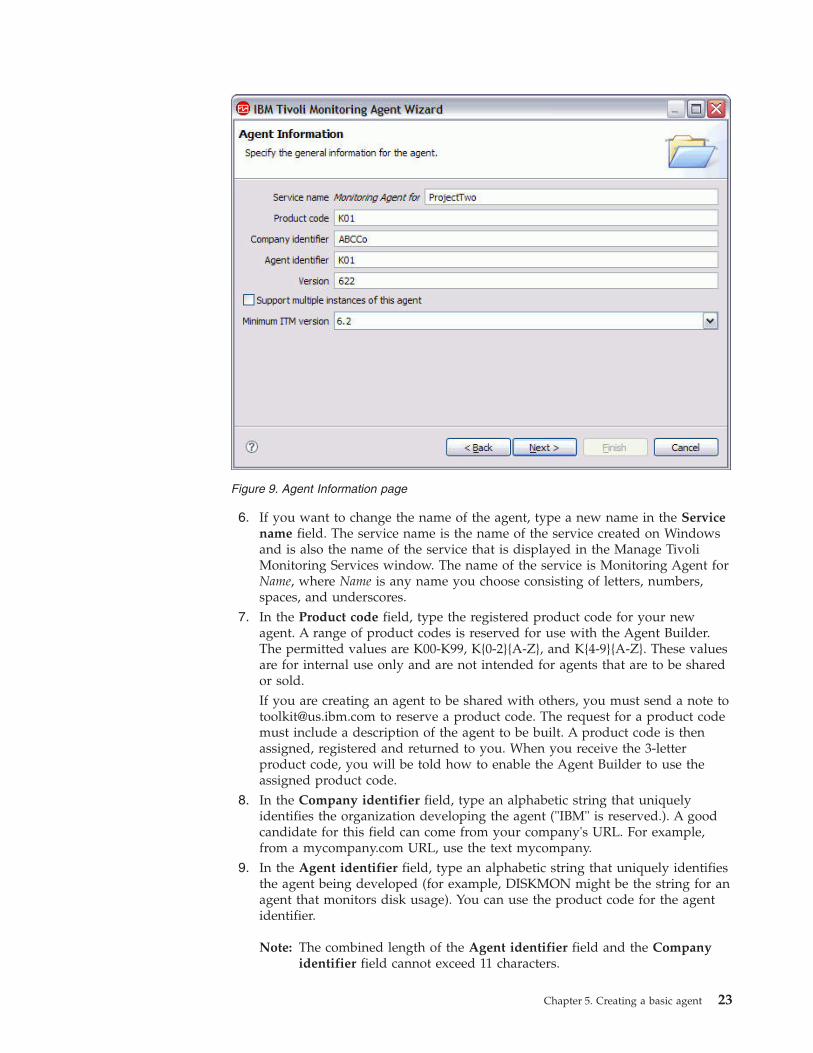
6. If you want to change the name of the agent, type a new name in the Servicename field. The service name is the name of the service created on Windowsand is also the name of the service that is displayed in the Manage TivoliMonitoring Services window. The name of the service is Monitoring Agent forName, where Name is any name you choose consisting of letters, numbers,spaces, and underscores.
7. In the Product code field, type the registered product code for your newagent. A range of product codes is reserved for use with the Agent Builder.The permitted values are K00-K99, K{0-2}{A-Z}, and K{4-9}{A-Z}. These valuesare for internal use only and are not intended for agents that are to be sharedor sold.If you are creating an agent to be shared with others, you must send a note [email protected] to reserve a product code. The request for a product codemust include a description of the agent to be built. A product code is thenassigned, registered and returned to you. When you receive the 3-letterproduct code, you will be told how to enable the Agent Builder to use theassigned product code.
8. In the Company identifier field, type an alphabetic string that uniquelyidentifies the organization developing the agent ("IBM" is reserved.). A goodcandidate for this field can come from your company's URL. For example,from a mycompany.com URL, use the text mycompany.
9. In the Agent identifier field, type an alphabetic string that uniquely identifiesthe agent being developed (for example, DISKMON might be the string for anagent that monitors disk usage). You can use the product code for the agentidentifier.
Note: The combined length of the Agent identifier field and the Companyidentifier field cannot exceed 11 characters.
Figure 9. Agent Information page
Chapter 5. Creating a basic agent 23
By default, Agent Builder sets the Agent identifier to be the same as theProduct code.
10. In the Version field, type a 3-digit number that identifies the agent version inthe format VRR, where:
V = VersionR = ReleaseR = Release
The VRR entered is converted to a Tivoli Monitoring VVRRMMFF format inthe following way: 0V.RR.00.00.In the agent editor, a patch level field is available when you need to release afix for an agent, but you do not want to update the version.
11. If you want your agent to support multiple instances, select the Supportmultiple instances of this agent check box.Some applications can be configured to run multiple instances of theapplication on a system at the same time. When building agents for thesetypes of applications, it is often desirable to separate the management of eachof the application instances so that the Tivoli Monitoring user knows whenthere are problems with one of the application instances. A similar conditionhappens if you are building an agent that uses a data provider from the Datafrom a server monitoring category. Because these data monitors can be used tomonitor remote systems, it is possible to install the agent on one system andmonitor several other systems at the same time. Each of these remote systemscan be represented separately in Tivoli Monitoring and each can have differentconfiguration values for communication. To do this, select the Supportmultiple instances of this agent check box, which causes the Agent Builder tocreate a "template" agent. After the agent is installed, you can create andconfigure an instance of the agent for each instance of the monitoredapplication.
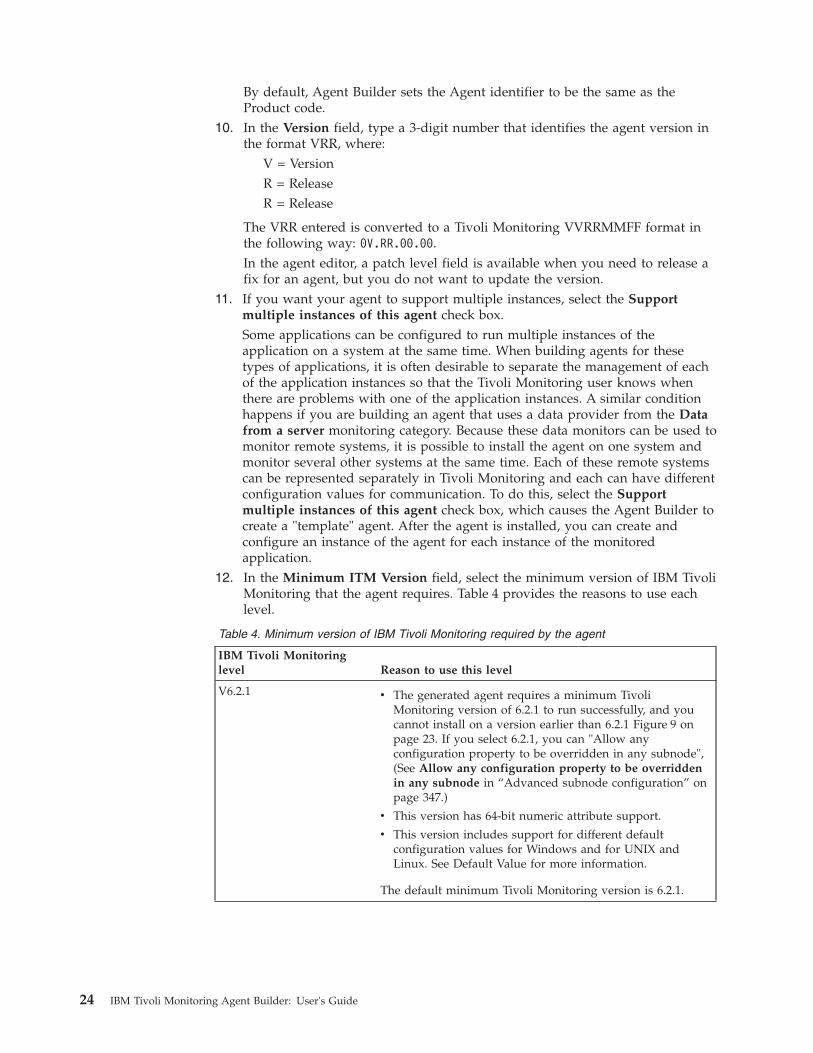
12. In the Minimum ITM Version field, select the minimum version of IBM TivoliMonitoring that the agent requires. Table 4 provides the reasons to use eachlevel.
Table 4. Minimum version of IBM Tivoli Monitoring required by the agent
IBM Tivoli Monitoringlevel Reason to use this level
V6.2.1 v The generated agent requires a minimum TivoliMonitoring version of 6.2.1 to run successfully, and youcannot install on a version earlier than 6.2.1 Figure 9 onpage 23. If you select 6.2.1, you can "Allow anyconfiguration property to be overridden in any subnode",(See Allow any configuration property to be overriddenin any subnode in “Advanced subnode configuration” onpage 347.)
v This version has 64-bit numeric attribute support.
v This version includes support for different defaultconfiguration values for Windows and for UNIX andLinux. See Default Value for more information.
The default minimum Tivoli Monitoring version is 6.2.1.
24 IBM Tivoli Monitoring Agent Builder: User's Guide
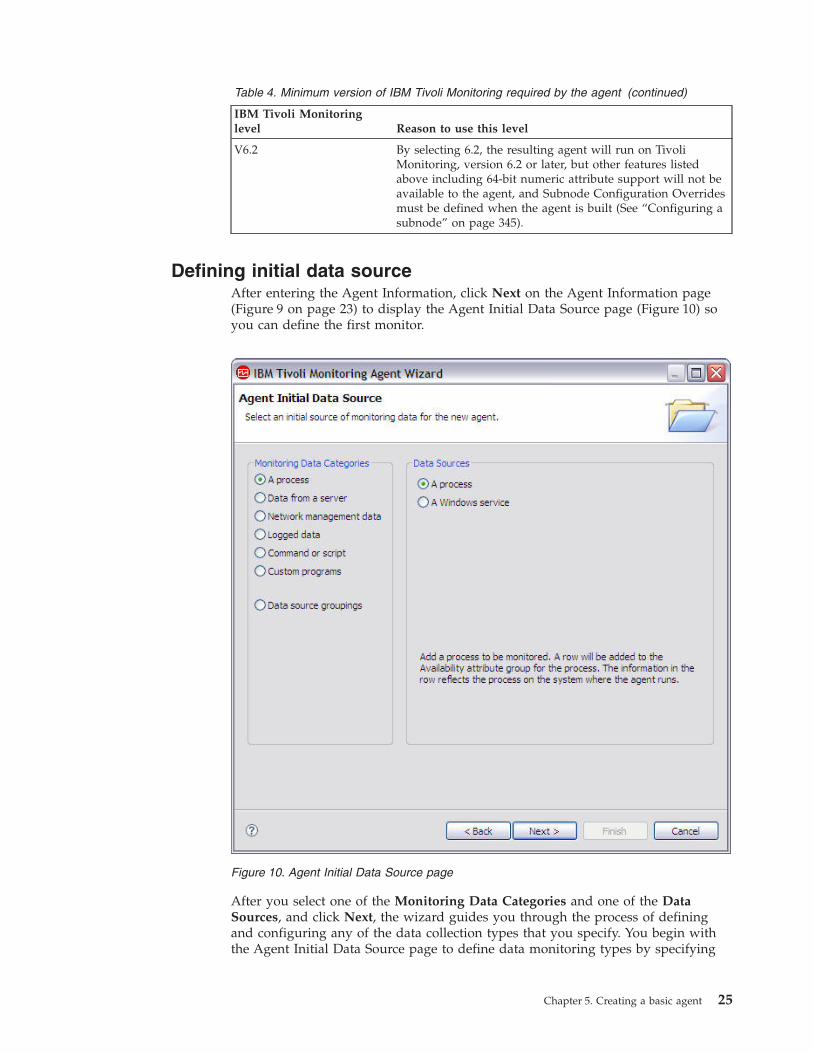
Table 4. Minimum version of IBM Tivoli Monitoring required by the agent (continued)
IBM Tivoli Monitoringlevel Reason to use this level
V6.2 By selecting 6.2, the resulting agent will run on TivoliMonitoring, version 6.2 or later, but other features listedabove including 64-bit numeric attribute support will not beavailable to the agent, and Subnode Configuration Overridesmust be defined when the agent is built (See “Configuring asubnode” on page 345).
Defining initial data sourceAfter entering the Agent Information, click Next on the Agent Information page(Figure 9 on page 23) to display the Agent Initial Data Source page (Figure 10) soyou can define the first monitor.
After you select one of the Monitoring Data Categories and one of the DataSources, and click Next, the wizard guides you through the process of definingand configuring any of the data collection types that you specify. You begin withthe Agent Initial Data Source page to define data monitoring types by specifying
Figure 10. Agent Initial Data Source page
Chapter 5. Creating a basic agent 25
the monitoring data categories and the data sources that your new agent is tomonitor. For detailed information about each data source, see “Data Sources.”
After you define the initial monitor, you can define additional monitors from theData Source Definition page, the last page of the New Agent Wizard. See “Definingadditional data sources” on page 28.
If you decide to add one or more of the monitoring types after you finish thewizard, use the following information to add them using the Agent Editor:Chapter 6, “Modifying your agent by using the Tivoli Monitoring Agent Editor,”on page 37.
If you have created a new data source that might return more than one data row,you are prompted to select key attributes, see “Selecting key attributes” on page27. When you finish defining all of your monitors, click Finish, and then generateand install your new agent. See “Installing and testing an agent” on page 377.
Data Sourcesv Server process monitoring category
– Process– Windows service
v Data from a server monitoring category– WMI– Perfmon– CIM– SNMP– SNMP Events– JDBC– JMX– HTTP– SOAP
v Network management data– Ping
v Logged data monitoring category– Log File– AIX Binary Log– Windows Event Log
v Command or script monitoring category– Command return code– Output from a script
v Custom programs monitoring category– Socket– Java API
v Existing data sources monitoring category– Join two data sources– “Filtered Attribute Groups” on page 323
v Data source groupings monitoring category
26 IBM Tivoli Monitoring Agent Builder: User's Guide
– Subnode Definition– Navigator group
Selecting key attributesWhen an attribute group can return more than one data row, each row representsan entity that is being monitored. Each time monitored data is sampled, IBM TivoliMonitoring needs to a match a row to the entity that is being monitored and toprevious samples for that entity. This matching is done with key attributes. One ormore attributes in the attribute group can be identified as key attributes. These keyattributes, when taken together, distinguish one monitored entity from another, anddo not change from one sample to the next when referring to the same monitoredentity.
Rate and delta attributes are calculated by comparing the current sample to theprevious sample, and identical key attributes ensure that the agent is comparingvalues for the same monitored entity. Similarly, the summarization and pruningagent summarizes samples that have identical key attributes. In addition, anyattribute that is set as a key attribute can also be used as a "Display item" in asituation.
After you have specified the details about your new data source (using theinformation in “Defining initial data source” on page 25), if it is possible formultiple data rows to be returned by the data source, the Agent Builder promptsyou to select key attributes on the Select key attributes page (Figure 11 on page 28).
Note: If the browser detected key attributes, those attributes are marked as keyattributes and the Select key attributes page is not displayed.
Chapter 5. Creating a basic agent 27
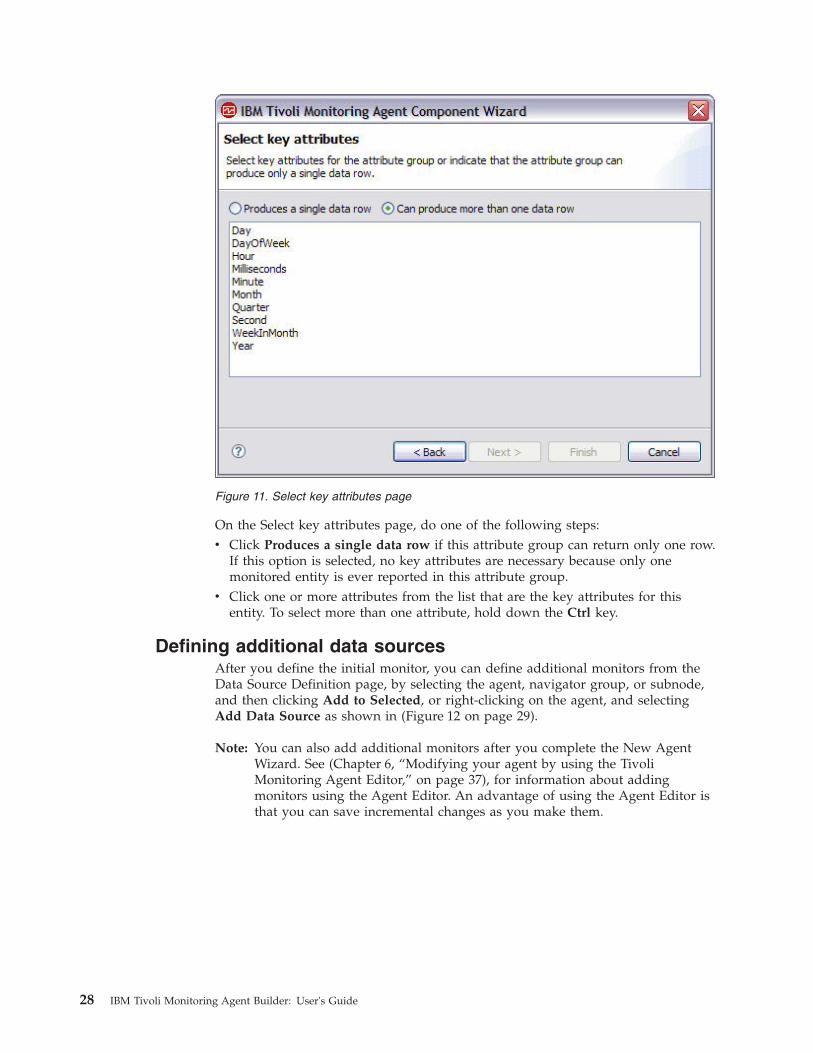
On the Select key attributes page, do one of the following steps:v Click Produces a single data row if this attribute group can return only one row.
If this option is selected, no key attributes are necessary because only onemonitored entity is ever reported in this attribute group.
v Click one or more attributes from the list that are the key attributes for thisentity. To select more than one attribute, hold down the Ctrl key.
Defining additional data sourcesAfter you define the initial monitor, you can define additional monitors from theData Source Definition page, by selecting the agent, navigator group, or subnode,and then clicking Add to Selected, or right-clicking on the agent, and selectingAdd Data Source as shown in (Figure 12 on page 29).
Note: You can also add additional monitors after you complete the New AgentWizard. See (Chapter 6, “Modifying your agent by using the TivoliMonitoring Agent Editor,” on page 37), for information about addingmonitors using the Agent Editor. An advantage of using the Agent Editor isthat you can save incremental changes as you make them.
Figure 11. Select key attributes page
28 IBM Tivoli Monitoring Agent Builder: User's Guide

When you add a monitor using the Agent Editor Data Source Definition page, theData Source Location page is displayed (Figure 13 on page 30). This page is thesame as the Agent Initial Data Source page (Figure 10 on page 25) except for thename of the page.
Figure 12. Data Source Definition page: defining additional monitors
Chapter 5. Creating a basic agent 29

After you select one of the Monitoring Data Categories and one of the DataSources, and click Next, the wizard guides you through the process of definingand configuring any of the data collection types that you specify. You begin withthe Agent Initial Data Source page to define data monitoring types by specifyingthe monitoring data categories and the data sources that your new agent is tomonitor. For detailed information about each data source, see “Data Sources” onpage 26.
Click Finish to add the new data source to the Data Source Definition page.
Organizing the agentYou can organize the data sources for the agent in the following ways:v Navigator groupsv Subnodes
A navigator group is a way of grouping data sources in the Tivoli EnterprisePortal. By default, a separate navigation item is created in the Tivoli EnterprisePortal under your agent for each data source that you define. A query is associatedwith that navigator item so a default workspace displays the data collected by thatdata source in a simple table view. If a data source is placed inside a navigator
Figure 13. Data Source Location page
30 IBM Tivoli Monitoring Agent Builder: User's Guide
group, a separate navigator item is no longer displayed under the agent.Workspaces that are created for the navigator group might display viewsconstructed from all of the data sources contained in the navigator group. Inaddition to the information in this section (“Navigator groups”), see Chapter 28,“Creating a navigator group,” on page 327 for additional information aboutnavigator groups.
A subnode is a portion of an agent that can be replicated as necessary, dependingon the application or enterprise being monitored. In addition to the information inthis section (“Subnodes”), see Chapter 29, “Creating subnodes,” on page 331 foradditional information about subnodes.
Navigator groupsNavigator groups are generally used to group several related data sources togetherso that workspaces can be created that show views of the related data sources. Youmight be able to collect file system data from more than one data source. It can beuseful to create one workspace that shows views of all file system data from thosedifferent data sources.
Navigator groups are also a good way to "hide" data sources. You might decidethat certain metrics collected from 2 data sources are most useful if the datasources are joined to create a combined, third data source. You want to see onlythe data combined in the Joined datasource. You can create a navigator group thatcontains all three data sources and create a workspace that contains views todisplay only the combined data source. The two original data sources areeffectively hidden from view in the Tivoli Enterprise Portal. See Chapter 27,“Creating attribute groups from existing sources,” on page 317 for informationabout joining data sources.
Note: When you group data sources in a navigator group, Tivoli Monitoring doesnot associate a query with the navigator group. It is assumed that youdefine a default workspace for the navigator group to display the datasources in a useful format.
The following criteria apply to navigator groups:v A navigator group can be defined in the base agent or in a subnode.v A navigator group cannot contain another Navigator group.
SubnodesYou can build a single agent that accomplishes the following tasks by usingsubnodes:v Monitors each instance of an application running on a system instead of having
to use separate instances of the agent, one for each application instance.v Monitors several different remote systems instead of having to use separate
instances of the agent, one for each remote system.v Monitors several different types of entities from one agent instead of having to
build and deploy several different agents.v Displays an additional level in the Tivoli Enterprise Portal physical Navigation
tree allowing additional grouping and customization.v Defines additional Managed System Lists allowing another level of granularity
with situations.
An agent developer defines subnode types in the Agent Builder. Each type mustcorrespond to a different type of entity that an agent can monitor. Attribute groups
Chapter 5. Creating a basic agent 31
and attributes are added to the subnode type that describes the entity that is beingmonitored. When the agent is deployed and configured, one or more instances ofeach subnode type can be created. Each instance of a subnode must correspond toan instance of an application, a remote system, or whatever entity the subnodetype was designed to monitor. All subnode instances of a single subnode type haveattribute groups and workspaces that have an identical form, but have data thatcomes from the particular entity that is being monitored.
The number of subnodes of each type is determined when the agent is configured.Some configuration data can apply to the agent as a whole, but other configurationdata applies to only a single subnode. Configure each subnode differently from theother subnodes, at least slightly, so that they do not monitor the exact same entityand display the exact same data.
A subnode is displayed within the agent in the physical Navigation tree in theTivoli Enterprise Portal. Workspaces display the data defined by a subnode andsituations can be distributed to one or more instances of a subnode. A managedsystem list is automatically created that contains all instances of the subnode, justlike the Managed System List that is created for an agent.
Because the agents built using the Agent Builder create the subnode instancesbased on configuration values, these subnodes have the same life span as theagent. There is still just one heartbeat performed for the agent, not a separateheartbeat for each subnode. Defining monitoring for a number of systems orapplication instances using subnodes instead of agent instances can significantlyincrease the possible scale of the Tivoli Monitoring environment.
Adding or removing a subnode requires reconfiguring the agent, which involvesstopping and restarting it. For this reason, it can be good practice to define theagent as a multi-instance agent as well, so that you can manage portions of yourenvironment separately.
Along with attribute groups in subnodes, an agent can define agent-level attributegroups that reside outside of a subnode. In the Tivoli Enterprise Portal Navigatortree, a subnode type is displayed under the agent name, and subnode instances aredisplayed under a subnode type. Subnodes are identified by a Managed SystemName (MSN) just like agents, for example 94:Hill.cmn.
For example in the Navigator tree in Figure 14 on page 33, "Watching Over OurFriends" is an agent with three entities (Boarders, Common Areas, and KennelRuns) and two subnode types (Common Area and Kennel Run). Two of theseentities have subnode types defined for them (Common Area and Kennel Run). Asubnode is not required for the third entity (Boarder), which is represented by asingle row in a table at the base agent level. The Common Area subnode type has3 subnode instances: 94:Hill:cmn, 94:Meadow:cmn, and 94:Tree:cmn representingthree common areas in the kennel. The Kennel Run subnode type has foursubnode instances: 94:system1:run, 94:system2:run, 94:system4:run, and94:system5:run representing four kennel runs.
32 IBM Tivoli Monitoring Agent Builder: User's Guide
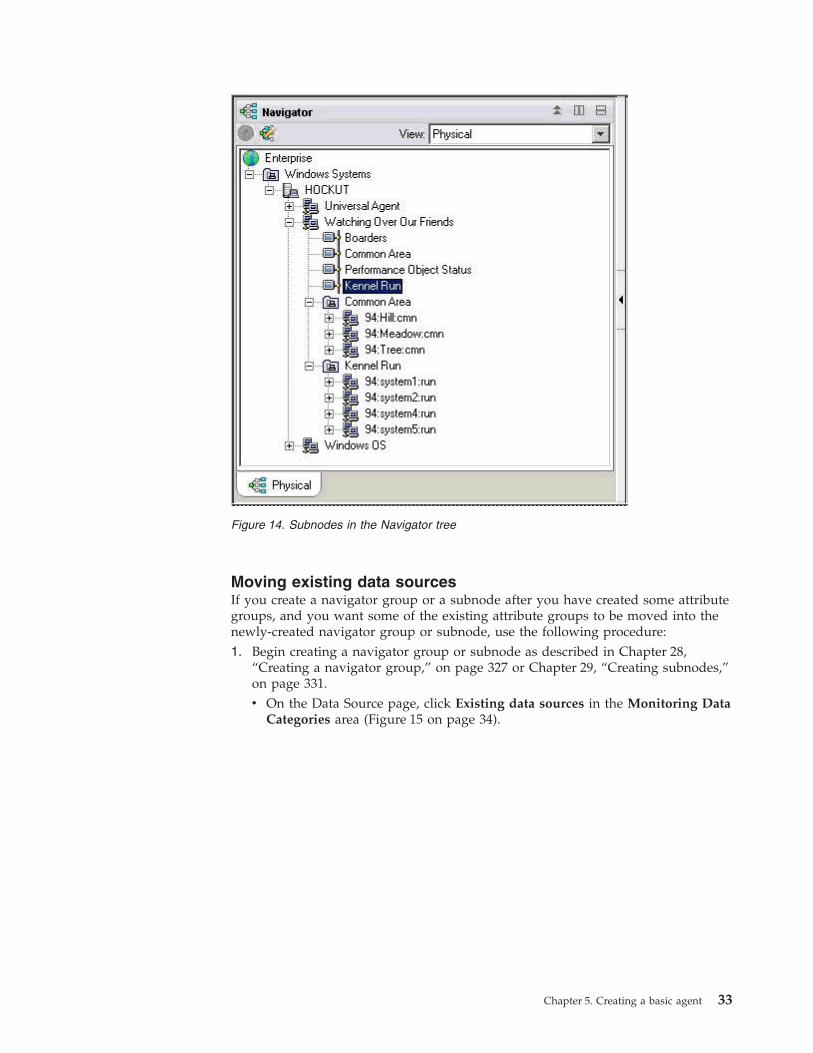
Moving existing data sourcesIf you create a navigator group or a subnode after you have created some attributegroups, and you want some of the existing attribute groups to be moved into thenewly-created navigator group or subnode, use the following procedure:1. Begin creating a navigator group or subnode as described in Chapter 28,
“Creating a navigator group,” on page 327 or Chapter 29, “Creating subnodes,”on page 331.v On the Data Source page, click Existing data sources in the Monitoring Data
Categories area (Figure 15 on page 34).
Figure 14. Subnodes in the Navigator tree
Chapter 5. Creating a basic agent 33

v In the Data Sources area, click Move existing data sources in the DataSources area.
v Click Next.2. On the Currently Defined Data Sources page, select one or more data sources
(Figure 16 on page 35).
Figure 15. Move existing data sources
34 IBM Tivoli Monitoring Agent Builder: User's Guide
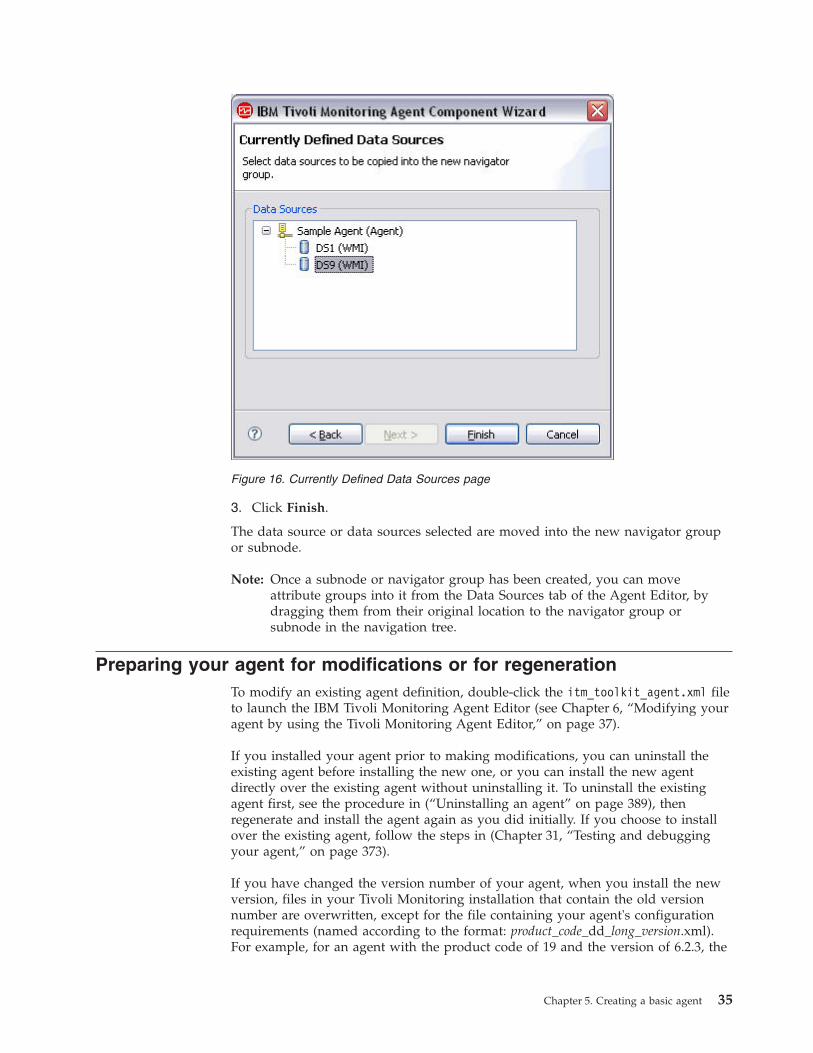
3. Click Finish.
The data source or data sources selected are moved into the new navigator groupor subnode.
Note: Once a subnode or navigator group has been created, you can moveattribute groups into it from the Data Sources tab of the Agent Editor, bydragging them from their original location to the navigator group orsubnode in the navigation tree.
Preparing your agent for modifications or for regenerationTo modify an existing agent definition, double-click the itm_toolkit_agent.xml fileto launch the IBM Tivoli Monitoring Agent Editor (see Chapter 6, “Modifying youragent by using the Tivoli Monitoring Agent Editor,” on page 37).
If you installed your agent prior to making modifications, you can uninstall theexisting agent before installing the new one, or you can install the new agentdirectly over the existing agent without uninstalling it. To uninstall the existingagent first, see the procedure in (“Uninstalling an agent” on page 389), thenregenerate and install the agent again as you did initially. If you choose to installover the existing agent, follow the steps in (Chapter 31, “Testing and debuggingyour agent,” on page 373).
If you have changed the version number of your agent, when you install the newversion, files in your Tivoli Monitoring installation that contain the old versionnumber are overwritten, except for the file containing your agent's configurationrequirements (named according to the format: product_code_dd_long_version.xml).For example, for an agent with the product code of 19 and the version of 6.2.3, the
Figure 16. Currently Defined Data Sources page
Chapter 5. Creating a basic agent 35

file is called 19_dd_062300000.xml along with the remote deployment bundle foryour agent. Both of these are added to the system alongside the old versions ratherthan replacing them.
36 IBM Tivoli Monitoring Agent Builder: User's Guide
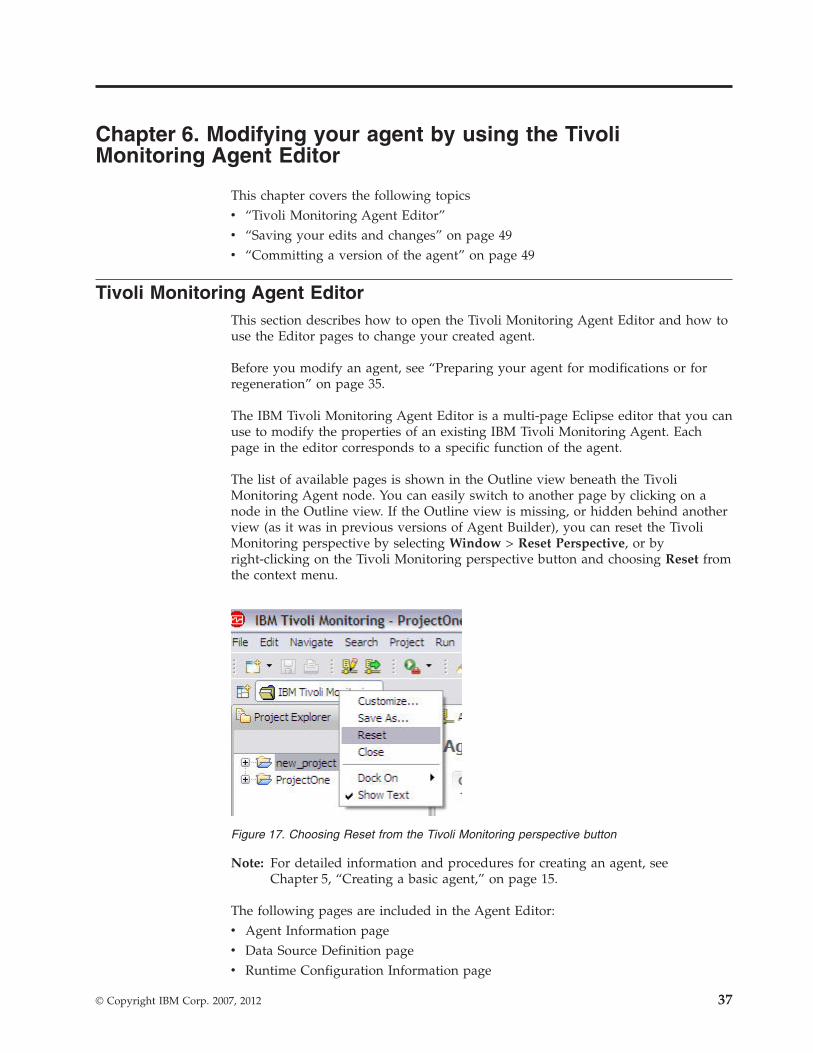
Chapter 6. Modifying your agent by using the TivoliMonitoring Agent Editor
This chapter covers the following topicsv “Tivoli Monitoring Agent Editor”v “Saving your edits and changes” on page 49v “Committing a version of the agent” on page 49
Tivoli Monitoring Agent EditorThis section describes how to open the Tivoli Monitoring Agent Editor and how touse the Editor pages to change your created agent.
Before you modify an agent, see “Preparing your agent for modifications or forregeneration” on page 35.
The IBM Tivoli Monitoring Agent Editor is a multi-page Eclipse editor that you canuse to modify the properties of an existing IBM Tivoli Monitoring Agent. Eachpage in the editor corresponds to a specific function of the agent.
The list of available pages is shown in the Outline view beneath the TivoliMonitoring Agent node. You can easily switch to another page by clicking on anode in the Outline view. If the Outline view is missing, or hidden behind anotherview (as it was in previous versions of Agent Builder), you can reset the TivoliMonitoring perspective by selecting Window > Reset Perspective, or byright-clicking on the Tivoli Monitoring perspective button and choosing Reset fromthe context menu.
Note: For detailed information and procedures for creating an agent, seeChapter 5, “Creating a basic agent,” on page 15.
The following pages are included in the Agent Editor:v Agent Information pagev Data Source Definition pagev Runtime Configuration Information page
Figure 17. Choosing Reset from the Tivoli Monitoring perspective button
© Copyright IBM Corp. 2007, 2012 37
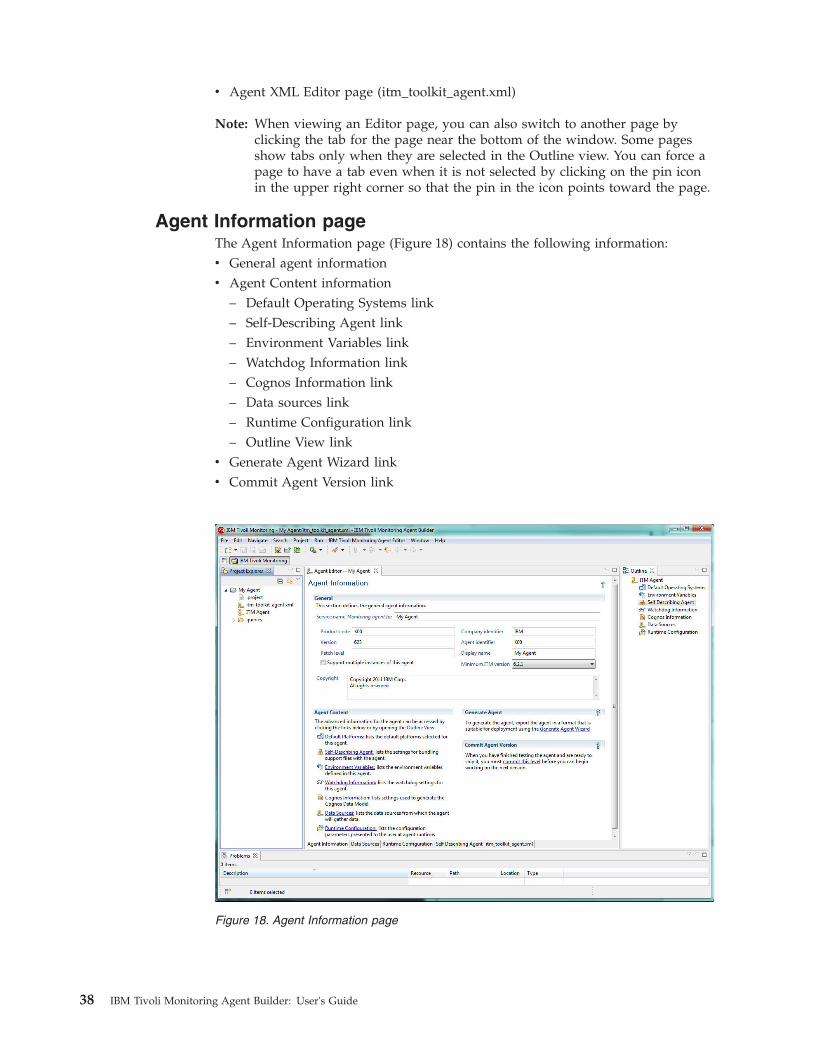
v Agent XML Editor page (itm_toolkit_agent.xml)
Note: When viewing an Editor page, you can also switch to another page byclicking the tab for the page near the bottom of the window. Some pagesshow tabs only when they are selected in the Outline view. You can force apage to have a tab even when it is not selected by clicking on the pin iconin the upper right corner so that the pin in the icon points toward the page.
Agent Information pageThe Agent Information page (Figure 18) contains the following information:v General agent informationv Agent Content information
– Default Operating Systems link– Self-Describing Agent link– Environment Variables link– Watchdog Information link– Cognos Information link– Data sources link– Runtime Configuration link– Outline View link
v Generate Agent Wizard linkv Commit Agent Version link
Figure 18. Agent Information page
38 IBM Tivoli Monitoring Agent Builder: User's Guide
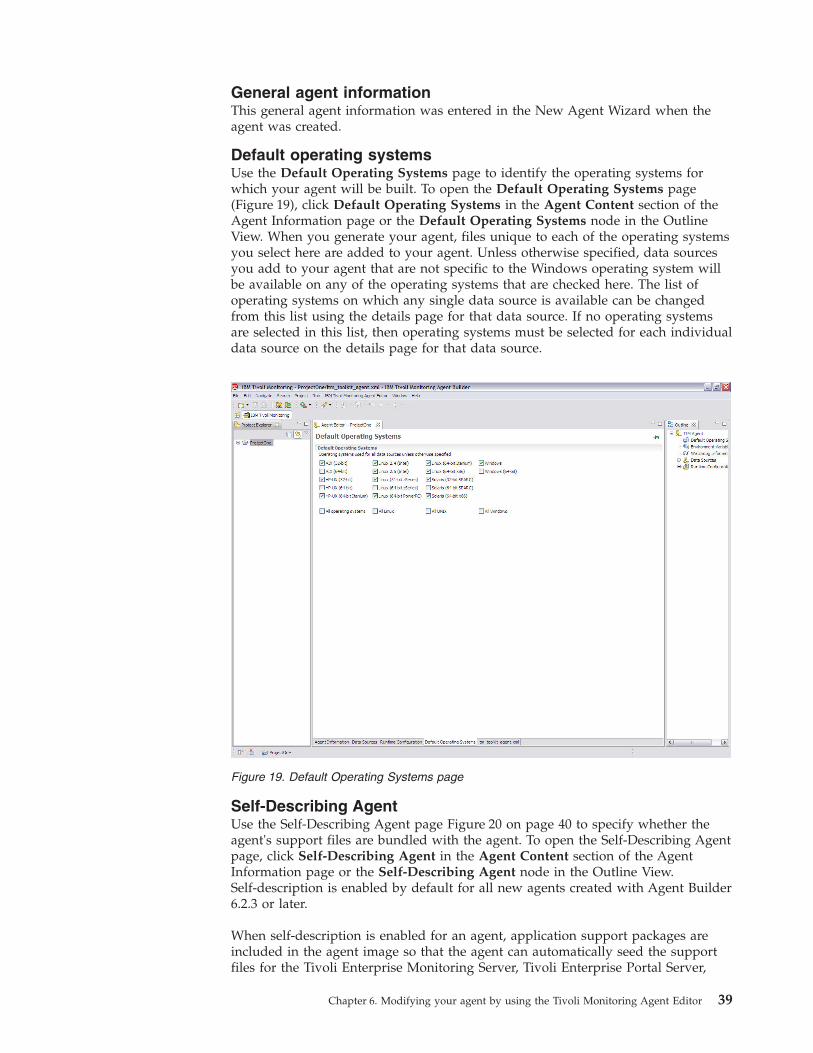
General agent informationThis general agent information was entered in the New Agent Wizard when theagent was created.
Default operating systemsUse the Default Operating Systems page to identify the operating systems forwhich your agent will be built. To open the Default Operating Systems page(Figure 19), click Default Operating Systems in the Agent Content section of theAgent Information page or the Default Operating Systems node in the OutlineView. When you generate your agent, files unique to each of the operating systemsyou select here are added to your agent. Unless otherwise specified, data sourcesyou add to your agent that are not specific to the Windows operating system willbe available on any of the operating systems that are checked here. The list ofoperating systems on which any single data source is available can be changedfrom this list using the details page for that data source. If no operating systemsare selected in this list, then operating systems must be selected for each individualdata source on the details page for that data source.
Self-Describing AgentUse the Self-Describing Agent page Figure 20 on page 40 to specify whether theagent's support files are bundled with the agent. To open the Self-Describing Agentpage, click Self-Describing Agent in the Agent Content section of the AgentInformation page or the Self-Describing Agent node in the Outline View.Self-description is enabled by default for all new agents created with Agent Builder6.2.3 or later.
When self-description is enabled for an agent, application support packages areincluded in the agent image so that the agent can automatically seed the supportfiles for the Tivoli Enterprise Monitoring Server, Tivoli Enterprise Portal Server,
Figure 19. Default Operating Systems page
Chapter 6. Modifying your agent by using the Tivoli Monitoring Agent Editor 39
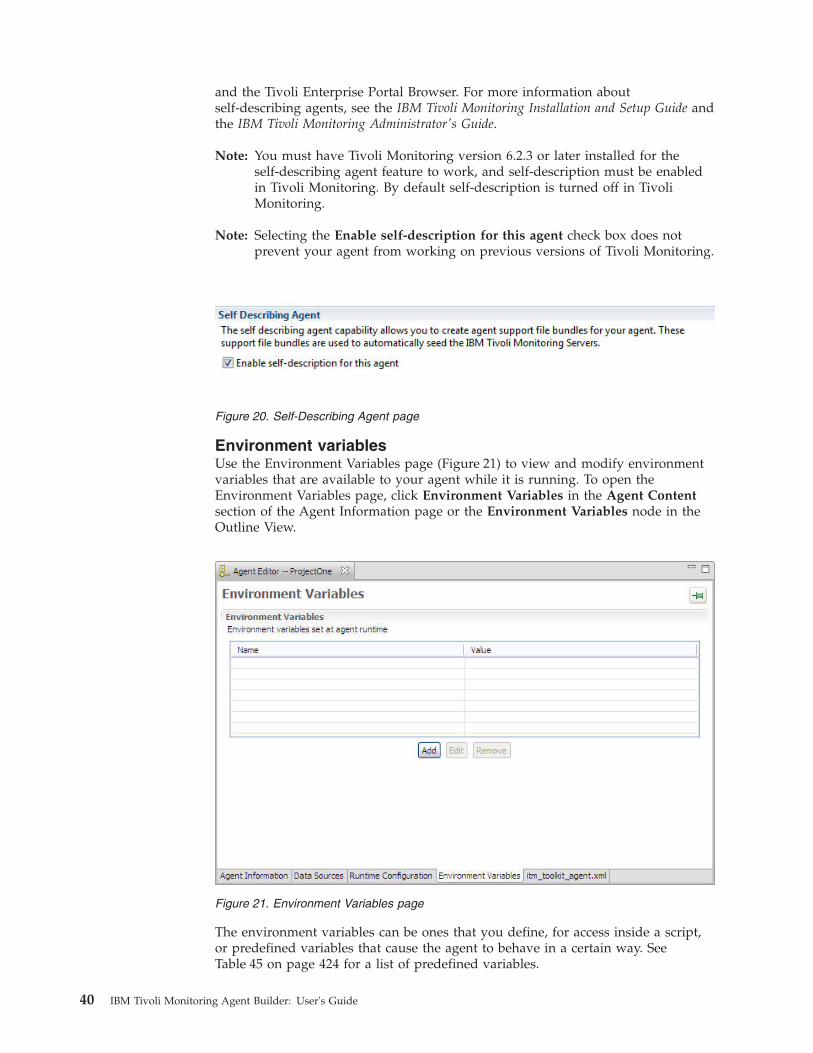
and the Tivoli Enterprise Portal Browser. For more information aboutself-describing agents, see the IBM Tivoli Monitoring Installation and Setup Guide andthe IBM Tivoli Monitoring Administrator's Guide.
Note: You must have Tivoli Monitoring version 6.2.3 or later installed for theself-describing agent feature to work, and self-description must be enabledin Tivoli Monitoring. By default self-description is turned off in TivoliMonitoring.
Note: Selecting the Enable self-description for this agent check box does notprevent your agent from working on previous versions of Tivoli Monitoring.
Environment variablesUse the Environment Variables page (Figure 21) to view and modify environmentvariables that are available to your agent while it is running. To open theEnvironment Variables page, click Environment Variables in the Agent Contentsection of the Agent Information page or the Environment Variables node in theOutline View.
The environment variables can be ones that you define, for access inside a script,or predefined variables that cause the agent to behave in a certain way. SeeTable 45 on page 424 for a list of predefined variables.
Figure 20. Self-Describing Agent page
Figure 21. Environment Variables page
40 IBM Tivoli Monitoring Agent Builder: User's Guide
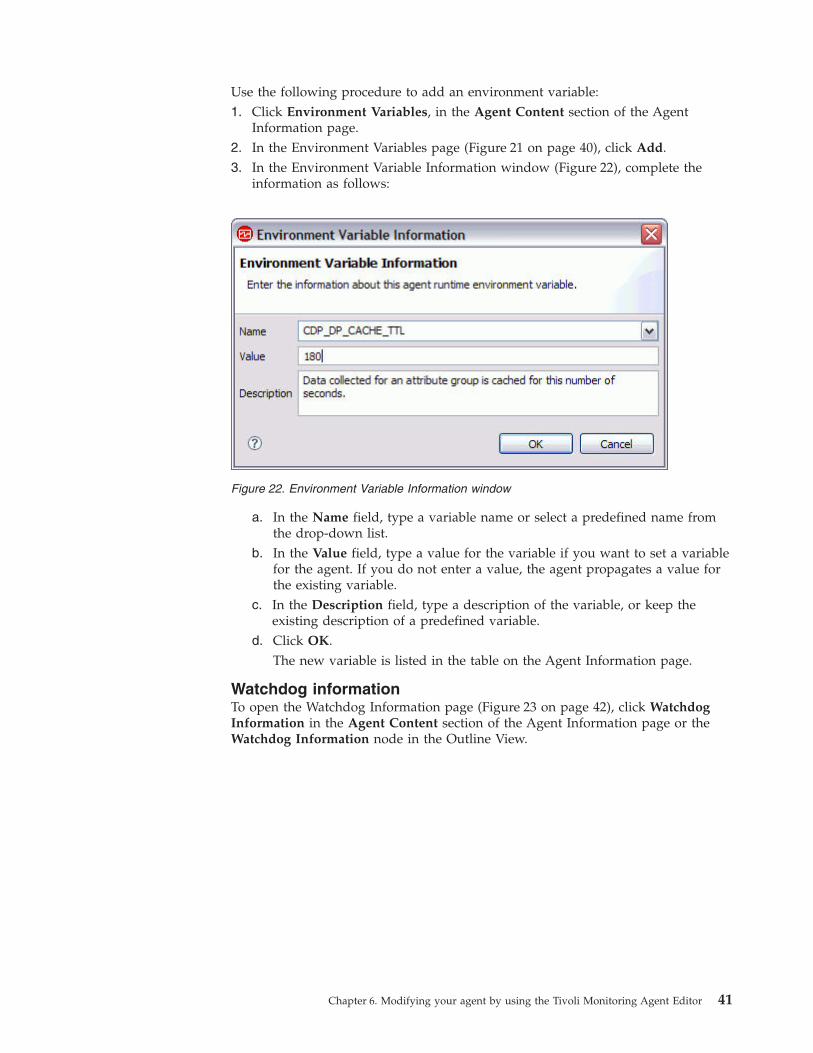
Use the following procedure to add an environment variable:1. Click Environment Variables, in the Agent Content section of the Agent
Information page.2. In the Environment Variables page (Figure 21 on page 40), click Add.3. In the Environment Variable Information window (Figure 22), complete the
information as follows:
a. In the Name field, type a variable name or select a predefined name fromthe drop-down list.
b. In the Value field, type a value for the variable if you want to set a variablefor the agent. If you do not enter a value, the agent propagates a value forthe existing variable.
c. In the Description field, type a description of the variable, or keep theexisting description of a predefined variable.
d. Click OK.The new variable is listed in the table on the Agent Information page.
Watchdog informationTo open the Watchdog Information page (Figure 23 on page 42), click WatchdogInformation in the Agent Content section of the Agent Information page or theWatchdog Information node in the Outline View.
Figure 22. Environment Variable Information window
Chapter 6. Modifying your agent by using the Tivoli Monitoring Agent Editor 41
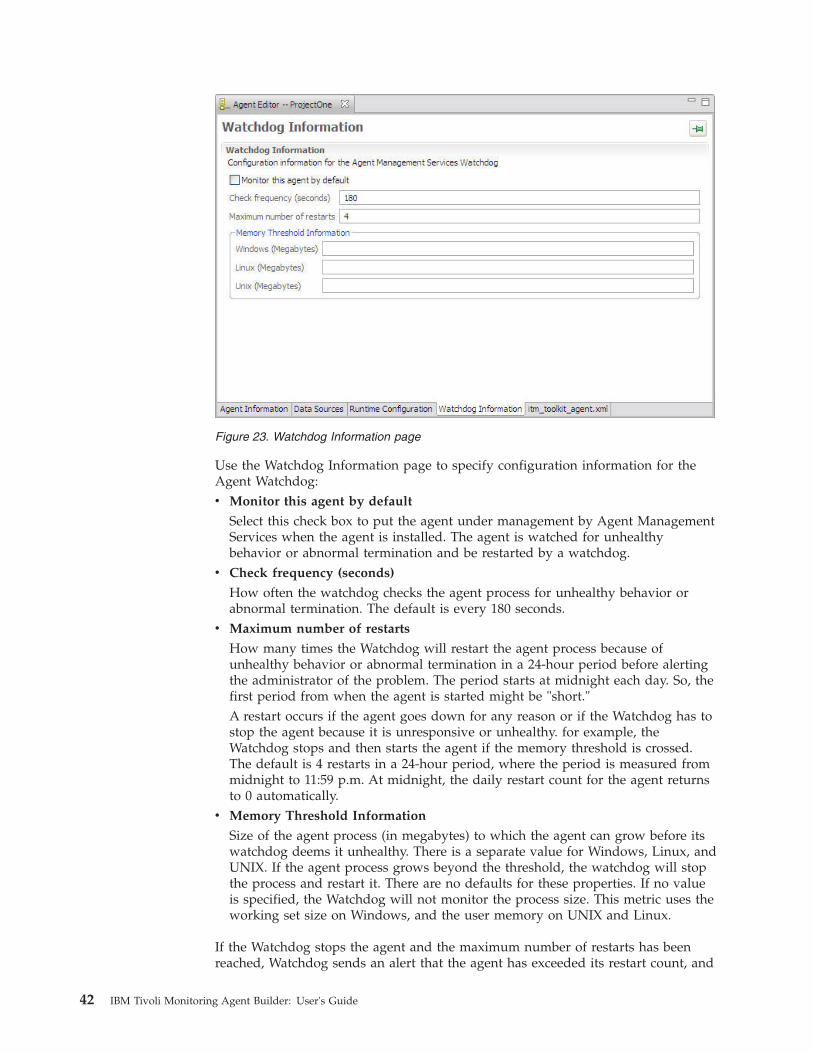
Use the Watchdog Information page to specify configuration information for theAgent Watchdog:v Monitor this agent by default
Select this check box to put the agent under management by Agent ManagementServices when the agent is installed. The agent is watched for unhealthybehavior or abnormal termination and be restarted by a watchdog.
v Check frequency (seconds)
How often the watchdog checks the agent process for unhealthy behavior orabnormal termination. The default is every 180 seconds.
v Maximum number of restarts
How many times the Watchdog will restart the agent process because ofunhealthy behavior or abnormal termination in a 24-hour period before alertingthe administrator of the problem. The period starts at midnight each day. So, thefirst period from when the agent is started might be "short."A restart occurs if the agent goes down for any reason or if the Watchdog has tostop the agent because it is unresponsive or unhealthy. for example, theWatchdog stops and then starts the agent if the memory threshold is crossed.The default is 4 restarts in a 24-hour period, where the period is measured frommidnight to 11:59 p.m. At midnight, the daily restart count for the agent returnsto 0 automatically.
v Memory Threshold Information
Size of the agent process (in megabytes) to which the agent can grow before itswatchdog deems it unhealthy. There is a separate value for Windows, Linux, andUNIX. If the agent process grows beyond the threshold, the watchdog will stopthe process and restart it. There are no defaults for these properties. If no valueis specified, the Watchdog will not monitor the process size. This metric uses theworking set size on Windows, and the user memory on UNIX and Linux.
If the Watchdog stops the agent and the maximum number of restarts has beenreached, Watchdog sends an alert that the agent has exceeded its restart count, and
Figure 23. Watchdog Information page
42 IBM Tivoli Monitoring Agent Builder: User's Guide
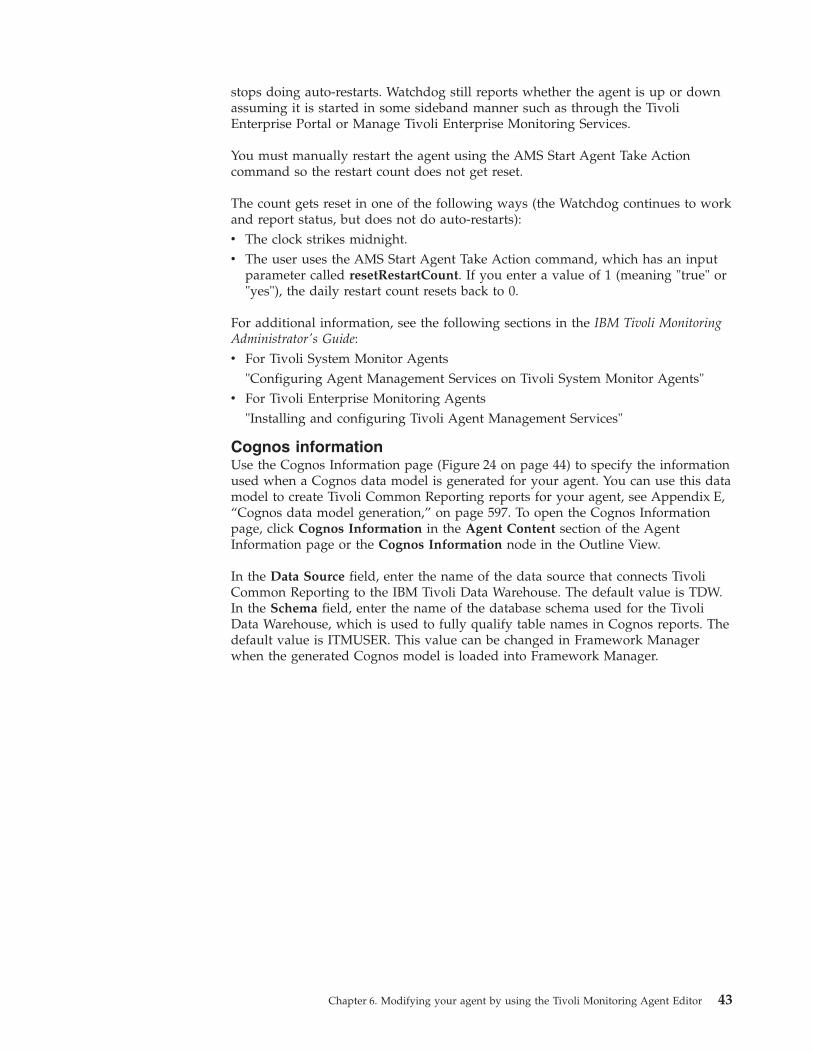
stops doing auto-restarts. Watchdog still reports whether the agent is up or downassuming it is started in some sideband manner such as through the TivoliEnterprise Portal or Manage Tivoli Enterprise Monitoring Services.
You must manually restart the agent using the AMS Start Agent Take Actioncommand so the restart count does not get reset.
The count gets reset in one of the following ways (the Watchdog continues to workand report status, but does not do auto-restarts):v The clock strikes midnight.v The user uses the AMS Start Agent Take Action command, which has an input
parameter called resetRestartCount. If you enter a value of 1 (meaning "true" or"yes"), the daily restart count resets back to 0.
For additional information, see the following sections in the IBM Tivoli MonitoringAdministrator's Guide:v For Tivoli System Monitor Agents
"Configuring Agent Management Services on Tivoli System Monitor Agents"v For Tivoli Enterprise Monitoring Agents
"Installing and configuring Tivoli Agent Management Services"
Cognos informationUse the Cognos Information page (Figure 24 on page 44) to specify the informationused when a Cognos data model is generated for your agent. You can use this datamodel to create Tivoli Common Reporting reports for your agent, see Appendix E,“Cognos data model generation,” on page 597. To open the Cognos Informationpage, click Cognos Information in the Agent Content section of the AgentInformation page or the Cognos Information node in the Outline View.
In the Data Source field, enter the name of the data source that connects TivoliCommon Reporting to the IBM Tivoli Data Warehouse. The default value is TDW.In the Schema field, enter the name of the database schema used for the TivoliData Warehouse, which is used to fully qualify table names in Cognos reports. Thedefault value is ITMUSER. This value can be changed in Framework Managerwhen the generated Cognos model is loaded into Framework Manager.
Chapter 6. Modifying your agent by using the Tivoli Monitoring Agent Editor 43
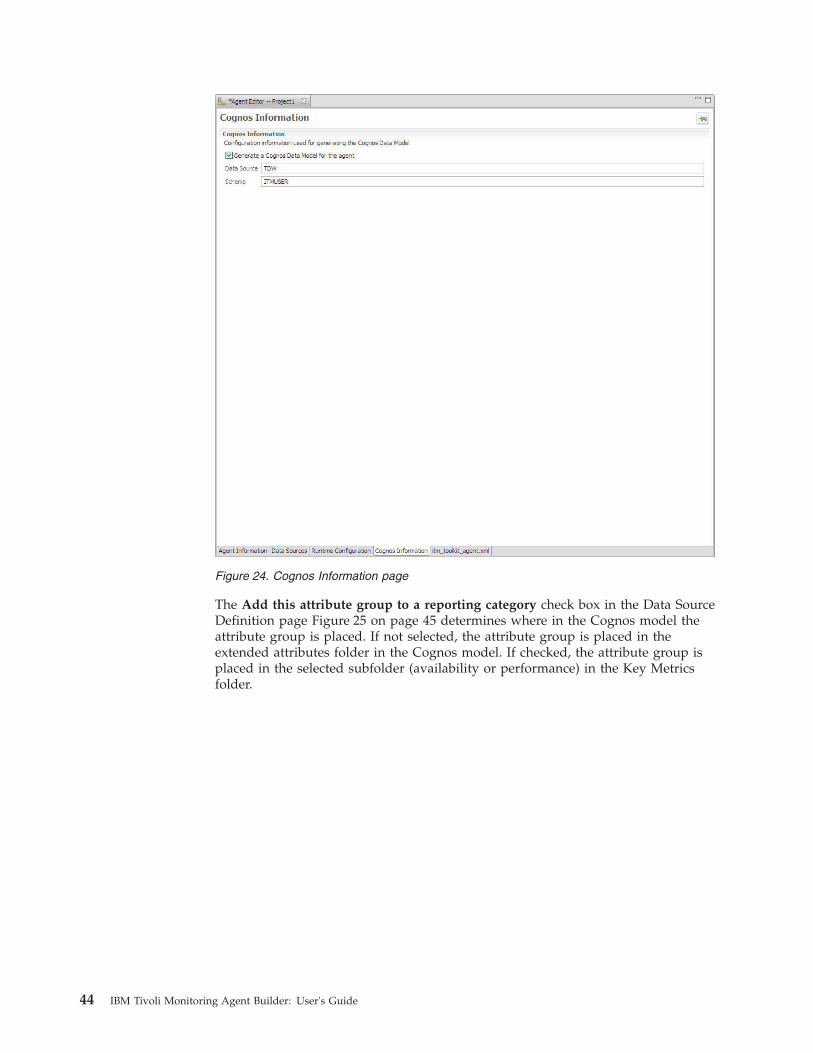
The Add this attribute group to a reporting category check box in the Data SourceDefinition page Figure 25 on page 45 determines where in the Cognos model theattribute group is placed. If not selected, the attribute group is placed in theextended attributes folder in the Cognos model. If checked, the attribute group isplaced in the selected subfolder (availability or performance) in the Key Metricsfolder.
Figure 24. Cognos Information page
44 IBM Tivoli Monitoring Agent Builder: User's Guide
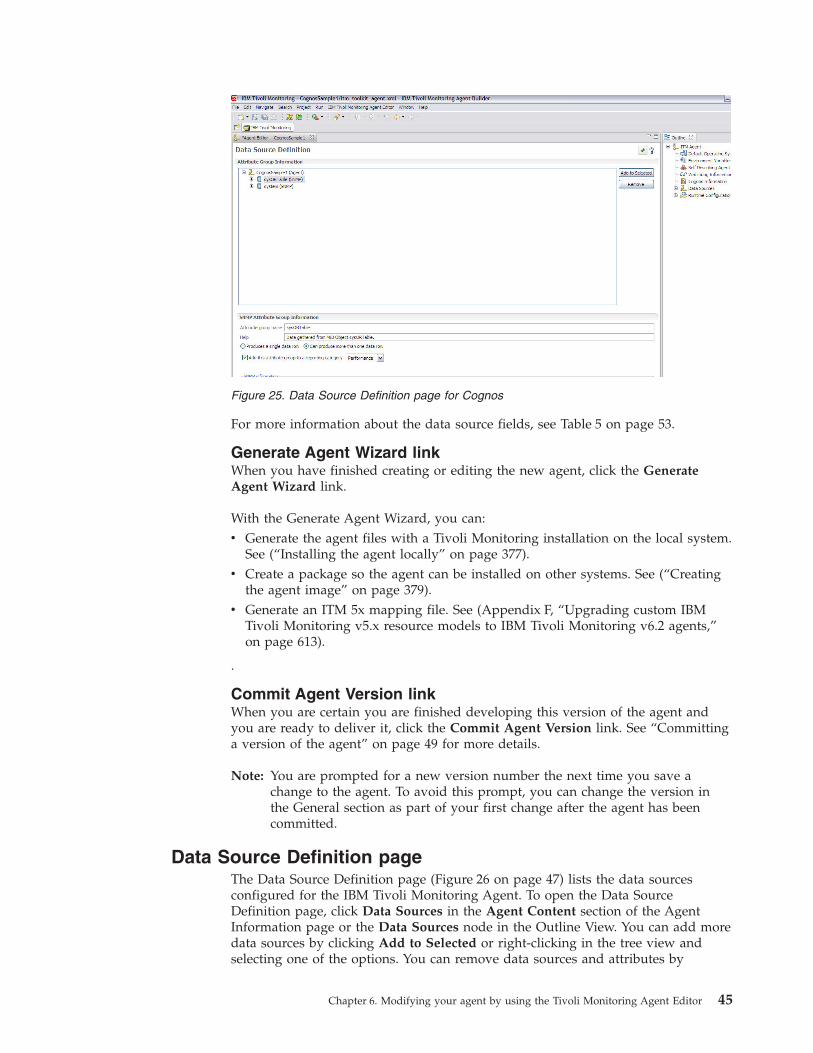
For more information about the data source fields, see Table 5 on page 53.
Generate Agent Wizard linkWhen you have finished creating or editing the new agent, click the GenerateAgent Wizard link.
With the Generate Agent Wizard, you can:v Generate the agent files with a Tivoli Monitoring installation on the local system.
See (“Installing the agent locally” on page 377).v Create a package so the agent can be installed on other systems. See (“Creating
the agent image” on page 379).v Generate an ITM 5x mapping file. See (Appendix F, “Upgrading custom IBM
Tivoli Monitoring v5.x resource models to IBM Tivoli Monitoring v6.2 agents,”on page 613).
.
Commit Agent Version linkWhen you are certain you are finished developing this version of the agent andyou are ready to deliver it, click the Commit Agent Version link. See “Committinga version of the agent” on page 49 for more details.
Note: You are prompted for a new version number the next time you save achange to the agent. To avoid this prompt, you can change the version inthe General section as part of your first change after the agent has beencommitted.
Data Source Definition pageThe Data Source Definition page (Figure 26 on page 47) lists the data sourcesconfigured for the IBM Tivoli Monitoring Agent. To open the Data SourceDefinition page, click Data Sources in the Agent Content section of the AgentInformation page or the Data Sources node in the Outline View. You can add moredata sources by clicking Add to Selected or right-clicking in the tree view andselecting one of the options. You can remove data sources and attributes by
Figure 25. Data Source Definition page for Cognos
Chapter 6. Modifying your agent by using the Tivoli Monitoring Agent Editor 45
right-clicking on them and selecting Remove. When you select a data source orattribute in the tree, the page is updated to display the properties for the selectedobject. Use the fields to modify the properties for the data source or attributeselected.
Note: For detailed information and procedures concerning monitoring with datasources, see the chapters in this user's guide about the individual datasources.
Data sources that result in Tivoli Monitoring attribute groups (all exceptAvailability and Windows Event Log data sources) can be copied to the clipboardand pasted back to this agent or another agent.1. Select the attribute groups that you want to copy.2. Cut or copy the attribute group using one of the following steps, depending on
whether you want to remove the data sources that have been placed on theclipboard (cut) or leave the data sources in place (copy):v Click Edit > Cut or Edit > Copy from the menu bar.v Right-click one of the selected items and click Cut or Copy from the context
menu.v Use one of the operating system or Eclipse key strokes that invokes the cut
or copy action. For example, on Windows systems, pressing Ctrl-C invokesthe copy action.
3. Select the parent of an attribute group (the agent, a subnode, or a navigatorgroup) or select an existing attribute group.
4. Paste the selection by using one of the following steps:v Select Edit > Paste from the menu bar.v Right-click the node where you want to paste the selection in the tree, and
click Paste on the context menu.v Use one of the operating system or Eclipse key strokes that invokes the paste
action. For example, on Windows systems, pressing Ctrl-V invokes the pasteaction.
The attribute groups from the clipboard are placed in the selected parent, or inthe parent of an existing attribute group if an attribute group is selected.If there is a name conflict with another attribute group while pasting, thepasted attribute group name is changed slightly to avoid the conflict.
You can specify the name and help text for a navigator group by clicking NewNavigator Group A navigator group is a way of grouping data sources. Anavigator group must contain at least two data sources. You can drag data sourcesinto navigator groups as desired, or drag them out to the top level of the tree.
46 IBM Tivoli Monitoring Agent Builder: User's Guide
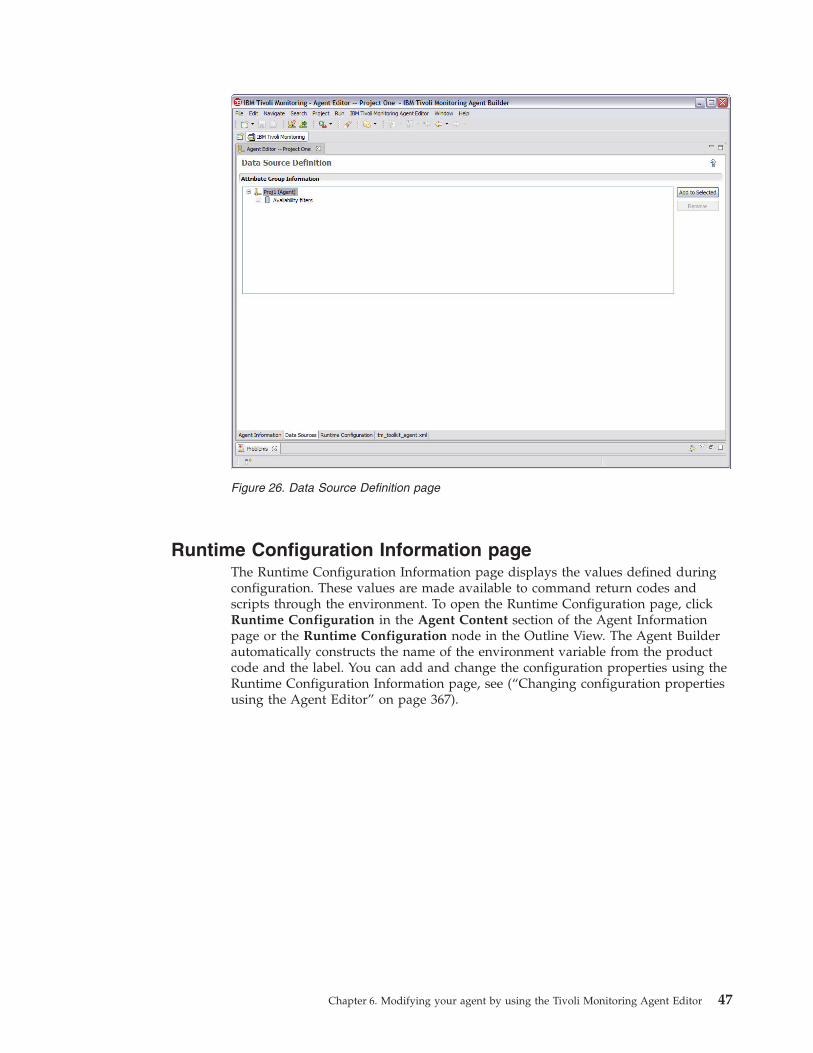
Runtime Configuration Information pageThe Runtime Configuration Information page displays the values defined duringconfiguration. These values are made available to command return codes andscripts through the environment. To open the Runtime Configuration page, clickRuntime Configuration in the Agent Content section of the Agent Informationpage or the Runtime Configuration node in the Outline View. The Agent Builderautomatically constructs the name of the environment variable from the productcode and the label. You can add and change the configuration properties using theRuntime Configuration Information page, see (“Changing configuration propertiesusing the Agent Editor” on page 367).
Figure 26. Data Source Definition page
Chapter 6. Modifying your agent by using the Tivoli Monitoring Agent Editor 47
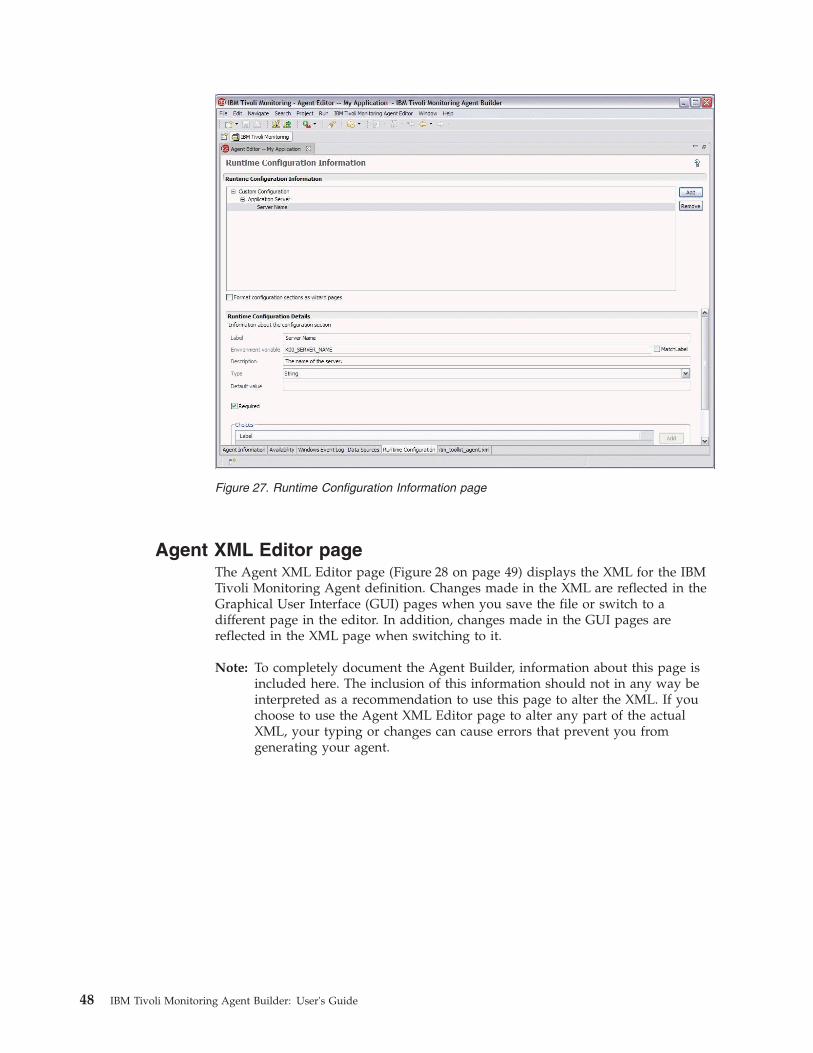
Agent XML Editor pageThe Agent XML Editor page (Figure 28 on page 49) displays the XML for the IBMTivoli Monitoring Agent definition. Changes made in the XML are reflected in theGraphical User Interface (GUI) pages when you save the file or switch to adifferent page in the editor. In addition, changes made in the GUI pages arereflected in the XML page when switching to it.
Note: To completely document the Agent Builder, information about this page isincluded here. The inclusion of this information should not in any way beinterpreted as a recommendation to use this page to alter the XML. If youchoose to use the Agent XML Editor page to alter any part of the actualXML, your typing or changes can cause errors that prevent you fromgenerating your agent.
Figure 27. Runtime Configuration Information page
48 IBM Tivoli Monitoring Agent Builder: User's Guide
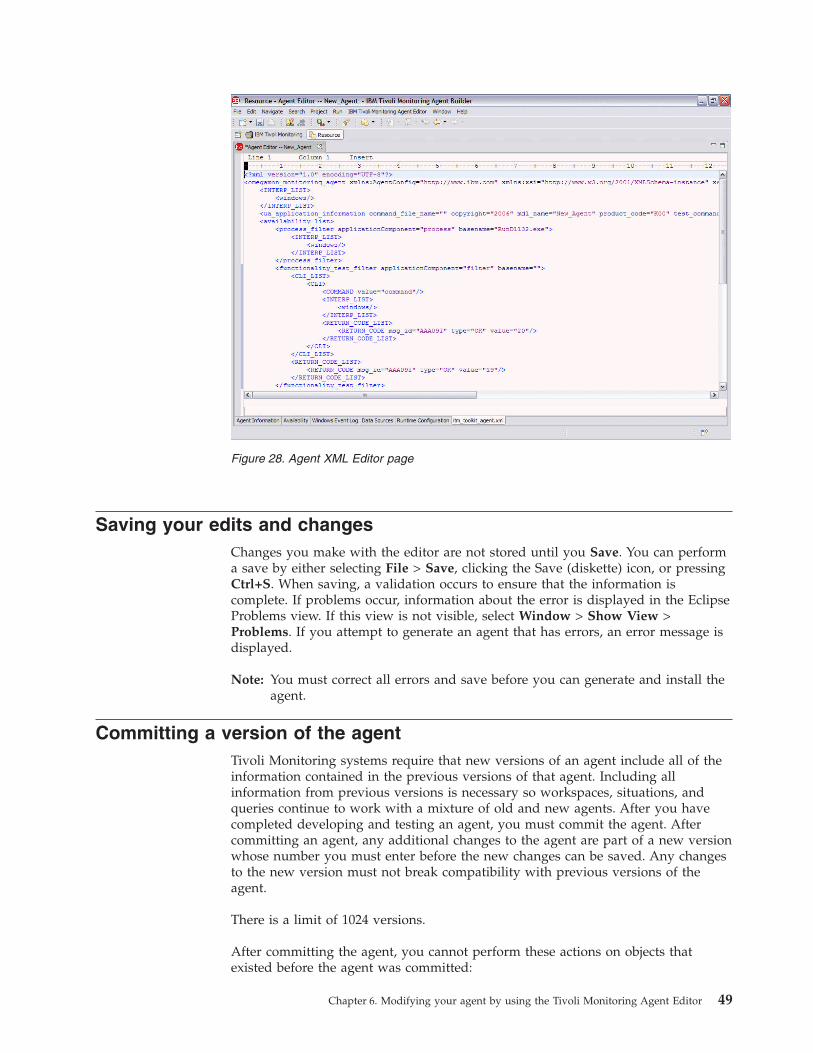
Saving your edits and changesChanges you make with the editor are not stored until you Save. You can performa save by either selecting File > Save, clicking the Save (diskette) icon, or pressingCtrl+S. When saving, a validation occurs to ensure that the information iscomplete. If problems occur, information about the error is displayed in the EclipseProblems view. If this view is not visible, select Window > Show View >Problems. If you attempt to generate an agent that has errors, an error message isdisplayed.
Note: You must correct all errors and save before you can generate and install theagent.
Committing a version of the agentTivoli Monitoring systems require that new versions of an agent include all of theinformation contained in the previous versions of that agent. Including allinformation from previous versions is necessary so workspaces, situations, andqueries continue to work with a mixture of old and new agents. After you havecompleted developing and testing an agent, you must commit the agent. Aftercommitting an agent, any additional changes to the agent are part of a new versionwhose number you must enter before the new changes can be saved. Any changesto the new version must not break compatibility with previous versions of theagent.
There is a limit of 1024 versions.
After committing the agent, you cannot perform these actions on objects thatexisted before the agent was committed:
Figure 28. Agent XML Editor page
Chapter 6. Modifying your agent by using the Tivoli Monitoring Agent Editor 49
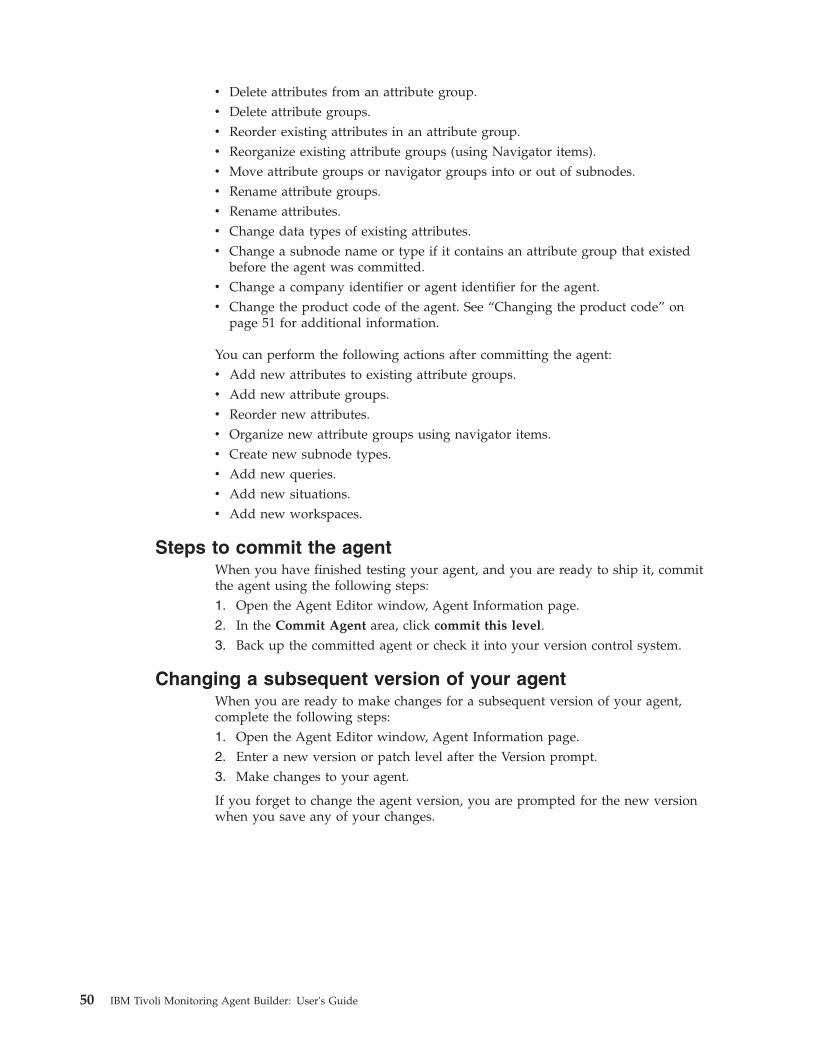
v Delete attributes from an attribute group.v Delete attribute groups.v Reorder existing attributes in an attribute group.v Reorganize existing attribute groups (using Navigator items).v Move attribute groups or navigator groups into or out of subnodes.v Rename attribute groups.v Rename attributes.v Change data types of existing attributes.v Change a subnode name or type if it contains an attribute group that existed
before the agent was committed.v Change a company identifier or agent identifier for the agent.v Change the product code of the agent. See “Changing the product code” on
page 51 for additional information.
You can perform the following actions after committing the agent:v Add new attributes to existing attribute groups.v Add new attribute groups.v Reorder new attributes.v Organize new attribute groups using navigator items.v Create new subnode types.v Add new queries.v Add new situations.v Add new workspaces.
Steps to commit the agentWhen you have finished testing your agent, and you are ready to ship it, committhe agent using the following steps:1. Open the Agent Editor window, Agent Information page.2. In the Commit Agent area, click commit this level.3. Back up the committed agent or check it into your version control system.
Changing a subsequent version of your agentWhen you are ready to make changes for a subsequent version of your agent,complete the following steps:1. Open the Agent Editor window, Agent Information page.2. Enter a new version or patch level after the Version prompt.3. Make changes to your agent.
If you forget to change the agent version, you are prompted for the new versionwhen you save any of your changes.
50 IBM Tivoli Monitoring Agent Builder: User's Guide
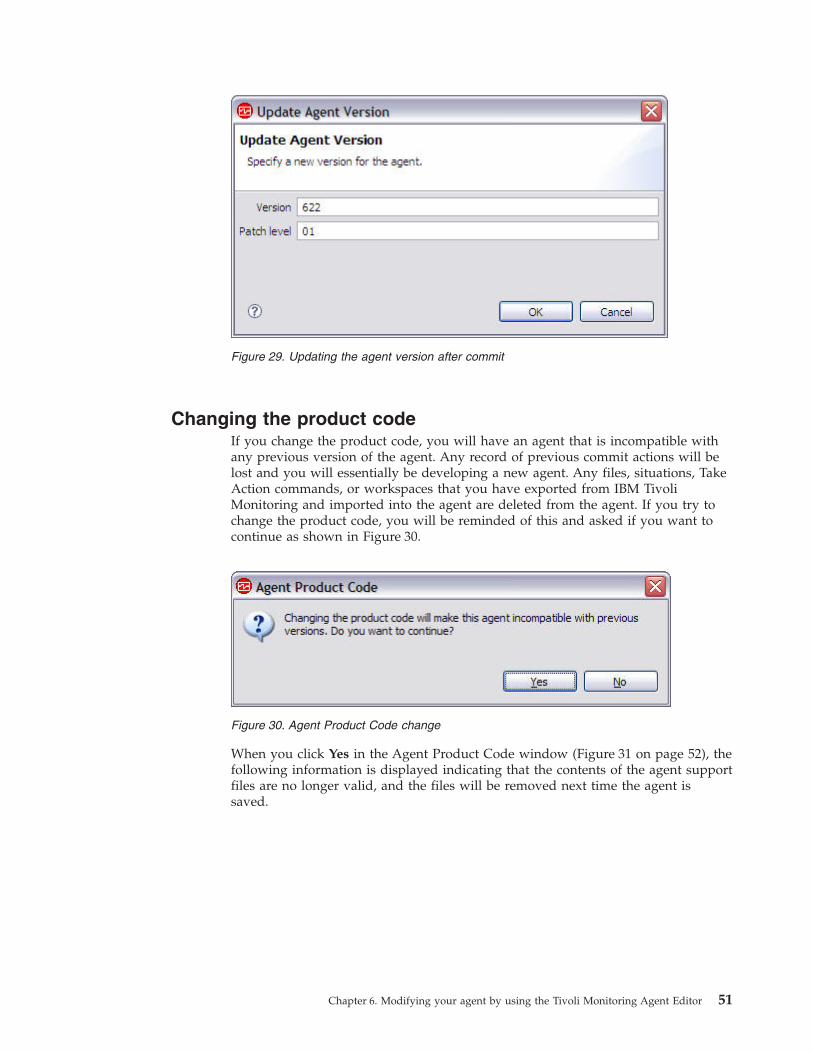
Changing the product codeIf you change the product code, you will have an agent that is incompatible withany previous version of the agent. Any record of previous commit actions will belost and you will essentially be developing a new agent. Any files, situations, TakeAction commands, or workspaces that you have exported from IBM TivoliMonitoring and imported into the agent are deleted from the agent. If you try tochange the product code, you will be reminded of this and asked if you want tocontinue as shown in Figure 30.
When you click Yes in the Agent Product Code window (Figure 31 on page 52), thefollowing information is displayed indicating that the contents of the agent supportfiles are no longer valid, and the files will be removed next time the agent issaved.
Figure 29. Updating the agent version after commit
Figure 30. Agent Product Code change
Chapter 6. Modifying your agent by using the Tivoli Monitoring Agent Editor 51
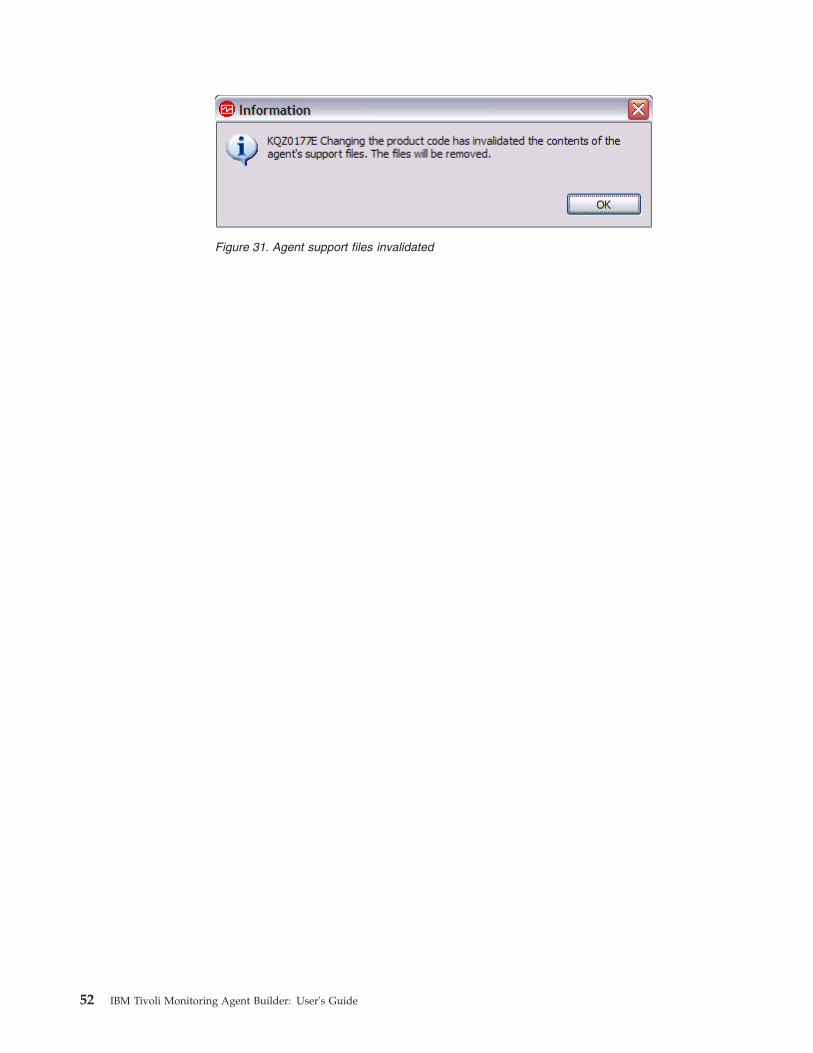
Figure 31. Agent support files invalidated
52 IBM Tivoli Monitoring Agent Builder: User's Guide
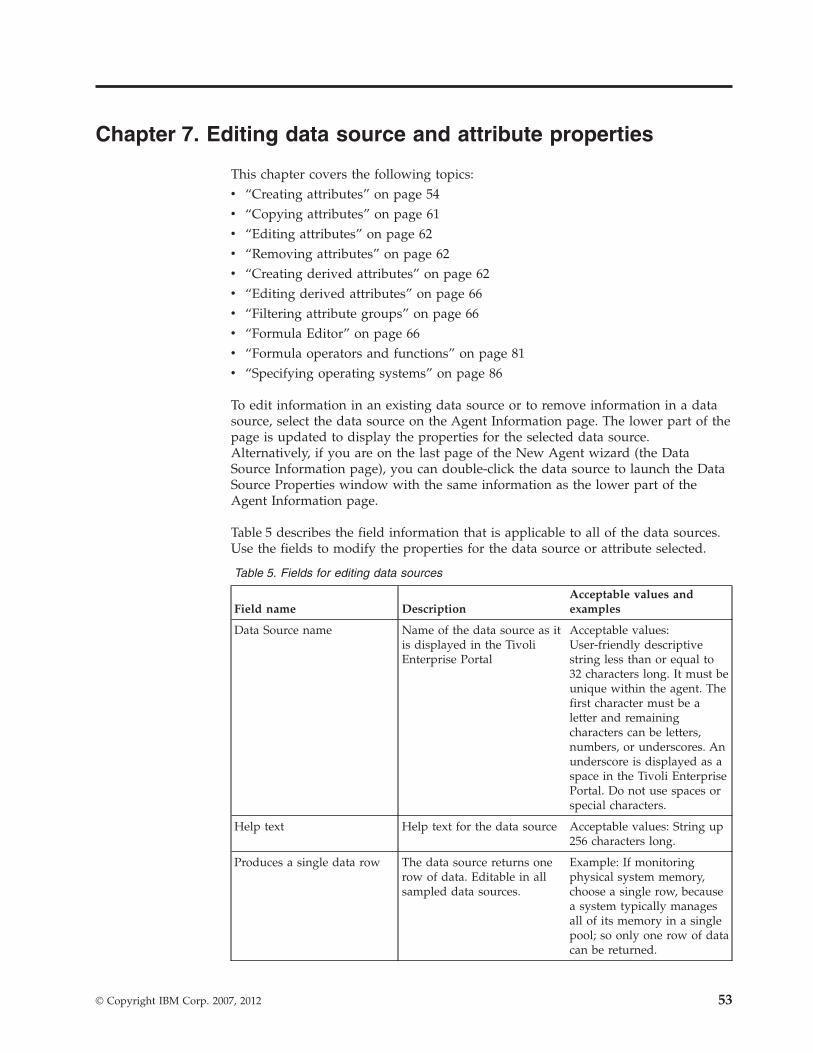
Chapter 7. Editing data source and attribute properties
This chapter covers the following topics:v “Creating attributes” on page 54v “Copying attributes” on page 61v “Editing attributes” on page 62v “Removing attributes” on page 62v “Creating derived attributes” on page 62v “Editing derived attributes” on page 66v “Filtering attribute groups” on page 66v “Formula Editor” on page 66v “Formula operators and functions” on page 81v “Specifying operating systems” on page 86
To edit information in an existing data source or to remove information in a datasource, select the data source on the Agent Information page. The lower part of thepage is updated to display the properties for the selected data source.Alternatively, if you are on the last page of the New Agent wizard (the DataSource Information page), you can double-click the data source to launch the DataSource Properties window with the same information as the lower part of theAgent Information page.
Table 5 describes the field information that is applicable to all of the data sources.Use the fields to modify the properties for the data source or attribute selected.
Table 5. Fields for editing data sources
Field name DescriptionAcceptable values andexamples
Data Source name Name of the data source as itis displayed in the TivoliEnterprise Portal
Acceptable values:User-friendly descriptivestring less than or equal to32 characters long. It must beunique within the agent. Thefirst character must be aletter and remainingcharacters can be letters,numbers, or underscores. Anunderscore is displayed as aspace in the Tivoli EnterprisePortal. Do not use spaces orspecial characters.
Help text Help text for the data source Acceptable values: String up256 characters long.
Produces a single data row The data source returns onerow of data. Editable in allsampled data sources.
Example: If monitoringphysical system memory,choose a single row, becausea system typically managesall of its memory in a singlepool; so only one row of datacan be returned.
© Copyright IBM Corp. 2007, 2012 53
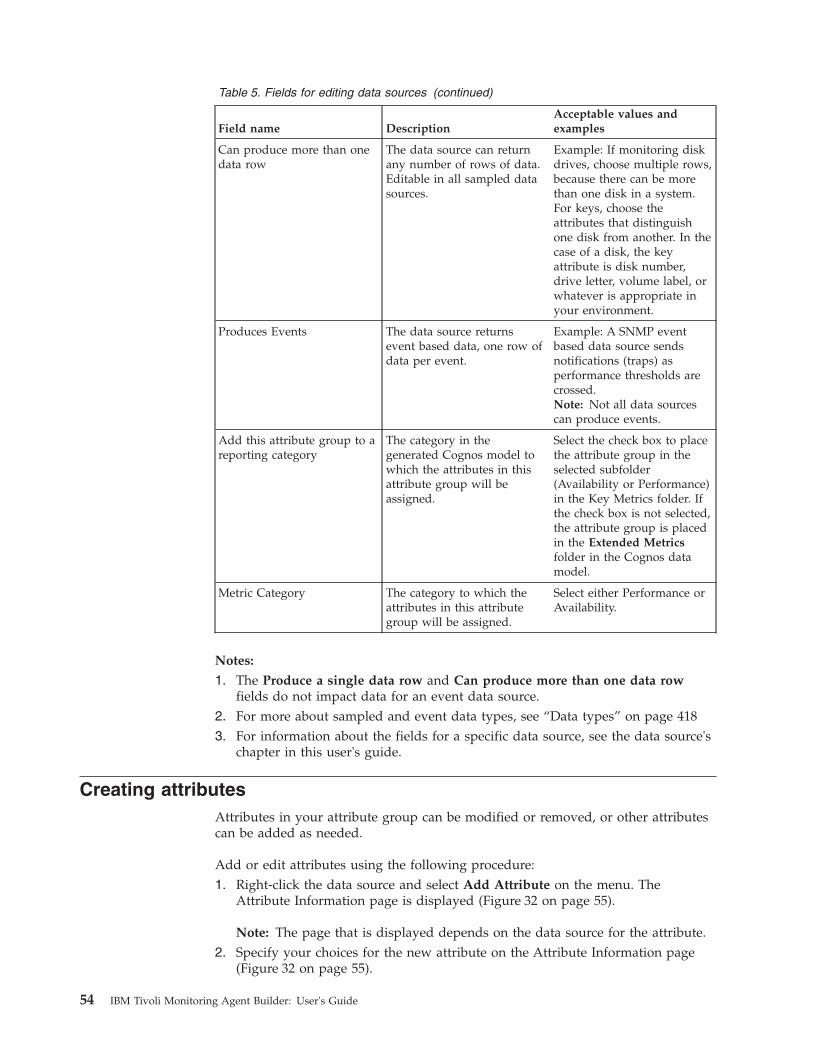
Table 5. Fields for editing data sources (continued)
Field name DescriptionAcceptable values andexamples
Can produce more than onedata row
The data source can returnany number of rows of data.Editable in all sampled datasources.
Example: If monitoring diskdrives, choose multiple rows,because there can be morethan one disk in a system.For keys, choose theattributes that distinguishone disk from another. In thecase of a disk, the keyattribute is disk number,drive letter, volume label, orwhatever is appropriate inyour environment.
Produces Events The data source returnsevent based data, one row ofdata per event.
Example: A SNMP eventbased data source sendsnotifications (traps) asperformance thresholds arecrossed.Note: Not all data sourcescan produce events.
Add this attribute group to areporting category
The category in thegenerated Cognos model towhich the attributes in thisattribute group will beassigned.
Select the check box to placethe attribute group in theselected subfolder(Availability or Performance)in the Key Metrics folder. Ifthe check box is not selected,the attribute group is placedin the Extended Metricsfolder in the Cognos datamodel.
Metric Category The category to which theattributes in this attributegroup will be assigned.
Select either Performance orAvailability.
Notes:
1. The Produce a single data row and Can produce more than one data rowfields do not impact data for an event data source.
2. For more about sampled and event data types, see “Data types” on page 4183. For information about the fields for a specific data source, see the data source's
chapter in this user's guide.
Creating attributesAttributes in your attribute group can be modified or removed, or other attributescan be added as needed.
Add or edit attributes using the following procedure:1. Right-click the data source and select Add Attribute on the menu. The
Attribute Information page is displayed (Figure 32 on page 55).
Note: The page that is displayed depends on the data source for the attribute.2. Specify your choices for the new attribute on the Attribute Information page
(Figure 32 on page 55).
54 IBM Tivoli Monitoring Agent Builder: User's Guide
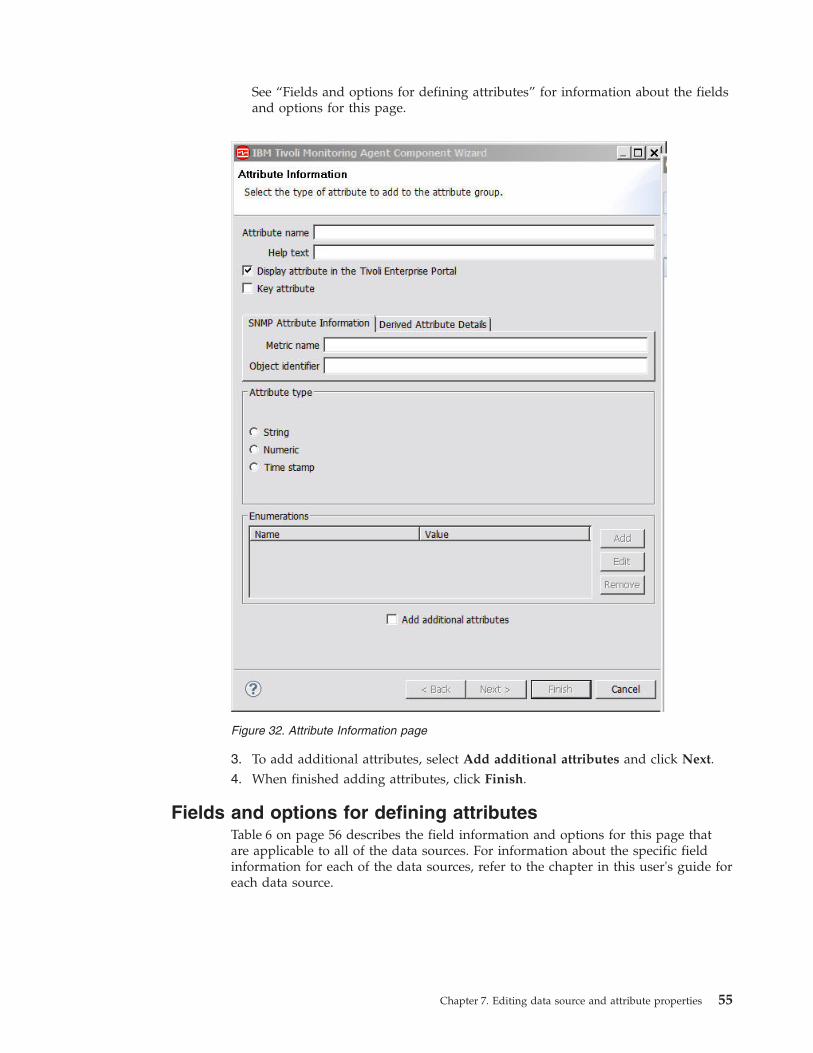
See “Fields and options for defining attributes” for information about the fieldsand options for this page.
3. To add additional attributes, select Add additional attributes and click Next.4. When finished adding attributes, click Finish.
Fields and options for defining attributesTable 6 on page 56 describes the field information and options for this page thatare applicable to all of the data sources. For information about the specific fieldinformation for each of the data sources, refer to the chapter in this user's guide foreach data source.
Figure 32. Attribute Information page
Chapter 7. Editing data source and attribute properties 55
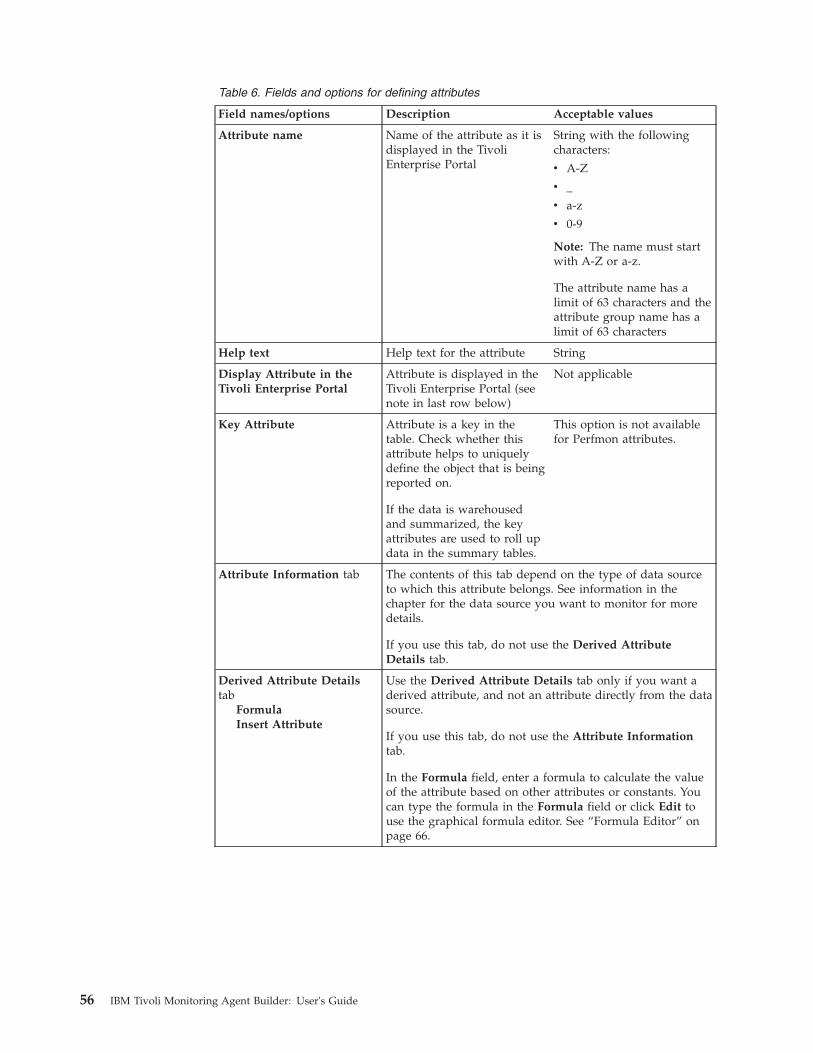
Table 6. Fields and options for defining attributes
Field names/options Description Acceptable values
Attribute name Name of the attribute as it isdisplayed in the TivoliEnterprise Portal
String with the followingcharacters:
v A-Z
v _
v a-z
v 0-9
Note: The name must startwith A-Z or a-z.
The attribute name has alimit of 63 characters and theattribute group name has alimit of 63 characters
Help text Help text for the attribute String
Display Attribute in theTivoli Enterprise Portal
Attribute is displayed in theTivoli Enterprise Portal (seenote in last row below)
Not applicable
Key Attribute Attribute is a key in thetable. Check whether thisattribute helps to uniquelydefine the object that is beingreported on.
If the data is warehousedand summarized, the keyattributes are used to roll updata in the summary tables.
This option is not availablefor Perfmon attributes.
Attribute Information tab The contents of this tab depend on the type of data sourceto which this attribute belongs. See information in thechapter for the data source you want to monitor for moredetails.
If you use this tab, do not use the Derived AttributeDetails tab.
Derived Attribute Detailstab
FormulaInsert Attribute
Use the Derived Attribute Details tab only if you want aderived attribute, and not an attribute directly from the datasource.
If you use this tab, do not use the Attribute Informationtab.
In the Formula field, enter a formula to calculate the valueof the attribute based on other attributes or constants. Youcan type the formula in the Formula field or click Edit touse the graphical formula editor. See “Formula Editor” onpage 66.
56 IBM Tivoli Monitoring Agent Builder: User's Guide
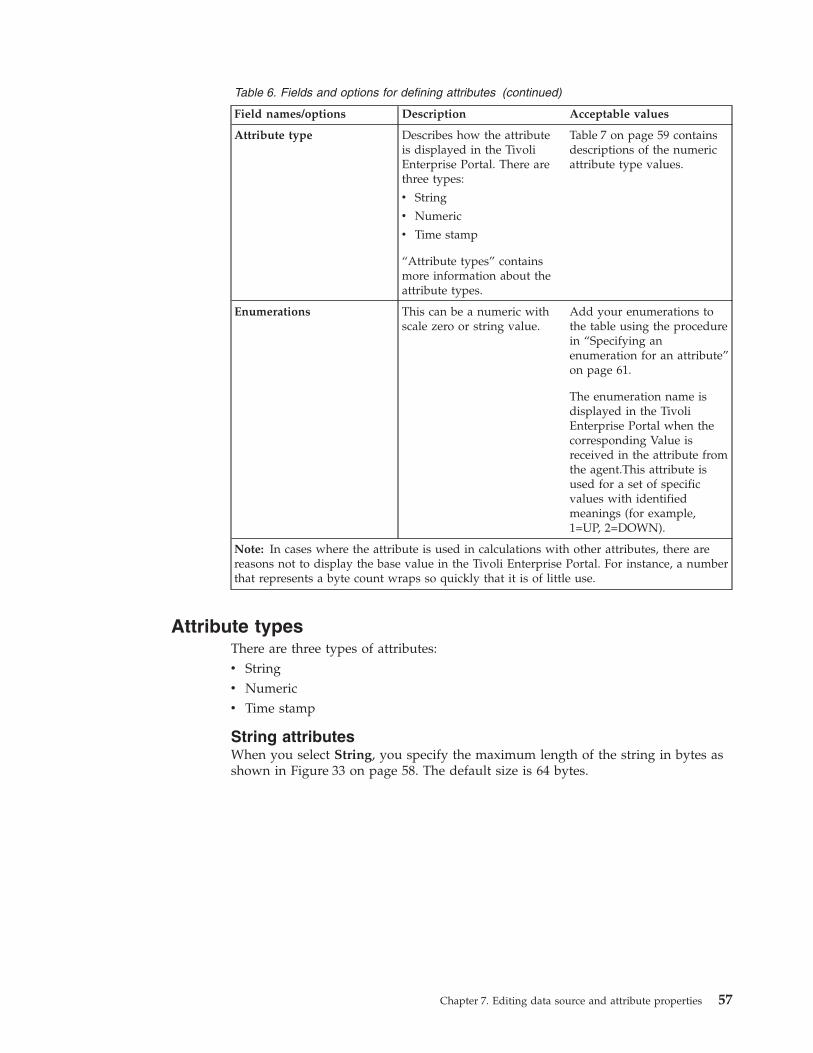
Table 6. Fields and options for defining attributes (continued)
Field names/options Description Acceptable values
Attribute type Describes how the attributeis displayed in the TivoliEnterprise Portal. There arethree types:
v String
v Numeric
v Time stamp
“Attribute types” containsmore information about theattribute types.
Table 7 on page 59 containsdescriptions of the numericattribute type values.
Enumerations This can be a numeric withscale zero or string value.
Add your enumerations tothe table using the procedurein “Specifying anenumeration for an attribute”on page 61.
The enumeration name isdisplayed in the TivoliEnterprise Portal when thecorresponding Value isreceived in the attribute fromthe agent.This attribute isused for a set of specificvalues with identifiedmeanings (for example,1=UP, 2=DOWN).
Note: In cases where the attribute is used in calculations with other attributes, there arereasons not to display the base value in the Tivoli Enterprise Portal. For instance, a numberthat represents a byte count wraps so quickly that it is of little use.
Attribute typesThere are three types of attributes:v Stringv Numericv Time stamp
String attributesWhen you select String, you specify the maximum length of the string in bytes asshown in Figure 33 on page 58. The default size is 64 bytes.
Chapter 7. Editing data source and attribute properties 57
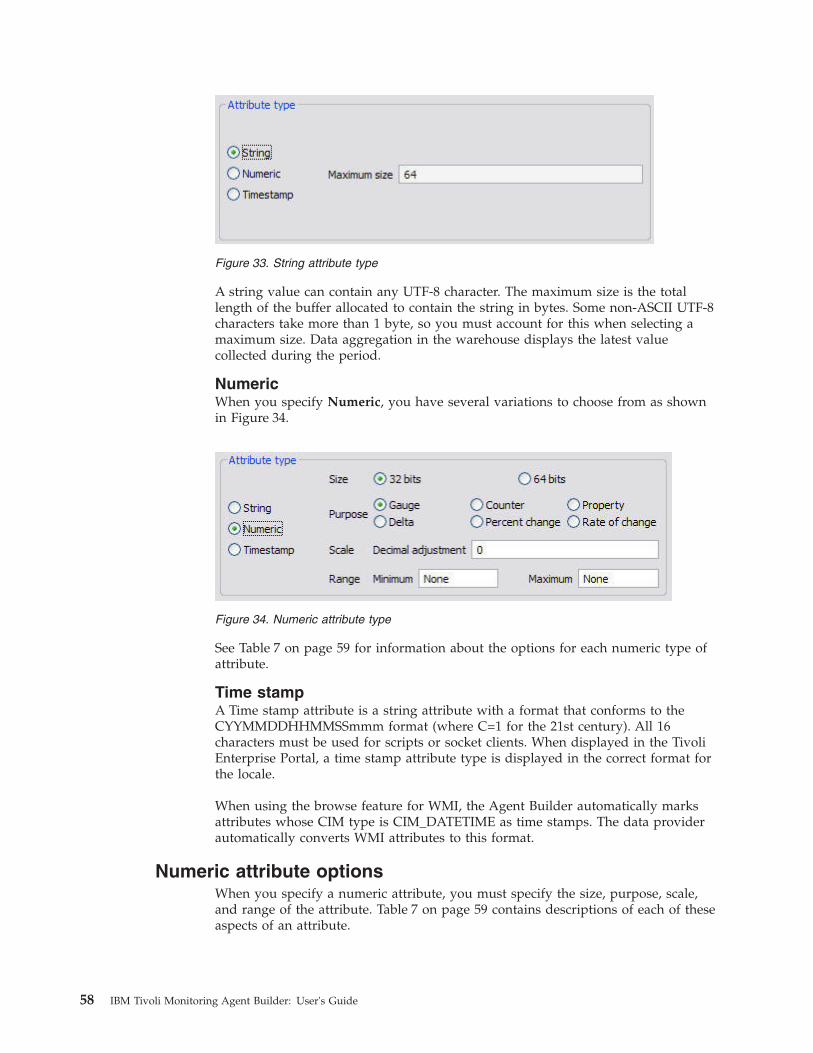
A string value can contain any UTF-8 character. The maximum size is the totallength of the buffer allocated to contain the string in bytes. Some non-ASCII UTF-8characters take more than 1 byte, so you must account for this when selecting amaximum size. Data aggregation in the warehouse displays the latest valuecollected during the period.
NumericWhen you specify Numeric, you have several variations to choose from as shownin Figure 34.
See Table 7 on page 59 for information about the options for each numeric type ofattribute.
Time stampA Time stamp attribute is a string attribute with a format that conforms to theCYYMMDDHHMMSSmmm format (where C=1 for the 21st century). All 16characters must be used for scripts or socket clients. When displayed in the TivoliEnterprise Portal, a time stamp attribute type is displayed in the correct format forthe locale.
When using the browse feature for WMI, the Agent Builder automatically marksattributes whose CIM type is CIM_DATETIME as time stamps. The data providerautomatically converts WMI attributes to this format.
Numeric attribute optionsWhen you specify a numeric attribute, you must specify the size, purpose, scale,and range of the attribute. Table 7 on page 59 contains descriptions of each of theseaspects of an attribute.
Figure 33. String attribute type
Figure 34. Numeric attribute type
58 IBM Tivoli Monitoring Agent Builder: User's Guide
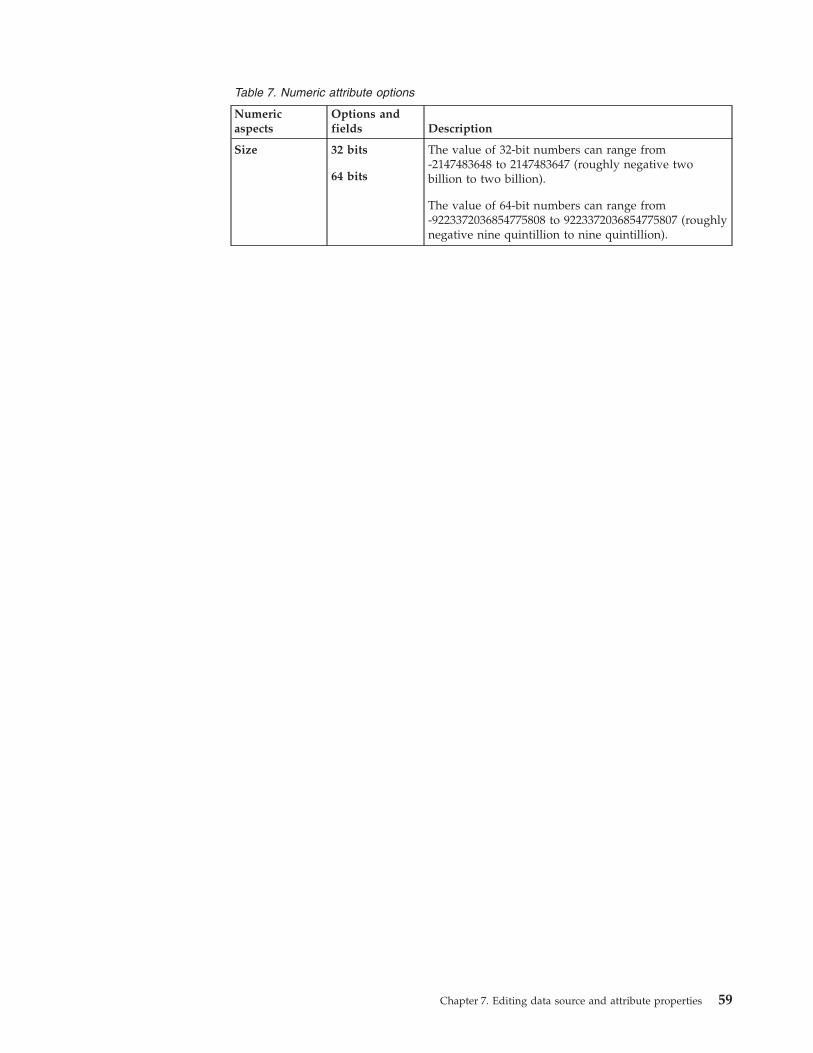
Table 7. Numeric attribute options
Numericaspects
Options andfields Description
Size 32 bits
64 bits
The value of 32-bit numbers can range from-2147483648 to 2147483647 (roughly negative twobillion to two billion).
The value of 64-bit numbers can range from-9223372036854775808 to 9223372036854775807 (roughlynegative nine quintillion to nine quintillion).
Chapter 7. Editing data source and attribute properties 59
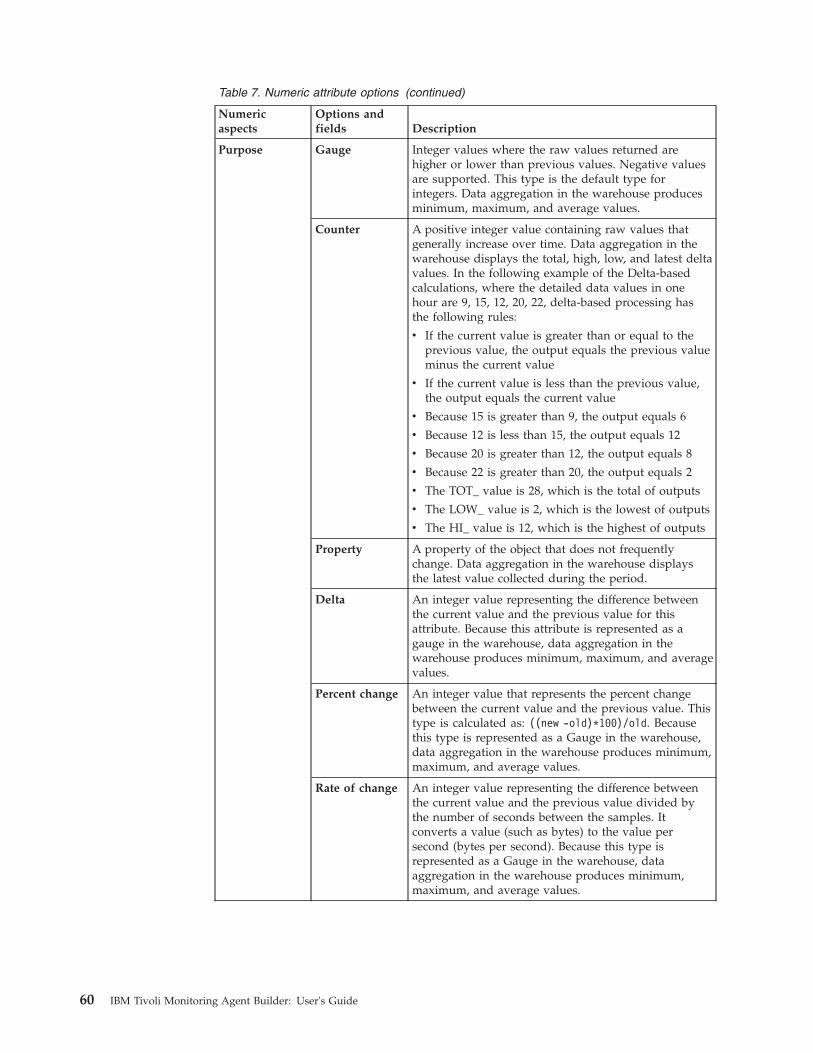
Table 7. Numeric attribute options (continued)
Numericaspects
Options andfields Description
Purpose Gauge Integer values where the raw values returned arehigher or lower than previous values. Negative valuesare supported. This type is the default type forintegers. Data aggregation in the warehouse producesminimum, maximum, and average values.
Counter A positive integer value containing raw values thatgenerally increase over time. Data aggregation in thewarehouse displays the total, high, low, and latest deltavalues. In the following example of the Delta-basedcalculations, where the detailed data values in onehour are 9, 15, 12, 20, 22, delta-based processing hasthe following rules:
v If the current value is greater than or equal to theprevious value, the output equals the previous valueminus the current value
v If the current value is less than the previous value,the output equals the current value
v Because 15 is greater than 9, the output equals 6
v Because 12 is less than 15, the output equals 12
v Because 20 is greater than 12, the output equals 8
v Because 22 is greater than 20, the output equals 2
v The TOT_ value is 28, which is the total of outputs
v The LOW_ value is 2, which is the lowest of outputs
v The HI_ value is 12, which is the highest of outputs
Property A property of the object that does not frequentlychange. Data aggregation in the warehouse displaysthe latest value collected during the period.
Delta An integer value representing the difference betweenthe current value and the previous value for thisattribute. Because this attribute is represented as agauge in the warehouse, data aggregation in thewarehouse produces minimum, maximum, and averagevalues.
Percent change An integer value that represents the percent changebetween the current value and the previous value. Thistype is calculated as: ((new -old)*100)/old. Becausethis type is represented as a Gauge in the warehouse,data aggregation in the warehouse produces minimum,maximum, and average values.
Rate of change An integer value representing the difference betweenthe current value and the previous value divided bythe number of seconds between the samples. Itconverts a value (such as bytes) to the value persecond (bytes per second). Because this type isrepresented as a Gauge in the warehouse, dataaggregation in the warehouse produces minimum,maximum, and average values.
60 IBM Tivoli Monitoring Agent Builder: User's Guide
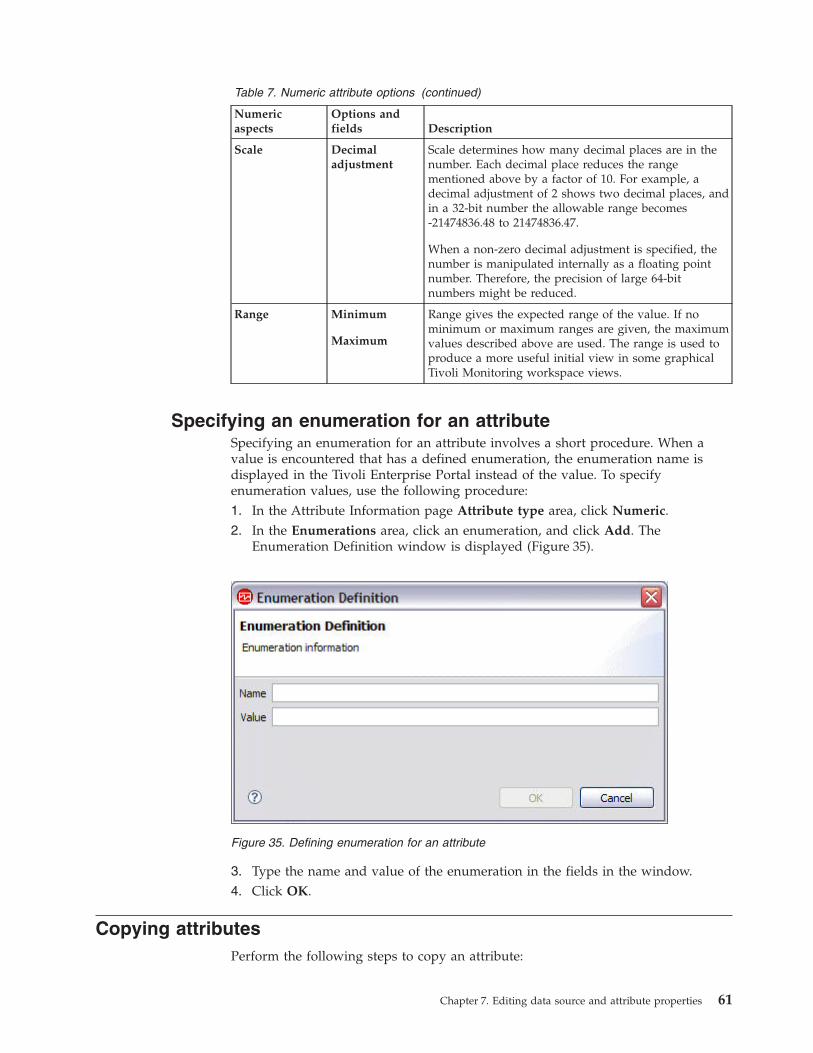
Table 7. Numeric attribute options (continued)
Numericaspects
Options andfields Description
Scale Decimaladjustment
Scale determines how many decimal places are in thenumber. Each decimal place reduces the rangementioned above by a factor of 10. For example, adecimal adjustment of 2 shows two decimal places, andin a 32-bit number the allowable range becomes-21474836.48 to 21474836.47.
When a non-zero decimal adjustment is specified, thenumber is manipulated internally as a floating pointnumber. Therefore, the precision of large 64-bitnumbers might be reduced.
Range Minimum
Maximum
Range gives the expected range of the value. If nominimum or maximum ranges are given, the maximumvalues described above are used. The range is used toproduce a more useful initial view in some graphicalTivoli Monitoring workspace views.
Specifying an enumeration for an attributeSpecifying an enumeration for an attribute involves a short procedure. When avalue is encountered that has a defined enumeration, the enumeration name isdisplayed in the Tivoli Enterprise Portal instead of the value. To specifyenumeration values, use the following procedure:1. In the Attribute Information page Attribute type area, click Numeric.2. In the Enumerations area, click an enumeration, and click Add. The
Enumeration Definition window is displayed (Figure 35).
3. Type the name and value of the enumeration in the fields in the window.4. Click OK.
Copying attributesPerform the following steps to copy an attribute:
Figure 35. Defining enumeration for an attribute
Chapter 7. Editing data source and attribute properties 61
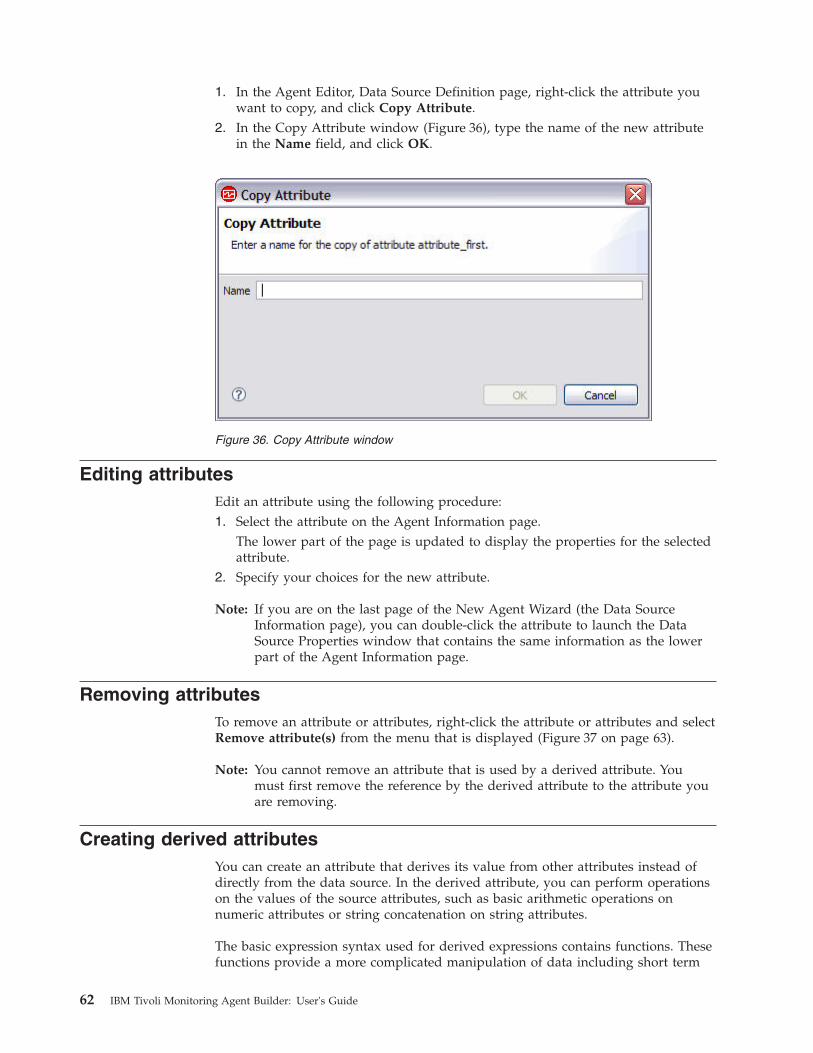
1. In the Agent Editor, Data Source Definition page, right-click the attribute youwant to copy, and click Copy Attribute.
2. In the Copy Attribute window (Figure 36), type the name of the new attributein the Name field, and click OK.
Editing attributesEdit an attribute using the following procedure:1. Select the attribute on the Agent Information page.
The lower part of the page is updated to display the properties for the selectedattribute.
2. Specify your choices for the new attribute.
Note: If you are on the last page of the New Agent Wizard (the Data SourceInformation page), you can double-click the attribute to launch the DataSource Properties window that contains the same information as the lowerpart of the Agent Information page.
Removing attributesTo remove an attribute or attributes, right-click the attribute or attributes and selectRemove attribute(s) from the menu that is displayed (Figure 37 on page 63).
Note: You cannot remove an attribute that is used by a derived attribute. Youmust first remove the reference by the derived attribute to the attribute youare removing.
Creating derived attributesYou can create an attribute that derives its value from other attributes instead ofdirectly from the data source. In the derived attribute, you can perform operationson the values of the source attributes, such as basic arithmetic operations onnumeric attributes or string concatenation on string attributes.
The basic expression syntax used for derived expressions contains functions. Thesefunctions provide a more complicated manipulation of data including short term
Figure 36. Copy Attribute window
62 IBM Tivoli Monitoring Agent Builder: User's Guide
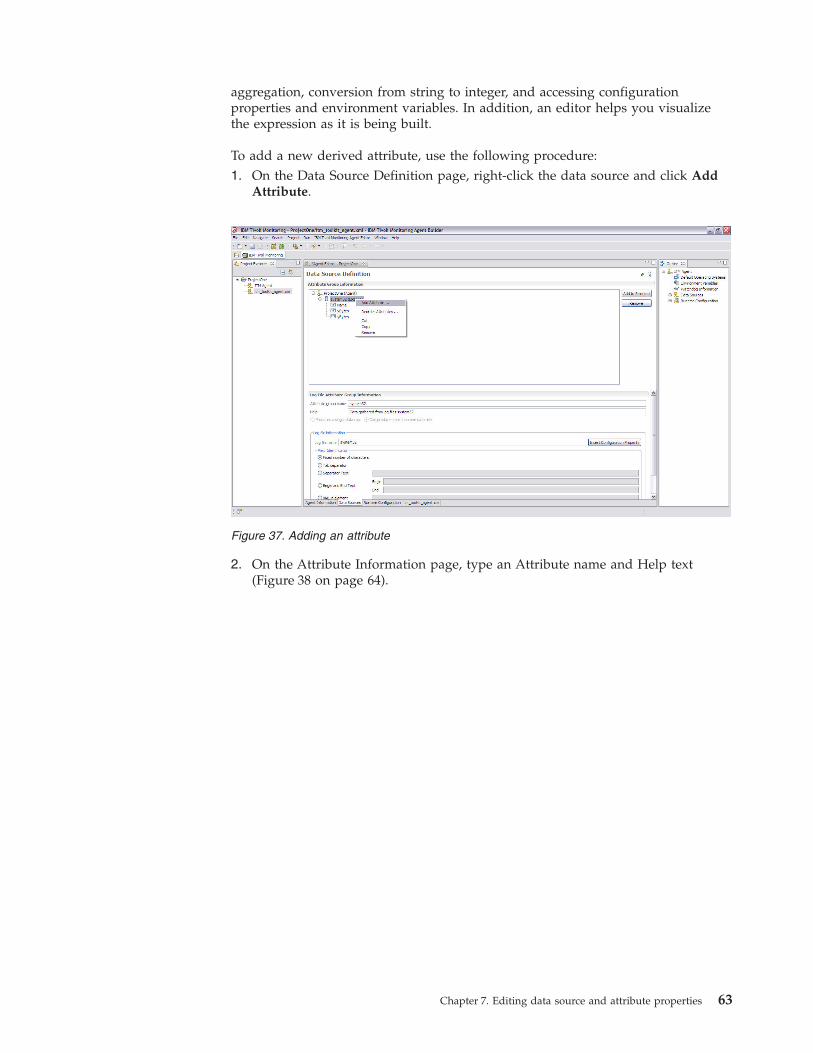
aggregation, conversion from string to integer, and accessing configurationproperties and environment variables. In addition, an editor helps you visualizethe expression as it is being built.
To add a new derived attribute, use the following procedure:1. On the Data Source Definition page, right-click the data source and click Add
Attribute.
2. On the Attribute Information page, type an Attribute name and Help text(Figure 38 on page 64).
Figure 37. Adding an attribute
Chapter 7. Editing data source and attribute properties 63
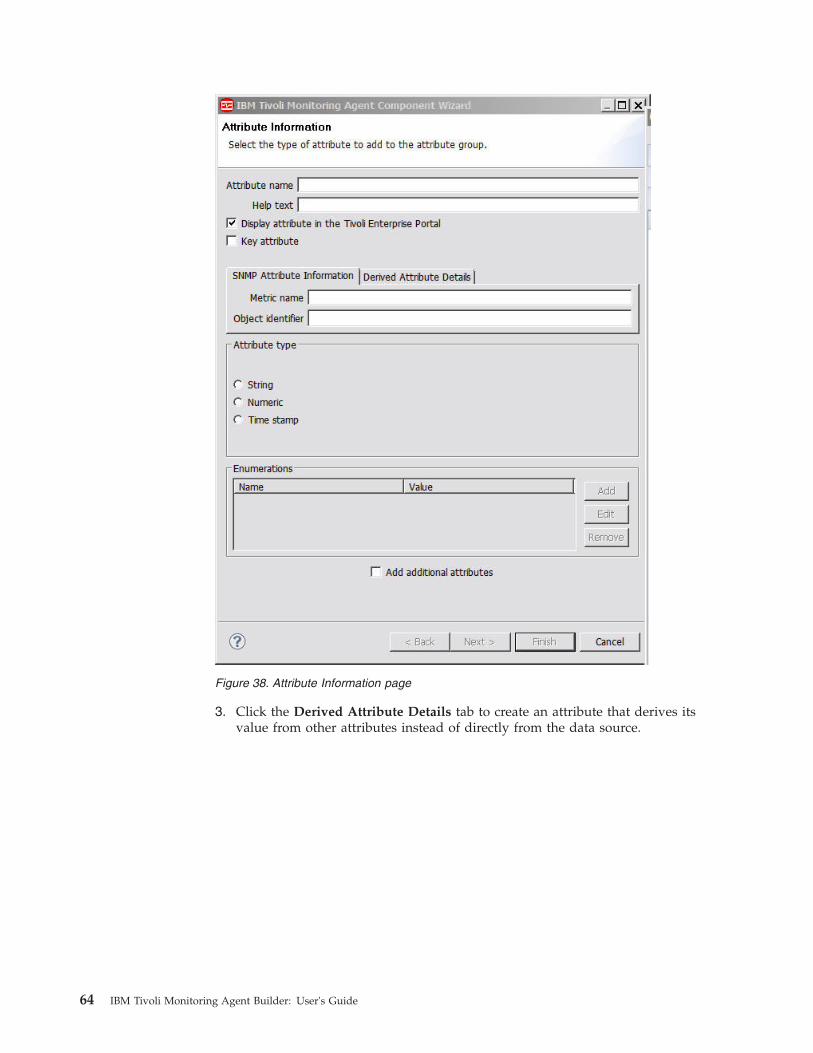
3. Click the Derived Attribute Details tab to create an attribute that derives itsvalue from other attributes instead of directly from the data source.
Figure 38. Attribute Information page
64 IBM Tivoli Monitoring Agent Builder: User's Guide
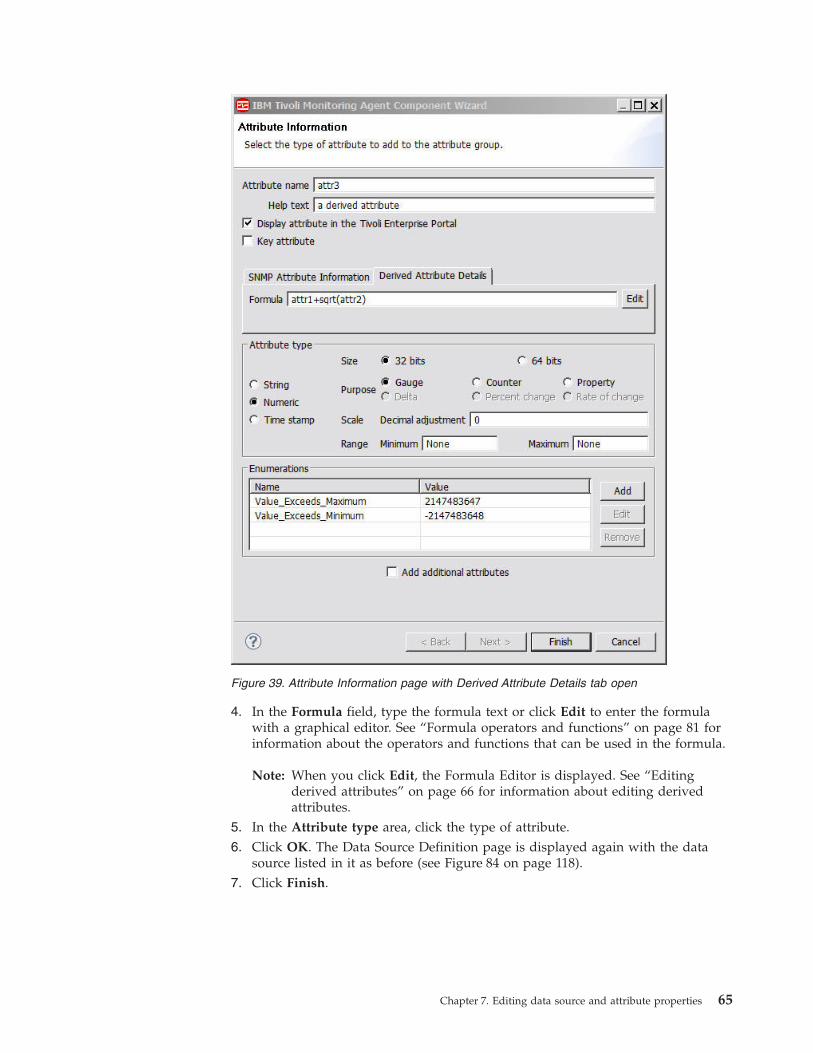
4. In the Formula field, type the formula text or click Edit to enter the formulawith a graphical editor. See “Formula operators and functions” on page 81 forinformation about the operators and functions that can be used in the formula.
Note: When you click Edit, the Formula Editor is displayed. See “Editingderived attributes” on page 66 for information about editing derivedattributes.
5. In the Attribute type area, click the type of attribute.6. Click OK. The Data Source Definition page is displayed again with the data
source listed in it as before (see Figure 84 on page 118).7. Click Finish.
Figure 39. Attribute Information page with Derived Attribute Details tab open
Chapter 7. Editing data source and attribute properties 65
Editing derived attributesYou use the Formula Editor to edit derived attributes. This editor is available fromthe Derived Attribute Details tab on the Attribute Information page as describedin Step 3 of “Creating derived attributes” on page 62. For more information aboutthe Formula Editor, see “Formula Editor”
Filtering attribute groupsYou can create a filter to limit the data that is returned from an attribute groupthat returns sampled data.
To create an attribute group filter, use the following procedure:1. Use one of the following steps to begin creating the filter
a. If you are creating an attribute group, click Advanced in the initial datasource information page.
b. If the attribute group exists, select the attribute group in the Agent Editorand click Advanced in the Data Sources page
2. In the Advanced Data Source Properties page, enter a selection formula. Theselection formula you enter must evaluate to a Boolean result, true, or false.
Note: In the Advanced Data Source Properties page, you can click Edit to enteror modify the formula using the Formula Editor. For more informationabout the Formula Editor, see “Formula Editor”
3. When you finish entering the filter selection formula click OK until you returnto the Data Source Definition page.
When the filter is created, the agent uses the filter to evaluate each row of data.When the filter evaluates to "true" for a row of data, the data is sent to TivoliMonitoring, when the filter evaluates to "false" the row of data is not sent and isdiscarded.
You can validate that the filter is performing the intended task using the testfunction for the attribute group. For more information about attribute grouptesting, see “Attribute group testing” on page 373
Formula EditorThe Formula Editor is a graphical editor that aids in the creation of formulae in theAgent Builder. The Formula Editor is displayed when performing one of thefollowing tasks:1. Creating or editing derived attributes, see “Creating derived attributes” on
page 62 and “Editing derived attributes”2. Creating Filtered Attribute groups, see “Filtered Attribute Groups” on page 3233. Filtering data from attribute groups, see “Filtering attribute groups”
66 IBM Tivoli Monitoring Agent Builder: User's Guide

Attention:
v When creating derived attributes, the formula that you create must result in adata type that matches the type of the attribute. For example if the derivedattribute type is a number, the formula you create must evaluate to a numericresult.
v When creating Filtered attribute groups or when filtering data from attributegroups, the formula that you create must result in a Boolean value, "true" or"false".
Note: In the following views, the Formula Editor is shown creating formulae forderived attributes. The views are identical when using the Formula Editorwith filtered attribute groups or to filter data from attribute groups. Theviews show the heading Derived Formula Editor or Filter Formula Editordepending on use.
When the Formula Editor (Figure 40 on page 68) is displayed, the current formulais loaded into the editor. If a formula does not exist, you can enter one by typingdirectly into the formula space at the bottom of the Formula Editor window.Alternatively you can click Insert to begin entering a formula using the editormenu options. The editor contains two views of the formula in the defaultwindow, and an option for a third view:v Formula field (default view): The complete formula is in the field at the bottom
of the window. You can edit the formula by typing in this box.v Component view (default view): The component of the formula being edited is
in the upper part of the window. In Figure 40 on page 68, the + Operator is thecurrent component. The operator and its two operands can be edited.
v Formula hierarchy tree view: The formula hierarchy tree is displayed on the leftside of the window by selecting the Show formula hierarchy check box. SeeFigure 41 on page 69. The state of the check box is remembered in subsequentinvocations of the Formula Editor.
Chapter 7. Editing data source and attribute properties 67
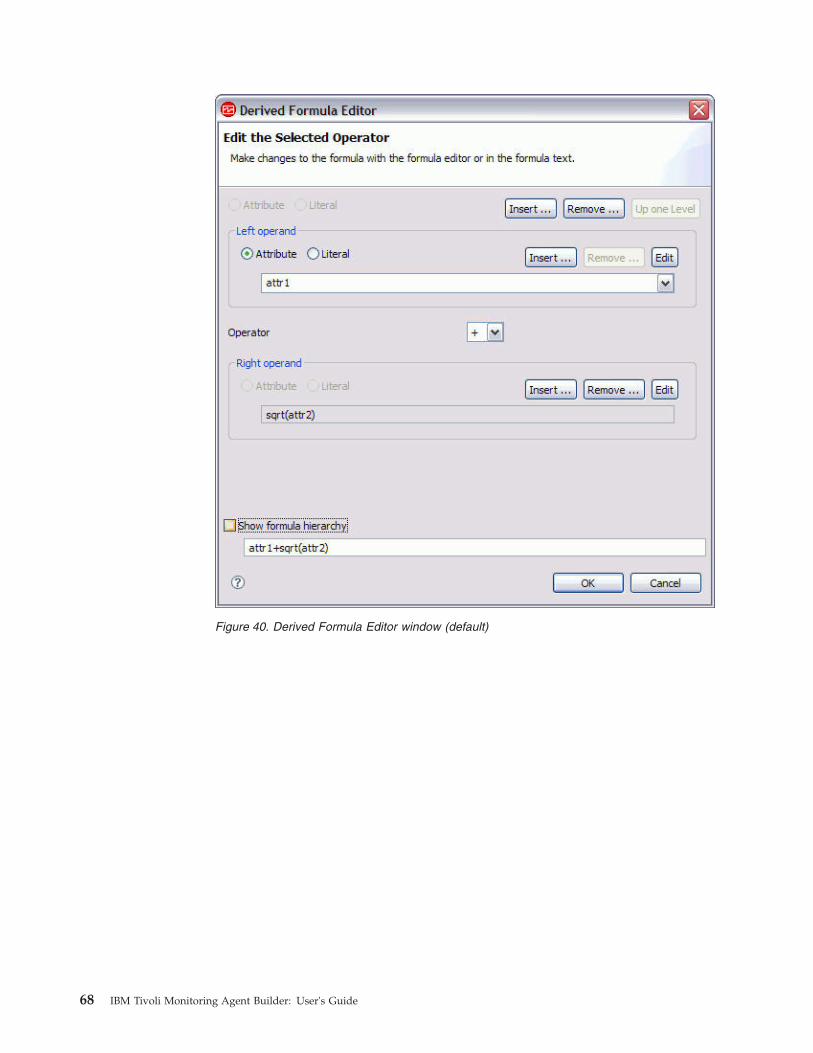
Figure 40. Derived Formula Editor window (default)
68 IBM Tivoli Monitoring Agent Builder: User's Guide
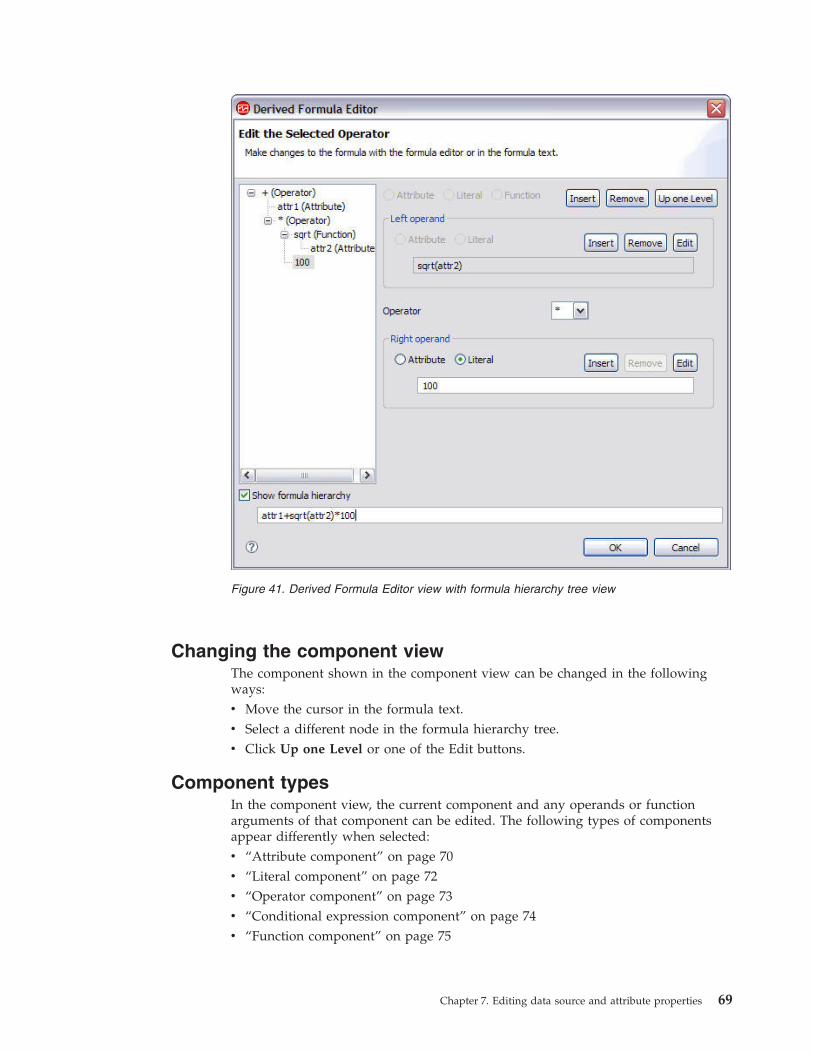
Changing the component viewThe component shown in the component view can be changed in the followingways:v Move the cursor in the formula text.v Select a different node in the formula hierarchy tree.v Click Up one Level or one of the Edit buttons.
Component typesIn the component view, the current component and any operands or functionarguments of that component can be edited. The following types of componentsappear differently when selected:v “Attribute component” on page 70v “Literal component” on page 72v “Operator component” on page 73v “Conditional expression component” on page 74v “Function component” on page 75
Figure 41. Derived Formula Editor view with formula hierarchy tree view
Chapter 7. Editing data source and attribute properties 69
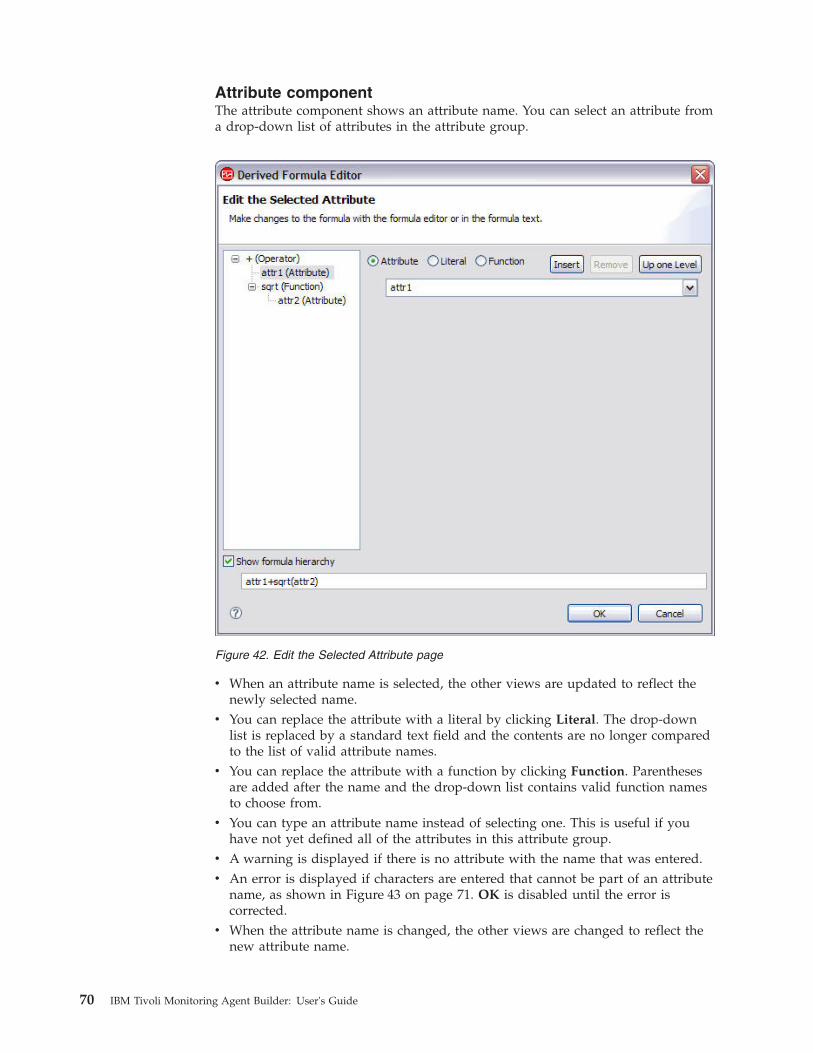
Attribute componentThe attribute component shows an attribute name. You can select an attribute froma drop-down list of attributes in the attribute group.
v When an attribute name is selected, the other views are updated to reflect thenewly selected name.
v You can replace the attribute with a literal by clicking Literal. The drop-downlist is replaced by a standard text field and the contents are no longer comparedto the list of valid attribute names.
v You can replace the attribute with a function by clicking Function. Parenthesesare added after the name and the drop-down list contains valid function namesto choose from.
v You can type an attribute name instead of selecting one. This is useful if youhave not yet defined all of the attributes in this attribute group.
v A warning is displayed if there is no attribute with the name that was entered.v An error is displayed if characters are entered that cannot be part of an attribute
name, as shown in Figure 43 on page 71. OK is disabled until the error iscorrected.
v When the attribute name is changed, the other views are changed to reflect thenew attribute name.
Figure 42. Edit the Selected Attribute page
70 IBM Tivoli Monitoring Agent Builder: User's Guide
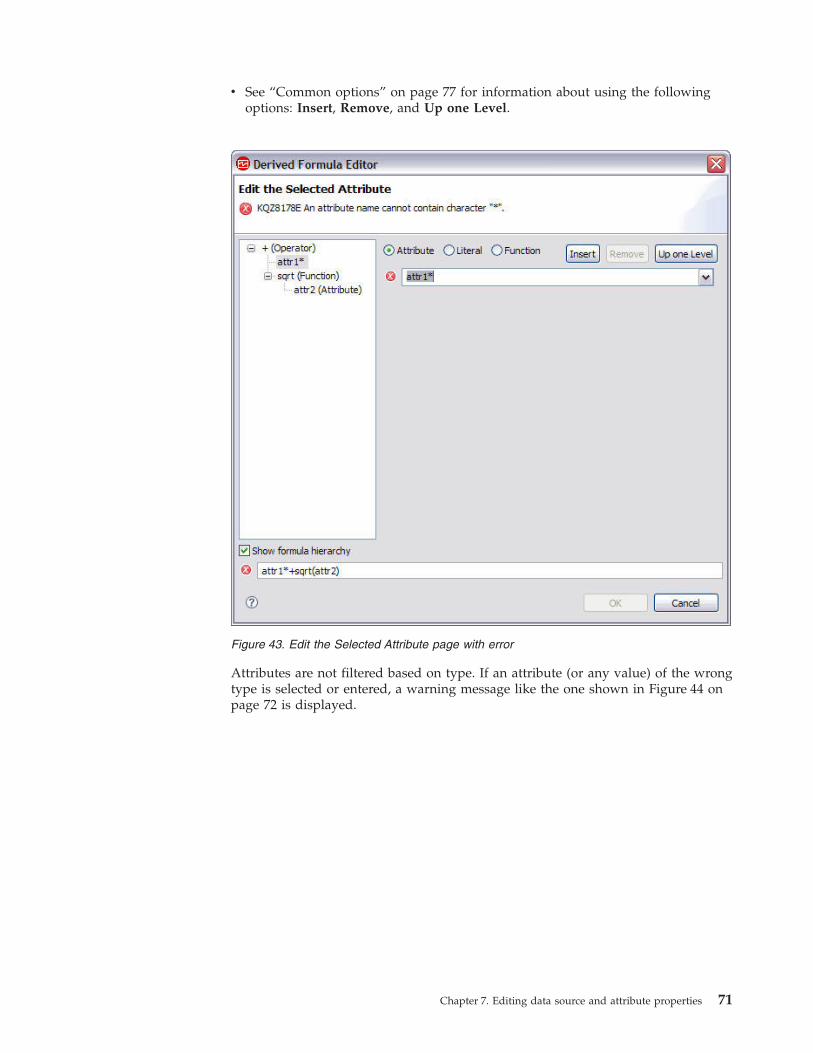
v See “Common options” on page 77 for information about using the followingoptions: Insert, Remove, and Up one Level.
Attributes are not filtered based on type. If an attribute (or any value) of the wrongtype is selected or entered, a warning message like the one shown in Figure 44 onpage 72 is displayed.
Figure 43. Edit the Selected Attribute page with error
Chapter 7. Editing data source and attribute properties 71
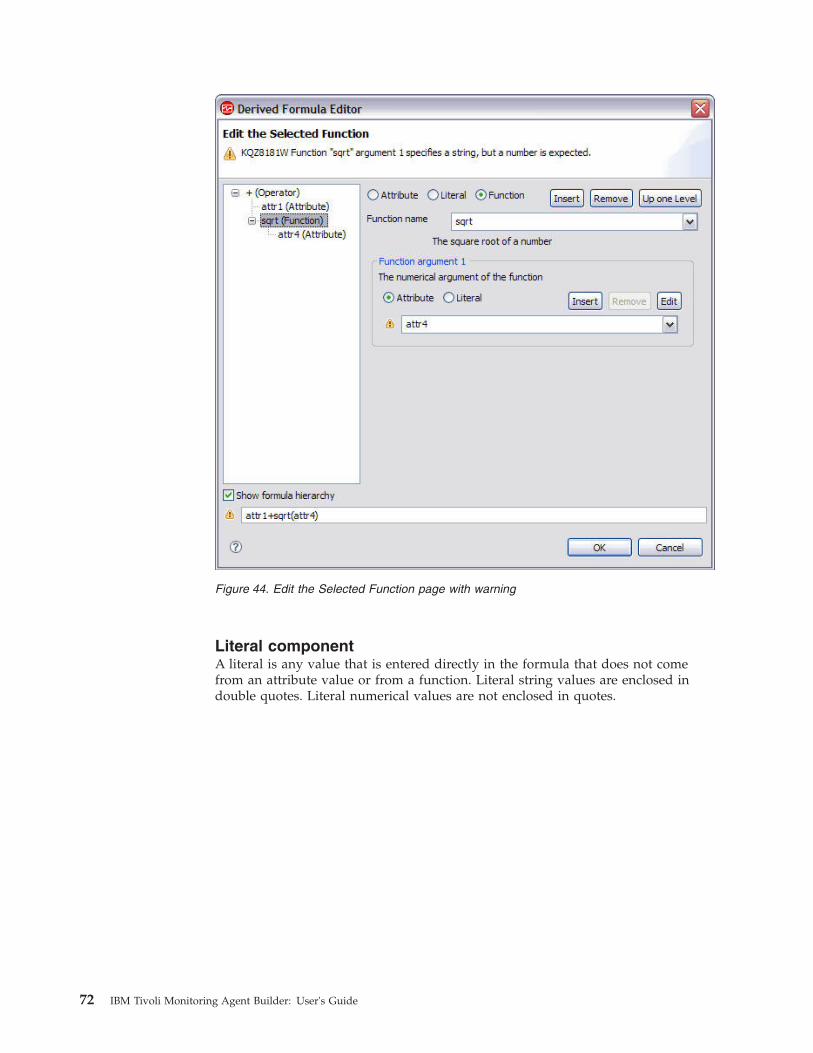
Literal componentA literal is any value that is entered directly in the formula that does not comefrom an attribute value or from a function. Literal string values are enclosed indouble quotes. Literal numerical values are not enclosed in quotes.
Figure 44. Edit the Selected Function page with warning
72 IBM Tivoli Monitoring Agent Builder: User's Guide
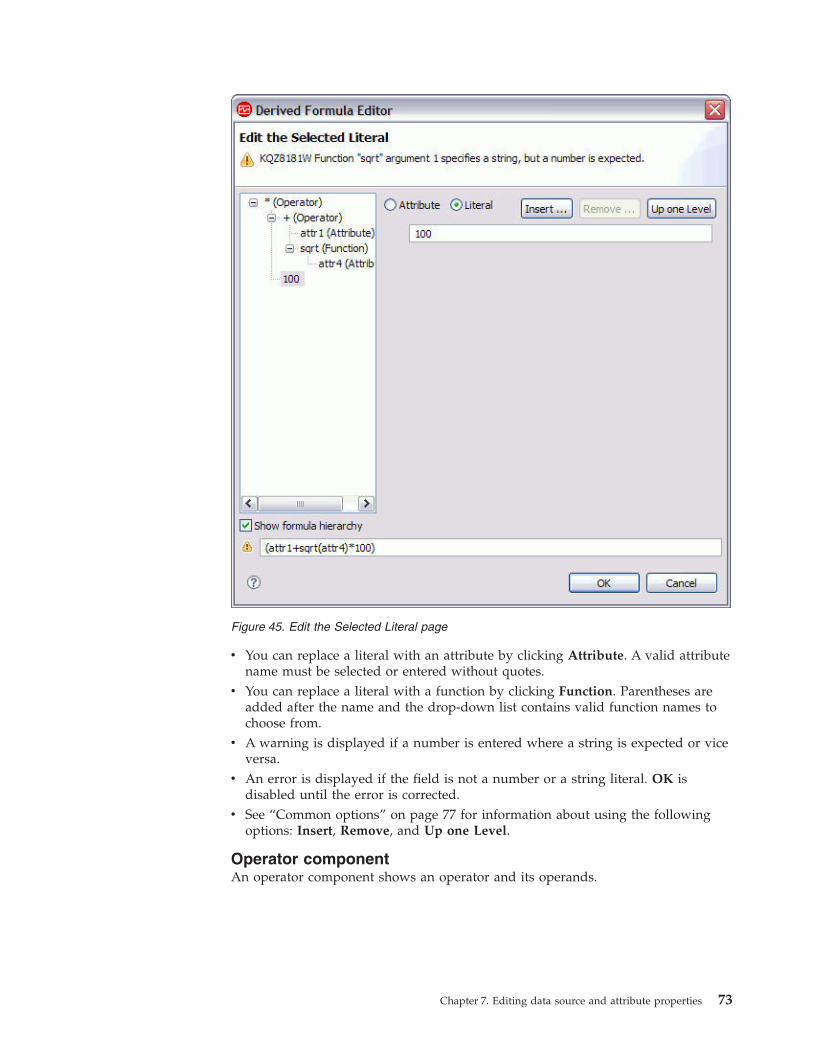
v You can replace a literal with an attribute by clicking Attribute. A valid attributename must be selected or entered without quotes.
v You can replace a literal with a function by clicking Function. Parentheses areadded after the name and the drop-down list contains valid function names tochoose from.
v A warning is displayed if a number is entered where a string is expected or viceversa.
v An error is displayed if the field is not a number or a string literal. OK isdisabled until the error is corrected.
v See “Common options” on page 77 for information about using the followingoptions: Insert, Remove, and Up one Level.
Operator componentAn operator component shows an operator and its operands.
Figure 45. Edit the Selected Literal page
Chapter 7. Editing data source and attribute properties 73
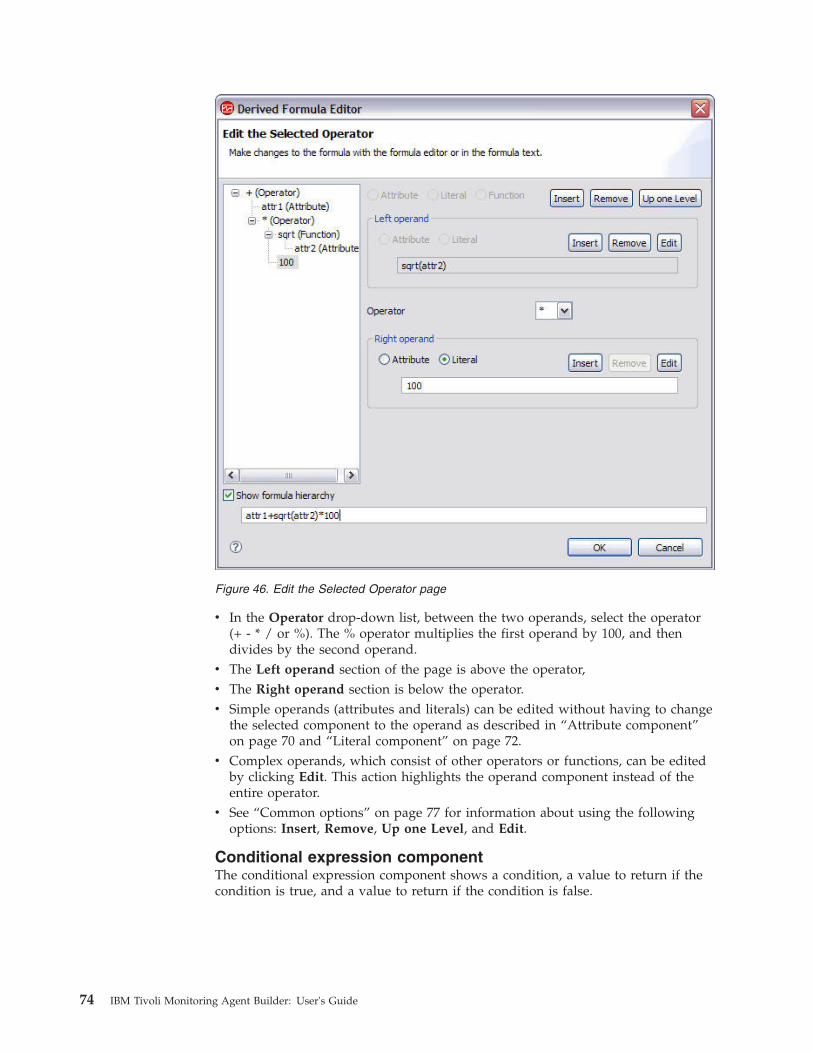
v In the Operator drop-down list, between the two operands, select the operator(+ - * / or %). The % operator multiplies the first operand by 100, and thendivides by the second operand.
v The Left operand section of the page is above the operator,v The Right operand section is below the operator.v Simple operands (attributes and literals) can be edited without having to change
the selected component to the operand as described in “Attribute component”on page 70 and “Literal component” on page 72.
v Complex operands, which consist of other operators or functions, can be editedby clicking Edit. This action highlights the operand component instead of theentire operator.
v See “Common options” on page 77 for information about using the followingoptions: Insert, Remove, Up one Level, and Edit.
Conditional expression componentThe conditional expression component shows a condition, a value to return if thecondition is true, and a value to return if the condition is false.
Figure 46. Edit the Selected Operator page
74 IBM Tivoli Monitoring Agent Builder: User's Guide
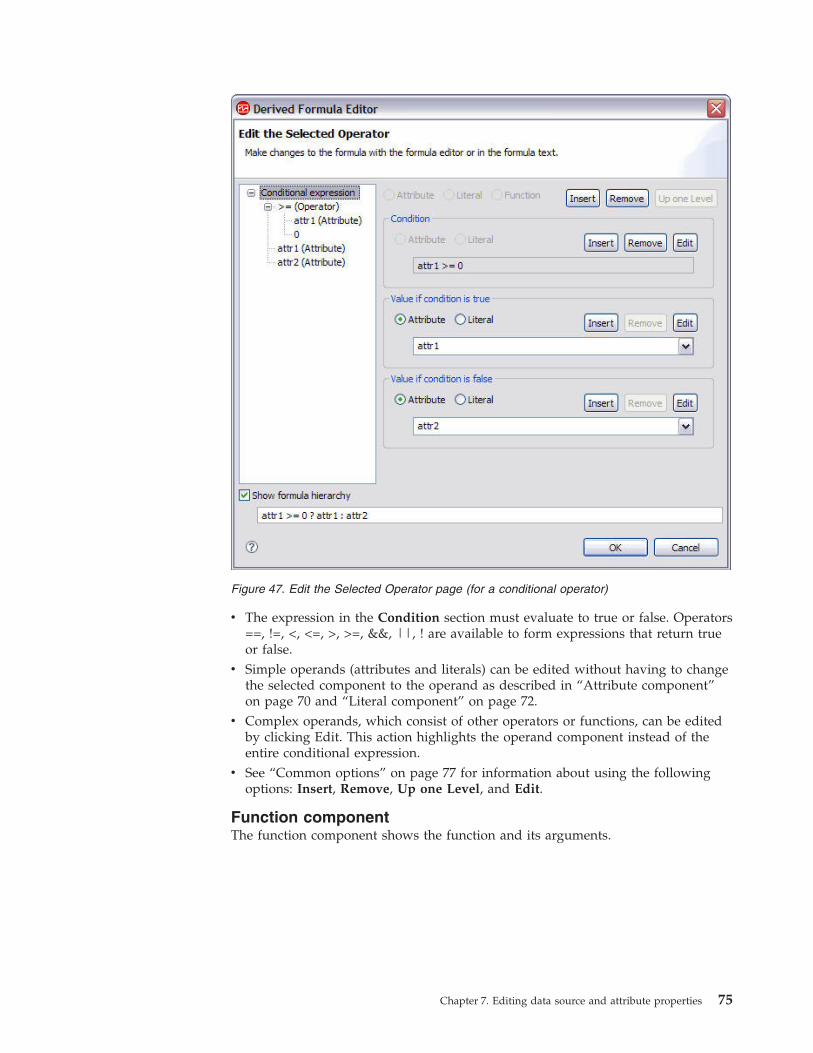
v The expression in the Condition section must evaluate to true or false. Operators==, !=, <, <=, >, >=, &&, ||, ! are available to form expressions that return trueor false.
v Simple operands (attributes and literals) can be edited without having to changethe selected component to the operand as described in “Attribute component”on page 70 and “Literal component” on page 72.
v Complex operands, which consist of other operators or functions, can be editedby clicking Edit. This action highlights the operand component instead of theentire conditional expression.
v See “Common options” on page 77 for information about using the followingoptions: Insert, Remove, Up one Level, and Edit.
Function componentThe function component shows the function and its arguments.
Figure 47. Edit the Selected Operator page (for a conditional operator)
Chapter 7. Editing data source and attribute properties 75
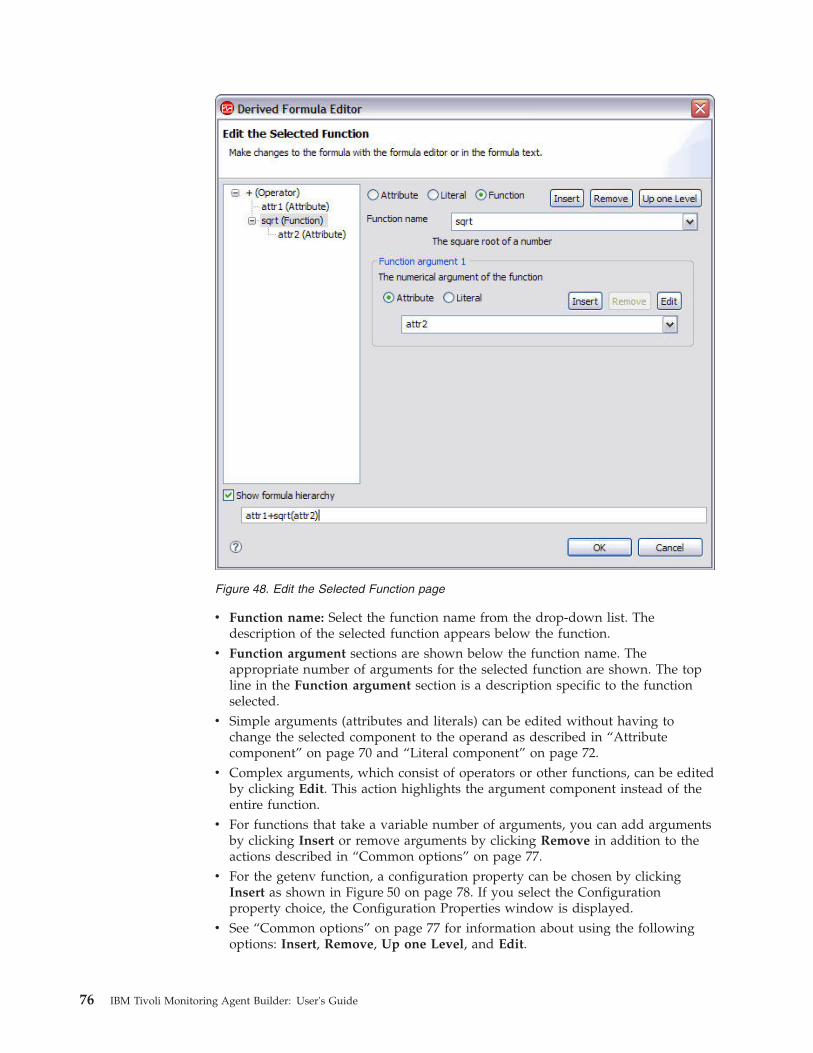
v Function name: Select the function name from the drop-down list. Thedescription of the selected function appears below the function.
v Function argument sections are shown below the function name. Theappropriate number of arguments for the selected function are shown. The topline in the Function argument section is a description specific to the functionselected.
v Simple arguments (attributes and literals) can be edited without having tochange the selected component to the operand as described in “Attributecomponent” on page 70 and “Literal component” on page 72.
v Complex arguments, which consist of operators or other functions, can be editedby clicking Edit. This action highlights the argument component instead of theentire function.
v For functions that take a variable number of arguments, you can add argumentsby clicking Insert or remove arguments by clicking Remove in addition to theactions described in “Common options” on page 77.
v For the getenv function, a configuration property can be chosen by clickingInsert as shown in Figure 50 on page 78. If you select the Configurationproperty choice, the Configuration Properties window is displayed.
v See “Common options” on page 77 for information about using the followingoptions: Insert, Remove, Up one Level, and Edit.
Figure 48. Edit the Selected Function page
76 IBM Tivoli Monitoring Agent Builder: User's Guide
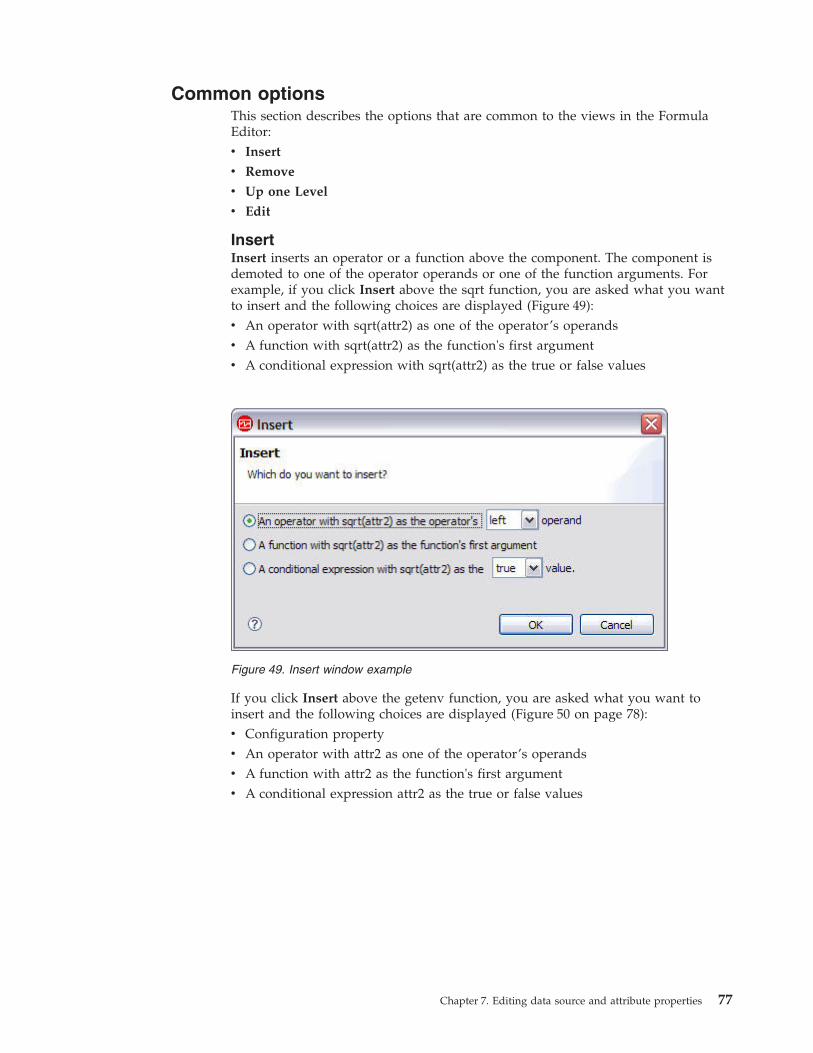
Common optionsThis section describes the options that are common to the views in the FormulaEditor:v Insert
v Remove
v Up one Level
v Edit
InsertInsert inserts an operator or a function above the component. The component isdemoted to one of the operator operands or one of the function arguments. Forexample, if you click Insert above the sqrt function, you are asked what you wantto insert and the following choices are displayed (Figure 49):v An operator with sqrt(attr2) as one of the operator’s operandsv A function with sqrt(attr2) as the function's first argumentv A conditional expression with sqrt(attr2) as the true or false values
If you click Insert above the getenv function, you are asked what you want toinsert and the following choices are displayed (Figure 50 on page 78):v Configuration propertyv An operator with attr2 as one of the operator’s operandsv A function with attr2 as the function's first argumentv A conditional expression attr2 as the true or false values
Figure 49. Insert window example
Chapter 7. Editing data source and attribute properties 77

RemoveRemove is available only for operators and functions, and is the inverse of Insert.When you click Remove, you are asked what is to replace the removed operator orfunction. For example, Remove above the sqrt function shows the followingchoices (Figure 51):v An attribute or literal value
v The current argument 1, attr2
Click An attribute or literal value to discard the entire tree below the point beingremoved and replace it with a new attribute or literal value.
Click the second choice (and subsequent choices if there are more arguments oroperands) to promote the selected operand or argument to replace the removedoperator or function. Any other operands or arguments are discarded.
Figure 50. Insert window example for getenv function
Figure 51. Remove function and its Arguments page
78 IBM Tivoli Monitoring Agent Builder: User's Guide
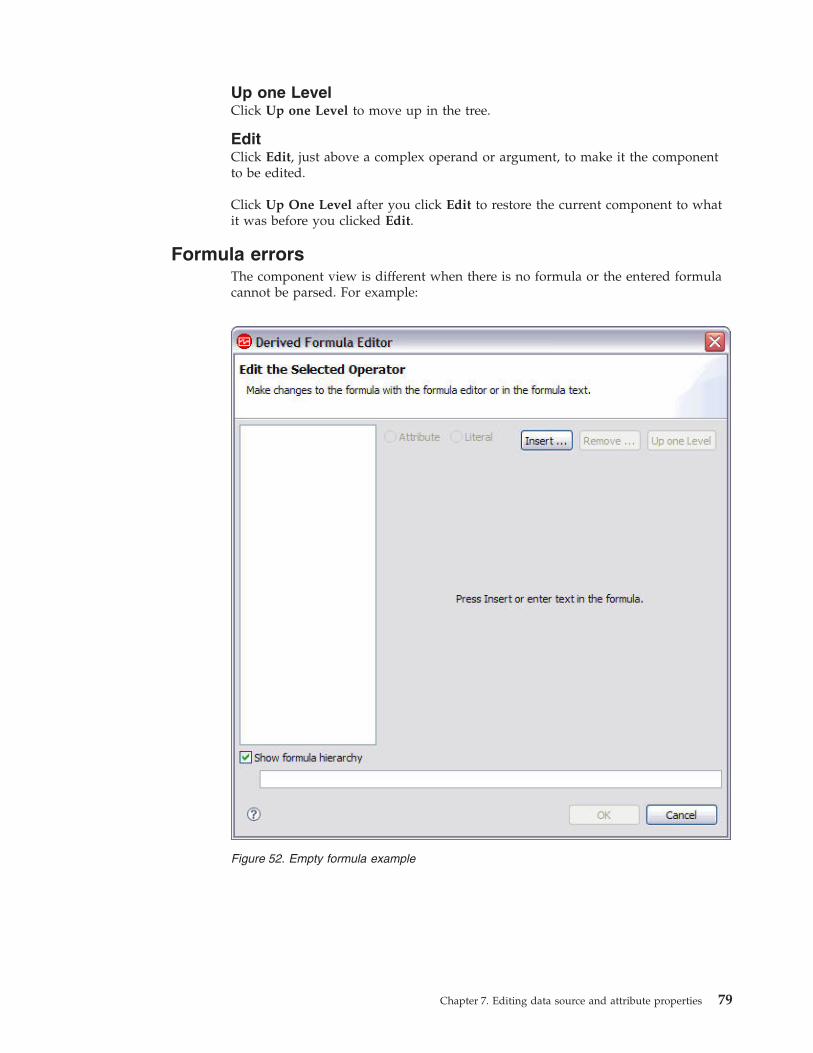
Up one LevelClick Up one Level to move up in the tree.
EditClick Edit, just above a complex operand or argument, to make it the componentto be edited.
Click Up One Level after you click Edit to restore the current component to whatit was before you clicked Edit.
Formula errorsThe component view is different when there is no formula or the entered formulacannot be parsed. For example:
Figure 52. Empty formula example
Chapter 7. Editing data source and attribute properties 79
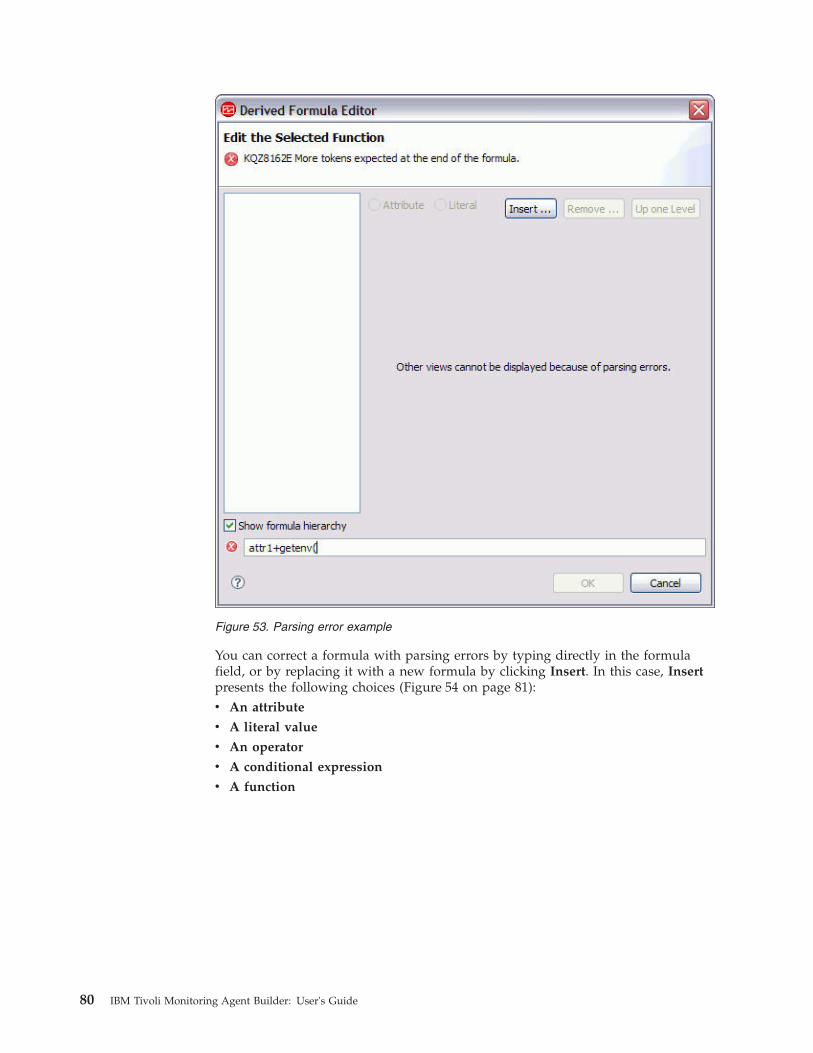
You can correct a formula with parsing errors by typing directly in the formulafield, or by replacing it with a new formula by clicking Insert. In this case, Insertpresents the following choices (Figure 54 on page 81):v An attribute
v A literal value
v An operator
v A conditional expression
v A function
Figure 53. Parsing error example
80 IBM Tivoli Monitoring Agent Builder: User's Guide
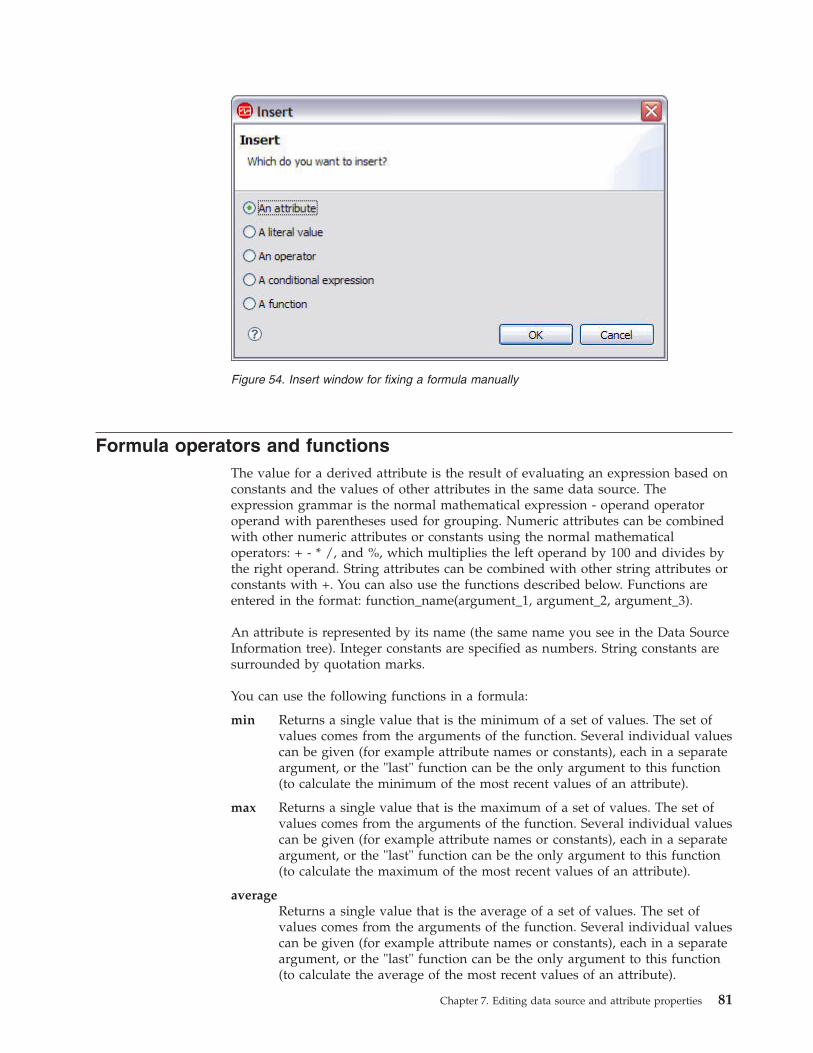
Formula operators and functionsThe value for a derived attribute is the result of evaluating an expression based onconstants and the values of other attributes in the same data source. Theexpression grammar is the normal mathematical expression - operand operatoroperand with parentheses used for grouping. Numeric attributes can be combinedwith other numeric attributes or constants using the normal mathematicaloperators: + - * /, and %, which multiplies the left operand by 100 and divides bythe right operand. String attributes can be combined with other string attributes orconstants with +. You can also use the functions described below. Functions areentered in the format: function_name(argument_1, argument_2, argument_3).
An attribute is represented by its name (the same name you see in the Data SourceInformation tree). Integer constants are specified as numbers. String constants aresurrounded by quotation marks.
You can use the following functions in a formula:
min Returns a single value that is the minimum of a set of values. The set ofvalues comes from the arguments of the function. Several individual valuescan be given (for example attribute names or constants), each in a separateargument, or the "last" function can be the only argument to this function(to calculate the minimum of the most recent values of an attribute).
max Returns a single value that is the maximum of a set of values. The set ofvalues comes from the arguments of the function. Several individual valuescan be given (for example attribute names or constants), each in a separateargument, or the "last" function can be the only argument to this function(to calculate the maximum of the most recent values of an attribute).
averageReturns a single value that is the average of a set of values. The set ofvalues comes from the arguments of the function. Several individual valuescan be given (for example attribute names or constants), each in a separateargument, or the "last" function can be the only argument to this function(to calculate the average of the most recent values of an attribute).
Figure 54. Insert window for fixing a formula manually
Chapter 7. Editing data source and attribute properties 81
Examples of this function in use are:average (Attr_A, AttrB, Attr_C)
average (last (Attr_A, 10))
stddevReturns a single value that is the standard deviation of a set of values. Theset of values comes from the arguments of the function. Several individualvalues can be given (for example attribute names or constants), each in aseparate argument, or the "last" function can be the only argument to thisfunction (to calculate the standard deviation of the most recent values ofan attribute).
sum Returns a single value that is the sum of a set of values. The set of valuescomes from the arguments of the function. Several individual values canbe given (for example attribute names or constants), each in a separateargument, or the "last" function can be the only argument to this function(to calculate the sum of the most recent values of an attribute).
last Returns a list of values for use by the min, max, average, and stddevfunctions. It takes two arguments: the attribute to collect and the numberof values to use in the calculation. If the required attribute is an integralvalue in a string attribute, the first argument can contain the atoi function,such atoi(numericalStringAttribute). The second argument must be anumber. It can either be hardcoded as a constant or it can be the result ofan atoi(getenv("ENV_VAR")) expression. It cannot reference an attributevalue.
Examples of this function in use are:average (last (Attr_A, 10))
last (Attribute_A, ${K01_NUM_COLLECTIONS}))
matchesReturns a boolean, true or false, indicating whether or not a regularexpression matches a value. It takes two arguments, string source and aregular expression whose result the string is compared to. This function isuseful for attribute group filtering.
round Rounds the number to the nearest whole number.
abs Returns the absolute value of a number
sqrt Returns the square root of a number
atof Converts a string to a floating point value
atoi Converts a string to an integer value. It operates in the same way thenormal C atoi works: it stops at the first non-decimal character.
itoa Converts an integer into a string. This function is most useful when youwant to concatenate a numeric value onto a string. The derived string +function only takes two string arguments.
getenvReturns the value of the provided environment or "configuration variable".
tokenizeOne token of a tokenized string. This function requires three arguments.The first argument is a string to be split into tokens. The second argumentgives one or more characters in the string that separate one token fromanother. Any occurrence of any of the characters from this argument isused to identify and separate tokens in the first argument. The thirdargument is the index of the token to return as a result of this function.
82 IBM Tivoli Monitoring Agent Builder: User's Guide
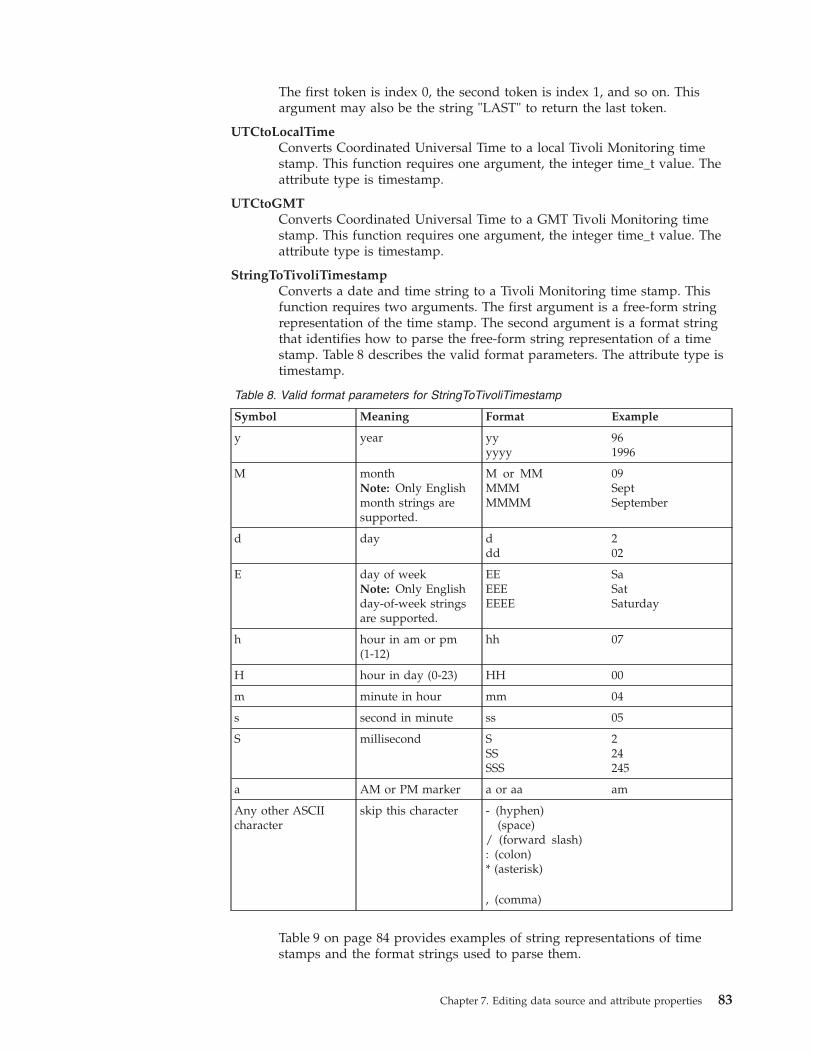
The first token is index 0, the second token is index 1, and so on. Thisargument may also be the string "LAST" to return the last token.
UTCtoLocalTimeConverts Coordinated Universal Time to a local Tivoli Monitoring timestamp. This function requires one argument, the integer time_t value. Theattribute type is timestamp.
UTCtoGMTConverts Coordinated Universal Time to a GMT Tivoli Monitoring timestamp. This function requires one argument, the integer time_t value. Theattribute type is timestamp.
StringToTivoliTimestampConverts a date and time string to a Tivoli Monitoring time stamp. Thisfunction requires two arguments. The first argument is a free-form stringrepresentation of the time stamp. The second argument is a format stringthat identifies how to parse the free-form string representation of a timestamp. Table 8 describes the valid format parameters. The attribute type istimestamp.
Table 8. Valid format parameters for StringToTivoliTimestamp
Symbol Meaning Format Example
y year yyyyyy
961996
M monthNote: Only Englishmonth strings aresupported.
M or MMMMMMMMM
09SeptSeptember
d day ddd
202
E day of weekNote: Only Englishday-of-week stringsare supported.
EEEEEEEEE
SaSatSaturday
h hour in am or pm(1-12)
hh 07
H hour in day (0-23) HH 00
m minute in hour mm 04
s second in minute ss 05
S millisecond SSSSSS
224245
a AM or PM marker a or aa am
Any other ASCIIcharacter
skip this character - (hyphen)(space)
/ (forward slash): (colon)* (asterisk)
, (comma)
Table 9 on page 84 provides examples of string representations of timestamps and the format strings used to parse them.
Chapter 7. Editing data source and attribute properties 83
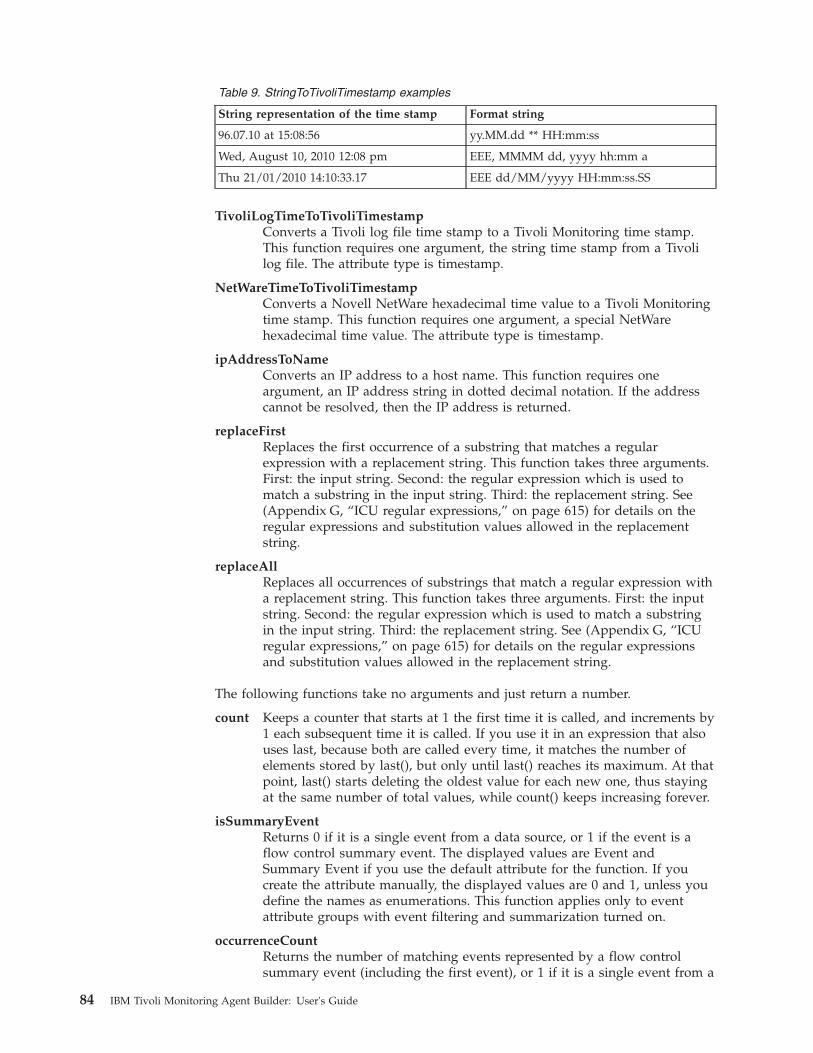
Table 9. StringToTivoliTimestamp examples
String representation of the time stamp Format string
96.07.10 at 15:08:56 yy.MM.dd ** HH:mm:ss
Wed, August 10, 2010 12:08 pm EEE, MMMM dd, yyyy hh:mm a
Thu 21/01/2010 14:10:33.17 EEE dd/MM/yyyy HH:mm:ss.SS
TivoliLogTimeToTivoliTimestampConverts a Tivoli log file time stamp to a Tivoli Monitoring time stamp.This function requires one argument, the string time stamp from a Tivolilog file. The attribute type is timestamp.
NetWareTimeToTivoliTimestampConverts a Novell NetWare hexadecimal time value to a Tivoli Monitoringtime stamp. This function requires one argument, a special NetWarehexadecimal time value. The attribute type is timestamp.
ipAddressToNameConverts an IP address to a host name. This function requires oneargument, an IP address string in dotted decimal notation. If the addresscannot be resolved, then the IP address is returned.
replaceFirstReplaces the first occurrence of a substring that matches a regularexpression with a replacement string. This function takes three arguments.First: the input string. Second: the regular expression which is used tomatch a substring in the input string. Third: the replacement string. See(Appendix G, “ICU regular expressions,” on page 615) for details on theregular expressions and substitution values allowed in the replacementstring.
replaceAllReplaces all occurrences of substrings that match a regular expression witha replacement string. This function takes three arguments. First: the inputstring. Second: the regular expression which is used to match a substringin the input string. Third: the replacement string. See (Appendix G, “ICUregular expressions,” on page 615) for details on the regular expressionsand substitution values allowed in the replacement string.
The following functions take no arguments and just return a number.
count Keeps a counter that starts at 1 the first time it is called, and increments by1 each subsequent time it is called. If you use it in an expression that alsouses last, because both are called every time, it matches the number ofelements stored by last(), but only until last() reaches its maximum. At thatpoint, last() starts deleting the oldest value for each new one, thus stayingat the same number of total values, while count() keeps increasing forever.
isSummaryEventReturns 0 if it is a single event from a data source, or 1 if the event is aflow control summary event. The displayed values are Event andSummary Event if you use the default attribute for the function. If youcreate the attribute manually, the displayed values are 0 and 1, unless youdefine the names as enumerations. This function applies only to eventattribute groups with event filtering and summarization turned on.
occurrenceCountReturns the number of matching events represented by a flow controlsummary event (including the first event), or 1 if it is a single event from a
84 IBM Tivoli Monitoring Agent Builder: User's Guide
data source. This function applies only to event attribute groups with eventfiltering and summarization turned on.
summaryIntervalReturns the summary interval configured for the attribute group whichgenerated the event, in seconds. This function applies only to eventattribute groups with event filtering and summarization turned on.
eventThresholdReturns the threshold value configured for the attribute group whichgenerated the event. This is a number, with three enumerations:v SEND_ALL (-3)v SEND_FIRST (-2)v SEND_NONE (-1)
The number in parentheses is the raw value, but the Agent Builder definesthe enumerations so by default the text version is visible on the TivoliEnterprise Portal. If you specify an actual numeric threshold and not oneof the three pre-defined choices, that number is returned by this function.This should be an integer > 0. This function applies only to event attributegroups with event filtering and summarization turned on.
cumulativeSumReturns the sum of argument values of duplicate events represented by aflow control summary event, or returns the argument if it is a single eventfrom a data source. It takes a single numeric argument. This functionapplies only to event attribute groups with event filtering andsummarization turned on.
Examples
Derived AttributesExample: If you have a data source that defines the following attribute type:v Name Stringv xBytes Numericv yBytes Numericv Virtual_Size Numeric
You can define:v An attribute 'totalBytes' to be the sum of xBytes and yBytes. You enter the
formula 'xBytes + yBytes'v An attribute 'yPercent' to be the percentage of the total bytes, which are yBytes,
can be defined as 'yBytes % (xBytes + yBytes)' or 'yBytes % totalBytes'
Example: The following formula returns the maximum of the recently collectedvalues for the Virtual_Size attribute. The number of samples collected is the valueof the configuration variable, K4P_COLLECTIONS_PER_HISTORY_INTERVAL(accessed through getenv), converted to a number (through atoi):max(last(Virtual_Size,atoi(getenv("K4P_COLLECTIONS_PER_HISTORY_INTERVAL"))))
Example: The following formula returns the square root of the sum of the squaresof the xBytes and yBytes attribute values:sqrt(xBytes * xBytes + yBtyes * yBytes)
Chapter 7. Editing data source and attribute properties 85
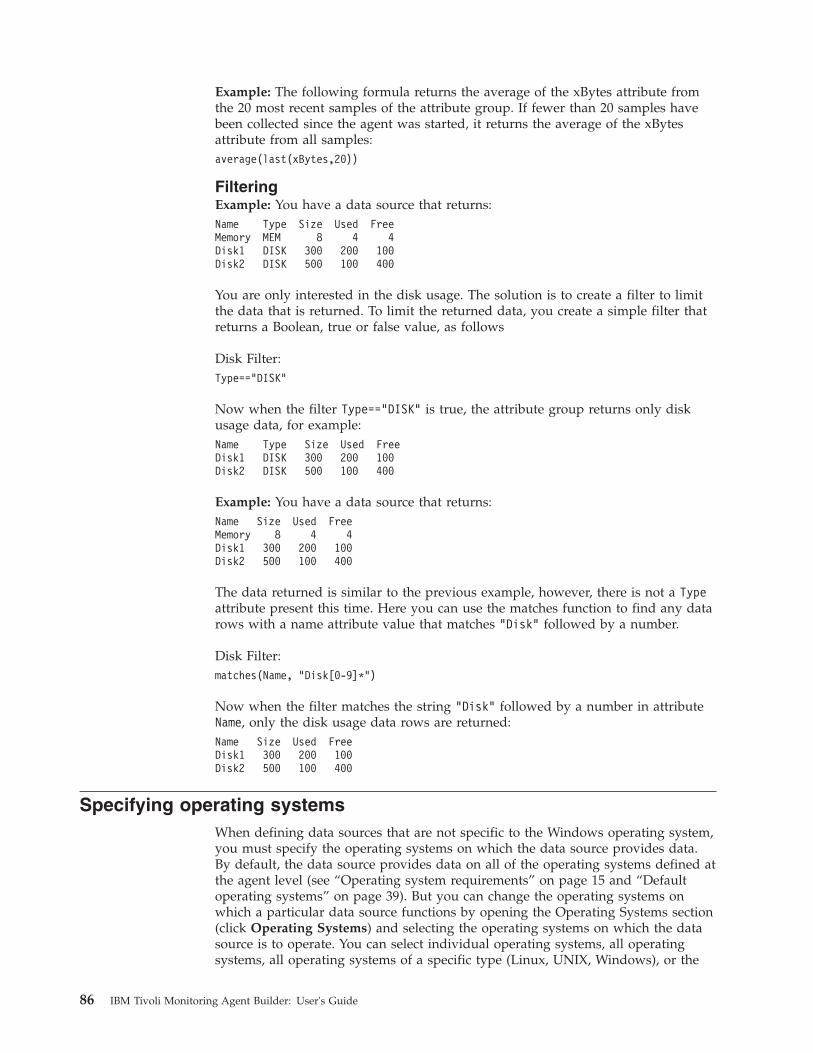
Example: The following formula returns the average of the xBytes attribute fromthe 20 most recent samples of the attribute group. If fewer than 20 samples havebeen collected since the agent was started, it returns the average of the xBytesattribute from all samples:average(last(xBytes,20))
FilteringExample: You have a data source that returns:Name Type Size Used FreeMemory MEM 8 4 4Disk1 DISK 300 200 100Disk2 DISK 500 100 400
You are only interested in the disk usage. The solution is to create a filter to limitthe data that is returned. To limit the returned data, you create a simple filter thatreturns a Boolean, true or false value, as follows
Disk Filter:Type=="DISK"
Now when the filter Type=="DISK" is true, the attribute group returns only diskusage data, for example:Name Type Size Used FreeDisk1 DISK 300 200 100Disk2 DISK 500 100 400
Example: You have a data source that returns:Name Size Used FreeMemory 8 4 4Disk1 300 200 100Disk2 500 100 400
The data returned is similar to the previous example, however, there is not a Typeattribute present this time. Here you can use the matches function to find any datarows with a name attribute value that matches "Disk" followed by a number.
Disk Filter:matches(Name, "Disk[0-9]*")
Now when the filter matches the string "Disk" followed by a number in attributeName, only the disk usage data rows are returned:Name Size Used FreeDisk1 300 200 100Disk2 500 100 400
Specifying operating systemsWhen defining data sources that are not specific to the Windows operating system,you must specify the operating systems on which the data source provides data.By default, the data source provides data on all of the operating systems defined atthe agent level (see “Operating system requirements” on page 15 and “Defaultoperating systems” on page 39). But you can change the operating systems onwhich a particular data source functions by opening the Operating Systems section(click Operating Systems) and selecting the operating systems on which the datasource is to operate. You can select individual operating systems, all operatingsystems, all operating systems of a specific type (Linux, UNIX, Windows), or the
86 IBM Tivoli Monitoring Agent Builder: User's Guide
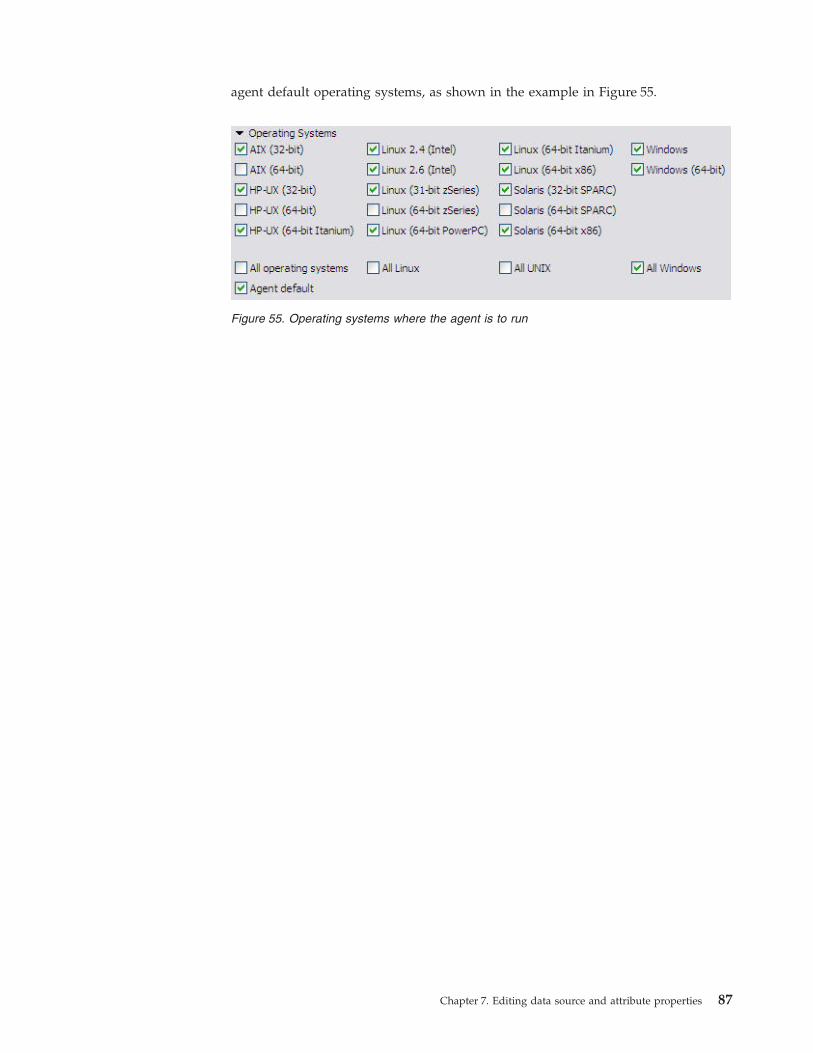
agent default operating systems, as shown in the example in Figure 55.
Figure 55. Operating systems where the agent is to run
Chapter 7. Editing data source and attribute properties 87

88 IBM Tivoli Monitoring Agent Builder: User's Guide
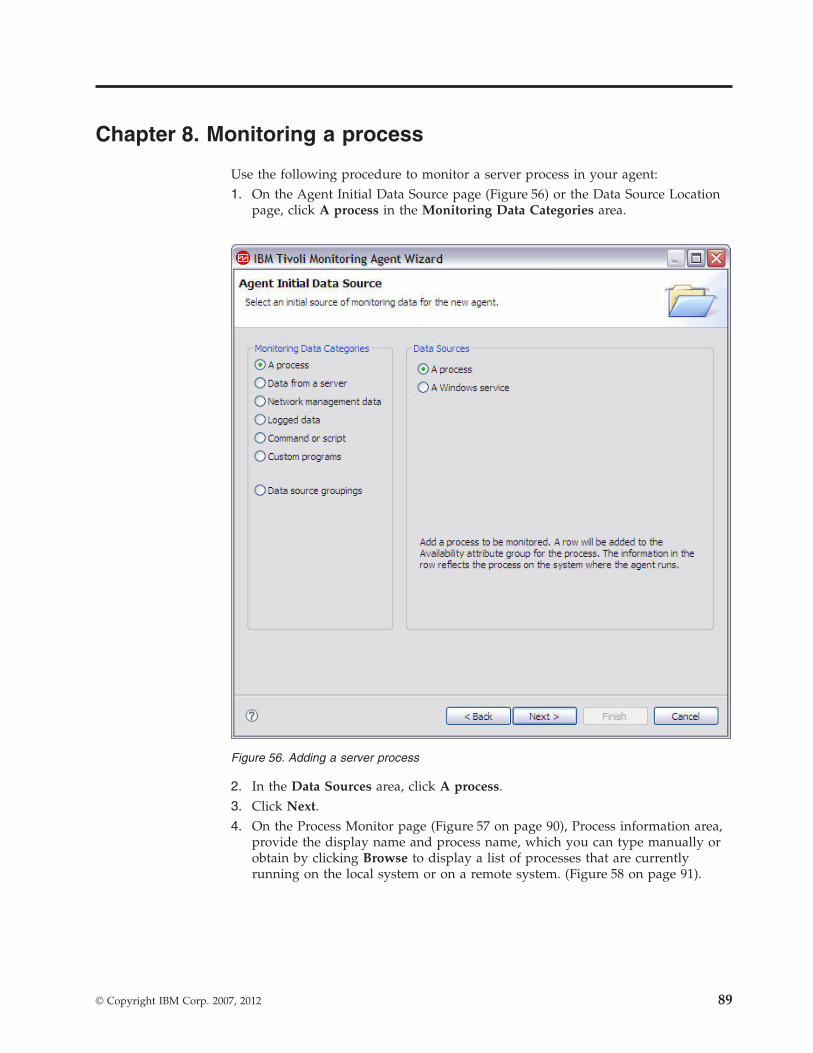
Chapter 8. Monitoring a process
Use the following procedure to monitor a server process in your agent:1. On the Agent Initial Data Source page (Figure 56) or the Data Source Location
page, click A process in the Monitoring Data Categories area.
2. In the Data Sources area, click A process.3. Click Next.4. On the Process Monitor page (Figure 57 on page 90), Process information area,
provide the display name and process name, which you can type manually orobtain by clicking Browse to display a list of processes that are currentlyrunning on the local system or on a remote system. (Figure 58 on page 91).
Figure 56. Adding a server process
© Copyright IBM Corp. 2007, 2012 89
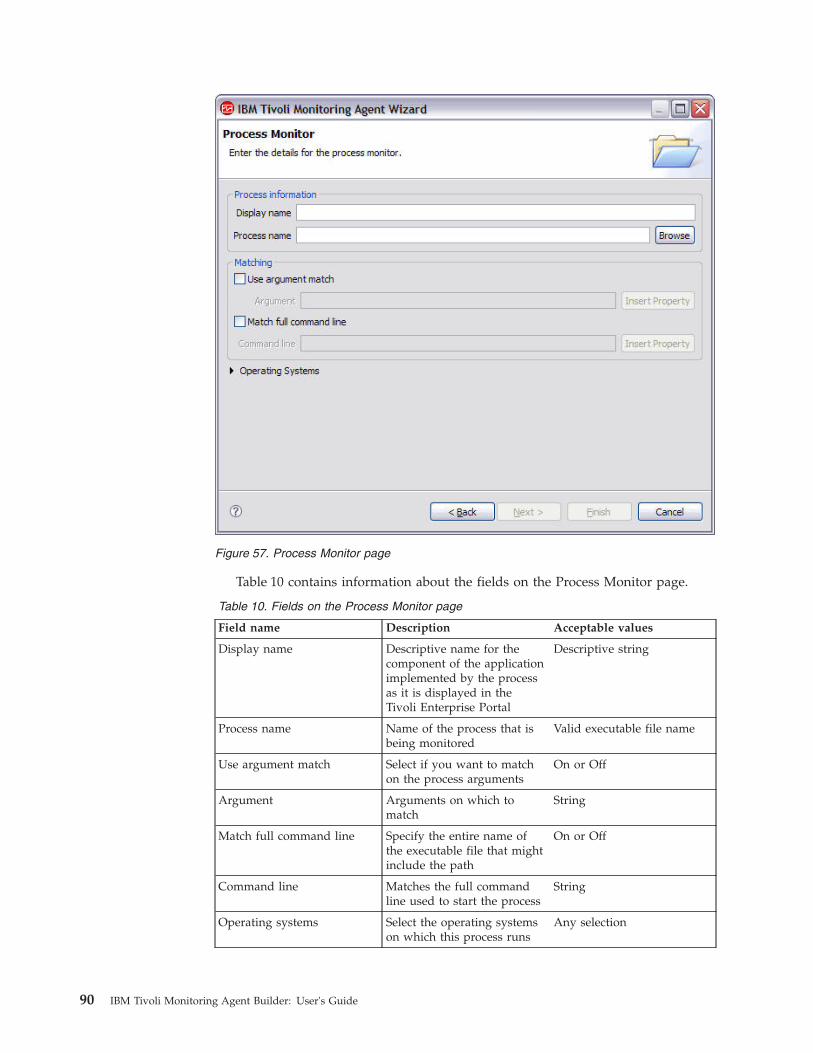
Table 10 contains information about the fields on the Process Monitor page.
Table 10. Fields on the Process Monitor page
Field name Description Acceptable values
Display name Descriptive name for thecomponent of the applicationimplemented by the processas it is displayed in theTivoli Enterprise Portal
Descriptive string
Process name Name of the process that isbeing monitored
Valid executable file name
Use argument match Select if you want to matchon the process arguments
On or Off
Argument Arguments on which tomatch
String
Match full command line Specify the entire name ofthe executable file that mightinclude the path
On or Off
Command line Matches the full commandline used to start the process
String
Operating systems Select the operating systemson which this process runs
Any selection
Figure 57. Process Monitor page
90 IBM Tivoli Monitoring Agent Builder: User's Guide
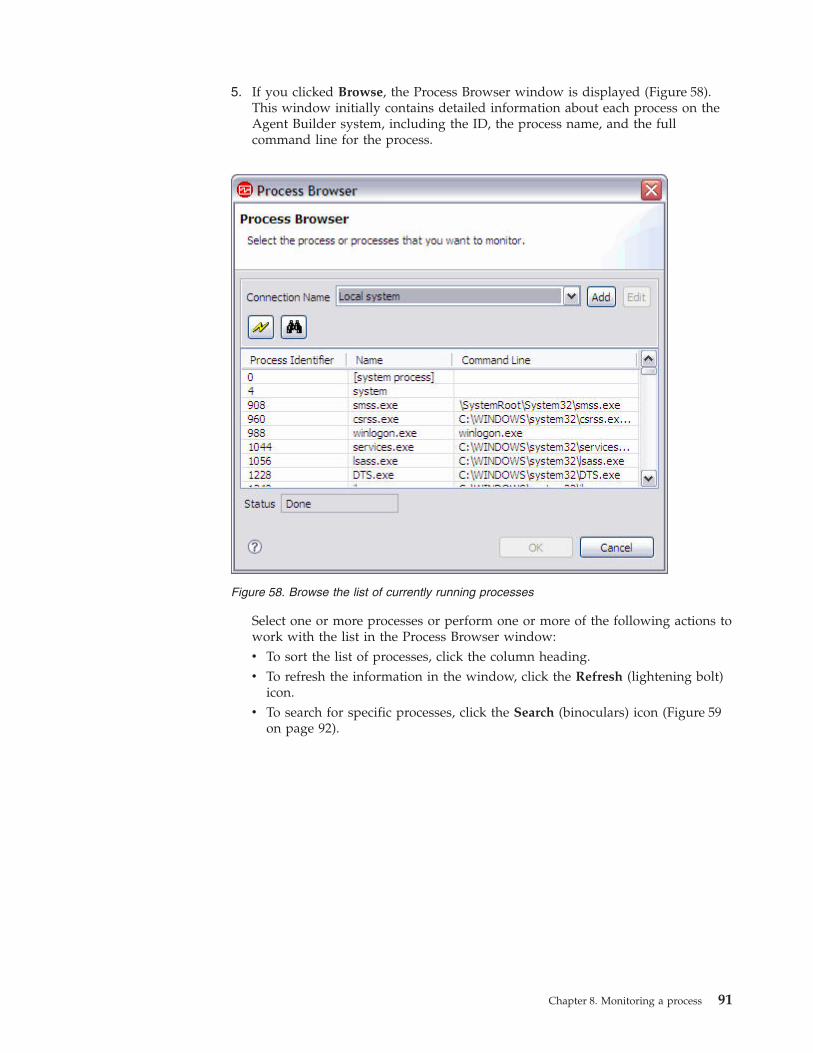
5. If you clicked Browse, the Process Browser window is displayed (Figure 58).This window initially contains detailed information about each process on theAgent Builder system, including the ID, the process name, and the fullcommand line for the process.
Select one or more processes or perform one or more of the following actions towork with the list in the Process Browser window:v To sort the list of processes, click the column heading.v To refresh the information in the window, click the Refresh (lightening bolt)
icon.v To search for specific processes, click the Search (binoculars) icon (Figure 59
on page 92).
Figure 58. Browse the list of currently running processes
Chapter 8. Monitoring a process 91
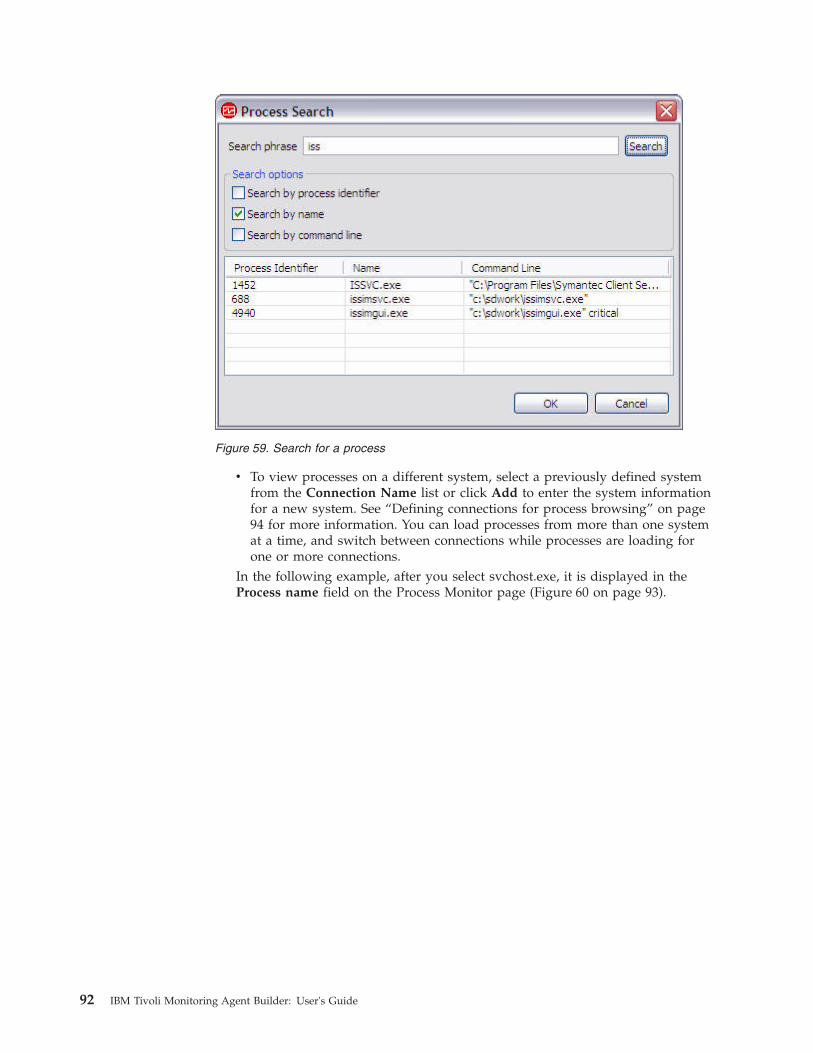
v To view processes on a different system, select a previously defined systemfrom the Connection Name list or click Add to enter the system informationfor a new system. See “Defining connections for process browsing” on page94 for more information. You can load processes from more than one systemat a time, and switch between connections while processes are loading forone or more connections.
In the following example, after you select svchost.exe, it is displayed in theProcess name field on the Process Monitor page (Figure 60 on page 93).
Figure 59. Search for a process
92 IBM Tivoli Monitoring Agent Builder: User's Guide
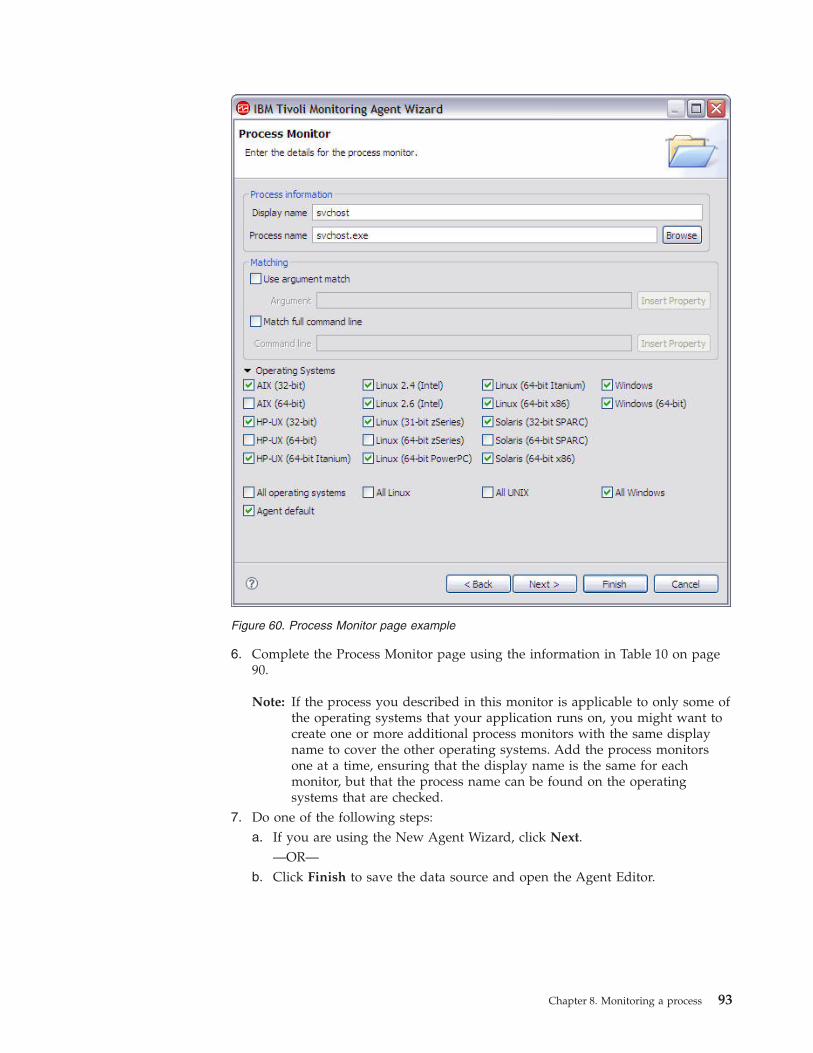
6. Complete the Process Monitor page using the information in Table 10 on page90.
Note: If the process you described in this monitor is applicable to only some ofthe operating systems that your application runs on, you might want tocreate one or more additional process monitors with the same displayname to cover the other operating systems. Add the process monitorsone at a time, ensuring that the display name is the same for eachmonitor, but that the process name can be found on the operatingsystems that are checked.
7. Do one of the following steps:a. If you are using the New Agent Wizard, click Next.
—OR—b. Click Finish to save the data source and open the Agent Editor.
Figure 60. Process Monitor page example
Chapter 8. Monitoring a process 93
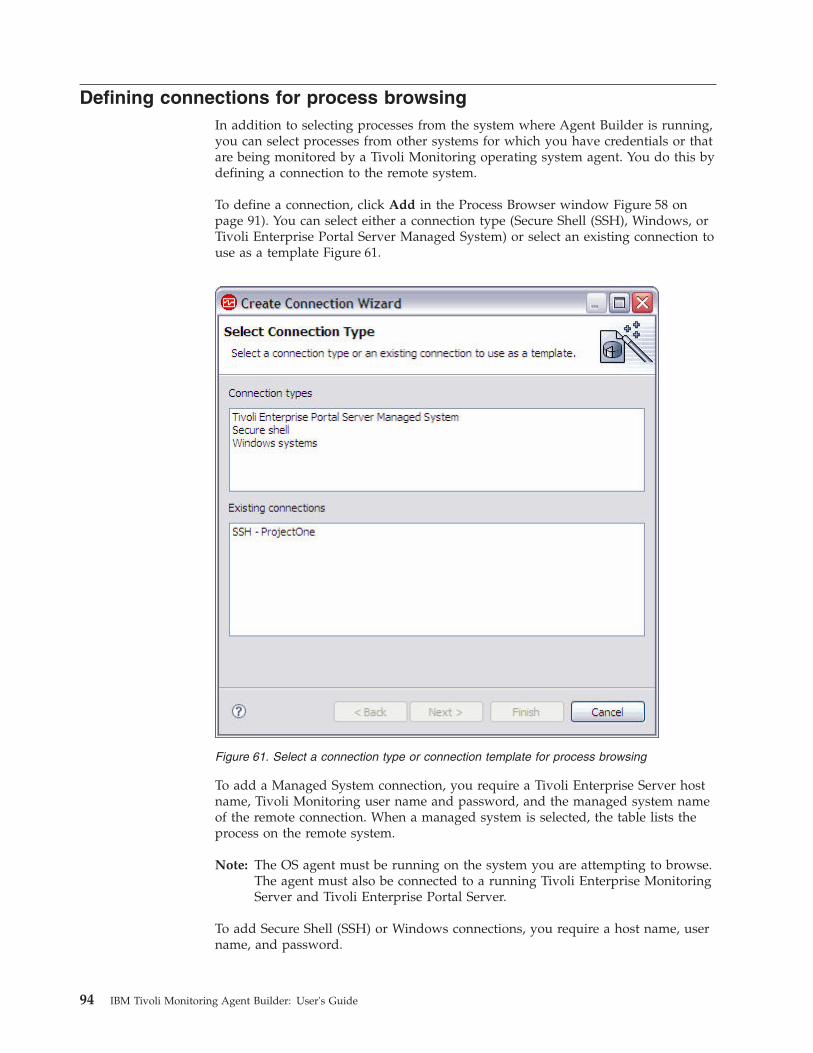
Defining connections for process browsingIn addition to selecting processes from the system where Agent Builder is running,you can select processes from other systems for which you have credentials or thatare being monitored by a Tivoli Monitoring operating system agent. You do this bydefining a connection to the remote system.
To define a connection, click Add in the Process Browser window Figure 58 onpage 91). You can select either a connection type (Secure Shell (SSH), Windows, orTivoli Enterprise Portal Server Managed System) or select an existing connection touse as a template Figure 61.
To add a Managed System connection, you require a Tivoli Enterprise Server hostname, Tivoli Monitoring user name and password, and the managed system nameof the remote connection. When a managed system is selected, the table lists theprocess on the remote system.
Note: The OS agent must be running on the system you are attempting to browse.The agent must also be connected to a running Tivoli Enterprise MonitoringServer and Tivoli Enterprise Portal Server.
To add Secure Shell (SSH) or Windows connections, you require a host name, username, and password.
Figure 61. Select a connection type or connection template for process browsing
94 IBM Tivoli Monitoring Agent Builder: User's Guide
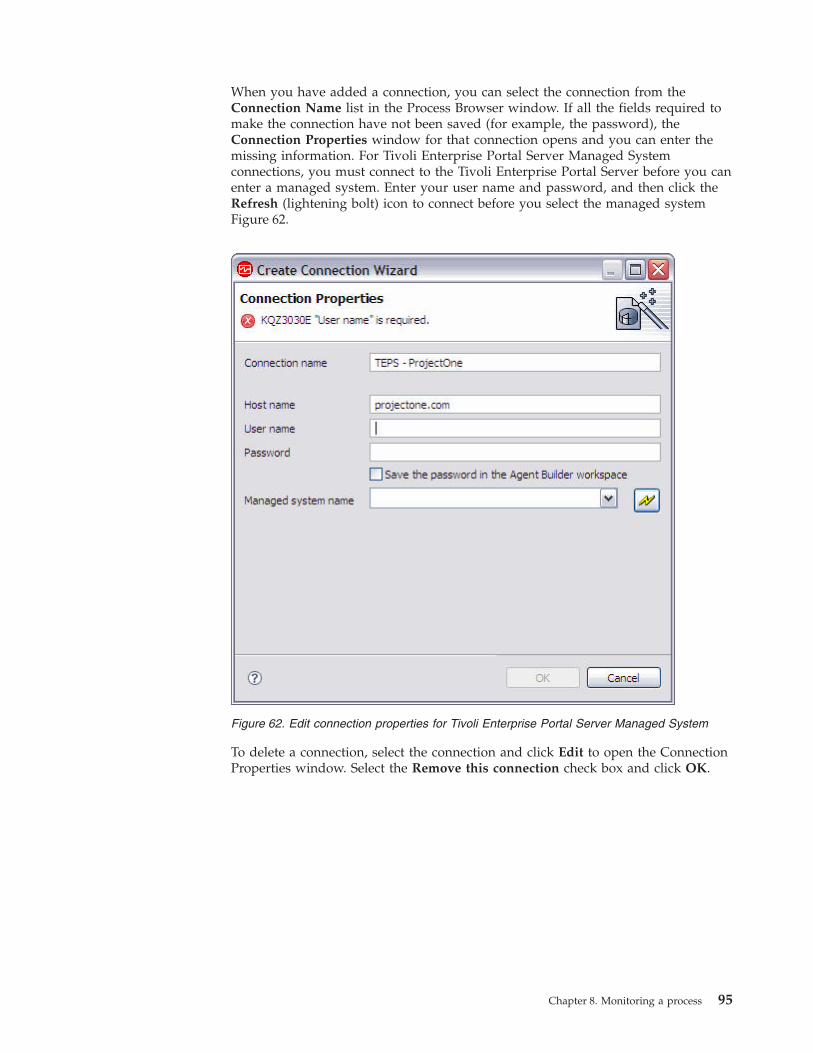
When you have added a connection, you can select the connection from theConnection Name list in the Process Browser window. If all the fields required tomake the connection have not been saved (for example, the password), theConnection Properties window for that connection opens and you can enter themissing information. For Tivoli Enterprise Portal Server Managed Systemconnections, you must connect to the Tivoli Enterprise Portal Server before you canenter a managed system. Enter your user name and password, and then click theRefresh (lightening bolt) icon to connect before you select the managed systemFigure 62.
To delete a connection, select the connection and click Edit to open the ConnectionProperties window. Select the Remove this connection check box and click OK.
Figure 62. Edit connection properties for Tivoli Enterprise Portal Server Managed System
Chapter 8. Monitoring a process 95

96 IBM Tivoli Monitoring Agent Builder: User's Guide
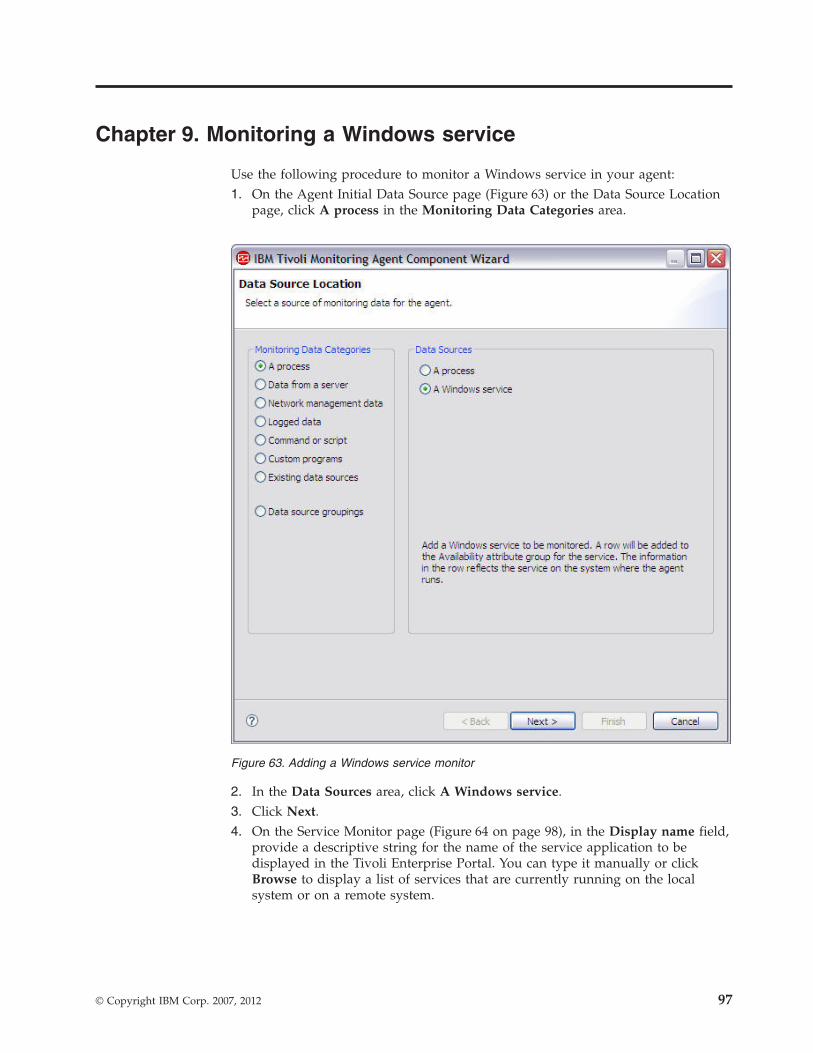
Chapter 9. Monitoring a Windows service
Use the following procedure to monitor a Windows service in your agent:1. On the Agent Initial Data Source page (Figure 63) or the Data Source Location
page, click A process in the Monitoring Data Categories area.
2. In the Data Sources area, click A Windows service.3. Click Next.4. On the Service Monitor page (Figure 64 on page 98), in the Display name field,
provide a descriptive string for the name of the service application to bedisplayed in the Tivoli Enterprise Portal. You can type it manually or clickBrowse to display a list of services that are currently running on the localsystem or on a remote system.
Figure 63. Adding a Windows service monitor
© Copyright IBM Corp. 2007, 2012 97
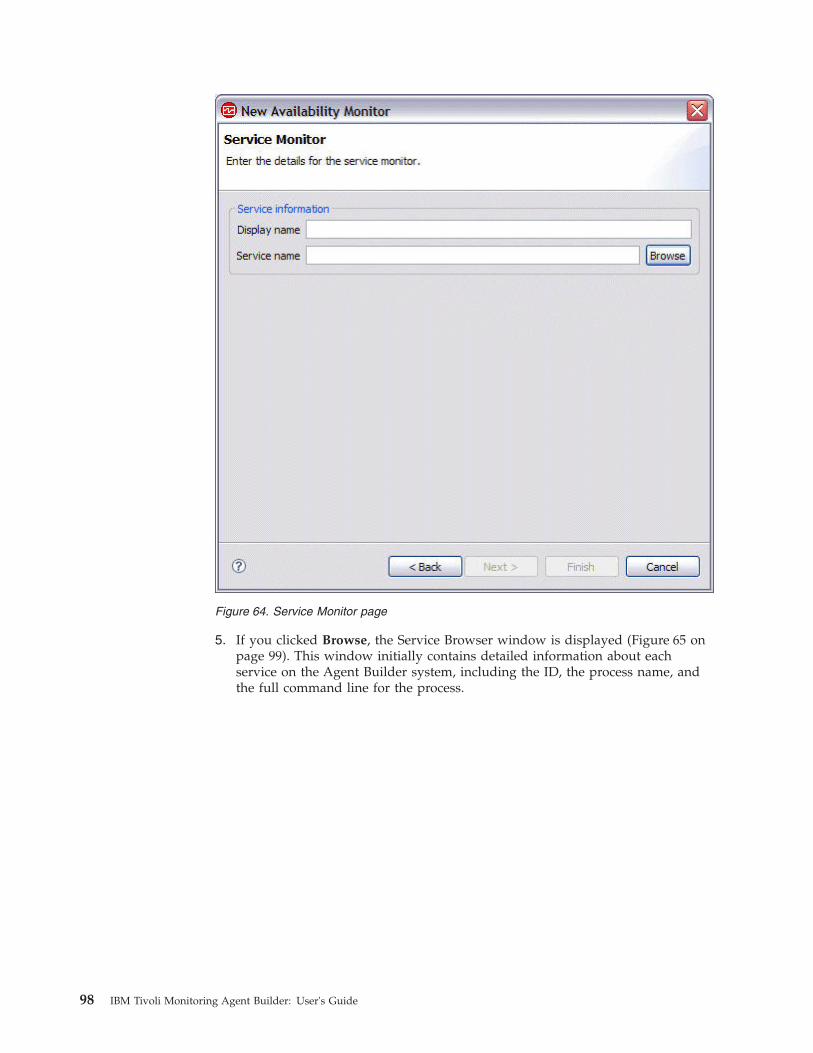
5. If you clicked Browse, the Service Browser window is displayed (Figure 65 onpage 99). This window initially contains detailed information about eachservice on the Agent Builder system, including the ID, the process name, andthe full command line for the process.
Figure 64. Service Monitor page
98 IBM Tivoli Monitoring Agent Builder: User's Guide
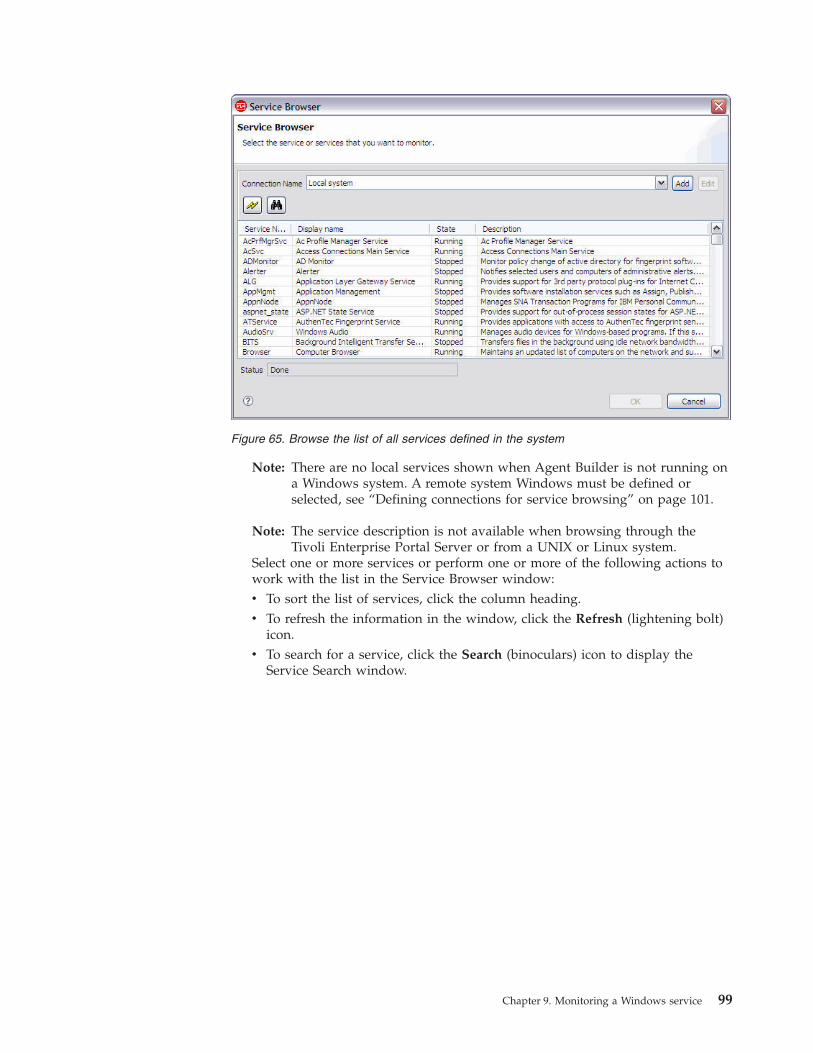
Note: There are no local services shown when Agent Builder is not running ona Windows system. A remote system Windows must be defined orselected, see “Defining connections for service browsing” on page 101.
Note: The service description is not available when browsing through theTivoli Enterprise Portal Server or from a UNIX or Linux system.
Select one or more services or perform one or more of the following actions towork with the list in the Service Browser window:v To sort the list of services, click the column heading.v To refresh the information in the window, click the Refresh (lightening bolt)
icon.v To search for a service, click the Search (binoculars) icon to display the
Service Search window.
Figure 65. Browse the list of all services defined in the system
Chapter 9. Monitoring a Windows service 99
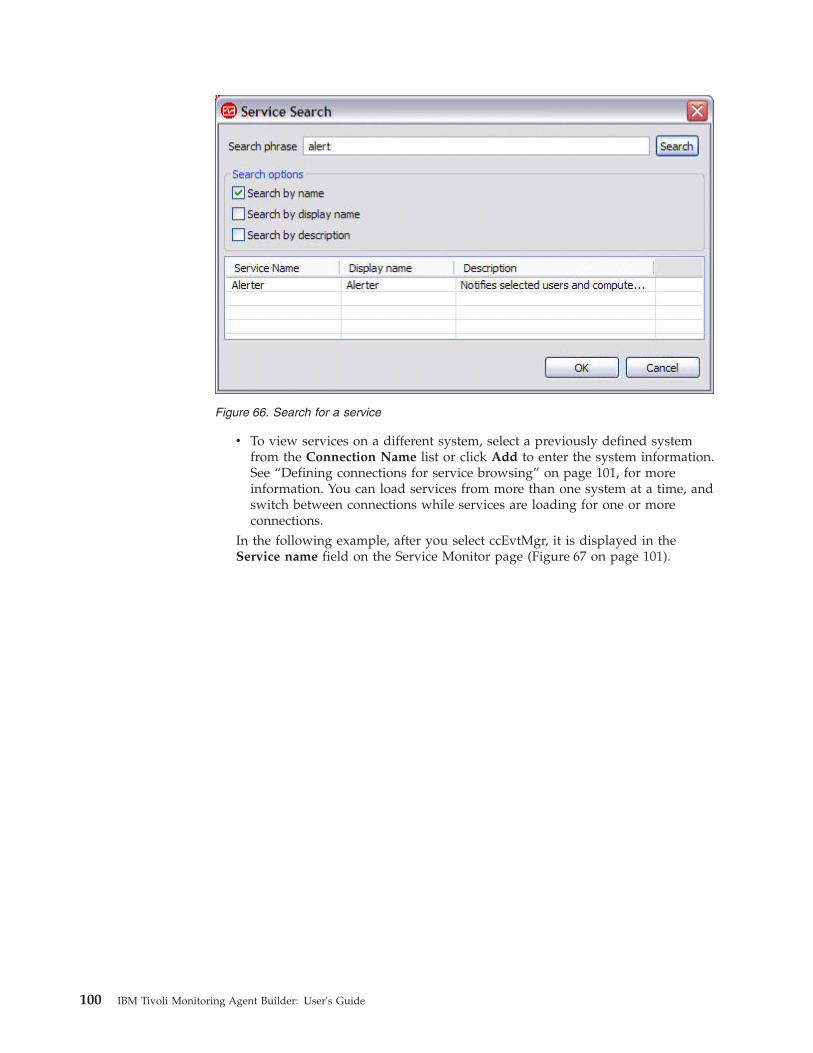
v To view services on a different system, select a previously defined systemfrom the Connection Name list or click Add to enter the system information.See “Defining connections for service browsing” on page 101, for moreinformation. You can load services from more than one system at a time, andswitch between connections while services are loading for one or moreconnections.
In the following example, after you select ccEvtMgr, it is displayed in theService name field on the Service Monitor page (Figure 67 on page 101).
Figure 66. Search for a service
100 IBM Tivoli Monitoring Agent Builder: User's Guide
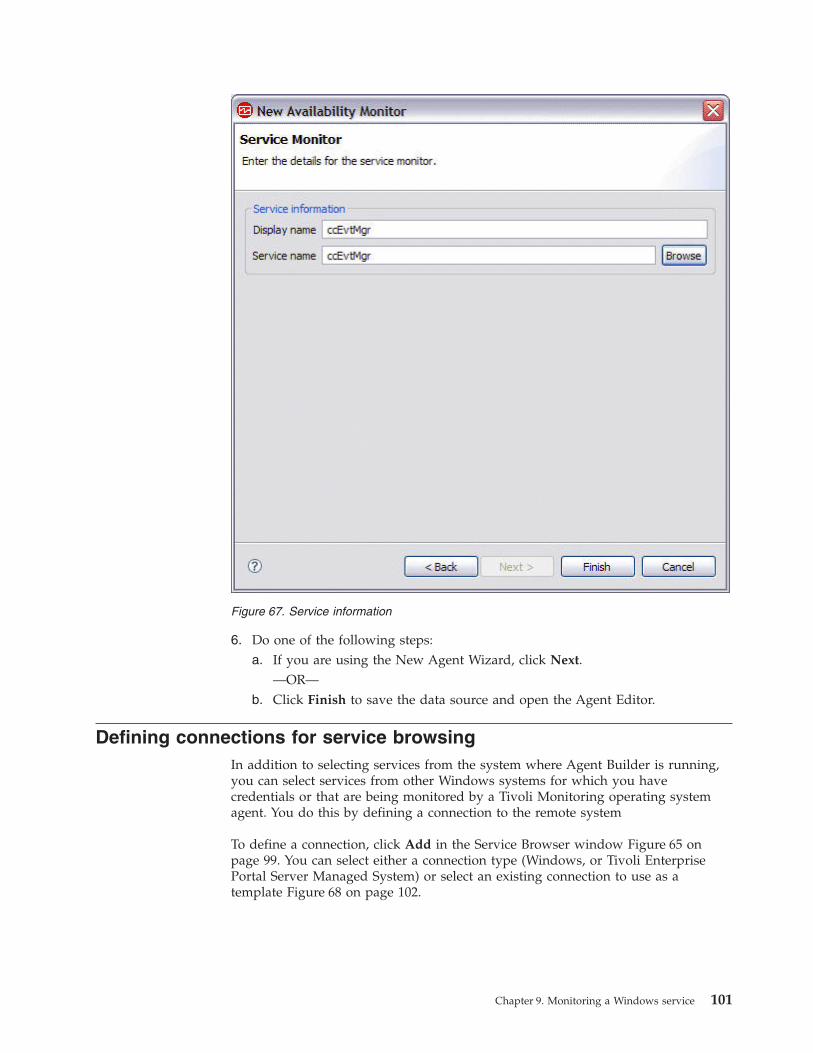
6. Do one of the following steps:a. If you are using the New Agent Wizard, click Next.
—OR—b. Click Finish to save the data source and open the Agent Editor.
Defining connections for service browsingIn addition to selecting services from the system where Agent Builder is running,you can select services from other Windows systems for which you havecredentials or that are being monitored by a Tivoli Monitoring operating systemagent. You do this by defining a connection to the remote system
To define a connection, click Add in the Service Browser window Figure 65 onpage 99. You can select either a connection type (Windows, or Tivoli EnterprisePortal Server Managed System) or select an existing connection to use as atemplate Figure 68 on page 102.
Figure 67. Service information
Chapter 9. Monitoring a Windows service 101
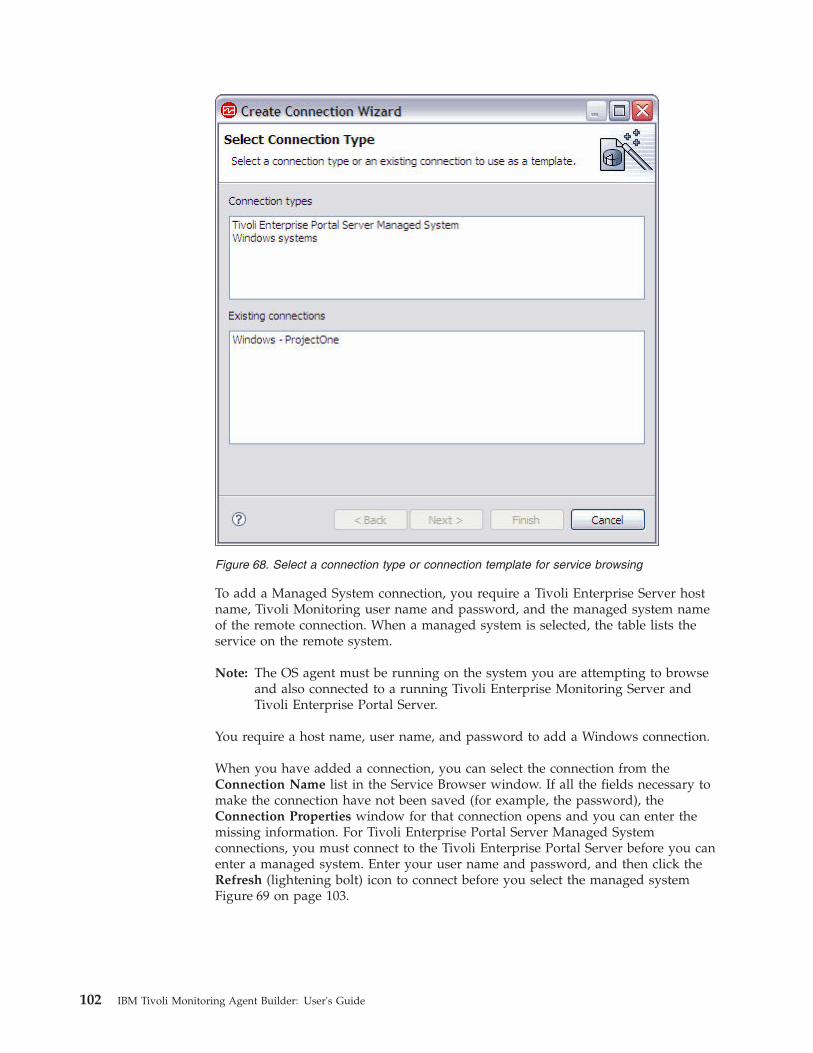
To add a Managed System connection, you require a Tivoli Enterprise Server hostname, Tivoli Monitoring user name and password, and the managed system nameof the remote connection. When a managed system is selected, the table lists theservice on the remote system.
Note: The OS agent must be running on the system you are attempting to browseand also connected to a running Tivoli Enterprise Monitoring Server andTivoli Enterprise Portal Server.
You require a host name, user name, and password to add a Windows connection.
When you have added a connection, you can select the connection from theConnection Name list in the Service Browser window. If all the fields necessary tomake the connection have not been saved (for example, the password), theConnection Properties window for that connection opens and you can enter themissing information. For Tivoli Enterprise Portal Server Managed Systemconnections, you must connect to the Tivoli Enterprise Portal Server before you canenter a managed system. Enter your user name and password, and then click theRefresh (lightening bolt) icon to connect before you select the managed systemFigure 69 on page 103.
Figure 68. Select a connection type or connection template for service browsing
102 IBM Tivoli Monitoring Agent Builder: User's Guide
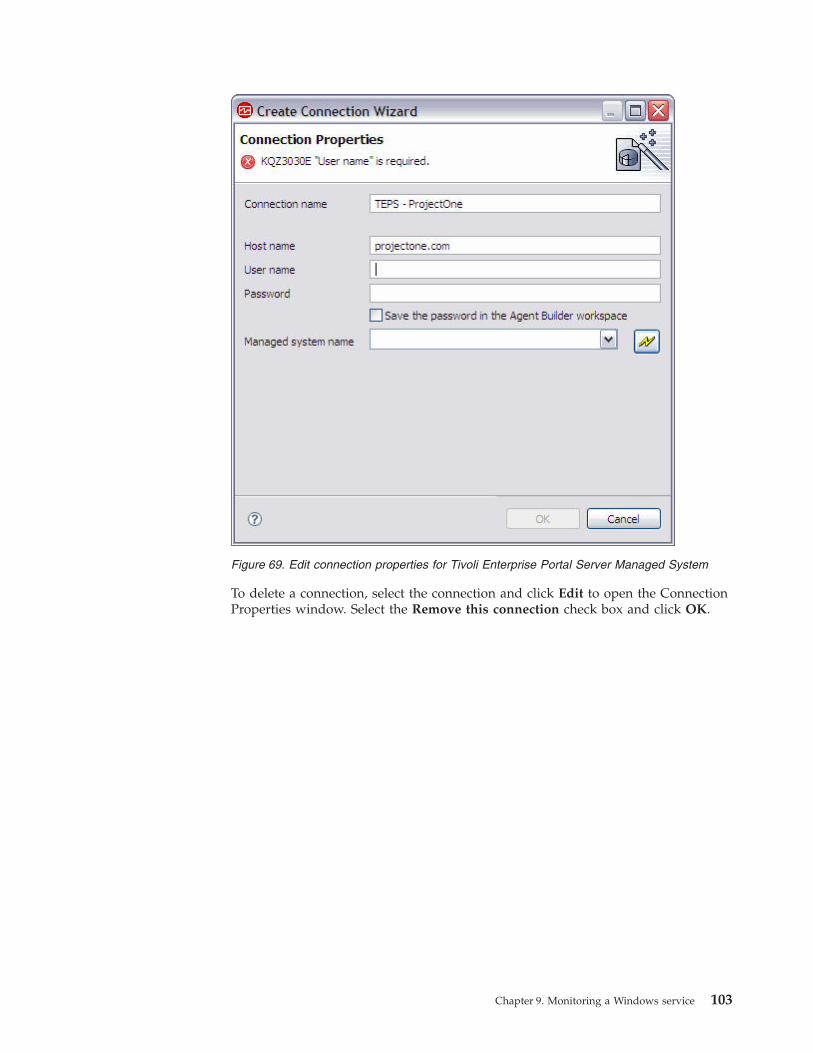
To delete a connection, select the connection and click Edit to open the ConnectionProperties window. Select the Remove this connection check box and click OK.
Figure 69. Edit connection properties for Tivoli Enterprise Portal Server Managed System
Chapter 9. Monitoring a Windows service 103

104 IBM Tivoli Monitoring Agent Builder: User's Guide
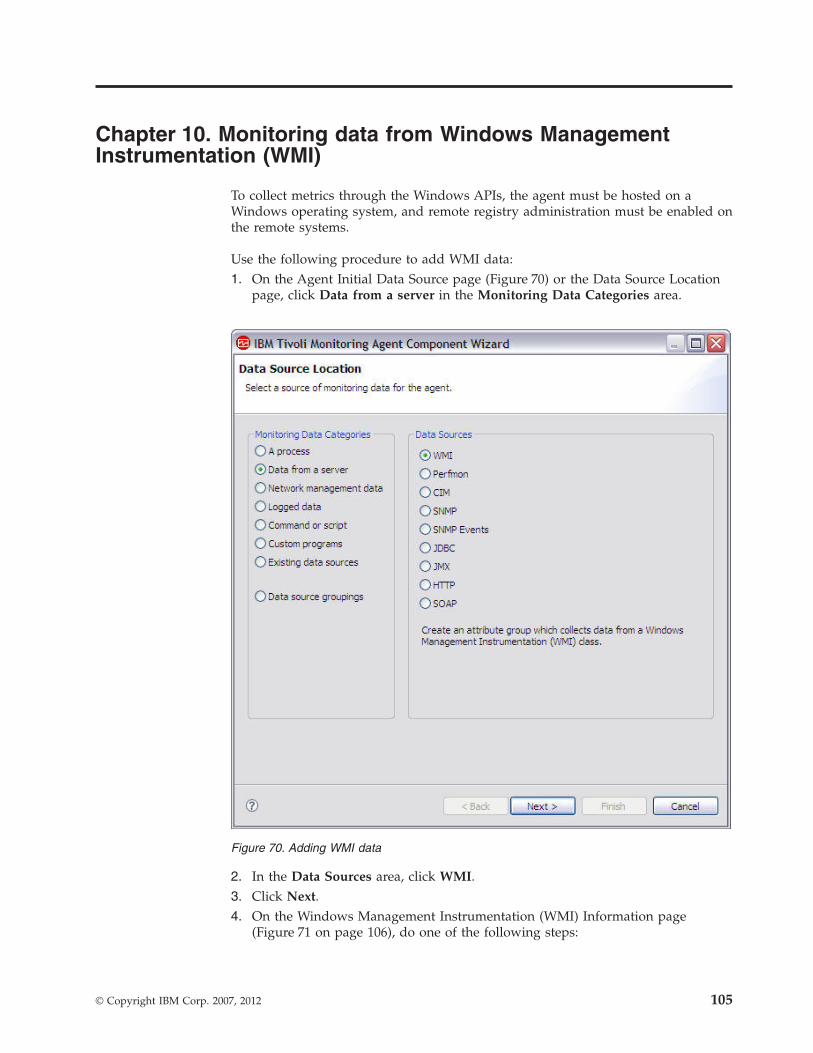
Chapter 10. Monitoring data from Windows ManagementInstrumentation (WMI)
To collect metrics through the Windows APIs, the agent must be hosted on aWindows operating system, and remote registry administration must be enabled onthe remote systems.
Use the following procedure to add WMI data:1. On the Agent Initial Data Source page (Figure 70) or the Data Source Location
page, click Data from a server in the Monitoring Data Categories area.
2. In the Data Sources area, click WMI.3. Click Next.4. On the Windows Management Instrumentation (WMI) Information page
(Figure 71 on page 106), do one of the following steps:
Figure 70. Adding WMI data
© Copyright IBM Corp. 2007, 2012 105

a. Type a name for the WMI namespace and a name for the WMI class namein the fields.—OR—
b. Click Browse to see all of the WMI classes on the system (Figure 72 on page107).To browse a remote system, select a system from the drop-down list (if onehas been defined) or click Add to add the host name of a Windows system.Provide an Administrator ID and password. The page is updated with theinformation for the remote system. Browsing is only available when theAgent Builder is run on a Windows system, and can only browse Windowssystems. For instance, you cannot add the host name of a Linux or Solarissystem to do a remote browse.
Figure 71. WMI Information page
106 IBM Tivoli Monitoring Agent Builder: User's Guide
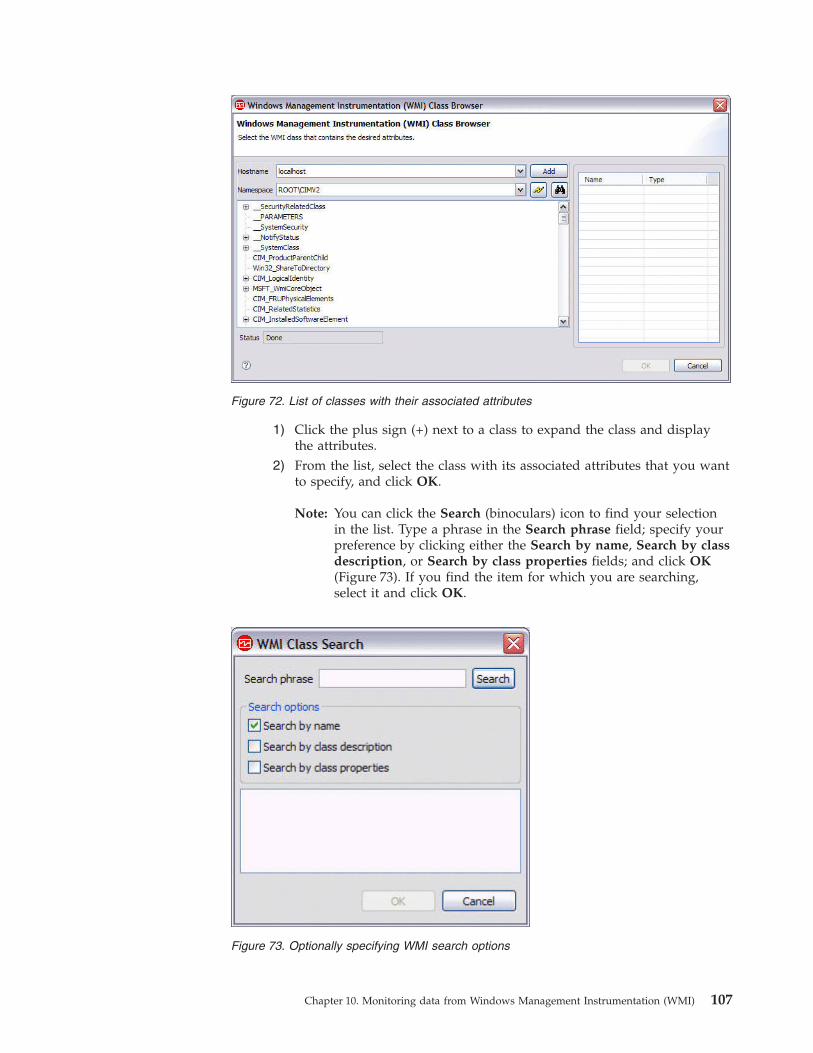
1) Click the plus sign (+) next to a class to expand the class and displaythe attributes.
2) From the list, select the class with its associated attributes that you wantto specify, and click OK.
Note: You can click the Search (binoculars) icon to find your selectionin the list. Type a phrase in the Search phrase field; specify yourpreference by clicking either the Search by name, Search by classdescription, or Search by class properties fields; and click OK(Figure 73). If you find the item for which you are searching,select it and click OK.
Figure 72. List of classes with their associated attributes
Figure 73. Optionally specifying WMI search options
Chapter 10. Monitoring data from Windows Management Instrumentation (WMI) 107
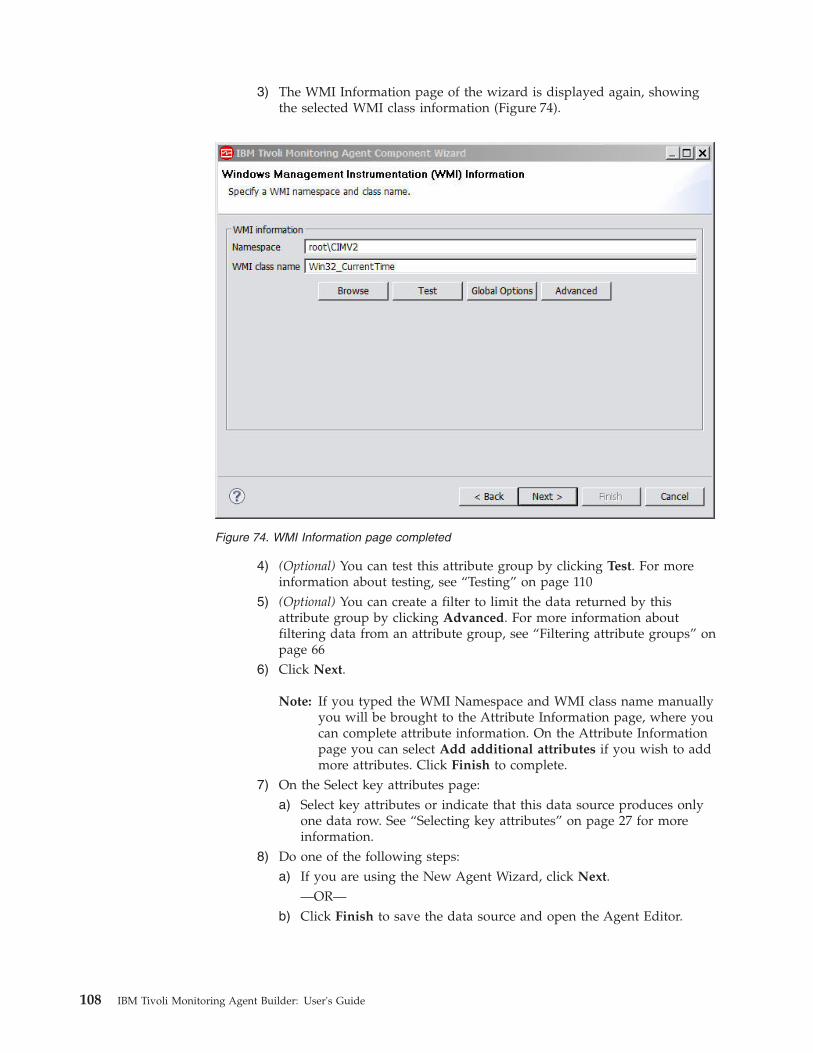
3) The WMI Information page of the wizard is displayed again, showingthe selected WMI class information (Figure 74).
4) (Optional) You can test this attribute group by clicking Test. For moreinformation about testing, see “Testing” on page 110
5) (Optional) You can create a filter to limit the data returned by thisattribute group by clicking Advanced. For more information aboutfiltering data from an attribute group, see “Filtering attribute groups” onpage 66
6) Click Next.
Note: If you typed the WMI Namespace and WMI class name manuallyyou will be brought to the Attribute Information page, where youcan complete attribute information. On the Attribute Informationpage you can select Add additional attributes if you wish to addmore attributes. Click Finish to complete.
7) On the Select key attributes page:a) Select key attributes or indicate that this data source produces only
one data row. See “Selecting key attributes” on page 27 for moreinformation.
8) Do one of the following steps:a) If you are using the New Agent Wizard, click Next.
—OR—b) Click Finish to save the data source and open the Agent Editor.
Figure 74. WMI Information page completed
108 IBM Tivoli Monitoring Agent Builder: User's Guide
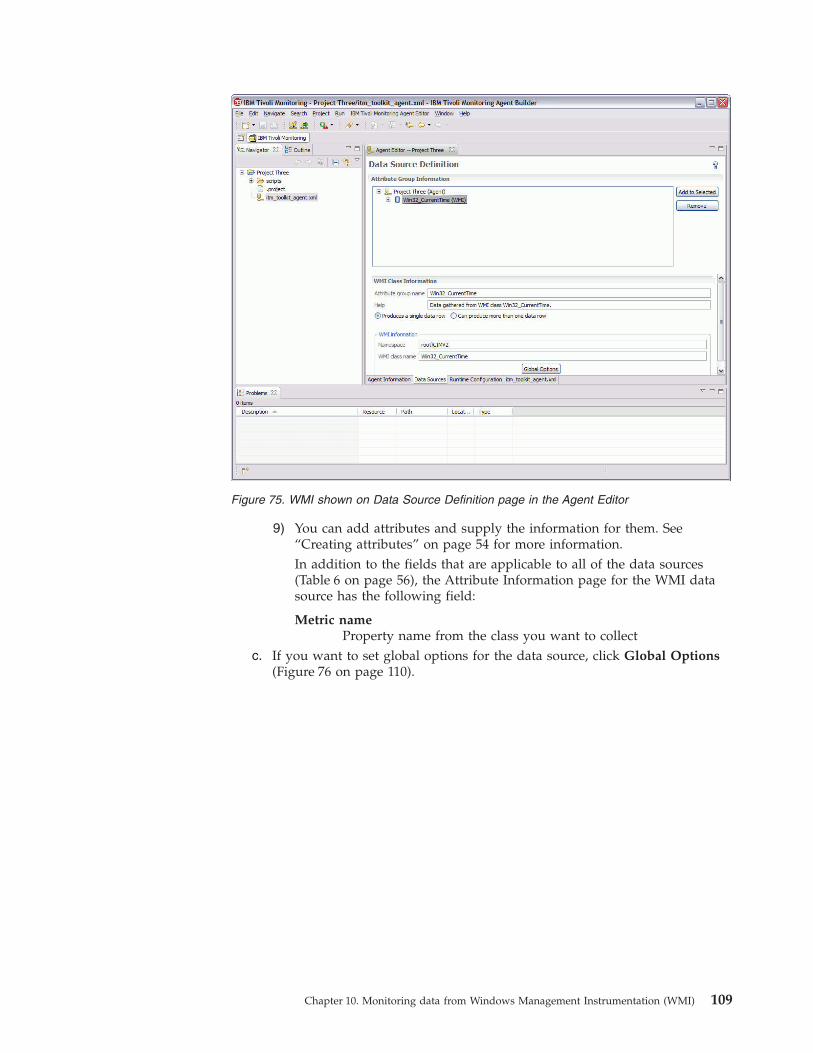
9) You can add attributes and supply the information for them. See“Creating attributes” on page 54 for more information.In addition to the fields that are applicable to all of the data sources(Table 6 on page 56), the Attribute Information page for the WMI datasource has the following field:
Metric nameProperty name from the class you want to collect
c. If you want to set global options for the data source, click Global Options(Figure 76 on page 110).
Figure 75. WMI shown on Data Source Definition page in the Agent Editor
Chapter 10. Monitoring data from Windows Management Instrumentation (WMI) 109
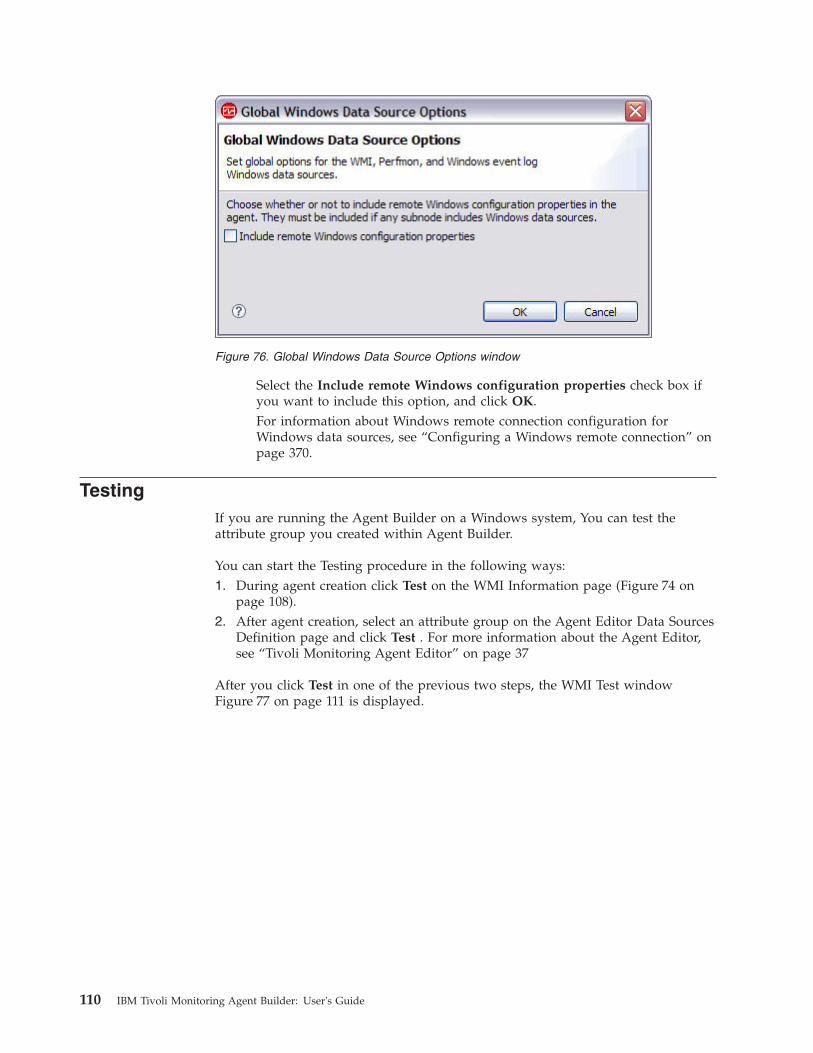
Select the Include remote Windows configuration properties check box ifyou want to include this option, and click OK.For information about Windows remote connection configuration forWindows data sources, see “Configuring a Windows remote connection” onpage 370.
TestingIf you are running the Agent Builder on a Windows system, You can test theattribute group you created within Agent Builder.
You can start the Testing procedure in the following ways:1. During agent creation click Test on the WMI Information page (Figure 74 on
page 108).2. After agent creation, select an attribute group on the Agent Editor Data Sources
Definition page and click Test . For more information about the Agent Editor,see “Tivoli Monitoring Agent Editor” on page 37
After you click Test in one of the previous two steps, the WMI Test windowFigure 77 on page 111 is displayed.
Figure 76. Global Windows Data Source Options window
110 IBM Tivoli Monitoring Agent Builder: User's Guide
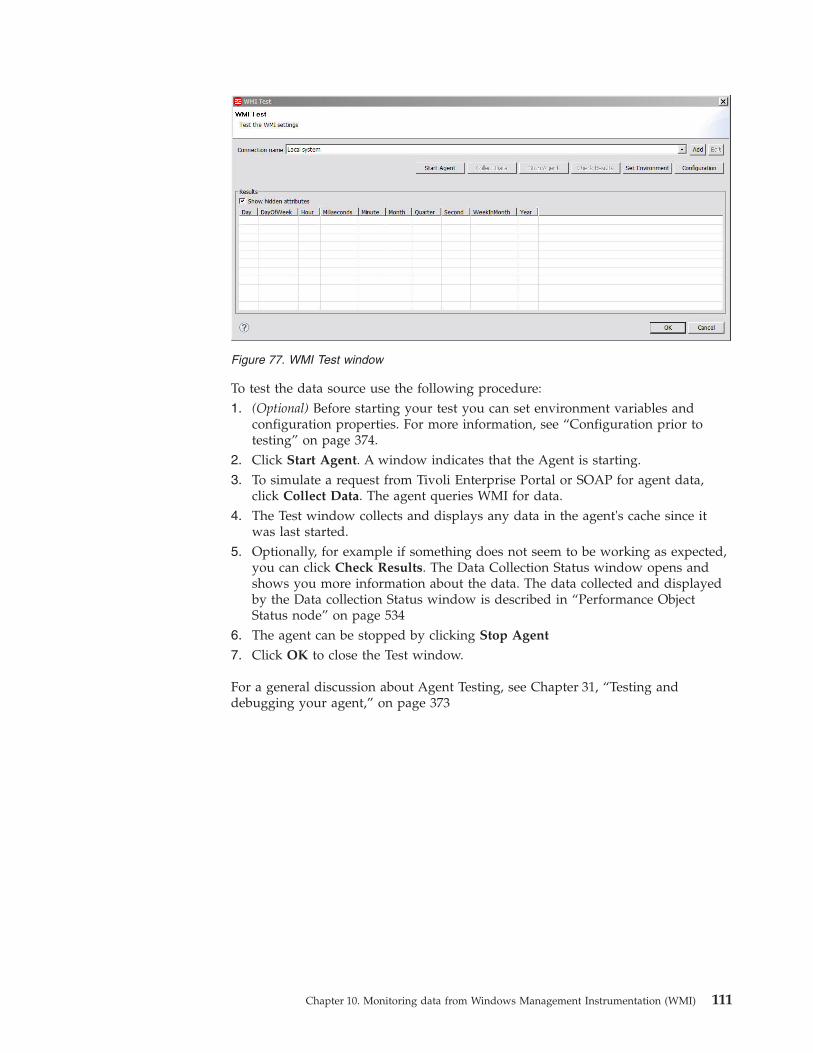
To test the data source use the following procedure:1. (Optional) Before starting your test you can set environment variables and
configuration properties. For more information, see “Configuration prior totesting” on page 374.
2. Click Start Agent. A window indicates that the Agent is starting.3. To simulate a request from Tivoli Enterprise Portal or SOAP for agent data,
click Collect Data. The agent queries WMI for data.4. The Test window collects and displays any data in the agent's cache since it
was last started.5. Optionally, for example if something does not seem to be working as expected,
you can click Check Results. The Data Collection Status window opens andshows you more information about the data. The data collected and displayedby the Data collection Status window is described in “Performance ObjectStatus node” on page 534
6. The agent can be stopped by clicking Stop Agent
7. Click OK to close the Test window.
For a general discussion about Agent Testing, see Chapter 31, “Testing anddebugging your agent,” on page 373
Figure 77. WMI Test window
Chapter 10. Monitoring data from Windows Management Instrumentation (WMI) 111

112 IBM Tivoli Monitoring Agent Builder: User's Guide
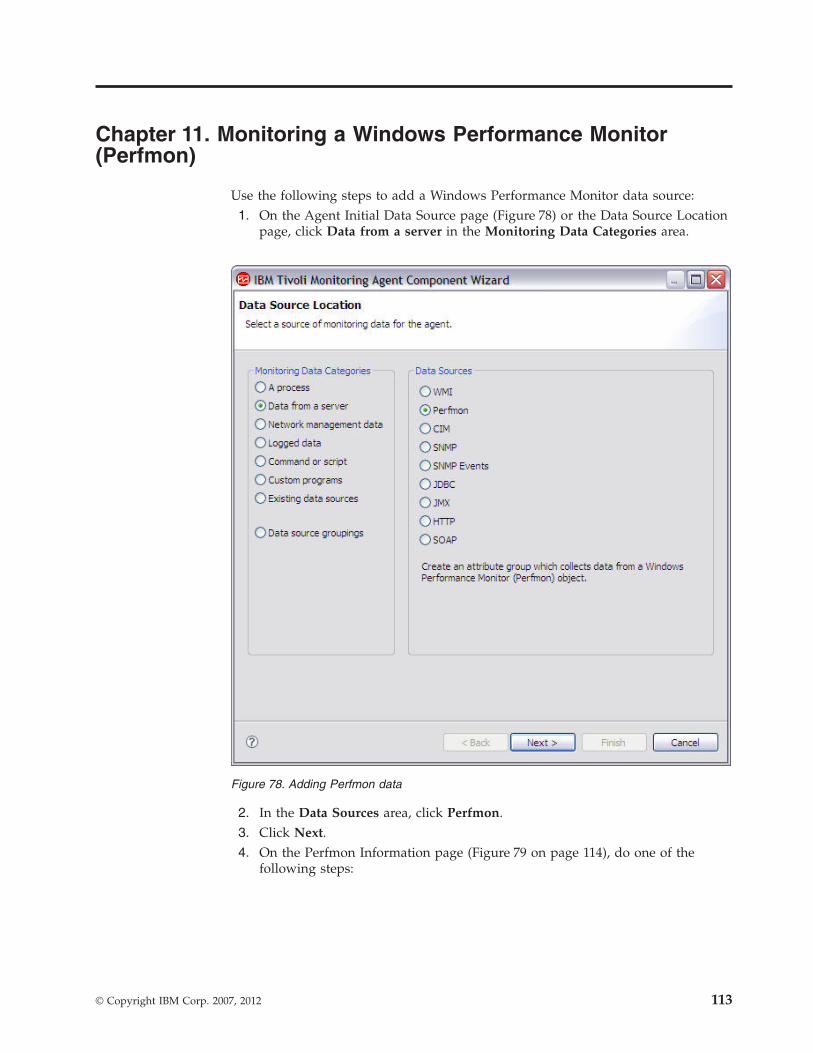
Chapter 11. Monitoring a Windows Performance Monitor(Perfmon)
Use the following steps to add a Windows Performance Monitor data source:1. On the Agent Initial Data Source page (Figure 78) or the Data Source Location
page, click Data from a server in the Monitoring Data Categories area.
2. In the Data Sources area, click Perfmon.3. Click Next.4. On the Perfmon Information page (Figure 79 on page 114), do one of the
following steps:
Figure 78. Adding Perfmon data
© Copyright IBM Corp. 2007, 2012 113
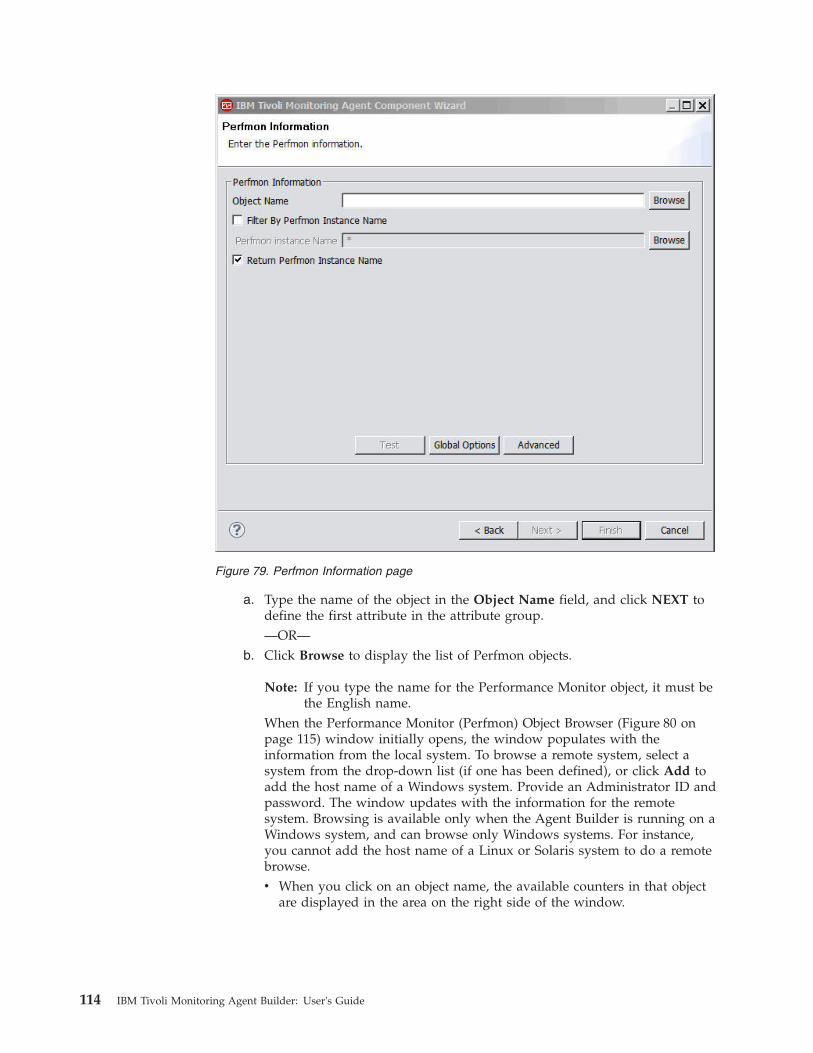
a. Type the name of the object in the Object Name field, and click NEXT todefine the first attribute in the attribute group.—OR—
b. Click Browse to display the list of Perfmon objects.
Note: If you type the name for the Performance Monitor object, it must bethe English name.
When the Performance Monitor (Perfmon) Object Browser (Figure 80 onpage 115) window initially opens, the window populates with theinformation from the local system. To browse a remote system, select asystem from the drop-down list (if one has been defined), or click Add toadd the host name of a Windows system. Provide an Administrator ID andpassword. The window updates with the information for the remotesystem. Browsing is available only when the Agent Builder is running on aWindows system, and can browse only Windows systems. For instance,you cannot add the host name of a Linux or Solaris system to do a remotebrowse.v When you click on an object name, the available counters in that object
are displayed in the area on the right side of the window.
Figure 79. Perfmon Information page
114 IBM Tivoli Monitoring Agent Builder: User's Guide
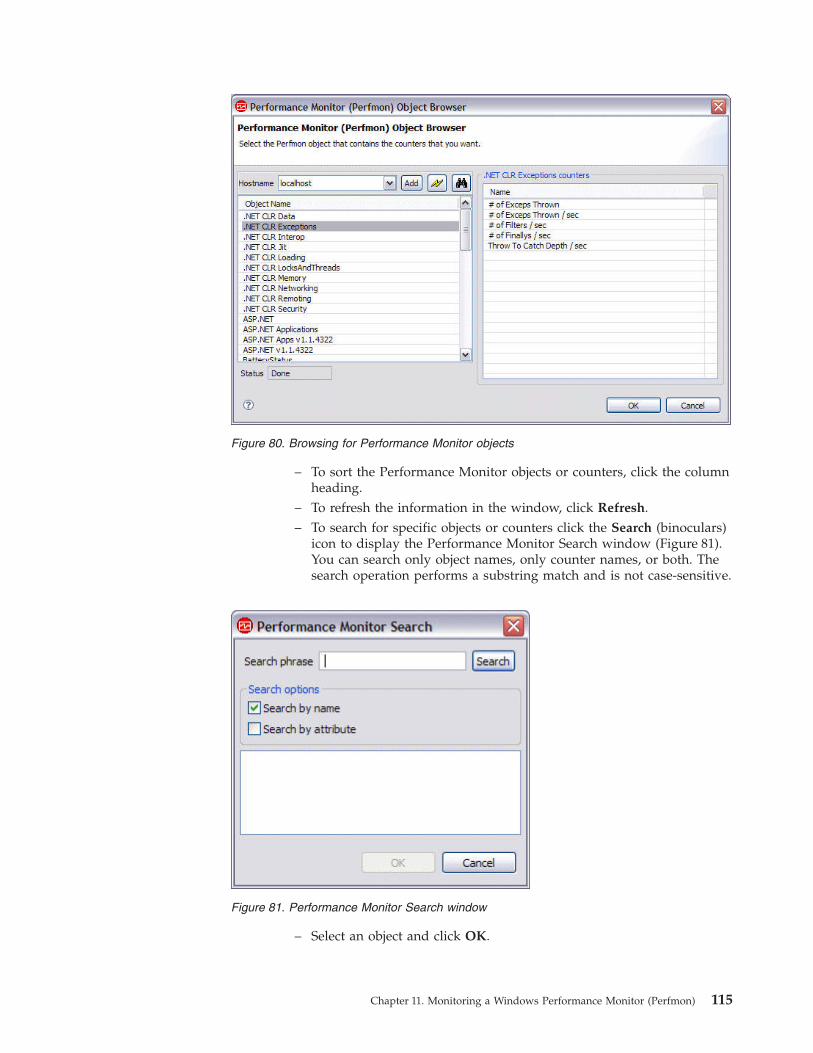
– To sort the Performance Monitor objects or counters, click the columnheading.
– To refresh the information in the window, click Refresh.– To search for specific objects or counters click the Search (binoculars)
icon to display the Performance Monitor Search window (Figure 81).You can search only object names, only counter names, or both. Thesearch operation performs a substring match and is not case-sensitive.
– Select an object and click OK.
Figure 80. Browsing for Performance Monitor objects
Figure 81. Performance Monitor Search window
Chapter 11. Monitoring a Windows Performance Monitor (Perfmon) 115
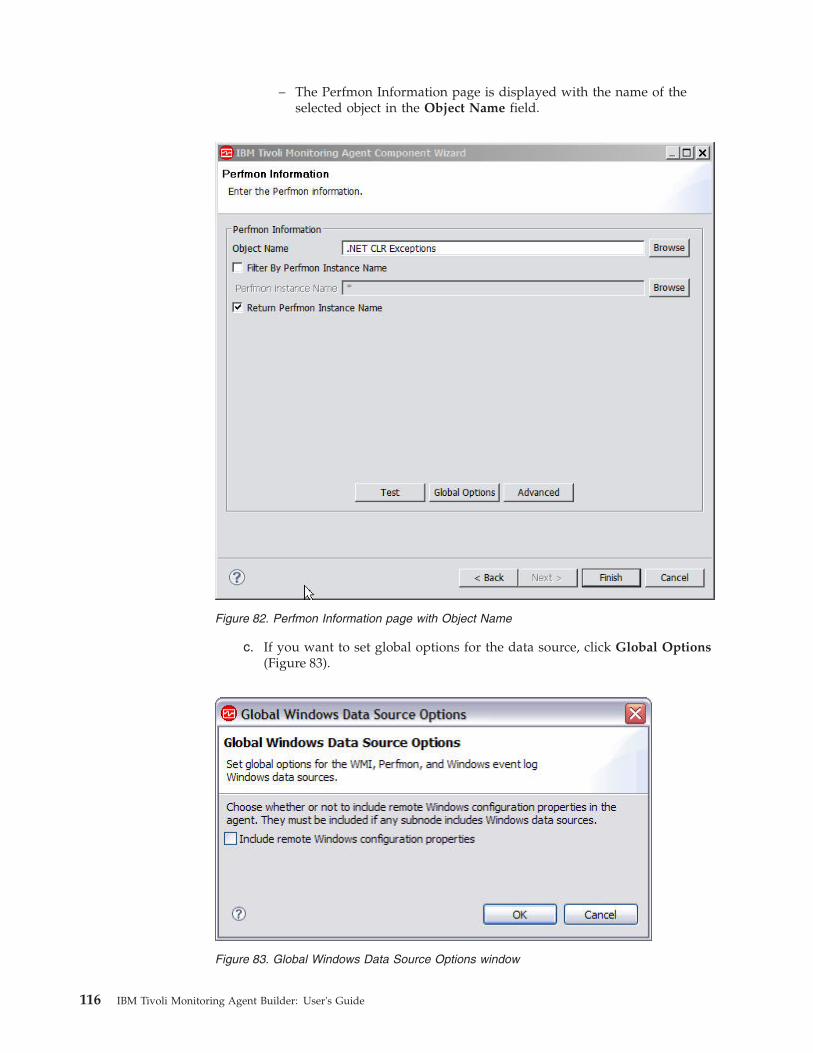
– The Perfmon Information page is displayed with the name of theselected object in the Object Name field.
c. If you want to set global options for the data source, click Global Options(Figure 83).
Figure 82. Perfmon Information page with Object Name
Figure 83. Global Windows Data Source Options window
116 IBM Tivoli Monitoring Agent Builder: User's Guide
Select the Include remote Windows configuration properties check box ifyou want to include this option, and click OK.For information about Windows remote connection configuration forWindows data sources, see “Configuring a Windows remote connection”on page 370.
5. If the Performance Monitor object selected returns multiple instances and youwant to filter the results based on the instance name, select the Filter byPerfmon Instance Name check box on the Perfmon Information page. In thePerfmon Instance Name field, type the name of the instance to be filtered, orclick Browse to list the instances available.To browse a remote system, either select one from the drop-down list, or clickAdd to add the host name of a Windows system. After you select a host,provide an Administrator ID and password. The table is updated with the listof instances on the remote system.
Note: You can also filter by attribute group, see step 96. If the selected Performance Monitor Object is to return multiple instances, and
you want the instance name to be returned, select Return Instance Name onthe Perfmon Information page (Figure 79 on page 114). Checking this optionadds an additional attribute to the data source that is not displayed in the listof attributes. This attribute contains the instance name.
Note: If you browsed for the selected object, and that object is defined ashaving multiple instances, this check box is selected automatically.
7. If you did not check the option to return the instance name, the Select keyattributes page is displayed. On the Select key attributes page, select keyattributes or indicate that this data source produces only one data row. See“Selecting key attributes” on page 27 for more information.
8. (Optional) You can test this attribute group by clicking Test. For moreinformation about testing, see “Testing” on page 118
9. (Optional) You can create a filter to limit the data returned by this attributegroup by clicking Advanced. For more information about filtering data froman attribute group, see step“Filtering attribute groups” on page 66
Note: You can also filter by instance name, see 510. Do one of the following steps:
a. If you are using the New Agent Wizard, click Next.—OR—
b. Click Finish to save the data source and open the Agent Editor.The Agent Editor Data Source Definition page displays a list that containsthe object (Figure 84 on page 118) and information about the object.
Chapter 11. Monitoring a Windows Performance Monitor (Perfmon) 117
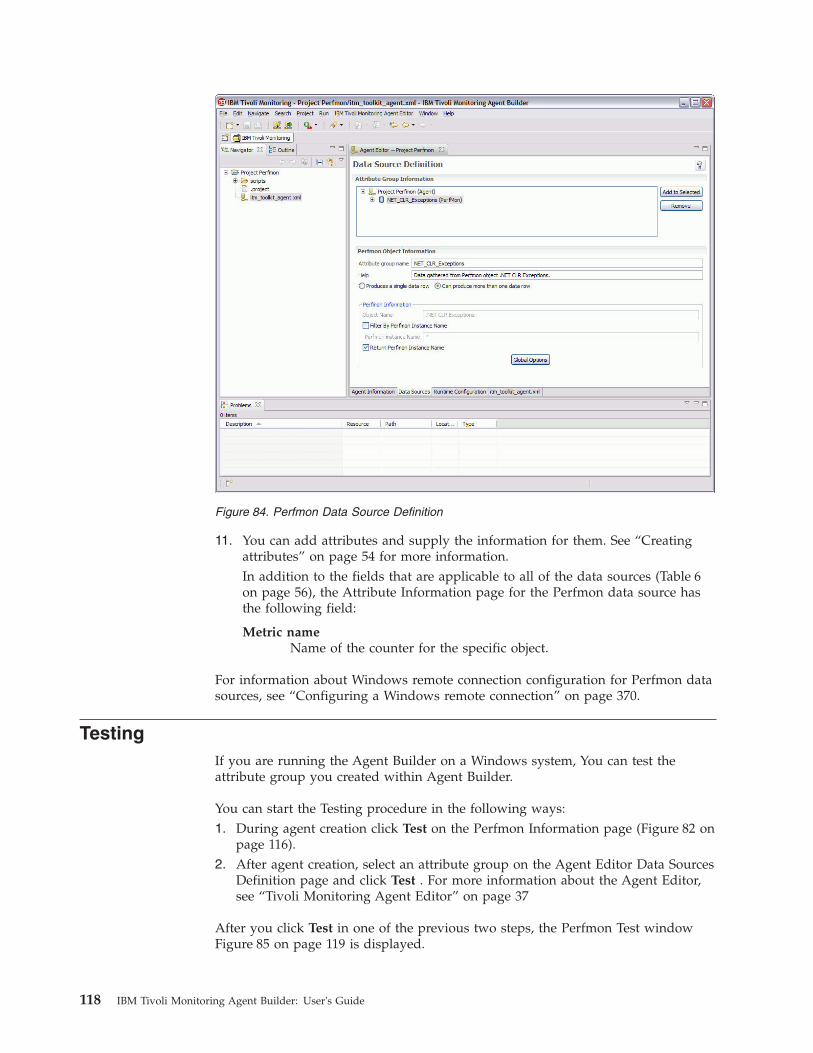
11. You can add attributes and supply the information for them. See “Creatingattributes” on page 54 for more information.In addition to the fields that are applicable to all of the data sources (Table 6on page 56), the Attribute Information page for the Perfmon data source hasthe following field:
Metric nameName of the counter for the specific object.
For information about Windows remote connection configuration for Perfmon datasources, see “Configuring a Windows remote connection” on page 370.
TestingIf you are running the Agent Builder on a Windows system, You can test theattribute group you created within Agent Builder.
You can start the Testing procedure in the following ways:1. During agent creation click Test on the Perfmon Information page (Figure 82 on
page 116).2. After agent creation, select an attribute group on the Agent Editor Data Sources
Definition page and click Test . For more information about the Agent Editor,see “Tivoli Monitoring Agent Editor” on page 37
After you click Test in one of the previous two steps, the Perfmon Test windowFigure 85 on page 119 is displayed.
Figure 84. Perfmon Data Source Definition
118 IBM Tivoli Monitoring Agent Builder: User's Guide
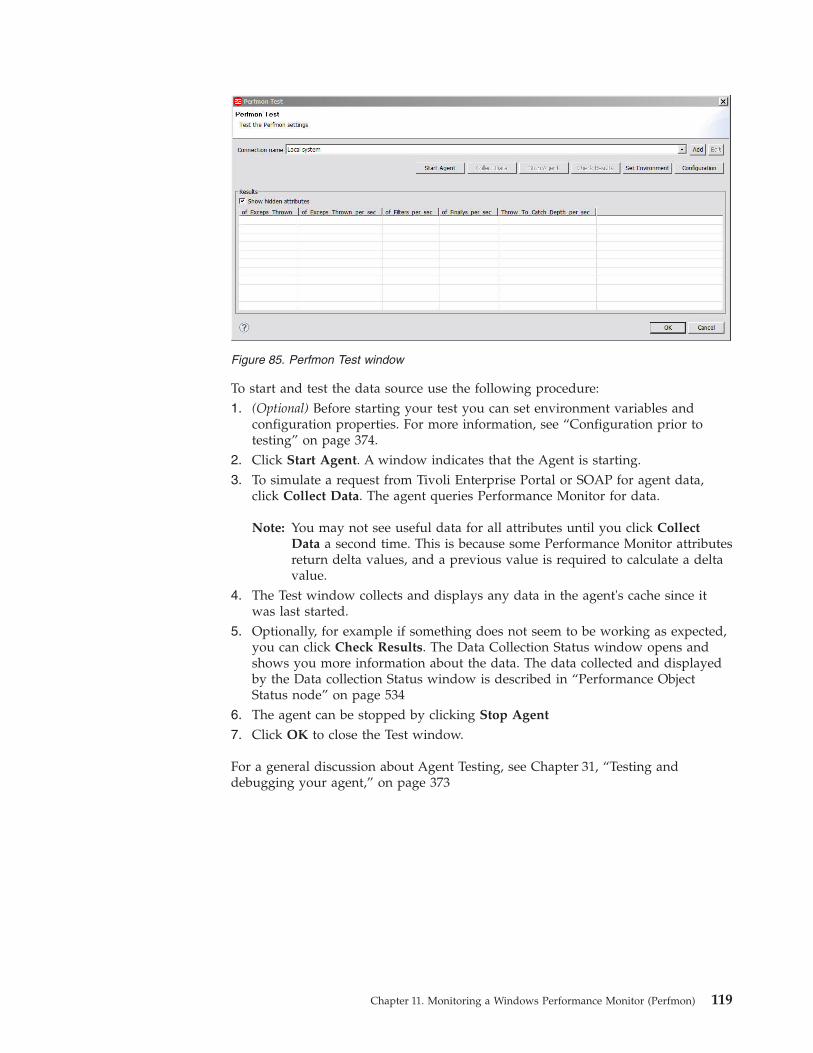
To start and test the data source use the following procedure:1. (Optional) Before starting your test you can set environment variables and
configuration properties. For more information, see “Configuration prior totesting” on page 374.
2. Click Start Agent. A window indicates that the Agent is starting.3. To simulate a request from Tivoli Enterprise Portal or SOAP for agent data,
click Collect Data. The agent queries Performance Monitor for data.
Note: You may not see useful data for all attributes until you click CollectData a second time. This is because some Performance Monitor attributesreturn delta values, and a previous value is required to calculate a deltavalue.
4. The Test window collects and displays any data in the agent's cache since itwas last started.
5. Optionally, for example if something does not seem to be working as expected,you can click Check Results. The Data Collection Status window opens andshows you more information about the data. The data collected and displayedby the Data collection Status window is described in “Performance ObjectStatus node” on page 534
6. The agent can be stopped by clicking Stop Agent
7. Click OK to close the Test window.
For a general discussion about Agent Testing, see Chapter 31, “Testing anddebugging your agent,” on page 373
Figure 85. Perfmon Test window
Chapter 11. Monitoring a Windows Performance Monitor (Perfmon) 119

120 IBM Tivoli Monitoring Agent Builder: User's Guide
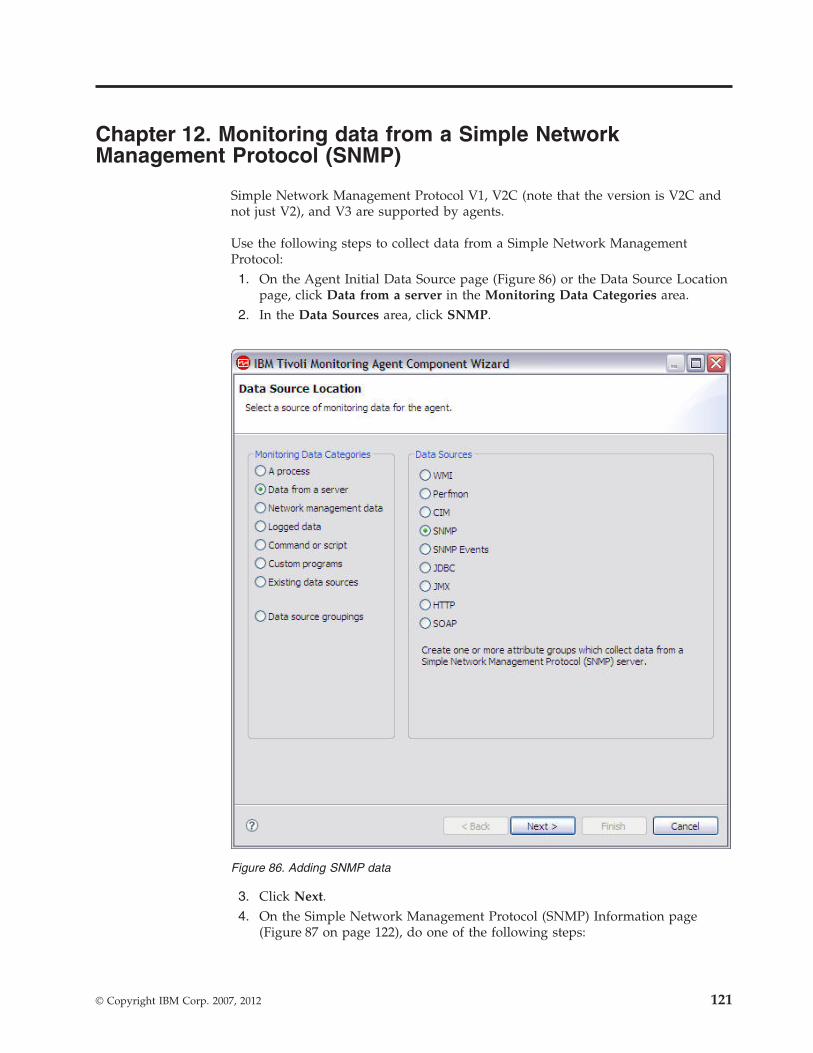
Chapter 12. Monitoring data from a Simple NetworkManagement Protocol (SNMP)
Simple Network Management Protocol V1, V2C (note that the version is V2C andnot just V2), and V3 are supported by agents.
Use the following steps to collect data from a Simple Network ManagementProtocol:1. On the Agent Initial Data Source page (Figure 86) or the Data Source Location
page, click Data from a server in the Monitoring Data Categories area.2. In the Data Sources area, click SNMP.
3. Click Next.4. On the Simple Network Management Protocol (SNMP) Information page
(Figure 87 on page 122), do one of the following steps:
Figure 86. Adding SNMP data
© Copyright IBM Corp. 2007, 2012 121
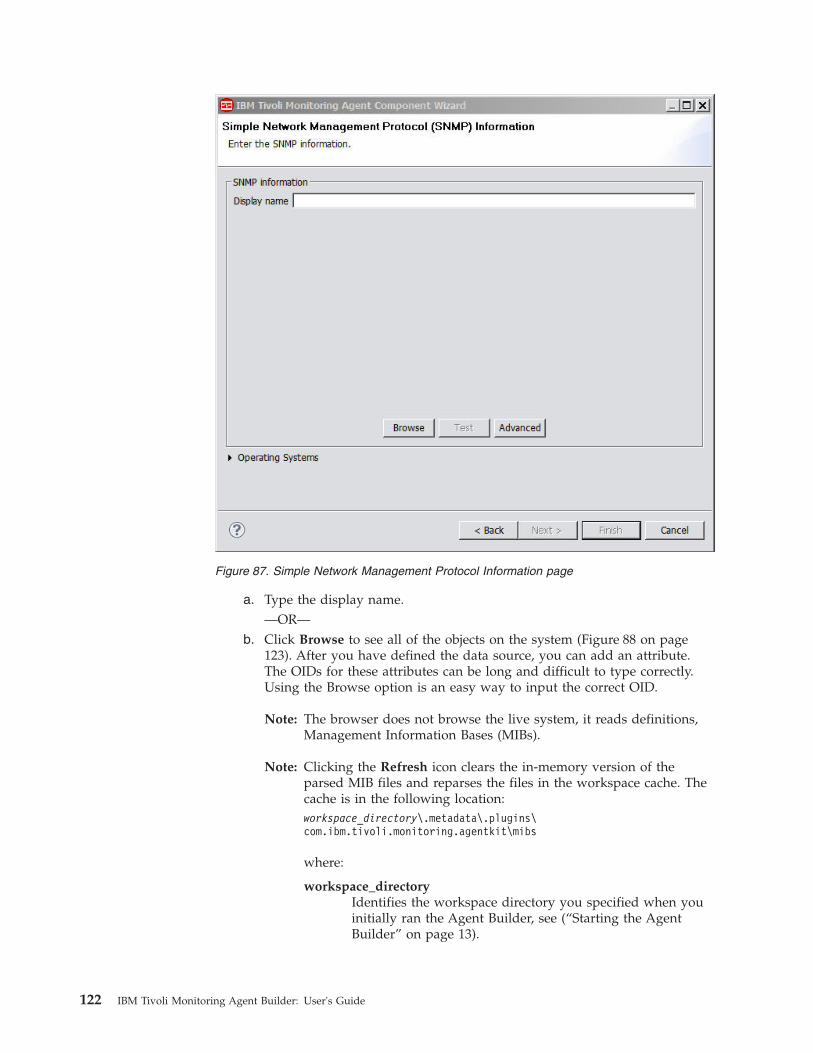
a. Type the display name.—OR—
b. Click Browse to see all of the objects on the system (Figure 88 on page123). After you have defined the data source, you can add an attribute.The OIDs for these attributes can be long and difficult to type correctly.Using the Browse option is an easy way to input the correct OID.
Note: The browser does not browse the live system, it reads definitions,Management Information Bases (MIBs).
Note: Clicking the Refresh icon clears the in-memory version of theparsed MIB files and reparses the files in the workspace cache. Thecache is in the following location:workspace_directory\.metadata\.plugins\com.ibm.tivoli.monitoring.agentkit\mibs
where:
workspace_directoryIdentifies the workspace directory you specified when youinitially ran the Agent Builder, see (“Starting the AgentBuilder” on page 13).
Figure 87. Simple Network Management Protocol Information page
122 IBM Tivoli Monitoring Agent Builder: User's Guide
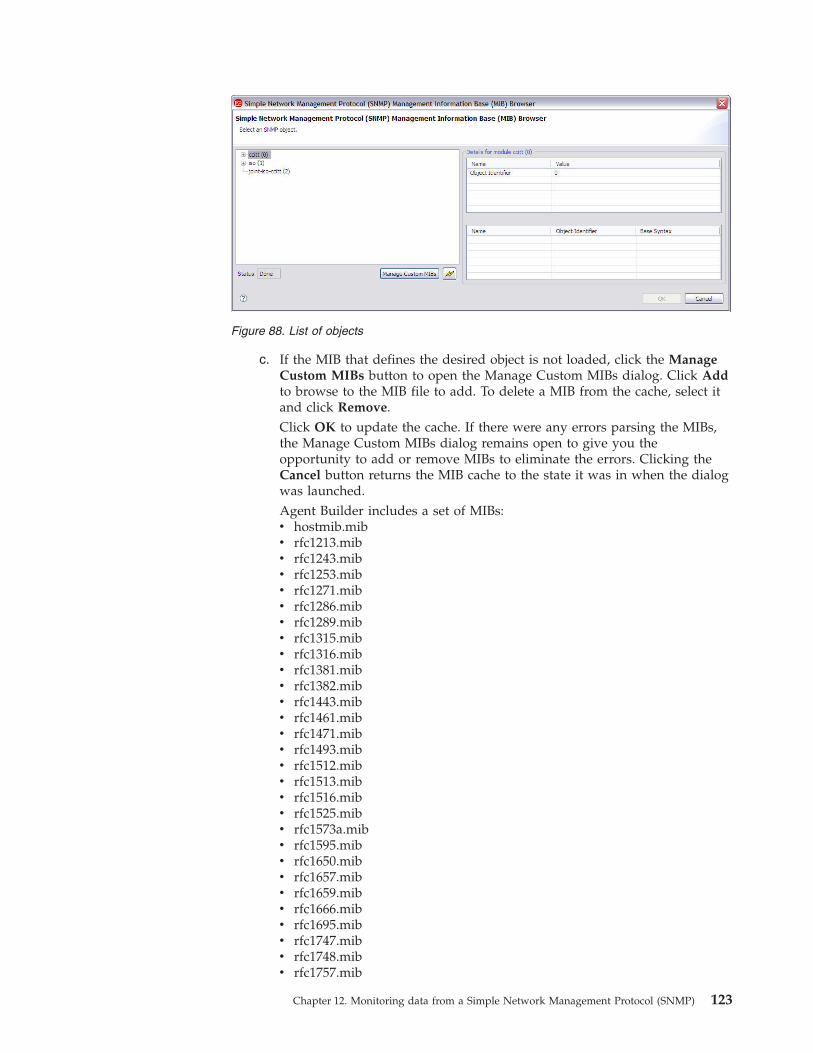
c. If the MIB that defines the desired object is not loaded, click the ManageCustom MIBs button to open the Manage Custom MIBs dialog. Click Addto browse to the MIB file to add. To delete a MIB from the cache, select itand click Remove.Click OK to update the cache. If there were any errors parsing the MIBs,the Manage Custom MIBs dialog remains open to give you theopportunity to add or remove MIBs to eliminate the errors. Clicking theCancel button returns the MIB cache to the state it was in when the dialogwas launched.Agent Builder includes a set of MIBs:v hostmib.mibv rfc1213.mibv rfc1243.mibv rfc1253.mibv rfc1271.mibv rfc1286.mibv rfc1289.mibv rfc1315.mibv rfc1316.mibv rfc1381.mibv rfc1382.mibv rfc1443.mibv rfc1461.mibv rfc1471.mibv rfc1493.mibv rfc1512.mibv rfc1513.mibv rfc1516.mibv rfc1525.mibv rfc1573a.mibv rfc1595.mibv rfc1650.mibv rfc1657.mibv rfc1659.mibv rfc1666.mibv rfc1695.mibv rfc1747.mibv rfc1748.mibv rfc1757.mib
Figure 88. List of objects
Chapter 12. Monitoring data from a Simple Network Management Protocol (SNMP) 123
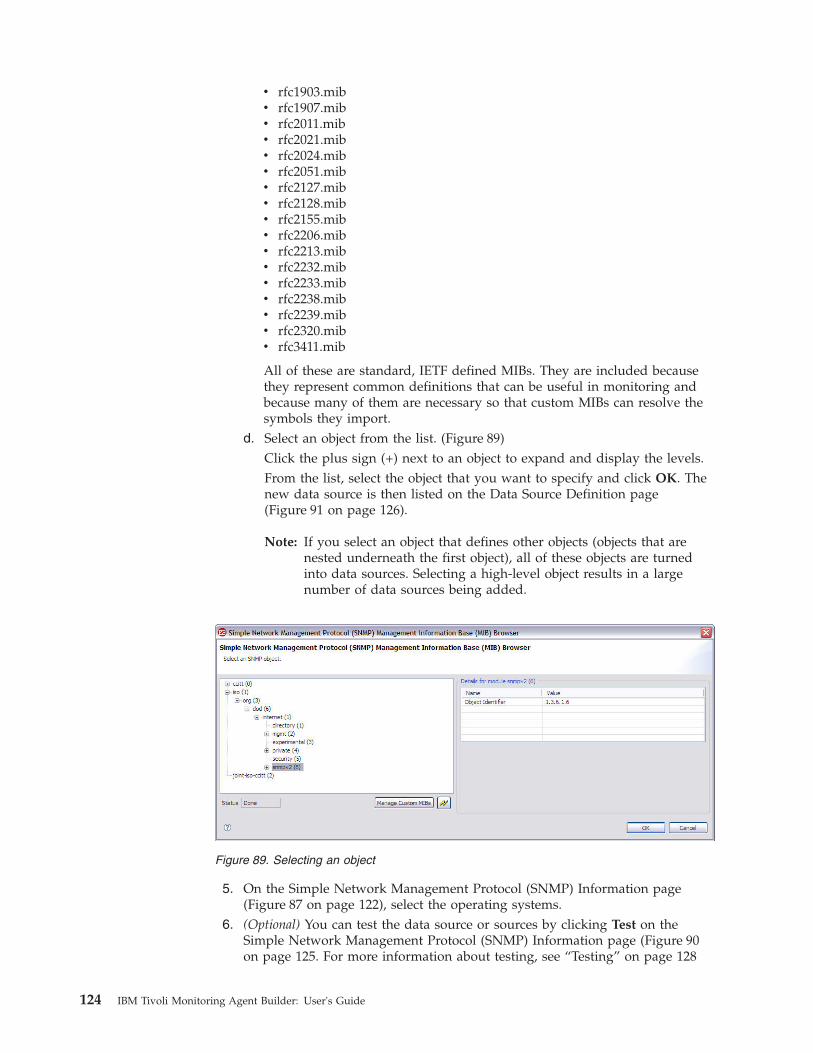
v rfc1903.mibv rfc1907.mibv rfc2011.mibv rfc2021.mibv rfc2024.mibv rfc2051.mibv rfc2127.mibv rfc2128.mibv rfc2155.mibv rfc2206.mibv rfc2213.mibv rfc2232.mibv rfc2233.mibv rfc2238.mibv rfc2239.mibv rfc2320.mibv rfc3411.mib
All of these are standard, IETF defined MIBs. They are included becausethey represent common definitions that can be useful in monitoring andbecause many of them are necessary so that custom MIBs can resolve thesymbols they import.
d. Select an object from the list. (Figure 89)Click the plus sign (+) next to an object to expand and display the levels.From the list, select the object that you want to specify and click OK. Thenew data source is then listed on the Data Source Definition page(Figure 91 on page 126).
Note: If you select an object that defines other objects (objects that arenested underneath the first object), all of these objects are turnedinto data sources. Selecting a high-level object results in a largenumber of data sources being added.
5. On the Simple Network Management Protocol (SNMP) Information page(Figure 87 on page 122), select the operating systems.
6. (Optional) You can test the data source or sources by clicking Test on theSimple Network Management Protocol (SNMP) Information page (Figure 90on page 125. For more information about testing, see “Testing” on page 128
Figure 89. Selecting an object
124 IBM Tivoli Monitoring Agent Builder: User's Guide
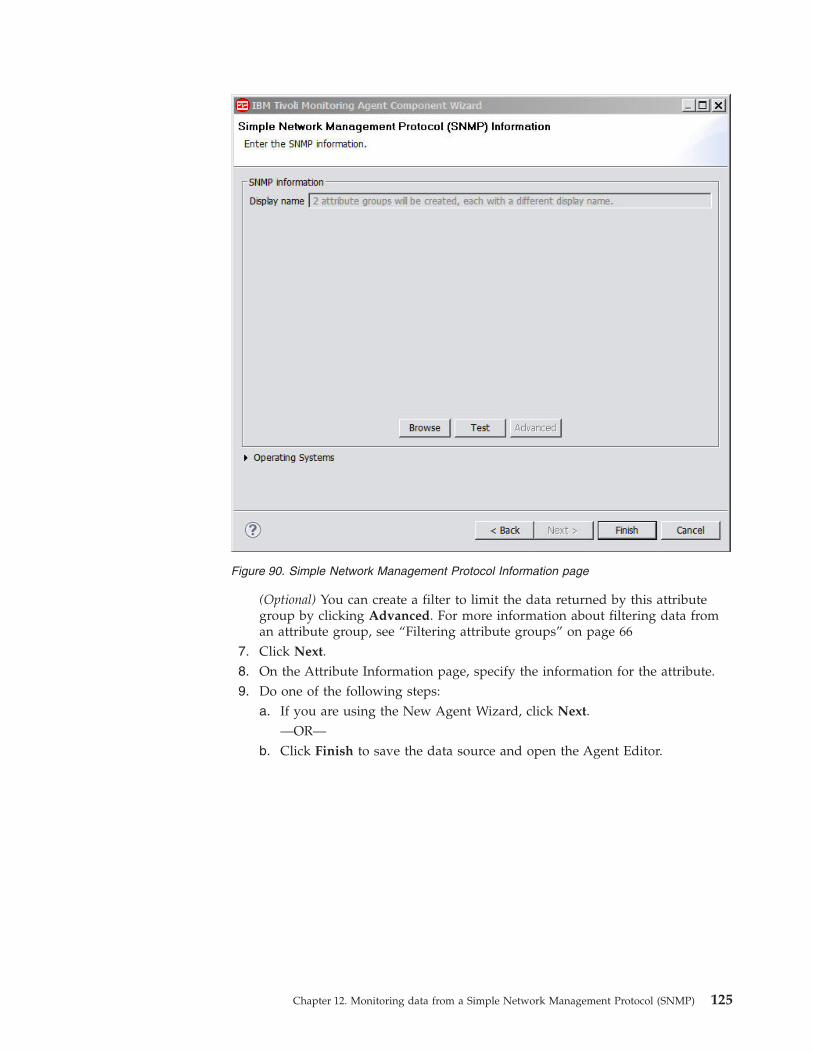
(Optional) You can create a filter to limit the data returned by this attributegroup by clicking Advanced. For more information about filtering data froman attribute group, see “Filtering attribute groups” on page 66
7. Click Next.8. On the Attribute Information page, specify the information for the attribute.9. Do one of the following steps:
a. If you are using the New Agent Wizard, click Next.—OR—
b. Click Finish to save the data source and open the Agent Editor.
Figure 90. Simple Network Management Protocol Information page
Chapter 12. Monitoring data from a Simple Network Management Protocol (SNMP) 125
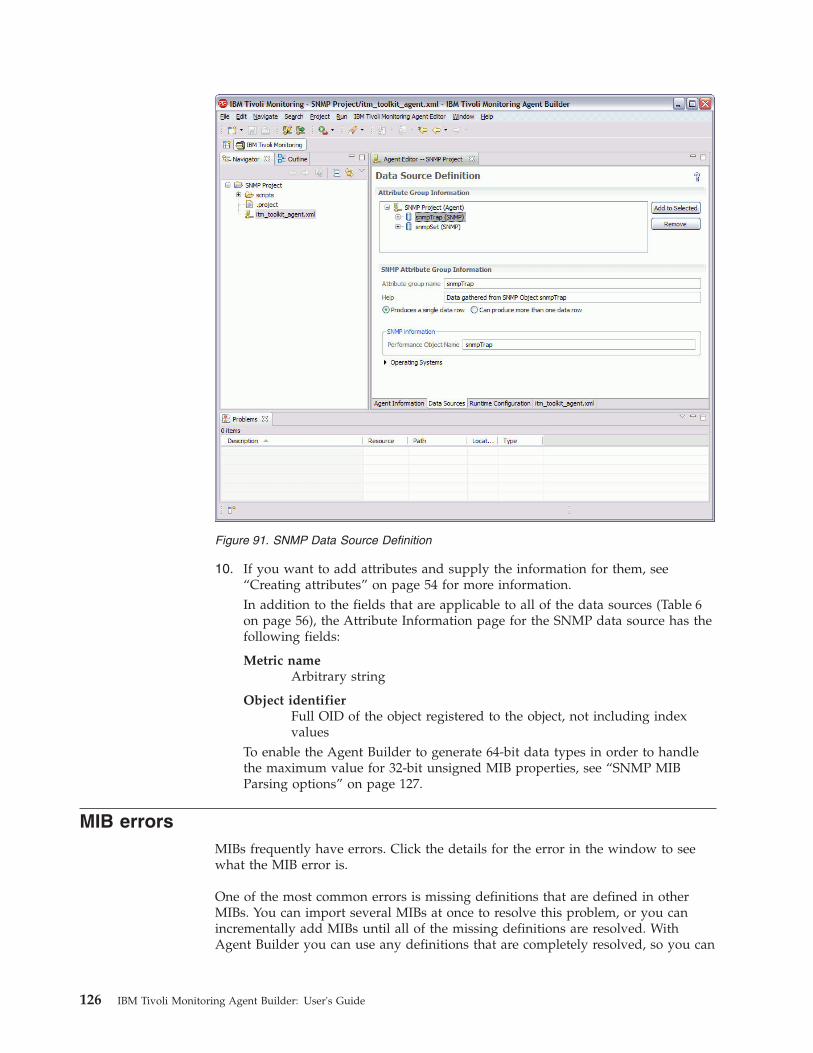
10. If you want to add attributes and supply the information for them, see“Creating attributes” on page 54 for more information.In addition to the fields that are applicable to all of the data sources (Table 6on page 56), the Attribute Information page for the SNMP data source has thefollowing fields:
Metric nameArbitrary string
Object identifierFull OID of the object registered to the object, not including indexvalues
To enable the Agent Builder to generate 64-bit data types in order to handlethe maximum value for 32-bit unsigned MIB properties, see “SNMP MIBParsing options” on page 127.
MIB errorsMIBs frequently have errors. Click the details for the error in the window to seewhat the MIB error is.
One of the most common errors is missing definitions that are defined in otherMIBs. You can import several MIBs at once to resolve this problem, or you canincrementally add MIBs until all of the missing definitions are resolved. WithAgent Builder you can use any definitions that are completely resolved, so you can
Figure 91. SNMP Data Source Definition
126 IBM Tivoli Monitoring Agent Builder: User's Guide
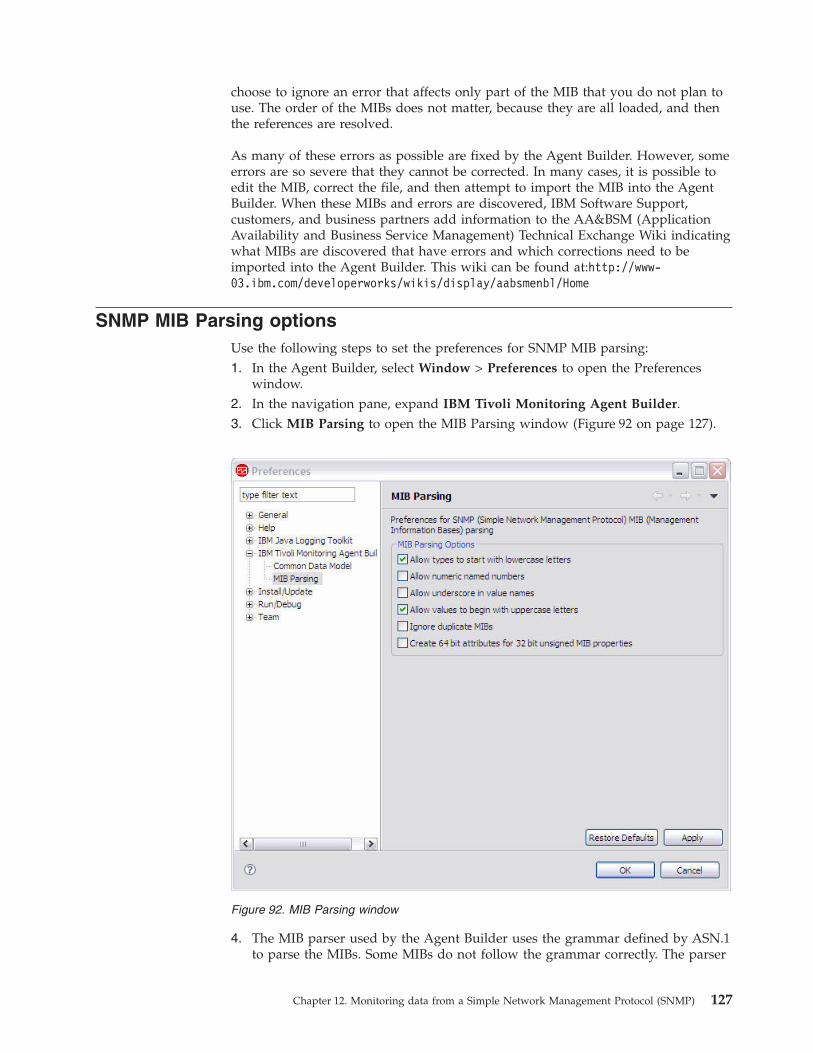
choose to ignore an error that affects only part of the MIB that you do not plan touse. The order of the MIBs does not matter, because they are all loaded, and thenthe references are resolved.
As many of these errors as possible are fixed by the Agent Builder. However, someerrors are so severe that they cannot be corrected. In many cases, it is possible toedit the MIB, correct the file, and then attempt to import the MIB into the AgentBuilder. When these MIBs and errors are discovered, IBM Software Support,customers, and business partners add information to the AA&BSM (ApplicationAvailability and Business Service Management) Technical Exchange Wiki indicatingwhat MIBs are discovered that have errors and which corrections need to beimported into the Agent Builder. This wiki can be found at:http://www-03.ibm.com/developerworks/wikis/display/aabsmenbl/Home
SNMP MIB Parsing optionsUse the following steps to set the preferences for SNMP MIB parsing:1. In the Agent Builder, select Window > Preferences to open the Preferences
window.2. In the navigation pane, expand IBM Tivoli Monitoring Agent Builder.3. Click MIB Parsing to open the MIB Parsing window (Figure 92 on page 127).
4. The MIB parser used by the Agent Builder uses the grammar defined by ASN.1to parse the MIBs. Some MIBs do not follow the grammar correctly. The parser
Figure 92. MIB Parsing window
Chapter 12. Monitoring data from a Simple Network Management Protocol (SNMP) 127

can relax certain rules to accommodate the most common errors. By relaxingthese rules you can parse non-conforming MIBs.
Allow types to start with lower case lettersAllows types that people write in MIBs, such as values
Allow numeric named numbersAllows numbers that start with uppercase letters
Allow underscore in value nameAllows underscore characters
Allow values to begin with uppercase lettersAllows values that start with uppercase letters
Ignore duplicate MIBsTurns off warning for duplicate MIB modules
5. Selecting the Create 64-bit attributes for 32 bit unsigned MIB properties checkbox, enables the Agent Builder to generate 64-bit data types to handle themaximum value for 32-bit unsigned MIB properties.Selecting this option does not change any existing agent field definitions. Youmust browse to the MIB file to create new data sources for these properties.
6. When you have finished editing the preferences, click OK.
TestingYou can test the attribute group you created within Agent Builder.
You can start the Testing procedure in the following ways:1. During agent creation click Test on the Simple Network Management Protocol
Information page (Figure 90 on page 125).
Note:
If the SNMP object selected contains more than one attribute group, youwill be prompted to select the attribute group to test, on the SelectGroup window,Figure 93.
2. After agent creation, select an attribute group on the Agent Editor Data SourcesDefinition page and click Test. For more information about the Agent Editor,see “Tivoli Monitoring Agent Editor” on page 37
Figure 93. SNMP Attribute Group Test selection
128 IBM Tivoli Monitoring Agent Builder: User's Guide
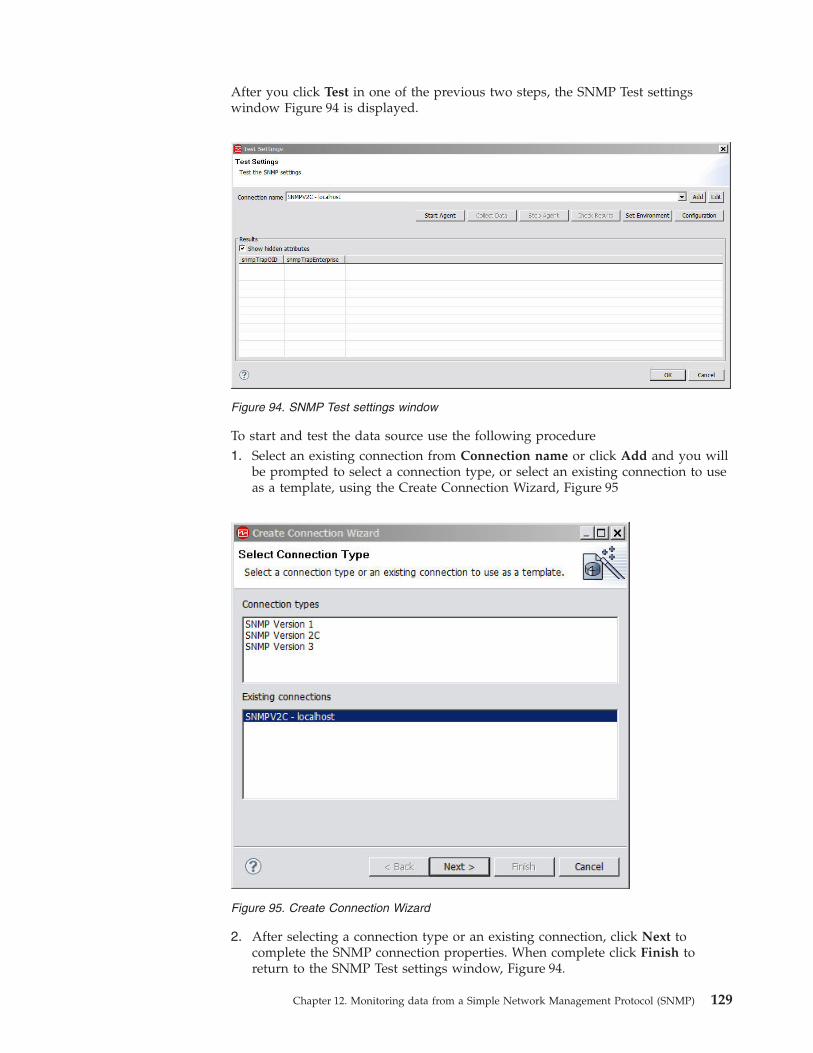
After you click Test in one of the previous two steps, the SNMP Test settingswindow Figure 94 is displayed.
To start and test the data source use the following procedure1. Select an existing connection from Connection name or click Add and you will
be prompted to select a connection type, or select an existing connection to useas a template, using the Create Connection Wizard, Figure 95
2. After selecting a connection type or an existing connection, click Next tocomplete the SNMP connection properties. When complete click Finish toreturn to the SNMP Test settings window, Figure 94.
Figure 94. SNMP Test settings window
Figure 95. Create Connection Wizard
Chapter 12. Monitoring data from a Simple Network Management Protocol (SNMP) 129
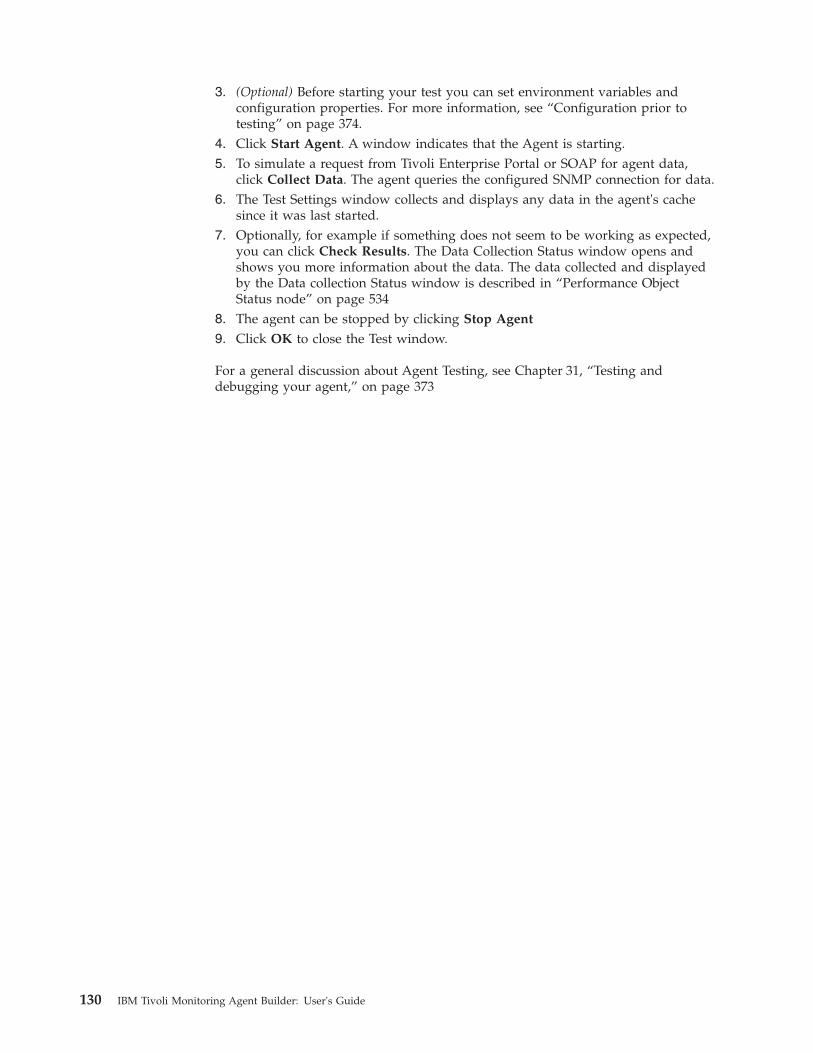
3. (Optional) Before starting your test you can set environment variables andconfiguration properties. For more information, see “Configuration prior totesting” on page 374.
4. Click Start Agent. A window indicates that the Agent is starting.5. To simulate a request from Tivoli Enterprise Portal or SOAP for agent data,
click Collect Data. The agent queries the configured SNMP connection for data.6. The Test Settings window collects and displays any data in the agent's cache
since it was last started.7. Optionally, for example if something does not seem to be working as expected,
you can click Check Results. The Data Collection Status window opens andshows you more information about the data. The data collected and displayedby the Data collection Status window is described in “Performance ObjectStatus node” on page 534
8. The agent can be stopped by clicking Stop Agent
9. Click OK to close the Test window.
For a general discussion about Agent Testing, see Chapter 31, “Testing anddebugging your agent,” on page 373
130 IBM Tivoli Monitoring Agent Builder: User's Guide
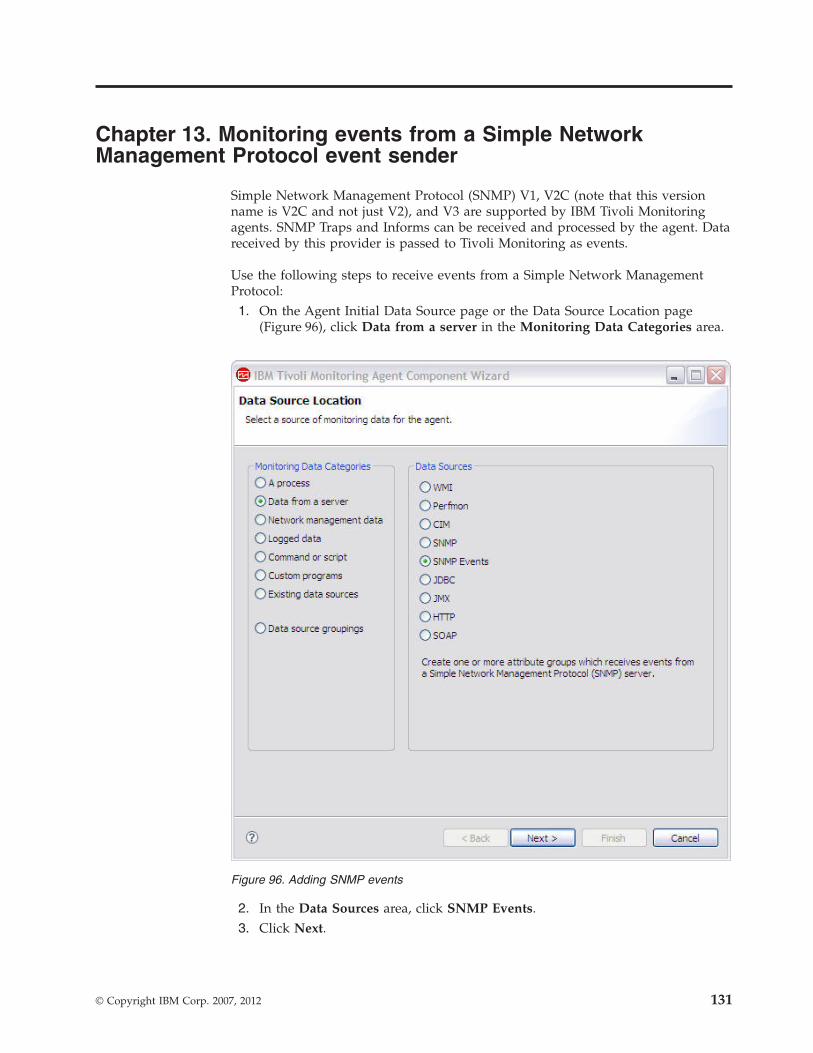
Chapter 13. Monitoring events from a Simple NetworkManagement Protocol event sender
Simple Network Management Protocol (SNMP) V1, V2C (note that this versionname is V2C and not just V2), and V3 are supported by IBM Tivoli Monitoringagents. SNMP Traps and Informs can be received and processed by the agent. Datareceived by this provider is passed to Tivoli Monitoring as events.
Use the following steps to receive events from a Simple Network ManagementProtocol:1. On the Agent Initial Data Source page or the Data Source Location page
(Figure 96), click Data from a server in the Monitoring Data Categories area.
2. In the Data Sources area, click SNMP Events.3. Click Next.
Figure 96. Adding SNMP events
© Copyright IBM Corp. 2007, 2012 131
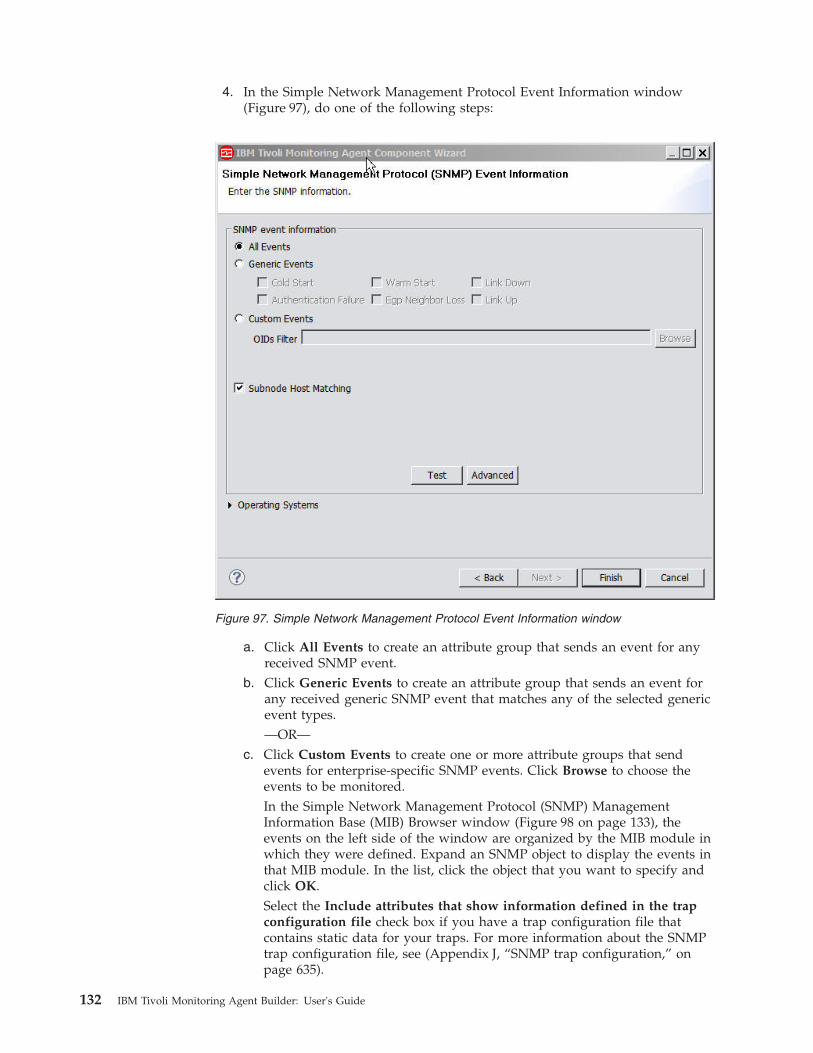
4. In the Simple Network Management Protocol Event Information window(Figure 97), do one of the following steps:
a. Click All Events to create an attribute group that sends an event for anyreceived SNMP event.
b. Click Generic Events to create an attribute group that sends an event forany received generic SNMP event that matches any of the selected genericevent types.—OR—
c. Click Custom Events to create one or more attribute groups that sendevents for enterprise-specific SNMP events. Click Browse to choose theevents to be monitored.In the Simple Network Management Protocol (SNMP) ManagementInformation Base (MIB) Browser window (Figure 98 on page 133), theevents on the left side of the window are organized by the MIB module inwhich they were defined. Expand an SNMP object to display the events inthat MIB module. In the list, click the object that you want to specify andclick OK.Select the Include attributes that show information defined in the trapconfiguration file check box if you have a trap configuration file thatcontains static data for your traps. For more information about the SNMPtrap configuration file, see (Appendix J, “SNMP trap configuration,” onpage 635).
Figure 97. Simple Network Management Protocol Event Information window
132 IBM Tivoli Monitoring Agent Builder: User's Guide
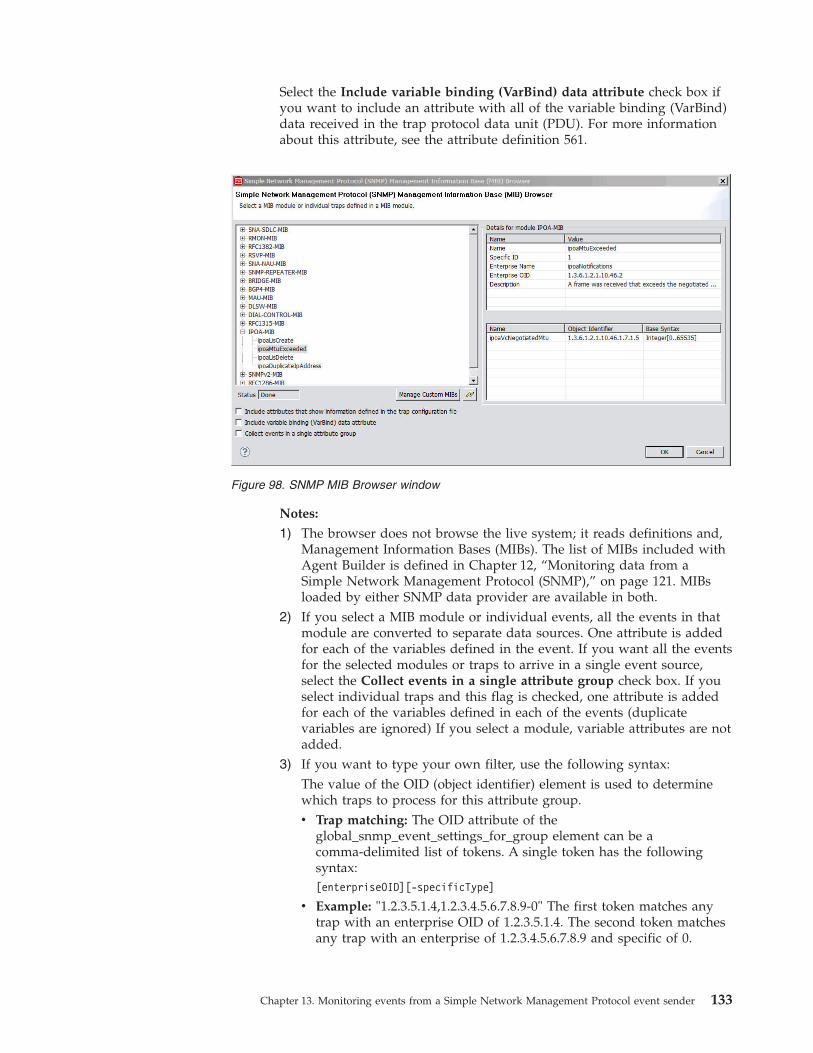
Select the Include variable binding (VarBind) data attribute check box ifyou want to include an attribute with all of the variable binding (VarBind)data received in the trap protocol data unit (PDU). For more informationabout this attribute, see the attribute definition 561.
Notes:
1) The browser does not browse the live system; it reads definitions and,Management Information Bases (MIBs). The list of MIBs included withAgent Builder is defined in Chapter 12, “Monitoring data from aSimple Network Management Protocol (SNMP),” on page 121. MIBsloaded by either SNMP data provider are available in both.
2) If you select a MIB module or individual events, all the events in thatmodule are converted to separate data sources. One attribute is addedfor each of the variables defined in the event. If you want all the eventsfor the selected modules or traps to arrive in a single event source,select the Collect events in a single attribute group check box. If youselect individual traps and this flag is checked, one attribute is addedfor each of the variables defined in each of the events (duplicatevariables are ignored) If you select a module, variable attributes are notadded.
3) If you want to type your own filter, use the following syntax:The value of the OID (object identifier) element is used to determinewhich traps to process for this attribute group.v Trap matching: The OID attribute of the
global_snmp_event_settings_for_group element can be acomma-delimited list of tokens. A single token has the followingsyntax:[enterpriseOID][-specificType]
v Example: "1.2.3.5.1.4,1.2.3.4.5.6.7.8.9-0" The first token matches anytrap with an enterprise OID of 1.2.3.5.1.4. The second token matchesany trap with an enterprise of 1.2.3.4.5.6.7.8.9 and specific of 0.
Figure 98. SNMP MIB Browser window
Chapter 13. Monitoring events from a Simple Network Management Protocol event sender 133
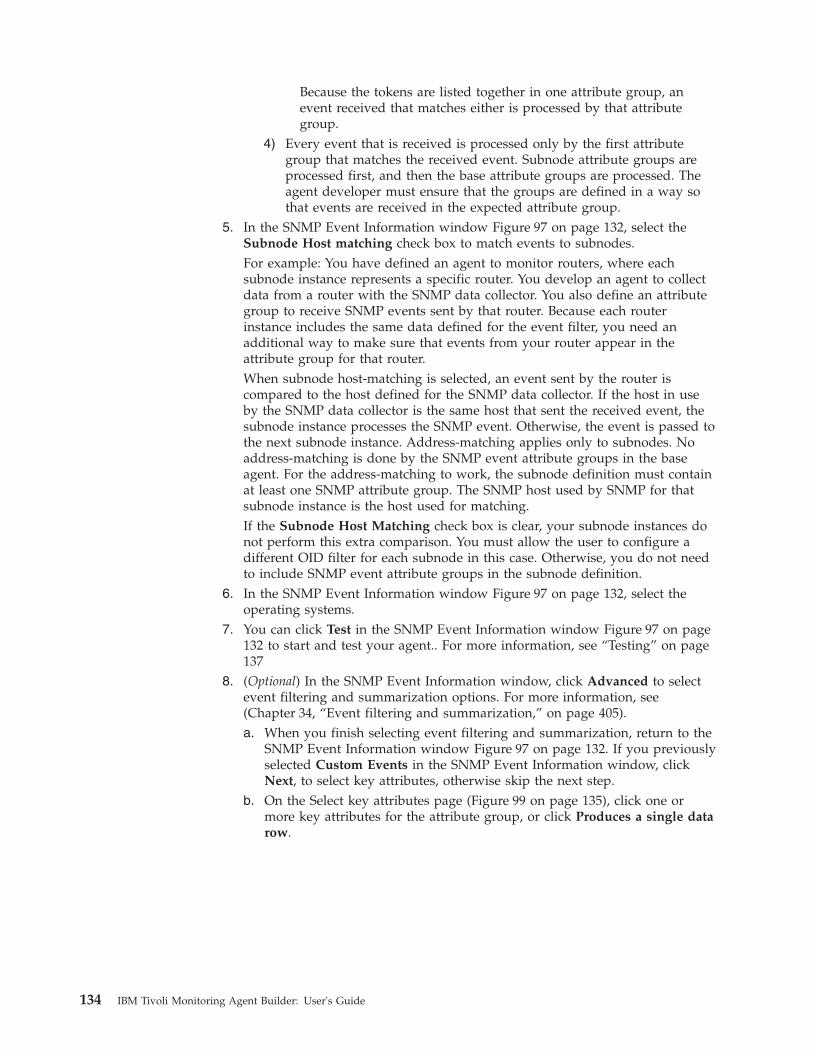
Because the tokens are listed together in one attribute group, anevent received that matches either is processed by that attributegroup.
4) Every event that is received is processed only by the first attributegroup that matches the received event. Subnode attribute groups areprocessed first, and then the base attribute groups are processed. Theagent developer must ensure that the groups are defined in a way sothat events are received in the expected attribute group.
5. In the SNMP Event Information window Figure 97 on page 132, select theSubnode Host matching check box to match events to subnodes.For example: You have defined an agent to monitor routers, where eachsubnode instance represents a specific router. You develop an agent to collectdata from a router with the SNMP data collector. You also define an attributegroup to receive SNMP events sent by that router. Because each routerinstance includes the same data defined for the event filter, you need anadditional way to make sure that events from your router appear in theattribute group for that router.When subnode host-matching is selected, an event sent by the router iscompared to the host defined for the SNMP data collector. If the host in useby the SNMP data collector is the same host that sent the received event, thesubnode instance processes the SNMP event. Otherwise, the event is passed tothe next subnode instance. Address-matching applies only to subnodes. Noaddress-matching is done by the SNMP event attribute groups in the baseagent. For the address-matching to work, the subnode definition must containat least one SNMP attribute group. The SNMP host used by SNMP for thatsubnode instance is the host used for matching.If the Subnode Host Matching check box is clear, your subnode instances donot perform this extra comparison. You must allow the user to configure adifferent OID filter for each subnode in this case. Otherwise, you do not needto include SNMP event attribute groups in the subnode definition.
6. In the SNMP Event Information window Figure 97 on page 132, select theoperating systems.
7. You can click Test in the SNMP Event Information window Figure 97 on page132 to start and test your agent.. For more information, see “Testing” on page137
8. (Optional) In the SNMP Event Information window, click Advanced to selectevent filtering and summarization options. For more information, see(Chapter 34, “Event filtering and summarization,” on page 405).a. When you finish selecting event filtering and summarization, return to the
SNMP Event Information window Figure 97 on page 132. If you previouslyselected Custom Events in the SNMP Event Information window, clickNext, to select key attributes, otherwise skip the next step.
b. On the Select key attributes page (Figure 99 on page 135), click one ormore key attributes for the attribute group, or click Produces a single datarow.
134 IBM Tivoli Monitoring Agent Builder: User's Guide

9. Click Next, or click Finish if you are using the new agent wizard to save theagent and open the Agent Editor.
10. For information about adding further attributes, see “Creating attributes” onpage 54.
For more information about the attribute groups for SNMP events, see (“SNMPEvent attribute groups” on page 560).
ConfigurationAfter a data source is added, the configuration is displayed on the RuntimeConfiguration page of the Agent Editor. For example, Figure 100 on page 136shows the configuration sections and some of the configuration properties that areautomatically created when an SNMP Event attribute group is added to the agent.
Figure 99. Select key attributes page
Chapter 13. Monitoring events from a Simple Network Management Protocol event sender 135
The labels, descriptions, and default values of predefined configuration propertiescan be changed, but variable names and types cannot be changed. The SNMPEvents configuration section contains the following properties:
Table 11. SNMP Events configuration properties
Name Valid values Required Description
Port Number positive integer Yes Required portnumber used forlistening to events
Security Level noAuthNoPriv,authNoPriv, authPriv
No SNMP V3 securitylevel
User Name String No SNMP V3 user name
Auth Protocol MD5 or SHA No SNMP V3authenticationprotocol
Auth Password String No SNMP V3authenticationpassword
Figure 100. Runtime Configuration page
136 IBM Tivoli Monitoring Agent Builder: User's Guide
Table 11. SNMP Events configuration properties (continued)
Name Valid values Required Description
Priv Password String No SNMP V3 privacypassword
Trap configurationfile
File name includingpath
No Location of the trapconfiguration file. Ifthe file is not locatedusing thisconfigurationproperty, an attemptis made to find atrapcnfg file in theagent bin directory.
No configuration is required for V1 or V2C events. All V1 or V2C events areprocessed regardless of the source or community name specified. The onlysupported privacy protocol is DES, so there is no option to specify the privacyprotocol. The SNMP V3 configuration options are not required (each can beoptionally specified). If you need to specify them, you must specify the appropriatevalues for the security level you select.
TestingYou can test the attribute group you have created within Agent Builder. To test theattribute group you will need to use a test program or application to generateSNMP events.
You can start the Testing procedure in the following ways:1. During agent creation click Test in the SNMP Event Information window
(Figure 97 on page 132).2. After agent creation, select an attribute group on the Agent Editor Data Sources
Definition page and click Test. For more information about the Agent Editor,see “Tivoli Monitoring Agent Editor” on page 37
After you click Test in one of the previous two steps, the Test Event Settingwindow Figure 101 on page 138 is displayed.
Chapter 13. Monitoring events from a Simple Network Management Protocol event sender 137

To start and test your agent use the following procedure1. (Optional) Before starting your test you can set environment variables and
configuration properties. For more information, see “Configuration prior totesting” on page 374. For more about SNMP Event configuration properties, see“Configuration” on page 135.
2. Click Start Agent. A window indicates that the Agent is starting.3. When the agent starts, it listens for SNMP events according to its configuration.4. To test your agent's data collection you generate SNMP events matching the
agents configuration. You can do this using an application or an eventgenerator. When the agent receives SNMP events matching its configuration, itadds the events to its internal cache.
5. To simulate a request from Tivoli Enterprise Portal or SOAP for agent data,click Collect Data. The Test Settings window collects and displays any eventsin the agent's cache since it was last started. An example data collection isshown in Figure 102
Figure 101. Test Event Settings window
Figure 102. Test Event Settings window showing collected SNMP event data
138 IBM Tivoli Monitoring Agent Builder: User's Guide
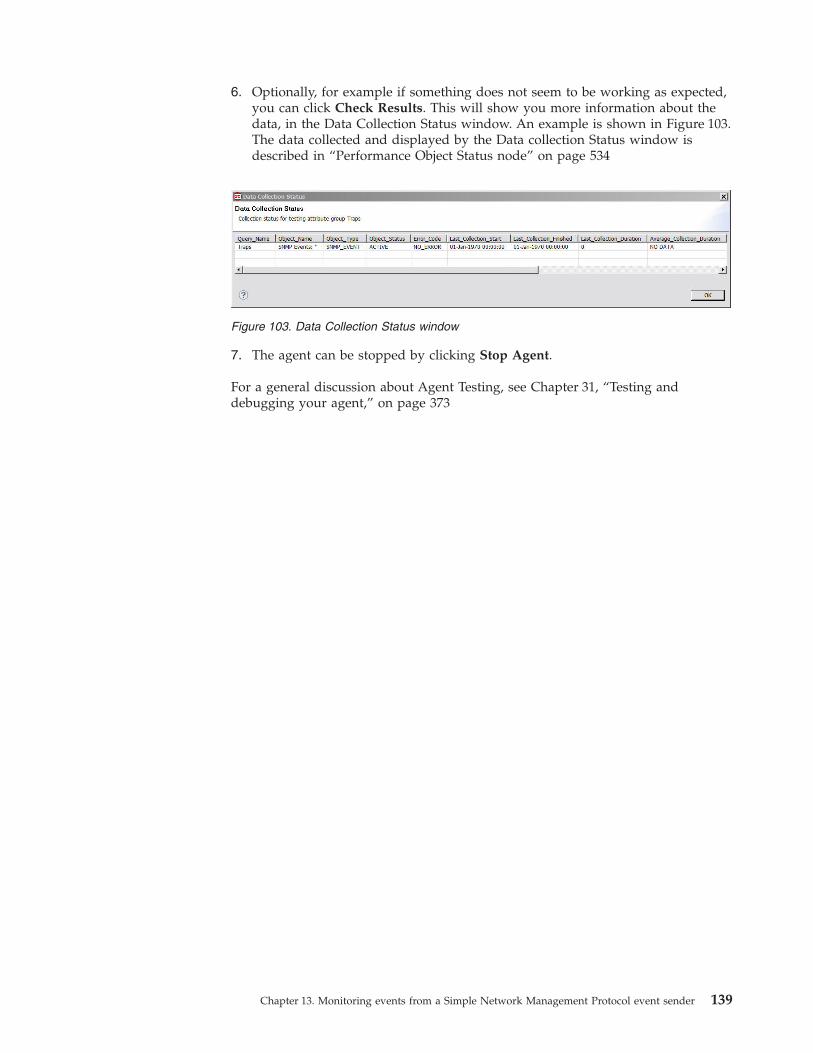
6. Optionally, for example if something does not seem to be working as expected,you can click Check Results. This will show you more information about thedata, in the Data Collection Status window. An example is shown in Figure 103.The data collected and displayed by the Data collection Status window isdescribed in “Performance Object Status node” on page 534
7. The agent can be stopped by clicking Stop Agent.
For a general discussion about Agent Testing, see Chapter 31, “Testing anddebugging your agent,” on page 373
Figure 103. Data Collection Status window
Chapter 13. Monitoring events from a Simple Network Management Protocol event sender 139

140 IBM Tivoli Monitoring Agent Builder: User's Guide
Chapter 14. Monitoring Java Management Extensions (JMX)MBeans
With the JMX data provider you can collect data from JMX MBeans. Each JMXdata source you define must identify either a single MBean (single instance) or acertain type of MBean (multiple instances). You must know the Object Name of theMBean or an Object Name pattern for a type of MBean that contains the data youwant to collect. Use an Object Name pattern to only identify a set of similarMBeans. The set of MBeans that match the pattern must all provide the data thatyou want to see in the monitoring table. A typical Object Name pattern looks like*:j2eeType=Servlet,*. This Object Name Pattern matches all MBeans that have aj2eeType of Servlet. You can expect any MBean matching that pattern to have asimilar set of exposed attributes and operations that can be added to your datasource. A data source that uses that pattern collects data from each MBeanmatching that pattern. The attributes that you define for this data source must beavailable for any MBean matching the Object Name pattern you defined for thedata source.
Use the following steps to add a JMX data source to collect data from JavaManagement Extension (JMX) MBeans:1. On the Agent Initial Data Source page (Figure 104 on page 142) or the Data
Source Location page, click Data from a server in the Monitoring DataCategories area.
© Copyright IBM Corp. 2007, 2012 141
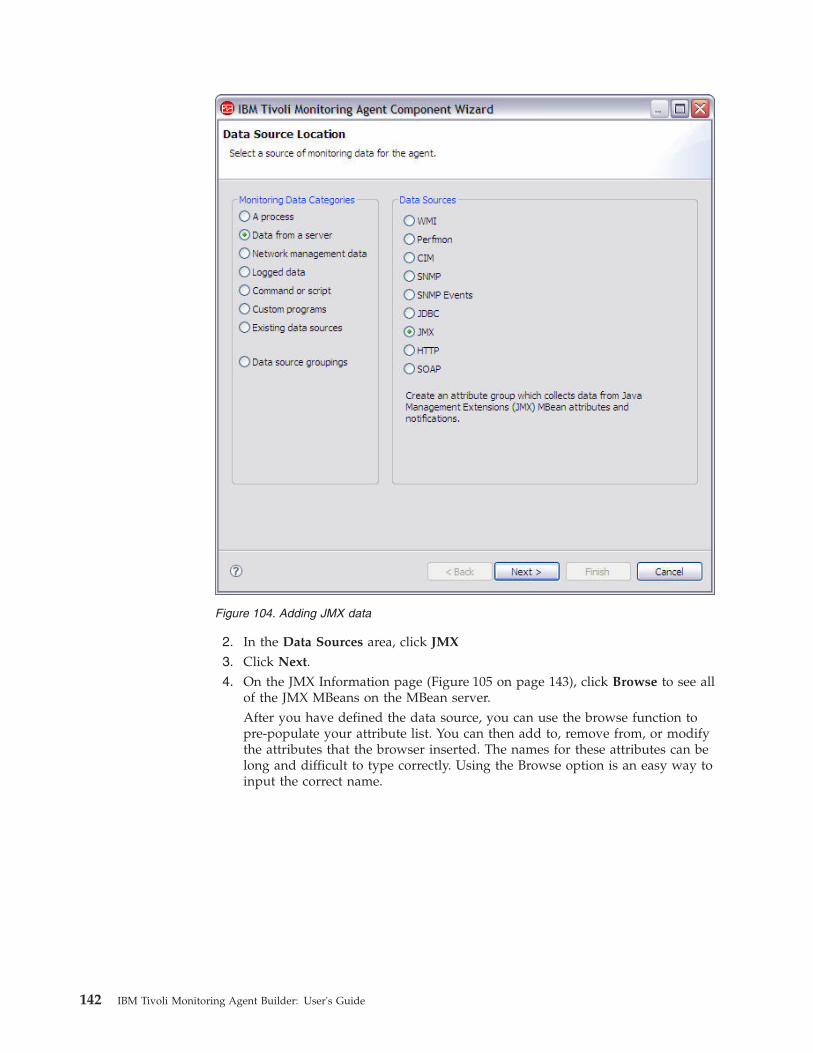
2. In the Data Sources area, click JMX
3. Click Next.4. On the JMX Information page (Figure 105 on page 143), click Browse to see all
of the JMX MBeans on the MBean server.After you have defined the data source, you can use the browse function topre-populate your attribute list. You can then add to, remove from, or modifythe attributes that the browser inserted. The names for these attributes can belong and difficult to type correctly. Using the Browse option is an easy way toinput the correct name.
Figure 104. Adding JMX data
142 IBM Tivoli Monitoring Agent Builder: User's Guide
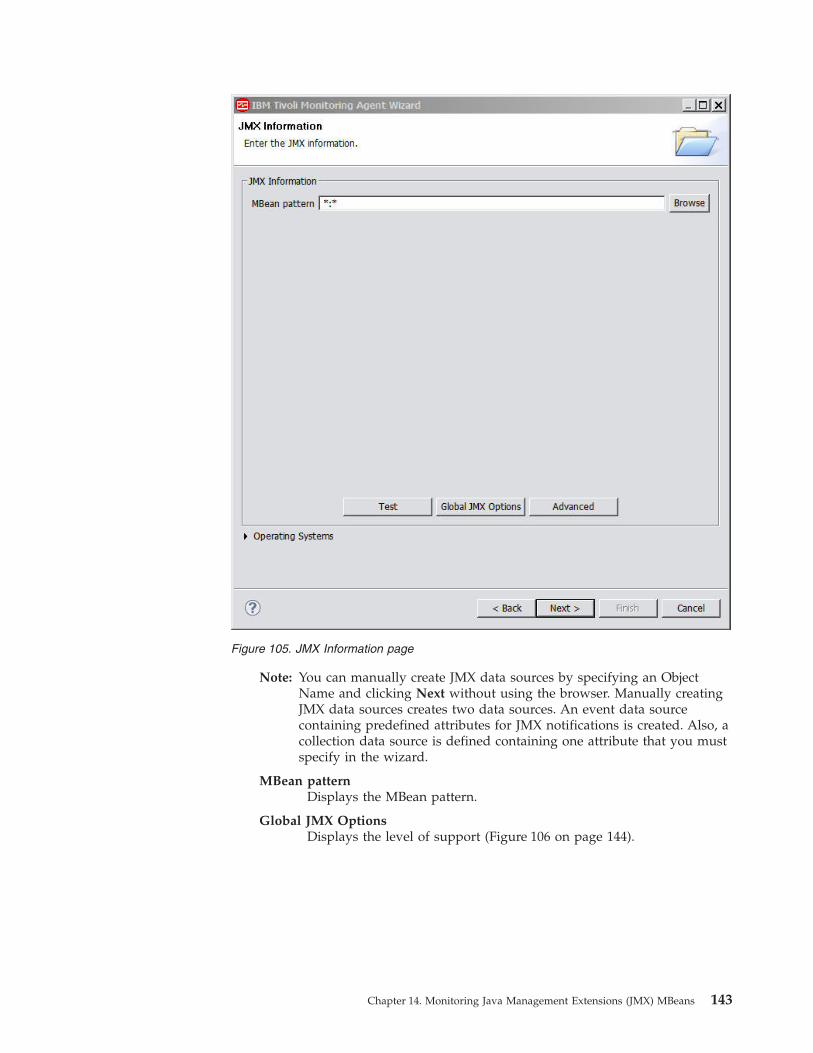
Note: You can manually create JMX data sources by specifying an ObjectName and clicking Next without using the browser. Manually creatingJMX data sources creates two data sources. An event data sourcecontaining predefined attributes for JMX notifications is created. Also, acollection data source is defined containing one attribute that you mustspecify in the wizard.
MBean patternDisplays the MBean pattern.
Global JMX OptionsDisplays the level of support (Figure 106 on page 144).
Figure 105. JMX Information page
Chapter 14. Monitoring Java Management Extensions (JMX) MBeans 143
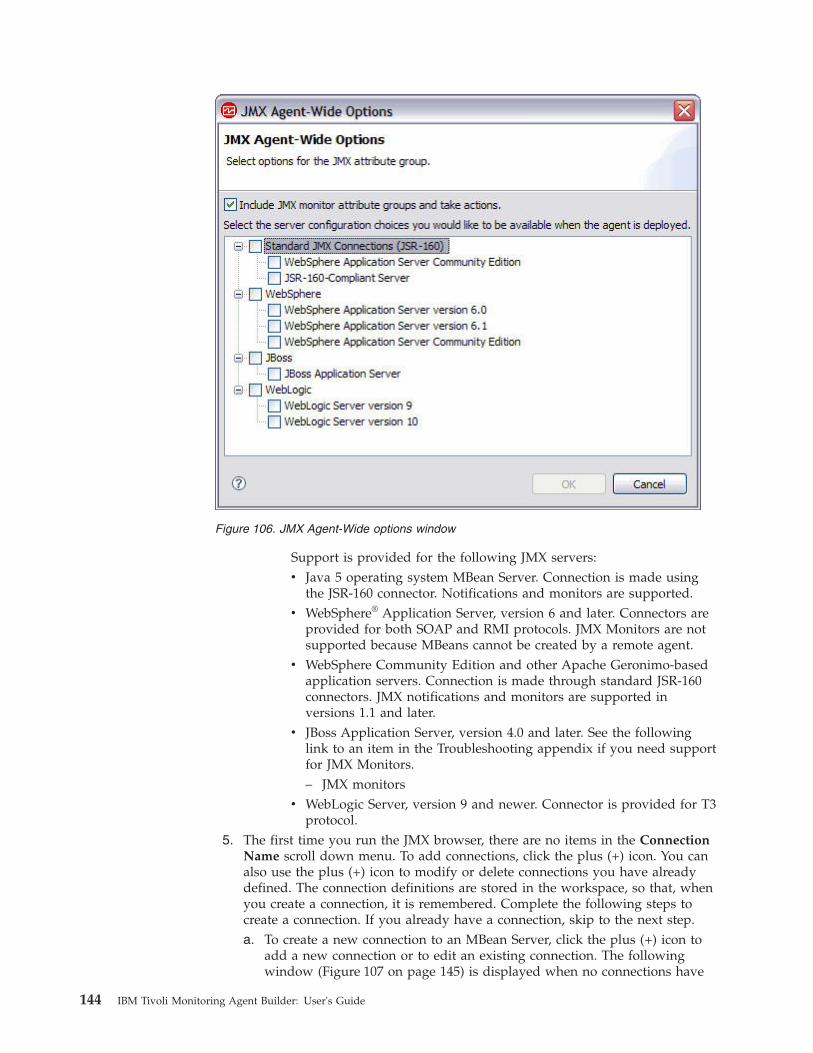
Support is provided for the following JMX servers:v Java 5 operating system MBean Server. Connection is made using
the JSR-160 connector. Notifications and monitors are supported.v WebSphere® Application Server, version 6 and later. Connectors are
provided for both SOAP and RMI protocols. JMX Monitors are notsupported because MBeans cannot be created by a remote agent.
v WebSphere Community Edition and other Apache Geronimo-basedapplication servers. Connection is made through standard JSR-160connectors. JMX notifications and monitors are supported inversions 1.1 and later.
v JBoss Application Server, version 4.0 and later. See the followinglink to an item in the Troubleshooting appendix if you need supportfor JMX Monitors.– JMX monitors
v WebLogic Server, version 9 and newer. Connector is provided for T3protocol.
5. The first time you run the JMX browser, there are no items in the ConnectionName scroll down menu. To add connections, click the plus (+) icon. You canalso use the plus (+) icon to modify or delete connections you have alreadydefined. The connection definitions are stored in the workspace, so that, whenyou create a connection, it is remembered. Complete the following steps tocreate a connection. If you already have a connection, skip to the next step.a. To create a new connection to an MBean Server, click the plus (+) icon to
add a new connection or to edit an existing connection. The followingwindow (Figure 107 on page 145) is displayed when no connections have
Figure 106. JMX Agent-Wide options window
144 IBM Tivoli Monitoring Agent Builder: User's Guide
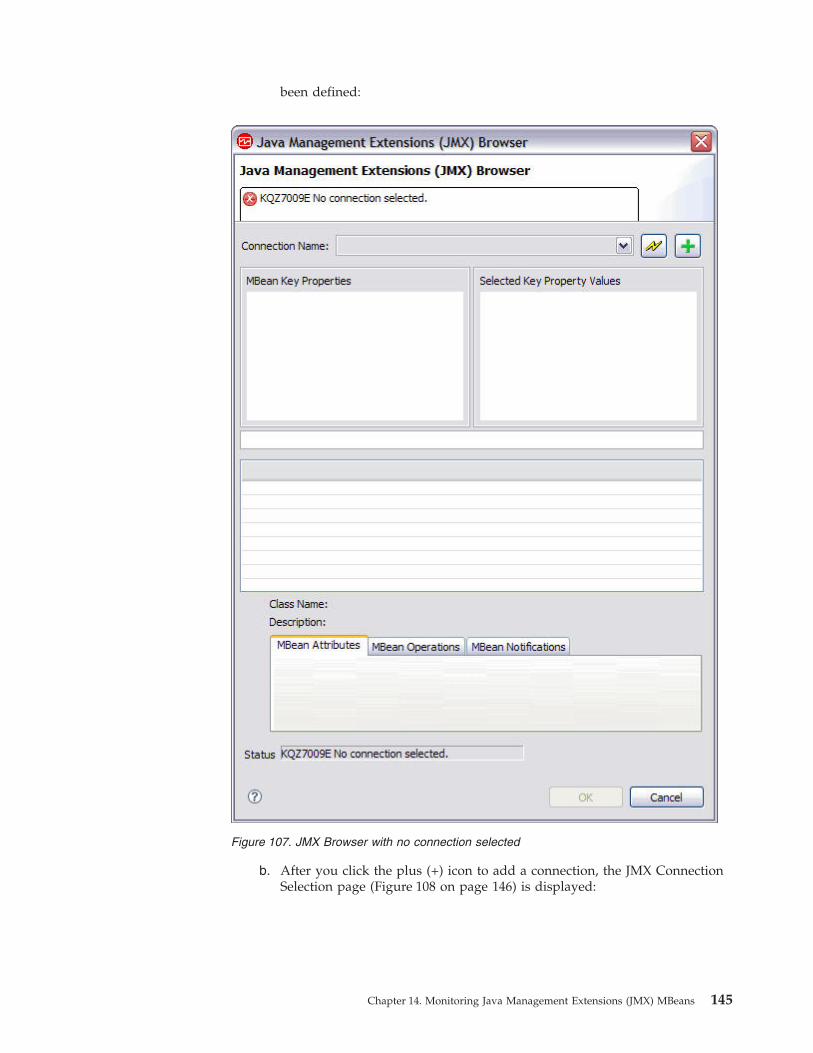
been defined:
b. After you click the plus (+) icon to add a connection, the JMX ConnectionSelection page (Figure 108 on page 146) is displayed:
Figure 107. JMX Browser with no connection selected
Chapter 14. Monitoring Java Management Extensions (JMX) MBeans 145
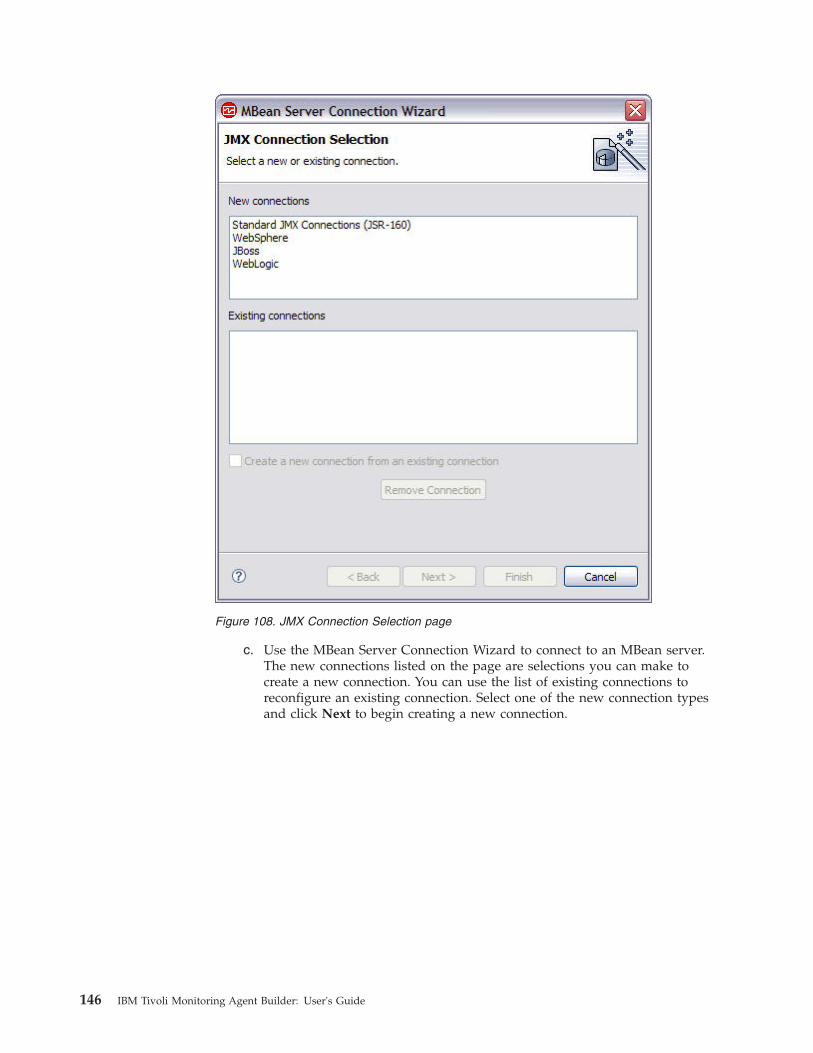
c. Use the MBean Server Connection Wizard to connect to an MBean server.The new connections listed on the page are selections you can make tocreate a new connection. You can use the list of existing connections toreconfigure an existing connection. Select one of the new connection typesand click Next to begin creating a new connection.
Figure 108. JMX Connection Selection page
146 IBM Tivoli Monitoring Agent Builder: User's Guide
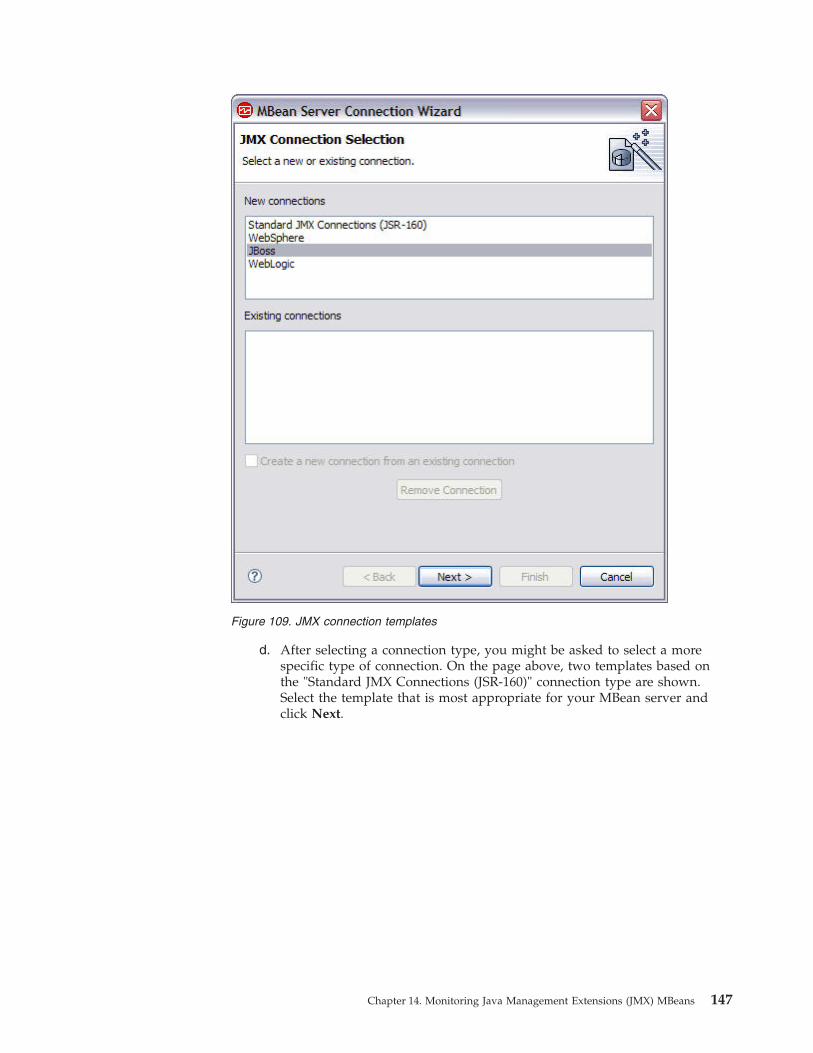
d. After selecting a connection type, you might be asked to select a morespecific type of connection. On the page above, two templates based onthe "Standard JMX Connections (JSR-160)" connection type are shown.Select the template that is most appropriate for your MBean server andclick Next.
Figure 109. JMX connection templates
Chapter 14. Monitoring Java Management Extensions (JMX) MBeans 147
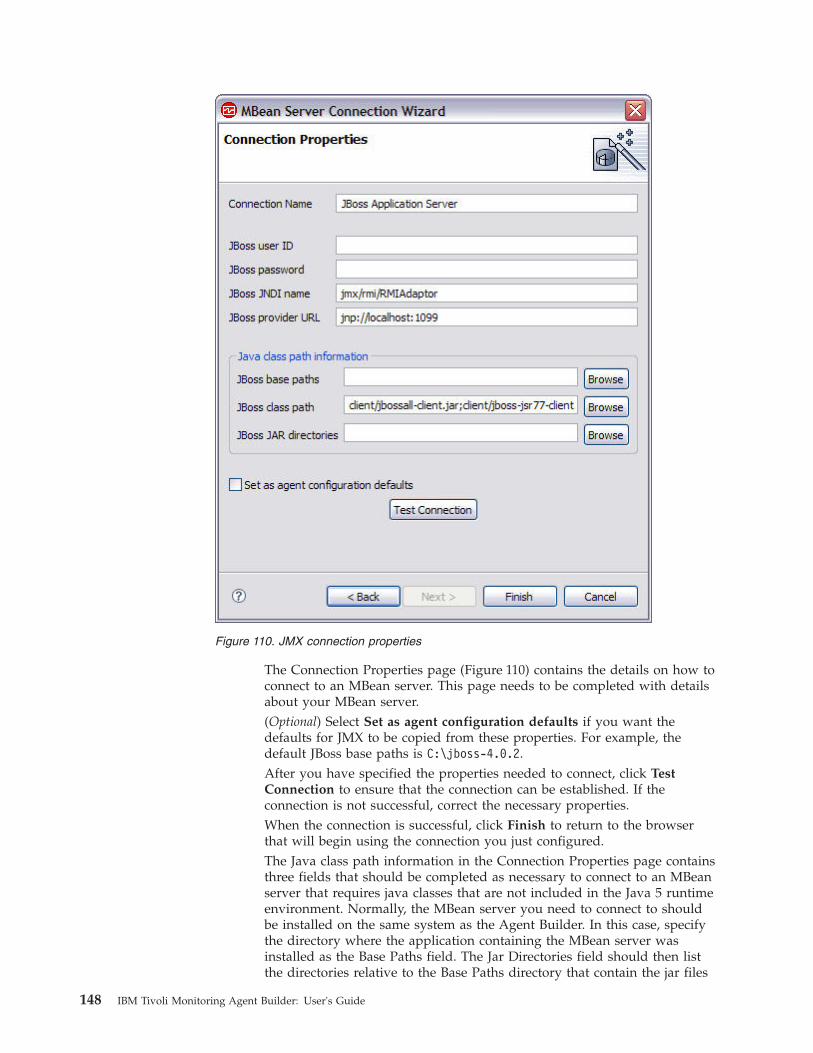
The Connection Properties page (Figure 110) contains the details on how toconnect to an MBean server. This page needs to be completed with detailsabout your MBean server.(Optional) Select Set as agent configuration defaults if you want thedefaults for JMX to be copied from these properties. For example, thedefault JBoss base paths is C:\jboss-4.0.2.After you have specified the properties needed to connect, click TestConnection to ensure that the connection can be established. If theconnection is not successful, correct the necessary properties.When the connection is successful, click Finish to return to the browserthat will begin using the connection you just configured.The Java class path information in the Connection Properties page containsthree fields that should be completed as necessary to connect to an MBeanserver that requires java classes that are not included in the Java 5 runtimeenvironment. Normally, the MBean server you need to connect to shouldbe installed on the same system as the Agent Builder. In this case, specifythe directory where the application containing the MBean server wasinstalled as the Base Paths field. The Jar Directories field should then listthe directories relative to the Base Paths directory that contain the jar files
Figure 110. JMX connection properties
148 IBM Tivoli Monitoring Agent Builder: User's Guide

needed to connect to the MBean server. The Class Path field can be used toinclude specific jar files. The jar files listed in the Jar Directories field donot need to be listed separately in the Class Path field.Any of the fields can contain more than one reference; just separate theentries by a semicolon. These values are the same values that are neededwhen configuring the agent. See “JMX configuration” on page 157 foradditional information about these fields.
6. After you have selected a connection, the JMX Browser downloadsinformation about the MBeans from the JMX server. This information isdisplayed in the following four areas of the JMX Browser window (Figure 111on page 150):
Chapter 14. Monitoring Java Management Extensions (JMX) MBeans 149
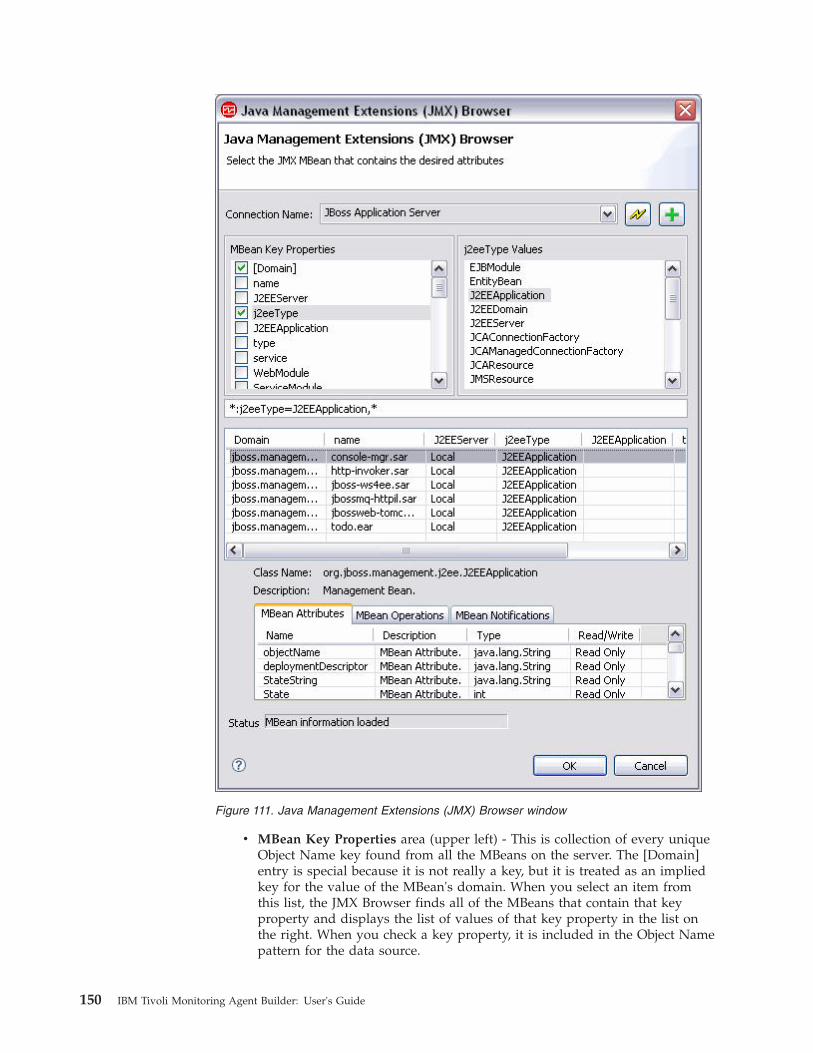
v MBean Key Properties area (upper left) - This is collection of every uniqueObject Name key found from all the MBeans on the server. The [Domain]entry is special because it is not really a key, but it is treated as an impliedkey for the value of the MBean's domain. When you select an item fromthis list, the JMX Browser finds all of the MBeans that contain that keyproperty and displays the list of values of that key property in the list onthe right. When you check a key property, it is included in the Object Namepattern for the data source.
Figure 111. Java Management Extensions (JMX) Browser window
150 IBM Tivoli Monitoring Agent Builder: User's Guide
v Selected Key Property Values area (upper right) - Shows the values of thecurrently-selected MBean Key Property from all MBeans. Selecting one ofthese values will check the MBean key property and update the ObjectName Pattern that is displayed in the text field below with the MBean keyproperty name and value.
v A table listing all MBeans matching the Object Name Pattern (center) - Asyou select Key Properties and Values from the MBean Key Properties andSelected Key Property Values lists, you will see the Object Name Patternupdate and the list of MBeans in this table will change to reflect the list ofMBeans that match the pattern you have currently selected. If you have apattern that is not matching any MBeans, you can clear entries in theMBean Key Properties list by clicking the check box next to a key beingused by your pattern and removing the check mark. Also, you canmanually edit the pattern to find the MBeans you are looking for. Thepattern *:* selects all MBeans.You can use this table to browse the MBeans from the server and decidewhich ones contain the data you want to monitor. To help browse apotentially large number of MBeans, you can sort by any key attribute(from the context menu or by clicking on a column header). You can alsoshow any key attribute in any column by selecting "Show Key Property"from the context menu. When you see a key property value in the table thatidentifies MBeans you want to monitor, right-click on that value and chooseSelect only MBeans with Key Property from the context menu.
v A table containing details for a selected MBean - The JMX Browser showsyou information about a single MBean. To see details for an MBean, youselect the MBean from the table showing the list of MBeans matching thecurrent filter. The key information about the MBean is the list of Attributes,Operations, and Notifications it defines.
To create a data source from the JMX Browser, use the four panels describedabove to build an Object Name Pattern that matches a set of MBeans that eachcontains the monitoring data you want to collect. For example, if you wantedto monitor data from all of the ThreadPool MBeans, you would do thefollowing:a. Select type from the MBean Key Properties panel. Selecting type causes the
values in the Selected Key Properties Values to be updated to list allunique values from the type key of any MBean.
b. Select ThreadPool from the list of values for the type key. After selectingThreadPool, the type key property name is checked in the MBean KeyProperties panel and the Object Name Pattern is updated to"*:type=ThreadPool,*". The list of MBeans is also updated to show only theMBeans that match this pattern.
c. Select one of the MBeans from the MBean list to see the attributes,operations and notifications available for the MBean. If your MBean listcontains more MBeans than you want to monitor, you must continue thisprocedure of selecting key properties and values until you have the ObjectName Pattern that identifies the set of MBeans you want to monitor. Youcan also display a context menu in the MBean list to update the ObjectPattern with key property values shown in the table.
7. When the object name pattern is correct, select an MBean from the table. Allattributes of the selected MBean will be the initial attributes in the new JMXdata source. Some attributes might not contain data. After the JMX datasource is created review the attributes and remove any that are not significant.If the selected MBean has no attributes, you will be warned that the data
Chapter 14. Monitoring Java Management Extensions (JMX) MBeans 151
source will be created with no attributes. If the selected MBean containsnotifications, an "Event" data source will also be created to receivenotifications from the MBeans.
8. Click Finish in the filled on JMX Information page. Data sources are createdbased on the MBean that was selected in the previous step. If no MBean wasselected, an attribute group with no attributes is created and a warning isdisplayed, giving you a chance to select an MBean if you want to. Thenotification data source has the word, Event, at the beginning of the datasource name to distinguish it from the data source that shows attributes.
9. To change other JMX options for the agent, click Global JMX Options. Withthese options you can do the following:v Select whether JMX monitors are supported by this agent. See the next
section for a description of JMX monitors. If you want JMX monitorattribute groups and Take Action commands to be created, check IncludeJMX monitor attribute groups and take actions.
v Select the types of MBean servers your agent will connect to when it isdeployed. There are several vendor-specific types of servers listed, alongwith a generic JSR-160-Compliant Server for standards-based servers. Youcan select as many as needed, but you should only select server types thatsupport the MBeans that are being monitored. You must select at least one.If you select more than one, at agent configuration time you are promptedto specify which type of server you want to connect to.
10. Click OK after you have selected the desired option.
152 IBM Tivoli Monitoring Agent Builder: User's Guide
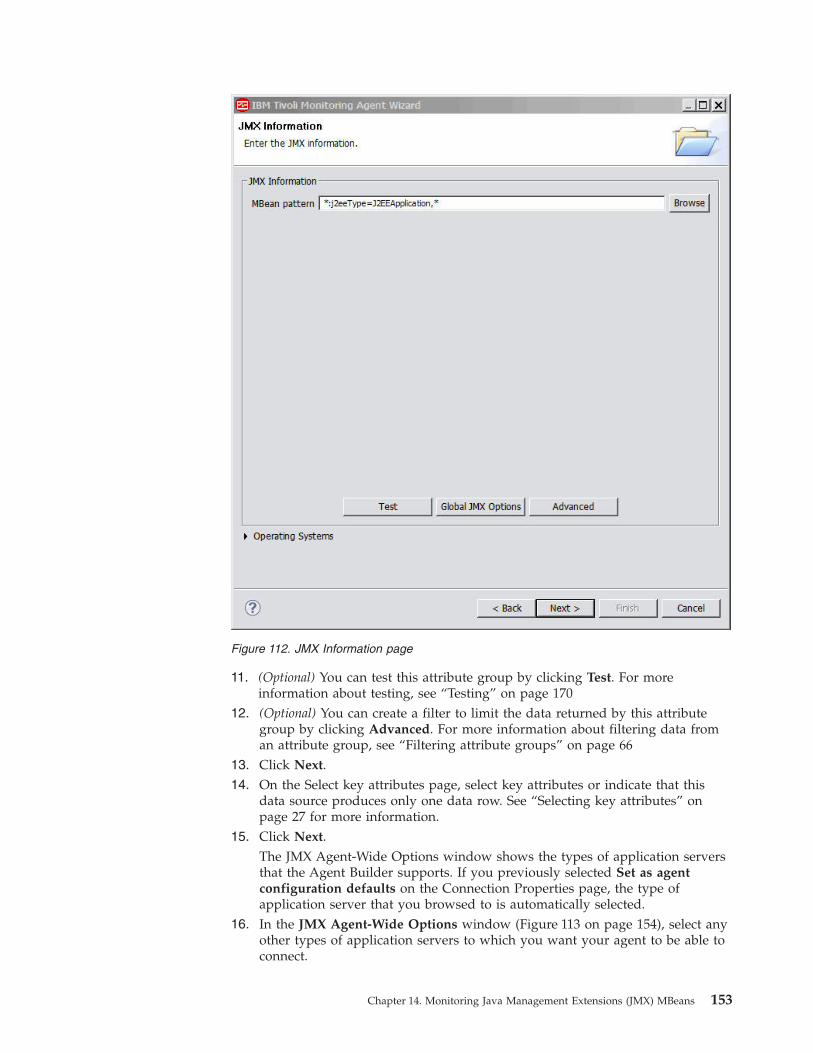
11. (Optional) You can test this attribute group by clicking Test. For moreinformation about testing, see “Testing” on page 170
12. (Optional) You can create a filter to limit the data returned by this attributegroup by clicking Advanced. For more information about filtering data froman attribute group, see “Filtering attribute groups” on page 66
13. Click Next.14. On the Select key attributes page, select key attributes or indicate that this
data source produces only one data row. See “Selecting key attributes” onpage 27 for more information.
15. Click Next.The JMX Agent-Wide Options window shows the types of application serversthat the Agent Builder supports. If you previously selected Set as agentconfiguration defaults on the Connection Properties page, the type ofapplication server that you browsed to is automatically selected.
16. In the JMX Agent-Wide Options window (Figure 113 on page 154), select anyother types of application servers to which you want your agent to be able toconnect.
Figure 112. JMX Information page
Chapter 14. Monitoring Java Management Extensions (JMX) MBeans 153
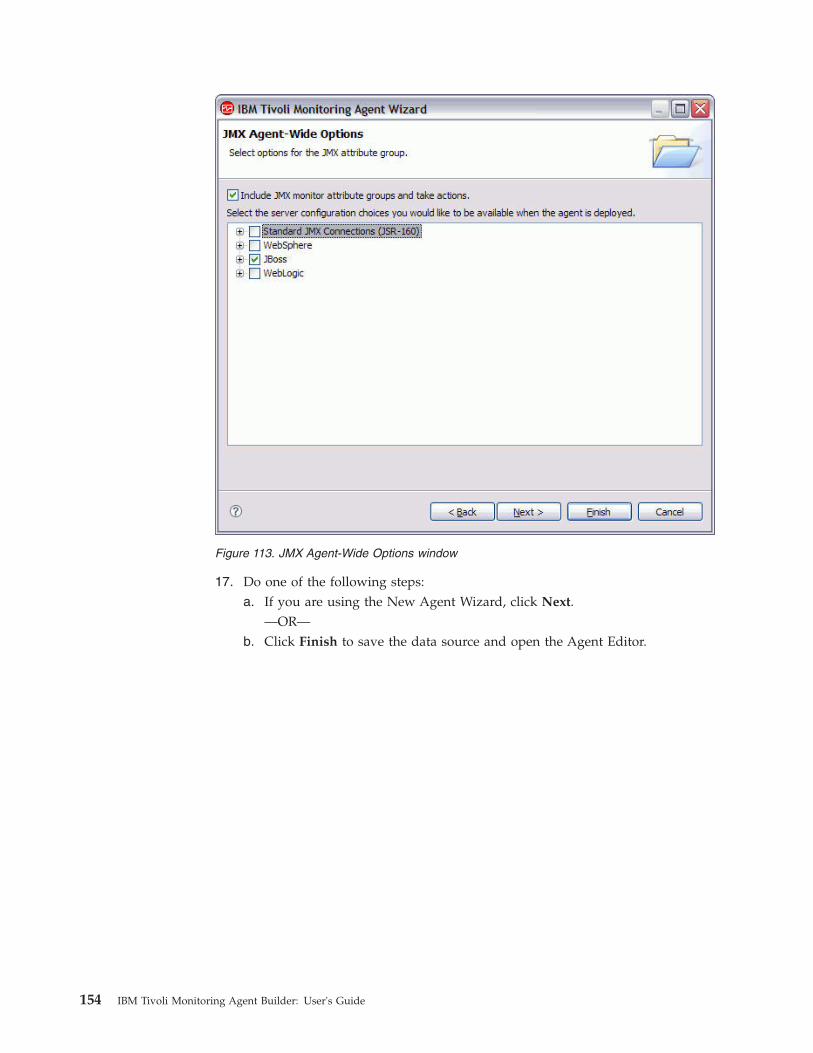
17. Do one of the following steps:a. If you are using the New Agent Wizard, click Next.
—OR—b. Click Finish to save the data source and open the Agent Editor.
Figure 113. JMX Agent-Wide Options window
154 IBM Tivoli Monitoring Agent Builder: User's Guide
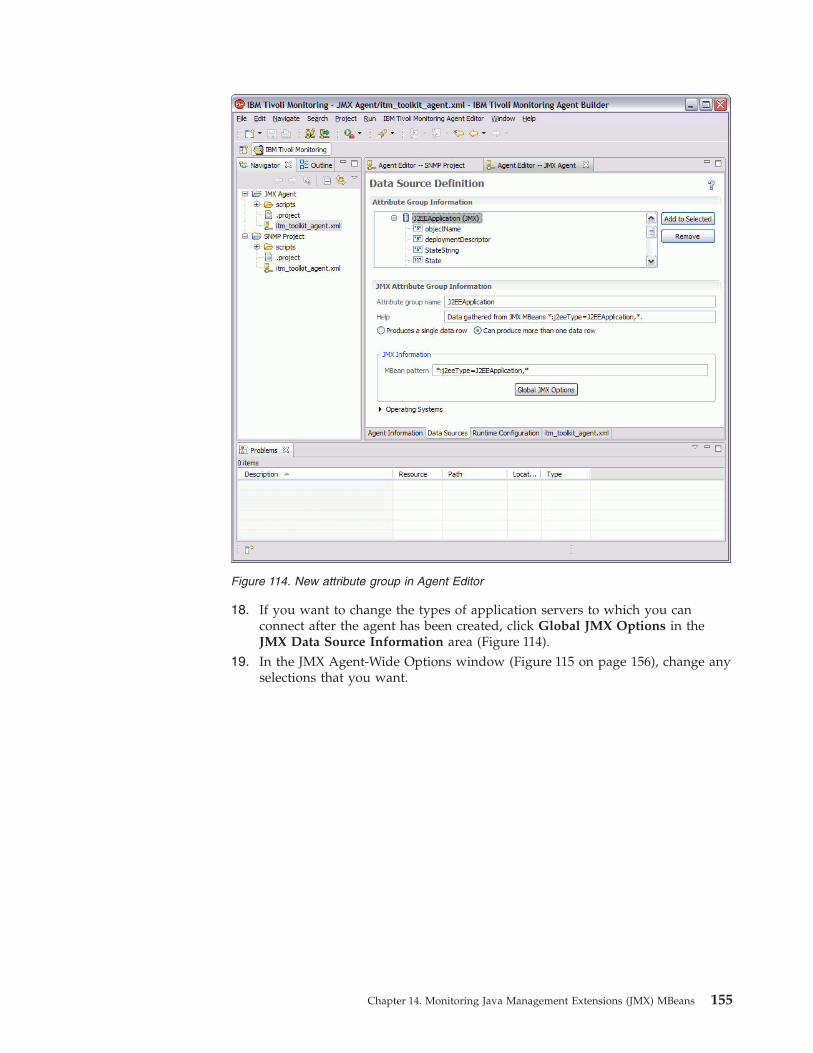
18. If you want to change the types of application servers to which you canconnect after the agent has been created, click Global JMX Options in theJMX Data Source Information area (Figure 114).
19. In the JMX Agent-Wide Options window (Figure 115 on page 156), change anyselections that you want.
Figure 114. New attribute group in Agent Editor
Chapter 14. Monitoring Java Management Extensions (JMX) MBeans 155
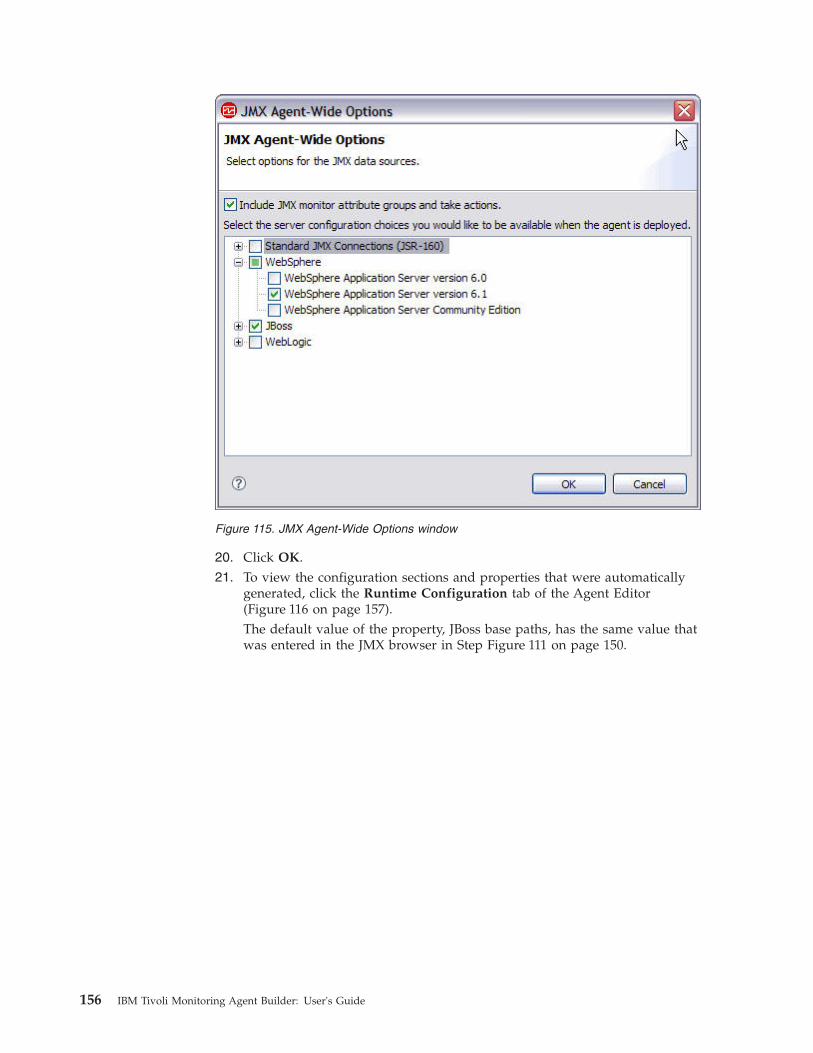
20. Click OK.21. To view the configuration sections and properties that were automatically
generated, click the Runtime Configuration tab of the Agent Editor(Figure 116 on page 157).The default value of the property, JBoss base paths, has the same value thatwas entered in the JMX browser in Step Figure 111 on page 150.
Figure 115. JMX Agent-Wide Options window
156 IBM Tivoli Monitoring Agent Builder: User's Guide
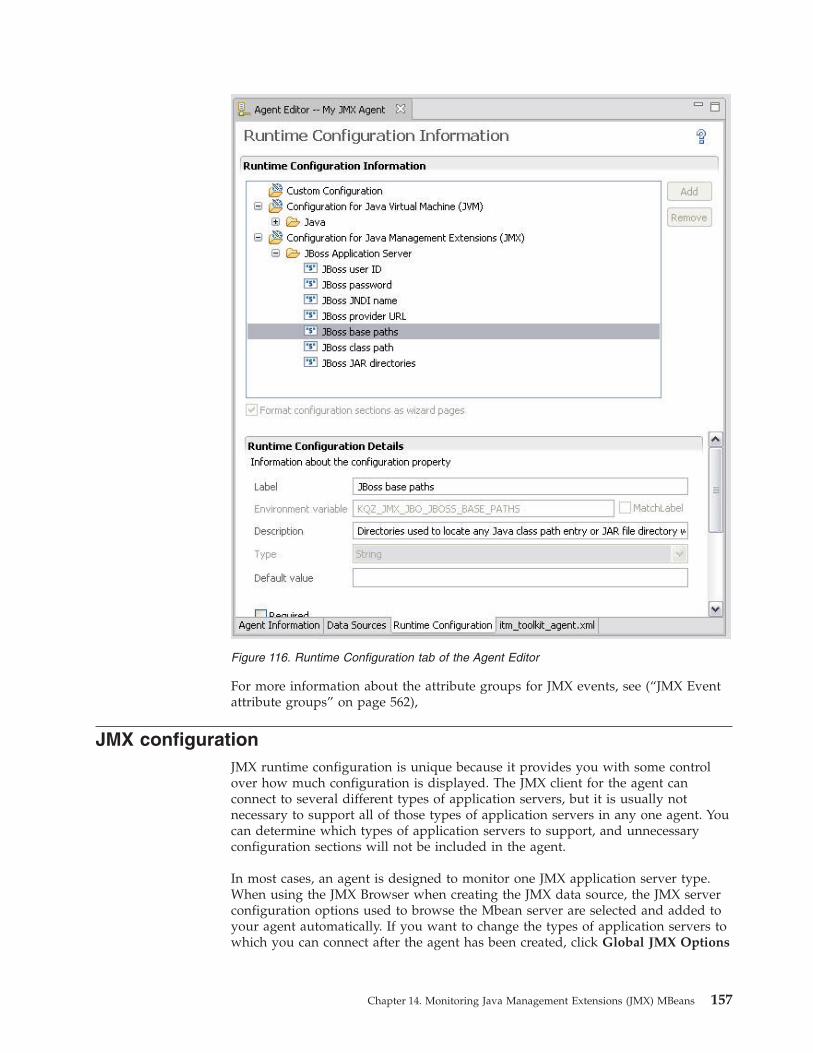
For more information about the attribute groups for JMX events, see (“JMX Eventattribute groups” on page 562),
JMX configurationJMX runtime configuration is unique because it provides you with some controlover how much configuration is displayed. The JMX client for the agent canconnect to several different types of application servers, but it is usually notnecessary to support all of those types of application servers in any one agent. Youcan determine which types of application servers to support, and unnecessaryconfiguration sections will not be included in the agent.
In most cases, an agent is designed to monitor one JMX application server type.When using the JMX Browser when creating the JMX data source, the JMX serverconfiguration options used to browse the Mbean server are selected and added toyour agent automatically. If you want to change the types of application servers towhich you can connect after the agent has been created, click Global JMX Options
Figure 116. Runtime Configuration tab of the Agent Editor
Chapter 14. Monitoring Java Management Extensions (JMX) MBeans 157
in the JMX Data Source Information area (Figure 114 on page 155). In the JMXAgent-Wide Options page (Figure 115 on page 156), change any selections that youwant.
You can design a generic agent that monitors more than one type of JMXapplication server. In this case, more than one JMX server configuration choice canbe selected on the JMX Agent-Wide Options page (Figure 115 on page 156). Whenmore than one type of JMX connection is supported, the runtime configurationprompts you for the connection type that will be used for that agent instance.
Note: An instance of an agent can connect only to one type of JMX applicationserver. Subnodes can be used to connect to different JMX application serversof the same type within an agent instance. To connect to more than one typeof JMX application server, you must configure at least one agent instance foreach JMX application server type.
You can view, add, and change the configuration properties using the Agent Editor.See “Changing configuration properties using the Agent Editor” on page 367. If aJMX data source is defined in a subnode, you will also be able to specify SubnodeConfiguration Overrides. See “Subnode configuration” on page 344.
If you define a JMX data source in your agent, the agent must use Java to connectto the JMX application server. Java configuration properties are added to the agentautomatically.
The following Java configuration properties are specific to the agent runtimeconfiguration (The Agent Builder does not require these properties because it usesits own JVM and logging, which is configured through the JLog plugin.):
Java HomeFully qualified path that points to the Java installation directory
Configure the agent to use the same JVM that the application you aremonitoring uses, particularly for the WebLogic Server and WebSphereApplication Server.
JVM ArgumentsSpecifies an optional list of arguments to the java virtual machine.
Trace LevelDefines the amount of information to write to the java trace file. Thedefault is to write only Error data to the log file. For more information see“Trace log format” on page 414.
If you define a JMX data source in your agent, the following required, commonconfiguration fields are added to the agent automatically:
ConnectionThe type of connection to the MBean server
User IDUser name that is used to authenticate with the MBean server.
PasswordPassword for the User Name entered above.
Base pathsList of directories that are searched for jar files named in the Class Path, ordirectories named in the JAR directories field, that are not fully qualified.
158 IBM Tivoli Monitoring Agent Builder: User's Guide
Directory names are separated by a semi-colon (';') on Windows, and by asemi-colon (';') or colon (':') on UNIX systems.
Class pathExplicitly named jar files to be searched by the agent. Any that are notfully qualified will be appended to each of the Base Paths until the jar fileis found.
JAR directoriesList of directories that are searched for jar files. Directory names areseparated by a semi-colon (';') on Windows, and by a semi-colon (';') orcolon (':') on UNIX systems. The jar files in these directories do not need tobe explicitly identified; they will be found because they reside in one ofthese directories. Subdirectories of these directories are not searched. Anydirectory names that are not fully qualified will be appended to each of theBase Paths until the directory is found.
Note: When monitoring remotely, the jar files and all of their dependent jar filesthat are required to connect to the application being monitored must beinstalled locally on the computer where the agent is running. These jar filesmust be configured in the JAR directories, in the base and class path fields.In addition, locally install a supported JVM for the application you aremonitoring and specify the path in the Java Home configuration field.
Examples:
v For Weblogic 10, the class path is server/lib/wlclient.jar;server/lib/wljmxclient.jar. The base path points to the WebLogic application serverdirectory where the server/lib directory is located.
v For WebSphere, the base path points to the location where the WebSphereapplication server is installed. Multiple base paths are listed in this example toprovide a default for Windows and UNIX. The class path lists the jar filesrelative to the base path. The relative value lib for the Jar directories fieldcauses all jar files in this directory under the base path to be loaded.– Base paths: C:\Program Files\IBM\WebSphere\AppServer;/opt/IBM/WebSphere/
AppServer
– Class path: runtimes/com.ibm.ws.admin.client_6.1.0.jar;plugins/com.ibm.ws.security.crypto_6.1.0.jar
– JAR directories: lib
Depending on which JMX server types are selected in the JMX Agent-WideOptions page, some or all of the following configuration properties are added.Default values are provided by the Agent Builder, and can be modified:
JSR-160 Compliant Server and WebSphere Community Edition connectionspecific configuration properties:
JMX Service URLJMX Services URL to connect to for monitoring.
WebSphere Application Server 6.0, 6.1, and 7.0 connection specific configurationproperties:
Host nameHost name of the system where the application server you aremonitoring resides. If monitoring locally, this is the local systemname. If monitoring remotely, this is the host name of the systemwhere the application server resides.
Chapter 14. Monitoring Java Management Extensions (JMX) MBeans 159
Port Port number to use on the host name to be monitored.
Connector protocolConnector protocol to be used by the monitoring connection. RMIand SOAP are supported.
Profile nameName of the profile to use for configuring the connection.
JBoss Application Server connection specific configuration properties:
JNDI NameJndi Name used to look up the MBean server.
Provider URLJmx Services provider URL to connect to for monitoring.
WebLogic Server version 9 and 10 connection specific configuration properties:
Service URLJmx Services provider URL to connect to for monitoring includingthe JNDI name.
Note: If WebSphere administrative security is enabled you must make sure clientlogin prompting is disabled in the appropriate client connection propertiesfiles. For RMI connections, to prevent clients from prompting the user, youmust modify the com.ibm.CORBA.loginSource property in thesas.client.props file in your WebSphere application server profile's propertiesdirectory. For a SOAP connection, you must modify thecom.ibm.SOAP.loginSource property in the soap.client.props file in the samedirectory. In both cases, the loginSource property should be set to notcontain a value.
You can view, add, and change the configuration properties using the Agent Editor.See “Changing configuration properties using the Agent Editor” on page 367. If aWindows data source is defined in a subnode, you can also specify SubnodeConfiguration Overrides. See “Subnode configuration” on page 344.
JMX notifications, monitors, and operationsIn addition to providing monitoring data when requested, some MBeans alsoprovide the following data:v “JMX notifications”v “JMX monitors” on page 161v “JMX operations” on page 166
JMX notificationsIn addition to providing monitoring data when requested, some MBeans alsoprovide notifications. A notification is an object generated by an MBean that ispassed to registered listeners when an event occurs.
Agents built by the Agent Builder can define attribute groups that contain valuesfrom notifications rather than MBeans.
When the agent is started, a notification listener is registered with each MBean thatmatches the attribute group’s MBean pattern. The attribute group then displaysone row per notification received. Each column contains one item of data from the
160 IBM Tivoli Monitoring Agent Builder: User's Guide
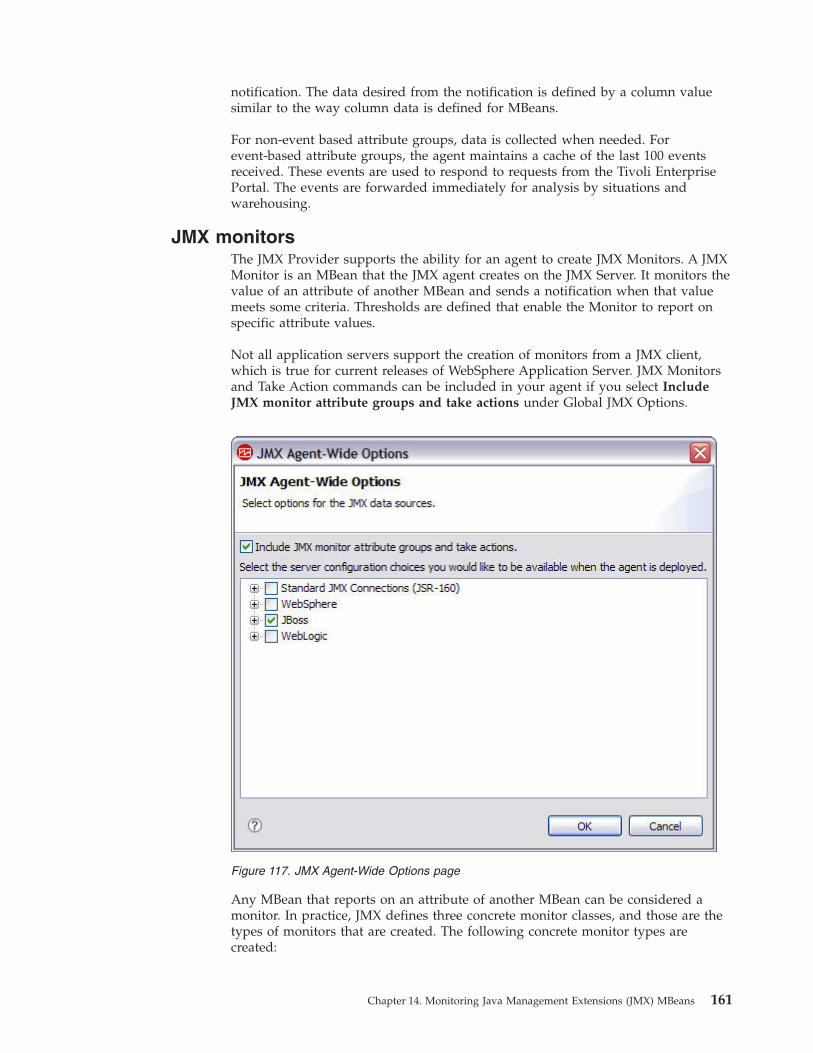
notification. The data desired from the notification is defined by a column valuesimilar to the way column data is defined for MBeans.
For non-event based attribute groups, data is collected when needed. Forevent-based attribute groups, the agent maintains a cache of the last 100 eventsreceived. These events are used to respond to requests from the Tivoli EnterprisePortal. The events are forwarded immediately for analysis by situations andwarehousing.
JMX monitorsThe JMX Provider supports the ability for an agent to create JMX Monitors. A JMXMonitor is an MBean that the JMX agent creates on the JMX Server. It monitors thevalue of an attribute of another MBean and sends a notification when that valuemeets some criteria. Thresholds are defined that enable the Monitor to report onspecific attribute values.
Not all application servers support the creation of monitors from a JMX client,which is true for current releases of WebSphere Application Server. JMX Monitorsand Take Action commands can be included in your agent if you select IncludeJMX monitor attribute groups and take actions under Global JMX Options.
Any MBean that reports on an attribute of another MBean can be considered amonitor. In practice, JMX defines three concrete monitor classes, and those are thetypes of monitors that are created. The following concrete monitor types arecreated:
Figure 117. JMX Agent-Wide Options page
Chapter 14. Monitoring Java Management Extensions (JMX) MBeans 161
v String monitor – watches a string attribute, reports equality or inequality of thatstring.
v Gauge monitor – watches a variable numeric attribute, reports up or downmovement beyond threshold values.
v Counter monitor – watches an increasing numeric attribute, reports when itreaches a threshold value or increases by a certain amount.
The following attribute groups might be automatically added to the agent to collector represent JMX Monitor notifications:v Registered Monitors
This attribute group displays all of the JMX Monitors that have been added bythe user.
v Counter NotificationsThis attribute group reports all notification received from Counter Monitors.
v Gauge NotificationsThis attribute group reports all notification received from Gauge Monitors.
v String NotificationsThis attribute group reports all notifications received from String Monitors.
Take Action commands for monitorsA monitor is created by running a Take Action command. Three Take Actioncommands are defined, one to create each type of monitor, and a fourth TakeAction is defined to delete an existing monitor. A 256-character limit applies toTake Action commands.
The monitor attribute groups are a part of every JMX agent that is built, includingall agents built by the Agent Builder. The four Take Action commands are availableto all agents, though they cannot be used unless it is a JMX agent.
The following sections provide the parameters needed to create each type ofmonitor and examples:v “JMX Add String Metric Watcher”v “JMX Add Gauge Metric Watcher” on page 163v “JMX Add Counter Metric Watcher” on page 164v “JMX Delete Metric Watcher” on page 165
JMX Add String Metric Watcher: Use this Take Action command to create amonitor.
Parameters:
MBean patternAll MBeans matching this pattern will be monitored by this monitor.
Observed attributeName of the MBean string attribute that is being watched.
Notify matchTrue if a notification is to be sent when the monitored string matches areference value, false if not (defaults to false).
Notify differTrue if a notification is to be sent when the monitored string does notmatch the reference value, false if not (defaults to true)
162 IBM Tivoli Monitoring Agent Builder: User's Guide
Reference valueString to compare with the observed attribute.
A default means the argument is not specified.
Example: Request a notification when a service is stopped:STRING_METRIC_WATCHER [*:type=Service,*] [StateString] [true] [false] [Stopped]
Where:
*:type=Service,*MBean pattern: This monitors any MBean with a key property named typewhose value is Service.
StateStringObserved attribute: A string attribute that is common to all MBeans oftype=Service.
true Notify match: You want a notification to be sent to your agent when theStateString attribute matches your reference value of Stopped.
false Notify differ: You do not want to be notified when the Service attributedoes not match Stopped.
StoppedReference value: When the StateString attribute changes to the valueStopped, a notification will be sent.
JMX Add Gauge Metric Watcher: Use this Take Action command to create amonitor.
Parameters:
MBean patternAll MBeans matching this pattern are monitored by this monitor.
Observed attributeName of the MBean string attribute that is being watched.
Difference modeTrue if the value monitored is the difference between the actual currentand previous values of the attribute, false if the value monitored is theactual current value of the attribute (defaults to false).
Notify highTrue if a notification is to be sent when an increasing monitored valuecrosses the high threshold, false if not (defaults to true).
Notify lowTrue if a notification is to be sent when a decreasing monitored valuecrosses the low threshold, false if not (defaults to true).
High thresholdValue that the observed attribute is expected to stay below.
Low thresholdValue that the observed attribute is expected to stay above.
Example: Request a notification when free memory goes below 10M:GAUGE_METRIC_WATCHER [ServerInfo] [FreeMemory] [false] [false] [true] [30000000][10000000]
Chapter 14. Monitoring Java Management Extensions (JMX) MBeans 163
Where:
*:type=ServerInfoMBean pattern: Monitors any MBean whose name has a single keyproperty named type whose value is ServerInfo.
FreeMemoryObserved attribute: Numeric attribute that fluctuates up or down, this oneindicating the amount of free memory in the application server.
false Difference mode: Monitors the actual attribute value, not the differencebetween one observation and another.
false Notify high: Notification is not sent when free memory goes up.
true Notify low: Notification is not sent when the free memory becomes toolow.
30000000High threshold: Even though you are not concerned with passing a highthreshold, you need a reasonable high threshold value. A second lowthreshold notification will not occur until the attribute value hits or passesthe high threshold.
10000000Low threshold: Low threshold value that you want to be notified about.
JMX Add Counter Metric Watcher: Use this Take Action command to create amonitor.
Parameters:
MBean patternAll MBeans matching this pattern are monitored by this monitor.
Observed attributeName of the MBean string attribute that is being watched.
Initial thresholdValue that the observed attribute is compared.
Offset Value added to the threshold after the threshold is exceeded, to create anew threshold.
ModulusCounter's maximum value, after which it rolls over to 0
Difference modeTrue if the value monitored is the difference between the actual currentand previous values of the attribute, false if the value monitored is theactual current value of the attribute (defaults to false). This effectivelyturns on rate-of-change monitoring.
Granularity periodFrequency with which measurements are taken (defaults to 20 seconds).Most important if difference mode is true.
Example: Request a notification when any server has three or more errors.:COUNTER_METRIC_WATCHER [*:j2eeType=Servlet,*] [errorCount] [3] [4] [] [diff][gran]
Where:
164 IBM Tivoli Monitoring Agent Builder: User's Guide
*:j2eeType=Servlet,*MBean pattern: Monitors any J2EE Servlet MBean whose name has a singlekey property named type whose value is ServerInfo.
errorCountObserved attribute: Increasing numeric attribute, this one indicating thenumber of errors of the servlet.
3 Initial threshold: You want to be notified when errorCount meets orexceeds 3.
4 Offset: When you get a notification for 3 errors, 4 will be added to theprevious threshold of 3 to make a new threshold of 7. A second notificationwill be sent after errorCount reaches 7; a third at 11; a fourth at 15, etc.Zero or none is not valid because it expects the counter to always increaseand not increasing the offset would not make sense for a counter.
Modulus:errorCount has no architected maximum value, so use an unreasonablyhigh value.
false Difference mode: You are concerned with absolute error counts. Differenceis true if you are interested in the rate that errorCount was increasing.
Granularity period: Not set, so take the default granularity period of 20seconds. Granularity period is available for all monitor types, but isexposed with a counter monitor so that a meaningful rate of change (withdifference mode=true) can be determined.
JMX Delete Metric Watcher: Use this Take Action to delete a monitor.
Parameter:
NumberMonitor number as shown in the REGISTERED_MONITORS table
Example: Delete monitor number 2:DELETE_WATCHER [2]
Where:
2 Number of monitor to be deleted.
Starting and stopping monitorsMonitors are persistent across starts and stops of the agent and the JMX server. Ifthe agent detects that the JMX server has been recycled, it reregisters the monitors.If the agent is recycled, monitors are reregistered. The monitor definitions arestored in a file called default_instanceName.monitors where instanceName is theagent instance name or default if it is a single instance agent. This file is located inthe following directory (note that xx denotes the 2 character product code):v Windows systems: TMAITM6/kxx/configv UNIX/Linux systems: architecture/xx/config (see “New files on your system”
on page 382 for information about determining the architecture value)
If the agent is restarted, it will use the monitor definitions file to restore themonitors.
Chapter 14. Monitoring Java Management Extensions (JMX) MBeans 165

JMX operationsAgents that have JMX data sources include the JMX_INVOKE Take Actioncommand that you can use to run JMX operations against the server you aremonitoring.
Take Action command syntaxThe action has the following syntax:JMX_INVOKE [MBean pattern] [Operation name] [Argument 1] [Argument 2][Argument 3] [Argument 4]
Where:
MBean patternMBean query that selects the MBeans on which the operation will run . Ifthe pattern matches more than one MBean, the operation executes on eachof the matched MBeans.
Operation nameName of the MBean operation to execute.
Argument 1, Argument 2, Argument 3, Argument 4Optional arguments that can be provided to the MBean operation.Arguments must be a simple data type such as a string or an integer.
The JMX invoke Take Action command returns success if the operation issuccessfully executed. If the operation returns a value, that value is written to theJMX data provider log file.
Example: Invoke an operation to reset a counterThis action runs the resetPeakThreadCount operation on the Threading MBeans:JMX_INVOKE [*:type=Threading,*] [resetPeakThreadCount][] [] [] []
Where:
*:type=Threading,*MBean Pattern: This pattern matches all MBeans that have a type ofThreading
resetPeakThreadCountOperation name: This is the operation that is executed on every MBeanthat matches the pattern.
[] [] [] []Argument 1, 2, 3, 4: The arguments are not needed for this operation. Theyare specified only to comply with the syntax of the action.
Example: Invoke an action with an argumentThis action runs the getThreadCpuTime operation on the Threading MBeans. Theresult is logged to the JMX data provider trace file.JMX_INVOKE [*:type=Threading,*] [getThreadCpuTime] [1] [] [] []
Where:
*:type=Threading,*MBean Pattern: This pattern matches all MBeans that have a type ofThreading
166 IBM Tivoli Monitoring Agent Builder: User's Guide

getThreadCpuTimeOperation name: This is the operation that is executed on every MBeanthat matches the pattern.
1 Argument 1: The thread id that is being queried.
[] [] [] Argument 2, 3, 4: These arguments are not needed for this operation. Theyare specified as empty arguments to comply with the Take Actioncommand syntax.
Running the JMX_INVOKE Take Action commandThe agent developer cannot expect the end user to run the JMX_INVOKE TakeAction command. Instead, additional actions must be developed that run theJMX_INVOKE Take Action. If possible in these actions, hide the details such as theoperation name and the MBean pattern from the user.
Specific fields for Java Management Extensions (JMX) MBeans
Figure 118. Attribute Information page
Chapter 14. Monitoring Java Management Extensions (JMX) MBeans 167
The syntax of the metric name for a JMX Attribute group consists of tokensseparated by a period. The tokens form primary values and optionally secondaryvalues:v Primary value: a value obtained directly from the MBean or Notification in a
given row of the table. Primary values from an MBean are obtained either froman MBean attribute or from the invocation of an MBean operation (method call).Primary values from a Notification are obtained from a field or invocation of amethod on the Notification object. Primary values can be primitive types, or canbe Java objects.
v Secondary value: a value obtained by further processing a primary value orother secondary value. Secondary values are processed internally to the engineand do not involve calls to the JMX server. If the primary (or other secondaryvalue) is a Java object, a secondary value is the result of fetching a public fieldfrom that object, or the result of a method call on that object. Such secondaryvalues are obtained using Java introspection of the primary (or other secondary)Java object. If the primary (or other secondary) value is a Java String in the formof an MBean name, the secondary value can also be the domain or any of theproperties that make up the MBean name.
The following syntax describes the format for the Metric name field:Metric Name = PrimaryValue [ .SecondaryValue ]PrimaryValue = Attribute.attributeName |
Method.methodName |Domain |Property.propertyName |Field.fieldName |Name
SecondaryValue = Field.fieldName |Method.methodName |Domain |Property.propertyName |Explode |ElementCount
propertyName = the name of a key property in an MBean ObjectNameattributeName = the name of an MBean attributemethodName = a zero-argument operation of an MBean or a zero-argument methodof a Notification or other Java object.methodName(argument) = A single-argument operation of an MBean or asingle-argument method of a Notification or other Java object. Theargument will be passed to the method as a string.fieldName = the name of a public instance variable in a Notification orother Java objectnotificationMethod = the name of a public zero-argument method of aNotification object
By including only a primary value in the metric name definition, the data collectedcan be any of the following items:v MBean domainv MBean string valuev Key property from the MBean namev Numeric or string attribute value on an MBean attribute (including the full
name of another MBean) a numeric or string return value from one of an MBeanoperations
v Value of a numeric or string public instance variable in a Notification objectv Numeric or string return value from one of a Notification’s operations
168 IBM Tivoli Monitoring Agent Builder: User's Guide
By adding a secondary value to the metric's definition, you can drill down into aJava object's primary value, and invoke a public method or fetch a public instancevariable.
By adding a secondary value to another secondary value in the metric's definition,you can drill down into a secondary value object. This can continue as deeply asobjects are nested inside an MBean or a Notification.
Tokens that make up primary and secondary values are either keywords or names.In most cases, a keyword token is followed by a name token. The following tableshows some examples:
Metric name sampleAttribute grouptype Description of the data returned
Domain MBean The domain portion of the MBean(the part before the colon).
Name MBean The full string representation of theMBean.
Attribute.serverVendor MBean MBean attribute serverVendor.
Method.getHeapSize MBean The value returned by thegetHeapSize() on the MBean.
Property.j2eeType MBean The value of j2eeType is extractedfrom the MBean name.
Field.Message Event(Notification)
The Message field in a notification.
The keywords Attribute, Method, and Field can return Java objects which containother data. You can perform operations on those objects by appending secondaryvalue definitions. More examples:
Metric name sampleAttribute grouptype Description of the data returned
Attribute.deployedObject.Method.getName
MBean Takes the deployedObject attributefrom the MBean and gets the resultof the getName() method.
Attribute.eventProvider.Method.getException.Method.getDescription
MBean This goes three deep: an attributenamed eventProvider is presumed tobe an object which has agetException() method. This methodreturns an object with agetDescription() method. Thatmethod is called and the return valueis put in the column.
Attribute.HeapMemoryUsage.Method.get(used)
MBean Takes the HeapMemoryUsageattribute from the MBean and getsthe result of the get(String value)method. The string used is passed tothe method as the argument. Onlyone argument can be provided and itmust be a literal string value.
Shows how you can collect data froman open MBean composite datastructure.
Chapter 14. Monitoring Java Management Extensions (JMX) MBeans 169
Note that Domain and Property can be used as keywords in secondary values ifthe previous value returned a String in the format of an MBean name. Forexample:
Metric name sampleAttribute grouptype Description of the data returned
Attribute.jdbcDriver.Property.name
MBean The attribute jdbcDriver returns anMBean name, and the key property,name, is extracted from the MBeanname.
Attribute.jdbcDriver.Domain MBean The attribute jdbcDriver returns anMBean name, and the domain isextracted from the MBean name.
The ElementCount and Explode keywords perform operations on arrays orcollections of data.v ElementCount – returns the number of elements in an array.v Explode – this explodes a row into several rows, one new row for each element
of an array.
Examples of each of the above:
Metric name sampleAttribute grouptype Description of the data returned
Attribute.deployedObjects.ElementCount
MBean The MBean attribute deployedObjectsis an array, and this column willcontain the number of elements inthe array.
Attribute.deployedObjects.Explode.MBean.Property.j2eeType
MBean This causes the table to have one rowfor each element in deployed objects.This column contains the deployedObject’s j2eeType.
Attribute.SystemProperties.Method.values.Explode.Method.get(key)
MBean Causes you to get one new row foreach entry in an open MBean tabulardata structure. Each tabular datastructure contains a composite datastructure with an item named key,which is returned.
TestingYou can test the attribute group you created within Agent Builder.
You can start the Testing procedure in the following ways:1. During agent creation click Test on the JMX Information page (Figure 112 on
page 153).2. After agent creation, select an attribute group on the Agent Editor Data Sources
Definition page and click Test . For more information about the Agent Editor,see “Tivoli Monitoring Agent Editor” on page 37.
After you click Test in one of the previous two steps, the JMX Test windowFigure 119 on page 171 is displayed
170 IBM Tivoli Monitoring Agent Builder: User's Guide
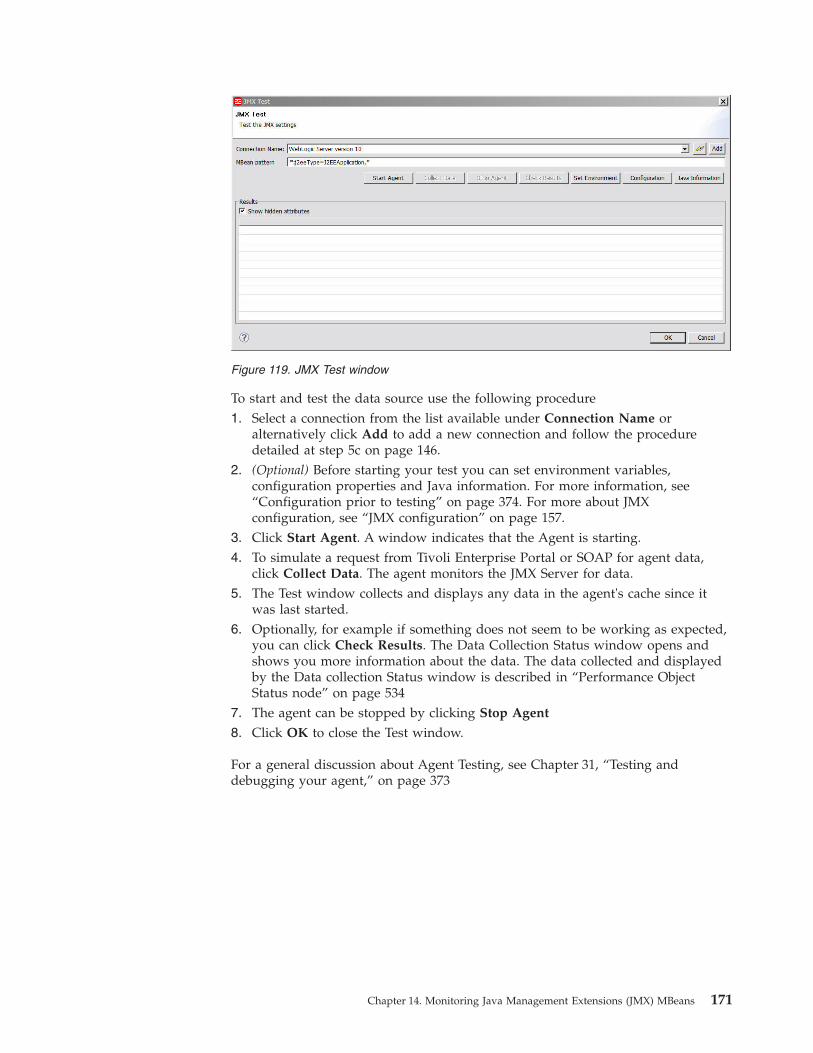
To start and test the data source use the following procedure1. Select a connection from the list available under Connection Name or
alternatively click Add to add a new connection and follow the proceduredetailed at step 5c on page 146.
2. (Optional) Before starting your test you can set environment variables,configuration properties and Java information. For more information, see“Configuration prior to testing” on page 374. For more about JMXconfiguration, see “JMX configuration” on page 157.
3. Click Start Agent. A window indicates that the Agent is starting.4. To simulate a request from Tivoli Enterprise Portal or SOAP for agent data,
click Collect Data. The agent monitors the JMX Server for data.5. The Test window collects and displays any data in the agent's cache since it
was last started.6. Optionally, for example if something does not seem to be working as expected,
you can click Check Results. The Data Collection Status window opens andshows you more information about the data. The data collected and displayedby the Data collection Status window is described in “Performance ObjectStatus node” on page 534
7. The agent can be stopped by clicking Stop Agent
8. Click OK to close the Test window.
For a general discussion about Agent Testing, see Chapter 31, “Testing anddebugging your agent,” on page 373
Figure 119. JMX Test window
Chapter 14. Monitoring Java Management Extensions (JMX) MBeans 171

172 IBM Tivoli Monitoring Agent Builder: User's Guide
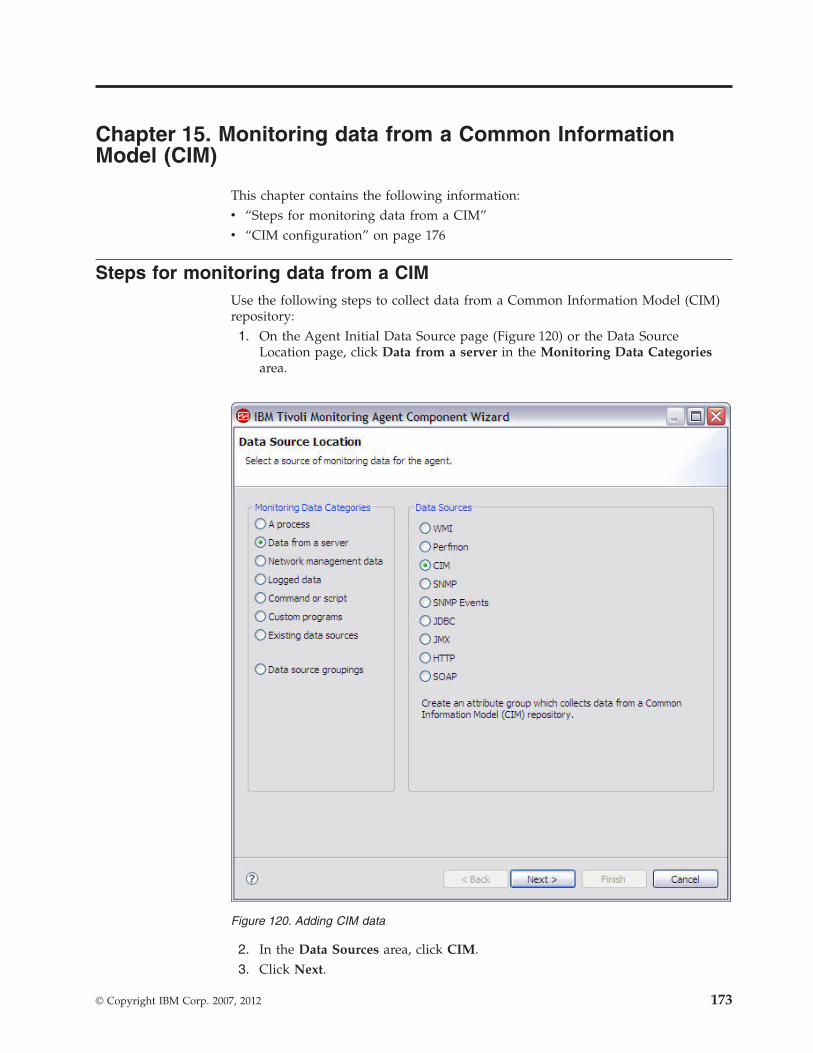
Chapter 15. Monitoring data from a Common InformationModel (CIM)
This chapter contains the following information:v “Steps for monitoring data from a CIM”v “CIM configuration” on page 176
Steps for monitoring data from a CIMUse the following steps to collect data from a Common Information Model (CIM)repository:1. On the Agent Initial Data Source page (Figure 120) or the Data Source
Location page, click Data from a server in the Monitoring Data Categoriesarea.
2. In the Data Sources area, click CIM.3. Click Next.
Figure 120. Adding CIM data
© Copyright IBM Corp. 2007, 2012 173
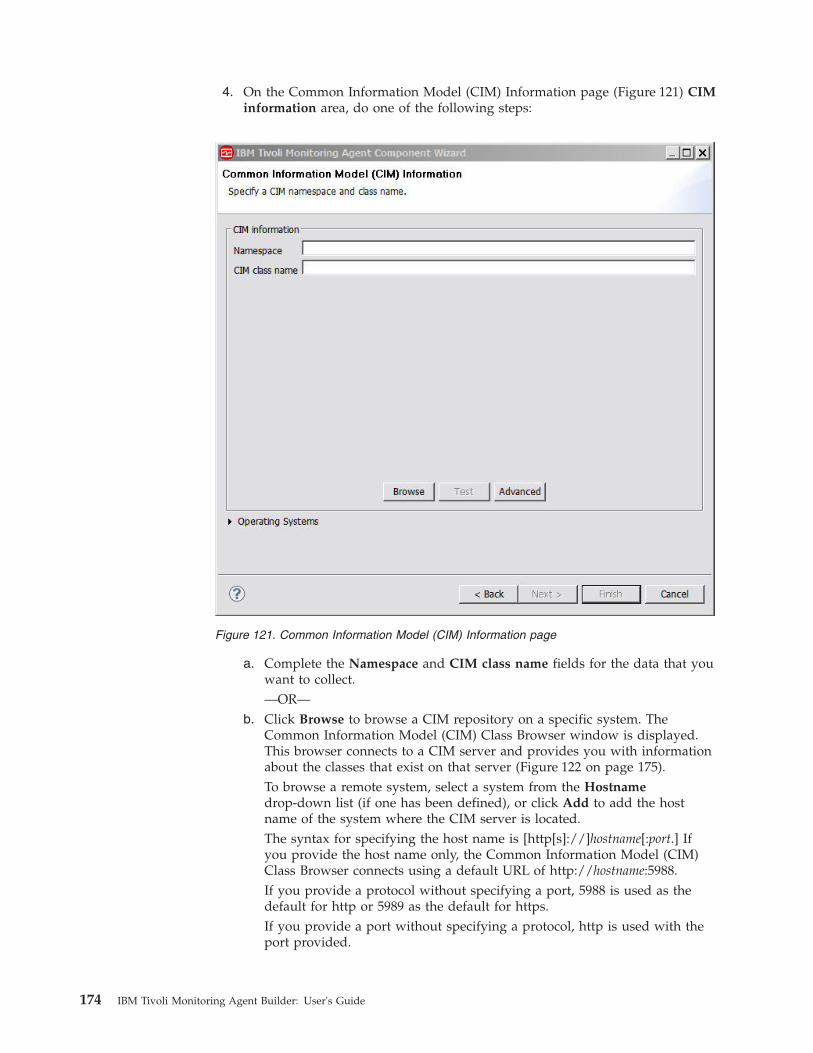
4. On the Common Information Model (CIM) Information page (Figure 121) CIMinformation area, do one of the following steps:
a. Complete the Namespace and CIM class name fields for the data that youwant to collect.—OR—
b. Click Browse to browse a CIM repository on a specific system. TheCommon Information Model (CIM) Class Browser window is displayed.This browser connects to a CIM server and provides you with informationabout the classes that exist on that server (Figure 122 on page 175).To browse a remote system, select a system from the Hostnamedrop-down list (if one has been defined), or click Add to add the hostname of the system where the CIM server is located.The syntax for specifying the host name is [http[s]://]hostname[:port.] Ifyou provide the host name only, the Common Information Model (CIM)Class Browser connects using a default URL of http://hostname:5988.If you provide a protocol without specifying a port, 5988 is used as thedefault for http or 5989 as the default for https.If you provide a port without specifying a protocol, http is used with theport provided.
Figure 121. Common Information Model (CIM) Information page
174 IBM Tivoli Monitoring Agent Builder: User's Guide
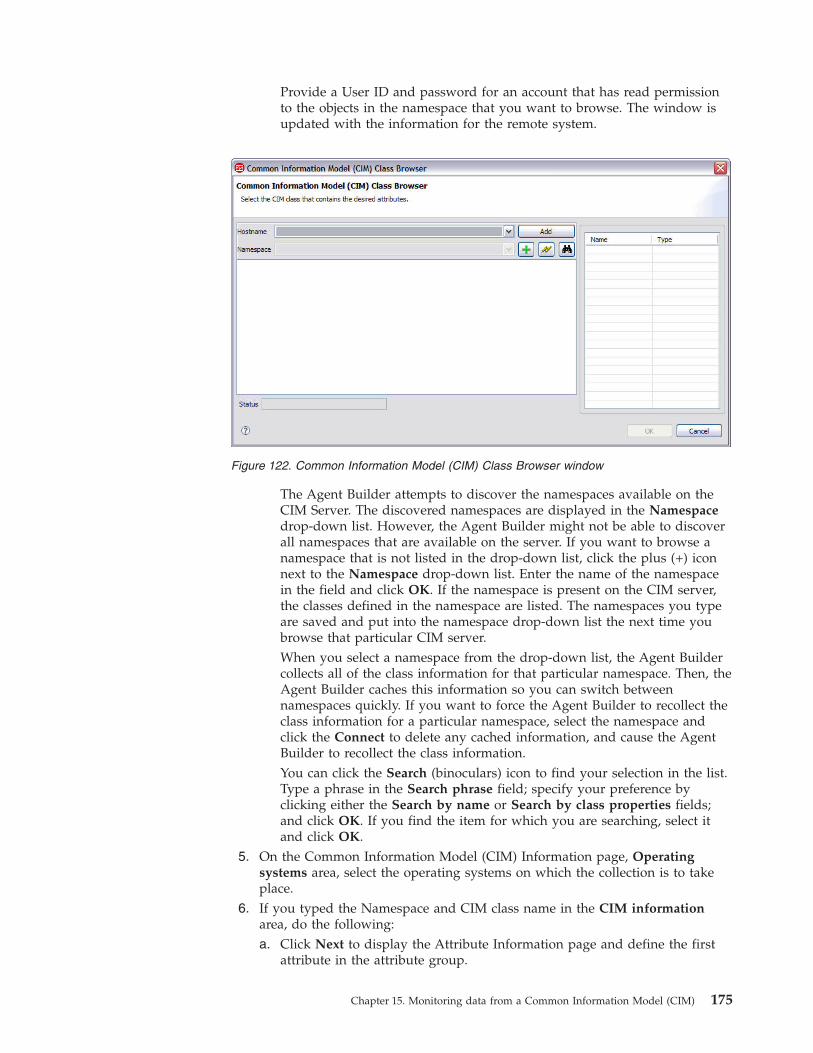
Provide a User ID and password for an account that has read permissionto the objects in the namespace that you want to browse. The window isupdated with the information for the remote system.
The Agent Builder attempts to discover the namespaces available on theCIM Server. The discovered namespaces are displayed in the Namespacedrop-down list. However, the Agent Builder might not be able to discoverall namespaces that are available on the server. If you want to browse anamespace that is not listed in the drop-down list, click the plus (+) iconnext to the Namespace drop-down list. Enter the name of the namespacein the field and click OK. If the namespace is present on the CIM server,the classes defined in the namespace are listed. The namespaces you typeare saved and put into the namespace drop-down list the next time youbrowse that particular CIM server.When you select a namespace from the drop-down list, the Agent Buildercollects all of the class information for that particular namespace. Then, theAgent Builder caches this information so you can switch betweennamespaces quickly. If you want to force the Agent Builder to recollect theclass information for a particular namespace, select the namespace andclick the Connect to delete any cached information, and cause the AgentBuilder to recollect the class information.You can click the Search (binoculars) icon to find your selection in the list.Type a phrase in the Search phrase field; specify your preference byclicking either the Search by name or Search by class properties fields;and click OK. If you find the item for which you are searching, select itand click OK.
5. On the Common Information Model (CIM) Information page, Operatingsystems area, select the operating systems on which the collection is to takeplace.
6. If you typed the Namespace and CIM class name in the CIM informationarea, do the following:a. Click Next to display the Attribute Information page and define the first
attribute in the attribute group.
Figure 122. Common Information Model (CIM) Class Browser window
Chapter 15. Monitoring data from a Common Information Model (CIM) 175
b. Specify the information on the Attribute Information page, and clickFinish.
7. If you browsed the CIM information, the Select key attributes page isdisplayed. On the Select key attributes page, select key attributes or indicatethat this data source produces only one data row. See “Selecting keyattributes” on page 27 for more information.
8. If you browsed to the CIM information, click Finish.9. (Optional) You can test this attribute group by clicking Test. For more
information about testing, see “Testing” on page 17710. (Optional) You can create a filter to limit the data returned by this attribute
group by clicking Advanced. For more information about filtering data froman attribute group, see “Filtering attribute groups” on page 66
11. Do one of the following steps:a. If you are using the New Agent Wizard, click Next.
—OR—b. Click Finish to save the data source and open the Agent Editor.
CIM configurationIf you define a CIM data source in your agent, CIM configuration properties areadded to the agent automatically. You can view, add, and change the configurationproperties using the Agent Editor. See “Changing configuration properties usingthe Agent Editor” on page 367. If a CIM data source is defined in a subnode,specify Subnode Configuration Overrides. See “Subnode configuration” on page344.
The following connection specific configuration properties are on the CIMconfiguration page:
CIM Local or RemoteLocal or remote authentication to the CIM server. Local/Remote Defaultvalue is Remote
CIM user IDThe user ID used to access the CIM server
CIM passwordThe password to access the CIM server
CIM host nameThe host name to be accessed for CIM data
CIM over SSLUse SSL for communication with the CIM server. The options are Yes andNo. The default value is No.
CIM port numberThe port number used for communication that is not secure.
CIM SSL port numberThe port number used for secure communication. The default value is5989. (The default value for Solaris 8 is usually different.)
176 IBM Tivoli Monitoring Agent Builder: User's Guide
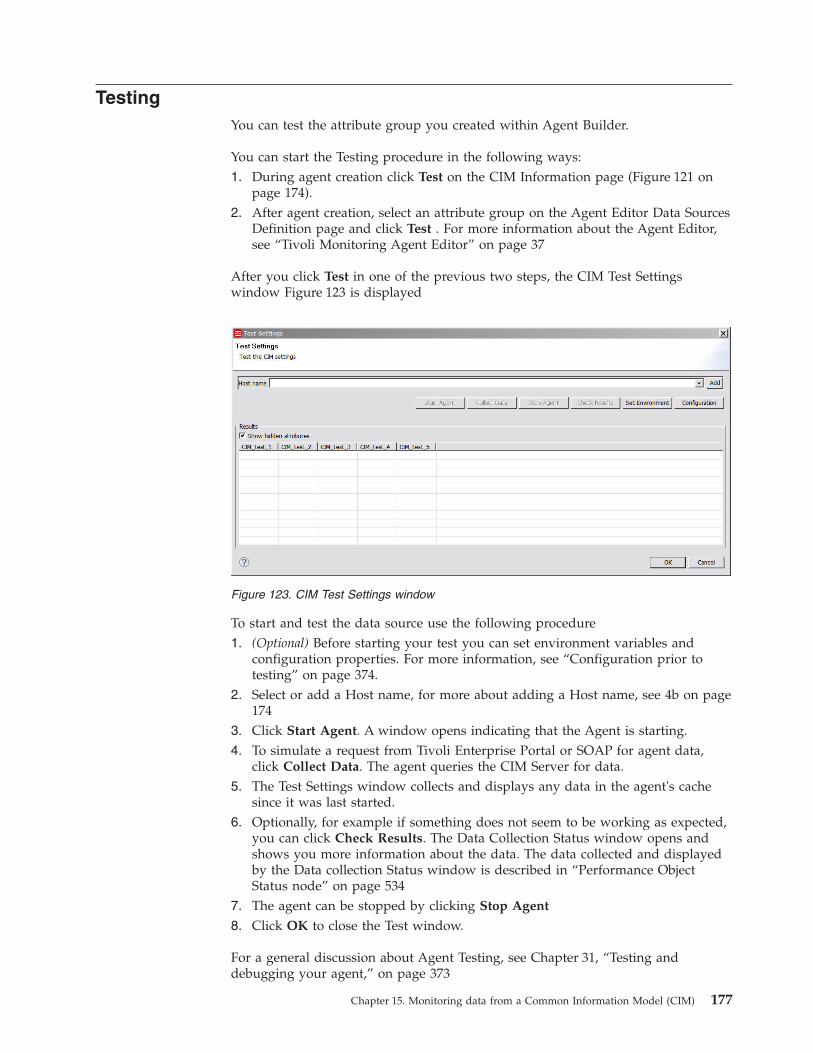
TestingYou can test the attribute group you created within Agent Builder.
You can start the Testing procedure in the following ways:1. During agent creation click Test on the CIM Information page (Figure 121 on
page 174).2. After agent creation, select an attribute group on the Agent Editor Data Sources
Definition page and click Test . For more information about the Agent Editor,see “Tivoli Monitoring Agent Editor” on page 37
After you click Test in one of the previous two steps, the CIM Test Settingswindow Figure 123 is displayed
To start and test the data source use the following procedure1. (Optional) Before starting your test you can set environment variables and
configuration properties. For more information, see “Configuration prior totesting” on page 374.
2. Select or add a Host name, for more about adding a Host name, see 4b on page174
3. Click Start Agent. A window opens indicating that the Agent is starting.4. To simulate a request from Tivoli Enterprise Portal or SOAP for agent data,
click Collect Data. The agent queries the CIM Server for data.5. The Test Settings window collects and displays any data in the agent's cache
since it was last started.6. Optionally, for example if something does not seem to be working as expected,
you can click Check Results. The Data Collection Status window opens andshows you more information about the data. The data collected and displayedby the Data collection Status window is described in “Performance ObjectStatus node” on page 534
7. The agent can be stopped by clicking Stop Agent
8. Click OK to close the Test window.
For a general discussion about Agent Testing, see Chapter 31, “Testing anddebugging your agent,” on page 373
Figure 123. CIM Test Settings window
Chapter 15. Monitoring data from a Common Information Model (CIM) 177

178 IBM Tivoli Monitoring Agent Builder: User's Guide
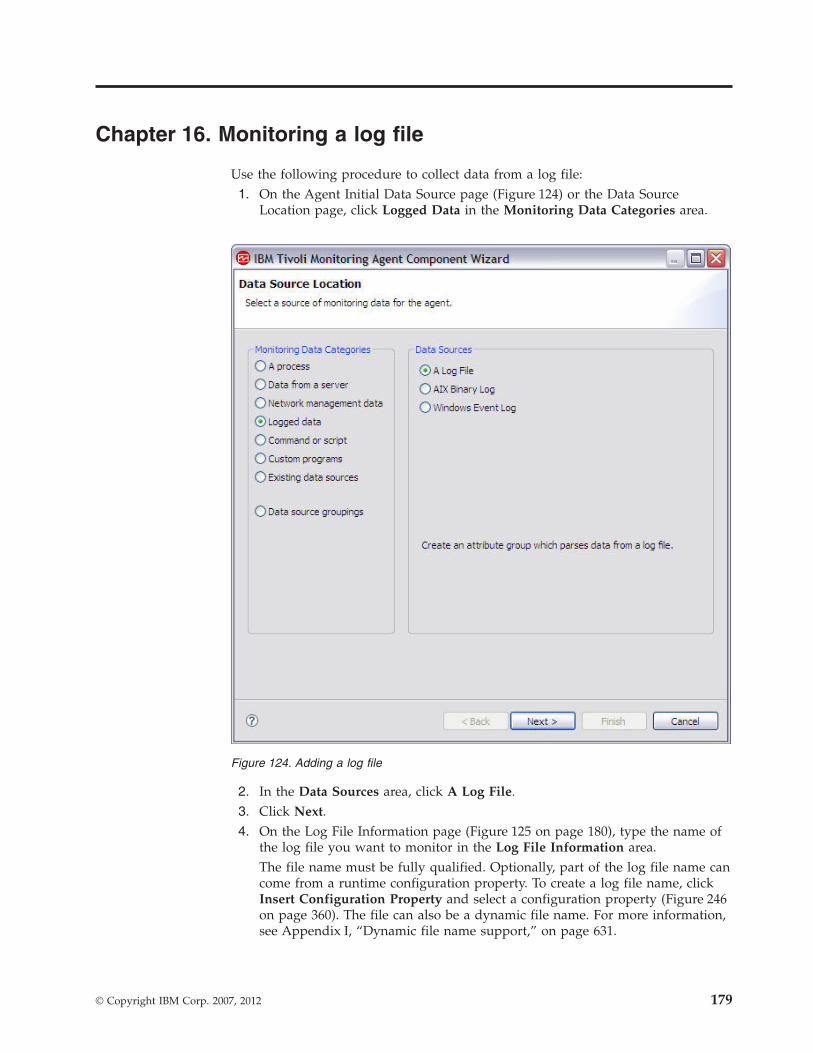
Chapter 16. Monitoring a log file
Use the following procedure to collect data from a log file:1. On the Agent Initial Data Source page (Figure 124) or the Data Source
Location page, click Logged Data in the Monitoring Data Categories area.
2. In the Data Sources area, click A Log File.3. Click Next.4. On the Log File Information page (Figure 125 on page 180), type the name of
the log file you want to monitor in the Log File Information area.The file name must be fully qualified. Optionally, part of the log file name cancome from a runtime configuration property. To create a log file name, clickInsert Configuration Property and select a configuration property (Figure 246on page 360). The file can also be a dynamic file name. For more information,see Appendix I, “Dynamic file name support,” on page 631.
Figure 124. Adding a log file
© Copyright IBM Corp. 2007, 2012 179
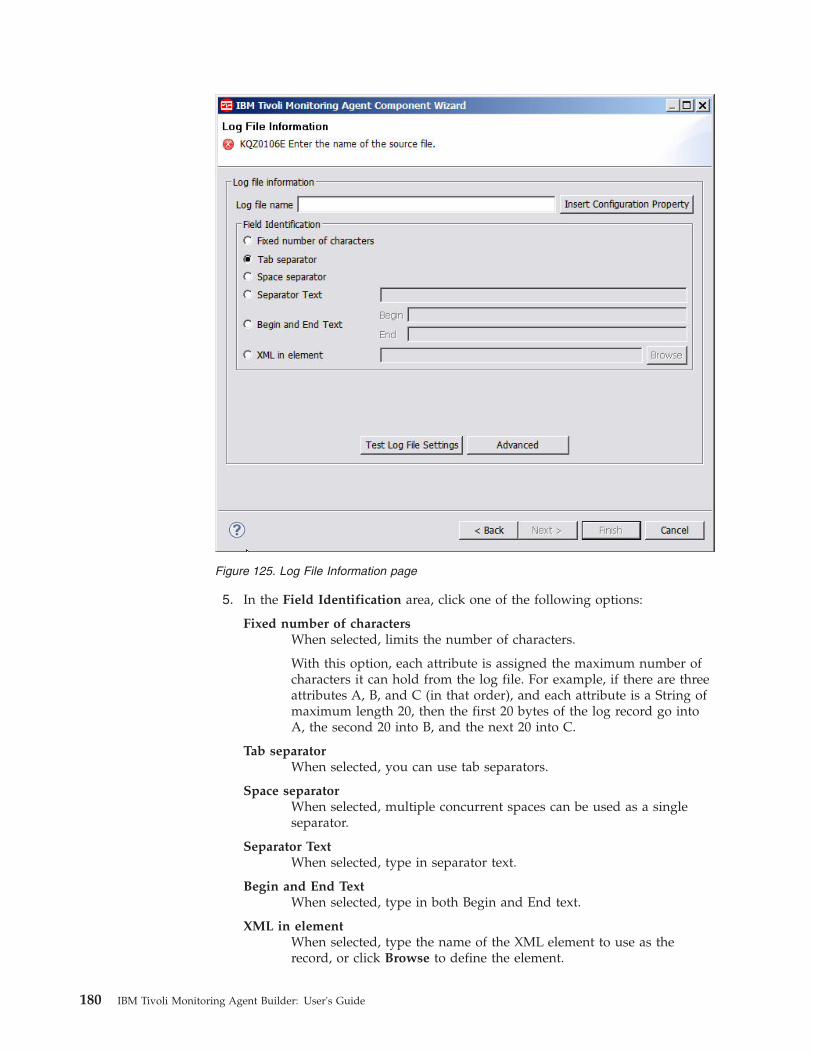
5. In the Field Identification area, click one of the following options:
Fixed number of charactersWhen selected, limits the number of characters.
With this option, each attribute is assigned the maximum number ofcharacters it can hold from the log file. For example, if there are threeattributes A, B, and C (in that order), and each attribute is a String ofmaximum length 20, then the first 20 bytes of the log record go intoA, the second 20 into B, and the next 20 into C.
Tab separatorWhen selected, you can use tab separators.
Space separatorWhen selected, multiple concurrent spaces can be used as a singleseparator.
Separator TextWhen selected, type in separator text.
Begin and End TextWhen selected, type in both Begin and End text.
XML in elementWhen selected, type the name of the XML element to use as therecord, or click Browse to define the element.
Figure 125. Log File Information page
180 IBM Tivoli Monitoring Agent Builder: User's Guide
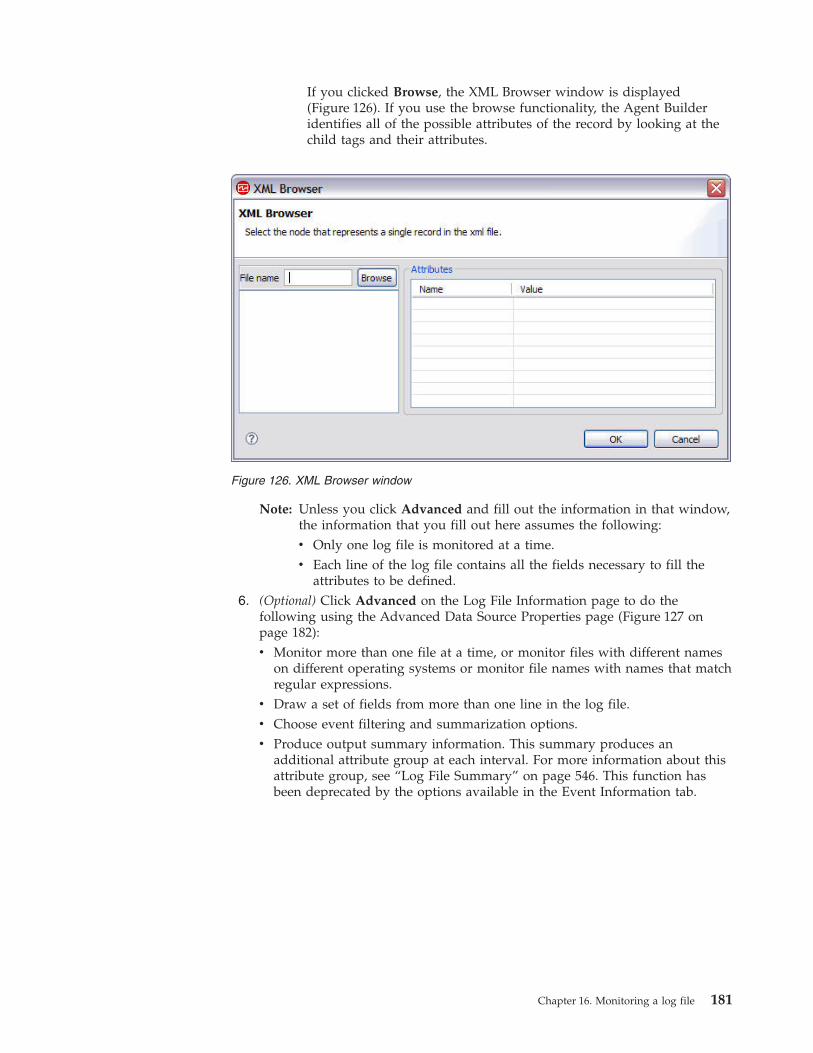
If you clicked Browse, the XML Browser window is displayed(Figure 126). If you use the browse functionality, the Agent Builderidentifies all of the possible attributes of the record by looking at thechild tags and their attributes.
Note: Unless you click Advanced and fill out the information in that window,the information that you fill out here assumes the following:v Only one log file is monitored at a time.v Each line of the log file contains all the fields necessary to fill the
attributes to be defined.6. (Optional) Click Advanced on the Log File Information page to do the
following using the Advanced Data Source Properties page (Figure 127 onpage 182):v Monitor more than one file at a time, or monitor files with different names
on different operating systems or monitor file names with names that matchregular expressions.
v Draw a set of fields from more than one line in the log file.v Choose event filtering and summarization options.v Produce output summary information. This summary produces an
additional attribute group at each interval. For more information about thisattribute group, see “Log File Summary” on page 546. This function hasbeen deprecated by the options available in the Event Information tab.
Figure 126. XML Browser window
Chapter 16. Monitoring a log file 181
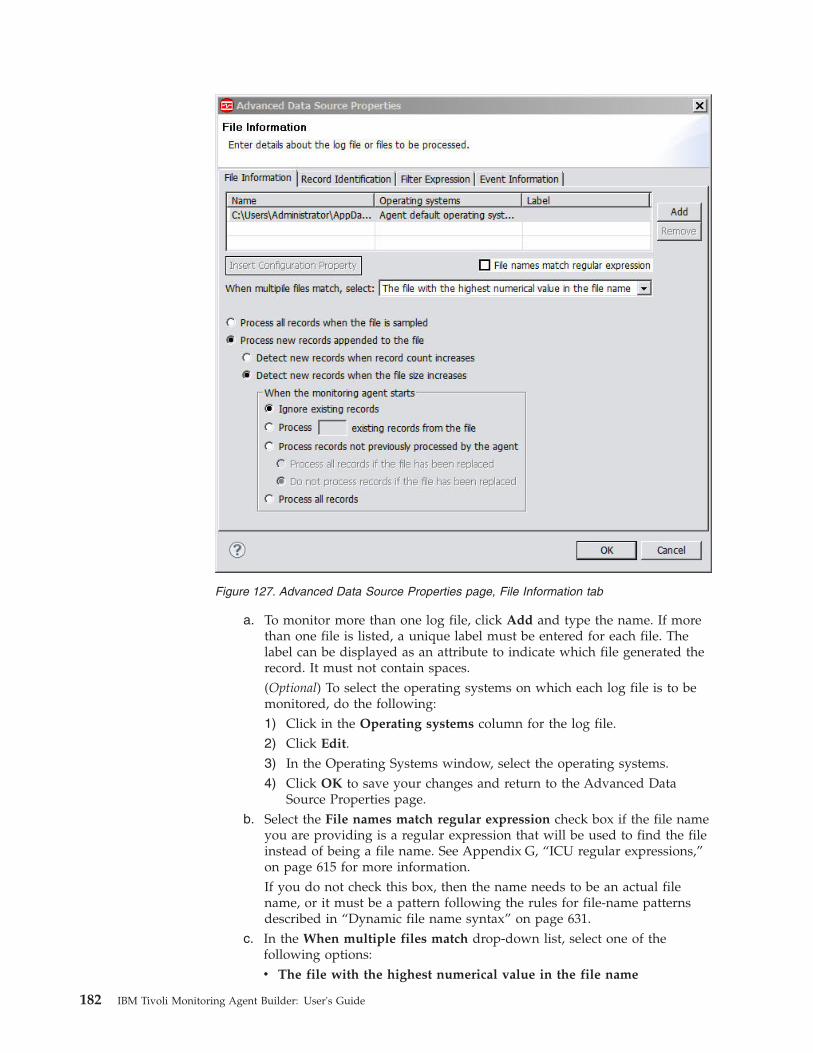
a. To monitor more than one log file, click Add and type the name. If morethan one file is listed, a unique label must be entered for each file. Thelabel can be displayed as an attribute to indicate which file generated therecord. It must not contain spaces.(Optional) To select the operating systems on which each log file is to bemonitored, do the following:1) Click in the Operating systems column for the log file.2) Click Edit.3) In the Operating Systems window, select the operating systems.4) Click OK to save your changes and return to the Advanced Data
Source Properties page.b. Select the File names match regular expression check box if the file name
you are providing is a regular expression that will be used to find the fileinstead of being a file name. See Appendix G, “ICU regular expressions,”on page 615 for more information.If you do not check this box, then the name needs to be an actual filename, or it must be a pattern following the rules for file-name patternsdescribed in “Dynamic file name syntax” on page 631.
c. In the When multiple files match drop-down list, select one of thefollowing options:v The file with the highest numerical value in the file name
Figure 127. Advanced Data Source Properties page, File Information tab
182 IBM Tivoli Monitoring Agent Builder: User's Guide
v The biggest file
v The most recently-updated file
v The most recently-created file
v All files that match
Note: When you select All files that match, the agent identifies all files inthe directory that match the dynamic file-name pattern, andmonitors updates to all of the files in parallel. Data from all files isintermingled during the data collection process. The best practice isto add an attribute by selecting Log file name in Record FieldInformation to correlate log messages to the log files that containthe log messages. Ensure that all files that match the dynamicfile-name pattern can be split into attributes in a consistent manner.If the log files selected cannot be coherently parsed, then the bestpractice is to select Entire record in Record Field Information todefine a single attribute. See Step 8 on page 187 for moreinformation about specifying Record Field Information forattributes.
d. Choose how the file is processed. With Process all records when the file issampled, you can process all records in the entire file every time asituation runs against the data source or a sample is taken. The samerecords are reported every time unless they are removed from the file.With this selection, event data is not produced when new records arewritten to the file. A file must have at least two records to be processedcorrectly. With Process new records appended to the file, you can processnew records appended to the file while the agent is running. An eventrecord is produced for every record added to the file. If the file is replaced(the first record changes in any way), the entire file is processed and anevent is produced for each record in the file.
Note: If you are appending records to an XML log file, the append recordsmust contain a complete set of elements defined within the XMLelement you selected as Field Identification.
e. If you chose to process new records appended to the file, you can alsochoose how new records are detected. With Detect new records whenrecord count increases, new records can be detected when the number ofrecords in the file increases, whether or not the size of the file changes.This is useful when an entire log file is pre-allocated before any records arewritten to the file. Note that this can be selected for files that are notpre-allocated, but it is less efficient than monitoring the size of the file.With Detect new records when the file size increases you can determinewhen a new entry has been appended to a file in the typical way. Theremight be a brief delay recognizing that a monitored file has been replaced.
f. If you chose to detect new records based on the size of the file, you canalso choose how to process a file that exists when the monitoring agentstarts. Ignore existing records disables event production for any record inthe file at the time agent starts. Process ___ existing records from the filespecifies production of an event for a fixed number of records from the endof the file at the time the agent starts. Process records not previouslyprocessed by the agent specifies for restart data to be maintained by themonitoring agent so the agent knows which records were processed the lasttime it ran. Events are produced for any records appended to the file sincethe last time the agent was running. Note that this involves a little extraoverhead each time a record is added to the file.
Chapter 16. Monitoring a log file 183
g. If you chose to process records not previously processed by the agent, youcan choose what to do when the agent starts and it appears that theexisting file has been replaced. Process all records if the file has beenreplaced specifies the production of events for all records in the file if thecurrent information about the monitored file and the information stored inthe restart data do not match. Examples of mismatches include: the filename or file creation time has changed, the file size has decreased, the filelast modification time is earlier than it was. Do not process records if thefile has been replaced disables processing of any existing records in thefile if the current information about the monitored file and the informationstored in the restart data do not match.
h. Click the Record Identification tab (Figure 128 on page 185) to interpretmultiple lines in the log file as a single logical record.
Note: The Record Identification tab does not display if you select XML inelement as the field identification on the Log File Information page.
v Single line interprets each line as a single logical record.v Separator line you can enter a sequence of characters that identifies a
line that separates one record from another.
Note: The separator line is not part of the previous or the next record.v Rule enables you to identify a maximum number of lines that make up
a record and optionally a sequence of characters that indicate thebeginning or end of a record. With Rule, you can specify the followingproperties:– Maximum non-blank line defines the maximum number of non
blank lines that can be processed by a rule.– Type of rule can either be No text comparison (the Maximum lines
per record indicates a single logical record), Identify the beginningof record (which marks the start of the single logical record), orIdentify the end of record (which marks the end of the single logicalrecord).
– Offset specifies the location within a line where the ComparisonString must occur.
– Comparison Test can either be Equals, requiring a character sequencematch at the specific offset, or Does not equal, indicating a particularcharacter sequence does not occur at the specific offset.
– Comparison String defines the character sequence to be compared.v Regular Expression enables you to identify a pattern used to indicate
the beginning or end of a record. By using Regular Expression, you canspecify the following properties:– Comparison String defines the character sequence to be matched.
—OR—– Beginning or end of record:
- Identify the beginning of record marks the start of the singlelogical record.
- Identify the end of record marks the end of the single logicalrecord.
184 IBM Tivoli Monitoring Agent Builder: User's Guide
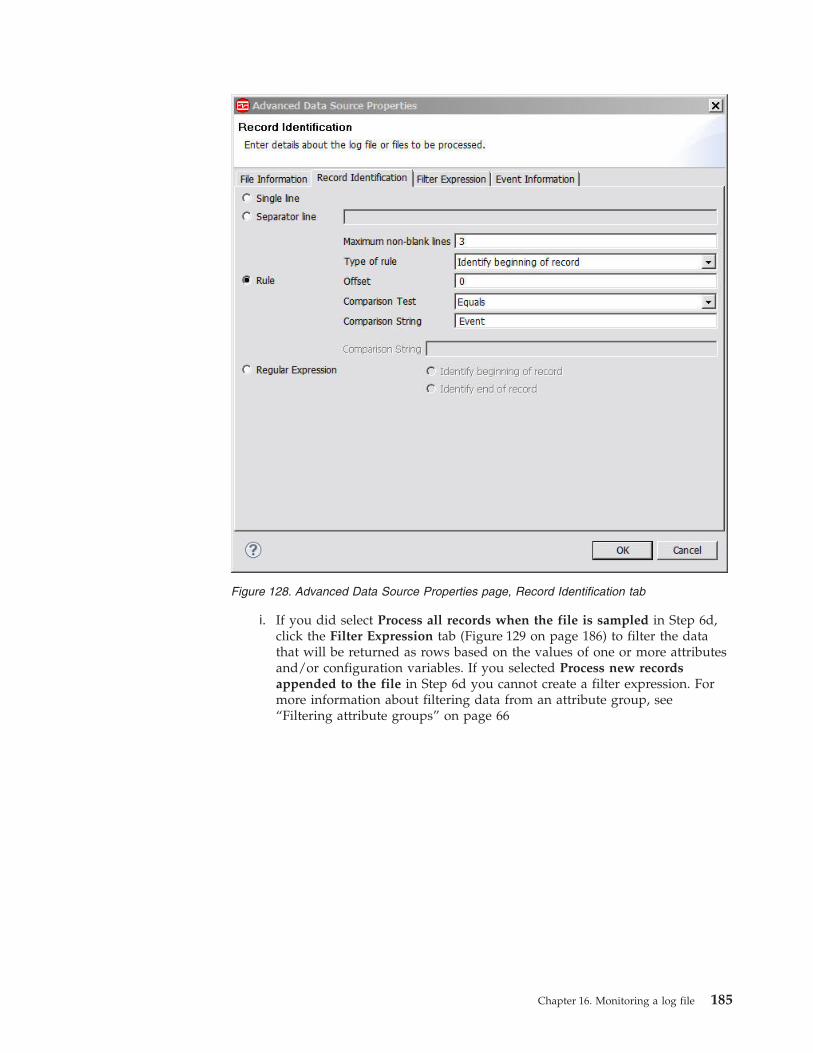
i. If you did select Process all records when the file is sampled in Step 6d,click the Filter Expression tab (Figure 129 on page 186) to filter the datathat will be returned as rows based on the values of one or more attributesand/or configuration variables. If you selected Process new recordsappended to the file in Step 6d you cannot create a filter expression. Formore information about filtering data from an attribute group, see“Filtering attribute groups” on page 66
Figure 128. Advanced Data Source Properties page, Record Identification tab
Chapter 16. Monitoring a log file 185

j. If you selected Process new records appended to the file in Step 6d, clickthe Event Information tab Figure 130 on page 187 to select event filteringand summarization options. For more information, see (Chapter 34, “Eventfiltering and summarization,” on page 405).
Note: The Summary tab may be present if the agent was created with anearlier version of Agent Builder. The summary tab has now beendeprecated by the Event Information tab
Figure 129. Advanced Data Source Properties page, Filter Expression tab
186 IBM Tivoli Monitoring Agent Builder: User's Guide
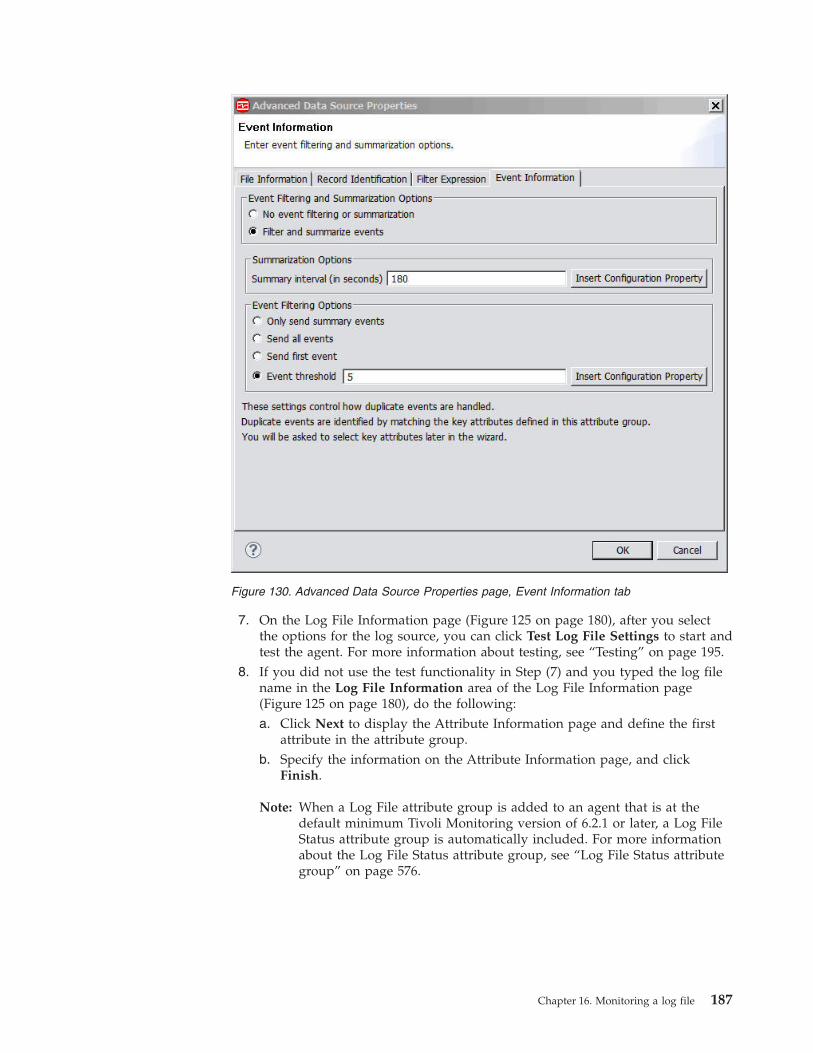
7. On the Log File Information page (Figure 125 on page 180), after you selectthe options for the log source, you can click Test Log File Settings to start andtest the agent. For more information about testing, see “Testing” on page 195.
8. If you did not use the test functionality in Step (7) and you typed the log filename in the Log File Information area of the Log File Information page(Figure 125 on page 180), do the following:a. Click Next to display the Attribute Information page and define the first
attribute in the attribute group.b. Specify the information on the Attribute Information page, and click
Finish.
Note: When a Log File attribute group is added to an agent that is at thedefault minimum Tivoli Monitoring version of 6.2.1 or later, a Log FileStatus attribute group is automatically included. For more informationabout the Log File Status attribute group, see “Log File Status attributegroup” on page 576.
Figure 130. Advanced Data Source Properties page, Event Information tab
Chapter 16. Monitoring a log file 187

Along with the fields that are applicable to all of the data sources (Table 6 onpage 56), the Attribute Information page for the Log File data source has someadditional fields in the Record Field Information area.The Record Field Information fields are:
Next fieldShows the next field after parsing, using the delimiters from theattribute group (or special delimiters for this attribute from theAdvanced dialog).
Figure 131. Attribute Information page
188 IBM Tivoli Monitoring Agent Builder: User's Guide

Remainder of recordShows the rest of the record after previous attributes have beenparsed. This is the last attribute, except for possibly the log file nameor log file label.
Entire recordShows the entire record, which can be the only attribute, except forpossibly the log file name or log file label.
Log file nameShows the name of the log file.
Log file labelShows the label assigned to the file on the advanced panel (above).
Note: Use the Derived Attribute Details tab only if you want a derivedattribute, and not an attribute directly from the log file.
9. If you click Advanced in the Record Field Information area, the AdvancedLog File Attribute Information page (Figure 132 on page 190) is displayed.
Chapter 16. Monitoring a log file 189
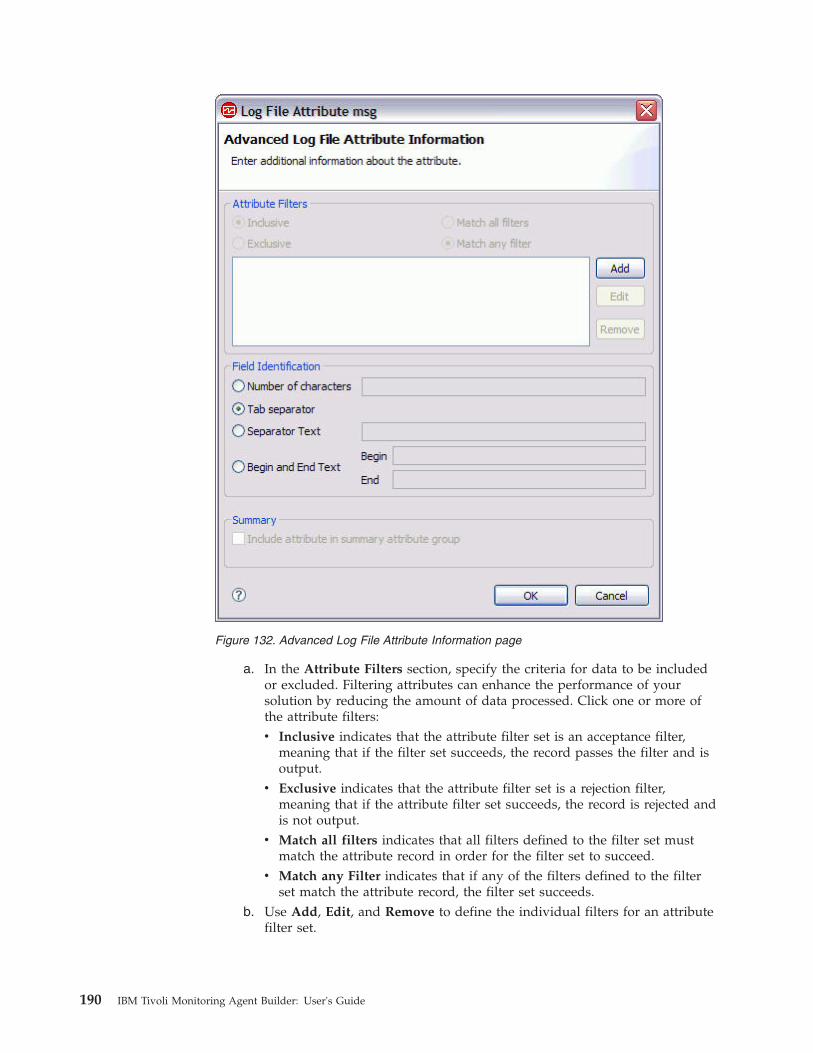
a. In the Attribute Filters section, specify the criteria for data to be includedor excluded. Filtering attributes can enhance the performance of yoursolution by reducing the amount of data processed. Click one or more ofthe attribute filters:v Inclusive indicates that the attribute filter set is an acceptance filter,
meaning that if the filter set succeeds, the record passes the filter and isoutput.
v Exclusive indicates that the attribute filter set is a rejection filter,meaning that if the attribute filter set succeeds, the record is rejected andis not output.
v Match all filters indicates that all filters defined to the filter set mustmatch the attribute record in order for the filter set to succeed.
v Match any Filter indicates that if any of the filters defined to the filterset match the attribute record, the filter set succeeds.
b. Use Add, Edit, and Remove to define the individual filters for an attributefilter set.
Figure 132. Advanced Log File Attribute Information page
190 IBM Tivoli Monitoring Agent Builder: User's Guide
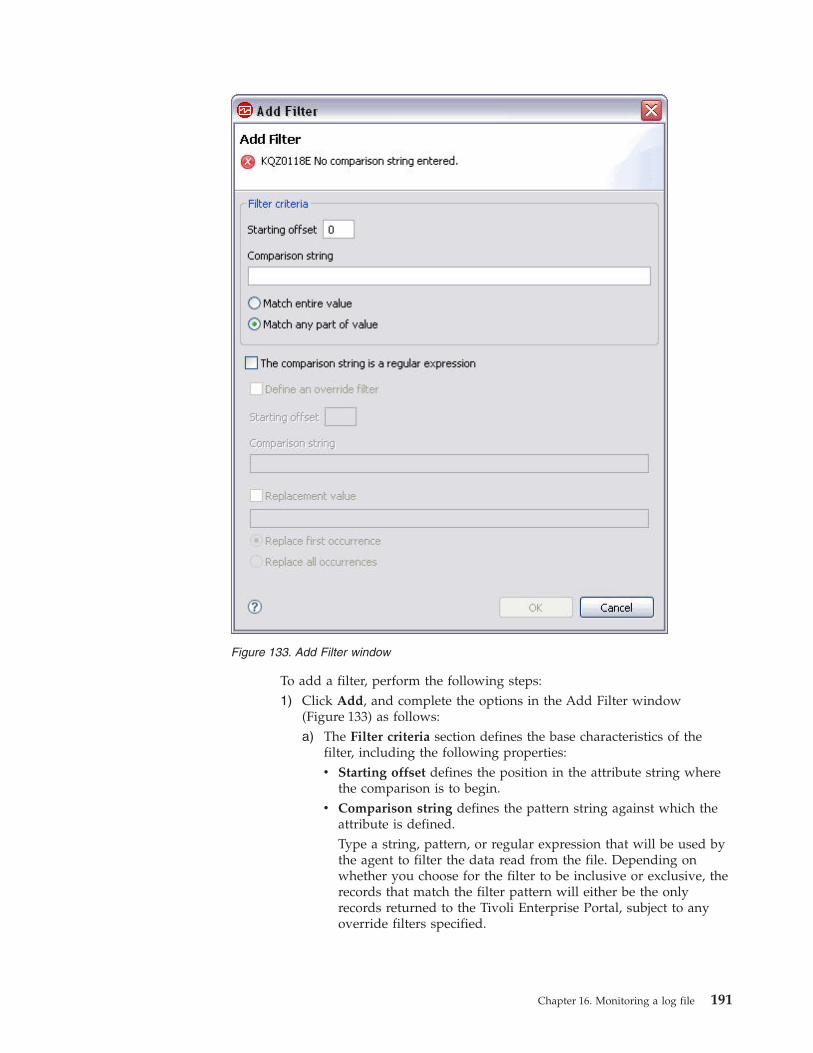
To add a filter, perform the following steps:1) Click Add, and complete the options in the Add Filter window
(Figure 133) as follows:a) The Filter criteria section defines the base characteristics of the
filter, including the following properties:v Starting offset defines the position in the attribute string where
the comparison is to begin.v Comparison string defines the pattern string against which the
attribute is defined.Type a string, pattern, or regular expression that will be used bythe agent to filter the data read from the file. Depending onwhether you choose for the filter to be inclusive or exclusive, therecords that match the filter pattern will either be the onlyrecords returned to the Tivoli Enterprise Portal, subject to anyoverride filters specified.
Figure 133. Add Filter window
Chapter 16. Monitoring a log file 191

v Match entire value checks for an exact occurrence of thecomparison string in the attribute string starting from thestarting offset position.
v Match any part of value checks for the comparison stringanywhere in the attribute string starting from the starting offsetposition.
b) The comparison string is a regular expression indicates thecomparison string is a regular expression pattern that can beapplied against the attribute string.Regular expression-filtering support is provided by using theInternational Components for Unicode (ICU) libraries to checkwhether the attribute value being examined matches the specifiedpattern.To effectively use regular expression support, you must be familiarwith the specifics of how ICU implements regular expressions,which is not identical to how regular expression support isimplemented in Perl, grep, sed, Java regular expressions, and otherimplementations that you might have worked with in the past. SeeAppendix G, “ICU regular expressions,” on page 615 for guidanceon creating regular expression filters.
c) Define an override filter indicates that you want to provide a morespecific filter comparison that overrides the base characteristicspreviously defined. This additional comparison string is used toreverse the filter result. When the filter is Inclusive, the overrideacts as an exclusion qualifier for the filter expression. When thefilter is Exclusive, the override acts as an inclusion qualifier for thefilter expression. (See Chapter 15, Step 9a for more details onInclusive versus Exclusive, and the examples in Step 2 of this set ofprocedures). The override filter has the following properties:v Starting offset defines the position in the attribute string where
the comparison is to begin.v Comparison string defines the pattern string against which the
attribute is matched.Type a regular expression that will be used by the agent to filterthe data read from the file. Depending on whether you choosefor the filter to be inclusive or exclusive, the records that matchthe filter pattern are be eliminated from the records returned tothe Tivoli Enterprise Portal, or they will be the only recordsreturned to the Tivoli Enterprise Portal.
d) Replacement value can be used to alter the raw attribute stringwith a new value. See Appendix G, “ICU regular expressions,” onpage 615 for more details about special characters that can be used.
e) Replace first occurrence replaces the first occurrence matched bythe comparison string with new text.
f) Replace all occurrences replaces all occurrences matched by thecomparison string with new text.
2) Click OK.Example 1
192 IBM Tivoli Monitoring Agent Builder: User's Guide
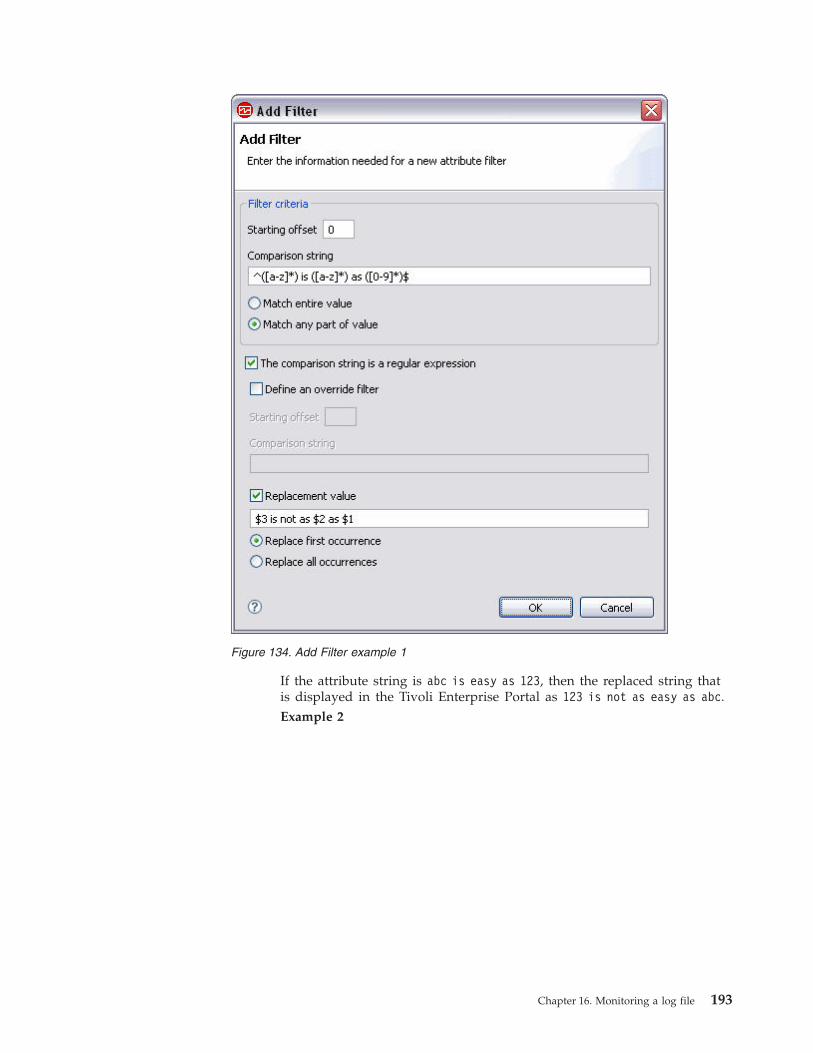
If the attribute string is abc is easy as 123, then the replaced string thatis displayed in the Tivoli Enterprise Portal as 123 is not as easy as abc.Example 2
Figure 134. Add Filter example 1
Chapter 16. Monitoring a log file 193
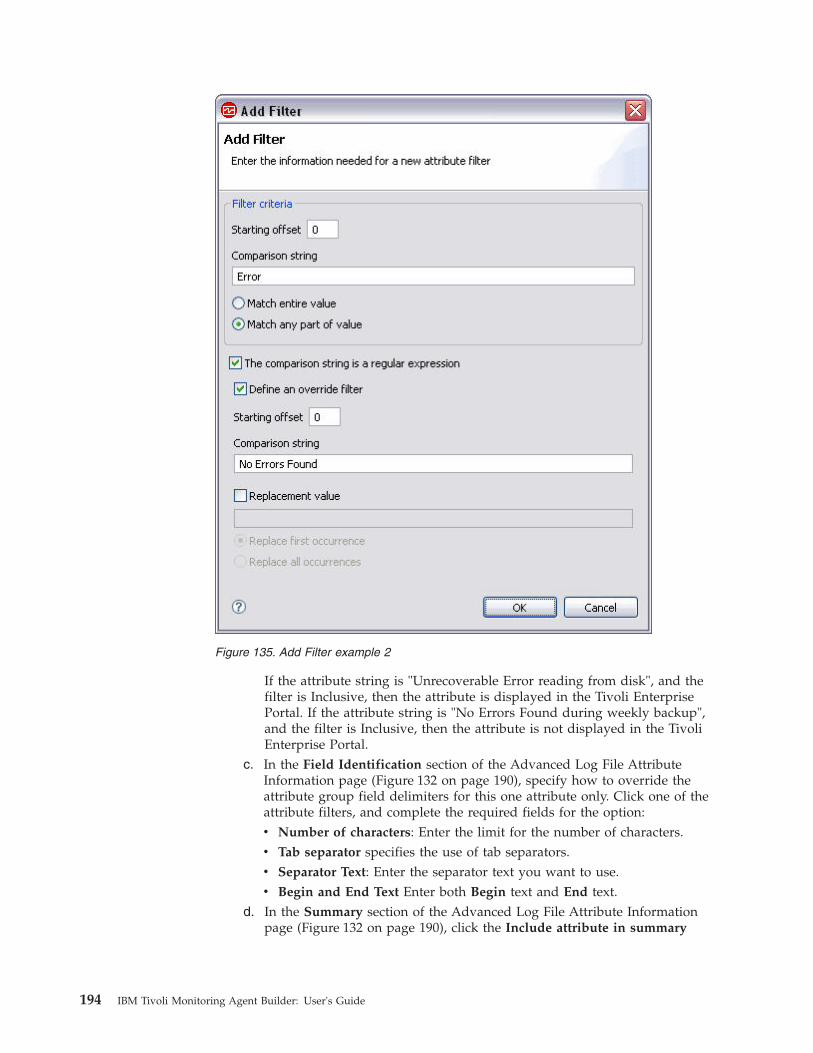
If the attribute string is "Unrecoverable Error reading from disk", and thefilter is Inclusive, then the attribute is displayed in the Tivoli EnterprisePortal. If the attribute string is "No Errors Found during weekly backup",and the filter is Inclusive, then the attribute is not displayed in the TivoliEnterprise Portal.
c. In the Field Identification section of the Advanced Log File AttributeInformation page (Figure 132 on page 190), specify how to override theattribute group field delimiters for this one attribute only. Click one of theattribute filters, and complete the required fields for the option:v Number of characters: Enter the limit for the number of characters.v Tab separator specifies the use of tab separators.v Separator Text: Enter the separator text you want to use.v Begin and End Text Enter both Begin text and End text.
d. In the Summary section of the Advanced Log File Attribute Informationpage (Figure 132 on page 190), click the Include attribute in summary
Figure 135. Add Filter example 2
194 IBM Tivoli Monitoring Agent Builder: User's Guide
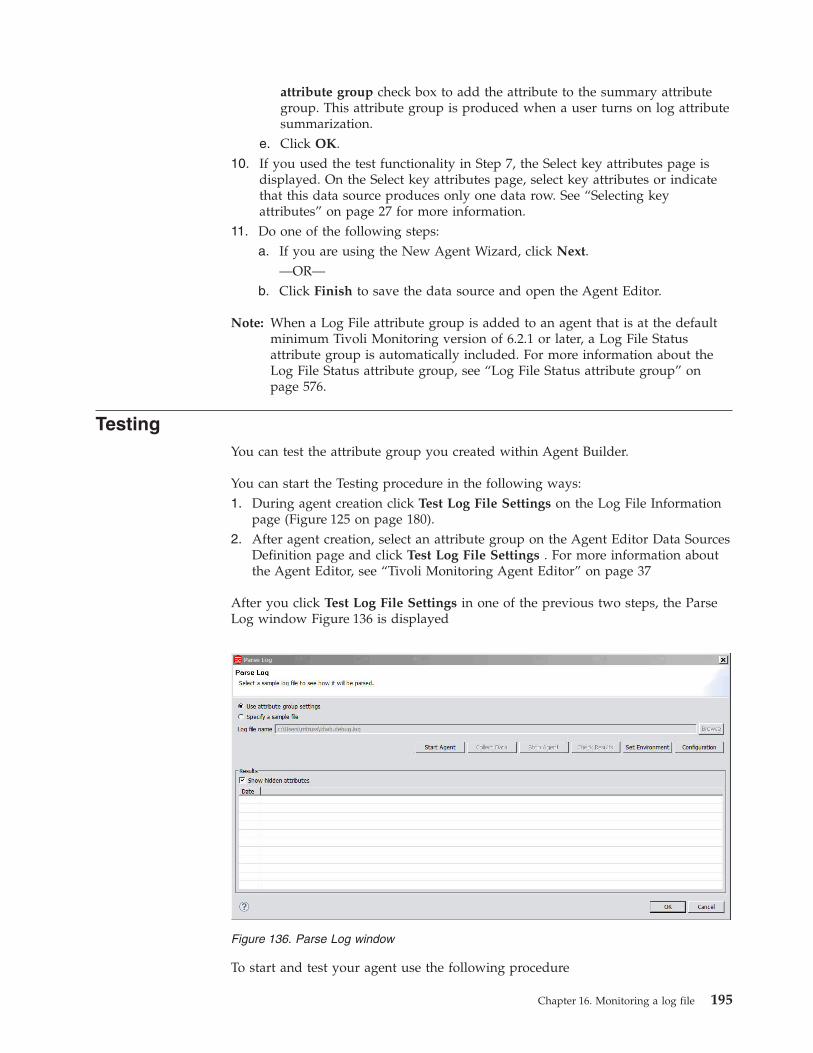
attribute group check box to add the attribute to the summary attributegroup. This attribute group is produced when a user turns on log attributesummarization.
e. Click OK.10. If you used the test functionality in Step 7, the Select key attributes page is
displayed. On the Select key attributes page, select key attributes or indicatethat this data source produces only one data row. See “Selecting keyattributes” on page 27 for more information.
11. Do one of the following steps:a. If you are using the New Agent Wizard, click Next.
—OR—b. Click Finish to save the data source and open the Agent Editor.
Note: When a Log File attribute group is added to an agent that is at the defaultminimum Tivoli Monitoring version of 6.2.1 or later, a Log File Statusattribute group is automatically included. For more information about theLog File Status attribute group, see “Log File Status attribute group” onpage 576.
TestingYou can test the attribute group you created within Agent Builder.
You can start the Testing procedure in the following ways:1. During agent creation click Test Log File Settings on the Log File Information
page (Figure 125 on page 180).2. After agent creation, select an attribute group on the Agent Editor Data Sources
Definition page and click Test Log File Settings . For more information aboutthe Agent Editor, see “Tivoli Monitoring Agent Editor” on page 37
After you click Test Log File Settings in one of the previous two steps, the ParseLog window Figure 136 is displayed
To start and test your agent use the following procedure
Figure 136. Parse Log window
Chapter 16. Monitoring a log file 195
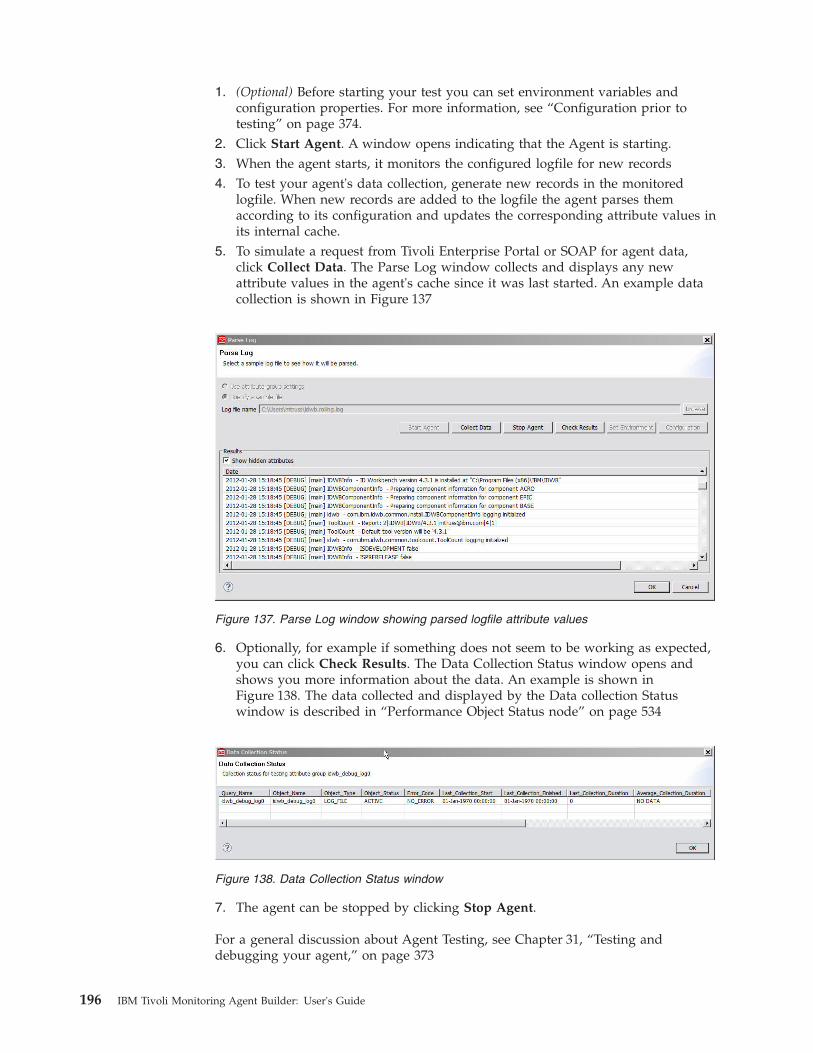
1. (Optional) Before starting your test you can set environment variables andconfiguration properties. For more information, see “Configuration prior totesting” on page 374.
2. Click Start Agent. A window opens indicating that the Agent is starting.3. When the agent starts, it monitors the configured logfile for new records4. To test your agent's data collection, generate new records in the monitored
logfile. When new records are added to the logfile the agent parses themaccording to its configuration and updates the corresponding attribute values inits internal cache.
5. To simulate a request from Tivoli Enterprise Portal or SOAP for agent data,click Collect Data. The Parse Log window collects and displays any newattribute values in the agent's cache since it was last started. An example datacollection is shown in Figure 137
6. Optionally, for example if something does not seem to be working as expected,you can click Check Results. The Data Collection Status window opens andshows you more information about the data. An example is shown inFigure 138. The data collected and displayed by the Data collection Statuswindow is described in “Performance Object Status node” on page 534
7. The agent can be stopped by clicking Stop Agent.
For a general discussion about Agent Testing, see Chapter 31, “Testing anddebugging your agent,” on page 373
Figure 137. Parse Log window showing parsed logfile attribute values
Figure 138. Data Collection Status window
196 IBM Tivoli Monitoring Agent Builder: User's Guide
Chapter 17. Monitoring an AIX Binary Log
Log Monitoring supports the monitoring of AIX binary error logs through theerrpt command. The errpt command generates an error report from entries in anerror log. It includes flags for selecting errors that match specific criteria. Thissupport for the monitoring of AIX binary error logs through the errpt command ismodeled on the support for the same function in the Tivoli Monitoring UNIX LogsAgent (product code "kul" or "ul").
When you supply the Agent Builder with an errpt command string, it processesthe events that result from running this command. Agent Builder enforces thesame constraints on this command that the Monitoring Agent for UNIX Logs does.In particular, you must use the '-c' (concurrent mode) option so that the commandruns continuously, and you cannot use the '-t' option or the following options thatresult in detailed ouput: '-a', '-A', or '-g'.
An Agent Builder agent that monitors the AIX errpt command automaticallyincludes the same information as a Monitoring Agent for UNIX Logs does. Formore information about the attribute groups for AIX binary error logs, see “AIXBinary Log attribute group” on page 548.
Use the following procedure to collect data from the AIX Binary log.1. On the Agent Initial Data Source page (Figure 151 on page 212) or the Data
Source Location page, click Logged data in the Monitoring Data Categoriesarea.
© Copyright IBM Corp. 2007, 2012 197
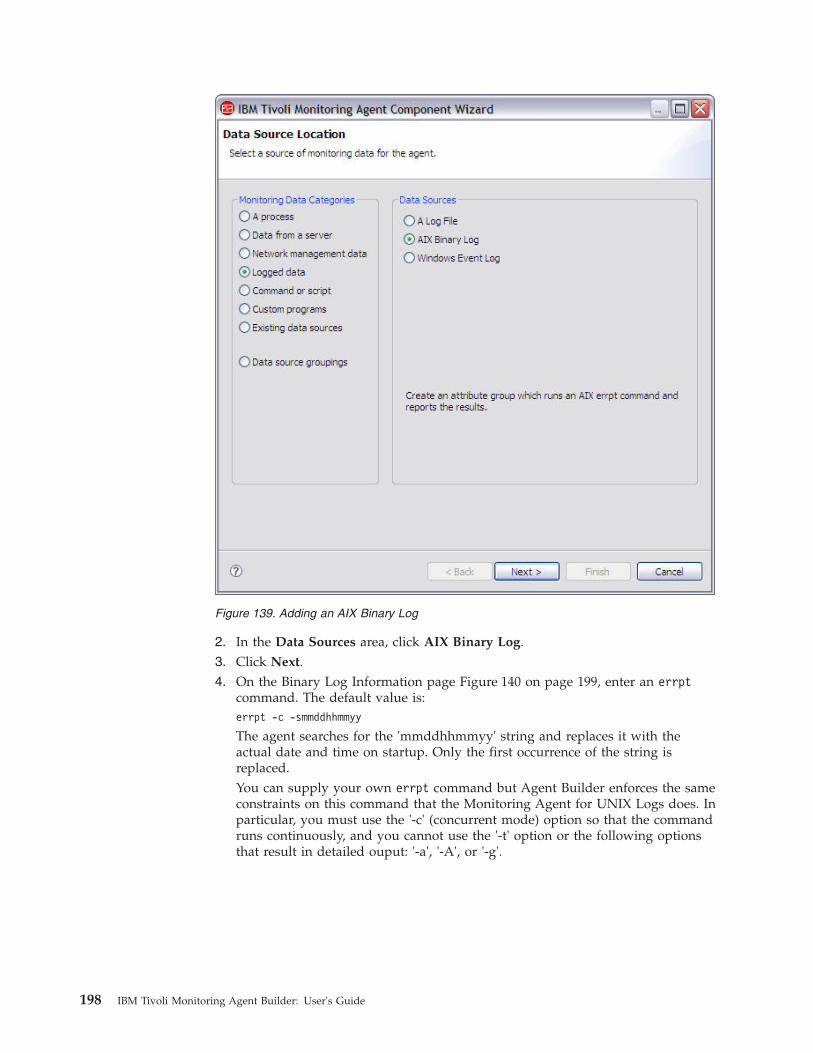
2. In the Data Sources area, click AIX Binary Log.3. Click Next.4. On the Binary Log Information page Figure 140 on page 199, enter an errpt
command. The default value is:errpt -c -smmddhhmmyy
The agent searches for the 'mmddhhmmyy' string and replaces it with theactual date and time on startup. Only the first occurrence of the string isreplaced.You can supply your own errpt command but Agent Builder enforces the sameconstraints on this command that the Monitoring Agent for UNIX Logs does. Inparticular, you must use the '-c' (concurrent mode) option so that the commandruns continuously, and you cannot use the '-t' option or the following optionsthat result in detailed ouput: '-a', '-A', or '-g'.
Figure 139. Adding an AIX Binary Log
198 IBM Tivoli Monitoring Agent Builder: User's Guide
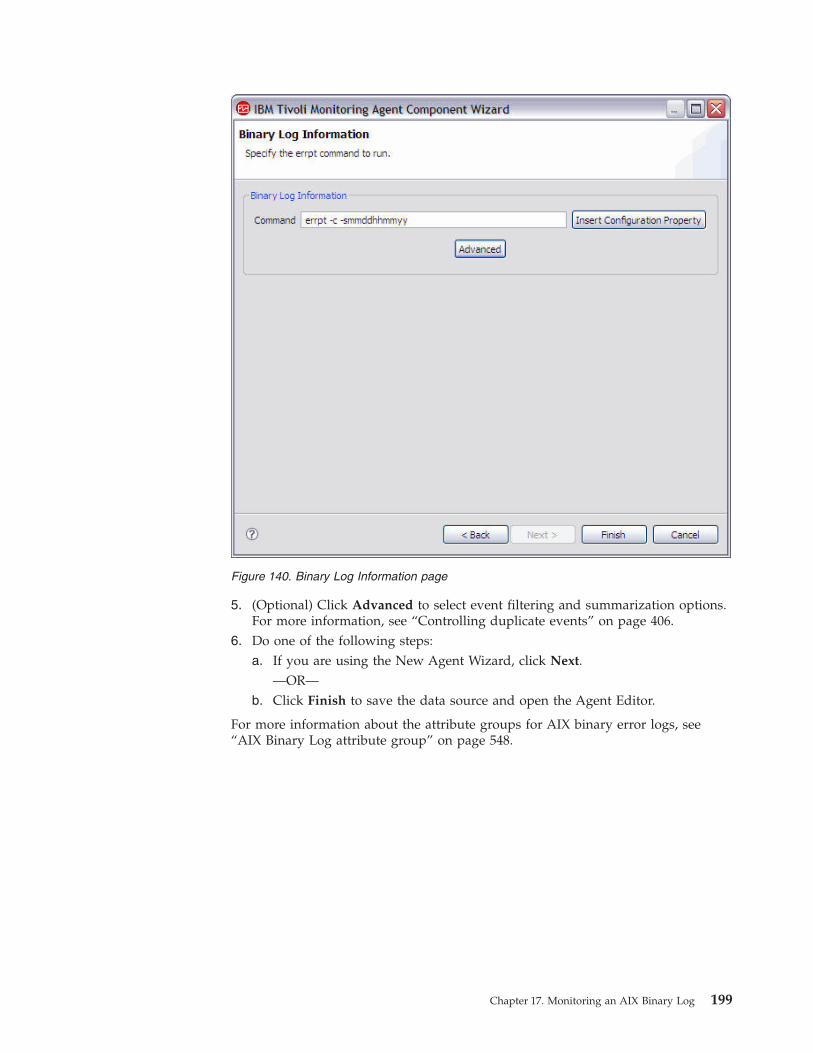
5. (Optional) Click Advanced to select event filtering and summarization options.For more information, see “Controlling duplicate events” on page 406.
6. Do one of the following steps:a. If you are using the New Agent Wizard, click Next.
—OR—b. Click Finish to save the data source and open the Agent Editor.
For more information about the attribute groups for AIX binary error logs, see“AIX Binary Log attribute group” on page 548.
Figure 140. Binary Log Information page
Chapter 17. Monitoring an AIX Binary Log 199

200 IBM Tivoli Monitoring Agent Builder: User's Guide

Chapter 18. Monitoring a Windows Event Log
You can collect data from the Windows event log by using the type, source, or IDof events to filter the log events that the Windows system has gathered. The agentcompares each new event in the monitored event log against the specified filter. Ifthe event matches one of the event types, event sources, and event IDs specified inthe filter, it passes.
For example, if the Event log filter is for the Application log, specifying Error asthe event type, the agent matches all events logged to the Application log wherethe event type value is error. If you add the Diskeeper and Symantec AntiVirusevent sources, the agent matches all error events from either of these sources. Youcan add specific event IDs to refine the filter further. No direct association existsbetween the event type, event source, and event ID. If one of the values for eachmatches an event, the event matches.
By default, only events generated after the agent starts are processed. However,you can enable the agent when it restarts to process log events that are generatedwhile the agent is shut down. See Step 6 on page 203 for more information aboutenabling the agent to process events generated while the agent is shut down.
Use the following procedure to collect data from the Windows event log:1. On the Agent Initial Data Source page (Figure 141 on page 202) or the Data
Source Location page, click Logged Data in the Monitoring Data Categoriesarea.
© Copyright IBM Corp. 2007, 2012 201

2. In the Data Sources area, click Windows Event Log.3. Click Next.4. On the Windows Event Log page (Figure 142 on page 203), select the name
from one of the logs in the Windows Event Log name list, or type a name forthe event log.The list is constructed from the set of logs on the current system, for example:
ApplicationSecuritySystem
Figure 141. Adding a Windows Event log
202 IBM Tivoli Monitoring Agent Builder: User's Guide
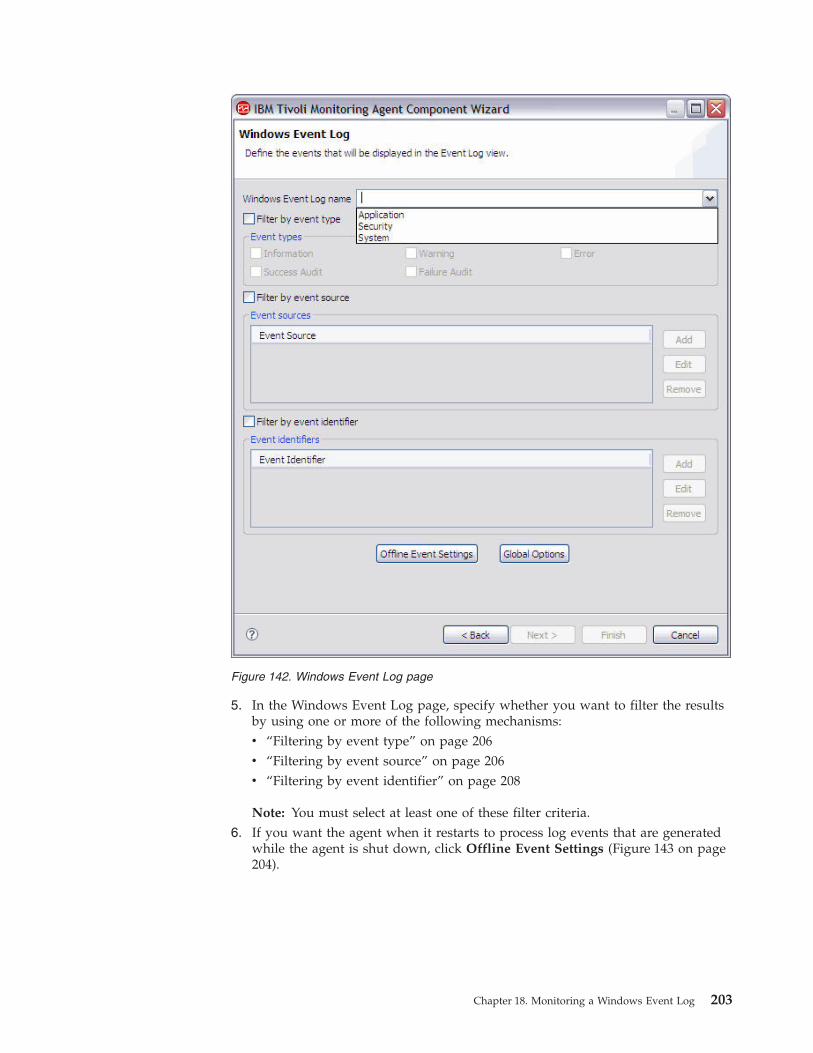
5. In the Windows Event Log page, specify whether you want to filter the resultsby using one or more of the following mechanisms:v “Filtering by event type” on page 206v “Filtering by event source” on page 206v “Filtering by event identifier” on page 208
Note: You must select at least one of these filter criteria.6. If you want the agent when it restarts to process log events that are generated
while the agent is shut down, click Offline Event Settings (Figure 143 on page204).
Figure 142. Windows Event Log page
Chapter 18. Monitoring a Windows Event Log 203
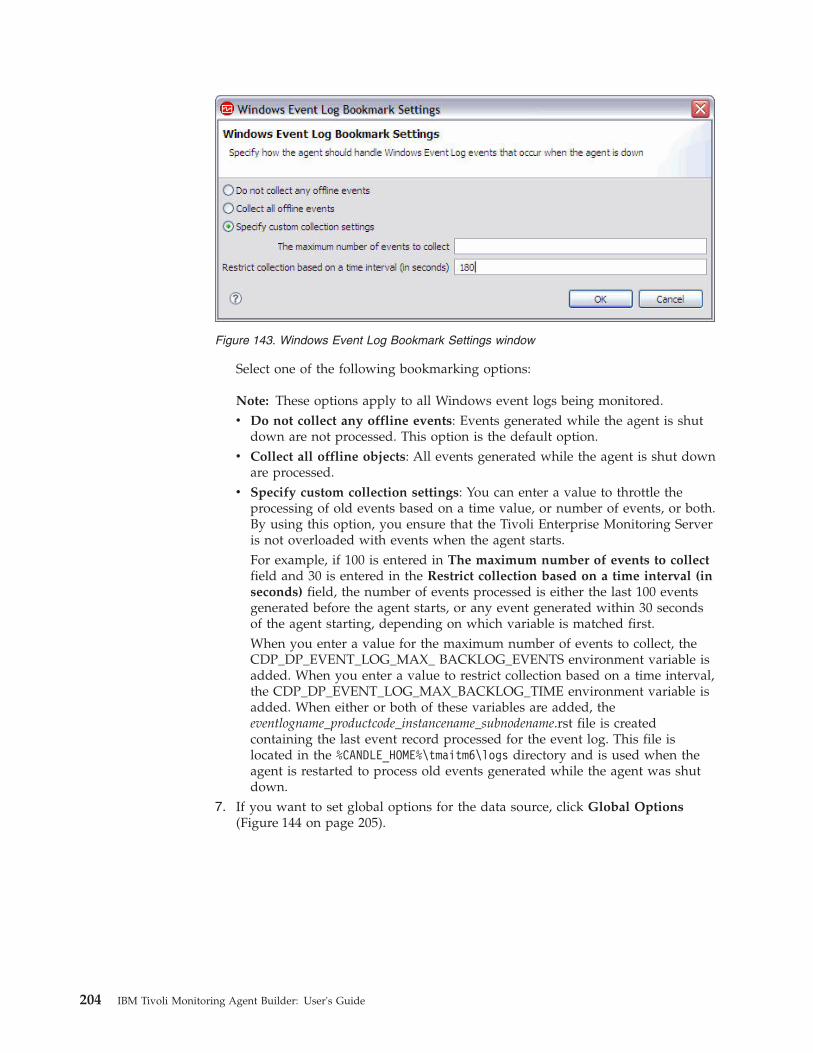
Select one of the following bookmarking options:
Note: These options apply to all Windows event logs being monitored.v Do not collect any offline events: Events generated while the agent is shut
down are not processed. This option is the default option.v Collect all offline objects: All events generated while the agent is shut down
are processed.v Specify custom collection settings: You can enter a value to throttle the
processing of old events based on a time value, or number of events, or both.By using this option, you ensure that the Tivoli Enterprise Monitoring Serveris not overloaded with events when the agent starts.For example, if 100 is entered in The maximum number of events to collectfield and 30 is entered in the Restrict collection based on a time interval (inseconds) field, the number of events processed is either the last 100 eventsgenerated before the agent starts, or any event generated within 30 secondsof the agent starting, depending on which variable is matched first.When you enter a value for the maximum number of events to collect, theCDP_DP_EVENT_LOG_MAX_ BACKLOG_EVENTS environment variable isadded. When you enter a value to restrict collection based on a time interval,the CDP_DP_EVENT_LOG_MAX_BACKLOG_TIME environment variable isadded. When either or both of these variables are added, theeventlogname_productcode_instancename_subnodename.rst file is createdcontaining the last event record processed for the event log. This file islocated in the %CANDLE_HOME%\tmaitm6\logs directory and is used when theagent is restarted to process old events generated while the agent was shutdown.
7. If you want to set global options for the data source, click Global Options(Figure 144 on page 205).
Figure 143. Windows Event Log Bookmark Settings window
204 IBM Tivoli Monitoring Agent Builder: User's Guide

Select the Include remote Windows configuration properties check box if youwant to include this option, and click OK.For information about Windows remote connection configuration for Windowsdata sources, see “Configuring a Windows remote connection” on page 370.
8. After specifying the filter and clicking OK, on the Windows Event Log page,do one of the following steps:a. If you are using the New Agent Wizard, click Next.
—OR—b. Click Finish to save the data source and open the Agent Editor. The name
of the new Windows Event Log is displayed on the Agent Editor DataSource Definition page.
Figure 144. Global Windows Data Source Options window
Chapter 18. Monitoring a Windows Event Log 205
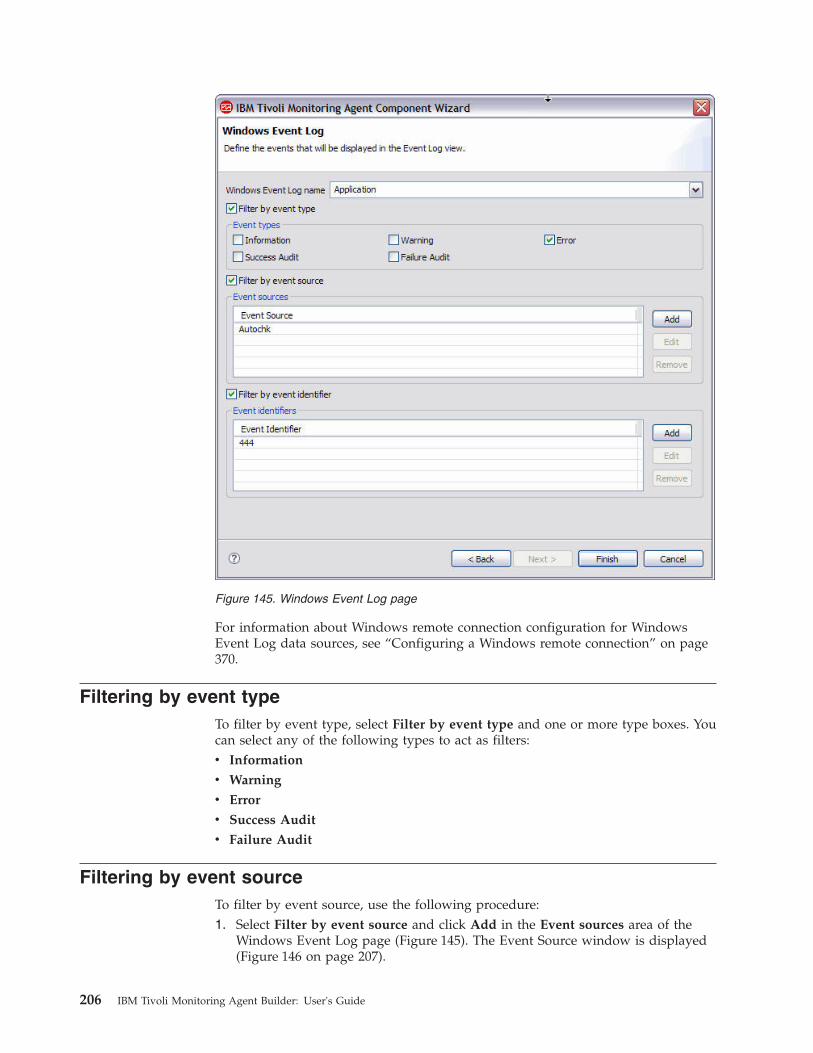
For information about Windows remote connection configuration for WindowsEvent Log data sources, see “Configuring a Windows remote connection” on page370.
Filtering by event typeTo filter by event type, select Filter by event type and one or more type boxes. Youcan select any of the following types to act as filters:v Information
v Warning
v Error
v Success Audit
v Failure Audit
Filtering by event sourceTo filter by event source, use the following procedure:1. Select Filter by event source and click Add in the Event sources area of the
Windows Event Log page (Figure 145). The Event Source window is displayed(Figure 146 on page 207).
Figure 145. Windows Event Log page
206 IBM Tivoli Monitoring Agent Builder: User's Guide
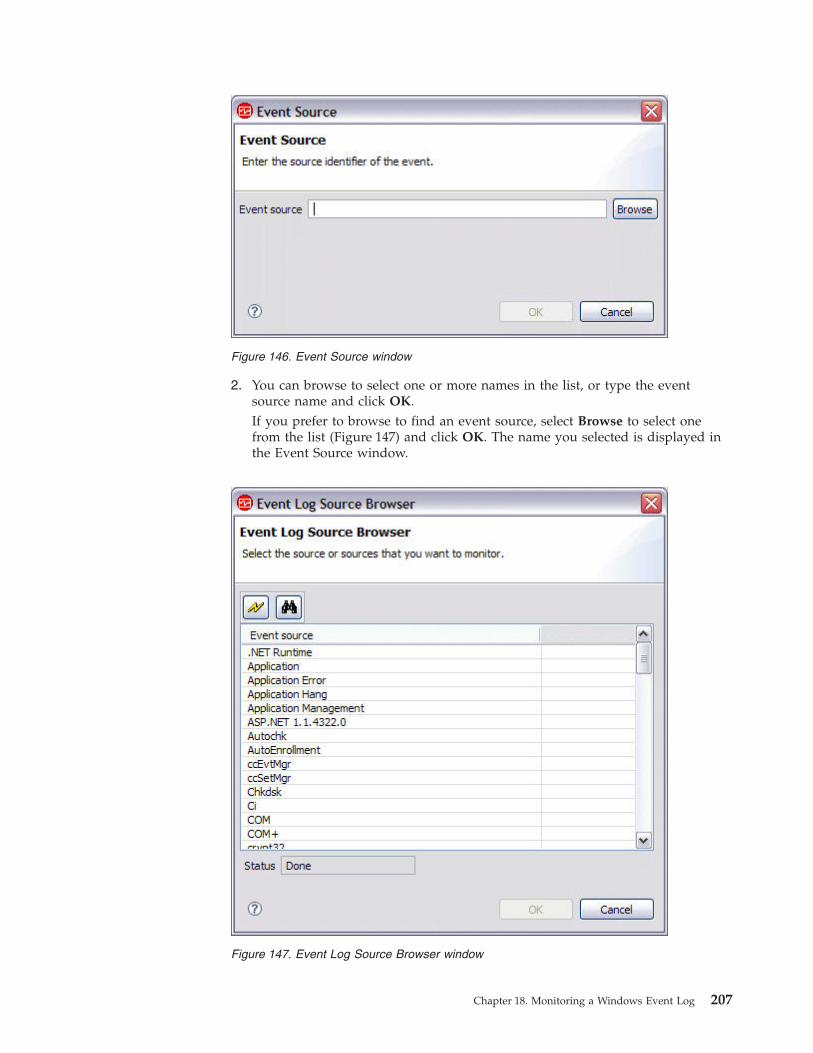
2. You can browse to select one or more names in the list, or type the eventsource name and click OK.If you prefer to browse to find an event source, select Browse to select onefrom the list (Figure 147) and click OK. The name you selected is displayed inthe Event Source window.
Figure 146. Event Source window
Figure 147. Event Log Source Browser window
Chapter 18. Monitoring a Windows Event Log 207
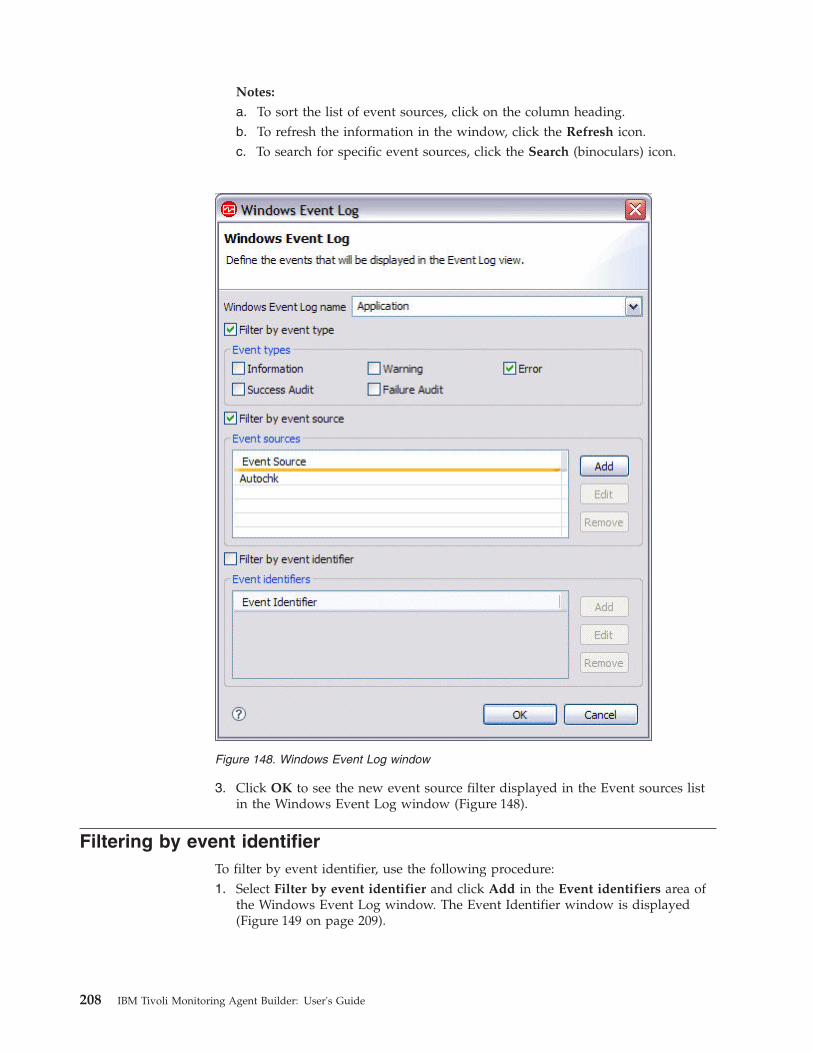
Notes:
a. To sort the list of event sources, click on the column heading.b. To refresh the information in the window, click the Refresh icon.c. To search for specific event sources, click the Search (binoculars) icon.
3. Click OK to see the new event source filter displayed in the Event sources listin the Windows Event Log window (Figure 148).
Filtering by event identifierTo filter by event identifier, use the following procedure:1. Select Filter by event identifier and click Add in the Event identifiers area of
the Windows Event Log window. The Event Identifier window is displayed(Figure 149 on page 209).
Figure 148. Windows Event Log window
208 IBM Tivoli Monitoring Agent Builder: User's Guide
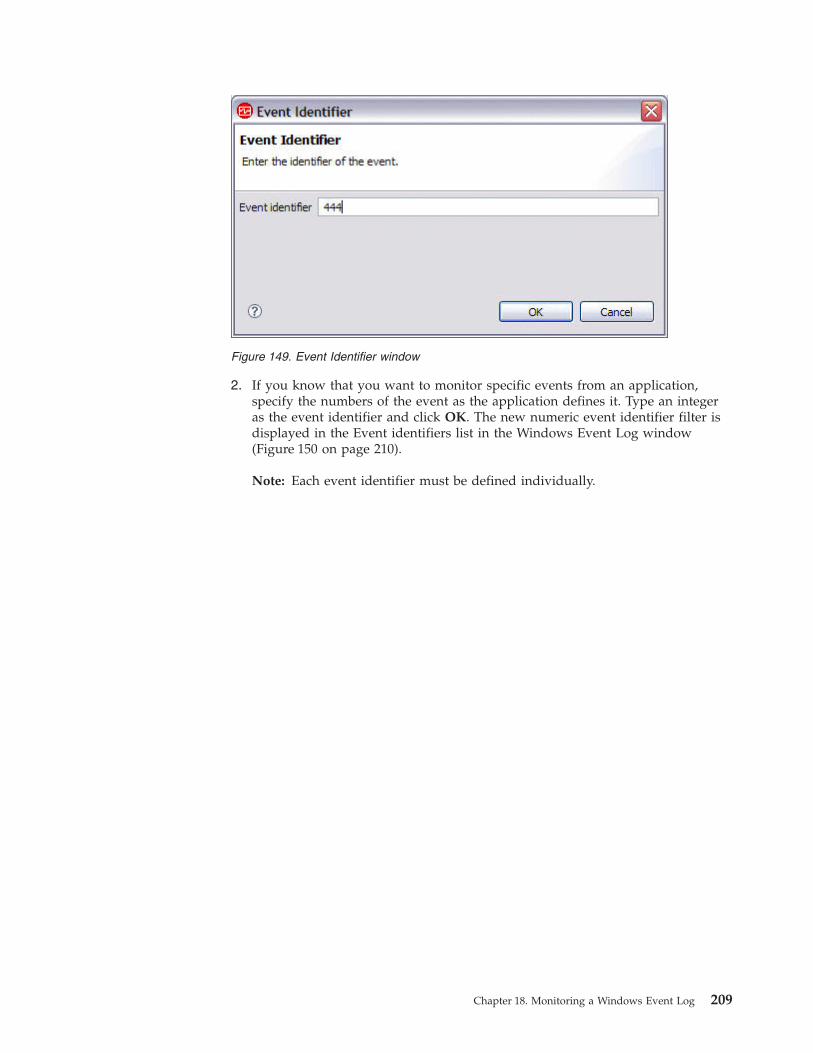
2. If you know that you want to monitor specific events from an application,specify the numbers of the event as the application defines it. Type an integeras the event identifier and click OK. The new numeric event identifier filter isdisplayed in the Event identifiers list in the Windows Event Log window(Figure 150 on page 210).
Note: Each event identifier must be defined individually.
Figure 149. Event Identifier window
Chapter 18. Monitoring a Windows Event Log 209

3. If you want to modify a Windows event log, select it and click Edit.4. If you want to delete a Windows event log, select it and click Remove.5. You can add more event logs to the list, or click Finish.
Figure 150. Windows Event Log window
210 IBM Tivoli Monitoring Agent Builder: User's Guide

Chapter 19. Monitoring a command return code
You can test whether an application or system being monitored is available byusing a command return code. A command return code is a user created script,executable file, query, or system command that is an application-specificmechanism for determining whether the application or system being monitored isavailable. The agent runs the specified command and determines the state of theapplication or system being monitored by examining the return code.
The command must present a unique return code for each descriptive state anddefine a message to be used by the agent for each of these return codes. Thecommand may use environment and configuration variables within the usercreated script, executable file, query, or system command. The command may notuse environment or configuration variables on the command line invocation of thecommand, with only the following exceptions available: AGENT_BIN_DIR,AGENT_ETC_DIR, AGENT_LIB_DIR, CANDLE_HOME, and CANDLEHOME.
Use the following procedure to monitor a command return code:1. On the Agent Initial Data Source page (Figure 151 on page 212) or the Data
Source Location page, click Command or script in the Monitoring DataCategories area.
© Copyright IBM Corp. 2007, 2012 211
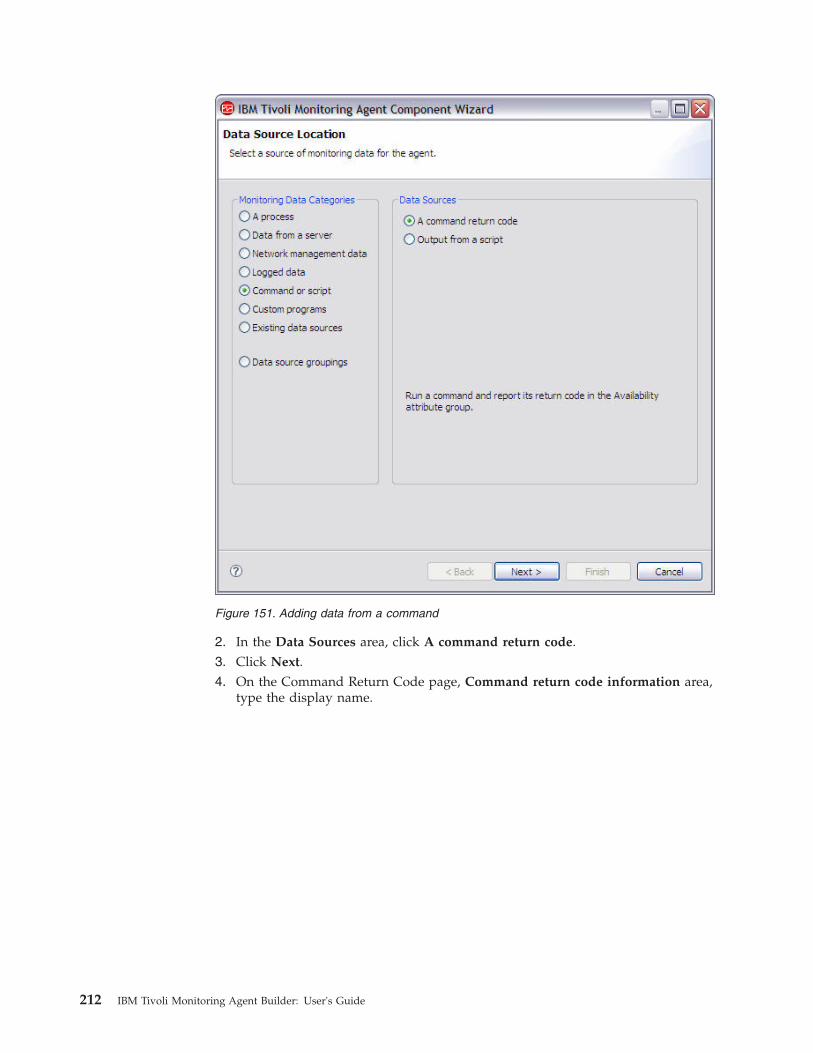
2. In the Data Sources area, click A command return code.3. Click Next.4. On the Command Return Code page, Command return code information area,
type the display name.
Figure 151. Adding data from a command
212 IBM Tivoli Monitoring Agent Builder: User's Guide
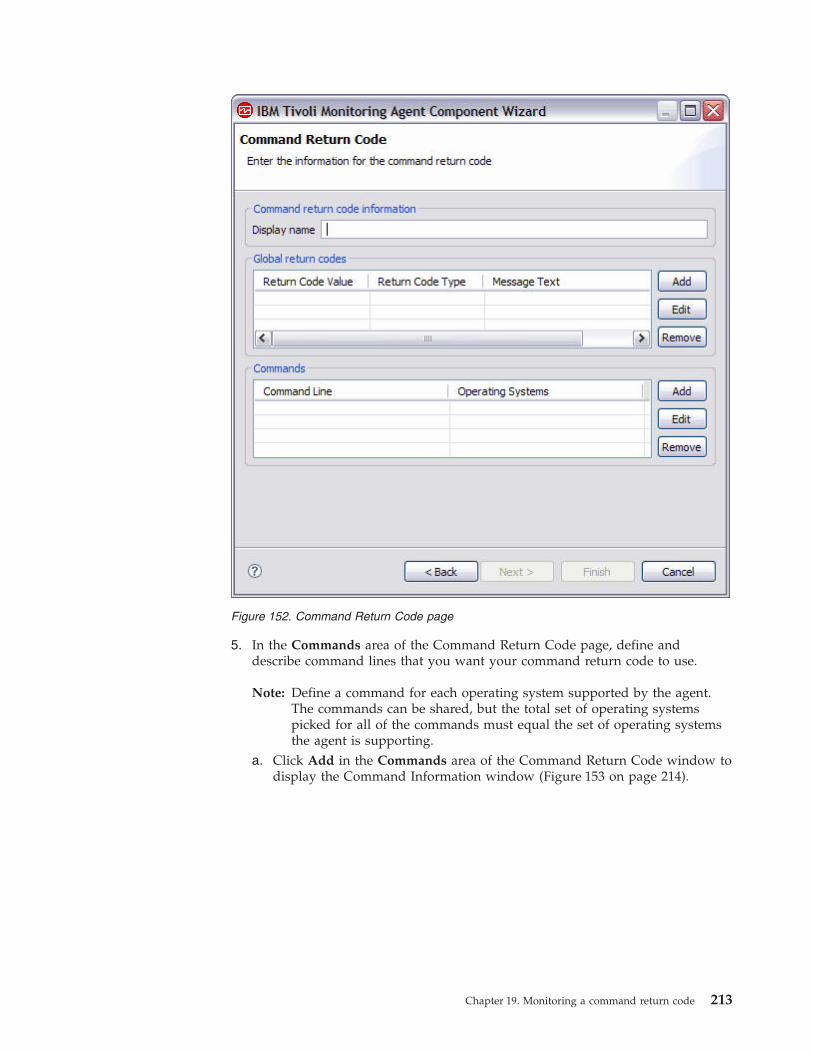
5. In the Commands area of the Command Return Code page, define anddescribe command lines that you want your command return code to use.
Note: Define a command for each operating system supported by the agent.The commands can be shared, but the total set of operating systemspicked for all of the commands must equal the set of operating systemsthe agent is supporting.
a. Click Add in the Commands area of the Command Return Code window todisplay the Command Information window (Figure 153 on page 214).
Figure 152. Command Return Code page
Chapter 19. Monitoring a command return code 213
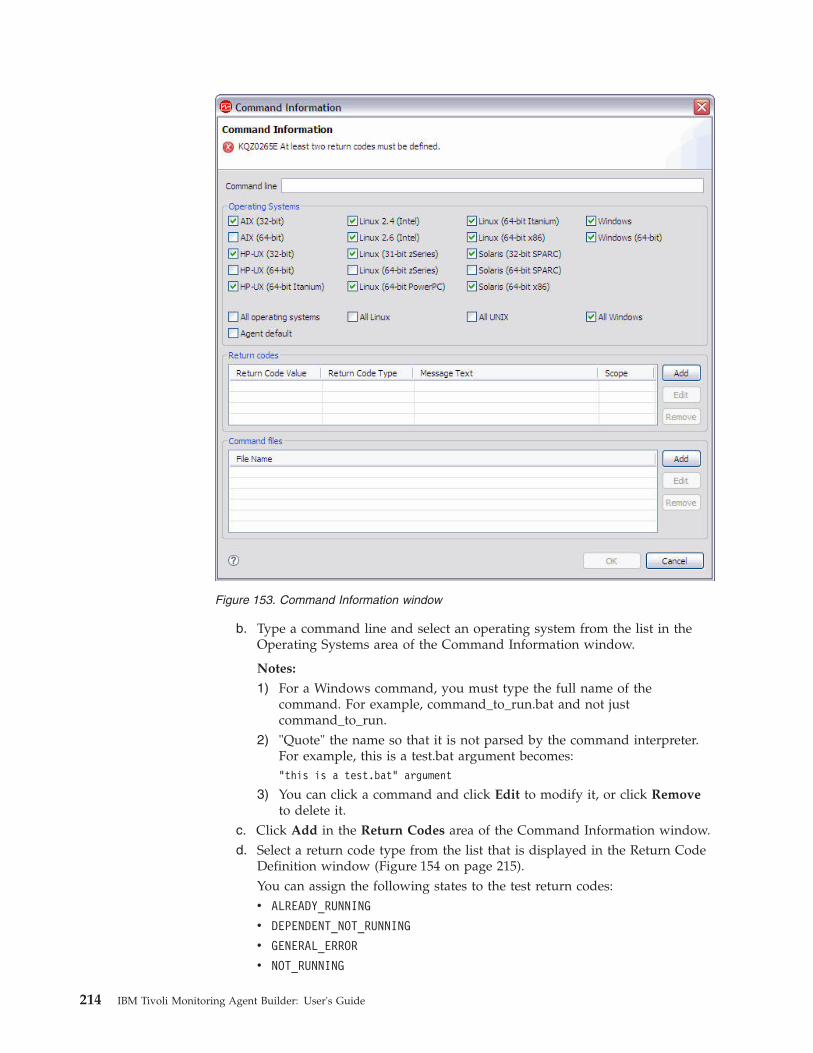
b. Type a command line and select an operating system from the list in theOperating Systems area of the Command Information window.
Notes:
1) For a Windows command, you must type the full name of thecommand. For example, command_to_run.bat and not justcommand_to_run.
2) "Quote" the name so that it is not parsed by the command interpreter.For example, this is a test.bat argument becomes:"this is a test.bat" argument
3) You can click a command and click Edit to modify it, or click Removeto delete it.
c. Click Add in the Return Codes area of the Command Information window.d. Select a return code type from the list that is displayed in the Return Code
Definition window (Figure 154 on page 215).You can assign the following states to the test return codes:v ALREADY_RUNNING
v DEPENDENT_NOT_RUNNING
v GENERAL_ERROR
v NOT_RUNNING
Figure 153. Command Information window
214 IBM Tivoli Monitoring Agent Builder: User's Guide
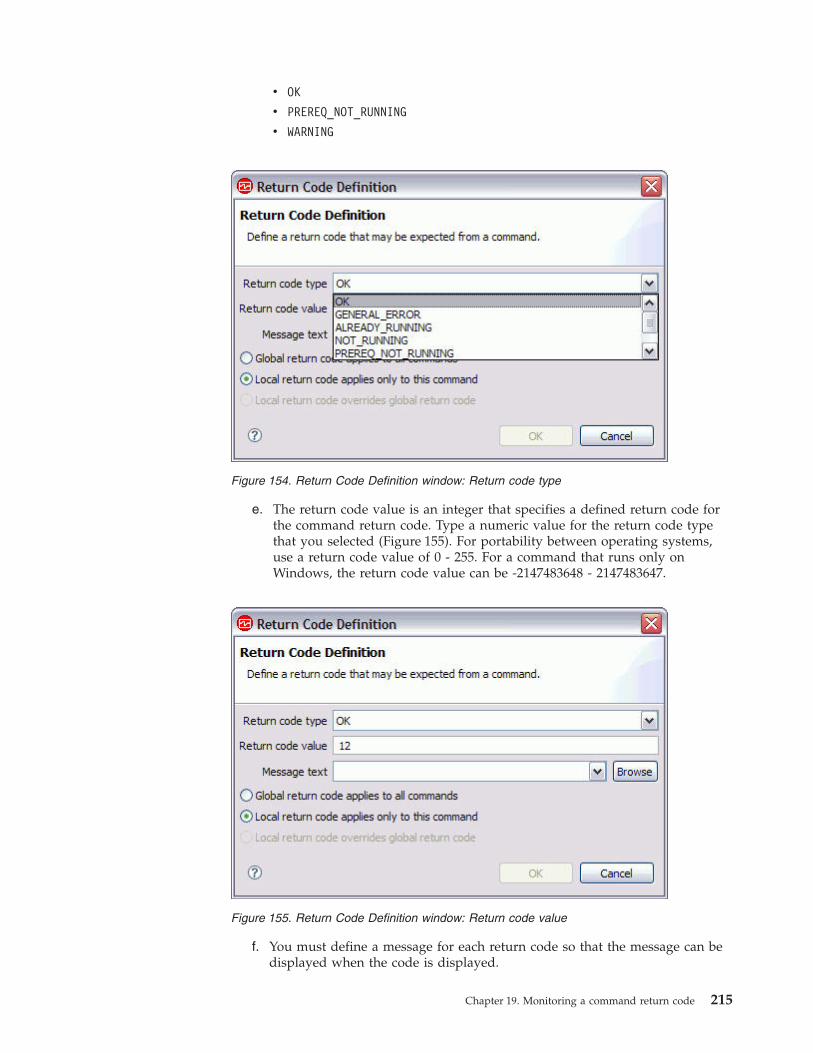
v OK
v PREREQ_NOT_RUNNING
v WARNING
e. The return code value is an integer that specifies a defined return code forthe command return code. Type a numeric value for the return code typethat you selected (Figure 155). For portability between operating systems,use a return code value of 0 - 255. For a command that runs only onWindows, the return code value can be -2147483648 - 2147483647.
f. You must define a message for each return code so that the message can bedisplayed when the code is displayed.
Figure 154. Return Code Definition window: Return code type
Figure 155. Return Code Definition window: Return code value
Chapter 19. Monitoring a command return code 215
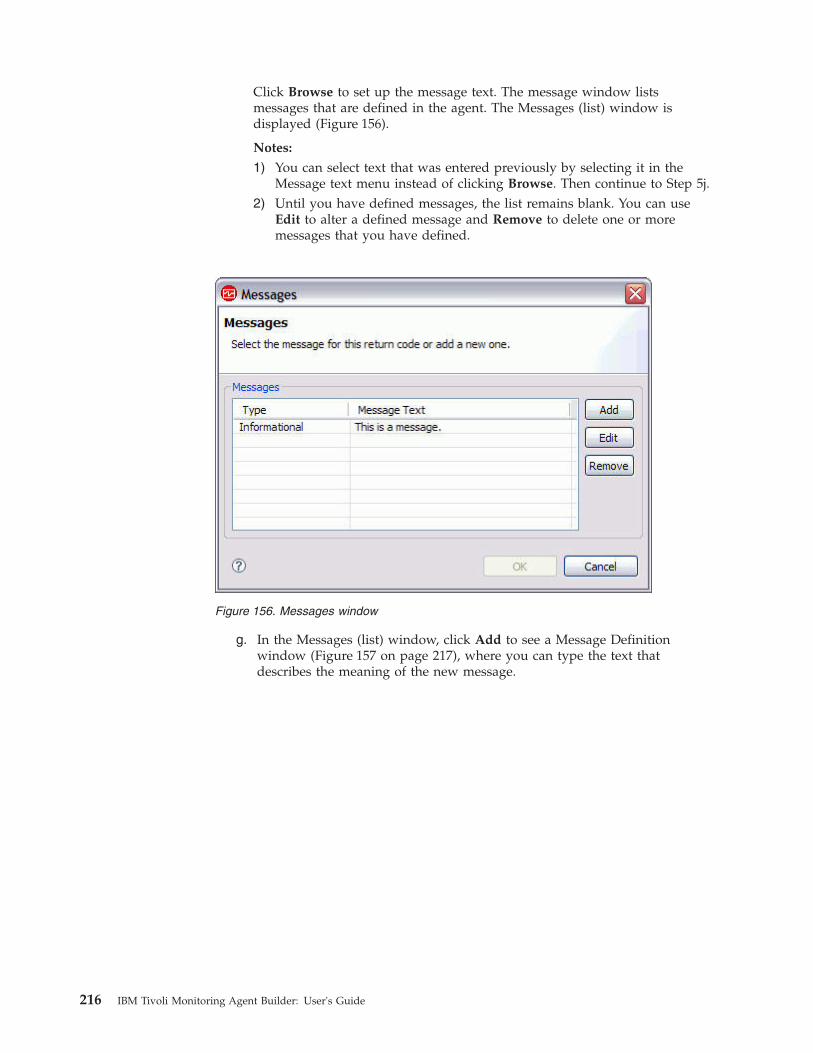
Click Browse to set up the message text. The message window listsmessages that are defined in the agent. The Messages (list) window isdisplayed (Figure 156).
Notes:
1) You can select text that was entered previously by selecting it in theMessage text menu instead of clicking Browse. Then continue to Step 5j.
2) Until you have defined messages, the list remains blank. You can useEdit to alter a defined message and Remove to delete one or moremessages that you have defined.
g. In the Messages (list) window, click Add to see a Message Definitionwindow (Figure 157 on page 217), where you can type the text thatdescribes the meaning of the new message.
Figure 156. Messages window
216 IBM Tivoli Monitoring Agent Builder: User's Guide
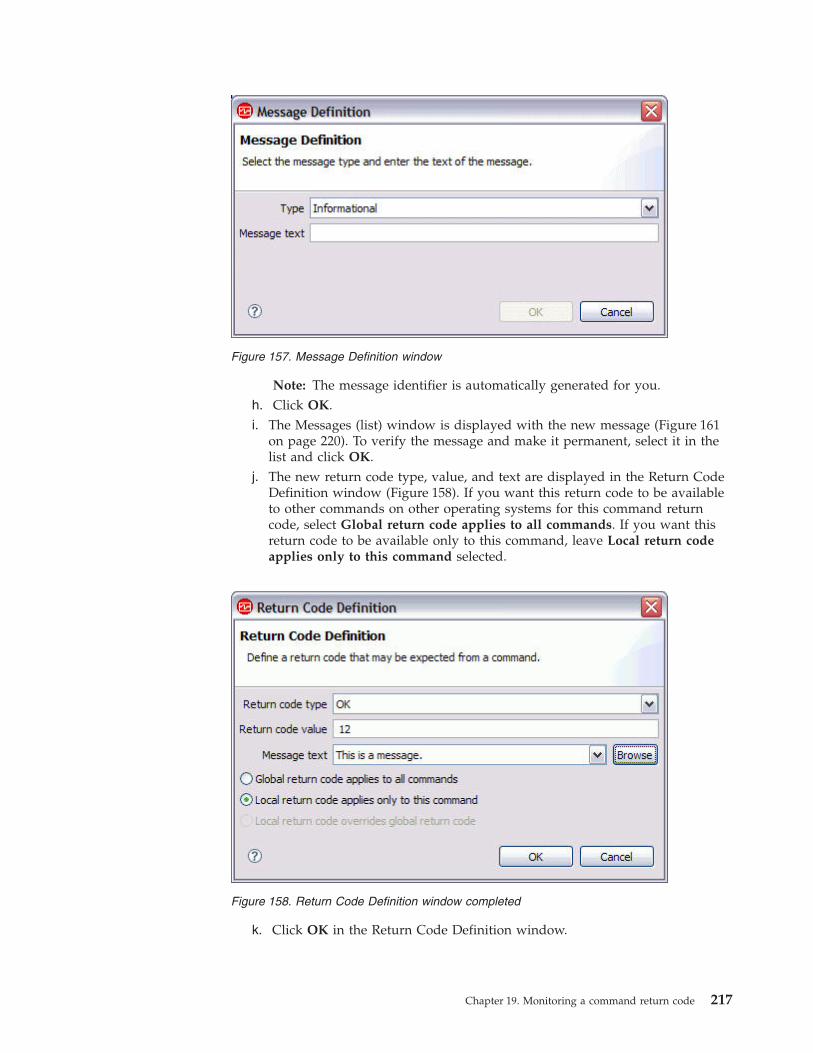
Note: The message identifier is automatically generated for you.h. Click OK.i. The Messages (list) window is displayed with the new message (Figure 161
on page 220). To verify the message and make it permanent, select it in thelist and click OK.
j. The new return code type, value, and text are displayed in the Return CodeDefinition window (Figure 158). If you want this return code to be availableto other commands on other operating systems for this command returncode, select Global return code applies to all commands. If you want thisreturn code to be available only to this command, leave Local return codeapplies only to this command selected.
k. Click OK in the Return Code Definition window.
Figure 157. Message Definition window
Figure 158. Return Code Definition window completed
Chapter 19. Monitoring a command return code 217
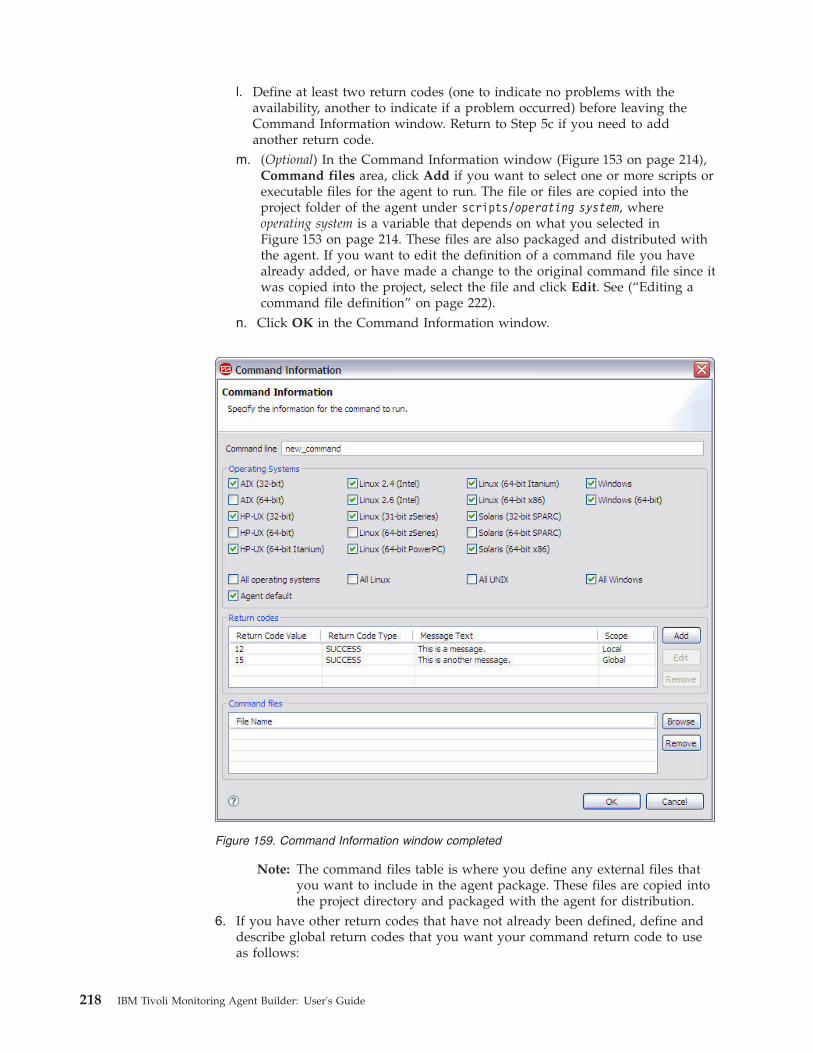
l. Define at least two return codes (one to indicate no problems with theavailability, another to indicate if a problem occurred) before leaving theCommand Information window. Return to Step 5c if you need to addanother return code.
m. (Optional) In the Command Information window (Figure 153 on page 214),Command files area, click Add if you want to select one or more scripts orexecutable files for the agent to run. The file or files are copied into theproject folder of the agent under scripts/operating system, whereoperating system is a variable that depends on what you selected inFigure 153 on page 214. These files are also packaged and distributed withthe agent. If you want to edit the definition of a command file you havealready added, or have made a change to the original command file since itwas copied into the project, select the file and click Edit. See (“Editing acommand file definition” on page 222).
n. Click OK in the Command Information window.
Note: The command files table is where you define any external files thatyou want to include in the agent package. These files are copied intothe project directory and packaged with the agent for distribution.
6. If you have other return codes that have not already been defined, define anddescribe global return codes that you want your command return code to useas follows:
Figure 159. Command Information window completed
218 IBM Tivoli Monitoring Agent Builder: User's Guide

a. Click Add in the Global return codes area of the Command Return Codepage (Figure 152 on page 213).
Note: The return codes defined here are global, which means they areappropriate for all of the commands defined for the command returncode. (They are not shared between command return codes). Inaddition, you can define return codes while entering commandinformation (Figure 153 on page 214). The return codes defined herecan be global or local. Local return codes are only appropriate for thisspecific command. This hierarchy is useful if you have a return codethat is the same across all operating systems. (For example, if areturn code is 0, this means that everything is functioning correctly.You can define it at the global level once, and then all definedcommands interpret 0 in this way.) In addition, if the command on aWindows system returns a 5, but none of the other operating systemsgives a return code of 5, you can define the return code of 5 only forthe Windows command. In addition, if you define the same returncode at the local command level that was previously defined at theglobal level, the one defined at the command level is used. You canuse this to override return codes on specific operating systems. Forinstance, if on all UNIX operating systems, a return code of 2 meansone thing, but, on Windows, it means something different, you candefine a return code of 2 at the global level as expected by the UNIXoperating systems. Then, in the command for Windows, you canredefine return code 2 for the meaning on Windows.
b. Select a return code type from the list that is displayed in the Return CodeDefinition window (Figure 154 on page 215).You can assign the following states to the test return codes:v ALREADY_RUNNING
v DEPENDENT_NOT_RUNNING
v GENERAL_ERROR
v NOT_RUNNING
v OK
v PREREQ_NOT_RUNNING
v WARNING
c. The return code value is an integer that specifies a defined return code forthe command return code. Type a numeric value for the return code typethat you selected (Figure 160 on page 220).
Chapter 19. Monitoring a command return code 219
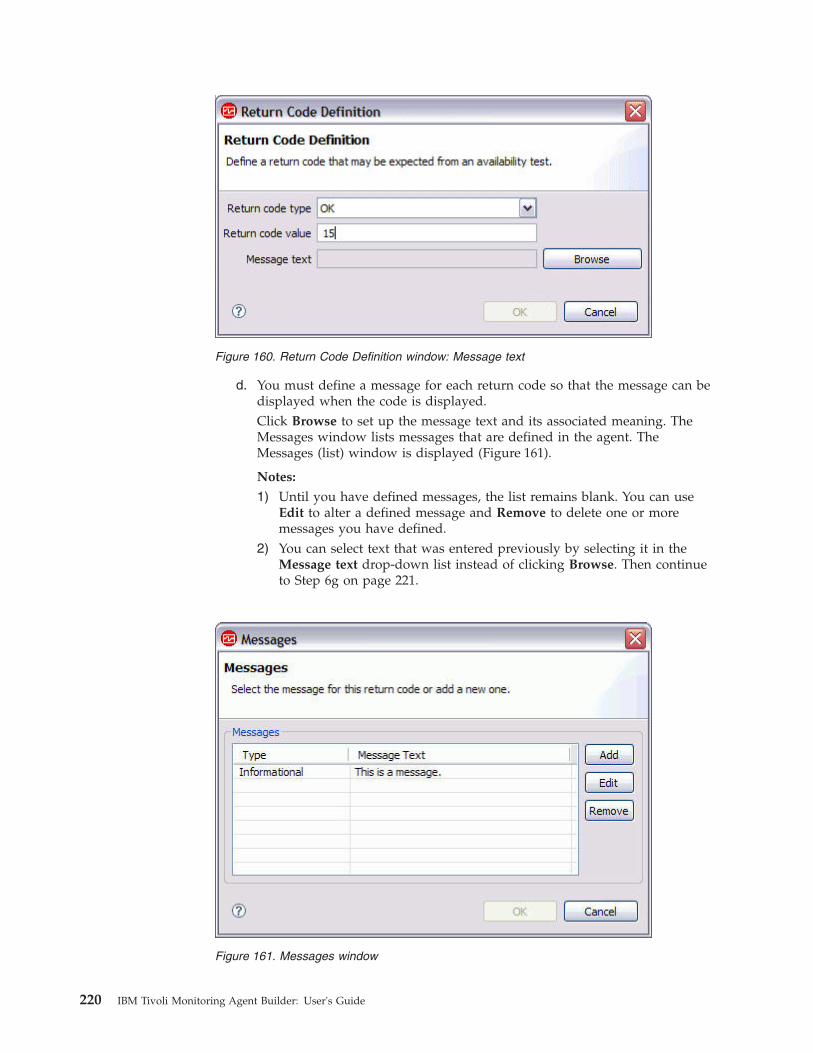
d. You must define a message for each return code so that the message can bedisplayed when the code is displayed.Click Browse to set up the message text and its associated meaning. TheMessages window lists messages that are defined in the agent. TheMessages (list) window is displayed (Figure 161).
Notes:
1) Until you have defined messages, the list remains blank. You can useEdit to alter a defined message and Remove to delete one or moremessages you have defined.
2) You can select text that was entered previously by selecting it in theMessage text drop-down list instead of clicking Browse. Then continueto Step 6g on page 221.
Figure 160. Return Code Definition window: Message text
Figure 161. Messages window
220 IBM Tivoli Monitoring Agent Builder: User's Guide
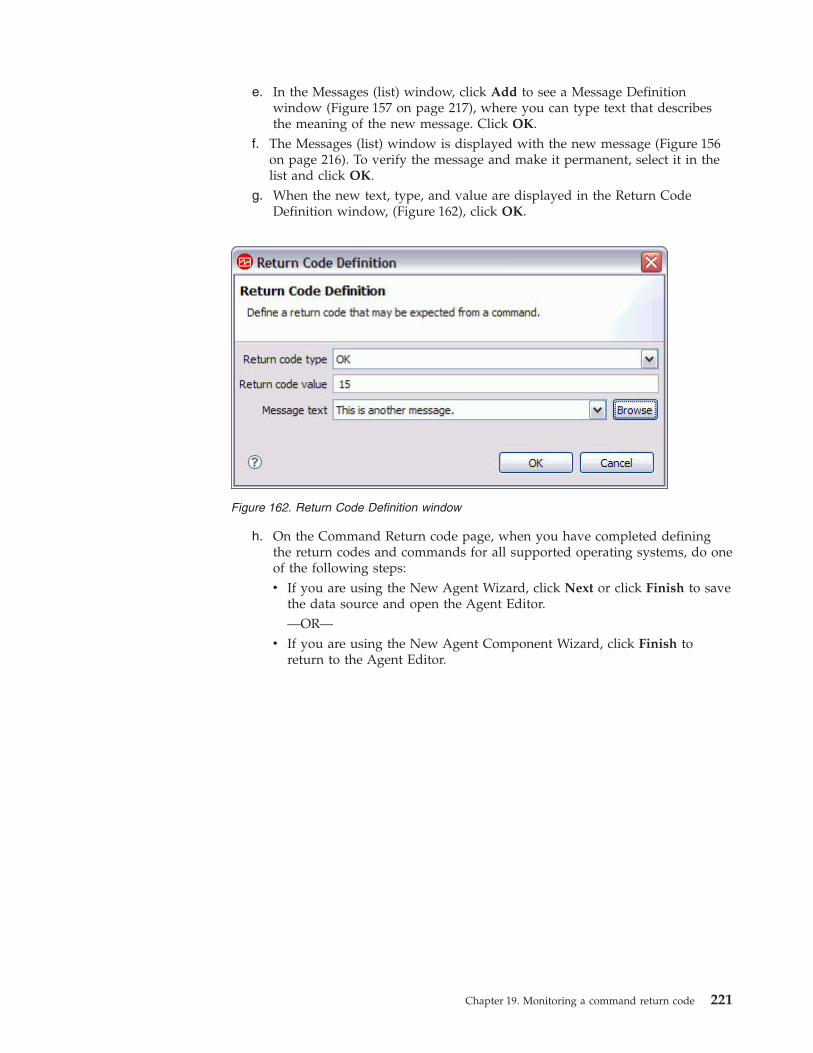
e. In the Messages (list) window, click Add to see a Message Definitionwindow (Figure 157 on page 217), where you can type text that describesthe meaning of the new message. Click OK.
f. The Messages (list) window is displayed with the new message (Figure 156on page 216). To verify the message and make it permanent, select it in thelist and click OK.
g. When the new text, type, and value are displayed in the Return CodeDefinition window, (Figure 162), click OK.
h. On the Command Return code page, when you have completed definingthe return codes and commands for all supported operating systems, do oneof the following steps:v If you are using the New Agent Wizard, click Next or click Finish to save
the data source and open the Agent Editor.—OR—
v If you are using the New Agent Component Wizard, click Finish toreturn to the Agent Editor.
Figure 162. Return Code Definition window
Chapter 19. Monitoring a command return code 221
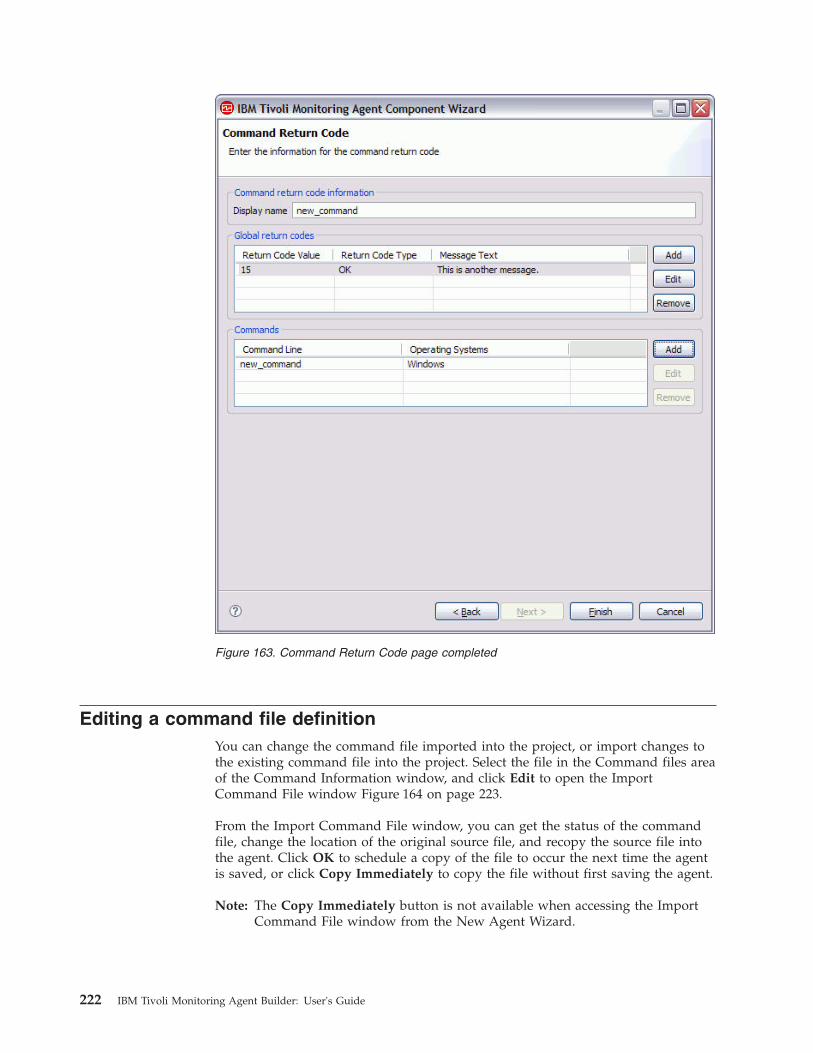
Editing a command file definitionYou can change the command file imported into the project, or import changes tothe existing command file into the project. Select the file in the Command files areaof the Command Information window, and click Edit to open the ImportCommand File window Figure 164 on page 223.
From the Import Command File window, you can get the status of the commandfile, change the location of the original source file, and recopy the source file intothe agent. Click OK to schedule a copy of the file to occur the next time the agentis saved, or click Copy Immediately to copy the file without first saving the agent.
Note: The Copy Immediately button is not available when accessing the ImportCommand File window from the New Agent Wizard.
Figure 163. Command Return Code page completed
222 IBM Tivoli Monitoring Agent Builder: User's Guide
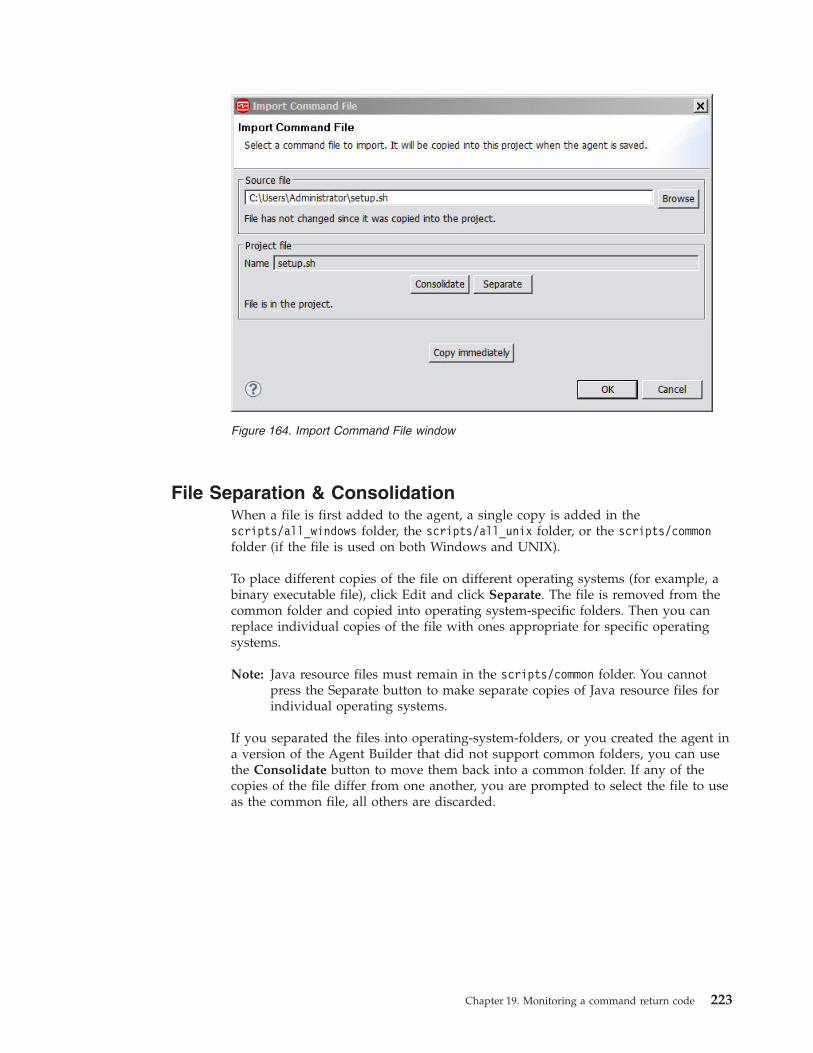
File Separation & ConsolidationWhen a file is first added to the agent, a single copy is added in thescripts/all_windows folder, the scripts/all_unix folder, or the scripts/commonfolder (if the file is used on both Windows and UNIX).
To place different copies of the file on different operating systems (for example, abinary executable file), click Edit and click Separate. The file is removed from thecommon folder and copied into operating system-specific folders. Then you canreplace individual copies of the file with ones appropriate for specific operatingsystems.
Note: Java resource files must remain in the scripts/common folder. You cannotpress the Separate button to make separate copies of Java resource files forindividual operating systems.
If you separated the files into operating-system-folders, or you created the agent ina version of the Agent Builder that did not support common folders, you can usethe Consolidate button to move them back into a common folder. If any of thecopies of the file differ from one another, you are prompted to select the file to useas the common file, all others are discarded.
Figure 164. Import Command File window
Chapter 19. Monitoring a command return code 223

224 IBM Tivoli Monitoring Agent Builder: User's Guide
Chapter 20. Monitoring output from a script
When application data is not available through a standard management interface, ascript or external program can be used to collect data for an attribute group fromeither a local or remote system. The output of the program must contain onlyvalues for each attribute within the attribute group. To return multiple rows ofdata, the data for each row must be separated by a line break. The attributes ineach row of data are separated by the separator(s) you define. For moreinformation about separators, see “Script parsing and separators”
The command may use environment and configuration variables within theuser-created script, executable file, query, or system command. The command maynot use environment or configuration variables on the command line invocation ofthe command, with only the following exceptions available: AGENT_BIN_DIR,AGENT_ETC_DIR, AGENT_LIB_DIR, CANDLE_HOME, and CANDLEHOME.
Collecting data from a remote systemTo collect data from a remote system, Agent Builder creates a Secure Shell (SSH)session and invokes the script or external program on the remote system. Theagent establishes and logs into an SSH session, uploads the scripts to the remotesystem, invokes the script or external program, and retrieves the output. The agentcan be configured to keep the session open or reestablish the session for eachinvocation. If the session is kept open, the script can be reused or uploaded foreach invocation. By default, a single SSH session is used and the scripts are reusedfor each invocation.
Agent Builder only supports use of SSH Protocol Version 2 with Rivest, Shamirand Adleman (RSA) or Digital Signature Algorithm (DSA) keys. The agent is eitherauthenticated by user name and password, or by public key authentication. Thegeneration and distribution of the public keys is an administrative task that mustbe performed outside of the agent and Agent Builder.
To run a Take Action command written against a Secure Shell (SSH) enabled scriptdata provider on the remote system, see “SSHEXEC action” on page 640.
Script parsing and separatorsWhen you create a script attribute group, a single character text separator is bydefault assigned. The default separator is ";". The separator is used by the agentto parse and delimit the data for each attribute in the data row. You can change thedefault separator to use a different character. You can also assign specificseparators to one or more individual attributes.
You can assign specific separators for individual attributes that:v Take a fixed number of bytes from the output.v Separate one attribute from the next with a custom separator, which can be more
than one character.v Delimit an attribute value with a string at the beginning and end of the value.v Return the rest of the text as the attribute value (whether it contains embedded
separators or not).
© Copyright IBM Corp. 2007, 2012 225
You can use one or more of these separators to extract attribute values from thedata rows.
Examples
Simple script outputSome scripts can output data rows with clear and regular separators, for example:Row One;1;2Row Two;3;4Row Three;5;6
Here the ";" character is a clear and regular separator between the three pieces ofdata on each row. In this case, the default separator is fine, so there is no need tochange or define other separators. It is not difficult to imagine a similar scriptoutput where the separator is a different character, for example:Row One-1-2Row Two-3-4Row Three-5-6
In this example the separator is changed from a ";" character to a "-" character, soin this case when defining the attributes, change the default separator to use the"-" character.
Complex script outputSome scripts may output data rows that have irregular or changing separators, forexample:Row One;1;2;[option]Hour:MIN;fourtabby The end;4Row Two;3;4;[required]12:30;fourvery tabby the tail;5Row Three;5;6;[out]March:12;fourline up the rest of the story;6
In this example an assignment of separators to attribute definitions that you canuse is:1. Initially the default separator ";" is fine for the first three attributes in each
data row. In this case, you assign the separator type Separator Text set to ";"when you define each attribute, this setting is the default one.
2. For the fourth attribute, assume the string between the"[" and "]" is a valuethat you want to extract. In this case when defining the fourth attribute, youassign a separator type Begin and End Text with begin and end text values of"[" and "]".
3. For the fifth attribute, assume you want to extract the values between the "]"and ":" characters. In this case when defining the fifth attribute, you assignseparator type Separator Text set to ":".
4. For the sixth attribute, the default separator ";" is fine again, accept thedefault.
5. For the seventh attribute, you would like to extract the string in the next fourcharacters "four". There is not a clear separator at the end of this string. Youcan assign a number of characters to define the separation from the nextattribute. You assign a separator type Number of characters, and specify fourcharacters as the length.
6. For the eighth attribute you would like to extract the strings tabby, very tabbyand line up. In this case, you can assume that all of these strings are followedby a tab character. In this case, you assign a separator of type Tab separator.
7. For the ninth attribute, you revert again to the default separator type to extractthe remaining text to this attribute.
226 IBM Tivoli Monitoring Agent Builder: User's Guide
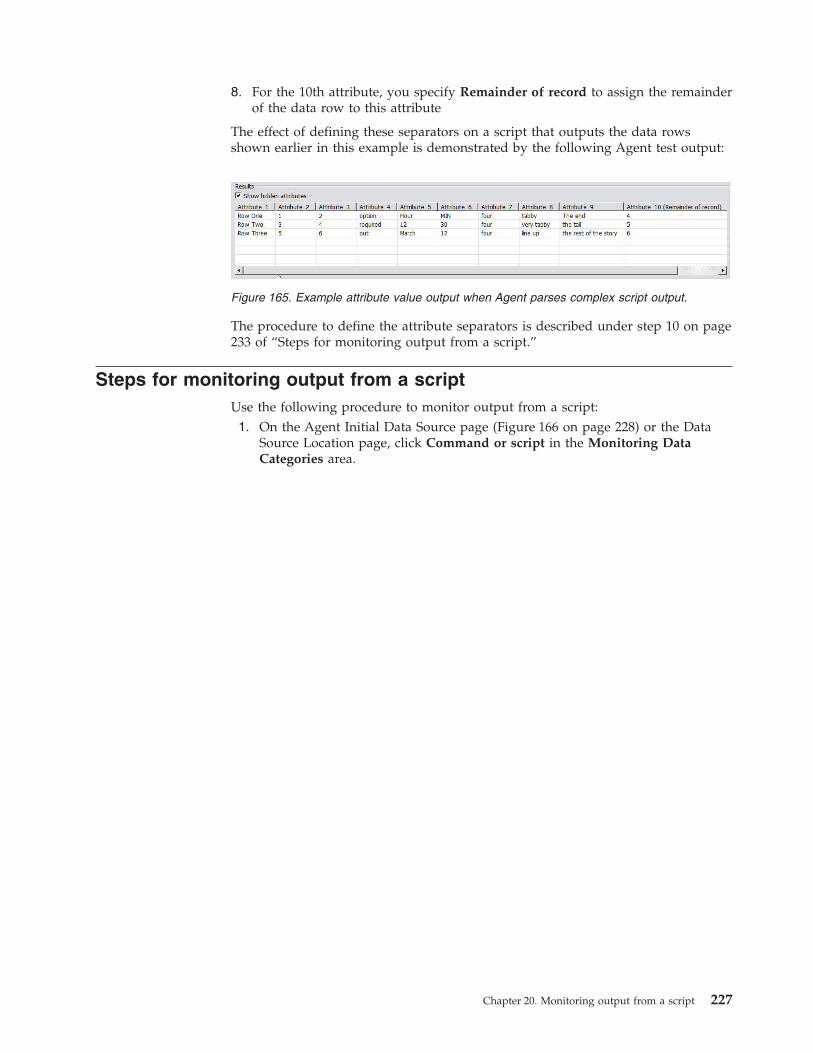
8. For the 10th attribute, you specify Remainder of record to assign the remainderof the data row to this attribute
The effect of defining these separators on a script that outputs the data rowsshown earlier in this example is demonstrated by the following Agent test output:
The procedure to define the attribute separators is described under step 10 on page233 of “Steps for monitoring output from a script.”
Steps for monitoring output from a scriptUse the following procedure to monitor output from a script:1. On the Agent Initial Data Source page (Figure 166 on page 228) or the Data
Source Location page, click Command or script in the Monitoring DataCategories area.
Figure 165. Example attribute value output when Agent parses complex script output.
Chapter 20. Monitoring output from a script 227
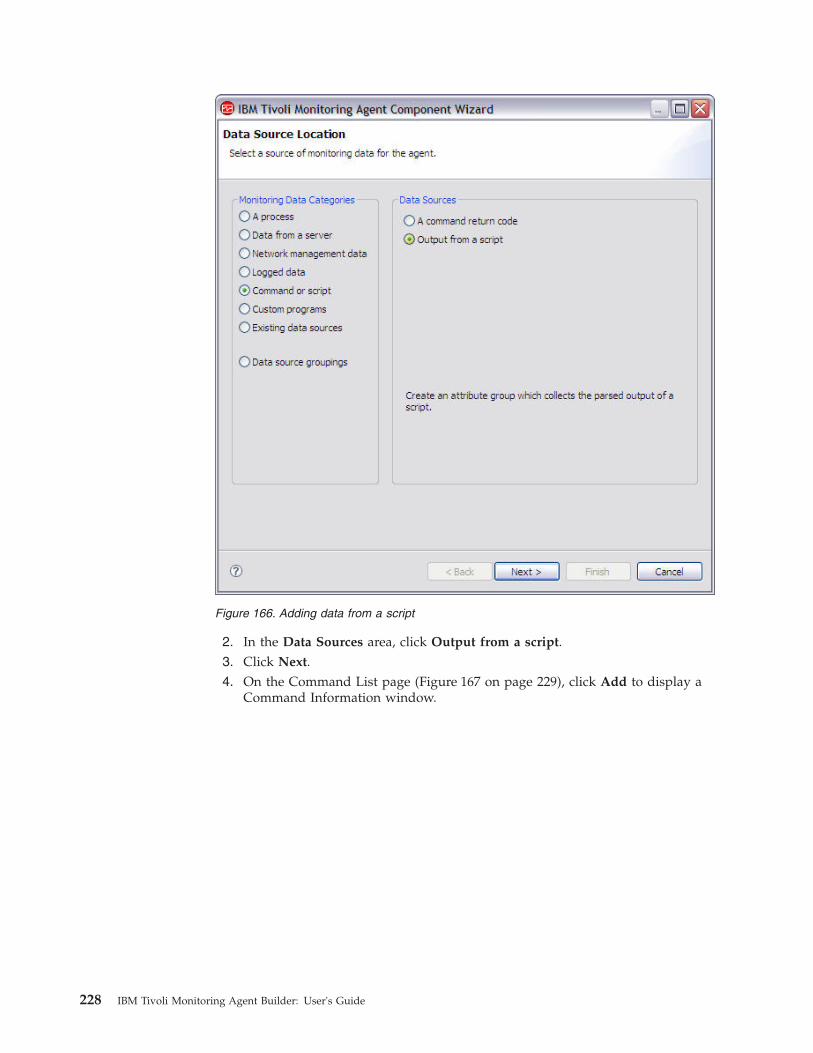
2. In the Data Sources area, click Output from a script.3. Click Next.4. On the Command List page (Figure 167 on page 229), click Add to display a
Command Information window.
Figure 166. Adding data from a script
228 IBM Tivoli Monitoring Agent Builder: User's Guide
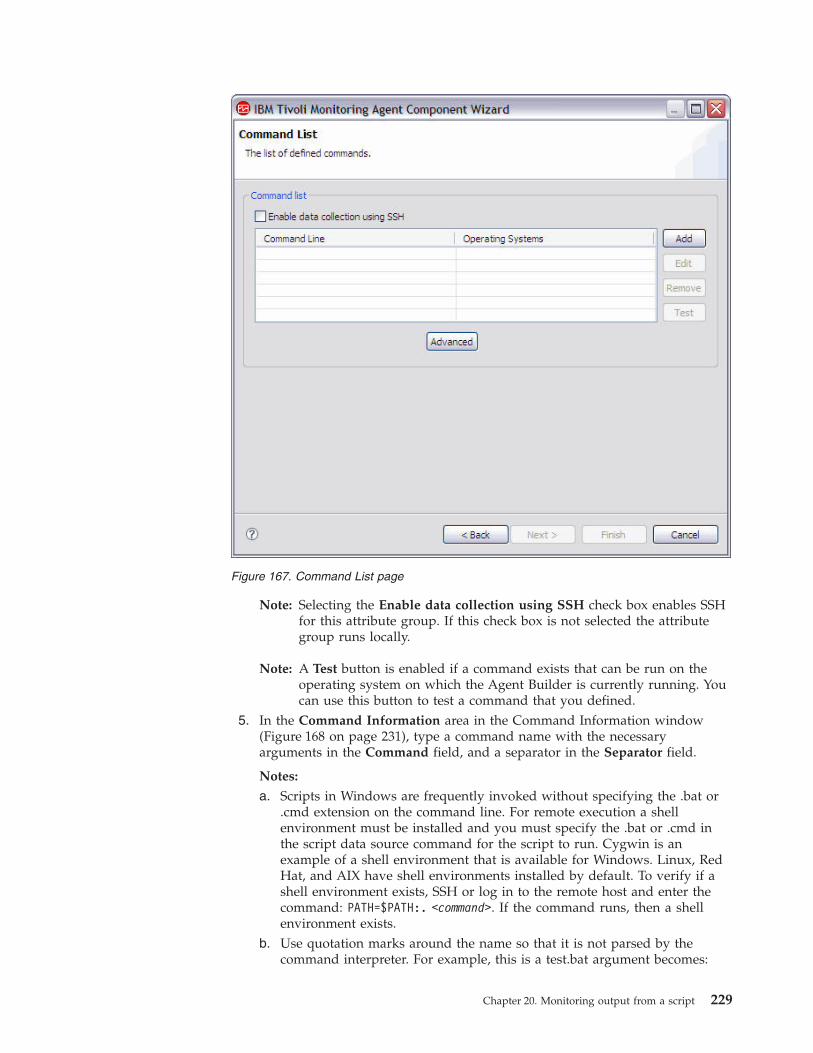
Note: Selecting the Enable data collection using SSH check box enables SSHfor this attribute group. If this check box is not selected the attributegroup runs locally.
Note: A Test button is enabled if a command exists that can be run on theoperating system on which the Agent Builder is currently running. Youcan use this button to test a command that you defined.
5. In the Command Information area in the Command Information window(Figure 168 on page 231), type a command name with the necessaryarguments in the Command field, and a separator in the Separator field.
Notes:
a. Scripts in Windows are frequently invoked without specifying the .bat or.cmd extension on the command line. For remote execution a shellenvironment must be installed and you must specify the .bat or .cmd inthe script data source command for the script to run. Cygwin is anexample of a shell environment that is available for Windows. Linux, RedHat, and AIX have shell environments installed by default. To verify if ashell environment exists, SSH or log in to the remote host and enter thecommand: PATH=$PATH:. <command>. If the command runs, then a shellenvironment exists.
b. Use quotation marks around the name so that it is not parsed by thecommand interpreter. For example, this is a test.bat argument becomes:
Figure 167. Command List page
Chapter 20. Monitoring output from a script 229
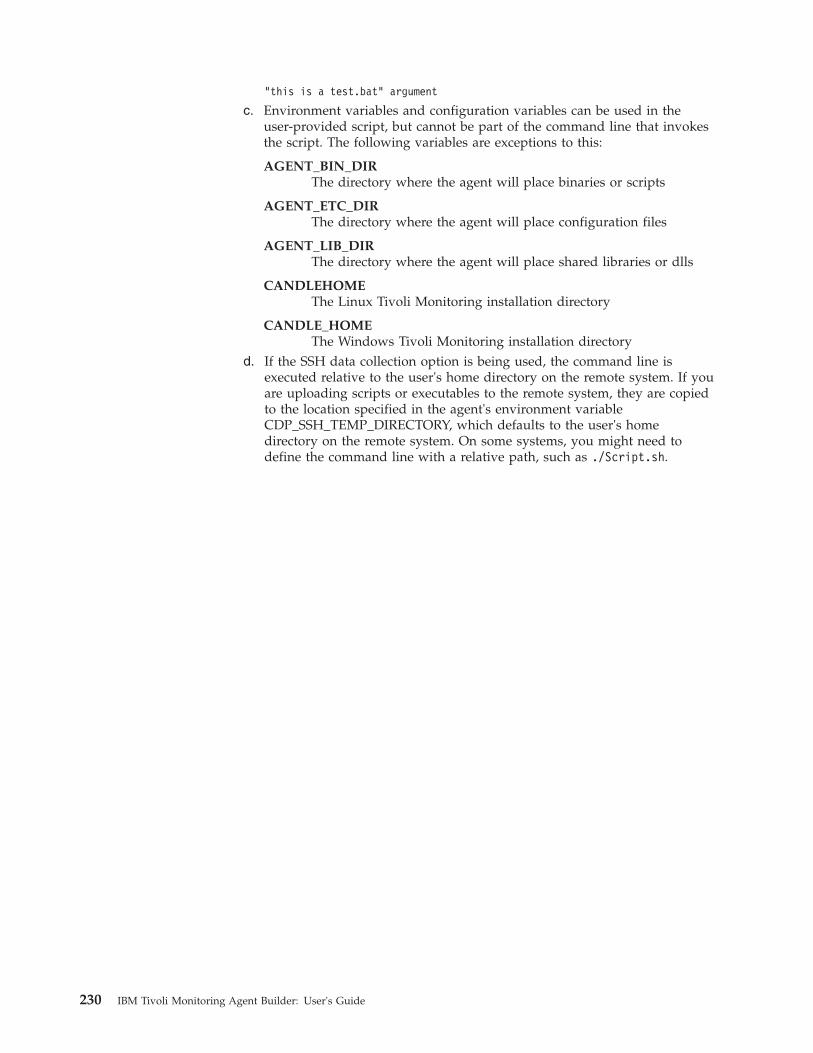
"this is a test.bat" argument
c. Environment variables and configuration variables can be used in theuser-provided script, but cannot be part of the command line that invokesthe script. The following variables are exceptions to this:
AGENT_BIN_DIRThe directory where the agent will place binaries or scripts
AGENT_ETC_DIRThe directory where the agent will place configuration files
AGENT_LIB_DIRThe directory where the agent will place shared libraries or dlls
CANDLEHOMEThe Linux Tivoli Monitoring installation directory
CANDLE_HOMEThe Windows Tivoli Monitoring installation directory
d. If the SSH data collection option is being used, the command line isexecuted relative to the user's home directory on the remote system. If youare uploading scripts or executables to the remote system, they are copiedto the location specified in the agent's environment variableCDP_SSH_TEMP_DIRECTORY, which defaults to the user's homedirectory on the remote system. On some systems, you might need todefine the command line with a relative path, such as ./Script.sh.
230 IBM Tivoli Monitoring Agent Builder: User's Guide
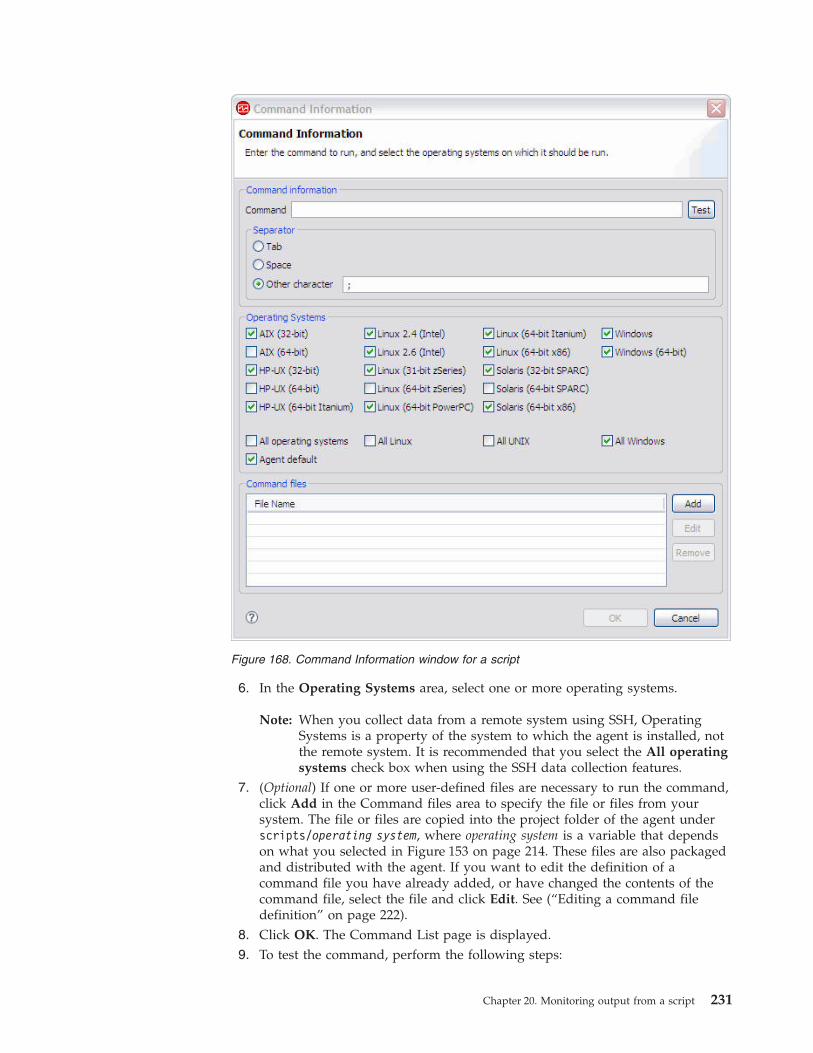
6. In the Operating Systems area, select one or more operating systems.
Note: When you collect data from a remote system using SSH, OperatingSystems is a property of the system to which the agent is installed, notthe remote system. It is recommended that you select the All operatingsystems check box when using the SSH data collection features.
7. (Optional) If one or more user-defined files are necessary to run the command,click Add in the Command files area to specify the file or files from yoursystem. The file or files are copied into the project folder of the agent underscripts/operating system, where operating system is a variable that dependson what you selected in Figure 153 on page 214. These files are also packagedand distributed with the agent. If you want to edit the definition of acommand file you have already added, or have changed the contents of thecommand file, select the file and click Edit. See (“Editing a command filedefinition” on page 222).
8. Click OK. The Command List page is displayed.9. To test the command, perform the following steps:
Figure 168. Command Information window for a script
Chapter 20. Monitoring output from a script 231
a. Click Test to open the command information and display the TestCommand window (Figure 169). To test the script on a remote system,select a system from the drop-down list (if one has been defined) or clickAdd to add the host name of a system.
b. Use the Test Command window to change the command, default separatorand attribute separators, and to view how these changes affect the datathat is returned.1) Type the command and separator in the fields if they are not already
filled in.
Note: You can specify other separators using the Attribute Informationwindow Figure 170 on page 234 at attribute creation time or byusing the Agent Editor to modify an existing attribute. For moreinformation about the Agent Editor, see “Tivoli MonitoringAgent Editor” on page 37 and for more information aboutmanipulating data source and attributes, see Chapter 7, “Editingdata source and attribute properties,” on page 53
2) (Optional) Before starting your test you can set environment variablesand configuration properties. For more information, see “Configurationprior to testing” on page 374.
3) Click OK to return to the Test Settings window.4) Click Start Agent. A window indicates that the Agent is starting.5) To simulate a request from Tivoli Enterprise Portal or SOAP for agent
data, click Collect Data. The Agent Builder runs your command. If youhad specified a remote system, provide a user ID and password. Evenif the return code is not 0, the Agent Builder parses the results of thecommand in the same way the agent does.
6) The Test Settings window collects and displays any data in the agent'scache since it was last started. The initial names of the attributes are
Figure 169. Test Command window
232 IBM Tivoli Monitoring Agent Builder: User's Guide

Attribute_1, Attribute_2, and so on; however, you can modify theproperties of the attributes by clicking the appropriate column heading.
7) Click Check Results to view the return code from the command, theunparsed data, and any error messages that were returned.
8) The agent can be stopped by clicking Stop Agent
9) Click OK to return to the Command Information window.If you made changes to the command or the separator, the appropriatecommand is updated to reflect those changes.If this window was launched when creating the script data source, theattributes were added to the new script data source.If this window was launched from an existing script data source, thenany changes to the attributes are made to the script data source andany additional attributes are added, but any extra attributes are notremoved. These options affect only the attributes parsed from the scriptoutput. Any derived attributes are not affected. You might need toupdate or remove derived attributes manually if any of these attributesbecome invalid based on the attributes they reference. The derivedattribute formula is displayed and not the actual result value.
Note: If the attribute group already exists, to start a test, complete thefollowing procedurea. Select the attribute group on the Agent Editor Data Sources
Definition page.b. Select the script to be tested from the Command Listc. Click Test and follow the procedure at step 9a on page 232
10. If you skipped testing the command in Step 9, perform the following steps:a. On the Command List page with the completed command information,
click Next. See (Figure 167 on page 229).b. On the Attribute Information page Figure 170 on page 234, complete the
attribute name and type information using Table 6 on page 56. Select Addadditional attributes to add further attributes
c. On the Attribute Information page Figure 170 on page 234, use the ScriptAttribute Information tab to choose a specific data separator for thisattribute. The standard separator ; is selected by default. You can choose anumber of other separators such as, a string, a number of characters, a tab,a space, or a different string separator for the beginning and end of thedata. Finally you can also choose Remainder of record to assign theremainder of the record to the attribute.
Chapter 20. Monitoring output from a script 233
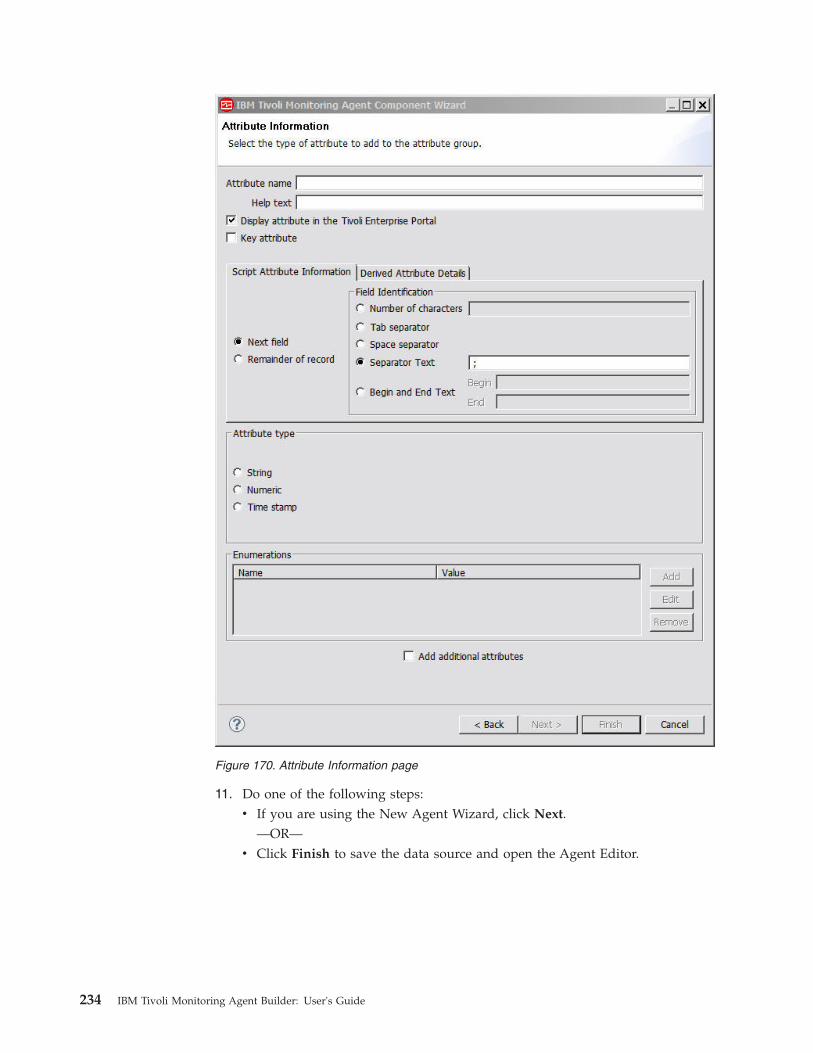
11. Do one of the following steps:v If you are using the New Agent Wizard, click Next.
—OR—v Click Finish to save the data source and open the Agent Editor.
Figure 170. Attribute Information page
234 IBM Tivoli Monitoring Agent Builder: User's Guide
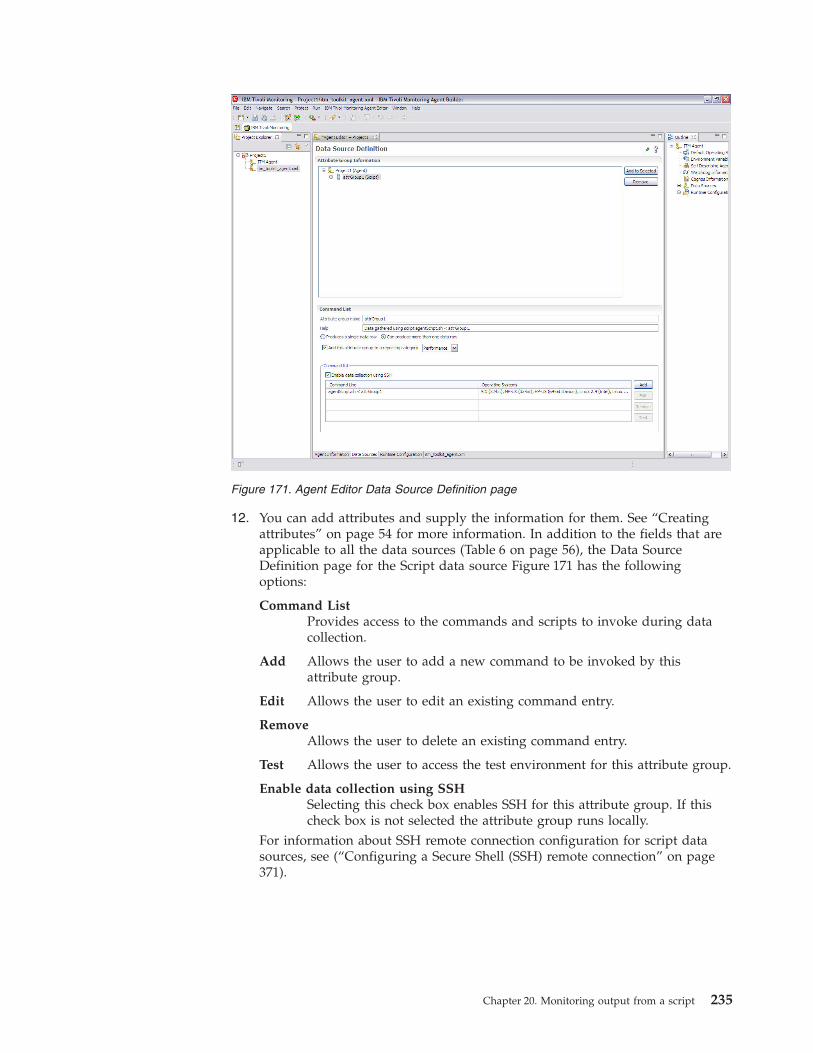
12. You can add attributes and supply the information for them. See “Creatingattributes” on page 54 for more information. In addition to the fields that areapplicable to all the data sources (Table 6 on page 56), the Data SourceDefinition page for the Script data source Figure 171 has the followingoptions:
Command ListProvides access to the commands and scripts to invoke during datacollection.
Add Allows the user to add a new command to be invoked by thisattribute group.
Edit Allows the user to edit an existing command entry.
RemoveAllows the user to delete an existing command entry.
Test Allows the user to access the test environment for this attribute group.
Enable data collection using SSHSelecting this check box enables SSH for this attribute group. If thischeck box is not selected the attribute group runs locally.
For information about SSH remote connection configuration for script datasources, see (“Configuring a Secure Shell (SSH) remote connection” on page371).
Figure 171. Agent Editor Data Source Definition page
Chapter 20. Monitoring output from a script 235

236 IBM Tivoli Monitoring Agent Builder: User's Guide
Chapter 21. Monitoring data from Java Database Connectivity(JDBC)
Use the JDBC data source to collect data from Agent Builder databases. Each JDBCdata source that you define runs an SQL query to collect data from the database.Each column returned by the query is a Tivoli Monitoring attribute in the JDBCdata source. The JDBC data provider supports the following database servers:v IBM DB2 9.x and 8.xv Microsoft SQL Server 2008, 2005, and 2000v Oracle Database 11g and 10g
Agent Builder does not include the JDBC drivers for these databases. The JDBCdrivers are a set of jar files provided by the vendor that are necessary to establish aJDBC connection to the database. For convenience, here are links to where thosedrivers can be downloaded:v IBM DB2: JDBC drivers are included with the database server installation in a
subdirectory named java located under the main DB2 installation directory.v Microsoft SQL Server Web site at www.microsoft.comv Oracle Database: http://www.oracle.com/technology/software/tech/java/
sqlj_jdbc/index.html
Note: An important thing to remember is that the JDBC data provider canremotely monitor your database servers. A Java runtime environment andthe JDBC driver jar files for the database server you are connecting to mustalready be located on the system where you will run the agent.
The following versions of Java are supported:v Sun Microsystems Java Version 5 or laterv IBM Corporation Java Version 5 or later
ProcedureUse the following procedure to add a JDBC data source:1. On the Agent Initial Data Source page (Figure 172 on page 238) or the Data
Source Location page, click Data from a server in the Monitoring DataCategories area.
© Copyright IBM Corp. 2007, 2012 237
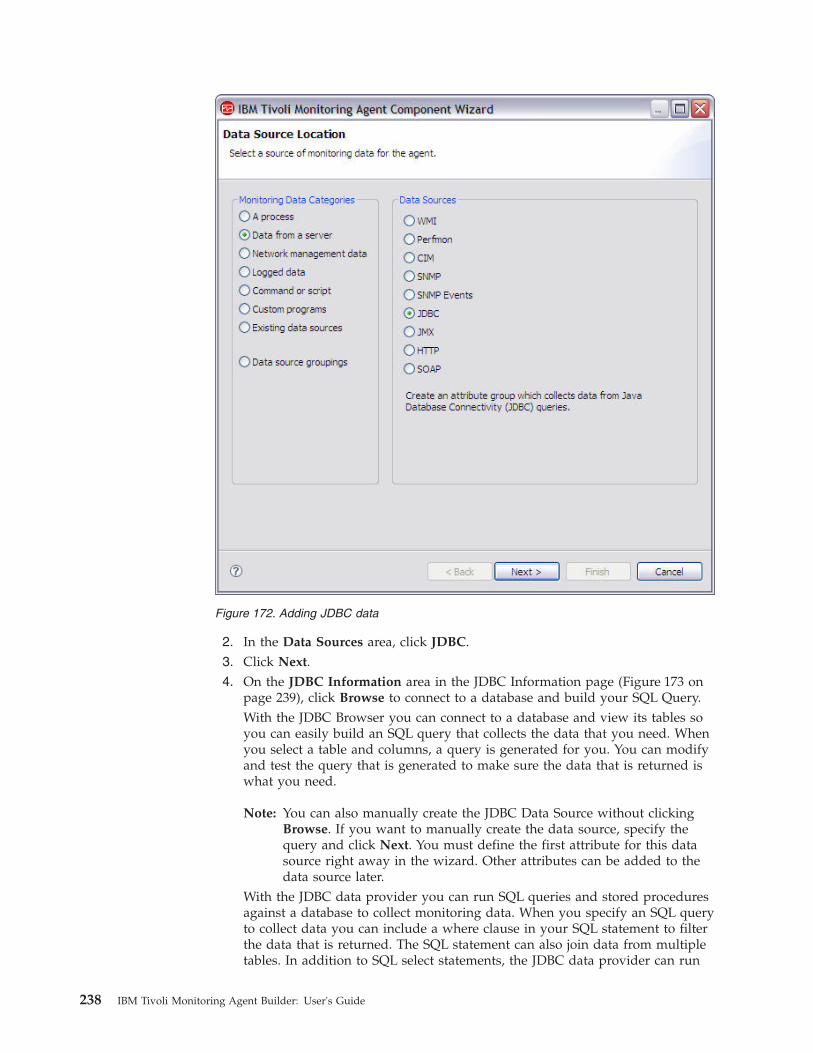
2. In the Data Sources area, click JDBC.3. Click Next.4. On the JDBC Information area in the JDBC Information page (Figure 173 on
page 239), click Browse to connect to a database and build your SQL Query.With the JDBC Browser you can connect to a database and view its tables soyou can easily build an SQL query that collects the data that you need. Whenyou select a table and columns, a query is generated for you. You can modifyand test the query that is generated to make sure the data that is returned iswhat you need.
Note: You can also manually create the JDBC Data Source without clickingBrowse. If you want to manually create the data source, specify thequery and click Next. You must define the first attribute for this datasource right away in the wizard. Other attributes can be added to thedata source later.
With the JDBC data provider you can run SQL queries and stored proceduresagainst a database to collect monitoring data. When you specify an SQL queryto collect data you can include a where clause in your SQL statement to filterthe data that is returned. The SQL statement can also join data from multipletables. In addition to SQL select statements, the JDBC data provider can run
Figure 172. Adding JDBC data
238 IBM Tivoli Monitoring Agent Builder: User's Guide
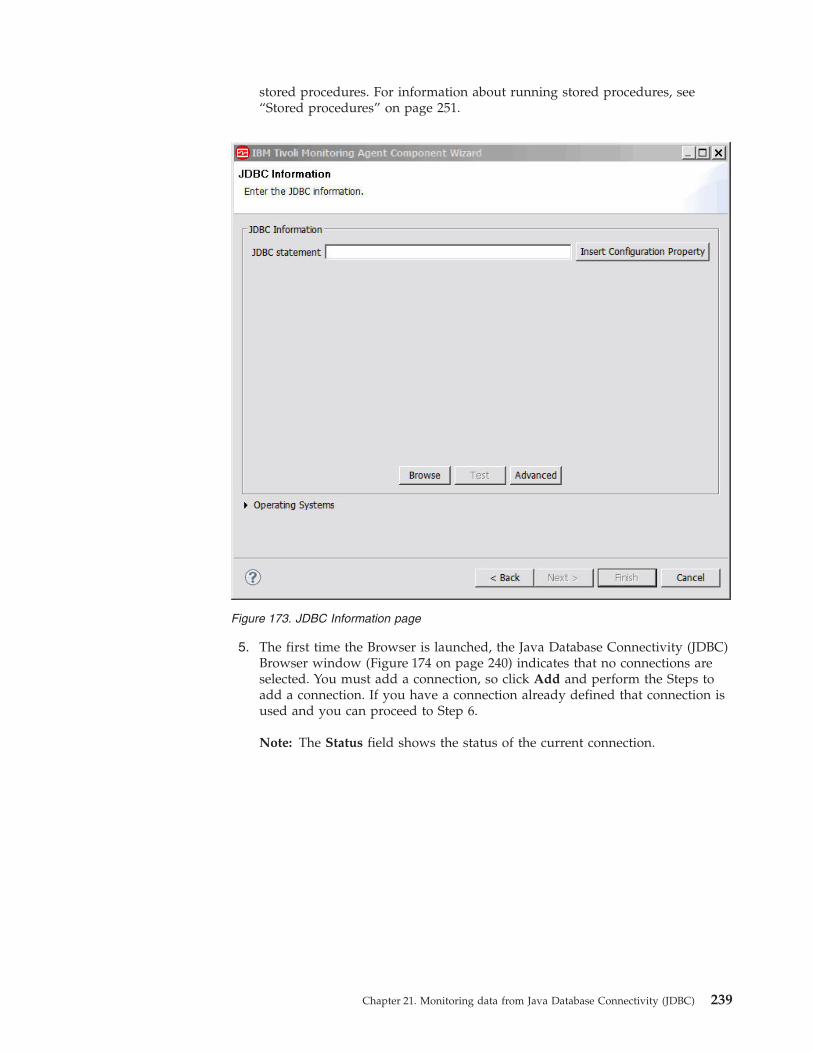
stored procedures. For information about running stored procedures, see“Stored procedures” on page 251.
5. The first time the Browser is launched, the Java Database Connectivity (JDBC)Browser window (Figure 174 on page 240) indicates that no connections areselected. You must add a connection, so click Add and perform the Steps toadd a connection. If you have a connection already defined that connection isused and you can proceed to Step 6.
Note: The Status field shows the status of the current connection.
Figure 173. JDBC Information page
Chapter 21. Monitoring data from Java Database Connectivity (JDBC) 239

Steps to add a connection:
a. On the JDBC Connections page (Figure 175 on page 241), click NewConnection, and click Next.
Figure 174. JDBC Browser window
240 IBM Tivoli Monitoring Agent Builder: User's Guide
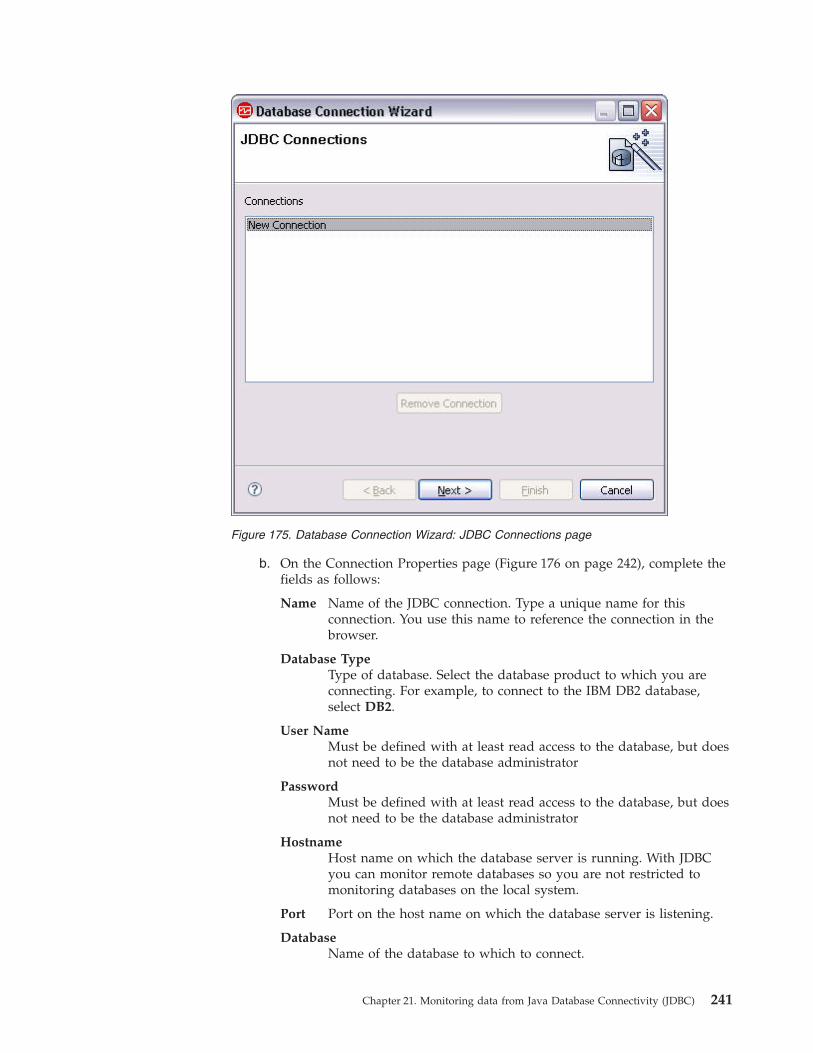
b. On the Connection Properties page (Figure 176 on page 242), complete thefields as follows:
Name Name of the JDBC connection. Type a unique name for thisconnection. You use this name to reference the connection in thebrowser.
Database TypeType of database. Select the database product to which you areconnecting. For example, to connect to the IBM DB2 database,select DB2.
User NameMust be defined with at least read access to the database, but doesnot need to be the database administrator
PasswordMust be defined with at least read access to the database, but doesnot need to be the database administrator
HostnameHost name on which the database server is running. With JDBCyou can monitor remote databases so you are not restricted tomonitoring databases on the local system.
Port Port on the host name on which the database server is listening.
DatabaseName of the database to which to connect.
Figure 175. Database Connection Wizard: JDBC Connections page
Chapter 21. Monitoring data from Java Database Connectivity (JDBC) 241
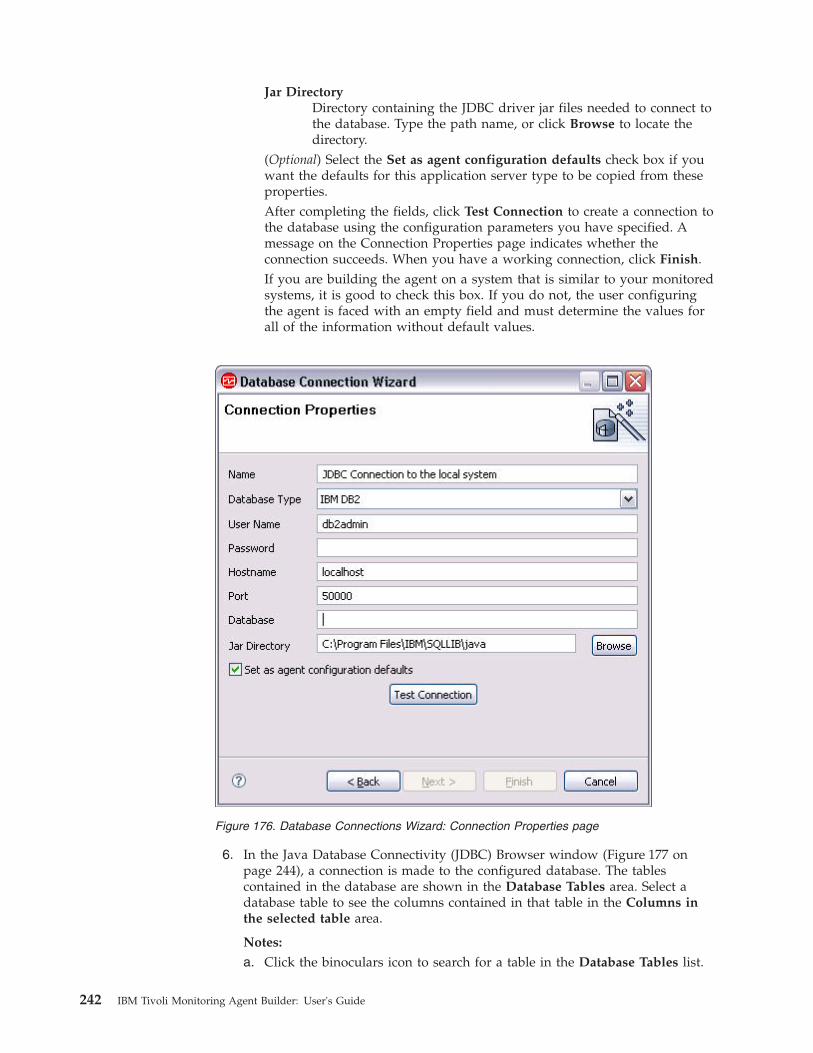
Jar DirectoryDirectory containing the JDBC driver jar files needed to connect tothe database. Type the path name, or click Browse to locate thedirectory.
(Optional) Select the Set as agent configuration defaults check box if youwant the defaults for this application server type to be copied from theseproperties.After completing the fields, click Test Connection to create a connection tothe database using the configuration parameters you have specified. Amessage on the Connection Properties page indicates whether theconnection succeeds. When you have a working connection, click Finish.If you are building the agent on a system that is similar to your monitoredsystems, it is good to check this box. If you do not, the user configuringthe agent is faced with an empty field and must determine the values forall of the information without default values.
6. In the Java Database Connectivity (JDBC) Browser window (Figure 177 onpage 244), a connection is made to the configured database. The tablescontained in the database are shown in the Database Tables area. Select adatabase table to see the columns contained in that table in the Columns inthe selected table area.
Notes:
a. Click the binoculars icon to search for a table in the Database Tables list.
Figure 176. Database Connections Wizard: Connection Properties page
242 IBM Tivoli Monitoring Agent Builder: User's Guide
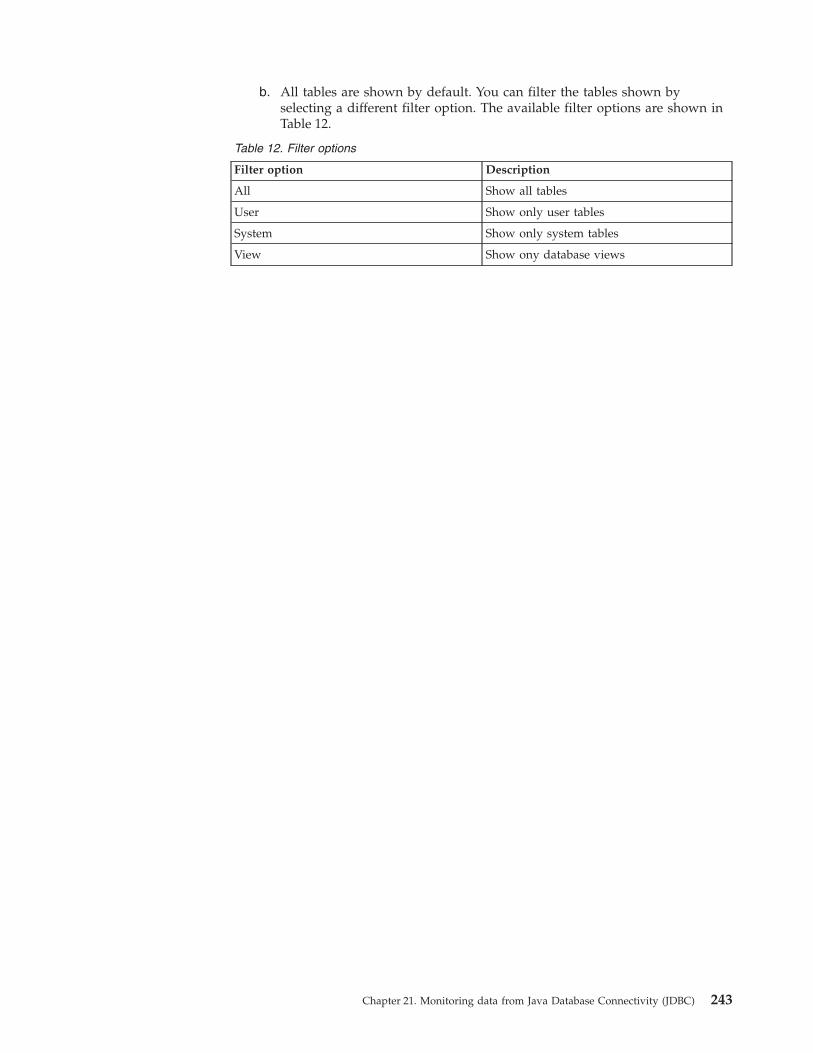
b. All tables are shown by default. You can filter the tables shown byselecting a different filter option. The available filter options are shown inTable 12.
Table 12. Filter options
Filter option Description
All Show all tables
User Show only user tables
System Show only system tables
View Show ony database views
Chapter 21. Monitoring data from Java Database Connectivity (JDBC) 243
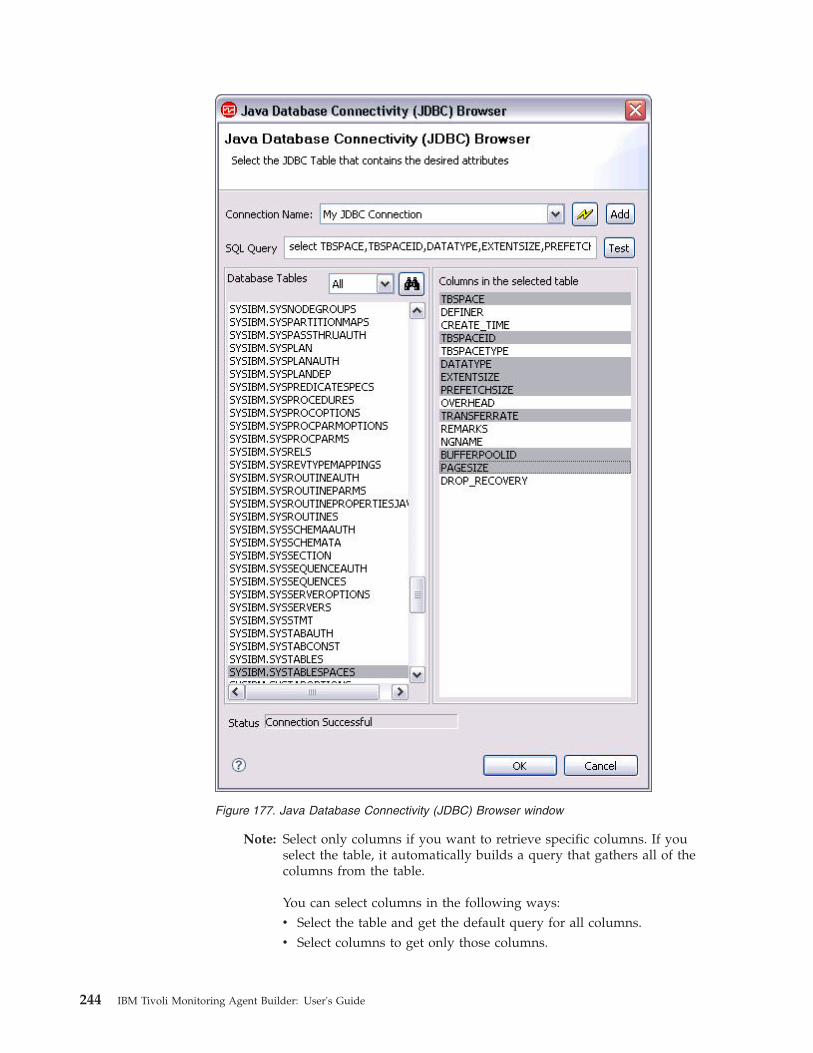
Note: Select only columns if you want to retrieve specific columns. If youselect the table, it automatically builds a query that gathers all of thecolumns from the table.
You can select columns in the following ways:v Select the table and get the default query for all columns.v Select columns to get only those columns.
Figure 177. Java Database Connectivity (JDBC) Browser window
244 IBM Tivoli Monitoring Agent Builder: User's Guide
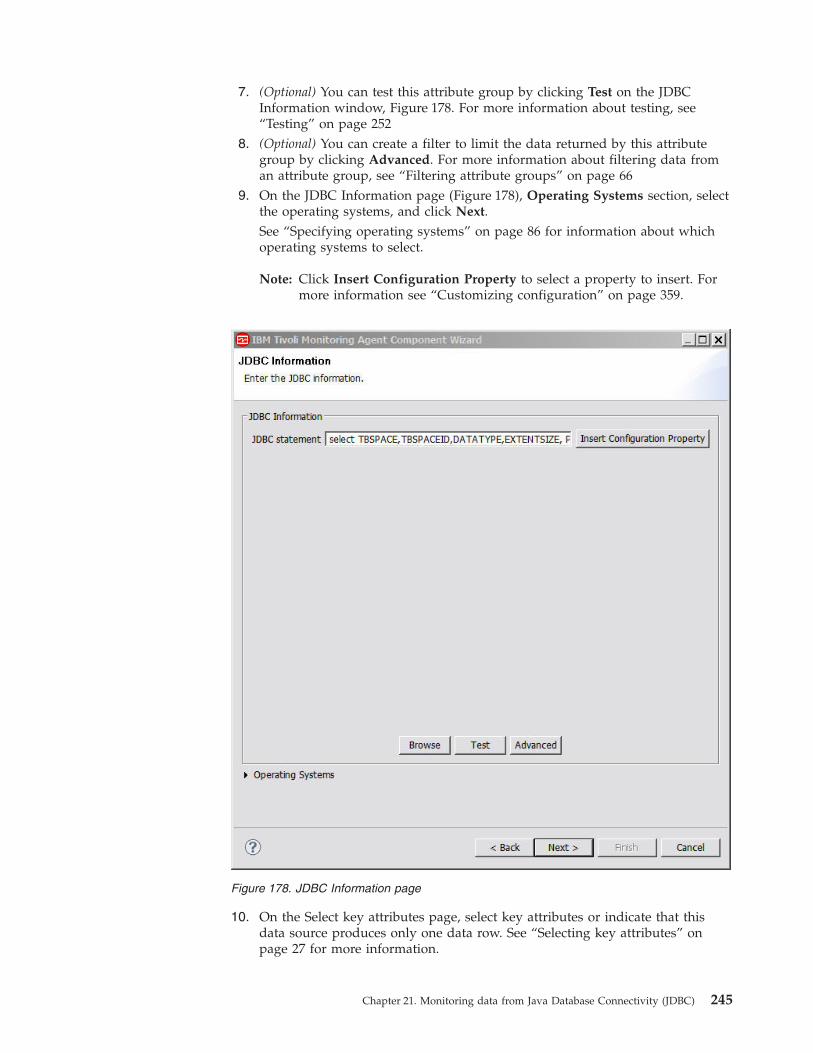
7. (Optional) You can test this attribute group by clicking Test on the JDBCInformation window, Figure 178. For more information about testing, see“Testing” on page 252
8. (Optional) You can create a filter to limit the data returned by this attributegroup by clicking Advanced. For more information about filtering data froman attribute group, see “Filtering attribute groups” on page 66
9. On the JDBC Information page (Figure 178), Operating Systems section, selectthe operating systems, and click Next.See “Specifying operating systems” on page 86 for information about whichoperating systems to select.
Note: Click Insert Configuration Property to select a property to insert. Formore information see “Customizing configuration” on page 359.
10. On the Select key attributes page, select key attributes or indicate that thisdata source produces only one data row. See “Selecting key attributes” onpage 27 for more information.
Figure 178. JDBC Information page
Chapter 21. Monitoring data from Java Database Connectivity (JDBC) 245
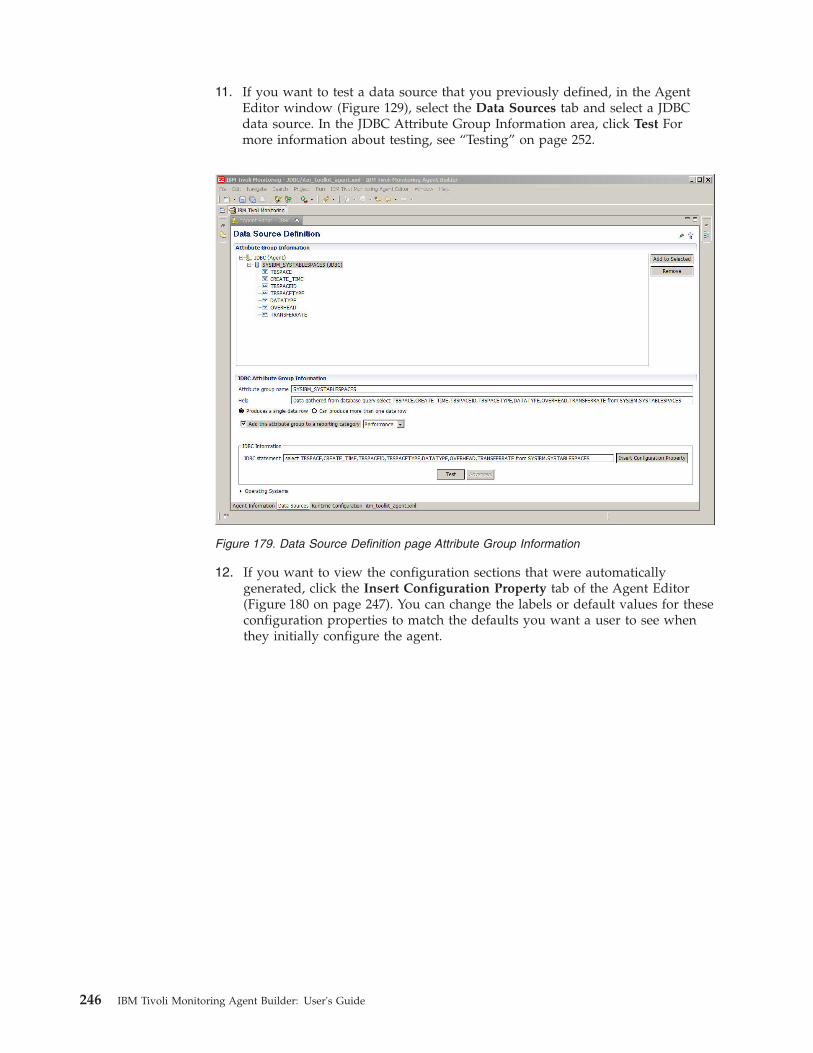
11. If you want to test a data source that you previously defined, in the AgentEditor window (Figure 129), select the Data Sources tab and select a JDBCdata source. In the JDBC Attribute Group Information area, click Test Formore information about testing, see “Testing” on page 252.
12. If you want to view the configuration sections that were automaticallygenerated, click the Insert Configuration Property tab of the Agent Editor(Figure 180 on page 247). You can change the labels or default values for theseconfiguration properties to match the defaults you want a user to see whenthey initially configure the agent.
Figure 179. Data Source Definition page Attribute Group Information
246 IBM Tivoli Monitoring Agent Builder: User's Guide

13. (Optional) If you chose to manually create the JDBC Data Source withoutclicking Browse in Step 4, complete the information on the AttributeInformation page using Table 6 on page 56.
Figure 180. Runtime Configuration Information page, Configuration for Java Virtual Machine(JVM)
Chapter 21. Monitoring data from Java Database Connectivity (JDBC) 247
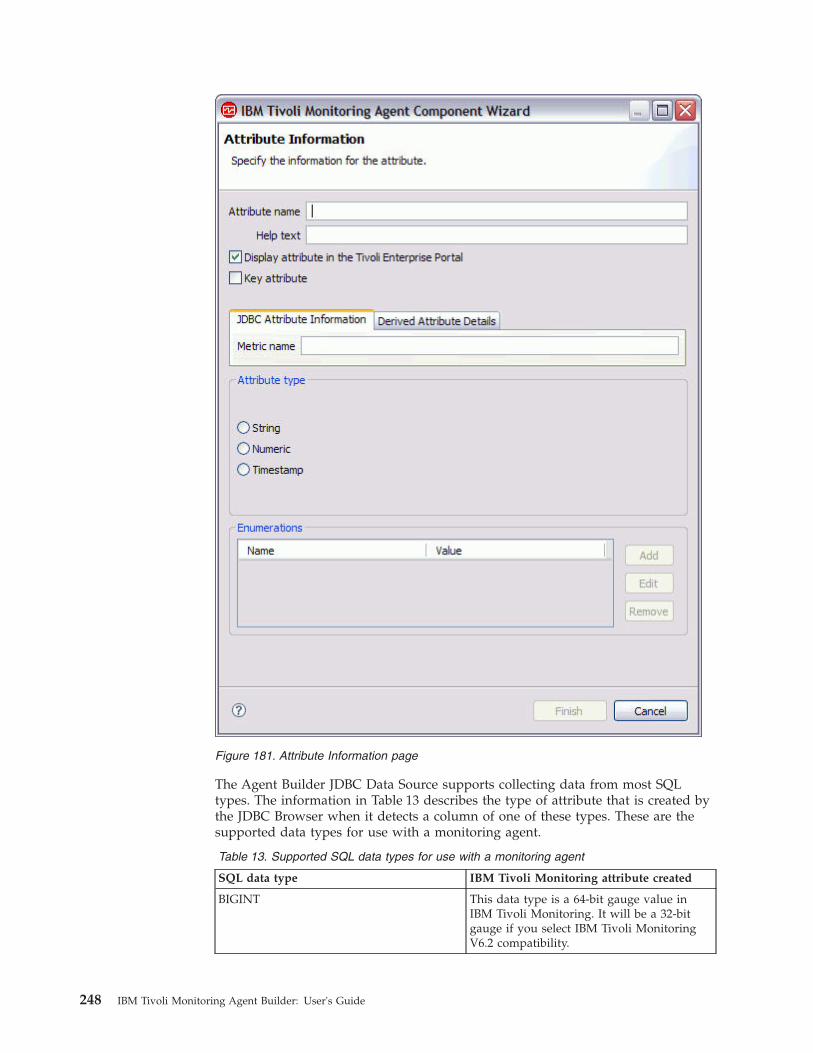
The Agent Builder JDBC Data Source supports collecting data from most SQLtypes. The information in Table 13 describes the type of attribute that is created bythe JDBC Browser when it detects a column of one of these types. These are thesupported data types for use with a monitoring agent.
Table 13. Supported SQL data types for use with a monitoring agent
SQL data type IBM Tivoli Monitoring attribute created
BIGINT This data type is a 64-bit gauge value inIBM Tivoli Monitoring. It will be a 32-bitgauge if you select IBM Tivoli MonitoringV6.2 compatibility.
Figure 181. Attribute Information page
248 IBM Tivoli Monitoring Agent Builder: User's Guide
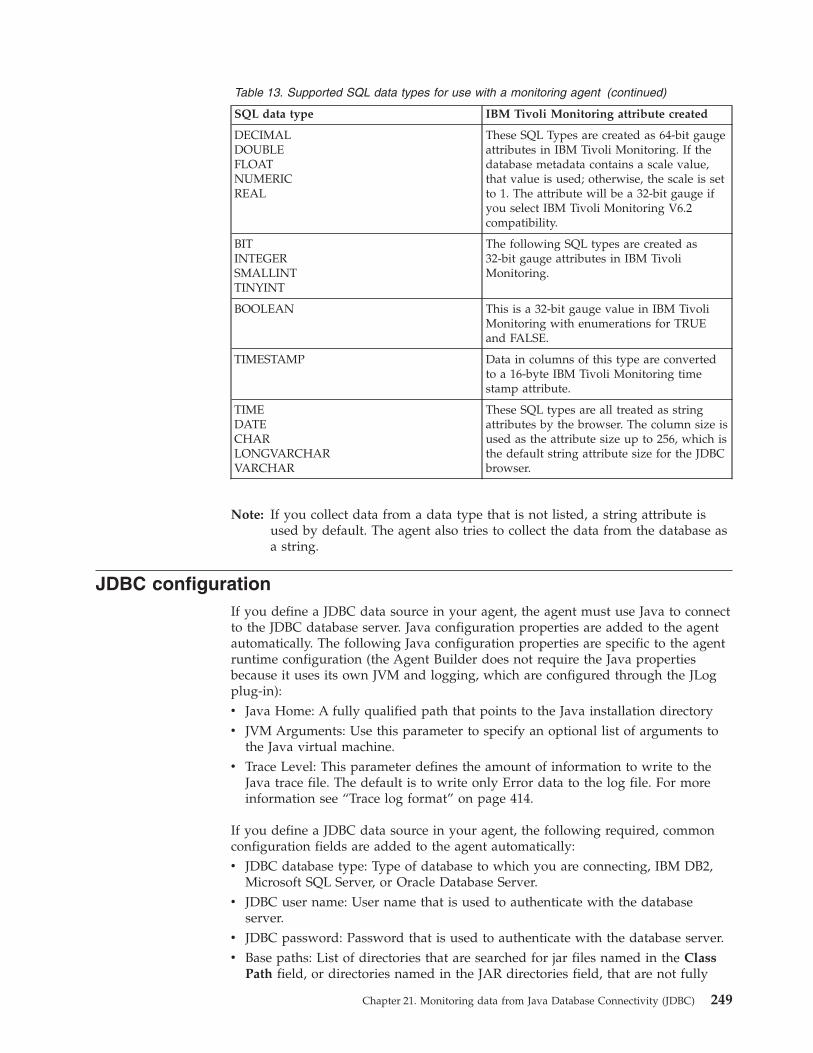
Table 13. Supported SQL data types for use with a monitoring agent (continued)
SQL data type IBM Tivoli Monitoring attribute created
DECIMALDOUBLEFLOATNUMERICREAL
These SQL Types are created as 64-bit gaugeattributes in IBM Tivoli Monitoring. If thedatabase metadata contains a scale value,that value is used; otherwise, the scale is setto 1. The attribute will be a 32-bit gauge ifyou select IBM Tivoli Monitoring V6.2compatibility.
BITINTEGERSMALLINTTINYINT
The following SQL types are created as32-bit gauge attributes in IBM TivoliMonitoring.
BOOLEAN This is a 32-bit gauge value in IBM TivoliMonitoring with enumerations for TRUEand FALSE.
TIMESTAMP Data in columns of this type are convertedto a 16-byte IBM Tivoli Monitoring timestamp attribute.
TIMEDATECHARLONGVARCHARVARCHAR
These SQL types are all treated as stringattributes by the browser. The column size isused as the attribute size up to 256, which isthe default string attribute size for the JDBCbrowser.
Note: If you collect data from a data type that is not listed, a string attribute isused by default. The agent also tries to collect the data from the database asa string.
JDBC configurationIf you define a JDBC data source in your agent, the agent must use Java to connectto the JDBC database server. Java configuration properties are added to the agentautomatically. The following Java configuration properties are specific to the agentruntime configuration (the Agent Builder does not require the Java propertiesbecause it uses its own JVM and logging, which are configured through the JLogplug-in):v Java Home: A fully qualified path that points to the Java installation directoryv JVM Arguments: Use this parameter to specify an optional list of arguments to
the Java virtual machine.v Trace Level: This parameter defines the amount of information to write to the
Java trace file. The default is to write only Error data to the log file. For moreinformation see “Trace log format” on page 414.
If you define a JDBC data source in your agent, the following required, commonconfiguration fields are added to the agent automatically:v JDBC database type: Type of database to which you are connecting, IBM DB2,
Microsoft SQL Server, or Oracle Database Server.v JDBC user name: User name that is used to authenticate with the database
server.v JDBC password: Password that is used to authenticate with the database server.v Base paths: List of directories that are searched for jar files named in the Class
Path field, or directories named in the JAR directories field, that are not fully
Chapter 21. Monitoring data from Java Database Connectivity (JDBC) 249
qualified. Directory names are separated by a semi-colon (';’) on Windows, andby a semi-colon (';') or colon (':') on UNIX systems.
v Class path: Explicitly named jar files to be searched by the agent. Any files thatare not fully qualified are appended to each of the Base Paths until the jar file isfound.
v JAR directories: List of directories that are searched for jar files. Directory namesare separated by a semi-colon (';’) on Windows, and by a semi-colon (';') or colon(':') on UNIX systems. The jar files in these directories do not need to beexplicitly identified; they will be found because they are located in one of thesedirectories. Subdirectories of these directories are not searched. Any directoriesthat are not fully qualified are appended to each of the Base Paths until thedirectory is found.
The runtime configuration also requires that you specify some additional details toconnect to the database. You can choose how to specify the remainingconfiguration items, either as a JDBC URL or as basic configuration properties (thedefault):
URL configuration optionJDBC connection URL: Vendor-specific connection URL that provides detailson which host the database is located on and the port number to which toconnect. The URL format typically looks like this:jdbc:identifier://server:port/database
See the JDBC driver vendor documentation for the different URL formats.JDBC Basic Properties option (default)
JDBC server name: Host name that the database server is running on.JDBC database name: Name of the database on the host where theconnection is made.JDBC port number: Port number on which the database server is listening.
Note: With the JDBC data provider you can monitor multiple database types inthe same agent using subnodes. To do this you must carefully define theSubnode Configuration Overrides. If you monitor multiple database types,the following configuration settings are likely to be different:v JDBC database typev JDBC user namev JDBC password
If you are using the basic configuration option, you must also defineoverrides for the following properties on the Subnode ConfigurationOverrides page:v JDBC server namev JDBC port numberv JDBC database name
To define the configuration overrides for your subnode, see Chapter 29,“Creating subnodes,” on page 331 for more details about accessing theSubnode Configuration Overrides page. When configuring the agent atruntime, all of these properties must be configured by the user for each newsubnode instance created.
In addition to the subnode overrides, your agent must also point to JDBCdrivers for each database type to which you are going to connect in your
250 IBM Tivoli Monitoring Agent Builder: User's Guide
subnodes. The Jar directories parameter is the most convenient way to pointto your JDBC drivers. List the directories containing the JDBC drivers with asemicolon separating each directory entry. For example, if you areconnecting to DB2 and Oracle databases with the agent, you must specify aJar directories value similar to the following: C:\ProgramFiles\IBM\SQLLIB\java;C:\oracle\jdbc.
Stored proceduresThe JDBC data provider can process the result sets returned by a stored procedure.String or integer input parameters can be passed to the stored procedure. Thefollowing syntax runs a stored procedure:call[:index] procedureName [argument] ...
Where:
index An optional integer that specifies which result set is to be used by the dataprovider. This parameter is useful when the stored procedure returnsmultiple result sets and you only want to collect the values from one of theresult sets. If an index is not specified, data from each result set is collectedand returned.
procedureNameThe name of the stored procedure that is to be run by the JDBC dataprovider.
argumentAn input argument to the stored procedure. Multiple arguments must beseparated by a space. If the argument contains a space character, enclosethe entire argument in double quotes. If the argument can be parsed as aninteger it is passed to the stored procedure as an integer argument. Anyargument enclosed in double quotes is passed as a string argument.
SQL Server Samples
call sp_helpdbRuns the procedure called sp_helpdb which requires no arguments. Data from allreturned result sets are included in the data returned by the data provider.
call:2 sp_helpdb masterRuns the procedure called sp_helpdb with the master argument. This argument isa string input argument. Only the data from the second result set returned by thestored procedure is included in the data returned by the data provider.
When the index is not specified, data from all returned results sets is collected. Youmust ensure that the data returned in these cases is compatible with the attributesyou define. Agent Builder creates attributes from the first returned result set, andany expected additional result sets are expected to be compatible with the first one.
DB2 stored procedureHere is a sample DB2 function written in SQL that demonstrates how to returnresults that can be processed by the Agent Builder JDBC data provider:-- Run this script as follows:-- db2 -td# -vf db2sample.sql
-- Procedure to demonstrate how to return a query from-- a DB2 stored procedure, which can then be used by
Chapter 21. Monitoring data from Java Database Connectivity (JDBC) 251
-- an Agent Builder JDBC provider. The stored procedure-- returns the following columns:-- Name Description Data Type-- current_timestamp The current system time timestamp-- lock_timeout The lock timeout numeric scale 0-- user The user for the session String 128 characters longDROP procedure db2sample#
CREATE PROCEDURE db2sample()RESULT SETS 1LANGUAGE SQL
BEGIN ATOMIC
-- Define the SQL for the queryDECLARE c1 CURSOR WITH HOLD WITH RETURN FORSELECT CURRENT TIMESTAMP as current_timestamp,
CURRENT LOCK TIMEOUT as lock_timeout, CURRENT USER as userFROM sysibm.sysdummy1;
-- Issue the query and return the dataOPEN c1;
END#
This function can be called from Agent Builder using the same syntax defined forother stored procedures. In this case you define call db2sample as your JDBCstatement to run this stored procedure.
Oracle stored proceduresOracle stored procedures do not return result sets. Instead, you must write afunction that returns an Oracle reference cursor. Here is a sample Oracle functionwritten in PL/SQL that demonstrates how to return results that can be processedby the Agent Builder JDBC data provider:CREATE OR REPLACE FUNCTION ITMTESTRETURN SYS_REFCURSORIS
v_rc SYS_REFCURSOR;BEGIN
OPEN v_rc FOR SELECT * FROM ALL_CLUSTERS;RETURN v_rc;
END;
This function can be called from Agent Builder using the same syntax defined forother stored procedures. In this case you define call ITMTEST as your JDBCstatement to run this stored procedure. Because the Oracle function must return acursor reference, only one result set can be processed by Oracle functions. Thismeans that the index option is not supported for Oracle because there is no way toreturn multiple result sets.
TestingYou can test the attribute group you created within Agent Builder.
You can start the Testing procedure in the following ways:1. During agent creation click Test on the JDBC Information page (Figure 178 on
page 245).2. After agent creation, select an attribute group on the Agent Editor Data Sources
Definition page and click Test . For more information about the Agent Editor,see “Tivoli Monitoring Agent Editor” on page 37
252 IBM Tivoli Monitoring Agent Builder: User's Guide
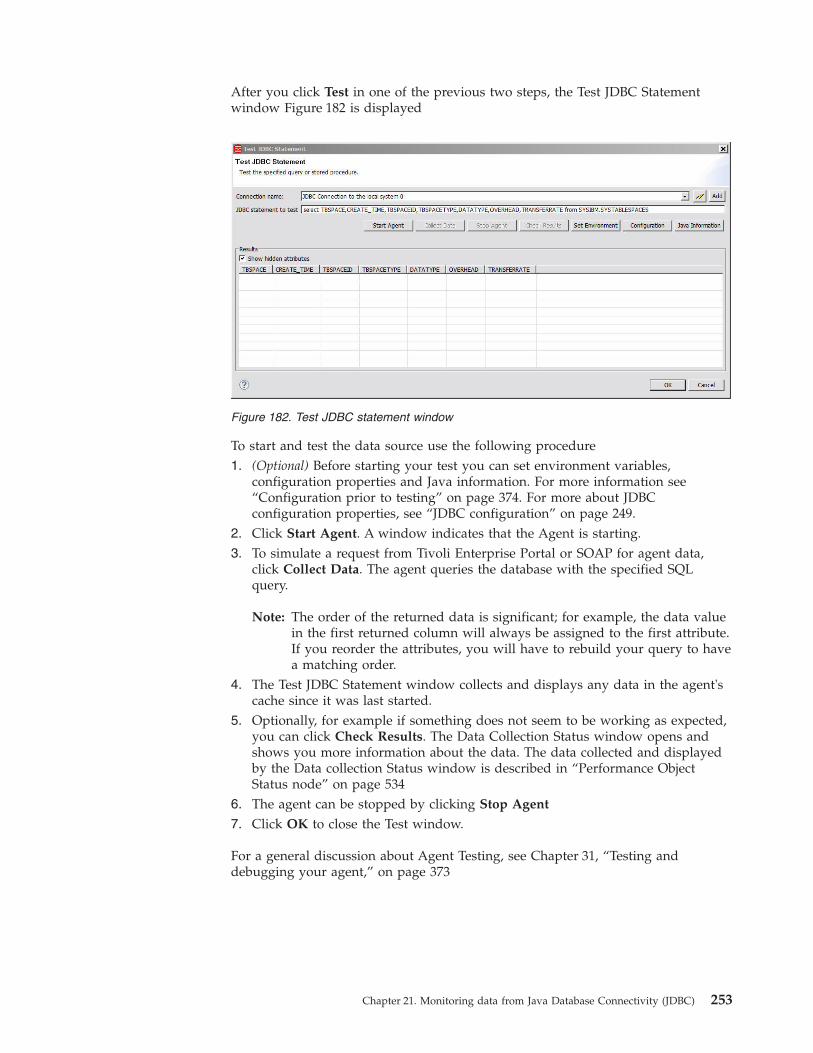
After you click Test in one of the previous two steps, the Test JDBC Statementwindow Figure 182 is displayed
To start and test the data source use the following procedure1. (Optional) Before starting your test you can set environment variables,
configuration properties and Java information. For more information see“Configuration prior to testing” on page 374. For more about JDBCconfiguration properties, see “JDBC configuration” on page 249.
2. Click Start Agent. A window indicates that the Agent is starting.3. To simulate a request from Tivoli Enterprise Portal or SOAP for agent data,
click Collect Data. The agent queries the database with the specified SQLquery.
Note: The order of the returned data is significant; for example, the data valuein the first returned column will always be assigned to the first attribute.If you reorder the attributes, you will have to rebuild your query to havea matching order.
4. The Test JDBC Statement window collects and displays any data in the agent'scache since it was last started.
5. Optionally, for example if something does not seem to be working as expected,you can click Check Results. The Data Collection Status window opens andshows you more information about the data. The data collected and displayedby the Data collection Status window is described in “Performance ObjectStatus node” on page 534
6. The agent can be stopped by clicking Stop Agent
7. Click OK to close the Test window.
For a general discussion about Agent Testing, see Chapter 31, “Testing anddebugging your agent,” on page 373
Figure 182. Test JDBC statement window
Chapter 21. Monitoring data from Java Database Connectivity (JDBC) 253

254 IBM Tivoli Monitoring Agent Builder: User's Guide

Chapter 22. Monitoring system availability using Ping
Part of network management involves the ability to determine if systems respondto an Internet Control Message Protocol (ICMP) ping. Using this data provider youcan monitor basic online or offline status for a set of servers or other criticaldevices in your environment in a simple and low-overhead fashion. To monitor alist of systems, add the Ping data collector to your agent.
Ping configuration filesThe agent must be provided with the list of systems to be monitored. The filesused are not managed or updated by the agent; the user must make all requiredupdates to the files. Both a ping configuration file and a device list file must becreated.
The ping configuration file is a text file that must be specified as a runtimeconfiguration parameter to the agent. The contents of each line in this file must bethe location of a device list file. Each of the entries in the ping configuration filecauses the agent to start a separate thread for monitoring the devices in theprovided device list file. This thread loops through all the devices in the device listfile, sending each a ping request. These threads run at intervals of 60 seconds or atintervals of 30 seconds plus the time it takes to ping the list, whichever is longer.
Note: The entries in the ping configuration file must either contain the fullyqualified path to the device list file or be relative to the location of the pingconfiguration file.
A device list file is a text file containing a LISTNAME definition (optional) and alist of device and host names. For example:LISTNAME=TivoliWebwww.ibm.commercuryus07 ishtar
The list of device and host names can be separated by spaces and line breaks. Inthe example, us07 and ishtar are separate devices.
LISTNAME definition. The defined list name becomes the description for thedevices in that file. If no list name is defined, the name of the device list file isused. If the list name is defined, the list name definition must take the followingform: LISTNAME=listname The list name specification does not need to be the firstrecord of the managed node list definition. However, if the list name is definedmore than once in the description, the last specification is used as the definition forthe systems.
Device and host names. There is no limit to the number of network devices andhosts that you can include in a device list file. However, including too manyentries defeats the purpose of having a targeted list of critical devices and increasesthe overall workload. There might also be difficulties in obtaining a status on eachdevice within the 60-second monitoring interval. You can specify one or morenetwork devices in each record.
© Copyright IBM Corp. 2007, 2012 255
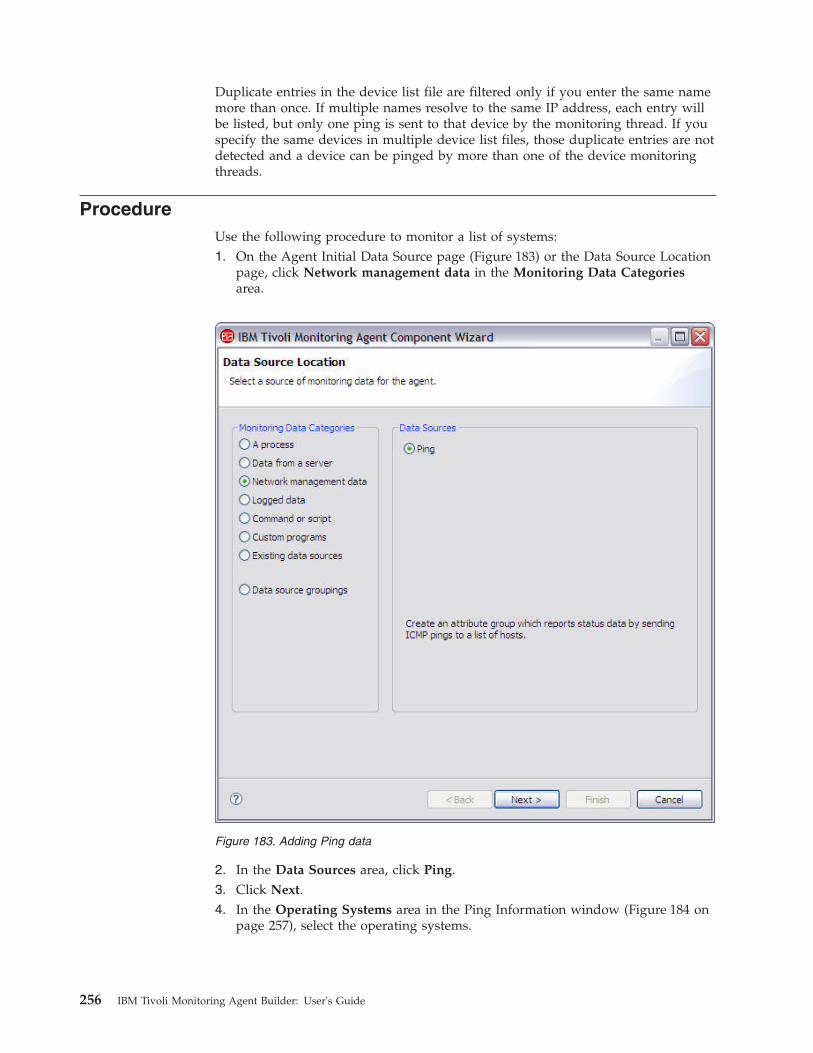
Duplicate entries in the device list file are filtered only if you enter the same namemore than once. If multiple names resolve to the same IP address, each entry willbe listed, but only one ping is sent to that device by the monitoring thread. If youspecify the same devices in multiple device list files, those duplicate entries are notdetected and a device can be pinged by more than one of the device monitoringthreads.
ProcedureUse the following procedure to monitor a list of systems:1. On the Agent Initial Data Source page (Figure 183) or the Data Source Location
page, click Network management data in the Monitoring Data Categoriesarea.
2. In the Data Sources area, click Ping.3. Click Next.4. In the Operating Systems area in the Ping Information window (Figure 184 on
page 257), select the operating systems.
Figure 183. Adding Ping data
256 IBM Tivoli Monitoring Agent Builder: User's Guide
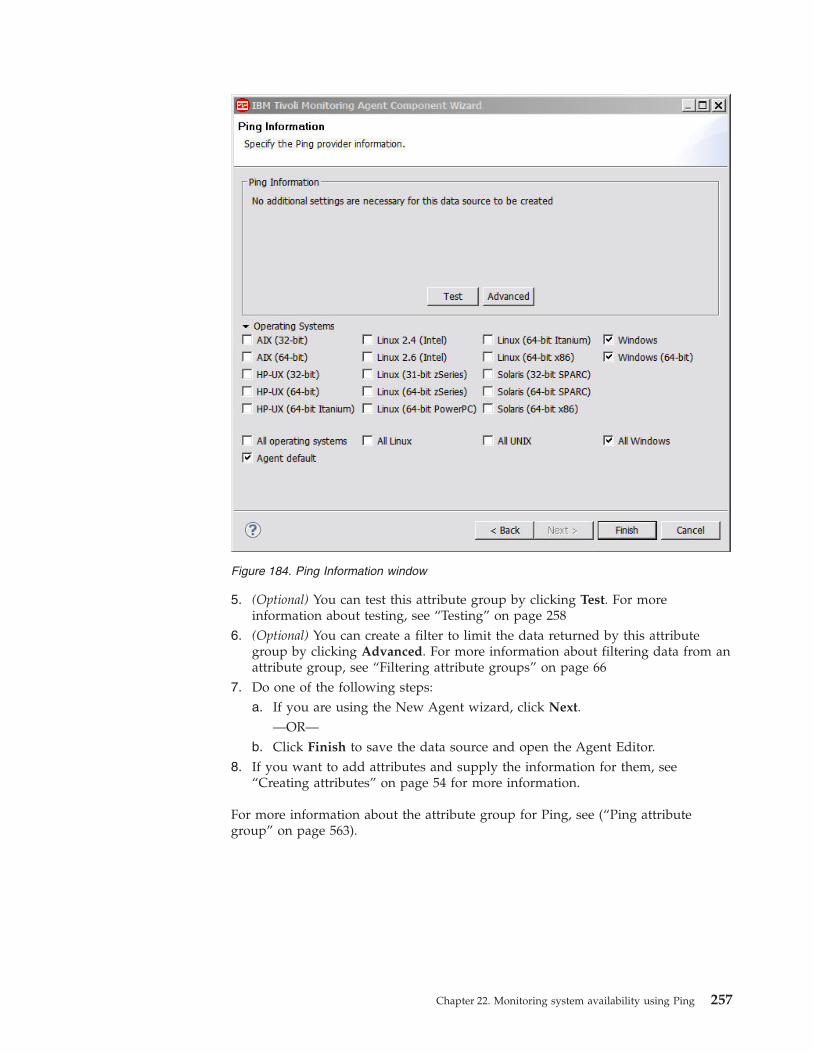
5. (Optional) You can test this attribute group by clicking Test. For moreinformation about testing, see “Testing” on page 258
6. (Optional) You can create a filter to limit the data returned by this attributegroup by clicking Advanced. For more information about filtering data from anattribute group, see “Filtering attribute groups” on page 66
7. Do one of the following steps:a. If you are using the New Agent wizard, click Next.
—OR—b. Click Finish to save the data source and open the Agent Editor.
8. If you want to add attributes and supply the information for them, see“Creating attributes” on page 54 for more information.
For more information about the attribute group for Ping, see (“Ping attributegroup” on page 563).
Figure 184. Ping Information window
Chapter 22. Monitoring system availability using Ping 257
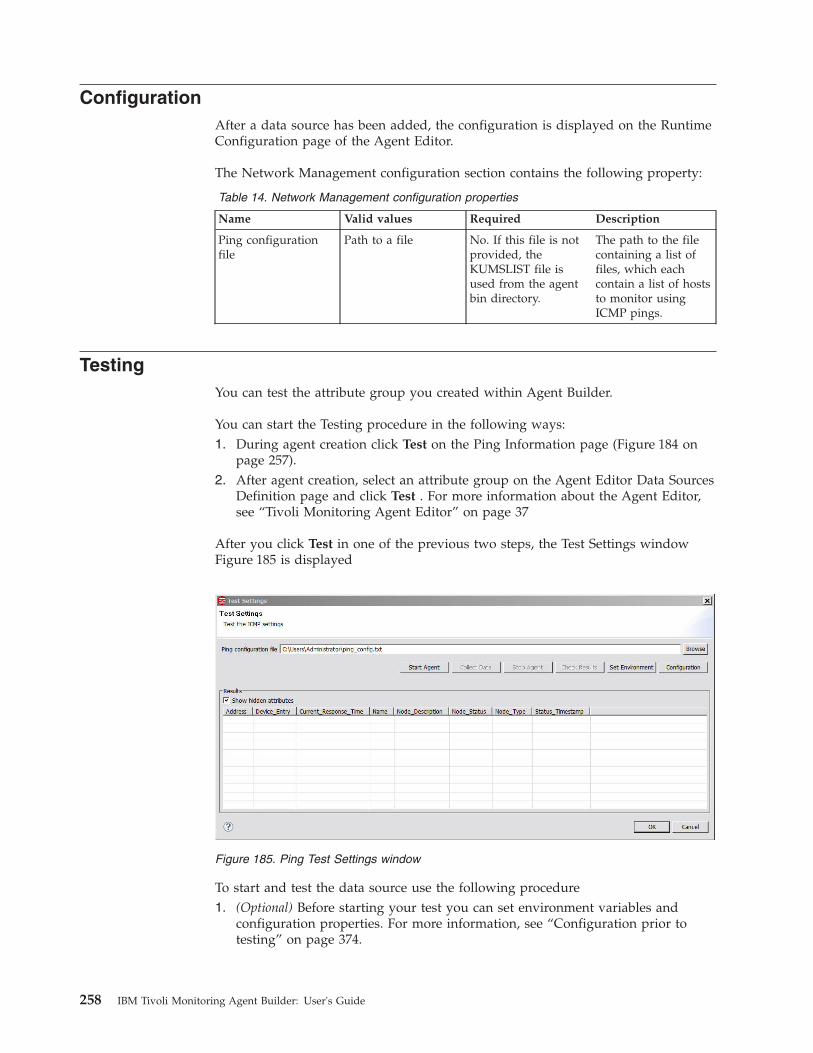
ConfigurationAfter a data source has been added, the configuration is displayed on the RuntimeConfiguration page of the Agent Editor.
The Network Management configuration section contains the following property:
Table 14. Network Management configuration properties
Name Valid values Required Description
Ping configurationfile
Path to a file No. If this file is notprovided, theKUMSLIST file isused from the agentbin directory.
The path to the filecontaining a list offiles, which eachcontain a list of hoststo monitor usingICMP pings.
TestingYou can test the attribute group you created within Agent Builder.
You can start the Testing procedure in the following ways:1. During agent creation click Test on the Ping Information page (Figure 184 on
page 257).2. After agent creation, select an attribute group on the Agent Editor Data Sources
Definition page and click Test . For more information about the Agent Editor,see “Tivoli Monitoring Agent Editor” on page 37
After you click Test in one of the previous two steps, the Test Settings windowFigure 185 is displayed
To start and test the data source use the following procedure1. (Optional) Before starting your test you can set environment variables and
configuration properties. For more information, see “Configuration prior totesting” on page 374.
Figure 185. Ping Test Settings window
258 IBM Tivoli Monitoring Agent Builder: User's Guide
2. Click Browse to select a Ping configuration file. For more about Pingconfiguration files, see “Ping configuration files” on page 255
3. Click Start Agent. A window indicates that the Agent is starting.4. To simulate a request from Tivoli Enterprise Portal or SOAP for agent data,
click Collect Data. The agent pings the devices specified in the device list filewhich is referenced from the Ping configuration file.
5. The Test Settings window collects and displays any data in the agent's cachesince it was last started.
6. Optionally, for example if something does not seem to be working as expected,you can click Check Results. The Data Collection Status window opens andshows you more information about the data. The data collected and displayedby the Data collection Status window is described in “Performance ObjectStatus node” on page 534
7. The agent can be stopped by clicking Stop Agent
8. Click OK to close the Test window.
For a general discussion about Agent Testing, see Chapter 31, “Testing anddebugging your agent,” on page 373
Chapter 22. Monitoring system availability using Ping 259

260 IBM Tivoli Monitoring Agent Builder: User's Guide

Chapter 23. Monitoring HTTP availability and response time
Using the HTTP data source, you can monitor the availability and response time ofselected URLs. For each URL, the results provide general information about theHTTP response to the HTTP request, including whether it can be retrieved, howlong it takes to retrieve, and the size of the response. If the response content isHTML, information is also provided about the page objects within the URL.
You can monitor URLs that use the HTTP, HTTPS, FTP, and file protocols. Youspecify the URLs to monitor in the HTTP URLs file, or through Take Actionoptions.
This data source requires a Java runtime environment. The following versions ofJava are supported:v Sun Microsystems Java Version 5 or laterv IBM Corporation Java Version 5 or later
Use the following procedure to create an attribute group to monitor a list of URLs:1. On the Agent Initial Data Source page (Figure 186 on page 262) or the Data
Source Location page, click Data from a server in the Monitoring DataCategories area.
© Copyright IBM Corp. 2007, 2012 261
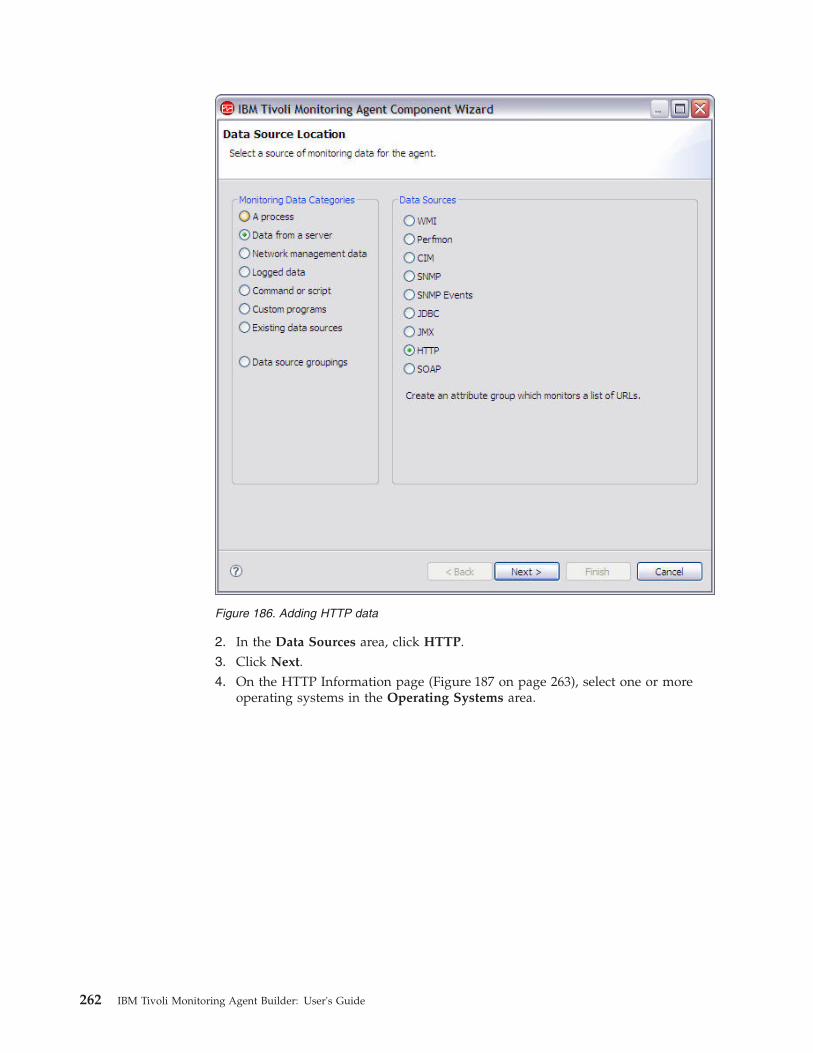
2. In the Data Sources area, click HTTP.3. Click Next.4. On the HTTP Information page (Figure 187 on page 263), select one or more
operating systems in the Operating Systems area.
Figure 186. Adding HTTP data
262 IBM Tivoli Monitoring Agent Builder: User's Guide
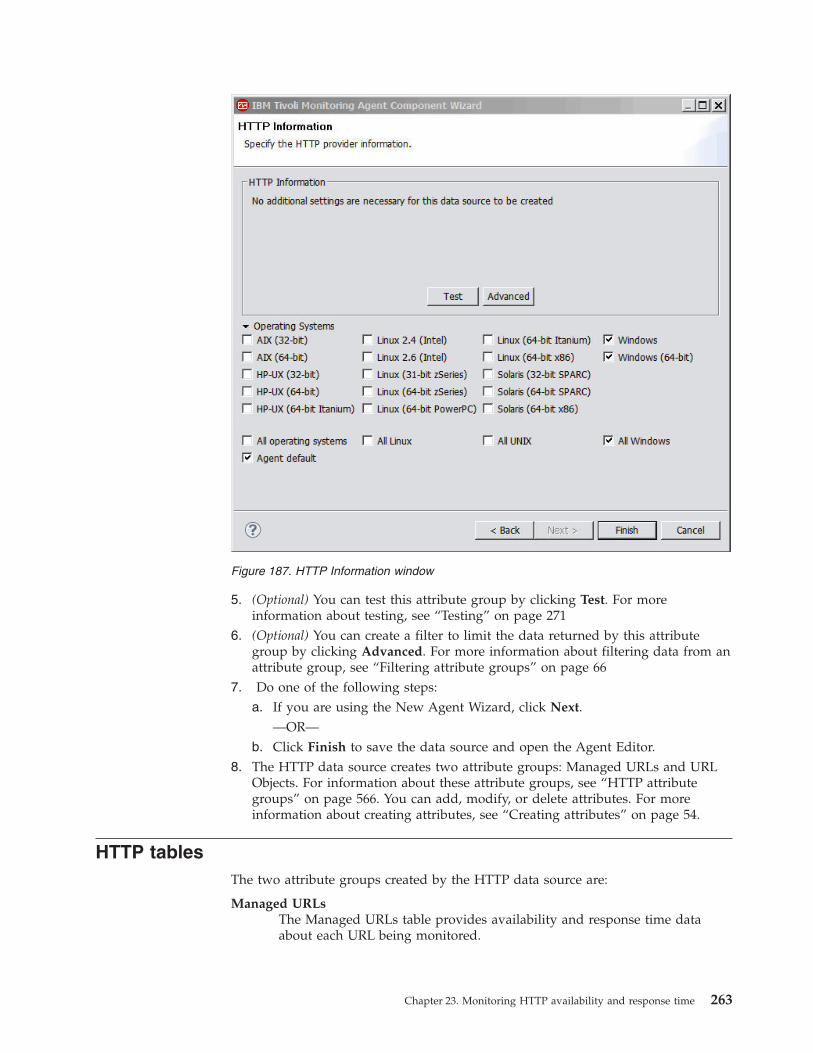
5. (Optional) You can test this attribute group by clicking Test. For moreinformation about testing, see “Testing” on page 271
6. (Optional) You can create a filter to limit the data returned by this attributegroup by clicking Advanced. For more information about filtering data from anattribute group, see “Filtering attribute groups” on page 66
7. Do one of the following steps:a. If you are using the New Agent Wizard, click Next.
—OR—b. Click Finish to save the data source and open the Agent Editor.
8. The HTTP data source creates two attribute groups: Managed URLs and URLObjects. For information about these attribute groups, see “HTTP attributegroups” on page 566. You can add, modify, or delete attributes. For moreinformation about creating attributes, see “Creating attributes” on page 54.
HTTP tablesThe two attribute groups created by the HTTP data source are:
Managed URLsThe Managed URLs table provides availability and response time dataabout each URL being monitored.
Figure 187. HTTP Information window
Chapter 23. Monitoring HTTP availability and response time 263
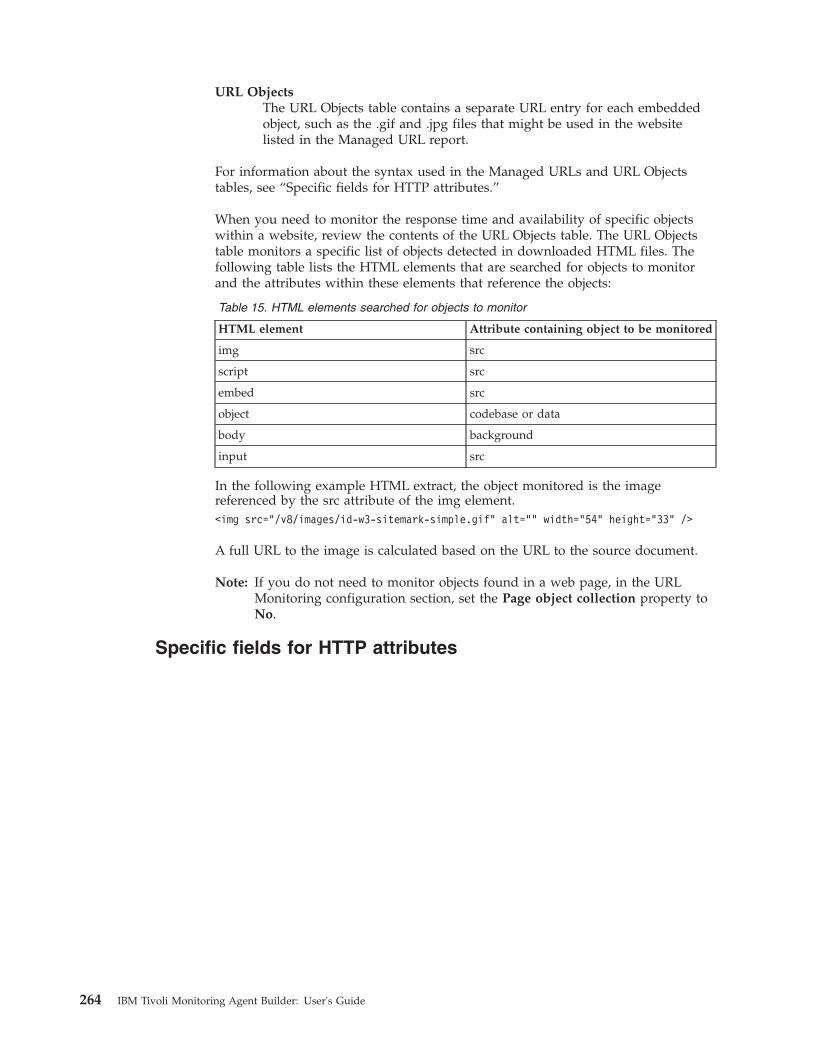
URL ObjectsThe URL Objects table contains a separate URL entry for each embeddedobject, such as the .gif and .jpg files that might be used in the websitelisted in the Managed URL report.
For information about the syntax used in the Managed URLs and URL Objectstables, see “Specific fields for HTTP attributes.”
When you need to monitor the response time and availability of specific objectswithin a website, review the contents of the URL Objects table. The URL Objectstable monitors a specific list of objects detected in downloaded HTML files. Thefollowing table lists the HTML elements that are searched for objects to monitorand the attributes within these elements that reference the objects:
Table 15. HTML elements searched for objects to monitor
HTML element Attribute containing object to be monitored
img src
script src
embed src
object codebase or data
body background
input src
In the following example HTML extract, the object monitored is the imagereferenced by the src attribute of the img element.<img src="/v8/images/id-w3-sitemark-simple.gif" alt="" width="54" height="33" />
A full URL to the image is calculated based on the URL to the source document.
Note: If you do not need to monitor objects found in a web page, in the URLMonitoring configuration section, set the Page object collection property toNo.
Specific fields for HTTP attributes
264 IBM Tivoli Monitoring Agent Builder: User's Guide
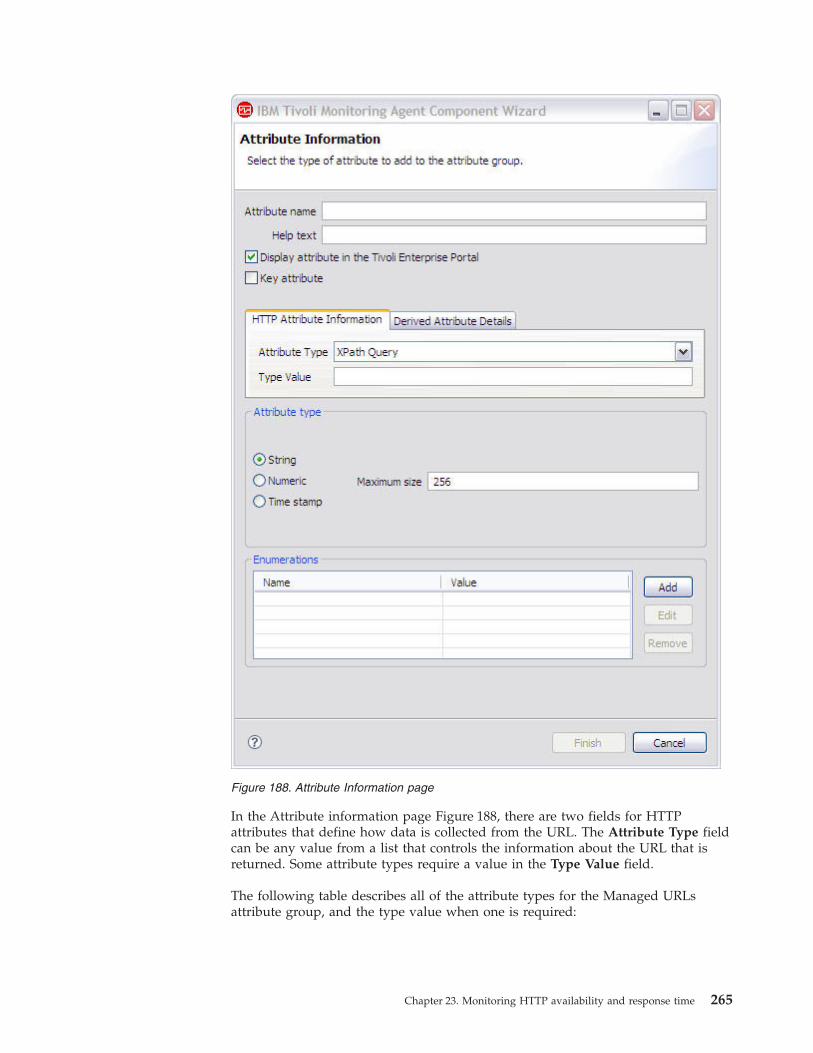
In the Attribute information page Figure 188, there are two fields for HTTPattributes that define how data is collected from the URL. The Attribute Type fieldcan be any value from a list that controls the information about the URL that isreturned. Some attribute types require a value in the Type Value field.
The following table describes all of the attribute types for the Managed URLsattribute group, and the type value when one is required:
Figure 188. Attribute Information page
Chapter 23. Monitoring HTTP availability and response time 265
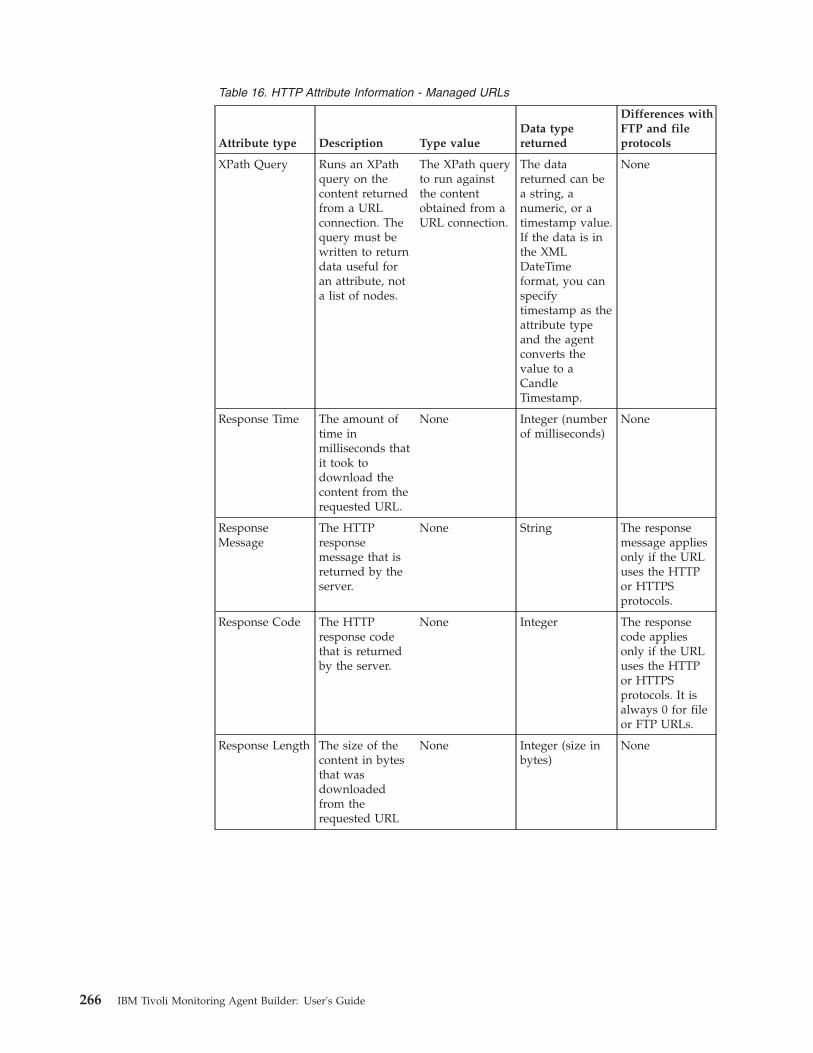
Table 16. HTTP Attribute Information - Managed URLs
Attribute type Description Type valueData typereturned
Differences withFTP and fileprotocols
XPath Query Runs an XPathquery on thecontent returnedfrom a URLconnection. Thequery must bewritten to returndata useful foran attribute, nota list of nodes.
The XPath queryto run againstthe contentobtained from aURL connection.
The datareturned can bea string, anumeric, or atimestamp value.If the data is inthe XMLDateTimeformat, you canspecifytimestamp as theattribute typeand the agentconverts thevalue to aCandleTimestamp.
None
Response Time The amount oftime inmilliseconds thatit took todownload thecontent from therequested URL.
None Integer (numberof milliseconds)
None
ResponseMessage
The HTTPresponsemessage that isreturned by theserver.
None String The responsemessage appliesonly if the URLuses the HTTPor HTTPSprotocols.
Response Code The HTTPresponse codethat is returnedby the server.
None Integer The responsecode appliesonly if the URLuses the HTTPor HTTPSprotocols. It isalways 0 for fileor FTP URLs.
Response Length The size of thecontent in bytesthat wasdownloadedfrom therequested URL
None Integer (size inbytes)
None
266 IBM Tivoli Monitoring Agent Builder: User's Guide
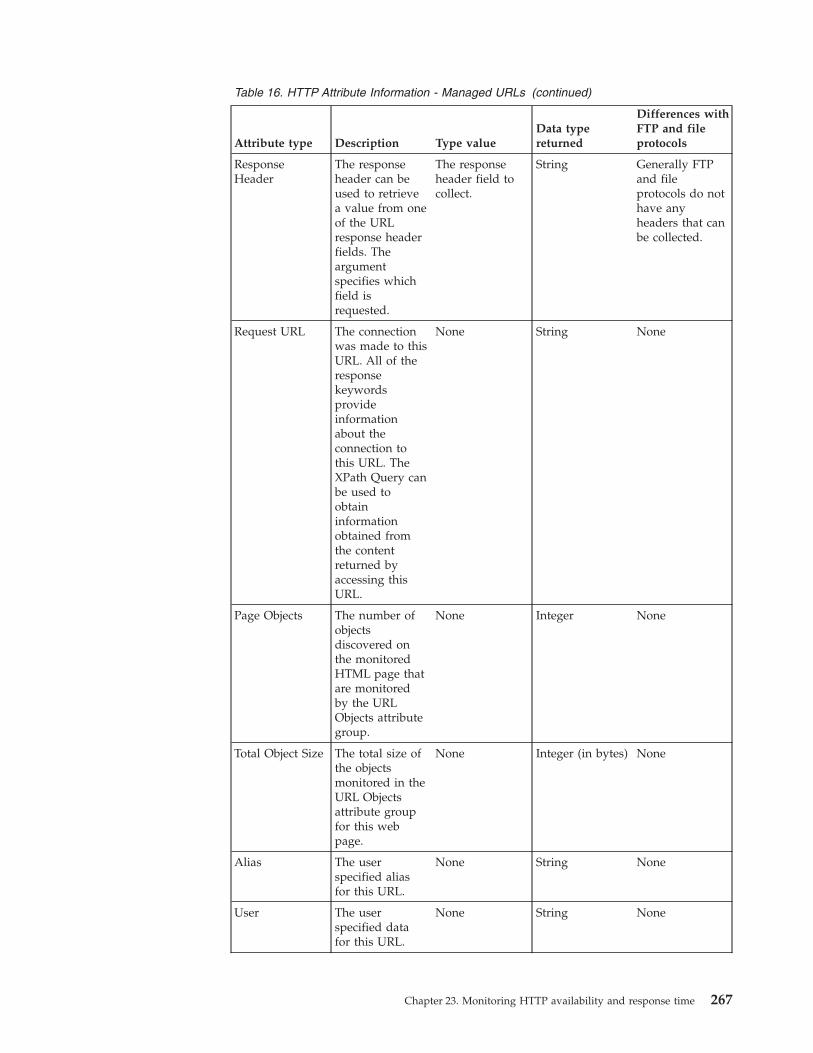
Table 16. HTTP Attribute Information - Managed URLs (continued)
Attribute type Description Type valueData typereturned
Differences withFTP and fileprotocols
ResponseHeader
The responseheader can beused to retrievea value from oneof the URLresponse headerfields. Theargumentspecifies whichfield isrequested.
The responseheader field tocollect.
String Generally FTPand fileprotocols do nothave anyheaders that canbe collected.
Request URL The connectionwas made to thisURL. All of theresponsekeywordsprovideinformationabout theconnection tothis URL. TheXPath Query canbe used toobtaininformationobtained fromthe contentreturned byaccessing thisURL.
None String None
Page Objects The number ofobjectsdiscovered onthe monitoredHTML page thatare monitoredby the URLObjects attributegroup.
None Integer None
Total Object Size The total size ofthe objectsmonitored in theURL Objectsattribute groupfor this webpage.
None Integer (in bytes) None
Alias The userspecified aliasfor this URL.
None String None
User The userspecified datafor this URL.
None String None
Chapter 23. Monitoring HTTP availability and response time 267
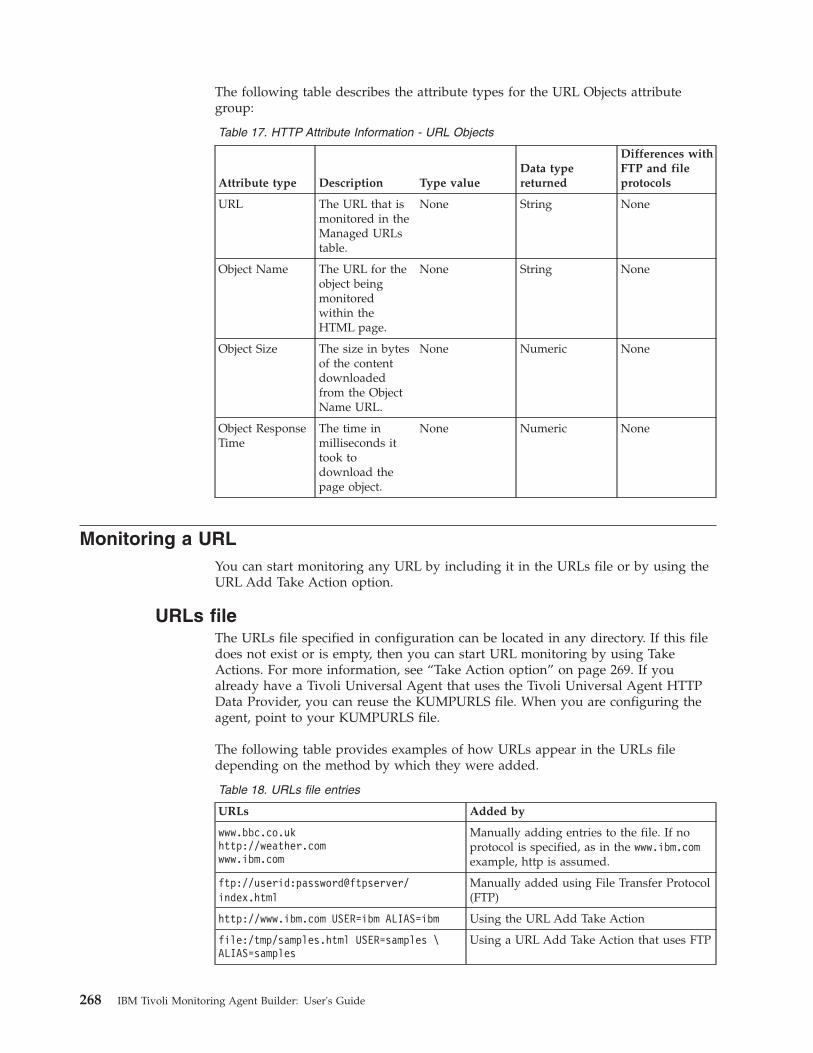
The following table describes the attribute types for the URL Objects attributegroup:
Table 17. HTTP Attribute Information - URL Objects
Attribute type Description Type valueData typereturned
Differences withFTP and fileprotocols
URL The URL that ismonitored in theManaged URLstable.
None String None
Object Name The URL for theobject beingmonitoredwithin theHTML page.
None String None
Object Size The size in bytesof the contentdownloadedfrom the ObjectName URL.
None Numeric None
Object ResponseTime
The time inmilliseconds ittook todownload thepage object.
None Numeric None
Monitoring a URLYou can start monitoring any URL by including it in the URLs file or by using theURL Add Take Action option.
URLs fileThe URLs file specified in configuration can be located in any directory. If this filedoes not exist or is empty, then you can start URL monitoring by using TakeActions. For more information, see “Take Action option” on page 269. If youalready have a Tivoli Universal Agent that uses the Tivoli Universal Agent HTTPData Provider, you can reuse the KUMPURLS file. When you are configuring theagent, point to your KUMPURLS file.
The following table provides examples of how URLs appear in the URLs filedepending on the method by which they were added.
Table 18. URLs file entries
URLs Added by
www.bbc.co.ukhttp://weather.comwww.ibm.com
Manually adding entries to the file. If noprotocol is specified, as in the www.ibm.comexample, http is assumed.
ftp://userid:password@ftpserver/index.html
Manually added using File Transfer Protocol(FTP)
http://www.ibm.com USER=ibm ALIAS=ibm Using the URL Add Take Action
file:/tmp/samples.html USER=samples \ALIAS=samples
Using a URL Add Take Action that uses FTP
268 IBM Tivoli Monitoring Agent Builder: User's Guide
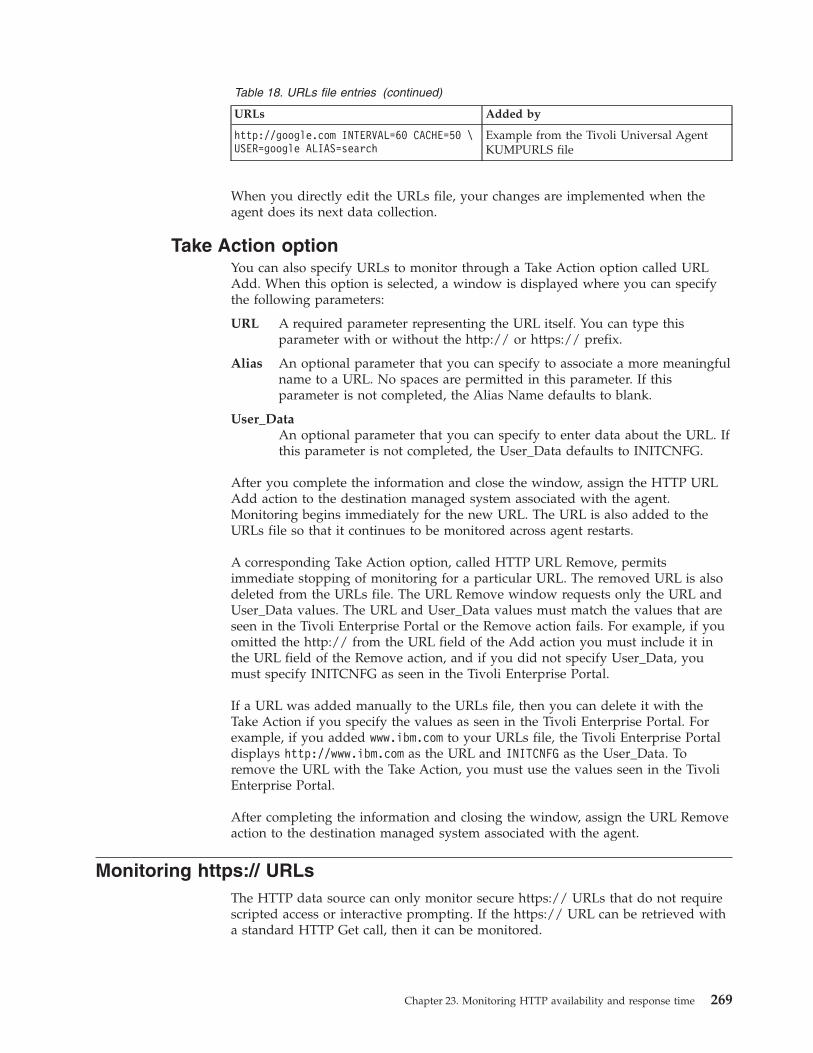
Table 18. URLs file entries (continued)
URLs Added by
http://google.com INTERVAL=60 CACHE=50 \USER=google ALIAS=search
Example from the Tivoli Universal AgentKUMPURLS file
When you directly edit the URLs file, your changes are implemented when theagent does its next data collection.
Take Action optionYou can also specify URLs to monitor through a Take Action option called URLAdd. When this option is selected, a window is displayed where you can specifythe following parameters:
URL A required parameter representing the URL itself. You can type thisparameter with or without the http:// or https:// prefix.
Alias An optional parameter that you can specify to associate a more meaningfulname to a URL. No spaces are permitted in this parameter. If thisparameter is not completed, the Alias Name defaults to blank.
User_DataAn optional parameter that you can specify to enter data about the URL. Ifthis parameter is not completed, the User_Data defaults to INITCNFG.
After you complete the information and close the window, assign the HTTP URLAdd action to the destination managed system associated with the agent.Monitoring begins immediately for the new URL. The URL is also added to theURLs file so that it continues to be monitored across agent restarts.
A corresponding Take Action option, called HTTP URL Remove, permitsimmediate stopping of monitoring for a particular URL. The removed URL is alsodeleted from the URLs file. The URL Remove window requests only the URL andUser_Data values. The URL and User_Data values must match the values that areseen in the Tivoli Enterprise Portal or the Remove action fails. For example, if youomitted the http:// from the URL field of the Add action you must include it inthe URL field of the Remove action, and if you did not specify User_Data, youmust specify INITCNFG as seen in the Tivoli Enterprise Portal.
If a URL was added manually to the URLs file, then you can delete it with theTake Action if you specify the values as seen in the Tivoli Enterprise Portal. Forexample, if you added www.ibm.com to your URLs file, the Tivoli Enterprise Portaldisplays http://www.ibm.com as the URL and INITCNFG as the User_Data. Toremove the URL with the Take Action, you must use the values seen in the TivoliEnterprise Portal.
After completing the information and closing the window, assign the URL Removeaction to the destination managed system associated with the agent.
Monitoring https:// URLsThe HTTP data source can only monitor secure https:// URLs that do not requirescripted access or interactive prompting. If the https:// URL can be retrieved witha standard HTTP Get call, then it can be monitored.
Chapter 23. Monitoring HTTP availability and response time 269
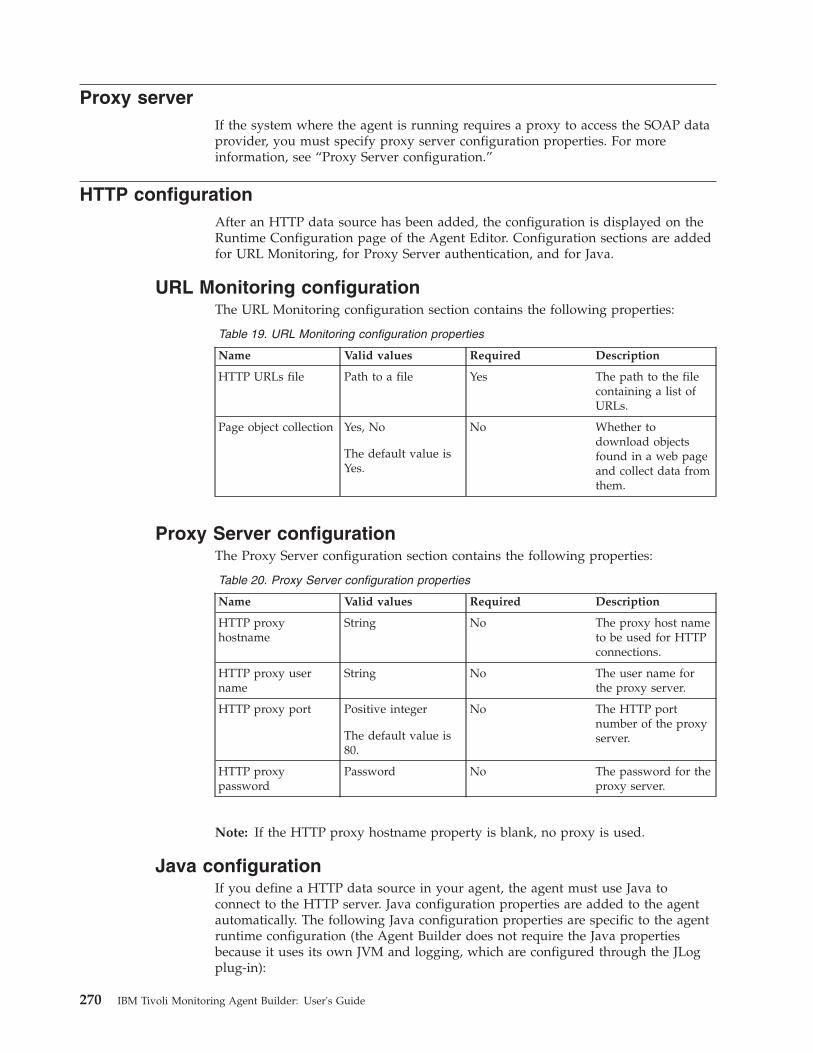
Proxy serverIf the system where the agent is running requires a proxy to access the SOAP dataprovider, you must specify proxy server configuration properties. For moreinformation, see “Proxy Server configuration.”
HTTP configurationAfter an HTTP data source has been added, the configuration is displayed on theRuntime Configuration page of the Agent Editor. Configuration sections are addedfor URL Monitoring, for Proxy Server authentication, and for Java.
URL Monitoring configurationThe URL Monitoring configuration section contains the following properties:
Table 19. URL Monitoring configuration properties
Name Valid values Required Description
HTTP URLs file Path to a file Yes The path to the filecontaining a list ofURLs.
Page object collection Yes, No
The default value isYes.
No Whether todownload objectsfound in a web pageand collect data fromthem.
Proxy Server configurationThe Proxy Server configuration section contains the following properties:
Table 20. Proxy Server configuration properties
Name Valid values Required Description
HTTP proxyhostname
String No The proxy host nameto be used for HTTPconnections.
HTTP proxy username
String No The user name forthe proxy server.
HTTP proxy port Positive integer
The default value is80.
No The HTTP portnumber of the proxyserver.
HTTP proxypassword
Password No The password for theproxy server.
Note: If the HTTP proxy hostname property is blank, no proxy is used.
Java configurationIf you define a HTTP data source in your agent, the agent must use Java toconnect to the HTTP server. Java configuration properties are added to the agentautomatically. The following Java configuration properties are specific to the agentruntime configuration (the Agent Builder does not require the Java propertiesbecause it uses its own JVM and logging, which are configured through the JLogplug-in):
270 IBM Tivoli Monitoring Agent Builder: User's Guide
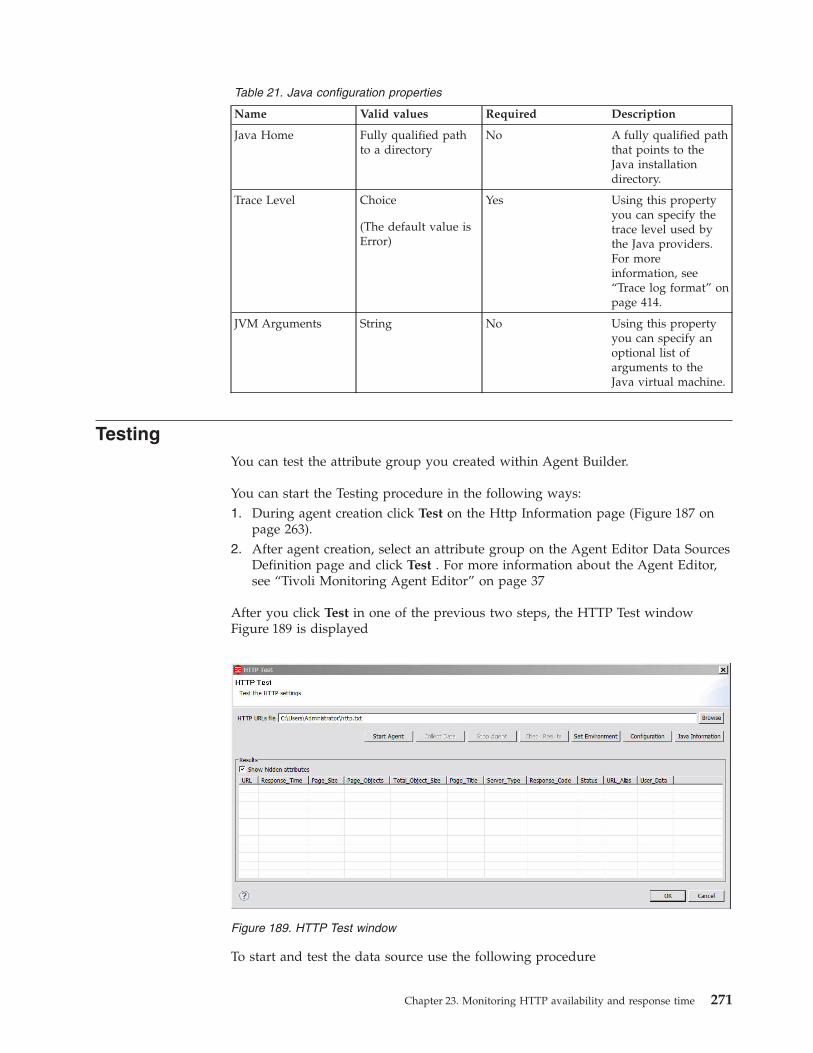
Table 21. Java configuration properties
Name Valid values Required Description
Java Home Fully qualified pathto a directory
No A fully qualified paththat points to theJava installationdirectory.
Trace Level Choice
(The default value isError)
Yes Using this propertyyou can specify thetrace level used bythe Java providers.For moreinformation, see“Trace log format” onpage 414.
JVM Arguments String No Using this propertyyou can specify anoptional list ofarguments to theJava virtual machine.
TestingYou can test the attribute group you created within Agent Builder.
You can start the Testing procedure in the following ways:1. During agent creation click Test on the Http Information page (Figure 187 on
page 263).2. After agent creation, select an attribute group on the Agent Editor Data Sources
Definition page and click Test . For more information about the Agent Editor,see “Tivoli Monitoring Agent Editor” on page 37
After you click Test in one of the previous two steps, the HTTP Test windowFigure 189 is displayed
To start and test the data source use the following procedure
Figure 189. HTTP Test window
Chapter 23. Monitoring HTTP availability and response time 271
1. Click Browse to select the HTTP URLs file, for more information about URLsfiles, see “URLs file” on page 268
2. (Optional) Before starting your test you can set environment variables,configuration properties and Java information. For more information, see“Configuration prior to testing” on page 374. For more about HTTPconfiguration, see “HTTP configuration” on page 270.
3. Click Start Agent. A window indicates that the Agent is starting.4. To simulate a request from Tivoli Enterprise Portal or SOAP for agent data,
click Collect Data. The agent monitors the URLs defined in the HTTP URLsfile.
5. The HTTP Test window displays any data that is returned.6. Optionally, for example if something does not seem to be working as expected,
you can click Check Results. The Data Collection Status window opens andshows you more information about the data. The data collected and displayedby the Data collection Status window is described in “Performance ObjectStatus node” on page 534
7. The agent can be stopped by clicking Stop Agent
8. Click OK to close the Test window.
For a general discussion about Agent Testing, see Chapter 31, “Testing anddebugging your agent,” on page 373
272 IBM Tivoli Monitoring Agent Builder: User's Guide
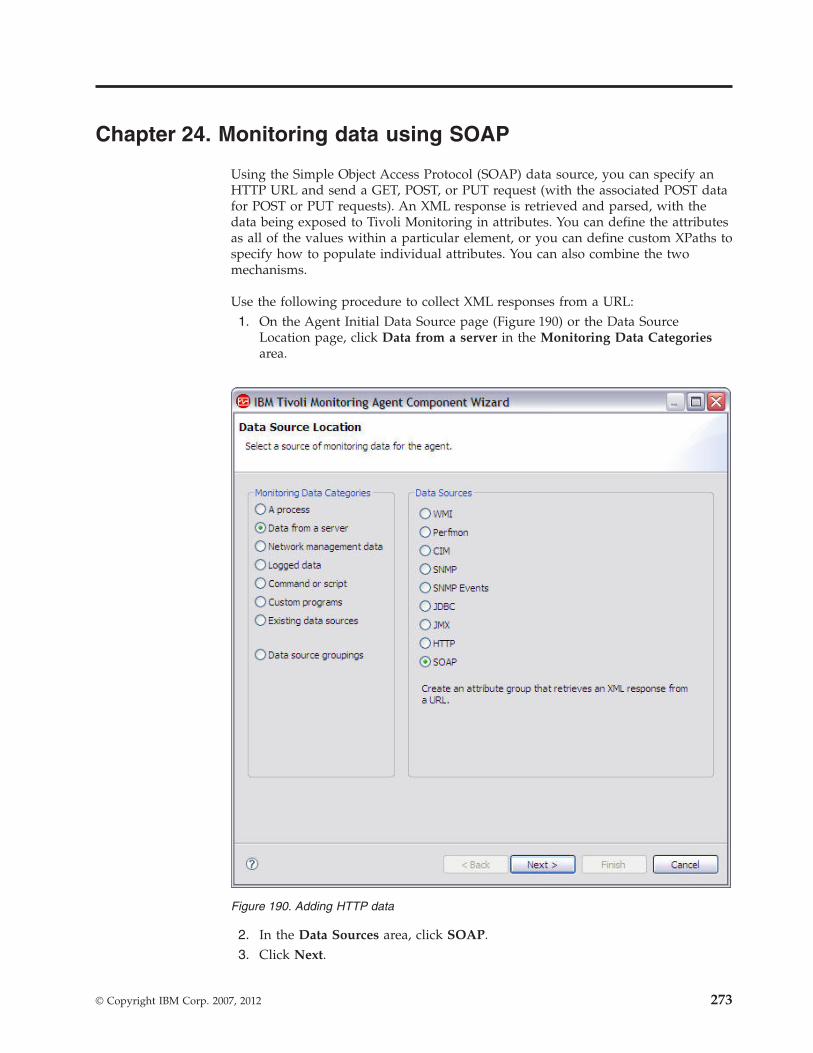
Chapter 24. Monitoring data using SOAP
Using the Simple Object Access Protocol (SOAP) data source, you can specify anHTTP URL and send a GET, POST, or PUT request (with the associated POST datafor POST or PUT requests). An XML response is retrieved and parsed, with thedata being exposed to Tivoli Monitoring in attributes. You can define the attributesas all of the values within a particular element, or you can define custom XPaths tospecify how to populate individual attributes. You can also combine the twomechanisms.
Use the following procedure to collect XML responses from a URL:1. On the Agent Initial Data Source page (Figure 190) or the Data Source
Location page, click Data from a server in the Monitoring Data Categoriesarea.
2. In the Data Sources area, click SOAP.3. Click Next.
Figure 190. Adding HTTP data
© Copyright IBM Corp. 2007, 2012 273
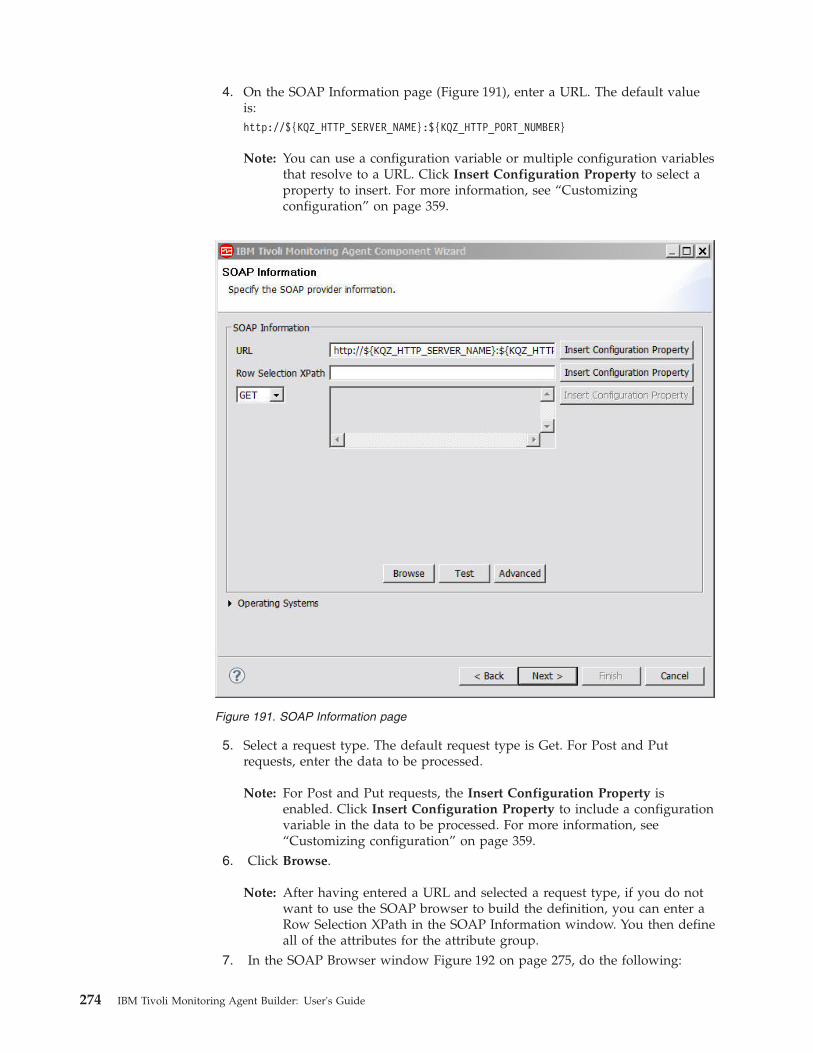
4. On the SOAP Information page (Figure 191), enter a URL. The default valueis:http://${KQZ_HTTP_SERVER_NAME}:${KQZ_HTTP_PORT_NUMBER}
Note: You can use a configuration variable or multiple configuration variablesthat resolve to a URL. Click Insert Configuration Property to select aproperty to insert. For more information, see “Customizingconfiguration” on page 359.
5. Select a request type. The default request type is Get. For Post and Putrequests, enter the data to be processed.
Note: For Post and Put requests, the Insert Configuration Property isenabled. Click Insert Configuration Property to include a configurationvariable in the data to be processed. For more information, see“Customizing configuration” on page 359.
6. Click Browse.
Note: After having entered a URL and selected a request type, if you do notwant to use the SOAP browser to build the definition, you can enter aRow Selection XPath in the SOAP Information window. You then defineall of the attributes for the attribute group.
7. In the SOAP Browser window Figure 192 on page 275, do the following:
Figure 191. SOAP Information page
274 IBM Tivoli Monitoring Agent Builder: User's Guide
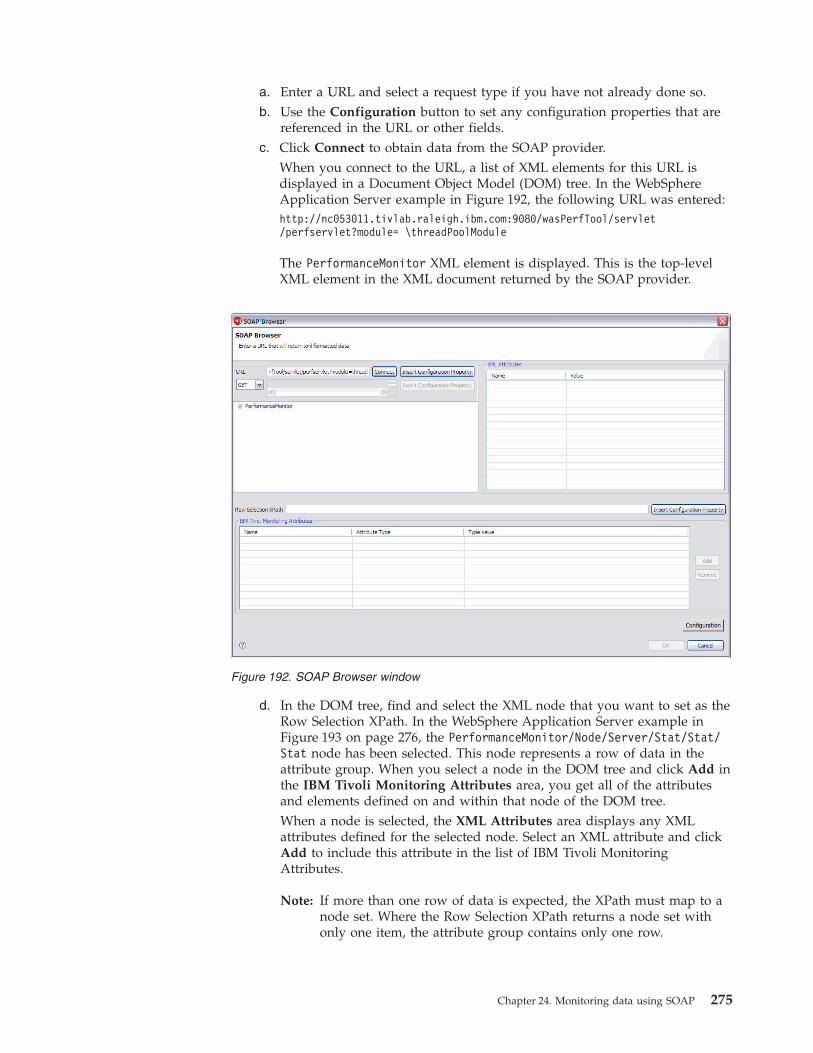
a. Enter a URL and select a request type if you have not already done so.b. Use the Configuration button to set any configuration properties that are
referenced in the URL or other fields.c. Click Connect to obtain data from the SOAP provider.
When you connect to the URL, a list of XML elements for this URL isdisplayed in a Document Object Model (DOM) tree. In the WebSphereApplication Server example in Figure 192, the following URL was entered:http://nc053011.tivlab.raleigh.ibm.com:9080/wasPerfTool/servlet/perfservlet?module= \threadPoolModule
The PerformanceMonitor XML element is displayed. This is the top-levelXML element in the XML document returned by the SOAP provider.
d. In the DOM tree, find and select the XML node that you want to set as theRow Selection XPath. In the WebSphere Application Server example inFigure 193 on page 276, the PerformanceMonitor/Node/Server/Stat/Stat/Stat node has been selected. This node represents a row of data in theattribute group. When you select a node in the DOM tree and click Add inthe IBM Tivoli Monitoring Attributes area, you get all of the attributesand elements defined on and within that node of the DOM tree.When a node is selected, the XML Attributes area displays any XMLattributes defined for the selected node. Select an XML attribute and clickAdd to include this attribute in the list of IBM Tivoli MonitoringAttributes.
Note: If more than one row of data is expected, the XPath must map to anode set. Where the Row Selection XPath returns a node set withonly one item, the attribute group contains only one row.
Figure 192. SOAP Browser window
Chapter 24. Monitoring data using SOAP 275
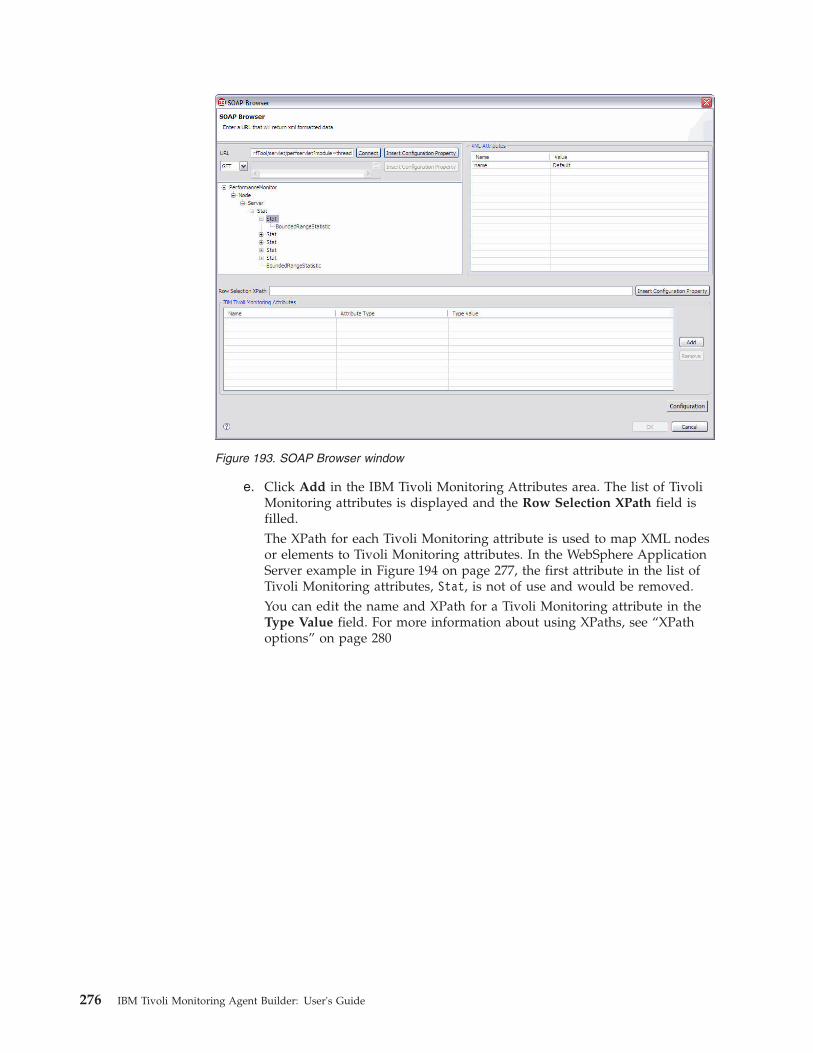
e. Click Add in the IBM Tivoli Monitoring Attributes area. The list of TivoliMonitoring attributes is displayed and the Row Selection XPath field isfilled.The XPath for each Tivoli Monitoring attribute is used to map XML nodesor elements to Tivoli Monitoring attributes. In the WebSphere ApplicationServer example in Figure 194 on page 277, the first attribute in the list ofTivoli Monitoring attributes, Stat, is not of use and would be removed.You can edit the name and XPath for a Tivoli Monitoring attribute in theType Value field. For more information about using XPaths, see “XPathoptions” on page 280
Figure 193. SOAP Browser window
276 IBM Tivoli Monitoring Agent Builder: User's Guide
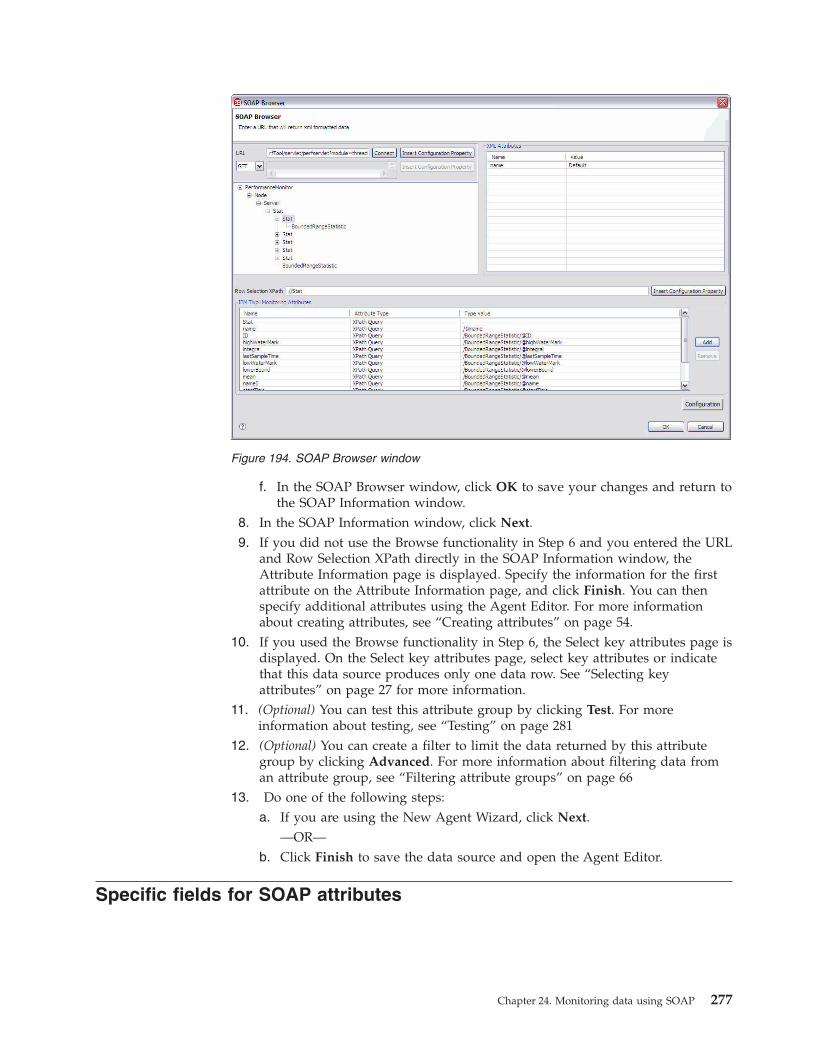
f. In the SOAP Browser window, click OK to save your changes and return tothe SOAP Information window.
8. In the SOAP Information window, click Next.9. If you did not use the Browse functionality in Step 6 and you entered the URL
and Row Selection XPath directly in the SOAP Information window, theAttribute Information page is displayed. Specify the information for the firstattribute on the Attribute Information page, and click Finish. You can thenspecify additional attributes using the Agent Editor. For more informationabout creating attributes, see “Creating attributes” on page 54.
10. If you used the Browse functionality in Step 6, the Select key attributes page isdisplayed. On the Select key attributes page, select key attributes or indicatethat this data source produces only one data row. See “Selecting keyattributes” on page 27 for more information.
11. (Optional) You can test this attribute group by clicking Test. For moreinformation about testing, see “Testing” on page 281
12. (Optional) You can create a filter to limit the data returned by this attributegroup by clicking Advanced. For more information about filtering data froman attribute group, see “Filtering attribute groups” on page 66
13. Do one of the following steps:a. If you are using the New Agent Wizard, click Next.
—OR—b. Click Finish to save the data source and open the Agent Editor.
Specific fields for SOAP attributes
Figure 194. SOAP Browser window
Chapter 24. Monitoring data using SOAP 277
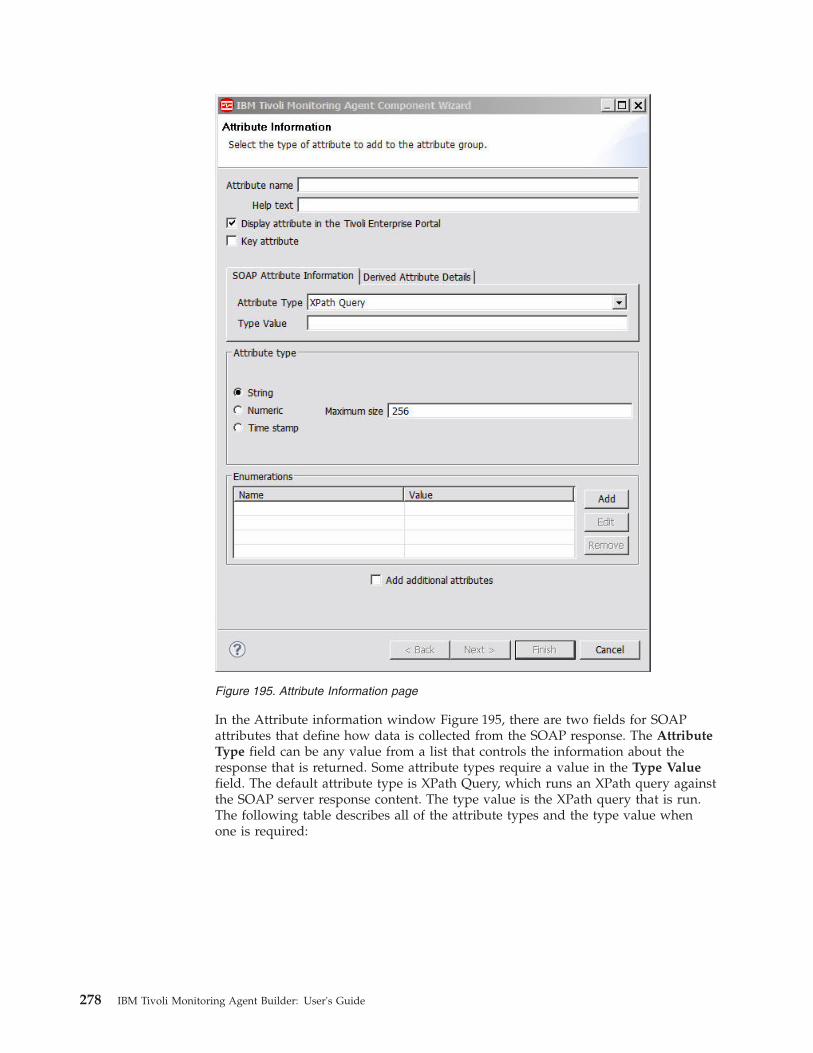
In the Attribute information window Figure 195, there are two fields for SOAPattributes that define how data is collected from the SOAP response. The AttributeType field can be any value from a list that controls the information about theresponse that is returned. Some attribute types require a value in the Type Valuefield. The default attribute type is XPath Query, which runs an XPath query againstthe SOAP server response content. The type value is the XPath query that is run.The following table describes all of the attribute types and the type value whenone is required:
Figure 195. Attribute Information page
278 IBM Tivoli Monitoring Agent Builder: User's Guide

Table 22. SOAP Attribute Information
Attribute type Description Type valueData typereturned
Differences withFTP and fileprotocols
XPath Query Runs an XPathquery on thecontent returnedfrom a URLconnection. Thequery must bewritten to returndata useful foran attribute, nota list of nodes.
The XPath queryto run againstthe contentobtained from aURL connection.If a rowselection querywas defined, thisXPath queryshould berelative to therow selectionquery.
The datareturned can bea string, anumeric, or atimestamp value.The AgentBuilder browserfor SOAPgenerally detectsthe correct datatype for theattribute fromthe data beingbrowsed. If thedata is in theXML DateTimeformat, you canspecifytimestamp as theattribute typeand the agentconverts thevalue to aCandleTimestamp.
None
Response Time The amount oftime inmilliseconds thatit took todownload thecontent from therequested URL.
None Integer (numberof milliseconds)
None
ResponseMessage
The HTTPresponsemessage that isreturned by theserver.
None String The responsemessage appliesonly if the URLuses the HTTPor HTTPSprotocols.
Response Code The HTTPresponse codethat is returnedby the server.
None Integer The responsecode appliesonly if the URLuses the HTTPor HTTPSprotocols. It isalways 0 for fileor FTP URLs.
Response Length The size of thecontent in bytesthat wasdownloadedfrom therequested URL
None Integer (size inbytes)
None
Chapter 24. Monitoring data using SOAP 279
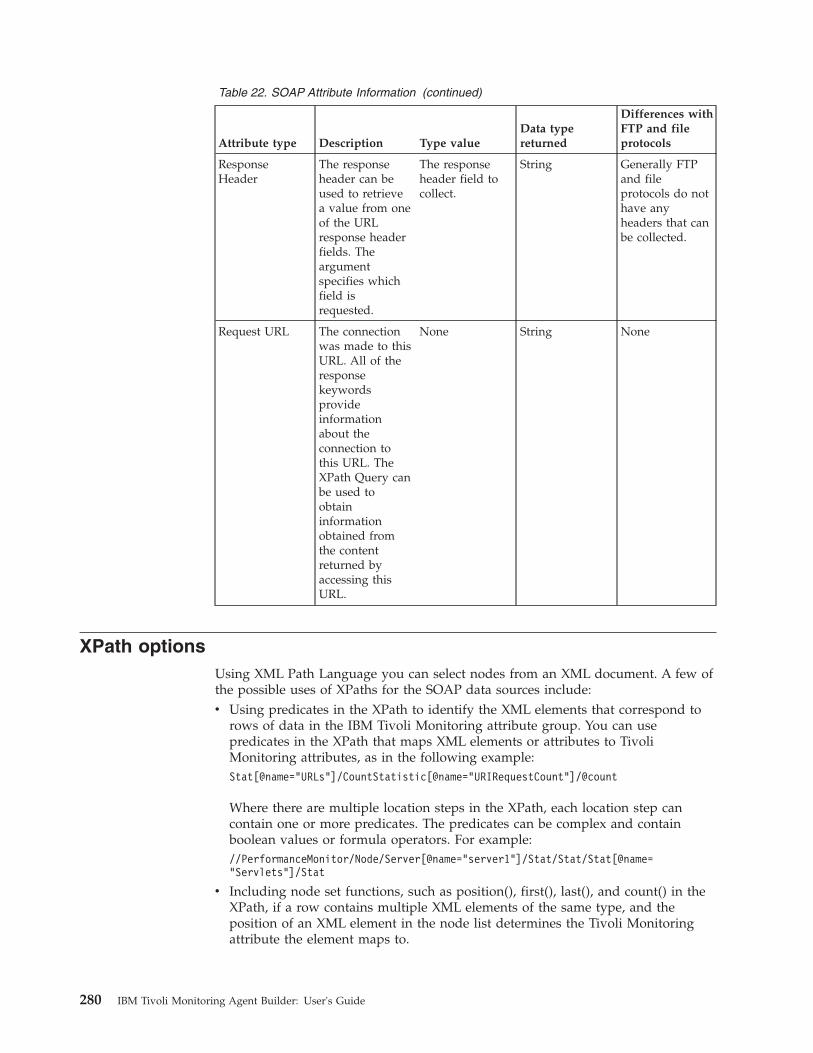
Table 22. SOAP Attribute Information (continued)
Attribute type Description Type valueData typereturned
Differences withFTP and fileprotocols
ResponseHeader
The responseheader can beused to retrievea value from oneof the URLresponse headerfields. Theargumentspecifies whichfield isrequested.
The responseheader field tocollect.
String Generally FTPand fileprotocols do nothave anyheaders that canbe collected.
Request URL The connectionwas made to thisURL. All of theresponsekeywordsprovideinformationabout theconnection tothis URL. TheXPath Query canbe used toobtaininformationobtained fromthe contentreturned byaccessing thisURL.
None String None
XPath optionsUsing XML Path Language you can select nodes from an XML document. A few ofthe possible uses of XPaths for the SOAP data sources include:v Using predicates in the XPath to identify the XML elements that correspond to
rows of data in the IBM Tivoli Monitoring attribute group. You can usepredicates in the XPath that maps XML elements or attributes to TivoliMonitoring attributes, as in the following example:Stat[@name="URLs"]/CountStatistic[@name="URIRequestCount"]/@count
Where there are multiple location steps in the XPath, each location step cancontain one or more predicates. The predicates can be complex and containboolean values or formula operators. For example://PerformanceMonitor/Node/Server[@name="server1"]/Stat/Stat/Stat[@name="Servlets"]/Stat
v Including node set functions, such as position(), first(), last(), and count() in theXPath, if a row contains multiple XML elements of the same type, and theposition of an XML element in the node list determines the Tivoli Monitoringattribute the element maps to.
280 IBM Tivoli Monitoring Agent Builder: User's Guide
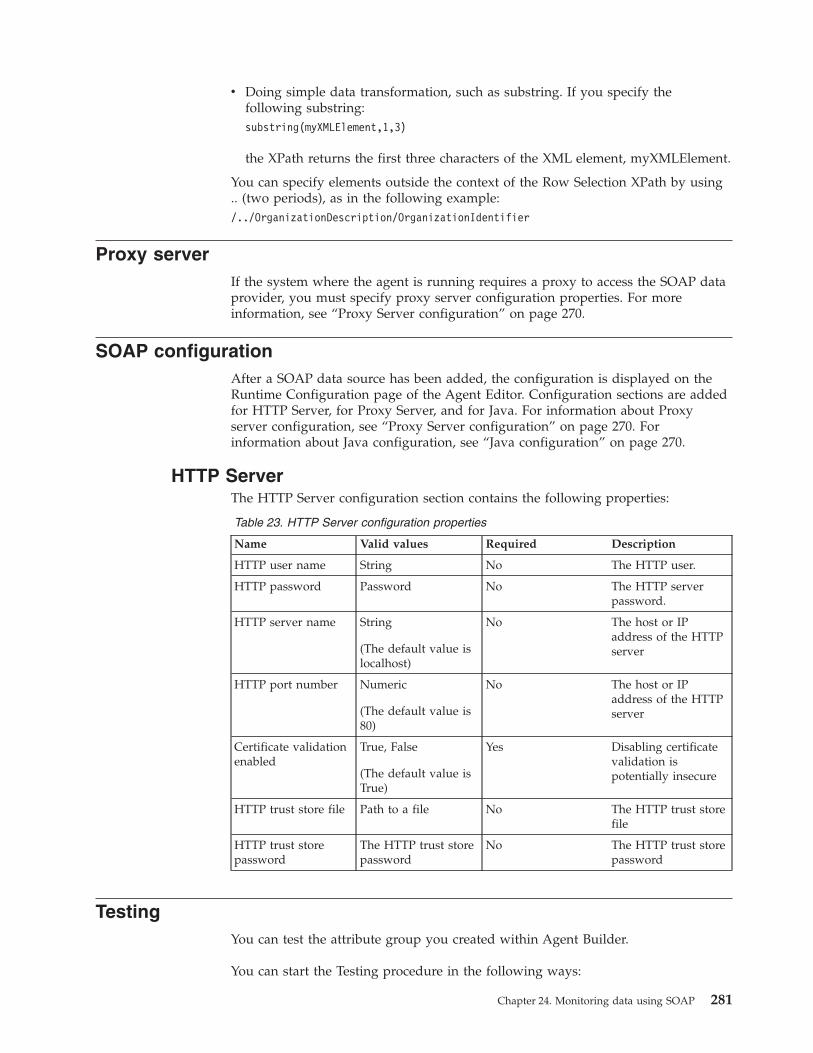
v Doing simple data transformation, such as substring. If you specify thefollowing substring:substring(myXMLElement,1,3)
the XPath returns the first three characters of the XML element, myXMLElement.
You can specify elements outside the context of the Row Selection XPath by using.. (two periods), as in the following example:/../OrganizationDescription/OrganizationIdentifier
Proxy serverIf the system where the agent is running requires a proxy to access the SOAP dataprovider, you must specify proxy server configuration properties. For moreinformation, see “Proxy Server configuration” on page 270.
SOAP configurationAfter a SOAP data source has been added, the configuration is displayed on theRuntime Configuration page of the Agent Editor. Configuration sections are addedfor HTTP Server, for Proxy Server, and for Java. For information about Proxyserver configuration, see “Proxy Server configuration” on page 270. Forinformation about Java configuration, see “Java configuration” on page 270.
HTTP ServerThe HTTP Server configuration section contains the following properties:
Table 23. HTTP Server configuration properties
Name Valid values Required Description
HTTP user name String No The HTTP user.
HTTP password Password No The HTTP serverpassword.
HTTP server name String
(The default value islocalhost)
No The host or IPaddress of the HTTPserver
HTTP port number Numeric
(The default value is80)
No The host or IPaddress of the HTTPserver
Certificate validationenabled
True, False
(The default value isTrue)
Yes Disabling certificatevalidation ispotentially insecure
HTTP trust store file Path to a file No The HTTP trust storefile
HTTP trust storepassword
The HTTP trust storepassword
No The HTTP trust storepassword
TestingYou can test the attribute group you created within Agent Builder.
You can start the Testing procedure in the following ways:
Chapter 24. Monitoring data using SOAP 281
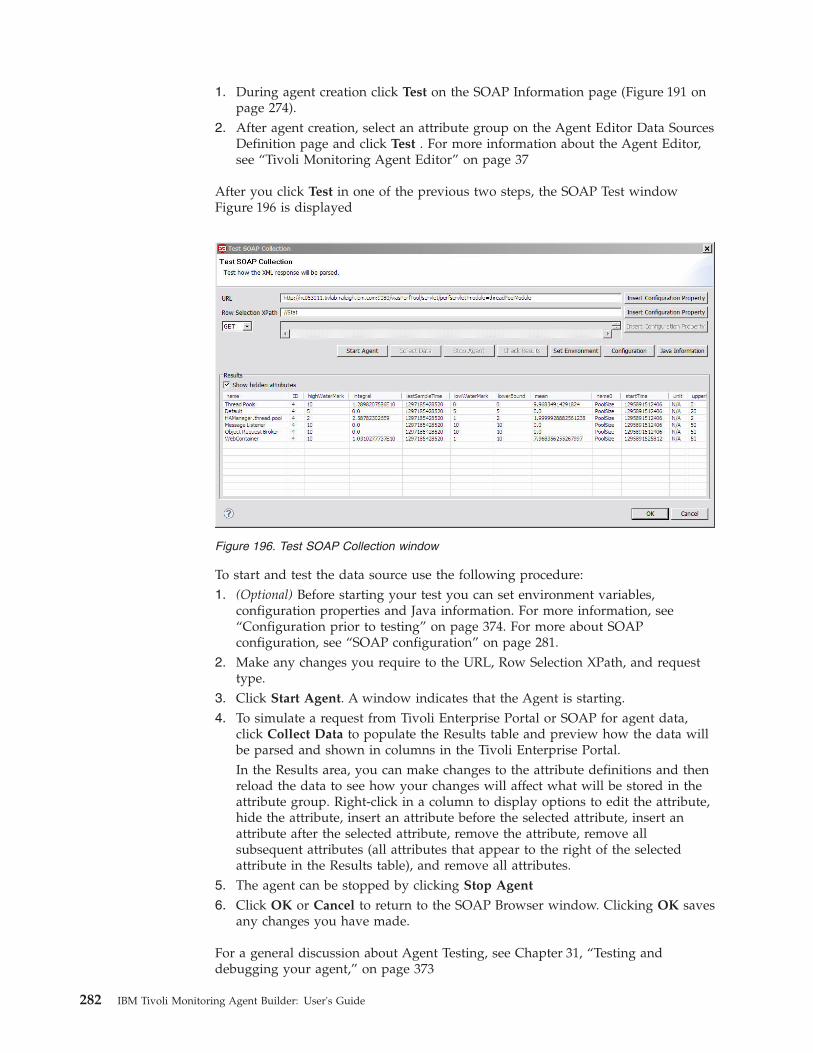
1. During agent creation click Test on the SOAP Information page (Figure 191 onpage 274).
2. After agent creation, select an attribute group on the Agent Editor Data SourcesDefinition page and click Test . For more information about the Agent Editor,see “Tivoli Monitoring Agent Editor” on page 37
After you click Test in one of the previous two steps, the SOAP Test windowFigure 196 is displayed
To start and test the data source use the following procedure:1. (Optional) Before starting your test you can set environment variables,
configuration properties and Java information. For more information, see“Configuration prior to testing” on page 374. For more about SOAPconfiguration, see “SOAP configuration” on page 281.
2. Make any changes you require to the URL, Row Selection XPath, and requesttype.
3. Click Start Agent. A window indicates that the Agent is starting.4. To simulate a request from Tivoli Enterprise Portal or SOAP for agent data,
click Collect Data to populate the Results table and preview how the data willbe parsed and shown in columns in the Tivoli Enterprise Portal.In the Results area, you can make changes to the attribute definitions and thenreload the data to see how your changes will affect what will be stored in theattribute group. Right-click in a column to display options to edit the attribute,hide the attribute, insert an attribute before the selected attribute, insert anattribute after the selected attribute, remove the attribute, remove allsubsequent attributes (all attributes that appear to the right of the selectedattribute in the Results table), and remove all attributes.
5. The agent can be stopped by clicking Stop Agent
6. Click OK or Cancel to return to the SOAP Browser window. Clicking OK savesany changes you have made.
For a general discussion about Agent Testing, see Chapter 31, “Testing anddebugging your agent,” on page 373
Figure 196. Test SOAP Collection window
282 IBM Tivoli Monitoring Agent Builder: User's Guide
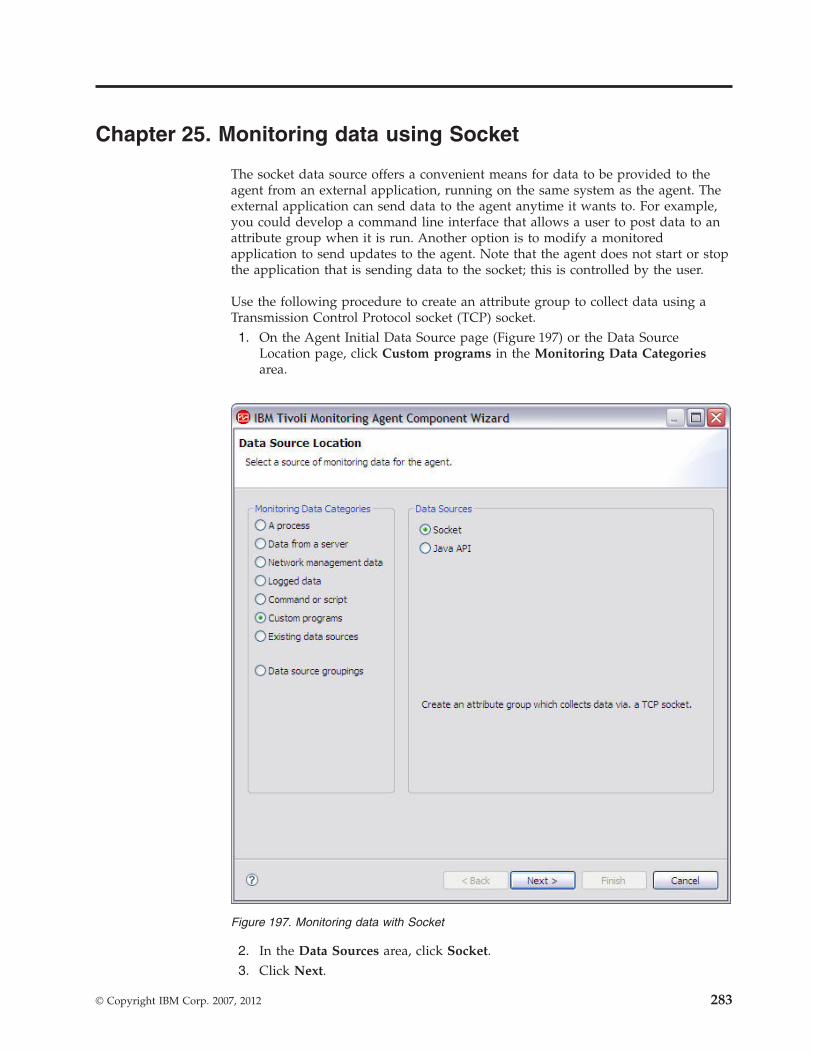
Chapter 25. Monitoring data using Socket
The socket data source offers a convenient means for data to be provided to theagent from an external application, running on the same system as the agent. Theexternal application can send data to the agent anytime it wants to. For example,you could develop a command line interface that allows a user to post data to anattribute group when it is run. Another option is to modify a monitoredapplication to send updates to the agent. Note that the agent does not start or stopthe application that is sending data to the socket; this is controlled by the user.
Use the following procedure to create an attribute group to collect data using aTransmission Control Protocol socket (TCP) socket.1. On the Agent Initial Data Source page (Figure 197) or the Data Source
Location page, click Custom programs in the Monitoring Data Categoriesarea.
2. In the Data Sources area, click Socket.3. Click Next.
Figure 197. Monitoring data with Socket
© Copyright IBM Corp. 2007, 2012 283
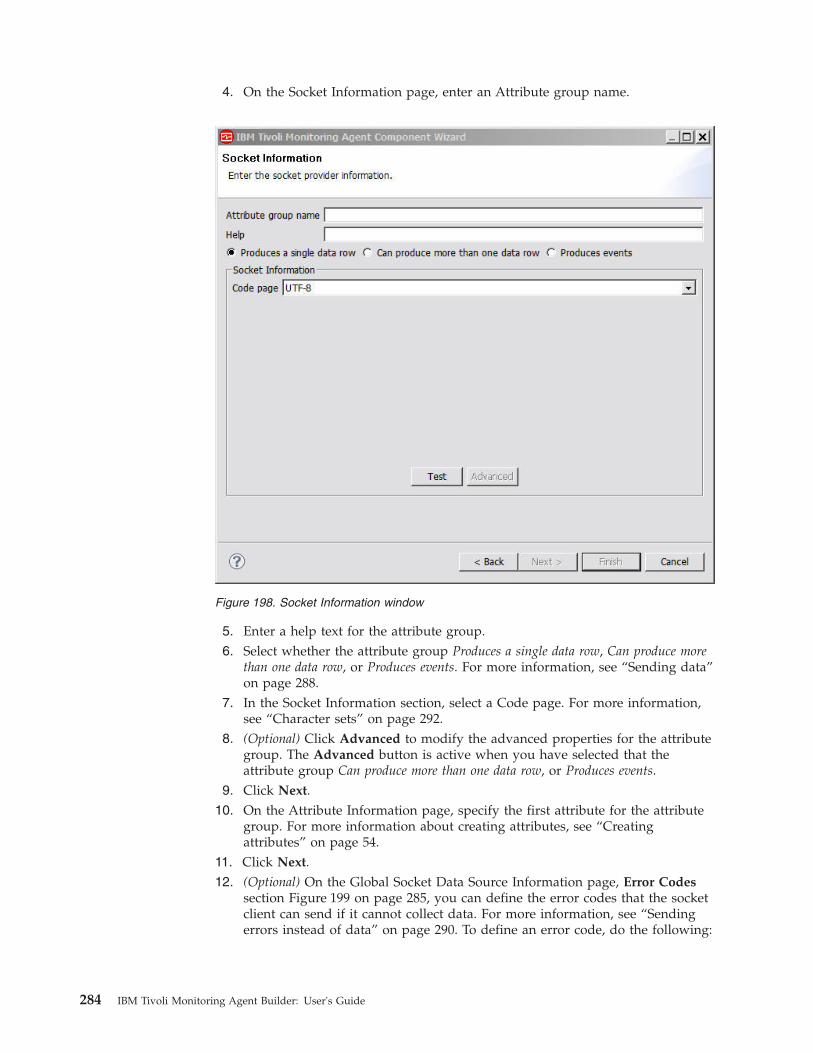
4. On the Socket Information page, enter an Attribute group name.
5. Enter a help text for the attribute group.6. Select whether the attribute group Produces a single data row, Can produce more
than one data row, or Produces events. For more information, see “Sending data”on page 288.
7. In the Socket Information section, select a Code page. For more information,see “Character sets” on page 292.
8. (Optional) Click Advanced to modify the advanced properties for the attributegroup. The Advanced button is active when you have selected that theattribute group Can produce more than one data row, or Produces events.
9. Click Next.10. On the Attribute Information page, specify the first attribute for the attribute
group. For more information about creating attributes, see “Creatingattributes” on page 54.
11. Click Next.12. (Optional) On the Global Socket Data Source Information page, Error Codes
section Figure 199 on page 285, you can define the error codes that the socketclient can send if it cannot collect data. For more information, see “Sendingerrors instead of data” on page 290. To define an error code, do the following:
Figure 198. Socket Information window
284 IBM Tivoli Monitoring Agent Builder: User's Guide
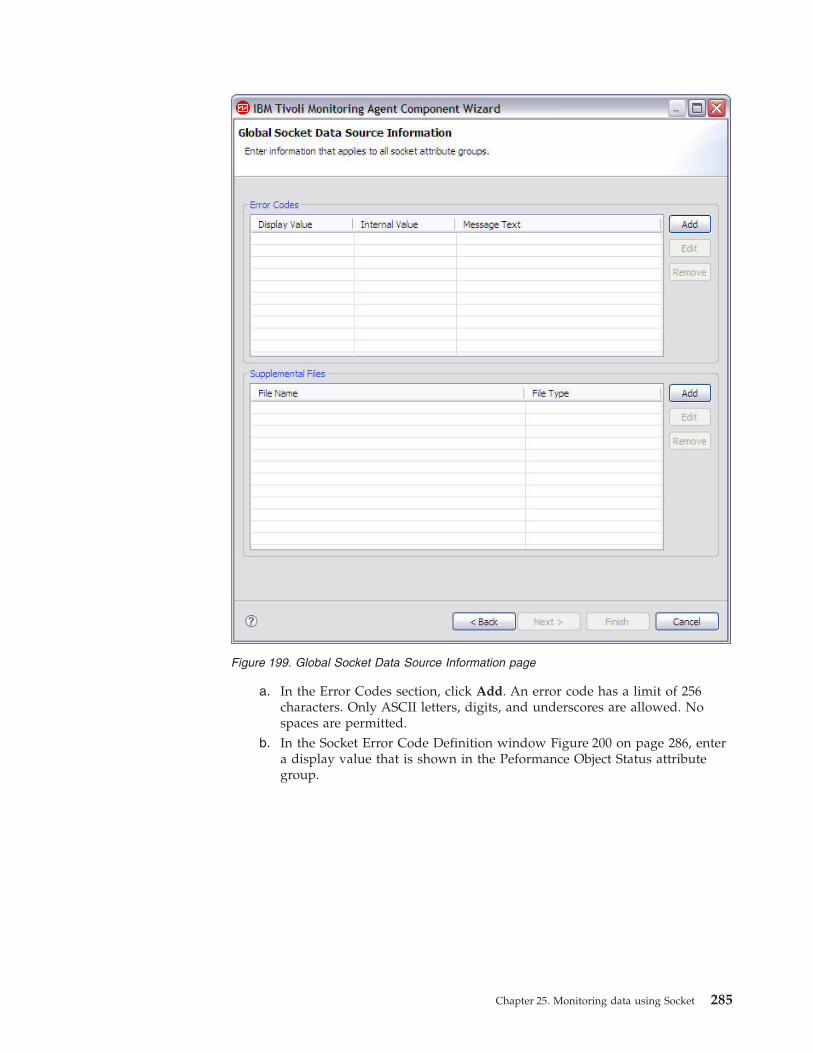
a. In the Error Codes section, click Add. An error code has a limit of 256characters. Only ASCII letters, digits, and underscores are allowed. Nospaces are permitted.
b. In the Socket Error Code Definition window Figure 200 on page 286, entera display value that is shown in the Peformance Object Status attributegroup.
Figure 199. Global Socket Data Source Information page
Chapter 25. Monitoring data using Socket 285
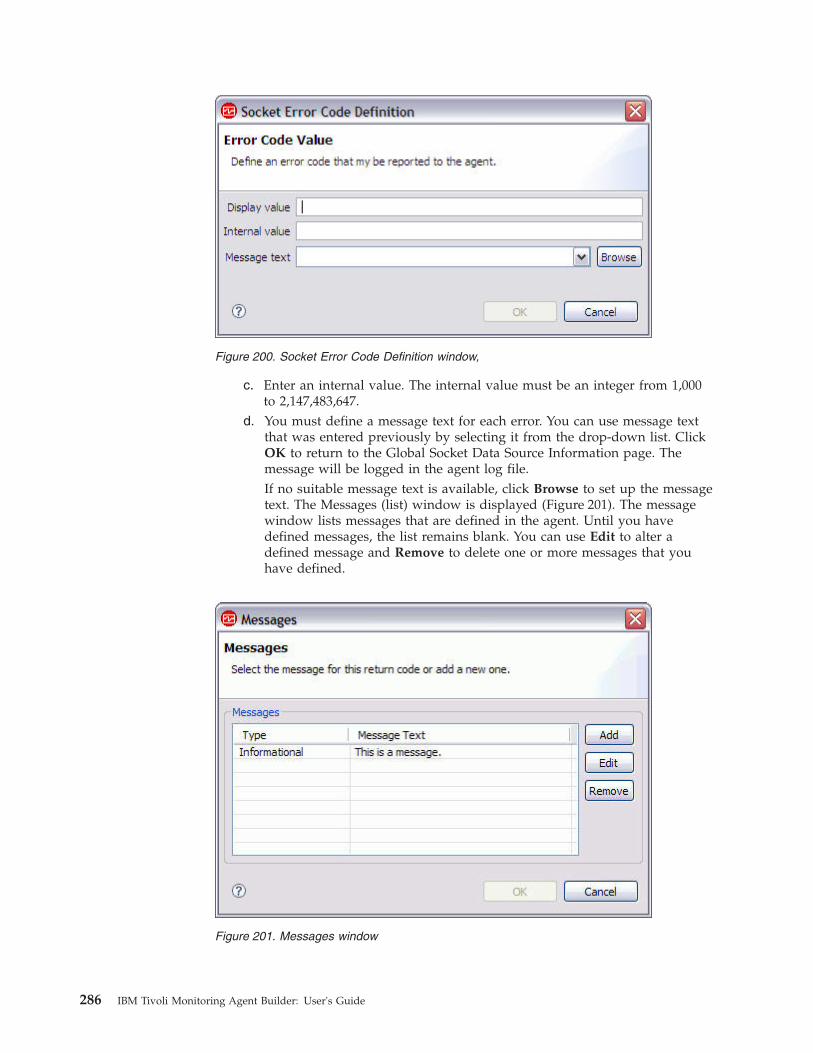
c. Enter an internal value. The internal value must be an integer from 1,000to 2,147,483,647.
d. You must define a message text for each error. You can use message textthat was entered previously by selecting it from the drop-down list. ClickOK to return to the Global Socket Data Source Information page. Themessage will be logged in the agent log file.If no suitable message text is available, click Browse to set up the messagetext. The Messages (list) window is displayed (Figure 201). The messagewindow lists messages that are defined in the agent. Until you havedefined messages, the list remains blank. You can use Edit to alter adefined message and Remove to delete one or more messages that youhave defined.
Figure 200. Socket Error Code Definition window,
Figure 201. Messages window
286 IBM Tivoli Monitoring Agent Builder: User's Guide
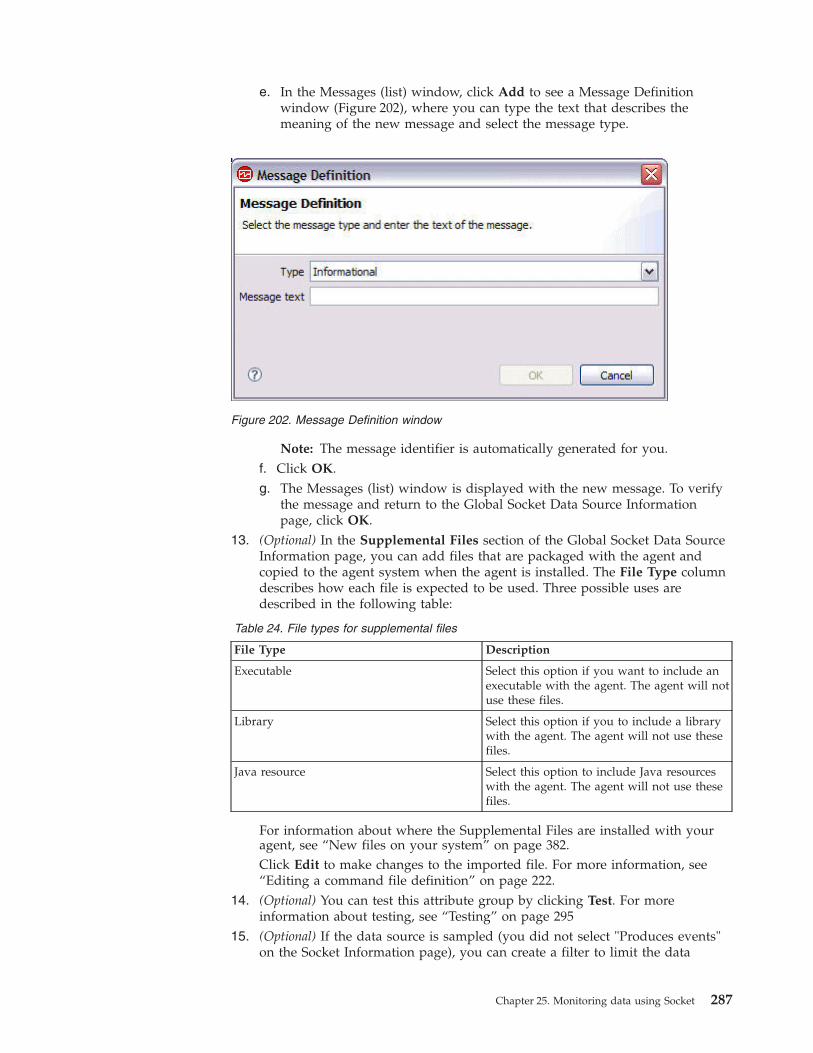
e. In the Messages (list) window, click Add to see a Message Definitionwindow (Figure 202), where you can type the text that describes themeaning of the new message and select the message type.
Note: The message identifier is automatically generated for you.f. Click OK.g. The Messages (list) window is displayed with the new message. To verify
the message and return to the Global Socket Data Source Informationpage, click OK.
13. (Optional) In the Supplemental Files section of the Global Socket Data SourceInformation page, you can add files that are packaged with the agent andcopied to the agent system when the agent is installed. The File Type columndescribes how each file is expected to be used. Three possible uses aredescribed in the following table:
Table 24. File types for supplemental files
File Type Description
Executable Select this option if you want to include anexecutable with the agent. The agent will notuse these files.
Library Select this option if you to include a librarywith the agent. The agent will not use thesefiles.
Java resource Select this option to include Java resourceswith the agent. The agent will not use thesefiles.
For information about where the Supplemental Files are installed with youragent, see “New files on your system” on page 382.Click Edit to make changes to the imported file. For more information, see“Editing a command file definition” on page 222.
14. (Optional) You can test this attribute group by clicking Test. For moreinformation about testing, see “Testing” on page 295
15. (Optional) If the data source is sampled (you did not select "Produces events"on the Socket Information page), you can create a filter to limit the data
Figure 202. Message Definition window
Chapter 25. Monitoring data using Socket 287

returned by this attribute group by clicking Advanced. For more informationabout filtering data from an attribute group, see “Filtering attribute groups”on page 66
16. Do one of the following steps:a. If you are using the New Agent Wizard, click Next.
—OR—b. Click Finish to save the data source and open the Agent Editor.Select the operating systems on which the agent listens to data from socketclients in the Operating Systems section of the Socket Provider Settings page.To open this page, click Socket Provider Settings in the outline view or clickGlobal Settings in the Agent Editor on any socket attribute group page.
Note: Error codes and supplemental files can be updated in the Error Codesand Supplemental Files sections of the Socket Provider Settings page.
Sending information to the agentWhen your agent contains one or more socket attribute groups, the agent opens asocket and listens for data from clients. The data received must follow a structuredXML format. The following XML information flows are possible using the socketdata source:v Send one or more rows of data to the agent for a sampled attribute groupv Send a row of data to the agent for an attribute group that Produces eventsv Send an error code to the agent instead of data.v Send a task prefix registration to the agentv Receive a task request from the agentv Send a task response to the agent
Sending dataAn attribute group is defined to receive sampled data or event data. When youcreate the attribute group, you specify an option that indicates whether the data tobe received:v Produces a single data rowv Produce more than one data rowv Produces events
If you select that the attribute group is to produce one or more data rows, that is asampled attribute group. If you select Produces events then your attribute groupsends an event to Tivoli Monitoring each time a row is received.
When you view sampled data in the Tivoli Enterprise Portal, you see the latest setof collected rows. The data displayed for an event attribute group is the contentsof a local cache maintained by the agent. For event data, the agent adds the newentry to the cache, until the size is reached when the oldest one is deleted. Forsampled data, the agent replaces the contents of the cache every time you senddata.
If you select Produces events or Produces a single data row when you create yourattribute group, you must send only one row of data to the agent for that attributegroup in each message. You can send as many events as you want, just send eachevent in a separate message
288 IBM Tivoli Monitoring Agent Builder: User's Guide
Normally sampled data is collected by the agent on request, but the socket clientprovides updated samples on its own schedule. You can update a sampledattribute group (single row or multiple row) as often as you require. When thedata is requested by Tivoli Monitoring, the agent provides the latest data.
If there are missing rows of data for the socket attribute group in the TivoliEnterprise Portal or if the data in the attribute group is not as expected, check theerrors in the log file. The socket data source attempts to process whatever it canfrom the input. For example, if the client sends three well-formed rows and onethat is not valid (for example, malformed XML), you will see:v Three rows of data in the attribute groupv An error is logged for the malformed row in the agent's log filev Since valid rows were returned, the Performance Object Status will show a
status of NO_ERROR
For both event and sampled data, the data is sent to the agent as a single XMLdata flow from the socket client. Data sent from a socket client must always beterminated with a newline character: '\n'. The agent reads data until it sees thenewline character and then an attempt is made to process what was received. Anydata received that cannot be processed is discarded. The following is a sample ofhow you would send two rows of data to the agent for an attribute group namedabc:<socketData><attrGroup name="abc"><in><a v="1"/><a v="no"/><a v="5"/></in><in> \<a v="3"/><a v="yes"/><a v="5"/></in></attrGroup></socketData>\n
This sample sends two rows of data to the agent where each row contains threeattributes. The order of the attributes is important and must follow the orderdefined in your attribute group. The only exception to this is that the derivedattributes must be skipped, regardless of where they appear in your attributegroup.
If the attribute group is defined in a subnode, then the subnode instance ID mustbe identified when data is sent to the agent using the subnode attribute in thesocketData element. A convention must be adopted for configuring subnodeinstance IDs for use by the socket client since the client cannot query instance IDsor configuration properties. Data sent to a subnode which is not configured isignored.
Here is a sample:<socketData subnode="app1"><attrGroup name="abc"><in><a v="1"/><a v="no"/><a v="5"/></in><in> \<a v="3"/><a v="yes"/><a v="5"/></in></attrGroup></socketData>\n
In this sample, the data is sent to the subnode with an instance ID equal to "app1".Note that "app1" is not the managed system name, but the instance identifierspecified when the subnode instance is configured.
The following XML elements make up the socket data:
socketDataThis is the root element. It has one optional attribute called subnode thatspecifies the subnode instance ID.
attrGroupThis element identifies the attribute group that the socket data is for.The name attribute is required and is used to specify the attribute groupname.
Chapter 25. Monitoring data using Socket 289
in This element is required to identify a new row of data. All of the attributevalues for a row of data must be children of the same in element.
a The a element identifies an attribute value. The v attribute is required andis used to specify the attribute value.
Sending errors instead of dataSometimes the application that posts socket data may not be able to collect thedata necessary for an attribute group. In this case, instead of sending data to theagent, an error code can be returned. The error code gives you a way to tell theTivoli Monitoring environment about your problem. An example error is:<socketData><attrGroup name="abc"/><error rc="1000"/></attrGroup></socketData>\n
The error code must be defined in the agent in "a list" that is common to all of thesocket attribute groups. When the agent receives an error code, the defined errormessage is logged in the agent log file. In addition, the attribute group namedPerformance Object Status has an Error Code attribute that is updated with theError Code Type that is defined for the error code you send.
For the example above, you must have defined the Error Code Value of 1000 in theagent. See the following sample error code definition:
Table 25. Sample error code
Error Code Value Error Code Type Message
1000 APP_NOT_RUNNING The application is notrunning
When the error code is sent, a message similar to the following is logged in theagent log file:(4D7FA153.0000-5:customproviderserver.cpp,1799,"processRC") Received error code 1000from client. \Message: K1C0001E The application is not running
If you select the Performance Object Status query from the Tivoli Enterprise Portal,you will see the value APP_NOT_RUNNING in the Error Code column of the row forthe abc attribute group in that table.
Sending an error to a sampled attribute group clears any data that was previouslyreceived for that attribute group. Sending data to the attribute group causes theerror code to no longer be displayed in the Performance Object Status attributegroup. You can also send an error code of 0 to clear the error code from that table.
Sending an error to an attribute group that produces events does not clear thecache of events that have previously been sent.
Handling take actionsThe socket client can register to receive take action requests from the agent whenthe action command matches a certain prefix. Any action that does not match ishandled by the agent. The prefix must not conflict with actions that the agent isexpected to handle, so use the agent product code as the prefix. Take actionsprovided with the Agent Builder are named after the data source the take actionwill use. For example, the JMX_INVOKE take action operates on the JMX datasource. Another example is the SSHEXEC take action which uses the SSH scriptdata provider. Since these actions do not use the product code, the product code isa safe prefix to use as the take action prefix.
290 IBM Tivoli Monitoring Agent Builder: User's Guide
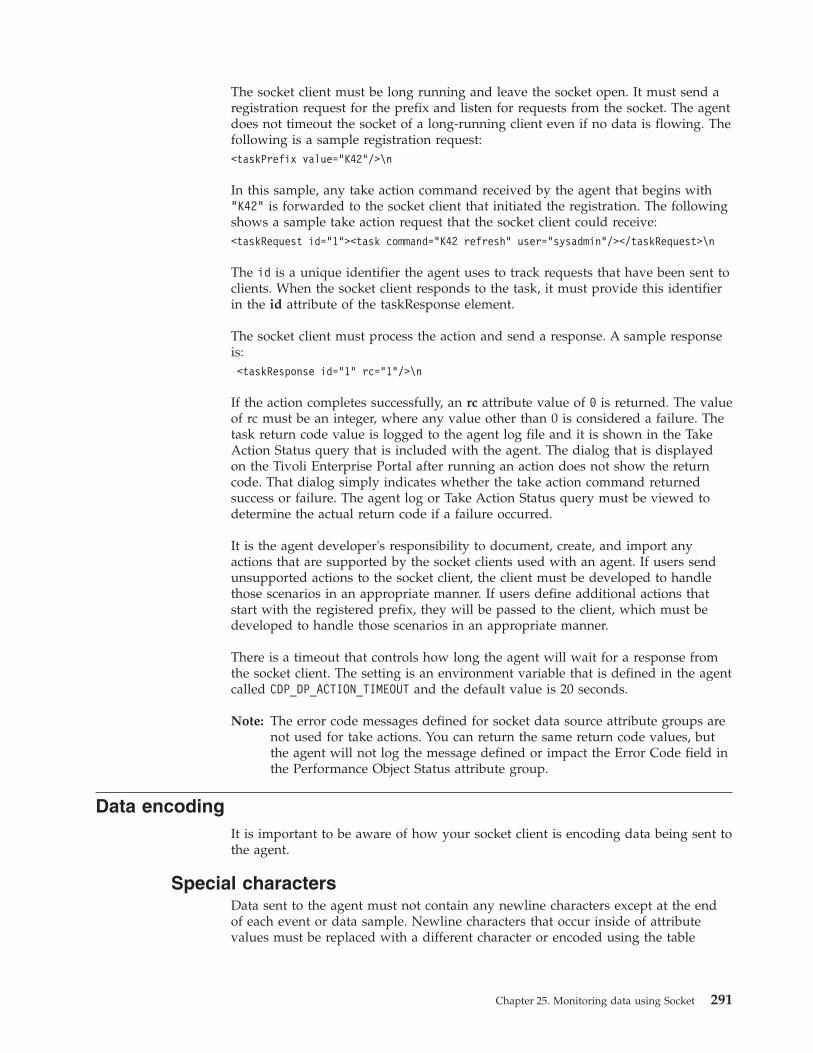
The socket client must be long running and leave the socket open. It must send aregistration request for the prefix and listen for requests from the socket. The agentdoes not timeout the socket of a long-running client even if no data is flowing. Thefollowing is a sample registration request:<taskPrefix value="K42"/>\n
In this sample, any take action command received by the agent that begins with"K42" is forwarded to the socket client that initiated the registration. The followingshows a sample take action request that the socket client could receive:<taskRequest id="1"><task command="K42 refresh" user="sysadmin"/></taskRequest>\n
The id is a unique identifier the agent uses to track requests that have been sent toclients. When the socket client responds to the task, it must provide this identifierin the id attribute of the taskResponse element.
The socket client must process the action and send a response. A sample responseis:<taskResponse id="1" rc="1"/>\n
If the action completes successfully, an rc attribute value of 0 is returned. The valueof rc must be an integer, where any value other than 0 is considered a failure. Thetask return code value is logged to the agent log file and it is shown in the TakeAction Status query that is included with the agent. The dialog that is displayedon the Tivoli Enterprise Portal after running an action does not show the returncode. That dialog simply indicates whether the take action command returnedsuccess or failure. The agent log or Take Action Status query must be viewed todetermine the actual return code if a failure occurred.
It is the agent developer's responsibility to document, create, and import anyactions that are supported by the socket clients used with an agent. If users sendunsupported actions to the socket client, the client must be developed to handlethose scenarios in an appropriate manner. If users define additional actions thatstart with the registered prefix, they will be passed to the client, which must bedeveloped to handle those scenarios in an appropriate manner.
There is a timeout that controls how long the agent will wait for a response fromthe socket client. The setting is an environment variable that is defined in the agentcalled CDP_DP_ACTION_TIMEOUT and the default value is 20 seconds.
Note: The error code messages defined for socket data source attribute groups arenot used for take actions. You can return the same return code values, butthe agent will not log the message defined or impact the Error Code field inthe Performance Object Status attribute group.
Data encodingIt is important to be aware of how your socket client is encoding data being sent tothe agent.
Special charactersData sent to the agent must not contain any newline characters except at the endof each event or data sample. Newline characters that occur inside of attributevalues must be replaced with a different character or encoded using the table
Chapter 25. Monitoring data using Socket 291
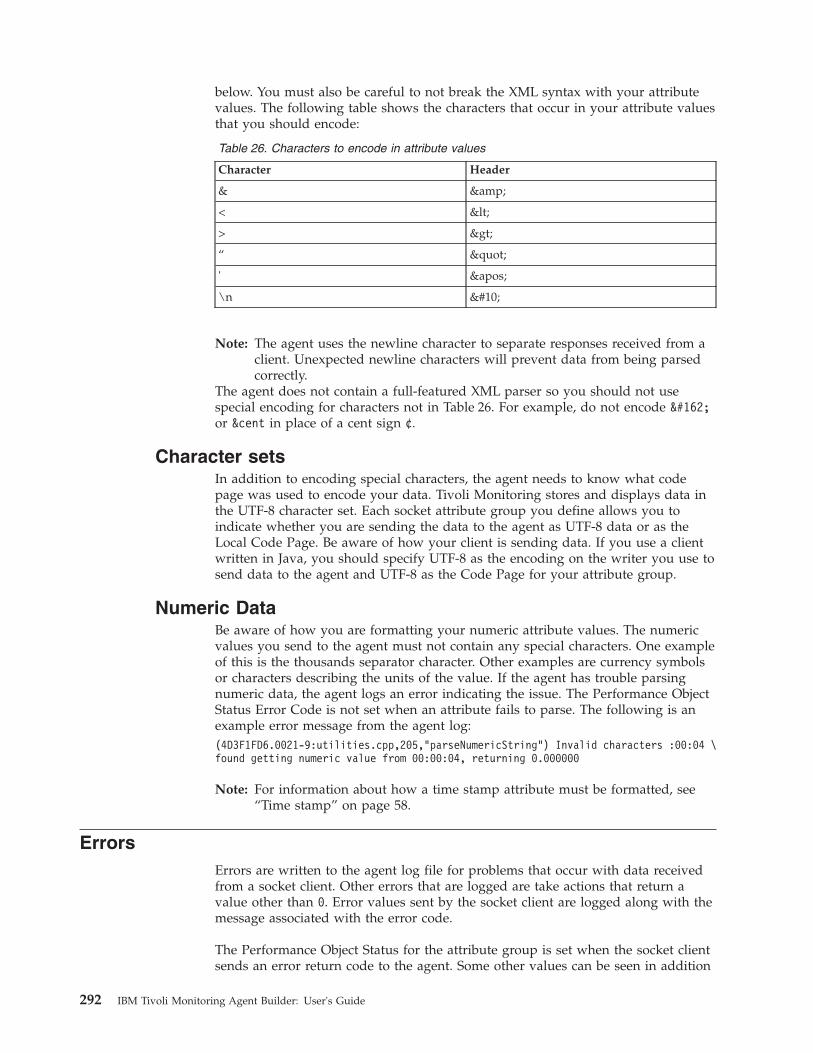
below. You must also be careful to not break the XML syntax with your attributevalues. The following table shows the characters that occur in your attribute valuesthat you should encode:
Table 26. Characters to encode in attribute values
Character Header
& &
< <
> >
“ "
' '
\n
Note: The agent uses the newline character to separate responses received from aclient. Unexpected newline characters will prevent data from being parsedcorrectly.
The agent does not contain a full-featured XML parser so you should not usespecial encoding for characters not in Table 26. For example, do not encode ¢or ¢ in place of a cent sign ¢.
Character setsIn addition to encoding special characters, the agent needs to know what codepage was used to encode your data. Tivoli Monitoring stores and displays data inthe UTF-8 character set. Each socket attribute group you define allows you toindicate whether you are sending the data to the agent as UTF-8 data or as theLocal Code Page. Be aware of how your client is sending data. If you use a clientwritten in Java, you should specify UTF-8 as the encoding on the writer you use tosend data to the agent and UTF-8 as the Code Page for your attribute group.
Numeric DataBe aware of how you are formatting your numeric attribute values. The numericvalues you send to the agent must not contain any special characters. One exampleof this is the thousands separator character. Other examples are currency symbolsor characters describing the units of the value. If the agent has trouble parsingnumeric data, the agent logs an error indicating the issue. The Performance ObjectStatus Error Code is not set when an attribute fails to parse. The following is anexample error message from the agent log:(4D3F1FD6.0021-9:utilities.cpp,205,"parseNumericString") Invalid characters :00:04 \found getting numeric value from 00:00:04, returning 0.000000
Note: For information about how a time stamp attribute must be formatted, see“Time stamp” on page 58.
ErrorsErrors are written to the agent log file for problems that occur with data receivedfrom a socket client. Other errors that are logged are take actions that return avalue other than 0. Error values sent by the socket client are logged along with themessage associated with the error code.
The Performance Object Status for the attribute group is set when the socket clientsends an error return code to the agent. Some other values can be seen in addition
292 IBM Tivoli Monitoring Agent Builder: User's Guide
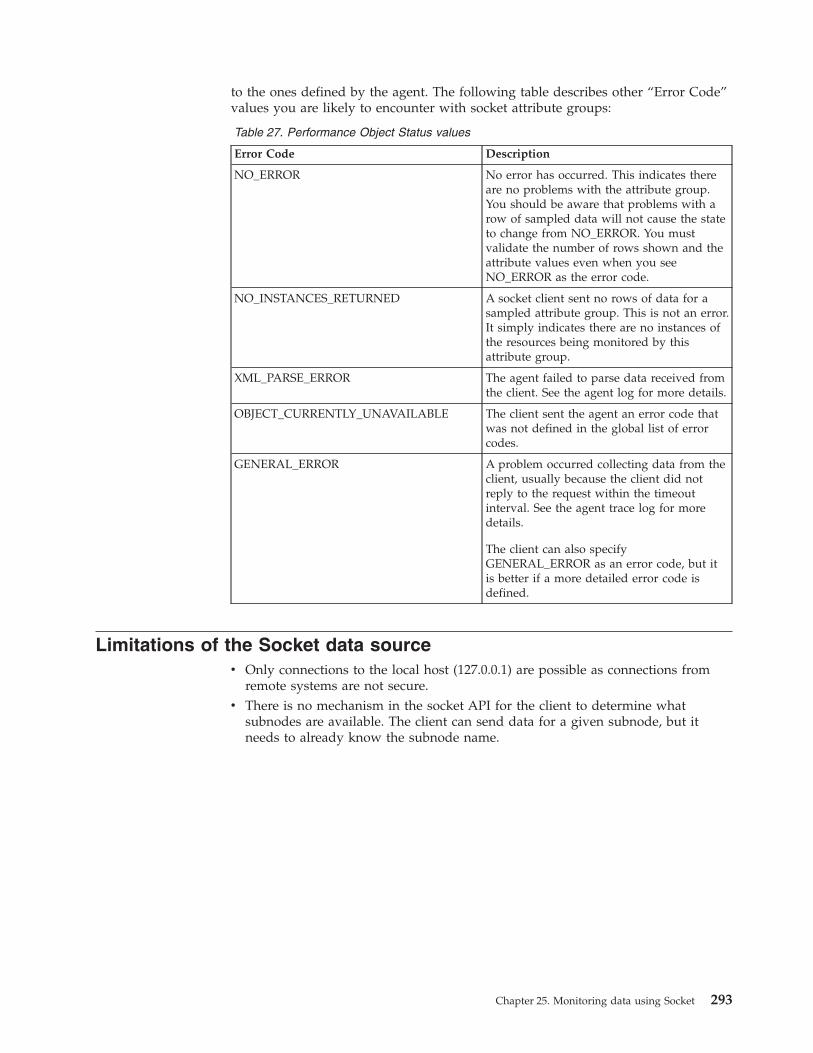
to the ones defined by the agent. The following table describes other “Error Code”values you are likely to encounter with socket attribute groups:
Table 27. Performance Object Status values
Error Code Description
NO_ERROR No error has occurred. This indicates thereare no problems with the attribute group.You should be aware that problems with arow of sampled data will not cause the stateto change from NO_ERROR. You mustvalidate the number of rows shown and theattribute values even when you seeNO_ERROR as the error code.
NO_INSTANCES_RETURNED A socket client sent no rows of data for asampled attribute group. This is not an error.It simply indicates there are no instances ofthe resources being monitored by thisattribute group.
XML_PARSE_ERROR The agent failed to parse data received fromthe client. See the agent log for more details.
OBJECT_CURRENTLY_UNAVAILABLE The client sent the agent an error code thatwas not defined in the global list of errorcodes.
GENERAL_ERROR A problem occurred collecting data from theclient, usually because the client did notreply to the request within the timeoutinterval. See the agent trace log for moredetails.
The client can also specifyGENERAL_ERROR as an error code, but itis better if a more detailed error code isdefined.
Limitations of the Socket data sourcev Only connections to the local host (127.0.0.1) are possible as connections from
remote systems are not secure.v There is no mechanism in the socket API for the client to determine what
subnodes are available. The client can send data for a given subnode, but itneeds to already know the subnode name.
Chapter 25. Monitoring data using Socket 293
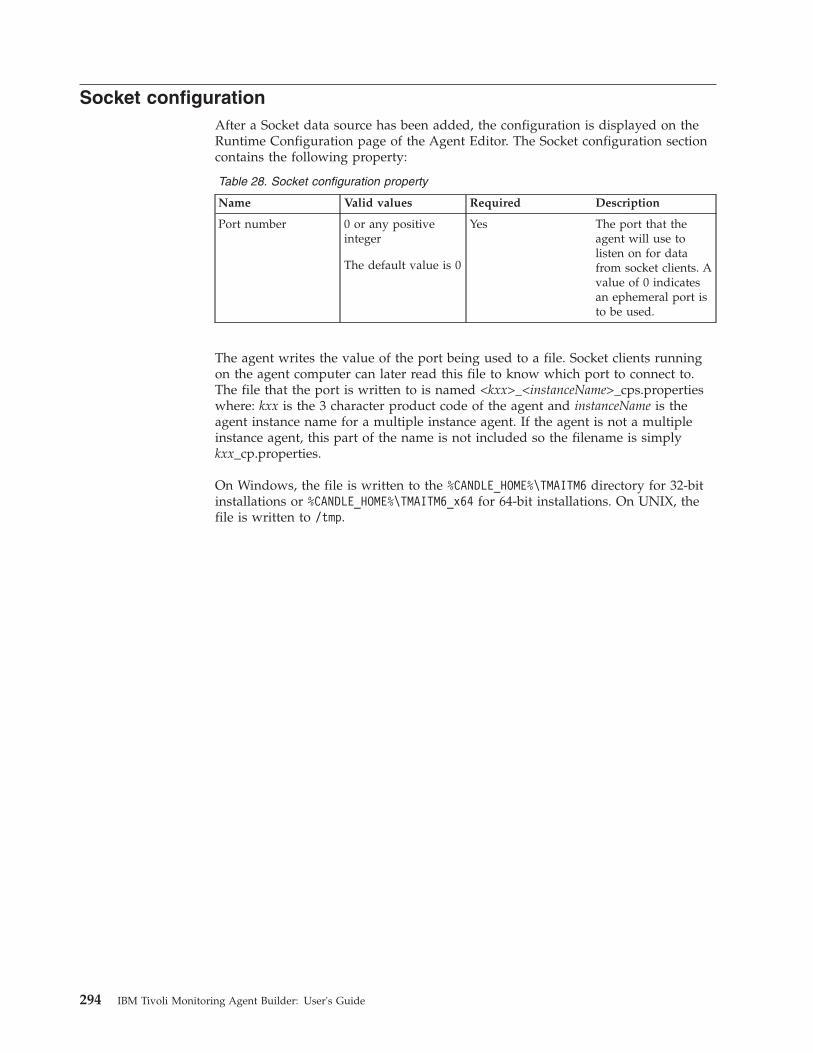
Socket configurationAfter a Socket data source has been added, the configuration is displayed on theRuntime Configuration page of the Agent Editor. The Socket configuration sectioncontains the following property:
Table 28. Socket configuration property
Name Valid values Required Description
Port number 0 or any positiveinteger
The default value is 0
Yes The port that theagent will use tolisten on for datafrom socket clients. Avalue of 0 indicatesan ephemeral port isto be used.
The agent writes the value of the port being used to a file. Socket clients runningon the agent computer can later read this file to know which port to connect to.The file that the port is written to is named <kxx>_<instanceName>_cps.propertieswhere: kxx is the 3 character product code of the agent and instanceName is theagent instance name for a multiple instance agent. If the agent is not a multipleinstance agent, this part of the name is not included so the filename is simplykxx_cp.properties.
On Windows, the file is written to the %CANDLE_HOME%\TMAITM6 directory for 32-bitinstallations or %CANDLE_HOME%\TMAITM6_x64 for 64-bit installations. On UNIX, thefile is written to /tmp.
294 IBM Tivoli Monitoring Agent Builder: User's Guide
Sample script for socketThe samples script in this section demonstrate how a socket client could bewritten.
Perl sampleThe following sample Perl script connects to a socket and sends data. This samplewas written for an agent running on UNIX, with the product code k00 and anattribute group called SocketData.#!/usr/bin/perl -w# SocketTest.pl# A simple Agent Builder Socket client using IO:Socket#------------------------
use strict;use IO::Socket;
# Initialize socket connection to the agent#-----------------------my $host = ’127.0.0.1’;my $port = 0;# This sample is for an agent with the k00 product code. The product code is# used in the following line to find the file containing the port number to use.open PORTFILE, "/tmp/k00_cps.properties" || die "Port file not found $!\n";while (<PORTFILE>) {
if (/^CP_PORT=([0-9]+)/) {$port = $1;
}}
if ($port == 0) {die "Could not find port to use to connect to agent.\n";
}
my $sock = new IO::Socket::INET( PeerAddr => $host, PeerPort => $port,Proto => ’tcp’); $sock or die "no socket :$!";
# The following call sends 2 rows of data to the agent. Each row contains 1# String attribute and 3 numeric attributes.syswrite $sock, "<socketData><attrGroup name=\"SocketData\"><in><a v=\"A messagefrom perl\"/> \<a v=\"1\"/><a v=\"2\"/><a v=\"123\"/></in><in><a v=\"More fromperl\"/><a v=\"456\"/> \<a v=\"123\"/><a v=\"789\"/></in></attrGroup></socketData>\n";
close $sock;
TestingYou can test the attribute group you have created within Agent Builder. To test theattribute group you will need a socket client to send data. An example socketclient written with perl script can be seen at “Sample script for socket”
You can start the Testing procedure in the following ways:1. During agent creation click Test in the Socket Information window Figure 198
on page 284).2. After agent creation, select an attribute group on the Agent Editor Data Sources
Definition page and click Test. For more information about the Agent Editor,see “Tivoli Monitoring Agent Editor” on page 37
Chapter 25. Monitoring data using Socket 295
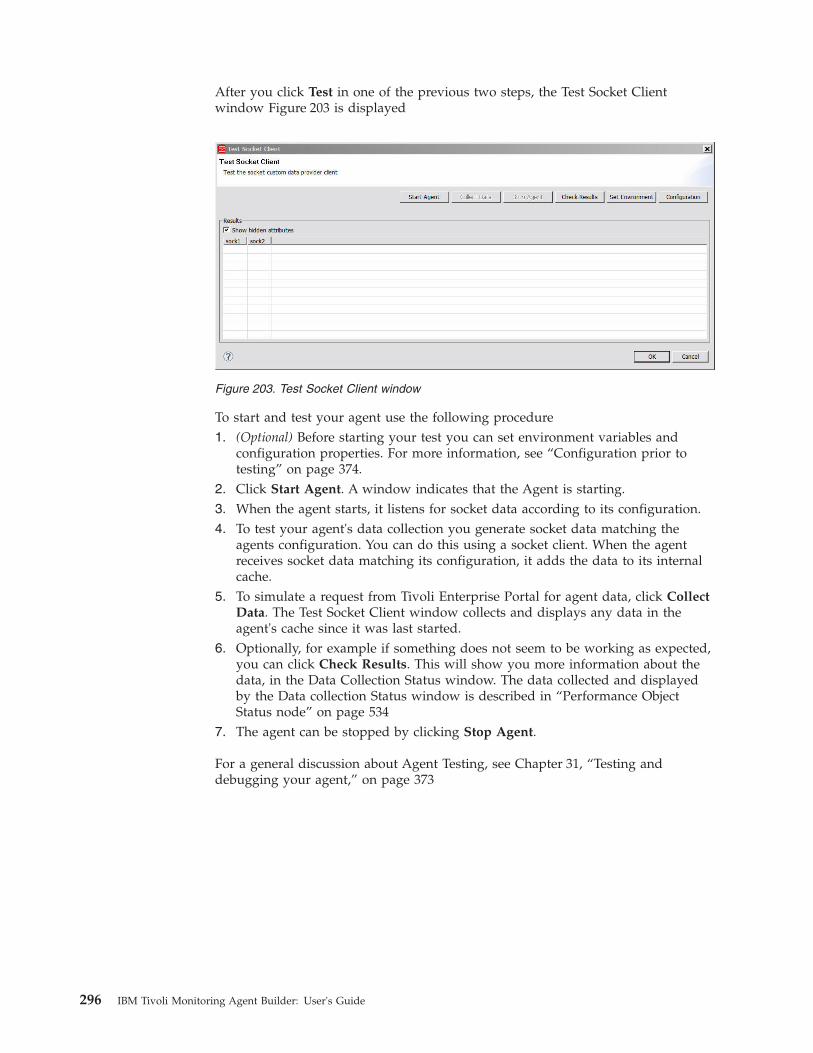
After you click Test in one of the previous two steps, the Test Socket Clientwindow Figure 203 is displayed
To start and test your agent use the following procedure1. (Optional) Before starting your test you can set environment variables and
configuration properties. For more information, see “Configuration prior totesting” on page 374.
2. Click Start Agent. A window indicates that the Agent is starting.3. When the agent starts, it listens for socket data according to its configuration.4. To test your agent's data collection you generate socket data matching the
agents configuration. You can do this using a socket client. When the agentreceives socket data matching its configuration, it adds the data to its internalcache.
5. To simulate a request from Tivoli Enterprise Portal for agent data, click CollectData. The Test Socket Client window collects and displays any data in theagent's cache since it was last started.
6. Optionally, for example if something does not seem to be working as expected,you can click Check Results. This will show you more information about thedata, in the Data Collection Status window. The data collected and displayedby the Data collection Status window is described in “Performance ObjectStatus node” on page 534
7. The agent can be stopped by clicking Stop Agent.
For a general discussion about Agent Testing, see Chapter 31, “Testing anddebugging your agent,” on page 373
Figure 203. Test Socket Client window
296 IBM Tivoli Monitoring Agent Builder: User's Guide
Chapter 26. Monitoring data using Java API
The agent developer can use the Java application programming interface (API)data source and the Java programming language to carry out data collection in along-running process that is separate from the agent process. This provides theflexibility to the agent developer to collect data that cannot be collected with theother data sources supported in the Agent Builder. The agent starts the Javaapplication and sends a shutdown request when it is time to shutdown. The Javaapplication must only exit when it is requested to do so.
An agent that contains Java API attribute groups interfaces with the Javaapplication process. The Java application uses the Java Provider Client API tointerface with the agent. For information about the API, see the Javadoc on theTivoli Monitoring and OMEGAMON® XE Information Center. The Java APIprovides the ability to:v Connect to the agent process and register for attribute groups supported by the
Java applicationv Receive and reply to a request for sampled datav Send data asynchronously for an attribute group that produces eventsv Send an error for an attribute group where data collection is failingv Support attribute groups in subnodes with configured subnode instancesv Receive and reply to a take action request
Use the following procedure to create an attribute group which collects data in aJava application and sends it using the Java API and to create a sample Javaapplication to use as a starting point for your Java application.1. On the Agent Initial Data Source page (Figure 204 on page 298) or the Data
Source Location page, click Custom programs in the Monitoring DataCategories area.
© Copyright IBM Corp. 2007, 2012 297
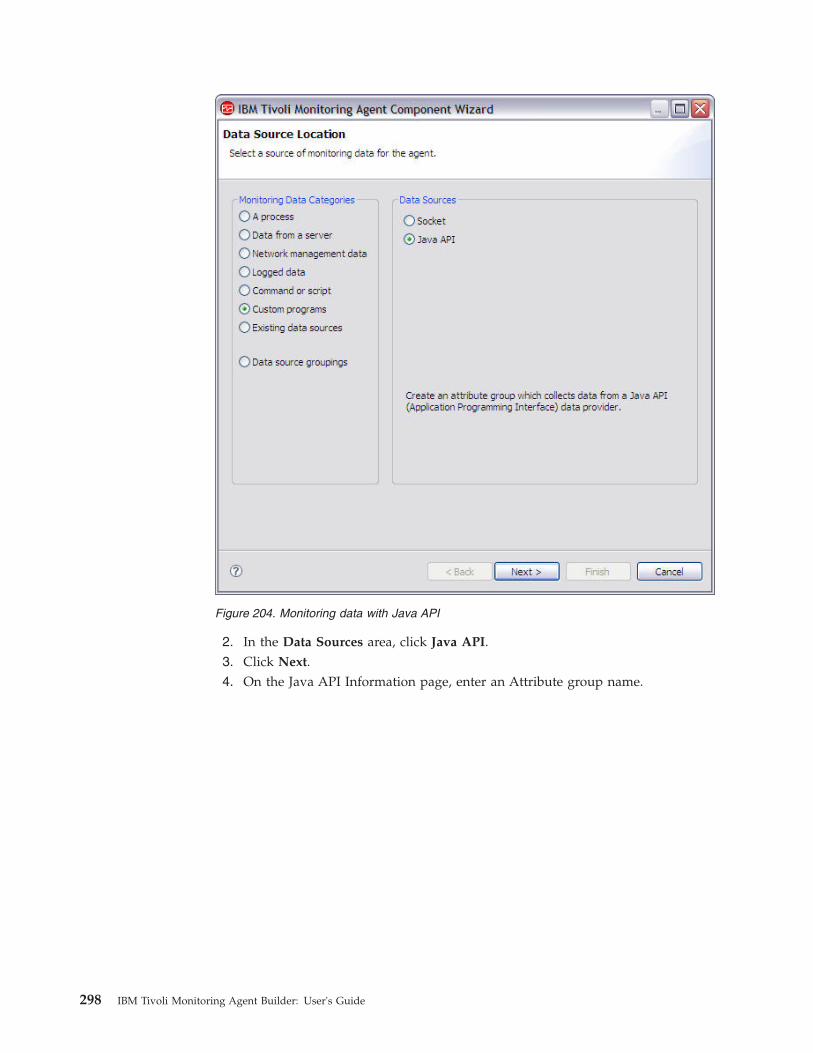
2. In the Data Sources area, click Java API.3. Click Next.4. On the Java API Information page, enter an Attribute group name.
Figure 204. Monitoring data with Java API
298 IBM Tivoli Monitoring Agent Builder: User's Guide
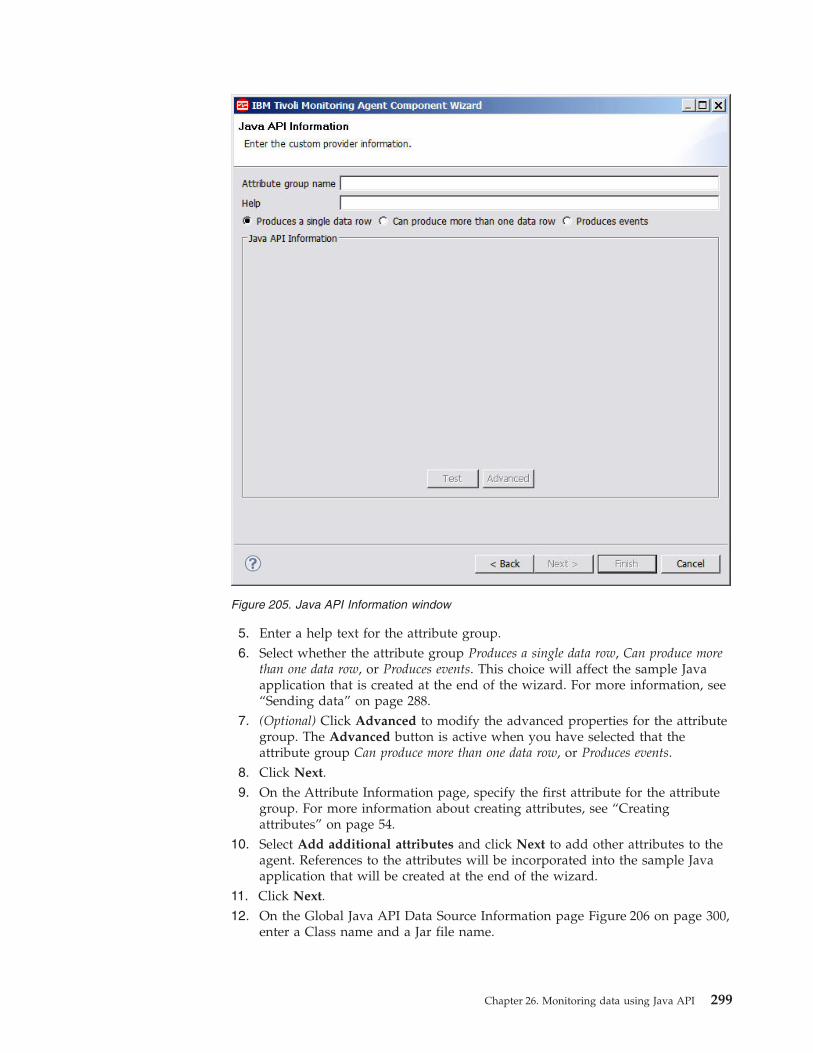
5. Enter a help text for the attribute group.6. Select whether the attribute group Produces a single data row, Can produce more
than one data row, or Produces events. This choice will affect the sample Javaapplication that is created at the end of the wizard. For more information, see“Sending data” on page 288.
7. (Optional) Click Advanced to modify the advanced properties for the attributegroup. The Advanced button is active when you have selected that theattribute group Can produce more than one data row, or Produces events.
8. Click Next.9. On the Attribute Information page, specify the first attribute for the attribute
group. For more information about creating attributes, see “Creatingattributes” on page 54.
10. Select Add additional attributes and click Next to add other attributes to theagent. References to the attributes will be incorporated into the sample Javaapplication that will be created at the end of the wizard.
11. Click Next.12. On the Global Java API Data Source Information page Figure 206 on page 300,
enter a Class name and a Jar file name.
Figure 205. Java API Information window
Chapter 26. Monitoring data using Java API 299
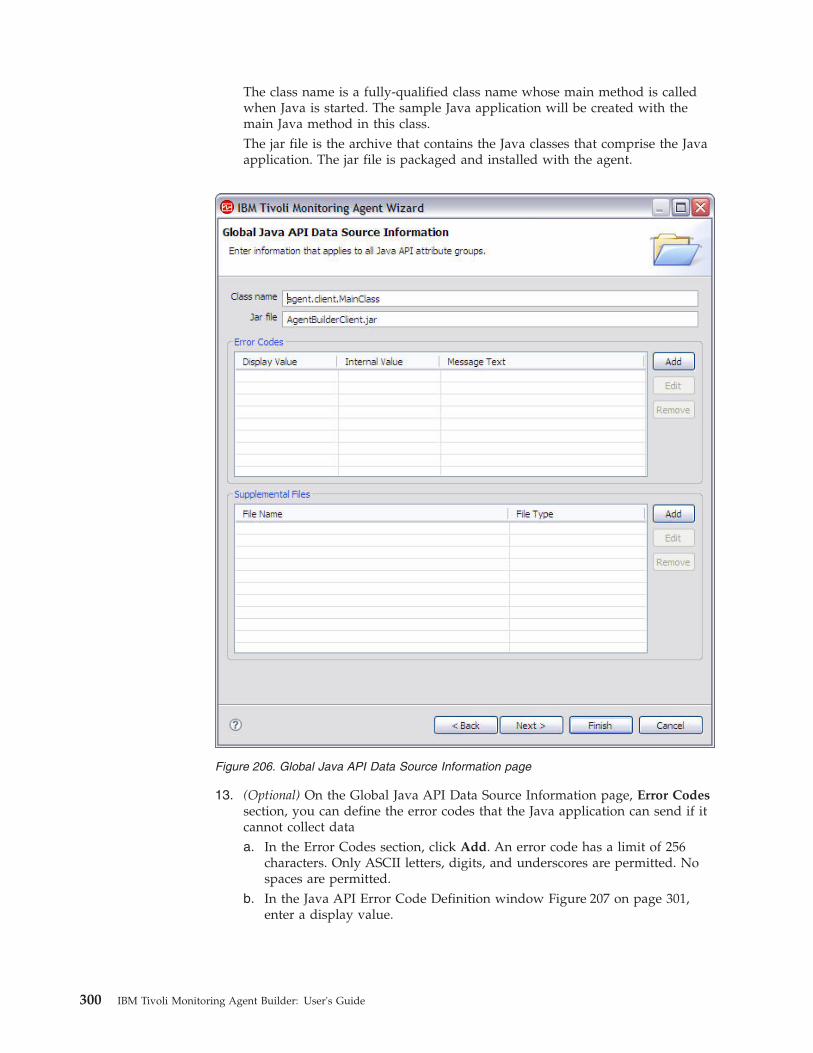
The class name is a fully-qualified class name whose main method is calledwhen Java is started. The sample Java application will be created with themain Java method in this class.The jar file is the archive that contains the Java classes that comprise the Javaapplication. The jar file is packaged and installed with the agent.
13. (Optional) On the Global Java API Data Source Information page, Error Codessection, you can define the error codes that the Java application can send if itcannot collect dataa. In the Error Codes section, click Add. An error code has a limit of 256
characters. Only ASCII letters, digits, and underscores are permitted. Nospaces are permitted.
b. In the Java API Error Code Definition window Figure 207 on page 301,enter a display value.
Figure 206. Global Java API Data Source Information page
300 IBM Tivoli Monitoring Agent Builder: User's Guide
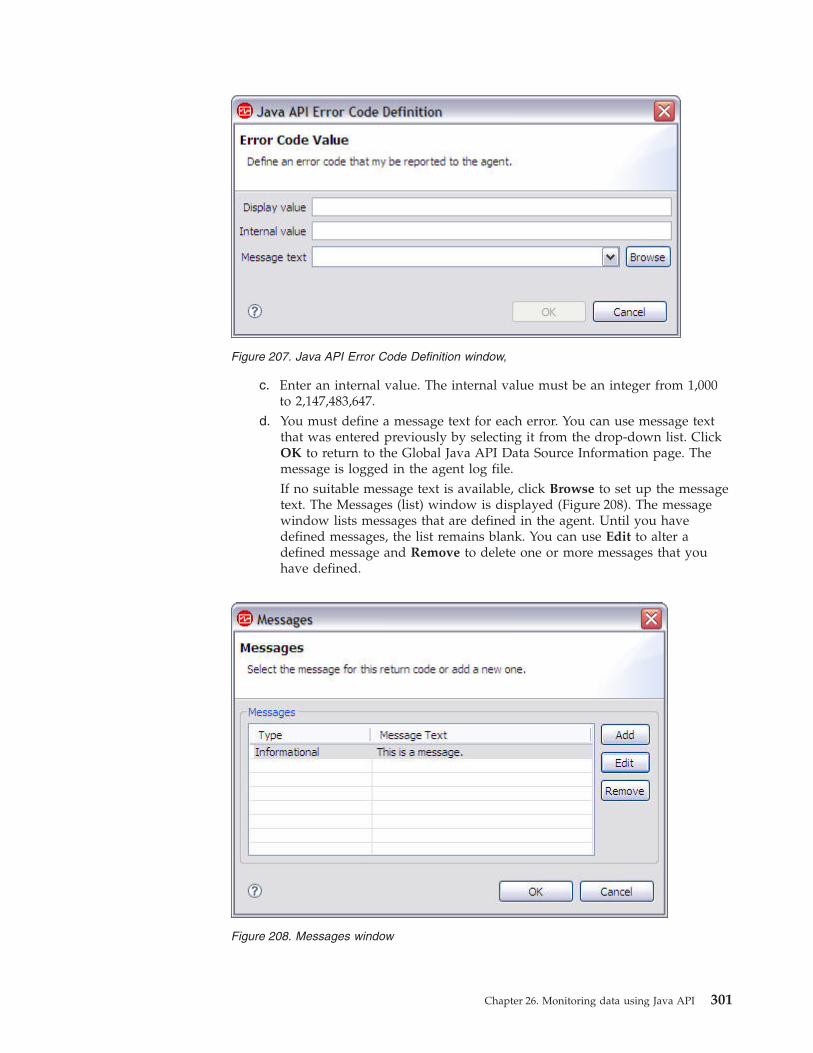
c. Enter an internal value. The internal value must be an integer from 1,000to 2,147,483,647.
d. You must define a message text for each error. You can use message textthat was entered previously by selecting it from the drop-down list. ClickOK to return to the Global Java API Data Source Information page. Themessage is logged in the agent log file.If no suitable message text is available, click Browse to set up the messagetext. The Messages (list) window is displayed (Figure 208). The messagewindow lists messages that are defined in the agent. Until you havedefined messages, the list remains blank. You can use Edit to alter adefined message and Remove to delete one or more messages that youhave defined.
Figure 207. Java API Error Code Definition window,
Figure 208. Messages window
Chapter 26. Monitoring data using Java API 301
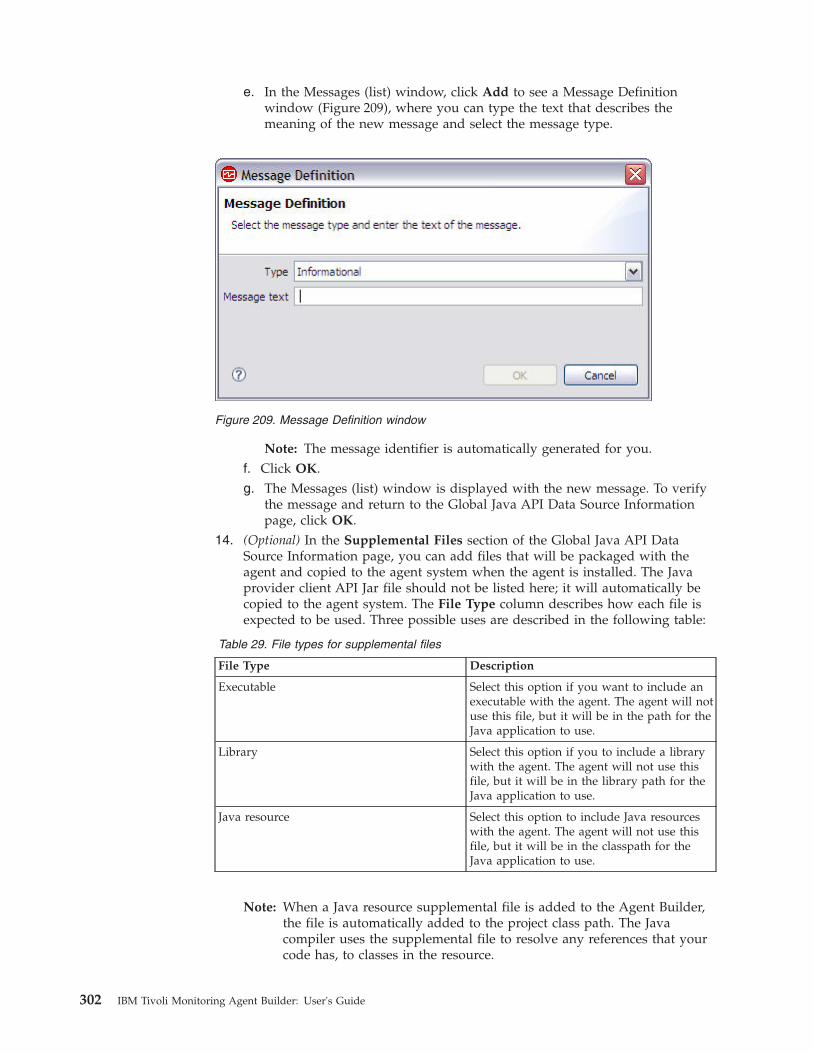
e. In the Messages (list) window, click Add to see a Message Definitionwindow (Figure 209), where you can type the text that describes themeaning of the new message and select the message type.
Note: The message identifier is automatically generated for you.f. Click OK.g. The Messages (list) window is displayed with the new message. To verify
the message and return to the Global Java API Data Source Informationpage, click OK.
14. (Optional) In the Supplemental Files section of the Global Java API DataSource Information page, you can add files that will be packaged with theagent and copied to the agent system when the agent is installed. The Javaprovider client API Jar file should not be listed here; it will automatically becopied to the agent system. The File Type column describes how each file isexpected to be used. Three possible uses are described in the following table:
Table 29. File types for supplemental files
File Type Description
Executable Select this option if you want to include anexecutable with the agent. The agent will notuse this file, but it will be in the path for theJava application to use.
Library Select this option if you to include a librarywith the agent. The agent will not use thisfile, but it will be in the library path for theJava application to use.
Java resource Select this option to include Java resourceswith the agent. The agent will not use thisfile, but it will be in the classpath for theJava application to use.
Note: When a Java resource supplemental file is added to the Agent Builder,the file is automatically added to the project class path. The Javacompiler uses the supplemental file to resolve any references that yourcode has, to classes in the resource.
Figure 209. Message Definition window
302 IBM Tivoli Monitoring Agent Builder: User's Guide
For information about where the Supplemental Files are installed with youragent, see “New files on your system” on page 382.Click Edit to make changes to the imported file. For more information, see“Editing a command file definition” on page 222.
15. (Optional) If the data is sampled (you did not select "Produces events" on theJava API Information page), you can create a filter to limit the data returnedby this attribute group by clicking Advanced. For more information aboutfiltering data from an attribute group, see “Filtering attribute groups” on page66
16. If you are adding this data source to a subnode, the Subnode ConfigurationOverrides page will be shown so you can add configuration properties to thesubnode. At least one configuration property is needed under the subnode forthe sample Java application to be created, since the sample uses aconfiguration property to distinguish one subnode instance from another.
17. Do one of the following steps:a. If you are using the New Agent Wizard, click Next.
—OR—b. Click Finish to save the data source and open the Agent Editor.If this attribute group and the Java application are to run on operatingsystems different than the operating systems defined for the agent, select thecorrect operating systems on the Java API Settings page. To open this page,click Java API Settings in the outline view or click Global Settings in theAgent Editor on any Java API attribute group page.
Note: Error codes and supplemental files can be updated later in the ErrorCodes and Supplemental Files sections of the Java API Settings page.
Initializing the Java applicationThe agent starts the Java application while the agent is starting and initializing.Configuration settings are used to control which Java runtime is used to launch theprocess. Java virtual machine arguments and the Java logging level can also bespecified in the configuration. For more information about Java API configuration,see “Java API configuration” on page 314. The Java process inherits theenvironment variables that are defined for the agent. Runtime configurationsettings are also placed in the environment and can be queried using API calls.
The Java application must be a long-running process. It should not terminateunless it receives a shutdown request from the API. If the Java application doesterminate after it has registered with the agent, the agent will attempt to restart theJava application up to 3 times. If data collection is successfully resumed, thisrestart count is reset. The agent logs an error when a Java application terminatesand when a restart is initiated.
Note: If the Java application terminates before attribute group registration iscompleted, no restart is attempted.
DependenciesA Java application must use a Java runtime environment. The following versions ofJava are supported:v Sun Microsystems Java Version 5 or laterv IBM Corporation Java Version 5 or later
Chapter 26. Monitoring data using Java API 303
Java must already be installed on the agent system when the agent is configuredand started. The Java jar file containing the API used to communicate with theagent is automatically included with the agent runtime and included in theclasspath of the Java virtual machine. Any additional Jar files that are needed byyour Java application must be defined as Supplemental Files to the Java APIattribute groups. Any supplemental files that have a File Type of Java resource areautomatically added to the Java application's base classpath, along with the JavaAPI Jar file.
Any Jar files that are not included with the agent, but are necessary for theruntime operation of the Java application, must be included in the “Classpath forexternal jars” configuration setting.
Generated sample Java applicationWhen you create an agent with one or more Java API data sources, the AgentBuilder generates Java application source code in the agent project that follows thestructure of your agent. You will need to add your own Java code to the generatedapplication to collect data for sampled attribute groups, handle events to be postedto event-based attribute groups, report errors if any problems are encountered, andperform tasks. The generated application does supply the agent with data, but it issample data, to be replaced with data obtained from the resources you want tomonitor.
This section describes the code that the Agent Builder generates and the code youneed to add or replace for the resources you want to monitor.
In the discussion that follows, a sample agent is assumed that has the followingcharacteristics:v Product code: K91v Java API Main class: agent.client.MainClassv Agent data source structure as shown in Figure 210 on page 305:
304 IBM Tivoli Monitoring Agent Builder: User's Guide
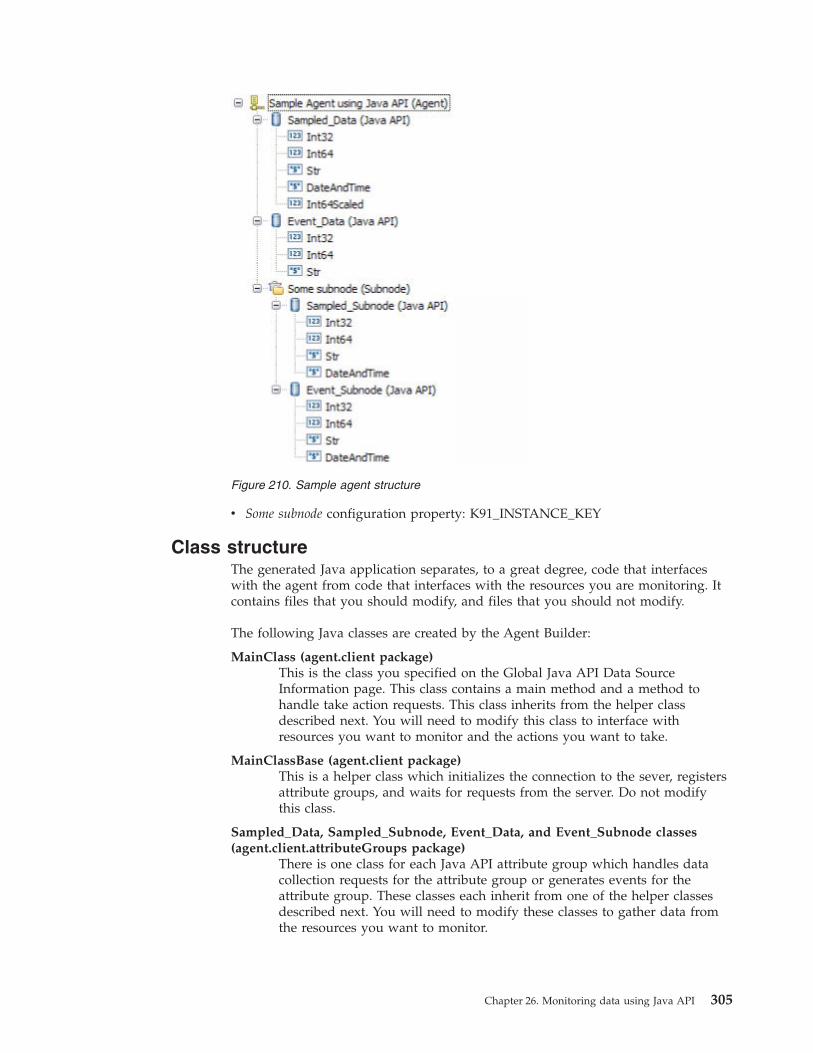
v Some subnode configuration property: K91_INSTANCE_KEY
Class structureThe generated Java application separates, to a great degree, code that interfaceswith the agent from code that interfaces with the resources you are monitoring. Itcontains files that you should modify, and files that you should not modify.
The following Java classes are created by the Agent Builder:
MainClass (agent.client package)This is the class you specified on the Global Java API Data SourceInformation page. This class contains a main method and a method tohandle take action requests. This class inherits from the helper classdescribed next. You will need to modify this class to interface withresources you want to monitor and the actions you want to take.
MainClassBase (agent.client package)This is a helper class which initializes the connection to the sever, registersattribute groups, and waits for requests from the server. Do not modifythis class.
Sampled_Data, Sampled_Subnode, Event_Data, and Event_Subnode classes(agent.client.attributeGroups package)
There is one class for each Java API attribute group which handles datacollection requests for the attribute group or generates events for theattribute group. These classes each inherit from one of the helper classesdescribed next. You will need to modify these classes to gather data fromthe resources you want to monitor.
Figure 210. Sample agent structure
Chapter 26. Monitoring data using Java API 305

Sampled_DataBase, Sampled_SubnodeBase, Event_DataBase, andEvent_SubnodeBase classes (agent.client.attributeGroups package)
These are helper classes, one for each Java API attribute group, whichdefine the structure of the group's attributes in an internal class. Do notmodify these classes.
ICustomAttributeGroup interface (agent.client.attributeGroups package)This is an interface that defines public methods in each attribute groupclass. Do not modify this interface.
The classes which you can and should modify are never overwritten by the AgentBuilder. The Agent Builder only creates them if they do not exist.
The helper classes and the interface are overwritten each time the Agent Builder issaved. As you make changes to the agent and save the agent, the helper classes areupdated to reflect any structural changes to the Java API attribute groups. Theinterface and helper classes contain a warning in the header reminding you not tomodify the file.
Initialization and clean upThe main method in MainClass is called when the agent is started. It creates aMainClass instance and then enters the long-running method to receive and handleagent requests.
Most of the initialization and clean-up code should be added to MainClass. In theconstructor, add initialization that is needed to create or access your resources. Youmay want to open connections to remote resources, create handles, or initializedata structures.
Before the agent terminates, the stopDataCollection method is called. If you needto close connections or perform any clean up before the Java application ends, addthat code to the stopDataCollection method.
If initialization is needed only for a particular attribute group, that initializationcan be added to the constructor of the attribute group's class. Similarly, if any cleanup is needed only for a particular attribute group, that clean-up code can be addedto the attribute group's stopDataCollection method.
When stopDataCollection is called, if you pass the clean-up work to anotherthread, be sure to wait for that thread to finish (or at least give it a reasonableamount of time to finish) before returning from the stopDataCollection method.Otherwise, the clean-up work could be abruptly terminated when the process endsbecause the main thread has completed.
Any code in the Java application can use the logger object to write log entries. (Themain helper class creates a protected logger object in its constructor, and theattribute group helper objects create a protected reference to that logger in theirconstructors.) The logger object uses Java's trace logging utility. Errors and detailedtrace information can be obtained from the trace log that is created by the logger.This is very important for troubleshooting problems with the provider.
One of the agent configuration settings is for the Java trace level. The followingtable shows the values you can set in the JAVA_TRACE_LEVEL configuration property,and if the API created the logger for you, the Level used by the logger.
306 IBM Tivoli Monitoring Agent Builder: User's Guide

Table 30. Java trace level options
Configured trace level Java logging trace level Description
Off OFF No logging is performed.
Error SEVERE Trace problems that haveoccurred in the Javaapplication.
Warning WARNING Trace errors and potentialerrors.
Information INFORMATION Trace important informationabout the Java application.
Minimum Debug FINE Trace high level detailsnecessary to analyze thebehavior of the Javaapplication.
Medium Debug FINER Trace details about theprogram flow of the Javaapplication.
Maximum Debug FINEST Trace all details about theJava application.
All ALL Trace all messages.
The name of the log file created by the Java application in this example isk91_trace0.log. If the agent is a multiple instance agent the instance name isincluded in the log file name.
Note: Do not write messages to standard error or to standard out. On Windowssystems, these messages will be lost. On UNIX and Linux systems, this datawill be written to a file that does not wrap.
Collecting sampled attribute group dataThe class for a sampled attribute group (one that collects one or more data rows)contains a collectData method, for example, Sampled_Data.collectData. Thismethod is called whenever data is requested by the agent.
The attribute group's helper class defines an inner class called Attributes which hasone field for each attribute defined in your attribute group. Derived attributes arenot included since they are calculated by the agent. The field types are Javaequivalents to the Tivoli Monitoring attribute types, as shown in Table 31.
Table 31. Attribute field types and their IBM Tivoli Monitoring attribute type equivalents
Tivoli Monitoring type Attributes field type
String String
Numeric, 32-bit, no decimal adjustment int
Numeric, 64-bit, no decimal adjustment long
Numeric, non-zero decimal adjustment double
Time stamp Calendar
The collectData method needs to:1. Collect the appropriate data from the resource being monitored.2. Create an Attributes object.
Chapter 26. Monitoring data using Java API 307
3. Add the data to the fields of the Attributes object.4. Call the Attributes.setAttributeValues method to copy the data to an internal
buffer.5. Repeat steps 1 to 4 as necessary for each data row. (You may skip steps 1 to 4
altogether and return no rows. In this case the Error Code column of thePerformance Object Status table will have a value ofNO_INSTANCES_RETURNED. See (“Error codes” on page 311), for moreinformation about error codes.)
6. Call AgentConnection.sendData to send the data to the agent, or call sendErrorto discard data copied from calls to setAttributeValues and send an error codeinstead.
You will need to collect the data from your resource (Step 1), replacing the sampledata used in the generated application.
To populate the Attributes object, you can pass the data in using the Attributesconstructor (as is done in the generated application), or use the zero-argumentconstructor to create an Attributes object and then assign the fields of the attributesobject to the attribute values you have collected. Fields have the same name as theattributes, though they start with a lower case letter.
Collecting sampled data for a subnodeIf a sampled attribute group is in a subnode, there are presumably multipleresources that you are monitoring (a different one for each subnode), and you needto determine which resource to collect data from. There should be one or moreconfiguration properties that identify which resource is being monitored.
For this example, it is assumed that one configuration property, K91_INSTANCE_KEY,contains a value that identifies the resource from which data should be collected.
Use the following steps to find the correct resource:1. Get the instance ID of all configured subnodes by calling
AgentConnection.getConfiguredSubnodeInstanceIDs. Each subnode that isconfigured has a unique instance ID.
2. For each instance ID, get the K91_INSTANCE_KEY configuration property bycalling AgentConnection.getSubnodeConfigurationProperty.
3. Find the resource represented by the value in K91_INSTANCE_KEY.
These steps could be done in the collectData method, before the series of stepsdetailed in “Collecting sampled attribute group data” on page 307.
Alternatively, you may want to perform these steps in the attribute group classconstructor (for example the Sampled_Subnode constructor) and establish a directmapping from instance ID to resource. This would also give you the opportunityto create handles or open connections that could be used through the life of theagent, making access to your resources more efficient.
The generated code creates sample resource objects of type MonitoredEntity in theconstructor, and adds them to a configurationLookup map. You should remove theMonitoredEntity inner class, and replace the MonitoredEntity objects with objectsthat access your own resources. If you choose to perform the entire lookupprocedure in the collectData method, you can remove the configurationLookupmap from the class.
308 IBM Tivoli Monitoring Agent Builder: User's Guide
If you perform the steps above in the constructor, mapping the subnode instanceID to your resource, the steps in the collectData method are:1. Retrieve the instance ID of the subnode from the request parameter, by calling
Request.getSubnodeInstanceID.2. Retrieve the resource object from the map created in the constructor.3. Perform the series of steps detailed in “Collecting sampled attribute group
data” on page 307 to send data to the agent.
The Agent Builder chooses an arbitrary subnode property to use in its example, inthis case K91_INSTANCE_KEY. If it chose the wrong property, or more than oneproperty is needed to identify the correct resource, you should get the correctproperties to find the desired resource.
Sending eventsFor attribute groups that generate events, there is no periodic call to a collectDatamethod. Events are sent by your application as your resource posts them.
As an example of producing events, the generated code for an event-basedattribute group (the Event_Data class) creates and starts a thread which runs froman internal class named SampleEventClass. It periodically wakes up and sends anevent. If you need to periodically poll your resource for events, you can use thestructure of the Event_Data class as it was generated:1. From the Event_Data constructor, create and start a thread.2. In the thread's run method, loop until the agent terminates.3. Sleep for a period of time before checking for events. You may want to change
the polling interval of 5000 milliseconds to a number that makes sense for youragent.
4. Determine if one or more events has occurred. The generated application doesnot check this, but always posts a single event.
5. For each event that needs to be posted, get the event data to be posted.6. Create and populate the Attributes object (like the collectData method did for a
sampled attribute group).7. Call the Attributes.sendEventData method. Events consist of a single row, so
only a single event can be sent at a time.
Alternatively, if you are working with a JAVA API that reports events from its ownthread, you could initialize that thread in the Event_Data constructor and registeryour own event handling object with your resource's event-handling mechanism.In your event handler, do the following:1. Get the event data to be posted.2. Create and populate the Attributes object.3. Call the Attributes.sendEventData method.
In this case, you would not need to create your own thread in the Event_Data classnor would you need the SampleEventClass class.
Sending events in a subnodeWhen an event is detected for a subnode attribute group, the Java applicationneeds to post the event to the correct subnode.
For this example, it is assumed that one configuration property, K91_INSTANCE_KEY,contains a value that identifies an instance of a resource which can produce events.
Chapter 26. Monitoring data using Java API 309
It is also assumed that the value of the K91_INSTANCE_KEY property is retrievedalong with data to be posted in the event. To do this, the Java application performsthe following steps:1. Gets the event data to be posted, along with the “instance key”.2. Creates and populates the Attributes object.3. Gets a list of all configured subnode instance IDs by calling
AgentConnection.getConfiguredSubnodeInstanceIDs.4. For each subnode instance, fetches the value of K91_INSTANCE_KEY by calling
AgentConnection.getSubnodeConfigurationProperty.5. When the value of K91_INSTANCE_KEY is found which matches the value
obtained with the event data, remembers the corresponding subnode instanceID.
6. Calls Attributes.sendSubnodeEventData, passing the remembered subnodeinstance ID.
The generated application does not do the lookup described in steps 4 and 5, butinstead posts an event to every subnode's attribute group. This is probably not thecorrect behavior for a production agent.
Take actionsTake actions are defined either in the Tivoli Enterprise Portal or by using the tacmdcreateaction command and can be imported into the agent's Agent Builder projectso that they are created when the agent is installed. For more information aboutimporting take action commands, see (Chapter 33, “Importing application supportfiles,” on page 397).
The generated Java application registers for any actions that begin with theproduct code of the agent, for example, K91Refresh. This is done in the mainhelper class (MainClassBase) from the registerActionPrefix method. If you wish toregister other prefixes, or not register for actions at all, override theregisterActionPrefix in MainClass.
When the agent needs to run an action which starts with a prefix your agent hasregistered, the MainClass.takeAction method is called. You add code to callRequest.getAction(), perform the appropriate action, and then callAgentConnection.sendActionReturnCode to send the return code from your action.A return code of 0 means the action succeeded, any other return code means theaction failed.
Handling exceptionsThe collectData and takeAction methods can throw any Java exception, so youmay allow your collection code to throw exceptions without catching them. ThehandleException method (for collectData) or handleActionException method (fortakeAction) will be called when the helper class gets the exception.
For collectData exceptions, you should call AgentConnection.sendError when anexception occurs or when there is any problem collecting data. The generatedapplication passes an error code of GENERAL_ERROR, but you should replace thiswith an error code defined by your agent that best describes the problem that wasencountered. For more information about adding error codes, see Step 13 on page300.
For takeAction exceptions, you should callAgentConnection.sendActionReturnCode with a non-zero return code.
310 IBM Tivoli Monitoring Agent Builder: User's Guide
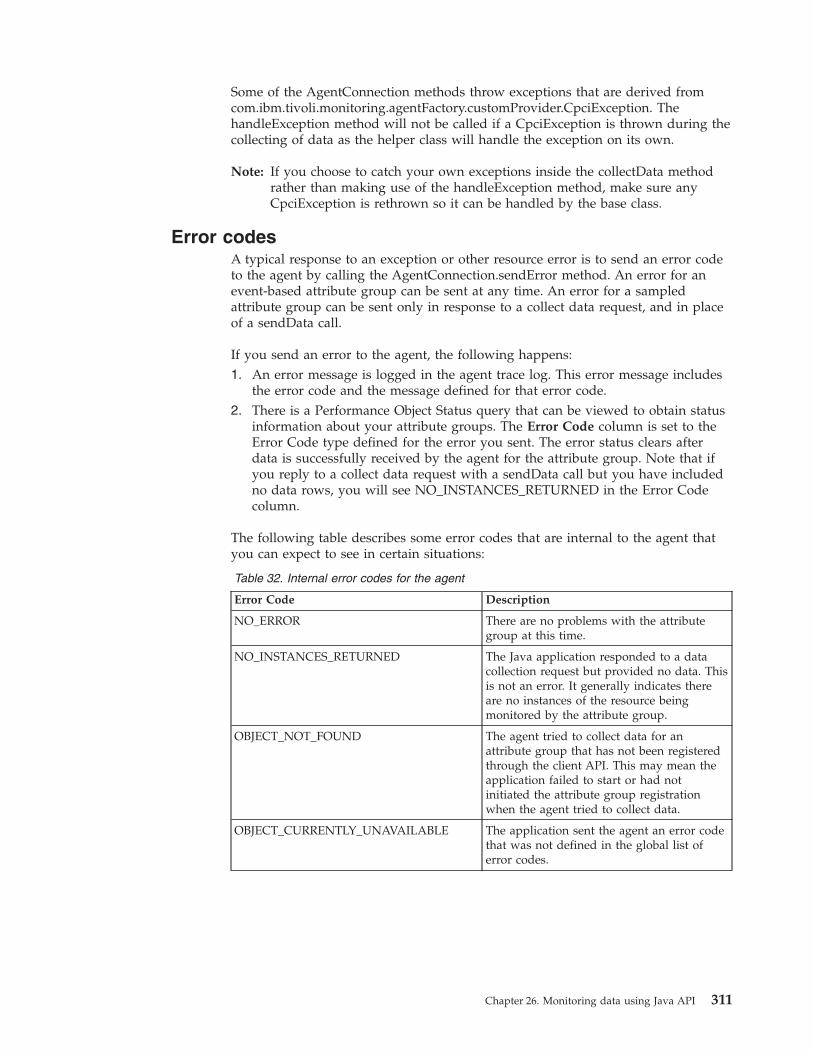
Some of the AgentConnection methods throw exceptions that are derived fromcom.ibm.tivoli.monitoring.agentFactory.customProvider.CpciException. ThehandleException method will not be called if a CpciException is thrown during thecollecting of data as the helper class will handle the exception on its own.
Note: If you choose to catch your own exceptions inside the collectData methodrather than making use of the handleException method, make sure anyCpciException is rethrown so it can be handled by the base class.
Error codesA typical response to an exception or other resource error is to send an error codeto the agent by calling the AgentConnection.sendError method. An error for anevent-based attribute group can be sent at any time. An error for a sampledattribute group can be sent only in response to a collect data request, and in placeof a sendData call.
If you send an error to the agent, the following happens:1. An error message is logged in the agent trace log. This error message includes
the error code and the message defined for that error code.2. There is a Performance Object Status query that can be viewed to obtain status
information about your attribute groups. The Error Code column is set to theError Code type defined for the error you sent. The error status clears afterdata is successfully received by the agent for the attribute group. Note that ifyou reply to a collect data request with a sendData call but you have includedno data rows, you will see NO_INSTANCES_RETURNED in the Error Codecolumn.
The following table describes some error codes that are internal to the agent thatyou can expect to see in certain situations:
Table 32. Internal error codes for the agent
Error Code Description
NO_ERROR There are no problems with the attributegroup at this time.
NO_INSTANCES_RETURNED The Java application responded to a datacollection request but provided no data. Thisis not an error. It generally indicates thereare no instances of the resource beingmonitored by the attribute group.
OBJECT_NOT_FOUND The agent tried to collect data for anattribute group that has not been registeredthrough the client API. This may mean theapplication failed to start or had notinitiated the attribute group registrationwhen the agent tried to collect data.
OBJECT_CURRENTLY_UNAVAILABLE The application sent the agent an error codethat was not defined in the global list oferror codes.
Chapter 26. Monitoring data using Java API 311
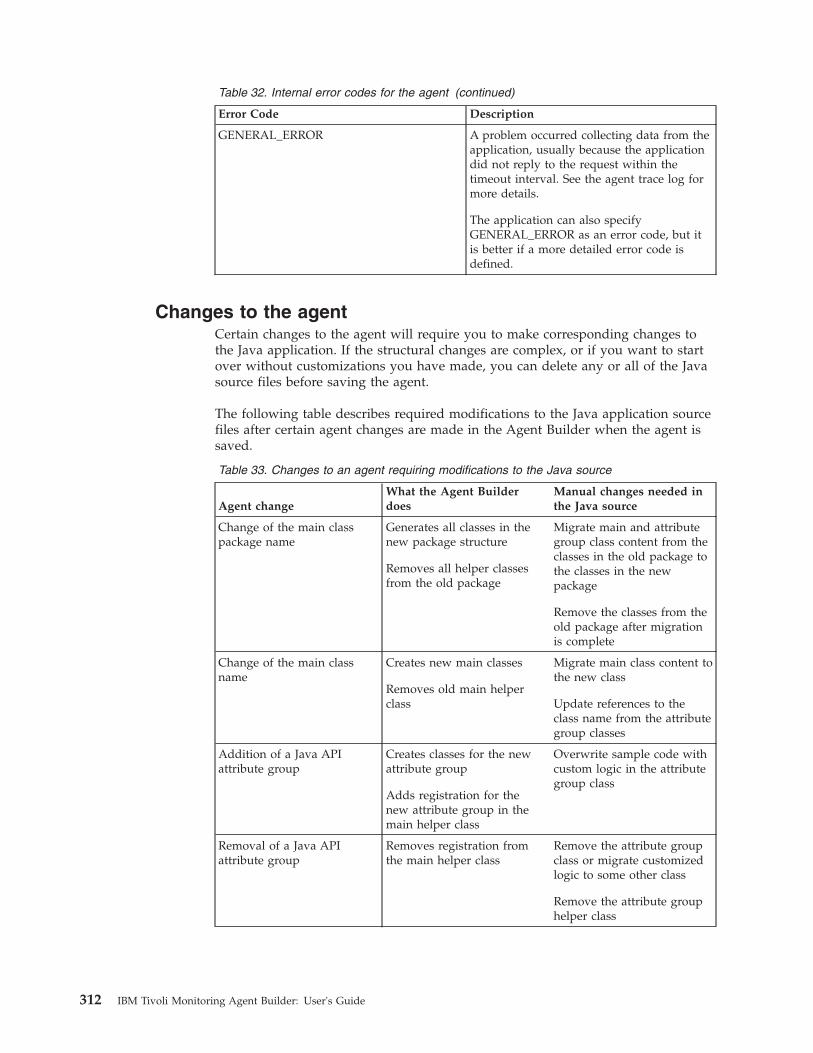
Table 32. Internal error codes for the agent (continued)
Error Code Description
GENERAL_ERROR A problem occurred collecting data from theapplication, usually because the applicationdid not reply to the request within thetimeout interval. See the agent trace log formore details.
The application can also specifyGENERAL_ERROR as an error code, but itis better if a more detailed error code isdefined.
Changes to the agentCertain changes to the agent will require you to make corresponding changes tothe Java application. If the structural changes are complex, or if you want to startover without customizations you have made, you can delete any or all of the Javasource files before saving the agent.
The following table describes required modifications to the Java application sourcefiles after certain agent changes are made in the Agent Builder when the agent issaved.
Table 33. Changes to an agent requiring modifications to the Java source
Agent changeWhat the Agent Builderdoes
Manual changes needed inthe Java source
Change of the main classpackage name
Generates all classes in thenew package structure
Removes all helper classesfrom the old package
Migrate main and attributegroup class content from theclasses in the old package tothe classes in the newpackage
Remove the classes from theold package after migrationis complete
Change of the main classname
Creates new main classes
Removes old main helperclass
Migrate main class content tothe new class
Update references to theclass name from the attributegroup classes
Addition of a Java APIattribute group
Creates classes for the newattribute group
Adds registration for thenew attribute group in themain helper class
Overwrite sample code withcustom logic in the attributegroup class
Removal of a Java APIattribute group
Removes registration fromthe main helper class
Remove the attribute groupclass or migrate customizedlogic to some other class
Remove the attribute grouphelper class
312 IBM Tivoli Monitoring Agent Builder: User's Guide
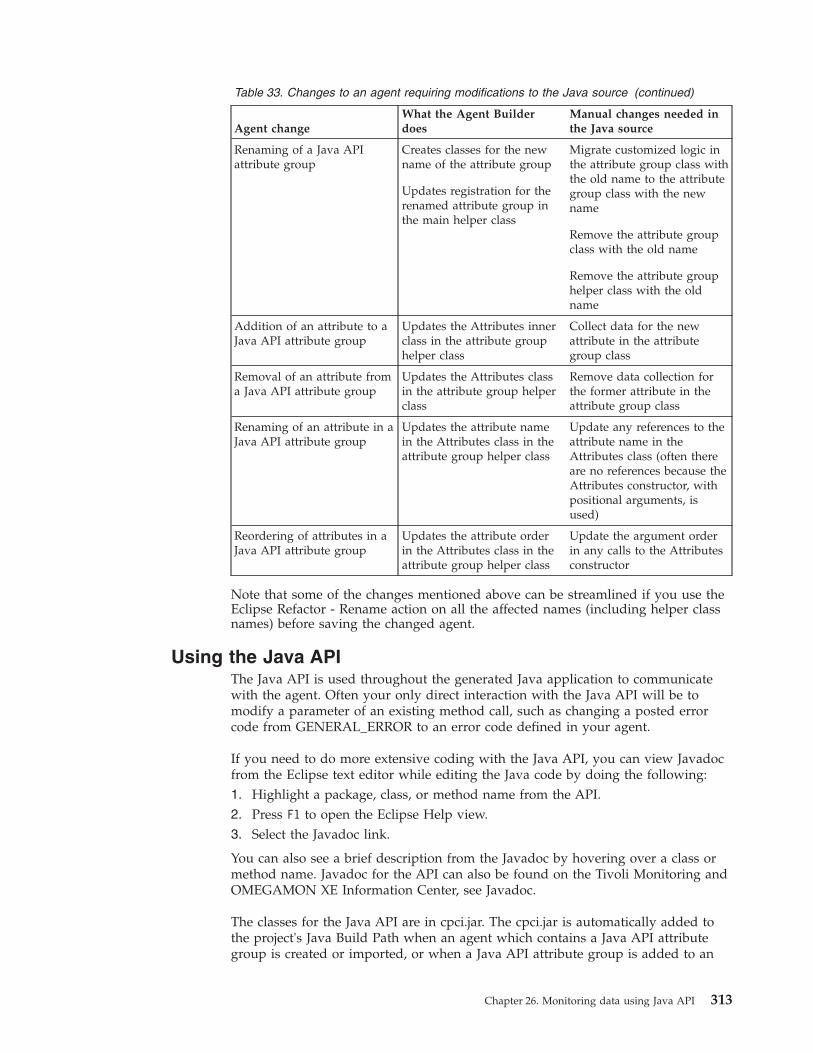
Table 33. Changes to an agent requiring modifications to the Java source (continued)
Agent changeWhat the Agent Builderdoes
Manual changes needed inthe Java source
Renaming of a Java APIattribute group
Creates classes for the newname of the attribute group
Updates registration for therenamed attribute group inthe main helper class
Migrate customized logic inthe attribute group class withthe old name to the attributegroup class with the newname
Remove the attribute groupclass with the old name
Remove the attribute grouphelper class with the oldname
Addition of an attribute to aJava API attribute group
Updates the Attributes innerclass in the attribute grouphelper class
Collect data for the newattribute in the attributegroup class
Removal of an attribute froma Java API attribute group
Updates the Attributes classin the attribute group helperclass
Remove data collection forthe former attribute in theattribute group class
Renaming of an attribute in aJava API attribute group
Updates the attribute namein the Attributes class in theattribute group helper class
Update any references to theattribute name in theAttributes class (often thereare no references because theAttributes constructor, withpositional arguments, isused)
Reordering of attributes in aJava API attribute group
Updates the attribute orderin the Attributes class in theattribute group helper class
Update the argument orderin any calls to the Attributesconstructor
Note that some of the changes mentioned above can be streamlined if you use theEclipse Refactor - Rename action on all the affected names (including helper classnames) before saving the changed agent.
Using the Java APIThe Java API is used throughout the generated Java application to communicatewith the agent. Often your only direct interaction with the Java API will be tomodify a parameter of an existing method call, such as changing a posted errorcode from GENERAL_ERROR to an error code defined in your agent.
If you need to do more extensive coding with the Java API, you can view Javadocfrom the Eclipse text editor while editing the Java code by doing the following:1. Highlight a package, class, or method name from the API.2. Press F1 to open the Eclipse Help view.3. Select the Javadoc link.
You can also see a brief description from the Javadoc by hovering over a class ormethod name. Javadoc for the API can also be found on the Tivoli Monitoring andOMEGAMON XE Information Center, see Javadoc.
The classes for the Java API are in cpci.jar. The cpci.jar is automatically added tothe project's Java Build Path when an agent which contains a Java API attributegroup is created or imported, or when a Java API attribute group is added to an
Chapter 26. Monitoring data using Java API 313
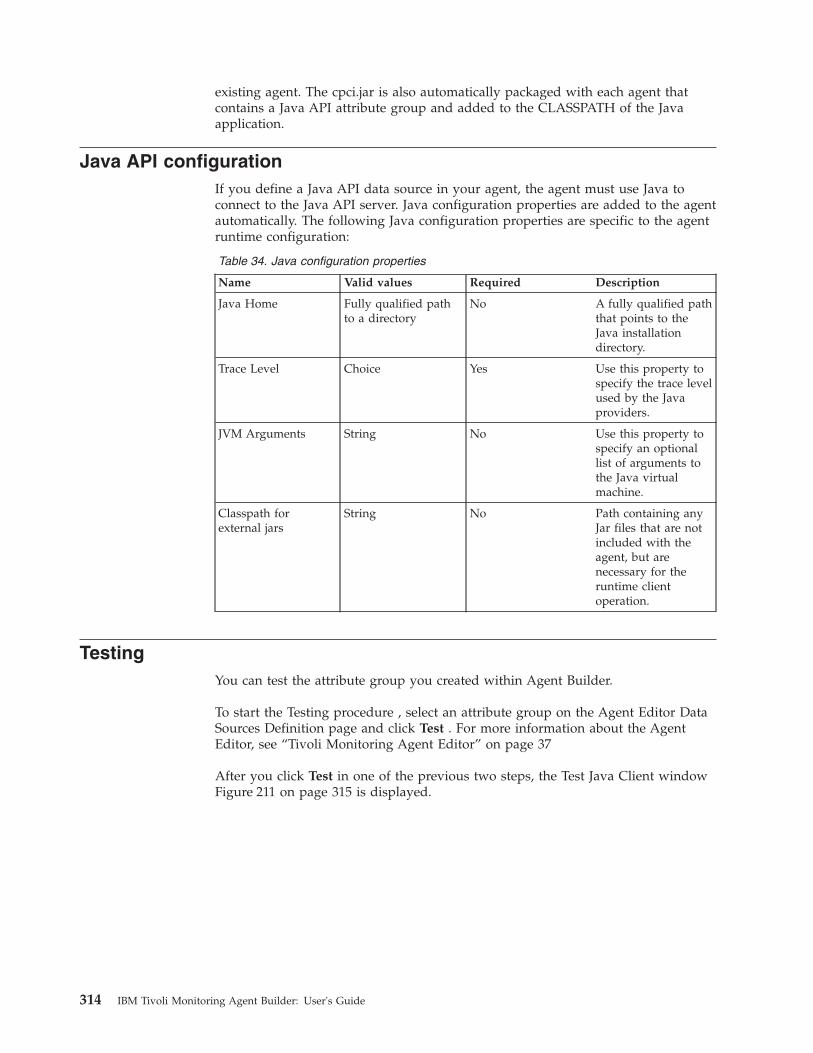
existing agent. The cpci.jar is also automatically packaged with each agent thatcontains a Java API attribute group and added to the CLASSPATH of the Javaapplication.
Java API configurationIf you define a Java API data source in your agent, the agent must use Java toconnect to the Java API server. Java configuration properties are added to the agentautomatically. The following Java configuration properties are specific to the agentruntime configuration:
Table 34. Java configuration properties
Name Valid values Required Description
Java Home Fully qualified pathto a directory
No A fully qualified paththat points to theJava installationdirectory.
Trace Level Choice Yes Use this property tospecify the trace levelused by the Javaproviders.
JVM Arguments String No Use this property tospecify an optionallist of arguments tothe Java virtualmachine.
Classpath forexternal jars
String No Path containing anyJar files that are notincluded with theagent, but arenecessary for theruntime clientoperation.
TestingYou can test the attribute group you created within Agent Builder.
To start the Testing procedure , select an attribute group on the Agent Editor DataSources Definition page and click Test . For more information about the AgentEditor, see “Tivoli Monitoring Agent Editor” on page 37
After you click Test in one of the previous two steps, the Test Java Client windowFigure 211 on page 315 is displayed.
314 IBM Tivoli Monitoring Agent Builder: User's Guide
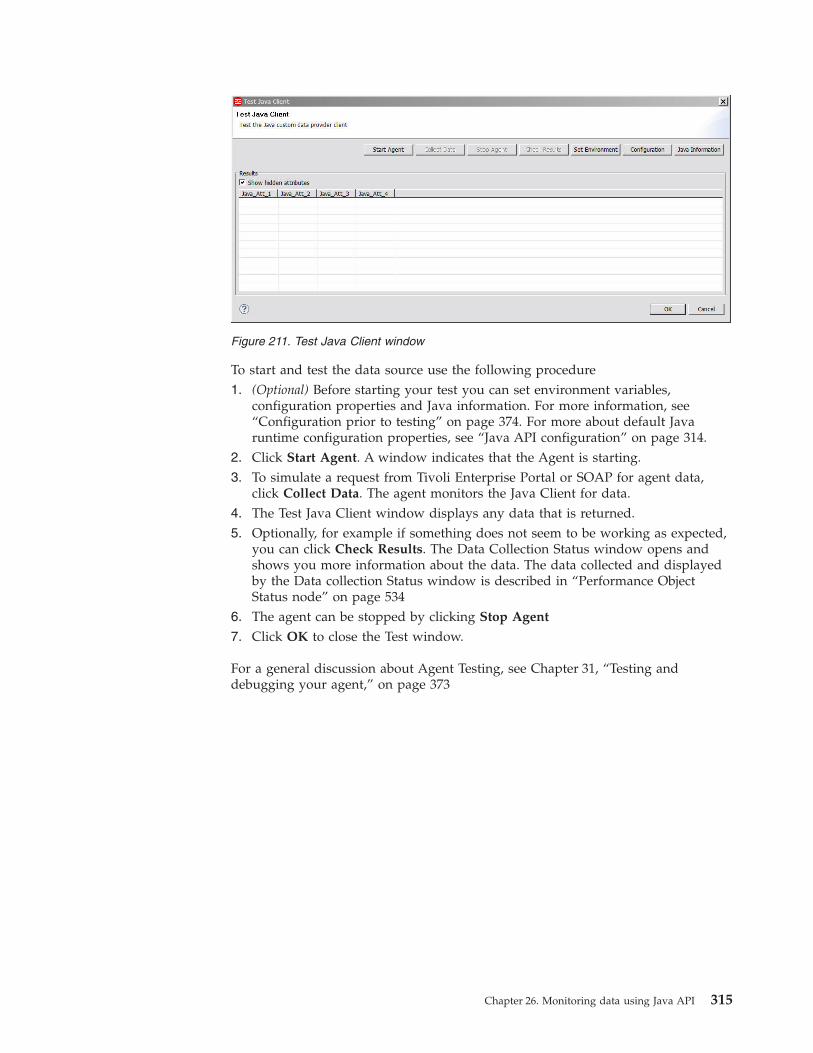
To start and test the data source use the following procedure1. (Optional) Before starting your test you can set environment variables,
configuration properties and Java information. For more information, see“Configuration prior to testing” on page 374. For more about default Javaruntime configuration properties, see “Java API configuration” on page 314.
2. Click Start Agent. A window indicates that the Agent is starting.3. To simulate a request from Tivoli Enterprise Portal or SOAP for agent data,
click Collect Data. The agent monitors the Java Client for data.4. The Test Java Client window displays any data that is returned.5. Optionally, for example if something does not seem to be working as expected,
you can click Check Results. The Data Collection Status window opens andshows you more information about the data. The data collected and displayedby the Data collection Status window is described in “Performance ObjectStatus node” on page 534
6. The agent can be stopped by clicking Stop Agent
7. Click OK to close the Test window.
For a general discussion about Agent Testing, see Chapter 31, “Testing anddebugging your agent,” on page 373
Figure 211. Test Java Client window
Chapter 26. Monitoring data using Java API 315

316 IBM Tivoli Monitoring Agent Builder: User's Guide
Chapter 27. Creating attribute groups from existing sources
When at least one attribute group exists the option to create an attribute groupusing an existing attribute group or groups is available to you on the Agent editorData Source Location page (Figure 212 on page 318). You can create an attributegroup using existing data sources in the following ways:1. Joining data from two existing attribute groups2. Filtering data from an existing attribute group
Note: The option to join two attribute groups is available only after two or moreattribute groups are created. You can then join two attribute groups to createa third attribute group that contains all the attributes that were in theoriginal two attribute groups.
Use the following procedure to create an attribute group using existing datasources:1. On the Agent Initial Data Source page or the Data Source Location page
(Figure 212 on page 318), click Existing data sources in the Monitoring DataCategories area.
© Copyright IBM Corp. 2007, 2012 317
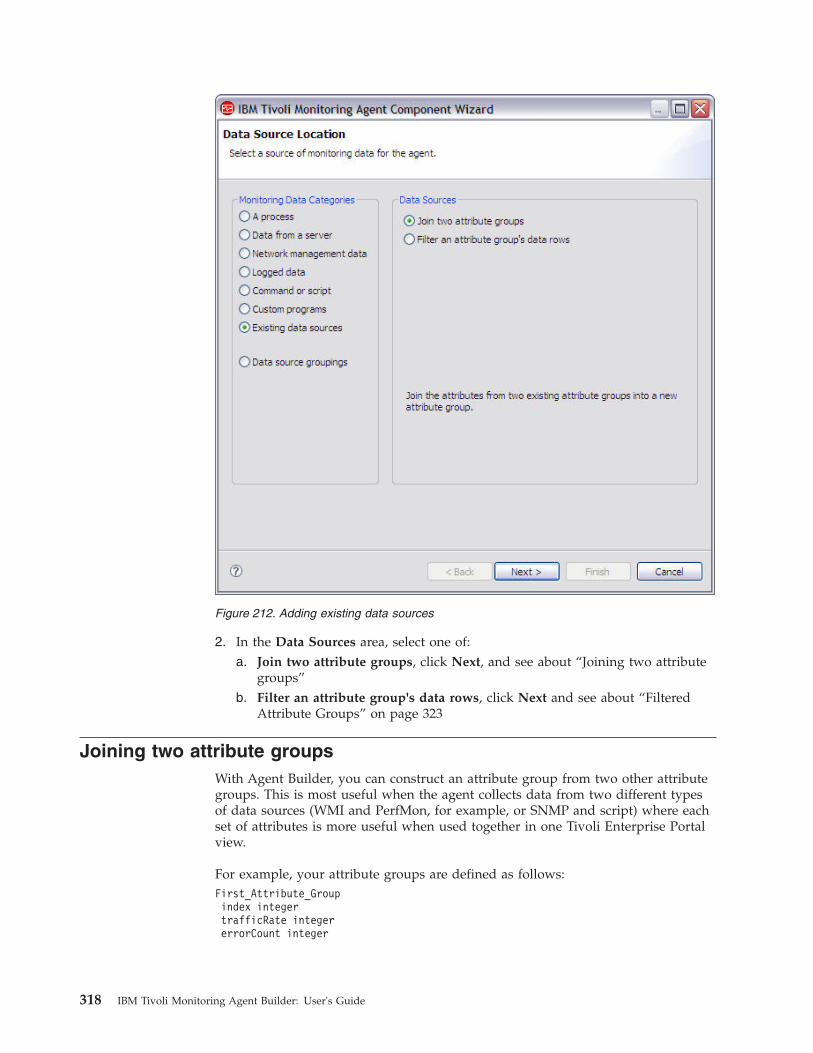
2. In the Data Sources area, select one of:a. Join two attribute groups, click Next, and see about “Joining two attribute
groups”b. Filter an attribute group's data rows, click Next and see about “Filtered
Attribute Groups” on page 323
Joining two attribute groupsWith Agent Builder, you can construct an attribute group from two other attributegroups. This is most useful when the agent collects data from two different typesof data sources (WMI and PerfMon, for example, or SNMP and script) where eachset of attributes is more useful when used together in one Tivoli Enterprise Portalview.
For example, your attribute groups are defined as follows:First_Attribute_Groupindex integertrafficRate integererrorCount integer
Figure 212. Adding existing data sources
318 IBM Tivoli Monitoring Agent Builder: User's Guide
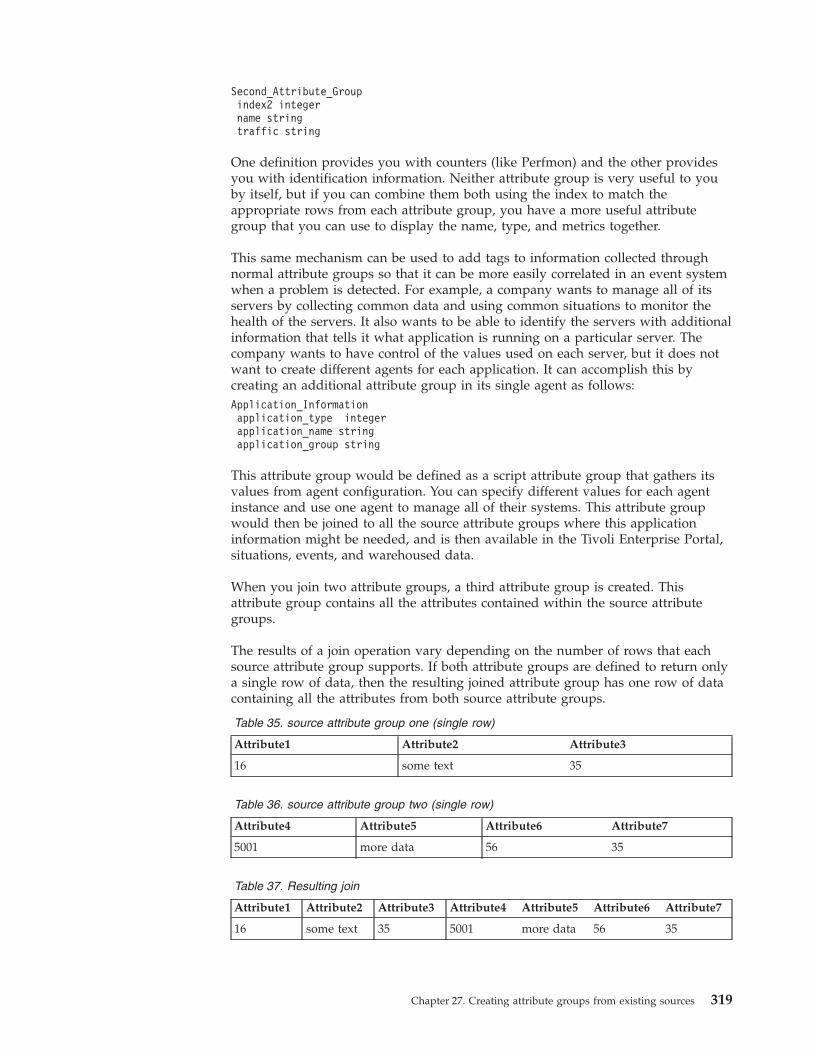
Second_Attribute_Groupindex2 integername stringtraffic string
One definition provides you with counters (like Perfmon) and the other providesyou with identification information. Neither attribute group is very useful to youby itself, but if you can combine them both using the index to match theappropriate rows from each attribute group, you have a more useful attributegroup that you can use to display the name, type, and metrics together.
This same mechanism can be used to add tags to information collected throughnormal attribute groups so that it can be more easily correlated in an event systemwhen a problem is detected. For example, a company wants to manage all of itsservers by collecting common data and using common situations to monitor thehealth of the servers. It also wants to be able to identify the servers with additionalinformation that tells it what application is running on a particular server. Thecompany wants to have control of the values used on each server, but it does notwant to create different agents for each application. It can accomplish this bycreating an additional attribute group in its single agent as follows:Application_Informationapplication_type integerapplication_name stringapplication_group string
This attribute group would be defined as a script attribute group that gathers itsvalues from agent configuration. You can specify different values for each agentinstance and use one agent to manage all of their systems. This attribute groupwould then be joined to all the source attribute groups where this applicationinformation might be needed, and is then available in the Tivoli Enterprise Portal,situations, events, and warehoused data.
When you join two attribute groups, a third attribute group is created. Thisattribute group contains all the attributes contained within the source attributegroups.
The results of a join operation vary depending on the number of rows that eachsource attribute group supports. If both attribute groups are defined to return onlya single row of data, then the resulting joined attribute group has one row of datacontaining all the attributes from both source attribute groups.
Table 35. source attribute group one (single row)
Attribute1 Attribute2 Attribute3
16 some text 35
Table 36. source attribute group two (single row)
Attribute4 Attribute5 Attribute6 Attribute7
5001 more data 56 35
Table 37. Resulting join
Attribute1 Attribute2 Attribute3 Attribute4 Attribute5 Attribute6 Attribute7
16 some text 35 5001 more data 56 35
Chapter 27. Creating attribute groups from existing sources 319
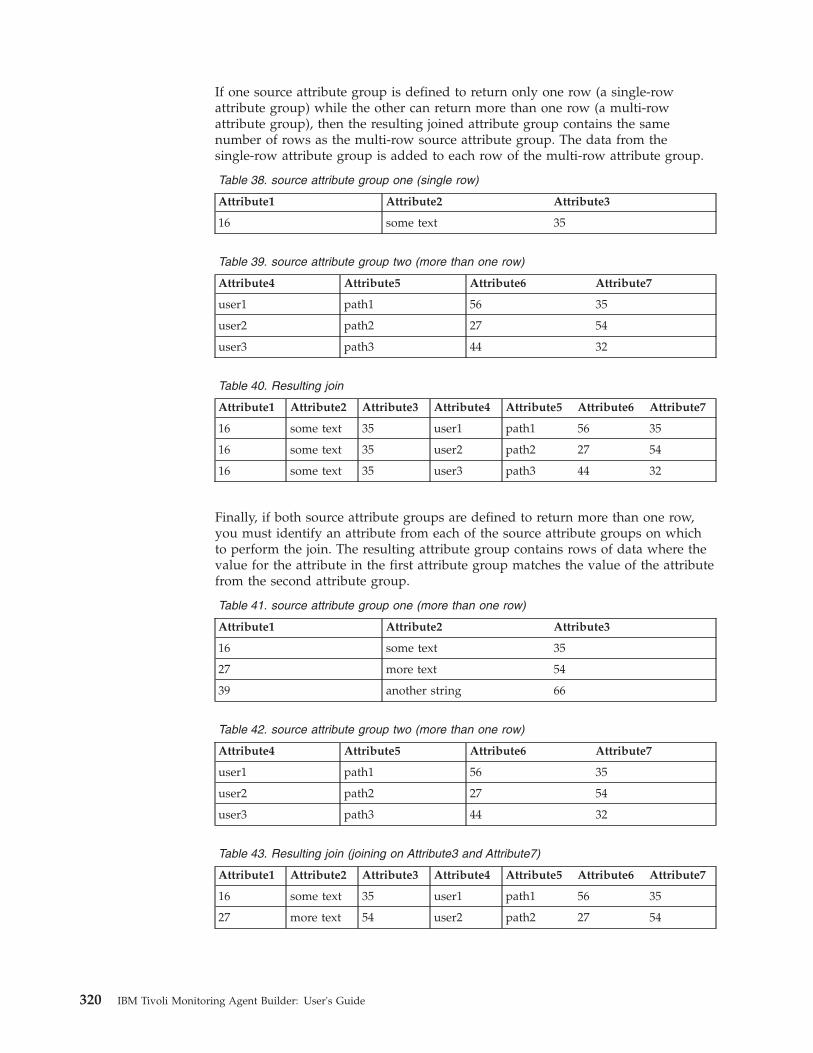
If one source attribute group is defined to return only one row (a single-rowattribute group) while the other can return more than one row (a multi-rowattribute group), then the resulting joined attribute group contains the samenumber of rows as the multi-row source attribute group. The data from thesingle-row attribute group is added to each row of the multi-row attribute group.
Table 38. source attribute group one (single row)
Attribute1 Attribute2 Attribute3
16 some text 35
Table 39. source attribute group two (more than one row)
Attribute4 Attribute5 Attribute6 Attribute7
user1 path1 56 35
user2 path2 27 54
user3 path3 44 32
Table 40. Resulting join
Attribute1 Attribute2 Attribute3 Attribute4 Attribute5 Attribute6 Attribute7
16 some text 35 user1 path1 56 35
16 some text 35 user2 path2 27 54
16 some text 35 user3 path3 44 32
Finally, if both source attribute groups are defined to return more than one row,you must identify an attribute from each of the source attribute groups on whichto perform the join. The resulting attribute group contains rows of data where thevalue for the attribute in the first attribute group matches the value of the attributefrom the second attribute group.
Table 41. source attribute group one (more than one row)
Attribute1 Attribute2 Attribute3
16 some text 35
27 more text 54
39 another string 66
Table 42. source attribute group two (more than one row)
Attribute4 Attribute5 Attribute6 Attribute7
user1 path1 56 35
user2 path2 27 54
user3 path3 44 32
Table 43. Resulting join (joining on Attribute3 and Attribute7)
Attribute1 Attribute2 Attribute3 Attribute4 Attribute5 Attribute6 Attribute7
16 some text 35 user1 path1 56 35
27 more text 54 user2 path2 27 54
320 IBM Tivoli Monitoring Agent Builder: User's Guide
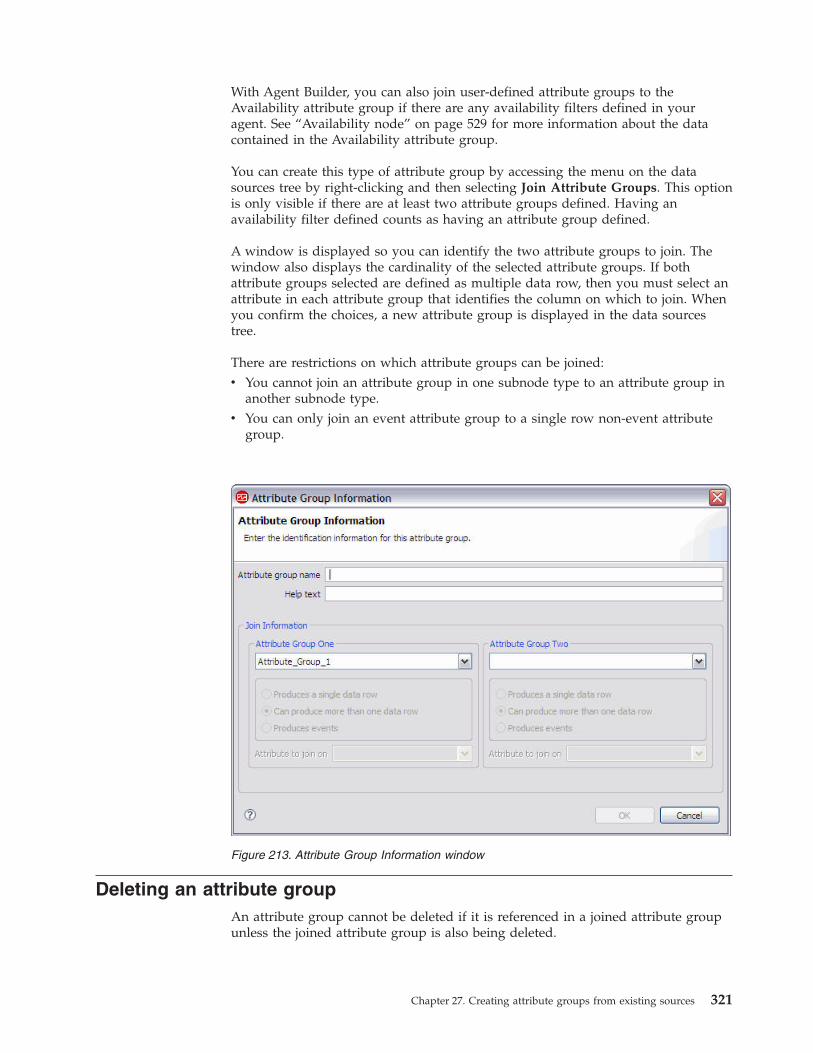
With Agent Builder, you can also join user-defined attribute groups to theAvailability attribute group if there are any availability filters defined in youragent. See “Availability node” on page 529 for more information about the datacontained in the Availability attribute group.
You can create this type of attribute group by accessing the menu on the datasources tree by right-clicking and then selecting Join Attribute Groups. This optionis only visible if there are at least two attribute groups defined. Having anavailability filter defined counts as having an attribute group defined.
A window is displayed so you can identify the two attribute groups to join. Thewindow also displays the cardinality of the selected attribute groups. If bothattribute groups selected are defined as multiple data row, then you must select anattribute in each attribute group that identifies the column on which to join. Whenyou confirm the choices, a new attribute group is displayed in the data sourcestree.
There are restrictions on which attribute groups can be joined:v You cannot join an attribute group in one subnode type to an attribute group in
another subnode type.v You can only join an event attribute group to a single row non-event attribute
group.
Deleting an attribute groupAn attribute group cannot be deleted if it is referenced in a joined attribute groupunless the joined attribute group is also being deleted.
Figure 213. Attribute Group Information window
Chapter 27. Creating attribute groups from existing sources 321
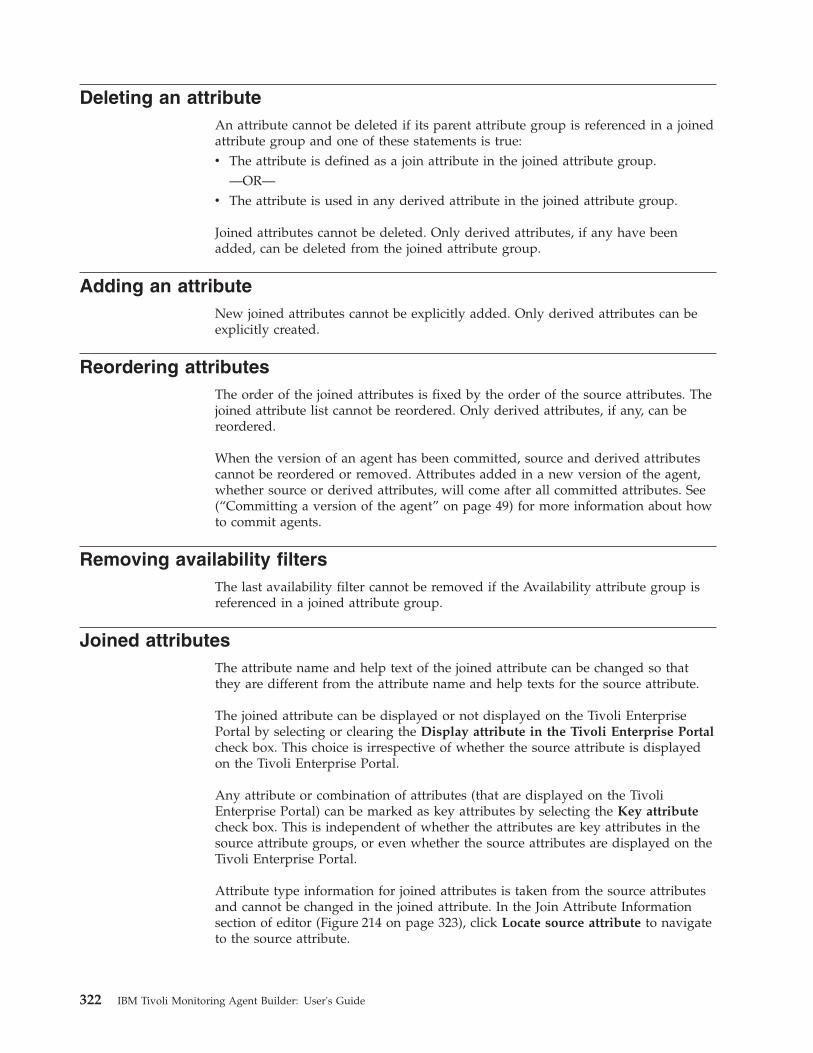
Deleting an attributeAn attribute cannot be deleted if its parent attribute group is referenced in a joinedattribute group and one of these statements is true:v The attribute is defined as a join attribute in the joined attribute group.
—OR—v The attribute is used in any derived attribute in the joined attribute group.
Joined attributes cannot be deleted. Only derived attributes, if any have beenadded, can be deleted from the joined attribute group.
Adding an attributeNew joined attributes cannot be explicitly added. Only derived attributes can beexplicitly created.
Reordering attributesThe order of the joined attributes is fixed by the order of the source attributes. Thejoined attribute list cannot be reordered. Only derived attributes, if any, can bereordered.
When the version of an agent has been committed, source and derived attributescannot be reordered or removed. Attributes added in a new version of the agent,whether source or derived attributes, will come after all committed attributes. See(“Committing a version of the agent” on page 49) for more information about howto commit agents.
Removing availability filtersThe last availability filter cannot be removed if the Availability attribute group isreferenced in a joined attribute group.
Joined attributesThe attribute name and help text of the joined attribute can be changed so thatthey are different from the attribute name and help texts for the source attribute.
The joined attribute can be displayed or not displayed on the Tivoli EnterprisePortal by selecting or clearing the Display attribute in the Tivoli Enterprise Portalcheck box. This choice is irrespective of whether the source attribute is displayedon the Tivoli Enterprise Portal.
Any attribute or combination of attributes (that are displayed on the TivoliEnterprise Portal) can be marked as key attributes by selecting the Key attributecheck box. This is independent of whether the attributes are key attributes in thesource attribute groups, or even whether the source attributes are displayed on theTivoli Enterprise Portal.
Attribute type information for joined attributes is taken from the source attributesand cannot be changed in the joined attribute. In the Join Attribute Informationsection of editor (Figure 214 on page 323), click Locate source attribute to navigateto the source attribute.
322 IBM Tivoli Monitoring Agent Builder: User's Guide
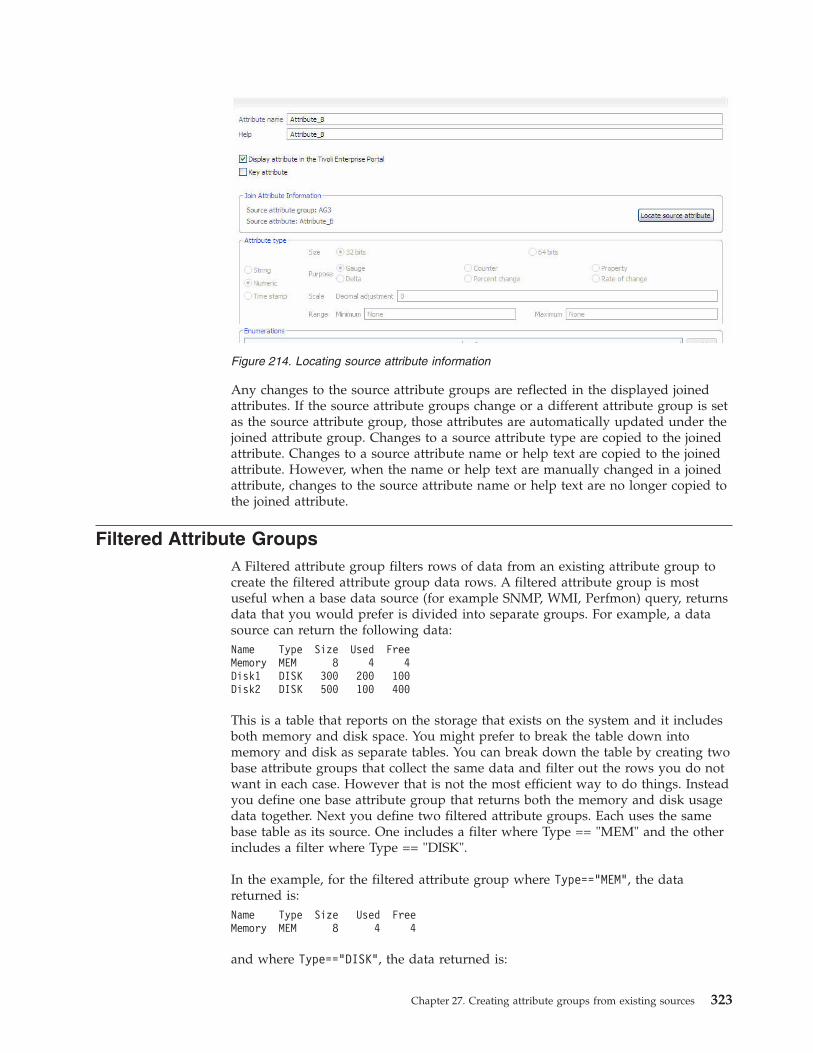
Any changes to the source attribute groups are reflected in the displayed joinedattributes. If the source attribute groups change or a different attribute group is setas the source attribute group, those attributes are automatically updated under thejoined attribute group. Changes to a source attribute type are copied to the joinedattribute. Changes to a source attribute name or help text are copied to the joinedattribute. However, when the name or help text are manually changed in a joinedattribute, changes to the source attribute name or help text are no longer copied tothe joined attribute.
Filtered Attribute GroupsA Filtered attribute group filters rows of data from an existing attribute group tocreate the filtered attribute group data rows. A filtered attribute group is mostuseful when a base data source (for example SNMP, WMI, Perfmon) query, returnsdata that you would prefer is divided into separate groups. For example, a datasource can return the following data:Name Type Size Used FreeMemory MEM 8 4 4Disk1 DISK 300 200 100Disk2 DISK 500 100 400
This is a table that reports on the storage that exists on the system and it includesboth memory and disk space. You might prefer to break the table down intomemory and disk as separate tables. You can break down the table by creating twobase attribute groups that collect the same data and filter out the rows you do notwant in each case. However that is not the most efficient way to do things. Insteadyou define one base attribute group that returns both the memory and disk usagedata together. Next you define two filtered attribute groups. Each uses the samebase table as its source. One includes a filter where Type == "MEM" and the otherincludes a filter where Type == "DISK".
In the example, for the filtered attribute group where Type=="MEM", the datareturned is:Name Type Size Used FreeMemory MEM 8 4 4
and where Type=="DISK", the data returned is:
Figure 214. Locating source attribute information
Chapter 27. Creating attribute groups from existing sources 323
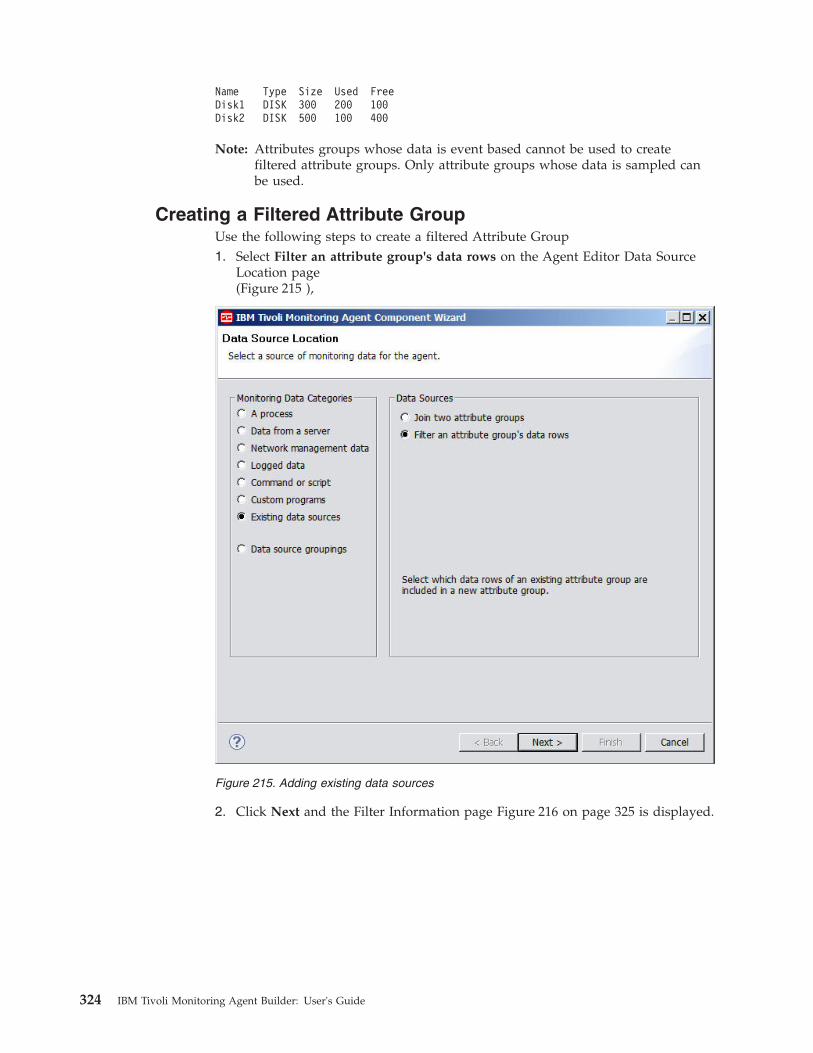
Name Type Size Used FreeDisk1 DISK 300 200 100Disk2 DISK 500 100 400
Note: Attributes groups whose data is event based cannot be used to createfiltered attribute groups. Only attribute groups whose data is sampled canbe used.
Creating a Filtered Attribute GroupUse the following steps to create a filtered Attribute Group1. Select Filter an attribute group's data rows on the Agent Editor Data Source
Location page(Figure 215 ),
2. Click Next and the Filter Information page Figure 216 on page 325 is displayed.
Figure 215. Adding existing data sources
324 IBM Tivoli Monitoring Agent Builder: User's Guide
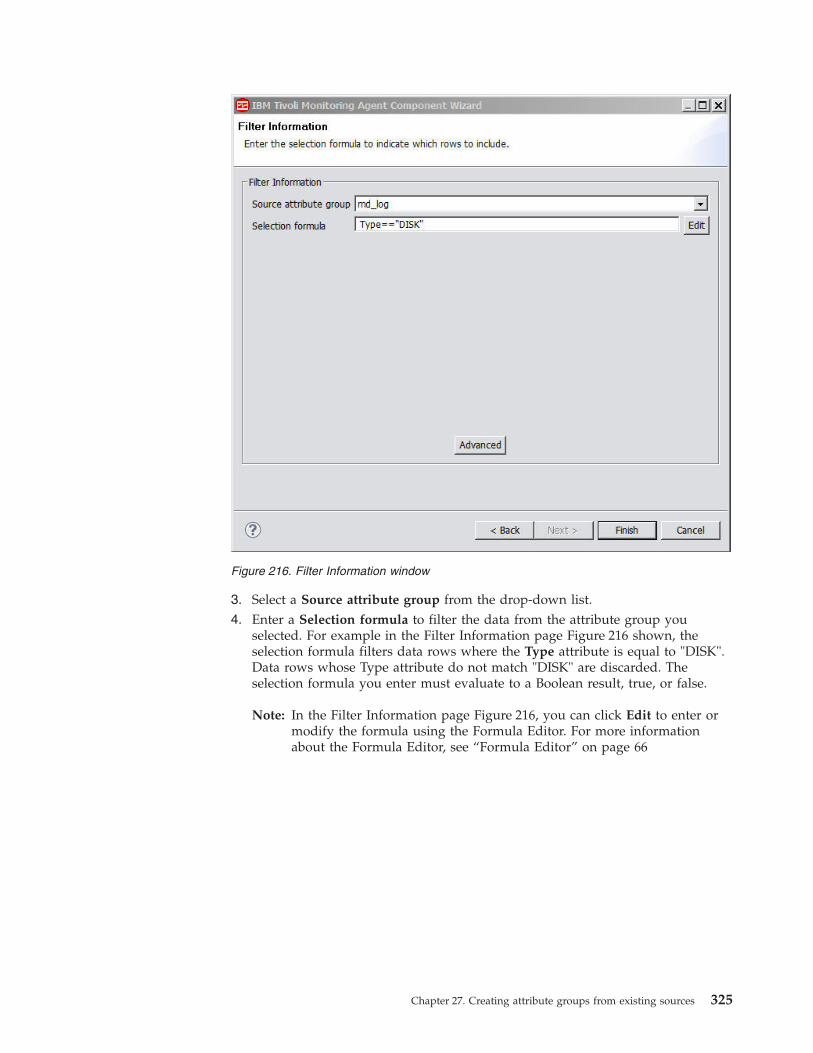
3. Select a Source attribute group from the drop-down list.4. Enter a Selection formula to filter the data from the attribute group you
selected. For example in the Filter Information page Figure 216 shown, theselection formula filters data rows where the Type attribute is equal to "DISK".Data rows whose Type attribute do not match "DISK" are discarded. Theselection formula you enter must evaluate to a Boolean result, true, or false.
Note: In the Filter Information page Figure 216, you can click Edit to enter ormodify the formula using the Formula Editor. For more informationabout the Formula Editor, see “Formula Editor” on page 66
Figure 216. Filter Information window
Chapter 27. Creating attribute groups from existing sources 325

326 IBM Tivoli Monitoring Agent Builder: User's Guide
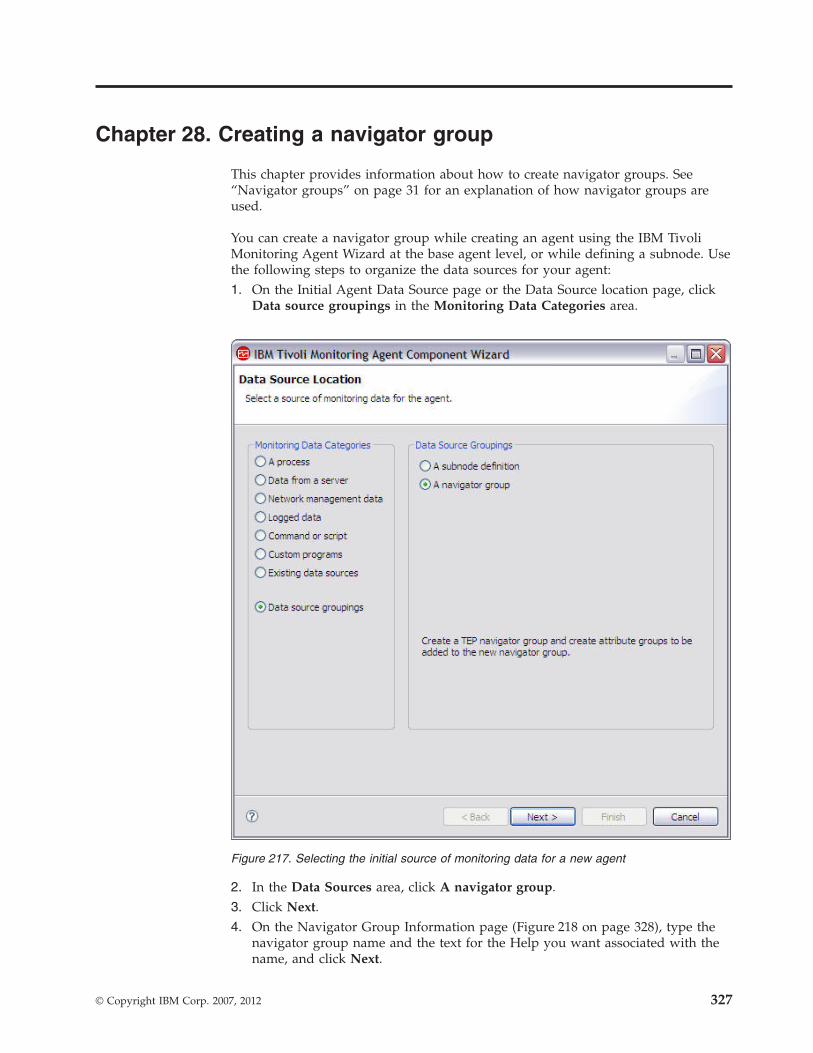
Chapter 28. Creating a navigator group
This chapter provides information about how to create navigator groups. See“Navigator groups” on page 31 for an explanation of how navigator groups areused.
You can create a navigator group while creating an agent using the IBM TivoliMonitoring Agent Wizard at the base agent level, or while defining a subnode. Usethe following steps to organize the data sources for your agent:1. On the Initial Agent Data Source page or the Data Source location page, click
Data source groupings in the Monitoring Data Categories area.
2. In the Data Sources area, click A navigator group.3. Click Next.4. On the Navigator Group Information page (Figure 218 on page 328), type the
navigator group name and the text for the Help you want associated with thename, and click Next.
Figure 217. Selecting the initial source of monitoring data for a new agent
© Copyright IBM Corp. 2007, 2012 327
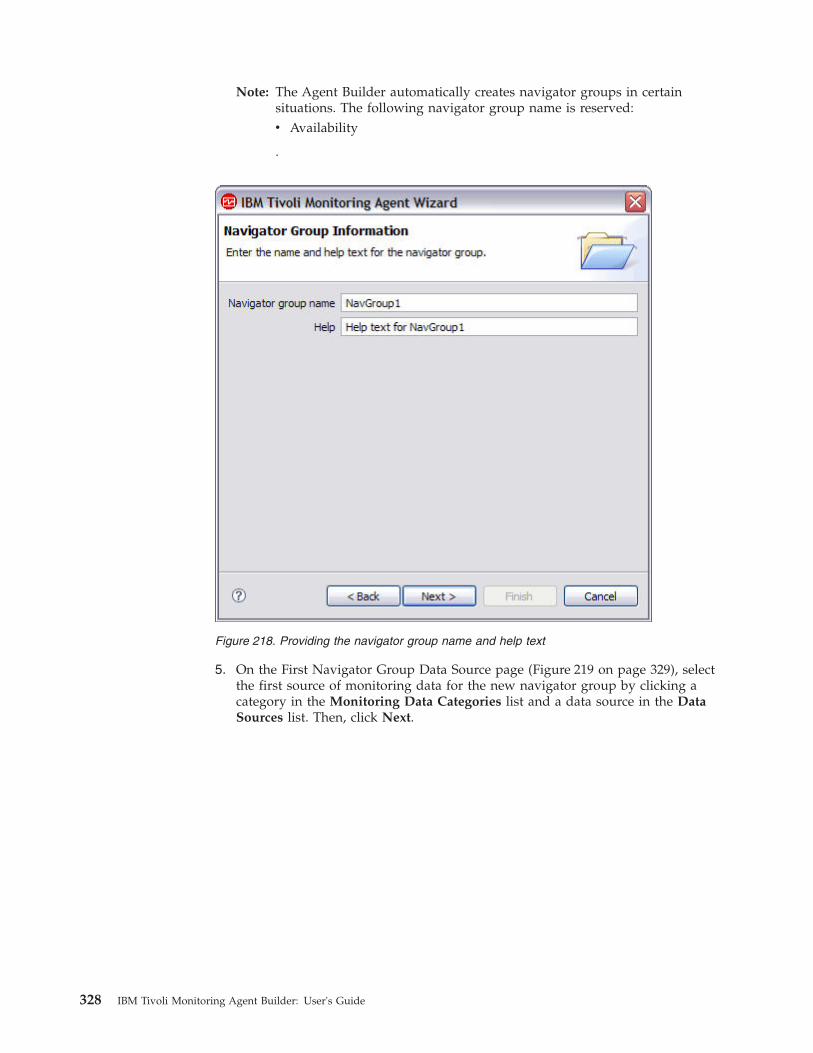
Note: The Agent Builder automatically creates navigator groups in certainsituations. The following navigator group name is reserved:v Availability
.
5. On the First Navigator Group Data Source page (Figure 219 on page 329), selectthe first source of monitoring data for the new navigator group by clicking acategory in the Monitoring Data Categories list and a data source in the DataSources list. Then, click Next.
Figure 218. Providing the navigator group name and help text
328 IBM Tivoli Monitoring Agent Builder: User's Guide
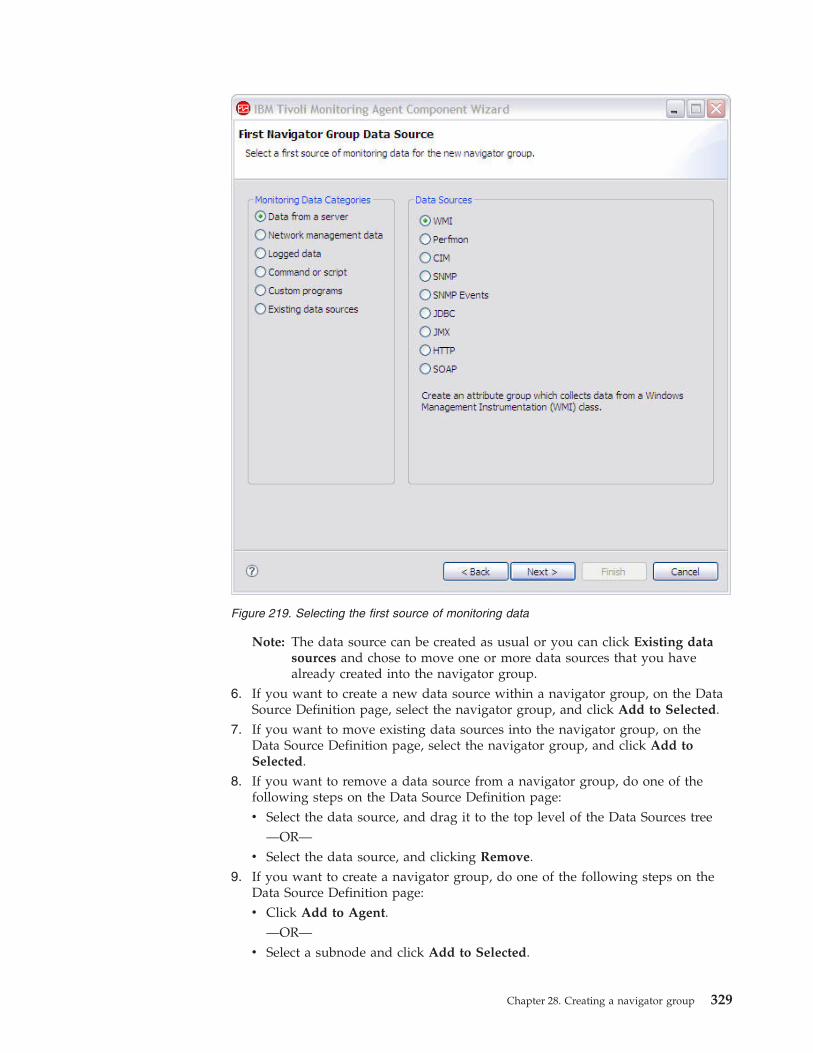
Note: The data source can be created as usual or you can click Existing datasources and chose to move one or more data sources that you havealready created into the navigator group.
6. If you want to create a new data source within a navigator group, on the DataSource Definition page, select the navigator group, and click Add to Selected.
7. If you want to move existing data sources into the navigator group, on theData Source Definition page, select the navigator group, and click Add toSelected.
8. If you want to remove a data source from a navigator group, do one of thefollowing steps on the Data Source Definition page:v Select the data source, and drag it to the top level of the Data Sources tree
—OR—v Select the data source, and clicking Remove.
9. If you want to create a navigator group, do one of the following steps on theData Source Definition page:v Click Add to Agent.
—OR—v Select a subnode and click Add to Selected.
Figure 219. Selecting the first source of monitoring data
Chapter 28. Creating a navigator group 329

330 IBM Tivoli Monitoring Agent Builder: User's Guide

Chapter 29. Creating subnodes
This chapter provides information about how to create subnodes. See “Subnodes”on page 31 for an explanation of how subnodes are used.
There are two ways that a single agent can use subnodes:v The agent can have different subnodes of the same type.v The agent can have subnodes of different types.
Monitoring the same data from different sourcesWhen one agent represents multiple instances of the same type of monitored entity,each subnode includes the same attribute groups and the correct values for thespecific monitored entity instance. The number of subnodes varies based on agentconfiguration. The example in Figure 220 shows the monitoring of differentsystems.
Figure 220. Subnodes monitoring different systems
© Copyright IBM Corp. 2007, 2012 331
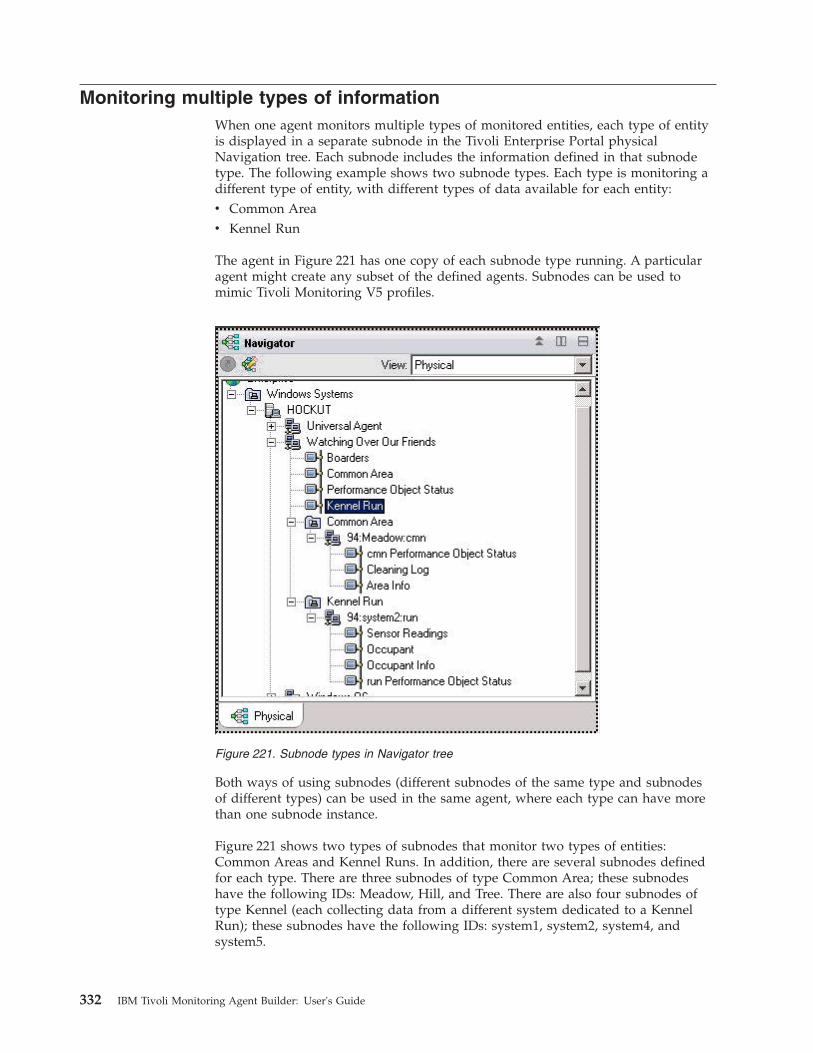
Monitoring multiple types of informationWhen one agent monitors multiple types of monitored entities, each type of entityis displayed in a separate subnode in the Tivoli Enterprise Portal physicalNavigation tree. Each subnode includes the information defined in that subnodetype. The following example shows two subnode types. Each type is monitoring adifferent type of entity, with different types of data available for each entity:v Common Areav Kennel Run
The agent in Figure 221 has one copy of each subnode type running. A particularagent might create any subset of the defined agents. Subnodes can be used tomimic Tivoli Monitoring V5 profiles.
Both ways of using subnodes (different subnodes of the same type and subnodesof different types) can be used in the same agent, where each type can have morethan one subnode instance.
Figure 221 shows two types of subnodes that monitor two types of entities:Common Areas and Kennel Runs. In addition, there are several subnodes definedfor each type. There are three subnodes of type Common Area; these subnodeshave the following IDs: Meadow, Hill, and Tree. There are also four subnodes oftype Kennel (each collecting data from a different system dedicated to a KennelRun); these subnodes have the following IDs: system1, system2, system4, andsystem5.
Figure 221. Subnode types in Navigator tree
332 IBM Tivoli Monitoring Agent Builder: User's Guide
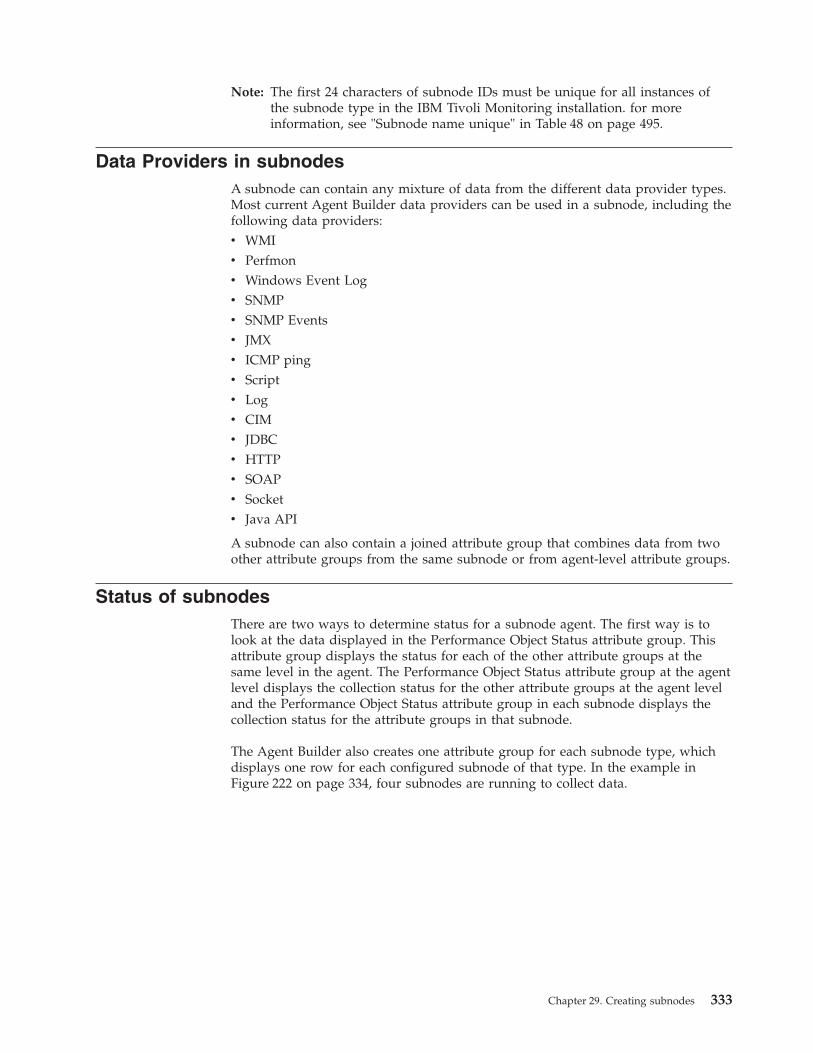
Note: The first 24 characters of subnode IDs must be unique for all instances ofthe subnode type in the IBM Tivoli Monitoring installation. for moreinformation, see "Subnode name unique" in Table 48 on page 495.
Data Providers in subnodesA subnode can contain any mixture of data from the different data provider types.Most current Agent Builder data providers can be used in a subnode, including thefollowing data providers:v WMIv Perfmonv Windows Event Logv SNMPv SNMP Eventsv JMXv ICMP pingv Scriptv Logv CIMv JDBCv HTTPv SOAPv Socketv Java API
A subnode can also contain a joined attribute group that combines data from twoother attribute groups from the same subnode or from agent-level attribute groups.
Status of subnodesThere are two ways to determine status for a subnode agent. The first way is tolook at the data displayed in the Performance Object Status attribute group. Thisattribute group displays the status for each of the other attribute groups at thesame level in the agent. The Performance Object Status attribute group at the agentlevel displays the collection status for the other attribute groups at the agent leveland the Performance Object Status attribute group in each subnode displays thecollection status for the attribute groups in that subnode.
The Agent Builder also creates one attribute group for each subnode type, whichdisplays one row for each configured subnode of that type. In the example inFigure 222 on page 334, four subnodes are running to collect data.
Chapter 29. Creating subnodes 333
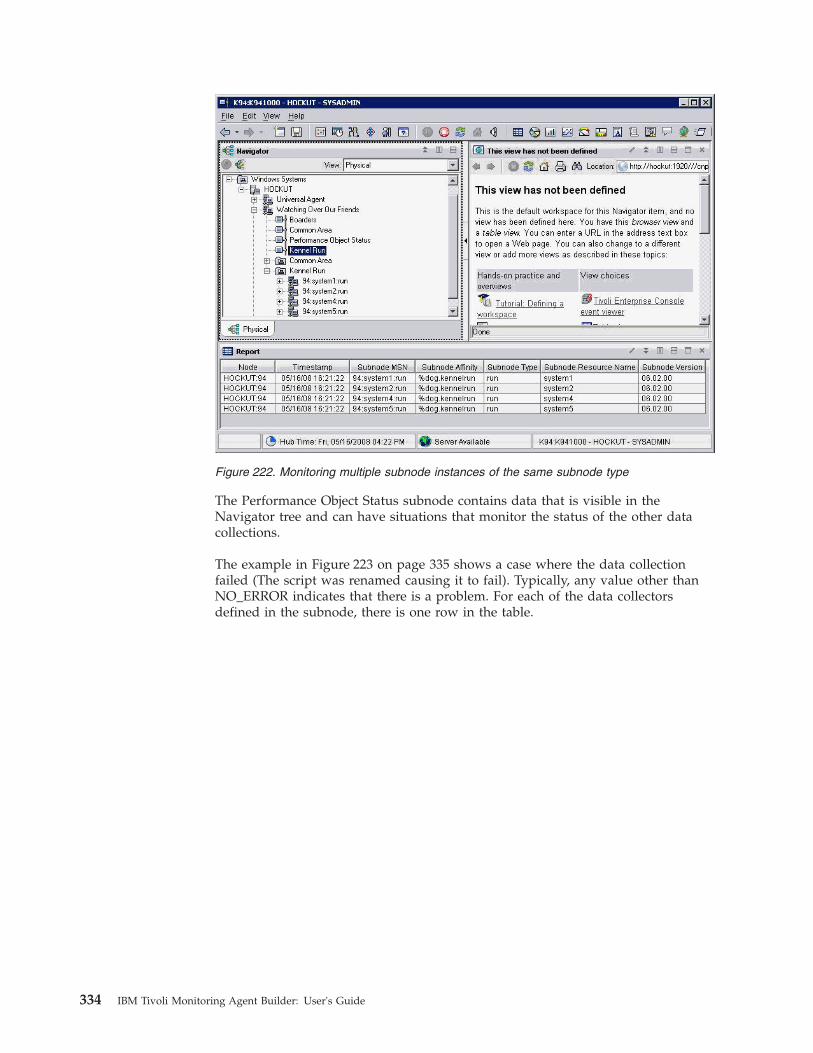
The Performance Object Status subnode contains data that is visible in theNavigator tree and can have situations that monitor the status of the other datacollections.
The example in Figure 223 on page 335 shows a case where the data collectionfailed (The script was renamed causing it to fail). Typically, any value other thanNO_ERROR indicates that there is a problem. For each of the data collectorsdefined in the subnode, there is one row in the table.
Figure 222. Monitoring multiple subnode instances of the same subnode type
334 IBM Tivoli Monitoring Agent Builder: User's Guide
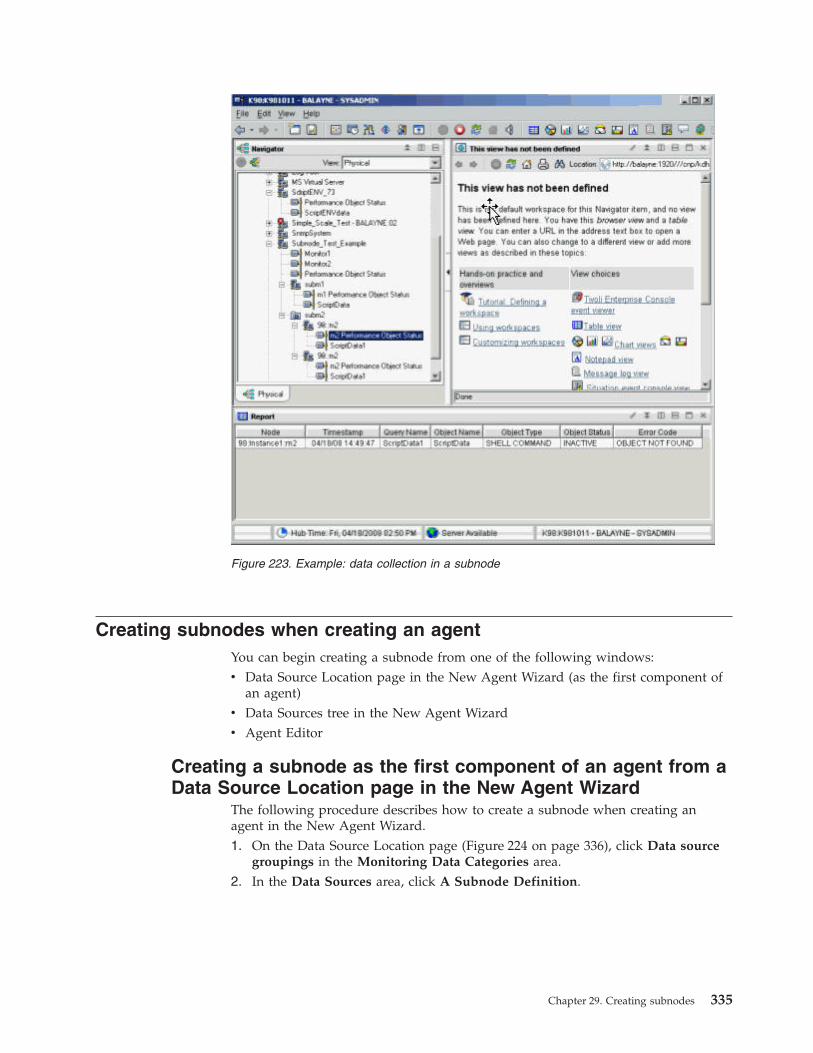
Creating subnodes when creating an agentYou can begin creating a subnode from one of the following windows:v Data Source Location page in the New Agent Wizard (as the first component of
an agent)v Data Sources tree in the New Agent Wizardv Agent Editor
Creating a subnode as the first component of an agent from aData Source Location page in the New Agent Wizard
The following procedure describes how to create a subnode when creating anagent in the New Agent Wizard.1. On the Data Source Location page (Figure 224 on page 336), click Data source
groupings in the Monitoring Data Categories area.2. In the Data Sources area, click A Subnode Definition.
Figure 223. Example: data collection in a subnode
Chapter 29. Creating subnodes 335
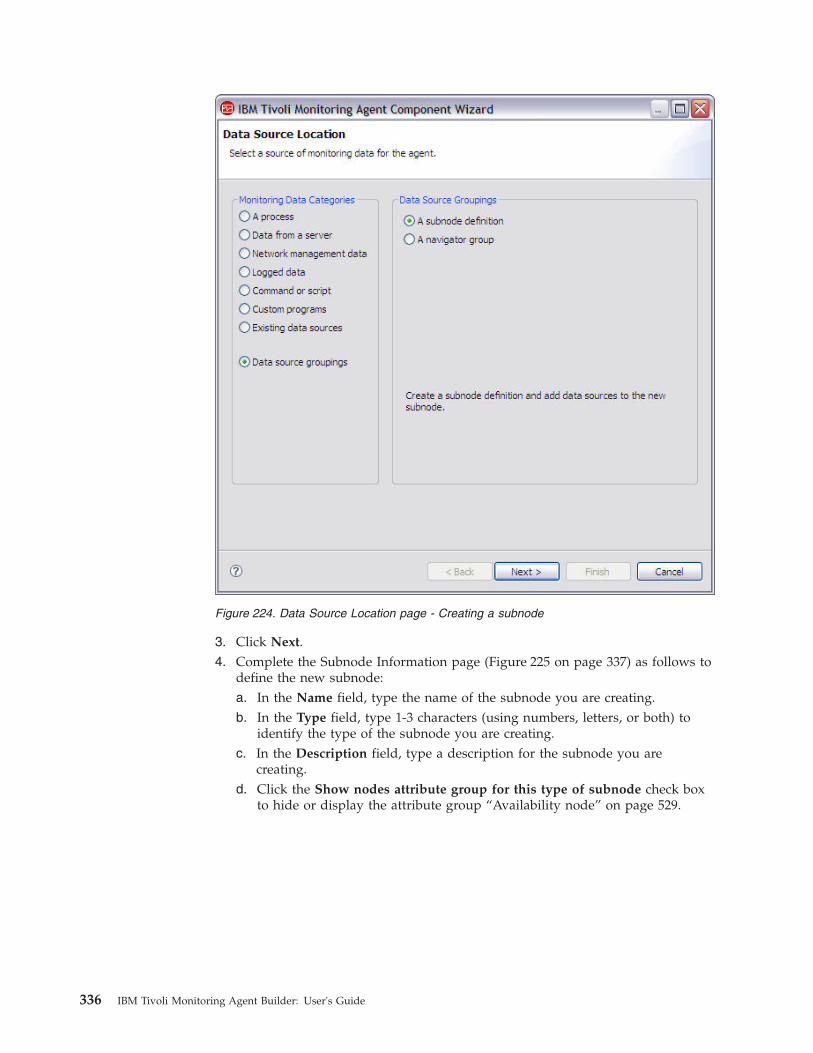
3. Click Next.4. Complete the Subnode Information page (Figure 225 on page 337) as follows to
define the new subnode:a. In the Name field, type the name of the subnode you are creating.b. In the Type field, type 1-3 characters (using numbers, letters, or both) to
identify the type of the subnode you are creating.c. In the Description field, type a description for the subnode you are
creating.d. Click the Show nodes attribute group for this type of subnode check box
to hide or display the attribute group “Availability node” on page 529.
Figure 224. Data Source Location page - Creating a subnode
336 IBM Tivoli Monitoring Agent Builder: User's Guide
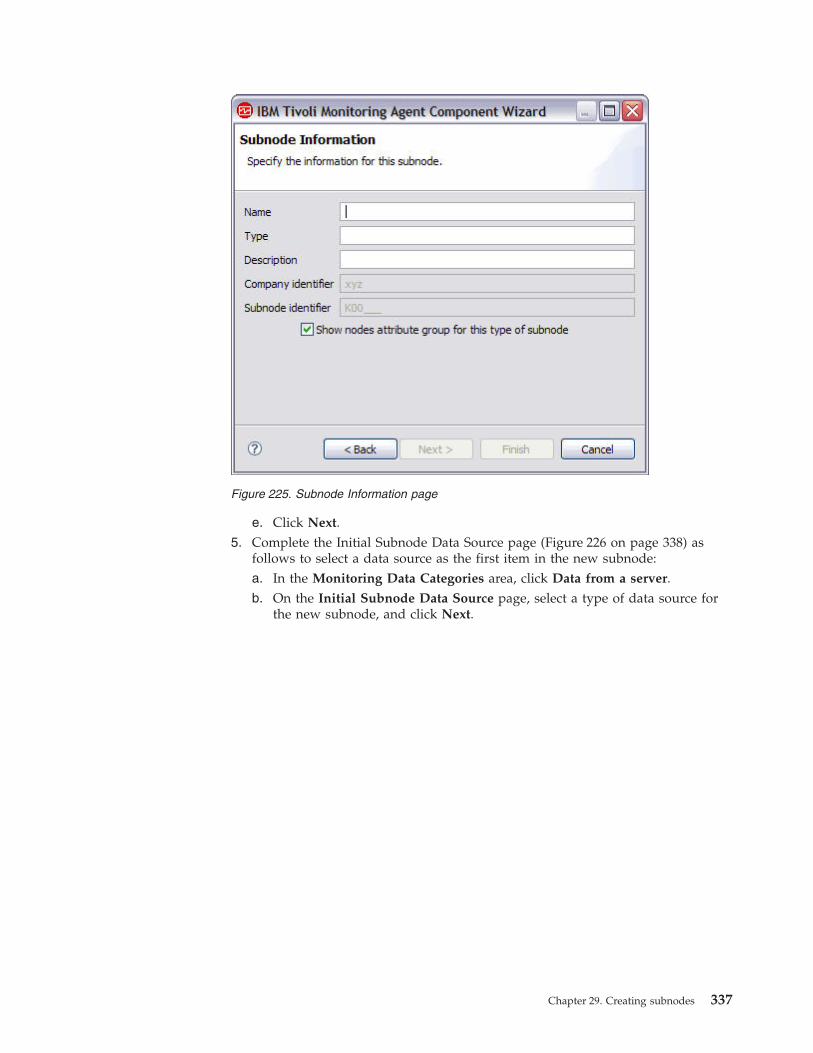
e. Click Next.5. Complete the Initial Subnode Data Source page (Figure 226 on page 338) as
follows to select a data source as the first item in the new subnode:a. In the Monitoring Data Categories area, click Data from a server.b. On the Initial Subnode Data Source page, select a type of data source for
the new subnode, and click Next.
Figure 225. Subnode Information page
Chapter 29. Creating subnodes 337
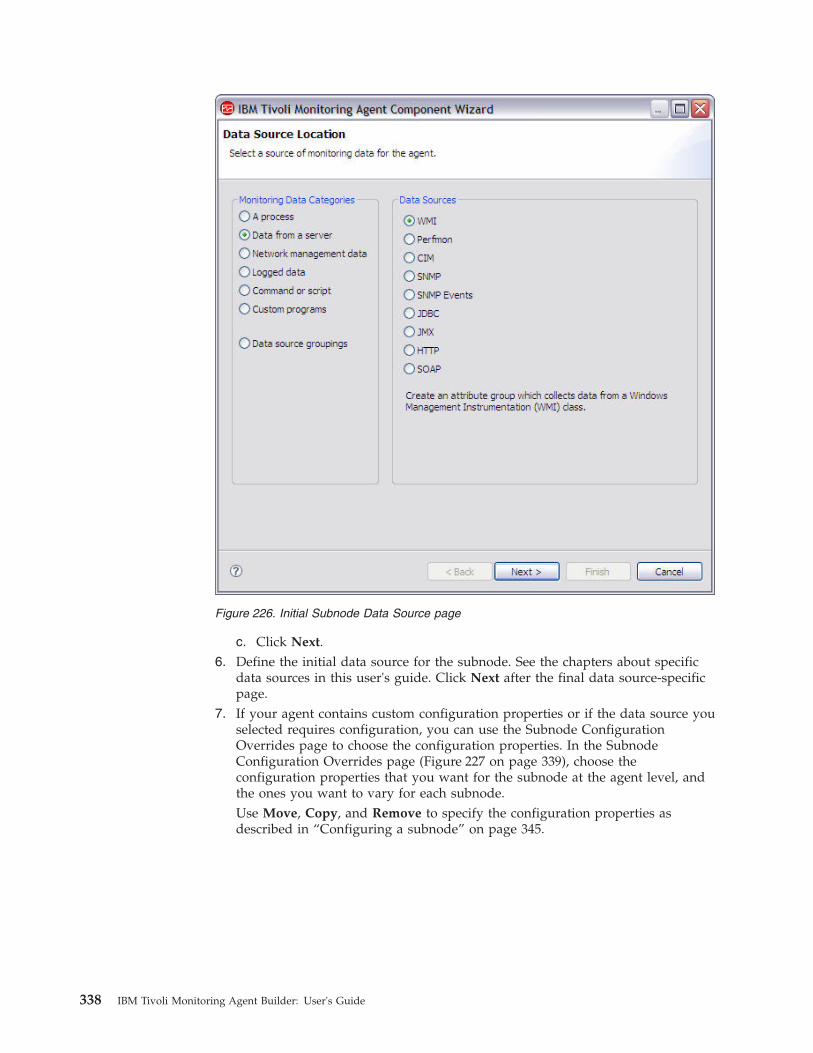
c. Click Next.6. Define the initial data source for the subnode. See the chapters about specific
data sources in this user's guide. Click Next after the final data source-specificpage.
7. If your agent contains custom configuration properties or if the data source youselected requires configuration, you can use the Subnode ConfigurationOverrides page to choose the configuration properties. In the SubnodeConfiguration Overrides page (Figure 227 on page 339), choose theconfiguration properties that you want for the subnode at the agent level, andthe ones you want to vary for each subnode.Use Move, Copy, and Remove to specify the configuration properties asdescribed in “Configuring a subnode” on page 345.
Figure 226. Initial Subnode Data Source page
338 IBM Tivoli Monitoring Agent Builder: User's Guide
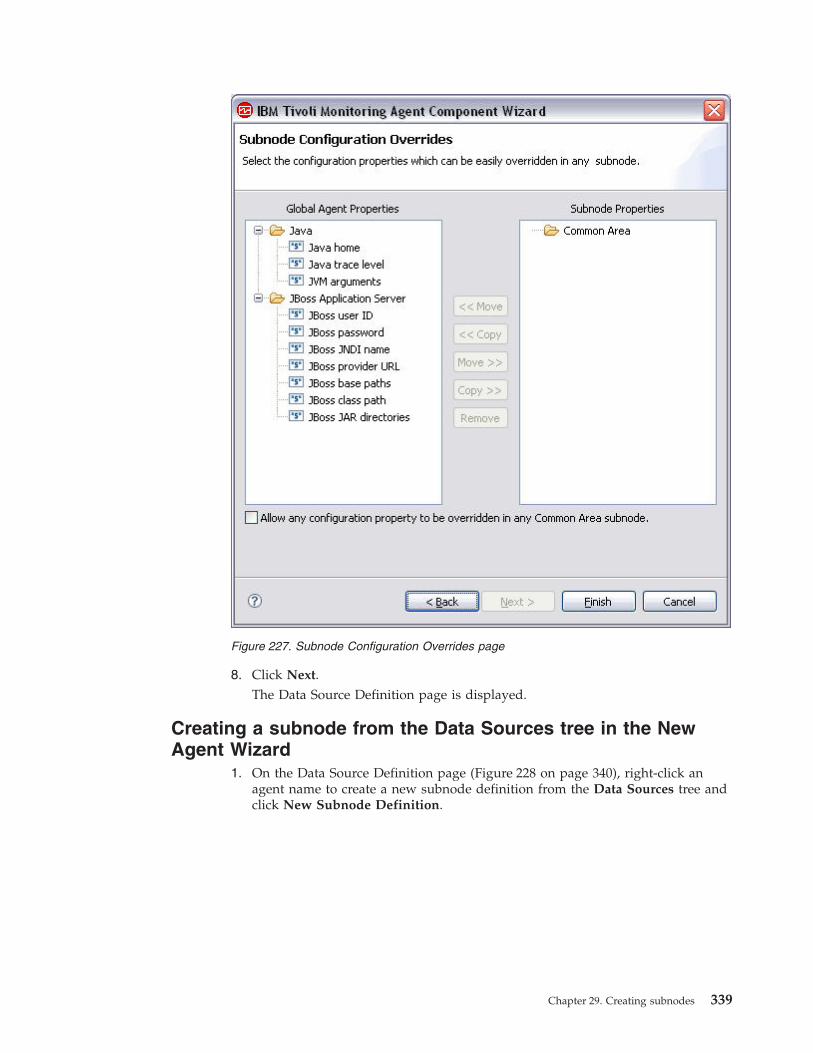
8. Click Next.The Data Source Definition page is displayed.
Creating a subnode from the Data Sources tree in the NewAgent Wizard
1. On the Data Source Definition page (Figure 228 on page 340), right-click anagent name to create a new subnode definition from the Data Sources tree andclick New Subnode Definition.
Figure 227. Subnode Configuration Overrides page
Chapter 29. Creating subnodes 339
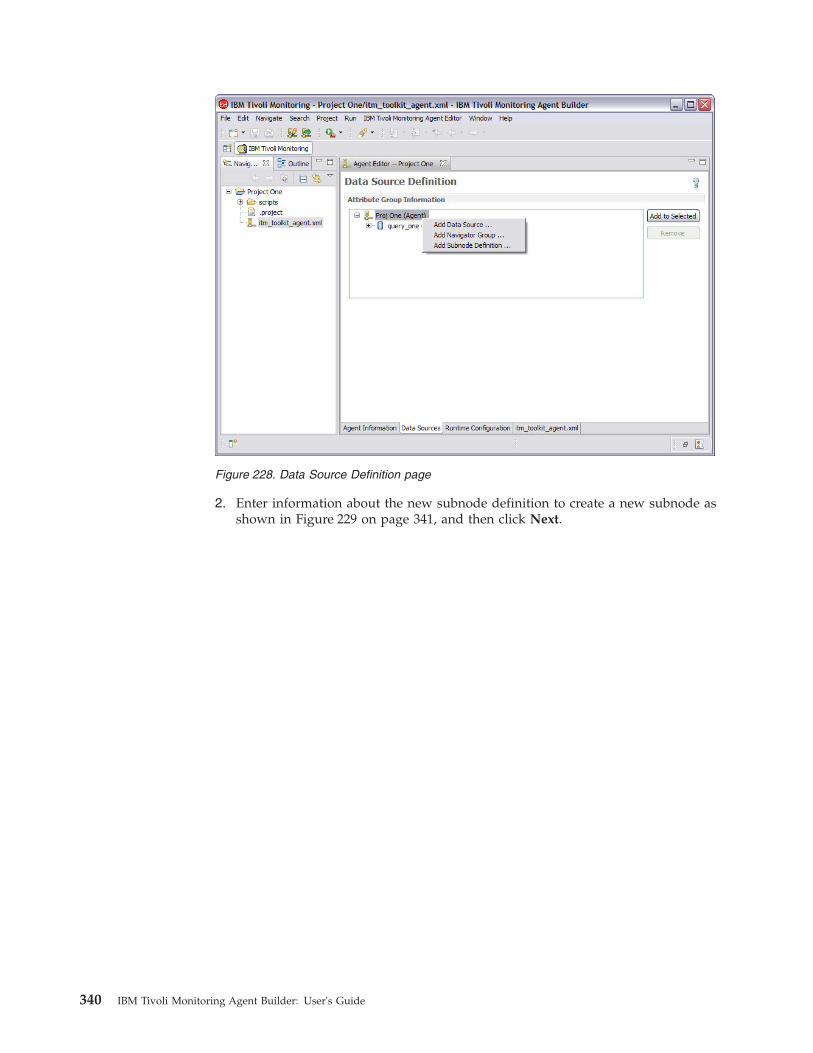
2. Enter information about the new subnode definition to create a new subnode asshown in Figure 229 on page 341, and then click Next.
Figure 228. Data Source Definition page
340 IBM Tivoli Monitoring Agent Builder: User's Guide
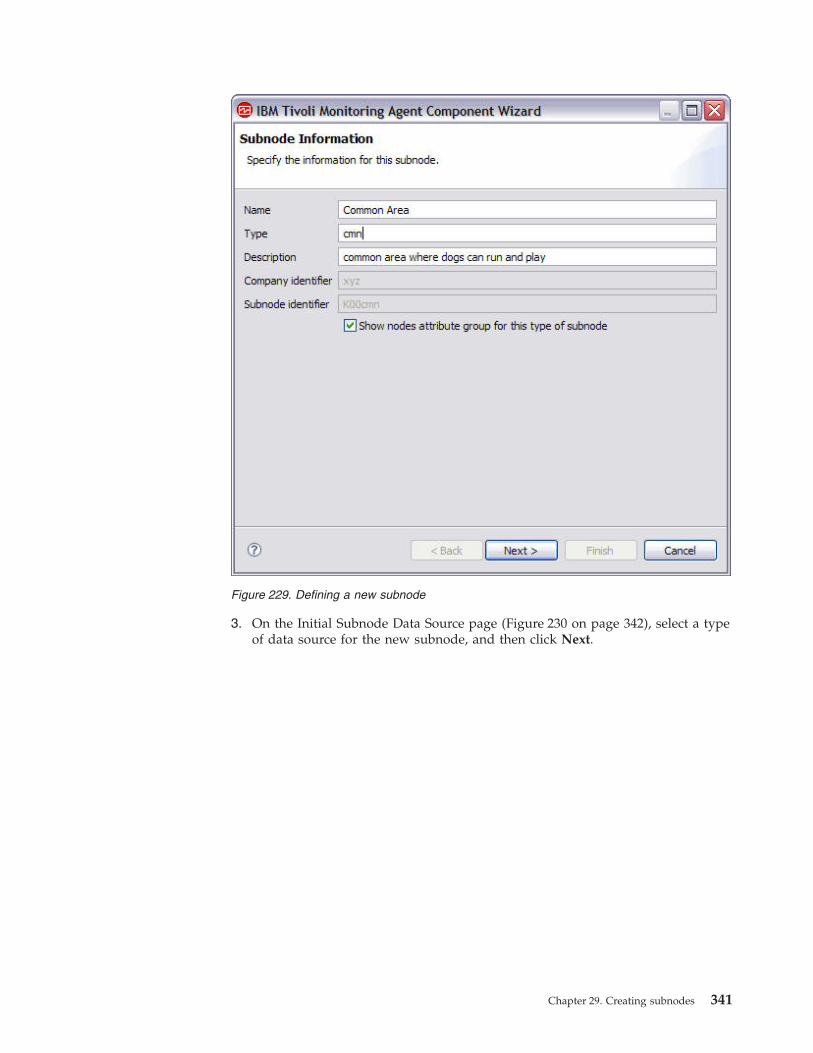
3. On the Initial Subnode Data Source page (Figure 230 on page 342), select a typeof data source for the new subnode, and then click Next.
Figure 229. Defining a new subnode
Chapter 29. Creating subnodes 341

4. Define the initial data source for the subnode. See the chapters about specificdata sources in this user's guide. Then, click Next after completing the finaldata source-specific page.
5. On the Subnode Configuration Overrides page (Figure 231 on page 343),identify which configuration properties are to remain at the agent level andwhich ones to vary for each subnode instance.
Note: Properties in the Global Agent Properties list are configured at the agentlevel. Properties in the Subnode Properties list can be configured foreach subnode. Properties can be in both lists, in which case the subnodeproperty, if it is set, overrides the global property for that subnode. Someproperties must be configured at the agent level and cannot be moved tothe subnode level. For SNMP, "SNMP Version" cannot be copied ormoved under "Subnode Properties".
a. Use Move, Copy, and Remove to specify the configuration properties asdescribed in “Configuring a subnode” on page 345.
Figure 230. Initial Subnode Data Source page
342 IBM Tivoli Monitoring Agent Builder: User's Guide
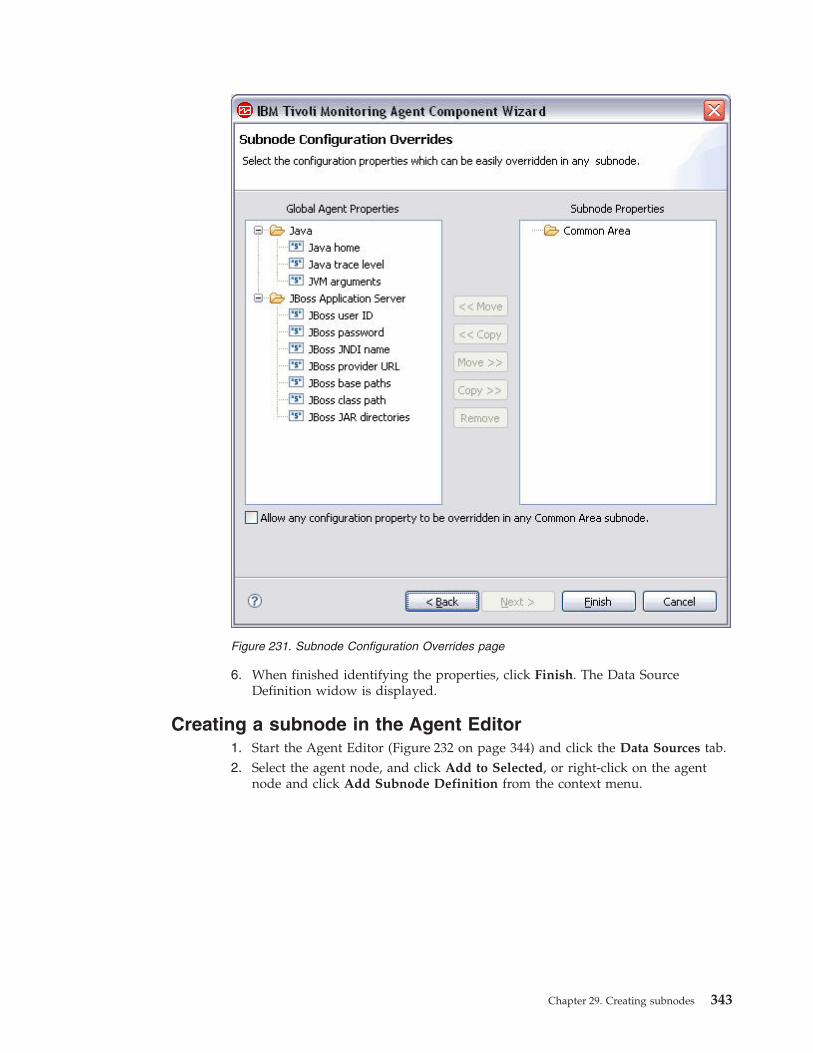
6. When finished identifying the properties, click Finish. The Data SourceDefinition widow is displayed.
Creating a subnode in the Agent Editor1. Start the Agent Editor (Figure 232 on page 344) and click the Data Sources tab.2. Select the agent node, and click Add to Selected, or right-click on the agent
node and click Add Subnode Definition from the context menu.
Figure 231. Subnode Configuration Overrides page
Chapter 29. Creating subnodes 343
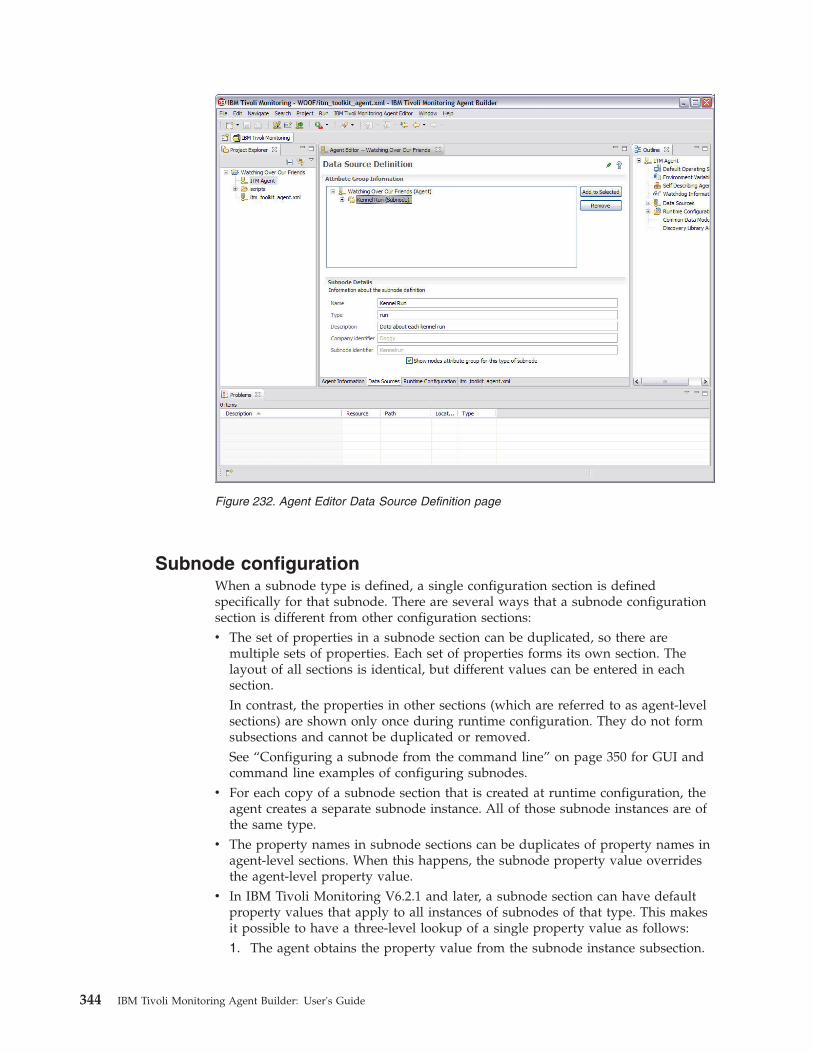
Subnode configurationWhen a subnode type is defined, a single configuration section is definedspecifically for that subnode. There are several ways that a subnode configurationsection is different from other configuration sections:v The set of properties in a subnode section can be duplicated, so there are
multiple sets of properties. Each set of properties forms its own section. Thelayout of all sections is identical, but different values can be entered in eachsection.In contrast, the properties in other sections (which are referred to as agent-levelsections) are shown only once during runtime configuration. They do not formsubsections and cannot be duplicated or removed.See “Configuring a subnode from the command line” on page 350 for GUI andcommand line examples of configuring subnodes.
v For each copy of a subnode section that is created at runtime configuration, theagent creates a separate subnode instance. All of those subnode instances are ofthe same type.
v The property names in subnode sections can be duplicates of property names inagent-level sections. When this happens, the subnode property value overridesthe agent-level property value.
v In IBM Tivoli Monitoring V6.2.1 and later, a subnode section can have defaultproperty values that apply to all instances of subnodes of that type. This makesit possible to have a three-level lookup of a single property value as follows:1. The agent obtains the property value from the subnode instance subsection.
Figure 232. Agent Editor Data Source Definition page
344 IBM Tivoli Monitoring Agent Builder: User's Guide
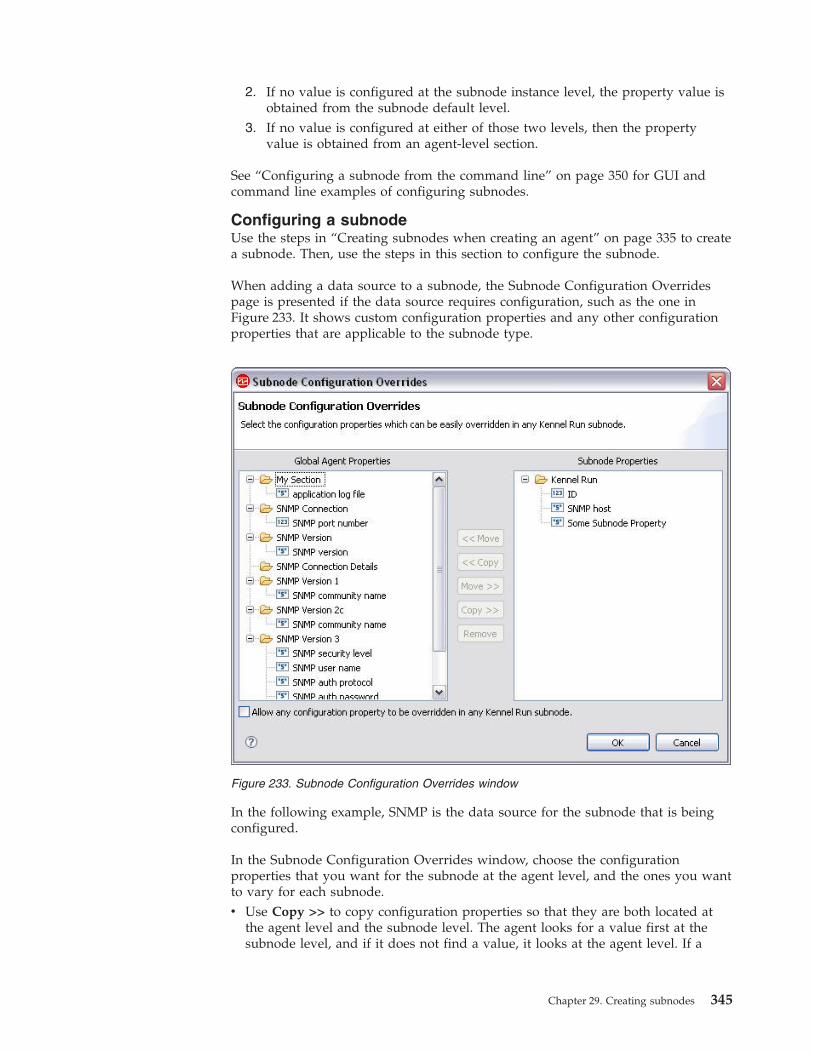
2. If no value is configured at the subnode instance level, the property value isobtained from the subnode default level.
3. If no value is configured at either of those two levels, then the propertyvalue is obtained from an agent-level section.
See “Configuring a subnode from the command line” on page 350 for GUI andcommand line examples of configuring subnodes.
Configuring a subnodeUse the steps in “Creating subnodes when creating an agent” on page 335 to createa subnode. Then, use the steps in this section to configure the subnode.
When adding a data source to a subnode, the Subnode Configuration Overridespage is presented if the data source requires configuration, such as the one inFigure 233. It shows custom configuration properties and any other configurationproperties that are applicable to the subnode type.
In the following example, SNMP is the data source for the subnode that is beingconfigured.
In the Subnode Configuration Overrides window, choose the configurationproperties that you want for the subnode at the agent level, and the ones you wantto vary for each subnode.v Use Copy >> to copy configuration properties so that they are both located at
the agent level and the subnode level. The agent looks for a value first at thesubnode level, and if it does not find a value, it looks at the agent level. If a
Figure 233. Subnode Configuration Overrides window
Chapter 29. Creating subnodes 345
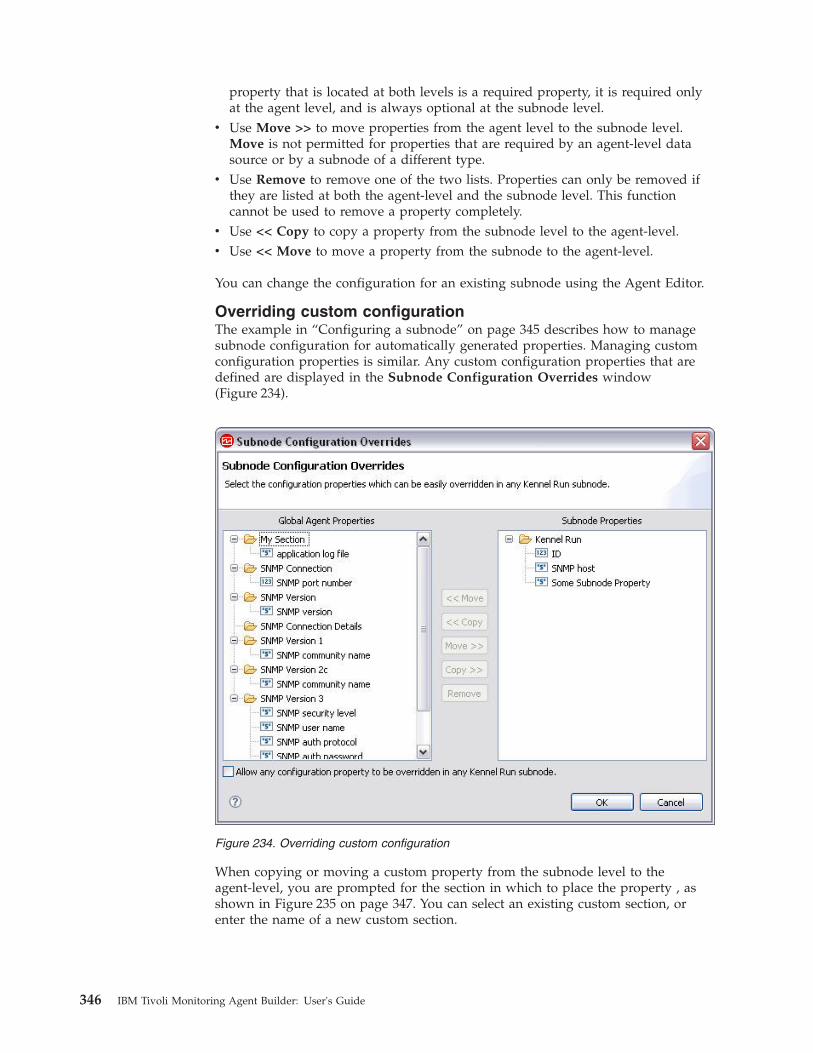
property that is located at both levels is a required property, it is required onlyat the agent level, and is always optional at the subnode level.
v Use Move >> to move properties from the agent level to the subnode level.Move is not permitted for properties that are required by an agent-level datasource or by a subnode of a different type.
v Use Remove to remove one of the two lists. Properties can only be removed ifthey are listed at both the agent-level and the subnode level. This functioncannot be used to remove a property completely.
v Use << Copy to copy a property from the subnode level to the agent-level.v Use << Move to move a property from the subnode to the agent-level.
You can change the configuration for an existing subnode using the Agent Editor.
Overriding custom configurationThe example in “Configuring a subnode” on page 345 describes how to managesubnode configuration for automatically generated properties. Managing customconfiguration properties is similar. Any custom configuration properties that aredefined are displayed in the Subnode Configuration Overrides window(Figure 234).
When copying or moving a custom property from the subnode level to theagent-level, you are prompted for the section in which to place the property , asshown in Figure 235 on page 347. You can select an existing custom section, orenter the name of a new custom section.
Figure 234. Overriding custom configuration
346 IBM Tivoli Monitoring Agent Builder: User's Guide
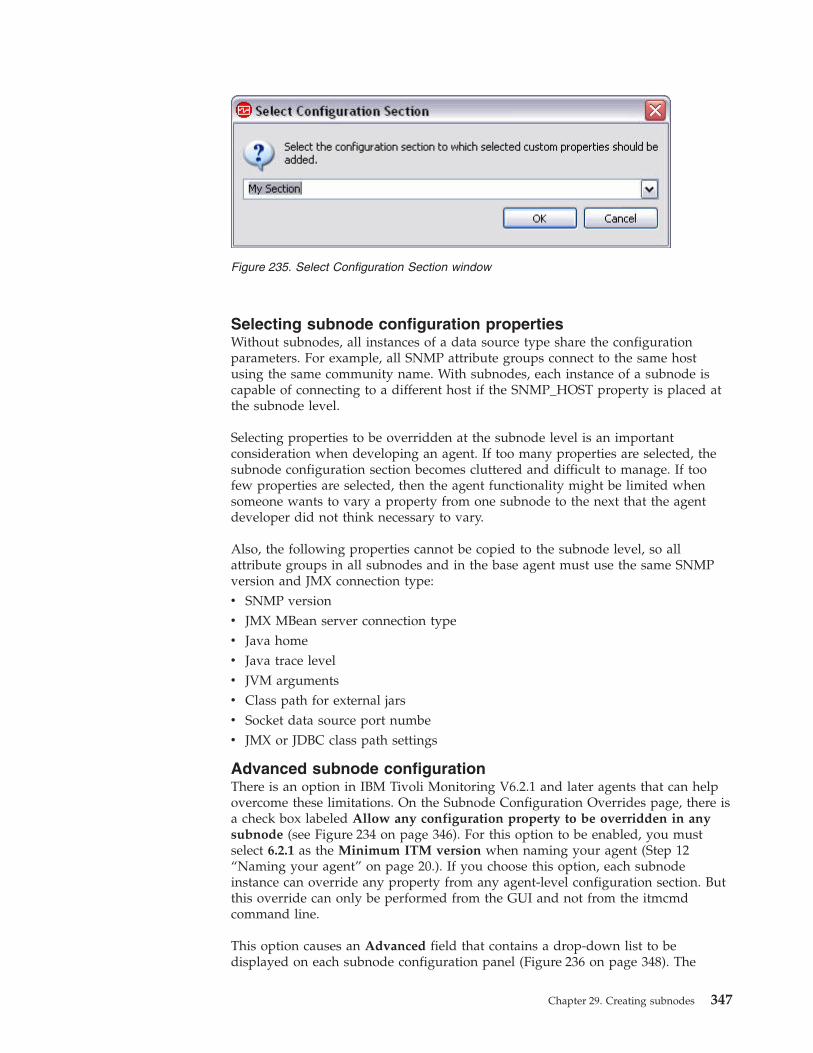
Selecting subnode configuration propertiesWithout subnodes, all instances of a data source type share the configurationparameters. For example, all SNMP attribute groups connect to the same hostusing the same community name. With subnodes, each instance of a subnode iscapable of connecting to a different host if the SNMP_HOST property is placed atthe subnode level.
Selecting properties to be overridden at the subnode level is an importantconsideration when developing an agent. If too many properties are selected, thesubnode configuration section becomes cluttered and difficult to manage. If toofew properties are selected, then the agent functionality might be limited whensomeone wants to vary a property from one subnode to the next that the agentdeveloper did not think necessary to vary.
Also, the following properties cannot be copied to the subnode level, so allattribute groups in all subnodes and in the base agent must use the same SNMPversion and JMX connection type:v SNMP versionv JMX MBean server connection typev Java homev Java trace levelv JVM argumentsv Class path for external jarsv Socket data source port numbev JMX or JDBC class path settings
Advanced subnode configurationThere is an option in IBM Tivoli Monitoring V6.2.1 and later agents that can helpovercome these limitations. On the Subnode Configuration Overrides page, there isa check box labeled Allow any configuration property to be overridden in anysubnode (see Figure 234 on page 346). For this option to be enabled, you mustselect 6.2.1 as the Minimum ITM version when naming your agent (Step 12“Naming your agent” on page 20.). If you choose this option, each subnodeinstance can override any property from any agent-level configuration section. Butthis override can only be performed from the GUI and not from the itmcmdcommand line.
This option causes an Advanced field that contains a drop-down list to bedisplayed on each subnode configuration panel (Figure 236 on page 348). The
Figure 235. Select Configuration Section window
Chapter 29. Creating subnodes 347
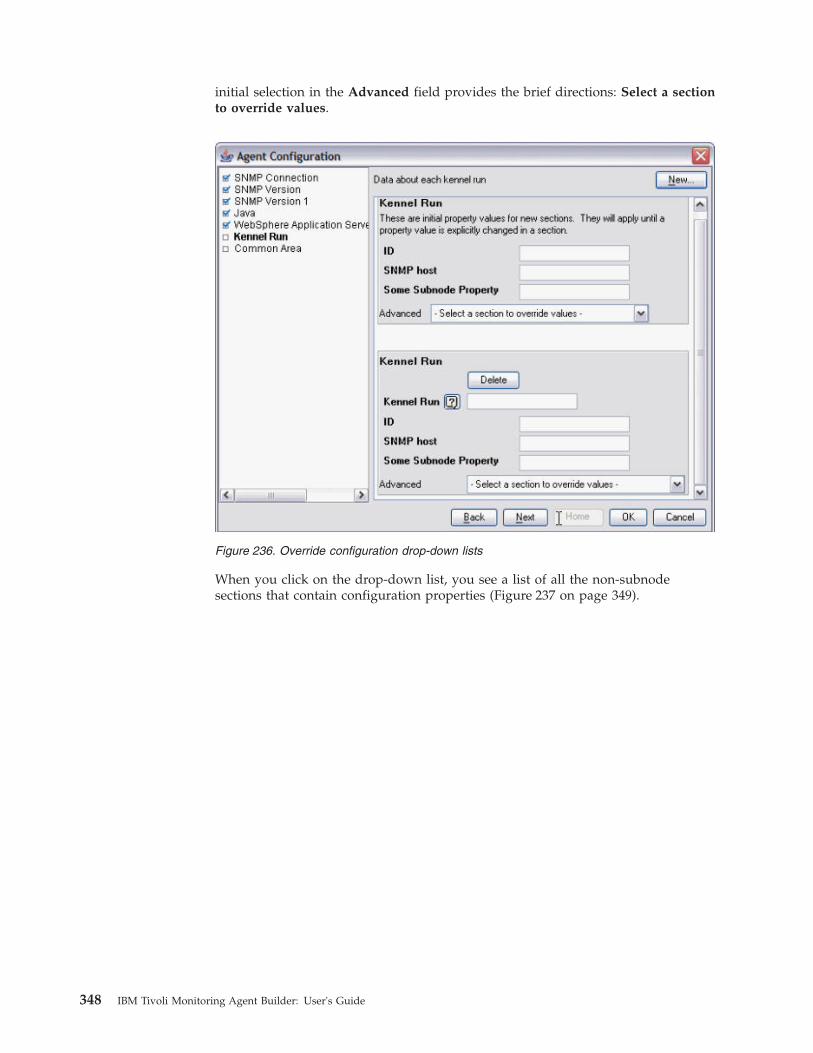
initial selection in the Advanced field provides the brief directions: Select a sectionto override values.
When you click on the drop-down list, you see a list of all the non-subnodesections that contain configuration properties (Figure 237 on page 349).
Figure 236. Override configuration drop-down lists
348 IBM Tivoli Monitoring Agent Builder: User's Guide
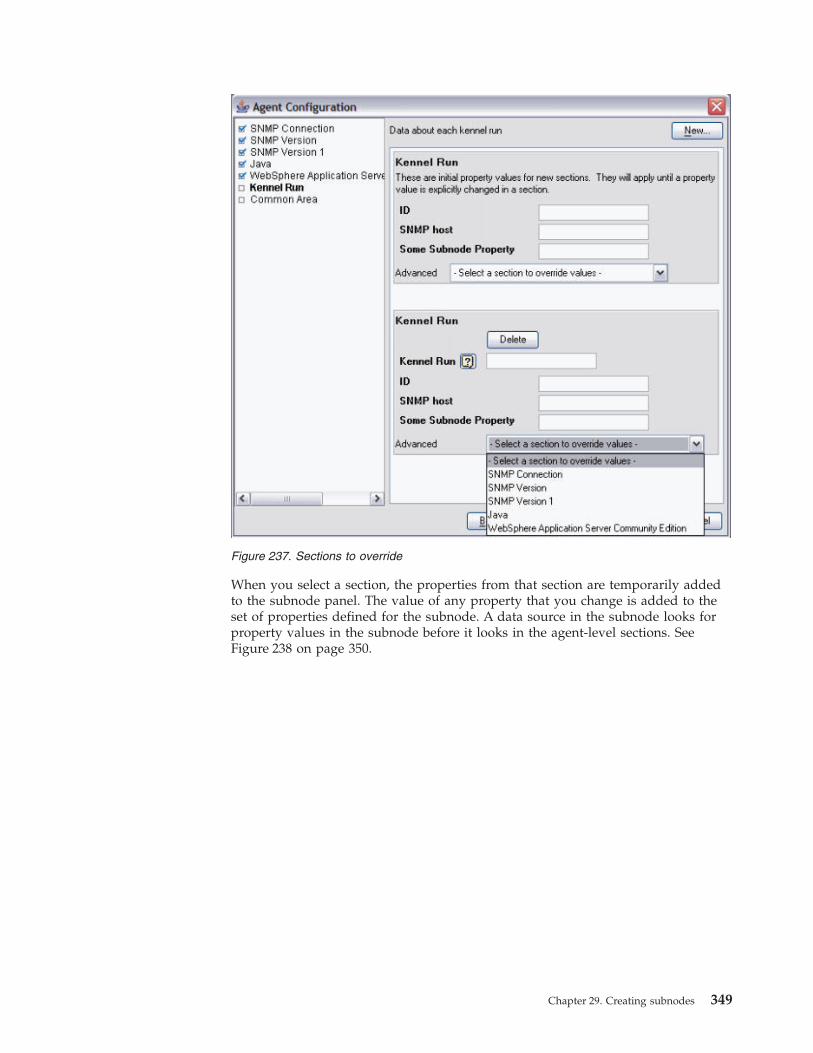
When you select a section, the properties from that section are temporarily addedto the subnode panel. The value of any property that you change is added to theset of properties defined for the subnode. A data source in the subnode looks forproperty values in the subnode before it looks in the agent-level sections. SeeFigure 238 on page 350.
Figure 237. Sections to override
Chapter 29. Creating subnodes 349
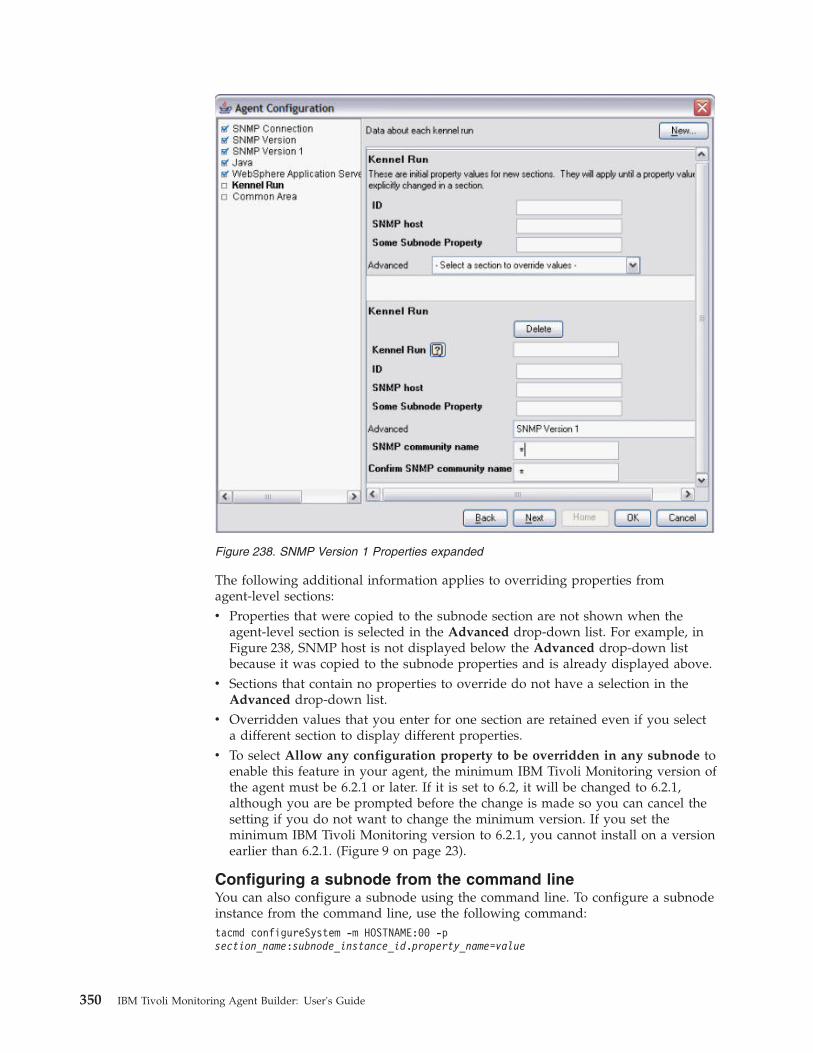
The following additional information applies to overriding properties fromagent-level sections:v Properties that were copied to the subnode section are not shown when the
agent-level section is selected in the Advanced drop-down list. For example, inFigure 238, SNMP host is not displayed below the Advanced drop-down listbecause it was copied to the subnode properties and is already displayed above.
v Sections that contain no properties to override do not have a selection in theAdvanced drop-down list.
v Overridden values that you enter for one section are retained even if you selecta different section to display different properties.
v To select Allow any configuration property to be overridden in any subnode toenable this feature in your agent, the minimum IBM Tivoli Monitoring version ofthe agent must be 6.2.1 or later. If it is set to 6.2, it will be changed to 6.2.1,although you are be prompted before the change is made so you can cancel thesetting if you do not want to change the minimum version. If you set theminimum IBM Tivoli Monitoring version to 6.2.1, you cannot install on a versionearlier than 6.2.1. (Figure 9 on page 23).
Configuring a subnode from the command lineYou can also configure a subnode using the command line. To configure a subnodeinstance from the command line, use the following command:tacmd configureSystem -m HOSTNAME:00 -psection_name:subnode_instance_id.property_name=value
Figure 238. SNMP Version 1 Properties expanded
350 IBM Tivoli Monitoring Agent Builder: User's Guide
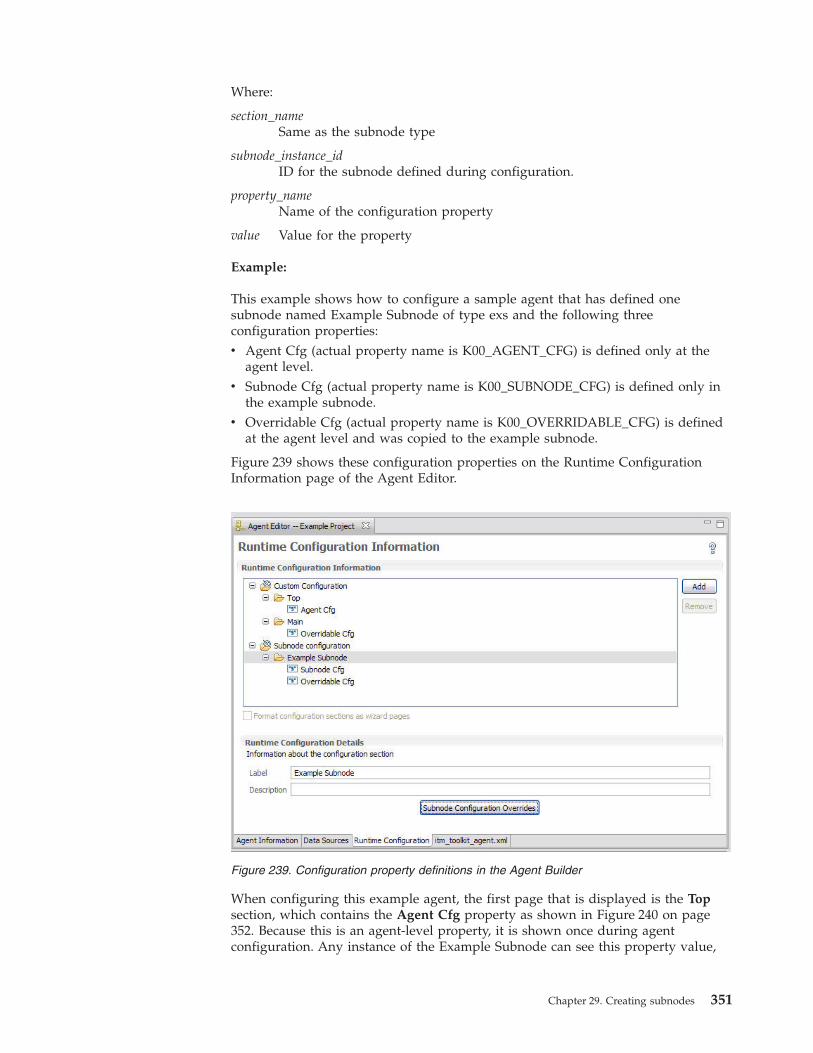
Where:
section_nameSame as the subnode type
subnode_instance_idID for the subnode defined during configuration.
property_nameName of the configuration property
value Value for the property
Example:
This example shows how to configure a sample agent that has defined onesubnode named Example Subnode of type exs and the following threeconfiguration properties:v Agent Cfg (actual property name is K00_AGENT_CFG) is defined only at the
agent level.v Subnode Cfg (actual property name is K00_SUBNODE_CFG) is defined only in
the example subnode.v Overridable Cfg (actual property name is K00_OVERRIDABLE_CFG) is defined
at the agent level and was copied to the example subnode.
Figure 239 shows these configuration properties on the Runtime ConfigurationInformation page of the Agent Editor.
When configuring this example agent, the first page that is displayed is the Topsection, which contains the Agent Cfg property as shown in Figure 240 on page352. Because this is an agent-level property, it is shown once during agentconfiguration. Any instance of the Example Subnode can see this property value,
Figure 239. Configuration property definitions in the Agent Builder
Chapter 29. Creating subnodes 351
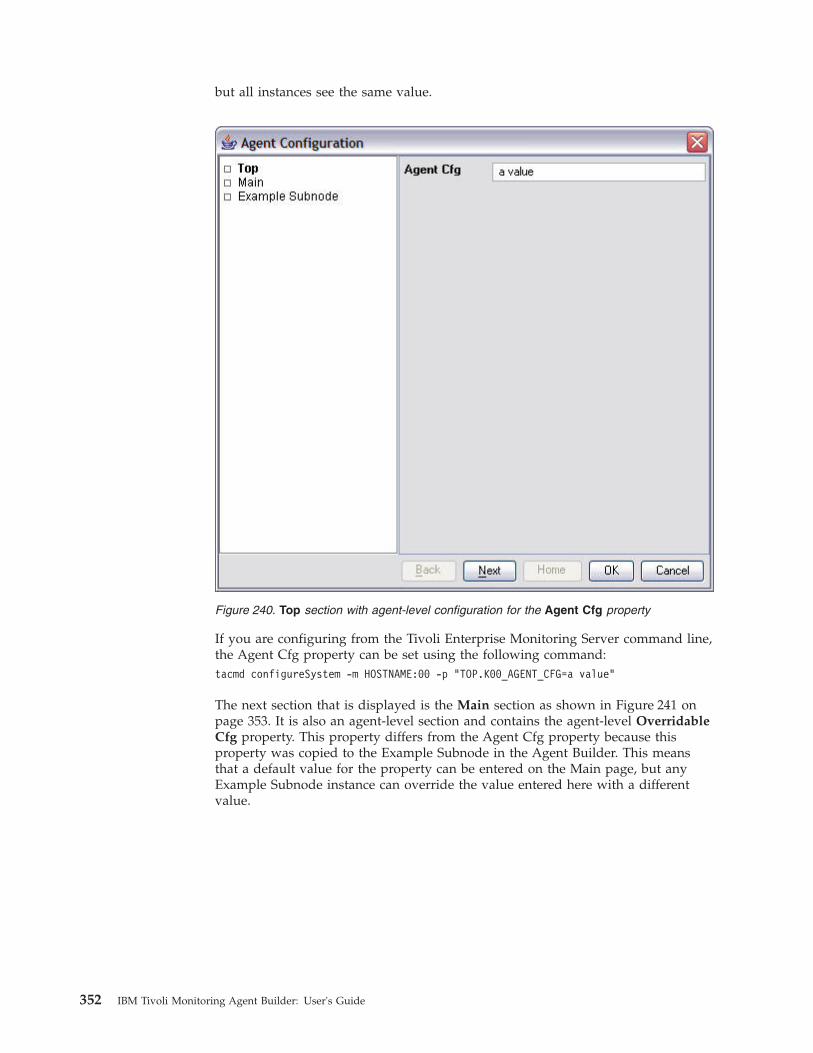
but all instances see the same value.
If you are configuring from the Tivoli Enterprise Monitoring Server command line,the Agent Cfg property can be set using the following command:tacmd configureSystem -m HOSTNAME:00 -p "TOP.K00_AGENT_CFG=a value"
The next section that is displayed is the Main section as shown in Figure 241 onpage 353. It is also an agent-level section and contains the agent-level OverridableCfg property. This property differs from the Agent Cfg property because thisproperty was copied to the Example Subnode in the Agent Builder. This meansthat a default value for the property can be entered on the Main page, but anyExample Subnode instance can override the value entered here with a differentvalue.
Figure 240. Top section with agent-level configuration for the Agent Cfg property
352 IBM Tivoli Monitoring Agent Builder: User's Guide
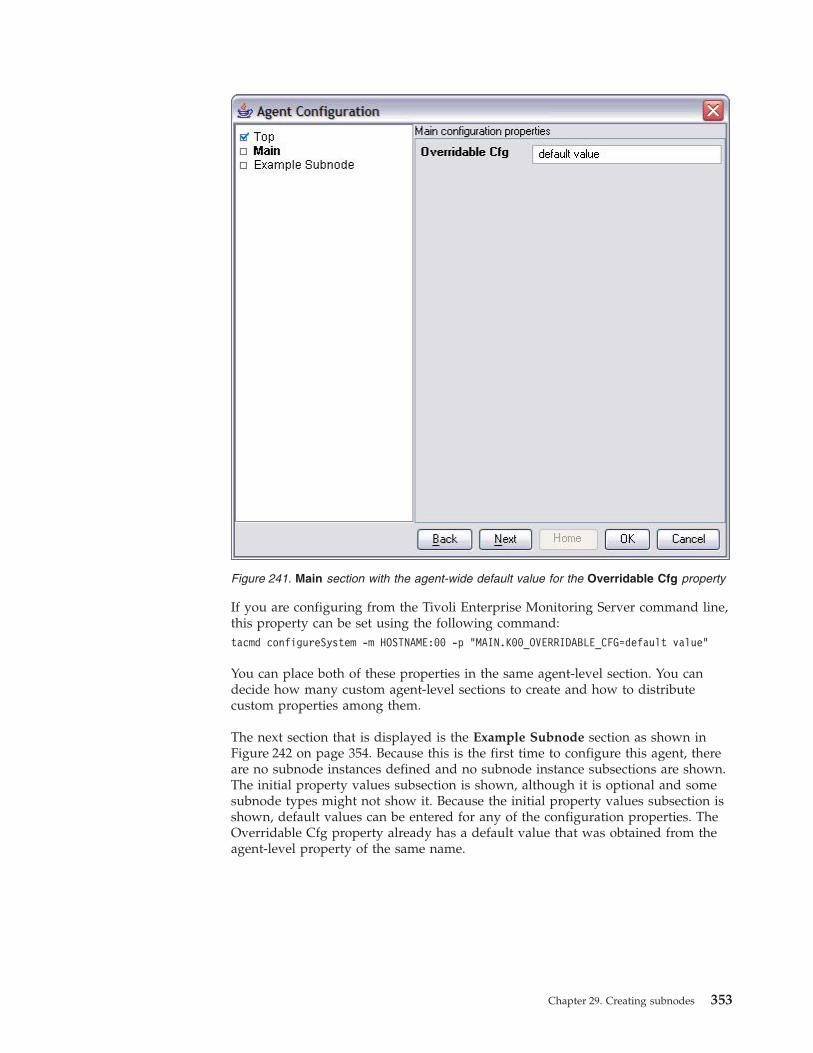
If you are configuring from the Tivoli Enterprise Monitoring Server command line,this property can be set using the following command:tacmd configureSystem -m HOSTNAME:00 -p "MAIN.K00_OVERRIDABLE_CFG=default value"
You can place both of these properties in the same agent-level section. You candecide how many custom agent-level sections to create and how to distributecustom properties among them.
The next section that is displayed is the Example Subnode section as shown inFigure 242 on page 354. Because this is the first time to configure this agent, thereare no subnode instances defined and no subnode instance subsections are shown.The initial property values subsection is shown, although it is optional and somesubnode types might not show it. Because the initial property values subsection isshown, default values can be entered for any of the configuration properties. TheOverridable Cfg property already has a default value that was obtained from theagent-level property of the same name.
Figure 241. Main section with the agent-wide default value for the Overridable Cfg property
Chapter 29. Creating subnodes 353

Subnode instances are defined by performing the following actions on the emptyExample Subnode section page (Figure 243 on page 355):1. In the initial Example Subnode section, in the Subnode Cfg field, type the
following default string for the property: sub-default value.2. Click New. The first Example Subnode subsection is displayed below the
initial properties subsection.3. In the Example Subnode field, type the following subnode instance ID: do.4. Click New. A second Example Subnode subsection appears below the first.5. In the second Example Subnode field, type the following subnode instance ID:
re.6. In the Subnode Cfg field, type the following value for the Subnode Cfg
property: sc override.7. In the Overridable Cfg field, type the following value for the Overridable Cfg
property: oc override.
Figure 242. Example Subnode section page with no subnode
354 IBM Tivoli Monitoring Agent Builder: User's Guide
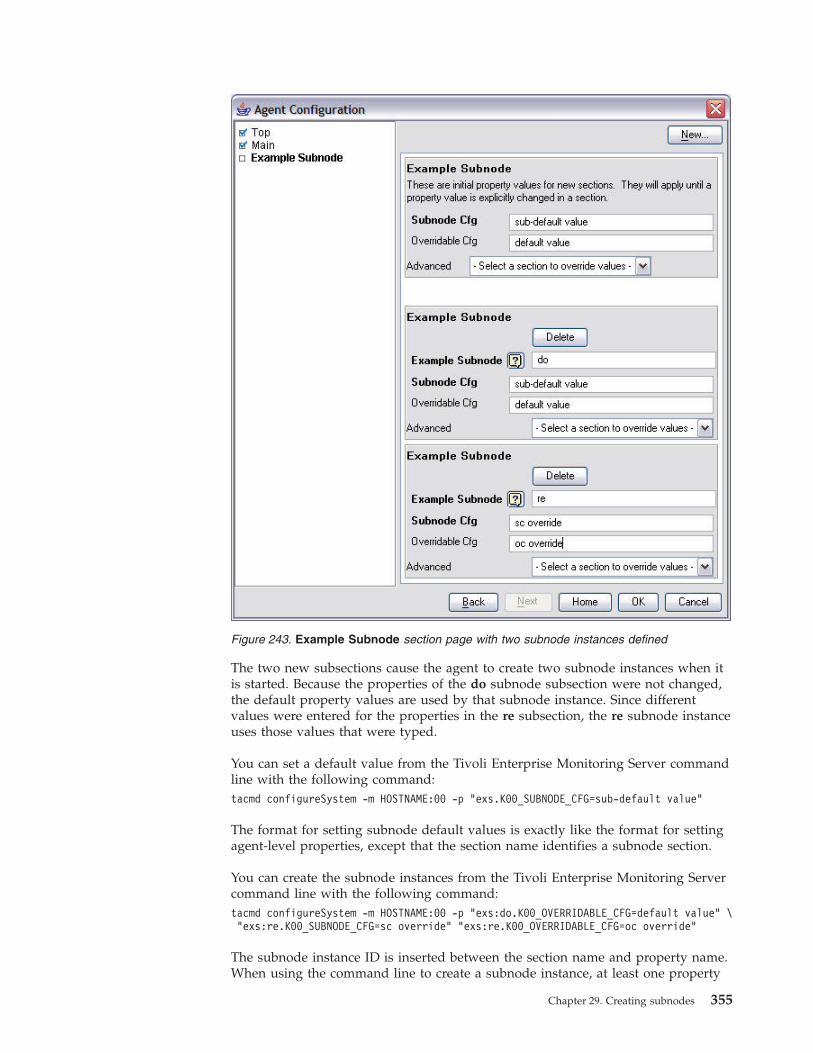
The two new subsections cause the agent to create two subnode instances when itis started. Because the properties of the do subnode subsection were not changed,the default property values are used by that subnode instance. Since differentvalues were entered for the properties in the re subsection, the re subnode instanceuses those values that were typed.
You can set a default value from the Tivoli Enterprise Monitoring Server commandline with the following command:tacmd configureSystem -m HOSTNAME:00 -p "exs.K00_SUBNODE_CFG=sub-default value"
The format for setting subnode default values is exactly like the format for settingagent-level properties, except that the section name identifies a subnode section.
You can create the subnode instances from the Tivoli Enterprise Monitoring Servercommand line with the following command:tacmd configureSystem -m HOSTNAME:00 -p "exs:do.K00_OVERRIDABLE_CFG=default value" \"exs:re.K00_SUBNODE_CFG=sc override" "exs:re.K00_OVERRIDABLE_CFG=oc override"
The subnode instance ID is inserted between the section name and property name.When using the command line to create a subnode instance, at least one property
Figure 243. Example Subnode section page with two subnode instances defined
Chapter 29. Creating subnodes 355
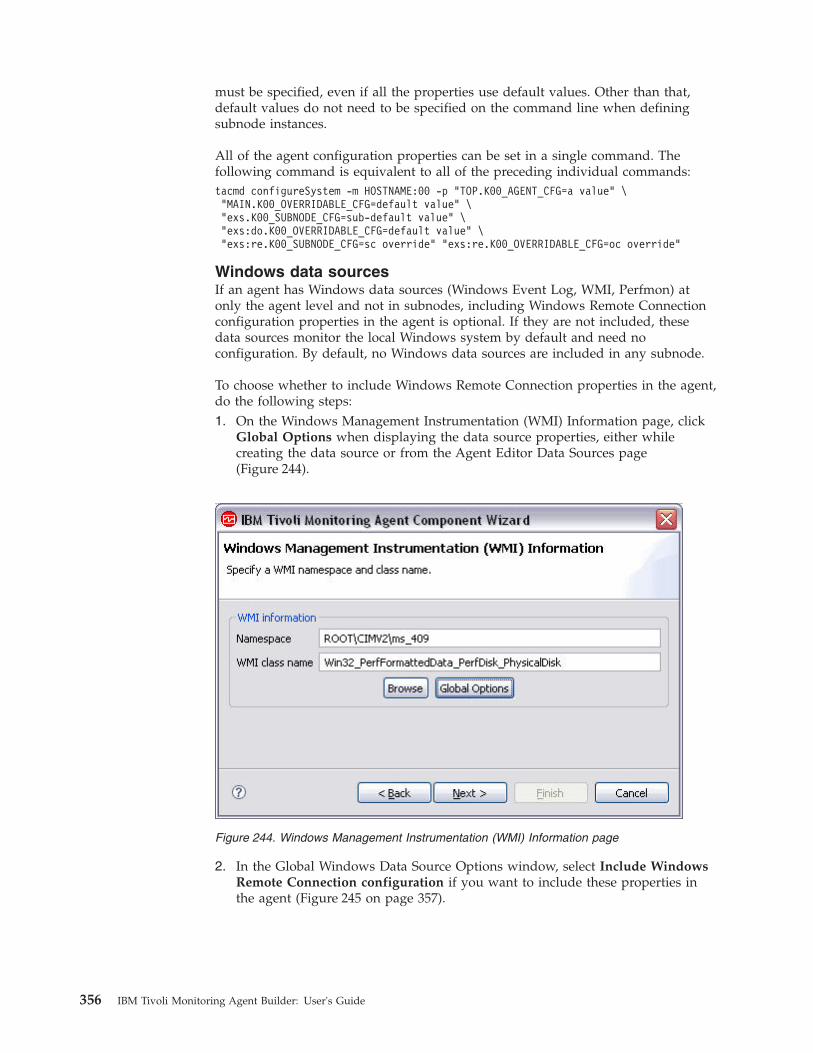
must be specified, even if all the properties use default values. Other than that,default values do not need to be specified on the command line when definingsubnode instances.
All of the agent configuration properties can be set in a single command. Thefollowing command is equivalent to all of the preceding individual commands:tacmd configureSystem -m HOSTNAME:00 -p "TOP.K00_AGENT_CFG=a value" \"MAIN.K00_OVERRIDABLE_CFG=default value" \"exs.K00_SUBNODE_CFG=sub-default value" \"exs:do.K00_OVERRIDABLE_CFG=default value" \"exs:re.K00_SUBNODE_CFG=sc override" "exs:re.K00_OVERRIDABLE_CFG=oc override"
Windows data sourcesIf an agent has Windows data sources (Windows Event Log, WMI, Perfmon) atonly the agent level and not in subnodes, including Windows Remote Connectionconfiguration properties in the agent is optional. If they are not included, thesedata sources monitor the local Windows system by default and need noconfiguration. By default, no Windows data sources are included in any subnode.
To choose whether to include Windows Remote Connection properties in the agent,do the following steps:1. On the Windows Management Instrumentation (WMI) Information page, click
Global Options when displaying the data source properties, either whilecreating the data source or from the Agent Editor Data Sources page(Figure 244).
2. In the Global Windows Data Source Options window, select Include WindowsRemote Connection configuration if you want to include these properties inthe agent (Figure 245 on page 357).
Figure 244. Windows Management Instrumentation (WMI) Information page
356 IBM Tivoli Monitoring Agent Builder: User's Guide

Script data sourcesSubnode instance configuration properties are accessed in subnode scripts just asthey are in agent-level scripts. Scripts have access to all agent-level configurationproperties and all subnode instance configuration properties. If an agent-levelproperty is overridden at the subnode level, the script has access only to thesubnode level property value.
Figure 245. Global Windows Data Source Options
Chapter 29. Creating subnodes 357

358 IBM Tivoli Monitoring Agent Builder: User's Guide
Chapter 30. Configuring an agent
If you are adding SNMP, JMX, CIM, JDBC, HTTP, and SOAP data sources to youragent, you configure these data sources while defining the data source as describedin the following chapters:v Chapter 12, “Monitoring data from a Simple Network Management Protocol
(SNMP),” on page 121v Chapter 14, “Monitoring Java Management Extensions (JMX) MBeans,” on page
141v Chapter 15, “Monitoring data from a Common Information Model (CIM),” on
page 173v Chapter 21, “Monitoring data from Java Database Connectivity (JDBC),” on page
237v Chapter 23, “Monitoring HTTP availability and response time,” on page 261v Chapter 24, “Monitoring data using SOAP,” on page 273
This chapter provides information about the following topics:v Customizing the configuration of process, log file, and script data sources so an
agent can access the application it is monitoringv Changing configuration properties using the Agent Editorv Configuring a Windows remote connectionv Configuring an SSH remote connection
All IBM Tivoli Monitoring agents must be configured before they can be started.All agents must have basic configuration information such as the method ofconnecting to the Tivoli Enterprise Monitoring Server. Many times, an agent musthave additional configuration information so it has access to information specific tothe system on which it is running. For example, if you must know the installationlocation of a software product, or the user ID and password to access an interface,you can add configuration properties to prompt for this information.
Customizing configurationCustom configuration is defined by the agent developer. It is not required for allagents, but can be used in the following areas of data collection:v Matching an argument in a Process Monitorv Matching the command line in a Process Monitorv Forming a log file path or namev Defining an environment variable in a script
Note: Certain data sources such as JMX and SNMP add this configurationautomatically.
Note: When data source specific configuration is added automatically by theAgent Builder, this configuration is added in English only.
© Copyright IBM Corp. 2007, 2012 359
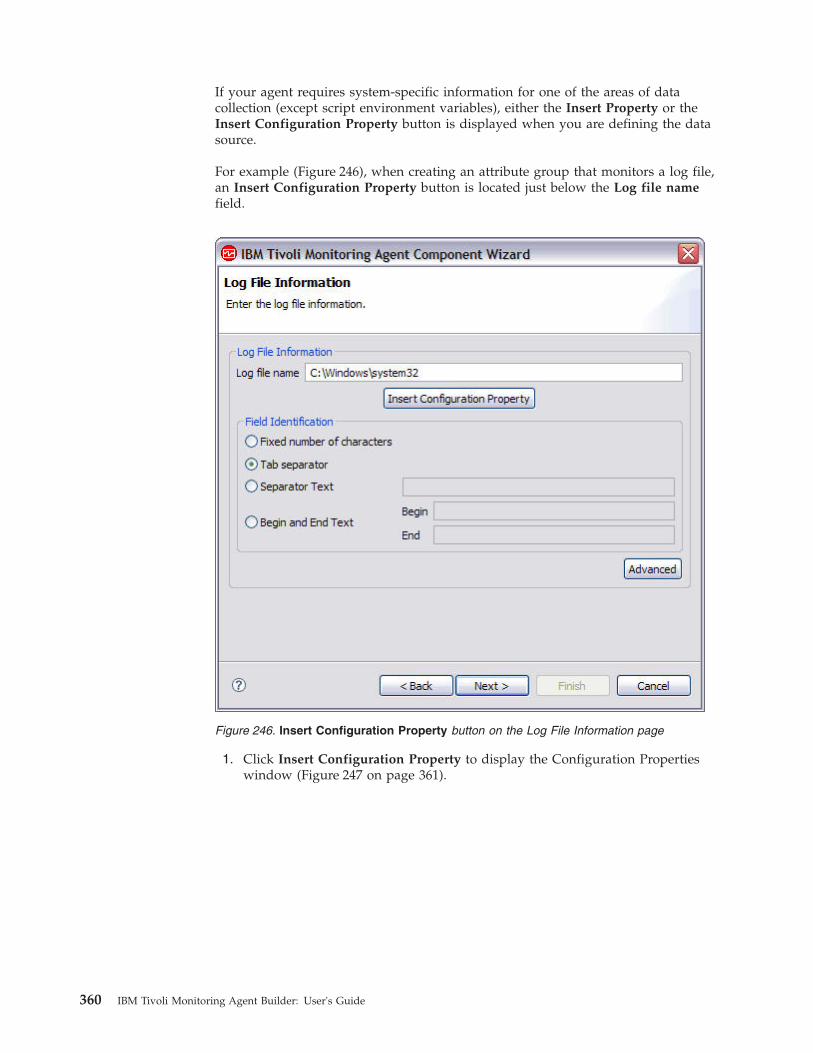
If your agent requires system-specific information for one of the areas of datacollection (except script environment variables), either the Insert Property or theInsert Configuration Property button is displayed when you are defining the datasource.
For example (Figure 246), when creating an attribute group that monitors a log file,an Insert Configuration Property button is located just below the Log file namefield.
1. Click Insert Configuration Property to display the Configuration Propertieswindow (Figure 247 on page 361).
Figure 246. Insert Configuration Property button on the Log File Information page
360 IBM Tivoli Monitoring Agent Builder: User's Guide
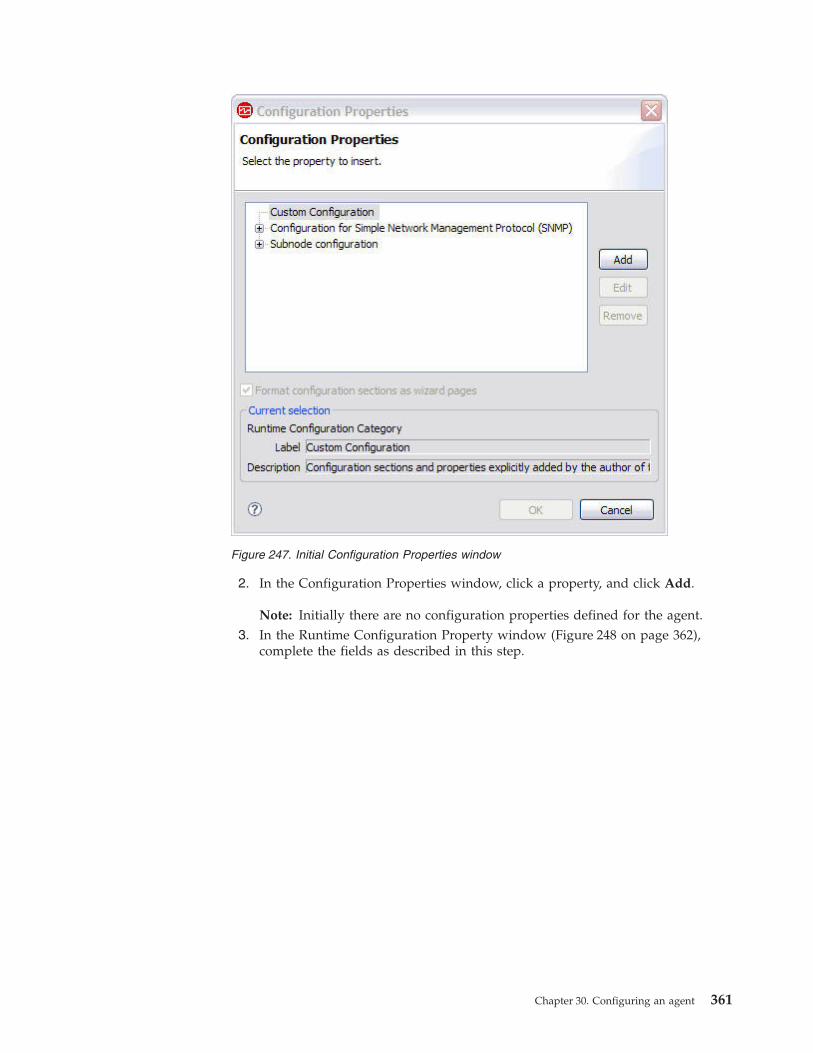
2. In the Configuration Properties window, click a property, and click Add.
Note: Initially there are no configuration properties defined for the agent.3. In the Runtime Configuration Property window (Figure 248 on page 362),
complete the fields as described in this step.
Figure 247. Initial Configuration Properties window
Chapter 30. Configuring an agent 361
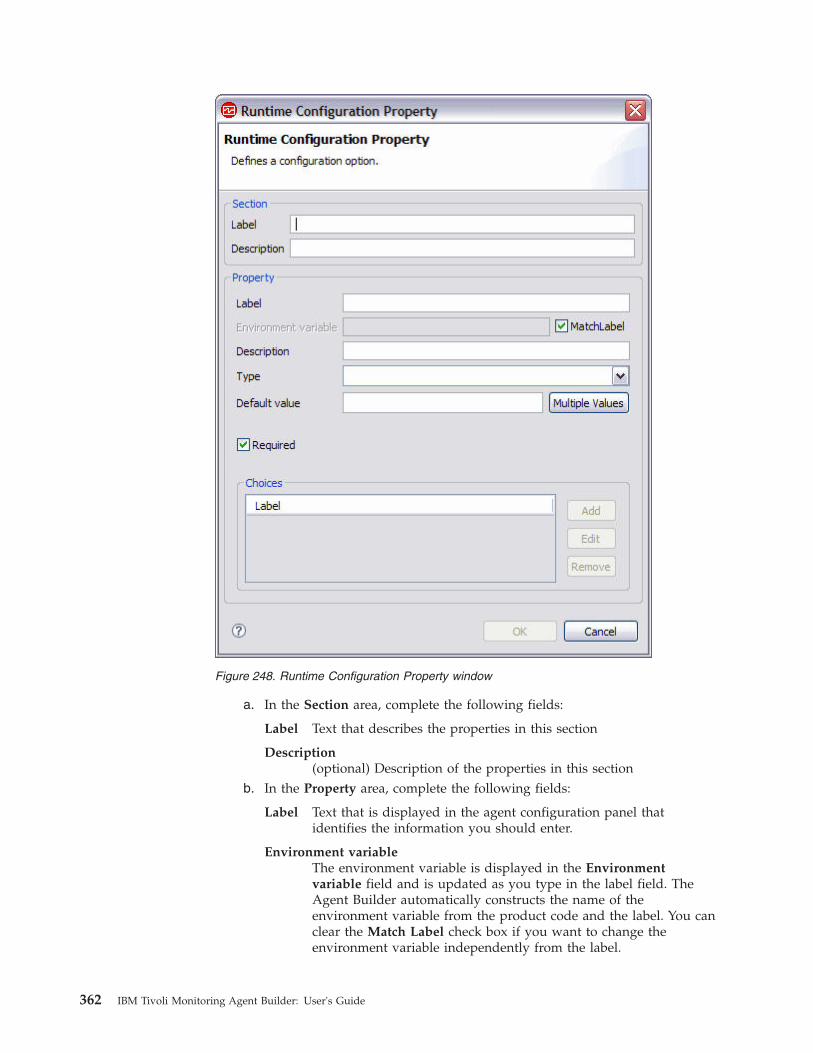
a. In the Section area, complete the following fields:
Label Text that describes the properties in this section
Description(optional) Description of the properties in this section
b. In the Property area, complete the following fields:
Label Text that is displayed in the agent configuration panel thatidentifies the information you should enter.
Environment variableThe environment variable is displayed in the Environmentvariable field and is updated as you type in the label field. TheAgent Builder automatically constructs the name of theenvironment variable from the product code and the label. You canclear the Match Label check box if you want to change theenvironment variable independently from the label.
Figure 248. Runtime Configuration Property window
362 IBM Tivoli Monitoring Agent Builder: User's Guide
Description(optional) Description of the property that is being defined.
Type Type of information being collected, one of the following options:
String For any alphabetic information that needs to be collected(for example, installation locations, user names, and hostnames).
PasswordFor any information that must be encrypted when stored.In addition to providing encryption of the data, the datatyped into the text box is obscured by asterisks. Inaddition, you are required to type this information twice tovalidate the data.
NumericFor any numeric information (for example, port numbers).
ChoiceFor a list of specific values. This option enables theChoices table. You can define specific values by clickingAdd. The values entered are displayed in the agentconfiguration panel as a group of radio buttons, you canmake only one selection from the group of buttons.
Read Only TextDisplays text when configuring the agent, but noinformation is collected.
SeparatorDisplays a horizontal separator, but no information iscollected.
File BrowserCollects a string, which is a file name. A Browse buttonenables you to browse the file system for the desired file.
Default value(Optional) Specify the value that will appear in the configurationpanel at runtime when the agent is configured for the first time. Ifyou want a default value for UNIX/Linux that is different from adefault value for Windows, click Multiple Values.
In the Configuration Property Default Values window (Figure 249on page 364), specify the default values you want for Windowsand for UNIX and Linux.
Chapter 30. Configuring an agent 363
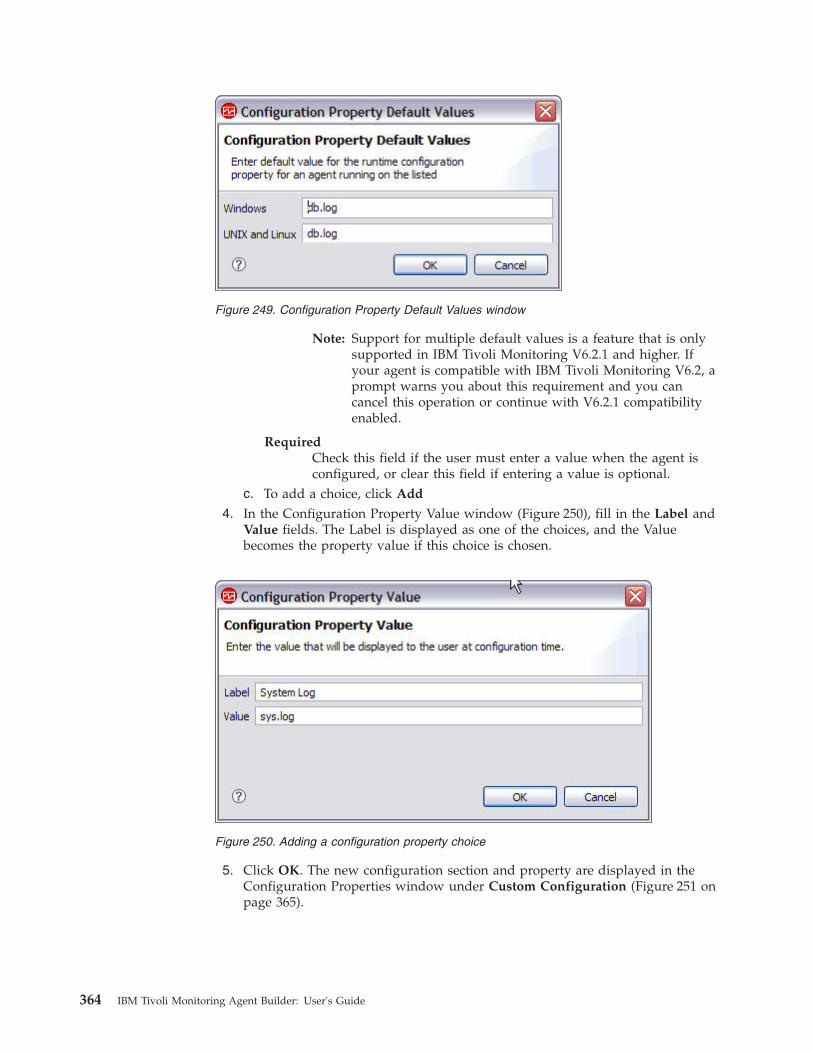
Note: Support for multiple default values is a feature that is onlysupported in IBM Tivoli Monitoring V6.2.1 and higher. Ifyour agent is compatible with IBM Tivoli Monitoring V6.2, aprompt warns you about this requirement and you cancancel this operation or continue with V6.2.1 compatibilityenabled.
RequiredCheck this field if the user must enter a value when the agent isconfigured, or clear this field if entering a value is optional.
c. To add a choice, click Add
4. In the Configuration Property Value window (Figure 250), fill in the Label andValue fields. The Label is displayed as one of the choices, and the Valuebecomes the property value if this choice is chosen.
5. Click OK. The new configuration section and property are displayed in theConfiguration Properties window under Custom Configuration (Figure 251 onpage 365).
Figure 249. Configuration Property Default Values window
Figure 250. Adding a configuration property choice
364 IBM Tivoli Monitoring Agent Builder: User's Guide
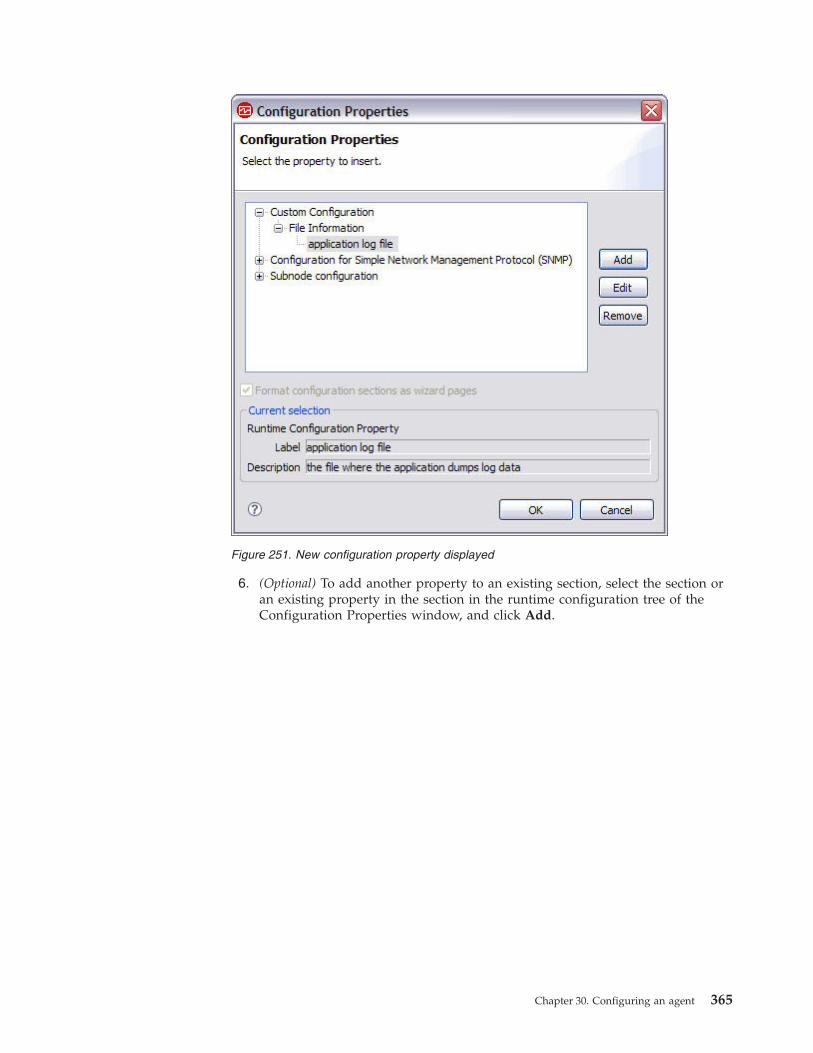
6. (Optional) To add another property to an existing section, select the section oran existing property in the section in the runtime configuration tree of theConfiguration Properties window, and click Add.
Figure 251. New configuration property displayed
Chapter 30. Configuring an agent 365
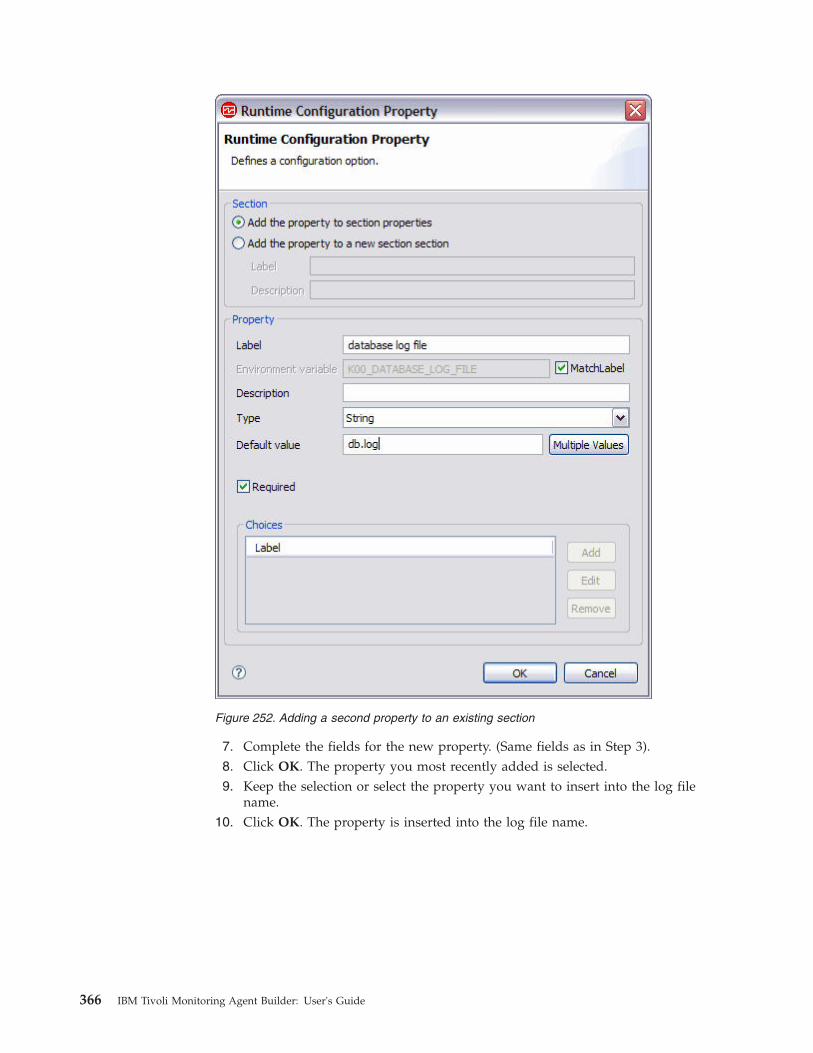
7. Complete the fields for the new property. (Same fields as in Step 3).8. Click OK. The property you most recently added is selected.9. Keep the selection or select the property you want to insert into the log file
name.10. Click OK. The property is inserted into the log file name.
Figure 252. Adding a second property to an existing section
366 IBM Tivoli Monitoring Agent Builder: User's Guide
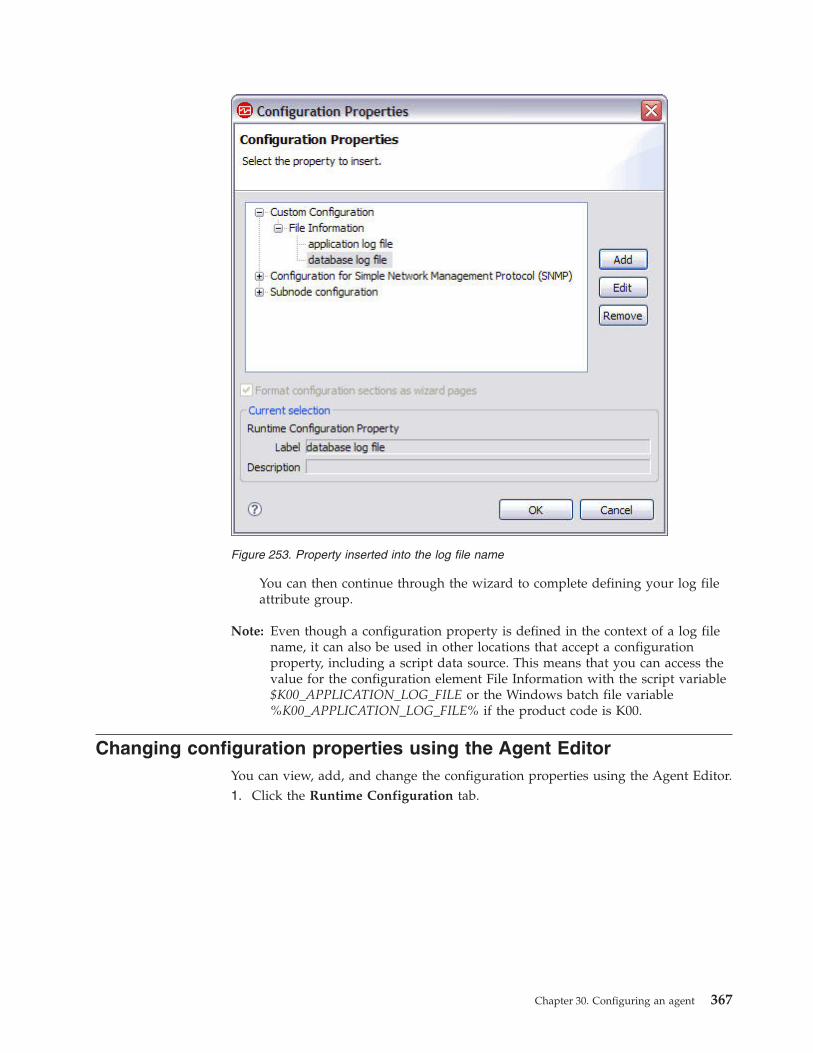
You can then continue through the wizard to complete defining your log fileattribute group.
Note: Even though a configuration property is defined in the context of a log filename, it can also be used in other locations that accept a configurationproperty, including a script data source. This means that you can access thevalue for the configuration element File Information with the script variable$K00_APPLICATION_LOG_FILE or the Windows batch file variable%K00_APPLICATION_LOG_FILE% if the product code is K00.
Changing configuration properties using the Agent EditorYou can view, add, and change the configuration properties using the Agent Editor.1. Click the Runtime Configuration tab.
Figure 253. Property inserted into the log file name
Chapter 30. Configuring an agent 367
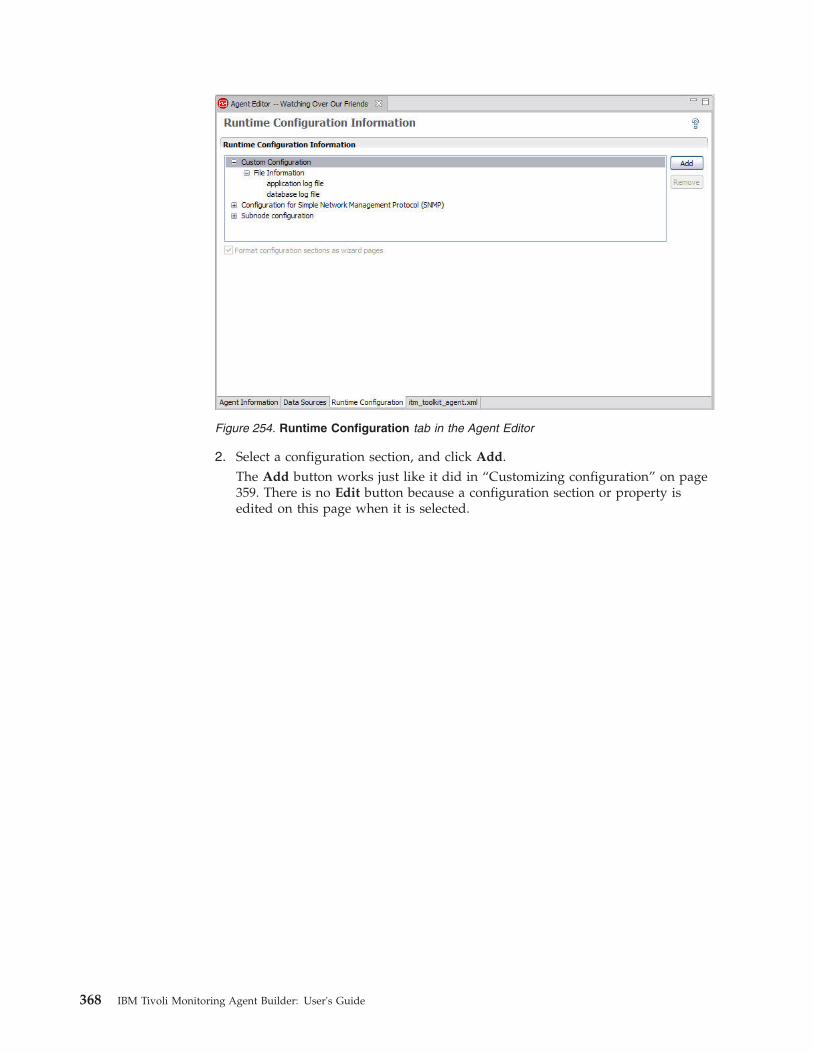
2. Select a configuration section, and click Add.The Add button works just like it did in “Customizing configuration” on page359. There is no Edit button because a configuration section or property isedited on this page when it is selected.
Figure 254. Runtime Configuration tab in the Agent Editor
368 IBM Tivoli Monitoring Agent Builder: User's Guide
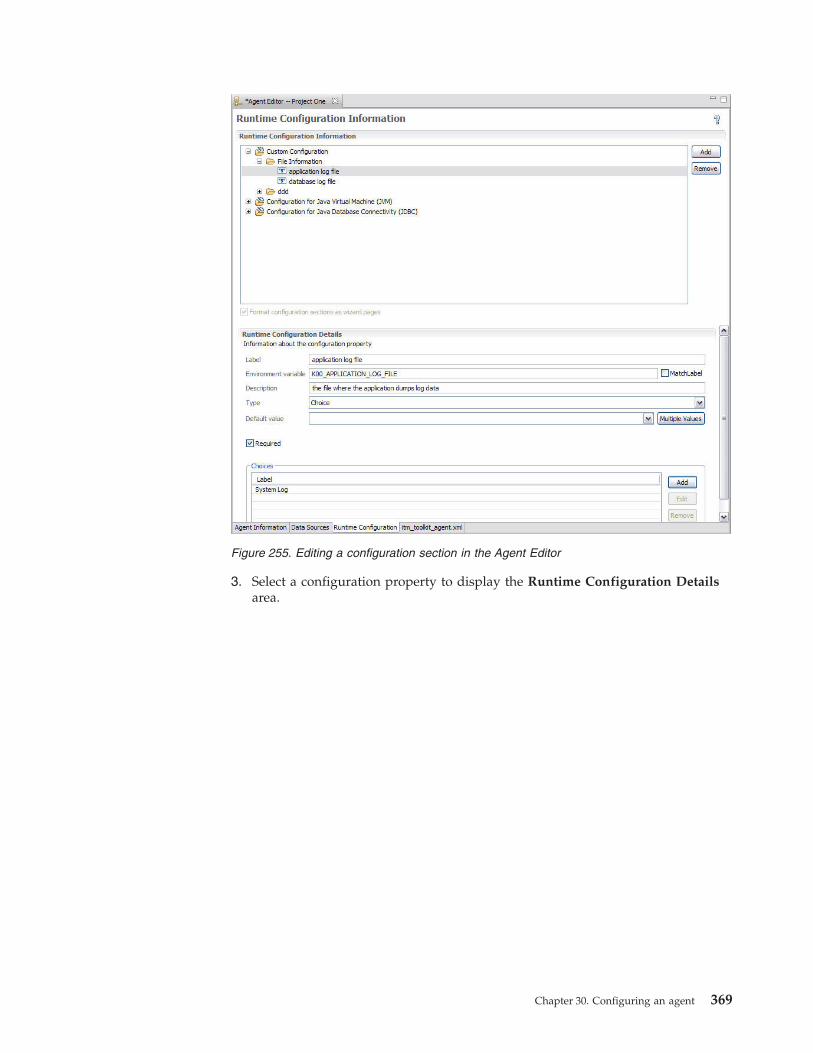
3. Select a configuration property to display the Runtime Configuration Detailsarea.
Figure 255. Editing a configuration section in the Agent Editor
Chapter 30. Configuring an agent 369
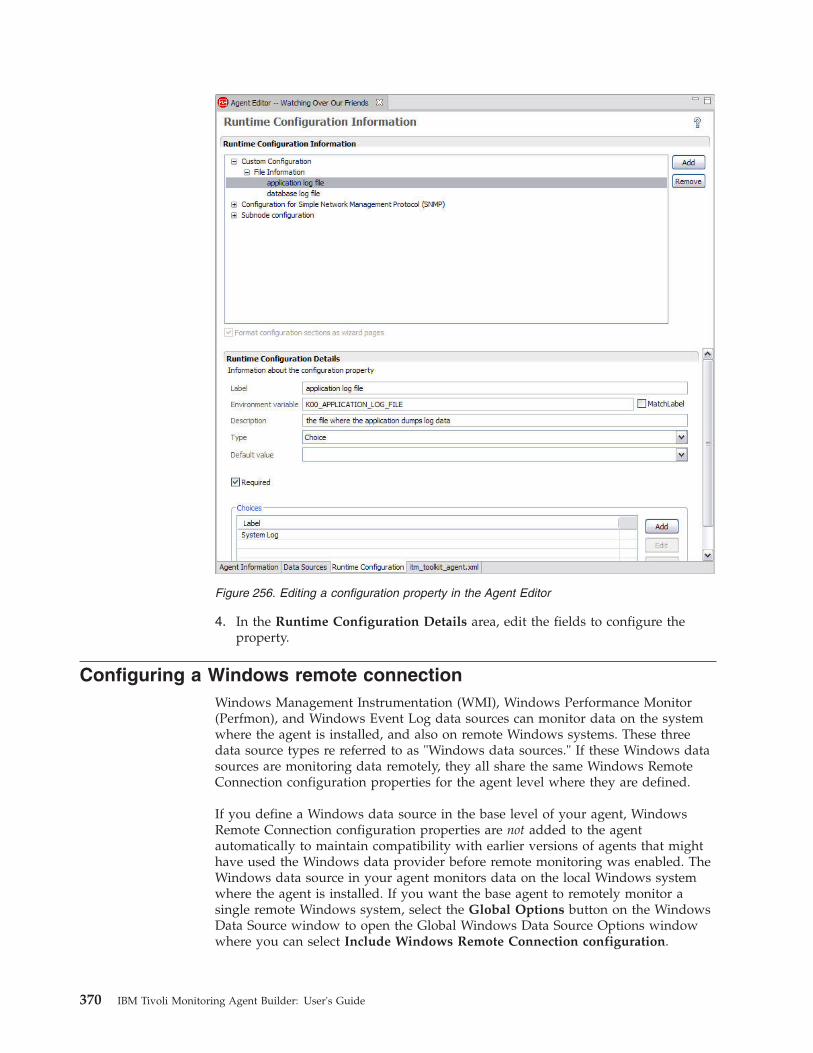
4. In the Runtime Configuration Details area, edit the fields to configure theproperty.
Configuring a Windows remote connectionWindows Management Instrumentation (WMI), Windows Performance Monitor(Perfmon), and Windows Event Log data sources can monitor data on the systemwhere the agent is installed, and also on remote Windows systems. These threedata source types re referred to as "Windows data sources." If these Windows datasources are monitoring data remotely, they all share the same Windows RemoteConnection configuration properties for the agent level where they are defined.
If you define a Windows data source in the base level of your agent, WindowsRemote Connection configuration properties are not added to the agentautomatically to maintain compatibility with earlier versions of agents that mighthave used the Windows data provider before remote monitoring was enabled. TheWindows data source in your agent monitors data on the local Windows systemwhere the agent is installed. If you want the base agent to remotely monitor asingle remote Windows system, select the Global Options button on the WindowsData Source window to open the Global Windows Data Source Options windowwhere you can select Include Windows Remote Connection configuration.
Figure 256. Editing a configuration property in the Agent Editor
370 IBM Tivoli Monitoring Agent Builder: User's Guide
If you define a Windows data source in a subnode in your agent, Windows RemoteConnection configuration properties are added to the agent automatically. TheWindows data source must allow Windows Remote Connection if it is in asubnode and you cannot clear the option until all windows data sources areremoved from all subnodes in the agent. Each instance of a subnode might beconfigured to monitor a different remote Windows system. All Windows datasources in the subnode will share the same Windows Remote Connectionconfiguration properties.
You can view, add, and change the configuration properties using the Agent Editor.See “Changing configuration properties using the Agent Editor” on page 367. If aWindows data source is defined in a subnode, you can also specify SubnodeConfiguration Overrides. See “Subnode configuration” on page 344.
The following connection specific configuration properties are on the WindowsRemote Connection configuration page:
Remote Windows hostHost name of remote Windows computer
Remote Windows passwordPassword for remote Windows
Remote Windows DOMAIN\user nameUser name for the remote Windows host
Configuring a Secure Shell (SSH) remote connectionScript data sources can monitor data on the system where the agent is installedand also on remote systems. If script data sources are monitoring data remotely,they all share the same SSH remote connection configuration properties for theagent level where they are defined. To maintain compatibility with earlier versionsof agents that might have used the script data provider before remote monitoringwas enabled, SSH remote connection configuration properties are not automaticallyadded to the agent. The script data source in your agent monitors data on the localsystem where the agent is installed.
If you want the agent to remotely monitor a remote system, click Global Optionson the Script Data Source window to open the Global Script Data Source Optionswindow. Here you can select the Include SSH Remote connection configurationcheck box. If you define a Script data source in a subnode in your agent and youchoose to enable the SSH remote connection configuration properties, you canconfigure each instance of a subnode to monitor a different remote system. Allscript data sources in the subnode share the same SSH remote connectionconfiguration properties.
You can view, add, and change the configuration properties using the Agent Editor.See (“Changing configuration properties using the Agent Editor” on page 367). Ifthe SSH Remote Connection configuration properties are included in a subnode,you can also specify Subnode Configuration Overrides. See (“Subnodeconfiguration” on page 344).
The following connection-specific configuration properties are on the SSH remoteconnection configuration page:
Network addressThe IP address or host name of the remote computer.
Chapter 30. Configuring an agent 371

SSH Port NumberThe IP port number on which the SSH server is running. The default valueis 22.
Authentication TypeType of authentication to use when logging in to the remote SSH server.You can choose Password or Public Key.
Disconnect from the remote system after each collection intervalAn option to determine if the script data provider drops the login sessionto the remote system after collecting data. By default, the value is No.
Remove script from the remote system after each collection intervalAn option to delete the script from the remote system after each datacollection interval. By default, the value is No.
If the Authentication Type is set to Password, the following configurationproperties are enabled on the Password Configuration page:
UsernameUser name for the remote system
PasswordPassword for the remote system
If Authentication Type is set to Public Key, the following configuration propertiesare enabled on the Public Key Configuration page:
UsernameUser name associated with the public key file
Public KeyfilePublic key file associated with the user
Private KeyfilePrivate key file associated with the user
PasswordPassword used to unlock the private key file
372 IBM Tivoli Monitoring Agent Builder: User's Guide
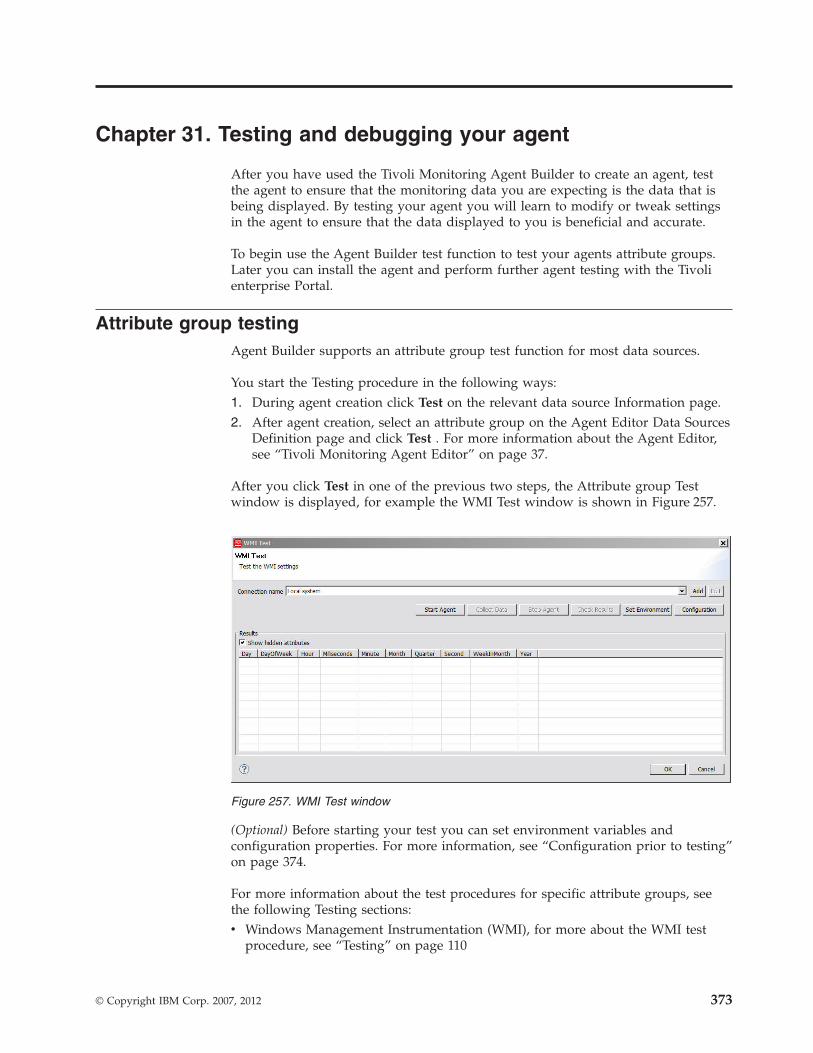
Chapter 31. Testing and debugging your agent
After you have used the Tivoli Monitoring Agent Builder to create an agent, testthe agent to ensure that the monitoring data you are expecting is the data that isbeing displayed. By testing your agent you will learn to modify or tweak settingsin the agent to ensure that the data displayed to you is beneficial and accurate.
To begin use the Agent Builder test function to test your agents attribute groups.Later you can install the agent and perform further agent testing with the Tivolienterprise Portal.
Attribute group testingAgent Builder supports an attribute group test function for most data sources.
You start the Testing procedure in the following ways:1. During agent creation click Test on the relevant data source Information page.2. After agent creation, select an attribute group on the Agent Editor Data Sources
Definition page and click Test . For more information about the Agent Editor,see “Tivoli Monitoring Agent Editor” on page 37.
After you click Test in one of the previous two steps, the Attribute group Testwindow is displayed, for example the WMI Test window is shown in Figure 257.
(Optional) Before starting your test you can set environment variables andconfiguration properties. For more information, see “Configuration prior to testing”on page 374.
For more information about the test procedures for specific attribute groups, seethe following Testing sections:v Windows Management Instrumentation (WMI), for more about the WMI test
procedure, see “Testing” on page 110
Figure 257. WMI Test window
© Copyright IBM Corp. 2007, 2012 373
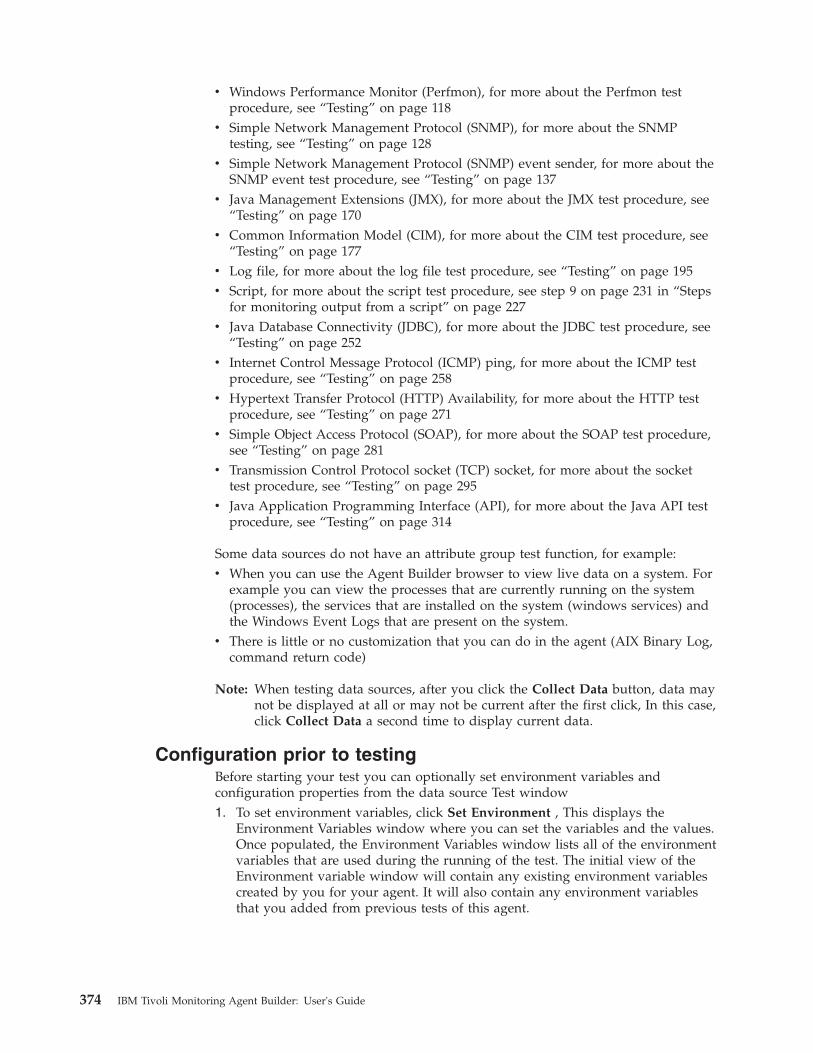
v Windows Performance Monitor (Perfmon), for more about the Perfmon testprocedure, see “Testing” on page 118
v Simple Network Management Protocol (SNMP), for more about the SNMPtesting, see “Testing” on page 128
v Simple Network Management Protocol (SNMP) event sender, for more about theSNMP event test procedure, see “Testing” on page 137
v Java Management Extensions (JMX), for more about the JMX test procedure, see“Testing” on page 170
v Common Information Model (CIM), for more about the CIM test procedure, see“Testing” on page 177
v Log file, for more about the log file test procedure, see “Testing” on page 195v Script, for more about the script test procedure, see step 9 on page 231 in “Steps
for monitoring output from a script” on page 227v Java Database Connectivity (JDBC), for more about the JDBC test procedure, see
“Testing” on page 252v Internet Control Message Protocol (ICMP) ping, for more about the ICMP test
procedure, see “Testing” on page 258v Hypertext Transfer Protocol (HTTP) Availability, for more about the HTTP test
procedure, see “Testing” on page 271v Simple Object Access Protocol (SOAP), for more about the SOAP test procedure,
see “Testing” on page 281v Transmission Control Protocol socket (TCP) socket, for more about the socket
test procedure, see “Testing” on page 295v Java Application Programming Interface (API), for more about the Java API test
procedure, see “Testing” on page 314
Some data sources do not have an attribute group test function, for example:v When you can use the Agent Builder browser to view live data on a system. For
example you can view the processes that are currently running on the system(processes), the services that are installed on the system (windows services) andthe Windows Event Logs that are present on the system.
v There is little or no customization that you can do in the agent (AIX Binary Log,command return code)
Note: When testing data sources, after you click the Collect Data button, data maynot be displayed at all or may not be current after the first click, In this case,click Collect Data a second time to display current data.
Configuration prior to testingBefore starting your test you can optionally set environment variables andconfiguration properties from the data source Test window1. To set environment variables, click Set Environment , This displays the
Environment Variables window where you can set the variables and the values.Once populated, the Environment Variables window lists all of the environmentvariables that are used during the running of the test. The initial view of theEnvironment variable window will contain any existing environment variablescreated by you for your agent. It will also contain any environment variablesthat you added from previous tests of this agent.
374 IBM Tivoli Monitoring Agent Builder: User's Guide
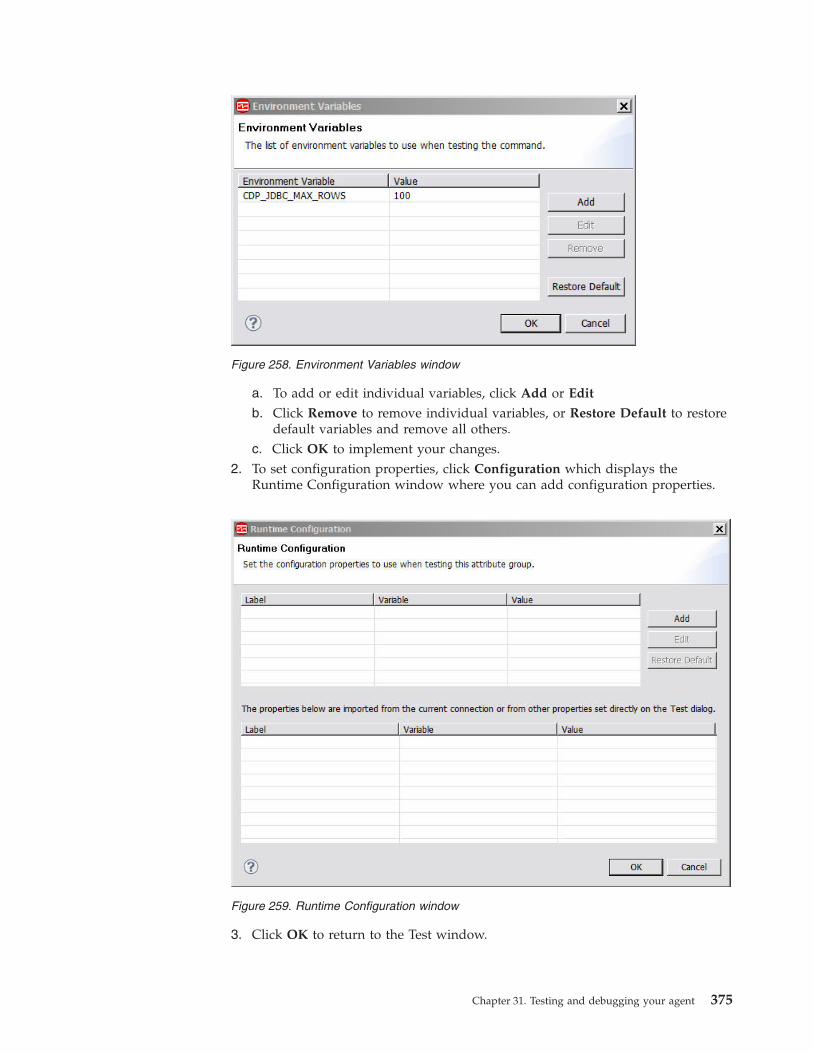
a. To add or edit individual variables, click Add or Edit
b. Click Remove to remove individual variables, or Restore Default to restoredefault variables and remove all others.
c. Click OK to implement your changes.2. To set configuration properties, click Configuration which displays the
Runtime Configuration window where you can add configuration properties.
3. Click OK to return to the Test window.
Figure 258. Environment Variables window
Figure 259. Runtime Configuration window
Chapter 31. Testing and debugging your agent 375
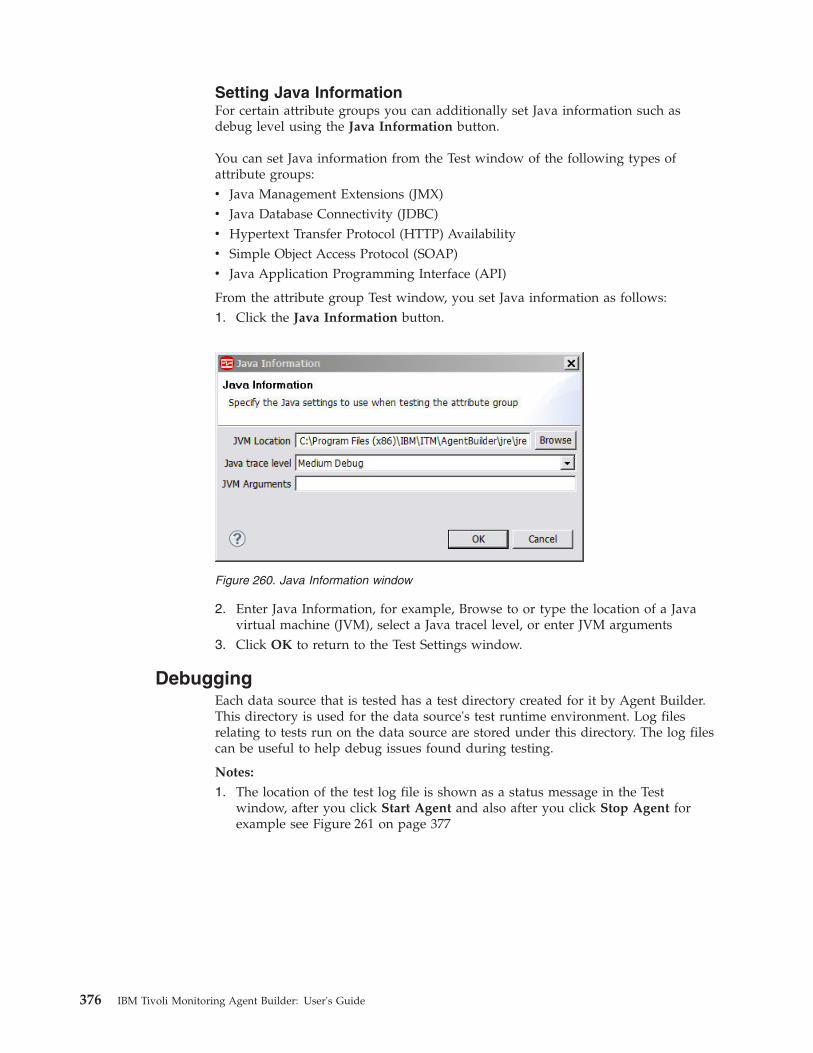
Setting Java InformationFor certain attribute groups you can additionally set Java information such asdebug level using the Java Information button.
You can set Java information from the Test window of the following types ofattribute groups:v Java Management Extensions (JMX)v Java Database Connectivity (JDBC)v Hypertext Transfer Protocol (HTTP) Availabilityv Simple Object Access Protocol (SOAP)v Java Application Programming Interface (API)
From the attribute group Test window, you set Java information as follows:1. Click the Java Information button.
2. Enter Java Information, for example, Browse to or type the location of a Javavirtual machine (JVM), select a Java tracel level, or enter JVM arguments
3. Click OK to return to the Test Settings window.
DebuggingEach data source that is tested has a test directory created for it by Agent Builder.This directory is used for the data source's test runtime environment. Log filesrelating to tests run on the data source are stored under this directory. The log filescan be useful to help debug issues found during testing.
Notes:
1. The location of the test log file is shown as a status message in the Testwindow, after you click Start Agent and also after you click Stop Agent forexample see Figure 261 on page 377
Figure 260. Java Information window
376 IBM Tivoli Monitoring Agent Builder: User's Guide
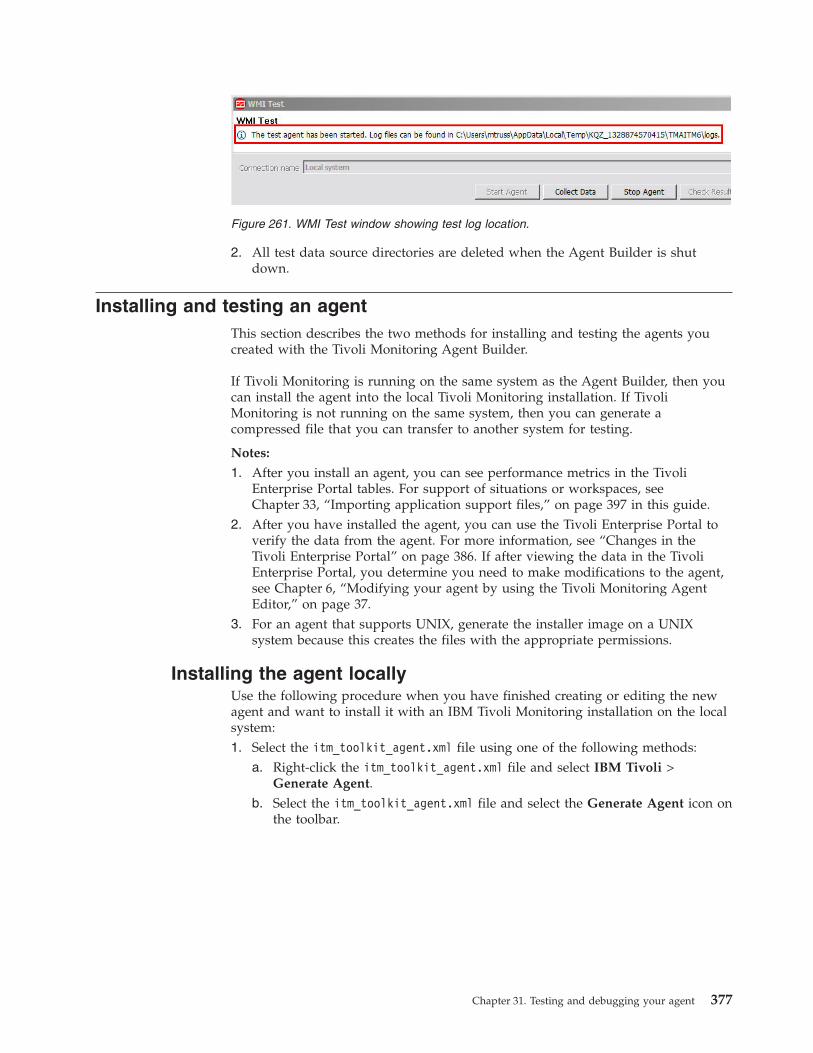
2. All test data source directories are deleted when the Agent Builder is shutdown.
Installing and testing an agentThis section describes the two methods for installing and testing the agents youcreated with the Tivoli Monitoring Agent Builder.
If Tivoli Monitoring is running on the same system as the Agent Builder, then youcan install the agent into the local Tivoli Monitoring installation. If TivoliMonitoring is not running on the same system, then you can generate acompressed file that you can transfer to another system for testing.
Notes:
1. After you install an agent, you can see performance metrics in the TivoliEnterprise Portal tables. For support of situations or workspaces, seeChapter 33, “Importing application support files,” on page 397 in this guide.
2. After you have installed the agent, you can use the Tivoli Enterprise Portal toverify the data from the agent. For more information, see “Changes in theTivoli Enterprise Portal” on page 386. If after viewing the data in the TivoliEnterprise Portal, you determine you need to make modifications to the agent,see Chapter 6, “Modifying your agent by using the Tivoli Monitoring AgentEditor,” on page 37.
3. For an agent that supports UNIX, generate the installer image on a UNIXsystem because this creates the files with the appropriate permissions.
Installing the agent locallyUse the following procedure when you have finished creating or editing the newagent and want to install it with an IBM Tivoli Monitoring installation on the localsystem:1. Select the itm_toolkit_agent.xml file using one of the following methods:
a. Right-click the itm_toolkit_agent.xml file and select IBM Tivoli >Generate Agent.
b. Select the itm_toolkit_agent.xml file and select the Generate Agent icon onthe toolbar.
Figure 261. WMI Test window showing test log location.
Chapter 31. Testing and debugging your agent 377
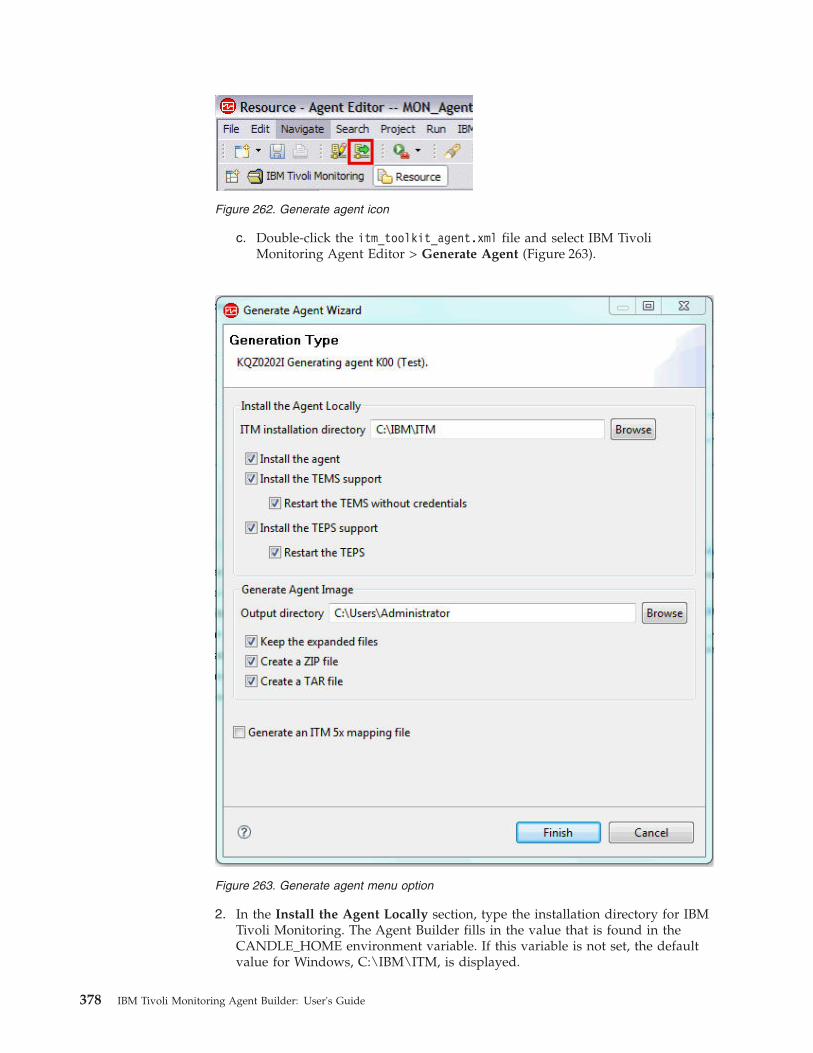
c. Double-click the itm_toolkit_agent.xml file and select IBM TivoliMonitoring Agent Editor > Generate Agent (Figure 263).
2. In the Install the Agent Locally section, type the installation directory for IBMTivoli Monitoring. The Agent Builder fills in the value that is found in theCANDLE_HOME environment variable. If this variable is not set, the defaultvalue for Windows, C:\IBM\ITM, is displayed.
Figure 262. Generate agent icon
Figure 263. Generate agent menu option
378 IBM Tivoli Monitoring Agent Builder: User's Guide
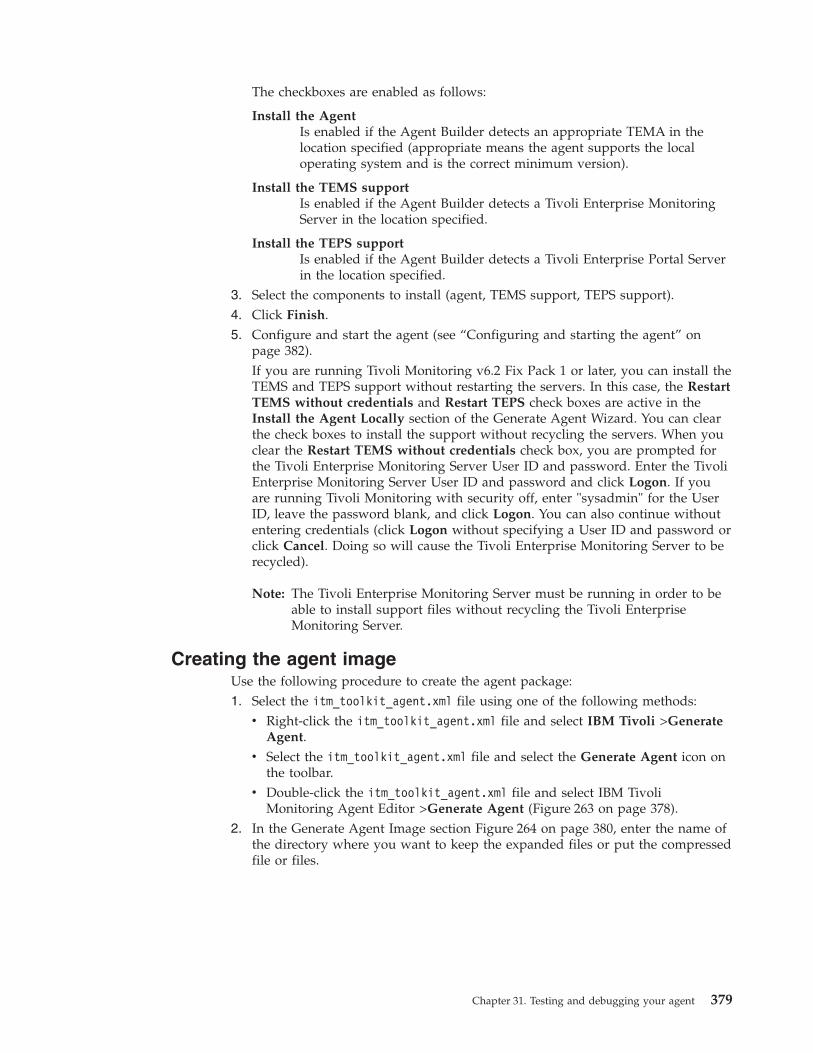
The checkboxes are enabled as follows:
Install the AgentIs enabled if the Agent Builder detects an appropriate TEMA in thelocation specified (appropriate means the agent supports the localoperating system and is the correct minimum version).
Install the TEMS supportIs enabled if the Agent Builder detects a Tivoli Enterprise MonitoringServer in the location specified.
Install the TEPS supportIs enabled if the Agent Builder detects a Tivoli Enterprise Portal Serverin the location specified.
3. Select the components to install (agent, TEMS support, TEPS support).4. Click Finish.5. Configure and start the agent (see “Configuring and starting the agent” on
page 382).If you are running Tivoli Monitoring v6.2 Fix Pack 1 or later, you can install theTEMS and TEPS support without restarting the servers. In this case, the RestartTEMS without credentials and Restart TEPS check boxes are active in theInstall the Agent Locally section of the Generate Agent Wizard. You can clearthe check boxes to install the support without recycling the servers. When youclear the Restart TEMS without credentials check box, you are prompted forthe Tivoli Enterprise Monitoring Server User ID and password. Enter the TivoliEnterprise Monitoring Server User ID and password and click Logon. If youare running Tivoli Monitoring with security off, enter "sysadmin" for the UserID, leave the password blank, and click Logon. You can also continue withoutentering credentials (click Logon without specifying a User ID and password orclick Cancel. Doing so will cause the Tivoli Enterprise Monitoring Server to berecycled).
Note: The Tivoli Enterprise Monitoring Server must be running in order to beable to install support files without recycling the Tivoli EnterpriseMonitoring Server.
Creating the agent imageUse the following procedure to create the agent package:1. Select the itm_toolkit_agent.xml file using one of the following methods:
v Right-click the itm_toolkit_agent.xml file and select IBM Tivoli >GenerateAgent.
v Select the itm_toolkit_agent.xml file and select the Generate Agent icon onthe toolbar.
v Double-click the itm_toolkit_agent.xml file and select IBM TivoliMonitoring Agent Editor >Generate Agent (Figure 263 on page 378).
2. In the Generate Agent Image section Figure 264 on page 380, enter the name ofthe directory where you want to keep the expanded files or put the compressedfile or files.
Chapter 31. Testing and debugging your agent 379
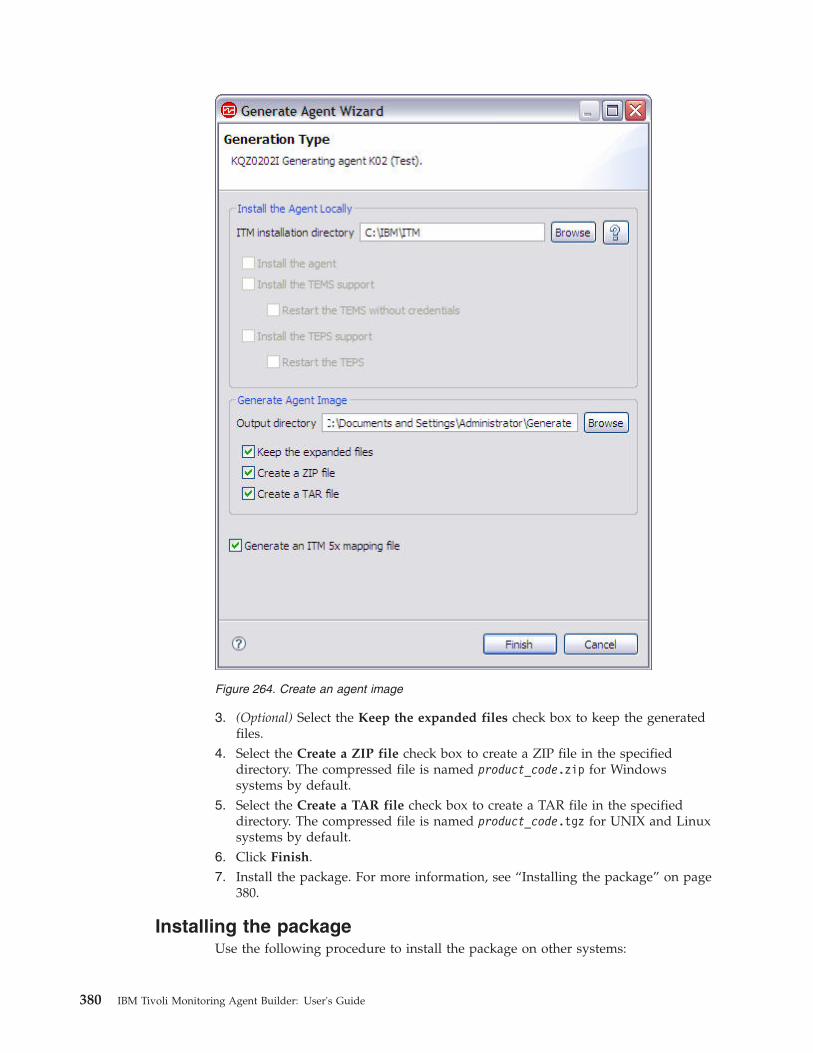
3. (Optional) Select the Keep the expanded files check box to keep the generatedfiles.
4. Select the Create a ZIP file check box to create a ZIP file in the specifieddirectory. The compressed file is named product_code.zip for Windowssystems by default.
5. Select the Create a TAR file check box to create a TAR file in the specifieddirectory. The compressed file is named product_code.tgz for UNIX and Linuxsystems by default.
6. Click Finish.7. Install the package. For more information, see “Installing the package” on page
380.
Installing the packageUse the following procedure to install the package on other systems:
Figure 264. Create an agent image
380 IBM Tivoli Monitoring Agent Builder: User's Guide
1. Copy the compressed file, which is named product_code.zip for Windowssystems or product_code.tgz for UNIX and Linux systems by default.
2. Extract the file in a temporary location.
Note: For UNIX, this temporary location cannot be /tmp/product_code, wherethe product code is lower case.
You can install remotely using the compressed file.On a Linux system use the following commands to extract your tgz file:tar -xvzf filename
On an AIX system use the following commands to extract your tgz file:gunzip filenametar -xvf filename
3. Run the appropriate installation script.v InstallIra.bat/.sh itm_install_location [[-h Hub_TEMS_hostname] -u
HUB_TEMS_username -p Hub_TEMS_password]-, installs the agent, TivoliEnterprise Monitoring Server, Tivoli Enterprise Portal Server, and TivoliEnterprise Portal support all at once.
v installIraAgent.bat/.sh itm_install_location - for the agent-only installation.v installIraAgentTEMS.bat/.sh itm_install_location [[-h Hub_TEMS_hostname] -u
HUB_TEMS_username -p Hub_TEMS_password] - installs the Tivoli EnterpriseMonitoring Server support.
v installIraAgentTEPS.bat/.sh itm_install_location - installs the Tivoli EnterprisePortal Server and Tivoli Enterprise Portal support.
The install location is mandatory on all scripts: installIra.bat/.sh,installIraAgent.bat/.sh, installIraAgentTEMS.bat/.sh,andinstallIraAgentTEPS.bat/.sh, and must be the first argument. The rest isoptional. If you are installing on a Tivoli Monitoring v6.2 Fix Pack 1 systemand do not provide a userid to the installIra or installIraAgentTEMS, then theTivoli Enterprise Monitoring Server will be recycled after the support files areinstalled. The Tivoli Enterprise Monitoring Server will restart during theprocess of loading the support. If the system on which you are installing isTivoli Monitoring v6.2, then the new arguments are not permitted, because thenew function that uses them is not available. On a Tivoli Monitoring v6.2 FixPack 1 system, if you provide the new arguments, then Tivoli EnterpriseMonitoring Server support will be loaded without causing the Tivoli EnterpriseMonitoring Server to restart.
Note: The agent, Tivoli Enterprise Monitoring Server, Tivoli Enterprise PortalServer, and Tivoli Enterprise Portal support must be installed before theagent is displayed correctly in the Tivoli Enterprise Portal.
4. Configure and start the agent (see “Configuring and starting the agent” onpage 382).
After you install the agentAfter installing the agent, if you have made any changes to the layout of youragent that cause Navigator items to be moved or removed, restart the TivoliEnterprise Portal Server and Tivoli Enterprise Portal for the changes to be correctlyrecognized.
Chapter 31. Testing and debugging your agent 381
Configuring and starting the agentThis section describes the procedure for installing agents that you created with theTivoli Monitoring Agent Builder.1. Open Manage Tivoli Monitoring Service. The new entry Monitoring Agent
for agent_name is displayed.
Note: If the Manage Tivoli Monitoring Service window is already displayed,you can refresh the screen to see the new service.
2. Right-click the entry and select Configure Using Defaults. Click OK to acceptthe defaults if you are prompted.
Notes:
a. On UNIX systems, the option to select is Configure.b. In the case of multi-instance agents, when you are configuring, you are
prompted for an instance name.3. If you added runtime configuration elements to your agent, or if you selected a
data source, then you are presented with configuration panels to collect therequired information for your agent.
4. Start the agent.5. Open the Tivoli Enterprise Portal and navigate to the new agent.
Results after generating and installing the agent with the AgentBuilder
This section describes changes that you see after generating and installing the newagent created with the Tivoli Monitoring Agent Builder.
New files on your systemAfter you generate and install the new agent that you created with the TivoliMonitoring Agent Builder, you can see the following new files on your agentsystem:
Note: xx denotes the two character product code.
Windows systems:
TMAITM6\kxxagent.exeAgent binary
TMAITM6\KxxENVEnvironment variable settings
TMAITM6\Kxx.refAgent provider configuration
TMAITM6\SQLLIB\kxx.hisSQL description of agent attribute information
TMAITM6\SQLLIB\kxx.atrAgent attribute information
TMAITM6\xx_dd_062000000.xmlProduct description
TMAITM6\xx_dd.propertiesProduct name
382 IBM Tivoli Monitoring Agent Builder: User's Guide
TMAITM6\kxxcma.iniAgent service definition file
TMAITM6\<your files>Supplemental Files included from the Java API or Socket data sources witha File Type of Executable or Library. Scripts included from the Script orCommand return code data sources.
UNIX/Linux systems:
registry/xxarchitecture.verInternal versions and prereqs file
architecture/xx/bin/xx_dd_061000000.xmlProduct description
architecture/xx/bin/kxxagentAgent binary
architecture/xx/bin/xx_dd.propertiesProduct name
architecture/xx/work/kxx.refAgent provider configuration
architecture/xx/tables/ATTRLIB/kxx.atrAgent attribute information
architecture/xx/hist/kxx.hisSQL description of agent attribute information
architecture/xx/bin/<your files>Supplemental Files included from the Java API or Socket data sources witha File Type of Executable. Scripts included from the Script or Commandreturn code data sources.
architecture/xx/lib/<your files>Supplemental Files included from the Java API or Socket data sources witha File Type of Library.
config/.xx.rcInternal setup file
config/xx.configEnvironment settings
config/xx_dd_062000000.xmlProduct description
config/xx_dd.propertiesProduct name
config/.ConfigData/kxxenvEnvironment variable settings
config/xx.iniEnvironment settings
Note: Run the following command to find out the architecture of the system:cinfo -pxx
where xx is the two-character product code.For example, for a Solaris 8 64-bit system running an agent with product code 19,here's the output:
Chapter 31. Testing and debugging your agent 383
# /opt/IBM/ITM/bin/cinfo -p 19
*********** Fri Aug 17 11:23:58 EDT 2007 ******************User : root Group: otherHost name : guadalajara Installer Lvl:06.20.00.00CandleHome: /opt/IBM/ITM***********************************************************Platform codes:sol286 : Current machinesol286 : Product (19)tmaitm6/sol286 : CT Framework (ax)
The line in bold is the relevant one-- the string left of the colon, "sol286" is thearchitecture in use for this agent. It will be different for different combinations ofoperating system and computer hardware type. Note that the agent must alreadybe installed in order for this to work.
The following are the files for the Java-based data sources. These files are onlycreated if the agent contains JMX, JDBC, HTTP or SOAP data sources:v cpci.jarv jlog.jarv common/jatlib-1.0.jar
The following are the files for JMX runtime support. These files are only created ifthe agent contains JMX data sources:v common/jmx-1.0.jarv common/connectors/jboss/connJboss-1.0.jarv common/connectors/jsr160/connJSR160-1.0.jarv common/connectors/was/connWas-1.0.jarv common/connectors/weblogic/connWeblogic-1.0.jar
The following are the files for JDBC runtime support. These files are only created ifthe agent contains JDBC data sources:v common/jdbc-1.0.jar
The following are the files for HTTP or SOAP runtime support. These files are onlycreated if the agent contains HTTP or SOAP data sources:v http-1.0.jar
The following are the files for the Java API runtime support. These files are onlycreated if the agent contains a Java API data source:v cpci.jarv custom/<your Jar file> The name of this Jar is specified in the Global settings
of a Java API data source.v custom/<your Jar file> Supplemental Files with a File Type of Java resource
The same files exist on both Windows and on UNIX/Linux systems for Java-baseddata sources, but they are in different directories:v Windows path: TMAITM6\kxx\jarsv UNIX/Linux path: architecture/xx/jars
The following are the files for Log File Monitoring runtime support. These files areonly created if the agent contains Log File data sources:v On Windows systems: TMAITM6\kxxudp.dll
384 IBM Tivoli Monitoring Agent Builder: User's Guide
v On Solaris/Linux systems: architecture/xx/lib/libkxxudp.sov On HP-UX systems: architecture/xx/lib/libkxxudp.slv On AIX systems: architecture/xx/lib/libkxxudp.a
The following are the files for SSH Script Monitoring runtime support. These filesare only created if the agent contains a script data source that has been enabled forSSH collection:v On Windows systems: TMAITM6\kxxssh.dllv On Solaris/Linux systems: architecture/xx/lib/libkxxssh.sov On HP-UX systems: architecture/xx/lib/libkxxssh.slv On AIX systems: architecture/xx/lib/libkxxssh.a
Changes in the Manage Tivoli Enterprise Monitoring Serviceswindow
After you generate and install the new agent that you created with the TivoliMonitoring Agent Builder, you can see an entry for the agent in the Manage TivoliEnterprise Monitoring Services window named Monitoring Agent for agent_name.
On Windows systems, this entry contains a Task/Subsystem column that identifieswhether your agent supports multiple instances:v A single instance agent displays a new application in the Manage Tivoli
Enterprise Monitoring Services window named Monitoring Agent foragent_name. A service is created for the agent (Figure 265 on page 386). TheTask/Subsystem column contains the value Primary.
v A multiple instance agent displays a new application template in the ManageTivoli Enterprise Monitoring Services window named Monitoring Agent foragent_name. A service is not created for the agent until you create an instance ofthe agent from this template. The Task/Subsystem column contains the valueTemplate to indicate this entry is a template that is used to create instances ofthe agent.
On UNIX systems, the entry for the agent is the same whether or not your agentsupports multiple instances.
Note: The following screens were taken from a Windows system. UNIX systemshave similar screens.
Chapter 31. Testing and debugging your agent 385
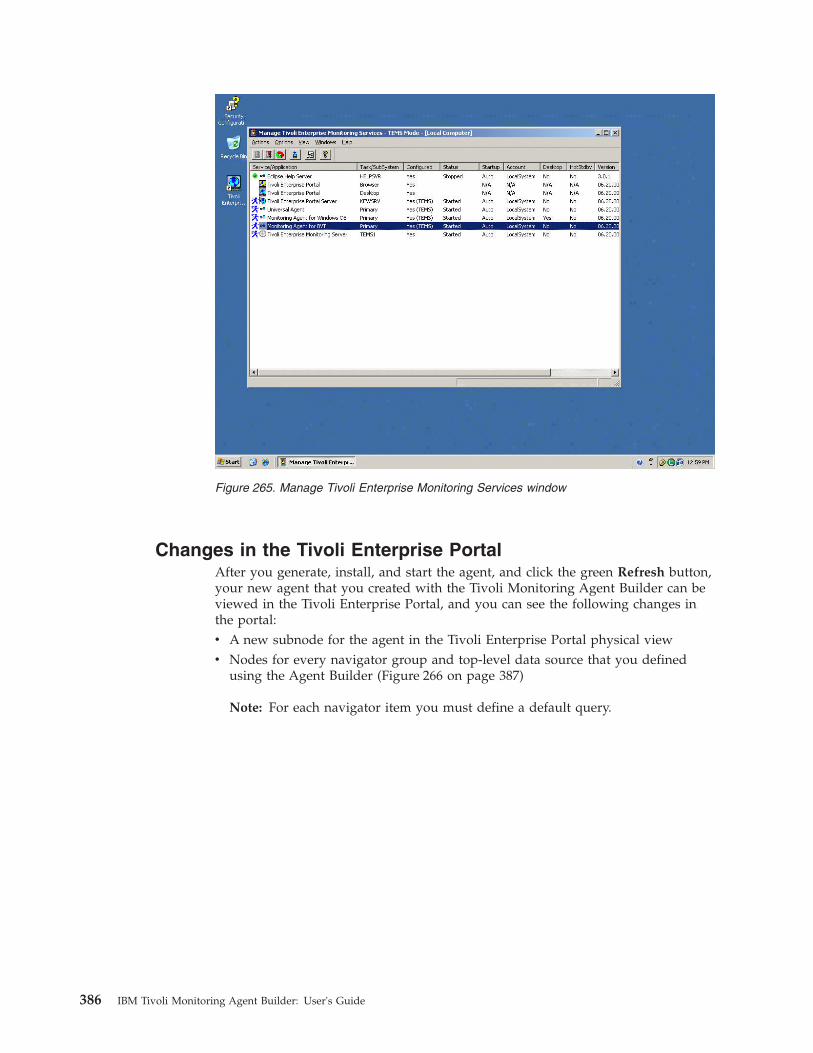
Changes in the Tivoli Enterprise PortalAfter you generate, install, and start the agent, and click the green Refresh button,your new agent that you created with the Tivoli Monitoring Agent Builder can beviewed in the Tivoli Enterprise Portal, and you can see the following changes inthe portal:v A new subnode for the agent in the Tivoli Enterprise Portal physical viewv Nodes for every navigator group and top-level data source that you defined
using the Agent Builder (Figure 266 on page 387)
Note: For each navigator item you must define a default query.
Figure 265. Manage Tivoli Enterprise Monitoring Services window
386 IBM Tivoli Monitoring Agent Builder: User's Guide
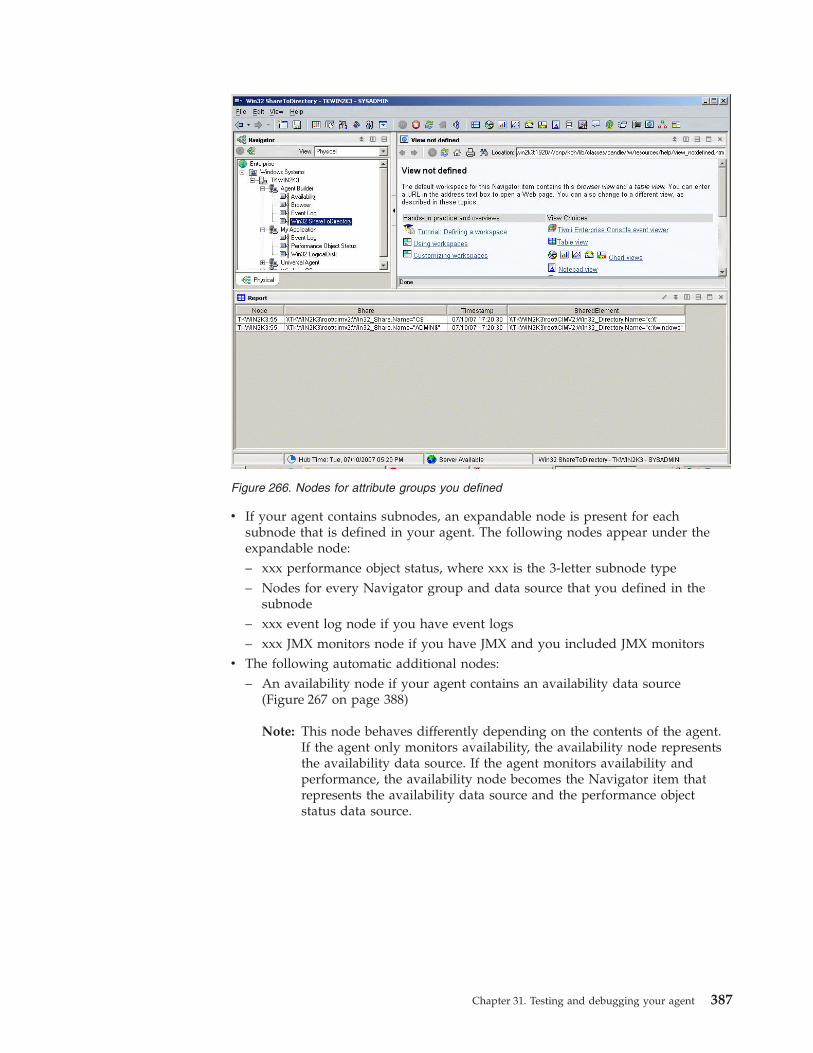
v If your agent contains subnodes, an expandable node is present for eachsubnode that is defined in your agent. The following nodes appear under theexpandable node:– xxx performance object status, where xxx is the 3-letter subnode type– Nodes for every Navigator group and data source that you defined in the
subnode– xxx event log node if you have event logs– xxx JMX monitors node if you have JMX and you included JMX monitors
v The following automatic additional nodes:– An availability node if your agent contains an availability data source
(Figure 267 on page 388)
Note: This node behaves differently depending on the contents of the agent.If the agent only monitors availability, the availability node representsthe availability data source. If the agent monitors availability andperformance, the availability node becomes the Navigator item thatrepresents the availability data source and the performance objectstatus data source.
Figure 266. Nodes for attribute groups you defined
Chapter 31. Testing and debugging your agent 387
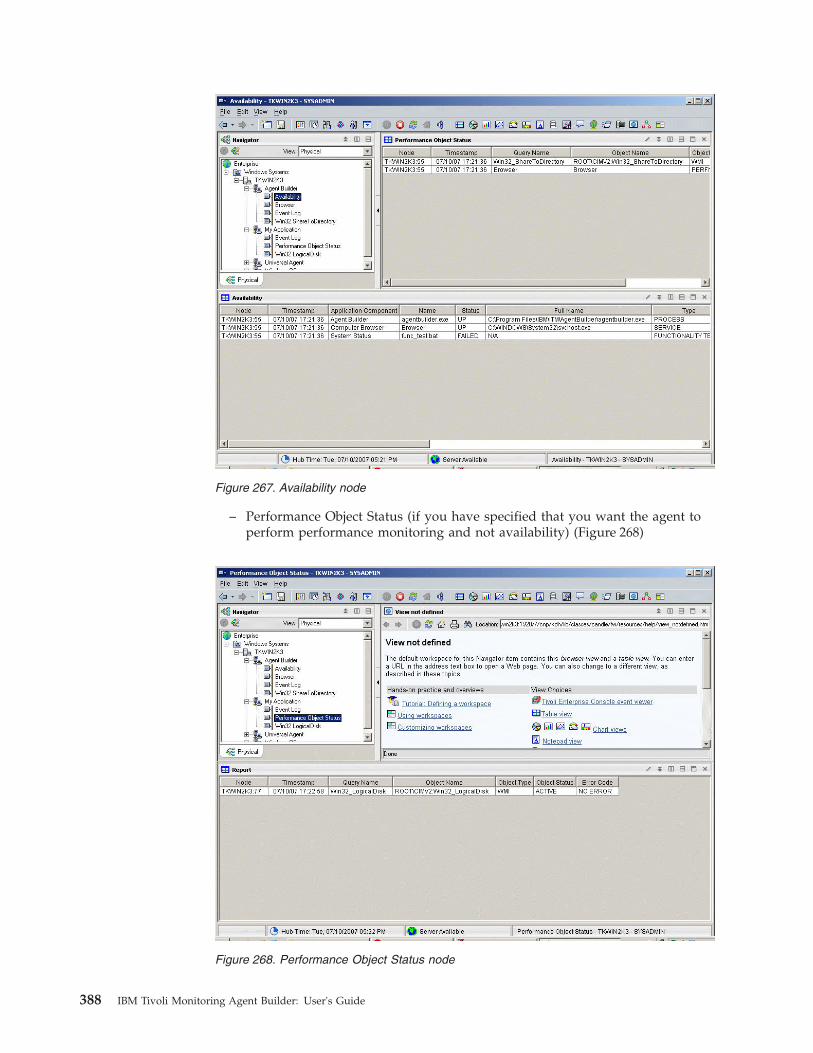
– Performance Object Status (if you have specified that you want the agent toperform performance monitoring and not availability) (Figure 268)
Figure 267. Availability node
Figure 268. Performance Object Status node
388 IBM Tivoli Monitoring Agent Builder: User's Guide

– Event log (if you have specified that filter for your agent) (Figure 269)
See Appendix C, “Attributes reference,” on page 529 for descriptions of theattribute groups and attributes for Agent Builder.
Uninstalling an agentThe uninstallation process uninstalls only the agent from the agent system. Thisprocess does not uninstall Tivoli Enterprise Monitoring Server, Tivoli EnterprisePortal Server, or Tivoli Enterprise Portal Desktop support.
You can use one of the following procedures to remove an agent that the AgentBuilder generated:v “Removing an agent using the Tivoli Enterprise Portal”v “Removing an agent without using Tivoli Enterprise Portal” on page 390
Removing an agent using the Tivoli Enterprise PortalTo use the Tivoli Enterprise Portal to remove an agent that the Agent Buildergenerated, perform the following step:
Right-click the agent from the Tivoli Enterprise Portal Navigation tree andselect Remove.
Note: Your OS agent must be running in order to remove your created agent.
Figure 269. Event log node
Chapter 31. Testing and debugging your agent 389

Removing an agent without using Tivoli Enterprise PortalWhen you want to remove an agent that the Agent Builder generated from thetarget system, but you do not have a Tivoli Enterprise Portal, you can use thefollowing commands:
Windows systems
Command:cd ITM_INSTALL/TMAITM6kxx_uninstall.vbs ITM_INSTALL
where xx is the product code for the agent
Uninstallation script: If you want to run the kxx_uninstall.vbs script from a scriptor from the command line, use the cscript kxx_uninstall.vbs command. (cscript.exeis the command line interface parser for vbs scripts and does not display awindow; instead, a message is displayed on the console.)
UNIX systemsUse the uninstall.sh file found in ITM_INSTALL/bin:uninstall.sh [-f] [-i] [-h ITM_INSTALL][product platformCode]
Clearing the agent from the Tivoli Enterprise Portal after removing theagent
After removing the agent using the Tivoli Enterprise Portal, or not using the TivoliEnterprise Portal, perform the following steps to clear the agent from the portal:1. Ensure your Tivoli Enterprise Monitoring Server and Tivoli Enterprise Portal
Server are up and running.2. Log in to your Tivoli Enterprise Portal client.3. From the Tivoli Enterprise Portal client Physical Navigator views, right-click
Enterprise and select Workspace > Managed System Status. The ManagedSystem Status workspace is displayed.
4. Select all of the IBM Tivoli Managed Systems for your agent.5. Right-click and select Clear off-line entry, which clears all of the entries from
that table.
390 IBM Tivoli Monitoring Agent Builder: User's Guide
Chapter 32. Creating workspaces, Take Action commands,and situations
After you have created, installed, and tested your agent solution, you can prepareto create workspaces, queries, Take Action commands, and situations for thesolution.
The situations, workspaces, Take Action commands, and queries that you createcan be included in the installation package. To have a single installation image forboth situations and workspaces, as well as the agent itself, the situation andworkspace files must be in the same project as the agent. The Agent Builderprovides a wizard to create the appropriate files in the agent project. forinformation about importing application support files, see Chapter 33, “Importingapplication support files,” on page 397.
Creating situations, Take Action commands, and queriesTo create situations, Take Action commands, and queries, use the Tivoli EnterprisePortal and the embedded Situation editor. For detailed information about how tocreate situations and queries, use the online IBM Tivoli Monitoring documentationor use the help documentation that is installed with your Tivoli Enterprise PortalServer. An Agent Builder monitoring agent can recognize and perform specialprocessing for a set of specific Take Action commands. For more information aboutthese special Take Action commands, see (Appendix K, “Take Action commandsreference,” on page 639).
Situations for system monitor agents are created differently from the Enterprisesituations that are created with the Tivoli Enterprise Portal Situation editor or thetacmd createSit command. For system monitor agents, private situations arecreated in a local private situation configuration XML file for the agent. Forinformation about creating situations for system monitor agents, see "Privatesituations" in the "Agent Autonomy" chapter of the IBM Tivoli MonitoringAdministrator's Guide.
Creating workspacesBuild the workspaces in the environment from which they will be used. Whenbuilding the workspaces, you must change the display settings on your computerto build workspaces at the lowest resolution normally used in your environmentenvironment. Building workspaces at a higher resolution can create views that aretoo cluttered to be used reasonably at lower resolutions.
To create workspaces that you can export and include in your solution, the TivoliEnterprise Portal must be placed in the "Administrator" mode. To place the TivoliEnterprise Portal in "Administrator" mode, perform the following steps:1. Go to the ITM_INSTALL/CNP directory and open the cnp.bat file. If you used the
default installation, this is the C:\IBM\ITM\CNP directory. In the cnp.bat file, youmust update the set _CMD= %_JAVA_CMD% line to include option-Dcnp.candle.mode="$_KCJ_$".If you want to create extensions on Linux or AIX systems, use the followingpath:/opt/IBM/ITM/li263/cj/bin/cnp.sh
© Copyright IBM Corp. 2007, 2012 391
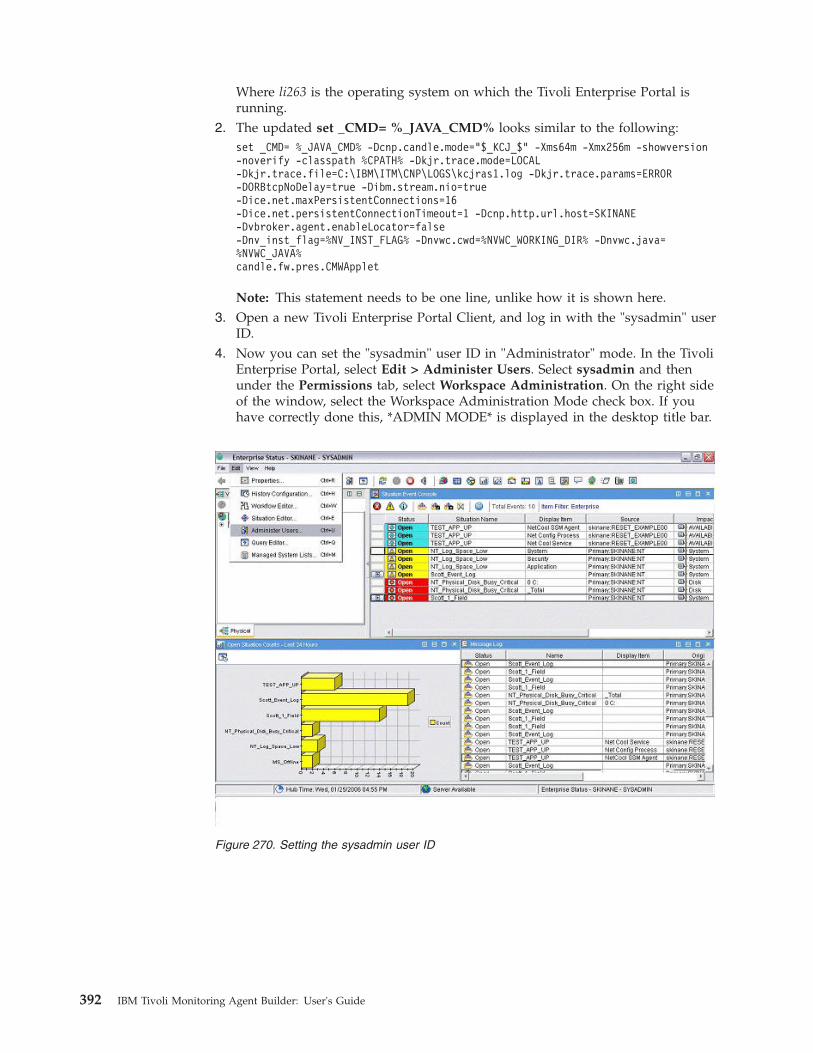
Where li263 is the operating system on which the Tivoli Enterprise Portal isrunning.
2. The updated set _CMD= %_JAVA_CMD% looks similar to the following:set _CMD= %_JAVA_CMD% -Dcnp.candle.mode="$_KCJ_$" -Xms64m -Xmx256m -showversion-noverify -classpath %CPATH% -Dkjr.trace.mode=LOCAL-Dkjr.trace.file=C:\IBM\ITM\CNP\LOGS\kcjras1.log -Dkjr.trace.params=ERROR-DORBtcpNoDelay=true -Dibm.stream.nio=true-Dice.net.maxPersistentConnections=16-Dice.net.persistentConnectionTimeout=1 -Dcnp.http.url.host=SKINANE-Dvbroker.agent.enableLocator=false-Dnv_inst_flag=%NV_INST_FLAG% -Dnvwc.cwd=%NVWC_WORKING_DIR% -Dnvwc.java=%NVWC_JAVA%candle.fw.pres.CMWApplet
Note: This statement needs to be one line, unlike how it is shown here.3. Open a new Tivoli Enterprise Portal Client, and log in with the "sysadmin" user
ID.4. Now you can set the "sysadmin" user ID in "Administrator" mode. In the Tivoli
Enterprise Portal, select Edit > Administer Users. Select sysadmin and thenunder the Permissions tab, select Workspace Administration. On the right sideof the window, select the Workspace Administration Mode check box. If youhave correctly done this, *ADMIN MODE* is displayed in the desktop title bar.
Figure 270. Setting the sysadmin user ID
392 IBM Tivoli Monitoring Agent Builder: User's Guide
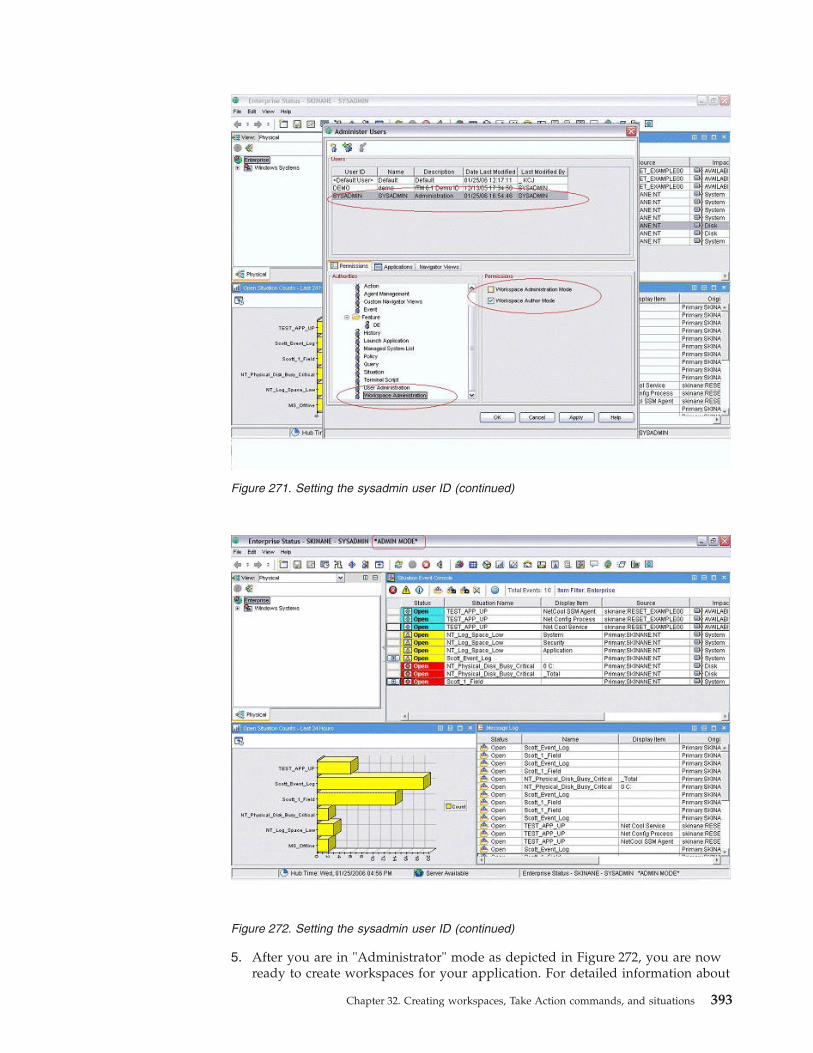
5. After you are in "Administrator" mode as depicted in Figure 272, you are nowready to create workspaces for your application. For detailed information about
Figure 271. Setting the sysadmin user ID (continued)
Figure 272. Setting the sysadmin user ID (continued)
Chapter 32. Creating workspaces, Take Action commands, and situations 393
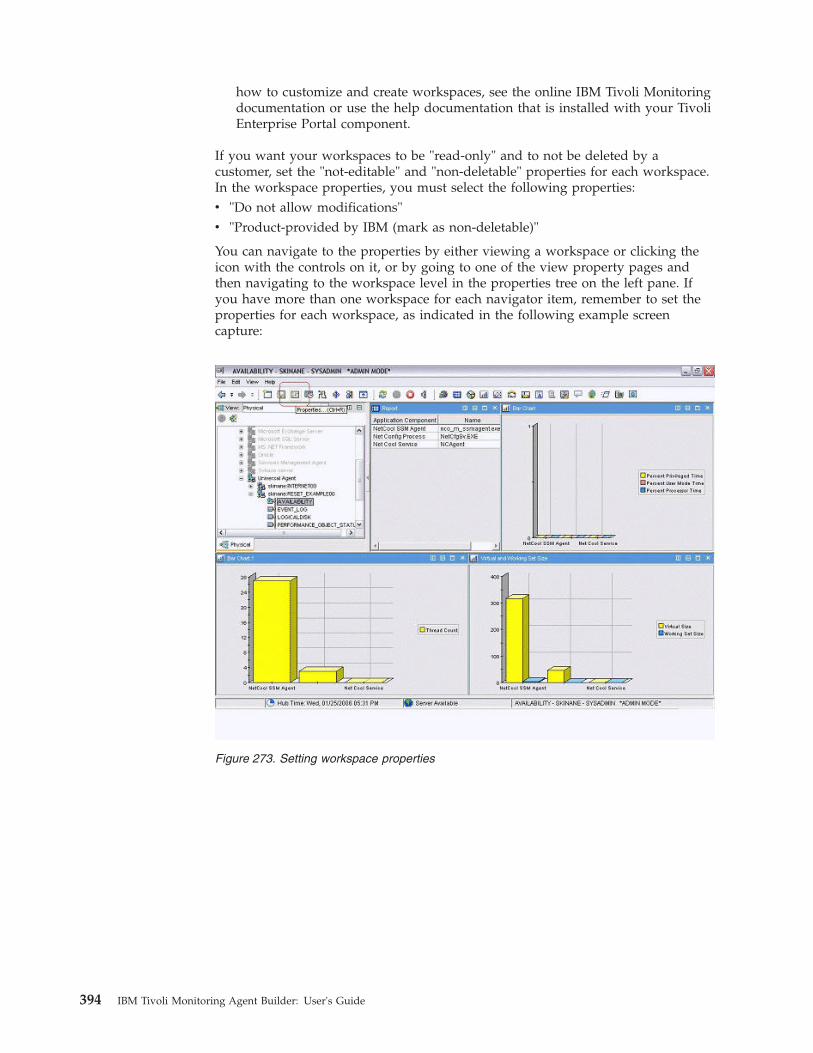
how to customize and create workspaces, see the online IBM Tivoli Monitoringdocumentation or use the help documentation that is installed with your TivoliEnterprise Portal component.
If you want your workspaces to be "read-only" and to not be deleted by acustomer, set the "not-editable" and "non-deletable" properties for each workspace.In the workspace properties, you must select the following properties:v "Do not allow modifications"v "Product-provided by IBM (mark as non-deletable)"
You can navigate to the properties by either viewing a workspace or clicking theicon with the controls on it, or by going to one of the view property pages andthen navigating to the workspace level in the properties tree on the left pane. Ifyou have more than one workspace for each navigator item, remember to set theproperties for each workspace, as indicated in the following example screencapture:
Figure 273. Setting workspace properties
394 IBM Tivoli Monitoring Agent Builder: User's Guide
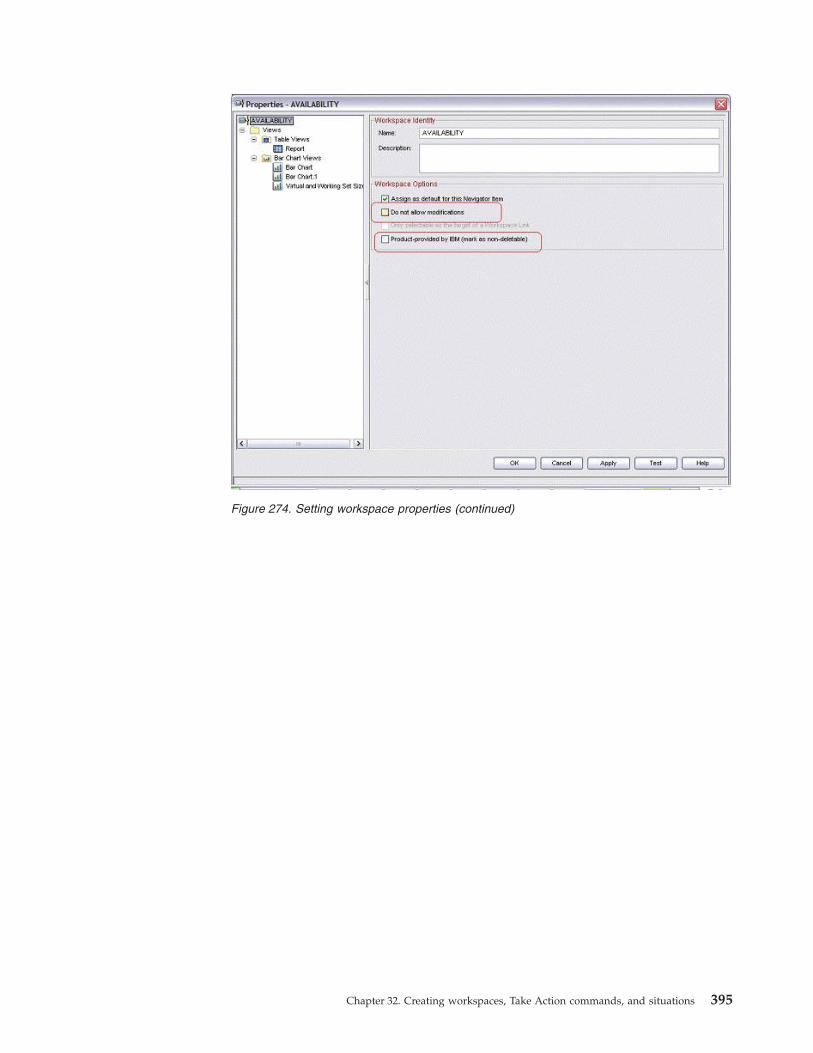
Figure 274. Setting workspace properties (continued)
Chapter 32. Creating workspaces, Take Action commands, and situations 395

396 IBM Tivoli Monitoring Agent Builder: User's Guide
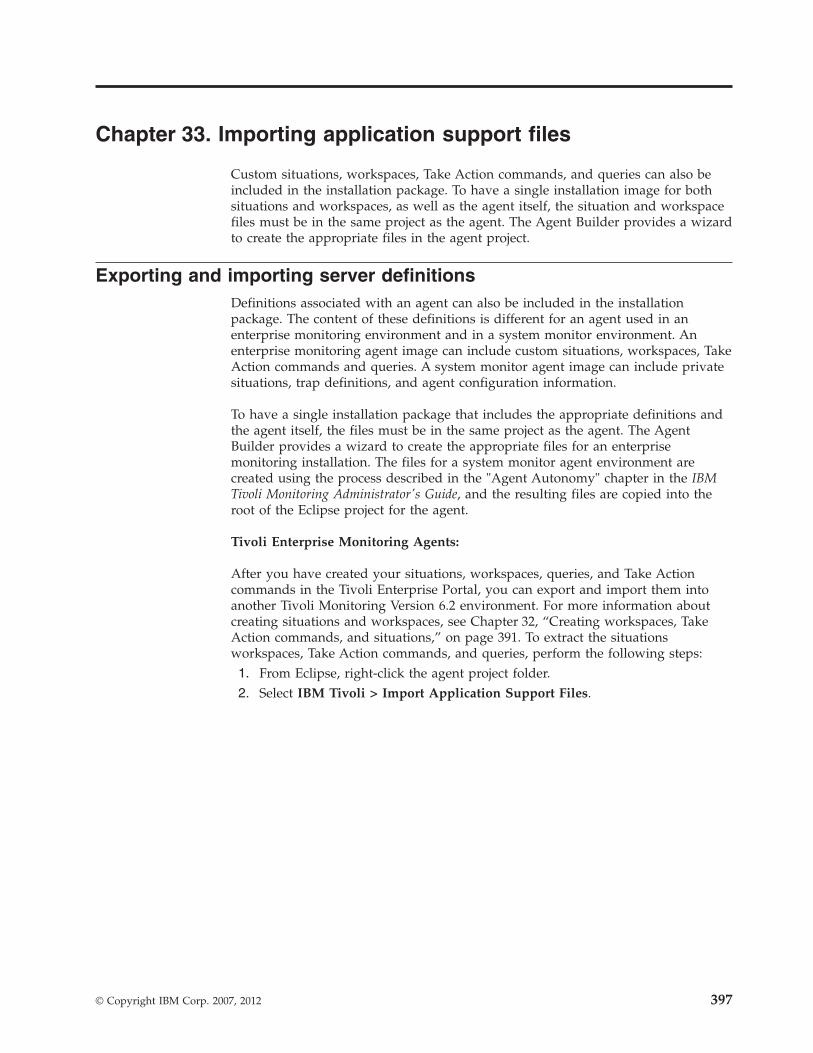
Chapter 33. Importing application support files
Custom situations, workspaces, Take Action commands, and queries can also beincluded in the installation package. To have a single installation image for bothsituations and workspaces, as well as the agent itself, the situation and workspacefiles must be in the same project as the agent. The Agent Builder provides a wizardto create the appropriate files in the agent project.
Exporting and importing server definitionsDefinitions associated with an agent can also be included in the installationpackage. The content of these definitions is different for an agent used in anenterprise monitoring environment and in a system monitor environment. Anenterprise monitoring agent image can include custom situations, workspaces, TakeAction commands and queries. A system monitor agent image can include privatesituations, trap definitions, and agent configuration information.
To have a single installation package that includes the appropriate definitions andthe agent itself, the files must be in the same project as the agent. The AgentBuilder provides a wizard to create the appropriate files for an enterprisemonitoring installation. The files for a system monitor agent environment arecreated using the process described in the "Agent Autonomy" chapter in the IBMTivoli Monitoring Administrator's Guide, and the resulting files are copied into theroot of the Eclipse project for the agent.
Tivoli Enterprise Monitoring Agents:
After you have created your situations, workspaces, queries, and Take Actioncommands in the Tivoli Enterprise Portal, you can export and import them intoanother Tivoli Monitoring Version 6.2 environment. For more information aboutcreating situations and workspaces, see Chapter 32, “Creating workspaces, TakeAction commands, and situations,” on page 391. To extract the situationsworkspaces, Take Action commands, and queries, perform the following steps:1. From Eclipse, right-click the agent project folder.2. Select IBM Tivoli > Import Application Support Files.
© Copyright IBM Corp. 2007, 2012 397
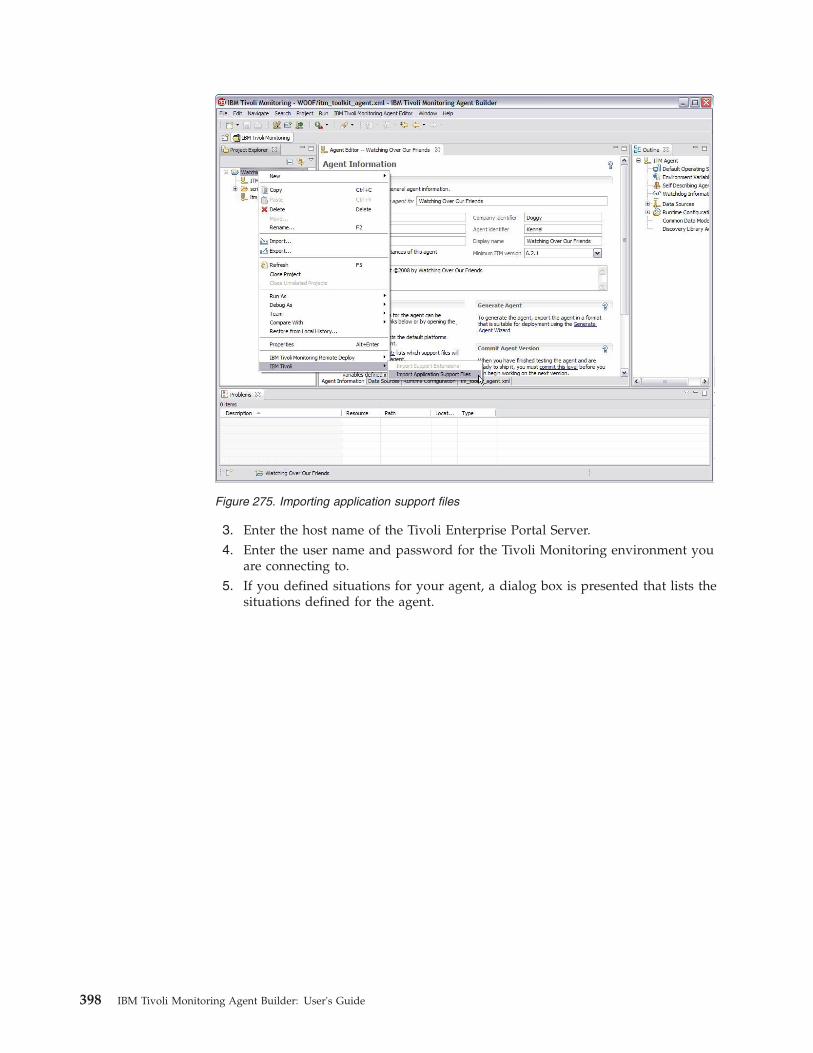
3. Enter the host name of the Tivoli Enterprise Portal Server.4. Enter the user name and password for the Tivoli Monitoring environment you
are connecting to.5. If you defined situations for your agent, a dialog box is presented that lists the
situations defined for the agent.
Figure 275. Importing application support files
398 IBM Tivoli Monitoring Agent Builder: User's Guide
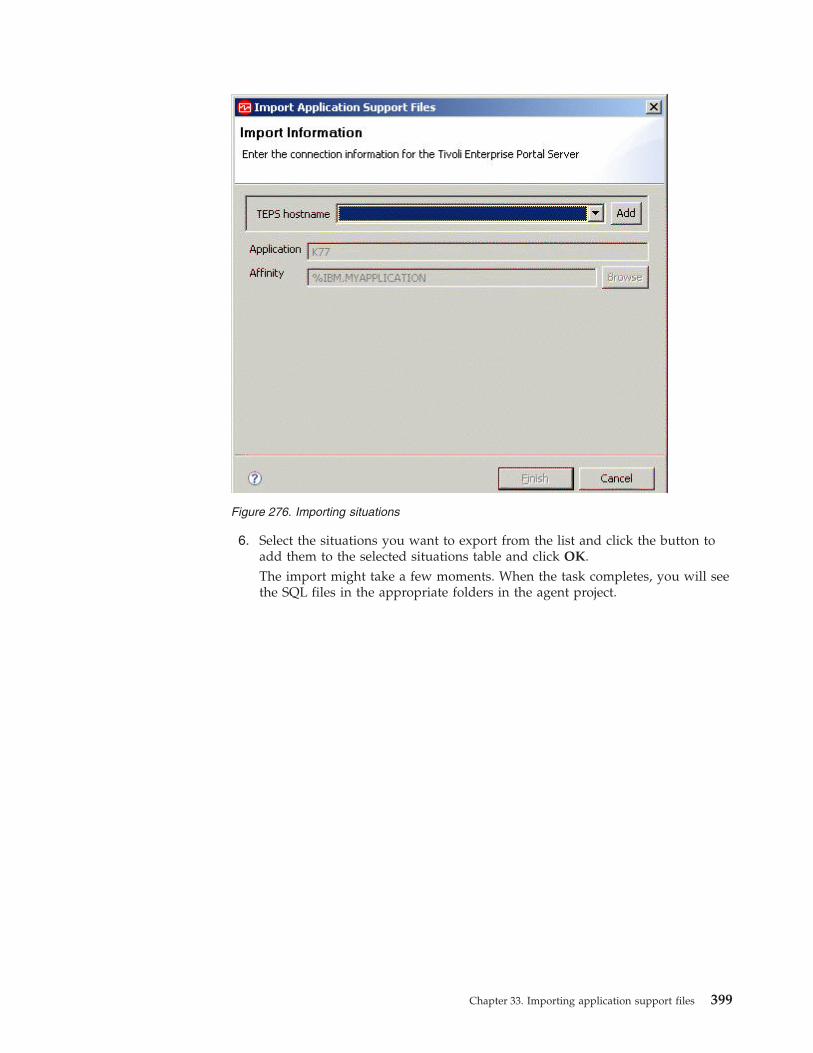
6. Select the situations you want to export from the list and click the button toadd them to the selected situations table and click OK.The import might take a few moments. When the task completes, you will seethe SQL files in the appropriate folders in the agent project.
Figure 276. Importing situations
Chapter 33. Importing application support files 399
7. If you defined Take Action commands for your agent, a dialog presents theTake Action commands defined.
8. Select the Take Action commands you want to export from the list and clickthe button to add them to the Selected Take Actions table and click OK.The import might take a few moments. When the task completes, you see theSQL files in the appropriate folders in the agent project.
Figure 277. Selecting situations
400 IBM Tivoli Monitoring Agent Builder: User's Guide

9. If you defined custom queries for your agent, a dialog presents the TakeAction commands defined.
10. Select the queries you want to export from the list and click the button to addthem to the Selected Queries table and click OK.
Figure 278. Select Take Action commands
Chapter 33. Importing application support files 401
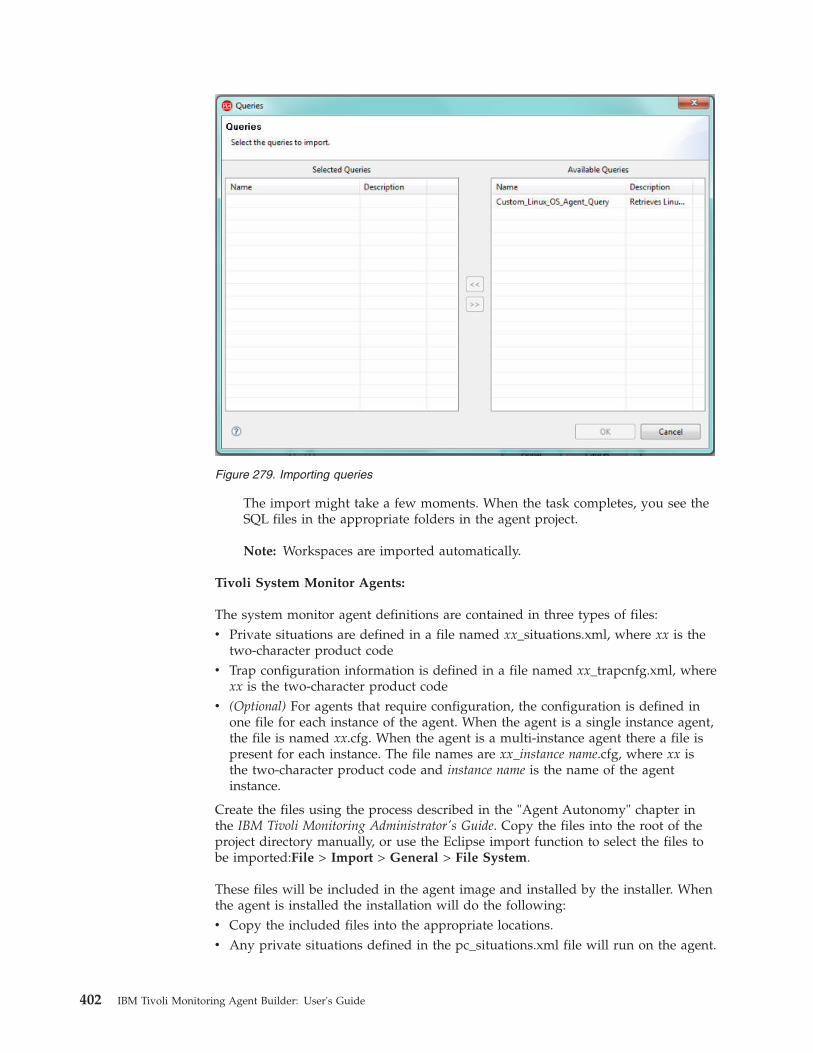
The import might take a few moments. When the task completes, you see theSQL files in the appropriate folders in the agent project.
Note: Workspaces are imported automatically.
Tivoli System Monitor Agents:
The system monitor agent definitions are contained in three types of files:v Private situations are defined in a file named xx_situations.xml, where xx is the
two-character product codev Trap configuration information is defined in a file named xx_trapcnfg.xml, where
xx is the two-character product codev (Optional) For agents that require configuration, the configuration is defined in
one file for each instance of the agent. When the agent is a single instance agent,the file is named xx.cfg. When the agent is a multi-instance agent there a file ispresent for each instance. The file names are xx_instance name.cfg, where xx isthe two-character product code and instance name is the name of the agentinstance.
Create the files using the process described in the "Agent Autonomy" chapter inthe IBM Tivoli Monitoring Administrator's Guide. Copy the files into the root of theproject directory manually, or use the Eclipse import function to select the files tobe imported:File > Import > General > File System.
These files will be included in the agent image and installed by the installer. Whenthe agent is installed the installation will do the following:v Copy the included files into the appropriate locations.v Any private situations defined in the pc_situations.xml file will run on the agent.
Figure 279. Importing queries
402 IBM Tivoli Monitoring Agent Builder: User's Guide

v The trap definitions defined in the pc_trapcnfg.xml will be used to forward trapsbased on the situations.
v The agent will be automatically configured and started if– The agent is a single instance agent with no configuration defined as part of
the agent.– The agent is a single instance agent with configuration defined as part of the
agent and the image includes a pc.cfg file.– The agent is a multi-instance agent (all multi-instance agents require
configuration): the installer will start one instance of the agent for eachpc_inst.cfg file.
Chapter 33. Importing application support files 403

404 IBM Tivoli Monitoring Agent Builder: User's Guide
Chapter 34. Event filtering and summarization
An attribute group is defined to be pure event or sampled. Pure event attributegroups contain data rows that occur asynchronously. As each new row of dataarrives, it is processed immediately by Tivoli Monitoring. Sampled attribute groupscollect the current set of data rows each time the data is requested. The followingattribute groups illustrate the difference:v An "SnmpEvents" attribute group is created that represents all of the SNMP
Traps and informs that are sent to the agent. Traps or informs arriveasynchronously as they are sent by the monitored systems. As each eventarrives, it is passed to Tivoli Monitoring.
v A "Disk" attribute group is created to represent information about all of the diskson a system. The disk information is collected periodically. Each time diskinformation is collected, the agent returns a number of rows of data, one foreach disk.
The difference between pure event and sampled attribute groups affects variousaspects of Tivoli Monitoring. These aspects include: situations, warehouse data,and Tivoli Enterprise Portal views.
Each situation is assigned (or distributed) to one or more managed systems to bemonitored for a specific condition of a set of conditions. When the determinationof the event must be made based on observations made at specific intervals, theevent is known as a sampled event. When the event is based on a spontaneousoccurrence, the event is known as a pure event. Therefore, situations for sampledevents have an interval associated with them, while situations for pure events donot. Another characteristic of sampled events is that the condition that caused theevent can change, thus causing it to be no longer true. Pure events cannot change.Therefore, alerts raised for sampled events can change from true to false, while apure event stays true when it occurs.
An example of a sampled event is number of processes > 100. An event becomestrue when the number of processes exceeds 100 and later becomes false againwhen this count drops to 100 or lower. A situation that monitors for an invalidlogon attempt by user is a pure event; the event occurs when an invalid logonattempt is detected, and does not become a False event. While you can createsituations that are evaluated on a specific interval for sampled attribute groups,this is not possible for pure event attribute groups.
Similarly, for historical data, you can configure how frequently sampled data iscollected, but when you turn collection on for pure event data, you get each rowwhen it happens.
The data displayed in the Tivoli Enterprise Portal for sampled data is the latest setof collected rows. The data displayed for pure event attribute groups is thecontents of a local cache maintained by the agent. It does not necessarily match thedata that is passed to Tivoli Monitoring for situation evaluation and historicalcollection.
© Copyright IBM Corp. 2007, 2012 405
Controlling duplicate eventsThe Agent Builder defines attribute groups that represent event data as pure eventin Tivoli Monitoring. These attribute groups include log file, AIX Binary Log,SNMP events, and JMX notifications. These attribute groups can produce multipleduplicate events. You can control how these duplicate events are sent to TivoliMonitoring. You can activate these controls for log file, SNMP events, and JMXnotifications attribute groups in the Event Information tab under Advanced DataSource Properties in the Advanced window Figure 280 on page 407.
Whether an event is treated as a duplicate of other events is determined by the keyattributes you define in the attribute group. An event is considered a duplicateonly if the values for all key attributes in the event match the values for the samekey attributes in an existing event. When event filtering and summarization isenabled, the attributes for the isSummary, occurrenceCount, summaryInterval, andeventThreshold functions are added automatically.
In the Event Filtering and Summarization Options area, select one of thefollowing options:v No event filtering or summarization: Sends all events without any event
filtering or summarization. This option is the default option.v Filter and summarize events: Use this option to create a summary record for
each event with duplicates and each unique event based on the key attributes,and to choose the event filtering option. In the Summarization Options area,enter the summary interval. You can enter either a value in seconds or insert aconfiguration property.The event filtering options are:– Only send summary events: Sends only the summary records for the
specified interval.– Send all events: Sends all events and summary records.– Send first event: For each event, sends only the first event received in the
summary interval specified and no duplicate events. This option also sendsthe summary records.
– Event threshold: Sends an event to Tivoli Monitoring for processing bysituations and historical collection when the number of duplicate eventsreceived in the interval is evenly divisible by the threshold. For example, ifyou set the event threshold to 5 and you receive less than 5 duplicates(including the first event) in the interval, no event is sent to TivoliMonitoring. If you receive 5, 6, 7, 8, or 9 duplicates, 1 event is sent. If youreceive 10 duplicates, 2 events are sent. In the Event threshold field, you canenter a number or insert a configuration property. This option also sends thesummary records.
406 IBM Tivoli Monitoring Agent Builder: User's Guide
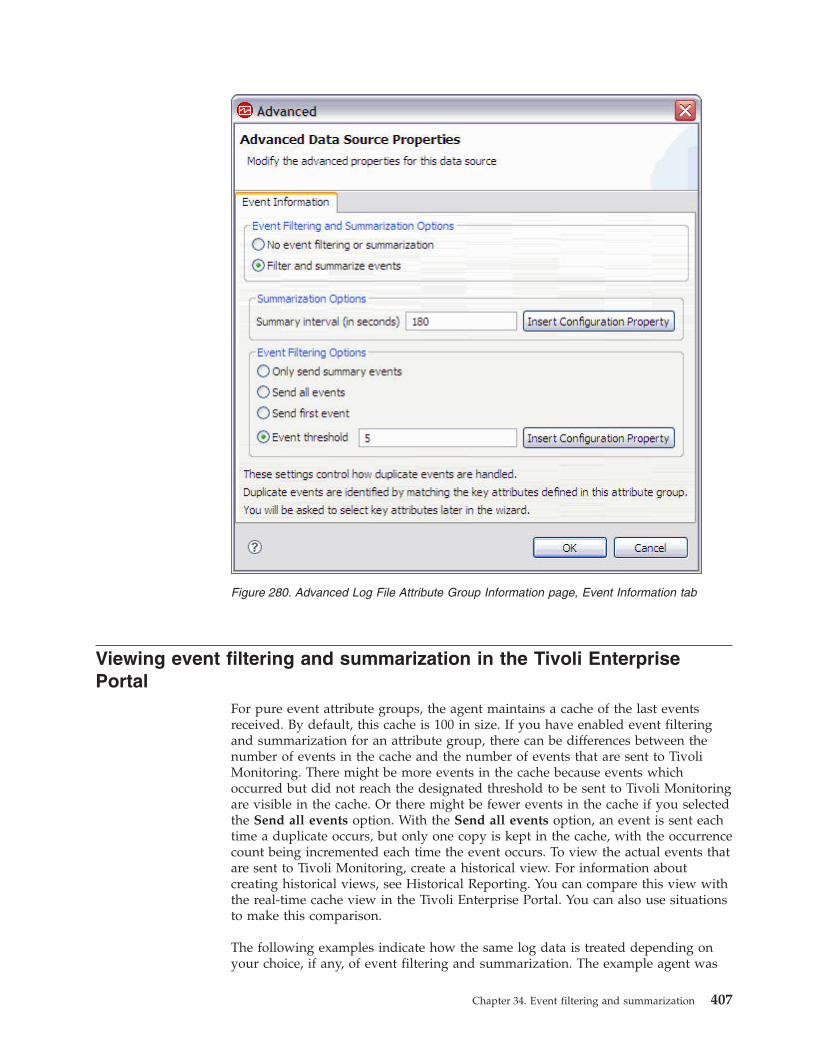
Viewing event filtering and summarization in the Tivoli EnterprisePortal
For pure event attribute groups, the agent maintains a cache of the last eventsreceived. By default, this cache is 100 in size. If you have enabled event filteringand summarization for an attribute group, there can be differences between thenumber of events in the cache and the number of events that are sent to TivoliMonitoring. There might be more events in the cache because events whichoccurred but did not reach the designated threshold to be sent to Tivoli Monitoringare visible in the cache. Or there might be fewer events in the cache if you selectedthe Send all events option. With the Send all events option, an event is sent eachtime a duplicate occurs, but only one copy is kept in the cache, with the occurrencecount being incremented each time the event occurs. To view the actual events thatare sent to Tivoli Monitoring, create a historical view. For information aboutcreating historical views, see Historical Reporting. You can compare this view withthe real-time cache view in the Tivoli Enterprise Portal. You can also use situationsto make this comparison.
The following examples indicate how the same log data is treated depending onyour choice, if any, of event filtering and summarization. The example agent was
Figure 280. Advanced Log File Attribute Group Information page, Event Information tab
Chapter 34. Event filtering and summarization 407
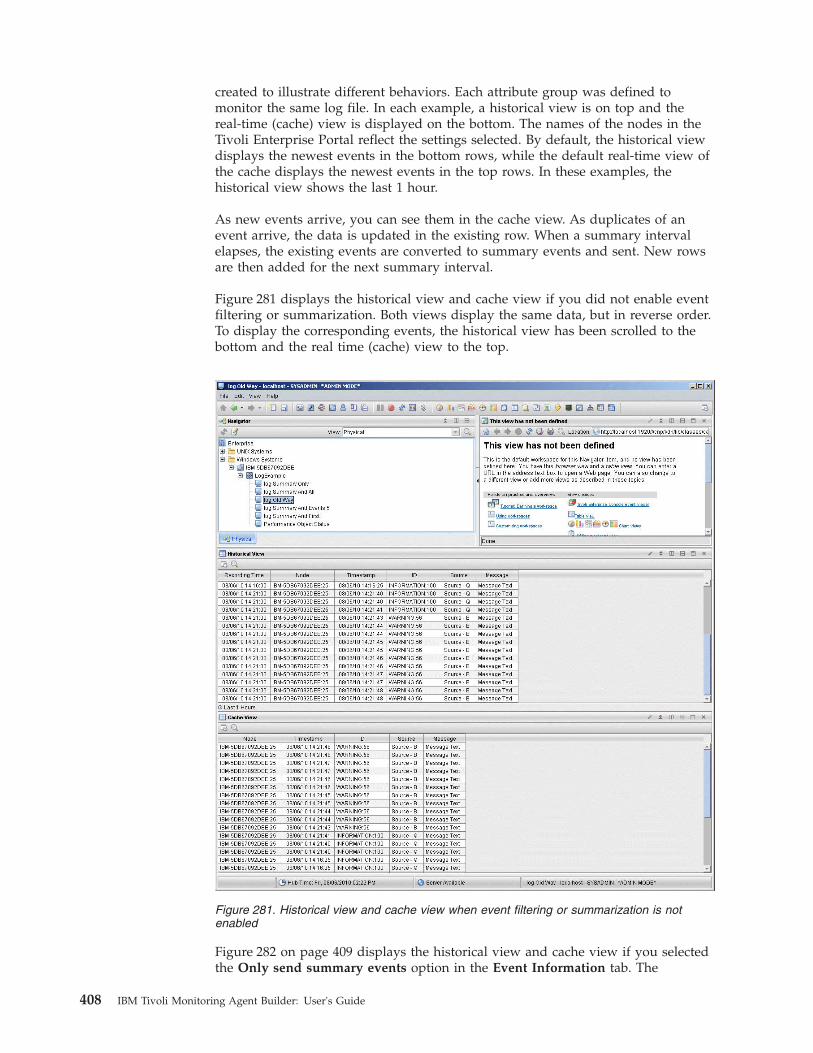
created to illustrate different behaviors. Each attribute group was defined tomonitor the same log file. In each example, a historical view is on top and thereal-time (cache) view is displayed on the bottom. The names of the nodes in theTivoli Enterprise Portal reflect the settings selected. By default, the historical viewdisplays the newest events in the bottom rows, while the default real-time view ofthe cache displays the newest events in the top rows. In these examples, thehistorical view shows the last 1 hour.
As new events arrive, you can see them in the cache view. As duplicates of anevent arrive, the data is updated in the existing row. When a summary intervalelapses, the existing events are converted to summary events and sent. New rowsare then added for the next summary interval.
Figure 281 displays the historical view and cache view if you did not enable eventfiltering or summarization. Both views display the same data, but in reverse order.To display the corresponding events, the historical view has been scrolled to thebottom and the real time (cache) view to the top.
Figure 282 on page 409 displays the historical view and cache view if you selectedthe Only send summary events option in the Event Information tab. The
Figure 281. Historical view and cache view when event filtering or summarization is notenabled
408 IBM Tivoli Monitoring Agent Builder: User's Guide
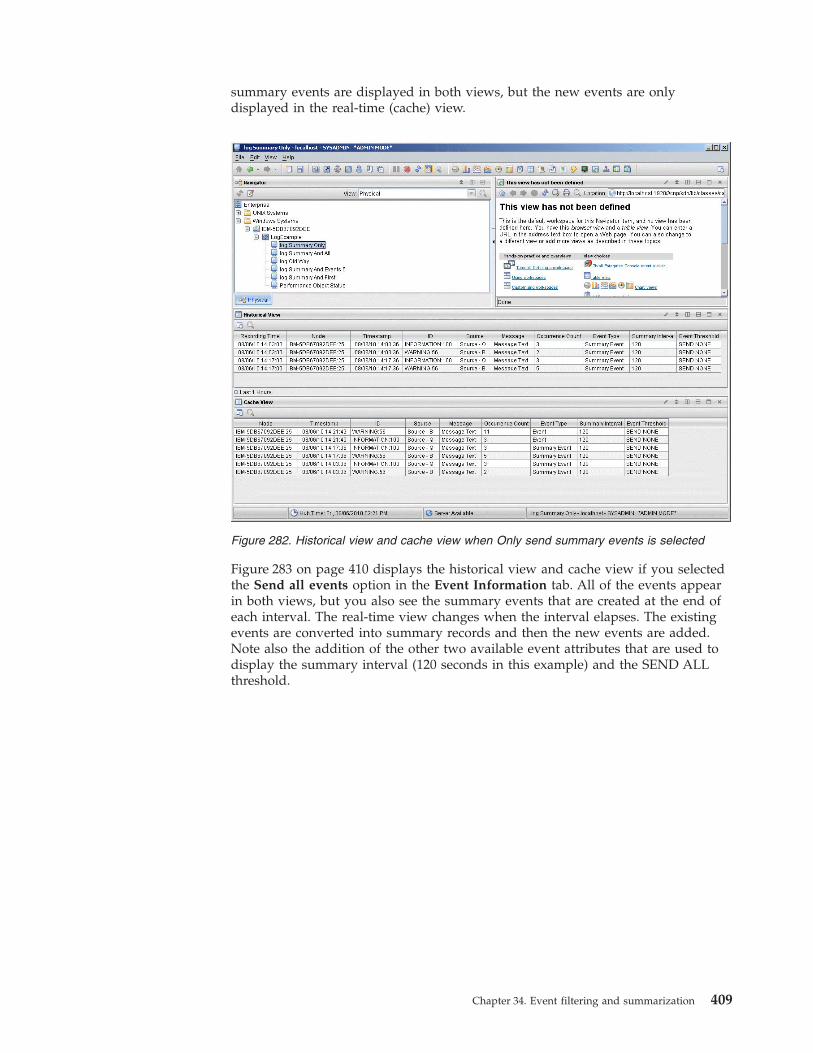
summary events are displayed in both views, but the new events are onlydisplayed in the real-time (cache) view.
Figure 283 on page 410 displays the historical view and cache view if you selectedthe Send all events option in the Event Information tab. All of the events appearin both views, but you also see the summary events that are created at the end ofeach interval. The real-time view changes when the interval elapses. The existingevents are converted into summary records and then the new events are added.Note also the addition of the other two available event attributes that are used todisplay the summary interval (120 seconds in this example) and the SEND ALLthreshold.
Figure 282. Historical view and cache view when Only send summary events is selected
Chapter 34. Event filtering and summarization 409
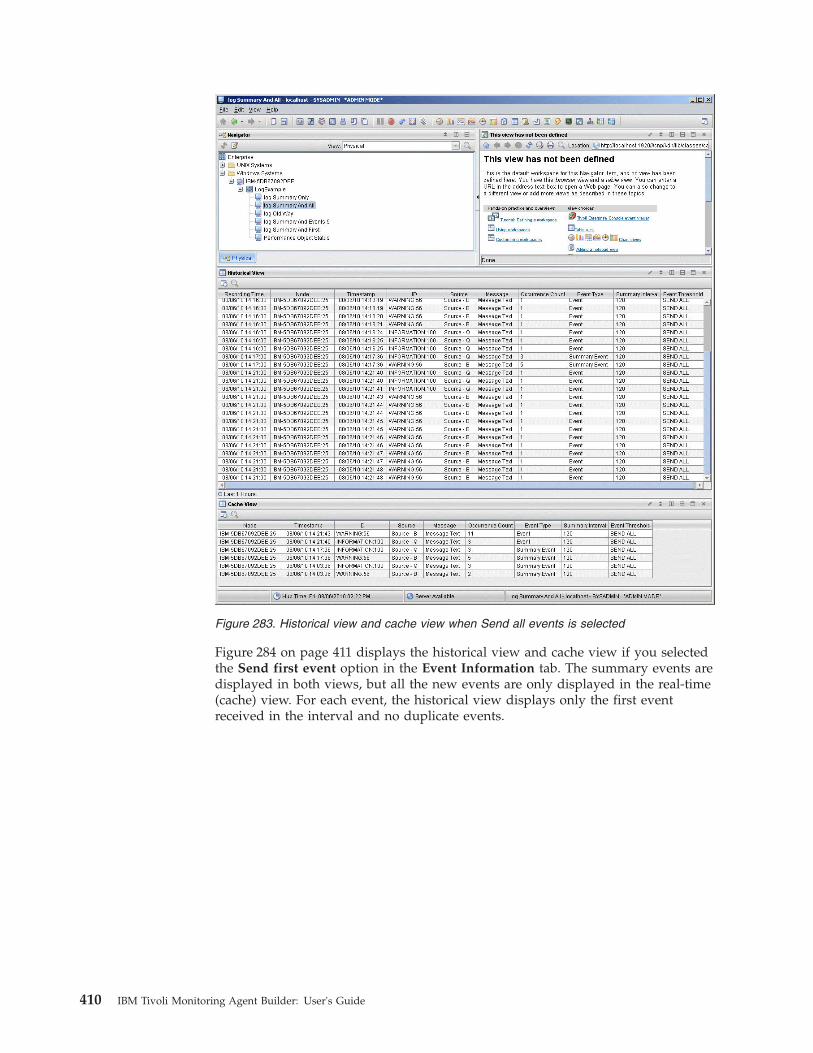
Figure 284 on page 411 displays the historical view and cache view if you selectedthe Send first event option in the Event Information tab. The summary events aredisplayed in both views, but all the new events are only displayed in the real-time(cache) view. For each event, the historical view displays only the first eventreceived in the interval and no duplicate events.
Figure 283. Historical view and cache view when Send all events is selected
410 IBM Tivoli Monitoring Agent Builder: User's Guide
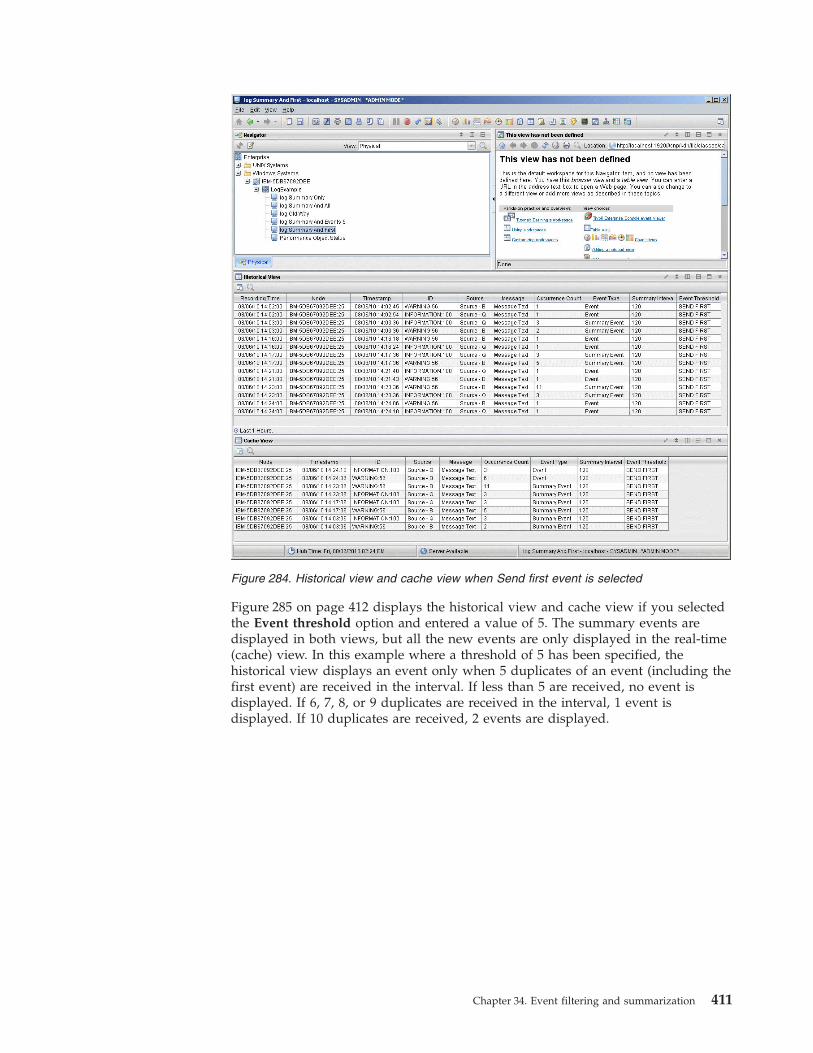
Figure 285 on page 412 displays the historical view and cache view if you selectedthe Event threshold option and entered a value of 5. The summary events aredisplayed in both views, but all the new events are only displayed in the real-time(cache) view. In this example where a threshold of 5 has been specified, thehistorical view displays an event only when 5 duplicates of an event (including thefirst event) are received in the interval. If less than 5 are received, no event isdisplayed. If 6, 7, 8, or 9 duplicates are received in the interval, 1 event isdisplayed. If 10 duplicates are received, 2 events are displayed.
Figure 284. Historical view and cache view when Send first event is selected
Chapter 34. Event filtering and summarization 411
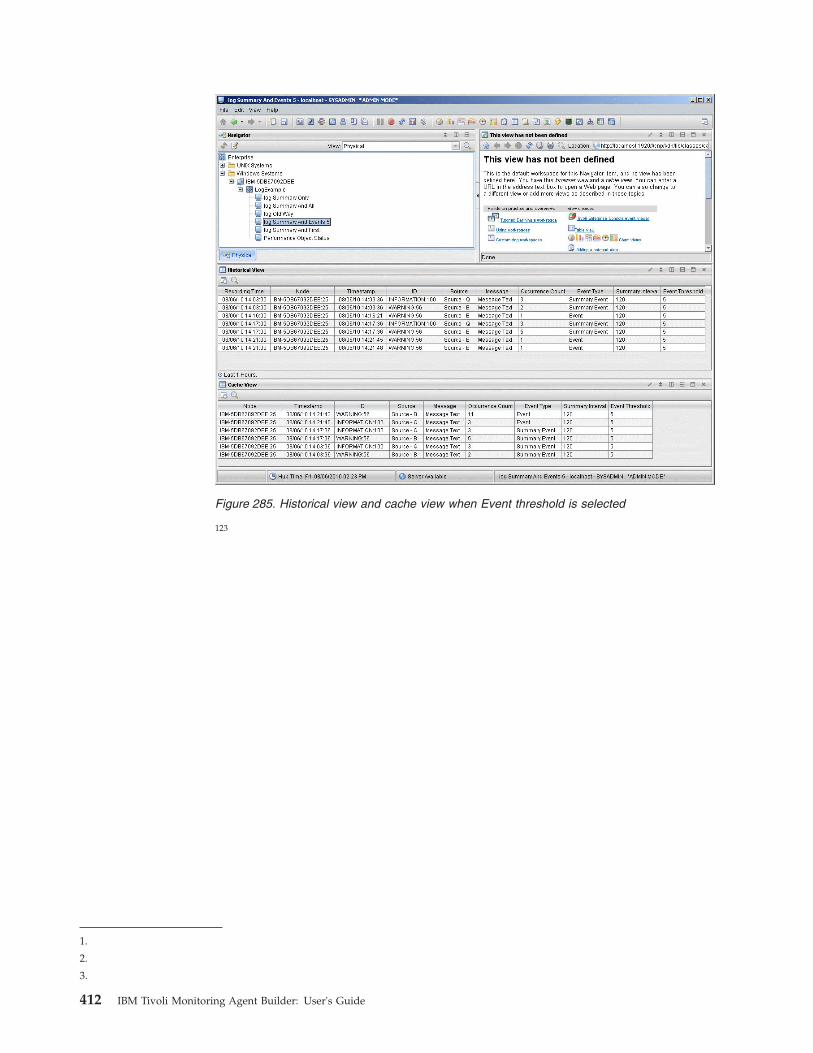
123
1.
2.
3.
Figure 285. Historical view and cache view when Event threshold is selected
412 IBM Tivoli Monitoring Agent Builder: User's Guide
Chapter 35. Troubleshooting
This appendix explains how to troubleshoot the Tivoli Monitoring Agent Builderand the resulting agents. Troubleshooting, or problem determination, is the processof determining why a certain product is malfunctioning. You might be able toresolve some problems by ensuring that your system matches the systemrequirements listed in Chapter 3, “Installing the Tivoli Monitoring Agent Builder,”on page 7.
Gathering product information for IBM Software SupportBefore contacting IBM Software Support, gather the information in Table 44 thatrelates to the problem.
Table 44. Information to gather before contacting IBM Software Support
Information type Description
Log files Collect trace log files from failing systems.Most logs are located in a logs subdirectoryon the host computer. See “Agent Buildertrace logging” on page 413 for lists of alltrace log files and their locations.
Operating system Operating system version number and patchlevel
Messages Messages and other information displayed onthe screen
Version numbers for Tivoli Monitoring Version number of the following members ofthe monitoring environment
v Tivoli Monitoring. Also provide the patchlevel, if available.
v Tivoli Monitoring: Windows OS Agent
v Tivoli Monitoring: UNIX OS Agent
v Tivoli Monitoring: Linux OS Agent
v Tivoli Universal Agent
Screen captures Screen captures of incorrect output, if any
itm_agent_toolkit.xml file For an agent that exhibits a problem, send asmall non-confidential agent .xml file of aspecial case or sample test scenario thatillustrates the problem.
Agent Builder trace logging
Note: Trace logs contain detailed internal information and require an internalunderstanding. These logs are for use only by IBM Software Support.
Trace logging is built into the software to assist IBM Software Support in gatheringinformation to determine why a problem is occurring. If you encounter an issue,IBM Software Support might ask you to obtain the trace logs to review theinformation. This chapter introduces trace logging and explains how to locate theappropriate files.
© Copyright IBM Corp. 2007, 2012 413
Trace logging captures information about the operating environment when the codefails to operate as intended.
The Tivoli Monitoring Agent Builder supports tracing through the Java Logging(JLog) Toolkit. The trace logger is configurable through the Eclipse plug-inpreferences. For more information about configuration of the trace logging, see“Logging configuration” on page 416.
Agent Builder trace logging overviewTrace logs capture information about the operating environment when componentcode fails to operate as intended. These logs are in the English language only. IBMSoftware Support uses the information captured by trace loggers to trace a problemto its source or to determine why an error occurred. Generally, this information isnot enabled by default, but logging can be enabled without stopping theapplication.
Trace log locationTrace logging is kept in a configurable number of rotating log files. The log filenames follow the format "traceKQZ.log, traceKQZ1.log..." where traceKQZ.log isthe most recent log file.
You can retrieve trace logs in the following location:workspace_directory/.metadata/tivoli/KQZ/logs
where:
workspace_directoryIdentifies the workspace directory you specified when you initially ran theAgent Builder, see (“Starting the Agent Builder” on page 13).
To save the log data, you must select the Enable trace logging to files option on theOutput page of the Tivoli Monitoring Agent Builder preferences. For informationabout the Output page, see “Output window” on page 417.
Trace log formatThe trace log record format is as follows:[Date]-Level-Server-Thread-FileName.Method-LogTextException(StackTrace)
Where:
Date Time the log was produced specified in milliseconds, since January 1st1970, for example, 1015343592000.
ServerHost name on which the program is running.
Level The level of detail the trace represents, which can be one of the followingoptions:
ERRORError message.
WARNWarning.
INFO Informational message.
414 IBM Tivoli Monitoring Agent Builder: User's Guide
MIN The minimum level of tracing provides some information about theprogram state with only a minimal impact on the performance ofthe program.
MID The medium level of tracing follows the paths of some high-levelAPIs and their parameters.
MAX The maximum level of tracing follows the paths of most of thecode and provide a detailed program flow. This level includesminimum and medium level tracing as well.
See “IBM Java Logging Toolkit” on page 416 for more information aboutsetting these levels.
FileNameName of the file or class to which the trace refers.
MethodThe method in the class to which the trace refers.
ThreadThread to which the trace refers. Thread element refers to the operatingsystem-specific notion of a thread.
LogTextA description of the error.
ExceptionException element depends upon the specific language or platform. ForJava, it is a stack trace.
Trace log exampleThe following text shows an example of a trace recorded in the trace log:[2007-08-17T17:50:17.527-04:00] - MIN - myhost - main -AgentXMLDocument.parseAgent - begin parsing document
Where:
2007-08-17Specifies the date that the log entry was produced.
17:50:17.527Specifies the time that the log entry was produced.
-04:00 Specifies the GMT offset.
MIN Specifies the level of detail the trace entry represents, in this case,minimum debug level.
myhostSpecifies the host name of the system that produced the trace entry
main Specifies name of the thread to which the trace entry refers.
AgentXMLDocumentSpecifies name of the file or class to which the trace refers.
parseAgentSpecifies the method in the class to which the trace refers.
begin parsing documentSpecifies the description of the condition or error.
Chapter 35. Troubleshooting 415
Logging configurationTivoli Monitoring Agent Builder logging options can be configured afterinstallation. If you are experiencing problems, IBM Software Support might askyou to configure logging and tracing information. This section explains how toconfigure the product to provide logging data.
Configuration optionsYou can configure trace logging by using the IBM Java Logging Toolkit to set thetrace level for the appropriate component of the Tivoli Monitoring Agent Builder.
IBM Java Logging Toolkit: You can perform all logging configuration in the IBMJava Logging Toolkit. Access the Eclipse preference window by performing thefollowing steps:1. Select Window - Preferences to display the Window toolbar menu.2. Click IBM Java Logging Toolkit to display the IBM Java Logging Toolkit
window.The Logger Configuration table displays the trace configuration for thefollowing components:
JLog IBM Tivoli Monitoring Logger Trace Logger
KQZGeneratorTraceIBM Tivoli Monitoring Generator Trace Logger
KQZTraceIBM Tivoli Monitoring Agent Builder Trace Logger
The trace level for each component can be set independently to one of thefollowing values. Selecting a trace level causes trace entries of that level and allhigher levels to be included in the log file.v Error - Error messages.v Warning - Warnings.v Information - Informational messages.v Minimum - The Minimum level of tracing provides some information about
the program state with only a minimal impact on the performance of theprogram.
v Medium - The Medium level of tracing follows the paths of some high-levelAPIs and their parameters.
v Maximum - The Maximum level of tracing follows the paths of most of thecode and provide a detailed program flow.
Logging for each component can also be enabled or disabled by selecting On orOff for Logging.
416 IBM Tivoli Monitoring Agent Builder: User's Guide
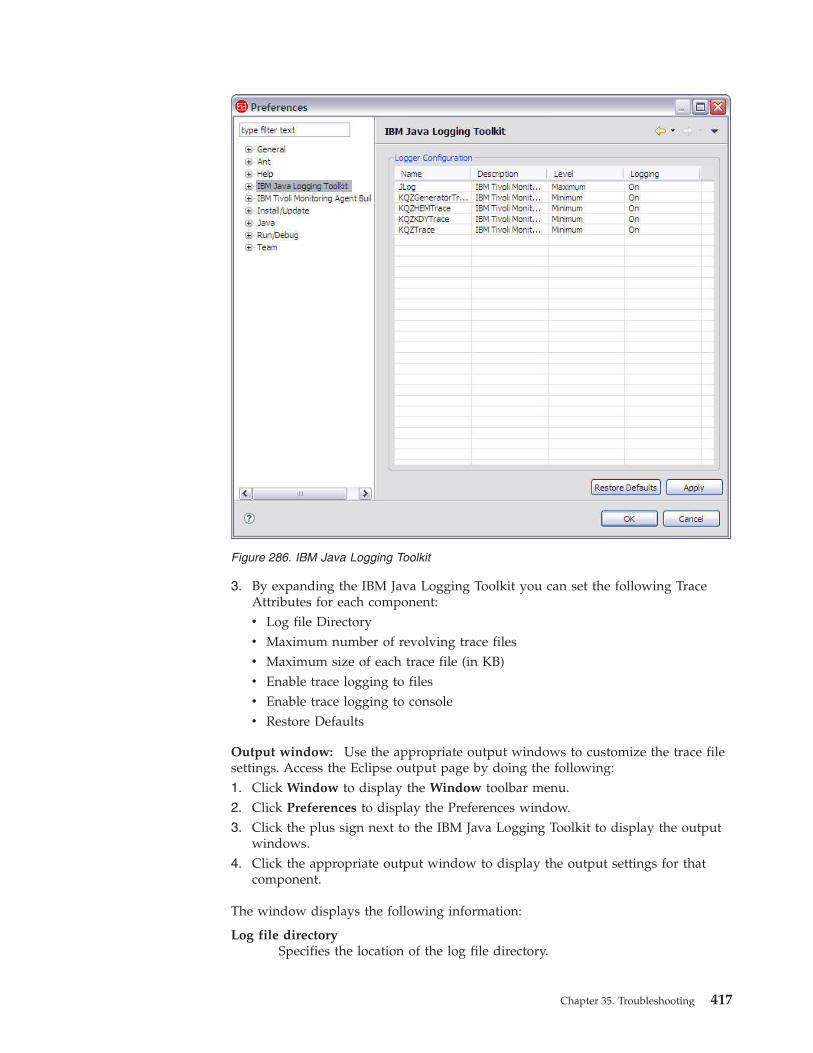
3. By expanding the IBM Java Logging Toolkit you can set the following TraceAttributes for each component:v Log file Directoryv Maximum number of revolving trace filesv Maximum size of each trace file (in KB)v Enable trace logging to filesv Enable trace logging to consolev Restore Defaults
Output window: Use the appropriate output windows to customize the trace filesettings. Access the Eclipse output page by doing the following:1. Click Window to display the Window toolbar menu.2. Click Preferences to display the Preferences window.3. Click the plus sign next to the IBM Java Logging Toolkit to display the output
windows.4. Click the appropriate output window to display the output settings for that
component.
The window displays the following information:
Log file directorySpecifies the location of the log file directory.
Figure 286. IBM Java Logging Toolkit
Chapter 35. Troubleshooting 417
Maximum number of revolving trace filesSpecifies the number of trace files that will be used and reused to store thetrace data.
Maximum size of each trace file (in Kilobytes)Specifies the maximum size in KB for each of the revolving trace files.
Enable trace logging to files(Optional) Check this box to store the trace logging data.
Enable logging to console(Optional) Check this box to send logging information to a developmentconsole.
Note: If you enable this option, you must restart the Tivoli MonitoringAgent Builder as described in the following procedure:1. Close the Tivoli Monitoring Agent Builder.2. Modify the install_dir/agentbuilder.ini file.
v On Windows systems, change install_dir/_jre/jre/bin/javaw.exe to install_dir/_jre/jre/bin/java.exe.
v On Linux or AIX systems, change install_dir/_jre/jre/bin/javaw to install_dir/_jre/jre/bin/java.
3. Relaunch the Tivoli Monitoring Agent Builder.
Configuring and Tuning data collectionWhen an Agent Builder agent is created, you can configure and tune its datacollection to achieve the best results. How you configure and tune your agent canbe different for different Agent Builder agents and even between attribute groupsin a single agent. Agent Builder agents can include two types of data and theysupport two basic methods of data collection for the most common type of data.
Data typesAn agent collects two types of data:1. Most Tivoli Monitoring attribute groups represent snapshots of data. Someone
asks for the data and it is returned. Agents use this type of data to representconfiguration information, performance metrics, status, and other informationwhere a set of data collected at one time makes sense. This data is called"sampled data".
2. Some Tivoli Monitoring data represents events. In this case, an "event" happensand the agent must forward data to Tivoli Monitoring. Examples of events areSNMP Traps, Windows Event Log entries, and new records being written to alog file. For simplicity, these types of data are grouped together and referred toas "event data".
Sampled dataWhen sampled data is required, a request is sent to the agent for a specificattribute group. The request might be initiated by clicking a workspace in theTivoli Enterprise Portal, a situation running, a data collection for the Warehouse, ora SOAP request. When the agent receives the request, the agent returns the currentdata for that attribute group. Tivoli Enterprise Portal requests target a specificattribute group in a particular Managed System Name (MSN). Situations andhistorical requests are more interesting, especially in an agent which includessubnodes. When a situation needs data for an attribute group in a subnode, theagent receives one request with a list of the targeted subnodes. The agent must
418 IBM Tivoli Monitoring Agent Builder: User's Guide
respond with all the data for the requested attribute group for all of the subnodesbefore Tivoli Monitoring can work on the next request.
The most straightforward way for an agent to satisfy a request is to collect dataevery time it receives a request from Tivoli Monitoring. Agent Builder agents donot collect data every time, because it often takes time or uses resources to collectdata and in many cases the same data is requested many times in a short period.For example, a user might define several situations that run at the same interval onan attribute group and the situations can signal several different conditions. Eachof these situations results in a request to the agent, but you might prefer each ofthe situations to see the same data. It is likely that by each situation seeing thesame data, you get more consistent results and you minimize the demand forsystem resources by the monitoring agent.
The agent developer can configure agents to optimize data collection by choosingto run the collection in one of the following two modes:1. On-demand collection: The agent collects data when it receives a request and
returns that data.2. Scheduled collection: The agent performs data collection in the background on
scheduled intervals and returns the most recently collected data when itreceives a request.
The agent uses a short-term cache in both of these modes. If another request fordata is received while the cache is valid, the agent returns data from the cachewithout collecting new data for each request. Using data from the cache solves theproblem caused by multiple concurrent situations (and other types of) requests.The amount of time the data remains valid, the scheduled collection interval, thenumber of threads used for collection and whether the agent runs in "on demand"or "scheduled" mode are all defined by environment variables. Using theenvironment variables you can tune each agent for the best operation in itsenvironment.
See the following examples that illustrate how the agent works in both modes:v Agent 1 on demand collection: A simple agent that collects a relatively small
amount of data that is normally accessed only by situations or on an infrequentbasis in the Tivoli Enterprise Portal. Data collection is reasonably fast, but it canuse up computing and networking resources. This agent is normally defined torun on demand. If no situations are running or no one clicks the Tivoli EnterprisePortal, the agent does nothing. When data is needed it is collected and returned.The data is placed into the short-term cache so that additional requests at aboutthe same time return the same data. This type of collection is likely the mostefficient way for this agent to run because it collects data only when someoneactually needs it.
v Agent 2 scheduled collection: A complex agent that includes subnodes andcollects data from multiple copies of the monitored resource. Many copies of theresource can be managed by one agent. It is normal to run situations on the dataon a relatively frequent basis to monitor the status and performance of themonitored resource. This agent is defined to run a "scheduled" collection. Onereason for running a "scheduled collection" is the way that situations areevaluated by Tivoli Monitoring agents. Because situations are running on theattribute groups in the subnodes, the agent receives one request for the datafrom all of the subnodes at once. The agent cannot respond to other requestsuntil all of the data is returned for a situation. If the agent collected all of thedata when the request arrived, the agent would "freeze" when you click one ofits workspaces in the Tivoli Enterprise Portal. To avoid "freezing" the agent, the
Chapter 35. Troubleshooting 419
agent builder automatically defines all subnode agents to run using "scheduled"collection. The agent developer tunes the number of threads and refresh intervalto collect the data at a reasonable interval for the type of data being collected.For example, the refresh interval can be once a minute, or once every 5 minutes.
Environment variables: An agent determines which mode to use and how thescheduled data collection runs based on the values of a set of environmentvariables. These environment variables can be set in the definition of the agent onthe Environment Variables panel. Each environment variable is listed in the menualong with the default values. The environment variables can also be set ormodified for an installed agent by editing the agent's environment (env) file onWindows or initialization (ini) file on UNIX. The environment variables thatcontrol data collections for sampled attribute groups are:v CDP_DP_CACHE_TTL=<validity period for the cached data - default value 60
seconds>
v CDP_DP_THREAD_POOL_SIZE=<number of threads to use for concurrentcollection - default value 15 for subnode agents>
v CDP_DP_REFRESH_INTERVAL=<number of seconds between collections - defaultvalue 60 seconds for subnode agents>
v CDP_DP_IMPATIENT_COLLECTOR_TIMEOUT=<amount of time to wait for new dataafter validity period expires - default value 5 seconds>
The most important of these variables are CDP_DP_CACHE_TTL,CDP_DP_REFRESH_INTERVAL, and CDP_DP_THREAD_POOL_SIZE.
If CDP_DP_THREAD_POOL_SIZE has a value greater than or equal to 1 or the agentincludes subnodes, the agent operates in "scheduled" collection mode. IfCDP_DP_THREAD_POOL_SIZE is not set or is 0, the agent runs in "on demand"collection mode.
If the agent is running in "scheduled" mode, then the agent automatically collectsall attribute groups every CDP_DP_REFRESH_INTERVAL seconds. It uses a set ofbackground threads to do the collection. The number of threads is set usingCDP_DP_THREAD_POOL_SIZE. The right value for the CDP_DP_THREAD_POOL_SIZE variesbased on what the agent is doing. For example:v If the agent is collecting data from remote systems using SNMP, it is best to
have CDP_DP_THREAD_POOL_SIZE similar to the number of remote systems beingmonitored. By setting the pool size similar to the number of remote systemsbeing monitored, the agent can collect data in parallel, but limits the concurrentload on the remote systems. SNMP daemons tend to throw away requests whenthey get busy. Discarding requests forces the agent into a "try again mode" and itends up taking more time and more resources to collect the data.
v If the agent includes a number of attribute groups that take a long time tocollect (for example, if the script runs for a long time, or a JDBC query takes along time) and the target resource can handle it, use enough threads so that longdata collections can run in parallel, and probably a few more for the rest of theattribute groups.
Running an agent with a larger thread pool causes the agent to use more memory(primarily for the stack that is allocated for each thread). It does not howeverincrease the CPU usage of the process or increase the actual working set size of theprocess noticeably. The agent is more efficient with the correct thread pool size forthe workload so the thread pool size can be tuned to provide the wanted behaviorfor a particular agent in a particular environment.
420 IBM Tivoli Monitoring Agent Builder: User's Guide

When data is collected it is placed in the internal cache. This cache is used tosatisfy additional requests until new data is collected. The validity period for thecache is controlled by CDP_DP_CACHE_TTL. By default the validity period is set to 60seconds. When an agent is running in "scheduled" mode it is best to set thevalidity period to the same value as CDP_DP_REFRESH_INTERVAL (or slightly larger ifdata collection can take a long time), so that the data is considered valid until itsnext scheduled collection.
The final variable is CDP_DP_IMPATIENT_COLLECTOR_TIMEOUT. This variable comesinto play only when CDP_DP_CACHE_TTL expires before new data is collected. Whenthe cache expires before new data is collected, the agent schedules anothercollection for the data immediately. It then waits for this collection to complete upto CDP_DP_IMPATIENT_COLLECTOR_TIMEOUT seconds. If the new collection completes,the cache is updated and fresh data is returned. If the new collection does notcomplete, the existing data is returned. The agent does not clear the cache whenCDP_DP_CACHE_TTL completes, to prevent a problem seen with the Universal Agent.The Universal Agent always clears its data cache when the validity period ends. Ifthe Universal Agent clears its data cache before the next collection completes, ithas an empty cache for that attribute group and returns no data until the collectioncompletes. Returning no data becomes a problem when situations are running.Any situation that runs after the cache cleared but before the next collectioncompletes sees no data and any of the situations that fire are cleared. The result isfloods of events firing and clearing just because data collection is a little slow. TheAgent Builder agents do not cause this problem. If the 'old' data causes a situationto fire generally the same data leaves that situation in the same state. After thenext collection completes, the situation gets the new data and it either fires orclears based on valid data.
Attribute groups: Agent Builder agents include two attribute groups that you canuse to inspect the operation of data collection and to tune the agent for yourenvironment. The attribute groups are Performance Object Status and Thread PoolStatus. These attribute groups are described in Appendix C, “Attributes reference,”on page 529. When these attribute groups are used to tune data collectionperformance, the most interesting data is:v Performance Object Status, Average Collection Duration attribute. This
attribute shows you how long each attribute group is taking to collect data.Often a small percentage of the attribute groups in an agent represents most ofthe CPU usage or time used by the agent. You might be able to optimize thecollection for one or more of these attribute groups, or you can modify thecollection interval for one or more of them if you do not need some data to beas up-to-date as other data. For more information, see “Examples and AdvancedTuning” on page 423.
v Performance Object Status, Intervals Skipped attribute. This attribute showsyou how many times the agent tried to schedule a new collection for theattribute group and it found that the previous collection was still on the queuewaiting to be run or already running. In a normally behaved agent this attributevalue is zero for all attribute groups. If this number starts growing, you tune thedata collection, by adding threads, lengthening the interval between collections,or optimizing the collection.
v Thread Pool Status, Thread Pool Avg Active Threads attribute. You cancompare this value to the Thread Pool Size attribute group to see how well yourthread pool is being used. Allocating a thread pool size of 100 threads when theaverage number of active threads is 5 is probably just wasting memory.
v Thread Pool Status, Thread Pool Avg Job wait and Thread Pool Avg QueueLength attributes. These attributes represent the time an average data collection
Chapter 35. Troubleshooting 421
spends waiting on the queue to be processed by a thread and the averagenumber of collections on the queue. Due to the way this data is collected, evenan idle system indicates at least an average of one job is waiting on the queue. Alarger number of waiting jobs or a large average wait time indicates thatcollections are being starved, you can consider adding threads, lengthening theinterval between collections or optimizing the collection for one or moreattribute groups.
Event DataAgent Builder agents can expose several types of event data. Some behavior iscommon for all event data. The agent receives each new event as a separate row ofdata. When a row of event data is received, it is sent immediately to TivoliMonitoring for processing, and added to an internal cache in the agent. Situationsand historical collection are performed by Tivoli Monitoring when each row is sentto Tivoli Monitoring. The cache is used to satisfy Tivoli Enterprise Portal or SOAPrequests for the data and the agent can use the cache to perform duplicatedetection, filtering, and summarization if defined for the attribute group. The sizeof the event cache for each attribute group is set by CDP_PURE_EVENT_CACHE_SIZE.This cache contains the most recent CDP_PURE_EVENT_CACHE_SIZE events with themost recent event returned first. There are separate caches for each event attributegroup. When the cache for an attribute group fills, the oldest event is droppedfrom the list.
The Agent Builder agent can expose events for:v Windows Event Log entriesv SNMP Traps or Informsv Records added to log filesv JMX mBean notificationsv JMX monitorsv Events from a Java API provider or socket provider.v Joined attribute groups (where one of the data sources is an event data source)
These events are handled in the most appropriate way for each of the sources.SNMP Traps/Informs, JMX notifications and events from the Java API and socketproviders are received asynchronously and forwarded to Tivoli Monitoringimmediately. There is no need to tune these collectors. The agent subscribes toreceive Windows Event Log entries from the operating system using the WindowsEvent Log API. If the agent is using the older Event Logging API, it polls thesystem for new events using the thread pool settings. For joined attribute groupswhere one of the data sources is an event data source, there is no tuning to applyto the joined attribute group, though it will benefit from any tuning applied to theevent source group.
File monitoring is more complicated. The agent must monitor the existence of thefiles and when new records are added to the files. The agent can be configured tomonitor files using patterns for the file name or a static name. As the set of filesthat match the patterns can change over time, the agent checks for new or changedfiles every KUMP_DP_FILE_SWITCH_CHECK_INTERVAL seconds. This global environmentvariable governs all file monitoring in an agent instance. When the agentdetermines the appropriate files to monitor, it needs to determine when the fileschange. On Windows systems, the agent uses Operating System APIs to listen forthese changes. The agent is informed when the files are updated and processesthem immediately. On UNIX systems, the agent checks for file changes everyKUMP_DP_EVENT seconds. This global environment variable governs all file
422 IBM Tivoli Monitoring Agent Builder: User's Guide
monitoring in an agent instance. When the agent notices that a file changed itprocesses all of the new data in the file and then waits for the next change.
Examples and Advanced TuningEnvironment variables used for more advanced tuning are defined at the agentlevel. You set the following variables once and they apply to the all of the attributegroups in the agent:v CDP_DP_CACHE_TTL
v CDP_DP_IMPATIENT_COLLECTOR_TIMEOUT
v KUMP_DP_FILE_SWITCH_CHECK_INTERVAL
v KUMP_DP_EVENT
You can make the following variables apply to individual attribute groups (theystill have a global setting that applies to all other attribute groups in the agent) :v CDP_DP_REFRESH_INTERVAL
v CDP_PURE_EVENT_CACHE_SIZE
Example: If you defined an agent to include the following six attribute groups:v EventDataOnev EventDataTwov EventDataThreev SampledDataOnev SampledDataTwov SampledDataThree
You might set the following default variables:v CDP_DP_CACHE_TTL=60
v CDP_DP_IMPATIENT_COLLECTOR_TIMEOUT=2
v CDP_DP_REFRESH_INTERVAL=60
v CDP_PURE_EVENT_CACHE_SIZE=100
As a result, all of the attribute groups which contain sampled data(SampledDataOne, SampledDataTwo, and SampledDataThree) would be collectedevery 60 seconds. Each of the event attribute groups (EventDataOne,EventDataTwo, and EventDataThree) would store the last 100 events in their cache.
These settings might work perfectly, or there might be reasons you need to controlthe settings at a more granular level. For example, what if EventDataOne generallyreceives 10 times as many events as EventDataTwo and EventDataThree? Tofurther complicate things, there really is a link between EventDataOne andEventDataTwo. When one event is received for EventDataTwo there are alwaysmultiple events for EventDataOne and users want to correlate these events. Thereis not a single correct setting for the cache size. It would be nice to be able to haveEventDataOne store a larger number of events and EventDataTwo store a smallernumber. You can achieve this storage by setting CDP_PURE_EVENT_CACHE_SIZE to thesize that makes sense for most of the event attribute groups, 100 seems good. Thenyou can set CDP_EVENTDATAONE_PURE_EVENT_CACHE_SIZE to 1000. That way all of thecorresponding events are visible in the Tivoli Enterprise Portal.
The same thing can be done with CDP_DP_REFRESH_INTERVAL. Set a default valuethat works for the largest number of attribute groups in the agent and then setCDP_<attribute group name>_REFRESH_INTERVAL for the attribute groups whichneed to be collected differently. To optimize collection, set the default
Chapter 35. Troubleshooting 423
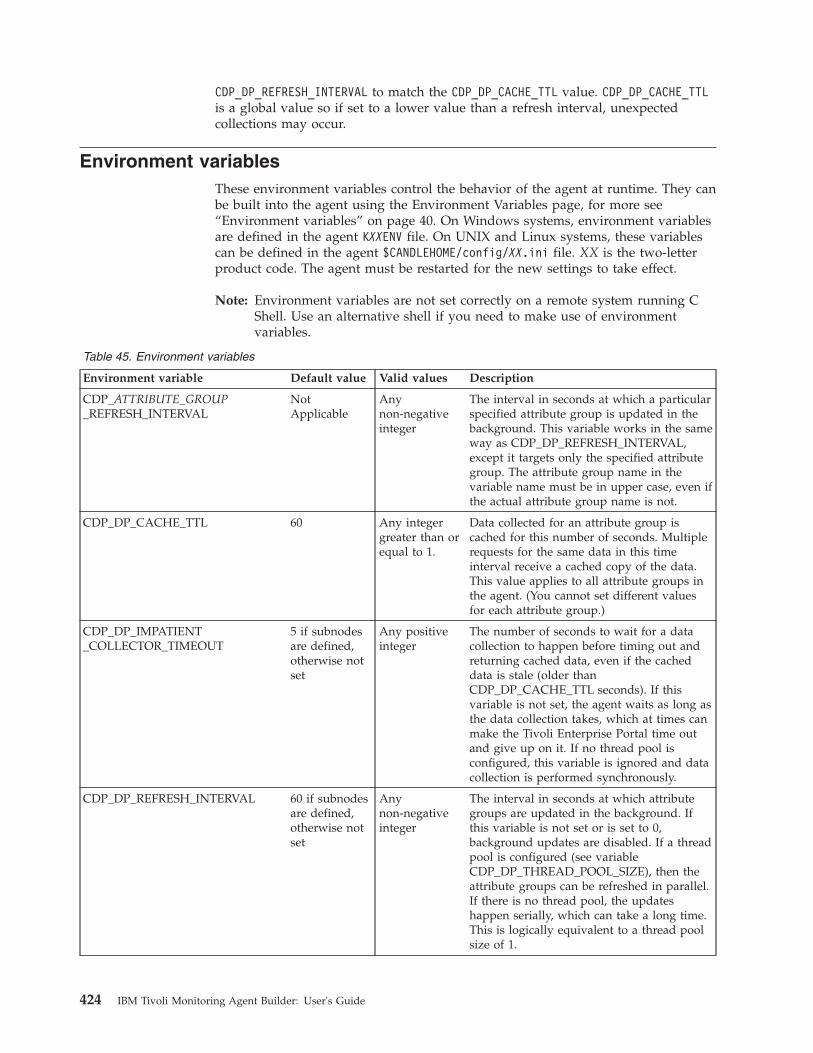
CDP_DP_REFRESH_INTERVAL to match the CDP_DP_CACHE_TTL value. CDP_DP_CACHE_TTLis a global value so if set to a lower value than a refresh interval, unexpectedcollections may occur.
Environment variablesThese environment variables control the behavior of the agent at runtime. They canbe built into the agent using the Environment Variables page, for more see“Environment variables” on page 40. On Windows systems, environment variablesare defined in the agent KXXENV file. On UNIX and Linux systems, these variablescan be defined in the agent $CANDLEHOME/config/XX.ini file. XX is the two-letterproduct code. The agent must be restarted for the new settings to take effect.
Note: Environment variables are not set correctly on a remote system running CShell. Use an alternative shell if you need to make use of environmentvariables.
Table 45. Environment variables
Environment variable Default value Valid values Description
CDP_ATTRIBUTE_GROUP_REFRESH_INTERVAL
NotApplicable
Anynon-negativeinteger
The interval in seconds at which a particularspecified attribute group is updated in thebackground. This variable works in the sameway as CDP_DP_REFRESH_INTERVAL,except it targets only the specified attributegroup. The attribute group name in thevariable name must be in upper case, even ifthe actual attribute group name is not.
CDP_DP_CACHE_TTL 60 Any integergreater than orequal to 1.
Data collected for an attribute group iscached for this number of seconds. Multiplerequests for the same data in this timeinterval receive a cached copy of the data.This value applies to all attribute groups inthe agent. (You cannot set different valuesfor each attribute group.)
CDP_DP_IMPATIENT_COLLECTOR_TIMEOUT
5 if subnodesare defined,otherwise notset
Any positiveinteger
The number of seconds to wait for a datacollection to happen before timing out andreturning cached data, even if the cacheddata is stale (older thanCDP_DP_CACHE_TTL seconds). If thisvariable is not set, the agent waits as long asthe data collection takes, which at times canmake the Tivoli Enterprise Portal time outand give up on it. If no thread pool isconfigured, this variable is ignored and datacollection is performed synchronously.
CDP_DP_REFRESH_INTERVAL 60 if subnodesare defined,otherwise notset
Anynon-negativeinteger
The interval in seconds at which attributegroups are updated in the background. Ifthis variable is not set or is set to 0,background updates are disabled. If a threadpool is configured (see variableCDP_DP_THREAD_POOL_SIZE), then theattribute groups can be refreshed in parallel.If there is no thread pool, the updateshappen serially, which can take a long time.This is logically equivalent to a thread poolsize of 1.
424 IBM Tivoli Monitoring Agent Builder: User's Guide
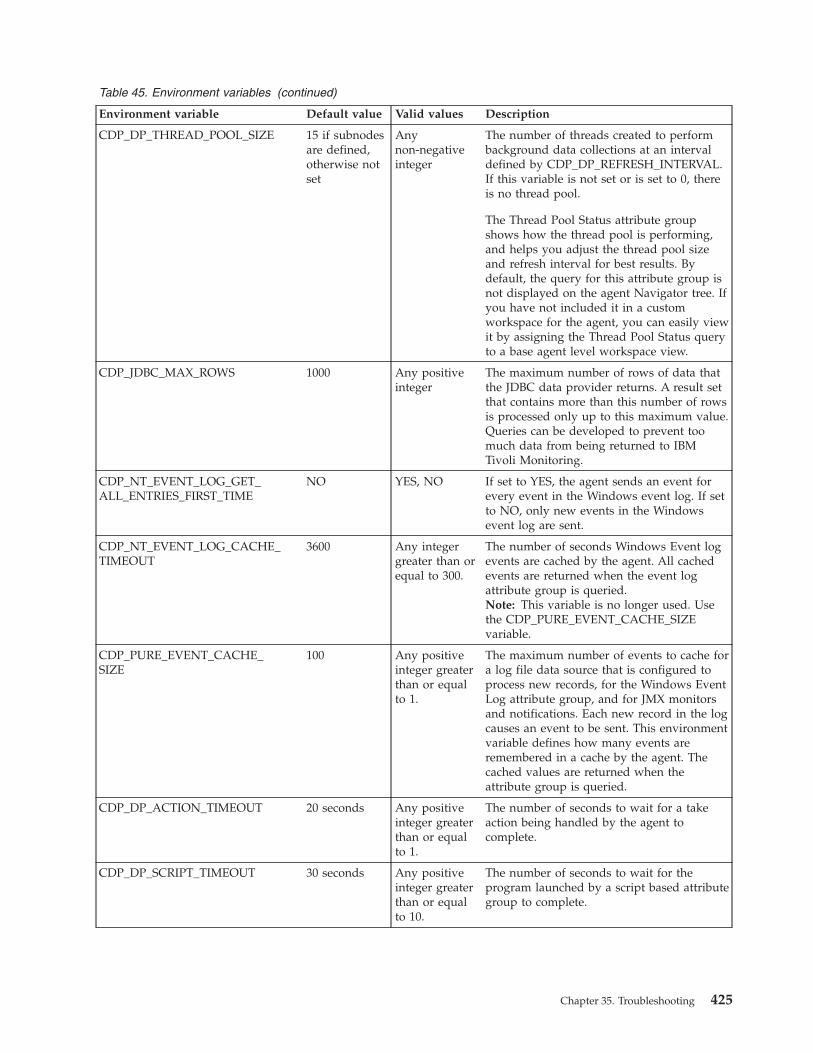
Table 45. Environment variables (continued)
Environment variable Default value Valid values Description
CDP_DP_THREAD_POOL_SIZE 15 if subnodesare defined,otherwise notset
Anynon-negativeinteger
The number of threads created to performbackground data collections at an intervaldefined by CDP_DP_REFRESH_INTERVAL.If this variable is not set or is set to 0, thereis no thread pool.
The Thread Pool Status attribute groupshows how the thread pool is performing,and helps you adjust the thread pool sizeand refresh interval for best results. Bydefault, the query for this attribute group isnot displayed on the agent Navigator tree. Ifyou have not included it in a customworkspace for the agent, you can easily viewit by assigning the Thread Pool Status queryto a base agent level workspace view.
CDP_JDBC_MAX_ROWS 1000 Any positiveinteger
The maximum number of rows of data thatthe JDBC data provider returns. A result setthat contains more than this number of rowsis processed only up to this maximum value.Queries can be developed to prevent toomuch data from being returned to IBMTivoli Monitoring.
CDP_NT_EVENT_LOG_GET_ALL_ENTRIES_FIRST_TIME
NO YES, NO If set to YES, the agent sends an event forevery event in the Windows event log. If setto NO, only new events in the Windowsevent log are sent.
CDP_NT_EVENT_LOG_CACHE_TIMEOUT
3600 Any integergreater than orequal to 300.
The number of seconds Windows Event logevents are cached by the agent. All cachedevents are returned when the event logattribute group is queried.Note: This variable is no longer used. Usethe CDP_PURE_EVENT_CACHE_SIZEvariable.
CDP_PURE_EVENT_CACHE_SIZE
100 Any positiveinteger greaterthan or equalto 1.
The maximum number of events to cache fora log file data source that is configured toprocess new records, for the Windows EventLog attribute group, and for JMX monitorsand notifications. Each new record in the logcauses an event to be sent. This environmentvariable defines how many events areremembered in a cache by the agent. Thecached values are returned when theattribute group is queried.
CDP_DP_ACTION_TIMEOUT 20 seconds Any positiveinteger greaterthan or equalto 1.
The number of seconds to wait for a takeaction being handled by the agent tocomplete.
CDP_DP_SCRIPT_TIMEOUT 30 seconds Any positiveinteger greaterthan or equalto 10.
The number of seconds to wait for theprogram launched by a script based attributegroup to complete.
Chapter 35. Troubleshooting 425
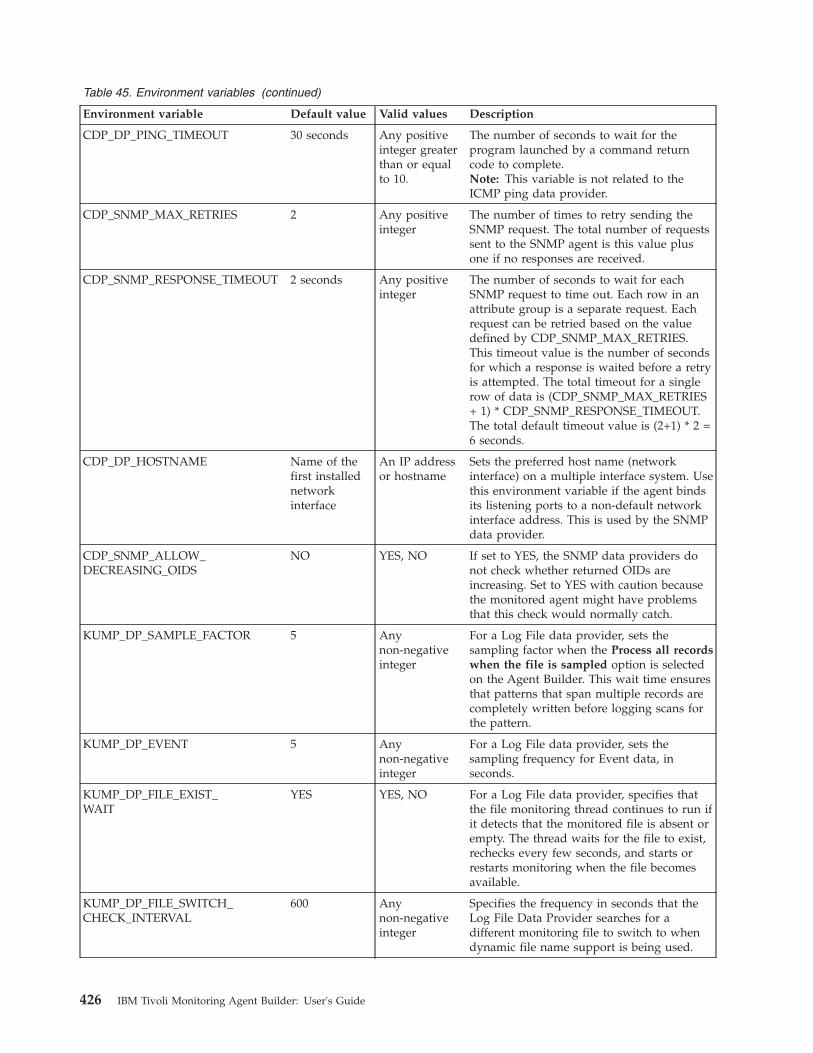
Table 45. Environment variables (continued)
Environment variable Default value Valid values Description
CDP_DP_PING_TIMEOUT 30 seconds Any positiveinteger greaterthan or equalto 10.
The number of seconds to wait for theprogram launched by a command returncode to complete.Note: This variable is not related to theICMP ping data provider.
CDP_SNMP_MAX_RETRIES 2 Any positiveinteger
The number of times to retry sending theSNMP request. The total number of requestssent to the SNMP agent is this value plusone if no responses are received.
CDP_SNMP_RESPONSE_TIMEOUT 2 seconds Any positiveinteger
The number of seconds to wait for eachSNMP request to time out. Each row in anattribute group is a separate request. Eachrequest can be retried based on the valuedefined by CDP_SNMP_MAX_RETRIES.This timeout value is the number of secondsfor which a response is waited before a retryis attempted. The total timeout for a singlerow of data is (CDP_SNMP_MAX_RETRIES+ 1) * CDP_SNMP_RESPONSE_TIMEOUT.The total default timeout value is (2+1) * 2 =6 seconds.
CDP_DP_HOSTNAME Name of thefirst installednetworkinterface
An IP addressor hostname
Sets the preferred host name (networkinterface) on a multiple interface system. Usethis environment variable if the agent bindsits listening ports to a non-default networkinterface address. This is used by the SNMPdata provider.
CDP_SNMP_ALLOW_DECREASING_OIDS
NO YES, NO If set to YES, the SNMP data providers donot check whether returned OIDs areincreasing. Set to YES with caution becausethe monitored agent might have problemsthat this check would normally catch.
KUMP_DP_SAMPLE_FACTOR 5 Anynon-negativeinteger
For a Log File data provider, sets thesampling factor when the Process all recordswhen the file is sampled option is selectedon the Agent Builder. This wait time ensuresthat patterns that span multiple records arecompletely written before logging scans forthe pattern.
KUMP_DP_EVENT 5 Anynon-negativeinteger
For a Log File data provider, sets thesampling frequency for Event data, inseconds.
KUMP_DP_FILE_EXIST_WAIT
YES YES, NO For a Log File data provider, specifies thatthe file monitoring thread continues to run ifit detects that the monitored file is absent orempty. The thread waits for the file to exist,rechecks every few seconds, and starts orrestarts monitoring when the file becomesavailable.
KUMP_DP_FILE_SWITCH_CHECK_INTERVAL
600 Anynon-negativeinteger
Specifies the frequency in seconds that theLog File Data Provider searches for adifferent monitoring file to switch to whendynamic file name support is being used.
426 IBM Tivoli Monitoring Agent Builder: User's Guide
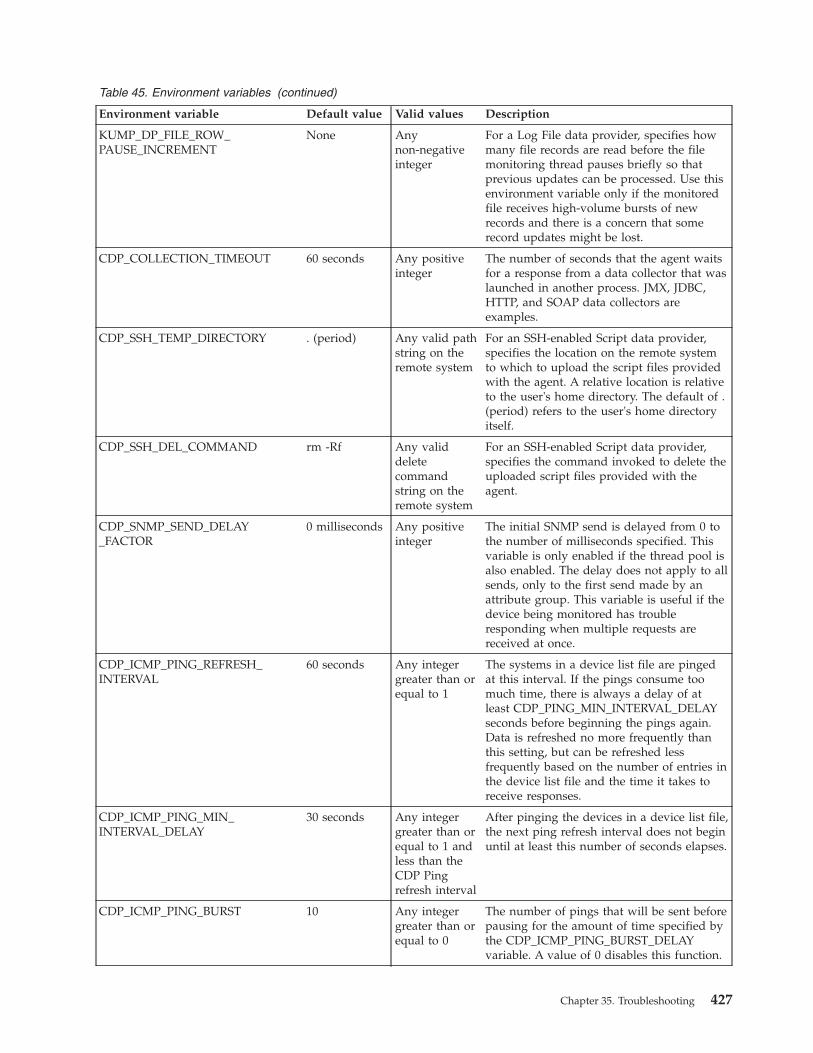
Table 45. Environment variables (continued)
Environment variable Default value Valid values Description
KUMP_DP_FILE_ROW_PAUSE_INCREMENT
None Anynon-negativeinteger
For a Log File data provider, specifies howmany file records are read before the filemonitoring thread pauses briefly so thatprevious updates can be processed. Use thisenvironment variable only if the monitoredfile receives high-volume bursts of newrecords and there is a concern that somerecord updates might be lost.
CDP_COLLECTION_TIMEOUT 60 seconds Any positiveinteger
The number of seconds that the agent waitsfor a response from a data collector that waslaunched in another process. JMX, JDBC,HTTP, and SOAP data collectors areexamples.
CDP_SSH_TEMP_DIRECTORY . (period) Any valid pathstring on theremote system
For an SSH-enabled Script data provider,specifies the location on the remote systemto which to upload the script files providedwith the agent. A relative location is relativeto the user's home directory. The default of .(period) refers to the user's home directoryitself.
CDP_SSH_DEL_COMMAND rm -Rf Any validdeletecommandstring on theremote system
For an SSH-enabled Script data provider,specifies the command invoked to delete theuploaded script files provided with theagent.
CDP_SNMP_SEND_DELAY_FACTOR
0 milliseconds Any positiveinteger
The initial SNMP send is delayed from 0 tothe number of milliseconds specified. Thisvariable is only enabled if the thread pool isalso enabled. The delay does not apply to allsends, only to the first send made by anattribute group. This variable is useful if thedevice being monitored has troubleresponding when multiple requests arereceived at once.
CDP_ICMP_PING_REFRESH_INTERVAL
60 seconds Any integergreater than orequal to 1
The systems in a device list file are pingedat this interval. If the pings consume toomuch time, there is always a delay of atleast CDP_PING_MIN_INTERVAL_DELAYseconds before beginning the pings again.Data is refreshed no more frequently thanthis setting, but can be refreshed lessfrequently based on the number of entries inthe device list file and the time it takes toreceive responses.
CDP_ICMP_PING_MIN_INTERVAL_DELAY
30 seconds Any integergreater than orequal to 1 andless than theCDP Pingrefresh interval
After pinging the devices in a device list file,the next ping refresh interval does not beginuntil at least this number of seconds elapses.
CDP_ICMP_PING_BURST 10 Any integergreater than orequal to 0
The number of pings that will be sent beforepausing for the amount of time specified bythe CDP_ICMP_PING_BURST_DELAYvariable. A value of 0 disables this function.
Chapter 35. Troubleshooting 427
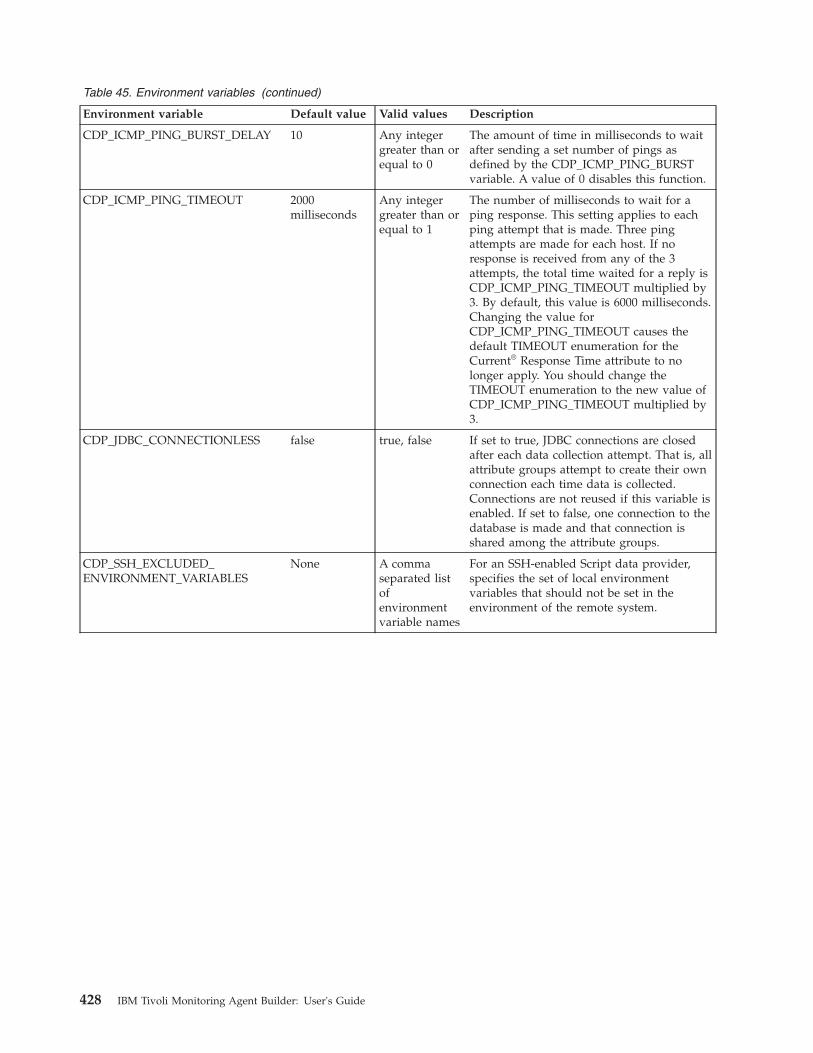
Table 45. Environment variables (continued)
Environment variable Default value Valid values Description
CDP_ICMP_PING_BURST_DELAY 10 Any integergreater than orequal to 0
The amount of time in milliseconds to waitafter sending a set number of pings asdefined by the CDP_ICMP_PING_BURSTvariable. A value of 0 disables this function.
CDP_ICMP_PING_TIMEOUT 2000milliseconds
Any integergreater than orequal to 1
The number of milliseconds to wait for aping response. This setting applies to eachping attempt that is made. Three pingattempts are made for each host. If noresponse is received from any of the 3attempts, the total time waited for a reply isCDP_ICMP_PING_TIMEOUT multiplied by3. By default, this value is 6000 milliseconds.Changing the value forCDP_ICMP_PING_TIMEOUT causes thedefault TIMEOUT enumeration for theCurrent® Response Time attribute to nolonger apply. You should change theTIMEOUT enumeration to the new value ofCDP_ICMP_PING_TIMEOUT multiplied by3.
CDP_JDBC_CONNECTIONLESS false true, false If set to true, JDBC connections are closedafter each data collection attempt. That is, allattribute groups attempt to create their ownconnection each time data is collected.Connections are not reused if this variable isenabled. If set to false, one connection to thedatabase is made and that connection isshared among the attribute groups.
CDP_SSH_EXCLUDED_ENVIRONMENT_VARIABLES
None A commaseparated listofenvironmentvariable names
For an SSH-enabled Script data provider,specifies the set of local environmentvariables that should not be set in theenvironment of the remote system.
428 IBM Tivoli Monitoring Agent Builder: User's Guide
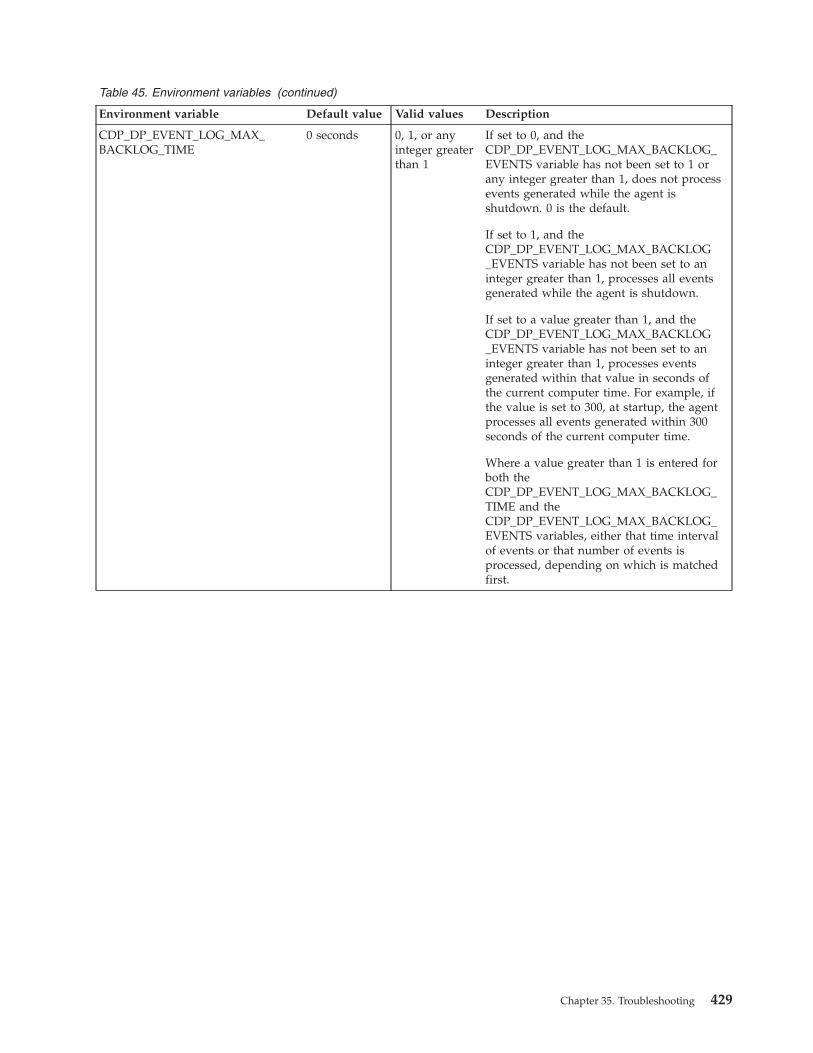
Table 45. Environment variables (continued)
Environment variable Default value Valid values Description
CDP_DP_EVENT_LOG_MAX_BACKLOG_TIME
0 seconds 0, 1, or anyinteger greaterthan 1
If set to 0, and theCDP_DP_EVENT_LOG_MAX_BACKLOG_EVENTS variable has not been set to 1 orany integer greater than 1, does not processevents generated while the agent isshutdown. 0 is the default.
If set to 1, and theCDP_DP_EVENT_LOG_MAX_BACKLOG_EVENTS variable has not been set to aninteger greater than 1, processes all eventsgenerated while the agent is shutdown.
If set to a value greater than 1, and theCDP_DP_EVENT_LOG_MAX_BACKLOG_EVENTS variable has not been set to aninteger greater than 1, processes eventsgenerated within that value in seconds ofthe current computer time. For example, ifthe value is set to 300, at startup, the agentprocesses all events generated within 300seconds of the current computer time.
Where a value greater than 1 is entered forboth theCDP_DP_EVENT_LOG_MAX_BACKLOG_TIME and theCDP_DP_EVENT_LOG_MAX_BACKLOG_EVENTS variables, either that time intervalof events or that number of events isprocessed, depending on which is matchedfirst.
Chapter 35. Troubleshooting 429
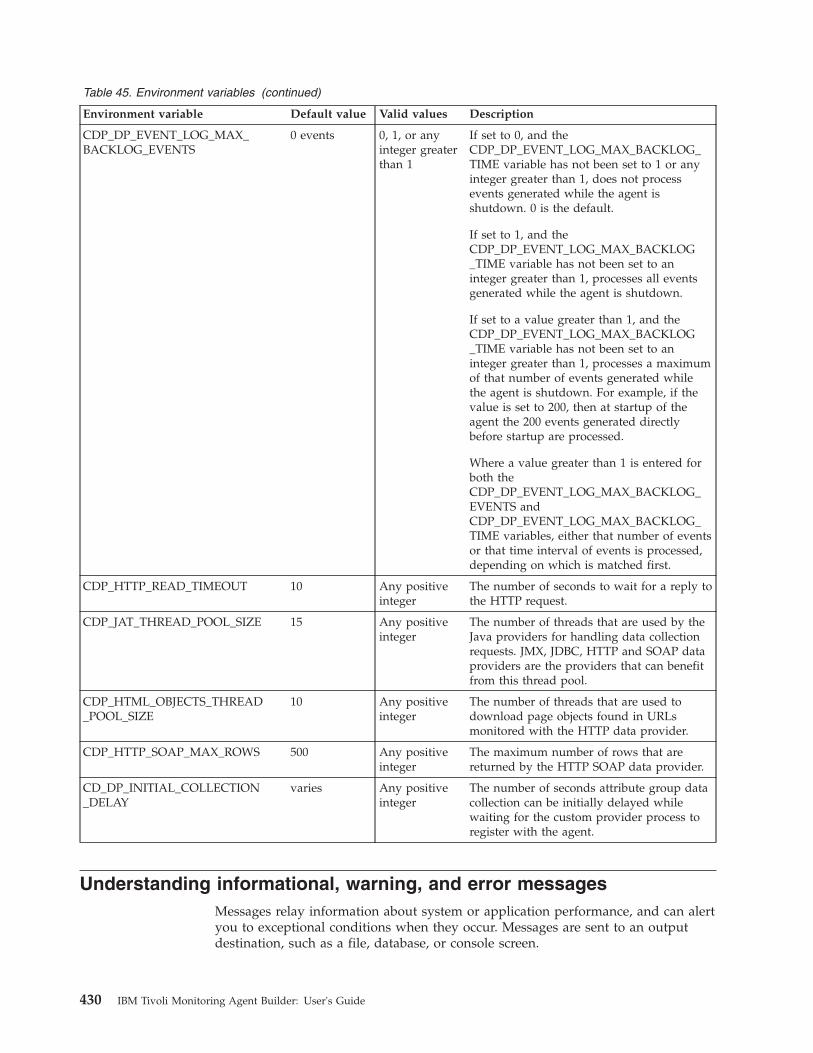
Table 45. Environment variables (continued)
Environment variable Default value Valid values Description
CDP_DP_EVENT_LOG_MAX_BACKLOG_EVENTS
0 events 0, 1, or anyinteger greaterthan 1
If set to 0, and theCDP_DP_EVENT_LOG_MAX_BACKLOG_TIME variable has not been set to 1 or anyinteger greater than 1, does not processevents generated while the agent isshutdown. 0 is the default.
If set to 1, and theCDP_DP_EVENT_LOG_MAX_BACKLOG_TIME variable has not been set to aninteger greater than 1, processes all eventsgenerated while the agent is shutdown.
If set to a value greater than 1, and theCDP_DP_EVENT_LOG_MAX_BACKLOG_TIME variable has not been set to aninteger greater than 1, processes a maximumof that number of events generated whilethe agent is shutdown. For example, if thevalue is set to 200, then at startup of theagent the 200 events generated directlybefore startup are processed.
Where a value greater than 1 is entered forboth theCDP_DP_EVENT_LOG_MAX_BACKLOG_EVENTS andCDP_DP_EVENT_LOG_MAX_BACKLOG_TIME variables, either that number of eventsor that time interval of events is processed,depending on which is matched first.
CDP_HTTP_READ_TIMEOUT 10 Any positiveinteger
The number of seconds to wait for a reply tothe HTTP request.
CDP_JAT_THREAD_POOL_SIZE 15 Any positiveinteger
The number of threads that are used by theJava providers for handling data collectionrequests. JMX, JDBC, HTTP and SOAP dataproviders are the providers that can benefitfrom this thread pool.
CDP_HTML_OBJECTS_THREAD_POOL_SIZE
10 Any positiveinteger
The number of threads that are used todownload page objects found in URLsmonitored with the HTTP data provider.
CDP_HTTP_SOAP_MAX_ROWS 500 Any positiveinteger
The maximum number of rows that arereturned by the HTTP SOAP data provider.
CD_DP_INITIAL_COLLECTION_DELAY
varies Any positiveinteger
The number of seconds attribute group datacollection can be initially delayed whilewaiting for the custom provider process toregister with the agent.
Understanding informational, warning, and error messagesMessages relay information about system or application performance, and can alertyou to exceptional conditions when they occur. Messages are sent to an outputdestination, such as a file, database, or console screen.
430 IBM Tivoli Monitoring Agent Builder: User's Guide
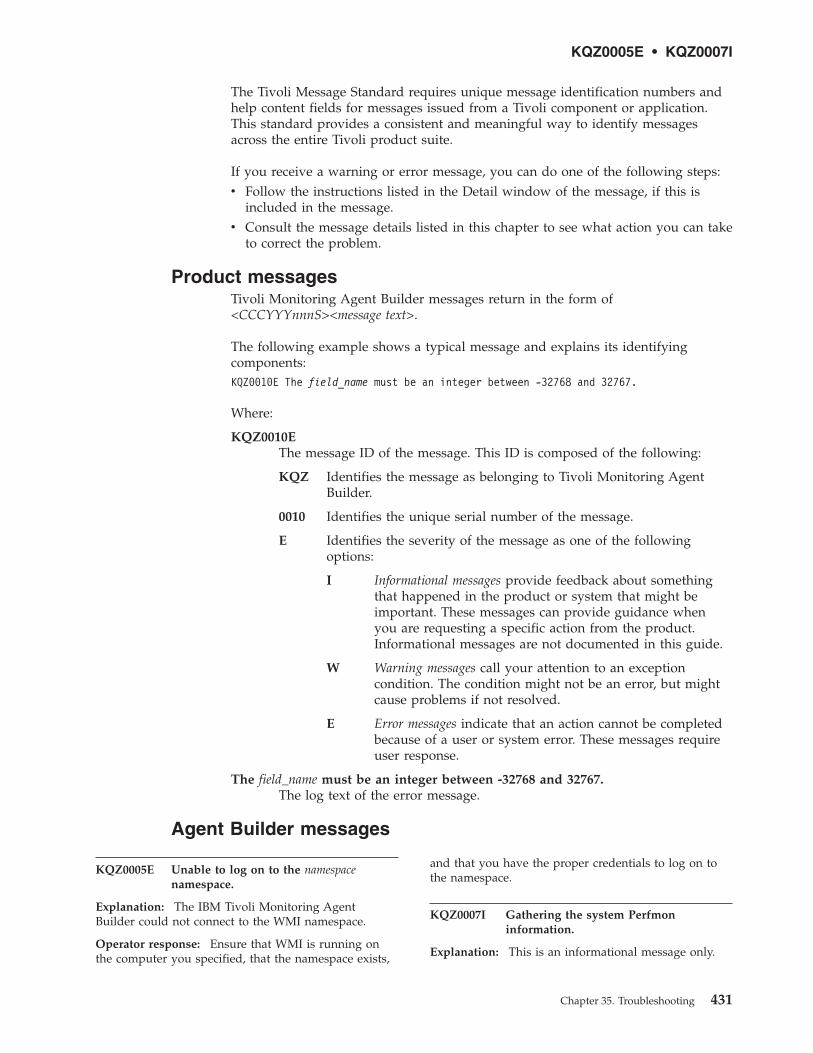
The Tivoli Message Standard requires unique message identification numbers andhelp content fields for messages issued from a Tivoli component or application.This standard provides a consistent and meaningful way to identify messagesacross the entire Tivoli product suite.
If you receive a warning or error message, you can do one of the following steps:v Follow the instructions listed in the Detail window of the message, if this is
included in the message.v Consult the message details listed in this chapter to see what action you can take
to correct the problem.
Product messagesTivoli Monitoring Agent Builder messages return in the form of<CCCYYYnnnS><message text>.
The following example shows a typical message and explains its identifyingcomponents:KQZ0010E The field_name must be an integer between -32768 and 32767.
Where:
KQZ0010EThe message ID of the message. This ID is composed of the following:
KQZ Identifies the message as belonging to Tivoli Monitoring AgentBuilder.
0010 Identifies the unique serial number of the message.
E Identifies the severity of the message as one of the followingoptions:
I Informational messages provide feedback about somethingthat happened in the product or system that might beimportant. These messages can provide guidance whenyou are requesting a specific action from the product.Informational messages are not documented in this guide.
W Warning messages call your attention to an exceptioncondition. The condition might not be an error, but mightcause problems if not resolved.
E Error messages indicate that an action cannot be completedbecause of a user or system error. These messages requireuser response.
The field_name must be an integer between -32768 and 32767.The log text of the error message.
Agent Builder messages
KQZ0005E Unable to log on to the namespacenamespace.
Explanation: The IBM Tivoli Monitoring AgentBuilder could not connect to the WMI namespace.
Operator response: Ensure that WMI is running onthe computer you specified, that the namespace exists,
and that you have the proper credentials to log on tothe namespace.
KQZ0007I Gathering the system Perfmoninformation.
Explanation: This is an informational message only.
KQZ0005E • KQZ0007I
Chapter 35. Troubleshooting 431
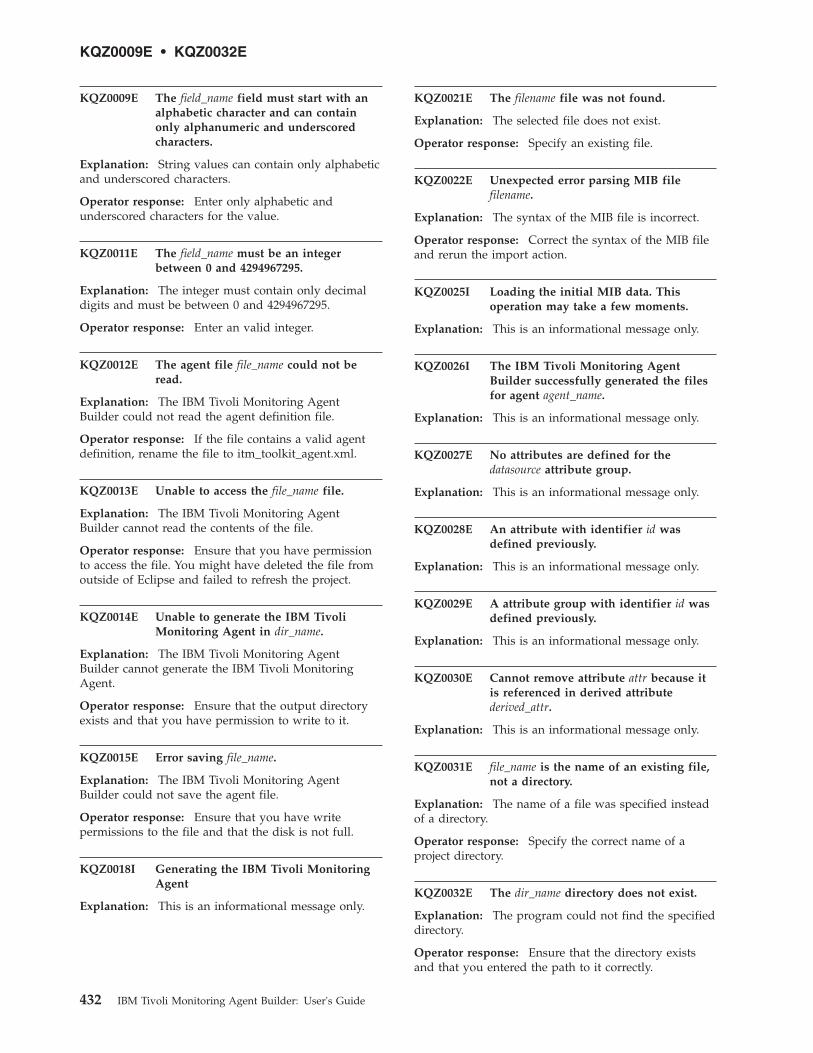
KQZ0009E The field_name field must start with analphabetic character and can containonly alphanumeric and underscoredcharacters.
Explanation: String values can contain only alphabeticand underscored characters.
Operator response: Enter only alphabetic andunderscored characters for the value.
KQZ0011E The field_name must be an integerbetween 0 and 4294967295.
Explanation: The integer must contain only decimaldigits and must be between 0 and 4294967295.
Operator response: Enter an valid integer.
KQZ0012E The agent file file_name could not beread.
Explanation: The IBM Tivoli Monitoring AgentBuilder could not read the agent definition file.
Operator response: If the file contains a valid agentdefinition, rename the file to itm_toolkit_agent.xml.
KQZ0013E Unable to access the file_name file.
Explanation: The IBM Tivoli Monitoring AgentBuilder cannot read the contents of the file.
Operator response: Ensure that you have permissionto access the file. You might have deleted the file fromoutside of Eclipse and failed to refresh the project.
KQZ0014E Unable to generate the IBM TivoliMonitoring Agent in dir_name.
Explanation: The IBM Tivoli Monitoring AgentBuilder cannot generate the IBM Tivoli MonitoringAgent.
Operator response: Ensure that the output directoryexists and that you have permission to write to it.
KQZ0015E Error saving file_name.
Explanation: The IBM Tivoli Monitoring AgentBuilder could not save the agent file.
Operator response: Ensure that you have writepermissions to the file and that the disk is not full.
KQZ0018I Generating the IBM Tivoli MonitoringAgent
Explanation: This is an informational message only.
KQZ0021E The filename file was not found.
Explanation: The selected file does not exist.
Operator response: Specify an existing file.
KQZ0022E Unexpected error parsing MIB filefilename.
Explanation: The syntax of the MIB file is incorrect.
Operator response: Correct the syntax of the MIB fileand rerun the import action.
KQZ0025I Loading the initial MIB data. Thisoperation may take a few moments.
Explanation: This is an informational message only.
KQZ0026I The IBM Tivoli Monitoring AgentBuilder successfully generated the filesfor agent agent_name.
Explanation: This is an informational message only.
KQZ0027E No attributes are defined for thedatasource attribute group.
Explanation: This is an informational message only.
KQZ0028E An attribute with identifier id wasdefined previously.
Explanation: This is an informational message only.
KQZ0029E A attribute group with identifier id wasdefined previously.
Explanation: This is an informational message only.
KQZ0030E Cannot remove attribute attr because itis referenced in derived attributederived_attr.
Explanation: This is an informational message only.
KQZ0031E file_name is the name of an existing file,not a directory.
Explanation: The name of a file was specified insteadof a directory.
Operator response: Specify the correct name of aproject directory.
KQZ0032E The dir_name directory does not exist.
Explanation: The program could not find the specifieddirectory.
Operator response: Ensure that the directory existsand that you entered the path to it correctly.
KQZ0009E • KQZ0032E
432 IBM Tivoli Monitoring Agent Builder: User's Guide
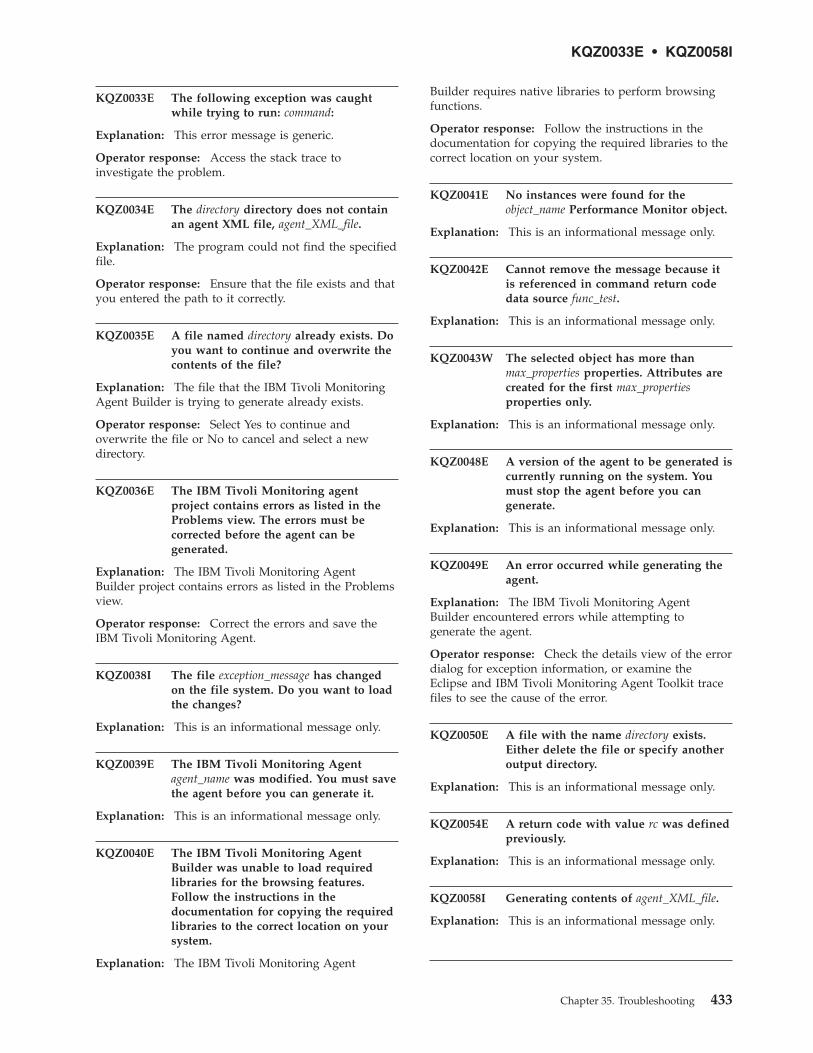
KQZ0033E The following exception was caughtwhile trying to run: command:
Explanation: This error message is generic.
Operator response: Access the stack trace toinvestigate the problem.
KQZ0034E The directory directory does not containan agent XML file, agent_XML_file.
Explanation: The program could not find the specifiedfile.
Operator response: Ensure that the file exists and thatyou entered the path to it correctly.
KQZ0035E A file named directory already exists. Doyou want to continue and overwrite thecontents of the file?
Explanation: The file that the IBM Tivoli MonitoringAgent Builder is trying to generate already exists.
Operator response: Select Yes to continue andoverwrite the file or No to cancel and select a newdirectory.
KQZ0036E The IBM Tivoli Monitoring agentproject contains errors as listed in theProblems view. The errors must becorrected before the agent can begenerated.
Explanation: The IBM Tivoli Monitoring AgentBuilder project contains errors as listed in the Problemsview.
Operator response: Correct the errors and save theIBM Tivoli Monitoring Agent.
KQZ0038I The file exception_message has changedon the file system. Do you want to loadthe changes?
Explanation: This is an informational message only.
KQZ0039E The IBM Tivoli Monitoring Agentagent_name was modified. You must savethe agent before you can generate it.
Explanation: This is an informational message only.
KQZ0040E The IBM Tivoli Monitoring AgentBuilder was unable to load requiredlibraries for the browsing features.Follow the instructions in thedocumentation for copying the requiredlibraries to the correct location on yoursystem.
Explanation: The IBM Tivoli Monitoring Agent
Builder requires native libraries to perform browsingfunctions.
Operator response: Follow the instructions in thedocumentation for copying the required libraries to thecorrect location on your system.
KQZ0041E No instances were found for theobject_name Performance Monitor object.
Explanation: This is an informational message only.
KQZ0042E Cannot remove the message because itis referenced in command return codedata source func_test.
Explanation: This is an informational message only.
KQZ0043W The selected object has more thanmax_properties properties. Attributes arecreated for the first max_propertiesproperties only.
Explanation: This is an informational message only.
KQZ0048E A version of the agent to be generated iscurrently running on the system. Youmust stop the agent before you cangenerate.
Explanation: This is an informational message only.
KQZ0049E An error occurred while generating theagent.
Explanation: The IBM Tivoli Monitoring AgentBuilder encountered errors while attempting togenerate the agent.
Operator response: Check the details view of the errordialog for exception information, or examine theEclipse and IBM Tivoli Monitoring Agent Toolkit tracefiles to see the cause of the error.
KQZ0050E A file with the name directory exists.Either delete the file or specify anotheroutput directory.
Explanation: This is an informational message only.
KQZ0054E A return code with value rc was definedpreviously.
Explanation: This is an informational message only.
KQZ0058I Generating contents of agent_XML_file.
Explanation: This is an informational message only.
KQZ0033E • KQZ0058I
Chapter 35. Troubleshooting 433
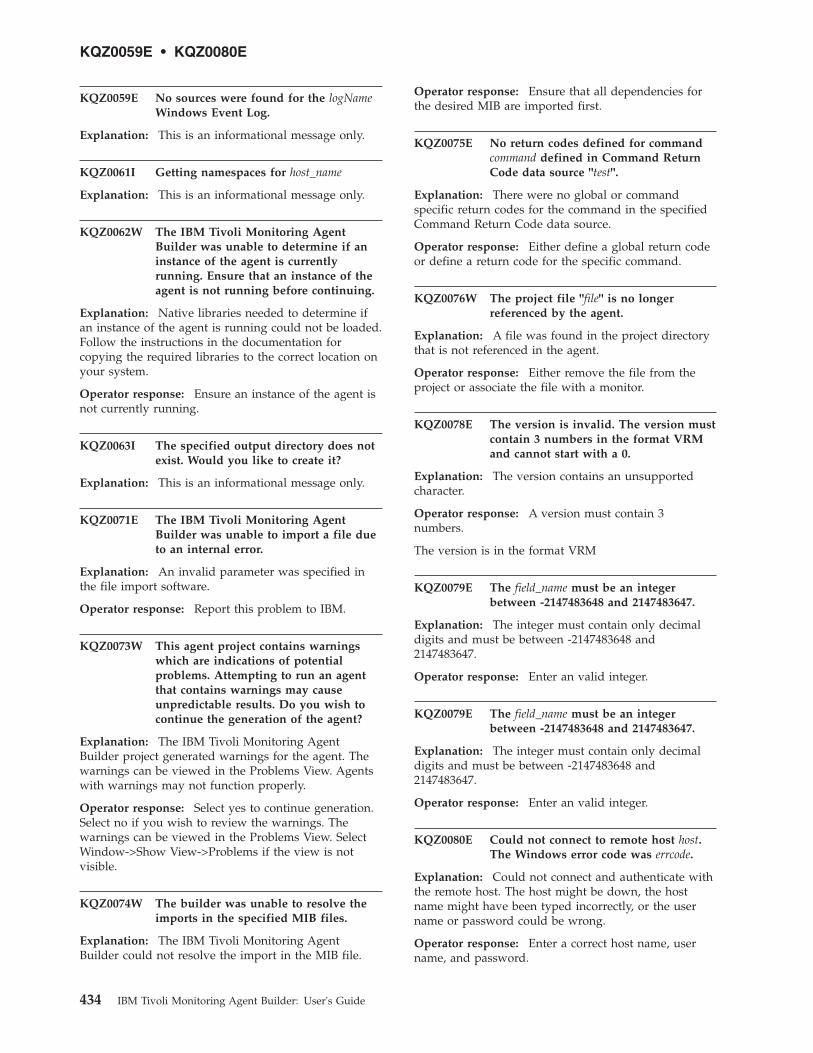
KQZ0059E No sources were found for the logNameWindows Event Log.
Explanation: This is an informational message only.
KQZ0061I Getting namespaces for host_name
Explanation: This is an informational message only.
KQZ0062W The IBM Tivoli Monitoring AgentBuilder was unable to determine if aninstance of the agent is currentlyrunning. Ensure that an instance of theagent is not running before continuing.
Explanation: Native libraries needed to determine ifan instance of the agent is running could not be loaded.Follow the instructions in the documentation forcopying the required libraries to the correct location onyour system.
Operator response: Ensure an instance of the agent isnot currently running.
KQZ0063I The specified output directory does notexist. Would you like to create it?
Explanation: This is an informational message only.
KQZ0071E The IBM Tivoli Monitoring AgentBuilder was unable to import a file dueto an internal error.
Explanation: An invalid parameter was specified inthe file import software.
Operator response: Report this problem to IBM.
KQZ0073W This agent project contains warningswhich are indications of potentialproblems. Attempting to run an agentthat contains warnings may causeunpredictable results. Do you wish tocontinue the generation of the agent?
Explanation: The IBM Tivoli Monitoring AgentBuilder project generated warnings for the agent. Thewarnings can be viewed in the Problems View. Agentswith warnings may not function properly.
Operator response: Select yes to continue generation.Select no if you wish to review the warnings. Thewarnings can be viewed in the Problems View. SelectWindow->Show View->Problems if the view is notvisible.
KQZ0074W The builder was unable to resolve theimports in the specified MIB files.
Explanation: The IBM Tivoli Monitoring AgentBuilder could not resolve the import in the MIB file.
Operator response: Ensure that all dependencies forthe desired MIB are imported first.
KQZ0075E No return codes defined for commandcommand defined in Command ReturnCode data source "test".
Explanation: There were no global or commandspecific return codes for the command in the specifiedCommand Return Code data source.
Operator response: Either define a global return codeor define a return code for the specific command.
KQZ0076W The project file "file" is no longerreferenced by the agent.
Explanation: A file was found in the project directorythat is not referenced in the agent.
Operator response: Either remove the file from theproject or associate the file with a monitor.
KQZ0078E The version is invalid. The version mustcontain 3 numbers in the format VRMand cannot start with a 0.
Explanation: The version contains an unsupportedcharacter.
Operator response: A version must contain 3numbers.
The version is in the format VRM
KQZ0079E The field_name must be an integerbetween -2147483648 and 2147483647.
Explanation: The integer must contain only decimaldigits and must be between -2147483648 and2147483647.
Operator response: Enter an valid integer.
KQZ0079E The field_name must be an integerbetween -2147483648 and 2147483647.
Explanation: The integer must contain only decimaldigits and must be between -2147483648 and2147483647.
Operator response: Enter an valid integer.
KQZ0080E Could not connect to remote host host.The Windows error code was errcode.
Explanation: Could not connect and authenticate withthe remote host. The host might be down, the hostname might have been typed incorrectly, or the username or password could be wrong.
Operator response: Enter a correct host name, username, and password.
KQZ0059E • KQZ0080E
434 IBM Tivoli Monitoring Agent Builder: User's Guide
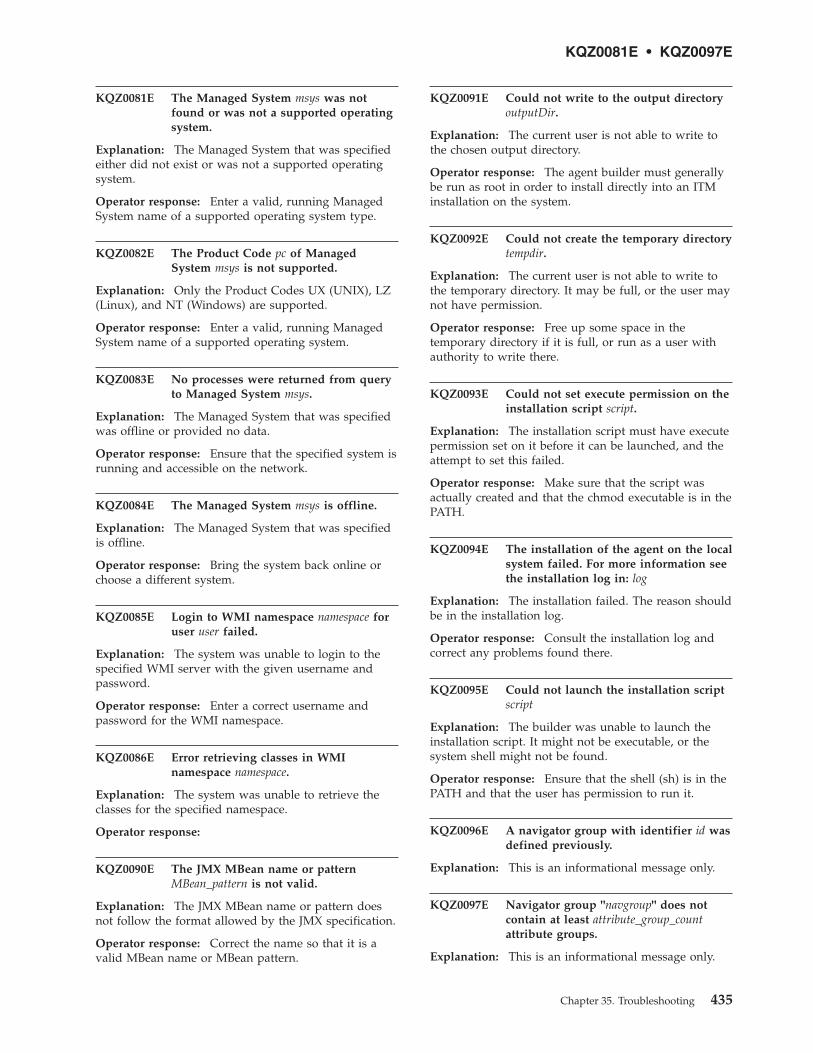
KQZ0081E The Managed System msys was notfound or was not a supported operatingsystem.
Explanation: The Managed System that was specifiedeither did not exist or was not a supported operatingsystem.
Operator response: Enter a valid, running ManagedSystem name of a supported operating system type.
KQZ0082E The Product Code pc of ManagedSystem msys is not supported.
Explanation: Only the Product Codes UX (UNIX), LZ(Linux), and NT (Windows) are supported.
Operator response: Enter a valid, running ManagedSystem name of a supported operating system.
KQZ0083E No processes were returned from queryto Managed System msys.
Explanation: The Managed System that was specifiedwas offline or provided no data.
Operator response: Ensure that the specified system isrunning and accessible on the network.
KQZ0084E The Managed System msys is offline.
Explanation: The Managed System that was specifiedis offline.
Operator response: Bring the system back online orchoose a different system.
KQZ0085E Login to WMI namespace namespace foruser user failed.
Explanation: The system was unable to login to thespecified WMI server with the given username andpassword.
Operator response: Enter a correct username andpassword for the WMI namespace.
KQZ0086E Error retrieving classes in WMInamespace namespace.
Explanation: The system was unable to retrieve theclasses for the specified namespace.
Operator response:
KQZ0090E The JMX MBean name or patternMBean_pattern is not valid.
Explanation: The JMX MBean name or pattern doesnot follow the format allowed by the JMX specification.
Operator response: Correct the name so that it is avalid MBean name or MBean pattern.
KQZ0091E Could not write to the output directoryoutputDir.
Explanation: The current user is not able to write tothe chosen output directory.
Operator response: The agent builder must generallybe run as root in order to install directly into an ITMinstallation on the system.
KQZ0092E Could not create the temporary directorytempdir.
Explanation: The current user is not able to write tothe temporary directory. It may be full, or the user maynot have permission.
Operator response: Free up some space in thetemporary directory if it is full, or run as a user withauthority to write there.
KQZ0093E Could not set execute permission on theinstallation script script.
Explanation: The installation script must have executepermission set on it before it can be launched, and theattempt to set this failed.
Operator response: Make sure that the script wasactually created and that the chmod executable is in thePATH.
KQZ0094E The installation of the agent on the localsystem failed. For more information seethe installation log in: log
Explanation: The installation failed. The reason shouldbe in the installation log.
Operator response: Consult the installation log andcorrect any problems found there.
KQZ0095E Could not launch the installation scriptscript
Explanation: The builder was unable to launch theinstallation script. It might not be executable, or thesystem shell might not be found.
Operator response: Ensure that the shell (sh) is in thePATH and that the user has permission to run it.
KQZ0096E A navigator group with identifier id wasdefined previously.
Explanation: This is an informational message only.
KQZ0097E Navigator group "navgroup" does notcontain at least attribute_group_countattribute groups.
Explanation: This is an informational message only.
KQZ0081E • KQZ0097E
Chapter 35. Troubleshooting 435
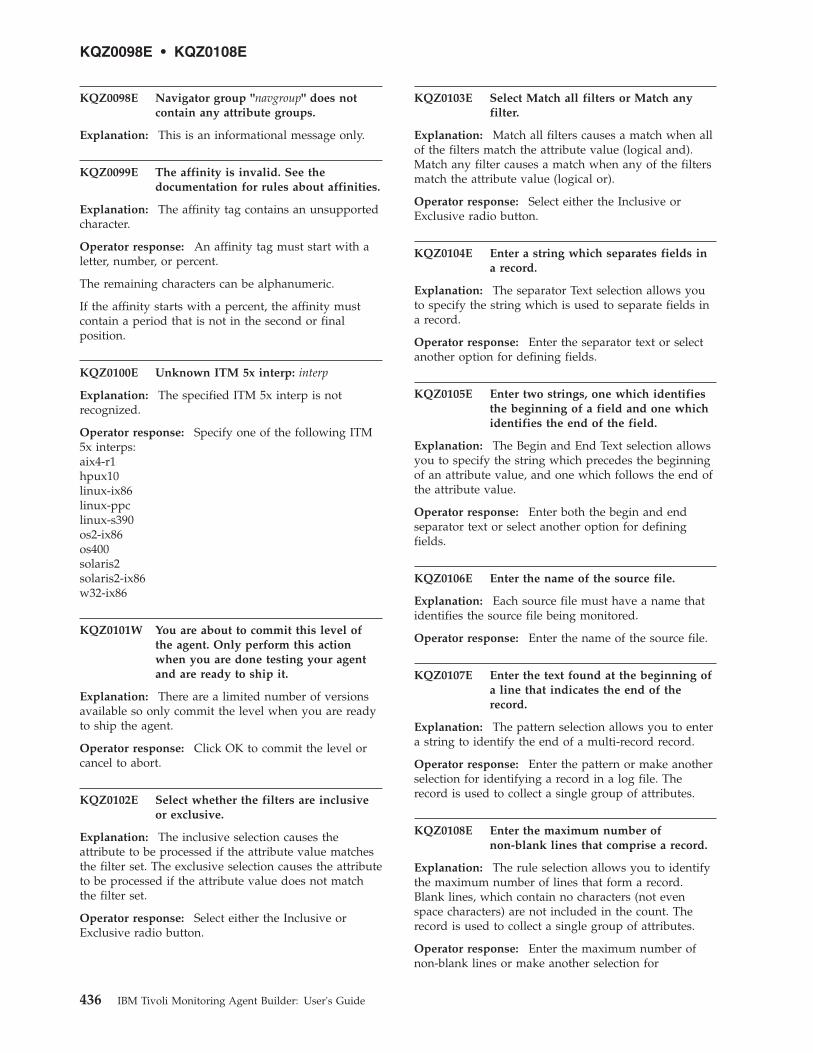
KQZ0098E Navigator group "navgroup" does notcontain any attribute groups.
Explanation: This is an informational message only.
KQZ0099E The affinity is invalid. See thedocumentation for rules about affinities.
Explanation: The affinity tag contains an unsupportedcharacter.
Operator response: An affinity tag must start with aletter, number, or percent.
The remaining characters can be alphanumeric.
If the affinity starts with a percent, the affinity mustcontain a period that is not in the second or finalposition.
KQZ0100E Unknown ITM 5x interp: interp
Explanation: The specified ITM 5x interp is notrecognized.
Operator response: Specify one of the following ITM5x interps:aix4-r1hpux10linux-ix86linux-ppclinux-s390os2-ix86os400solaris2solaris2-ix86w32-ix86
KQZ0101W You are about to commit this level ofthe agent. Only perform this actionwhen you are done testing your agentand are ready to ship it.
Explanation: There are a limited number of versionsavailable so only commit the level when you are readyto ship the agent.
Operator response: Click OK to commit the level orcancel to abort.
KQZ0102E Select whether the filters are inclusiveor exclusive.
Explanation: The inclusive selection causes theattribute to be processed if the attribute value matchesthe filter set. The exclusive selection causes the attributeto be processed if the attribute value does not matchthe filter set.
Operator response: Select either the Inclusive orExclusive radio button.
KQZ0103E Select Match all filters or Match anyfilter.
Explanation: Match all filters causes a match when allof the filters match the attribute value (logical and).Match any filter causes a match when any of the filtersmatch the attribute value (logical or).
Operator response: Select either the Inclusive orExclusive radio button.
KQZ0104E Enter a string which separates fields ina record.
Explanation: The separator Text selection allows youto specify the string which is used to separate fields ina record.
Operator response: Enter the separator text or selectanother option for defining fields.
KQZ0105E Enter two strings, one which identifiesthe beginning of a field and one whichidentifies the end of the field.
Explanation: The Begin and End Text selection allowsyou to specify the string which precedes the beginningof an attribute value, and one which follows the end ofthe attribute value.
Operator response: Enter both the begin and endseparator text or select another option for definingfields.
KQZ0106E Enter the name of the source file.
Explanation: Each source file must have a name thatidentifies the source file being monitored.
Operator response: Enter the name of the source file.
KQZ0107E Enter the text found at the beginning ofa line that indicates the end of therecord.
Explanation: The pattern selection allows you to entera string to identify the end of a multi-record record.
Operator response: Enter the pattern or make anotherselection for identifying a record in a log file. Therecord is used to collect a single group of attributes.
KQZ0108E Enter the maximum number ofnon-blank lines that comprise a record.
Explanation: The rule selection allows you to identifythe maximum number of lines that form a record.Blank lines, which contain no characters (not evenspace characters) are not included in the count. Therecord is used to collect a single group of attributes.
Operator response: Enter the maximum number ofnon-blank lines or make another selection for
KQZ0098E • KQZ0108E
436 IBM Tivoli Monitoring Agent Builder: User's Guide
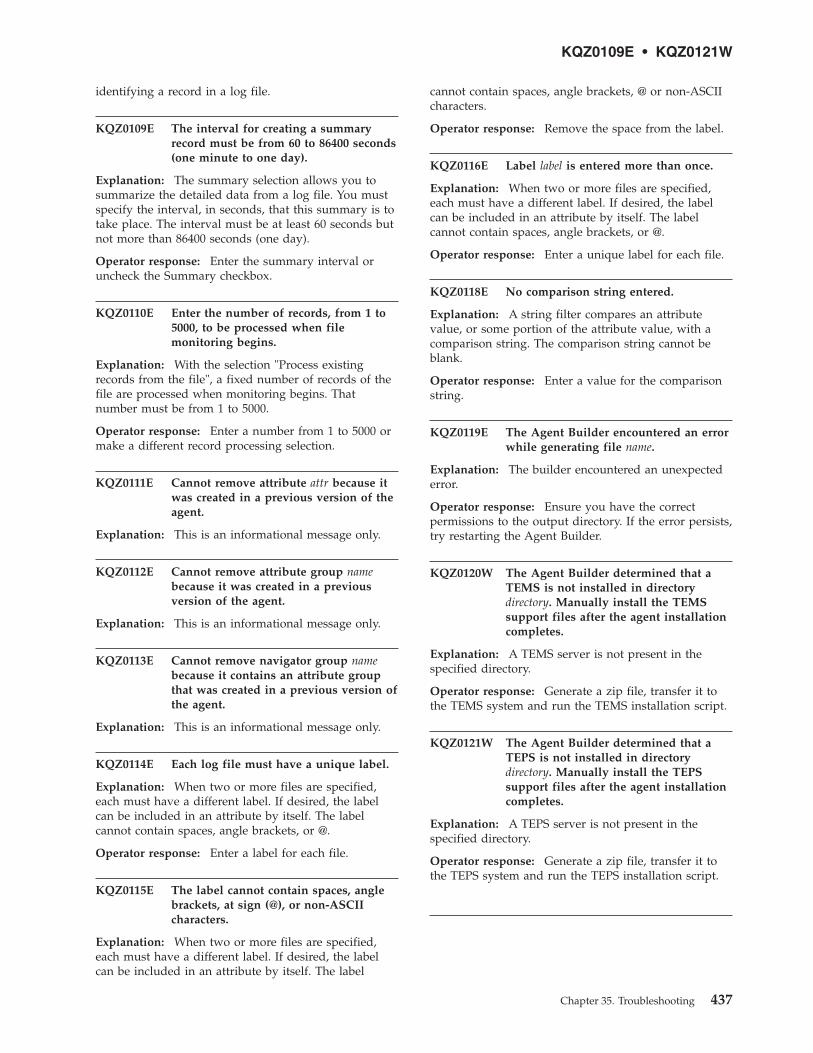
identifying a record in a log file.
KQZ0109E The interval for creating a summaryrecord must be from 60 to 86400 seconds(one minute to one day).
Explanation: The summary selection allows you tosummarize the detailed data from a log file. You mustspecify the interval, in seconds, that this summary is totake place. The interval must be at least 60 seconds butnot more than 86400 seconds (one day).
Operator response: Enter the summary interval oruncheck the Summary checkbox.
KQZ0110E Enter the number of records, from 1 to5000, to be processed when filemonitoring begins.
Explanation: With the selection "Process existingrecords from the file", a fixed number of records of thefile are processed when monitoring begins. Thatnumber must be from 1 to 5000.
Operator response: Enter a number from 1 to 5000 ormake a different record processing selection.
KQZ0111E Cannot remove attribute attr because itwas created in a previous version of theagent.
Explanation: This is an informational message only.
KQZ0112E Cannot remove attribute group namebecause it was created in a previousversion of the agent.
Explanation: This is an informational message only.
KQZ0113E Cannot remove navigator group namebecause it contains an attribute groupthat was created in a previous version ofthe agent.
Explanation: This is an informational message only.
KQZ0114E Each log file must have a unique label.
Explanation: When two or more files are specified,each must have a different label. If desired, the labelcan be included in an attribute by itself. The labelcannot contain spaces, angle brackets, or @.
Operator response: Enter a label for each file.
KQZ0115E The label cannot contain spaces, anglebrackets, at sign (@), or non-ASCIIcharacters.
Explanation: When two or more files are specified,each must have a different label. If desired, the labelcan be included in an attribute by itself. The label
cannot contain spaces, angle brackets, @ or non-ASCIIcharacters.
Operator response: Remove the space from the label.
KQZ0116E Label label is entered more than once.
Explanation: When two or more files are specified,each must have a different label. If desired, the labelcan be included in an attribute by itself. The labelcannot contain spaces, angle brackets, or @.
Operator response: Enter a unique label for each file.
KQZ0118E No comparison string entered.
Explanation: A string filter compares an attributevalue, or some portion of the attribute value, with acomparison string. The comparison string cannot beblank.
Operator response: Enter a value for the comparisonstring.
KQZ0119E The Agent Builder encountered an errorwhile generating file name.
Explanation: The builder encountered an unexpectederror.
Operator response: Ensure you have the correctpermissions to the output directory. If the error persists,try restarting the Agent Builder.
KQZ0120W The Agent Builder determined that aTEMS is not installed in directorydirectory. Manually install the TEMSsupport files after the agent installationcompletes.
Explanation: A TEMS server is not present in thespecified directory.
Operator response: Generate a zip file, transfer it tothe TEMS system and run the TEMS installation script.
KQZ0121W The Agent Builder determined that aTEPS is not installed in directorydirectory. Manually install the TEPSsupport files after the agent installationcompletes.
Explanation: A TEPS server is not present in thespecified directory.
Operator response: Generate a zip file, transfer it tothe TEPS system and run the TEPS installation script.
KQZ0109E • KQZ0121W
Chapter 35. Troubleshooting 437
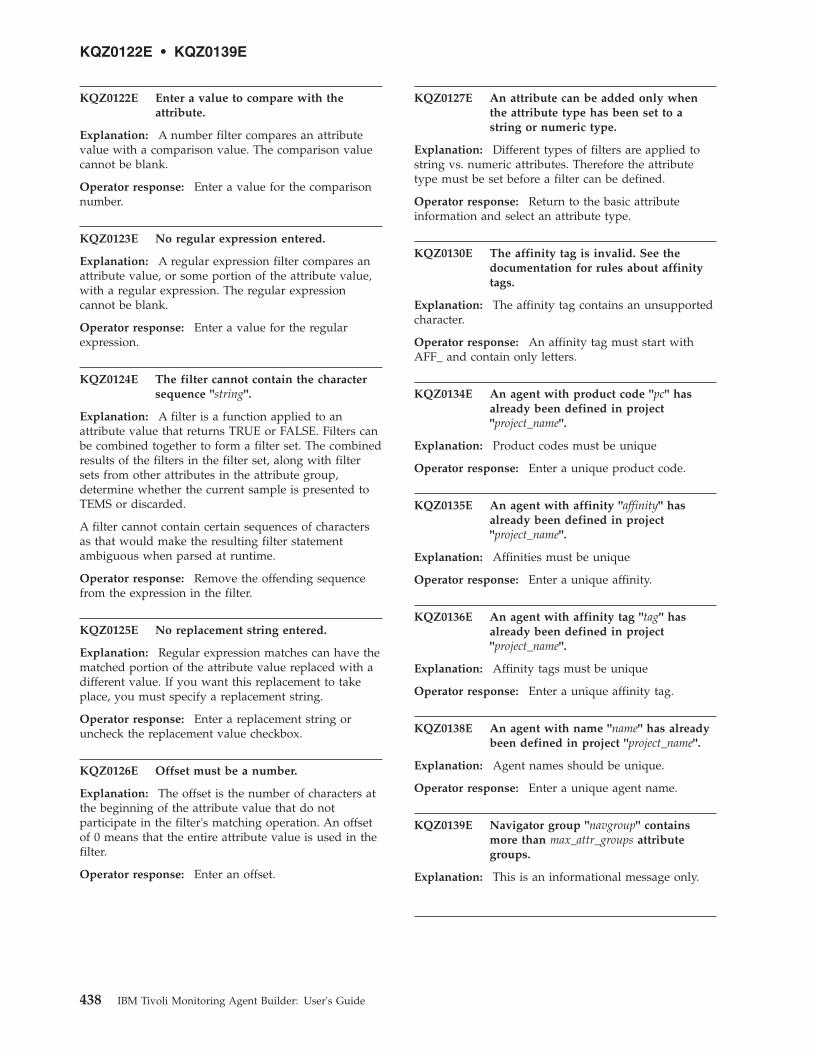
KQZ0122E Enter a value to compare with theattribute.
Explanation: A number filter compares an attributevalue with a comparison value. The comparison valuecannot be blank.
Operator response: Enter a value for the comparisonnumber.
KQZ0123E No regular expression entered.
Explanation: A regular expression filter compares anattribute value, or some portion of the attribute value,with a regular expression. The regular expressioncannot be blank.
Operator response: Enter a value for the regularexpression.
KQZ0124E The filter cannot contain the charactersequence "string".
Explanation: A filter is a function applied to anattribute value that returns TRUE or FALSE. Filters canbe combined together to form a filter set. The combinedresults of the filters in the filter set, along with filtersets from other attributes in the attribute group,determine whether the current sample is presented toTEMS or discarded.
A filter cannot contain certain sequences of charactersas that would make the resulting filter statementambiguous when parsed at runtime.
Operator response: Remove the offending sequencefrom the expression in the filter.
KQZ0125E No replacement string entered.
Explanation: Regular expression matches can have thematched portion of the attribute value replaced with adifferent value. If you want this replacement to takeplace, you must specify a replacement string.
Operator response: Enter a replacement string oruncheck the replacement value checkbox.
KQZ0126E Offset must be a number.
Explanation: The offset is the number of characters atthe beginning of the attribute value that do notparticipate in the filter's matching operation. An offsetof 0 means that the entire attribute value is used in thefilter.
Operator response: Enter an offset.
KQZ0127E An attribute can be added only whenthe attribute type has been set to astring or numeric type.
Explanation: Different types of filters are applied tostring vs. numeric attributes. Therefore the attributetype must be set before a filter can be defined.
Operator response: Return to the basic attributeinformation and select an attribute type.
KQZ0130E The affinity tag is invalid. See thedocumentation for rules about affinitytags.
Explanation: The affinity tag contains an unsupportedcharacter.
Operator response: An affinity tag must start withAFF_ and contain only letters.
KQZ0134E An agent with product code "pc" hasalready been defined in project"project_name".
Explanation: Product codes must be unique
Operator response: Enter a unique product code.
KQZ0135E An agent with affinity "affinity" hasalready been defined in project"project_name".
Explanation: Affinities must be unique
Operator response: Enter a unique affinity.
KQZ0136E An agent with affinity tag "tag" hasalready been defined in project"project_name".
Explanation: Affinity tags must be unique
Operator response: Enter a unique affinity tag.
KQZ0138E An agent with name "name" has alreadybeen defined in project "project_name".
Explanation: Agent names should be unique.
Operator response: Enter a unique agent name.
KQZ0139E Navigator group "navgroup" containsmore than max_attr_groups attributegroups.
Explanation: This is an informational message only.
KQZ0122E • KQZ0139E
438 IBM Tivoli Monitoring Agent Builder: User's Guide
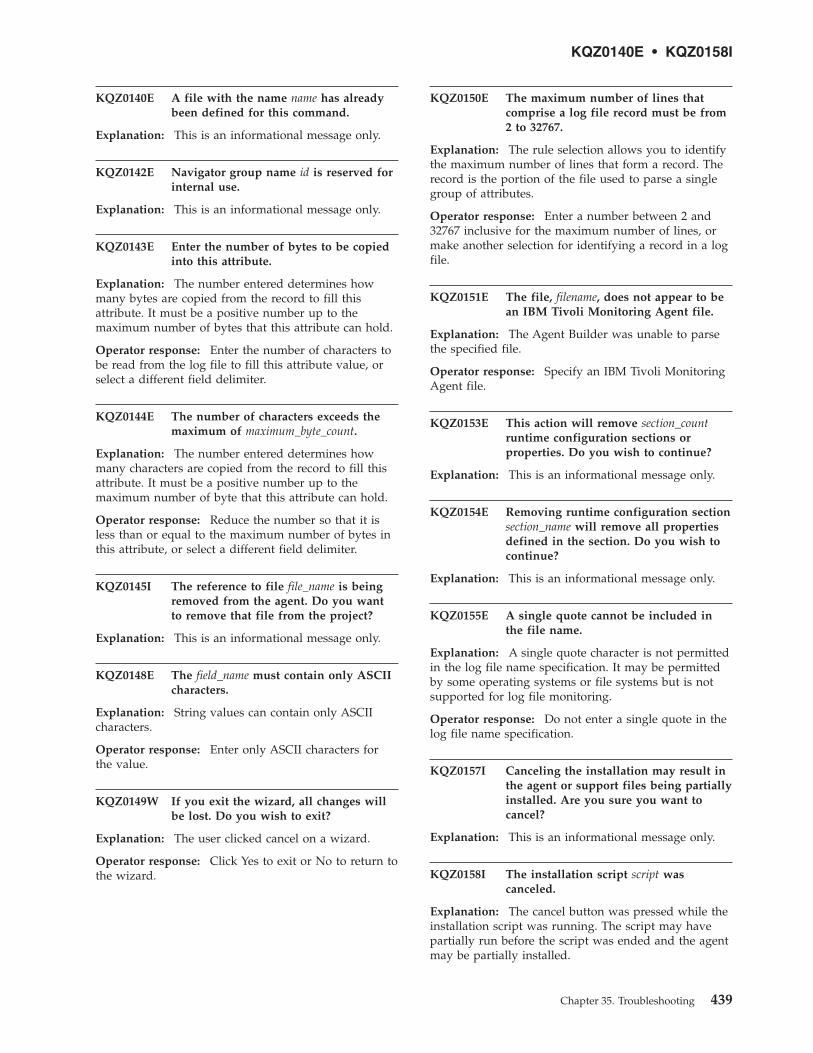
KQZ0140E A file with the name name has alreadybeen defined for this command.
Explanation: This is an informational message only.
KQZ0142E Navigator group name id is reserved forinternal use.
Explanation: This is an informational message only.
KQZ0143E Enter the number of bytes to be copiedinto this attribute.
Explanation: The number entered determines howmany bytes are copied from the record to fill thisattribute. It must be a positive number up to themaximum number of bytes that this attribute can hold.
Operator response: Enter the number of characters tobe read from the log file to fill this attribute value, orselect a different field delimiter.
KQZ0144E The number of characters exceeds themaximum of maximum_byte_count.
Explanation: The number entered determines howmany characters are copied from the record to fill thisattribute. It must be a positive number up to themaximum number of byte that this attribute can hold.
Operator response: Reduce the number so that it isless than or equal to the maximum number of bytes inthis attribute, or select a different field delimiter.
KQZ0145I The reference to file file_name is beingremoved from the agent. Do you wantto remove that file from the project?
Explanation: This is an informational message only.
KQZ0148E The field_name must contain only ASCIIcharacters.
Explanation: String values can contain only ASCIIcharacters.
Operator response: Enter only ASCII characters forthe value.
KQZ0149W If you exit the wizard, all changes willbe lost. Do you wish to exit?
Explanation: The user clicked cancel on a wizard.
Operator response: Click Yes to exit or No to return tothe wizard.
KQZ0150E The maximum number of lines thatcomprise a log file record must be from2 to 32767.
Explanation: The rule selection allows you to identifythe maximum number of lines that form a record. Therecord is the portion of the file used to parse a singlegroup of attributes.
Operator response: Enter a number between 2 and32767 inclusive for the maximum number of lines, ormake another selection for identifying a record in a logfile.
KQZ0151E The file, filename, does not appear to bean IBM Tivoli Monitoring Agent file.
Explanation: The Agent Builder was unable to parsethe specified file.
Operator response: Specify an IBM Tivoli MonitoringAgent file.
KQZ0153E This action will remove section_countruntime configuration sections orproperties. Do you wish to continue?
Explanation: This is an informational message only.
KQZ0154E Removing runtime configuration sectionsection_name will remove all propertiesdefined in the section. Do you wish tocontinue?
Explanation: This is an informational message only.
KQZ0155E A single quote cannot be included inthe file name.
Explanation: A single quote character is not permittedin the log file name specification. It may be permittedby some operating systems or file systems but is notsupported for log file monitoring.
Operator response: Do not enter a single quote in thelog file name specification.
KQZ0157I Canceling the installation may result inthe agent or support files being partiallyinstalled. Are you sure you want tocancel?
Explanation: This is an informational message only.
KQZ0158I The installation script script wascanceled.
Explanation: The cancel button was pressed while theinstallation script was running. The script may havepartially run before the script was ended and the agentmay be partially installed.
KQZ0140E • KQZ0158I
Chapter 35. Troubleshooting 439
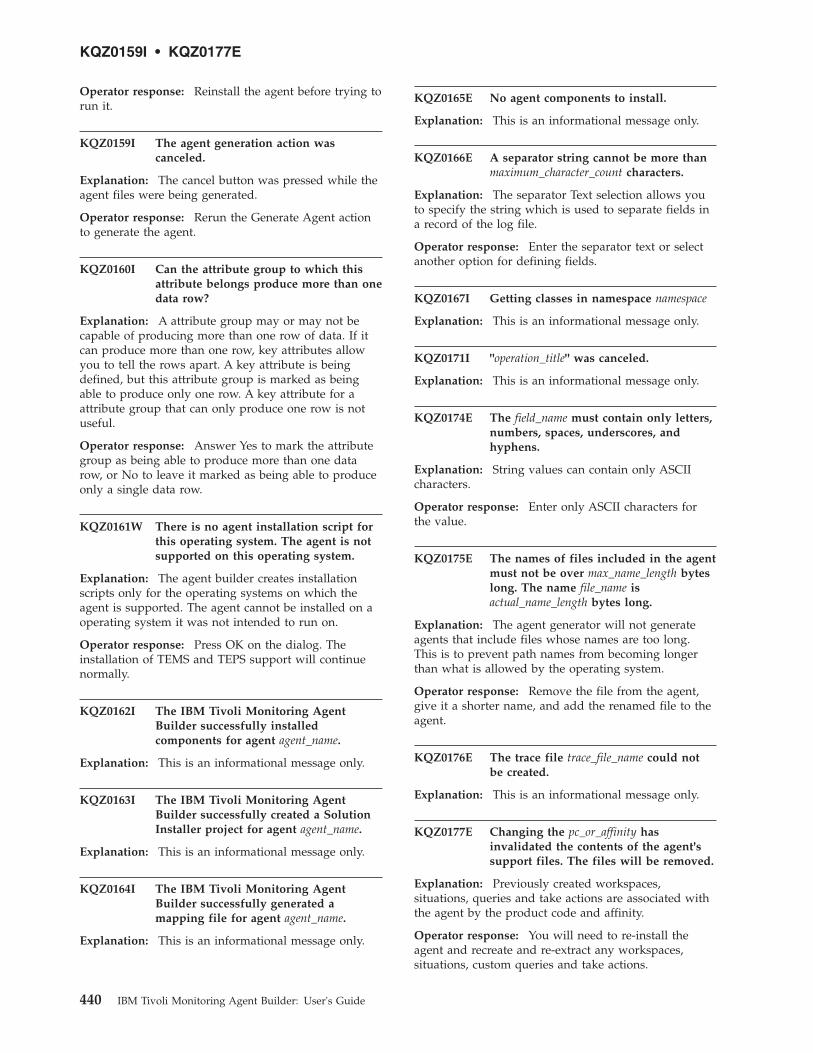
Operator response: Reinstall the agent before trying torun it.
KQZ0159I The agent generation action wascanceled.
Explanation: The cancel button was pressed while theagent files were being generated.
Operator response: Rerun the Generate Agent actionto generate the agent.
KQZ0160I Can the attribute group to which thisattribute belongs produce more than onedata row?
Explanation: A attribute group may or may not becapable of producing more than one row of data. If itcan produce more than one row, key attributes allowyou to tell the rows apart. A key attribute is beingdefined, but this attribute group is marked as beingable to produce only one row. A key attribute for aattribute group that can only produce one row is notuseful.
Operator response: Answer Yes to mark the attributegroup as being able to produce more than one datarow, or No to leave it marked as being able to produceonly a single data row.
KQZ0161W There is no agent installation script forthis operating system. The agent is notsupported on this operating system.
Explanation: The agent builder creates installationscripts only for the operating systems on which theagent is supported. The agent cannot be installed on aoperating system it was not intended to run on.
Operator response: Press OK on the dialog. Theinstallation of TEMS and TEPS support will continuenormally.
KQZ0162I The IBM Tivoli Monitoring AgentBuilder successfully installedcomponents for agent agent_name.
Explanation: This is an informational message only.
KQZ0163I The IBM Tivoli Monitoring AgentBuilder successfully created a SolutionInstaller project for agent agent_name.
Explanation: This is an informational message only.
KQZ0164I The IBM Tivoli Monitoring AgentBuilder successfully generated amapping file for agent agent_name.
Explanation: This is an informational message only.
KQZ0165E No agent components to install.
Explanation: This is an informational message only.
KQZ0166E A separator string cannot be more thanmaximum_character_count characters.
Explanation: The separator Text selection allows youto specify the string which is used to separate fields ina record of the log file.
Operator response: Enter the separator text or selectanother option for defining fields.
KQZ0167I Getting classes in namespace namespace
Explanation: This is an informational message only.
KQZ0171I "operation_title" was canceled.
Explanation: This is an informational message only.
KQZ0174E The field_name must contain only letters,numbers, spaces, underscores, andhyphens.
Explanation: String values can contain only ASCIIcharacters.
Operator response: Enter only ASCII characters forthe value.
KQZ0175E The names of files included in the agentmust not be over max_name_length byteslong. The name file_name isactual_name_length bytes long.
Explanation: The agent generator will not generateagents that include files whose names are too long.This is to prevent path names from becoming longerthan what is allowed by the operating system.
Operator response: Remove the file from the agent,give it a shorter name, and add the renamed file to theagent.
KQZ0176E The trace file trace_file_name could notbe created.
Explanation: This is an informational message only.
KQZ0177E Changing the pc_or_affinity hasinvalidated the contents of the agent'ssupport files. The files will be removed.
Explanation: Previously created workspaces,situations, queries and take actions are associated withthe agent by the product code and affinity.
Operator response: You will need to re-install theagent and recreate and re-extract any workspaces,situations, custom queries and take actions.
KQZ0159I • KQZ0177E
440 IBM Tivoli Monitoring Agent Builder: User's Guide
KQZ0179E Make a selection for data_source.
Explanation: You must select two attribute groups inorder to create a joined attribute group.
Operator response: Select one more attribute group.
KQZ0180E Cannot join an attribute group withitself.
Explanation: You must select two different attributegroups in order to create a joined attribute group.
Operator response: Select two different attributegroups.
KQZ0182E Select an attribute to join on forattribute_group.
Explanation: When both selected attribute groups aredefined as returning multiple rows, you must select anattribute from each in order to correlate the data.
Operator response: Select an attribute from eachattribute group.
KQZ0183E Select a key attribute for the joinedattribute group.
Explanation: By default, the keys for the base attributegroups are used as the keys for the joined attributegroup. However, you can specify one attribute to be thekey.
Operator response: Select the key attribute.
KQZ0184E The selection cannot be removedbecause joined attribute groupreferencing_attribute_group_namereferences attribute groupreferenced_attribute_group_name.
Explanation: The attribute group you are trying todelete is referenced in a joined attribute group which isnot being deleted.
Operator response: You must delete the joinedattribute group before or along with any referencedattribute groups.
KQZ0185E Cannot remove attribute attribute_namebecause it is defined as a join attributefor joined attribute groupattribute_group_name.
Explanation: The attribute you are attempting todelete is defined as the attribute on which to join in ajoined attribute group.
Operator response: Modify or remove the joinedattribute group if you would like to remove theattribute.
KQZ0186E Cannot remove attribute attribute_namebecause it is defined as the key forjoined attribute groupattribute_group_name.
Explanation: The attribute you are attempting todelete is defined as the key attribute in a joinedattribute group.
Operator response: Modify or remove the joinedattribute group if you would like to remove theattribute.
KQZ0187E Cannot install the agent to directorybecause the Tivoli EnterpriseMonitoring Agent Framework is notpresent in that location.
Explanation: In order to install and run the agent, theTivoli Enterprise Monitoring Agent Framework must beinstalled in the same location you wish to install theagent.
Operator response: Install the Tivoli EnterpriseMonitoring Agent Framework or install the agent into adifferent location.
KQZ0188E Cannot install the agent to directorybecause no other IBM Tivoli MonitoringAgents are present in that location.
Explanation: In order to install and run the agent, atleast one other agent must be installed.
Operator response: Install the another agent or installthis agent in another location.
KQZ0189W The file file_name already exists in theproject. Do you want to overwrite theexisting files with the one from new_file?
Explanation: A file with the same name already exists.
Operator response: Click "Yes" to overwrite the file or"No" to keep the existing file.
KQZ0190E A section with label section_label alreadyexists.
Explanation: Each configuration section needs to havea different label.
Operator response: Change the label to one that hasnot been used by another section.
KQZ0191E A property with label property_labelalready exists in this section.
Explanation: Each configuration property in a sectionneeds to have a different label.
Operator response: Change the label to one that has
KQZ0179E • KQZ0191E
Chapter 35. Troubleshooting 441
not already been used by another property in thissection.
KQZ0192E A choice with label choice_label alreadyexists in this property.
Explanation: Each choice in a configuration propertyneeds to have a different label.
Operator response: Change the label to one that hasnot already been used by another choice in thisproperty.
KQZ0193E A choice with value choice_value alreadyexists in this property.
Explanation: Each choice in a configuration propertyneeds to have a different value.
Operator response: Change the value to one that hasnot already been used by another choice in thisproperty.
KQZ0194E Configuration section section_name doesnot contain any configurationproperties.
Explanation: A configuration section must contain atleast one configuration property.
Operator response: Add a configuration property tothe section or delete the section.
KQZ0195E Return code return_code cannot bereturned by UNIX or Linux commands,but only UNIX or Linux operatingsystems are selected.
Explanation: Return codes outside the range 0 to 255cannot be returned by UNIX or Linux commands. OnlyUNIX and Linux operating systems are selected so thisreturn code can never be issued.
Operator response: Add the Windows operatingsystem which allows a wider range of return codes(-2147483648 to 2147483647), change the return codevalue to be in the range 0 to 255, or remove the returncode.
KQZ0196E Return code return_code cannot bereturned by UNIX or Linux commands,but only UNIX or Linux commands aredefined.
Explanation: Return codes outside the range 0 to 255cannot be returned by UNIX or Linux commands. OnlyUNIX and Linux commands are defined so this returncode can never be issued.
Operator response: Add a Windows command whichallows a wider range of return codes (-2147483648 to2147483647), add the Windows operating system to oneof the existing commands, change the return code value
to be in the range 0 to 255, or remove the return code.
KQZ0197E The combined length of companyidentifier and agent identifier cannotexceed character_count characters.
Explanation: Ensure that the combined length of thecompany identifier and agent identifier does not exceed11 characters.
Operator response: Modify the company identifierand/or agent identifier to make the combined length 11or fewer characters.
KQZ0198I You have made changes to theconfiguration. Do you want to keepthose changes in the agent?
Explanation: Some changes were made to theconfiguration while performing some other operation,such as creating a new attribute group. The otheroperation is being canceled and you have a chance tokeep or discard the configuration changes.
Operator response: Click Yes to keep theconfiguration changes or No to discard them.
KQZ0199E The specified directory does not appearto be a valid ITM installation directory.
Explanation: The Agent Builder determined that thespecified directory does not appear to be an ITMinstallation directory.
Operator response: Re-run the task and specify avalid ITM installation directory.
KQZ0200E Cannot remove the final availabilityfilter because joined attribute groupreferencing_attribute_group_namereferences the Availability group.
Explanation: A joined attribute group exists whichincludes availability information.
Operator response: You need to remove theAvailability Joined Attribute Group before you canremove the final availability filter.
KQZ0201E The property environment variableduplicate_name has already been usedand is being replaced with unique_name.
Explanation: Configuration property environmentvariable names must be unique across all configurationproperties in the agent. The variable name that wasentered has already been used, so it was changed to aunique variable name.
Operator response: Accept the changed variable nameor enter a different one.
KQZ0192E • KQZ0201E
442 IBM Tivoli Monitoring Agent Builder: User's Guide
KQZ0202I Generating agent product code(display_name).
Explanation: This is an informational message only.
KQZ0203E No agent is selected for the generateoperation.
Explanation: No agent file was selected or no AgentEditor had focus.
Operator response: Select an agent file from theNavigator View or give focus to an Agent Editor andrerun the command.
KQZ0204E The specified version of new_version isnot greater than the current version ofcurrent_version.
Explanation: The version specified must be greaterthan the current version
Operator response: Specify a version greater than thecurrent version.
KQZ0205E The specified directory does not exist.
Explanation: The Agent Builder determined that thespecified directory does not exist.
Operator response: Re-run the task and specify avalid ITM installation directory.
KQZ0206E The specified location is not a directory.
Explanation: The Agent Builder determined that thespecified location is not a directory.
Operator response: Re-run the task and specify avalid ITM installation directory.
KQZ0208E The specified username or password isincorrect.
Explanation: The specified username or password isincorrect.
Operator response: Specify the correct username andpassword.
KQZ0209E The Tivoli Enterprise Monitoring Serveris not running.
Explanation: The Tivoli Enterprise Monitoring Serveris not running.
Operator response: Start the Tivoli EnterpriseMonitoring Server and rerun the command.
KQZ0210E Name "name" has already been used bythe agent or another subnode.
Explanation: The agent display name and subnodenames should be unique within an agent.
Operator response: Enter a unique name.
KQZ0211E A subnode with type "type" has alreadybeen defined.
Explanation: Subnode types should be unique withinan agent.
Operator response: Enter a unique subnode type.
KQZ0212E The subnode type type is not valid. Itmust be 1 to 3 characters and containonly letters and numbers.
Explanation: The subnode type entered containedinvalid characters or too many characters.
Operator response: Enter a subnode type from 1 to 3characters consisting of letters A-Z or numbers.
KQZ0213E The combined length of companyidentifier and subnode identifier cannotexceed character_count characters.
Explanation: Ensure that the combined length of thecompany identifier and subnode identifier does notexceed 14 characters.
Operator response: Modify the company identifierand/or subnode identifier to make the combined length14 or fewer characters.
KQZ0214I The following items are selected andwill be removed. Do you want tocontinue?
Explanation: This is an informational message only.
KQZ0215E Could not launch command script
Explanation: The builder was unable to launch thecommand. It might not be executable, or the systemshell might not be found.
Operator response: Ensure that the shell (sh) is in thePATH and that the user has permission to run it.
KQZ0216I The command command was canceled.
Explanation: The cancel button was pressed while thecommand was running. The command may havepartially run before the command was ended.
Operator response: None.
KQZ0202I • KQZ0216I
Chapter 35. Troubleshooting 443
KQZ0217I Do you wish to cancel the command?
Explanation: This is an informational message only.
KQZ0218I Based on this data, some attributesmight be better represented by otherdata types. Do you wish to view thesuggested data types?
Explanation: The Agent Builder detected adiscrepency in the data types specified and the datareturned.
Operator response: Click Yes to view the attributes orNo to leave the data types unchaged.
KQZ0219I Attribute attribute is defined as numeric,however, the string data was returned.Do you want to change the type tostring?
Explanation: The Agent Builder determined that thethe data returned for the attribute is string data,however, the attribute is defined as numeric. This maycause a problem at runtime.
Operator response: Click Yes to change the type orNo to leave it as numeric.
KQZ0220E There is not a command defined for theoperating system on which the AgentBuilder is currently running.
Explanation: In order to test a command, you musthave a command defined that will run on the operatingsystem on which the Agent Builder is currentlyrunning.
Operator response: Define a command for the currentoperating system and retry the action.
KQZ0222I The command returned with a non-zeroreturn code. Click the "Check Results"button to view the results.
Explanation: There are already attributes defined forthe script attribute group.
Operator response: Click Yes to replace the attributesor No to keep the attributes.
KQZ0223E Could not connect to the CIM server onhost host.
Explanation: The agent builder could not connect tothe server on the specified host.
Operator response: Check that the host name is typedcorrectly and that the CIM server is acceptingconnections.
KQZ0224E An unknown error occurred whenattempting to connect to the CIM serveron host host.
Explanation: The agent builder could not connect tothe server on the specified host.
Operator response: Check that the host name is typedcorrectly and that the CIM server is acceptingconnections.
KQZ0225E The selection cannot be moved becausejoined attribute groupreferencing_attribute_group_namereferences attribute groupreferenced_attribute_group_name.
Explanation: A joined attribute group at the agentlevel (i.e. not part of a subnode definition) can onlyreference other attribute groups which are also at theagent level. A joined attribute group in a subnodedefinition can only reference other attribute groupswhich are in the same subnode definition or at theagent level. This move would cause a joined attributegroup to be unable to reference the source attributegroups.
Operator response: If moving a joined attribute groupout of a subnode, also move any referenced attributegroups out of that subnode at the same time. If movingan attribute group into a subnode, also move anyjoined attriubte groups that reference it into thesubnode at the same time.
KQZ0226E Subnode definition "subnode_name" doesnot contain any attribute groups.
Explanation: This is an informational message only.
KQZ0229E Two attribute groups which collectevent data cannot be joined together.
Explanation: Both attribute groups selected collectsevent data rather than sampled data. At least oneattribute group must collect sampled data.
Operator response: Choose an attribute group whichcollects sampled data for one or both attribute groupsto be joined.
KQZ0230E An attribute group that collects eventdata cannot be joined to an attributegroup which can produce more than onerow.
Explanation: One selected attribute group collectsevent data and the other collects sampled data but cancontain more than one row of data in the sample. Onlyan attribute group which collects a single row in itssample can be joined to an attribute group whichcollects event data.
Operator response: Choose an attribute group which
KQZ0217I • KQZ0230E
444 IBM Tivoli Monitoring Agent Builder: User's Guide
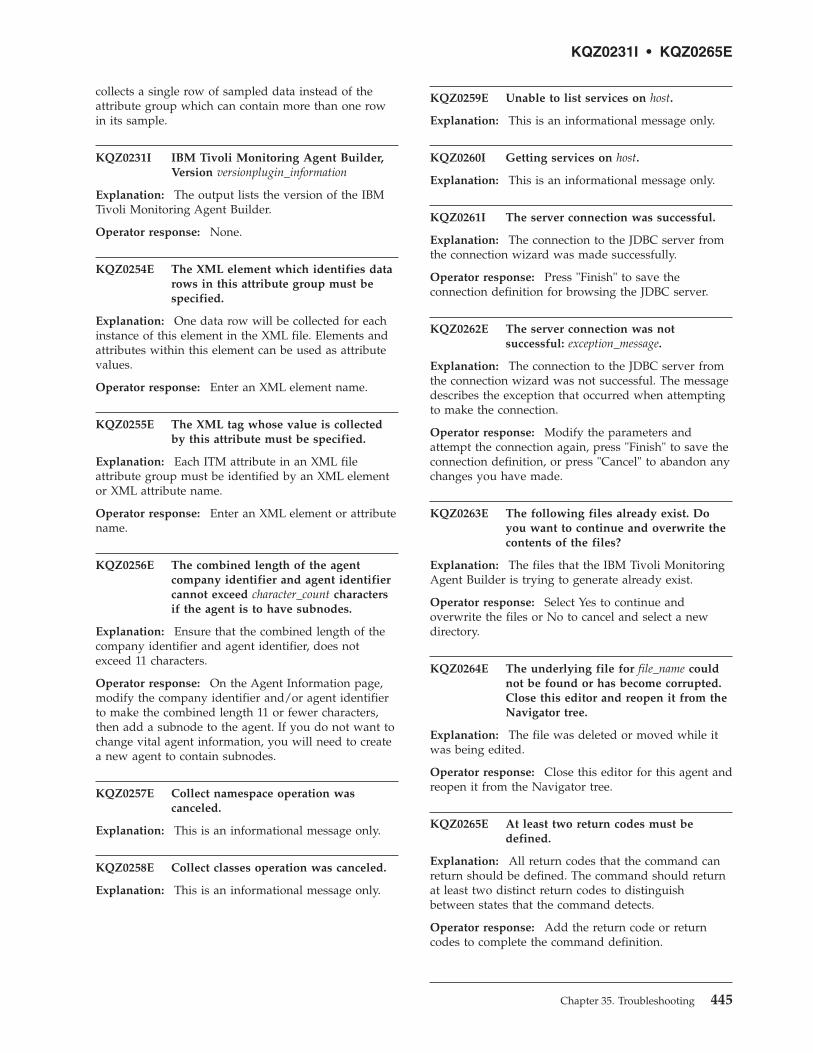
collects a single row of sampled data instead of theattribute group which can contain more than one rowin its sample.
KQZ0231I IBM Tivoli Monitoring Agent Builder,Version versionplugin_information
Explanation: The output lists the version of the IBMTivoli Monitoring Agent Builder.
Operator response: None.
KQZ0254E The XML element which identifies datarows in this attribute group must bespecified.
Explanation: One data row will be collected for eachinstance of this element in the XML file. Elements andattributes within this element can be used as attributevalues.
Operator response: Enter an XML element name.
KQZ0255E The XML tag whose value is collectedby this attribute must be specified.
Explanation: Each ITM attribute in an XML fileattribute group must be identified by an XML elementor XML attribute name.
Operator response: Enter an XML element or attributename.
KQZ0256E The combined length of the agentcompany identifier and agent identifiercannot exceed character_count charactersif the agent is to have subnodes.
Explanation: Ensure that the combined length of thecompany identifier and agent identifier, does notexceed 11 characters.
Operator response: On the Agent Information page,modify the company identifier and/or agent identifierto make the combined length 11 or fewer characters,then add a subnode to the agent. If you do not want tochange vital agent information, you will need to createa new agent to contain subnodes.
KQZ0257E Collect namespace operation wascanceled.
Explanation: This is an informational message only.
KQZ0258E Collect classes operation was canceled.
Explanation: This is an informational message only.
KQZ0259E Unable to list services on host.
Explanation: This is an informational message only.
KQZ0260I Getting services on host.
Explanation: This is an informational message only.
KQZ0261I The server connection was successful.
Explanation: The connection to the JDBC server fromthe connection wizard was made successfully.
Operator response: Press "Finish" to save theconnection definition for browsing the JDBC server.
KQZ0262E The server connection was notsuccessful: exception_message.
Explanation: The connection to the JDBC server fromthe connection wizard was not successful. The messagedescribes the exception that occurred when attemptingto make the connection.
Operator response: Modify the parameters andattempt the connection again, press "Finish" to save theconnection definition, or press "Cancel" to abandon anychanges you have made.
KQZ0263E The following files already exist. Doyou want to continue and overwrite thecontents of the files?
Explanation: The files that the IBM Tivoli MonitoringAgent Builder is trying to generate already exist.
Operator response: Select Yes to continue andoverwrite the files or No to cancel and select a newdirectory.
KQZ0264E The underlying file for file_name couldnot be found or has become corrupted.Close this editor and reopen it from theNavigator tree.
Explanation: The file was deleted or moved while itwas being edited.
Operator response: Close this editor for this agent andreopen it from the Navigator tree.
KQZ0265E At least two return codes must bedefined.
Explanation: All return codes that the command canreturn should be defined. The command should returnat least two distinct return codes to distinguishbetween states that the command detects.
Operator response: Add the return code or returncodes to complete the command definition.
KQZ0231I • KQZ0265E
Chapter 35. Troubleshooting 445
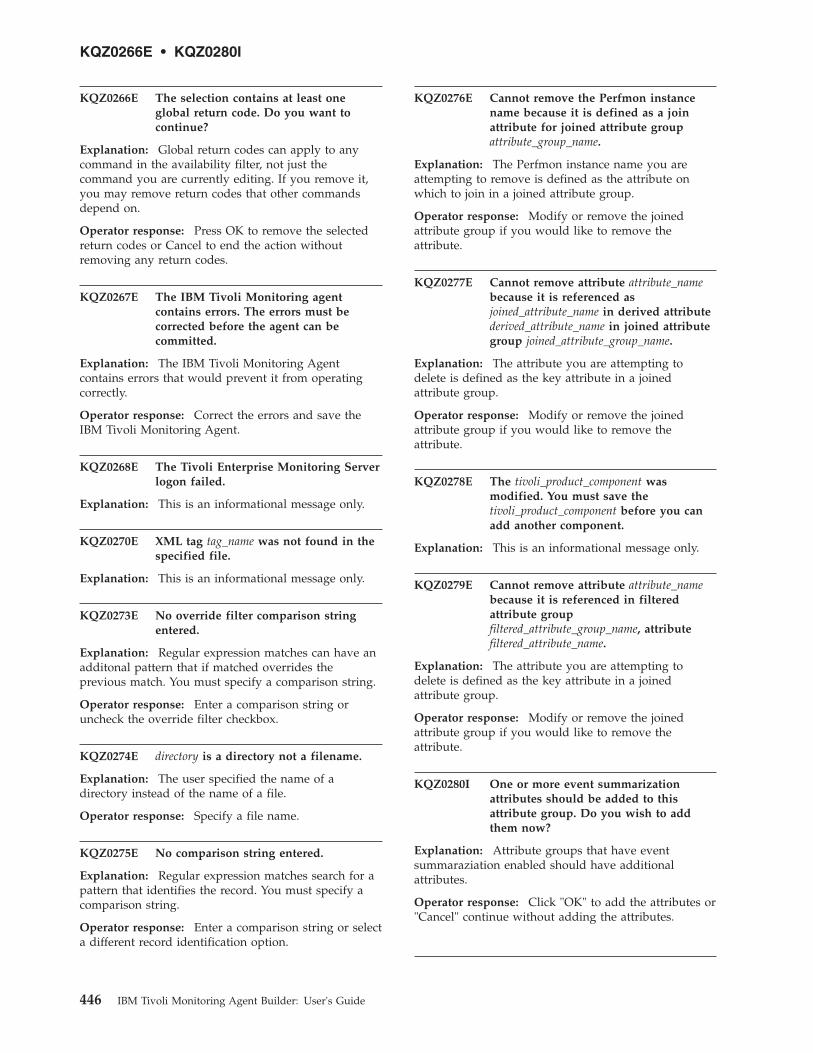
KQZ0266E The selection contains at least oneglobal return code. Do you want tocontinue?
Explanation: Global return codes can apply to anycommand in the availability filter, not just thecommand you are currently editing. If you remove it,you may remove return codes that other commandsdepend on.
Operator response: Press OK to remove the selectedreturn codes or Cancel to end the action withoutremoving any return codes.
KQZ0267E The IBM Tivoli Monitoring agentcontains errors. The errors must becorrected before the agent can becommitted.
Explanation: The IBM Tivoli Monitoring Agentcontains errors that would prevent it from operatingcorrectly.
Operator response: Correct the errors and save theIBM Tivoli Monitoring Agent.
KQZ0268E The Tivoli Enterprise Monitoring Serverlogon failed.
Explanation: This is an informational message only.
KQZ0270E XML tag tag_name was not found in thespecified file.
Explanation: This is an informational message only.
KQZ0273E No override filter comparison stringentered.
Explanation: Regular expression matches can have anadditonal pattern that if matched overrides theprevious match. You must specify a comparison string.
Operator response: Enter a comparison string oruncheck the override filter checkbox.
KQZ0274E directory is a directory not a filename.
Explanation: The user specified the name of adirectory instead of the name of a file.
Operator response: Specify a file name.
KQZ0275E No comparison string entered.
Explanation: Regular expression matches search for apattern that identifies the record. You must specify acomparison string.
Operator response: Enter a comparison string or selecta different record identification option.
KQZ0276E Cannot remove the Perfmon instancename because it is defined as a joinattribute for joined attribute groupattribute_group_name.
Explanation: The Perfmon instance name you areattempting to remove is defined as the attribute onwhich to join in a joined attribute group.
Operator response: Modify or remove the joinedattribute group if you would like to remove theattribute.
KQZ0277E Cannot remove attribute attribute_namebecause it is referenced asjoined_attribute_name in derived attributederived_attribute_name in joined attributegroup joined_attribute_group_name.
Explanation: The attribute you are attempting todelete is defined as the key attribute in a joinedattribute group.
Operator response: Modify or remove the joinedattribute group if you would like to remove theattribute.
KQZ0278E The tivoli_product_component wasmodified. You must save thetivoli_product_component before you canadd another component.
Explanation: This is an informational message only.
KQZ0279E Cannot remove attribute attribute_namebecause it is referenced in filteredattribute groupfiltered_attribute_group_name, attributefiltered_attribute_name.
Explanation: The attribute you are attempting todelete is defined as the key attribute in a joinedattribute group.
Operator response: Modify or remove the joinedattribute group if you would like to remove theattribute.
KQZ0280I One or more event summarizationattributes should be added to thisattribute group. Do you wish to addthem now?
Explanation: Attribute groups that have eventsummaraziation enabled should have additionalattributes.
Operator response: Click "OK" to add the attributes or"Cancel" continue without adding the attributes.
KQZ0266E • KQZ0280I
446 IBM Tivoli Monitoring Agent Builder: User's Guide
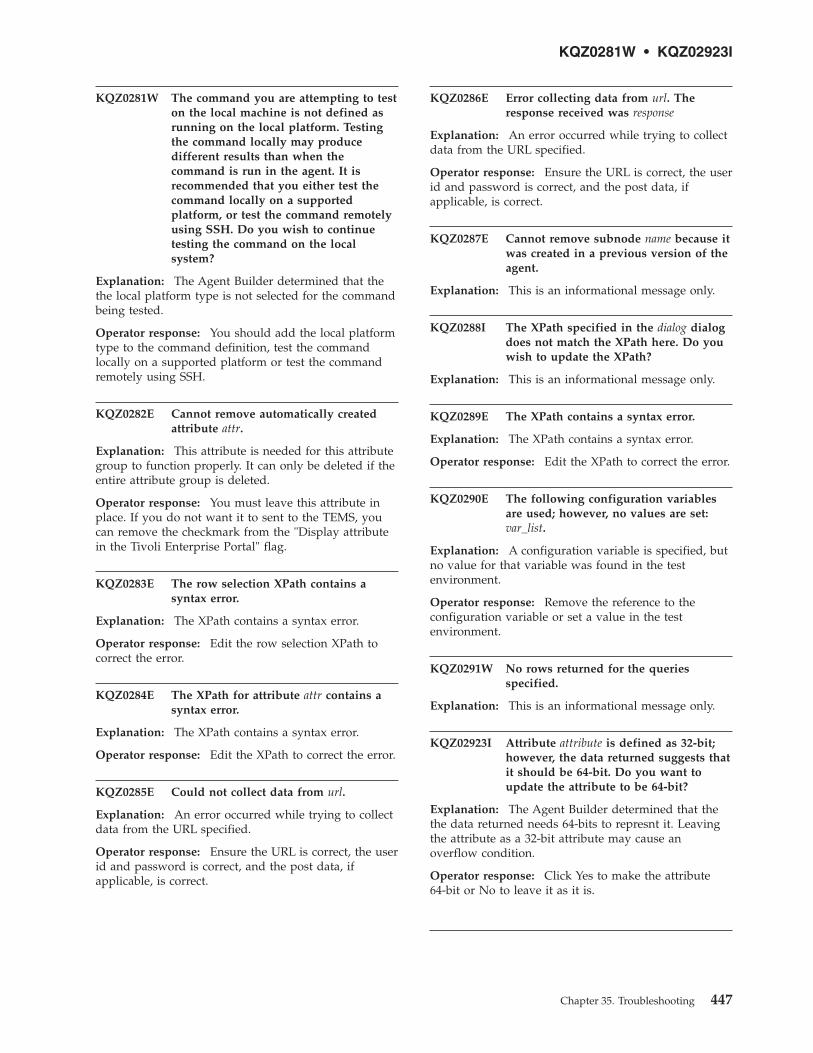
KQZ0281W The command you are attempting to teston the local machine is not defined asrunning on the local platform. Testingthe command locally may producedifferent results than when thecommand is run in the agent. It isrecommended that you either test thecommand locally on a supportedplatform, or test the command remotelyusing SSH. Do you wish to continuetesting the command on the localsystem?
Explanation: The Agent Builder determined that thethe local platform type is not selected for the commandbeing tested.
Operator response: You should add the local platformtype to the command definition, test the commandlocally on a supported platform or test the commandremotely using SSH.
KQZ0282E Cannot remove automatically createdattribute attr.
Explanation: This attribute is needed for this attributegroup to function properly. It can only be deleted if theentire attribute group is deleted.
Operator response: You must leave this attribute inplace. If you do not want it to sent to the TEMS, youcan remove the checkmark from the "Display attributein the Tivoli Enterprise Portal" flag.
KQZ0283E The row selection XPath contains asyntax error.
Explanation: The XPath contains a syntax error.
Operator response: Edit the row selection XPath tocorrect the error.
KQZ0284E The XPath for attribute attr contains asyntax error.
Explanation: The XPath contains a syntax error.
Operator response: Edit the XPath to correct the error.
KQZ0285E Could not collect data from url.
Explanation: An error occurred while trying to collectdata from the URL specified.
Operator response: Ensure the URL is correct, the userid and password is correct, and the post data, ifapplicable, is correct.
KQZ0286E Error collecting data from url. Theresponse received was response
Explanation: An error occurred while trying to collectdata from the URL specified.
Operator response: Ensure the URL is correct, the userid and password is correct, and the post data, ifapplicable, is correct.
KQZ0287E Cannot remove subnode name because itwas created in a previous version of theagent.
Explanation: This is an informational message only.
KQZ0288I The XPath specified in the dialog dialogdoes not match the XPath here. Do youwish to update the XPath?
Explanation: This is an informational message only.
KQZ0289E The XPath contains a syntax error.
Explanation: The XPath contains a syntax error.
Operator response: Edit the XPath to correct the error.
KQZ0290E The following configuration variablesare used; however, no values are set:var_list.
Explanation: A configuration variable is specified, butno value for that variable was found in the testenvironment.
Operator response: Remove the reference to theconfiguration variable or set a value in the testenvironment.
KQZ0291W No rows returned for the queriesspecified.
Explanation: This is an informational message only.
KQZ02923I Attribute attribute is defined as 32-bit;however, the data returned suggests thatit should be 64-bit. Do you want toupdate the attribute to be 64-bit?
Explanation: The Agent Builder determined that thethe data returned needs 64-bits to represnt it. Leavingthe attribute as a 32-bit attribute may cause anoverflow condition.
Operator response: Click Yes to make the attribute64-bit or No to leave it as it is.
KQZ0281W • KQZ02923I
Chapter 35. Troubleshooting 447
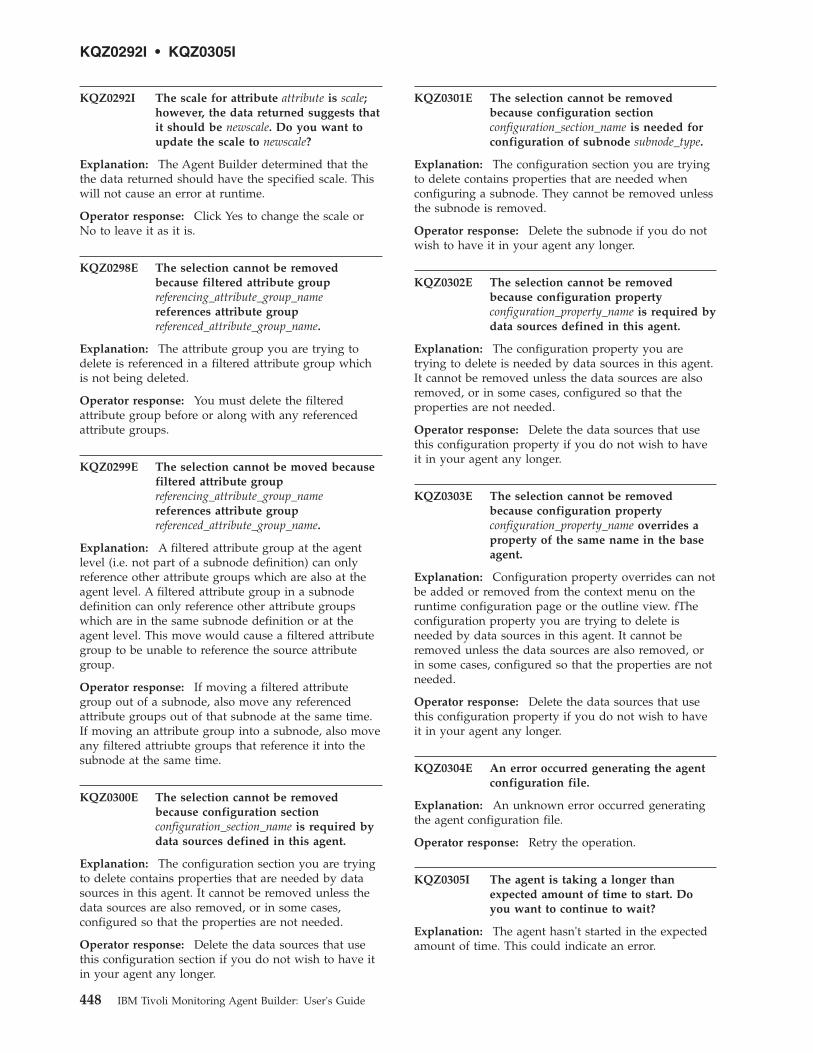
KQZ0292I The scale for attribute attribute is scale;however, the data returned suggests thatit should be newscale. Do you want toupdate the scale to newscale?
Explanation: The Agent Builder determined that thethe data returned should have the specified scale. Thiswill not cause an error at runtime.
Operator response: Click Yes to change the scale orNo to leave it as it is.
KQZ0298E The selection cannot be removedbecause filtered attribute groupreferencing_attribute_group_namereferences attribute groupreferenced_attribute_group_name.
Explanation: The attribute group you are trying todelete is referenced in a filtered attribute group whichis not being deleted.
Operator response: You must delete the filteredattribute group before or along with any referencedattribute groups.
KQZ0299E The selection cannot be moved becausefiltered attribute groupreferencing_attribute_group_namereferences attribute groupreferenced_attribute_group_name.
Explanation: A filtered attribute group at the agentlevel (i.e. not part of a subnode definition) can onlyreference other attribute groups which are also at theagent level. A filtered attribute group in a subnodedefinition can only reference other attribute groupswhich are in the same subnode definition or at theagent level. This move would cause a filtered attributegroup to be unable to reference the source attributegroup.
Operator response: If moving a filtered attributegroup out of a subnode, also move any referencedattribute groups out of that subnode at the same time.If moving an attribute group into a subnode, also moveany filtered attriubte groups that reference it into thesubnode at the same time.
KQZ0300E The selection cannot be removedbecause configuration sectionconfiguration_section_name is required bydata sources defined in this agent.
Explanation: The configuration section you are tryingto delete contains properties that are needed by datasources in this agent. It cannot be removed unless thedata sources are also removed, or in some cases,configured so that the properties are not needed.
Operator response: Delete the data sources that usethis configuration section if you do not wish to have itin your agent any longer.
KQZ0301E The selection cannot be removedbecause configuration sectionconfiguration_section_name is needed forconfiguration of subnode subnode_type.
Explanation: The configuration section you are tryingto delete contains properties that are needed whenconfiguring a subnode. They cannot be removed unlessthe subnode is removed.
Operator response: Delete the subnode if you do notwish to have it in your agent any longer.
KQZ0302E The selection cannot be removedbecause configuration propertyconfiguration_property_name is required bydata sources defined in this agent.
Explanation: The configuration property you aretrying to delete is needed by data sources in this agent.It cannot be removed unless the data sources are alsoremoved, or in some cases, configured so that theproperties are not needed.
Operator response: Delete the data sources that usethis configuration property if you do not wish to haveit in your agent any longer.
KQZ0303E The selection cannot be removedbecause configuration propertyconfiguration_property_name overrides aproperty of the same name in the baseagent.
Explanation: Configuration property overrides can notbe added or removed from the context menu on theruntime configuration page or the outline view. fTheconfiguration property you are trying to delete isneeded by data sources in this agent. It cannot beremoved unless the data sources are also removed, orin some cases, configured so that the properties are notneeded.
Operator response: Delete the data sources that usethis configuration property if you do not wish to haveit in your agent any longer.
KQZ0304E An error occurred generating the agentconfiguration file.
Explanation: An unknown error occurred generatingthe agent configuration file.
Operator response: Retry the operation.
KQZ0305I The agent is taking a longer thanexpected amount of time to start. Doyou want to continue to wait?
Explanation: The agent hasn't started in the expectedamount of time. This could indicate an error.
KQZ0292I • KQZ0305I
448 IBM Tivoli Monitoring Agent Builder: User's Guide
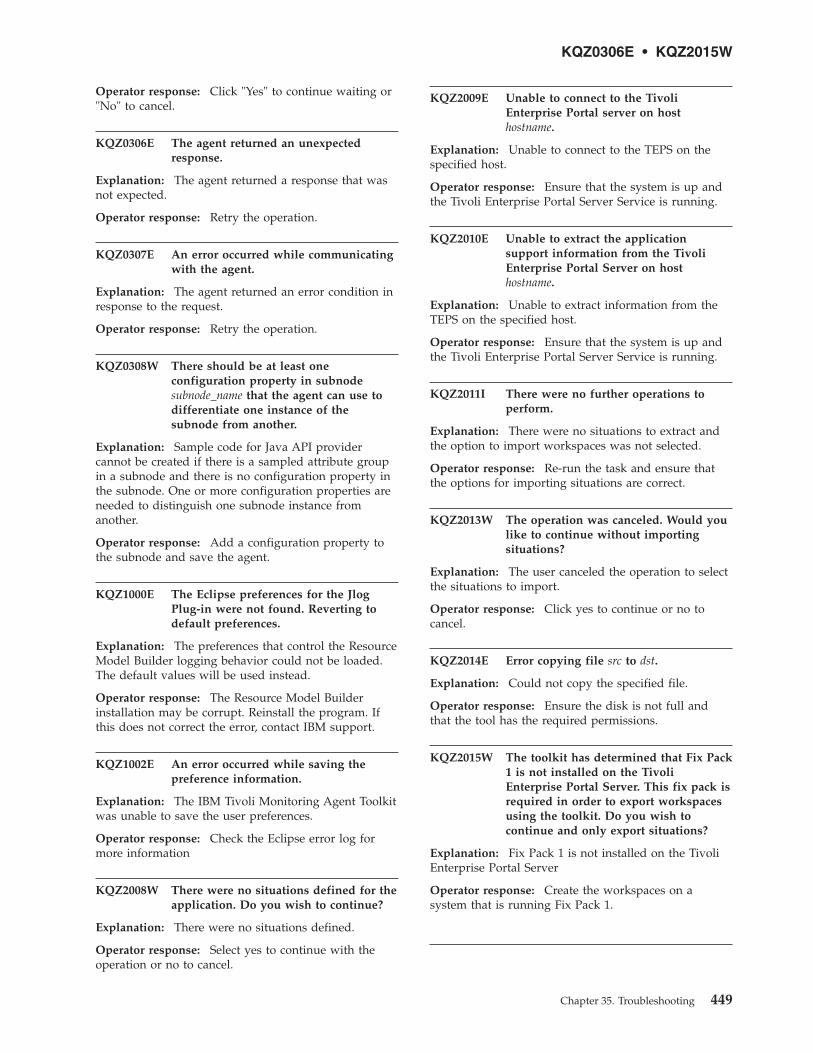
Operator response: Click "Yes" to continue waiting or"No" to cancel.
KQZ0306E The agent returned an unexpectedresponse.
Explanation: The agent returned a response that wasnot expected.
Operator response: Retry the operation.
KQZ0307E An error occurred while communicatingwith the agent.
Explanation: The agent returned an error condition inresponse to the request.
Operator response: Retry the operation.
KQZ0308W There should be at least oneconfiguration property in subnodesubnode_name that the agent can use todifferentiate one instance of thesubnode from another.
Explanation: Sample code for Java API providercannot be created if there is a sampled attribute groupin a subnode and there is no configuration property inthe subnode. One or more configuration properties areneeded to distinguish one subnode instance fromanother.
Operator response: Add a configuration property tothe subnode and save the agent.
KQZ1000E The Eclipse preferences for the JlogPlug-in were not found. Reverting todefault preferences.
Explanation: The preferences that control the ResourceModel Builder logging behavior could not be loaded.The default values will be used instead.
Operator response: The Resource Model Builderinstallation may be corrupt. Reinstall the program. Ifthis does not correct the error, contact IBM support.
KQZ1002E An error occurred while saving thepreference information.
Explanation: The IBM Tivoli Monitoring Agent Toolkitwas unable to save the user preferences.
Operator response: Check the Eclipse error log formore information
KQZ2008W There were no situations defined for theapplication. Do you wish to continue?
Explanation: There were no situations defined.
Operator response: Select yes to continue with theoperation or no to cancel.
KQZ2009E Unable to connect to the TivoliEnterprise Portal server on hosthostname.
Explanation: Unable to connect to the TEPS on thespecified host.
Operator response: Ensure that the system is up andthe Tivoli Enterprise Portal Server Service is running.
KQZ2010E Unable to extract the applicationsupport information from the TivoliEnterprise Portal Server on hosthostname.
Explanation: Unable to extract information from theTEPS on the specified host.
Operator response: Ensure that the system is up andthe Tivoli Enterprise Portal Server Service is running.
KQZ2011I There were no further operations toperform.
Explanation: There were no situations to extract andthe option to import workspaces was not selected.
Operator response: Re-run the task and ensure thatthe options for importing situations are correct.
KQZ2013W The operation was canceled. Would youlike to continue without importingsituations?
Explanation: The user canceled the operation to selectthe situations to import.
Operator response: Click yes to continue or no tocancel.
KQZ2014E Error copying file src to dst.
Explanation: Could not copy the specified file.
Operator response: Ensure the disk is not full andthat the tool has the required permissions.
KQZ2015W The toolkit has determined that Fix Pack1 is not installed on the TivoliEnterprise Portal Server. This fix pack isrequired in order to export workspacesusing the toolkit. Do you wish tocontinue and only export situations?
Explanation: Fix Pack 1 is not installed on the TivoliEnterprise Portal Server
Operator response: Create the workspaces on asystem that is running Fix Pack 1.
KQZ0306E • KQZ2015W
Chapter 35. Troubleshooting 449
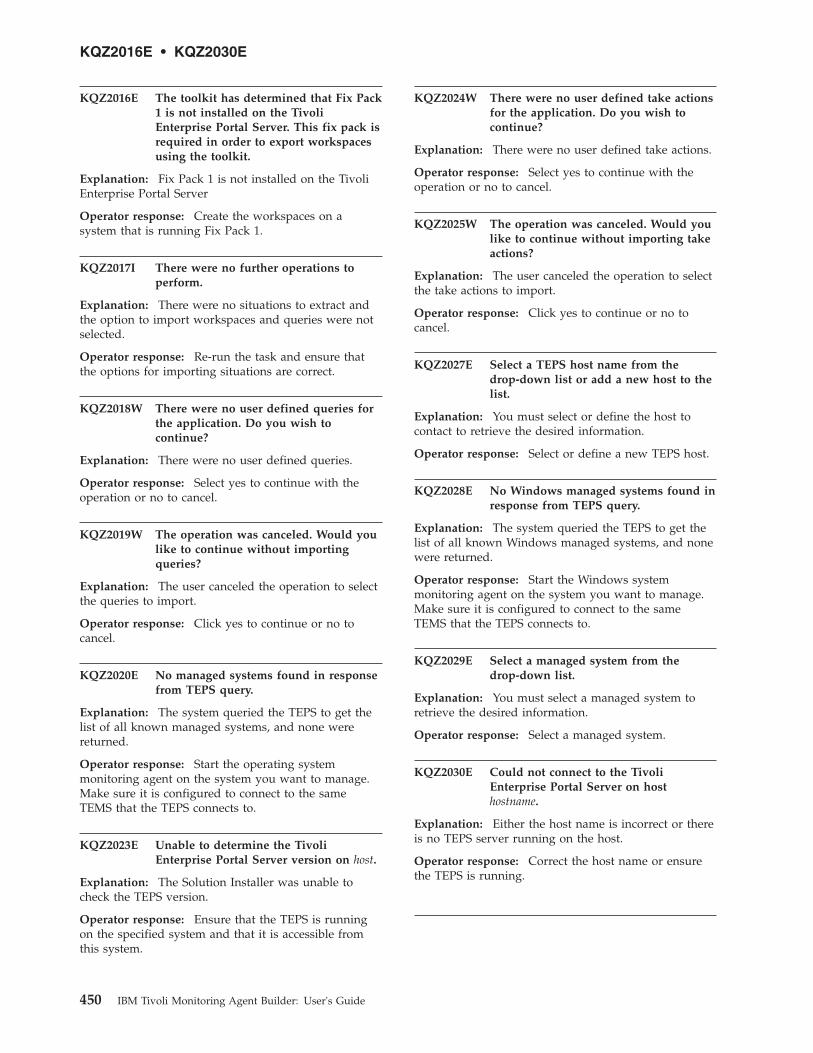
KQZ2016E The toolkit has determined that Fix Pack1 is not installed on the TivoliEnterprise Portal Server. This fix pack isrequired in order to export workspacesusing the toolkit.
Explanation: Fix Pack 1 is not installed on the TivoliEnterprise Portal Server
Operator response: Create the workspaces on asystem that is running Fix Pack 1.
KQZ2017I There were no further operations toperform.
Explanation: There were no situations to extract andthe option to import workspaces and queries were notselected.
Operator response: Re-run the task and ensure thatthe options for importing situations are correct.
KQZ2018W There were no user defined queries forthe application. Do you wish tocontinue?
Explanation: There were no user defined queries.
Operator response: Select yes to continue with theoperation or no to cancel.
KQZ2019W The operation was canceled. Would youlike to continue without importingqueries?
Explanation: The user canceled the operation to selectthe queries to import.
Operator response: Click yes to continue or no tocancel.
KQZ2020E No managed systems found in responsefrom TEPS query.
Explanation: The system queried the TEPS to get thelist of all known managed systems, and none werereturned.
Operator response: Start the operating systemmonitoring agent on the system you want to manage.Make sure it is configured to connect to the sameTEMS that the TEPS connects to.
KQZ2023E Unable to determine the TivoliEnterprise Portal Server version on host.
Explanation: The Solution Installer was unable tocheck the TEPS version.
Operator response: Ensure that the TEPS is runningon the specified system and that it is accessible fromthis system.
KQZ2024W There were no user defined take actionsfor the application. Do you wish tocontinue?
Explanation: There were no user defined take actions.
Operator response: Select yes to continue with theoperation or no to cancel.
KQZ2025W The operation was canceled. Would youlike to continue without importing takeactions?
Explanation: The user canceled the operation to selectthe take actions to import.
Operator response: Click yes to continue or no tocancel.
KQZ2027E Select a TEPS host name from thedrop-down list or add a new host to thelist.
Explanation: You must select or define the host tocontact to retrieve the desired information.
Operator response: Select or define a new TEPS host.
KQZ2028E No Windows managed systems found inresponse from TEPS query.
Explanation: The system queried the TEPS to get thelist of all known Windows managed systems, and nonewere returned.
Operator response: Start the Windows systemmonitoring agent on the system you want to manage.Make sure it is configured to connect to the sameTEMS that the TEPS connects to.
KQZ2029E Select a managed system from thedrop-down list.
Explanation: You must select a managed system toretrieve the desired information.
Operator response: Select a managed system.
KQZ2030E Could not connect to the TivoliEnterprise Portal Server on hosthostname.
Explanation: Either the host name is incorrect or thereis no TEPS server running on the host.
Operator response: Correct the host name or ensurethe TEPS is running.
KQZ2016E • KQZ2030E
450 IBM Tivoli Monitoring Agent Builder: User's Guide
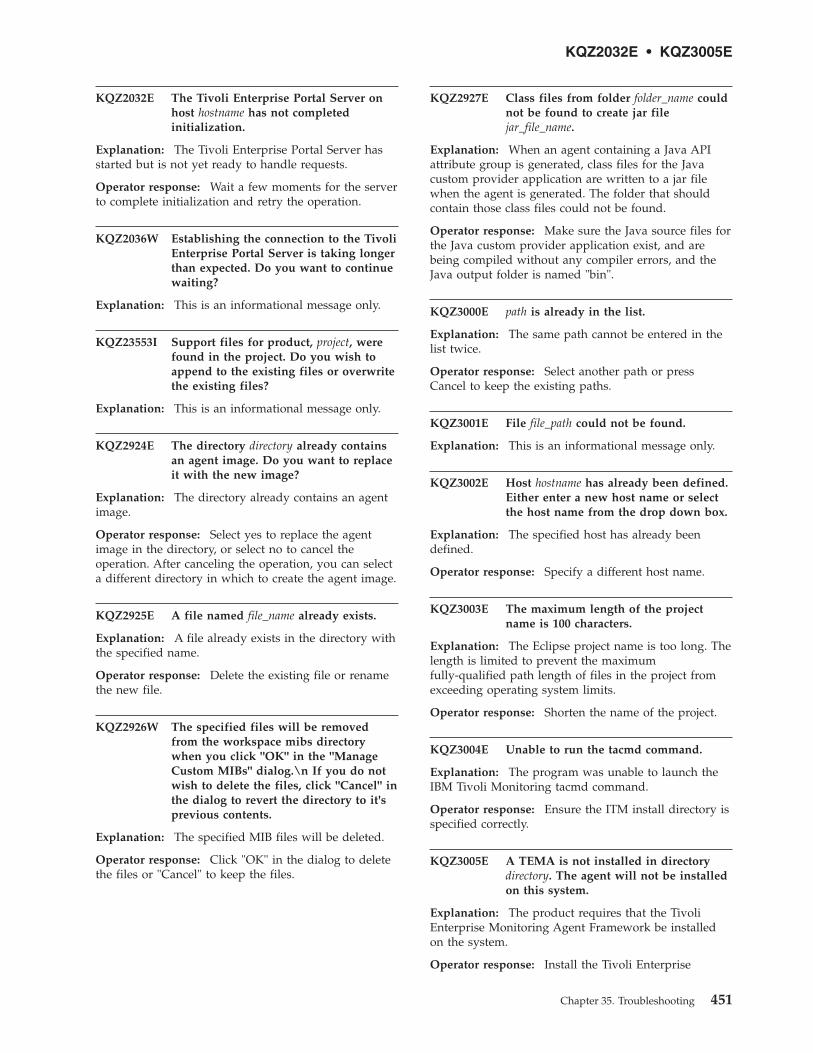
KQZ2032E The Tivoli Enterprise Portal Server onhost hostname has not completedinitialization.
Explanation: The Tivoli Enterprise Portal Server hasstarted but is not yet ready to handle requests.
Operator response: Wait a few moments for the serverto complete initialization and retry the operation.
KQZ2036W Establishing the connection to the TivoliEnterprise Portal Server is taking longerthan expected. Do you want to continuewaiting?
Explanation: This is an informational message only.
KQZ23553I Support files for product, project, werefound in the project. Do you wish toappend to the existing files or overwritethe existing files?
Explanation: This is an informational message only.
KQZ2924E The directory directory already containsan agent image. Do you want to replaceit with the new image?
Explanation: The directory already contains an agentimage.
Operator response: Select yes to replace the agentimage in the directory, or select no to cancel theoperation. After canceling the operation, you can selecta different directory in which to create the agent image.
KQZ2925E A file named file_name already exists.
Explanation: A file already exists in the directory withthe specified name.
Operator response: Delete the existing file or renamethe new file.
KQZ2926W The specified files will be removedfrom the workspace mibs directorywhen you click "OK" in the "ManageCustom MIBs" dialog.\n If you do notwish to delete the files, click "Cancel" inthe dialog to revert the directory to it'sprevious contents.
Explanation: The specified MIB files will be deleted.
Operator response: Click "OK" in the dialog to deletethe files or "Cancel" to keep the files.
KQZ2927E Class files from folder folder_name couldnot be found to create jar filejar_file_name.
Explanation: When an agent containing a Java APIattribute group is generated, class files for the Javacustom provider application are written to a jar filewhen the agent is generated. The folder that shouldcontain those class files could not be found.
Operator response: Make sure the Java source files forthe Java custom provider application exist, and arebeing compiled without any compiler errors, and theJava output folder is named "bin".
KQZ3000E path is already in the list.
Explanation: The same path cannot be entered in thelist twice.
Operator response: Select another path or pressCancel to keep the existing paths.
KQZ3001E File file_path could not be found.
Explanation: This is an informational message only.
KQZ3002E Host hostname has already been defined.Either enter a new host name or selectthe host name from the drop down box.
Explanation: The specified host has already beendefined.
Operator response: Specify a different host name.
KQZ3003E The maximum length of the projectname is 100 characters.
Explanation: The Eclipse project name is too long. Thelength is limited to prevent the maximumfully-qualified path length of files in the project fromexceeding operating system limits.
Operator response: Shorten the name of the project.
KQZ3004E Unable to run the tacmd command.
Explanation: The program was unable to launch theIBM Tivoli Monitoring tacmd command.
Operator response: Ensure the ITM install directory isspecified correctly.
KQZ3005E A TEMA is not installed in directorydirectory. The agent will not be installedon this system.
Explanation: The product requires that the TivoliEnterprise Monitoring Agent Framework be installedon the system.
Operator response: Install the Tivoli Enterprise
KQZ2032E • KQZ3005E
Chapter 35. Troubleshooting 451
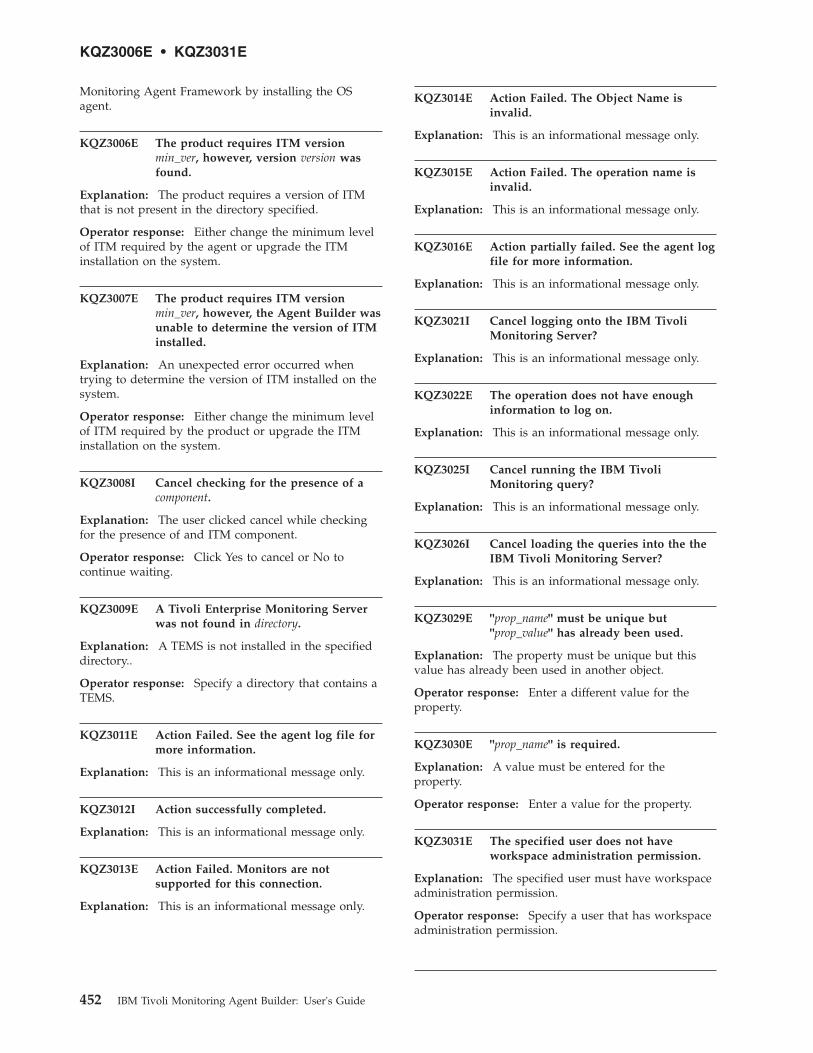
Monitoring Agent Framework by installing the OSagent.
KQZ3006E The product requires ITM versionmin_ver, however, version version wasfound.
Explanation: The product requires a version of ITMthat is not present in the directory specified.
Operator response: Either change the minimum levelof ITM required by the agent or upgrade the ITMinstallation on the system.
KQZ3007E The product requires ITM versionmin_ver, however, the Agent Builder wasunable to determine the version of ITMinstalled.
Explanation: An unexpected error occurred whentrying to determine the version of ITM installed on thesystem.
Operator response: Either change the minimum levelof ITM required by the product or upgrade the ITMinstallation on the system.
KQZ3008I Cancel checking for the presence of acomponent.
Explanation: The user clicked cancel while checkingfor the presence of and ITM component.
Operator response: Click Yes to cancel or No tocontinue waiting.
KQZ3009E A Tivoli Enterprise Monitoring Serverwas not found in directory.
Explanation: A TEMS is not installed in the specifieddirectory..
Operator response: Specify a directory that contains aTEMS.
KQZ3011E Action Failed. See the agent log file formore information.
Explanation: This is an informational message only.
KQZ3012I Action successfully completed.
Explanation: This is an informational message only.
KQZ3013E Action Failed. Monitors are notsupported for this connection.
Explanation: This is an informational message only.
KQZ3014E Action Failed. The Object Name isinvalid.
Explanation: This is an informational message only.
KQZ3015E Action Failed. The operation name isinvalid.
Explanation: This is an informational message only.
KQZ3016E Action partially failed. See the agent logfile for more information.
Explanation: This is an informational message only.
KQZ3021I Cancel logging onto the IBM TivoliMonitoring Server?
Explanation: This is an informational message only.
KQZ3022E The operation does not have enoughinformation to log on.
Explanation: This is an informational message only.
KQZ3025I Cancel running the IBM TivoliMonitoring query?
Explanation: This is an informational message only.
KQZ3026I Cancel loading the queries into the theIBM Tivoli Monitoring Server?
Explanation: This is an informational message only.
KQZ3029E "prop_name" must be unique but"prop_value" has already been used.
Explanation: The property must be unique but thisvalue has already been used in another object.
Operator response: Enter a different value for theproperty.
KQZ3030E "prop_name" is required.
Explanation: A value must be entered for theproperty.
Operator response: Enter a value for the property.
KQZ3031E The specified user does not haveworkspace administration permission.
Explanation: The specified user must have workspaceadministration permission.
Operator response: Specify a user that has workspaceadministration permission.
KQZ3006E • KQZ3031E
452 IBM Tivoli Monitoring Agent Builder: User's Guide
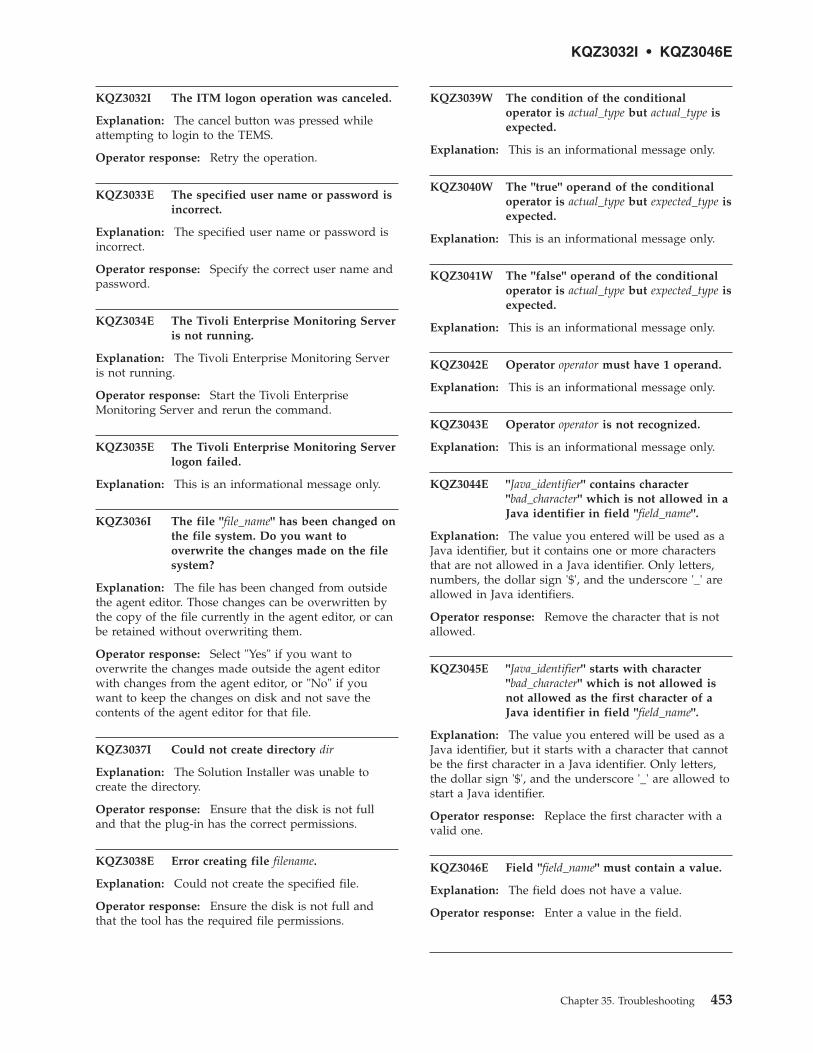
KQZ3032I The ITM logon operation was canceled.
Explanation: The cancel button was pressed whileattempting to login to the TEMS.
Operator response: Retry the operation.
KQZ3033E The specified user name or password isincorrect.
Explanation: The specified user name or password isincorrect.
Operator response: Specify the correct user name andpassword.
KQZ3034E The Tivoli Enterprise Monitoring Serveris not running.
Explanation: The Tivoli Enterprise Monitoring Serveris not running.
Operator response: Start the Tivoli EnterpriseMonitoring Server and rerun the command.
KQZ3035E The Tivoli Enterprise Monitoring Serverlogon failed.
Explanation: This is an informational message only.
KQZ3036I The file "file_name" has been changed onthe file system. Do you want tooverwrite the changes made on the filesystem?
Explanation: The file has been changed from outsidethe agent editor. Those changes can be overwritten bythe copy of the file currently in the agent editor, or canbe retained without overwriting them.
Operator response: Select "Yes" if you want tooverwrite the changes made outside the agent editorwith changes from the agent editor, or "No" if youwant to keep the changes on disk and not save thecontents of the agent editor for that file.
KQZ3037I Could not create directory dir
Explanation: The Solution Installer was unable tocreate the directory.
Operator response: Ensure that the disk is not fulland that the plug-in has the correct permissions.
KQZ3038E Error creating file filename.
Explanation: Could not create the specified file.
Operator response: Ensure the disk is not full andthat the tool has the required file permissions.
KQZ3039W The condition of the conditionaloperator is actual_type but actual_type isexpected.
Explanation: This is an informational message only.
KQZ3040W The "true" operand of the conditionaloperator is actual_type but expected_type isexpected.
Explanation: This is an informational message only.
KQZ3041W The "false" operand of the conditionaloperator is actual_type but expected_type isexpected.
Explanation: This is an informational message only.
KQZ3042E Operator operator must have 1 operand.
Explanation: This is an informational message only.
KQZ3043E Operator operator is not recognized.
Explanation: This is an informational message only.
KQZ3044E "Java_identifier" contains character"bad_character" which is not allowed in aJava identifier in field "field_name".
Explanation: The value you entered will be used as aJava identifier, but it contains one or more charactersthat are not allowed in a Java identifier. Only letters,numbers, the dollar sign '$', and the underscore '_' areallowed in Java identifiers.
Operator response: Remove the character that is notallowed.
KQZ3045E "Java_identifier" starts with character"bad_character" which is not allowed isnot allowed as the first character of aJava identifier in field "field_name".
Explanation: The value you entered will be used as aJava identifier, but it starts with a character that cannotbe the first character in a Java identifier. Only letters,the dollar sign '$', and the underscore '_' are allowed tostart a Java identifier.
Operator response: Replace the first character with avalid one.
KQZ3046E Field "field_name" must contain a value.
Explanation: The field does not have a value.
Operator response: Enter a value in the field.
KQZ3032I • KQZ3046E
Chapter 35. Troubleshooting 453

KQZ3047W Field "field_name" value "Java_class_name"should start with an upper-case letter.
Explanation: The value you entered will be used as aJava class name, but it does not start with anupper-case letter. It is recommended that Java classnames start with an upper-case letter.
Operator response: Replace the first character with anupper-case letter.
KQZ3048W Field "field_name" value"Java_package_name" should not start withan upper-case letter.
Explanation: The value you entered will be used as aJava package name, but it starts with an upper-caseletter. It is recommended that Java package names notstart with an upper-case letter.
Operator response: Replace the upper-case letter witha lower-case letter.
KQZ3049E Character "bad_character" is not allowedin file name value "file_name" in field"field_name".
Explanation: You should enter a valid file namewithout any path components.
Operator response: Remove the character that is notvalid.
KQZ3050E "Java_package_name" is not a valid Javapackage name in field "field_name".
Explanation: The value you entered will be used as aJava package name, but it does not contain a valid Javaidentifier in each portion of the package name. Thepackage name cannot contain a package separatorcharacter without an identifier on either side of it.
Operator response: Remove any leading or trailingdots in the package name, or dots that are next to otherdots without an intervening identifier.
KQZ3051E Directory "directory_name" does not exist.
Explanation: This is an informational message only.
KQZ3052E File "file_name" does not exist indirectory "directory_name".
Explanation: This is an informational message only.
KQZ3053E "keyword" is a Java keyword andtherefore not a valid Java identifier infield Field "field_name".
Explanation: The value you entered will be used as aJava identifier, but it contains one or more charactersthat are not allowed in a Java identifier. Only letters,
numbers, the dollar sign '$', and the underscore '_' areallowed in Java identifiers.
Operator response: Remove the character that is notallowed.
KQZ3054E Field "field_name" contains an empty Javapackage name.
Explanation: The package name you entered is emptyor contains only whitespace.
Operator response: Enter a valid Java package name.
KQZ3505E Field "field_name" can only containletters and digits.
Explanation: This is an informational message only.
KQZ3506E Field "field_name" can only containletters, digits and characters"allowable_characters".
Explanation: This is an informational message only.
KQZ3507E Field "field_name" can only containletters.
Explanation: This is an informational message only.
KQZ3508E Field "field_name" can only containletters and characters"allowable_characters".
Explanation: This is an informational message only.
KQZ3540E Field "field_name" can only contain digitsand characters "allowable_characters".
Explanation: This is an informational message only.
KQZ3541E Field "field_name" can only containcharacters "allowable_characters".
Explanation: This is an informational message only.
KQZ3542E Field "field_name" can only containcharacters "allowable_characters".
Explanation: This is an informational message only.
KQZ3543E Field "field_name" must be an integerfrom lower_bound to upper_bound.
Explanation: This is an informational message only.
KQZ3047W • KQZ3543E
454 IBM Tivoli Monitoring Agent Builder: User's Guide
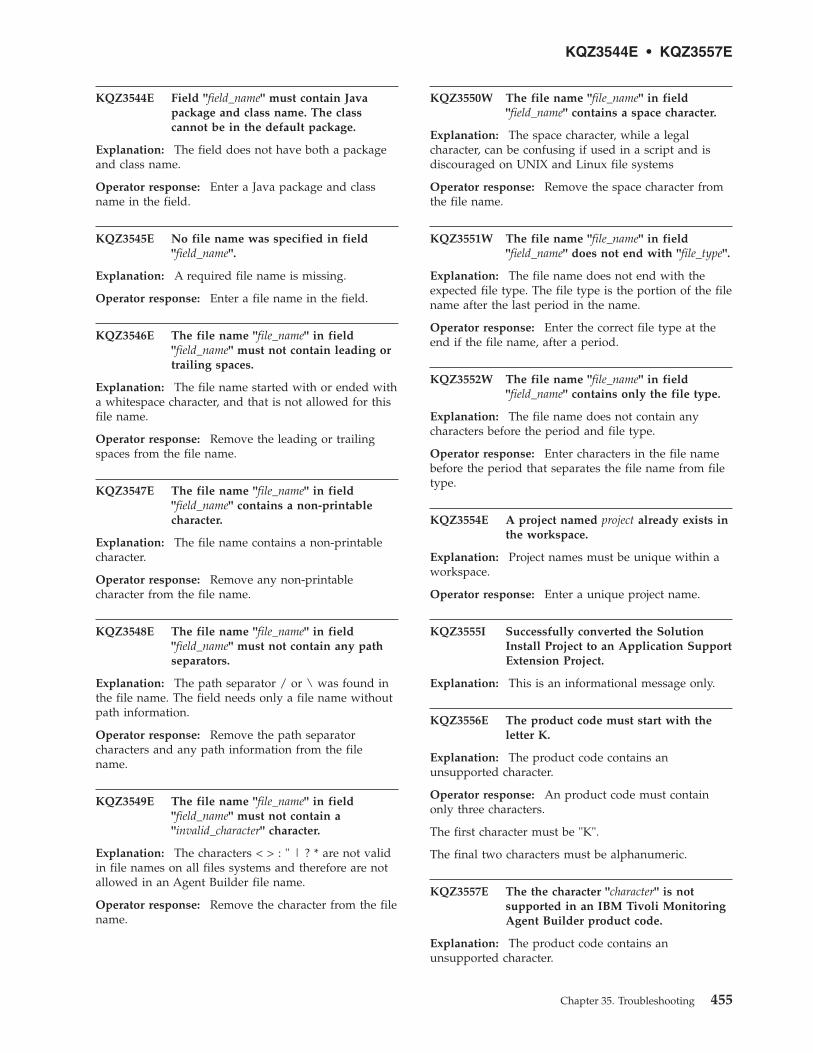
KQZ3544E Field "field_name" must contain Javapackage and class name. The classcannot be in the default package.
Explanation: The field does not have both a packageand class name.
Operator response: Enter a Java package and classname in the field.
KQZ3545E No file name was specified in field"field_name".
Explanation: A required file name is missing.
Operator response: Enter a file name in the field.
KQZ3546E The file name "file_name" in field"field_name" must not contain leading ortrailing spaces.
Explanation: The file name started with or ended witha whitespace character, and that is not allowed for thisfile name.
Operator response: Remove the leading or trailingspaces from the file name.
KQZ3547E The file name "file_name" in field"field_name" contains a non-printablecharacter.
Explanation: The file name contains a non-printablecharacter.
Operator response: Remove any non-printablecharacter from the file name.
KQZ3548E The file name "file_name" in field"field_name" must not contain any pathseparators.
Explanation: The path separator / or \ was found inthe file name. The field needs only a file name withoutpath information.
Operator response: Remove the path separatorcharacters and any path information from the filename.
KQZ3549E The file name "file_name" in field"field_name" must not contain a"invalid_character" character.
Explanation: The characters < > : " | ? * are not validin file names on all files systems and therefore are notallowed in an Agent Builder file name.
Operator response: Remove the character from the filename.
KQZ3550W The file name "file_name" in field"field_name" contains a space character.
Explanation: The space character, while a legalcharacter, can be confusing if used in a script and isdiscouraged on UNIX and Linux file systems
Operator response: Remove the space character fromthe file name.
KQZ3551W The file name "file_name" in field"field_name" does not end with "file_type".
Explanation: The file name does not end with theexpected file type. The file type is the portion of the filename after the last period in the name.
Operator response: Enter the correct file type at theend if the file name, after a period.
KQZ3552W The file name "file_name" in field"field_name" contains only the file type.
Explanation: The file name does not contain anycharacters before the period and file type.
Operator response: Enter characters in the file namebefore the period that separates the file name from filetype.
KQZ3554E A project named project already exists inthe workspace.
Explanation: Project names must be unique within aworkspace.
Operator response: Enter a unique project name.
KQZ3555I Successfully converted the SolutionInstall Project to an Application SupportExtension Project.
Explanation: This is an informational message only.
KQZ3556E The product code must start with theletter K.
Explanation: The product code contains anunsupported character.
Operator response: An product code must containonly three characters.
The first character must be "K".
The final two characters must be alphanumeric.
KQZ3557E The the character "character" is notsupported in an IBM Tivoli MonitoringAgent Builder product code.
Explanation: The product code contains anunsupported character.
KQZ3544E • KQZ3557E
Chapter 35. Troubleshooting 455
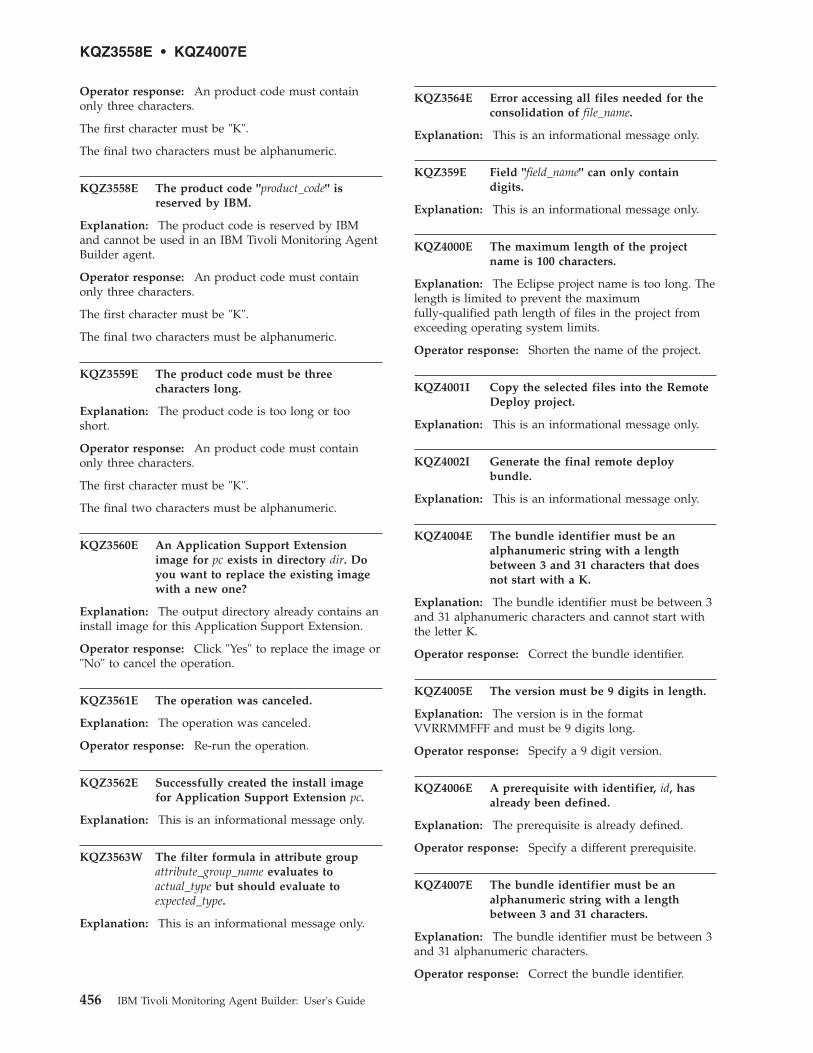
Operator response: An product code must containonly three characters.
The first character must be "K".
The final two characters must be alphanumeric.
KQZ3558E The product code "product_code" isreserved by IBM.
Explanation: The product code is reserved by IBMand cannot be used in an IBM Tivoli Monitoring AgentBuilder agent.
Operator response: An product code must containonly three characters.
The first character must be "K".
The final two characters must be alphanumeric.
KQZ3559E The product code must be threecharacters long.
Explanation: The product code is too long or tooshort.
Operator response: An product code must containonly three characters.
The first character must be "K".
The final two characters must be alphanumeric.
KQZ3560E An Application Support Extensionimage for pc exists in directory dir. Doyou want to replace the existing imagewith a new one?
Explanation: The output directory already contains aninstall image for this Application Support Extension.
Operator response: Click "Yes" to replace the image or"No" to cancel the operation.
KQZ3561E The operation was canceled.
Explanation: The operation was canceled.
Operator response: Re-run the operation.
KQZ3562E Successfully created the install imagefor Application Support Extension pc.
Explanation: This is an informational message only.
KQZ3563W The filter formula in attribute groupattribute_group_name evaluates toactual_type but should evaluate toexpected_type.
Explanation: This is an informational message only.
KQZ3564E Error accessing all files needed for theconsolidation of file_name.
Explanation: This is an informational message only.
KQZ359E Field "field_name" can only containdigits.
Explanation: This is an informational message only.
KQZ4000E The maximum length of the projectname is 100 characters.
Explanation: The Eclipse project name is too long. Thelength is limited to prevent the maximumfully-qualified path length of files in the project fromexceeding operating system limits.
Operator response: Shorten the name of the project.
KQZ4001I Copy the selected files into the RemoteDeploy project.
Explanation: This is an informational message only.
KQZ4002I Generate the final remote deploybundle.
Explanation: This is an informational message only.
KQZ4004E The bundle identifier must be analphanumeric string with a lengthbetween 3 and 31 characters that doesnot start with a K.
Explanation: The bundle identifier must be between 3and 31 alphanumeric characters and cannot start withthe letter K.
Operator response: Correct the bundle identifier.
KQZ4005E The version must be 9 digits in length.
Explanation: The version is in the formatVVRRMMFFF and must be 9 digits long.
Operator response: Specify a 9 digit version.
KQZ4006E A prerequisite with identifier, id, hasalready been defined.
Explanation: The prerequisite is already defined.
Operator response: Specify a different prerequisite.
KQZ4007E The bundle identifier must be analphanumeric string with a lengthbetween 3 and 31 characters.
Explanation: The bundle identifier must be between 3and 31 alphanumeric characters.
Operator response: Correct the bundle identifier.
KQZ3558E • KQZ4007E
456 IBM Tivoli Monitoring Agent Builder: User's Guide
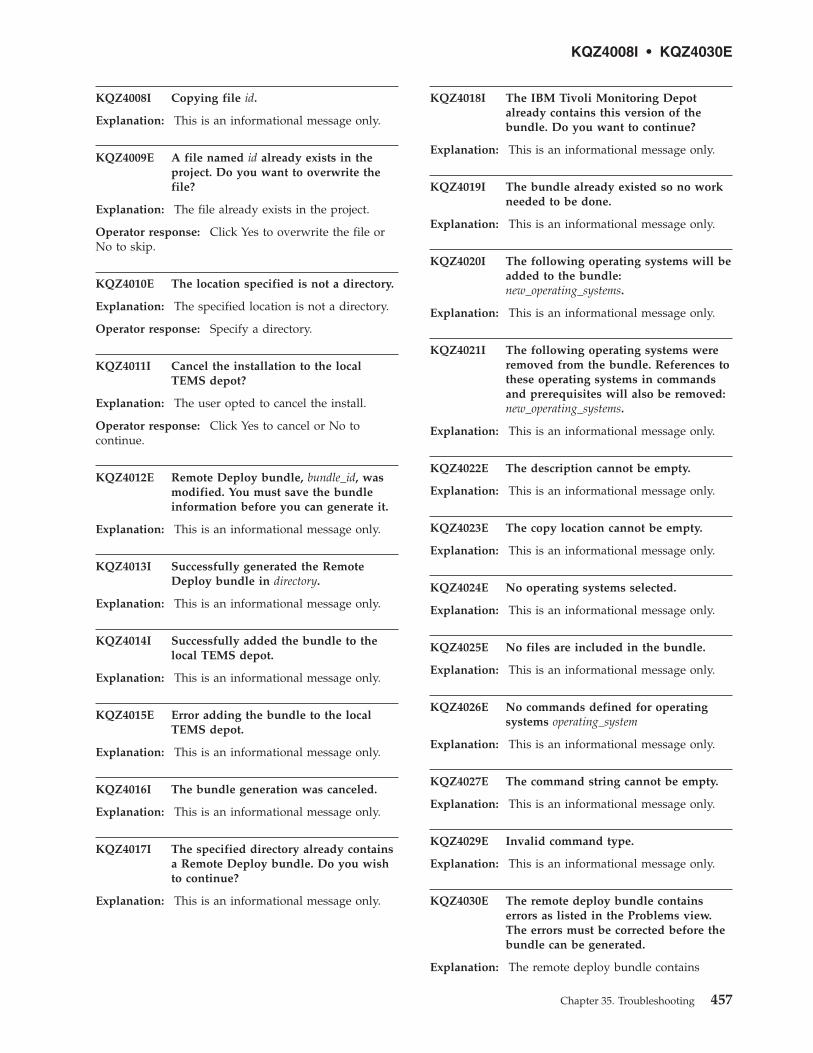
KQZ4008I Copying file id.
Explanation: This is an informational message only.
KQZ4009E A file named id already exists in theproject. Do you want to overwrite thefile?
Explanation: The file already exists in the project.
Operator response: Click Yes to overwrite the file orNo to skip.
KQZ4010E The location specified is not a directory.
Explanation: The specified location is not a directory.
Operator response: Specify a directory.
KQZ4011I Cancel the installation to the localTEMS depot?
Explanation: The user opted to cancel the install.
Operator response: Click Yes to cancel or No tocontinue.
KQZ4012E Remote Deploy bundle, bundle_id, wasmodified. You must save the bundleinformation before you can generate it.
Explanation: This is an informational message only.
KQZ4013I Successfully generated the RemoteDeploy bundle in directory.
Explanation: This is an informational message only.
KQZ4014I Successfully added the bundle to thelocal TEMS depot.
Explanation: This is an informational message only.
KQZ4015E Error adding the bundle to the localTEMS depot.
Explanation: This is an informational message only.
KQZ4016I The bundle generation was canceled.
Explanation: This is an informational message only.
KQZ4017I The specified directory already containsa Remote Deploy bundle. Do you wishto continue?
Explanation: This is an informational message only.
KQZ4018I The IBM Tivoli Monitoring Depotalready contains this version of thebundle. Do you want to continue?
Explanation: This is an informational message only.
KQZ4019I The bundle already existed so no workneeded to be done.
Explanation: This is an informational message only.
KQZ4020I The following operating systems will beadded to the bundle:new_operating_systems.
Explanation: This is an informational message only.
KQZ4021I The following operating systems wereremoved from the bundle. References tothese operating systems in commandsand prerequisites will also be removed:new_operating_systems.
Explanation: This is an informational message only.
KQZ4022E The description cannot be empty.
Explanation: This is an informational message only.
KQZ4023E The copy location cannot be empty.
Explanation: This is an informational message only.
KQZ4024E No operating systems selected.
Explanation: This is an informational message only.
KQZ4025E No files are included in the bundle.
Explanation: This is an informational message only.
KQZ4026E No commands defined for operatingsystems operating_system
Explanation: This is an informational message only.
KQZ4027E The command string cannot be empty.
Explanation: This is an informational message only.
KQZ4029E Invalid command type.
Explanation: This is an informational message only.
KQZ4030E The remote deploy bundle containserrors as listed in the Problems view.The errors must be corrected before thebundle can be generated.
Explanation: The remote deploy bundle contains
KQZ4008I • KQZ4030E
Chapter 35. Troubleshooting 457
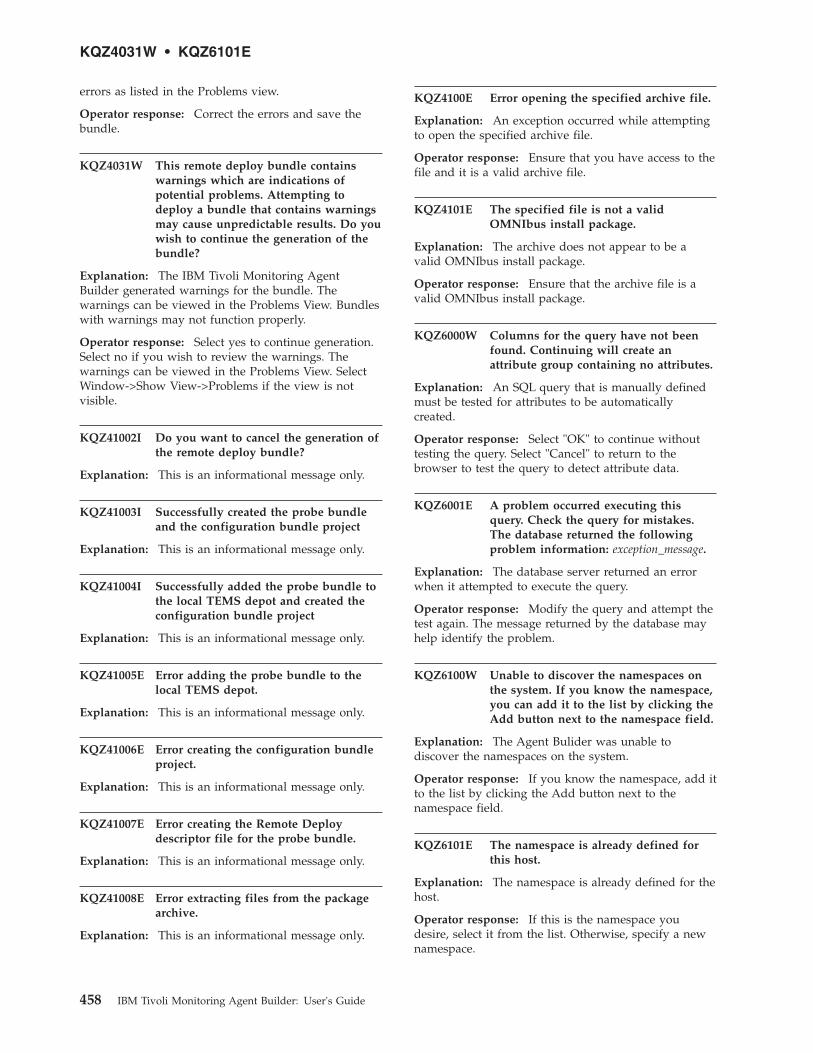
errors as listed in the Problems view.
Operator response: Correct the errors and save thebundle.
KQZ4031W This remote deploy bundle containswarnings which are indications ofpotential problems. Attempting todeploy a bundle that contains warningsmay cause unpredictable results. Do youwish to continue the generation of thebundle?
Explanation: The IBM Tivoli Monitoring AgentBuilder generated warnings for the bundle. Thewarnings can be viewed in the Problems View. Bundleswith warnings may not function properly.
Operator response: Select yes to continue generation.Select no if you wish to review the warnings. Thewarnings can be viewed in the Problems View. SelectWindow->Show View->Problems if the view is notvisible.
KQZ41002I Do you want to cancel the generation ofthe remote deploy bundle?
Explanation: This is an informational message only.
KQZ41003I Successfully created the probe bundleand the configuration bundle project
Explanation: This is an informational message only.
KQZ41004I Successfully added the probe bundle tothe local TEMS depot and created theconfiguration bundle project
Explanation: This is an informational message only.
KQZ41005E Error adding the probe bundle to thelocal TEMS depot.
Explanation: This is an informational message only.
KQZ41006E Error creating the configuration bundleproject.
Explanation: This is an informational message only.
KQZ41007E Error creating the Remote Deploydescriptor file for the probe bundle.
Explanation: This is an informational message only.
KQZ41008E Error extracting files from the packagearchive.
Explanation: This is an informational message only.
KQZ4100E Error opening the specified archive file.
Explanation: An exception occurred while attemptingto open the specified archive file.
Operator response: Ensure that you have access to thefile and it is a valid archive file.
KQZ4101E The specified file is not a validOMNIbus install package.
Explanation: The archive does not appear to be avalid OMNIbus install package.
Operator response: Ensure that the archive file is avalid OMNIbus install package.
KQZ6000W Columns for the query have not beenfound. Continuing will create anattribute group containing no attributes.
Explanation: An SQL query that is manually definedmust be tested for attributes to be automaticallycreated.
Operator response: Select "OK" to continue withouttesting the query. Select "Cancel" to return to thebrowser to test the query to detect attribute data.
KQZ6001E A problem occurred executing thisquery. Check the query for mistakes.The database returned the followingproblem information: exception_message.
Explanation: The database server returned an errorwhen it attempted to execute the query.
Operator response: Modify the query and attempt thetest again. The message returned by the database mayhelp identify the problem.
KQZ6100W Unable to discover the namespaces onthe system. If you know the namespace,you can add it to the list by clicking theAdd button next to the namespace field.
Explanation: The Agent Bulider was unable todiscover the namespaces on the system.
Operator response: If you know the namespace, add itto the list by clicking the Add button next to thenamespace field.
KQZ6101E The namespace is already defined forthis host.
Explanation: The namespace is already defined for thehost.
Operator response: If this is the namespace youdesire, select it from the list. Otherwise, specify a newnamespace.
KQZ4031W • KQZ6101E
458 IBM Tivoli Monitoring Agent Builder: User's Guide
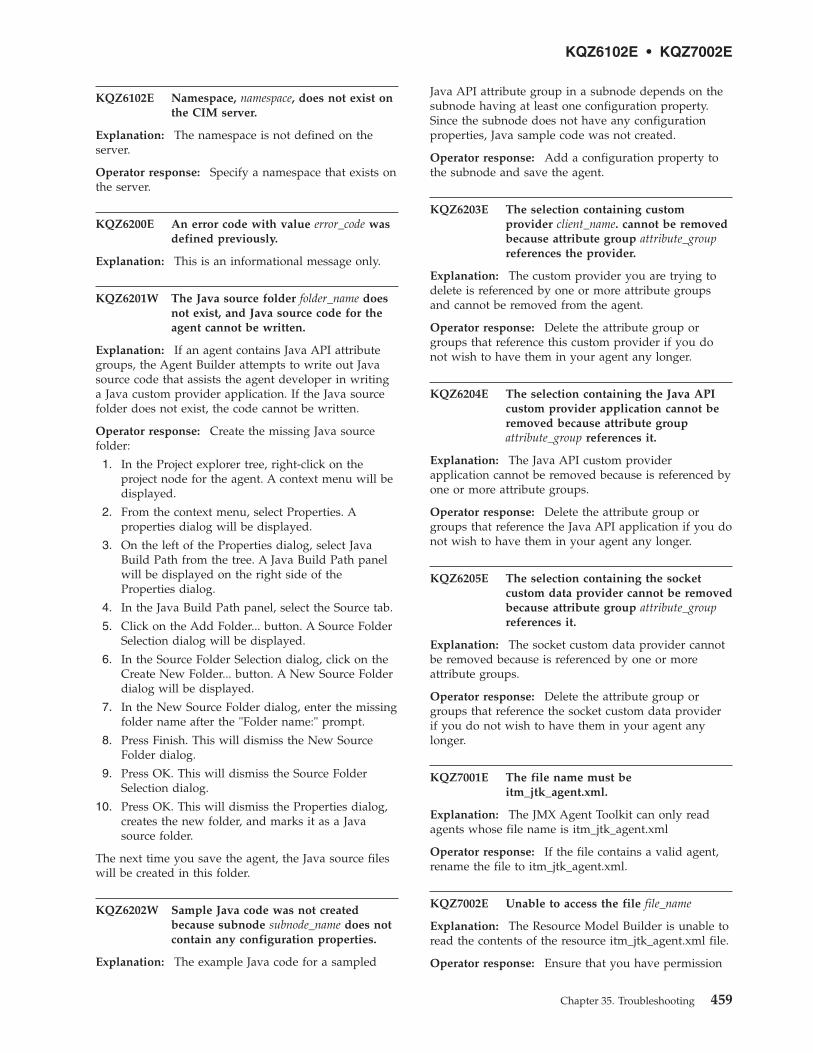
KQZ6102E Namespace, namespace, does not exist onthe CIM server.
Explanation: The namespace is not defined on theserver.
Operator response: Specify a namespace that exists onthe server.
KQZ6200E An error code with value error_code wasdefined previously.
Explanation: This is an informational message only.
KQZ6201W The Java source folder folder_name doesnot exist, and Java source code for theagent cannot be written.
Explanation: If an agent contains Java API attributegroups, the Agent Builder attempts to write out Javasource code that assists the agent developer in writinga Java custom provider application. If the Java sourcefolder does not exist, the code cannot be written.
Operator response: Create the missing Java sourcefolder:
1. In the Project explorer tree, right-click on theproject node for the agent. A context menu will bedisplayed.
2. From the context menu, select Properties. Aproperties dialog will be displayed.
3. On the left of the Properties dialog, select JavaBuild Path from the tree. A Java Build Path panelwill be displayed on the right side of theProperties dialog.
4. In the Java Build Path panel, select the Source tab.
5. Click on the Add Folder... button. A Source FolderSelection dialog will be displayed.
6. In the Source Folder Selection dialog, click on theCreate New Folder... button. A New Source Folderdialog will be displayed.
7. In the New Source Folder dialog, enter the missingfolder name after the "Folder name:" prompt.
8. Press Finish. This will dismiss the New SourceFolder dialog.
9. Press OK. This will dismiss the Source FolderSelection dialog.
10. Press OK. This will dismiss the Properties dialog,creates the new folder, and marks it as a Javasource folder.
The next time you save the agent, the Java source fileswill be created in this folder.
KQZ6202W Sample Java code was not createdbecause subnode subnode_name does notcontain any configuration properties.
Explanation: The example Java code for a sampled
Java API attribute group in a subnode depends on thesubnode having at least one configuration property.Since the subnode does not have any configurationproperties, Java sample code was not created.
Operator response: Add a configuration property tothe subnode and save the agent.
KQZ6203E The selection containing customprovider client_name. cannot be removedbecause attribute group attribute_groupreferences the provider.
Explanation: The custom provider you are trying todelete is referenced by one or more attribute groupsand cannot be removed from the agent.
Operator response: Delete the attribute group orgroups that reference this custom provider if you donot wish to have them in your agent any longer.
KQZ6204E The selection containing the Java APIcustom provider application cannot beremoved because attribute groupattribute_group references it.
Explanation: The Java API custom providerapplication cannot be removed because is referenced byone or more attribute groups.
Operator response: Delete the attribute group orgroups that reference the Java API application if you donot wish to have them in your agent any longer.
KQZ6205E The selection containing the socketcustom data provider cannot be removedbecause attribute group attribute_groupreferences it.
Explanation: The socket custom data provider cannotbe removed because is referenced by one or moreattribute groups.
Operator response: Delete the attribute group orgroups that reference the socket custom data providerif you do not wish to have them in your agent anylonger.
KQZ7001E The file name must beitm_jtk_agent.xml.
Explanation: The JMX Agent Toolkit can only readagents whose file name is itm_jtk_agent.xml
Operator response: If the file contains a valid agent,rename the file to itm_jtk_agent.xml.
KQZ7002E Unable to access the file file_name
Explanation: The Resource Model Builder is unable toread the contents of the resource itm_jtk_agent.xml file.
Operator response: Ensure that you have permission
KQZ6102E • KQZ7002E
Chapter 35. Troubleshooting 459
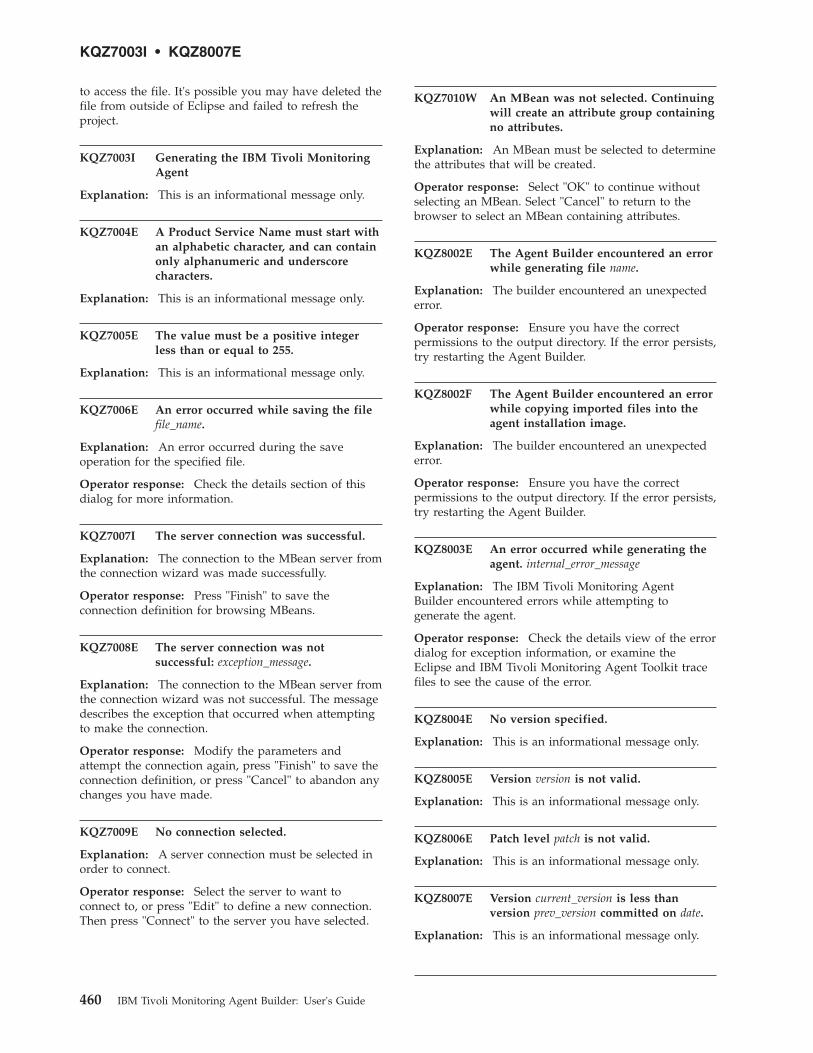
to access the file. It's possible you may have deleted thefile from outside of Eclipse and failed to refresh theproject.
KQZ7003I Generating the IBM Tivoli MonitoringAgent
Explanation: This is an informational message only.
KQZ7004E A Product Service Name must start withan alphabetic character, and can containonly alphanumeric and underscorecharacters.
Explanation: This is an informational message only.
KQZ7005E The value must be a positive integerless than or equal to 255.
Explanation: This is an informational message only.
KQZ7006E An error occurred while saving the filefile_name.
Explanation: An error occurred during the saveoperation for the specified file.
Operator response: Check the details section of thisdialog for more information.
KQZ7007I The server connection was successful.
Explanation: The connection to the MBean server fromthe connection wizard was made successfully.
Operator response: Press "Finish" to save theconnection definition for browsing MBeans.
KQZ7008E The server connection was notsuccessful: exception_message.
Explanation: The connection to the MBean server fromthe connection wizard was not successful. The messagedescribes the exception that occurred when attemptingto make the connection.
Operator response: Modify the parameters andattempt the connection again, press "Finish" to save theconnection definition, or press "Cancel" to abandon anychanges you have made.
KQZ7009E No connection selected.
Explanation: A server connection must be selected inorder to connect.
Operator response: Select the server to want toconnect to, or press "Edit" to define a new connection.Then press "Connect" to the server you have selected.
KQZ7010W An MBean was not selected. Continuingwill create an attribute group containingno attributes.
Explanation: An MBean must be selected to determinethe attributes that will be created.
Operator response: Select "OK" to continue withoutselecting an MBean. Select "Cancel" to return to thebrowser to select an MBean containing attributes.
KQZ8002E The Agent Builder encountered an errorwhile generating file name.
Explanation: The builder encountered an unexpectederror.
Operator response: Ensure you have the correctpermissions to the output directory. If the error persists,try restarting the Agent Builder.
KQZ8002F The Agent Builder encountered an errorwhile copying imported files into theagent installation image.
Explanation: The builder encountered an unexpectederror.
Operator response: Ensure you have the correctpermissions to the output directory. If the error persists,try restarting the Agent Builder.
KQZ8003E An error occurred while generating theagent. internal_error_message
Explanation: The IBM Tivoli Monitoring AgentBuilder encountered errors while attempting togenerate the agent.
Operator response: Check the details view of the errordialog for exception information, or examine theEclipse and IBM Tivoli Monitoring Agent Toolkit tracefiles to see the cause of the error.
KQZ8004E No version specified.
Explanation: This is an informational message only.
KQZ8005E Version version is not valid.
Explanation: This is an informational message only.
KQZ8006E Patch level patch is not valid.
Explanation: This is an informational message only.
KQZ8007E Version current_version is less thanversion prev_version committed on date.
Explanation: This is an informational message only.
KQZ7003I • KQZ8007E
460 IBM Tivoli Monitoring Agent Builder: User's Guide
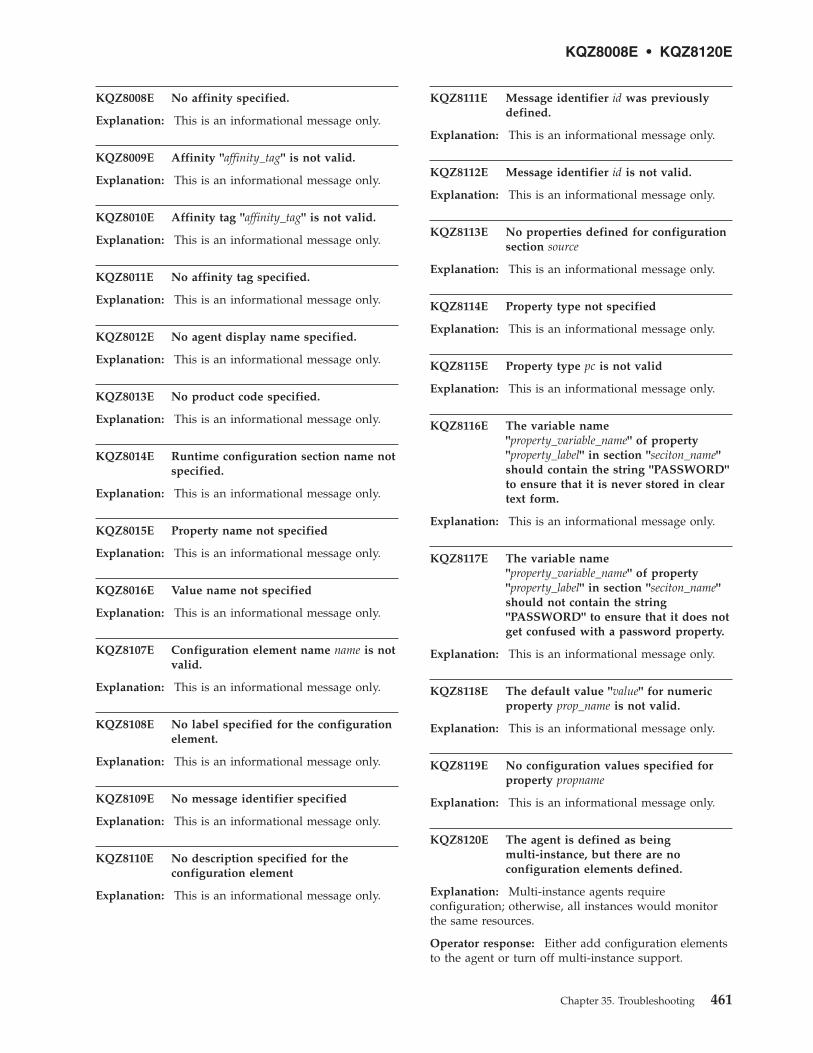
KQZ8008E No affinity specified.
Explanation: This is an informational message only.
KQZ8009E Affinity "affinity_tag" is not valid.
Explanation: This is an informational message only.
KQZ8010E Affinity tag "affinity_tag" is not valid.
Explanation: This is an informational message only.
KQZ8011E No affinity tag specified.
Explanation: This is an informational message only.
KQZ8012E No agent display name specified.
Explanation: This is an informational message only.
KQZ8013E No product code specified.
Explanation: This is an informational message only.
KQZ8014E Runtime configuration section name notspecified.
Explanation: This is an informational message only.
KQZ8015E Property name not specified
Explanation: This is an informational message only.
KQZ8016E Value name not specified
Explanation: This is an informational message only.
KQZ8107E Configuration element name name is notvalid.
Explanation: This is an informational message only.
KQZ8108E No label specified for the configurationelement.
Explanation: This is an informational message only.
KQZ8109E No message identifier specified
Explanation: This is an informational message only.
KQZ8110E No description specified for theconfiguration element
Explanation: This is an informational message only.
KQZ8111E Message identifier id was previouslydefined.
Explanation: This is an informational message only.
KQZ8112E Message identifier id is not valid.
Explanation: This is an informational message only.
KQZ8113E No properties defined for configurationsection source
Explanation: This is an informational message only.
KQZ8114E Property type not specified
Explanation: This is an informational message only.
KQZ8115E Property type pc is not valid
Explanation: This is an informational message only.
KQZ8116E The variable name"property_variable_name" of property"property_label" in section "seciton_name"should contain the string "PASSWORD"to ensure that it is never stored in cleartext form.
Explanation: This is an informational message only.
KQZ8117E The variable name"property_variable_name" of property"property_label" in section "seciton_name"should not contain the string"PASSWORD" to ensure that it does notget confused with a password property.
Explanation: This is an informational message only.
KQZ8118E The default value "value" for numericproperty prop_name is not valid.
Explanation: This is an informational message only.
KQZ8119E No configuration values specified forproperty propname
Explanation: This is an informational message only.
KQZ8120E The agent is defined as beingmulti-instance, but there are noconfiguration elements defined.
Explanation: Multi-instance agents requireconfiguration; otherwise, all instances would monitorthe same resources.
Operator response: Either add configuration elementsto the agent or turn off multi-instance support.
KQZ8008E • KQZ8120E
Chapter 35. Troubleshooting 461
KQZ8121E Navigator group name "navgroup_name"is not valid.
Explanation: The specified name contains invalidcharacters.
Operator response: A navigator group must start witha letter and can contain only letters, numbers orunderscores.
KQZ8122E A navigator group with identifier id wasdefined previously.
Explanation: Navigator group names must be unique.
Operator response: Enter a new name for thenavigator group.
KQZ8123E Navigator group name id is reserved forinternal use.
Explanation: The Agent Builder automatically createsnavigator groups in certain situations. The namespecified duplicates one of these navigator groups.
Operator response: See the User Guide for the list ofreserved navigator group names.
KQZ8124E A return code with value rc was definedpreviously.
Explanation: This is an informational message only.
KQZ8125E Return code "rc" is not numeric.
Explanation: This is an informational message only.
KQZ8126E Attribute group nameattribute_group_name is not valid.
Explanation: This is an informational message only.
KQZ8127E An attribute group with identifier idwas defined previously.
Explanation: This is an informational message only.
KQZ8128E Attribute group name id is reserved forinternal use.
Explanation: This is an informational message only.
KQZ8129E Attribute group attribute_group_namedoes not have help text.
Explanation: This is an informational message only.
KQZ8130E The help text for object_name exceeds themaximum length of max_length.
Explanation: This is an informational message only.
KQZ8131E No operating systems selected forattribute group "attribute_group_name".
Explanation: This is an informational message only.
KQZ8132E Attribute group"referencing_attribute_group" references anunknown attribute group"referenced_attribute_group".
Explanation: This is an informational message only.
KQZ8133E Joined attribute group"joined_attribute_group" attempts to joinattribute group"referenced_attribute_group" with itself.
Explanation: This is an informational message only.
KQZ8134E Attribute group referencing_attribute_groupreferences the Availability attributegroup; however, no availability filtersexist.
Explanation: This is an informational message only.
KQZ8135E No attribute to join specified forattribute group attribute_group.
Explanation: This is an informational message only.
KQZ8136E Join attribute "attribute" defined injoined attribute group"joined_attribute_group" was not found inattribute group data_source.
Explanation: This is an informational message only.
KQZ8138E Key attribute "attribute" defined injoined attribute group"joined_attribute_group" was not found ineither base attribute group.
Explanation: This is an informational message only.
KQZ8139E Attribute name attribute_name is notvalid.
Explanation: This is an informational message only.
KQZ8121E • KQZ8139E
462 IBM Tivoli Monitoring Agent Builder: User's Guide
KQZ8140E Attribute name attribute_name exceedsthe limit of limit characters.
Explanation: This is an informational message only.
KQZ8141E Attribute name id is reserved forinternal use.
Explanation: This is an informational message only.
KQZ8142E Attribute attribute_name does not havehelp text.
Explanation: This is an informational message only.
KQZ8143E Attribute attribute_name is attribute_bytesbytes long which exceeds the maximumsize of maximum_size bytes.
Explanation: This is an informational message only.
KQZ8144E The formula contains a syntax error.
Explanation: This is an informational message only.
KQZ8145E Attribute group id containsattribute_count attributes, more than thelimit of maximum_attribute_count.
Explanation: There are too many attributes in theattribute group set to display on the TEP.
Operator response: Remove some attributes, marksome attributes as not being displayed on the TEP, orsplit the group into two smaller groups.
KQZ8146E Attribute group id contains zeroattributes.
Explanation: This is an informational message only.
KQZ8147E Attributes in attribute groupattribute_group_name totalattribute_group_bytes bytes which exceedsthe maximum of maximum_size bytes.
Explanation: This is an informational message only.
KQZ8148E Attribute group source can produce morethan one data row but does not containa key attribute.
Explanation: This is an informational message only.
KQZ8149E Perfmon attribute group source canproduce more than one data row butdoes not return the Perfmon instancename or contain an other key attribute.
Explanation: This is an informational message only.
KQZ8150E Range value "range_endpoint_value" is nota valid numerical value.
Explanation: This is an informational message only.
KQZ8151E Range value "range_endpoint_value" is nota number from minimum_value tomaximum_value, the minimum andmaximum for a integer_size-bit number.
Explanation: This is an informational message only.
KQZ8152E Range value "range_endpoint_value" is nota number from minimum_value tomaximum_value, the minimum andmaximum for a integer_size-bit numberwith a decimal adjustment ofdecimal_adjustment.
Explanation: This is an informational message only.
KQZ8153E Minimum range valueminimum_range_endpoint_value is not lessthan maximum range valuemaximum_range_endpoint_value.
Explanation: This is an informational message only.
KQZ8154E Decimal adjustment (scale) must be anumber from 0 to maximum_scale forinteger_size-bit numbers.
Explanation: This is an informational message only.
KQZ8155E You can only join an attribute groupthat produces events to an attributegroup that produces a single data row.
Explanation: This is an informational message only.
KQZ8156E Attribute attribute_name is defined as akey, however it is defined as hidden.
Explanation: This is an informational message only.
KQZ8157E The metric name is missing in attributeattribute_name.
Explanation: This is an informational message only.
KQZ8158E No type is specified for attributeattribute_name.
Explanation: This is an informational message only.
KQZ8140E • KQZ8158E
Chapter 35. Troubleshooting 463
KQZ8159E Attribute attribute_name does not have avalid maximum size.
Explanation: This is an informational message only.
KQZ8160E The object identifier is missing inattribute attribute_name.
Explanation: This is an informational message only.
KQZ8161E "token" is not expected in columncolumn_number.
Explanation: This is an informational message only.
KQZ8162E More tokens expected at the end of theformula.
Explanation: This is an informational message only.
KQZ8163E Closing parenthesis for function call"function_name" not found.
Explanation: This is an informational message only.
KQZ8164E Two unary operators, "unary_operator"and "unary_operator" found without anintervening expression.
Explanation: This is an informational message only.
KQZ8165E "bad_function_name" is not a validfunction name.
Explanation: This is an informational message only.
KQZ8166E "token" found where identifier or literalwas expected.
Explanation: This is an informational message only.
KQZ8167E Missing argument in function"function_name".
Explanation: This is an informational message only.
KQZ8168E "bad_operator" is not a valid operator.
Explanation: This is an informational message only.
KQZ8169E Lexical error at column "column_number".Encountered: "bad_character" after"reference_character".
Explanation: This is an informational message only.
KQZ8170E No function name has been specified.
Explanation: This is an informational message only.
KQZ8171E A function name cannot start with anumber.
Explanation: This is an informational message only.
KQZ8172E A function name cannot contain a spacecharacter.
Explanation: This is an informational message only.
KQZ8173E A function name cannot containcharacter "bad_character".
Explanation: This is an informational message only.
KQZ8174W "function_name" is not a recognizedderived formula function.
Explanation: This is an informational message only.
KQZ8175E No attribute name has been specified.
Explanation: This is an informational message only.
KQZ8176E An attribute name cannot start with anumber.
Explanation: This is an informational message only.
KQZ8177E An attribute name cannot contain aspace character.
Explanation: This is an informational message only.
KQZ8178E An attribute name cannot containcharacter "bad_character".
Explanation: This is an informational message only.
KQZ8179W Attribute "attribute_name" is not found inthis attribute group.
Explanation: This is an informational message only.
KQZ8180W Function "function_name" hasargument_count arguments, butparameter_count arguments are expected.
Explanation: This is an informational message only.
KQZ8181W Function "function_name" argumentargument_number is actual_argument_type,but expected_parameter_type is expected.
Explanation: This is an informational message only.
KQZ8159E • KQZ8181W
464 IBM Tivoli Monitoring Agent Builder: User's Guide
KQZ8182E An object identifier is specified inattribute attribute_name which also hasan index reference.
Explanation: This is an informational message only.
KQZ8183E Expression "literal_token" is not a validliteral value.
Explanation: This is an informational message only.
KQZ8184E Operator operator must have 2 operands.
Explanation: This is an informational message only.
KQZ8185E Operator operator must have 1 or 2operands.
Explanation: This is an informational message only.
KQZ8186W The left operand of the operator operatoris left_operand_type and the right isright_operand_type. Both types should bethe same.
Explanation: This is an informational message only.
KQZ8187W The left operand of the operator operatoris actual_type_with_indefinite_article butactual_type_with_indefinite_article operandis expected.
Explanation: This is an informational message only.
KQZ8188W The right operand of the operatoroperator isactual_type_with_indefinite_article butactual_type_with_indefinite_article operandis expected.
Explanation: This is an informational message only.
KQZ8189W The derived formula in attributeattribute_name evaluates to actual_type butshould evaluate to expected_type to matchthe attribute type.
Explanation: This is an informational message only.
KQZ8190E There are no process or serviceavailability filters defined with theTADMM sensor "Use these criteria" boxchecked.
Explanation: One process or service availability filtermust have TADDM sensor criteria defined, and thecheck box labeled "Use these criteria to identify wherethe sensor should run" checked.
Operator response: Define a process availability filter,select the "TADDM sensor" tab, check the "Use these
criteria to identify where the sensor should run"checkbox, define criteria to identify the process, savethe file and regenerate the sensor.
KQZ8191E There are more than one process orservice availability filters defined withthe TADMM sensor "Use these criteria"box checked.
Explanation: Only one process or service availabilityfilter can have the check box labeled "Use these criteriato identify where the sensor should run" checked.
Operator response: Examine all the process andservice availability filters, select the "TADDM sensor"tab, and make sure only one of them has the "Use thesecriteria to identify where the sensor should run"checkbox checked. Then save the file and regeneratethe sensor.
KQZ8192E Cannot write to file maximum_count.
Explanation: An unsuccessful attempt was made towrite the file to the local file system.
Operator response: Change the path where the file isbeing written, or check that the specified path is notread-only or the disk partition is not full.
KQZ8195E Java resource resource_name cannot befound or read.
Explanation: This is an informational message only.
KQZ8196E Closing parenthesis after"expression_fragment" not found.
Explanation: This is an informational message only.
KQZ8197E An agent with affinity "affinity" hasalready been defined.
Explanation: Affinities must be unique
Operator response: Enter a unique affinity.
KQZ8198E Index, index, is not defined.
Explanation: The specified SNMP index is not definedin the set of MIBs loaded by the parser.
Operator response: Find the MIB that defines theindex and import it.
KQZ8199E Could not determine an OID for value,value.
Explanation: The parser could not determine the OIDfor the specified value.
Operator response: Find the MIB that defines thevalue and import it.
KQZ8182E • KQZ8199E
Chapter 35. Troubleshooting 465
KQZ8200W The size of attribute, name, was changedfrom original_size to new_size.
Explanation: The size reported by the MIB file waslarger than expected.
Operator response: If the size needs to be larger,modify the attribute to increase the size.
KQZ8201E "supposed_directory_name" is not a validdirectory name.
Explanation: The value is not a valid directory.
Operator response: Enter or select a valid directoryname.
KQZ8202E File "file_name" does not exist indirectory "directory_name"
Explanation: The file does not exist in the directory.
Operator response: Enter a valid directory name thatcontains the file.
KQZ8203E schema_file_name version schema_versionand naming_rules_file_name versionnaming_rules_version from directorydirectory_name do not match.
Explanation: The two files must be from the sameversion of the Common Data Model.
Operator response: Get files from the same version ofthe Common Data Model (at least CDM.xsd,NamingRules.xml, and oneschema.xml) and place themin the directory.
KQZ8204E The join attributes selected forattribute_group have different types.
Explanation: The two join attributes for a joinedattribute group must both be numeric or both be astring.
Operator response: Select two join attributes of thesame type, either both string or both numeric.
KQZ8205E The event threshold attribute can onlybe set if attribute group, attribute_group,is pure event.
Explanation: The attribute group is not a pure eventgroup, so the value set for the event threshold shouldnot be set.
Operator response: Remove the event thresholdattribute from the attribute group definition.
KQZ8206E The event summary interval attributecan only be set if attribute group,attribute_group, is pure event.
Explanation: The attribute group is not a pure eventgroup, so the value set for the event summary intervalshould not be set.
Operator response: Remove the event summaryinterval attribute from the attribute group definition.
KQZ8207E The event filtering threshold value forattribute group attribute_group is notvalid. It should be one of "send_none","send_first", "send_all", a positiveinteger or a configuration variable.
Explanation: The attribute does not contain a validvalue.
Operator response: Set a valid value for the attribute.
KQZ8208E The event summary interval forattribute group attribute_group is notvalid. It should be a positive integer ora configuration variable.
Explanation: The attribute does not contain a validvalue.
Operator response: Set a valid value for the attribute.
KQZ8209W An event threshold exists for attributegroup attribute_group; however, an eventsummary interval is not set.
Explanation: The event threshold should only be set ifan event summary interval is set.
Operator response: Either remove the event thresholdor specify an event summary interval.
KQZ8210E Event filtering and summarization isenabled for attribute groupattribute_group; however, no key attributeexists.
Explanation: The attribute group does not contain akey attribute.
Operator response: Specify a key attribute.
KQZ8211E Operating system operating_system isselected in more than one command for"command_definition_name".
Explanation: Two commands for a single commanddefinition are configured to run on the same operatingsystem. When alternate commands are defined in asingle script definition, the commands must to run ondifferent operating systems. For any given operatingsystem, only one command can be run.
KQZ8200W • KQZ8211E
466 IBM Tivoli Monitoring Agent Builder: User's Guide
Operator response: Remove the operating systemselection on one of the command definitions.
KQZ8212E No operating systems selected forcommand "command".
Explanation: This is an informational message only.
KQZ8213E Filtered attribute groupattribute_group_name has no formula forthe filter.
Explanation: This is an informational message only.
KQZ8214E Attribute group"referencing_attribute_group" referencesattribute group"referenced_attribute_group" which belongsto a different subnode.
Explanation: This is an informational message only.
KQZ8215E Attribute "attribute" has source type"source_class" in attribute group"attribute_group" which has settings type"settings_class". This attribute is expectedto be in a group with settings type"settings_class".
Explanation: This is an informational message only.
KQZ8216E Filtered attribute group "attribute_group"is missing a reference to a sourceattribute group.
Explanation: This is an informational message only.
KQZ8217E Filtered attribute group "attribute_group"has attribute "attribute" with a missingreferenced attribute name.
Explanation: This is an informational message only.
KQZ8218E Attribute "referencing_attribute" inattribute group"referencing_attribute_group" references anattribute named "source_attribute_name"that does not exist in attribute group"source_attribute_group".
Explanation: This is an informational message only.
KQZ8219E Attribute "referencing_attribute" of type"referencing_attribute_type" in attributegroup "referencing_attribute_group"references attribute "source_attribute" oftype "source_attribute_type" in attributegroup "source_attribute_group". Theattribute types should be the same.
Explanation: This is an informational message only.
KQZ8220W Function function_name should only becalled for event attribute groups, but iscalled for sampled attribute groupattribute_group_name.
Explanation: The functions isSummaryEvent,cumulativeSum, and occurrenceCount are applicableonly to pure event attribute groups, but one of themwas called for a sampled attribute group.
Operator response: Remove the function call from theformula.
KQZ8221E The formula is missing.
Explanation: This is an informational message only.
KQZ8222W Event summarization is enabled forattribute group attribute_group; however,no event summarization attributes exist.
Explanation: Although the attributes are notnecessary, they are useful when performing eventsummarization.
Operator response: Add the event summarizationattributes by right clicking on the attribute group.
KQZ8223W Event summarization is enabled forattribute group attribute_group; however,the event summarization occurrencecount attribute does not exist.
Explanation: Although the attribute is not necessary, itis useful when performing event summarization.
Operator response: Add the event summarizationattributes by right clicking on the attribute group.
KQZ8224W Event summarization is enabled forattribute group attribute_group; however,the summary event flag attribute doesnot exist.
Explanation: Although the attribute is not necessary, itis useful when performing event summarization.
Operator response: Add the event summary attributesby right clicking on the attribute group.
KQZ8225W Event summarization is enabled forattribute group attribute_group; however,the event threshold attribute does notexist.
Explanation: Although the attribute is not necessary, itis useful when performing event summarization.
Operator response: Add the event summarizationattributes by right clicking on the attribute group.
KQZ8212E • KQZ8225W
Chapter 35. Troubleshooting 467
KQZ8226W Event summarization is enabled forattribute group attribute_group; however,the summary interval attribute does notexist.
Explanation: Although the attribute is not necessary, itis useful when performing event summarization.
Operator response: Add the event summarizationattributes by right clicking on the attribute group.
KQZ8227W Attribute attribute_name must not beboth a key and a rate or delta.
Explanation: This is an informational message only.
KQZ8228E The subnode name cannot be empty
Explanation: No subnode name was entered.
Operator response: Enter a name for the subnode.
KQZ8229E The subnode description cannot beempty
Explanation: No subnode description was entered.
Operator response: Enter a description for thesubnode.
KQZ8230E The errpt command cannot be empty
Explanation: The errpt command line was notspecified
Operator response: Enter the errpt command thatshould be run.
KQZ8231E The command specified does not invokethe errpt command or is not aconfiguration variable.
Explanation: The command specified must run theerrpt command or it must be a configuration variable.
Operator response: Specify the errpt utility or aconfiguration variable.
KQZ8232E The command specified does notprovide the -c option.
Explanation: The -c option is required for the agent toproperly gather data from errpt.
Operator response: Specify the -c option.
KQZ8233E The configuration variable must startwith ${ and end with }.
Explanation: Ensure that the configuration variable isspecified properly.
Operator response: Specify a correct configurationvariable.
KQZ8234W Event filtering and summarization is notenabled for attribute group,attribute_group; however, eventsummarization attributes exist.
Explanation: The derived functions being use onlyreturn valid data when event filtering andsummarization is turned on.
Operator response: Remove the event summarizationattributes from the group or enable filtering andsummarization for the group.
KQZ8235E schema_file_name has a format error andcannot be parsed.
Explanation: There was an error parsing a CommonData Model file.
Operator response: Download the files from CommonData Model again (at least CDM.xsd,NamingRules.xml, and oneschema.xml) and place themin the directory specified in the Common Data Modelpreferences.
KQZ8236E The sensor has two or more layoutswith the same display name"layout_display_name".
Explanation: Each TADDM GUI layout must have aunique display name.
Operator response: In the TADDM GUI section, clickone of the layouts with the duplicate display name,click the Edit button, and change the display name.
KQZ8237E The sensor has two or more layoutswhich reference the same Common DataModel class "layout_class_name".
Explanation: Each TADDM GUI layout must referencea unique Common Data Model class.
Operator response: In the TADDM GUI section, clickone of the layouts with the duplicate class name, clickthe Edit button, and browse to a different class.
KQZ8238E TADDM GUI layout does not have adisplay name.
Explanation: A TADDM GUI layout definition doesnot have a display name.
Operator response: In the TADDM GUI section, selectthe layout without a name, click the Edit button, andenter a display name.
KQZ8239E TADDM GUI layout "layout_name" doesnot define a CDM class.
Explanation: A TADDM GUI layout definition doesnot have a Common Data Model class associated withit.
KQZ8226W • KQZ8239E
468 IBM Tivoli Monitoring Agent Builder: User's Guide
Operator response: In the TADDM GUI section, selectthe layout, click the Edit button, select Browse, andchoose a CDM class.
KQZ8240E TADDM GUI layout "layout_name" doesnot contain any tab definitions.
Explanation: Each TADDM GUI layout must define atleast one tab.
Operator response: In the TADDM GUI section, selectthe layout and click the Add button to define a tab inthe layout.
KQZ8241E TADDM GUI layout "layout_name" hastwo or more tabs with the same displayname "tab_display_name".
Explanation: Each TADDM GUI tab in a layout musthave a unique display name.
Operator response: In the TADDM GUI section, openthe layout, click one of the tabs with the duplicatedisplay name, click the Edit button, and change thedisplay name.
KQZ8242E TADDM GUI tab in layout "layout_name"does not have a display name.
Explanation: A TADDM GUI tab definition does nothave a display name.
Operator response: In the TADDM GUI section, selectthe tab without a name, click the Edit button, and entera display name.
KQZ8243E TADDM GUI tab "tab_name" in layout"layout_name" does not contain any tabledefinitions.
Explanation: Each TADDM GUI tab in a layout mustdefine at least one table.
Operator response: In the TADDM GUI section, selectthe tab and click the Add button to define a table in thetab.
KQZ8244E TADDM GUI tab "tab_name" in layout"layout_name" has two or more tableswith the same display name"tab_display_name".
Explanation: Each TADDM GUI table in a tab musthave a unique display name.
Operator response: In the TADDM GUI section, openthe layout and tab, click one of the tables with theduplicate display name, click the Edit button, andchange the display name.
KQZ8245E TADDM GUI table in tab "tab_name" inlayout "layout_name" does not have adisplay name.
Explanation: A TADDM GUI table definition does nothave a display name.
Operator response: In the TADDM GUI section, selectthe table without a name, click the Edit button, andenter a display name.
KQZ8246E TADDM GUI table in tab "tab_name" inlayout "layout_name" does not define aCDM class.
Explanation: A TADDM GUI table definition does nothave a Common Data Model class associated with it.
Operator response: In the TADDM GUI section, selectthe table, click the Edit button, select Browse, andchoose a CDM class.
KQZ8247E TADDM GUI table "table_name" in tab"tab_name" in layout "layout_name" doesnot contain any field definitions.
Explanation: Each TADDM GUI table must define atleast one field.
Operator response: In the TADDM GUI section, selectthe table and click the Add button to define a field inthe table.
KQZ8248E TADDM GUI field in table "table_name"in in tab "tab_name" in layout"layout_name" has no attribute selected.
Explanation: A TADDM GUI field must select anattribute from the parent table's class or parent field'sclass.
Operator response: In the TADDM GUI section, selectthe field, click the Edit button, and choose an attributename.
KQZ8249E TADDM GUI field "attribute_name" intable "table_name" in tab "tab_name" inlayout "layout_name" does not containany field definitions.
Explanation: A TADDM GUI field which identifiesanother Common Data Model object must define atleast one field from that object.
Operator response: In the TADDM GUI section, selectthe field and click the Add button to identify a fieldfrom the associated attribute.
KQZ8240E • KQZ8249E
Chapter 35. Troubleshooting 469
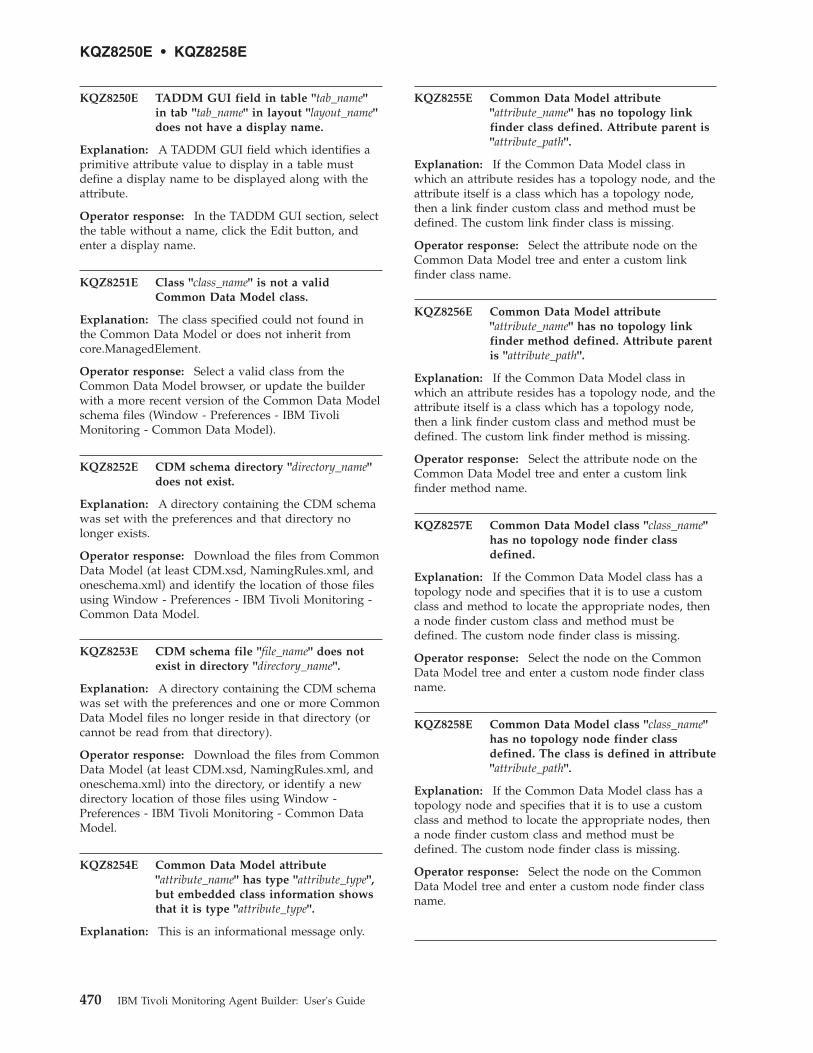
KQZ8250E TADDM GUI field in table "tab_name"in tab "tab_name" in layout "layout_name"does not have a display name.
Explanation: A TADDM GUI field which identifies aprimitive attribute value to display in a table mustdefine a display name to be displayed along with theattribute.
Operator response: In the TADDM GUI section, selectthe table without a name, click the Edit button, andenter a display name.
KQZ8251E Class "class_name" is not a validCommon Data Model class.
Explanation: The class specified could not found inthe Common Data Model or does not inherit fromcore.ManagedElement.
Operator response: Select a valid class from theCommon Data Model browser, or update the builderwith a more recent version of the Common Data Modelschema files (Window - Preferences - IBM TivoliMonitoring - Common Data Model).
KQZ8252E CDM schema directory "directory_name"does not exist.
Explanation: A directory containing the CDM schemawas set with the preferences and that directory nolonger exists.
Operator response: Download the files from CommonData Model (at least CDM.xsd, NamingRules.xml, andoneschema.xml) and identify the location of those filesusing Window - Preferences - IBM Tivoli Monitoring -Common Data Model.
KQZ8253E CDM schema file "file_name" does notexist in directory "directory_name".
Explanation: A directory containing the CDM schemawas set with the preferences and one or more CommonData Model files no longer reside in that directory (orcannot be read from that directory).
Operator response: Download the files from CommonData Model (at least CDM.xsd, NamingRules.xml, andoneschema.xml) into the directory, or identify a newdirectory location of those files using Window -Preferences - IBM Tivoli Monitoring - Common DataModel.
KQZ8254E Common Data Model attribute"attribute_name" has type "attribute_type",but embedded class information showsthat it is type "attribute_type".
Explanation: This is an informational message only.
KQZ8255E Common Data Model attribute"attribute_name" has no topology linkfinder class defined. Attribute parent is"attribute_path".
Explanation: If the Common Data Model class inwhich an attribute resides has a topology node, and theattribute itself is a class which has a topology node,then a link finder custom class and method must bedefined. The custom link finder class is missing.
Operator response: Select the attribute node on theCommon Data Model tree and enter a custom linkfinder class name.
KQZ8256E Common Data Model attribute"attribute_name" has no topology linkfinder method defined. Attribute parentis "attribute_path".
Explanation: If the Common Data Model class inwhich an attribute resides has a topology node, and theattribute itself is a class which has a topology node,then a link finder custom class and method must bedefined. The custom link finder method is missing.
Operator response: Select the attribute node on theCommon Data Model tree and enter a custom linkfinder method name.
KQZ8257E Common Data Model class "class_name"has no topology node finder classdefined.
Explanation: If the Common Data Model class has atopology node and specifies that it is to use a customclass and method to locate the appropriate nodes, thena node finder custom class and method must bedefined. The custom node finder class is missing.
Operator response: Select the node on the CommonData Model tree and enter a custom node finder classname.
KQZ8258E Common Data Model class "class_name"has no topology node finder classdefined. The class is defined in attribute"attribute_path".
Explanation: If the Common Data Model class has atopology node and specifies that it is to use a customclass and method to locate the appropriate nodes, thena node finder custom class and method must bedefined. The custom node finder class is missing.
Operator response: Select the node on the CommonData Model tree and enter a custom node finder classname.
KQZ8250E • KQZ8258E
470 IBM Tivoli Monitoring Agent Builder: User's Guide
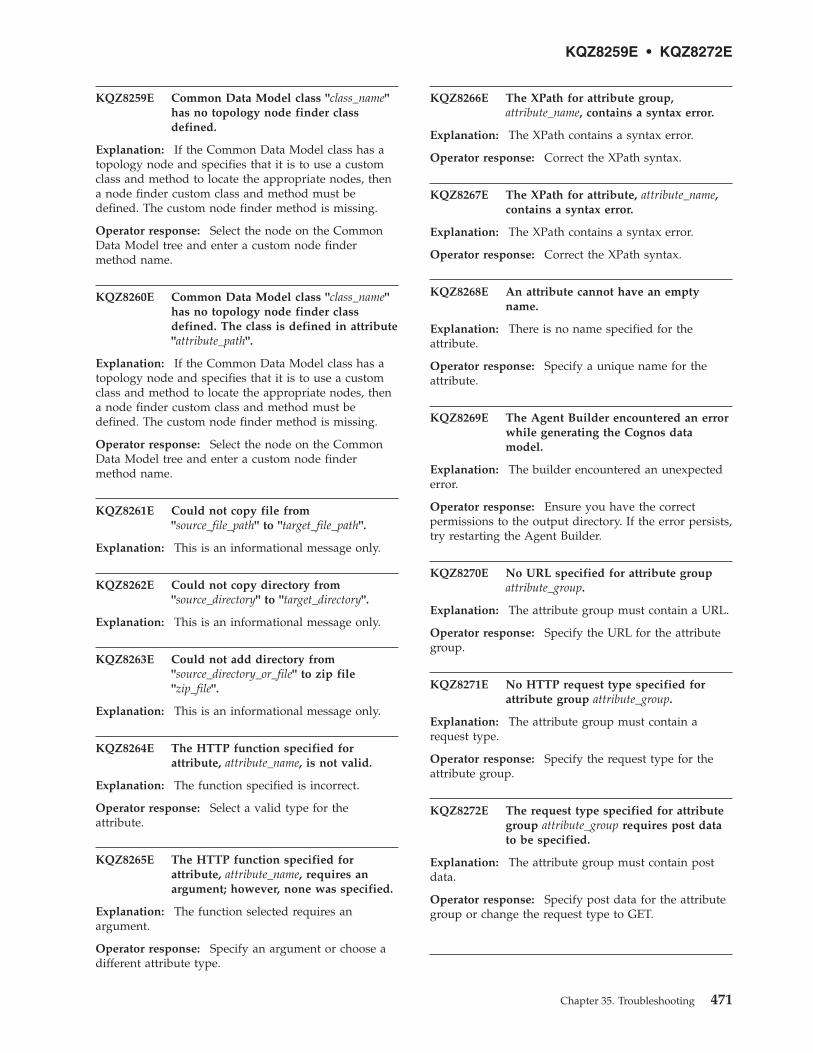
KQZ8259E Common Data Model class "class_name"has no topology node finder classdefined.
Explanation: If the Common Data Model class has atopology node and specifies that it is to use a customclass and method to locate the appropriate nodes, thena node finder custom class and method must bedefined. The custom node finder method is missing.
Operator response: Select the node on the CommonData Model tree and enter a custom node findermethod name.
KQZ8260E Common Data Model class "class_name"has no topology node finder classdefined. The class is defined in attribute"attribute_path".
Explanation: If the Common Data Model class has atopology node and specifies that it is to use a customclass and method to locate the appropriate nodes, thena node finder custom class and method must bedefined. The custom node finder method is missing.
Operator response: Select the node on the CommonData Model tree and enter a custom node findermethod name.
KQZ8261E Could not copy file from"source_file_path" to "target_file_path".
Explanation: This is an informational message only.
KQZ8262E Could not copy directory from"source_directory" to "target_directory".
Explanation: This is an informational message only.
KQZ8263E Could not add directory from"source_directory_or_file" to zip file"zip_file".
Explanation: This is an informational message only.
KQZ8264E The HTTP function specified forattribute, attribute_name, is not valid.
Explanation: The function specified is incorrect.
Operator response: Select a valid type for theattribute.
KQZ8265E The HTTP function specified forattribute, attribute_name, requires anargument; however, none was specified.
Explanation: The function selected requires anargument.
Operator response: Specify an argument or choose adifferent attribute type.
KQZ8266E The XPath for attribute group,attribute_name, contains a syntax error.
Explanation: The XPath contains a syntax error.
Operator response: Correct the XPath syntax.
KQZ8267E The XPath for attribute, attribute_name,contains a syntax error.
Explanation: The XPath contains a syntax error.
Operator response: Correct the XPath syntax.
KQZ8268E An attribute cannot have an emptyname.
Explanation: There is no name specified for theattribute.
Operator response: Specify a unique name for theattribute.
KQZ8269E The Agent Builder encountered an errorwhile generating the Cognos datamodel.
Explanation: The builder encountered an unexpectederror.
Operator response: Ensure you have the correctpermissions to the output directory. If the error persists,try restarting the Agent Builder.
KQZ8270E No URL specified for attribute groupattribute_group.
Explanation: The attribute group must contain a URL.
Operator response: Specify the URL for the attributegroup.
KQZ8271E No HTTP request type specified forattribute group attribute_group.
Explanation: The attribute group must contain arequest type.
Operator response: Specify the request type for theattribute group.
KQZ8272E The request type specified for attributegroup attribute_group requires post datato be specified.
Explanation: The attribute group must contain postdata.
Operator response: Specify post data for the attributegroup or change the request type to GET.
KQZ8259E • KQZ8272E
Chapter 35. Troubleshooting 471
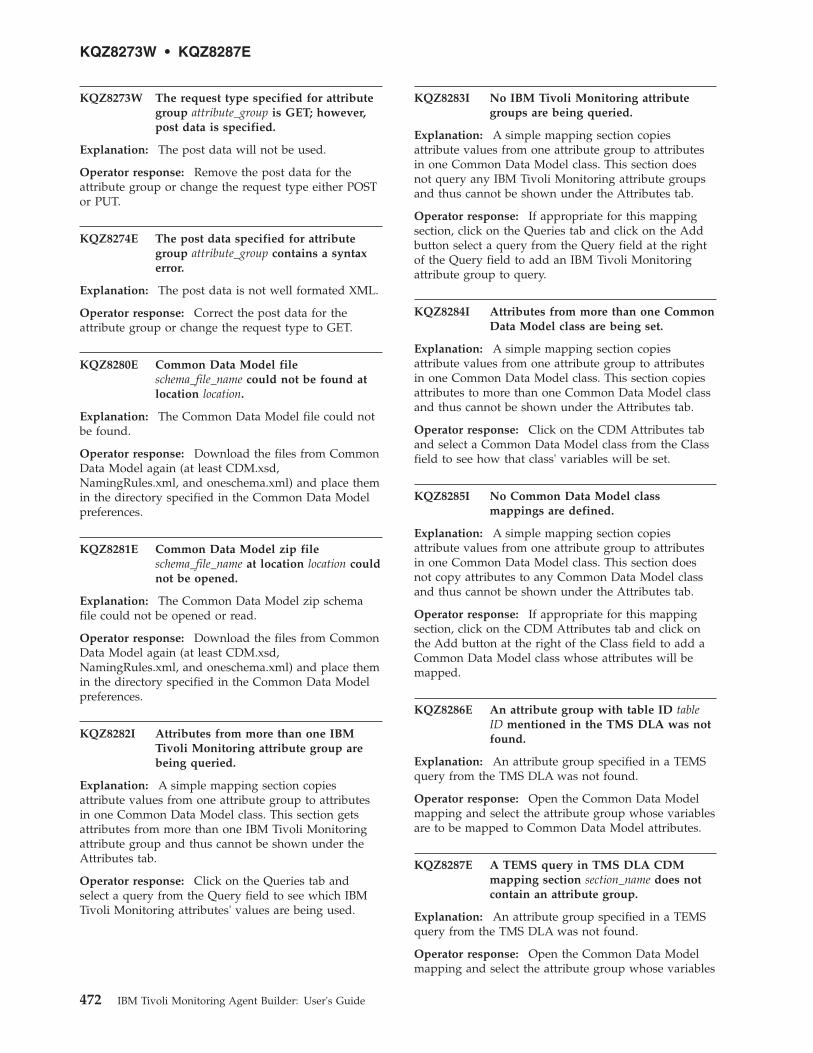
KQZ8273W The request type specified for attributegroup attribute_group is GET; however,post data is specified.
Explanation: The post data will not be used.
Operator response: Remove the post data for theattribute group or change the request type either POSTor PUT.
KQZ8274E The post data specified for attributegroup attribute_group contains a syntaxerror.
Explanation: The post data is not well formated XML.
Operator response: Correct the post data for theattribute group or change the request type to GET.
KQZ8280E Common Data Model fileschema_file_name could not be found atlocation location.
Explanation: The Common Data Model file could notbe found.
Operator response: Download the files from CommonData Model again (at least CDM.xsd,NamingRules.xml, and oneschema.xml) and place themin the directory specified in the Common Data Modelpreferences.
KQZ8281E Common Data Model zip fileschema_file_name at location location couldnot be opened.
Explanation: The Common Data Model zip schemafile could not be opened or read.
Operator response: Download the files from CommonData Model again (at least CDM.xsd,NamingRules.xml, and oneschema.xml) and place themin the directory specified in the Common Data Modelpreferences.
KQZ8282I Attributes from more than one IBMTivoli Monitoring attribute group arebeing queried.
Explanation: A simple mapping section copiesattribute values from one attribute group to attributesin one Common Data Model class. This section getsattributes from more than one IBM Tivoli Monitoringattribute group and thus cannot be shown under theAttributes tab.
Operator response: Click on the Queries tab andselect a query from the Query field to see which IBMTivoli Monitoring attributes' values are being used.
KQZ8283I No IBM Tivoli Monitoring attributegroups are being queried.
Explanation: A simple mapping section copiesattribute values from one attribute group to attributesin one Common Data Model class. This section doesnot query any IBM Tivoli Monitoring attribute groupsand thus cannot be shown under the Attributes tab.
Operator response: If appropriate for this mappingsection, click on the Queries tab and click on the Addbutton select a query from the Query field at the rightof the Query field to add an IBM Tivoli Monitoringattribute group to query.
KQZ8284I Attributes from more than one CommonData Model class are being set.
Explanation: A simple mapping section copiesattribute values from one attribute group to attributesin one Common Data Model class. This section copiesattributes to more than one Common Data Model classand thus cannot be shown under the Attributes tab.
Operator response: Click on the CDM Attributes taband select a Common Data Model class from the Classfield to see how that class' variables will be set.
KQZ8285I No Common Data Model classmappings are defined.
Explanation: A simple mapping section copiesattribute values from one attribute group to attributesin one Common Data Model class. This section doesnot copy attributes to any Common Data Model classand thus cannot be shown under the Attributes tab.
Operator response: If appropriate for this mappingsection, click on the CDM Attributes tab and click onthe Add button at the right of the Class field to add aCommon Data Model class whose attributes will bemapped.
KQZ8286E An attribute group with table ID tableID mentioned in the TMS DLA was notfound.
Explanation: An attribute group specified in a TEMSquery from the TMS DLA was not found.
Operator response: Open the Common Data Modelmapping and select the attribute group whose variablesare to be mapped to Common Data Model attributes.
KQZ8287E A TEMS query in TMS DLA CDMmapping section section_name does notcontain an attribute group.
Explanation: An attribute group specified in a TEMSquery from the TMS DLA was not found.
Operator response: Open the Common Data Modelmapping and select the attribute group whose variables
KQZ8273W • KQZ8287E
472 IBM Tivoli Monitoring Agent Builder: User's Guide
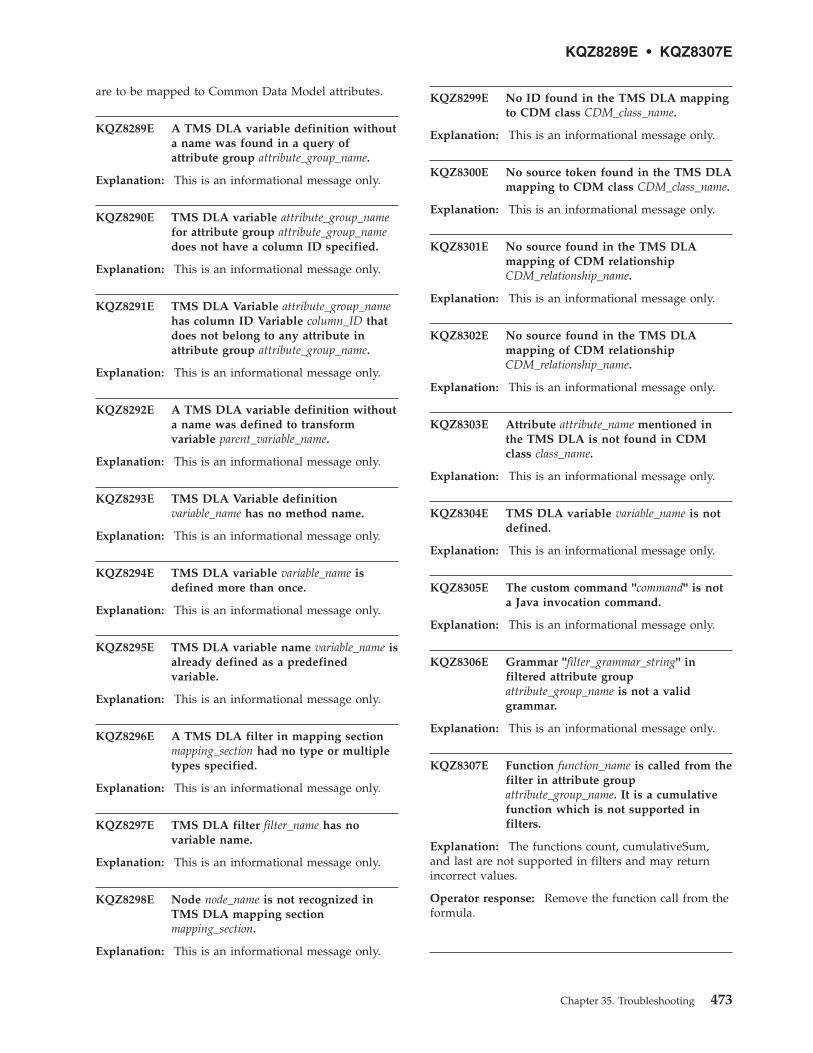
are to be mapped to Common Data Model attributes.
KQZ8289E A TMS DLA variable definition withouta name was found in a query ofattribute group attribute_group_name.
Explanation: This is an informational message only.
KQZ8290E TMS DLA variable attribute_group_namefor attribute group attribute_group_namedoes not have a column ID specified.
Explanation: This is an informational message only.
KQZ8291E TMS DLA Variable attribute_group_namehas column ID Variable column_ID thatdoes not belong to any attribute inattribute group attribute_group_name.
Explanation: This is an informational message only.
KQZ8292E A TMS DLA variable definition withouta name was defined to transformvariable parent_variable_name.
Explanation: This is an informational message only.
KQZ8293E TMS DLA Variable definitionvariable_name has no method name.
Explanation: This is an informational message only.
KQZ8294E TMS DLA variable variable_name isdefined more than once.
Explanation: This is an informational message only.
KQZ8295E TMS DLA variable name variable_name isalready defined as a predefinedvariable.
Explanation: This is an informational message only.
KQZ8296E A TMS DLA filter in mapping sectionmapping_section had no type or multipletypes specified.
Explanation: This is an informational message only.
KQZ8297E TMS DLA filter filter_name has novariable name.
Explanation: This is an informational message only.
KQZ8298E Node node_name is not recognized inTMS DLA mapping sectionmapping_section.
Explanation: This is an informational message only.
KQZ8299E No ID found in the TMS DLA mappingto CDM class CDM_class_name.
Explanation: This is an informational message only.
KQZ8300E No source token found in the TMS DLAmapping to CDM class CDM_class_name.
Explanation: This is an informational message only.
KQZ8301E No source found in the TMS DLAmapping of CDM relationshipCDM_relationship_name.
Explanation: This is an informational message only.
KQZ8302E No source found in the TMS DLAmapping of CDM relationshipCDM_relationship_name.
Explanation: This is an informational message only.
KQZ8303E Attribute attribute_name mentioned inthe TMS DLA is not found in CDMclass class_name.
Explanation: This is an informational message only.
KQZ8304E TMS DLA variable variable_name is notdefined.
Explanation: This is an informational message only.
KQZ8305E The custom command "command" is nota Java invocation command.
Explanation: This is an informational message only.
KQZ8306E Grammar "filter_grammar_string" infiltered attribute groupattribute_group_name is not a validgrammar.
Explanation: This is an informational message only.
KQZ8307E Function function_name is called from thefilter in attribute groupattribute_group_name. It is a cumulativefunction which is not supported infilters.
Explanation: The functions count, cumulativeSum,and last are not supported in filters and may returnincorrect values.
Operator response: Remove the function call from theformula.
KQZ8289E • KQZ8307E
Chapter 35. Troubleshooting 473
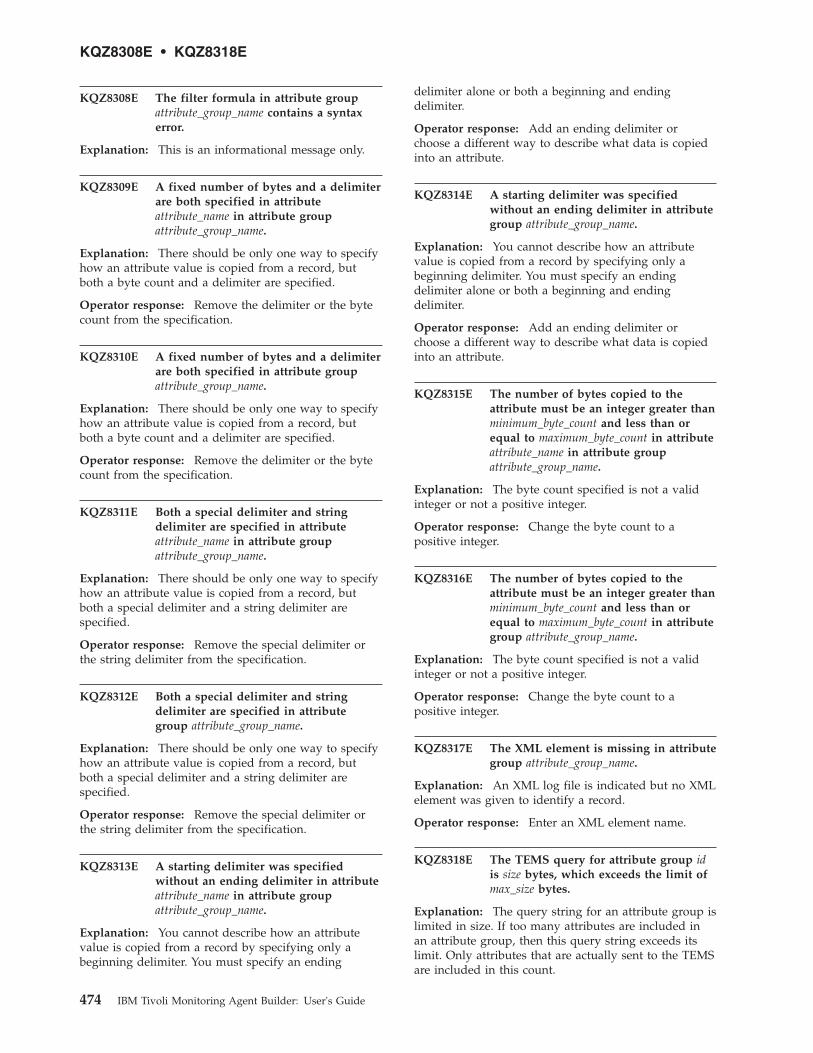
KQZ8308E The filter formula in attribute groupattribute_group_name contains a syntaxerror.
Explanation: This is an informational message only.
KQZ8309E A fixed number of bytes and a delimiterare both specified in attributeattribute_name in attribute groupattribute_group_name.
Explanation: There should be only one way to specifyhow an attribute value is copied from a record, butboth a byte count and a delimiter are specified.
Operator response: Remove the delimiter or the bytecount from the specification.
KQZ8310E A fixed number of bytes and a delimiterare both specified in attribute groupattribute_group_name.
Explanation: There should be only one way to specifyhow an attribute value is copied from a record, butboth a byte count and a delimiter are specified.
Operator response: Remove the delimiter or the bytecount from the specification.
KQZ8311E Both a special delimiter and stringdelimiter are specified in attributeattribute_name in attribute groupattribute_group_name.
Explanation: There should be only one way to specifyhow an attribute value is copied from a record, butboth a special delimiter and a string delimiter arespecified.
Operator response: Remove the special delimiter orthe string delimiter from the specification.
KQZ8312E Both a special delimiter and stringdelimiter are specified in attributegroup attribute_group_name.
Explanation: There should be only one way to specifyhow an attribute value is copied from a record, butboth a special delimiter and a string delimiter arespecified.
Operator response: Remove the special delimiter orthe string delimiter from the specification.
KQZ8313E A starting delimiter was specifiedwithout an ending delimiter in attributeattribute_name in attribute groupattribute_group_name.
Explanation: You cannot describe how an attributevalue is copied from a record by specifying only abeginning delimiter. You must specify an ending
delimiter alone or both a beginning and endingdelimiter.
Operator response: Add an ending delimiter orchoose a different way to describe what data is copiedinto an attribute.
KQZ8314E A starting delimiter was specifiedwithout an ending delimiter in attributegroup attribute_group_name.
Explanation: You cannot describe how an attributevalue is copied from a record by specifying only abeginning delimiter. You must specify an endingdelimiter alone or both a beginning and endingdelimiter.
Operator response: Add an ending delimiter orchoose a different way to describe what data is copiedinto an attribute.
KQZ8315E The number of bytes copied to theattribute must be an integer greater thanminimum_byte_count and less than orequal to maximum_byte_count in attributeattribute_name in attribute groupattribute_group_name.
Explanation: The byte count specified is not a validinteger or not a positive integer.
Operator response: Change the byte count to apositive integer.
KQZ8316E The number of bytes copied to theattribute must be an integer greater thanminimum_byte_count and less than orequal to maximum_byte_count in attributegroup attribute_group_name.
Explanation: The byte count specified is not a validinteger or not a positive integer.
Operator response: Change the byte count to apositive integer.
KQZ8317E The XML element is missing in attributegroup attribute_group_name.
Explanation: An XML log file is indicated but no XMLelement was given to identify a record.
Operator response: Enter an XML element name.
KQZ8318E The TEMS query for attribute group idis size bytes, which exceeds the limit ofmax_size bytes.
Explanation: The query string for an attribute group islimited in size. If too many attributes are included inan attribute group, then this query string exceeds itslimit. Only attributes that are actually sent to the TEMSare included in this count.
KQZ8308E • KQZ8318E
474 IBM Tivoli Monitoring Agent Builder: User's Guide
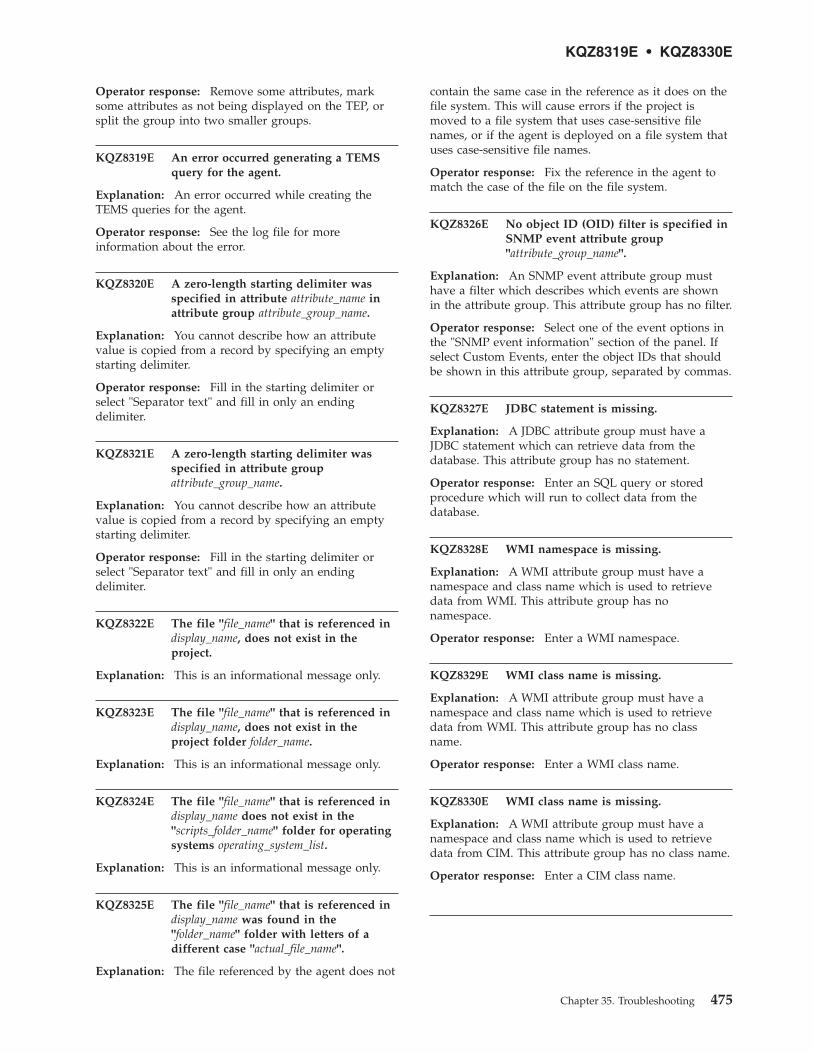
Operator response: Remove some attributes, marksome attributes as not being displayed on the TEP, orsplit the group into two smaller groups.
KQZ8319E An error occurred generating a TEMSquery for the agent.
Explanation: An error occurred while creating theTEMS queries for the agent.
Operator response: See the log file for moreinformation about the error.
KQZ8320E A zero-length starting delimiter wasspecified in attribute attribute_name inattribute group attribute_group_name.
Explanation: You cannot describe how an attributevalue is copied from a record by specifying an emptystarting delimiter.
Operator response: Fill in the starting delimiter orselect "Separator text" and fill in only an endingdelimiter.
KQZ8321E A zero-length starting delimiter wasspecified in attribute groupattribute_group_name.
Explanation: You cannot describe how an attributevalue is copied from a record by specifying an emptystarting delimiter.
Operator response: Fill in the starting delimiter orselect "Separator text" and fill in only an endingdelimiter.
KQZ8322E The file "file_name" that is referenced indisplay_name, does not exist in theproject.
Explanation: This is an informational message only.
KQZ8323E The file "file_name" that is referenced indisplay_name, does not exist in theproject folder folder_name.
Explanation: This is an informational message only.
KQZ8324E The file "file_name" that is referenced indisplay_name does not exist in the"scripts_folder_name" folder for operatingsystems operating_system_list.
Explanation: This is an informational message only.
KQZ8325E The file "file_name" that is referenced indisplay_name was found in the"folder_name" folder with letters of adifferent case "actual_file_name".
Explanation: The file referenced by the agent does not
contain the same case in the reference as it does on thefile system. This will cause errors if the project ismoved to a file system that uses case-sensitive filenames, or if the agent is deployed on a file system thatuses case-sensitive file names.
Operator response: Fix the reference in the agent tomatch the case of the file on the file system.
KQZ8326E No object ID (OID) filter is specified inSNMP event attribute group"attribute_group_name".
Explanation: An SNMP event attribute group musthave a filter which describes which events are shownin the attribute group. This attribute group has no filter.
Operator response: Select one of the event options inthe "SNMP event information" section of the panel. Ifselect Custom Events, enter the object IDs that shouldbe shown in this attribute group, separated by commas.
KQZ8327E JDBC statement is missing.
Explanation: A JDBC attribute group must have aJDBC statement which can retrieve data from thedatabase. This attribute group has no statement.
Operator response: Enter an SQL query or storedprocedure which will run to collect data from thedatabase.
KQZ8328E WMI namespace is missing.
Explanation: A WMI attribute group must have anamespace and class name which is used to retrievedata from WMI. This attribute group has nonamespace.
Operator response: Enter a WMI namespace.
KQZ8329E WMI class name is missing.
Explanation: A WMI attribute group must have anamespace and class name which is used to retrievedata from WMI. This attribute group has no classname.
Operator response: Enter a WMI class name.
KQZ8330E WMI class name is missing.
Explanation: A WMI attribute group must have anamespace and class name which is used to retrievedata from CIM. This attribute group has no class name.
Operator response: Enter a CIM class name.
KQZ8319E • KQZ8330E
Chapter 35. Troubleshooting 475
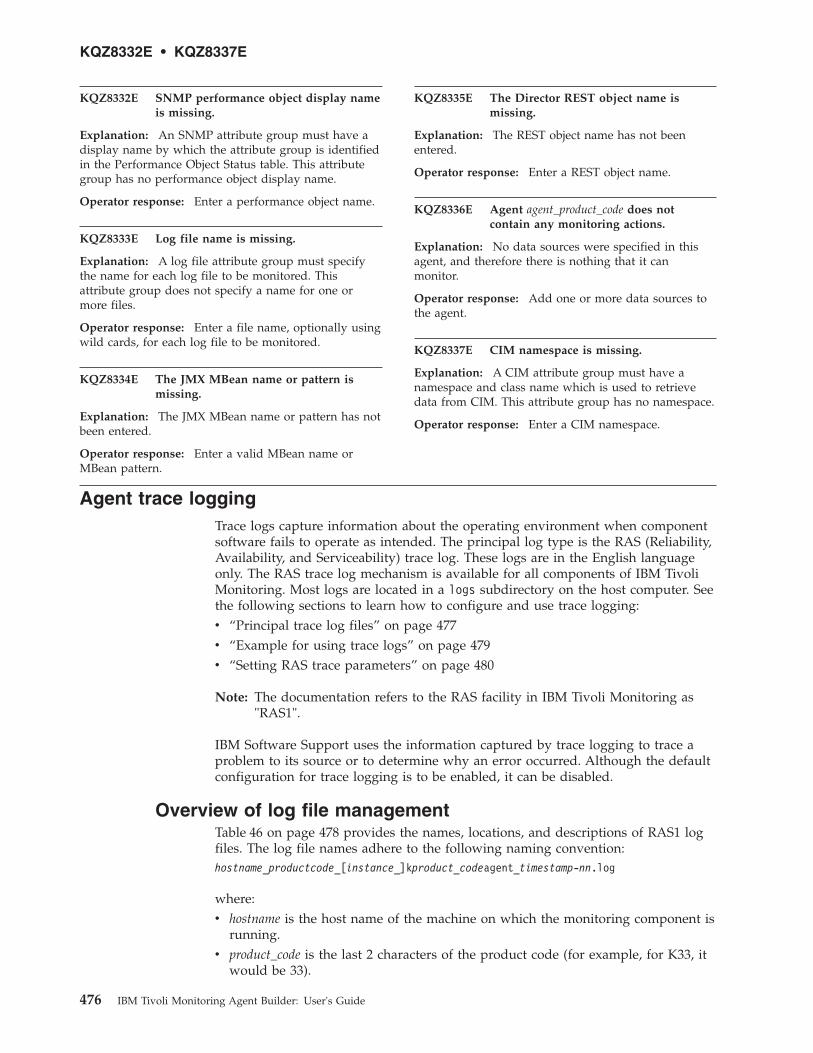
KQZ8332E SNMP performance object display nameis missing.
Explanation: An SNMP attribute group must have adisplay name by which the attribute group is identifiedin the Performance Object Status table. This attributegroup has no performance object display name.
Operator response: Enter a performance object name.
KQZ8333E Log file name is missing.
Explanation: A log file attribute group must specifythe name for each log file to be monitored. Thisattribute group does not specify a name for one ormore files.
Operator response: Enter a file name, optionally usingwild cards, for each log file to be monitored.
KQZ8334E The JMX MBean name or pattern ismissing.
Explanation: The JMX MBean name or pattern has notbeen entered.
Operator response: Enter a valid MBean name orMBean pattern.
KQZ8335E The Director REST object name ismissing.
Explanation: The REST object name has not beenentered.
Operator response: Enter a REST object name.
KQZ8336E Agent agent_product_code does notcontain any monitoring actions.
Explanation: No data sources were specified in thisagent, and therefore there is nothing that it canmonitor.
Operator response: Add one or more data sources tothe agent.
KQZ8337E CIM namespace is missing.
Explanation: A CIM attribute group must have anamespace and class name which is used to retrievedata from CIM. This attribute group has no namespace.
Operator response: Enter a CIM namespace.
Agent trace loggingTrace logs capture information about the operating environment when componentsoftware fails to operate as intended. The principal log type is the RAS (Reliability,Availability, and Serviceability) trace log. These logs are in the English languageonly. The RAS trace log mechanism is available for all components of IBM TivoliMonitoring. Most logs are located in a logs subdirectory on the host computer. Seethe following sections to learn how to configure and use trace logging:v “Principal trace log files” on page 477v “Example for using trace logs” on page 479v “Setting RAS trace parameters” on page 480
Note: The documentation refers to the RAS facility in IBM Tivoli Monitoring as"RAS1".
IBM Software Support uses the information captured by trace logging to trace aproblem to its source or to determine why an error occurred. Although the defaultconfiguration for trace logging is to be enabled, it can be disabled.
Overview of log file managementTable 46 on page 478 provides the names, locations, and descriptions of RAS1 logfiles. The log file names adhere to the following naming convention:hostname_productcode_[instance_]kproduct_codeagent_timestamp-nn.log
where:v hostname is the host name of the machine on which the monitoring component is
running.v product_code is the last 2 characters of the product code (for example, for K33, it
would be 33).
KQZ8332E • KQZ8337E
476 IBM Tivoli Monitoring Agent Builder: User's Guide
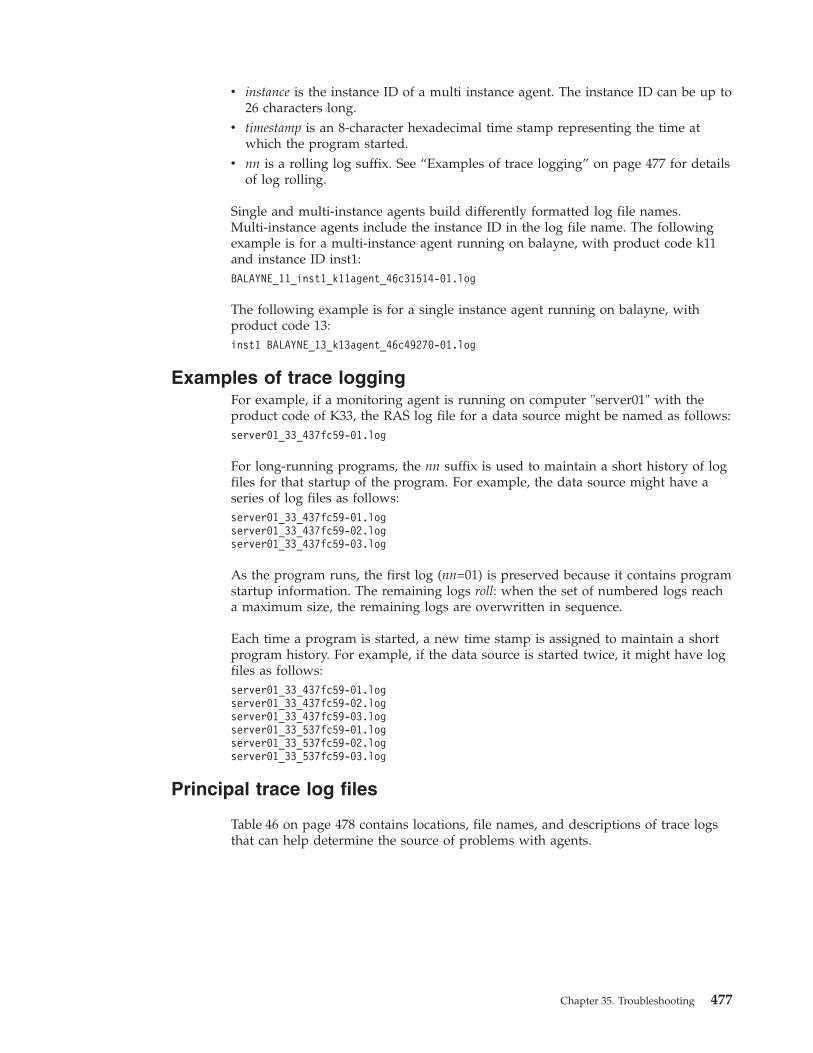
v instance is the instance ID of a multi instance agent. The instance ID can be up to26 characters long.
v timestamp is an 8-character hexadecimal time stamp representing the time atwhich the program started.
v nn is a rolling log suffix. See “Examples of trace logging” on page 477 for detailsof log rolling.
Single and multi-instance agents build differently formatted log file names.Multi-instance agents include the instance ID in the log file name. The followingexample is for a multi-instance agent running on balayne, with product code k11and instance ID inst1:BALAYNE_11_inst1_k11agent_46c31514-01.log
The following example is for a single instance agent running on balayne, withproduct code 13:inst1 BALAYNE_13_k13agent_46c49270-01.log
Examples of trace loggingFor example, if a monitoring agent is running on computer "server01" with theproduct code of K33, the RAS log file for a data source might be named as follows:server01_33_437fc59-01.log
For long-running programs, the nn suffix is used to maintain a short history of logfiles for that startup of the program. For example, the data source might have aseries of log files as follows:server01_33_437fc59-01.logserver01_33_437fc59-02.logserver01_33_437fc59-03.log
As the program runs, the first log (nn=01) is preserved because it contains programstartup information. The remaining logs roll: when the set of numbered logs reacha maximum size, the remaining logs are overwritten in sequence.
Each time a program is started, a new time stamp is assigned to maintain a shortprogram history. For example, if the data source is started twice, it might have logfiles as follows:server01_33_437fc59-01.logserver01_33_437fc59-02.logserver01_33_437fc59-03.logserver01_33_537fc59-01.logserver01_33_537fc59-02.logserver01_33_537fc59-03.log
Principal trace log files
Table 46 on page 478 contains locations, file names, and descriptions of trace logsthat can help determine the source of problems with agents.
Chapter 35. Troubleshooting 477
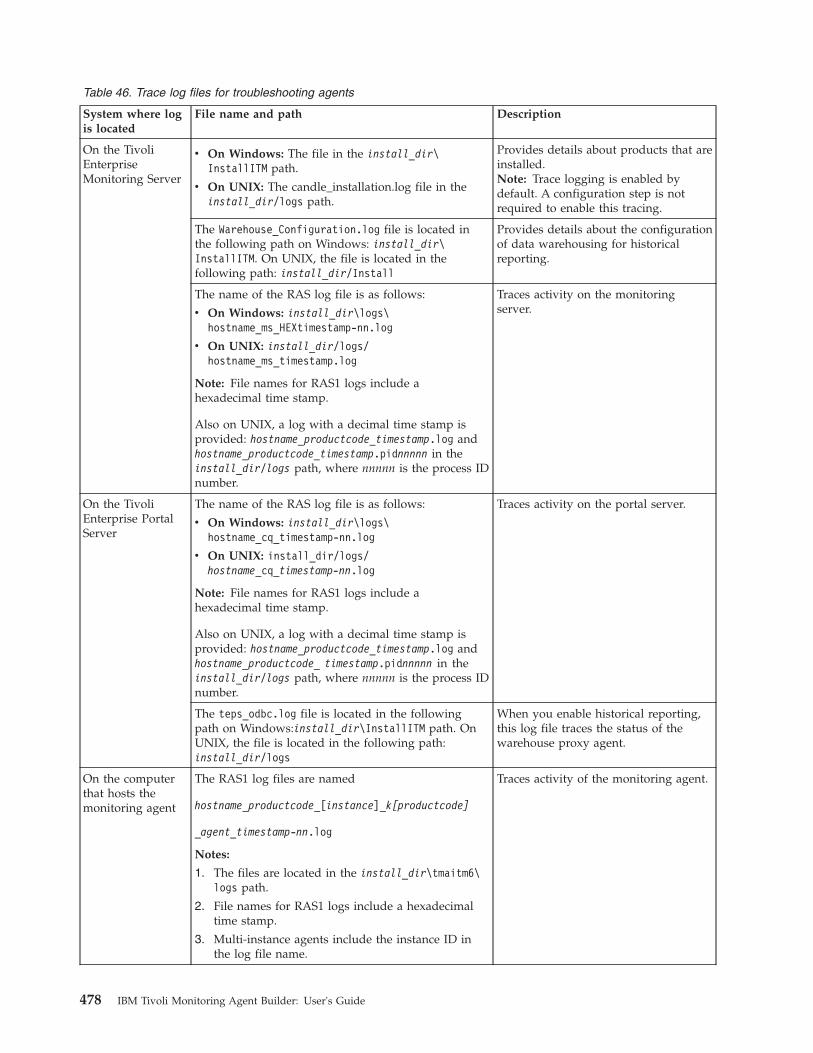
Table 46. Trace log files for troubleshooting agents
System where logis located
File name and path Description
On the TivoliEnterpriseMonitoring Server
v On Windows: The file in the install_dir\InstallITM path.
v On UNIX: The candle_installation.log file in theinstall_dir/logs path.
Provides details about products that areinstalled.Note: Trace logging is enabled bydefault. A configuration step is notrequired to enable this tracing.
The Warehouse_Configuration.log file is located inthe following path on Windows: install_dir\InstallITM. On UNIX, the file is located in thefollowing path: install_dir/Install
Provides details about the configurationof data warehousing for historicalreporting.
The name of the RAS log file is as follows:
v On Windows: install_dir\logs\hostname_ms_HEXtimestamp-nn.log
v On UNIX: install_dir/logs/hostname_ms_timestamp.log
Note: File names for RAS1 logs include ahexadecimal time stamp.
Also on UNIX, a log with a decimal time stamp isprovided: hostname_productcode_timestamp.log andhostname_productcode_timestamp.pidnnnnn in theinstall_dir/logs path, where nnnnn is the process IDnumber.
Traces activity on the monitoringserver.
On the TivoliEnterprise PortalServer
The name of the RAS log file is as follows:
v On Windows: install_dir\logs\hostname_cq_timestamp-nn.log
v On UNIX: install_dir/logs/hostname_cq_timestamp-nn.log
Note: File names for RAS1 logs include ahexadecimal time stamp.
Also on UNIX, a log with a decimal time stamp isprovided: hostname_productcode_timestamp.log andhostname_productcode_ timestamp.pidnnnnn in theinstall_dir/logs path, where nnnnn is the process IDnumber.
Traces activity on the portal server.
The teps_odbc.log file is located in the followingpath on Windows:install_dir\InstallITM path. OnUNIX, the file is located in the following path:install_dir/logs
When you enable historical reporting,this log file traces the status of thewarehouse proxy agent.
On the computerthat hosts themonitoring agent
The RAS1 log files are named
hostname_productcode_[instance]_k[productcode]
_agent_timestamp-nn.log
Notes:
1. The files are located in the install_dir\tmaitm6\logs path.
2. File names for RAS1 logs include a hexadecimaltime stamp.
3. Multi-instance agents include the instance ID inthe log file name.
Traces activity of the monitoring agent.
478 IBM Tivoli Monitoring Agent Builder: User's Guide
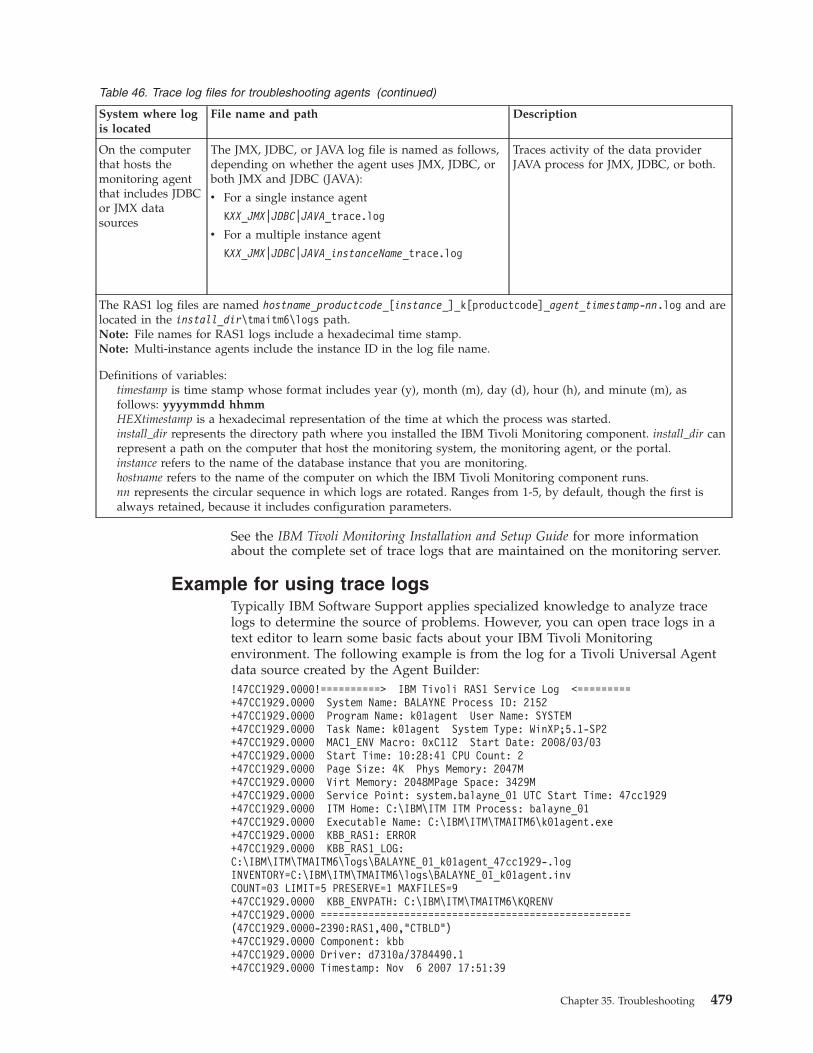
Table 46. Trace log files for troubleshooting agents (continued)
System where logis located
File name and path Description
On the computerthat hosts themonitoring agentthat includes JDBCor JMX datasources
The JMX, JDBC, or JAVA log file is named as follows,depending on whether the agent uses JMX, JDBC, orboth JMX and JDBC (JAVA):
v For a single instance agent
KXX_JMX|JDBC|JAVA_trace.log
v For a multiple instance agent
KXX_JMX|JDBC|JAVA_instanceName_trace.log
Traces activity of the data providerJAVA process for JMX, JDBC, or both.
The RAS1 log files are named hostname_productcode_[instance_]_k[productcode]_agent_timestamp-nn.log and arelocated in the install_dir\tmaitm6\logs path.Note: File names for RAS1 logs include a hexadecimal time stamp.Note: Multi-instance agents include the instance ID in the log file name.
Definitions of variables:timestamp is time stamp whose format includes year (y), month (m), day (d), hour (h), and minute (m), asfollows: yyyymmdd hhmmHEXtimestamp is a hexadecimal representation of the time at which the process was started.install_dir represents the directory path where you installed the IBM Tivoli Monitoring component. install_dir canrepresent a path on the computer that host the monitoring system, the monitoring agent, or the portal.instance refers to the name of the database instance that you are monitoring.hostname refers to the name of the computer on which the IBM Tivoli Monitoring component runs.nn represents the circular sequence in which logs are rotated. Ranges from 1-5, by default, though the first isalways retained, because it includes configuration parameters.
See the IBM Tivoli Monitoring Installation and Setup Guide for more informationabout the complete set of trace logs that are maintained on the monitoring server.
Example for using trace logsTypically IBM Software Support applies specialized knowledge to analyze tracelogs to determine the source of problems. However, you can open trace logs in atext editor to learn some basic facts about your IBM Tivoli Monitoringenvironment. The following example is from the log for a Tivoli Universal Agentdata source created by the Agent Builder:!47CC1929.0000!==========> IBM Tivoli RAS1 Service Log <=========+47CC1929.0000 System Name: BALAYNE Process ID: 2152+47CC1929.0000 Program Name: k01agent User Name: SYSTEM+47CC1929.0000 Task Name: k01agent System Type: WinXP;5.1-SP2+47CC1929.0000 MAC1_ENV Macro: 0xC112 Start Date: 2008/03/03+47CC1929.0000 Start Time: 10:28:41 CPU Count: 2+47CC1929.0000 Page Size: 4K Phys Memory: 2047M+47CC1929.0000 Virt Memory: 2048MPage Space: 3429M+47CC1929.0000 Service Point: system.balayne_01 UTC Start Time: 47cc1929+47CC1929.0000 ITM Home: C:\IBM\ITM ITM Process: balayne_01+47CC1929.0000 Executable Name: C:\IBM\ITM\TMAITM6\k01agent.exe+47CC1929.0000 KBB_RAS1: ERROR+47CC1929.0000 KBB_RAS1_LOG:C:\IBM\ITM\TMAITM6\logs\BALAYNE_01_k01agent_47cc1929-.logINVENTORY=C:\IBM\ITM\TMAITM6\logs\BALAYNE_01_k01agent.invCOUNT=03 LIMIT=5 PRESERVE=1 MAXFILES=9+47CC1929.0000 KBB_ENVPATH: C:\IBM\ITM\TMAITM6\KQRENV+47CC1929.0000 ====================================================(47CC1929.0000-2390:RAS1,400,"CTBLD")+47CC1929.0000 Component: kbb+47CC1929.0000 Driver: d7310a/3784490.1+47CC1929.0000 Timestamp: Nov 6 2007 17:51:39
Chapter 35. Troubleshooting 479
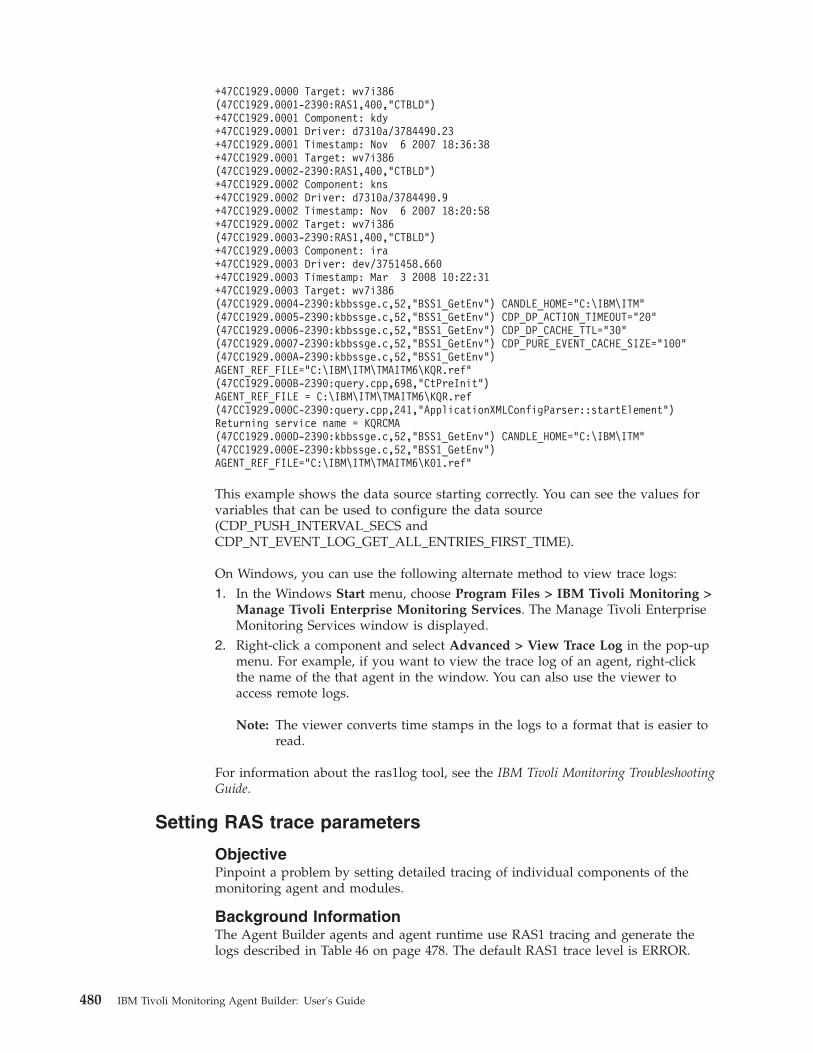
+47CC1929.0000 Target: wv7i386(47CC1929.0001-2390:RAS1,400,"CTBLD")+47CC1929.0001 Component: kdy+47CC1929.0001 Driver: d7310a/3784490.23+47CC1929.0001 Timestamp: Nov 6 2007 18:36:38+47CC1929.0001 Target: wv7i386(47CC1929.0002-2390:RAS1,400,"CTBLD")+47CC1929.0002 Component: kns+47CC1929.0002 Driver: d7310a/3784490.9+47CC1929.0002 Timestamp: Nov 6 2007 18:20:58+47CC1929.0002 Target: wv7i386(47CC1929.0003-2390:RAS1,400,"CTBLD")+47CC1929.0003 Component: ira+47CC1929.0003 Driver: dev/3751458.660+47CC1929.0003 Timestamp: Mar 3 2008 10:22:31+47CC1929.0003 Target: wv7i386(47CC1929.0004-2390:kbbssge.c,52,"BSS1_GetEnv") CANDLE_HOME="C:\IBM\ITM"(47CC1929.0005-2390:kbbssge.c,52,"BSS1_GetEnv") CDP_DP_ACTION_TIMEOUT="20"(47CC1929.0006-2390:kbbssge.c,52,"BSS1_GetEnv") CDP_DP_CACHE_TTL="30"(47CC1929.0007-2390:kbbssge.c,52,"BSS1_GetEnv") CDP_PURE_EVENT_CACHE_SIZE="100"(47CC1929.000A-2390:kbbssge.c,52,"BSS1_GetEnv")AGENT_REF_FILE="C:\IBM\ITM\TMAITM6\KQR.ref"(47CC1929.000B-2390:query.cpp,698,"CtPreInit")AGENT_REF_FILE = C:\IBM\ITM\TMAITM6\KQR.ref(47CC1929.000C-2390:query.cpp,241,"ApplicationXMLConfigParser::startElement")Returning service name = KQRCMA(47CC1929.000D-2390:kbbssge.c,52,"BSS1_GetEnv") CANDLE_HOME="C:\IBM\ITM"(47CC1929.000E-2390:kbbssge.c,52,"BSS1_GetEnv")AGENT_REF_FILE="C:\IBM\ITM\TMAITM6\K01.ref"
This example shows the data source starting correctly. You can see the values forvariables that can be used to configure the data source(CDP_PUSH_INTERVAL_SECS andCDP_NT_EVENT_LOG_GET_ALL_ENTRIES_FIRST_TIME).
On Windows, you can use the following alternate method to view trace logs:1. In the Windows Start menu, choose Program Files > IBM Tivoli Monitoring >
Manage Tivoli Enterprise Monitoring Services. The Manage Tivoli EnterpriseMonitoring Services window is displayed.
2. Right-click a component and select Advanced > View Trace Log in the pop-upmenu. For example, if you want to view the trace log of an agent, right-clickthe name of the that agent in the window. You can also use the viewer toaccess remote logs.
Note: The viewer converts time stamps in the logs to a format that is easier toread.
For information about the ras1log tool, see the IBM Tivoli Monitoring TroubleshootingGuide.
Setting RAS trace parameters
ObjectivePinpoint a problem by setting detailed tracing of individual components of themonitoring agent and modules.
Background InformationThe Agent Builder agents and agent runtime use RAS1 tracing and generate thelogs described in Table 46 on page 478. The default RAS1 trace level is ERROR.
480 IBM Tivoli Monitoring Agent Builder: User's Guide
Before you beginSee “Overview of log file management” on page 476 to ensure that you understandlog rolling and can reference the correct log files when you manage log filegeneration.
After you finishMonitor the size of the logs directory. Default behavior can generate a total of 45to 60 MB for each agent that is running on a computer. See the "Procedure" sectionto learn how to adjust file size and numbers of log files to prevent logging activityfrom occupying too much disk space.
Regularly prune log files other than the RAS1 log files in the logs directory. Unlikethe RAS1 log files that are pruned automatically, other log types can growindefinitely, for example, the logs in Table 46 on page 478 that include a process IDnumber (PID).
The following list comprises the RAS1 trace parameters settings:v No error tracing. KBB_RAS1=-nonev General error tracing. KBB_RAS1=ERRORv Intensive error tracing. KBB_RAS1=ERROR (COMP:kqz ALL)v Agent interaction with the TEMS. KBB_RAS1=ERROR (UNIT:genericagent ALL)
(UNIT:kra ALL)v Trace data collection. KBB_RAS1=ERROR (UNIT: ALL)v Trace Script data collection. KBB_RAS1=ERROR (UNIT:shell ALL)
(UNIT:commandwithtimeout ALL)v Trace Availability data collection. KBB_RAS1=ERROR (UNIT:availability ALL)
(UNIT:winavailability ALL)v Trace Windows Event Log data collection. KBB_RAS1=ERROR (UNIT:winlog
ALL) (UNIT:eventlog ALL)v Trace Log File data collection. KBB_RAS1=ERROR (UNIT:logmonitor ALL)v Trace SNMP data collection. KBB_RAS1=ERROR (UNIT:snmp ALL)v Trace ICMP Ping data collection. KBB_RAS1=ERROR (UNIT:ping ALL)v Trace CIM data collection. KBB_RAS1=ERROR (UNIT:cim ALL)v Trace PerfMon data collection. KBB_RAS1=ERROR (UNIT:queryclass ALL)v Trace WMI data collection. KBB_RAS1=ERROR (UNIT:wmi ALL)v Trace separate collector interface. KBB_RAS1=ERROR (UNIT:custom ALL)
(UNIT:CPS_Socket ALL) (UNIT:cpci ALL)
Note: The KDC_DEBUG setting and the Maximum error tracing setting cangenerate a large amount of trace logging. Use them only temporarily, whileyou are troubleshooting problems. Otherwise, the logs can occupy excessiveamounts of hard disk space.
ProcedureSpecify RAS1 trace options in the agent_nameENV file on Windows systems, and inthe agentname.ini file on UNIX systems.
Use the following procedure to manually edit the configuration file to set tracelogging:1. Open the trace options file. This file is located in the following folder:
v On Windows: install_dir\tmaitm6\productcodeENV
Chapter 35. Troubleshooting 481
v On UNIX: install_dir\config
2. Edit the line that begins with KBB_RAS1= to set trace logging preferences. Forexample, if you want detailed trace logging, set the Maximum Tracingoption:KBB_RAS1=ERROR (COMP:kqz ALL) (UNIT:kra ALL)
3. Edit the line that begins with KBB_RAS1_LOG= to manage the generation oflog files:v MAXFILES: the total number of files that are to be kept for all startups of a
given program. After this value is exceeded, the oldest log files arediscarded. Default value is 9.
v LIMIT: the maximum size, in megabytes (MB) of a RAS1 log file. Defaultvalue is 5.
v IBM Software Support might guide you to modify the following parameters:– COUNT: the number of log files to keep in the rolling cycle of one
program startup. Default is 3.– PRESERVE: the number of files that are not to be reused in the rolling
cycle of one program startup. Default value is 1.
Note: The KBB_RAS1_LOG parameter also provides for the specification ofthe log file directory, log file name, and the inventory control filedirectory and name. Do not modify these values or log information canbe lost.
4. Restart the monitoring agent so that your changes take effect.
(Windows only) Alternate method to edit trace logging parameters:1. Open the Manage Tivoli Enterprise Monitoring Services window.2. Right-click the icon of the monitoring agent whose logging you want to modify.3. Select Advanced > Edit Trace Parms. The Tivoli Enterprise Monitoring Server
Trace Parameters window is displayed.4. Select a new trace setting in the pull-down menu in the Enter RAS1 Filters
field or type a valid string.5. Modify the value for Maximum Log Size Per File (MB) to change the log file
size (changes LIMIT value).6. Modify the value for Maximum Number of Log Files Per Session to change the
number of log files per startup of a program (changes COUNT value).7. Modify the value for Maximum Number of Log Files Total to change the
number of log files for all startups of a program (changes MAXFILES value).8. (Optional) Click Y (Yes) in the KDC_DEBUG Setting menu to log information
that can help you diagnose communications and connectivity problemsbetween the monitoring agent and the monitoring server.
Note: The KDC_DEBUG setting and the Maximum error tracing setting cangenerate a large amount of trace logging. Use them only temporarily,while you are troubleshooting problems. Otherwise, the logs can occupyexcessive amounts of hard disk space.
9. Click OK. You see a message reporting a restart of the monitoring agent so thatyour changes take effect.
482 IBM Tivoli Monitoring Agent Builder: User's Guide
Problem classificationThis section provides symptom descriptions and detailed workarounds fortroubleshooting when you are using the Agent Builder or when you are workingwith your agent. See the Tivoli Monitoring: Troubleshooting Guide, GC32-9458 forgeneral problem determination. Also, see the IBM Tivoli Monitoring Messages Guidefor general IBM Tivoli Messages.
Troubleshooting: Agent BuilderTable 47 on page 484 shows solutions for installation, configuration, anduninstallation problems.v Maximum data size exceededv Receive error when installing Tivoli Enterprise Monitoring support on Windows
systemv Display name is not refreshedv Demo CD problemsv The -console flag does not workv No help is displayed when clicking on help links within the Agent Builderv Problems launching the Agent Builder on a non-English systemv Remote service browsing errorv Key attribute missingv Change command return code or script data provider executablev Error when attempting to launch Eclipsev Browsing processes or services on a remote system do not workv When I generate an agent and omit the .bat or .cmd in the script data source
command, the script does not run.v Resource out of syncv Parsing MIBsv MIBs frequently have errorsv Agent Builder version on UNIXv Adding new attributes to log file data sourcev Agent Builder does not allow duplicate data source names in different subnodesv CIM integer array valuev No CIM support for certificatesv How do I display large numeric values?v Parse Log window characters corruptedv Adding data source Browse button not activev Agent Builder CIM Browser does not show CIM Classes for AIX OpenPegasus
2.6.1.v Agent Builder CIM Browser does not show CIM classes for Solaris WBEM
Serverv JDBC connection to zOS DB2 database is failingv Specifying the internal_logon connection property for Oraclev The Agent Builder uninstall ends with an error.v Project default location errorv Product code and affinity errors not clearedv Agent Builder script argument parameterization does not work.
Chapter 35. Troubleshooting 483

v Error message in any of the Agent Builder wizards is truncated.v JRE or JDK not availablev Installing the agent locally fails with error KQZ0208Ev iFixes applied to the Agent Builder are not removed when the Agent Builder is
uninstalledv Agent Builder workspace screen not responding in UNIX over a Cygwin Xserverv
4
v JMX browser fails to connect to WebLogic 10.x
Table 47. Problems and solutions for installation and use of the Agent Builder
Problem Solution
Maximum data size exceeded
When saving an agent, you might see the followingerror in the Problems View:
Data source DataSourceName exceeds themaximum data size of 8192 bytes
Tivoli Monitoring currently limits the amount of data thatcan be returned for each row in a table to 8192 bytes. Foreach data source in the agent, the Agent Builder computesthe sizes of the attributes in the following ways:
v Only attributes marked Display attribute in theTivoli Enterprise Portal are counted.
v Each 32-bit numeric attribute is 4 bytes. Each 64-bitnumeric attribute is 8 bytes.
v For each string attribute, the value for maximum size isused (with a maximum value of 2048 bytes). Ensurethat the sizes listed for string attributes are set toreasonable values (under 100 bytes).
v Any request for data from an attribute group causescollection of all the data. Defining large attribute groupscan cause unnecessary overhead in the monitoringsystem. Where the data does not need to be displayedtogether, form smaller groups of data to optimize thebehavior of the system.
Receive error when installing Tivoli EnterpriseMonitoring support on Windows system
I tried to install Tivoli Enterprise Monitoring support ona Windows Tivoli Enterprise Monitoring with an AgentBuilder script, and received the following error:
F:\wspace1\CCMDB\export>installIra.batf:\IBM\ITM6.2Install of K41 Agent successful.FIND: `VRMF=’: No such file or directory06200100 was unexpected at this time.
Reset your PATH to ensure that the native Windows findcommand is found first. It is possible that something wasinstalled that is now the first find command in the PATH.
For example, if you have installed Cygwin (a set of UNIXtools for Windows), and it is first in your PATH, you hitthe Cygwin find command rather than the built-inWindows find command.
Display name is not refreshed
If you are browsing to add a process or a service andselect one, and then you select a different one beforeclicking OK, the display name is not refreshed for thenew process or service that is selected.
Delete the characters that are in the display name field,and then browse.
Demo CD problems
I am running the demo CD as my Tivoli Monitoringsystem. I selected the managed node to browse, and itshowed me an odd set of processes and it automaticallyselected UNIX operating systems for my process insteadof Windows.
You selected the wrong agent. The Demo CD contains alot of agents which would not normally be found togetheron a system. Stop the other OS agents and browse usingthe real Monitoring Agent for Windows, or browse usinga system that has a normal Tivoli Monitoring installation.
4. Using the Parse function on the Parse Log window, returns incorrect results, such as no rows appear
484 IBM Tivoli Monitoring Agent Builder: User's Guide
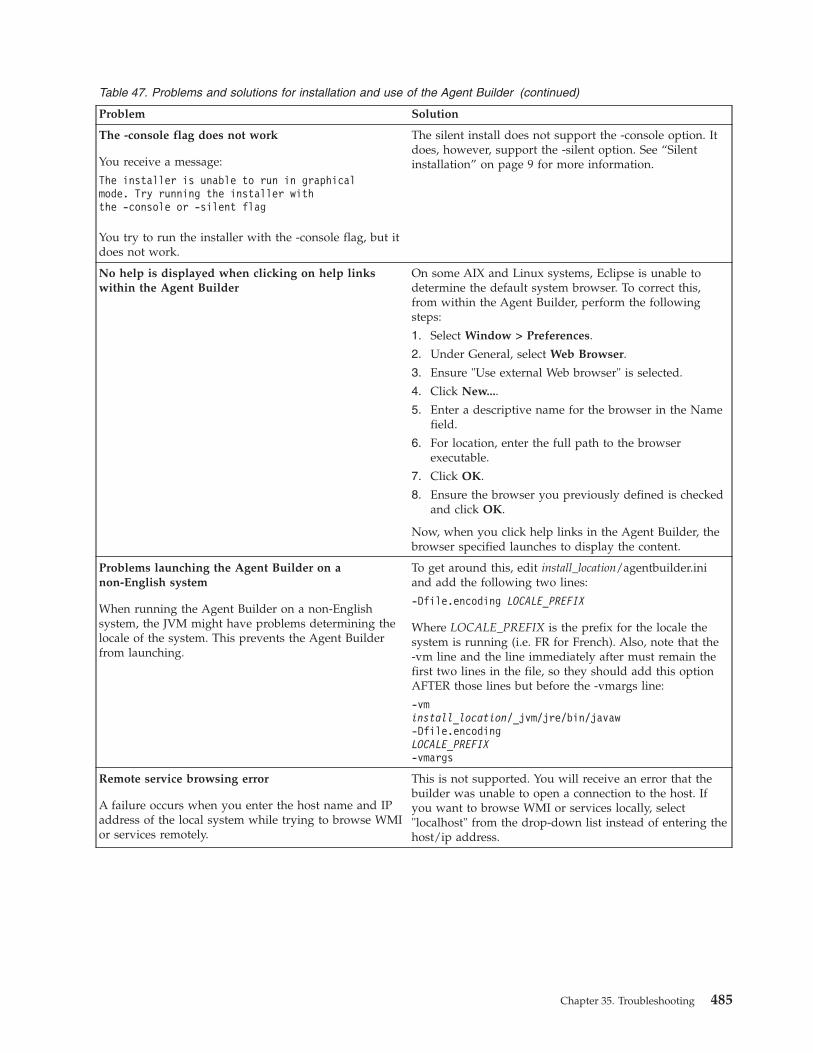
Table 47. Problems and solutions for installation and use of the Agent Builder (continued)
Problem Solution
The -console flag does not work
You receive a message:
The installer is unable to run in graphicalmode. Try running the installer withthe -console or -silent flag
You try to run the installer with the -console flag, but itdoes not work.
The silent install does not support the -console option. Itdoes, however, support the -silent option. See “Silentinstallation” on page 9 for more information.
No help is displayed when clicking on help linkswithin the Agent Builder
On some AIX and Linux systems, Eclipse is unable todetermine the default system browser. To correct this,from within the Agent Builder, perform the followingsteps:
1. Select Window > Preferences.
2. Under General, select Web Browser.
3. Ensure "Use external Web browser" is selected.
4. Click New....
5. Enter a descriptive name for the browser in the Namefield.
6. For location, enter the full path to the browserexecutable.
7. Click OK.
8. Ensure the browser you previously defined is checkedand click OK.
Now, when you click help links in the Agent Builder, thebrowser specified launches to display the content.
Problems launching the Agent Builder on anon-English system
When running the Agent Builder on a non-Englishsystem, the JVM might have problems determining thelocale of the system. This prevents the Agent Builderfrom launching.
To get around this, edit install_location/agentbuilder.iniand add the following two lines:
-Dfile.encoding LOCALE_PREFIX
Where LOCALE_PREFIX is the prefix for the locale thesystem is running (i.e. FR for French). Also, note that the-vm line and the line immediately after must remain thefirst two lines in the file, so they should add this optionAFTER those lines but before the -vmargs line:
-vminstall_location/_jvm/jre/bin/javaw-Dfile.encodingLOCALE_PREFIX-vmargs
Remote service browsing error
A failure occurs when you enter the host name and IPaddress of the local system while trying to browse WMIor services remotely.
This is not supported. You will receive an error that thebuilder was unable to open a connection to the host. Ifyou want to browse WMI or services locally, select"localhost" from the drop-down list instead of entering thehost/ip address.
Chapter 35. Troubleshooting 485
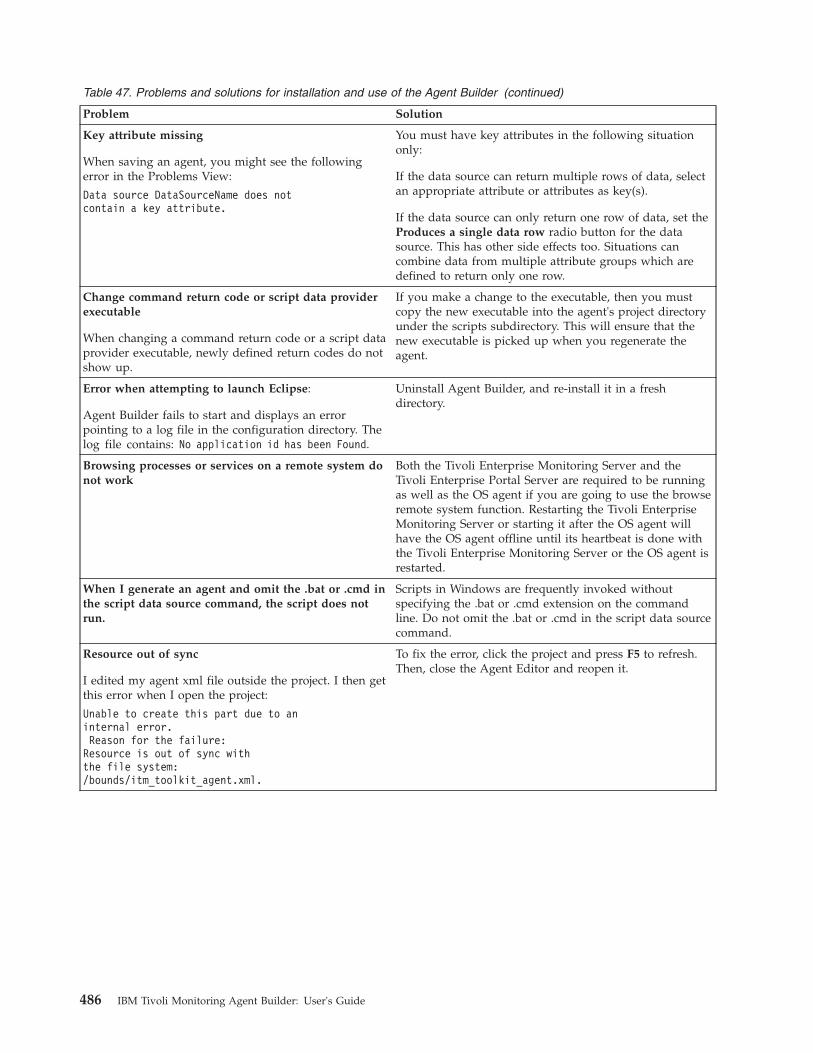
Table 47. Problems and solutions for installation and use of the Agent Builder (continued)
Problem Solution
Key attribute missing
When saving an agent, you might see the followingerror in the Problems View:
Data source DataSourceName does notcontain a key attribute.
You must have key attributes in the following situationonly:
If the data source can return multiple rows of data, selectan appropriate attribute or attributes as key(s).
If the data source can only return one row of data, set theProduces a single data row radio button for the datasource. This has other side effects too. Situations cancombine data from multiple attribute groups which aredefined to return only one row.
Change command return code or script data providerexecutable
When changing a command return code or a script dataprovider executable, newly defined return codes do notshow up.
If you make a change to the executable, then you mustcopy the new executable into the agent's project directoryunder the scripts subdirectory. This will ensure that thenew executable is picked up when you regenerate theagent.
Error when attempting to launch Eclipse:
Agent Builder fails to start and displays an errorpointing to a log file in the configuration directory. Thelog file contains: No application id has been Found.
Uninstall Agent Builder, and re-install it in a freshdirectory.
Browsing processes or services on a remote system donot work
Both the Tivoli Enterprise Monitoring Server and theTivoli Enterprise Portal Server are required to be runningas well as the OS agent if you are going to use the browseremote system function. Restarting the Tivoli EnterpriseMonitoring Server or starting it after the OS agent willhave the OS agent offline until its heartbeat is done withthe Tivoli Enterprise Monitoring Server or the OS agent isrestarted.
When I generate an agent and omit the .bat or .cmd inthe script data source command, the script does notrun.
Scripts in Windows are frequently invoked withoutspecifying the .bat or .cmd extension on the commandline. Do not omit the .bat or .cmd in the script data sourcecommand.
Resource out of sync
I edited my agent xml file outside the project. I then getthis error when I open the project:
Unable to create this part due to aninternal error.Reason for the failure:
Resource is out of sync withthe file system:/bounds/itm_toolkit_agent.xml.
To fix the error, click the project and press F5 to refresh.Then, close the Agent Editor and reopen it.
486 IBM Tivoli Monitoring Agent Builder: User's Guide
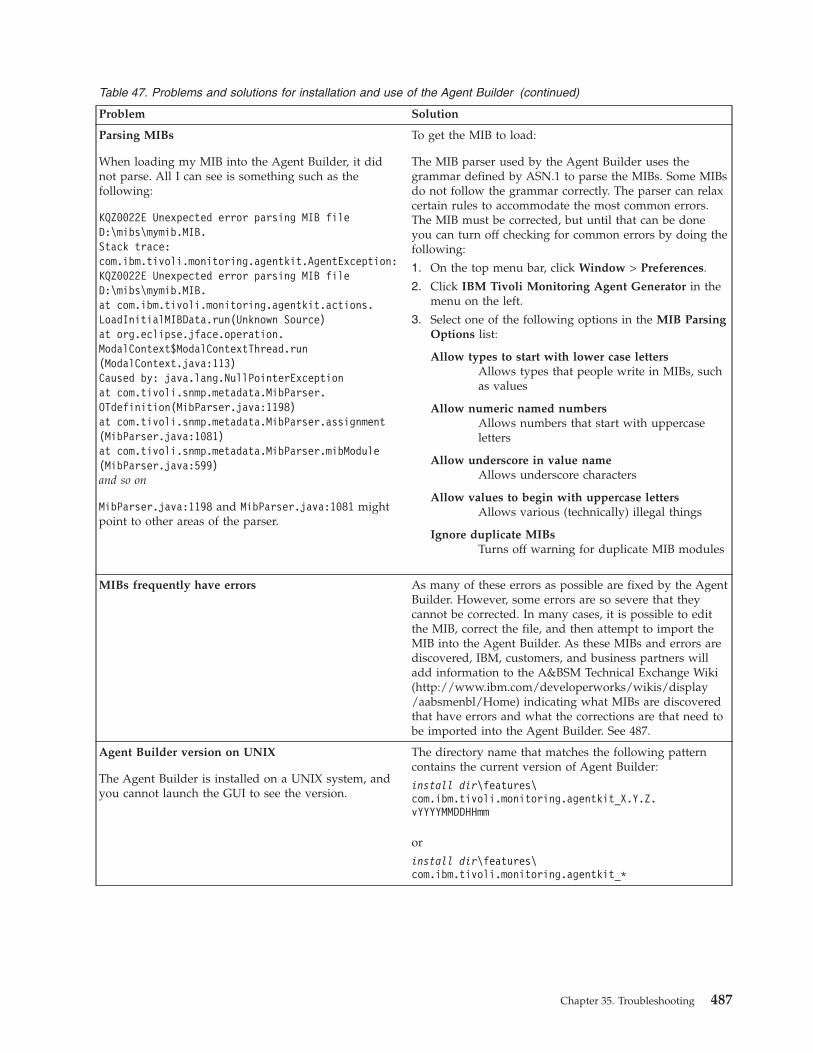
Table 47. Problems and solutions for installation and use of the Agent Builder (continued)
Problem Solution
Parsing MIBs
When loading my MIB into the Agent Builder, it didnot parse. All I can see is something such as thefollowing:
KQZ0022E Unexpected error parsing MIB fileD:\mibs\mymib.MIB.Stack trace:com.ibm.tivoli.monitoring.agentkit.AgentException:KQZ0022E Unexpected error parsing MIB fileD:\mibs\mymib.MIB.at com.ibm.tivoli.monitoring.agentkit.actions.LoadInitialMIBData.run(Unknown Source)at org.eclipse.jface.operation.ModalContext$ModalContextThread.run(ModalContext.java:113)Caused by: java.lang.NullPointerExceptionat com.tivoli.snmp.metadata.MibParser.OTdefinition(MibParser.java:1198)at com.tivoli.snmp.metadata.MibParser.assignment(MibParser.java:1081)at com.tivoli.snmp.metadata.MibParser.mibModule(MibParser.java:599)and so on
MibParser.java:1198 and MibParser.java:1081 mightpoint to other areas of the parser.
To get the MIB to load:
The MIB parser used by the Agent Builder uses thegrammar defined by ASN.1 to parse the MIBs. Some MIBsdo not follow the grammar correctly. The parser can relaxcertain rules to accommodate the most common errors.The MIB must be corrected, but until that can be doneyou can turn off checking for common errors by doing thefollowing:
1. On the top menu bar, click Window > Preferences.
2. Click IBM Tivoli Monitoring Agent Generator in themenu on the left.
3. Select one of the following options in the MIB ParsingOptions list:
Allow types to start with lower case lettersAllows types that people write in MIBs, suchas values
Allow numeric named numbersAllows numbers that start with uppercaseletters
Allow underscore in value nameAllows underscore characters
Allow values to begin with uppercase lettersAllows various (technically) illegal things
Ignore duplicate MIBsTurns off warning for duplicate MIB modules
MIBs frequently have errors As many of these errors as possible are fixed by the AgentBuilder. However, some errors are so severe that theycannot be corrected. In many cases, it is possible to editthe MIB, correct the file, and then attempt to import theMIB into the Agent Builder. As these MIBs and errors arediscovered, IBM, customers, and business partners willadd information to the A&BSM Technical Exchange Wiki(http://www.ibm.com/developerworks/wikis/display/aabsmenbl/Home) indicating what MIBs are discoveredthat have errors and what the corrections are that need tobe imported into the Agent Builder. See 487.
Agent Builder version on UNIX
The Agent Builder is installed on a UNIX system, andyou cannot launch the GUI to see the version.
The directory name that matches the following patterncontains the current version of Agent Builder:
install dir\features\com.ibm.tivoli.monitoring.agentkit_X.Y.Z.vYYYYMMDDHHmm
or
install dir\features\com.ibm.tivoli.monitoring.agentkit_*
Chapter 35. Troubleshooting 487
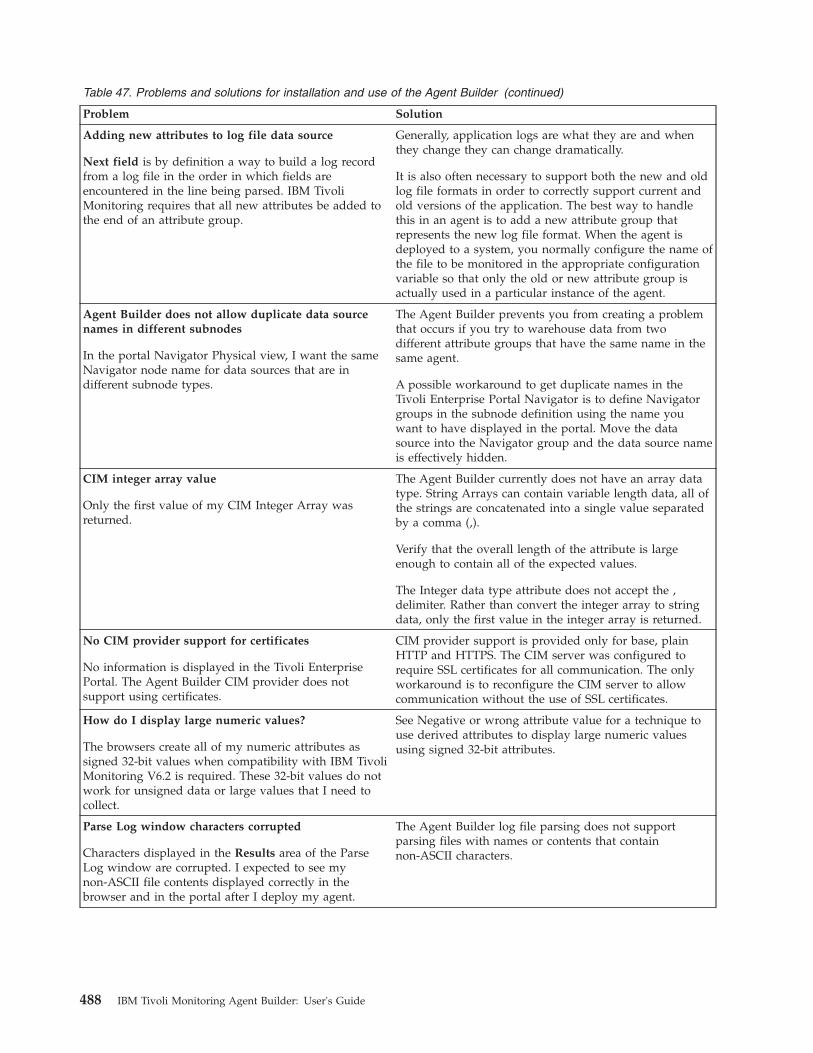
Table 47. Problems and solutions for installation and use of the Agent Builder (continued)
Problem Solution
Adding new attributes to log file data source
Next field is by definition a way to build a log recordfrom a log file in the order in which fields areencountered in the line being parsed. IBM TivoliMonitoring requires that all new attributes be added tothe end of an attribute group.
Generally, application logs are what they are and whenthey change they can change dramatically.
It is also often necessary to support both the new and oldlog file formats in order to correctly support current andold versions of the application. The best way to handlethis in an agent is to add a new attribute group thatrepresents the new log file format. When the agent isdeployed to a system, you normally configure the name ofthe file to be monitored in the appropriate configurationvariable so that only the old or new attribute group isactually used in a particular instance of the agent.
Agent Builder does not allow duplicate data sourcenames in different subnodes
In the portal Navigator Physical view, I want the sameNavigator node name for data sources that are indifferent subnode types.
The Agent Builder prevents you from creating a problemthat occurs if you try to warehouse data from twodifferent attribute groups that have the same name in thesame agent.
A possible workaround to get duplicate names in theTivoli Enterprise Portal Navigator is to define Navigatorgroups in the subnode definition using the name youwant to have displayed in the portal. Move the datasource into the Navigator group and the data source nameis effectively hidden.
CIM integer array value
Only the first value of my CIM Integer Array wasreturned.
The Agent Builder currently does not have an array datatype. String Arrays can contain variable length data, all ofthe strings are concatenated into a single value separatedby a comma (,).
Verify that the overall length of the attribute is largeenough to contain all of the expected values.
The Integer data type attribute does not accept the ,delimiter. Rather than convert the integer array to stringdata, only the first value in the integer array is returned.
No CIM provider support for certificates
No information is displayed in the Tivoli EnterprisePortal. The Agent Builder CIM provider does notsupport using certificates.
CIM provider support is provided only for base, plainHTTP and HTTPS. The CIM server was configured torequire SSL certificates for all communication. The onlyworkaround is to reconfigure the CIM server to allowcommunication without the use of SSL certificates.
How do I display large numeric values?
The browsers create all of my numeric attributes assigned 32-bit values when compatibility with IBM TivoliMonitoring V6.2 is required. These 32-bit values do notwork for unsigned data or large values that I need tocollect.
See Negative or wrong attribute value for a technique touse derived attributes to display large numeric valuesusing signed 32-bit attributes.
Parse Log window characters corrupted
Characters displayed in the Results area of the ParseLog window are corrupted. I expected to see mynon-ASCII file contents displayed correctly in thebrowser and in the portal after I deploy my agent.
The Agent Builder log file parsing does not supportparsing files with names or contents that containnon-ASCII characters.
488 IBM Tivoli Monitoring Agent Builder: User's Guide
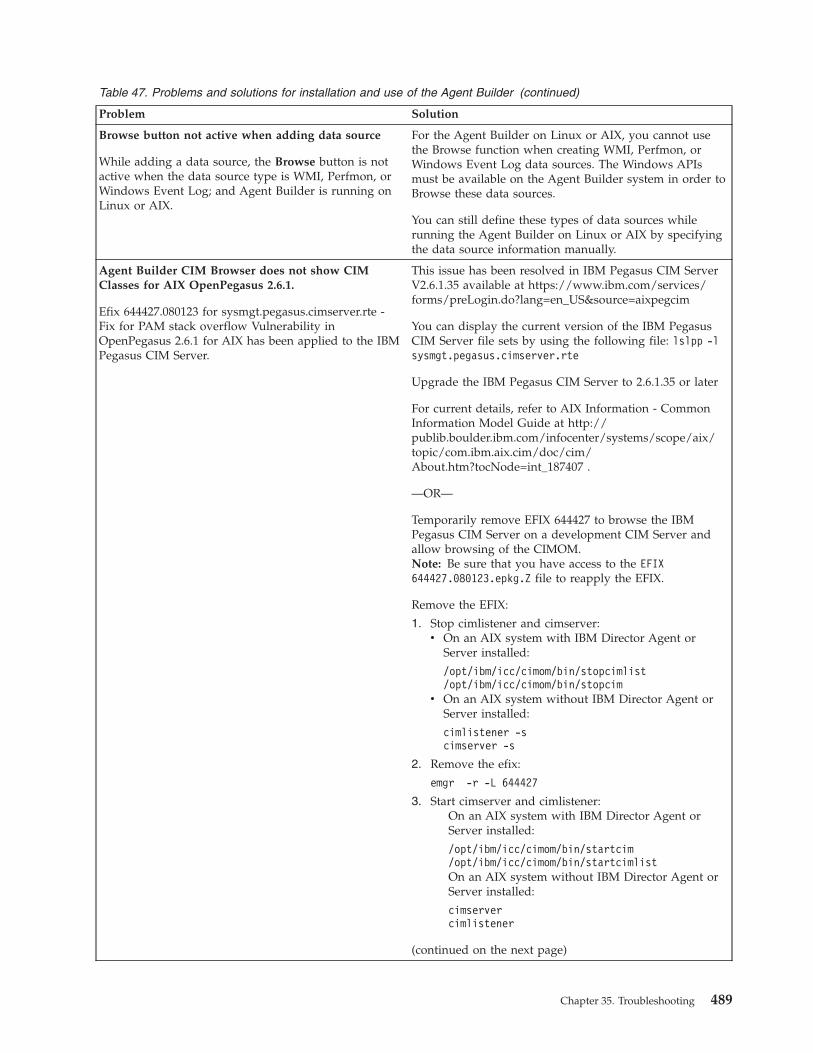
Table 47. Problems and solutions for installation and use of the Agent Builder (continued)
Problem Solution
Browse button not active when adding data source
While adding a data source, the Browse button is notactive when the data source type is WMI, Perfmon, orWindows Event Log; and Agent Builder is running onLinux or AIX.
For the Agent Builder on Linux or AIX, you cannot usethe Browse function when creating WMI, Perfmon, orWindows Event Log data sources. The Windows APIsmust be available on the Agent Builder system in order toBrowse these data sources.
You can still define these types of data sources whilerunning the Agent Builder on Linux or AIX by specifyingthe data source information manually.
Agent Builder CIM Browser does not show CIMClasses for AIX OpenPegasus 2.6.1.
Efix 644427.080123 for sysmgt.pegasus.cimserver.rte -Fix for PAM stack overflow Vulnerability inOpenPegasus 2.6.1 for AIX has been applied to the IBMPegasus CIM Server.
This issue has been resolved in IBM Pegasus CIM ServerV2.6.1.35 available at https://www.ibm.com/services/forms/preLogin.do?lang=en_US&source=aixpegcim
You can display the current version of the IBM PegasusCIM Server file sets by using the following file: lslpp -lsysmgt.pegasus.cimserver.rte
Upgrade the IBM Pegasus CIM Server to 2.6.1.35 or later
For current details, refer to AIX Information - CommonInformation Model Guide at http://publib.boulder.ibm.com/infocenter/systems/scope/aix/topic/com.ibm.aix.cim/doc/cim/About.htm?tocNode=int_187407 .
—OR—
Temporarily remove EFIX 644427 to browse the IBMPegasus CIM Server on a development CIM Server andallow browsing of the CIMOM.Note: Be sure that you have access to the EFIX644427.080123.epkg.Z file to reapply the EFIX.
Remove the EFIX:
1. Stop cimlistener and cimserver:v On an AIX system with IBM Director Agent or
Server installed:
/opt/ibm/icc/cimom/bin/stopcimlist/opt/ibm/icc/cimom/bin/stopcim
v On an AIX system without IBM Director Agent orServer installed:
cimlistener -scimserver -s
2. Remove the efix:
emgr -r -L 644427
3. Start cimserver and cimlistener:On an AIX system with IBM Director Agent orServer installed:
/opt/ibm/icc/cimom/bin/startcim/opt/ibm/icc/cimom/bin/startcimlistOn an AIX system without IBM Director Agent orServer installed:
cimservercimlistener
(continued on the next page)
Chapter 35. Troubleshooting 489
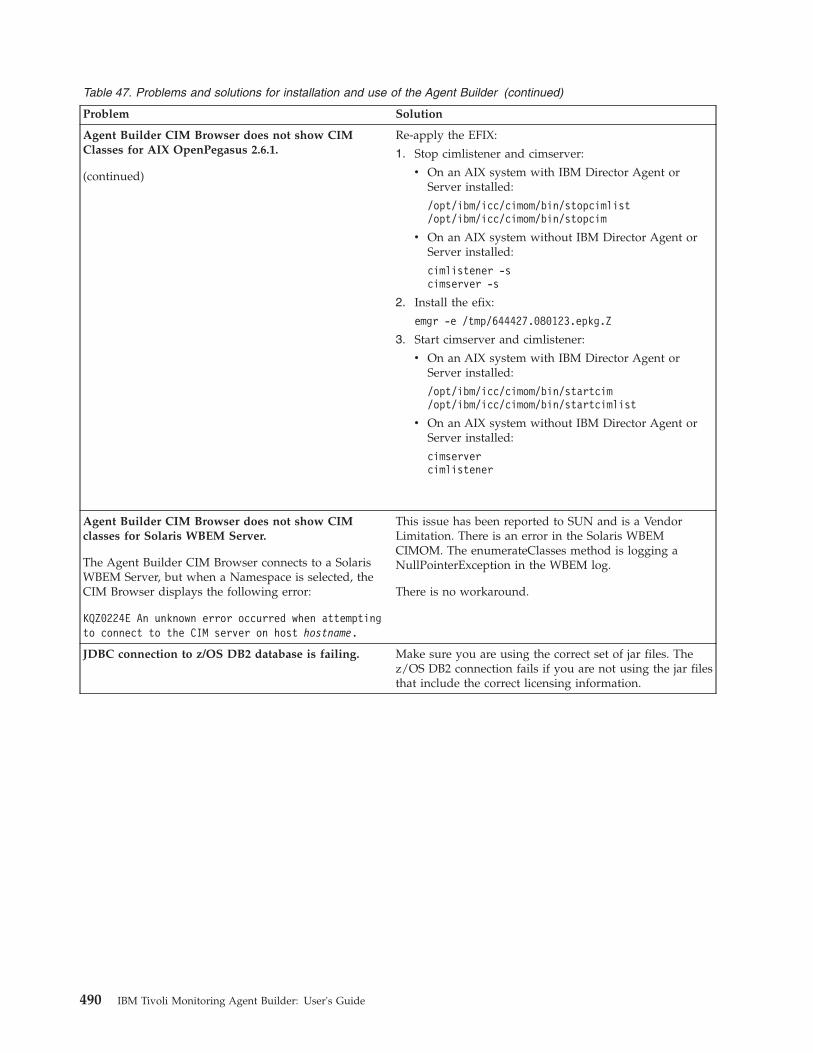
Table 47. Problems and solutions for installation and use of the Agent Builder (continued)
Problem Solution
Agent Builder CIM Browser does not show CIMClasses for AIX OpenPegasus 2.6.1.
(continued)
Re-apply the EFIX:
1. Stop cimlistener and cimserver:
v On an AIX system with IBM Director Agent orServer installed:
/opt/ibm/icc/cimom/bin/stopcimlist/opt/ibm/icc/cimom/bin/stopcim
v On an AIX system without IBM Director Agent orServer installed:
cimlistener -scimserver -s
2. Install the efix:
emgr -e /tmp/644427.080123.epkg.Z
3. Start cimserver and cimlistener:
v On an AIX system with IBM Director Agent orServer installed:
/opt/ibm/icc/cimom/bin/startcim/opt/ibm/icc/cimom/bin/startcimlist
v On an AIX system without IBM Director Agent orServer installed:
cimservercimlistener
Agent Builder CIM Browser does not show CIMclasses for Solaris WBEM Server.
The Agent Builder CIM Browser connects to a SolarisWBEM Server, but when a Namespace is selected, theCIM Browser displays the following error:
KQZ0224E An unknown error occurred when attemptingto connect to the CIM server on host hostname.
This issue has been reported to SUN and is a VendorLimitation. There is an error in the Solaris WBEMCIMOM. The enumerateClasses method is logging aNullPointerException in the WBEM log.
There is no workaround.
JDBC connection to z/OS DB2 database is failing. Make sure you are using the correct set of jar files. Thez/OS DB2 connection fails if you are not using the jar filesthat include the correct licensing information.
490 IBM Tivoli Monitoring Agent Builder: User's Guide
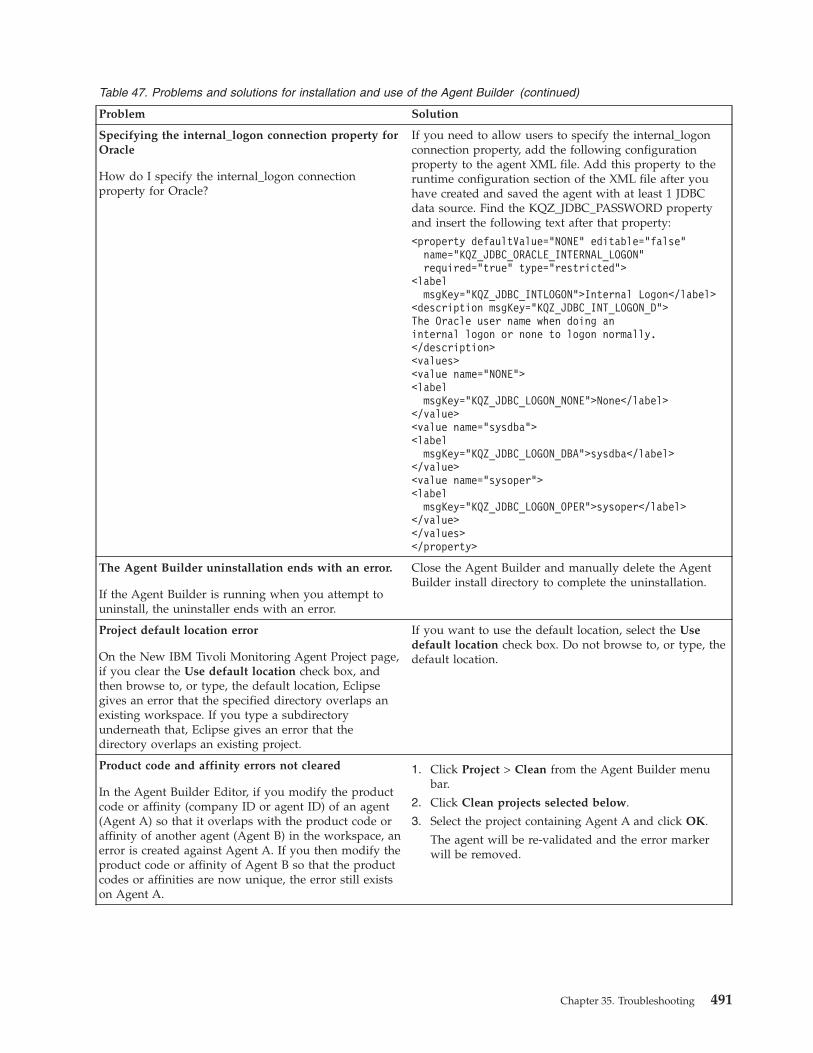
Table 47. Problems and solutions for installation and use of the Agent Builder (continued)
Problem Solution
Specifying the internal_logon connection property forOracle
How do I specify the internal_logon connectionproperty for Oracle?
If you need to allow users to specify the internal_logonconnection property, add the following configurationproperty to the agent XML file. Add this property to theruntime configuration section of the XML file after youhave created and saved the agent with at least 1 JDBCdata source. Find the KQZ_JDBC_PASSWORD propertyand insert the following text after that property:
<property defaultValue="NONE" editable="false"name="KQZ_JDBC_ORACLE_INTERNAL_LOGON"required="true" type="restricted">
<labelmsgKey="KQZ_JDBC_INTLOGON">Internal Logon</label>
<description msgKey="KQZ_JDBC_INT_LOGON_D">The Oracle user name when doing aninternal logon or none to logon normally.</description><values><value name="NONE"><label
msgKey="KQZ_JDBC_LOGON_NONE">None</label></value><value name="sysdba"><label
msgKey="KQZ_JDBC_LOGON_DBA">sysdba</label></value><value name="sysoper"><label
msgKey="KQZ_JDBC_LOGON_OPER">sysoper</label></value></values></property>
The Agent Builder uninstallation ends with an error.
If the Agent Builder is running when you attempt touninstall, the uninstaller ends with an error.
Close the Agent Builder and manually delete the AgentBuilder install directory to complete the uninstallation.
Project default location error
On the New IBM Tivoli Monitoring Agent Project page,if you clear the Use default location check box, andthen browse to, or type, the default location, Eclipsegives an error that the specified directory overlaps anexisting workspace. If you type a subdirectoryunderneath that, Eclipse gives an error that thedirectory overlaps an existing project.
If you want to use the default location, select the Usedefault location check box. Do not browse to, or type, thedefault location.
Product code and affinity errors not cleared
In the Agent Builder Editor, if you modify the productcode or affinity (company ID or agent ID) of an agent(Agent A) so that it overlaps with the product code oraffinity of another agent (Agent B) in the workspace, anerror is created against Agent A. If you then modify theproduct code or affinity of Agent B so that the productcodes or affinities are now unique, the error still existson Agent A.
1. Click Project > Clean from the Agent Builder menubar.
2. Click Clean projects selected below.
3. Select the project containing Agent A and click OK.
The agent will be re-validated and the error markerwill be removed.
Chapter 35. Troubleshooting 491

Table 47. Problems and solutions for installation and use of the Agent Builder (continued)
Problem Solution
Agent Builder script argument parameterization doesnot work.
When creating a script agent, passing a RuntimeParameter as an argument to the script at executiontime does not work.
The command line cannot include environment variables.Runtime parameters must be referenced inside the script.
The command cannot be script ${K51_PROCNAME}
Instead, inside the script, reference the variable:On Windows:
PROCNAME=%K51_PROCNAME%Linux or UNIX:
PROCNAME=$K51_PROCNAME
An error message in any of the Agent Builder wizardsis truncated.
Resize the window to make it wider so that the entiremessage can be viewed.
JRE or JDK not available
You receive the following message: A Java RuntimeEnvironment (JRE) or Java Development Kit (JDK)must be available in order to run Agentbuilder. NoJava virtual machine was found after searching thefollowing locations: C:\Program Files\IBM\ITM\AgentBuilder/jre/jre/bin/javaw.exe.
Open the install_dir/agentbuilder.ini file and modify anylines that have a leading space by removing the leadingspace.
Installing the agent locally fails with error messageKQZ0208E
When generating the agent and installing locally andspecifying a password with special characters, the loginto the monitoring server fails with error message:KQZ0208E The specified username or password isincorrect.
The password cannot include special characters.
iFixes applied to the Agent Builder are not removedwhen the Agent Builder is uninstalled
If you apply an iFix to the Agent Builder, when youuninstall the Agent Builder, the iFix is not removed.When uninstalling, an installer message informs youthat it was unable to remove all directories.
Remove the iFix directories manually before reinstallingthe Agent Builder.
Agent Builder workspace screen not responding inUNIX over a Cygwin Xserver
The Agent Builder workspace screen does not respondin UNIX over a Cygwin Xserver. When launching AgentBuilder, the buttons are greyed out on the workspacescreen and you are unable to perform any action.
This is an Eclipse issue with the Xming and Cygwin toolsand not an issue with the Agent Builder. There iscurrently no fix available.
Using the Parse function on the Parse Log window,returns incorrect results, such as no rows appear
When using the Parse function on the Parse Logwindow, incorrect results are returned, such as no rowsappear.
The Test Log File parser only reads the last 1,000 lines ofthe log file in tail mode. Make sure the data you aretrying to test for occurs in the last 1000 lines of yoursample log file.
492 IBM Tivoli Monitoring Agent Builder: User's Guide
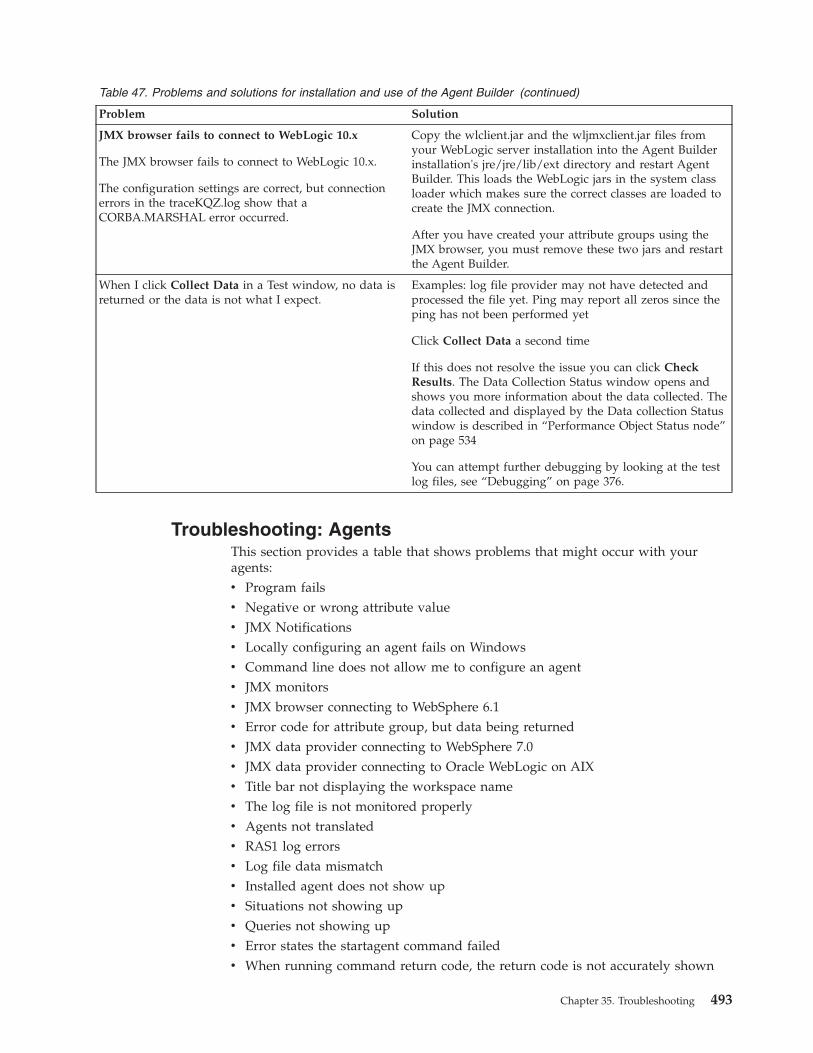
Table 47. Problems and solutions for installation and use of the Agent Builder (continued)
Problem Solution
JMX browser fails to connect to WebLogic 10.x
The JMX browser fails to connect to WebLogic 10.x.
The configuration settings are correct, but connectionerrors in the traceKQZ.log show that aCORBA.MARSHAL error occurred.
Copy the wlclient.jar and the wljmxclient.jar files fromyour WebLogic server installation into the Agent Builderinstallation's jre/jre/lib/ext directory and restart AgentBuilder. This loads the WebLogic jars in the system classloader which makes sure the correct classes are loaded tocreate the JMX connection.
After you have created your attribute groups using theJMX browser, you must remove these two jars and restartthe Agent Builder.
When I click Collect Data in a Test window, no data isreturned or the data is not what I expect.
Examples: log file provider may not have detected andprocessed the file yet. Ping may report all zeros since theping has not been performed yet
Click Collect Data a second time
If this does not resolve the issue you can click CheckResults. The Data Collection Status window opens andshows you more information about the data collected. Thedata collected and displayed by the Data collection Statuswindow is described in “Performance Object Status node”on page 534
You can attempt further debugging by looking at the testlog files, see “Debugging” on page 376.
Troubleshooting: AgentsThis section provides a table that shows problems that might occur with youragents:v Program failsv Negative or wrong attribute valuev JMX Notificationsv Locally configuring an agent fails on Windowsv Command line does not allow me to configure an agentv JMX monitorsv JMX browser connecting to WebSphere 6.1v Error code for attribute group, but data being returnedv JMX data provider connecting to WebSphere 7.0v JMX data provider connecting to Oracle WebLogic on AIXv Title bar not displaying the workspace namev The log file is not monitored properlyv Agents not translatedv RAS1 log errorsv Log file data mismatchv Installed agent does not show upv Situations not showing upv Queries not showing upv Error states the startagent command failedv When running command return code, the return code is not accurately shown
Chapter 35. Troubleshooting 493
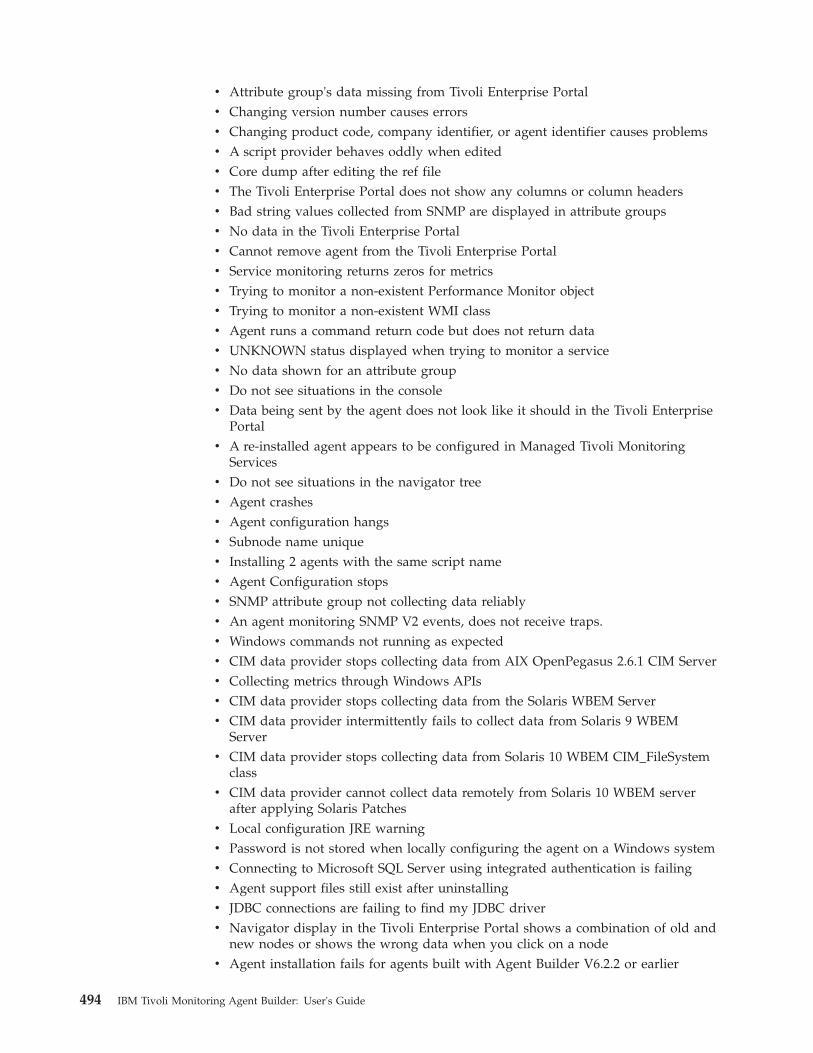
v Attribute group's data missing from Tivoli Enterprise Portalv Changing version number causes errorsv Changing product code, company identifier, or agent identifier causes problemsv A script provider behaves oddly when editedv Core dump after editing the ref filev The Tivoli Enterprise Portal does not show any columns or column headersv Bad string values collected from SNMP are displayed in attribute groupsv No data in the Tivoli Enterprise Portalv Cannot remove agent from the Tivoli Enterprise Portalv Service monitoring returns zeros for metricsv Trying to monitor a non-existent Performance Monitor objectv Trying to monitor a non-existent WMI classv Agent runs a command return code but does not return datav UNKNOWN status displayed when trying to monitor a servicev No data shown for an attribute groupv Do not see situations in the consolev Data being sent by the agent does not look like it should in the Tivoli Enterprise
Portalv A re-installed agent appears to be configured in Managed Tivoli Monitoring
Servicesv Do not see situations in the navigator treev Agent crashesv Agent configuration hangsv Subnode name uniquev Installing 2 agents with the same script namev Agent Configuration stopsv SNMP attribute group not collecting data reliablyv An agent monitoring SNMP V2 events, does not receive traps.v Windows commands not running as expectedv CIM data provider stops collecting data from AIX OpenPegasus 2.6.1 CIM Serverv Collecting metrics through Windows APIsv CIM data provider stops collecting data from the Solaris WBEM Serverv CIM data provider intermittently fails to collect data from Solaris 9 WBEM
Serverv CIM data provider stops collecting data from Solaris 10 WBEM CIM_FileSystem
classv CIM data provider cannot collect data remotely from Solaris 10 WBEM server
after applying Solaris Patchesv Local configuration JRE warningv Password is not stored when locally configuring the agent on a Windows systemv Connecting to Microsoft SQL Server using integrated authentication is failingv Agent support files still exist after uninstallingv JDBC connections are failing to find my JDBC driverv Navigator display in the Tivoli Enterprise Portal shows a combination of old and
new nodes or shows the wrong data when you click on a nodev Agent installation fails for agents built with Agent Builder V6.2.2 or earlier
494 IBM Tivoli Monitoring Agent Builder: User's Guide
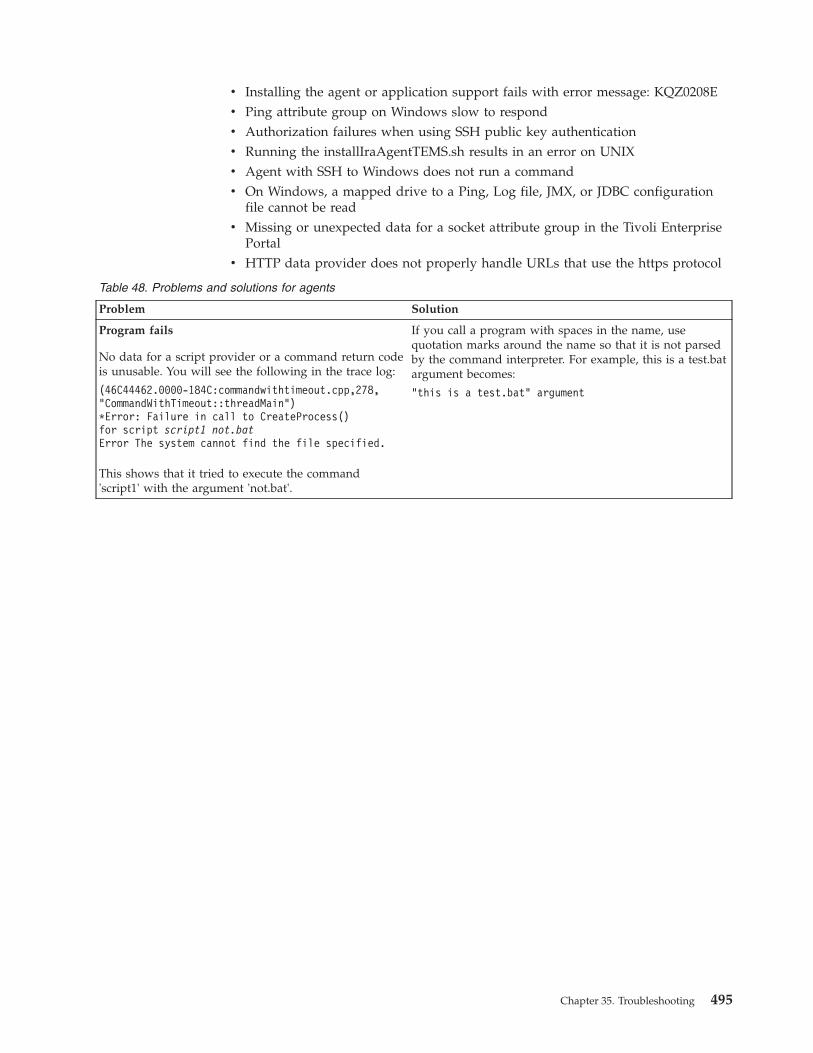
v Installing the agent or application support fails with error message: KQZ0208Ev Ping attribute group on Windows slow to respondv Authorization failures when using SSH public key authenticationv Running the installIraAgentTEMS.sh results in an error on UNIXv Agent with SSH to Windows does not run a commandv On Windows, a mapped drive to a Ping, Log file, JMX, or JDBC configuration
file cannot be readv Missing or unexpected data for a socket attribute group in the Tivoli Enterprise
Portalv HTTP data provider does not properly handle URLs that use the https protocol
Table 48. Problems and solutions for agents
Problem Solution
Program fails
No data for a script provider or a command return codeis unusable. You will see the following in the trace log:
(46C44462.0000-184C:commandwithtimeout.cpp,278,"CommandWithTimeout::threadMain")*Error: Failure in call to CreateProcess()for script script1 not.batError The system cannot find the file specified.
This shows that it tried to execute the command'script1' with the argument 'not.bat'.
If you call a program with spaces in the name, usequotation marks around the name so that it is not parsedby the command interpreter. For example, this is a test.batargument becomes:
"this is a test.bat" argument
Chapter 35. Troubleshooting 495
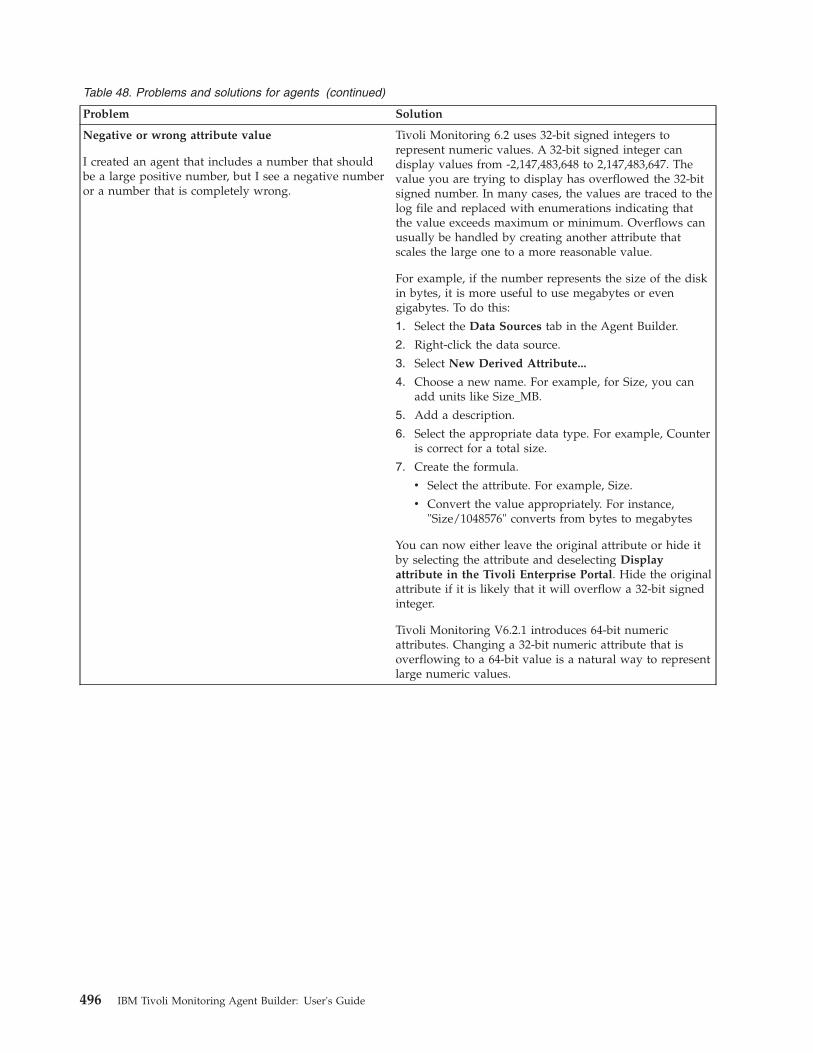
Table 48. Problems and solutions for agents (continued)
Problem Solution
Negative or wrong attribute value
I created an agent that includes a number that shouldbe a large positive number, but I see a negative numberor a number that is completely wrong.
Tivoli Monitoring 6.2 uses 32-bit signed integers torepresent numeric values. A 32-bit signed integer candisplay values from -2,147,483,648 to 2,147,483,647. Thevalue you are trying to display has overflowed the 32-bitsigned number. In many cases, the values are traced to thelog file and replaced with enumerations indicating thatthe value exceeds maximum or minimum. Overflows canusually be handled by creating another attribute thatscales the large one to a more reasonable value.
For example, if the number represents the size of the diskin bytes, it is more useful to use megabytes or evengigabytes. To do this:
1. Select the Data Sources tab in the Agent Builder.
2. Right-click the data source.
3. Select New Derived Attribute...
4. Choose a new name. For example, for Size, you canadd units like Size_MB.
5. Add a description.
6. Select the appropriate data type. For example, Counteris correct for a total size.
7. Create the formula.
v Select the attribute. For example, Size.
v Convert the value appropriately. For instance,"Size/1048576" converts from bytes to megabytes
You can now either leave the original attribute or hide itby selecting the attribute and deselecting Displayattribute in the Tivoli Enterprise Portal. Hide the originalattribute if it is likely that it will overflow a 32-bit signedinteger.
Tivoli Monitoring V6.2.1 introduces 64-bit numericattributes. Changing a 32-bit numeric attribute that isoverflowing to a 64-bit value is a natural way to representlarge numeric values.
496 IBM Tivoli Monitoring Agent Builder: User's Guide
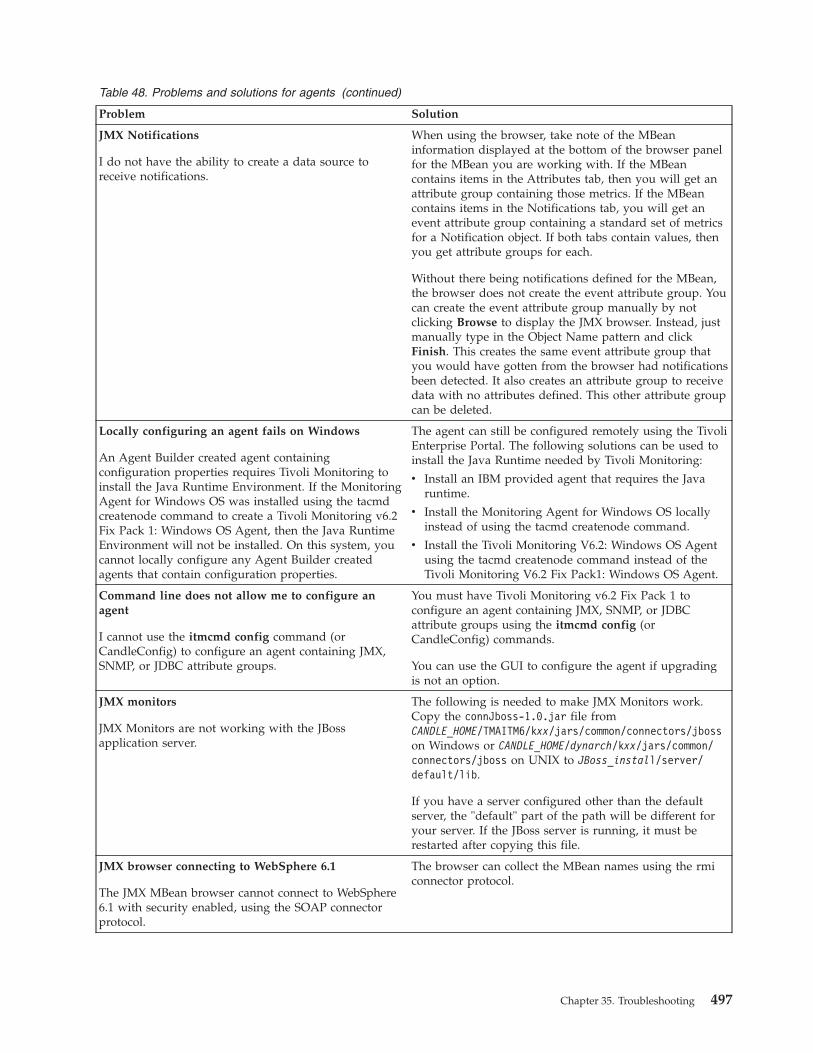
Table 48. Problems and solutions for agents (continued)
Problem Solution
JMX Notifications
I do not have the ability to create a data source toreceive notifications.
When using the browser, take note of the MBeaninformation displayed at the bottom of the browser panelfor the MBean you are working with. If the MBeancontains items in the Attributes tab, then you will get anattribute group containing those metrics. If the MBeancontains items in the Notifications tab, you will get anevent attribute group containing a standard set of metricsfor a Notification object. If both tabs contain values, thenyou get attribute groups for each.
Without there being notifications defined for the MBean,the browser does not create the event attribute group. Youcan create the event attribute group manually by notclicking Browse to display the JMX browser. Instead, justmanually type in the Object Name pattern and clickFinish. This creates the same event attribute group thatyou would have gotten from the browser had notificationsbeen detected. It also creates an attribute group to receivedata with no attributes defined. This other attribute groupcan be deleted.
Locally configuring an agent fails on Windows
An Agent Builder created agent containingconfiguration properties requires Tivoli Monitoring toinstall the Java Runtime Environment. If the MonitoringAgent for Windows OS was installed using the tacmdcreatenode command to create a Tivoli Monitoring v6.2Fix Pack 1: Windows OS Agent, then the Java RuntimeEnvironment will not be installed. On this system, youcannot locally configure any Agent Builder createdagents that contain configuration properties.
The agent can still be configured remotely using the TivoliEnterprise Portal. The following solutions can be used toinstall the Java Runtime needed by Tivoli Monitoring:
v Install an IBM provided agent that requires the Javaruntime.
v Install the Monitoring Agent for Windows OS locallyinstead of using the tacmd createnode command.
v Install the Tivoli Monitoring V6.2: Windows OS Agentusing the tacmd createnode command instead of theTivoli Monitoring V6.2 Fix Pack1: Windows OS Agent.
Command line does not allow me to configure anagent
I cannot use the itmcmd config command (orCandleConfig) to configure an agent containing JMX,SNMP, or JDBC attribute groups.
You must have Tivoli Monitoring v6.2 Fix Pack 1 toconfigure an agent containing JMX, SNMP, or JDBCattribute groups using the itmcmd config (orCandleConfig) commands.
You can use the GUI to configure the agent if upgradingis not an option.
JMX monitors
JMX Monitors are not working with the JBossapplication server.
The following is needed to make JMX Monitors work.Copy the connJboss-1.0.jar file fromCANDLE_HOME/TMAITM6/kxx/jars/common/connectors/jbosson Windows or CANDLE_HOME/dynarch/kxx/jars/common/connectors/jboss on UNIX to JBoss_install/server/default/lib.
If you have a server configured other than the defaultserver, the "default" part of the path will be different foryour server. If the JBoss server is running, it must berestarted after copying this file.
JMX browser connecting to WebSphere 6.1
The JMX MBean browser cannot connect to WebSphere6.1 with security enabled, using the SOAP connectorprotocol.
The browser can collect the MBean names using the rmiconnector protocol.
Chapter 35. Troubleshooting 497
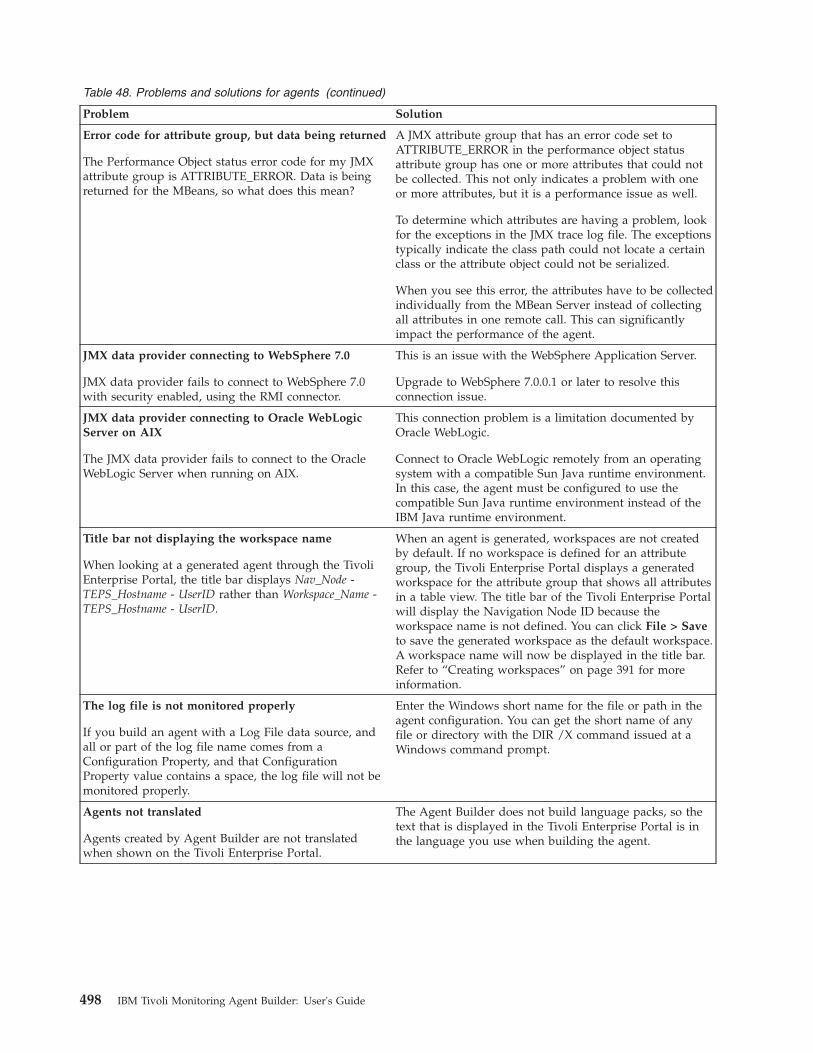
Table 48. Problems and solutions for agents (continued)
Problem Solution
Error code for attribute group, but data being returned
The Performance Object status error code for my JMXattribute group is ATTRIBUTE_ERROR. Data is beingreturned for the MBeans, so what does this mean?
A JMX attribute group that has an error code set toATTRIBUTE_ERROR in the performance object statusattribute group has one or more attributes that could notbe collected. This not only indicates a problem with oneor more attributes, but it is a performance issue as well.
To determine which attributes are having a problem, lookfor the exceptions in the JMX trace log file. The exceptionstypically indicate the class path could not locate a certainclass or the attribute object could not be serialized.
When you see this error, the attributes have to be collectedindividually from the MBean Server instead of collectingall attributes in one remote call. This can significantlyimpact the performance of the agent.
JMX data provider connecting to WebSphere 7.0
JMX data provider fails to connect to WebSphere 7.0with security enabled, using the RMI connector.
This is an issue with the WebSphere Application Server.
Upgrade to WebSphere 7.0.0.1 or later to resolve thisconnection issue.
JMX data provider connecting to Oracle WebLogicServer on AIX
The JMX data provider fails to connect to the OracleWebLogic Server when running on AIX.
This connection problem is a limitation documented byOracle WebLogic.
Connect to Oracle WebLogic remotely from an operatingsystem with a compatible Sun Java runtime environment.In this case, the agent must be configured to use thecompatible Sun Java runtime environment instead of theIBM Java runtime environment.
Title bar not displaying the workspace name
When looking at a generated agent through the TivoliEnterprise Portal, the title bar displays Nav_Node -TEPS_Hostname - UserID rather than Workspace_Name -TEPS_Hostname - UserID.
When an agent is generated, workspaces are not createdby default. If no workspace is defined for an attributegroup, the Tivoli Enterprise Portal displays a generatedworkspace for the attribute group that shows all attributesin a table view. The title bar of the Tivoli Enterprise Portalwill display the Navigation Node ID because theworkspace name is not defined. You can click File > Saveto save the generated workspace as the default workspace.A workspace name will now be displayed in the title bar.Refer to “Creating workspaces” on page 391 for moreinformation.
The log file is not monitored properly
If you build an agent with a Log File data source, andall or part of the log file name comes from aConfiguration Property, and that ConfigurationProperty value contains a space, the log file will not bemonitored properly.
Enter the Windows short name for the file or path in theagent configuration. You can get the short name of anyfile or directory with the DIR /X command issued at aWindows command prompt.
Agents not translated
Agents created by Agent Builder are not translatedwhen shown on the Tivoli Enterprise Portal.
The Agent Builder does not build language packs, so thetext that is displayed in the Tivoli Enterprise Portal is inthe language you use when building the agent.
498 IBM Tivoli Monitoring Agent Builder: User's Guide
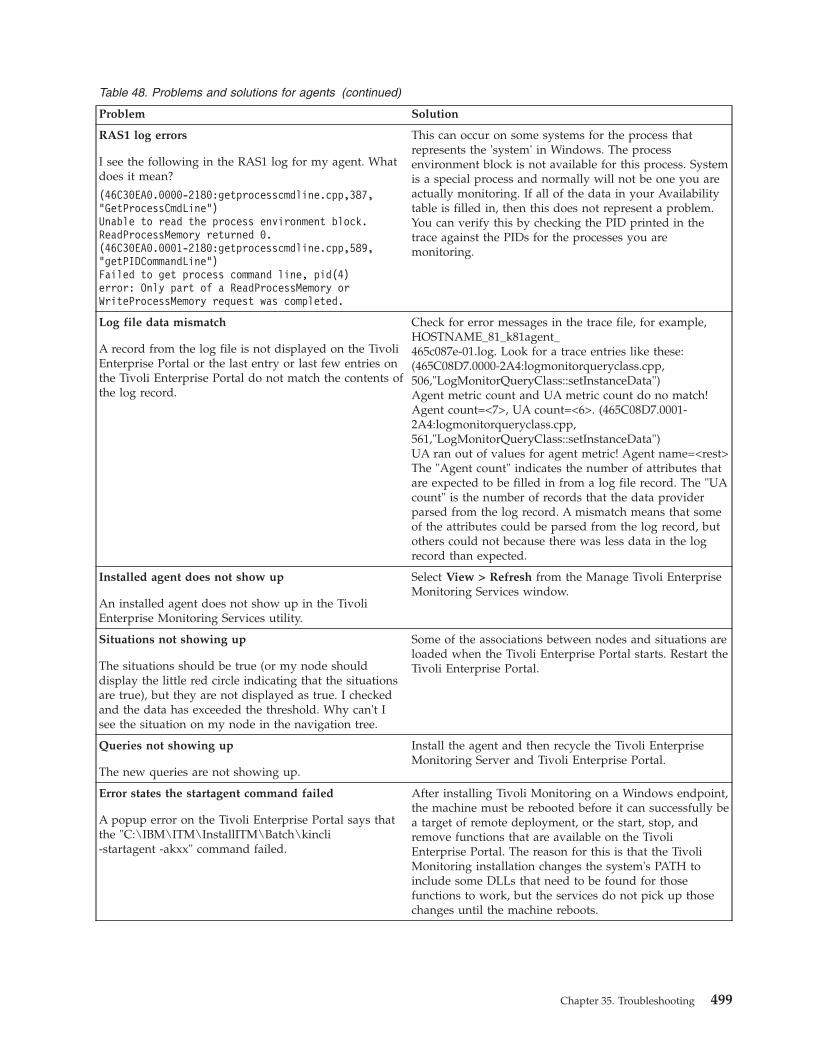
Table 48. Problems and solutions for agents (continued)
Problem Solution
RAS1 log errors
I see the following in the RAS1 log for my agent. Whatdoes it mean?
(46C30EA0.0000-2180:getprocesscmdline.cpp,387,"GetProcessCmdLine")Unable to read the process environment block.ReadProcessMemory returned 0.(46C30EA0.0001-2180:getprocesscmdline.cpp,589,"getPIDCommandLine")Failed to get process command line, pid(4)error: Only part of a ReadProcessMemory orWriteProcessMemory request was completed.
This can occur on some systems for the process thatrepresents the 'system' in Windows. The processenvironment block is not available for this process. Systemis a special process and normally will not be one you areactually monitoring. If all of the data in your Availabilitytable is filled in, then this does not represent a problem.You can verify this by checking the PID printed in thetrace against the PIDs for the processes you aremonitoring.
Log file data mismatch
A record from the log file is not displayed on the TivoliEnterprise Portal or the last entry or last few entries onthe Tivoli Enterprise Portal do not match the contents ofthe log record.
Check for error messages in the trace file, for example,HOSTNAME_81_k81agent_465c087e-01.log. Look for a trace entries like these:(465C08D7.0000-2A4:logmonitorqueryclass.cpp,506,"LogMonitorQueryClass::setInstanceData")Agent metric count and UA metric count do no match!Agent count=<7>, UA count=<6>. (465C08D7.0001-2A4:logmonitorqueryclass.cpp,561,"LogMonitorQueryClass::setInstanceData")UA ran out of values for agent metric! Agent name=<rest>The "Agent count" indicates the number of attributes thatare expected to be filled in from a log file record. The "UAcount" is the number of records that the data providerparsed from the log record. A mismatch means that someof the attributes could be parsed from the log record, butothers could not because there was less data in the logrecord than expected.
Installed agent does not show up
An installed agent does not show up in the TivoliEnterprise Monitoring Services utility.
Select View > Refresh from the Manage Tivoli EnterpriseMonitoring Services window.
Situations not showing up
The situations should be true (or my node shoulddisplay the little red circle indicating that the situationsare true), but they are not displayed as true. I checkedand the data has exceeded the threshold. Why can't Isee the situation on my node in the navigation tree.
Some of the associations between nodes and situations areloaded when the Tivoli Enterprise Portal starts. Restart theTivoli Enterprise Portal.
Queries not showing up
The new queries are not showing up.
Install the agent and then recycle the Tivoli EnterpriseMonitoring Server and Tivoli Enterprise Portal.
Error states the startagent command failed
A popup error on the Tivoli Enterprise Portal says thatthe "C:\IBM\ITM\InstallITM\Batch\kincli-startagent -akxx" command failed.
After installing Tivoli Monitoring on a Windows endpoint,the machine must be rebooted before it can successfully bea target of remote deployment, or the start, stop, andremove functions that are available on the TivoliEnterprise Portal. The reason for this is that the TivoliMonitoring installation changes the system's PATH toinclude some DLLs that need to be found for thosefunctions to work, but the services do not pick up thosechanges until the machine reboots.
Chapter 35. Troubleshooting 499
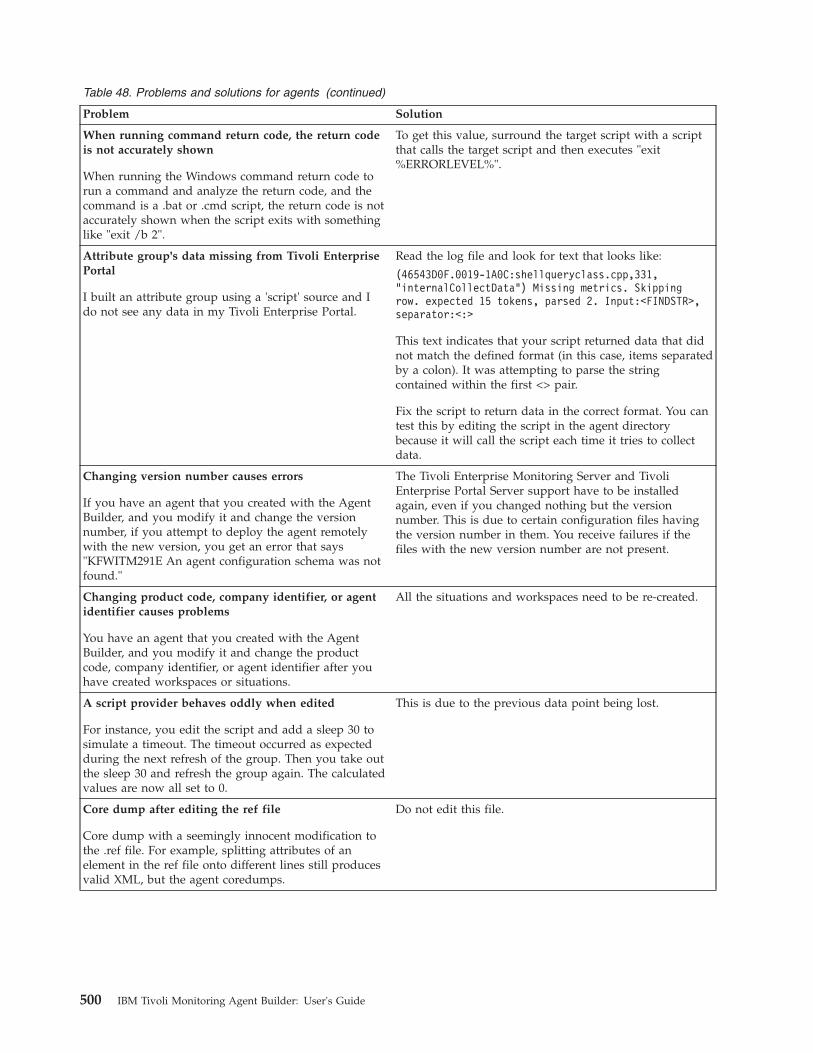
Table 48. Problems and solutions for agents (continued)
Problem Solution
When running command return code, the return codeis not accurately shown
When running the Windows command return code torun a command and analyze the return code, and thecommand is a .bat or .cmd script, the return code is notaccurately shown when the script exits with somethinglike "exit /b 2".
To get this value, surround the target script with a scriptthat calls the target script and then executes "exit%ERRORLEVEL%".
Attribute group's data missing from Tivoli EnterprisePortal
I built an attribute group using a 'script' source and Ido not see any data in my Tivoli Enterprise Portal.
Read the log file and look for text that looks like:
(46543D0F.0019-1A0C:shellqueryclass.cpp,331,"internalCollectData") Missing metrics. Skippingrow. expected 15 tokens, parsed 2. Input:<FINDSTR>,separator:<:>
This text indicates that your script returned data that didnot match the defined format (in this case, items separatedby a colon). It was attempting to parse the stringcontained within the first <> pair.
Fix the script to return data in the correct format. You cantest this by editing the script in the agent directorybecause it will call the script each time it tries to collectdata.
Changing version number causes errors
If you have an agent that you created with the AgentBuilder, and you modify it and change the versionnumber, if you attempt to deploy the agent remotelywith the new version, you get an error that says"KFWITM291E An agent configuration schema was notfound."
The Tivoli Enterprise Monitoring Server and TivoliEnterprise Portal Server support have to be installedagain, even if you changed nothing but the versionnumber. This is due to certain configuration files havingthe version number in them. You receive failures if thefiles with the new version number are not present.
Changing product code, company identifier, or agentidentifier causes problems
You have an agent that you created with the AgentBuilder, and you modify it and change the productcode, company identifier, or agent identifier after youhave created workspaces or situations.
All the situations and workspaces need to be re-created.
A script provider behaves oddly when edited
For instance, you edit the script and add a sleep 30 tosimulate a timeout. The timeout occurred as expectedduring the next refresh of the group. Then you take outthe sleep 30 and refresh the group again. The calculatedvalues are now all set to 0.
This is due to the previous data point being lost.
Core dump after editing the ref file
Core dump with a seemingly innocent modification tothe .ref file. For example, splitting attributes of anelement in the ref file onto different lines still producesvalid XML, but the agent coredumps.
Do not edit this file.
500 IBM Tivoli Monitoring Agent Builder: User's Guide
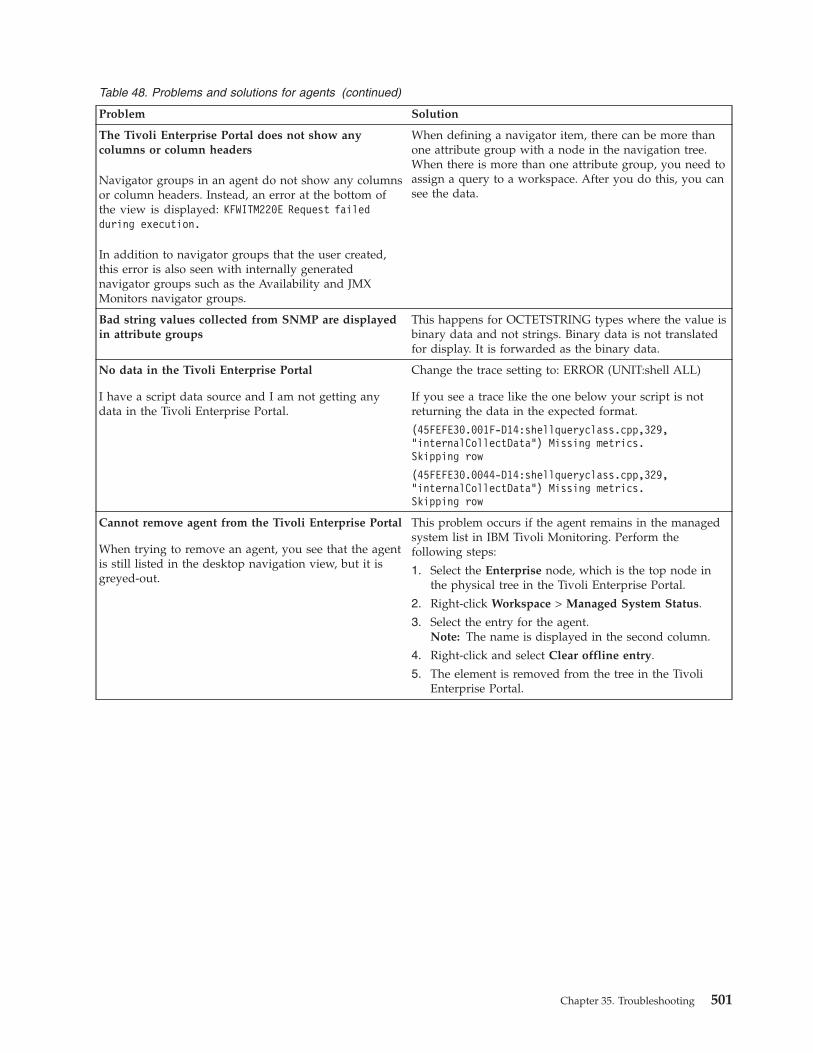
Table 48. Problems and solutions for agents (continued)
Problem Solution
The Tivoli Enterprise Portal does not show anycolumns or column headers
Navigator groups in an agent do not show any columnsor column headers. Instead, an error at the bottom ofthe view is displayed: KFWITM220E Request failedduring execution.
In addition to navigator groups that the user created,this error is also seen with internally generatednavigator groups such as the Availability and JMXMonitors navigator groups.
When defining a navigator item, there can be more thanone attribute group with a node in the navigation tree.When there is more than one attribute group, you need toassign a query to a workspace. After you do this, you cansee the data.
Bad string values collected from SNMP are displayedin attribute groups
This happens for OCTETSTRING types where the value isbinary data and not strings. Binary data is not translatedfor display. It is forwarded as the binary data.
No data in the Tivoli Enterprise Portal
I have a script data source and I am not getting anydata in the Tivoli Enterprise Portal.
Change the trace setting to: ERROR (UNIT:shell ALL)
If you see a trace like the one below your script is notreturning the data in the expected format.
(45FEFE30.001F-D14:shellqueryclass.cpp,329,"internalCollectData") Missing metrics.Skipping row
(45FEFE30.0044-D14:shellqueryclass.cpp,329,"internalCollectData") Missing metrics.Skipping row
Cannot remove agent from the Tivoli Enterprise Portal
When trying to remove an agent, you see that the agentis still listed in the desktop navigation view, but it isgreyed-out.
This problem occurs if the agent remains in the managedsystem list in IBM Tivoli Monitoring. Perform thefollowing steps:
1. Select the Enterprise node, which is the top node inthe physical tree in the Tivoli Enterprise Portal.
2. Right-click Workspace > Managed System Status.
3. Select the entry for the agent.Note: The name is displayed in the second column.
4. Right-click and select Clear offline entry.
5. The element is removed from the tree in the TivoliEnterprise Portal.
Chapter 35. Troubleshooting 501
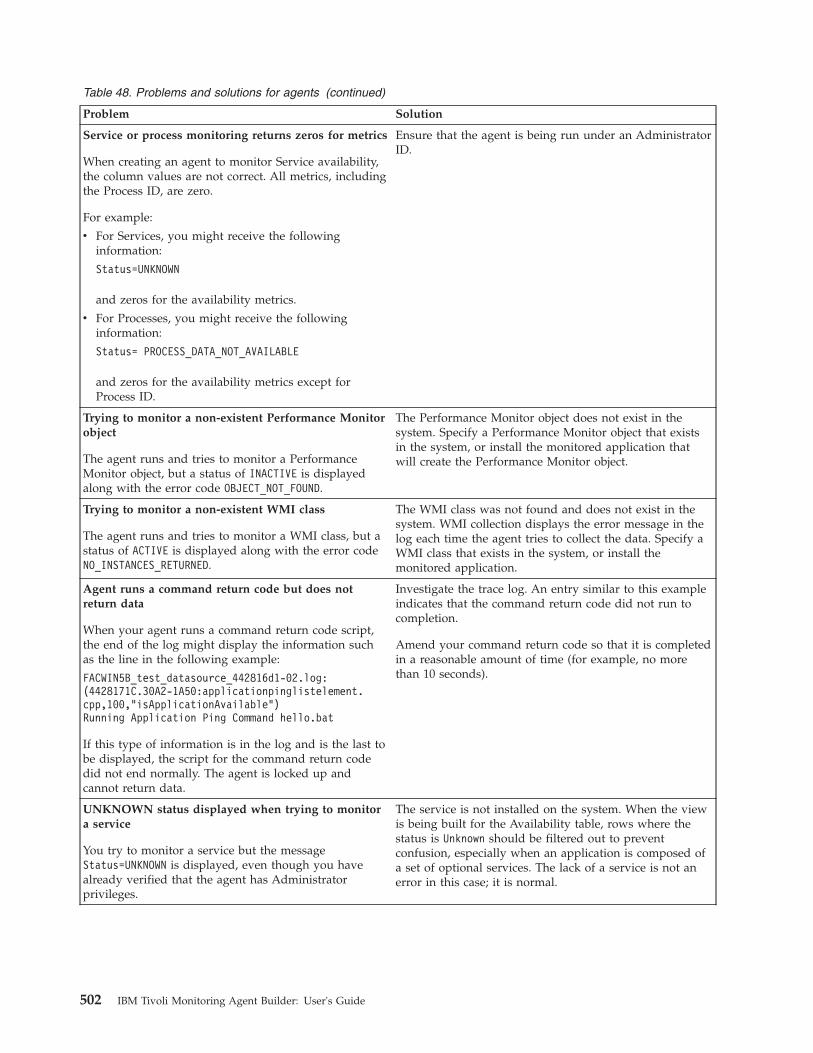
Table 48. Problems and solutions for agents (continued)
Problem Solution
Service or process monitoring returns zeros for metrics
When creating an agent to monitor Service availability,the column values are not correct. All metrics, includingthe Process ID, are zero.
For example:
v For Services, you might receive the followinginformation:
Status=UNKNOWN
and zeros for the availability metrics.
v For Processes, you might receive the followinginformation:
Status= PROCESS_DATA_NOT_AVAILABLE
and zeros for the availability metrics except forProcess ID.
Ensure that the agent is being run under an AdministratorID.
Trying to monitor a non-existent Performance Monitorobject
The agent runs and tries to monitor a PerformanceMonitor object, but a status of INACTIVE is displayedalong with the error code OBJECT_NOT_FOUND.
The Performance Monitor object does not exist in thesystem. Specify a Performance Monitor object that existsin the system, or install the monitored application thatwill create the Performance Monitor object.
Trying to monitor a non-existent WMI class
The agent runs and tries to monitor a WMI class, but astatus of ACTIVE is displayed along with the error codeNO_INSTANCES_RETURNED.
The WMI class was not found and does not exist in thesystem. WMI collection displays the error message in thelog each time the agent tries to collect the data. Specify aWMI class that exists in the system, or install themonitored application.
Agent runs a command return code but does notreturn data
When your agent runs a command return code script,the end of the log might display the information suchas the line in the following example:
FACWIN5B_test_datasource_442816d1-02.log:(4428171C.30A2-1A50:applicationpinglistelement.cpp,100,"isApplicationAvailable")Running Application Ping Command hello.bat
If this type of information is in the log and is the last tobe displayed, the script for the command return codedid not end normally. The agent is locked up andcannot return data.
Investigate the trace log. An entry similar to this exampleindicates that the command return code did not run tocompletion.
Amend your command return code so that it is completedin a reasonable amount of time (for example, no morethan 10 seconds).
UNKNOWN status displayed when trying to monitora service
You try to monitor a service but the messageStatus=UNKNOWN is displayed, even though you havealready verified that the agent has Administratorprivileges.
The service is not installed on the system. When the viewis being built for the Availability table, rows where thestatus is Unknown should be filtered out to preventconfusion, especially when an application is composed ofa set of optional services. The lack of a service is not anerror in this case; it is normal.
502 IBM Tivoli Monitoring Agent Builder: User's Guide

Table 48. Problems and solutions for agents (continued)
Problem Solution
No data shown for an attribute group
You try to monitor a data source but no data is shownfrom an attribute group that collects data.
If the systems used for developing and testing the agentare different, the WMI classes and the PerformanceMonitor objects could be different too. Develop and testthe agent on the same version of Windows and the sameversion of the monitored application that you want tomanage.
Do not see situations in the console
I installed my agent, situations and workspaces. Iconfigured the agent and started it. I see it in the TivoliEnterprise Portal, but I do not see the situations in thenavigator tree or the Situation Event Console. I havechecked, and the situations are associated with the rightnodes.
Restart the Tivoli Enterprise Portal.
Data being sent by the agent does not look like itshould in the Tivoli Enterprise Portal
The data looks like the attributes are not being parsedin the right places.
Re-installing Tivoli Monitoring is the safest way to ensurethat you have not introduced incompatibilities betweenthe phases of your development.Note: The agent builder includes features to prevent youfrom introducing these types of changes into later versionsof your agent, so you won't have this type of problem asyou build and deploy updates to an agent.
The status for a re-installed agent indicates that theagent is configured in Managed Tivoli MonitoringServices
While developing an agent, you will likely generate,install, test, update the agent and then generate, installand test again. When you do this, the agent statusindicates that the agent is configured in Managed TivoliMonitoring Services after the agent is re-installed.
If you modified the agent configuration, then reconfigurethe agent, and restart.
Do not see situations in the navigator tree
I installed my agent, situations and workspaces. Iconfigured the agent and started it. I see it in the TivoliEnterprise Portal, but I do not see the situations in thenavigator tree. They are not associated with the correctnode. (I right-click on the node and select the situations,but they do not appear in the default list.)
When you created the situation on a live system, it wasautomatically distributed to the agent using the hostname. This host name will not generally be available inevery environment, so you should distribute the situationto a generic managed system list that exists when theagent is installed.
Distribute the situations to the CUSTOM_app_name00Managed System List, and re-import the situations. Thenrebuild the Solution Installer image, and re-install theTivoli Enterprise Monitoring Server support for the agent.
Agent crashes
One reason this could occur is that the ICCRTE_DIRmight not be set in the ENV file on Windows systems.
You might have cygwin installed, so ICCRTE_DIR is setas:
ICCRTE_DIR=
The Kxxinstall.log has the following text that shows theproblem:
find: ICCRTE_DIR=: No such file or directory
You can fix this problem by taking cygwin out of the pathand setting ICCRTE_DIR manually.
Chapter 35. Troubleshooting 503
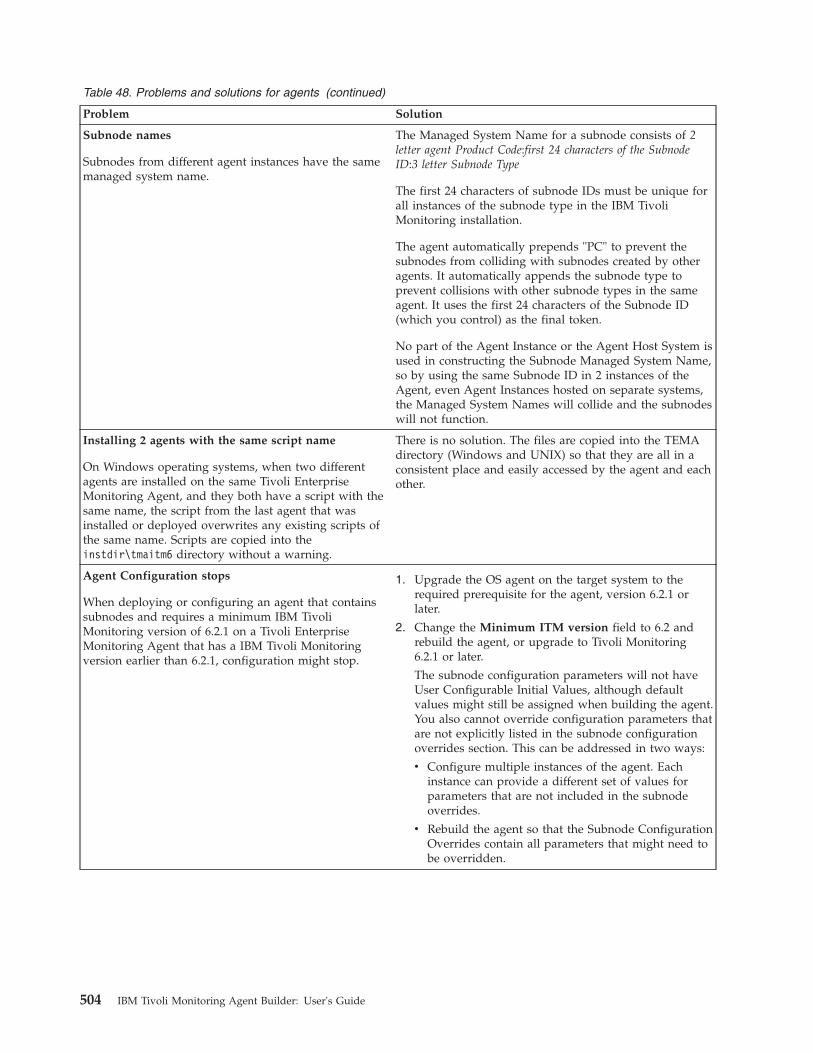
Table 48. Problems and solutions for agents (continued)
Problem Solution
Subnode names
Subnodes from different agent instances have the samemanaged system name.
The Managed System Name for a subnode consists of 2letter agent Product Code:first 24 characters of the SubnodeID:3 letter Subnode Type
The first 24 characters of subnode IDs must be unique forall instances of the subnode type in the IBM TivoliMonitoring installation.
The agent automatically prepends "PC" to prevent thesubnodes from colliding with subnodes created by otheragents. It automatically appends the subnode type toprevent collisions with other subnode types in the sameagent. It uses the first 24 characters of the Subnode ID(which you control) as the final token.
No part of the Agent Instance or the Agent Host System isused in constructing the Subnode Managed System Name,so by using the same Subnode ID in 2 instances of theAgent, even Agent Instances hosted on separate systems,the Managed System Names will collide and the subnodeswill not function.
Installing 2 agents with the same script name
On Windows operating systems, when two differentagents are installed on the same Tivoli EnterpriseMonitoring Agent, and they both have a script with thesame name, the script from the last agent that wasinstalled or deployed overwrites any existing scripts ofthe same name. Scripts are copied into theinstdir\tmaitm6 directory without a warning.
There is no solution. The files are copied into the TEMAdirectory (Windows and UNIX) so that they are all in aconsistent place and easily accessed by the agent and eachother.
Agent Configuration stops
When deploying or configuring an agent that containssubnodes and requires a minimum IBM TivoliMonitoring version of 6.2.1 on a Tivoli EnterpriseMonitoring Agent that has a IBM Tivoli Monitoringversion earlier than 6.2.1, configuration might stop.
1. Upgrade the OS agent on the target system to therequired prerequisite for the agent, version 6.2.1 orlater.
2. Change the Minimum ITM version field to 6.2 andrebuild the agent, or upgrade to Tivoli Monitoring6.2.1 or later.
The subnode configuration parameters will not haveUser Configurable Initial Values, although defaultvalues might still be assigned when building the agent.You also cannot override configuration parameters thatare not explicitly listed in the subnode configurationoverrides section. This can be addressed in two ways:
v Configure multiple instances of the agent. Eachinstance can provide a different set of values forparameters that are not included in the subnodeoverrides.
v Rebuild the agent so that the Subnode ConfigurationOverrides contain all parameters that might need tobe overridden.
504 IBM Tivoli Monitoring Agent Builder: User's Guide
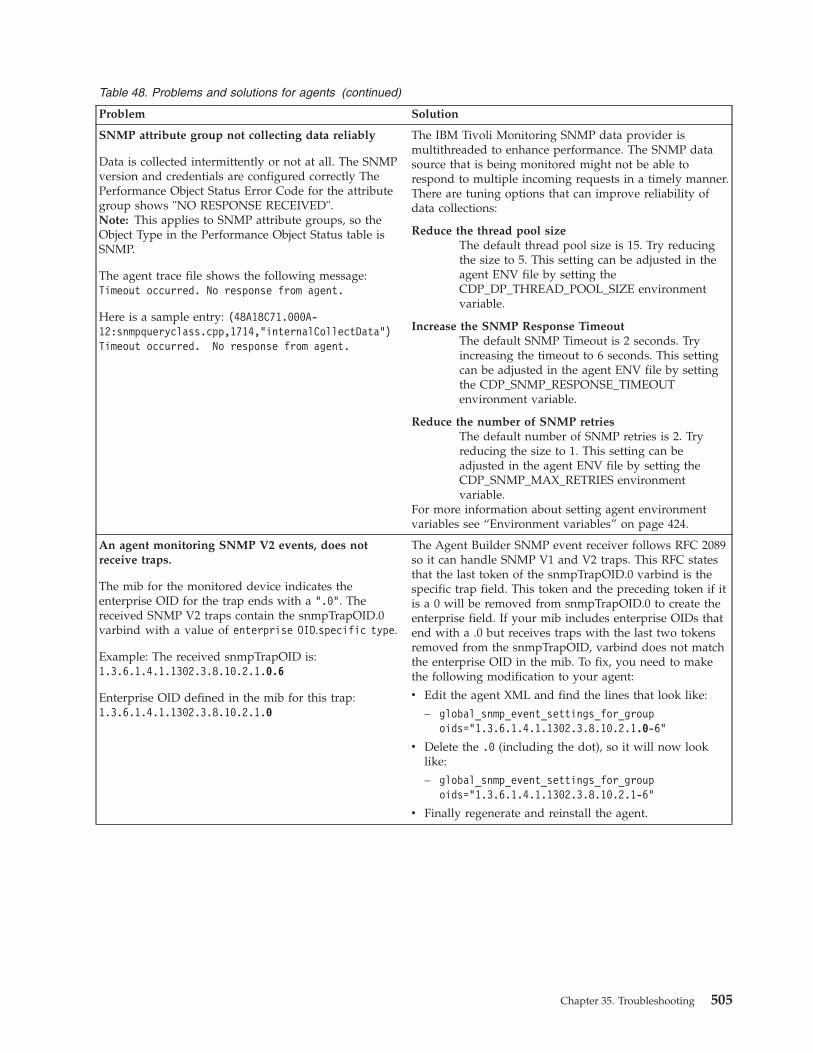
Table 48. Problems and solutions for agents (continued)
Problem Solution
SNMP attribute group not collecting data reliably
Data is collected intermittently or not at all. The SNMPversion and credentials are configured correctly ThePerformance Object Status Error Code for the attributegroup shows "NO RESPONSE RECEIVED".Note: This applies to SNMP attribute groups, so theObject Type in the Performance Object Status table isSNMP.
The agent trace file shows the following message:Timeout occurred. No response from agent.
Here is a sample entry: (48A18C71.000A-12:snmpqueryclass.cpp,1714,"internalCollectData")Timeout occurred. No response from agent.
The IBM Tivoli Monitoring SNMP data provider ismultithreaded to enhance performance. The SNMP datasource that is being monitored might not be able torespond to multiple incoming requests in a timely manner.There are tuning options that can improve reliability ofdata collections:
Reduce the thread pool sizeThe default thread pool size is 15. Try reducingthe size to 5. This setting can be adjusted in theagent ENV file by setting theCDP_DP_THREAD_POOL_SIZE environmentvariable.
Increase the SNMP Response TimeoutThe default SNMP Timeout is 2 seconds. Tryincreasing the timeout to 6 seconds. This settingcan be adjusted in the agent ENV file by settingthe CDP_SNMP_RESPONSE_TIMEOUTenvironment variable.
Reduce the number of SNMP retriesThe default number of SNMP retries is 2. Tryreducing the size to 1. This setting can beadjusted in the agent ENV file by setting theCDP_SNMP_MAX_RETRIES environmentvariable.
For more information about setting agent environmentvariables see “Environment variables” on page 424.
An agent monitoring SNMP V2 events, does notreceive traps.
The mib for the monitored device indicates theenterprise OID for the trap ends with a ".0". Thereceived SNMP V2 traps contain the snmpTrapOID.0varbind with a value of enterprise OID.specific type.
Example: The received snmpTrapOID is:1.3.6.1.4.1.1302.3.8.10.2.1.0.6
Enterprise OID defined in the mib for this trap:1.3.6.1.4.1.1302.3.8.10.2.1.0
The Agent Builder SNMP event receiver follows RFC 2089so it can handle SNMP V1 and V2 traps. This RFC statesthat the last token of the snmpTrapOID.0 varbind is thespecific trap field. This token and the preceding token if itis a 0 will be removed from snmpTrapOID.0 to create theenterprise field. If your mib includes enterprise OIDs thatend with a .0 but receives traps with the last two tokensremoved from the snmpTrapOID, varbind does not matchthe enterprise OID in the mib. To fix, you need to makethe following modification to your agent:
v Edit the agent XML and find the lines that look like:
– global_snmp_event_settings_for_groupoids="1.3.6.1.4.1.1302.3.8.10.2.1.0-6"
v Delete the .0 (including the dot), so it will now looklike:
– global_snmp_event_settings_for_groupoids="1.3.6.1.4.1.1302.3.8.10.2.1-6"
v Finally regenerate and reinstall the agent.
Chapter 35. Troubleshooting 505
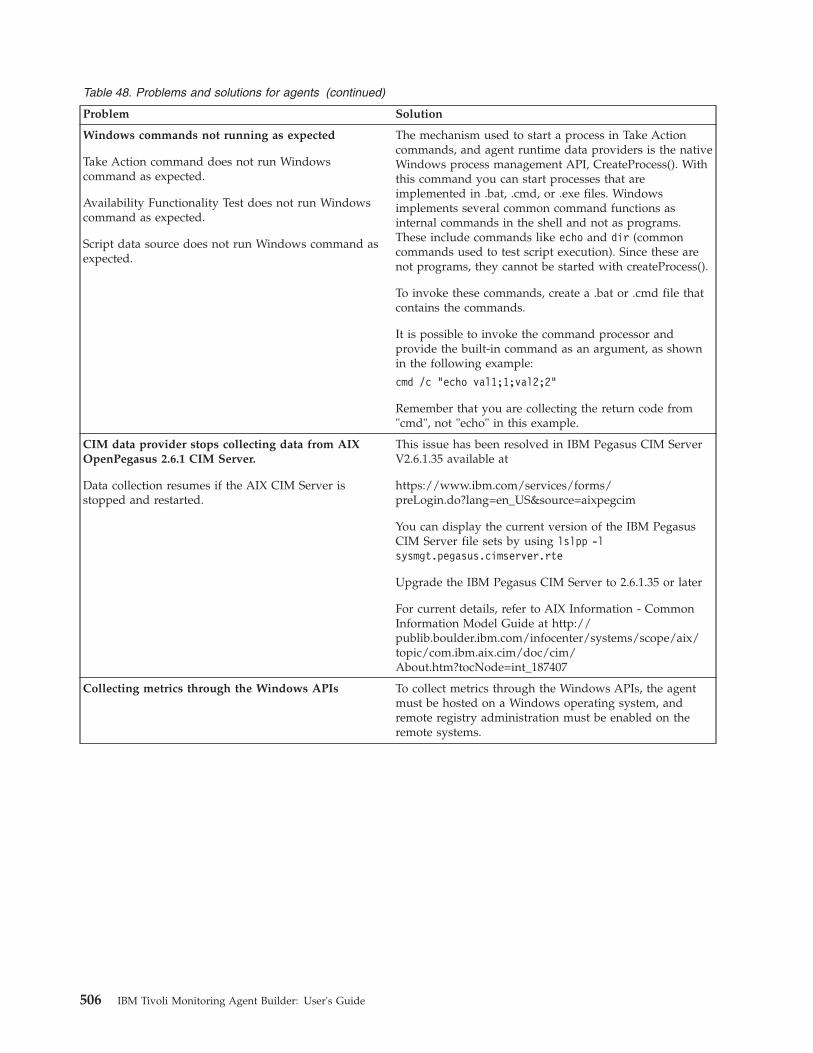
Table 48. Problems and solutions for agents (continued)
Problem Solution
Windows commands not running as expected
Take Action command does not run Windowscommand as expected.
Availability Functionality Test does not run Windowscommand as expected.
Script data source does not run Windows command asexpected.
The mechanism used to start a process in Take Actioncommands, and agent runtime data providers is the nativeWindows process management API, CreateProcess(). Withthis command you can start processes that areimplemented in .bat, .cmd, or .exe files. Windowsimplements several common command functions asinternal commands in the shell and not as programs.These include commands like echo and dir (commoncommands used to test script execution). Since these arenot programs, they cannot be started with createProcess().
To invoke these commands, create a .bat or .cmd file thatcontains the commands.
It is possible to invoke the command processor andprovide the built-in command as an argument, as shownin the following example:
cmd /c "echo val1;1;val2;2"
Remember that you are collecting the return code from"cmd", not "echo" in this example.
CIM data provider stops collecting data from AIXOpenPegasus 2.6.1 CIM Server.
Data collection resumes if the AIX CIM Server isstopped and restarted.
This issue has been resolved in IBM Pegasus CIM ServerV2.6.1.35 available at
https://www.ibm.com/services/forms/preLogin.do?lang=en_US&source=aixpegcim
You can display the current version of the IBM PegasusCIM Server file sets by using lslpp -lsysmgt.pegasus.cimserver.rte
Upgrade the IBM Pegasus CIM Server to 2.6.1.35 or later
For current details, refer to AIX Information - CommonInformation Model Guide at http://publib.boulder.ibm.com/infocenter/systems/scope/aix/topic/com.ibm.aix.cim/doc/cim/About.htm?tocNode=int_187407
Collecting metrics through the Windows APIs To collect metrics through the Windows APIs, the agentmust be hosted on a Windows operating system, andremote registry administration must be enabled on theremote systems.
506 IBM Tivoli Monitoring Agent Builder: User's Guide
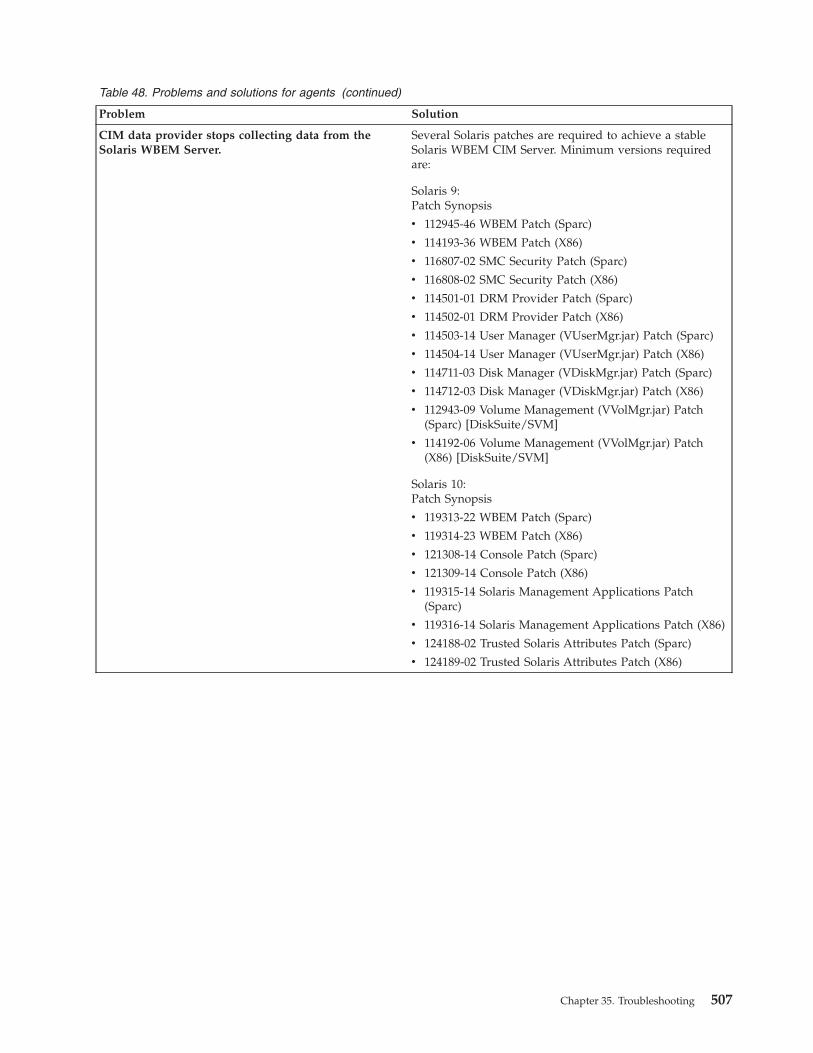
Table 48. Problems and solutions for agents (continued)
Problem Solution
CIM data provider stops collecting data from theSolaris WBEM Server.
Several Solaris patches are required to achieve a stableSolaris WBEM CIM Server. Minimum versions requiredare:
Solaris 9:Patch Synopsis
v 112945-46 WBEM Patch (Sparc)
v 114193-36 WBEM Patch (X86)
v 116807-02 SMC Security Patch (Sparc)
v 116808-02 SMC Security Patch (X86)
v 114501-01 DRM Provider Patch (Sparc)
v 114502-01 DRM Provider Patch (X86)
v 114503-14 User Manager (VUserMgr.jar) Patch (Sparc)
v 114504-14 User Manager (VUserMgr.jar) Patch (X86)
v 114711-03 Disk Manager (VDiskMgr.jar) Patch (Sparc)
v 114712-03 Disk Manager (VDiskMgr.jar) Patch (X86)
v 112943-09 Volume Management (VVolMgr.jar) Patch(Sparc) [DiskSuite/SVM]
v 114192-06 Volume Management (VVolMgr.jar) Patch(X86) [DiskSuite/SVM]
Solaris 10:Patch Synopsis
v 119313-22 WBEM Patch (Sparc)
v 119314-23 WBEM Patch (X86)
v 121308-14 Console Patch (Sparc)
v 121309-14 Console Patch (X86)
v 119315-14 Solaris Management Applications Patch(Sparc)
v 119316-14 Solaris Management Applications Patch (X86)
v 124188-02 Trusted Solaris Attributes Patch (Sparc)
v 124189-02 Trusted Solaris Attributes Patch (X86)
Chapter 35. Troubleshooting 507
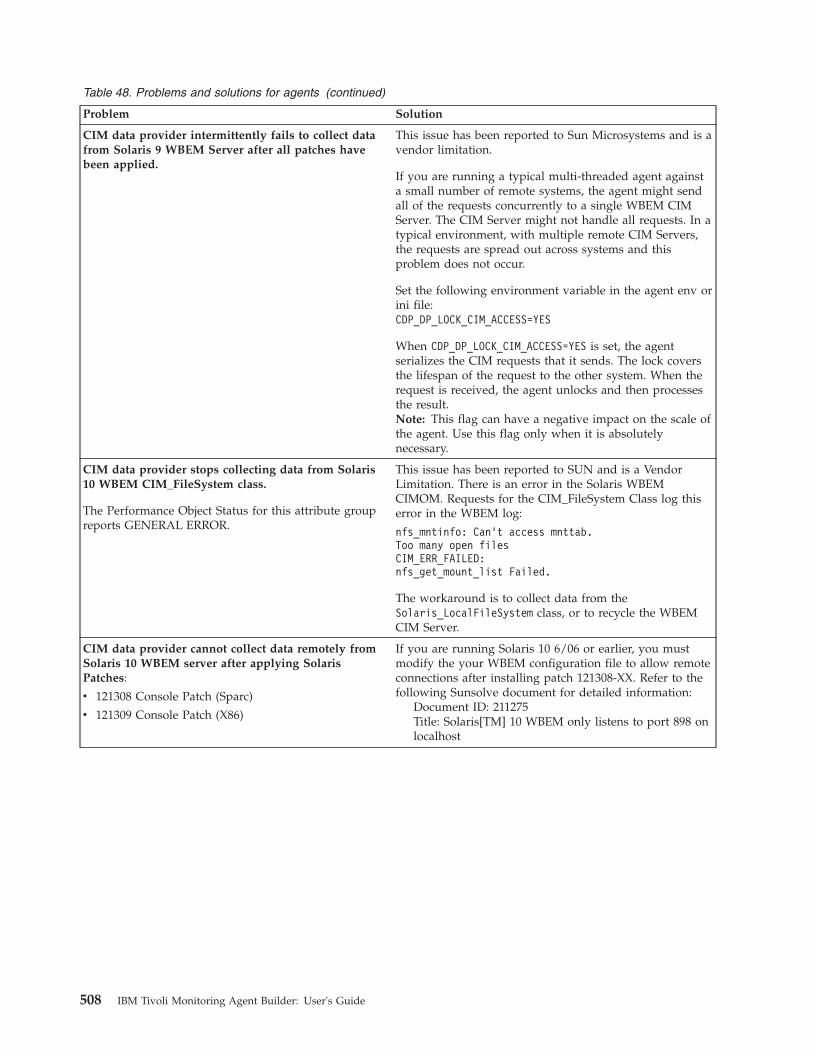
Table 48. Problems and solutions for agents (continued)
Problem Solution
CIM data provider intermittently fails to collect datafrom Solaris 9 WBEM Server after all patches havebeen applied.
This issue has been reported to Sun Microsystems and is avendor limitation.
If you are running a typical multi-threaded agent againsta small number of remote systems, the agent might sendall of the requests concurrently to a single WBEM CIMServer. The CIM Server might not handle all requests. In atypical environment, with multiple remote CIM Servers,the requests are spread out across systems and thisproblem does not occur.
Set the following environment variable in the agent env orini file:CDP_DP_LOCK_CIM_ACCESS=YES
When CDP_DP_LOCK_CIM_ACCESS=YES is set, the agentserializes the CIM requests that it sends. The lock coversthe lifespan of the request to the other system. When therequest is received, the agent unlocks and then processesthe result.Note: This flag can have a negative impact on the scale ofthe agent. Use this flag only when it is absolutelynecessary.
CIM data provider stops collecting data from Solaris10 WBEM CIM_FileSystem class.
The Performance Object Status for this attribute groupreports GENERAL ERROR.
This issue has been reported to SUN and is a VendorLimitation. There is an error in the Solaris WBEMCIMOM. Requests for the CIM_FileSystem Class log thiserror in the WBEM log:
nfs_mntinfo: Can’t access mnttab.Too many open filesCIM_ERR_FAILED:nfs_get_mount_list Failed.
The workaround is to collect data from theSolaris_LocalFileSystem class, or to recycle the WBEMCIM Server.
CIM data provider cannot collect data remotely fromSolaris 10 WBEM server after applying SolarisPatches:
v 121308 Console Patch (Sparc)
v 121309 Console Patch (X86)
If you are running Solaris 10 6/06 or earlier, you mustmodify the your WBEM configuration file to allow remoteconnections after installing patch 121308-XX. Refer to thefollowing Sunsolve document for detailed information:
Document ID: 211275Title: Solaris[TM] 10 WBEM only listens to port 898 onlocalhost
508 IBM Tivoli Monitoring Agent Builder: User's Guide
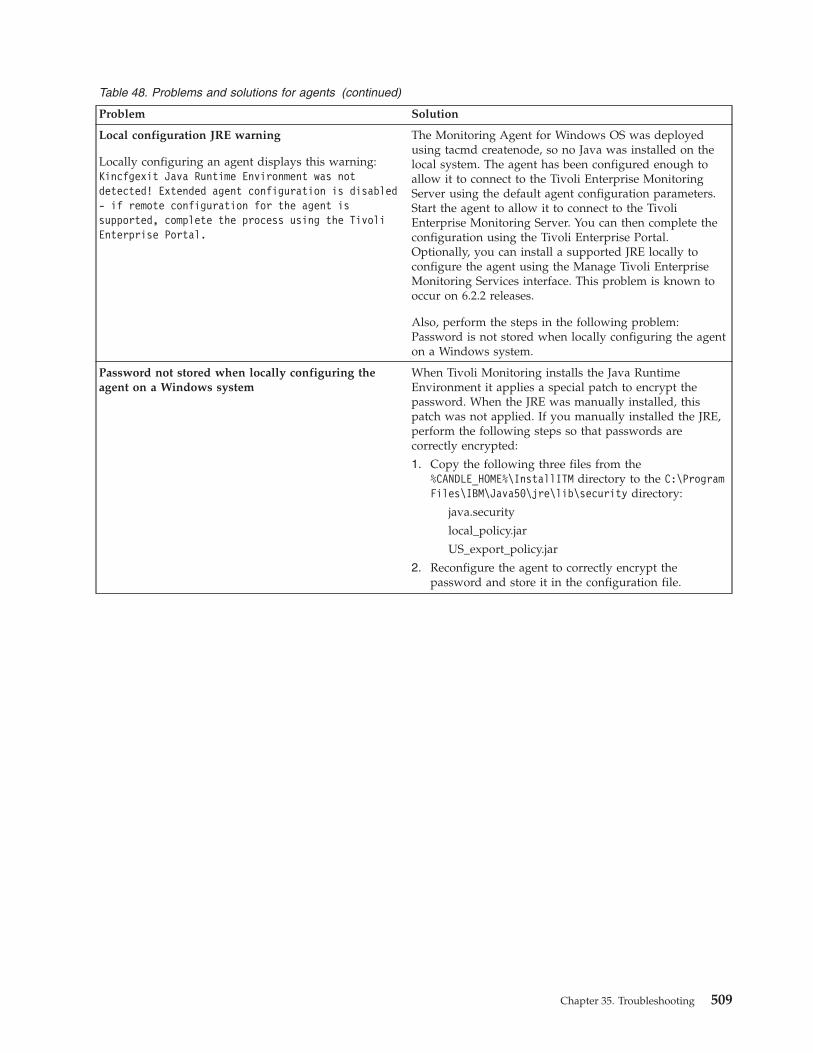
Table 48. Problems and solutions for agents (continued)
Problem Solution
Local configuration JRE warning
Locally configuring an agent displays this warning:Kincfgexit Java Runtime Environment was notdetected! Extended agent configuration is disabled- if remote configuration for the agent issupported, complete the process using the TivoliEnterprise Portal.
The Monitoring Agent for Windows OS was deployedusing tacmd createnode, so no Java was installed on thelocal system. The agent has been configured enough toallow it to connect to the Tivoli Enterprise MonitoringServer using the default agent configuration parameters.Start the agent to allow it to connect to the TivoliEnterprise Monitoring Server. You can then complete theconfiguration using the Tivoli Enterprise Portal.Optionally, you can install a supported JRE locally toconfigure the agent using the Manage Tivoli EnterpriseMonitoring Services interface. This problem is known tooccur on 6.2.2 releases.
Also, perform the steps in the following problem:Password is not stored when locally configuring the agenton a Windows system.
Password not stored when locally configuring theagent on a Windows system
When Tivoli Monitoring installs the Java RuntimeEnvironment it applies a special patch to encrypt thepassword. When the JRE was manually installed, thispatch was not applied. If you manually installed the JRE,perform the following steps so that passwords arecorrectly encrypted:
1. Copy the following three files from the%CANDLE_HOME%\InstallITM directory to the C:\ProgramFiles\IBM\Java50\jre\lib\security directory:
java.security
local_policy.jar
US_export_policy.jar
2. Reconfigure the agent to correctly encrypt thepassword and store it in the configuration file.
Chapter 35. Troubleshooting 509
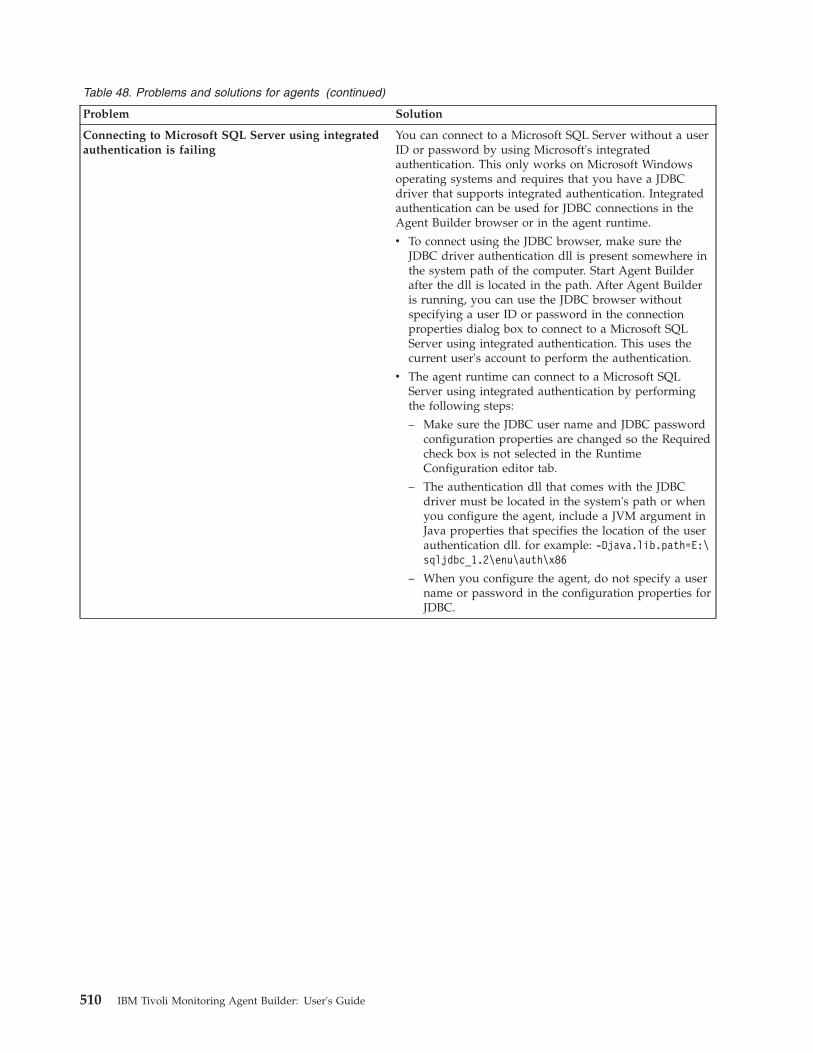
Table 48. Problems and solutions for agents (continued)
Problem Solution
Connecting to Microsoft SQL Server using integratedauthentication is failing
You can connect to a Microsoft SQL Server without a userID or password by using Microsoft's integratedauthentication. This only works on Microsoft Windowsoperating systems and requires that you have a JDBCdriver that supports integrated authentication. Integratedauthentication can be used for JDBC connections in theAgent Builder browser or in the agent runtime.
v To connect using the JDBC browser, make sure theJDBC driver authentication dll is present somewhere inthe system path of the computer. Start Agent Builderafter the dll is located in the path. After Agent Builderis running, you can use the JDBC browser withoutspecifying a user ID or password in the connectionproperties dialog box to connect to a Microsoft SQLServer using integrated authentication. This uses thecurrent user's account to perform the authentication.
v The agent runtime can connect to a Microsoft SQLServer using integrated authentication by performingthe following steps:
– Make sure the JDBC user name and JDBC passwordconfiguration properties are changed so the Requiredcheck box is not selected in the RuntimeConfiguration editor tab.
– The authentication dll that comes with the JDBCdriver must be located in the system's path or whenyou configure the agent, include a JVM argument inJava properties that specifies the location of the userauthentication dll. for example: -Djava.lib.path=E:\sqljdbc_1.2\enu\auth\x86
– When you configure the agent, do not specify a username or password in the configuration properties forJDBC.
510 IBM Tivoli Monitoring Agent Builder: User's Guide
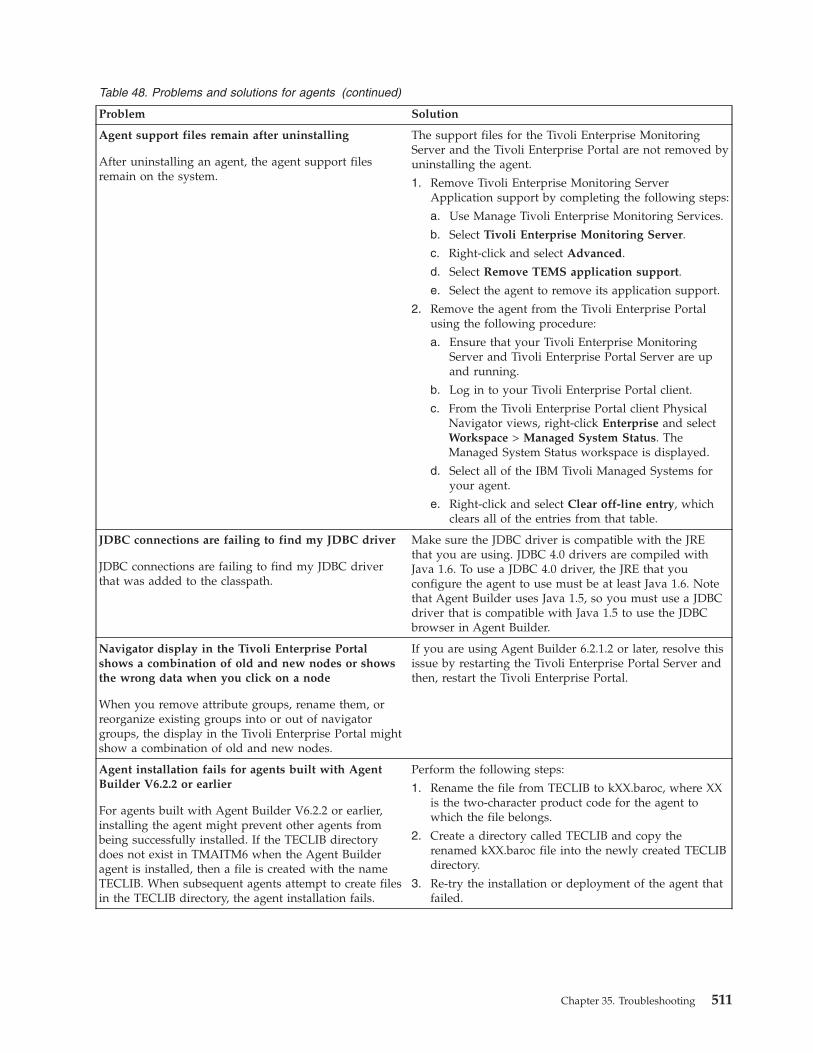
Table 48. Problems and solutions for agents (continued)
Problem Solution
Agent support files remain after uninstalling
After uninstalling an agent, the agent support filesremain on the system.
The support files for the Tivoli Enterprise MonitoringServer and the Tivoli Enterprise Portal are not removed byuninstalling the agent.
1. Remove Tivoli Enterprise Monitoring ServerApplication support by completing the following steps:
a. Use Manage Tivoli Enterprise Monitoring Services.
b. Select Tivoli Enterprise Monitoring Server.
c. Right-click and select Advanced.
d. Select Remove TEMS application support.
e. Select the agent to remove its application support.
2. Remove the agent from the Tivoli Enterprise Portalusing the following procedure:
a. Ensure that your Tivoli Enterprise MonitoringServer and Tivoli Enterprise Portal Server are upand running.
b. Log in to your Tivoli Enterprise Portal client.
c. From the Tivoli Enterprise Portal client PhysicalNavigator views, right-click Enterprise and selectWorkspace > Managed System Status. TheManaged System Status workspace is displayed.
d. Select all of the IBM Tivoli Managed Systems foryour agent.
e. Right-click and select Clear off-line entry, whichclears all of the entries from that table.
JDBC connections are failing to find my JDBC driver
JDBC connections are failing to find my JDBC driverthat was added to the classpath.
Make sure the JDBC driver is compatible with the JREthat you are using. JDBC 4.0 drivers are compiled withJava 1.6. To use a JDBC 4.0 driver, the JRE that youconfigure the agent to use must be at least Java 1.6. Notethat Agent Builder uses Java 1.5, so you must use a JDBCdriver that is compatible with Java 1.5 to use the JDBCbrowser in Agent Builder.
Navigator display in the Tivoli Enterprise Portalshows a combination of old and new nodes or showsthe wrong data when you click on a node
When you remove attribute groups, rename them, orreorganize existing groups into or out of navigatorgroups, the display in the Tivoli Enterprise Portal mightshow a combination of old and new nodes.
If you are using Agent Builder 6.2.1.2 or later, resolve thisissue by restarting the Tivoli Enterprise Portal Server andthen, restart the Tivoli Enterprise Portal.
Agent installation fails for agents built with AgentBuilder V6.2.2 or earlier
For agents built with Agent Builder V6.2.2 or earlier,installing the agent might prevent other agents frombeing successfully installed. If the TECLIB directorydoes not exist in TMAITM6 when the Agent Builderagent is installed, then a file is created with the nameTECLIB. When subsequent agents attempt to create filesin the TECLIB directory, the agent installation fails.
Perform the following steps:
1. Rename the file from TECLIB to kXX.baroc, where XXis the two-character product code for the agent towhich the file belongs.
2. Create a directory called TECLIB and copy therenamed kXX.baroc file into the newly created TECLIBdirectory.
3. Re-try the installation or deployment of the agent thatfailed.
Chapter 35. Troubleshooting 511
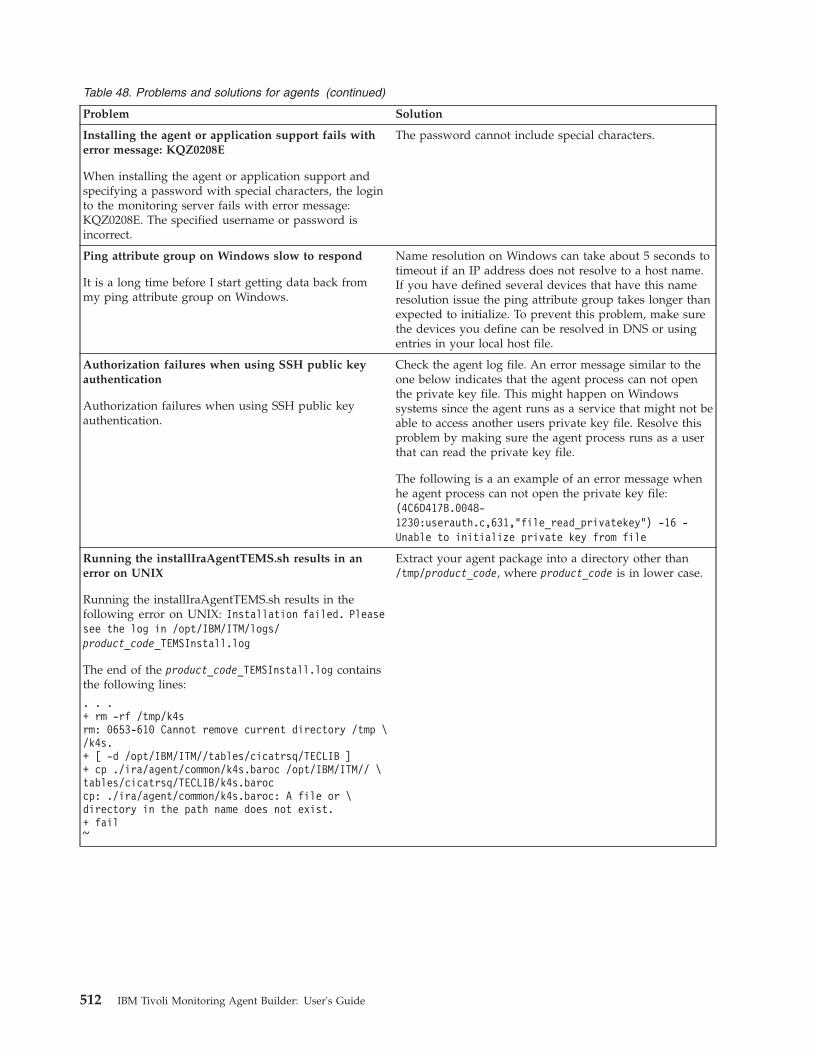
Table 48. Problems and solutions for agents (continued)
Problem Solution
Installing the agent or application support fails witherror message: KQZ0208E
When installing the agent or application support andspecifying a password with special characters, the loginto the monitoring server fails with error message:KQZ0208E. The specified username or password isincorrect.
The password cannot include special characters.
Ping attribute group on Windows slow to respond
It is a long time before I start getting data back frommy ping attribute group on Windows.
Name resolution on Windows can take about 5 seconds totimeout if an IP address does not resolve to a host name.If you have defined several devices that have this nameresolution issue the ping attribute group takes longer thanexpected to initialize. To prevent this problem, make surethe devices you define can be resolved in DNS or usingentries in your local host file.
Authorization failures when using SSH public keyauthentication
Authorization failures when using SSH public keyauthentication.
Check the agent log file. An error message similar to theone below indicates that the agent process can not openthe private key file. This might happen on Windowssystems since the agent runs as a service that might not beable to access another users private key file. Resolve thisproblem by making sure the agent process runs as a userthat can read the private key file.
The following is a an example of an error message whenhe agent process can not open the private key file:(4C6D417B.0048-1230:userauth.c,631,"file_read_privatekey") -16 -Unable to initialize private key from file
Running the installIraAgentTEMS.sh results in anerror on UNIX
Running the installIraAgentTEMS.sh results in thefollowing error on UNIX: Installation failed. Pleasesee the log in /opt/IBM/ITM/logs/product_code_TEMSInstall.log
The end of the product_code_TEMSInstall.log containsthe following lines:
. . .+ rm -rf /tmp/k4srm: 0653-610 Cannot remove current directory /tmp \/k4s.+ [ -d /opt/IBM/ITM//tables/cicatrsq/TECLIB ]+ cp ./ira/agent/common/k4s.baroc /opt/IBM/ITM// \tables/cicatrsq/TECLIB/k4s.baroccp: ./ira/agent/common/k4s.baroc: A file or \directory in the path name does not exist.+ fail~
Extract your agent package into a directory other than/tmp/product_code, where product_code is in lower case.
512 IBM Tivoli Monitoring Agent Builder: User's Guide
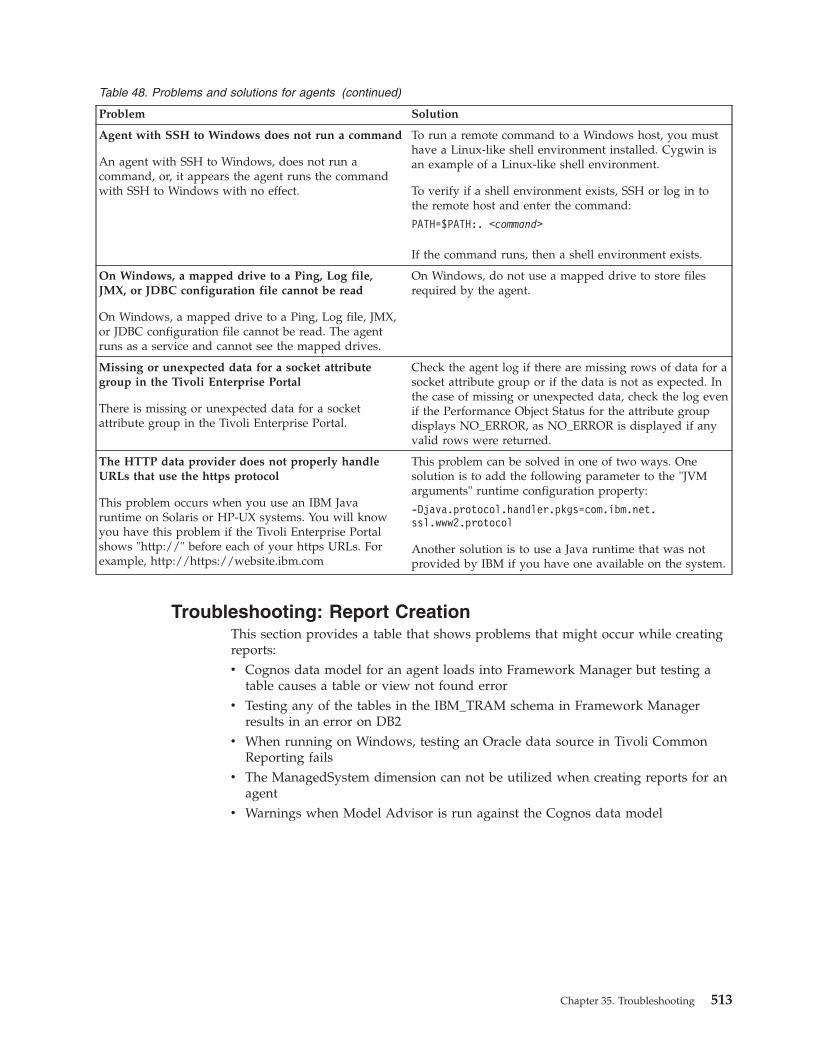
Table 48. Problems and solutions for agents (continued)
Problem Solution
Agent with SSH to Windows does not run a command
An agent with SSH to Windows, does not run acommand, or, it appears the agent runs the commandwith SSH to Windows with no effect.
To run a remote command to a Windows host, you musthave a Linux-like shell environment installed. Cygwin isan example of a Linux-like shell environment.
To verify if a shell environment exists, SSH or log in tothe remote host and enter the command:
PATH=$PATH:. <command>
If the command runs, then a shell environment exists.
On Windows, a mapped drive to a Ping, Log file,JMX, or JDBC configuration file cannot be read
On Windows, a mapped drive to a Ping, Log file, JMX,or JDBC configuration file cannot be read. The agentruns as a service and cannot see the mapped drives.
On Windows, do not use a mapped drive to store filesrequired by the agent.
Missing or unexpected data for a socket attributegroup in the Tivoli Enterprise Portal
There is missing or unexpected data for a socketattribute group in the Tivoli Enterprise Portal.
Check the agent log if there are missing rows of data for asocket attribute group or if the data is not as expected. Inthe case of missing or unexpected data, check the log evenif the Performance Object Status for the attribute groupdisplays NO_ERROR, as NO_ERROR is displayed if anyvalid rows were returned.
The HTTP data provider does not properly handleURLs that use the https protocol
This problem occurs when you use an IBM Javaruntime on Solaris or HP-UX systems. You will knowyou have this problem if the Tivoli Enterprise Portalshows "http://" before each of your https URLs. Forexample, http://https://website.ibm.com
This problem can be solved in one of two ways. Onesolution is to add the following parameter to the "JVMarguments" runtime configuration property:
-Djava.protocol.handler.pkgs=com.ibm.net.ssl.www2.protocol
Another solution is to use a Java runtime that was notprovided by IBM if you have one available on the system.
Troubleshooting: Report CreationThis section provides a table that shows problems that might occur while creatingreports:v Cognos data model for an agent loads into Framework Manager but testing a
table causes a table or view not found errorv Testing any of the tables in the IBM_TRAM schema in Framework Manager
results in an error on DB2v When running on Windows, testing an Oracle data source in Tivoli Common
Reporting failsv The ManagedSystem dimension can not be utilized when creating reports for an
agentv Warnings when Model Advisor is run against the Cognos data model
Chapter 35. Troubleshooting 513
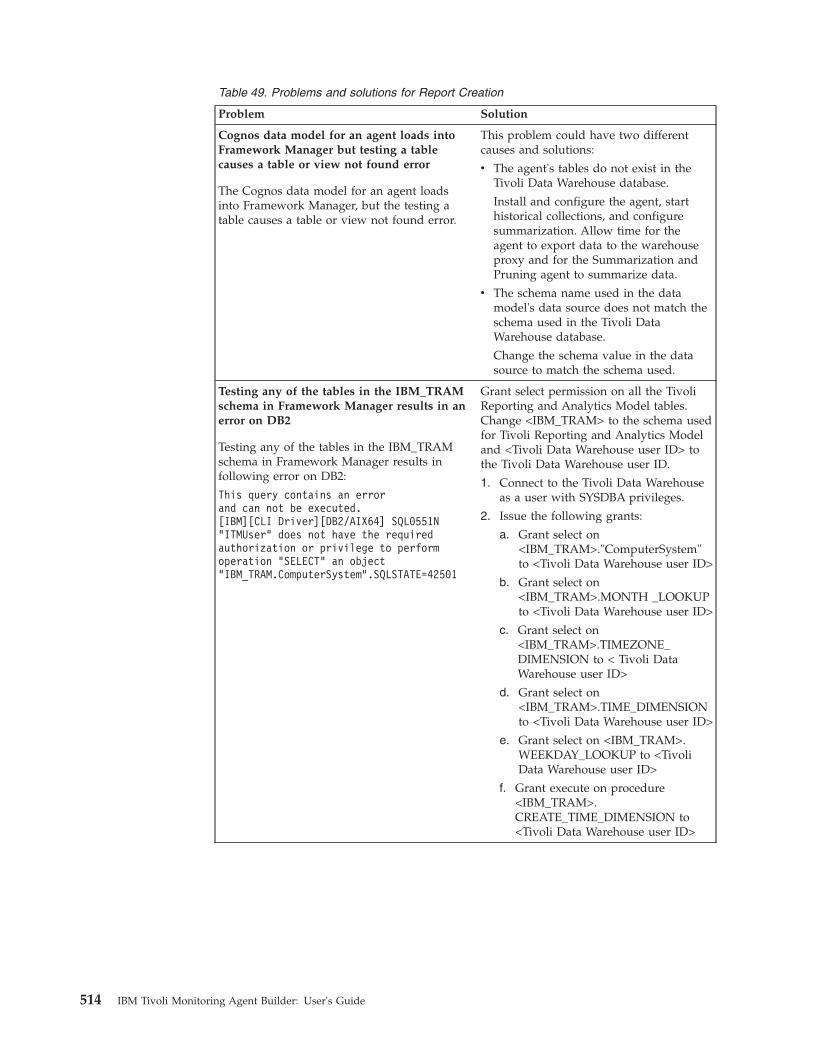
Table 49. Problems and solutions for Report Creation
Problem Solution
Cognos data model for an agent loads intoFramework Manager but testing a tablecauses a table or view not found error
The Cognos data model for an agent loadsinto Framework Manager, but the testing atable causes a table or view not found error.
This problem could have two differentcauses and solutions:
v The agent's tables do not exist in theTivoli Data Warehouse database.
Install and configure the agent, starthistorical collections, and configuresummarization. Allow time for theagent to export data to the warehouseproxy and for the Summarization andPruning agent to summarize data.
v The schema name used in the datamodel's data source does not match theschema used in the Tivoli DataWarehouse database.
Change the schema value in the datasource to match the schema used.
Testing any of the tables in the IBM_TRAMschema in Framework Manager results in anerror on DB2
Testing any of the tables in the IBM_TRAMschema in Framework Manager results infollowing error on DB2:
This query contains an errorand can not be executed.[IBM][CLI Driver][DB2/AIX64] SQL0551N"ITMUser" does not have the requiredauthorization or privilege to performoperation "SELECT" an object"IBM_TRAM.ComputerSystem".SQLSTATE=42501
Grant select permission on all the TivoliReporting and Analytics Model tables.Change <IBM_TRAM> to the schema usedfor Tivoli Reporting and Analytics Modeland <Tivoli Data Warehouse user ID> tothe Tivoli Data Warehouse user ID.
1. Connect to the Tivoli Data Warehouseas a user with SYSDBA privileges.
2. Issue the following grants:
a. Grant select on<IBM_TRAM>."ComputerSystem"to <Tivoli Data Warehouse user ID>
b. Grant select on<IBM_TRAM>.MONTH _LOOKUPto <Tivoli Data Warehouse user ID>
c. Grant select on<IBM_TRAM>.TIMEZONE_DIMENSION to < Tivoli DataWarehouse user ID>
d. Grant select on<IBM_TRAM>.TIME_DIMENSIONto <Tivoli Data Warehouse user ID>
e. Grant select on <IBM_TRAM>.WEEKDAY_LOOKUP to <TivoliData Warehouse user ID>
f. Grant execute on procedure<IBM_TRAM>.CREATE_TIME_DIMENSION to<Tivoli Data Warehouse user ID>
514 IBM Tivoli Monitoring Agent Builder: User's Guide
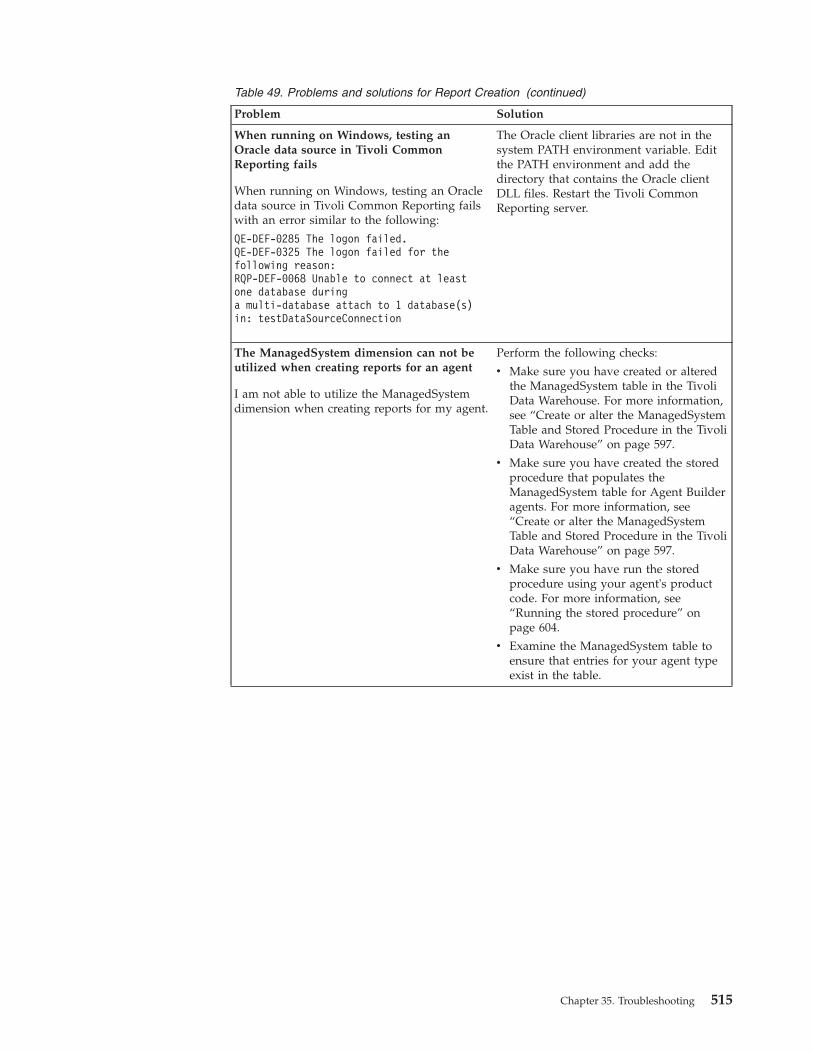
Table 49. Problems and solutions for Report Creation (continued)
Problem Solution
When running on Windows, testing anOracle data source in Tivoli CommonReporting fails
When running on Windows, testing an Oracledata source in Tivoli Common Reporting failswith an error similar to the following:
QE-DEF-0285 The logon failed.QE-DEF-0325 The logon failed for thefollowing reason:RQP-DEF-0068 Unable to connect at leastone database duringa multi-database attach to 1 database(s)in: testDataSourceConnection
The Oracle client libraries are not in thesystem PATH environment variable. Editthe PATH environment and add thedirectory that contains the Oracle clientDLL files. Restart the Tivoli CommonReporting server.
The ManagedSystem dimension can not beutilized when creating reports for an agent
I am not able to utilize the ManagedSystemdimension when creating reports for my agent.
Perform the following checks:
v Make sure you have created or alteredthe ManagedSystem table in the TivoliData Warehouse. For more information,see “Create or alter the ManagedSystemTable and Stored Procedure in the TivoliData Warehouse” on page 597.
v Make sure you have created the storedprocedure that populates theManagedSystem table for Agent Builderagents. For more information, see“Create or alter the ManagedSystemTable and Stored Procedure in the TivoliData Warehouse” on page 597.
v Make sure you have run the storedprocedure using your agent's productcode. For more information, see“Running the stored procedure” onpage 604.
v Examine the ManagedSystem table toensure that entries for your agent typeexist in the table.
Chapter 35. Troubleshooting 515
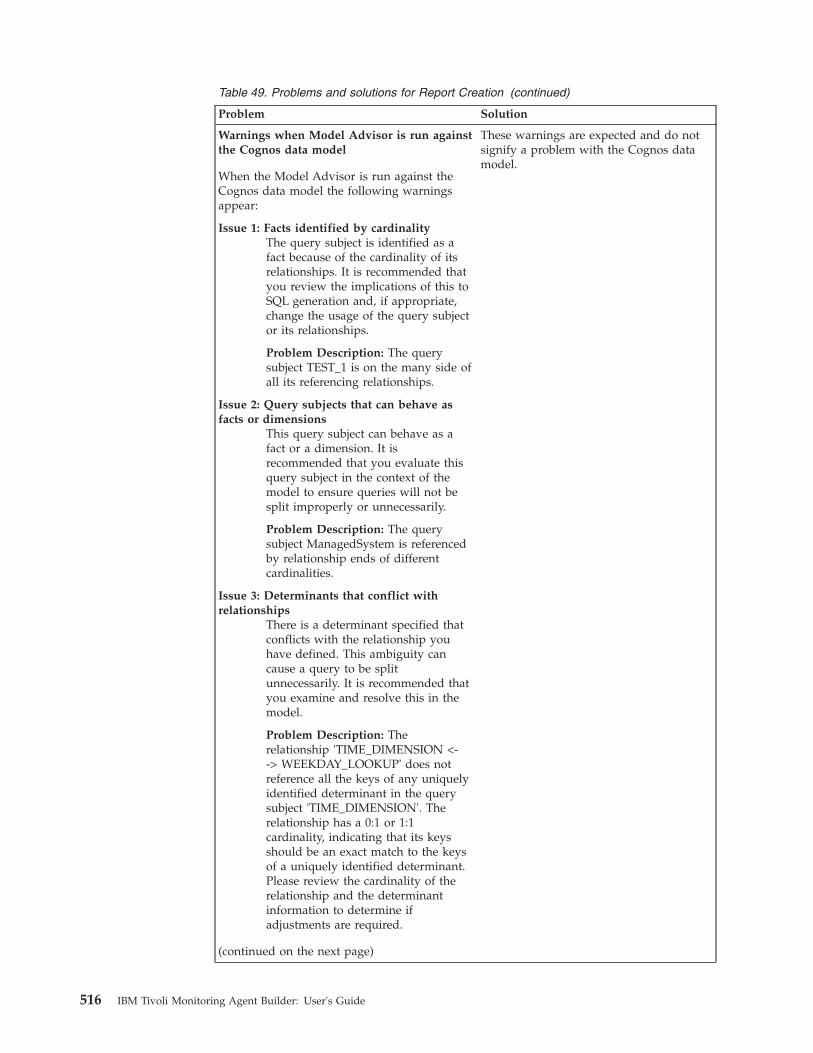
Table 49. Problems and solutions for Report Creation (continued)
Problem Solution
Warnings when Model Advisor is run againstthe Cognos data model
When the Model Advisor is run against theCognos data model the following warningsappear:
Issue 1: Facts identified by cardinalityThe query subject is identified as afact because of the cardinality of itsrelationships. It is recommended thatyou review the implications of this toSQL generation and, if appropriate,change the usage of the query subjector its relationships.
Problem Description: The querysubject TEST_1 is on the many side ofall its referencing relationships.
Issue 2: Query subjects that can behave asfacts or dimensions
This query subject can behave as afact or a dimension. It isrecommended that you evaluate thisquery subject in the context of themodel to ensure queries will not besplit improperly or unnecessarily.
Problem Description: The querysubject ManagedSystem is referencedby relationship ends of differentcardinalities.
Issue 3: Determinants that conflict withrelationships
There is a determinant specified thatconflicts with the relationship youhave defined. This ambiguity cancause a query to be splitunnecessarily. It is recommended thatyou examine and resolve this in themodel.
Problem Description: Therelationship 'TIME_DIMENSION <--> WEEKDAY_LOOKUP' does notreference all the keys of any uniquelyidentified determinant in the querysubject 'TIME_DIMENSION'. Therelationship has a 0:1 or 1:1cardinality, indicating that its keysshould be an exact match to the keysof a uniquely identified determinant.Please review the cardinality of therelationship and the determinantinformation to determine ifadjustments are required.
(continued on the next page)
These warnings are expected and do notsignify a problem with the Cognos datamodel.
516 IBM Tivoli Monitoring Agent Builder: User's Guide

Table 49. Problems and solutions for Report Creation (continued)
Problem Solution
Warnings when Model Advisor is run againstthe Cognos data model
(continued)
Issue 4: Factors that will override theMinimized SQL setting
A query subject has attributes thatwill override the SQL Generationtype setting of Minimized.Relationships between model querysubjects, determinants on modelquery subjects and data source querysubjects with modified SQL willoverride the Minimized SQLGeneration type.
Problem Description: There may beproblems generating minimized SQLfor the object Time Dimension. Theobject is set to use minimized SQL.
Problem Description: There may beproblems generating minimized SQLfor the object ManagedSystem. Theobject is set to use minimized SQL.
Problem Description: There may beproblems generating minimized SQLfor the object ManagedSystemName.The object is set to use minimizedSQL.
These warnings are expected and do notsignify a problem with the Cognos datamodel.
Support information
If you have a problem with your IBM software, you want to resolve it quickly. IBMprovides the following ways for you to obtain the support you need:
OnlineThe following sites contain troubleshooting information:v Go to the IBM Software Support site at http://www.ibm.com/software/
support/probsub.html and follow the instructions.v Go to the IBM Tivoli Distributed Monitoring and Application
Management Wiki at http://www.ibm.com/developerworks/wikis/display/tivolimonitoring/Home. Feel free to contribute to this wiki.
IBM Support AssistantThe IBM Support Assistant (ISA) is a free local software serviceabilityworkbench that helps you resolve questions and problems with IBMsoftware products. The ISA provides quick access to support-relatedinformation and serviceability tools for problem determination. To installthe ISA software, go to http://www.ibm.com/software/support/isa.
Chapter 35. Troubleshooting 517

518 IBM Tivoli Monitoring Agent Builder: User's Guide

Appendix A. Sharing project files
If you want to share an IBM Tivoli Monitoring agent project with someone,complete the following steps:1. Obtain their files. You need the entire contents of the directory with the same
name as the project in your workspace directory. For example, if yourworkspace directory is c:\Documents and Settings\User1\workspace and youwant to share your project named TestProject, you need to make the directoryc:\Documents and Settings\User1\workspace\TestProject and make all of itscontents accessible to your system
2. Select File > Import.
3. Open IBM Tivoli Monitoring.4. Select IBM Tivoli Monitoring Agent and click Next.
Figure 287. Importing files
© Copyright IBM Corp. 2007, 2012 519
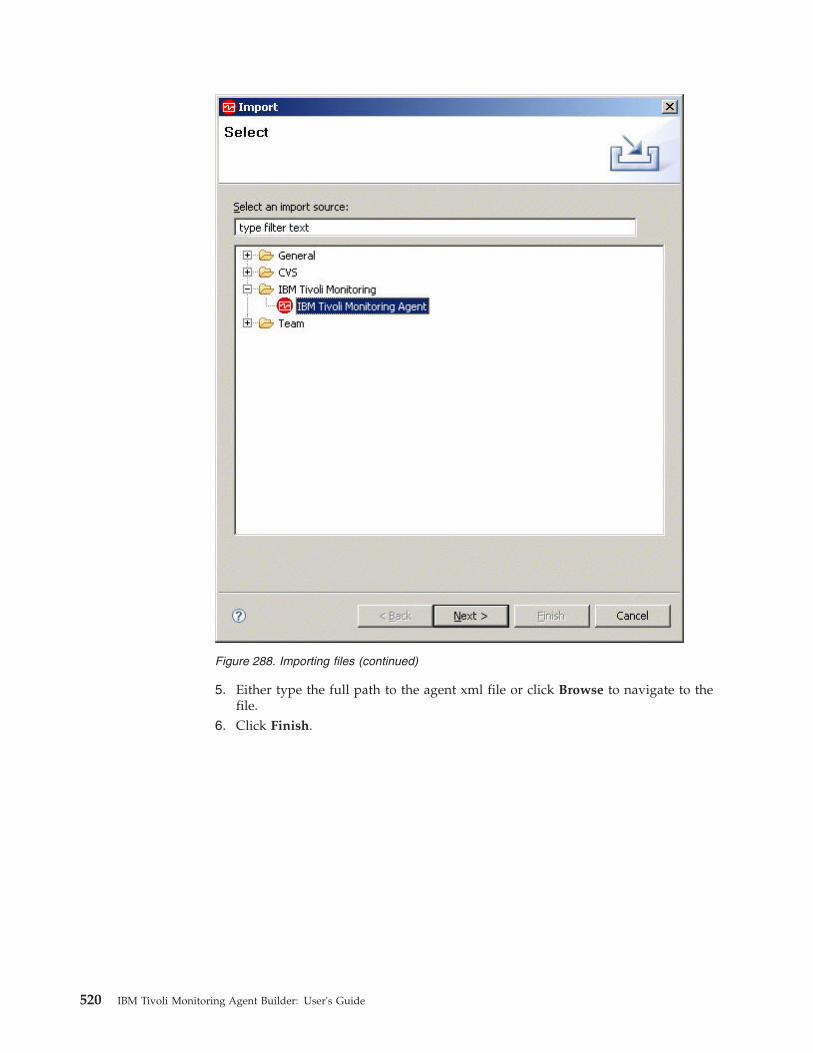
5. Either type the full path to the agent xml file or click Browse to navigate to thefile.
6. Click Finish.
Figure 288. Importing files (continued)
520 IBM Tivoli Monitoring Agent Builder: User's Guide
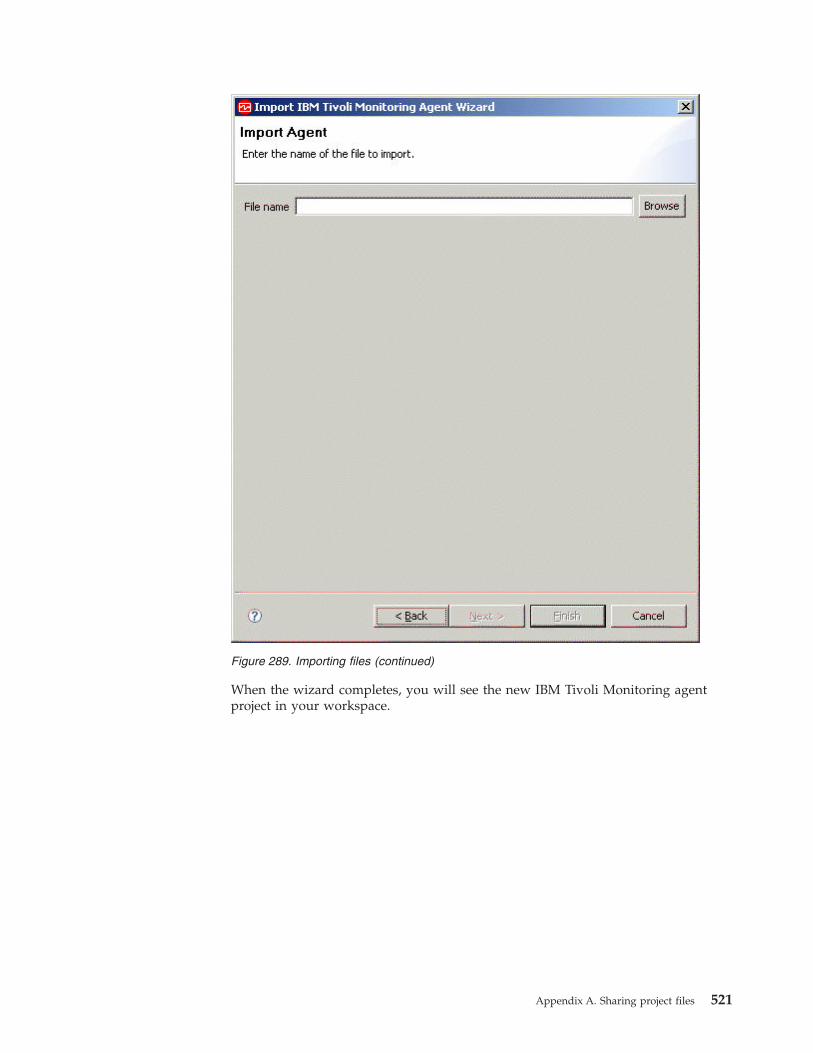
When the wizard completes, you will see the new IBM Tivoli Monitoring agentproject in your workspace.
Figure 289. Importing files (continued)
Appendix A. Sharing project files 521

522 IBM Tivoli Monitoring Agent Builder: User's Guide
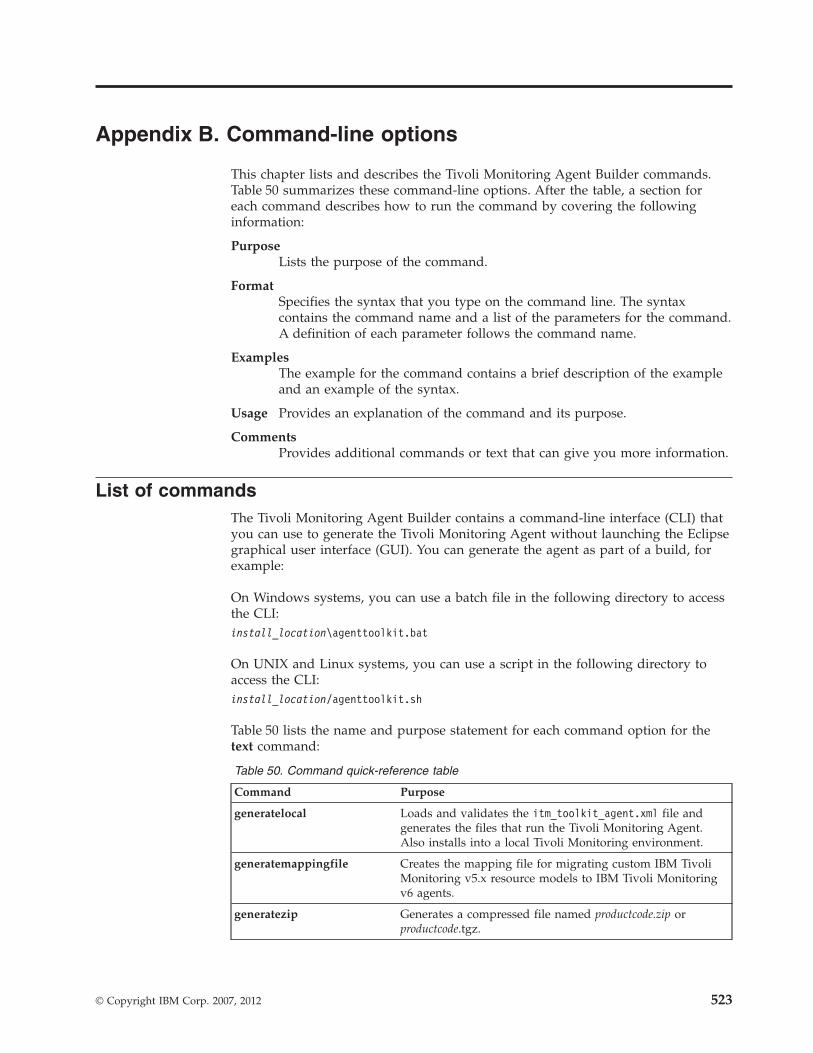
Appendix B. Command-line options
This chapter lists and describes the Tivoli Monitoring Agent Builder commands.Table 50 summarizes these command-line options. After the table, a section foreach command describes how to run the command by covering the followinginformation:
PurposeLists the purpose of the command.
FormatSpecifies the syntax that you type on the command line. The syntaxcontains the command name and a list of the parameters for the command.A definition of each parameter follows the command name.
ExamplesThe example for the command contains a brief description of the exampleand an example of the syntax.
Usage Provides an explanation of the command and its purpose.
CommentsProvides additional commands or text that can give you more information.
List of commandsThe Tivoli Monitoring Agent Builder contains a command-line interface (CLI) thatyou can use to generate the Tivoli Monitoring Agent without launching the Eclipsegraphical user interface (GUI). You can generate the agent as part of a build, forexample:
On Windows systems, you can use a batch file in the following directory to accessthe CLI:install_location\agenttoolkit.bat
On UNIX and Linux systems, you can use a script in the following directory toaccess the CLI:install_location/agenttoolkit.sh
Table 50 lists the name and purpose statement for each command option for thetext command:
Table 50. Command quick-reference table
Command Purpose
generatelocal Loads and validates the itm_toolkit_agent.xml file andgenerates the files that run the Tivoli Monitoring Agent.Also installs into a local Tivoli Monitoring environment.
generatemappingfile Creates the mapping file for migrating custom IBM TivoliMonitoring v5.x resource models to IBM Tivoli Monitoringv6 agents.
generatezip Generates a compressed file named productcode.zip orproductcode.tgz.
© Copyright IBM Corp. 2007, 2012 523

The commands in this appendix are formatted for Windows systems, which use abackslash (\) for directory paths.
For UNIX® or Linux® systems, use the same commands as for Windows systems,but with the following changes:v Use a forward slash (/) for directory paths instead of a backslash (\).v Use the agenttoolkit.sh script instead of the agenttoolkit.bat script.
524 IBM Tivoli Monitoring Agent Builder: User's Guide
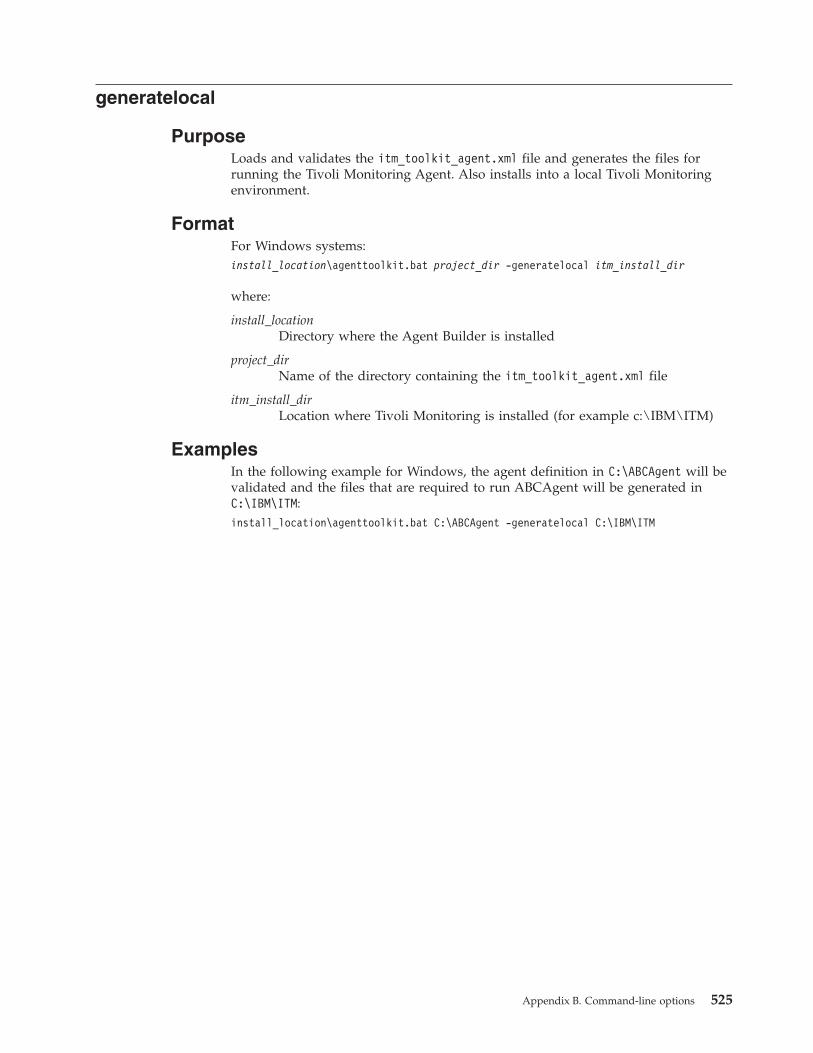
generatelocal
PurposeLoads and validates the itm_toolkit_agent.xml file and generates the files forrunning the Tivoli Monitoring Agent. Also installs into a local Tivoli Monitoringenvironment.
FormatFor Windows systems:install_location\agenttoolkit.bat project_dir -generatelocal itm_install_dir
where:
install_locationDirectory where the Agent Builder is installed
project_dirName of the directory containing the itm_toolkit_agent.xml file
itm_install_dirLocation where Tivoli Monitoring is installed (for example c:\IBM\ITM)
ExamplesIn the following example for Windows, the agent definition in C:\ABCAgent will bevalidated and the files that are required to run ABCAgent will be generated inC:\IBM\ITM:install_location\agenttoolkit.bat C:\ABCAgent -generatelocal C:\IBM\ITM
Appendix B. Command-line options 525
generatemappingfile
PurposeThis command creates the mapping file for migrating custom IBM TivoliMonitoring v5.x resource models to IBM Tivoli Monitoring v6 agents. For moreinformation, see Appendix F, “Upgrading custom IBM Tivoli Monitoring v5.xresource models to IBM Tivoli Monitoring v6.2 agents,” on page 613.
FormatFor Windows systems:install_location\agenttoolkit.bat project_dir -generatemappingfile output_dir
itm5_interp_list
where:
install_locationDirectory where the Agent Builder is installed
project_dirName of the directory containing itm_toolkit_agent.xml
output_dirName of the directory where the mapping file is written
itm5_interp_listComma-separated list of the ITM 5x operating systems on which thecustom resource model ran. The following values are allowed:v aix4-r1v hpux10v linux-ix86v linux-ppcv linux-s390v os2-ix86v os400v solaris2v solaris2-ix86v w32-ix86
ExamplesFor Windows systemsinstall_location\agenttoolkit.bat c:\ABCAgent -generatemappingfile c:\output
linux-ix86,linux-ppc,linux-s390
526 IBM Tivoli Monitoring Agent Builder: User's Guide
generatezip
PurposeLoads and validates the itm_toolkit_agent.xml file and generates a compressedfile named productcode.zip or productcode.tgz so that the agent can be installedon another system. Depending on your environment, both files can be generated.
FormatFor Windows systems:install_location\agenttoolkit.bat project_dir -generatezip output_dir
where:
project_dirName of a directory containing the itm_toolkit_agent.xml file
output_dirName of a directory where the compressed file is written
ExamplesIn the following example for Windows, the agent definition in C:\ABCAgent will bevalidated and a compressed file that contains the required files for runningABCAgent will be generated in C:\Output:install_location\agenttoolkit.bat\ C:\ABCAgent -generatezip C:\Output
Appendix B. Command-line options 527

528 IBM Tivoli Monitoring Agent Builder: User's Guide
Appendix C. Attributes reference
This appendix contains descriptions of the attributes for each attribute generatedgroup included in the Agent Builder.
Availability nodeThe Availability attribute group contains availability data for the application. Thetable provides a common format for representing application availability, whichincludes relevant information for three aspects of an application: processes, services(Windows only) and command return codes.
The following list contains information about each attribute in the Availabilityattribute group:
Node attribute - This attribute is a key attribute
DescriptionThe managed system name of the agent
Type String
Names
Attribute nameNode
Column nameORIGINNODE
Timestamp attribute
DescriptionThe local time at the agent when the data was collected
Type Time
Names
Attribute nameTimestamp
Column nameTIMESTAMP
Application Component attribute - This attribute is a key attribute
DescriptionThe descriptive name of a part of the application
Type String
Names
Attribute nameApplication_Component
Column nameCOMPONENT
Name attribute
© Copyright IBM Corp. 2007, 2012 529
DescriptionThe name of the process, service or functional test. This will matchthe executable name of the process, the service short name or thename of the process used to test the application.
Type String
Names
Attribute nameName
Column nameNAME
Status attribute
DescriptionThe status of the application component.v For processes this is 'UP', 'DOWN' 'WARNING' or
'PROCESS_DATA_NOT_AVAILABLE'.'PROCESS_DATA_NOT_AVAILABLE' will be displayed for aprocess when the matching process is running but the resourceuse information cannot be collected for that process.
v For services this is 'UP', 'DOWN' or 'UNKNOWN'. 'UNKNOWN'will be displayed when the service is not installed.
v For command return codes this is 'PASSED' or 'FAILED'
Type String
Names
Attribute nameStatus
Column nameSTATUS
Full Name attribute
DescriptionThe full name of the process including information that is processdependent. It might include the full path if the process was startedthat way, or a partial path or even a path that was changed by theprocess.
Type String
Names
Attribute nameFull_Name
Column nameFULLNAME
Type attribute
DescriptionIdentifies the type of the application component. Components areprocesses, services or command return codes.
Type Integer (Gauge)
Names
530 IBM Tivoli Monitoring Agent Builder: User's Guide
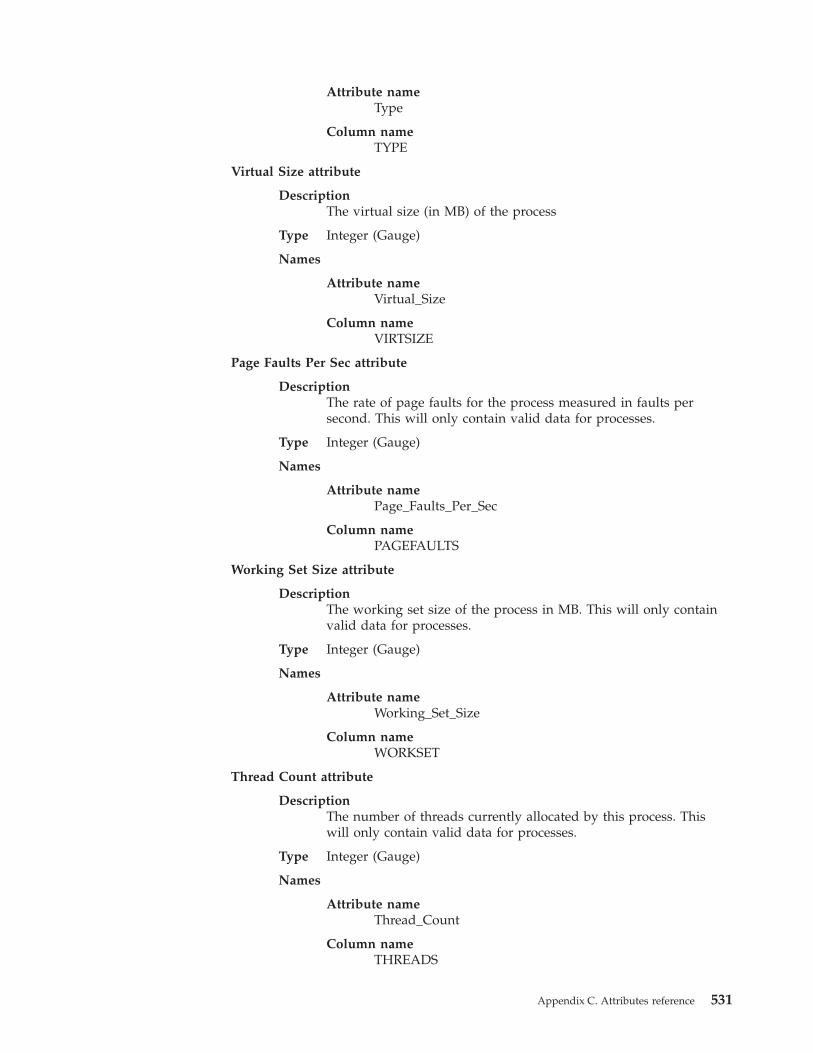
Attribute nameType
Column nameTYPE
Virtual Size attribute
DescriptionThe virtual size (in MB) of the process
Type Integer (Gauge)
Names
Attribute nameVirtual_Size
Column nameVIRTSIZE
Page Faults Per Sec attribute
DescriptionThe rate of page faults for the process measured in faults persecond. This will only contain valid data for processes.
Type Integer (Gauge)
Names
Attribute namePage_Faults_Per_Sec
Column namePAGEFAULTS
Working Set Size attribute
DescriptionThe working set size of the process in MB. This will only containvalid data for processes.
Type Integer (Gauge)
Names
Attribute nameWorking_Set_Size
Column nameWORKSET
Thread Count attribute
DescriptionThe number of threads currently allocated by this process. Thiswill only contain valid data for processes.
Type Integer (Gauge)
Names
Attribute nameThread_Count
Column nameTHREADS
Appendix C. Attributes reference 531
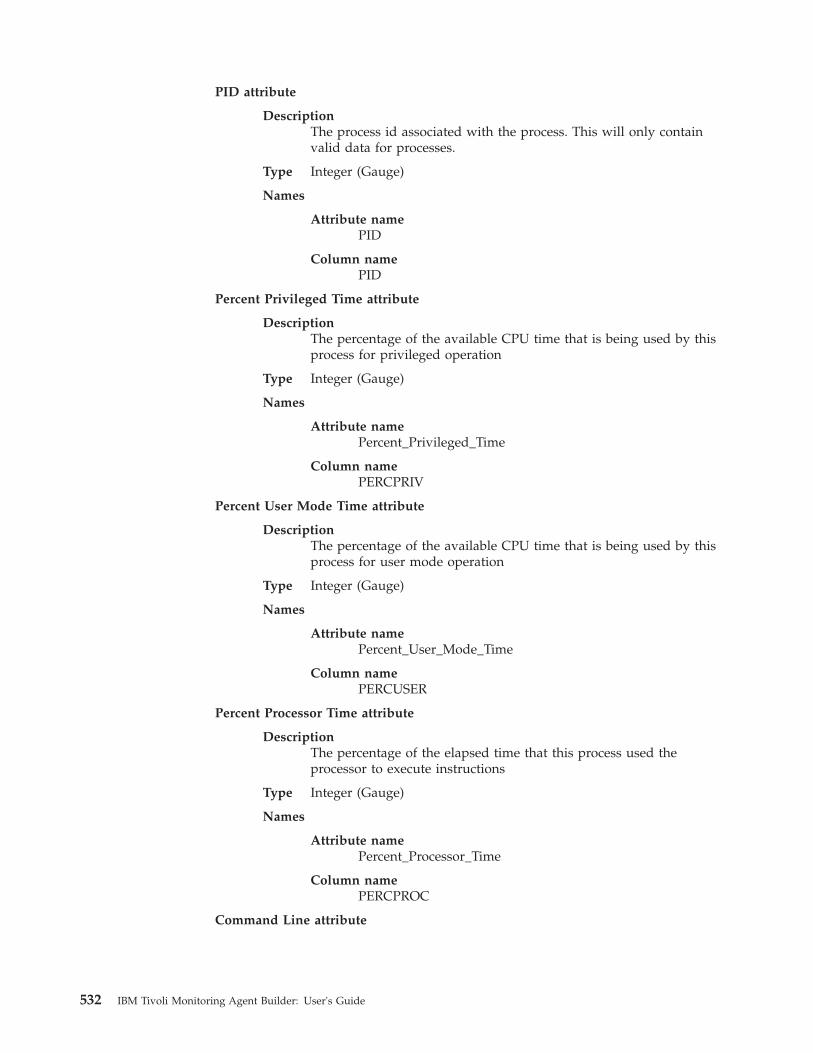
PID attribute
DescriptionThe process id associated with the process. This will only containvalid data for processes.
Type Integer (Gauge)
Names
Attribute namePID
Column namePID
Percent Privileged Time attribute
DescriptionThe percentage of the available CPU time that is being used by thisprocess for privileged operation
Type Integer (Gauge)
Names
Attribute namePercent_Privileged_Time
Column namePERCPRIV
Percent User Mode Time attribute
DescriptionThe percentage of the available CPU time that is being used by thisprocess for user mode operation
Type Integer (Gauge)
Names
Attribute namePercent_User_Mode_Time
Column namePERCUSER
Percent Processor Time attribute
DescriptionThe percentage of the elapsed time that this process used theprocessor to execute instructions
Type Integer (Gauge)
Names
Attribute namePercent_Processor_Time
Column namePERCPROC
Command Line attribute
532 IBM Tivoli Monitoring Agent Builder: User's Guide
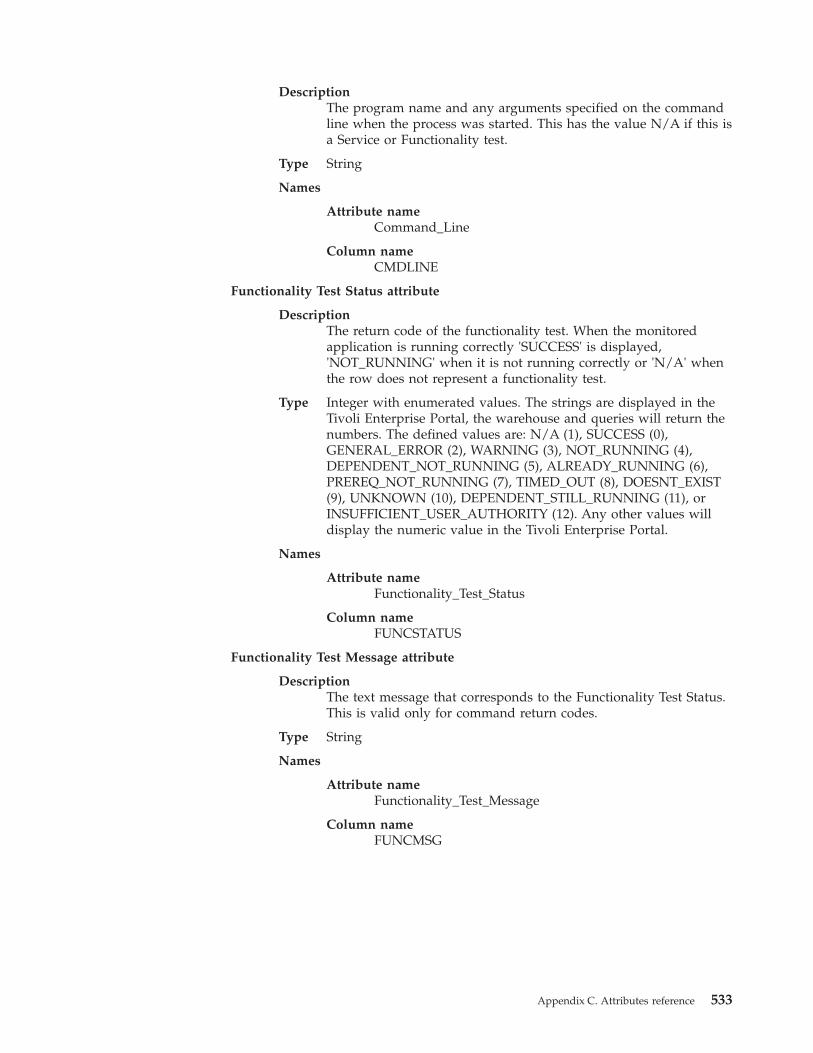
DescriptionThe program name and any arguments specified on the commandline when the process was started. This has the value N/A if this isa Service or Functionality test.
Type String
Names
Attribute nameCommand_Line
Column nameCMDLINE
Functionality Test Status attribute
DescriptionThe return code of the functionality test. When the monitoredapplication is running correctly 'SUCCESS' is displayed,'NOT_RUNNING' when it is not running correctly or 'N/A' whenthe row does not represent a functionality test.
Type Integer with enumerated values. The strings are displayed in theTivoli Enterprise Portal, the warehouse and queries will return thenumbers. The defined values are: N/A (1), SUCCESS (0),GENERAL_ERROR (2), WARNING (3), NOT_RUNNING (4),DEPENDENT_NOT_RUNNING (5), ALREADY_RUNNING (6),PREREQ_NOT_RUNNING (7), TIMED_OUT (8), DOESNT_EXIST(9), UNKNOWN (10), DEPENDENT_STILL_RUNNING (11), orINSUFFICIENT_USER_AUTHORITY (12). Any other values willdisplay the numeric value in the Tivoli Enterprise Portal.
Names
Attribute nameFunctionality_Test_Status
Column nameFUNCSTATUS
Functionality Test Message attribute
DescriptionThe text message that corresponds to the Functionality Test Status.This is valid only for command return codes.
Type String
Names
Attribute nameFunctionality_Test_Message
Column nameFUNCMSG
Appendix C. Attributes reference 533
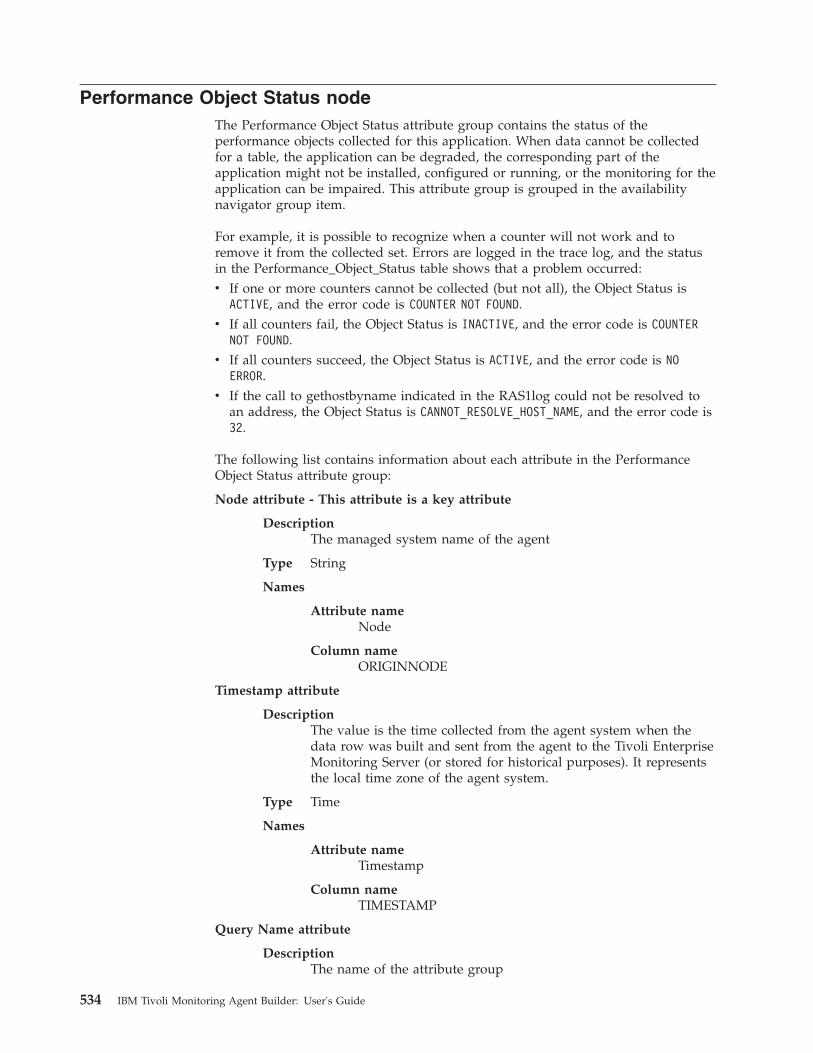
Performance Object Status nodeThe Performance Object Status attribute group contains the status of theperformance objects collected for this application. When data cannot be collectedfor a table, the application can be degraded, the corresponding part of theapplication might not be installed, configured or running, or the monitoring for theapplication can be impaired. This attribute group is grouped in the availabilitynavigator group item.
For example, it is possible to recognize when a counter will not work and toremove it from the collected set. Errors are logged in the trace log, and the statusin the Performance_Object_Status table shows that a problem occurred:v If one or more counters cannot be collected (but not all), the Object Status is
ACTIVE, and the error code is COUNTER NOT FOUND.v If all counters fail, the Object Status is INACTIVE, and the error code is COUNTER
NOT FOUND.v If all counters succeed, the Object Status is ACTIVE, and the error code is NO
ERROR.v If the call to gethostbyname indicated in the RAS1log could not be resolved to
an address, the Object Status is CANNOT_RESOLVE_HOST_NAME, and the error code is32.
The following list contains information about each attribute in the PerformanceObject Status attribute group:
Node attribute - This attribute is a key attribute
DescriptionThe managed system name of the agent
Type String
Names
Attribute nameNode
Column nameORIGINNODE
Timestamp attribute
DescriptionThe value is the time collected from the agent system when thedata row was built and sent from the agent to the Tivoli EnterpriseMonitoring Server (or stored for historical purposes). It representsthe local time zone of the agent system.
Type Time
Names
Attribute nameTimestamp
Column nameTIMESTAMP
Query Name attribute
DescriptionThe name of the attribute group
534 IBM Tivoli Monitoring Agent Builder: User's Guide
Type String
Names
Attribute nameQuery_Name
Column nameATTRGRP
Object Name attribute
DescriptionThe name of the performance object
Type String
Names
Attribute nameObject_Name
Column nameOBJNAME
Object Type attribute
DescriptionThe type of the performance object
Type Integer with enumerated values. The strings are displayed in theTivoli Enterprise Portal, the warehouse and queries will return thenumbers. The defined values are WMI(0), PERFMON(1), (4),SHELL COMMAND(5) or LOG_FILE (11). Any other values showthe numeric value in the Tivoli Enterprise Portal.
Names
Attribute nameObject_Type
Column nameOBJTYPE
Object Status attribute
DescriptionThe status of the performance object
Type Integer with enumerated values. The strings are displayed in theTidvoli Enterprise Portal, the warehouse and queries will returnthe numbers. The defined values are: ACTIVE (0) or INACTIVE(1). Any other values will display the numeric value in the TivoliEnterprise Portal.
Names
Attribute nameObject_Status
Column nameOBJSTTS
Error Code attribute
Appendix C. Attributes reference 535
DescriptionThe error code associated with the status. When the group isACTIVE this will be NO ERROR. Other values allow you to verifythe operation of the agent.
Type Integer with enumerated values. The strings are displayed in theTivoli Enterprise Portal, the warehouse and queries will return thenumbers. The defined values are: when the
NO ERROR (0) group is ACTIVE this will be NO ERROR (0).Other values allow you to verify the operation of the agent. Theyare:v GENERAL ERROR (1)v OBJECT NOT FOUND (2)v COUNTER NOT FOUND (3)v NAMESPACE ERROR (4)v OBJECT CURRENTLY UNAVAILABLE (5)v COM LIBRARY INIT FAILURE (6)v SECURITY INIT FAILURE (7)v PROXY SECURITY FAILURE (9)v NO INSTANCES RETURNED (10)v ASSOCIATOR QUERY FAILED (11)v REFERENCE QUERY FAILED (12)v NO RESPONSE RECEIVED (13)v CANNOT FIND JOINED QUERY (14)v CANNOT FIND JOIN ATTRIBUTE IN QUERY 1 RESULTS (15)v CANNOT FIND JOIN ATTRIBUTE IN QUERY 2 RESULTS (16)v QUERY 1 NOT A SINGLETON (17)v QUERY 2 NOT A SINGLETON (18)v NO INSTANCES RETURNED IN QUERY 1 (19)v NO INSTANCES RETURNED IN QUERY 2 (20)v CANNOT FIND ROLLUP QUERY (21)v CANNOT FIND ROLLUP ATTRIBUTE (22)v FILE OFFLINE (23)v NO HOSTNAME (24)v MISSING LIBRARY (25)v ATTRIBUTE COUNT MISMATCH (26)v ATTRIBUTE NAME MISMATCH (27)v COMMON DATA PROVIDER NOT STARTED (28)v CALLBACK REGISTRATION ERROR (29)v MDL LOAD ERROR (30)v AUTHENTICATION_FAILED (31)v CANNOT_RESOLVE_HOST_NAME (32)v SUBNODE_UNAVAILABLE (33)v SUBNODE_NOT_FOUND_IN_CONFIG (34)v ATTRIBUTE_ERROR (35)v CLASSPATH_ERROR (36)v CONNECTION_FAILURE (37)
536 IBM Tivoli Monitoring Agent Builder: User's Guide

v APPLICATION_HUNG (1000)v DISK_NOT_READABLE (1001)v FILTER_SYNTAX_ERROR (38)v FILE_NAME_MISSING (39)v SQL_QUERY_ERROR (40)v SQL_FILTER_QUERY_ERROR (41)v SQL_DB_QUERY_ERROR (42)v SQL_DB_FILTER_QUERY_ERROR (43)v PORT_OPEN_FAILED (44)v ACCESS_DENIED (45),v TIMEOUT (46)v NOT_IMPLEMENTED (47)v REQUESTED_A_BAD_VALUE (48)v RESPONSE_TOO_BIG (49)v GENERAL_RESPONSE_ERROR (50)v SCRIPT_NONZERO_RETURN (51)v SCRIPT_NOT_FOUND (52)v SCRIPT_LAUNCH_ERROR (53)v CONF_FILE_DOES_NOT_EXIST (54)v CONF_FILE_ACCESS_DENIED (55)v NVALID_CONF_FILE (56)v EIF_INITIALIZATION_FAILED (57)v CANNOT_OPEN_FORMAT_FILE" (58)v FORMAT_FILE_SYNTAX_ERROR (59)v REMOTE_HOST_UNAVAILABLE (60)v EVENT_LOG_DOES_NOT_EXIST (61)v PING_FILE_DOES_NOT_EXIST (62)v NO_PING_DEVICE_FILES (63)v PING_DEVICE_LIST_FILE_MISSING (64)v SNMP_MISSING_PASSWORD (65)v DISABLED (66)v URLS_FILE_NOT_FOUND (67)
Any other values will display the numeric value in the TivoliEnterprise Portal.
Names
Attribute nameError_Code
Column nameERRCODE
Last Collection Start attribute
DescriptionThe most recent time a data collection for this groupstarted
Type
Appendix C. Attributes reference 537
Timestamp with enumerated values. The strings aredisplayed in the Tivoli Enterprise Portal. The warehouseand queries return the values shown in parentheses. Thefollowing values are defined:v NOT COLLECTED (0691231190000000)
Any other values will display the actual value returned bythe agent in the Tivoli Enterprise Portal.
Names
Attribute nameLast_Collection_Start
Column nameCOLSTRT
Last Collection Finished attribute
DescriptionThe most recent time a data collection for this groupfinished
Type
Timestamp with enumerated values. The strings aredisplayed in the Tivoli Enterprise Portal. The warehouseand queries return the values shown in parentheses. Thefollowing values are defined:v NOT COLLECTED (0691231190000000)
Any other values will display the actual value returned bythe agent in the Tivoli Enterprise Portal.
Names
Attribute nameLast_Collection_Finished
Column nameCOLFINI
Last Collection Duration attribute
DescriptionThe duration of the most recently completed datacollection for this group in seconds.
Type
Real number (32 bit counter) with 2 decimal places ofprecision
Names
Attribute name
Column name
Average Collection Duration attribute
DescriptionThe average duration of all data collections for this groupin seconds.
Type
538 IBM Tivoli Monitoring Agent Builder: User's Guide
Real number (32 bit counter) with 2 decimal places ofprecision with enumerated values. The strings aredisplayed in the Tivoli Enterprise Portal. The warehouseand queries return the values shown in parentheses. Thefollowing values are defined:v NO DATA (-100)
Any other values will display the actual value returned bythe agent in the Tivoli Enterprise Portal.
Names
Attribute nameAverage_Collection_Duration
Column nameCOLAVGD
Refresh Interval attribute
DescriptionThe interval at which this group is refreshed in seconds.
Type Integer (32 bit counter)
Names
Attribute nameRefresh_Interval
Column nameREFRINT
Number of Collections attribute
DescriptionThe number of times this group has been collected sincethe agent started.
Type Integer (32 bit counter)
Names
Attribute nameNumber_of_Collections
Column nameNUMCOLL
Cache Hits attribute
DescriptionThe number of times a data request for this group wassatisfied from the cache.
Type Integer (32 bit counter)
Names
Attribute nameCache_Hits
Column nameCACHEHT
Cache Misses attribute
Appendix C. Attributes reference 539
DescriptionThe number of times a data request for this group was notavailable in the cache.
Type Integer (32 bit counter)
Names
Attribute nameCache_Misses
Column nameCACHEMS
Cache Hit Percent attribute
DescriptionThe percentage of data requests for this group that weresatisfied from the cache.
Type Real number (32-bit counter) with 2 decimal places ofprecision
Names
Attribute nameCache_Hit_Percent
Column nameCACHPCT
Intervals Skipped attribute
DescriptionThe number of times a background data collection for thisgroup was skipped because the previous collection wasstill running when the next one was due to start.
Type Integer
Names
Attribute nameIntervals_Skipped
Column nameINTSKIP
Thread Pool Status attribute groupThe Thread Pool Status attribute group contains information that reflects the statusof the internal thread pool used to collect data asynchronously.
The following comprises a list of the attributes for this attribute group. The namein bold text shows how the attribute is displayed in the Tivoli Enterprise Portal.
The following list contains information about each attribute in the Thread PoolStatus attribute group:
Node attribute - This attribute is a key attribute
DescriptionThe managed system name of the agent
Type String
540 IBM Tivoli Monitoring Agent Builder: User's Guide
Names
Attribute nameNode
Column nameORIGINNODE
Timestamp attribute
DescriptionThe value is the time collected from the agent system when thedata row was built and sent from the agent to the Tivoli EnterpriseMonitoring Server (or stored for historical purposes). It representsthe local time zone of the agent system.
Type Time
Names
Attribute nameTimestamp
Column nameTIMESTAMP
Thread Pool Size attribute
DescriptionThe number of threads currently existing in the thread pool.
Type Integer
Names
Attribute nameThread_Pool_Size
Column nameTHPSIZE
Thread Pool Max Size attribute
DescriptionThe maximum number of threads allowed to exist in the threadpool.
Type Integer
Names
Attribute nameThread_Pool_Max_Size
Column nameTPMAXSZ
Thread Pool Active Threads attribute
DescriptionThe number of threads in the thread pool currently active doingwork.
Type Integer
Names
Appendix C. Attributes reference 541
Attribute nameThread_Pool_Active_Threads
Column nameTPACTTH
Thread Pool Avg Active Threads attribute
DescriptionThe average number of threads in the thread pool simultaneouslyactive doing work.
Type Integer
Names
Attribute nameThread_Pool_Avg_Active_Threads
Column nameTPAVGAT
Thread Pool Min Active Threads attribute
DescriptionThe minimum number of threads in the thread poolsimultaneously active doing work.
Type Integer
Names
Attribute nameThread_Pool_Min_Active_Threads
Column nameTPMINAT
Thread Pool Max Active Threads attribute
DescriptionThe peak number of threads in the thread pool simultaneouslyactive doing work.
Type Integer
Names
Attribute nameThread_Pool_Max_Active_Threads
Column nameTPMAXAT
Thread Pool Queue Length attribute
DescriptionThe number of jobs currently waiting in the thread pool queue.
Type Integer
Names
Attribute nameThread_Pool_Queue_Length
Column nameTPQLGTH
542 IBM Tivoli Monitoring Agent Builder: User's Guide

Thread Pool Avg Queue Length attribute
DescriptionThe average length of the thread pool queue during this run.
Type Integer
Names
Attribute nameThread_Pool_Avg_Queue_Length
Column nameTPAVGQL
Thread Pool Min Queue Length attribute
DescriptionThe minimum length the thread pool queue has reached.
Type Integer
Names
Attribute nameThread_Pool_Min_Queue_Length
Column nameTPMINQL
Thread Pool Max Queue Length attribute
DescriptionThe peak length the thread pool queue has reached.
Type Integer
Names
Attribute nameThread_Pool_Max_Queue_Length
Column nameTPMAXQL
Thread Pool Avg Job Wait attribute
DescriptionThe average time a job spends waiting on the thread pool queue.
Type Integer
Names
Attribute nameThread_Pool_Avg_Job_Wait
Column nameTPAVJBW
Thread Pool Total Jobs attribute
DescriptionThe number of jobs completed by all threads in the pool sinceagent start.
Type Integer
Names
Appendix C. Attributes reference 543
Attribute nameThread_Pool_Total_Jobs
Column nameTPTJOBS
Event log attribute nodeThe Event log attribute group contains any recent event log entries that pertain tothe application. By default, the agent displays only events that occur after theagent is started. Events are removed from the Event Log view 1 hour after theyoccur.
The following list contains information about each attribute in the Event Logattribute group:
Node attribute - This attribute is a key attribute
DescriptionThe managed system name of the agent
Type String
Names
Attribute nameNode
Column nameORIGINNODE
Log Name attribute
DescriptionThe event log - Application, System, Security or anapplication-specific log
Type String
Names
Attribute nameLog_Name
Column nameLOGNAME
Event Source attribute
DescriptionThe event source defined by the application
Type String
Names
Attribute nameEvent_Source
Column nameEVTSOURCE
Event Type attribute
544 IBM Tivoli Monitoring Agent Builder: User's Guide
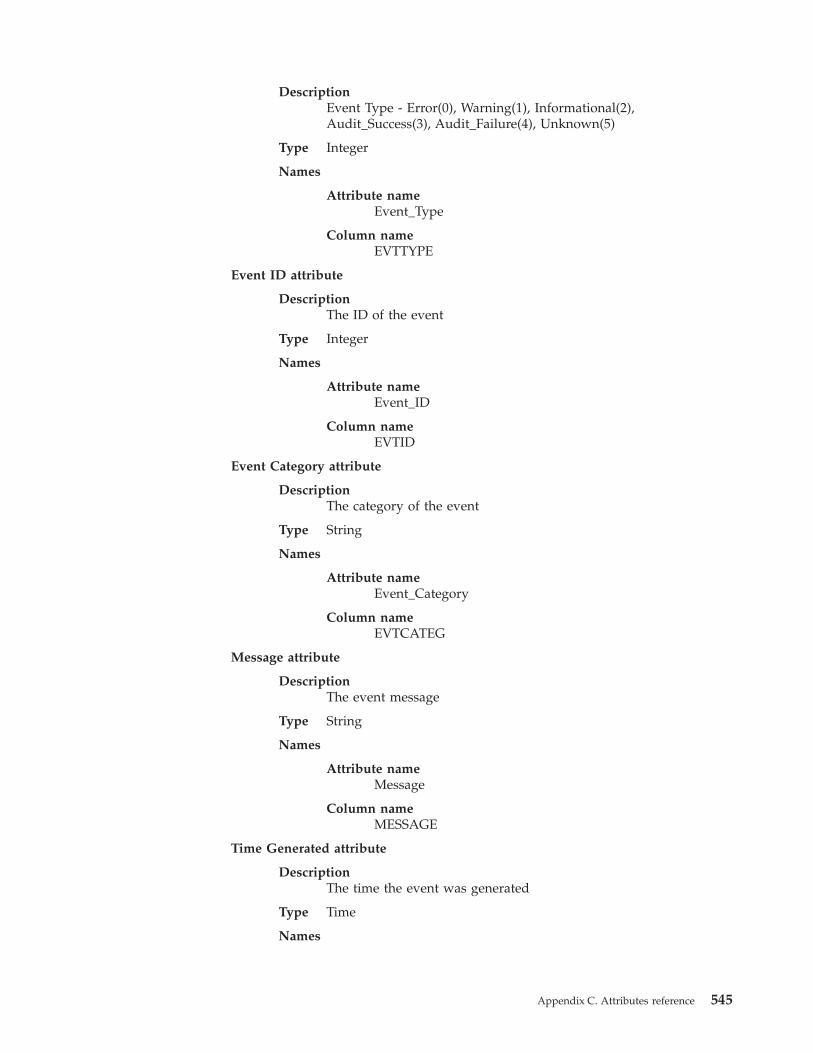
DescriptionEvent Type - Error(0), Warning(1), Informational(2),Audit_Success(3), Audit_Failure(4), Unknown(5)
Type Integer
Names
Attribute nameEvent_Type
Column nameEVTTYPE
Event ID attribute
DescriptionThe ID of the event
Type Integer
Names
Attribute nameEvent_ID
Column nameEVTID
Event Category attribute
DescriptionThe category of the event
Type String
Names
Attribute nameEvent_Category
Column nameEVTCATEG
Message attribute
DescriptionThe event message
Type String
Names
Attribute nameMessage
Column nameMESSAGE
Time Generated attribute
DescriptionThe time the event was generated
Type Time
Names
Appendix C. Attributes reference 545
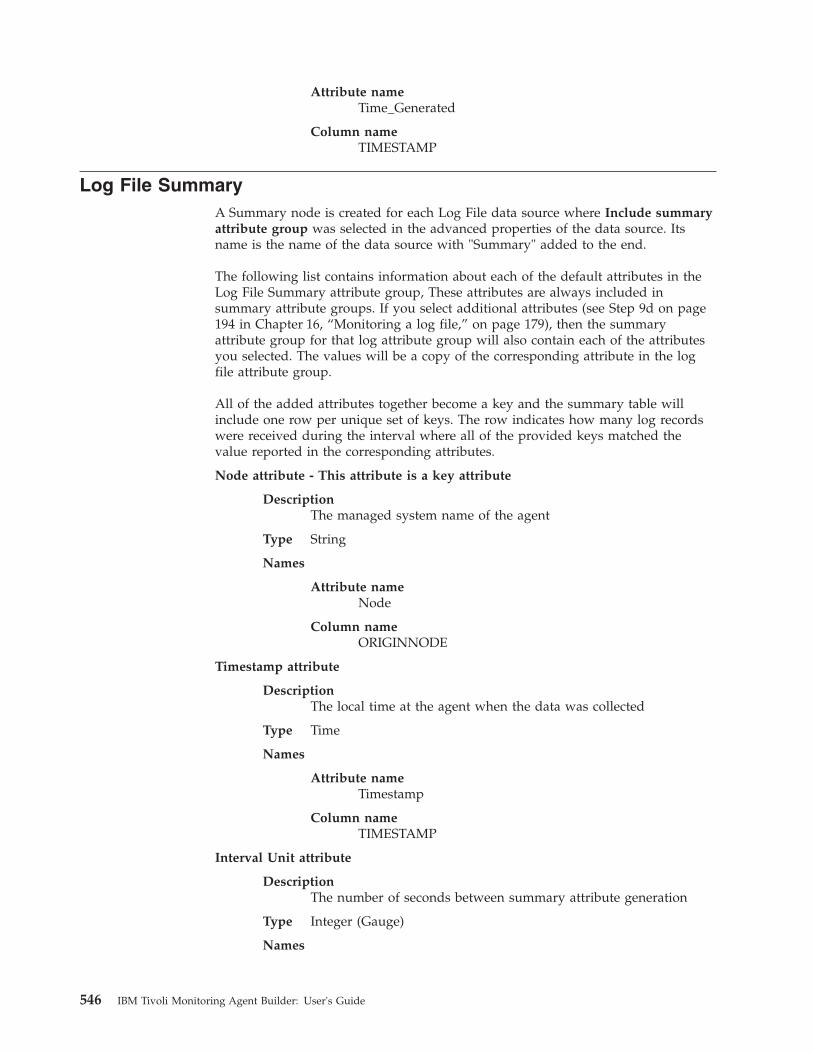
Attribute nameTime_Generated
Column nameTIMESTAMP
Log File SummaryA Summary node is created for each Log File data source where Include summaryattribute group was selected in the advanced properties of the data source. Itsname is the name of the data source with "Summary" added to the end.
The following list contains information about each of the default attributes in theLog File Summary attribute group, These attributes are always included insummary attribute groups. If you select additional attributes (see Step 9d on page194 in Chapter 16, “Monitoring a log file,” on page 179), then the summaryattribute group for that log attribute group will also contain each of the attributesyou selected. The values will be a copy of the corresponding attribute in the logfile attribute group.
All of the added attributes together become a key and the summary table willinclude one row per unique set of keys. The row indicates how many log recordswere received during the interval where all of the provided keys matched thevalue reported in the corresponding attributes.
Node attribute - This attribute is a key attribute
DescriptionThe managed system name of the agent
Type String
Names
Attribute nameNode
Column nameORIGINNODE
Timestamp attribute
DescriptionThe local time at the agent when the data was collected
Type Time
Names
Attribute nameTimestamp
Column nameTIMESTAMP
Interval Unit attribute
DescriptionThe number of seconds between summary attribute generation
Type Integer (Gauge)
Names
546 IBM Tivoli Monitoring Agent Builder: User's Guide
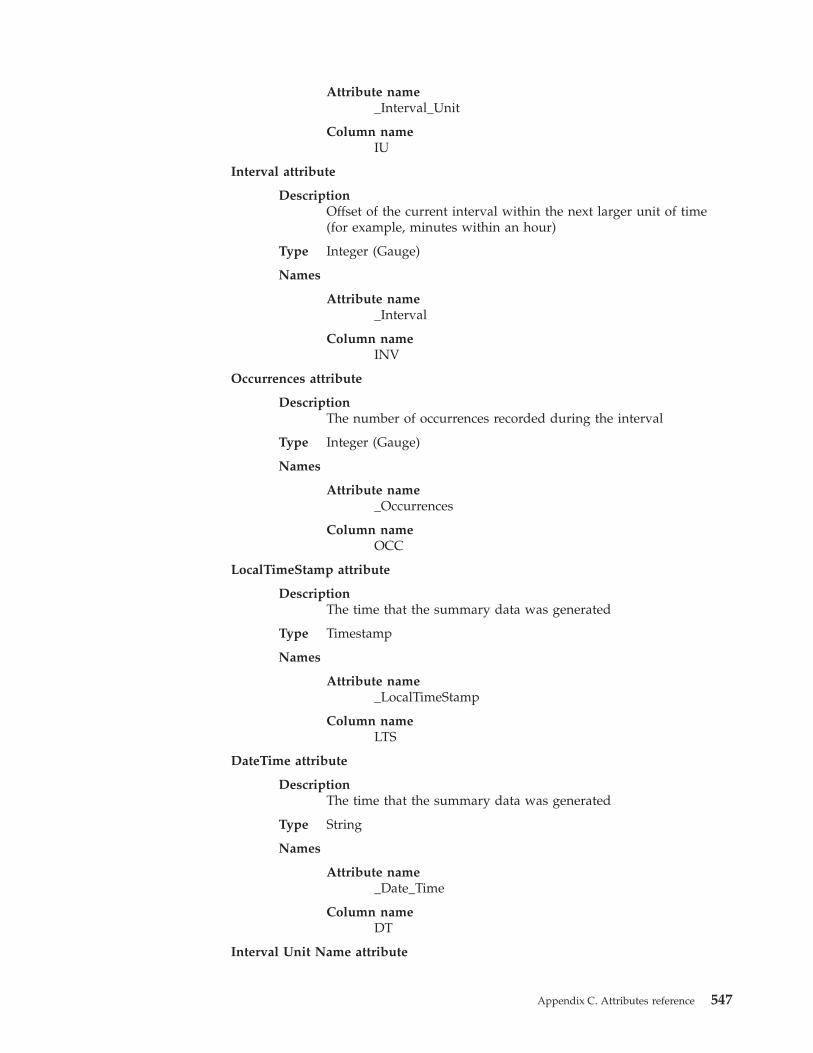
Attribute name_Interval_Unit
Column nameIU
Interval attribute
DescriptionOffset of the current interval within the next larger unit of time(for example, minutes within an hour)
Type Integer (Gauge)
Names
Attribute name_Interval
Column nameINV
Occurrences attribute
DescriptionThe number of occurrences recorded during the interval
Type Integer (Gauge)
Names
Attribute name_Occurrences
Column nameOCC
LocalTimeStamp attribute
DescriptionThe time that the summary data was generated
Type Timestamp
Names
Attribute name_LocalTimeStamp
Column nameLTS
DateTime attribute
DescriptionThe time that the summary data was generated
Type String
Names
Attribute name_Date_Time
Column nameDT
Interval Unit Name attribute
Appendix C. Attributes reference 547
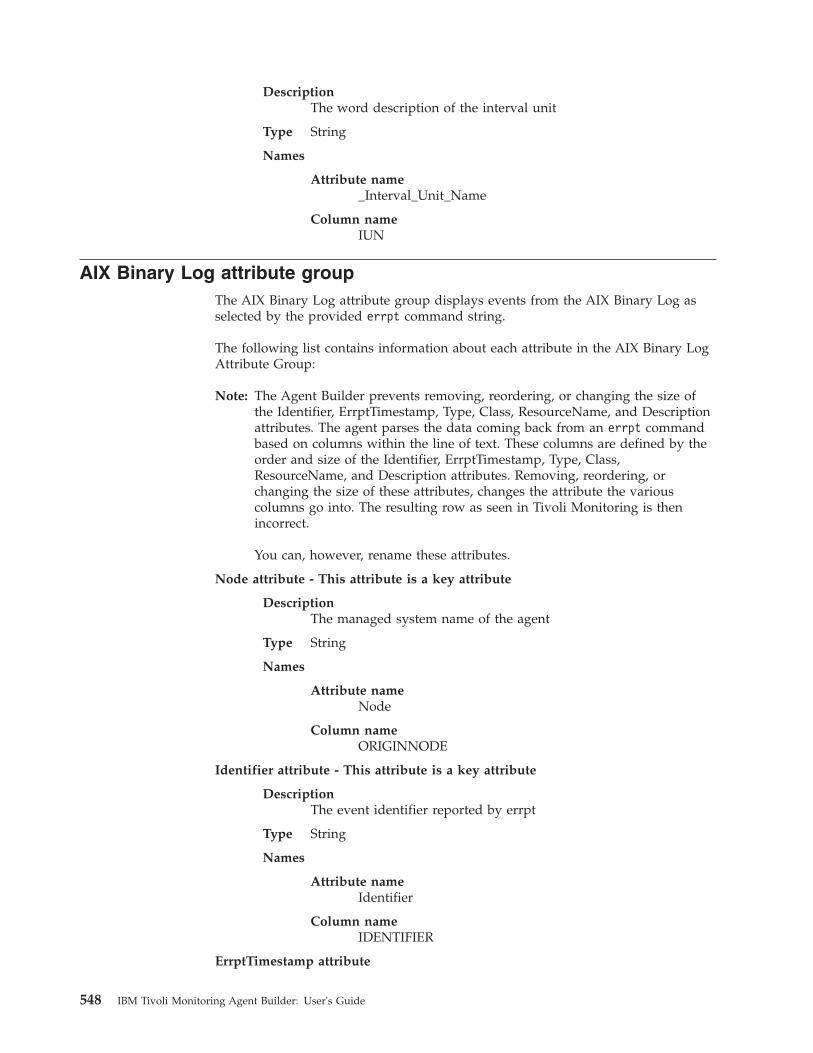
DescriptionThe word description of the interval unit
Type String
Names
Attribute name_Interval_Unit_Name
Column nameIUN
AIX Binary Log attribute groupThe AIX Binary Log attribute group displays events from the AIX Binary Log asselected by the provided errpt command string.
The following list contains information about each attribute in the AIX Binary LogAttribute Group:
Note: The Agent Builder prevents removing, reordering, or changing the size ofthe Identifier, ErrptTimestamp, Type, Class, ResourceName, and Descriptionattributes. The agent parses the data coming back from an errpt commandbased on columns within the line of text. These columns are defined by theorder and size of the Identifier, ErrptTimestamp, Type, Class,ResourceName, and Description attributes. Removing, reordering, orchanging the size of these attributes, changes the attribute the variouscolumns go into. The resulting row as seen in Tivoli Monitoring is thenincorrect.
You can, however, rename these attributes.
Node attribute - This attribute is a key attribute
DescriptionThe managed system name of the agent
Type String
Names
Attribute nameNode
Column nameORIGINNODE
Identifier attribute - This attribute is a key attribute
DescriptionThe event identifier reported by errpt
Type String
Names
Attribute nameIdentifier
Column nameIDENTIFIER
ErrptTimestamp attribute
548 IBM Tivoli Monitoring Agent Builder: User's Guide
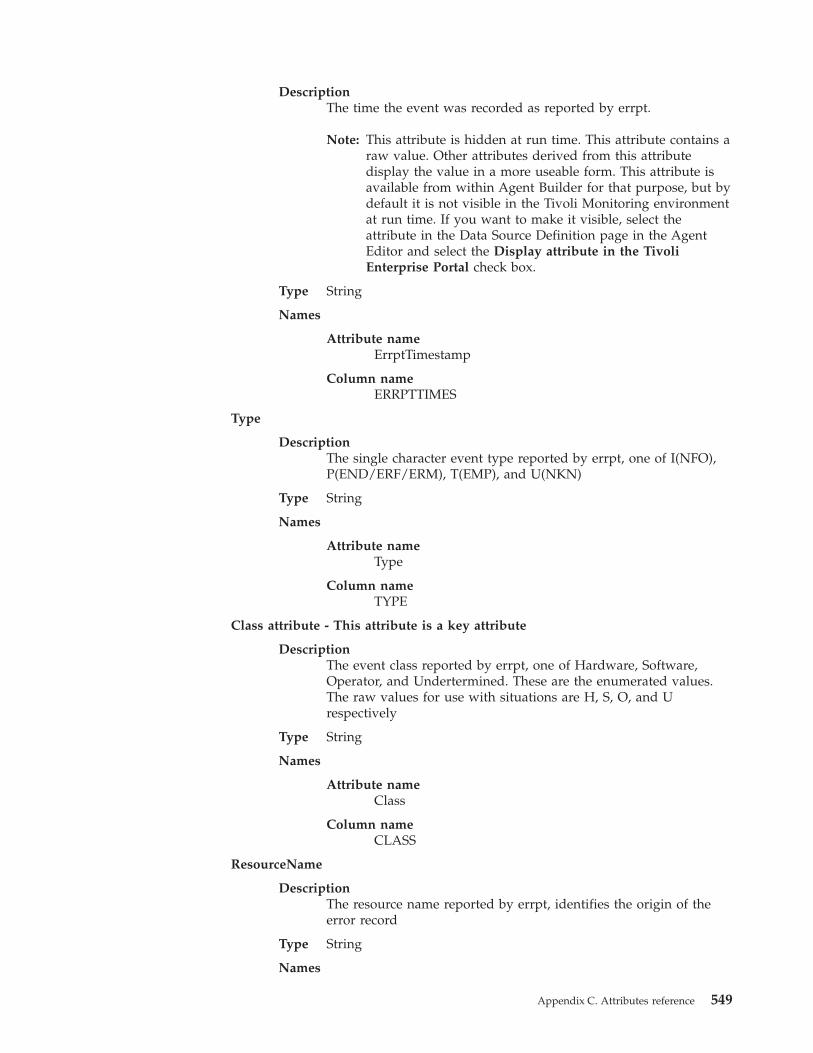
DescriptionThe time the event was recorded as reported by errpt.
Note: This attribute is hidden at run time. This attribute contains araw value. Other attributes derived from this attributedisplay the value in a more useable form. This attribute isavailable from within Agent Builder for that purpose, but bydefault it is not visible in the Tivoli Monitoring environmentat run time. If you want to make it visible, select theattribute in the Data Source Definition page in the AgentEditor and select the Display attribute in the TivoliEnterprise Portal check box.
Type String
Names
Attribute nameErrptTimestamp
Column nameERRPTTIMES
Type
DescriptionThe single character event type reported by errpt, one of I(NFO),P(END/ERF/ERM), T(EMP), and U(NKN)
Type String
Names
Attribute nameType
Column nameTYPE
Class attribute - This attribute is a key attribute
DescriptionThe event class reported by errpt, one of Hardware, Software,Operator, and Undertermined. These are the enumerated values.The raw values for use with situations are H, S, O, and Urespectively
Type String
Names
Attribute nameClass
Column nameCLASS
ResourceName
DescriptionThe resource name reported by errpt, identifies the origin of theerror record
Type String
Names
Appendix C. Attributes reference 549
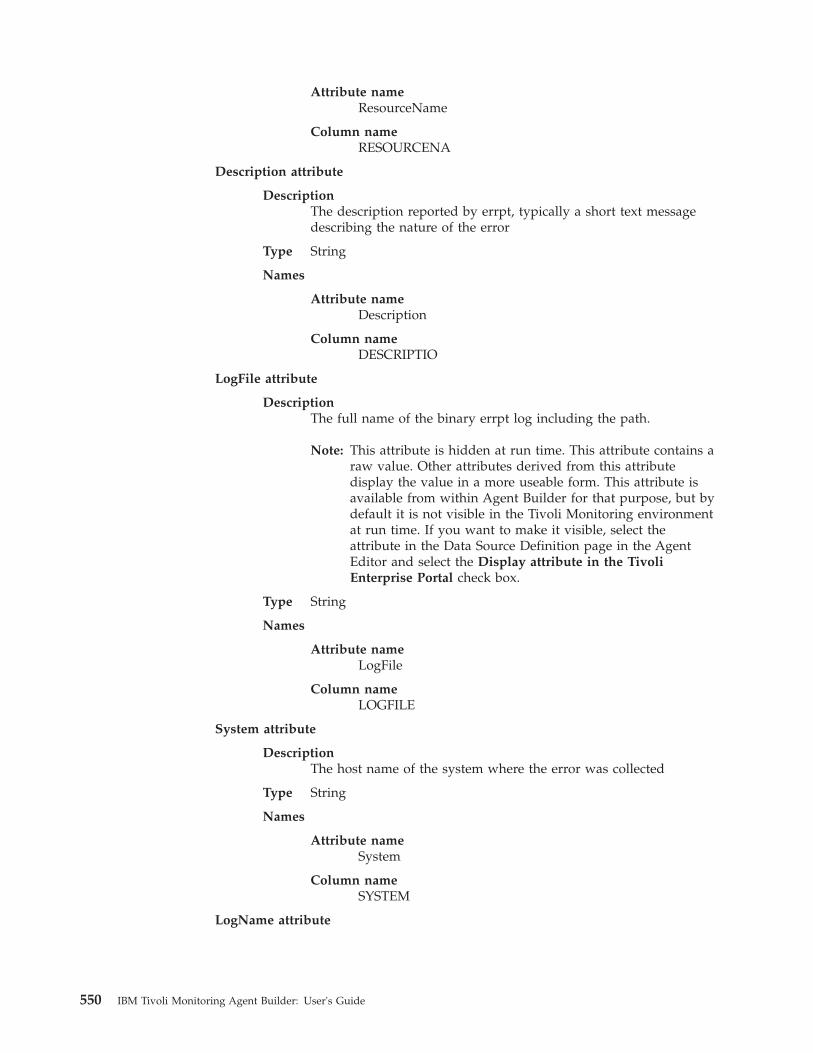
Attribute nameResourceName
Column nameRESOURCENA
Description attribute
DescriptionThe description reported by errpt, typically a short text messagedescribing the nature of the error
Type String
Names
Attribute nameDescription
Column nameDESCRIPTIO
LogFile attribute
DescriptionThe full name of the binary errpt log including the path.
Note: This attribute is hidden at run time. This attribute contains araw value. Other attributes derived from this attributedisplay the value in a more useable form. This attribute isavailable from within Agent Builder for that purpose, but bydefault it is not visible in the Tivoli Monitoring environmentat run time. If you want to make it visible, select theattribute in the Data Source Definition page in the AgentEditor and select the Display attribute in the TivoliEnterprise Portal check box.
Type String
Names
Attribute nameLogFile
Column nameLOGFILE
System attribute
DescriptionThe host name of the system where the error was collected
Type String
Names
Attribute nameSystem
Column nameSYSTEM
LogName attribute
550 IBM Tivoli Monitoring Agent Builder: User's Guide
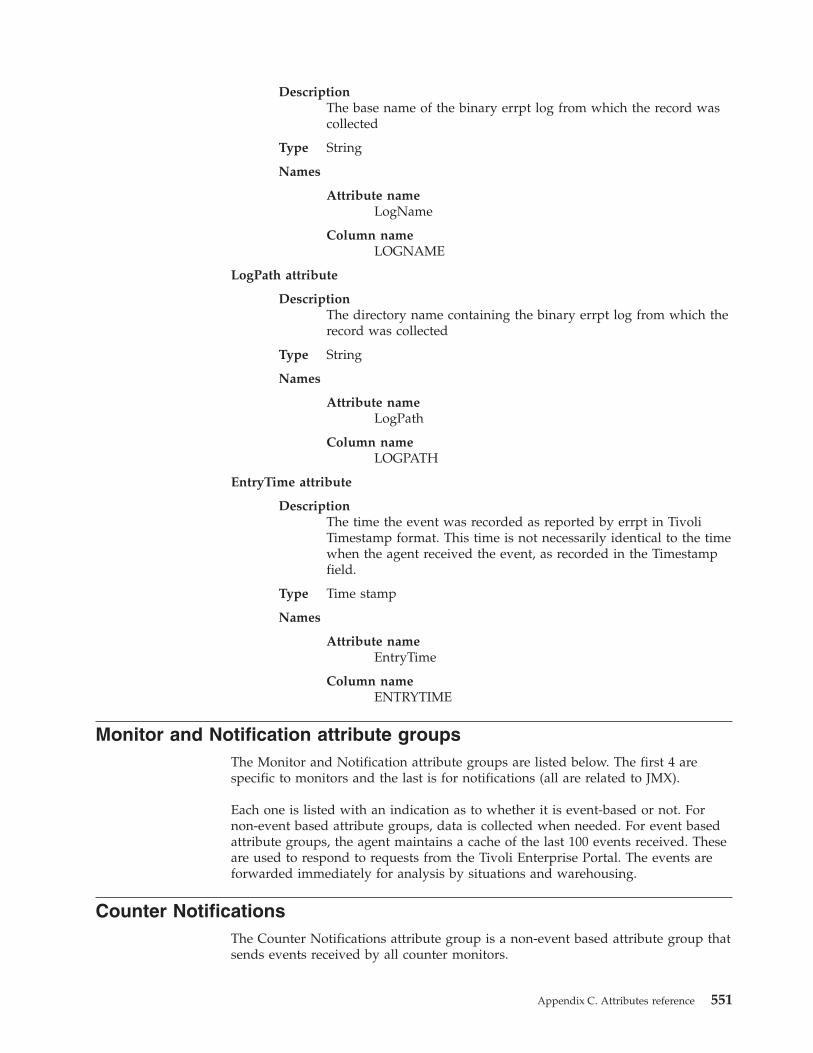
DescriptionThe base name of the binary errpt log from which the record wascollected
Type String
Names
Attribute nameLogName
Column nameLOGNAME
LogPath attribute
DescriptionThe directory name containing the binary errpt log from which therecord was collected
Type String
Names
Attribute nameLogPath
Column nameLOGPATH
EntryTime attribute
DescriptionThe time the event was recorded as reported by errpt in TivoliTimestamp format. This time is not necessarily identical to the timewhen the agent received the event, as recorded in the Timestampfield.
Type Time stamp
Names
Attribute nameEntryTime
Column nameENTRYTIME
Monitor and Notification attribute groupsThe Monitor and Notification attribute groups are listed below. The first 4 arespecific to monitors and the last is for notifications (all are related to JMX).
Each one is listed with an indication as to whether it is event-based or not. Fornon-event based attribute groups, data is collected when needed. For event basedattribute groups, the agent maintains a cache of the last 100 events received. Theseare used to respond to requests from the Tivoli Enterprise Portal. The events areforwarded immediately for analysis by situations and warehousing.
Counter NotificationsThe Counter Notifications attribute group is a non-event based attribute group thatsends events received by all counter monitors.
Appendix C. Attributes reference 551
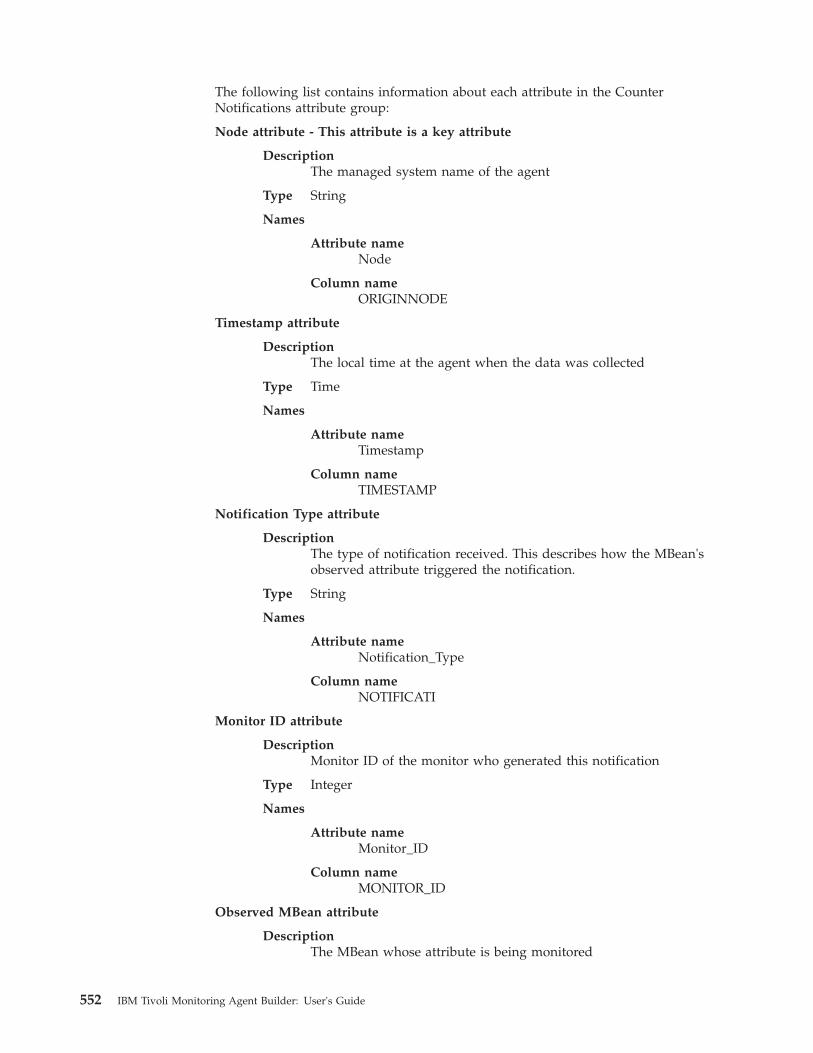
The following list contains information about each attribute in the CounterNotifications attribute group:
Node attribute - This attribute is a key attribute
DescriptionThe managed system name of the agent
Type String
Names
Attribute nameNode
Column nameORIGINNODE
Timestamp attribute
DescriptionThe local time at the agent when the data was collected
Type Time
Names
Attribute nameTimestamp
Column nameTIMESTAMP
Notification Type attribute
DescriptionThe type of notification received. This describes how the MBean'sobserved attribute triggered the notification.
Type String
Names
Attribute nameNotification_Type
Column nameNOTIFICATI
Monitor ID attribute
DescriptionMonitor ID of the monitor who generated this notification
Type Integer
Names
Attribute nameMonitor_ID
Column nameMONITOR_ID
Observed MBean attribute
DescriptionThe MBean whose attribute is being monitored
552 IBM Tivoli Monitoring Agent Builder: User's Guide
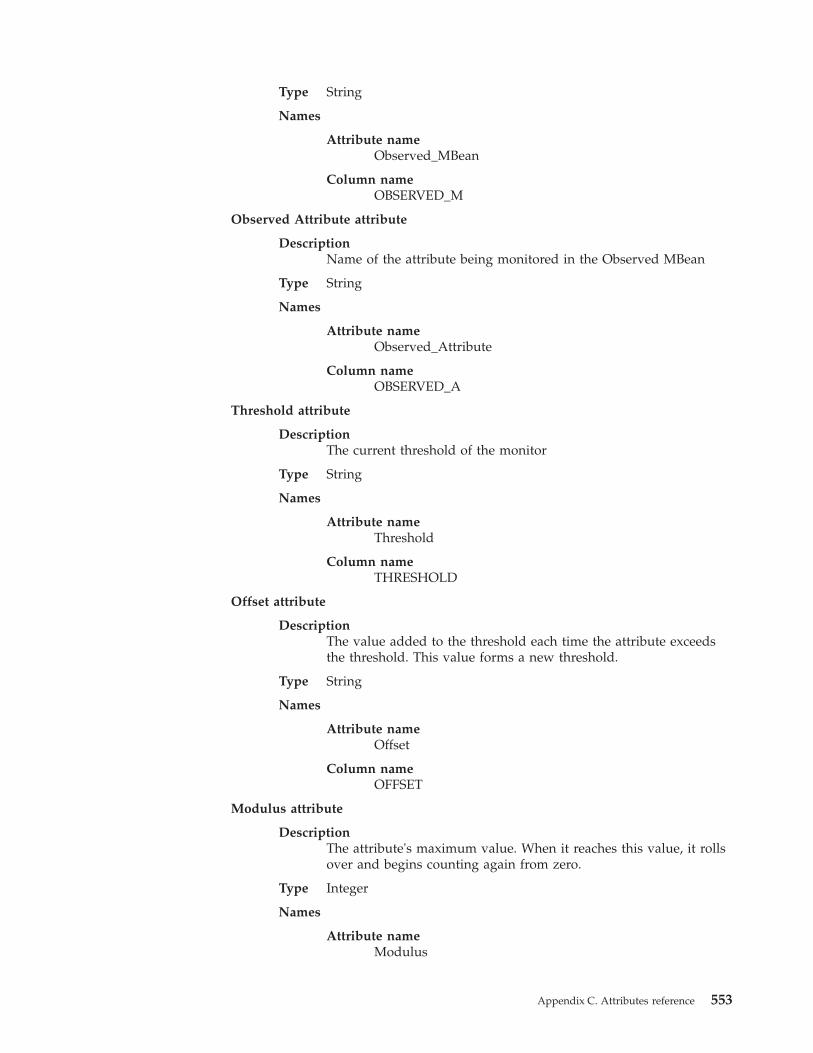
Type String
Names
Attribute nameObserved_MBean
Column nameOBSERVED_M
Observed Attribute attribute
DescriptionName of the attribute being monitored in the Observed MBean
Type String
Names
Attribute nameObserved_Attribute
Column nameOBSERVED_A
Threshold attribute
DescriptionThe current threshold of the monitor
Type String
Names
Attribute nameThreshold
Column nameTHRESHOLD
Offset attribute
DescriptionThe value added to the threshold each time the attribute exceedsthe threshold. This value forms a new threshold.
Type String
Names
Attribute nameOffset
Column nameOFFSET
Modulus attribute
DescriptionThe attribute's maximum value. When it reaches this value, it rollsover and begins counting again from zero.
Type Integer
Names
Attribute nameModulus
Appendix C. Attributes reference 553
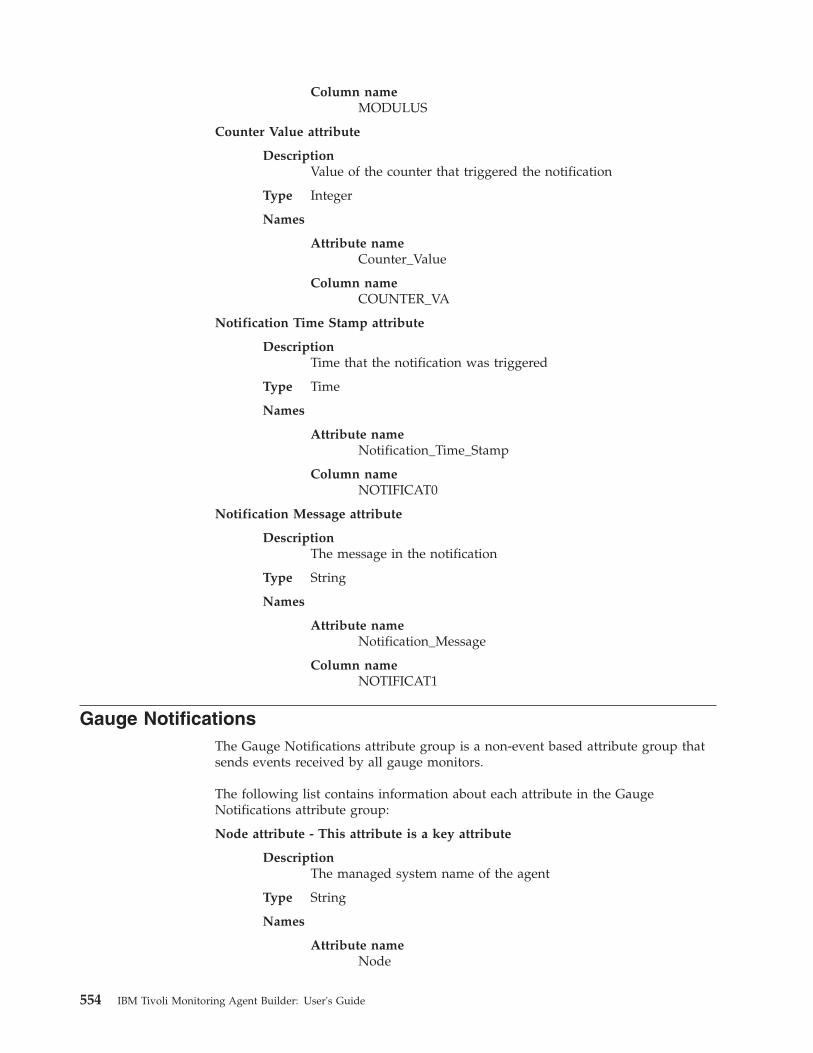
Column nameMODULUS
Counter Value attribute
DescriptionValue of the counter that triggered the notification
Type Integer
Names
Attribute nameCounter_Value
Column nameCOUNTER_VA
Notification Time Stamp attribute
DescriptionTime that the notification was triggered
Type Time
Names
Attribute nameNotification_Time_Stamp
Column nameNOTIFICAT0
Notification Message attribute
DescriptionThe message in the notification
Type String
Names
Attribute nameNotification_Message
Column nameNOTIFICAT1
Gauge NotificationsThe Gauge Notifications attribute group is a non-event based attribute group thatsends events received by all gauge monitors.
The following list contains information about each attribute in the GaugeNotifications attribute group:
Node attribute - This attribute is a key attribute
DescriptionThe managed system name of the agent
Type String
Names
Attribute nameNode
554 IBM Tivoli Monitoring Agent Builder: User's Guide
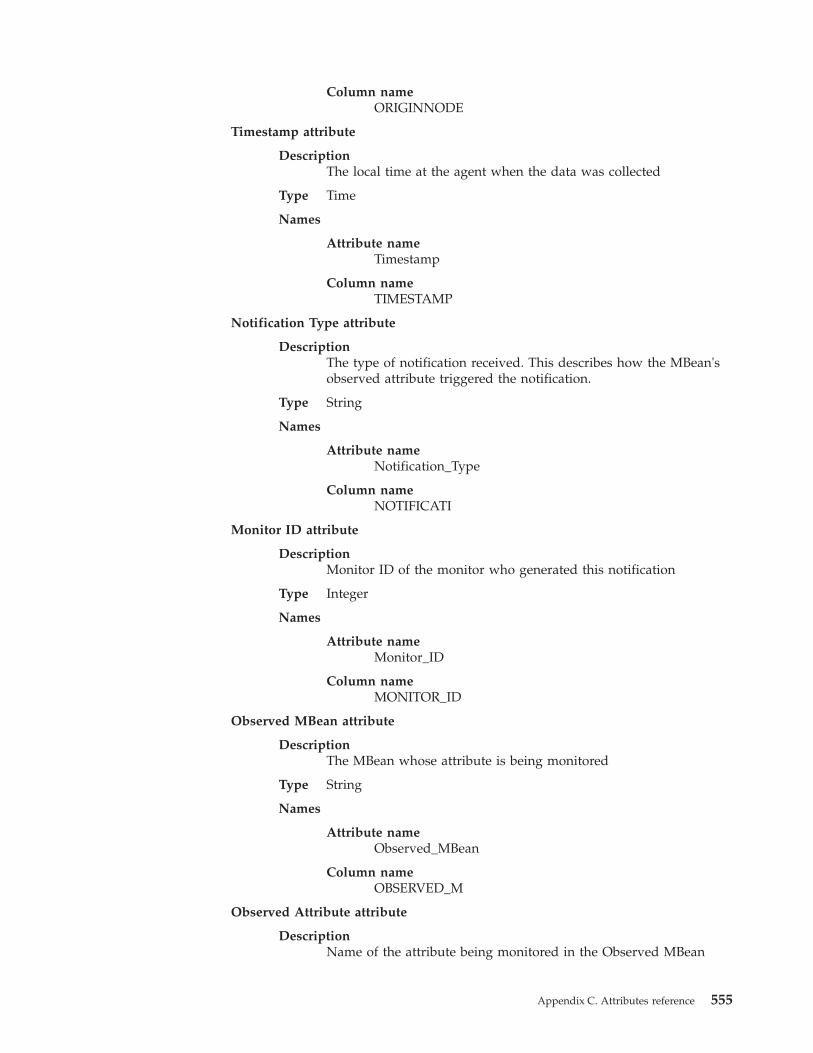
Column nameORIGINNODE
Timestamp attribute
DescriptionThe local time at the agent when the data was collected
Type Time
Names
Attribute nameTimestamp
Column nameTIMESTAMP
Notification Type attribute
DescriptionThe type of notification received. This describes how the MBean'sobserved attribute triggered the notification.
Type String
Names
Attribute nameNotification_Type
Column nameNOTIFICATI
Monitor ID attribute
DescriptionMonitor ID of the monitor who generated this notification
Type Integer
Names
Attribute nameMonitor_ID
Column nameMONITOR_ID
Observed MBean attribute
DescriptionThe MBean whose attribute is being monitored
Type String
Names
Attribute nameObserved_MBean
Column nameOBSERVED_M
Observed Attribute attribute
DescriptionName of the attribute being monitored in the Observed MBean
Appendix C. Attributes reference 555
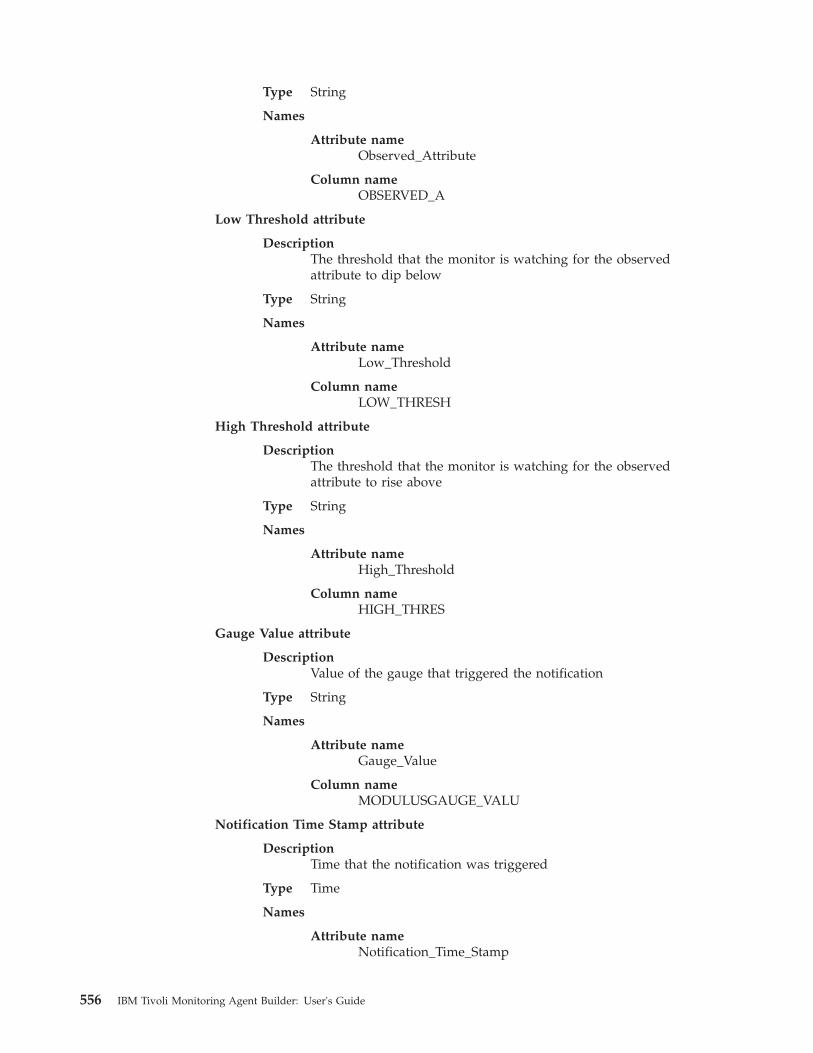
Type String
Names
Attribute nameObserved_Attribute
Column nameOBSERVED_A
Low Threshold attribute
DescriptionThe threshold that the monitor is watching for the observedattribute to dip below
Type String
Names
Attribute nameLow_Threshold
Column nameLOW_THRESH
High Threshold attribute
DescriptionThe threshold that the monitor is watching for the observedattribute to rise above
Type String
Names
Attribute nameHigh_Threshold
Column nameHIGH_THRES
Gauge Value attribute
DescriptionValue of the gauge that triggered the notification
Type String
Names
Attribute nameGauge_Value
Column nameMODULUSGAUGE_VALU
Notification Time Stamp attribute
DescriptionTime that the notification was triggered
Type Time
Names
Attribute nameNotification_Time_Stamp
556 IBM Tivoli Monitoring Agent Builder: User's Guide
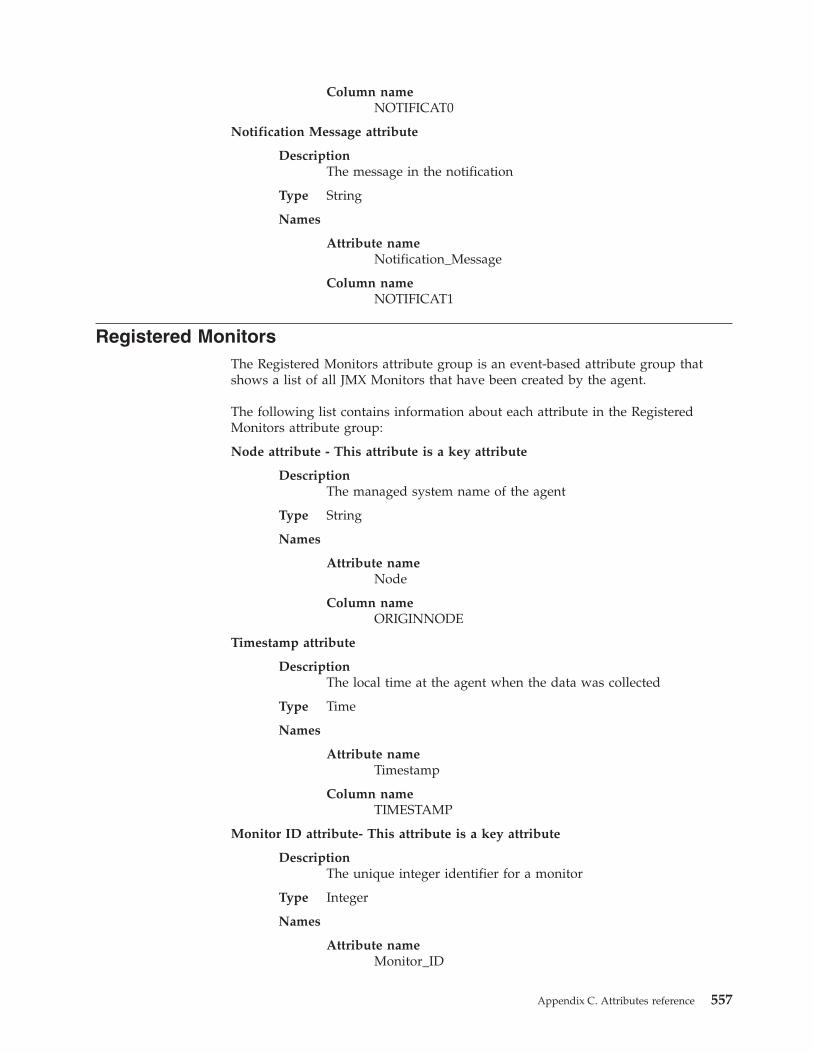
Column nameNOTIFICAT0
Notification Message attribute
DescriptionThe message in the notification
Type String
Names
Attribute nameNotification_Message
Column nameNOTIFICAT1
Registered MonitorsThe Registered Monitors attribute group is an event-based attribute group thatshows a list of all JMX Monitors that have been created by the agent.
The following list contains information about each attribute in the RegisteredMonitors attribute group:
Node attribute - This attribute is a key attribute
DescriptionThe managed system name of the agent
Type String
Names
Attribute nameNode
Column nameORIGINNODE
Timestamp attribute
DescriptionThe local time at the agent when the data was collected
Type Time
Names
Attribute nameTimestamp
Column nameTIMESTAMP
Monitor ID attribute- This attribute is a key attribute
DescriptionThe unique integer identifier for a monitor
Type Integer
Names
Attribute nameMonitor_ID
Appendix C. Attributes reference 557
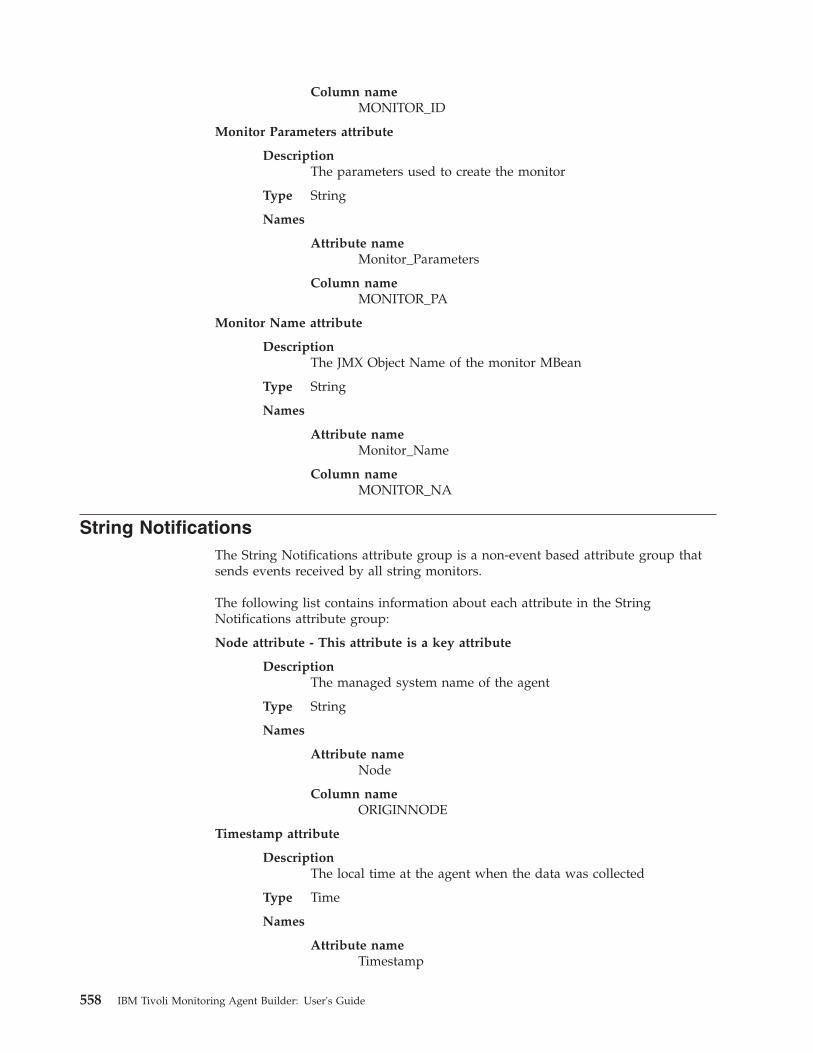
Column nameMONITOR_ID
Monitor Parameters attribute
DescriptionThe parameters used to create the monitor
Type String
Names
Attribute nameMonitor_Parameters
Column nameMONITOR_PA
Monitor Name attribute
DescriptionThe JMX Object Name of the monitor MBean
Type String
Names
Attribute nameMonitor_Name
Column nameMONITOR_NA
String NotificationsThe String Notifications attribute group is a non-event based attribute group thatsends events received by all string monitors.
The following list contains information about each attribute in the StringNotifications attribute group:
Node attribute - This attribute is a key attribute
DescriptionThe managed system name of the agent
Type String
Names
Attribute nameNode
Column nameORIGINNODE
Timestamp attribute
DescriptionThe local time at the agent when the data was collected
Type Time
Names
Attribute nameTimestamp
558 IBM Tivoli Monitoring Agent Builder: User's Guide
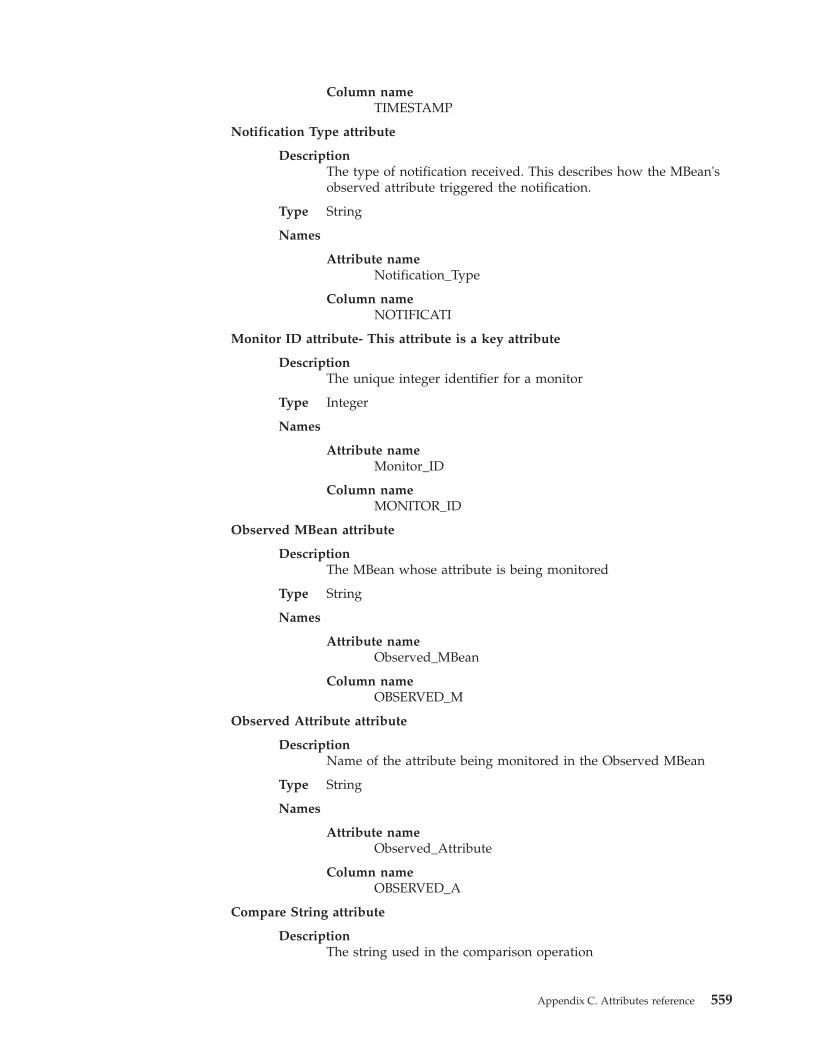
Column nameTIMESTAMP
Notification Type attribute
DescriptionThe type of notification received. This describes how the MBean'sobserved attribute triggered the notification.
Type String
Names
Attribute nameNotification_Type
Column nameNOTIFICATI
Monitor ID attribute- This attribute is a key attribute
DescriptionThe unique integer identifier for a monitor
Type Integer
Names
Attribute nameMonitor_ID
Column nameMONITOR_ID
Observed MBean attribute
DescriptionThe MBean whose attribute is being monitored
Type String
Names
Attribute nameObserved_MBean
Column nameOBSERVED_M
Observed Attribute attribute
DescriptionName of the attribute being monitored in the Observed MBean
Type String
Names
Attribute nameObserved_Attribute
Column nameOBSERVED_A
Compare String attribute
DescriptionThe string used in the comparison operation
Appendix C. Attributes reference 559
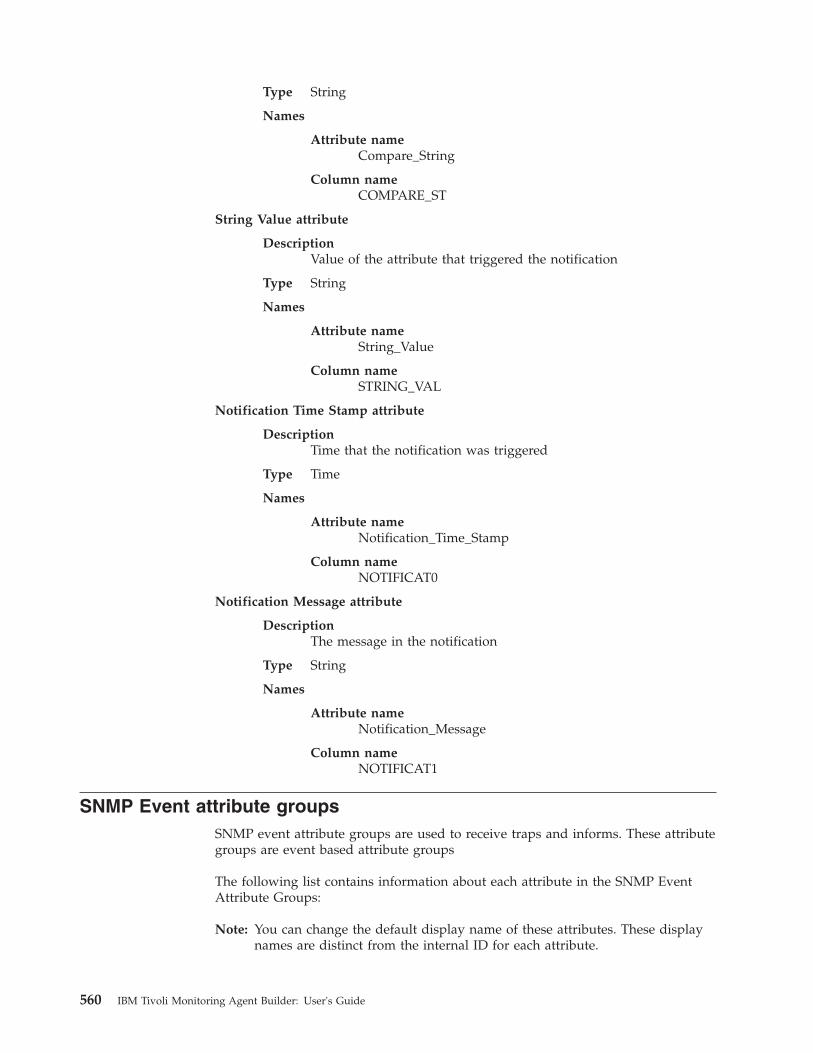
Type String
Names
Attribute nameCompare_String
Column nameCOMPARE_ST
String Value attribute
DescriptionValue of the attribute that triggered the notification
Type String
Names
Attribute nameString_Value
Column nameSTRING_VAL
Notification Time Stamp attribute
DescriptionTime that the notification was triggered
Type Time
Names
Attribute nameNotification_Time_Stamp
Column nameNOTIFICAT0
Notification Message attribute
DescriptionThe message in the notification
Type String
Names
Attribute nameNotification_Message
Column nameNOTIFICAT1
SNMP Event attribute groupsSNMP event attribute groups are used to receive traps and informs. These attributegroups are event based attribute groups
The following list contains information about each attribute in the SNMP EventAttribute Groups:
Note: You can change the default display name of these attributes. These displaynames are distinct from the internal ID for each attribute.
560 IBM Tivoli Monitoring Agent Builder: User's Guide
Enterprise_OIDThe enterprise OID that generated the trap.
Source_AddressHost name or IP address of the SNMP agent that sent the trap.
Generic_TrapGeneric trap number extracted from the received trap. Possible values:
0 ColdStart1 WarmStart2 LinkDown3 LinkUp4 Authentication Failure5 EGPNeighborLoss
Specific_TrapEnterprise-specific trap number extracted from the received trap. Appliesonly when Generic_Trap = 6.
Alert_NameTrap name as specified in the definition in the trap configuration file.
CategoryTrap category as specified in the definition in the trap configuration file.
DescriptionTrap description as specified in the definition in the trap configuration file.The maximum description length is 256 characters.
Enterprise_NameTrap Enterprise name as specified in the trap configuration file anddetermined through the trap object identifier.
Source_StatusStatus of the agent that originated the trap after sending it as specified inthe trap definition in the trap configuration file.
Source_TypeType of the agent that originated the trap as specified in the trap definitionin the trap configuration file.
Event_VariablesVariable binding (VarBind) data received in the trap protocol data unit(PDU). The string is constructed as:{OID[type]=value}{OID[type]=value}{oid[type]=value}...
Where:
oid MIB variable object identifier
type SMI data type
value Variable value
{} Each triplet is surrounded by braces ({}).
Note: The attributes Alert Name, Category, Description, Enterprise_Name,Source_Status, and Source_Type provide additional information. In theSNMP MIB Browser window (Figure 98 on page 133), select the Includestatic attributes check box to include these attributes.
Appendix C. Attributes reference 561
JMX Event attribute groupsJMX event attribute groups are used to receive notifications from an MBean server.These attribute groups are non-event based attribute groups and are generatedwith the following attributes that can be edited by the agent developer.
The following list contains information about each attribute in the JMX EventAttribute Groups:
Node attribute - This attribute is a key attribute
DescriptionThe managed system name of the agent
Type String
Names
Attribute nameNode
Column nameORIGINNODE
Timestamp attribute
DescriptionThe local time at the agent when the data was collected
Type Time
Names
Attribute nameTimestamp
Column nameTIMESTAMP
Type attribute
DescriptionThe notification type
Type String
Names
Attribute nameType
Column nameTYPE
Source attribute
DescriptionThe MBean that caused the notification to be sent
Type String
Names
Attribute nameSource
Column nameSOURCE
562 IBM Tivoli Monitoring Agent Builder: User's Guide
Sequence Number attribute
DescriptionThe sequence number from the notification object
Type String
Names
Attribute nameSequence_Number
Column nameSEQUENCE_N
Message attribute
DescriptionThe notification message
Type String
Names
Attribute nameMessage
Column nameMESSAGE
User Data attribute
DescriptionThe user data object from the notification
Type String
Names
Attribute nameUser_Data
Column nameUSER_DATA
Ping attribute groupThe Ping attribute group contains the results of ICMP pings that are sent to lists ofdevices.
The following list contains information about each attribute in the Ping AttributeGroup:
Node attribute - This attribute is a key attribute
DescriptionThe managed system name of the agent.
Type String
Names
Attribute nameNode
Column nameORIGINNODE
Appendix C. Attributes reference 563
Timestamp attribute
DescriptionThe value is the time collected from the agent system when thedata row was built and sent from the agent to the Tivoli EnterpriseMonitoring Server (or stored for historical purposes). It representsthe local time zone of the agent system.
Type Time
Names
Attribute nameTimestamp
Column nameTIMESTAMP
Address attribute - This attribute is a key attribute
DescriptionThe IP address of the host being monitored.
Type String with enumerated value. The value UNKNOWN_ADDRESSis displayed if the IP address is unknown. The warehouse andqueries return 0.0.0.0 for this enumeration. Any other IP addressvalues are displayed as is.
Names
Attribute nameAddress
Column namePNGADDR
Device Entry attribute - This attribute is a key attribute
DescriptionThe entry in the device list file for this node.
Type String
Names
Attribute nameDevice_Entry
Column namePINGDEVC
Current Response Time attribute
DescriptionThe current network response time for ICMP requests for themanaged node in milliseconds.
Type Integer with enumerated values. The strings are displayed in theTivoli Enterprise Portal. The warehouse and queries return thenumbers. The defined values are TIMEOUT(-1) andSEND_FAILURE(-2) Any other values show the numeric value.
Names
Attribute nameCurrent_Response_Time
564 IBM Tivoli Monitoring Agent Builder: User's Guide
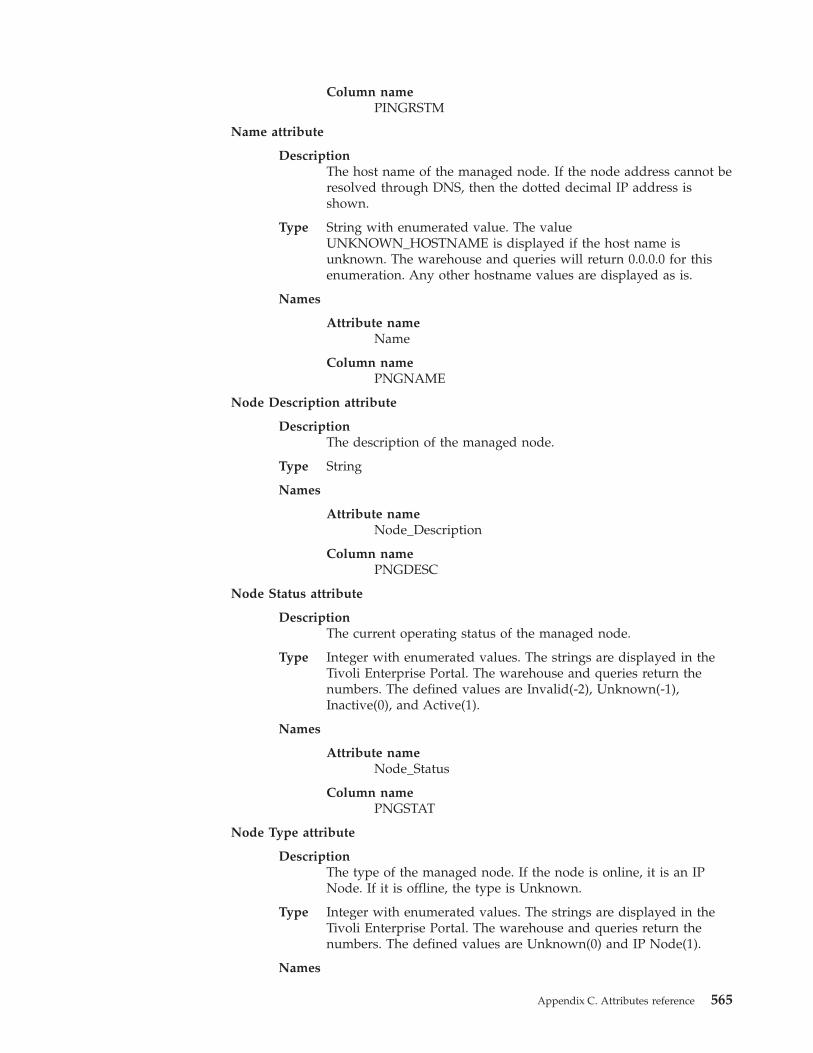
Column namePINGRSTM
Name attribute
DescriptionThe host name of the managed node. If the node address cannot beresolved through DNS, then the dotted decimal IP address isshown.
Type String with enumerated value. The valueUNKNOWN_HOSTNAME is displayed if the host name isunknown. The warehouse and queries will return 0.0.0.0 for thisenumeration. Any other hostname values are displayed as is.
Names
Attribute nameName
Column namePNGNAME
Node Description attribute
DescriptionThe description of the managed node.
Type String
Names
Attribute nameNode_Description
Column namePNGDESC
Node Status attribute
DescriptionThe current operating status of the managed node.
Type Integer with enumerated values. The strings are displayed in theTivoli Enterprise Portal. The warehouse and queries return thenumbers. The defined values are Invalid(-2), Unknown(-1),Inactive(0), and Active(1).
Names
Attribute nameNode_Status
Column namePNGSTAT
Node Type attribute
DescriptionThe type of the managed node. If the node is online, it is an IPNode. If it is offline, the type is Unknown.
Type Integer with enumerated values. The strings are displayed in theTivoli Enterprise Portal. The warehouse and queries return thenumbers. The defined values are Unknown(0) and IP Node(1).
Names
Appendix C. Attributes reference 565
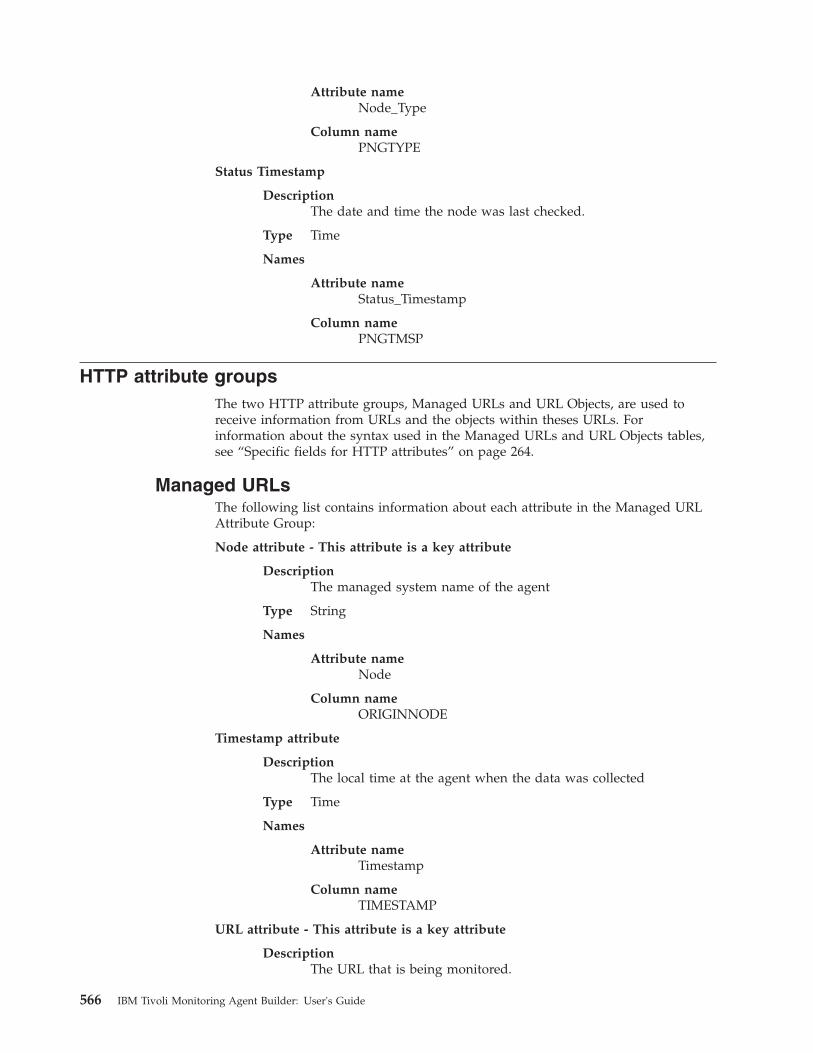
Attribute nameNode_Type
Column namePNGTYPE
Status Timestamp
DescriptionThe date and time the node was last checked.
Type Time
Names
Attribute nameStatus_Timestamp
Column namePNGTMSP
HTTP attribute groupsThe two HTTP attribute groups, Managed URLs and URL Objects, are used toreceive information from URLs and the objects within theses URLs. Forinformation about the syntax used in the Managed URLs and URL Objects tables,see “Specific fields for HTTP attributes” on page 264.
Managed URLsThe following list contains information about each attribute in the Managed URLAttribute Group:
Node attribute - This attribute is a key attribute
DescriptionThe managed system name of the agent
Type String
Names
Attribute nameNode
Column nameORIGINNODE
Timestamp attribute
DescriptionThe local time at the agent when the data was collected
Type Time
Names
Attribute nameTimestamp
Column nameTIMESTAMP
URL attribute - This attribute is a key attribute
DescriptionThe URL that is being monitored.
566 IBM Tivoli Monitoring Agent Builder: User's Guide
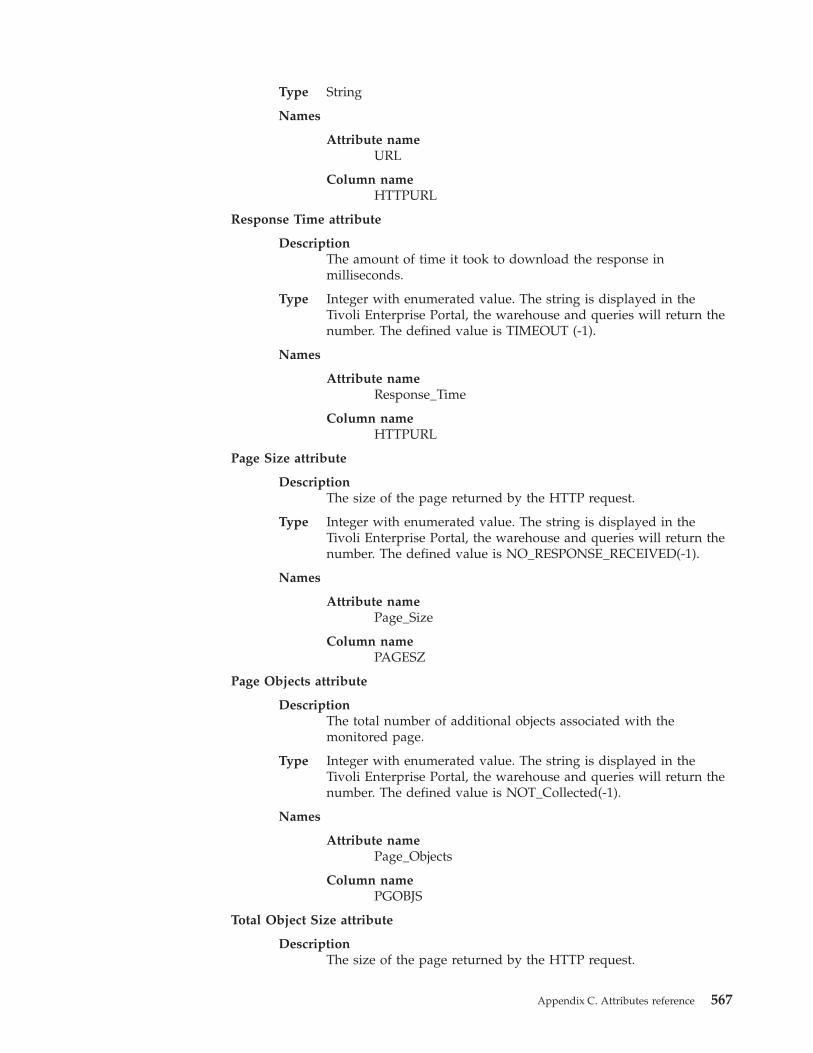
Type String
Names
Attribute nameURL
Column nameHTTPURL
Response Time attribute
DescriptionThe amount of time it took to download the response inmilliseconds.
Type Integer with enumerated value. The string is displayed in theTivoli Enterprise Portal, the warehouse and queries will return thenumber. The defined value is TIMEOUT (-1).
Names
Attribute nameResponse_Time
Column nameHTTPURL
Page Size attribute
DescriptionThe size of the page returned by the HTTP request.
Type Integer with enumerated value. The string is displayed in theTivoli Enterprise Portal, the warehouse and queries will return thenumber. The defined value is NO_RESPONSE_RECEIVED(-1).
Names
Attribute namePage_Size
Column namePAGESZ
Page Objects attribute
DescriptionThe total number of additional objects associated with themonitored page.
Type Integer with enumerated value. The string is displayed in theTivoli Enterprise Portal, the warehouse and queries will return thenumber. The defined value is NOT_Collected(-1).
Names
Attribute namePage_Objects
Column namePGOBJS
Total Object Size attribute
DescriptionThe size of the page returned by the HTTP request.
Appendix C. Attributes reference 567

Type Integer with enumerated value. The string is displayed in theTivoli Enterprise Portal, the warehouse and queries will return thenumber. The defined value is NOT_Collected(-1).
Names
Attribute nameTotal_Object_Size
Column nameTOTOSZ
Page Title attribute
DescriptionThe page title of the received URL page.
Type String
Names
Attribute namePage_Title
Column namePAGETTL
Server Type attribute
DescriptionThe type of server used at the target URL web site.
Type String
Names
Attribute nameServer_Type
Column nameSRVTYP
Response Code attribute
DescriptionThe response code of the HTTP request.
Type Integer with enumerated value. The string is displayed in theTivoli Enterprise Portal, the warehouse and queries will return thenumber. The defined value is NO_RESPONSE_RECEIVED(-1).
Names
Attribute nameResponse_Code
Column nameCODE
Status attribute
DescriptionThe current managed URL status (OK or status description).
Type String
Names
568 IBM Tivoli Monitoring Agent Builder: User's Guide
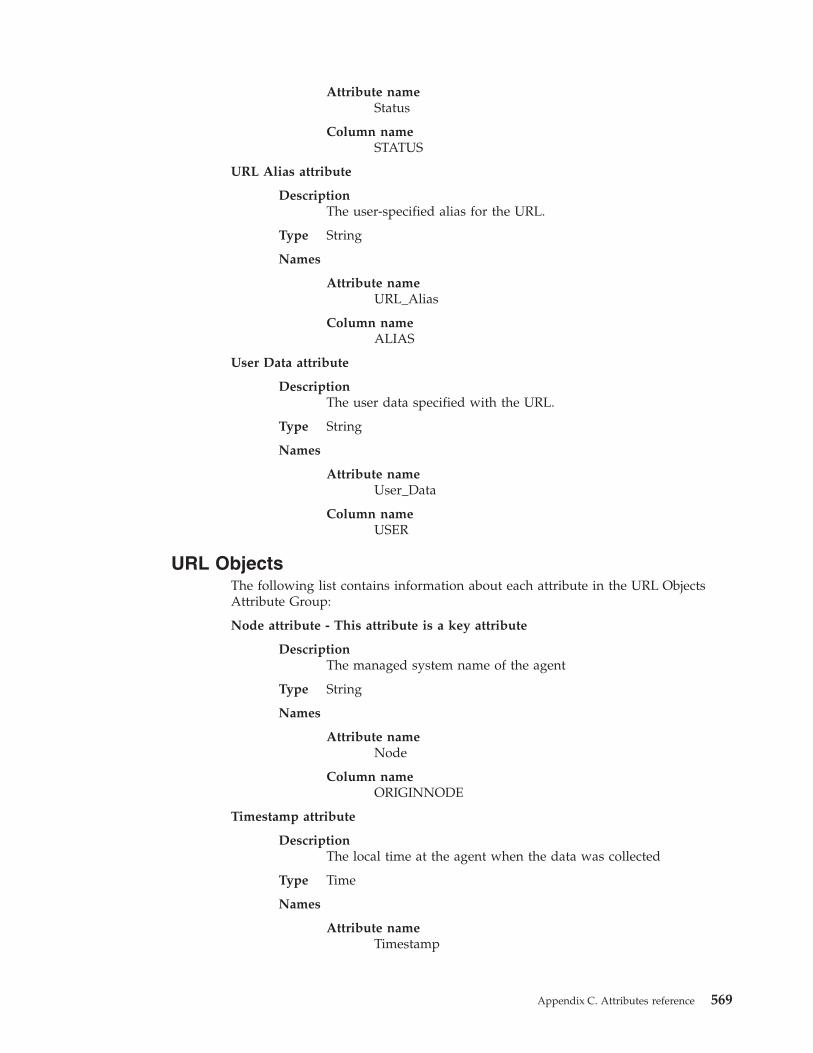
Attribute nameStatus
Column nameSTATUS
URL Alias attribute
DescriptionThe user-specified alias for the URL.
Type String
Names
Attribute nameURL_Alias
Column nameALIAS
User Data attribute
DescriptionThe user data specified with the URL.
Type String
Names
Attribute nameUser_Data
Column nameUSER
URL ObjectsThe following list contains information about each attribute in the URL ObjectsAttribute Group:
Node attribute - This attribute is a key attribute
DescriptionThe managed system name of the agent
Type String
Names
Attribute nameNode
Column nameORIGINNODE
Timestamp attribute
DescriptionThe local time at the agent when the data was collected
Type Time
Names
Attribute nameTimestamp
Appendix C. Attributes reference 569
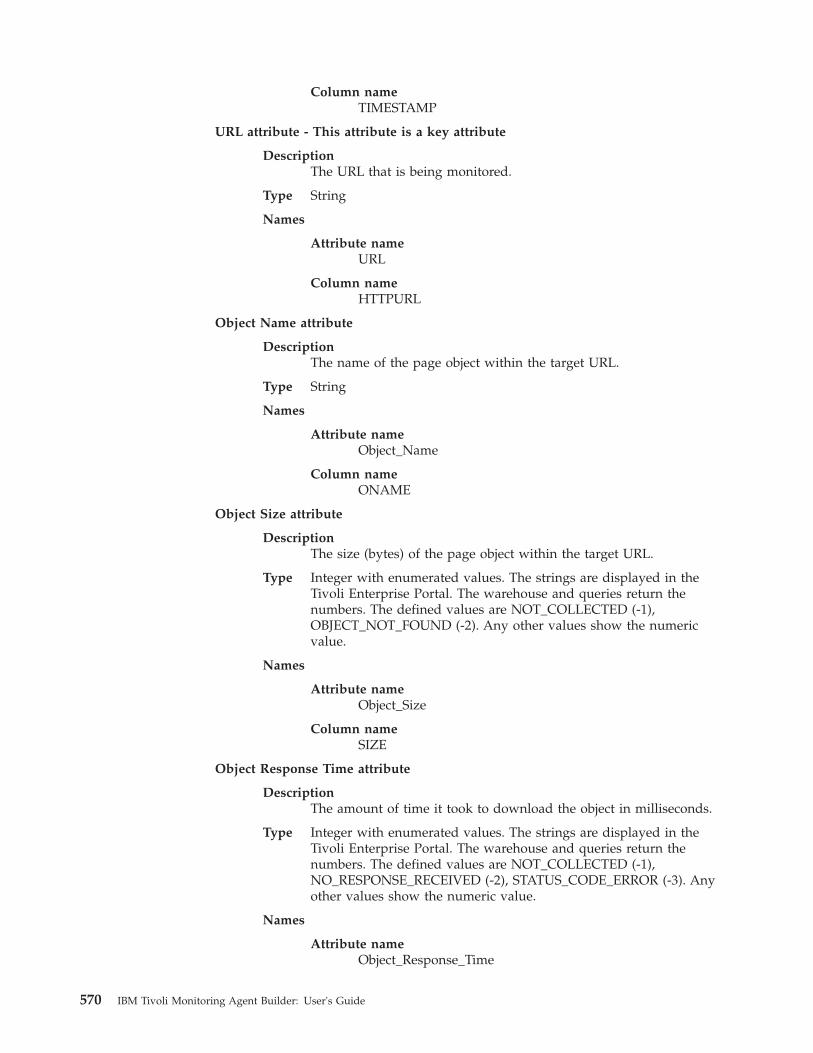
Column nameTIMESTAMP
URL attribute - This attribute is a key attribute
DescriptionThe URL that is being monitored.
Type String
Names
Attribute nameURL
Column nameHTTPURL
Object Name attribute
DescriptionThe name of the page object within the target URL.
Type String
Names
Attribute nameObject_Name
Column nameONAME
Object Size attribute
DescriptionThe size (bytes) of the page object within the target URL.
Type Integer with enumerated values. The strings are displayed in theTivoli Enterprise Portal. The warehouse and queries return thenumbers. The defined values are NOT_COLLECTED (-1),OBJECT_NOT_FOUND (-2). Any other values show the numericvalue.
Names
Attribute nameObject_Size
Column nameSIZE
Object Response Time attribute
DescriptionThe amount of time it took to download the object in milliseconds.
Type Integer with enumerated values. The strings are displayed in theTivoli Enterprise Portal. The warehouse and queries return thenumbers. The defined values are NOT_COLLECTED (-1),NO_RESPONSE_RECEIVED (-2), STATUS_CODE_ERROR (-3). Anyother values show the numeric value.
Names
Attribute nameObject_Response_Time
570 IBM Tivoli Monitoring Agent Builder: User's Guide
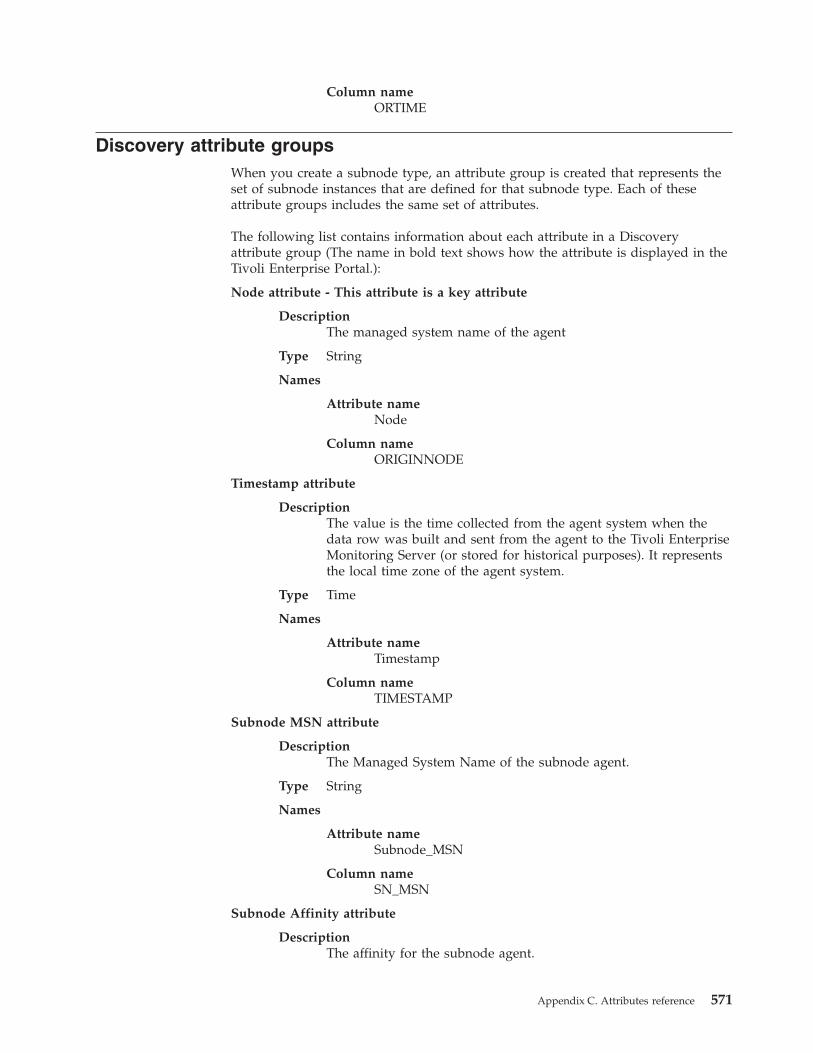
Column nameORTIME
Discovery attribute groupsWhen you create a subnode type, an attribute group is created that represents theset of subnode instances that are defined for that subnode type. Each of theseattribute groups includes the same set of attributes.
The following list contains information about each attribute in a Discoveryattribute group (The name in bold text shows how the attribute is displayed in theTivoli Enterprise Portal.):
Node attribute - This attribute is a key attribute
DescriptionThe managed system name of the agent
Type String
Names
Attribute nameNode
Column nameORIGINNODE
Timestamp attribute
DescriptionThe value is the time collected from the agent system when thedata row was built and sent from the agent to the Tivoli EnterpriseMonitoring Server (or stored for historical purposes). It representsthe local time zone of the agent system.
Type Time
Names
Attribute nameTimestamp
Column nameTIMESTAMP
Subnode MSN attribute
DescriptionThe Managed System Name of the subnode agent.
Type String
Names
Attribute nameSubnode_MSN
Column nameSN_MSN
Subnode Affinity attribute
DescriptionThe affinity for the subnode agent.
Appendix C. Attributes reference 571
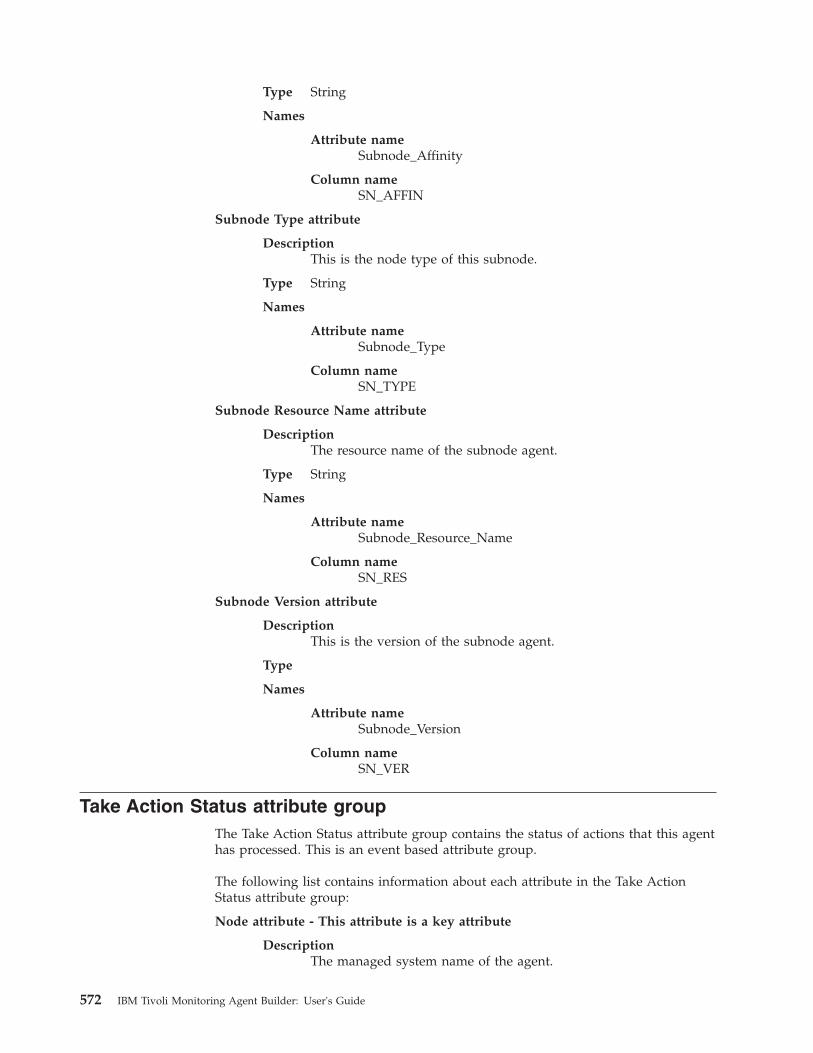
Type String
Names
Attribute nameSubnode_Affinity
Column nameSN_AFFIN
Subnode Type attribute
DescriptionThis is the node type of this subnode.
Type String
Names
Attribute nameSubnode_Type
Column nameSN_TYPE
Subnode Resource Name attribute
DescriptionThe resource name of the subnode agent.
Type String
Names
Attribute nameSubnode_Resource_Name
Column nameSN_RES
Subnode Version attribute
DescriptionThis is the version of the subnode agent.
Type
Names
Attribute nameSubnode_Version
Column nameSN_VER
Take Action Status attribute groupThe Take Action Status attribute group contains the status of actions that this agenthas processed. This is an event based attribute group.
The following list contains information about each attribute in the Take ActionStatus attribute group:
Node attribute - This attribute is a key attribute
DescriptionThe managed system name of the agent.
572 IBM Tivoli Monitoring Agent Builder: User's Guide
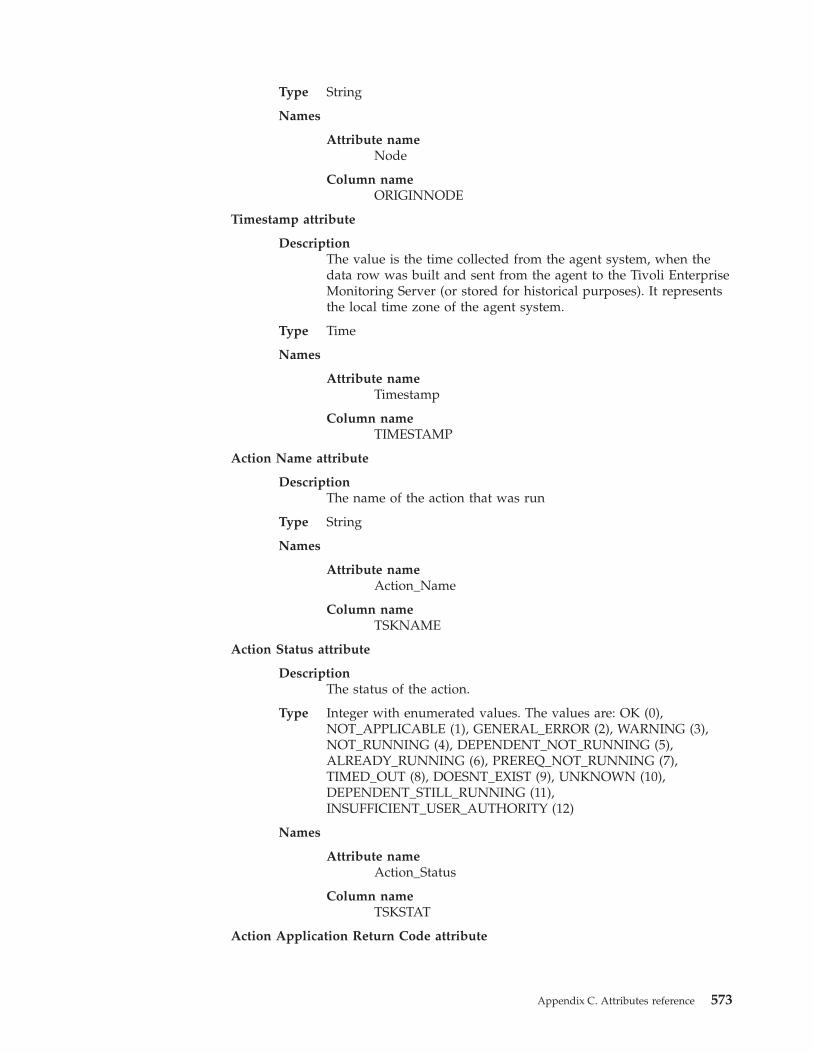
Type String
Names
Attribute nameNode
Column nameORIGINNODE
Timestamp attribute
DescriptionThe value is the time collected from the agent system, when thedata row was built and sent from the agent to the Tivoli EnterpriseMonitoring Server (or stored for historical purposes). It representsthe local time zone of the agent system.
Type Time
Names
Attribute nameTimestamp
Column nameTIMESTAMP
Action Name attribute
DescriptionThe name of the action that was run
Type String
Names
Attribute nameAction_Name
Column nameTSKNAME
Action Status attribute
DescriptionThe status of the action.
Type Integer with enumerated values. The values are: OK (0),NOT_APPLICABLE (1), GENERAL_ERROR (2), WARNING (3),NOT_RUNNING (4), DEPENDENT_NOT_RUNNING (5),ALREADY_RUNNING (6), PREREQ_NOT_RUNNING (7),TIMED_OUT (8), DOESNT_EXIST (9), UNKNOWN (10),DEPENDENT_STILL_RUNNING (11),INSUFFICIENT_USER_AUTHORITY (12)
Names
Attribute nameAction_Status
Column nameTSKSTAT
Action Application Return Code attribute
Appendix C. Attributes reference 573
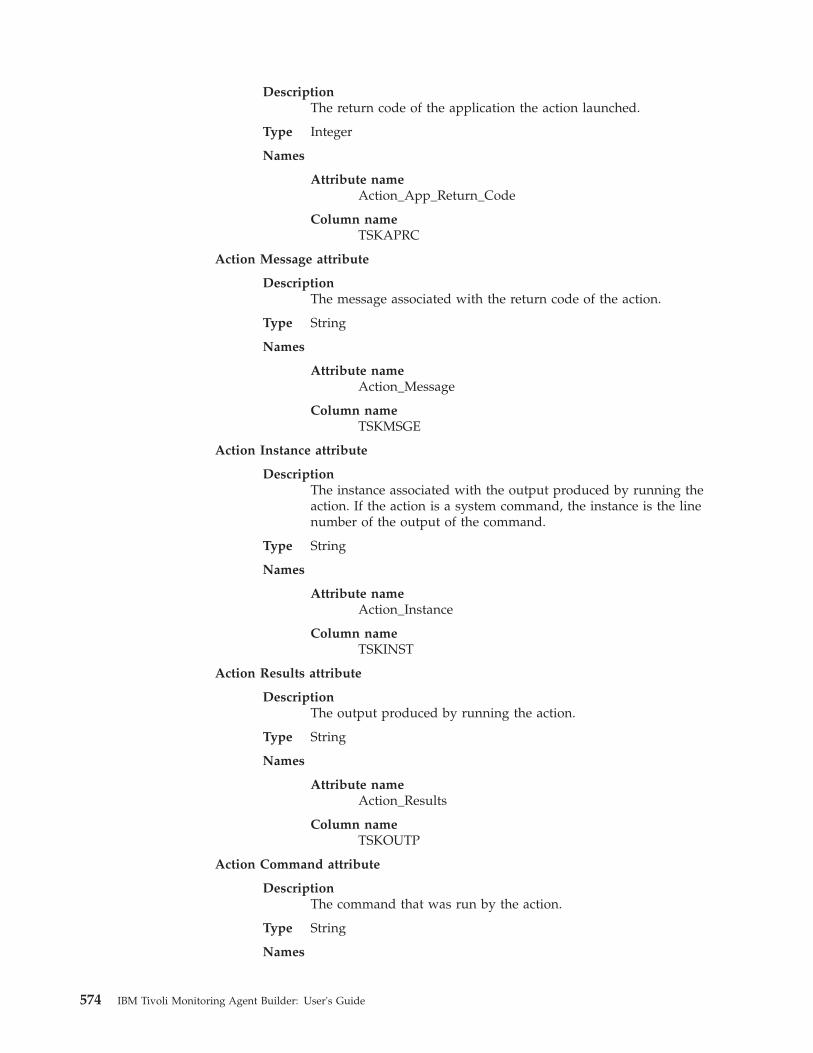
DescriptionThe return code of the application the action launched.
Type Integer
Names
Attribute nameAction_App_Return_Code
Column nameTSKAPRC
Action Message attribute
DescriptionThe message associated with the return code of the action.
Type String
Names
Attribute nameAction_Message
Column nameTSKMSGE
Action Instance attribute
DescriptionThe instance associated with the output produced by running theaction. If the action is a system command, the instance is the linenumber of the output of the command.
Type String
Names
Attribute nameAction_Instance
Column nameTSKINST
Action Results attribute
DescriptionThe output produced by running the action.
Type String
Names
Attribute nameAction_Results
Column nameTSKOUTP
Action Command attribute
DescriptionThe command that was run by the action.
Type String
Names
574 IBM Tivoli Monitoring Agent Builder: User's Guide

Attribute nameAction_Command
Column nameTSKCMND
Action Node attribute
DescriptionThe node where the action ran.
Type String
Names
Attribute nameAction_Node
Column nameTSKORGN
Action Subnode attribute
DescriptionThe subnode where the action ran.
Type String
Names
Attribute nameAction_Subnode
Column nameTSKSBND
Action ID attribute
DescriptionThe ID of the action.
Type Integer
Names
Attribute nameAction_ID
Column nameTSKID
Action Type attribute
DescriptionThe type of the action.
Type Integer with enumerated values. The strings are displayed in theTivoli Enterprise Portal, the warehouse and queries will return thenumbers. The defined values are: UNKNOWN (0), AUTOMATION(1).
Names
Attribute nameAction_Type
Column nameTSKTYPE
Appendix C. Attributes reference 575
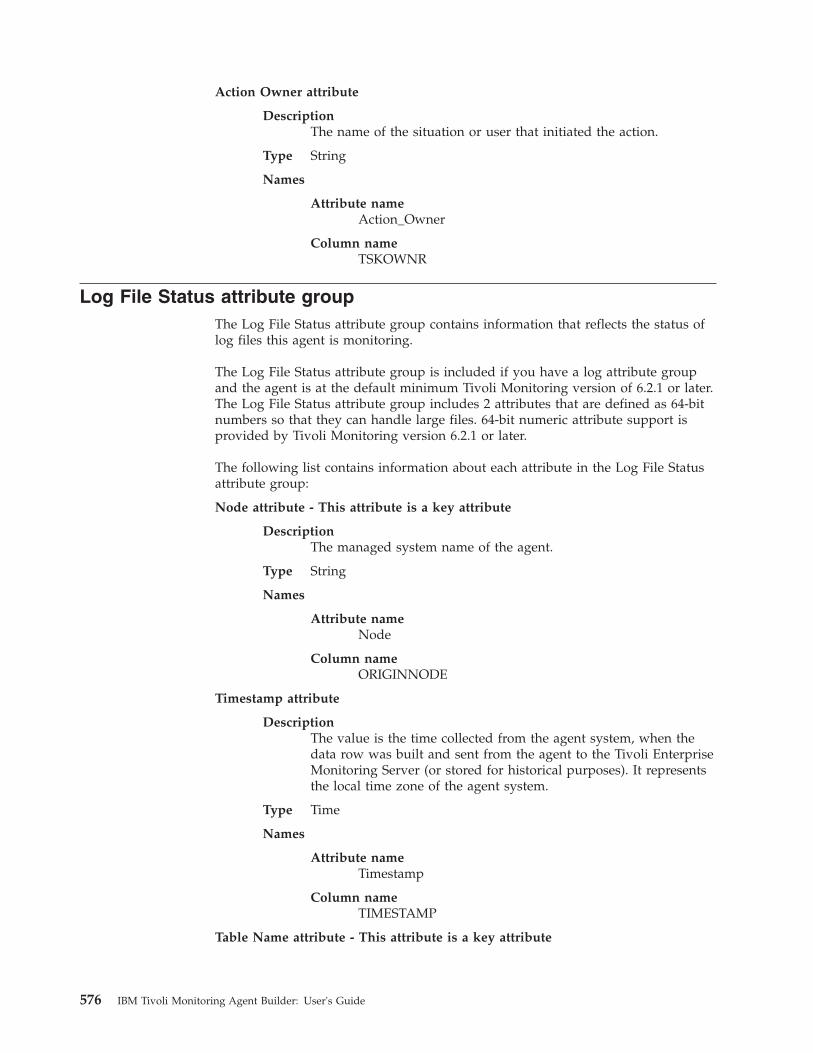
Action Owner attribute
DescriptionThe name of the situation or user that initiated the action.
Type String
Names
Attribute nameAction_Owner
Column nameTSKOWNR
Log File Status attribute groupThe Log File Status attribute group contains information that reflects the status oflog files this agent is monitoring.
The Log File Status attribute group is included if you have a log attribute groupand the agent is at the default minimum Tivoli Monitoring version of 6.2.1 or later.The Log File Status attribute group includes 2 attributes that are defined as 64-bitnumbers so that they can handle large files. 64-bit numeric attribute support isprovided by Tivoli Monitoring version 6.2.1 or later.
The following list contains information about each attribute in the Log File Statusattribute group:
Node attribute - This attribute is a key attribute
DescriptionThe managed system name of the agent.
Type String
Names
Attribute nameNode
Column nameORIGINNODE
Timestamp attribute
DescriptionThe value is the time collected from the agent system, when thedata row was built and sent from the agent to the Tivoli EnterpriseMonitoring Server (or stored for historical purposes). It representsthe local time zone of the agent system.
Type Time
Names
Attribute nameTimestamp
Column nameTIMESTAMP
Table Name attribute - This attribute is a key attribute
576 IBM Tivoli Monitoring Agent Builder: User's Guide
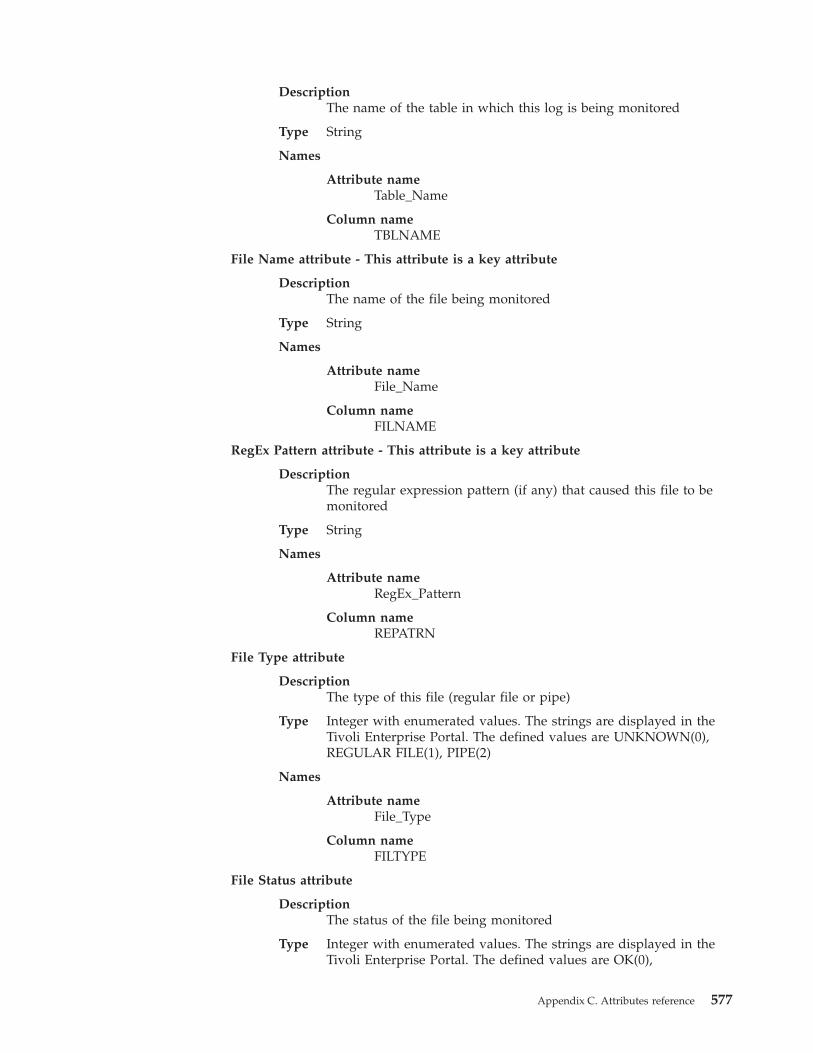
DescriptionThe name of the table in which this log is being monitored
Type String
Names
Attribute nameTable_Name
Column nameTBLNAME
File Name attribute - This attribute is a key attribute
DescriptionThe name of the file being monitored
Type String
Names
Attribute nameFile_Name
Column nameFILNAME
RegEx Pattern attribute - This attribute is a key attribute
DescriptionThe regular expression pattern (if any) that caused this file to bemonitored
Type String
Names
Attribute nameRegEx_Pattern
Column nameREPATRN
File Type attribute
DescriptionThe type of this file (regular file or pipe)
Type Integer with enumerated values. The strings are displayed in theTivoli Enterprise Portal. The defined values are UNKNOWN(0),REGULAR FILE(1), PIPE(2)
Names
Attribute nameFile_Type
Column nameFILTYPE
File Status attribute
DescriptionThe status of the file being monitored
Type Integer with enumerated values. The strings are displayed in theTivoli Enterprise Portal. The defined values are OK(0),
Appendix C. Attributes reference 577
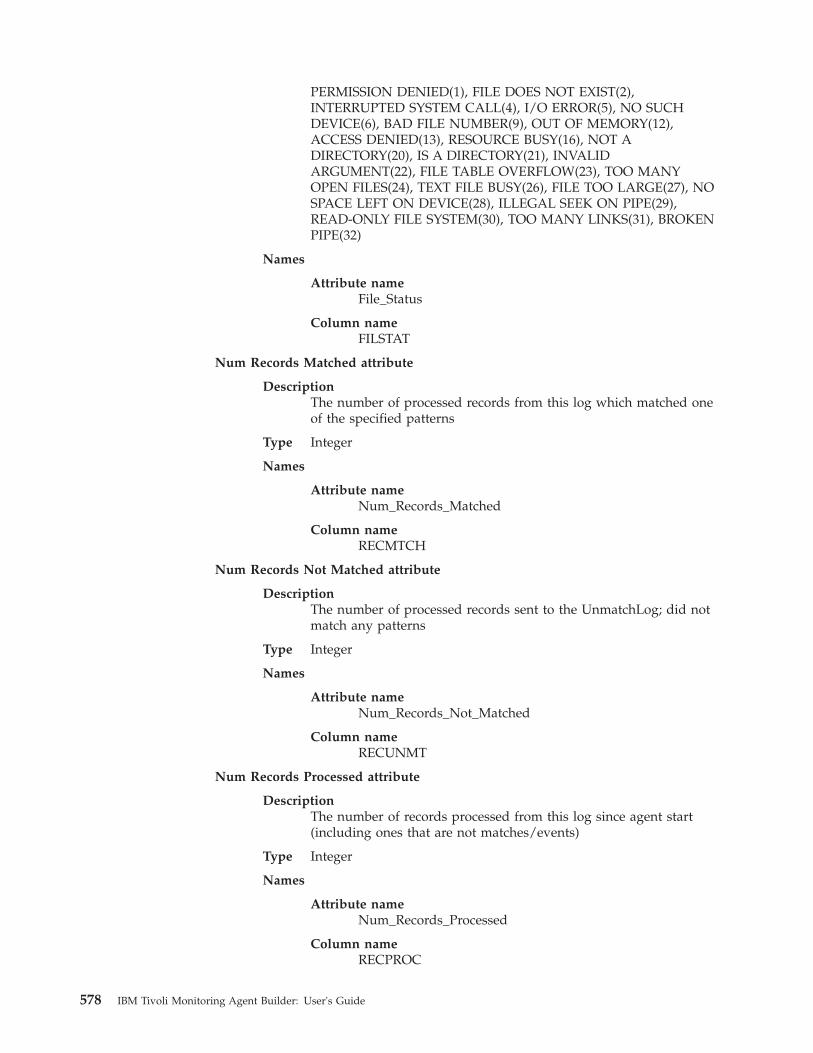
PERMISSION DENIED(1), FILE DOES NOT EXIST(2),INTERRUPTED SYSTEM CALL(4), I/O ERROR(5), NO SUCHDEVICE(6), BAD FILE NUMBER(9), OUT OF MEMORY(12),ACCESS DENIED(13), RESOURCE BUSY(16), NOT ADIRECTORY(20), IS A DIRECTORY(21), INVALIDARGUMENT(22), FILE TABLE OVERFLOW(23), TOO MANYOPEN FILES(24), TEXT FILE BUSY(26), FILE TOO LARGE(27), NOSPACE LEFT ON DEVICE(28), ILLEGAL SEEK ON PIPE(29),READ-ONLY FILE SYSTEM(30), TOO MANY LINKS(31), BROKENPIPE(32)
Names
Attribute nameFile_Status
Column nameFILSTAT
Num Records Matched attribute
DescriptionThe number of processed records from this log which matched oneof the specified patterns
Type Integer
Names
Attribute nameNum_Records_Matched
Column nameRECMTCH
Num Records Not Matched attribute
DescriptionThe number of processed records sent to the UnmatchLog; did notmatch any patterns
Type Integer
Names
Attribute nameNum_Records_Not_Matched
Column nameRECUNMT
Num Records Processed attribute
DescriptionThe number of records processed from this log since agent start(including ones that are not matches/events)
Type Integer
Names
Attribute nameNum_Records_Processed
Column nameRECPROC
578 IBM Tivoli Monitoring Agent Builder: User's Guide
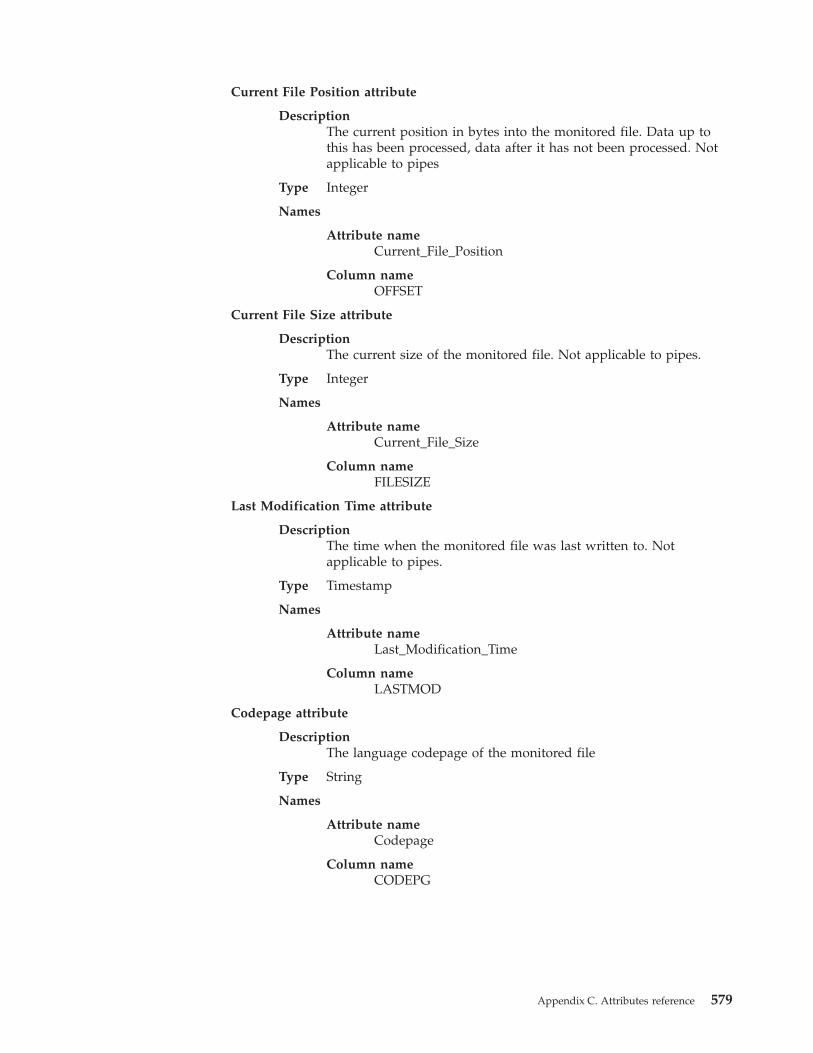
Current File Position attribute
DescriptionThe current position in bytes into the monitored file. Data up tothis has been processed, data after it has not been processed. Notapplicable to pipes
Type Integer
Names
Attribute nameCurrent_File_Position
Column nameOFFSET
Current File Size attribute
DescriptionThe current size of the monitored file. Not applicable to pipes.
Type Integer
Names
Attribute nameCurrent_File_Size
Column nameFILESIZE
Last Modification Time attribute
DescriptionThe time when the monitored file was last written to. Notapplicable to pipes.
Type Timestamp
Names
Attribute nameLast_Modification_Time
Column nameLASTMOD
Codepage attribute
DescriptionThe language codepage of the monitored file
Type String
Names
Attribute nameCodepage
Column nameCODEPG
Appendix C. Attributes reference 579
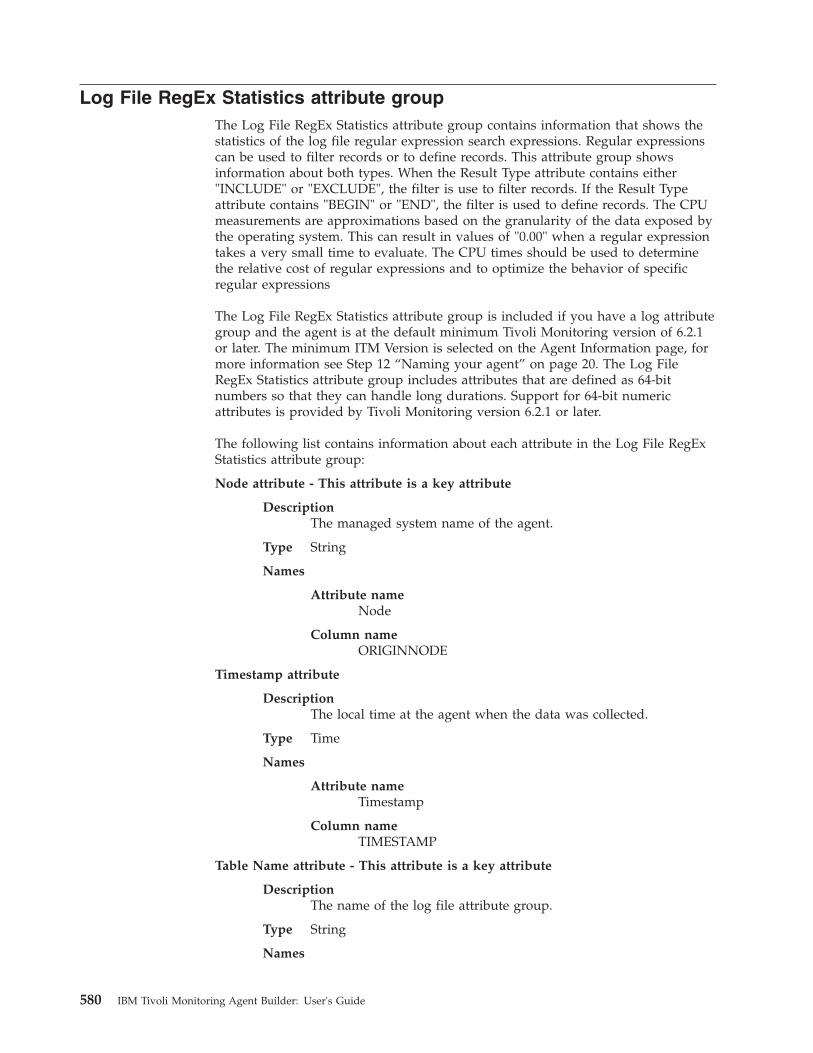
Log File RegEx Statistics attribute groupThe Log File RegEx Statistics attribute group contains information that shows thestatistics of the log file regular expression search expressions. Regular expressionscan be used to filter records or to define records. This attribute group showsinformation about both types. When the Result Type attribute contains either"INCLUDE" or "EXCLUDE", the filter is use to filter records. If the Result Typeattribute contains "BEGIN" or "END", the filter is used to define records. The CPUmeasurements are approximations based on the granularity of the data exposed bythe operating system. This can result in values of "0.00" when a regular expressiontakes a very small time to evaluate. The CPU times should be used to determinethe relative cost of regular expressions and to optimize the behavior of specificregular expressions
The Log File RegEx Statistics attribute group is included if you have a log attributegroup and the agent is at the default minimum Tivoli Monitoring version of 6.2.1or later. The minimum ITM Version is selected on the Agent Information page, formore information see Step 12 “Naming your agent” on page 20. The Log FileRegEx Statistics attribute group includes attributes that are defined as 64-bitnumbers so that they can handle long durations. Support for 64-bit numericattributes is provided by Tivoli Monitoring version 6.2.1 or later.
The following list contains information about each attribute in the Log File RegExStatistics attribute group:
Node attribute - This attribute is a key attribute
DescriptionThe managed system name of the agent.
Type String
Names
Attribute nameNode
Column nameORIGINNODE
Timestamp attribute
DescriptionThe local time at the agent when the data was collected.
Type Time
Names
Attribute nameTimestamp
Column nameTIMESTAMP
Table Name attribute - This attribute is a key attribute
DescriptionThe name of the log file attribute group.
Type String
Names
580 IBM Tivoli Monitoring Agent Builder: User's Guide
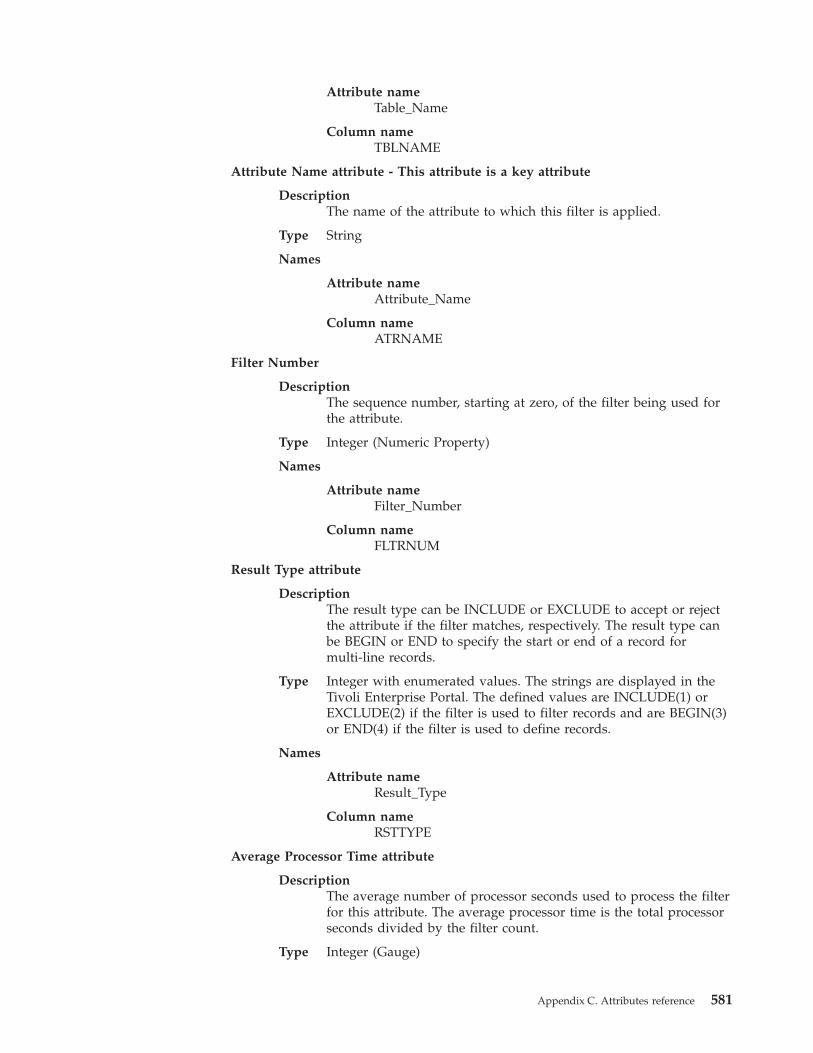
Attribute nameTable_Name
Column nameTBLNAME
Attribute Name attribute - This attribute is a key attribute
DescriptionThe name of the attribute to which this filter is applied.
Type String
Names
Attribute nameAttribute_Name
Column nameATRNAME
Filter Number
DescriptionThe sequence number, starting at zero, of the filter being used forthe attribute.
Type Integer (Numeric Property)
Names
Attribute nameFilter_Number
Column nameFLTRNUM
Result Type attribute
DescriptionThe result type can be INCLUDE or EXCLUDE to accept or rejectthe attribute if the filter matches, respectively. The result type canbe BEGIN or END to specify the start or end of a record formulti-line records.
Type Integer with enumerated values. The strings are displayed in theTivoli Enterprise Portal. The defined values are INCLUDE(1) orEXCLUDE(2) if the filter is used to filter records and are BEGIN(3)or END(4) if the filter is used to define records.
Names
Attribute nameResult_Type
Column nameRSTTYPE
Average Processor Time attribute
DescriptionThe average number of processor seconds used to process the filterfor this attribute. The average processor time is the total processorseconds divided by the filter count.
Type Integer (Gauge)
Appendix C. Attributes reference 581
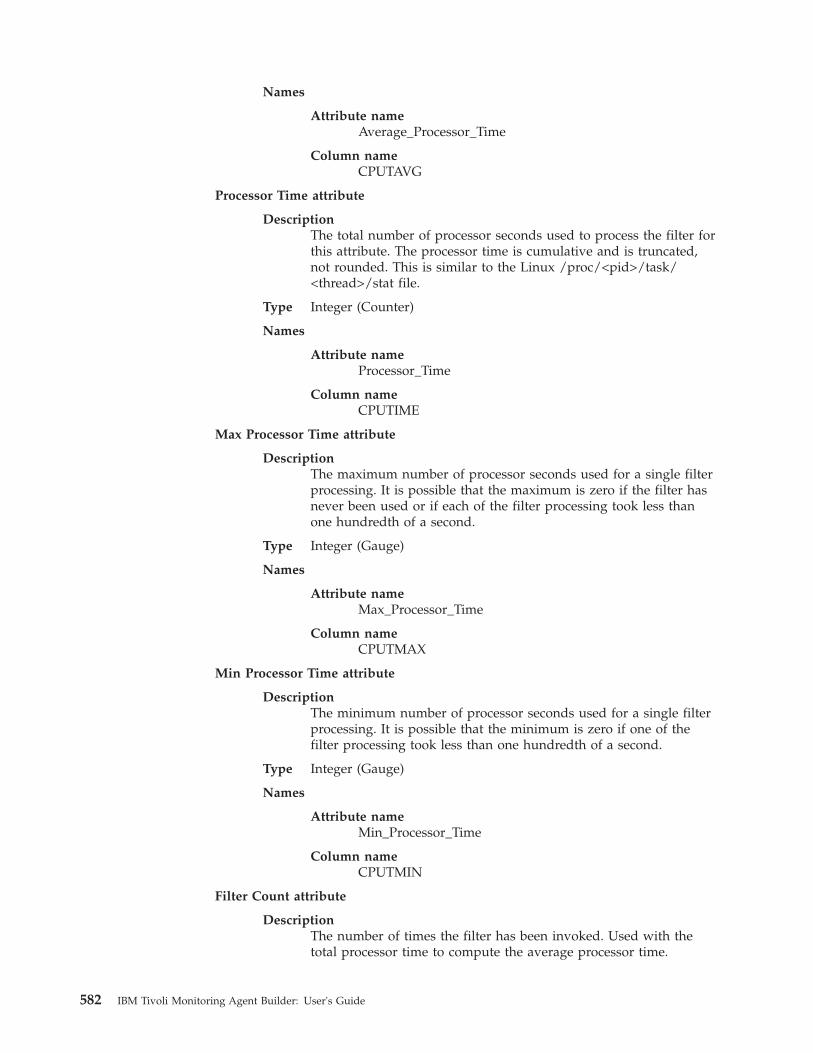
Names
Attribute nameAverage_Processor_Time
Column nameCPUTAVG
Processor Time attribute
DescriptionThe total number of processor seconds used to process the filter forthis attribute. The processor time is cumulative and is truncated,not rounded. This is similar to the Linux /proc/<pid>/task/<thread>/stat file.
Type Integer (Counter)
Names
Attribute nameProcessor_Time
Column nameCPUTIME
Max Processor Time attribute
DescriptionThe maximum number of processor seconds used for a single filterprocessing. It is possible that the maximum is zero if the filter hasnever been used or if each of the filter processing took less thanone hundredth of a second.
Type Integer (Gauge)
Names
Attribute nameMax_Processor_Time
Column nameCPUTMAX
Min Processor Time attribute
DescriptionThe minimum number of processor seconds used for a single filterprocessing. It is possible that the minimum is zero if one of thefilter processing took less than one hundredth of a second.
Type Integer (Gauge)
Names
Attribute nameMin_Processor_Time
Column nameCPUTMIN
Filter Count attribute
DescriptionThe number of times the filter has been invoked. Used with thetotal processor time to compute the average processor time.
582 IBM Tivoli Monitoring Agent Builder: User's Guide
Type Integer (Counter)
Names
Attribute nameFilter_Count
Column nameCOUNT
Filter Count Matched attribute
DescriptionThe number of times the filter has been invoked and the attributematched.
Type Integer (Counter)
Names
Attribute nameFilter_Count_Matched
Column nameCOUNTMA
Filter Count Unmatched attribute
DescriptionThe number of times the filter has been invoked and the attributedid not match.
Type Integer (Counter)
Names
Attribute nameFilter_Count_Unmatched
Column nameCOUNTUN
RegEx Pattern attribute - This attribute is a key attribute
DescriptionThe regular expression used for the match.
Type String
Names
Attribute nameRegEx_Pattern
Column nameREGXPAT
Last Matched Time attribute
DescriptionThe last time the filter was used and the result matched.
Type Time
Names
Attribute nameLast_Matched_Time
Appendix C. Attributes reference 583

Column nameLASTMAT
Last Unmatched Time attribute
DescriptionThe last time the filter was used and the result was unmatched.
Type Time
Names
Attribute nameLast_Unmatched_Time
Column nameLASTUMA
584 IBM Tivoli Monitoring Agent Builder: User's Guide
Appendix D. Creating application support extensions forexisting agents
Attention:: This is not how you add application support to an agent that you arebuilding. To add application support to an agent that you are buildingsee Chapter 33, “Importing application support files,” on page 397.
With Agent Builder you can build an installable package to easily distributecustom workspaces, situations, queries, and Take Action commands that you havecreated as an application support extension for an existing agent.
For more information about how to create custom situations, workspaces, TakeAction commands, and queries, see Chapter 32, “Creating workspaces, Take Actioncommands, and situations,” on page 391.
Creating a new Application Support Extension projectTo create an Application Support Extension project:1. From the Agent Builder, select File > New > Other.2. Select IBM Tivoli Application Support Extension under IBM Tivoli
Monitoring Wizards.
© Copyright IBM Corp. 2007, 2012 585
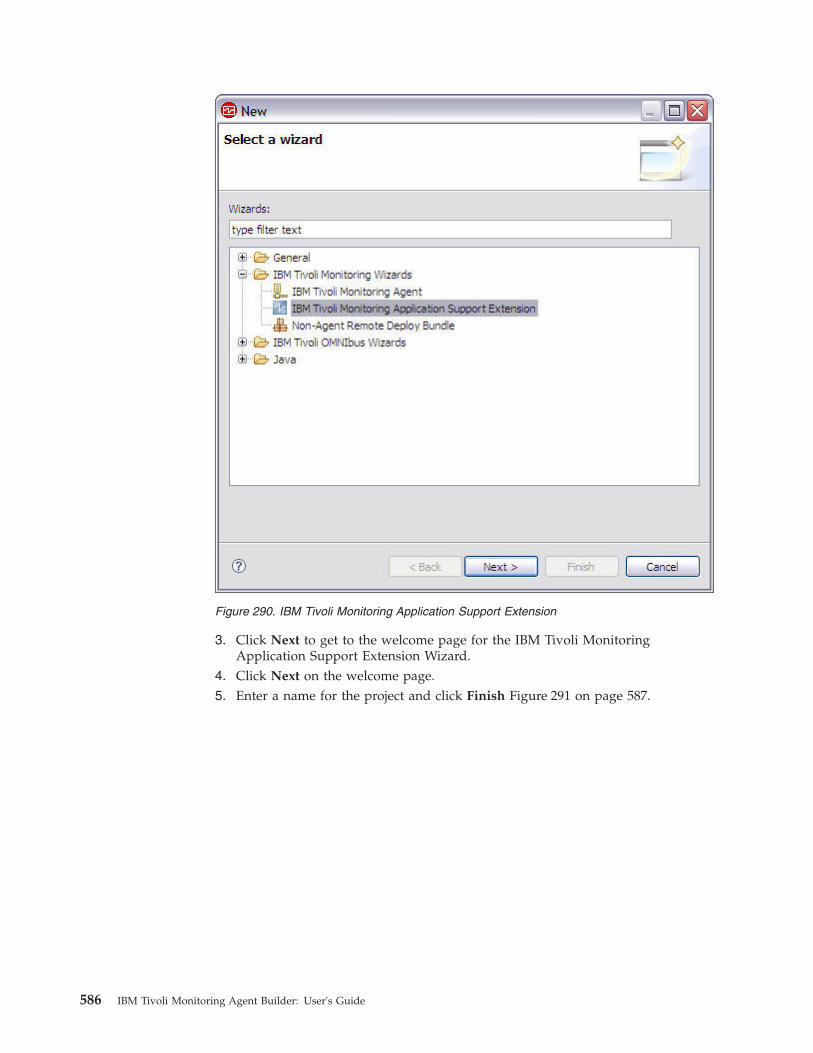
3. Click Next to get to the welcome page for the IBM Tivoli MonitoringApplication Support Extension Wizard.
4. Click Next on the welcome page.5. Enter a name for the project and click Finish Figure 291 on page 587.
Figure 290. IBM Tivoli Monitoring Application Support Extension
586 IBM Tivoli Monitoring Agent Builder: User's Guide
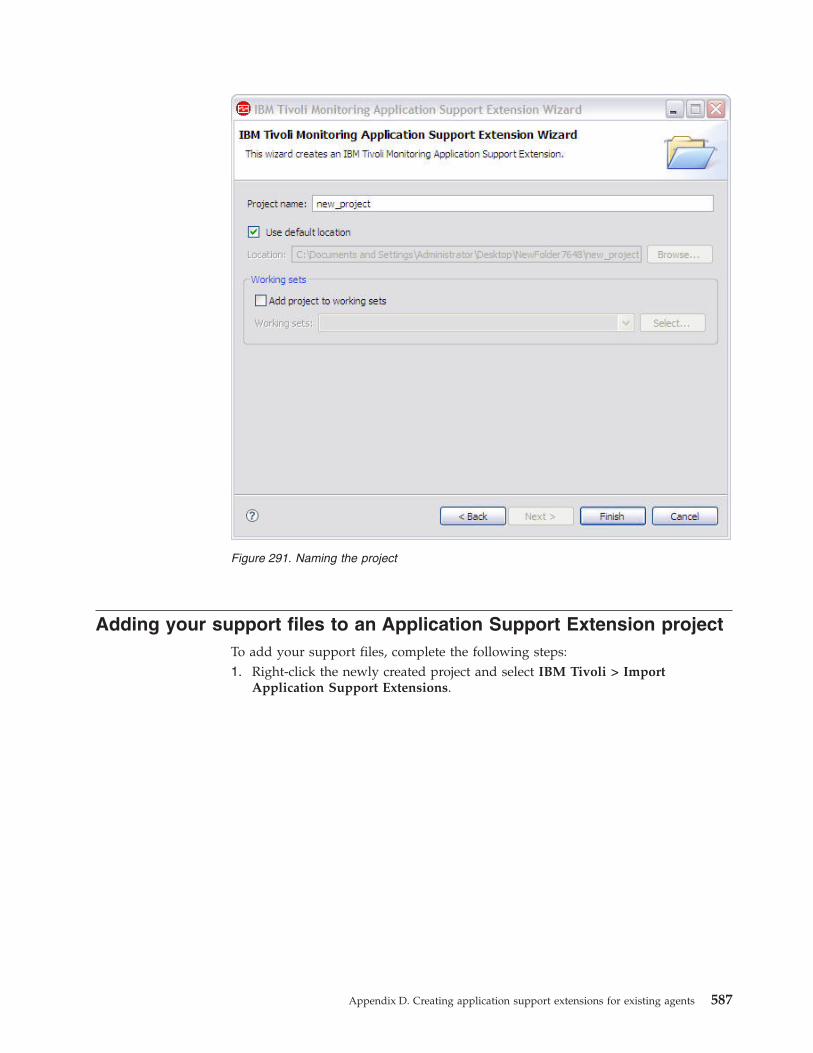
Adding your support files to an Application Support Extension projectTo add your support files, complete the following steps:1. Right-click the newly created project and select IBM Tivoli > Import
Application Support Extensions.
Figure 291. Naming the project
Appendix D. Creating application support extensions for existing agents 587
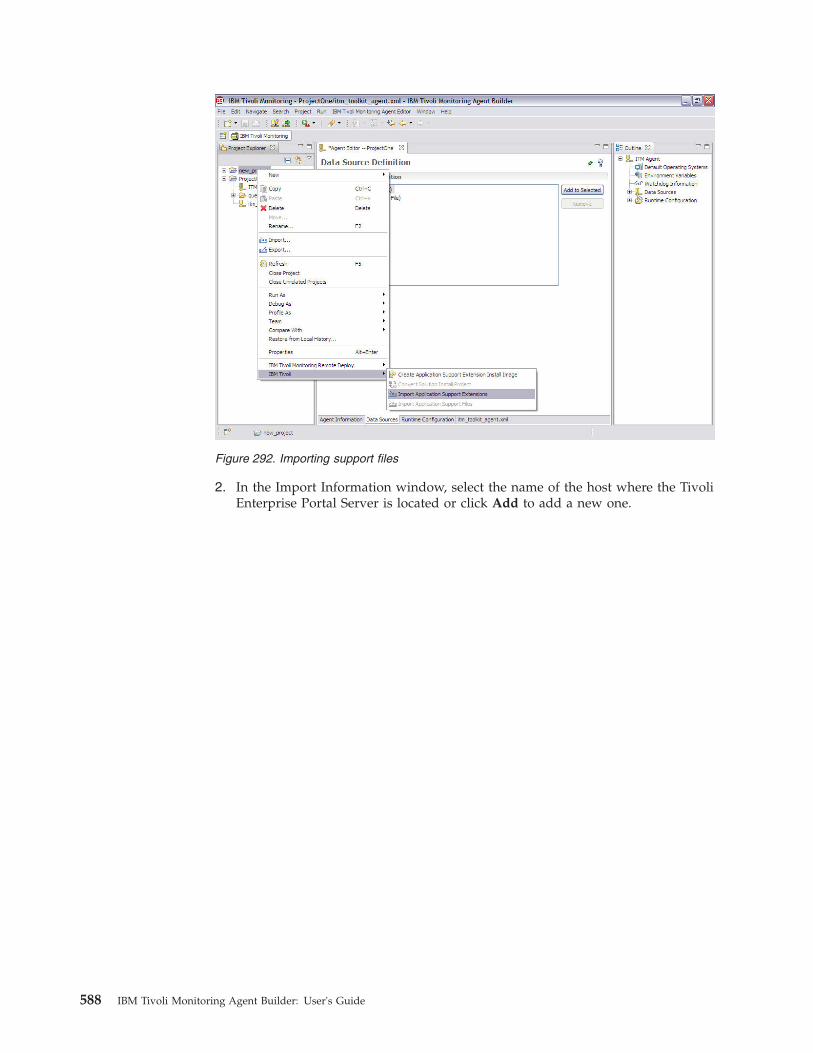
2. In the Import Information window, select the name of the host where the TivoliEnterprise Portal Server is located or click Add to add a new one.
Figure 292. Importing support files
588 IBM Tivoli Monitoring Agent Builder: User's Guide
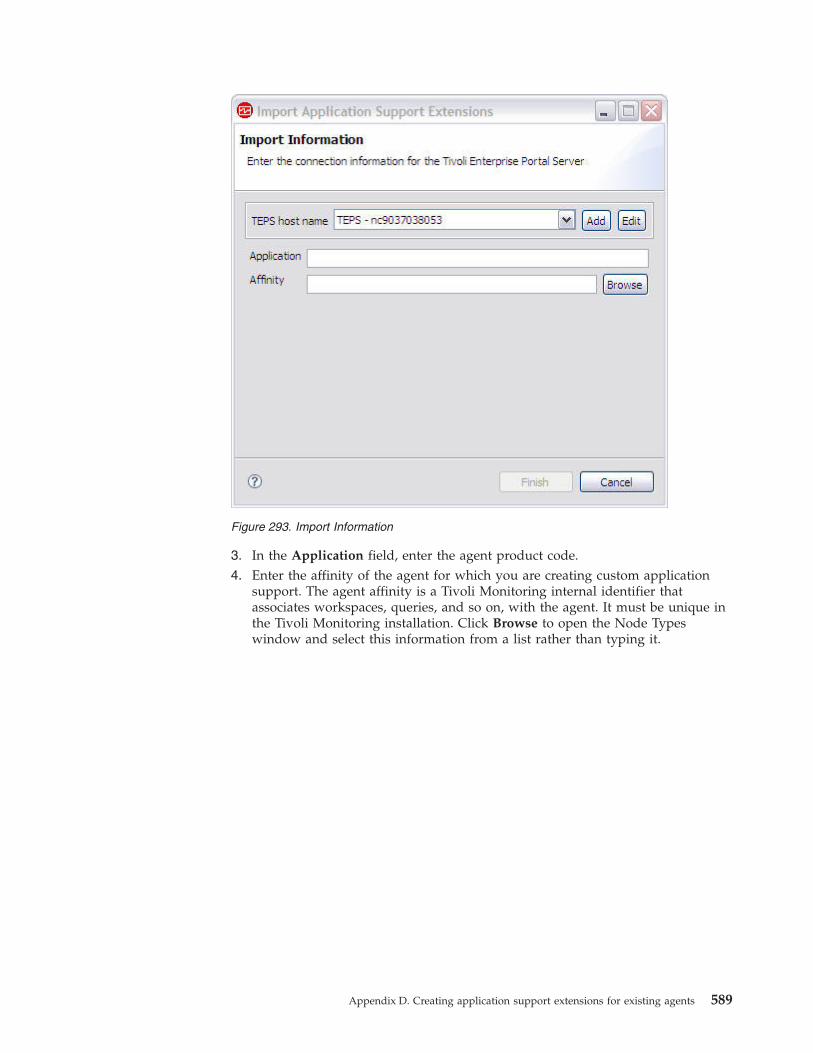
3. In the Application field, enter the agent product code.4. Enter the affinity of the agent for which you are creating custom application
support. The agent affinity is a Tivoli Monitoring internal identifier thatassociates workspaces, queries, and so on, with the agent. It must be unique inthe Tivoli Monitoring installation. Click Browse to open the Node Typeswindow and select this information from a list rather than typing it.
Figure 293. Import Information
Appendix D. Creating application support extensions for existing agents 589

5. When you are satisfied with the import information, click Finish.
6. In the Situations window Figure 296 on page 591, select the situations you wantto import from the Available Situations list. Click the button to add them to the
Figure 294. Affinities list
Figure 295. Import Information complete
590 IBM Tivoli Monitoring Agent Builder: User's Guide
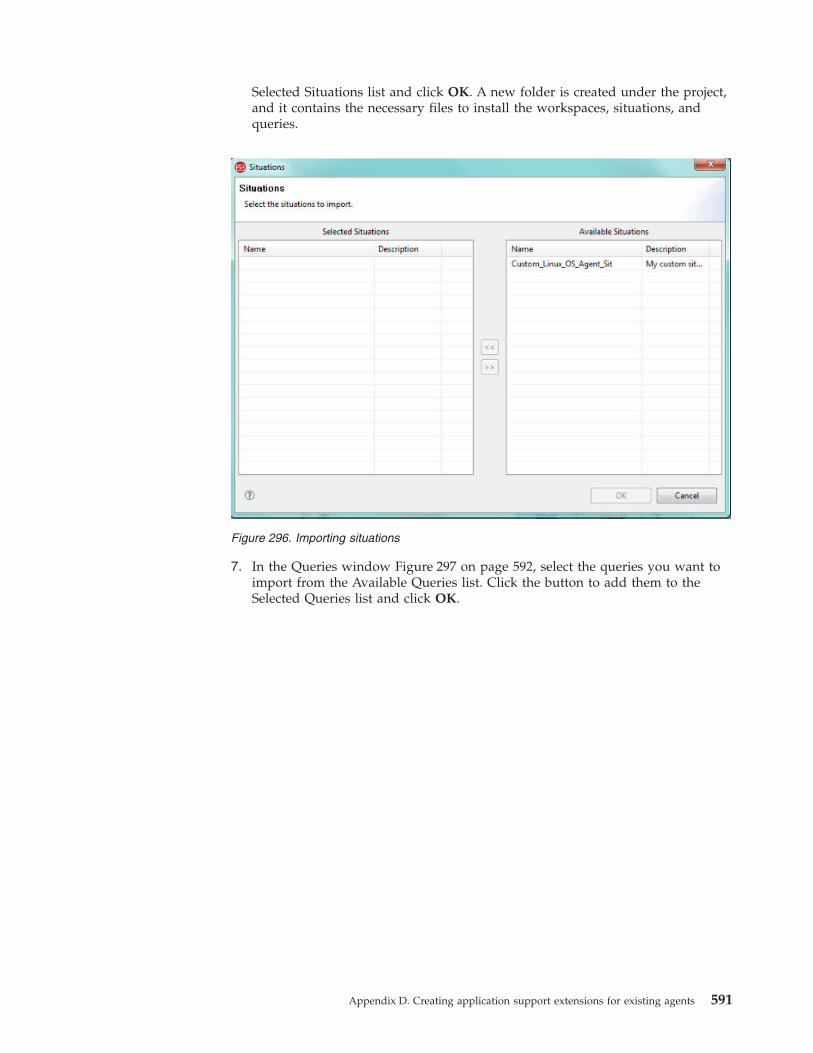
Selected Situations list and click OK. A new folder is created under the project,and it contains the necessary files to install the workspaces, situations, andqueries.
7. In the Queries window Figure 297 on page 592, select the queries you want toimport from the Available Queries list. Click the button to add them to theSelected Queries list and click OK.
Figure 296. Importing situations
Appendix D. Creating application support extensions for existing agents 591
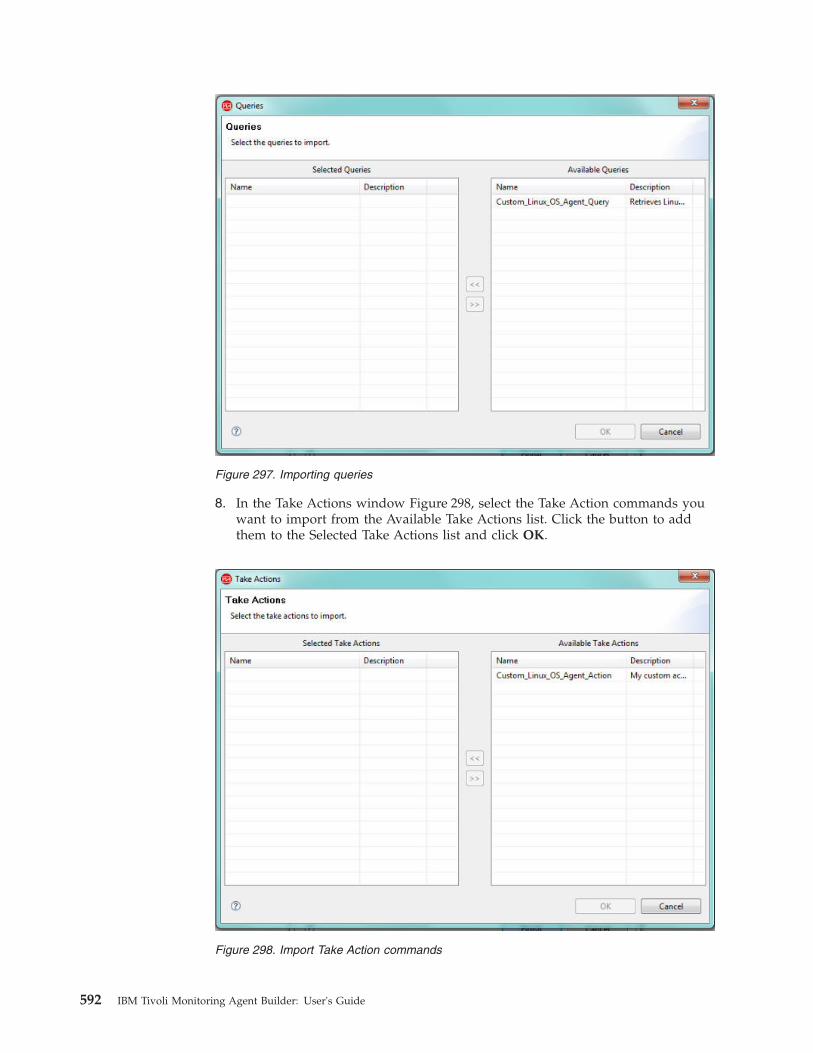
8. In the Take Actions window Figure 298, select the Take Action commands youwant to import from the Available Take Actions list. Click the button to addthem to the Selected Take Actions list and click OK.
Figure 297. Importing queries
Figure 298. Import Take Action commands
592 IBM Tivoli Monitoring Agent Builder: User's Guide

9. The support files for the agent are put in the project under the appropriatefolder.
You can repeat this process for as many different agents as you wish. The AgentBuilder will create a single install image from all of the support files in theApplication Support Extension project.
Generating the Application Support Extension install imageTo generate the install image for your Application Support Extension, perform thefollowing steps:1. Right-click on the Application Support Extension project and select IBM Tivoli
> Create Application Support Extension Install Image.2. In the Application Support Extension Install Image window Figure 300 on page
594, enter the directory where the image is to be placed.
Figure 299. Agent support files
Appendix D. Creating application support extensions for existing agents 593
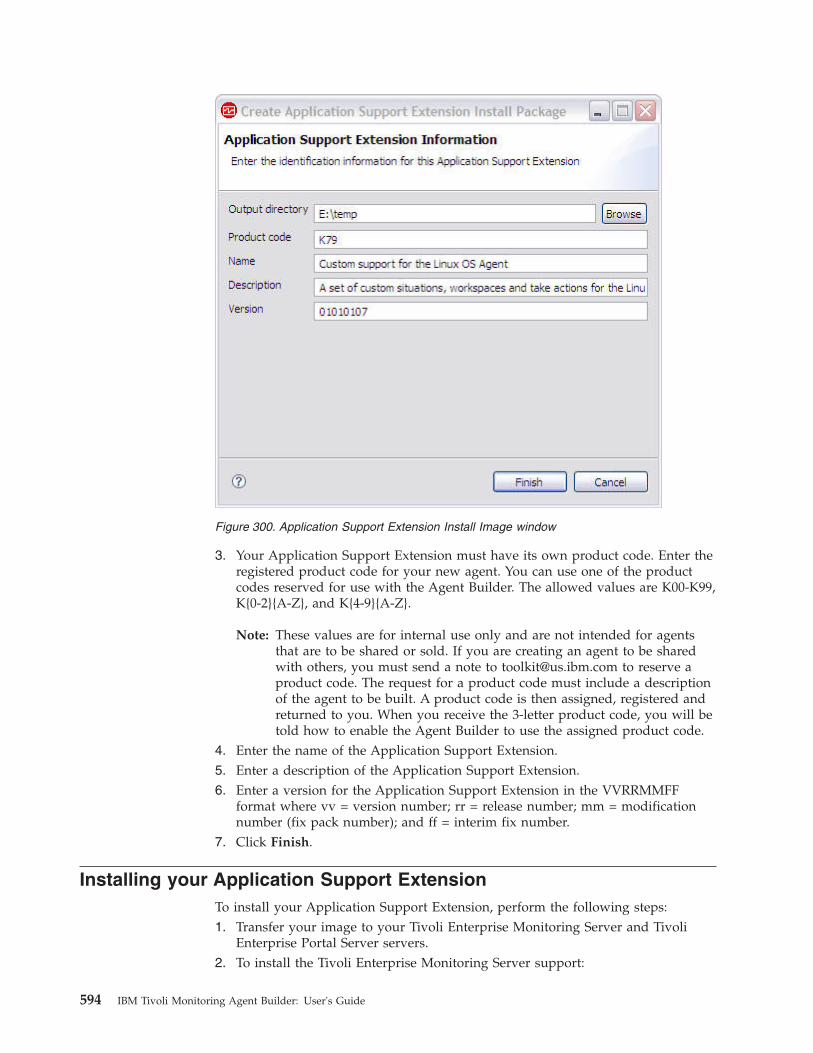
3. Your Application Support Extension must have its own product code. Enter theregistered product code for your new agent. You can use one of the productcodes reserved for use with the Agent Builder. The allowed values are K00-K99,K{0-2}{A-Z}, and K{4-9}{A-Z}.
Note: These values are for internal use only and are not intended for agentsthat are to be shared or sold. If you are creating an agent to be sharedwith others, you must send a note to [email protected] to reserve aproduct code. The request for a product code must include a descriptionof the agent to be built. A product code is then assigned, registered andreturned to you. When you receive the 3-letter product code, you will betold how to enable the Agent Builder to use the assigned product code.
4. Enter the name of the Application Support Extension.5. Enter a description of the Application Support Extension.6. Enter a version for the Application Support Extension in the VVRRMMFF
format where vv = version number; rr = release number; mm = modificationnumber (fix pack number); and ff = interim fix number.
7. Click Finish.
Installing your Application Support ExtensionTo install your Application Support Extension, perform the following steps:1. Transfer your image to your Tivoli Enterprise Monitoring Server and Tivoli
Enterprise Portal Server servers.2. To install the Tivoli Enterprise Monitoring Server support:
Figure 300. Application Support Extension Install Image window
594 IBM Tivoli Monitoring Agent Builder: User's Guide
a. Run the installKXXTEMSSupport.bat (on Windows) orinstallKXXTEMSSupport.sh (on Unix).
b. The format for the command is as follows:installKXXTEMSSupport[.bat | .sh] <ITM Install Directory> [-s tems_host][-u tems_user] \[-p tems_password]
3. To install the Tivoli Enterprise Portal Server support:a. Run the installKXXTEPSSupport.bat (on Windows) or installKXXTEM\
PSSupport.sh (on Unix).b. The format for the command is as follows:
installKXXTEPSSupport[.bat | .sh] <ITM Install Directory> [-r]
where -r indicates that the Tivoli Enterprise Portal Server should berestarted after installation
Converting an existing Solution Install Project to an ApplicationSupport Extension project
If you have existing Solution Install projects that you want to convert toApplication Support Extension projects, perform the following steps:
Note: Only support files in the Solution Install project will be migrated.1. Right-click on the Solution Install project and select IBM Tivoli > Convert
Solution Install Project.2. Enter the name of a new Application Support Extension project or select an
existing one from the list3. Click Finish.
Appendix D. Creating application support extensions for existing agents 595

596 IBM Tivoli Monitoring Agent Builder: User's Guide
Appendix E. Cognos data model generation
Agent Builder can generate a Cognos data model for each agent, which allows youto import agent information into the Cognos Framework Manager for reportcreation. This data model can be opened and viewed in the Framework Manager,which will build a model package to be published into Tivoli Common Reporting.The data model can also be customized or modified within the FrameworkManager prior to publication.
Once a report is created, Agent Builder also allows for a final report package to beimported into the Agent Builder project. This enables future agent projects to begenerated with the reports already part of the agent package. The reports that arepackaged as part of the agent install image can be imported into Tivoli Commonreporting in your production environment.
Note: In this appendix, note the following:v kxx or Kxx refers to the product code given to the agent, for example, k99.v dbType refers to the database being used by the Tivoli Data Warehouse, for
example, DB2.
PrerequisitesTo use this functionality, you need to perform the following prerequisite steps:
Note: These steps only need to be completed once, as all future data modelsgenerated with Agent Builder will use this environment.
Note: It is advisable to create an isolated development environment for agenttesting and report creation.
1. Install and configure a Tivoli Data Warehouse.2. Create tables and Procedures in the Tivoli Data Warehouse.
v Create or alter the ManagedSystem table in the Tivoli Data Warehouse, andcreate the stored procedure to populate the ManagedSystem table.
v Install the Tivoli Reporting and Analytics Model into the Tivoli DataWarehouse.
3. Install and configure Tivoli Common Reporting.4. Install and configure the Framework Manager.
Tivoli Data WarehouseTo create reports, you need a Tivoli Data Warehouse, a Warehouse Proxy agent,and a Summarization and Pruning agent installed and configured in yourenvironment. For more information, see the IBM Tivoli Monitoring Installation andSetup Guide.
Create tables and Procedures in the Tivoli Data Warehouse
Create or alter the ManagedSystem Table and Stored Procedurein the Tivoli Data WarehouseThe generated Cognos data model includes a ManagedSystem table which is usedto define a ManagedSystem dimension. The ManagedSystem dimension allows
© Copyright IBM Corp. 2007, 2012 597
reports to be created that can correlate managed systems. For example, if the agentis a subnode agent, the dimension can be used to determine the subnodes thatexist for a given agent instance.
The ManagedSystem table is not created by the Tivoli Data Warehouse. Therefore,when an agent is generated in Agent Builder, SQL scripts are generated for eachdatabase platform that will:v Create the ManagedSystem table. Use this script if the table does not already
exist in the Tivoli Data Warehouse.v Edit the ManagedSystem table. Use this script if the table already exists in the
Tivoli Data Warehouse. Other reporting products may create theManagedSystem table, but they do not create it with all of the required columns.
v Create a stored procedure that will populate the ManagedSystem table fromtables in the Tivoli Data Warehouse.
These scripts only need to be run once.
DB2: The scripts for DB2 are located in the following directory:reports/db2/Kxx/reports/cognos_reports/itmkxx/db_scripts
For DB2, perform the following steps:1. The generated scripts (create_table.sql, alter_table.sql, and
create_procedure.sql) all use itmuser as the Tivoli Data Warehouse user ID. Ifthis is not the Tivoli Data Warehouse user ID in your environment, change alloccurrences of itmuser to the correct user ID.
2. Connect to the Tivoli Data Warehouse as the Tivoli Data Warehouse User:db2 connect to <Tivoli Data Warehouse alias name> user<Tivoli Data Warehouse user id> using <password>
3. Determine whether the ManagedSystem table exists:db2 "select count(*) from sysibm.systables where name = ’MANAGEDSYSTEM’and creator=upper (’<Tivoli Data Warehouse user id>’)"
4. Create or alter the table.a. If the query returns 1, the table exists. Run the alter script:
db2 -tvf alter_table.sql
—OR—b. If the query returns 0, the table does not exist. Run the create script:
db2 -tvf create_table.sql
5. Run the script to create the stored procedure:db2 -td@ -f create_procedure.sql
Oracle: The scripts for Oracle are located in the following directory:reports/oracle/Kxx/reports/cognos_reports/itmkxx/db_scripts
For Oracle, perform the following steps:1. The generated scripts (create_table.sql, alter_table.sql, and
create_procedure.sql) all use itmuser as the Tivoli Data Warehouse user ID. Ifthis is not the Tivoli Data Warehouse user ID in your environment, change alloccurrences of itmuser to the correct user ID.
2. Start sqlplus:sqlplus <IBM Tivoli Monitoring user ID>/<password>@<Tivoli Data Warehouse SID>
3. Determine whether the ManagedSystem table exists:
598 IBM Tivoli Monitoring Agent Builder: User's Guide
select count(*) from user_tables where table_name = ’MANAGEDSYSTEM’;
4. Create or alter the table.a. If the query returns 1, the table exists. Run the alter script:
@<path to alter_table.sql>;
—OR—b. If the query returns 0, the table does not exist. Run the create script:
@<path to create_table.sql>;
5. Run the script to create the stored procedure:@<path to create_procedure.sql>;
SQL Server 2005 and 2008: The scripts for SQL Server are located in the followingdirectory:reports/mssql/Kxx/reports/cognos_reports/itmkxx/db_scripts
For SQL Server 2005 and 2008, perform the following steps:1. The generated scripts (create_table.sql, alter_table.sql, and
create_procedure.sql) all use itmuser as the Tivoli Data Warehouse user ID. Ifthis is not the Tivoli Data Warehouse user ID in your environment, change alloccurrences of itmuser to the correct user ID.
2. Determine whether the ManagedSystem table exists:osql -S <Server> -U <Tivoli Data Warehouse user ID> -P <password> -d<Tivoli Data Warehouse database name> -Q "Select count(*)from INFORMATION_SCHEMA.TABLES where table_name = ’ManagedSystem’"
3. Create or alter the table.a. If the query returns 1, the table exists. Run the alter script:
osql -S <Server> -U <Tivoli Data Warehouse user ID> -P <password> -d<Tivoli Data Warehouse database name> -I -n -i <path to alter_table.sql>
—OR—b. If the query returns 0, the table does not exist. Run the create script:
osql -S <Server> -U <Tivoli Data Warehouse user ID> -P <password> -d<Tivoli Data Warehouse database name> -I -n -i <path to create_table.sql>
4. Run the script to create the stored procedure:osql -S <Server> -U <Tivoli Data Warehouse user ID> -P<password> -d <Tivoli Data Warehouse database name>-I -n -i <path to create_procedure.sql>
Tivoli Reporting and Analytics ModelTivoli Reporting and Analytics Model (TRAM) contains the base set of knowledgethat is common to all reporting packages, and is installed by a set of scripts uniqueto each database. The necessary scripts for populating each supported database areincluded in the agent installation image, within the reports directory.
Populating the Tivoli Data Warehouse with the Tivoli Reporting and AnalyticsModel: Perform the following steps to create Tivoli Reporting and AnalyticsModel Common Dimensions in Tivoli Data Warehouse:1. Browse to the Tivoli Reporting and Analytics Model database scripts.
a. Extract the agent package.v On Windows systems, agent package is kxx.zip.v On Linux and UNIX systems, agent package is kxx.tgz.
b. Navigate to the appropriate database scripts.v DB2 scripts located in the Agent package at:
Appendix E. Cognos data model generation 599
reports/db2/Kxx/reports/cognos_reports/itmkxx/db_scripts
v Oracle scripts located in the Agent package at:reports/oracle/Kxx/reports/cognos_reports/itmkxx/db_scripts
v Microsoft SQL Server scripts located in the Agent package at:reports/mssql/Kxx/reports/cognos_reports/itmkxx/db_scripts
2. Run the database scripts to generate the common dimensions within the TivoliData Warehouse. Each script set provides a README for usage instructions.
3. Verify that the scripts added the following tables to the Tivoli Data Warehouse:“Computer System”, WEEKDAY_LOOKUP, MONTH_LOOKUP,TIMEZONE_DIMENSION, TIME_DIMENSION.
Tivoli Common ReportingTivoli Common Reporting contains the Cognos Business Intelligence engine, whichcontains elements to assist with the creation of agent reports. This applicationneeds to be installed and configured with a data source connecting to the TivoliData Warehouse.
Installing Tivoli Common ReportingYou must install Tivoli Common Reporting. Versions 1.3, 2.1, 2.1.1 or later aresupported. For information about installing Tivoli Common Reporting, seeInstalling Tivoli Common Reporting in the Tivoli Common Reporting User's Guide.
Configuring Tivoli Common ReportingYou must configure Tivoli Common Reporting. For information about configuringTivoli Common Reporting, see Configuring Tivoli Common Reporting in the TivoliCommon Reporting User's Guide.
Create a data source between the Tivoli Data Warehouse and Tivoli CommonReporting. For more information see Configuring database connection in the TivoliCommon Reporting User's Guide. Click on the appropriate database type. Note thename given to the data source. The default is TDW.
Note: The data source name must match the name in the Data source field of theCognos Information page. For more information about the CognosInformation page, see “Cognos information” on page 43.
Framework ManagerFramework Manager is an application that ships with the Tivoli CommonReporting application, but must be installed and configured separately. FrameworkManager is used to view and modify data models and to publish data models toTivoli Common Reporting
Installing Framework ManagerYou must install Framework Manager. Versions 8.4, 8.4.1 or later are supported.
The Framework Manager ships with Tivoli Common Reporting, but must bemanually installed. Tivoli Common Reporting 1.3 ships with Framework Manager8.4. Tivoli Common Reporting 2.1 and 2.1.1 ships with Framework Manager 8.4.1.For information about installing Framework Manager, see Installing FrameworkManager in the Tivoli Common Reporting User's Guide.
600 IBM Tivoli Monitoring Agent Builder: User's Guide
Configuring Framework ManagerYou must configure Framework Manager. For information about configuringFramework Manager, see Configuring Framework Manager in the Tivoli CommonReporting User's Guide.
Creating reportsGenerating an agent in Agent Builder creates an entire Framework Managerproject, which includes the data model and the Framework Manager project file.Framework Manager can open the project file directly, which will open the datamodel for modification, customization, or publication.
PrerequisitesOnce the agent has been completed, it must be installed into the Tivoli Monitoringenvironment. In addition, historical collection for the agent must be configured andthe agent be run for at least one warehouse upload interval. Summarization mustbe configured, and the summarization setting choices made in Tivoli Monitoringmust be identical to the summarization choices made in the Agent Builder. TheSummarization and Pruning agent must run at least once after the agent's data isuploaded to the warehouse.1. Install, configure, and start your agent.2. Create and distribute to the agent a historical collection for each attribute group
you want to create a report for.
Note: The warehouse upload interval defaults to daily. However, you maywant to shorten this interval.
For information about configuring historical collection, see Managing historicaldata in the IBM Tivoli Monitoring Administrator's Guide.
3. In Tivoli Monitoring, configure summarization for all of the attribute groupsyou created historical collections for in Step 2.
Note: Once you have configured historical collection and summarization youneed to wait a sufficient amount of time for data to end up in thesummary tables.
Note: By default, the Summarization and Pruning agent is configured to runonce a day at 2 a.m. You may want to change this setting. For example,you can configure it to run hourly. For information about configuring theTivoli Data Warehouse, see Setting up data warehousing in the IBMTivoli Monitoring Installation and Setup Guide.
Opening the Agent Data Model in Framework Manager
Note: The generated data model for the agent will contain all of the summary timedimensions for each attribute group: hourly, daily, weekly, monthly,quarterly, and yearly. The dimensions will only exist in the Tivoli DataWarehouse for the agent if summarization and pruning is configured for theagent and the dimensions are selected, and the Summarization and Pruningagent has created and populated the tables. Reports can be defined andpublished into Tivoli Common Reporting that use dimensions that do notexist, but they will not function until the summary tables are created by theSummarization and Pruning agent.
1. Open the Framework Manager.
Appendix E. Cognos data model generation 601
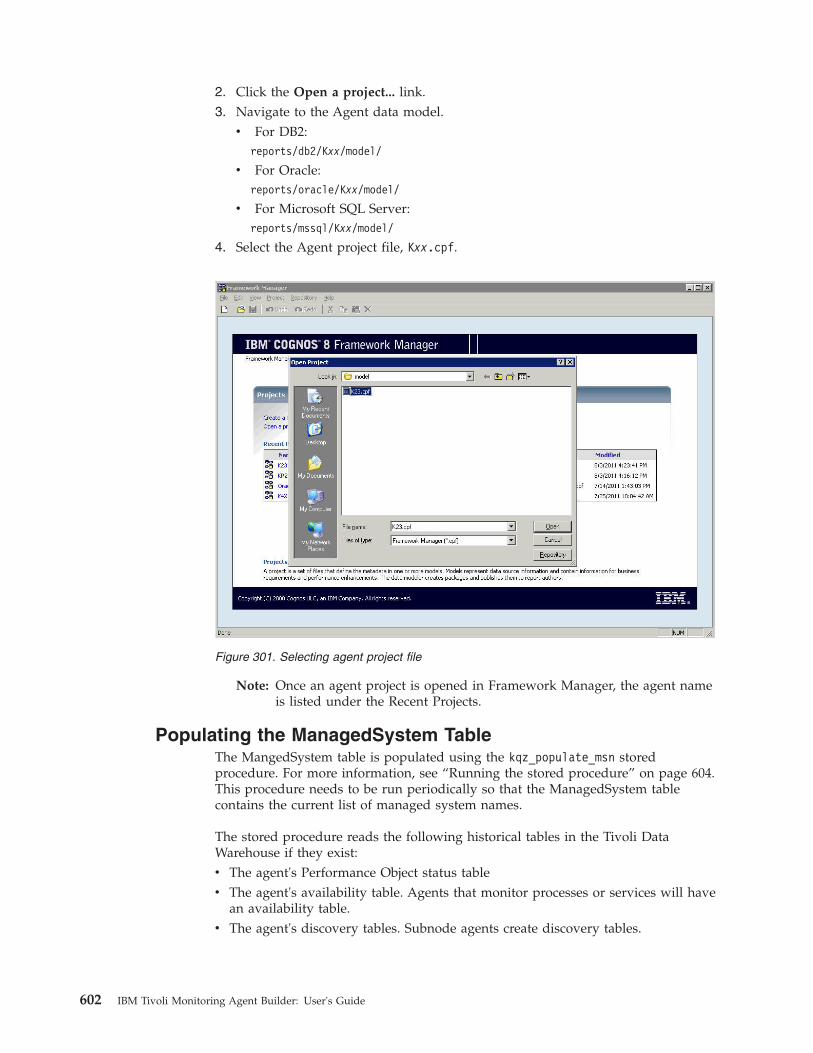
2. Click the Open a project... link.3. Navigate to the Agent data model.
v For DB2:reports/db2/Kxx/model/
v For Oracle:reports/oracle/Kxx/model/
v For Microsoft SQL Server:reports/mssql/Kxx/model/
4. Select the Agent project file, Kxx.cpf.
Note: Once an agent project is opened in Framework Manager, the agent nameis listed under the Recent Projects.
Populating the ManagedSystem TableThe MangedSystem table is populated using the kqz_populate_msn storedprocedure. For more information, see “Running the stored procedure” on page 604.This procedure needs to be run periodically so that the ManagedSystem tablecontains the current list of managed system names.
The stored procedure reads the following historical tables in the Tivoli DataWarehouse if they exist:v The agent's Performance Object status tablev The agent's availability table. Agents that monitor processes or services will have
an availability table.v The agent's discovery tables. Subnode agents create discovery tables.
Figure 301. Selecting agent project file
602 IBM Tivoli Monitoring Agent Builder: User's Guide
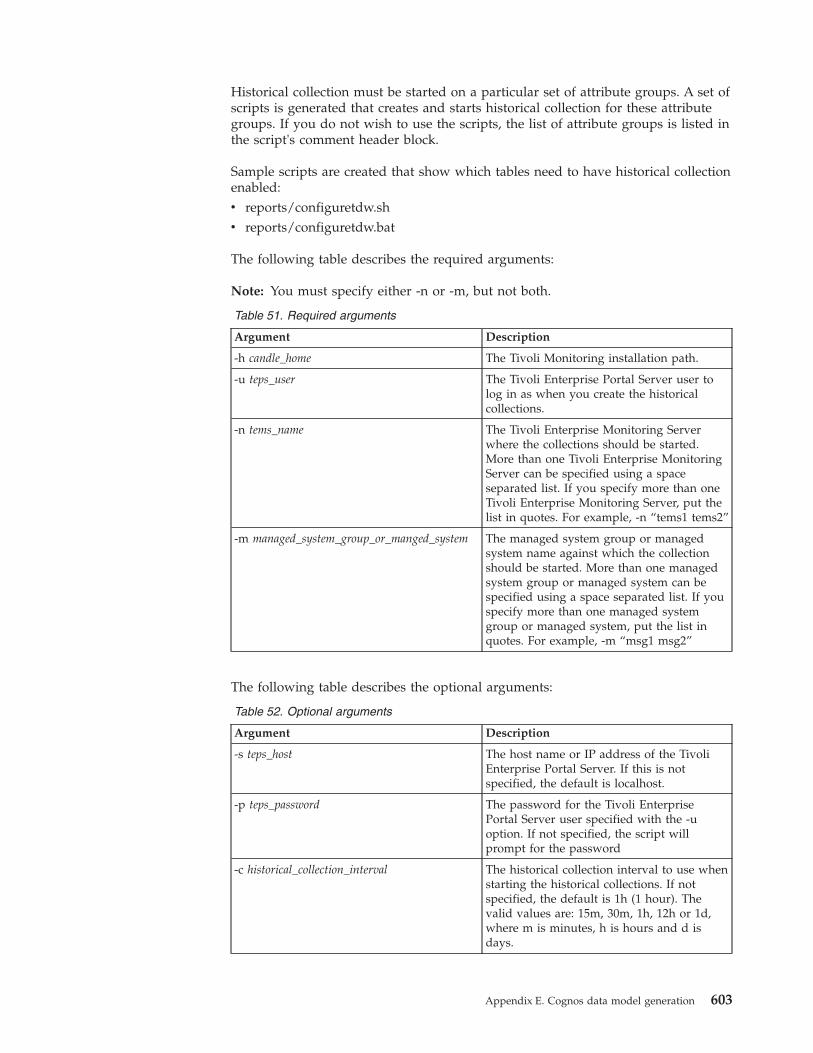
Historical collection must be started on a particular set of attribute groups. A set ofscripts is generated that creates and starts historical collection for these attributegroups. If you do not wish to use the scripts, the list of attribute groups is listed inthe script's comment header block.
Sample scripts are created that show which tables need to have historical collectionenabled:v reports/configuretdw.shv reports/configuretdw.bat
The following table describes the required arguments:
Note: You must specify either -n or -m, but not both.
Table 51. Required arguments
Argument Description
-h candle_home The Tivoli Monitoring installation path.
-u teps_user The Tivoli Enterprise Portal Server user tolog in as when you create the historicalcollections.
-n tems_name The Tivoli Enterprise Monitoring Serverwhere the collections should be started.More than one Tivoli Enterprise MonitoringServer can be specified using a spaceseparated list. If you specify more than oneTivoli Enterprise Monitoring Server, put thelist in quotes. For example, -n “tems1 tems2”
-m managed_system_group_or_manged_system The managed system group or managedsystem name against which the collectionshould be started. More than one managedsystem group or managed system can bespecified using a space separated list. If youspecify more than one managed systemgroup or managed system, put the list inquotes. For example, -m “msg1 msg2”
The following table describes the optional arguments:
Table 52. Optional arguments
Argument Description
-s teps_host The host name or IP address of the TivoliEnterprise Portal Server. If this is notspecified, the default is localhost.
-p teps_password The password for the Tivoli EnterprisePortal Server user specified with the -uoption. If not specified, the script willprompt for the password
-c historical_collection_interval The historical collection interval to use whenstarting the historical collections. If notspecified, the default is 1h (1 hour). Thevalid values are: 15m, 30m, 1h, 12h or 1d,where m is minutes, h is hours and d isdays.
Appendix E. Cognos data model generation 603
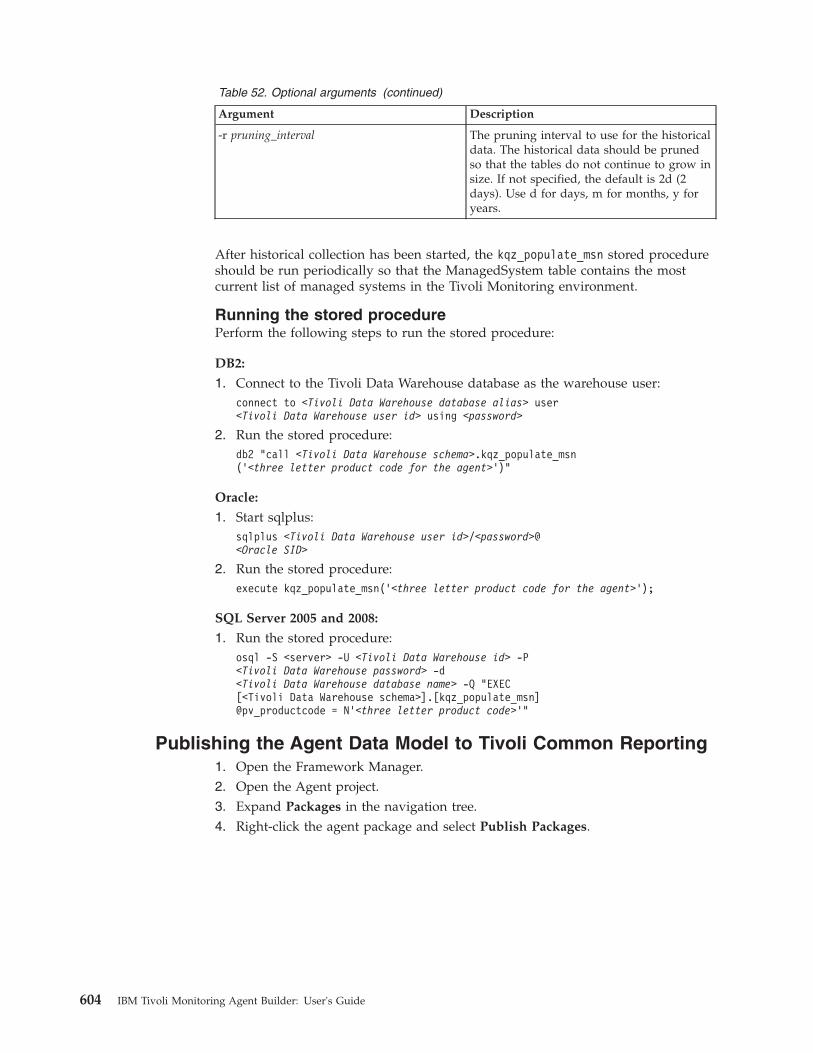
Table 52. Optional arguments (continued)
Argument Description
-r pruning_interval The pruning interval to use for the historicaldata. The historical data should be prunedso that the tables do not continue to grow insize. If not specified, the default is 2d (2days). Use d for days, m for months, y foryears.
After historical collection has been started, the kqz_populate_msn stored procedureshould be run periodically so that the ManagedSystem table contains the mostcurrent list of managed systems in the Tivoli Monitoring environment.
Running the stored procedurePerform the following steps to run the stored procedure:
DB2:
1. Connect to the Tivoli Data Warehouse database as the warehouse user:connect to <Tivoli Data Warehouse database alias> user<Tivoli Data Warehouse user id> using <password>
2. Run the stored procedure:db2 "call <Tivoli Data Warehouse schema>.kqz_populate_msn(’<three letter product code for the agent>’)"
Oracle:
1. Start sqlplus:sqlplus <Tivoli Data Warehouse user id>/<password>@<Oracle SID>
2. Run the stored procedure:execute kqz_populate_msn(’<three letter product code for the agent>’);
SQL Server 2005 and 2008:
1. Run the stored procedure:osql -S <server> -U <Tivoli Data Warehouse id> -P<Tivoli Data Warehouse password> -d<Tivoli Data Warehouse database name> -Q "EXEC[<Tivoli Data Warehouse schema>].[kqz_populate_msn]@pv_productcode = N’<three letter product code>’"
Publishing the Agent Data Model to Tivoli Common Reporting1. Open the Framework Manager.2. Open the Agent project.3. Expand Packages in the navigation tree.4. Right-click the agent package and select Publish Packages.
604 IBM Tivoli Monitoring Agent Builder: User's Guide
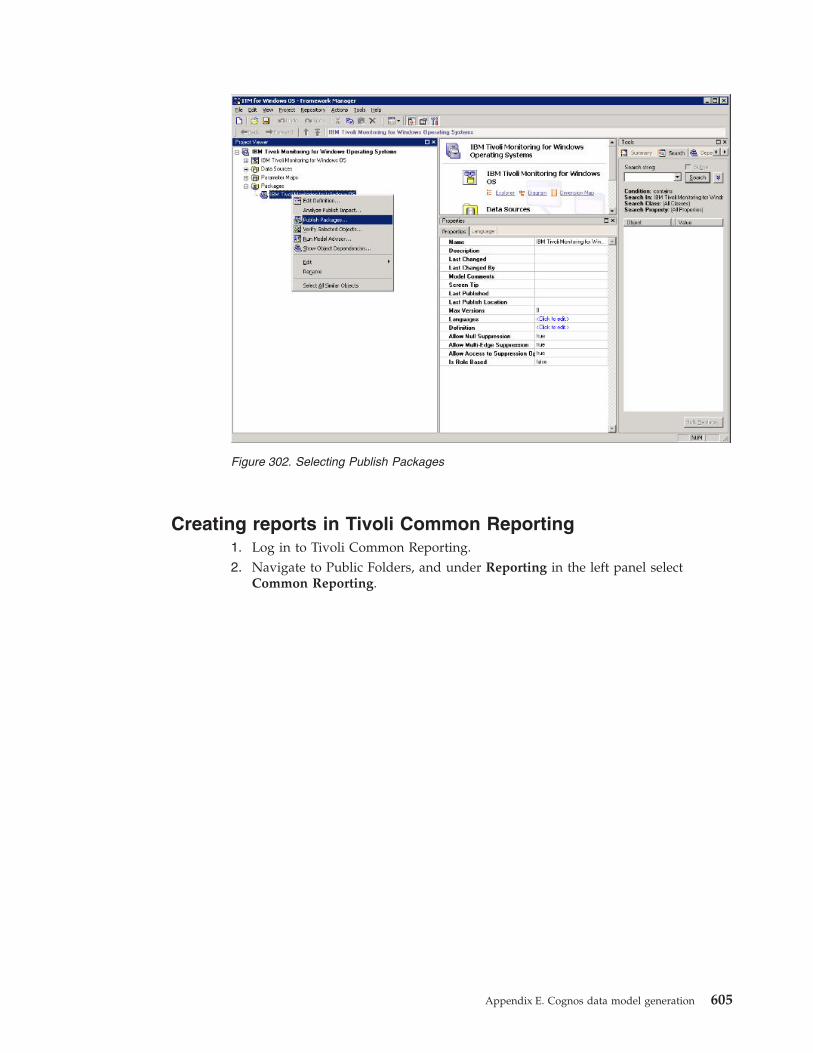
Creating reports in Tivoli Common Reporting1. Log in to Tivoli Common Reporting.2. Navigate to Public Folders, and under Reporting in the left panel select
Common Reporting.
Figure 302. Selecting Publish Packages
Appendix E. Cognos data model generation 605
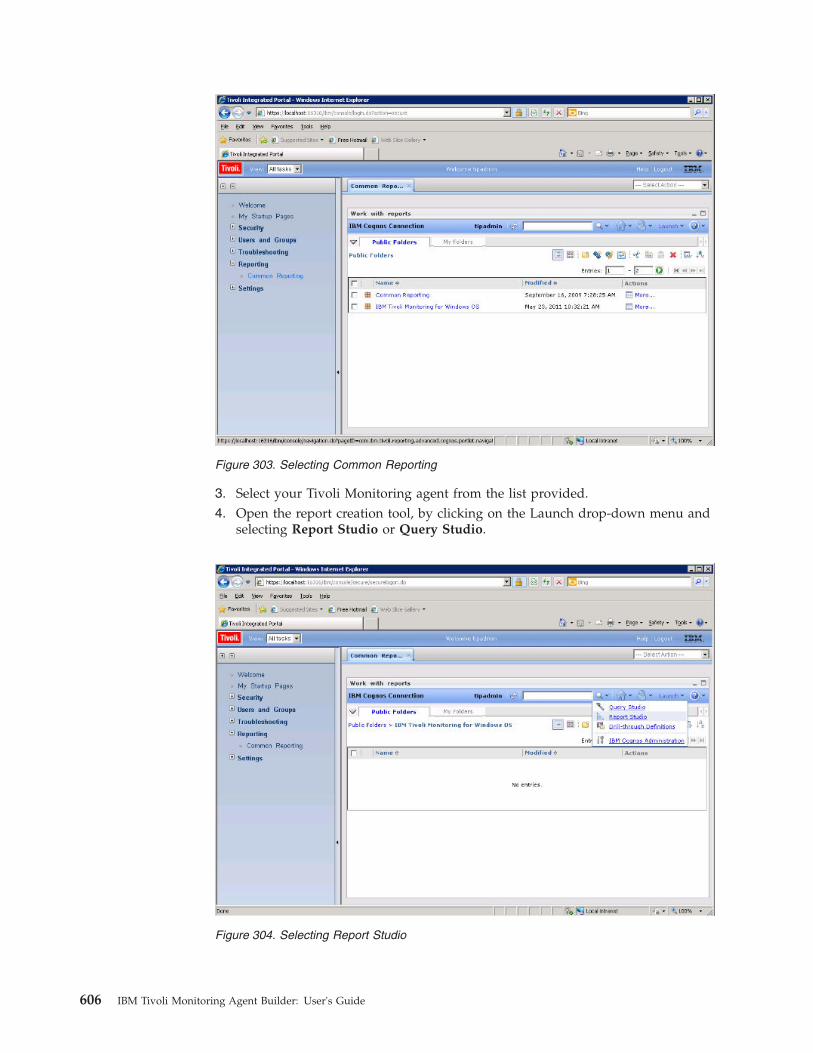
3. Select your Tivoli Monitoring agent from the list provided.4. Open the report creation tool, by clicking on the Launch drop-down menu and
selecting Report Studio or Query Studio.
Figure 303. Selecting Common Reporting
Figure 304. Selecting Report Studio
606 IBM Tivoli Monitoring Agent Builder: User's Guide
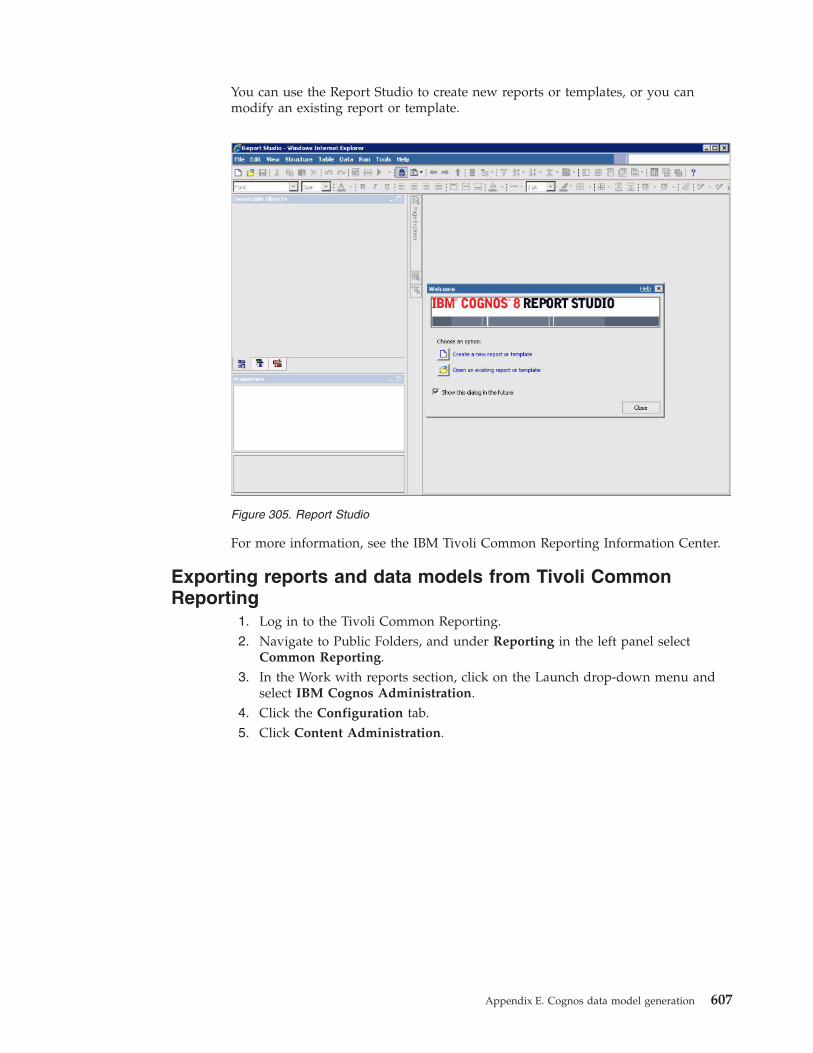
You can use the Report Studio to create new reports or templates, or you canmodify an existing report or template.
For more information, see the IBM Tivoli Common Reporting Information Center.
Exporting reports and data models from Tivoli CommonReporting
1. Log in to the Tivoli Common Reporting.2. Navigate to Public Folders, and under Reporting in the left panel select
Common Reporting.3. In the Work with reports section, click on the Launch drop-down menu and
select IBM Cognos Administration.4. Click the Configuration tab.5. Click Content Administration.
Figure 305. Report Studio
Appendix E. Cognos data model generation 607
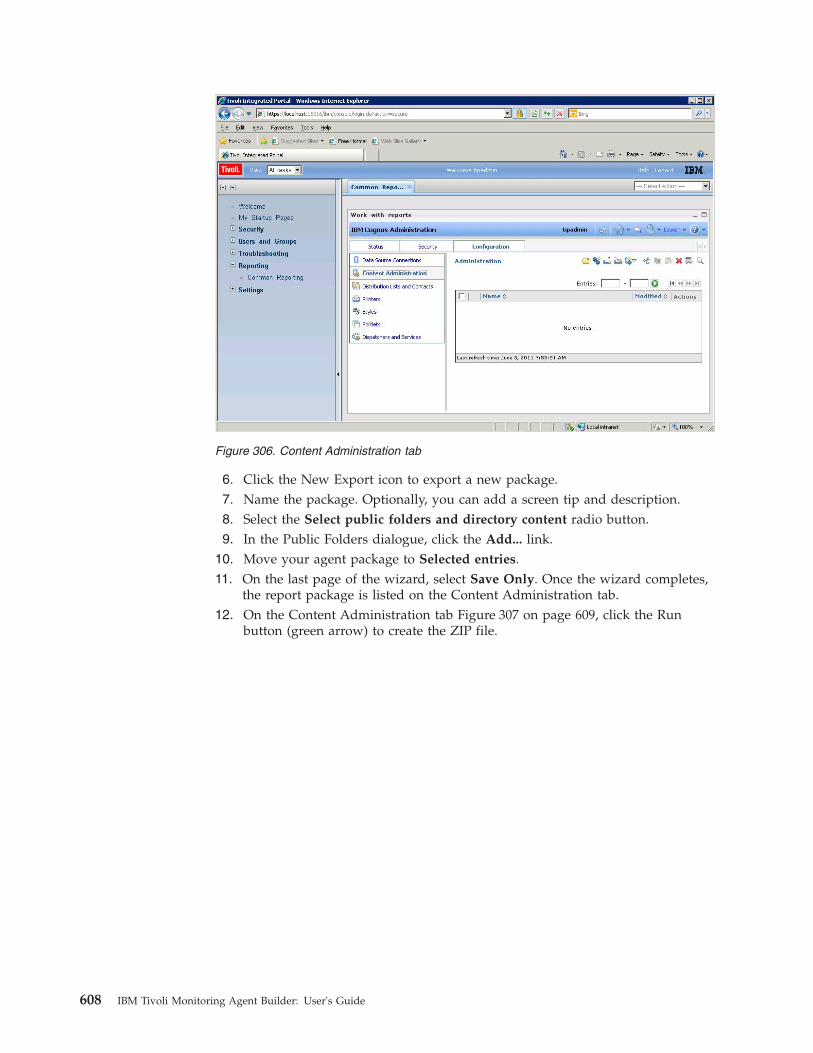
6. Click the New Export icon to export a new package.7. Name the package. Optionally, you can add a screen tip and description.8. Select the Select public folders and directory content radio button.9. In the Public Folders dialogue, click the Add... link.
10. Move your agent package to Selected entries.11. On the last page of the wizard, select Save Only. Once the wizard completes,
the report package is listed on the Content Administration tab.12. On the Content Administration tab Figure 307 on page 609, click the Run
button (green arrow) to create the ZIP file.
Figure 306. Content Administration tab
608 IBM Tivoli Monitoring Agent Builder: User's Guide
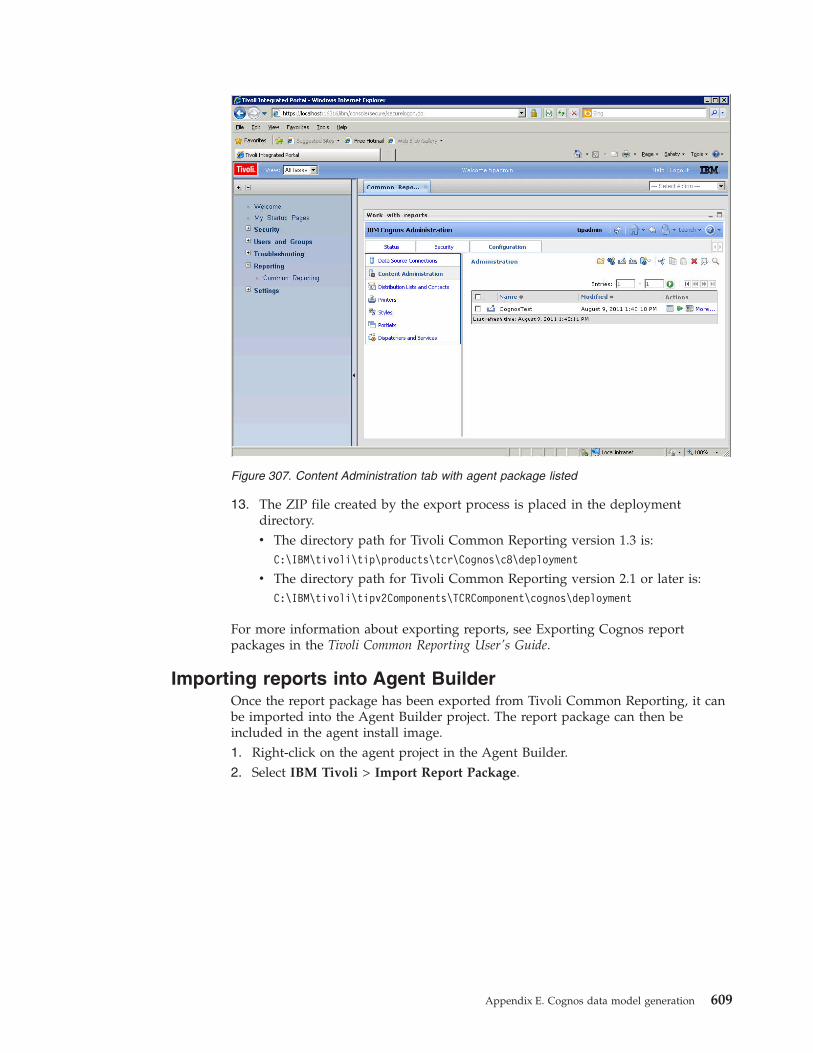
13. The ZIP file created by the export process is placed in the deploymentdirectory.v The directory path for Tivoli Common Reporting version 1.3 is:
C:\IBM\tivoli\tip\products\tcr\Cognos\c8\deployment
v The directory path for Tivoli Common Reporting version 2.1 or later is:C:\IBM\tivoli\tipv2Components\TCRComponent\cognos\deployment
For more information about exporting reports, see Exporting Cognos reportpackages in the Tivoli Common Reporting User's Guide.
Importing reports into Agent BuilderOnce the report package has been exported from Tivoli Common Reporting, it canbe imported into the Agent Builder project. The report package can then beincluded in the agent install image.1. Right-click on the agent project in the Agent Builder.2. Select IBM Tivoli > Import Report Package.
Figure 307. Content Administration tab with agent package listed
Appendix E. Cognos data model generation 609
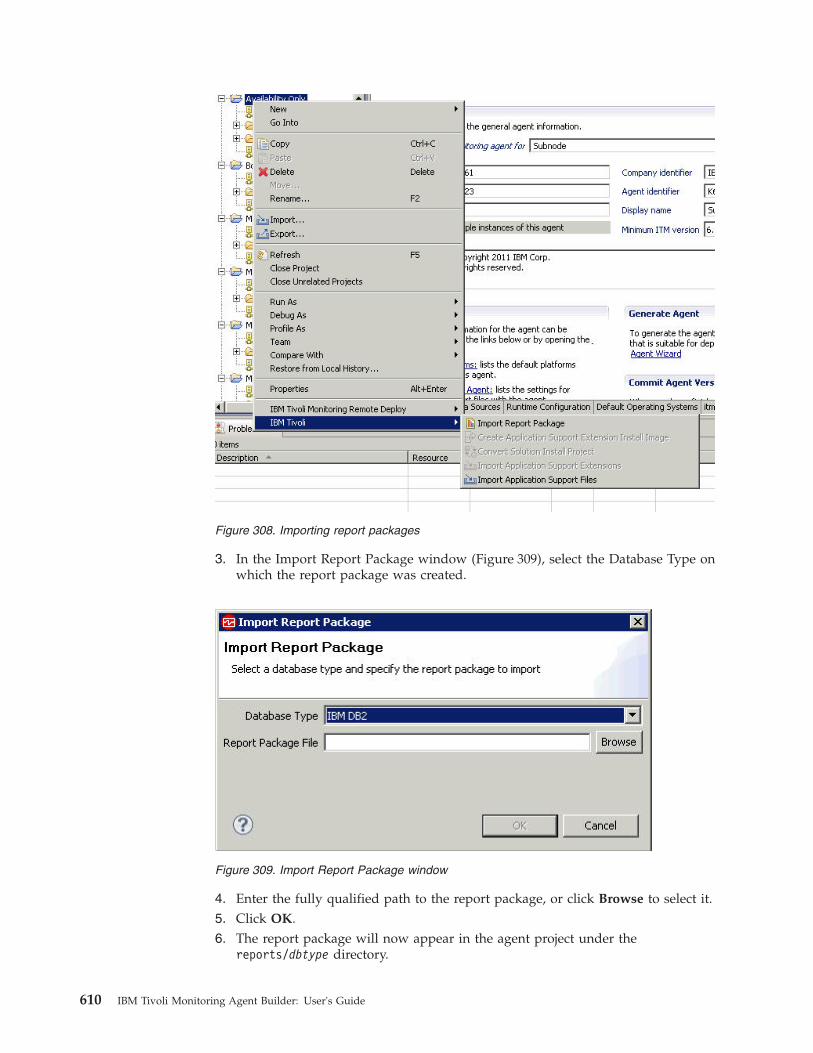
3. In the Import Report Package window (Figure 309), select the Database Type onwhich the report package was created.
4. Enter the fully qualified path to the report package, or click Browse to select it.5. Click OK.6. The report package will now appear in the agent project under the
reports/dbtype directory.
Figure 308. Importing report packages
Figure 309. Import Report Package window
610 IBM Tivoli Monitoring Agent Builder: User's Guide
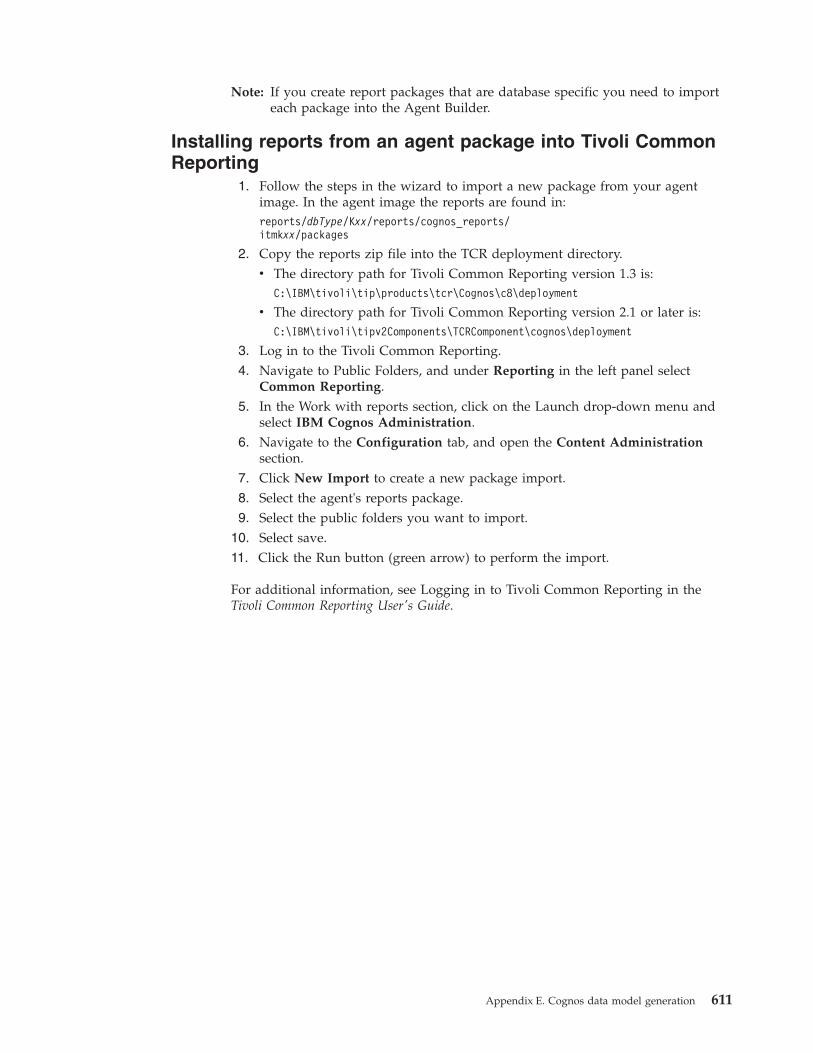
Note: If you create report packages that are database specific you need to importeach package into the Agent Builder.
Installing reports from an agent package into Tivoli CommonReporting
1. Follow the steps in the wizard to import a new package from your agentimage. In the agent image the reports are found in:reports/dbType/Kxx/reports/cognos_reports/itmkxx/packages
2. Copy the reports zip file into the TCR deployment directory.v The directory path for Tivoli Common Reporting version 1.3 is:
C:\IBM\tivoli\tip\products\tcr\Cognos\c8\deployment
v The directory path for Tivoli Common Reporting version 2.1 or later is:C:\IBM\tivoli\tipv2Components\TCRComponent\cognos\deployment
3. Log in to the Tivoli Common Reporting.4. Navigate to Public Folders, and under Reporting in the left panel select
Common Reporting.5. In the Work with reports section, click on the Launch drop-down menu and
select IBM Cognos Administration.6. Navigate to the Configuration tab, and open the Content Administration
section.7. Click New Import to create a new package import.8. Select the agent's reports package.9. Select the public folders you want to import.
10. Select save.11. Click the Run button (green arrow) to perform the import.
For additional information, see Logging in to Tivoli Common Reporting in theTivoli Common Reporting User's Guide.
Appendix E. Cognos data model generation 611

612 IBM Tivoli Monitoring Agent Builder: User's Guide
Appendix F. Upgrading custom IBM Tivoli Monitoring v5.xresource models to IBM Tivoli Monitoring v6.2 agents
If you determine that you need to create a new agent to map your IBM TivoliMonitoring v5.x resource models, complete the procedures for creating an agent inChapter 5, “Creating a basic agent,” on page 15. When generating the agent, ensurethat you have selected the Generate an ITM 5x mapping file option in theGenerate Agent Wizard. For more information, see “Installing the agent locally” onpage 377.
For the information about how to upgrade custom resource models, see the IBMTivoli Monitoring: Upgrading from IBM Tivoli Monitoring, version 5.1 to version 6.2document.
The procedure for upgrading a custom resource model differs in just these possiblerespects from that for a standard resource model:v When performing the upgrade, the resource model mapping file used by the
assess command must be created, either by copying and editing an existingmapping file, or by creating it from scratch
Note: For information about the assess command, see the IBM Tivoli Monitoring:Upgrading from IBM Tivoli Monitoring, version 5.1 to version 6.2 document.
v To evaluate this mapping file you might need to create a Java resource modelplug-in class, which you can use to add your own coding to the standardevaluation used by the Agent Builder
v If the resource model data collection is different from that used by the standardresource models, you might also have to create a new agent to collect the data,using the agent builder. For this agent you will also need to create an agentmapping file, to enable the migration to work correctly.
v If the data collection in the agent cannot be provided by standard operatingsystem facilities, you might need to create a Java agent plug-in class to do thecollection
When these items have been developed and tested, the migration follows exactlythe same steps as the migration of standard resource models.
© Copyright IBM Corp. 2007, 2012 613

614 IBM Tivoli Monitoring Agent Builder: User's Guide
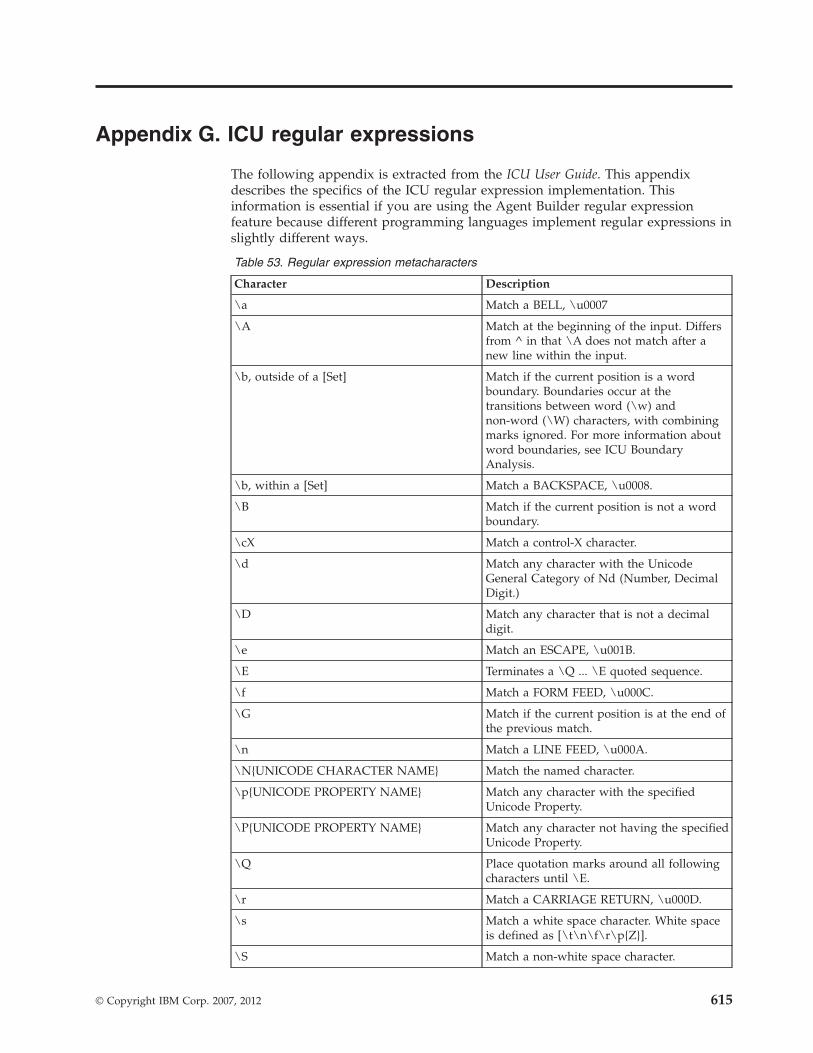
Appendix G. ICU regular expressions
The following appendix is extracted from the ICU User Guide. This appendixdescribes the specifics of the ICU regular expression implementation. Thisinformation is essential if you are using the Agent Builder regular expressionfeature because different programming languages implement regular expressions inslightly different ways.
Table 53. Regular expression metacharacters
Character Description
\a Match a BELL, \u0007
\A Match at the beginning of the input. Differsfrom ^ in that \A does not match after anew line within the input.
\b, outside of a [Set] Match if the current position is a wordboundary. Boundaries occur at thetransitions between word (\w) andnon-word (\W) characters, with combiningmarks ignored. For more information aboutword boundaries, see ICU BoundaryAnalysis.
\b, within a [Set] Match a BACKSPACE, \u0008.
\B Match if the current position is not a wordboundary.
\cX Match a control-X character.
\d Match any character with the UnicodeGeneral Category of Nd (Number, DecimalDigit.)
\D Match any character that is not a decimaldigit.
\e Match an ESCAPE, \u001B.
\E Terminates a \Q ... \E quoted sequence.
\f Match a FORM FEED, \u000C.
\G Match if the current position is at the end ofthe previous match.
\n Match a LINE FEED, \u000A.
\N{UNICODE CHARACTER NAME} Match the named character.
\p{UNICODE PROPERTY NAME} Match any character with the specifiedUnicode Property.
\P{UNICODE PROPERTY NAME} Match any character not having the specifiedUnicode Property.
\Q Place quotation marks around all followingcharacters until \E.
\r Match a CARRIAGE RETURN, \u000D.
\s Match a white space character. White spaceis defined as [\t\n\f\r\p{Z}].
\S Match a non-white space character.
© Copyright IBM Corp. 2007, 2012 615
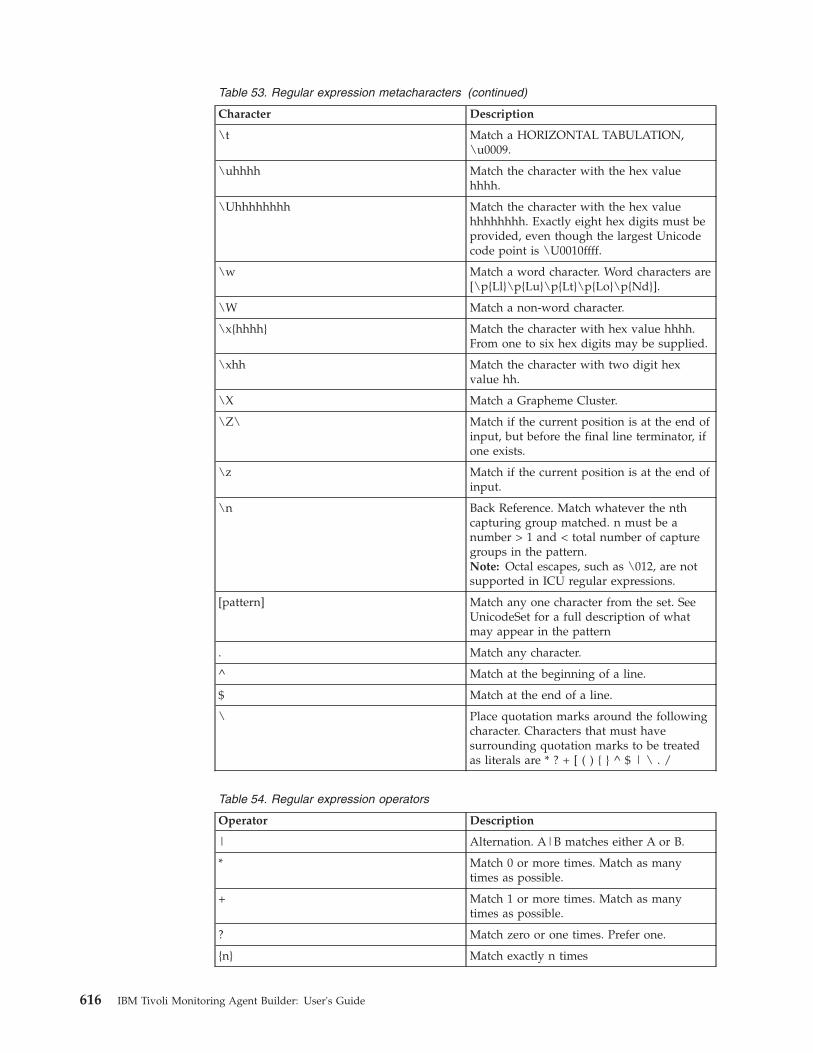
Table 53. Regular expression metacharacters (continued)
Character Description
\t Match a HORIZONTAL TABULATION,\u0009.
\uhhhh Match the character with the hex valuehhhh.
\Uhhhhhhhh Match the character with the hex valuehhhhhhhh. Exactly eight hex digits must beprovided, even though the largest Unicodecode point is \U0010ffff.
\w Match a word character. Word characters are[\p{Ll}\p{Lu}\p{Lt}\p{Lo}\p{Nd}].
\W Match a non-word character.
\x{hhhh} Match the character with hex value hhhh.From one to six hex digits may be supplied.
\xhh Match the character with two digit hexvalue hh.
\X Match a Grapheme Cluster.
\Z\ Match if the current position is at the end ofinput, but before the final line terminator, ifone exists.
\z Match if the current position is at the end ofinput.
\n Back Reference. Match whatever the nthcapturing group matched. n must be anumber > 1 and < total number of capturegroups in the pattern.Note: Octal escapes, such as \012, are notsupported in ICU regular expressions.
[pattern] Match any one character from the set. SeeUnicodeSet for a full description of whatmay appear in the pattern
. Match any character.
^ Match at the beginning of a line.
$ Match at the end of a line.
\ Place quotation marks around the followingcharacter. Characters that must havesurrounding quotation marks to be treatedas literals are * ? + [ ( ) { } ^ $ | \ . /
Table 54. Regular expression operators
Operator Description
| Alternation. A|B matches either A or B.
* Match 0 or more times. Match as manytimes as possible.
+ Match 1 or more times. Match as manytimes as possible.
? Match zero or one times. Prefer one.
{n} Match exactly n times
616 IBM Tivoli Monitoring Agent Builder: User's Guide
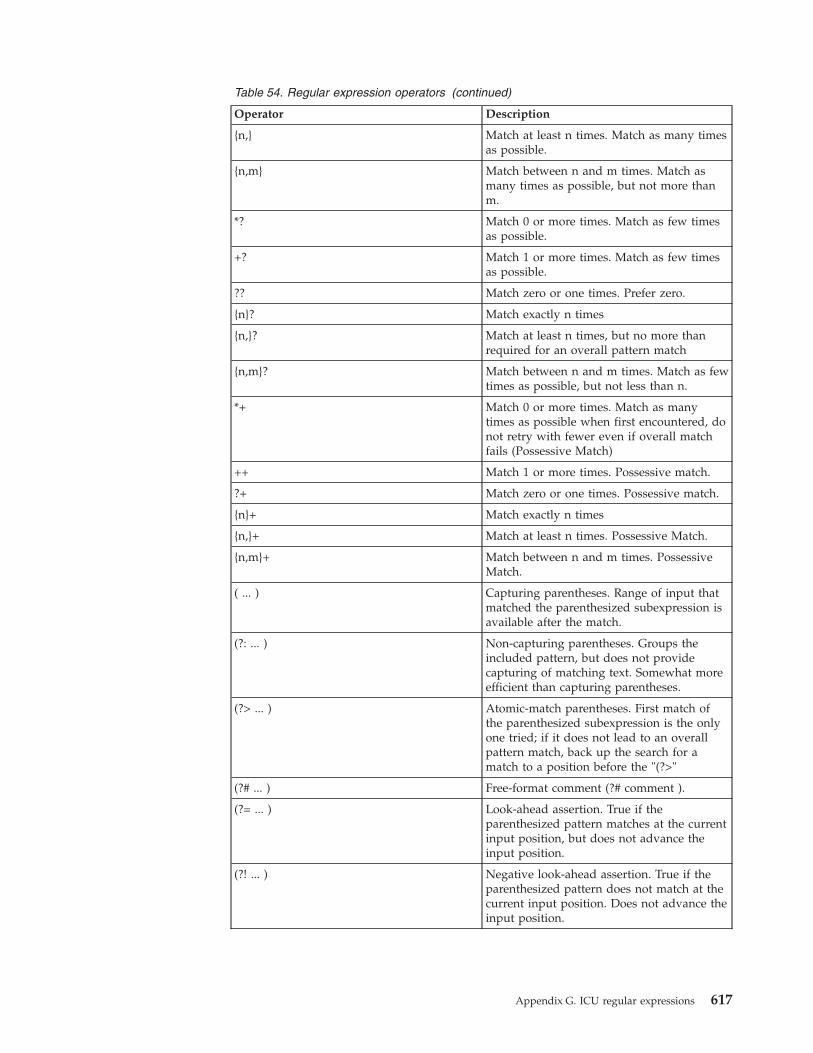
Table 54. Regular expression operators (continued)
Operator Description
{n,} Match at least n times. Match as many timesas possible.
{n,m} Match between n and m times. Match asmany times as possible, but not more thanm.
*? Match 0 or more times. Match as few timesas possible.
+? Match 1 or more times. Match as few timesas possible.
?? Match zero or one times. Prefer zero.
{n}? Match exactly n times
{n,}? Match at least n times, but no more thanrequired for an overall pattern match
{n,m}? Match between n and m times. Match as fewtimes as possible, but not less than n.
*+ Match 0 or more times. Match as manytimes as possible when first encountered, donot retry with fewer even if overall matchfails (Possessive Match)
++ Match 1 or more times. Possessive match.
?+ Match zero or one times. Possessive match.
{n}+ Match exactly n times
{n,}+ Match at least n times. Possessive Match.
{n,m}+ Match between n and m times. PossessiveMatch.
( ... ) Capturing parentheses. Range of input thatmatched the parenthesized subexpression isavailable after the match.
(?: ... ) Non-capturing parentheses. Groups theincluded pattern, but does not providecapturing of matching text. Somewhat moreefficient than capturing parentheses.
(?> ... ) Atomic-match parentheses. First match ofthe parenthesized subexpression is the onlyone tried; if it does not lead to an overallpattern match, back up the search for amatch to a position before the "(?>"
(?# ... ) Free-format comment (?# comment ).
(?= ... ) Look-ahead assertion. True if theparenthesized pattern matches at the currentinput position, but does not advance theinput position.
(?! ... ) Negative look-ahead assertion. True if theparenthesized pattern does not match at thecurrent input position. Does not advance theinput position.
Appendix G. ICU regular expressions 617
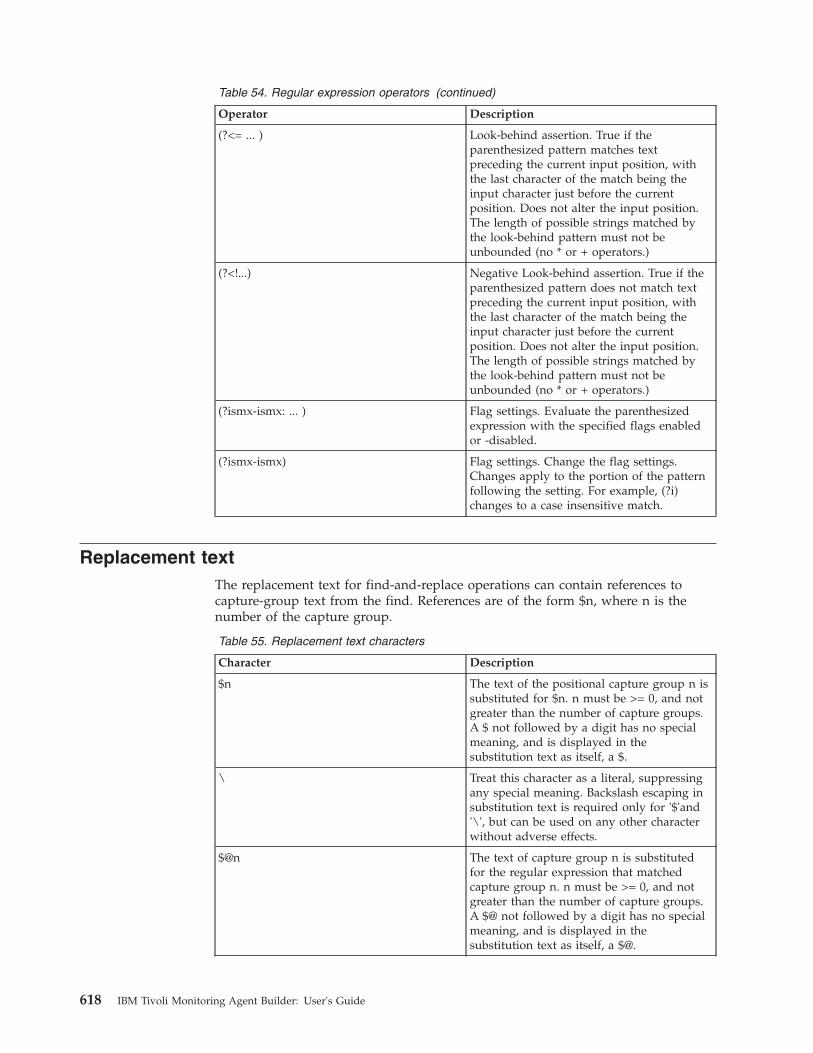
Table 54. Regular expression operators (continued)
Operator Description
(?<= ... ) Look-behind assertion. True if theparenthesized pattern matches textpreceding the current input position, withthe last character of the match being theinput character just before the currentposition. Does not alter the input position.The length of possible strings matched bythe look-behind pattern must not beunbounded (no * or + operators.)
(?<!...) Negative Look-behind assertion. True if theparenthesized pattern does not match textpreceding the current input position, withthe last character of the match being theinput character just before the currentposition. Does not alter the input position.The length of possible strings matched bythe look-behind pattern must not beunbounded (no * or + operators.)
(?ismx-ismx: ... ) Flag settings. Evaluate the parenthesizedexpression with the specified flags enabledor -disabled.
(?ismx-ismx) Flag settings. Change the flag settings.Changes apply to the portion of the patternfollowing the setting. For example, (?i)changes to a case insensitive match.
Replacement textThe replacement text for find-and-replace operations can contain references tocapture-group text from the find. References are of the form $n, where n is thenumber of the capture group.
Table 55. Replacement text characters
Character Description
$n The text of the positional capture group n issubstituted for $n. n must be >= 0, and notgreater than the number of capture groups.A $ not followed by a digit has no specialmeaning, and is displayed in thesubstitution text as itself, a $.
\ Treat this character as a literal, suppressingany special meaning. Backslash escaping insubstitution text is required only for '$'and'\', but can be used on any other characterwithout adverse effects.
$@n The text of capture group n is substitutedfor the regular expression that matchedcapture group n. n must be >= 0, and notgreater than the number of capture groups.A $@ not followed by a digit has no specialmeaning, and is displayed in thesubstitution text as itself, a $@.
618 IBM Tivoli Monitoring Agent Builder: User's Guide
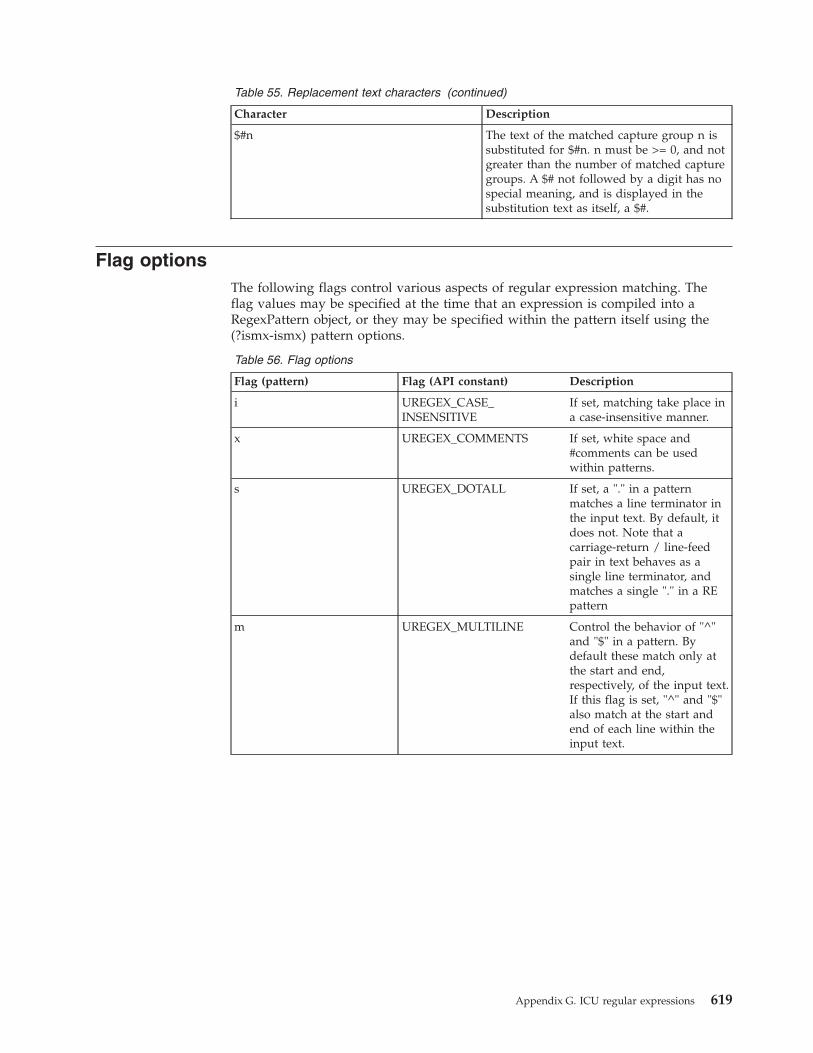
Table 55. Replacement text characters (continued)
Character Description
$#n The text of the matched capture group n issubstituted for $#n. n must be >= 0, and notgreater than the number of matched capturegroups. A $# not followed by a digit has nospecial meaning, and is displayed in thesubstitution text as itself, a $#.
Flag optionsThe following flags control various aspects of regular expression matching. Theflag values may be specified at the time that an expression is compiled into aRegexPattern object, or they may be specified within the pattern itself using the(?ismx-ismx) pattern options.
Table 56. Flag options
Flag (pattern) Flag (API constant) Description
i UREGEX_CASE_INSENSITIVE
If set, matching take place ina case-insensitive manner.
x UREGEX_COMMENTS If set, white space and#comments can be usedwithin patterns.
s UREGEX_DOTALL If set, a "." in a patternmatches a line terminator inthe input text. By default, itdoes not. Note that acarriage-return / line-feedpair in text behaves as asingle line terminator, andmatches a single "." in a REpattern
m UREGEX_MULTILINE Control the behavior of "^"and "$" in a pattern. Bydefault these match only atthe start and end,respectively, of the input text.If this flag is set, "^" and "$"also match at the start andend of each line within theinput text.
Appendix G. ICU regular expressions 619

620 IBM Tivoli Monitoring Agent Builder: User's Guide
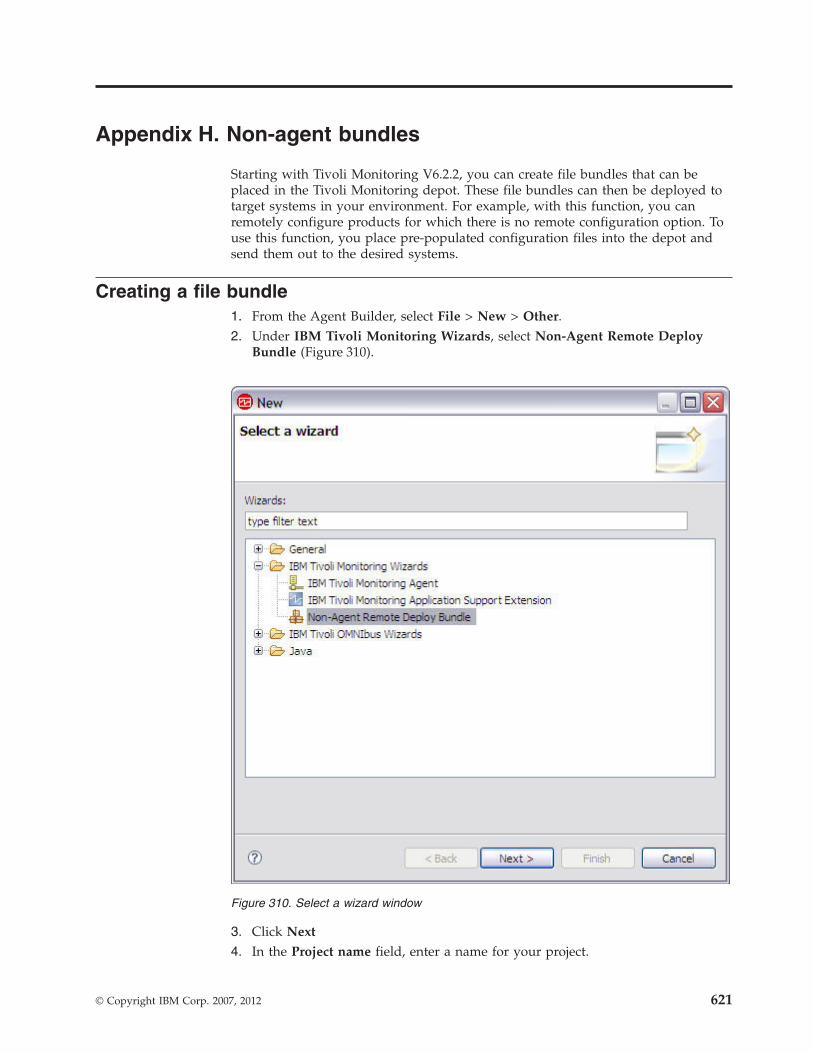
Appendix H. Non-agent bundles
Starting with Tivoli Monitoring V6.2.2, you can create file bundles that can beplaced in the Tivoli Monitoring depot. These file bundles can then be deployed totarget systems in your environment. For example, with this function, you canremotely configure products for which there is no remote configuration option. Touse this function, you place pre-populated configuration files into the depot andsend them out to the desired systems.
Creating a file bundle1. From the Agent Builder, select File > New > Other.2. Under IBM Tivoli Monitoring Wizards, select Non-Agent Remote Deploy
Bundle (Figure 310).
3. Click Next
4. In the Project name field, enter a name for your project.
Figure 310. Select a wizard window
© Copyright IBM Corp. 2007, 2012 621
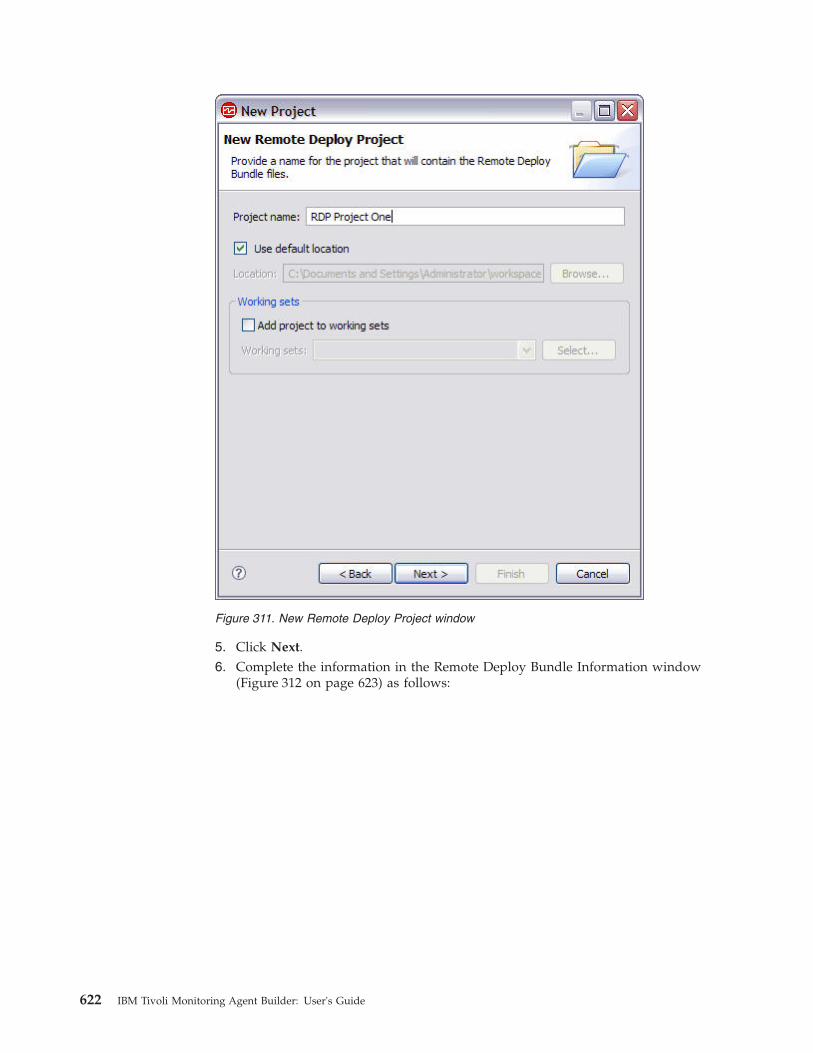
5. Click Next.6. Complete the information in the Remote Deploy Bundle Information window
(Figure 312 on page 623) as follows:
Figure 311. New Remote Deploy Project window
622 IBM Tivoli Monitoring Agent Builder: User's Guide
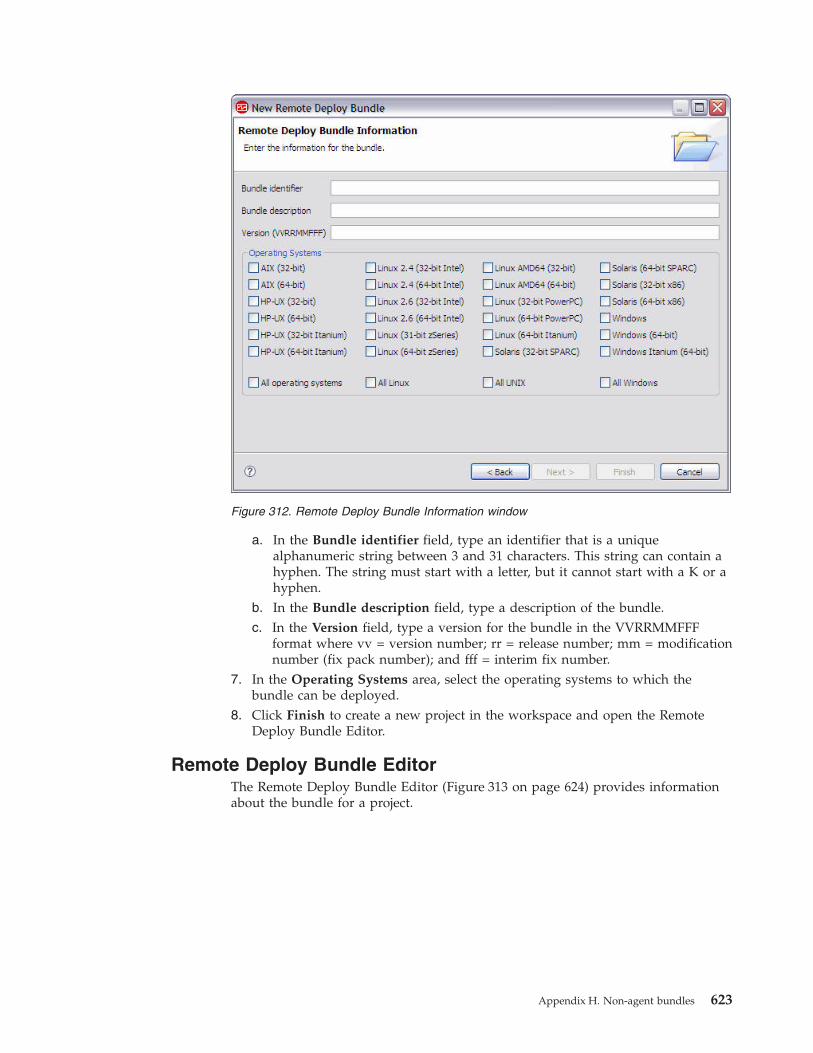
a. In the Bundle identifier field, type an identifier that is a uniquealphanumeric string between 3 and 31 characters. This string can contain ahyphen. The string must start with a letter, but it cannot start with a K or ahyphen.
b. In the Bundle description field, type a description of the bundle.c. In the Version field, type a version for the bundle in the VVRRMMFFF
format where vv = version number; rr = release number; mm = modificationnumber (fix pack number); and fff = interim fix number.
7. In the Operating Systems area, select the operating systems to which thebundle can be deployed.
8. Click Finish to create a new project in the workspace and open the RemoteDeploy Bundle Editor.
Remote Deploy Bundle EditorThe Remote Deploy Bundle Editor (Figure 313 on page 624) provides informationabout the bundle for a project.
Figure 312. Remote Deploy Bundle Information window
Appendix H. Non-agent bundles 623
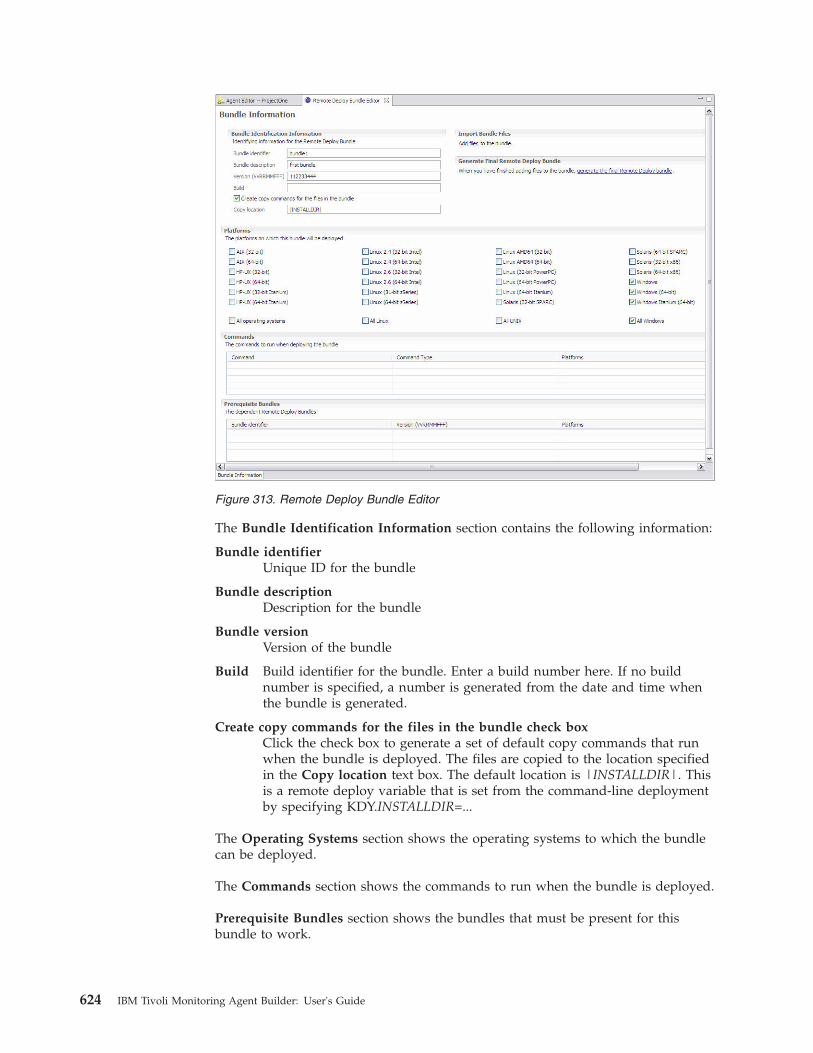
The Bundle Identification Information section contains the following information:
Bundle identifierUnique ID for the bundle
Bundle descriptionDescription for the bundle
Bundle versionVersion of the bundle
Build Build identifier for the bundle. Enter a build number here. If no buildnumber is specified, a number is generated from the date and time whenthe bundle is generated.
Create copy commands for the files in the bundle check boxClick the check box to generate a set of default copy commands that runwhen the bundle is deployed. The files are copied to the location specifiedin the Copy location text box. The default location is |INSTALLDIR|. Thisis a remote deploy variable that is set from the command-line deploymentby specifying KDY.INSTALLDIR=...
The Operating Systems section shows the operating systems to which the bundlecan be deployed.
The Commands section shows the commands to run when the bundle is deployed.
Prerequisite Bundles section shows the bundles that must be present for thisbundle to work.
Figure 313. Remote Deploy Bundle Editor
624 IBM Tivoli Monitoring Agent Builder: User's Guide
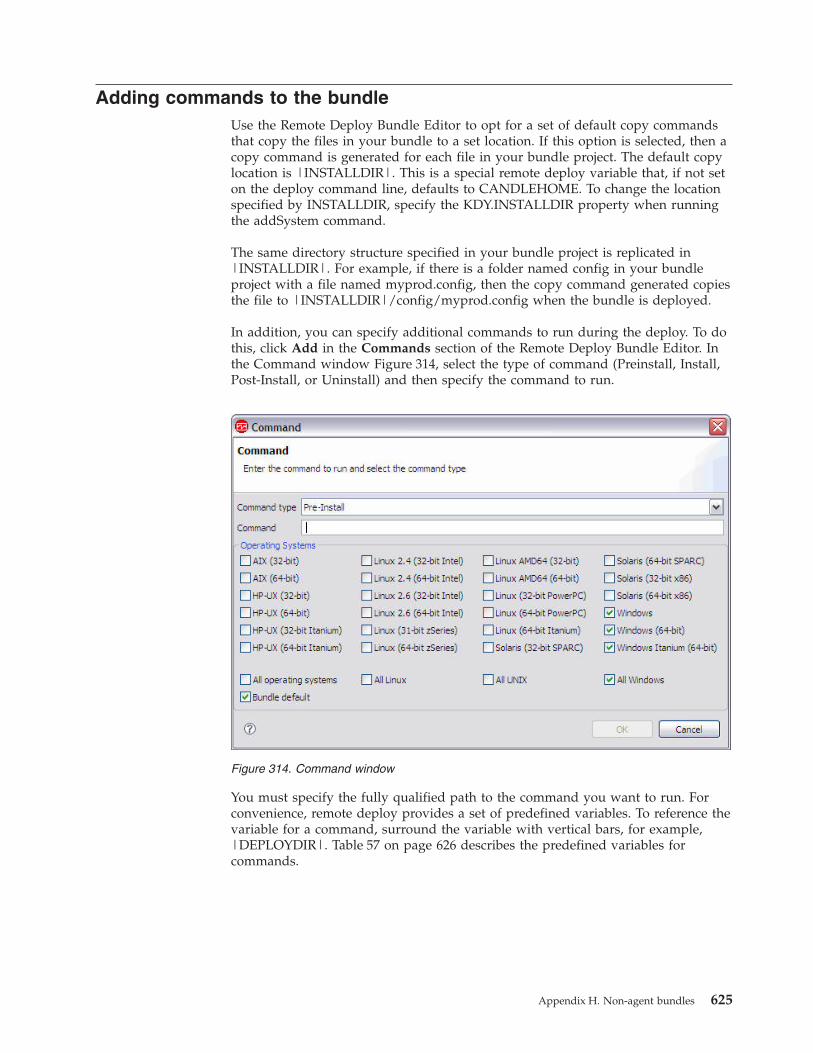
Adding commands to the bundleUse the Remote Deploy Bundle Editor to opt for a set of default copy commandsthat copy the files in your bundle to a set location. If this option is selected, then acopy command is generated for each file in your bundle project. The default copylocation is |INSTALLDIR|. This is a special remote deploy variable that, if not seton the deploy command line, defaults to CANDLEHOME. To change the locationspecified by INSTALLDIR, specify the KDY.INSTALLDIR property when runningthe addSystem command.
The same directory structure specified in your bundle project is replicated in|INSTALLDIR|. For example, if there is a folder named config in your bundleproject with a file named myprod.config, then the copy command generated copiesthe file to |INSTALLDIR|/config/myprod.config when the bundle is deployed.
In addition, you can specify additional commands to run during the deploy. To dothis, click Add in the Commands section of the Remote Deploy Bundle Editor. Inthe Command window Figure 314, select the type of command (Preinstall, Install,Post-Install, or Uninstall) and then specify the command to run.
You must specify the fully qualified path to the command you want to run. Forconvenience, remote deploy provides a set of predefined variables. To reference thevariable for a command, surround the variable with vertical bars, for example,|DEPLOYDIR|. Table 57 on page 626 describes the predefined variables forcommands.
Figure 314. Command window
Appendix H. Non-agent bundles 625
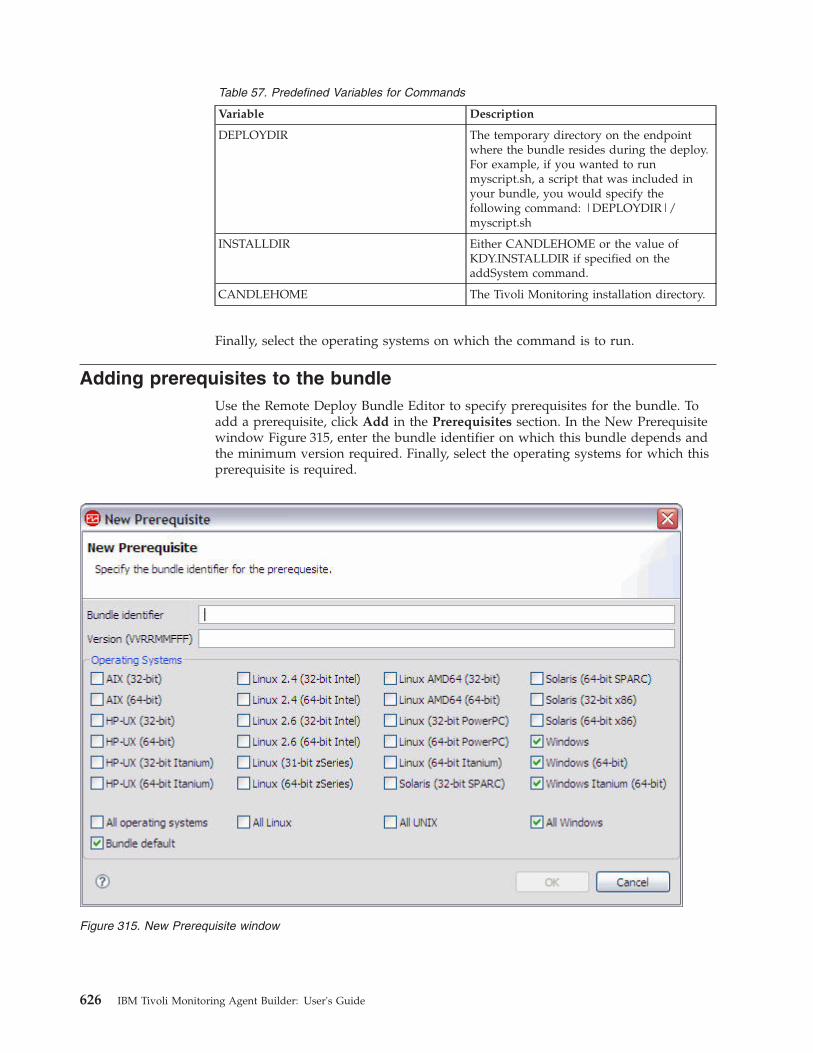
Table 57. Predefined Variables for Commands
Variable Description
DEPLOYDIR The temporary directory on the endpointwhere the bundle resides during the deploy.For example, if you wanted to runmyscript.sh, a script that was included inyour bundle, you would specify thefollowing command: |DEPLOYDIR|/myscript.sh
INSTALLDIR Either CANDLEHOME or the value ofKDY.INSTALLDIR if specified on theaddSystem command.
CANDLEHOME The Tivoli Monitoring installation directory.
Finally, select the operating systems on which the command is to run.
Adding prerequisites to the bundleUse the Remote Deploy Bundle Editor to specify prerequisites for the bundle. Toadd a prerequisite, click Add in the Prerequisites section. In the New Prerequisitewindow Figure 315, enter the bundle identifier on which this bundle depends andthe minimum version required. Finally, select the operating systems for which thisprerequisite is required.
Figure 315. New Prerequisite window
626 IBM Tivoli Monitoring Agent Builder: User's Guide

Adding files to the bundleTo add files to the remote deploy bundle, do one of the following procedures:v In the Bundle Editor, click Add files to the bundle.
—OR—v Right-click the project in the Navigator tree, then click IBM Tivoli Monitoring
Remote Deploy > Add Files to Bundle as shown in Figure 316.
Both of these actions display the Import Bundle Files window (Figure 317 on page628).
Figure 316. Adding files to the bundle or generating a bundle from the Navigator tree
Appendix H. Non-agent bundles 627
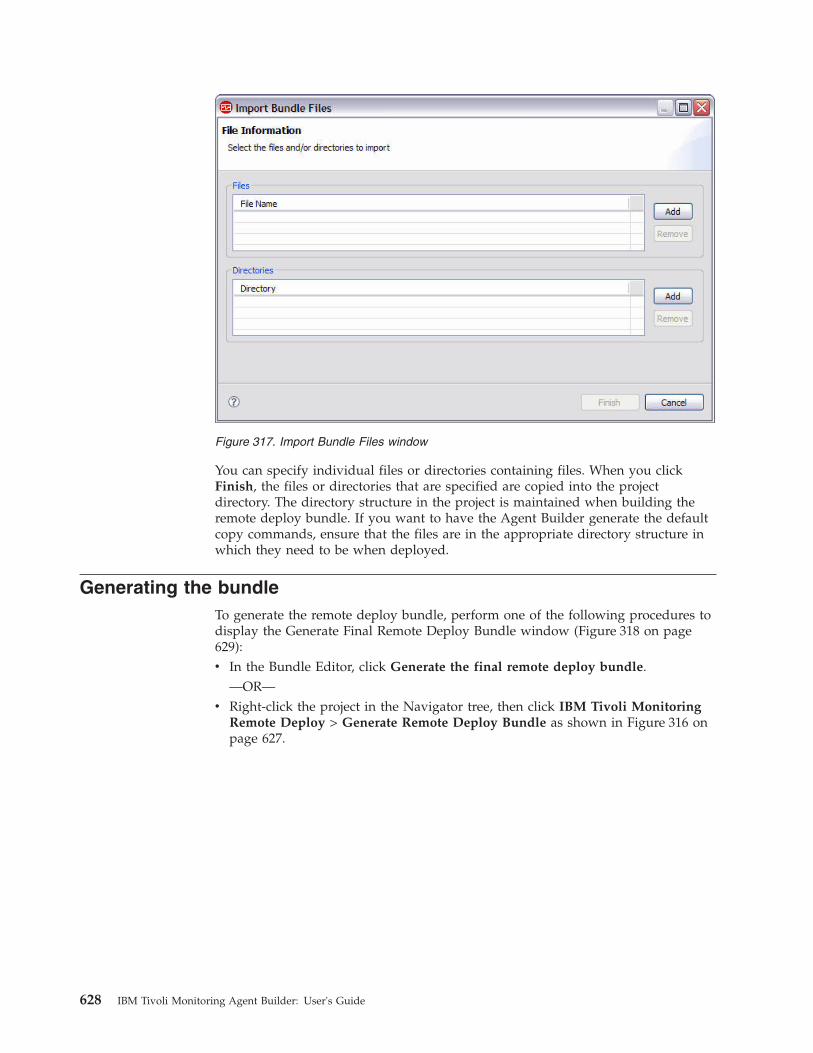
You can specify individual files or directories containing files. When you clickFinish, the files or directories that are specified are copied into the projectdirectory. The directory structure in the project is maintained when building theremote deploy bundle. If you want to have the Agent Builder generate the defaultcopy commands, ensure that the files are in the appropriate directory structure inwhich they need to be when deployed.
Generating the bundleTo generate the remote deploy bundle, perform one of the following procedures todisplay the Generate Final Remote Deploy Bundle window (Figure 318 on page629):v In the Bundle Editor, click Generate the final remote deploy bundle.
—OR—v Right-click the project in the Navigator tree, then click IBM Tivoli Monitoring
Remote Deploy > Generate Remote Deploy Bundle as shown in Figure 316 onpage 627.
Figure 317. Import Bundle Files window
628 IBM Tivoli Monitoring Agent Builder: User's Guide
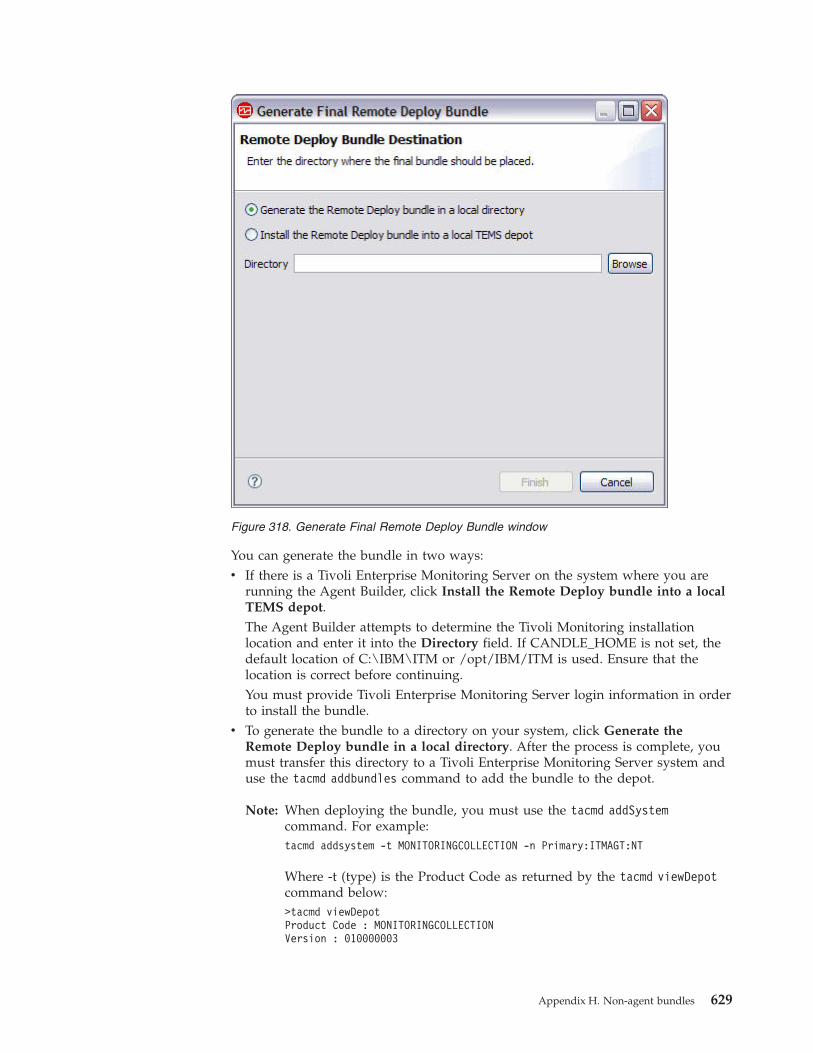
You can generate the bundle in two ways:v If there is a Tivoli Enterprise Monitoring Server on the system where you are
running the Agent Builder, click Install the Remote Deploy bundle into a localTEMS depot.The Agent Builder attempts to determine the Tivoli Monitoring installationlocation and enter it into the Directory field. If CANDLE_HOME is not set, thedefault location of C:\IBM\ITM or /opt/IBM/ITM is used. Ensure that thelocation is correct before continuing.You must provide Tivoli Enterprise Monitoring Server login information in orderto install the bundle.
v To generate the bundle to a directory on your system, click Generate theRemote Deploy bundle in a local directory. After the process is complete, youmust transfer this directory to a Tivoli Enterprise Monitoring Server system anduse the tacmd addbundles command to add the bundle to the depot.
Note: When deploying the bundle, you must use the tacmd addSystemcommand. For example:tacmd addsystem -t MONITORINGCOLLECTION -n Primary:ITMAGT:NT
Where -t (type) is the Product Code as returned by the tacmd viewDepotcommand below:>tacmd viewDepotProduct Code : MONITORINGCOLLECTIONVersion : 010000003
Figure 318. Generate Final Remote Deploy Bundle window
Appendix H. Non-agent bundles 629
Description : MonitoringCollectionScriptsHost Type : WINNTHost Version : WINNTPrerequisites:
Note: You cannot remote deploy from the Tivoli Enterprise Portal Desktop orBrowser. Remote deploy from the TEP Desktop or Browser results in theKFWITM219E message.
See the Tivoli Monitoring documentation for more details.
Creating deployable bundles for Tivoli Netcool/OMNIbus probesYou can use the Agent Builder to create package and configuration bundles thatcan be used to deploy Tivoli Netcool/OMNIbus probes to remote computers. Tosupport the remote deployment of probes, you can also create TivoliNetcool/OMNIbus bundles that can be deployed to the remote computers beforeyou deploy the probes.
Use the following procedure to create deployable bundles:1. From the Agent Builder, select File > New > Other.2. Under IBM Tivoli OMNIbus Wizards, select Package Bundle.3. Click Next.
You can then use the OMNIbus Install Bundle Wizard to create the bundles.For information about using this wizard, see the IBM Tivoli Netcool/OMNIbusV7.3 Installation and Deployment Guide in the Tivoli Netcool/OMNIbusinformation center at http://publib.boulder.ibm.com/infocenter/tivihelp/v8r1/topic/com.ibm.tivoli.nam.doc/welcome_ob.htm.
630 IBM Tivoli Monitoring Agent Builder: User's Guide
Appendix I. Dynamic file name support
Some application programs create an output file name that is subject to changebased on specific criteria such as the current day, month, year, or a file name thatincludes an incrementing sequence number. In these cases, you can specify thefile-name pattern instead of the actual file name. There are two pattern formatsthat are recognized when specifying the file-name pattern:v IBM Tivoli Universal Agent dynamic file name syntaxv Regular Expressions
Regular expression file-name patternsTo specify file-name patterns, you can use regular expressions according to theInternational Components for Unicode (ICU) syntax that is documented inAppendix G, “ICU regular expressions,” on page 615. To use this capability, youmust select the File names match regular expression check box on the AdvancedLog File Attribute Group Information page. When specifying regular expressionpatterns, you must also select an option from the When Multiple Files Matchdrop-down list on the Advanced Log File Attribute Group Information page tospecify the guidelines for selecting the most current matching file.
Note: Regular expressions is the preferred method to specify file-name patterns.
See Chapter 16, “Monitoring a log file,” on page 179, Step 6 on page 181 for moreinformation about how to configure advanced log file attribute group properties.For example, if you specified a file-name pattern:d:\program files\logs\tivoli.*
This pattern searches for file names starting with "tivoli" in the d:\programfiles\logs directory. Regular expressions can be specified only for the file nameportion, and not the path name.
Dynamic file name syntaxWith the dynamic file name syntax, only one file at a time can be monitored. TheFile Data Provider inspects all files in the designated path location, seeking filesthat match the defined pattern. The File Data Provider always monitors the mostcurrent matching file, based on whichever matching file name has the highestnumber or date/time value. The appropriate file to monitor is determined by filename, instead of by file creation or other criteria.
Patterns can be specified for file names with any number of parts. For example,Log{###} matches on one-part file names such as Log010 or Log456. In multi-partfile names, pattern characters can be specified in any part of the file name or inmultiple parts. For example, aaa.bbb{???}.ccc is a valid pattern, andaaa.bbb{???}.ccc{###} is also valid.
Note: Regular expressions rather than dynamic file name syntax is the preferredmethod to specify file-name patterns, for more about regular expressions,see “Regular expression file-name patterns”
The following examples illustrate file-name pattern specification:
© Copyright IBM Corp. 2007, 2012 631
{########}.abc Matches numeric file names of length 8 and the fileextension .abc, such as 10252006.abc or10262006.abc. File 10262006.abc is monitoredbecause 10262006 is greater than 10252006.
{########}.* Matches numeric file names of length 8 andignores the file extension. Examples include20061025.log, 20061101.log, and 10252006.abc. File20061101.log is monitored because 20061101 is thelargest number.
{######??}.abc Matches numeric file names of length 8 and fileextension .abc, and ignores the last two positions inthe name portion. Examples include 02110199.abc,02110200.abc, and 021101AZ.abc. File 02110200.abcis monitored because 021102 is the largest number.
Console.{######} Matches file names that contain Console in thename portion and a 6-digit number in theextension portion. Examples includeConsole.000133, Console.000201, andConsole.000134. File Console.000201 is monitored.
IN{######}.log Matches file names starting with IN followed bysix numerals and the file extension .log. Examplesinclude IN021001.log, IN021002.log, andIN021004.log. File IN021004.log is monitored.
PS{###}FTP.txt Matches file names starting with PS followed bythree numerals, followed by FTP, and the extension.txt. Examples include PS001FTP.txt, PS005FTP.txt,and PS010FTP.txt. File PS010FTP.txt is monitored.
Follow these guidelines to establish file-name patterns:v Use braces {} to enclose pattern characters in a file name. The presence of pattern
characters inside braces indicates a file-name pattern is being used.v Use an asterisk (*) as a wildcard to ignore file extensions or any trailing
characters in the file name. For example, Myapp{###}.log* specifies that any filename that starts with Myapp, followed by 3 digits, and followed by ".log," is amatch, regardless of what comes after.The asterisk must be specified after the curly braces ({ }) and cannot be used atthe beginning of a file name. When using the asterisk in a file name extension,the asterisk must be used by itself.Examples of correct wildcard (*) usage:err{??}.*error{$}.*
Examples of incorrect wildcard (*) usage:error.20* No curly braces precede the asterisk {*).error*.{###} The asterisk is not used at the end of the file name.error.* No curly braces precede the asterisk (*).
v If a specific file extension is defined, then only files with the same extension areconsidered.
v Use a pound sign to indicate each numeric element of a file name.v Use a question mark to exclude each element of the naming convention that
does not serve as search criteria in determining the appropriate file name.
632 IBM Tivoli Monitoring Agent Builder: User's Guide
v Use a dollar sign ($) to represent either any character or no character. Forexample, if you want to match on two files named Log and LogA, specifyLog{$}. The dollar sign has several usage restrictions. When using one or more$'s to prefix a file name as in {$$$$$$}_abc.log, the number of $'s must exactlymatch the number of characters in that position in the file name. Also, youcannot specify $'s in multiple locations in a file-name pattern, for example,{$$$}b{$$$}.log will not match abc.log. Given these $ restrictions, use regularexpression file-name patterns if there are an indeterminate number of charactersin the file names you are searching for.
v The total number of pound signs and question marks enclosed in braces issignificant. It must match the portion of file name exactly. For example, thepattern AA{####} instructs the File Data Provider to look for files such asAA0001. File names, such as AA001 or AA00001, are not considered.
v The exact file-name pattern, the constant and the numeric parts, must match thefile name exactly. For example, the pattern AA{###} instructs the File DataProvider to check file AA101. File names, such as XAA101, AA222X andAA55555, are not considered.
v Use the reserved pattern string {TIVOLILOGTIME} to substitute for the hextimestamp and file sequence number in a Tivoli Monitoring agent or server logfile. This pattern string is useful when performing self-monitoring of TivoliMonitoring components. For example, if you want to monitor the latestmonitoring server log in the /opt/IBM/ITM/logs directory, can specify afile-name pattern:/opt/IBM/ITM/logs/Host1_ms_{TIVOLILOGTIME}.log
If Host1_ms_452053c0-01.log, Host1_ms_451f11f4-01.log, Host1_ms_45205946-01.log, and Host1_ms_451f11f4-02.log are present in the /logs directory, theHost1_ms_45205946-01.log file is selected for monitoring.
To precisely specify a file name consisting of date components (year, month, andday), use the capital letters Y, M, and D. These letters must be specified withinbraces; otherwise they are treated as literal characters in the file name.
See the following examples:
{YYYYMMDD}.log Specifies file names such as 20060930.log or20061015.log.
{MMDDYY}.log Specifies file names such as 101106.log or110106.log.
{DDMMYYYY}.log Specifies file names such as 01092006.log. or15082006.log.
{DDMMMYY}.log Specifies file names such as 24Jan07 or 13Sep06.
{MM-DD-YY}.log Specifies file names such as 11-02-06 or 04-29-07.Note that the '-' separator character is ignored inthe date field and does not require a question markpattern character to skip over it.
MY{YYDDD}.log Specifies file names such as MY06202.log,MY06010.log or MY04350.log.
In more complex cases where a date field is embedded within a longer file name,and the date patterns listed in the previous examples are not sufficient, you cancreate patterns that mix pound signs and question marks and still perform numericcomparisons that select the most current file for monitoring. For example, the
Appendix I. Dynamic file name support 633
pattern ABC{?####?##?##?##?##?##?}XYZ.TXT can be used for file names such as'ABC 2006-04-20 11_22_33 XYZ.TXT', where you are interested in only the#-marked digits and the question marks serve as placeholders that allow you toignore other characters in the file name.
The File Data Provider periodically checks for new files that match the defined filepattern in the target path location. When a newer file that matches the pattern isdetected, the File Data Provider automatically switches application monitoring tothe new file. The File Data Provider searches for the best matching file when:v The File Data Provider first starts up.v The currently monitored file no longer exists due to possible renaming or
deleting.v The existing file contents have changed due to possible rewriting.v The check interval expired. The default interval is 10 minutes. You can change
the interval to a longer or shorter interval value by specifying the environmentvariableKUMP_DP_FILE_SWITCH_CHECK_INTERVAL=number-of-seconds
634 IBM Tivoli Monitoring Agent Builder: User's Guide
Appendix J. SNMP trap configuration
This appendix documents the configuration file used by the SNMP Data Providerto render trap information in a more easily readable form and to assign categories,severities, status, and source IDs to traps. It also contains instructions formodifying the default file or substituting your own configuration file.
SNMP trap configuration file, trapcnfgAt startup the SNMP Data Provider reads a configuration file named trapcnfg. Onepurpose of this file is to translate SNMP trap information into a more readableform. Another is to assign categories, severities, status, and source IDs to specifictraps, since these are not defined by SNMP.
You can modify the trapcnfg file to suit your site-specific needs by adding newtrap or enterprise definitions or changing the existing ones. You can also use yourown configuration file.
Using the HP OpenView trapd.conf fileThe trapcnfg file is very similar in format, but not identical, to the HP OpenViewNetwork Node Manager trap configuration file (trapd.conf), so you can copy theOpenView file and reuse many of the definition statements if necessary.
Types of recordstrapcnfg contains three types of records or record blocks:
commentsComment records begin with a pound sign (#).
enterprise definitionsEnterprise definitions consist of two blank-delimited tokens, where the firsttoken is a name and the second is an object identifier (OID) surrounded bycurly brackets ({ }).
trap definitionsTrap definitions consist of eight blank-delimited tokens. Trap definitionsare block records, because each definition might consist of multiplerecords.
The first type is self-explanatory. Figure 319 on page 636 shows examples of thesecond and third types.
The first example in Figure 319 shows an enterprise definition record which definesenterprise OID 1.3.6.1.4.1.311.1.1.3.1.1 as being MS-Windows NT.
The second example shows a trap definition record that defines trapNameMSNTCOLD as being associated with enterprise OID 1.3.6.1.4.1.311.1.1.3.1.1,generic trap number 0, and specific trap number 0. Notice that the severity is indecimal form whereas the category is in textual form. Severities are translated intotheir textual form before being displayed. The next record in the type 3 recordblock is the short description, which the Agent Builder does not use. The AgentBuilder uses the long description enclosed within the delimiters SDESC andEDESC.
© Copyright IBM Corp. 2007, 2012 635
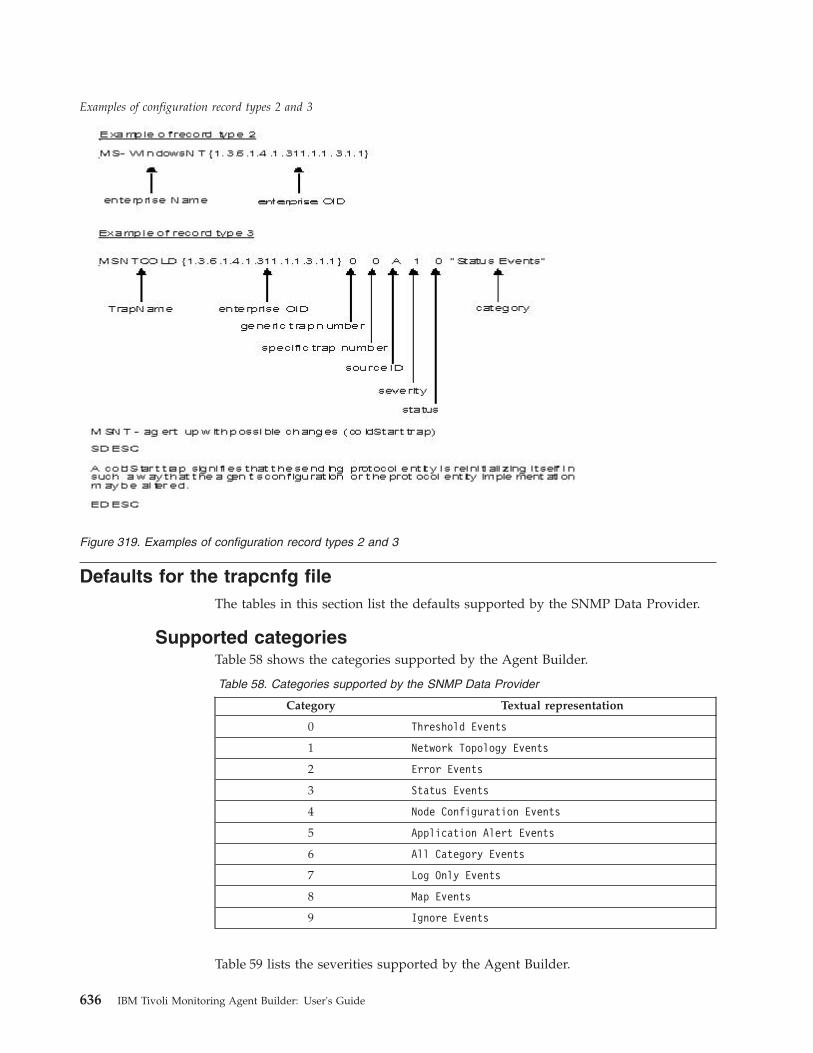
Defaults for the trapcnfg fileThe tables in this section list the defaults supported by the SNMP Data Provider.
Supported categoriesTable 58 shows the categories supported by the Agent Builder.
Table 58. Categories supported by the SNMP Data Provider
Category Textual representation
0 Threshold Events
1 Network Topology Events
2 Error Events
3 Status Events
4 Node Configuration Events
5 Application Alert Events
6 All Category Events
7 Log Only Events
8 Map Events
9 Ignore Events
Table 59 lists the severities supported by the Agent Builder.
Examples of configuration record types 2 and 3
Figure 319. Examples of configuration record types 2 and 3
636 IBM Tivoli Monitoring Agent Builder: User's Guide
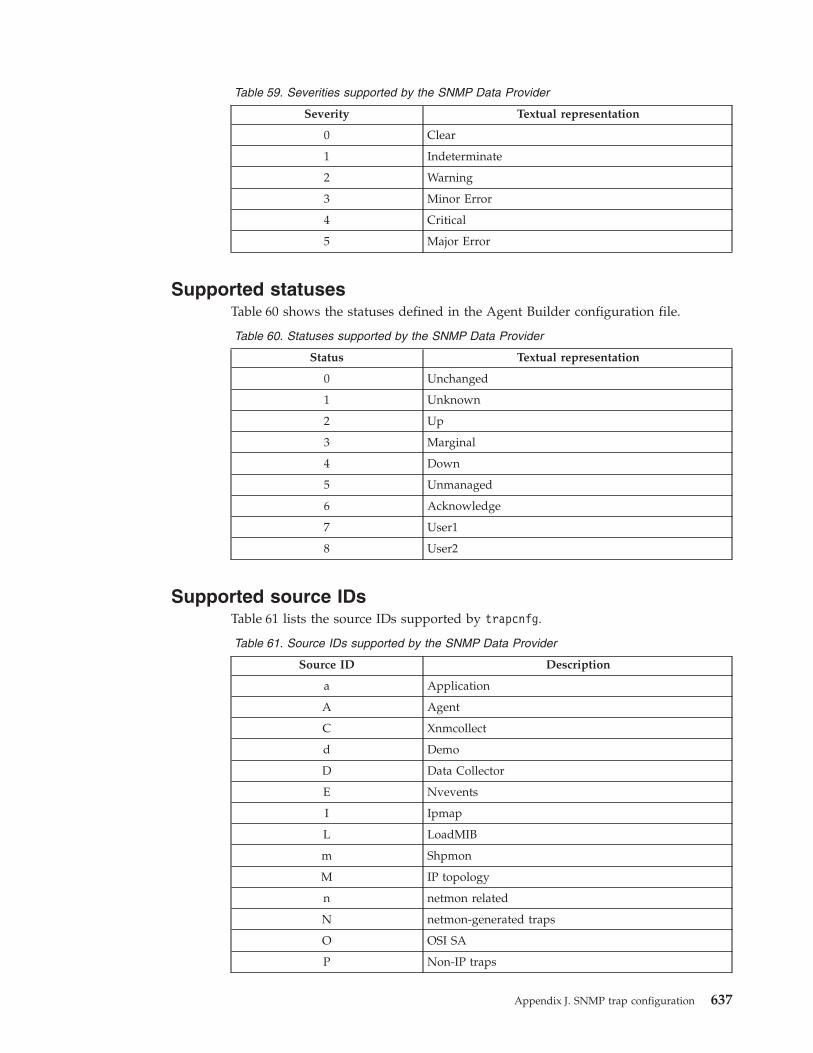
Table 59. Severities supported by the SNMP Data Provider
Severity Textual representation
0 Clear
1 Indeterminate
2 Warning
3 Minor Error
4 Critical
5 Major Error
Supported statusesTable 60 shows the statuses defined in the Agent Builder configuration file.
Table 60. Statuses supported by the SNMP Data Provider
Status Textual representation
0 Unchanged
1 Unknown
2 Up
3 Marginal
4 Down
5 Unmanaged
6 Acknowledge
7 User1
8 User2
Supported source IDsTable 61 lists the source IDs supported by trapcnfg.
Table 61. Source IDs supported by the SNMP Data Provider
Source ID Description
a Application
A Agent
C Xnmcollect
d Demo
D Data Collector
E Nvevents
I Ipmap
L LoadMIB
m Shpmon
M IP topology
n netmon related
N netmon-generated traps
O OSI SA
P Non-IP traps
Appendix J. SNMP trap configuration 637
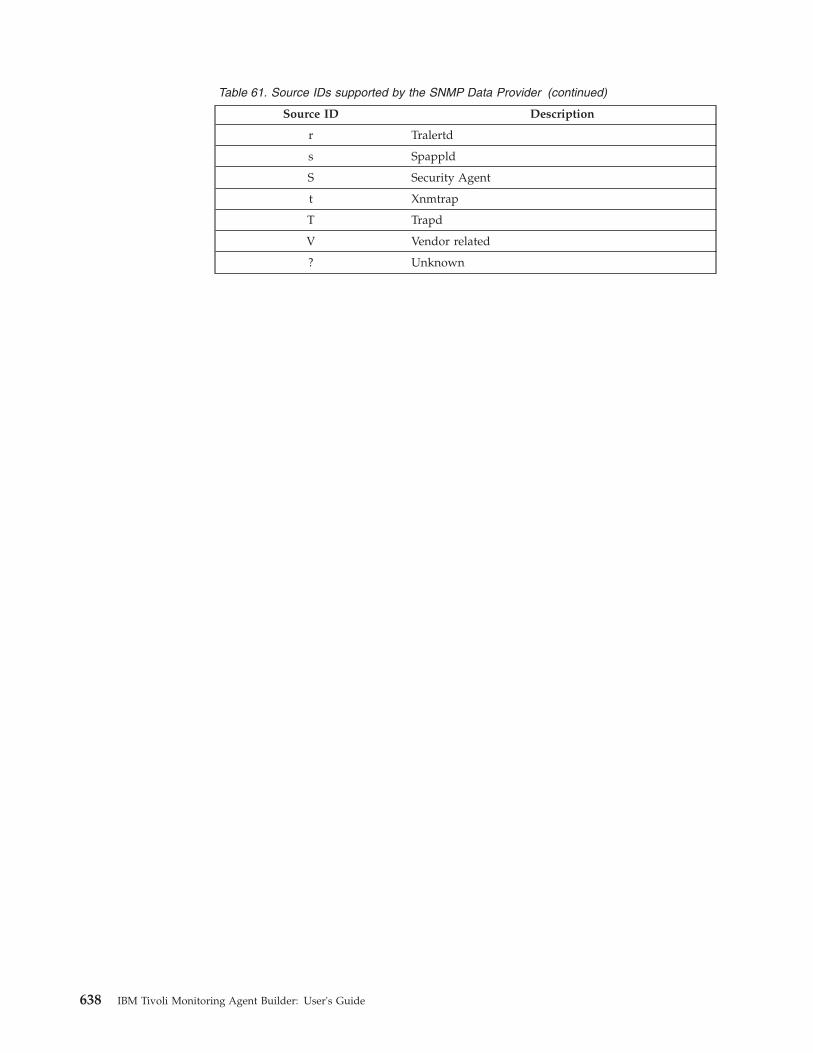
Table 61. Source IDs supported by the SNMP Data Provider (continued)
Source ID Description
r Tralertd
s Spappld
S Security Agent
t Xnmtrap
T Trapd
V Vendor related
? Unknown
638 IBM Tivoli Monitoring Agent Builder: User's Guide
Appendix K. Take Action commands reference
This appendix contains an overview of Take Action commands, references fordetailed information about Take Action commands, and descriptions of specialTake Action commands that can be included in an Agent Builder monitoring agent.
About Take Action commandsTake Action commands can be run from the portal client or included in a situationor a policy.
When included in a situation, the command runs when the situation becomes true.A Take Action command in a situation is also referred to as reflex automation.When you enable a Take Action command in a situation, you automate a responseto system conditions. For example, you can use a Take Action command to send acommand to restart a process on the managed system or to send a text message toa cell phone.
Advanced automation uses policies to perform actions, schedule work, andautomate manual tasks. A policy comprises a series of automated steps calledactivities that are connected to create a workflow. After an activity is completed,the Tivoli Enterprise Portal receives return code feedback, and advancedautomation logic responds with subsequent activities prescribed by the feedback.
A basic Take Action command displays the return code of the operation in amessage box that is displayed after the action completes or in a log file. After youclose this window, no further information is available for this action.
More information about Take Action commandsFor more information about working with Take Action commands, see the TivoliEnterprise Portal User's Guide.
For a list of the Take Action commands for this monitoring agent and a descriptionof each command, see the Special Take Action commands section in this appendixand the information in that section for each individual command.
Special Take Action commandsAn Agent Builder monitoring agent can recognize and perform special processingfor a set of Take Action commands:v SSHEXEC
For more information about creating these commands and including them in anAgent Builder monitoring agent project, see (Chapter 32, “Creating workspaces,Take Action commands, and situations,” on page 391).
The remaining sections of this appendix contain descriptions of these Take Actioncommands.
© Copyright IBM Corp. 2007, 2012 639

SSHEXEC actionThe SSHEXEC action is recognized for a monitored application that has at leastone SSH Script attribute group. It indicates that the command that follows theSSHEXEC keyword is remotely started on the SSH target system. The command isstarted with the credentials and privileges of the user configured to monitor theSSH target system. The command is run on the remote system that is representedby the Managed System Name.
To include the Take Action command in a situation or workflow policy, use thefollowing syntax for the system command:SSHEXEC [Command]
For example:SSHEXEC [ls &path]
Note: You can customize the command or portions of the command duringinvocation of the Take Action by using the Take Action arguments optionwith the Command.
Note: If the Command includes multiple arguments then consider including thebracket parenthesis in order to enable invocation of the Take Actioncommand with the tacmd command-line interface.
640 IBM Tivoli Monitoring Agent Builder: User's Guide
Appendix L. Documentation library
This appendix contains information about the publications related to TivoliMonitoring and to the commonly shared components of Tivoli ManagementServices. These publications are listed in the following categories:v Tivoli Monitoring libraryv Related publications
See Tivoli Monitoring and OMEGAMON XE Products: Documentation Guide,SC23-8816, for information about accessing and using the publications. You canfind the Documentation Guide in the Tivoli Monitoring and OMEGAMON XEInformation Center at http://publib.boulder.ibm.com/infocenter/tivihelp/v15r1/.
To find a list of new and changed publications, click What's new on the Welcomepage of the Tivoli Monitoring and OMEGAMON XE Information Center. To findpublications from the previous version of a product, click Previous informationcenters on the Welcome page for the product.
Tivoli Monitoring libraryThe following publications provide information about Tivoli Monitoring and aboutthe commonly shared components of Tivoli Management Services:v Quick Start Guide, GI11-8058
Introduces the components of Tivoli Monitoring.v Installation and Setup Guide, GC32-9407
Provides instructions for installing and configuring Tivoli Monitoringcomponents on Windows, Linux, and UNIX systems.
v Program Directory for IBM Tivoli Management Services on z/OS, GI11-4105Gives instructions for the SMP/E installation of the Tivoli Management Servicescomponents on z/OS.
v Configuring the Tivoli Enterprise Monitoring Server on z/OS, SC27-2313Gives detailed instructions for using the Configuration Tool to configure TivoliEnterprise Monitoring Server on z/OS systems. Includes scenarios for usingbatch mode to replicate monitoring environments across the z/OS enterprise.Also provides instructions for setting up security and for adding applicationsupport to a Tivoli Enterprise Monitoring Server on z/OS.
v Administrator's Guide, SC32-9408Describes the support tasks and functions required for the Tivoli EnterprisePortal Server and clients, including Tivoli Enterprise Portal user administration.
© Copyright IBM Corp. 2007, 2012 641
v High-Availability Guide for Distributed Systems, SC23-9768Gives instructions for several methods of ensuring the availability of the TivoliMonitoring components.
v Tivoli Enterprise Portal online helpProvides context-sensitive reference information about all features andcustomization options of the Tivoli Enterprise Portal. Also gives instructions forusing and administering the Tivoli Enterprise Portal.
v Tivoli Enterprise Portal User's Guide, SC32-9409Complements the Tivoli Enterprise Portal online help. The guide provideshands-on lessons and detailed instructions for all Tivoli Enterprise Portalfeatures.
v Command Reference, SC32-6045Provides detailed syntax and parameter information, as well as examples, for thecommands you can use in Tivoli Monitoring.
v Troubleshooting Guide, GC32-9458Provides information to help you troubleshoot problems with the software.
v Messages, SC23-7969Lists and explains messages generated by all Tivoli Monitoring components andby z/OS-based Tivoli Management Services components (such as TivoliEnterprise Monitoring Server on z/OS and TMS:Engine).
v IBM Tivoli Universal Agent User's Guide, SC32-9459Introduces you to the IBM Tivoli Universal Agent, an agent of Tivoli Monitoring.The IBM Tivoli Universal Agent enables you to use the monitoring andautomation capabilities of Tivoli Monitoring to monitor any type of data youcollect.
v IBM Tivoli Universal Agent API and Command Programming Reference Guide,SC32-9461Explains the procedures for implementing the IBM Tivoli Universal Agent APIsand provides descriptions, syntax, and return status codes for the API calls andcommand-line interface commands.
v Agent Builder User's Guide, SC32-1921Explains how to use the Agent Builder for creating monitoring agents and theirinstallation packages, and for adding functions to existing agents.
Documentation for the base agentsIf you purchased Tivoli Monitoring as a product, you received a set of basemonitoring agents as part of the product. If you purchased a monitoring agentproduct (for example, an OMEGAMON XE product) that includes the commonlyshared components of Tivoli Management Services, you did not receive the baseagents.
The following publications provide information about using the base agents.v Operating system agents:
– Windows OS Agent User's Guide, SC32-9445– UNIX OS Agent User's Guide, SC32-9446– Linux OS Agent User's Guide, SC32-9447– i5/OS Agent User's Guide, SC32-9448– UNIX Log Agent User's Guide, SC32-9471
642 IBM Tivoli Monitoring Agent Builder: User's Guide
v Agentless operating system monitors:– Agentless Monitoring for Windows Operating Systems User's Guide, SC23-9765– Agentless Monitoring for AIX Operating Systems User's Guide, SC23-9761– Agentless Monitoring for HP-UX Operating Systems User's Guide, SC23-9763– Agentless Monitoring for Solaris Operating Systems User's Guide, SC23-9764– Agentless Monitoring for Linux Operating Systems User's Guide, SC23-9762
v Warehouse agents:– Warehouse Summarization and Pruning Agent User's Guide, SC23-9767– Warehouse Proxy Agent User's Guide, SC23-9766
v System P agents:– AIX Premium Agent User's Guide, SA23-2237– CEC Base Agent User's Guide, SC23-5239– HMC Base Agent User's Guide, SA23-2239– VIOS Premium Agent User's Guide, SA23-2238
v Other base agents:– Monitoring Agent for IBM Tivoli Monitoring 5.x Endpoint User's Guide,
SC32-9490
Related publicationsYou can find useful information about the OMEGAMON XE monitoring agentproducts in the Tivoli Monitoring and OMEGAMON XE Information Center athttp://publib.boulder.ibm.com/infocenter/tivihelp/v15r1/.
Other sources of documentationYou can also obtain technical documentation about Tivoli Monitoring andOMEGAMON XE products from the following sources:v IBM Tivoli Integrated Service Management Library
http://www.ibm.com/software/tivoli/opalThe Integrated Service Management Library is an online catalog that containsintegration documentation as well as other downloadable product extensions.This library is updated daily.
v Redbookshttp://www.redbooks.ibm.com/IBM Redbooks®, Redpapers, and Redbooks Technotes provide information aboutproducts from operating system and solution perspectives.
v TechnotesYou can find Technotes through the IBM Software Support Web site athttp://www.ibm.com/software/support/probsub.html, or more directly throughyour product Web site, which contains a link to Technotes (under Solve aproblem).Technotes provide the latest information about known product limitations andworkarounds.
Appendix L. Documentation library 643

644 IBM Tivoli Monitoring Agent Builder: User's Guide
Appendix M. Accessibility
Accessibility features help a user who has a physical disability, such as restrictedmobility or limited vision, to use software products successfully. The majoraccessibility features in Tivoli Monitoring Agent Builder enable users to:v Use assistive technologies such as screen-reader software and a digital speech
synthesizer to hear what is displayed on the screenv Operate specific or equivalent features using only the keyboardv Magnify what is displayed on the screen
In addition, the product documentation has been modified to include features toaid accessibility:v All documentation available in both HTML and convertible PDF formats to give
the maximum opportunity for users to apply screen-reader software.v All images provided with alternative text so that users of the documentation
with vision impairments can understand the contents of the images.
Using assistive technologiesAssistive technology products such as screen-readers, function with both thetext-based and graphical user interfaces found in Tivoli Monitoring Agent Builder.Consult the assistive technology product documentation for specific informationabout using it to access command line or graphical interfaces.
Magnifying what is displayed on the screenIn all components of Tivoli Monitoring Agent Builder, you can magnify thewindows in the product interfaces. Operating systems on which the product is runprovide those facilities. For example, in a Windows environment you can changethe settings to a lower resolution to enlarge the font sizes of the text. Informationabout these facilities is provided in the relevant operating system documentation.
Documentation in accessible formatsAll user documentation is provided in HTML format, which can be read directlyby assistive tools such as screen readers, or in convertible PDF format. ConvertiblePDF files are those that can be converted from PDF to HTML by the Adobe PDF toHTML converter. For information about converting PDF documents to HTML, referto the Adobe book Optimizing Adobe PDF Files for Accessibility
Using alternative textAll documentation images are provided with an alternative text that can be readby assistive tools such as screen readers.
© Copyright IBM Corp. 2007, 2012 645

646 IBM Tivoli Monitoring Agent Builder: User's Guide
Appendix N. Notices
This information was developed for products and services offered in the U.S.A.IBM may not offer the products, services, or features discussed in this document inother countries. Consult your local IBM representative for information on theproducts and services currently available in your area. Any reference to an IBMproduct, program, or service is not intended to state or imply that only that IBMproduct, program, or service may be used. Any functionally equivalent product,program, or service that does not infringe any IBM intellectual property right maybe used instead. However, it is the user's responsibility to evaluate and verify theoperation of any non-IBM product, program, or service.
IBM may have patents or pending patent applications covering subject matterdescribed in this document. The furnishing of this document does not give youany license to these patents. You can send license inquiries, in writing, to:
IBM Director of LicensingIBM CorporationNorth Castle DriveArmonk, NY 10504-1785 U.S.A.
For license inquiries regarding double-byte (DBCS) information, contact the IBMIntellectual Property Department in your country or send inquiries, in writing, to:
Intellectual Property LicensingLegal and Intellectual Property LawIBM Japan, Ltd.1623-14, Shimotsuruma, Yamato-shiKanagawa 242-8502 Japan
The following paragraph does not apply to the United Kingdom or any othercountry where such provisions are inconsistent with local law:
INTERNATIONAL BUSINESS MACHINES CORPORATION PROVIDES THISPUBLICATION "AS IS" WITHOUT WARRANTY OF ANY KIND, EITHEREXPRESS OR IMPLIED, INCLUDING, BUT NOT LIMITED TO, THE IMPLIEDWARRANTIES OF NON-INFRINGEMENT, MERCHANTABILITY OR FITNESSFOR A PARTICULAR PURPOSE.
Some states do not allow disclaimer of express or implied warranties in certaintransactions, therefore, this statement might not apply to you.
This information could include technical inaccuracies or typographical errors.Changes are periodically made to the information herein; these changes will beincorporated in new editions of the publication. IBM may make improvementsand/or changes in the product(s) and/or the program(s) described in thispublication at any time without notice.
Any references in this information to non-IBM Web sites are provided forconvenience only and do not in any manner serve as an endorsement of those Websites. The materials at those Web sites are not part of the materials for this IBMproduct and use of those Web sites is at your own risk.
© Copyright IBM Corp. 2007, 2012 647
IBM may use or distribute any of the information you supply in any way itbelieves appropriate without incurring any obligation to you.
Licensees of this program who wish to have information about it for the purposeof enabling: (i) the exchange of information between independently createdprograms and other programs (including this one) and (ii) the mutual use of theinformation which has been exchanged, should contact:
IBM Corporation2Z4A/10111400 Burnet RoadAustin, TX 78758 U.S.A.
Such information may be available, subject to appropriate terms and conditions,including in some cases payment of a fee.
The licensed program described in this document and all licensed materialavailable for it are provided by IBM under terms of the IBM Customer Agreement,IBM International Program License Agreement or any equivalent agreementbetween us.
Any performance data contained herein was determined in a controlledenvironment. Therefore, the results obtained in other operating environments mayvary significantly. Some measurements may have been made on development-levelsystems and there is no guarantee that these measurements will be the same ongenerally available systems. Furthermore, some measurement may have beenestimated through extrapolation. Actual results may vary. Users of this documentshould verify the applicable data for their specific environment.
Information concerning non-IBM products was obtained from the suppliers ofthose products, their published announcements or other publicly available sources.IBM has not tested those products and cannot confirm the accuracy ofperformance, compatibility or any other claims related to non-IBM products.Questions on the capabilities of non-IBM products should be addressed to thesuppliers of those products.
All statements regarding IBM's future direction or intent are subject to change orwithdrawal without notice, and represent goals and objectives only.
COPYRIGHT LICENSE:
This information contains sample application programs in source language, whichillustrate programming techniques on various operating platforms. You may copy,modify, and distribute these sample programs in any form without payment toIBM, for the purposes of developing, using, marketing or distributing applicationprograms conforming to the application programming interface for the operatingplatform for which the sample programs are written. These examples have notbeen thoroughly tested under all conditions. IBM, therefore, cannot guarantee orimply reliability, serviceability, or function of these programs. You may copy,modify, and distribute these sample programs in any form without payment toIBM for the purposes of developing, using, marketing, or distributing applicationprograms conforming to IBM‘s application programming interfaces.
If you are viewing this information in softcopy form, the photographs and colorillustrations might not display.
648 IBM Tivoli Monitoring Agent Builder: User's Guide

TrademarksIBM, the IBM logo, and ibm.com® are trademarks or registered trademarks ofInternational Business Machines Corp., registered in many jurisdictions worldwide.Other product and service names might be trademarks of IBM or other companies.A current list of IBM trademarks is available on the Web at "Copyright andtrademark information" at www.ibm.com/legal/copytrade.shtml.
Adobe, the Adobe logo, PostScript, and the PostScript logo are either registeredtrademarks or trademarks of Adobe Systems Incorporated in the United States,and/or other countries.
Java and all Java-based trademarks and logos are trademarks orregistered trademarks of Sun Microsystems, Inc. in the United States,other countries, or both.
Linux is a trademark of Linus Torvalds in the United States, other countries, orboth.
Microsoft and Windows are registered trademarks of Microsoft Corporation in theUnited States, other countries, or both.
UNIX is a registered trademark of The Open Group in the United States and othercountries.
Other company, product, and service names may be trademarks or service marksof others.
Appendix N. Notices 649

650 IBM Tivoli Monitoring Agent Builder: User's Guide
Index
Aabs 81accessibility 645Address attribute 564Administrator authorization 8agent
name 20naming 20
Agent BuilderDVD 8guidelines for installation 7starting 13uninstalling 10
Agent Editor pages 37Agent Information page 38Agent Watchdog 41agent wizard, Starting the new 15Agent XML Editor page 48agent, committing version 49agent, creating a basic 15agent, organizing 30agents
after installation 382configuring and starting 382creating 15creation steps 13enterprise monitoring 397local installation 377modifying 35new files on your system 382regenerating 35removing 389solutions to problems 493system monitor 402testing 377uninstalling 389
AIX binary error logsmonitoring 197
AIX Binary Log 548Application Component attribute 529Application Support Extension project
creating 585Application Support Extensions project
adding support files 587atof 81atoi 81attribute groups
deleting 321attributes 548, 563
adding 322Address 564Application Component 529Availability 529, 571Average Collection Duration 538Cache Hit Percent 540Cache Hits 539Cache Misses 539Class Entry 549Command Line 532Compare String 559Counter Notifications 552
attributes (continued)Counter Value 554creating and editing 54DateTime 547deleting 322derived 62Description 550Device Entry 564editing 62EntryTime 551enumeration type 61Error Code 535ErrptTimestampp 548Event Category 545Event ID 545Event Log 544Event Source 544Event Type 544Full Name 530Functionality Test Message 533Functionality Test Status 533Gauge Notifications 554Gauge Value 556High Threshold 556HTTP 566, 569Identifier 548Interval 547Interval Unit 546Interval Unit Name 547Intervals Skipped 540JMX Event Attribute Groups 562joined 322Last Collection Duration 538Last Collection Finished 538Last Collection Start 537LocalTimeStamp 547Log File Summary 546Log Name 544LogFile 550LogName 550LogPath 551Low Threshold 556Message 545Message Attribute 563Modulus 553Monitor ID 552, 555, 557, 559Monitor Name 558Monitor Parameters 558Name 529, 565Node 529, 534, 540, 544, 546, 548,
552, 554, 557, 558, 562, 563, 566, 569,571
Node Description 565Node Status 565Node Type 565Notification Message 554, 557, 560Notification Time Stamp 554, 556,
560Notification Type 552, 555, 559Number of Collections 539numeric 58
attributes (continued)numeric options 58Object Name 535Object Name Time 570Object Response Tim 570Object Size 570Object Status 535Object Type 535Observed Attribute 553, 555, 559Observed MBean 552, 555, 559Occurrences 547Offset 553Page Faults Per Sec 531Page Objects 567Page Size 567Page Title 568Percent Privileged Time 532Percent Processor Time 532Percent User Mode Time 532Performance Object Status 534performing operations 62PID 532Query Name 534Refresh Interval 539Registered Monitors 557removing 62reordering 322ResourceName 549Response Code 568Response Time 564, 567Sequence Number 563Server Type 568Source 562Status 530, 568Status Timestamp 566string 57String Notifications 558String Value 560Subnode Affinity 571Subnode MSN 571Subnode Resource Name 572Subnode Type 572Subnode Version 572System 550Thread Count 531Thread Pool Active Threads 541Thread Pool Avg Active Threads 542Thread Pool Avg Job Wait 543Thread Pool Avg Queue Length 543Thread Pool Max Active Threads 542Thread Pool Max Queue Length 543Thread Pool Max Size 541Thread Pool Min Active Threads 542Thread Pool Min Queue Length 543Thread Pool Queue Length 542Thread Pool Size 541Thread Pool Status 540Thread Pool Total Jobs 543Threshold 553Time Generated 545timestamp 58
© Copyright IBM Corp. 2007, 2012 651
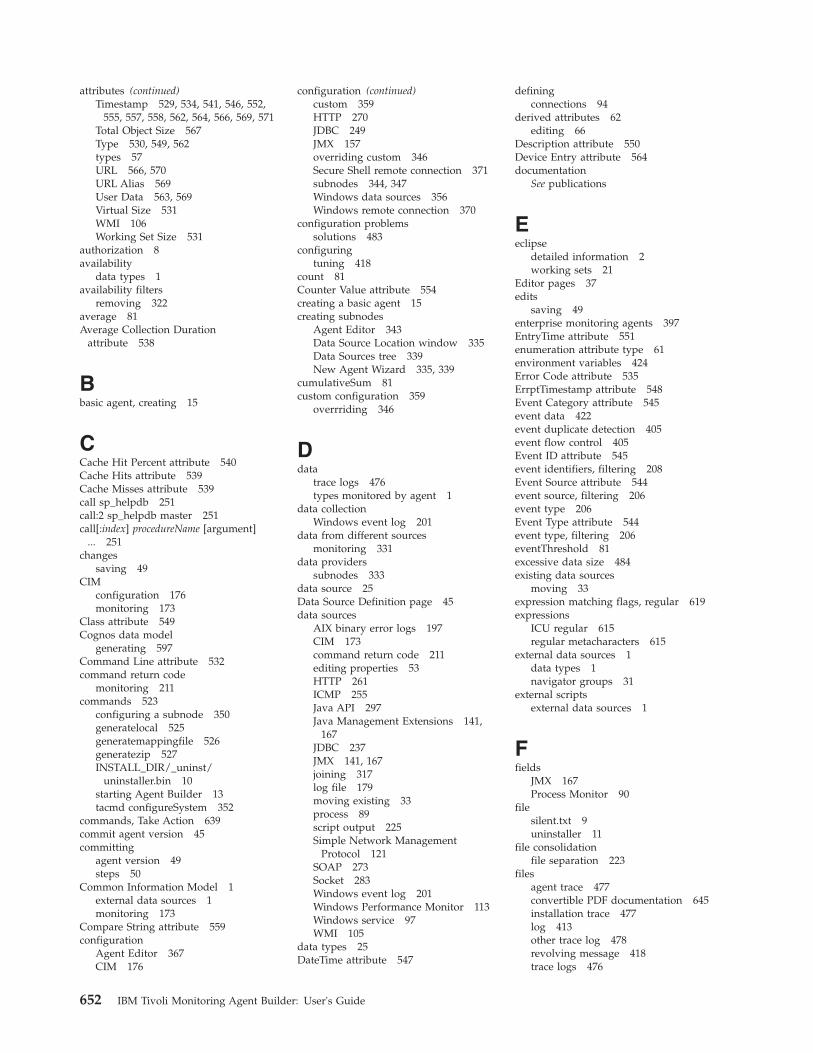
attributes (continued)Timestamp 529, 534, 541, 546, 552,
555, 557, 558, 562, 564, 566, 569, 571Total Object Size 567Type 530, 549, 562types 57URL 566, 570URL Alias 569User Data 563, 569Virtual Size 531WMI 106Working Set Size 531
authorization 8availability
data types 1availability filters
removing 322average 81Average Collection Duration
attribute 538
Bbasic agent, creating 15
CCache Hit Percent attribute 540Cache Hits attribute 539Cache Misses attribute 539call sp_helpdb 251call:2 sp_helpdb master 251call[:index] procedureName [argument]
... 251changes
saving 49CIM
configuration 176monitoring 173
Class attribute 549Cognos data model
generating 597Command Line attribute 532command return code
monitoring 211commands 523
configuring a subnode 350generatelocal 525generatemappingfile 526generatezip 527INSTALL_DIR/_uninst/
uninstaller.bin 10starting Agent Builder 13tacmd configureSystem 352
commands, Take Action 639commit agent version 45committing
agent version 49steps 50
Common Information Model 1external data sources 1monitoring 173
Compare String attribute 559configuration
Agent Editor 367CIM 176
configuration (continued)custom 359HTTP 270JDBC 249JMX 157overriding custom 346Secure Shell remote connection 371subnodes 344, 347Windows data sources 356Windows remote connection 370
configuration problemssolutions 483
configuringtuning 418
count 81Counter Value attribute 554creating a basic agent 15creating subnodes
Agent Editor 343Data Source Location window 335Data Sources tree 339New Agent Wizard 335, 339
cumulativeSum 81custom configuration 359
overrriding 346
Ddata
trace logs 476types monitored by agent 1
data collectionWindows event log 201
data from different sourcesmonitoring 331
data providerssubnodes 333
data source 25Data Source Definition page 45data sources
AIX binary error logs 197CIM 173command return code 211editing properties 53HTTP 261ICMP 255Java API 297Java Management Extensions 141,
167JDBC 237JMX 141, 167joining 317log file 179moving existing 33process 89script output 225Simple Network Management
Protocol 121SOAP 273Socket 283Windows event log 201Windows Performance Monitor 113Windows service 97WMI 105
data types 25DateTime attribute 547
definingconnections 94
derived attributes 62editing 66
Description attribute 550Device Entry attribute 564documentation
See publications
Eeclipse
detailed information 2working sets 21
Editor pages 37edits
saving 49enterprise monitoring agents 397EntryTime attribute 551enumeration attribute type 61environment variables 424Error Code attribute 535ErrptTimestamp attribute 548Event Category attribute 545event data 422event duplicate detection 405event flow control 405Event ID attribute 545event identifiers, filtering 208Event Source attribute 544event source, filtering 206event type 206Event Type attribute 544event type, filtering 206eventThreshold 81excessive data size 484existing data sources
moving 33expression matching flags, regular 619expressions
ICU regular 615regular metacharacters 615
external data sources 1data types 1navigator groups 31
external scriptsexternal data sources 1
Ffields
JMX 167Process Monitor 90
filesilent.txt 9uninstaller 11
file consolidationfile separation 223
filesagent trace 477convertible PDF documentation 645installation trace 477log 413other trace log 478revolving message 418trace logs 476
652 IBM Tivoli Monitoring Agent Builder: User's Guide
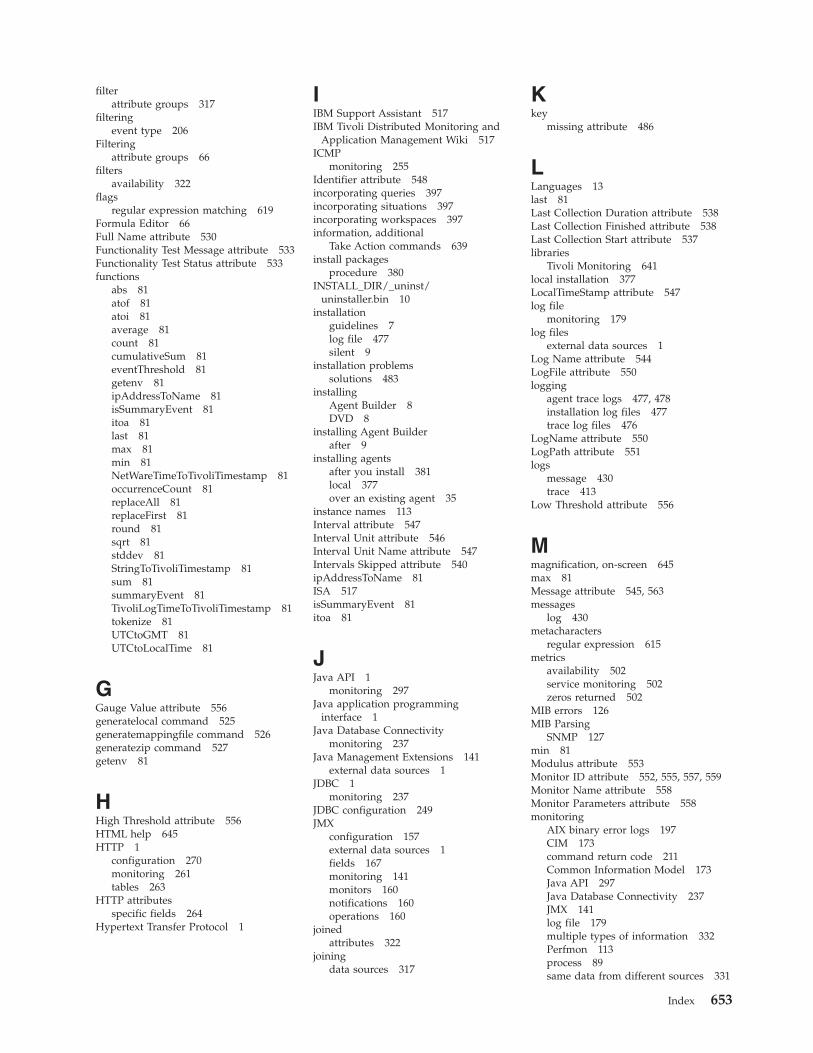
filterattribute groups 317
filteringevent type 206
Filteringattribute groups 66
filtersavailability 322
flagsregular expression matching 619
Formula Editor 66Full Name attribute 530Functionality Test Message attribute 533Functionality Test Status attribute 533functions
abs 81atof 81atoi 81average 81count 81cumulativeSum 81eventThreshold 81getenv 81ipAddressToName 81isSummaryEvent 81itoa 81last 81max 81min 81NetWareTimeToTivoliTimestamp 81occurrenceCount 81replaceAll 81replaceFirst 81round 81sqrt 81stddev 81StringToTivoliTimestamp 81sum 81summaryEvent 81TivoliLogTimeToTivoliTimestamp 81tokenize 81UTCtoGMT 81UTCtoLocalTime 81
GGauge Value attribute 556generatelocal command 525generatemappingfile command 526generatezip command 527getenv 81
HHigh Threshold attribute 556HTML help 645HTTP 1
configuration 270monitoring 261tables 263
HTTP attributesspecific fields 264
Hypertext Transfer Protocol 1
IIBM Support Assistant 517IBM Tivoli Distributed Monitoring and
Application Management Wiki 517ICMP
monitoring 255Identifier attribute 548incorporating queries 397incorporating situations 397incorporating workspaces 397information, additional
Take Action commands 639install packages
procedure 380INSTALL_DIR/_uninst/
uninstaller.bin 10installation
guidelines 7log file 477silent 9
installation problemssolutions 483
installingAgent Builder 8DVD 8
installing Agent Builderafter 9
installing agentsafter you install 381local 377over an existing agent 35
instance names 113Interval attribute 547Interval Unit attribute 546Interval Unit Name attribute 547Intervals Skipped attribute 540ipAddressToName 81ISA 517isSummaryEvent 81itoa 81
JJava API 1
monitoring 297Java application programming
interface 1Java Database Connectivity
monitoring 237Java Management Extensions 141
external data sources 1JDBC 1
monitoring 237JDBC configuration 249JMX
configuration 157external data sources 1fields 167monitoring 141monitors 160notifications 160operations 160
joinedattributes 322
joiningdata sources 317
Kkey
missing attribute 486
LLanguages 13last 81Last Collection Duration attribute 538Last Collection Finished attribute 538Last Collection Start attribute 537libraries
Tivoli Monitoring 641local installation 377LocalTimeStamp attribute 547log file
monitoring 179log files
external data sources 1Log Name attribute 544LogFile attribute 550logging
agent trace logs 477, 478installation log files 477trace log files 476
LogName attribute 550LogPath attribute 551logs
message 430trace 413
Low Threshold attribute 556
Mmagnification, on-screen 645max 81Message attribute 545, 563messages
log 430metacharacters
regular expression 615metrics
availability 502service monitoring 502zeros returned 502
MIB errors 126MIB Parsing
SNMP 127min 81Modulus attribute 553Monitor ID attribute 552, 555, 557, 559Monitor Name attribute 558Monitor Parameters attribute 558monitoring
AIX binary error logs 197CIM 173command return code 211Common Information Model 173Java API 297Java Database Connectivity 237JMX 141log file 179multiple types of information 332Perfmon 113process 89same data from different sources 331
Index 653
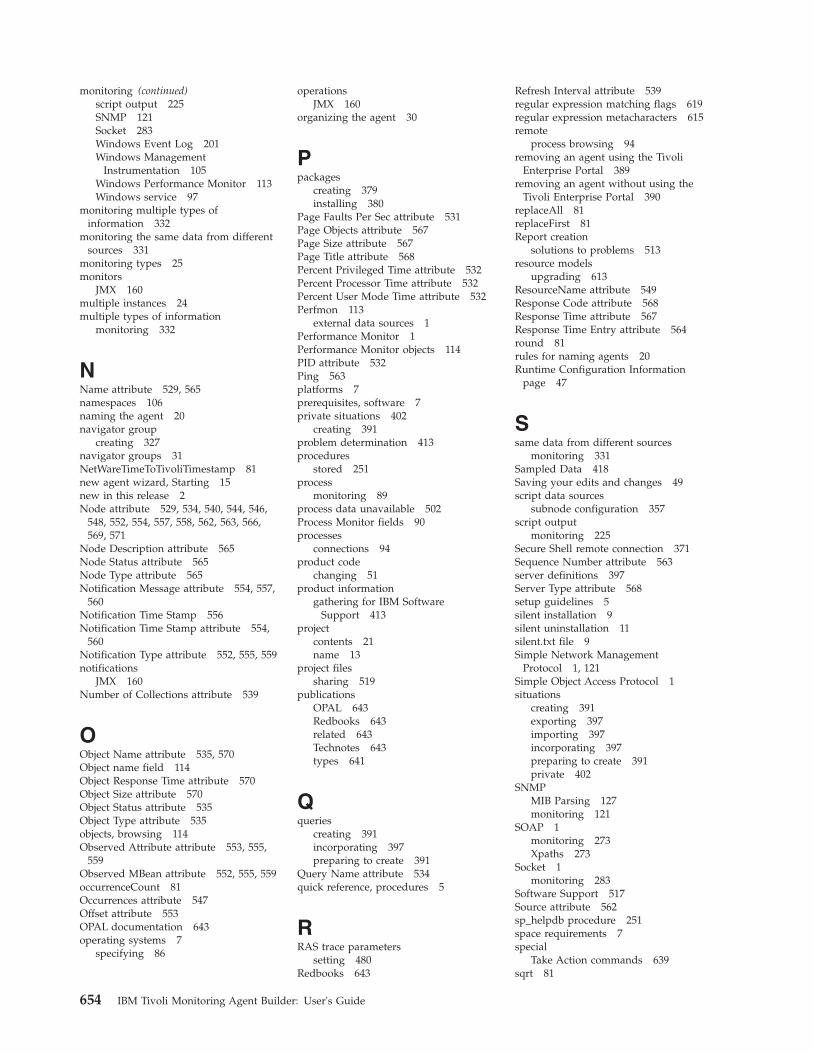
monitoring (continued)script output 225SNMP 121Socket 283Windows Event Log 201Windows Management
Instrumentation 105Windows Performance Monitor 113Windows service 97
monitoring multiple types ofinformation 332
monitoring the same data from differentsources 331
monitoring types 25monitors
JMX 160multiple instances 24multiple types of information
monitoring 332
NName attribute 529, 565namespaces 106naming the agent 20navigator group
creating 327navigator groups 31NetWareTimeToTivoliTimestamp 81new agent wizard, Starting 15new in this release 2Node attribute 529, 534, 540, 544, 546,
548, 552, 554, 557, 558, 562, 563, 566,569, 571
Node Description attribute 565Node Status attribute 565Node Type attribute 565Notification Message attribute 554, 557,
560Notification Time Stamp 556Notification Time Stamp attribute 554,
560Notification Type attribute 552, 555, 559notifications
JMX 160Number of Collections attribute 539
OObject Name attribute 535, 570Object name field 114Object Response Time attribute 570Object Size attribute 570Object Status attribute 535Object Type attribute 535objects, browsing 114Observed Attribute attribute 553, 555,
559Observed MBean attribute 552, 555, 559occurrenceCount 81Occurrences attribute 547Offset attribute 553OPAL documentation 643operating systems 7
specifying 86
operationsJMX 160
organizing the agent 30
Ppackages
creating 379installing 380
Page Faults Per Sec attribute 531Page Objects attribute 567Page Size attribute 567Page Title attribute 568Percent Privileged Time attribute 532Percent Processor Time attribute 532Percent User Mode Time attribute 532Perfmon 113
external data sources 1Performance Monitor 1Performance Monitor objects 114PID attribute 532Ping 563platforms 7prerequisites, software 7private situations 402
creating 391problem determination 413procedures
stored 251process
monitoring 89process data unavailable 502Process Monitor fields 90processes
connections 94product code
changing 51product information
gathering for IBM SoftwareSupport 413
projectcontents 21name 13
project filessharing 519
publicationsOPAL 643Redbooks 643related 643Technotes 643types 641
Qqueries
creating 391incorporating 397preparing to create 391
Query Name attribute 534quick reference, procedures 5
RRAS trace parameters
setting 480Redbooks 643
Refresh Interval attribute 539regular expression matching flags 619regular expression metacharacters 615remote
process browsing 94removing an agent using the Tivoli
Enterprise Portal 389removing an agent without using the
Tivoli Enterprise Portal 390replaceAll 81replaceFirst 81Report creation
solutions to problems 513resource models
upgrading 613ResourceName attribute 549Response Code attribute 568Response Time attribute 567Response Time Entry attribute 564round 81rules for naming agents 20Runtime Configuration Information
page 47
Ssame data from different sources
monitoring 331Sampled Data 418Saving your edits and changes 49script data sources
subnode configuration 357script output
monitoring 225Secure Shell remote connection 371Sequence Number attribute 563server definitions 397Server Type attribute 568setup guidelines 5silent installation 9silent uninstallation 11silent.txt file 9Simple Network Management
Protocol 1, 121Simple Object Access Protocol 1situations
creating 391exporting 397importing 397incorporating 397preparing to create 391private 402
SNMPMIB Parsing 127monitoring 121
SOAP 1monitoring 273Xpaths 273
Socket 1monitoring 283
Software Support 517Source attribute 562sp_helpdb procedure 251space requirements 7special
Take Action commands 639sqrt 81
654 IBM Tivoli Monitoring Agent Builder: User's Guide
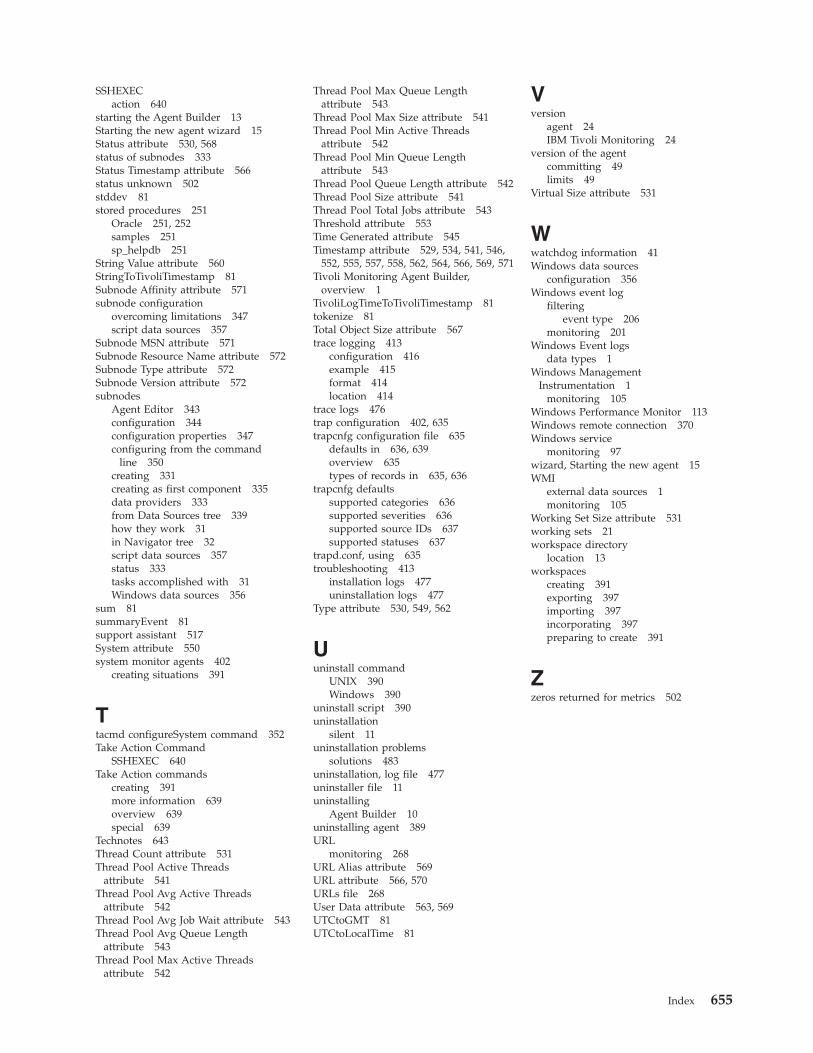
SSHEXECaction 640
starting the Agent Builder 13Starting the new agent wizard 15Status attribute 530, 568status of subnodes 333Status Timestamp attribute 566status unknown 502stddev 81stored procedures 251
Oracle 251, 252samples 251sp_helpdb 251
String Value attribute 560StringToTivoliTimestamp 81Subnode Affinity attribute 571subnode configuration
overcoming limitations 347script data sources 357
Subnode MSN attribute 571Subnode Resource Name attribute 572Subnode Type attribute 572Subnode Version attribute 572subnodes
Agent Editor 343configuration 344configuration properties 347configuring from the command
line 350creating 331creating as first component 335data providers 333from Data Sources tree 339how they work 31in Navigator tree 32script data sources 357status 333tasks accomplished with 31Windows data sources 356
sum 81summaryEvent 81support assistant 517System attribute 550system monitor agents 402
creating situations 391
Ttacmd configureSystem command 352Take Action Command
SSHEXEC 640Take Action commands
creating 391more information 639overview 639special 639
Technotes 643Thread Count attribute 531Thread Pool Active Threads
attribute 541Thread Pool Avg Active Threads
attribute 542Thread Pool Avg Job Wait attribute 543Thread Pool Avg Queue Length
attribute 543Thread Pool Max Active Threads
attribute 542
Thread Pool Max Queue Lengthattribute 543
Thread Pool Max Size attribute 541Thread Pool Min Active Threads
attribute 542Thread Pool Min Queue Length
attribute 543Thread Pool Queue Length attribute 542Thread Pool Size attribute 541Thread Pool Total Jobs attribute 543Threshold attribute 553Time Generated attribute 545Timestamp attribute 529, 534, 541, 546,
552, 555, 557, 558, 562, 564, 566, 569, 571Tivoli Monitoring Agent Builder,
overview 1TivoliLogTimeToTivoliTimestamp 81tokenize 81Total Object Size attribute 567trace logging 413
configuration 416example 415format 414location 414
trace logs 476trap configuration 402, 635trapcnfg configuration file 635
defaults in 636, 639overview 635types of records in 635, 636
trapcnfg defaultssupported categories 636supported severities 636supported source IDs 637supported statuses 637
trapd.conf, using 635troubleshooting 413
installation logs 477uninstallation logs 477
Type attribute 530, 549, 562
Uuninstall command
UNIX 390Windows 390
uninstall script 390uninstallation
silent 11uninstallation problems
solutions 483uninstallation, log file 477uninstaller file 11uninstalling
Agent Builder 10uninstalling agent 389URL
monitoring 268URL Alias attribute 569URL attribute 566, 570URLs file 268User Data attribute 563, 569UTCtoGMT 81UTCtoLocalTime 81
Vversion
agent 24IBM Tivoli Monitoring 24
version of the agentcommitting 49limits 49
Virtual Size attribute 531
Wwatchdog information 41Windows data sources
configuration 356Windows event log
filteringevent type 206
monitoring 201Windows Event logs
data types 1Windows Management
Instrumentation 1monitoring 105
Windows Performance Monitor 113Windows remote connection 370Windows service
monitoring 97wizard, Starting the new agent 15WMI
external data sources 1monitoring 105
Working Set Size attribute 531working sets 21workspace directory
location 13workspaces
creating 391exporting 397importing 397incorporating 397preparing to create 391
Zzeros returned for metrics 502
Index 655

656 IBM Tivoli Monitoring Agent Builder: User's Guide


����
Printed in USA
SC32-1921-13