Embed Size (px)
Citation preview
Redbooks
Front cover
IBM PowerHA SystemMirror V7.2.3 for IBM AIX and V7.2.2 for Linux
Dino Quintero
Jose Martin Abeleira
Adriano Almeida
Bernhard Buehler
Primitivo Cervantes
Stuart Cunliffe
Jes Kiran
Byron Martinez Martinez
Antony Steel
Oscar Humberto Torres
Stefan Velica


IBM Redbooks
IBM PowerHA SystemMirror V7.2.3 for IBM AIX and V7.2.2 for Linux
September 2019
SG24-8434-00

© Copyright International Business Machines Corporation 2019. All rights reserved.Note to U.S. Government Users Restricted Rights -- Use, duplication or disclosure restricted by GSA ADP ScheduleContract with IBM Corp.
First Edition (September 2019)
This edition applies to: PowerHA SystemMirror V7.2.3 Gold for AIX and V7.2.2 SP1 for LinuxIBM AIX 7200-01-02-1717Red Hat Enterprise Linux (RHEL) V7.5SUSE Linux Enterprise Server V12 SP3IBM Virtual I/O Server (VIOS) V2.2.6.31 and V2.2.3.60Hardware Management Console (HMC) V8.6 and V8.9IBM PowerVC V1.4.1
Note: Before using this information and the product it supports, read the information in “Notices” on page xi.
Contents
Notices . . . . . . . . . . . . . . . . . . . . . . . . . . . . . . . . . . . . . . . . . . . . . . . . . . . . . . . . . . . . . . . . . xiTrademarks . . . . . . . . . . . . . . . . . . . . . . . . . . . . . . . . . . . . . . . . . . . . . . . . . . . . . . . . . . . . . . xii
Preface . . . . . . . . . . . . . . . . . . . . . . . . . . . . . . . . . . . . . . . . . . . . . . . . . . . . . . . . . . . . . . . . xiiiAuthors. . . . . . . . . . . . . . . . . . . . . . . . . . . . . . . . . . . . . . . . . . . . . . . . . . . . . . . . . . . . . . . . . xiiiNow you can become a published author, too! . . . . . . . . . . . . . . . . . . . . . . . . . . . . . . . . . . .xvComments welcome. . . . . . . . . . . . . . . . . . . . . . . . . . . . . . . . . . . . . . . . . . . . . . . . . . . . . . . xviStay connected to IBM Redbooks . . . . . . . . . . . . . . . . . . . . . . . . . . . . . . . . . . . . . . . . . . . . xvi
Chapter 1. Introduction to IBM PowerHA SystemMirror for IBM AIX . . . . . . . . . . . . . . . 11.1 What is PowerHA SystemMirror for AIX . . . . . . . . . . . . . . . . . . . . . . . . . . . . . . . . . . . . . 2
1.1.1 High availability . . . . . . . . . . . . . . . . . . . . . . . . . . . . . . . . . . . . . . . . . . . . . . . . . . . . 21.1.2 Cluster multiprocessing. . . . . . . . . . . . . . . . . . . . . . . . . . . . . . . . . . . . . . . . . . . . . . 2
1.2 Availability solutions: An overview . . . . . . . . . . . . . . . . . . . . . . . . . . . . . . . . . . . . . . . . . 31.2.1 Downtime . . . . . . . . . . . . . . . . . . . . . . . . . . . . . . . . . . . . . . . . . . . . . . . . . . . . . . . . 51.2.2 Single point of failure . . . . . . . . . . . . . . . . . . . . . . . . . . . . . . . . . . . . . . . . . . . . . . . 5
1.3 History and evolution. . . . . . . . . . . . . . . . . . . . . . . . . . . . . . . . . . . . . . . . . . . . . . . . . . . . 61.3.1 PowerHA SystemMirror V7.2.0 . . . . . . . . . . . . . . . . . . . . . . . . . . . . . . . . . . . . . . . . 71.3.2 PowerHA SystemMirror Version 7.2.1 . . . . . . . . . . . . . . . . . . . . . . . . . . . . . . . . . . 71.3.3 PowerHA SystemMirror Version 7.2.2 . . . . . . . . . . . . . . . . . . . . . . . . . . . . . . . . . . 81.3.4 PowerHA SystemMirror Version 7.2.3 . . . . . . . . . . . . . . . . . . . . . . . . . . . . . . . . . . 8
1.4 HA terminology and concepts . . . . . . . . . . . . . . . . . . . . . . . . . . . . . . . . . . . . . . . . . . . . . 91.4.1 Terminology . . . . . . . . . . . . . . . . . . . . . . . . . . . . . . . . . . . . . . . . . . . . . . . . . . . . . . 9
1.5 Fault tolerance versus HA. . . . . . . . . . . . . . . . . . . . . . . . . . . . . . . . . . . . . . . . . . . . . . . 101.5.1 Fault-tolerant systems. . . . . . . . . . . . . . . . . . . . . . . . . . . . . . . . . . . . . . . . . . . . . . 101.5.2 HA systems. . . . . . . . . . . . . . . . . . . . . . . . . . . . . . . . . . . . . . . . . . . . . . . . . . . . . . 11
1.6 Additional PowerHA resources . . . . . . . . . . . . . . . . . . . . . . . . . . . . . . . . . . . . . . . . . . . 11
Chapter 2. New features . . . . . . . . . . . . . . . . . . . . . . . . . . . . . . . . . . . . . . . . . . . . . . . . . . 152.1 Easy Update . . . . . . . . . . . . . . . . . . . . . . . . . . . . . . . . . . . . . . . . . . . . . . . . . . . . . . . . . 16
2.1.1 Overview . . . . . . . . . . . . . . . . . . . . . . . . . . . . . . . . . . . . . . . . . . . . . . . . . . . . . . . . 162.1.2 Detailed description . . . . . . . . . . . . . . . . . . . . . . . . . . . . . . . . . . . . . . . . . . . . . . . 18
2.2 PowerHA SystemMirror User Interface enhancements. . . . . . . . . . . . . . . . . . . . . . . . . 252.3 Resource Optimized High Availability enhancements. . . . . . . . . . . . . . . . . . . . . . . . . . 262.4 PowerHA Log Analyzer and logging enhancements . . . . . . . . . . . . . . . . . . . . . . . . . . . 27
2.4.1 Logging enhancements. . . . . . . . . . . . . . . . . . . . . . . . . . . . . . . . . . . . . . . . . . . . . 272.4.2 Log Analyzer . . . . . . . . . . . . . . . . . . . . . . . . . . . . . . . . . . . . . . . . . . . . . . . . . . . . . 27
2.5 Event handling . . . . . . . . . . . . . . . . . . . . . . . . . . . . . . . . . . . . . . . . . . . . . . . . . . . . . . . 302.5.1 Event script failure option: Canceling the remaining events . . . . . . . . . . . . . . . . . 30
2.6 Additional details of changes in PowerHA SystemMirror . . . . . . . . . . . . . . . . . . . . . . . 322.6.1 Log analyzer changes. . . . . . . . . . . . . . . . . . . . . . . . . . . . . . . . . . . . . . . . . . . . . . 322.6.2 Event script failure improvements . . . . . . . . . . . . . . . . . . . . . . . . . . . . . . . . . . . . . 362.6.3 Event script failure option: Canceling the remaining events . . . . . . . . . . . . . . . . . 362.6.4 Change to the Cluster Event infrastructure . . . . . . . . . . . . . . . . . . . . . . . . . . . . . . 382.6.5 Administrator operation event . . . . . . . . . . . . . . . . . . . . . . . . . . . . . . . . . . . . . . . . 402.6.6 Network unstable event . . . . . . . . . . . . . . . . . . . . . . . . . . . . . . . . . . . . . . . . . . . . 412.6.7 Event serial number . . . . . . . . . . . . . . . . . . . . . . . . . . . . . . . . . . . . . . . . . . . . . . . 41
2.7 Logical Volume Manager preferred read. . . . . . . . . . . . . . . . . . . . . . . . . . . . . . . . . . . . 48
© Copyright IBM Corp. 2019. All rights reserved. iii
Chapter 3. Planning considerations . . . . . . . . . . . . . . . . . . . . . . . . . . . . . . . . . . . . . . . . 513.1 Introduction . . . . . . . . . . . . . . . . . . . . . . . . . . . . . . . . . . . . . . . . . . . . . . . . . . . . . . . . . . 52
3.1.1 Mirrored architecture. . . . . . . . . . . . . . . . . . . . . . . . . . . . . . . . . . . . . . . . . . . . . . . 523.1.2 Single storage architecture . . . . . . . . . . . . . . . . . . . . . . . . . . . . . . . . . . . . . . . . . . 533.1.3 Stretched cluster . . . . . . . . . . . . . . . . . . . . . . . . . . . . . . . . . . . . . . . . . . . . . . . . . . 533.1.4 Linked cluster . . . . . . . . . . . . . . . . . . . . . . . . . . . . . . . . . . . . . . . . . . . . . . . . . . . . 54
3.2 CAA repository disk. . . . . . . . . . . . . . . . . . . . . . . . . . . . . . . . . . . . . . . . . . . . . . . . . . . . 563.2.1 Preparing for a CAA repository disk . . . . . . . . . . . . . . . . . . . . . . . . . . . . . . . . . . . 573.2.2 CAA with multiple storage devices . . . . . . . . . . . . . . . . . . . . . . . . . . . . . . . . . . . . 57
3.3 CAA tunables . . . . . . . . . . . . . . . . . . . . . . . . . . . . . . . . . . . . . . . . . . . . . . . . . . . . . . . . 623.3.1 CAA network monitoring . . . . . . . . . . . . . . . . . . . . . . . . . . . . . . . . . . . . . . . . . . . . 623.3.2 Network failure detection time. . . . . . . . . . . . . . . . . . . . . . . . . . . . . . . . . . . . . . . . 63
3.4 Important considerations for Virtual I/O Server . . . . . . . . . . . . . . . . . . . . . . . . . . . . . . . 633.4.1 Using poll_uplink. . . . . . . . . . . . . . . . . . . . . . . . . . . . . . . . . . . . . . . . . . . . . . . . . . 633.4.2 Advantages for PowerHA when poll_uplink is used . . . . . . . . . . . . . . . . . . . . . . . 66
3.5 Network considerations. . . . . . . . . . . . . . . . . . . . . . . . . . . . . . . . . . . . . . . . . . . . . . . . . 663.5.1 Dual-adapter networks . . . . . . . . . . . . . . . . . . . . . . . . . . . . . . . . . . . . . . . . . . . . . 663.5.2 Single-adapter network . . . . . . . . . . . . . . . . . . . . . . . . . . . . . . . . . . . . . . . . . . . . . 673.5.3 The netmon.cf file . . . . . . . . . . . . . . . . . . . . . . . . . . . . . . . . . . . . . . . . . . . . . . . . . 67
3.6 Network File System tiebreaker . . . . . . . . . . . . . . . . . . . . . . . . . . . . . . . . . . . . . . . . . . 683.6.1 Introduction and concepts . . . . . . . . . . . . . . . . . . . . . . . . . . . . . . . . . . . . . . . . . . . 683.6.2 Test environment setup . . . . . . . . . . . . . . . . . . . . . . . . . . . . . . . . . . . . . . . . . . . . 693.6.3 NFS server and client configuration . . . . . . . . . . . . . . . . . . . . . . . . . . . . . . . . . . . 723.6.4 NFS tiebreaker configuration . . . . . . . . . . . . . . . . . . . . . . . . . . . . . . . . . . . . . . . . 743.6.5 NFS tiebreaker tests . . . . . . . . . . . . . . . . . . . . . . . . . . . . . . . . . . . . . . . . . . . . . . . 783.6.6 Log entries for monitoring and debugging . . . . . . . . . . . . . . . . . . . . . . . . . . . . . . 82
Chapter 4. Migration . . . . . . . . . . . . . . . . . . . . . . . . . . . . . . . . . . . . . . . . . . . . . . . . . . . . . 874.1 Migration planning. . . . . . . . . . . . . . . . . . . . . . . . . . . . . . . . . . . . . . . . . . . . . . . . . . . . . 88
4.1.1 PowerHA SystemMirror V7.2.2.sp1 requirements . . . . . . . . . . . . . . . . . . . . . . . . 884.1.2 PowerHA SystemMirror V7.2.3 requirements . . . . . . . . . . . . . . . . . . . . . . . . . . . . 894.1.3 Deprecated features . . . . . . . . . . . . . . . . . . . . . . . . . . . . . . . . . . . . . . . . . . . . . . . 894.1.4 Migration options. . . . . . . . . . . . . . . . . . . . . . . . . . . . . . . . . . . . . . . . . . . . . . . . . . 894.1.5 Migration steps . . . . . . . . . . . . . . . . . . . . . . . . . . . . . . . . . . . . . . . . . . . . . . . . . . . 904.1.6 Migration matrix to PowerHA SystemMirror V7.2.3. . . . . . . . . . . . . . . . . . . . . . . . 92
4.2 Migration scenarios from PowerHA V7.1.3 . . . . . . . . . . . . . . . . . . . . . . . . . . . . . . . . . . 924.2.1 PowerHA V7.1.3 test environment overview. . . . . . . . . . . . . . . . . . . . . . . . . . . . . 934.2.2 Rolling migration from PowerHA V7.1.3 . . . . . . . . . . . . . . . . . . . . . . . . . . . . . . . . 934.2.3 Offline migration from PowerHA V7.1.3 . . . . . . . . . . . . . . . . . . . . . . . . . . . . . . . . 974.2.4 Snapshot migration from PowerHA V7.1.3 . . . . . . . . . . . . . . . . . . . . . . . . . . . . . . 994.2.5 Nondisruptive upgrade from PowerHA V7.1.3 . . . . . . . . . . . . . . . . . . . . . . . . . . 101
4.3 Migration scenarios from PowerHA V7.2.0 . . . . . . . . . . . . . . . . . . . . . . . . . . . . . . . . . 1044.3.1 PowerHA V7.2.0 test environment overview. . . . . . . . . . . . . . . . . . . . . . . . . . . . 1044.3.2 Rolling migration from PowerHA V7.2.0 . . . . . . . . . . . . . . . . . . . . . . . . . . . . . . . 1054.3.3 Offline migration from PowerHA V7.2.0 . . . . . . . . . . . . . . . . . . . . . . . . . . . . . . . 1194.3.4 Snapshot migration from PowerHA V7.2.0 . . . . . . . . . . . . . . . . . . . . . . . . . . . . . 1204.3.5 Nondisruptive upgrade from PowerHA V7.2.0 . . . . . . . . . . . . . . . . . . . . . . . . . . 123
Chapter 5. PowerHA SystemMirror User Interface. . . . . . . . . . . . . . . . . . . . . . . . . . . . 1275.1 SMUI new features . . . . . . . . . . . . . . . . . . . . . . . . . . . . . . . . . . . . . . . . . . . . . . . . . . . 128
5.1.1 What is new for SMUI . . . . . . . . . . . . . . . . . . . . . . . . . . . . . . . . . . . . . . . . . . . . . 1285.2 Planning and installation of SMUI . . . . . . . . . . . . . . . . . . . . . . . . . . . . . . . . . . . . . . . . 129
5.2.1 Planning and installation of SMUI for AIX . . . . . . . . . . . . . . . . . . . . . . . . . . . . . . 1305.2.2 Planning and installation of SMUI for Linux . . . . . . . . . . . . . . . . . . . . . . . . . . . . 133
iv IBM PowerHA SystemMirror V7.2.3 for IBM AIX and V7.2.2 for Linux
5.2.3 Postinstallation actions for the SMUI server for AIX and Linux. . . . . . . . . . . . . . 1335.3 Navigating the SMUI . . . . . . . . . . . . . . . . . . . . . . . . . . . . . . . . . . . . . . . . . . . . . . . . . . 1365.4 Cluster management by using the SMUI . . . . . . . . . . . . . . . . . . . . . . . . . . . . . . . . . . 137
5.4.1 Managing zones . . . . . . . . . . . . . . . . . . . . . . . . . . . . . . . . . . . . . . . . . . . . . . . . . 1375.4.2 Managing clusters by using the SMUI. . . . . . . . . . . . . . . . . . . . . . . . . . . . . . . . . 1415.4.3 Creating resource groups and resources . . . . . . . . . . . . . . . . . . . . . . . . . . . . . . 1465.4.4 Moving, starting, and stopping a resource group . . . . . . . . . . . . . . . . . . . . . . . . 1535.4.5 Starting and stopping cluster services . . . . . . . . . . . . . . . . . . . . . . . . . . . . . . . . 1555.4.6 View Activity Log. . . . . . . . . . . . . . . . . . . . . . . . . . . . . . . . . . . . . . . . . . . . . . . . . 156
5.5 Cluster maintenance by using SMUI. . . . . . . . . . . . . . . . . . . . . . . . . . . . . . . . . . . . . . 1575.5.1 Verifying a cluster . . . . . . . . . . . . . . . . . . . . . . . . . . . . . . . . . . . . . . . . . . . . . . . . 1575.5.2 Synchronizing a cluster (AIX only) . . . . . . . . . . . . . . . . . . . . . . . . . . . . . . . . . . . 1585.5.3 Creating and restoring a snapshot . . . . . . . . . . . . . . . . . . . . . . . . . . . . . . . . . . . 158
5.6 SMUI access control . . . . . . . . . . . . . . . . . . . . . . . . . . . . . . . . . . . . . . . . . . . . . . . . . . 1605.6.1 User management . . . . . . . . . . . . . . . . . . . . . . . . . . . . . . . . . . . . . . . . . . . . . . . 1605.6.2 Role management. . . . . . . . . . . . . . . . . . . . . . . . . . . . . . . . . . . . . . . . . . . . . . . . 161
5.7 Troubleshooting SMUI . . . . . . . . . . . . . . . . . . . . . . . . . . . . . . . . . . . . . . . . . . . . . . . . 1615.7.1 Log files. . . . . . . . . . . . . . . . . . . . . . . . . . . . . . . . . . . . . . . . . . . . . . . . . . . . . . . . 1615.7.2 Managing SMUI services . . . . . . . . . . . . . . . . . . . . . . . . . . . . . . . . . . . . . . . . . . 1625.7.3 Troubleshooting logins . . . . . . . . . . . . . . . . . . . . . . . . . . . . . . . . . . . . . . . . . . . . 1635.7.4 Adding clusters . . . . . . . . . . . . . . . . . . . . . . . . . . . . . . . . . . . . . . . . . . . . . . . . . . 1635.7.5 Status not updating . . . . . . . . . . . . . . . . . . . . . . . . . . . . . . . . . . . . . . . . . . . . . . . 1645.7.6 The uisnap utility . . . . . . . . . . . . . . . . . . . . . . . . . . . . . . . . . . . . . . . . . . . . . . . . . 164
Chapter 6. Resource Optimized High Availability . . . . . . . . . . . . . . . . . . . . . . . . . . . . 1656.1 ROHA concepts and terminology . . . . . . . . . . . . . . . . . . . . . . . . . . . . . . . . . . . . . . . . 166
6.1.1 Environment requirement for ROHA . . . . . . . . . . . . . . . . . . . . . . . . . . . . . . . . . . 1676.2 New PowerHA SystemMirror SMIT configuration panels for ROHA . . . . . . . . . . . . . . 168
6.2.1 Entry point to ROHA . . . . . . . . . . . . . . . . . . . . . . . . . . . . . . . . . . . . . . . . . . . . . . 1686.2.2 ROHA panel . . . . . . . . . . . . . . . . . . . . . . . . . . . . . . . . . . . . . . . . . . . . . . . . . . . . 1696.2.3 HMC configuration . . . . . . . . . . . . . . . . . . . . . . . . . . . . . . . . . . . . . . . . . . . . . . . 1706.2.4 Hardware resource provisioning for an application controller . . . . . . . . . . . . . . . 1776.2.5 Change/Show Default Cluster Tunable menu. . . . . . . . . . . . . . . . . . . . . . . . . . . 182
6.3 New PowerHA SystemMirror verification enhancement for ROHA. . . . . . . . . . . . . . . 1836.4 Planning a ROHA cluster environment . . . . . . . . . . . . . . . . . . . . . . . . . . . . . . . . . . . . 186
6.4.1 Considerations before configuring ROHA. . . . . . . . . . . . . . . . . . . . . . . . . . . . . . 1866.4.2 Configuration steps for ROHA. . . . . . . . . . . . . . . . . . . . . . . . . . . . . . . . . . . . . . . 196
6.5 Resource acquisition and release process introduction . . . . . . . . . . . . . . . . . . . . . . . 1976.5.1 Steps for allocation and for release . . . . . . . . . . . . . . . . . . . . . . . . . . . . . . . . . . 197
6.6 Introduction to resource acquisition . . . . . . . . . . . . . . . . . . . . . . . . . . . . . . . . . . . . . . 1986.6.1 Querying the resources. . . . . . . . . . . . . . . . . . . . . . . . . . . . . . . . . . . . . . . . . . . . 1996.6.2 Computing the resources . . . . . . . . . . . . . . . . . . . . . . . . . . . . . . . . . . . . . . . . . . 2026.6.3 Identifying the method of resource allocation . . . . . . . . . . . . . . . . . . . . . . . . . . . 2036.6.4 Applying (acquiring) the resource . . . . . . . . . . . . . . . . . . . . . . . . . . . . . . . . . . . . 205
6.7 Introduction to the release of resources . . . . . . . . . . . . . . . . . . . . . . . . . . . . . . . . . . . 2076.7.1 Querying the release of resources . . . . . . . . . . . . . . . . . . . . . . . . . . . . . . . . . . . 2086.7.2 Computing the release of resources . . . . . . . . . . . . . . . . . . . . . . . . . . . . . . . . . . 2096.7.3 Identifying the resources to release . . . . . . . . . . . . . . . . . . . . . . . . . . . . . . . . . . 2116.7.4 Releasing (applying) resources. . . . . . . . . . . . . . . . . . . . . . . . . . . . . . . . . . . . . . 2126.7.5 Synchronous and asynchronous mode. . . . . . . . . . . . . . . . . . . . . . . . . . . . . . . . 2136.7.6 Automatic resource release process after an operating system crash . . . . . . . . 213
6.8 Example 1: Setting up one ROHA cluster (without On/Off CoD). . . . . . . . . . . . . . . . . 2146.8.1 Requirements . . . . . . . . . . . . . . . . . . . . . . . . . . . . . . . . . . . . . . . . . . . . . . . . . . . 214
Contents v
6.8.2 Hardware topology . . . . . . . . . . . . . . . . . . . . . . . . . . . . . . . . . . . . . . . . . . . . . . . 2146.8.3 Cluster configuration . . . . . . . . . . . . . . . . . . . . . . . . . . . . . . . . . . . . . . . . . . . . . . 2156.8.4 Showing the ROHA configuration . . . . . . . . . . . . . . . . . . . . . . . . . . . . . . . . . . . . 217
6.9 Test scenarios of Example 1 (without On/Off CoD) . . . . . . . . . . . . . . . . . . . . . . . . . . 2206.9.1 Bringing two resource groups online. . . . . . . . . . . . . . . . . . . . . . . . . . . . . . . . . . 2206.9.2 Moving one resource group to another node . . . . . . . . . . . . . . . . . . . . . . . . . . . 2266.9.3 Restarting with the current configuration after the primary node crashes. . . . . . 234
6.10 Example 2: Setting up one ROHA cluster (with On/Off CoD) . . . . . . . . . . . . . . . . . . 2366.10.1 Requirements . . . . . . . . . . . . . . . . . . . . . . . . . . . . . . . . . . . . . . . . . . . . . . . . . . 2366.10.2 Hardware topology . . . . . . . . . . . . . . . . . . . . . . . . . . . . . . . . . . . . . . . . . . . . . . 2366.10.3 Cluster configuration . . . . . . . . . . . . . . . . . . . . . . . . . . . . . . . . . . . . . . . . . . . . . 2376.10.4 Showing the ROHA configuration . . . . . . . . . . . . . . . . . . . . . . . . . . . . . . . . . . . 238
6.11 Test scenarios for Example 2 (with On/Off CoD) . . . . . . . . . . . . . . . . . . . . . . . . . . . 2416.11.1 Bringing two resource groups online. . . . . . . . . . . . . . . . . . . . . . . . . . . . . . . . . 2416.11.2 Bringing one resource group offline . . . . . . . . . . . . . . . . . . . . . . . . . . . . . . . . . 246
6.12 HMC HA introduction . . . . . . . . . . . . . . . . . . . . . . . . . . . . . . . . . . . . . . . . . . . . . . . . 2476.12.1 Switching to the backup HMC for the Power Enterprise Pool . . . . . . . . . . . . . . 249
6.13 Test scenario for HMC fallover . . . . . . . . . . . . . . . . . . . . . . . . . . . . . . . . . . . . . . . . . 2496.13.1 Hardware topology . . . . . . . . . . . . . . . . . . . . . . . . . . . . . . . . . . . . . . . . . . . . . . 2506.13.2 Bringing one resource group offline when the primary HMC fails . . . . . . . . . . . 2526.13.3 Testing summary . . . . . . . . . . . . . . . . . . . . . . . . . . . . . . . . . . . . . . . . . . . . . . . 257
6.14 Managing, monitoring, and troubleshooting . . . . . . . . . . . . . . . . . . . . . . . . . . . . . . . 2586.14.1 The clmgr interface to manage ROHA . . . . . . . . . . . . . . . . . . . . . . . . . . . . . . . 2586.14.2 Changing the DLPAR and CoD resources dynamically . . . . . . . . . . . . . . . . . . 2616.14.3 Viewing the ROHA report . . . . . . . . . . . . . . . . . . . . . . . . . . . . . . . . . . . . . . . . . 2616.14.4 Troubleshooting DLPAR and CoD operations . . . . . . . . . . . . . . . . . . . . . . . . . 262
Chapter 7. Geographical Logical Volume Manager configuration assistant. . . . . . . 2657.1 Introduction . . . . . . . . . . . . . . . . . . . . . . . . . . . . . . . . . . . . . . . . . . . . . . . . . . . . . . . . . 266
7.1.1 Geographical Logical Volume Manager . . . . . . . . . . . . . . . . . . . . . . . . . . . . . . . 2667.1.2 GLVM configuration assistant . . . . . . . . . . . . . . . . . . . . . . . . . . . . . . . . . . . . . . . 269
7.2 Prerequisites . . . . . . . . . . . . . . . . . . . . . . . . . . . . . . . . . . . . . . . . . . . . . . . . . . . . . . . . 2707.3 Using the GLVM wizard . . . . . . . . . . . . . . . . . . . . . . . . . . . . . . . . . . . . . . . . . . . . . . . 271
7.3.1 Test environment overview . . . . . . . . . . . . . . . . . . . . . . . . . . . . . . . . . . . . . . . . . 2717.3.2 Synchronous configuration . . . . . . . . . . . . . . . . . . . . . . . . . . . . . . . . . . . . . . . . . 2727.3.3 Asynchronous configuration . . . . . . . . . . . . . . . . . . . . . . . . . . . . . . . . . . . . . . . . 280
Chapter 8. Automation adaptation for Live Partition Mobility . . . . . . . . . . . . . . . . . . 2918.1 Concept. . . . . . . . . . . . . . . . . . . . . . . . . . . . . . . . . . . . . . . . . . . . . . . . . . . . . . . . . . . . 292
8.1.1 Prerequisites for PowerHA node support of HACMP . . . . . . . . . . . . . . . . . . . . . 2948.1.2 Reducing the HACMP freeze time . . . . . . . . . . . . . . . . . . . . . . . . . . . . . . . . . . . 294
8.2 Operation flow to support HACMP on a PowerHA node. . . . . . . . . . . . . . . . . . . . . . . 2948.2.1 Pre-migration operation flow . . . . . . . . . . . . . . . . . . . . . . . . . . . . . . . . . . . . . . . . 2958.2.2 Post-migration operation flow . . . . . . . . . . . . . . . . . . . . . . . . . . . . . . . . . . . . . . . 297
8.3 Example: HACMP scenario for PowerHA V7.2. . . . . . . . . . . . . . . . . . . . . . . . . . . . . . 2998.3.1 Topology introduction . . . . . . . . . . . . . . . . . . . . . . . . . . . . . . . . . . . . . . . . . . . . . 2998.3.2 Initial status . . . . . . . . . . . . . . . . . . . . . . . . . . . . . . . . . . . . . . . . . . . . . . . . . . . . . 3008.3.3 Manual pre- HACMP operations . . . . . . . . . . . . . . . . . . . . . . . . . . . . . . . . . . . . . 3048.3.4 Performing HACMP. . . . . . . . . . . . . . . . . . . . . . . . . . . . . . . . . . . . . . . . . . . . . . . 3118.3.5 Manual post-HACMP operations. . . . . . . . . . . . . . . . . . . . . . . . . . . . . . . . . . . . . 312
8.4 HACMP SMIT panel . . . . . . . . . . . . . . . . . . . . . . . . . . . . . . . . . . . . . . . . . . . . . . . . . . 3168.5 PowerHA V7.2 scenario and troubleshooting . . . . . . . . . . . . . . . . . . . . . . . . . . . . . . . 317
8.5.1 Troubleshooting . . . . . . . . . . . . . . . . . . . . . . . . . . . . . . . . . . . . . . . . . . . . . . . . . 318
vi IBM PowerHA SystemMirror V7.2.3 for IBM AIX and V7.2.2 for Linux
Chapter 9. Cluster partition management update . . . . . . . . . . . . . . . . . . . . . . . . . . . . 3239.1 Introduction to cluster partitioning . . . . . . . . . . . . . . . . . . . . . . . . . . . . . . . . . . . . . . . . 324
9.1.1 Causes of a partitioned cluster . . . . . . . . . . . . . . . . . . . . . . . . . . . . . . . . . . . . . . 3259.1.2 Terminology . . . . . . . . . . . . . . . . . . . . . . . . . . . . . . . . . . . . . . . . . . . . . . . . . . . . 325
9.2 PowerHA cluster split and merge policies (before PowerHA V7.2.1) . . . . . . . . . . . . . 3269.2.1 Split policy. . . . . . . . . . . . . . . . . . . . . . . . . . . . . . . . . . . . . . . . . . . . . . . . . . . . . . 3269.2.2 Merge policy . . . . . . . . . . . . . . . . . . . . . . . . . . . . . . . . . . . . . . . . . . . . . . . . . . . . 3289.2.3 Configuration for the split and merge policy . . . . . . . . . . . . . . . . . . . . . . . . . . . . 329
9.3 PowerHA quarantine policy. . . . . . . . . . . . . . . . . . . . . . . . . . . . . . . . . . . . . . . . . . . . . 3379.3.1 Active node halt quarantine policy . . . . . . . . . . . . . . . . . . . . . . . . . . . . . . . . . . . 3379.3.2 Disk fencing quarantine . . . . . . . . . . . . . . . . . . . . . . . . . . . . . . . . . . . . . . . . . . . 3389.3.3 Configuration of quarantine policies . . . . . . . . . . . . . . . . . . . . . . . . . . . . . . . . . . 339
9.4 Changes in split and merge policies in PowerHA V7.2.1 . . . . . . . . . . . . . . . . . . . . . . 3469.4.1 Configuring the split and merge policy by using SMIT . . . . . . . . . . . . . . . . . . . . 3479.4.2 Configuring the split and merge policy by using clmgr . . . . . . . . . . . . . . . . . . . . 3509.4.3 Starting cluster services after a split . . . . . . . . . . . . . . . . . . . . . . . . . . . . . . . . . . 3509.4.4 Migration and limitation . . . . . . . . . . . . . . . . . . . . . . . . . . . . . . . . . . . . . . . . . . . . 351
9.5 Considerations for using split and merge quarantine policies . . . . . . . . . . . . . . . . . . . 3529.6 Split and merge policy testing environment . . . . . . . . . . . . . . . . . . . . . . . . . . . . . . . . 355
9.6.1 Basic configuration . . . . . . . . . . . . . . . . . . . . . . . . . . . . . . . . . . . . . . . . . . . . . . . 3569.6.2 Specific hardware configuration for some scenarios. . . . . . . . . . . . . . . . . . . . . . 3569.6.3 Initial PowerHA service status for each scenario . . . . . . . . . . . . . . . . . . . . . . . . 356
9.7 Scenario: Default split and merge policy. . . . . . . . . . . . . . . . . . . . . . . . . . . . . . . . . . . 3629.7.1 Scenario description . . . . . . . . . . . . . . . . . . . . . . . . . . . . . . . . . . . . . . . . . . . . . . 3629.7.2 Split and merge configuration in PowerHA . . . . . . . . . . . . . . . . . . . . . . . . . . . . . 3639.7.3 Cluster split . . . . . . . . . . . . . . . . . . . . . . . . . . . . . . . . . . . . . . . . . . . . . . . . . . . . . 3649.7.4 Cluster merge . . . . . . . . . . . . . . . . . . . . . . . . . . . . . . . . . . . . . . . . . . . . . . . . . . . 3679.7.5 Scenario summary . . . . . . . . . . . . . . . . . . . . . . . . . . . . . . . . . . . . . . . . . . . . . . . 368
9.8 Scenario: Split and merge policy with a disk tiebreaker . . . . . . . . . . . . . . . . . . . . . . . 3699.8.1 Scenario description . . . . . . . . . . . . . . . . . . . . . . . . . . . . . . . . . . . . . . . . . . . . . . 3699.8.2 Split and merge configuration in PowerHA . . . . . . . . . . . . . . . . . . . . . . . . . . . . . 3709.8.3 Cluster split . . . . . . . . . . . . . . . . . . . . . . . . . . . . . . . . . . . . . . . . . . . . . . . . . . . . . 3729.8.4 How to change the tiebreaker group leader manually. . . . . . . . . . . . . . . . . . . . . 3759.8.5 Cluster merge . . . . . . . . . . . . . . . . . . . . . . . . . . . . . . . . . . . . . . . . . . . . . . . . . . . 3759.8.6 Scenario summary . . . . . . . . . . . . . . . . . . . . . . . . . . . . . . . . . . . . . . . . . . . . . . . 376
9.9 Scenario: Split and merge policy with the NFS tiebreaker . . . . . . . . . . . . . . . . . . . . . 3769.9.1 Scenario description . . . . . . . . . . . . . . . . . . . . . . . . . . . . . . . . . . . . . . . . . . . . . . 3769.9.2 Setting up the NFS environment . . . . . . . . . . . . . . . . . . . . . . . . . . . . . . . . . . . . . 3779.9.3 Setting the NFS split and merge policies . . . . . . . . . . . . . . . . . . . . . . . . . . . . . . 3789.9.4 Cluster split . . . . . . . . . . . . . . . . . . . . . . . . . . . . . . . . . . . . . . . . . . . . . . . . . . . . . 3819.9.5 Cluster merge . . . . . . . . . . . . . . . . . . . . . . . . . . . . . . . . . . . . . . . . . . . . . . . . . . . 3839.9.6 Scenario summary . . . . . . . . . . . . . . . . . . . . . . . . . . . . . . . . . . . . . . . . . . . . . . . 383
9.10 Scenario: Manual split and merge policy . . . . . . . . . . . . . . . . . . . . . . . . . . . . . . . . . 3849.10.1 Scenario description . . . . . . . . . . . . . . . . . . . . . . . . . . . . . . . . . . . . . . . . . . . . . 3849.10.2 Split and merge configuration in PowerHA . . . . . . . . . . . . . . . . . . . . . . . . . . . . 3849.10.3 Cluster split . . . . . . . . . . . . . . . . . . . . . . . . . . . . . . . . . . . . . . . . . . . . . . . . . . . . 3869.10.4 Cluster merge . . . . . . . . . . . . . . . . . . . . . . . . . . . . . . . . . . . . . . . . . . . . . . . . . . 3899.10.5 Scenario summary . . . . . . . . . . . . . . . . . . . . . . . . . . . . . . . . . . . . . . . . . . . . . . 389
9.11 Scenario: Active node halt policy quarantine . . . . . . . . . . . . . . . . . . . . . . . . . . . . . . 3909.11.1 Scenario description . . . . . . . . . . . . . . . . . . . . . . . . . . . . . . . . . . . . . . . . . . . . . 3909.11.2 HMC password-less access configuration . . . . . . . . . . . . . . . . . . . . . . . . . . . . 3909.11.3 HMC configuration in PowerHA . . . . . . . . . . . . . . . . . . . . . . . . . . . . . . . . . . . . 3929.11.4 Quarantine policy configuration in PowerHA. . . . . . . . . . . . . . . . . . . . . . . . . . . 395
Contents vii

9.11.5 Simulating a cluster split . . . . . . . . . . . . . . . . . . . . . . . . . . . . . . . . . . . . . . . . . . 3979.11.6 Cluster merge occurs . . . . . . . . . . . . . . . . . . . . . . . . . . . . . . . . . . . . . . . . . . . . 3989.11.7 Scenario summary . . . . . . . . . . . . . . . . . . . . . . . . . . . . . . . . . . . . . . . . . . . . . . 399
9.12 Scenario: Enabling the disk fencing quarantine policy . . . . . . . . . . . . . . . . . . . . . . . 3999.12.1 Scenario description . . . . . . . . . . . . . . . . . . . . . . . . . . . . . . . . . . . . . . . . . . . . . 3999.12.2 Quarantine policy configuration in PowerHA. . . . . . . . . . . . . . . . . . . . . . . . . . . 4009.12.3 Simulating a cluster split . . . . . . . . . . . . . . . . . . . . . . . . . . . . . . . . . . . . . . . . . . 4039.12.4 Simulating a cluster merge . . . . . . . . . . . . . . . . . . . . . . . . . . . . . . . . . . . . . . . . 4079.12.5 Scenario summary . . . . . . . . . . . . . . . . . . . . . . . . . . . . . . . . . . . . . . . . . . . . . . 409
Chapter 10. PowerHA SystemMirror special features . . . . . . . . . . . . . . . . . . . . . . . . . 41110.1 New option for starting PowerHA by using the clmgr command . . . . . . . . . . . . . . . . 412
10.1.1 PowerHA Resource Group dependency settings . . . . . . . . . . . . . . . . . . . . . . . 41210.1.2 Use case for using manage=delayed . . . . . . . . . . . . . . . . . . . . . . . . . . . . . . . . 413
10.2 PowerHA SystemMirror V7.2.3 for AIX new functions and updates . . . . . . . . . . . . . 41610.2.1 PowerHA SystemMirror User Interface. . . . . . . . . . . . . . . . . . . . . . . . . . . . . . . 41610.2.2 Availability metrics. . . . . . . . . . . . . . . . . . . . . . . . . . . . . . . . . . . . . . . . . . . . . . . 41710.2.3 Cloud backup management . . . . . . . . . . . . . . . . . . . . . . . . . . . . . . . . . . . . . . . 41810.2.4 Oracle database shutdown option . . . . . . . . . . . . . . . . . . . . . . . . . . . . . . . . . . 41810.2.5 Reliable Syslog facility (rsyslog) support. . . . . . . . . . . . . . . . . . . . . . . . . . . . . . 41910.2.6 Log analyzer improvements . . . . . . . . . . . . . . . . . . . . . . . . . . . . . . . . . . . . . . . 41910.2.7 Support for stand-alone enqueue server 2 . . . . . . . . . . . . . . . . . . . . . . . . . . . . 420
Chapter 11. PowerHA SystemMirror V7.2.2 for Linux . . . . . . . . . . . . . . . . . . . . . . . . . 42111.1 Architecture and planning of PowerHA SystemMirror for Linux . . . . . . . . . . . . . . . . 422
11.1.1 PowerHA for Linux architecture . . . . . . . . . . . . . . . . . . . . . . . . . . . . . . . . . . . . 42211.1.2 Differences between PowerHA SystemMirror for AIX and Linux . . . . . . . . . . . 42411.1.3 PowerHA for Linux planning . . . . . . . . . . . . . . . . . . . . . . . . . . . . . . . . . . . . . . . 425
11.2 Installation of PowerHA SystemMirror for Linux . . . . . . . . . . . . . . . . . . . . . . . . . . . . 42911.2.1 Prerequisites . . . . . . . . . . . . . . . . . . . . . . . . . . . . . . . . . . . . . . . . . . . . . . . . . . . 42911.2.2 Prerequisites check. . . . . . . . . . . . . . . . . . . . . . . . . . . . . . . . . . . . . . . . . . . . . . 42911.2.3 Test environment that is proposed for PowerHA installation . . . . . . . . . . . . . . 430
11.3 Configuring PowerHA SystemMirror for Linux. . . . . . . . . . . . . . . . . . . . . . . . . . . . . . 43811.3.1 Configuring dependencies between resource groups. . . . . . . . . . . . . . . . . . . . 454
11.4 Problem determination of PowerHA SystemMirror for Linux. . . . . . . . . . . . . . . . . . . 45511.4.1 The Linux log collection utility . . . . . . . . . . . . . . . . . . . . . . . . . . . . . . . . . . . . . . 45611.4.2 Solving common problems . . . . . . . . . . . . . . . . . . . . . . . . . . . . . . . . . . . . . . . . 456
Chapter 12. Infrastructure management with IBM PowerVC. . . . . . . . . . . . . . . . . . . . 46112.1 Management of virtual machines from PowerVC . . . . . . . . . . . . . . . . . . . . . . . . . . . 462
12.1.1 Adding a cluster node for management in IBM Cloud PowerVC Manager . . . . 46212.1.2 Adding or deleting processors and memory in PowerVC . . . . . . . . . . . . . . . . . 46412.1.3 Add network resources in PowerVC . . . . . . . . . . . . . . . . . . . . . . . . . . . . . . . . . 46712.1.4 Provisioning shared disk for PowerHA from PowerVC . . . . . . . . . . . . . . . . . . . 468
Appendix A. Storage migrations . . . . . . . . . . . . . . . . . . . . . . . . . . . . . . . . . . . . . . . . . . 477The new storage can be brought online along with the existing storage . . . . . . . . . . . . . . 477The new storage cannot be brought online along with the existing storage . . . . . . . . . . . 478
Appendix B. Migrating the cluster repository disk . . . . . . . . . . . . . . . . . . . . . . . . . . . 481
Related publications . . . . . . . . . . . . . . . . . . . . . . . . . . . . . . . . . . . . . . . . . . . . . . . . . . . . 485IBM Redbooks . . . . . . . . . . . . . . . . . . . . . . . . . . . . . . . . . . . . . . . . . . . . . . . . . . . . . . . . . . 485Online resources . . . . . . . . . . . . . . . . . . . . . . . . . . . . . . . . . . . . . . . . . . . . . . . . . . . . . . . . 485
viii IBM PowerHA SystemMirror V7.2.3 for IBM AIX and V7.2.2 for Linux

Help from IBM . . . . . . . . . . . . . . . . . . . . . . . . . . . . . . . . . . . . . . . . . . . . . . . . . . . . . . . . . . 485
Contents ix

x IBM PowerHA SystemMirror V7.2.3 for IBM AIX and V7.2.2 for Linux

Notices
This information was developed for products and services offered in the US. This material might be available from IBM in other languages. However, you may be required to own a copy of the product or product version in that language in order to access it.
IBM may not offer the products, services, or features discussed in this document in other countries. Consult your local IBM representative for information on the products and services currently available in your area. Any reference to an IBM product, program, or service is not intended to state or imply that only that IBM product, program, or service may be used. Any functionally equivalent product, program, or service that does not infringe any IBM intellectual property right may be used instead. However, it is the user’s responsibility to evaluate and verify the operation of any non-IBM product, program, or service.
IBM may have patents or pending patent applications covering subject matter described in this document. The furnishing of this document does not grant you any license to these patents. You can send license inquiries, in writing, to:IBM Director of Licensing, IBM Corporation, North Castle Drive, MD-NC119, Armonk, NY 10504-1785, US
INTERNATIONAL BUSINESS MACHINES CORPORATION PROVIDES THIS PUBLICATION “AS IS” WITHOUT WARRANTY OF ANY KIND, EITHER EXPRESS OR IMPLIED, INCLUDING, BUT NOT LIMITED TO, THE IMPLIED WARRANTIES OF NON-INFRINGEMENT, MERCHANTABILITY OR FITNESS FOR A PARTICULAR PURPOSE. Some jurisdictions do not allow disclaimer of express or implied warranties in certain transactions, therefore, this statement may not apply to you.
This information could include technical inaccuracies or typographical errors. Changes are periodically made to the information herein; these changes will be incorporated in new editions of the publication. IBM may make improvements and/or changes in the product(s) and/or the program(s) described in this publication at any time without notice.
Any references in this information to non-IBM websites are provided for convenience only and do not in any manner serve as an endorsement of those websites. The materials at those websites are not part of the materials for this IBM product and use of those websites is at your own risk.
IBM may use or distribute any of the information you provide in any way it believes appropriate without incurring any obligation to you.
The performance data and client examples cited are presented for illustrative purposes only. Actual performance results may vary depending on specific configurations and operating conditions.
Information concerning non-IBM products was obtained from the suppliers of those products, their published announcements or other publicly available sources. IBM has not tested those products and cannot confirm the accuracy of performance, compatibility or any other claims related to non-IBM products. Questions on the capabilities of non-IBM products should be addressed to the suppliers of those products.
Statements regarding IBM’s future direction or intent are subject to change or withdrawal without notice, and represent goals and objectives only.
This information contains examples of data and reports used in daily business operations. To illustrate them as completely as possible, the examples include the names of individuals, companies, brands, and products. All of these names are fictitious and any similarity to actual people or business enterprises is entirely coincidental.
COPYRIGHT LICENSE:
This information contains sample application programs in source language, which illustrate programming techniques on various operating platforms. You may copy, modify, and distribute these sample programs in any form without payment to IBM, for the purposes of developing, using, marketing or distributing application programs conforming to the application programming interface for the operating platform for which the sample programs are written. These examples have not been thoroughly tested under all conditions. IBM, therefore, cannot guarantee or imply reliability, serviceability, or function of these programs. The sample programs are provided “AS IS”, without warranty of any kind. IBM shall not be liable for any damages arising out of your use of the sample programs.
© Copyright IBM Corp. 2019. All rights reserved. xi
Trademarks
IBM, the IBM logo, and ibm.com are trademarks or registered trademarks of International Business Machines Corporation, registered in many jurisdictions worldwide. Other product and service names might be trademarks of IBM or other companies. A current list of IBM trademarks is available on the web at “Copyright and trademark information” at http://www.ibm.com/legal/copytrade.shtml
The following terms are trademarks or registered trademarks of International Business Machines Corporation, and might also be trademarks or registered trademarks in other countries.
AIX®GPFS™HACMP™HyperSwap®IBM®IBM Cloud™IBM Spectrum™IBM Spectrum Scale™
POWER®Power Systems™POWER7®POWER7+™POWER8®PowerHA®PowerLinux™PowerVM®
Redbooks®Redbooks (logo) ®RS/6000®Storwize®System Storage®SystemMirror®
The following terms are trademarks of other companies:
Linux is a trademark of Linus Torvalds in the United States, other countries, or both.
UNIX is a registered trademark of The Open Group in the United States and other countries.
Other company, product, or service names may be trademarks or service marks of others.
xii IBM PowerHA SystemMirror V7.2.3 for IBM AIX and V7.2.2 for Linux
Preface
This IBM® Redbooks® publication helps strengthen the position of the IBM PowerHA® SystemMirror® for Linux solution with well-defined and documented deployment models within an IBM Power Systems™ environment, which provides customers a planned foundation for business resilience and disaster recovery (DR) for their IBM Power Systems infrastructure solutions.
This book addresses topics to help answer customers' complex high availability (HA) and DR requirements for IBM AIX® and Linux on IBM Power Systems servers to help maximize system availability and resources and provide technical documentation to transfer the how-to-skills to users and support teams.
This publication is targeted at technical professionals (consultants, technical support staff, IT architects, and IT specialists) who are responsible for providing HA and DR solutions and support for IBM PowerHA SystemMirror for AIX and Linux Standard and Enterprise Editions on IBM Power Systems servers.
Authors
This book was produced by a team of specialists from around the world working at IBM Redbooks, Austin Center.
Dino Quintero is an IT Management Consultant and an IBM Level 3 Senior Certified IT Specialist with IBM Redbooks in Poughkeepsie, New York. Dino shares his technical computing passion and expertise by leading teams developing technical content in the areas of enterprise continuous availability, enterprise systems management, high-performance computing, cloud computing, artificial intelligence including machine and deep learning, and cognitive solutions. He also is a Certified Open Group Distinguished IT Specialist. Dino holds a Master of Computing Information Systems degree and a Bachelor of Science degree in Computer Science from Marist College.
Jose Martin Abeleira is a Senior Systems/Storage Administrator at DGI Uruguay. He worked at IBM and is a prior IBM Redbooks author. He is a Certified Consulting IT Specialist, and worked in IBM Certified Systems Expert Enterprise Technical Support for AIX and Linux in Montevideo, Uruguay. He worked with IBM for 8 years and has 15 years of AIX experience. He holds an Information Systems degree from Universidad Ort Uruguay. His areas of expertise include Power Systems, AIX, UNIX and LINUX, Live Partition Mobility (LPM), IBM PowerHA SystemMirror, storage area network (SAN) and Storage on the IBM DS family, Storwize® V7000, HITACHI HUSVM, and G200/G400.
© Copyright IBM Corp. 2019. All rights reserved. xiii

Adriano Almeida is a Senior Power Systems Consultant from IBM Systems Lab Services in Brazil. He has worked at IBM for 20 years. His areas of expertise include IBM AIX, IBM PowerVM®, IBM PowerVC, IBM PowerHA SystemMirror, Linux, IBM Cloud™ Private, and SAP HANA on IBM Power Systems. He is an IBM Certified Expert IT Specialist and IBM Certified Advanced Technical Expert on IBM Power Systems. He has worked extensively on PowerHA SystemMirror; PowerVM; and Linux and AIX projects, performing health checking; performance analyses; and consulting on IBM Power Systems environments, and also performing technical project leadership. He holds a degree in Computing Technology from the Faculdade de Tecnologia em Processamento de Dados do Litoral (FTPDL). He is also a coauthor of Exploiting IBM PowerHA SystemMirror V6.1 for AIX Enterprise Edition, SG24-7841 and IBM PowerVM Best Practices, SG24-8062.
Bernhard Buehler is an IT Specialist in Germany. He works for IBM Systems Lab Services in Nice, France. He has worked at IBM for 37 years and has 28 years of experience in AIX and the HA field. His areas of expertise include AIX, Linux, PowerHA SystemMirror, HA architecture, script programming, and AIX security. He is a co-author of several IBM Redbooks publications. He is also a co-author of several courses in the IBM AIX curriculum.
Primitivo Cervantes is a Senior Certified IT Specialist at IBM US and provides HA and DR services to clients for hardware and software components, especially for UNIX systems (AIX and Linux). He holds a Bachelor of Science degree in Electrical Engineering from California State University, Long Beach. Primitivo has worked for IBM for over 30 years, with most of that time in the HA/DR fields.
Stuart Cunliffe is a senior IBM Systems Consultant with IBM UK. He has worked for IBM since graduating from Leeds Metropolitan University in 1995 and has held roles in IBM Demonstration Group, GTS System Outsourcing, eBusiness hosting and ITS. He currently works for IBM System Group Lab Services where he specializes in IBM Power Systems, helping customers gain the most out of their Power infrastructure with solutions involving offerings such as PowerHA SystemMirror, PowerVM, PowerVC, AIX, Linux, IBM Cloud Private, IBM Cloud Automation Manager, and DevOps.
Jes Kiran is a Development Architect for Virtual Machine Recovery Manager for HA and DR products. He has worked in the IT industry for the last 18 years and has experience in the HA, DR, cloud, and virtualization areas. He is an expert in the Power Systems, IBM System Storage®, and AIX platforms.
Byron Martinez Martinez is an IT Specialist at IBM Colombia, where he provides services to clients for hardware and software components, especially for UNIX systems. He holds a degree in Electronics Engineering from the National University of Colombia. Furthermore, during the last 4 years he has worked as a deployment professional of IBM Power Systems. His areas of expertise include Power Systems, AIX, IBM PowerLinux™, UNIX based operating systems, PowerVM Virtualization, LPM, IBM Hardware Management Console (HMC), network install manager (NIM) servers, IBM Spectrum™ Scale (formerly GPFS™), IBM PowerHA SystemMirror, SAN and Storage on Brocade Communications Systems, and IBM Storwize storage systems.
Antony Steel is a Senior IT Specialist in Singapore. He has had over 25 years of field experience in AIX, performance tuning, clustering, and HA. He worked for IBM for 19 years in Australia and Singapore, and is now CTO for Systemethix in Singapore. He has co-authored many IBM Redbooks (Logical Volume Manager (LVM) and PowerHA SystemMirror) and helps prepare certification exams and runbooks for IBM Lab Services.
xiv IBM PowerHA SystemMirror V7.2.3 for IBM AIX and V7.2.2 for Linux

Oscar Humberto Torres is an IBM Power Systems Consultant at IBM. He has been with IBM since 2009. He has 16 years of experience in Power Systems and UNIX. He holds a degree in Systems Engineering from Universidad Autonoma de Colombia. During the last 8 years, he worked as a Power Systems Consultant deploying services and training courses. His areas of expertise include Power Systems, HANA On Power Systems, SUSE HA, AIX, LPM, IBM Spectrum Scale™ (GPFS), UNIX, IBM Cloud IBM PowerVC Manager, and IBM PowerHA SystemMirror.
Stefan Velica is an IT Specialist who currently works for IBM Global Technologies Services in Romania. He has 10 years of experience with IBM Power Systems. He is a Certified Specialist for IBM System p Administration, IBM High Availability Cluster Multi-Processing (IBM HACMP™) for AIX, High-end and Entry/Midrange DS Series, and Storage Networking Solutions. His areas of expertise include IBM System Storage, SAN, PowerVM, AIX, and PowerHA SystemMirror. Stefan holds a bachelor degree in Electronics and Telecommunications Engineering from the Polytechnic Institute of Bucharest.
Thanks to the following people for their contributions to this project:
Wade WallaceIBM Redbooks, Austin Center
P I Ganesh, Denise Genty, Kam Lee, Luis Pizaña, Ravi Shankar, Thomas WeaverIBM Austin
Maria-Katharina EsserIBM Germany
Luis BolinchesIBM Finland
Javier Bazan LazcanoIBM Argentina
Kelvin InegbenudaIBM West Africa
Ahmed (Mash) MashhourIBM Saudi Arabia
Shawn BodilyClear Technologies, an IBM Business Partner
Michael Coffey, Gary Lowther, Paul Moyer, Rajeev Nimmagadda, Ashish Kumar Pande, Teena PareekAltran (Formerly Aricent), an IBM Business Partner
Now you can become a published author, too!
Here’s an opportunity to spotlight your skills, grow your career, and become a published author—all at the same time! Join an IBM Redbooks residency project and help write a book in your area of expertise, while honing your experience using leading-edge technologies. Your efforts will help to increase product acceptance and customer satisfaction, as you expand your network of technical contacts and relationships. Residencies run from two to six weeks in length, and you can participate either in person or as a remote resident working from your home base.
Preface xv

Find out more about the residency program, browse the residency index, and apply online at:
ibm.com/redbooks/residencies.html
Comments welcome
Your comments are important to us!
We want our books to be as helpful as possible. Send us your comments about this book or other IBM Redbooks publications in one of the following ways:
� Use the online Contact us review Redbooks form found at:
ibm.com/redbooks
� Send your comments in an email to:
� Mail your comments to:
IBM Corporation, IBM RedbooksDept. HYTD Mail Station P0992455 South RoadPoughkeepsie, NY 12601-5400
Stay connected to IBM Redbooks
� Find us on Facebook:
http://www.facebook.com/IBMRedbooks
� Follow us on Twitter:
http://twitter.com/ibmredbooks
� Look for us on LinkedIn:
http://www.linkedin.com/groups?home=&gid=2130806
� Explore new Redbooks publications, residencies, and workshops with the IBM Redbooks weekly newsletter:
https://www.redbooks.ibm.com/Redbooks.nsf/subscribe?OpenForm
� Stay current on recent Redbooks publications with RSS Feeds:
http://www.redbooks.ibm.com/rss.html
xvi IBM PowerHA SystemMirror V7.2.3 for IBM AIX and V7.2.2 for Linux
Chapter 1. Introduction to IBM PowerHA SystemMirror for IBM AIX
This chapter provides an introduction to IBM PowerHA SystemMirror for newcomers to this solution and a refresher for those users that have implemented PowerHA SystemMirror and used it for many years.
This chapter covers the following topics:
� What is PowerHA SystemMirror for AIX
� Availability solutions: An overview
� History and evolution
� HA terminology and concepts
� Fault tolerance versus HA
� Additional PowerHA resources
1
© Copyright IBM Corp. 2019. All rights reserved. 1
1.1 What is PowerHA SystemMirror for AIX
PowerHA SystemMirror for AIX (also referred to as PowerHA) is the IBM Power Systems data center solution that helps protect critical business applications from outages, both planned and unplanned. One of the major objectives of PowerHA is to offer automatically continued business services by providing redundancy despite different component failures. PowerHA depends on Reliable Scalable Cluster Technology (RSCT) and Cluster Aware AIX (CAA).
RSCT is a set of low-level operating system components that allow the implementation of clustering technologies. RSCT is distributed with AIX. On the current AIX release, AIX 7.2, RSCT is Version 3.2.1.0. After installing the PowerHA and CAA file sets, the RSCT topology services subsystem is deactivated and all its functions are performed by CAA.
PowerHA V7.2 and later relies heavily on the CAA infrastructure that was introduced in AIX 6.1 TL6 (not supported anymore) and AIX 7.1 (supported from Technology Level 3 with Service Pack 9 or later) CAA provides communication interfaces and monitoring provisions for PowerHA and execution by using CAA commands with clcmd.
PowerHA Enterprise Edition also provides disaster recovery (DR) functions, such as cross-site mirroring, IBM HyperSwap®, Geographical Logical Volume Mirroring, and many storage-based replication methods. These cross-site clustering methods support PowerHA functions between two geographic sites. For more information, see IBM PowerHA SystemMirror 7.1.2 Enterprise Edition for AIX, SG24-8106 and IBM PowerHA SystemMirror V7.2.1 for IBM AIX Updates, SG24-8372.
For more information about features that are added in PowerHA V7.2.2. and PowerHA V7.2.3. and later, see 1.3, “History and evolution” on page 6.
1.1.1 High availability
In today’s complex environments, providing continuous service for applications is a key component of a successful IT implementation. High availability (HA) is one of the components that contributes to providing continuous service for the application clients by masking or eliminating both planned and unplanned systems and application downtime. A HA solution ensures that the failure of any component of the solution, either hardware; software; or system management, does not cause the application and its data to become permanently unavailable to the user.
HA solutions can help to eliminate single points of failure (SPOFs) through appropriate design, planning, selection of hardware, configuration of software, control of applications, a carefully controlled environment, and change management discipline.
In short, you can define HA as the process of ensuring, by using duplicated or shared hardware resources that are managed by a specialized software component, that an application stays up and available for use.
1.1.2 Cluster multiprocessing
In addition to HA, PowerHA also provides the multiprocessing component. The multiprocessing capability comes from the fact that in a cluster there are multiple hardware and software resources that are managed by PowerHA to provide complex application functions and better resource utilization.
2 IBM PowerHA SystemMirror V7.2.3 for IBM AIX and V7.2.2 for Linux

A short definition for cluster multiprocessing might be multiple applications running over several nodes with shared or concurrent access to the data.
Although desirable, the cluster multiprocessing component depends on the application capabilities and system implementation to efficiently use all resources that are available in a multi-node (cluster) environment. This solution must be implemented by starting with the cluster planning and design phase.
PowerHA is only one of the HA technologies, and it builds on increasingly reliable operating systems, hot-swappable hardware, and increasingly resilient applications by offering monitoring and automated response.
A HA solution that is based on PowerHA provides automated failure detection, diagnosis, application recovery, and node reintegration. PowerHA can also provide excellent horizontal and vertical scalability by combining other advanced functions, such as dynamic logical partitioning (DLPAR) and Capacity on Demand (CoD).
1.2 Availability solutions: An overview
Many solutions can provide a wide range of availability options. Table 1-1 lists various types of availability solutions and their characteristics.
Table 1-1 Types of availability solutions
HA solutions, in general, offer the following benefits:
� Standard hardware and networking components that can be used with the existing hardware.
� Works with nearly all applications.
� Works with a wide range of disks and network types.
� Excellent availability at a reasonable cost.
The high availability solution for IBM Power Systems servers offers distinct benefits:
� Proven solution with 29 years of product development
� Using off-the-shelf hardware components
� Proven commitment for supporting your customers
� IP version 6 (IPv6) support for both internal and external cluster communication
Solution Downtime Data availability Observations
Stand-alone Days From last backup Basic hardware and software
Enhanced stand-alone Hours Until last transaction Double most hardware components
HA clustering Seconds Until last transaction Double hardware and extra software costs
Fault-tolerant Zero No loss of data Specialized hardware and software, and expensive
Chapter 1. Introduction to IBM PowerHA SystemMirror for IBM AIX 3
� Smart Assist technology enabling HA support for all prominent applications
� Flexibility (virtually any application running on a stand-alone AIX system can be protected with PowerHA)
When you plan to implement a PowerHA solution, consider the following aspects:
� Thorough HA design and detailed planning from end to end
� Elimination of SPOFs
� Selection of appropriate hardware
� Correct implementation (do not take shortcuts)
� Disciplined system administration practices and change control
� Documented operational procedures
� Comprehensive test plan and thorough testing
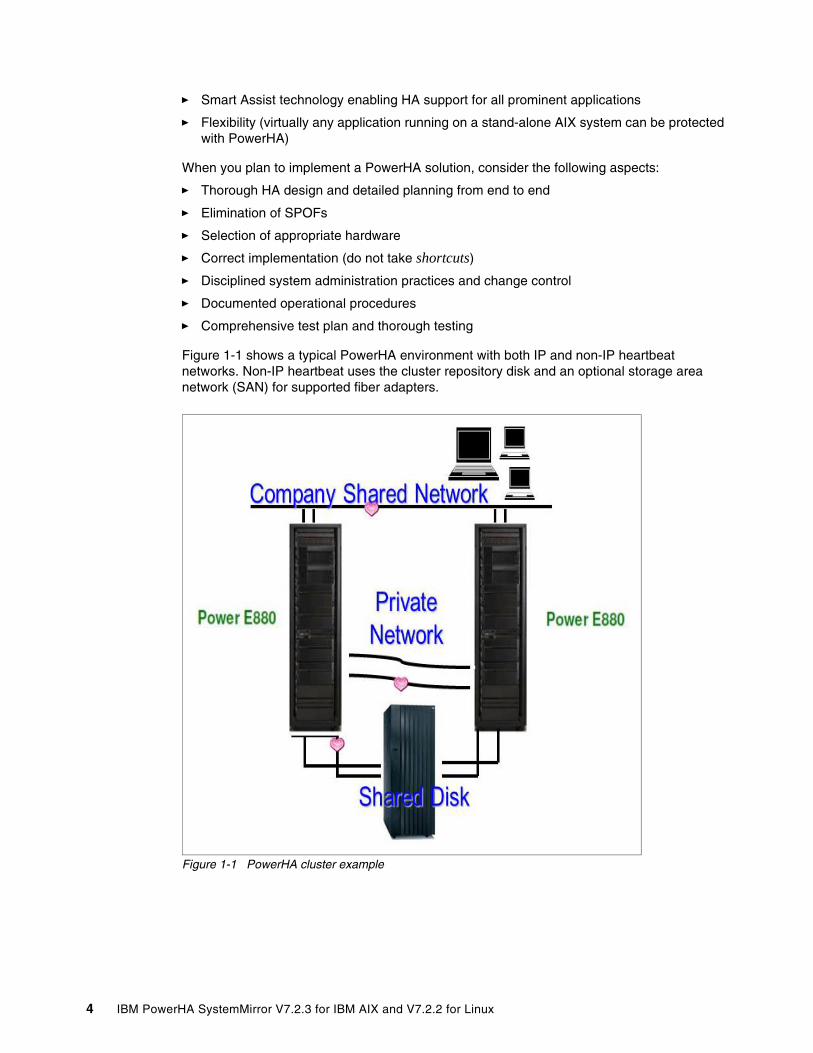
Figure 1-1 shows a typical PowerHA environment with both IP and non-IP heartbeat networks. Non-IP heartbeat uses the cluster repository disk and an optional storage area network (SAN) for supported fiber adapters.
Figure 1-1 PowerHA cluster example
4 IBM PowerHA SystemMirror V7.2.3 for IBM AIX and V7.2.2 for Linux
1.2.1 Downtime
Downtime is the period when an application is not available to serve its clients. Downtime can be classified into two categories: planned and unplanned.
� Planned:
– Hardware upgrades– Hardware or software repair or replacement– Software updates or upgrades– Backups (offline backups)– Testing (Periodic testing is required for good cluster maintenance.)– Development
� Unplanned:
– Administrator errors– Application failures– Hardware failures– Operating system errors– Environmental disasters
The role of PowerHA is to manage the application recovery after the outage. PowerHA provides monitoring and automatic recovery of the resources on which your application depends.
1.2.2 Single point of failure
A single point of failure (SPOF) is any individual component that is integrated into a cluster that, if it fails, renders the application unavailable for users.
Good design can remove SPOFs in the cluster: nodes, storage, and networks. PowerHA manages these components and also the resources that are required by the application (including the application start and stop scripts).
Ultimately, the goal of any IT solution in a critical environment is to provide continuous application availability and data protection. HA is one building block in achieving the continuous operation goal. HA is based on the availability of the hardware, software (operating system and its components), application, and network components.
To avoid SPOFs, use the following items:
� Redundant servers
� Redundant network paths
� Redundant storage (data) paths
� Redundant (mirrored and RAID) storage
� Monitoring of components
� Failure detection and diagnosis
� Automated application fallover
� Automated resource reintegration
A good design avoids SPOFs, and PowerHA can manage the availability of the application through the individual component failures. Table 1-2 lists each cluster object, which, if it fails, can result in loss of availability of the application. Each cluster object can be a physical or logical component.
Chapter 1. Introduction to IBM PowerHA SystemMirror for IBM AIX 5
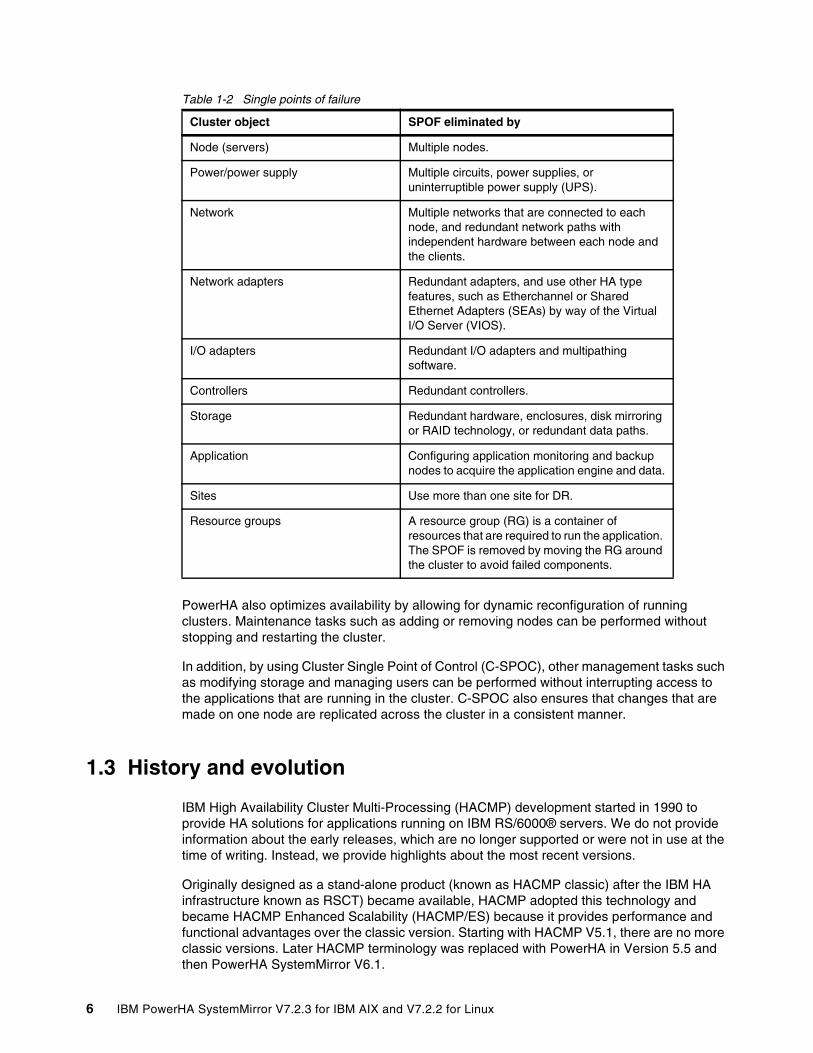
Table 1-2 Single points of failure
PowerHA also optimizes availability by allowing for dynamic reconfiguration of running clusters. Maintenance tasks such as adding or removing nodes can be performed without stopping and restarting the cluster.
In addition, by using Cluster Single Point of Control (C-SPOC), other management tasks such as modifying storage and managing users can be performed without interrupting access to the applications that are running in the cluster. C-SPOC also ensures that changes that are made on one node are replicated across the cluster in a consistent manner.
1.3 History and evolution
IBM High Availability Cluster Multi-Processing (HACMP) development started in 1990 to provide HA solutions for applications running on IBM RS/6000® servers. We do not provide information about the early releases, which are no longer supported or were not in use at the time of writing. Instead, we provide highlights about the most recent versions.
Originally designed as a stand-alone product (known as HACMP classic) after the IBM HA infrastructure known as RSCT) became available, HACMP adopted this technology and became HACMP Enhanced Scalability (HACMP/ES) because it provides performance and functional advantages over the classic version. Starting with HACMP V5.1, there are no more classic versions. Later HACMP terminology was replaced with PowerHA in Version 5.5 and then PowerHA SystemMirror V6.1.
Cluster object SPOF eliminated by
Node (servers) Multiple nodes.
Power/power supply Multiple circuits, power supplies, or uninterruptible power supply (UPS).
Network Multiple networks that are connected to each node, and redundant network paths with independent hardware between each node and the clients.
Network adapters Redundant adapters, and use other HA type features, such as Etherchannel or Shared Ethernet Adapters (SEAs) by way of the Virtual I/O Server (VIOS).
I/O adapters Redundant I/O adapters and multipathing software.
Controllers Redundant controllers.
Storage Redundant hardware, enclosures, disk mirroring or RAID technology, or redundant data paths.
Application Configuring application monitoring and backup nodes to acquire the application engine and data.
Sites Use more than one site for DR.
Resource groups A resource group (RG) is a container of resources that are required to run the application. The SPOF is removed by moving the RG around the cluster to avoid failed components.
6 IBM PowerHA SystemMirror V7.2.3 for IBM AIX and V7.2.2 for Linux
Starting with PowerHA V7.1, the CAA feature of the operating system is used to configure, verify, and monitor the cluster services. This major change improves the reliability of PowerHA because the cluster service functions now run in kernel space rather than user space. CAA was introduced in AIX 6.1 TL6. At the time of writing, the current release is PowerHA V7.2.3.
1.3.1 PowerHA SystemMirror V7.2.0
Released in December 2015, PowerHA V7.2 continued the development of PowerHA SystemMirror by adding further improvements in management, configuration simplification, automation, and performance areas. The following list summarizes the improvements in PowerHA V7.2:
� Resiliency enhancements:
– Integrated support for AIX Live Kernel Update (LKU)– Automatic Repository Replacement (ARR)– Verification enhancements– Exploitation of Logical Volume Manager (LVM) rootvg failure monitoring– Live Partition Mobility (LPM) automation
� CAA enhancements:
– Network Failure Detection Tunable per interface– Built-in netmon logic– Traffic simulation for better interface failure detection
� Enhanced split-brain handling:
– Quarantine protection against “sick but not dead” nodes– Network File System (NFS) TieBreaker support for split and merge policies
� Resource Optimized failovers by way of the Enterprise Pools (Resource Optimized High Availability (ROHA))
� Non-disruptive upgrades
The Systems Director plug-in was discontinued in PowerHA V7.2.0.
1.3.2 PowerHA SystemMirror Version 7.2.1
Released in December 2016, PowerHA V7.2.1 added the following improvements:
� Verification enhancements, some that are carried over from Version 7.2.0:
– The reserve policy value must not be single path.
– Checks for the consistency of /etc/filesystem. Do mount points exist and so on?
– LVM physical volume identifier (PVID) checks across LVM and Object Data Manager (ODM) on various nodes.
– Uses AIX Runtime Expert checks for LVM and NFS.
– Checks for network errors. If they cross a threshold (5% of packet count receive and transmit), warn the administrator about the network issue.
– Geographic Logical Volume Manager (GLVM) buffer size checks.
– Security configuration (password rules).
– Kernel parameters: Tunables that are related to AIX network, virtual memory manager (VMM), and security.
� Expanded support of resource optimized failovers by way of the Enterprise Pools (ROHA).
Chapter 1. Introduction to IBM PowerHA SystemMirror for IBM AIX 7
� Browser-based GUI, which is called PowerHA SystemMirror User Interface (SMUI). The initial release is for monitoring and troubleshooting, not configuring clusters.
� All split/merge policies are now available to both standard and stretched clusters when using AIX 7.2.1.
1.3.3 PowerHA SystemMirror Version 7.2.2
Released in December 2017, PowerHA V7.2.2 added the following improvements:
� Log Analyzer, provides capabilities for scanning and extracting detailed information about different types of errors from the PowerHA SystemMirror, AIX, and other system components log files.
� NovaLink supports the logical partitioning (LPAR) that is managed by PowerVM NovaLink.
� Easy Update, which is the cl_ezupdate tool.
� Shared listener support and added support for individual monitors of each of the Oracle listener threads.
� Oracle DB Shared Memory Clean Up. The shared memory that is associated with the Oracle database instance is cleaned up before starting the database.
� CAA autostart on the DR site. The CAA function stores the primary and backup repository disks’ PVIDs and uses them to identify the repository disks during DR when UUID-based identification fails.
� Monitor Restart Count adds support for a Monitor Restart Count function for long running Custom Application Monitors.
� Capturing CAA tunables in PowerHA Snapshot. Captures all the CAA tunables and customer security preferences as part of the snapshot database feature.
� The clRGinfo updates added the -i flag to show the status of applications with administrative control operations.
� Failover rehearsals (Enterprise version only).
� GLVM (Enterprise version only).
For more information about these improvements, see IBM PowerHA SystemMirror V7.2 for IBM AIX Updates, SG24-8278.
1.3.4 PowerHA SystemMirror Version 7.2.3
Released in May 2019, PowerHA V7.2.3 added the following improvements:
� SMUI new features
� Availability metrics
� Cloud backup management
� Oracle database shutdown option
� Reliable Syslog facility (rsyslog) support
� LVM read option
� Log analyzer improvements
� Support for stand-alone enqueue server 2
For more information about these improvements, see IBM PowerHA SystemMirror V7.2.3 for AIX offers new enhancements.
8 IBM PowerHA SystemMirror V7.2.3 for IBM AIX and V7.2.2 for Linux
1.4 HA terminology and concepts
To understand the functions of PowerHA and to use it effectively, you must understand several important terms and concepts.
1.4.1 Terminology
The terminology that is used to describe PowerHA configuration and operation continues to evolve. The following terms are used throughout this book:
Node An IBM Power Systems server (or logical partition (LPAR)) running AIX and PowerHA that are defined as part of a cluster. Each node has a collection of resources (disks, file systems, IP addresses, and applications) that can be transferred to another node in the cluster in case the node or a component fails.
Cluster A loosely coupled collection of independent systems (nodes) or LPARs that are organized into a network for sharing resources and communicating with each other.
PowerHA defines relationships among cooperating systems where peer cluster nodes provide the services that are offered by a cluster node if that node cannot do so. These individual nodes are responsible for maintaining the functions of one or more applications in case of a failure of any cluster component.
Client A client is a system that can access the application running on the cluster nodes over a local area network (LAN). Clients run a client application that connects to the server (node) where the application runs.
Topology Contains basic cluster components nodes, networks, communication interfaces, and communication adapters.
Resources Logical components or entities that are being made highly available (for example, file systems, raw devices, service IP labels, and applications) by being moved from one node to another. All resources that together form a high availability application or service are grouped in RGs.
PowerHA keeps the RG highly available as a single entity that can be moved from node to node in the event of a component or node failure. RGs can be available from a single node or in the case of concurrent applications, available simultaneously from multiple nodes. A cluster can host more than one RG, thus allowing for efficient use of the cluster nodes.
Dependencies PowerHA allows for dependencies and relationships to be defined between RGs that can be used to control their location, order of processing, and whether to bring online or take offline depending on the state of other resources.
Service IP label A label that matches to a service IP address and is used for communications between clients and the node. A service IP label is part of an RG, which means that PowerHA can monitor it and keep it highly available.
Chapter 1. Introduction to IBM PowerHA SystemMirror for IBM AIX 9

IP address takeover (IPAT) The process where an IP address is moved from one adapter to another adapter on the same logical network. This adapter can be on the same node or another node in the cluster. If aliasing is used as the method of assigning addresses to adapters, then more than one address can be on a single adapter.
Resource takeover This is the operation of transferring resources between nodes inside the cluster. If one component or node fails because of a hardware or operating system problem, its RGs are moved to another node.
Fallover This represents the movement of an RG from one active node to another node (backup node) in response to a failure on the active node or in the environment affecting the active node.
Fallback This represents the movement of an RG back from the backup node to the previous node when it becomes available. This movement is typically in response to the reintegration of the previously failed node.
Heartbeat packet A packet that is sent between communication interfaces in the cluster, and is used by the various cluster daemons to monitor the state of the cluster components (nodes, networks, and adapters).
RSCT daemons These consist of two types of processes: topology and Group Services. PowerHA uses Group Services, but depends on CAA for topology services. The cluster manager receives event information that is generated by these daemons and takes corresponding (response) actions in case of any failure.
Smart assists A set of HA agents, called smart assists, are bundled with the PowerHA SystemMirror Standard Edition to help discover and define HA policies for most common middleware products.
1.5 Fault tolerance versus HA
Based on the response time and response action to system detected failures, the clusters and systems can belong to one of the following classifications:
� Fault-tolerant systems
� HA systems
1.5.1 Fault-tolerant systems
The systems that are provided with fault tolerance are designed to operate without interruption regardless of the failure that might occur (except perhaps for a complete site shutdown because of a natural disaster). In such systems, all components are at least duplicated for both software or hardware.
All components, CPUs, memory, and disks have a special design and provide continuous service even if one subcomponent fails. Only special software solutions can run on fault-tolerant hardware.
Such systems are expensive and specialized. Implementing a fault-tolerant solution requires much effort and a high degree of customization for all system components.
10 IBM PowerHA SystemMirror V7.2.3 for IBM AIX and V7.2.2 for Linux
For environments where no downtime is acceptable (life-critical systems), fault-tolerant equipment and solutions are required.
1.5.2 HA systems
The systems that are configured for HA are a combination of hardware and software components that are configured to work together to ensure automated recovery in case of failure with minimal acceptable downtime.
In such systems, the software that is involved detects problems in the environment and manages application survivability by restarting it on the same or on another available machine (taking over the identity of the original machine node).
Therefore, eliminating all SPOFs in the environment is important. For example, if the machine has only one network interface (connection), provide a second network interface (connection) in the same node to take over in case the primary interface providing the service fails.
Another important issue is to protect the data by mirroring and placing it on shared disk areas that are accessible from any machine in the cluster.
The PowerHA software provides the framework and a set of tools for integrating applications in a highly available system. Applications to be integrated in a PowerHA cluster can require a fair amount of customization, possibly both at the application level and at the PowerHA and AIX platform level. PowerHA is a flexible platform that allows integration of generic applications running on the AIX platform, which provides for highly available systems at a reasonable cost.
PowerHA is not a fault-tolerant solution and must not be implemented as such.
1.6 Additional PowerHA resources
Here is a list of additional PowerHA resources and descriptions of each one:
� Entitled Software Support (download images)
� PowerHA fixes
� PowerHA, CAA, and RSCT migration interim fixes
� PowerHA wiki
This comprehensive resource contains links to all of the following references and much more.
� PowerHA LinkedIn group
� Base publications
All of the following PowerHA v7 publications are available at IBM Knowledge Center:
– Administering PowerHA SystemMirror
– Developing Smart Assist applications for PowerHA SystemMirror
– Geographic Logical Volume Manager for PowerHA SystemMirror Enterprise Edition
– Installing PowerHA SystemMirror
– Planning PowerHA SystemMirror
– PowerHA SystemMirror concepts
Chapter 1. Introduction to IBM PowerHA SystemMirror for IBM AIX 11
– PowerHA SystemMirror for IBM Systems Director
– Programming client applications for PowerHA SystemMirror
– Quick reference: clmgr command
– Smart Assists for PowerHA SystemMirror
– Storage-based high availability and disaster recovery for PowerHA SystemMirror Enterprise Edition
– Troubleshooting PowerHA SystemMirror
� PowerHA and Capacity Backup
� Videos
Shawn Bodily has several PowerHA related videos on his YouTube channel.
� Developer Discussion Forum
� IBM Redbooks publications
The main focus of each IBM PowerHA Redbooks publication differs a bit, but usually their main focus is covering what is new in a particular release. They generally have more details and advanced tips than the base publications.
Each new publication is rarely a complete replacement for the last. The only exception to this is IBM PowerHA SystemMirror for AIX Cookbook, SG24-7739-01. It was updated to Version 7.1.3 SP1 after replacing two previous cookbooks. It is probably the most comprehensive of all the current IBM Redbooks publications with regard to PowerHA Standard Edition specifically. Although there is some overlap across them, with multiple versions supported, it is important to reference the version of the book that is relevant to the version that you are using.
12 IBM PowerHA SystemMirror V7.2.3 for IBM AIX and V7.2.2 for Linux

Figure 1-2 shows a list of relevant PowerHA IBM Redbooks publications. Although it still includes PowerHA 7.1.3, which is no longer supported, that exact book is still the best base reference for configuring EMC SRDF and Hitachi TrueCopy.
Figure 1-2 IBM PowerHA SystemMirror Redbooks publications reference
� White papers
– PowerHA V7.1 quick config guide
– Implementing PowerHA with Storwize V7000
– PowerHA with EMC V-Plex
– Tips and Consideration with Oracle 11gR2 with PowerHA on AIX
– Tips and Consideration with Oracle 12cR1 with PowerHA on AIX
– Edison Group Report on the value of deep integration of PowerHA V7.1 and AIX
– PowerHA Case Study of Robert Wood Johnson University Hospital
– Performance Implications of LVM Mirroring
– AIX Higher Availability by using SAN services
Chapter 1. Introduction to IBM PowerHA SystemMirror for IBM AIX 13

14 IBM PowerHA SystemMirror V7.2.3 for IBM AIX and V7.2.2 for Linux
Chapter 2. New features
This chapter covers the specific features that are new to IBM PowerHA SystemMirror for IBM AIX for Version 7.2.1 SP1, Version 7.2.2, and Version 7.2.3. For information about earlier versions, see previous IBM Redbooks publications like IBM PowerHA SystemMirror V7.2.1 for IBM AIX Updates, SG24-8372.
This chapter covers the following topics:
� Easy Update
� PowerHA SystemMirror User Interface enhancements
� Resource Optimized High Availability enhancements
� PowerHA Log Analyzer and logging enhancements
� Event handling
� Additional details of changes in PowerHA SystemMirror
2
© Copyright IBM Corp. 2019. All rights reserved. 15
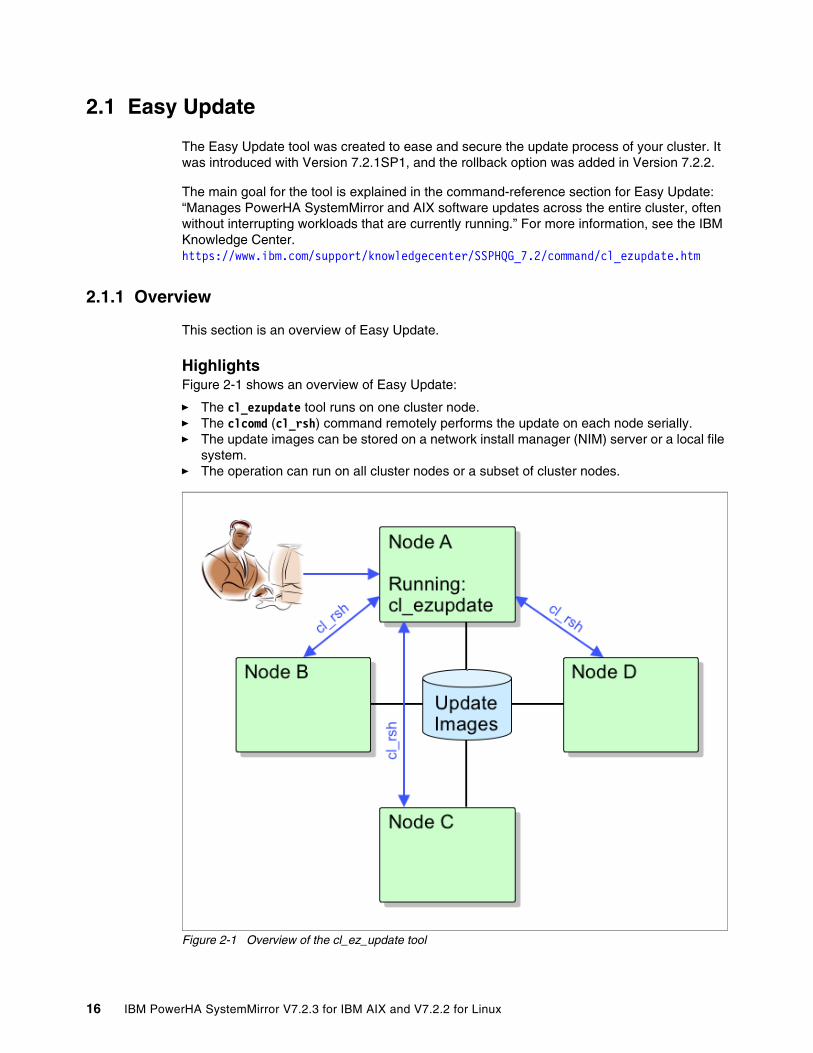
2.1 Easy Update
The Easy Update tool was created to ease and secure the update process of your cluster. It was introduced with Version 7.2.1SP1, and the rollback option was added in Version 7.2.2.
The main goal for the tool is explained in the command-reference section for Easy Update: “Manages PowerHA SystemMirror and AIX software updates across the entire cluster, often without interrupting workloads that are currently running.” For more information, see the IBM Knowledge Center. https://www.ibm.com/support/knowledgecenter/SSPHQG_7.2/command/cl_ezupdate.htm
2.1.1 Overview
This section is an overview of Easy Update.
HighlightsFigure 2-1 shows an overview of Easy Update:
� The cl_ezupdate tool runs on one cluster node. � The clcomd (cl_rsh) command remotely performs the update on each node serially. � The update images can be stored on a network install manager (NIM) server or a local file
system. � The operation can run on all cluster nodes or a subset of cluster nodes.
Figure 2-1 Overview of the cl_ez_update tool
16 IBM PowerHA SystemMirror V7.2.3 for IBM AIX and V7.2.2 for Linux

Updates can be grouped into different types. Each service pack (SP) and interim fix has an internal flag that indicates whether a restart is required. Table 2-1 lists these different types. The details of this table are:
� SPs, interim fixes, and technology-level updates (TLs) for PowerHA do not require a restart.
� AIX and Reliable Scalable Cluster Technology (RSCT) interim fixes rarely require a restart.
� AIX SPs almost always require a restart.
When a restart is required, the running resource groups (RGs) are moved to another node.
Table 2-1 Types of supported updates (cl_ezupdate)
Service operations that are possible by using cl_ezupdateHere a brief list of possible cl_ezupdate operations:
� Query:
– NIM information.
– Versions of AIX, RSCT, and PowerHA.
– PowerHA RGs and Concurrent volume groups (VGs).
� Preview service application:
– Prerequisite checking is done.
� Apply service:
– Apply updates.
– It can be rejected if needed.
� Reject service:
– Reject or remove updates.
� Commit service:
– Changes are applied updates from the “applied” mode.
– No rejection is possible.
� Rollback Feature (requires Version 7.2.2 or later):
– Rollback allows you to restore rootvg to the state it was in when the cl_ezupdate tool was run. The rollback is performed when an error is encountered applying the service or rejecting an already applied service.
– Rollback is accomplished by:
• Copying rootvg by using the AIX alt_disk_copy command before applying the service or rejecting the applied service before operations start.
• Restart the node by using the copy of rootvg.
Update type Restart required Nondisruptive
PowerHA: Interim fix, SP, and TL
No Yes
AIX, Cluster Aware AIX (CAA), and RSCT interim fix
No Yes
AIX SPs Yes (mostly) No
Chapter 2. New features 17
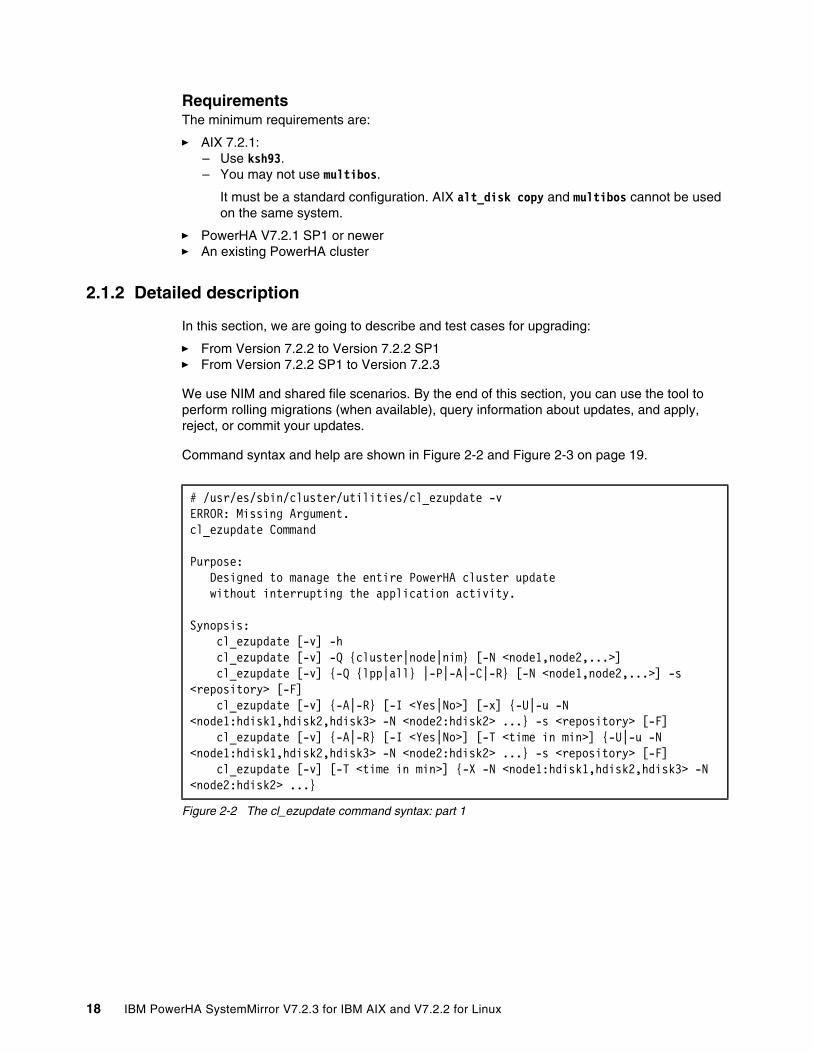
RequirementsThe minimum requirements are:
� AIX 7.2.1:– Use ksh93.– You may not use multibos.
It must be a standard configuration. AIX alt_disk copy and multibos cannot be used on the same system.
� PowerHA V7.2.1 SP1 or newer� An existing PowerHA cluster
2.1.2 Detailed description
In this section, we are going to describe and test cases for upgrading:
� From Version 7.2.2 to Version 7.2.2 SP1� From Version 7.2.2 SP1 to Version 7.2.3
We use NIM and shared file scenarios. By the end of this section, you can use the tool to perform rolling migrations (when available), query information about updates, and apply, reject, or commit your updates.
Command syntax and help are shown in Figure 2-2 and Figure 2-3 on page 19.
Figure 2-2 The cl_ezupdate command syntax: part 1
# /usr/es/sbin/cluster/utilities/cl_ezupdate -vERROR: Missing Argument.cl_ezupdate Command
Purpose: Designed to manage the entire PowerHA cluster update without interrupting the application activity.
Synopsis: cl_ezupdate [-v] -h cl_ezupdate [-v] -Q {cluster|node|nim} [-N <node1,node2,...>] cl_ezupdate [-v] {-Q {lpp|all} |-P|-A|-C|-R} [-N <node1,node2,...>] -s <repository> [-F] cl_ezupdate [-v] {-A|-R} [-I <Yes|No>] [-x] {-U|-u -N <node1:hdisk1,hdisk2,hdisk3> -N <node2:hdisk2> ...} -s <repository> [-F] cl_ezupdate [-v] {-A|-R} [-I <Yes|No>] [-T <time in min>] {-U|-u -N <node1:hdisk1,hdisk2,hdisk3> -N <node2:hdisk2> ...} -s <repository> [-F] cl_ezupdate [-v] [-T <time in min>] {-X -N <node1:hdisk1,hdisk2,hdisk3> -N <node2:hdisk2> ...}
18 IBM PowerHA SystemMirror V7.2.3 for IBM AIX and V7.2.2 for Linux

Figure 2-3 The cl_ezupdate command syntax: part 2
We use a test cluster in Version 7.2.2, update it to Version 7.2.2 SP1, and then to Version 7.2.3. This cluster is named decano_bolsilludo and the two active nodes are decano1 and bolsilludo2.
Description: Query information about cluster state and available updates, install updates in preview mode or apply, commit, or reject updates.
Flags: -h Displays the help for this program. -v Sets the verbose mode of help. -s Specifies the update source. It could be a directory, then it should start with "/" character. It could be an LPP source if the update is done through NIM server. -N Specify the node names. By default the scope is the entire cluster. -Q Query cluster status and or available updates. The scope of query request is: cluster|node|nim|lpp. -P Do not install any update, just try to install it in preview mode. -A Apply the updates located on the repository. -C Commit the latest update version. -R Roll back to the previous version. -F Force mode. only combined with -A option. Should be use if the installation is not possible because of an interim fix is locking an installable file set. -U Enable rollback of all modified nodes when an error is encountered on an Apply or Reject operation. -u Enable rollback of only the node that encountered an error during an Apply or Reject operation. -I Specifies interactive mode. If "Yes" is specified, then you will be asked if the rollback should continue when an error is encountered. Interactive mode is active by default. If "No" is specified, interactive mode is off and there will be no prompt before performing the rollback. -X exit after creating the alt_disk_copy of rootvg on each node. In order to use these copies of rootvg for rollback on subsequent runs, the -x argument must be used. -x Do not create an alt_disk_copy of the rootvg of each node for rollback. If a failure happens, just use the disks specified on the -N argument for rollback. -T Timeout value for backup of rootvg in minutes. If copy of rootvg is still continuing after timeout duration then do exit. Timeout is infinite by default. Maximum timeout allowed is 60 minutes. More than 60 minutes timeout is treated as infinite.
Output file: /var/hacmp/EZUpdate/EZUpdate.log
Chapter 2. New features 19
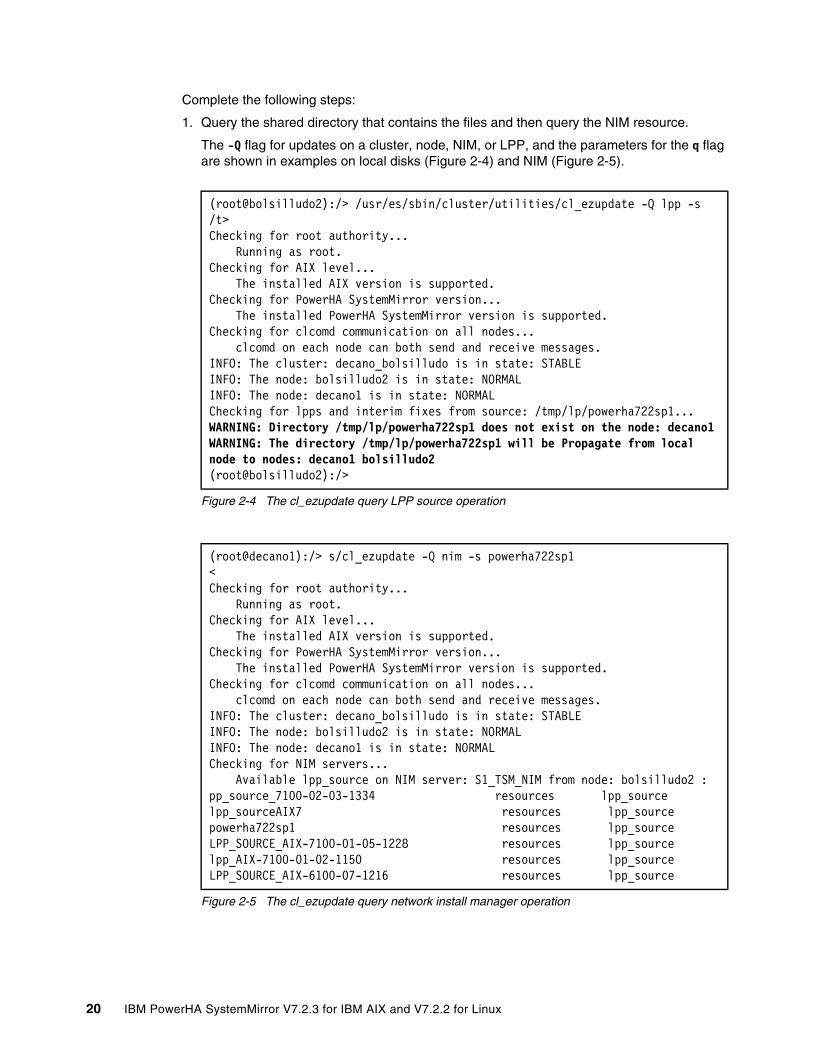
Complete the following steps:
1. Query the shared directory that contains the files and then query the NIM resource.
The -Q flag for updates on a cluster, node, NIM, or LPP, and the parameters for the q flag are shown in examples on local disks (Figure 2-4) and NIM (Figure 2-5).
Figure 2-4 The cl_ezupdate query LPP source operation
Figure 2-5 The cl_ezupdate query network install manager operation
(root@bolsilludo2):/> /usr/es/sbin/cluster/utilities/cl_ezupdate -Q lpp -s /t>Checking for root authority... Running as root.Checking for AIX level... The installed AIX version is supported.Checking for PowerHA SystemMirror version... The installed PowerHA SystemMirror version is supported.Checking for clcomd communication on all nodes... clcomd on each node can both send and receive messages.INFO: The cluster: decano_bolsilludo is in state: STABLEINFO: The node: bolsilludo2 is in state: NORMALINFO: The node: decano1 is in state: NORMALChecking for lpps and interim fixes from source: /tmp/lp/powerha722sp1...WARNING: Directory /tmp/lp/powerha722sp1 does not exist on the node: decano1WARNING: The directory /tmp/lp/powerha722sp1 will be Propagate from local node to nodes: decano1 bolsilludo2(root@bolsilludo2):/>
(root@decano1):/> s/cl_ezupdate -Q nim -s powerha722sp1 <Checking for root authority... Running as root.Checking for AIX level... The installed AIX version is supported.Checking for PowerHA SystemMirror version... The installed PowerHA SystemMirror version is supported.Checking for clcomd communication on all nodes... clcomd on each node can both send and receive messages.INFO: The cluster: decano_bolsilludo is in state: STABLEINFO: The node: bolsilludo2 is in state: NORMALINFO: The node: decano1 is in state: NORMALChecking for NIM servers... Available lpp_source on NIM server: S1_TSM_NIM from node: bolsilludo2 :pp_source_7100-02-03-1334 resources lpp_sourcelpp_sourceAIX7 resources lpp_sourcepowerha722sp1 resources lpp_sourceLPP_SOURCE_AIX-7100-01-05-1228 resources lpp_sourcelpp_AIX-7100-01-02-1150 resources lpp_sourceLPP_SOURCE_AIX-6100-07-1216 resources lpp_source
20 IBM PowerHA SystemMirror V7.2.3 for IBM AIX and V7.2.2 for Linux
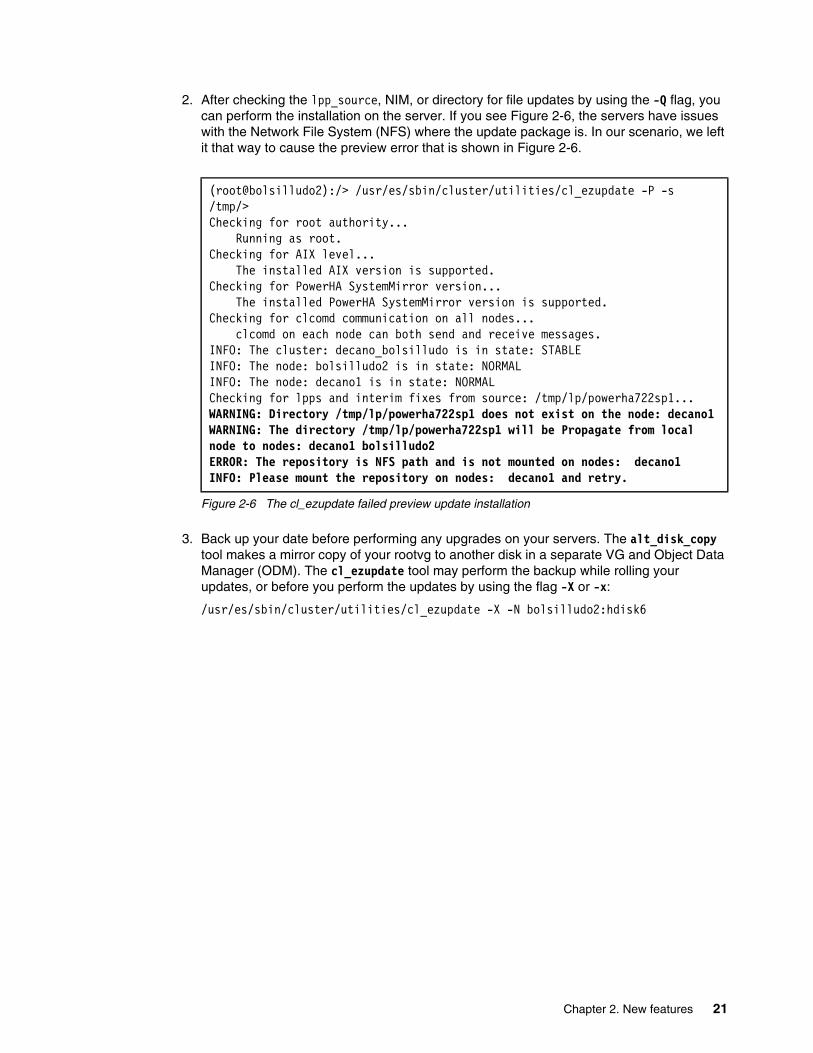
2. After checking the lpp_source, NIM, or directory for file updates by using the -Q flag, you can perform the installation on the server. If you see Figure 2-6, the servers have issues with the Network File System (NFS) where the update package is. In our scenario, we left it that way to cause the preview error that is shown in Figure 2-6.
Figure 2-6 The cl_ezupdate failed preview update installation
3. Back up your date before performing any upgrades on your servers. The alt_disk_copy tool makes a mirror copy of your rootvg to another disk in a separate VG and Object Data Manager (ODM). The cl_ezupdate tool may perform the backup while rolling your updates, or before you perform the updates by using the flag -X or -x:
/usr/es/sbin/cluster/utilities/cl_ezupdate -X -N bolsilludo2:hdisk6
(root@bolsilludo2):/> /usr/es/sbin/cluster/utilities/cl_ezupdate -P -s /tmp/>Checking for root authority... Running as root.Checking for AIX level... The installed AIX version is supported.Checking for PowerHA SystemMirror version... The installed PowerHA SystemMirror version is supported.Checking for clcomd communication on all nodes... clcomd on each node can both send and receive messages.INFO: The cluster: decano_bolsilludo is in state: STABLEINFO: The node: bolsilludo2 is in state: NORMALINFO: The node: decano1 is in state: NORMALChecking for lpps and interim fixes from source: /tmp/lp/powerha722sp1...WARNING: Directory /tmp/lp/powerha722sp1 does not exist on the node: decano1WARNING: The directory /tmp/lp/powerha722sp1 will be Propagate from local node to nodes: decano1 bolsilludo2ERROR: The repository is NFS path and is not mounted on nodes: decano1INFO: Please mount the repository on nodes: decano1 and retry.
Chapter 2. New features 21

The command performs an alt_disk_copy on the node and disks that is passed as a parameter to the -N flag, as shown in Figure 2-7.
.
Figure 2-7 The cl_ezupdate rollback feature enabled
(root@decano1):/> /cl_ezupdate -X -N bolsilludo2:hdisk6Checking for root authority... Running as root.Checking for AIX level... The installed AIX version is supported.Checking for PowerHA SystemMirror version... The installed PowerHA SystemMirror version is supported.Checking for clcomd communication on all nodes... clcomd on each node can both send and receive messages.INFO: The cluster: decano_bolsilludo is in state: STABLEINFO: The node: bolsilludo2 is in state: NORMALINFO: The node: decano1 is in state: NORMALINFO: rootvg copy is going on bolsilludo2 nodes.. It may take 10 to 15 minutes time to completeINFO: rootvg copy is going on since 0 minutesINFO: rootvg copy is going on since 8 minutesINFO: Rootvg copy is successful on hdisk6 for node bolsilludo2
22 IBM PowerHA SystemMirror V7.2.3 for IBM AIX and V7.2.2 for Linux
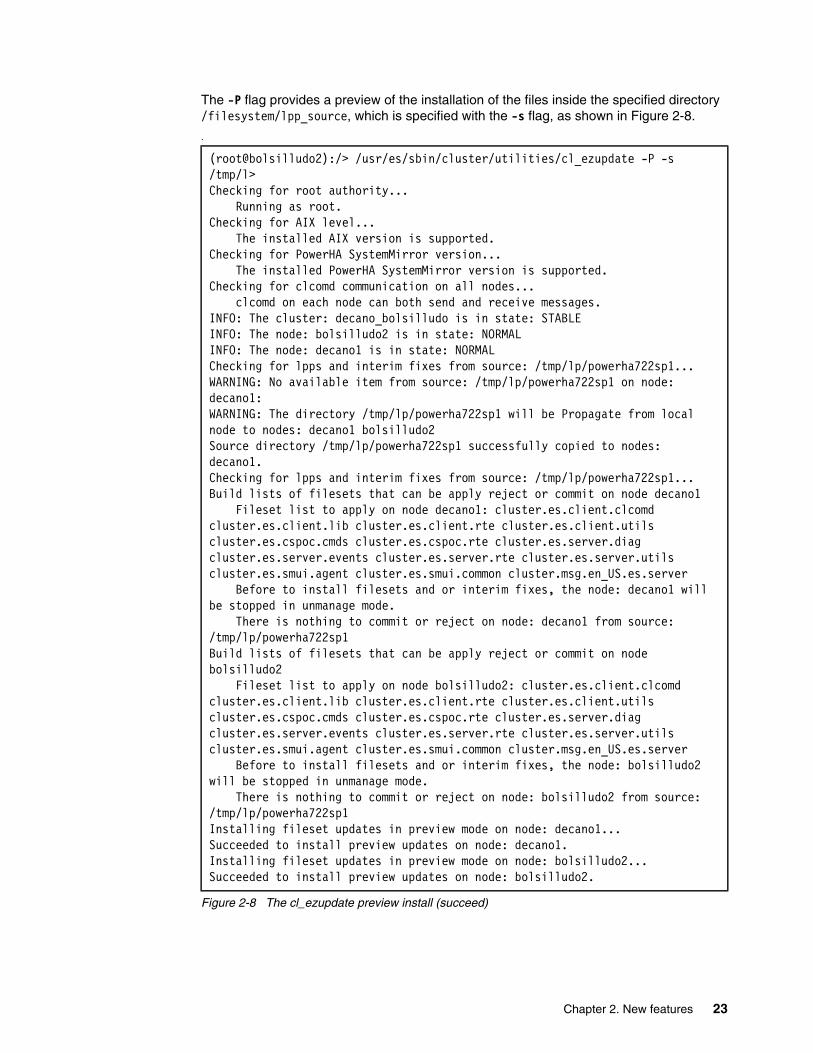
The -P flag provides a preview of the installation of the files inside the specified directory /filesystem/lpp_source, which is specified with the -s flag, as shown in Figure 2-8.
.
Figure 2-8 The cl_ezupdate preview install (succeed)
(root@bolsilludo2):/> /usr/es/sbin/cluster/utilities/cl_ezupdate -P -s /tmp/l>Checking for root authority... Running as root.Checking for AIX level... The installed AIX version is supported.Checking for PowerHA SystemMirror version... The installed PowerHA SystemMirror version is supported.Checking for clcomd communication on all nodes... clcomd on each node can both send and receive messages.INFO: The cluster: decano_bolsilludo is in state: STABLEINFO: The node: bolsilludo2 is in state: NORMALINFO: The node: decano1 is in state: NORMALChecking for lpps and interim fixes from source: /tmp/lp/powerha722sp1...WARNING: No available item from source: /tmp/lp/powerha722sp1 on node: decano1:WARNING: The directory /tmp/lp/powerha722sp1 will be Propagate from local node to nodes: decano1 bolsilludo2Source directory /tmp/lp/powerha722sp1 successfully copied to nodes: decano1.Checking for lpps and interim fixes from source: /tmp/lp/powerha722sp1...Build lists of filesets that can be apply reject or commit on node decano1 Fileset list to apply on node decano1: cluster.es.client.clcomd cluster.es.client.lib cluster.es.client.rte cluster.es.client.utils cluster.es.cspoc.cmds cluster.es.cspoc.rte cluster.es.server.diag cluster.es.server.events cluster.es.server.rte cluster.es.server.utils cluster.es.smui.agent cluster.es.smui.common cluster.msg.en_US.es.server Before to install filesets and or interim fixes, the node: decano1 will be stopped in unmanage mode. There is nothing to commit or reject on node: decano1 from source: /tmp/lp/powerha722sp1Build lists of filesets that can be apply reject or commit on node bolsilludo2 Fileset list to apply on node bolsilludo2: cluster.es.client.clcomd cluster.es.client.lib cluster.es.client.rte cluster.es.client.utils cluster.es.cspoc.cmds cluster.es.cspoc.rte cluster.es.server.diag cluster.es.server.events cluster.es.server.rte cluster.es.server.utils cluster.es.smui.agent cluster.es.smui.common cluster.msg.en_US.es.server Before to install filesets and or interim fixes, the node: bolsilludo2 will be stopped in unmanage mode. There is nothing to commit or reject on node: bolsilludo2 from source: /tmp/lp/powerha722sp1Installing fileset updates in preview mode on node: decano1...Succeeded to install preview updates on node: decano1.Installing fileset updates in preview mode on node: bolsilludo2...Succeeded to install preview updates on node: bolsilludo2.
Chapter 2. New features 23

4. The cluster is ready to be updated. Before you perform a package installation, commit the packages. If you do not commit your previously installed packages and a reject occurs because something went wrong during the upgrade, all non-committed packages are removed.
5. Use the -A flag to update your servers with applied packages. The -s flag is used to specify the packages location.
To run the update only on the node bolsilludo2, run the following command:
/usr/es/sbin/cluster/utilities/cl_ezupdate -A -s /tmp/lp/powerha722sp1 -N bolsilludo2
Figure 2-9 shows the output of the lslpp command, which shows the committed and applied clustered software.
.
Figure 2-9 cl_ezupdate lslpp output showing several cluster packages
If something goes wrong during the installation (for example, the virtual private network (VPN) connection goes down during the installation) or the cluster does not behave as expected after the upgrade, you can always reject the package. The -R flag rejects the applied packages and takes back your cluster to the previous state:
/usr/es/sbin/cluster/utilities/cl_ezupdate -R -s /tmp/lp/powerha722sp1 -N bolsilludo2
6. Commit the installed updates before installing the new updates, or when you are satisfied about how your cluster is running, you can commit your updates to the cluster by using the -C flag:
/usr/es/sbin/cluster/utilities/cl_ezupdate -C -s /tmp/lp/powerha722sp1 -N bolsilludo2
Note: Apply allows you to reject the packages and go back to the previous version with a simply package reject.
Important: If you do not specify the nodes to which you want to apply the update, the application runs on every node on the cluster. You must use the -N flag to specify the nodes that you want to update.
(root@bolsilludo2):/> lslpp -l | grep -i cluster bos.cdat 7.2.0.0 COMMITTED Cluster Data Aggregation Tool bos.cluster.rte 7.2.1.1 APPLIED Cluster Aware AIX cluster.adt.es.client.include cluster.adt.es.client.samples.clinfo cluster.adt.es.client.samples.clstat cluster.adt.es.client.samples.libcl cluster.es.assist.common 7.2.2.0 COMMITTED PowerHA SystemMirror Smart cluster.es.client.clcomd 7.2.2.1 APPLIED Cluster Communication cluster.es.client.lib 7.2.2.1 APPLIED PowerHA SystemMirror Client cluster.es.client.rte 7.2.2.1 APPLIED PowerHA SystemMirror Client cluster.es.client.utils 7.2.2.1 APPLIED PowerHA SystemMirror Client cluster.es.cspoc.cmds 7.2.2.1 APPLIED CSPOC Commands cluster.es.cspoc.rte 7.2.2.1 APPLIED CSPOC Runtime Commands
24 IBM PowerHA SystemMirror V7.2.3 for IBM AIX and V7.2.2 for Linux

All your actions regarding the installation are logged in /var/hacmp/EZUpdate, so you can check the progress of all your tasks there.
2.2 PowerHA SystemMirror User Interface enhancements
PowerHA SystemMirror V7.2.1 includes a browser-based GUI to monitor your cluster environment, Versions 7.2.2; 7.2.2sp1; and 7.2.3 sp3 added improvements, and new features.
Also, since Version 7.2.2 there is a Linux GUI that is available with the same features of the AIX versions.
HighlightsThe PowerHA SystemMirror User Interface (SMUI) provides the following advantages over the PowerHA SystemMirror command line:
� Monitors the status for all clusters, sites, nodes, and RGs in your environment.
� Scans event summaries and reads a detailed description for each event. If the event occurred because of an error or issue in your environment, you can read suggested solutions to fix the problem.
� Searches and compares log files. There are predefined search terms along with the ability to enter your own:
– Error– Fail– Could not
Also, the format of the log file is easy to read and helps identify important information. While viewing any log that has multiple versions, such as hacmp.out and hacmp.out.1, they are merged together into a single log.
The logs include:
– hacmp.out– cluster.log– clutils.log– clstrmgr.debug– syslog.caa– clverify.log– autoverify.log
� View properties for a cluster, such as:
– PowerHA SystemMirror version– Name of sites and nodes– Repository disk information
� Since Version 7.2.2, you can create zones to split your clusters by geographical location, by business areas, and so on.
� You can assign users and roles to your zones and clusters so that they can monitor, modify, or administer your clusters.
� With the Health Summary, you can do a visual check and monitor your clusters and zones.
� With the Activity Log, you can consolidate log filtering.
Chapter 2. New features 25
ZonesSince Version 7.2.2, you can create zones for managing your clusters when you manage a large group of clusters. Each zone contains a cluster or groups of clusters, and you can assign users and roles to this group of clusters.
UsersYou can create users and attach them to your zone and clusters. For each user, you define an email, phone number, and assign them a role in your zone.
RolesEach defined user has a role. The system now has six predefined roles: ha_root, ha_admin, ha_mon, ha_op, root, and an admin group for monitoring and operations. However, you can define your own customized roles for each user.
Health SummaryHealth Summary provides an overview of your zones; clusters; nodes; and resources groups, and you can drill down from zone to cluster.
Activity LogBy using the Activity Log function, you can filter logs by cluster, zones, resources, users, event types, and date and time and its combinations.
For more information about the PowerHA GUI, see Chapter 5, “PowerHA SystemMirror User Interface” on page 127.
2.3 Resource Optimized High Availability enhancements
This section describes the Resource Optimized High Availability (ROHA) enhancements.
� ROHA Live Partition Mobility (LPM) support
PowerHA SystemMirror listens to LPM events by registering with the AIX drmgr framework and does necessary validations to handle the ROHA resources that might be impacted during the LPM process.
� ROHA dynamic automatic reconfiguration (DARE) support
You can change the Capacity on Demand (CoD) resource requirement for existing application controllers, add an application controller, or remove an application controller without stopping the cluster services. Applications are refreshed so that the new resource requirements are effective after DARE.
� ROHA Hardware Management Console (HMC) Representational State Transfer (REST) API support
ROHA was originally supported by SSH communication with HMC only. However, most cloud deployments with PowerHA operate by using the REST API of HMC. To help customers deploy and manage PowerHA in cloud environments, ROHA support is based on the REST API.
� ROHA asynchronous release
ROHA resource release can be asynchronous if the source and target nodes of the cluster are from different central electronic complexes (CECs).
26 IBM PowerHA SystemMirror V7.2.3 for IBM AIX and V7.2.2 for Linux
2.4 PowerHA Log Analyzer and logging enhancements
The Log Analyzer on PowerHA V7.2.2 made some changes to the logging environment. PowerHA V7.2.3 added some improvements to the Log Analyzer.
2.4.1 Logging enhancements
The changes and enhancements to the logging environment can be summarized as follows:
� Fine-tuning of logs.
� Changed the time stamp of multiple critical log files to a single format, which is shown in the following example:
2018-09-28T03:31:54
� Option to modify a log file’s size.
� Ability to copy log files to a user-specified directory.
� Extract critical log files based on a time stamp range.
2.4.2 Log Analyzer
The Log Analyzer has a centric error analysis approach, which means that it checks log files from all nodes within a given cluster. The analysis options are based on the following items:
� Time window search, for example, analysis for specific time slots.� Error patterns, for example, Diskfailure or Sitefailure. � Last error� All errors
The tool also provides recommendations when possible. There are options to analyze both a live cluster or stored log files.
The tool requires logs that are generated by PowerHA V7.2.2 or later. It does not work if a log file contains entries from a previous version, which is important to know when you migrate from an earlier PowerHA version.
Changes in PowerHA SystemMirror V7.2.3The following changes were introduced in PowerHA V7.2.3. Some of these features are compatible with earlier version and are available in PowerHA 7.2.2 SP1 or later.
Here is a brief description of the changes:
� Progress indicator for long running analyses. Analysis can take some time if there is much data.
– The analysis process writes progress information to a file and the progress indicator process reads and displays it.
– Granularity is limited, but it achieves the goal of demonstrating that the process is not hung.
� Command inputs are no longer case-sensitive, for example, diskfailure instead of Diskfailure.
� Application failure analysis has a new string that is called applicationfailure, which looks for failing RGs that include an application controller.
Chapter 2. New features 27
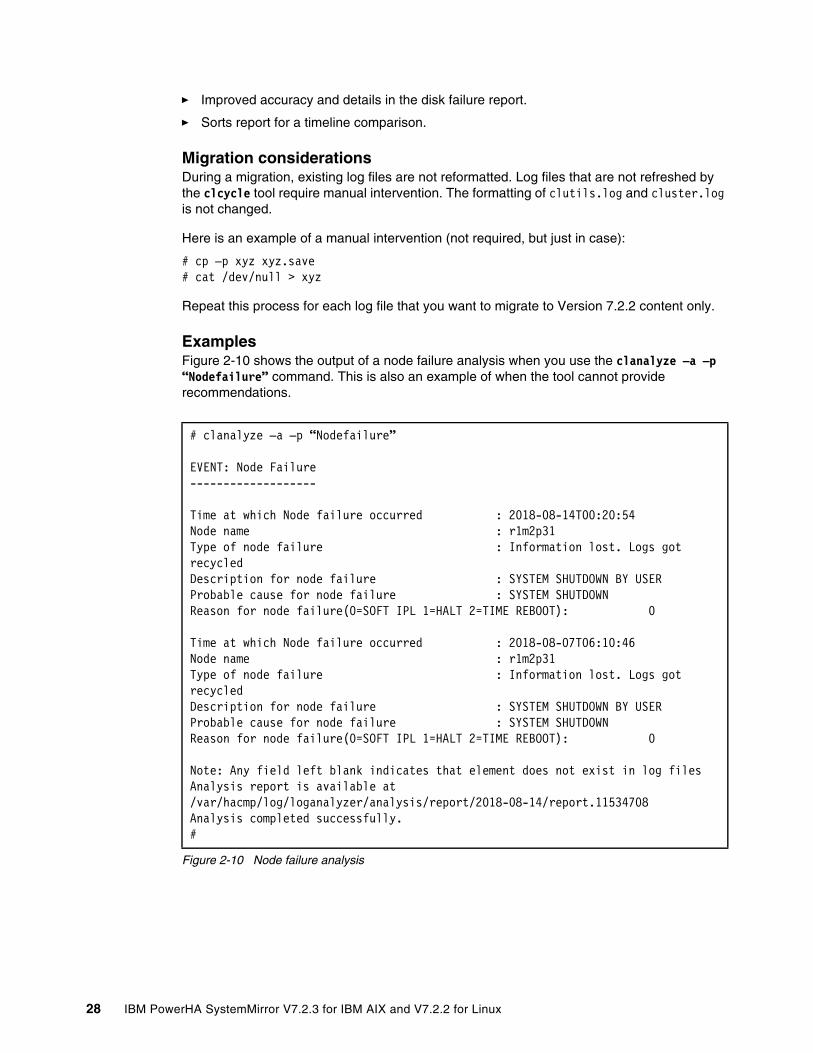
� Improved accuracy and details in the disk failure report.
� Sorts report for a timeline comparison.
Migration considerationsDuring a migration, existing log files are not reformatted. Log files that are not refreshed by the clcycle tool require manual intervention. The formatting of clutils.log and cluster.log is not changed.
Here is an example of a manual intervention (not required, but just in case):
# cp –p xyz xyz.save # cat /dev/null > xyz
Repeat this process for each log file that you want to migrate to Version 7.2.2 content only.
ExamplesFigure 2-10 shows the output of a node failure analysis when you use the clanalyze –a –p “Nodefailure” command. This is also an example of when the tool cannot provide recommendations.
Figure 2-10 Node failure analysis
# clanalyze –a –p “Nodefailure”
EVENT: Node Failure-------------------
Time at which Node failure occurred : 2018-08-14T00:20:54Node name : r1m2p31Type of node failure : Information lost. Logs got recycledDescription for node failure : SYSTEM SHUTDOWN BY USERProbable cause for node failure : SYSTEM SHUTDOWNReason for node failure(0=SOFT IPL 1=HALT 2=TIME REBOOT): 0
Time at which Node failure occurred : 2018-08-07T06:10:46Node name : r1m2p31Type of node failure : Information lost. Logs got recycledDescription for node failure : SYSTEM SHUTDOWN BY USERProbable cause for node failure : SYSTEM SHUTDOWNReason for node failure(0=SOFT IPL 1=HALT 2=TIME REBOOT): 0
Note: Any field left blank indicates that element does not exist in log filesAnalysis report is available at /var/hacmp/log/loganalyzer/analysis/report/2018-08-14/report.11534708Analysis completed successfully.#
28 IBM PowerHA SystemMirror V7.2.3 for IBM AIX and V7.2.2 for Linux
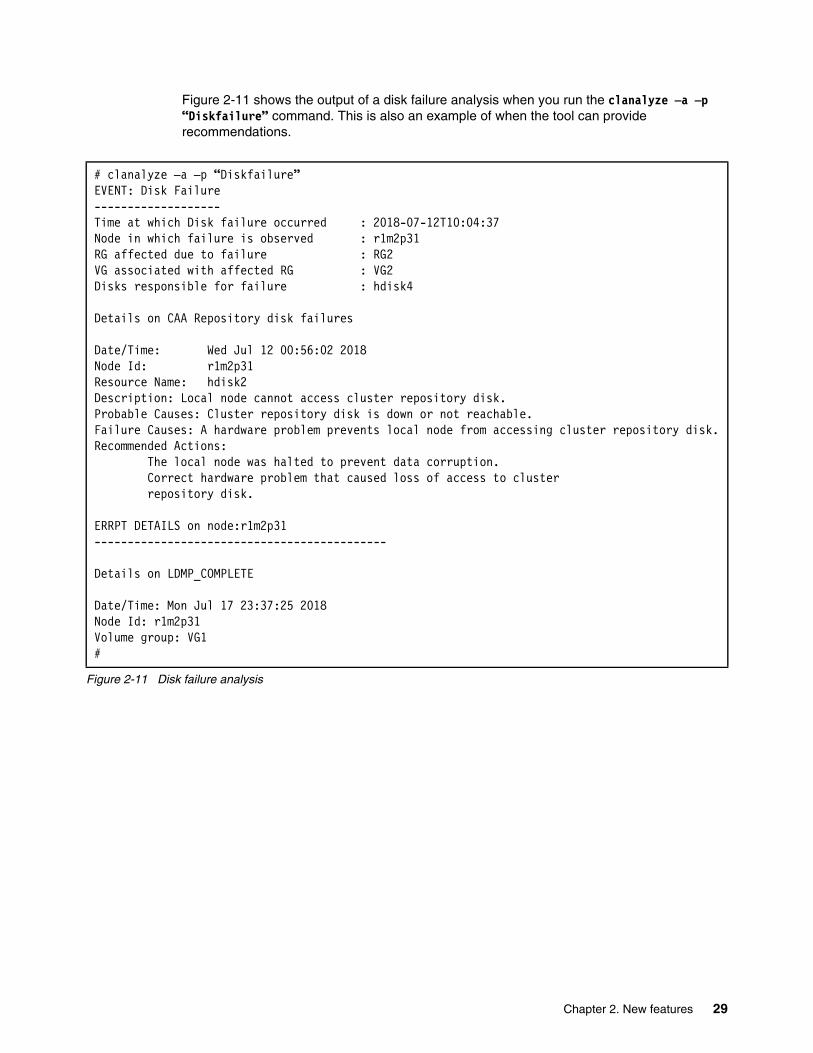
Figure 2-11 shows the output of a disk failure analysis when you run the clanalyze –a –p “Diskfailure” command. This is also an example of when the tool can provide recommendations.
Figure 2-11 Disk failure analysis
# clanalyze –a –p “Diskfailure” EVENT: Disk Failure-------------------Time at which Disk failure occurred : 2018-07-12T10:04:37Node in which failure is observed : r1m2p31RG affected due to failure : RG2VG associated with affected RG : VG2Disks responsible for failure : hdisk4
Details on CAA Repository disk failures
Date/Time: Wed Jul 12 00:56:02 2018Node Id: r1m2p31Resource Name: hdisk2Description: Local node cannot access cluster repository disk.Probable Causes: Cluster repository disk is down or not reachable.Failure Causes: A hardware problem prevents local node from accessing cluster repository disk.Recommended Actions: The local node was halted to prevent data corruption. Correct hardware problem that caused loss of access to cluster repository disk.
ERRPT DETAILS on node:r1m2p31--------------------------------------------
Details on LDMP_COMPLETE
Date/Time: Mon Jul 17 23:37:25 2018Node Id: r1m2p31Volume group: VG1#
Chapter 2. New features 29
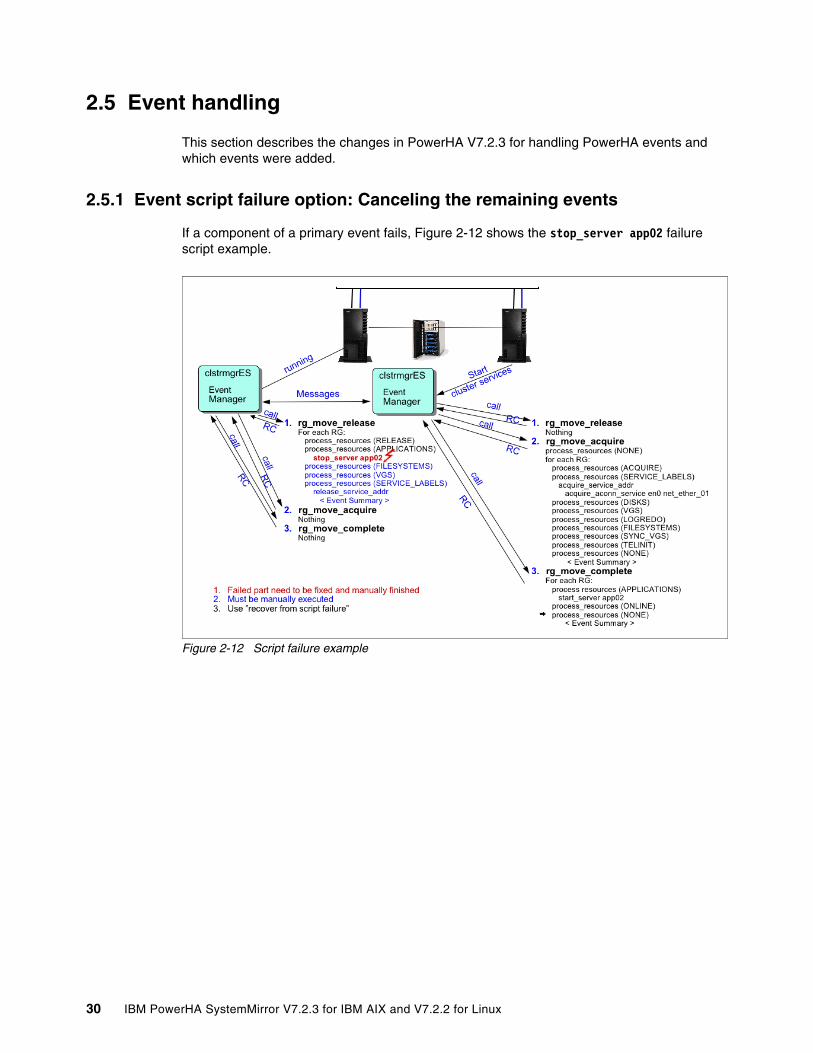
2.5 Event handling
This section describes the changes in PowerHA V7.2.3 for handling PowerHA events and which events were added.
2.5.1 Event script failure option: Canceling the remaining events
If a component of a primary event fails, Figure 2-12 shows the stop_server app02 failure script example.
Figure 2-12 Script failure example
30 IBM PowerHA SystemMirror V7.2.3 for IBM AIX and V7.2.2 for Linux
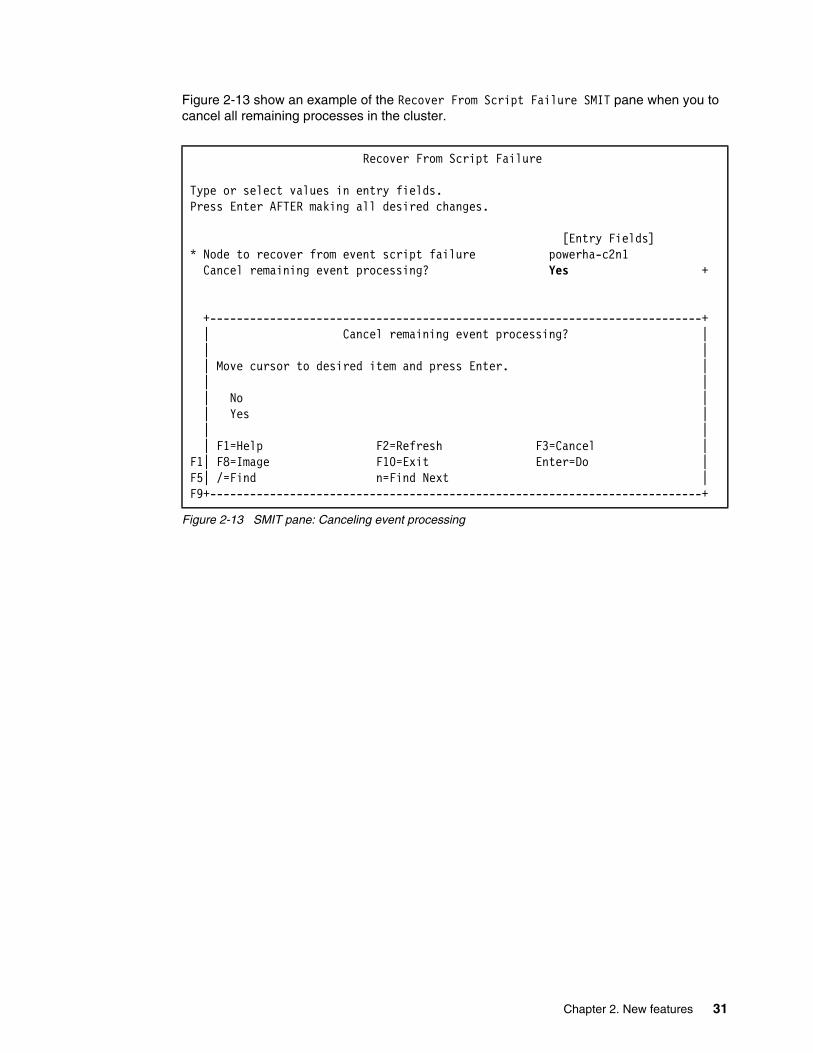
Figure 2-13 show an example of the Recover From Script Failure SMIT pane when you to cancel all remaining processes in the cluster.
Figure 2-13 SMIT pane: Canceling event processing
Recover From Script Failure
Type or select values in entry fields.Press Enter AFTER making all desired changes.
[Entry Fields]* Node to recover from event script failure powerha-c2n1 Cancel remaining event processing? Yes +
+--------------------------------------------------------------------------+ | Cancel remaining event processing? | | | | Move cursor to desired item and press Enter. | | | | No | | Yes | | | | F1=Help F2=Refresh F3=Cancel |F1| F8=Image F10=Exit Enter=Do |F5| /=Find n=Find Next |F9+--------------------------------------------------------------------------+
Chapter 2. New features 31
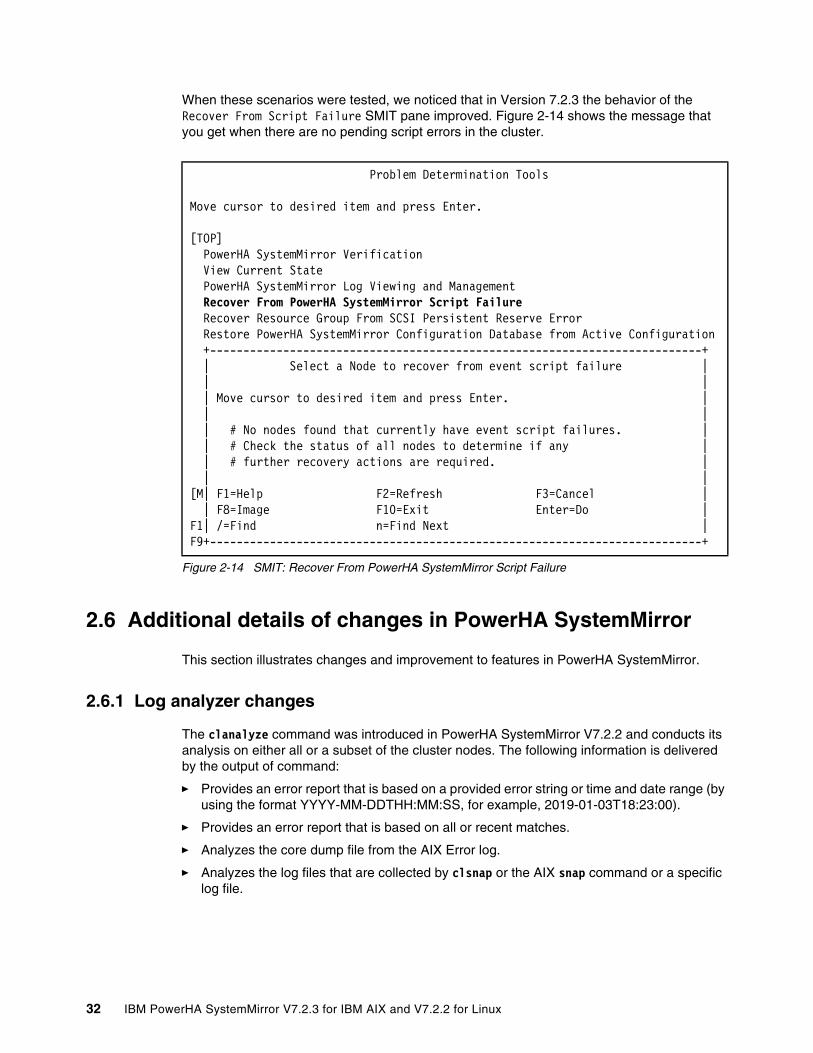
When these scenarios were tested, we noticed that in Version 7.2.3 the behavior of the Recover From Script Failure SMIT pane improved. Figure 2-14 shows the message that you get when there are no pending script errors in the cluster.
Figure 2-14 SMIT: Recover From PowerHA SystemMirror Script Failure
2.6 Additional details of changes in PowerHA SystemMirror
This section illustrates changes and improvement to features in PowerHA SystemMirror.
2.6.1 Log analyzer changes
The clanalyze command was introduced in PowerHA SystemMirror V7.2.2 and conducts its analysis on either all or a subset of the cluster nodes. The following information is delivered by the output of command:
� Provides an error report that is based on a provided error string or time and date range (by using the format YYYY-MM-DDTHH:MM:SS, for example, 2019-01-03T18:23:00).
� Provides an error report that is based on all or recent matches.
� Analyzes the core dump file from the AIX Error log.
� Analyzes the log files that are collected by clsnap or the AIX snap command or a specific log file.
Problem Determination Tools
Move cursor to desired item and press Enter.
[TOP] PowerHA SystemMirror Verification View Current State PowerHA SystemMirror Log Viewing and Management Recover From PowerHA SystemMirror Script Failure Recover Resource Group From SCSI Persistent Reserve Error Restore PowerHA SystemMirror Configuration Database from Active Configuration +--------------------------------------------------------------------------+ | Select a Node to recover from event script failure | | | | Move cursor to desired item and press Enter. | | | | # No nodes found that currently have event script failures. | | # Check the status of all nodes to determine if any | | # further recovery actions are required. | | |[M| F1=Help F2=Refresh F3=Cancel | | F8=Image F10=Exit Enter=Do |F1| /=Find n=Find Next |F9+--------------------------------------------------------------------------+
32 IBM PowerHA SystemMirror V7.2.3 for IBM AIX and V7.2.2 for Linux
The following changes were introduced with Version 7.2.3:
� A progress indicator was added. Although the process is not granular, it demonstrates that the process has not hung. Although the process is running, progress information is written to a file, which the progress indicator then reads and displays in a message that looks like the following output:
Less than 1% analysis is completed( . . . .)39% analysis is completed. 120sec elapsed.
� When 100% is reached, the report is produced.
� The error string is no longer case-sensitive, so Networkfailure and networkfailure are equivalent.
� A new string was added (applicationfailure), which generates a report about the failure of RGs that include an application controller.
The full list of error (case-insensitive) strings that are supported for log file analysis are show in the following list:
� diskfailure� applicationfailure� interfacefailure� networkfailure� globalnetworkfailure� nodefailure� sitefailure
The clanalyze command stores its output in /var/hacmp/log/loganalyzer/loganalyzer.log. Example 2-1 demonstrates how the command can be used.
Example 2-1 A clanalyze sample log
/usr/es/sbin/cluster/clanalyze/clanalyze -a -s "2019-01-20T20:00:00"-e "2019-01-20T23:25:00"-n ALLFollowing nodes will be considered for analysis or extraction: node1 node2.File: /var/hacmp/log/hacmp.out does not contain provided time stamp: 2019-01-20T20:00:00 in node: node1.File: /var/hacmp/log/clstrmgr.debug /var/hacmp/log/clstrmgr.debug.1 /var/hacmp/log/clstrmgr.debug.2 /var/hacmp/log/clstrmgr.debug.3 /var/hacmp/log/clstrmgr.debug.4 /var/hacmp/log/clstrmgr.debug.5 /var/hacmp/log/clstrmgr.debug.6 /var/hacmp/log/clstrmgr.debug.7 does not contain provided time stamp: 2019-01-20T23:25:00 in node: node1.File: /var/hacmp/log/clutils.log does not contain provided time stamp: 2019-01-20T23:25:00 in node: node1.File: /var/hacmp/log/loganalyzer/analysis/extract/errpt/node1/errpt.out does not contain provided time stamp: 2019-01-20T20:00:00 in node: node1.File: /var/hacmp/log/hacmp.out does not contain provided time stamp: 2019-01-20T20:00:00 in node: node2.File: /var/hacmp/log/clutils.log does not contain provided time stamp: 2019-01-20T23:25:00 in node: node2.File: /var/hacmp/log/loganalyzer/analysis/extract/errpt/node2/errpt.out does not contain provided time stamp: 2019-01-20T20:00:00 in node: node2.
Note: The string applicationfailure was added to Version 7.2.2 in SP1 but not the Version 7.2.3 SP0 release. It is in Version 7.2.3 SP1.
Chapter 2. New features 33
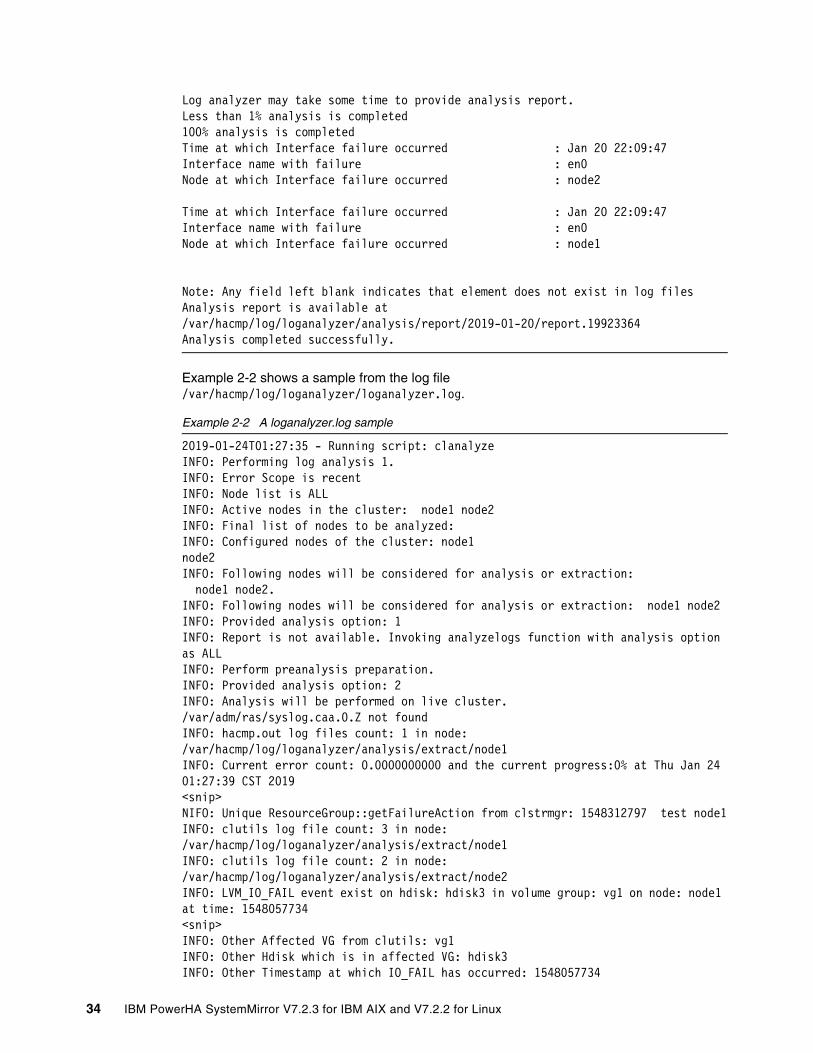
Log analyzer may take some time to provide analysis report.Less than 1% analysis is completed100% analysis is completedTime at which Interface failure occurred : Jan 20 22:09:47Interface name with failure : en0Node at which Interface failure occurred : node2
Time at which Interface failure occurred : Jan 20 22:09:47Interface name with failure : en0Node at which Interface failure occurred : node1
Note: Any field left blank indicates that element does not exist in log filesAnalysis report is available at /var/hacmp/log/loganalyzer/analysis/report/2019-01-20/report.19923364Analysis completed successfully.
Example 2-2 shows a sample from the log file /var/hacmp/log/loganalyzer/loganalyzer.log.
Example 2-2 A loganalyzer.log sample
2019-01-24T01:27:35 - Running script: clanalyzeINFO: Performing log analysis 1.INFO: Error Scope is recentINFO: Node list is ALLINFO: Active nodes in the cluster: node1 node2INFO: Final list of nodes to be analyzed:INFO: Configured nodes of the cluster: node1node2INFO: Following nodes will be considered for analysis or extraction: node1 node2.INFO: Following nodes will be considered for analysis or extraction: node1 node2INFO: Provided analysis option: 1INFO: Report is not available. Invoking analyzelogs function with analysis option as ALLINFO: Perform preanalysis preparation.INFO: Provided analysis option: 2INFO: Analysis will be performed on live cluster./var/adm/ras/syslog.caa.0.Z not foundINFO: hacmp.out log files count: 1 in node: /var/hacmp/log/loganalyzer/analysis/extract/node1INFO: Current error count: 0.0000000000 and the current progress:0% at Thu Jan 24 01:27:39 CST 2019<snip>NIFO: Unique ResourceGroup::getFailureAction from clstrmgr: 1548312797 test node1INFO: clutils log file count: 3 in node: /var/hacmp/log/loganalyzer/analysis/extract/node1INFO: clutils log file count: 2 in node: /var/hacmp/log/loganalyzer/analysis/extract/node2INFO: LVM_IO_FAIL event exist on hdisk: hdisk3 in volume group: vg1 on node: node1 at time: 1548057734<snip>INFO: Other Affected VG from clutils: vg1INFO: Other Hdisk which is in affected VG: hdisk3INFO: Other Timestamp at which IO_FAIL has occurred: 1548057734
34 IBM PowerHA SystemMirror V7.2.3 for IBM AIX and V7.2.2 for Linux

<snip>INFO: Other Affected VG from clutils: vg1INFO: Other Hdisk which is in affected VG: hdisk3INFO: Other Timestamp at which IO_FAIL has occurred: 1548057734<snip>INFO: Other Node down event occurred in hacmp for: node2 log_trace OtherINFO: hacmp.out log files count: 1INFO: hacmp.out log files count: 1INFO: Report is available. Checking for recent failureINFO: Analysis completed successfully.
This feature is similar to the Application Availability Analysis tool, which was introduced in IBM High Availability Cluster Multi-Processing (HACMP) V4.5, as shown in Example 2-3.
Example 2-3 Similar feature of HACMP V4.5
Analysis begins: Tuesday, 01-January-2019, 01:01Analysis ends: Monday, 21-January-2019, 01:48Application analyzed: testapp01
Total time: 20 days, 0 hours, 47 minutes, 50 seconds
Uptime: Amount: 0 days, 3 hours, 34 minutes, 39 seconds Percentage: 0.74% Longest period: 0 days, 3 hours, 27 minutes, 6 seconds
Downtime: Amount: 19 days, 21 hours, 13 minutes, 11 seconds Percentage: 99.26% Longest period: 19 days, 21 hours, 1 minute, 14 seconds
Log records terminated before the specified ending time was reached.
Many further enhancements were made around PowerHA SystemMirror logging, which include the following ones:
� Consistent time format across all PowerHA logs. The format that is used is YYYY-MM-DDTHH:MM:SS. For example, 2019-03-04T09:23:15.
� You can modify the size and location of log files.
� You can see an event serial number (see Example 2-4)
Example 2-4 Running smitty sysmirror and selecting System Management (C-SPOC) → PowerHA SystemMirror Logs
PowerHA SystemMirror Logs
Move cursor to desired item and press Enter.
View/Save/Remove PowerHA SystemMirror Event Summaries View Detailed PowerHA SystemMirror Log Files Change/Show PowerHA SystemMirror Log File Parameters Change/Show Cluster Manager Log File Parameters Change/Show a Cluster Log Directory Change All Cluster Logs Directory
Chapter 2. New features 35
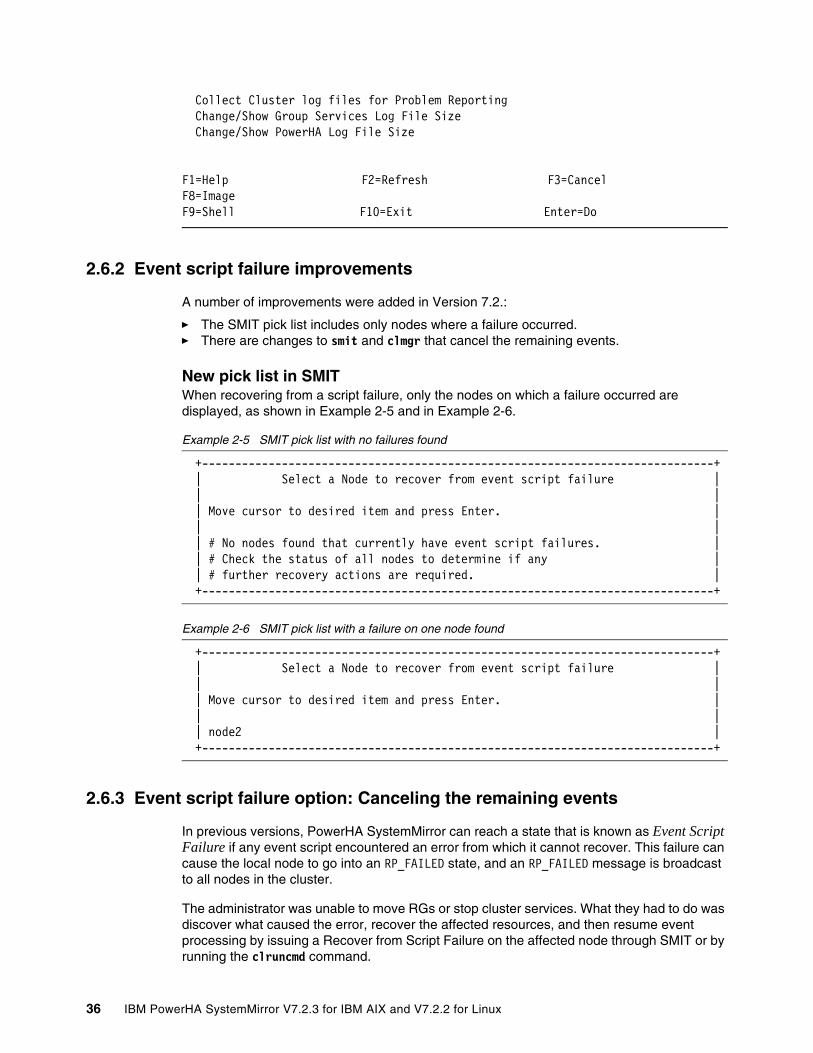
Collect Cluster log files for Problem Reporting Change/Show Group Services Log File Size Change/Show PowerHA Log File Size
F1=Help F2=Refresh F3=Cancel F8=ImageF9=Shell F10=Exit Enter=Do
2.6.2 Event script failure improvements
A number of improvements were added in Version 7.2.:
� The SMIT pick list includes only nodes where a failure occurred.� There are changes to smit and clmgr that cancel the remaining events.
New pick list in SMITWhen recovering from a script failure, only the nodes on which a failure occurred are displayed, as shown in Example 2-5 and in Example 2-6.
Example 2-5 SMIT pick list with no failures found
+-----------------------------------------------------------------------------+ | Select a Node to recover from event script failure | | | | Move cursor to desired item and press Enter. | | | | # No nodes found that currently have event script failures. | | # Check the status of all nodes to determine if any | | # further recovery actions are required. | +-----------------------------------------------------------------------------+
Example 2-6 SMIT pick list with a failure on one node found
+-----------------------------------------------------------------------------+ | Select a Node to recover from event script failure | | | | Move cursor to desired item and press Enter. | | | | node2 | +-----------------------------------------------------------------------------+
2.6.3 Event script failure option: Canceling the remaining events
In previous versions, PowerHA SystemMirror can reach a state that is known as Event Script Failure if any event script encountered an error from which it cannot recover. This failure can cause the local node to go into an RP_FAILED state, and an RP_FAILED message is broadcast to all nodes in the cluster.
The administrator was unable to move RGs or stop cluster services. What they had to do was discover what caused the error, recover the affected resources, and then resume event processing by issuing a Recover from Script Failure on the affected node through SMIT or by running the clruncmd command.
36 IBM PowerHA SystemMirror V7.2.3 for IBM AIX and V7.2.2 for Linux
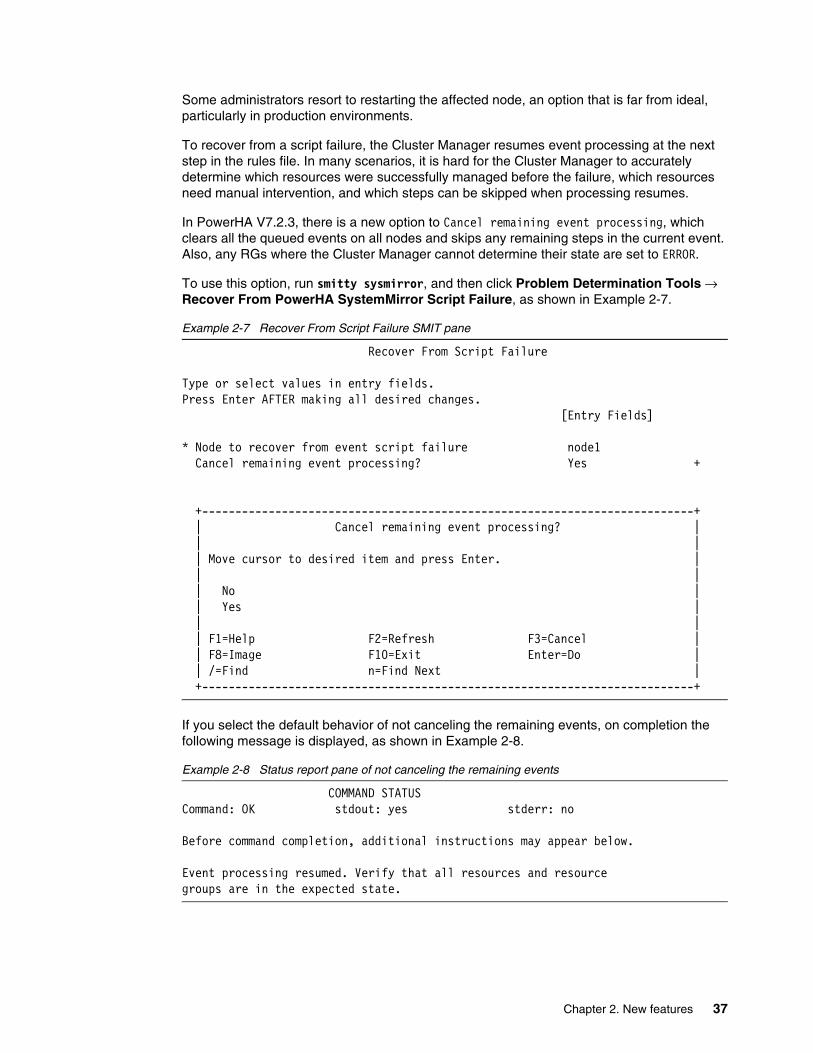
Some administrators resort to restarting the affected node, an option that is far from ideal, particularly in production environments.
To recover from a script failure, the Cluster Manager resumes event processing at the next step in the rules file. In many scenarios, it is hard for the Cluster Manager to accurately determine which resources were successfully managed before the failure, which resources need manual intervention, and which steps can be skipped when processing resumes.
In PowerHA V7.2.3, there is a new option to Cancel remaining event processing, which clears all the queued events on all nodes and skips any remaining steps in the current event. Also, any RGs where the Cluster Manager cannot determine their state are set to ERROR.
To use this option, run smitty sysmirror, and then click Problem Determination Tools → Recover From PowerHA SystemMirror Script Failure, as shown in Example 2-7.
Example 2-7 Recover From Script Failure SMIT pane
Recover From Script Failure
Type or select values in entry fields.Press Enter AFTER making all desired changes. [Entry Fields]
* Node to recover from event script failure node1 Cancel remaining event processing? Yes +
+--------------------------------------------------------------------------+ | Cancel remaining event processing? | | | | Move cursor to desired item and press Enter. | | | | No | | Yes | | | | F1=Help F2=Refresh F3=Cancel |
| F8=Image F10=Exit Enter=Do | | /=Find n=Find Next | +--------------------------------------------------------------------------+
If you select the default behavior of not canceling the remaining events, on completion the following message is displayed, as shown in Example 2-8.
Example 2-8 Status report pane of not canceling the remaining events
COMMAND STATUSCommand: OK stdout: yes stderr: no
Before command completion, additional instructions may appear below.
Event processing resumed. Verify that all resources and resourcegroups are in the expected state.
Chapter 2. New features 37
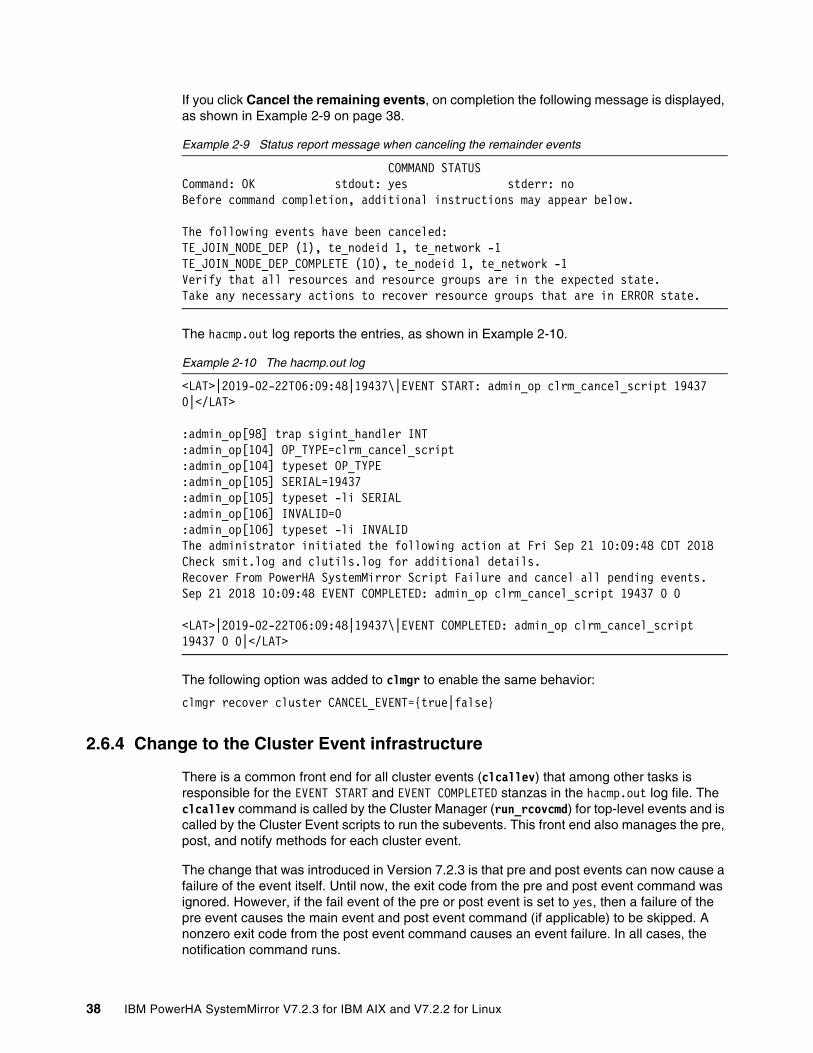
If you click Cancel the remaining events, on completion the following message is displayed, as shown in Example 2-9 on page 38.
Example 2-9 Status report message when canceling the remainder events
COMMAND STATUSCommand: OK stdout: yes stderr: noBefore command completion, additional instructions may appear below.
The following events have been canceled:TE_JOIN_NODE_DEP (1), te_nodeid 1, te_network -1TE_JOIN_NODE_DEP_COMPLETE (10), te_nodeid 1, te_network -1Verify that all resources and resource groups are in the expected state.Take any necessary actions to recover resource groups that are in ERROR state.
The hacmp.out log reports the entries, as shown in Example 2-10.
Example 2-10 The hacmp.out log
<LAT>|2019-02-22T06:09:48|19437\|EVENT START: admin_op clrm_cancel_script 19437 0|</LAT>
:admin_op[98] trap sigint_handler INT:admin_op[104] OP_TYPE=clrm_cancel_script:admin_op[104] typeset OP_TYPE:admin_op[105] SERIAL=19437:admin_op[105] typeset -li SERIAL:admin_op[106] INVALID=0:admin_op[106] typeset -li INVALIDThe administrator initiated the following action at Fri Sep 21 10:09:48 CDT 2018Check smit.log and clutils.log for additional details.Recover From PowerHA SystemMirror Script Failure and cancel all pending events.Sep 21 2018 10:09:48 EVENT COMPLETED: admin_op clrm_cancel_script 19437 0 0
<LAT>|2019-02-22T06:09:48|19437\|EVENT COMPLETED: admin_op clrm_cancel_script 19437 0 0|</LAT>
The following option was added to clmgr to enable the same behavior:
clmgr recover cluster CANCEL_EVENT={true|false}
2.6.4 Change to the Cluster Event infrastructure
There is a common front end for all cluster events (clcallev) that among other tasks is responsible for the EVENT START and EVENT COMPLETED stanzas in the hacmp.out log file. The clcallev command is called by the Cluster Manager (run_rcovcmd) for top-level events and is called by the Cluster Event scripts to run the subevents. This front end also manages the pre, post, and notify methods for each cluster event.
The change that was introduced in Version 7.2.3 is that pre and post events can now cause a failure of the event itself. Until now, the exit code from the pre and post event command was ignored. However, if the fail event of the pre or post event is set to yes, then a failure of the pre event causes the main event and post event command (if applicable) to be skipped. A nonzero exit code from the post event command causes an event failure. In all cases, the notification command runs.
38 IBM PowerHA SystemMirror V7.2.3 for IBM AIX and V7.2.2 for Linux
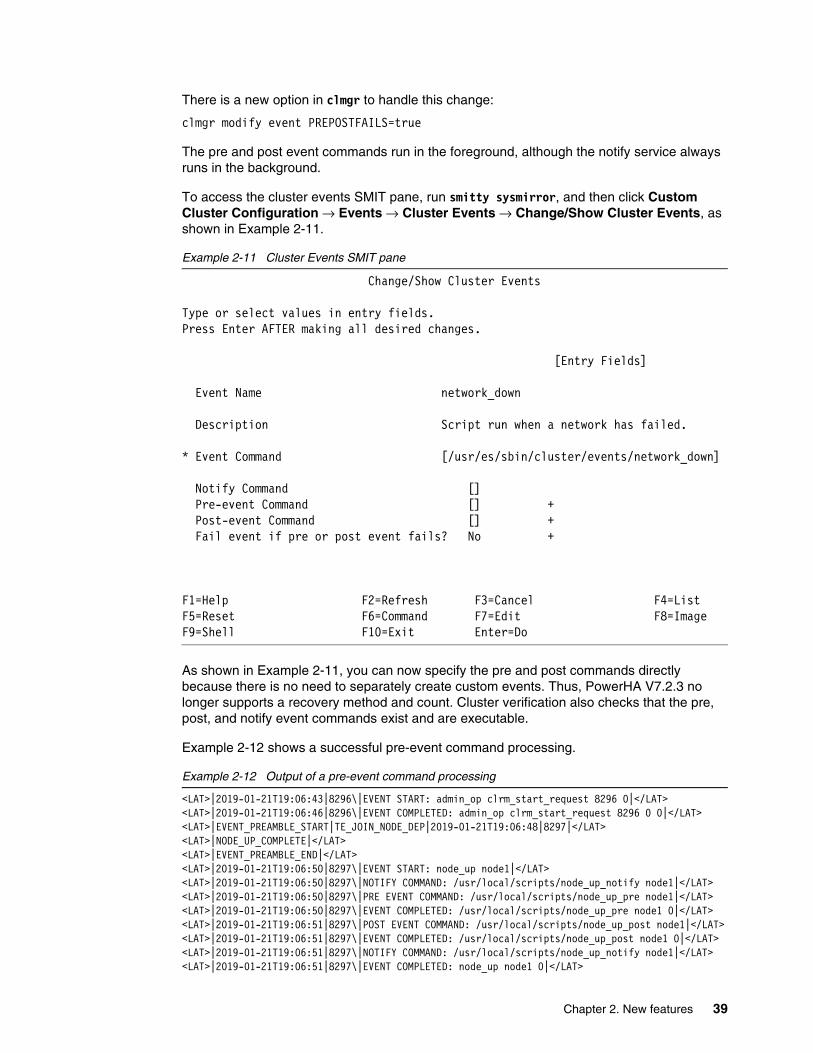
There is a new option in clmgr to handle this change:
clmgr modify event PREPOSTFAILS=true
The pre and post event commands run in the foreground, although the notify service always runs in the background.
To access the cluster events SMIT pane, run smitty sysmirror, and then click Custom Cluster Configuration → Events → Cluster Events → Change/Show Cluster Events, as shown in Example 2-11.
Example 2-11 Cluster Events SMIT pane
Change/Show Cluster Events
Type or select values in entry fields.Press Enter AFTER making all desired changes. [Entry Fields] Event Name network_down Description Script run when a network has failed. * Event Command [/usr/es/sbin/cluster/events/network_down] Notify Command [] Pre-event Command [] + Post-event Command [] + Fail event if pre or post event fails? No +
F1=Help F2=Refresh F3=Cancel F4=ListF5=Reset F6=Command F7=Edit F8=Image F9=Shell F10=Exit Enter=Do
As shown in Example 2-11, you can now specify the pre and post commands directly because there is no need to separately create custom events. Thus, PowerHA V7.2.3 no longer supports a recovery method and count. Cluster verification also checks that the pre, post, and notify event commands exist and are executable.
Example 2-12 shows a successful pre-event command processing.
Example 2-12 Output of a pre-event command processing
<LAT>|2019-01-21T19:06:43|8296\|EVENT START: admin_op clrm_start_request 8296 0|</LAT><LAT>|2019-01-21T19:06:46|8296\|EVENT COMPLETED: admin_op clrm_start_request 8296 0 0|</LAT><LAT>|EVENT_PREAMBLE_START|TE_JOIN_NODE_DEP|2019-01-21T19:06:48|8297|</LAT><LAT>|NODE_UP_COMPLETE|</LAT><LAT>|EVENT_PREAMBLE_END|</LAT><LAT>|2019-01-21T19:06:50|8297\|EVENT START: node_up node1|</LAT><LAT>|2019-01-21T19:06:50|8297\|NOTIFY COMMAND: /usr/local/scripts/node_up_notify node1|</LAT><LAT>|2019-01-21T19:06:50|8297\|PRE EVENT COMMAND: /usr/local/scripts/node_up_pre node1|</LAT><LAT>|2019-01-21T19:06:50|8297\|EVENT COMPLETED: /usr/local/scripts/node_up_pre node1 0|</LAT><LAT>|2019-01-21T19:06:51|8297\|POST EVENT COMMAND: /usr/local/scripts/node_up_post node1|</LAT><LAT>|2019-01-21T19:06:51|8297\|EVENT COMPLETED: /usr/local/scripts/node_up_post node1 0|</LAT><LAT>|2019-01-21T19:06:51|8297\|NOTIFY COMMAND: /usr/local/scripts/node_up_notify node1|</LAT><LAT>|2019-01-21T19:06:51|8297\|EVENT COMPLETED: node_up node1 0|</LAT>
Chapter 2. New features 39
<LAT>|EVENT_PREAMBLE_START|TE_JOIN_NODE_DEP_COMPLETE|2019-01-21T19:06:54|8298|</LAT><LAT>|EVENT_PREAMBLE_END|</LAT><LAT>|2019-01-21T19:06:54|8298\|EVENT START: node_up_complete node1|</LAT><LAT>|2019-01-21T19:06:54|8298\|EVENT COMPLETED: node_up_complete node1 0|</LAT>
Example 2-13 shows failed pre-event command processing.
Example 2-13 Output of a failed pre-event command
<LAT>|2019-01-21T19:12:04|8301\|EVENT START: admin_op clrm_start_request 8301 0|</LAT><LAT>|2019-01-21T19:12:04|8301\|EVENT COMPLETED: admin_op clrm_start_request 8301 0 0|</LAT><LAT>|EVENT_PREAMBLE_START|TE_JOIN_NODE_DEP|2019-01-21T19:12:05|8301|</LAT><LAT>|NODE_UP_COMPLETE|</LAT><LAT>|EVENT_PREAMBLE_END|</LAT><LAT>|2019-01-21T19:12:05|8301\|EVENT START: node_up node1|</LAT><LAT>|2019-01-21T19:12:05|8301\|NOTIFY COMMAND: /usr/local/scripts/node_up_notify node1|</LAT><LAT>|2019-01-21T19:12:05|8301\|PRE EVENT COMMAND: /usr/local/scripts/node_up_pre node1|</LAT><LAT>|2019-01-21T19:12:05|8301\|EVENT FAILED: 1: /usr/local/scripts/node_up_pre node1 1|</LAT><LAT>|2019-01-21T19:12:05|8301\|EVENT FAILED: 1: node_up node1 1|</LAT><LAT>|2019-01-21T19:12:05|8301\|NOTIFY COMMAND: /usr/local/scripts/node_up_notify node1|</LAT><LAT>|2019-01-21T19:12:05|8301\|EVENT START: cluster_ffdc -e 8301|</LAT><LAT>|2019-01-21T19:12:05|8301\|EVENT START: event_error 1 TE_JOIN_NODE_DEP|</LAT><LAT>|2019-01-21T19:12:05|8301\|EVENT COMPLETED: event_error 1 TE_JOIN_NODE_DEP 0|</LAT><LAT>|2019-01-21T19:12:06|8301\|EVENT COMPLETED: cluster_ffdc -e 8301 0|</LAT>
2.6.5 Administrator operation event
Previously, there was no indication in the hacmp.log whether an event was initiated by a user. For example, the node_down failure might have been caused by a node crash or by the operator stopping cluster services. To determine the cause, look through the other PowerHA logs (typically, the clstrmgr debug log).
To make this task easier, there is a new event (admin_op), which is run locally on the node where the command is run, and it logs to hacmp.out, as shown in Example 2-14. Because it is implemented as a cluster event, it is now possible to configure pre or post and notification event commands, including setting the option that a failure of the pre or post method can cancel the following cluster events.
The following operator actions trigger these events:
� Start or stop cluster services.� Any change in configuration (triggering a DARE).� Movement of an RG.� Suspension and resumption of application monitoring.� Recovery from script failure.
Example 2-14 The hacmp.out log output
<LAT>|2019-01-20T22:01:56|19317\|EVENT START: admin_op clrm_start_request 19317 0|</LAT>
:admin_op[98] trap sigint_handler INT:admin_op[104] OP_TYPE=clrm_start_request:admin_op[104] typeset OP_TYPE:admin_op[105] SERIAL=19317:admin_op[105] typeset -li SERIAL:admin_op[106] INVALID=0:admin_op[106] typeset -li INVALIDThe administrator initiated the following action at Sun Jan 20 22:01:56 CST 2019Check smit.log and clutils.log for additional details.
40 IBM PowerHA SystemMirror V7.2.3 for IBM AIX and V7.2.2 for Linux
Starting PowerHA cluster services on node: node1 in normal mode...Jan 20 2019 22:01:59 EVENT COMPLETED: admin_op clrm_start_request 19317 0 0
<LAT>|2019-01-20T22:01:59|19317\|EVENT COMPLETED: admin_op clrm_start_request 19317 0 0|</LAT>
Example 2-15 shows the autoclstrcfgmonitor.out log.
Example 2-15 The autoclstrcfgmonitor.out log
clver_dgets: read 5577 bytes from collector ID: 43 on node node1START->|/usr/es/sbin/cluster/events/admin_op:R:rwxr--r--:1|<-END
File: /usr/es/sbin/cluster/events/admin_op Type: Permission: rwxr--r--check_file_stats: ret = 15END admin_op: /usr/es/sbin/cluster/events/admin_op PASS
2.6.6 Network unstable event
When PowerHA SystemMirror detects a network event, it responds with network, adapter, and in some cases RG events. The recovery actions can affect RGs with Service IP resources and so on. If the cause is transient in nature, then you might not want PowerHA SystemMirror to act because it can result in a longer outage.
A new event was created to handle network flapping, which in PowerHA SystemMirror is defined as receiving a defined number of network events within a given period. This threshold can be configured and is by default set at three events within a period of 60 seconds.
As with the config_too_long event, the network_unstable event runs until stability returns and the network_stable event is run. Also, like config_too_long, event messages are logged in hacmp.out with decreasing frequency the longer the event runs.
As with other events, a network_unstable event can be customized with pre and post events and notify event commands.
2.6.7 Event serial number
Troubleshooting PowerHA SystemMirror has always been a difficult task because information about cluster events can be found in many logs (the syslog, the various cluster manager debug logs, hacmp.out, and so on), across many nodes, and in multiple layers of the stack. Traditionally, we relied on the time stamp as a starting point, but even it is not reliable, particularly across nodes because there can be processing delays or different time zones that are configured.
In PowerHA SystemMirror V7.2.3, an event serial number was introduced to uniquely identify events across all the PowerHA SystemMirror logs. When initiated, the Cluster Manager uses rand() to generate the first serial number, which is then coordinated across the cluster with the same number being used across all nodes for the same event:
� When the cluster is started, the serial number is reported in smit.log and clutils.log.
� During event voting, the Cluster Manager assigns each event a unique number, and the wining event’s serial number is used by all participating nodes.
Chapter 2. New features 41
� Key steps and synchronization points in the clstrmgr.debug list the serial number.
� The serial number is exported as an environmental variable that can be used by customized event scripts.
� Event preamble, summaries, and some key steps in hacmp.out show the serial number.
It is intended that the log analyzer and GUI use the event serial number in upcoming releases.
The following examples show the use of the event serial number:
� In smit.log, as shown in Example 2-16, which shows the event serial number that is assigned for the start of the Cluster Manager.
Example 2-16 The smit.log output
Jan 22 2019 20:47:26/usr/es/sbin/cluster/utilities/clstart: called with flags -m -G -i -b -P cl_rc_cluster -C interactive -B -Anode2: Jan 22 2019 20:47:49Detected previous unexpected software or node failure during startup.node2: Collection First Failure Data Capture in directory /tmp/ibmsupt/hacmp/ffdc.2019.01.22.20.47.node2: Estimating space requirements for First Failure Data Capture.node2: 0513-059 The clevmgrdES Subsystem has been started. Subsystem PID is 14614980.node2: PowerHA: Cluster services started on Tue Jan 22 20:47:51 CST 2019node2: event serial number 22414node2: 0513-059 The gsclvmd Subsystem has been started. Subsystem PID is 15794678.node2: Please review the PowerHA SystemMirror logs and report any problems to IBM Service.node2: Jan 22 2019 20:47:54Completed execution of /usr/es/sbin/cluster/etc/rc.clusternode2: with parameters: -boot -N -b -i -C interactive -P cl_rc_cluster -A.node2: Exit status = 0
� In hacmp.out (Example 2-17), you can trace the progress of the RG move operation for node 1 by its event serial number of 22422.
Example 2-17 The hacmp.out log for node 1
Jan 21 2019 19:53:59 EVENT START: rg_move_fence node1 1
<LAT>|2019-01-21T19:53:59|22422\|EVENT START: rg_move_fence node1 1|</LAT>
+ clcycle clavailability.log
. . . . . .
Jan 21 2019 19:53:59 EVENT COMPLETED: rg_move_fence node1 1 0
<LAT>|2019-01-21T19:53:59|22422\|EVENT COMPLETED: rg_move_fence node1 1 0|</LAT>
+ clcycle clavailability.log
. . . . . .
42 IBM PowerHA SystemMirror V7.2.3 for IBM AIX and V7.2.2 for Linux
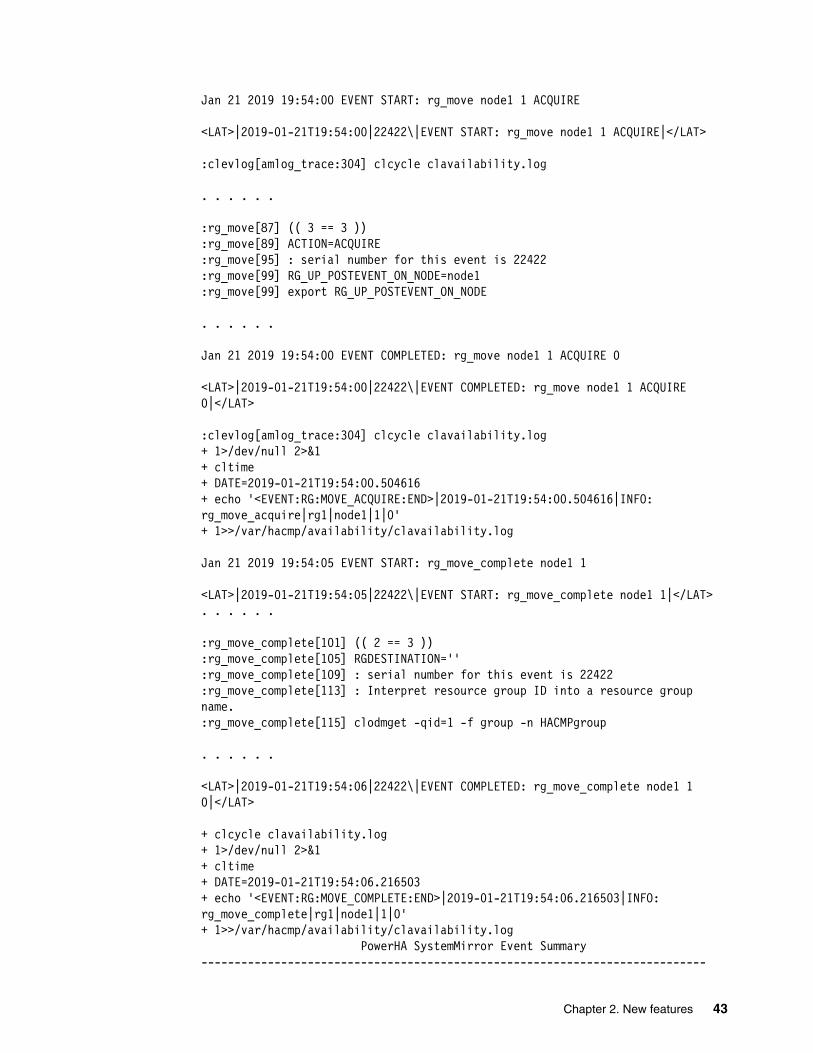
Jan 21 2019 19:54:00 EVENT START: rg_move node1 1 ACQUIRE
<LAT>|2019-01-21T19:54:00|22422\|EVENT START: rg_move node1 1 ACQUIRE|</LAT>
:clevlog[amlog_trace:304] clcycle clavailability.log
. . . . . .
:rg_move[87] (( 3 == 3 )):rg_move[89] ACTION=ACQUIRE:rg_move[95] : serial number for this event is 22422:rg_move[99] RG_UP_POSTEVENT_ON_NODE=node1:rg_move[99] export RG_UP_POSTEVENT_ON_NODE
. . . . . .
Jan 21 2019 19:54:00 EVENT COMPLETED: rg_move node1 1 ACQUIRE 0
<LAT>|2019-01-21T19:54:00|22422\|EVENT COMPLETED: rg_move node1 1 ACQUIRE 0|</LAT>
:clevlog[amlog_trace:304] clcycle clavailability.log+ 1>/dev/null 2>&1+ cltime+ DATE=2019-01-21T19:54:00.504616+ echo '<EVENT:RG:MOVE_ACQUIRE:END>|2019-01-21T19:54:00.504616|INFO: rg_move_acquire|rg1|node1|1|0'+ 1>>/var/hacmp/availability/clavailability.log
Jan 21 2019 19:54:05 EVENT START: rg_move_complete node1 1
<LAT>|2019-01-21T19:54:05|22422\|EVENT START: rg_move_complete node1 1|</LAT>. . . . . .
:rg_move_complete[101] (( 2 == 3 )):rg_move_complete[105] RGDESTINATION='':rg_move_complete[109] : serial number for this event is 22422:rg_move_complete[113] : Interpret resource group ID into a resource group name.:rg_move_complete[115] clodmget -qid=1 -f group -n HACMPgroup
. . . . . .
<LAT>|2019-01-21T19:54:06|22422\|EVENT COMPLETED: rg_move_complete node1 1 0|</LAT>
+ clcycle clavailability.log+ 1>/dev/null 2>&1+ cltime+ DATE=2019-01-21T19:54:06.216503+ echo '<EVENT:RG:MOVE_COMPLETE:END>|2019-01-21T19:54:06.216503|INFO: rg_move_complete|rg1|node1|1|0'+ 1>>/var/hacmp/availability/clavailability.log PowerHA SystemMirror Event Summary----------------------------------------------------------------------------
Chapter 2. New features 43
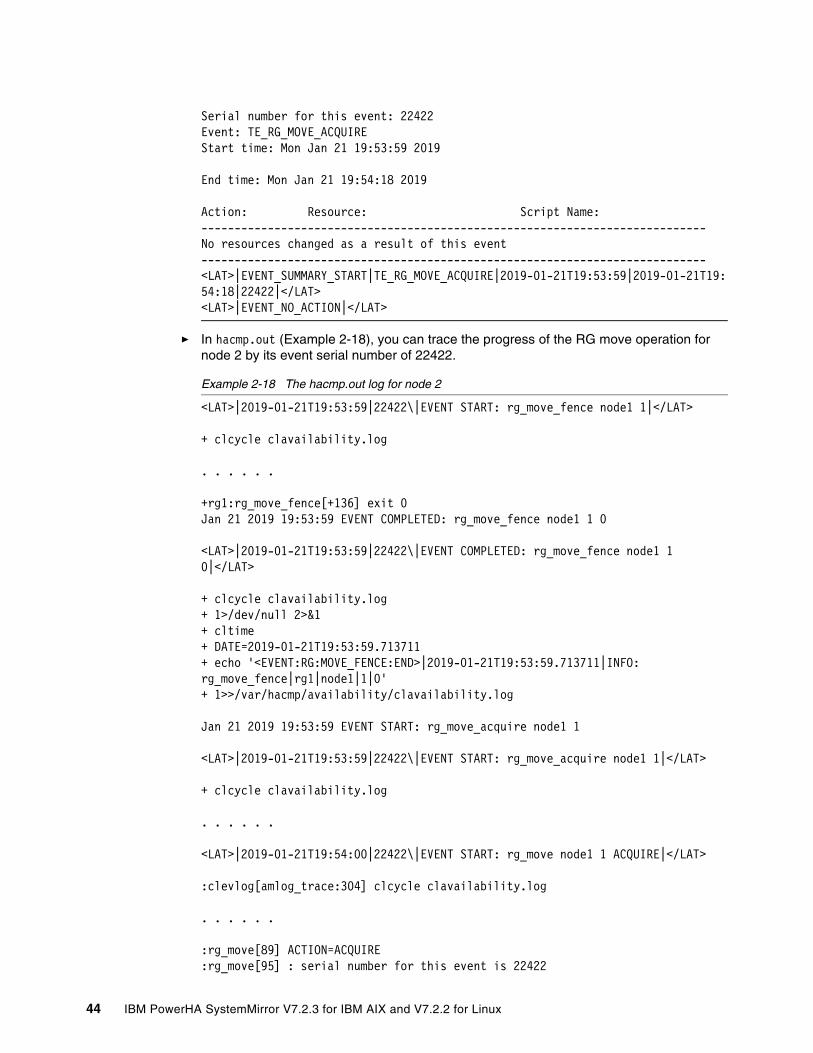
Serial number for this event: 22422Event: TE_RG_MOVE_ACQUIREStart time: Mon Jan 21 19:53:59 2019
End time: Mon Jan 21 19:54:18 2019
Action: Resource: Script Name:----------------------------------------------------------------------------No resources changed as a result of this event----------------------------------------------------------------------------<LAT>|EVENT_SUMMARY_START|TE_RG_MOVE_ACQUIRE|2019-01-21T19:53:59|2019-01-21T19:54:18|22422|</LAT><LAT>|EVENT_NO_ACTION|</LAT>
� In hacmp.out (Example 2-18), you can trace the progress of the RG move operation for node 2 by its event serial number of 22422.
Example 2-18 The hacmp.out log for node 2
<LAT>|2019-01-21T19:53:59|22422\|EVENT START: rg_move_fence node1 1|</LAT>
+ clcycle clavailability.log
. . . . . .
+rg1:rg_move_fence[+136] exit 0Jan 21 2019 19:53:59 EVENT COMPLETED: rg_move_fence node1 1 0
<LAT>|2019-01-21T19:53:59|22422\|EVENT COMPLETED: rg_move_fence node1 1 0|</LAT>
+ clcycle clavailability.log+ 1>/dev/null 2>&1+ cltime+ DATE=2019-01-21T19:53:59.713711+ echo '<EVENT:RG:MOVE_FENCE:END>|2019-01-21T19:53:59.713711|INFO: rg_move_fence|rg1|node1|1|0'+ 1>>/var/hacmp/availability/clavailability.log
Jan 21 2019 19:53:59 EVENT START: rg_move_acquire node1 1
<LAT>|2019-01-21T19:53:59|22422\|EVENT START: rg_move_acquire node1 1|</LAT>
+ clcycle clavailability.log
. . . . . .
<LAT>|2019-01-21T19:54:00|22422\|EVENT START: rg_move node1 1 ACQUIRE|</LAT>
:clevlog[amlog_trace:304] clcycle clavailability.log
. . . . . .
:rg_move[89] ACTION=ACQUIRE:rg_move[95] : serial number for this event is 22422
44 IBM PowerHA SystemMirror V7.2.3 for IBM AIX and V7.2.2 for Linux
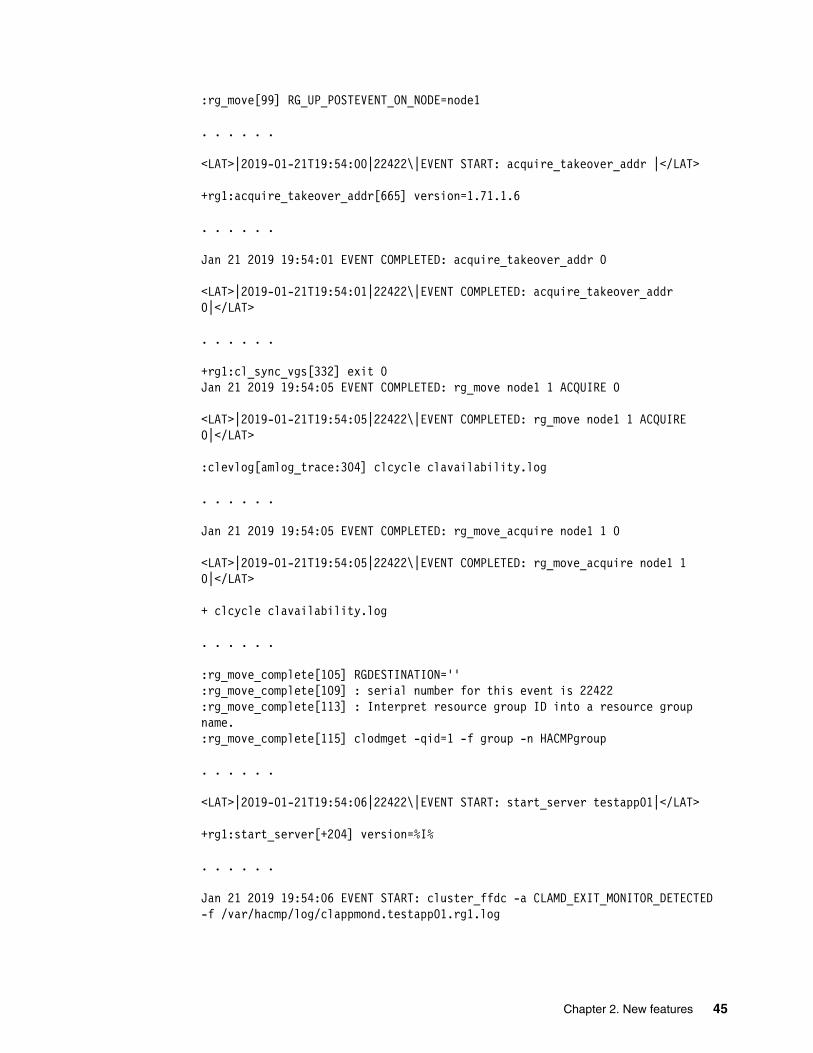
:rg_move[99] RG_UP_POSTEVENT_ON_NODE=node1
. . . . . .
<LAT>|2019-01-21T19:54:00|22422\|EVENT START: acquire_takeover_addr |</LAT>
+rg1:acquire_takeover_addr[665] version=1.71.1.6
. . . . . .
Jan 21 2019 19:54:01 EVENT COMPLETED: acquire_takeover_addr 0
<LAT>|2019-01-21T19:54:01|22422\|EVENT COMPLETED: acquire_takeover_addr 0|</LAT>
. . . . . .
+rg1:cl_sync_vgs[332] exit 0Jan 21 2019 19:54:05 EVENT COMPLETED: rg_move node1 1 ACQUIRE 0
<LAT>|2019-01-21T19:54:05|22422\|EVENT COMPLETED: rg_move node1 1 ACQUIRE 0|</LAT>
:clevlog[amlog_trace:304] clcycle clavailability.log
. . . . . .
Jan 21 2019 19:54:05 EVENT COMPLETED: rg_move_acquire node1 1 0
<LAT>|2019-01-21T19:54:05|22422\|EVENT COMPLETED: rg_move_acquire node1 1 0|</LAT>
+ clcycle clavailability.log
. . . . . .
:rg_move_complete[105] RGDESTINATION='':rg_move_complete[109] : serial number for this event is 22422:rg_move_complete[113] : Interpret resource group ID into a resource group name.:rg_move_complete[115] clodmget -qid=1 -f group -n HACMPgroup
. . . . . .
<LAT>|2019-01-21T19:54:06|22422\|EVENT START: start_server testapp01|</LAT>
+rg1:start_server[+204] version=%I%
. . . . . .
Jan 21 2019 19:54:06 EVENT START: cluster_ffdc -a CLAMD_EXIT_MONITOR_DETECTED -f /var/hacmp/log/clappmond.testapp01.rg1.log
Chapter 2. New features 45
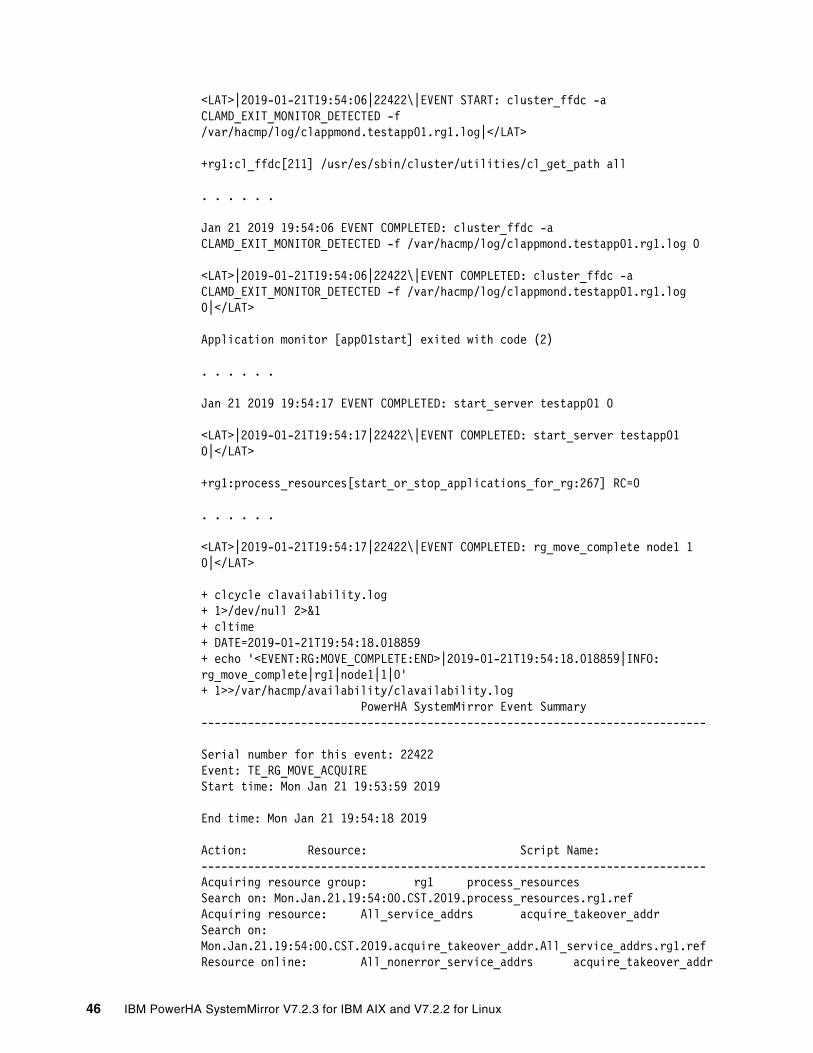
<LAT>|2019-01-21T19:54:06|22422\|EVENT START: cluster_ffdc -a CLAMD_EXIT_MONITOR_DETECTED -f /var/hacmp/log/clappmond.testapp01.rg1.log|</LAT>
+rg1:cl_ffdc[211] /usr/es/sbin/cluster/utilities/cl_get_path all
. . . . . .
Jan 21 2019 19:54:06 EVENT COMPLETED: cluster_ffdc -a CLAMD_EXIT_MONITOR_DETECTED -f /var/hacmp/log/clappmond.testapp01.rg1.log 0
<LAT>|2019-01-21T19:54:06|22422\|EVENT COMPLETED: cluster_ffdc -a CLAMD_EXIT_MONITOR_DETECTED -f /var/hacmp/log/clappmond.testapp01.rg1.log 0|</LAT>
Application monitor [app01start] exited with code (2)
. . . . . .
Jan 21 2019 19:54:17 EVENT COMPLETED: start_server testapp01 0
<LAT>|2019-01-21T19:54:17|22422\|EVENT COMPLETED: start_server testapp01 0|</LAT>
+rg1:process_resources[start_or_stop_applications_for_rg:267] RC=0
. . . . . .
<LAT>|2019-01-21T19:54:17|22422\|EVENT COMPLETED: rg_move_complete node1 1 0|</LAT>
+ clcycle clavailability.log+ 1>/dev/null 2>&1+ cltime+ DATE=2019-01-21T19:54:18.018859+ echo '<EVENT:RG:MOVE_COMPLETE:END>|2019-01-21T19:54:18.018859|INFO: rg_move_complete|rg1|node1|1|0'+ 1>>/var/hacmp/availability/clavailability.log PowerHA SystemMirror Event Summary----------------------------------------------------------------------------
Serial number for this event: 22422Event: TE_RG_MOVE_ACQUIREStart time: Mon Jan 21 19:53:59 2019
End time: Mon Jan 21 19:54:18 2019
Action: Resource: Script Name:----------------------------------------------------------------------------Acquiring resource group: rg1 process_resourcesSearch on: Mon.Jan.21.19:54:00.CST.2019.process_resources.rg1.refAcquiring resource: All_service_addrs acquire_takeover_addrSearch on: Mon.Jan.21.19:54:00.CST.2019.acquire_takeover_addr.All_service_addrs.rg1.refResource online: All_nonerror_service_addrs acquire_takeover_addr
46 IBM PowerHA SystemMirror V7.2.3 for IBM AIX and V7.2.2 for Linux
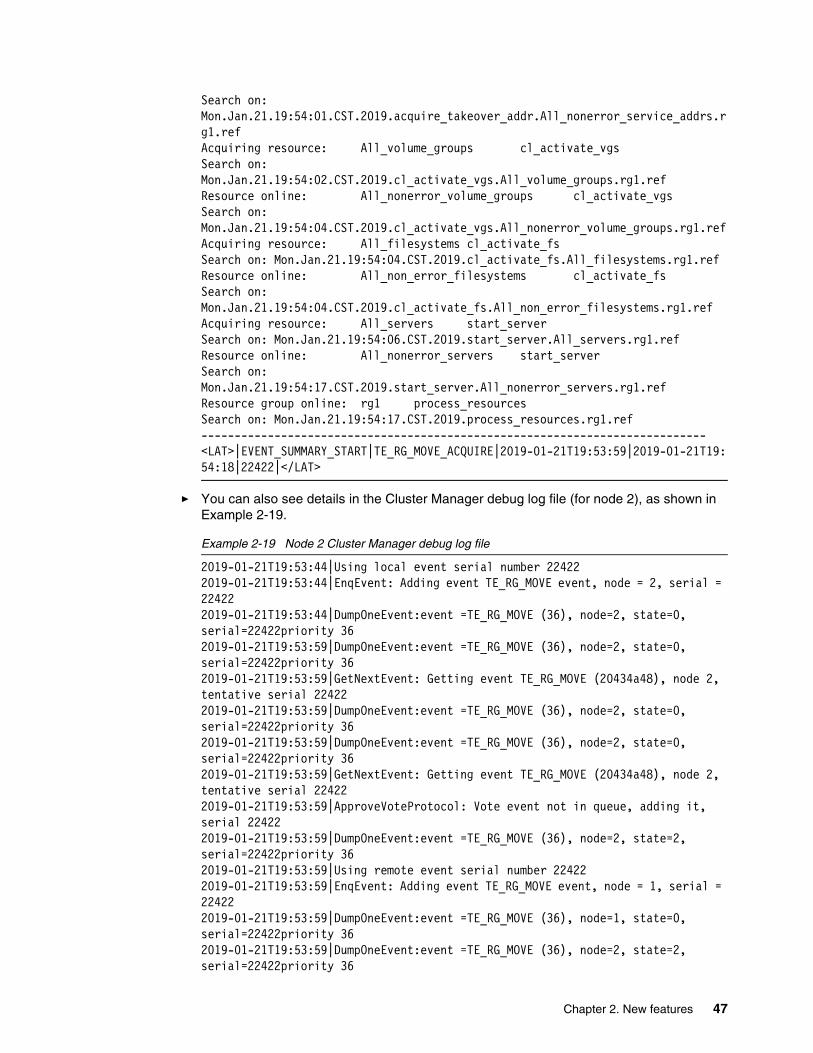
Search on: Mon.Jan.21.19:54:01.CST.2019.acquire_takeover_addr.All_nonerror_service_addrs.rg1.refAcquiring resource: All_volume_groups cl_activate_vgsSearch on: Mon.Jan.21.19:54:02.CST.2019.cl_activate_vgs.All_volume_groups.rg1.refResource online: All_nonerror_volume_groups cl_activate_vgsSearch on: Mon.Jan.21.19:54:04.CST.2019.cl_activate_vgs.All_nonerror_volume_groups.rg1.refAcquiring resource: All_filesystems cl_activate_fsSearch on: Mon.Jan.21.19:54:04.CST.2019.cl_activate_fs.All_filesystems.rg1.refResource online: All_non_error_filesystems cl_activate_fsSearch on: Mon.Jan.21.19:54:04.CST.2019.cl_activate_fs.All_non_error_filesystems.rg1.refAcquiring resource: All_servers start_serverSearch on: Mon.Jan.21.19:54:06.CST.2019.start_server.All_servers.rg1.refResource online: All_nonerror_servers start_serverSearch on: Mon.Jan.21.19:54:17.CST.2019.start_server.All_nonerror_servers.rg1.refResource group online: rg1 process_resourcesSearch on: Mon.Jan.21.19:54:17.CST.2019.process_resources.rg1.ref----------------------------------------------------------------------------<LAT>|EVENT_SUMMARY_START|TE_RG_MOVE_ACQUIRE|2019-01-21T19:53:59|2019-01-21T19:54:18|22422|</LAT>
� You can also see details in the Cluster Manager debug log file (for node 2), as shown in Example 2-19.
Example 2-19 Node 2 Cluster Manager debug log file
2019-01-21T19:53:44|Using local event serial number 224222019-01-21T19:53:44|EnqEvent: Adding event TE_RG_MOVE event, node = 2, serial = 224222019-01-21T19:53:44|DumpOneEvent:event =TE_RG_MOVE (36), node=2, state=0, serial=22422priority 362019-01-21T19:53:59|DumpOneEvent:event =TE_RG_MOVE (36), node=2, state=0, serial=22422priority 362019-01-21T19:53:59|GetNextEvent: Getting event TE_RG_MOVE (20434a48), node 2, tentative serial 224222019-01-21T19:53:59|DumpOneEvent:event =TE_RG_MOVE (36), node=2, state=0, serial=22422priority 362019-01-21T19:53:59|DumpOneEvent:event =TE_RG_MOVE (36), node=2, state=0, serial=22422priority 362019-01-21T19:53:59|GetNextEvent: Getting event TE_RG_MOVE (20434a48), node 2, tentative serial 224222019-01-21T19:53:59|ApproveVoteProtocol: Vote event not in queue, adding it, serial 224222019-01-21T19:53:59|DumpOneEvent:event =TE_RG_MOVE (36), node=2, state=2, serial=22422priority 362019-01-21T19:53:59|Using remote event serial number 224222019-01-21T19:53:59|EnqEvent: Adding event TE_RG_MOVE event, node = 1, serial = 224222019-01-21T19:53:59|DumpOneEvent:event =TE_RG_MOVE (36), node=1, state=0, serial=22422priority 362019-01-21T19:53:59|DumpOneEvent:event =TE_RG_MOVE (36), node=2, state=2, serial=22422priority 36
Chapter 2. New features 47
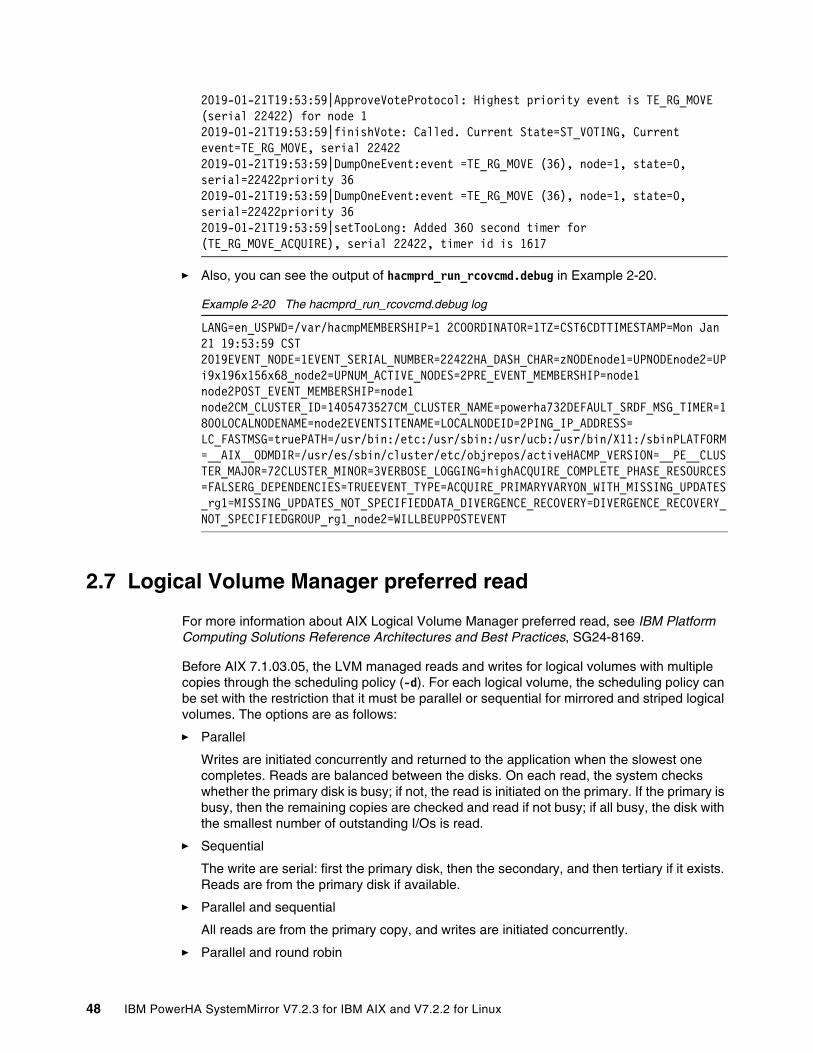
2019-01-21T19:53:59|ApproveVoteProtocol: Highest priority event is TE_RG_MOVE (serial 22422) for node 12019-01-21T19:53:59|finishVote: Called. Current State=ST_VOTING, Current event=TE_RG_MOVE, serial 224222019-01-21T19:53:59|DumpOneEvent:event =TE_RG_MOVE (36), node=1, state=0, serial=22422priority 362019-01-21T19:53:59|DumpOneEvent:event =TE_RG_MOVE (36), node=1, state=0, serial=22422priority 362019-01-21T19:53:59|setTooLong: Added 360 second timer for (TE_RG_MOVE_ACQUIRE), serial 22422, timer id is 1617
� Also, you can see the output of hacmprd_run_rcovcmd.debug in Example 2-20.
Example 2-20 The hacmprd_run_rcovcmd.debug log
LANG=en_USPWD=/var/hacmpMEMBERSHIP=1 2COORDINATOR=1TZ=CST6CDTTIMESTAMP=Mon Jan 21 19:53:59 CST 2019EVENT_NODE=1EVENT_SERIAL_NUMBER=22422HA_DASH_CHAR=zNODEnode1=UPNODEnode2=UPi9x196x156x68_node2=UPNUM_ACTIVE_NODES=2PRE_EVENT_MEMBERSHIP=node1 node2POST_EVENT_MEMBERSHIP=node1 node2CM_CLUSTER_ID=1405473527CM_CLUSTER_NAME=powerha732DEFAULT_SRDF_MSG_TIMER=1800LOCALNODENAME=node2EVENTSITENAME=LOCALNODEID=2PING_IP_ADDRESS= LC_FASTMSG=truePATH=/usr/bin:/etc:/usr/sbin:/usr/ucb:/usr/bin/X11:/sbinPLATFORM=__AIX__ODMDIR=/usr/es/sbin/cluster/etc/objrepos/activeHACMP_VERSION=__PE__CLUSTER_MAJOR=72CLUSTER_MINOR=3VERBOSE_LOGGING=highACQUIRE_COMPLETE_PHASE_RESOURCES=FALSERG_DEPENDENCIES=TRUEEVENT_TYPE=ACQUIRE_PRIMARYVARYON_WITH_MISSING_UPDATES_rg1=MISSING_UPDATES_NOT_SPECIFIEDDATA_DIVERGENCE_RECOVERY=DIVERGENCE_RECOVERY_NOT_SPECIFIEDGROUP_rg1_node2=WILLBEUPPOSTEVENT
2.7 Logical Volume Manager preferred read
For more information about AIX Logical Volume Manager preferred read, see IBM Platform Computing Solutions Reference Architectures and Best Practices, SG24-8169.
Before AIX 7.1.03.05, the LVM managed reads and writes for logical volumes with multiple copies through the scheduling policy (-d). For each logical volume, the scheduling policy can be set with the restriction that it must be parallel or sequential for mirrored and striped logical volumes. The options are as follows:
� Parallel
Writes are initiated concurrently and returned to the application when the slowest one completes. Reads are balanced between the disks. On each read, the system checks whether the primary disk is busy; if not, the read is initiated on the primary. If the primary is busy, then the remaining copies are checked and read if not busy; if all busy, the disk with the smallest number of outstanding I/Os is read.
� Sequential
The write are serial: first the primary disk, then the secondary, and then tertiary if it exists. Reads are from the primary disk if available.
� Parallel and sequential
All reads are from the primary copy, and writes are initiated concurrently.
� Parallel and round robin
48 IBM PowerHA SystemMirror V7.2.3 for IBM AIX and V7.2.2 for Linux

Similar to the parallel policy, but rather than checking the primary first, reads are alternated between all copies.
With AIX 7.1.03.05, a new option was introduced for AIX LVM that allows a preferred read to be set to one copy of the logical volume. This flag (-R) is used with mirror pools and setting the value 1 - 3 to specify the preferred mirror pool. Setting the value to 0 disables the preferred read copy.
With PowerHA V7.2.3, the Cluster Single Point of Control (C-SPOC) SMIT menus were modified to include the preferred read option so that logical volumes can be configured at the cluster level with mirror pools and a preferred read set.
Note: Setting the preferred read copy overrides the scheduling policy while the preferred copy is available. If it is not available, the reads follow the scheduling policy for the logical volume.
Note: Some problems were found with the implementation of this change during the testing for this IBM Redbooks publication. Check the readme file for details about the fix that is available in the Version 7.2.3 SP1 release.
Chapter 2. New features 49

50 IBM PowerHA SystemMirror V7.2.3 for IBM AIX and V7.2.2 for Linux
Chapter 3. Planning considerations
This chapter provides information to help you plan the implementation of IBM PowerHA SystemMirror.
This chapter covers the following topics:
� Introduction
� CAA repository disk
� CAA tunables
� Important considerations for Virtual I/O Server
� Network considerations
� Network File System tiebreaker
3
© Copyright IBM Corp. 2019. All rights reserved. 51

3.1 Introduction
There are many different ways to build a highly available environment. This chapter describes a small subset.
3.1.1 Mirrored architecture
In a mirrored architecture, you have identical or nearly identical physical components in each part of the data center. You can have this type of setup in a single room (although this is not recommended), in different rooms in the same building, or in different buildings. The distance between each part can be between few kilometers or several kilometers (or up to 50+ km, depending on the application latency requirements).
Figure 3-1 shows a high-level diagram of a cluster. In this example, there are two networks, two managed systems, two Virtual Input/Output Servers (VIOSs) per managed system, and two storage subsystems. This example also uses the Logical Volume Manager (LVM) mirroring for maintaining a complete copy of data within each storage subsystem.
This example also has a logical unit number (LUN) for the Cluster Aware AIX (CAA) repository disk on each storage subsystem. For more information about how to set up the CAA repository disk, see 3.2, “CAA repository disk” on page 56.
Figure 3-1 Cluster with multiple storage subsystems
52 IBM PowerHA SystemMirror V7.2.3 for IBM AIX and V7.2.2 for Linux
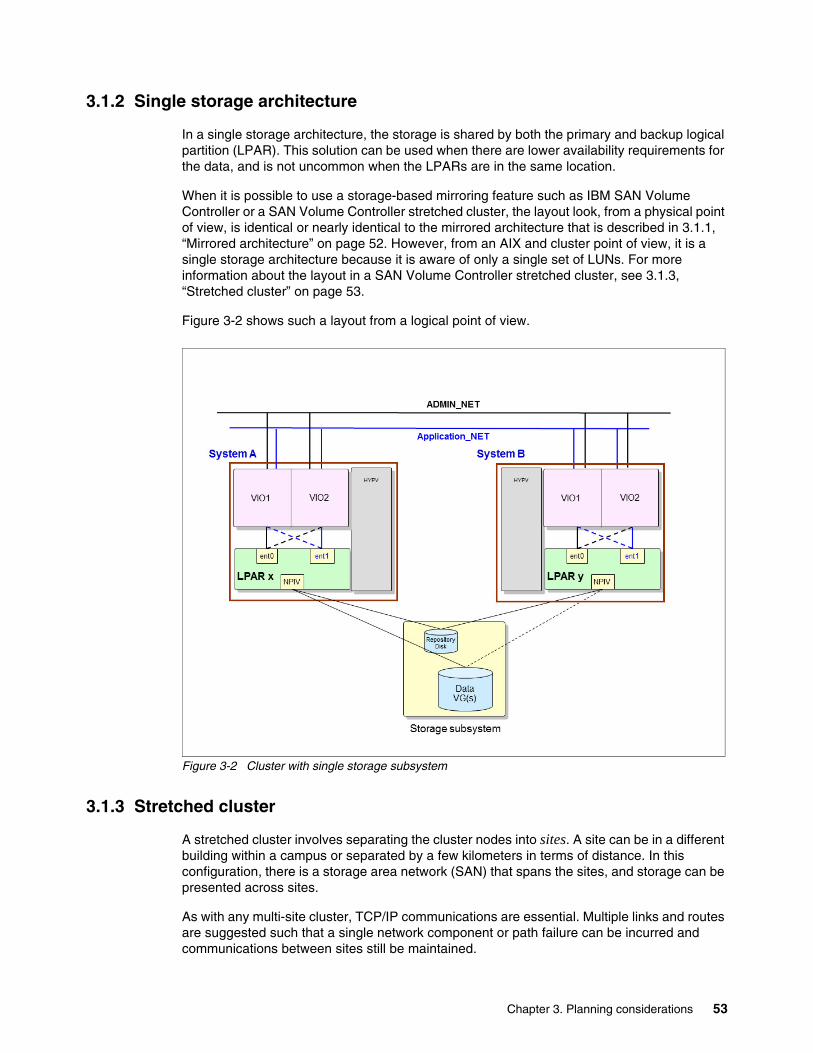
3.1.2 Single storage architecture
In a single storage architecture, the storage is shared by both the primary and backup logical partition (LPAR). This solution can be used when there are lower availability requirements for the data, and is not uncommon when the LPARs are in the same location.
When it is possible to use a storage-based mirroring feature such as IBM SAN Volume Controller or a SAN Volume Controller stretched cluster, the layout look, from a physical point of view, is identical or nearly identical to the mirrored architecture that is described in 3.1.1, “Mirrored architecture” on page 52. However, from an AIX and cluster point of view, it is a single storage architecture because it is aware of only a single set of LUNs. For more information about the layout in a SAN Volume Controller stretched cluster, see 3.1.3, “Stretched cluster” on page 53.
Figure 3-2 shows such a layout from a logical point of view.
Figure 3-2 Cluster with single storage subsystem
3.1.3 Stretched cluster
A stretched cluster involves separating the cluster nodes into sites. A site can be in a different building within a campus or separated by a few kilometers in terms of distance. In this configuration, there is a storage area network (SAN) that spans the sites, and storage can be presented across sites.
As with any multi-site cluster, TCP/IP communications are essential. Multiple links and routes are suggested such that a single network component or path failure can be incurred and communications between sites still be maintained.
Chapter 3. Planning considerations 53

Another main concern is having redundant storage and verifying that the data within the storage devices is synchronized across sites. The following section presents a method for synchronizing the shared data.
SAN Volume Controller in a stretched configurationThe SAN Volume Controller can be configured in a stretched configuration. In the stretched configuration, the SAN Volume Controller presents two storage devices that are separated by distance but look as though it is a single SAN Volume Controller device. The SAN Volume Controller itself keeps the data between the sites consistent through its disk mirroring technology.
The SAN Volume Controller in a stretched configuration allows the PowerHA cluster to provide continuous availability of the storage LUNs even if there is a single component failure anywhere in the storage environment. With this combination, the behavior of the cluster is similar in terms of function and failure scenarios in a local cluster (Figure 3-3).
Figure 3-3 SAN Volume Controller stretched configuration
3.1.4 Linked cluster
A linked cluster is another type of cluster that involves multiple sites. In this case, there is no SAN across sites because the distance between sites is often too far or the expense is too great. In this configuration, the repository disk is mirrored across the IP network. Each site has its own copy of the repository disk and PowerHA keeps those disks synchronized.
54 IBM PowerHA SystemMirror V7.2.3 for IBM AIX and V7.2.2 for Linux

TCP/IP communications are essential, and multiple links and routes are suggested such that a single network component or path failure can be incurred and communications between sites still be maintained.
For more information about linked clusters see IBM PowerHA SystemMirror 7.1.2 Enterprise Edition for AIX, SG24-8106.
IBM supported storage that uses copy servicesThere are several IBM supported storage devices with copy services capabilities. For the following example, we use one of these devices, the SAN Volume Controller. SAN Volume Controller can replicate data across long distances by using the SAN Volume Controller copy services functions. The data can be replicated in synchronous or asynchronous modes where synchronous provides the most up-to-date data redundancy.
For data replication in synchronous mode where both writes must complete before acknowledgment is sent to the application, the distance can greatly affect application performance. Synchronous mode is commonly used for 100 kilometers or less. Asynchronous modes are often used for distances over 100 km. However, these are common baseline recommendations.
If there is a failure that requires moving the workload to the remaining site, PowerHA interacts directly with the storage to switch the direction of the replication. PowerHA then makes the LUNs read/write-capable and varies on the appropriate volume groups (VGs) to activate the application on the remaining site.
Chapter 3. Planning considerations 55
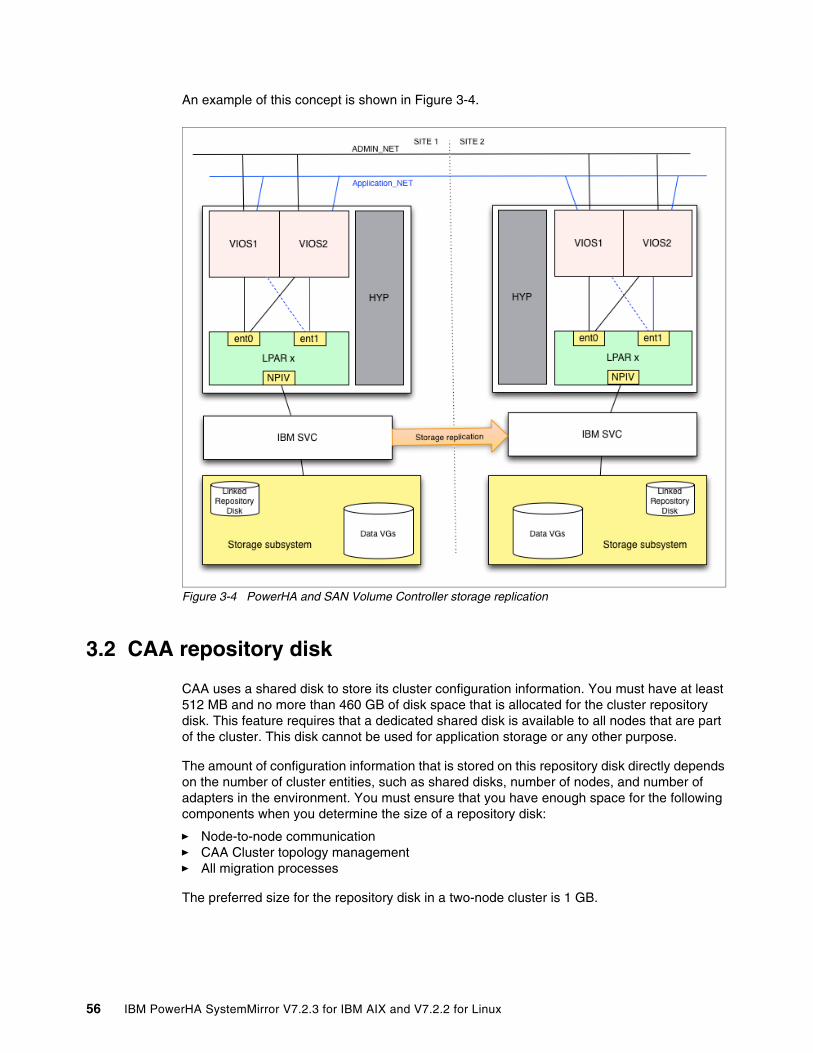
An example of this concept is shown in Figure 3-4.
Figure 3-4 PowerHA and SAN Volume Controller storage replication
3.2 CAA repository disk
CAA uses a shared disk to store its cluster configuration information. You must have at least 512 MB and no more than 460 GB of disk space that is allocated for the cluster repository disk. This feature requires that a dedicated shared disk is available to all nodes that are part of the cluster. This disk cannot be used for application storage or any other purpose.
The amount of configuration information that is stored on this repository disk directly depends on the number of cluster entities, such as shared disks, number of nodes, and number of adapters in the environment. You must ensure that you have enough space for the following components when you determine the size of a repository disk:
� Node-to-node communication� CAA Cluster topology management� All migration processes
The preferred size for the repository disk in a two-node cluster is 1 GB.
56 IBM PowerHA SystemMirror V7.2.3 for IBM AIX and V7.2.2 for Linux
3.2.1 Preparing for a CAA repository disk
A common way to protect the repository disk is to use storage-based mirroring or RAID. One example is the one that is described in 3.1.2, “Single storage architecture” on page 53. In this example, you must make sure that the LUN for the CAA repository disk is visible on all cluster nodes, and that there is a physical volume identifier (PVID) that is assigned to it.
If you have a multi-storage environment, such as the one that is described in 3.1.1, “Mirrored architecture” on page 52, then see 3.2.2, “CAA with multiple storage devices” on page 57.
3.2.2 CAA with multiple storage devices
The description here is related to the architecture that is described in 3.1.1, “Mirrored architecture” on page 52. This example uses one backup CAA repository disk. The maximum number of backup disks that you can define is six.
If you plan to use one or more disks, which can potentially be used as backup disks for the CAA repository, it is a best practice to rename the disks, as described in “Renaming the hdisk” on page 59. However, this is not possible in all cases.
The examples in this section mainly use smitty sysmirror. However, using the clmgr command can be faster, but it can be hard to use by a novice. The examples use the clmgr command where it makes sense or where it is the only option.
Using the standard hdisk nameA current drawback of having multiple LUNs that can be used as repository disks is that they are not clearly identified as such by the lspv output. In this example, hdisk3 and hdisk4 are the LUNs that are prepared for the primary and backup CAA repository disks. Therefore, hdisk1 and hdisk2 are used for the application. Example 3-1 shows the output of the lspv command before starting the configuration.
Example 3-1 The lspv output before configuring CAA
# lspvhdisk0 00f71e6a059e7e1a rootvg activehdisk1 00c3f55e34ff43cc Nonehdisk2 00c3f55e34ff433d Nonehdisk3 00f747c9b40ebfa5 Nonehdisk4 00f747c9b476a148 Nonehdisk5 00f71e6a059e701b rootvg active#
Important: The repository is not supported for mirroring by LVM.
Important: Third-party MultiPath I/O (MPIO) management software, such as EMC PowerPath, uses disk mapping to manage multi-paths. These software programs typically have a disk definition at a higher level, and path-specific disks underneath. Also, these software programs typically use special naming conventions.
Renaming these types of disks by using the AIX rendev command can confuse the third-party MPIO software and create disk-related issues. For more information about any disk renaming tool that is available as part of the vendor’s software kit, see your vendor documentation.
Chapter 3. Planning considerations 57

After selecting hdisk3 as the CAA repository disk, synchronizing and creating the cluster, and creating the application VG, you get the output that is listed in Example 3-2. The commands that are used for this example are the following ones:
clmgr add cluster test_clclmgr sync cluster
As shown in Example 3-2, the problem is that the lspv command does not show that hdisk4 is reserved as the backup disk for the CAA repository.
Example 3-2 The lspv output after configuring CAA
# lspvhdisk0 00f71e6a059e7e1a rootvg activehdisk1 00c3f55e34ff43cc testvghdisk2 00c3f55e34ff433d testvghdisk3 00f747c9b40ebfa5 caavg_private activehdisk4 00f747c9b476a148 Nonehdisk5 00f71e6a059e701b rootvg active#
To see which disk is reserved as a backup disk, use the clmgr -v query repository command or the odmget HACMPsircol command. Example 3-3 shows the output of the clmgr command, and Example 3-4 on page 59 shows the output of the odmget command.
Example 3-3 The clmgr -v query repository output
# clmgr -v query repositoryNAME="hdisk3"NODE="c2n1"PVID="00f747c9b40ebfa5"UUID="12d1d9a1-916a-ceb2-235d-8c2277f53d06"BACKUP="0"TYPE="mpioosdisk"DESCRIPTION="MPIO IBM 2076 FC Disk"SIZE="1024"AVAILABLE="512"CONCURRENT="true"ENHANCED_CONCURRENT_MODE="true"STATUS="UP"
NAME="hdisk4"NODE="c2n1"PVID="00f747c9b476a148"UUID="c961dda2-f5e6-58da-934e-7878cfbe199f"BACKUP="1"TYPE="mpioosdisk"DESCRIPTION="MPIO IBM 2076 FC Disk"SIZE="1024"AVAILABLE="95808"CONCURRENT="true"ENHANCED_CONCURRENT_MODE="true"STATUS="BACKUP"#
58 IBM PowerHA SystemMirror V7.2.3 for IBM AIX and V7.2.2 for Linux
As you can see in the clmgr output, you can directly see the hdisk name. The odmget command output (Example 3-4 on page 59) lists the PVIDs.
Example 3-4 The odmget HACMPsircol output
# odmget HACMPsircol
HACMPsircol: name = "c2n1_cluster_sircol" id = 0 uuid = "0" ip_address = "" repository = "00f747c9b40ebfa5" backup_repository = "00f747c9b476a148"#
Renaming the hdiskTo get around the issues that are mentioned in “Using the standard hdisk name” on page 57, rename the hdisks. The advantage is that it is much easier to see which disk is reserved as the CAA repository disk.
There are some points to consider:
� Generally, you can use any name, but if it gets too long you can experience some administration issues.
� The name must be unique.
� It is preferable not to have the string “disk” as part of the name. There might be some scripts or tools that can search for the string “disk”.
� You must manually rename the hdisks on all cluster nodes.
Using a long nameFirst, we test by using a longer and more descriptive name. Example 3-5 shows the output of the lspv command before we started.
Example 3-5 The lspv output before using rendev
# lspvhdisk0 00f71e6a059e7e1a rootvg activehdisk1 00c3f55e34ff43cc Nonehdisk2 00c3f55e34ff433d Nonehdisk3 00f747c9b40ebfa5 Nonehdisk4 00f747c9b476a148 Nonehdisk5 00f71e6a059e701b rootvg active
Important: Third-party MPIO management software, such as EMC PowerPath, uses disk mapping to manage multi-paths. These software programs typically have a disk definition at a higher level, and path-specific disks underneath. Also, these software programs typically use special naming conventions.
Renaming these types of disks by using the AIX rendev command can confuse the third-party MPIO software and create disk-related issues. For more information about any disk renaming tool that is available as part of the vendor’s software kit, see your vendor documentation.
Chapter 3. Planning considerations 59
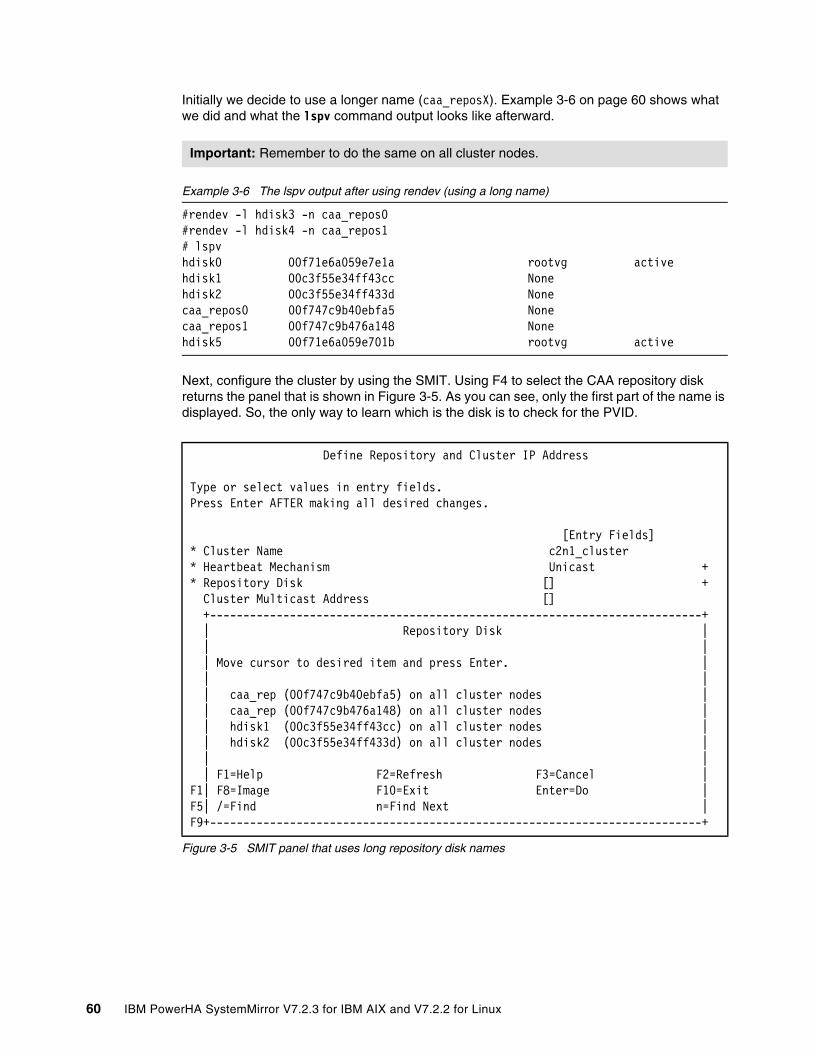
Initially we decide to use a longer name (caa_reposX). Example 3-6 on page 60 shows what we did and what the lspv command output looks like afterward.
Example 3-6 The lspv output after using rendev (using a long name)
#rendev -l hdisk3 -n caa_repos0#rendev -l hdisk4 -n caa_repos1# lspvhdisk0 00f71e6a059e7e1a rootvg activehdisk1 00c3f55e34ff43cc Nonehdisk2 00c3f55e34ff433d Nonecaa_repos0 00f747c9b40ebfa5 Nonecaa_repos1 00f747c9b476a148 Nonehdisk5 00f71e6a059e701b rootvg active
Next, configure the cluster by using the SMIT. Using F4 to select the CAA repository disk returns the panel that is shown in Figure 3-5. As you can see, only the first part of the name is displayed. So, the only way to learn which is the disk is to check for the PVID.
Figure 3-5 SMIT panel that uses long repository disk names
Important: Remember to do the same on all cluster nodes.
Define Repository and Cluster IP Address
Type or select values in entry fields.Press Enter AFTER making all desired changes.
[Entry Fields]* Cluster Name c2n1_cluster* Heartbeat Mechanism Unicast +* Repository Disk [] + Cluster Multicast Address [] +--------------------------------------------------------------------------+ | Repository Disk | | | | Move cursor to desired item and press Enter. | | | | caa_rep (00f747c9b40ebfa5) on all cluster nodes | | caa_rep (00f747c9b476a148) on all cluster nodes | | hdisk1 (00c3f55e34ff43cc) on all cluster nodes | | hdisk2 (00c3f55e34ff433d) on all cluster nodes | | | | F1=Help F2=Refresh F3=Cancel |F1| F8=Image F10=Exit Enter=Do |F5| /=Find n=Find Next |F9+--------------------------------------------------------------------------+
60 IBM PowerHA SystemMirror V7.2.3 for IBM AIX and V7.2.2 for Linux
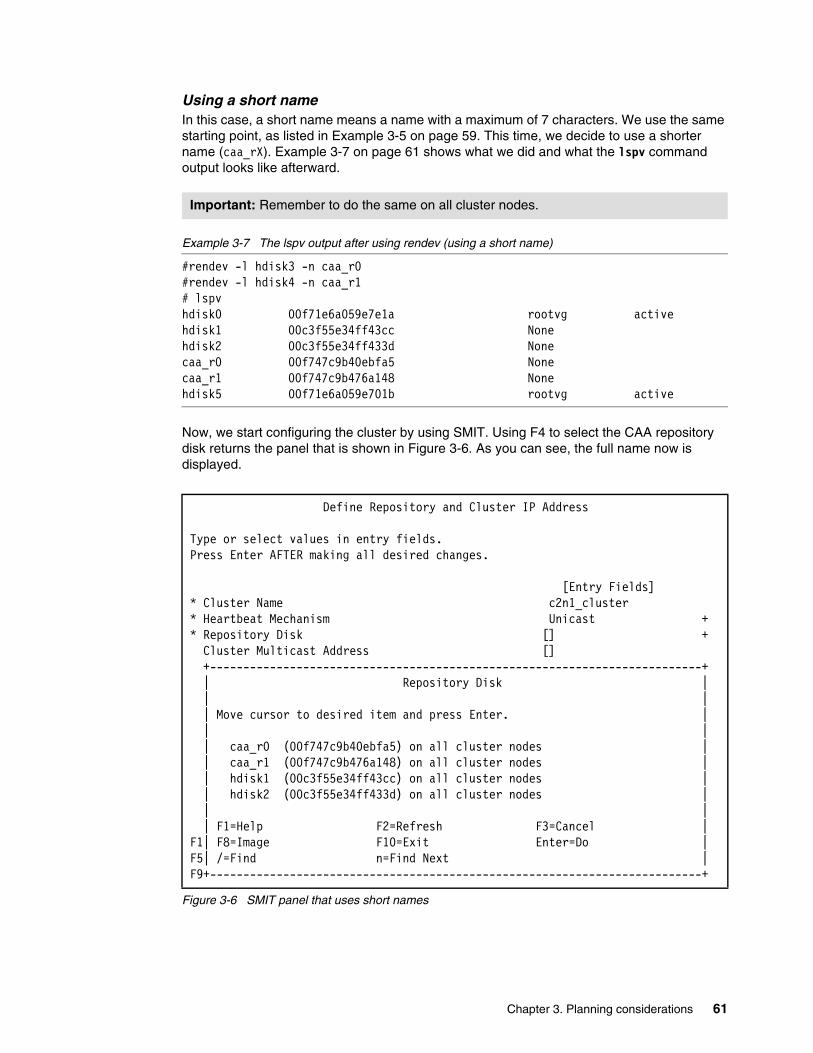
Using a short nameIn this case, a short name means a name with a maximum of 7 characters. We use the same starting point, as listed in Example 3-5 on page 59. This time, we decide to use a shorter name (caa_rX). Example 3-7 on page 61 shows what we did and what the lspv command output looks like afterward.
Example 3-7 The lspv output after using rendev (using a short name)
#rendev -l hdisk3 -n caa_r0#rendev -l hdisk4 -n caa_r1# lspvhdisk0 00f71e6a059e7e1a rootvg activehdisk1 00c3f55e34ff43cc Nonehdisk2 00c3f55e34ff433d Nonecaa_r0 00f747c9b40ebfa5 Nonecaa_r1 00f747c9b476a148 Nonehdisk5 00f71e6a059e701b rootvg active
Now, we start configuring the cluster by using SMIT. Using F4 to select the CAA repository disk returns the panel that is shown in Figure 3-6. As you can see, the full name now is displayed.
Figure 3-6 SMIT panel that uses short names
Important: Remember to do the same on all cluster nodes.
Define Repository and Cluster IP Address
Type or select values in entry fields.Press Enter AFTER making all desired changes.
[Entry Fields]* Cluster Name c2n1_cluster* Heartbeat Mechanism Unicast +* Repository Disk [] + Cluster Multicast Address [] +--------------------------------------------------------------------------+ | Repository Disk | | | | Move cursor to desired item and press Enter. | | | | caa_r0 (00f747c9b40ebfa5) on all cluster nodes | | caa_r1 (00f747c9b476a148) on all cluster nodes | | hdisk1 (00c3f55e34ff43cc) on all cluster nodes | | hdisk2 (00c3f55e34ff433d) on all cluster nodes | | | | F1=Help F2=Refresh F3=Cancel |F1| F8=Image F10=Exit Enter=Do |F5| /=Find n=Find Next |F9+--------------------------------------------------------------------------+
Chapter 3. Planning considerations 61
3.3 CAA tunables
This section describes some CAA tunables and what they are used for. Example 3-8 on page 62 shows the list of the CAA tunables with IBM AIX 7.2.0.0 and IBM PowerHA V7.2.0. Newer versions can have more tunables, different defaults, or both.
In general, you must never modify these values because these values are modified and managed by PowerHA.
Example 3-8 List of CAA tunables
# clctrl -tune -aha72cluster(71a0d83c-e467-11e5-8022-4217e0ce7b02).communication_mode = u ha72cluster(71a0d83c-e467-11e5-8022-4217e0ce7b02).config_timeout = 240 ha72cluster(71a0d83c-e467-11e5-8022-4217e0ce7b02).deadman_mode = a ha72cluster(71a0d83c-e467-11e5-8022-4217e0ce7b02).link_timeout = 30000 ha72cluster(71a0d83c-e467-11e5-8022-4217e0ce7b02).local_merge_policy = m ha72cluster(71a0d83c-e467-11e5-8022-4217e0ce7b02).network_fdt = 20000ha72cluster(71a0d83c-e467-11e5-8022-4217e0ce7b02).no_if_traffic_monitor = 0 ha72cluster(71a0d83c-e467-11e5-8022-4217e0ce7b02).node_down_delay = 10000 ha72cluster(71a0d83c-e467-11e5-8022-4217e0ce7b02).node_timeout = 30000 ha72cluster(71a0d83c-e467-11e5-8022-4217e0ce7b02).packet_ttl = 32 ha72cluster(71a0d83c-e467-11e5-8022-4217e0ce7b02).remote_hb_factor = 1 ha72cluster(71a0d83c-e467-11e5-8022-4217e0ce7b02).repos_mode = e ha72cluster(71a0d83c-e467-11e5-8022-4217e0ce7b02).site_merge_policy = p
3.3.1 CAA network monitoring
By default, CAA monitors for incoming IP traffic and physical link status. In rare situations when you are using physical Ethernet adapters, you might need to disable the monitoring for incoming IP traffic. As mentioned before, this is done in PowerHA and not in CAA.
In general, do not change the monitoring values unless you are instructed by IBM.
For your information, some details are listed in this section. To list and change this setting, use the clmgr command. This change affects all IP networks.
� To list the current setting, run:clmgr -a MONITOR_INTERFACE query cluster
The default is MONITOR_INTERFACE=enable.
� To disable it, run:clmgr -f modify cluster MONITOR_INTERFACE=disable
Attention: Do not change any of these tunables without the explicit permission of IBM technical support.
Note: Starting with PowerHA V7.2, the traffic stimulation feature makes this flag obsolete.
Attention: Do not change this tunable without the explicit permission of IBM technical support.
62 IBM PowerHA SystemMirror V7.2.3 for IBM AIX and V7.2.2 for Linux

In PowerHA V7.2.0 and later, most of these issues do not exist any longer. Therefore, it is advised to change it back to the default (MONITOR_INTERFACE=enable) and test it.
� To enable it, run:clmgr -f modify cluster MONITOR_INTERFACE=enable
In the clctrl -tune -a command output, this is listed as no_if_traffic_monitor. The value 0 means enabled and the value 1 means disabled.
3.3.2 Network failure detection time
Starting with PowerHA V7.2.0, the network failure detection time can be defined. The default is 20 seconds. In the clctrl command output, it is listed as network_fdt.
To change this option, use the clmgr or smit commands.
3.4 Important considerations for Virtual I/O Server
This section lists some new features of AIX and Virtual I/O Server (VIOS) that help to increase overall availability, and are specially suggested for use with PowerHA environments.
3.4.1 Using poll_uplink
To use the poll_uplink option, you must have the following versions and settings:
� VIOS V2.2.5 (Version 2.2.6 is recommended when supported) or later installed in all related VIOS.
� The LPAR must be at AIX 7.1 TL3 SP7 for PowerHA V7.2.1, and AIX 7.1 TL4 SP2 for Version 7.2.2.
� The option poll_uplink must be set on the LPAR on the virtual entX interfaces.
The option poll_uplink can be defined directly on the virtual interface if you are using Shared Ethernet Adapter (SEA) fallover or the Etherchannel device that points to the virtual interfaces. To enable poll_uplink, use the following command:
chdev -l entX -a poll_uplink=yes –P
There are no additional changes to PowerHA and CAA needed. The information about the virtual link status is automatically detected by CAA. There is no need to change the MONITOR_INTERFACE setting. Details about MONITOR_INTERFACE are described in 3.3.1, “CAA network monitoring” on page 62.
Important: You must restart the LPAR to activate poll_uplink.
Chapter 3. Planning considerations 63
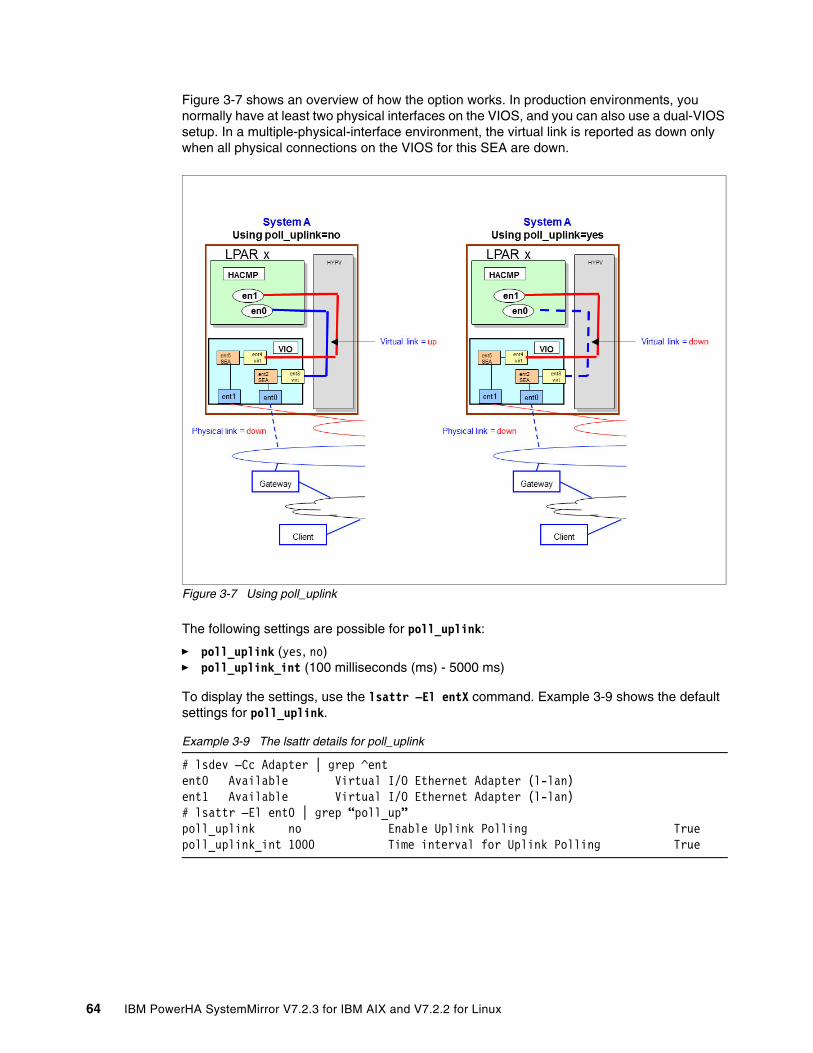
Figure 3-7 shows an overview of how the option works. In production environments, you normally have at least two physical interfaces on the VIOS, and you can also use a dual-VIOS setup. In a multiple-physical-interface environment, the virtual link is reported as down only when all physical connections on the VIOS for this SEA are down.
Figure 3-7 Using poll_uplink
The following settings are possible for poll_uplink:
� poll_uplink (yes, no)� poll_uplink_int (100 milliseconds (ms) - 5000 ms)
To display the settings, use the lsattr –El entX command. Example 3-9 shows the default settings for poll_uplink.
Example 3-9 The lsattr details for poll_uplink
# lsdev –Cc Adapter | grep ^entent0 Available Virtual I/O Ethernet Adapter (l-lan)ent1 Available Virtual I/O Ethernet Adapter (l-lan)# lsattr –El ent0 | grep “poll_up”poll_uplink no Enable Uplink Polling Truepoll_uplink_int 1000 Time interval for Uplink Polling True
64 IBM PowerHA SystemMirror V7.2.3 for IBM AIX and V7.2.2 for Linux
If your LPAR is at least AIX 7.1 TL3 SP7 or later, you can use the entstat command to check for the poll_uplink status and if it is enabled. Example 3-10 shows an excerpt of the entstat command output in an LPAR where poll_uplink is not enabled (set to no).
Example 3-10 Using poll_uplink=no
# entstat -d ent0--------------------------------------------------ETHERNET STATISTICS (en0) :Device Type: Virtual I/O Ethernet Adapter (l-lan)...General Statistics:-------------------No mbuf Errors: 0Adapter Reset Count: 0Adapter Data Rate: 20000Driver Flags: Up Broadcast Running Simplex 64BitSupport ChecksumOffload DataRateSet VIOENT...LAN State: Operational...#
Compared to Example 3-10, Example 3-11 shows the entstat command output on a system where poll_uplink is enabled and where all physical links that are related to this virtual interface are up. The text in bold shows the additional displayed content:
� VIRTUAL_PORT� PHYS_LINK_UP� Bridge Status: Up
Example 3-11 Using poll_uplink=yes when the physical link is up
# entstat -d ent0--------------------------------------------------ETHERNET STATISTICS (en0) :Device Type: Virtual I/O Ethernet Adapter (l-lan)...General Statistics:-------------------No mbuf Errors: 0Adapter Reset Count: 0Adapter Data Rate: 20000Driver Flags: Up Broadcast Running Simplex 64BitSupport ChecksumOffload DataRateSet VIOENT VIRTUAL_PORT PHYS_LINK_UP...LAN State: OperationalBridge Status: Up...#
Chapter 3. Planning considerations 65

When all physical links on the VIOS are down, then the output that is listed in Example 3-12 is displayed. The text PHYS_LINK_UP no longer displays, and the Bridge Status changes from Up to Unknown.
Example 3-12 Using poll_uplink=yes when the physical link is down
# entstat -d ent0--------------------------------------------------ETHERNET STATISTICS (en0) :Device Type: Virtual I/O Ethernet Adapter (l-lan)...General Statistics:-------------------No mbuf Errors: 0Adapter Reset Count: 0Adapter Data Rate: 20000Driver Flags: Up Broadcast Running Simplex 64BitSupport ChecksumOffload DataRateSet VIOENT VIRTUAL_PORT...LAN State: OperationalBridge Status: Unknown...#
3.4.2 Advantages for PowerHA when poll_uplink is used
In PowerHA V7, the network down detection is performed by CAA. CAA by default checks for IP traffic and for the link status of an interface. Therefore, using poll_uplink is advised for PowerHA LPARs, which helps the system to make a better decision when a given interface is up or down.
The network down failure detection is much faster if poll_uplink is used and the link is marked as down.
3.5 Network considerations
This section focuses on the network considerations from a PowerHA point of view only. From this point of view, it does not matter if you have virtual or physical network devices.
3.5.1 Dual-adapter networks
This type of network has historically been the most common since the inception of PowerHA SystemMirror. However, starting with virtualization, this type was replaced with single adapter network solutions. But, the “single” adapter is redundant by using Etherchannel and often combined with SEA.
In PowerHA V7.2, this solution can still be used, but it is not recommended. The cross-adapter checking logic is not implemented in PowerHA V7. The advantage of not having this feature is that PowerHA V7.2 and later versions do not require that the IP source route is enabled.
66 IBM PowerHA SystemMirror V7.2.3 for IBM AIX and V7.2.2 for Linux
When using a dual-adapter network in PowerHA V7.2 or later, you must also use the netmon.cf file in a similar way as that for a single adapter layout. In this case, the netmon.cf file must have a path for all potential enX interfaces that are defined.
3.5.2 Single-adapter network
When we describe a single-adapter network, it is from a PowerHA point of view. In a HA environment, you must always have redundant ways to access the network. This is commonly done today by using SEA fallover or Etherchannel Link Aggregation or node initialization block (NIB). The Etherchannel NIB-based solution can be used in both scenarios by using virtual adapters or physical adapters. The Etherchannel Link Aggregation-based solution can be used only if you have direct-attached adapters.
This setup eases the setup from a TCP/IP point of view, and it also reduces the content of the netmon.cf file. But, netmon.cf must still be used.
3.5.3 The netmon.cf file
In PowerHA V7.2, the netmon.cf file is now used by CAA. Before PowerHA V7.2, it was used by Reliable Scalable Cluster Technology (RSCT). There are now (starting with PowerHA V7.2) different rules for the netmon.cf content, as listed in Table 3-1.
Table 3-1 The netmon.cf file changes
Independent from the PowerHA version that is used, if possible, you must have more than one address defined (by interface). It is not recommended to use the gateway address. Modern gateways start dropping ICMP packages if there is high workload. ICMP packages that are sent to an address behind the gateway are not affected by this behavior. However, the network team can decide to drop all ICMP packets that are addressed to the gateway.
Note: With a single adapter, you use the SEA fallover or the Etherchannel fallover.
PowerHA V7.1.x PowerHA V7.2.x
RSCT based. CAA based.
Up to 30 lines by interface. Up to five lines by interface. Uses the last five lines if more than five lines are defined.
Checked every 4 seconds. Checked every 10 minutes. To force a reread, run clusterconf.
Runs continuously. Run only if CAA detects an outage.
Chapter 3. Planning considerations 67
3.6 Network File System tiebreaker
This section describes the Network File System (NFS) tiebreaker.
3.6.1 Introduction and concepts
The NFS tiebreaker function represents an extension of the previously introduced disk tiebreaker feature that relied on a Small Computer System Interface (SCSI) disk that is accessible to all nodes in a PowerHA cluster. The differences between the protocols that are used for accessing the tiebreaker (SCSI disk or NFS-mounted file) favor the NFS-based solution for linked clusters.
Split-brain situationA cluster split-brain event can occur when a group of nodes cannot communicate with the remaining nodes in a cluster. For example, in a two-site linked cluster, a split occurs if all communication links between the two sites fail. Depending on the communication network topology and the location of the interruption, a cluster split event splits the cluster into two (or more) partitions, each of them containing one or more cluster nodes. The resulting situation is commonly referred to as a split-brain situation.
In a split-brain situation, the two partitions have no knowledge of each other’s status, each of them considering the other as being offline. As a consequence, each partition tries to bring online the other partition’s resource groups (RGs), thus generating a high risk of data corruption on all shared disks. To prevent a split-brain situation and subsequent potential data corruption, split and merge policies are available to be configured.
Tiebreaker featureThe tiebreaker feature uses a tiebreaker resource to select a surviving partition that continues to operate when a cluster split-brain event occurs. This feature prevents data corruption on the shared cluster disks. The tiebreaker is identified either as a SCSI disk or an NFS-mounted file that must be accessible, under normal conditions, to all nodes in the cluster.
Split policyWhen a split-brain situation occurs, each partition attempts to acquire the tiebreaker by placing a lock on the tiebreaker disk or on the NFS file. The partition that first locks the SCSI disk or reserves the NFS file wins, and the other loses.
All nodes in the winning partition continue to process cluster events, and all nodes in the losing partition attempt to recover according to the defined split and merge action plan. This plan most often implies either the restart of the cluster nodes, or merely the restart of cluster services on those nodes.
Merge policyThere are situations in which, depending on the cluster split-brain policy, the cluster can have two partitions that run independent of each other. However, most often it is a best practice to configure a merge policy so that the partitions operate together again after communications are restored between them.
68 IBM PowerHA SystemMirror V7.2.3 for IBM AIX and V7.2.2 for Linux

In this second approach, when partitions that were part of the cluster are brought back online after the communication failure, they must be able to communicate with the partition that owns the tiebreaker disk or NFS file. If a partition that is brought back online cannot communicate with the tiebreaker disk or the NFS file, it does not join the cluster. The tiebreaker disk or NFS file is released when all nodes in the configuration rejoin the cluster.
The merge policy configuration, in this case an NFS-based tiebreaker, must be of the same type as that for the split policy.
3.6.2 Test environment setup
The lab environment that we use to test the NFS tiebreaker function consists of a two-site linked cluster, each site having a single node with a common NFS-mounted resource, as shown in Figure 3-8.
Figure 3-8 NFS tiebreaker test environment
Chapter 3. Planning considerations 69
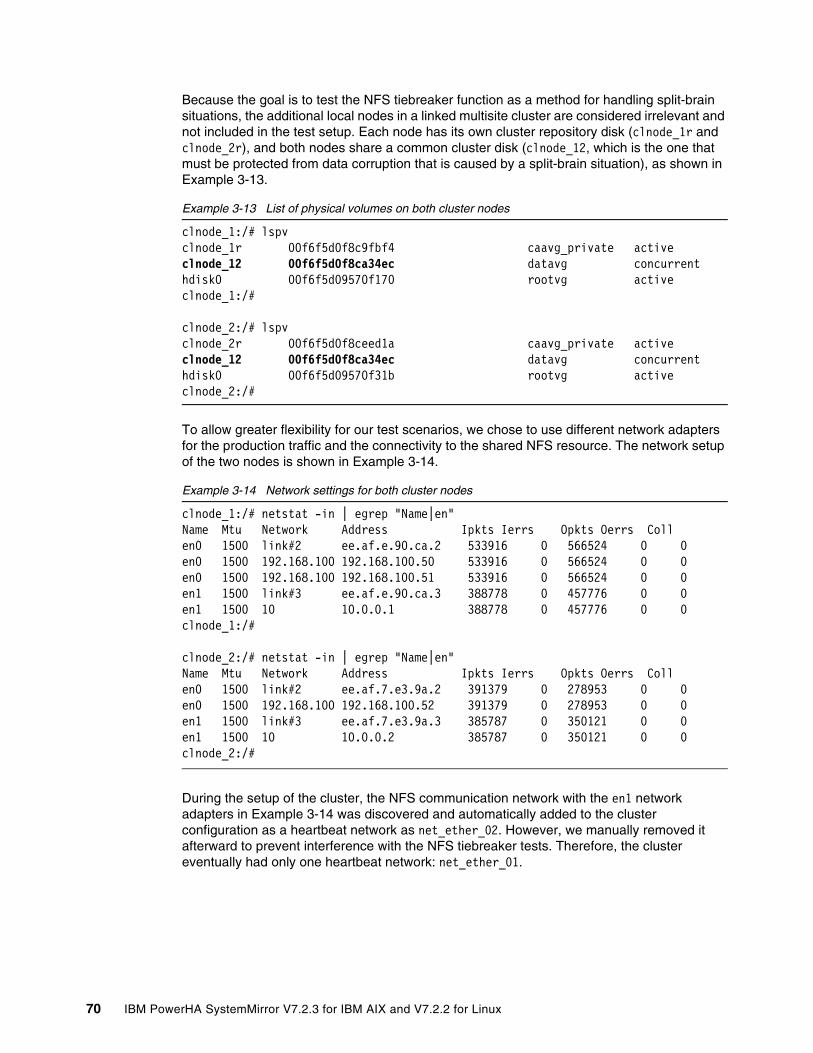
Because the goal is to test the NFS tiebreaker function as a method for handling split-brain situations, the additional local nodes in a linked multisite cluster are considered irrelevant and not included in the test setup. Each node has its own cluster repository disk (clnode_1r and clnode_2r), and both nodes share a common cluster disk (clnode_12, which is the one that must be protected from data corruption that is caused by a split-brain situation), as shown in Example 3-13.
Example 3-13 List of physical volumes on both cluster nodes
clnode_1:/# lspvclnode_1r 00f6f5d0f8c9fbf4 caavg_private activeclnode_12 00f6f5d0f8ca34ec datavg concurrenthdisk0 00f6f5d09570f170 rootvg activeclnode_1:/#
clnode_2:/# lspvclnode_2r 00f6f5d0f8ceed1a caavg_private activeclnode_12 00f6f5d0f8ca34ec datavg concurrenthdisk0 00f6f5d09570f31b rootvg activeclnode_2:/#
To allow greater flexibility for our test scenarios, we chose to use different network adapters for the production traffic and the connectivity to the shared NFS resource. The network setup of the two nodes is shown in Example 3-14.
Example 3-14 Network settings for both cluster nodes
clnode_1:/# netstat -in | egrep "Name|en"Name Mtu Network Address Ipkts Ierrs Opkts Oerrs Collen0 1500 link#2 ee.af.e.90.ca.2 533916 0 566524 0 0en0 1500 192.168.100 192.168.100.50 533916 0 566524 0 0en0 1500 192.168.100 192.168.100.51 533916 0 566524 0 0en1 1500 link#3 ee.af.e.90.ca.3 388778 0 457776 0 0en1 1500 10 10.0.0.1 388778 0 457776 0 0clnode_1:/#
clnode_2:/# netstat -in | egrep "Name|en"Name Mtu Network Address Ipkts Ierrs Opkts Oerrs Collen0 1500 link#2 ee.af.7.e3.9a.2 391379 0 278953 0 0en0 1500 192.168.100 192.168.100.52 391379 0 278953 0 0en1 1500 link#3 ee.af.7.e3.9a.3 385787 0 350121 0 0en1 1500 10 10.0.0.2 385787 0 350121 0 0clnode_2:/#
During the setup of the cluster, the NFS communication network with the en1 network adapters in Example 3-14 was discovered and automatically added to the cluster configuration as a heartbeat network as net_ether_02. However, we manually removed it afterward to prevent interference with the NFS tiebreaker tests. Therefore, the cluster eventually had only one heartbeat network: net_ether_01.
70 IBM PowerHA SystemMirror V7.2.3 for IBM AIX and V7.2.2 for Linux
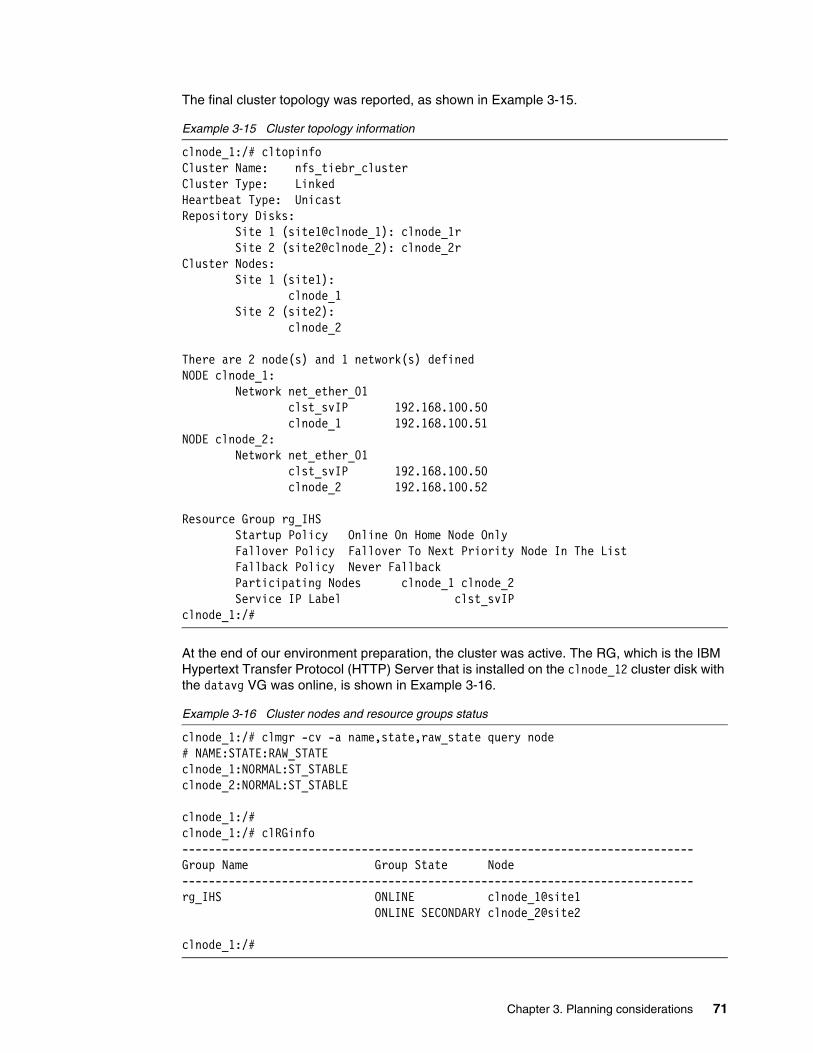
The final cluster topology was reported, as shown in Example 3-15.
Example 3-15 Cluster topology information
clnode_1:/# cltopinfoCluster Name: nfs_tiebr_clusterCluster Type: LinkedHeartbeat Type: UnicastRepository Disks: Site 1 (site1@clnode_1): clnode_1r Site 2 (site2@clnode_2): clnode_2rCluster Nodes: Site 1 (site1): clnode_1 Site 2 (site2): clnode_2
There are 2 node(s) and 1 network(s) definedNODE clnode_1: Network net_ether_01 clst_svIP 192.168.100.50 clnode_1 192.168.100.51NODE clnode_2: Network net_ether_01 clst_svIP 192.168.100.50 clnode_2 192.168.100.52
Resource Group rg_IHS Startup Policy Online On Home Node Only Fallover Policy Fallover To Next Priority Node In The List Fallback Policy Never Fallback Participating Nodes clnode_1 clnode_2 Service IP Label clst_svIPclnode_1:/#
At the end of our environment preparation, the cluster was active. The RG, which is the IBM Hypertext Transfer Protocol (HTTP) Server that is installed on the clnode_12 cluster disk with the datavg VG was online, is shown in Example 3-16.
Example 3-16 Cluster nodes and resource groups status
clnode_1:/# clmgr -cv -a name,state,raw_state query node# NAME:STATE:RAW_STATEclnode_1:NORMAL:ST_STABLEclnode_2:NORMAL:ST_STABLE
clnode_1:/#clnode_1:/# clRGinfo-----------------------------------------------------------------------------Group Name Group State Node-----------------------------------------------------------------------------rg_IHS ONLINE clnode_1@site1 ONLINE SECONDARY clnode_2@site2
clnode_1:/#
Chapter 3. Planning considerations 71
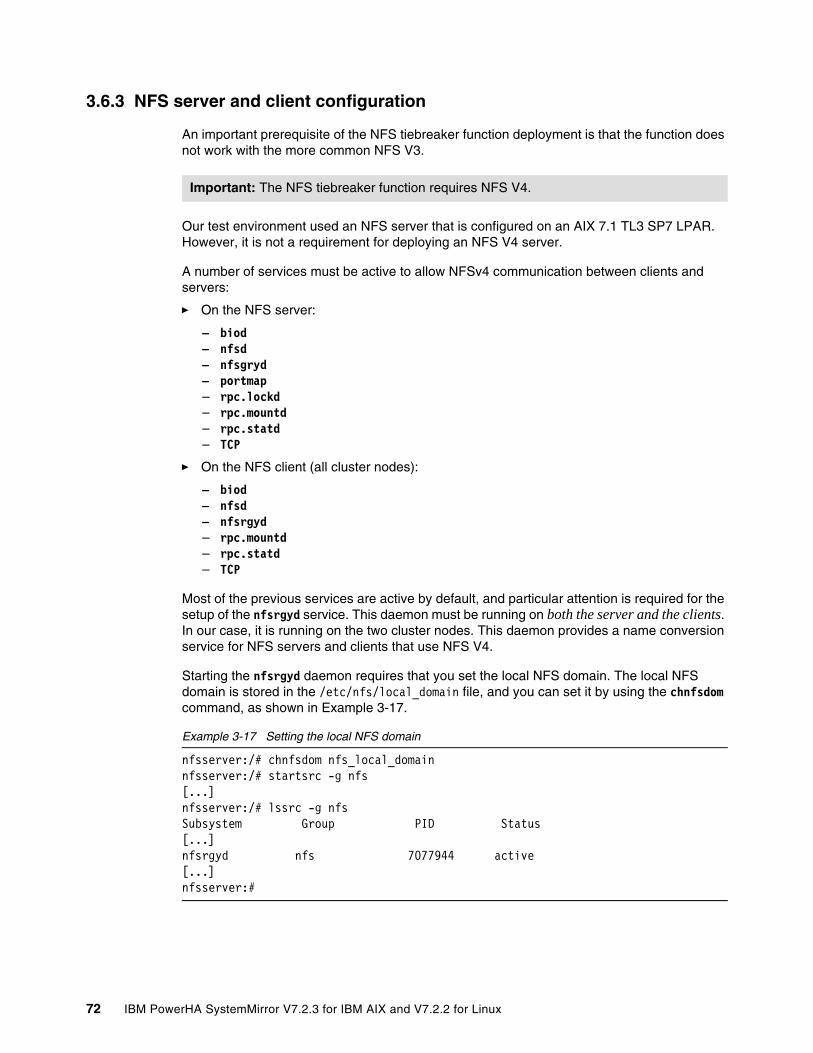
3.6.3 NFS server and client configuration
An important prerequisite of the NFS tiebreaker function deployment is that the function does not work with the more common NFS V3.
Our test environment used an NFS server that is configured on an AIX 7.1 TL3 SP7 LPAR. However, it is not a requirement for deploying an NFS V4 server.
A number of services must be active to allow NFSv4 communication between clients and servers:
� On the NFS server:
– biod– nfsd– nfsgryd– portmap– rpc.lockd– rpc.mountd– rpc.statd– TCP
� On the NFS client (all cluster nodes):
– biod– nfsd– nfsrgyd– rpc.mountd– rpc.statd– TCP
Most of the previous services are active by default, and particular attention is required for the setup of the nfsrgyd service. This daemon must be running on both the server and the clients. In our case, it is running on the two cluster nodes. This daemon provides a name conversion service for NFS servers and clients that use NFS V4.
Starting the nfsrgyd daemon requires that you set the local NFS domain. The local NFS domain is stored in the /etc/nfs/local_domain file, and you can set it by using the chnfsdom command, as shown in Example 3-17.
Example 3-17 Setting the local NFS domain
nfsserver:/# chnfsdom nfs_local_domainnfsserver:/# startsrc -g nfs[...]nfsserver:/# lssrc -g nfsSubsystem Group PID Status[...]nfsrgyd nfs 7077944 active[...]nfsserver:#
Important: The NFS tiebreaker function requires NFS V4.
72 IBM PowerHA SystemMirror V7.2.3 for IBM AIX and V7.2.2 for Linux
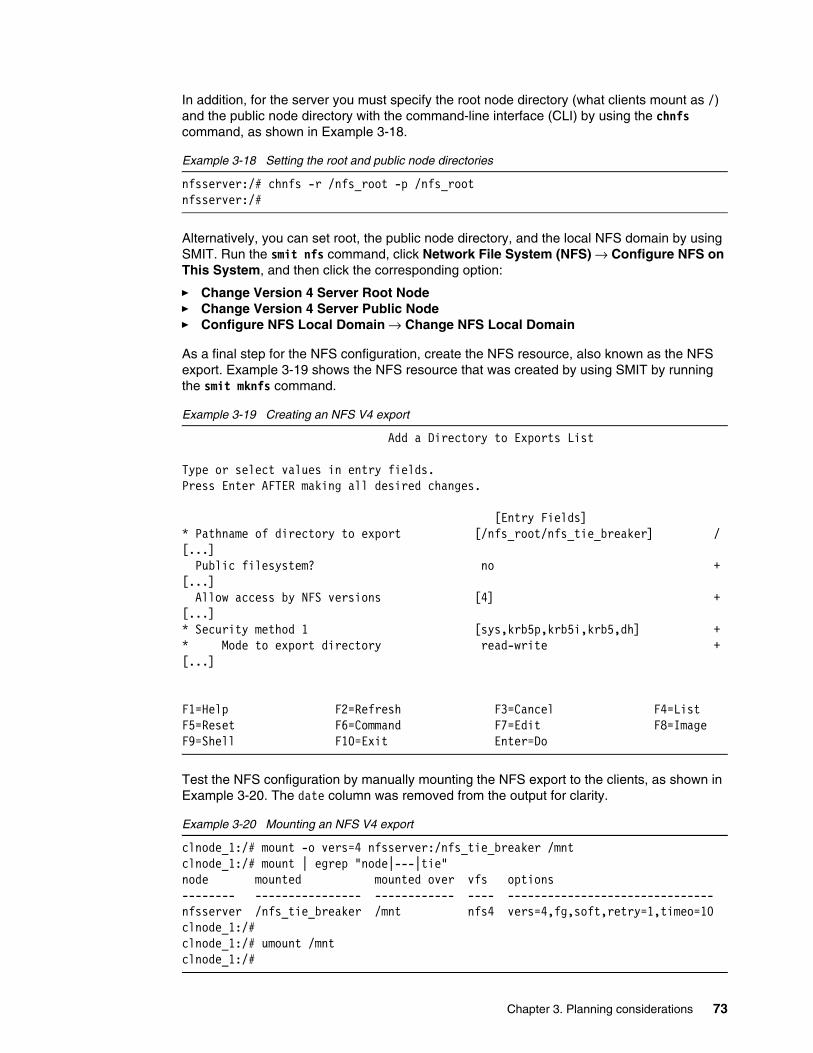
In addition, for the server you must specify the root node directory (what clients mount as /) and the public node directory with the command-line interface (CLI) by using the chnfs command, as shown in Example 3-18.
Example 3-18 Setting the root and public node directories
nfsserver:/# chnfs -r /nfs_root -p /nfs_rootnfsserver:/#
Alternatively, you can set root, the public node directory, and the local NFS domain by using SMIT. Run the smit nfs command, click Network File System (NFS) → Configure NFS on This System, and then click the corresponding option:
� Change Version 4 Server Root Node� Change Version 4 Server Public Node� Configure NFS Local Domain → Change NFS Local Domain
As a final step for the NFS configuration, create the NFS resource, also known as the NFS export. Example 3-19 shows the NFS resource that was created by using SMIT by running the smit mknfs command.
Example 3-19 Creating an NFS V4 export
Add a Directory to Exports List
Type or select values in entry fields.Press Enter AFTER making all desired changes.
[Entry Fields]* Pathname of directory to export [/nfs_root/nfs_tie_breaker] /[...] Public filesystem? no +[...] Allow access by NFS versions [4] +[...]* Security method 1 [sys,krb5p,krb5i,krb5,dh] +* Mode to export directory read-write +[...]
F1=Help F2=Refresh F3=Cancel F4=ListF5=Reset F6=Command F7=Edit F8=ImageF9=Shell F10=Exit Enter=Do
Test the NFS configuration by manually mounting the NFS export to the clients, as shown in Example 3-20. The date column was removed from the output for clarity.
Example 3-20 Mounting an NFS V4 export
clnode_1:/# mount -o vers=4 nfsserver:/nfs_tie_breaker /mntclnode_1:/# mount | egrep "node|---|tie"node mounted mounted over vfs options-------- ---------------- ------------ ---- -------------------------------nfsserver /nfs_tie_breaker /mnt nfs4 vers=4,fg,soft,retry=1,timeo=10clnode_1:/#clnode_1:/# umount /mntclnode_1:/#
Chapter 3. Planning considerations 73
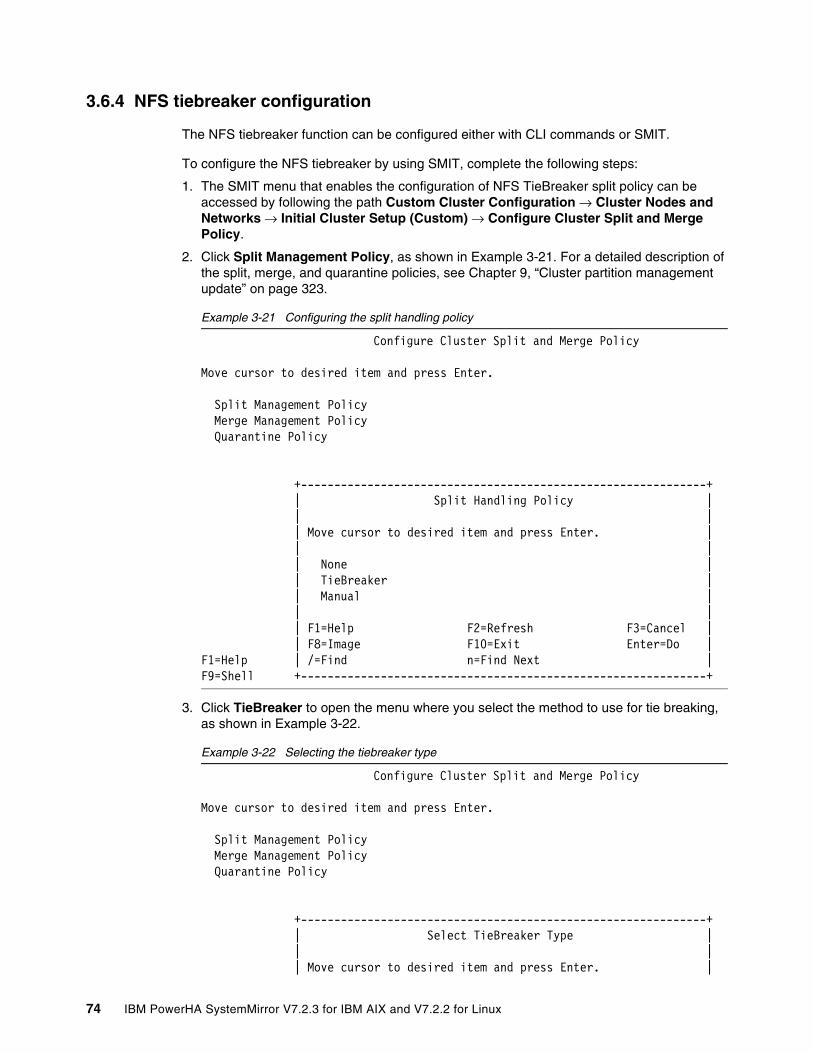
3.6.4 NFS tiebreaker configuration
The NFS tiebreaker function can be configured either with CLI commands or SMIT.
To configure the NFS tiebreaker by using SMIT, complete the following steps:
1. The SMIT menu that enables the configuration of NFS TieBreaker split policy can be accessed by following the path Custom Cluster Configuration → Cluster Nodes and Networks → Initial Cluster Setup (Custom) → Configure Cluster Split and Merge Policy.
2. Click Split Management Policy, as shown in Example 3-21. For a detailed description of the split, merge, and quarantine policies, see Chapter 9, “Cluster partition management update” on page 323.
Example 3-21 Configuring the split handling policy
Configure Cluster Split and Merge Policy
Move cursor to desired item and press Enter.
Split Management Policy Merge Management Policy Quarantine Policy
+-------------------------------------------------------------+ | Split Handling Policy | | | | Move cursor to desired item and press Enter. | | | | None | | TieBreaker | | Manual | | | | F1=Help F2=Refresh F3=Cancel | | F8=Image F10=Exit Enter=Do |F1=Help | /=Find n=Find Next |F9=Shell +-------------------------------------------------------------+
3. Click TieBreaker to open the menu where you select the method to use for tie breaking, as shown in Example 3-22.
Example 3-22 Selecting the tiebreaker type
Configure Cluster Split and Merge Policy
Move cursor to desired item and press Enter.
Split Management Policy Merge Management Policy Quarantine Policy
+-------------------------------------------------------------+ | Select TieBreaker Type | | | | Move cursor to desired item and press Enter. |
74 IBM PowerHA SystemMirror V7.2.3 for IBM AIX and V7.2.2 for Linux
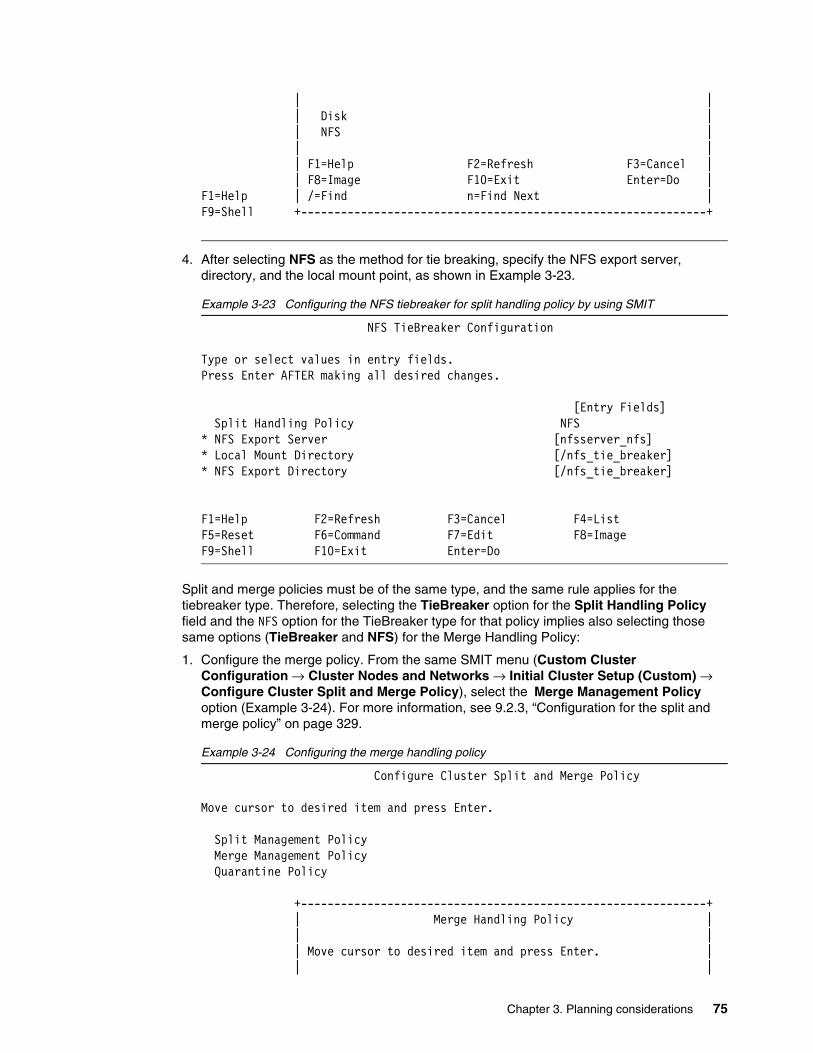
| | | Disk | | NFS | | | | F1=Help F2=Refresh F3=Cancel | | F8=Image F10=Exit Enter=Do |F1=Help | /=Find n=Find Next |F9=Shell +-------------------------------------------------------------+
4. After selecting NFS as the method for tie breaking, specify the NFS export server, directory, and the local mount point, as shown in Example 3-23.
Example 3-23 Configuring the NFS tiebreaker for split handling policy by using SMIT
NFS TieBreaker Configuration
Type or select values in entry fields.Press Enter AFTER making all desired changes.
[Entry Fields] Split Handling Policy NFS* NFS Export Server [nfsserver_nfs]* Local Mount Directory [/nfs_tie_breaker]* NFS Export Directory [/nfs_tie_breaker]
F1=Help F2=Refresh F3=Cancel F4=ListF5=Reset F6=Command F7=Edit F8=ImageF9=Shell F10=Exit Enter=Do
Split and merge policies must be of the same type, and the same rule applies for the tiebreaker type. Therefore, selecting the TieBreaker option for the Split Handling Policy field and the NFS option for the TieBreaker type for that policy implies also selecting those same options (TieBreaker and NFS) for the Merge Handling Policy:
1. Configure the merge policy. From the same SMIT menu (Custom Cluster Configuration → Cluster Nodes and Networks → Initial Cluster Setup (Custom) → Configure Cluster Split and Merge Policy), select the Merge Management Policy option (Example 3-24). For more information, see 9.2.3, “Configuration for the split and merge policy” on page 329.
Example 3-24 Configuring the merge handling policy
Configure Cluster Split and Merge Policy
Move cursor to desired item and press Enter.
Split Management Policy Merge Management Policy Quarantine Policy
+-------------------------------------------------------------+ | Merge Handling Policy | | | | Move cursor to desired item and press Enter. | | |
Chapter 3. Planning considerations 75
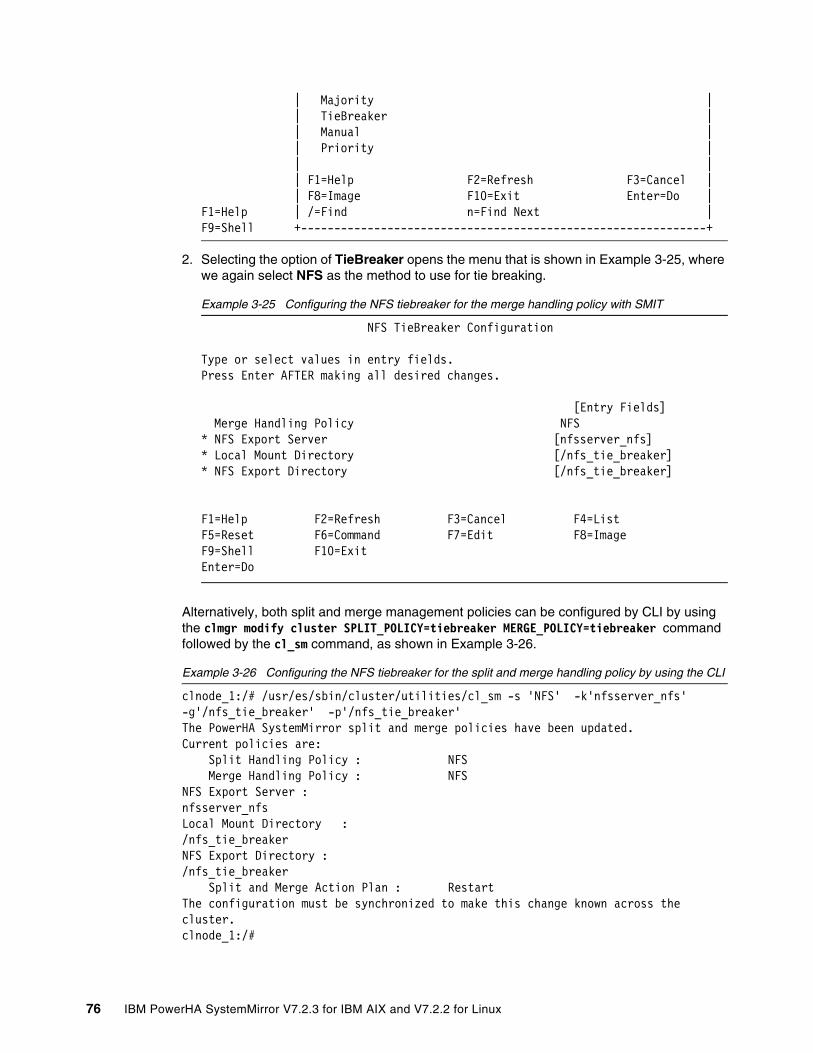
| Majority | | TieBreaker | | Manual | | Priority | | | | F1=Help F2=Refresh F3=Cancel | | F8=Image F10=Exit Enter=Do |F1=Help | /=Find n=Find Next |F9=Shell +-------------------------------------------------------------+
2. Selecting the option of TieBreaker opens the menu that is shown in Example 3-25, where we again select NFS as the method to use for tie breaking.
Example 3-25 Configuring the NFS tiebreaker for the merge handling policy with SMIT
NFS TieBreaker Configuration
Type or select values in entry fields.Press Enter AFTER making all desired changes.
[Entry Fields] Merge Handling Policy NFS* NFS Export Server [nfsserver_nfs]* Local Mount Directory [/nfs_tie_breaker]* NFS Export Directory [/nfs_tie_breaker]
F1=Help F2=Refresh F3=Cancel F4=ListF5=Reset F6=Command F7=Edit F8=ImageF9=Shell F10=Exit Enter=Do
Alternatively, both split and merge management policies can be configured by CLI by using the clmgr modify cluster SPLIT_POLICY=tiebreaker MERGE_POLICY=tiebreaker command followed by the cl_sm command, as shown in Example 3-26.
Example 3-26 Configuring the NFS tiebreaker for the split and merge handling policy by using the CLI
clnode_1:/# /usr/es/sbin/cluster/utilities/cl_sm -s 'NFS' -k'nfsserver_nfs' -g'/nfs_tie_breaker' -p'/nfs_tie_breaker'The PowerHA SystemMirror split and merge policies have been updated.Current policies are: Split Handling Policy : NFS Merge Handling Policy : NFSNFS Export Server :nfsserver_nfsLocal Mount Directory :/nfs_tie_breakerNFS Export Directory :/nfs_tie_breaker Split and Merge Action Plan : RestartThe configuration must be synchronized to make this change known across the cluster.clnode_1:/#
76 IBM PowerHA SystemMirror V7.2.3 for IBM AIX and V7.2.2 for Linux
clnode_1:/# /usr/es/sbin/cluster/utilities/cl_sm -m 'NFS' -k'nfsserver_nfs' -g'/nfs_tie_breaker' -p'/nfs_tie_breaker'The PowerHA SystemMirror split and merge policies have been updated.Current policies are: Split Handling Policy : NFS Merge Handling Policy : NFSNFS Export Server :nfsserver_nfsLocal Mount Directory :/nfs_tie_breakerNFS Export Directory :/nfs_tie_breaker Split and Merge Action Plan : RestartThe configuration must be synchronized to make this change known across the cluster.clnode_1:/#
A PowerHA cluster synchronization and restart and a CAA cluster restart are required. Complete the following steps:
1. Verify and synchronize the changes across the cluster either by using the SMIT menu (run the smit sysmirror command and then click Cluster Applications and Resources → Resource Groups → Verify and Synchronize Cluster Configuration), or by running the clmgr sync cluster command.
2. Stop the cluster services for all nodes in the cluster by running the clmgr stop cluster command.
3. Stop the CAA daemon on all cluster nodes by running the stopsrc -s clconfd command.
4. Start the CAA daemon on all cluster nodes by running the startsrc -s clconfd command.
5. Start the cluster services for all nodes in the cluster by running the clmgr start cluster command.
When all cluster nodes are synchronized and active, and the split and merge management policies are applied and the NFS resource is accessed by all nodes, as shown in Example 3-27 (the date column is removed for clarity).
Example 3-27 Checking for the NFS export that is mounted on clients
clnode_1:/# mount | egrep "node|---|tie"node mounted mounted over vfs options------------- --------------- ---------------- ---- ----------------------nfsserver_nfs /nfs_tie_breaker /nfs_tie_breaker nfs4 vers=4,fg,soft,retry=1,timeo=10clnode_1:/#
clnode_2:/# mount | egrep "node|---|tie"node mounted mounted over vfs options------------- --------------- ---------------- ---- ----------------------
Important: Verify all output messages that are generated by the synchronization and restart of the cluster because if an error occurred when activating the NFS tiebreaker policies, it might not necessarily produce an error on the overall result of a cluster synchronization action.
Chapter 3. Planning considerations 77

nfsserver_nfs /nfs_tie_breaker /nfs_tie_breaker nfs4 vers=4,fg,soft,retry=1,timeo=10clnode_2:/#
3.6.5 NFS tiebreaker tests
A common method to simulate network connectivity loss is to use the ifconfig command to bring network interfaces down. Its effect is not persistent across restarts, so the NFS tiebreaker induced restart has the expected recovery effect. The test scenarios that we use and the actual results that we got are presented in the following sections.
Loss of network communication to the NFS serverBecause using an NFS server resource is a secondary communication means, the primary one being the heartbeat network, the loss of communication between the cluster nodes and the NFS server did not have any visible results other than the expected log entries.
Loss of production heartbeat network communication on a standby nodeThe loss of the production heartbeat network communication on the standby node triggered no response because no RGs were online on that node at the time that the simulated event occurred.
Loss of production heartbeat network communication on the active nodeThe loss of the production heartbeat network communication on the active node triggered the expected fallover action because the network service IP and the underlying network (resources that are essential to the RG that was online until the simulated event) were no longer available.
This action can be seen in both nodes’ logs, as shown in the cluster.mmddyyy logs in Example 3-28, for the disconnected node (the one that releases the RG).
Example 3-28 The cluster.mmddyyy log for the node releasing the resource group
Nov 13 14:42:13 EVENT START: network_down clnode_1 net_ether_01Nov 13 14:42:13 EVENT COMPLETED: network_down clnode_1 net_ether_01 0Nov 13 14:42:13 EVENT START: network_down_complete clnode_1 net_ether_01Nov 13 14:42:13 EVENT COMPLETED: network_down_complete clnode_1 net_ether_01 0Nov 13 14:42:20 EVENT START: resource_state_change clnode_1Nov 13 14:42:20 EVENT COMPLETED: resource_state_change clnode_1 0Nov 13 14:42:20 EVENT START: rg_move_release clnode_1 1Nov 13 14:42:20 EVENT START: rg_move clnode_1 1 RELEASENov 13 14:42:20 EVENT START: stop_server app_IHS Nov 13 14:42:20 EVENT COMPLETED: stop_server app_IHS 0Nov 13 14:42:21 EVENT START: release_service_addr Nov 13 14:42:22 EVENT COMPLETED: release_service_addr 0Nov 13 14:42:25 EVENT COMPLETED: rg_move clnode_1 1 RELEASE 0Nov 13 14:42:25 EVENT COMPLETED: rg_move_release clnode_1 1 0Nov 13 14:42:27 EVENT START: rg_move_fence clnode_1 1Nov 13 14:42:27 EVENT COMPLETED: rg_move_fence clnode_1 1 0Nov 13 14:42:30 EVENT START: network_up clnode_1 net_ether_01Nov 13 14:42:30 EVENT COMPLETED: network_up clnode_1 net_ether_01 0Nov 13 14:42:31 EVENT START: network_up_complete clnode_1 net_ether_01
78 IBM PowerHA SystemMirror V7.2.3 for IBM AIX and V7.2.2 for Linux

Nov 13 14:42:31 EVENT COMPLETED: network_up_complete clnode_1 net_ether_01 0Nov 13 14:42:33 EVENT START: rg_move_release clnode_1 1Nov 13 14:42:33 EVENT START: rg_move clnode_1 1 RELEASENov 13 14:42:33 EVENT COMPLETED: rg_move clnode_1 1 RELEASE 0Nov 13 14:42:33 EVENT COMPLETED: rg_move_release clnode_1 1 0Nov 13 14:42:35 EVENT START: rg_move_fence clnode_1 1Nov 13 14:42:36 EVENT COMPLETED: rg_move_fence clnode_1 1 0Nov 13 14:42:38 EVENT START: rg_move_fence clnode_1 1Nov 13 14:42:39 EVENT COMPLETED: rg_move_fence clnode_1 1 0Nov 13 14:42:39 EVENT START: rg_move_acquire clnode_1 1Nov 13 14:42:39 EVENT START: rg_move clnode_1 1 ACQUIRENov 13 14:42:39 EVENT COMPLETED: rg_move clnode_1 1 ACQUIRE 0Nov 13 14:42:39 EVENT COMPLETED: rg_move_acquire clnode_1 1 0Nov 13 14:42:41 EVENT START: rg_move_complete clnode_1 1Nov 13 14:42:42 EVENT COMPLETED: rg_move_complete clnode_1 1 0Nov 13 14:42:46 EVENT START: rg_move_fence clnode_1 1Nov 13 14:42:47 EVENT COMPLETED: rg_move_fence clnode_1 1 0Nov 13 14:42:47 EVENT START: rg_move_acquire clnode_1 1Nov 13 14:42:47 EVENT START: rg_move clnode_1 1 ACQUIRENov 13 14:42:47 EVENT COMPLETED: rg_move clnode_1 1 ACQUIRE 0Nov 13 14:42:47 EVENT COMPLETED: rg_move_acquire clnode_1 1 0Nov 13 14:42:49 EVENT START: rg_move_complete clnode_1 1Nov 13 14:42:53 EVENT COMPLETED: rg_move_complete clnode_1 1 0Nov 13 14:42:55 EVENT START: resource_state_change_complete clnode_1Nov 13 14:42:55 EVENT COMPLETED: resource_state_change_complete clnode_1 0
This action is also shown in Example 3-29 for the other node (the one that acquires the RG).
Example 3-29 The cluster.mmddyyy log for the node acquiring the resource group
Nov 13 14:42:13 EVENT START: network_down clnode_1 net_ether_01Nov 13 14:42:13 EVENT COMPLETED: network_down clnode_1 net_ether_01 0Nov 13 14:42:14 EVENT START: network_down_complete clnode_1 net_ether_01Nov 13 14:42:14 EVENT COMPLETED: network_down_complete clnode_1 net_ether_01 0Nov 13 14:42:20 EVENT START: resource_state_change clnode_1Nov 13 14:42:20 EVENT COMPLETED: resource_state_change clnode_1 0Nov 13 14:42:20 EVENT START: rg_move_release clnode_1 1Nov 13 14:42:20 EVENT START: rg_move clnode_1 1 RELEASENov 13 14:42:20 EVENT COMPLETED: rg_move clnode_1 1 RELEASE 0Nov 13 14:42:20 EVENT COMPLETED: rg_move_release clnode_1 1 0Nov 13 14:42:27 EVENT START: rg_move_fence clnode_1 1Nov 13 14:42:29 EVENT COMPLETED: rg_move_fence clnode_1 1 0Nov 13 14:42:31 EVENT START: network_up clnode_1 net_ether_01Nov 13 14:42:31 EVENT COMPLETED: network_up clnode_1 net_ether_01 0Nov 13 14:42:31 EVENT START: network_up_complete clnode_1 net_ether_01Nov 13 14:42:31 EVENT COMPLETED: network_up_complete clnode_1 net_ether_01 0Nov 13 14:42:33 EVENT START: rg_move_release clnode_1 1Nov 13 14:42:33 EVENT START: rg_move clnode_1 1 RELEASENov 13 14:42:34 EVENT COMPLETED: rg_move clnode_1 1 RELEASE 0Nov 13 14:42:34 EVENT COMPLETED: rg_move_release clnode_1 1 0Nov 13 14:42:36 EVENT START: rg_move_fence clnode_1 1Nov 13 14:42:36 EVENT COMPLETED: rg_move_fence clnode_1 1 0Nov 13 14:42:39 EVENT START: rg_move_fence clnode_1 1Nov 13 14:42:39 EVENT COMPLETED: rg_move_fence clnode_1 1 0Nov 13 14:42:39 EVENT START: rg_move_acquire clnode_1 1Nov 13 14:42:39 EVENT START: rg_move clnode_1 1 ACQUIRE
Chapter 3. Planning considerations 79

Nov 13 14:42:39 EVENT COMPLETED: rg_move clnode_1 1 ACQUIRE 0Nov 13 14:42:39 EVENT COMPLETED: rg_move_acquire clnode_1 1 0Nov 13 14:42:42 EVENT START: rg_move_complete clnode_1 1Nov 13 14:42:45 EVENT COMPLETED: rg_move_complete clnode_1 1 0Nov 13 14:42:47 EVENT START: rg_move_fence clnode_1 1Nov 13 14:42:47 EVENT COMPLETED: rg_move_fence clnode_1 1 0Nov 13 14:42:47 EVENT START: rg_move_acquire clnode_1 1Nov 13 14:42:47 EVENT START: rg_move clnode_1 1 ACQUIRENov 13 14:42:49 EVENT START: acquire_takeover_addr Nov 13 14:42:50 EVENT COMPLETED: acquire_takeover_addr 0Nov 13 14:42:50 EVENT COMPLETED: rg_move clnode_1 1 ACQUIRE 0Nov 13 14:42:50 EVENT COMPLETED: rg_move_acquire clnode_1 1 0Nov 13 14:42:50 EVENT START: rg_move_complete clnode_1 1Nov 13 14:42:50 EVENT START: start_server app_IHSNov 13 14:42:51 EVENT COMPLETED: start_server app_IHS 0Nov 13 14:42:52 EVENT COMPLETED: rg_move_complete clnode_1 1 0Nov 13 14:42:55 EVENT START: resource_state_change_complete clnode_1Nov 13 14:42:55 EVENT COMPLETED: resource_state_change_complete clnode_1 0
Either log includes split_merge_prompt, site_down, or node_down events.
Loss of all network communication on the standby nodeThe loss of all network communications from both the production heartbeat and connectivity to the NFS server on the standby node triggers a restart of that node. This is in accordance with the split and merge action plan that was defined earlier.
As a starting point, both nodes were operational and the RG was online on node clnode_1 (Example 3-30).
Example 3-30 The cluster nodes and resource group status before the simulated network down event
clnode_1:/# clmgr -cva name,state,raw_state query node# NAME:STATE:RAW_STATEclnode_1:NORMAL:ST_STABLEclnode_2:NORMAL:ST_STABLEclnode_1:/#
clnode_1:/# clRGinfo-----------------------------------------------------------------------------Group Name Group State Node-----------------------------------------------------------------------------rg_IHS ONLINE clnode_1@site1 ONLINE SECONDARY clnode_2@site2clnode_1:/#
80 IBM PowerHA SystemMirror V7.2.3 for IBM AIX and V7.2.2 for Linux
Complete the following steps:
1. Temporarily bring down the network interfaces on the standby node clnode_2 in a terminal console that you open by using the Hardware Management Console (HMC), as shown in Example 3-31.
Example 3-31 Simulating a network down event
clnode_2:/# ifconfig en0 down; ifconfig en1 downclnode_2:/#
2. Within about a minute of the step 1 as a response to the split-brain situation, the node clnode_2 (with no communication to the NFS server) restarts itself. You can view this action on the virtual terminal console that is opened (by using the HMC) on that node, which is also reflected by the status of the cluster nodes (Example 3-32).
Example 3-32 Cluster nodes status immediately after a simulated network down event
clnode_1:/# clmgr -cva name,state,raw_state query node# NAME:STATE:RAW_STATEclnode_1:NORMAL:ST_STABLEclnode_2:UNKNOWN:UNKNOWNclnode_1:/#
3. After a restart, the node clnode_2 is functional, but with the cluster services stopped (Example 3-33).
Example 3-33 Cluster nodes and resource group status after node restart
clnode_1:/# clmgr -cva name,state,raw_state query node# NAME:STATE:RAW_STATEclnode_1:NORMAL:ST_STABLEclnode_2:OFFLINE:ST_INITclnode_1:/#
clnode_2:/# clRGinfo-----------------------------------------------------------------------------Group Name Group State Node-----------------------------------------------------------------------------rg_IHS ONLINE clnode_1@site1 OFFLINE clnode_2@site2clnode_2:/#
4. Manually start the services on the clnode_2 node (Example 3-34).
Example 3-34 Starting cluster services on the recently restarted node
clnode_2:/# clmgr start node[...]clnode_2: Completed execution of /usr/es/sbin/cluster/etc/rc.clusterclnode_2: with parameters: -boot -N -A -b -P cl_rc_cluster.clnode_2: Exit status = 0clnode_2:/#
Note: In previous versions of PowerHA, PowerHA tries to bring up the adapter as part of its recovery mechanism.
Chapter 3. Planning considerations 81
5. You are now back to the point before the simulated network loss event with both nodes operational and the RG online on node clnode_1 (Example 3-35).
Example 3-35 Cluster nodes and resource group status after cluster services start
clnode_2:/# clmgr -cva name,state,raw_state query node# NAME:STATE:RAW_STATEclnode_1:NORMAL:ST_STABLEclnode_2:NORMAL:ST_STABLEclnode_2:/#
clnode_2:/# clRGinfo-----------------------------------------------------------------------------Group Name Group State Node-----------------------------------------------------------------------------rg_IHS ONLINE clnode_1@site1 ONLINE SECONDARY clnode_2@site2clnode_2:/#
Loss of all network communication on the active nodeThe loss of all network communications for the production heartbeat and connectivity to NFS server on the active node, which is the node with the RG online, triggers the restart of that node. Concurrently, the RG is independently brought online on the other node.
The test was performed exactly like the one on the standby node, as described in “Loss of all network communication on the standby node” on page 80, and the process was similar. The only notable difference was that the previously active node, now disconnected, restarted. The other node, previously the standby node, was now bringing the RG online, thus ensuring service availability.
3.6.6 Log entries for monitoring and debugging
As expected, the usual system and cluster log files contain information that is related to the NFS tiebreaker events and actions. However, the particular content of these logs varies between the nodes as each node’s role differs.
Error report (errpt)The surviving node includes log entries that are presented in chronological order with older entries first, as shown in Example 3-36.
Example 3-36 Error report events on the surviving node
LABEL: CONFIGRM_SITE_SPLITDescriptionConfigRM received Site Split event notification
LABEL: CONFIGRM_PENDINGQUODescriptionThe operational quorum state of the active peer domain has changed to PENDING_QUORUM. This state usually indicates that exactly half of the nodes that are defined in the peer domain are online. In this state cluster resources cannot be recovered although none will be stopped explicitly.
82 IBM PowerHA SystemMirror V7.2.3 for IBM AIX and V7.2.2 for Linux
LABEL: LVM_GS_RLEAVEDescriptionRemote node Concurrent Volume Group failure detected
LABEL: CONFIGRM_HASQUORUM_DescriptionThe operational quorum state of the active peer domain has changed to HAS_QUORUM.In this state, cluster resources may be recovered and controlled as needed bymanagement applications.
The disconnected or restarted node includes log entries that are presented in chronological order with the older entries listed first, as shown in Example 3-37.
Example 3-37 Error report events on the restarted node
LABEL: CONFIGRM_SITE_SPLITDescriptionConfigRM received Site Split event notification
LABEL: CONFIGRM_PENDINGQUODescriptionThe operational quorum state of the active peer domain has changed to PENDING_QUORUM. This state usually indicates that exactly half of the nodes that are defined in the peer domain are online. In this state cluster resources cannot be recovered although none will be stopped explicitly.
LABEL: LVM_GS_RLEAVEDescriptionRemote node Concurrent Volume Group failure detected
LABEL: CONFIGRM_NOQUORUM_EDescriptionThe operational quorum state of the active peer domain has changed to NO_QUORUM.This indicates that recovery of cluster resources can no longer occur and thatthe node may be rebooted or halted in order to ensure that critical resourcesare released so that they can be recovered by another subdomain that may haveoperational quorum.
LABEL: CONFIGRM_REBOOTOS_EDescriptionThe operating system is being rebooted to ensure that critical resources arestopped so that another subdomain that has operational quorum may recoverthese resources without causing corruption or conflict.
LABEL: REBOOT_IDDescriptionSYSTEM SHUTDOWN BY USER
LABEL: CONFIGRM_HASQUORUM_
Chapter 3. Planning considerations 83
DescriptionThe operational quorum state of the active peer domain has changed to HAS_QUORUM.In this state, cluster resources may be recovered and controlled as needed bymanagement applications.
LABEL: CONFIGRM_ONLINE_STDescriptionThe node is online in the domain indicated in the detail data.
The restarted node’s log includes information that is relative to the surviving node’s log and information about the restart event.
The cluster.mmddyyy log fileFor each split-brain situation encountered, the content of the cluster.mmddyyy log file was similar on the two nodes. The surviving node’s log entries are presented in Example 3-38.
Example 3-38 The cluster.mmddyyy log entries on the surviving node
Nov 13 13:40:03 EVENT START: split_merge_prompt splitNov 13 13:40:07 EVENT COMPLETED: split_merge_prompt split 0Nov 13 13:40:07 EVENT START: site_down site2Nov 13 13:40:09 EVENT START: site_down_remote site2Nov 13 13:40:09 EVENT COMPLETED: site_down_remote site2 0Nov 13 13:40:09 EVENT COMPLETED: site_down site2 0Nov 13 13:40:09 EVENT START: node_down clnode_2Nov 13 13:40:09 EVENT COMPLETED: node_down clnode_2 0Nov 13 13:40:11 EVENT START: rg_move_release clnode_1 1Nov 13 13:40:11 EVENT START: rg_move clnode_1 1 RELEASENov 13 13:40:11 EVENT COMPLETED: rg_move clnode_1 1 RELEASE 0Nov 13 13:40:11 EVENT COMPLETED: rg_move_release clnode_1 1 0Nov 13 13:40:11 EVENT START: rg_move_fence clnode_1 1Nov 13 13:40:12 EVENT COMPLETED: rg_move_fence clnode_1 1 0Nov 13 13:40:14 EVENT START: node_down_complete clnode_2Nov 13 13:40:14 EVENT COMPLETED: node_down_complete clnode_2 0
The log entries for the same event, but this time on the disconnected or restarted node, are shown in Example 3-39.
Example 3-39 The cluster.mmddyyy log entries on the restarted node
Nov 13 13:40:03 EVENT START: split_merge_prompt splitNov 13 13:40:03 EVENT COMPLETED: split_merge_prompt split 0Nov 13 13:40:12 EVENT START: site_down site1Nov 13 13:40:13 EVENT START: site_down_remote site1Nov 13 13:40:13 EVENT COMPLETED: site_down_remote site1 0Nov 13 13:40:13 EVENT COMPLETED: site_down site1 0Nov 13 13:40:13 EVENT START: node_down clnode_1Nov 13 13:40:13 EVENT COMPLETED: node_down clnode_1 0Nov 13 13:40:15 EVENT START: network_down clnode_2 net_ether_01Nov 13 13:40:15 EVENT COMPLETED: network_down clnode_2 net_ether_01 0Nov 13 13:40:15 EVENT START: network_down_complete clnode_2 net_ether_01Nov 13 13:40:15 EVENT COMPLETED: network_down_complete clnode_2 net_ether_01 0Nov 13 13:40:18 EVENT START: rg_move_release clnode_2 1Nov 13 13:40:18 EVENT START: rg_move clnode_2 1 RELEASE
84 IBM PowerHA SystemMirror V7.2.3 for IBM AIX and V7.2.2 for Linux
Nov 13 13:40:18 EVENT COMPLETED: rg_move clnode_2 1 RELEASE 0Nov 13 13:40:18 EVENT COMPLETED: rg_move_release clnode_2 1 0Nov 13 13:40:18 EVENT START: rg_move_fence clnode_2 1Nov 13 13:40:19 EVENT COMPLETED: rg_move_fence clnode_2 1 0Nov 13 13:40:21 EVENT START: node_down_complete clnode_1Nov 13 13:40:21 EVENT COMPLETED: node_down_complete clnode_1 0
This log also includes the information about the network_down event.
The cluster.log fileThe cluster.log file includes much of the information in the cluster.mmddyyy log file. The notable exception is that this one cluster.log also included information about the quorum status losing and regaining quorum. For the disconnected or restarted node only, the cluster.log file has information about the restart event, as shown in Example 3-40.
Example 3-40 The cluster.log entries on the restarted node
Nov 13 13:40:03 clnode_2 [...] EVENT START: split_merge_prompt split Nov 13 13:40:03 clnode_2 [...] CONFIGRM_SITE_SPLIT_ST ConfigRM received Site Split event notificationNov 13 13:40:03 clnode_2 [...] EVENT COMPLETED: split_merge_prompt split 0 Nov 13 13:40:09 clnode_2 [...] CONFIGRM_PENDINGQUORUM_ER The operational quorum state of the active peer domain has changed to PENDING_QUORUM. This state usually indicates that exactly half of the nodes that are defined in the peer domain are online. In this state cluster resources cannot be recovered although none will be stopped explicitly.Nov 13 13:40:12 clnode_2 [...] EVENT START: site_down site1 Nov 13 13:40:13 clnode_2 [...] EVENT START: site_down_remote site1 Nov 13 13:40:13 clnode_2 [...] EVENT COMPLETED: site_down_remote site1 0 Nov 13 13:40:13 clnode_2 [...] EVENT COMPLETED: site_down site1 0 Nov 13 13:40:13 clnode_2 [...] EVENT START: node_down clnode_1 Nov 13 13:40:13 clnode_2 [...] EVENT COMPLETED: node_down clnode_1 0 Nov 13 13:40:15 clnode_2 [...] EVENT START: network_down clnode_2 net_ether_01 Nov 13 13:40:15 clnode_2 [...] EVENT COMPLETED: network_down clnode_2 net_ether_01 0 Nov 13 13:40:15 clnode_2 [...] EVENT START: network_down_complete clnode_2 net_ether_01 Nov 13 13:40:16 clnode_2 [...] EVENT COMPLETED: network_down_complete clnode_2 net_ether_01 0 Nov 13 13:40:18 clnode_2 [...] EVENT START: rg_move_release clnode_2 1 Nov 13 13:40:18 clnode_2 [...] EVENT START: rg_move clnode_2 1 RELEASE Nov 13 13:40:18 clnode_2 [...] EVENT COMPLETED: rg_move clnode_2 1 RELEASE 0 Nov 13 13:40:18 clnode_2 [...] EVENT COMPLETED: rg_move_release clnode_2 1 0 Nov 13 13:40:18 clnode_2 [...] EVENT START: rg_move_fence clnode_2 1 Nov 13 13:40:19 clnode_2 [...] EVENT COMPLETED: rg_move_fence clnode_2 1 0 Nov 13 13:40:21 clnode_2 [...] EVENT START: node_down_complete clnode_1 Nov 13 13:40:21 clnode_2 [...] EVENT COMPLETED: node_down_complete clnode_1 0 Nov 13 13:40:29 clnode_2 [...] CONFIGRM_NOQUORUM_ER The operational quorum state of the active peer domain has changed to NO_QUORUM. This indicates that recovery of cluster resources can no longer occur and that the node may be rebooted or halted in order to ensure that critical resources are released so that they can be recovered by another subdomain that may have operational quorum.Nov 13 13:40:29 clnode_2 [...] CONFIGRM_REBOOTOS_ER The operating system is being rebooted to ensure that critical resources are stopped so that another subdomain that has operational quorum may recover these resources without causing corruption or conflict.[...]Nov 13 13:41:32 clnode_2 [...] RMCD_INFO_0_ST The daemon is started.Nov 13 13:41:33 clnode_2 [...] CONFIGRM_STARTED_ST IBM.ConfigRM daemon has started. Nov 13 13:42:03 clnode_2 [...] GS_START_ST Group Services daemon started DIAGNOSTIC EXPLANATION HAGS daemon started by SRC. Log file is /var/ct/1Z4w8kYNeHvP2dxgyEaCe2/log/cthags/trace.
Chapter 3. Planning considerations 85

Nov 13 13:42:36 clnode_2 [...] CONFIGRM_HASQUORUM_ST The operational quorum state of the active peer domain has changed to HAS_QUORUM. In this state, cluster resources may be recovered and controlled as needed by management applications.Nov 13 13:42:36 clnode_2 [...] CONFIGRM_ONLINE_ST The node is online in the domain indicated in the detail data. Peer Domain Name nfs_tiebr_clusterNov 13 13:42:38 clnode_2 [...] STORAGERM_STARTED_ST IBM.StorageRM daemon has started.
86 IBM PowerHA SystemMirror V7.2.3 for IBM AIX and V7.2.2 for Linux
Chapter 4. Migration
This chapter covers the migration options from PowerHA V7.1.3 to PowerHA V7.2.
This chapter covers the following topics:
� Migration planning
� Migration scenarios from PowerHA V7.1.3
� Migration scenarios from PowerHA V7.2.0
4
© Copyright IBM Corp. 2019. All rights reserved. 87
4.1 Migration planning
Proper planning of the migration procedure of clusters to IBM PowerHA SystemMirror V7.2.3 is important to minimize the risk duration of the process itself. The following set of actions must be considered when planning the migration of existing PowerHA clusters.
Before beginning the migration procedure, always have a contingency plan in case any problems occur. Here are some general suggestions:
� Create a backup of rootvg.
In some cases of upgrading PowerHA, depending on the starting point, updating or upgrading the AIX base operating system is also required. Therefore, a best practice is to save your existing rootvg. One method is to create a clone by using alt_disk_copy on other available disks on the system. That way, a simple change to the bootlist and a restart can easily return the system to the beginning state.
Other options are available, such as mksysb, alt_disk_install, and multibos.
If you use the new tool cl_ezupdate you can run alt_disk_install by using the cl_ezupdate -X option, as described in 2.1, “Easy Update” on page 16.
� Save the existing cluster configuration.
Create a cluster snapshot before the migration. By default, it is stored in the following directory. Make a copy of it and save a copy from the cluster nodes for extra safety.
/usr/es/sbin/cluster/snapshots
� Save any user-provided scripts.
This most commonly refers to custom events, pre- and post-events, the application controller, and application monitoring scripts.
� Save common configuration files that are needed for proper functioning, such as:
– /etc/hosts– /etc/cluster/rhosts– /usr/es/sbin/cluster/netmon.cf
Verify by using the lslpp -h cluster.* command that the current version of PowerHA is in the COMMIT state and not in the APPLY state. If not, run smit install_commit before you install the most recent software version.
4.1.1 PowerHA SystemMirror V7.2.2.sp1 requirements
Here are the software and hardware requirements that must be met before migrating to PowerHA SystemMirror V7.2.2.sp1.
Software requirementsHere are the software requirements:
� IBM AIX 7.1 with Technology Level 4 with Service Pack 2 or later� IBM AIX 7.1 with Technology Level 5 or later� IBM AIX 7.2 with Service Pack 2 or later� IBM AIX 7.2 with Technology Level 1 with Service Pack 1 or later� IBM AIX 7.2 with Technology Level 2 or later
88 IBM PowerHA SystemMirror V7.2.3 for IBM AIX and V7.2.2 for Linux
HardwareSupport is available only for POWER5 processor-based technologies and later. (This support directly depends on the AIX base version. AIX 7.2 requires an IBM POWER7® processor-based system or later).
4.1.2 PowerHA SystemMirror V7.2.3 requirements
Here are the software and hardware requirements that must be met before migrating to PowerHA SystemMirror V7.2.3.
Software requirementsThe software requirements are as follows:
� IBM AIX 7.1 with Technology Level 4 with Service Pack 2 or later� IBM AIX 7.1 with Technology Level 5 or later� IBM AIX 7.2 with Service Pack 2 or later� IBM AIX 7.2 with Technology Level 1, Service Pack 1 or later� IBM AIX 7.2 with Technology Level 2 or later
HardwareThis support directly depends on the AIX base version. For example, AIX 7.2 requires a POWER7 processor-based system or later.
4.1.3 Deprecated features
Starting with PowerHA V7.2.0, the IBM Systems Director plug-in is no longer supported or available. However, PowerHA V7.2.1 does provide a new GUI that is referred to as the PowerHA SystemMirror User Interface (SMUI). For more information about this feature, see 5.1, “SMUI new features” on page 128.
4.1.4 Migration options
There are four methods of performing a migration of a PowerHA cluster. Each of them is briefly described, and in more detail for the corresponding migration scenarios that are included in this chapter.
Offline A migration method where PowerHA is brought offline on all nodes before performing the software upgrade. During this time, the cluster resource groups (RGs) are not available.
Rolling A migration method from one PowerHA version to another during which cluster services are stopped one node at a time. That node is upgraded and reintegrated into the cluster before the next node is upgraded. It requires little downtime, mostly for moving the RGs between nodes so that each node can be upgraded.
Note: Check adapter support for the storage area network (SAN) heartbeat during the planning stage.
Chapter 4. Migration 89
Snapshot A migration method from one PowerHA version to another, during which you take a snapshot of the current cluster configuration, stop cluster services on all nodes, uninstall the current version of PowerHA and then install the preferred version of PowerHA SystemMirror, convert the snapshot by running the clconvert_snapshot utility, and restore the cluster configuration from the converted snapshot.
Nondisruptive This method is preferred method of migration whenever possible. As its name implies, the cluster RGs remain available and the applications functional during the cluster migration. All cluster nodes are sequentially (one node at a time) set to an unmanaged state so that all RGs on that node remain operational while cluster services are stopped. However, this method can generally be used only when applying service packs to the cluster and not doing major upgrades. This option does not apply when the upgrade of the base operating system is also required, such as when migrating PowerHA to a version newer than 7.1.x from an older version.
4.1.5 Migration steps
The following sections give an overview of the steps that are required to perform each type of migration. Detailed examples of each migration type can be found in 4.2.5, “Nondisruptive upgrade from PowerHA V7.1.3” on page 101.
Offline methodSome of these steps can be performed in parallel because the entire cluster is offline.
Complete the following steps:
1. Stop cluster services on all nodes and bring the RGs offline.
2. Upgrade AIX (as needed):
a. Ensure that the prerequisites are installed, such as bos.cluster.
b. Restart.
3. Upgrade PowerHA. This step can be performed on both nodes in parallel.
4. Review the /tmp/clconvert.log file.
5. Restart the cluster services.
Rolling methodA rolling migration provides the least amount of downtime by upgrading one node at a time.
Important: Nodes in a cluster running two separate versions of PowerHA are considered to be in a mixed cluster state. A cluster in this state does not support any configuration changes or synchronization until all the nodes are migrated. Complete either the rolling or nondisruptive migration as soon as possible to ensure stable cluster functions.
Important: Always start with the latest service packs that are available for PowerHA, AIX, and Virtual I/O Server (VIOS).
90 IBM PowerHA SystemMirror V7.2.3 for IBM AIX and V7.2.2 for Linux
Complete the following steps:
1. Stop cluster services on one node (move the RGs as needed).
2. Upgrade AIX (as needed) and restart.
3. Upgrade PowerHA.
4. Review the /tmp/clconvert.log file.
5. Restart the cluster services.
6. Repeat these steps for each node.
Snapshot methodSome of these steps can often be performed in parallel because the entire cluster is offline.
More specifics when migrating from PowerHA V7.1, including crucial interim fixes, can be found at PowerHA SystemMirror interim fix Bundles information.
Complete the following steps:
1. Stop cluster services on all nodes and bring the RGs offline.
2. Create a cluster snapshot. Save copies of it off the cluster.
3. Upgrade AIX (as needed) and restart.
4. Upgrade PowerHA. This step can be performed on both nodes in parallel.
5. Review the /tmp/clconvert.log file.
6. Restart the cluster services.
Nondisruptive upgradeThis method applies only when the AIX level is already at the appropriate levels to support PowerHA V7.2.1 or later. Complete the following steps on one node:
1. Stop cluster services by unmanaging the RGs.
2. Upgrade PowerHA (run update_all).
3. Start cluster services with an automatic manage of the RGs.
Important: Always start with the latest service packs that are available for PowerHA, AIX, and VIOS.
Important: Always start with the latest service packs that are available for PowerHA, AIX, and VIOS.
Important: When restarting cluster services with the Automatic option for managing RGs, the application start scripts are invoked. Make sure that the application scripts can detect that the application is already running, or copy them and put a dummy blank executable script in their place and then copy them back after start.
Chapter 4. Migration 91
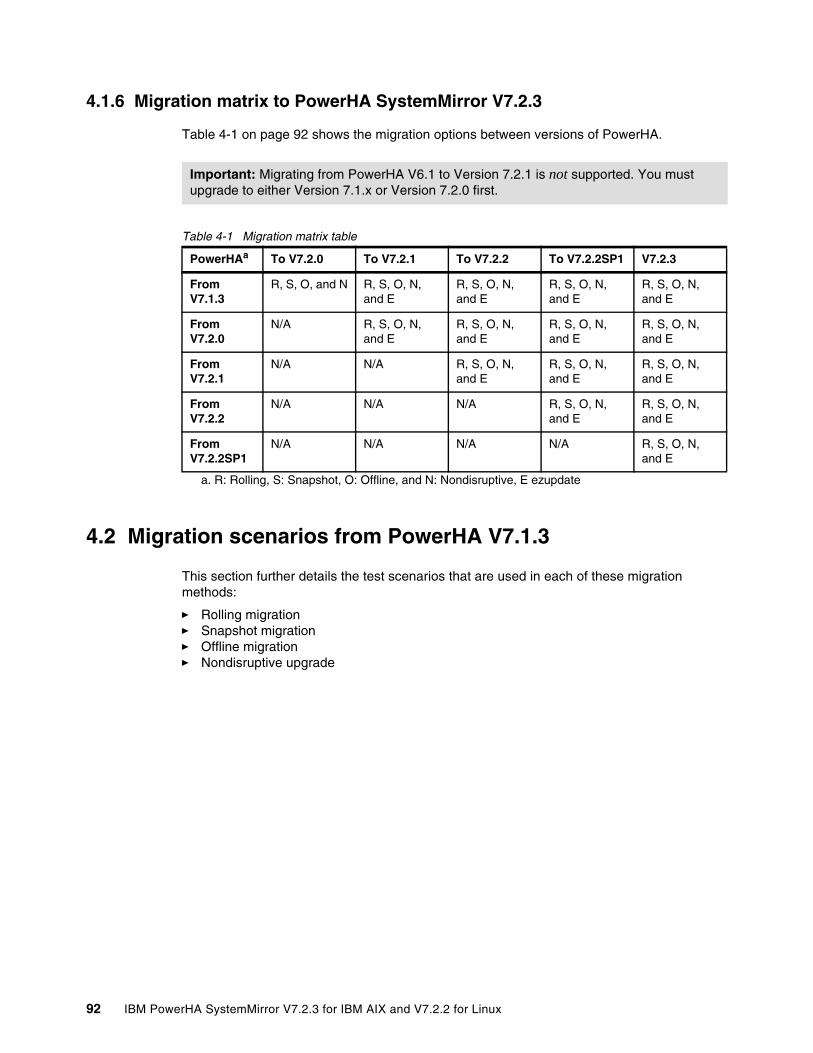
4.1.6 Migration matrix to PowerHA SystemMirror V7.2.3
Table 4-1 on page 92 shows the migration options between versions of PowerHA.
Table 4-1 Migration matrix table
4.2 Migration scenarios from PowerHA V7.1.3
This section further details the test scenarios that are used in each of these migration methods:
� Rolling migration� Snapshot migration� Offline migration� Nondisruptive upgrade
Important: Migrating from PowerHA V6.1 to Version 7.2.1 is not supported. You must upgrade to either Version 7.1.x or Version 7.2.0 first.
PowerHAa
a. R: Rolling, S: Snapshot, O: Offline, and N: Nondisruptive, E ezupdate
To V7.2.0 To V7.2.1 To V7.2.2 To V7.2.2SP1 V7.2.3
From V7.1.3
R, S, O, and N R, S, O, N, and E
R, S, O, N, and E
R, S, O, N, and E
R, S, O, N, and E
From V7.2.0
N/A R, S, O, N, and E
R, S, O, N, and E
R, S, O, N, and E
R, S, O, N, and E
From V7.2.1
N/A N/A R, S, O, N, and E
R, S, O, N, and E
R, S, O, N, and E
From V7.2.2
N/A N/A N/A R, S, O, N, and E
R, S, O, N, and E
From V7.2.2SP1
N/A N/A N/A N/A R, S, O, N, and E
92 IBM PowerHA SystemMirror V7.2.3 for IBM AIX and V7.2.2 for Linux

4.2.1 PowerHA V7.1.3 test environment overview
For the following scenarios, we use a two-node cluster with nodes decano1 and bolsilludo2. The cluster consists of a single RG that is configured in a typical hot-hot configuration. Our test configuration consists of the following hardware and software (see Figure 4-1 on page 93):
� IBM Power Systems PS700 (Power PS700)� Hardware Management Console (HMC) V8R8.7.0� AIX 7.2.0 SP4� PowerHA V7.1.3 SP9� Hitachi G400 Storage
Figure 4-1 PowerHA V7.1.3 test migration cluster
4.2.2 Rolling migration from PowerHA V7.1.3
Here are the steps for a rolling migration from PowerHA V7.1.3.
Checking and documenting the initial stageThis step is common to all migration scenarios and methods.
Chapter 4. Migration 93
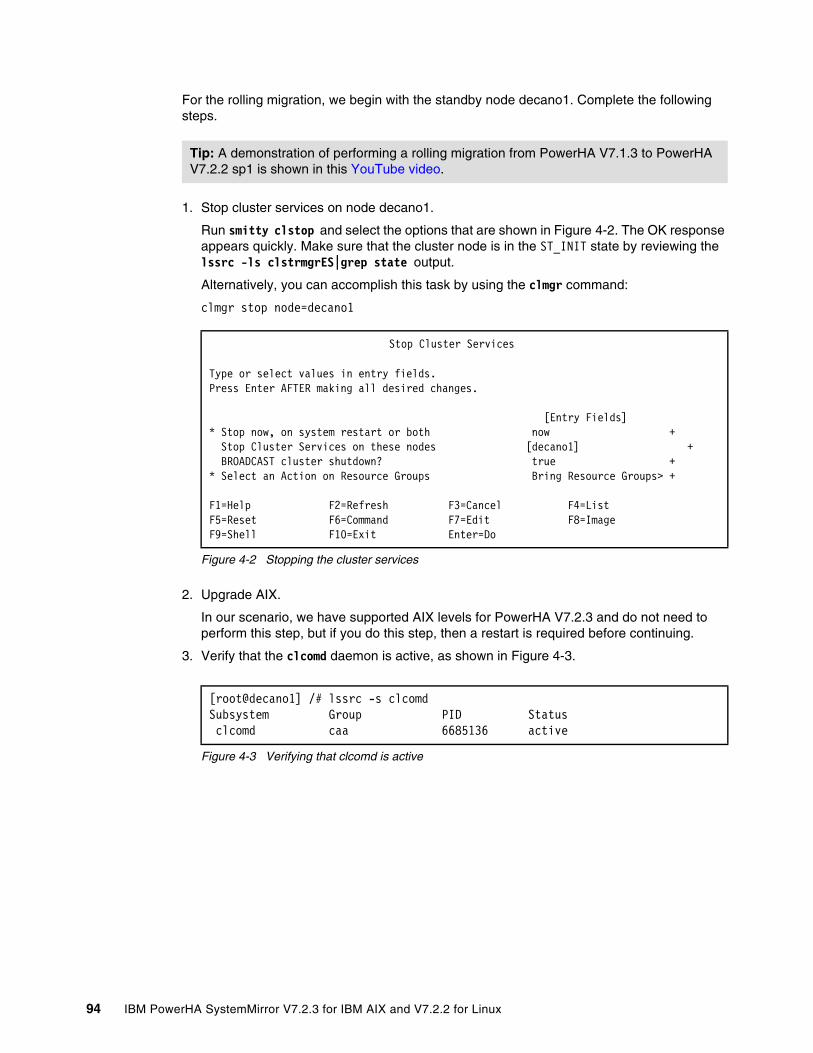
For the rolling migration, we begin with the standby node decano1. Complete the following steps.
1. Stop cluster services on node decano1.
Run smitty clstop and select the options that are shown in Figure 4-2. The OK response appears quickly. Make sure that the cluster node is in the ST_INIT state by reviewing the lssrc -ls clstrmgrES|grep state output.
Alternatively, you can accomplish this task by using the clmgr command:
clmgr stop node=decano1
Figure 4-2 Stopping the cluster services
2. Upgrade AIX.
In our scenario, we have supported AIX levels for PowerHA V7.2.3 and do not need to perform this step, but if you do this step, then a restart is required before continuing.
3. Verify that the clcomd daemon is active, as shown in Figure 4-3.
Figure 4-3 Verifying that clcomd is active
Tip: A demonstration of performing a rolling migration from PowerHA V7.1.3 to PowerHA V7.2.2 sp1 is shown in this YouTube video.
Stop Cluster Services
Type or select values in entry fields.Press Enter AFTER making all desired changes.
[Entry Fields]* Stop now, on system restart or both now + Stop Cluster Services on these nodes [decano1] + BROADCAST cluster shutdown? true +* Select an Action on Resource Groups Bring Resource Groups> +
F1=Help F2=Refresh F3=Cancel F4=ListF5=Reset F6=Command F7=Edit F8=ImageF9=Shell F10=Exit Enter=Do
[root@decano1] /# lssrc -s clcomdSubsystem Group PID Status clcomd caa 6685136 active
94 IBM PowerHA SystemMirror V7.2.3 for IBM AIX and V7.2.2 for Linux
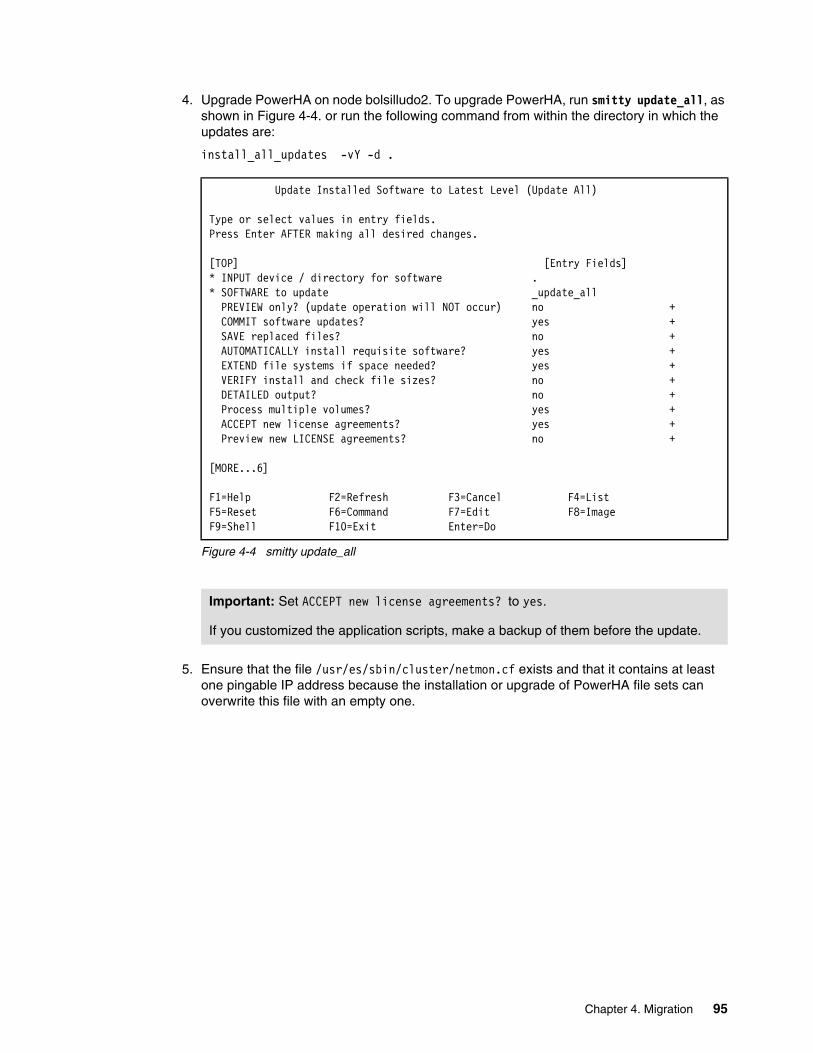
4. Upgrade PowerHA on node bolsilludo2. To upgrade PowerHA, run smitty update_all, as shown in Figure 4-4. or run the following command from within the directory in which the updates are:
install_all_updates -vY -d .
Figure 4-4 smitty update_all
5. Ensure that the file /usr/es/sbin/cluster/netmon.cf exists and that it contains at least one pingable IP address because the installation or upgrade of PowerHA file sets can overwrite this file with an empty one.
Update Installed Software to Latest Level (Update All)
Type or select values in entry fields.Press Enter AFTER making all desired changes.
[TOP] [Entry Fields]* INPUT device / directory for software .* SOFTWARE to update _update_all PREVIEW only? (update operation will NOT occur) no + COMMIT software updates? yes + SAVE replaced files? no + AUTOMATICALLY install requisite software? yes + EXTEND file systems if space needed? yes + VERIFY install and check file sizes? no + DETAILED output? no + Process multiple volumes? yes + ACCEPT new license agreements? yes + Preview new LICENSE agreements? no +
[MORE...6]
F1=Help F2=Refresh F3=Cancel F4=ListF5=Reset F6=Command F7=Edit F8=ImageF9=Shell F10=Exit Enter=Do
Important: Set ACCEPT new license agreements? to yes.
If you customized the application scripts, make a backup of them before the update.
Chapter 4. Migration 95

6. Start cluster services on node bolsilludo2 by running smitty clstart or clmgr start node=bolsilludo2.
A message displays about cluster verification being skipped because of mixed versions, as shown in Figure 4-5 on page 96.
After starting, validate that the cluster is stable before continuing by running the following command:
lssrc -ls clstrmgrES |grep -i state.
Figure 4-5 Verification skipped
7. Repeat the previous steps for node bolsilludo2. However, when stopping cluster services, click the Move Resource Groups option, as shown in Figure 4-6.
Figure 4-6 Running clstop and moving the resource group
8. Upgrade AIX (if needed).
In our scenario, we have supported AIX levels for PowerHA V7.2.3 and do not need to perform this step, but if you do this step, a restart is required before continuing.
Important: During the time the cluster is a mixed cluster state, do not make any cluster changes or attempt to synchronize the cluster.
Verifying Cluster Configuration Prior to Starting Cluster Services.
Cluster services are running at different levels acrossthe cluster. Verification will not be invoked in this environment.
Starting Cluster Services on node: decano1This may take a few minutes. Please wait...decano1: Dec 19 2018 18:38:13Starting execution of /usr/es/sbin/cluster/etc/rc.clusterdecano1: with parameters: -boot -N -C interactive -P cl_rc_cluster -A
Stop Cluster Services
Type or select values in entry fields.Press Enter AFTER making all desired changes.
[Entry Fields]* Stop now, on system restart or both now + Stop Cluster Services on these nodes [bolsilludo2] + BROADCAST cluster shutdown? true +* Select an Action on Resource Groups Move Resource Groups +
Important: If upgrading to AIX 7.2.0, see the AIX 7.2 Release Notes regarding Reliable Scalable Cluster Technology (RSCT) file sets when upgrading.
96 IBM PowerHA SystemMirror V7.2.3 for IBM AIX and V7.2.2 for Linux
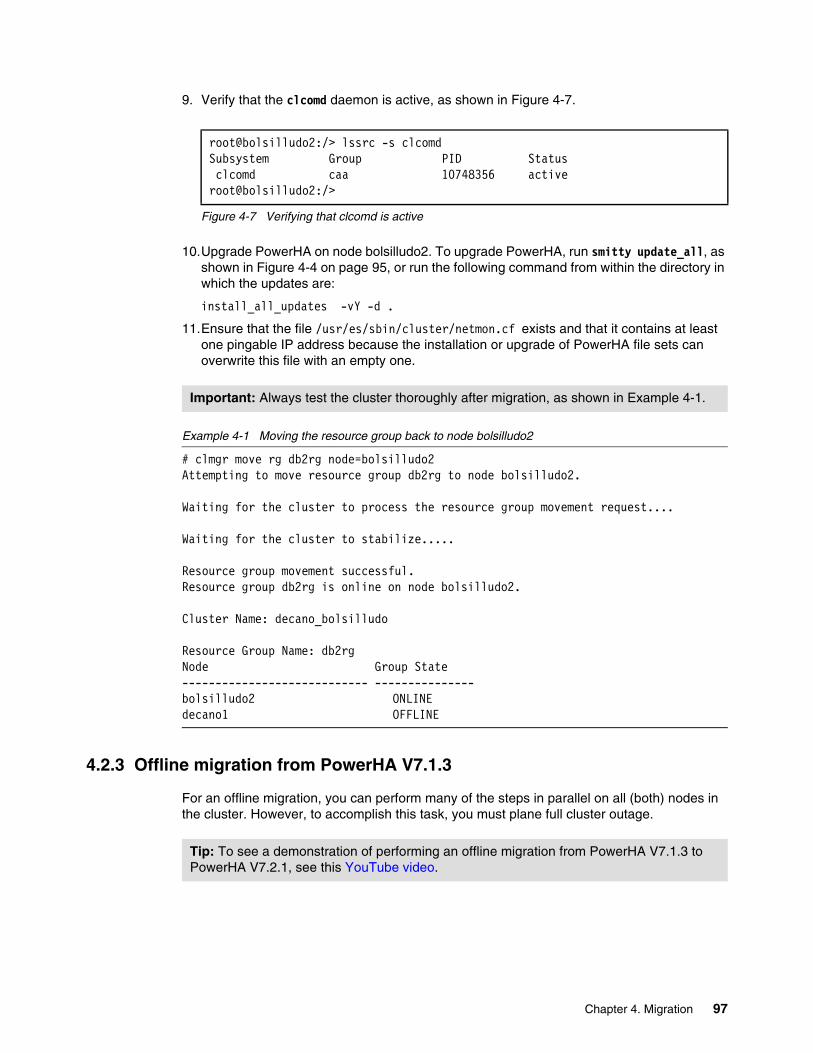
9. Verify that the clcomd daemon is active, as shown in Figure 4-7.
Figure 4-7 Verifying that clcomd is active
10.Upgrade PowerHA on node bolsilludo2. To upgrade PowerHA, run smitty update_all, as shown in Figure 4-4 on page 95, or run the following command from within the directory in which the updates are:
install_all_updates -vY -d .
11.Ensure that the file /usr/es/sbin/cluster/netmon.cf exists and that it contains at least one pingable IP address because the installation or upgrade of PowerHA file sets can overwrite this file with an empty one.
Example 4-1 Moving the resource group back to node bolsilludo2
# clmgr move rg db2rg node=bolsilludo2Attempting to move resource group db2rg to node bolsilludo2.
Waiting for the cluster to process the resource group movement request....
Waiting for the cluster to stabilize.....
Resource group movement successful.Resource group db2rg is online on node bolsilludo2.
Cluster Name: decano_bolsilludo
Resource Group Name: db2rgNode Group State---------------------------- ---------------bolsilludo2 ONLINEdecano1 OFFLINE
4.2.3 Offline migration from PowerHA V7.1.3
For an offline migration, you can perform many of the steps in parallel on all (both) nodes in the cluster. However, to accomplish this task, you must plane full cluster outage.
root@bolsilludo2:/> lssrc -s clcomdSubsystem Group PID Status clcomd caa 10748356 activeroot@bolsilludo2:/>
Important: Always test the cluster thoroughly after migration, as shown in Example 4-1.
Tip: To see a demonstration of performing an offline migration from PowerHA V7.1.3 to PowerHA V7.2.1, see this YouTube video.
Chapter 4. Migration 97
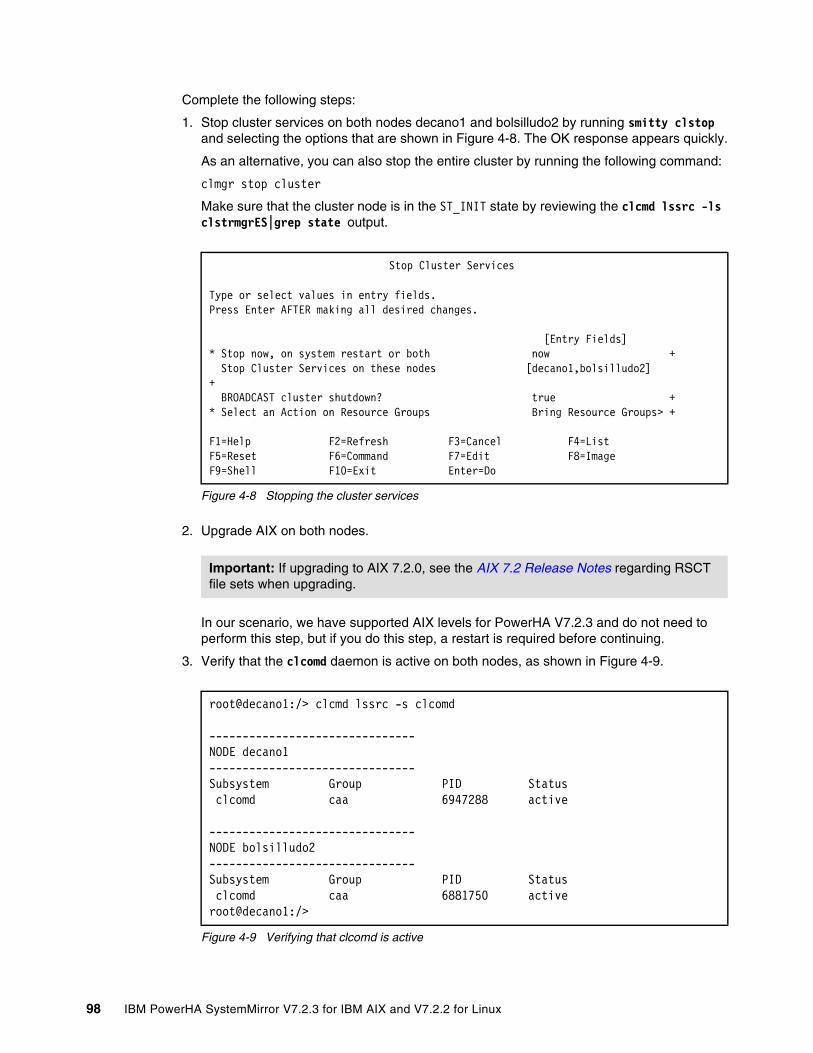
Complete the following steps:
1. Stop cluster services on both nodes decano1 and bolsilludo2 by running smitty clstop and selecting the options that are shown in Figure 4-8. The OK response appears quickly.
As an alternative, you can also stop the entire cluster by running the following command:
clmgr stop cluster
Make sure that the cluster node is in the ST_INIT state by reviewing the clcmd lssrc -ls clstrmgrES|grep state output.
Figure 4-8 Stopping the cluster services
2. Upgrade AIX on both nodes.
In our scenario, we have supported AIX levels for PowerHA V7.2.3 and do not need to perform this step, but if you do this step, a restart is required before continuing.
3. Verify that the clcomd daemon is active on both nodes, as shown in Figure 4-9.
Figure 4-9 Verifying that clcomd is active
Stop Cluster Services
Type or select values in entry fields.Press Enter AFTER making all desired changes.
[Entry Fields]* Stop now, on system restart or both now + Stop Cluster Services on these nodes [decano1,bolsilludo2] + BROADCAST cluster shutdown? true +* Select an Action on Resource Groups Bring Resource Groups> +
F1=Help F2=Refresh F3=Cancel F4=ListF5=Reset F6=Command F7=Edit F8=ImageF9=Shell F10=Exit Enter=Do
Important: If upgrading to AIX 7.2.0, see the AIX 7.2 Release Notes regarding RSCT file sets when upgrading.
root@decano1:/> clcmd lssrc -s clcomd
-------------------------------NODE decano1-------------------------------Subsystem Group PID Status clcomd caa 6947288 active
-------------------------------NODE bolsilludo2-------------------------------Subsystem Group PID Status clcomd caa 6881750 activeroot@decano1:/>
98 IBM PowerHA SystemMirror V7.2.3 for IBM AIX and V7.2.2 for Linux

4. Upgrade to PowerHA V7.2.3 by running smitty update_all on both nodes or by running the following command from within the directory in which the updates are:
install_all_updates -vY -d .
5. Verify that the version numbers show correctly, as shown in Example 4-1 on page 97.
6. Ensure that the file /usr/es/sbin/cluster/netmon.cf exists on all nodes and that it contains at least one pingable IP address because the installation or upgrade of PowerHA file sets can overwrite this file with an empty one.
7. Restart the cluster on both nodes by running clmgr start cluster.
4.2.4 Snapshot migration from PowerHA V7.1.3
For a snapshot migration, you can perform many of the steps in parallel on all (both) nodes in the cluster. However, this requires a full cluster outage.
Complete the following steps:
1. Stop cluster services on both nodes decano1 and bolsilludo2 by running smitty clstop and selecting the options that are shown in Figure 4-10. The OK response appears quickly.
As an alternative, you can also stop the entire cluster by running clmgr stop cluster.
Make sure that the cluster node is in the ST_INIT state by reviewing the clcmd lssrc -ls clstrmgrES|grep state output.
Figure 4-10 Stopping the cluster services
Important: Always test the cluster thoroughly after migrating.
Tip: To see a demonstration of performing an offline migration from PowerHA V7.1.3 to PowerHA V7.2.3, see this YouTube video.
Stop Cluster Services
Type or select values in entry fields.Press Enter AFTER making all desired changes.
[Entry Fields]* Stop now, on system restart or both now + Stop Cluster Services on these nodes [bolsilludo2,decano1] + BROADCAST cluster shutdown? true +* Select an Action on Resource Groups Bring Resource Groups> +
F1=Help F2=Refresh F3=Cancel F4=ListF5=Reset F6=Command F7=Edit F8=Image
Chapter 4. Migration 99
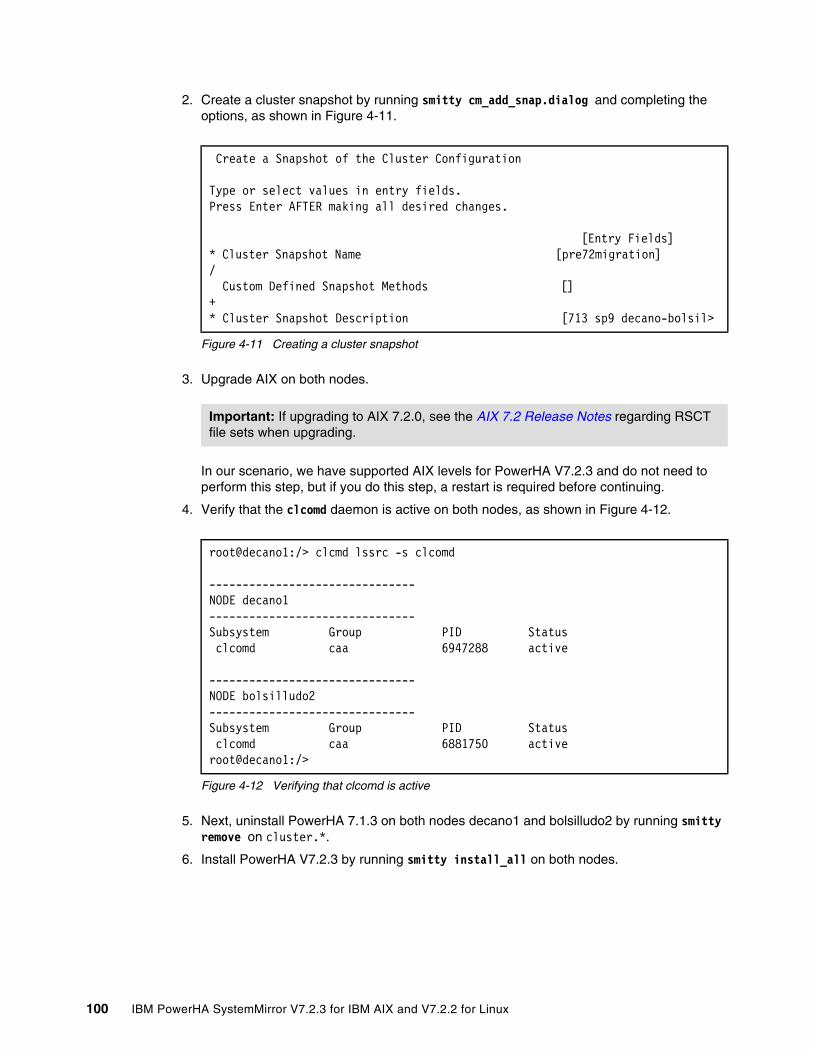
2. Create a cluster snapshot by running smitty cm_add_snap.dialog and completing the options, as shown in Figure 4-11.
Figure 4-11 Creating a cluster snapshot
3. Upgrade AIX on both nodes.
In our scenario, we have supported AIX levels for PowerHA V7.2.3 and do not need to perform this step, but if you do this step, a restart is required before continuing.
4. Verify that the clcomd daemon is active on both nodes, as shown in Figure 4-12.
Figure 4-12 Verifying that clcomd is active
5. Next, uninstall PowerHA 7.1.3 on both nodes decano1 and bolsilludo2 by running smitty remove on cluster.*.
6. Install PowerHA V7.2.3 by running smitty install_all on both nodes.
Create a Snapshot of the Cluster Configuration
Type or select values in entry fields.Press Enter AFTER making all desired changes.
[Entry Fields]* Cluster Snapshot Name [pre72migration] / Custom Defined Snapshot Methods [] +* Cluster Snapshot Description [713 sp9 decano-bolsil>
Important: If upgrading to AIX 7.2.0, see the AIX 7.2 Release Notes regarding RSCT file sets when upgrading.
root@decano1:/> clcmd lssrc -s clcomd
-------------------------------NODE decano1-------------------------------Subsystem Group PID Status clcomd caa 6947288 active
-------------------------------NODE bolsilludo2-------------------------------Subsystem Group PID Status clcomd caa 6881750 activeroot@decano1:/>
100 IBM PowerHA SystemMirror V7.2.3 for IBM AIX and V7.2.2 for Linux

7. Convert the previously created snapshot as follows:
root@decano1:/home/pha723>clconvert_snapshot -v 7.1.3 -s pre72migrati*Extracting ODM's from snapshot file... done.Converting extracted ODM's... done.Rebuilding snapshot file... done.root@decano1:/home/pha723>.
8. Restore the cluster configuration from the converted snapshot by running smitty cm_apply_snap.select and selecting the snapshot from the menu. The snapshot auto fills the last menu, as shown in Figure 4-13.
Figure 4-13 Restoring a cluster configuration from a snapshot
The restore process automatically re-creates and synchronizes the cluster.
9. Verify that the version numbers show correctly, as shown in Example 4-1 on page 97.
10.Ensure that the file /usr/es/sbin/cluster/netmon.cf exists on all nodes and that it contains at least one pingable IP address because the installation or upgrade of PowerHA file sets might overwrite this file with an empty one.
11.Restart the cluster on both nodes by running clmgr start cluster.
4.2.5 Nondisruptive upgrade from PowerHA V7.1.3
This method applies only when the AIX level is already at the appropriate levels to support PowerHA V7.2.2sp1 (or later).
Complete the following steps:
1. Stop cluster services by using the unmanage option on the RGs on node decano1, as shown in Example 4-2.
Example 4-2 Stopping a cluster node with the unmanage option
# root@decano1:/> clmgr stop node=decano1 manage=unmanage <
Warning: "WHEN" must be specified. Since it was not, a default of "now" will be used.
Restore the Cluster Snapshot
Type or select values in entry fields.Press Enter AFTER making all desired changes.
[Entry Fields] Cluster Snapshot Name pre72migration Cluster Snapshot Description 713 sp9 decano-bolsil> Un/Configure Cluster Resources? [Yes] + Force apply if verify fails? [No] +
Important: Always test the cluster thoroughly after migrating.
Tip: To see a demonstration of performing an offline migration from PowerHA V7.1.3 to PowerHA V7.2.3, see this YouTube video.
Chapter 4. Migration 101

Broadcast message from root@decano1 (tty) at 14:13:04 ...
PowerHA SystemMirror on decano1 shutting down. Please exit any cluster applications...decano1: 0513-044 The clevmgrdES Subsystem was requested to stop.."decano1" is now unmanaged.
decano1: Jan 14 2019 14:13:04 /usr/es/sbin/cluster/utilities/clstop: called with flags -N -f
2. Upgrade PowerHA (update_all) by running the following command from within the directory in which the updates are:
install_all_updates -vY -d .
3. Start cluster services by using an automatic manage of the RGs on decano1, as shown in Example 4-3.
Example 4-3 Starting the cluster node with the automatic manage option
# /clmgr start node=decano1 <
Warning: "WHEN" must be specified. Since it was not, a default of "now" will be used.
Warning: "MANAGE" must be specified. Since it was not, a default of "auto" will be used.
Verifying Cluster Configuration Prior to Starting Cluster Services.decano1: start_cluster: Starting PowerHA SystemMirror.........."decano1" is now online.
Cluster services are running at different levels acrossthe cluster. Verification will not be invoked in this environment.
Starting Cluster Services on node: decano1This may take a few minutes. Please wait...decano1: Jan 14 2019 14:43:32Starting execution of /usr/es/sbin/cluster/etc/rc.clusterdecano1: with parameters: -boot -N -b -P cl_rc_cluster -Adecano1:decano1: Jan 14 2019 14:43:32usage: cl_echo messageid (default) messageJan 14 2019 14:43:32usage: cl_echo messageid (default) messageRETURN_CODE=0
Important: Restarting cluster services with the Automatic option for managing RGs invokes the application start scripts. Make sure that the application scripts can detect that the application is already running or copy and put a dummy blank executable script in their place and then copy them back after start.
102 IBM PowerHA SystemMirror V7.2.3 for IBM AIX and V7.2.2 for Linux
Repeat the steps on node bolsilludo2.
4. Stop cluster services by using the unmanage option on the RGs on node bolsilludo2, as shown in Example 4-4 on page 103.
Example 4-4 Stopping the cluster node with the unmanage option
# clmgr stop node=bolsilludo2 manage=unmanage <
Warning: "WHEN" must be specified. Since it was not, a default of "now" will be used.
Broadcast message from root@bolsilludo2 (tty) at 14:47:04 ...
PowerHA SystemMirror on bolsilludo2 shutting down. Please exit any cluster applications...bolsilludo2: 0513-044 The clevmgrdES Subsystem was requested to stop.."bolsilludo2" is now unmanaged.
bolsilludo2: Jan 14 2019 14:47:04 /usr/es/sbin/cluster/utilities/clstop: called with flags -N -f
5. Upgrade PowerHA (update_all) by running the following command from within the directory in which the updates are:
install_all_updates -vY -d .
6. Start cluster services by performing an automatic manage of the RGs on bolsilludo2, as shown in Example 4-5.
Example 4-5 Start a cluster node with the automatic manage option
# /clmgr start node=bolsilludo2 <
Warning: "WHEN" must be specified. Since it was not, a default of "now" will be used.
Warning: "MANAGE" must be specified. Since it was not, a default of "auto" will be used.
Verifying Cluster Configuration Prior to Starting Cluster Services.bolsilludo2: start_cluster: Starting PowerHA SystemMirror.........."bolsilludo2" is now online.
Cluster services are running at different levels acrossthe cluster. Verification will not be invoked in this environment.
Starting Cluster Services on node: bolsilludo2This may take a few minutes. Please wait...bolsilludo2: Jan 14 2019 15:03:43Starting execution of /usr/es/sbin/cluster/etc/rc.clusterbolsilludo2: with parameters: -boot -N -b -P cl_rc_cluster -Abolsilludo2:bolsilludo2: Jan 14 2019 15:03:43usage: cl_echo messageid (default) messageJan 14 2019 15:03:43usage: cl_echo messageid (default) messageRETURN_CODE=0
Chapter 4. Migration 103
7. Verify that the version numbers show correctly, as shown in Example 4-1 on page 97.
8. Ensure that the file /usr/es/sbin/cluster/netmon.cf exists on all nodes and that it contains at least one pingable IP address because the installation or upgrade of PowerHA file sets can overwrite this file with an empty one.
4.3 Migration scenarios from PowerHA V7.2.0
This section further describes test scenarios that are used in each of these migrations methods:
� Rolling migration� Snapshot migration� Offline migration� Nondisruptive upgrade
4.3.1 PowerHA V7.2.0 test environment overview
For the following scenarios, we use a two-node cluster with nodes abdon and hugo-atilio. The cluster consists of a single RG that is configured in a typical hot-standby, as shown in Figure 4-14 on page 105:
� IBM Power Systems e870 with firmware 870� HMC 8 V8R7 � AIX 7.2.0 SP4� PowerHA V7.2.0 SP2� Hitachi G400
Important: Restarting cluster services with the Automatic option for managing RGs invokes the application start scripts. Make sure that the application scripts can detect that the application is already running or copy and put a dummy blank executable script in their place and then copy them back after start.
104 IBM PowerHA SystemMirror V7.2.3 for IBM AIX and V7.2.2 for Linux
Figure 4-14 PowerHA V7.2.0 test migration cluster
4.3.2 Rolling migration from PowerHA V7.2.0
For the rolling migration, begin with the standby node hugo-atilio.
Tip: To see a demonstration of performing an offline migration from PowerHA V7.1.3 to PowerHA V7.2.1, see this YouTube video.
Although the version level is different, the steps are identical as though starting from Version 7.2.0.
Chapter 4. Migration 105

Complete the following steps:
1. Stop the cluster services on node hugo-atilio by running smitty clstop and selecting the options that are shown in Figure 4-15 on page 106. The OK response appears quickly. Make sure that the cluster node is in the ST_INIT state by reviewing the lssrc -ls clstrmgrES|grep state output, as shown in Example 4-6.
Example 4-6 Cluster node state
# lssrc -ls clstrmgrES|grep stateCurrent state: ST_INIT
Figure 4-15 Stopping the cluster services
You can also stop cluster services by using the clmgr command:
clmgr stop node=hugo-atilio
2. Upgrade AIX.
In our scenario, we have supported AIX levels for PowerHA V7.2.3 and do not need to perform this step, but if you do this step, a restart is required before continuing.
3. Verify that the clcomd daemon is active, as shown in Figure 4-16.
Figure 4-16 Verifying that clcomd is active
4. Upgrade PowerHA on node hugo-atilio. To upgrade PowerHA, run smitty update_all, as shown in Figure 4-4 on page 95, or run the following command from within the directory in which the updates are (Example 4-7):
install_all_updates -vY -d .
Example 4-7 Install_all_updates command
# root@hugo-atilio:/home/pha723> install_all_updates -vY -d .install_all_updates: Initializing system parameters.install_all_updates: Log file is /var/adm/ras/install_all_updates.loginstall_all_updates: Checking for updated install utilities on media.install_all_updates: Processing media.install_all_updates: Generating list of updatable installp file sets.
*** ATTENTION: the following list of file sets are installable base imagesthat are updates to currently installed file sets. Because these file sets are
Stop Cluster Services
Type or select values in entry fields.Press Enter AFTER making all desired changes.
[Entry Fields]* Stop now, on system restart or both now + Stop Cluster Services on these nodes [hugo-atilio] + BROADCAST cluster shutdown? true +* Select an Action on Resource Groups Unmanage Resource Gro>
root@hugo-atilio:/> lssrc -s clcomdSubsystem Group PID Status clcomd caa 6095310 activeroot@hugo-atilio:/>
106 IBM PowerHA SystemMirror V7.2.3 for IBM AIX and V7.2.2 for Linux
base-level images, they will be committed automatically. After these file setsare installed, they can be down-leveled by performing a force-overwrite withthe previous base-level. See the installp man page for more details. ***
cluster.adt.es.client.include 7.2.3.0 cluster.adt.es.client.samples.clinfo 7.2.3.0 cluster.adt.es.client.samples.clstat 7.2.3.0 cluster.adt.es.client.samples.libcl 7.2.3.0 cluster.es.assist.common 7.2.3.0 cluster.es.assist.db2 7.2.3.0 cluster.es.assist.dhcp 7.2.3.0 cluster.es.assist.dns 7.2.3.0 cluster.es.assist.domino 7.2.3.0 cluster.es.assist.filenet 7.2.3.0 cluster.es.assist.ihs 7.2.3.0 cluster.es.assist.maxdb 7.2.3.0 cluster.es.assist.oraappsrv 7.2.3.0 cluster.es.assist.oracle 7.2.3.0 cluster.es.assist.printServer 7.2.3.0 cluster.es.assist.sap 7.2.3.0 cluster.es.assist.tds 7.2.3.0 cluster.es.assist.tsmadmin 7.2.3.0 cluster.es.assist.tsmclient 7.2.3.0 cluster.es.assist.tsmserver 7.2.3.0 cluster.es.assist.websphere 7.2.3.0 cluster.es.assist.wmq 7.2.3.0 cluster.es.client.clcomd 7.2.3.0 cluster.es.client.lib 7.2.3.0 cluster.es.client.rte 7.2.3.0 cluster.es.client.utils 7.2.3.0 cluster.es.cspoc.cmds 7.2.3.0 cluster.es.cspoc.rte 7.2.3.0 cluster.es.migcheck 7.2.3.0 cluster.es.nfs.rte 7.2.3.0 cluster.es.server.diag 7.2.3.0 cluster.es.server.events 7.2.3.0 cluster.es.server.rte 7.2.3.0 cluster.es.server.testtool 7.2.3.0 cluster.es.server.utils 7.2.3.0 cluster.es.smui.agent 7.2.3.0 cluster.es.smui.common 7.2.3.0 cluster.license 7.2.3.0 cluster.man.en_US.es.data 7.2.2.0
<< End of file set List >>
install_all_updates: The following file sets have been selected as updatesto currently installed software:
cluster.adt.es.client.include 7.2.3.0 cluster.adt.es.client.samples.clinfo 7.2.3.0 cluster.adt.es.client.samples.clstat 7.2.3.0 cluster.adt.es.client.samples.libcl 7.2.3.0 cluster.es.assist.common 7.2.3.0 cluster.es.assist.db2 7.2.3.0
Chapter 4. Migration 107
cluster.es.assist.dhcp 7.2.3.0 cluster.es.assist.dns 7.2.3.0 cluster.es.assist.domino 7.2.3.0 cluster.es.assist.filenet 7.2.3.0 cluster.es.assist.ihs 7.2.3.0 cluster.es.assist.maxdb 7.2.3.0 cluster.es.assist.oraappsrv 7.2.3.0 cluster.es.assist.oracle 7.2.3.0 cluster.es.assist.printServer 7.2.3.0 cluster.es.assist.sap 7.2.3.0 cluster.es.assist.tds 7.2.3.0 cluster.es.assist.tsmadmin 7.2.3.0 cluster.es.assist.tsmclient 7.2.3.0 cluster.es.assist.tsmserver 7.2.3.0 cluster.es.assist.websphere 7.2.3.0 cluster.es.assist.wmq 7.2.3.0 cluster.es.client.clcomd 7.2.3.0 cluster.es.client.lib 7.2.3.0 cluster.es.client.rte 7.2.3.0 cluster.es.client.utils 7.2.3.0 cluster.es.cspoc.cmds 7.2.3.0 cluster.es.cspoc.rte 7.2.3.0 cluster.es.migcheck 7.2.3.0 cluster.es.nfs.rte 7.2.3.0 cluster.es.server.diag 7.2.3.0 cluster.es.server.events 7.2.3.0 cluster.es.server.rte 7.2.3.0 cluster.es.server.testtool 7.2.3.0 cluster.es.server.utils 7.2.3.0 cluster.es.smui.agent 7.2.3.0 cluster.es.smui.common 7.2.3.0 cluster.license 7.2.3.0 cluster.man.en_US.es.data 7.2.2.0
<< End of file set List >>
install_all_updates: Performing installp update.+-----------------------------------------------------------------------------+ Pre-installation Verification...+-----------------------------------------------------------------------------+Verifying selections...doneVerifying requisites...doneResults...
SUCCESSES--------- File sets listed in this section passed pre-installation verification and will be installed.
Selected file sets ----------------- cluster.adt.es.client.include 7.2.3.0 # PowerHA SystemMirror Client ... cluster.adt.es.client.samples.clinfo 7.2.3.0 # PowerHA SystemMirror Client CLINFO Samples
108 IBM PowerHA SystemMirror V7.2.3 for IBM AIX and V7.2.2 for Linux
cluster.adt.es.client.samples.clstat 7.2.3.0 # PowerHA SystemMirror Client Clstat Samples cluster.adt.es.client.samples.libcl 7.2.3.0 # PowerHA SystemMirror Client ... cluster.es.assist.common 7.2.3.0 # PowerHA SystemMirror Smart A... cluster.es.assist.db2 7.2.3.0 # PowerHA SystemMirror Smart A... cluster.es.assist.dhcp 7.2.3.0 # PowerHA SystemMirror Smart A... cluster.es.assist.dns 7.2.3.0 # PowerHA SystemMirror Smart A... cluster.es.assist.domino 7.2.3.0 # PowerHA SystemMirror SmartAs... cluster.es.assist.filenet 7.2.3.0 # PowerHA SystemMirror Smart A... cluster.es.assist.ihs 7.2.3.0 # PowerHA SystemMirror Smart A... cluster.es.assist.maxdb 7.2.3.0 # PowerHA SystemMirror Smart A... cluster.es.assist.oraappsrv 7.2.3.0 # PowerHA SystemMirror Smart A... cluster.es.assist.oracle 7.2.3.0 # PowerHA SystemMirror Smart A... cluster.es.assist.printServer 7.2.3.0 # PowerHA SystemMirror Smart A... cluster.es.assist.sap 7.2.3.0 # PowerHA SystemMirror Smart A... cluster.es.assist.tds 7.2.3.0 # PowerHA SystemMirror Smart A... cluster.es.assist.tsmadmin 7.2.3.0 # PowerHA SystemMirror SmartAs... cluster.es.assist.tsmclient 7.2.3.0 # PowerHA SystemMirror SmartAs... cluster.es.assist.tsmserver 7.2.3.0 # PowerHA SystemMirror SmartAs... cluster.es.assist.websphere 7.2.3.0 # PowerHA SystemMirror Smart A... cluster.es.assist.wmq 7.2.3.0 # PowerHA SystemMirror Smart A... cluster.es.client.clcomd 7.2.3.0 # Cluster Communication Infras... cluster.es.client.lib 7.2.3.0 # PowerHA SystemMirror Client ... cluster.es.client.rte 7.2.3.0 # PowerHA SystemMirror Client ... cluster.es.client.utils 7.2.3.0 # PowerHA SystemMirror Client ... cluster.es.cspoc.cmds 7.2.3.0 # CSPOC Commands cluster.es.cspoc.rte 7.2.3.0 # CSPOC Runtime Commands cluster.es.migcheck 7.2.3.0 # PowerHA SystemMirror Migrati... cluster.es.nfs.rte 7.2.3.0 # NFS Support cluster.es.server.diag 7.2.3.0 # Server Diags cluster.es.server.events 7.2.3.0 # Server Events cluster.es.server.rte 7.2.3.0 # Base Server Runtime cluster.es.server.testtool 7.2.3.0 # Cluster Test Tool cluster.es.server.utils 7.2.3.0 # Server Utilities cluster.es.smui.agent 7.2.3.0 # SystemMirror User Interface ... cluster.es.smui.common 7.2.3.0 # SystemMirror User Interface ... cluster.license 7.2.3.0 # PowerHA SystemMirror Electro... cluster.man.en_US.es.data 7.2.2.0 # SystemMirror manual commands...
<< End of Success Section >>
+-----------------------------------------------------------------------------+ BUILDDATE Verification ...+-----------------------------------------------------------------------------+Verifying build dates...doneFILESET STATISTICS------------------ 39 Selected to be installed, of which: 39 Passed pre-installation verification ---- 39 Total to be installed
+-----------------------------------------------------------------------------+ Installing Software...+-----------------------------------------------------------------------------+
Chapter 4. Migration 109
installp: APPLYING software for: cluster.man.en_US.es.data 7.2.2.0
. . . . . << Copyright notice for cluster.man.en_US.es.data >> . . . . . . . Licensed Materials - Property of IBM
5765H3900 Copyright International Business Machines Corp. 1997, 2017. Copyright Apollo Computer Inc. 1987. Copyright AT&T 1984, 1985, 1986, 1987, 1988, 1989. Copyright Regents of the University of California 1986, 1987, 1988, 1989. Copyright Carnegie Mellon, 1988. Copyright Cornell University 1990. Copyright Digital Equipment Corporation, 1985, 1988, 1990, 1991. Copyright Graphic Software Systems Incorporated 1984, 1990, 1991. Copyright Massachusetts Institute of Technology, 1985, 1986, 1987, 1988, 1989. Copyright Stanford University, 1988. Copyright TITN Inc. 1984, 1989.
All rights reserved. US Government Users Restricted Rights - Use, duplication or disclosure restricted by GSA ADP Schedule Contract with IBM Corp.. . . . . << End of copyright notice for cluster.man.en_US.es.data >>. . . .
File sets processed: 1 of 39 (Total time: 7 secs).
installp: APPLYING software for: cluster.license 7.2.3.0
. . . . . << Copyright notice for cluster.license >> . . . . . . . Licensed Materials - Property of IBM
5765H3900 Copyright International Business Machines Corp. 2001, 2016.
All rights reserved. US Government Users Restricted Rights - Use, duplication or disclosure restricted by GSA ADP Schedule Contract with IBM Corp.. . . . . << End of copyright notice for cluster.license >>. . . .
File sets processed: 2 of 39 (Total time: 8 secs).
installp: APPLYING software for: cluster.es.smui.common 7.2.3.0
. . . . . << Copyright notice for cluster.es.smui >> . . . . . . . Licensed Materials - Property of IBM
5765H3900 Copyright International Business Machines Corp. 2016.
110 IBM PowerHA SystemMirror V7.2.3 for IBM AIX and V7.2.2 for Linux
All rights reserved. US Government Users Restricted Rights - Use, duplication or disclosure restricted by GSA ADP Schedule Contract with IBM Corp.. . . . . << End of copyright notice for cluster.es.smui >>. . . .
Restoring files, please wait.157 files restored.793 files restored.1317 files restored.1883 files restored.2568 files restored.3037 files restored.3419 files restored.File sets processed: 3 of 39 (Total time: 5 mins 43 secs).
installp: APPLYING software for: cluster.es.migcheck 7.2.3.0
. . . . . << Copyright notice for cluster.es.migcheck >> . . . . . . . Licensed Materials - Property of IBM
5765H3900 Copyright International Business Machines Corp. 2010, 2016.
All rights reserved. US Government Users Restricted Rights - Use, duplication or disclosure restricted by GSA ADP Schedule Contract with IBM Corp.. . . . . << End of copyright notice for cluster.es.migcheck >>. . . .
File sets processed: 4 of 39 (Total time: 5 mins 55 secs).
installp: APPLYING software for: cluster.es.cspoc.rte 7.2.3.0 cluster.es.cspoc.cmds 7.2.3.0
. . . . . << Copyright notice for cluster.es.cspoc >> . . . . . . . Licensed Materials - Property of IBM
5765H3900 Copyright International Business Machines Corp. 1985, 2016.
All rights reserved. US Government Users Restricted Rights - Use, duplication or disclosure restricted by GSA ADP Schedule Contract with IBM Corp.. . . . . << End of copyright notice for cluster.es.cspoc >>. . . .
File sets processed: 6 of 39 (Total time: 6 mins 27 secs).
installp: APPLYING software for: cluster.es.client.rte 7.2.3.0 cluster.es.client.utils 7.2.3.0 cluster.es.client.lib 7.2.3.0
Chapter 4. Migration 111
cluster.es.client.clcomd 7.2.3.0
. . . . . << Copyright notice for cluster.es.client >> . . . . . . . Licensed Materials - Property of IBM
5765H3900 Copyright International Business Machines Corp. 1985, 2016.
All rights reserved. US Government Users Restricted Rights - Use, duplication or disclosure restricted by GSA ADP Schedule Contract with IBM Corp.
Licensed Materials - Property of IBM
5765H3900 Copyright International Business Machines Corp. 2008, 2016.
All rights reserved. US Government Users Restricted Rights - Use, duplication or disclosure restricted by GSA ADP Schedule Contract with IBM Corp.. . . . . << End of copyright notice for cluster.es.client >>. . . .
0513-044 The clcomd Subsystem was requested to stop.0513-077 Subsystem has been changed.0513-059 The clcomd Subsystem has been started. Subsystem PID is 8782086.File sets processed: 10 of 39 (Total time: 7 mins 20 secs).
installp: APPLYING software for: cluster.adt.es.client.samples.libcl 7.2.3.0 cluster.adt.es.client.samples.clstat 7.2.3.0 cluster.adt.es.client.samples.clinfo 7.2.3.0 cluster.adt.es.client.include 7.2.3.0
. . . . . << Copyright notice for cluster.adt.es >> . . . . . . . Licensed Materials - Property of IBM
5765H3900 Copyright International Business Machines Corp. 1985, 2016.
All rights reserved. US Government Users Restricted Rights - Use, duplication or disclosure restricted by GSA ADP Schedule Contract with IBM Corp.. . . . . << End of copyright notice for cluster.adt.es >>. . . .
File sets processed: 14 of 39 (Total time: 7 mins 25 secs).
installp: APPLYING software for: cluster.es.server.testtool 7.2.3.0 cluster.es.server.rte 7.2.3.0 cluster.es.server.utils 7.2.3.0 cluster.es.server.events 7.2.3.0 cluster.es.server.diag 7.2.3.0
112 IBM PowerHA SystemMirror V7.2.3 for IBM AIX and V7.2.2 for Linux
. . . . . << Copyright notice for cluster.es.server >> . . . . . . . Licensed Materials - Property of IBM
5765H3900 Copyright International Business Machines Corp. 1985, 2016.
All rights reserved. US Government Users Restricted Rights - Use, duplication or disclosure restricted by GSA ADP Schedule Contract with IBM Corp.. . . . . << End of copyright notice for cluster.es.server >>. . . .
Restoring files, please wait.588 files restored.Existing configuration was saved by ./cluster.es.server.rte.pre_rm run on Tue Jan 15 19:02:53 UYT 20190513-095 The request for subsystem refresh was completed successfully.File sets processed: 19 of 39 (Total time: 10 mins 22 secs).
installp: APPLYING software for: cluster.es.nfs.rte 7.2.3.0
. . . . . << Copyright notice for cluster.es.nfs >> . . . . . . . Licensed Materials - Property of IBM
5765H3900 Copyright International Business Machines Corp. 2007, 2016.
All rights reserved. US Government Users Restricted Rights - Use, duplication or disclosure restricted by GSA ADP Schedule Contract with IBM Corp.. . . . . << End of copyright notice for cluster.es.nfs >>. . . .
File sets processed: 20 of 39 (Total time: 10 mins 27 secs).
installp: APPLYING software for: cluster.es.assist.common 7.2.3.0 cluster.es.assist.wmq 7.2.3.0 cluster.es.assist.websphere 7.2.3.0 cluster.es.assist.tsmserver 7.2.3.0 cluster.es.assist.tsmclient 7.2.3.0 cluster.es.assist.tsmadmin 7.2.3.0 cluster.es.assist.tds 7.2.3.0 cluster.es.assist.sap 7.2.3.0 cluster.es.assist.printServer 7.2.3.0 cluster.es.assist.oracle 7.2.3.0 cluster.es.assist.oraappsrv 7.2.3.0 cluster.es.assist.maxdb 7.2.3.0 cluster.es.assist.ihs 7.2.3.0 cluster.es.assist.domino 7.2.3.0 cluster.es.assist.dns 7.2.3.0 cluster.es.assist.dhcp 7.2.3.0 cluster.es.assist.db2 7.2.3.0 cluster.es.assist.filenet 7.2.3.0
Chapter 4. Migration 113
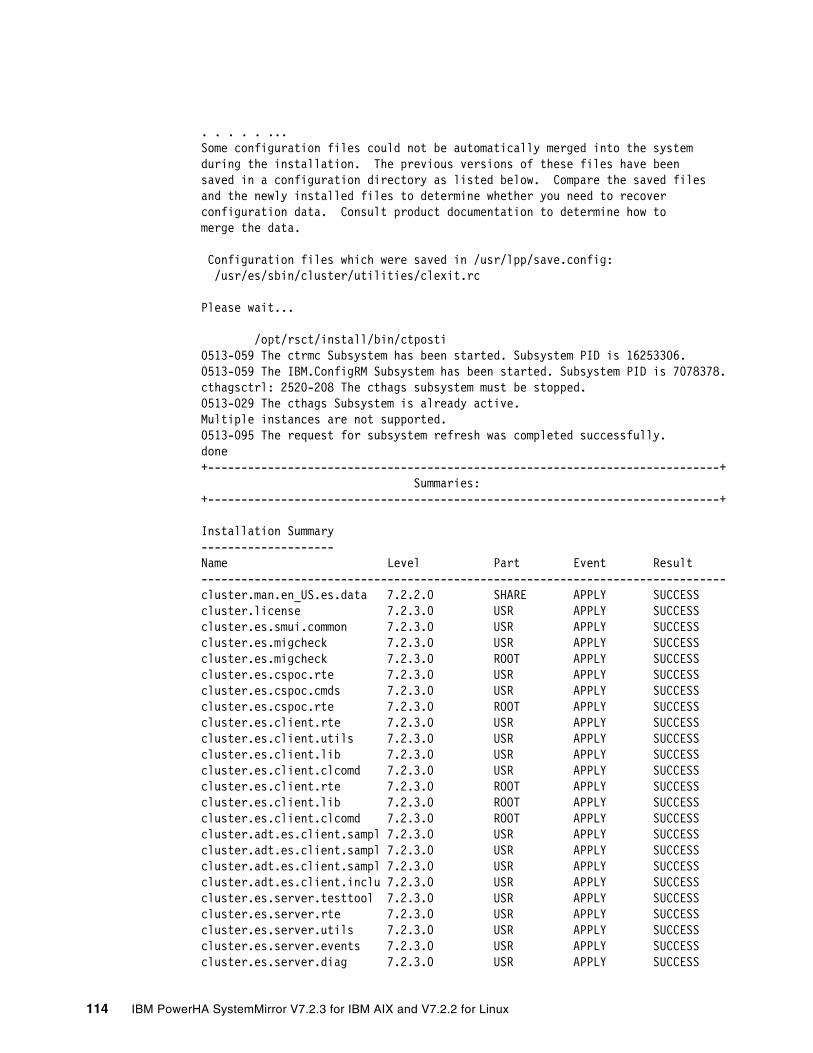
. . . . . ...Some configuration files could not be automatically merged into the systemduring the installation. The previous versions of these files have beensaved in a configuration directory as listed below. Compare the saved filesand the newly installed files to determine whether you need to recoverconfiguration data. Consult product documentation to determine how tomerge the data.
Configuration files which were saved in /usr/lpp/save.config: /usr/es/sbin/cluster/utilities/clexit.rc
Please wait...
/opt/rsct/install/bin/ctposti0513-059 The ctrmc Subsystem has been started. Subsystem PID is 16253306.0513-059 The IBM.ConfigRM Subsystem has been started. Subsystem PID is 7078378.cthagsctrl: 2520-208 The cthags subsystem must be stopped.0513-029 The cthags Subsystem is already active.Multiple instances are not supported.0513-095 The request for subsystem refresh was completed successfully.done+-----------------------------------------------------------------------------+ Summaries:+-----------------------------------------------------------------------------+
Installation Summary--------------------Name Level Part Event Result-------------------------------------------------------------------------------cluster.man.en_US.es.data 7.2.2.0 SHARE APPLY SUCCESScluster.license 7.2.3.0 USR APPLY SUCCESScluster.es.smui.common 7.2.3.0 USR APPLY SUCCESScluster.es.migcheck 7.2.3.0 USR APPLY SUCCESScluster.es.migcheck 7.2.3.0 ROOT APPLY SUCCESScluster.es.cspoc.rte 7.2.3.0 USR APPLY SUCCESScluster.es.cspoc.cmds 7.2.3.0 USR APPLY SUCCESScluster.es.cspoc.rte 7.2.3.0 ROOT APPLY SUCCESScluster.es.client.rte 7.2.3.0 USR APPLY SUCCESScluster.es.client.utils 7.2.3.0 USR APPLY SUCCESScluster.es.client.lib 7.2.3.0 USR APPLY SUCCESScluster.es.client.clcomd 7.2.3.0 USR APPLY SUCCESScluster.es.client.rte 7.2.3.0 ROOT APPLY SUCCESScluster.es.client.lib 7.2.3.0 ROOT APPLY SUCCESScluster.es.client.clcomd 7.2.3.0 ROOT APPLY SUCCESScluster.adt.es.client.sampl 7.2.3.0 USR APPLY SUCCESScluster.adt.es.client.sampl 7.2.3.0 USR APPLY SUCCESScluster.adt.es.client.sampl 7.2.3.0 USR APPLY SUCCESScluster.adt.es.client.inclu 7.2.3.0 USR APPLY SUCCESScluster.es.server.testtool 7.2.3.0 USR APPLY SUCCESScluster.es.server.rte 7.2.3.0 USR APPLY SUCCESScluster.es.server.utils 7.2.3.0 USR APPLY SUCCESScluster.es.server.events 7.2.3.0 USR APPLY SUCCESScluster.es.server.diag 7.2.3.0 USR APPLY SUCCESS
114 IBM PowerHA SystemMirror V7.2.3 for IBM AIX and V7.2.2 for Linux
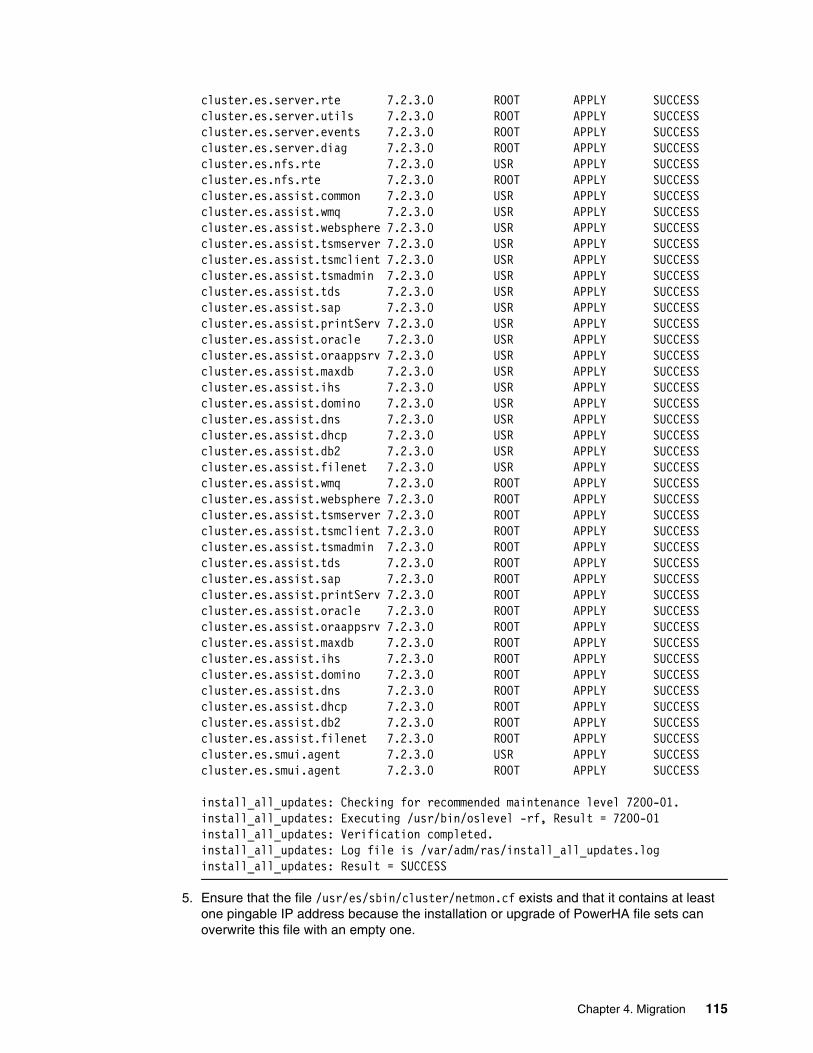
cluster.es.server.rte 7.2.3.0 ROOT APPLY SUCCESScluster.es.server.utils 7.2.3.0 ROOT APPLY SUCCESScluster.es.server.events 7.2.3.0 ROOT APPLY SUCCESScluster.es.server.diag 7.2.3.0 ROOT APPLY SUCCESScluster.es.nfs.rte 7.2.3.0 USR APPLY SUCCESScluster.es.nfs.rte 7.2.3.0 ROOT APPLY SUCCESScluster.es.assist.common 7.2.3.0 USR APPLY SUCCESScluster.es.assist.wmq 7.2.3.0 USR APPLY SUCCESScluster.es.assist.websphere 7.2.3.0 USR APPLY SUCCESScluster.es.assist.tsmserver 7.2.3.0 USR APPLY SUCCESScluster.es.assist.tsmclient 7.2.3.0 USR APPLY SUCCESScluster.es.assist.tsmadmin 7.2.3.0 USR APPLY SUCCESScluster.es.assist.tds 7.2.3.0 USR APPLY SUCCESScluster.es.assist.sap 7.2.3.0 USR APPLY SUCCESScluster.es.assist.printServ 7.2.3.0 USR APPLY SUCCESScluster.es.assist.oracle 7.2.3.0 USR APPLY SUCCESScluster.es.assist.oraappsrv 7.2.3.0 USR APPLY SUCCESScluster.es.assist.maxdb 7.2.3.0 USR APPLY SUCCESScluster.es.assist.ihs 7.2.3.0 USR APPLY SUCCESScluster.es.assist.domino 7.2.3.0 USR APPLY SUCCESScluster.es.assist.dns 7.2.3.0 USR APPLY SUCCESScluster.es.assist.dhcp 7.2.3.0 USR APPLY SUCCESScluster.es.assist.db2 7.2.3.0 USR APPLY SUCCESScluster.es.assist.filenet 7.2.3.0 USR APPLY SUCCESScluster.es.assist.wmq 7.2.3.0 ROOT APPLY SUCCESScluster.es.assist.websphere 7.2.3.0 ROOT APPLY SUCCESScluster.es.assist.tsmserver 7.2.3.0 ROOT APPLY SUCCESScluster.es.assist.tsmclient 7.2.3.0 ROOT APPLY SUCCESScluster.es.assist.tsmadmin 7.2.3.0 ROOT APPLY SUCCESScluster.es.assist.tds 7.2.3.0 ROOT APPLY SUCCESScluster.es.assist.sap 7.2.3.0 ROOT APPLY SUCCESScluster.es.assist.printServ 7.2.3.0 ROOT APPLY SUCCESScluster.es.assist.oracle 7.2.3.0 ROOT APPLY SUCCESScluster.es.assist.oraappsrv 7.2.3.0 ROOT APPLY SUCCESScluster.es.assist.maxdb 7.2.3.0 ROOT APPLY SUCCESScluster.es.assist.ihs 7.2.3.0 ROOT APPLY SUCCESScluster.es.assist.domino 7.2.3.0 ROOT APPLY SUCCESScluster.es.assist.dns 7.2.3.0 ROOT APPLY SUCCESScluster.es.assist.dhcp 7.2.3.0 ROOT APPLY SUCCESScluster.es.assist.db2 7.2.3.0 ROOT APPLY SUCCESScluster.es.assist.filenet 7.2.3.0 ROOT APPLY SUCCESScluster.es.smui.agent 7.2.3.0 USR APPLY SUCCESScluster.es.smui.agent 7.2.3.0 ROOT APPLY SUCCESS
install_all_updates: Checking for recommended maintenance level 7200-01.install_all_updates: Executing /usr/bin/oslevel -rf, Result = 7200-01install_all_updates: Verification completed.install_all_updates: Log file is /var/adm/ras/install_all_updates.loginstall_all_updates: Result = SUCCESS
5. Ensure that the file /usr/es/sbin/cluster/netmon.cf exists and that it contains at least one pingable IP address because the installation or upgrade of PowerHA file sets can overwrite this file with an empty one.
Chapter 4. Migration 115
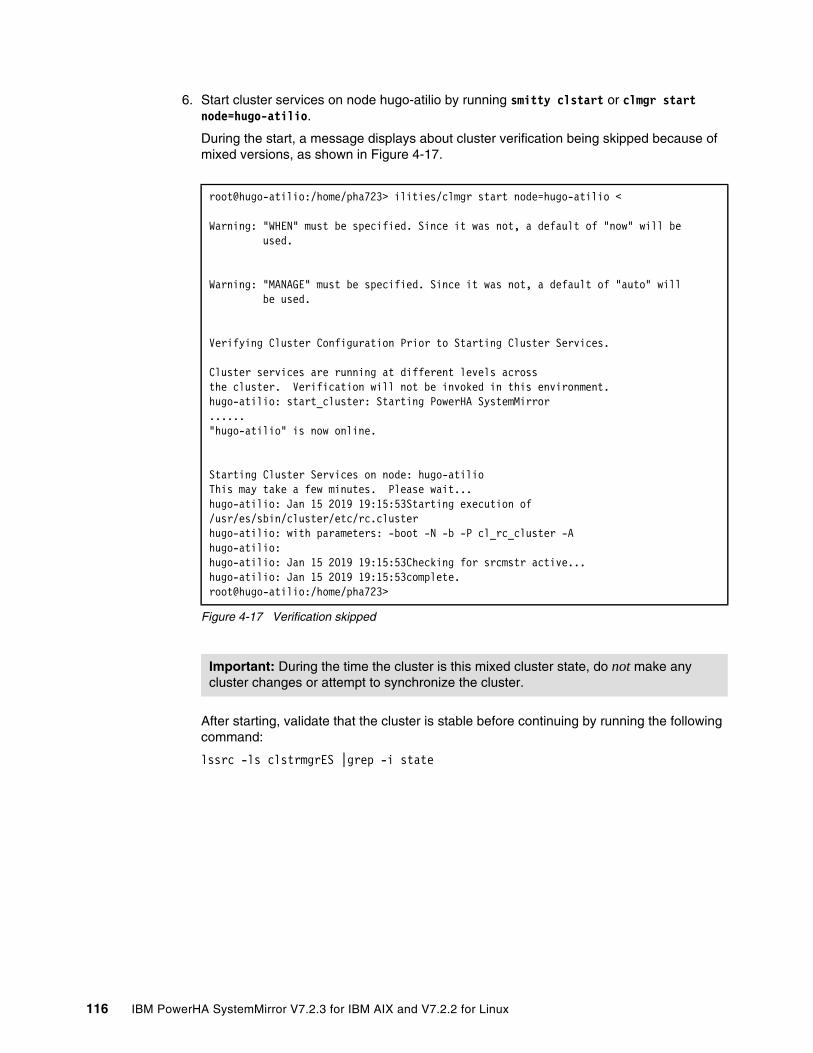
6. Start cluster services on node hugo-atilio by running smitty clstart or clmgr start node=hugo-atilio.
During the start, a message displays about cluster verification being skipped because of mixed versions, as shown in Figure 4-17.
Figure 4-17 Verification skipped
After starting, validate that the cluster is stable before continuing by running the following command:
lssrc -ls clstrmgrES |grep -i state
root@hugo-atilio:/home/pha723> ilities/clmgr start node=hugo-atilio <
Warning: "WHEN" must be specified. Since it was not, a default of "now" will be used.
Warning: "MANAGE" must be specified. Since it was not, a default of "auto" will be used.
Verifying Cluster Configuration Prior to Starting Cluster Services.
Cluster services are running at different levels acrossthe cluster. Verification will not be invoked in this environment.hugo-atilio: start_cluster: Starting PowerHA SystemMirror......"hugo-atilio" is now online.
Starting Cluster Services on node: hugo-atilioThis may take a few minutes. Please wait...hugo-atilio: Jan 15 2019 19:15:53Starting execution of /usr/es/sbin/cluster/etc/rc.clusterhugo-atilio: with parameters: -boot -N -b -P cl_rc_cluster -Ahugo-atilio:hugo-atilio: Jan 15 2019 19:15:53Checking for srcmstr active...hugo-atilio: Jan 15 2019 19:15:53complete.root@hugo-atilio:/home/pha723>
Important: During the time the cluster is this mixed cluster state, do not make any cluster changes or attempt to synchronize the cluster.
116 IBM PowerHA SystemMirror V7.2.3 for IBM AIX and V7.2.2 for Linux
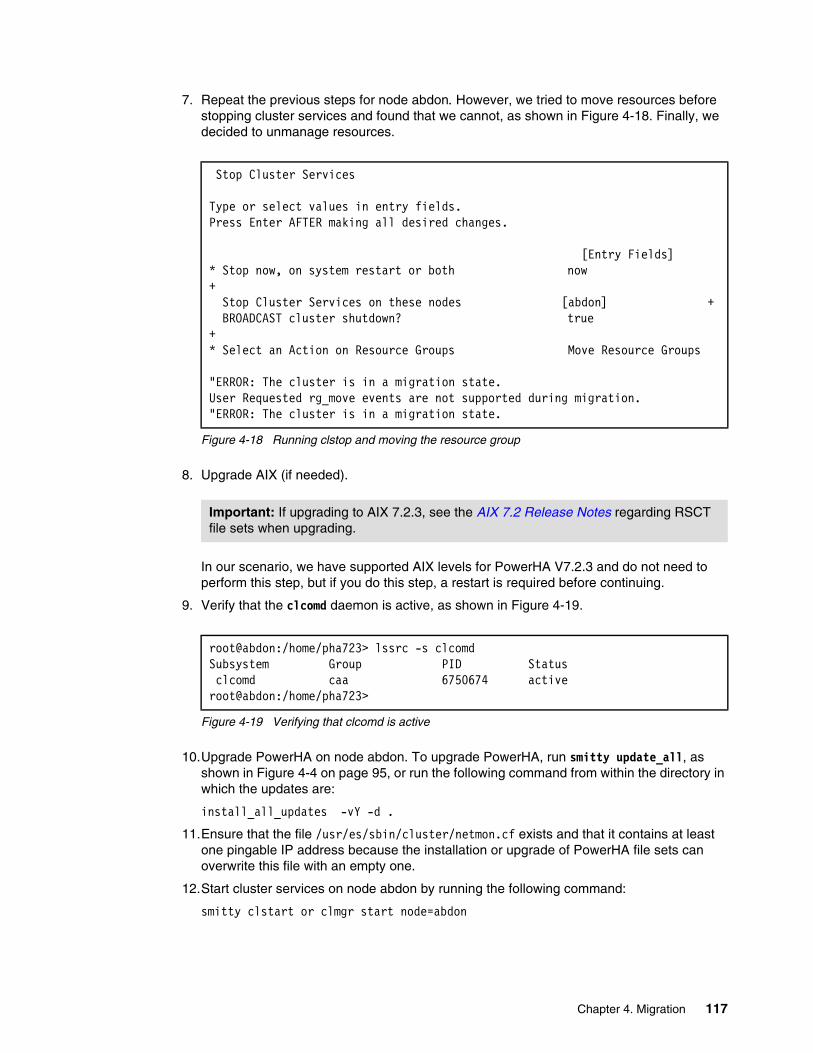
7. Repeat the previous steps for node abdon. However, we tried to move resources before stopping cluster services and found that we cannot, as shown in Figure 4-18. Finally, we decided to unmanage resources.
Figure 4-18 Running clstop and moving the resource group
8. Upgrade AIX (if needed).
In our scenario, we have supported AIX levels for PowerHA V7.2.3 and do not need to perform this step, but if you do this step, a restart is required before continuing.
9. Verify that the clcomd daemon is active, as shown in Figure 4-19.
Figure 4-19 Verifying that clcomd is active
10.Upgrade PowerHA on node abdon. To upgrade PowerHA, run smitty update_all, as shown in Figure 4-4 on page 95, or run the following command from within the directory in which the updates are:
install_all_updates -vY -d .
11.Ensure that the file /usr/es/sbin/cluster/netmon.cf exists and that it contains at least one pingable IP address because the installation or upgrade of PowerHA file sets can overwrite this file with an empty one.
12.Start cluster services on node abdon by running the following command:
smitty clstart or clmgr start node=abdon
Stop Cluster Services
Type or select values in entry fields.Press Enter AFTER making all desired changes.
[Entry Fields]* Stop now, on system restart or both now + Stop Cluster Services on these nodes [abdon] + BROADCAST cluster shutdown? true +* Select an Action on Resource Groups Move Resource Groups
"ERROR: The cluster is in a migration state.User Requested rg_move events are not supported during migration."ERROR: The cluster is in a migration state.
Important: If upgrading to AIX 7.2.3, see the AIX 7.2 Release Notes regarding RSCT file sets when upgrading.
root@abdon:/home/pha723> lssrc -s clcomdSubsystem Group PID Status clcomd caa 6750674 activeroot@abdon:/home/pha723>
Chapter 4. Migration 117

13.Verify that the cluster completed the migration on both nodes by checking that the version number is 19, as shown in Example 4-8.
Example 4-8 Verifying the cluster version on both nodes
root@abdon:/> clcmd odmget HACMPcluster |grep version cluster_version = 19 cluster_version = 19root@abdon:/>
root@abdon:/> clcmd odmget HACMPnode |grep version |sort -u version = 19root@abdon:/>
14.Although the migration is complete, and in the previous stage the migration of resources failed due to the migration stage, we test our cluster by moving the nfs resource from one node and back, as shown in Example 4-9. You might not be able to do this in a production environment.
Example 4-9 Moving the resource group back to node hugo-atilio and back to abdon
root@abdon:/> clmgr move rg nfsrg node=abdon <Attempting to move resource group nfsrg to node abdon.
Waiting for the cluster to stabilize.................
Resource group movement successful.Resource group nfsrg is online on node abdon.
Cluster Name: abdon_atilio
Resource Group Name: nfsrgPrimary instance(s):The following node temporarily has the highest priority for this instance:abdon, user-requested rg_move performed on Thu Jan 17 15:26:00 2019
Node Group State ---------------------------------------------------------------- ---------------abdon ONLINE hugo-atilio OFFLINE
Resource Group Name: db2rgNode Group State ---------------------------------------------------------------- ---------------hugo-atilio ONLINE abdon OFFLINE root@abdon:/>
Important: Both nodes must show version=19; otherwise, the migration did not complete. Call IBM Support.
118 IBM PowerHA SystemMirror V7.2.3 for IBM AIX and V7.2.2 for Linux
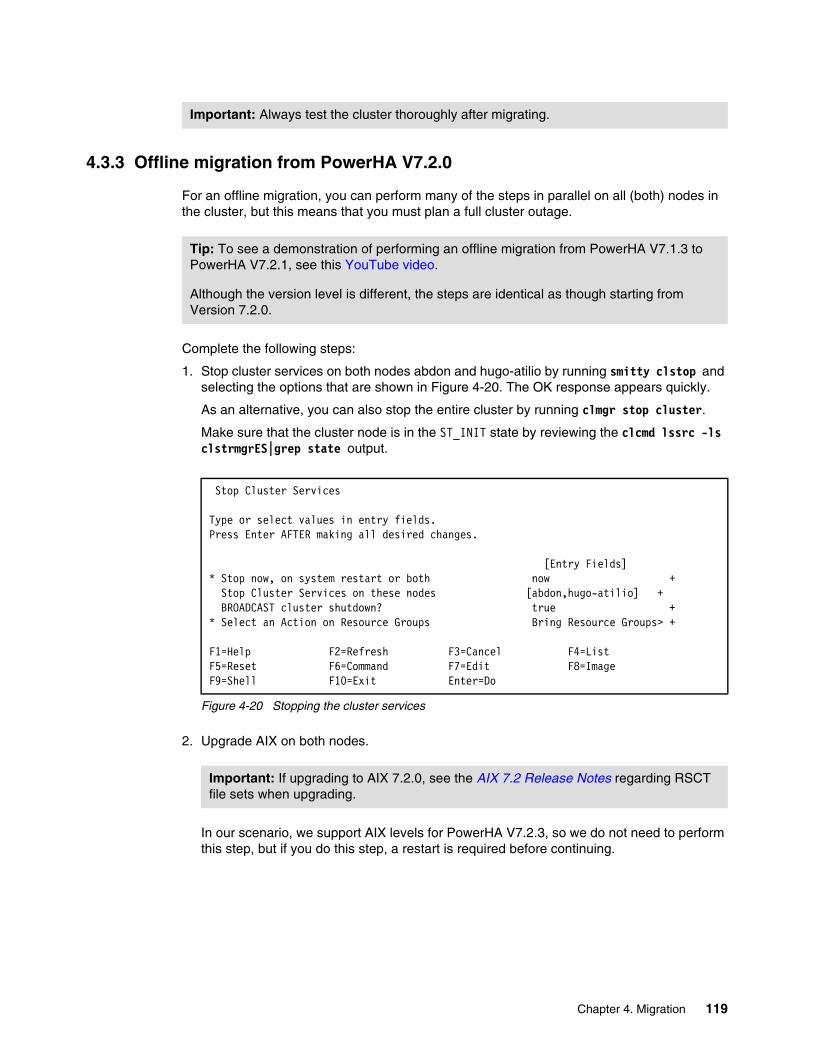
4.3.3 Offline migration from PowerHA V7.2.0
For an offline migration, you can perform many of the steps in parallel on all (both) nodes in the cluster, but this means that you must plan a full cluster outage.
Complete the following steps:
1. Stop cluster services on both nodes abdon and hugo-atilio by running smitty clstop and selecting the options that are shown in Figure 4-20. The OK response appears quickly.
As an alternative, you can also stop the entire cluster by running clmgr stop cluster.
Make sure that the cluster node is in the ST_INIT state by reviewing the clcmd lssrc -ls clstrmgrES|grep state output.
Figure 4-20 Stopping the cluster services
2. Upgrade AIX on both nodes.
In our scenario, we support AIX levels for PowerHA V7.2.3, so we do not need to perform this step, but if you do this step, a restart is required before continuing.
Important: Always test the cluster thoroughly after migrating.
Tip: To see a demonstration of performing an offline migration from PowerHA V7.1.3 to PowerHA V7.2.1, see this YouTube video.
Although the version level is different, the steps are identical as though starting from Version 7.2.0.
Stop Cluster Services
Type or select values in entry fields.Press Enter AFTER making all desired changes.
[Entry Fields]* Stop now, on system restart or both now + Stop Cluster Services on these nodes [abdon,hugo-atilio] + BROADCAST cluster shutdown? true +* Select an Action on Resource Groups Bring Resource Groups> +
F1=Help F2=Refresh F3=Cancel F4=ListF5=Reset F6=Command F7=Edit F8=ImageF9=Shell F10=Exit Enter=Do
Important: If upgrading to AIX 7.2.0, see the AIX 7.2 Release Notes regarding RSCT file sets when upgrading.
Chapter 4. Migration 119

3. Verify that the clcomd daemon is active on both nodes, as shown in Figure 4-21.
Figure 4-21 Verifying that clcomd is active
4. Upgrade to PowerHA V7.2.3 by running smitty update_all on both nodes, as shown in Figure 4-4 on page 95, or by running the following command from within the directory in which the updates are (see Example 4-7 on page 106):
install_all_updates -vY -d .
5. Ensure that the file /usr/es/sbin/cluster/netmon.cf exists on all nodes and that it contains at least one pingable IP address because the installation or upgrade of PowerHA file sets can overwrite this file with an empty one. Restart the cluster on both nodes by running clmgr start cluster.
6. Verify that the version numbers show correctly, as shown in Example 4-8 on page 118.
4.3.4 Snapshot migration from PowerHA V7.2.0
For a snapshot migration, you can perform many of the steps in parallel on all (both) nodes in the cluster. However, this migration requires a full cluster outage.
root@abdon:/> clcmd lssrc -s clcomd
-------------------------------NODE abdon-------------------------------Subsystem Group PID Status clcomd caa 5570994 active
-------------------------------NODE hugo-atilio-------------------------------Subsystem Group PID Status clcomd caa 6750674 activeroot@abdon:/>
Important: Always test the cluster thoroughly after migrating.
Tip: To see a demonstration of performing an offline migration from PowerHA V7.1.3 to PowerHA V7.2.1, see this YouTube video.
Although the version level is different, the steps are identical as though starting from Version 7.2.0.
120 IBM PowerHA SystemMirror V7.2.3 for IBM AIX and V7.2.2 for Linux
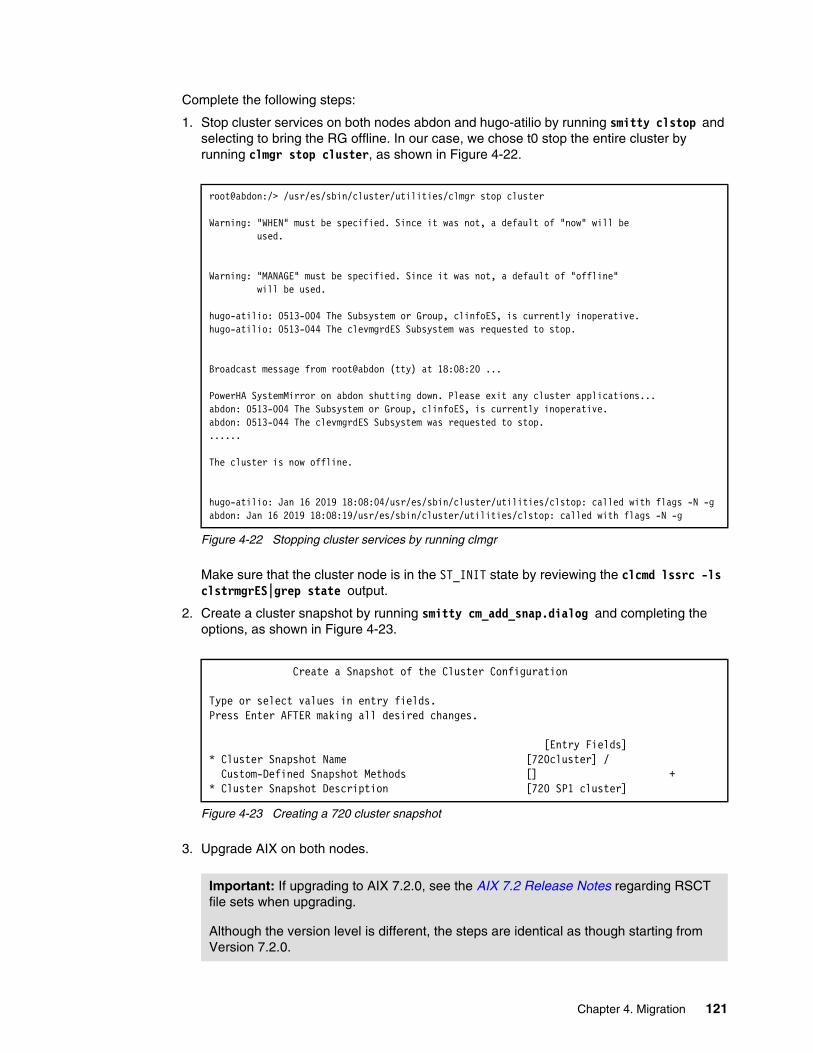
Complete the following steps:
1. Stop cluster services on both nodes abdon and hugo-atilio by running smitty clstop and selecting to bring the RG offline. In our case, we chose t0 stop the entire cluster by running clmgr stop cluster, as shown in Figure 4-22.
Figure 4-22 Stopping cluster services by running clmgr
Make sure that the cluster node is in the ST_INIT state by reviewing the clcmd lssrc -ls clstrmgrES|grep state output.
2. Create a cluster snapshot by running smitty cm_add_snap.dialog and completing the options, as shown in Figure 4-23.
Figure 4-23 Creating a 720 cluster snapshot
3. Upgrade AIX on both nodes.
root@abdon:/> /usr/es/sbin/cluster/utilities/clmgr stop cluster
Warning: "WHEN" must be specified. Since it was not, a default of "now" will be used.
Warning: "MANAGE" must be specified. Since it was not, a default of "offline" will be used.
hugo-atilio: 0513-004 The Subsystem or Group, clinfoES, is currently inoperative.hugo-atilio: 0513-044 The clevmgrdES Subsystem was requested to stop.
Broadcast message from root@abdon (tty) at 18:08:20 ...
PowerHA SystemMirror on abdon shutting down. Please exit any cluster applications...abdon: 0513-004 The Subsystem or Group, clinfoES, is currently inoperative.abdon: 0513-044 The clevmgrdES Subsystem was requested to stop.......
The cluster is now offline.
hugo-atilio: Jan 16 2019 18:08:04/usr/es/sbin/cluster/utilities/clstop: called with flags -N -gabdon: Jan 16 2019 18:08:19/usr/es/sbin/cluster/utilities/clstop: called with flags -N -g
Create a Snapshot of the Cluster Configuration
Type or select values in entry fields.Press Enter AFTER making all desired changes.
[Entry Fields]* Cluster Snapshot Name [720cluster] / Custom-Defined Snapshot Methods [] +* Cluster Snapshot Description [720 SP1 cluster]
Important: If upgrading to AIX 7.2.0, see the AIX 7.2 Release Notes regarding RSCT file sets when upgrading.
Although the version level is different, the steps are identical as though starting from Version 7.2.0.
Chapter 4. Migration 121
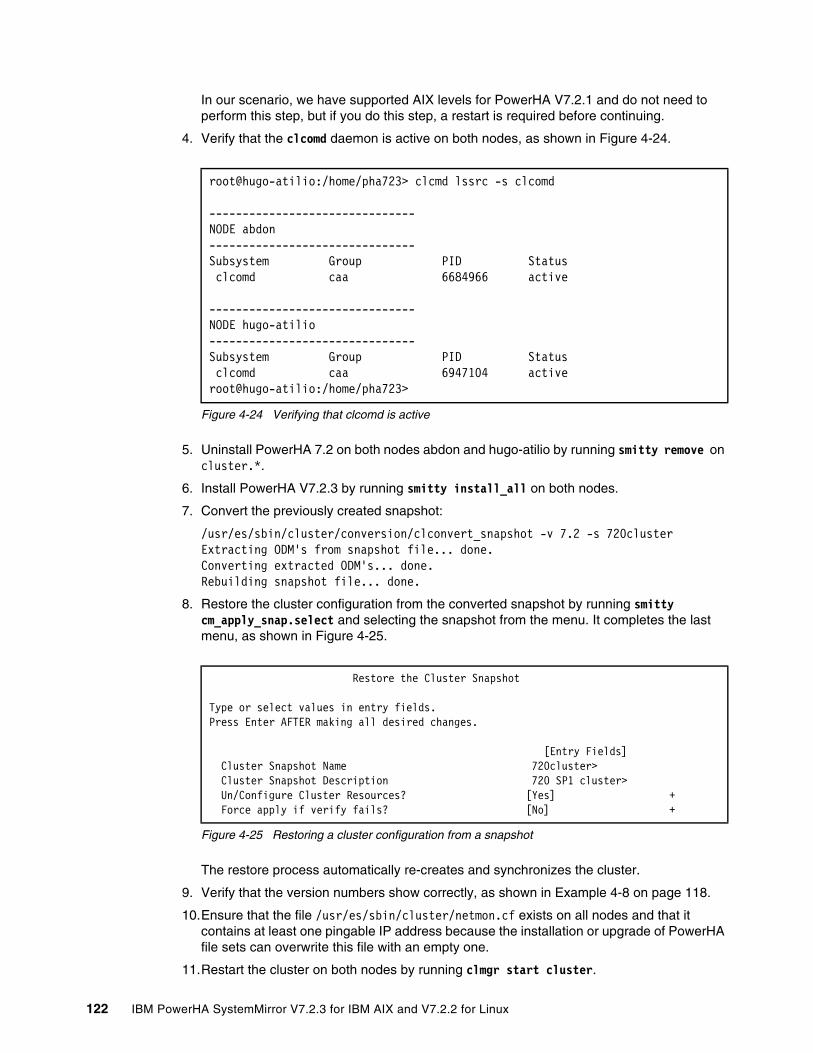
In our scenario, we have supported AIX levels for PowerHA V7.2.1 and do not need to perform this step, but if you do this step, a restart is required before continuing.
4. Verify that the clcomd daemon is active on both nodes, as shown in Figure 4-24.
Figure 4-24 Verifying that clcomd is active
5. Uninstall PowerHA 7.2 on both nodes abdon and hugo-atilio by running smitty remove on cluster.*.
6. Install PowerHA V7.2.3 by running smitty install_all on both nodes.
7. Convert the previously created snapshot:
/usr/es/sbin/cluster/conversion/clconvert_snapshot -v 7.2 -s 720clusterExtracting ODM's from snapshot file... done.Converting extracted ODM's... done.Rebuilding snapshot file... done.
8. Restore the cluster configuration from the converted snapshot by running smitty cm_apply_snap.select and selecting the snapshot from the menu. It completes the last menu, as shown in Figure 4-25.
Figure 4-25 Restoring a cluster configuration from a snapshot
The restore process automatically re-creates and synchronizes the cluster.
9. Verify that the version numbers show correctly, as shown in Example 4-8 on page 118.
10.Ensure that the file /usr/es/sbin/cluster/netmon.cf exists on all nodes and that it contains at least one pingable IP address because the installation or upgrade of PowerHA file sets can overwrite this file with an empty one.
11.Restart the cluster on both nodes by running clmgr start cluster.
root@hugo-atilio:/home/pha723> clcmd lssrc -s clcomd
-------------------------------NODE abdon-------------------------------Subsystem Group PID Status clcomd caa 6684966 active
-------------------------------NODE hugo-atilio-------------------------------Subsystem Group PID Status clcomd caa 6947104 activeroot@hugo-atilio:/home/pha723>
Restore the Cluster Snapshot
Type or select values in entry fields.Press Enter AFTER making all desired changes.
[Entry Fields] Cluster Snapshot Name 720cluster> Cluster Snapshot Description 720 SP1 cluster> Un/Configure Cluster Resources? [Yes] + Force apply if verify fails? [No] +
122 IBM PowerHA SystemMirror V7.2.3 for IBM AIX and V7.2.2 for Linux
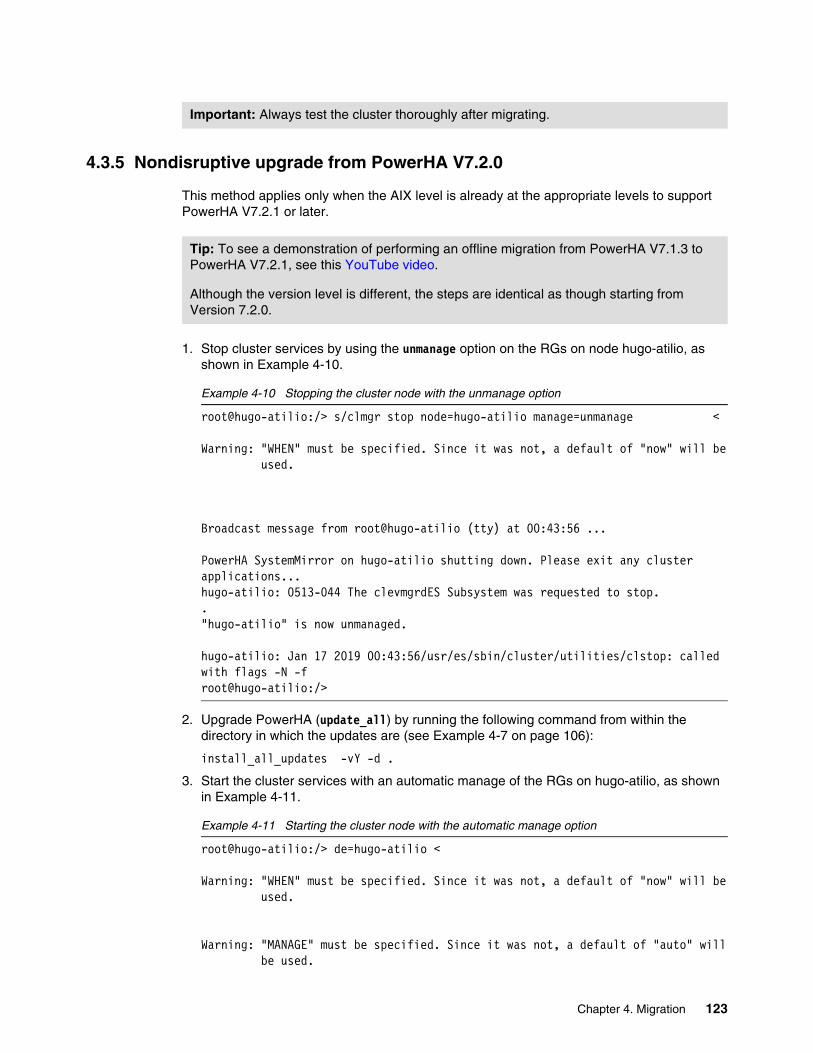
4.3.5 Nondisruptive upgrade from PowerHA V7.2.0
This method applies only when the AIX level is already at the appropriate levels to support PowerHA V7.2.1 or later.
1. Stop cluster services by using the unmanage option on the RGs on node hugo-atilio, as shown in Example 4-10.
Example 4-10 Stopping the cluster node with the unmanage option
root@hugo-atilio:/> s/clmgr stop node=hugo-atilio manage=unmanage <
Warning: "WHEN" must be specified. Since it was not, a default of "now" will be used.
Broadcast message from root@hugo-atilio (tty) at 00:43:56 ...
PowerHA SystemMirror on hugo-atilio shutting down. Please exit any cluster applications...hugo-atilio: 0513-044 The clevmgrdES Subsystem was requested to stop.."hugo-atilio" is now unmanaged.
hugo-atilio: Jan 17 2019 00:43:56/usr/es/sbin/cluster/utilities/clstop: called with flags -N -froot@hugo-atilio:/>
2. Upgrade PowerHA (update_all) by running the following command from within the directory in which the updates are (see Example 4-7 on page 106):
install_all_updates -vY -d .
3. Start the cluster services with an automatic manage of the RGs on hugo-atilio, as shown in Example 4-11.
Example 4-11 Starting the cluster node with the automatic manage option
root@hugo-atilio:/> de=hugo-atilio <
Warning: "WHEN" must be specified. Since it was not, a default of "now" will be used.
Warning: "MANAGE" must be specified. Since it was not, a default of "auto" will be used.
Important: Always test the cluster thoroughly after migrating.
Tip: To see a demonstration of performing an offline migration from PowerHA V7.1.3 to PowerHA V7.2.1, see this YouTube video.
Although the version level is different, the steps are identical as though starting from Version 7.2.0.
Chapter 4. Migration 123
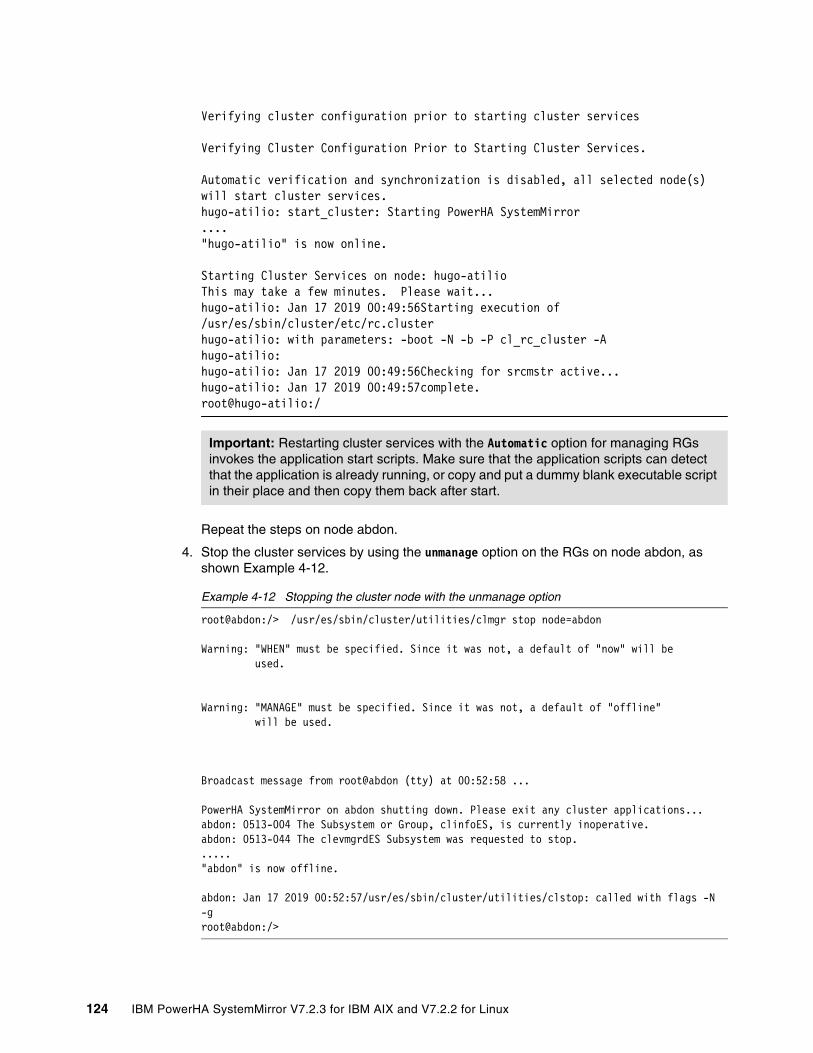
Verifying cluster configuration prior to starting cluster services
Verifying Cluster Configuration Prior to Starting Cluster Services.
Automatic verification and synchronization is disabled, all selected node(s)will start cluster services.hugo-atilio: start_cluster: Starting PowerHA SystemMirror...."hugo-atilio" is now online.
Starting Cluster Services on node: hugo-atilioThis may take a few minutes. Please wait...hugo-atilio: Jan 17 2019 00:49:56Starting execution of /usr/es/sbin/cluster/etc/rc.clusterhugo-atilio: with parameters: -boot -N -b -P cl_rc_cluster -Ahugo-atilio:hugo-atilio: Jan 17 2019 00:49:56Checking for srcmstr active...hugo-atilio: Jan 17 2019 00:49:57complete.root@hugo-atilio:/
Repeat the steps on node abdon.
4. Stop the cluster services by using the unmanage option on the RGs on node abdon, as shown Example 4-12.
Example 4-12 Stopping the cluster node with the unmanage option
root@abdon:/> /usr/es/sbin/cluster/utilities/clmgr stop node=abdon
Warning: "WHEN" must be specified. Since it was not, a default of "now" will be used.
Warning: "MANAGE" must be specified. Since it was not, a default of "offline" will be used.
Broadcast message from root@abdon (tty) at 00:52:58 ...
PowerHA SystemMirror on abdon shutting down. Please exit any cluster applications...abdon: 0513-004 The Subsystem or Group, clinfoES, is currently inoperative.abdon: 0513-044 The clevmgrdES Subsystem was requested to stop......"abdon" is now offline.
abdon: Jan 17 2019 00:52:57/usr/es/sbin/cluster/utilities/clstop: called with flags -N -groot@abdon:/>
Important: Restarting cluster services with the Automatic option for managing RGs invokes the application start scripts. Make sure that the application scripts can detect that the application is already running, or copy and put a dummy blank executable script in their place and then copy them back after start.
124 IBM PowerHA SystemMirror V7.2.3 for IBM AIX and V7.2.2 for Linux
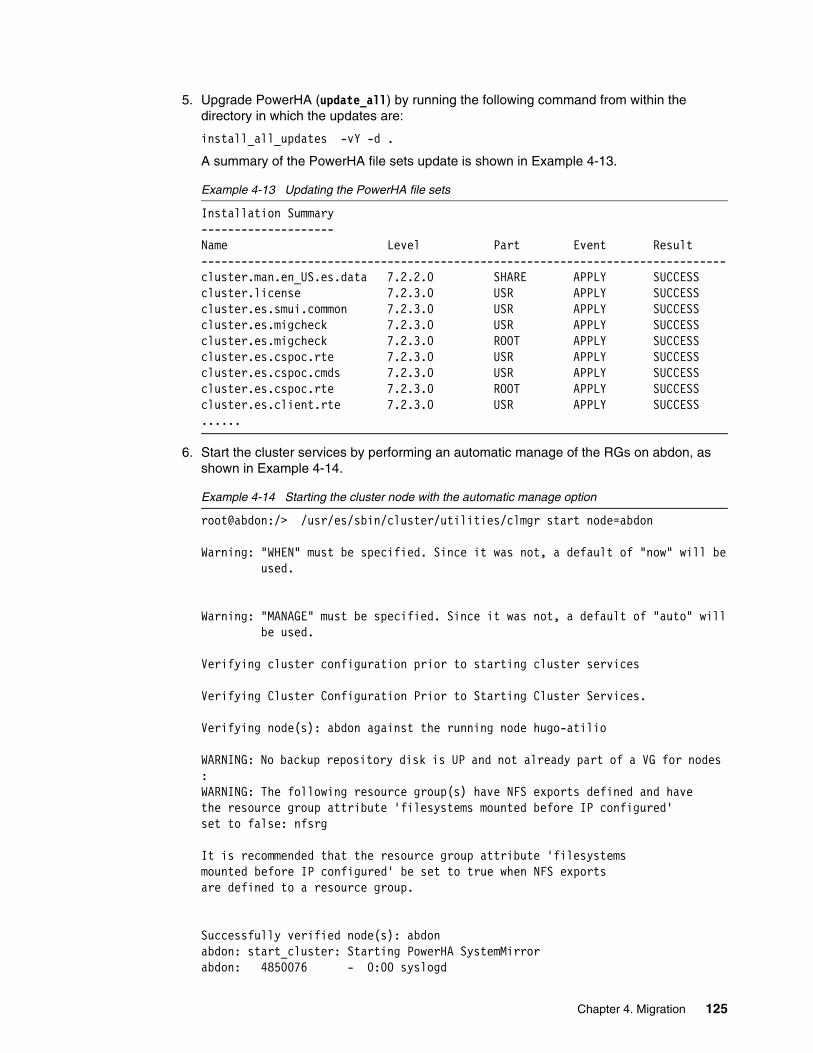
5. Upgrade PowerHA (update_all) by running the following command from within the directory in which the updates are:
install_all_updates -vY -d .
A summary of the PowerHA file sets update is shown in Example 4-13.
Example 4-13 Updating the PowerHA file sets
Installation Summary--------------------Name Level Part Event Result-------------------------------------------------------------------------------cluster.man.en_US.es.data 7.2.2.0 SHARE APPLY SUCCESScluster.license 7.2.3.0 USR APPLY SUCCESScluster.es.smui.common 7.2.3.0 USR APPLY SUCCESScluster.es.migcheck 7.2.3.0 USR APPLY SUCCESScluster.es.migcheck 7.2.3.0 ROOT APPLY SUCCESScluster.es.cspoc.rte 7.2.3.0 USR APPLY SUCCESScluster.es.cspoc.cmds 7.2.3.0 USR APPLY SUCCESScluster.es.cspoc.rte 7.2.3.0 ROOT APPLY SUCCESScluster.es.client.rte 7.2.3.0 USR APPLY SUCCESS......
6. Start the cluster services by performing an automatic manage of the RGs on abdon, as shown in Example 4-14.
Example 4-14 Starting the cluster node with the automatic manage option
root@abdon:/> /usr/es/sbin/cluster/utilities/clmgr start node=abdon
Warning: "WHEN" must be specified. Since it was not, a default of "now" will be used.
Warning: "MANAGE" must be specified. Since it was not, a default of "auto" will be used.
Verifying cluster configuration prior to starting cluster services
Verifying Cluster Configuration Prior to Starting Cluster Services.
Verifying node(s): abdon against the running node hugo-atilio
WARNING: No backup repository disk is UP and not already part of a VG for nodes :WARNING: The following resource group(s) have NFS exports defined and havethe resource group attribute 'filesystems mounted before IP configured'set to false: nfsrg
It is recommended that the resource group attribute 'filesystemsmounted before IP configured' be set to true when NFS exportsare defined to a resource group.
Successfully verified node(s): abdonabdon: start_cluster: Starting PowerHA SystemMirrorabdon: 4850076 - 0:00 syslogd
Chapter 4. Migration 125
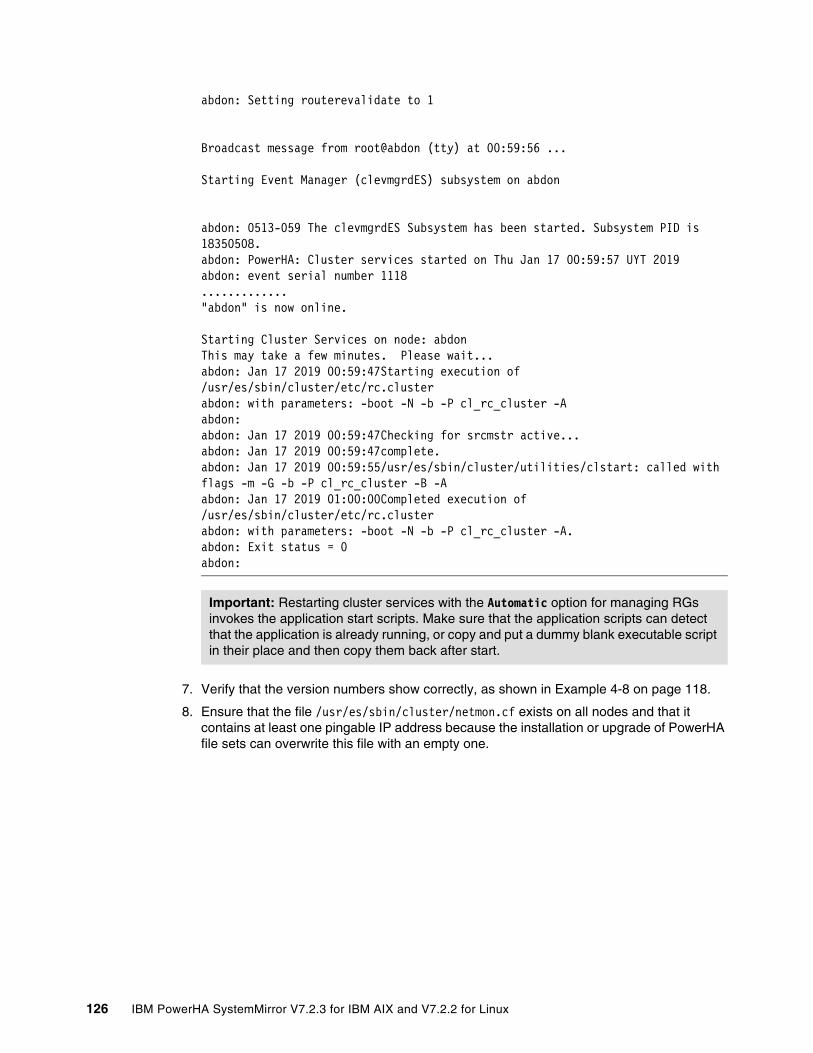
abdon: Setting routerevalidate to 1
Broadcast message from root@abdon (tty) at 00:59:56 ...
Starting Event Manager (clevmgrdES) subsystem on abdon
abdon: 0513-059 The clevmgrdES Subsystem has been started. Subsystem PID is 18350508.abdon: PowerHA: Cluster services started on Thu Jan 17 00:59:57 UYT 2019abdon: event serial number 1118............."abdon" is now online.
Starting Cluster Services on node: abdonThis may take a few minutes. Please wait...abdon: Jan 17 2019 00:59:47Starting execution of /usr/es/sbin/cluster/etc/rc.clusterabdon: with parameters: -boot -N -b -P cl_rc_cluster -Aabdon:abdon: Jan 17 2019 00:59:47Checking for srcmstr active...abdon: Jan 17 2019 00:59:47complete.abdon: Jan 17 2019 00:59:55/usr/es/sbin/cluster/utilities/clstart: called with flags -m -G -b -P cl_rc_cluster -B -Aabdon: Jan 17 2019 01:00:00Completed execution of /usr/es/sbin/cluster/etc/rc.clusterabdon: with parameters: -boot -N -b -P cl_rc_cluster -A.abdon: Exit status = 0abdon:
7. Verify that the version numbers show correctly, as shown in Example 4-8 on page 118.
8. Ensure that the file /usr/es/sbin/cluster/netmon.cf exists on all nodes and that it contains at least one pingable IP address because the installation or upgrade of PowerHA file sets can overwrite this file with an empty one.
Important: Restarting cluster services with the Automatic option for managing RGs invokes the application start scripts. Make sure that the application scripts can detect that the application is already running, or copy and put a dummy blank executable script in their place and then copy them back after start.
126 IBM PowerHA SystemMirror V7.2.3 for IBM AIX and V7.2.2 for Linux

Chapter 5. PowerHA SystemMirror User Interface
This chapter provides practical information about PowerHA SystemMirror User Interface (SMUI) for AIX and Linux.
This chapter covers the following topics:
� SMUI new features
� Planning and installation of SMUI
� Navigating the SMUI
� Cluster management by using the SMUI
� Cluster maintenance by using SMUI
� SMUI access control
� Troubleshooting SMUI
5
© Copyright IBM Corp. 2019. All rights reserved. 127
5.1 SMUI new features
SMUI was released with PowerHA SystemMirror V7.2.1 and offered health monitoring and a centralized log view for resolving PowerHA cluster problems. In later releases, SMUI added many useful administrative capabilities to manage and monitor AIX and Linux PowerHA clusters.
5.1.1 What is new for SMUI
The following sections highlight many new features of SMUI for PowerHA SystemMirror Versions 7.2.2 and 7.2.3.
Security and organizationSMUI offers a higher level of security and organization by providing the following capabilities:
� User management
� Role-based access control (RBAC)
UsabilityThere are usability improvements for better navigation and management:
� Zones and context-sensitive views from the navigation tree.
� Eliminated the smuiinst.ksh requirement in Linux. It is still needed if AIX clusters are added to a Linux server.
Support for PowerLinuxBecause PowerHA V7.2.2 is available also for PowerLinux, the most recent versions of SMUI have the following capabilities:
� Linux clusters can be managed on an AIX SMUI server.
� AIX clusters can be managed on a Linux SMUI server.
� One server can manage both Linux and AIX clusters.
New administrative capabilitiesThere are new administrative capabilities for managing clusters by using the SMUI, such as creating, deleting, and modifying existing clusters and cluster configuration objects:
� Clusters� Resource groups (RGs)� Volume groups (VGs)� File systems� Service IP addresses� Persistent IP addresses
Cluster snapshots and reports Now you can make snapshots of and get reports about PowerHA by sing the SMUI. For example, you can clone clusters by using snapshots by using the SMUI.
128 IBM PowerHA SystemMirror V7.2.3 for IBM AIX and V7.2.2 for Linux

Here are some of the tasks that you can do by using this function:
� Actions for PowerHA Reports:– Create– Save– Print
� Actions for PowerHA Snapshots:– Create– Edit– View– Restore– Delete
Application monitoring and availability metricsFrom the Application monitoring and availability metrics menu of the SMUI, you can do the following actions:
� Suspend application monitoring.
� Resume application monitoring
� Display graphics for cluster availability.
Troubleshooting utility (uisnap) The uisnap utility collects log information that helps Level 2 and 3 support and development solve problems faster.
5.2 Planning and installation of SMUI
Before you can install SMUI, you must do proper planning to meet certain requirements.
You must install and configure SMUI server only on one node of a cluster or multi-cluster environment that is designated a server. You do not need to install SMUI server on every node in a cluster. You can install it on a single node to manage multiple PowerHA clusters whether they are AIX or Linux.
Here are the definitions of SMUI clients and server:
SMUI clients A node that is part of an AIX or Linux PowerHA SystemMirror cluster.
SMUI server A server running Linux or AIX that provides SMUI.
Important: Although the SMUI server can be a cluster node, it a best practice to place it on a separate stand-alone AIX or Linux system. Also, ideally the SMUI server must have internet access to download more open source packages as required. However, this section describes how to work around this requirement.
Chapter 5. PowerHA SystemMirror User Interface 129
Prerequisites for Linux and AIXThere are some prerequisites for installing SMUI to run on AIX and Linux.
Supported web browsersSMUI is supported by the following web browsers:
1. Google Chrome Version 57 or later
2. Firefox Version 52 or later
5.2.1 Planning and installation of SMUI for AIX
PlanningThe cluster nodes and SMUI server must be at one of the following AIX levels:
� AIX Version 7.1 Service Pack 6 or later
� AIX Version 7.2 Service Pack 1 or later
File sets to use with SMUIYou must install the following file sets:
cluster.es.smui.common This file set must be installed on SMUI clients and the server.
cluster.es.smui.agent You must install the SMUI agent file set on all nodes that you want to manage with the SMUI.
cluster.es.smui.server The GUI server file set is typically installed on only one system to manage clusters.
SMUI clients file setsYou must install the following file sets on all nodes that you want to manage with the SMUI:
� cluster.es.smui.agent
� cluster.es.smui.common
SMUI server file setsThe GUI server file set is typically installed on only one system to manage clusters. The cluster.es.smui.common file set must be installed on both SMUI clients and the server.
� cluster.es.smui.server
� cluster.es.smui.common
Important:
� Before using the SMUI, you must install and configure Secure Shell (SSH) on each node.
� OpenSSL and OpenSSH must be installed on the system that is used as the SMUI server.
� For some clusters utilities, it is necessary to have installed Python.
Warning: It is recommended that the PowerHA GUI binary files match with the same version of PowerHA SystemMirror. If the GUI is an earlier version, the administrator can potentially experience problems when managing the cluster through the GUI (usually communication problems).
130 IBM PowerHA SystemMirror V7.2.3 for IBM AIX and V7.2.2 for Linux
Installing SMUI clients for AIXThis section describes how to install SMUI clients for AIX.
PrerequisitesFor more information about prerequisites, see “Prerequisites for Linux and AIX” on page 130.
InstallationThe cluster.es.smui.common and cluster.es.smui.agent file sets are part of the group of PowerHA SystemMirror file sets and are installed automatically while installing PowerHA. To check whether you already have the SMUI file sets installed, run the following command:
lslpp -L |grep -i smui
If you already have the SMUI file sets installed on all cluster nodes that you want to manage, skip this section and install the SMUI server. If not, go to the PowerHA installation media path and run the following command to check whether all required packages are included in it. Also, check Example 5-1.
installp -Ld ./ | grep cluster.es.smui | cut -d':' -f1-3
Example 5-1 Checking the SMUI file sets within the PowerHA installation path
root@LPARAIX01:/# cd /tmp/PHA7.2.3root@LPARAIX01:/tmp/PHA7.2.3# installp -Ld ./|grep cluster.es.smui|cut -d':' -f1-3cluster.es.smui:cluster.es.smui.agent:7.2.3.0cluster.es.smui:cluster.es.smui.common:7.2.3.0cluster.es.smui.server:cluster.es.smui.server:7.2.3.0root@LPARAIX01:/tmp/PHA7.2.3#
Example 5-1 shows how to discover whether the SMUI file sets are included within the PowerHA installation media. Example 5-1 also shows three columns that are delimited by colons:
� The first column represents the installation package.� The second column shows the file set to be installed.� The last column shows the version of the file set.
In Example 5-1, in this case we have the three main components for SMUI included within the installation media. So, to install all PowerHA components including SMUI, run the command smit install_all.
If you already installed PowerHA and you want to install only the SMUI clients, run the following commands (Example 5-2):
installp -aYXgd install_path_images -e /tmp/SMUIinstall.log \cluster.es.smui.agent cluster.es.smui.common
Example 5-2 Installing file sets for only the SMUI clients
root@LPARAIX01:/# installp -aYgd /tmp/PHA_7.2.3_20181022 -e /tmp/install.log cluster.es.smui.agent cluster.es.smui.common+-----------------------------------------------------------------------------+ Pre-installation Verification...+-----------------------------------------------------------------------------+Verifying selections...doneVerifying requisites...doneResults...
SUCCESSES
Chapter 5. PowerHA SystemMirror User Interface 131
...---------Installation Summary--------------------Name Level Part Event Result-------------------------------------------------------------------------------cluster.es.smui.common 7.2.3.0 USR APPLY SUCCESS cluster.es.smui.agent 7.2.3.0 USR APPLY SUCCESS cluster.es.smui.agent 7.2.3.0 ROOT APPLY SUCCESS
SMUI server installation for AIXTo install the SMUI server, you must use the cluster.es.smui.common and cluster.es.smui.server file sets.
PrerequisitesFor information about prerequisites, see “Prerequisites for Linux and AIX” on page 130.
InstallationYou use file sets to install the SMUI server files. The node on which you install the cluster.es.smui.server file set is known as the SMUI server.
To install, run the following command. Example 5-3 shows the output.
installp -aYXgd install_path_images -e /tmp/SMUIinstall.log \cluster.es.smui.server cluster.es.smui.common
Example 5-3 Installing file sets for the SMUI server
root@LPARAIX02:/# installp -aYgd /tmp/PHA_7.2.3_20181022 -e /tmp/SMUIinstall.log cluster.es.smui.server cluster.es.smui.common+-----------------------------------------------------------------------------+ Pre-installation Verification...+-----------------------------------------------------------------------------+Verifying selections...doneVerifying requisites...doneResults...SUCCESSES---------Installation Summary--------------------Name Level Part Event Result-------------------------------------------------------------------------------cluster.es.smui.common 7.2.3.0 USR APPLY SUCCESS cluster.es.smui.server 7.2.3.0 USR APPLY SUCCESS cluster.es.smui.server 7.2.3.0 ROOT APPLY SUCCESS root@LPARAIX02:/#
Note: You do not need to install the cluster.es.smui.server file set on every node in the cluster or on every cluster that is to be managed. You install this file set on a single node to manage multiple clusters.
Note: A postinstallation procedure is required for the SMUI server, which is described in 5.2.3, “Postinstallation actions for the SMUI server for AIX and Linux” on page 133.
132 IBM PowerHA SystemMirror V7.2.3 for IBM AIX and V7.2.2 for Linux
5.2.2 Planning and installation of SMUI for Linux
The SMUI software for Linux is delivered with the PowerHA SystemMirror package. The SMUI installation script installPHAGUI is available within the GUI directory of the PowerHA installation media.
PlanningBefore installing SMUI, your SMUI server must meet certain requirements, which are outlined in the following sections.
Linux operating system requirementsThe nodes in the clusters on which you are running the installation scripts must be running one of the following versions of the Linux operating system:
� SUSE Linux Enterprise Server 12 SP1 (64-bit)� SUSE Linux Enterprise Server 12 SP2 (64-bit)� SUSE Linux Enterprise Server 12 SP3 (64-bit)� SUSE Linux Enterprise Server for SAP 12 SP1 (64-bit)� SUSE Linux Enterprise Server for SAP 12 SP2 (64-bit)� SUSE Linux Enterprise Server for SAP 12 SP3 (64-bit)� Red Hat Enterprise Linux (RHEL) 7.2 (64-bit)� Red Hat Enterprise Linux (RHEL) 7.3 (64-bit)� Red Hat Enterprise Linux (RHEL) 7.4 (64-bit)
Prerequisites for AIX and LinuxThe following prerequisites must be met before you install the SMUI on a Linux system:
� The prerequisites that are described in “Prerequisites for Linux and AIX” on page 130.
� The PowerHA SystemMirror package must be installed on your system.
� The KSH93 package is required on each SUSE Linux Enterprise Server and RHEL system.
If you run the script installPHAGUI without any option, the agent and server are installed.
SMUI client installation for LinuxTo install the agent and common RPMs for SMUI clients only, run the following script:
./installPHAGUI -a -c
SMUI server installation for LinuxTo install the SMUI server and common RPMs only, run the following script:
./installPHAGUI -s -c
5.2.3 Postinstallation actions for the SMUI server for AIX and Linux
In the following cases, it is necessary to install extra files. These extra files are not included in the SMUI server file set because they are licensed under the General Public License (GPL).
Note: If any previous installation of the agent exists, uninstall it by running the following script before you install the new version:
./installPHAGUI -u -a -c
Chapter 5. PowerHA SystemMirror User Interface 133
The smuiinst.ksh requirement for SMUI on LinuxThe smuiinst.ksh package is optional for Linux-only environments, and it is needed if AIX clusters are added to SMUI server on Linux.
For Linux, the following extra packages are required:
� libgcc-4.9.2-1.aix6.1.ppc.rpm� libgcc-4.9.2-1.aix7.1.ppc.rpm� libstdc++-4.9.2-1.aix6.1.ppc.rpm� libstdc++-4.9.2-1.aix7.1.ppc.rpm
The smuiinst.ksh requirement for SMUI on AIXFor AIX servers, smuiinst.ksh is run only one time.
For AIX, the following extra packages are required:
� bash-4.2-5.aix5.3.ppc.rpm� cpio-2.11-2.aix6.1.ppc.rpm� gettext-0.17-6.aix5.3.ppc.rpm� info-4.13-3.aix5.3.ppc.rpm� libgcc-4.9.2-1.aix6.1.ppc.rpm� libgcc-4.9.2-1.aix7.1.ppc.rpm� libiconv-1.13.1-2.aix5.3.ppc.rpm� libstdc++-4.9.2-1.aix6.1.ppc.rpm� libstdc++-4.9.2-1.aix7.1.ppc.rpm� readline-6.2-2.aix5.3.ppc.rpm
Installation: Offline methodYou can alternatively download and install extra components that are not included in the SMUI server but are required. This method is called offline mode, which means that if your SMUI server does not have internet access, you must run smuiinst.ksh in offline mode. To do so, complete the following steps:
1. Copy the smuiinst.ksh package from the SMUI server to a system that is running the same operating system and has internet access.
2. From the system that has internet access, run the smuiinst.ksh -d /directory command, where /directory is the location where you want to the download the files.
3. Copy the downloaded files from /directory to a directory on the SMUI server.
4. From the SMUI server, run the smuiinst.ksh -i /directory command, where /directory is the location where you copied the downloaded files.
While smuiinst.ksh is running, the rpms are installed and the SMUI server service starts. It also shows a URL for the SMUI server that is similar to what is shown in Example 5-4. Enter the specified URL into a web browser and the SMUI login window opens.
Example 5-4 SMUI server installation script output
root@LPARAIX01:/# /usr/es/sbin/cluster/ui/server/bin/smuiinst.ksh \ -i /tmp/smui_rpmsAIXAttempting to install any needed requisites....Packaging the Node.js libraries for AIX 6.1...Packaging the Node.js libraries for AIX 7.1...Packaging the Node.js libraries for AIX 7.2......Attempting to start the server...
134 IBM PowerHA SystemMirror V7.2.3 for IBM AIX and V7.2.2 for Linux
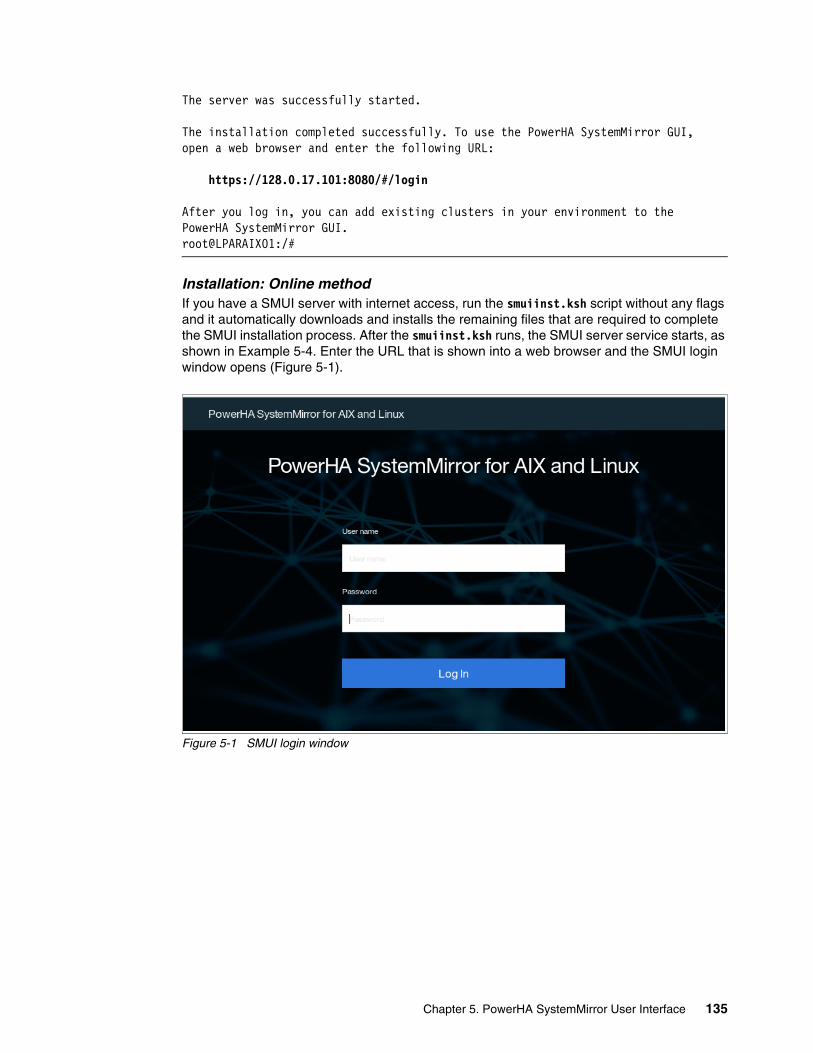
The server was successfully started.
The installation completed successfully. To use the PowerHA SystemMirror GUI,open a web browser and enter the following URL:
https://128.0.17.101:8080/#/login
After you log in, you can add existing clusters in your environment to thePowerHA SystemMirror GUI.root@LPARAIX01:/#
Installation: Online methodIf you have a SMUI server with internet access, run the smuiinst.ksh script without any flags and it automatically downloads and installs the remaining files that are required to complete the SMUI installation process. After the smuiinst.ksh runs, the SMUI server service starts, as shown in Example 5-4. Enter the URL that is shown into a web browser and the SMUI login window opens (Figure 5-1).
Figure 5-1 SMUI login window
Chapter 5. PowerHA SystemMirror User Interface 135
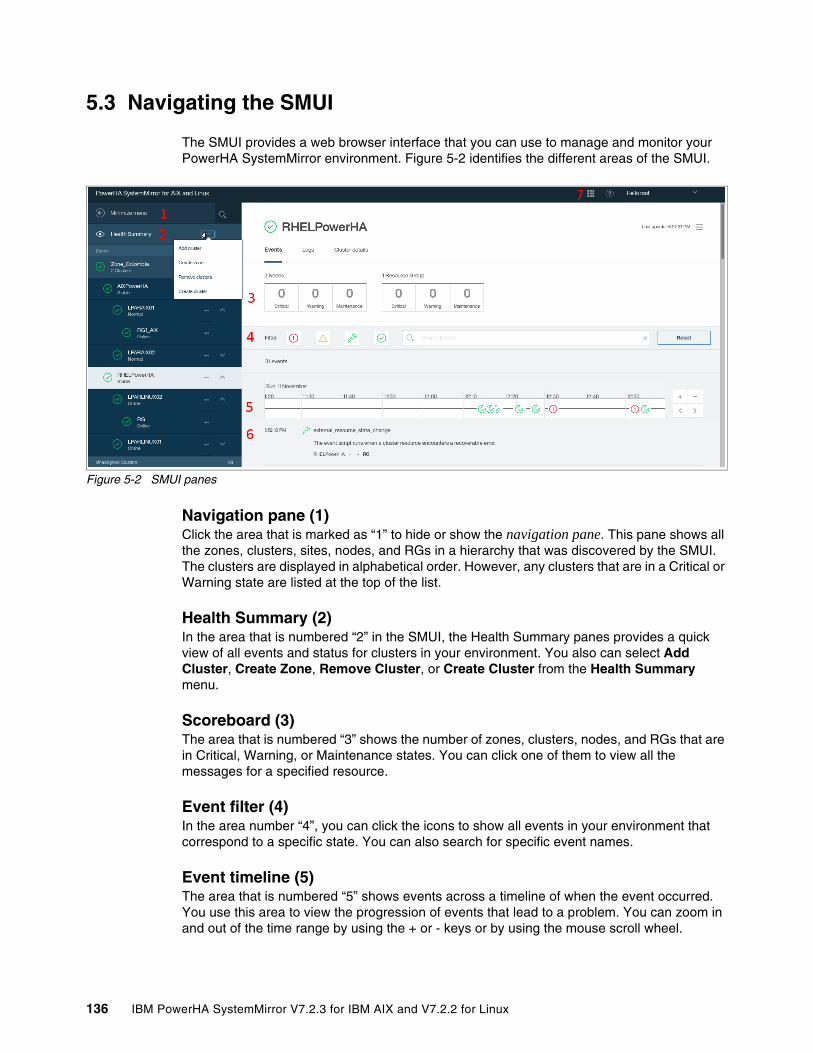
5.3 Navigating the SMUI
The SMUI provides a web browser interface that you can use to manage and monitor your PowerHA SystemMirror environment. Figure 5-2 identifies the different areas of the SMUI.
Figure 5-2 SMUI panes
Navigation pane (1)Click the area that is marked as “1” to hide or show the navigation pane. This pane shows all the zones, clusters, sites, nodes, and RGs in a hierarchy that was discovered by the SMUI. The clusters are displayed in alphabetical order. However, any clusters that are in a Critical or Warning state are listed at the top of the list.
Health Summary (2)In the area that is numbered “2” in the SMUI, the Health Summary panes provides a quick view of all events and status for clusters in your environment. You also can select Add Cluster, Create Zone, Remove Cluster, or Create Cluster from the Health Summary menu.
Scoreboard (3)The area that is numbered “3” shows the number of zones, clusters, nodes, and RGs that are in Critical, Warning, or Maintenance states. You can click one of them to view all the messages for a specified resource.
Event filter (4)In the area number “4”, you can click the icons to show all events in your environment that correspond to a specific state. You can also search for specific event names.
Event timeline (5)The area that is numbered “5” shows events across a timeline of when the event occurred. You use this area to view the progression of events that lead to a problem. You can zoom in and out of the time range by using the + or - keys or by using the mouse scroll wheel.
136 IBM PowerHA SystemMirror V7.2.3 for IBM AIX and V7.2.2 for Linux
Event list (6)The areas numbered “6” shows the name of the event, the time when each event occurred, and a description of the event. The information that is shown in this area corresponds to the events you selected from the event timeline area. The most recent event that occurred is shown first. You can click this area to display more detailed information about the event, such as possible causes and suggested actions.
Action menu (7)The area that is numbered “7” shows the following menus options:
� User Management
An administrator can create and manage users by using the User Management menu. The administrator can assign roles to users. For more information, see 5.6.1, “User management” on page 160.
� Role Management
The Role Management menu shows information about the available roles for each user. An administrator can create custom roles and assign permissions to different users. For more information, see 5.6.2, “Role management” on page 161.
� Zone Management
By using the Zone Management menu, you can create zones, which are groups of clusters. An administrator can create or edit zones and assign any number of clusters to a zone. For more information, see 5.4.1, “Managing zones” on page 137.
� View Activity Log
By using the View Activity Log menu, you can view information about all activities that are performed in the SMUI that resulted in a change. This view provides various filters to search for specific activities for the cluster, roles, zone, or user management changes.
5.4 Cluster management by using the SMUI
This section describes using the SMUI for cluster management.
5.4.1 Managing zones
You can use zones to create groups of clusters. For example, you might create a zone for all your production clusters, another zone for development clusters, and another zone for test clusters. You can also give users access to specific zones.
To open the Zone Management window, complete the following steps:
1. Click the Action menu.
2. Click Zone Management.
Chapter 5. PowerHA SystemMirror User Interface 137
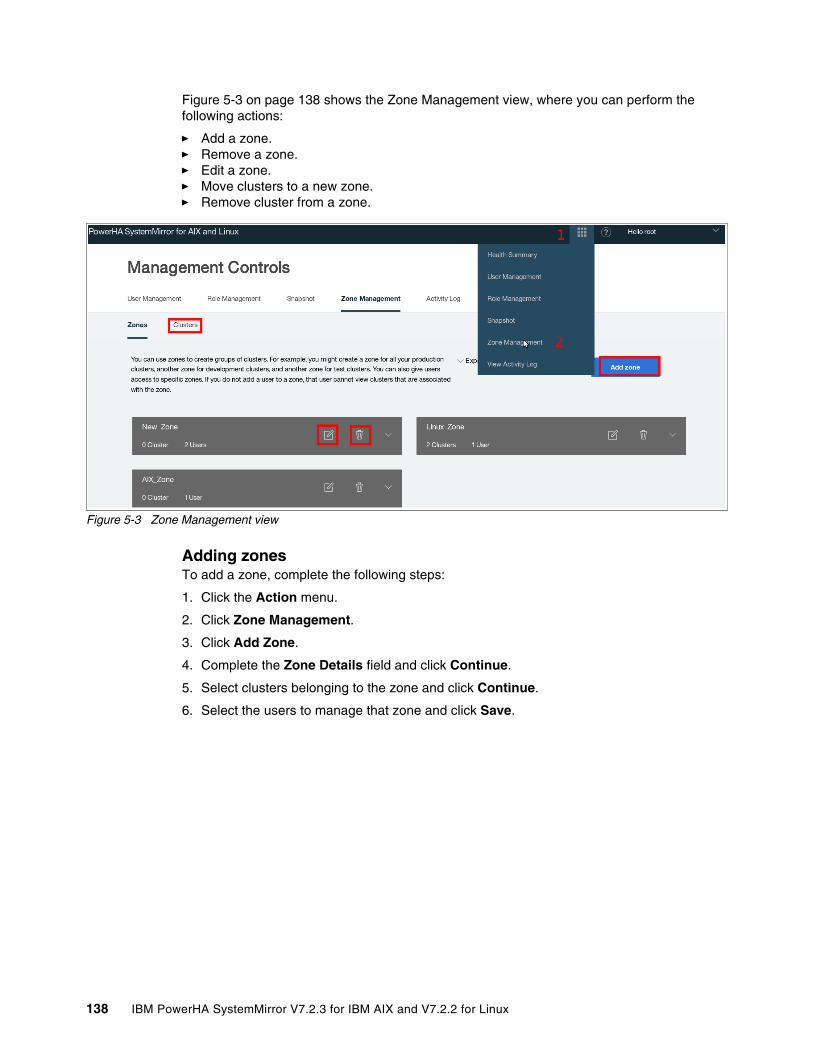
Figure 5-3 on page 138 shows the Zone Management view, where you can perform the following actions:
� Add a zone.� Remove a zone.� Edit a zone.� Move clusters to a new zone.� Remove cluster from a zone.
Figure 5-3 Zone Management view
Adding zones To add a zone, complete the following steps:
1. Click the Action menu.
2. Click Zone Management.
3. Click Add Zone.
4. Complete the Zone Details field and click Continue.
5. Select clusters belonging to the zone and click Continue.
6. Select the users to manage that zone and click Save.
138 IBM PowerHA SystemMirror V7.2.3 for IBM AIX and V7.2.2 for Linux
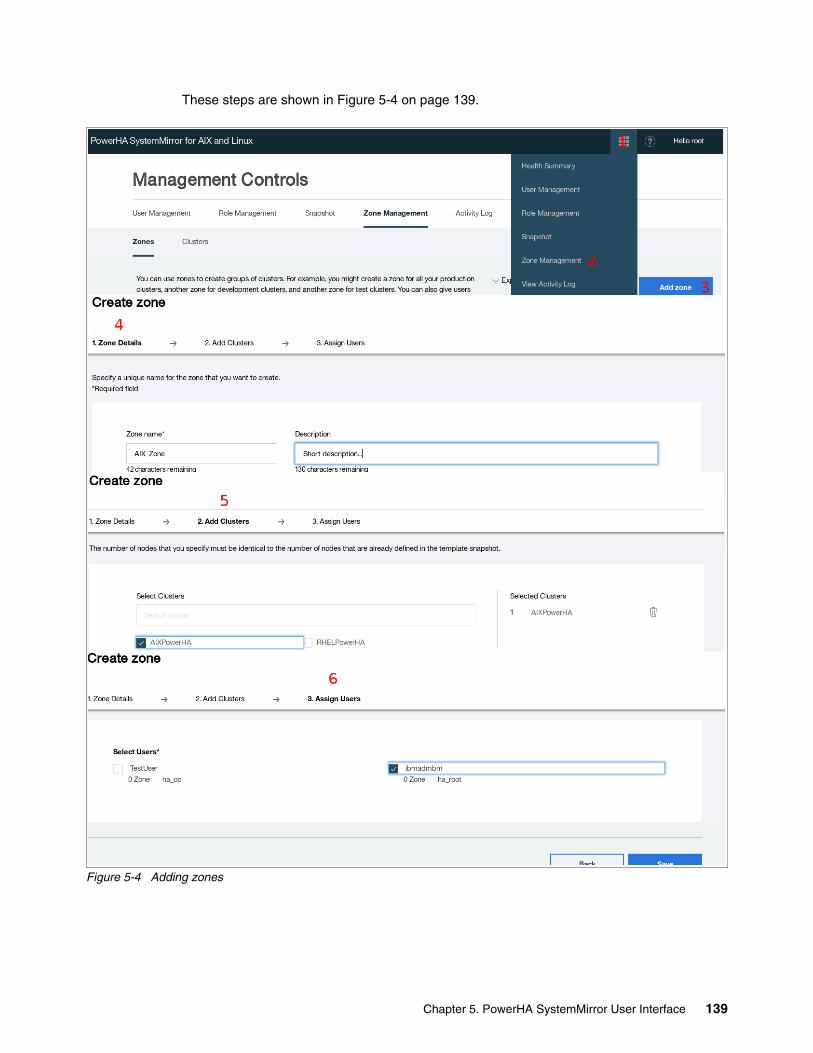
These steps are shown in Figure 5-4 on page 139.
Figure 5-4 Adding zones
Chapter 5. PowerHA SystemMirror User Interface 139

Removing zonesTo remove a zone, complete the following steps:
1. Click the Action menu.
2. Click Zone Management.
3. Go to the zone and click Delete.
4. Click Delete again to confirm the action.
Editing zonesTo edit a zone, complete the following steps:
1. Click the Action menu.
2. Click Zone Management.
3. Click Edit and complete the fields.
4. Click Save.
Moving a cluster to a different zoneYou can move a cluster to a different zone by completing the following steps:
1. Click the Action menu.
2. Click Zone Management.
3. Click Cluster.
4. Select the cluster on which you want to perform the action.
5. Click Action and click Move.
6. Select the new zone and click Move.
These steps are shown in Figure 5-5.
Figure 5-5 Moving a cluster to a different zone
Removing a cluster from a zoneTo remove a cluster from a zone, complete the following steps:
1. Click the Action menu.
2. Click Zone Management.
140 IBM PowerHA SystemMirror V7.2.3 for IBM AIX and V7.2.2 for Linux
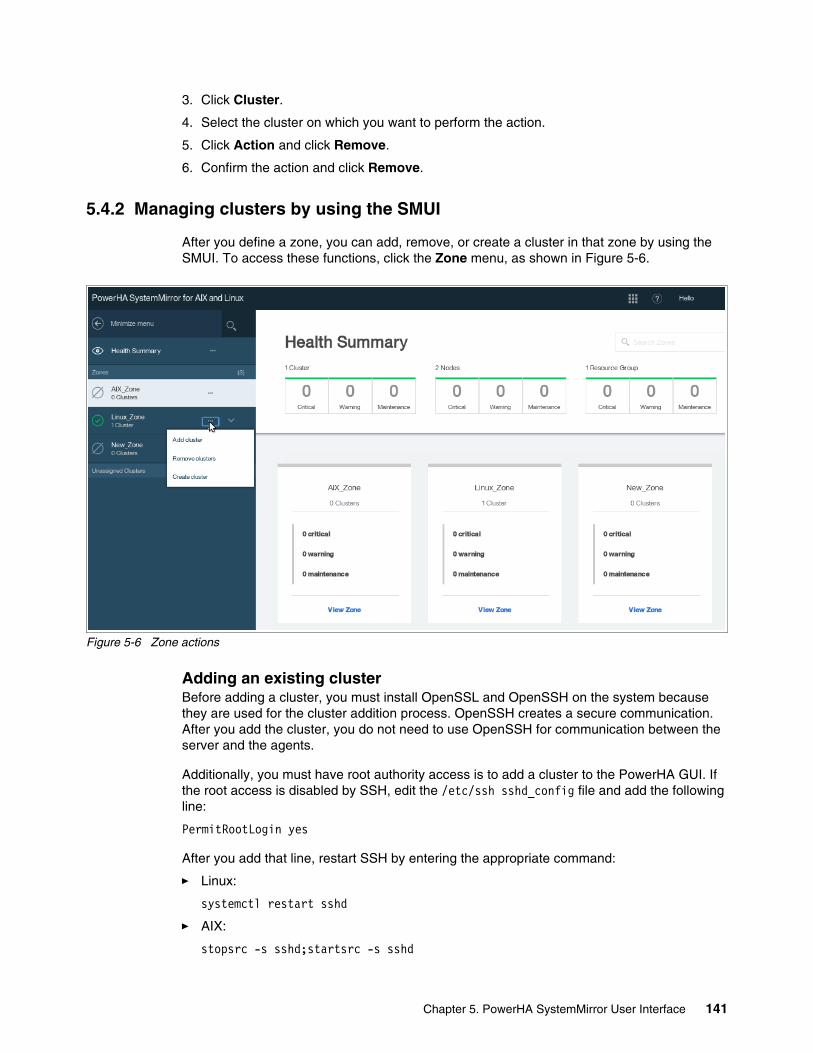
3. Click Cluster.
4. Select the cluster on which you want to perform the action.
5. Click Action and click Remove.
6. Confirm the action and click Remove.
5.4.2 Managing clusters by using the SMUI
After you define a zone, you can add, remove, or create a cluster in that zone by using the SMUI. To access these functions, click the Zone menu, as shown in Figure 5-6.
Figure 5-6 Zone actions
Adding an existing clusterBefore adding a cluster, you must install OpenSSL and OpenSSH on the system because they are used for the cluster addition process. OpenSSH creates a secure communication. After you add the cluster, you do not need to use OpenSSH for communication between the server and the agents.
Additionally, you must have root authority access is to add a cluster to the PowerHA GUI. If the root access is disabled by SSH, edit the /etc/ssh sshd_config file and add the following line:
PermitRootLogin yes
After you add that line, restart SSH by entering the appropriate command:
� Linux:
systemctl restart sshd
� AIX:
stopsrc -s sshd;startsrc -s sshd
Chapter 5. PowerHA SystemMirror User Interface 141
To add an existing cluster by using the SMUI, complete the following steps:
1. On the navigation pane, go to a zone and click More, as shown in Figure 5-6.
2. Click Add Cluster.
3. Complete the following fields:
– Hostname or IP address
Provide a hostname or IP address for one node of the cluster.
– Authentication method
Provide one authentication method to reach the selected node. PowerHA SystemMirror supports both the key-based and password-based form of SSH authentication for cluster discovery. The private key specification option for cluster discovery is useful for cases where you have restricted root access through ssh and root is permitted only by using the option PermitRootLogin without-password in the /etc/ssh/sshd_config file.
– Zone
Select a zone.
– User ID
The user ID and corresponding password that is used for SSH authentication on that node. You need root authority to discover a PowerHA cluster, except for the scenario that is described in “Non-root cluster discovery” on page 144.
– Password/SSH key
Enter either the SSH password or the private key for authentication of the user ID that you entered before.
4. Click Discover Clusters.
5. Click Close to finish.
Important: During our testing, we had mixed results when using the hostname or IP address to gather all the cluster data. In some cases, it was necessary that SMUI server was able to resolve a hostname, either locally through /etc/hosts or by DNS.
Note: You connect to only one node in the cluster. After the node is connected, the SMUI automatically adds all other nodes in the cluster.
142 IBM PowerHA SystemMirror V7.2.3 for IBM AIX and V7.2.2 for Linux
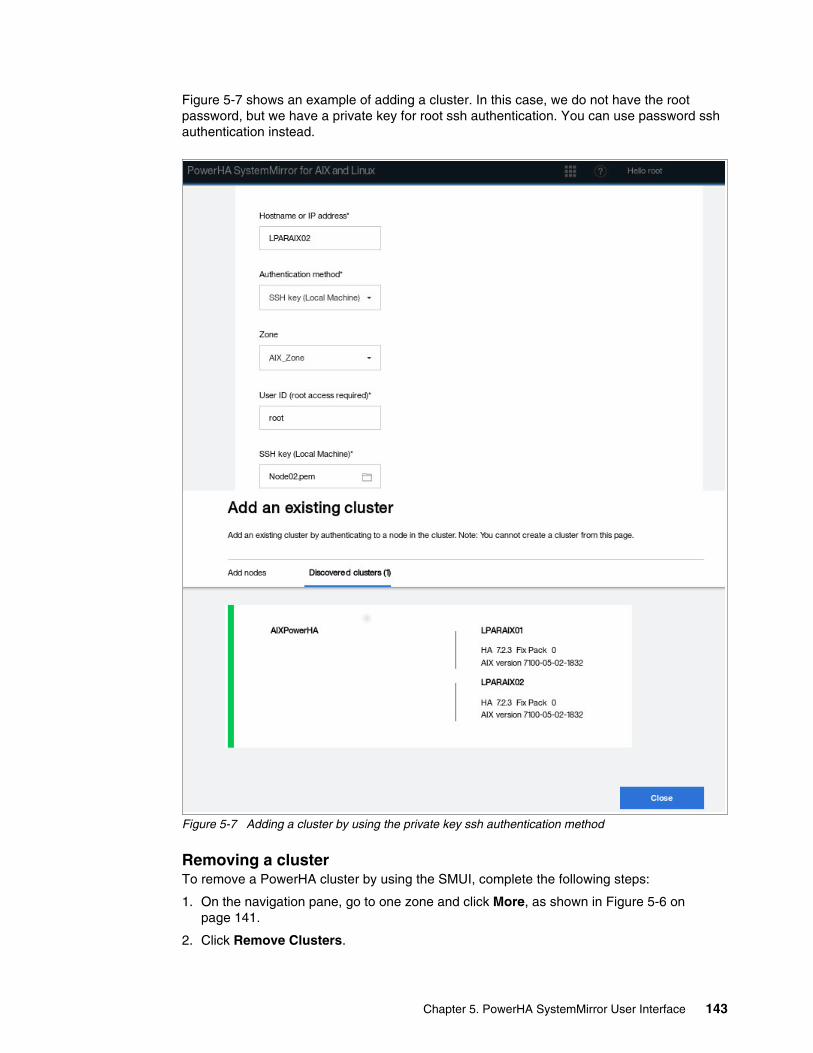
Figure 5-7 shows an example of adding a cluster. In this case, we do not have the root password, but we have a private key for root ssh authentication. You can use password ssh authentication instead.
Figure 5-7 Adding a cluster by using the private key ssh authentication method
Removing a clusterTo remove a PowerHA cluster by using the SMUI, complete the following steps:
1. On the navigation pane, go to one zone and click More, as shown in Figure 5-6 on page 141.
2. Click Remove Clusters.
Chapter 5. PowerHA SystemMirror User Interface 143
3. Select the cluster that you want to remove.
4. Click Remove.
Non-root cluster discoveryIt is possible to discover PowerHA clusters without having the access to the root password by adding the following platform-specific lines to the /etc/sudoers file. Add the lines to only one node that belongs to the cluster, which is the node that is used for discovery.
� AIX
User_Alias POWERHA_GUI_USERS = <USER_LOGIN_IDS>Cmnd_Alias POWERHA_GUI_CMDS = /usr/es/sbin/cluster/utilities/clmgr -v query nodes,/usr/es/sbin/cluster/utilities/clmgr query cluster,/bin/mkdir -p /usr/es/sbin/cluster/ui/security,/bin/tar -xf /tmp/smui-security.tar,/bin/ls,/bin/ksh93 ./deployment.sh,/bin/ksh93 ./distribute.sh,/bin/rm -f ./deployment.sh ./distribute.sh ./configuration-agent.json ./smui-security.tarPOWERHA_GUI_USERS ALL= NOPASSWD: POWERHA_GUI_CMDS
� Linux
User_Alias POWERHA_GUI_USERS = <USER_LOGIN_IDS>Cmnd_Alias POWERHA_GUI_CMDS = /usr/bin/clmgr -v query nodes, /usr/bin/clmgr query cluster, /bin/mkdir -p /usr/es/sbin/cluster/ui/security, /bin/tar -xf /tmp/smui-security.tar, /bin/ls, /bin/ksh93 ./deployment.sh, /bin/ksh93 ./distribute.sh, /bin/rm -f ./deployment.sh ./distribute.sh ./configuration-agent.json ./smui-security.tarPOWERHA_GUI_USERS ALL= NOPASSWD: POWERHA_GUI_CMDS
Creating a PowerHA cluster by using the SMUITo create a PowerHA cluster by using the SMUI, complete the following steps:
1. On the navigation pane, go to one zone and click More, as shown in Figure 5-6 on page 141.
2. Click Create Cluster.
3. Complete the fields for Node Authentication and click Continue. In this node, the cluster is created when the creation completes. A synchronization is necessary to share the cluster information across all nodes.
4. Write the cluster name, select the type of cluster, and click Continue.
5. Add nodes to the cluster and click Continue.
6. Select the repository disks and click Continue. Select two repository disks: the primary and the backup. The repository disks must be shared across all cluster nodes.
7. Select the Specification Summary for the new cluster and click Submit.
8. After the cluster is created, verify and synchronize it (only for AIX).
A few steps are shown in Figure 5-8 on page 145.
144 IBM PowerHA SystemMirror V7.2.3 for IBM AIX and V7.2.2 for Linux
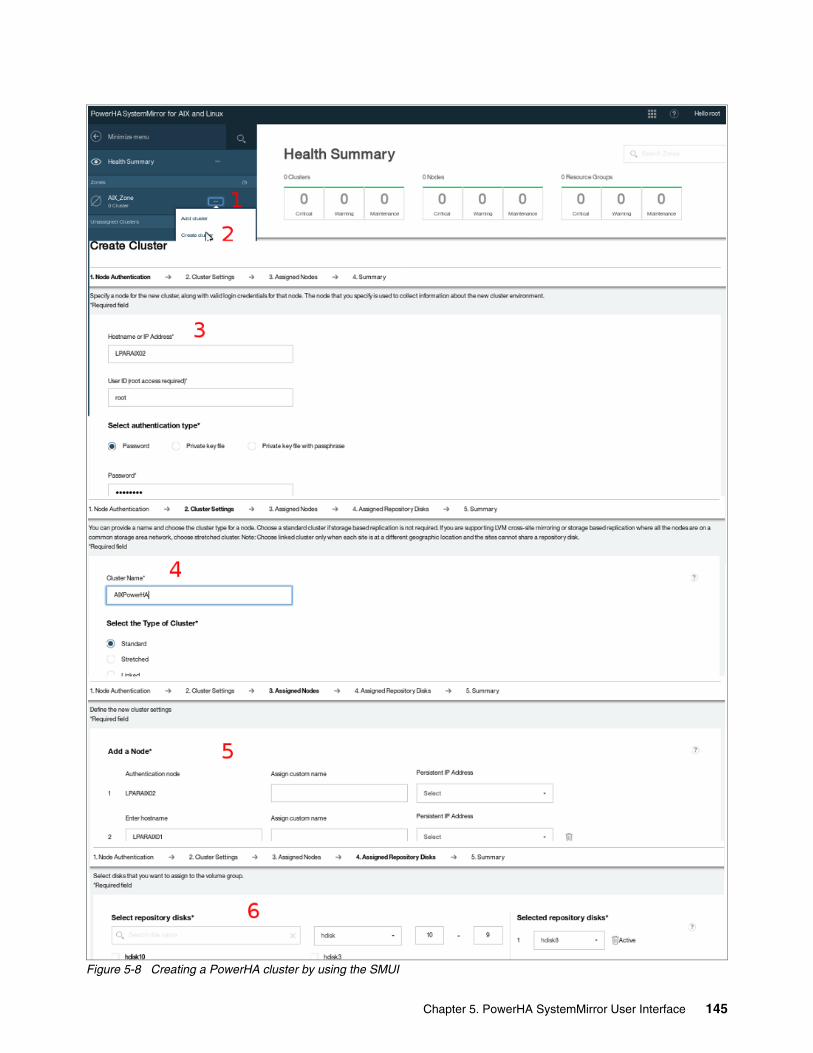
Figure 5-8 Creating a PowerHA cluster by using the SMUI
Chapter 5. PowerHA SystemMirror User Interface 145
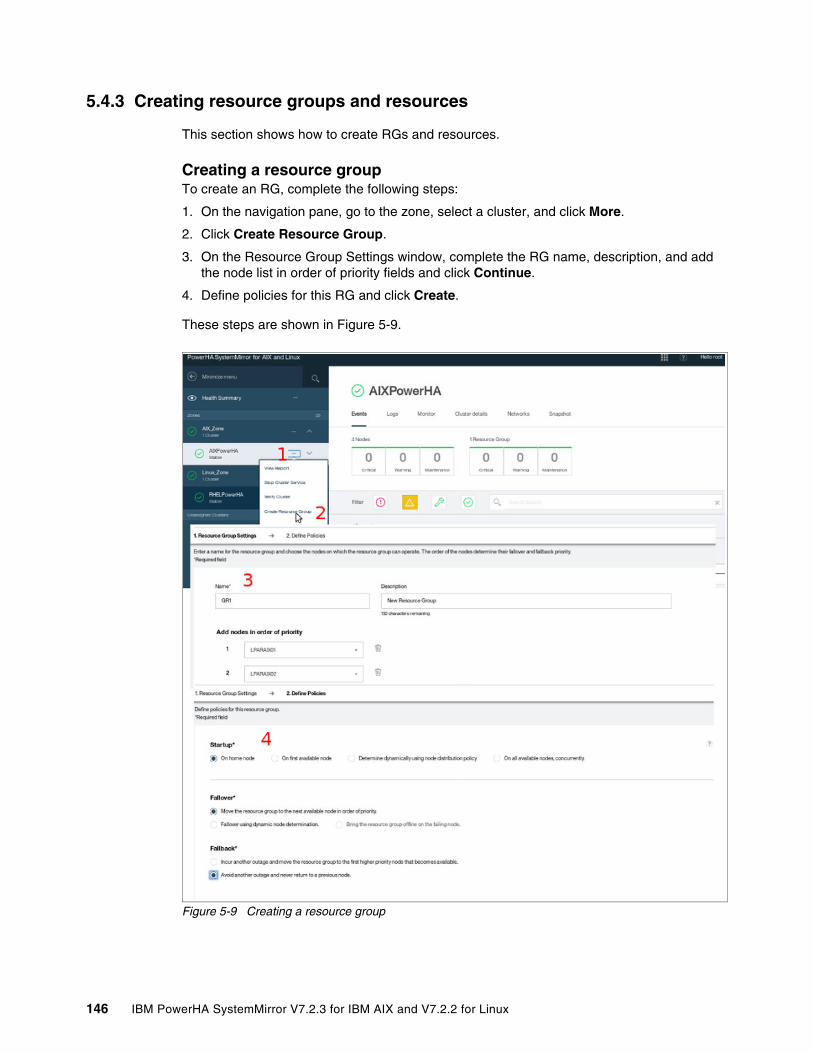
5.4.3 Creating resource groups and resources
This section shows how to create RGs and resources.
Creating a resource groupTo create an RG, complete the following steps:
1. On the navigation pane, go to the zone, select a cluster, and click More.
2. Click Create Resource Group.
3. On the Resource Group Settings window, complete the RG name, description, and add the node list in order of priority fields and click Continue.
4. Define policies for this RG and click Create.
These steps are shown in Figure 5-9.
Figure 5-9 Creating a resource group
146 IBM PowerHA SystemMirror V7.2.3 for IBM AIX and V7.2.2 for Linux

Creating a resourceAfter you discover or create a cluster, you can manage RGs, which are composed of the components that you want to have highly available. From the SMUI, you can also manage some resources:
� On PowerHA clusters for AIX:– Service IP– VG– JFS– Application controller
� On PowerHA clusters for Linux:– Service IP– File system– Application controller
To create an RG, complete the following steps:
1. On the navigation pane, go to the zone, select a cluster, select an RG, and click More.
2. Click Create resource.
3. Select a resource that you want to create.
4. Enter the required fields and click Create.
For more information, see “Creating a volume group resource for AIX” on page 148, “Creating a journaled file system resource for AIX” on page 149 and “Creating a file system resource for Linux” on page 150.
Chapter 5. PowerHA SystemMirror User Interface 147

Creating a volume group resource for AIXBased on the steps that are described in “Creating a resource”, we selected a VG to create one in GR1. At the disks selection, you see the disks that are shared between the nodes that own GR1, as shown in Figure 5-10 on page 148.
Figure 5-10 Creating a volume group resource for AIX
Important: Synchronize the cluster after any cluster modification.
148 IBM PowerHA SystemMirror V7.2.3 for IBM AIX and V7.2.2 for Linux
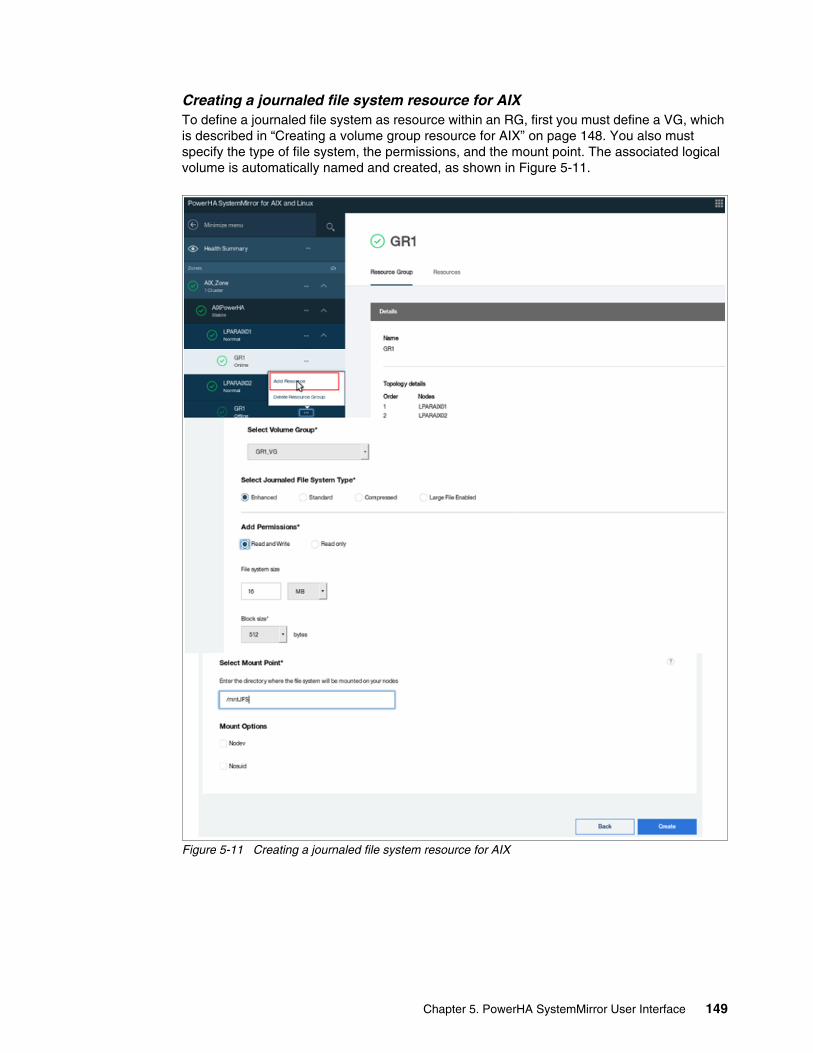
Creating a journaled file system resource for AIXTo define a journaled file system as resource within an RG, first you must define a VG, which is described in “Creating a volume group resource for AIX” on page 148. You also must specify the type of file system, the permissions, and the mount point. The associated logical volume is automatically named and created, as shown in Figure 5-11.
Figure 5-11 Creating a journaled file system resource for AIX
Chapter 5. PowerHA SystemMirror User Interface 149
Creating a file system resource for LinuxBefore adding a file system to an RG by using the SMUI, you must create a VG and a logical volume. To do these tasks, complete the following steps:
1. Verify that the disk is shared between nodes in the cluster that are in the node list of the RG, as shown in Example 5-5 on page 150 and Example 5-6 on page 150. LPARLINUX01 and LPARLINUX02 are nodes of the cluster that are in the node list of the resource group RG, and 360050764008102c0280000000000001d represents the ID of the shared disk.
Example 5-5 Verifying that the disks are shared in the node LPARLINUX01
[root@LPARLINUX01 ~]# clmgr query resource_group RG | grep NODESNODES="LPARLINUX01 LPARLINUX02"[root@LPARLINUX01 ~]# multipath -ll | grep 360050764008102c0280000000000001dmpathg (360050764008102c0280000000000001d) dm-11 IBM ,2145 [root@LPARLINUX01 ~]#
Example 5-6 Verifying that the disks are shared in the node LPARLINUX02
[root@LPARLINUX02 ~]# multipath -ll | grep 360050764008102c0280000000000001dmpathg (360050764008102c0280000000000001d) dm-11 IBM ,2145 [root@LPARLINUX02 ~]#
2. Create a partition on the shared disk, as shown in Example 5-7.
Example 5-7 Creating a partition on the shared disk
[root@LPARLINUX01 ~]# ls -l /dev/mapper/mpathg*lrwxrwxrwx. 1 root root 8 Nov 18 12:09 /dev/mapper/mpathg -> ../dm-11[root@LPARLINUX01 ~]# fdisk /dev/mapper/mpathgWelcome to fdisk (util-linux 2.23.2).
Changes will remain in memory only, until you decide to write them.Be careful before using the write command.
Command (m for help): nPartition type: p primary (0 primary, 0 extended, 4 free) e extendedSelect (default p): pPartition number (1-4, default 1): First sector (2048-209715199, default 2048): Using default value 2048Last sector, +sectors or +size{K,M,G} (2048-209715199, default 209715199): Using default value 209715199Partition 1 of type Linux and of size 100 GiB is set
Command (m for help): tSelected partition 1Hex code (type L to list all codes): fdChanged type of partition 'Linux' to 'Linux raid autodetect'
Command (m for help): wqThe partition table has been altered!
Calling ioctl() to reread partition table.
150 IBM PowerHA SystemMirror V7.2.3 for IBM AIX and V7.2.2 for Linux
WARNING: Rereading the partition table failed with error 22: Invalid argument.The kernel still uses the old table. The new table will be used atthe next restart or after you run partprobe(8) or kpartx(8)Syncing disks.[root@LPARLINUX01 ~]# partprobe[root@LPARLINUX01 ~]# ls -l /dev/mapper/mpathg*lrwxrwxrwx. 1 root root 8 Nov 18 12:09 /dev/mapper/mpathg -> ../dm-11lrwxrwxrwx. 1 root root 8 Nov 18 12:09 /dev/mapper/mpathg1 -> ../dm-20[root@LPARLINUX01 ~]#
3. Create a physical volume on the partition, as shown in Example 5-8.
Example 5-8 Creating a physical volume on the partition
[root@LPARLINUX01 ~]# pvs PV VG Fmt Attr PSize PFree /dev/mapper/mpathd3 rootvg lvm2 a-- 49.49g 37.49g /dev/mapper/mpathh1 Datavg lvm2 a-- 100.00g 50.00g[root@LPARLINUX01 ~]# pvcreate /dev/mapper/mpathg1 Physical volume "/dev/mapper/mpathg1" successfully created.[root@LPARLINUX01 ~]# pvs PV VG Fmt Attr PSize PFree /dev/mapper/mpathd3 rootvg lvm2 a-- 49.49g 37.49g /dev/mapper/mpathg1 lvm2 --- 100.00g 100.00g /dev/mapper/mpathh1 Datavg lvm2 a-- 100.00g 50.00g[root@LPARLINUX01 ~]#
4. Create a VG on the partition, as shown in Example 5-9.
Example 5-9 Creating a volume group on the partition
[root@LPARLINUX01 ~]# vgs VG #PV #LV #SN Attr VSize VFree Datavg 1 1 0 wz--n- 100.00g 50.00g rootvg 1 4 0 wz--n- 49.49g 37.49g[root@LPARLINUX01 ~]# vgcreate filesvg /dev/mapper/mpathg1 Volume group "filesvg" successfully created[root@LPARLINUX01 ~]# vgs VG #PV #LV #SN Attr VSize VFree Datavg 1 1 0 wz--n- 100.00g 50.00g filesvg 1 0 0 wz--n- 100.00g 100.00g rootvg 1 4 0 wz--n- 49.49g 37.49g[root@LPARLINUX01 ~]#
5. Create a logical volume on the partition, as shown in Example 5-10.
Example 5-10 Creating a logical volume on the partition
[root@LPARLINUX01 ~]# lvs LV VG Attr LSize Pool Origin Data% Meta% Move Log Cpy%Sync Convert datalv Datavg -wi-ao---- 50.00g home rootvg -wi-ao---- 2.00g root rootvg -wi-ao---- 4.00g swap rootvg -wi-ao---- 2.00g var rootvg -wi-ao---- 4.00g [root@LPARLINUX01 ~]# lvcreate -L 80G -n fileslv filesvg
Chapter 5. PowerHA SystemMirror User Interface 151

Logical volume "fileslv" created.[root@LPARLINUX01 ~]# lvs LV VG Attr LSize Pool Origin Data% Meta% Move Log Cpy%Sync Convert datalv Datavg -wi-ao---- 50.00g fileslv filesvg -wi-a----- 80.00g home rootvg -wi-ao---- 2.00g root rootvg -wi-ao---- 4.00g swap rootvg -wi-ao---- 2.00g var rootvg -wi-ao---- 4.00g [root@LPARLINUX01 ~]#
6. Finally, run partprobe on the other nodes to see the changes on the physical partition (PP), as shown in Example 5-11.
Example 5-11 Scanning the changes on the physical partition.
[root@LPARLINUX02 ~]# pvs PV VG Fmt Attr PSize PFree /dev/mapper/mpathd3 rootvg lvm2 a-- 49.49g 39.49g /dev/mapper/mpathh1 Datavg lvm2 a-- 100.00g 50.00g[root@LPARLINUX02 ~]# vgs VG #PV #LV #SN Attr VSize VFree Datavg 1 1 0 wz--n- 100.00g 50.00g rootvg 1 4 0 wz--n- 49.49g 39.49g[root@LPARLINUX02 ~]# lvs LV VG Attr LSize Pool Origin Data% Meta% Move Log Cpy%Sync datalv Datavg -wi------- 50.00g home rootvg -wi-ao---- 1.00g root rootvg -wi-ao---- 4.00g swap rootvg -wi-ao---- 2.00g var rootvg -wi-ao---- 3.00g [root@LPARLINUX02 ~]# partprobe[root@LPARLINUX02 ~]# pvs PV VG Fmt Attr PSize PFree /dev/mapper/mpathd3 rootvg lvm2 a-- 49.49g 39.49g /dev/mapper/mpathg1 filesvg lvm2 a-- 100.00g 20.00g /dev/mapper/mpathh1 Datavg lvm2 a-- 100.00g 50.00g[root@LPARLINUX02 ~]# vgs VG #PV #LV #SN Attr VSize VFree Datavg 1 1 0 wz--n- 100.00g 50.00g filesvg 1 1 0 wz--n- 100.00g 20.00g rootvg 1 4 0 wz--n- 49.49g 39.49g[root@LPARLINUX02 ~]# lvs LV VG Attr LSize Pool Origin Data% Meta% Move Log Cpy%Sync datalv Datavg -wi------- 50.00g fileslv filesvg -wi-a----- 80.00g home rootvg -wi-ao---- 1.00g root rootvg -wi-ao---- 4.00g swap rootvg -wi-ao---- 2.00g var rootvg -wi-ao---- 3.00g [root@LPARLINUX02 ~]#
152 IBM PowerHA SystemMirror V7.2.3 for IBM AIX and V7.2.2 for Linux
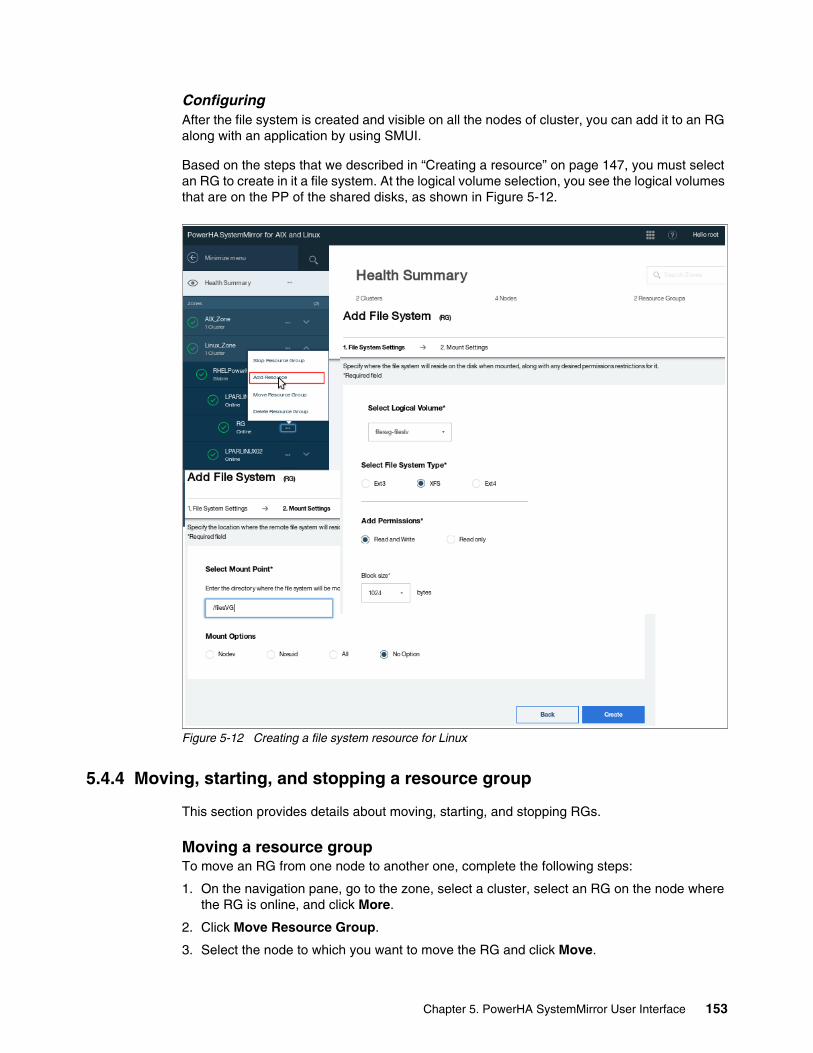
ConfiguringAfter the file system is created and visible on all the nodes of cluster, you can add it to an RG along with an application by using SMUI.
Based on the steps that we described in “Creating a resource” on page 147, you must select an RG to create in it a file system. At the logical volume selection, you see the logical volumes that are on the PP of the shared disks, as shown in Figure 5-12.
Figure 5-12 Creating a file system resource for Linux
5.4.4 Moving, starting, and stopping a resource group
This section provides details about moving, starting, and stopping RGs.
Moving a resource groupTo move an RG from one node to another one, complete the following steps:
1. On the navigation pane, go to the zone, select a cluster, select an RG on the node where the RG is online, and click More.
2. Click Move Resource Group.
3. Select the node to which you want to move the RG and click Move.
Chapter 5. PowerHA SystemMirror User Interface 153
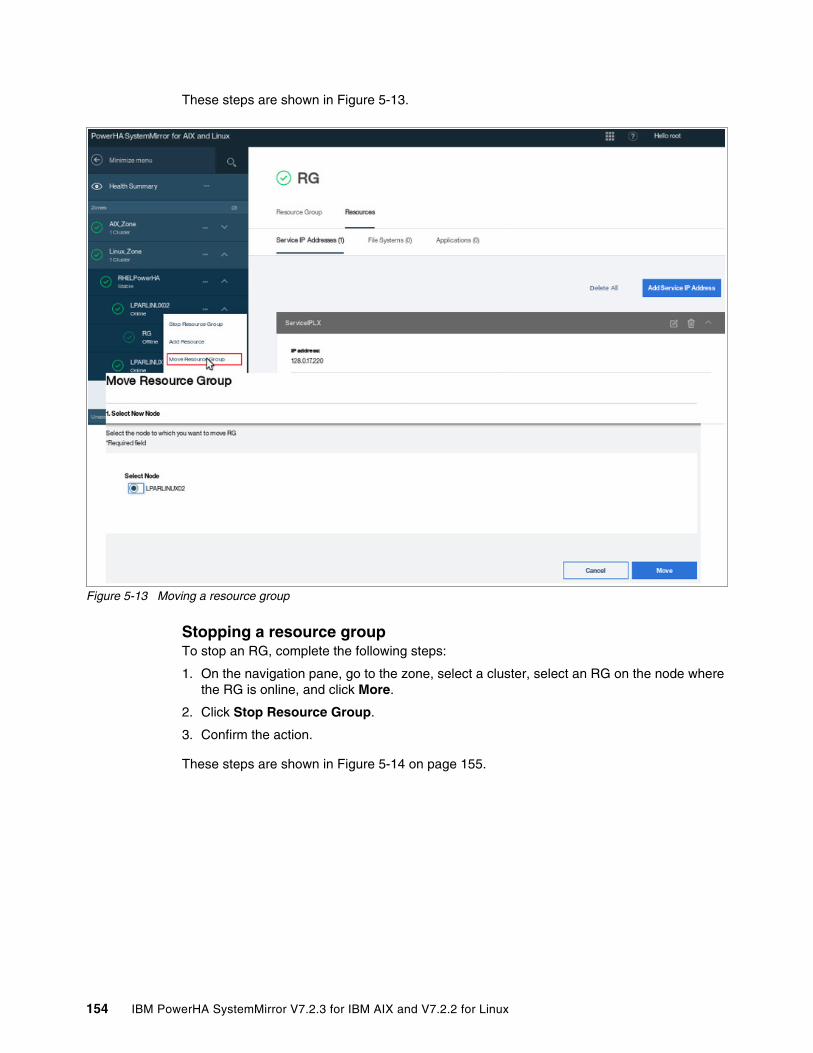
These steps are shown in Figure 5-13.
Figure 5-13 Moving a resource group
Stopping a resource groupTo stop an RG, complete the following steps:
1. On the navigation pane, go to the zone, select a cluster, select an RG on the node where the RG is online, and click More.
2. Click Stop Resource Group.
3. Confirm the action.
These steps are shown in Figure 5-14 on page 155.
154 IBM PowerHA SystemMirror V7.2.3 for IBM AIX and V7.2.2 for Linux
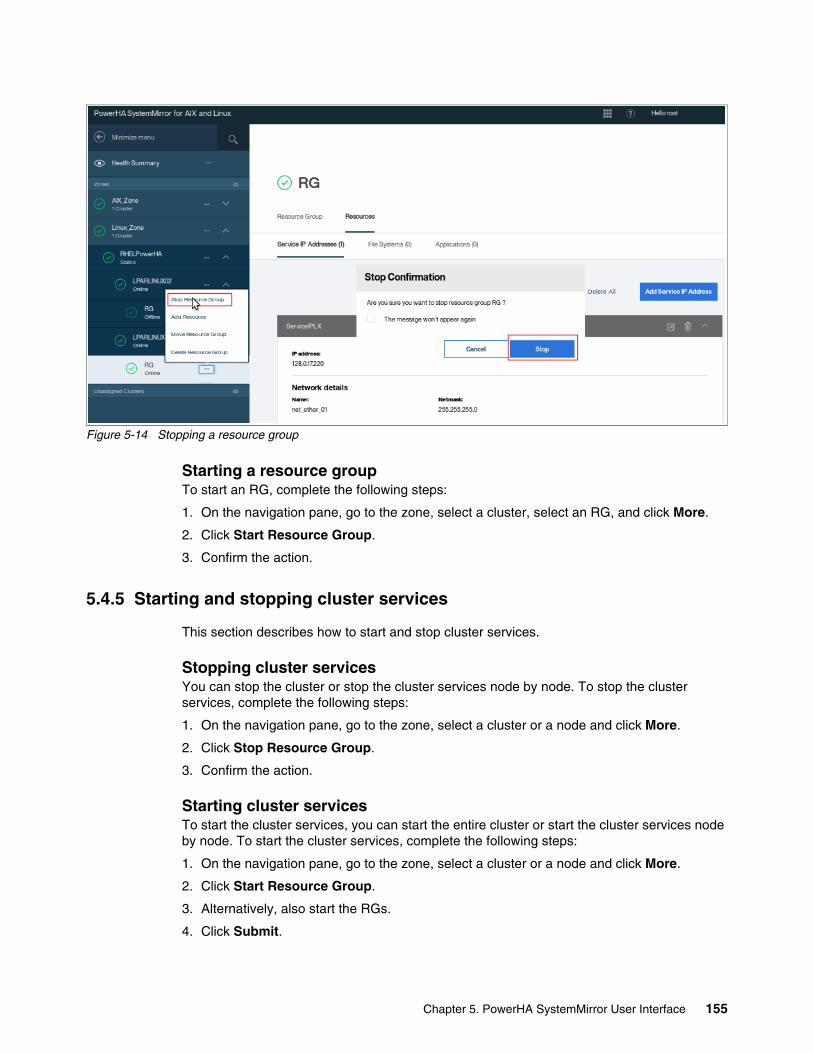
Figure 5-14 Stopping a resource group
Starting a resource groupTo start an RG, complete the following steps:
1. On the navigation pane, go to the zone, select a cluster, select an RG, and click More.
2. Click Start Resource Group.
3. Confirm the action.
5.4.5 Starting and stopping cluster services
This section describes how to start and stop cluster services.
Stopping cluster servicesYou can stop the cluster or stop the cluster services node by node. To stop the cluster services, complete the following steps:
1. On the navigation pane, go to the zone, select a cluster or a node and click More.
2. Click Stop Resource Group.
3. Confirm the action.
Starting cluster servicesTo start the cluster services, you can start the entire cluster or start the cluster services node by node. To start the cluster services, complete the following steps:
1. On the navigation pane, go to the zone, select a cluster or a node and click More.
2. Click Start Resource Group.
3. Alternatively, also start the RGs.
4. Click Submit.
Chapter 5. PowerHA SystemMirror User Interface 155
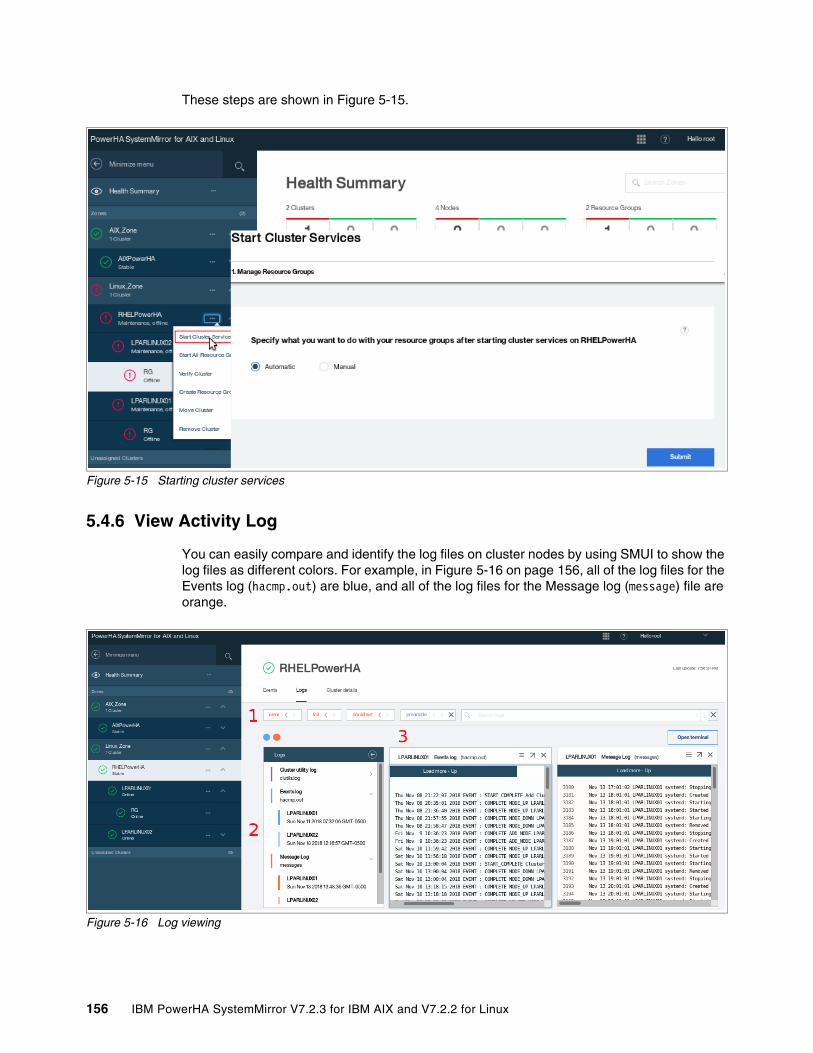
These steps are shown in Figure 5-15.
Figure 5-15 Starting cluster services
5.4.6 View Activity Log
You can easily compare and identify the log files on cluster nodes by using SMUI to show the log files as different colors. For example, in Figure 5-16 on page 156, all of the log files for the Events log (hacmp.out) are blue, and all of the log files for the Message log (message) file are orange.
Figure 5-16 Log viewing
156 IBM PowerHA SystemMirror V7.2.3 for IBM AIX and V7.2.2 for Linux
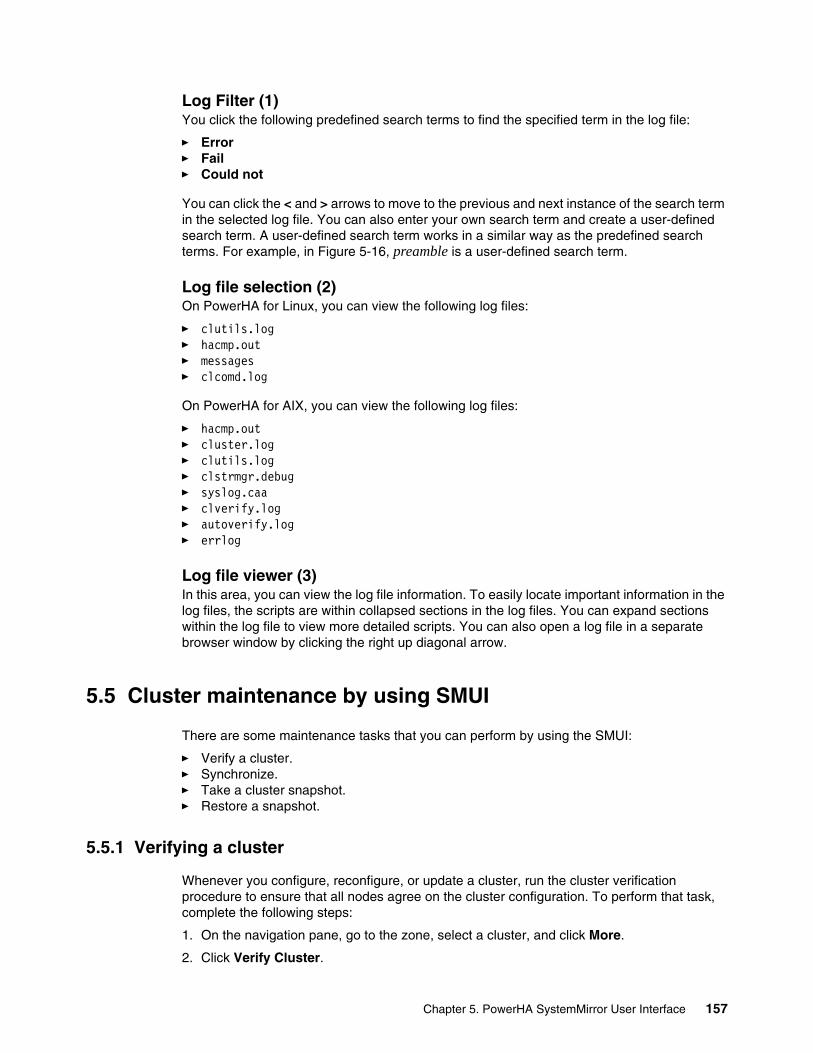
Log Filter (1)You click the following predefined search terms to find the specified term in the log file:
� Error� Fail� Could not
You can click the < and > arrows to move to the previous and next instance of the search term in the selected log file. You can also enter your own search term and create a user-defined search term. A user-defined search term works in a similar way as the predefined search terms. For example, in Figure 5-16, preamble is a user-defined search term.
Log file selection (2)On PowerHA for Linux, you can view the following log files:
� clutils.log� hacmp.out� messages� clcomd.log
On PowerHA for AIX, you can view the following log files:
� hacmp.out� cluster.log� clutils.log� clstrmgr.debug� syslog.caa� clverify.log� autoverify.log� errlog
Log file viewer (3)In this area, you can view the log file information. To easily locate important information in the log files, the scripts are within collapsed sections in the log files. You can expand sections within the log file to view more detailed scripts. You can also open a log file in a separate browser window by clicking the right up diagonal arrow.
5.5 Cluster maintenance by using SMUI
There are some maintenance tasks that you can perform by using the SMUI:
� Verify a cluster.� Synchronize.� Take a cluster snapshot.� Restore a snapshot.
5.5.1 Verifying a cluster
Whenever you configure, reconfigure, or update a cluster, run the cluster verification procedure to ensure that all nodes agree on the cluster configuration. To perform that task, complete the following steps:
1. On the navigation pane, go to the zone, select a cluster, and click More.
2. Click Verify Cluster.
Chapter 5. PowerHA SystemMirror User Interface 157
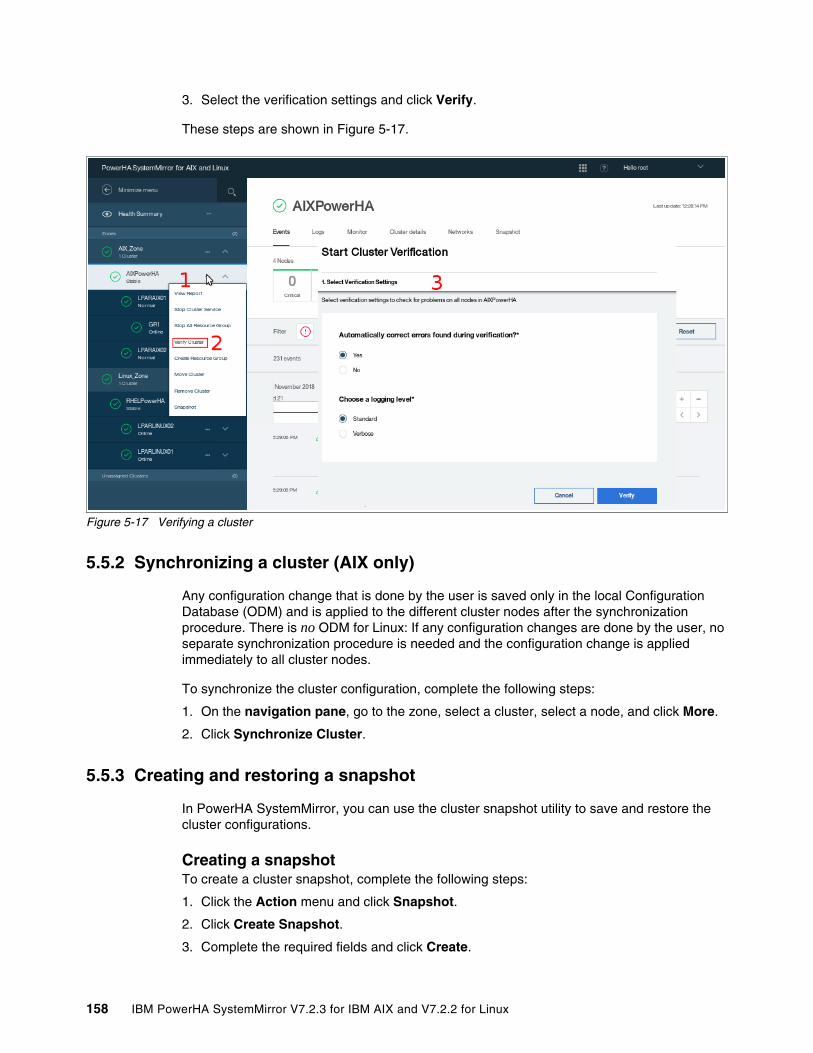
3. Select the verification settings and click Verify.
These steps are shown in Figure 5-17.
Figure 5-17 Verifying a cluster
5.5.2 Synchronizing a cluster (AIX only)
Any configuration change that is done by the user is saved only in the local Configuration Database (ODM) and is applied to the different cluster nodes after the synchronization procedure. There is no ODM for Linux: If any configuration changes are done by the user, no separate synchronization procedure is needed and the configuration change is applied immediately to all cluster nodes.
To synchronize the cluster configuration, complete the following steps:
1. On the navigation pane, go to the zone, select a cluster, select a node, and click More.
2. Click Synchronize Cluster.
5.5.3 Creating and restoring a snapshot
In PowerHA SystemMirror, you can use the cluster snapshot utility to save and restore the cluster configurations.
Creating a snapshotTo create a cluster snapshot, complete the following steps:
1. Click the Action menu and click Snapshot.
2. Click Create Snapshot.
3. Complete the required fields and click Create.
158 IBM PowerHA SystemMirror V7.2.3 for IBM AIX and V7.2.2 for Linux
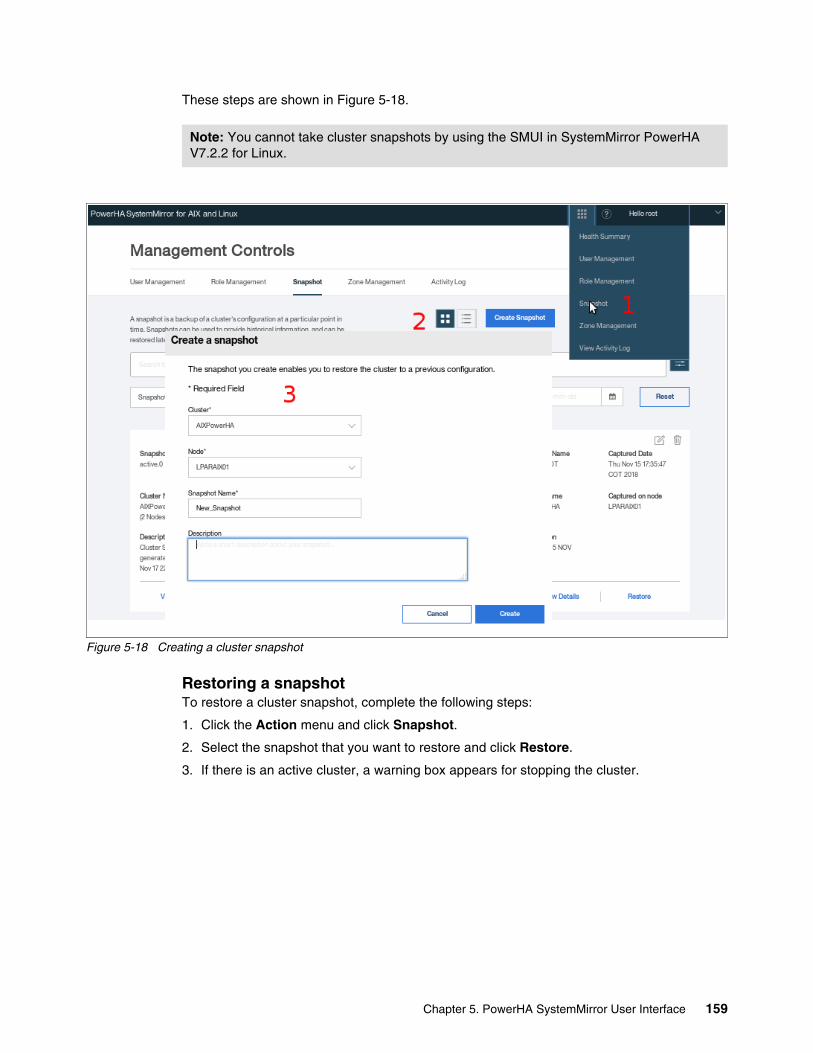
These steps are shown in Figure 5-18.
Figure 5-18 Creating a cluster snapshot
Restoring a snapshotTo restore a cluster snapshot, complete the following steps:
1. Click the Action menu and click Snapshot.
2. Select the snapshot that you want to restore and click Restore.
3. If there is an active cluster, a warning box appears for stopping the cluster.
Note: You cannot take cluster snapshots by using the SMUI in SystemMirror PowerHA V7.2.2 for Linux.
Chapter 5. PowerHA SystemMirror User Interface 159
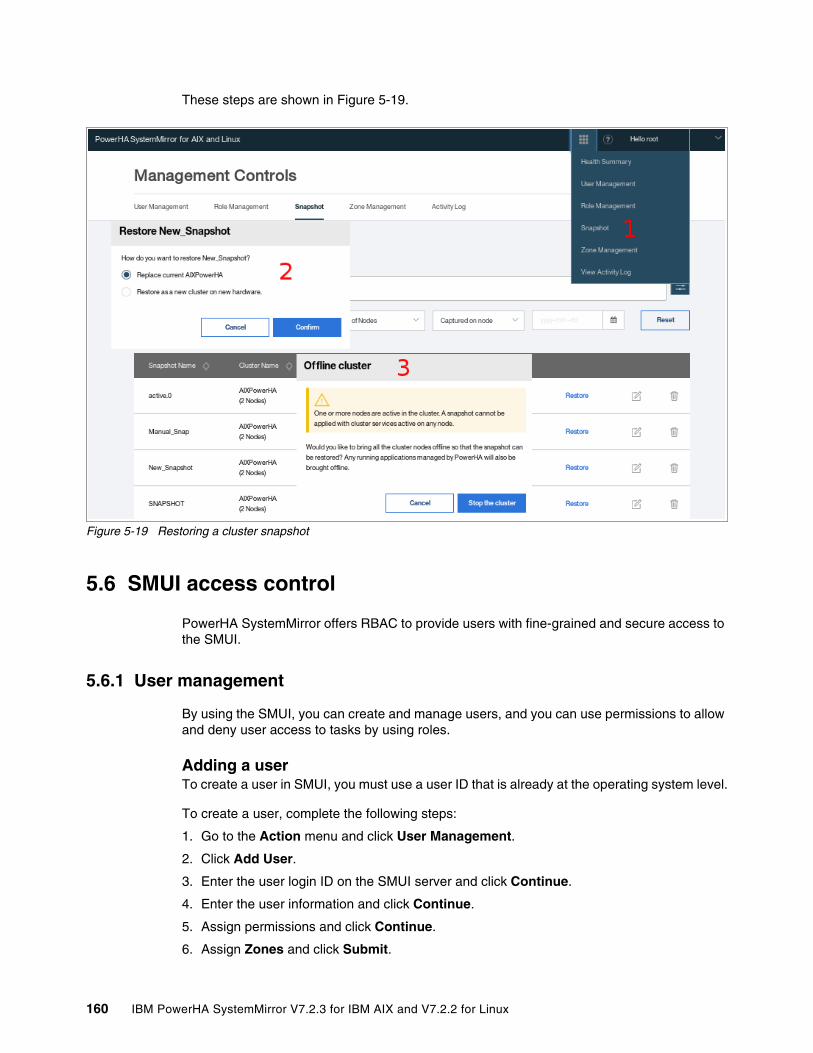
These steps are shown in Figure 5-19.
Figure 5-19 Restoring a cluster snapshot
5.6 SMUI access control
PowerHA SystemMirror offers RBAC to provide users with fine-grained and secure access to the SMUI.
5.6.1 User management
By using the SMUI, you can create and manage users, and you can use permissions to allow and deny user access to tasks by using roles.
Adding a userTo create a user in SMUI, you must use a user ID that is already at the operating system level.
To create a user, complete the following steps:
1. Go to the Action menu and click User Management.
2. Click Add User.
3. Enter the user login ID on the SMUI server and click Continue.
4. Enter the user information and click Continue.
5. Assign permissions and click Continue.
6. Assign Zones and click Submit.
160 IBM PowerHA SystemMirror V7.2.3 for IBM AIX and V7.2.2 for Linux

5.6.2 Role management
A role is a set of permissions that you can assign to users. You can add custom roles and assign them multiple permissions.
Adding a custom roleTo add a custom role, complete the following steps:
1. Go to the Action menu and click Role Management.
2. Click Add custom role.
3. Enter the role name and a description.
4. Select Permissions. The permissions are listed in two categories:
– Cluster Management:
• Manage clusters.
• Create RGs and resources.
• Move, start, and stop RGs.
• Start and stop cluster services.
• Synchronize a cluster (AIX only).
• View the activity log.
• Restore snapshot.
– Maintenance
• Verify a cluster.
• Create a snapshot.
5. Click Submit.
5.7 Troubleshooting SMUI
This section provides a reference guide for different techniques and log files that you can use to troubleshoot problems with the SMUI.
5.7.1 Log files
There is a set of log files that you can use to troubleshoot SMUI, which is described in the following sections.
Logs for the SMUI agentThese logs are in the /usr/es/sbin/cluster/ui/agent/logs/ directory:
smui-agent.log The smui-agent.log file contains information about the local agent that is installed on each PowerHA SystemMirror node.
notify-event.log The notify-event.log file contains information about all PowerHA SystemMirror events that are sent from the SMUI agent to the SMUI server.
Chapter 5. PowerHA SystemMirror User Interface 161
agent_deploy.log The agent_deploy.log file contains information about the deployment configuration of the SMUI agent on the local node.
uiagent.log The uiagent.log file contains information about the startup log of the agent on that node.
Logs for the SMUI serverThese log files are in the /usr/es/sbin/cluster/ui/server/logs/ directory:
smui-server.log The smui-server.log file contains information about the SMUI server.
uiserver.log The uiserver.log file contains information about the startup log of the SMUI server on that node.
5.7.2 Managing SMUI services
A common problem of SMUI is the communication between the SMUI agent and the SMUI server. You must ensure that the agent is running always on all nodes that belong to the PowerHA cluster.
There are some differences about how to start or stop SMUI services depending the system version on which the services are running.
Managing SMUI services on Linux Run the following commands to manage SMUI services on Linux:
To stop, start, or check the status of the SMUI agent, run the relevant command from the following list:
� systemctl stop phauiagent� systemctl start phauiagent� systemctl status phauiagent
To stop, start, or check the status of the SMUI server, run the relevant command from the following list:
� systemctl stop phauiserver� systemctl start phauiserver� systemctl status phauiserver
Managing SMUI services on AIXRun the following commands to manage SMUI services on AIX:
To stop, start, or check the status of the SMUI agent, run the relevant command from the following list:
� stopsrc -s phauiagent� startsrc -s phauiagent� lssrc -s phauiagent
To stop, start, or check the status of the SMUI server, run the relevant command from the following list:
� stopsrc -s phauiserver� startsrc -s phauiserver� lssrc -s phauiserver
162 IBM PowerHA SystemMirror V7.2.3 for IBM AIX and V7.2.2 for Linux
5.7.3 Troubleshooting logins
If you are experiencing problems logging in to the SMUI, complete the following steps:
1. On the SMUI server, check for issues in the following file:
/usr/es/sbin/cluster/ui/server/logs/smui-server.log
2. Verify that the smuiauth command is installed correctly. Also, verify that the smuiauth command has the correct permissions by running the ls -l command from the following directory:
/usr/es/sbin/cluster/ui/server/node_modules/smui-server/lib/auth/smuiauth
Here is the output of the ls -l command:
-r-x------ 1 root system 71782 Nov 15 07:36 /usr/es/sbin/cluster/ui/server/node_modules/smui-server/lib/auth/smuiauth
3. Verify that you can run the smuiauth command by running the smuiauth -h command.
4. Verify that the pluggable authentication module (PAM) framework is configured correctly by finding the following lines (the PAM configuration occurs when you install the SMUI server):
– In the /etc/pam.conf file for AIX:
smuiauth auth required pam_aixsmuiauth account required pam_aix
– In the /etc/pam.d/smuiauth file for Linux:
• Red Hat Enterprise Linux:
auth requisite pam_nologin.soauth required pam_env.soauth optional pam_gnome_keyring.soauth required pam_unix.so try_first_passaccount requisite pam_nologin.soaccount required pam_unix.so try_first_pass
• SUSE Linux Enterprise Server:
auth requisite pam_nologin.soauth include common-authaccount requisite pam_nologin.soaccount include common-account
5.7.4 Adding clusters
To add clusters to the SMUI, complete the following steps:
1. Check for issues in the /usr/es/sbin/cluster/ui/server/logs/smui-server.log file:
a. If SSH File Transfer Protocol (SFTP) -related signatures are in the log file, such as Received exit code 127 during the time of establishing an SFTP session, a problem exists with the SSH communication between the SMUI server and the cluster that you are trying to add.
b. From the command line, verify that you can connect to the target system by using SFTP. If you cannot connect, verify that the daemon is running on the SMUI server and the target node by running the following command:
ps –ef | grep –w sshd | grep –v grep
Chapter 5. PowerHA SystemMirror User Interface 163
You can also check the ssh configuration in the /etc/ssh/sshd_config file and verify that it is correct. If the configuration is not correct, you must correct the /etc/ssh/sshd_config file and then restart the sshd subsystem.
2. Check for issues in the /usr/es/sbin/cluster/ui/agent/logs/agent_deploy.log file on the target cluster.
3. Check for issues in the /usr/es/sbin/cluster/ui/agent/logs/agent_distribution.log file on the target cluster.
5.7.5 Status not updating
If the SMUI is not updating the cluster status or displaying new events, complete the following steps:
1. Check for issues in the /usr/es/sbin/cluster/ui/server/logs/smui-server.log file.
2. Check for issues in the /usr/es/sbin/cluster/ui/agent/logs/smui-agent.log file. If a certificate-related problem exists in the log file, the certificate on the target cluster and the certificate on the server do not match, as shown in Example 5-12 on page 164.
Example 5-12 Certificate error
WebSocket server - Agent authentication failed, remoteAddress:::ffff:10.40.20.186, Reason:SELF_SIGNED_CERT_IN_CHAIN
5.7.6 The uisnap utility
The PowerHA GUI has its own log and data collection tool, as shown in Example 5-13. It collects information to help technical support team to troubleshoot the SMUI.
Example 5-13 The uisnap utility help page
Usage: uisnap -[xq] [-v|-vv|-vvv] [-a|-s] [-p {1|2}] [{-L|-n <NODES>}] [-d <DIRECTORY>] uisnap -h [-v]
-a Collect agent data only. NOTE: can only be used directly on a cluster node.
-d Destination directory to put the data. Defaults to /tmp.-L Collect data only from the local host.-n A list of specific node names to collect data from. The default is all available nodes.NOTE: this only applies to collections initiated within a cluster.-p A specific pass to execute, 1 or 2.
Pass 1 calculates the amount of space needed for the collection, displays it, then exits. Pass 2 performs the data collection. The default behavior is to run pass 1, then 2, but the second pass will only be attempted if pass 1 indicates there is enough available space.
-q Quick snap. Collects a subset of the available logs, including only the newest logs, and none of the older logs. If the active log has rolled over and has very little data in it, then the previous version of the log will be collected, too.
-s Collect server data only.-v Requests more verbose output. May be specified more than once
to increase the amount of output.-x Run in debugging mode, generating a trace file of the internal
execution.
164 IBM PowerHA SystemMirror V7.2.3 for IBM AIX and V7.2.2 for Linux
Chapter 6. Resource Optimized High Availability
This chapter describes Resource Optimized High Availability (ROHA). This feature is a new feature of PowerHA SystemMirror Standard and Enterprise Edition V7.2.
This chapter covers the following topics:
� ROHA concepts and terminology
� New PowerHA SystemMirror SMIT configuration panels for ROHA
� New PowerHA SystemMirror verification enhancement for ROHA
� Planning a ROHA cluster environment
� Resource acquisition and release process introduction
� Introduction to resource acquisition
� Introduction to the release of resources
� Example 1: Setting up one ROHA cluster (without On/Off CoD)
� Test scenarios of Example 1 (without On/Off CoD)
� Example 2: Setting up one ROHA cluster (with On/Off CoD)
� Test scenarios for Example 2 (with On/Off CoD)
� HMC HA introduction
� Test scenario for HMC fallover
� Managing, monitoring, and troubleshooting
6
© Copyright IBM Corp. 2019. All rights reserved. 165
6.1 ROHA concepts and terminology
With this feature, PowerHA SystemMirror can manage dynamic logical partitioning (DLPAR) and Capacity of Demand (CoD) resources. CoD resources are composed of Enterprise Pool Capacity on Demand (EPCoD) resources and On/Off Capacity on Demand (On/OFF CoD) resources.
EPCoD resourcesEPCoD resources are resources that can be freely moved among servers in the same pool where the resources are best used. Physical resources (such as CPU or memory) are not moved between servers; what is moved is the privilege to use them. You can grant this privilege to any server of the pool so that you can flexibly manage the pool of resources and acquire the resources where they are most needed.
On/Off CoD resourcesOn/Off CoD resources are preinstalled and inactive (and unpaid for) physical resources for a server, whether they are processors or memory capacity. On/Off CoD is a type of CoD license enabling temporary activation of processors and memory. PowerHA SystemMirror can dynamically activate these resources and can make them available to the system so that they are allocated when needed to the logical partition (LPAR) through a DLPAR operation.
Dynamic logical partitioningDLPAR represents the facilities in some IBM Power Systems that you can use to logically attach and detach a managed system’s resources to and from an LPAR’s operating system without restarting.
By integrating with DLPAR and CoD resources, PowerHA SystemMirror ensures that each node can support the application with reasonable performance at a minimum cost. This way, you can tune the capacity of the LPAR flexibly when your application requires more resources without having to pay for idle capacity until you need it (for On/Off CoD or without keeping acquired resources if you do not use them (for EPCoD).
You can configure cluster resources so that the LPAR with minimally allocated resources serves as a standby node, and the application is on another LPAR node that has more resources than the standby node. This way, you do not use any additional resources that the frames have until the resources are required by the application.
PowerHA SystemMirror uses the system-connected Hardware Management Console (HMC) to perform DLPAR operations and manage CoD resources.
Table 6-1 displays all available types of the CoD offering. Only two of them are dynamically managed and controlled by PowerHA SystemMirror: EPCoD and On/Off CoD.
Table 6-1 CoD offerings and PowerHA
CoD offering PowerHA SystemMirror V6.1 Standard and Enterprise Edition
PowerHA SystemMirror V7.1 or V7.2 Standard and Enterprise Edition
Enterprise PoolMemory and Processor
No. Yes, from Version 7.2.
On/Off CoD (temporary)Memory
No. Yes, from Version 7.1.3 SP2.
166 IBM PowerHA SystemMirror V7.2.3 for IBM AIX and V7.2.2 for Linux
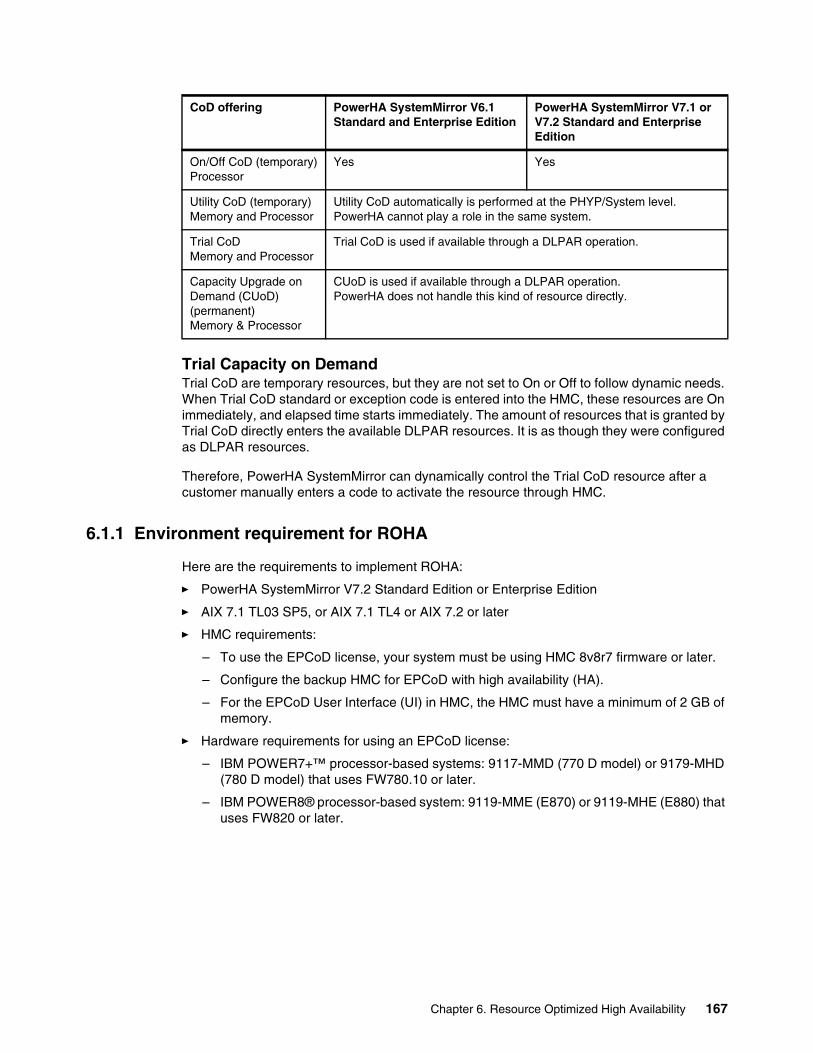
Trial Capacity on DemandTrial CoD are temporary resources, but they are not set to On or Off to follow dynamic needs. When Trial CoD standard or exception code is entered into the HMC, these resources are On immediately, and elapsed time starts immediately. The amount of resources that is granted by Trial CoD directly enters the available DLPAR resources. It is as though they were configured as DLPAR resources.
Therefore, PowerHA SystemMirror can dynamically control the Trial CoD resource after a customer manually enters a code to activate the resource through HMC.
6.1.1 Environment requirement for ROHA
Here are the requirements to implement ROHA:
� PowerHA SystemMirror V7.2 Standard Edition or Enterprise Edition
� AIX 7.1 TL03 SP5, or AIX 7.1 TL4 or AIX 7.2 or later
� HMC requirements:
– To use the EPCoD license, your system must be using HMC 8v8r7 firmware or later.
– Configure the backup HMC for EPCoD with high availability (HA).
– For the EPCoD User Interface (UI) in HMC, the HMC must have a minimum of 2 GB of memory.
� Hardware requirements for using an EPCoD license:
– IBM POWER7+™ processor-based systems: 9117-MMD (770 D model) or 9179-MHD (780 D model) that uses FW780.10 or later.
– IBM POWER8® processor-based system: 9119-MME (E870) or 9119-MHE (E880) that uses FW820 or later.
On/Off CoD (temporary)Processor
Yes Yes
Utility CoD (temporary)Memory and Processor
Utility CoD automatically is performed at the PHYP/System level. PowerHA cannot play a role in the same system.
Trial CoDMemory and Processor
Trial CoD is used if available through a DLPAR operation.
Capacity Upgrade on Demand (CUoD) (permanent)Memory & Processor
CUoD is used if available through a DLPAR operation. PowerHA does not handle this kind of resource directly.
CoD offering PowerHA SystemMirror V6.1 Standard and Enterprise Edition
PowerHA SystemMirror V7.1 or V7.2 Standard and Enterprise Edition
Chapter 6. Resource Optimized High Availability 167
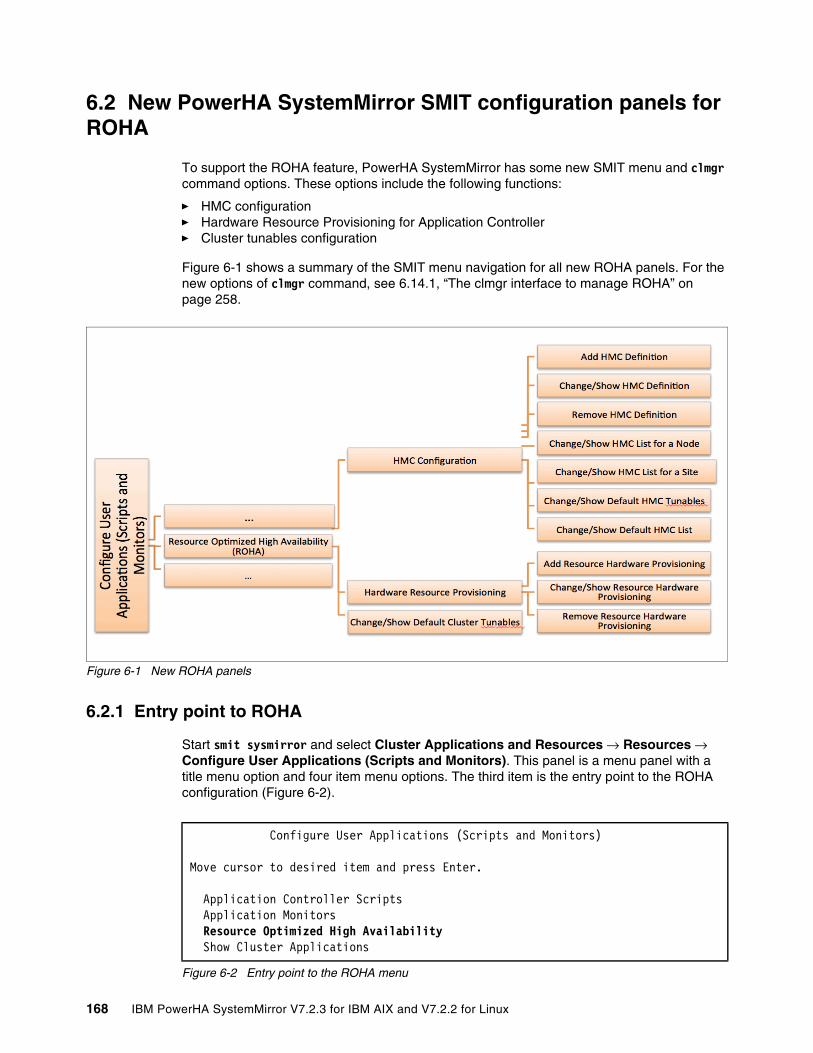
6.2 New PowerHA SystemMirror SMIT configuration panels for ROHA
To support the ROHA feature, PowerHA SystemMirror has some new SMIT menu and clmgr command options. These options include the following functions:
� HMC configuration� Hardware Resource Provisioning for Application Controller� Cluster tunables configuration
Figure 6-1 shows a summary of the SMIT menu navigation for all new ROHA panels. For the new options of clmgr command, see 6.14.1, “The clmgr interface to manage ROHA” on page 258.
Figure 6-1 New ROHA panels
6.2.1 Entry point to ROHA
Start smit sysmirror and select Cluster Applications and Resources → Resources → Configure User Applications (Scripts and Monitors). This panel is a menu panel with a title menu option and four item menu options. The third item is the entry point to the ROHA configuration (Figure 6-2).
Figure 6-2 Entry point to the ROHA menu
Configure User Applications (Scripts and Monitors)
Move cursor to desired item and press Enter.
Application Controller Scripts Application Monitors Resource Optimized High Availability Show Cluster Applications
168 IBM PowerHA SystemMirror V7.2.3 for IBM AIX and V7.2.2 for Linux

Table 6-2 shows the context-sensitive help for the ROHA entry point.
Table 6-2 Context-sensitive help for the ROHA entry point
6.2.2 ROHA panel
Start smit sysmirror and select Cluster Applications and Resources → Resources → Configure User Applications (Scripts and Monitors) → Resource Optimized High Availability. The next panel is a menu panel with a title menu option and three item menu options. Its fast path is cm_cfg_roha (Figure 6-3).
Figure 6-3 ROHA panel
Table 6-3 shows the help information for the ROHA panel.
Table 6-3 Context-sensitive help for the ROHA panel
Name and fast path Context-sensitive help (F1)
ROHA# smitty cm_cfg_roha
Select this option to configure ROHA. ROHA performs dynamic management of hardware resources (memory and CPU) for the PowerHA SystemMirror account. This dynamic management of resources uses three types of mechanism: DLPAR, On/Off CoD, and EPCoD. If the resources that are available on the central electronic complex (CEC) are not sufficient, and cannot be obtained through a DLPAR operation, it is possible to fetch external pools of resources that are provided by either On/Off CoD or EPCoD. On/Off CoD can result in extra costs, and a formal agreement from the user is required. The user must configure HMC for the acquisition and release of resources.
Resource Optimized High Availability
Move cursor to desired item and press Enter.
HMC Configuration Hardware Resource Provisioning for Application Controller Change/Show Default Cluster Tunables
Name and fast path Context-sensitive help (F1)
HMC Configuration# smitty cm_cfg_hmc
This option configures the HMC that is used by your cluster configuration, and to optionally associate the HMC to your cluster’s nodes. If no HMC is associated with a node, PowerHA SystemMirror uses the default cluster configuration.
Change/Show Hardware Resource Provisioning for Application Controller# smitty cm_cfg_hr_prov
This option changes or shows CPU and memory resource requirements for any application controller that runs in a cluster that uses DLPAR, CoD, or EPCoD capable nodes, or a combination.
Change/Show Default Cluster Tunables# smitty cm_cfg_def_cl_tun
This option modifies or views the DLPAR, CoD, and EPCoD configuration parameters.
Chapter 6. Resource Optimized High Availability 169
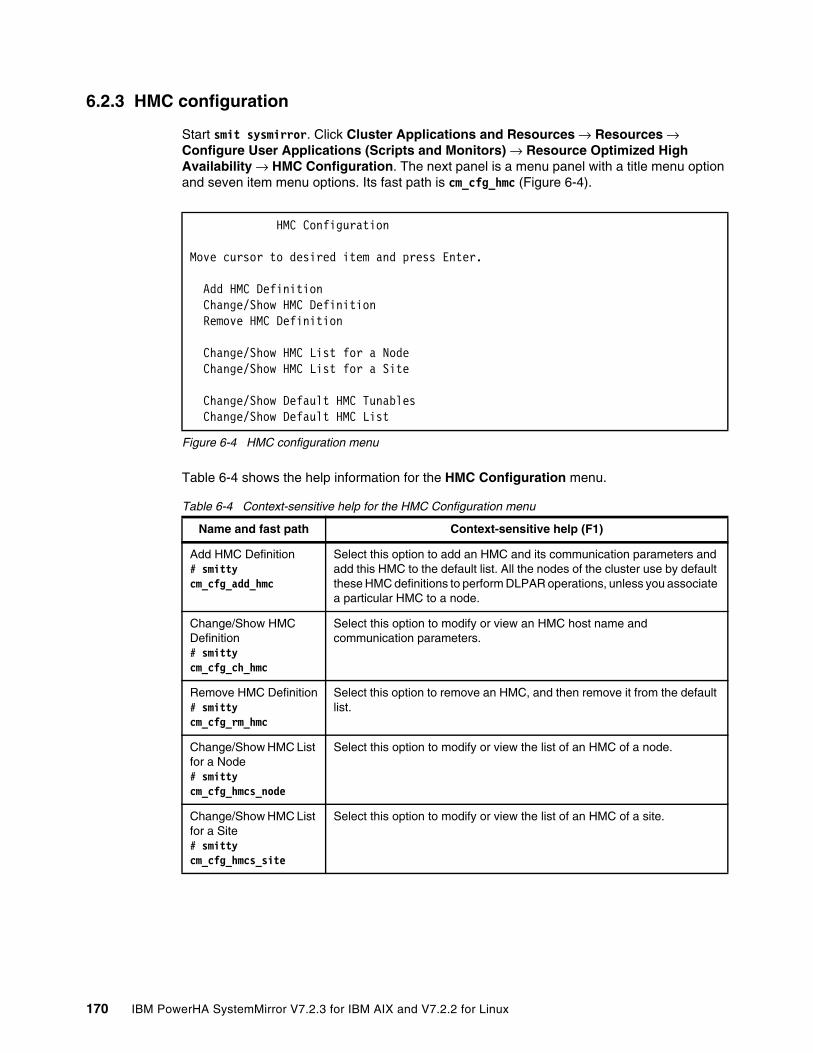
6.2.3 HMC configuration
Start smit sysmirror. Click Cluster Applications and Resources → Resources → Configure User Applications (Scripts and Monitors) → Resource Optimized High Availability → HMC Configuration. The next panel is a menu panel with a title menu option and seven item menu options. Its fast path is cm_cfg_hmc (Figure 6-4).
Figure 6-4 HMC configuration menu
Table 6-4 shows the help information for the HMC Configuration menu.
Table 6-4 Context-sensitive help for the HMC Configuration menu
HMC Configuration
Move cursor to desired item and press Enter.
Add HMC Definition Change/Show HMC Definition Remove HMC Definition Change/Show HMC List for a Node Change/Show HMC List for a Site Change/Show Default HMC Tunables Change/Show Default HMC List
Name and fast path Context-sensitive help (F1)
Add HMC Definition# smitty cm_cfg_add_hmc
Select this option to add an HMC and its communication parameters and add this HMC to the default list. All the nodes of the cluster use by default these HMC definitions to perform DLPAR operations, unless you associate a particular HMC to a node.
Change/Show HMC Definition# smitty cm_cfg_ch_hmc
Select this option to modify or view an HMC host name and communication parameters.
Remove HMC Definition# smitty cm_cfg_rm_hmc
Select this option to remove an HMC, and then remove it from the default list.
Change/Show HMC List for a Node# smitty cm_cfg_hmcs_node
Select this option to modify or view the list of an HMC of a node.
Change/Show HMC List for a Site# smitty cm_cfg_hmcs_site
Select this option to modify or view the list of an HMC of a site.
170 IBM PowerHA SystemMirror V7.2.3 for IBM AIX and V7.2.2 for Linux
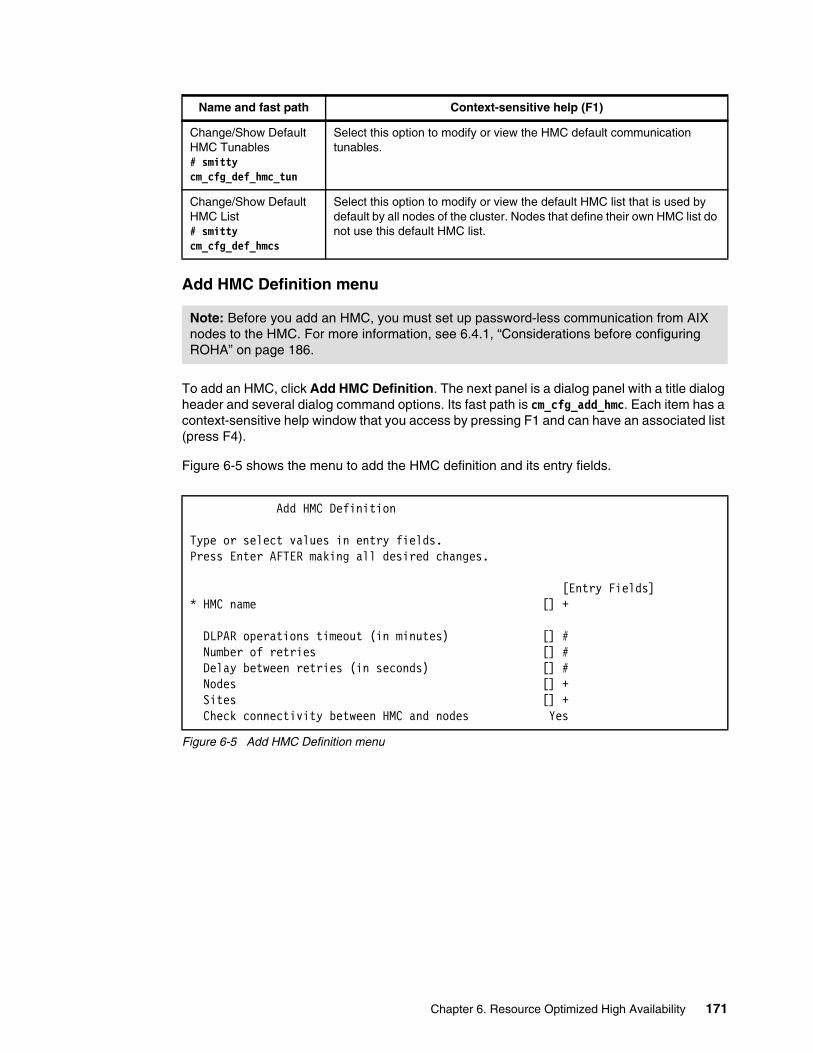
Add HMC Definition menu
To add an HMC, click Add HMC Definition. The next panel is a dialog panel with a title dialog header and several dialog command options. Its fast path is cm_cfg_add_hmc. Each item has a context-sensitive help window that you access by pressing F1 and can have an associated list (press F4).
Figure 6-5 shows the menu to add the HMC definition and its entry fields.
Figure 6-5 Add HMC Definition menu
Change/Show Default HMC Tunables# smitty cm_cfg_def_hmc_tun
Select this option to modify or view the HMC default communication tunables.
Change/Show Default HMC List# smitty cm_cfg_def_hmcs
Select this option to modify or view the default HMC list that is used by default by all nodes of the cluster. Nodes that define their own HMC list do not use this default HMC list.
Note: Before you add an HMC, you must set up password-less communication from AIX nodes to the HMC. For more information, see 6.4.1, “Considerations before configuring ROHA” on page 186.
Add HMC Definition
Type or select values in entry fields.Press Enter AFTER making all desired changes. [Entry Fields]* HMC name [] + DLPAR operations timeout (in minutes) [] # Number of retries [] # Delay between retries (in seconds) [] # Nodes [] + Sites [] + Check connectivity between HMC and nodes Yes
Name and fast path Context-sensitive help (F1)
Chapter 6. Resource Optimized High Availability 171
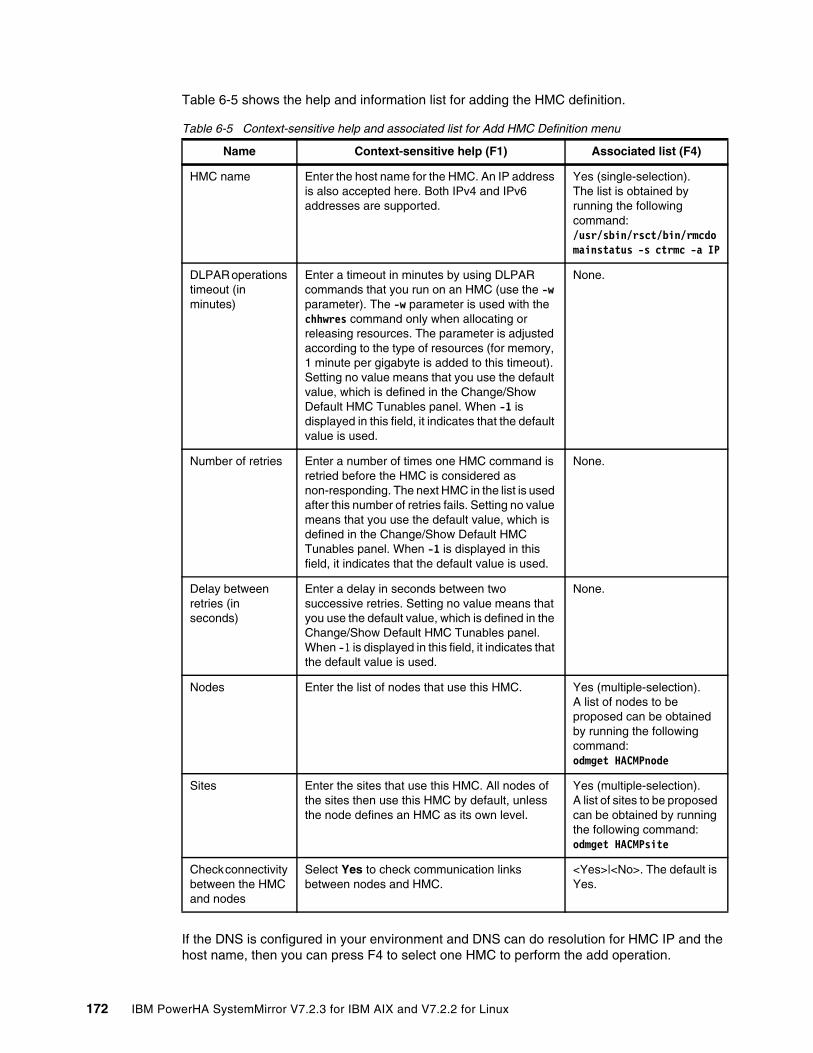
Table 6-5 shows the help and information list for adding the HMC definition.
Table 6-5 Context-sensitive help and associated list for Add HMC Definition menu
If the DNS is configured in your environment and DNS can do resolution for HMC IP and the host name, then you can press F4 to select one HMC to perform the add operation.
Name Context-sensitive help (F1) Associated list (F4)
HMC name Enter the host name for the HMC. An IP address is also accepted here. Both IPv4 and IPv6 addresses are supported.
Yes (single-selection).The list is obtained by running the following command: /usr/sbin/rsct/bin/rmcdomainstatus -s ctrmc -a IP
DLPAR operations timeout (in minutes)
Enter a timeout in minutes by using DLPAR commands that you run on an HMC (use the -w parameter). The -w parameter is used with the chhwres command only when allocating or releasing resources. The parameter is adjusted according to the type of resources (for memory, 1 minute per gigabyte is added to this timeout). Setting no value means that you use the default value, which is defined in the Change/Show Default HMC Tunables panel. When -1 is displayed in this field, it indicates that the default value is used.
None.
Number of retries Enter a number of times one HMC command is retried before the HMC is considered as non-responding. The next HMC in the list is used after this number of retries fails. Setting no value means that you use the default value, which is defined in the Change/Show Default HMC Tunables panel. When -1 is displayed in this field, it indicates that the default value is used.
None.
Delay between retries (in seconds)
Enter a delay in seconds between two successive retries. Setting no value means that you use the default value, which is defined in the Change/Show Default HMC Tunables panel. When -1 is displayed in this field, it indicates that the default value is used.
None.
Nodes Enter the list of nodes that use this HMC. Yes (multiple-selection).A list of nodes to be proposed can be obtained by running the following command: odmget HACMPnode
Sites Enter the sites that use this HMC. All nodes of the sites then use this HMC by default, unless the node defines an HMC as its own level.
Yes (multiple-selection).A list of sites to be proposed can be obtained by running the following command: odmget HACMPsite
Check connectivity between the HMC and nodes
Select Yes to check communication links between nodes and HMC.
<Yes>|<No>. The default is Yes.
172 IBM PowerHA SystemMirror V7.2.3 for IBM AIX and V7.2.2 for Linux
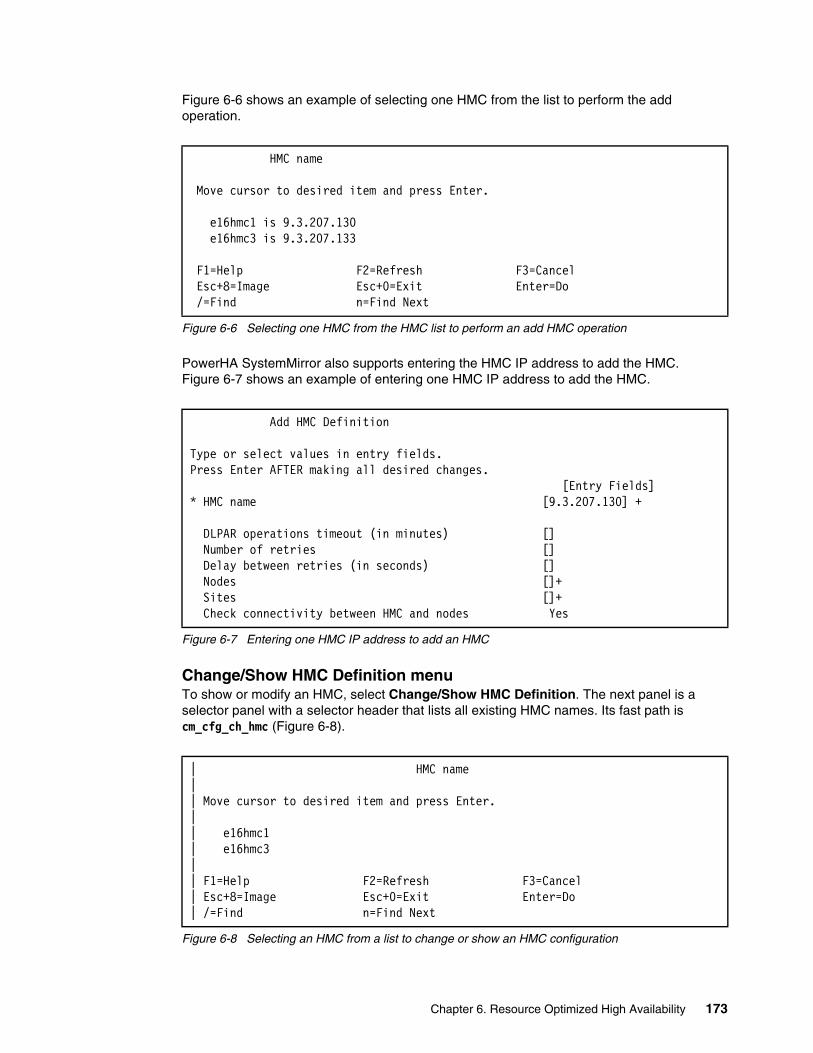
Figure 6-6 shows an example of selecting one HMC from the list to perform the add operation.
Figure 6-6 Selecting one HMC from the HMC list to perform an add HMC operation
PowerHA SystemMirror also supports entering the HMC IP address to add the HMC. Figure 6-7 shows an example of entering one HMC IP address to add the HMC.
Figure 6-7 Entering one HMC IP address to add an HMC
Change/Show HMC Definition menuTo show or modify an HMC, select Change/Show HMC Definition. The next panel is a selector panel with a selector header that lists all existing HMC names. Its fast path is cm_cfg_ch_hmc (Figure 6-8).
Figure 6-8 Selecting an HMC from a list to change or show an HMC configuration
HMC name Move cursor to desired item and press Enter. e16hmc1 is 9.3.207.130 e16hmc3 is 9.3.207.133 F1=Help F2=Refresh F3=Cancel Esc+8=Image Esc+0=Exit Enter=Do /=Find n=Find Next
Add HMC Definition
Type or select values in entry fields.Press Enter AFTER making all desired changes. [Entry Fields]* HMC name [9.3.207.130] + DLPAR operations timeout (in minutes) [] Number of retries [] Delay between retries (in seconds) [] Nodes []+ Sites []+ Check connectivity between HMC and nodes Yes
| HMC name | | Move cursor to desired item and press Enter. | | e16hmc1 | e16hmc3 | | F1=Help F2=Refresh F3=Cancel | Esc+8=Image Esc+0=Exit Enter=Do | /=Find n=Find Next
Chapter 6. Resource Optimized High Availability 173

To modify an existing HMC, select it and press Enter. The next panel is the one that is shown in Figure 6-9. You cannot change the name of the HMC.
Figure 6-9 Change/Show HMC Definition menu
Remove HMC Definition menuTo delete an HMC, select Remove HMC Definition. The panel that is shown in Figure 6-10 is the same selector panel. To remove an existing HMC name, select it and press Enter. Its fast path is cm_cfg_rm_hmc.
Figure 6-10 Selecting an HMC to remove
Figure 6-11 shows the removed HMC definition.
Figure 6-11 Removing an HMC
Change/Show HMC Definition
Type or select values in entry fields.Press Enter AFTER making all desired changes. [Entry Fields]* HMC name e16hmc1 DLPAR operations timeout (in minutes) [5] # Number of retries [3] # Delay between retries (in seconds) [10] # Nodes [ITSO_rar1m3_Node1 ITSO_r1r9m1_Node1] + Sites [] + Check connectivity between HMC and nodes Yes
HMC name
Move cursor to desired item and press Enter.
e16hmc1 e16hmc3
F1=Help F2=Refresh F3=Cancel Esc+8=Image Esc+0=Exit Enter=Do /=Find n=Find Next
Remove HMC Definition
Type or select values in entry fields.Press Enter AFTER making all desired changes. [Entry Fields]* HMC name e16hmc1
174 IBM PowerHA SystemMirror V7.2.3 for IBM AIX and V7.2.2 for Linux
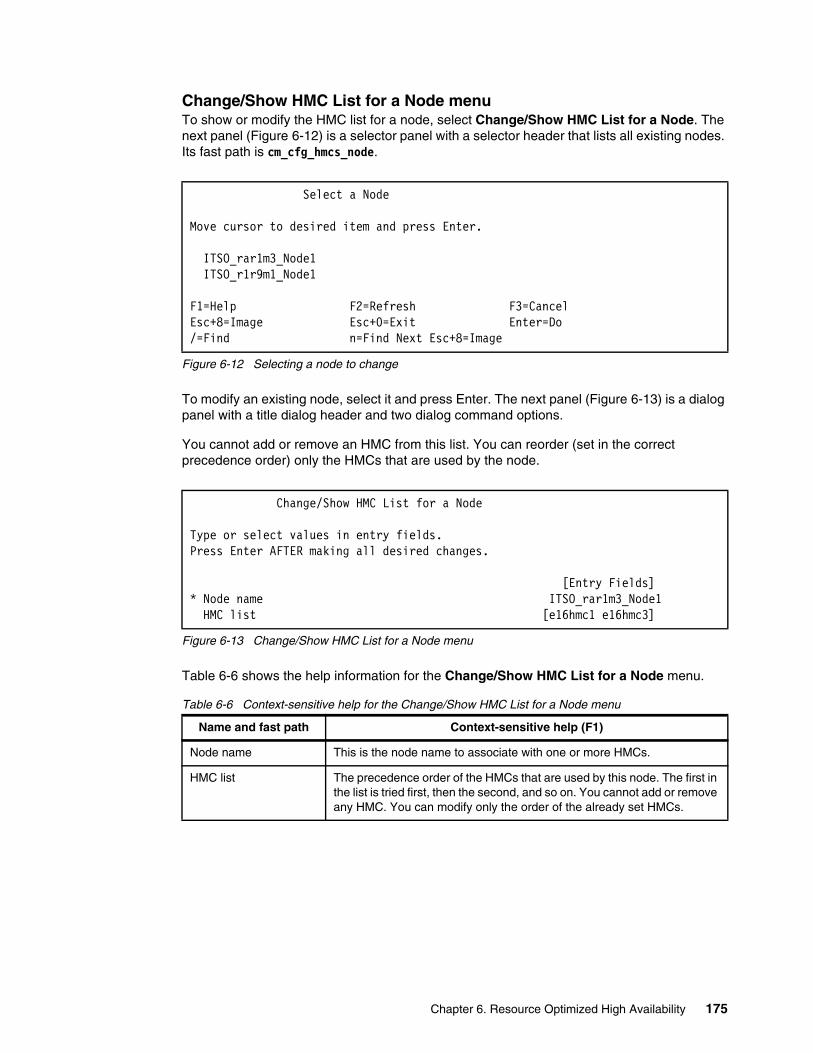
Change/Show HMC List for a Node menuTo show or modify the HMC list for a node, select Change/Show HMC List for a Node. The next panel (Figure 6-12) is a selector panel with a selector header that lists all existing nodes. Its fast path is cm_cfg_hmcs_node.
Figure 6-12 Selecting a node to change
To modify an existing node, select it and press Enter. The next panel (Figure 6-13) is a dialog panel with a title dialog header and two dialog command options.
You cannot add or remove an HMC from this list. You can reorder (set in the correct precedence order) only the HMCs that are used by the node.
Figure 6-13 Change/Show HMC List for a Node menu
Table 6-6 shows the help information for the Change/Show HMC List for a Node menu.
Table 6-6 Context-sensitive help for the Change/Show HMC List for a Node menu
Select a Node
Move cursor to desired item and press Enter.
ITSO_rar1m3_Node1 ITSO_r1r9m1_Node1
F1=Help F2=Refresh F3=Cancel Esc+8=Image Esc+0=Exit Enter=Do /=Find n=Find Next Esc+8=Image
Change/Show HMC List for a Node
Type or select values in entry fields.Press Enter AFTER making all desired changes. [Entry Fields]* Node name ITSO_rar1m3_Node1 HMC list [e16hmc1 e16hmc3]
Name and fast path Context-sensitive help (F1)
Node name This is the node name to associate with one or more HMCs.
HMC list The precedence order of the HMCs that are used by this node. The first in the list is tried first, then the second, and so on. You cannot add or remove any HMC. You can modify only the order of the already set HMCs.
Chapter 6. Resource Optimized High Availability 175

Change/Show HMC List for a Site menuTo show or modify the HMC list for a node, select Change/Show HMC List for a Site. The next panel (Figure 6-14) is a selector panel with a selector header that lists all existing sites. Its fast path is cm_cfg_hmcs_site.
Figure 6-14 Select a Site menu
To modify an existing site, select it and press Enter. The next panel (Figure 6-15) is a dialog panel with a title dialog header and two dialog command options.
Figure 6-15 Change/Show HMC List for a Site menu
You cannot add or remove an HMC from the list. You can reorder (set in the correct precedence order) only the HMCs that are used by the site.
Table 6-7 shows the help information for the Change/Show HMC List for a Site menu.
Table 6-7 Site and HMC usage list
Select a Site
Move cursor to desired item and press Enter.
site1 site2
F1=Help F2=Refresh F3=Cancel Esc+8=Image Esc+0=Exit Enter=Do /=Find n=Find Next
Change/Show HMC List for a Site
Type or select values in entry fields.Press Enter AFTER making all desired changes. [Entry Fields]* Site Name site1 HMC list [e16hmc1 e16hmc3]
Name and fast path Context-sensitive help (F1)
Site name This is the site name to associate with one or more HMCs.
HMC list The precedence order of the HMCs that are used by this site. The first in the list is tried first, then the second, and so on. You cannot add or remove any HMC. You can modify only the order of the already set HMCs.
176 IBM PowerHA SystemMirror V7.2.3 for IBM AIX and V7.2.2 for Linux
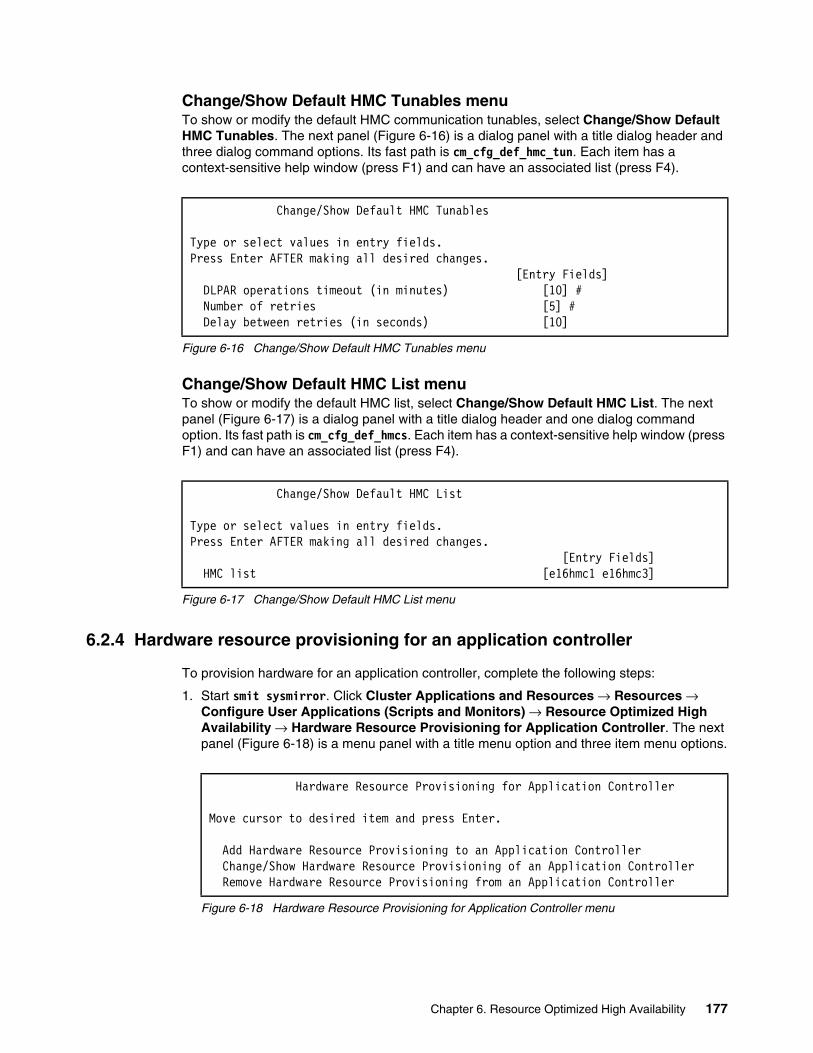
Change/Show Default HMC Tunables menuTo show or modify the default HMC communication tunables, select Change/Show Default HMC Tunables. The next panel (Figure 6-16) is a dialog panel with a title dialog header and three dialog command options. Its fast path is cm_cfg_def_hmc_tun. Each item has a context-sensitive help window (press F1) and can have an associated list (press F4).
Figure 6-16 Change/Show Default HMC Tunables menu
Change/Show Default HMC List menuTo show or modify the default HMC list, select Change/Show Default HMC List. The next panel (Figure 6-17) is a dialog panel with a title dialog header and one dialog command option. Its fast path is cm_cfg_def_hmcs. Each item has a context-sensitive help window (press F1) and can have an associated list (press F4).
Figure 6-17 Change/Show Default HMC List menu
6.2.4 Hardware resource provisioning for an application controller
To provision hardware for an application controller, complete the following steps:
1. Start smit sysmirror. Click Cluster Applications and Resources → Resources → Configure User Applications (Scripts and Monitors) → Resource Optimized High Availability → Hardware Resource Provisioning for Application Controller. The next panel (Figure 6-18) is a menu panel with a title menu option and three item menu options.
Figure 6-18 Hardware Resource Provisioning for Application Controller menu
Change/Show Default HMC Tunables
Type or select values in entry fields.Press Enter AFTER making all desired changes.
[Entry Fields] DLPAR operations timeout (in minutes) [10] # Number of retries [5] # Delay between retries (in seconds) [10]
Change/Show Default HMC List
Type or select values in entry fields.Press Enter AFTER making all desired changes. [Entry Fields] HMC list [e16hmc1 e16hmc3]
Hardware Resource Provisioning for Application Controller
Move cursor to desired item and press Enter.
Add Hardware Resource Provisioning to an Application Controller Change/Show Hardware Resource Provisioning of an Application Controller Remove Hardware Resource Provisioning from an Application Controller
Chapter 6. Resource Optimized High Availability 177
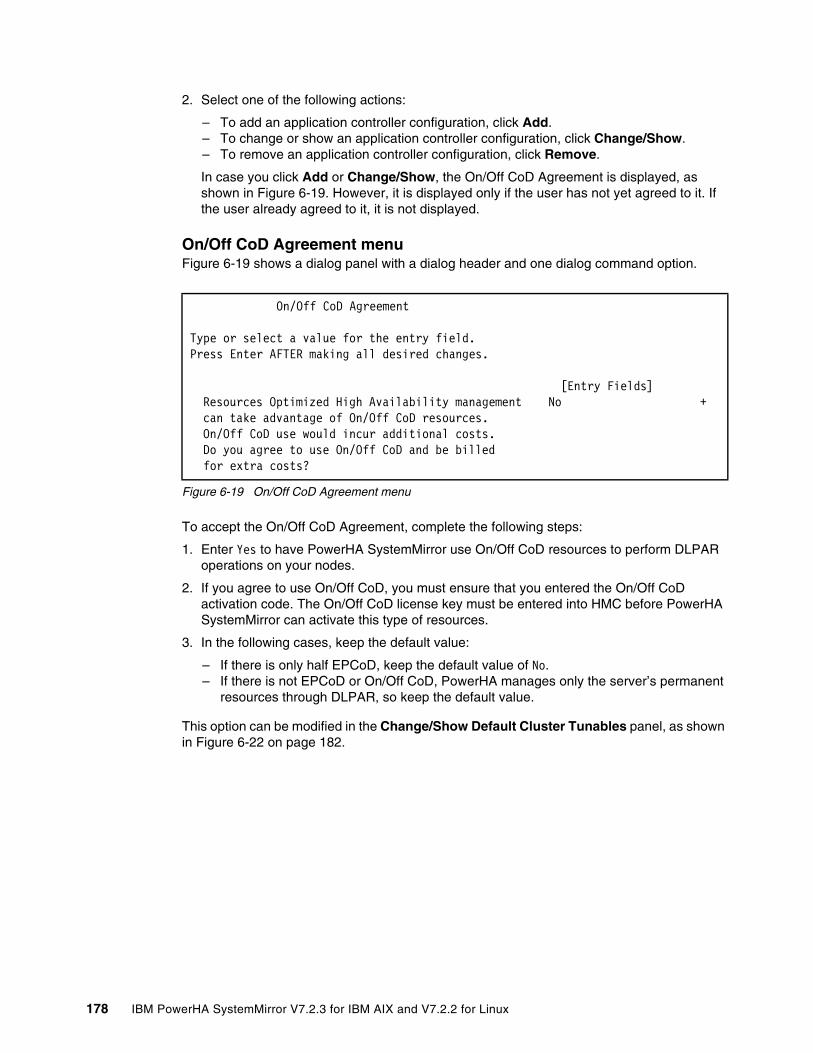
2. Select one of the following actions:
– To add an application controller configuration, click Add. – To change or show an application controller configuration, click Change/Show. – To remove an application controller configuration, click Remove.
In case you click Add or Change/Show, the On/Off CoD Agreement is displayed, as shown in Figure 6-19. However, it is displayed only if the user has not yet agreed to it. If the user already agreed to it, it is not displayed.
On/Off CoD Agreement menuFigure 6-19 shows a dialog panel with a dialog header and one dialog command option.
Figure 6-19 On/Off CoD Agreement menu
To accept the On/Off CoD Agreement, complete the following steps:
1. Enter Yes to have PowerHA SystemMirror use On/Off CoD resources to perform DLPAR operations on your nodes.
2. If you agree to use On/Off CoD, you must ensure that you entered the On/Off CoD activation code. The On/Off CoD license key must be entered into HMC before PowerHA SystemMirror can activate this type of resources.
3. In the following cases, keep the default value:
– If there is only half EPCoD, keep the default value of No.– If there is not EPCoD or On/Off CoD, PowerHA manages only the server’s permanent
resources through DLPAR, so keep the default value.
This option can be modified in the Change/Show Default Cluster Tunables panel, as shown in Figure 6-22 on page 182.
On/Off CoD Agreement Type or select a value for the entry field. Press Enter AFTER making all desired changes. [Entry Fields] Resources Optimized High Availability management No + can take advantage of On/Off CoD resources. On/Off CoD use would incur additional costs. Do you agree to use On/Off CoD and be billed for extra costs?
178 IBM PowerHA SystemMirror V7.2.3 for IBM AIX and V7.2.2 for Linux
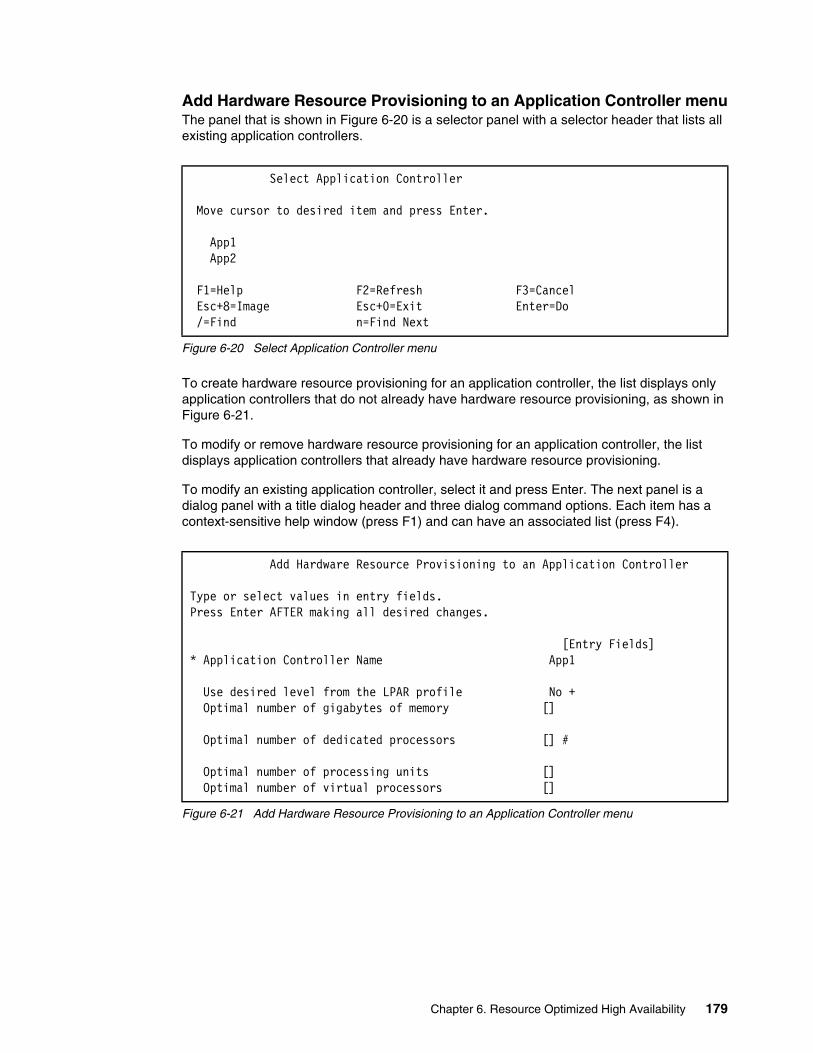
Add Hardware Resource Provisioning to an Application Controller menuThe panel that is shown in Figure 6-20 is a selector panel with a selector header that lists all existing application controllers.
Figure 6-20 Select Application Controller menu
To create hardware resource provisioning for an application controller, the list displays only application controllers that do not already have hardware resource provisioning, as shown in Figure 6-21.
To modify or remove hardware resource provisioning for an application controller, the list displays application controllers that already have hardware resource provisioning.
To modify an existing application controller, select it and press Enter. The next panel is a dialog panel with a title dialog header and three dialog command options. Each item has a context-sensitive help window (press F1) and can have an associated list (press F4).
Figure 6-21 Add Hardware Resource Provisioning to an Application Controller menu
Select Application Controller
Move cursor to desired item and press Enter.
App1 App2
F1=Help F2=Refresh F3=Cancel Esc+8=Image Esc+0=Exit Enter=Do /=Find n=Find Next
Add Hardware Resource Provisioning to an Application Controller
Type or select values in entry fields.Press Enter AFTER making all desired changes. [Entry Fields]* Application Controller Name App1 Use desired level from the LPAR profile No + Optimal number of gigabytes of memory [] Optimal number of dedicated processors [] #
Optimal number of processing units [] Optimal number of virtual processors []
Chapter 6. Resource Optimized High Availability 179
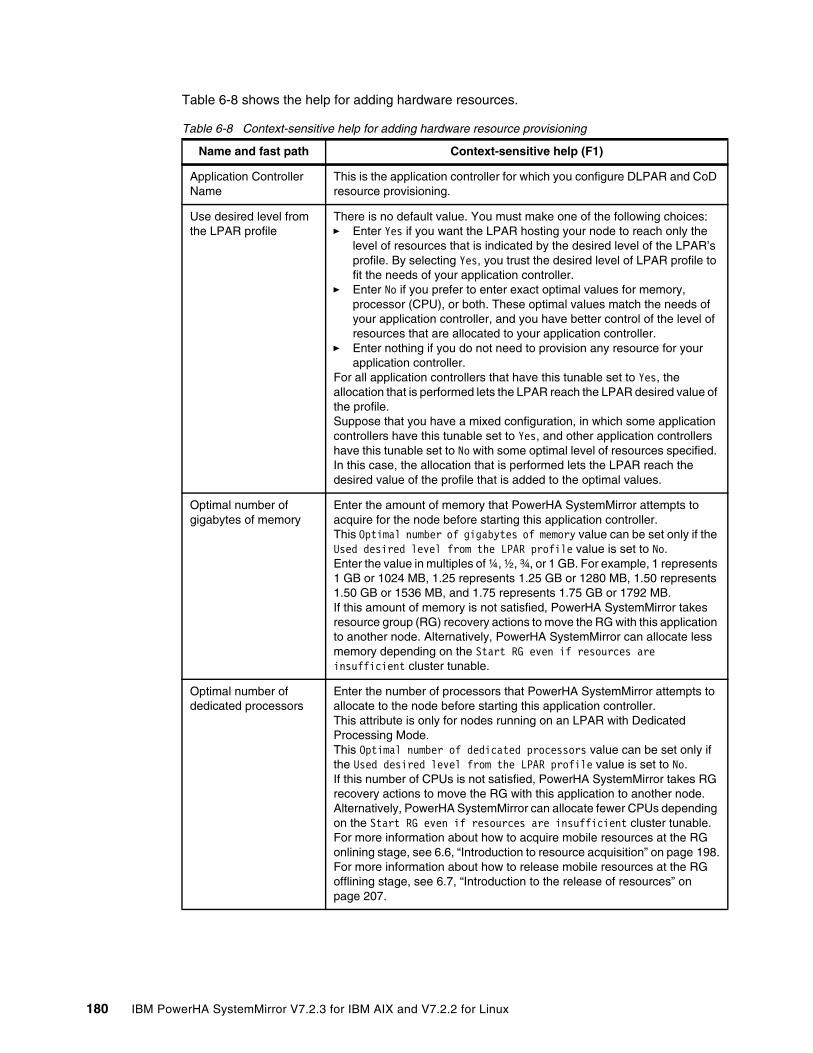
Table 6-8 shows the help for adding hardware resources.
Table 6-8 Context-sensitive help for adding hardware resource provisioning
Name and fast path Context-sensitive help (F1)
Application Controller Name
This is the application controller for which you configure DLPAR and CoD resource provisioning.
Use desired level from the LPAR profile
There is no default value. You must make one of the following choices:� Enter Yes if you want the LPAR hosting your node to reach only the
level of resources that is indicated by the desired level of the LPAR’s profile. By selecting Yes, you trust the desired level of LPAR profile to fit the needs of your application controller.
� Enter No if you prefer to enter exact optimal values for memory, processor (CPU), or both. These optimal values match the needs of your application controller, and you have better control of the level of resources that are allocated to your application controller.
� Enter nothing if you do not need to provision any resource for your application controller.
For all application controllers that have this tunable set to Yes, the allocation that is performed lets the LPAR reach the LPAR desired value of the profile. Suppose that you have a mixed configuration, in which some application controllers have this tunable set to Yes, and other application controllers have this tunable set to No with some optimal level of resources specified. In this case, the allocation that is performed lets the LPAR reach the desired value of the profile that is added to the optimal values.
Optimal number of gigabytes of memory
Enter the amount of memory that PowerHA SystemMirror attempts to acquire for the node before starting this application controller. This Optimal number of gigabytes of memory value can be set only if the Used desired level from the LPAR profile value is set to No. Enter the value in multiples of ¼, ½, ¾, or 1 GB. For example, 1 represents 1 GB or 1024 MB, 1.25 represents 1.25 GB or 1280 MB, 1.50 represents 1.50 GB or 1536 MB, and 1.75 represents 1.75 GB or 1792 MB.If this amount of memory is not satisfied, PowerHA SystemMirror takes resource group (RG) recovery actions to move the RG with this application to another node. Alternatively, PowerHA SystemMirror can allocate less memory depending on the Start RG even if resources are insufficient cluster tunable.
Optimal number of dedicated processors
Enter the number of processors that PowerHA SystemMirror attempts to allocate to the node before starting this application controller. This attribute is only for nodes running on an LPAR with Dedicated Processing Mode.This Optimal number of dedicated processors value can be set only if the Used desired level from the LPAR profile value is set to No. If this number of CPUs is not satisfied, PowerHA SystemMirror takes RG recovery actions to move the RG with this application to another node. Alternatively, PowerHA SystemMirror can allocate fewer CPUs depending on the Start RG even if resources are insufficient cluster tunable.For more information about how to acquire mobile resources at the RG onlining stage, see 6.6, “Introduction to resource acquisition” on page 198.For more information about how to release mobile resources at the RG offlining stage, see 6.7, “Introduction to the release of resources” on page 207.
180 IBM PowerHA SystemMirror V7.2.3 for IBM AIX and V7.2.2 for Linux
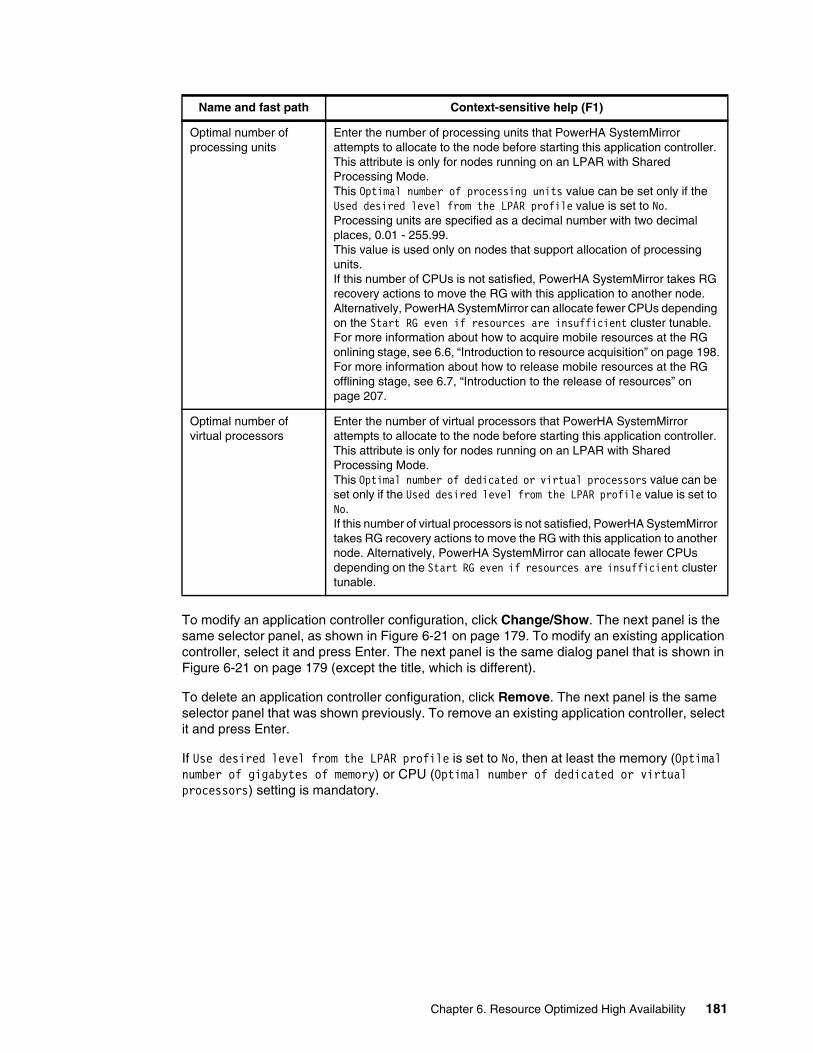
To modify an application controller configuration, click Change/Show. The next panel is the same selector panel, as shown in Figure 6-21 on page 179. To modify an existing application controller, select it and press Enter. The next panel is the same dialog panel that is shown in Figure 6-21 on page 179 (except the title, which is different).
To delete an application controller configuration, click Remove. The next panel is the same selector panel that was shown previously. To remove an existing application controller, select it and press Enter.
If Use desired level from the LPAR profile is set to No, then at least the memory (Optimal number of gigabytes of memory) or CPU (Optimal number of dedicated or virtual processors) setting is mandatory.
Optimal number of processing units
Enter the number of processing units that PowerHA SystemMirror attempts to allocate to the node before starting this application controller. This attribute is only for nodes running on an LPAR with Shared Processing Mode.This Optimal number of processing units value can be set only if the Used desired level from the LPAR profile value is set to No. Processing units are specified as a decimal number with two decimal places, 0.01 - 255.99. This value is used only on nodes that support allocation of processing units. If this number of CPUs is not satisfied, PowerHA SystemMirror takes RG recovery actions to move the RG with this application to another node. Alternatively, PowerHA SystemMirror can allocate fewer CPUs depending on the Start RG even if resources are insufficient cluster tunable.For more information about how to acquire mobile resources at the RG onlining stage, see 6.6, “Introduction to resource acquisition” on page 198.For more information about how to release mobile resources at the RG offlining stage, see 6.7, “Introduction to the release of resources” on page 207.
Optimal number of virtual processors
Enter the number of virtual processors that PowerHA SystemMirror attempts to allocate to the node before starting this application controller. This attribute is only for nodes running on an LPAR with Shared Processing Mode.This Optimal number of dedicated or virtual processors value can be set only if the Used desired level from the LPAR profile value is set to No. If this number of virtual processors is not satisfied, PowerHA SystemMirror takes RG recovery actions to move the RG with this application to another node. Alternatively, PowerHA SystemMirror can allocate fewer CPUs depending on the Start RG even if resources are insufficient cluster tunable.
Name and fast path Context-sensitive help (F1)
Chapter 6. Resource Optimized High Availability 181
6.2.5 Change/Show Default Cluster Tunable menu
Start smit sysmirror. Click Cluster Applications and Resources → Resources → Configure User Applications (Scripts and Monitors) → Resource Optimized High Availability → Change/Show Default Cluster Tunables. The next panel (Figure 6-22) is a dialog panel with a title dialog header and seven dialog command options. Each item has a context-sensitive help window (press F1) and can have an associated list (press F4). Its fast path is cm_cfg_def_cl_tun.
Figure 6-22 Change/Show Default Cluster Tunables menu
Table 6-9 shows the help for the cluster tunables.
Table 6-9 Context-sensitive help for Change/Show Default Cluster Tunables menu
Change/Show Default Cluster Tunables
Type or select values in entry fields.Press Enter AFTER making all desired changes.
[Entry Fields] Dynamic LPAR Always Start Resource Groups Yes + Adjust Shared Processor Pool size if required No + Force synchronous release of DLPAR resources No +
Enterprise Pool Resource Allocation order Free Pool First +
On/Off CoD I agree to use On/Off CoD and be billed for No + extra costs Number of activating days for On/Off CoD requests [30] #
F1=Help F2=Refresh F3=Cancel F4=ListF5=Reset F6=Command F7=Edit F8=ImageF9=Shell F10=Exit Enter=Do
Name and fast path Context-sensitive help (F1)
Always start Resource Groups
Enter Yes to have PowerHA SystemMirror start RGs even if there are any errors in ROHA resources activation. Errors can occur when the total requested resources exceed the LPAR profile’s maximum or the combined available resources, or if there is a total loss of HMC connectivity. Thus, the best-can-do allocation is performed.Enter No to prevent starting RGs if any errors occur during ROHA resources acquisition.The default is Yes.
182 IBM PowerHA SystemMirror V7.2.3 for IBM AIX and V7.2.2 for Linux
6.3 New PowerHA SystemMirror verification enhancement for ROHA
The ROHA function enables PowerHA SystemMirror to automatically or manually check for environment discrepancies. The clverify tool was improved to check ROHA-related configuration integrity.
Customers can use the verification tool to ensure that their environment is correct regarding their ROHA setup. Discrepancies are called out by PowerHA SystemMirror, and the tool assists customers to correct the configuration if possible.
The results appear in the following files:
� The /var/hacmp/log/clverify.log file� The /var/hacmp/log/autoverify.log file
The user is actively notified of critical errors. A distinction can be made between errors that are raised during configuration and errors that are raised during cluster synchronization.
As a general principal, any problems that are detected at configuration time are presented as warnings instead of errors.
Adjust Shared Processor Pool size if required
Enter Yes to authorize PowerHA SystemMirror to dynamically change the user-defined Shared Processors Pool boundaries, if necessary. This change can occur only at takeover, and only if CoD resources are activated for the CEC so that changing the maximum size of a particular Shared Processors Pool is not done to the detriment of other Shared Processors Pools.The default is No.
Force synchronous release of DLPAR resources
Enter Yes to have PowerHA SystemMirror release CPU and memory resources synchronously. For example, if the client must free resources on one side before they can be used on the other side. By default, PowerHA SystemMirror automatically detects the resource release mode by looking at whether Active and Backup nodes are on the same or different CECs. A best practice is to have asynchronous release to not delay the takeover.The default is No.
I agree to use On/Off CoD and be billed for extra costs
Enter Yes to have PowerHA SystemMirror use On/Off CoD to obtain enough resources to fulfill the optimal amount that is requested. Using On/Off CoD requires an activation code to be entered on the HMC and can result in extra costs due to the usage of the On/Off CoD license.The default is No.
Number of activating days for On/Off CoD requests
Enter a number of activating days for On/Off CoD requests. If the requested available resources are insufficient for this duration, then longest-can-do allocation is performed. Try to allocate the amount of resources that is requested for the longest duration. To do that, consider the overall resources that are available. This number is the sum of the On/Off CoD resources that are already activated but not yet used, and the On/Off CoD resources not yet activated. The default is 30.
Name and fast path Context-sensitive help (F1)
Chapter 6. Resource Optimized High Availability 183
Another general principle is that PowerHA SystemMirror checks only what is being configured at configuration time and not the whole configuration. PowerHA SystemMirror checks the whole configuration at verification time.
For example, when adding an HMC, you check only the new HMC (verify that it is pingable, at an appropriate software level, and so on) and not all of the HMCs. Checking the whole configuration can take some time and is done at verify and sync time rather than each individual configuration step.
General verificationTable 6-10 shows the general verification list.
Table 6-10 General verification list
HMC communication verificationTable 6-11 shows the HMC communication verification list.
Table 6-11 HMC communication verification list
Item Configuration time
Synchronizationtime
Check that all RG active and standby nodes are on different CECs, which enables the asynchronous mode of releasing resources.
Info Warning
This code cannot run on an IBM POWER4 processor-based system.
Error Error
Item Configuration time
Synchronizationtime
Only one HMC is configured per node. None Warning
Two HMCs are configured per node. None OK
One node is without an HMC (if ROHA only). None Error
Only one HMC per node can be pinged. Warning Warning
Two HMCs per node can be pinged. OK OK
One node has a non-pingable HMC. Warning Error
Only one HMC with password-less SSH communication exists per node.
Warning Warning
Two HMCs with password-less SSH communication exist per node.
OK OK
One node exists with a non-SSH accessible HMC. Warning Error
Check that all HMCs share the same level (the same version of HMC).
Warning Warning
Check that all HMCs administer the CEC hosting the current node. Configure two HMCs administering the CEC hosting the current node. If not, PowerHA gives a warning message.
Warning Warning
Check whether the HMC level supports FSP Lock Queuing. Info Info
184 IBM PowerHA SystemMirror V7.2.3 for IBM AIX and V7.2.2 for Linux
CoD verificationTable 6-12 shows the CoD verification.
Table 6-12 CoD verification
Power Enterprise Pool verificationTable 6-13 shows the enterprise pool verification list.
Table 6-13 Power Enterprise Pool verification
Resource provisioning verificationTable 6-14 shows the resource provisioning verification information.
Table 6-14 Resource provisioning verification
Item Configuration Time
SynchronizationTime
Check that all CECs are CoD-capable. Info Warning
Check whether CoD is enabled. Info Warning
Item @info @Sync
Check that all CECs are Enterprise Pool-capable. Info Info
Determine which HMC is the master, and which HMC is the non-master.
Info Info
Check that the nodes of the cluster are on different pools, which enables the asynchronous mode of releasing resources.
Info Info
Check that all HMCs are at level 7.8 or later. Info Warning
Check that the CEC has unlicensed resources. Info Warning
Item @info @Sync
Check that for one given node, the total of optimal memory (of RGs on this node) that is added to the profile’s minimum does not exceed the profile’s maximum.
Warning Error
Check that for one given node, the total of optimal CPU (of RGs on this node) that is added to the profile’s minimum does not exceed the profile’s maximum.
Warning Error
Check that for one given node, the total of optimal PU (of RGs on this node) that is added to the profile’s minimum does not exceed the profile’s maximum.
Warning Error
Check that the total processing units do not break the minimum processing units per virtual processor ratio.
Error Error
Chapter 6. Resource Optimized High Availability 185
6.4 Planning a ROHA cluster environment
The following sections describe planning a ROHA cluster environment.
6.4.1 Considerations before configuring ROHA
This section describes a few considerations to know before configuring ROHA.
Tips for an Enterprise Pool licenseIf you ordered an IBM Power Enterprise Pool license for your servers, and you want to use the resources with your PowerHA SystemMirror cluster, then you must create the Enterprise Pool manually.
Before you create the Enterprise Pool, get the configuration XML file and the deactivation code from the IBM CoD project office at this IBM website.
The configuration XML file is used to enable and generate mobile resources.
The deactivation code is used to deactivate some of the permanent resources and place them in inactive mode. The number is the same independent of how many mobile resources are on the server’s order.
For example, in one order, there are two Power Systems servers. Each one has 16 static CPUs, 8 mobile CPUs, and eight inactive CPUs, for a total of 32 CPUs. When you turn them on for the first time, you see that each server has 24 permanent CPUs, 16 static CPUs, and 8 mobile CPUs.
After you create the Enterprise Pool with the XML configuration file, you see that there are 16 mobile CPUs that are generated in the Enterprise Pool, but the previous eight mobile CPUs still have a permanent status in each server. This configuration results in the server’s status being different from its original order, which causes some issues in future post-sales activities.
There are two steps to complete the Enterprise Pool implementation:
1. Create the Enterprise Pool by using the XML configuration file.
2. Deactivate some permanent resources (the number is the same as the mobile resources) by using the deactivation code.
After you finish these steps, each server has 16 static CPUs and 16 inactive CPUs, and the Enterprise Pool has 16 mobile CPUs. Then, the mobile CPUs can be assigned to each of the two servers through the HMC GUI or the command-line interface (CLI).
How to get the deactivation code and use itThe following steps explain how to get the deactivation code and use it:
1. Send an email to the IBM CoD project office ([email protected]). You must provide the following information or attach the server order:
– Customer name– Each server’s system type and serial number– Configuration XML file
Note: These two steps will be combined into one step in the future. At the time of writing, you must perform each step separately.
186 IBM PowerHA SystemMirror V7.2.3 for IBM AIX and V7.2.2 for Linux

2. In reply to this note, you receive from the CoD project office a de-activation code for the servers. The de-activation code lowers the number of activated resources to align it with your server order.
3. Enter this de-activation code in the corresponding servers through the HMC, as shown in Figure 6-23 (shows the menu for Enter CoD Code).
Figure 6-23 Enter CoD Code menu
4. After entering the de-activation code, you must send a listing of the updated Vital Product Data (VPD) output to the CoD Project office at [email protected].
Collect the VPD by using the HMC CLI, as shown in Example 6-1.
Example 6-1 Collecting the VPD information case
Collect the VPD using the HMC command line instruction for every server:Processor:lscod -m your_system_name -t code -r proc -c mobileMemory:lscod -m your_system_name -t code -r mem -c mobile
5. With the receipt of the lscod profile, the project office updates the CoD database records and closes out your request.
For more information about how to use the configuration XML file to create Power Enterprise Pool and some management concepts, see Power Enterprise Pools on IBM Power Systems, REDP-5101.
Configuring redundant HMCs or adding an Enterprise Pool’s master and backup HMCsSection 6.12, “HMC HA introduction” on page 247 introduces HMC HA design in PowerHA SystemMirror. For the ROHA solution, the HMC is critical, so configuring redundant HMCs is advised.
Note: This de-activation code updates the IBM CoD website after you receive the note. This de-activation code has RPROC and RMEM. RPROC is for reducing processor resources, and RMEM is for reducing memory resources.
Chapter 6. Resource Optimized High Availability 187
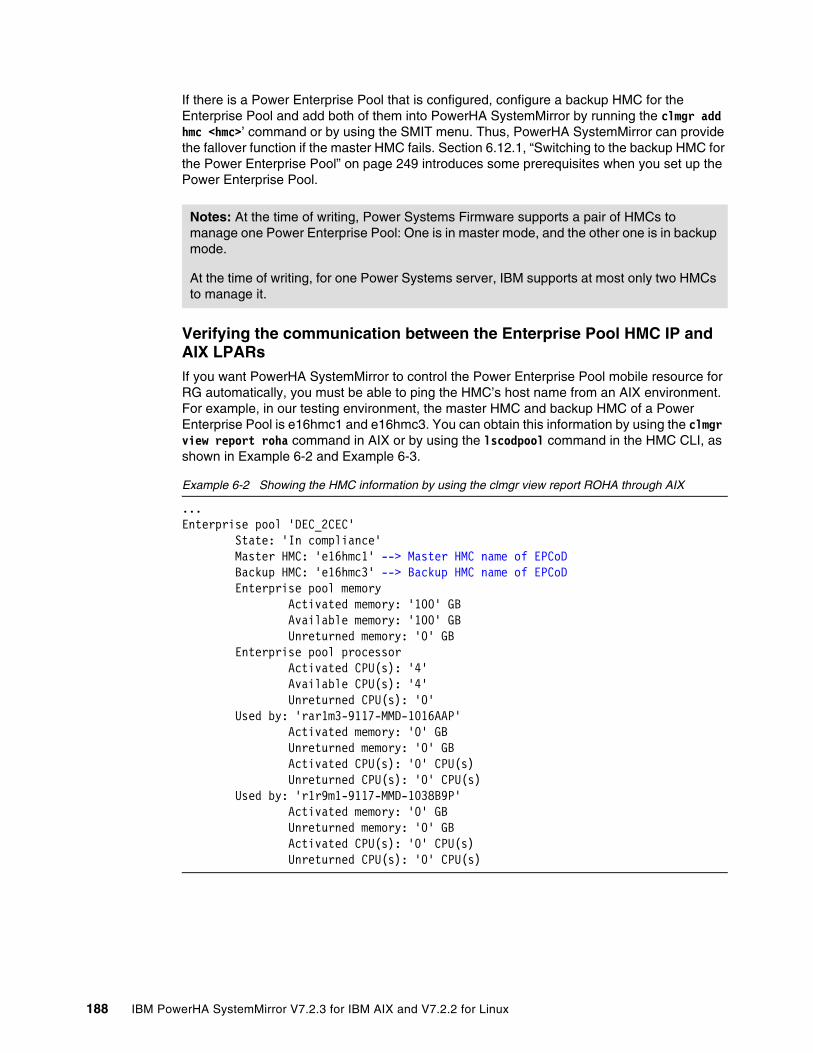
If there is a Power Enterprise Pool that is configured, configure a backup HMC for the Enterprise Pool and add both of them into PowerHA SystemMirror by running the clmgr add hmc <hmc>’ command or by using the SMIT menu. Thus, PowerHA SystemMirror can provide the fallover function if the master HMC fails. Section 6.12.1, “Switching to the backup HMC for the Power Enterprise Pool” on page 249 introduces some prerequisites when you set up the Power Enterprise Pool.
Verifying the communication between the Enterprise Pool HMC IP and AIX LPARsIf you want PowerHA SystemMirror to control the Power Enterprise Pool mobile resource for RG automatically, you must be able to ping the HMC’s host name from an AIX environment. For example, in our testing environment, the master HMC and backup HMC of a Power Enterprise Pool is e16hmc1 and e16hmc3. You can obtain this information by using the clmgr view report roha command in AIX or by using the lscodpool command in the HMC CLI, as shown in Example 6-2 and Example 6-3.
Example 6-2 Showing the HMC information by using the clmgr view report ROHA through AIX
...Enterprise pool 'DEC_2CEC' State: 'In compliance' Master HMC: 'e16hmc1' --> Master HMC name of EPCoD Backup HMC: 'e16hmc3' --> Backup HMC name of EPCoD Enterprise pool memory Activated memory: '100' GB Available memory: '100' GB Unreturned memory: '0' GB Enterprise pool processor Activated CPU(s): '4' Available CPU(s): '4' Unreturned CPU(s): '0' Used by: 'rar1m3-9117-MMD-1016AAP' Activated memory: '0' GB Unreturned memory: '0' GB Activated CPU(s): '0' CPU(s) Unreturned CPU(s): '0' CPU(s) Used by: 'r1r9m1-9117-MMD-1038B9P' Activated memory: '0' GB Unreturned memory: '0' GB Activated CPU(s): '0' CPU(s) Unreturned CPU(s): '0' CPU(s)
Notes: At the time of writing, Power Systems Firmware supports a pair of HMCs to manage one Power Enterprise Pool: One is in master mode, and the other one is in backup mode.
At the time of writing, for one Power Systems server, IBM supports at most only two HMCs to manage it.
188 IBM PowerHA SystemMirror V7.2.3 for IBM AIX and V7.2.2 for Linux
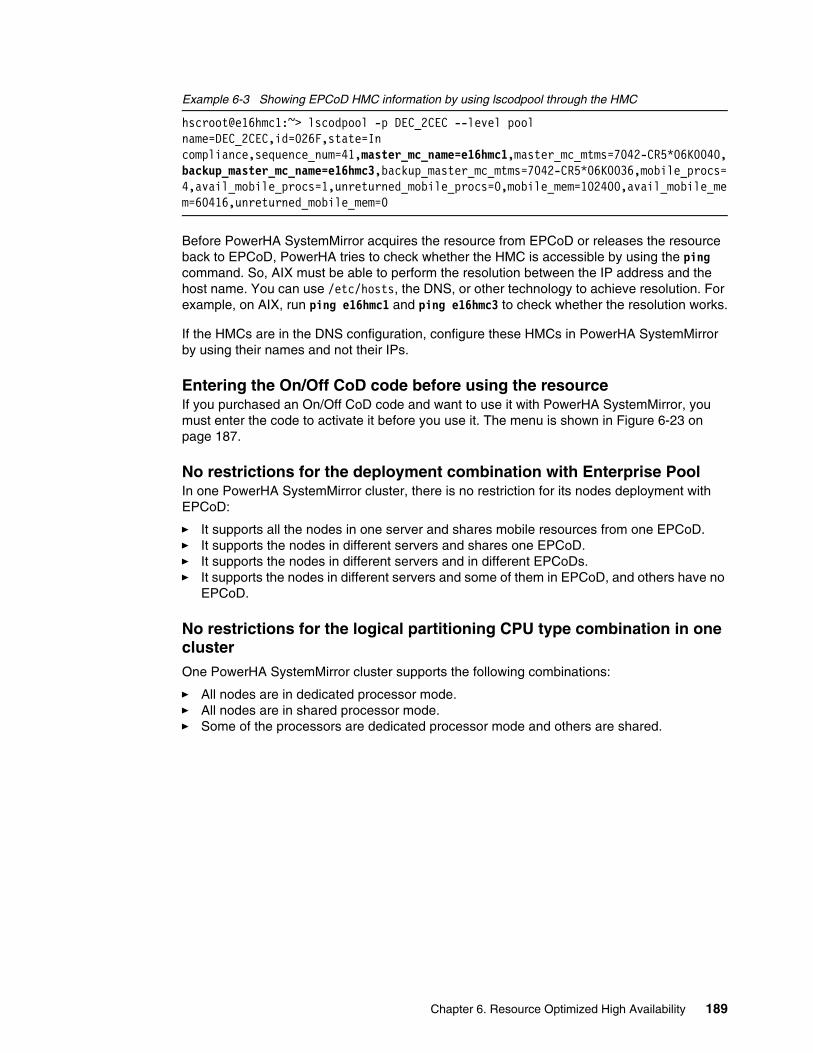
Example 6-3 Showing EPCoD HMC information by using lscodpool through the HMC
hscroot@e16hmc1:~> lscodpool -p DEC_2CEC --level pool name=DEC_2CEC,id=026F,state=In compliance,sequence_num=41,master_mc_name=e16hmc1,master_mc_mtms=7042-CR5*06K0040,backup_master_mc_name=e16hmc3,backup_master_mc_mtms=7042-CR5*06K0036,mobile_procs=4,avail_mobile_procs=1,unreturned_mobile_procs=0,mobile_mem=102400,avail_mobile_mem=60416,unreturned_mobile_mem=0
Before PowerHA SystemMirror acquires the resource from EPCoD or releases the resource back to EPCoD, PowerHA tries to check whether the HMC is accessible by using the ping command. So, AIX must be able to perform the resolution between the IP address and the host name. You can use /etc/hosts, the DNS, or other technology to achieve resolution. For example, on AIX, run ping e16hmc1 and ping e16hmc3 to check whether the resolution works.
If the HMCs are in the DNS configuration, configure these HMCs in PowerHA SystemMirror by using their names and not their IPs.
Entering the On/Off CoD code before using the resourceIf you purchased an On/Off CoD code and want to use it with PowerHA SystemMirror, you must enter the code to activate it before you use it. The menu is shown in Figure 6-23 on page 187.
No restrictions for the deployment combination with Enterprise PoolIn one PowerHA SystemMirror cluster, there is no restriction for its nodes deployment with EPCoD:
� It supports all the nodes in one server and shares mobile resources from one EPCoD.� It supports the nodes in different servers and shares one EPCoD.� It supports the nodes in different servers and in different EPCoDs.� It supports the nodes in different servers and some of them in EPCoD, and others have no
EPCoD.
No restrictions for the logical partitioning CPU type combination in one clusterOne PowerHA SystemMirror cluster supports the following combinations:
� All nodes are in dedicated processor mode.� All nodes are in shared processor mode.� Some of the processors are dedicated processor mode and others are shared.
Chapter 6. Resource Optimized High Availability 189
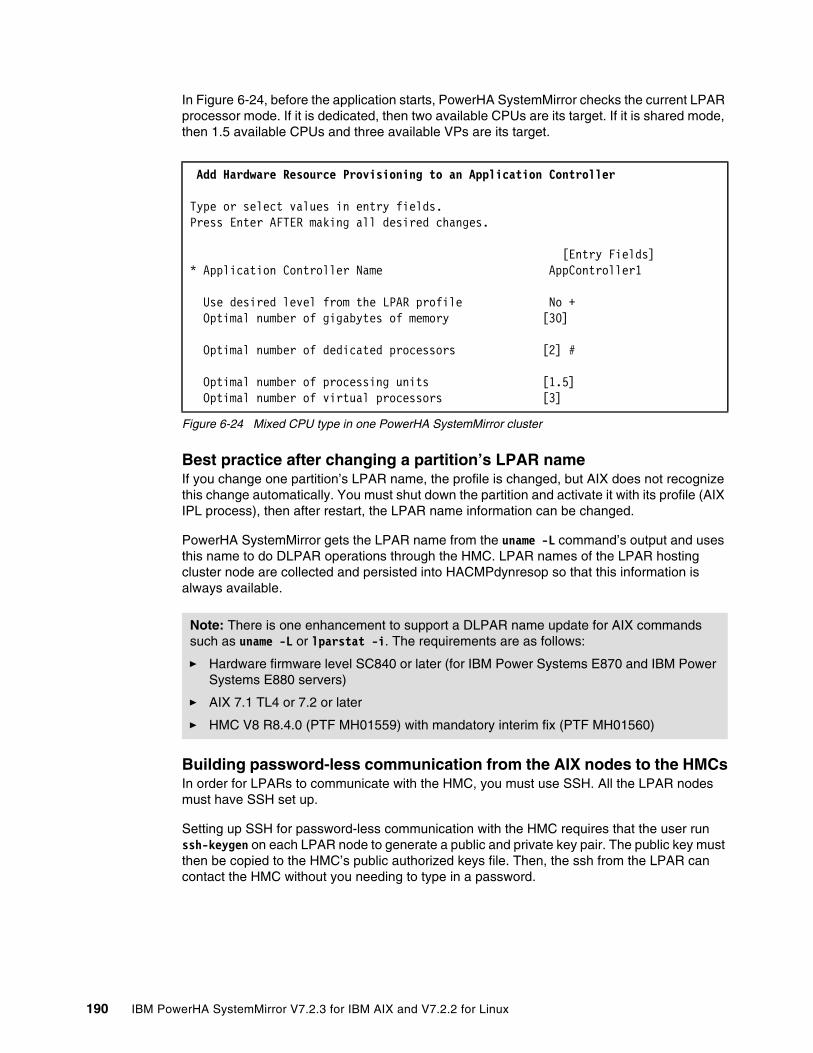
In Figure 6-24, before the application starts, PowerHA SystemMirror checks the current LPAR processor mode. If it is dedicated, then two available CPUs are its target. If it is shared mode, then 1.5 available CPUs and three available VPs are its target.
Figure 6-24 Mixed CPU type in one PowerHA SystemMirror cluster
Best practice after changing a partition’s LPAR nameIf you change one partition’s LPAR name, the profile is changed, but AIX does not recognize this change automatically. You must shut down the partition and activate it with its profile (AIX IPL process), then after restart, the LPAR name information can be changed.
PowerHA SystemMirror gets the LPAR name from the uname -L command’s output and uses this name to do DLPAR operations through the HMC. LPAR names of the LPAR hosting cluster node are collected and persisted into HACMPdynresop so that this information is always available.
Building password-less communication from the AIX nodes to the HMCsIn order for LPARs to communicate with the HMC, you must use SSH. All the LPAR nodes must have SSH set up.
Setting up SSH for password-less communication with the HMC requires that the user run ssh-keygen on each LPAR node to generate a public and private key pair. The public key must then be copied to the HMC’s public authorized keys file. Then, the ssh from the LPAR can contact the HMC without you needing to type in a password.
Add Hardware Resource Provisioning to an Application Controller
Type or select values in entry fields. Press Enter AFTER making all desired changes.
[Entry Fields]* Application Controller Name AppController1
Use desired level from the LPAR profile No + Optimal number of gigabytes of memory [30]
Optimal number of dedicated processors [2] #
Optimal number of processing units [1.5] Optimal number of virtual processors [3]
Note: There is one enhancement to support a DLPAR name update for AIX commands such as uname -L or lparstat -i. The requirements are as follows:
� Hardware firmware level SC840 or later (for IBM Power Systems E870 and IBM Power Systems E880 servers)
� AIX 7.1 TL4 or 7.2 or later
� HMC V8 R8.4.0 (PTF MH01559) with mandatory interim fix (PTF MH01560)
190 IBM PowerHA SystemMirror V7.2.3 for IBM AIX and V7.2.2 for Linux
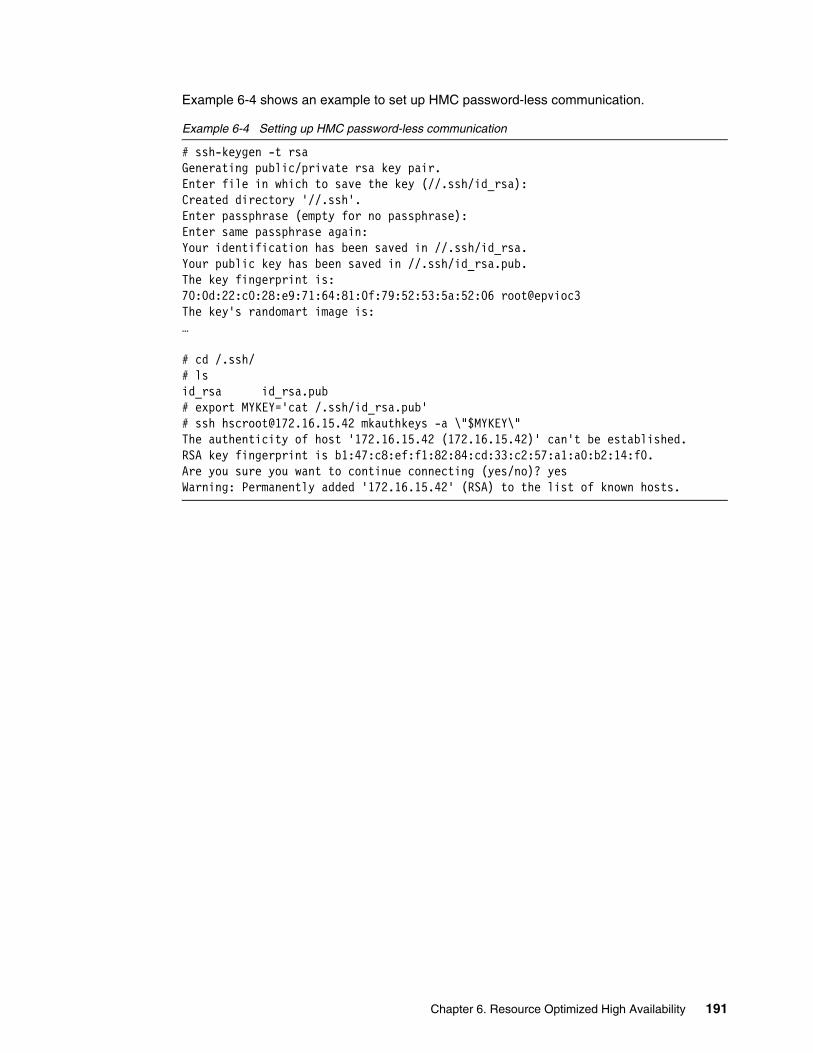
Example 6-4 shows an example to set up HMC password-less communication.
Example 6-4 Setting up HMC password-less communication
# ssh-keygen -t rsaGenerating public/private rsa key pair.Enter file in which to save the key (//.ssh/id_rsa): Created directory '//.ssh'.Enter passphrase (empty for no passphrase): Enter same passphrase again: Your identification has been saved in //.ssh/id_rsa.Your public key has been saved in //.ssh/id_rsa.pub.The key fingerprint is:70:0d:22:c0:28:e9:71:64:81:0f:79:52:53:5a:52:06 root@epvioc3The key's randomart image is:…
# cd /.ssh/# lsid_rsa id_rsa.pub# export MYKEY='cat /.ssh/id_rsa.pub'# ssh [email protected] mkauthkeys -a \"$MYKEY\"The authenticity of host '172.16.15.42 (172.16.15.42)' can't be established.RSA key fingerprint is b1:47:c8:ef:f1:82:84:cd:33:c2:57:a1:a0:b2:14:f0.Are you sure you want to continue connecting (yes/no)? yesWarning: Permanently added '172.16.15.42' (RSA) to the list of known hosts.
Chapter 6. Resource Optimized High Availability 191
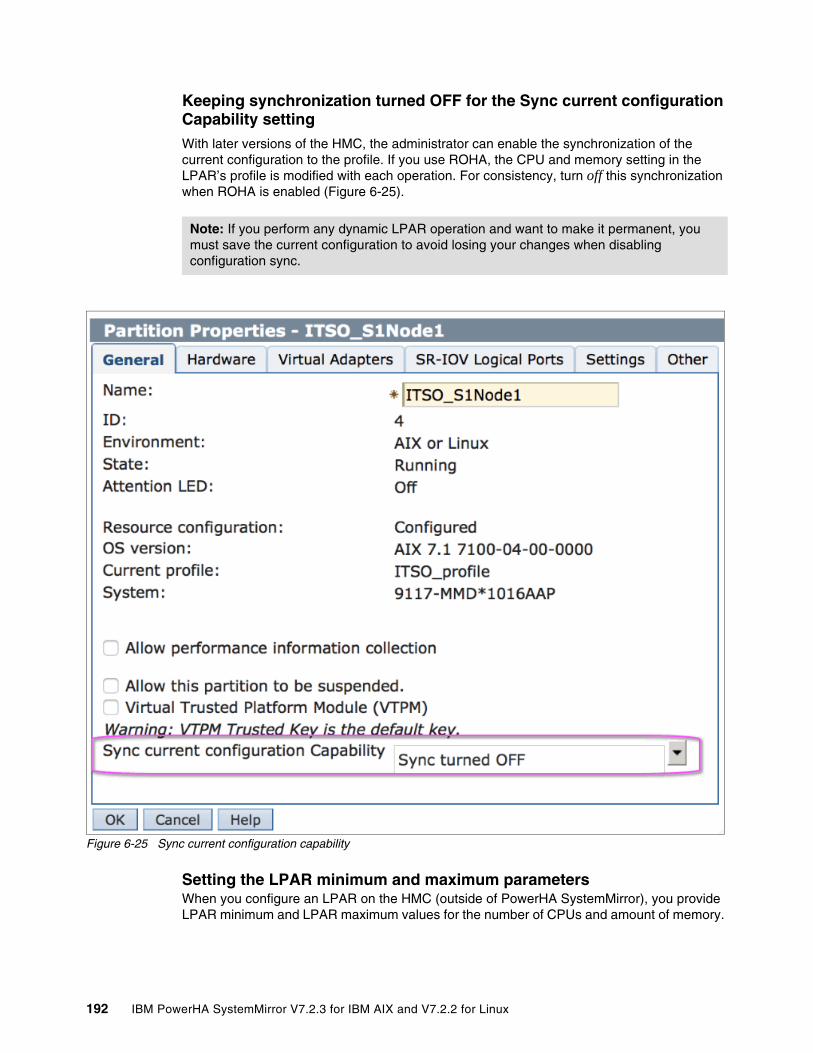
Keeping synchronization turned OFF for the Sync current configuration Capability settingWith later versions of the HMC, the administrator can enable the synchronization of the current configuration to the profile. If you use ROHA, the CPU and memory setting in the LPAR’s profile is modified with each operation. For consistency, turn off this synchronization when ROHA is enabled (Figure 6-25).
Figure 6-25 Sync current configuration capability
Setting the LPAR minimum and maximum parametersWhen you configure an LPAR on the HMC (outside of PowerHA SystemMirror), you provide LPAR minimum and LPAR maximum values for the number of CPUs and amount of memory.
Note: If you perform any dynamic LPAR operation and want to make it permanent, you must save the current configuration to avoid losing your changes when disabling configuration sync.
192 IBM PowerHA SystemMirror V7.2.3 for IBM AIX and V7.2.2 for Linux
The stated minimum values of the resources must be available when an LPAR node starts. If more resources are available in the free pool on the frame, an LPAR can allocate up to the stated wanted values. During dynamic allocation operations, the system does not allow the values for CPU and memory to go below the minimum or above the maximum amounts that are specified for the LPAR.
PowerHA SystemMirror obtains the LPAR minimum and LPAR maximum amounts and uses them to allocate and release CPU and memory when application controllers are started and stopped on the LPAR node.
In the planning stage, you must carefully consider how many resources are needed to satisfy all the RGs online and set the LPAR’s minimal and maximum parameters correctly.
Using pre-event and post-event scriptsExisting pre-event and post-event scripts that you might be using in a cluster with LPARs (before using the CoD integration with PowerHA SystemMirror) might need to be modified or rewritten if you plan to configure CoD and DLPAR requirements in PowerHA SystemMirror.
Keep in mind the following considerations:
� PowerHA SystemMirror performs all the DLPAR operations before the application controllers are started and after they are stopped. You might need to rewrite the scripts to account for this situation.
� Because PowerHA SystemMirror takes care of the resource calculations, and requests more resources from the DLPAR operations and, if allowed, from CUoD, you can dispose the portions of your scripts that perform those functions.
� PowerHA SystemMirror considers the On/Off CoD possibility, for example, even though the cluster is configured in a single frame. If your cluster is configured within one frame, then modifying the scripts as stated before is sufficient.
� However, if a cluster is configured with LPAR nodes that are on two frames, you might still require the portions of the existing pre-event and post-event scripts that deal with dynamically allocating resources from the free pool on one frame to the node on another frame, if the application requires these resources.
Elapsed time of the DLPAR operationWhen you plan a PowerHA SystemMirror cluster with the ROHA feature, you must consider the DLPAR elapsed time.
While initially bringing the RG online, PowerHA SystemMirror must wait for all the resources acquisition to complete before it can start the user’s application.
Tip: Be careful with your processor count when you have mixed processor environments such as Linux -only processors and AIX and Linux processors. It is a best practice to create pools for each processor class because they can be easily mixed, and the HMC counts do not show them clearly.
Note: When you deal with EPCoD or On/Off CoD resources, it does not matter whether there is one or two frames. For case scenarios with EPCoD or On/Off CoD, you activate (for On/Off) and acquire (for EPCoD), and modify the portion of code that deals with On/Off activation and EPCoD acquisition.
Chapter 6. Resource Optimized High Availability 193
While performing a takeover (for example, fallover to the next priority node), PowerHA SystemMirror tries to perform some operations (DLPAR or adjust the CoD and EPCoD resources) in parallel to the release of resources on the source node and the acquisition of resources on target node if the user allows it in the tunables (the value of Force synchronous release of DLPAR resources is No).
Table 6-15 shows the testing results of the DLPAR operation. The result might be different in other environments, particularly if the resource is being used.
There is one LPAR. Its current running CPU resource size is 2C, and the running memory resource size is 8 GB. The DLPAR operation includes add and remove.
Table 6-15 Elapsed time of the DLPAR operation
AIX ProbeVue maximum pinned memory settingProbeVue is a dynamic tracing facility of AIX. You can use it for both performance analysis and problem debugging. ProbeVue uses the Vue programming language to dynamically specify trace points and provide the actions to run at the specified trace points. This feature is enabled by default. There is one restriction regarding ProbeVue’s maximum pinned memory and DLPAR remove memory operation: The Max Pinned Memory For ProbeVue tunable cannot cross the 40% limit of system running memory.
For example, you configure one profile for an LPAR with 8 GB (minimum) and 40 GB (wanted). When you activate this LPAR, the maximum pinned memory of ProbVue is set to 4 GB (10% of system running memory), as shown in Example 6-5.
From AIX 7.1 TL4 onward, the tunables are derived based on the available system memory. The maximum pinned memory is set to 10% of the system memory. It cannot be adjusted when you restart the operating system or adjust the memory size with the DLPAR operation.
Example 6-5 Current maximum pinned memory for ProbeVue
# probevctrl -lProbevue Features: on --> ProbeVue is enabled at this timeMAX pinned memory for Probevue framework(in MB): 4096 --> this is the value that we are discussing...
Now, if you want to reduce the memory 40 - 8 GB, run the following command:
chhwres -r mem -m r1r9m1-9117-MMD-1038B9P -o r -p ITSO_S2Node1 -q 32768
The command fails with the error that is shown in Example 6-6 on page 195.
Incremental value By DLPAR
Add CPU(in seconds)
Add memory(in seconds)
Remove CPU(in seconds)
Remove memory(in minutes and seconds)
2C and 8 GB 5.5 s 8 s 6 s 88 s (1 m 28 s)
4C and 16 GB 7 s 12 s 9.8 s 149 s (2 m 29 s)
8C and 32 GB 13 s 27 s 23 s 275 s (4 m 35 s)
16C and 64 GB 18 s 34 s 33 s 526 s (8 m 46 s)
32C and 128 GB 24 s 75 s 52 s 1010 s (16 m 50 s)
48C and 192 GB 41 s 179 s 87 s 1480 s (24 m 40 s)
194 IBM PowerHA SystemMirror V7.2.3 for IBM AIX and V7.2.2 for Linux
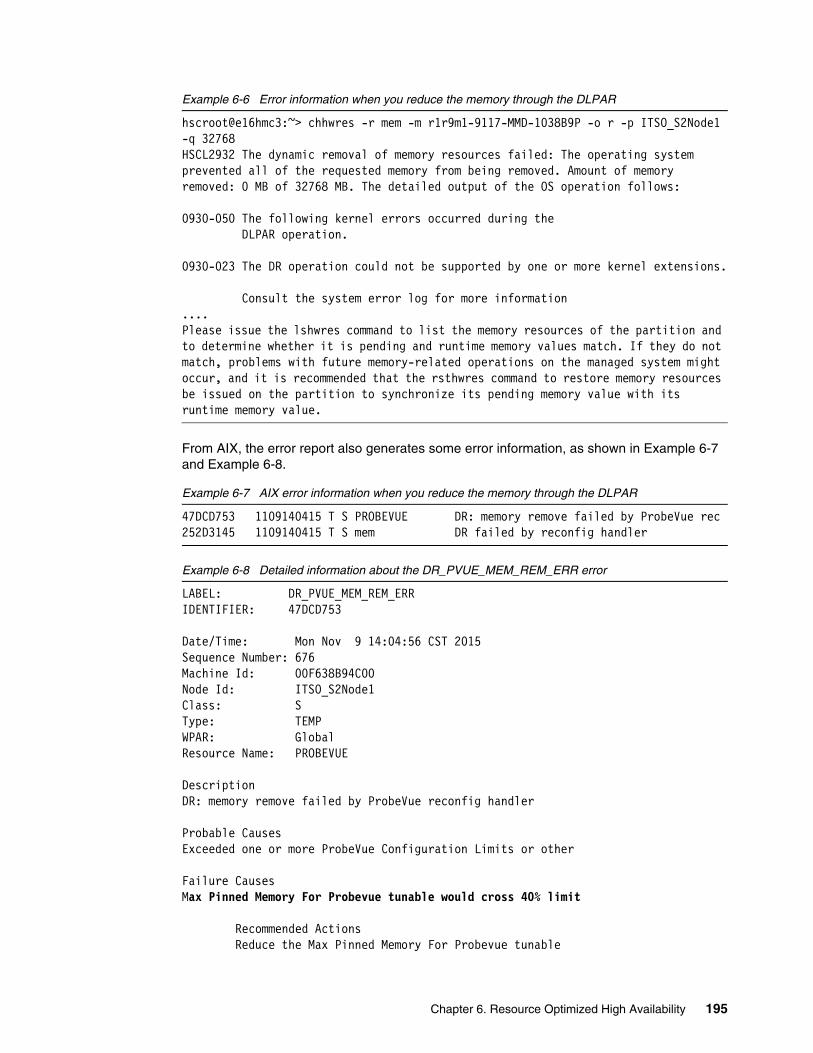
Example 6-6 Error information when you reduce the memory through the DLPAR
hscroot@e16hmc3:~> chhwres -r mem -m r1r9m1-9117-MMD-1038B9P -o r -p ITSO_S2Node1 -q 32768HSCL2932 The dynamic removal of memory resources failed: The operating system prevented all of the requested memory from being removed. Amount of memory removed: 0 MB of 32768 MB. The detailed output of the OS operation follows:
0930-050 The following kernel errors occurred during the DLPAR operation.
0930-023 The DR operation could not be supported by one or more kernel extensions.
Consult the system error log for more information....Please issue the lshwres command to list the memory resources of the partition and to determine whether it is pending and runtime memory values match. If they do not match, problems with future memory-related operations on the managed system might occur, and it is recommended that the rsthwres command to restore memory resources be issued on the partition to synchronize its pending memory value with its runtime memory value.
From AIX, the error report also generates some error information, as shown in Example 6-7 and Example 6-8.
Example 6-7 AIX error information when you reduce the memory through the DLPAR
47DCD753 1109140415 T S PROBEVUE DR: memory remove failed by ProbeVue rec252D3145 1109140415 T S mem DR failed by reconfig handler
Example 6-8 Detailed information about the DR_PVUE_MEM_REM_ERR error
LABEL: DR_PVUE_MEM_REM_ERRIDENTIFIER: 47DCD753
Date/Time: Mon Nov 9 14:04:56 CST 2015Sequence Number: 676Machine Id: 00F638B94C00Node Id: ITSO_S2Node1Class: SType: TEMPWPAR: GlobalResource Name: PROBEVUE
DescriptionDR: memory remove failed by ProbeVue reconfig handler
Probable CausesExceeded one or more ProbeVue Configuration Limits or other
Failure CausesMax Pinned Memory For Probevue tunable would cross 40% limit
Recommended Actions Reduce the Max Pinned Memory For Probevue tunable
Chapter 6. Resource Optimized High Availability 195
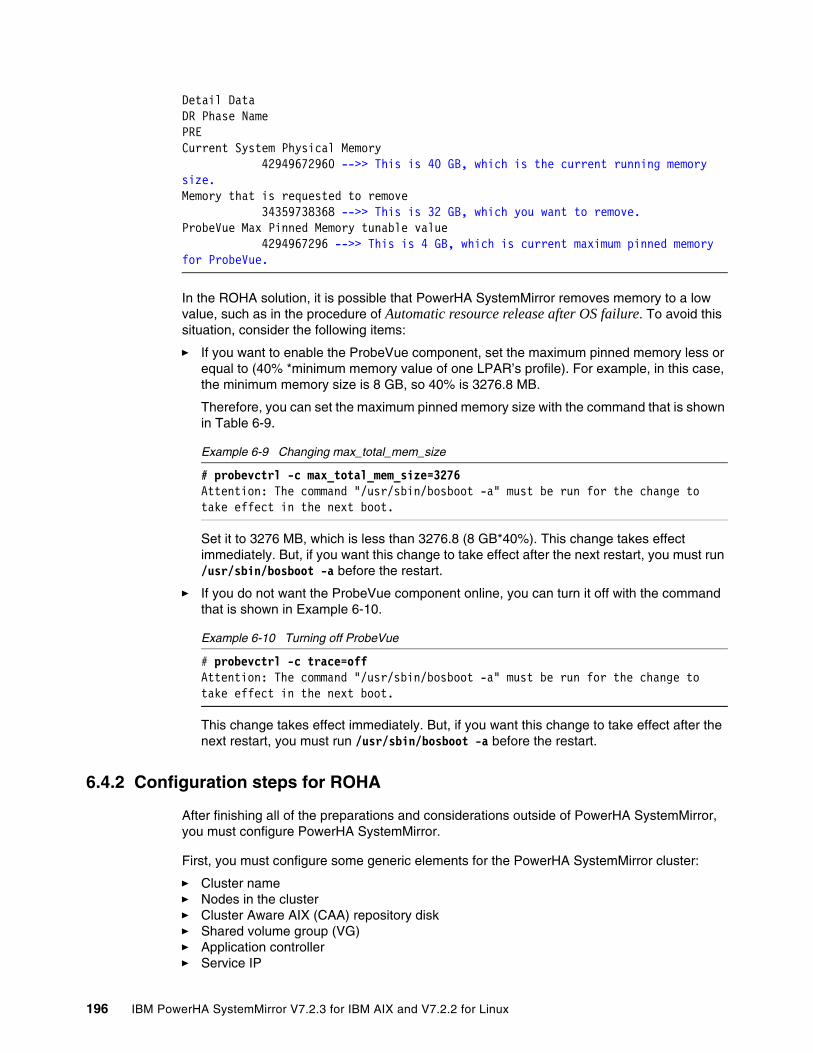
Detail DataDR Phase NamePRECurrent System Physical Memory
42949672960 -->> This is 40 GB, which is the current running memory size.Memory that is requested to remove
34359738368 -->> This is 32 GB, which you want to remove.ProbeVue Max Pinned Memory tunable value 4294967296 -->> This is 4 GB, which is current maximum pinned memory for ProbeVue.
In the ROHA solution, it is possible that PowerHA SystemMirror removes memory to a low value, such as in the procedure of Automatic resource release after OS failure. To avoid this situation, consider the following items:
� If you want to enable the ProbeVue component, set the maximum pinned memory less or equal to (40% *minimum memory value of one LPAR’s profile). For example, in this case, the minimum memory size is 8 GB, so 40% is 3276.8 MB.
Therefore, you can set the maximum pinned memory size with the command that is shown in Table 6-9.
Example 6-9 Changing max_total_mem_size
# probevctrl -c max_total_mem_size=3276Attention: The command "/usr/sbin/bosboot -a" must be run for the change to take effect in the next boot.
Set it to 3276 MB, which is less than 3276.8 (8 GB*40%). This change takes effect immediately. But, if you want this change to take effect after the next restart, you must run /usr/sbin/bosboot -a before the restart.
� If you do not want the ProbeVue component online, you can turn it off with the command that is shown in Example 6-10.
Example 6-10 Turning off ProbeVue
# probevctrl -c trace=offAttention: The command "/usr/sbin/bosboot -a" must be run for the change to take effect in the next boot.
This change takes effect immediately. But, if you want this change to take effect after the next restart, you must run /usr/sbin/bosboot -a before the restart.
6.4.2 Configuration steps for ROHA
After finishing all of the preparations and considerations outside of PowerHA SystemMirror, you must configure PowerHA SystemMirror.
First, you must configure some generic elements for the PowerHA SystemMirror cluster:
� Cluster name� Nodes in the cluster� Cluster Aware AIX (CAA) repository disk � Shared volume group (VG)� Application controller� Service IP
196 IBM PowerHA SystemMirror V7.2.3 for IBM AIX and V7.2.2 for Linux
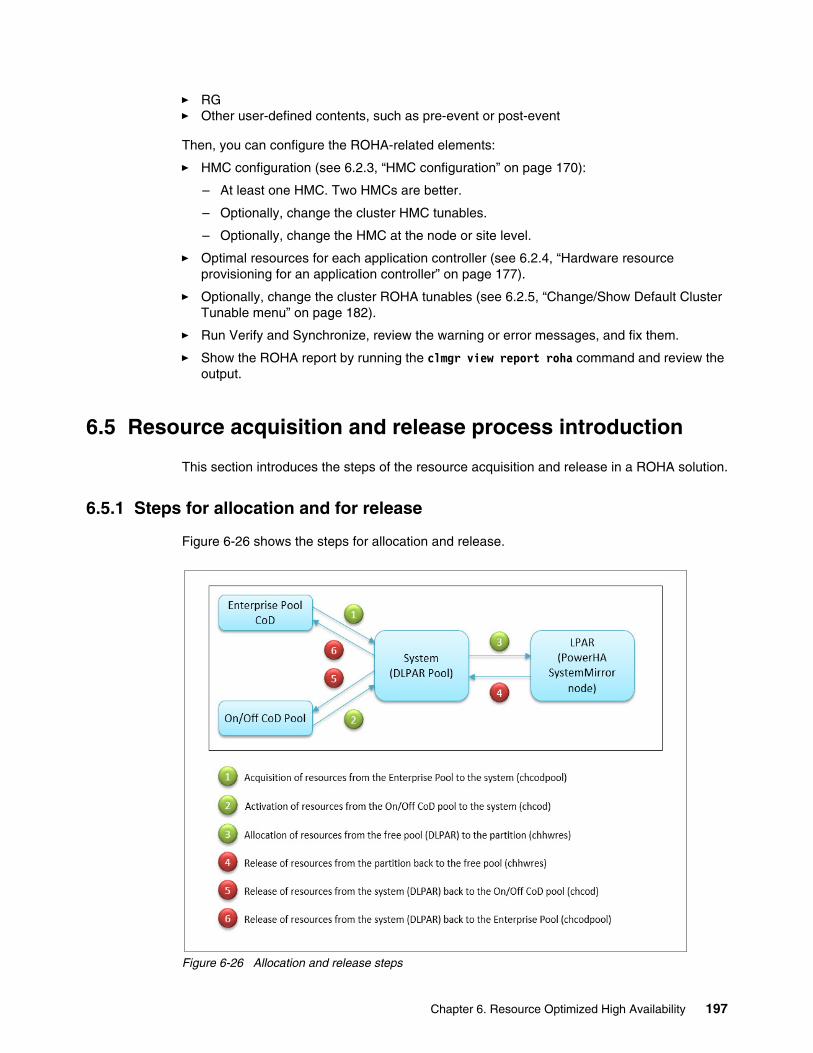
� RG� Other user-defined contents, such as pre-event or post-event
Then, you can configure the ROHA-related elements:
� HMC configuration (see 6.2.3, “HMC configuration” on page 170):
– At least one HMC. Two HMCs are better.
– Optionally, change the cluster HMC tunables.
– Optionally, change the HMC at the node or site level.
� Optimal resources for each application controller (see 6.2.4, “Hardware resource provisioning for an application controller” on page 177).
� Optionally, change the cluster ROHA tunables (see 6.2.5, “Change/Show Default Cluster Tunable menu” on page 182).
� Run Verify and Synchronize, review the warning or error messages, and fix them.
� Show the ROHA report by running the clmgr view report roha command and review the output.
6.5 Resource acquisition and release process introduction
This section introduces the steps of the resource acquisition and release in a ROHA solution.
6.5.1 Steps for allocation and for release
Figure 6-26 shows the steps for allocation and release.
Figure 6-26 Allocation and release steps
Chapter 6. Resource Optimized High Availability 197
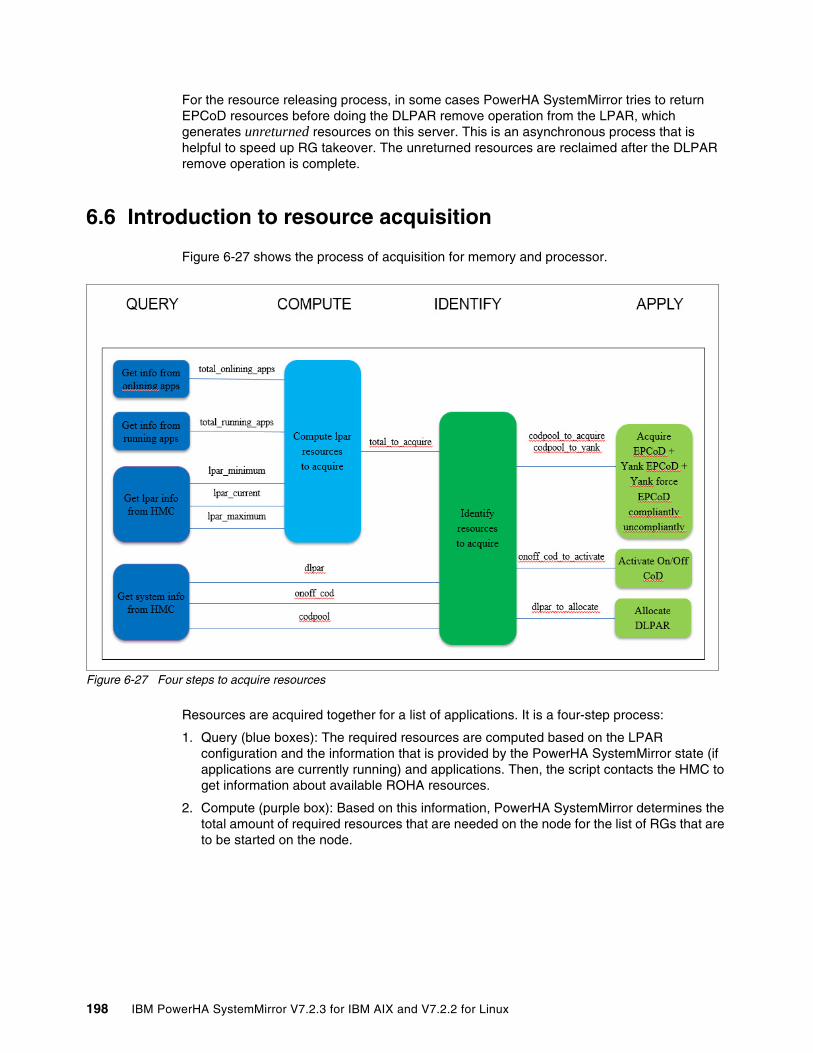
For the resource releasing process, in some cases PowerHA SystemMirror tries to return EPCoD resources before doing the DLPAR remove operation from the LPAR, which generates unreturned resources on this server. This is an asynchronous process that is helpful to speed up RG takeover. The unreturned resources are reclaimed after the DLPAR remove operation is complete.
6.6 Introduction to resource acquisition
Figure 6-27 shows the process of acquisition for memory and processor.
Figure 6-27 Four steps to acquire resources
Resources are acquired together for a list of applications. It is a four-step process:
1. Query (blue boxes): The required resources are computed based on the LPAR configuration and the information that is provided by the PowerHA SystemMirror state (if applications are currently running) and applications. Then, the script contacts the HMC to get information about available ROHA resources.
2. Compute (purple box): Based on this information, PowerHA SystemMirror determines the total amount of required resources that are needed on the node for the list of RGs that are to be started on the node.
198 IBM PowerHA SystemMirror V7.2.3 for IBM AIX and V7.2.2 for Linux

3. Identify (green box): PowerHA SystemMirror determines how to perform this allocation for the node by looking at each kind of allocation to be made, that is, which part must come from EPCoD resources, which part must come from On/Off CoD resources to provide some supplementary resources to the CEC, and which amount of resources must be allocated from the CEC to the LPAR through a DLPAR operation.
4. Apply (orange boxes): After these decisions are made, the script contacts the HMC to acquire resources. First, it acquires EPCoD resources and activates On/Off CoD resources, and then allocates all DLPAR resources. The amount of DLPAR resources that are allocated is persisted in the HACMPdynresop Object Data Manager (ODM) object for release purposes.
There are many reasons for success. The script immediately returns whether the applications are not configured with optimal resources. The script also exits if there are already enough resources allocated. Finally, the script exits when the entire process of acquisition succeeds.
However, the script can fail and return an error if one of the following situations occurs:
� The maximum LPAR size as indicated in the LPAR profile is exceeded and the Always Start RGs tunable is set to No.
� The shared processor pool size is exceeded and the Adjust SPP size if the required tunable is set to No.
� There are not enough free resources on the CEC, the EPCoD, or the On/Off CoD, and the Always Start RGs tunable is set to No.
� Any one step of the acquisition fails (see steps 1 on page 198 - 4). Thus, successful actions that were previously performed are rolled back, and the node is reset to its initial allocation state.
In a shared processor partition, more operations must be done. For example, you must account for both virtual CPUs and processing units instead of only a number of processors. To activate On/Off CoD resources or acquire EPCoD resources, decimal processing units are converted to integers, and decimal gigabytes of memory must be converted to integers.
On shared processor pool partitions, the maximum pool size can be automatically adjusted if necessary and authorized by the user.
6.6.1 Querying the resources
In the query step, PowerHA SystemMirror gets the information that is listed in the following sections.
Getting information from onlining appsOnlining applications see the applications being brought online. The process is achieved by summing values that are returned by an ODM request to the HACMPserver object containing the applications resources provisioning.
Getting information from running appsRunning applications see the applications currently running on the node. The process is achieved by calling the clRGinfo command to obtain all the running applications and summing values that are returned by an ODM request on all those applications.
Getting LPAR information from the HMCThe minimum, maximum, and currently allocated resources for the partition are listed through the HMC command lshwres.
Chapter 6. Resource Optimized High Availability 199
Getting the DLPAR resource information from the HMCSome people think only the available resources (the query method is shown in Table 6-16) can be used for the DLPAR operation.
Table 6-16 Get server’s available resources from HMC
Strictly speaking, this situation is not correct. Two kinds of cases must be considered:
� There are stopped partitions on the CEC.
A stopped partition still keeps its resources because the resources do not appear as Available in the CEC. As a matter of fact, the resources are available for other LPARs. Therefore, if you stopped a partition on the CEC, the resource that stopped the partition must be available for the DLPAR operation.
� There are uncapped mode partitions in the CEC.
In an uncapped shared processor partition, considering only the maximum processor unit is not correct.
Consider the following case, where one LPAR’s profile includes the following configuration:
– Minimum processor unit: 0.5
– Assigned processor unit: 1.5
– Maximum processor unit: 3
– Minimum virtual processor: 1
– Assigned virtual processor: 6
– Maximum virtual processor: 8
This LPAR can acquire six processor units if the workload increases and these resources are available in the CEC. Also, this value is above the limit that is set by the Maximum processor unit, which has a value of 3.
But in any case, allocation beyond the limit of the maximum processor unit is something that is performed at the CEC level, and it cannot be controlled at the PowerHA SystemMirror level.
But it is true that the calculation of available resources can consider what is really being used in the CEC, and it should not consider the Maximum processor unit as an intangible maximum. The real maximum comes from the value of Assigned Virtual Processor.
PowerHA SystemMirror supports the uncapped mode, but does not play a direct role in this support because this mode is used at the CEC level. There is no difference in uncapped mode compared with the capped mode for PowerHA SystemMirror.
Memory lshwres -m <cec> --level sys -r mem -F curr_avail_sys_mem
CPU lshwres -m <cec> --level sys -r proc -F curr_avail_sys_proc_units
Tip: The lshwres commands in Table 6-16 are examples, but it is not necessary for the user to run these commands. These commands are embedded in to the ROHA run time, and run as part of the ROHA acquisition and release steps.
200 IBM PowerHA SystemMirror V7.2.3 for IBM AIX and V7.2.2 for Linux
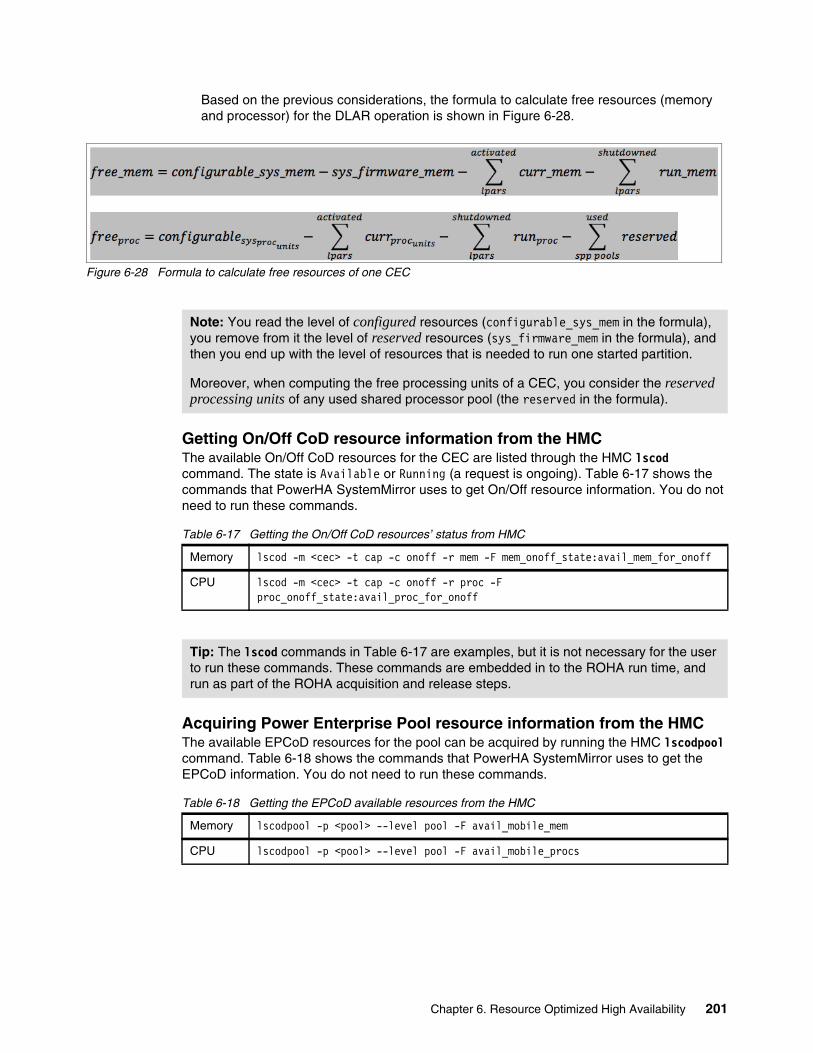
Based on the previous considerations, the formula to calculate free resources (memory and processor) for the DLAR operation is shown in Figure 6-28.
Figure 6-28 Formula to calculate free resources of one CEC
Getting On/Off CoD resource information from the HMCThe available On/Off CoD resources for the CEC are listed through the HMC lscod command. The state is Available or Running (a request is ongoing). Table 6-17 shows the commands that PowerHA SystemMirror uses to get On/Off resource information. You do not need to run these commands.
Table 6-17 Getting the On/Off CoD resources’ status from HMC
Acquiring Power Enterprise Pool resource information from the HMCThe available EPCoD resources for the pool can be acquired by running the HMC lscodpool command. Table 6-18 shows the commands that PowerHA SystemMirror uses to get the EPCoD information. You do not need to run these commands.
Table 6-18 Getting the EPCoD available resources from the HMC
Note: You read the level of configured resources (configurable_sys_mem in the formula), you remove from it the level of reserved resources (sys_firmware_mem in the formula), and then you end up with the level of resources that is needed to run one started partition.
Moreover, when computing the free processing units of a CEC, you consider the reserved processing units of any used shared processor pool (the reserved in the formula).
Memory lscod -m <cec> -t cap -c onoff -r mem -F mem_onoff_state:avail_mem_for_onoff
CPU lscod -m <cec> -t cap -c onoff -r proc -F proc_onoff_state:avail_proc_for_onoff
Tip: The lscod commands in Table 6-17 are examples, but it is not necessary for the user to run these commands. These commands are embedded in to the ROHA run time, and run as part of the ROHA acquisition and release steps.
Memory lscodpool -p <pool> --level pool -F avail_mobile_mem
CPU lscodpool -p <pool> --level pool -F avail_mobile_procs
Chapter 6. Resource Optimized High Availability 201
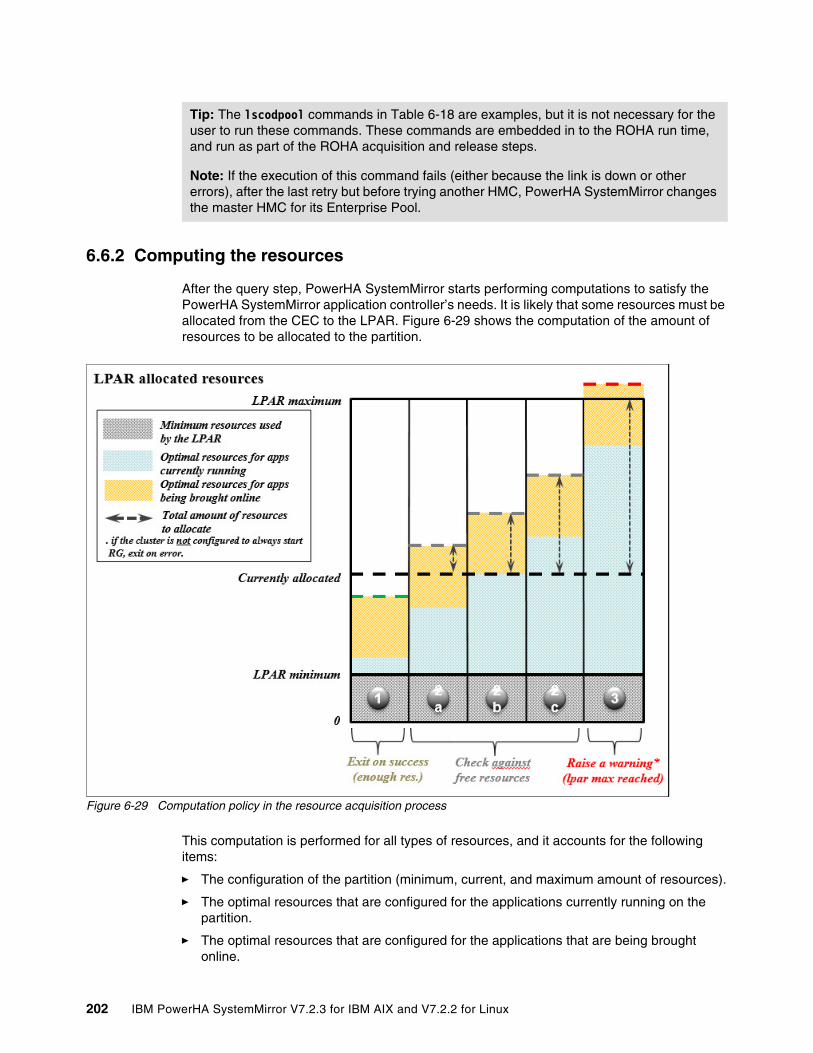
6.6.2 Computing the resources
After the query step, PowerHA SystemMirror starts performing computations to satisfy the PowerHA SystemMirror application controller’s needs. It is likely that some resources must be allocated from the CEC to the LPAR. Figure 6-29 shows the computation of the amount of resources to be allocated to the partition.
Figure 6-29 Computation policy in the resource acquisition process
This computation is performed for all types of resources, and it accounts for the following items:
� The configuration of the partition (minimum, current, and maximum amount of resources).
� The optimal resources that are configured for the applications currently running on the partition.
� The optimal resources that are configured for the applications that are being brought online.
Tip: The lscodpool commands in Table 6-18 are examples, but it is not necessary for the user to run these commands. These commands are embedded in to the ROHA run time, and run as part of the ROHA acquisition and release steps.
Note: If the execution of this command fails (either because the link is down or other errors), after the last retry but before trying another HMC, PowerHA SystemMirror changes the master HMC for its Enterprise Pool.
202 IBM PowerHA SystemMirror V7.2.3 for IBM AIX and V7.2.2 for Linux
In Figure 6-29, case 2b is the normal case. The currently allocated resources level matches the blue level, which is the level of resources for the application controllers currently running. PowerHA SystemMirror adds the yellow amount to the blue amount.
But in some cases, where these two levels do not match, consider having a start fresh policy. This policy performs a readjustment of the allocation to the exact needs of the currently running application controllers that are added to the application controllers that are being brought online (always provides an optimal amount of resources to application controllers). Those alternative cases can occur when the user manually releases (case 2a) or acquires (case 2c) resources.
Here is information about the cases:
� In case 1, PowerHA SystemMirror keeps the allocated level current to satisfy your needs. This case can occur when a partition is at its profile’s desired level, which is greater than its profile’s minimum.
� In case 2a, the readjustment consists of allocating only the missing part of the application controllers that are being brought online.
� In case 2c, the readjustment consists of allocating the missing part of the application controllers currently running that is added to the application controllers that are being brought online.
� In case 3, the needed resources cannot be satisfied by this partition. It exceeds the partition profile’s maximum. In this particular case, two behaviors can happen here depending on the Always Start RGs tunable. If enabled, PowerHA SystemMirror tries to allocate all that can be allocated, raises a warning, and continues. If disabled, PowerHA SystemMirror stops and returns an error.
In shared processor partitions, both virtual CPUs and processing units are computed. In shared processor partitions that are part of a shared processor pool, the need for computation is checked against the PU/VP ratio (ratio of physical CPU to virtual CPU) and adjusted as needed. If it is less than what you need, everything is fine and the process continues. If it is greater than you need, set the Adjust SPP size if required tunable to No. The process stops and returns an error. Otherwise, it raises a warning, changes the pools size to the new size, and goes on.
6.6.3 Identifying the method of resource allocation
In the resource compute step, the amount of resources that are needed by the LPAR is computed, so now you must identify how to achieve the wanted amount. PowerHA SystemMirror considers multiple strategies in the following order:
1. Consider the CEC current free pool for DLPAR operations. This section explains how these available resources are computed.
2. If resources are still insufficient, consider the Enterprise Pool of resources, first by considering the available amount of Enterprise Pool in the local frame, then by considering the amount of Enterprise Pool resources that is acquired by the other frame (and see whether it can be returned back to be available on the local frame), and then by considering the amount of Enterprise Pool of all frames sharing this Enterprise Pool (and see whether they can be returned back compliantly or uncompliantly to be available on the local frame).
3. If resources are still insufficient, consider the CoD pool of resources if a license was activated, and if any On/Off CoD resources are available.
Chapter 6. Resource Optimized High Availability 203
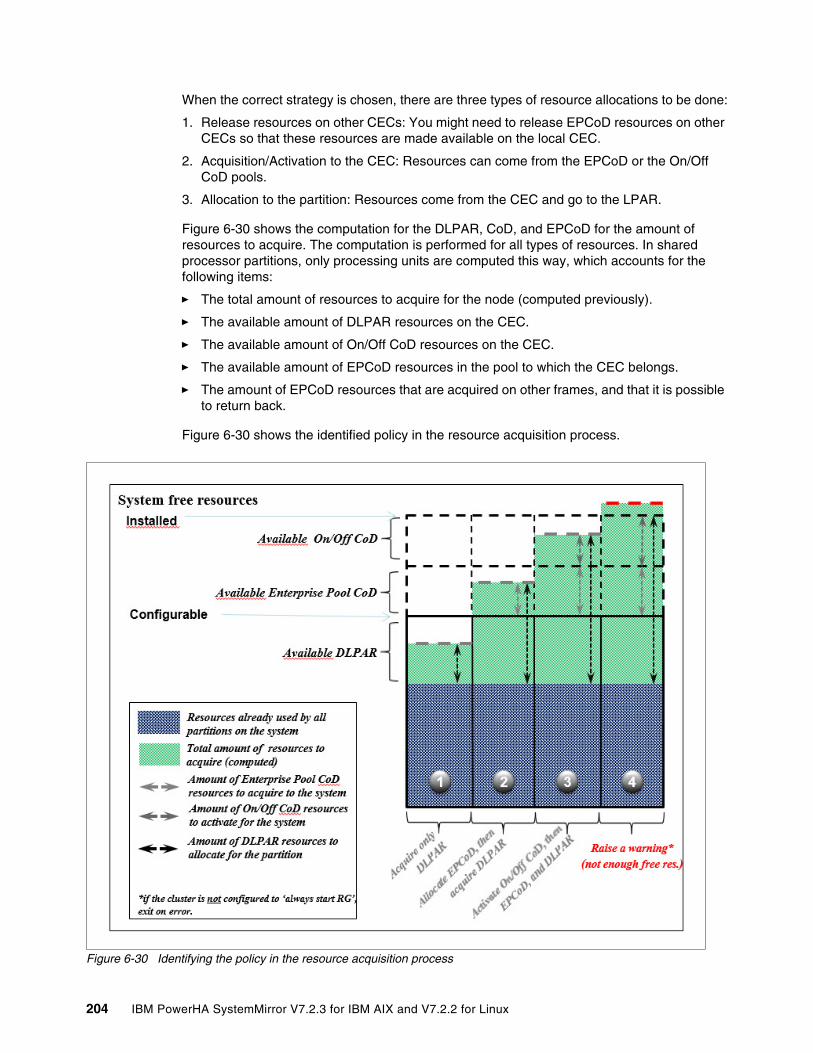
When the correct strategy is chosen, there are three types of resource allocations to be done:
1. Release resources on other CECs: You might need to release EPCoD resources on other CECs so that these resources are made available on the local CEC.
2. Acquisition/Activation to the CEC: Resources can come from the EPCoD or the On/Off CoD pools.
3. Allocation to the partition: Resources come from the CEC and go to the LPAR.
Figure 6-30 shows the computation for the DLPAR, CoD, and EPCoD for the amount of resources to acquire. The computation is performed for all types of resources. In shared processor partitions, only processing units are computed this way, which accounts for the following items:
� The total amount of resources to acquire for the node (computed previously).
� The available amount of DLPAR resources on the CEC.
� The available amount of On/Off CoD resources on the CEC.
� The available amount of EPCoD resources in the pool to which the CEC belongs.
� The amount of EPCoD resources that are acquired on other frames, and that it is possible to return back.
Figure 6-30 shows the identified policy in the resource acquisition process.
Figure 6-30 Identifying the policy in the resource acquisition process
204 IBM PowerHA SystemMirror V7.2.3 for IBM AIX and V7.2.2 for Linux
There are four possible cases:
1. There are sufficient DLPAR resources to fulfill the optimal configuration. No EPCoD resources or On/Off CoD resources are allocated to the CEC. A portion of the available DLPAR resources is allocated to the node.
2. A portion of available EPCoD resources is allocated to the CEC, and then all DLPAR resources are allocated. No On/Off CoD resources will be activated.
Alternative case: If there are no available EPCoD resources, a portion of available On/Off CoD resources is activated instead, and then all DLPAR resources are allocated.
3. All available EPCoD resources are allocated to the CEC, a portion of On/Off CoD resources is activated, and then all DLPAR resources are allocated.
Alternative case: If there are no available EPCoD resources, a portion of available On/Off CoD resources is activated instead, and then all DLPAR resources are allocated (as in case 2).
4. All available EPCoD resources are allocated to the CEC, all On/Off CoD resources are activated, and then all DLPAR resources are allocated.
Alternative case: If the cluster is not configured to automatically start the RGs even if resources are insufficient, do not allocate or acquire any resources because this action exceeds the available resources for this CEC and exits on error instead.
In shared processor partitions, PowerHA SystemMirror accounts for the minimum ratio of assigned processing units to assigned virtual processors for the partition that is supported by the CEC. In IBM POWER7 processor-based and IBM POWER8 processor-base servers, the ratio is 0.05.
For example, if the current assigned processing unit in the partition is 0.6 and the current assigned virtual processor is 6 and PowerHA SystemMirror acquires virtual processors, it raises an error because it breaks the minimum ratio rule. The same error occurs when PowerHA SystemMirror releases the processing units. PowerHA SystemMirror must compare the expected ratio to the configured ratio.
6.6.4 Applying (acquiring) the resource
After finishing the steps in 6.6.3, “Identifying the method of resource allocation” on page 203, PowerHA SystemMirror performs the acquire operation.
Acquiring the Power Enterprise Pool resourceThe EPCoD resources are allocated by the HMC chcodpool command. Table 6-19 shows the commands that PowerHA SystemMirror uses to assign EPCoD resources to one server. You do not need to run these commands.
Table 6-19 Acquiring the EPCoD mobile resources
Memory chcodpool -p <pool> -m <system> -o add -r mem -q <mb_of_memory>
CPU chcodpool -p <pool> -m <system> -o add -r proc -q <cpu>
Tip: The chcodpool commands are given in Table 6-19 as examples, but it is not necessary for the user to run these commands. These commands are embedded in to the ROHA run time, and run as part of the ROHA acquisition and release steps.
Chapter 6. Resource Optimized High Availability 205
Activating the On/Off CoD resourcesOn/Off CoD resources are activated by the HMC chcod command. Table 6-20 shows the commands that PowerHA SystemMirror uses to assign the On/Off CoD resource to one server. You do not need to run these commands.
Table 6-20 Acquiring On/Off available resources
Allocating the DLPAR resourcesDLPAR resources are allocated by using the HMC chhwres command. Table 6-21 shows the commands that PowerHA SystemMirror uses to assign resources from the server’s free pool to one LPAR. You do not need to run these commands.
Table 6-21 Assigning resources from the server’s free pool to target LPAR
For shared processor partitions in a shared processors pool that is not the default pool, it might be necessary to adjust the maximum processing units of the shared processor pool. To do so, use the operation that is shown in Example 6-11, which uses the HMC chhwres command. The enablement of this adjustment is authorized by a tunable.
Example 6-11 shows the command that PowerHA SystemMirror uses to change the shared processor pool’s maximum processing units. You do not need to run this command.
Example 6-11 DLPAR CLI from HMC
chhwres -m <cec> -o s -r procpool --poolname <pool> -a max_pool_proc_units=<pu>
Memory chcod -m <cec> -o a -c onoff -r mem -q <mb_of_memory> -d <days>
CPU chcod -m <cec> -o a -c onoff -r proc -q <cpu> -d <days>
Tip: The chcod commands are given in Table 6-20 as examples, but it is not necessary for the user to run these commands. These commands are embedded in to the ROHA run time, and run as part of the ROHA acquisition and release steps.
Note: For acquiring the Power Enterprise Pool and the On/Off CoD resources, every amount of memory resources is expressed in MB but aligned in GB of memory (for example, 1024 or 4096), and every number of processing units is aligned on the whole upper integer.
All Power Enterprise Pool and On/Off CoD resources that are acquired are in the CEC’s free pool, and these are automatically added to the target LPAR by using DLPAR.
Dedicate Memory chhwres -m <cec> -p <lpar> -o a -r mem -q <mb_of_memory>
Dedicate CPU chhwres -m <cec> -p <lpar> -o a -r proc --procs <cpu>
Shared CPU chhwres -m <cec> -p <lpar> -o a -r proc --procs <vp> --proc_units <pu>
Tip: The chhwres commands are given in Table 6-21 as examples, but it is not necessary for the user to run these commands. These commands are embedded in to the ROHA run time, and run as part of the ROHA acquisition and release steps.
206 IBM PowerHA SystemMirror V7.2.3 for IBM AIX and V7.2.2 for Linux
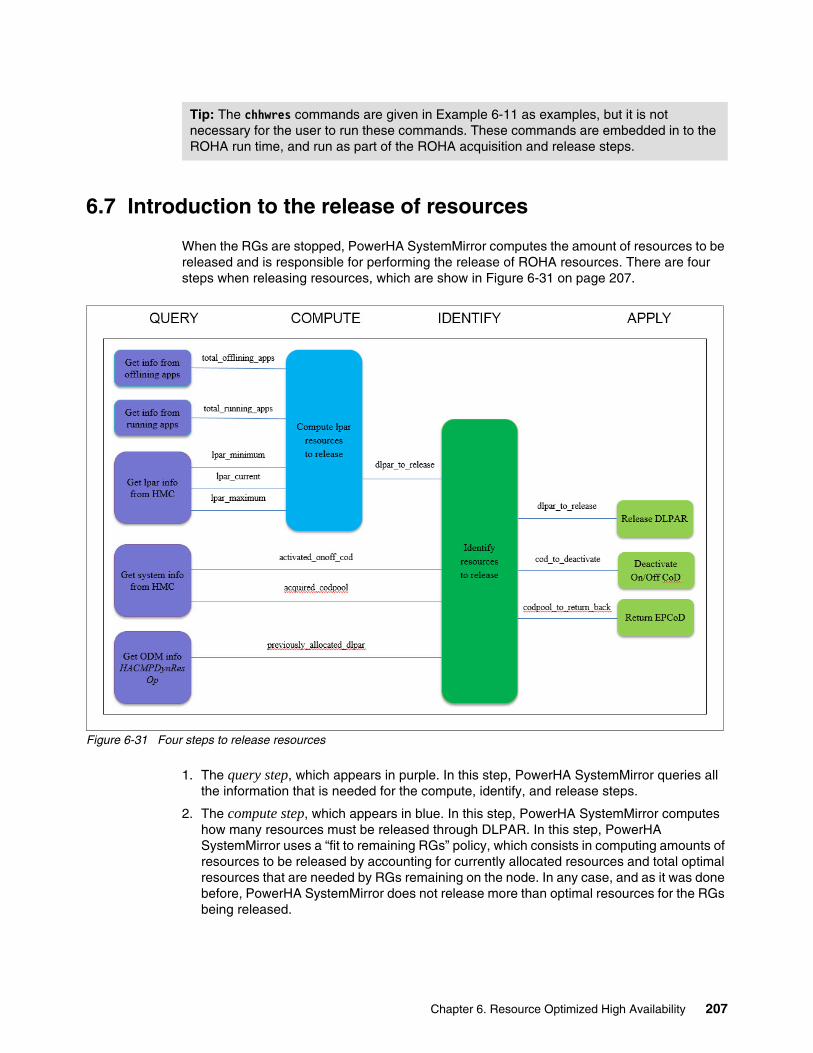
6.7 Introduction to the release of resources
When the RGs are stopped, PowerHA SystemMirror computes the amount of resources to be released and is responsible for performing the release of ROHA resources. There are four steps when releasing resources, which are show in Figure 6-31 on page 207.
Figure 6-31 Four steps to release resources
1. The query step, which appears in purple. In this step, PowerHA SystemMirror queries all the information that is needed for the compute, identify, and release steps.
2. The compute step, which appears in blue. In this step, PowerHA SystemMirror computes how many resources must be released through DLPAR. In this step, PowerHA SystemMirror uses a “fit to remaining RGs” policy, which consists in computing amounts of resources to be released by accounting for currently allocated resources and total optimal resources that are needed by RGs remaining on the node. In any case, and as it was done before, PowerHA SystemMirror does not release more than optimal resources for the RGs being released.
Tip: The chhwres commands are given in Example 6-11 as examples, but it is not necessary for the user to run these commands. These commands are embedded in to the ROHA run time, and run as part of the ROHA acquisition and release steps.
Chapter 6. Resource Optimized High Availability 207
3. The identify step, which appears in green. In this step, PowerHA SystemMirror identifies how many resources must be removed from the LPAR, and identify how many resources must be released to the On/Off CoD and to the Power Enterprise Pool.
4. In the apply step, you remove resources from the LPAR and release resources from the CEC to On/Off CoD and Power Enterprise Pool, which appears in light green. In this step, PowerHA SystemMirror performs the DLPAR remove operation and then releases On/Off CoD resources and EPCoD resources. You can release up to the amount, but no more, of the DLPAR resources being released.
6.7.1 Querying the release of resources
In the query step, PowerHA SystemMirror gets the information that is described in the following sections for the compute step.
Getting information from offlining appsOfflining applications see the resources being taken offline. Check that the release of resources is needed. At least one application is configured with optimal resources.
Getting information from running appsRunning applications see the resources currently running on the node. You get this information by starting clRGinfo to obtain all the running applications and summing values that are returned by an ODM request on all those applications.
Getting LPAR information from the HMCThe minimum, maximum, and currently allocated resources for the partition are listed by running the HMC lshwres command.
Getting On/Off CoD resource information from the HMCThe active On/Off CoD resources for the CEC are listed by the HMC lscod command. Table 6-22 shows the commands that PowerHA SystemMirror uses to get On/Off CoD information. You do not need to run these commands.
Table 6-22 Getting On/Off active resources in this server from the HMC
Memory lscod -m <cec> -t cap -c onoff -r mem -F activated_onoff_mem
CPU lscod -m <cec> -t cap -c onoff -r proc -F activated_onoff_proc
Tip: The lscod commands are given in Table 6-22 as examples, but it is not necessary for the user to run these commands. These commands are embedded in to the ROHA run time, and run as part of the ROHA acquisition and release steps.
208 IBM PowerHA SystemMirror V7.2.3 for IBM AIX and V7.2.2 for Linux
Getting Power Enterprise Pool resource information from the HMCThe allocated EPCoD resources for the pool are listed by the HMC lscodpool command. Table 6-23 shows the commands that PowerHA SystemMirror uses to get EPCoD information. You do not need to run these commands.
Table 6-23 Getting the EPCoD resource information
6.7.2 Computing the release of resources
The level of resources to be left on the LPAR is computed by using the Fit to remaining RGs policy. What is above this level is released, and it accounts for the following information:
1. The configuration of the LPAR (minimum, current, and maximum amount of resources).
2. The optimal resources that are configured for the applications currently running on the LPAR. PowerHA SystemMirror tries to fit to the level of remaining RGs running on the node.
3. The optimal amount of resources of the stopping RGs because you do not de-allocate more than that amount.
Memory lscodpool -p <pool> --level pool -F mobile_memlscodpool -p <cec> --level sys --filter "names=server name" -F mobile_mem
CPU lscodpool -p <pool> --level pool -F mobile_procslscodpool -p <cec> --level sys --filter "names=server name" -F mobile_procs
Tip: The lscodpool commands are given in Table 6-23 as examples, but it is not necessary for the user to run these commands. These commands are embedded in to the ROHA run time, and run as part of the ROHA acquisition and release steps.
Chapter 6. Resource Optimized High Availability 209
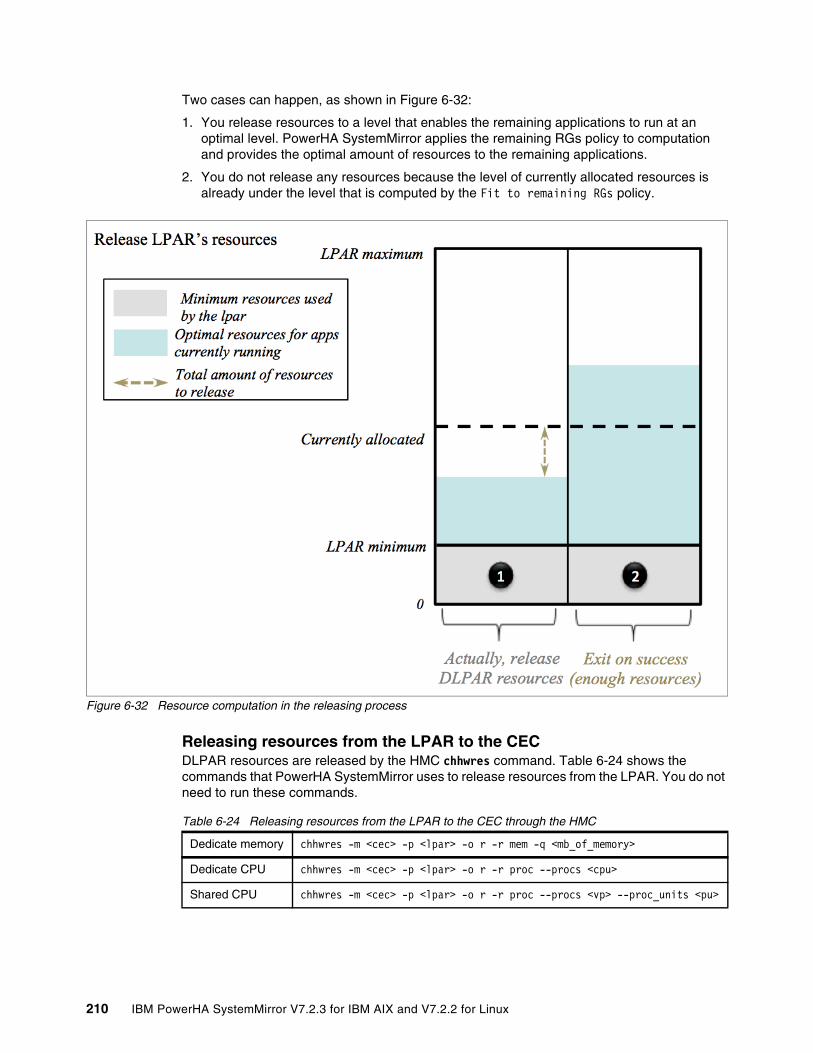
Two cases can happen, as shown in Figure 6-32:
1. You release resources to a level that enables the remaining applications to run at an optimal level. PowerHA SystemMirror applies the remaining RGs policy to computation and provides the optimal amount of resources to the remaining applications.
2. You do not release any resources because the level of currently allocated resources is already under the level that is computed by the Fit to remaining RGs policy.
Figure 6-32 Resource computation in the releasing process
Releasing resources from the LPAR to the CECDLPAR resources are released by the HMC chhwres command. Table 6-24 shows the commands that PowerHA SystemMirror uses to release resources from the LPAR. You do not need to run these commands.
Table 6-24 Releasing resources from the LPAR to the CEC through the HMC
Dedicate memory chhwres -m <cec> -p <lpar> -o r -r mem -q <mb_of_memory>
Dedicate CPU chhwres -m <cec> -p <lpar> -o r -r proc --procs <cpu>
Shared CPU chhwres -m <cec> -p <lpar> -o r -r proc --procs <vp> --proc_units <pu>
210 IBM PowerHA SystemMirror V7.2.3 for IBM AIX and V7.2.2 for Linux
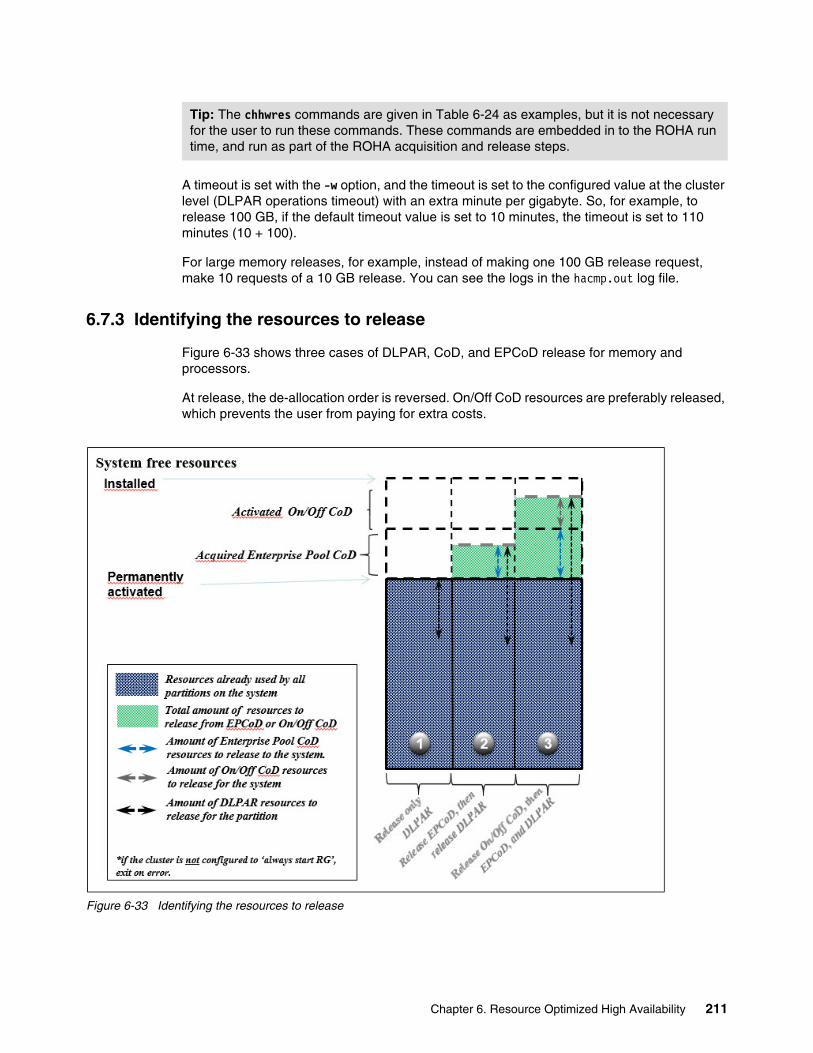
A timeout is set with the -w option, and the timeout is set to the configured value at the cluster level (DLPAR operations timeout) with an extra minute per gigabyte. So, for example, to release 100 GB, if the default timeout value is set to 10 minutes, the timeout is set to 110 minutes (10 + 100).
For large memory releases, for example, instead of making one 100 GB release request, make 10 requests of a 10 GB release. You can see the logs in the hacmp.out log file.
6.7.3 Identifying the resources to release
Figure 6-33 shows three cases of DLPAR, CoD, and EPCoD release for memory and processors.
At release, the de-allocation order is reversed. On/Off CoD resources are preferably released, which prevents the user from paying for extra costs.
Figure 6-33 Identifying the resources to release
Tip: The chhwres commands are given in Table 6-24 as examples, but it is not necessary for the user to run these commands. These commands are embedded in to the ROHA run time, and run as part of the ROHA acquisition and release steps.
Chapter 6. Resource Optimized High Availability 211
There are three cases in the identify step:
1. There are no On/Off CoD or Enterprise Pool resources that are used by the CEC. Therefore, no resources must be released to On/Off CoD or the Enterprise Pool.
2. There are On/Off resources that are allocated to the CEC. Some of the On/Off CoD resources are deactivated up to the amount, but no more than the DLPAR resources that are released.
3. There are both On/Off CoD resources and Enterprise Pool resources that are allocated to the CEC. Then, On/Off CoD resources are deactivated up to the amount, but no more than, of the DLPAR resources that are released.
Alternative case: If there are no On/Off CoD resources that are activated on the CEC, only return Enterprise Pool resources to the pool.
Generating “unreturned” resourcesIn this step, if some EPCoD resource is identified, it is possible for PowerHA SystemMirror to release them to EPCoD immediately and before the DLPAR remove operation even starts.
PowerHA SystemMirror raises an asynchronous process to do the DLPAR remove operation. PowerHA SystemMirror does not need to wait for the DLPAR operation to complete. So, PowerHA SystemMirror on standby mode can bring the online RGs quickly.
This asynchronous process happens only under the following two conditions:
1. If there are only two nodes in the cluster and those two nodes are on different managed systems, or if there are more than two nodes in the cluster and the operation is a move to target node and the source node is on another managed system.
2. If you set the Force synchronous release of DLPAR resources as the default, which is No, see 6.2.5, “Change/Show Default Cluster Tunable menu” on page 182.
About the “unreturned” resourcesThe unreturned resource is one function of EPCoD. With this function, you can remove Mobile CoD resources from a server that the server cannot reclaim because they are still in use; these resources become unreturned resources. From the EPCoD pool point of view, the resource is back and can be assigned to other nodes. This function can allow the standby node to acquire the resource and application to use them during the time the resource is being released by the primary node.
When an unreturned resource is generated, a grace period timer starts for the unreturned Mobile CoD resources on that server, and EPCoD is in Approaching out of compliance (within server grace period) status. After the releasing operation completes physically on the primary node, the unreturned resource is reclaimed automatically, and the EPCoD’s status is changed back to In compliance.
6.7.4 Releasing (applying) resources
This section describes the release resource concept.
Deactivating the On/Off CoD resourceCoD resources are deactivated through the HMC chcod command. PowerHA SystemMirror runs the command automatically.
Note: For more information about the Enterprise Pool’s status, see IBM Knowledge Center.
212 IBM PowerHA SystemMirror V7.2.3 for IBM AIX and V7.2.2 for Linux
Releasing (or returning back) the EPCoD resourceEPCoD resources are returned back to the pool by using the HMC chcodpool command. PowerHA SystemMirror runs the command automatically.
6.7.5 Synchronous and asynchronous mode
Because release requests take time, PowerHA SystemMirror tries to release DLPAR resources asynchronously. In asynchronous mode, the process of release is run in the background and gives priority back to other tasks.
By default, the release is asynchronous. This default behavior can be changed with a cluster tunable.
Synchronous mode is automatically computed as follows:
� All nodes of a cluster are on the same CEC.� Otherwise, the backup LPARs of the list of RGs are on the same CEC.
For example, if one PowerHA SystemMirror cluster includes two nodes, the two nodes are deployed on different servers and the two servers share one Power Enterprise Pool. In this case, if you are using asynchronous mode, you can benefit from the RG move scenarios because EPCoD’s unreturned resource feature and asynchronous release mode can reduce takeover time.
When an RG is offline, operations to release resources to EPCoD pool can be done even if physical resources are not free on the server then. The freed resources are added back to the EPCoD pool as available resources immediately so that the backup partition can use these resources to bring the RG online immediately.
6.7.6 Automatic resource release process after an operating system crash
Sometimes, the ROHA resources are not released by a node before the node failed or crashed. In these cases, an automatic mechanism is implemented to release these resources when the node restarts.
A history of what was allocated for the partition is kept in the AIX ODM object database, and PowerHA SystemMirror uses it to release the same amount of resources at start time.
Note: You do not need to start PowerHA SystemMirror service to activate this process after an operating system restart because this operation is triggered by the /usr/es/sbin/cluster/etc/rc.init script, which is in the /etc/inittab file.
Chapter 6. Resource Optimized High Availability 213
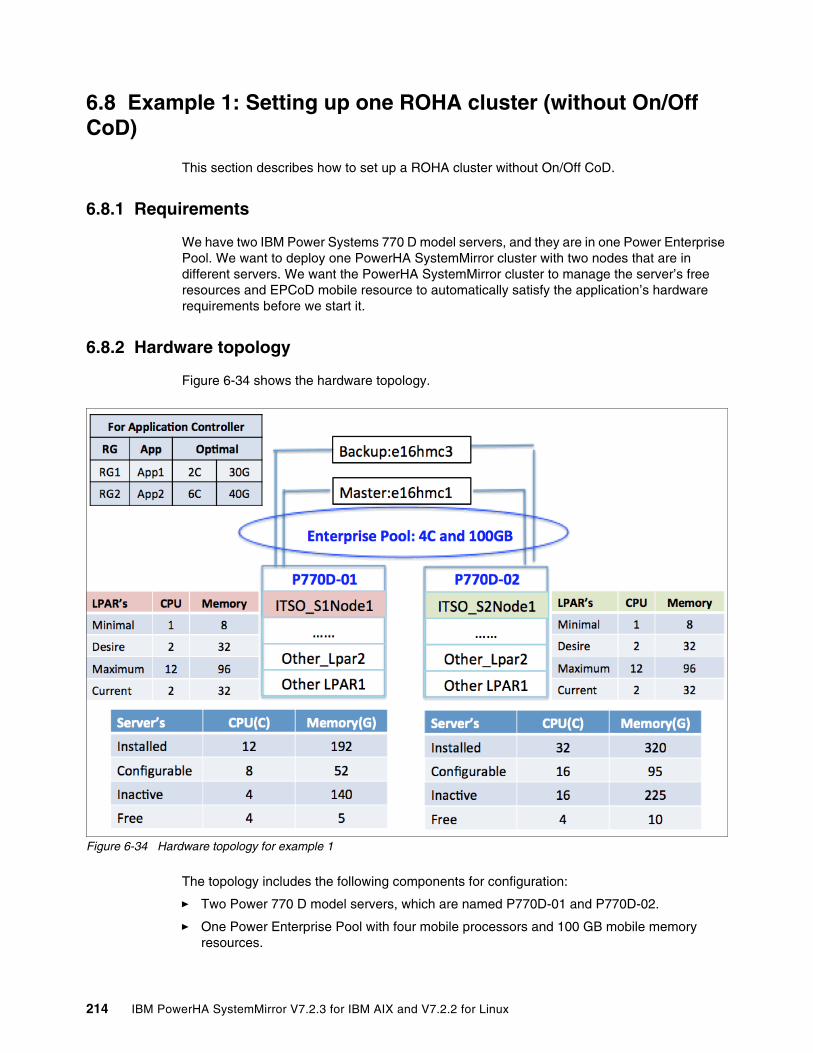
6.8 Example 1: Setting up one ROHA cluster (without On/Off CoD)
This section describes how to set up a ROHA cluster without On/Off CoD.
6.8.1 Requirements
We have two IBM Power Systems 770 D model servers, and they are in one Power Enterprise Pool. We want to deploy one PowerHA SystemMirror cluster with two nodes that are in different servers. We want the PowerHA SystemMirror cluster to manage the server’s free resources and EPCoD mobile resource to automatically satisfy the application’s hardware requirements before we start it.
6.8.2 Hardware topology
Figure 6-34 shows the hardware topology.
Figure 6-34 Hardware topology for example 1
The topology includes the following components for configuration:
� Two Power 770 D model servers, which are named P770D-01 and P770D-02.
� One Power Enterprise Pool with four mobile processors and 100 GB mobile memory resources.
214 IBM PowerHA SystemMirror V7.2.3 for IBM AIX and V7.2.2 for Linux
� The PowerHA SystemMirror cluster includes two nodes, ITSO_S1Node1 and ITSO_S2Node1.
� P770D-01 has four inactive CPUs, 140 GB of inactive memory, four available CPUs, and 5 GB of free memory.
� P770D-02 has 16 inactive CPUs, 225 GB of inactive memory, four available CPUs, and 10 GB of free memory.
� This topology also includes the profile configuration for each LPAR.
There are two HMCs to manage the EPCoD, which are named e16hmc1 and e16hmc3. Here, e16hmc1 is the master and e16hmc3 is the backup. There are two applications in this cluster and the related resource requirement.
6.8.3 Cluster configuration
This section describes the cluster configuration.
Topology and resource group configurationTable 6-25 shows the cluster’s attributes.
Table 6-25 Cluster’s attributes
Attribute ITSO_S1Node1 ITSO_S2Node2
Cluster name ITSO_ROHA_clusterCluster type: No Site Cluster (NSC)
Network interface en0: 10.40.1.218Netmask: 255.255.254.0Gateway: 10.40.1.1
en0: 10.40.0.11Netmask: 255.255.254.0Gateway: 10.40.1.1
Network net_ether_01 (10.40.0.0/23)
CAA UnicastPrimary disk: repdisk1Backup disk: repdisk2
Shared VG shareVG1: hdisk18shareVG2: hdisk19
shareVG1: hdisk8shareVG2: hdisk9
Application controller App1Controller:/home/bing/app1start.sh/home/bing/app1stop.shApp2Controller:/home/bing/app2start.sh/home/bing/app2stop.sh
Service IP 10.40.1.61 ITSO_ROHA_service110.40.1.62 ITSO_ROHA_service2
RG RG1 includes shareVG1, ITSO_ROHA_service1, and App1Controller.RG2 includes shareVG2, ITSO_ROHA_service2, and App2Controller.The node order is ITSO_S1Node1 ITSO_S2Node1.Startup Policy: Online On Home Node Only Fallover Policy: Fallover To Next Priority Node In The List Fallback Policy: Never Fallback
Chapter 6. Resource Optimized High Availability 215
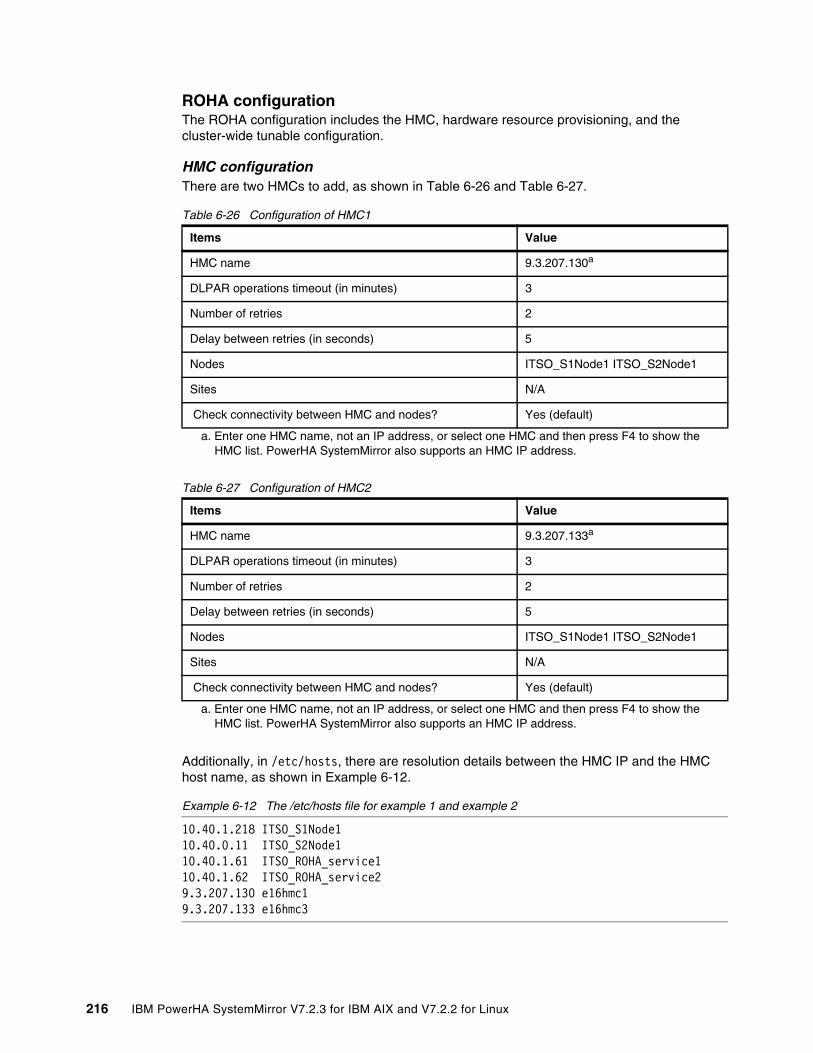
ROHA configurationThe ROHA configuration includes the HMC, hardware resource provisioning, and the cluster-wide tunable configuration.
HMC configurationThere are two HMCs to add, as shown in Table 6-26 and Table 6-27.
Table 6-26 Configuration of HMC1
Table 6-27 Configuration of HMC2
Additionally, in /etc/hosts, there are resolution details between the HMC IP and the HMC host name, as shown in Example 6-12.
Example 6-12 The /etc/hosts file for example 1 and example 2
10.40.1.218 ITSO_S1Node110.40.0.11 ITSO_S2Node110.40.1.61 ITSO_ROHA_service110.40.1.62 ITSO_ROHA_service29.3.207.130 e16hmc19.3.207.133 e16hmc3
Items Value
HMC name 9.3.207.130a
a. Enter one HMC name, not an IP address, or select one HMC and then press F4 to show the HMC list. PowerHA SystemMirror also supports an HMC IP address.
DLPAR operations timeout (in minutes) 3
Number of retries 2
Delay between retries (in seconds) 5
Nodes ITSO_S1Node1 ITSO_S2Node1
Sites N/A
Check connectivity between HMC and nodes? Yes (default)
Items Value
HMC name 9.3.207.133a
a. Enter one HMC name, not an IP address, or select one HMC and then press F4 to show the HMC list. PowerHA SystemMirror also supports an HMC IP address.
DLPAR operations timeout (in minutes) 3
Number of retries 2
Delay between retries (in seconds) 5
Nodes ITSO_S1Node1 ITSO_S2Node1
Sites N/A
Check connectivity between HMC and nodes? Yes (default)
216 IBM PowerHA SystemMirror V7.2.3 for IBM AIX and V7.2.2 for Linux
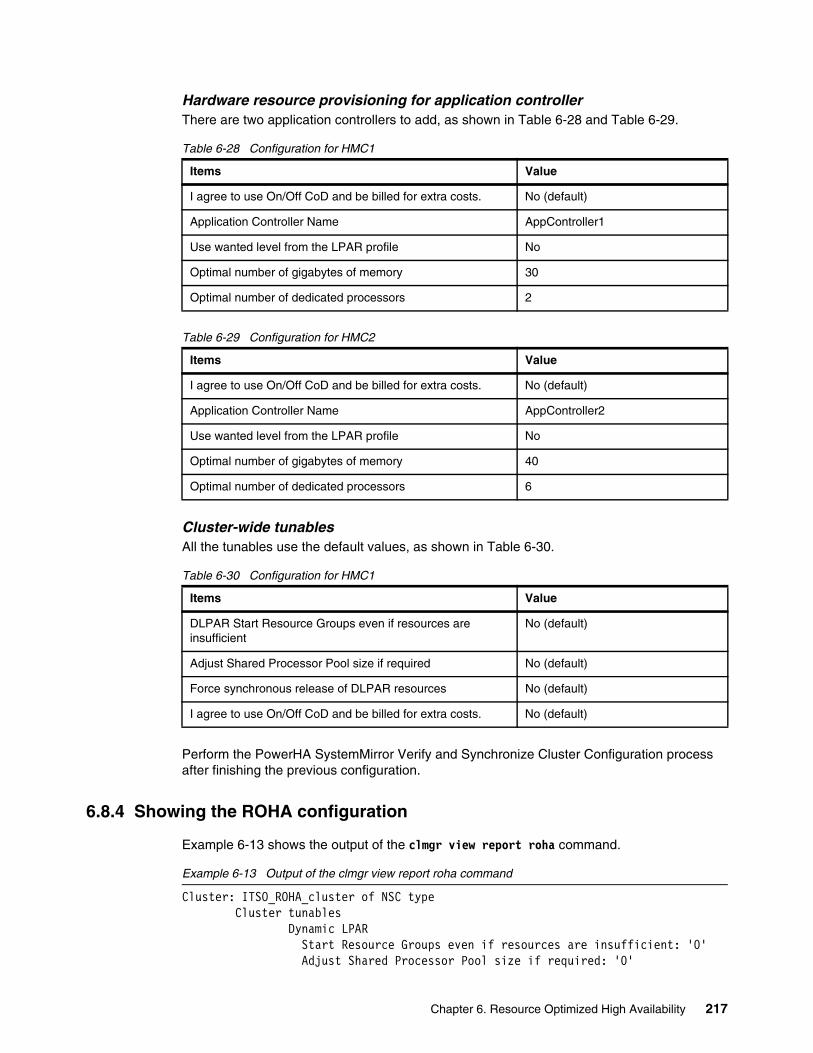
Hardware resource provisioning for application controllerThere are two application controllers to add, as shown in Table 6-28 and Table 6-29.
Table 6-28 Configuration for HMC1
Table 6-29 Configuration for HMC2
Cluster-wide tunablesAll the tunables use the default values, as shown in Table 6-30.
Table 6-30 Configuration for HMC1
Perform the PowerHA SystemMirror Verify and Synchronize Cluster Configuration process after finishing the previous configuration.
6.8.4 Showing the ROHA configuration
Example 6-13 shows the output of the clmgr view report roha command.
Example 6-13 Output of the clmgr view report roha command
Cluster: ITSO_ROHA_cluster of NSC type Cluster tunables Dynamic LPAR Start Resource Groups even if resources are insufficient: '0' Adjust Shared Processor Pool size if required: '0'
Items Value
I agree to use On/Off CoD and be billed for extra costs. No (default)
Application Controller Name AppController1
Use wanted level from the LPAR profile No
Optimal number of gigabytes of memory 30
Optimal number of dedicated processors 2
Items Value
I agree to use On/Off CoD and be billed for extra costs. No (default)
Application Controller Name AppController2
Use wanted level from the LPAR profile No
Optimal number of gigabytes of memory 40
Optimal number of dedicated processors 6
Items Value
DLPAR Start Resource Groups even if resources are insufficient
No (default)
Adjust Shared Processor Pool size if required No (default)
Force synchronous release of DLPAR resources No (default)
I agree to use On/Off CoD and be billed for extra costs. No (default)
Chapter 6. Resource Optimized High Availability 217
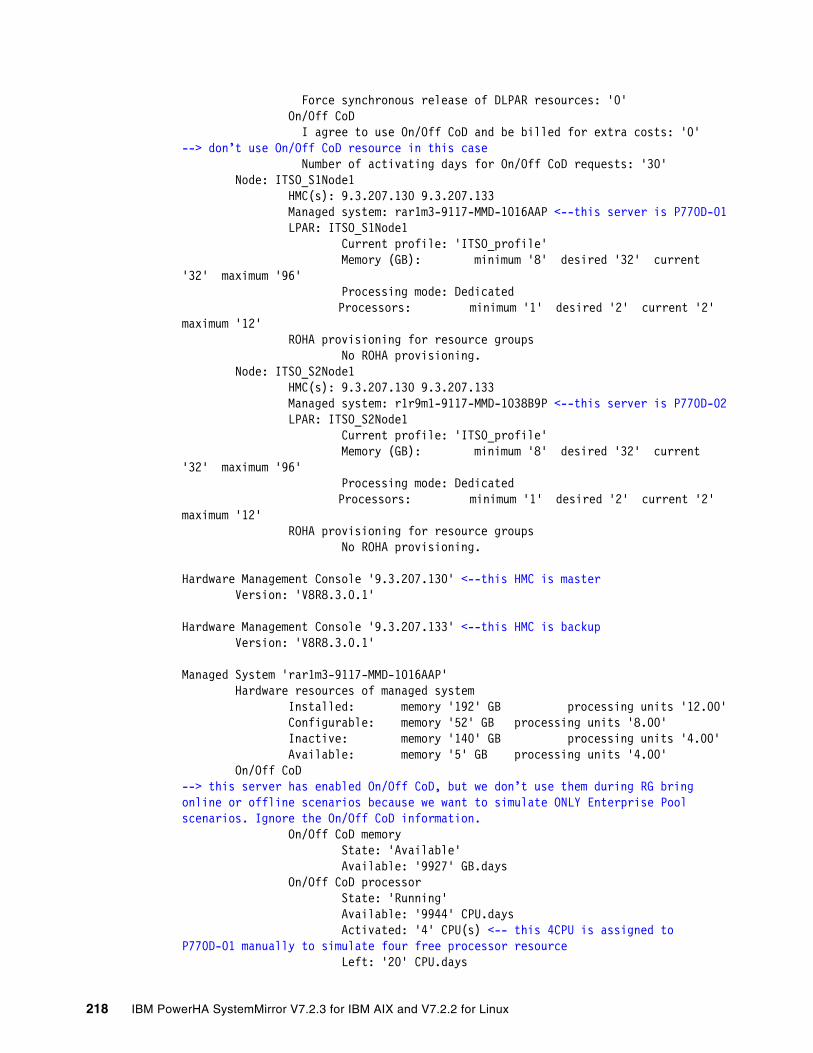
Force synchronous release of DLPAR resources: '0' On/Off CoD I agree to use On/Off CoD and be billed for extra costs: '0'--> don’t use On/Off CoD resource in this case Number of activating days for On/Off CoD requests: '30' Node: ITSO_S1Node1 HMC(s): 9.3.207.130 9.3.207.133 Managed system: rar1m3-9117-MMD-1016AAP <--this server is P770D-01 LPAR: ITSO_S1Node1 Current profile: 'ITSO_profile' Memory (GB): minimum '8' desired '32' current '32' maximum '96' Processing mode: Dedicated Processors: minimum '1' desired '2' current '2' maximum '12' ROHA provisioning for resource groups No ROHA provisioning. Node: ITSO_S2Node1 HMC(s): 9.3.207.130 9.3.207.133 Managed system: r1r9m1-9117-MMD-1038B9P <--this server is P770D-02 LPAR: ITSO_S2Node1 Current profile: 'ITSO_profile' Memory (GB): minimum '8' desired '32' current '32' maximum '96' Processing mode: Dedicated Processors: minimum '1' desired '2' current '2' maximum '12' ROHA provisioning for resource groups No ROHA provisioning.
Hardware Management Console '9.3.207.130' <--this HMC is master Version: 'V8R8.3.0.1'
Hardware Management Console '9.3.207.133' <--this HMC is backup Version: 'V8R8.3.0.1'
Managed System 'rar1m3-9117-MMD-1016AAP' Hardware resources of managed system Installed: memory '192' GB processing units '12.00' Configurable: memory '52' GB processing units '8.00' Inactive: memory '140' GB processing units '4.00' Available: memory '5' GB processing units '4.00' On/Off CoD--> this server has enabled On/Off CoD, but we don’t use them during RG bring online or offline scenarios because we want to simulate ONLY Enterprise Pool scenarios. Ignore the On/Off CoD information. On/Off CoD memory State: 'Available' Available: '9927' GB.days On/Off CoD processor State: 'Running' Available: '9944' CPU.days Activated: '4' CPU(s) <-- this 4CPU is assigned to P770D-01 manually to simulate four free processor resource Left: '20' CPU.days
218 IBM PowerHA SystemMirror V7.2.3 for IBM AIX and V7.2.2 for Linux
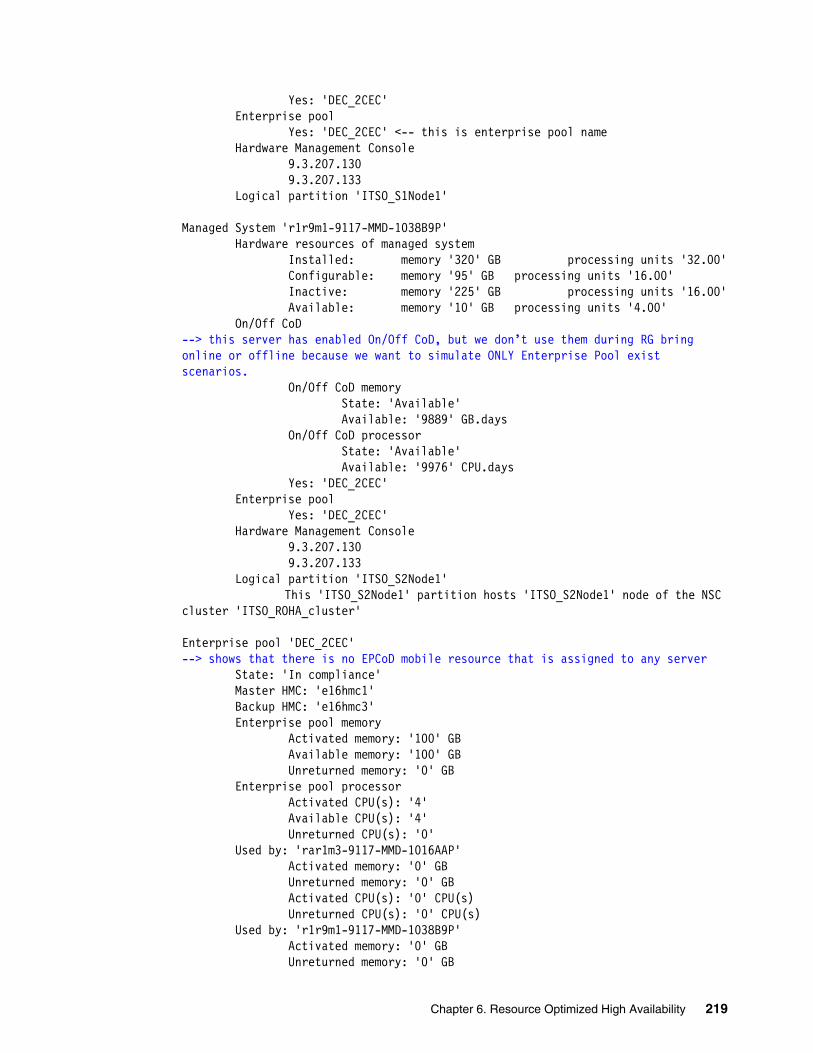
Yes: 'DEC_2CEC' Enterprise pool Yes: 'DEC_2CEC' <-- this is enterprise pool name Hardware Management Console 9.3.207.130 9.3.207.133 Logical partition 'ITSO_S1Node1'
Managed System 'r1r9m1-9117-MMD-1038B9P' Hardware resources of managed system Installed: memory '320' GB processing units '32.00' Configurable: memory '95' GB processing units '16.00' Inactive: memory '225' GB processing units '16.00' Available: memory '10' GB processing units '4.00' On/Off CoD--> this server has enabled On/Off CoD, but we don’t use them during RG bring online or offline because we want to simulate ONLY Enterprise Pool exist scenarios. On/Off CoD memory State: 'Available' Available: '9889' GB.days On/Off CoD processor State: 'Available' Available: '9976' CPU.days Yes: 'DEC_2CEC' Enterprise pool Yes: 'DEC_2CEC' Hardware Management Console 9.3.207.130 9.3.207.133 Logical partition 'ITSO_S2Node1' This 'ITSO_S2Node1' partition hosts 'ITSO_S2Node1' node of the NSC cluster 'ITSO_ROHA_cluster'
Enterprise pool 'DEC_2CEC'--> shows that there is no EPCoD mobile resource that is assigned to any server State: 'In compliance' Master HMC: 'e16hmc1' Backup HMC: 'e16hmc3' Enterprise pool memory Activated memory: '100' GB Available memory: '100' GB Unreturned memory: '0' GB Enterprise pool processor Activated CPU(s): '4' Available CPU(s): '4' Unreturned CPU(s): '0' Used by: 'rar1m3-9117-MMD-1016AAP' Activated memory: '0' GB Unreturned memory: '0' GB Activated CPU(s): '0' CPU(s) Unreturned CPU(s): '0' CPU(s) Used by: 'r1r9m1-9117-MMD-1038B9P' Activated memory: '0' GB Unreturned memory: '0' GB
Chapter 6. Resource Optimized High Availability 219
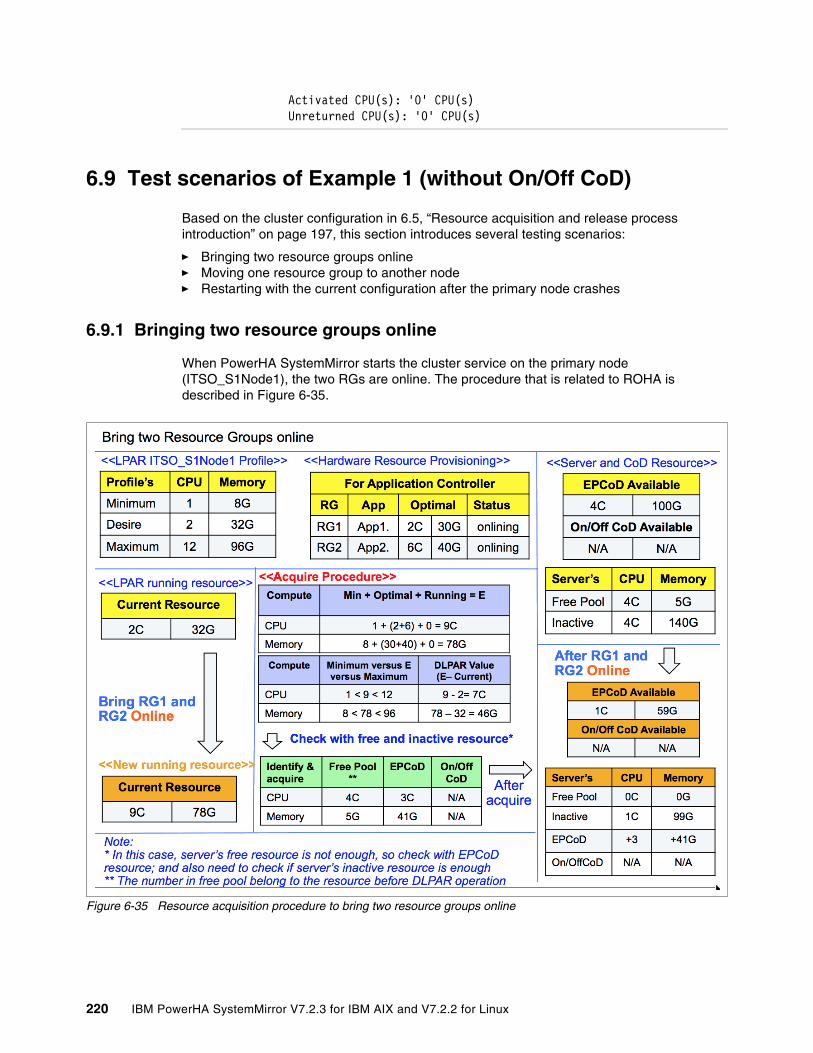
Activated CPU(s): '0' CPU(s) Unreturned CPU(s): '0' CPU(s)
6.9 Test scenarios of Example 1 (without On/Off CoD)
Based on the cluster configuration in 6.5, “Resource acquisition and release process introduction” on page 197, this section introduces several testing scenarios:
� Bringing two resource groups online� Moving one resource group to another node� Restarting with the current configuration after the primary node crashes
6.9.1 Bringing two resource groups online
When PowerHA SystemMirror starts the cluster service on the primary node (ITSO_S1Node1), the two RGs are online. The procedure that is related to ROHA is described in Figure 6-35.
Figure 6-35 Resource acquisition procedure to bring two resource groups online
220 IBM PowerHA SystemMirror V7.2.3 for IBM AIX and V7.2.2 for Linux
Section 6.6, “Introduction to resource acquisition” on page 198 introduces four steps for PowerHA SystemMirror to acquire resources. In this case, the following section provides the detailed description for the four steps.
Query stepPowerHA SystemMirror queries the server, the EPCoD, the LPARs, and the current RG information. The data is shown in yellow in Figure 6-35.
Compute stepIn this step, PowerHA SystemMirror computes how many resources are added by using DLPAR. It needs 7C and 46 GB. The purple table shows the process in Figure 6-35. For example:
� The expected total CPU number is as follows: 1 (Min) + 2 (RG1 requires) + 6 (RG2 requires) + 0 (running RG requires, there is no running RG) = 9C.
� Take this value to compare with the LPAR’s profile needs less than or equal to the Maximum and more than or equal to the Minimum value.
� If the requirement is satisfied and takes this value minus the current running CPU, 9 - 2 = 7, you get the CPU number to add through the DLPAR.
Identify and acquire stepsAfter the compute step, PowerHA SystemMirror identifies how to satisfy the requirements. For CPU, it gets the remaining 4C of this server and 3C from EPCoD. For memory, it gets the remaining 5 GB of this server and 41 GB from EPCoD. The process is shown in the green table in Figure 6-35 on page 220. For example:
� There are four CPUs that are available in the server’s free pool, so PowerHA SystemMirror reserves them and then needs another three CPUs (7 - 4).
� There are four mobile CPUs in the EPCoD pool, so PowerHA SystemMirror assigns the three CPUs from EPCoD to this server by using the HMC (by running the chcodpool command). Currently, there are seven CPUs in the free pool, so PowerHA SystemMirror assigns all of them to the LPAR (ITSO_S1Node1) by using the DLPAR operation (by using the chhwres command).
The orange tables (Figure 6-35 on page 220) show the result after the resource acquisition, and include the LPAR’s running resource, EPCoD, and the server’s resource status.
Tracking the hacmp.out logBy reviewing the hacmp.out log, you know that the resources (seven CPUs and 41 memory) cost 53 seconds, as shown in Example 6-14.
Example 6-14 The hacmp.out log shows the resource acquisition process for example 1
# egrep "ROHALOG|Close session|Open session" /var/hacmp/log/hacmp.out+RG1 RG2:clmanageroha[roha_session_open:162] roha_session_log 'Open session Open session 22937664 at Sun Nov 8 09:11:39 CST 2015INFO: acquisition is always synchronous.=== HACMProhaparam ODM ====
Note: During this process, PowerHA SystemMirror adds mobile resources from EPCoD to the server’s free pool first, then adds all the free pool’s resources to the LPAR by using DLPAR. To describe the process clearly, the free pool means only the available resources of one server before adding the EPCoD’s resources to it.
Chapter 6. Resource Optimized High Availability 221
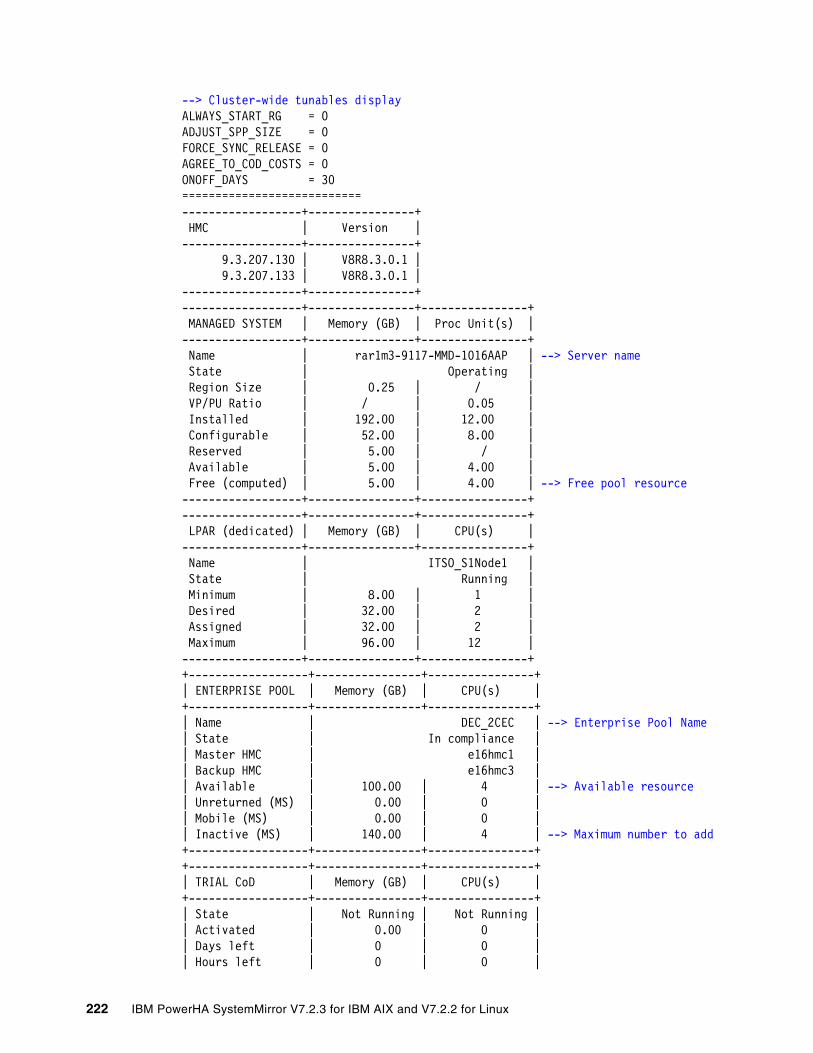
--> Cluster-wide tunables displayALWAYS_START_RG = 0ADJUST_SPP_SIZE = 0FORCE_SYNC_RELEASE = 0AGREE_TO_COD_COSTS = 0ONOFF_DAYS = 30===========================------------------+----------------+ HMC | Version |------------------+----------------+ 9.3.207.130 | V8R8.3.0.1 | 9.3.207.133 | V8R8.3.0.1 |------------------+----------------+------------------+----------------+----------------+ MANAGED SYSTEM | Memory (GB) | Proc Unit(s) |------------------+----------------+----------------+ Name | rar1m3-9117-MMD-1016AAP | --> Server name State | Operating | Region Size | 0.25 | / | VP/PU Ratio | / | 0.05 | Installed | 192.00 | 12.00 | Configurable | 52.00 | 8.00 | Reserved | 5.00 | / | Available | 5.00 | 4.00 | Free (computed) | 5.00 | 4.00 | --> Free pool resource------------------+----------------+----------------+------------------+----------------+----------------+ LPAR (dedicated) | Memory (GB) | CPU(s) |------------------+----------------+----------------+ Name | ITSO_S1Node1 | State | Running | Minimum | 8.00 | 1 | Desired | 32.00 | 2 | Assigned | 32.00 | 2 | Maximum | 96.00 | 12 |------------------+----------------+----------------++------------------+----------------+----------------+| ENTERPRISE POOL | Memory (GB) | CPU(s) |+------------------+----------------+----------------+| Name | DEC_2CEC | --> Enterprise Pool Name| State | In compliance || Master HMC | e16hmc1 || Backup HMC | e16hmc3 || Available | 100.00 | 4 | --> Available resource| Unreturned (MS) | 0.00 | 0 || Mobile (MS) | 0.00 | 0 || Inactive (MS) | 140.00 | 4 | --> Maximum number to add+------------------+----------------+----------------++------------------+----------------+----------------+| TRIAL CoD | Memory (GB) | CPU(s) |+------------------+----------------+----------------+| State | Not Running | Not Running || Activated | 0.00 | 0 || Days left | 0 | 0 || Hours left | 0 | 0 |
222 IBM PowerHA SystemMirror V7.2.3 for IBM AIX and V7.2.2 for Linux
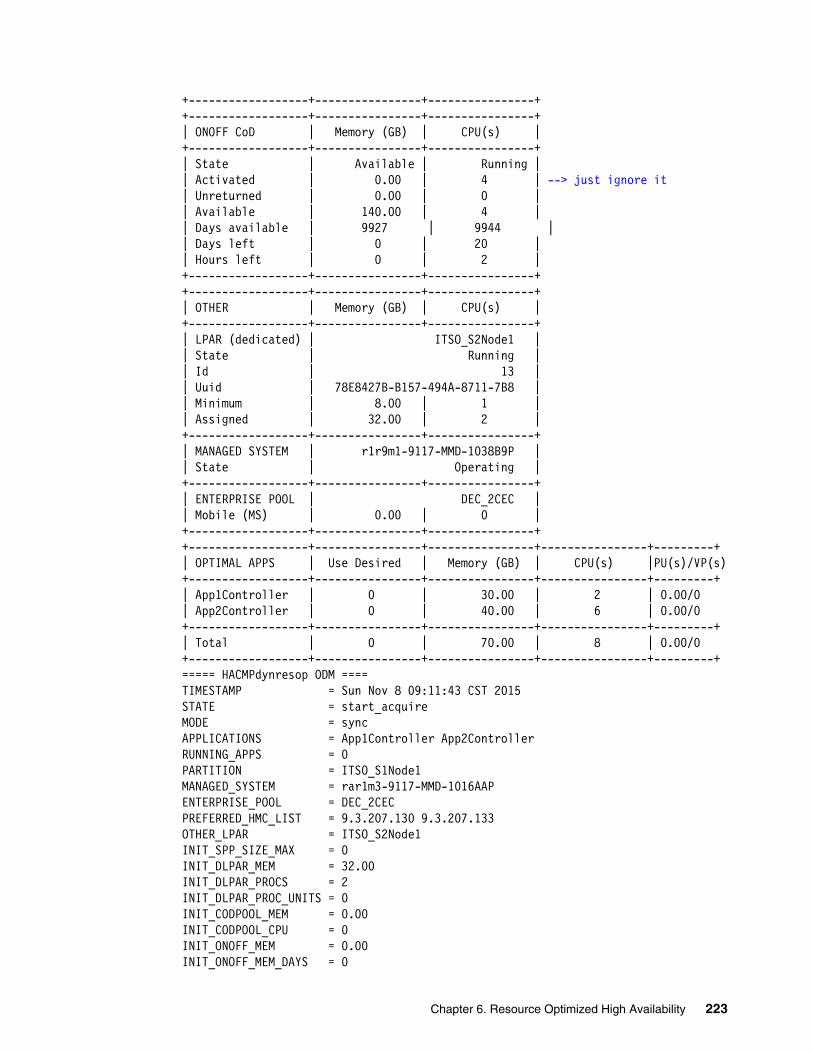
+------------------+----------------+----------------++------------------+----------------+----------------+| ONOFF CoD | Memory (GB) | CPU(s) |+------------------+----------------+----------------+| State | Available | Running || Activated | 0.00 | 4 | --> just ignore it| Unreturned | 0.00 | 0 || Available | 140.00 | 4 || Days available | 9927 | 9944 || Days left | 0 | 20 || Hours left | 0 | 2 |+------------------+----------------+----------------++------------------+----------------+----------------+| OTHER | Memory (GB) | CPU(s) |+------------------+----------------+----------------+| LPAR (dedicated) | ITSO_S2Node1 || State | Running || Id | 13 || Uuid | 78E8427B-B157-494A-8711-7B8 || Minimum | 8.00 | 1 || Assigned | 32.00 | 2 |+------------------+----------------+----------------+| MANAGED SYSTEM | r1r9m1-9117-MMD-1038B9P || State | Operating |+------------------+----------------+----------------+| ENTERPRISE POOL | DEC_2CEC || Mobile (MS) | 0.00 | 0 |+------------------+----------------+----------------++------------------+----------------+----------------+----------------+---------+| OPTIMAL APPS | Use Desired | Memory (GB) | CPU(s) |PU(s)/VP(s)+------------------+----------------+----------------+----------------+---------+| App1Controller | 0 | 30.00 | 2 | 0.00/0 | App2Controller | 0 | 40.00 | 6 | 0.00/0+------------------+----------------+----------------+----------------+---------+| Total | 0 | 70.00 | 8 | 0.00/0+------------------+----------------+----------------+----------------+---------+===== HACMPdynresop ODM ====TIMESTAMP = Sun Nov 8 09:11:43 CST 2015STATE = start_acquireMODE = syncAPPLICATIONS = App1Controller App2ControllerRUNNING_APPS = 0PARTITION = ITSO_S1Node1MANAGED_SYSTEM = rar1m3-9117-MMD-1016AAPENTERPRISE_POOL = DEC_2CECPREFERRED_HMC_LIST = 9.3.207.130 9.3.207.133OTHER_LPAR = ITSO_S2Node1INIT_SPP_SIZE_MAX = 0INIT_DLPAR_MEM = 32.00INIT_DLPAR_PROCS = 2INIT_DLPAR_PROC_UNITS = 0INIT_CODPOOL_MEM = 0.00INIT_CODPOOL_CPU = 0INIT_ONOFF_MEM = 0.00INIT_ONOFF_MEM_DAYS = 0
Chapter 6. Resource Optimized High Availability 223
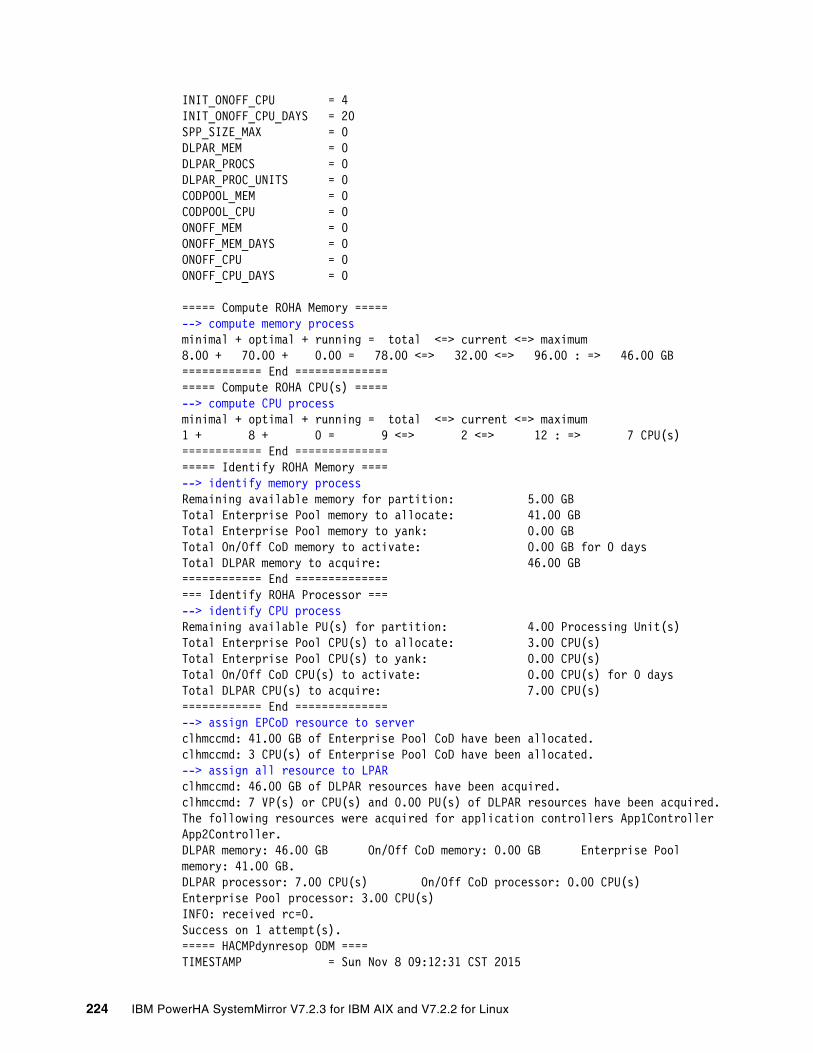
INIT_ONOFF_CPU = 4INIT_ONOFF_CPU_DAYS = 20SPP_SIZE_MAX = 0DLPAR_MEM = 0DLPAR_PROCS = 0DLPAR_PROC_UNITS = 0CODPOOL_MEM = 0CODPOOL_CPU = 0ONOFF_MEM = 0ONOFF_MEM_DAYS = 0ONOFF_CPU = 0ONOFF_CPU_DAYS = 0
===== Compute ROHA Memory =====--> compute memory processminimal + optimal + running = total <=> current <=> maximum8.00 + 70.00 + 0.00 = 78.00 <=> 32.00 <=> 96.00 : => 46.00 GB============ End =================== Compute ROHA CPU(s) =====--> compute CPU processminimal + optimal + running = total <=> current <=> maximum1 + 8 + 0 = 9 <=> 2 <=> 12 : => 7 CPU(s)============ End =================== Identify ROHA Memory ====--> identify memory processRemaining available memory for partition: 5.00 GBTotal Enterprise Pool memory to allocate: 41.00 GBTotal Enterprise Pool memory to yank: 0.00 GBTotal On/Off CoD memory to activate: 0.00 GB for 0 daysTotal DLPAR memory to acquire: 46.00 GB============ End ================= Identify ROHA Processor ===--> identify CPU processRemaining available PU(s) for partition: 4.00 Processing Unit(s)Total Enterprise Pool CPU(s) to allocate: 3.00 CPU(s)Total Enterprise Pool CPU(s) to yank: 0.00 CPU(s)Total On/Off CoD CPU(s) to activate: 0.00 CPU(s) for 0 daysTotal DLPAR CPU(s) to acquire: 7.00 CPU(s)============ End ==============--> assign EPCoD resource to serverclhmccmd: 41.00 GB of Enterprise Pool CoD have been allocated.clhmccmd: 3 CPU(s) of Enterprise Pool CoD have been allocated.--> assign all resource to LPARclhmccmd: 46.00 GB of DLPAR resources have been acquired.clhmccmd: 7 VP(s) or CPU(s) and 0.00 PU(s) of DLPAR resources have been acquired.The following resources were acquired for application controllers App1Controller App2Controller.DLPAR memory: 46.00 GB On/Off CoD memory: 0.00 GB Enterprise Pool memory: 41.00 GB.DLPAR processor: 7.00 CPU(s) On/Off CoD processor: 0.00 CPU(s) Enterprise Pool processor: 3.00 CPU(s)INFO: received rc=0.Success on 1 attempt(s).===== HACMPdynresop ODM ====TIMESTAMP = Sun Nov 8 09:12:31 CST 2015
224 IBM PowerHA SystemMirror V7.2.3 for IBM AIX and V7.2.2 for Linux

STATE = end_acquireMODE = 0APPLICATIONS = 0RUNNING_APPS = 0PARTITION = 0MANAGED_SYSTEM = 0ENTERPRISE_POOL = 0PREFERRED_HMC_LIST = 0OTHER_LPAR = 0INIT_SPP_SIZE_MAX = 0INIT_DLPAR_MEM = 0INIT_DLPAR_PROCS = 0INIT_DLPAR_PROC_UNITS = 0INIT_CODPOOL_MEM = 0INIT_CODPOOL_CPU = 0INIT_ONOFF_MEM = 0INIT_ONOFF_MEM_DAYS = 0INIT_ONOFF_CPU = 0INIT_ONOFF_CPU_DAYS = 0SPP_SIZE_MAX = 0DLPAR_MEM = 46DLPAR_PROCS = 7DLPAR_PROC_UNITS = 0CODPOOL_MEM = 41CODPOOL_CPU = 3ONOFF_MEM = 0ONOFF_MEM_DAYS = 0ONOFF_CPU = 0ONOFF_CPU_DAYS = 0============================Session_close:313] roha_session_log 'Close session 22937664 at Sun Nov 8 09:12:32 CST 2015'
ROHA report updateThe clmgr view report roha command output (Example 6-15) shows updates on the resources of P770D-01 and the Enterprise Pool.
Example 6-15 The update in the ROHA report shows the resource acquisition process for example 1
# clmgr view report roha...Managed System 'rar1m3-9117-MMD-1016AAP' --> this is P770D-01 server Hardware resources of managed system Installed: memory '192' GB processing units '12.00' Configurable: memory '93' GB processing units '11.00' Inactive: memory '99' GB processing units '1.00' Available: memory '0' GB processing units '0.00'...
Enterprise pool 'DEC_2CEC' State: 'In compliance'
Important: The contents of the HACMPsynresop ODM changed in PowerHA SystemMirror V7.2.1. Although the exact form changed, the idea of persisting values into HACMPdynresop was kept, so the contents of information that is persisted into HACMPdynresop is subject to change depending on the PowerHA SystemMirror version.
Chapter 6. Resource Optimized High Availability 225
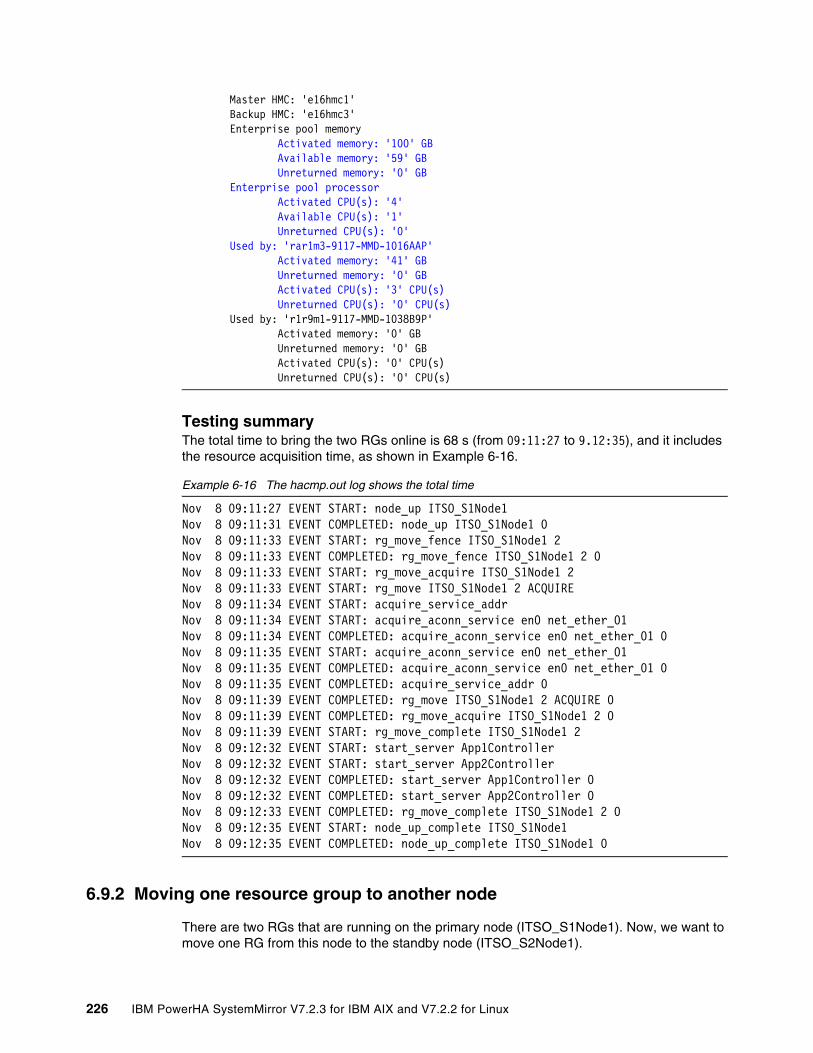
Master HMC: 'e16hmc1' Backup HMC: 'e16hmc3' Enterprise pool memory Activated memory: '100' GB Available memory: '59' GB Unreturned memory: '0' GB Enterprise pool processor Activated CPU(s): '4' Available CPU(s): '1' Unreturned CPU(s): '0' Used by: 'rar1m3-9117-MMD-1016AAP' Activated memory: '41' GB Unreturned memory: '0' GB Activated CPU(s): '3' CPU(s) Unreturned CPU(s): '0' CPU(s) Used by: 'r1r9m1-9117-MMD-1038B9P' Activated memory: '0' GB Unreturned memory: '0' GB Activated CPU(s): '0' CPU(s) Unreturned CPU(s): '0' CPU(s)
Testing summaryThe total time to bring the two RGs online is 68 s (from 09:11:27 to 9.12:35), and it includes the resource acquisition time, as shown in Example 6-16.
Example 6-16 The hacmp.out log shows the total time
Nov 8 09:11:27 EVENT START: node_up ITSO_S1Node1Nov 8 09:11:31 EVENT COMPLETED: node_up ITSO_S1Node1 0Nov 8 09:11:33 EVENT START: rg_move_fence ITSO_S1Node1 2Nov 8 09:11:33 EVENT COMPLETED: rg_move_fence ITSO_S1Node1 2 0Nov 8 09:11:33 EVENT START: rg_move_acquire ITSO_S1Node1 2Nov 8 09:11:33 EVENT START: rg_move ITSO_S1Node1 2 ACQUIRENov 8 09:11:34 EVENT START: acquire_service_addr Nov 8 09:11:34 EVENT START: acquire_aconn_service en0 net_ether_01Nov 8 09:11:34 EVENT COMPLETED: acquire_aconn_service en0 net_ether_01 0Nov 8 09:11:35 EVENT START: acquire_aconn_service en0 net_ether_01Nov 8 09:11:35 EVENT COMPLETED: acquire_aconn_service en0 net_ether_01 0Nov 8 09:11:35 EVENT COMPLETED: acquire_service_addr 0Nov 8 09:11:39 EVENT COMPLETED: rg_move ITSO_S1Node1 2 ACQUIRE 0Nov 8 09:11:39 EVENT COMPLETED: rg_move_acquire ITSO_S1Node1 2 0Nov 8 09:11:39 EVENT START: rg_move_complete ITSO_S1Node1 2Nov 8 09:12:32 EVENT START: start_server App1ControllerNov 8 09:12:32 EVENT START: start_server App2ControllerNov 8 09:12:32 EVENT COMPLETED: start_server App1Controller 0Nov 8 09:12:32 EVENT COMPLETED: start_server App2Controller 0Nov 8 09:12:33 EVENT COMPLETED: rg_move_complete ITSO_S1Node1 2 0Nov 8 09:12:35 EVENT START: node_up_complete ITSO_S1Node1Nov 8 09:12:35 EVENT COMPLETED: node_up_complete ITSO_S1Node1 0
6.9.2 Moving one resource group to another node
There are two RGs that are running on the primary node (ITSO_S1Node1). Now, we want to move one RG from this node to the standby node (ITSO_S2Node1).
226 IBM PowerHA SystemMirror V7.2.3 for IBM AIX and V7.2.2 for Linux
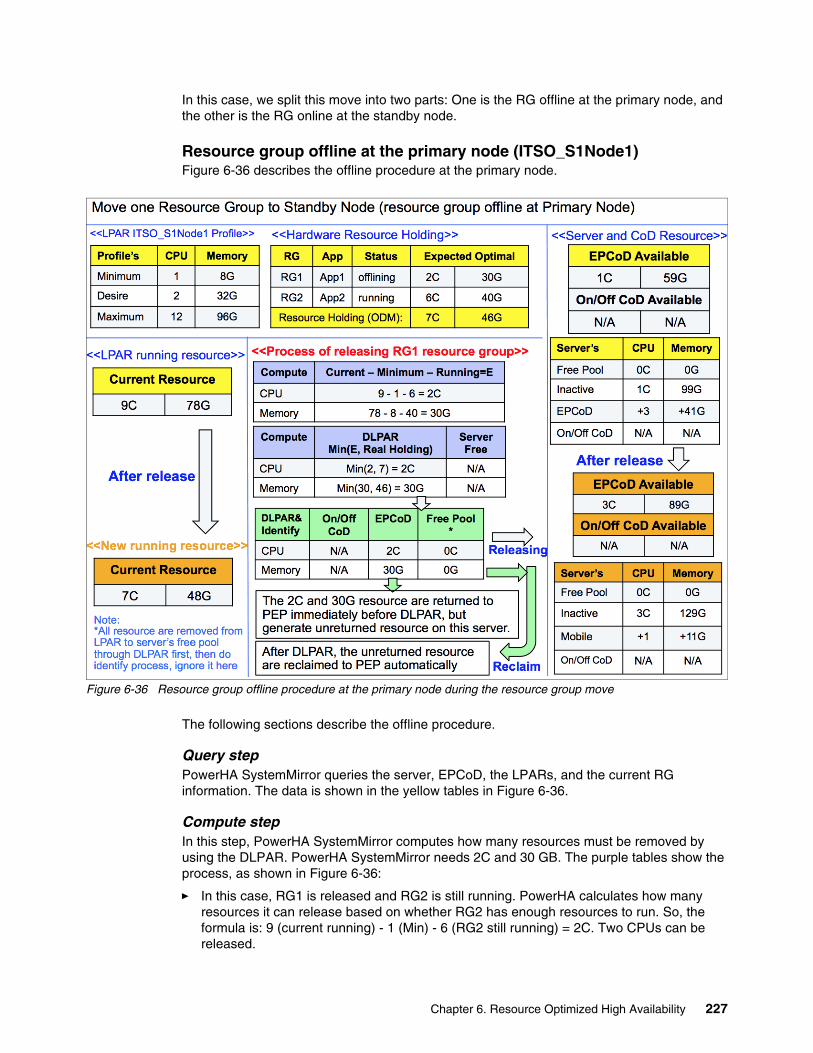
In this case, we split this move into two parts: One is the RG offline at the primary node, and the other is the RG online at the standby node.
Resource group offline at the primary node (ITSO_S1Node1)Figure 6-36 describes the offline procedure at the primary node.
Figure 6-36 Resource group offline procedure at the primary node during the resource group move
The following sections describe the offline procedure.
Query stepPowerHA SystemMirror queries the server, EPCoD, the LPARs, and the current RG information. The data is shown in the yellow tables in Figure 6-36.
Compute stepIn this step, PowerHA SystemMirror computes how many resources must be removed by using the DLPAR. PowerHA SystemMirror needs 2C and 30 GB. The purple tables show the process, as shown in Figure 6-36:
� In this case, RG1 is released and RG2 is still running. PowerHA calculates how many resources it can release based on whether RG2 has enough resources to run. So, the formula is: 9 (current running) - 1 (Min) - 6 (RG2 still running) = 2C. Two CPUs can be released.
Chapter 6. Resource Optimized High Availability 227
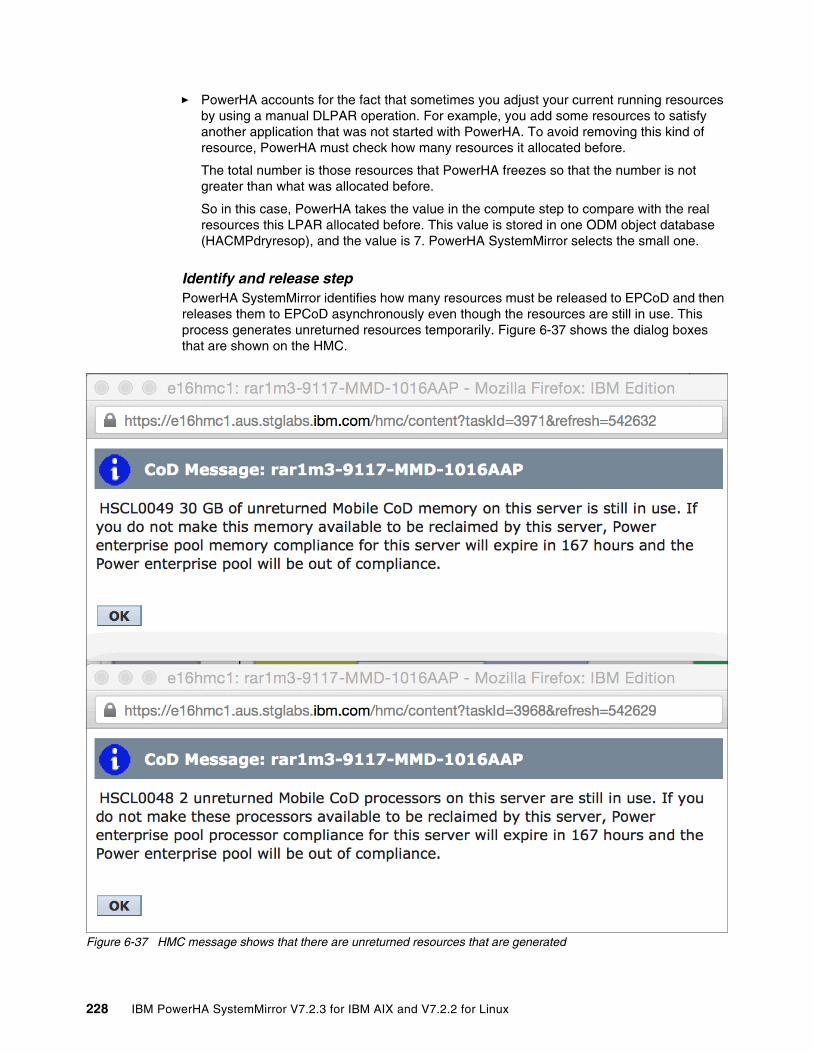
� PowerHA accounts for the fact that sometimes you adjust your current running resources by using a manual DLPAR operation. For example, you add some resources to satisfy another application that was not started with PowerHA. To avoid removing this kind of resource, PowerHA must check how many resources it allocated before.
The total number is those resources that PowerHA freezes so that the number is not greater than what was allocated before.
So in this case, PowerHA takes the value in the compute step to compare with the real resources this LPAR allocated before. This value is stored in one ODM object database (HACMPdryresop), and the value is 7. PowerHA SystemMirror selects the small one.
Identify and release step PowerHA SystemMirror identifies how many resources must be released to EPCoD and then releases them to EPCoD asynchronously even though the resources are still in use. This process generates unreturned resources temporarily. Figure 6-37 shows the dialog boxes that are shown on the HMC.
Figure 6-37 HMC message shows that there are unreturned resources that are generated
228 IBM PowerHA SystemMirror V7.2.3 for IBM AIX and V7.2.2 for Linux
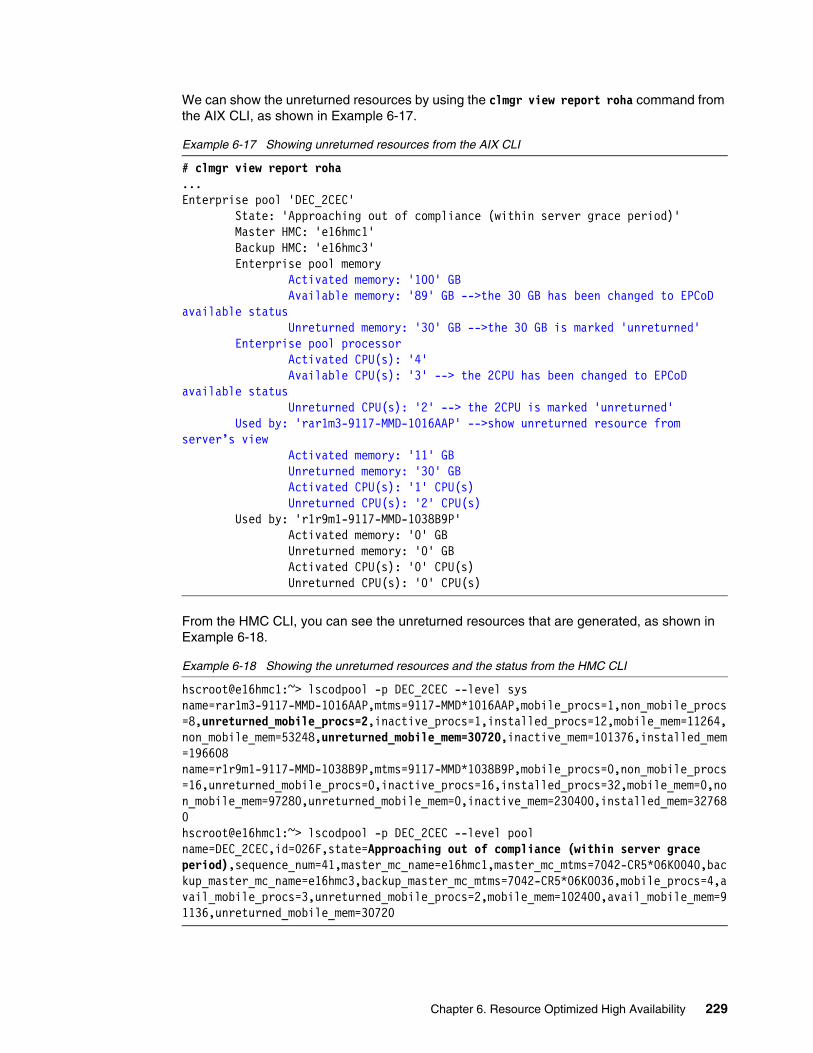
We can show the unreturned resources by using the clmgr view report roha command from the AIX CLI, as shown in Example 6-17.
Example 6-17 Showing unreturned resources from the AIX CLI
# clmgr view report roha...Enterprise pool 'DEC_2CEC' State: 'Approaching out of compliance (within server grace period)' Master HMC: 'e16hmc1' Backup HMC: 'e16hmc3' Enterprise pool memory Activated memory: '100' GB Available memory: '89' GB -->the 30 GB has been changed to EPCoD available status Unreturned memory: '30' GB -->the 30 GB is marked 'unreturned' Enterprise pool processor Activated CPU(s): '4' Available CPU(s): '3' --> the 2CPU has been changed to EPCoD available status Unreturned CPU(s): '2' --> the 2CPU is marked 'unreturned' Used by: 'rar1m3-9117-MMD-1016AAP' -->show unreturned resource from server’s view Activated memory: '11' GB Unreturned memory: '30' GB Activated CPU(s): '1' CPU(s) Unreturned CPU(s): '2' CPU(s) Used by: 'r1r9m1-9117-MMD-1038B9P' Activated memory: '0' GB Unreturned memory: '0' GB Activated CPU(s): '0' CPU(s) Unreturned CPU(s): '0' CPU(s)
From the HMC CLI, you can see the unreturned resources that are generated, as shown in Example 6-18.
Example 6-18 Showing the unreturned resources and the status from the HMC CLI
hscroot@e16hmc1:~> lscodpool -p DEC_2CEC --level sys name=rar1m3-9117-MMD-1016AAP,mtms=9117-MMD*1016AAP,mobile_procs=1,non_mobile_procs=8,unreturned_mobile_procs=2,inactive_procs=1,installed_procs=12,mobile_mem=11264,non_mobile_mem=53248,unreturned_mobile_mem=30720,inactive_mem=101376,installed_mem=196608name=r1r9m1-9117-MMD-1038B9P,mtms=9117-MMD*1038B9P,mobile_procs=0,non_mobile_procs=16,unreturned_mobile_procs=0,inactive_procs=16,installed_procs=32,mobile_mem=0,non_mobile_mem=97280,unreturned_mobile_mem=0,inactive_mem=230400,installed_mem=327680hscroot@e16hmc1:~> lscodpool -p DEC_2CEC --level poolname=DEC_2CEC,id=026F,state=Approaching out of compliance (within server grace period),sequence_num=41,master_mc_name=e16hmc1,master_mc_mtms=7042-CR5*06K0040,backup_master_mc_name=e16hmc3,backup_master_mc_mtms=7042-CR5*06K0036,mobile_procs=4,avail_mobile_procs=3,unreturned_mobile_procs=2,mobile_mem=102400,avail_mobile_mem=91136,unreturned_mobile_mem=30720
Chapter 6. Resource Optimized High Availability 229
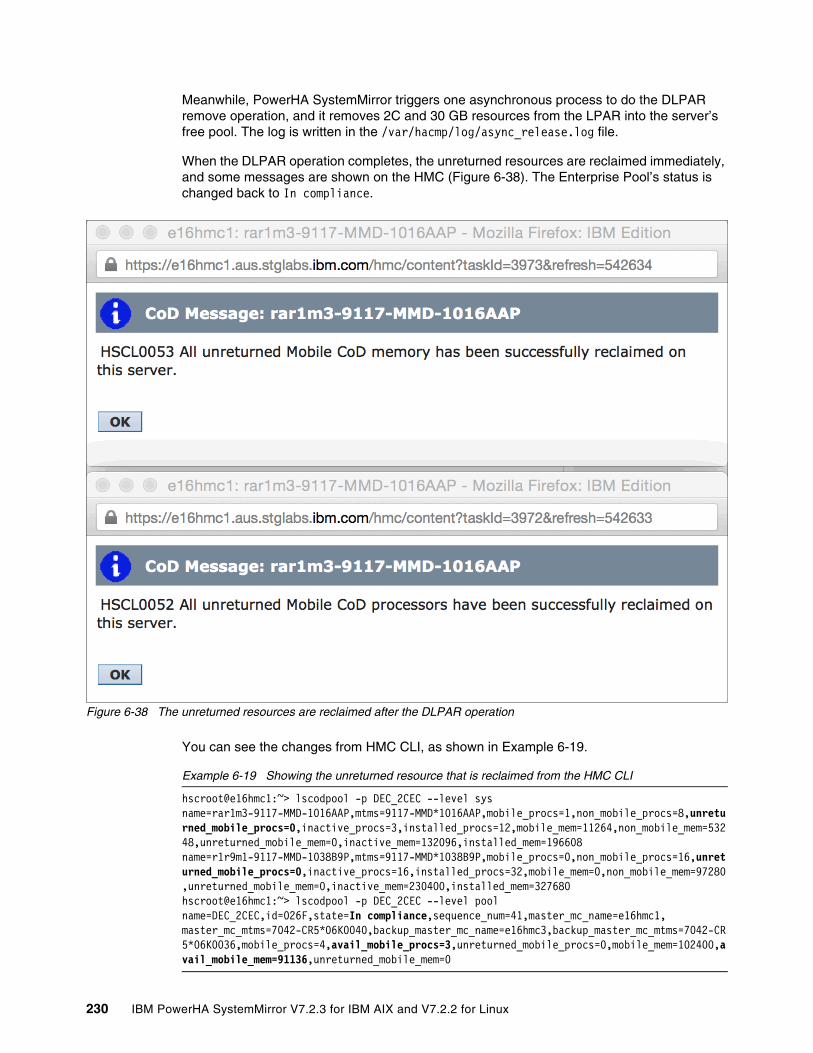
Meanwhile, PowerHA SystemMirror triggers one asynchronous process to do the DLPAR remove operation, and it removes 2C and 30 GB resources from the LPAR into the server’s free pool. The log is written in the /var/hacmp/log/async_release.log file.
When the DLPAR operation completes, the unreturned resources are reclaimed immediately, and some messages are shown on the HMC (Figure 6-38). The Enterprise Pool’s status is changed back to In compliance.
Figure 6-38 The unreturned resources are reclaimed after the DLPAR operation
You can see the changes from HMC CLI, as shown in Example 6-19.
Example 6-19 Showing the unreturned resource that is reclaimed from the HMC CLI
hscroot@e16hmc1:~> lscodpool -p DEC_2CEC --level sys name=rar1m3-9117-MMD-1016AAP,mtms=9117-MMD*1016AAP,mobile_procs=1,non_mobile_procs=8,unreturned_mobile_procs=0,inactive_procs=3,installed_procs=12,mobile_mem=11264,non_mobile_mem=53248,unreturned_mobile_mem=0,inactive_mem=132096,installed_mem=196608name=r1r9m1-9117-MMD-1038B9P,mtms=9117-MMD*1038B9P,mobile_procs=0,non_mobile_procs=16,unreturned_mobile_procs=0,inactive_procs=16,installed_procs=32,mobile_mem=0,non_mobile_mem=97280,unreturned_mobile_mem=0,inactive_mem=230400,installed_mem=327680hscroot@e16hmc1:~> lscodpool -p DEC_2CEC --level poolname=DEC_2CEC,id=026F,state=In compliance,sequence_num=41,master_mc_name=e16hmc1,master_mc_mtms=7042-CR5*06K0040,backup_master_mc_name=e16hmc3,backup_master_mc_mtms=7042-CR5*06K0036,mobile_procs=4,avail_mobile_procs=3,unreturned_mobile_procs=0,mobile_mem=102400,avail_mobile_mem=91136,unreturned_mobile_mem=0
230 IBM PowerHA SystemMirror V7.2.3 for IBM AIX and V7.2.2 for Linux

Log information in the hacmp.out fileThe hacmp.out log file records the process of the RG offlining, as shown in Example 6-20.
Example 6-20 The hacmp.out log file information about the resource group offline process
#egrep "ROHALOG|Close session|Open session" /var/hacmp/log/hacmp.out...===== Compute ROHA Memory =====minimum + running = total <=> current <=> optimal <=> saved8.00 + 40.00 = 48.00 <=> 78.00 <=> 30.00 <=> 46.00 : => 30.00 GB============ End =================== Compute ROHA CPU(s) =====minimal + running = total <=> current <=> optimal <=> saved1 + 6 = 7 <=> 9 <=> 2 <=> 7 : => 2 CPU(s)============ End =================== Identify ROHA Memory ====Total Enterprise Pool memory to return back: 30.00 GBTotal On/Off CoD memory to de-activate: 0.00 GBTotal DLPAR memory to release: 30.00 GB============ End ================= Identify ROHA Processor ===Total Enterprise Pool CPU(s) to return back: 2.00 CPU(s)Total On/Off CoD CPU(s) to de-activate: 0.00 CPU(s)Total DLPAR CPU(s) to release: 2.00 CPU(s)============ End ==============clhmccmd: 30.00 GB of Enterprise Pool CoD have been returned.clhmccmd: 2 CPU(s) of Enterprise Pool CoD have been returned.The following resources were released for application controllers App1Controller.DLPAR memory: 30.00 GB On/Off CoD memory: 0.00 GB Enterprise Pool memory: 30.00 GB.DLPAR processor: 2.00 CPU(s) On/Off CoD processor: 0.00 CPU(s) Enterprise Pool processor: 2.00 CPU(s)Close session 22937664 at Sun Nov 8 09:12:32 CST 2015..
During the release process, the de-allocation order is EPCoD and then the local server’s free pool. Because EPCoD is shared between different servers, the standby node on other servers always needs this resource to bring the RG online in a takeover scenario.
Resources online at the standby node (ITSO_S2Node1)In this case, the RG online on standby node does not need to wait for the DLPAR to complete on the primary node because it is an asynchronous process. In this process, PowerHA SystemMirror acquires a corresponding resource for the onlining RG.
Note: The Approaching out of compliance status is a normal status in the Enterprise Pool, and it is useful when you need extra resources temporarily. The PowerHA SystemMirror RG takeover scenario is one of the cases.
Note: Before acquiring the process start, the 2C and 30 GB resources were available in the Enterprise Pool, so this kind of resource can also be used by standby node.
Chapter 6. Resource Optimized High Availability 231
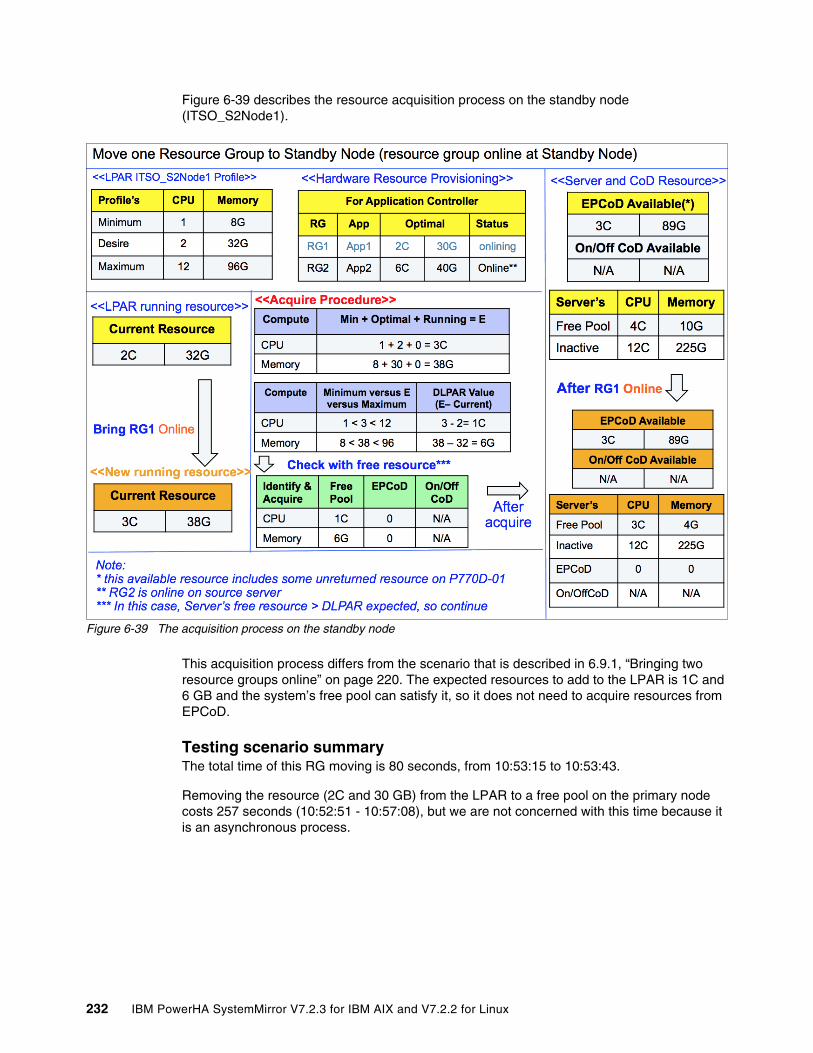
Figure 6-39 describes the resource acquisition process on the standby node (ITSO_S2Node1).
Figure 6-39 The acquisition process on the standby node
This acquisition process differs from the scenario that is described in 6.9.1, “Bringing two resource groups online” on page 220. The expected resources to add to the LPAR is 1C and 6 GB and the system’s free pool can satisfy it, so it does not need to acquire resources from EPCoD.
Testing scenario summaryThe total time of this RG moving is 80 seconds, from 10:53:15 to 10:53:43.
Removing the resource (2C and 30 GB) from the LPAR to a free pool on the primary node costs 257 seconds (10:52:51 - 10:57:08), but we are not concerned with this time because it is an asynchronous process.
232 IBM PowerHA SystemMirror V7.2.3 for IBM AIX and V7.2.2 for Linux
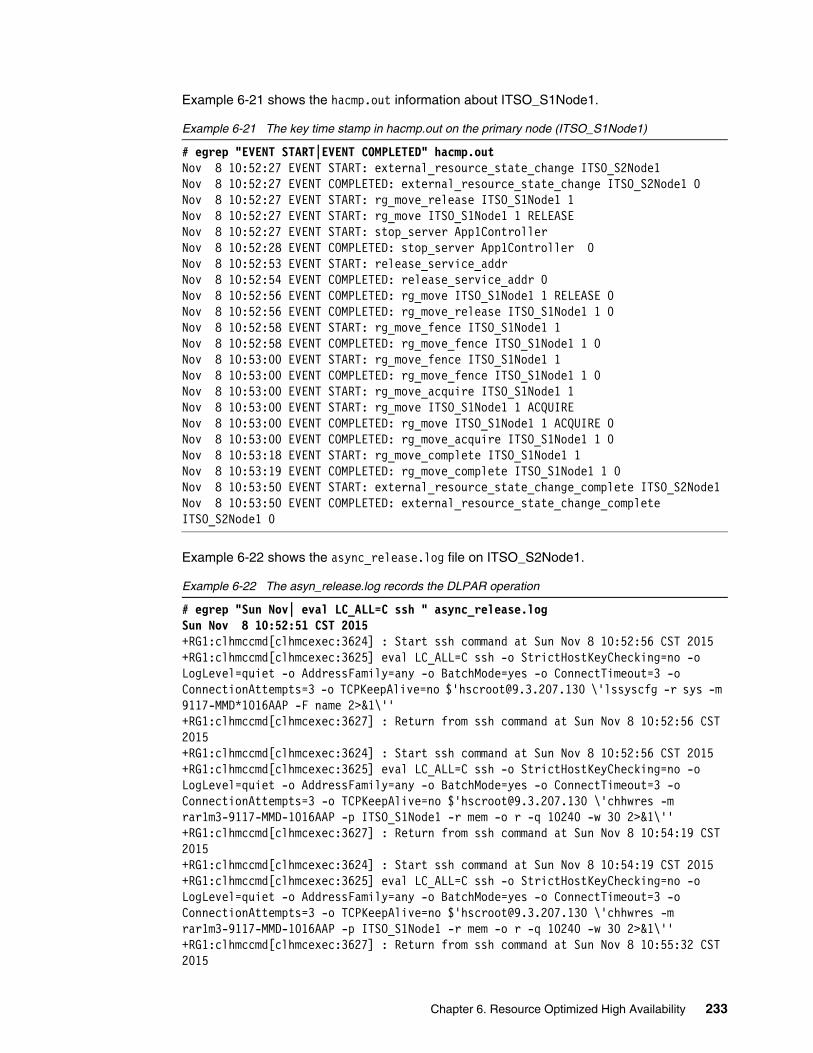
Example 6-21 shows the hacmp.out information about ITSO_S1Node1.
Example 6-21 The key time stamp in hacmp.out on the primary node (ITSO_S1Node1)
# egrep "EVENT START|EVENT COMPLETED" hacmp.outNov 8 10:52:27 EVENT START: external_resource_state_change ITSO_S2Node1Nov 8 10:52:27 EVENT COMPLETED: external_resource_state_change ITSO_S2Node1 0Nov 8 10:52:27 EVENT START: rg_move_release ITSO_S1Node1 1Nov 8 10:52:27 EVENT START: rg_move ITSO_S1Node1 1 RELEASENov 8 10:52:27 EVENT START: stop_server App1Controller Nov 8 10:52:28 EVENT COMPLETED: stop_server App1Controller 0Nov 8 10:52:53 EVENT START: release_service_addr Nov 8 10:52:54 EVENT COMPLETED: release_service_addr 0Nov 8 10:52:56 EVENT COMPLETED: rg_move ITSO_S1Node1 1 RELEASE 0Nov 8 10:52:56 EVENT COMPLETED: rg_move_release ITSO_S1Node1 1 0Nov 8 10:52:58 EVENT START: rg_move_fence ITSO_S1Node1 1Nov 8 10:52:58 EVENT COMPLETED: rg_move_fence ITSO_S1Node1 1 0Nov 8 10:53:00 EVENT START: rg_move_fence ITSO_S1Node1 1Nov 8 10:53:00 EVENT COMPLETED: rg_move_fence ITSO_S1Node1 1 0Nov 8 10:53:00 EVENT START: rg_move_acquire ITSO_S1Node1 1Nov 8 10:53:00 EVENT START: rg_move ITSO_S1Node1 1 ACQUIRENov 8 10:53:00 EVENT COMPLETED: rg_move ITSO_S1Node1 1 ACQUIRE 0Nov 8 10:53:00 EVENT COMPLETED: rg_move_acquire ITSO_S1Node1 1 0Nov 8 10:53:18 EVENT START: rg_move_complete ITSO_S1Node1 1Nov 8 10:53:19 EVENT COMPLETED: rg_move_complete ITSO_S1Node1 1 0Nov 8 10:53:50 EVENT START: external_resource_state_change_complete ITSO_S2Node1Nov 8 10:53:50 EVENT COMPLETED: external_resource_state_change_complete ITSO_S2Node1 0
Example 6-22 shows the async_release.log file on ITSO_S2Node1.
Example 6-22 The asyn_release.log records the DLPAR operation
# egrep "Sun Nov| eval LC_ALL=C ssh " async_release.logSun Nov 8 10:52:51 CST 2015+RG1:clhmccmd[clhmcexec:3624] : Start ssh command at Sun Nov 8 10:52:56 CST 2015+RG1:clhmccmd[clhmcexec:3625] eval LC_ALL=C ssh -o StrictHostKeyChecking=no -o LogLevel=quiet -o AddressFamily=any -o BatchMode=yes -o ConnectTimeout=3 -o ConnectionAttempts=3 -o TCPKeepAlive=no $'[email protected] \'lssyscfg -r sys -m 9117-MMD*1016AAP -F name 2>&1\''+RG1:clhmccmd[clhmcexec:3627] : Return from ssh command at Sun Nov 8 10:52:56 CST 2015+RG1:clhmccmd[clhmcexec:3624] : Start ssh command at Sun Nov 8 10:52:56 CST 2015+RG1:clhmccmd[clhmcexec:3625] eval LC_ALL=C ssh -o StrictHostKeyChecking=no -o LogLevel=quiet -o AddressFamily=any -o BatchMode=yes -o ConnectTimeout=3 -o ConnectionAttempts=3 -o TCPKeepAlive=no $'[email protected] \'chhwres -m rar1m3-9117-MMD-1016AAP -p ITSO_S1Node1 -r mem -o r -q 10240 -w 30 2>&1\''+RG1:clhmccmd[clhmcexec:3627] : Return from ssh command at Sun Nov 8 10:54:19 CST 2015+RG1:clhmccmd[clhmcexec:3624] : Start ssh command at Sun Nov 8 10:54:19 CST 2015+RG1:clhmccmd[clhmcexec:3625] eval LC_ALL=C ssh -o StrictHostKeyChecking=no -o LogLevel=quiet -o AddressFamily=any -o BatchMode=yes -o ConnectTimeout=3 -o ConnectionAttempts=3 -o TCPKeepAlive=no $'[email protected] \'chhwres -m rar1m3-9117-MMD-1016AAP -p ITSO_S1Node1 -r mem -o r -q 10240 -w 30 2>&1\''+RG1:clhmccmd[clhmcexec:3627] : Return from ssh command at Sun Nov 8 10:55:32 CST 2015
Chapter 6. Resource Optimized High Availability 233
+RG1:clhmccmd[clhmcexec:3624] : Start ssh command at Sun Nov 8 10:55:32 CST 2015+RG1:clhmccmd[clhmcexec:3625] eval LC_ALL=C ssh -o StrictHostKeyChecking=no -o LogLevel=quiet -o AddressFamily=any -o BatchMode=yes -o ConnectTimeout=3 -o ConnectionAttempts=3 -o TCPKeepAlive=no $'[email protected] \'chhwres -m rar1m3-9117-MMD-1016AAP -p ITSO_S1Node1 -r mem -o r -q 10240 -w 30 2>&1\''+RG1:clhmccmd[clhmcexec:3627] : Return from ssh command at Sun Nov 8 10:56:40 CST 2015+RG1:clhmccmd[clhmcexec:3624] : Start ssh command at Sun Nov 8 10:56:40 CST 2015+RG1:clhmccmd[clhmcexec:3625] eval LC_ALL=C ssh -o StrictHostKeyChecking=no -o LogLevel=quiet -o AddressFamily=any -o BatchMode=yes -o ConnectTimeout=3 -o ConnectionAttempts=3 -o TCPKeepAlive=no $'[email protected] \'chhwres -m rar1m3-9117-MMD-1016AAP -p ITSO_S1Node1 -r proc -o r --procs 2 -w 30 2>&1\''+RG1:clhmccmd[clhmcexec:3627] : Return from ssh command at Sun Nov 8 10:57:08 CST 2015Sun Nov 8 10:57:08 CST 2015
Example 6-23 shows the hacmp.out information about ITSO_S2Node1.
Example 6-23 The key time stamp in hacmp.out on the standby node (ITSO_S1Node1)
#egrep "EVENT START|EVENT COMPLETED" hacmp.outNov 8 10:52:24 EVENT START: rg_move_release ITSO_S1Node1 1Nov 8 10:52:24 EVENT START: rg_move ITSO_S1Node1 1 RELEASENov 8 10:52:25 EVENT COMPLETED: rg_move ITSO_S1Node1 1 RELEASE 0Nov 8 10:52:25 EVENT COMPLETED: rg_move_release ITSO_S1Node1 1 0Nov 8 10:52:55 EVENT START: rg_move_fence ITSO_S1Node1 1Nov 8 10:52:55 EVENT COMPLETED: rg_move_fence ITSO_S1Node1 1 0Nov 8 10:52:57 EVENT START: rg_move_fence ITSO_S1Node1 1Nov 8 10:52:57 EVENT COMPLETED: rg_move_fence ITSO_S1Node1 1 0Nov 8 10:52:57 EVENT START: rg_move_acquire ITSO_S1Node1 1Nov 8 10:52:57 EVENT START: rg_move ITSO_S1Node1 1 ACQUIRENov 8 10:52:57 EVENT START: acquire_takeover_addr Nov 8 10:52:58 EVENT COMPLETED: acquire_takeover_addr 0Nov 8 10:53:15 EVENT COMPLETED: rg_move ITSO_S1Node1 1 ACQUIRE 0Nov 8 10:53:15 EVENT COMPLETED: rg_move_acquire ITSO_S1Node1 1 0Nov 8 10:53:15 EVENT START: rg_move_complete ITSO_S1Node1 1Nov 8 10:53:43 EVENT START: start_server App1ControllerNov 8 10:53:43 EVENT COMPLETED: start_server App1Controller 0Nov 8 10:53:45 EVENT COMPLETED: rg_move_complete ITSO_S1Node1 1 0Nov 8 10:53:47 EVENT START: external_resource_state_change_complete ITSO_S2Node1Nov 8 10:53:47 EVENT COMPLETED: external_resource_state_change_complete ITSO_S2Node1 0
6.9.3 Restarting with the current configuration after the primary node crashes
This case introduces the Automatic Release After a Failure (ARAF) process. We simulate a primary node that failed immediately. We do not describe how the RG is online on standby node; we describe only what PowerHA SystemMirror does after the primary node restarts. Assume that we activate this node with the current configuration, which means that this LPAR still can hold the same amount of resources as before the crash.
As described in 6.7.6, “Automatic resource release process after an operating system crash” on page 213, after the primary node restarts, the /usr/es/sbin/cluster/etc/rc.init script is triggered by /etc/inittab and performs the resource releasing operation.
234 IBM PowerHA SystemMirror V7.2.3 for IBM AIX and V7.2.2 for Linux

The process is shown in Figure 6-40.
Figure 6-40 Resource release process by using the ARAF process
The process is similar to “Resource group offline at the primary node (ITSO_S1Node1)” on page 227. In this process, PowerHA SystemMirror tries to release all the resources that were held by the two RGs before.
Testing summaryIf a resource was not released because of a PowerHA SystemMirror service crash or an AIX operating system crash, PowerHA SystemMirror can do the release operation automatically after this node starts. This operation occurs before you start the PowerHA SystemMirror service by using the smitty clstart or the clmgr start cluster commands.
Chapter 6. Resource Optimized High Availability 235
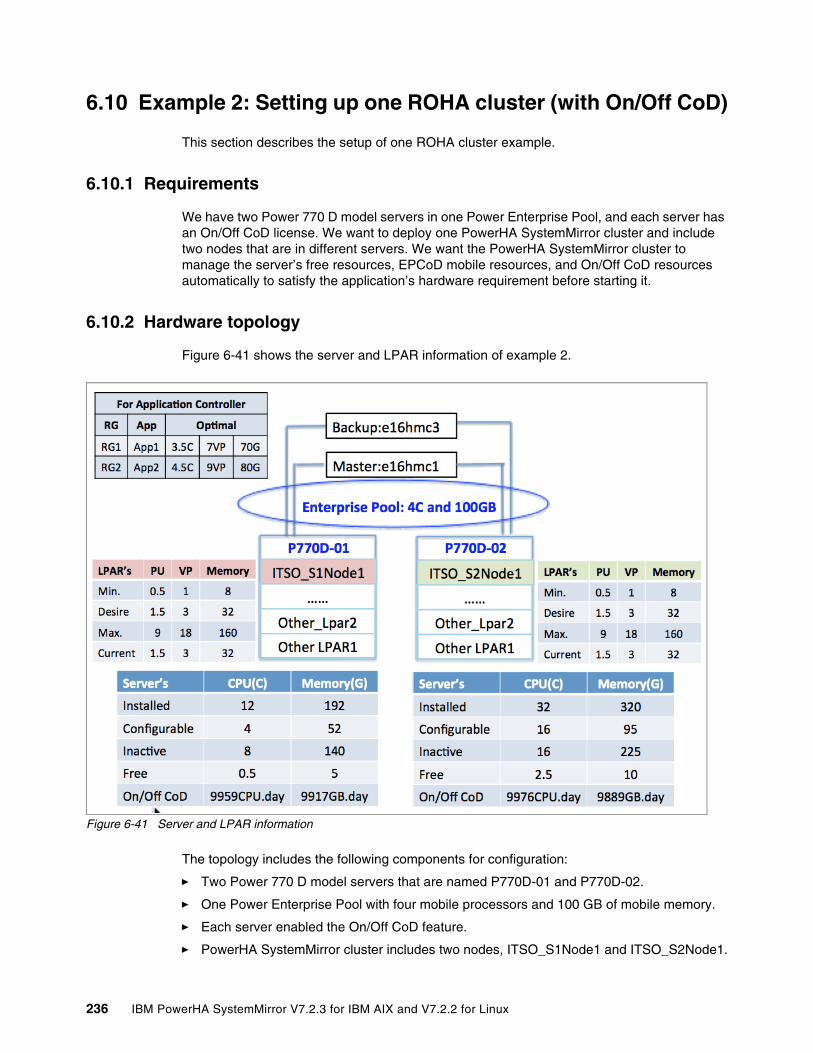
6.10 Example 2: Setting up one ROHA cluster (with On/Off CoD)
This section describes the setup of one ROHA cluster example.
6.10.1 Requirements
We have two Power 770 D model servers in one Power Enterprise Pool, and each server has an On/Off CoD license. We want to deploy one PowerHA SystemMirror cluster and include two nodes that are in different servers. We want the PowerHA SystemMirror cluster to manage the server’s free resources, EPCoD mobile resources, and On/Off CoD resources automatically to satisfy the application’s hardware requirement before starting it.
6.10.2 Hardware topology
Figure 6-41 shows the server and LPAR information of example 2.
Figure 6-41 Server and LPAR information
The topology includes the following components for configuration:
� Two Power 770 D model servers that are named P770D-01 and P770D-02.
� One Power Enterprise Pool with four mobile processors and 100 GB of mobile memory.
� Each server enabled the On/Off CoD feature.
� PowerHA SystemMirror cluster includes two nodes, ITSO_S1Node1 and ITSO_S2Node1.
236 IBM PowerHA SystemMirror V7.2.3 for IBM AIX and V7.2.2 for Linux
� P770D-01 has eight inactive CPUs, 140 GB of inactive memory, 0.5 free CPUs, and 5 GB of available memory.
� P770D-02 has 16 inactive CPUs, 225 GB of inactive memory, 2.5 free CPUs, and 10 GB of available memory.
� This topology also includes the profile configuration for each LPAR.
There are two HMCs to manage the EPCoD, which are named e16hmc1 and e16hmc3. Here, e16hmc1 is the master and e16hmc3 is the backup. There are two applications in this cluster and related resource requirements.
Available resources in On/Off CoDIn the examples, the resources that we have at the On/Off CoD level are GB.Days or Processor.Days. For example, we can have 600 GB.Days, or 120 Processors.Days in the On/Off CoD pool. The time scope of the activation is determined through a tunable variable: Number of activating days for On/Off CoD requests (for more information, see 6.2.5, “Change/Show Default Cluster Tunable menu” on page 182).
If the tunable is set to 30, for example, it means that we want to activate the resources for 30 days. So, the tunable allocates 20 GB of memory only, and we have 20 GB On/Off CoD only, even if we have 600 GB.Days available.
6.10.3 Cluster configuration
The Topology and RG configuration and HMC configuration is the same as shown in 6.8.3, “Cluster configuration” on page 215.
Hardware resource provisioning for the application controllersThere are two application controllers to add, as shown in Table 6-31 and Table 6-32.
Table 6-31 Configuring HMC1
Table 6-32 Configuring HMC1
Items Value
I agree to use On/Off CoD and be billed for extra costs Yes
Application Controller Name AppController1
Use wanted level from the LPAR profile No
Optimal number of gigabytes of memory 70
Optimal number of processing units 3.5
Optimal number of virtual processors 7
Items Value
I agree to use On/Off CoD and be billed for extra costs Yes
Application Controller Name AppController2
Use wanted level from the LPAR profile No
Optimal number of gigabytes of memory 80
Chapter 6. Resource Optimized High Availability 237
Cluster-wide tunablesAll the tunables are at the default values, as shown in Table 6-33.
Table 6-33 Configuration of HMC1
This configuration requires that you perform a Verify and Synchronize Cluster Configuration action after changing the previous configuration.
6.10.4 Showing the ROHA configuration
The clmgr view report roha command shows the current ROHA data, as shown in Example 6-24.
Example 6-24 Showing the ROHA data with the clmgr view report roha command
# clmgr view report rohaCluster: ITSO_ROHA_cluster of NSC type Cluster tunables --> Following is the cluster tunables Dynamic LPAR Start Resource Groups even if resources are insufficient: '0' Adjust Shared Processor Pool size if required: '0' Force synchronous release of DLPAR resources: '0' On/Off CoD I agree to use On/Off CoD and be billed for extra costs: '1' Number of activating days for On/Off CoD requests: '30' Node: ITSO_S1Node1 --> Information of ITSO_S1Node1 node HMC(s): 9.3.207.130 9.3.207.133 Managed system: rar1m3-9117-MMD-1016AAP LPAR: ITSO_S1Node1 Current profile: 'ITSO_profile' Memory (GB): minimum '8' desired '32' current '32' maximum '160' Processing mode: Shared Shared processor pool: 'DefaultPool' Processing units: minimum '0.5' desired '1.5' current '1.5' maximum '9.0' Virtual processors: minimum '1' desired '3' current '3' maximum '18' ROHA provisioning for resource groups No ROHA provisioning.
Optimal number of processing units 4.5
Optimal number of virtual processors 9
Items Value
DLPAR Always Start RGs No (default)
Adjust Shared Processor Pool size if required No (default)
Force synchronous release of DLPAR resources No (default)
I agree to use On/Off CoD and be billed for extra costs Yes
Number of activating days for On/Off CoD requests 30 (default)
Items Value
238 IBM PowerHA SystemMirror V7.2.3 for IBM AIX and V7.2.2 for Linux
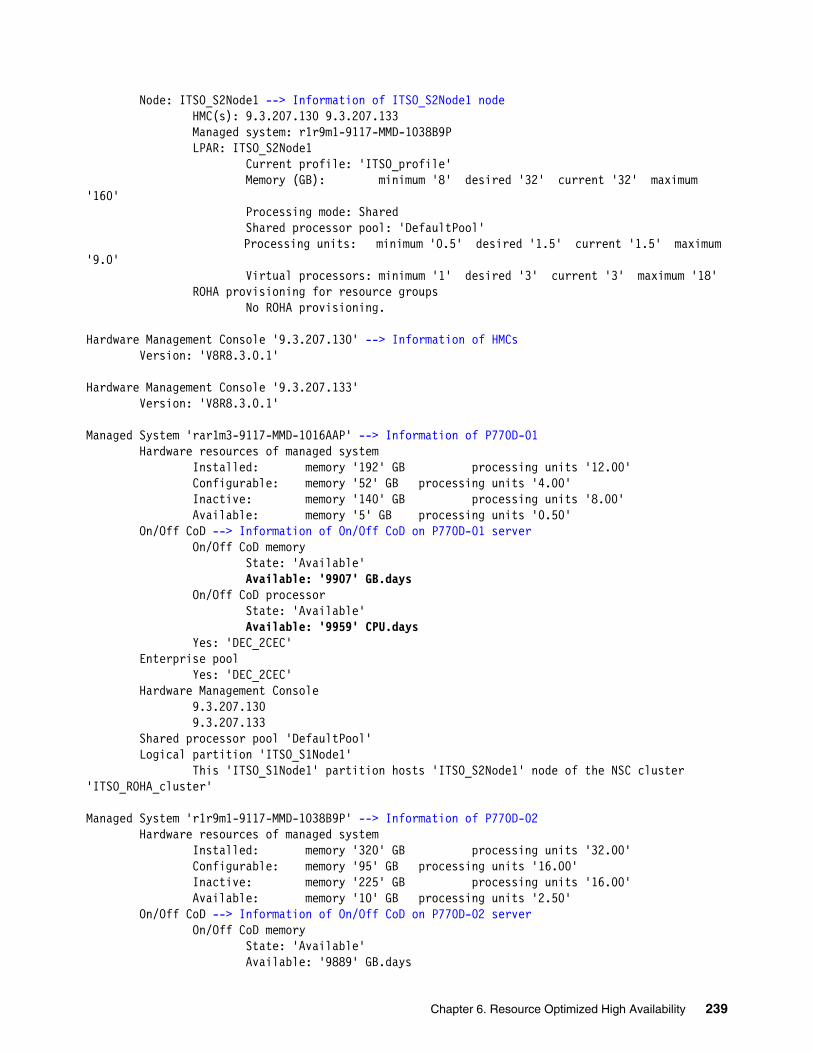
Node: ITSO_S2Node1 --> Information of ITSO_S2Node1 node HMC(s): 9.3.207.130 9.3.207.133 Managed system: r1r9m1-9117-MMD-1038B9P LPAR: ITSO_S2Node1 Current profile: 'ITSO_profile' Memory (GB): minimum '8' desired '32' current '32' maximum '160' Processing mode: Shared Shared processor pool: 'DefaultPool' Processing units: minimum '0.5' desired '1.5' current '1.5' maximum '9.0' Virtual processors: minimum '1' desired '3' current '3' maximum '18' ROHA provisioning for resource groups No ROHA provisioning.
Hardware Management Console '9.3.207.130' --> Information of HMCs Version: 'V8R8.3.0.1'
Hardware Management Console '9.3.207.133' Version: 'V8R8.3.0.1'
Managed System 'rar1m3-9117-MMD-1016AAP' --> Information of P770D-01 Hardware resources of managed system Installed: memory '192' GB processing units '12.00' Configurable: memory '52' GB processing units '4.00' Inactive: memory '140' GB processing units '8.00' Available: memory '5' GB processing units '0.50' On/Off CoD --> Information of On/Off CoD on P770D-01 server On/Off CoD memory State: 'Available' Available: '9907' GB.days On/Off CoD processor State: 'Available' Available: '9959' CPU.days Yes: 'DEC_2CEC' Enterprise pool Yes: 'DEC_2CEC' Hardware Management Console 9.3.207.130 9.3.207.133 Shared processor pool 'DefaultPool' Logical partition 'ITSO_S1Node1' This 'ITSO_S1Node1' partition hosts 'ITSO_S2Node1' node of the NSC cluster 'ITSO_ROHA_cluster'
Managed System 'r1r9m1-9117-MMD-1038B9P' --> Information of P770D-02 Hardware resources of managed system Installed: memory '320' GB processing units '32.00' Configurable: memory '95' GB processing units '16.00' Inactive: memory '225' GB processing units '16.00' Available: memory '10' GB processing units '2.50' On/Off CoD --> Information of On/Off CoD on P770D-02 server On/Off CoD memory State: 'Available' Available: '9889' GB.days
Chapter 6. Resource Optimized High Availability 239
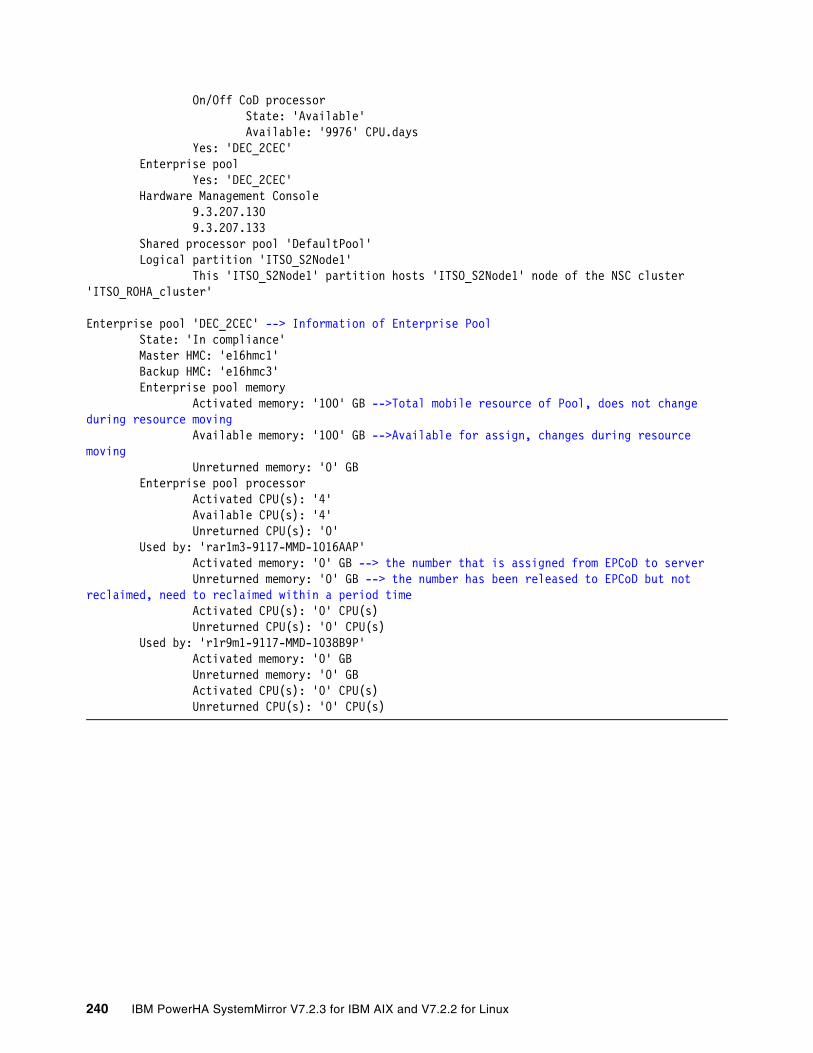
On/Off CoD processor State: 'Available' Available: '9976' CPU.days Yes: 'DEC_2CEC' Enterprise pool Yes: 'DEC_2CEC' Hardware Management Console 9.3.207.130 9.3.207.133 Shared processor pool 'DefaultPool' Logical partition 'ITSO_S2Node1' This 'ITSO_S2Node1' partition hosts 'ITSO_S2Node1' node of the NSC cluster 'ITSO_ROHA_cluster'
Enterprise pool 'DEC_2CEC' --> Information of Enterprise Pool State: 'In compliance' Master HMC: 'e16hmc1' Backup HMC: 'e16hmc3' Enterprise pool memory Activated memory: '100' GB -->Total mobile resource of Pool, does not change during resource moving Available memory: '100' GB -->Available for assign, changes during resource moving Unreturned memory: '0' GB Enterprise pool processor Activated CPU(s): '4' Available CPU(s): '4' Unreturned CPU(s): '0' Used by: 'rar1m3-9117-MMD-1016AAP' Activated memory: '0' GB --> the number that is assigned from EPCoD to server Unreturned memory: '0' GB --> the number has been released to EPCoD but not reclaimed, need to reclaimed within a period time Activated CPU(s): '0' CPU(s) Unreturned CPU(s): '0' CPU(s) Used by: 'r1r9m1-9117-MMD-1038B9P' Activated memory: '0' GB Unreturned memory: '0' GB Activated CPU(s): '0' CPU(s) Unreturned CPU(s): '0' CPU(s)
240 IBM PowerHA SystemMirror V7.2.3 for IBM AIX and V7.2.2 for Linux
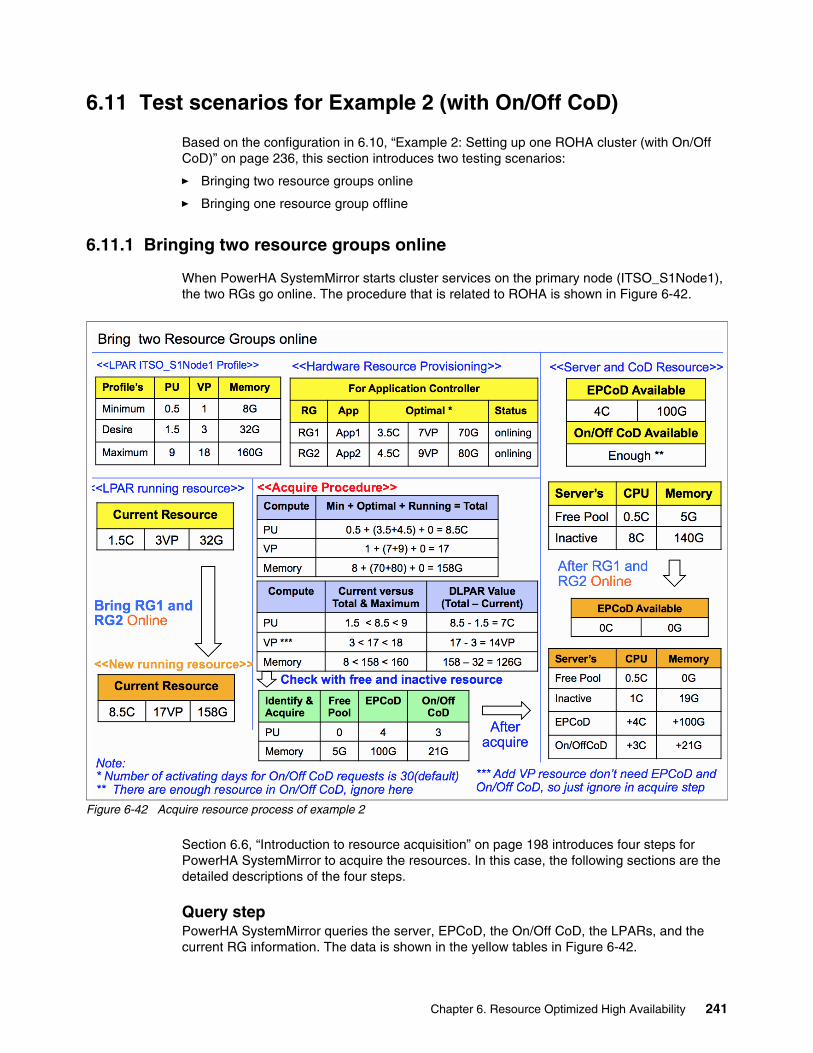
6.11 Test scenarios for Example 2 (with On/Off CoD)
Based on the configuration in 6.10, “Example 2: Setting up one ROHA cluster (with On/Off CoD)” on page 236, this section introduces two testing scenarios:
� Bringing two resource groups online
� Bringing one resource group offline
6.11.1 Bringing two resource groups online
When PowerHA SystemMirror starts cluster services on the primary node (ITSO_S1Node1), the two RGs go online. The procedure that is related to ROHA is shown in Figure 6-42.
Figure 6-42 Acquire resource process of example 2
Section 6.6, “Introduction to resource acquisition” on page 198 introduces four steps for PowerHA SystemMirror to acquire the resources. In this case, the following sections are the detailed descriptions of the four steps.
Query stepPowerHA SystemMirror queries the server, EPCoD, the On/Off CoD, the LPARs, and the current RG information. The data is shown in the yellow tables in Figure 6-42.
Chapter 6. Resource Optimized High Availability 241
For the On/Off CoD resources, we do not display the available resources because there are enough resources in our testing environment:
� P770D-01 has 9959 CPU.days and 9917 GB.days.� P770D-02 has 9976 CPU.days and 9889 GB.days.
We display the actual amount that is used.
Compute stepIn this step, PowerHA SystemMirror computes how many resources you must add through the DLPAR. PowerHA SystemMirror needs 7C and 126 GB. The purple tables show this process (Figure 6-42 on page 241). We take the CPU resources as follows:
� The expected total processor unit number is 0.5 (Min) + 3.5 (RG1 requirement) + 4.5 (RG2 requirement) +0 (running RG requirement (there is no running RG)) = 8.5C.
� Take this value to compare with the LPAR’s profile, which must be less than or equal to the Maximum value and more than or equal to the Minimum value.
� If this configuration satisfies the requirement, then take this value minus the current running CPU (8.5 - 1.5 = 7), and this is the number that we want to add to the LPAR through DLPAR.
Identify and acquire stepAfter the compute step, PowerHA SystemMirror identifies how to satisfy the requirement. For CPU, it gets 4C from EPCoD and 3C from the On/Off CoD. Because the minimum operation unit is 1 for EPCoD and On/Off CoD, and even if there is 0.5 CPU in the server’s free pool, the requirement is 7, so you leave it in the free pool.
PowerHA SystemMirror gets the remaining 5 GB of this server, all 100 GB from EPCoD, and 21 GB from the On/Off CoD. The process is shown in the green table in Figure 6-42 on page 241.
The orange table shows (Figure 6-42 on page 241) the result of this scenario, including the LPAR’s running resources, EPCoD, On/Off CoD, and the server’s resource status.
Tracking the hacmp.out logFrom hacmp.out, you know that all the resources (seven CPUs and 126 memory) cost 117 seconds as a synchronous process, as shown in Example 6-25:
22:44:40 → 22:46:37
Example 6-25 The hacmp.out log shows the resource acquisition of example 2
===== Compute ROHA Memory =====minimal + optimal + running = total <=> current <=> maximum8.00 + 150.00 + 0.00 = 158.00 <=> 32.00 <=> 160.00 : => 126.00 GB============ End ================= Compute ROHA PU(s)/VP(s) ==minimal + optimal + running = total <=> current <=> maximum1 + 16 + 0 = 17 <=> 3 <=> 18 : => 14 Virtual Processor(s)
Note: During this process, PowerHA SystemMirror adds mobile resources from EPCoD to the server’s free pool first, then adds all the free pool’s resources to the LPAR through DLPAR. To describe this clearly, the free pool means the available resources of only one server before adding the EPCoD’s resources to it.
242 IBM PowerHA SystemMirror V7.2.3 for IBM AIX and V7.2.2 for Linux

minimal + optimal + running = total <=> current <=> maximum0.50 + 8.00 + 0.00 = 8.50 <=> 1.50 <=> 9.00 : => 7.00 Processing Unit(s)============ End =================== Identify ROHA Memory ====Remaining available memory for partition: 5.00 GBTotal Enterprise Pool memory to allocate: 100.00 GBTotal Enterprise Pool memory to yank: 0.00 GBTotal On/Off CoD memory to activate: 21.00 GB for 30 daysTotal DLPAR memory to acquire: 126.00 GB============ End ================= Identify ROHA Processor ===Remaining available PU(s) for partition: 0.50 Processing Unit(s)Total Enterprise Pool CPU(s) to allocate: 4.00 CPU(s)Total Enterprise Pool CPU(s) to yank: 0.00 CPU(s)Total On/Off CoD CPU(s) to activate: 3.00 CPU(s) for 30 daysTotal DLPAR PU(s)/VP(s) to acquire: 7.00 Processing Unit(s) and 14.00 Virtual Processor(s)============ End ==============clhmccmd: 100.00 GB of Enterprise Pool CoD have been allocated.clhmccmd: 4 CPU(s) of Enterprise Pool CoD have been allocated.clhmccmd: 21.00 GB of On/Off CoD resources have been activated for 30 days.clhmccmd: 3 CPU(s) of On/Off CoD resources have been activated for 30 days. clhmccmd: 126.00 GB of DLPAR resources have been acquired. clhmccmd: 14 VP(s) or CPU(s) and 7.00 PU(s) of DLPAR resources have been acquired. The following resources were acquired for application controllers App1Controller App2Controller. DLPAR memory: 126.00 GB On/Off CoD memory: 21.00 GB Enterprise Pool memory: 100.00 GB. DLPAR processor: 7.00 PU/14.00 VP On/Off CoD processor: 3.00 CPU(s) Enterprise Pool processor: 4.00 CPU(s)
ROHA report updateThe clmgr view report roha command reports the ROHA data, as shown in Example 6-26.
Example 6-26 ROHA data after acquiring resources in example 2
# clmgr view report rohaCluster: ITSO_ROHA_cluster of NSC type Cluster tunables Dynamic LPAR Start Resource Groups even if resources are insufficient: '0' Adjust Shared Processor Pool size if required: '0' Force synchronous release of DLPAR resources: '0' On/Off CoD I agree to use On/Off CoD and be billed for extra costs: '1' Number of activating days for On/Off CoD requests: '30' Node: ITSO_S1Node1 HMC(s): 9.3.207.130 9.3.207.133 Managed system: rar1m3-9117-MMD-1016AAP LPAR: ITSO_S1Node1 Current profile: 'ITSO_profile' Memory (GB): minimum '8' desired '32' current '158' maximum '160'
Chapter 6. Resource Optimized High Availability 243
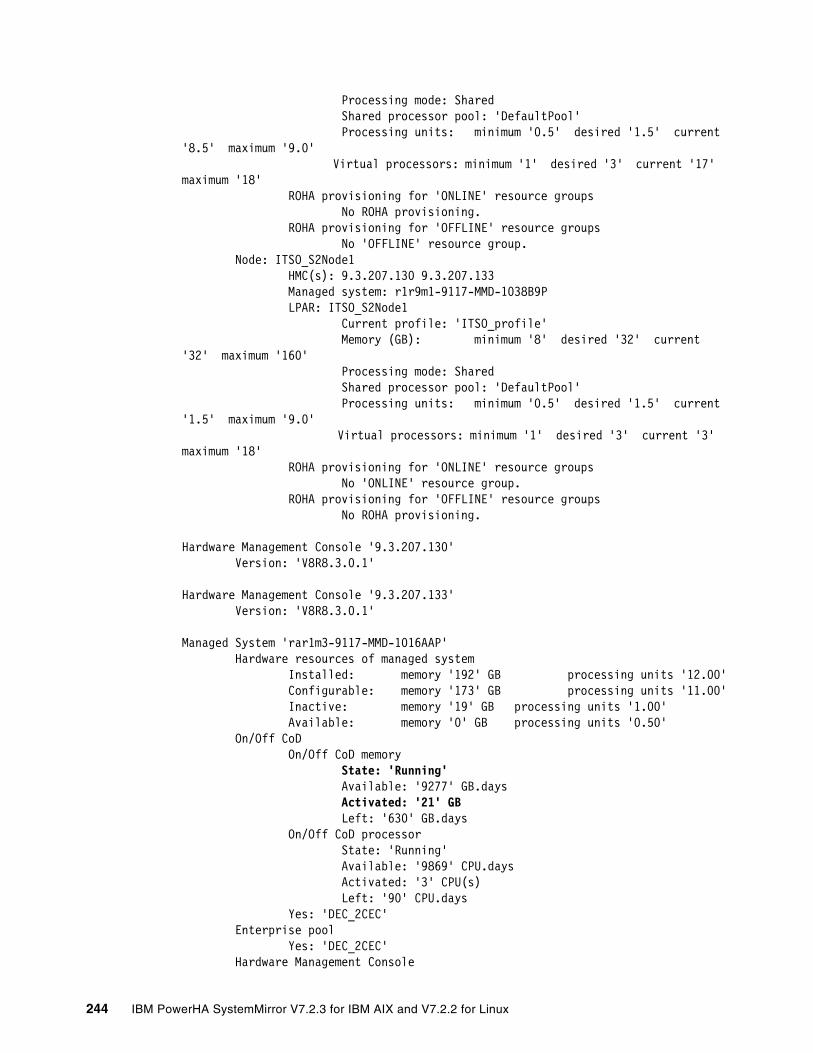
Processing mode: Shared Shared processor pool: 'DefaultPool' Processing units: minimum '0.5' desired '1.5' current '8.5' maximum '9.0' Virtual processors: minimum '1' desired '3' current '17' maximum '18' ROHA provisioning for 'ONLINE' resource groups No ROHA provisioning. ROHA provisioning for 'OFFLINE' resource groups No 'OFFLINE' resource group. Node: ITSO_S2Node1 HMC(s): 9.3.207.130 9.3.207.133 Managed system: r1r9m1-9117-MMD-1038B9P LPAR: ITSO_S2Node1 Current profile: 'ITSO_profile' Memory (GB): minimum '8' desired '32' current '32' maximum '160' Processing mode: Shared Shared processor pool: 'DefaultPool' Processing units: minimum '0.5' desired '1.5' current '1.5' maximum '9.0' Virtual processors: minimum '1' desired '3' current '3' maximum '18' ROHA provisioning for 'ONLINE' resource groups No 'ONLINE' resource group. ROHA provisioning for 'OFFLINE' resource groups No ROHA provisioning.
Hardware Management Console '9.3.207.130' Version: 'V8R8.3.0.1'
Hardware Management Console '9.3.207.133' Version: 'V8R8.3.0.1'
Managed System 'rar1m3-9117-MMD-1016AAP' Hardware resources of managed system Installed: memory '192' GB processing units '12.00' Configurable: memory '173' GB processing units '11.00' Inactive: memory '19' GB processing units '1.00' Available: memory '0' GB processing units '0.50' On/Off CoD On/Off CoD memory State: 'Running' Available: '9277' GB.days Activated: '21' GB Left: '630' GB.days On/Off CoD processor State: 'Running' Available: '9869' CPU.days Activated: '3' CPU(s) Left: '90' CPU.days Yes: 'DEC_2CEC' Enterprise pool Yes: 'DEC_2CEC' Hardware Management Console
244 IBM PowerHA SystemMirror V7.2.3 for IBM AIX and V7.2.2 for Linux
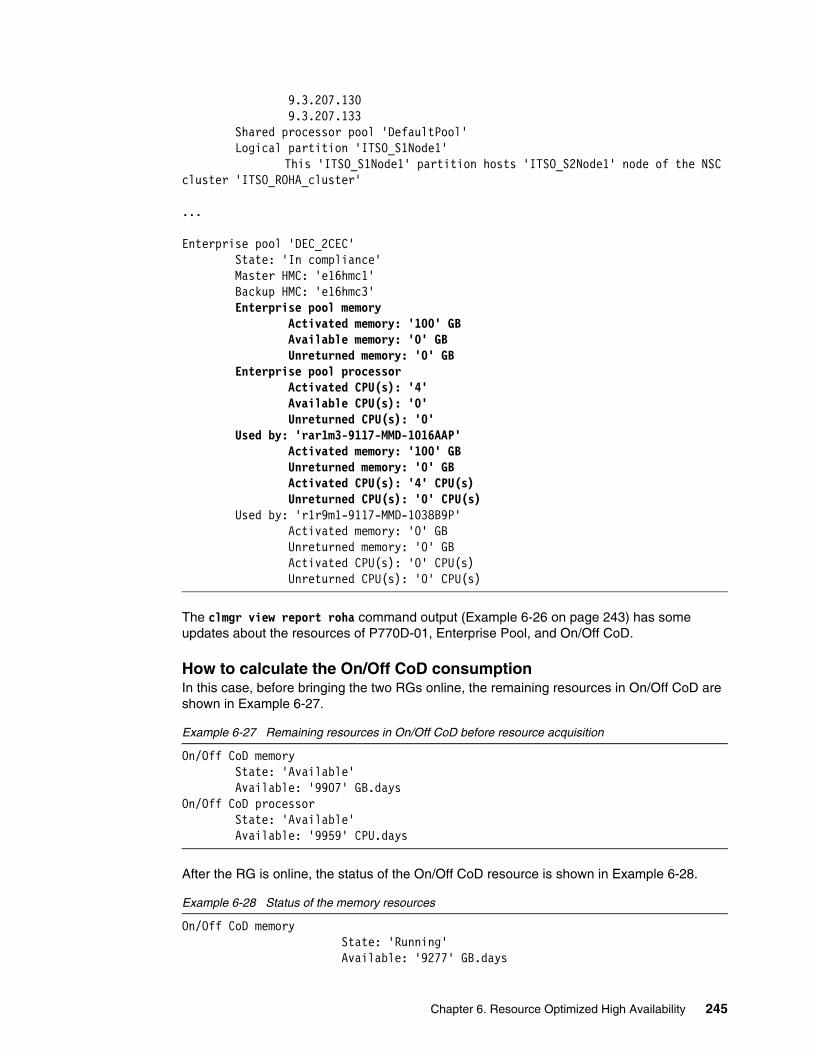
9.3.207.130 9.3.207.133 Shared processor pool 'DefaultPool' Logical partition 'ITSO_S1Node1' This 'ITSO_S1Node1' partition hosts 'ITSO_S2Node1' node of the NSC cluster 'ITSO_ROHA_cluster'
...
Enterprise pool 'DEC_2CEC' State: 'In compliance' Master HMC: 'e16hmc1' Backup HMC: 'e16hmc3' Enterprise pool memory Activated memory: '100' GB Available memory: '0' GB Unreturned memory: '0' GB Enterprise pool processor Activated CPU(s): '4' Available CPU(s): '0' Unreturned CPU(s): '0' Used by: 'rar1m3-9117-MMD-1016AAP' Activated memory: '100' GB Unreturned memory: '0' GB Activated CPU(s): '4' CPU(s) Unreturned CPU(s): '0' CPU(s) Used by: 'r1r9m1-9117-MMD-1038B9P' Activated memory: '0' GB Unreturned memory: '0' GB Activated CPU(s): '0' CPU(s) Unreturned CPU(s): '0' CPU(s)
The clmgr view report roha command output (Example 6-26 on page 243) has some updates about the resources of P770D-01, Enterprise Pool, and On/Off CoD.
How to calculate the On/Off CoD consumptionIn this case, before bringing the two RGs online, the remaining resources in On/Off CoD are shown in Example 6-27.
Example 6-27 Remaining resources in On/Off CoD before resource acquisition
On/Off CoD memory State: 'Available' Available: '9907' GB.daysOn/Off CoD processor State: 'Available' Available: '9959' CPU.days
After the RG is online, the status of the On/Off CoD resource is shown in Example 6-28.
Example 6-28 Status of the memory resources
On/Off CoD memory State: 'Running' Available: '9277' GB.days
Chapter 6. Resource Optimized High Availability 245
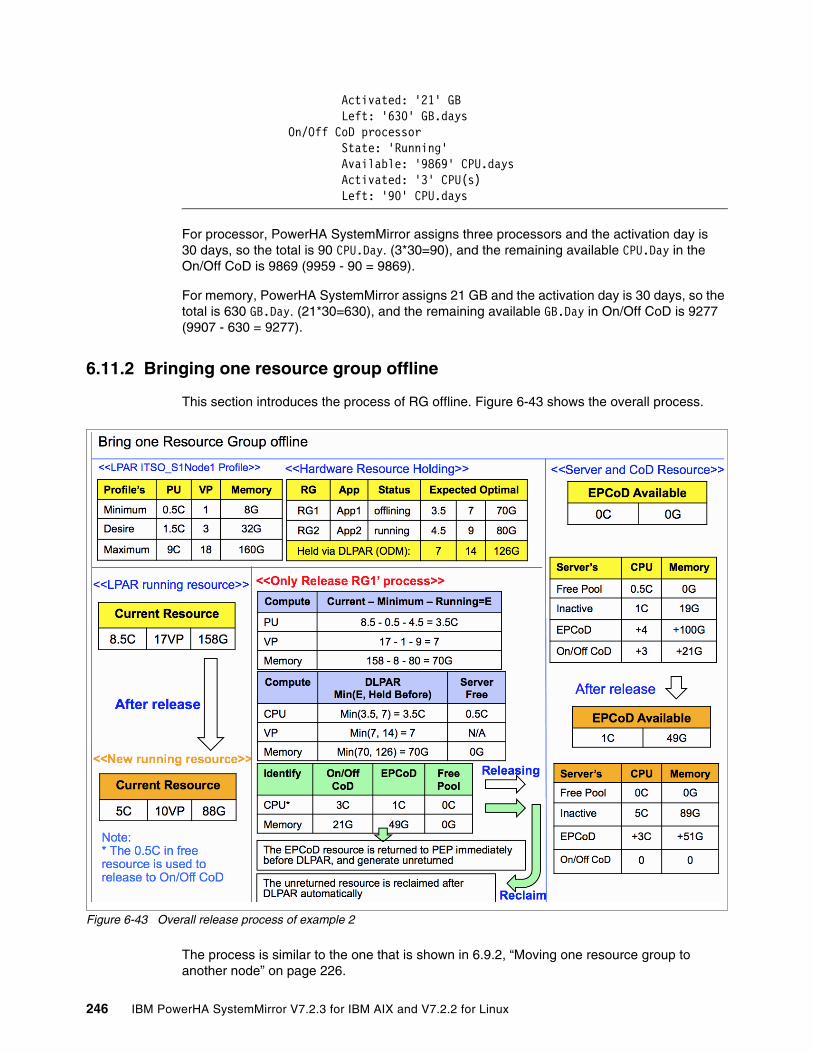
Activated: '21' GB Left: '630' GB.days On/Off CoD processor State: 'Running' Available: '9869' CPU.days Activated: '3' CPU(s) Left: '90' CPU.days
For processor, PowerHA SystemMirror assigns three processors and the activation day is 30 days, so the total is 90 CPU.Day. (3*30=90), and the remaining available CPU.Day in the On/Off CoD is 9869 (9959 - 90 = 9869).
For memory, PowerHA SystemMirror assigns 21 GB and the activation day is 30 days, so the total is 630 GB.Day. (21*30=630), and the remaining available GB.Day in On/Off CoD is 9277 (9907 - 630 = 9277).
6.11.2 Bringing one resource group offline
This section introduces the process of RG offline. Figure 6-43 shows the overall process.
Figure 6-43 Overall release process of example 2
The process is similar to the one that is shown in 6.9.2, “Moving one resource group to another node” on page 226.
246 IBM PowerHA SystemMirror V7.2.3 for IBM AIX and V7.2.2 for Linux
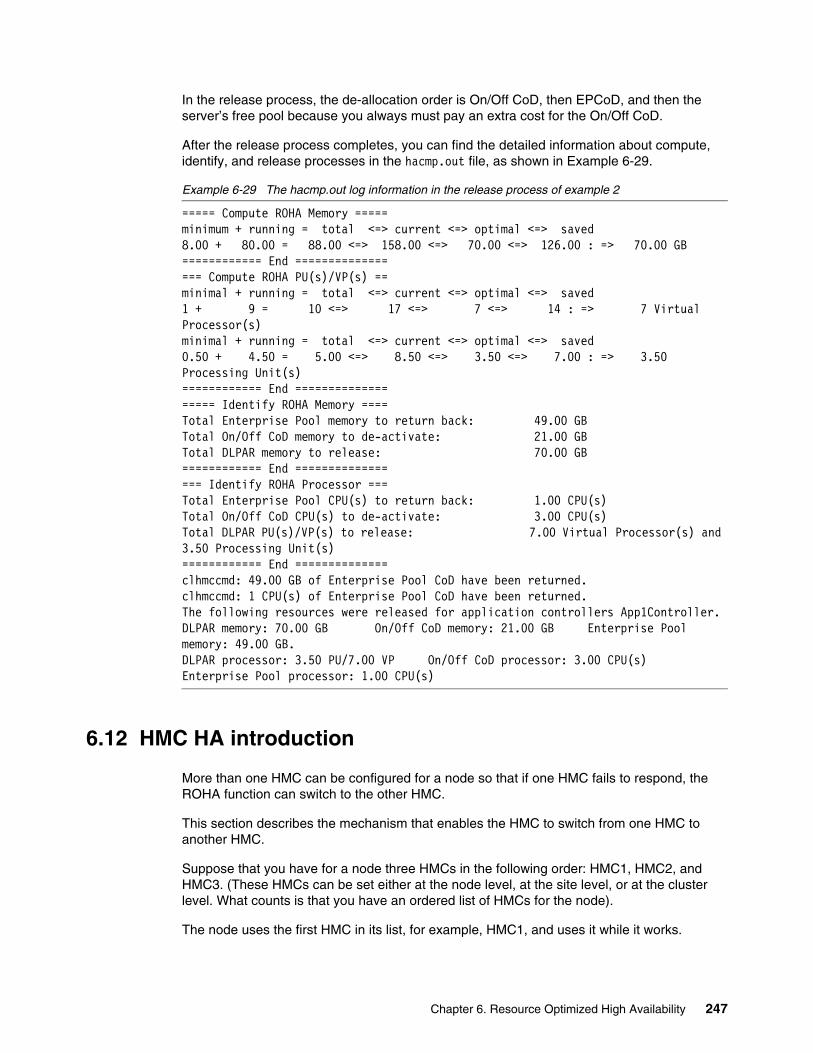
In the release process, the de-allocation order is On/Off CoD, then EPCoD, and then the server’s free pool because you always must pay an extra cost for the On/Off CoD.
After the release process completes, you can find the detailed information about compute, identify, and release processes in the hacmp.out file, as shown in Example 6-29.
Example 6-29 The hacmp.out log information in the release process of example 2
===== Compute ROHA Memory =====minimum + running = total <=> current <=> optimal <=> saved8.00 + 80.00 = 88.00 <=> 158.00 <=> 70.00 <=> 126.00 : => 70.00 GB============ End ================= Compute ROHA PU(s)/VP(s) ==minimal + running = total <=> current <=> optimal <=> saved1 + 9 = 10 <=> 17 <=> 7 <=> 14 : => 7 Virtual Processor(s)minimal + running = total <=> current <=> optimal <=> saved0.50 + 4.50 = 5.00 <=> 8.50 <=> 3.50 <=> 7.00 : => 3.50 Processing Unit(s)============ End =================== Identify ROHA Memory ====Total Enterprise Pool memory to return back: 49.00 GBTotal On/Off CoD memory to de-activate: 21.00 GBTotal DLPAR memory to release: 70.00 GB============ End ================= Identify ROHA Processor ===Total Enterprise Pool CPU(s) to return back: 1.00 CPU(s)Total On/Off CoD CPU(s) to de-activate: 3.00 CPU(s)Total DLPAR PU(s)/VP(s) to release: 7.00 Virtual Processor(s) and 3.50 Processing Unit(s)============ End ==============clhmccmd: 49.00 GB of Enterprise Pool CoD have been returned.clhmccmd: 1 CPU(s) of Enterprise Pool CoD have been returned.The following resources were released for application controllers App1Controller.DLPAR memory: 70.00 GB On/Off CoD memory: 21.00 GB Enterprise Pool memory: 49.00 GB.DLPAR processor: 3.50 PU/7.00 VP On/Off CoD processor: 3.00 CPU(s) Enterprise Pool processor: 1.00 CPU(s)
6.12 HMC HA introduction
More than one HMC can be configured for a node so that if one HMC fails to respond, the ROHA function can switch to the other HMC.
This section describes the mechanism that enables the HMC to switch from one HMC to another HMC.
Suppose that you have for a node three HMCs in the following order: HMC1, HMC2, and HMC3. (These HMCs can be set either at the node level, at the site level, or at the cluster level. What counts is that you have an ordered list of HMCs for the node).
The node uses the first HMC in its list, for example, HMC1, and uses it while it works.
Chapter 6. Resource Optimized High Availability 247
HMC1 might fail for different reasons. For example:
1. HMC1 is not reachable by the ping command.
One parameter controls the ping command in the HMC: Timeout on ping (which is set by default to 3 seconds, and you cannot adjust it). If an HMC cannot be pinged after this timeout, you cannot use it through ssh, so switch immediately to another HMC, in this case the HMC following the current one in the list (for example, HMC2).
2. HMC1 is not reachable through SSH:
– SSH is not properly configured between the node and HMC1, so it is not worth trying to use HMC1, and it is best to switch to another HMC, in this case, the HMC following the current one in the list, for example, HMC2.
– SSH has temporary conditions that prevent it from responding.
Two parameters control the ssh command on the HMC:
– Connect Attempts (which is set by default to 5).
– Connect Timeout (which is set by default to 5), meaning that after a 25-second delay, the HMC can be considered as not reachable through ssh.
If the HMC is not reachable through ssh, it is not worth trying to perform a hmc command through ssh on it, and it is best to switch to another HMC. In this case, the HMC following the current one in the list, for example, HMC2.
3. The HMC is repeatedly busy.
When the HMC is processing a command, it cannot perform another command concurrently. The command fails with RC=-1 with the HSCL3205 message indicating that the HMC is busy.
The PowerHA SystemMirror ROHA function has a retry mechanism that is controlled by two parameters:
– RETRY_COUNT, which indicates how many retries must be done.
– RETRY_DELAY, which indicates how long to wait between retries.
When the HMC is busy, the retry mechanism is used until declaring that the HMC is flooded.
When the HMC is considered flooded, it is not worth using it again, and it is best to switch immediately to another HMC, which is the HMC following the current one in the list, for example, HMC2.
4. The HMC returns an application error. Several cases can occur:
– One case is when you request an amount of resources that is not available, and the same request is attempted with another smaller amount.
– A second case is when the command is not understandable by the HMC, which is more like a programming bug. In these cases, the bug must be debugged at test time. In any case, this is not a reason to switch to another HMC.
If you decide to switch to another HMC, consider the next HMC of the list, and use it.
If the first HMC is not usable (HMC1), you are currently using the second HMC in the list (HMC2), which helps prevent the ROHA function from trying again and failing again by using the first HMC (HMC1). You can add (persistence) into the ODM for which HMC is being used (for example, HMC2).
This mechanism enables the ROHA function to skip the failing HMCs and to use the HMC that works (in this case, HMC2). At the end of the session, the persistence in the ODM is cleared, meaning that the first HMC in the list is restored to its role of HMC1 or the first in the list.
248 IBM PowerHA SystemMirror V7.2.3 for IBM AIX and V7.2.2 for Linux
6.12.1 Switching to the backup HMC for the Power Enterprise Pool
For Enterprise Pool operations, querying operations can be run on the master or backup HMC, but changing operations must run on the master HMC. If the master HMC fails, the PowerHA SystemMirror actions are as follows:
� For querying operations, PowerHA SystemMirror tries to switch to the backup HMC to continue the operation, but does not set the backup HMC as the master.
� For changing operations, PowerHA SystemMirror tries to set the backup HMC as the master, and then continues the operation. Example 6-30 shows the command that PowerHA SystemMirror performs to set the backup HMC as the master. This command is triggered by PowerHA SystemMirror automatically.
Example 6-30 Setting the backup HMC as the master
chcodpool -o setmaster -p <pool> --mc backup
There are some prerequisites in PowerHA SystemMirror that must be met before switching to the backup HMC when the master HMC fails:
� Configure the master HMC and the backup HMC for your Power Enterprise Pool.
For more information about how to configure the backup HMC for the Power Enterprise Pool, see IBM Knowledge Center and Power Enterprise Pools on IBM Power Systems, REDP-5101.
� Ensure that both HMCs are configured in PowerHA SystemMirror.
� Establish password-less communication between the PowerHA SystemMirror nodes to the two HMCs.
� Ensure reachability (pingable) from PowerHA SystemMirror nodes to the master and backup HMCs.
� Ensure that all of the servers that participate in the pool are connected to the two HMCs.
� Ensure that the participating servers are in either the Standby state or the Operating state.
6.13 Test scenario for HMC fallover
This section shows how PowerHA SystemMirror switches the HMC automatically when the primary HMC fails.
Chapter 6. Resource Optimized High Availability 249
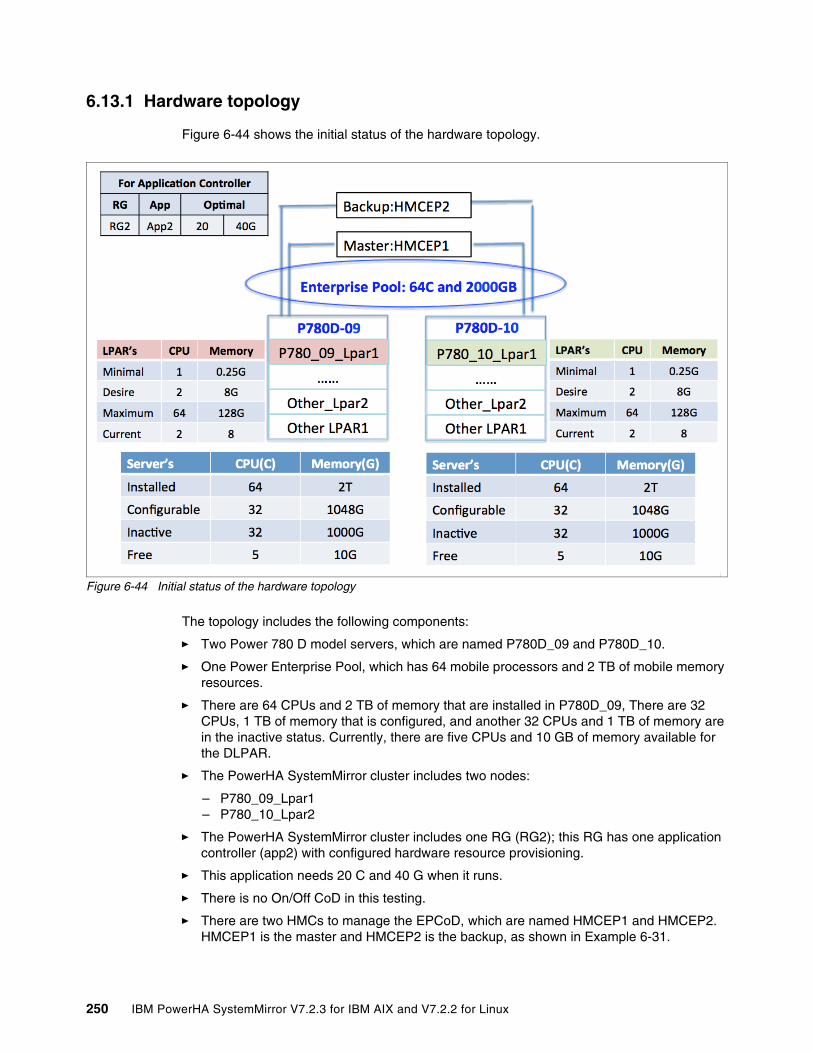
6.13.1 Hardware topology
Figure 6-44 shows the initial status of the hardware topology.
Figure 6-44 Initial status of the hardware topology
The topology includes the following components:
� Two Power 780 D model servers, which are named P780D_09 and P780D_10.
� One Power Enterprise Pool, which has 64 mobile processors and 2 TB of mobile memory resources.
� There are 64 CPUs and 2 TB of memory that are installed in P780D_09, There are 32 CPUs, 1 TB of memory that is configured, and another 32 CPUs and 1 TB of memory are in the inactive status. Currently, there are five CPUs and 10 GB of memory available for the DLPAR.
� The PowerHA SystemMirror cluster includes two nodes:
– P780_09_Lpar1– P780_10_Lpar2
� The PowerHA SystemMirror cluster includes one RG (RG2); this RG has one application controller (app2) with configured hardware resource provisioning.
� This application needs 20 C and 40 G when it runs.
� There is no On/Off CoD in this testing.
� There are two HMCs to manage the EPCoD, which are named HMCEP1 and HMCEP2. HMCEP1 is the master and HMCEP2 is the backup, as shown in Example 6-31.
250 IBM PowerHA SystemMirror V7.2.3 for IBM AIX and V7.2.2 for Linux
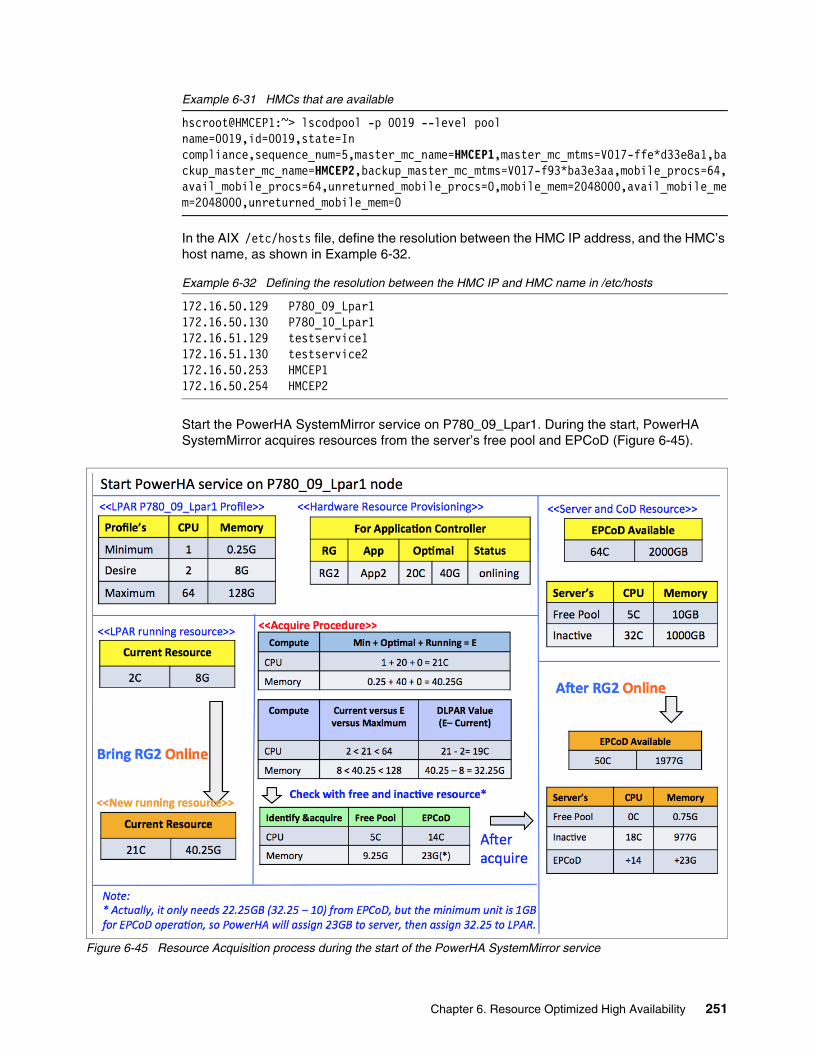
Example 6-31 HMCs that are available
hscroot@HMCEP1:~> lscodpool -p 0019 --level poolname=0019,id=0019,state=In compliance,sequence_num=5,master_mc_name=HMCEP1,master_mc_mtms=V017-ffe*d33e8a1,backup_master_mc_name=HMCEP2,backup_master_mc_mtms=V017-f93*ba3e3aa,mobile_procs=64,avail_mobile_procs=64,unreturned_mobile_procs=0,mobile_mem=2048000,avail_mobile_mem=2048000,unreturned_mobile_mem=0
In the AIX /etc/hosts file, define the resolution between the HMC IP address, and the HMC’s host name, as shown in Example 6-32.
Example 6-32 Defining the resolution between the HMC IP and HMC name in /etc/hosts
172.16.50.129 P780_09_Lpar1172.16.50.130 P780_10_Lpar1172.16.51.129 testservice1172.16.51.130 testservice2172.16.50.253 HMCEP1172.16.50.254 HMCEP2
Start the PowerHA SystemMirror service on P780_09_Lpar1. During the start, PowerHA SystemMirror acquires resources from the server’s free pool and EPCoD (Figure 6-45).
Figure 6-45 Resource Acquisition process during the start of the PowerHA SystemMirror service
Chapter 6. Resource Optimized High Availability 251
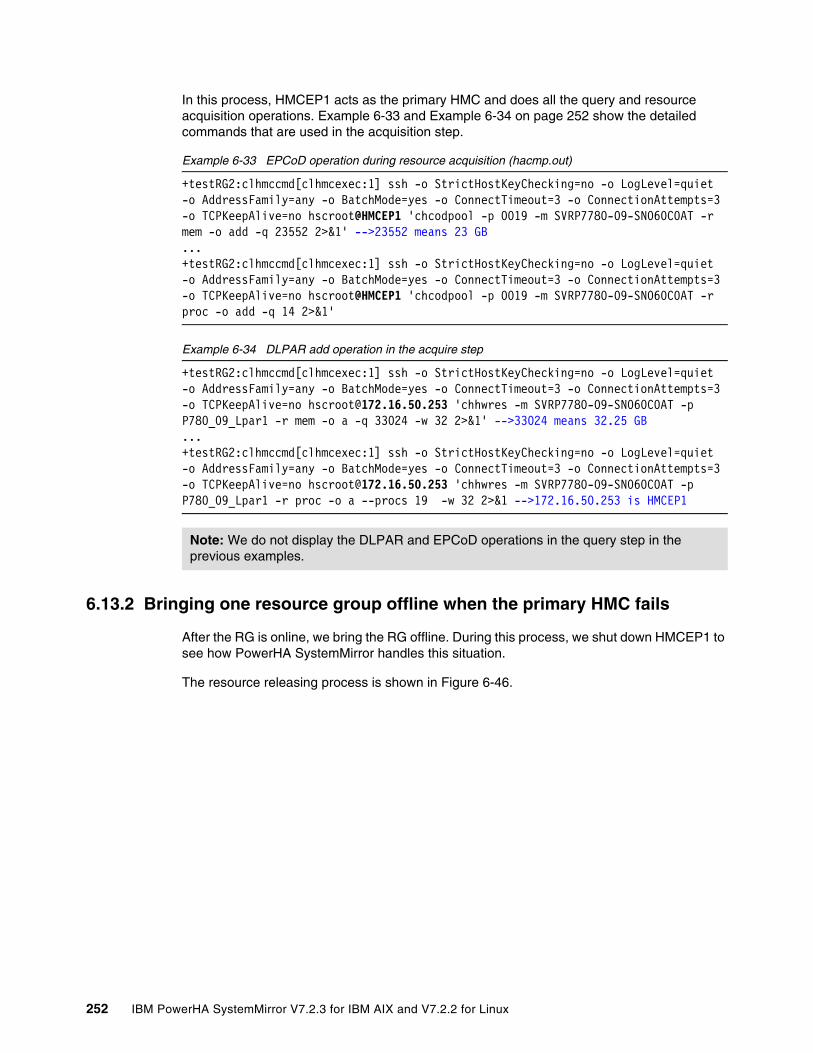
In this process, HMCEP1 acts as the primary HMC and does all the query and resource acquisition operations. Example 6-33 and Example 6-34 on page 252 show the detailed commands that are used in the acquisition step.
Example 6-33 EPCoD operation during resource acquisition (hacmp.out)
+testRG2:clhmccmd[clhmcexec:1] ssh -o StrictHostKeyChecking=no -o LogLevel=quiet -o AddressFamily=any -o BatchMode=yes -o ConnectTimeout=3 -o ConnectionAttempts=3 -o TCPKeepAlive=no hscroot@HMCEP1 'chcodpool -p 0019 -m SVRP7780-09-SN060C0AT -r mem -o add -q 23552 2>&1' -->23552 means 23 GB...+testRG2:clhmccmd[clhmcexec:1] ssh -o StrictHostKeyChecking=no -o LogLevel=quiet -o AddressFamily=any -o BatchMode=yes -o ConnectTimeout=3 -o ConnectionAttempts=3 -o TCPKeepAlive=no hscroot@HMCEP1 'chcodpool -p 0019 -m SVRP7780-09-SN060C0AT -r proc -o add -q 14 2>&1'
Example 6-34 DLPAR add operation in the acquire step
+testRG2:clhmccmd[clhmcexec:1] ssh -o StrictHostKeyChecking=no -o LogLevel=quiet -o AddressFamily=any -o BatchMode=yes -o ConnectTimeout=3 -o ConnectionAttempts=3 -o TCPKeepAlive=no [email protected] 'chhwres -m SVRP7780-09-SN060C0AT -p P780_09_Lpar1 -r mem -o a -q 33024 -w 32 2>&1' -->33024 means 32.25 GB...+testRG2:clhmccmd[clhmcexec:1] ssh -o StrictHostKeyChecking=no -o LogLevel=quiet -o AddressFamily=any -o BatchMode=yes -o ConnectTimeout=3 -o ConnectionAttempts=3 -o TCPKeepAlive=no [email protected] 'chhwres -m SVRP7780-09-SN060C0AT -p P780_09_Lpar1 -r proc -o a --procs 19 -w 32 2>&1 -->172.16.50.253 is HMCEP1
6.13.2 Bringing one resource group offline when the primary HMC fails
After the RG is online, we bring the RG offline. During this process, we shut down HMCEP1 to see how PowerHA SystemMirror handles this situation.
The resource releasing process is shown in Figure 6-46.
Note: We do not display the DLPAR and EPCoD operations in the query step in the previous examples.
252 IBM PowerHA SystemMirror V7.2.3 for IBM AIX and V7.2.2 for Linux
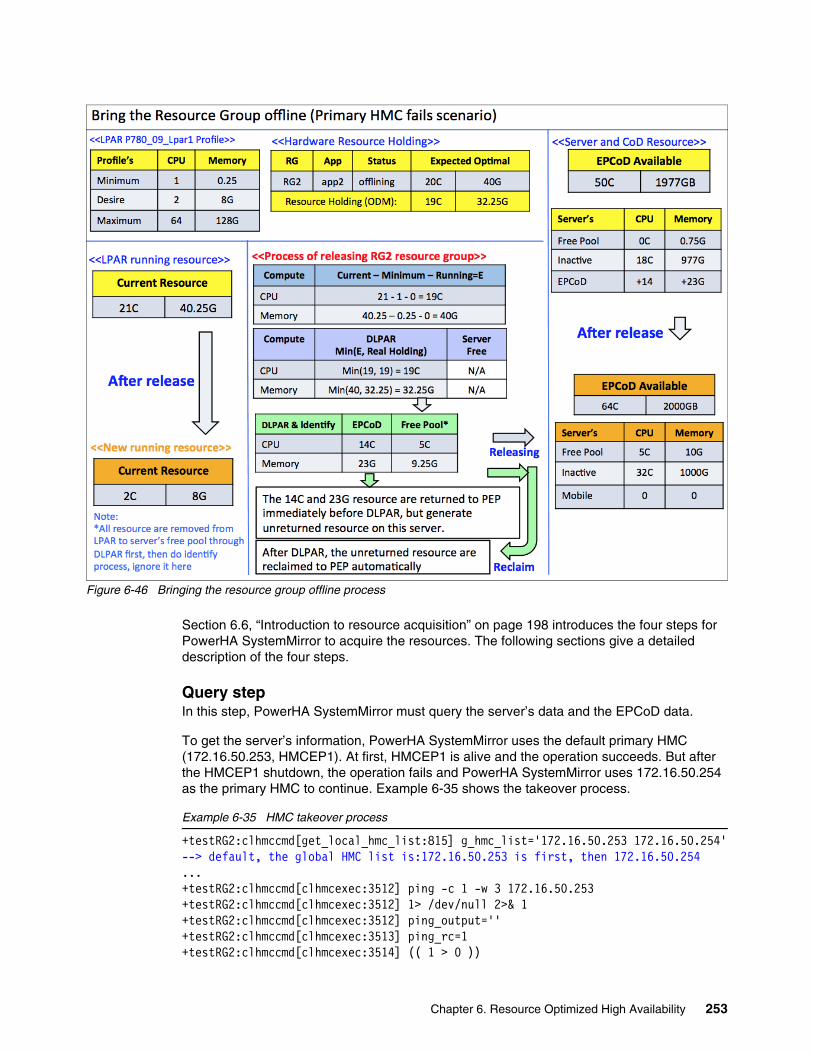
Figure 6-46 Bringing the resource group offline process
Section 6.6, “Introduction to resource acquisition” on page 198 introduces the four steps for PowerHA SystemMirror to acquire the resources. The following sections give a detailed description of the four steps.
Query stepIn this step, PowerHA SystemMirror must query the server’s data and the EPCoD data.
To get the server’s information, PowerHA SystemMirror uses the default primary HMC (172.16.50.253, HMCEP1). At first, HMCEP1 is alive and the operation succeeds. But after the HMCEP1 shutdown, the operation fails and PowerHA SystemMirror uses 172.16.50.254 as the primary HMC to continue. Example 6-35 shows the takeover process.
Example 6-35 HMC takeover process
+testRG2:clhmccmd[get_local_hmc_list:815] g_hmc_list='172.16.50.253 172.16.50.254'--> default, the global HMC list is:172.16.50.253 is first, then 172.16.50.254...+testRG2:clhmccmd[clhmcexec:3512] ping -c 1 -w 3 172.16.50.253+testRG2:clhmccmd[clhmcexec:3512] 1> /dev/null 2>& 1+testRG2:clhmccmd[clhmcexec:3512] ping_output=''+testRG2:clhmccmd[clhmcexec:3513] ping_rc=1+testRG2:clhmccmd[clhmcexec:3514] (( 1 > 0 ))
Chapter 6. Resource Optimized High Availability 253
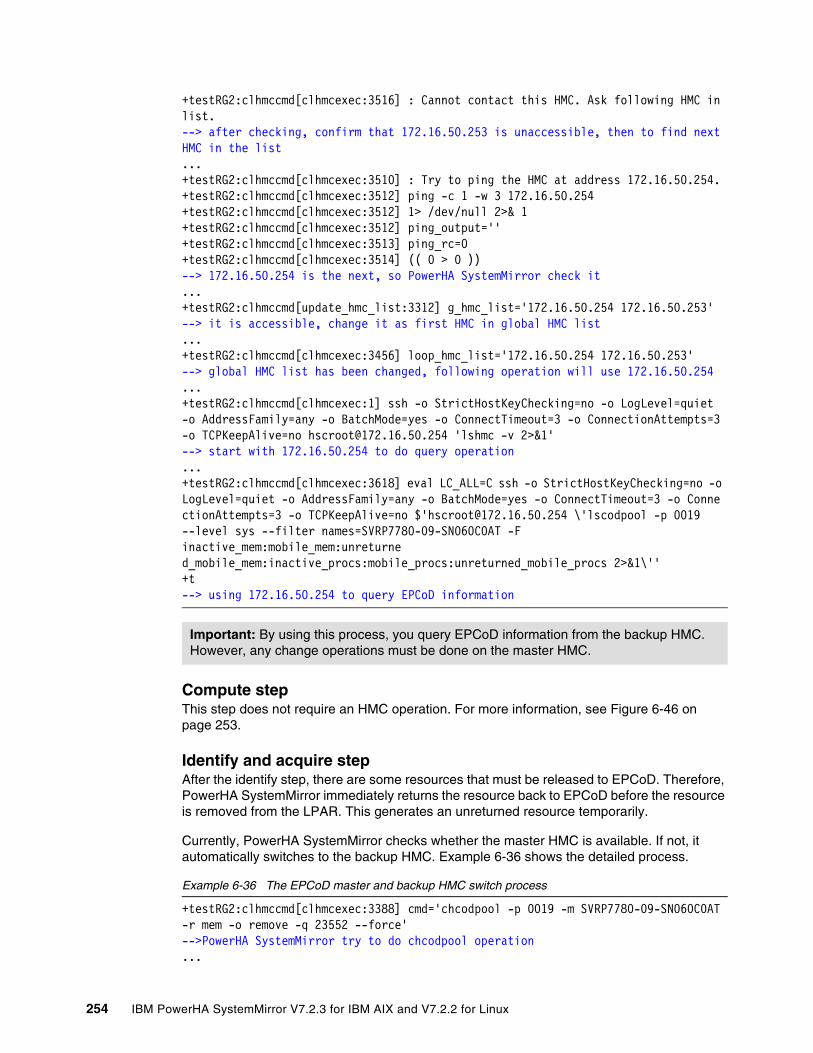
+testRG2:clhmccmd[clhmcexec:3516] : Cannot contact this HMC. Ask following HMC in list.--> after checking, confirm that 172.16.50.253 is unaccessible, then to find next HMC in the list...+testRG2:clhmccmd[clhmcexec:3510] : Try to ping the HMC at address 172.16.50.254.+testRG2:clhmccmd[clhmcexec:3512] ping -c 1 -w 3 172.16.50.254+testRG2:clhmccmd[clhmcexec:3512] 1> /dev/null 2>& 1+testRG2:clhmccmd[clhmcexec:3512] ping_output=''+testRG2:clhmccmd[clhmcexec:3513] ping_rc=0+testRG2:clhmccmd[clhmcexec:3514] (( 0 > 0 ))--> 172.16.50.254 is the next, so PowerHA SystemMirror check it...+testRG2:clhmccmd[update_hmc_list:3312] g_hmc_list='172.16.50.254 172.16.50.253'--> it is accessible, change it as first HMC in global HMC list...+testRG2:clhmccmd[clhmcexec:3456] loop_hmc_list='172.16.50.254 172.16.50.253'--> global HMC list has been changed, following operation will use 172.16.50.254...+testRG2:clhmccmd[clhmcexec:1] ssh -o StrictHostKeyChecking=no -o LogLevel=quiet -o AddressFamily=any -o BatchMode=yes -o ConnectTimeout=3 -o ConnectionAttempts=3 -o TCPKeepAlive=no [email protected] 'lshmc -v 2>&1'--> start with 172.16.50.254 to do query operation...+testRG2:clhmccmd[clhmcexec:3618] eval LC_ALL=C ssh -o StrictHostKeyChecking=no -o LogLevel=quiet -o AddressFamily=any -o BatchMode=yes -o ConnectTimeout=3 -o ConnectionAttempts=3 -o TCPKeepAlive=no $'[email protected] \'lscodpool -p 0019 --level sys --filter names=SVRP7780-09-SN060C0AT -F inactive_mem:mobile_mem:unreturned_mobile_mem:inactive_procs:mobile_procs:unreturned_mobile_procs 2>&1\''+t--> using 172.16.50.254 to query EPCoD information
Compute stepThis step does not require an HMC operation. For more information, see Figure 6-46 on page 253.
Identify and acquire stepAfter the identify step, there are some resources that must be released to EPCoD. Therefore, PowerHA SystemMirror immediately returns the resource back to EPCoD before the resource is removed from the LPAR. This generates an unreturned resource temporarily.
Currently, PowerHA SystemMirror checks whether the master HMC is available. If not, it automatically switches to the backup HMC. Example 6-36 shows the detailed process.
Example 6-36 The EPCoD master and backup HMC switch process
+testRG2:clhmccmd[clhmcexec:3388] cmd='chcodpool -p 0019 -m SVRP7780-09-SN060C0AT -r mem -o remove -q 23552 --force'-->PowerHA SystemMirror try to do chcodpool operation...
Important: By using this process, you query EPCoD information from the backup HMC. However, any change operations must be done on the master HMC.
254 IBM PowerHA SystemMirror V7.2.3 for IBM AIX and V7.2.2 for Linux
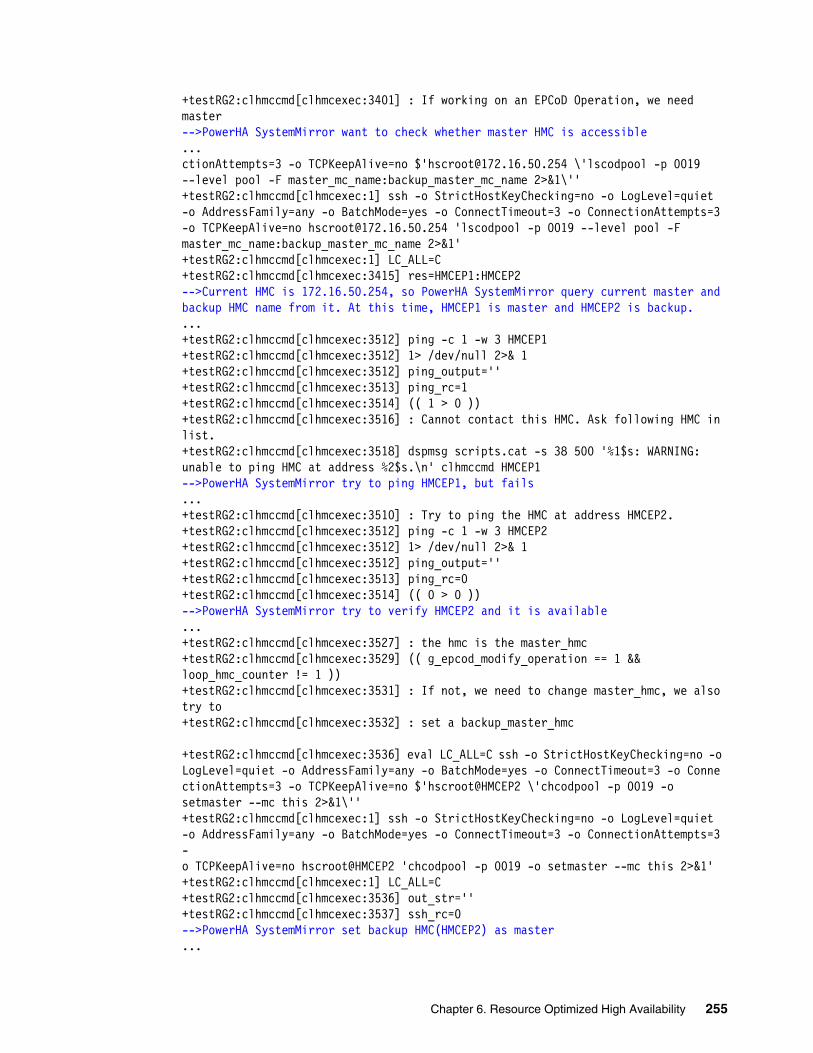
+testRG2:clhmccmd[clhmcexec:3401] : If working on an EPCoD Operation, we need master-->PowerHA SystemMirror want to check whether master HMC is accessible...ctionAttempts=3 -o TCPKeepAlive=no $'[email protected] \'lscodpool -p 0019 --level pool -F master_mc_name:backup_master_mc_name 2>&1\''+testRG2:clhmccmd[clhmcexec:1] ssh -o StrictHostKeyChecking=no -o LogLevel=quiet -o AddressFamily=any -o BatchMode=yes -o ConnectTimeout=3 -o ConnectionAttempts=3 -o TCPKeepAlive=no [email protected] 'lscodpool -p 0019 --level pool -F master_mc_name:backup_master_mc_name 2>&1'+testRG2:clhmccmd[clhmcexec:1] LC_ALL=C+testRG2:clhmccmd[clhmcexec:3415] res=HMCEP1:HMCEP2-->Current HMC is 172.16.50.254, so PowerHA SystemMirror query current master and backup HMC name from it. At this time, HMCEP1 is master and HMCEP2 is backup....+testRG2:clhmccmd[clhmcexec:3512] ping -c 1 -w 3 HMCEP1+testRG2:clhmccmd[clhmcexec:3512] 1> /dev/null 2>& 1+testRG2:clhmccmd[clhmcexec:3512] ping_output=''+testRG2:clhmccmd[clhmcexec:3513] ping_rc=1+testRG2:clhmccmd[clhmcexec:3514] (( 1 > 0 ))+testRG2:clhmccmd[clhmcexec:3516] : Cannot contact this HMC. Ask following HMC in list.+testRG2:clhmccmd[clhmcexec:3518] dspmsg scripts.cat -s 38 500 '%1$s: WARNING: unable to ping HMC at address %2$s.\n' clhmccmd HMCEP1-->PowerHA SystemMirror try to ping HMCEP1, but fails...+testRG2:clhmccmd[clhmcexec:3510] : Try to ping the HMC at address HMCEP2.+testRG2:clhmccmd[clhmcexec:3512] ping -c 1 -w 3 HMCEP2+testRG2:clhmccmd[clhmcexec:3512] 1> /dev/null 2>& 1+testRG2:clhmccmd[clhmcexec:3512] ping_output=''+testRG2:clhmccmd[clhmcexec:3513] ping_rc=0+testRG2:clhmccmd[clhmcexec:3514] (( 0 > 0 ))-->PowerHA SystemMirror try to verify HMCEP2 and it is available...+testRG2:clhmccmd[clhmcexec:3527] : the hmc is the master_hmc+testRG2:clhmccmd[clhmcexec:3529] (( g_epcod_modify_operation == 1 && loop_hmc_counter != 1 ))+testRG2:clhmccmd[clhmcexec:3531] : If not, we need to change master_hmc, we also try to+testRG2:clhmccmd[clhmcexec:3532] : set a backup_master_hmc
+testRG2:clhmccmd[clhmcexec:3536] eval LC_ALL=C ssh -o StrictHostKeyChecking=no -o LogLevel=quiet -o AddressFamily=any -o BatchMode=yes -o ConnectTimeout=3 -o ConnectionAttempts=3 -o TCPKeepAlive=no $'hscroot@HMCEP2 \'chcodpool -p 0019 -o setmaster --mc this 2>&1\''+testRG2:clhmccmd[clhmcexec:1] ssh -o StrictHostKeyChecking=no -o LogLevel=quiet -o AddressFamily=any -o BatchMode=yes -o ConnectTimeout=3 -o ConnectionAttempts=3 -o TCPKeepAlive=no hscroot@HMCEP2 'chcodpool -p 0019 -o setmaster --mc this 2>&1'+testRG2:clhmccmd[clhmcexec:1] LC_ALL=C+testRG2:clhmccmd[clhmcexec:3536] out_str=''+testRG2:clhmccmd[clhmcexec:3537] ssh_rc=0-->PowerHA SystemMirror set backup HMC(HMCEP2) as master...
Chapter 6. Resource Optimized High Availability 255
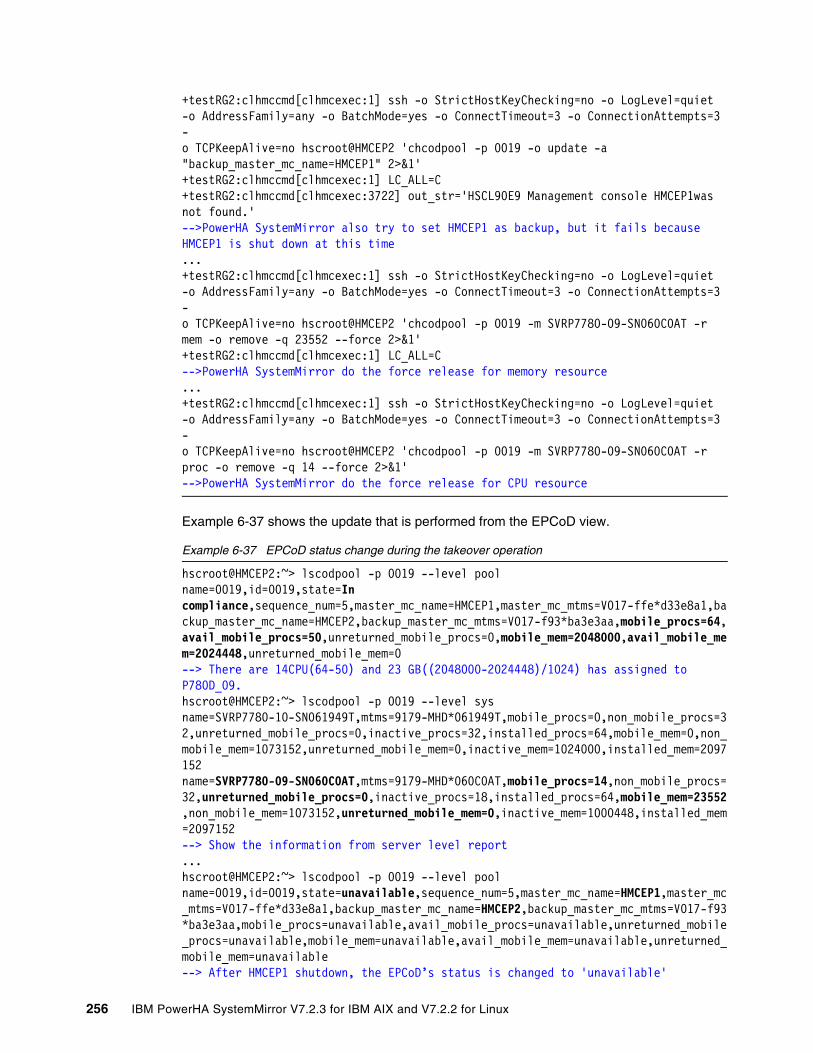
+testRG2:clhmccmd[clhmcexec:1] ssh -o StrictHostKeyChecking=no -o LogLevel=quiet -o AddressFamily=any -o BatchMode=yes -o ConnectTimeout=3 -o ConnectionAttempts=3 -o TCPKeepAlive=no hscroot@HMCEP2 'chcodpool -p 0019 -o update -a "backup_master_mc_name=HMCEP1" 2>&1'+testRG2:clhmccmd[clhmcexec:1] LC_ALL=C+testRG2:clhmccmd[clhmcexec:3722] out_str='HSCL90E9 Management console HMCEP1was not found.'-->PowerHA SystemMirror also try to set HMCEP1 as backup, but it fails because HMCEP1 is shut down at this time...+testRG2:clhmccmd[clhmcexec:1] ssh -o StrictHostKeyChecking=no -o LogLevel=quiet -o AddressFamily=any -o BatchMode=yes -o ConnectTimeout=3 -o ConnectionAttempts=3 -o TCPKeepAlive=no hscroot@HMCEP2 'chcodpool -p 0019 -m SVRP7780-09-SN060C0AT -r mem -o remove -q 23552 --force 2>&1'+testRG2:clhmccmd[clhmcexec:1] LC_ALL=C-->PowerHA SystemMirror do the force release for memory resource...+testRG2:clhmccmd[clhmcexec:1] ssh -o StrictHostKeyChecking=no -o LogLevel=quiet -o AddressFamily=any -o BatchMode=yes -o ConnectTimeout=3 -o ConnectionAttempts=3 -o TCPKeepAlive=no hscroot@HMCEP2 'chcodpool -p 0019 -m SVRP7780-09-SN060C0AT -r proc -o remove -q 14 --force 2>&1'-->PowerHA SystemMirror do the force release for CPU resource
Example 6-37 shows the update that is performed from the EPCoD view.
Example 6-37 EPCoD status change during the takeover operation
hscroot@HMCEP2:~> lscodpool -p 0019 --level poolname=0019,id=0019,state=In compliance,sequence_num=5,master_mc_name=HMCEP1,master_mc_mtms=V017-ffe*d33e8a1,backup_master_mc_name=HMCEP2,backup_master_mc_mtms=V017-f93*ba3e3aa,mobile_procs=64,avail_mobile_procs=50,unreturned_mobile_procs=0,mobile_mem=2048000,avail_mobile_mem=2024448,unreturned_mobile_mem=0--> There are 14CPU(64-50) and 23 GB((2048000-2024448)/1024) has assigned to P780D_09.hscroot@HMCEP2:~> lscodpool -p 0019 --level sys name=SVRP7780-10-SN061949T,mtms=9179-MHD*061949T,mobile_procs=0,non_mobile_procs=32,unreturned_mobile_procs=0,inactive_procs=32,installed_procs=64,mobile_mem=0,non_mobile_mem=1073152,unreturned_mobile_mem=0,inactive_mem=1024000,installed_mem=2097152name=SVRP7780-09-SN060C0AT,mtms=9179-MHD*060C0AT,mobile_procs=14,non_mobile_procs=32,unreturned_mobile_procs=0,inactive_procs=18,installed_procs=64,mobile_mem=23552,non_mobile_mem=1073152,unreturned_mobile_mem=0,inactive_mem=1000448,installed_mem=2097152--> Show the information from server level report...hscroot@HMCEP2:~> lscodpool -p 0019 --level poolname=0019,id=0019,state=unavailable,sequence_num=5,master_mc_name=HMCEP1,master_mc_mtms=V017-ffe*d33e8a1,backup_master_mc_name=HMCEP2,backup_master_mc_mtms=V017-f93*ba3e3aa,mobile_procs=unavailable,avail_mobile_procs=unavailable,unreturned_mobile_procs=unavailable,mobile_mem=unavailable,avail_mobile_mem=unavailable,unreturned_mobile_mem=unavailable--> After HMCEP1 shutdown, the EPCoD’s status is changed to 'unavailable'
256 IBM PowerHA SystemMirror V7.2.3 for IBM AIX and V7.2.2 for Linux
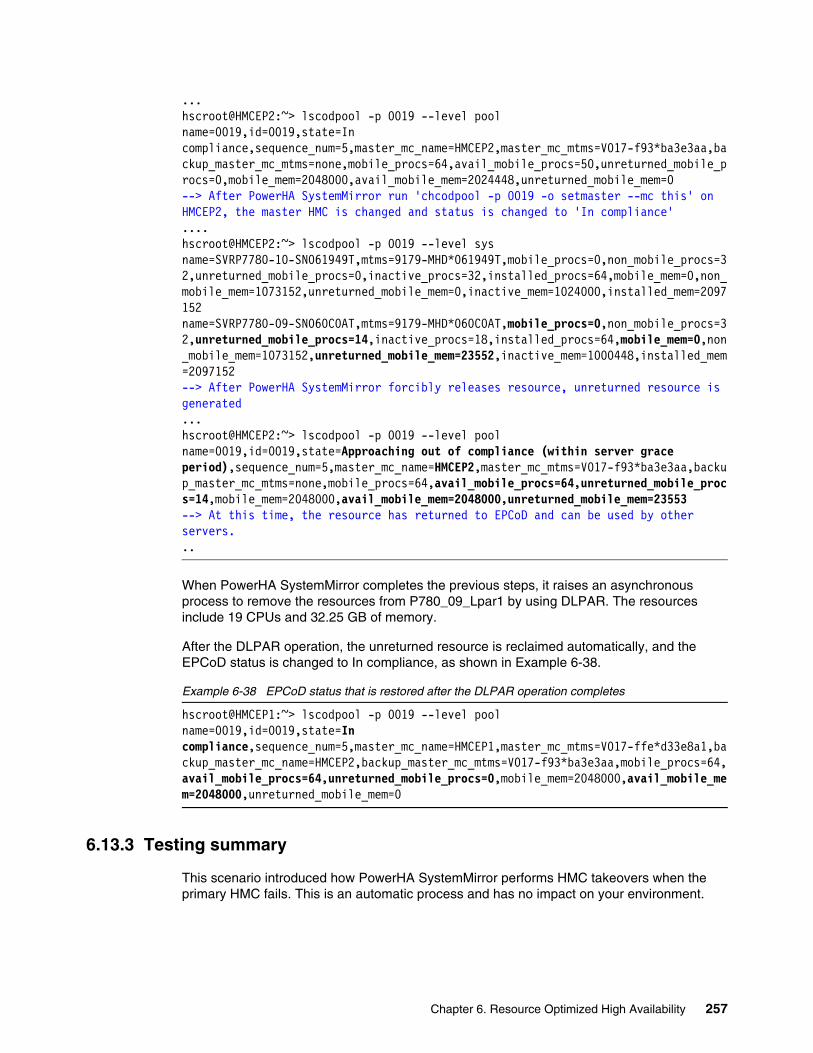
...hscroot@HMCEP2:~> lscodpool -p 0019 --level poolname=0019,id=0019,state=In compliance,sequence_num=5,master_mc_name=HMCEP2,master_mc_mtms=V017-f93*ba3e3aa,backup_master_mc_mtms=none,mobile_procs=64,avail_mobile_procs=50,unreturned_mobile_procs=0,mobile_mem=2048000,avail_mobile_mem=2024448,unreturned_mobile_mem=0--> After PowerHA SystemMirror run 'chcodpool -p 0019 -o setmaster --mc this' on HMCEP2, the master HMC is changed and status is changed to 'In compliance'....hscroot@HMCEP2:~> lscodpool -p 0019 --level sys name=SVRP7780-10-SN061949T,mtms=9179-MHD*061949T,mobile_procs=0,non_mobile_procs=32,unreturned_mobile_procs=0,inactive_procs=32,installed_procs=64,mobile_mem=0,non_mobile_mem=1073152,unreturned_mobile_mem=0,inactive_mem=1024000,installed_mem=2097152name=SVRP7780-09-SN060C0AT,mtms=9179-MHD*060C0AT,mobile_procs=0,non_mobile_procs=32,unreturned_mobile_procs=14,inactive_procs=18,installed_procs=64,mobile_mem=0,non_mobile_mem=1073152,unreturned_mobile_mem=23552,inactive_mem=1000448,installed_mem=2097152--> After PowerHA SystemMirror forcibly releases resource, unreturned resource is generated...hscroot@HMCEP2:~> lscodpool -p 0019 --level poolname=0019,id=0019,state=Approaching out of compliance (within server grace period),sequence_num=5,master_mc_name=HMCEP2,master_mc_mtms=V017-f93*ba3e3aa,backup_master_mc_mtms=none,mobile_procs=64,avail_mobile_procs=64,unreturned_mobile_procs=14,mobile_mem=2048000,avail_mobile_mem=2048000,unreturned_mobile_mem=23553--> At this time, the resource has returned to EPCoD and can be used by other servers...
When PowerHA SystemMirror completes the previous steps, it raises an asynchronous process to remove the resources from P780_09_Lpar1 by using DLPAR. The resources include 19 CPUs and 32.25 GB of memory.
After the DLPAR operation, the unreturned resource is reclaimed automatically, and the EPCoD status is changed to In compliance, as shown in Example 6-38.
Example 6-38 EPCoD status that is restored after the DLPAR operation completes
hscroot@HMCEP1:~> lscodpool -p 0019 --level pool name=0019,id=0019,state=In compliance,sequence_num=5,master_mc_name=HMCEP1,master_mc_mtms=V017-ffe*d33e8a1,backup_master_mc_name=HMCEP2,backup_master_mc_mtms=V017-f93*ba3e3aa,mobile_procs=64,avail_mobile_procs=64,unreturned_mobile_procs=0,mobile_mem=2048000,avail_mobile_mem=2048000,unreturned_mobile_mem=0
6.13.3 Testing summary
This scenario introduced how PowerHA SystemMirror performs HMC takeovers when the primary HMC fails. This is an automatic process and has no impact on your environment.
Chapter 6. Resource Optimized High Availability 257
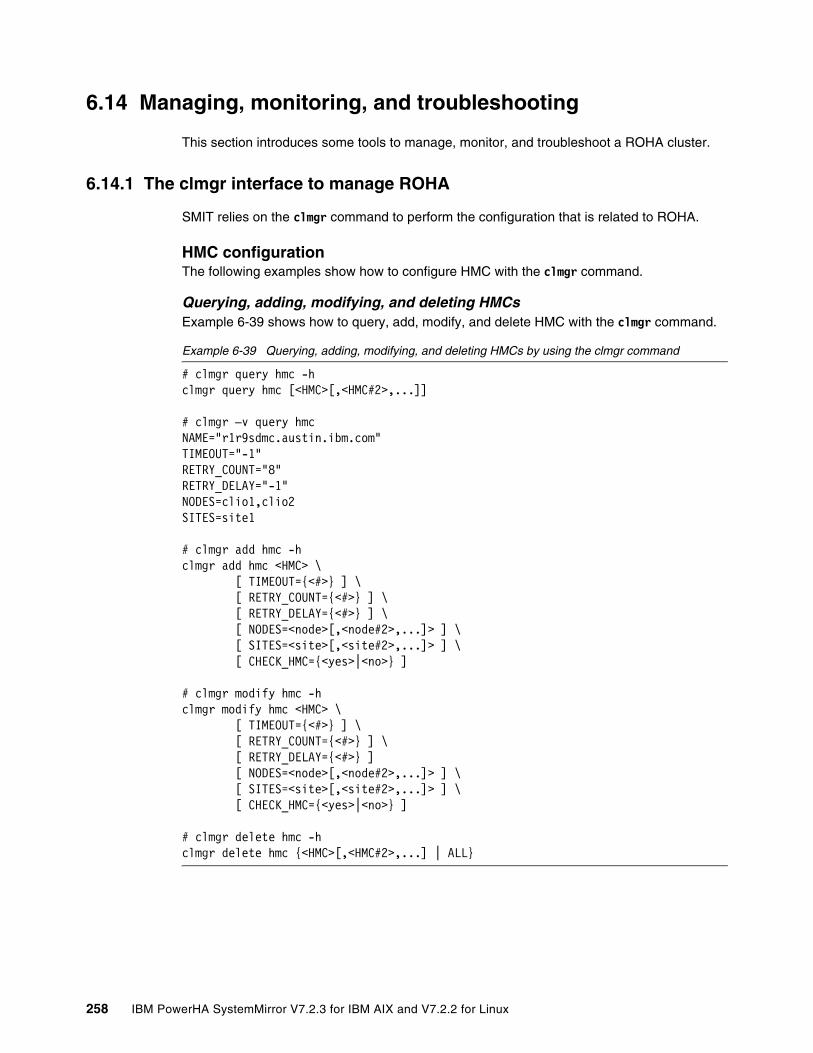
6.14 Managing, monitoring, and troubleshooting
This section introduces some tools to manage, monitor, and troubleshoot a ROHA cluster.
6.14.1 The clmgr interface to manage ROHA
SMIT relies on the clmgr command to perform the configuration that is related to ROHA.
HMC configurationThe following examples show how to configure HMC with the clmgr command.
Querying, adding, modifying, and deleting HMCsExample 6-39 shows how to query, add, modify, and delete HMC with the clmgr command.
Example 6-39 Querying, adding, modifying, and deleting HMCs by using the clmgr command
# clmgr query hmc -hclmgr query hmc [<HMC>[,<HMC#2>,...]]
# clmgr –v query hmcNAME="r1r9sdmc.austin.ibm.com"TIMEOUT="-1"RETRY_COUNT="8"RETRY_DELAY="-1"NODES=clio1,clio2SITES=site1
# clmgr add hmc -hclmgr add hmc <HMC> \ [ TIMEOUT={<#>} ] \ [ RETRY_COUNT={<#>} ] \ [ RETRY_DELAY={<#>} ] \ [ NODES=<node>[,<node#2>,...]> ] \ [ SITES=<site>[,<site#2>,...]> ] \ [ CHECK_HMC={<yes>|<no>} ]
# clmgr modify hmc -hclmgr modify hmc <HMC> \ [ TIMEOUT={<#>} ] \ [ RETRY_COUNT={<#>} ] \ [ RETRY_DELAY={<#>} ] [ NODES=<node>[,<node#2>,...]> ] \ [ SITES=<site>[,<site#2>,...]> ] \ [ CHECK_HMC={<yes>|<no>} ]
# clmgr delete hmc -hclmgr delete hmc {<HMC>[,<HMC#2>,...] | ALL}
258 IBM PowerHA SystemMirror V7.2.3 for IBM AIX and V7.2.2 for Linux
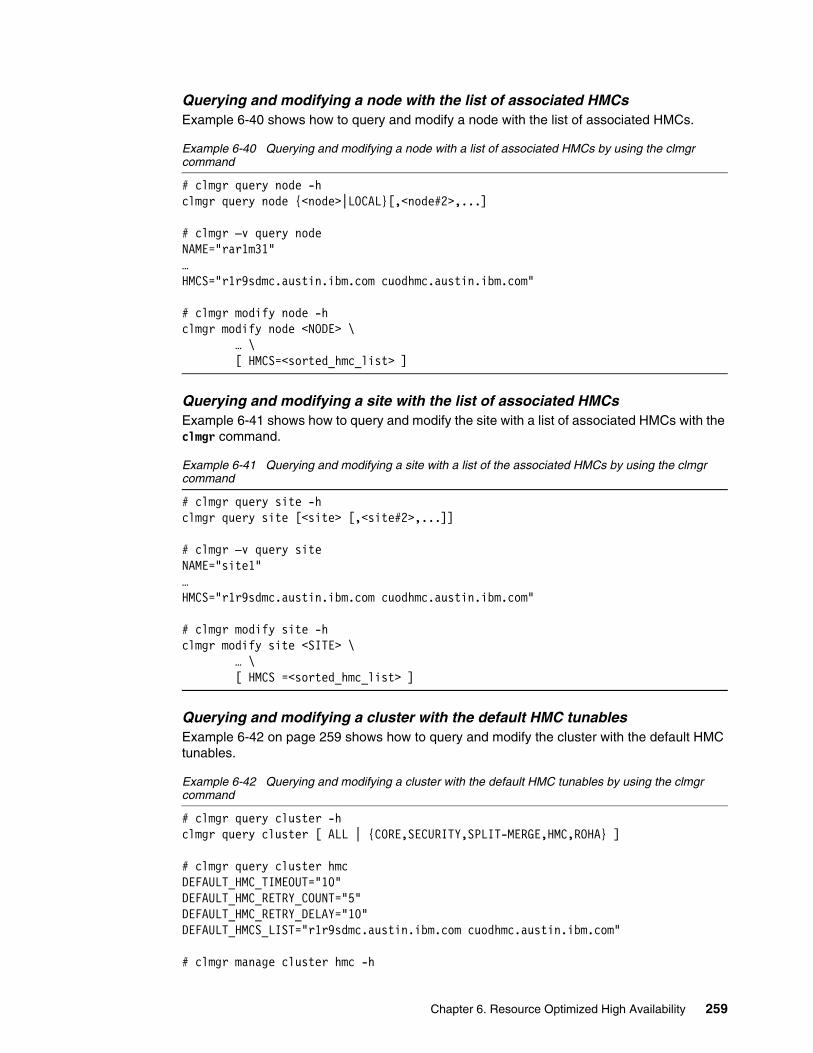
Querying and modifying a node with the list of associated HMCsExample 6-40 shows how to query and modify a node with the list of associated HMCs.
Example 6-40 Querying and modifying a node with a list of associated HMCs by using the clmgr command
# clmgr query node -hclmgr query node {<node>|LOCAL}[,<node#2>,...]
# clmgr –v query nodeNAME="rar1m31"…HMCS="r1r9sdmc.austin.ibm.com cuodhmc.austin.ibm.com"
# clmgr modify node -hclmgr modify node <NODE> \ … \ [ HMCS=<sorted_hmc_list> ]
Querying and modifying a site with the list of associated HMCsExample 6-41 shows how to query and modify the site with a list of associated HMCs with the clmgr command.
Example 6-41 Querying and modifying a site with a list of the associated HMCs by using the clmgr command
# clmgr query site -hclmgr query site [<site> [,<site#2>,...]]
# clmgr –v query siteNAME="site1"…HMCS="r1r9sdmc.austin.ibm.com cuodhmc.austin.ibm.com"
# clmgr modify site -hclmgr modify site <SITE> \ … \ [ HMCS =<sorted_hmc_list> ]
Querying and modifying a cluster with the default HMC tunablesExample 6-42 on page 259 shows how to query and modify the cluster with the default HMC tunables.
Example 6-42 Querying and modifying a cluster with the default HMC tunables by using the clmgr command
# clmgr query cluster -hclmgr query cluster [ ALL | {CORE,SECURITY,SPLIT-MERGE,HMC,ROHA} ]
# clmgr query cluster hmcDEFAULT_HMC_TIMEOUT="10"DEFAULT_HMC_RETRY_COUNT="5"DEFAULT_HMC_RETRY_DELAY="10"DEFAULT_HMCS_LIST="r1r9sdmc.austin.ibm.com cuodhmc.austin.ibm.com"
# clmgr manage cluster hmc -h
Chapter 6. Resource Optimized High Availability 259
clmgr manage cluster hmc \ [ DEFAULT_HMC_TIMEOUT=# ] \ [ DEFAULT_HMC_RETRY_COUNT=# ] \ [ DEFAULT_HMC_RETRY_DELAY=# ] \ [ DEFAULT_HMCS_LIST=<new_hmcs_list> ]
Hardware resource provisioningSMIT relies on the clmgr command to list or query the current values of the hardware resource provisioning and to add, modify, or delete the HACMPserver ODM data structure, as shown in Example 6-43.
Example 6-43 Hardware resource provisioning configuration by using the clmgr command
# clmgr query cod -hclmgr query cod [<APP>[,<APP#2>,...]]
# clmgr –v query codNAME="appli1_APPCON_A"USE_DESIRED=NoOPTIMAL_MEM="4"OPTIMAL_CPU="3"OPTIMAL_PU="2.5"OPTIMAL_PV="3.0"
# clmgr add cod -hclmgr add cod <APPCTRL> \ [ USE_DESIRED =<Yes|No> ] \ [ OPTIMAL_MEM=# ] \ [ OPTIMAL_CPU=# ] \ [ OPTIMAL_PU=#.# ] \ [ OPTIMAL_PV=#.# ]
# clmgr modify cod -hclmgr modify cod <APPCTRL> \ [ USE_DESIRED =<Yes|No> ] \ [ OPTIMAL_MEM=# ] \ [ OPTIMAL_CPU=# ] \ [ OPTIMAL_PU=#.# ] \ [ OPTIMAL_PV=# ]
# clmgr delete cod -hclmgr delete cod {<APPCTRL> | ALL}
Cluster tunablesSMIT relies on the clmgr command to query or modify cluster CoD tunables, as shown in Example 6-44.
Example 6-44 Cluster-wide tunables configuration by using the clmgr command
# clmgr query cluster -hclmgr query cluster [ ALL | {CORE,SECURITY,SPLIT-MERGE,HMC,ROHA} ]
# clmgr query cluster rohaALWAYS_START_RG="no"
260 IBM PowerHA SystemMirror V7.2.3 for IBM AIX and V7.2.2 for Linux
ADJUST_SPP_SIZE="yes"FORCE_SYNC_RELEASE="no"AGREE_TO_COD_COSTS="no"COD_ONOFF_DAYS="30"RESOURCE_ALLOCATION_ORDER="free_pool_first"
# clmgr manage cluster roha –hclmgr manage cluster roha \ [ ALWAYS_START_RG={yes|no} ] \ [ ADJUST_SPP_SIZE={yes|no} ] \ [ FORCE_SYNC_RELEASE={yes|no} ] \ [ AGREE_TO_COD_COSTS={yes|no} ] \ [ COD_ONOFF_DAYS=<new_number_of_days> ] \
6.14.2 Changing the DLPAR and CoD resources dynamically
You can change the DLPAR and CoD resource requirements for application controllers without stopping the cluster services. Synchronize the cluster after making the changes.
The new configuration is not reflected until the next event that causes the application (hence the RG) to be released and reacquired on another node. A change in the resource requirements for CPUs, memory, or both does not cause the recalculation of the DLPAR resources. PowerHA SystemMirror does not stop and restart the application controllers solely for making the application provisioning changes.
If another dynamic reconfiguration change causes the RGs to be released and reacquired, the new resource requirements for DLPAR and CoD are used at the end of this dynamic reconfiguration event.
6.14.3 Viewing the ROHA report
The clmgr view report roha command is intended to query all the ROHA data so that a report and a summary can be presented to the user.
The output of this command includes the following sections:
� CEC name� LPAR name� LPAR profile (min, desired, and max)
Important: There is a new variable that is shown in Example 6-44:
RESOURCE_ALLOCATION_ORDER
The resource allocation order specifies the order in which resources are allocated. The resources are released in the reverse order in which they are allocated. The default value for this field is Free Pool First.
Select Free Pool First to acquire resources from the free pool. If the amount of resources in the free pool is insufficient, PowerHA SystemMirror first requests more resources from the Enterprise Pool and then from the CoD pool.
Select Enterprise Pool First to acquire the resources from the Enterprise Pool. If the amount of resources in the CoD pool is insufficient, PowerHA SystemMirror first requests more resources from the free pool and then from the CoD pool.
Chapter 6. Resource Optimized High Availability 261

� LPAR processing mode� If shared (capped or uncapped, SPP name, and SPP size)� LPAR current level of resources (mem, cpu, and pu)� Number and names of AC and optimal level of resources, and the sum of them� Release mode (sync/async), which is computed at release time� All On/Off CoD information of the CECs� All EPCoD information of the CECs
There is an example of the report in 6.10.4, “Showing the ROHA configuration” on page 238.
6.14.4 Troubleshooting DLPAR and CoD operations
This section provides some troubleshooting action for the DLPAR and CoD operations.
Log filesThere are several log files that you can use to track the ROHA operation process.
Logs for verificationIn Verify and Synchronize Cluster Configuration, there are some log files that are generated in the /var/hacmp/clverify directory. The clverify.log and the ver_collect_dlpar.log files are useful for debugging if the process fails. For example, after performing the process, there is some error information appearing in the console output (/smit.log), as shown in Example 6-45.
Example 6-45 Error information about the console or /smit.log
WARNING: At the time of verification, node ITSO_S2Node1 would not have been able to acquire sufficient resources to run Resource Group(s) RG1 (multiple Resource Groups in case of node collocation). Please note that the amount of resources and CoD resources available at the time of verification may be different from the amount available at the time of an actual acquisition of resources. Reason : 708.00 GB of memory that is needed will exceed LPAR maximum of 160.00 GB. 12.50 Processing Unit(s) needed will exceed LPAR maximum of 9.00 Processing Unit(s).ERROR: At the time of verification, no node (out of 2) was able to acquire sufficient resources to run Resource Group(s) RG1
You can get detailed information to help you identify the errors’ root causes from the clverify.log and the ver_collect_dlpar.log files, as shown in Example 6-46.
Example 6-46 Detailed information in ver_collect_dlpar.log
[ROHALOG:2490918:(19.127)] clmanageroha: ERROR: 708.00 GB of memory that is needed will exceed LPAR maximum of 160.00 GB.[ROHALOG:2490918:(19.130)] ===== Compute ROHA Memory =====[ROHALOG:2490918:(19.133)] minimal + optimal + running = total <=> current <=> maximum[ROHALOG:2490918:(19.137)] 8.00 + 700.00 + 0.00 = 708.00 <=> 32.00 <=> 160.00 : => 0.00 GB[ROHALOG:2490918:(19.140)] ============ End ==============[ROHALOG:2490918:(19.207)] clmanageroha: ERROR: 12.50 Processing Unit(s) needed will exceed LPAR maximum of 9.00 Processing Unit(s).[ROHALOG:2490918:(19.212)] === Compute ROHA PU(s)/VP(s) ==[ROHALOG:2490918:(19.214)] minimal + optimal + running = total <=> current <=> maximum[ROHALOG:2490918:(19.217)] 1 + 12 + 0 = 13 <=> 3 <=> 18 : => 0 Virtual Processor(s)[ROHALOG:2490918:(19.220)] minimal + optimal + running = total <=> current <=> maximum[ROHALOG:2490918:(19.223)] 0.50 + 12.00 + 0.00 = 12.50 <=> 1.50 <=> 9.00 : => 0.00 Processing Unit(s)
262 IBM PowerHA SystemMirror V7.2.3 for IBM AIX and V7.2.2 for Linux
[ROHALOG:2490918:(19.227)] ============ End ==============[ROHALOG:2490918:(19.231)] INFO: received error code 21.[ROHALOG:2490918:(19.233)] No or no more reassessment.[ROHALOG:2490918:(19.241)] An error occurred while performing acquire operation.
PowerHA SystemMirror simulates the resource acquisition process based on the current configuration and generates the log in the ver_collect_dlpar.log file.
Logs for resource group online and offlineDuring the process of resource online or offline, the hacmp.out and the async_release.log logs are useful for monitoring or debugging. In some RG offline scenarios, the DLPAR remove operation is a synchronous process. In this case, PowerHA SystemMirror generates the DLPAR operation logs in the async_release.log file. In a synchronous process, only hacmp.out is used.
AIX errpt outputSometimes, the DLPAR operation fails, and AIX generates some errors that are found in the errpt output, as shown in Example 6-47.
Example 6-47 The errpt error report
252D3145 1109140415 T S mem DR failed by reconfig handler47DCD753 1109140415 T S PROBEVUE DR: memory remove failed by ProbeVue rec
You can identify the root cause of the failure by using this information.
HMC commandsYou can use the following commands on the HMC to do monitoring or maintenance. For a detailed description of the commands, see the man page for the HMC.
The lshwres commandThis command shows the LPAR minimum, LPAR maximum, the total amount of memory, and the number of CPUs that are currently allocated to the LPAR values.
The lssyscfg commandThis command verifies that the LPAR node is DLPAR-capable.
The chhwres commandThis command runs the DLPAR operations on the HMC outside of PowerHA SystemMirror to manually change the LPAR minimum, LPAR minimum, and LPAR required values for the LPAR. This command might be necessary if PowerHA SystemMirror issues an error or a warning during the verification process if you requested DLPAR and CoD resources in PowerHA SystemMirror.
The lscod commandThis command shows the system CoD of the current configuration.
The chcod commandThis command runs the CoD operations on the HMC outside of PowerHA SystemMirror and manually changes the Trial CoD, On/Off CoD, and so on, of the activated resources. This command is necessary if PowerHA SystemMirror issues an error or a warning during the verification process, or if you want to use DLPAR and On/Off CoD resources in PowerHA SystemMirror.
Chapter 6. Resource Optimized High Availability 263

The lscodpool commandThis command shows the system Enterprise Pool current configuration.
The chcodpool commandThis command runs the EPCoD operations on the HMC outside of PowerHA SystemMirror and manually changes the Enterprise Pool capacity resources. This command is necessary if PowerHA SystemMirror issues an error or a warning during the verification process, or if you want to use DLPAR, On/Off CoD, or EPCoD resources in PowerHA SystemMirror.
264 IBM PowerHA SystemMirror V7.2.3 for IBM AIX and V7.2.2 for Linux
Chapter 7. Geographical Logical Volume Manager configuration assistant
This chapter covers the following topics:
� Introduction
� Prerequisites
� Using the GLVM wizard
7
© Copyright IBM Corp. 2019. All rights reserved. 265
7.1 Introduction
The following sections introduce Geographical Logical Volume Manager (GLVM) and the configuration assistant. More details, including planning and implementing, can be found in the base documentation available at IBM Knowledge Center.
7.1.1 Geographical Logical Volume Manager
GLVM provides an IP-based data mirroring capability for the data at geographically separated sites. It protects the data against total site failure by remote mirroring, and supports unlimited distance between participating sites.
GLVM for PowerHA SystemMirror Enterprise Edition provides automated disaster recovery (DR) capability by using the AIX Logical Volume Manager (LVM) and GLVM subsystems to create volume groups (VGs) and logical volumes that span across two geographically separated sites.
You can use the GLVM technology as a stand-alone method or use it in combination with PowerHA SystemMirror Enterprise Edition.
The software increases data availability by providing continuing service during hardware or software outages (or both), planned or unplanned, for a two-site cluster. The distance between sites can be unlimited, and both sites can access the mirrored VGs serially over IP-based networks.
Also, it enables your business application to continue running at the takeover system at a remote site while the failed system is recovering from a disaster or a planned outage.
The software takes advantage of the following software components to reduce downtime and recovery time during DR:
� AIX LVM subsystem and GLVM� TCP/IP subsystem� PowerHA SystemMirror for AIX cluster management
Definitions and conceptsThis section defines the basic concepts of GLVM:
� Remote physical volume (RPV)
A pseudo-device driver that provides access to remote disks as though they were locally attached. The remote system must be connected by way of the IP network. The distance between the sites is limited by the latency and bandwidth of the connecting networks.
The RPV consists of two parts:
– RPV Client:
This is a pseudo-device driver that runs on the local machine and allows the AIX LVM to access RPVs as though they were local. The RPV clients are seen as hdisk devices, which are logical representations of the RPV.
The RPV client device driver appears as an ordinary disk device. For example, the RPV client device hdisk8 has all its I/O directed to the remote RPV server. It also has no knowledge at all about the nodes, networks, and so on.
266 IBM PowerHA SystemMirror V7.2.3 for IBM AIX and V7.2.2 for Linux
When configuring the RPV client, the following details are defined:
• The IP address of the RPV server.
• The local IP address (defines the network to use).
• The timeout. This field is primarily for the stand-alone GLVM option, as PowerHA overwrites this field with the cluster’s config_too_long time. In a PowerHA cluster, this is the worst case scenario because PowerHA detects problems with the remote node before then.
The SMIT fast path to configure the RPV clients is smitty rpvclient.
– RPV server
The RPV server runs on the remote machine, one for each physical volume that is being replicated. The RPV server can listen to many remote RPV clients on different hosts to handle fallover.
The RPV server is an instance of the kernel extension of the RPV device driver with names such as rpvserver0, and is not an actual physical device.
When configuring the RPV server, the following items are defined:
• The physical volume identifier (PVID) of the local physical volume.
• The IP addresses of the RPV clients (comma-separated).
– Geographically mirrored volume group (GMVG)
A VG that consists of local PVs and RPVs. Strict rules apply to GMVGs to ensure that you have a complete copy of the mirror at each site. For this reason, the superstrict allocation policy is required for each logical volume in a GMVG.
PowerHA SystemMirror Enterprise Edition also expects each logical volume in a GMVG to be mirrored, and for asynchronous replication it requires AIX mirror pools. GMVGs are managed by PowerHA and recognized as a separate class of resource (GMVG Replicated Resources), so they have their own events. PowerHA verification issued a warning if there are resource groups (RGs) that contain GMVG resources that do not have the forced varyon flag set and if quorum is not disabled.
The SMIT fast path to configure the RPV servers is smitty rpvserver.
PowerHA enforces the requirement that each physical volume that is part of a VG with RPV clients has the reverse relationship defined. This, at a minimum, means that every GMVG consists of two physical volumes on each site. One disk is locally attached, and the other is a logical representation of the RPV.
– GLVM utilities
GLVM provides SMIT menus to create the GMVGs and the logical volumes. Although they are not required because they perform the same function as the equivalent SMIT menus in the background, they do control the location of the logical volumes to ensure proper placement of mirror copies. If you use the standard commands to configure your GMVGs, use the GLVM verification utility.
– Network types:
XD_data A network that can be used only for data replication. A maximum of four XD_data networks can be defined. Etherchannel is supported for this network type. This network supports adapter swap, but not fallover to another node. Heartbeat packets are also sent over this network.
XD_ip An IP-based network that is used for participation in heartbeating and client communication.
Chapter 7. Geographical Logical Volume Manager configuration assistant 267
– Mirror pools:
Mirror pools make it possible to divide the physical volumes of a VG into separate pools.
A mirror pool is made up of one or more physical volumes. Each physical volume can belong to only one mirror pool at a time. When creating a logical volume, each copy of the logical volume being created can be assigned to a mirror pool. Logical volume copies that are assigned to a mirror pool allocate only partitions from the physical volumes in that mirror pool, which can restrict the disks that a logical volume copy can use.
Without mirror pools, the only way to restrict which physical volume is used for allocation when creating or extending a logical volume is to use a map file. Thus, using mirror pools greatly simplify this process. Think of mirror pools as an operating-system-level feature similar to storage consistency groups that are used when replicating data.
Although mirror pools are an AIX and not a GLVM-specific component, it is a best practice to use them in all GLVM configurations. However, they are required only when configuring asynchronous mode of GLVM.
– aio_cache logical volumes
An aio_cache is a special type of logical volume that stores write requests locally while it waits for the data to be written to a remote disk. The size of this logical volume dictates how far behind the data is allowed to be between the two sites. There is one defined at each site and they are not mirrored. Similar to data volumes, these volumes must be protected locally, usually by some form of RAID.
GLVM example Figure 7-1 on page 269 shows a relatively basic two-site GLVM implementation. It consists of only one node at each site, although PowerHA does support multiple nodes within a site.
The New York site is considered the primary site because its node primarily hosts RPV clients. The Texas site is the standby site because it primarily hosts RPV servers. However, each site contains both RPV servers and clients based on where the resources are running.
Each site has two data disk volumes that are physically associated with the site node. In this case, the disks are hdisk1 and hdisk2 at both sites. However, the hdisk names do not need to match across sites. These two disks are also configured as RPV servers on each node. In turn, these are logically linked to the RPV clients at the opposite site. This configuration creates two more pseudo-device disks that are known as hdisk3 and hdisk4. Their associated disk definitions clearly state that they are RPV clients and not real physical disks.
268 IBM PowerHA SystemMirror V7.2.3 for IBM AIX and V7.2.2 for Linux

Figure 7-1 GLVM example configuration
7.1.2 GLVM configuration assistant
The GLVM configuration assistant was introduced in PowerHA SystemMirror for AIX Enterprise Edition 6.1.0 primarily for asynchronous mode. It has been continuously enhanced over its release cycle and also includes support for synchronous mode. It is also often referred to as the GLVM wizard. The idea of the GLVM wizard is to streamline an otherwise cumbersome set of procedures down to minimal inputs:
� It takes the name of the nodes from both sites.� It prompts for the selection of PVIDs to be mirrored on each site.� When configuring async GLVM, it also prompts for the size of the aio_cache.
Given this information, the GLVM wizard configures all of the following items:
� GMVGs.� RPV servers.� RPV clients.� Mirror pools.� RG.� Synchronizes the cluster.
Chapter 7. Geographical Logical Volume Manager configuration assistant 269
The GMVG is created as a scalable VG. It also activates the rpvserver at the remote site and the rpvclient on the local site and leaves the VG active. The node upon which the GLVM wizard is run becomes the primary node, and is considered the local site. The RG is created with the key settings that are shown in Example 7-1.
Example 7-1 GLVM wizard resource group settings
Startup Policy Online On Home Node OnlyFallover Policy Fallover To Next Priority Node In The ListFallback Policy Never FallbackSite Relationship Prefer Primary SiteVolume Groups asyncglvmUse forced varyon for volume groups, if necessary trueGMVG Replicated Resources asyncglvm
The GMVG does not do the following actions:
� Create any data-specific logical volumes or file systems within the GMVGs.
� Add any other resources into the RG (for example, service IPs and application controllers).
� Work for more than one GMVG.
This process can be used for the first GMVG, but more GMVGs must be manually created and added into an RG.
7.2 Prerequisites
Before you use the GLVM wizard, you must have the following prerequisites:
� Extra file sets from the PowerHA SystemMirror Enterprise Edition media:
– cluster.xd.base
– cluster.xd.glvm
– cluster.xd.license
– glvm.rpv.client
– glvm.rpv.server
� A linked cluster that is configured with sites.
� A repository disk that is defined at each site.
� The verification and synchronization process completes successfully on the cluster.
� XD_data networks with persistent IP labels are defined on the cluster.
� The network communication between the local site and remote site is working.
� All PowerHA SystemMirror services are active on both nodes in the cluster.
� The /etc/hosts file on both sites contains all of the host IP, service IP, and persistent IP labels that you want to use in the GLVM configuration.
� The remote site must have enough free disks and enough free space on those disks to support all of the local site VGs that are created for geographical mirroring.
270 IBM PowerHA SystemMirror V7.2.3 for IBM AIX and V7.2.2 for Linux
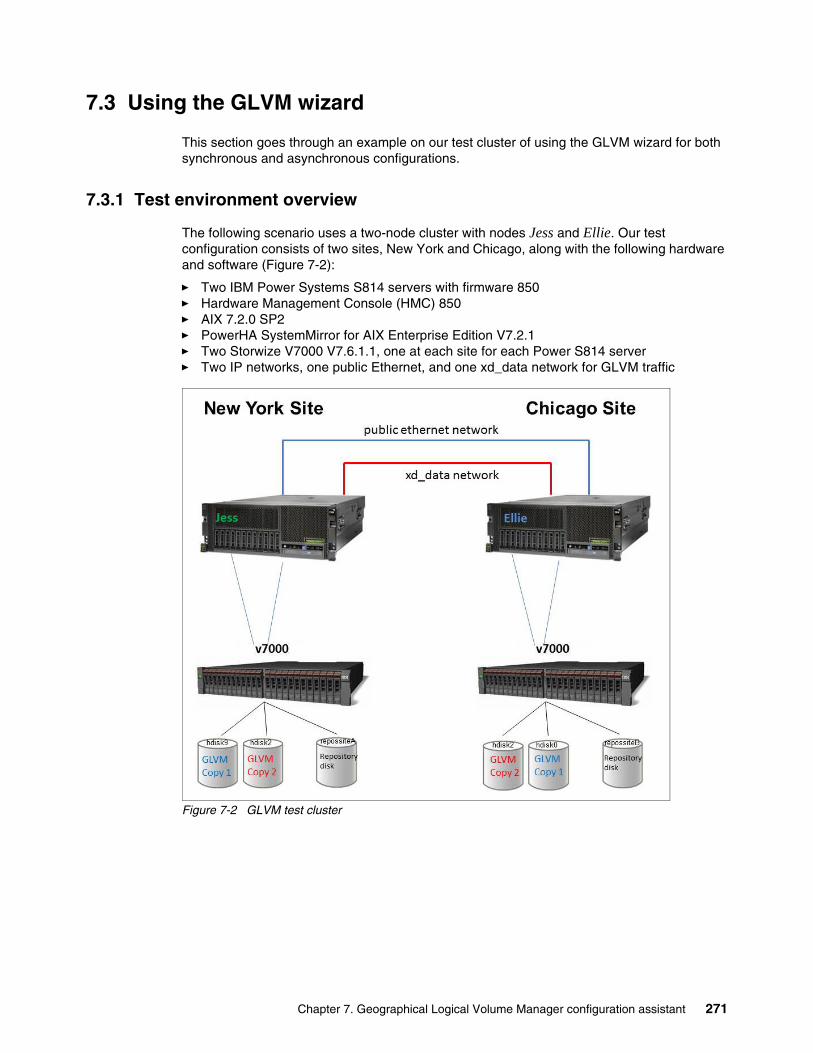
7.3 Using the GLVM wizard
This section goes through an example on our test cluster of using the GLVM wizard for both synchronous and asynchronous configurations.
7.3.1 Test environment overview
The following scenario uses a two-node cluster with nodes Jess and Ellie. Our test configuration consists of two sites, New York and Chicago, along with the following hardware and software (Figure 7-2):
� Two IBM Power Systems S814 servers with firmware 850� Hardware Management Console (HMC) 850� AIX 7.2.0 SP2� PowerHA SystemMirror for AIX Enterprise Edition V7.2.1� Two Storwize V7000 V7.6.1.1, one at each site for each Power S814 server� Two IP networks, one public Ethernet, and one xd_data network for GLVM traffic
Figure 7-2 GLVM test cluster
Chapter 7. Geographical Logical Volume Manager configuration assistant 271
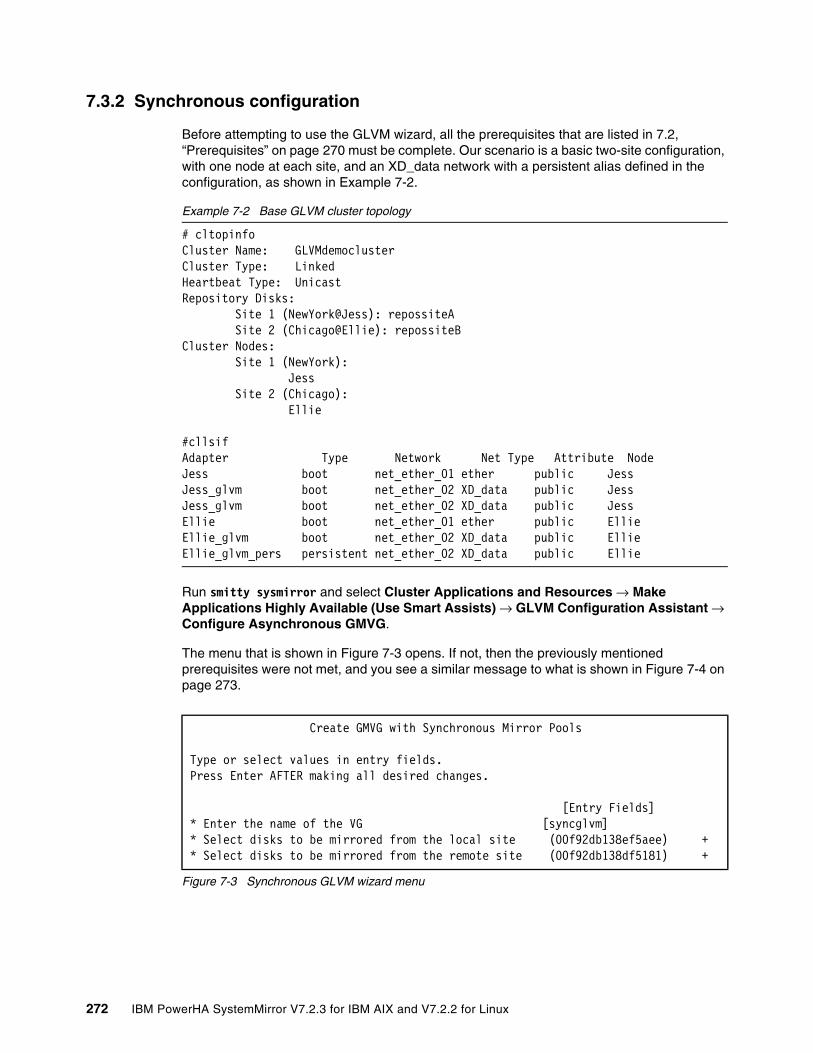
7.3.2 Synchronous configuration
Before attempting to use the GLVM wizard, all the prerequisites that are listed in 7.2, “Prerequisites” on page 270 must be complete. Our scenario is a basic two-site configuration, with one node at each site, and an XD_data network with a persistent alias defined in the configuration, as shown in Example 7-2.
Example 7-2 Base GLVM cluster topology
# cltopinfoCluster Name: GLVMdemoclusterCluster Type: LinkedHeartbeat Type: UnicastRepository Disks: Site 1 (NewYork@Jess): repossiteA Site 2 (Chicago@Ellie): repossiteBCluster Nodes: Site 1 (NewYork): Jess Site 2 (Chicago): Ellie
#cllsifAdapter Type Network Net Type Attribute Node Jess boot net_ether_01 ether public Jess Jess_glvm boot net_ether_02 XD_data public Jess Jess_glvm boot net_ether_02 XD_data public JessEllie boot net_ether_01 ether public Ellie Ellie_glvm boot net_ether_02 XD_data public Ellie Ellie_glvm_pers persistent net_ether_02 XD_data public Ellie
Run smitty sysmirror and select Cluster Applications and Resources → Make Applications Highly Available (Use Smart Assists) → GLVM Configuration Assistant → Configure Asynchronous GMVG.
The menu that is shown in Figure 7-3 opens. If not, then the previously mentioned prerequisites were not met, and you see a similar message to what is shown in Figure 7-4 on page 273.
Figure 7-3 Synchronous GLVM wizard menu
Create GMVG with Synchronous Mirror Pools
Type or select values in entry fields.Press Enter AFTER making all desired changes.
[Entry Fields]* Enter the name of the VG [syncglvm]* Select disks to be mirrored from the local site (00f92db138ef5aee) +* Select disks to be mirrored from the remote site (00f92db138df5181) +
272 IBM PowerHA SystemMirror V7.2.3 for IBM AIX and V7.2.2 for Linux
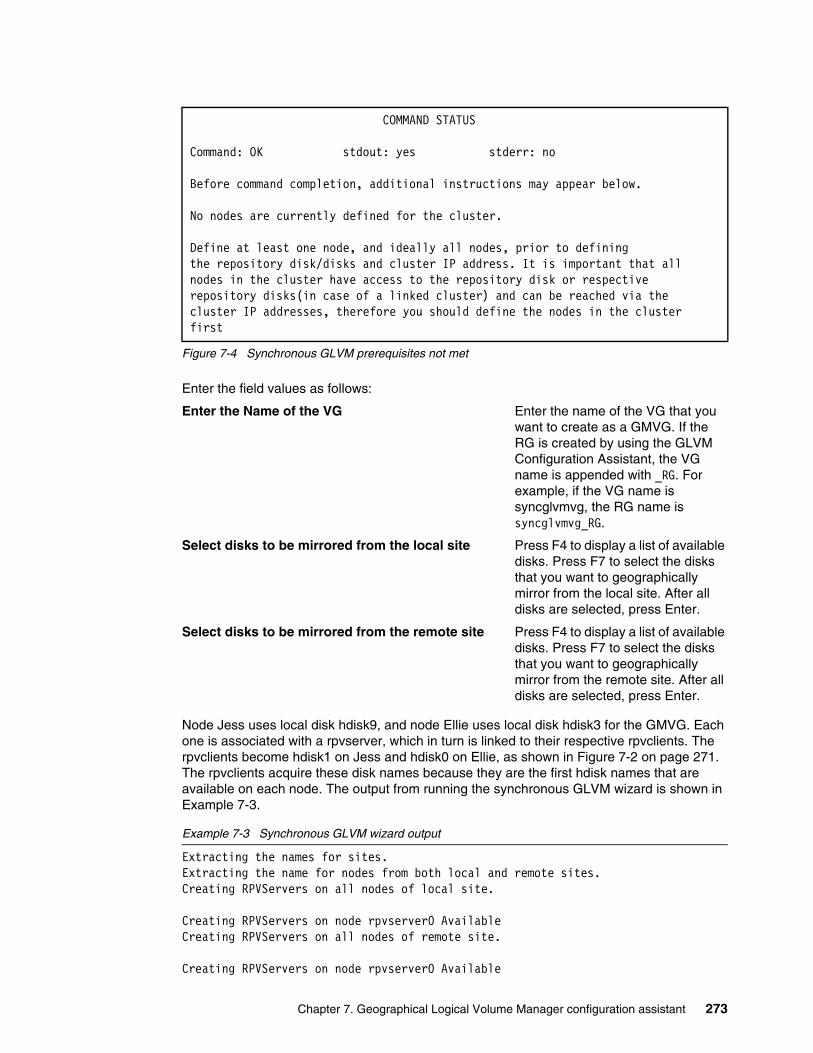
Figure 7-4 Synchronous GLVM prerequisites not met
Enter the field values as follows:
Enter the Name of the VG Enter the name of the VG that you want to create as a GMVG. If the RG is created by using the GLVM Configuration Assistant, the VG name is appended with _RG. For example, if the VG name is syncglvmvg, the RG name is syncglvmvg_RG.
Select disks to be mirrored from the local site Press F4 to display a list of available disks. Press F7 to select the disks that you want to geographically mirror from the local site. After all disks are selected, press Enter.
Select disks to be mirrored from the remote site Press F4 to display a list of available disks. Press F7 to select the disks that you want to geographically mirror from the remote site. After all disks are selected, press Enter.
Node Jess uses local disk hdisk9, and node Ellie uses local disk hdisk3 for the GMVG. Each one is associated with a rpvserver, which in turn is linked to their respective rpvclients. The rpvclients become hdisk1 on Jess and hdisk0 on Ellie, as shown in Figure 7-2 on page 271. The rpvclients acquire these disk names because they are the first hdisk names that are available on each node. The output from running the synchronous GLVM wizard is shown in Example 7-3.
Example 7-3 Synchronous GLVM wizard output
Extracting the names for sites.Extracting the name for nodes from both local and remote sites.Creating RPVServers on all nodes of local site.
Creating RPVServers on node rpvserver0 AvailableCreating RPVServers on all nodes of remote site. Creating RPVServers on node rpvserver0 Available
COMMAND STATUS
Command: OK stdout: yes stderr: no
Before command completion, additional instructions may appear below.
No nodes are currently defined for the cluster.
Define at least one node, and ideally all nodes, prior to definingthe repository disk/disks and cluster IP address. It is important that allnodes in the cluster have access to the repository disk or respectiverepository disks(in case of a linked cluster) and can be reached via thecluster IP addresses, therefore you should define the nodes in the cluster first
Chapter 7. Geographical Logical Volume Manager configuration assistant 273

Creating RPVServers on node rpvserver0 AvailableCreating RPVClients on all nodes of local site. Creating RPVClients on node hdisk1 AvailableCreating RPVClients on all nodes of remote site. Creating RPVClients on node hdisk0 AvailableChanging RPVServers and RPVClients to defined and available state accordinglyto facilitate the creation of VG. Changing RPVServer rpvserver0 Defined
Changing RPVClient hdisk0 DefinedGenerating Unique Names for Mirror pools and Resource Group.Generating resource group (RG) name.Unique names generated. Creating VG syncglvmvg Creating first mirror pool Extending the VG to RPVClient disks and creating second mirror pool
Creating SYNC Mirror Pools Varying on volume group: Setting attributes for 0516-1804 chvg: The quorum change takes effect immediately. Varying off volume group: Changing RPVClient hdisk1 Defined Changing RPVServer rpvserver0 Defined Changing RPVServer rpvserver0 Available
Importing the VG Changing RPVClient hdisk0 Available Importing the VG synclvodm: No logical volumes in volume group syncglvmvg.syncglvmvg
Varying on volume group: Setting attributes for 0516-1804 chvg: The quorum change takes effect immediately.
Varying off volume group: Changing RPVClient hdisk0 DefinedDefinition of VG is available on all the nodes of the cluster. Changing RPVServer rpvserver0 Defined
274 IBM PowerHA SystemMirror V7.2.3 for IBM AIX and V7.2.2 for Linux
Creating a resource group. Adding VG Verifying and synchronising the cluster configuration ...
Verification to be performed on the following: Cluster Topology Cluster Resources
Retrieving data from available cluster nodes. This could take a few minutes.
Start data collection on node Jess Start data collection on node Ellie Collector on node Jess completed Collector on node Ellie completed Data collection completeWARNING: No backup repository disk is UP and not already part of a VG for nodes: - Jess - Ellie
Completed 10 percent of the verification checks
WARNING: There are IP labels known to PowerHA SystemMirror and not listed in file /usr/es/sbin/cluster/etc/clhosts.client on node: Jess. Clverify can automatically populate this file to be used on a client node, if executed in auto-corrective mode.WARNING: There are IP labels known to PowerHA SystemMirror and not listed in file /usr/es/sbin/cluster/etc/clhosts.client on node: Ellie. Clverify can automatically populate this file to be used on a client node, if executed in auto-corrective mode.WARNING: An XD_data network has been defined, but no additionalXD heartbeat network is defined. It is strongly recommended thatan XD_ip network be configured in order to help preventcluster partitioning if the XD_data network fails. Cluster partitioningmay lead to data corruption for your replicated resources. Completed 30 percent of the verification checksThis cluster uses Unicast heartbeat Completed 40 percent of the verification checks Completed 50 percent of the verification checks Completed 60 percent of the verification checks Completed 70 percent of the verification checks
Verifying XD Solutions...
Completed 80 percent of the verification checks Completed 90 percent of the verification checksVerifying additional prerequisites for Dynamic Reconfiguration......completed.
Committing any changes, as required, to all available nodes...Adding any necessary PowerHA SystemMirror for AIX entries to /etc/inittab and/etc/rc.net for IP address Takeover on node Jess.Checking for any added or removed nodes1 tunable updated on cluster GLVMdemocluster.Adding any necessary PowerHA SystemMirror for AIX entries to /etc/inittab and/etc/rc.net for IP address Takeover on node Ellie.
Chapter 7. Geographical Logical Volume Manager configuration assistant 275
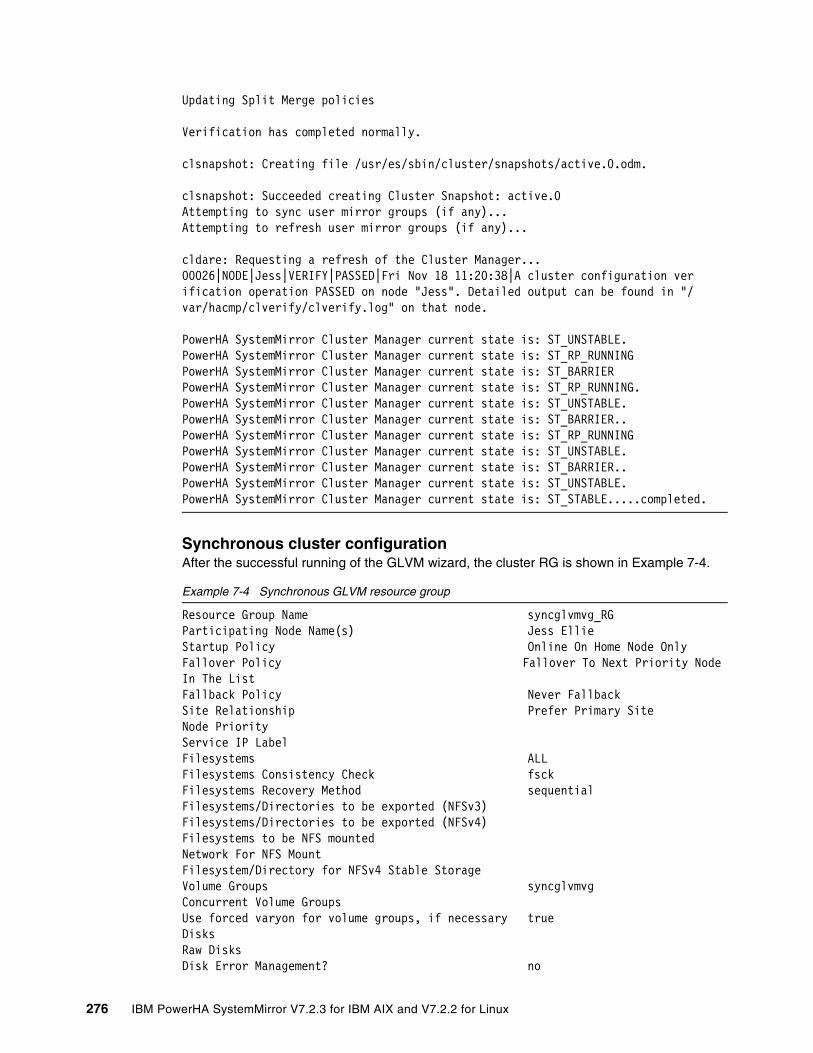
Updating Split Merge policies
Verification has completed normally.
clsnapshot: Creating file /usr/es/sbin/cluster/snapshots/active.0.odm.
clsnapshot: Succeeded creating Cluster Snapshot: active.0Attempting to sync user mirror groups (if any)...Attempting to refresh user mirror groups (if any)...
cldare: Requesting a refresh of the Cluster Manager...00026|NODE|Jess|VERIFY|PASSED|Fri Nov 18 11:20:38|A cluster configuration verification operation PASSED on node "Jess". Detailed output can be found in "/var/hacmp/clverify/clverify.log" on that node.
PowerHA SystemMirror Cluster Manager current state is: ST_UNSTABLE.PowerHA SystemMirror Cluster Manager current state is: ST_RP_RUNNINGPowerHA SystemMirror Cluster Manager current state is: ST_BARRIERPowerHA SystemMirror Cluster Manager current state is: ST_RP_RUNNING.PowerHA SystemMirror Cluster Manager current state is: ST_UNSTABLE.PowerHA SystemMirror Cluster Manager current state is: ST_BARRIER..PowerHA SystemMirror Cluster Manager current state is: ST_RP_RUNNINGPowerHA SystemMirror Cluster Manager current state is: ST_UNSTABLE.PowerHA SystemMirror Cluster Manager current state is: ST_BARRIER..PowerHA SystemMirror Cluster Manager current state is: ST_UNSTABLE.PowerHA SystemMirror Cluster Manager current state is: ST_STABLE.....completed.
Synchronous cluster configurationAfter the successful running of the GLVM wizard, the cluster RG is shown in Example 7-4.
Example 7-4 Synchronous GLVM resource group
Resource Group Name syncglvmvg_RGParticipating Node Name(s) Jess EllieStartup Policy Online On Home Node OnlyFallover Policy Fallover To Next Priority Node In The ListFallback Policy Never FallbackSite Relationship Prefer Primary SiteNode PriorityService IP LabelFilesystems ALLFilesystems Consistency Check fsckFilesystems Recovery Method sequentialFilesystems/Directories to be exported (NFSv3)Filesystems/Directories to be exported (NFSv4)Filesystems to be NFS mountedNetwork For NFS MountFilesystem/Directory for NFSv4 Stable StorageVolume Groups syncglvmvgConcurrent Volume GroupsUse forced varyon for volume groups, if necessary trueDisksRaw DisksDisk Error Management? no
276 IBM PowerHA SystemMirror V7.2.3 for IBM AIX and V7.2.2 for Linux
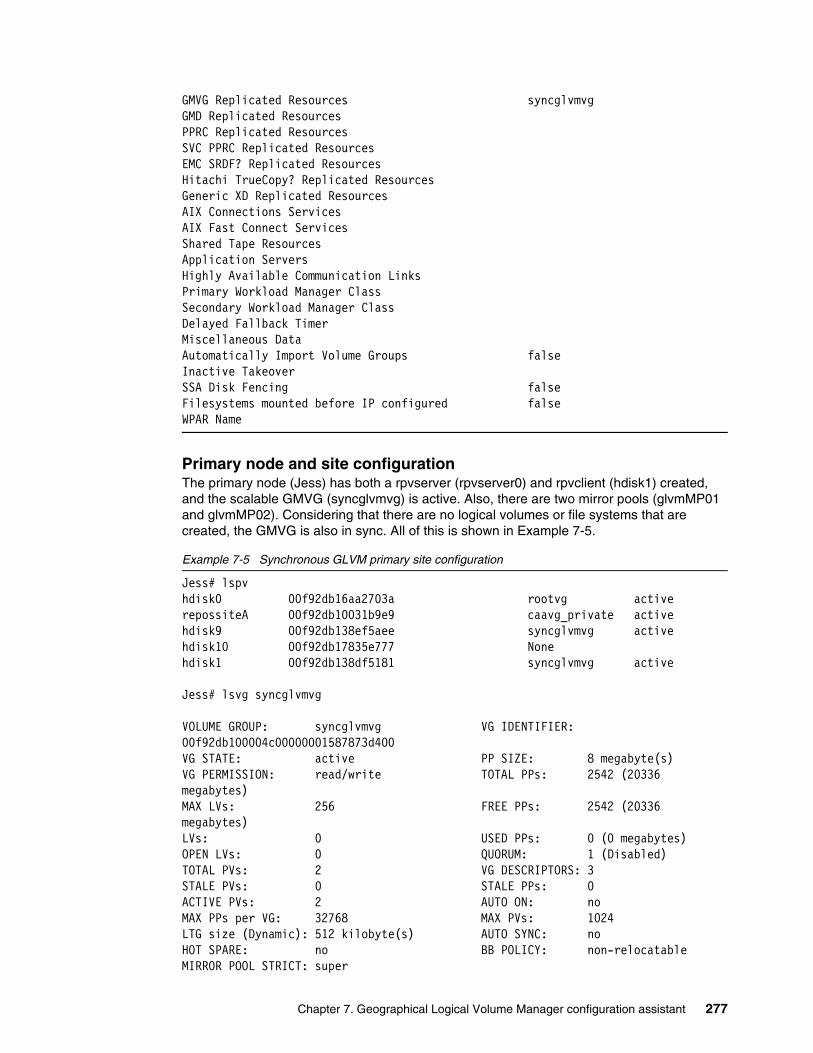
GMVG Replicated Resources syncglvmvgGMD Replicated ResourcesPPRC Replicated ResourcesSVC PPRC Replicated ResourcesEMC SRDF? Replicated ResourcesHitachi TrueCopy? Replicated ResourcesGeneric XD Replicated ResourcesAIX Connections ServicesAIX Fast Connect ServicesShared Tape ResourcesApplication ServersHighly Available Communication LinksPrimary Workload Manager ClassSecondary Workload Manager ClassDelayed Fallback TimerMiscellaneous DataAutomatically Import Volume Groups falseInactive TakeoverSSA Disk Fencing falseFilesystems mounted before IP configured falseWPAR Name
Primary node and site configurationThe primary node (Jess) has both a rpvserver (rpvserver0) and rpvclient (hdisk1) created, and the scalable GMVG (syncglvmvg) is active. Also, there are two mirror pools (glvmMP01 and glvmMP02). Considering that there are no logical volumes or file systems that are created, the GMVG is also in sync. All of this is shown in Example 7-5.
Example 7-5 Synchronous GLVM primary site configuration
Jess# lspvhdisk0 00f92db16aa2703a rootvg activerepossiteA 00f92db10031b9e9 caavg_private activehdisk9 00f92db138ef5aee syncglvmvg activehdisk10 00f92db17835e777 Nonehdisk1 00f92db138df5181 syncglvmvg active
Jess# lsvg syncglvmvg
VOLUME GROUP: syncglvmvg VG IDENTIFIER: 00f92db100004c00000001587873d400VG STATE: active PP SIZE: 8 megabyte(s)VG PERMISSION: read/write TOTAL PPs: 2542 (20336 megabytes)MAX LVs: 256 FREE PPs: 2542 (20336 megabytes)LVs: 0 USED PPs: 0 (0 megabytes)OPEN LVs: 0 QUORUM: 1 (Disabled)TOTAL PVs: 2 VG DESCRIPTORS: 3STALE PVs: 0 STALE PPs: 0ACTIVE PVs: 2 AUTO ON: noMAX PPs per VG: 32768 MAX PVs: 1024LTG size (Dynamic): 512 kilobyte(s) AUTO SYNC: noHOT SPARE: no BB POLICY: non-relocatableMIRROR POOL STRICT: super
Chapter 7. Geographical Logical Volume Manager configuration assistant 277

PV RESTRICTION: none INFINITE RETRY: noDISK BLOCK SIZE: 512 CRITICAL VG: yesFS SYNC OPTION: no
Jess# lsmp -A syncglvmvgVOLUME GROUP: syncglvmvg Mirror Pool Super Strict: yes
MIRROR POOL: glvmMP01 Mirroring Mode: SYNCMIRROR POOL: glvmMP02 Mirroring Mode: SYNC
Jess# lsrpvclient -H# RPV Client Physical Volume Identifier Remote Site# ----------------------------------------------------------- hdisk1 00f92db138df5181 Chicago
Jess# lsrpvserver -H# RPV Server Physical Volume Identifier Physical Volume# ----------------------------------------------------------- rpvserver0 00f92db138ef5aee hdisk9
Jess# gmvgstatGMVG Name PVs RPVs Tot Vols St Vols Total PPs Stale PPs Sync--------------- ---- ---- -------- -------- ---------- ---------- ----syncglvmvg 1 1 2 0 2542 0 100%
Secondary node and site configurationThe secondary node (Ellie) has both a rpvserver (rpvserver0) and rpvclient (hdisk0) created, and the scalable GMVG (syncglvmvg) is offline. Although the GMVG and mirror pools exist, they are not active on the secondary node, so their status is not known. All of this is shown in Example 7-6.
Example 7-6 Synchronous GLVM secondary site configuration
Ellie# lspv
repossiteB 00f92db1002568b2 caavg_private activehdisk12 00f92db16aa2703a rootvg activehdisk3 00f92db138df5181 syncglvmvghdisk2 00f92db17837528a None
Ellie#lsvg syncglvmvg0516-010 : Volume group must be varied on; use varyonvg command.#Ellie# lsmp -A syncglvmvg0516-010 lsmp: Volume group must be varied on; use varyonvg command.
Ellie# lsrpvserver -H# RPV Server Physical Volume Identifier Physical Volumer# ----------------------------------------------------------- rpvserver0 00f92db138df5181 hdisk3
# lsrpvclient -H# RPV Client Physical Volume Identifier Remote Site# ----------------------------------------------------------- hdisk0 00f92db138ef5aee Unknown
278 IBM PowerHA SystemMirror V7.2.3 for IBM AIX and V7.2.2 for Linux
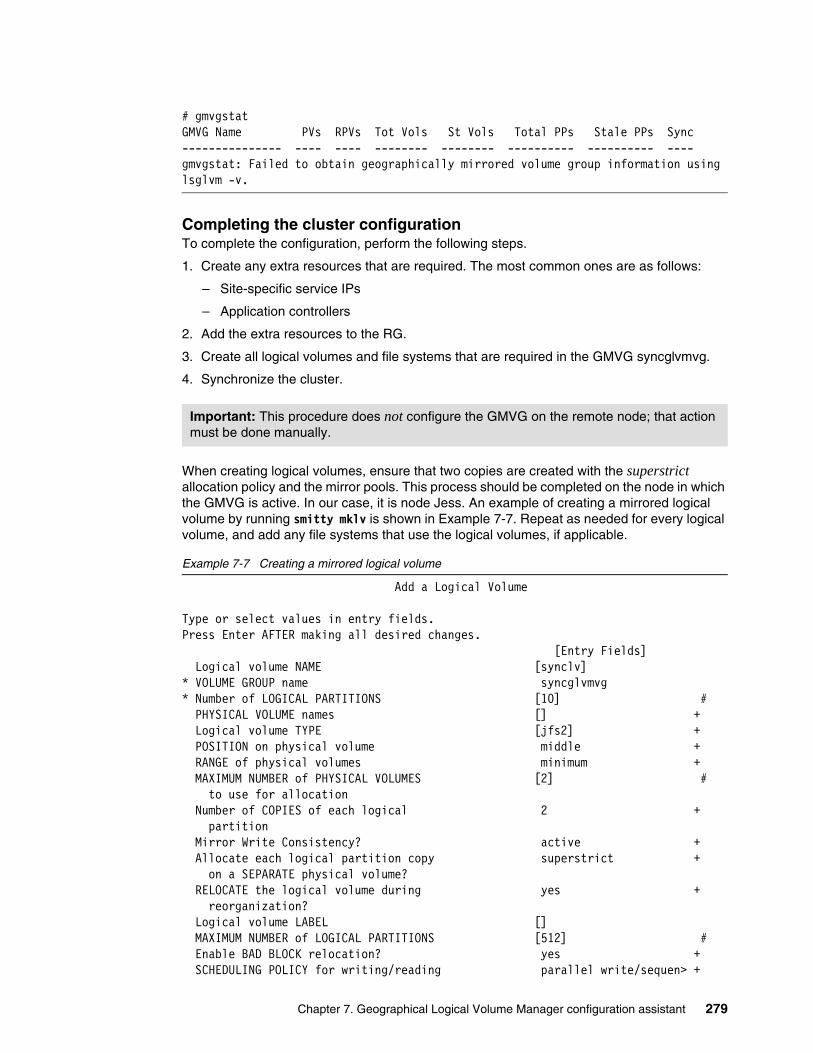
# gmvgstatGMVG Name PVs RPVs Tot Vols St Vols Total PPs Stale PPs Sync--------------- ---- ---- -------- -------- ---------- ---------- ----gmvgstat: Failed to obtain geographically mirrored volume group information using lsglvm -v.
Completing the cluster configurationTo complete the configuration, perform the following steps.
1. Create any extra resources that are required. The most common ones are as follows:
– Site-specific service IPs
– Application controllers
2. Add the extra resources to the RG.
3. Create all logical volumes and file systems that are required in the GMVG syncglvmvg.
4. Synchronize the cluster.
When creating logical volumes, ensure that two copies are created with the superstrict allocation policy and the mirror pools. This process should be completed on the node in which the GMVG is active. In our case, it is node Jess. An example of creating a mirrored logical volume by running smitty mklv is shown in Example 7-7. Repeat as needed for every logical volume, and add any file systems that use the logical volumes, if applicable.
Example 7-7 Creating a mirrored logical volume
Add a Logical Volume
Type or select values in entry fields.Press Enter AFTER making all desired changes. [Entry Fields] Logical volume NAME [synclv]* VOLUME GROUP name syncglvmvg* Number of LOGICAL PARTITIONS [10] # PHYSICAL VOLUME names [] + Logical volume TYPE [jfs2] + POSITION on physical volume middle + RANGE of physical volumes minimum + MAXIMUM NUMBER of PHYSICAL VOLUMES [2] # to use for allocation Number of COPIES of each logical 2 + partition Mirror Write Consistency? active + Allocate each logical partition copy superstrict + on a SEPARATE physical volume? RELOCATE the logical volume during yes + reorganization? Logical volume LABEL [] MAXIMUM NUMBER of LOGICAL PARTITIONS [512] # Enable BAD BLOCK relocation? yes + SCHEDULING POLICY for writing/reading parallel write/sequen> +
Important: This procedure does not configure the GMVG on the remote node; that action must be done manually.
Chapter 7. Geographical Logical Volume Manager configuration assistant 279
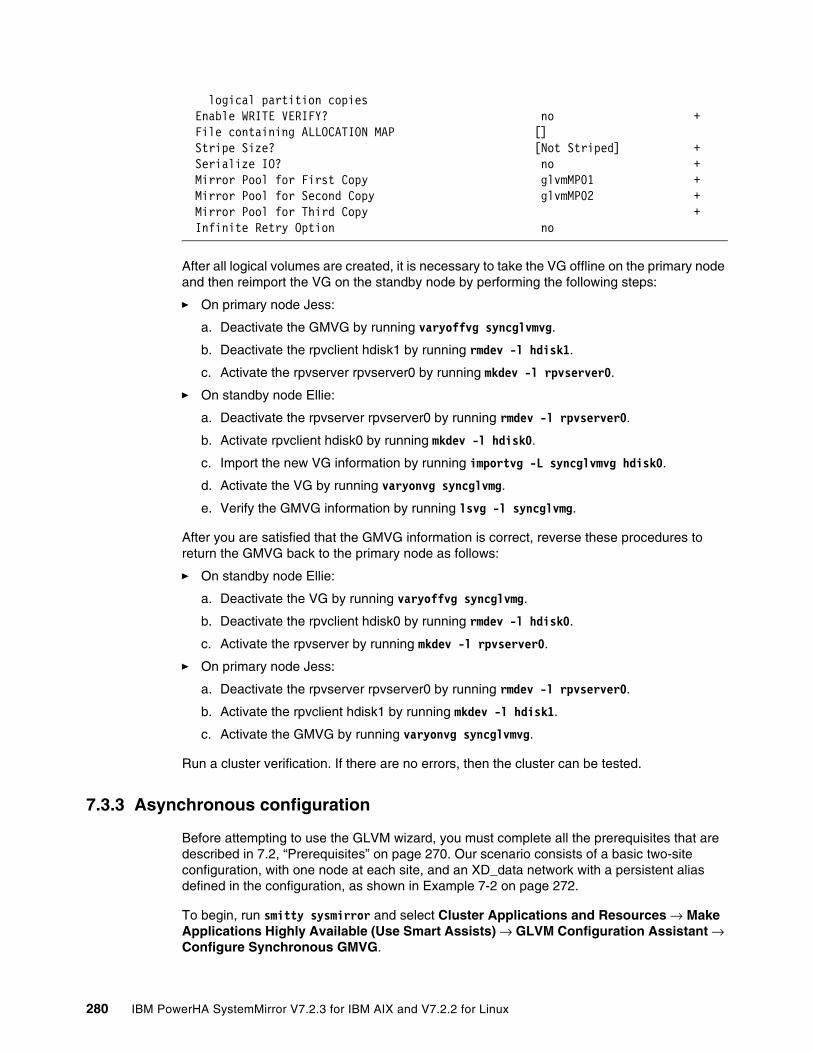
logical partition copies Enable WRITE VERIFY? no + File containing ALLOCATION MAP [] Stripe Size? [Not Striped] + Serialize IO? no + Mirror Pool for First Copy glvmMP01 + Mirror Pool for Second Copy glvmMP02 + Mirror Pool for Third Copy + Infinite Retry Option no
After all logical volumes are created, it is necessary to take the VG offline on the primary node and then reimport the VG on the standby node by performing the following steps:
� On primary node Jess:
a. Deactivate the GMVG by running varyoffvg syncglvmvg.
b. Deactivate the rpvclient hdisk1 by running rmdev -l hdisk1.
c. Activate the rpvserver rpvserver0 by running mkdev -l rpvserver0.
� On standby node Ellie:
a. Deactivate the rpvserver rpvserver0 by running rmdev -l rpvserver0.
b. Activate rpvclient hdisk0 by running mkdev -l hdisk0.
c. Import the new VG information by running importvg -L syncglvmvg hdisk0.
d. Activate the VG by running varyonvg syncglvmg.
e. Verify the GMVG information by running lsvg -l syncglvmg.
After you are satisfied that the GMVG information is correct, reverse these procedures to return the GMVG back to the primary node as follows:
� On standby node Ellie:
a. Deactivate the VG by running varyoffvg syncglvmg.
b. Deactivate the rpvclient hdisk0 by running rmdev -l hdisk0.
c. Activate the rpvserver by running mkdev -l rpvserver0.
� On primary node Jess:
a. Deactivate the rpvserver rpvserver0 by running rmdev -l rpvserver0.
b. Activate the rpvclient hdisk1 by running mkdev -l hdisk1.
c. Activate the GMVG by running varyonvg syncglvmvg.
Run a cluster verification. If there are no errors, then the cluster can be tested.
7.3.3 Asynchronous configuration
Before attempting to use the GLVM wizard, you must complete all the prerequisites that are described in 7.2, “Prerequisites” on page 270. Our scenario consists of a basic two-site configuration, with one node at each site, and an XD_data network with a persistent alias defined in the configuration, as shown in Example 7-2 on page 272.
To begin, run smitty sysmirror and select Cluster Applications and Resources → Make Applications Highly Available (Use Smart Assists) → GLVM Configuration Assistant → Configure Synchronous GMVG.
280 IBM PowerHA SystemMirror V7.2.3 for IBM AIX and V7.2.2 for Linux
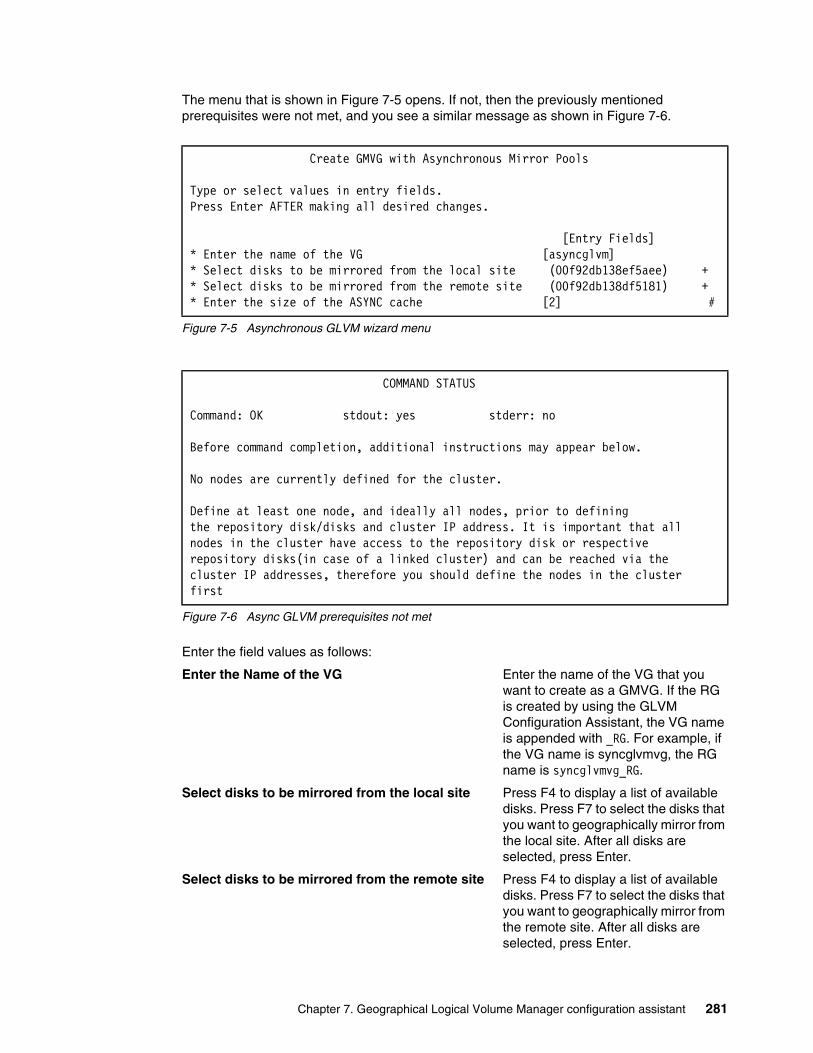
The menu that is shown in Figure 7-5 opens. If not, then the previously mentioned prerequisites were not met, and you see a similar message as shown in Figure 7-6.
Figure 7-5 Asynchronous GLVM wizard menu
Figure 7-6 Async GLVM prerequisites not met
Enter the field values as follows:
Enter the Name of the VG Enter the name of the VG that you want to create as a GMVG. If the RG is created by using the GLVM Configuration Assistant, the VG name is appended with _RG. For example, if the VG name is syncglvmvg, the RG name is syncglvmvg_RG.
Select disks to be mirrored from the local site Press F4 to display a list of available disks. Press F7 to select the disks that you want to geographically mirror from the local site. After all disks are selected, press Enter.
Select disks to be mirrored from the remote site Press F4 to display a list of available disks. Press F7 to select the disks that you want to geographically mirror from the remote site. After all disks are selected, press Enter.
Create GMVG with Asynchronous Mirror Pools
Type or select values in entry fields.Press Enter AFTER making all desired changes.
[Entry Fields]* Enter the name of the VG [asyncglvm]* Select disks to be mirrored from the local site (00f92db138ef5aee) +* Select disks to be mirrored from the remote site (00f92db138df5181) +* Enter the size of the ASYNC cache [2] #
COMMAND STATUS
Command: OK stdout: yes stderr: no
Before command completion, additional instructions may appear below.
No nodes are currently defined for the cluster.
Define at least one node, and ideally all nodes, prior to definingthe repository disk/disks and cluster IP address. It is important that allnodes in the cluster have access to the repository disk or respectiverepository disks(in case of a linked cluster) and can be reached via thecluster IP addresses, therefore you should define the nodes in the cluster first
Chapter 7. Geographical Logical Volume Manager configuration assistant 281

Enter the size of the ASYNCH cache This is the aio_cache_lv, and one is created at each site. Enter the number of physical partitions (PPs) on the VG. The number that you enter depends on the load of the applications and bandwidth that is available in the network. You might need to enter different values for peak workload optimization.
Node Jess is using local disk hdisk9, and node Ellie is using hdisk3 for the GMVG. Each one is associated with a rpvserver, which in turn is linked to their respective rpvclients. The rpvclients become hdisk1 on Jess and hdisk0 on Ellie, as shown in Figure 7-2 on page 271. The rpvclients acquire those disk names because they are the first hdisk names that are available on each node. The output from running the synchronous GLVM wizard is shown in Example 7-8.
Example 7-8 Asynchronous GLVM wizard output
Extracting the names for sites.Extracting the name for nodes from both local and remote sites.Creating RPVServers on all nodes of local site.
Creating RPVServers on node rpvserver0 AvailableCreating RPVServers on all nodes of remote site. Creating RPVServers on node rpvserver0 Available Creating RPVServers on node rpvserver0 AvailableCreating RPVClients on all nodes of local site. Creating RPVClients on node hdisk1 AvailableCreating RPVClients on all nodes of remote site. Creating RPVClients on node hdisk0 AvailableChanging RPVServers and RPVClients to defined and available state accordinglyto facilitate the creation of VG. Changing RPVServer rpvserver0 Defined
Changing RPVClient hdisk0 DefinedGenerating Unique Names for Mirror pools and Resource Group.Generating resource group (RG) name.Unique names generated. Creating VG asyncglvmvg Creating first mirror pool Extending the VG to RPVClient disks and creating second mirror pool
Creating first ASYNC cache LV glvm_cache_LV01
Creating second ASYNC cache LV glvm_cache_LV02
Varying on volume group:
282 IBM PowerHA SystemMirror V7.2.3 for IBM AIX and V7.2.2 for Linux
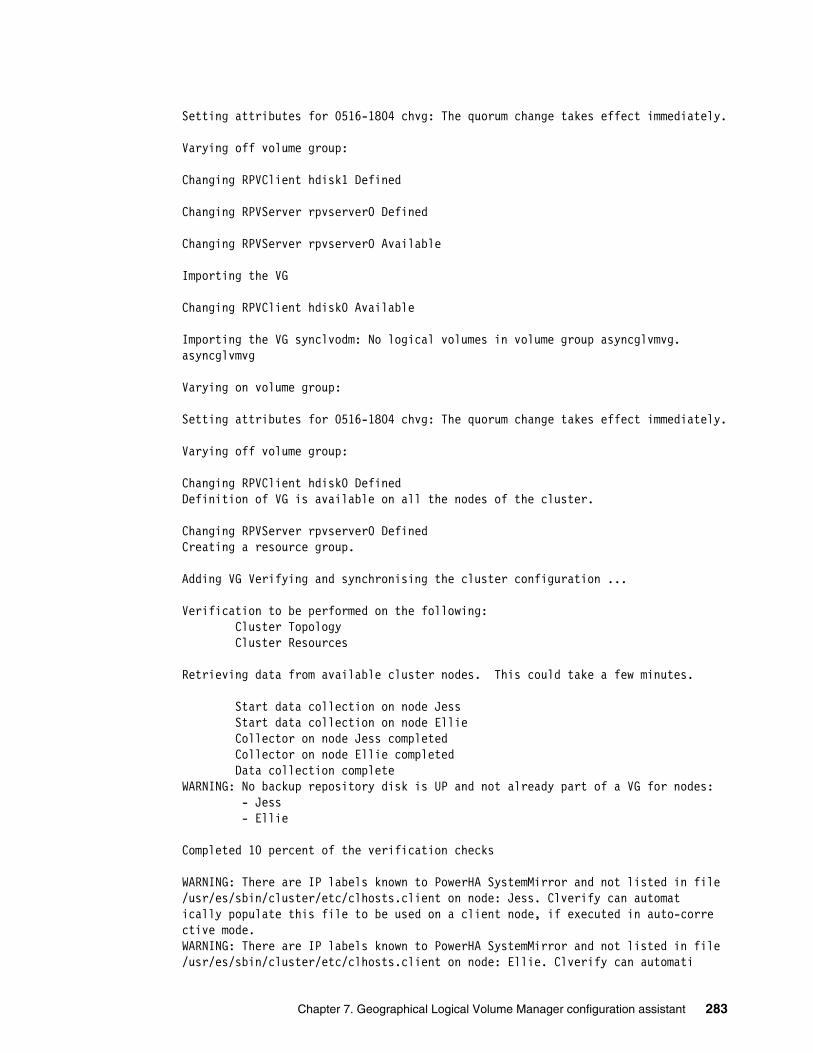
Setting attributes for 0516-1804 chvg: The quorum change takes effect immediately. Varying off volume group: Changing RPVClient hdisk1 Defined Changing RPVServer rpvserver0 Defined Changing RPVServer rpvserver0 Available
Importing the VG Changing RPVClient hdisk0 Available Importing the VG synclvodm: No logical volumes in volume group asyncglvmvg.asyncglvmvg
Varying on volume group: Setting attributes for 0516-1804 chvg: The quorum change takes effect immediately.
Varying off volume group: Changing RPVClient hdisk0 DefinedDefinition of VG is available on all the nodes of the cluster. Changing RPVServer rpvserver0 DefinedCreating a resource group. Adding VG Verifying and synchronising the cluster configuration ...
Verification to be performed on the following: Cluster Topology Cluster Resources
Retrieving data from available cluster nodes. This could take a few minutes.
Start data collection on node Jess Start data collection on node Ellie Collector on node Jess completed Collector on node Ellie completed Data collection completeWARNING: No backup repository disk is UP and not already part of a VG for nodes: - Jess - Ellie
Completed 10 percent of the verification checks
WARNING: There are IP labels known to PowerHA SystemMirror and not listed in file /usr/es/sbin/cluster/etc/clhosts.client on node: Jess. Clverify can automatically populate this file to be used on a client node, if executed in auto-corrective mode.WARNING: There are IP labels known to PowerHA SystemMirror and not listed in file /usr/es/sbin/cluster/etc/clhosts.client on node: Ellie. Clverify can automati
Chapter 7. Geographical Logical Volume Manager configuration assistant 283
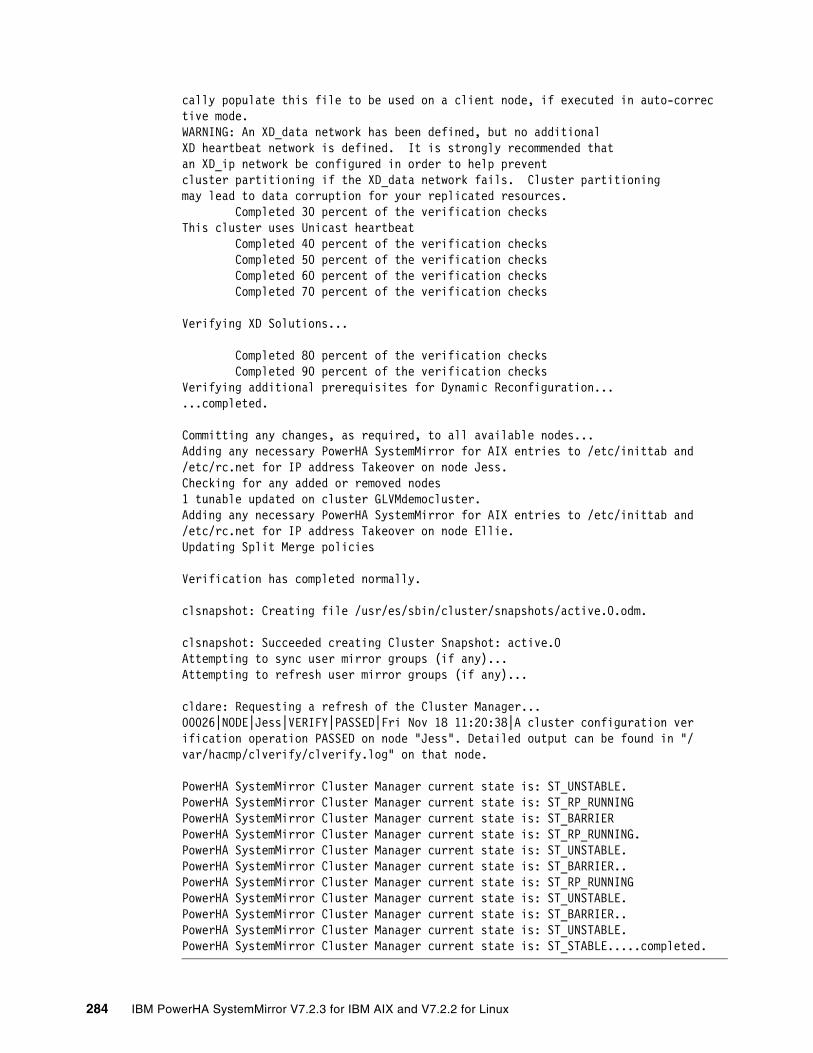
cally populate this file to be used on a client node, if executed in auto-corrective mode.WARNING: An XD_data network has been defined, but no additionalXD heartbeat network is defined. It is strongly recommended thatan XD_ip network be configured in order to help preventcluster partitioning if the XD_data network fails. Cluster partitioningmay lead to data corruption for your replicated resources. Completed 30 percent of the verification checksThis cluster uses Unicast heartbeat Completed 40 percent of the verification checks Completed 50 percent of the verification checks Completed 60 percent of the verification checks Completed 70 percent of the verification checks
Verifying XD Solutions...
Completed 80 percent of the verification checks Completed 90 percent of the verification checksVerifying additional prerequisites for Dynamic Reconfiguration......completed.
Committing any changes, as required, to all available nodes...Adding any necessary PowerHA SystemMirror for AIX entries to /etc/inittab and/etc/rc.net for IP address Takeover on node Jess.Checking for any added or removed nodes1 tunable updated on cluster GLVMdemocluster.Adding any necessary PowerHA SystemMirror for AIX entries to /etc/inittab and/etc/rc.net for IP address Takeover on node Ellie.Updating Split Merge policies
Verification has completed normally.
clsnapshot: Creating file /usr/es/sbin/cluster/snapshots/active.0.odm.
clsnapshot: Succeeded creating Cluster Snapshot: active.0Attempting to sync user mirror groups (if any)...Attempting to refresh user mirror groups (if any)...
cldare: Requesting a refresh of the Cluster Manager...00026|NODE|Jess|VERIFY|PASSED|Fri Nov 18 11:20:38|A cluster configuration verification operation PASSED on node "Jess". Detailed output can be found in "/var/hacmp/clverify/clverify.log" on that node.
PowerHA SystemMirror Cluster Manager current state is: ST_UNSTABLE.PowerHA SystemMirror Cluster Manager current state is: ST_RP_RUNNINGPowerHA SystemMirror Cluster Manager current state is: ST_BARRIERPowerHA SystemMirror Cluster Manager current state is: ST_RP_RUNNING.PowerHA SystemMirror Cluster Manager current state is: ST_UNSTABLE.PowerHA SystemMirror Cluster Manager current state is: ST_BARRIER..PowerHA SystemMirror Cluster Manager current state is: ST_RP_RUNNINGPowerHA SystemMirror Cluster Manager current state is: ST_UNSTABLE.PowerHA SystemMirror Cluster Manager current state is: ST_BARRIER..PowerHA SystemMirror Cluster Manager current state is: ST_UNSTABLE.PowerHA SystemMirror Cluster Manager current state is: ST_STABLE.....completed.
284 IBM PowerHA SystemMirror V7.2.3 for IBM AIX and V7.2.2 for Linux
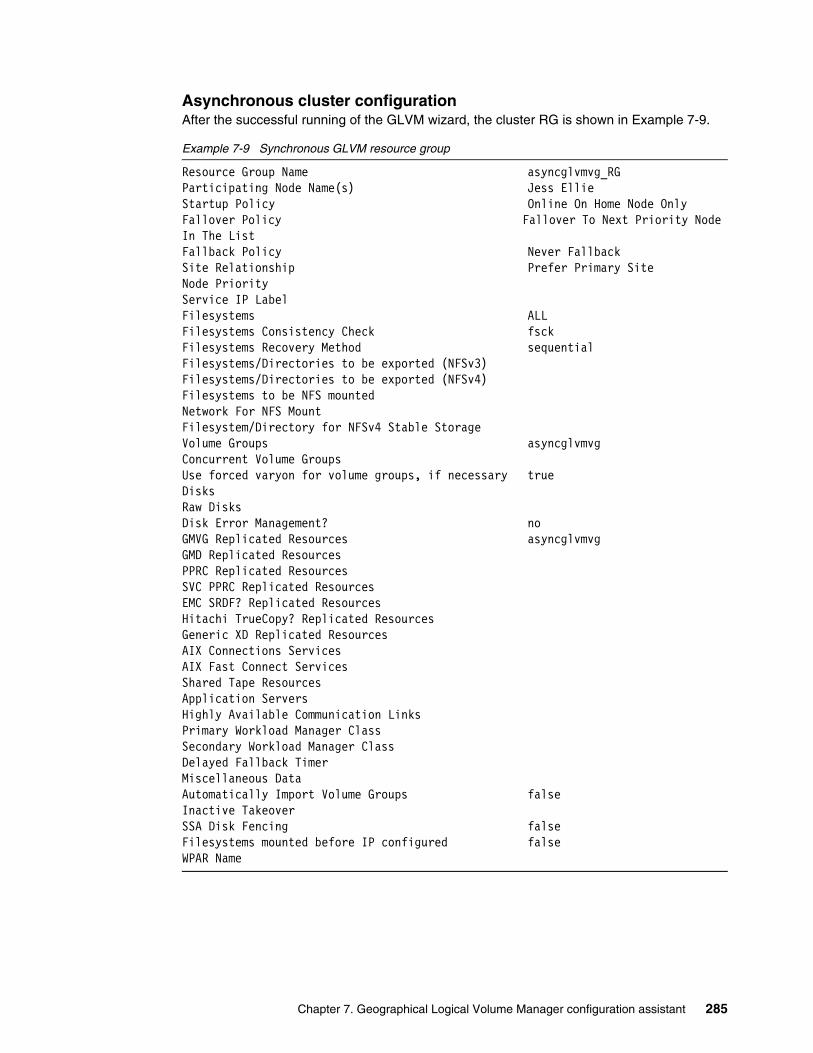
Asynchronous cluster configurationAfter the successful running of the GLVM wizard, the cluster RG is shown in Example 7-9.
Example 7-9 Synchronous GLVM resource group
Resource Group Name asyncglvmvg_RGParticipating Node Name(s) Jess EllieStartup Policy Online On Home Node OnlyFallover Policy Fallover To Next Priority Node In The ListFallback Policy Never FallbackSite Relationship Prefer Primary SiteNode PriorityService IP LabelFilesystems ALLFilesystems Consistency Check fsckFilesystems Recovery Method sequentialFilesystems/Directories to be exported (NFSv3)Filesystems/Directories to be exported (NFSv4)Filesystems to be NFS mountedNetwork For NFS MountFilesystem/Directory for NFSv4 Stable StorageVolume Groups asyncglvmvgConcurrent Volume GroupsUse forced varyon for volume groups, if necessary trueDisksRaw DisksDisk Error Management? noGMVG Replicated Resources asyncglvmvgGMD Replicated ResourcesPPRC Replicated ResourcesSVC PPRC Replicated ResourcesEMC SRDF? Replicated ResourcesHitachi TrueCopy? Replicated ResourcesGeneric XD Replicated ResourcesAIX Connections ServicesAIX Fast Connect ServicesShared Tape ResourcesApplication ServersHighly Available Communication LinksPrimary Workload Manager ClassSecondary Workload Manager ClassDelayed Fallback TimerMiscellaneous DataAutomatically Import Volume Groups falseInactive TakeoverSSA Disk Fencing falseFilesystems mounted before IP configured falseWPAR Name
Chapter 7. Geographical Logical Volume Manager configuration assistant 285
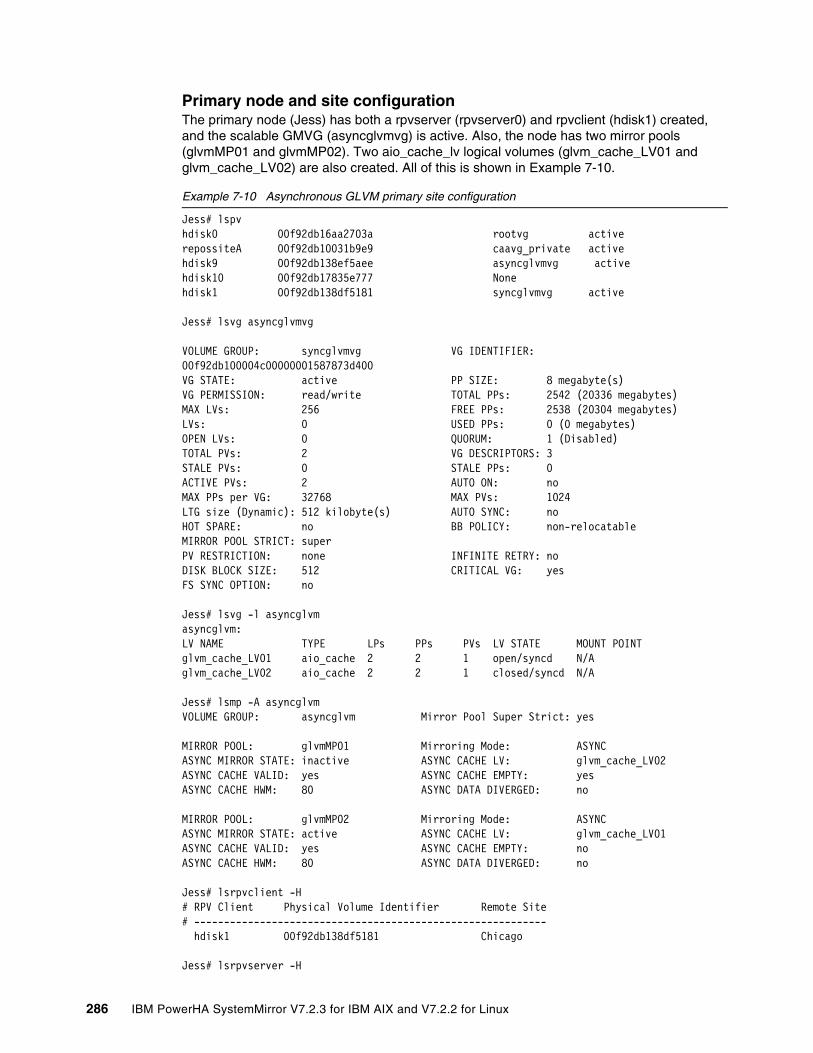
Primary node and site configurationThe primary node (Jess) has both a rpvserver (rpvserver0) and rpvclient (hdisk1) created, and the scalable GMVG (asyncglvmvg) is active. Also, the node has two mirror pools (glvmMP01 and glvmMP02). Two aio_cache_lv logical volumes (glvm_cache_LV01 and glvm_cache_LV02) are also created. All of this is shown in Example 7-10.
Example 7-10 Asynchronous GLVM primary site configuration
Jess# lspvhdisk0 00f92db16aa2703a rootvg activerepossiteA 00f92db10031b9e9 caavg_private activehdisk9 00f92db138ef5aee asyncglvmvg activehdisk10 00f92db17835e777 Nonehdisk1 00f92db138df5181 syncglvmvg active
Jess# lsvg asyncglvmvg
VOLUME GROUP: syncglvmvg VG IDENTIFIER: 00f92db100004c00000001587873d400VG STATE: active PP SIZE: 8 megabyte(s)VG PERMISSION: read/write TOTAL PPs: 2542 (20336 megabytes)MAX LVs: 256 FREE PPs: 2538 (20304 megabytes)LVs: 0 USED PPs: 0 (0 megabytes)OPEN LVs: 0 QUORUM: 1 (Disabled)TOTAL PVs: 2 VG DESCRIPTORS: 3STALE PVs: 0 STALE PPs: 0ACTIVE PVs: 2 AUTO ON: noMAX PPs per VG: 32768 MAX PVs: 1024LTG size (Dynamic): 512 kilobyte(s) AUTO SYNC: noHOT SPARE: no BB POLICY: non-relocatableMIRROR POOL STRICT: superPV RESTRICTION: none INFINITE RETRY: noDISK BLOCK SIZE: 512 CRITICAL VG: yesFS SYNC OPTION: no
Jess# lsvg -l asyncglvmasyncglvm:LV NAME TYPE LPs PPs PVs LV STATE MOUNT POINTglvm_cache_LV01 aio_cache 2 2 1 open/syncd N/Aglvm_cache_LV02 aio_cache 2 2 1 closed/syncd N/A
Jess# lsmp -A asyncglvmVOLUME GROUP: asyncglvm Mirror Pool Super Strict: yes
MIRROR POOL: glvmMP01 Mirroring Mode: ASYNCASYNC MIRROR STATE: inactive ASYNC CACHE LV: glvm_cache_LV02ASYNC CACHE VALID: yes ASYNC CACHE EMPTY: yesASYNC CACHE HWM: 80 ASYNC DATA DIVERGED: no
MIRROR POOL: glvmMP02 Mirroring Mode: ASYNCASYNC MIRROR STATE: active ASYNC CACHE LV: glvm_cache_LV01ASYNC CACHE VALID: yes ASYNC CACHE EMPTY: noASYNC CACHE HWM: 80 ASYNC DATA DIVERGED: no
Jess# lsrpvclient -H# RPV Client Physical Volume Identifier Remote Site# ----------------------------------------------------------- hdisk1 00f92db138df5181 Chicago
Jess# lsrpvserver -H
286 IBM PowerHA SystemMirror V7.2.3 for IBM AIX and V7.2.2 for Linux
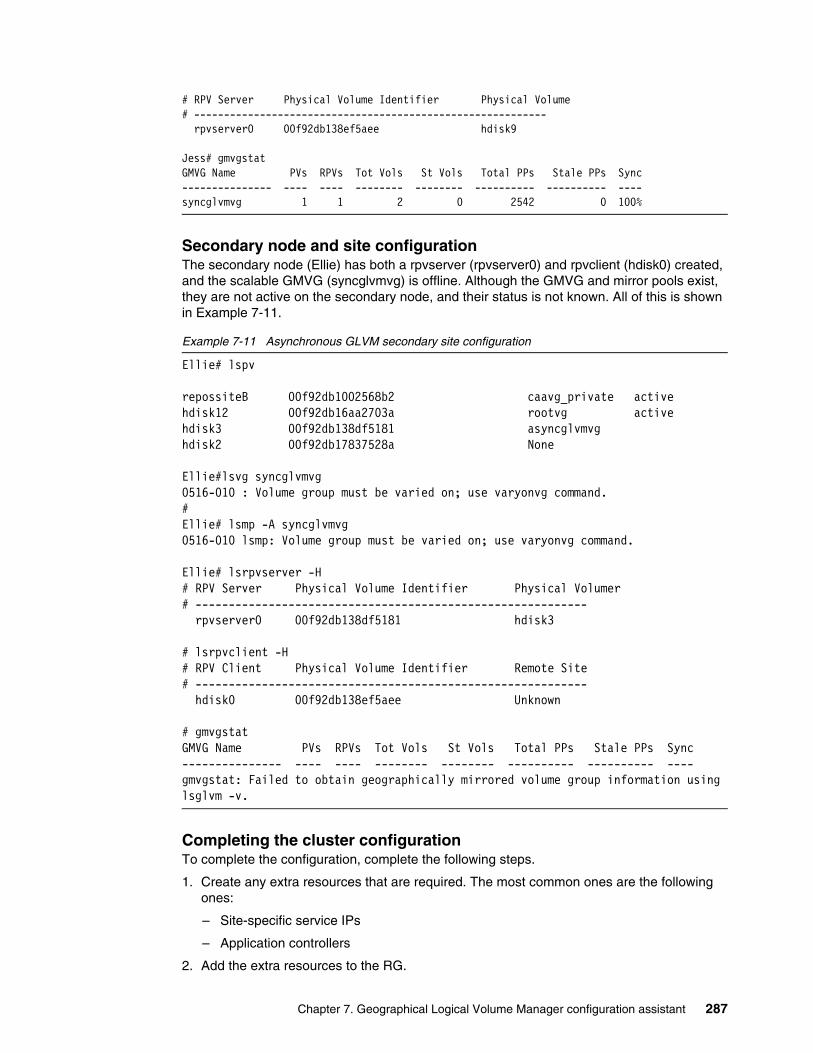
# RPV Server Physical Volume Identifier Physical Volume# ----------------------------------------------------------- rpvserver0 00f92db138ef5aee hdisk9
Jess# gmvgstatGMVG Name PVs RPVs Tot Vols St Vols Total PPs Stale PPs Sync--------------- ---- ---- -------- -------- ---------- ---------- ----syncglvmvg 1 1 2 0 2542 0 100%
Secondary node and site configurationThe secondary node (Ellie) has both a rpvserver (rpvserver0) and rpvclient (hdisk0) created, and the scalable GMVG (syncglvmvg) is offline. Although the GMVG and mirror pools exist, they are not active on the secondary node, and their status is not known. All of this is shown in Example 7-11.
Example 7-11 Asynchronous GLVM secondary site configuration
Ellie# lspv
repossiteB 00f92db1002568b2 caavg_private activehdisk12 00f92db16aa2703a rootvg activehdisk3 00f92db138df5181 asyncglvmvghdisk2 00f92db17837528a None
Ellie#lsvg syncglvmvg0516-010 : Volume group must be varied on; use varyonvg command.#Ellie# lsmp -A syncglvmvg0516-010 lsmp: Volume group must be varied on; use varyonvg command.
Ellie# lsrpvserver -H# RPV Server Physical Volume Identifier Physical Volumer# ----------------------------------------------------------- rpvserver0 00f92db138df5181 hdisk3
# lsrpvclient -H# RPV Client Physical Volume Identifier Remote Site# ----------------------------------------------------------- hdisk0 00f92db138ef5aee Unknown
# gmvgstatGMVG Name PVs RPVs Tot Vols St Vols Total PPs Stale PPs Sync--------------- ---- ---- -------- -------- ---------- ---------- ----gmvgstat: Failed to obtain geographically mirrored volume group information using lsglvm -v.
Completing the cluster configurationTo complete the configuration, complete the following steps.
1. Create any extra resources that are required. The most common ones are the following ones:
– Site-specific service IPs
– Application controllers
2. Add the extra resources to the RG.
Chapter 7. Geographical Logical Volume Manager configuration assistant 287
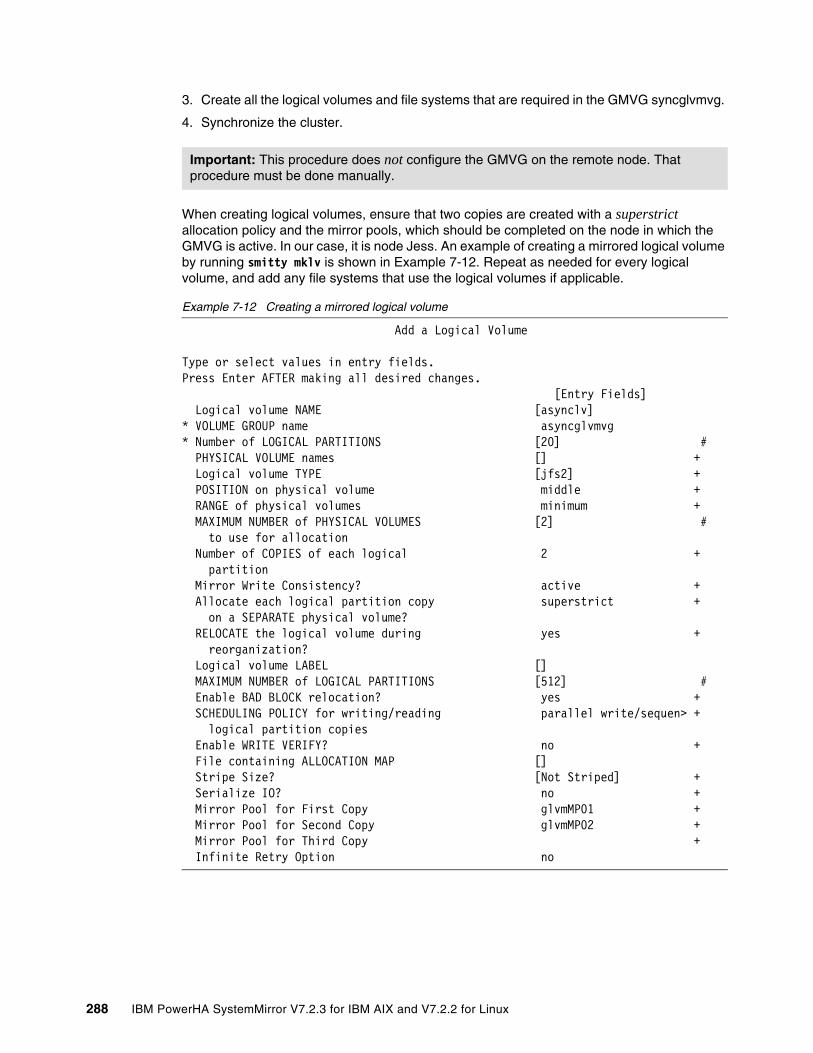
3. Create all the logical volumes and file systems that are required in the GMVG syncglvmvg.
4. Synchronize the cluster.
When creating logical volumes, ensure that two copies are created with a superstrict allocation policy and the mirror pools, which should be completed on the node in which the GMVG is active. In our case, it is node Jess. An example of creating a mirrored logical volume by running smitty mklv is shown in Example 7-12. Repeat as needed for every logical volume, and add any file systems that use the logical volumes if applicable.
Example 7-12 Creating a mirrored logical volume
Add a Logical Volume
Type or select values in entry fields.Press Enter AFTER making all desired changes. [Entry Fields] Logical volume NAME [asynclv]* VOLUME GROUP name asyncglvmvg* Number of LOGICAL PARTITIONS [20] # PHYSICAL VOLUME names [] + Logical volume TYPE [jfs2] + POSITION on physical volume middle + RANGE of physical volumes minimum + MAXIMUM NUMBER of PHYSICAL VOLUMES [2] # to use for allocation Number of COPIES of each logical 2 + partition Mirror Write Consistency? active + Allocate each logical partition copy superstrict + on a SEPARATE physical volume? RELOCATE the logical volume during yes + reorganization? Logical volume LABEL [] MAXIMUM NUMBER of LOGICAL PARTITIONS [512] # Enable BAD BLOCK relocation? yes + SCHEDULING POLICY for writing/reading parallel write/sequen> + logical partition copies Enable WRITE VERIFY? no + File containing ALLOCATION MAP [] Stripe Size? [Not Striped] + Serialize IO? no + Mirror Pool for First Copy glvmMP01 + Mirror Pool for Second Copy glvmMP02 + Mirror Pool for Third Copy + Infinite Retry Option no
Important: This procedure does not configure the GMVG on the remote node. That procedure must be done manually.
288 IBM PowerHA SystemMirror V7.2.3 for IBM AIX and V7.2.2 for Linux
After all logical volumes are created, it is necessary to take the VG offline on the primary node and then reimport the VG on the standby node by completing the following steps:
� On primary node Jess:
a. Deactivate the GMVG by running varyoffvg asyncglvmvg.
b. Deactivate the rpvclient hdisk1 by running rmdev -l hdisk1.
c. Activate the rpvserver rpvserver0 by running mkdev -l rpvserver0.
� On standby node Ellie:
a. Deactivate the rpvserver rpvserver0 by running rmdev -l rpvserver0.
b. Activate rpvclient hdisk0 by running mkdev -l hdisk0.
c. Import new VG information by running importvg -L asyncglvmvg hdisk0.
d. Activate the VG by running varyonvg syncglvmg.
e. Verify the GMVG information by running lsvg -l syncglvmg.
After you are satisfied that the GMVG information is correct, reverse these procedures to return the GMVG back to the primary node:
� On standby node Ellie:
a. Deactivate the VG by running varyoffvg asyncglvmg.
b. Deactivate the rpvclient hdisk0 by running rmdev -l hdisk0.
c. Activate the rpvserver by running mkdev -l rpvserver0.
� On primary node Jess:
a. Deactivate the rpvserver rpvserver0 by running rmdev -l rpvserver0.
b. Activate the rpvclient hdisk1 by running mkdev -l hdisk1.
c. Activate the GMVG by running varyonvg asyncglvmvg.
Run a cluster verification. If there are no errors, then the cluster can be tested.
Chapter 7. Geographical Logical Volume Manager configuration assistant 289

290 IBM PowerHA SystemMirror V7.2.3 for IBM AIX and V7.2.2 for Linux

Chapter 8. Automation adaptation for Live Partition Mobility
This chapter covers a feature that was originally introduced in PowerHA V7.2.0: automation adaptation for Live Partition Mobility (LPM).
Before PowerHA SystemMirror V7.2, if customers wanted to implement the LPM operation for one AIX logical partition (LPAR) that is running the PowerHA service, they had to perform a manual operation, which is illustrated at IBM Knowledge Center.
This feature plugs into the LPM infrastructure to maintain awareness of LPM events and adjusts the clustering related monitoring as needed for the LPM operation to succeed without disruption. This feature reduces the burden on the administrator to perform manual operations on the cluster node during LPM operations. For more information about this feature, see IBM Knowledge Center.
This chapter introduces the necessary operations to ensure that the LPM operation for the PowerHA node completes successfully. This chapter uses PowerHA V7.2.1 environments to illustrate the scenarios.
This chapter covers the following topics:
� Concept
� Operation flow to support HACMP on a PowerHA node
� Example: HACMP scenario for PowerHA V7.2
� HACMP SMIT panel
� PowerHA V7.2 scenario and troubleshooting
8
© Copyright IBM Corp. 2019. All rights reserved. 291
8.1 Concept
This section provides an introduction to the LPM concepts.
IBM High Availability Cluster Multi-Processing (HACMP)With LPM, you can migrate LPARs running the AIX operating system and their hosted applications from one physical server to another without disrupting the infrastructure services. The migration operation maintains system transactional integrity and transfers the entire system environment, including processor state, memory, attached virtual devices, and connected users.
LPM provides the facility for no downtime for planned hardware maintenance. However, LPM does not offer the same facility for software maintenance or unplanned downtime. You can use PowerHA SystemMirror within a partition that is capable of LPM. However, this does not mean PowerHA SystemMirror uses LPM, and PowerHA treats LPM as another application within the partition.
HACMP operation and freeze timesThe amount of operational time that an LPM migration requires on an LPAR is determined by multiple factors, such as the LPAR’s memory size, workload activity (more memory pages require more memory updates across the system), and network performance.
The LPAR freeze time is a part of LPM operational time, and it occurs when the LPM tries to reestablish the memory state. During this time, no other processes can operate in the LPAR. As part of this memory reestablishment process, memory pages from the source system can be copied to the target system over the network connection. If the network connection is congested, this process of copying over the memory pages can increase the overall LPAR freeze time.
Cluster software in a PowerHA cluster environmentIn a PowerHA solution, although PowerHA is one cluster software, there are two other kinds of cluster software running behind the PowerHA cluster:
� Reliable Scalable Cluster Technology (RSCT)� Cluster Aware AIX (CAA)
PowerHA cluster heartbeating and the dead man switchPowerHA SystemMirror uses constant communication between the nodes to track the health of the cluster, nodes, and so on. One of the key components of communication is the heartbeating between the nodes. Lack of heartbeats forms a critical part of the decision-making process to declare a node to be dead.
The PowerHA V7.2 default node failure detection time is 40 seconds (30 seconds for node communication timeout plus a 10-second grace period). These values can be altered as wanted.
Node A declares partner Node B to be dead if Node A did not receive any communication or heartbeats for more than 40 seconds. This process works well when Node B is dead (crashed, powered off, and so on). However, there are scenarios where Node B is not dead but cannot communicate for long periods.
292 IBM PowerHA SystemMirror V7.2.3 for IBM AIX and V7.2.2 for Linux
Here are two examples of such scenarios:
� There is one communication link between the nodes and it is broken (multiple communication links must be deployed between the nodes to avoid this scenario).
� Due to a rare situation, the operating system freezes the cluster processes and kernel threads such that the node cannot send any I/O (disk or network) for more than 40 seconds. This situation results in the same situation where Node A cannot receive any communication from Node B for more than 40 seconds, and therefore declares Node B to be dead even though it is alive. This leads to a split-brain condition, which can result in data corruption if the disks are shared across nodes.
Some scenarios can be handled in the cluster. For example, in scenario Ê, when Node B is allowed to run after the unfreeze, it recognizes the fact that it could not communicate with other nodes for a long period and takes evasive actions. Those types of action are called dead man switch (DMS) protection.
DMS involves timers that monitor various activities such as I/O traffic and process health to recognize stray cases where there is potential for it (Node B) to be considered dead by its peers in the cluster. In these cases, the DMS timers trigger just before the node failure detection time and evasive action is initiated. A typical evasive action involves fencing the node.
PowerHA SystemMirror consists of different DMS protections:
� CAA DMS protection
When CAA detects that a node is isolated in a multiple-node environment, a DMS is triggered. This timeout occurs when the node cannot communicate with other nodes during the delay that is specified by the node_timeout cluster tunable. The system crashes with an errlog Deadman timer triggered if the deadman_mode cluster tunable (clctrl -tune) is set to a (assert mode, which is the default) or log an event only if deadman_mode is set to e (event mode).
This protection can occur on the node performing LPM, or on both nodes in a two-node cluster. To prevent a system crash due to this timeout, increase node_timeout to its maximum value, which is 600 seconds before LPM and restore it after LPM.
� Group Services DMS
Group Services is a critical component that allows for cluster-wide membership and group management. This daemon’s health is monitored continuously. If this process exits or becomes inactive for long periods, then the node is brought down.
� RSCT RMC, ConfigRMC, clstrmgr, and IBM.StorageRM daemons
Group Services monitor the health of these daemons. If they are inactive for a long time or exit, then the node is brought down.
Therefore, if the LPM freeze time is longer than the Group Services DMS timeout, Group Services (cthags) reacts and halts the node.
Note: This operation is done manually with a PowerHA SystemMirror V7.2 node. Section 8.3, “Example: HACMP scenario for PowerHA V7.2” on page 299 describes the operation. This operation is done automatically with a PowerHA System V7.2 node, as described in 8.4, “HACMP SMIT panel” on page 316.
Note: The Group Services (cthags) DMS timeout with AIX 7.2.1 at the time of writing is 60 seconds. For now, it is hardcoded and cannot be changed.
Chapter 8. Automation adaptation for Live Partition Mobility 293

Because we cannot tune the parameter to increase its timeout, you must disable RSCT critical process monitoring before LPM and enable it after LPM by using the following commands:
– Disable RSCT critical process monitoring
To disable RSCT monitoring process, use the following commands:
/usr/sbin/rsct/bin/hags_disable_client_kill -s cthags/usr/sbin/rsct/bin/dms/stopdms -s cthags
– Enable RSCT critical process monitoring
To enable RSCT monitoring process, use the following commands:
/usr/sbin/rsct/bin/dms/startdms -s cthags/usr/sbin/rsct/bin/hags_enable_client_kill -s cthags
8.1.1 Prerequisites for PowerHA node support of HACMP
This section describes the prerequisites for PowerHA node support for LPM.
8.1.2 Reducing the HACMP freeze time
To reduce the freeze time during the LPM operation, use 10 Gb network adapters and a dedicated network with enough bandwidth available, and reduce memory activity during LPM.
8.2 Operation flow to support HACMP on a PowerHA node
The operation flow includes pre-migration and post-migration.
If the PowerHA version is earlier than Version 7.2, then you must perform the operations manually. If PowerHA version is Version 7.2 or later, the PowerHA performs the operations automatically.
This section introduces pre-migration and post-migration operation flow during LPM.
Note: This operation is done manually in a PowerHA SystemMirror V7.1 node, as described in 8.3, “Example: HACMP scenario for PowerHA V7.2” on page 299. This operation is done automatically in a PowerHA System V7.2 node, as described in 8.4, “HACMP SMIT panel” on page 316.
294 IBM PowerHA SystemMirror V7.2.3 for IBM AIX and V7.2.2 for Linux
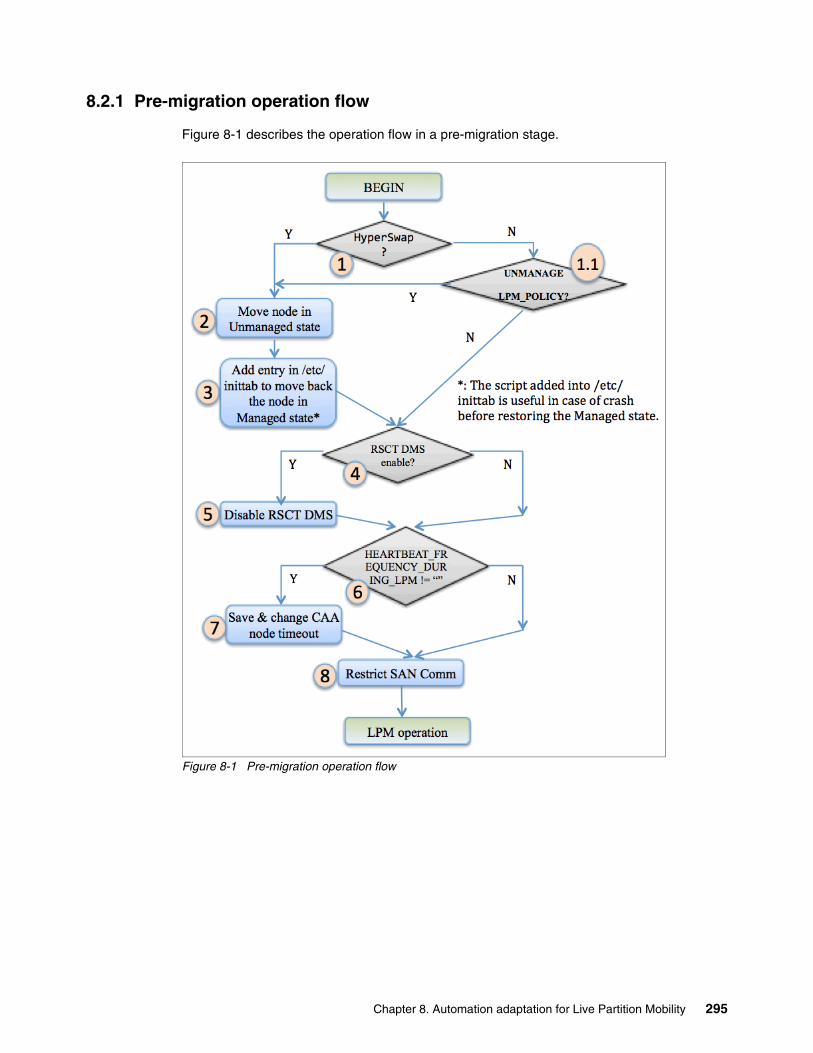
8.2.1 Pre-migration operation flow
Figure 8-1 describes the operation flow in a pre-migration stage.
Figure 8-1 Pre-migration operation flow
Chapter 8. Automation adaptation for Live Partition Mobility 295
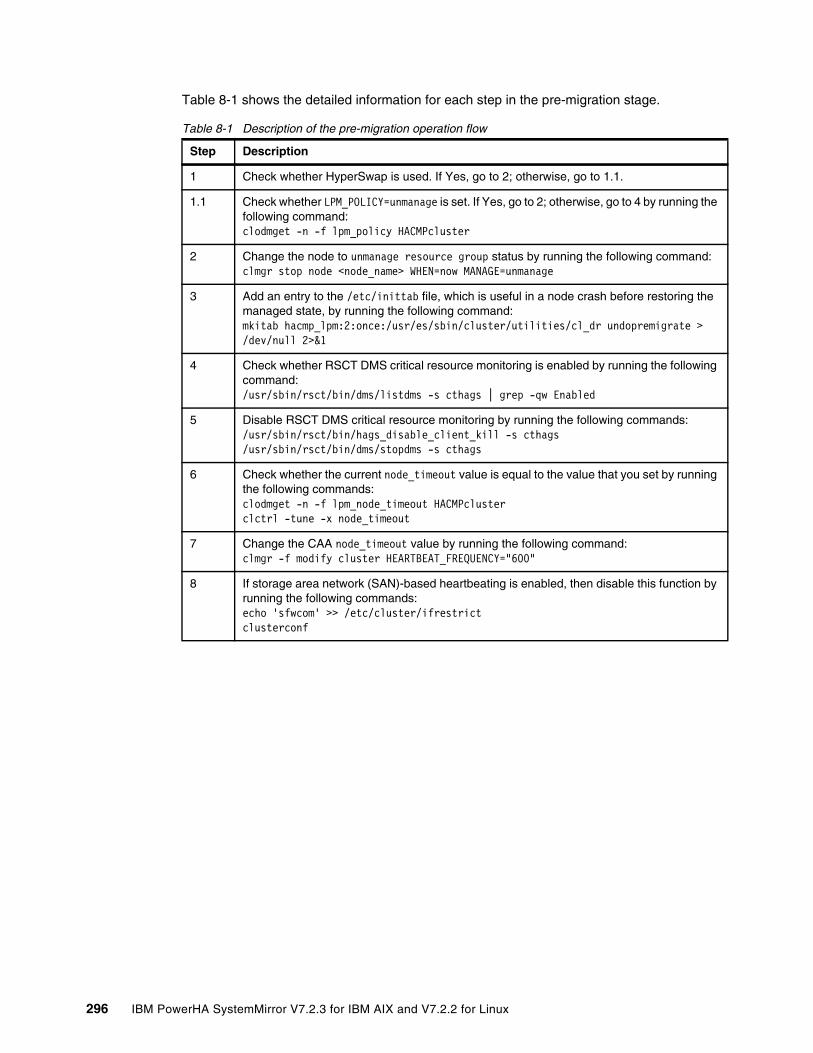
Table 8-1 shows the detailed information for each step in the pre-migration stage.
Table 8-1 Description of the pre-migration operation flow
Step Description
1 Check whether HyperSwap is used. If Yes, go to 2; otherwise, go to 1.1.
1.1 Check whether LPM_POLICY=unmanage is set. If Yes, go to 2; otherwise, go to 4 by running the following command:clodmget -n -f lpm_policy HACMPcluster
2 Change the node to unmanage resource group status by running the following command:clmgr stop node <node_name> WHEN=now MANAGE=unmanage
3 Add an entry to the /etc/inittab file, which is useful in a node crash before restoring the managed state, by running the following command:mkitab hacmp_lpm:2:once:/usr/es/sbin/cluster/utilities/cl_dr undopremigrate > /dev/null 2>&1
4 Check whether RSCT DMS critical resource monitoring is enabled by running the following command:/usr/sbin/rsct/bin/dms/listdms -s cthags | grep -qw Enabled
5 Disable RSCT DMS critical resource monitoring by running the following commands:/usr/sbin/rsct/bin/hags_disable_client_kill -s cthags/usr/sbin/rsct/bin/dms/stopdms -s cthags
6 Check whether the current node_timeout value is equal to the value that you set by running the following commands:clodmget -n -f lpm_node_timeout HACMPclusterclctrl -tune -x node_timeout
7 Change the CAA node_timeout value by running the following command:clmgr -f modify cluster HEARTBEAT_FREQUENCY="600"
8 If storage area network (SAN)-based heartbeating is enabled, then disable this function by running the following commands:echo 'sfwcom' >> /etc/cluster/ifrestrictclusterconf
296 IBM PowerHA SystemMirror V7.2.3 for IBM AIX and V7.2.2 for Linux
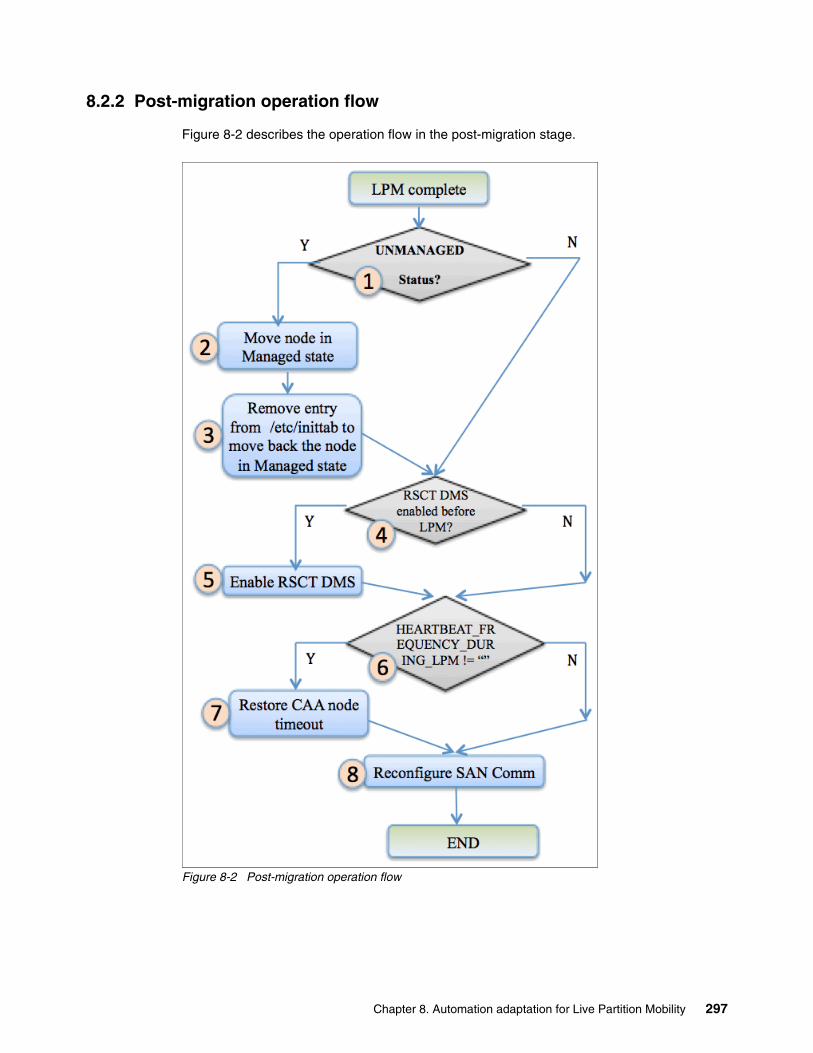
8.2.2 Post-migration operation flow
Figure 8-2 describes the operation flow in the post-migration stage.
Figure 8-2 Post-migration operation flow
Chapter 8. Automation adaptation for Live Partition Mobility 297

Table 8-2 shows the detailed information for each step in the post-migration stage.
Table 8-2 Description of the post-migration operation flow
Step Description
1 Check whether the current resource group status is unmanaged. If Yes, go to 2; otherwise, go to 4.
2 Change the node back to the manage resource group status by running the following command:clmgr start node <node_name> WHEN=now MANAGE=auto
3 Remove the entry from the /etc/inittab file that was added in the pre-migration process by running the following command:rmitab hacmp_lpm
4 Check whether the RSCT DMS critical resource monitoring function is enabled before the LPM operation.
5 Enable RSCT DMS critical resource monitoring by running the following commands:/usr/sbin/rsct/bin/dms/startdms -s cthags/usr/sbin/rsct/bin/hags_enable_client_kill -s cthags
6 Check whether the current node_timeout value is equal to the value that you set before by running the following commands:clctrl -tune -x node_timeoutclodmget -n -f lpm_node_timeout HACMPcluster
7 Restore the CAA node_timeout value by running the following command:clmgr -f modify cluster HEARTBEAT_FREQUENCY="30"
8 If SAN-based heartbeating is enabled, then enable this function by running the following commands:rm -f /etc/cluster/ifrestrictclusterconfrmdev -l sfwcomm*mkdev -l sfwcomm*
298 IBM PowerHA SystemMirror V7.2.3 for IBM AIX and V7.2.2 for Linux
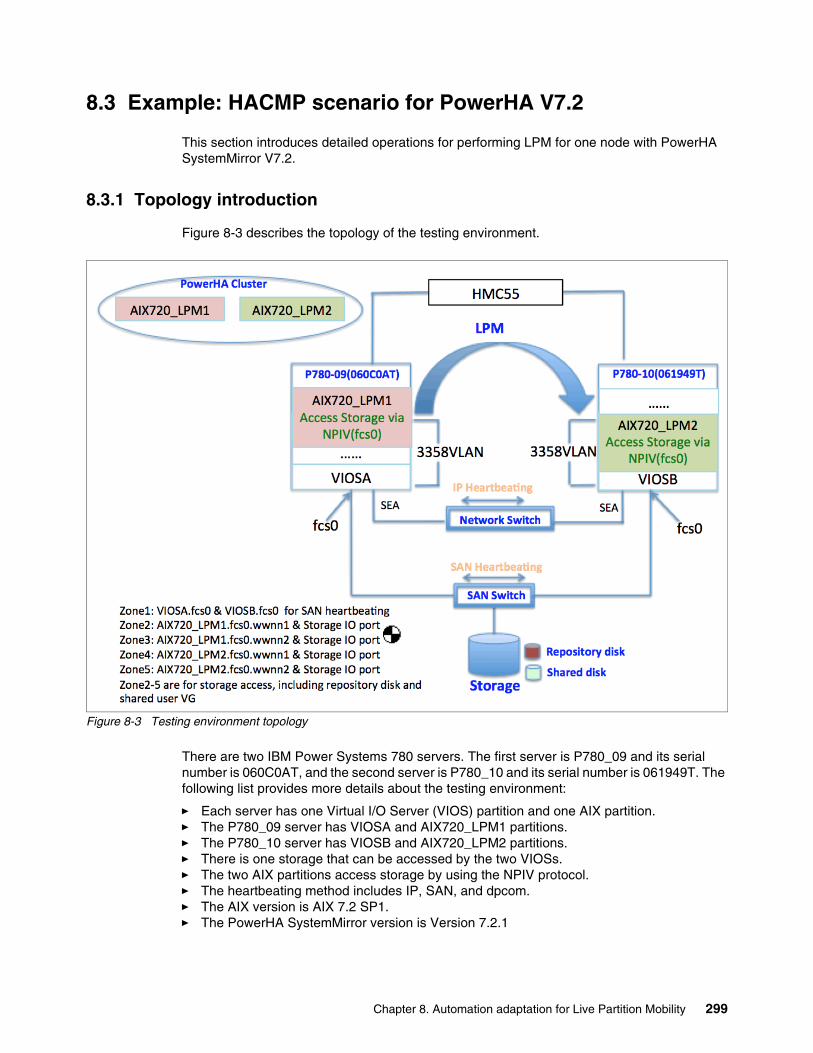
8.3 Example: HACMP scenario for PowerHA V7.2
This section introduces detailed operations for performing LPM for one node with PowerHA SystemMirror V7.2.
8.3.1 Topology introduction
Figure 8-3 describes the topology of the testing environment.
Figure 8-3 Testing environment topology
There are two IBM Power Systems 780 servers. The first server is P780_09 and its serial number is 060C0AT, and the second server is P780_10 and its serial number is 061949T. The following list provides more details about the testing environment:
� Each server has one Virtual I/O Server (VIOS) partition and one AIX partition.� The P780_09 server has VIOSA and AIX720_LPM1 partitions.� The P780_10 server has VIOSB and AIX720_LPM2 partitions.� There is one storage that can be accessed by the two VIOSs.� The two AIX partitions access storage by using the NPIV protocol.� The heartbeating method includes IP, SAN, and dpcom.� The AIX version is AIX 7.2 SP1.� The PowerHA SystemMirror version is Version 7.2.1
Chapter 8. Automation adaptation for Live Partition Mobility 299
8.3.2 Initial status
This section describes the initial cluster status.
PowerHA and AIX versionExample 8-1 shows the PowerHA and the AIX version information.
Example 8-1 PowerHA and AIX version information
AIX720_LPM1:/usr/es/sbin/cluster/utilities/ # clhaverNode AIX720_LPM2 has HACMP version 7230 installedNode AIX720_LPM1 has HACMP version 7230 installed
AIX720_LPM1:/usr/es/sbin/cluster # clcmd oslevel -s-------------------------------NODE AIX720_LPM2-------------------------------7200-00-01-1543
-------------------------------NODE AIX720_LPM1-------------------------------7200-00-01-1543
PowerHA configurationTable 8-3 shows the cluster’s configuration.
Table 8-3 Cluster configuration
Item AIX720_LPM1 AIX720_LPM2
Cluster name LPMClusterCluster type: No Site Cluster (NSC)
Network interface en1: 172.16.50.21Netmask: 255.255.255.0Gateway: 172.16.50.1
en0: 172.16.50.22Netmask: 255.255.255.0Gateway: 172.16.50.1
Network net_ether_01 (172.16.50.0/24)
CAA UnicastPrimary disk: hdisk1
Shared volume group (VG)
testVG: hdisk2
Service IP 172.16.50.23 AIX720_LPM_Service
Resource group (RG) testRG includes testVG, AIX720_LPM_Service.The node order is AIX720_LPM1, AIX720_LPM2.Startup Policy: Online On Home Node Only Fallover Policy: Fallover To Next Priority Node In The List Fallback Policy: Never Fallback
300 IBM PowerHA SystemMirror V7.2.3 for IBM AIX and V7.2.2 for Linux
PowerHA and resource group statusExample 8-2 shows the status of PowerHA and the RG.
Example 8-2 PowerHA and resource group status
AIX720_LPM1:/ # clcmd -n LPMCluster lssrc -ls clstrmgrES|egrep "NODE|state"|grep -v "Last" NODE AIX720_LPM2Current state: ST_STABLENODE AIX720_LPM1Current state: ST_STABLE
AIX720_LPM1:/ # clcmd -n LPMCluster clRGinfo-------------------------------NODE AIX720_LPM2------------------------------------------------------------------------------------------------------------Group Name State Node -----------------------------------------------------------------------------testRG ONLINE AIX720_LPM1 OFFLINE AIX720_LPM2
-------------------------------NODE AIX720_LPM1------------------------------------------------------------------------------------------------------------Group Name State Node -----------------------------------------------------------------------------testRG ONLINE AIX720_LPM1 OFFLINE AIX720_LPM2
CAA heartbeating statusExample 8-3 shows the current CAA heartbeating status and the value of the node_timeout parameter.
Example 8-3 CAA heartbeating status and the value of the node_timeout parameter
AIX720_LPM1:/ # clcmd lscluster -m
-------------------------------NODE AIX720_LPM2-------------------------------Calling node query for all nodes...Node query number of nodes examined: 2
Node name: AIX720_LPM1 Cluster shorthand id for node: 1 UUID for node: 112552f0-c4b7-11e5-8014-56c6a3855d04 State of node: UP Smoothed rtt to node: 7 Mean Deviation in network rtt to node: 3 Number of clusters node is a member in: 1 CLUSTER NAME SHID UUID LPMCluster 0 11403f34-c4b7-11e5-8014-56c6a3855d04
Chapter 8. Automation adaptation for Live Partition Mobility 301
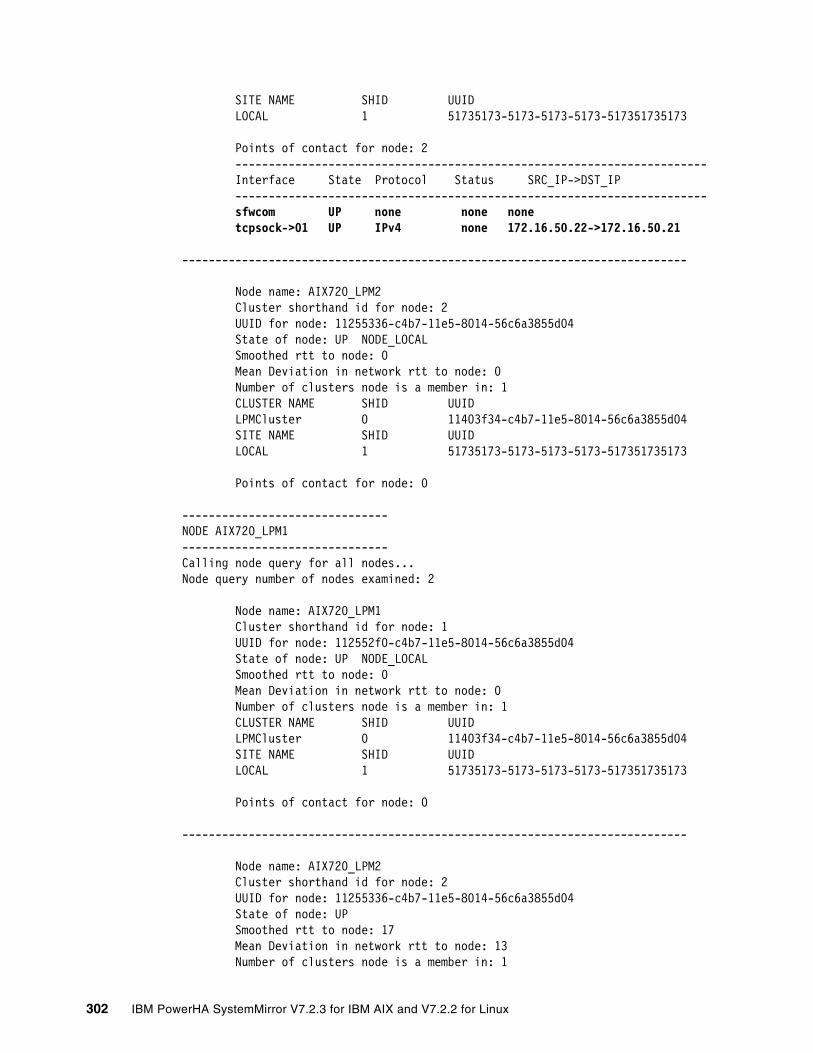
SITE NAME SHID UUID LOCAL 1 51735173-5173-5173-5173-517351735173
Points of contact for node: 2 ----------------------------------------------------------------------- Interface State Protocol Status SRC_IP->DST_IP ----------------------------------------------------------------------- sfwcom UP none none none tcpsock->01 UP IPv4 none 172.16.50.22->172.16.50.21
----------------------------------------------------------------------------
Node name: AIX720_LPM2 Cluster shorthand id for node: 2 UUID for node: 11255336-c4b7-11e5-8014-56c6a3855d04 State of node: UP NODE_LOCAL Smoothed rtt to node: 0 Mean Deviation in network rtt to node: 0 Number of clusters node is a member in: 1 CLUSTER NAME SHID UUID LPMCluster 0 11403f34-c4b7-11e5-8014-56c6a3855d04 SITE NAME SHID UUID LOCAL 1 51735173-5173-5173-5173-517351735173
Points of contact for node: 0
-------------------------------NODE AIX720_LPM1-------------------------------Calling node query for all nodes...Node query number of nodes examined: 2
Node name: AIX720_LPM1 Cluster shorthand id for node: 1 UUID for node: 112552f0-c4b7-11e5-8014-56c6a3855d04 State of node: UP NODE_LOCAL Smoothed rtt to node: 0 Mean Deviation in network rtt to node: 0 Number of clusters node is a member in: 1 CLUSTER NAME SHID UUID LPMCluster 0 11403f34-c4b7-11e5-8014-56c6a3855d04 SITE NAME SHID UUID LOCAL 1 51735173-5173-5173-5173-517351735173
Points of contact for node: 0
----------------------------------------------------------------------------
Node name: AIX720_LPM2 Cluster shorthand id for node: 2 UUID for node: 11255336-c4b7-11e5-8014-56c6a3855d04 State of node: UP Smoothed rtt to node: 17 Mean Deviation in network rtt to node: 13 Number of clusters node is a member in: 1
302 IBM PowerHA SystemMirror V7.2.3 for IBM AIX and V7.2.2 for Linux
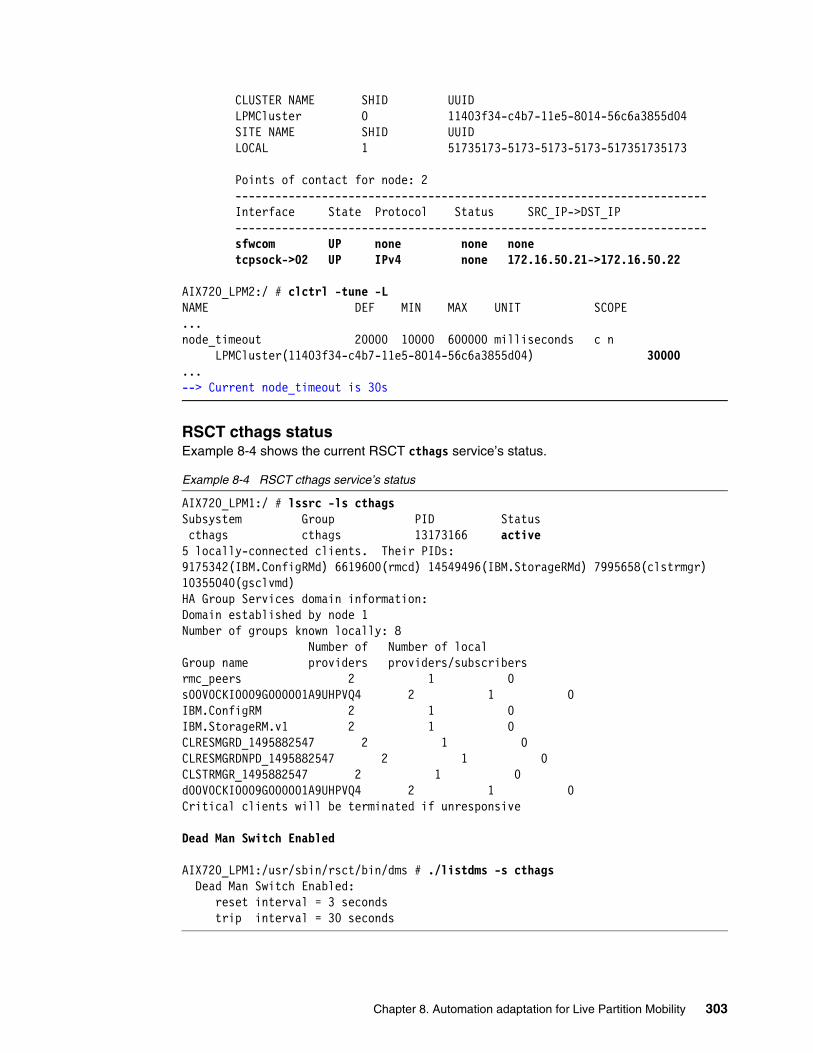
CLUSTER NAME SHID UUID LPMCluster 0 11403f34-c4b7-11e5-8014-56c6a3855d04 SITE NAME SHID UUID LOCAL 1 51735173-5173-5173-5173-517351735173
Points of contact for node: 2 ----------------------------------------------------------------------- Interface State Protocol Status SRC_IP->DST_IP ----------------------------------------------------------------------- sfwcom UP none none none tcpsock->02 UP IPv4 none 172.16.50.21->172.16.50.22
AIX720_LPM2:/ # clctrl -tune -LNAME DEF MIN MAX UNIT SCOPE...node_timeout 20000 10000 600000 milliseconds c n LPMCluster(11403f34-c4b7-11e5-8014-56c6a3855d04) 30000 ...--> Current node_timeout is 30s
RSCT cthags statusExample 8-4 shows the current RSCT cthags service’s status.
Example 8-4 RSCT cthags service’s status
AIX720_LPM1:/ # lssrc -ls cthagsSubsystem Group PID Status cthags cthags 13173166 active5 locally-connected clients. Their PIDs:9175342(IBM.ConfigRMd) 6619600(rmcd) 14549496(IBM.StorageRMd) 7995658(clstrmgr) 10355040(gsclvmd) HA Group Services domain information:Domain established by node 1Number of groups known locally: 8 Number of Number of localGroup name providers providers/subscribersrmc_peers 2 1 0s00V0CKI0009G000001A9UHPVQ4 2 1 0IBM.ConfigRM 2 1 0IBM.StorageRM.v1 2 1 0CLRESMGRD_1495882547 2 1 0CLRESMGRDNPD_1495882547 2 1 0CLSTRMGR_1495882547 2 1 0d00V0CKI0009G000001A9UHPVQ4 2 1 0Critical clients will be terminated if unresponsive
Dead Man Switch Enabled
AIX720_LPM1:/usr/sbin/rsct/bin/dms # ./listdms -s cthags Dead Man Switch Enabled: reset interval = 3 seconds trip interval = 30 seconds
Chapter 8. Automation adaptation for Live Partition Mobility 303
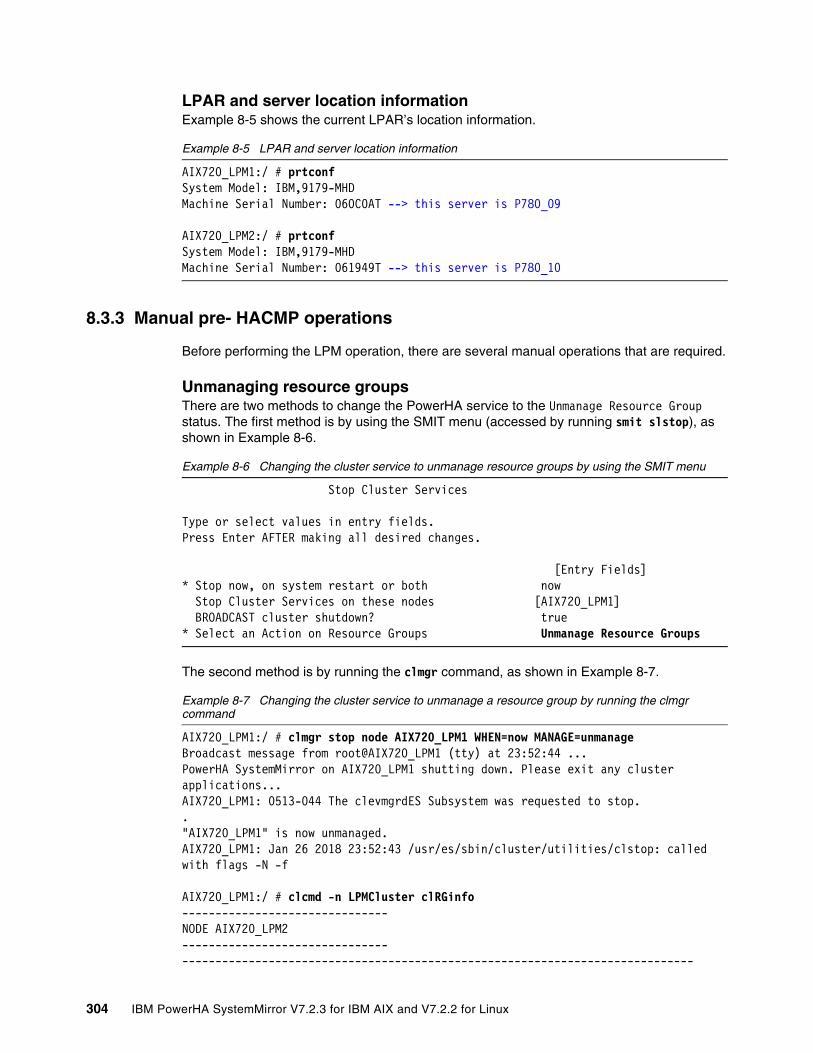
LPAR and server location informationExample 8-5 shows the current LPAR’s location information.
Example 8-5 LPAR and server location information
AIX720_LPM1:/ # prtconfSystem Model: IBM,9179-MHDMachine Serial Number: 060C0AT --> this server is P780_09
AIX720_LPM2:/ # prtconfSystem Model: IBM,9179-MHDMachine Serial Number: 061949T --> this server is P780_10
8.3.3 Manual pre- HACMP operations
Before performing the LPM operation, there are several manual operations that are required.
Unmanaging resource groupsThere are two methods to change the PowerHA service to the Unmanage Resource Group status. The first method is by using the SMIT menu (accessed by running smit slstop), as shown in Example 8-6.
Example 8-6 Changing the cluster service to unmanage resource groups by using the SMIT menu
Stop Cluster Services
Type or select values in entry fields.Press Enter AFTER making all desired changes.
[Entry Fields]* Stop now, on system restart or both now Stop Cluster Services on these nodes [AIX720_LPM1] BROADCAST cluster shutdown? true * Select an Action on Resource Groups Unmanage Resource Groups
The second method is by running the clmgr command, as shown in Example 8-7.
Example 8-7 Changing the cluster service to unmanage a resource group by running the clmgr command
AIX720_LPM1:/ # clmgr stop node AIX720_LPM1 WHEN=now MANAGE=unmanageBroadcast message from root@AIX720_LPM1 (tty) at 23:52:44 ... PowerHA SystemMirror on AIX720_LPM1 shutting down. Please exit any cluster applications...AIX720_LPM1: 0513-044 The clevmgrdES Subsystem was requested to stop.."AIX720_LPM1" is now unmanaged.AIX720_LPM1: Jan 26 2018 23:52:43 /usr/es/sbin/cluster/utilities/clstop: called with flags -N -f
AIX720_LPM1:/ # clcmd -n LPMCluster clRGinfo -------------------------------NODE AIX720_LPM2------------------------------------------------------------------------------------------------------------
304 IBM PowerHA SystemMirror V7.2.3 for IBM AIX and V7.2.2 for Linux
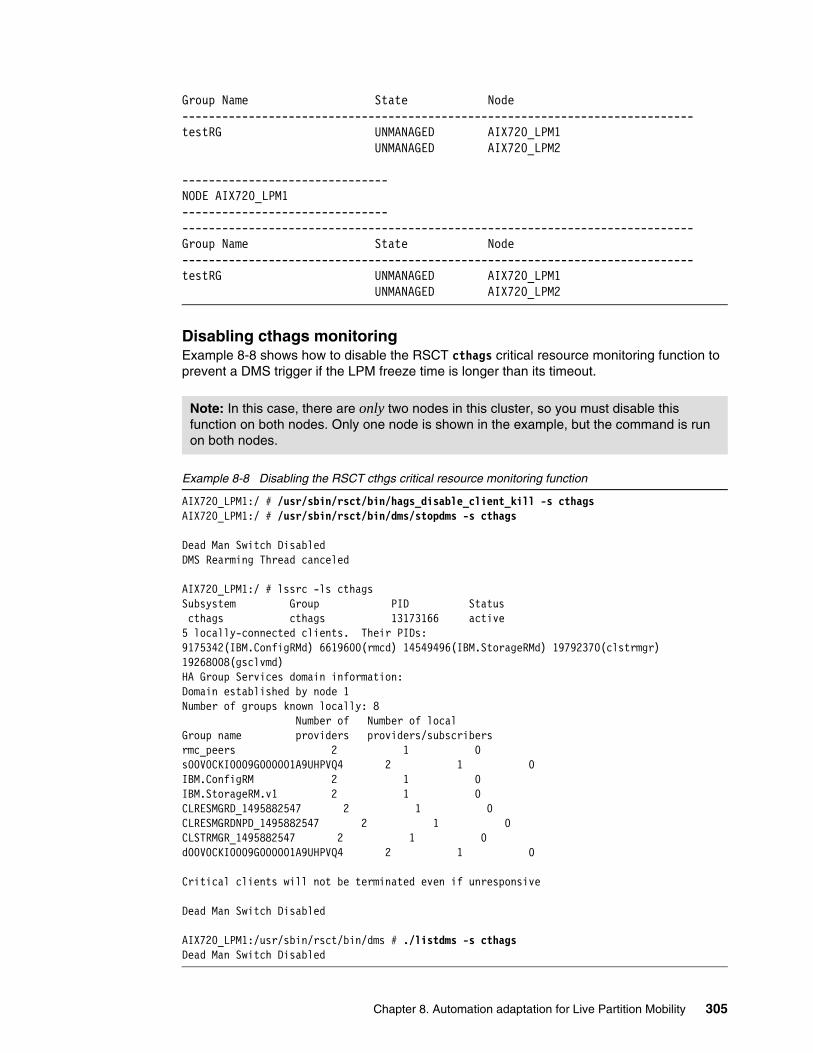
Group Name State Node -----------------------------------------------------------------------------testRG UNMANAGED AIX720_LPM1 UNMANAGED AIX720_LPM2
-------------------------------NODE AIX720_LPM1------------------------------------------------------------------------------------------------------------Group Name State Node -----------------------------------------------------------------------------testRG UNMANAGED AIX720_LPM1 UNMANAGED AIX720_LPM2
Disabling cthags monitoringExample 8-8 shows how to disable the RSCT cthags critical resource monitoring function to prevent a DMS trigger if the LPM freeze time is longer than its timeout.
Example 8-8 Disabling the RSCT cthgs critical resource monitoring function
AIX720_LPM1:/ # /usr/sbin/rsct/bin/hags_disable_client_kill -s cthagsAIX720_LPM1:/ # /usr/sbin/rsct/bin/dms/stopdms -s cthags
Dead Man Switch DisabledDMS Rearming Thread canceled
AIX720_LPM1:/ # lssrc -ls cthagsSubsystem Group PID Status cthags cthags 13173166 active5 locally-connected clients. Their PIDs:9175342(IBM.ConfigRMd) 6619600(rmcd) 14549496(IBM.StorageRMd) 19792370(clstrmgr) 19268008(gsclvmd) HA Group Services domain information:Domain established by node 1Number of groups known locally: 8 Number of Number of localGroup name providers providers/subscribersrmc_peers 2 1 0s00V0CKI0009G000001A9UHPVQ4 2 1 0IBM.ConfigRM 2 1 0IBM.StorageRM.v1 2 1 0CLRESMGRD_1495882547 2 1 0CLRESMGRDNPD_1495882547 2 1 0CLSTRMGR_1495882547 2 1 0d00V0CKI0009G000001A9UHPVQ4 2 1 0
Critical clients will not be terminated even if unresponsive
Dead Man Switch Disabled
AIX720_LPM1:/usr/sbin/rsct/bin/dms # ./listdms -s cthagsDead Man Switch Disabled
Note: In this case, there are only two nodes in this cluster, so you must disable this function on both nodes. Only one node is shown in the example, but the command is run on both nodes.
Chapter 8. Automation adaptation for Live Partition Mobility 305
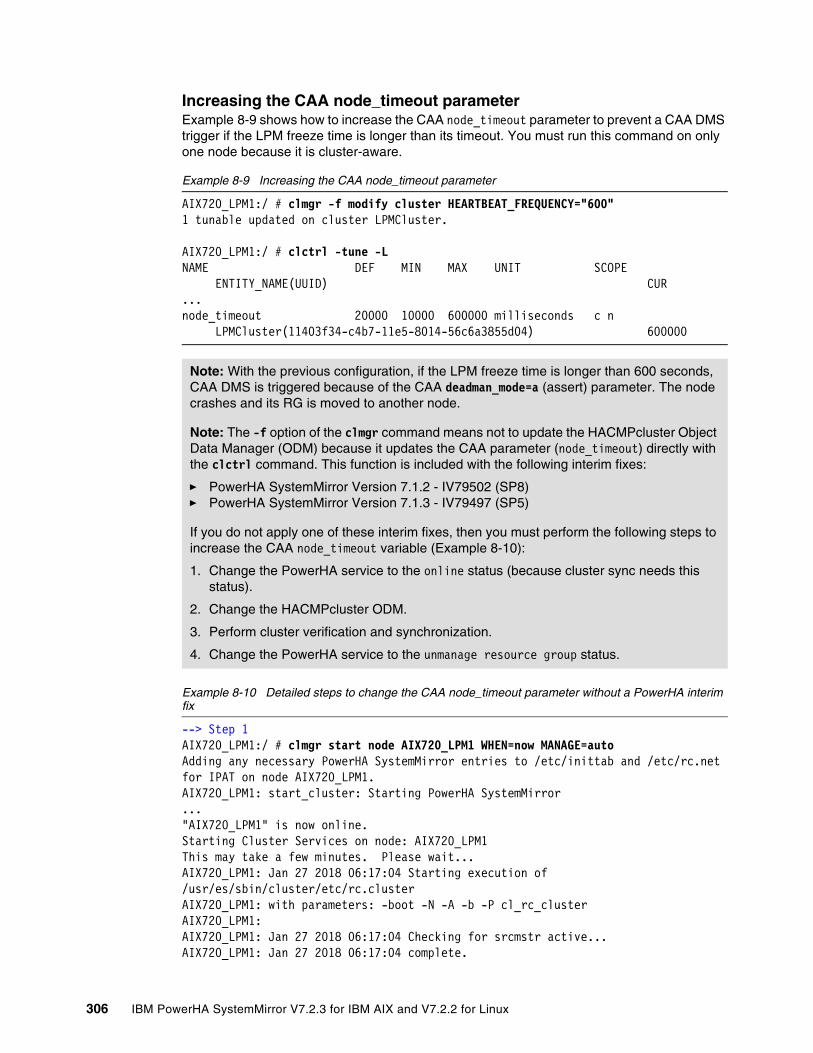
Increasing the CAA node_timeout parameter Example 8-9 shows how to increase the CAA node_timeout parameter to prevent a CAA DMS trigger if the LPM freeze time is longer than its timeout. You must run this command on only one node because it is cluster-aware.
Example 8-9 Increasing the CAA node_timeout parameter
AIX720_LPM1:/ # clmgr -f modify cluster HEARTBEAT_FREQUENCY="600"1 tunable updated on cluster LPMCluster.
AIX720_LPM1:/ # clctrl -tune -LNAME DEF MIN MAX UNIT SCOPE ENTITY_NAME(UUID) CUR ...node_timeout 20000 10000 600000 milliseconds c n LPMCluster(11403f34-c4b7-11e5-8014-56c6a3855d04) 600000
Example 8-10 Detailed steps to change the CAA node_timeout parameter without a PowerHA interim fix
--> Step 1AIX720_LPM1:/ # clmgr start node AIX720_LPM1 WHEN=now MANAGE=autoAdding any necessary PowerHA SystemMirror entries to /etc/inittab and /etc/rc.net for IPAT on node AIX720_LPM1.AIX720_LPM1: start_cluster: Starting PowerHA SystemMirror..."AIX720_LPM1" is now online.Starting Cluster Services on node: AIX720_LPM1This may take a few minutes. Please wait...AIX720_LPM1: Jan 27 2018 06:17:04 Starting execution of /usr/es/sbin/cluster/etc/rc.clusterAIX720_LPM1: with parameters: -boot -N -A -b -P cl_rc_clusterAIX720_LPM1: AIX720_LPM1: Jan 27 2018 06:17:04 Checking for srcmstr active...AIX720_LPM1: Jan 27 2018 06:17:04 complete.
Note: With the previous configuration, if the LPM freeze time is longer than 600 seconds, CAA DMS is triggered because of the CAA deadman_mode=a (assert) parameter. The node crashes and its RG is moved to another node.
Note: The -f option of the clmgr command means not to update the HACMPcluster Object Data Manager (ODM) because it updates the CAA parameter (node_timeout) directly with the clctrl command. This function is included with the following interim fixes:
� PowerHA SystemMirror Version 7.1.2 - IV79502 (SP8)� PowerHA SystemMirror Version 7.1.3 - IV79497 (SP5)
If you do not apply one of these interim fixes, then you must perform the following steps to increase the CAA node_timeout variable (Example 8-10):
1. Change the PowerHA service to the online status (because cluster sync needs this status).
2. Change the HACMPcluster ODM.
3. Perform cluster verification and synchronization.
4. Change the PowerHA service to the unmanage resource group status.
306 IBM PowerHA SystemMirror V7.2.3 for IBM AIX and V7.2.2 for Linux
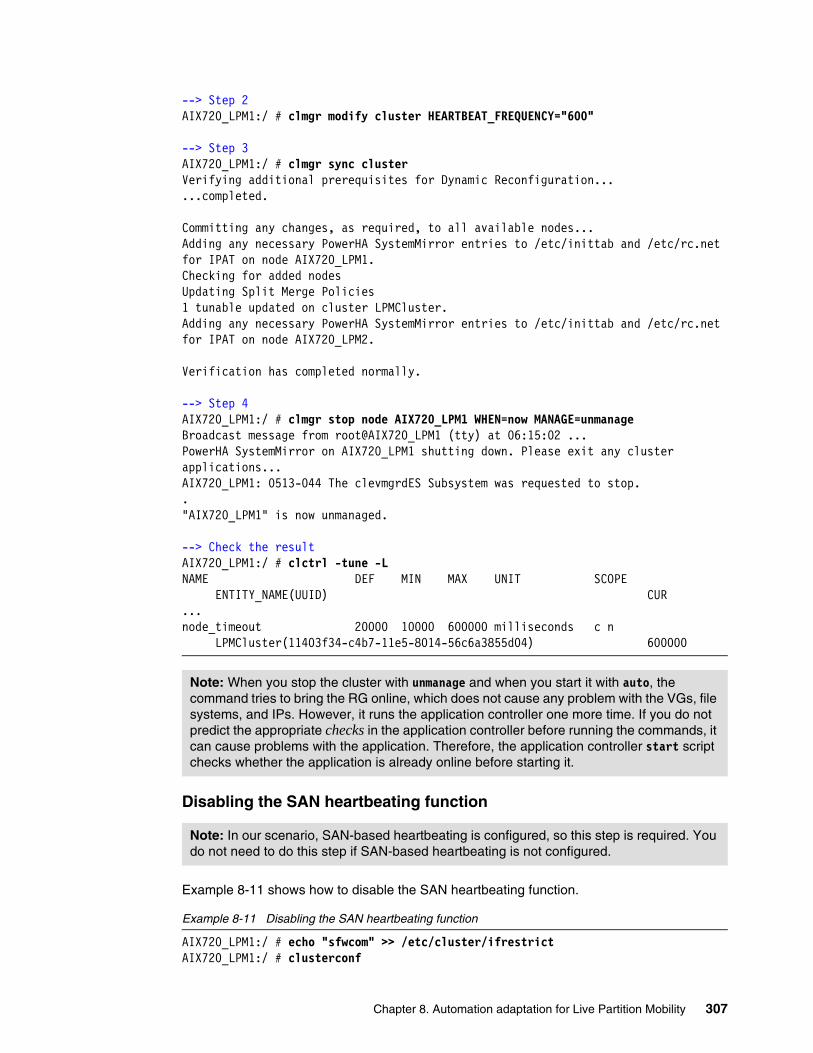
--> Step 2AIX720_LPM1:/ # clmgr modify cluster HEARTBEAT_FREQUENCY="600"
--> Step 3AIX720_LPM1:/ # clmgr sync cluster Verifying additional prerequisites for Dynamic Reconfiguration......completed.
Committing any changes, as required, to all available nodes...Adding any necessary PowerHA SystemMirror entries to /etc/inittab and /etc/rc.net for IPAT on node AIX720_LPM1.Checking for added nodesUpdating Split Merge Policies1 tunable updated on cluster LPMCluster.Adding any necessary PowerHA SystemMirror entries to /etc/inittab and /etc/rc.net for IPAT on node AIX720_LPM2.
Verification has completed normally.
--> Step 4AIX720_LPM1:/ # clmgr stop node AIX720_LPM1 WHEN=now MANAGE=unmanageBroadcast message from root@AIX720_LPM1 (tty) at 06:15:02 ... PowerHA SystemMirror on AIX720_LPM1 shutting down. Please exit any cluster applications...AIX720_LPM1: 0513-044 The clevmgrdES Subsystem was requested to stop.."AIX720_LPM1" is now unmanaged.
--> Check the resultAIX720_LPM1:/ # clctrl -tune -LNAME DEF MIN MAX UNIT SCOPE ENTITY_NAME(UUID) CUR ...node_timeout 20000 10000 600000 milliseconds c n LPMCluster(11403f34-c4b7-11e5-8014-56c6a3855d04) 600000
Disabling the SAN heartbeating function
Example 8-11 shows how to disable the SAN heartbeating function.
Example 8-11 Disabling the SAN heartbeating function
AIX720_LPM1:/ # echo "sfwcom" >> /etc/cluster/ifrestrict AIX720_LPM1:/ # clusterconf
Note: When you stop the cluster with unmanage and when you start it with auto, the command tries to bring the RG online, which does not cause any problem with the VGs, file systems, and IPs. However, it runs the application controller one more time. If you do not predict the appropriate checks in the application controller before running the commands, it can cause problems with the application. Therefore, the application controller start script checks whether the application is already online before starting it.
Note: In our scenario, SAN-based heartbeating is configured, so this step is required. You do not need to do this step if SAN-based heartbeating is not configured.
Chapter 8. Automation adaptation for Live Partition Mobility 307

AIX720_LPM2:/ # echo "sfwcom" >> /etc/cluster/ifrestrict AIX720_LPM2:/ # clusterconf
AIX720_LPM1:/ # clcmd lscluster -m
-------------------------------NODE AIX720_LPM2-------------------------------Calling node query for all nodes...Node query number of nodes examined: 2
Node name: AIX720_LPM1 Cluster shorthand id for node: 1 UUID for node: 112552f0-c4b7-11e5-8014-56c6a3855d04 State of node: UP Smoothed rtt to node: 7 Mean Deviation in network rtt to node: 3 Number of clusters node is a member in: 1 CLUSTER NAME SHID UUID LPMCluster 0 11403f34-c4b7-11e5-8014-56c6a3855d04 SITE NAME SHID UUID LOCAL 1 51735173-5173-5173-5173-517351735173
Points of contact for node: 1 ----------------------------------------------------------------------- Interface State Protocol Status SRC_IP->DST_IP ----------------------------------------------------------------------- tcpsock->01 UP IPv4 none 172.16.50.22->172.16.50.21----------------------------------------------------------------------------
Node name: AIX720_LPM2 Cluster shorthand id for node: 2 UUID for node: 11255336-c4b7-11e5-8014-56c6a3855d04 State of node: UP NODE_LOCAL Smoothed rtt to node: 0 Mean Deviation in network rtt to node: 0 Number of clusters node is a member in: 1 CLUSTER NAME SHID UUID LPMCluster 0 11403f34-c4b7-11e5-8014-56c6a3855d04 SITE NAME SHID UUID LOCAL 1 51735173-5173-5173-5173-517351735173
Points of contact for node: 0
-------------------------------NODE AIX720_LPM1-------------------------------Calling node query for all nodes...Node query number of nodes examined: 2
Node name: AIX720_LPM1 Cluster shorthand id for node: 1 UUID for node: 112552f0-c4b7-11e5-8014-56c6a3855d04 State of node: UP NODE_LOCAL
308 IBM PowerHA SystemMirror V7.2.3 for IBM AIX and V7.2.2 for Linux
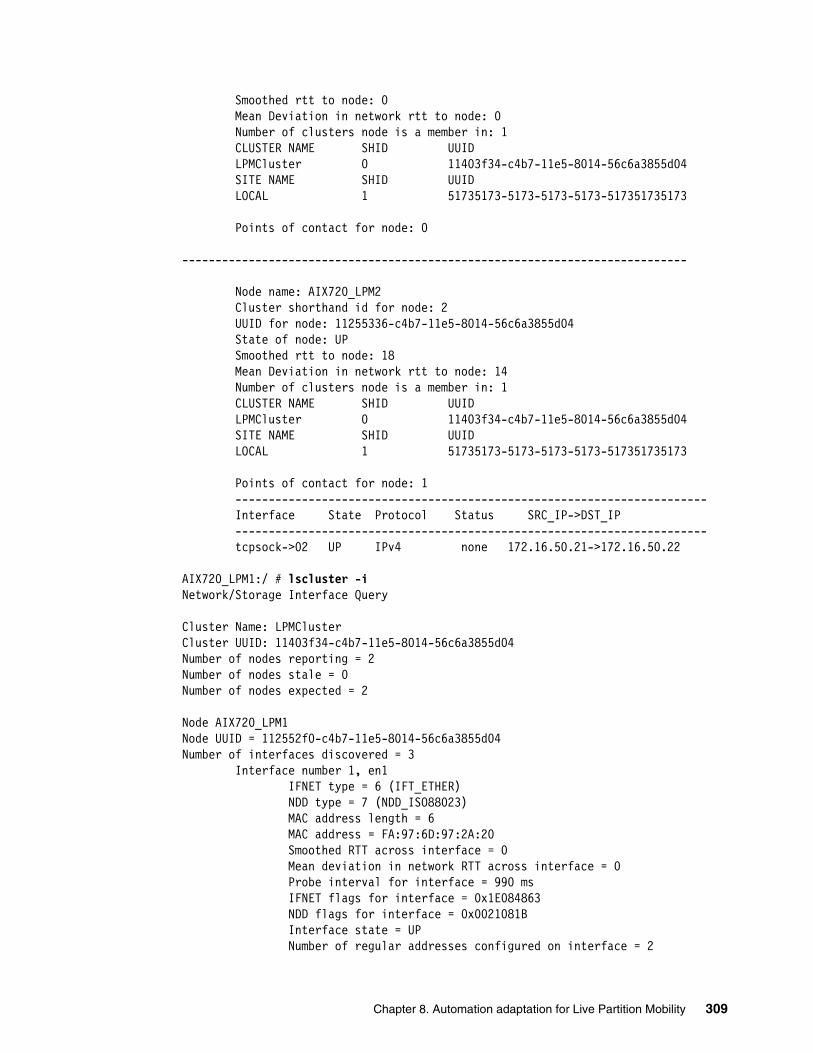
Smoothed rtt to node: 0 Mean Deviation in network rtt to node: 0 Number of clusters node is a member in: 1 CLUSTER NAME SHID UUID LPMCluster 0 11403f34-c4b7-11e5-8014-56c6a3855d04 SITE NAME SHID UUID LOCAL 1 51735173-5173-5173-5173-517351735173
Points of contact for node: 0
----------------------------------------------------------------------------
Node name: AIX720_LPM2 Cluster shorthand id for node: 2 UUID for node: 11255336-c4b7-11e5-8014-56c6a3855d04 State of node: UP Smoothed rtt to node: 18 Mean Deviation in network rtt to node: 14 Number of clusters node is a member in: 1 CLUSTER NAME SHID UUID LPMCluster 0 11403f34-c4b7-11e5-8014-56c6a3855d04 SITE NAME SHID UUID LOCAL 1 51735173-5173-5173-5173-517351735173
Points of contact for node: 1 ----------------------------------------------------------------------- Interface State Protocol Status SRC_IP->DST_IP ----------------------------------------------------------------------- tcpsock->02 UP IPv4 none 172.16.50.21->172.16.50.22
AIX720_LPM1:/ # lscluster -iNetwork/Storage Interface Query
Cluster Name: LPMClusterCluster UUID: 11403f34-c4b7-11e5-8014-56c6a3855d04Number of nodes reporting = 2Number of nodes stale = 0Number of nodes expected = 2
Node AIX720_LPM1Node UUID = 112552f0-c4b7-11e5-8014-56c6a3855d04Number of interfaces discovered = 3 Interface number 1, en1 IFNET type = 6 (IFT_ETHER) NDD type = 7 (NDD_ISO88023) MAC address length = 6 MAC address = FA:97:6D:97:2A:20 Smoothed RTT across interface = 0 Mean deviation in network RTT across interface = 0 Probe interval for interface = 990 ms IFNET flags for interface = 0x1E084863 NDD flags for interface = 0x0021081B Interface state = UP Number of regular addresses configured on interface = 2
Chapter 8. Automation adaptation for Live Partition Mobility 309

IPv4 ADDRESS: 172.16.50.21 broadcast 172.16.50.255 netmask 255.255.255.0 IPv4 ADDRESS: 172.16.50.23 broadcast 172.16.50.255 netmask 255.255.255.0 Number of cluster multicast addresses configured on interface = 1 IPv4 MULTICAST ADDRESS: 228.16.50.21 Interface number 2, sfwcom IFNET type = 0 (none) NDD type = 304 (NDD_SANCOMM) Smoothed RTT across interface = 7 Mean deviation in network RTT across interface = 3 Probe interval for interface = 990 ms IFNET flags for interface = 0x00000000 NDD flags for interface = 0x00000009 Interface state = DOWN RESTRICTED SOURCE HARDWARE RECEIVE SOURCE HARDWARE TRANSMIT Interface number 3, dpcom IFNET type = 0 (none) NDD type = 305 (NDD_PINGCOMM) Smoothed RTT across interface = 750 Mean deviation in network RTT across interface = 1500 Probe interval for interface = 22500 ms IFNET flags for interface = 0x00000000 NDD flags for interface = 0x00000009 Interface state = UP RESTRICTED AIX_CONTROLLED
Node AIX720_LPM2Node UUID = 11255336-c4b7-11e5-8014-56c6a3855d04Number of interfaces discovered = 3 Interface number 1, en1 IFNET type = 6 (IFT_ETHER) NDD type = 7 (NDD_ISO88023) MAC address length = 6 MAC address = FA:F2:D3:29:50:20 Smoothed RTT across interface = 0 Mean deviation in network RTT across interface = 0 Probe interval for interface = 990 ms IFNET flags for interface = 0x1E084863 NDD flags for interface = 0x0021081B Interface state = UP Number of regular addresses configured on interface = 1 IPv4 ADDRESS: 172.16.50.22 broadcast 172.16.50.255 netmask 255.255.255.0 Number of cluster multicast addresses configured on interface = 1 IPv4 MULTICAST ADDRESS: 228.16.50.21 Interface number 2, sfwcom IFNET type = 0 (none) NDD type = 304 (NDD_SANCOMM) Smoothed RTT across interface = 7 Mean deviation in network RTT across interface = 3 Probe interval for interface = 990 ms IFNET flags for interface = 0x00000000 NDD flags for interface = 0x00000009 Interface state = DOWN RESTRICTED SOURCE HARDWARE RECEIVE SOURCE HARDWARE TRANSMIT
310 IBM PowerHA SystemMirror V7.2.3 for IBM AIX and V7.2.2 for Linux
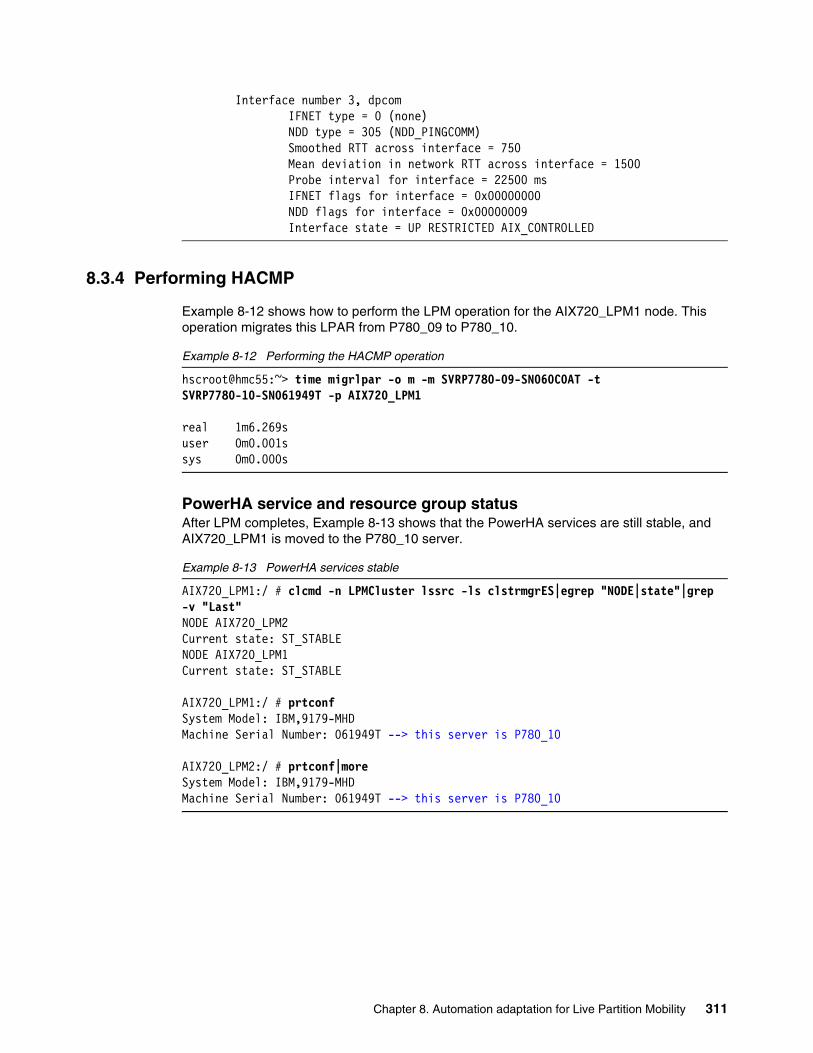
Interface number 3, dpcom IFNET type = 0 (none) NDD type = 305 (NDD_PINGCOMM) Smoothed RTT across interface = 750 Mean deviation in network RTT across interface = 1500 Probe interval for interface = 22500 ms IFNET flags for interface = 0x00000000 NDD flags for interface = 0x00000009 Interface state = UP RESTRICTED AIX_CONTROLLED
8.3.4 Performing HACMP
Example 8-12 shows how to perform the LPM operation for the AIX720_LPM1 node. This operation migrates this LPAR from P780_09 to P780_10.
Example 8-12 Performing the HACMP operation
hscroot@hmc55:~> time migrlpar -o m -m SVRP7780-09-SN060C0AT -t SVRP7780-10-SN061949T -p AIX720_LPM1
real 1m6.269suser 0m0.001ssys 0m0.000s
PowerHA service and resource group statusAfter LPM completes, Example 8-13 shows that the PowerHA services are still stable, and AIX720_LPM1 is moved to the P780_10 server.
Example 8-13 PowerHA services stable
AIX720_LPM1:/ # clcmd -n LPMCluster lssrc -ls clstrmgrES|egrep "NODE|state"|grep -v "Last"NODE AIX720_LPM2Current state: ST_STABLENODE AIX720_LPM1Current state: ST_STABLE
AIX720_LPM1:/ # prtconfSystem Model: IBM,9179-MHDMachine Serial Number: 061949T --> this server is P780_10
AIX720_LPM2:/ # prtconf|moreSystem Model: IBM,9179-MHDMachine Serial Number: 061949T --> this server is P780_10
Chapter 8. Automation adaptation for Live Partition Mobility 311
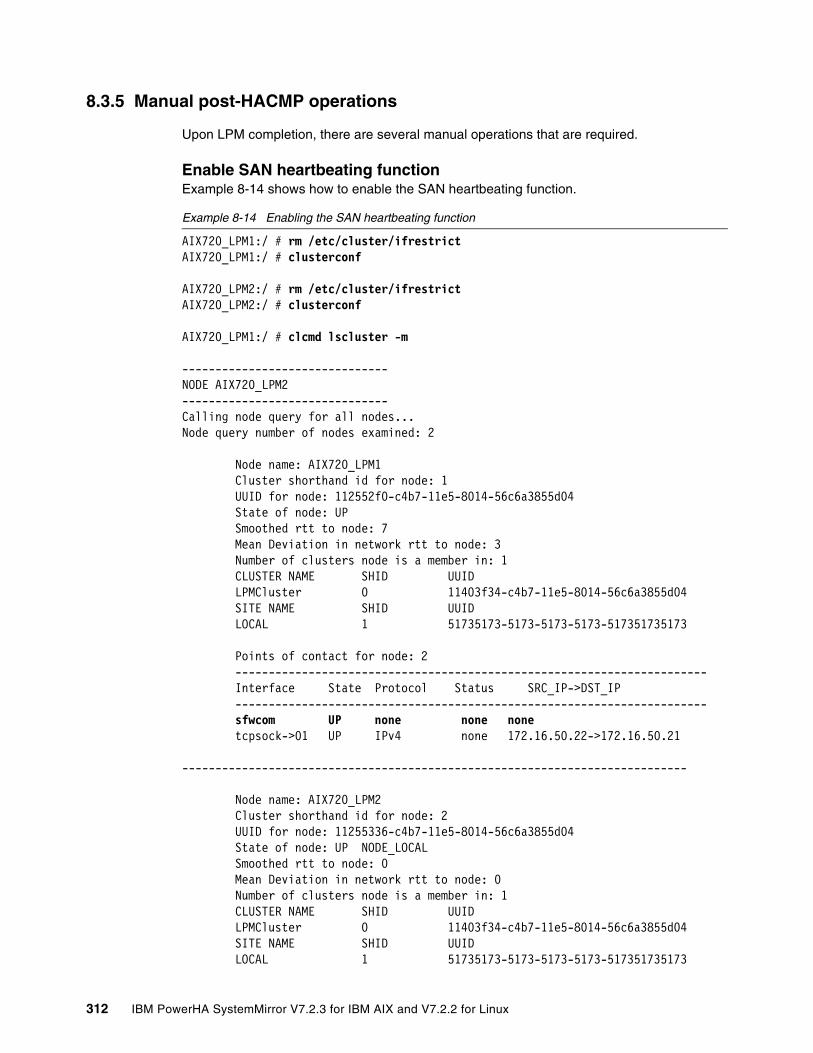
8.3.5 Manual post-HACMP operations
Upon LPM completion, there are several manual operations that are required.
Enable SAN heartbeating functionExample 8-14 shows how to enable the SAN heartbeating function.
Example 8-14 Enabling the SAN heartbeating function
AIX720_LPM1:/ # rm /etc/cluster/ifrestrictAIX720_LPM1:/ # clusterconf
AIX720_LPM2:/ # rm /etc/cluster/ifrestrictAIX720_LPM2:/ # clusterconf
AIX720_LPM1:/ # clcmd lscluster -m
-------------------------------NODE AIX720_LPM2-------------------------------Calling node query for all nodes...Node query number of nodes examined: 2
Node name: AIX720_LPM1 Cluster shorthand id for node: 1 UUID for node: 112552f0-c4b7-11e5-8014-56c6a3855d04 State of node: UP Smoothed rtt to node: 7 Mean Deviation in network rtt to node: 3 Number of clusters node is a member in: 1 CLUSTER NAME SHID UUID LPMCluster 0 11403f34-c4b7-11e5-8014-56c6a3855d04 SITE NAME SHID UUID LOCAL 1 51735173-5173-5173-5173-517351735173
Points of contact for node: 2 ----------------------------------------------------------------------- Interface State Protocol Status SRC_IP->DST_IP ----------------------------------------------------------------------- sfwcom UP none none none tcpsock->01 UP IPv4 none 172.16.50.22->172.16.50.21
----------------------------------------------------------------------------
Node name: AIX720_LPM2 Cluster shorthand id for node: 2 UUID for node: 11255336-c4b7-11e5-8014-56c6a3855d04 State of node: UP NODE_LOCAL Smoothed rtt to node: 0 Mean Deviation in network rtt to node: 0 Number of clusters node is a member in: 1 CLUSTER NAME SHID UUID LPMCluster 0 11403f34-c4b7-11e5-8014-56c6a3855d04 SITE NAME SHID UUID LOCAL 1 51735173-5173-5173-5173-517351735173
312 IBM PowerHA SystemMirror V7.2.3 for IBM AIX and V7.2.2 for Linux
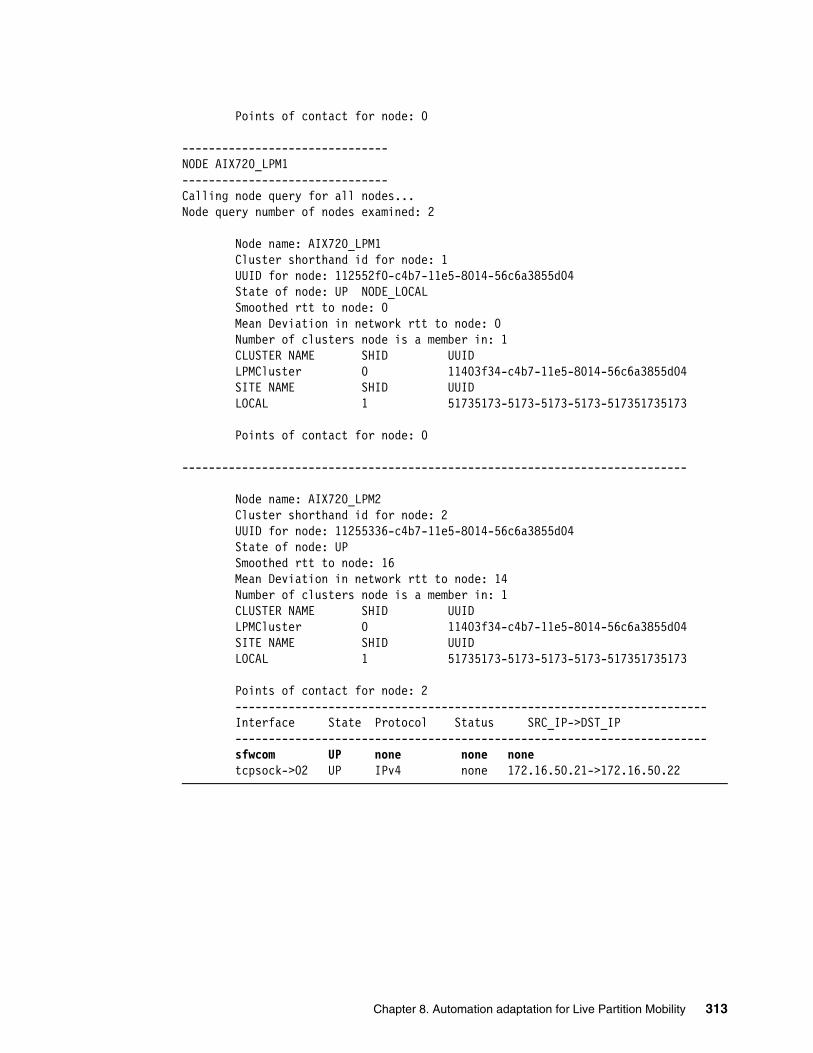
Points of contact for node: 0
-------------------------------NODE AIX720_LPM1-------------------------------Calling node query for all nodes...Node query number of nodes examined: 2
Node name: AIX720_LPM1 Cluster shorthand id for node: 1 UUID for node: 112552f0-c4b7-11e5-8014-56c6a3855d04 State of node: UP NODE_LOCAL Smoothed rtt to node: 0 Mean Deviation in network rtt to node: 0 Number of clusters node is a member in: 1 CLUSTER NAME SHID UUID LPMCluster 0 11403f34-c4b7-11e5-8014-56c6a3855d04 SITE NAME SHID UUID LOCAL 1 51735173-5173-5173-5173-517351735173
Points of contact for node: 0
----------------------------------------------------------------------------
Node name: AIX720_LPM2 Cluster shorthand id for node: 2 UUID for node: 11255336-c4b7-11e5-8014-56c6a3855d04 State of node: UP Smoothed rtt to node: 16 Mean Deviation in network rtt to node: 14 Number of clusters node is a member in: 1 CLUSTER NAME SHID UUID LPMCluster 0 11403f34-c4b7-11e5-8014-56c6a3855d04 SITE NAME SHID UUID LOCAL 1 51735173-5173-5173-5173-517351735173
Points of contact for node: 2 ----------------------------------------------------------------------- Interface State Protocol Status SRC_IP->DST_IP ----------------------------------------------------------------------- sfwcom UP none none none tcpsock->02 UP IPv4 none 172.16.50.21->172.16.50.22
Chapter 8. Automation adaptation for Live Partition Mobility 313
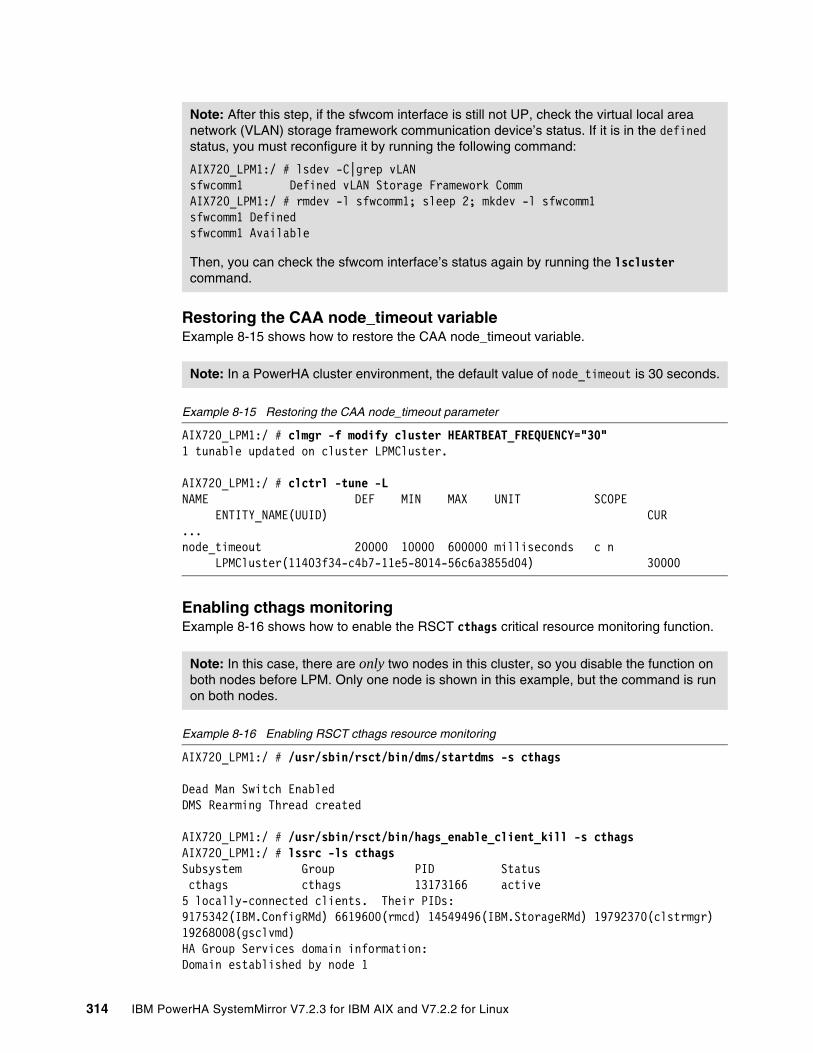
Restoring the CAA node_timeout variableExample 8-15 shows how to restore the CAA node_timeout variable.
Example 8-15 Restoring the CAA node_timeout parameter
AIX720_LPM1:/ # clmgr -f modify cluster HEARTBEAT_FREQUENCY="30"1 tunable updated on cluster LPMCluster.
AIX720_LPM1:/ # clctrl -tune -LNAME DEF MIN MAX UNIT SCOPE ENTITY_NAME(UUID) CUR ...node_timeout 20000 10000 600000 milliseconds c n LPMCluster(11403f34-c4b7-11e5-8014-56c6a3855d04) 30000
Enabling cthags monitoring Example 8-16 shows how to enable the RSCT cthags critical resource monitoring function.
Example 8-16 Enabling RSCT cthags resource monitoring
AIX720_LPM1:/ # /usr/sbin/rsct/bin/dms/startdms -s cthags
Dead Man Switch EnabledDMS Rearming Thread created
AIX720_LPM1:/ # /usr/sbin/rsct/bin/hags_enable_client_kill -s cthagsAIX720_LPM1:/ # lssrc -ls cthagsSubsystem Group PID Status cthags cthags 13173166 active5 locally-connected clients. Their PIDs:9175342(IBM.ConfigRMd) 6619600(rmcd) 14549496(IBM.StorageRMd) 19792370(clstrmgr) 19268008(gsclvmd) HA Group Services domain information:Domain established by node 1
Note: After this step, if the sfwcom interface is still not UP, check the virtual local area network (VLAN) storage framework communication device’s status. If it is in the defined status, you must reconfigure it by running the following command:
AIX720_LPM1:/ # lsdev -C|grep vLANsfwcomm1 Defined vLAN Storage Framework CommAIX720_LPM1:/ # rmdev -l sfwcomm1; sleep 2; mkdev -l sfwcomm1sfwcomm1 Definedsfwcomm1 Available
Then, you can check the sfwcom interface’s status again by running the lscluster command.
Note: In a PowerHA cluster environment, the default value of node_timeout is 30 seconds.
Note: In this case, there are only two nodes in this cluster, so you disable the function on both nodes before LPM. Only one node is shown in this example, but the command is run on both nodes.
314 IBM PowerHA SystemMirror V7.2.3 for IBM AIX and V7.2.2 for Linux
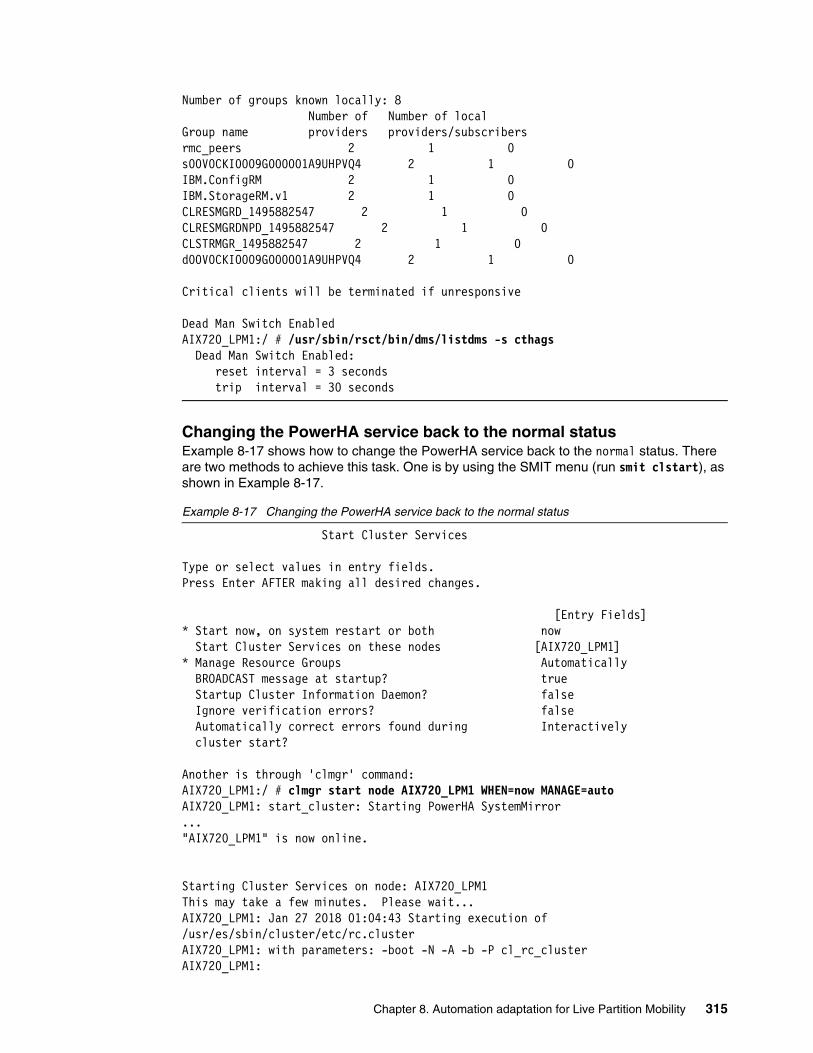
Number of groups known locally: 8 Number of Number of localGroup name providers providers/subscribersrmc_peers 2 1 0s00V0CKI0009G000001A9UHPVQ4 2 1 0IBM.ConfigRM 2 1 0IBM.StorageRM.v1 2 1 0CLRESMGRD_1495882547 2 1 0CLRESMGRDNPD_1495882547 2 1 0CLSTRMGR_1495882547 2 1 0d00V0CKI0009G000001A9UHPVQ4 2 1 0
Critical clients will be terminated if unresponsive
Dead Man Switch EnabledAIX720_LPM1:/ # /usr/sbin/rsct/bin/dms/listdms -s cthags Dead Man Switch Enabled: reset interval = 3 seconds trip interval = 30 seconds
Changing the PowerHA service back to the normal statusExample 8-17 shows how to change the PowerHA service back to the normal status. There are two methods to achieve this task. One is by using the SMIT menu (run smit clstart), as shown in Example 8-17.
Example 8-17 Changing the PowerHA service back to the normal status
Start Cluster Services
Type or select values in entry fields.Press Enter AFTER making all desired changes.
[Entry Fields]* Start now, on system restart or both now Start Cluster Services on these nodes [AIX720_LPM1] * Manage Resource Groups Automatically BROADCAST message at startup? true Startup Cluster Information Daemon? false Ignore verification errors? false Automatically correct errors found during Interactively cluster start?
Another is through 'clmgr' command:AIX720_LPM1:/ # clmgr start node AIX720_LPM1 WHEN=now MANAGE=autoAIX720_LPM1: start_cluster: Starting PowerHA SystemMirror..."AIX720_LPM1" is now online.
Starting Cluster Services on node: AIX720_LPM1This may take a few minutes. Please wait...AIX720_LPM1: Jan 27 2018 01:04:43 Starting execution of /usr/es/sbin/cluster/etc/rc.clusterAIX720_LPM1: with parameters: -boot -N -A -b -P cl_rc_clusterAIX720_LPM1:
Chapter 8. Automation adaptation for Live Partition Mobility 315
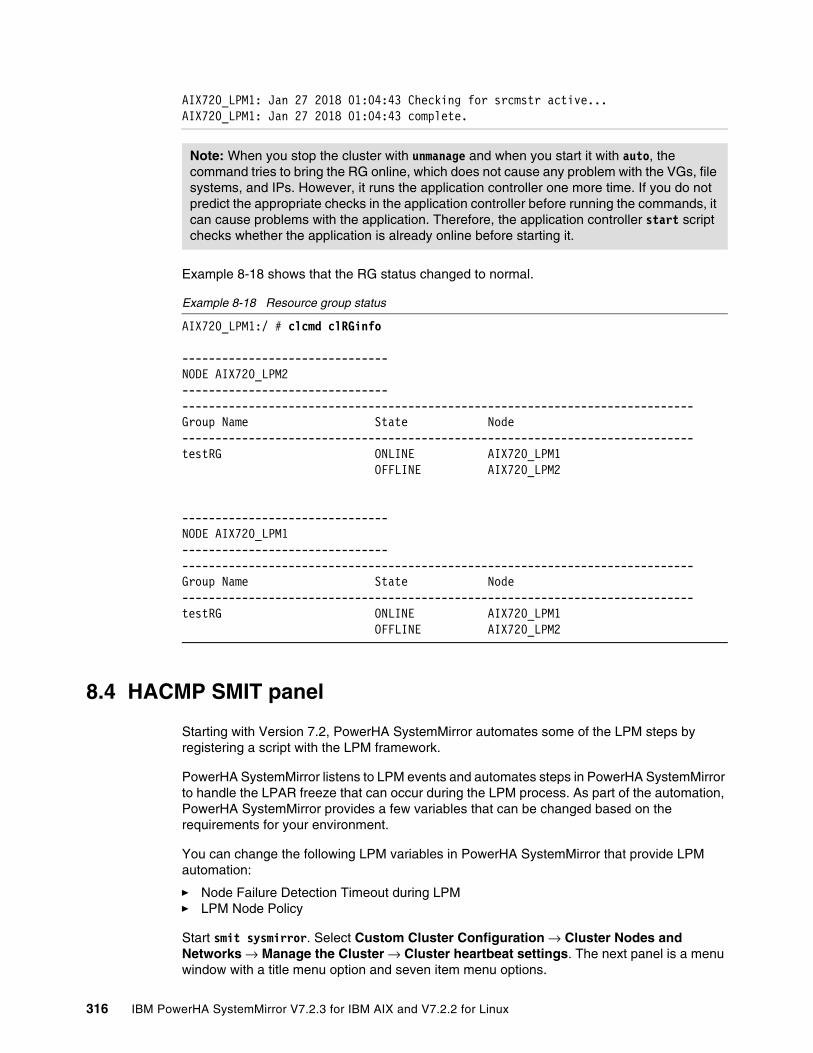
AIX720_LPM1: Jan 27 2018 01:04:43 Checking for srcmstr active...AIX720_LPM1: Jan 27 2018 01:04:43 complete.
Example 8-18 shows that the RG status changed to normal.
Example 8-18 Resource group status
AIX720_LPM1:/ # clcmd clRGinfo
-------------------------------NODE AIX720_LPM2------------------------------------------------------------------------------------------------------------Group Name State Node -----------------------------------------------------------------------------testRG ONLINE AIX720_LPM1 OFFLINE AIX720_LPM2
-------------------------------NODE AIX720_LPM1------------------------------------------------------------------------------------------------------------Group Name State Node -----------------------------------------------------------------------------testRG ONLINE AIX720_LPM1 OFFLINE AIX720_LPM2
8.4 HACMP SMIT panel
Starting with Version 7.2, PowerHA SystemMirror automates some of the LPM steps by registering a script with the LPM framework.
PowerHA SystemMirror listens to LPM events and automates steps in PowerHA SystemMirror to handle the LPAR freeze that can occur during the LPM process. As part of the automation, PowerHA SystemMirror provides a few variables that can be changed based on the requirements for your environment.
You can change the following LPM variables in PowerHA SystemMirror that provide LPM automation:
� Node Failure Detection Timeout during LPM� LPM Node Policy
Start smit sysmirror. Select Custom Cluster Configuration → Cluster Nodes and Networks → Manage the Cluster → Cluster heartbeat settings. The next panel is a menu window with a title menu option and seven item menu options.
Note: When you stop the cluster with unmanage and when you start it with auto, the command tries to bring the RG online, which does not cause any problem with the VGs, file systems, and IPs. However, it runs the application controller one more time. If you do not predict the appropriate checks in the application controller before running the commands, it can cause problems with the application. Therefore, the application controller start script checks whether the application is already online before starting it.
316 IBM PowerHA SystemMirror V7.2.3 for IBM AIX and V7.2.2 for Linux
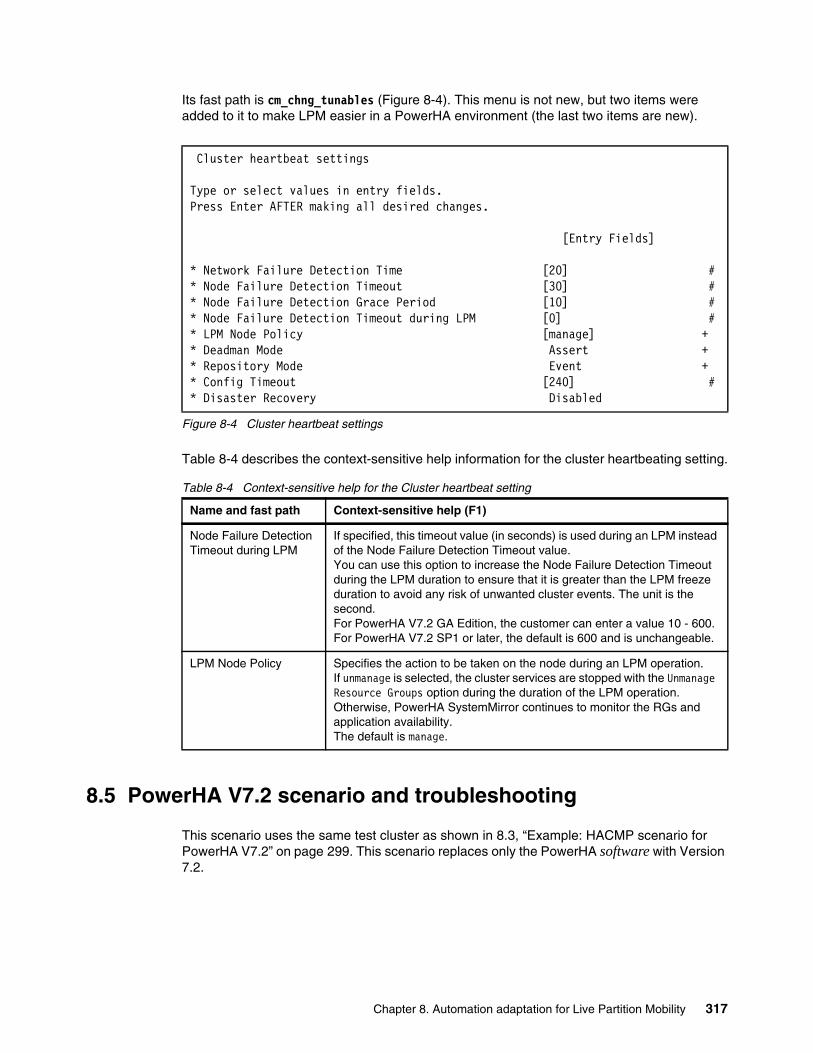
Its fast path is cm_chng_tunables (Figure 8-4). This menu is not new, but two items were added to it to make LPM easier in a PowerHA environment (the last two items are new).
Figure 8-4 Cluster heartbeat settings
Table 8-4 describes the context-sensitive help information for the cluster heartbeating setting.
Table 8-4 Context-sensitive help for the Cluster heartbeat setting
8.5 PowerHA V7.2 scenario and troubleshooting
This scenario uses the same test cluster as shown in 8.3, “Example: HACMP scenario for PowerHA V7.2” on page 299. This scenario replaces only the PowerHA software with Version 7.2.
Cluster heartbeat settings
Type or select values in entry fields.Press Enter AFTER making all desired changes.
[Entry Fields]
* Network Failure Detection Time [20] #* Node Failure Detection Timeout [30] #* Node Failure Detection Grace Period [10] #* Node Failure Detection Timeout during LPM [0] #* LPM Node Policy [manage] +* Deadman Mode Assert +* Repository Mode Event +* Config Timeout [240] #* Disaster Recovery Disabled
Name and fast path Context-sensitive help (F1)
Node Failure Detection Timeout during LPM
If specified, this timeout value (in seconds) is used during an LPM instead of the Node Failure Detection Timeout value.You can use this option to increase the Node Failure Detection Timeout during the LPM duration to ensure that it is greater than the LPM freeze duration to avoid any risk of unwanted cluster events. The unit is the second.For PowerHA V7.2 GA Edition, the customer can enter a value 10 - 600.For PowerHA V7.2 SP1 or later, the default is 600 and is unchangeable.
LPM Node Policy Specifies the action to be taken on the node during an LPM operation. If unmanage is selected, the cluster services are stopped with the Unmanage Resource Groups option during the duration of the LPM operation. Otherwise, PowerHA SystemMirror continues to monitor the RGs and application availability.The default is manage.
Chapter 8. Automation adaptation for Live Partition Mobility 317
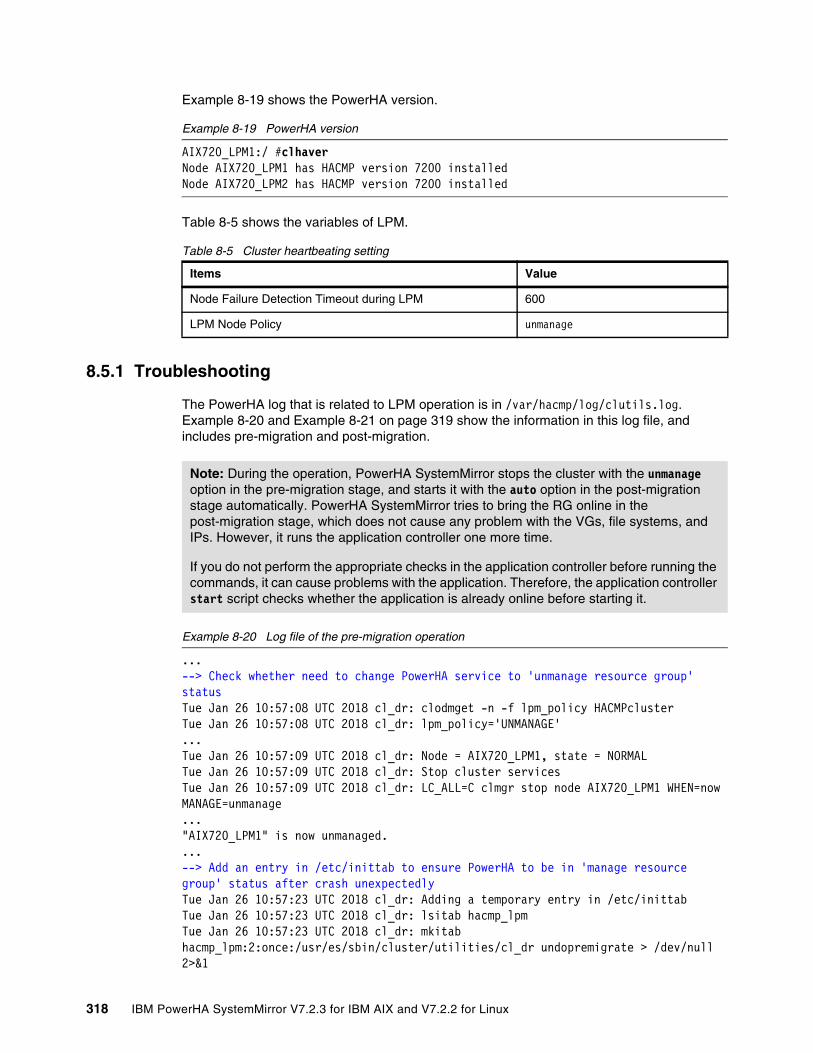
Example 8-19 shows the PowerHA version.
Example 8-19 PowerHA version
AIX720_LPM1:/ #clhaverNode AIX720_LPM1 has HACMP version 7200 installedNode AIX720_LPM2 has HACMP version 7200 installed
Table 8-5 shows the variables of LPM.
Table 8-5 Cluster heartbeating setting
8.5.1 Troubleshooting
The PowerHA log that is related to LPM operation is in /var/hacmp/log/clutils.log. Example 8-20 and Example 8-21 on page 319 show the information in this log file, and includes pre-migration and post-migration.
Example 8-20 Log file of the pre-migration operation
...--> Check whether need to change PowerHA service to 'unmanage resource group' statusTue Jan 26 10:57:08 UTC 2018 cl_dr: clodmget -n -f lpm_policy HACMPclusterTue Jan 26 10:57:08 UTC 2018 cl_dr: lpm_policy='UNMANAGE'...Tue Jan 26 10:57:09 UTC 2018 cl_dr: Node = AIX720_LPM1, state = NORMALTue Jan 26 10:57:09 UTC 2018 cl_dr: Stop cluster servicesTue Jan 26 10:57:09 UTC 2018 cl_dr: LC_ALL=C clmgr stop node AIX720_LPM1 WHEN=now MANAGE=unmanage..."AIX720_LPM1" is now unmanaged....--> Add an entry in /etc/inittab to ensure PowerHA to be in 'manage resource group' status after crash unexpectedlyTue Jan 26 10:57:23 UTC 2018 cl_dr: Adding a temporary entry in /etc/inittabTue Jan 26 10:57:23 UTC 2018 cl_dr: lsitab hacmp_lpmTue Jan 26 10:57:23 UTC 2018 cl_dr: mkitab hacmp_lpm:2:once:/usr/es/sbin/cluster/utilities/cl_dr undopremigrate > /dev/null 2>&1
Items Value
Node Failure Detection Timeout during LPM 600
LPM Node Policy unmanage
Note: During the operation, PowerHA SystemMirror stops the cluster with the unmanage option in the pre-migration stage, and starts it with the auto option in the post-migration stage automatically. PowerHA SystemMirror tries to bring the RG online in the post-migration stage, which does not cause any problem with the VGs, file systems, and IPs. However, it runs the application controller one more time.
If you do not perform the appropriate checks in the application controller before running the commands, it can cause problems with the application. Therefore, the application controller start script checks whether the application is already online before starting it.
318 IBM PowerHA SystemMirror V7.2.3 for IBM AIX and V7.2.2 for Linux
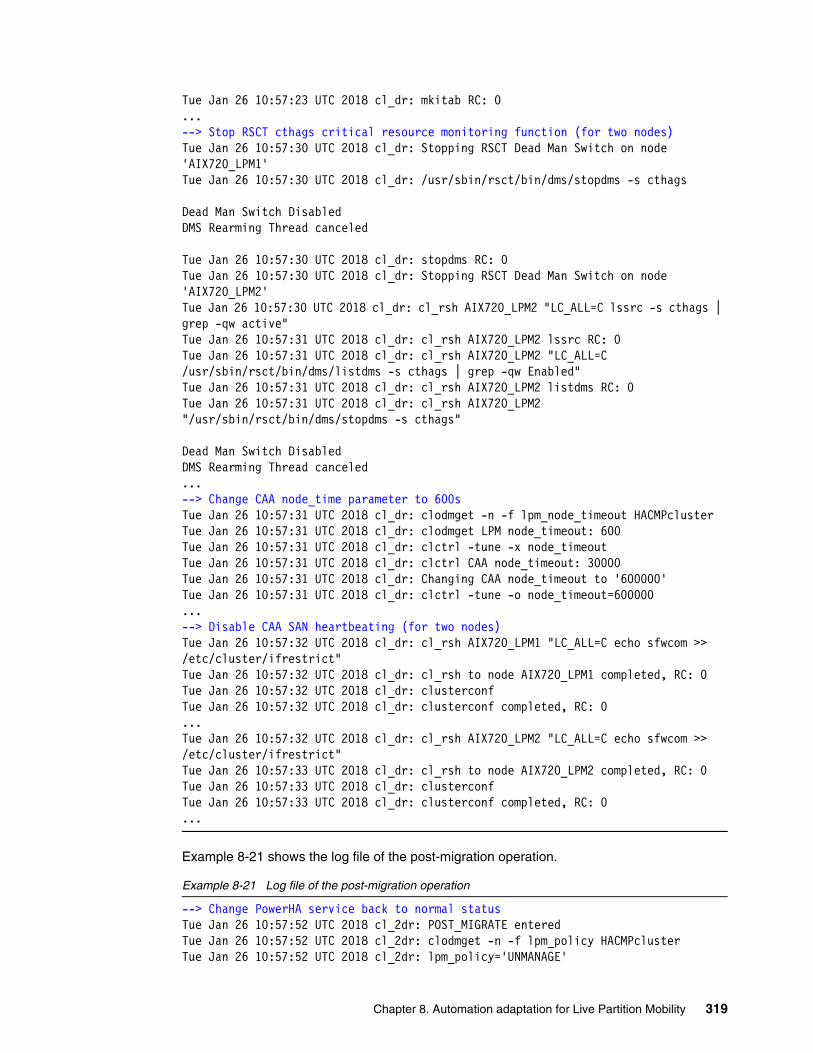
Tue Jan 26 10:57:23 UTC 2018 cl_dr: mkitab RC: 0...--> Stop RSCT cthags critical resource monitoring function (for two nodes)Tue Jan 26 10:57:30 UTC 2018 cl_dr: Stopping RSCT Dead Man Switch on node 'AIX720_LPM1'Tue Jan 26 10:57:30 UTC 2018 cl_dr: /usr/sbin/rsct/bin/dms/stopdms -s cthags
Dead Man Switch DisabledDMS Rearming Thread canceled
Tue Jan 26 10:57:30 UTC 2018 cl_dr: stopdms RC: 0Tue Jan 26 10:57:30 UTC 2018 cl_dr: Stopping RSCT Dead Man Switch on node 'AIX720_LPM2'Tue Jan 26 10:57:30 UTC 2018 cl_dr: cl_rsh AIX720_LPM2 "LC_ALL=C lssrc -s cthags | grep -qw active"Tue Jan 26 10:57:31 UTC 2018 cl_dr: cl_rsh AIX720_LPM2 lssrc RC: 0Tue Jan 26 10:57:31 UTC 2018 cl_dr: cl_rsh AIX720_LPM2 "LC_ALL=C /usr/sbin/rsct/bin/dms/listdms -s cthags | grep -qw Enabled"Tue Jan 26 10:57:31 UTC 2018 cl_dr: cl_rsh AIX720_LPM2 listdms RC: 0Tue Jan 26 10:57:31 UTC 2018 cl_dr: cl_rsh AIX720_LPM2 "/usr/sbin/rsct/bin/dms/stopdms -s cthags"
Dead Man Switch DisabledDMS Rearming Thread canceled...--> Change CAA node_time parameter to 600sTue Jan 26 10:57:31 UTC 2018 cl_dr: clodmget -n -f lpm_node_timeout HACMPclusterTue Jan 26 10:57:31 UTC 2018 cl_dr: clodmget LPM node_timeout: 600Tue Jan 26 10:57:31 UTC 2018 cl_dr: clctrl -tune -x node_timeoutTue Jan 26 10:57:31 UTC 2018 cl_dr: clctrl CAA node_timeout: 30000Tue Jan 26 10:57:31 UTC 2018 cl_dr: Changing CAA node_timeout to '600000'Tue Jan 26 10:57:31 UTC 2018 cl_dr: clctrl -tune -o node_timeout=600000...--> Disable CAA SAN heartbeating (for two nodes)Tue Jan 26 10:57:32 UTC 2018 cl_dr: cl_rsh AIX720_LPM1 "LC_ALL=C echo sfwcom >> /etc/cluster/ifrestrict"Tue Jan 26 10:57:32 UTC 2018 cl_dr: cl_rsh to node AIX720_LPM1 completed, RC: 0Tue Jan 26 10:57:32 UTC 2018 cl_dr: clusterconfTue Jan 26 10:57:32 UTC 2018 cl_dr: clusterconf completed, RC: 0...Tue Jan 26 10:57:32 UTC 2018 cl_dr: cl_rsh AIX720_LPM2 "LC_ALL=C echo sfwcom >> /etc/cluster/ifrestrict"Tue Jan 26 10:57:33 UTC 2018 cl_dr: cl_rsh to node AIX720_LPM2 completed, RC: 0Tue Jan 26 10:57:33 UTC 2018 cl_dr: clusterconfTue Jan 26 10:57:33 UTC 2018 cl_dr: clusterconf completed, RC: 0...
Example 8-21 shows the log file of the post-migration operation.
Example 8-21 Log file of the post-migration operation
--> Change PowerHA service back to normal statusTue Jan 26 10:57:52 UTC 2018 cl_2dr: POST_MIGRATE enteredTue Jan 26 10:57:52 UTC 2018 cl_2dr: clodmget -n -f lpm_policy HACMPclusterTue Jan 26 10:57:52 UTC 2018 cl_2dr: lpm_policy='UNMANAGE'
Chapter 8. Automation adaptation for Live Partition Mobility 319
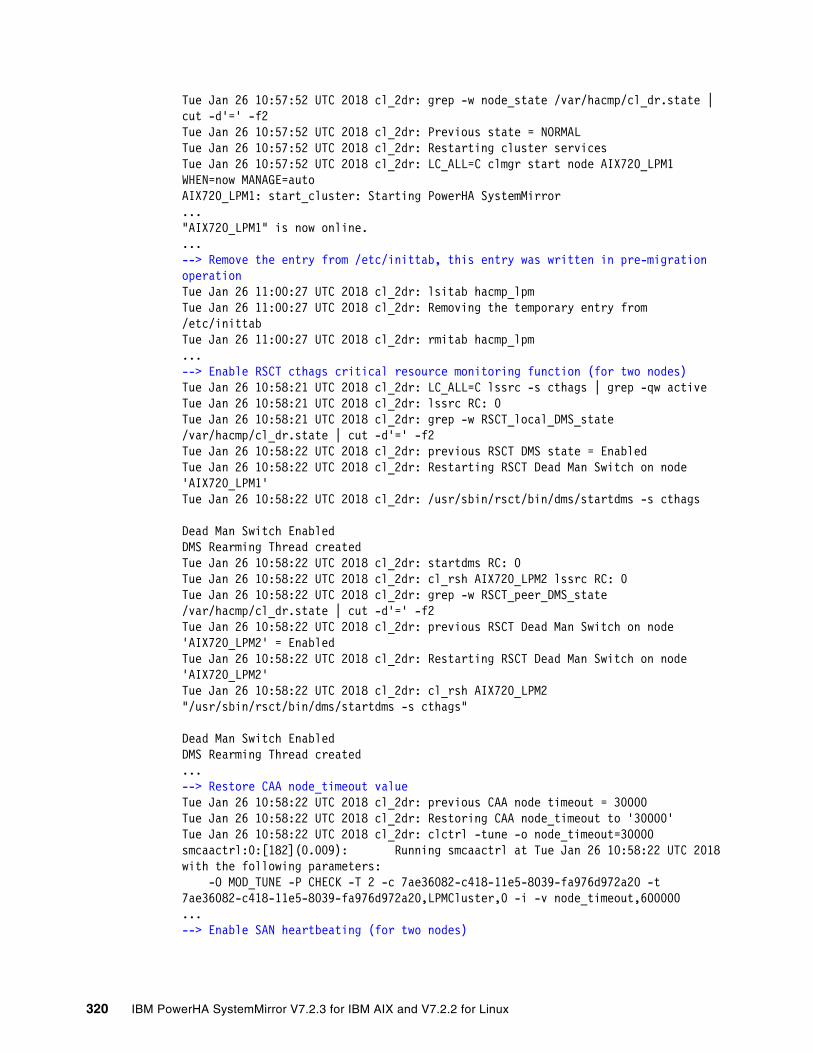
Tue Jan 26 10:57:52 UTC 2018 cl_2dr: grep -w node_state /var/hacmp/cl_dr.state | cut -d'=' -f2Tue Jan 26 10:57:52 UTC 2018 cl_2dr: Previous state = NORMALTue Jan 26 10:57:52 UTC 2018 cl_2dr: Restarting cluster servicesTue Jan 26 10:57:52 UTC 2018 cl_2dr: LC_ALL=C clmgr start node AIX720_LPM1 WHEN=now MANAGE=autoAIX720_LPM1: start_cluster: Starting PowerHA SystemMirror..."AIX720_LPM1" is now online....--> Remove the entry from /etc/inittab, this entry was written in pre-migration operationTue Jan 26 11:00:27 UTC 2018 cl_2dr: lsitab hacmp_lpmTue Jan 26 11:00:27 UTC 2018 cl_2dr: Removing the temporary entry from /etc/inittabTue Jan 26 11:00:27 UTC 2018 cl_2dr: rmitab hacmp_lpm...--> Enable RSCT cthags critical resource monitoring function (for two nodes)Tue Jan 26 10:58:21 UTC 2018 cl_2dr: LC_ALL=C lssrc -s cthags | grep -qw activeTue Jan 26 10:58:21 UTC 2018 cl_2dr: lssrc RC: 0Tue Jan 26 10:58:21 UTC 2018 cl_2dr: grep -w RSCT_local_DMS_state /var/hacmp/cl_dr.state | cut -d'=' -f2Tue Jan 26 10:58:22 UTC 2018 cl_2dr: previous RSCT DMS state = EnabledTue Jan 26 10:58:22 UTC 2018 cl_2dr: Restarting RSCT Dead Man Switch on node 'AIX720_LPM1'Tue Jan 26 10:58:22 UTC 2018 cl_2dr: /usr/sbin/rsct/bin/dms/startdms -s cthags
Dead Man Switch EnabledDMS Rearming Thread createdTue Jan 26 10:58:22 UTC 2018 cl_2dr: startdms RC: 0Tue Jan 26 10:58:22 UTC 2018 cl_2dr: cl_rsh AIX720_LPM2 lssrc RC: 0Tue Jan 26 10:58:22 UTC 2018 cl_2dr: grep -w RSCT_peer_DMS_state /var/hacmp/cl_dr.state | cut -d'=' -f2Tue Jan 26 10:58:22 UTC 2018 cl_2dr: previous RSCT Dead Man Switch on node 'AIX720_LPM2' = EnabledTue Jan 26 10:58:22 UTC 2018 cl_2dr: Restarting RSCT Dead Man Switch on node 'AIX720_LPM2'Tue Jan 26 10:58:22 UTC 2018 cl_2dr: cl_rsh AIX720_LPM2 "/usr/sbin/rsct/bin/dms/startdms -s cthags"
Dead Man Switch EnabledDMS Rearming Thread created...--> Restore CAA node_timeout valueTue Jan 26 10:58:22 UTC 2018 cl_2dr: previous CAA node timeout = 30000Tue Jan 26 10:58:22 UTC 2018 cl_2dr: Restoring CAA node_timeout to '30000'Tue Jan 26 10:58:22 UTC 2018 cl_2dr: clctrl -tune -o node_timeout=30000smcaactrl:0:[182](0.009): Running smcaactrl at Tue Jan 26 10:58:22 UTC 2018 with the following parameters: -O MOD_TUNE -P CHECK -T 2 -c 7ae36082-c418-11e5-8039-fa976d972a20 -t 7ae36082-c418-11e5-8039-fa976d972a20,LPMCluster,0 -i -v node_timeout,600000...--> Enable SAN heartbeating (for two nodes)
320 IBM PowerHA SystemMirror V7.2.3 for IBM AIX and V7.2.2 for Linux
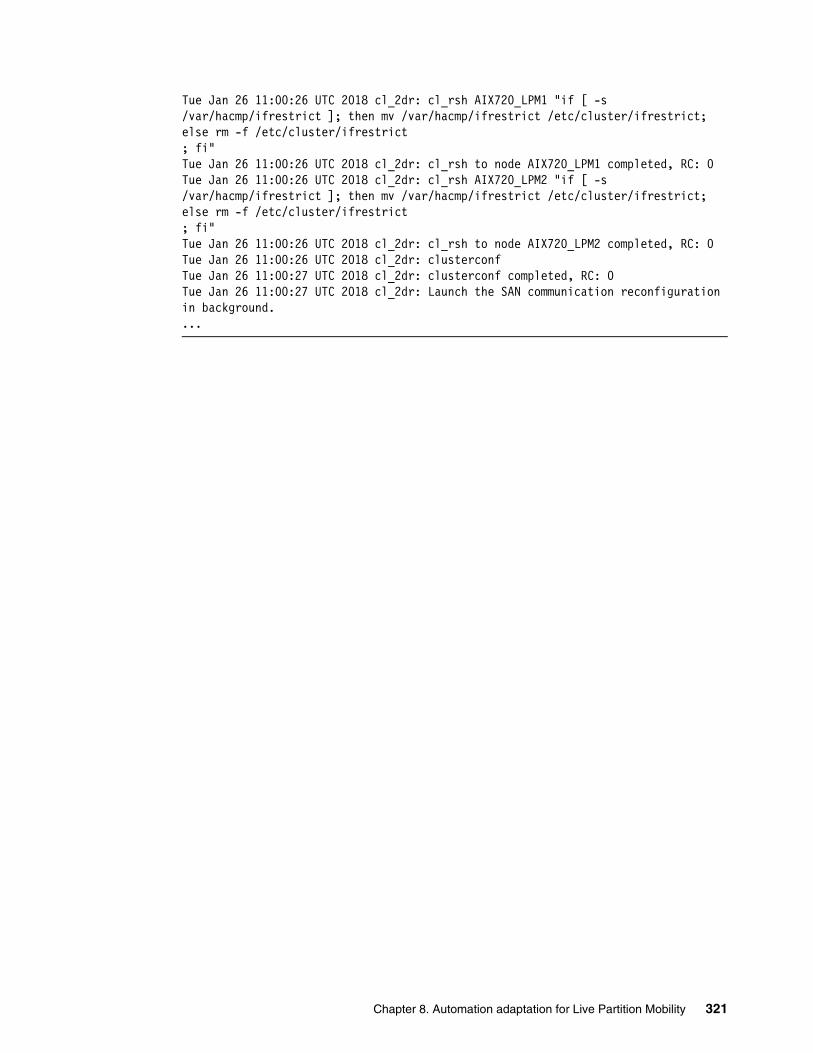
Tue Jan 26 11:00:26 UTC 2018 cl_2dr: cl_rsh AIX720_LPM1 "if [ -s /var/hacmp/ifrestrict ]; then mv /var/hacmp/ifrestrict /etc/cluster/ifrestrict; else rm -f /etc/cluster/ifrestrict; fi"Tue Jan 26 11:00:26 UTC 2018 cl_2dr: cl_rsh to node AIX720_LPM1 completed, RC: 0Tue Jan 26 11:00:26 UTC 2018 cl_2dr: cl_rsh AIX720_LPM2 "if [ -s /var/hacmp/ifrestrict ]; then mv /var/hacmp/ifrestrict /etc/cluster/ifrestrict; else rm -f /etc/cluster/ifrestrict; fi"Tue Jan 26 11:00:26 UTC 2018 cl_2dr: cl_rsh to node AIX720_LPM2 completed, RC: 0Tue Jan 26 11:00:26 UTC 2018 cl_2dr: clusterconfTue Jan 26 11:00:27 UTC 2018 cl_2dr: clusterconf completed, RC: 0Tue Jan 26 11:00:27 UTC 2018 cl_2dr: Launch the SAN communication reconfiguration in background....
Chapter 8. Automation adaptation for Live Partition Mobility 321

322 IBM PowerHA SystemMirror V7.2.3 for IBM AIX and V7.2.2 for Linux
Chapter 9. Cluster partition management update
From Version 7.1 onward, PowerHA SystemMirror provides more split and merge policies. Split and merge policies are important features in PowerHA SystemMirror because they are used to protect customers’ data consistency and maintain application stability in cluster split scenarios and other unstable situations. They are vital for customer environments.
This chapter describes split and merge policies.
This chapter covers the following topics:
� Introduction to cluster partitioning
� PowerHA cluster split and merge policies (before PowerHA V7.2.1)
� PowerHA quarantine policy
� Changes in split and merge policies in PowerHA V7.2.1
� Considerations for using split and merge quarantine policies
� Split and merge policy testing environment
� Scenario: Default split and merge policy
� Scenario: Split and merge policy with a disk tiebreaker
� Scenario: Split and merge policy with the NFS tiebreaker
� Scenario: Manual split and merge policy
� Scenario: Active node halt policy quarantine
� Scenario: Enabling the disk fencing quarantine policy
9
© Copyright IBM Corp. 2019. All rights reserved. 323
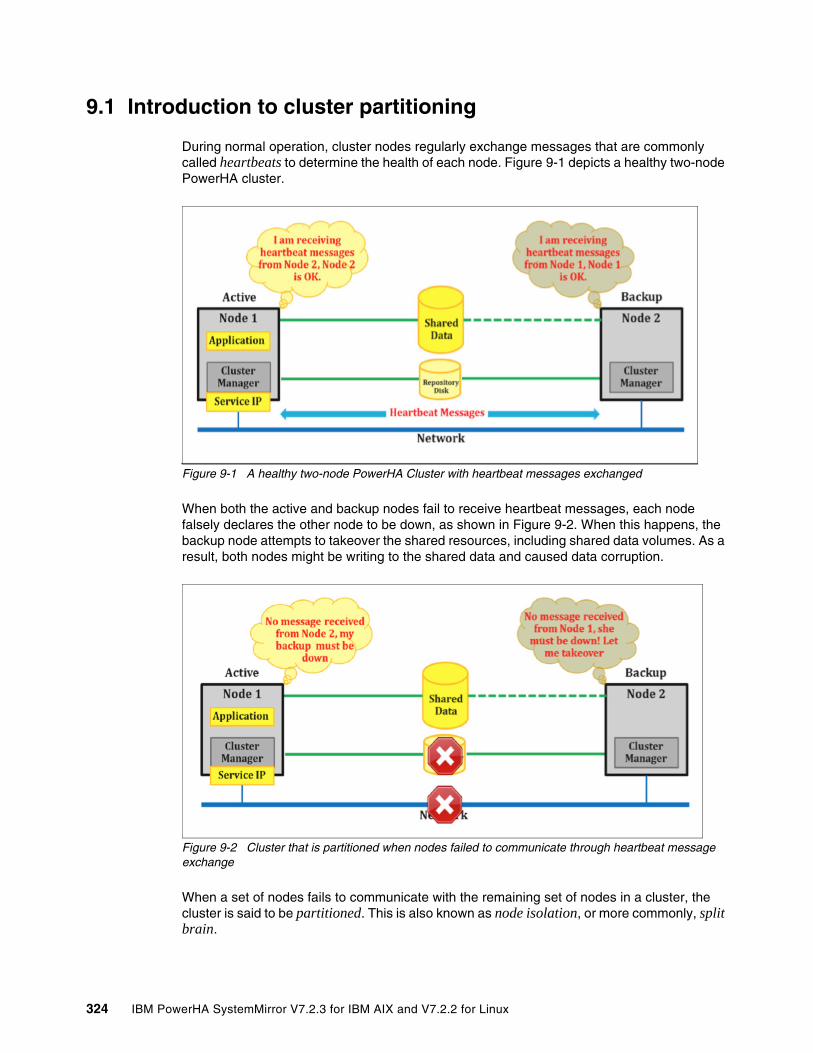
9.1 Introduction to cluster partitioning
During normal operation, cluster nodes regularly exchange messages that are commonly called heartbeats to determine the health of each node. Figure 9-1 depicts a healthy two-node PowerHA cluster.
Figure 9-1 A healthy two-node PowerHA Cluster with heartbeat messages exchanged
When both the active and backup nodes fail to receive heartbeat messages, each node falsely declares the other node to be down, as shown in Figure 9-2. When this happens, the backup node attempts to takeover the shared resources, including shared data volumes. As a result, both nodes might be writing to the shared data and caused data corruption.
Figure 9-2 Cluster that is partitioned when nodes failed to communicate through heartbeat message exchange
When a set of nodes fails to communicate with the remaining set of nodes in a cluster, the cluster is said to be partitioned. This is also known as node isolation, or more commonly, split brain.
324 IBM PowerHA SystemMirror V7.2.3 for IBM AIX and V7.2.2 for Linux

9.1.1 Causes of a partitioned cluster
Loss of all heartbeats can be caused by one of the following situations:
� When all communication paths between the nodes fail (as shown in Figure 9-2 on page 324).
Here is an example scenario based on a real-world experience:
a. A cluster had two communication paths for heartbeat, the network and repository disk. The PowerHA network heartbeat mode was configured as multicast.
b. One day, a network configuration change was made that disabled the multicast network communication. As a result, network heartbeating no longer worked. But, system administrators were unaware of this problem because they did not monitor the PowerHA network status. The network heartbeat failure was left uncorrected.
c. The cluster continued to operate with heartbeat through the repository disk.
d. Some days later, the repository disk failed and the cluster was partitioned.
� One of the nodes is sick but not dead.
One node cannot send or receive heartbeat messages for a period, but resumes sending and receiving heartbeat messages afterward.
� Another possible scenario is:
a. There is a cluster with nodes in separate physical hosts with dual Virtual I/O Servers (VIOSs).
b. Due to some software or firmware defect, one node cannot perform I/O through the VIOSs for a period but resumes I/O afterward. This causes an intermittent loss of heartbeats through all communication paths between the nodes.
c. When the duration of I/O freeze exceeds the node failure detection time, the nodes declare each other as down and the cluster is partitioned.
Although increasing the number of communication paths for heartbeating can minimize the occurrence of cluster partitioning due to communication path failure, the possibility cannot be eliminated completely.
9.1.2 Terminology
Here is the terminology that is used throughout this chapter:
Cluster split When the nodes in a cluster fail to communicate with each other for a period, each node declares the other node as down. The cluster is split into partitions. A cluster split is said to have occurred.
Split policy A PowerHA split policy defines the behavior of a cluster when a cluster split occurs.
Cluster merge A PowerHA cluster merge policy defines the behavior of a cluster when a cluster merge occurs.
Note: As two-node clusters are the most common PowerHA cluster configuration, we introduce cluster partitioning concepts in the following sections in the context of a two-node cluster. These basic concepts can be applied similarly to clusters with more than two nodes and are further elaborated where necessary.
Chapter 9. Cluster partition management update 325
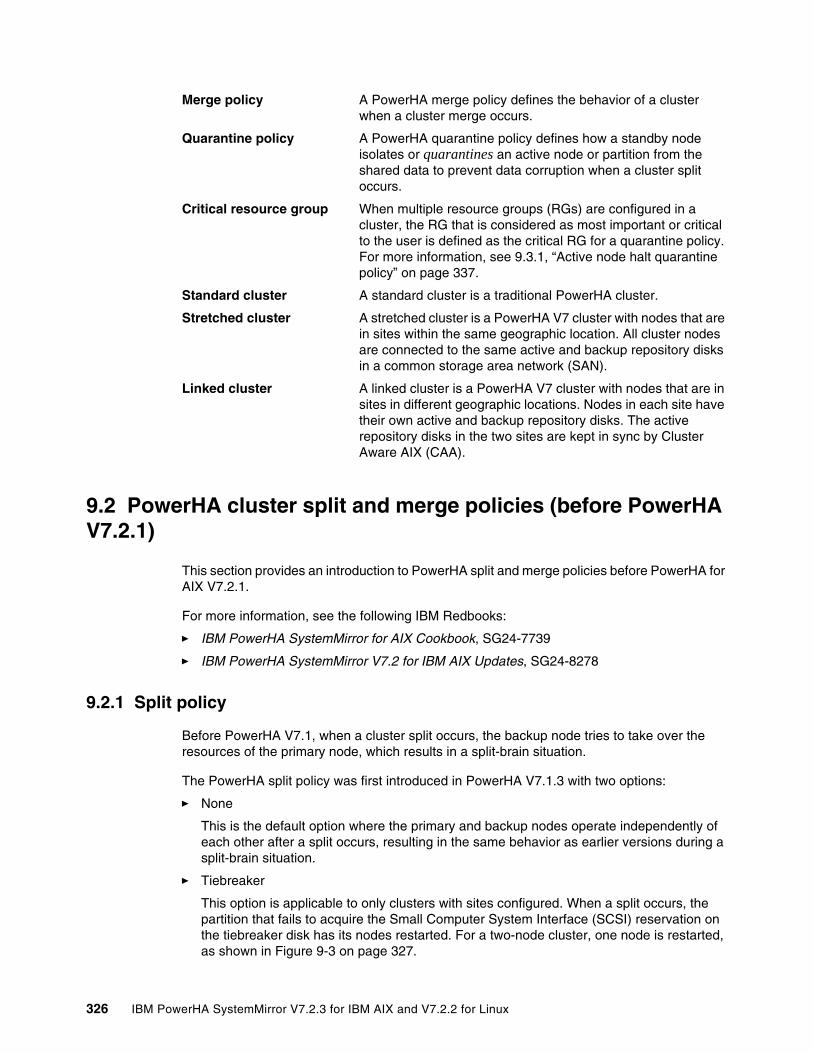
Merge policy A PowerHA merge policy defines the behavior of a cluster when a cluster merge occurs.
Quarantine policy A PowerHA quarantine policy defines how a standby node isolates or quarantines an active node or partition from the shared data to prevent data corruption when a cluster split occurs.
Critical resource group When multiple resource groups (RGs) are configured in a cluster, the RG that is considered as most important or critical to the user is defined as the critical RG for a quarantine policy. For more information, see 9.3.1, “Active node halt quarantine policy” on page 337.
Standard cluster A standard cluster is a traditional PowerHA cluster.
Stretched cluster A stretched cluster is a PowerHA V7 cluster with nodes that are in sites within the same geographic location. All cluster nodes are connected to the same active and backup repository disks in a common storage area network (SAN).
Linked cluster A linked cluster is a PowerHA V7 cluster with nodes that are in sites in different geographic locations. Nodes in each site have their own active and backup repository disks. The active repository disks in the two sites are kept in sync by Cluster Aware AIX (CAA).
9.2 PowerHA cluster split and merge policies (before PowerHA V7.2.1)
This section provides an introduction to PowerHA split and merge policies before PowerHA for AIX V7.2.1.
For more information, see the following IBM Redbooks:
� IBM PowerHA SystemMirror for AIX Cookbook, SG24-7739
� IBM PowerHA SystemMirror V7.2 for IBM AIX Updates, SG24-8278
9.2.1 Split policy
Before PowerHA V7.1, when a cluster split occurs, the backup node tries to take over the resources of the primary node, which results in a split-brain situation.
The PowerHA split policy was first introduced in PowerHA V7.1.3 with two options:
� None
This is the default option where the primary and backup nodes operate independently of each other after a split occurs, resulting in the same behavior as earlier versions during a split-brain situation.
� Tiebreaker
This option is applicable to only clusters with sites configured. When a split occurs, the partition that fails to acquire the Small Computer System Interface (SCSI) reservation on the tiebreaker disk has its nodes restarted. For a two-node cluster, one node is restarted, as shown in Figure 9-3 on page 327.
326 IBM PowerHA SystemMirror V7.2.3 for IBM AIX and V7.2.2 for Linux
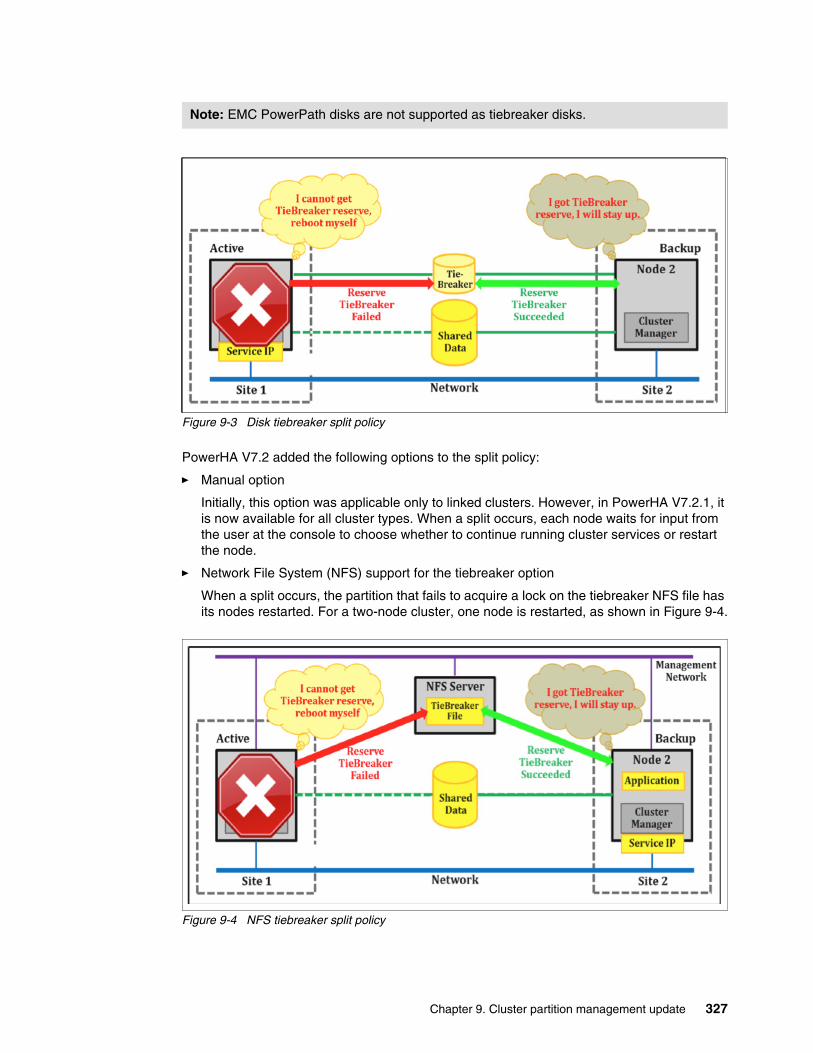
Figure 9-3 Disk tiebreaker split policy
PowerHA V7.2 added the following options to the split policy:
� Manual option
Initially, this option was applicable only to linked clusters. However, in PowerHA V7.2.1, it is now available for all cluster types. When a split occurs, each node waits for input from the user at the console to choose whether to continue running cluster services or restart the node.
� Network File System (NFS) support for the tiebreaker option
When a split occurs, the partition that fails to acquire a lock on the tiebreaker NFS file has its nodes restarted. For a two-node cluster, one node is restarted, as shown in Figure 9-4.
Figure 9-4 NFS tiebreaker split policy
Note: EMC PowerPath disks are not supported as tiebreaker disks.
Chapter 9. Cluster partition management update 327
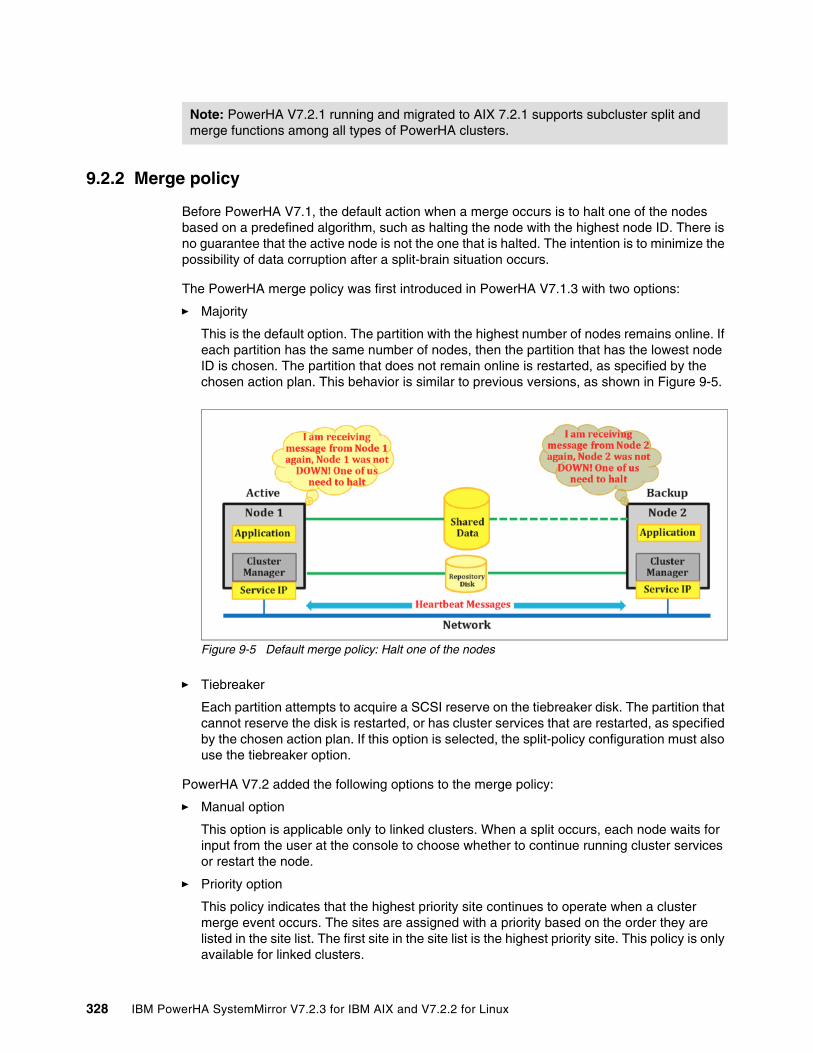
9.2.2 Merge policy
Before PowerHA V7.1, the default action when a merge occurs is to halt one of the nodes based on a predefined algorithm, such as halting the node with the highest node ID. There is no guarantee that the active node is not the one that is halted. The intention is to minimize the possibility of data corruption after a split-brain situation occurs.
The PowerHA merge policy was first introduced in PowerHA V7.1.3 with two options:
� Majority
This is the default option. The partition with the highest number of nodes remains online. If each partition has the same number of nodes, then the partition that has the lowest node ID is chosen. The partition that does not remain online is restarted, as specified by the chosen action plan. This behavior is similar to previous versions, as shown in Figure 9-5.
Figure 9-5 Default merge policy: Halt one of the nodes
� Tiebreaker
Each partition attempts to acquire a SCSI reserve on the tiebreaker disk. The partition that cannot reserve the disk is restarted, or has cluster services that are restarted, as specified by the chosen action plan. If this option is selected, the split-policy configuration must also use the tiebreaker option.
PowerHA V7.2 added the following options to the merge policy:
� Manual option
This option is applicable only to linked clusters. When a split occurs, each node waits for input from the user at the console to choose whether to continue running cluster services or restart the node.
� Priority option
This policy indicates that the highest priority site continues to operate when a cluster merge event occurs. The sites are assigned with a priority based on the order they are listed in the site list. The first site in the site list is the highest priority site. This policy is only available for linked clusters.
Note: PowerHA V7.2.1 running and migrated to AIX 7.2.1 supports subcluster split and merge functions among all types of PowerHA clusters.
328 IBM PowerHA SystemMirror V7.2.3 for IBM AIX and V7.2.2 for Linux

� NFS support for the tiebreaker option
When a split occurs, the partition that fails to acquire a lock on the tiebreaker NFS file has its nodes restarted. If this option is selected, the split-policy configuration must also use the tiebreaker option.
9.2.3 Configuration for the split and merge policy
Complete the following steps:
1. In the SMIT interface, select Custom Cluster Configuration → Cluster Nodes and Networks → Initial Cluster Setup (Custom) → Configure Cluster Split and Merge Policy → Split Management Policy, as shown in Figure 9-6.
Figure 9-6 Configuring the cluster split and merge policy
Configure Cluster Split and Merge Policy
Move cursor to desired item and press Enter.
Split and Merge Management Policy Quarantine Policy+--------------------------------------------------------------------------+| Split Handling Policy || || Move cursor to desired item and press Enter. || || None || TieBreaker || Manual || || F1=Help F2=Refresh F3=Cancel || F8=Image F10=Exit Enter=Do || /=Find n=Find Next |+--------------------------------------------------------------------------+
Chapter 9. Cluster partition management update 329

2. Select TieBreaker. The manual option is not available if the cluster you are configuring is not a linked cluster. Select either Disk or NFS as the tiebreaker, as shown in Figure 9-7.
Figure 9-7 Selecting the tiebreaker disk
Configure Cluster Split and Merge Policy
Move cursor to desired item and press Enter.
Split and Merge Management Policy Quarantine Policy+--------------------------------------------------------------------------+| Select TieBreaker Type || || Move cursor to desired item and press Enter. || || Disk || NFS || || F1=Help F2=Refresh F3=Cancel || F8=Image F10=Exit Enter=Do || /=Find n=Find Next |+--------------------------------------------------------------------------+
330 IBM PowerHA SystemMirror V7.2.3 for IBM AIX and V7.2.2 for Linux
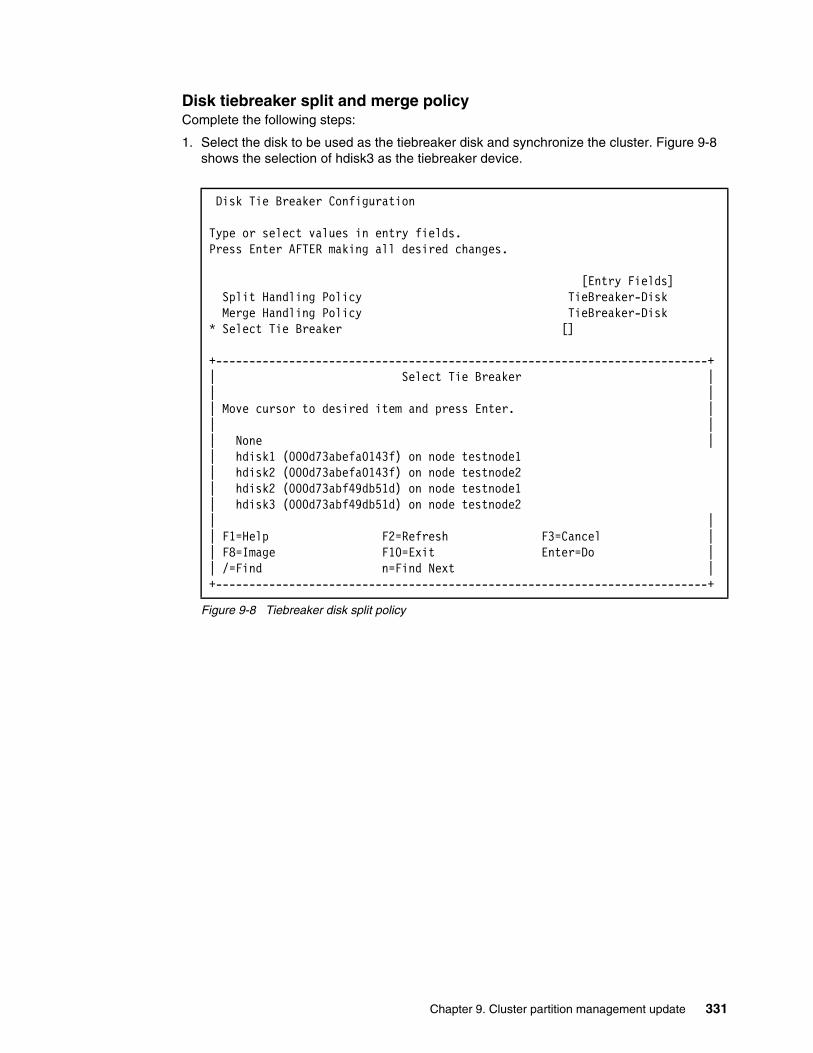
Disk tiebreaker split and merge policyComplete the following steps:
1. Select the disk to be used as the tiebreaker disk and synchronize the cluster. Figure 9-8 shows the selection of hdisk3 as the tiebreaker device.
Figure 9-8 Tiebreaker disk split policy
Disk Tie Breaker Configuration
Type or select values in entry fields.Press Enter AFTER making all desired changes.
[Entry Fields] Split Handling Policy TieBreaker-Disk Merge Handling Policy TieBreaker-Disk* Select Tie Breaker [] +--------------------------------------------------------------------------+| Select Tie Breaker || || Move cursor to desired item and press Enter. || || None || hdisk1 (000d73abefa0143f) on node testnode1 | hdisk2 (000d73abefa0143f) on node testnode2 | hdisk2 (000d73abf49db51d) on node testnode1 | hdisk3 (000d73abf49db51d) on node testnode2 | || F1=Help F2=Refresh F3=Cancel || F8=Image F10=Exit Enter=Do || /=Find n=Find Next |+--------------------------------------------------------------------------+
Chapter 9. Cluster partition management update 331
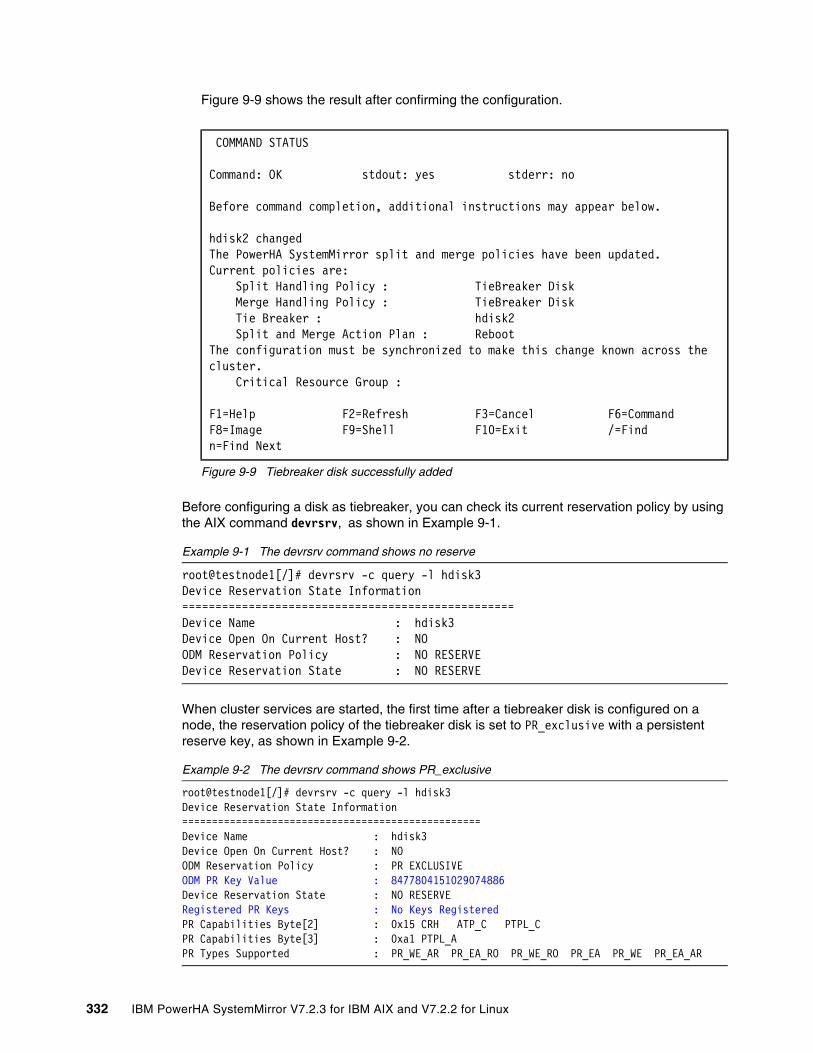
Figure 9-9 shows the result after confirming the configuration.
Figure 9-9 Tiebreaker disk successfully added
Before configuring a disk as tiebreaker, you can check its current reservation policy by using the AIX command devrsrv, as shown in Example 9-1.
Example 9-1 The devrsrv command shows no reserve
root@testnode1[/]# devrsrv -c query -l hdisk3Device Reservation State Information==================================================Device Name : hdisk3Device Open On Current Host? : NOODM Reservation Policy : NO RESERVEDevice Reservation State : NO RESERVE
When cluster services are started, the first time after a tiebreaker disk is configured on a node, the reservation policy of the tiebreaker disk is set to PR_exclusive with a persistent reserve key, as shown in Example 9-2.
Example 9-2 The devrsrv command shows PR_exclusive
root@testnode1[/]# devrsrv -c query -l hdisk3Device Reservation State Information==================================================Device Name : hdisk3Device Open On Current Host? : NOODM Reservation Policy : PR EXCLUSIVEODM PR Key Value : 8477804151029074886Device Reservation State : NO RESERVERegistered PR Keys : No Keys RegisteredPR Capabilities Byte[2] : 0x15 CRH ATP_C PTPL_CPR Capabilities Byte[3] : 0xa1 PTPL_APR Types Supported : PR_WE_AR PR_EA_RO PR_WE_RO PR_EA PR_WE PR_EA_AR
COMMAND STATUS
Command: OK stdout: yes stderr: no
Before command completion, additional instructions may appear below.
hdisk2 changedThe PowerHA SystemMirror split and merge policies have been updated.Current policies are: Split Handling Policy : TieBreaker Disk Merge Handling Policy : TieBreaker Disk Tie Breaker : hdisk2 Split and Merge Action Plan : RebootThe configuration must be synchronized to make this change known across the cluster. Critical Resource Group :
F1=Help F2=Refresh F3=Cancel F6=CommandF8=Image F9=Shell F10=Exit /=Findn=Find Next
332 IBM PowerHA SystemMirror V7.2.3 for IBM AIX and V7.2.2 for Linux
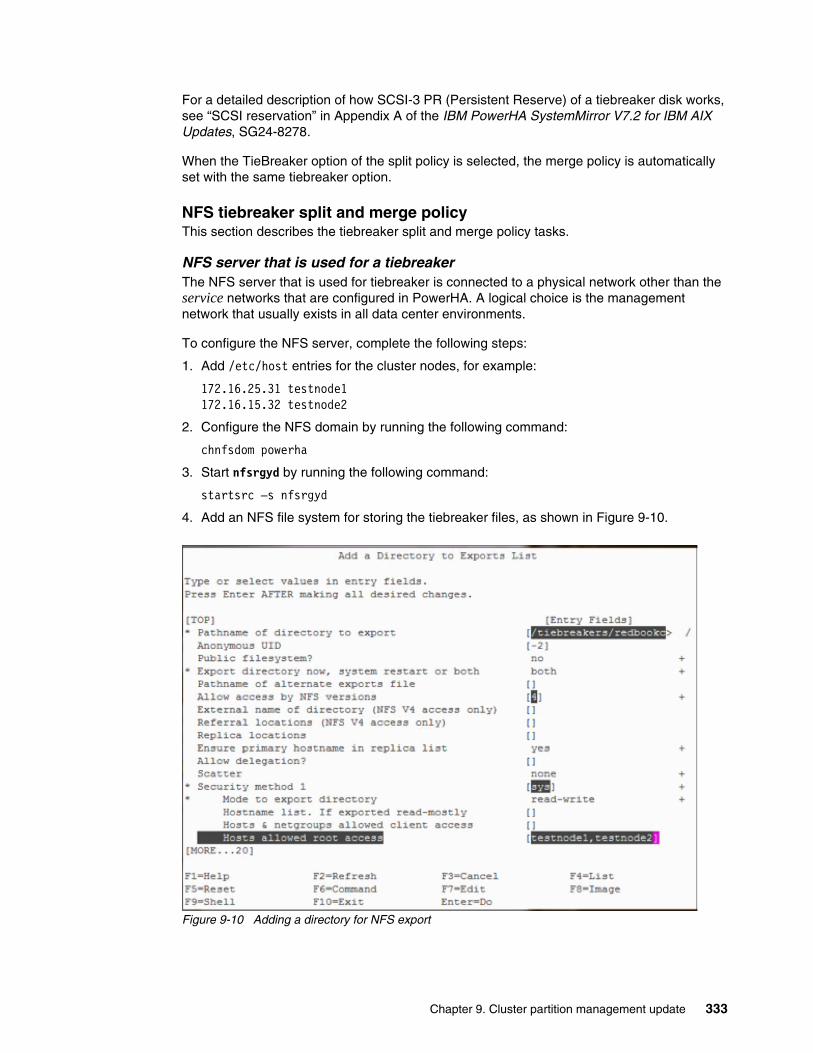
For a detailed description of how SCSI-3 PR (Persistent Reserve) of a tiebreaker disk works, see “SCSI reservation” in Appendix A of the IBM PowerHA SystemMirror V7.2 for IBM AIX Updates, SG24-8278.
When the TieBreaker option of the split policy is selected, the merge policy is automatically set with the same tiebreaker option.
NFS tiebreaker split and merge policyThis section describes the tiebreaker split and merge policy tasks.
NFS server that is used for a tiebreakerThe NFS server that is used for tiebreaker is connected to a physical network other than the service networks that are configured in PowerHA. A logical choice is the management network that usually exists in all data center environments.
To configure the NFS server, complete the following steps:
1. Add /etc/host entries for the cluster nodes, for example:
172.16.25.31 testnode1172.16.15.32 testnode2
2. Configure the NFS domain by running the following command:
chnfsdom powerha
3. Start nfsrgyd by running the following command:
startsrc –s nfsrgyd
4. Add an NFS file system for storing the tiebreaker files, as shown in Figure 9-10.
Figure 9-10 Adding a directory for NFS export
Chapter 9. Cluster partition management update 333

Here, the NFS server is used as tiebreaker for two clusters, redbookcluster and RBcluster, as shown in Example 9-3.
Example 9-3 Directories exported
Example:[root@atsnim:/]#exportfs/software -vers=3,public,sec=sys:krb5p:krb5i:krb5:dh,rw/pha -vers=3:4,sec=sys:krb5p:krb5i:krb5:dh,rw/docs -vers=3,public,sec=sys:krb5p:krb5i:krb5:dh,rw/sybase -sec=sys:krb5p:krb5i:krb5:dh,rw,root=172.16.0.0/leilintemp -sec=sys:none,rw/powerhatest -sec=sys:krb5p:krb5i:krb5:dh,rw,root=testnode1/tiebreakers/redbookcluster -vers=4,sec=sys,rw,root=testnode1:testnode2/tiebreakers/RBcluster -vers=4,sec=sys,rw,root=testnode3:testnode4
On each PowerHA nodeComplete the following tasks:
1. Add an entry for the NFS server to /etc/hosts:
10.1.1.3 tiebreaker
2. Configure the NFS domain by running the following command:
chnfsdom powerha
3. Start nfsrgyd by running the following command:
startsrc –s nfsrgyd
4. Add the NFS tiebreaker directory to be mounted, as shown in Figure 9-11.
Figure 9-11 NFS directory to mount
Add a Directory to Exports List
* Pathname of directory to export [/tiebrakers/redbook] / Anonymous UID [-2] Public filesystem? no + Export directory now, system restart or both both + Pathname of alternate exports file [] Allow access by NFS versions [4] + External name of directory (NFS V4 access only) [] Referral locations (NFS V4 access only) [] Replica locations [] Ensure primary hostname in replica list yes + Allow delegation? [] Scatter none + Security method 1 [sys] +* Mode to export directory read-write + Hostname list. If exported read-mostly [] Hosts & netgroups allowed client access [] Hosts allowed root access [testnode1,testnode2] Security method 2 [] +
334 IBM PowerHA SystemMirror V7.2.3 for IBM AIX and V7.2.2 for Linux
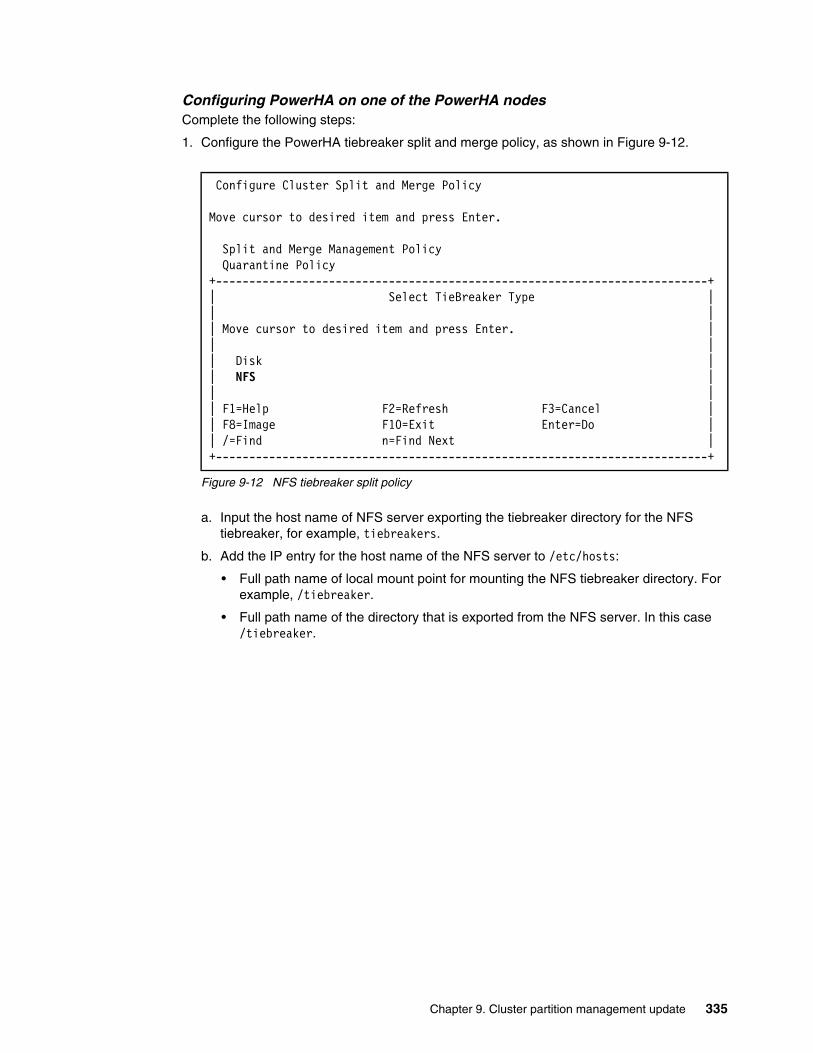
Configuring PowerHA on one of the PowerHA nodesComplete the following steps:
1. Configure the PowerHA tiebreaker split and merge policy, as shown in Figure 9-12.
Figure 9-12 NFS tiebreaker split policy
a. Input the host name of NFS server exporting the tiebreaker directory for the NFS tiebreaker, for example, tiebreakers.
b. Add the IP entry for the host name of the NFS server to /etc/hosts:
• Full path name of local mount point for mounting the NFS tiebreaker directory. For example, /tiebreaker.
• Full path name of the directory that is exported from the NFS server. In this case /tiebreaker.
Configure Cluster Split and Merge Policy
Move cursor to desired item and press Enter.
Split and Merge Management Policy Quarantine Policy+--------------------------------------------------------------------------+| Select TieBreaker Type || || Move cursor to desired item and press Enter. || || Disk || NFS || || F1=Help F2=Refresh F3=Cancel || F8=Image F10=Exit Enter=Do || /=Find n=Find Next |+--------------------------------------------------------------------------+
Chapter 9. Cluster partition management update 335
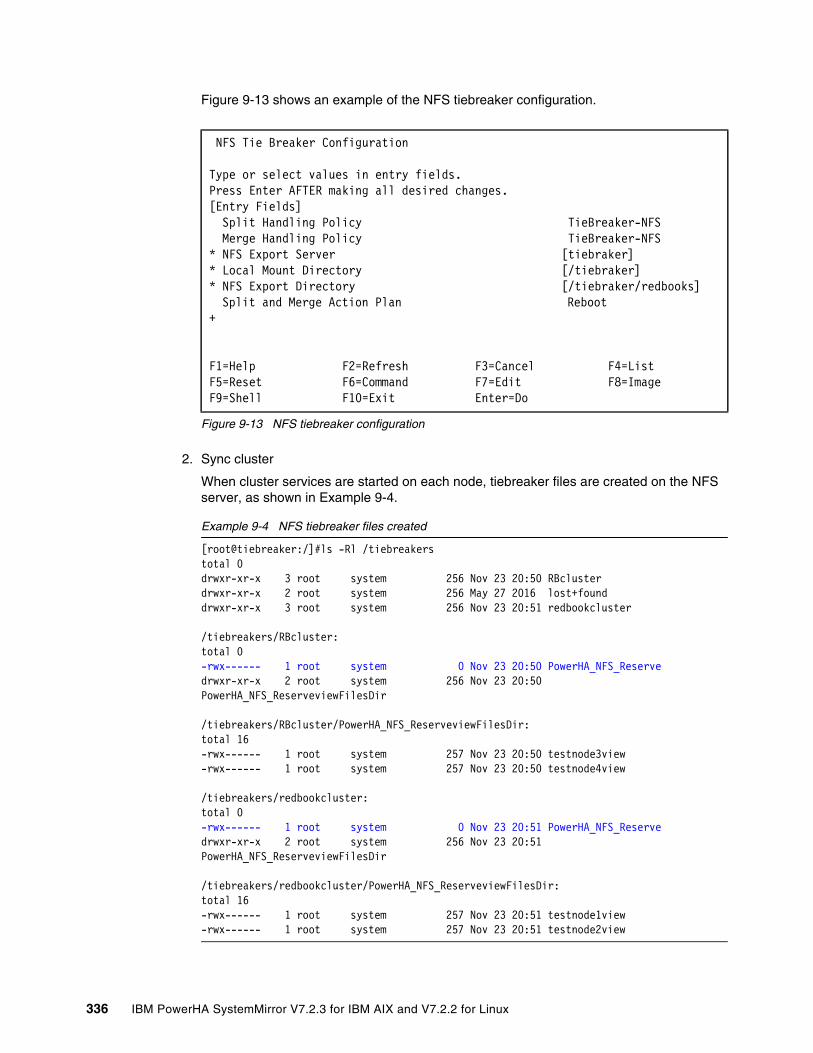
Figure 9-13 shows an example of the NFS tiebreaker configuration.
Figure 9-13 NFS tiebreaker configuration
2. Sync cluster
When cluster services are started on each node, tiebreaker files are created on the NFS server, as shown in Example 9-4.
Example 9-4 NFS tiebreaker files created
[root@tiebreaker:/]#ls -Rl /tiebreakerstotal 0drwxr-xr-x 3 root system 256 Nov 23 20:50 RBclusterdrwxr-xr-x 2 root system 256 May 27 2016 lost+founddrwxr-xr-x 3 root system 256 Nov 23 20:51 redbookcluster
/tiebreakers/RBcluster:total 0-rwx------ 1 root system 0 Nov 23 20:50 PowerHA_NFS_Reservedrwxr-xr-x 2 root system 256 Nov 23 20:50 PowerHA_NFS_ReserveviewFilesDir
/tiebreakers/RBcluster/PowerHA_NFS_ReserveviewFilesDir:total 16-rwx------ 1 root system 257 Nov 23 20:50 testnode3view-rwx------ 1 root system 257 Nov 23 20:50 testnode4view
/tiebreakers/redbookcluster:total 0-rwx------ 1 root system 0 Nov 23 20:51 PowerHA_NFS_Reservedrwxr-xr-x 2 root system 256 Nov 23 20:51 PowerHA_NFS_ReserveviewFilesDir
/tiebreakers/redbookcluster/PowerHA_NFS_ReserveviewFilesDir:total 16-rwx------ 1 root system 257 Nov 23 20:51 testnode1view-rwx------ 1 root system 257 Nov 23 20:51 testnode2view
NFS Tie Breaker Configuration
Type or select values in entry fields.Press Enter AFTER making all desired changes.[Entry Fields] Split Handling Policy TieBreaker-NFS Merge Handling Policy TieBreaker-NFS* NFS Export Server [tiebraker]* Local Mount Directory [/tiebraker]* NFS Export Directory [/tiebraker/redbooks] Split and Merge Action Plan Reboot +
F1=Help F2=Refresh F3=Cancel F4=ListF5=Reset F6=Command F7=Edit F8=ImageF9=Shell F10=Exit Enter=Do
336 IBM PowerHA SystemMirror V7.2.3 for IBM AIX and V7.2.2 for Linux
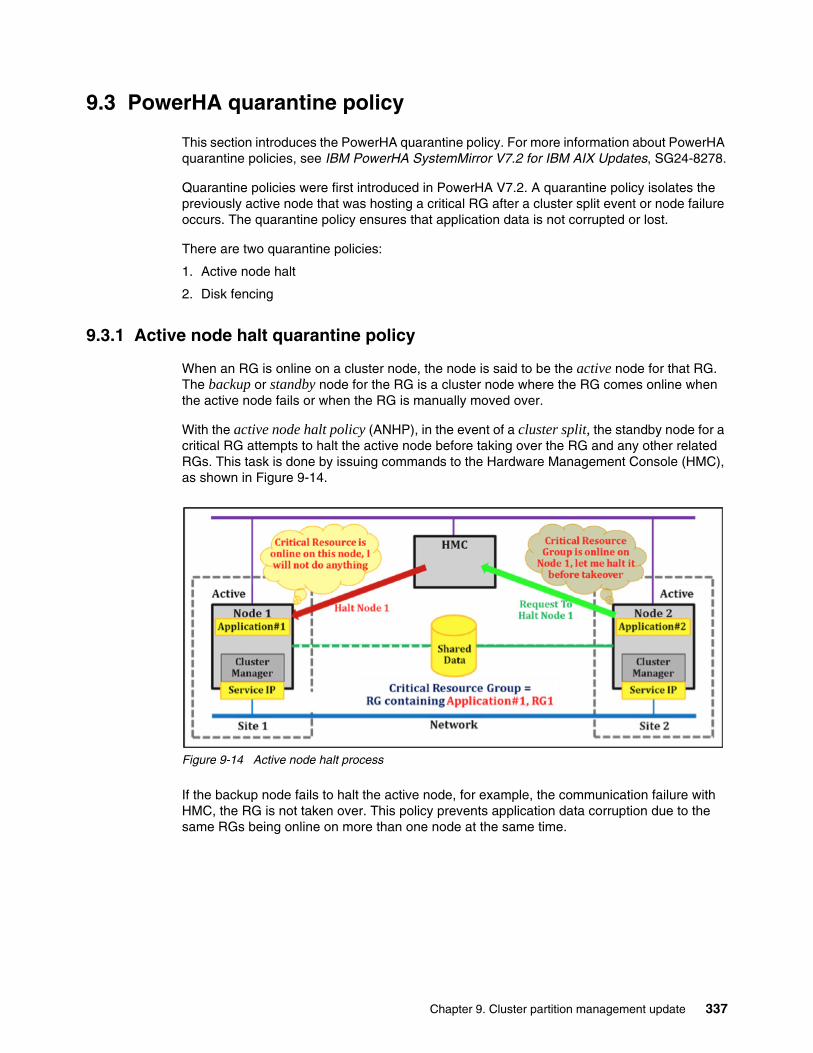
9.3 PowerHA quarantine policy
This section introduces the PowerHA quarantine policy. For more information about PowerHA quarantine policies, see IBM PowerHA SystemMirror V7.2 for IBM AIX Updates, SG24-8278.
Quarantine policies were first introduced in PowerHA V7.2. A quarantine policy isolates the previously active node that was hosting a critical RG after a cluster split event or node failure occurs. The quarantine policy ensures that application data is not corrupted or lost.
There are two quarantine policies:
1. Active node halt
2. Disk fencing
9.3.1 Active node halt quarantine policy
When an RG is online on a cluster node, the node is said to be the active node for that RG. The backup or standby node for the RG is a cluster node where the RG comes online when the active node fails or when the RG is manually moved over.
With the active node halt policy (ANHP), in the event of a cluster split, the standby node for a critical RG attempts to halt the active node before taking over the RG and any other related RGs. This task is done by issuing commands to the Hardware Management Console (HMC), as shown in Figure 9-14.
Figure 9-14 Active node halt process
If the backup node fails to halt the active node, for example, the communication failure with HMC, the RG is not taken over. This policy prevents application data corruption due to the same RGs being online on more than one node at the same time.
Chapter 9. Cluster partition management update 337
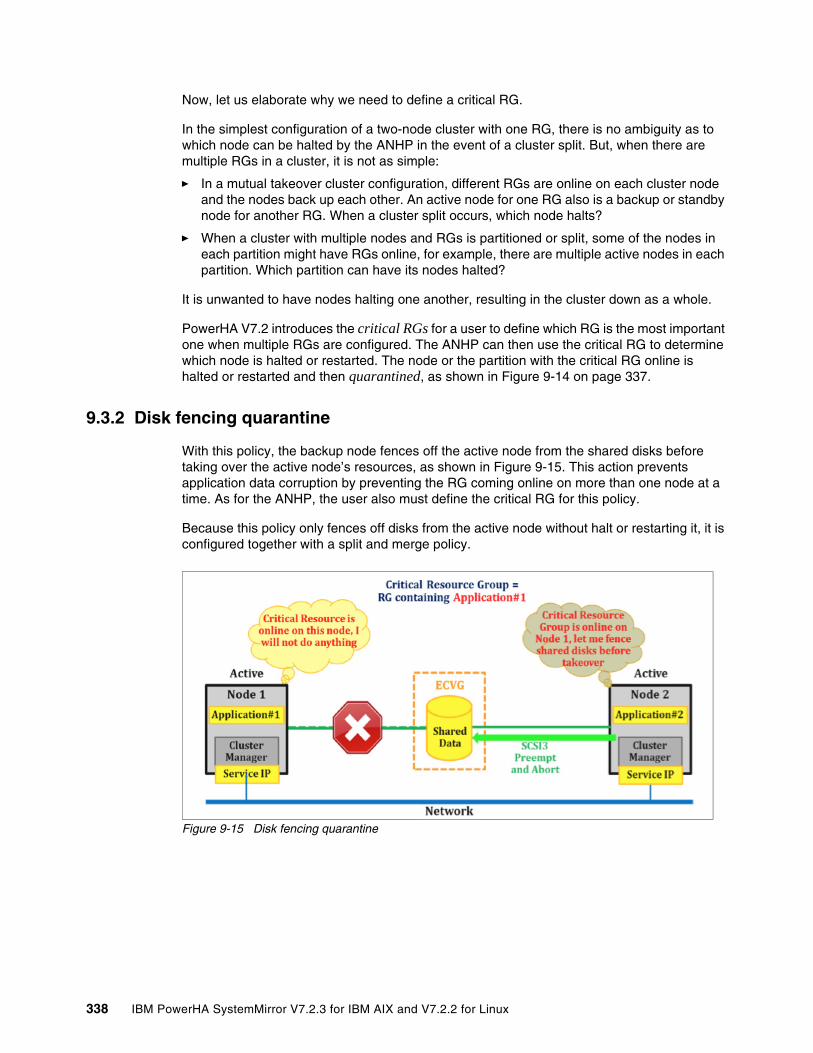
Now, let us elaborate why we need to define a critical RG.
In the simplest configuration of a two-node cluster with one RG, there is no ambiguity as to which node can be halted by the ANHP in the event of a cluster split. But, when there are multiple RGs in a cluster, it is not as simple:
� In a mutual takeover cluster configuration, different RGs are online on each cluster node and the nodes back up each other. An active node for one RG also is a backup or standby node for another RG. When a cluster split occurs, which node halts?
� When a cluster with multiple nodes and RGs is partitioned or split, some of the nodes in each partition might have RGs online, for example, there are multiple active nodes in each partition. Which partition can have its nodes halted?
It is unwanted to have nodes halting one another, resulting in the cluster down as a whole.
PowerHA V7.2 introduces the critical RGs for a user to define which RG is the most important one when multiple RGs are configured. The ANHP can then use the critical RG to determine which node is halted or restarted. The node or the partition with the critical RG online is halted or restarted and then quarantined, as shown in Figure 9-14 on page 337.
9.3.2 Disk fencing quarantine
With this policy, the backup node fences off the active node from the shared disks before taking over the active node’s resources, as shown in Figure 9-15. This action prevents application data corruption by preventing the RG coming online on more than one node at a time. As for the ANHP, the user also must define the critical RG for this policy.
Because this policy only fences off disks from the active node without halt or restarting it, it is configured together with a split and merge policy.
Figure 9-15 Disk fencing quarantine
338 IBM PowerHA SystemMirror V7.2.3 for IBM AIX and V7.2.2 for Linux
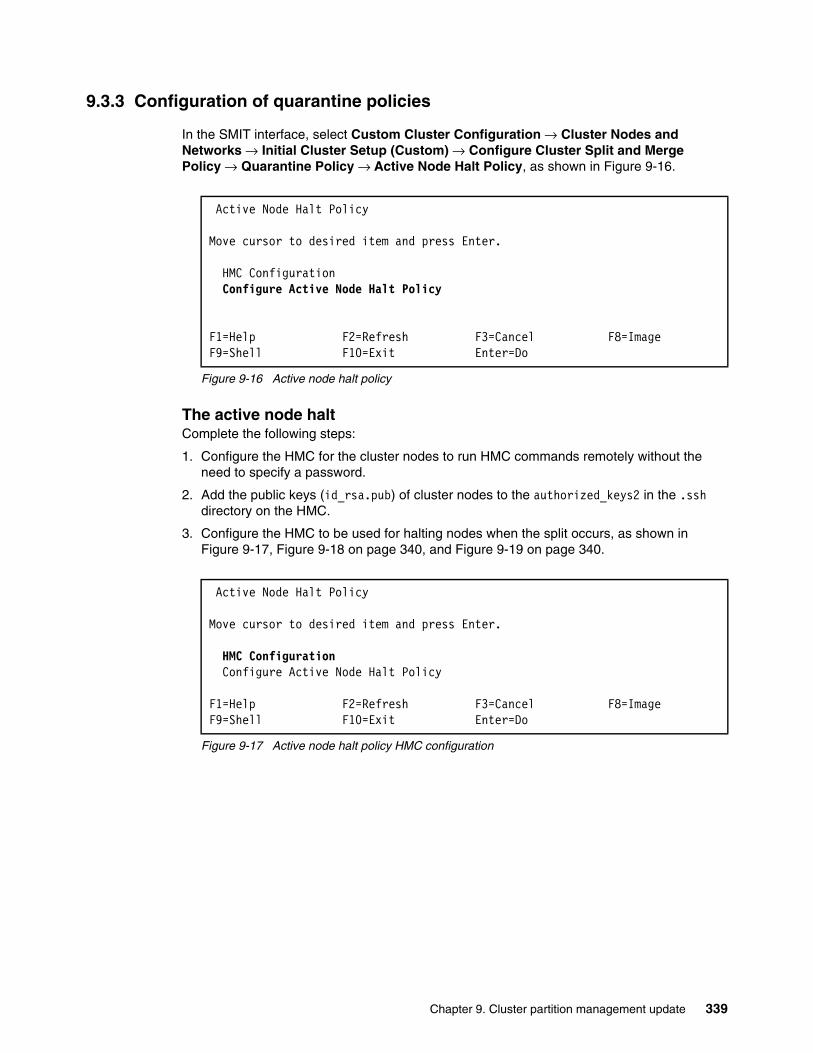
9.3.3 Configuration of quarantine policies
In the SMIT interface, select Custom Cluster Configuration → Cluster Nodes and Networks → Initial Cluster Setup (Custom) → Configure Cluster Split and Merge Policy → Quarantine Policy → Active Node Halt Policy, as shown in Figure 9-16.
Figure 9-16 Active node halt policy
The active node haltComplete the following steps:
1. Configure the HMC for the cluster nodes to run HMC commands remotely without the need to specify a password.
2. Add the public keys (id_rsa.pub) of cluster nodes to the authorized_keys2 in the .ssh directory on the HMC.
3. Configure the HMC to be used for halting nodes when the split occurs, as shown in Figure 9-17, Figure 9-18 on page 340, and Figure 9-19 on page 340.
Figure 9-17 Active node halt policy HMC configuration
Active Node Halt Policy
Move cursor to desired item and press Enter.
HMC Configuration Configure Active Node Halt Policy
F1=Help F2=Refresh F3=Cancel F8=ImageF9=Shell F10=Exit Enter=Do
Active Node Halt Policy
Move cursor to desired item and press Enter.
HMC Configuration Configure Active Node Halt Policy
F1=Help F2=Refresh F3=Cancel F8=ImageF9=Shell F10=Exit Enter=Do
Chapter 9. Cluster partition management update 339
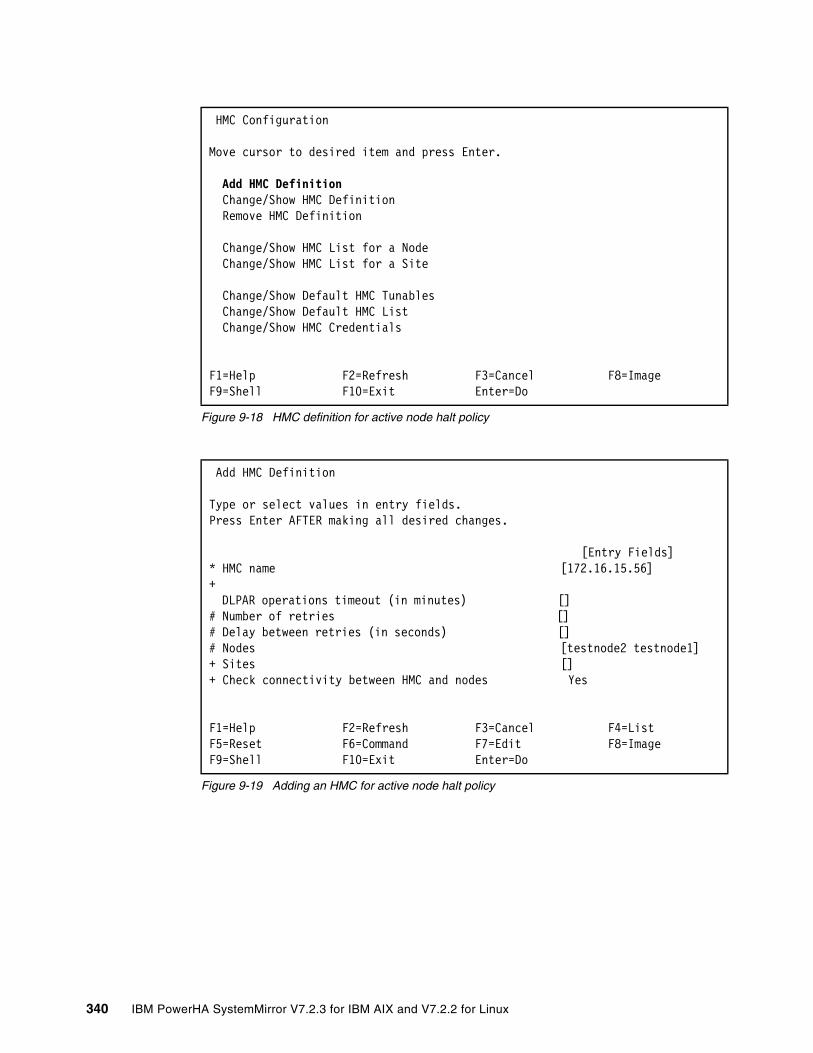
Figure 9-18 HMC definition for active node halt policy
Figure 9-19 Adding an HMC for active node halt policy
HMC Configuration
Move cursor to desired item and press Enter.
Add HMC Definition Change/Show HMC Definition Remove HMC Definition
Change/Show HMC List for a Node Change/Show HMC List for a Site
Change/Show Default HMC Tunables Change/Show Default HMC List Change/Show HMC Credentials
F1=Help F2=Refresh F3=Cancel F8=ImageF9=Shell F10=Exit Enter=Do
Add HMC Definition
Type or select values in entry fields.Press Enter AFTER making all desired changes.
[Entry Fields]* HMC name [172.16.15.56] + DLPAR operations timeout (in minutes) [] # Number of retries [] # Delay between retries (in seconds) [] # Nodes [testnode2 testnode1] + Sites [] + Check connectivity between HMC and nodes Yes
F1=Help F2=Refresh F3=Cancel F4=ListF5=Reset F6=Command F7=Edit F8=ImageF9=Shell F10=Exit Enter=Do
340 IBM PowerHA SystemMirror V7.2.3 for IBM AIX and V7.2.2 for Linux
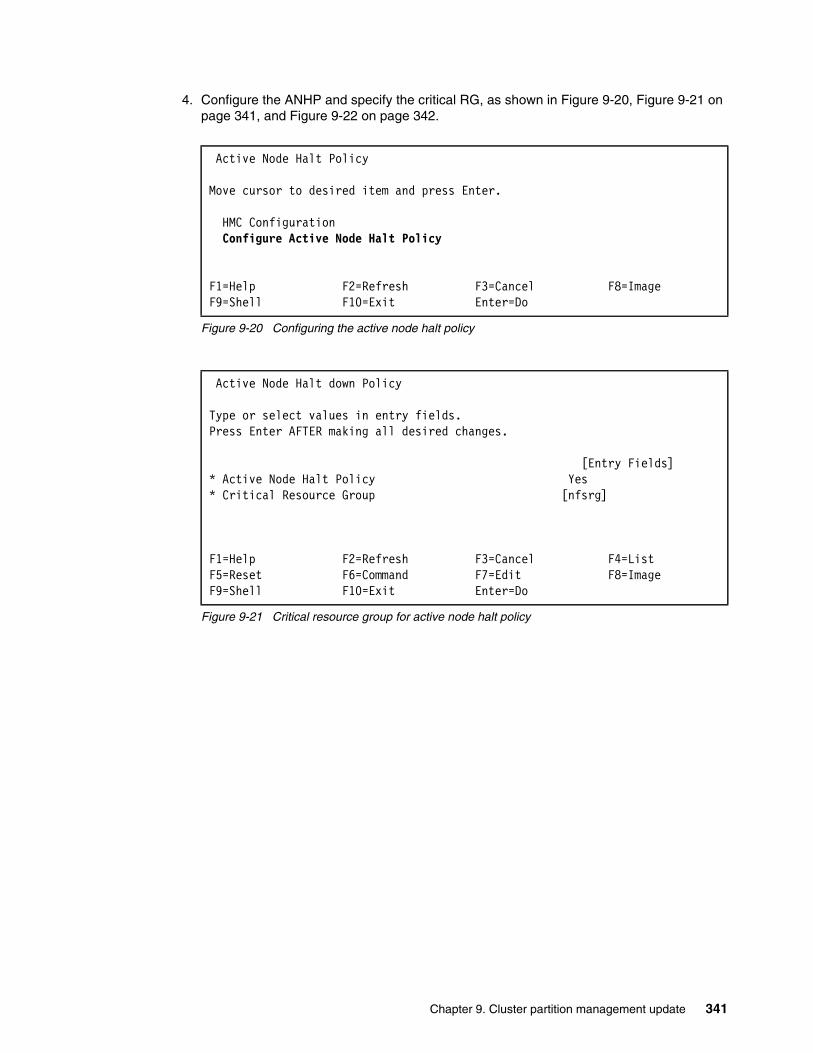
4. Configure the ANHP and specify the critical RG, as shown in Figure 9-20, Figure 9-21 on page 341, and Figure 9-22 on page 342.
Figure 9-20 Configuring the active node halt policy
Figure 9-21 Critical resource group for active node halt policy
Active Node Halt Policy
Move cursor to desired item and press Enter.
HMC Configuration Configure Active Node Halt Policy
F1=Help F2=Refresh F3=Cancel F8=ImageF9=Shell F10=Exit Enter=Do
Active Node Halt down Policy
Type or select values in entry fields.Press Enter AFTER making all desired changes.
[Entry Fields]* Active Node Halt Policy Yes * Critical Resource Group [nfsrg]
F1=Help F2=Refresh F3=Cancel F4=ListF5=Reset F6=Command F7=Edit F8=ImageF9=Shell F10=Exit Enter=Do
Chapter 9. Cluster partition management update 341
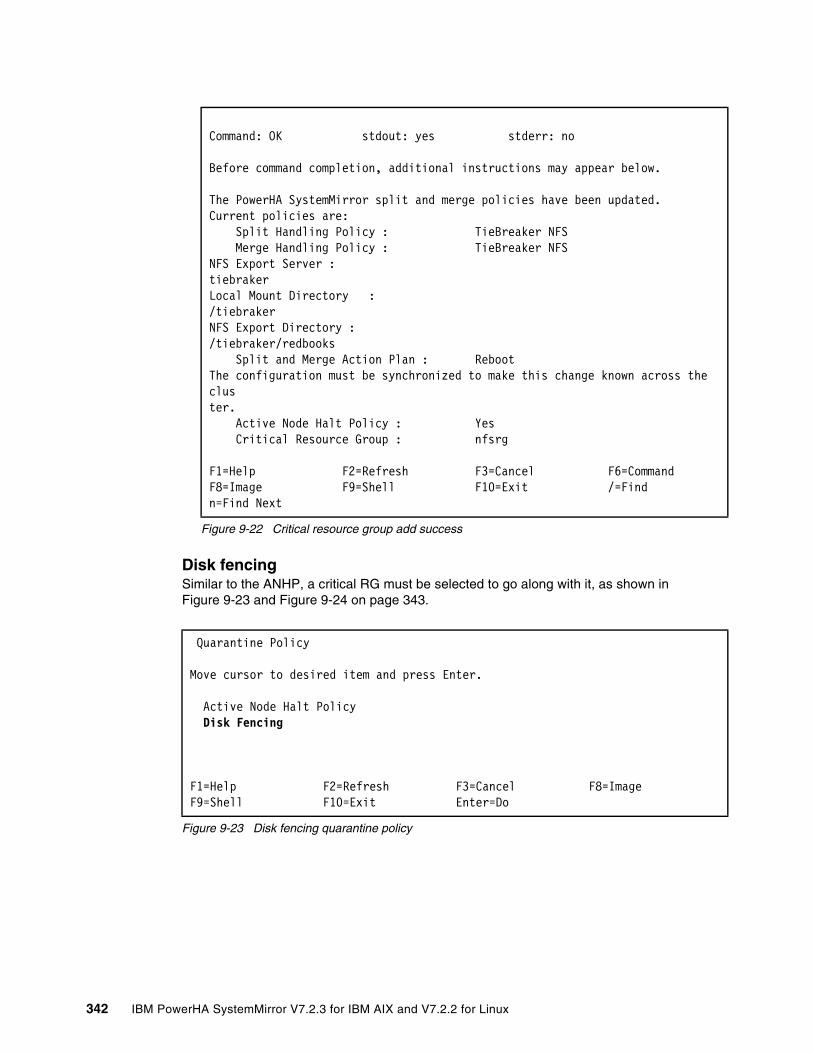
Figure 9-22 Critical resource group add success
Disk fencingSimilar to the ANHP, a critical RG must be selected to go along with it, as shown in Figure 9-23 and Figure 9-24 on page 343.
Figure 9-23 Disk fencing quarantine policy
Command: OK stdout: yes stderr: no
Before command completion, additional instructions may appear below.
The PowerHA SystemMirror split and merge policies have been updated.Current policies are: Split Handling Policy : TieBreaker NFS Merge Handling Policy : TieBreaker NFSNFS Export Server :tiebrakerLocal Mount Directory :/tiebrakerNFS Export Directory :/tiebraker/redbooks Split and Merge Action Plan : RebootThe configuration must be synchronized to make this change known across the cluster. Active Node Halt Policy : Yes Critical Resource Group : nfsrg
F1=Help F2=Refresh F3=Cancel F6=CommandF8=Image F9=Shell F10=Exit /=Findn=Find Next
Quarantine Policy
Move cursor to desired item and press Enter.
Active Node Halt Policy Disk Fencing
F1=Help F2=Refresh F3=Cancel F8=ImageF9=Shell F10=Exit Enter=Do
342 IBM PowerHA SystemMirror V7.2.3 for IBM AIX and V7.2.2 for Linux

Figure 9-24 Disk fencing critical resource group
The current setting of the quarantine policy can be checked by using clmgr, as shown in Example 9-5.
Example 9-5 The clmgr command displaying the current quarantine policy
root@testnode1[/]#clmgr query cluster | grep -i quarantineQUARANTINE_POLICY="fencing"
When cluster services are started on a node after enabling the disk fencing quarantine policy, the reservation policy and state of the shared volumes are set to PR Shared with the PR keys of both nodes registered. This action can be observed by using the devrsrv command, as shown in Example 9-6.
Example 9-6 Querying the reservation policy
root@testnode3[/]#clmgr query cluster | grep -i cluster_nameCLUSTER_NAME="RBcluster"
root@testnode3[/]#clmgr query nodestestnode4testnode3
root@testnode3[/]#clmgr query resource_grouprgroot@testnode3[/]#clmgr query resource_group rg | grep -i volumeVOLUME_GROUP="vg1"root@testnode3[/]#lspvhdisk0 00f8806f26239b8c rootvg activehdisk2 00f8806f909bc31a caavg_private activehdisk3 00f8806f909bc357 vg1 concurrenthdisk4 00f8806f909bc396 vg1 concurrent
root@testnode3[/]#clRGinfo-----------------------------------------------------------------------------Group Name State Node -----------------------------------------------------------------------------rg ONLINE testnode3
Disk Fencing
Type or select values in entry fields.Press Enter AFTER making all desired changes.
[Entry Fields]* Disk Fencing Yes * Critical Resource Group [nfsrg] +
F1=Help F2=Refresh F3=Cancel F4=ListF5=Reset F6=Command F7=Edit F8=ImageF9=Shell F10=Exit Enter=Do
Important: The disk fencing quarantine policy cannot be enabled or disabled if cluster services are active.
Chapter 9. Cluster partition management update 343
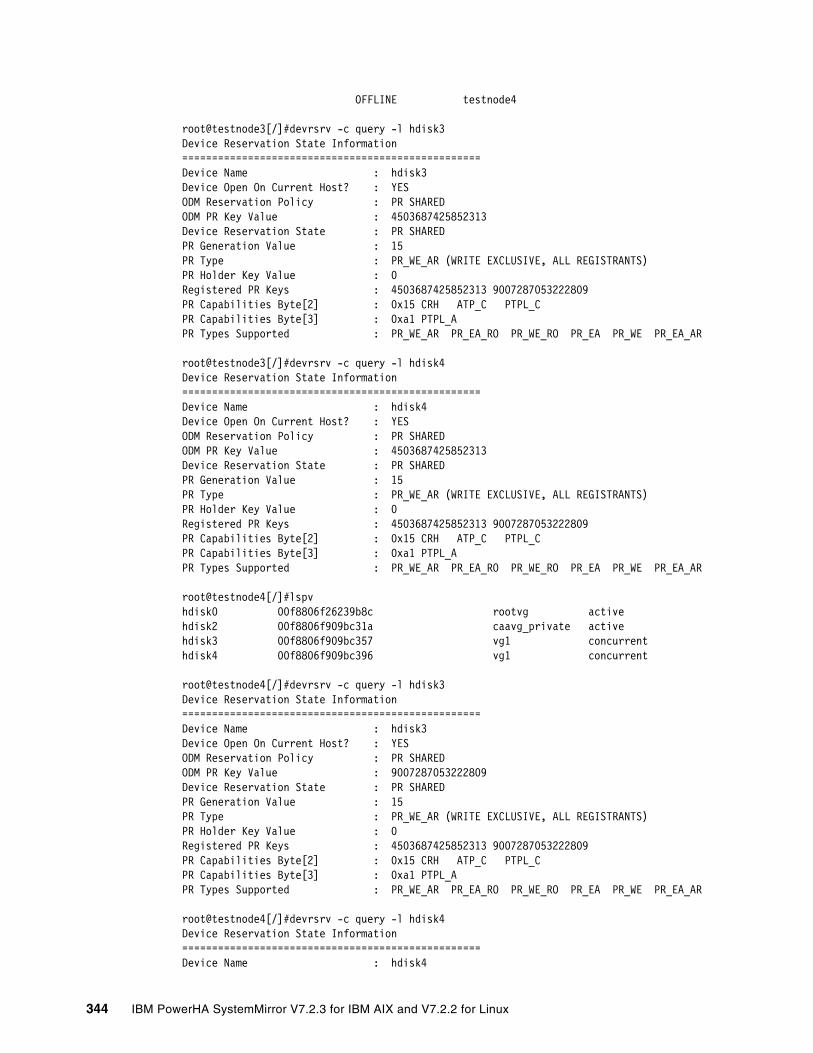
OFFLINE testnode4
root@testnode3[/]#devrsrv -c query -l hdisk3Device Reservation State Information==================================================Device Name : hdisk3Device Open On Current Host? : YESODM Reservation Policy : PR SHAREDODM PR Key Value : 4503687425852313Device Reservation State : PR SHAREDPR Generation Value : 15PR Type : PR_WE_AR (WRITE EXCLUSIVE, ALL REGISTRANTS)PR Holder Key Value : 0Registered PR Keys : 4503687425852313 9007287053222809PR Capabilities Byte[2] : 0x15 CRH ATP_C PTPL_CPR Capabilities Byte[3] : 0xa1 PTPL_APR Types Supported : PR_WE_AR PR_EA_RO PR_WE_RO PR_EA PR_WE PR_EA_AR
root@testnode3[/]#devrsrv -c query -l hdisk4Device Reservation State Information==================================================Device Name : hdisk4Device Open On Current Host? : YESODM Reservation Policy : PR SHAREDODM PR Key Value : 4503687425852313Device Reservation State : PR SHAREDPR Generation Value : 15PR Type : PR_WE_AR (WRITE EXCLUSIVE, ALL REGISTRANTS)PR Holder Key Value : 0Registered PR Keys : 4503687425852313 9007287053222809PR Capabilities Byte[2] : 0x15 CRH ATP_C PTPL_CPR Capabilities Byte[3] : 0xa1 PTPL_APR Types Supported : PR_WE_AR PR_EA_RO PR_WE_RO PR_EA PR_WE PR_EA_AR
root@testnode4[/]#lspvhdisk0 00f8806f26239b8c rootvg activehdisk2 00f8806f909bc31a caavg_private activehdisk3 00f8806f909bc357 vg1 concurrenthdisk4 00f8806f909bc396 vg1 concurrent
root@testnode4[/]#devrsrv -c query -l hdisk3Device Reservation State Information==================================================Device Name : hdisk3Device Open On Current Host? : YESODM Reservation Policy : PR SHAREDODM PR Key Value : 9007287053222809Device Reservation State : PR SHAREDPR Generation Value : 15PR Type : PR_WE_AR (WRITE EXCLUSIVE, ALL REGISTRANTS)PR Holder Key Value : 0Registered PR Keys : 4503687425852313 9007287053222809PR Capabilities Byte[2] : 0x15 CRH ATP_C PTPL_CPR Capabilities Byte[3] : 0xa1 PTPL_APR Types Supported : PR_WE_AR PR_EA_RO PR_WE_RO PR_EA PR_WE PR_EA_AR
root@testnode4[/]#devrsrv -c query -l hdisk4Device Reservation State Information==================================================Device Name : hdisk4
344 IBM PowerHA SystemMirror V7.2.3 for IBM AIX and V7.2.2 for Linux
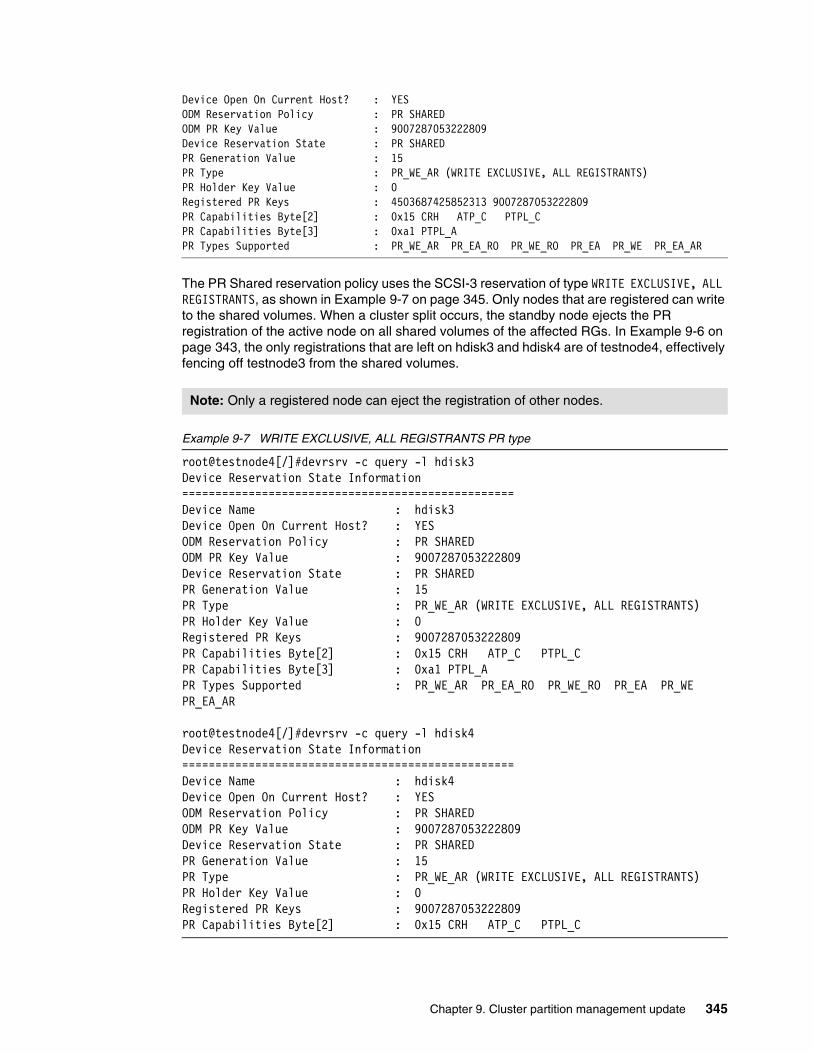
Device Open On Current Host? : YESODM Reservation Policy : PR SHAREDODM PR Key Value : 9007287053222809Device Reservation State : PR SHAREDPR Generation Value : 15PR Type : PR_WE_AR (WRITE EXCLUSIVE, ALL REGISTRANTS)PR Holder Key Value : 0Registered PR Keys : 4503687425852313 9007287053222809PR Capabilities Byte[2] : 0x15 CRH ATP_C PTPL_CPR Capabilities Byte[3] : 0xa1 PTPL_APR Types Supported : PR_WE_AR PR_EA_RO PR_WE_RO PR_EA PR_WE PR_EA_AR
The PR Shared reservation policy uses the SCSI-3 reservation of type WRITE EXCLUSIVE, ALL REGISTRANTS, as shown in Example 9-7 on page 345. Only nodes that are registered can write to the shared volumes. When a cluster split occurs, the standby node ejects the PR registration of the active node on all shared volumes of the affected RGs. In Example 9-6 on page 343, the only registrations that are left on hdisk3 and hdisk4 are of testnode4, effectively fencing off testnode3 from the shared volumes.
Example 9-7 WRITE EXCLUSIVE, ALL REGISTRANTS PR type
root@testnode4[/]#devrsrv -c query -l hdisk3Device Reservation State Information==================================================Device Name : hdisk3Device Open On Current Host? : YESODM Reservation Policy : PR SHAREDODM PR Key Value : 9007287053222809Device Reservation State : PR SHAREDPR Generation Value : 15PR Type : PR_WE_AR (WRITE EXCLUSIVE, ALL REGISTRANTS)PR Holder Key Value : 0Registered PR Keys : 9007287053222809PR Capabilities Byte[2] : 0x15 CRH ATP_C PTPL_CPR Capabilities Byte[3] : 0xa1 PTPL_APR Types Supported : PR_WE_AR PR_EA_RO PR_WE_RO PR_EA PR_WE PR_EA_AR
root@testnode4[/]#devrsrv -c query -l hdisk4Device Reservation State Information==================================================Device Name : hdisk4Device Open On Current Host? : YESODM Reservation Policy : PR SHAREDODM PR Key Value : 9007287053222809Device Reservation State : PR SHAREDPR Generation Value : 15PR Type : PR_WE_AR (WRITE EXCLUSIVE, ALL REGISTRANTS)PR Holder Key Value : 0Registered PR Keys : 9007287053222809PR Capabilities Byte[2] : 0x15 CRH ATP_C PTPL_C
Note: Only a registered node can eject the registration of other nodes.
Chapter 9. Cluster partition management update 345
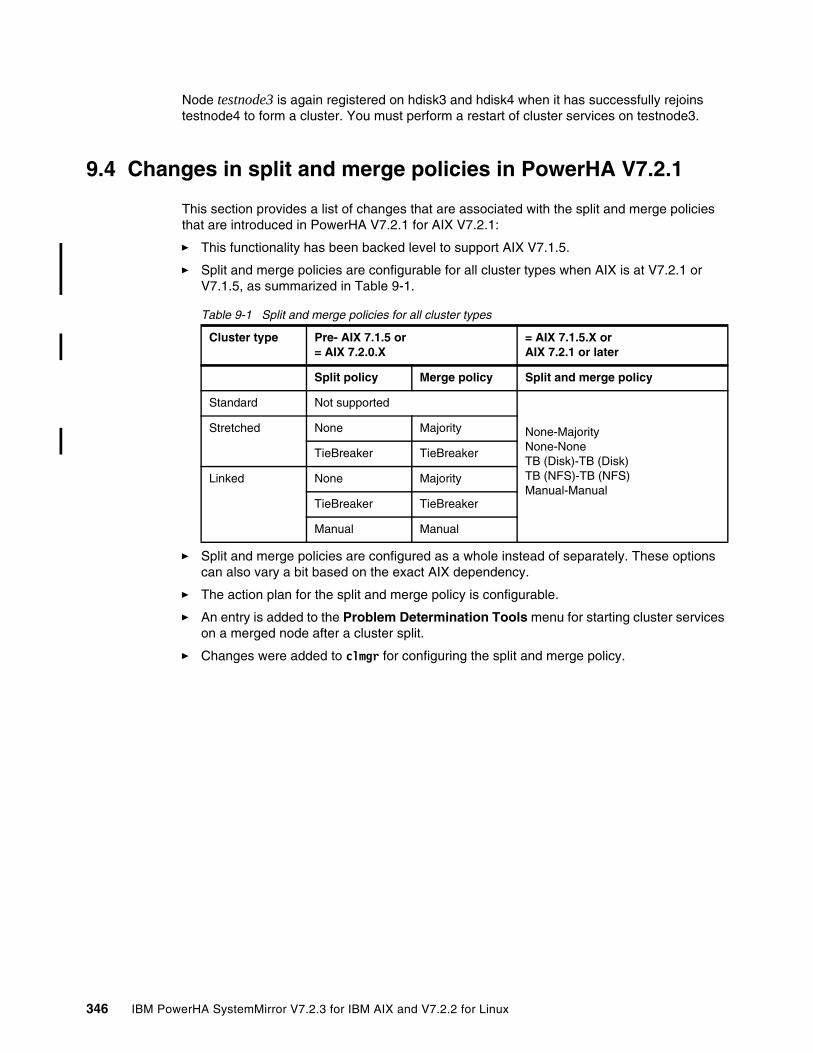
Node testnode3 is again registered on hdisk3 and hdisk4 when it has successfully rejoins testnode4 to form a cluster. You must perform a restart of cluster services on testnode3.
9.4 Changes in split and merge policies in PowerHA V7.2.1
This section provides a list of changes that are associated with the split and merge policies that are introduced in PowerHA V7.2.1 for AIX V7.2.1:
� This functionality has been backed level to support AIX V7.1.5.
� Split and merge policies are configurable for all cluster types when AIX is at V7.2.1 or V7.1.5, as summarized in Table 9-1.
Table 9-1 Split and merge policies for all cluster types
� Split and merge policies are configured as a whole instead of separately. These options can also vary a bit based on the exact AIX dependency.
� The action plan for the split and merge policy is configurable.
� An entry is added to the Problem Determination Tools menu for starting cluster services on a merged node after a cluster split.
� Changes were added to clmgr for configuring the split and merge policy.
Cluster type Pre- AIX 7.1.5 or= AIX 7.2.0.X
= AIX 7.1.5.X or AIX 7.2.1 or later
Split policy Merge policy Split and merge policy
Standard Not supported
None-MajorityNone-NoneTB (Disk)-TB (Disk)TB (NFS)-TB (NFS)Manual-Manual
Stretched None Majority
TieBreaker TieBreaker
Linked None Majority
TieBreaker TieBreaker
Manual Manual
346 IBM PowerHA SystemMirror V7.2.3 for IBM AIX and V7.2.2 for Linux
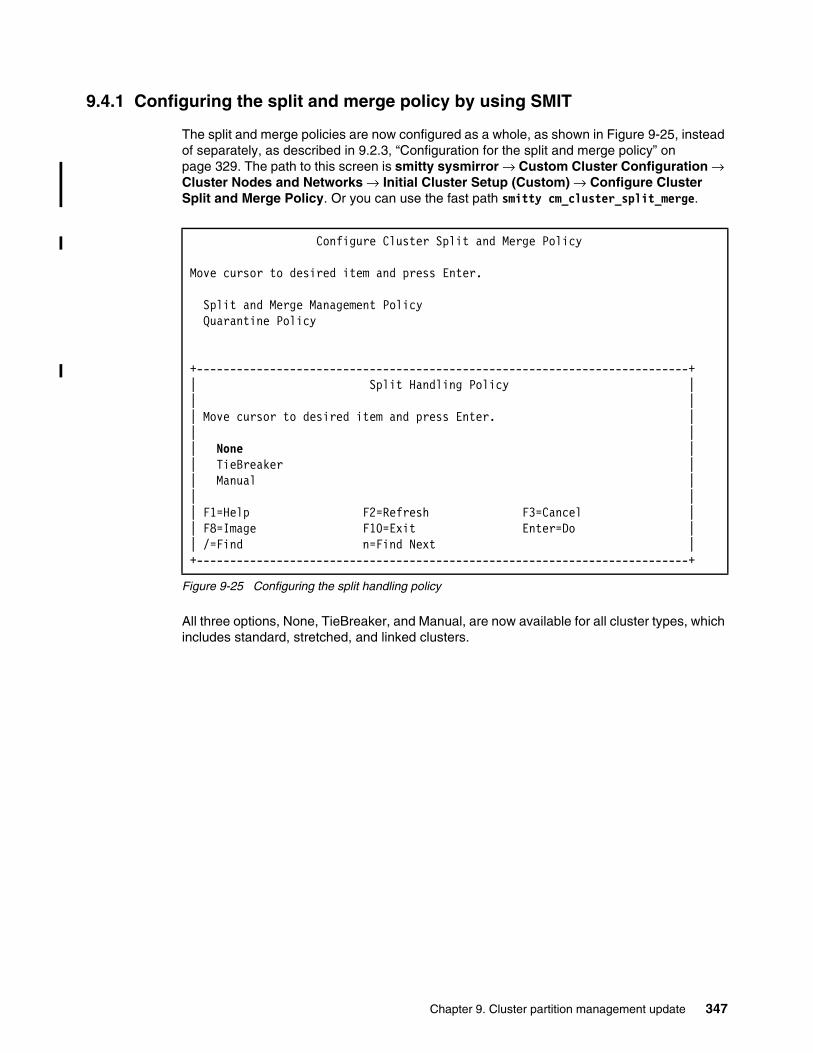
9.4.1 Configuring the split and merge policy by using SMIT
The split and merge policies are now configured as a whole, as shown in Figure 9-25, instead of separately, as described in 9.2.3, “Configuration for the split and merge policy” on page 329. The path to this screen is smitty sysmirror → Custom Cluster Configuration → Cluster Nodes and Networks → Initial Cluster Setup (Custom) → Configure Cluster Split and Merge Policy. Or you can use the fast path smitty cm_cluster_split_merge.
Figure 9-25 Configuring the split handling policy
All three options, None, TieBreaker, and Manual, are now available for all cluster types, which includes standard, stretched, and linked clusters.
Configure Cluster Split and Merge Policy
Move cursor to desired item and press Enter.
Split and Merge Management Policy Quarantine Policy
+--------------------------------------------------------------------------+| Split Handling Policy || || Move cursor to desired item and press Enter. || || None || TieBreaker || Manual || || F1=Help F2=Refresh F3=Cancel || F8=Image F10=Exit Enter=Do || /=Find n=Find Next |+--------------------------------------------------------------------------+
Chapter 9. Cluster partition management update 347
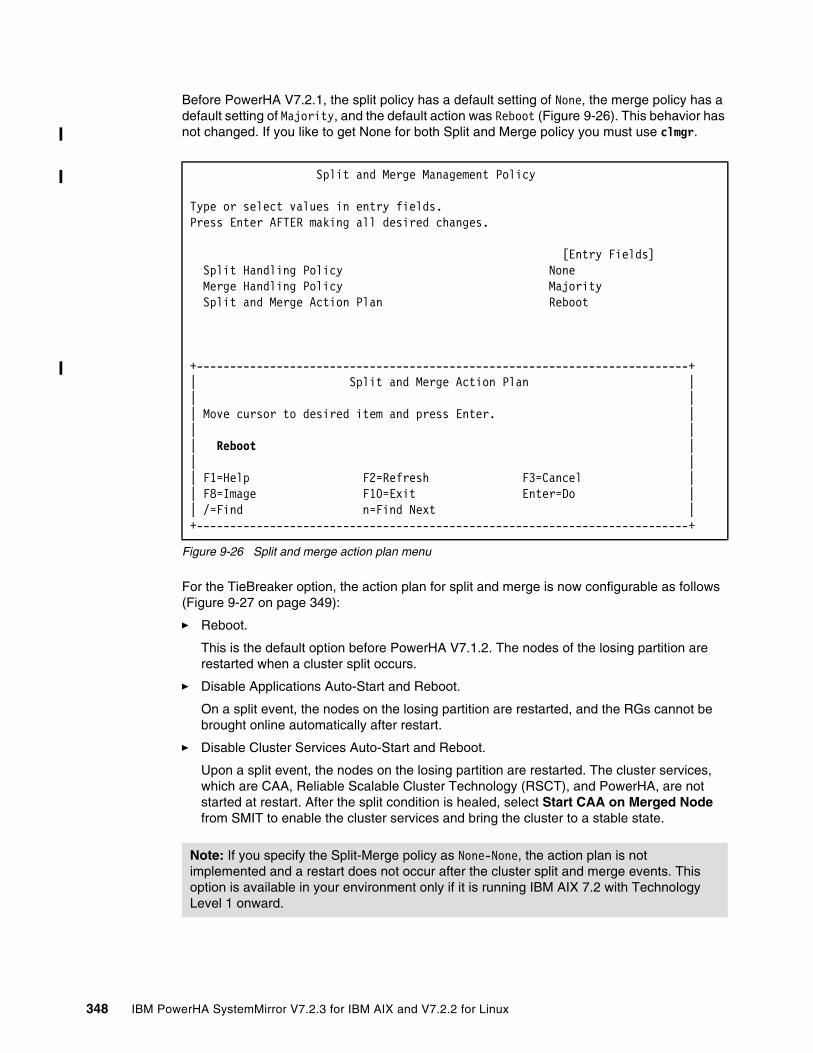
Before PowerHA V7.2.1, the split policy has a default setting of None, the merge policy has a default setting of Majority, and the default action was Reboot (Figure 9-26). This behavior has not changed. If you like to get None for both Split and Merge policy you must use clmgr.
Figure 9-26 Split and merge action plan menu
For the TieBreaker option, the action plan for split and merge is now configurable as follows (Figure 9-27 on page 349):
� Reboot.
This is the default option before PowerHA V7.1.2. The nodes of the losing partition are restarted when a cluster split occurs.
� Disable Applications Auto-Start and Reboot.
On a split event, the nodes on the losing partition are restarted, and the RGs cannot be brought online automatically after restart.
� Disable Cluster Services Auto-Start and Reboot.
Upon a split event, the nodes on the losing partition are restarted. The cluster services, which are CAA, Reliable Scalable Cluster Technology (RSCT), and PowerHA, are not started at restart. After the split condition is healed, select Start CAA on Merged Node from SMIT to enable the cluster services and bring the cluster to a stable state.
Split and Merge Management Policy
Type or select values in entry fields.Press Enter AFTER making all desired changes.
[Entry Fields] Split Handling Policy None Merge Handling Policy Majority Split and Merge Action Plan Reboot
+--------------------------------------------------------------------------+| Split and Merge Action Plan || || Move cursor to desired item and press Enter. || || Reboot || || F1=Help F2=Refresh F3=Cancel || F8=Image F10=Exit Enter=Do || /=Find n=Find Next |+--------------------------------------------------------------------------+
Note: If you specify the Split-Merge policy as None-None, the action plan is not implemented and a restart does not occur after the cluster split and merge events. This option is available in your environment only if it is running IBM AIX 7.2 with Technology Level 1 onward.
348 IBM PowerHA SystemMirror V7.2.3 for IBM AIX and V7.2.2 for Linux
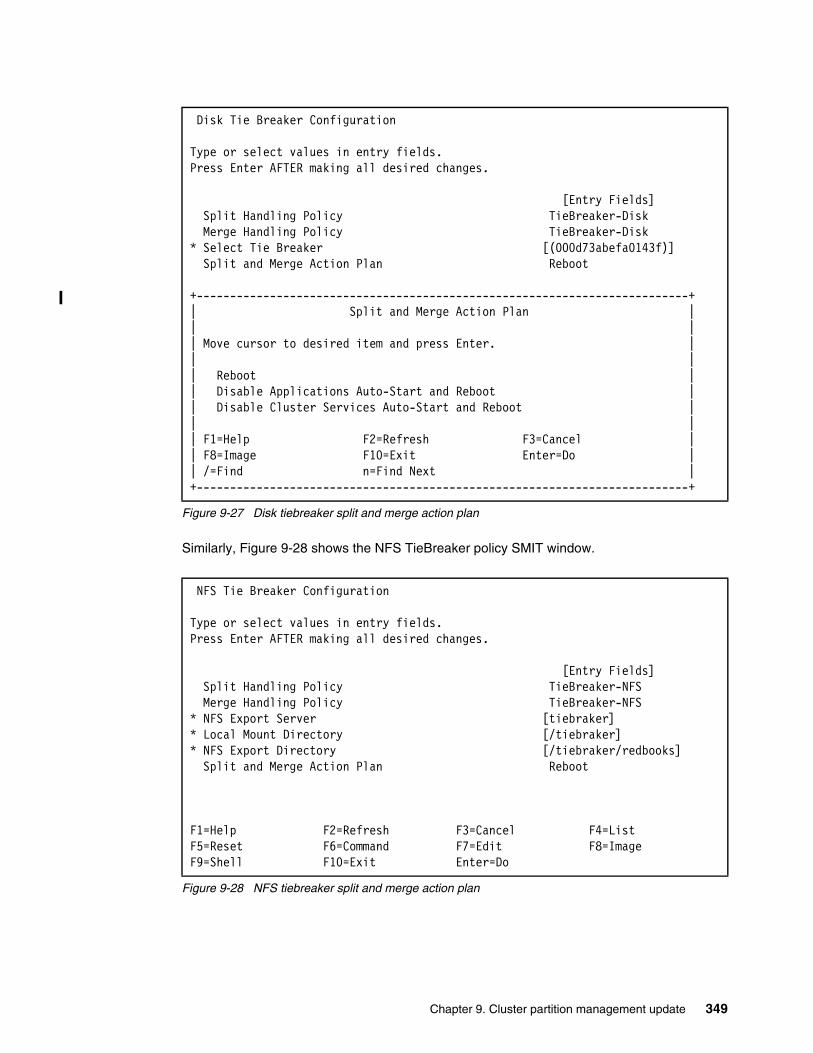
Figure 9-27 Disk tiebreaker split and merge action plan
Similarly, Figure 9-28 shows the NFS TieBreaker policy SMIT window.
Figure 9-28 NFS tiebreaker split and merge action plan
Disk Tie Breaker Configuration
Type or select values in entry fields.Press Enter AFTER making all desired changes.
[Entry Fields] Split Handling Policy TieBreaker-Disk Merge Handling Policy TieBreaker-Disk* Select Tie Breaker [(000d73abefa0143f)] Split and Merge Action Plan Reboot
+--------------------------------------------------------------------------+| Split and Merge Action Plan || || Move cursor to desired item and press Enter. || || Reboot || Disable Applications Auto-Start and Reboot || Disable Cluster Services Auto-Start and Reboot || || F1=Help F2=Refresh F3=Cancel || F8=Image F10=Exit Enter=Do || /=Find n=Find Next |+--------------------------------------------------------------------------+
NFS Tie Breaker Configuration
Type or select values in entry fields.Press Enter AFTER making all desired changes.
[Entry Fields] Split Handling Policy TieBreaker-NFS Merge Handling Policy TieBreaker-NFS* NFS Export Server [tiebraker]* Local Mount Directory [/tiebraker]* NFS Export Directory [/tiebraker/redbooks] Split and Merge Action Plan Reboot
F1=Help F2=Refresh F3=Cancel F4=ListF5=Reset F6=Command F7=Edit F8=ImageF9=Shell F10=Exit Enter=Do
Chapter 9. Cluster partition management update 349
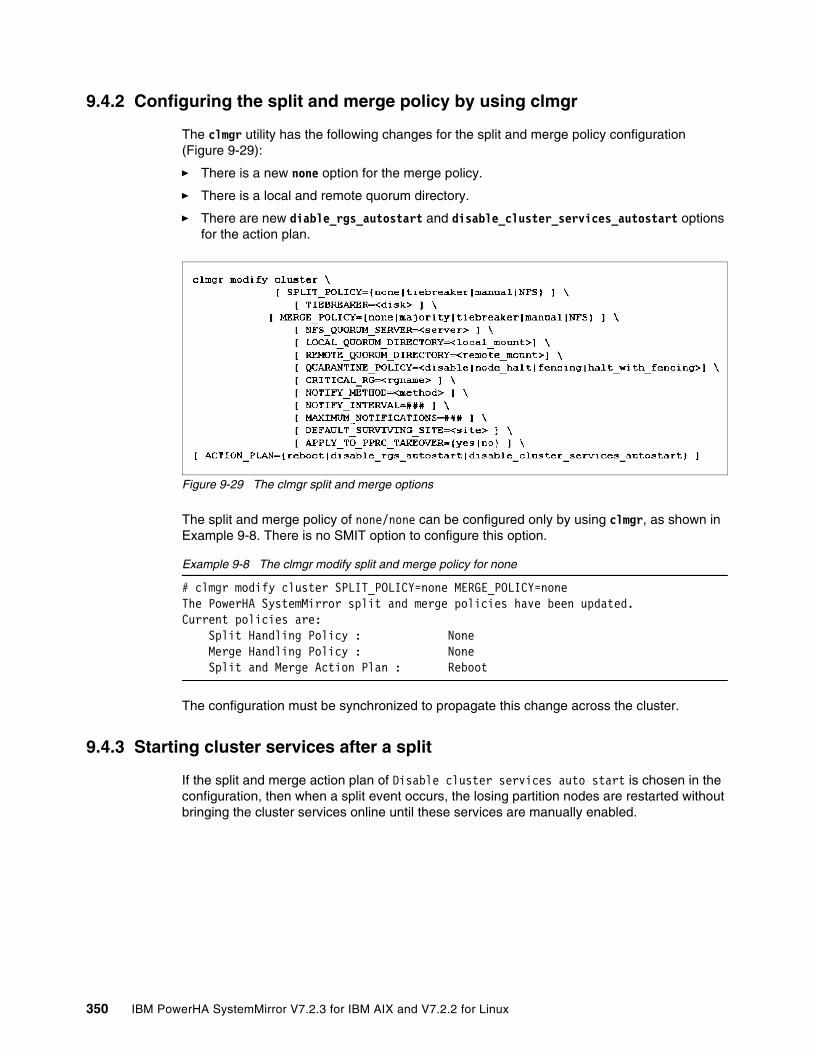
9.4.2 Configuring the split and merge policy by using clmgr
The clmgr utility has the following changes for the split and merge policy configuration (Figure 9-29):
� There is a new none option for the merge policy.
� There is a local and remote quorum directory.
� There are new diable_rgs_autostart and disable_cluster_services_autostart options for the action plan.
Figure 9-29 The clmgr split and merge options
The split and merge policy of none/none can be configured only by using clmgr, as shown in Example 9-8. There is no SMIT option to configure this option.
Example 9-8 The clmgr modify split and merge policy for none
# clmgr modify cluster SPLIT_POLICY=none MERGE_POLICY=noneThe PowerHA SystemMirror split and merge policies have been updated.Current policies are: Split Handling Policy : None Merge Handling Policy : None Split and Merge Action Plan : Reboot
The configuration must be synchronized to propagate this change across the cluster.
9.4.3 Starting cluster services after a split
If the split and merge action plan of Disable cluster services auto start is chosen in the configuration, then when a split event occurs, the losing partition nodes are restarted without bringing the cluster services online until these services are manually enabled.
350 IBM PowerHA SystemMirror V7.2.3 for IBM AIX and V7.2.2 for Linux
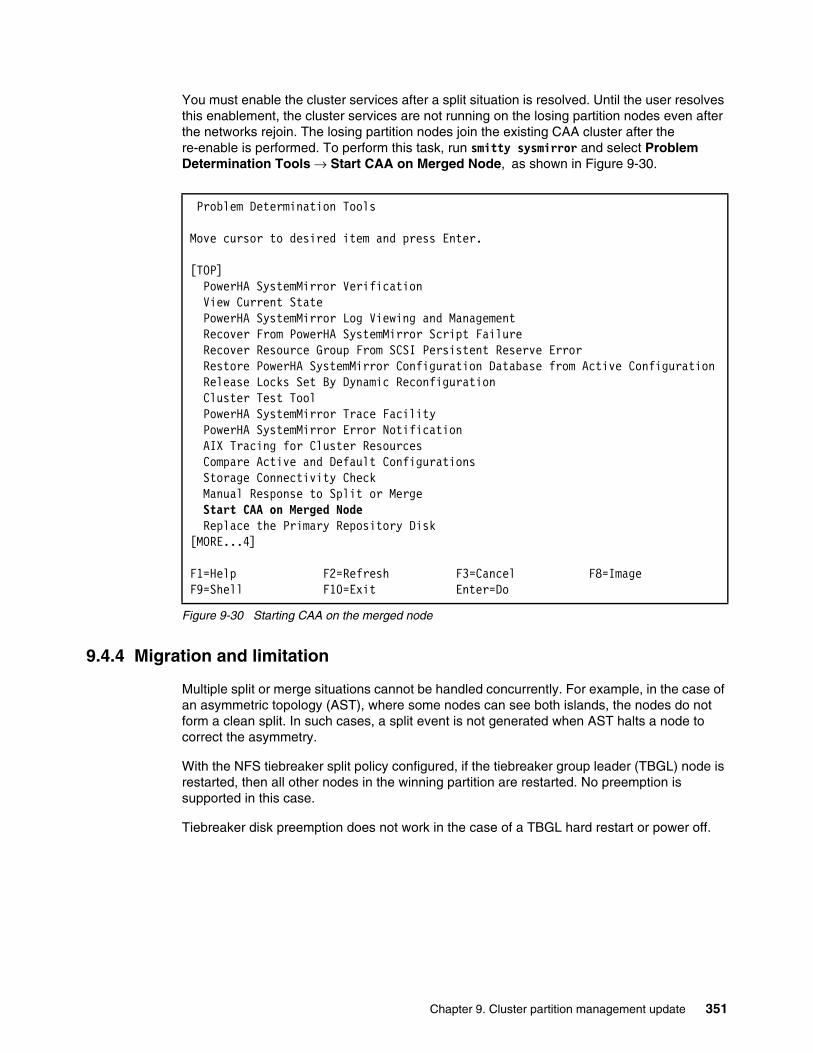
You must enable the cluster services after a split situation is resolved. Until the user resolves this enablement, the cluster services are not running on the losing partition nodes even after the networks rejoin. The losing partition nodes join the existing CAA cluster after the re-enable is performed. To perform this task, run smitty sysmirror and select Problem Determination Tools → Start CAA on Merged Node, as shown in Figure 9-30.
Figure 9-30 Starting CAA on the merged node
9.4.4 Migration and limitation
Multiple split or merge situations cannot be handled concurrently. For example, in the case of an asymmetric topology (AST), where some nodes can see both islands, the nodes do not form a clean split. In such cases, a split event is not generated when AST halts a node to correct the asymmetry.
With the NFS tiebreaker split policy configured, if the tiebreaker group leader (TBGL) node is restarted, then all other nodes in the winning partition are restarted. No preemption is supported in this case.
Tiebreaker disk preemption does not work in the case of a TBGL hard restart or power off.
Problem Determination Tools
Move cursor to desired item and press Enter.
[TOP] PowerHA SystemMirror Verification View Current State PowerHA SystemMirror Log Viewing and Management Recover From PowerHA SystemMirror Script Failure Recover Resource Group From SCSI Persistent Reserve Error Restore PowerHA SystemMirror Configuration Database from Active Configuration Release Locks Set By Dynamic Reconfiguration Cluster Test Tool PowerHA SystemMirror Trace Facility PowerHA SystemMirror Error Notification AIX Tracing for Cluster Resources Compare Active and Default Configurations Storage Connectivity Check Manual Response to Split or Merge Start CAA on Merged Node Replace the Primary Repository Disk[MORE...4]
F1=Help F2=Refresh F3=Cancel F8=ImageF9=Shell F10=Exit Enter=Do
Chapter 9. Cluster partition management update 351

The merge events are not available in a stretched cluster with versions earlier than AIX 7.2.1, as shown in Figure 9-31.
Figure 9-31 Split merge policies pre- and post-migration
9.5 Considerations for using split and merge quarantine policies
A split and merge policy is used for deciding which node or partition can be restarted when a cluster split occurs. A quarantine policy is used for fencing off, or quarantining, the active node from shared disks when a cluster split occurs. Both types of policies are designed to prevent data corruption in the event of cluster partitioning.
The quarantine policy does not require extra infrastructure resources, but the split and merge policy does. Users select the appropriate policy or combination of policies that suit their data center environments.
352 IBM PowerHA SystemMirror V7.2.3 for IBM AIX and V7.2.2 for Linux
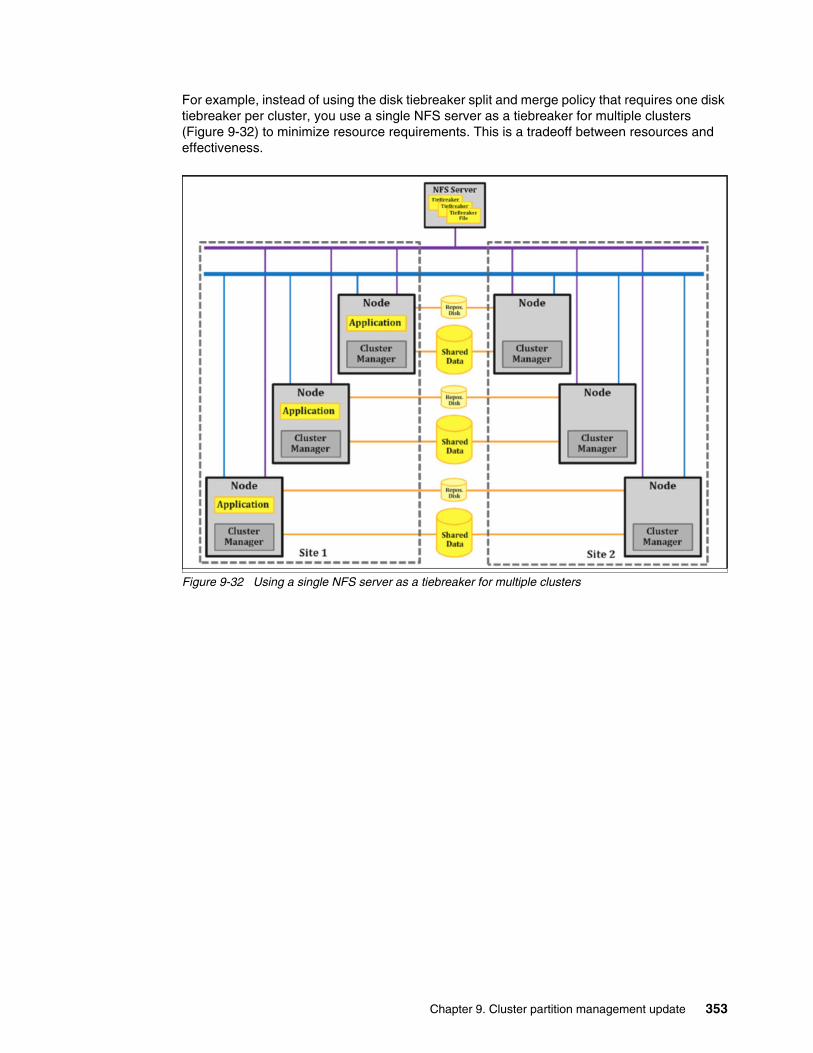
For example, instead of using the disk tiebreaker split and merge policy that requires one disk tiebreaker per cluster, you use a single NFS server as a tiebreaker for multiple clusters (Figure 9-32) to minimize resource requirements. This is a tradeoff between resources and effectiveness.
Figure 9-32 Using a single NFS server as a tiebreaker for multiple clusters
Chapter 9. Cluster partition management update 353
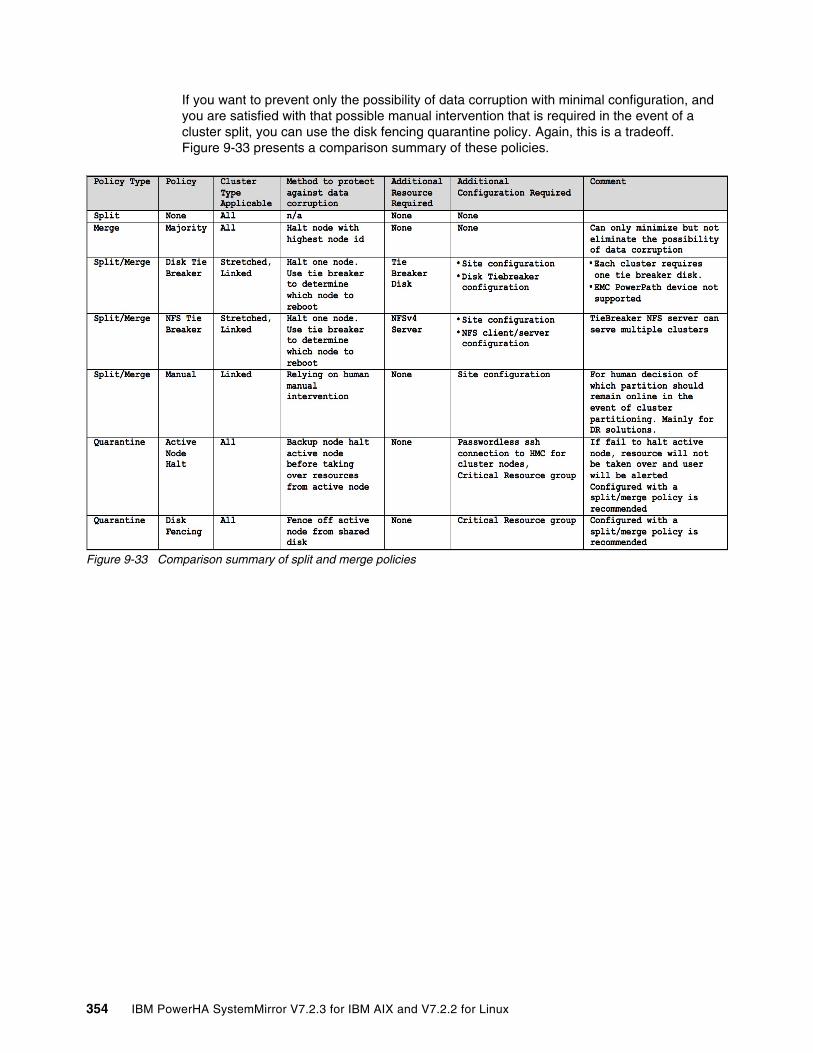
If you want to prevent only the possibility of data corruption with minimal configuration, and you are satisfied with that possible manual intervention that is required in the event of a cluster split, you can use the disk fencing quarantine policy. Again, this is a tradeoff. Figure 9-33 presents a comparison summary of these policies.
Figure 9-33 Comparison summary of split and merge policies
354 IBM PowerHA SystemMirror V7.2.3 for IBM AIX and V7.2.2 for Linux
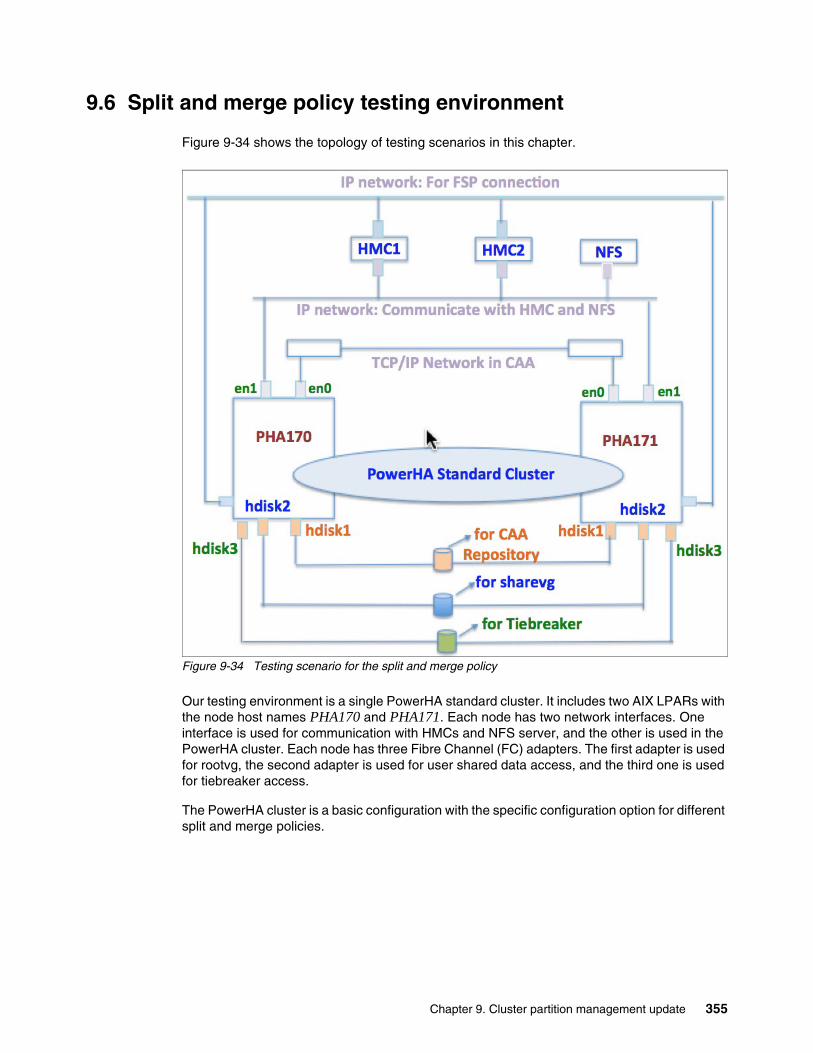
9.6 Split and merge policy testing environment
Figure 9-34 shows the topology of testing scenarios in this chapter.
Figure 9-34 Testing scenario for the split and merge policy
Our testing environment is a single PowerHA standard cluster. It includes two AIX LPARs with the node host names PHA170 and PHA171. Each node has two network interfaces. One interface is used for communication with HMCs and NFS server, and the other is used in the PowerHA cluster. Each node has three Fibre Channel (FC) adapters. The first adapter is used for rootvg, the second adapter is used for user shared data access, and the third one is used for tiebreaker access.
The PowerHA cluster is a basic configuration with the specific configuration option for different split and merge policies.
Chapter 9. Cluster partition management update 355
9.6.1 Basic configuration
Table 9-2 shows the PowerHA cluster’s attributes. This is a basic two-node PowerHA standard cluster.
Table 9-2 PowerHA cluster’s configuration
9.6.2 Specific hardware configuration for some scenarios
This section describes the specific hardware configurations for some scenarios.
Split and merge policy is tiebreaker (disk)In this scenario, add one shared disk (hdisk2) to act as the tiebreaker.
Split and merge policy is tiebreaker (NFS)In this scenario, add one Network File System (NFS) node to act as the tiebreaker.
Quarantine policy is the active node halt policyIn this scenario, add two HMCs that are used to shut down the relevant LPARs in case of a cluster split scenario.
The following sections contain the detailed PowerHA configuration of each scenario.
9.6.3 Initial PowerHA service status for each scenario
Each scenario has the same start status for the PowerHA and CAA service’s status. We show the status in this section because we do not show it in each scenario.
Component PHA170 PHA171
Cluster name PHA_clusterCluster type: Standard Cluster or No Site Cluster (NSC)
Network interface en0: 172.16.51.170Netmask: 255.255.255.0Gateway: 172.16.51.1en1: 172.16.15.242
en0: 172.16.51.171Netmask: 255.255.255.0Gateway: 172.16.51.1en1: 172.16.15.243
Network net_ether_01 (172.16.51.0/24)
CAA UnicastRepository disk: hdisk1
Shared volume group (VG)
sharevg:hdisk2
Service IP 172.16.51.172 PHASvc
RG RG testRG:� Startup Policy: Online On Home Node Only� Fallover Policy: Fallover To Next Priority Node In The List� Fallback Policy: Never Fallback� Participating Nodes: PHA170 PHA171� Service IP Label: PHASvc� VG: sharevg
356 IBM PowerHA SystemMirror V7.2.3 for IBM AIX and V7.2.2 for Linux
PowerHA configurationExample 9-9 shows PowerHA basic configuration by using the cltopinfo command.
Example 9-9 PowerHA basic configuration that is shown by using the cltopinfo command
# cltopinfoCluster Name: PHA_ClusterCluster Type: StandardHeartbeat Type: UnicastRepository Disk: hdisk1 (00fa2342a1093403)
There are 2 node(s) and 1 network(s) defined
NODE PHA170: Network net_ether_01 PHASvc 172.16.51.172 PHA170 172.16.51.170
NODE PHA171: Network net_ether_01 PHASvc 172.16.51.172 PHA171 172.16.51.171
Resource Group testRG Startup Policy Online On Home Node Only Fallover Policy Fallover To Next Priority Node In The List Fallback Policy Never Fallback Participating Nodes PHA170 PHA171 Service IP Label PHASvc Volume Group sharevg
PowerHA serviceExample 9-10 shows the PowerHA nodes status from each PowerHA node.
Example 9-10 PowerHA nodes status in each scenario before a cluster split
# clmgr -cv -a name,state,raw_state query node# NAME:STATE:RAW_STATEPHA170:NORMAL:ST_STABLEPHA171:NORMAL:ST_STABLE
Example 9-11 shows the PowerHA RG status from each PowerHA node. The RG (testRG) is online on PHA170 node.
Example 9-11 PowerHA resource group status in each scenario before the cluster split
# clRGinfo -v
Cluster Name: PHA_Cluster
Resource Group Name: testRGStartup Policy: Online On Home Node OnlyFallover Policy: Fallover To Next Priority Node In The ListFallback Policy: Never FallbackSite Policy: ignoreNode State
Chapter 9. Cluster partition management update 357
---------------------------------------------------------------- --------------- PHA170 ONLINE PHA171 OFFLINE
CAA service statusExample 9-12 shows the CAA configuration by using the lscluster -c command.
Example 9-12 Showing the CAA cluster configuration by using the lscluster -c command
# lscluster -cCluster Name: PHA_ClusterCluster UUID: 28bf3ac0-b516-11e6-8007-faac90b6fe20Number of nodes in cluster = 2 Cluster ID for node PHA170: 1 Primary IP address for node PHA170: 172.16.51.170 Cluster ID for node PHA171: 2 Primary IP address for node PHA171: 172.16.51.171Number of disks in cluster = 1 Disk = hdisk1 UUID = 58a286b2-fe51-5e39-98b1-43acf62025ab cluster_major = 0 cluster_minor = 1Multicast for site LOCAL: IPv4 228.16.51.170 IPv6 ff05::e410:33aaCommunication Mode: unicastLocal node maximum capabilities: SPLT_MRG, CAA_NETMON, AUTO_REPOS_REPLACE, HNAME_CHG, UNICAST, IPV6, SITEEffective cluster-wide capabilities: SPLT_MRG, CAA_NETMON, AUTO_REPOS_REPLACE, HNAME_CHG, UNICAST, IPV6, SITELocal node max level: 50000Effective cluster level: 50000
Example 9-13 shows the CAA configuration by using the lscluster -d command.
Example 9-13 CAA cluster configuration
# lscluster -dStorage Interface Query
Cluster Name: PHA_ClusterCluster UUID: 28bf3ac0-b516-11e6-8007-faac90b6fe20Number of nodes reporting = 2Number of nodes expected = 2
Node PHA170Node UUID = 28945a80-b516-11e6-8007-faac90b6fe20Number of disks discovered = 1 hdisk1: State : UP uDid : 33213600507680284001D5800000000005C8B04214503IBMfcp uUid : 58a286b2-fe51-5e39-98b1-43acf62025ab Site uUid : 51735173-5173-5173-5173-517351735173 Type : REPDISK
Node PHA171Node UUID = 28945a3a-b516-11e6-8007-faac90b6fe20Number of disks discovered = 1 hdisk1: State : UP uDid : 33213600507680284001D5800000000005C8B04214503IBMfcp uUid : 58a286b2-fe51-5e39-98b1-43acf62025ab Site uUid : 51735173-5173-
358 IBM PowerHA SystemMirror V7.2.3 for IBM AIX and V7.2.2 for Linux
Example 9-14 and Example 9-15 show the output from the PHA170 and PHA171 nodes by using the lscluster -m command. The current heartbeat channel is the network.
Example 9-14 CAA information from node PHA170
# hostnamePHA170# lscluster -mCalling node query for all nodes...Node query number of nodes examined: 2
Node name: PHA171 Cluster shorthand id for node: 2 UUID for node: 28945a3a-b516-11e6-8007-faac90b6fe20 State of node: UP Reason: NONE Smoothed rtt to node: 7 Mean Deviation in network rtt to node: 3 Number of clusters node is a member in: 1 CLUSTER NAME SHID UUID PHA_Cluster 0 28bf3ac0-b516-11e6-8007-faac90b6fe20 SITE NAME SHID UUID LOCAL 1 51735173-5173-5173-5173-517351735173
Points of contact for node: 1 ----------------------------------------------------------------------- Interface State Protocol Status SRC_IP->DST_IP ----------------------------------------------------------------------- tcpsock->02 UP IPv4 none 172.16.51.170->172.16.51.171
Example 9-15 CAA information from node PHA171
# hostnamePHA171# lscluster -mCalling node query for all nodes...Node query number of nodes examined: 2
Node name: PHA170 Cluster shorthand id for node: 1 UUID for node: 28945a80-b516-11e6-8007-faac90b6fe20 State of node: UP Reason: NONE Smoothed rtt to node: 7 Mean Deviation in network rtt to node: 3 Number of clusters node is a member in: 1 CLUSTER NAME SHID UUID PHA_Cluster 0 28bf3ac0-b516-11e6-8007-faac90b6fe20 SITE NAME SHID UUID
Note: For production environments, configure more backup repository disks.
PowerHA V7.2 supports up to six backup repository disks. It also supports automatic repository disk replacement in the event of repository disk failure. For more information, see IBM PowerHA SystemMirror V7.2 for IBM AIX Updates, SG24-8278.
Chapter 9. Cluster partition management update 359

LOCAL 1 51735173-5173-5173-5173-517351735173
Points of contact for node: 1 ----------------------------------------------------------------------- Interface State Protocol Status SRC_IP->DST_IP ----------------------------------------------------------------------- tcpsock->01 UP IPv4 none 172.16.51.171->172.16.51.170
Example 9-16 shows the current heartbeat devices that are configured in the testing environment. There is not a SAN-based heartbeat device.
Example 9-16 CAA interfaces
# lscluster -gNetwork/Storage Interface Query
Cluster Name: PHA_ClusterCluster UUID: 28bf3ac0-b516-11e6-8007-faac90b6fe20Number of nodes reporting = 2Number of nodes stale = 0Number of nodes expected = 2
Node PHA171Node UUID = 28945a3a-b516-11e6-8007-faac90b6fe20Number of interfaces discovered = 2 Interface number 1, en0 IFNET type = 6 (IFT_ETHER) NDD type = 7 (NDD_ISO88023) MAC address length = 6 MAC address = FA:9D:66:B2:87:20 Smoothed RTT across interface = 0 Mean deviation in network RTT across interface = 0 Probe interval for interface = 990 ms IFNET flags for interface = 0x1E084863 NDD flags for interface = 0x0021081B Interface state = UP Number of regular addresses configured on interface = 1 IPv4 ADDRESS: 172.16.51.171 broadcast 172.16.51.255 netmask 255.255.255.0 Number of cluster multicast addresses configured on interface = 1 IPv4 MULTICAST ADDRESS: 228.16.51.170 Interface number 2, dpcom IFNET type = 0 (none) NDD type = 305 (NDD_PINGCOMM) Smoothed RTT across interface = 750 Mean deviation in network RTT across interface = 1500 Probe interval for interface = 22500 ms IFNET flags for interface = 0x00000000 NDD flags for interface = 0x00000009 Interface state = UP RESTRICTED AIX_CONTROLLED
Node PHA170Node UUID = 28945a80-b516-11e6-8007-faac90b6fe20Number of interfaces discovered = 2 Interface number 1, en0 IFNET type = 6 (IFT_ETHER)
360 IBM PowerHA SystemMirror V7.2.3 for IBM AIX and V7.2.2 for Linux
NDD type = 7 (NDD_ISO88023) MAC address length = 6 MAC address = FA:AC:90:B6:FE:20 Smoothed RTT across interface = 0 Mean deviation in network RTT across interface = 0 Probe interval for interface = 990 ms IFNET flags for interface = 0x1E084863 NDD flags for interface = 0x0161081B Interface state = UP Number of regular addresses configured on interface = 1 IPv4 ADDRESS: 172.16.51.170 broadcast 172.16.51.255 netmask 255.255.255.0 Number of cluster multicast addresses configured on interface = 1 IPv4 MULTICAST ADDRESS: 228.16.51.170 Interface number 2, dpcom IFNET type = 0 (none) NDD type = 305 (NDD_PINGCOMM) Smoothed RTT across interface = 594 Mean deviation in network RTT across interface = 979 Probe interval for interface = 15730 ms IFNET flags for interface = 0x00000000 NDD flags for interface = 0x00000009 Interface state = UP RESTRICTED AIX_CONTROLLED
Shared file system statusExample 9-17 shows that the /sharefs file system is mounted on the PHA170 node because the RG is online on this node.
Example 9-17 Shared file system status
(0) root @ PHA170: /# dfFilesystem 512-blocks Free %Used Iused %Iused Mounted on.../dev/sharelv 1310720 1309864 1% 4 1% /sharefs
Note: To identify physical FC adapters that can be used in the PowerHA cluster as the SAN-based heartbeat, go to IBM Knowledge Center.
At the time of writing, there is no plan to support this feature for all 16 Gb FC adapters.
Chapter 9. Cluster partition management update 361
9.7 Scenario: Default split and merge policy
This section shows a scenario with the default split and merge policy.
9.7.1 Scenario description
Figure 9-35 shows the topology of the default split and merge scenario.
Figure 9-35 Topology of the default split and merge scenario
This scenario keeps the default configuration for the split and merge policy and does not set the quarantine policy. To simulate a cluster split, break the network communication between the two PowerHA nodes, and disable the repository disk access from the PHA170 node.
After a cluster split occurs, restore communications to generate a cluster merge event.
362 IBM PowerHA SystemMirror V7.2.3 for IBM AIX and V7.2.2 for Linux
9.7.2 Split and merge configuration in PowerHA
In this scenario, you do not need to set specific parameters for the split and merge policy because it is the default policy. Run the clmgr command to display the current policy, as shown in Example 9-18.
Example 9-18 The clmgr command displays the current split and merge settings
# clmgr view cluster SPLIT-MERGESPLIT_POLICY="none"MERGE_POLICY="majority"ACTION_PLAN="reboot"<...>
Complete the following steps:
1. To change the current split and merge policy from the default by using SMIT, use the fast path smitty cm_cluster_sm_policy_chk. Otherwise, run smitty sysmirror and select Custom Cluster Configuration → Cluster Nodes and Networks → Initial Cluster Setup (Custom) → Configure Cluster Split and Merge Policy → Split and Merge Management Policy. Example 9-19 shows the window where you select the None option.
Example 9-19 Split handling policy
Split Handling Policy Move cursor to desired item and press Enter. None TieBreaker Manual
After pressing Enter, the menu shows the policy, as shown in Example 9-20.
Example 9-20 Split and merge management policy
Split and Merge Management Policy
Type or select values in entry fields.Press Enter AFTER making all desired changes. [Entry Fields] Split Handling Policy None Merge Handling Policy Majority + Split and Merge Action Plan Reboot
2. Keep the default values. After pressing Enter, you see the summary that is shown in Example 9-21.
Example 9-21 Successful setting of the split and merge policy
Command: OK stdout: yes stderr: no
Before command completion, additional instructions may appear below.
The PowerHA SystemMirror split and merge policies have been updated.Current policies are: Split Handling Policy : None Merge Handling Policy : Majority
Chapter 9. Cluster partition management update 363
Split and Merge Action Plan : RebootThe configuration must be synchronized to make this change known across the cluster.
3. Synchronize the cluster. After the synchronization operation is complete, the cluster can be activated.
9.7.3 Cluster split
Before simulating a cluster split, check the status, as described in 9.6.3, “Initial PowerHA service status for each scenario” on page 356.
In this case, we sever all communications between two nodes at 21:55:23.
Steps of CAA and PowerHA on PHA170 nodeThe following events occur:
� 21:55:23: All communication between the two nodes is broken.� 21:55:23: The PHA170 node marks REP_DOWN for the repository disk.� 21:55:33: The PHA170 node CAA marks ADAPTER_DOWN for the PHA171 node.� 21:56:02: The PHA170 node CAA marks NODE_DOWN for the PHA171 node.� 21:56:02: PowerHA triggers the split_merge_prompt split event.� 21:56:11: PowerHA triggers the split_merge_prompt quorum event.
Then, keep the current PowerHA service status.
Steps of CAA and PowerHA on PHA171 nodeThe following events occur:
� 21:55:23: All communication between the two nodes is broken.� 21:55:33: PHA171 node CAA marked ADAPTER_DOWN for PHA170 node.� 21:56:02: PHA171 node CAA marked NODE_DOWN for PHA170 node.� 21:56:02: PowerHA triggered split_merge_prompt split event.� 21:56:07: PowerHA triggered split_merge_prompt quorum event.
Then, PHA171 takes over the RG.
You see that PHA171 took over the RG although the RG is still online on the PHA170 node.
Note: The log file of the CAA service is /var/adm/ras/syslog.caa.
364 IBM PowerHA SystemMirror V7.2.3 for IBM AIX and V7.2.2 for Linux

Displaying the resource group status from the PHA170 node after the cluster splitExample 9-22 shows that the PHA170 node cannot get the PHA171 node’s status.
Example 9-22 Resource group unknown status post split
# hostnamePHA170# clmgr -cv -a name,state,raw_state query node# NAME:STATE:RAW_STATEPHA170:NORMAL:ST_RP_RUNNINGPHA171:UNKNOWN:UNKNOWN
Example 9-23 shows that the RG is online on the PHA170 node.
Example 9-23 Resource group still online PHA170 post split
# hostnamePHA170# clRGinfoNode State ---------------------------------------------------------------- --------------- PHA170 ONLINEPHA171 OFFLINE
Note: The duration between REP_DOWN or ADAPTER_DOWN to NODE DOWN is 30 seconds. This duration is controlled by the CAA parameter node_timeout. Its value can be shown by running the following command:
# clctrl -tune -L node_timeout
Here is the output:
NAME DEF MIN MAX UNIT SCOPE ENTITY_NAME(UUID) CUR --------------------------------------------------------------------------------node_timeout 20000 10000 600000 milliseconds c n PHA_Cluster(28bf3ac0-b516-11e6-8007-faac90b6fe20) 30000 --------------------------------------------------------------------------------
To change this value, either run the PowerHA clmgr command or use the SMIT menu:
� From the SMIT menu, run smitty sysmirror, select Custom Cluster Configuration → Cluster Nodes and Networks → Manage the Cluster → Cluster heartbeat settings, and then change the Node Failure Detection Timeout parameter.
� To use the clmgr command, run the following command:
clmgr modify cluster HEARTBEAT_FREQUENCY= <the value you want to set, default is 30>
Chapter 9. Cluster partition management update 365
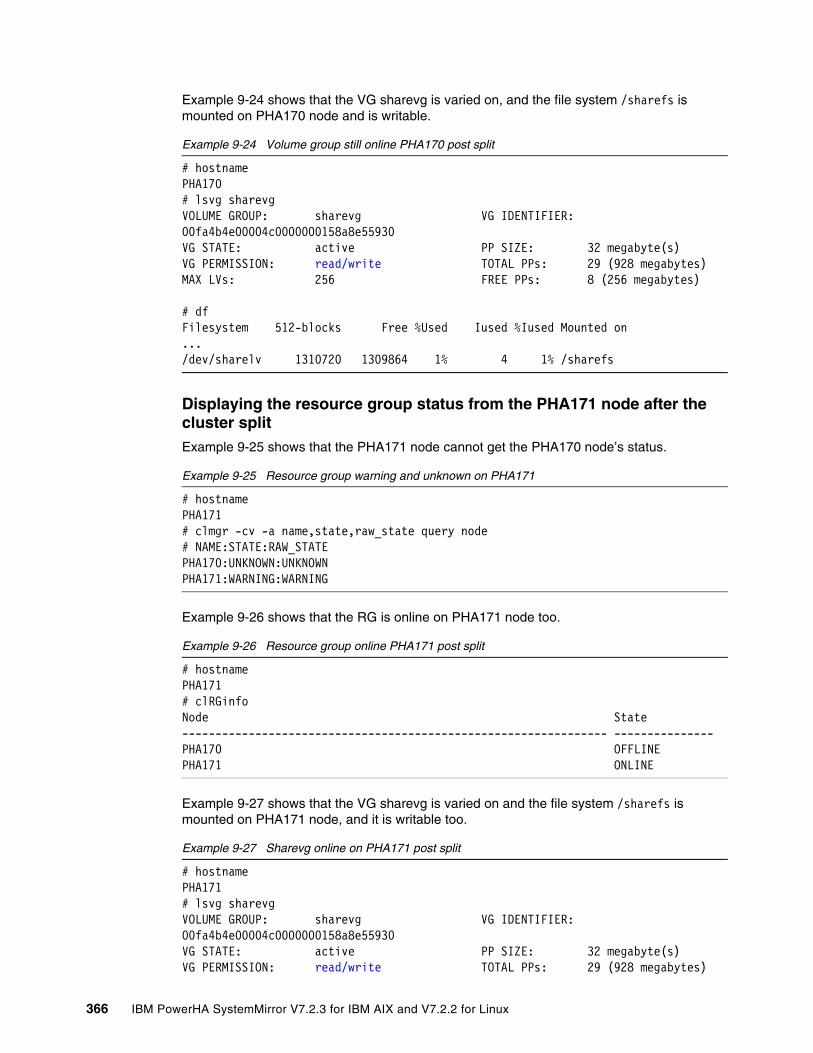
Example 9-24 shows that the VG sharevg is varied on, and the file system /sharefs is mounted on PHA170 node and is writable.
Example 9-24 Volume group still online PHA170 post split
# hostnamePHA170# lsvg sharevgVOLUME GROUP: sharevg VG IDENTIFIER: 00fa4b4e00004c0000000158a8e55930VG STATE: active PP SIZE: 32 megabyte(s)VG PERMISSION: read/write TOTAL PPs: 29 (928 megabytes)MAX LVs: 256 FREE PPs: 8 (256 megabytes)
# dfFilesystem 512-blocks Free %Used Iused %Iused Mounted on.../dev/sharelv 1310720 1309864 1% 4 1% /sharefs
Displaying the resource group status from the PHA171 node after the cluster splitExample 9-25 shows that the PHA171 node cannot get the PHA170 node’s status.
Example 9-25 Resource group warning and unknown on PHA171
# hostnamePHA171# clmgr -cv -a name,state,raw_state query node# NAME:STATE:RAW_STATEPHA170:UNKNOWN:UNKNOWNPHA171:WARNING:WARNING
Example 9-26 shows that the RG is online on PHA171 node too.
Example 9-26 Resource group online PHA171 post split
# hostnamePHA171# clRGinfoNode State ---------------------------------------------------------------- --------------- PHA170 OFFLINE PHA171 ONLINE
Example 9-27 shows that the VG sharevg is varied on and the file system /sharefs is mounted on PHA171 node, and it is writable too.
Example 9-27 Sharevg online on PHA171 post split
# hostnamePHA171# lsvg sharevgVOLUME GROUP: sharevg VG IDENTIFIER: 00fa4b4e00004c0000000158a8e55930VG STATE: active PP SIZE: 32 megabyte(s)VG PERMISSION: read/write TOTAL PPs: 29 (928 megabytes)
366 IBM PowerHA SystemMirror V7.2.3 for IBM AIX and V7.2.2 for Linux
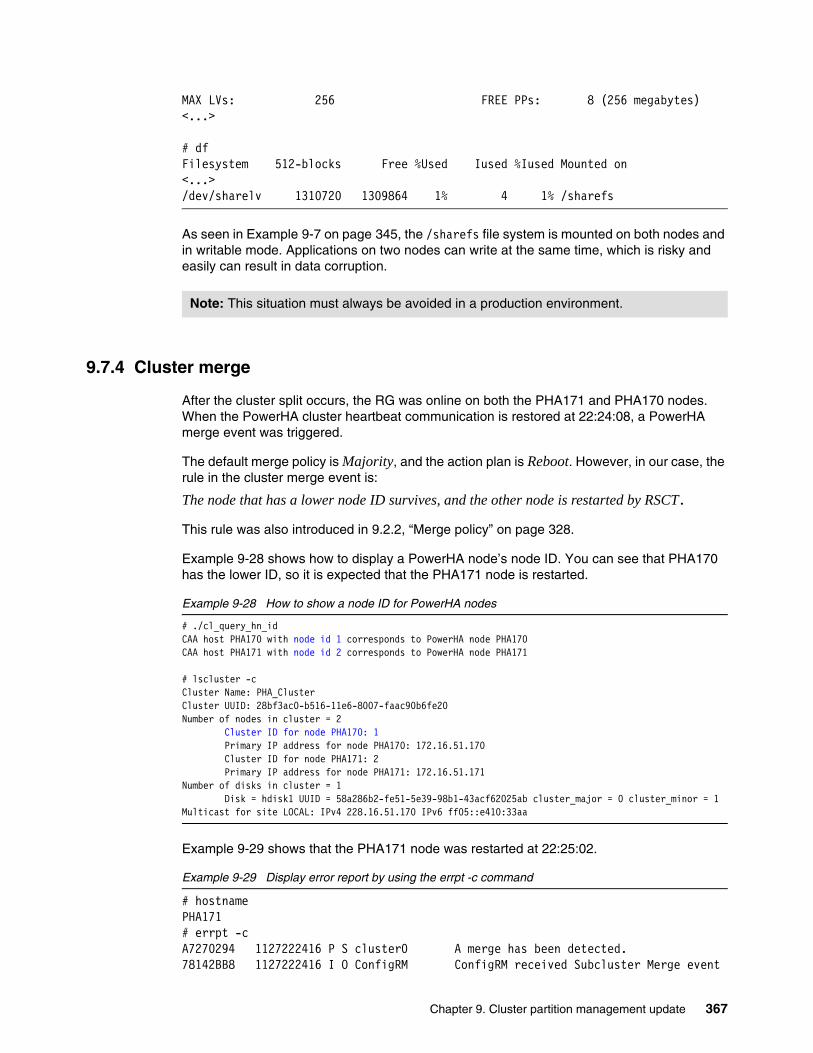
MAX LVs: 256 FREE PPs: 8 (256 megabytes)<...>
# dfFilesystem 512-blocks Free %Used Iused %Iused Mounted on<...>/dev/sharelv 1310720 1309864 1% 4 1% /sharefs
As seen in Example 9-7 on page 345, the /sharefs file system is mounted on both nodes and in writable mode. Applications on two nodes can write at the same time, which is risky and easily can result in data corruption.
9.7.4 Cluster merge
After the cluster split occurs, the RG was online on both the PHA171 and PHA170 nodes. When the PowerHA cluster heartbeat communication is restored at 22:24:08, a PowerHA merge event was triggered.
The default merge policy is Majority, and the action plan is Reboot. However, in our case, the rule in the cluster merge event is:
The node that has a lower node ID survives, and the other node is restarted by RSCT.
This rule was also introduced in 9.2.2, “Merge policy” on page 328.
Example 9-28 shows how to display a PowerHA node’s node ID. You can see that PHA170 has the lower ID, so it is expected that the PHA171 node is restarted.
Example 9-28 How to show a node ID for PowerHA nodes
# ./cl_query_hn_idCAA host PHA170 with node id 1 corresponds to PowerHA node PHA170CAA host PHA171 with node id 2 corresponds to PowerHA node PHA171
# lscluster -cCluster Name: PHA_ClusterCluster UUID: 28bf3ac0-b516-11e6-8007-faac90b6fe20Number of nodes in cluster = 2 Cluster ID for node PHA170: 1 Primary IP address for node PHA170: 172.16.51.170 Cluster ID for node PHA171: 2 Primary IP address for node PHA171: 172.16.51.171Number of disks in cluster = 1 Disk = hdisk1 UUID = 58a286b2-fe51-5e39-98b1-43acf62025ab cluster_major = 0 cluster_minor = 1Multicast for site LOCAL: IPv4 228.16.51.170 IPv6 ff05::e410:33aa
Example 9-29 shows that the PHA171 node was restarted at 22:25:02.
Example 9-29 Display error report by using the errpt -c command
# hostnamePHA171# errpt -cA7270294 1127222416 P S cluster0 A merge has been detected.78142BB8 1127222416 I O ConfigRM ConfigRM received Subcluster Merge event
Note: This situation must always be avoided in a production environment.
Chapter 9. Cluster partition management update 367
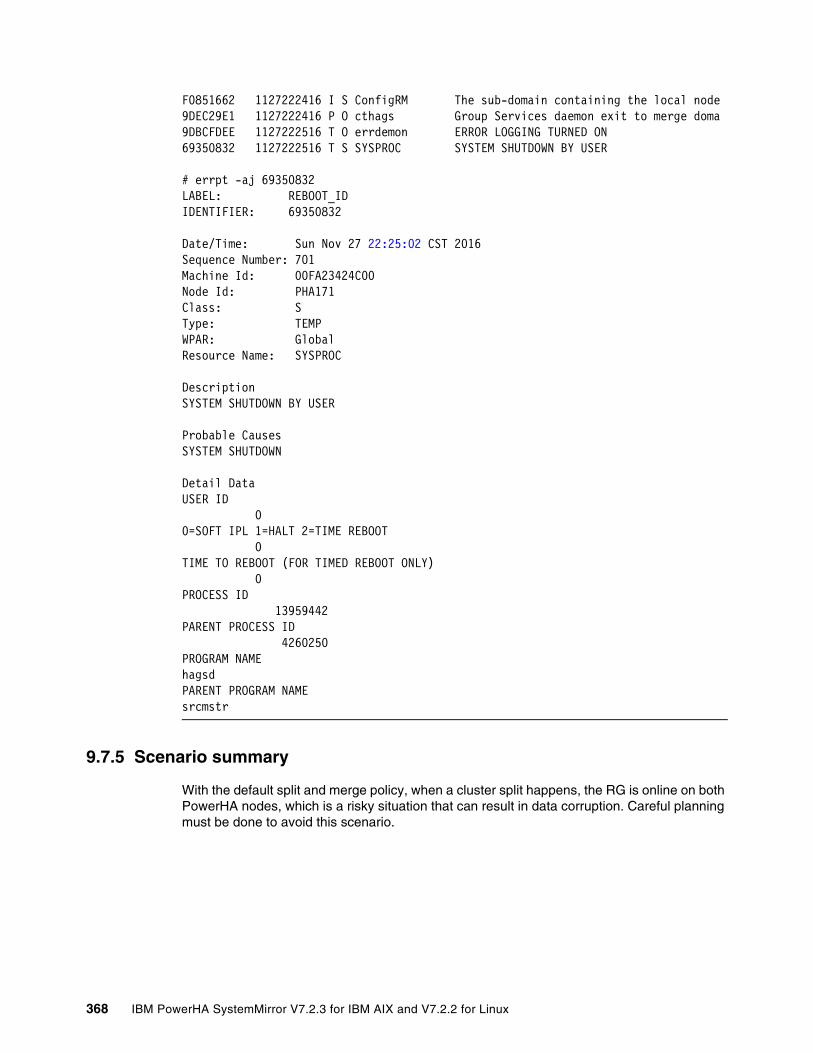
F0851662 1127222416 I S ConfigRM The sub-domain containing the local node9DEC29E1 1127222416 P O cthags Group Services daemon exit to merge doma9DBCFDEE 1127222516 T O errdemon ERROR LOGGING TURNED ON69350832 1127222516 T S SYSPROC SYSTEM SHUTDOWN BY USER
# errpt -aj 69350832LABEL: REBOOT_IDIDENTIFIER: 69350832
Date/Time: Sun Nov 27 22:25:02 CST 2016Sequence Number: 701Machine Id: 00FA23424C00Node Id: PHA171Class: SType: TEMPWPAR: GlobalResource Name: SYSPROC
DescriptionSYSTEM SHUTDOWN BY USER
Probable CausesSYSTEM SHUTDOWN
Detail DataUSER ID 00=SOFT IPL 1=HALT 2=TIME REBOOT 0TIME TO REBOOT (FOR TIMED REBOOT ONLY) 0PROCESS ID 13959442PARENT PROCESS ID 4260250PROGRAM NAMEhagsdPARENT PROGRAM NAMEsrcmstr
9.7.5 Scenario summary
With the default split and merge policy, when a cluster split happens, the RG is online on both PowerHA nodes, which is a risky situation that can result in data corruption. Careful planning must be done to avoid this scenario.
368 IBM PowerHA SystemMirror V7.2.3 for IBM AIX and V7.2.2 for Linux
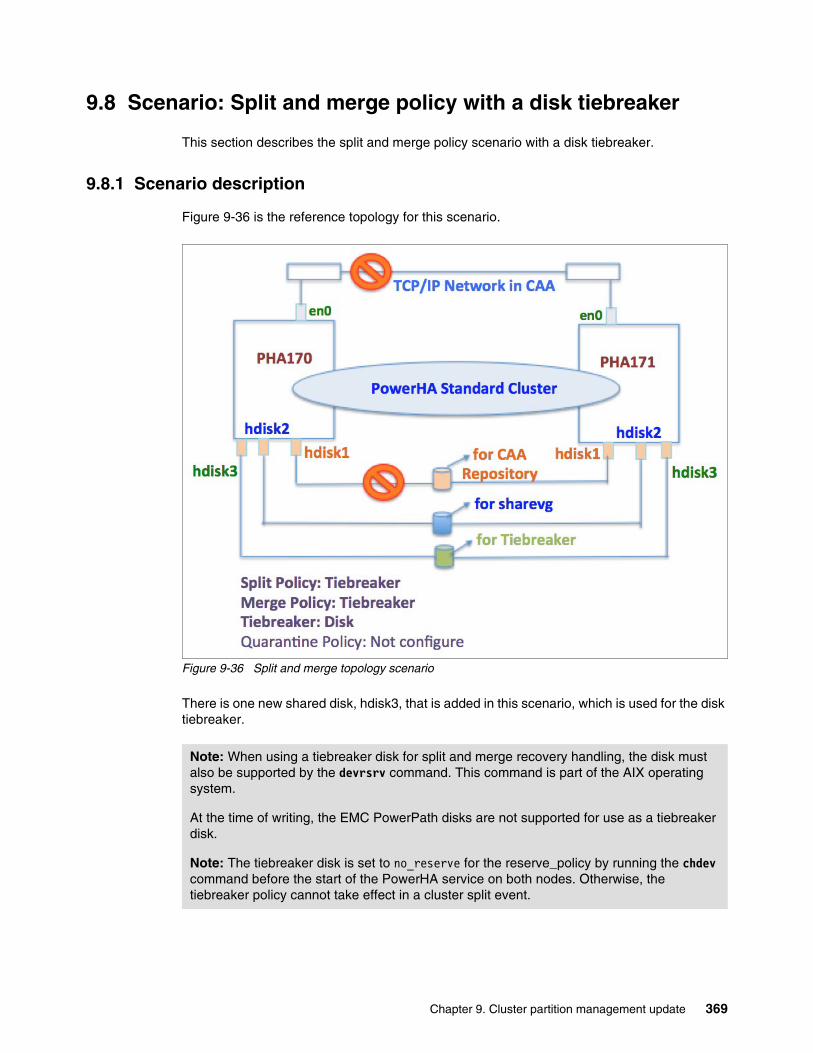
9.8 Scenario: Split and merge policy with a disk tiebreaker
This section describes the split and merge policy scenario with a disk tiebreaker.
9.8.1 Scenario description
Figure 9-36 is the reference topology for this scenario.
Figure 9-36 Split and merge topology scenario
There is one new shared disk, hdisk3, that is added in this scenario, which is used for the disk tiebreaker.
Note: When using a tiebreaker disk for split and merge recovery handling, the disk must also be supported by the devrsrv command. This command is part of the AIX operating system.
At the time of writing, the EMC PowerPath disks are not supported for use as a tiebreaker disk.
Note: The tiebreaker disk is set to no_reserve for the reserve_policy by running the chdev command before the start of the PowerHA service on both nodes. Otherwise, the tiebreaker policy cannot take effect in a cluster split event.
Chapter 9. Cluster partition management update 369
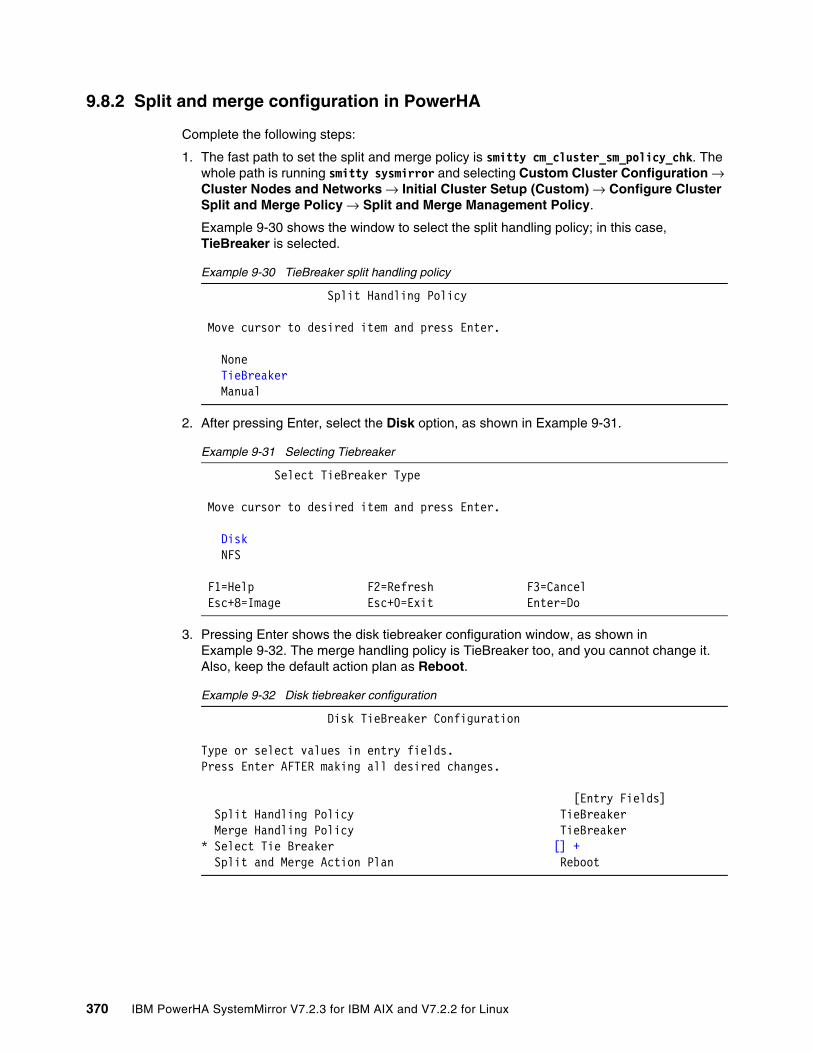
9.8.2 Split and merge configuration in PowerHA
Complete the following steps:
1. The fast path to set the split and merge policy is smitty cm_cluster_sm_policy_chk. The whole path is running smitty sysmirror and selecting Custom Cluster Configuration → Cluster Nodes and Networks → Initial Cluster Setup (Custom) → Configure Cluster Split and Merge Policy → Split and Merge Management Policy.
Example 9-30 shows the window to select the split handling policy; in this case, TieBreaker is selected.
Example 9-30 TieBreaker split handling policy
Split Handling Policy Move cursor to desired item and press Enter. None TieBreaker Manual
2. After pressing Enter, select the Disk option, as shown in Example 9-31.
Example 9-31 Selecting Tiebreaker
Select TieBreaker Type Move cursor to desired item and press Enter. Disk NFS F1=Help F2=Refresh F3=Cancel Esc+8=Image Esc+0=Exit Enter=Do
3. Pressing Enter shows the disk tiebreaker configuration window, as shown in Example 9-32. The merge handling policy is TieBreaker too, and you cannot change it. Also, keep the default action plan as Reboot.
Example 9-32 Disk tiebreaker configuration
Disk TieBreaker Configuration
Type or select values in entry fields.Press Enter AFTER making all desired changes. [Entry Fields] Split Handling Policy TieBreaker Merge Handling Policy TieBreaker* Select Tie Breaker [] + Split and Merge Action Plan Reboot
370 IBM PowerHA SystemMirror V7.2.3 for IBM AIX and V7.2.2 for Linux
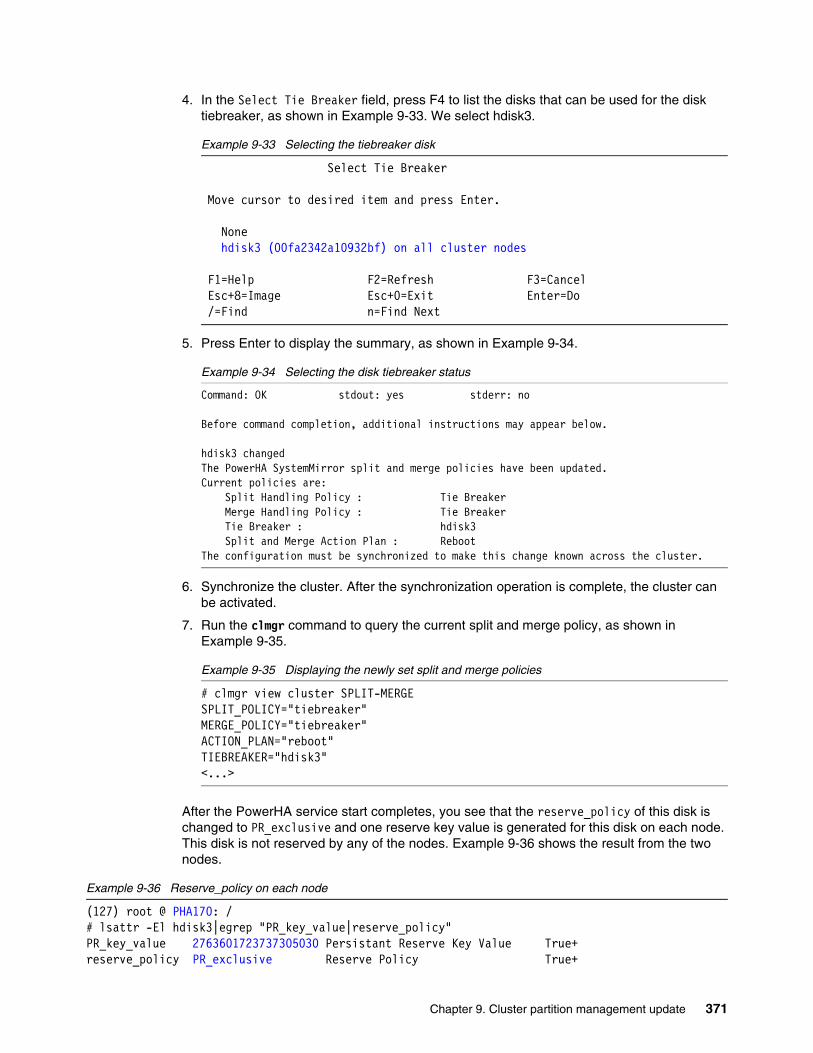
4. In the Select Tie Breaker field, press F4 to list the disks that can be used for the disk tiebreaker, as shown in Example 9-33. We select hdisk3.
Example 9-33 Selecting the tiebreaker disk
Select Tie Breaker Move cursor to desired item and press Enter. None hdisk3 (00fa2342a10932bf) on all cluster nodes F1=Help F2=Refresh F3=Cancel Esc+8=Image Esc+0=Exit Enter=Do /=Find n=Find Next
5. Press Enter to display the summary, as shown in Example 9-34.
Example 9-34 Selecting the disk tiebreaker status
Command: OK stdout: yes stderr: no
Before command completion, additional instructions may appear below.
hdisk3 changedThe PowerHA SystemMirror split and merge policies have been updated.Current policies are: Split Handling Policy : Tie Breaker Merge Handling Policy : Tie Breaker Tie Breaker : hdisk3 Split and Merge Action Plan : RebootThe configuration must be synchronized to make this change known across the cluster.
6. Synchronize the cluster. After the synchronization operation is complete, the cluster can be activated.
7. Run the clmgr command to query the current split and merge policy, as shown in Example 9-35.
Example 9-35 Displaying the newly set split and merge policies
# clmgr view cluster SPLIT-MERGE SPLIT_POLICY="tiebreaker"MERGE_POLICY="tiebreaker"ACTION_PLAN="reboot"TIEBREAKER="hdisk3"<...>
After the PowerHA service start completes, you see that the reserve_policy of this disk is changed to PR_exclusive and one reserve key value is generated for this disk on each node. This disk is not reserved by any of the nodes. Example 9-36 shows the result from the two nodes.
Example 9-36 Reserve_policy on each node
(127) root @ PHA170: /# lsattr -El hdisk3|egrep "PR_key_value|reserve_policy"PR_key_value 2763601723737305030 Persistant Reserve Key Value True+reserve_policy PR_exclusive Reserve Policy True+
Chapter 9. Cluster partition management update 371
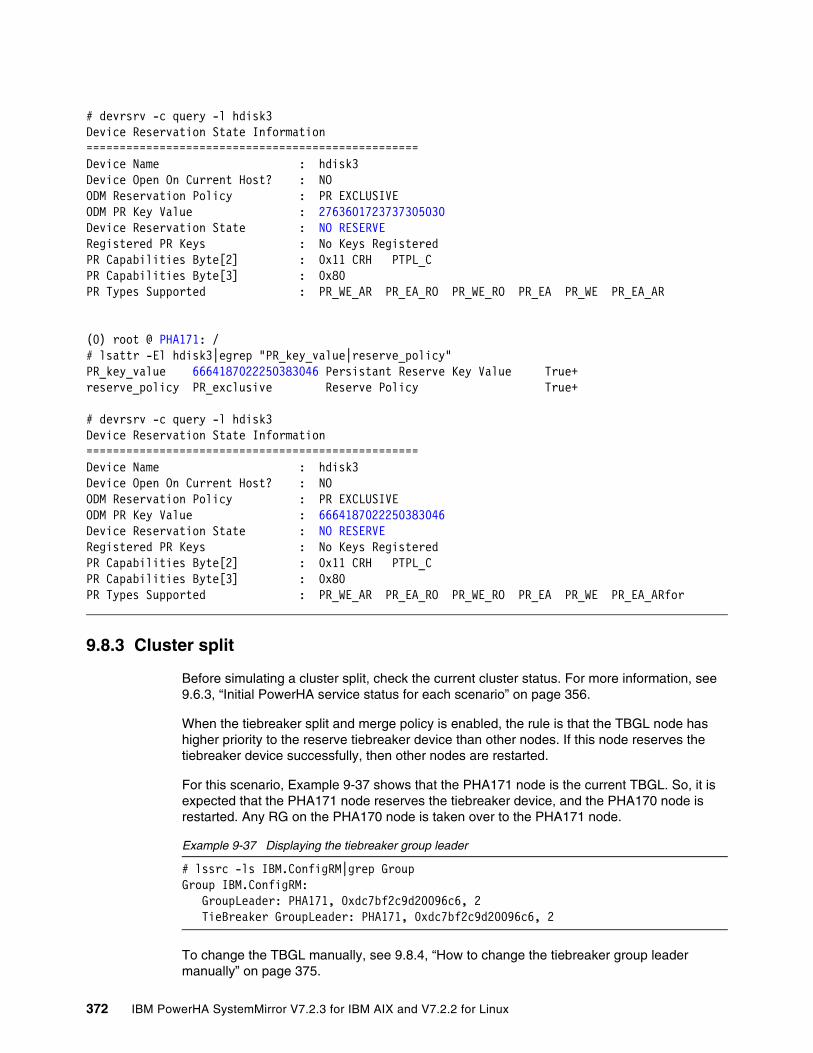
# devrsrv -c query -l hdisk3Device Reservation State Information==================================================Device Name : hdisk3Device Open On Current Host? : NOODM Reservation Policy : PR EXCLUSIVEODM PR Key Value : 2763601723737305030Device Reservation State : NO RESERVERegistered PR Keys : No Keys RegisteredPR Capabilities Byte[2] : 0x11 CRH PTPL_C PR Capabilities Byte[3] : 0x80 PR Types Supported : PR_WE_AR PR_EA_RO PR_WE_RO PR_EA PR_WE PR_EA_AR
(0) root @ PHA171: /# lsattr -El hdisk3|egrep "PR_key_value|reserve_policy"PR_key_value 6664187022250383046 Persistant Reserve Key Value True+reserve_policy PR_exclusive Reserve Policy True+
# devrsrv -c query -l hdisk3Device Reservation State Information==================================================Device Name : hdisk3Device Open On Current Host? : NOODM Reservation Policy : PR EXCLUSIVEODM PR Key Value : 6664187022250383046Device Reservation State : NO RESERVERegistered PR Keys : No Keys RegisteredPR Capabilities Byte[2] : 0x11 CRH PTPL_C PR Capabilities Byte[3] : 0x80 PR Types Supported : PR_WE_AR PR_EA_RO PR_WE_RO PR_EA PR_WE PR_EA_ARfor
9.8.3 Cluster split
Before simulating a cluster split, check the current cluster status. For more information, see 9.6.3, “Initial PowerHA service status for each scenario” on page 356.
When the tiebreaker split and merge policy is enabled, the rule is that the TBGL node has higher priority to the reserve tiebreaker device than other nodes. If this node reserves the tiebreaker device successfully, then other nodes are restarted.
For this scenario, Example 9-37 shows that the PHA171 node is the current TBGL. So, it is expected that the PHA171 node reserves the tiebreaker device, and the PHA170 node is restarted. Any RG on the PHA170 node is taken over to the PHA171 node.
Example 9-37 Displaying the tiebreaker group leader
# lssrc -ls IBM.ConfigRM|grep GroupGroup IBM.ConfigRM: GroupLeader: PHA171, 0xdc7bf2c9d20096c6, 2 TieBreaker GroupLeader: PHA171, 0xdc7bf2c9d20096c6, 2
To change the TBGL manually, see 9.8.4, “How to change the tiebreaker group leader manually” on page 375.
372 IBM PowerHA SystemMirror V7.2.3 for IBM AIX and V7.2.2 for Linux
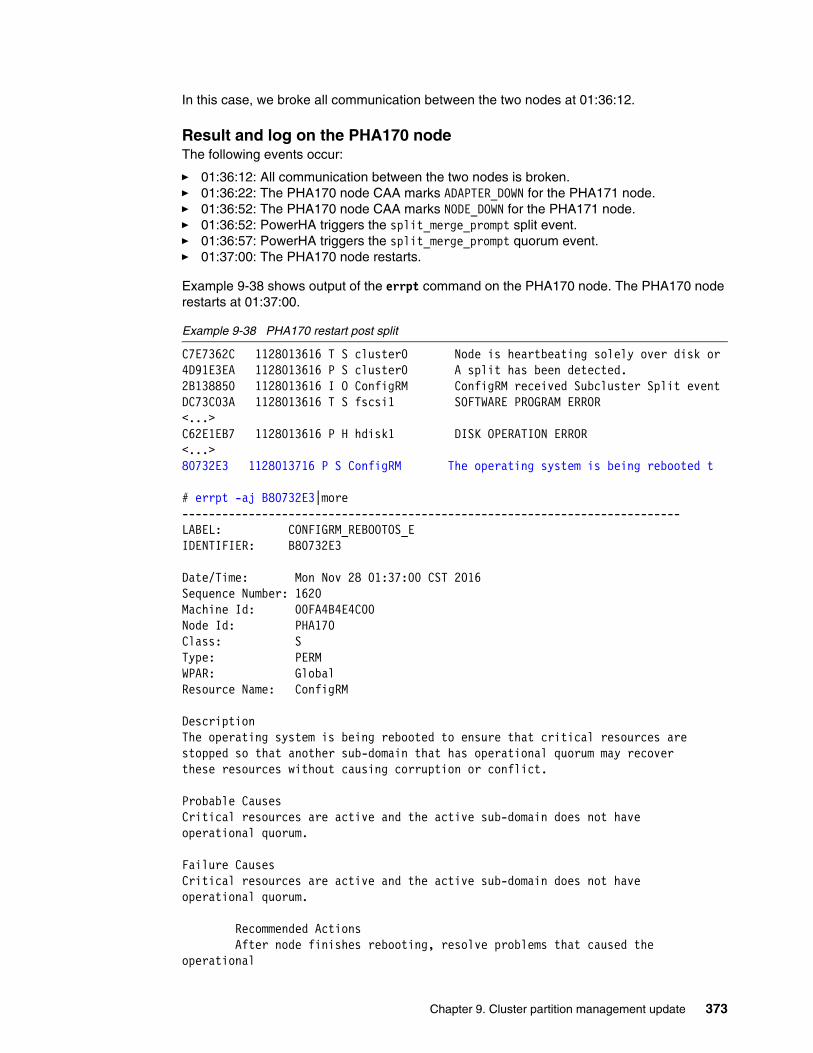
In this case, we broke all communication between the two nodes at 01:36:12.
Result and log on the PHA170 nodeThe following events occur:
� 01:36:12: All communication between the two nodes is broken.� 01:36:22: The PHA170 node CAA marks ADAPTER_DOWN for the PHA171 node.� 01:36:52: The PHA170 node CAA marks NODE_DOWN for the PHA171 node.� 01:36:52: PowerHA triggers the split_merge_prompt split event.� 01:36:57: PowerHA triggers the split_merge_prompt quorum event.� 01:37:00: The PHA170 node restarts.
Example 9-38 shows output of the errpt command on the PHA170 node. The PHA170 node restarts at 01:37:00.
Example 9-38 PHA170 restart post split
C7E7362C 1128013616 T S cluster0 Node is heartbeating solely over disk or4D91E3EA 1128013616 P S cluster0 A split has been detected.2B138850 1128013616 I O ConfigRM ConfigRM received Subcluster Split eventDC73C03A 1128013616 T S fscsi1 SOFTWARE PROGRAM ERROR<...>C62E1EB7 1128013616 P H hdisk1 DISK OPERATION ERROR<...>80732E3 1128013716 P S ConfigRM The operating system is being rebooted t
# errpt -aj B80732E3|more---------------------------------------------------------------------------LABEL: CONFIGRM_REBOOTOS_EIDENTIFIER: B80732E3
Date/Time: Mon Nov 28 01:37:00 CST 2016Sequence Number: 1620Machine Id: 00FA4B4E4C00Node Id: PHA170Class: SType: PERMWPAR: GlobalResource Name: ConfigRM
DescriptionThe operating system is being rebooted to ensure that critical resources are stopped so that another sub-domain that has operational quorum may recover these resources without causing corruption or conflict.
Probable CausesCritical resources are active and the active sub-domain does not have operational quorum.
Failure CausesCritical resources are active and the active sub-domain does not have operational quorum.
Recommended Actions After node finishes rebooting, resolve problems that caused the operational
Chapter 9. Cluster partition management update 373

quorum to be lost.
Detail DataDETECTING MODULERSCT,PeerDomain.C,1.99.22.299,23992 ERROR ID
Result and log on the PHA171 nodeThe following events occur:
� 01:36:12: All communication between the two nodes is broken.
� 01:36:22: The PHA171 node CAA marks ADAPTER_DOWN for the PHA170 node.
� 01:36:52: The PHA171 node CAA marks NODE_DOWN for the PHA170 node.
� 01:36:52: PowerHA triggers a split_merge_prompt split event.
� 01:37:04: PowerHA triggers a split_merge_prompt quorum event, and then PHA171 takes over the RG.
� 01:37:15: PowerHA completes the RG takeover operation.
As shown in Example 9-38 on page 373 with the time stamp, PHA170 restarts at 01:37:00. PHA171 starts the takeover of the RG at 01:37:04. There is no opportunity for both nodes to mount the /sharefs file system at the same time so that the data integrity is maintained.
The PHA171 node holds the tiebreaker disk during a cluster splitExample 9-39 shows that the tiebreaker disk is reserved by the PHA171 node after the cluster split event happens.
Example 9-39 Tiebreaker disk reservation from PHA171
# hostnamePHA171
# lsattr -El hdisk3|egrep "PR_key_value|reserve_policy"PR_key_value 6664187022250383046 Persistant Reserve Key Value True+reserve_policy PR_exclusive Reserve Policy True+
# devrsrv -c query -l hdisk3Device Reservation State Information==================================================Device Name : hdisk3Device Open On Current Host? : NOODM Reservation Policy : PR EXCLUSIVEODM PR Key Value : 6664187022250383046Device Reservation State : PR EXCLUSIVEPR Generation Value : 152PR Type : PR_WE_RO (WRITE EXCLUSIVE, REGISTRANTS ONLY)PR Holder Key Value : 6664187022250383046Registered PR Keys : 6664187022250383046 6664187022250383046 PR Capabilities Byte[2] : 0x11 CRH PTPL_C PR Capabilities Byte[3] : 0x81 PTPL_A PR Types Supported : PR_WE_AR PR_EA_RO PR_WE_RO PR_EA PR_WE PR_EA_AR
374 IBM PowerHA SystemMirror V7.2.3 for IBM AIX and V7.2.2 for Linux
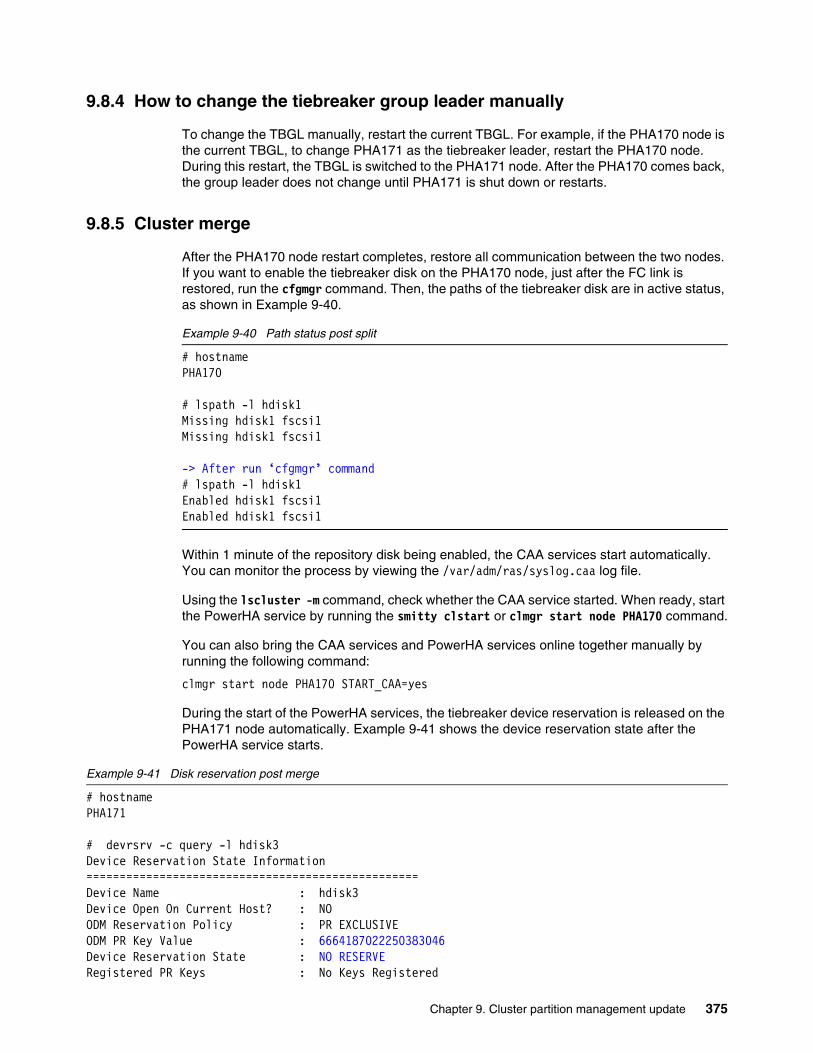
9.8.4 How to change the tiebreaker group leader manually
To change the TBGL manually, restart the current TBGL. For example, if the PHA170 node is the current TBGL, to change PHA171 as the tiebreaker leader, restart the PHA170 node. During this restart, the TBGL is switched to the PHA171 node. After the PHA170 comes back, the group leader does not change until PHA171 is shut down or restarts.
9.8.5 Cluster merge
After the PHA170 node restart completes, restore all communication between the two nodes. If you want to enable the tiebreaker disk on the PHA170 node, just after the FC link is restored, run the cfgmgr command. Then, the paths of the tiebreaker disk are in active status, as shown in Example 9-40.
Example 9-40 Path status post split
# hostnamePHA170
# lspath -l hdisk1Missing hdisk1 fscsi1Missing hdisk1 fscsi1
-> After run ‘cfgmgr’ command# lspath -l hdisk1Enabled hdisk1 fscsi1Enabled hdisk1 fscsi1
Within 1 minute of the repository disk being enabled, the CAA services start automatically. You can monitor the process by viewing the /var/adm/ras/syslog.caa log file.
Using the lscluster -m command, check whether the CAA service started. When ready, start the PowerHA service by running the smitty clstart or clmgr start node PHA170 command.
You can also bring the CAA services and PowerHA services online together manually by running the following command:
clmgr start node PHA170 START_CAA=yes
During the start of the PowerHA services, the tiebreaker device reservation is released on the PHA171 node automatically. Example 9-41 shows the device reservation state after the PowerHA service starts.
Example 9-41 Disk reservation post merge
# hostnamePHA171
# devrsrv -c query -l hdisk3Device Reservation State Information==================================================Device Name : hdisk3Device Open On Current Host? : NOODM Reservation Policy : PR EXCLUSIVEODM PR Key Value : 6664187022250383046Device Reservation State : NO RESERVERegistered PR Keys : No Keys Registered
Chapter 9. Cluster partition management update 375

PR Capabilities Byte[2] : 0x11 CRH PTPL_C PR Capabilities Byte[3] : 0x81 PTPL_A PR Types Supported : PR_WE_AR PR_EA_RO PR_WE_RO PR_EA PR_WE PR_EA_AR
9.8.6 Scenario summary
If you set a disk tiebreaker as a split and merge policy for the PowerHA cluster, when the cluster split occurs, the TBGL has a higher priority to reserve the tiebreaker device. Other nodes restart. The RGs are online on the surviving node.
During the cluster merge process, the tiebreaker reservation is automatically released.
9.9 Scenario: Split and merge policy with the NFS tiebreaker
This section describes the split and merge scenario with the NFS tiebreaker policy.
9.9.1 Scenario description
Figure 9-37 shows the topology of this scenario.
Figure 9-37 Split and merge topology scenario with the NFS tiebreaker
In this scenario, there is one NFS server. Each PowerHA node has one network interface, en1, which is used to communicate with the NFS server. The NFS tiebreaker requires NFS protocol Version 4.
376 IBM PowerHA SystemMirror V7.2.3 for IBM AIX and V7.2.2 for Linux
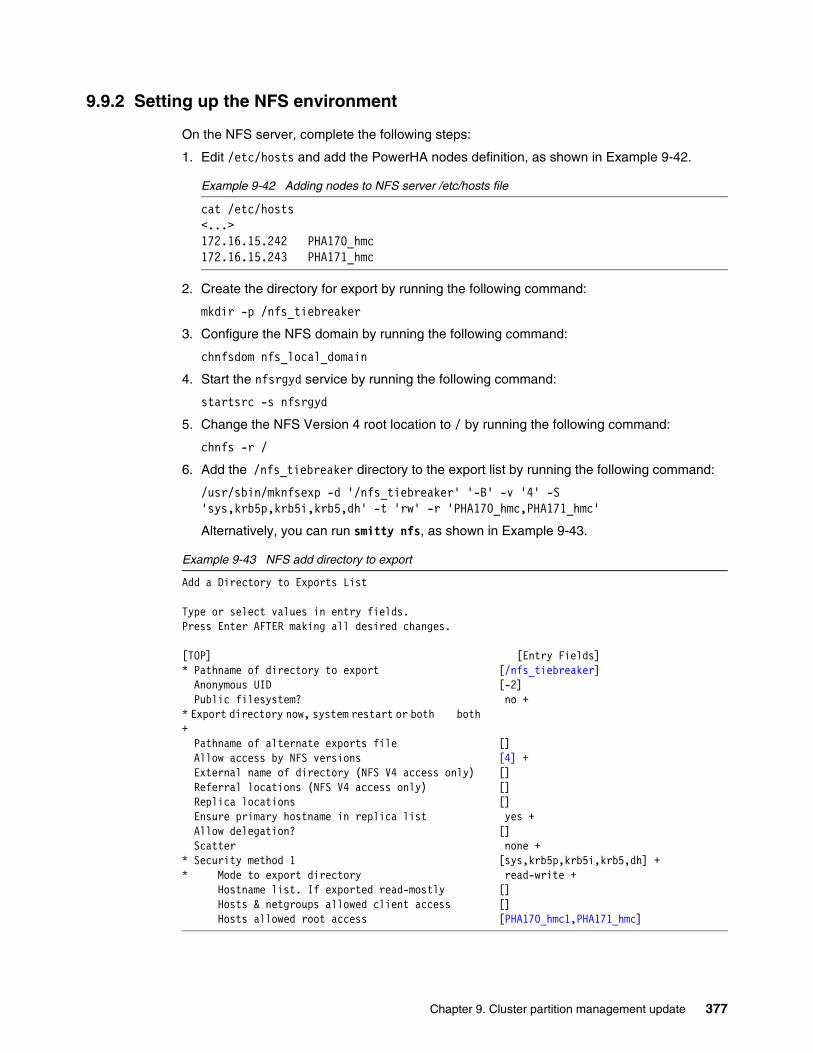
9.9.2 Setting up the NFS environment
On the NFS server, complete the following steps:
1. Edit /etc/hosts and add the PowerHA nodes definition, as shown in Example 9-42.
Example 9-42 Adding nodes to NFS server /etc/hosts file
cat /etc/hosts<...>172.16.15.242 PHA170_hmc172.16.15.243 PHA171_hmc
2. Create the directory for export by running the following command:
mkdir -p /nfs_tiebreaker
3. Configure the NFS domain by running the following command:
chnfsdom nfs_local_domain
4. Start the nfsrgyd service by running the following command:
startsrc -s nfsrgyd
5. Change the NFS Version 4 root location to / by running the following command:
chnfs -r /
6. Add the /nfs_tiebreaker directory to the export list by running the following command:
/usr/sbin/mknfsexp -d '/nfs_tiebreaker' '-B' -v '4' -S 'sys,krb5p,krb5i,krb5,dh' -t 'rw' -r 'PHA170_hmc,PHA171_hmc'
Alternatively, you can run smitty nfs, as shown in Example 9-43.
Example 9-43 NFS add directory to export
Add a Directory to Exports List
Type or select values in entry fields.Press Enter AFTER making all desired changes. [TOP] [Entry Fields]* Pathname of directory to export [/nfs_tiebreaker] Anonymous UID [-2] Public filesystem? no +* Export directory now, system restart or both both + Pathname of alternate exports file [] Allow access by NFS versions [4] + External name of directory (NFS V4 access only) [] Referral locations (NFS V4 access only) [] Replica locations [] Ensure primary hostname in replica list yes + Allow delegation? [] Scatter none +* Security method 1 [sys,krb5p,krb5i,krb5,dh] +* Mode to export directory read-write + Hostname list. If exported read-mostly [] Hosts & netgroups allowed client access [] Hosts allowed root access [PHA170_hmc1,PHA171_hmc]
Chapter 9. Cluster partition management update 377
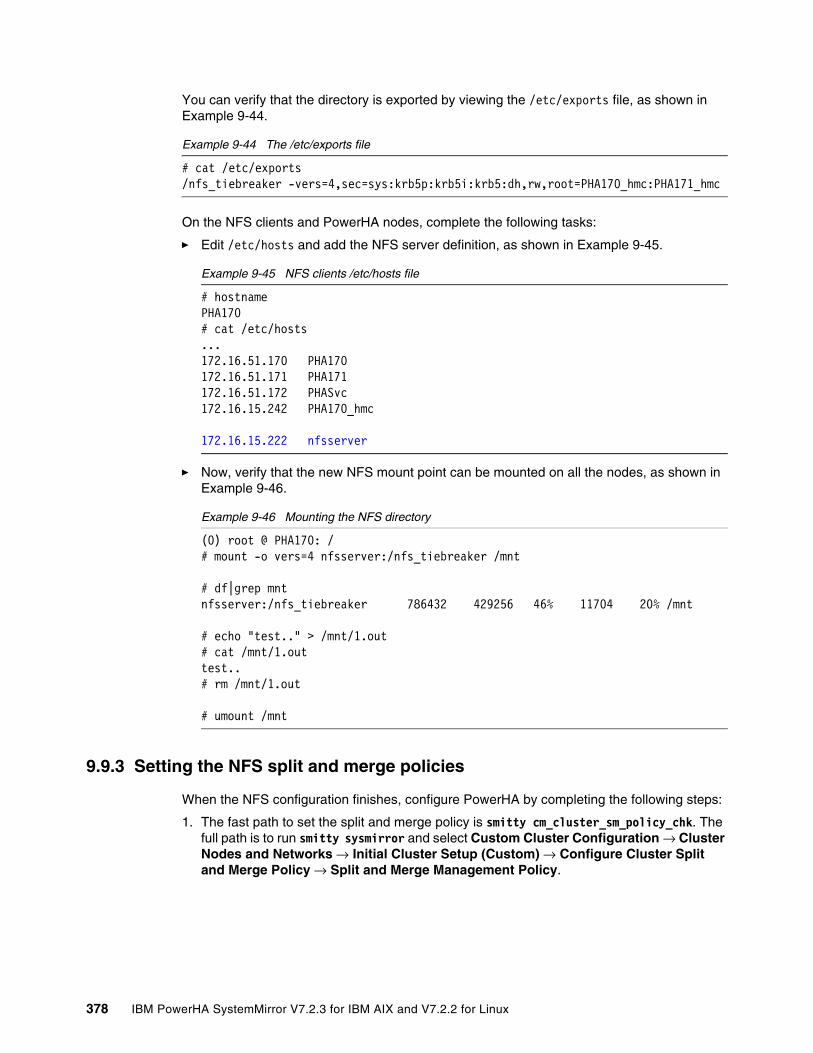
You can verify that the directory is exported by viewing the /etc/exports file, as shown in Example 9-44.
Example 9-44 The /etc/exports file
# cat /etc/exports/nfs_tiebreaker -vers=4,sec=sys:krb5p:krb5i:krb5:dh,rw,root=PHA170_hmc:PHA171_hmc
On the NFS clients and PowerHA nodes, complete the following tasks:
� Edit /etc/hosts and add the NFS server definition, as shown in Example 9-45.
Example 9-45 NFS clients /etc/hosts file
# hostnamePHA170# cat /etc/hosts...172.16.51.170 PHA170172.16.51.171 PHA171172.16.51.172 PHASvc172.16.15.242 PHA170_hmc
172.16.15.222 nfsserver
� Now, verify that the new NFS mount point can be mounted on all the nodes, as shown in Example 9-46.
Example 9-46 Mounting the NFS directory
(0) root @ PHA170: /# mount -o vers=4 nfsserver:/nfs_tiebreaker /mnt
# df|grep mntnfsserver:/nfs_tiebreaker 786432 429256 46% 11704 20% /mnt
# echo "test.." > /mnt/1.out# cat /mnt/1.outtest..# rm /mnt/1.out
# umount /mnt
9.9.3 Setting the NFS split and merge policies
When the NFS configuration finishes, configure PowerHA by completing the following steps:
1. The fast path to set the split and merge policy is smitty cm_cluster_sm_policy_chk. The full path is to run smitty sysmirror and select Custom Cluster Configuration → Cluster Nodes and Networks → Initial Cluster Setup (Custom) → Configure Cluster Split and Merge Policy → Split and Merge Management Policy.
378 IBM PowerHA SystemMirror V7.2.3 for IBM AIX and V7.2.2 for Linux
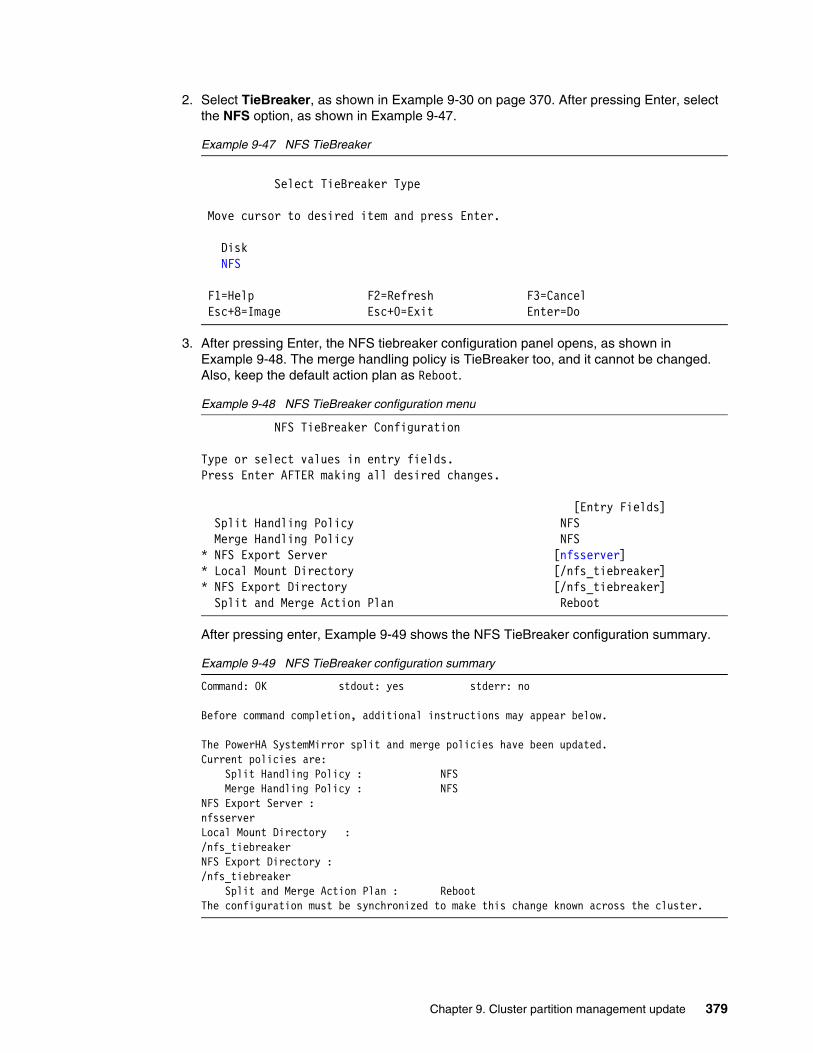
2. Select TieBreaker, as shown in Example 9-30 on page 370. After pressing Enter, select the NFS option, as shown in Example 9-47.
Example 9-47 NFS TieBreaker
Select TieBreaker Type Move cursor to desired item and press Enter. Disk NFS F1=Help F2=Refresh F3=Cancel Esc+8=Image Esc+0=Exit Enter=Do
3. After pressing Enter, the NFS tiebreaker configuration panel opens, as shown in Example 9-48. The merge handling policy is TieBreaker too, and it cannot be changed. Also, keep the default action plan as Reboot.
Example 9-48 NFS TieBreaker configuration menu
NFS TieBreaker Configuration
Type or select values in entry fields.Press Enter AFTER making all desired changes. [Entry Fields] Split Handling Policy NFS Merge Handling Policy NFS* NFS Export Server [nfsserver]* Local Mount Directory [/nfs_tiebreaker]* NFS Export Directory [/nfs_tiebreaker] Split and Merge Action Plan Reboot
After pressing enter, Example 9-49 shows the NFS TieBreaker configuration summary.
Example 9-49 NFS TieBreaker configuration summary
Command: OK stdout: yes stderr: no
Before command completion, additional instructions may appear below.
The PowerHA SystemMirror split and merge policies have been updated.Current policies are: Split Handling Policy : NFS Merge Handling Policy : NFSNFS Export Server :nfsserverLocal Mount Directory :/nfs_tiebreakerNFS Export Directory :/nfs_tiebreaker Split and Merge Action Plan : RebootThe configuration must be synchronized to make this change known across the cluster.
Chapter 9. Cluster partition management update 379
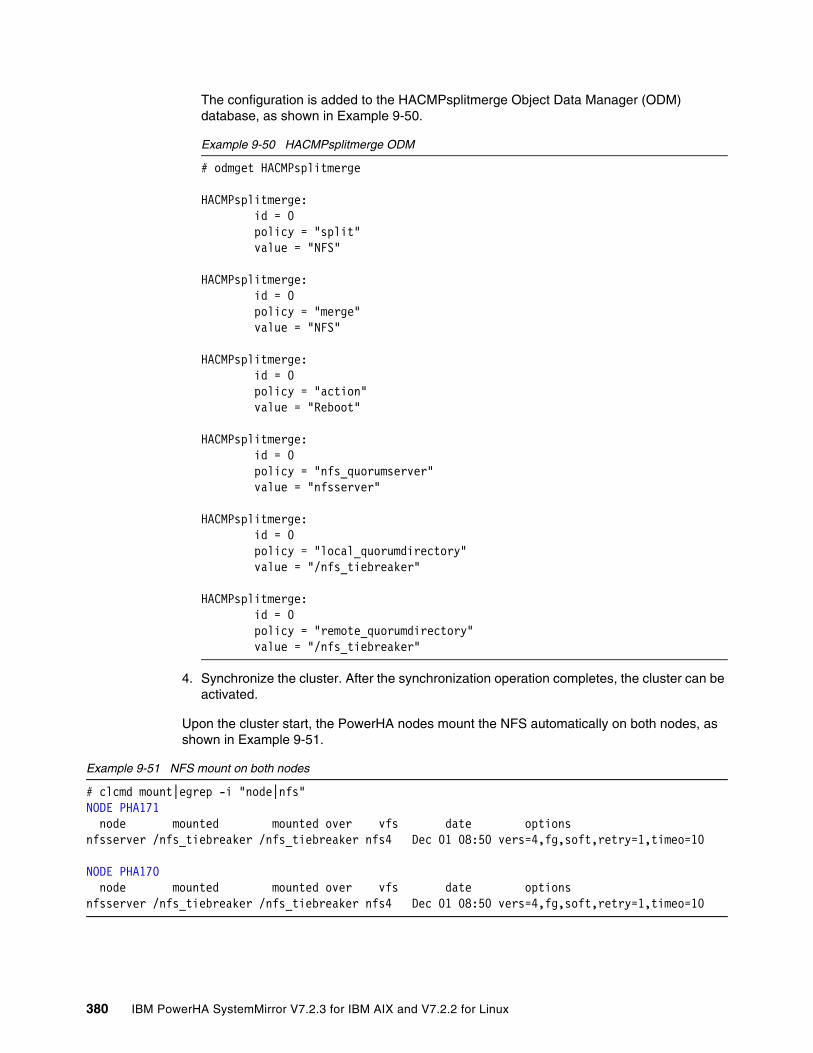
The configuration is added to the HACMPsplitmerge Object Data Manager (ODM) database, as shown in Example 9-50.
Example 9-50 HACMPsplitmerge ODM
# odmget HACMPsplitmerge
HACMPsplitmerge: id = 0 policy = "split" value = "NFS"
HACMPsplitmerge: id = 0 policy = "merge" value = "NFS"
HACMPsplitmerge: id = 0 policy = "action" value = "Reboot"
HACMPsplitmerge: id = 0 policy = "nfs_quorumserver" value = "nfsserver"
HACMPsplitmerge: id = 0 policy = "local_quorumdirectory" value = "/nfs_tiebreaker"
HACMPsplitmerge: id = 0 policy = "remote_quorumdirectory" value = "/nfs_tiebreaker"
4. Synchronize the cluster. After the synchronization operation completes, the cluster can be activated.
Upon the cluster start, the PowerHA nodes mount the NFS automatically on both nodes, as shown in Example 9-51.
Example 9-51 NFS mount on both nodes
# clcmd mount|egrep -i "node|nfs"NODE PHA171 node mounted mounted over vfs date options nfsserver /nfs_tiebreaker /nfs_tiebreaker nfs4 Dec 01 08:50 vers=4,fg,soft,retry=1,timeo=10
NODE PHA170 node mounted mounted over vfs date options nfsserver /nfs_tiebreaker /nfs_tiebreaker nfs4 Dec 01 08:50 vers=4,fg,soft,retry=1,timeo=10
380 IBM PowerHA SystemMirror V7.2.3 for IBM AIX and V7.2.2 for Linux
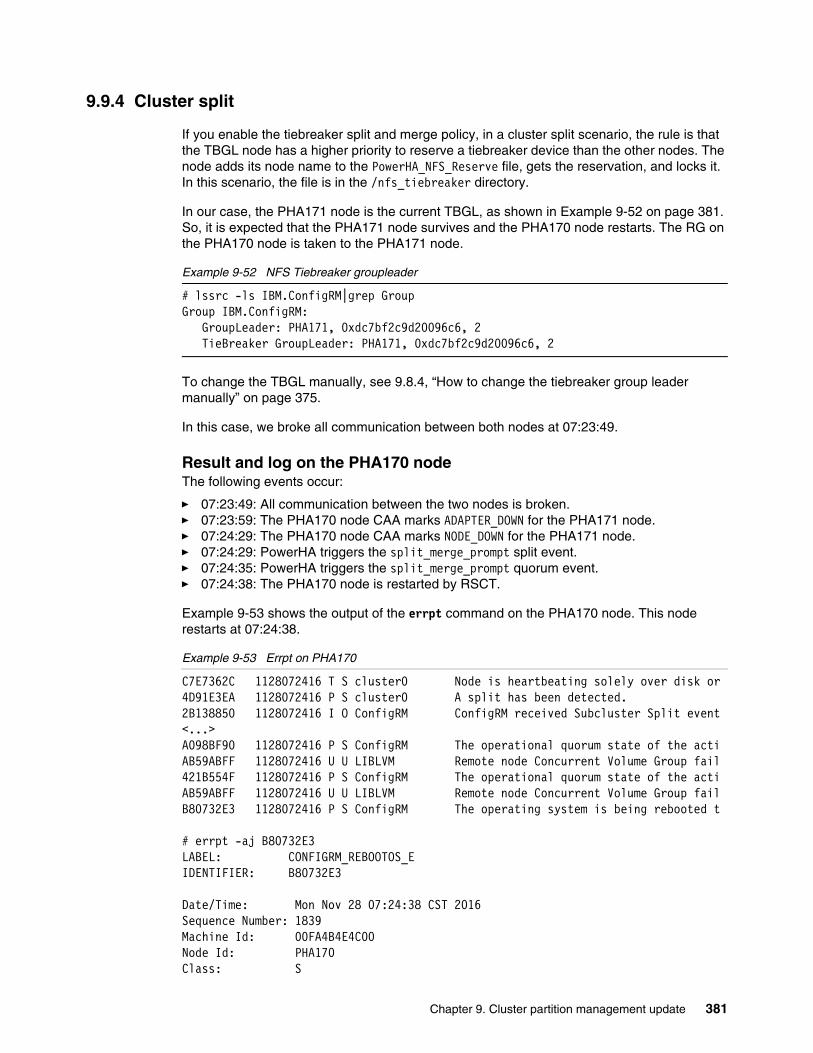
9.9.4 Cluster split
If you enable the tiebreaker split and merge policy, in a cluster split scenario, the rule is that the TBGL node has a higher priority to reserve a tiebreaker device than the other nodes. The node adds its node name to the PowerHA_NFS_Reserve file, gets the reservation, and locks it. In this scenario, the file is in the /nfs_tiebreaker directory.
In our case, the PHA171 node is the current TBGL, as shown in Example 9-52 on page 381. So, it is expected that the PHA171 node survives and the PHA170 node restarts. The RG on the PHA170 node is taken to the PHA171 node.
Example 9-52 NFS Tiebreaker groupleader
# lssrc -ls IBM.ConfigRM|grep GroupGroup IBM.ConfigRM: GroupLeader: PHA171, 0xdc7bf2c9d20096c6, 2 TieBreaker GroupLeader: PHA171, 0xdc7bf2c9d20096c6, 2
To change the TBGL manually, see 9.8.4, “How to change the tiebreaker group leader manually” on page 375.
In this case, we broke all communication between both nodes at 07:23:49.
Result and log on the PHA170 nodeThe following events occur:
� 07:23:49: All communication between the two nodes is broken.� 07:23:59: The PHA170 node CAA marks ADAPTER_DOWN for the PHA171 node.� 07:24:29: The PHA170 node CAA marks NODE_DOWN for the PHA171 node.� 07:24:29: PowerHA triggers the split_merge_prompt split event.� 07:24:35: PowerHA triggers the split_merge_prompt quorum event.� 07:24:38: The PHA170 node is restarted by RSCT.
Example 9-53 shows the output of the errpt command on the PHA170 node. This node restarts at 07:24:38.
Example 9-53 Errpt on PHA170
C7E7362C 1128072416 T S cluster0 Node is heartbeating solely over disk or4D91E3EA 1128072416 P S cluster0 A split has been detected.2B138850 1128072416 I O ConfigRM ConfigRM received Subcluster Split event<...>A098BF90 1128072416 P S ConfigRM The operational quorum state of the actiAB59ABFF 1128072416 U U LIBLVM Remote node Concurrent Volume Group fail421B554F 1128072416 P S ConfigRM The operational quorum state of the actiAB59ABFF 1128072416 U U LIBLVM Remote node Concurrent Volume Group failB80732E3 1128072416 P S ConfigRM The operating system is being rebooted t
# errpt -aj B80732E3LABEL: CONFIGRM_REBOOTOS_EIDENTIFIER: B80732E3
Date/Time: Mon Nov 28 07:24:38 CST 2016Sequence Number: 1839Machine Id: 00FA4B4E4C00Node Id: PHA170Class: S
Chapter 9. Cluster partition management update 381
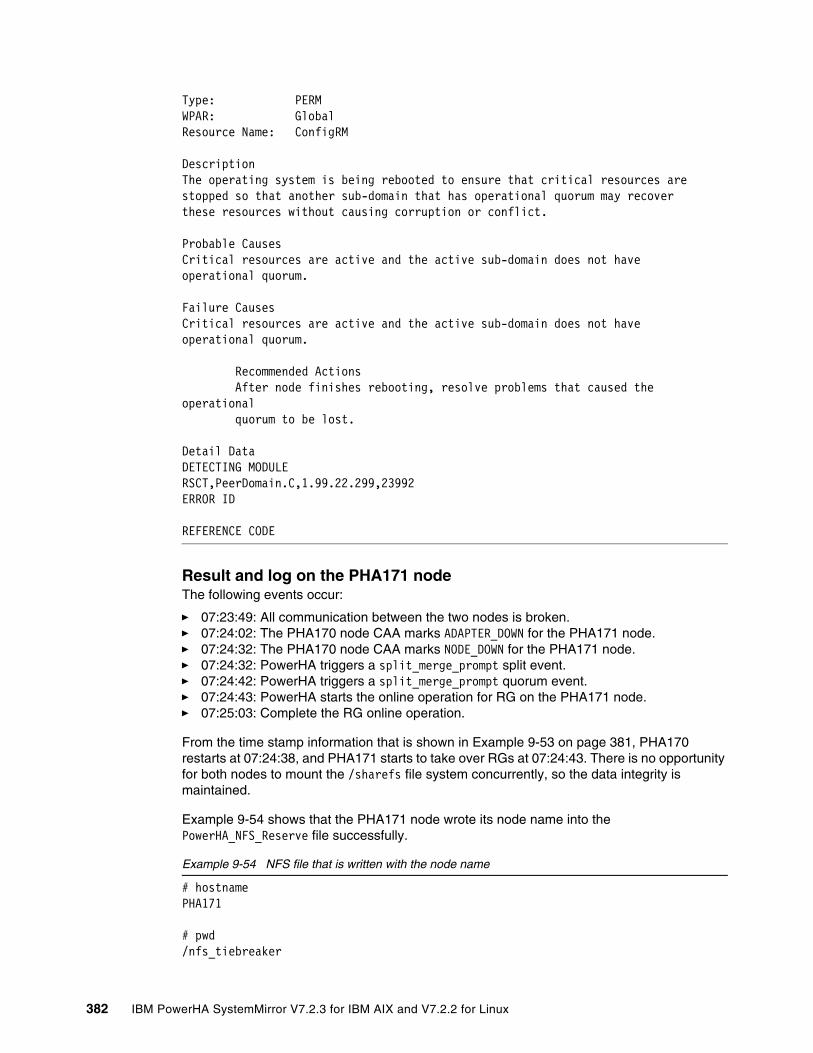
Type: PERMWPAR: GlobalResource Name: ConfigRM
DescriptionThe operating system is being rebooted to ensure that critical resources are stopped so that another sub-domain that has operational quorum may recover these resources without causing corruption or conflict.
Probable CausesCritical resources are active and the active sub-domain does not have operational quorum.
Failure CausesCritical resources are active and the active sub-domain does not have operational quorum.
Recommended Actions After node finishes rebooting, resolve problems that caused the operational quorum to be lost.
Detail DataDETECTING MODULERSCT,PeerDomain.C,1.99.22.299,23992 ERROR ID REFERENCE CODE
Result and log on the PHA171 nodeThe following events occur:
� 07:23:49: All communication between the two nodes is broken.� 07:24:02: The PHA170 node CAA marks ADAPTER_DOWN for the PHA171 node.� 07:24:32: The PHA170 node CAA marks NODE_DOWN for the PHA171 node.� 07:24:32: PowerHA triggers a split_merge_prompt split event.� 07:24:42: PowerHA triggers a split_merge_prompt quorum event.� 07:24:43: PowerHA starts the online operation for RG on the PHA171 node.� 07:25:03: Complete the RG online operation.
From the time stamp information that is shown in Example 9-53 on page 381, PHA170 restarts at 07:24:38, and PHA171 starts to take over RGs at 07:24:43. There is no opportunity for both nodes to mount the /sharefs file system concurrently, so the data integrity is maintained.
Example 9-54 shows that the PHA171 node wrote its node name into the PowerHA_NFS_Reserve file successfully.
Example 9-54 NFS file that is written with the node name
# hostnamePHA171
# pwd/nfs_tiebreaker
382 IBM PowerHA SystemMirror V7.2.3 for IBM AIX and V7.2.2 for Linux
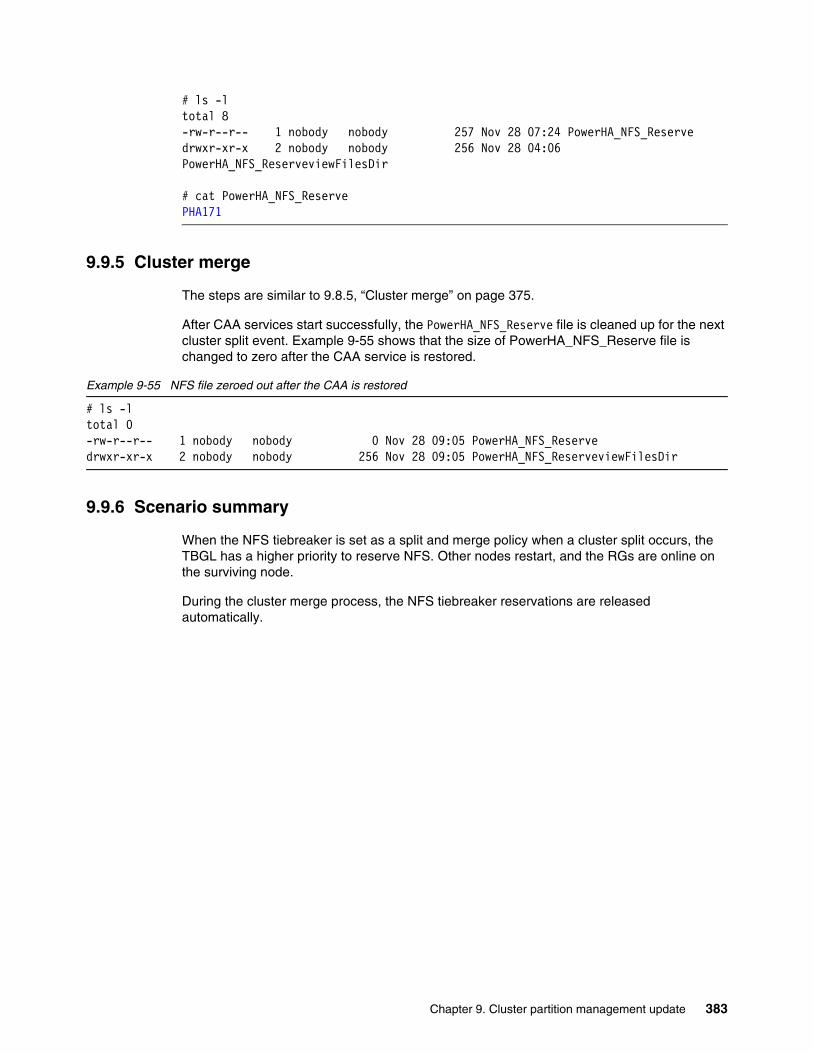
# ls -ltotal 8-rw-r--r-- 1 nobody nobody 257 Nov 28 07:24 PowerHA_NFS_Reservedrwxr-xr-x 2 nobody nobody 256 Nov 28 04:06 PowerHA_NFS_ReserveviewFilesDir
# cat PowerHA_NFS_ReservePHA171
9.9.5 Cluster merge
The steps are similar to 9.8.5, “Cluster merge” on page 375.
After CAA services start successfully, the PowerHA_NFS_Reserve file is cleaned up for the next cluster split event. Example 9-55 shows that the size of PowerHA_NFS_Reserve file is changed to zero after the CAA service is restored.
Example 9-55 NFS file zeroed out after the CAA is restored
# ls -ltotal 0-rw-r--r-- 1 nobody nobody 0 Nov 28 09:05 PowerHA_NFS_Reservedrwxr-xr-x 2 nobody nobody 256 Nov 28 09:05 PowerHA_NFS_ReserveviewFilesDir
9.9.6 Scenario summary
When the NFS tiebreaker is set as a split and merge policy when a cluster split occurs, the TBGL has a higher priority to reserve NFS. Other nodes restart, and the RGs are online on the surviving node.
During the cluster merge process, the NFS tiebreaker reservations are released automatically.
Chapter 9. Cluster partition management update 383
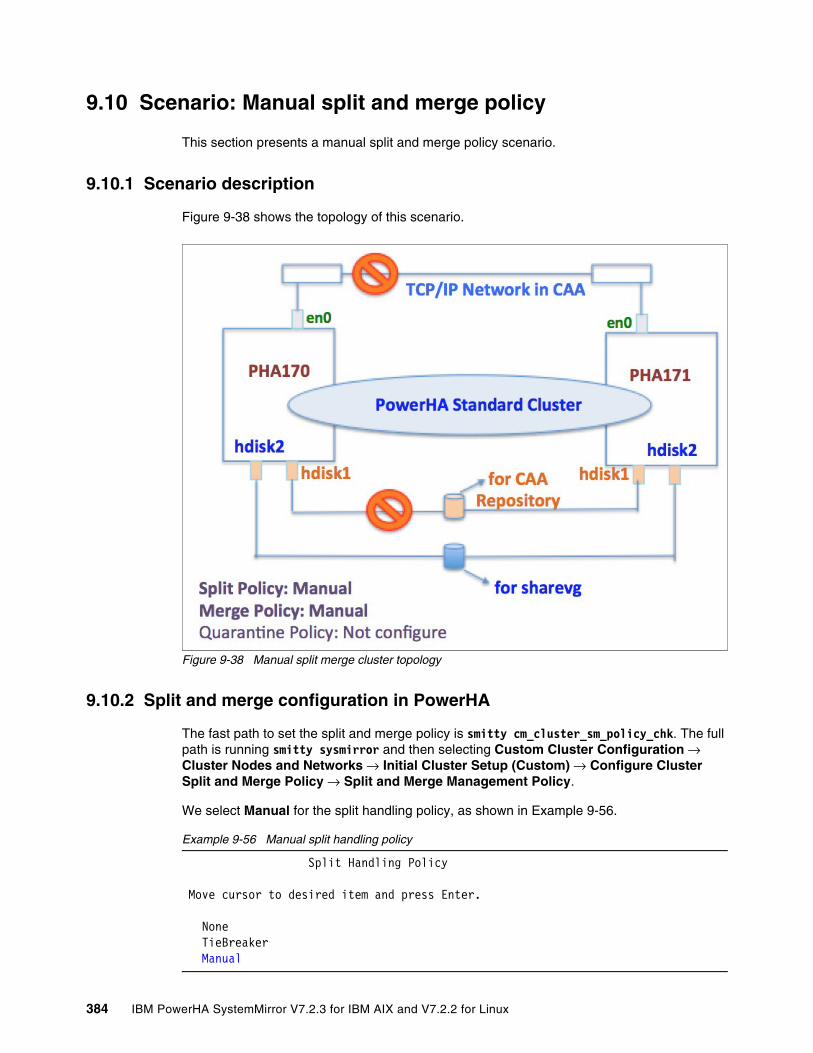
9.10 Scenario: Manual split and merge policy
This section presents a manual split and merge policy scenario.
9.10.1 Scenario description
Figure 9-38 shows the topology of this scenario.
Figure 9-38 Manual split merge cluster topology
9.10.2 Split and merge configuration in PowerHA
The fast path to set the split and merge policy is smitty cm_cluster_sm_policy_chk. The full path is running smitty sysmirror and then selecting Custom Cluster Configuration → Cluster Nodes and Networks → Initial Cluster Setup (Custom) → Configure Cluster Split and Merge Policy → Split and Merge Management Policy.
We select Manual for the split handling policy, as shown in Example 9-56.
Example 9-56 Manual split handling policy
Split Handling Policy Move cursor to desired item and press Enter. None TieBreaker Manual
384 IBM PowerHA SystemMirror V7.2.3 for IBM AIX and V7.2.2 for Linux
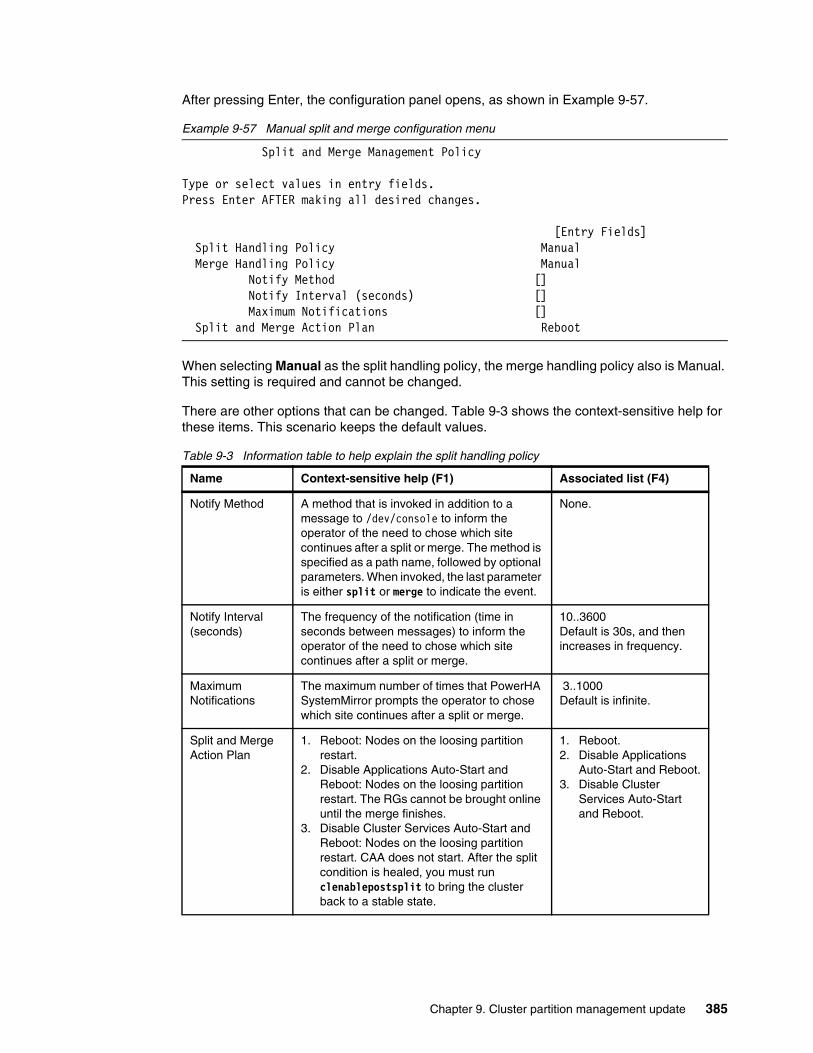
After pressing Enter, the configuration panel opens, as shown in Example 9-57.
Example 9-57 Manual split and merge configuration menu
Split and Merge Management Policy
Type or select values in entry fields. Press Enter AFTER making all desired changes.
[Entry Fields] Split Handling Policy Manual Merge Handling Policy Manual Notify Method [] Notify Interval (seconds) [] Maximum Notifications [] Split and Merge Action Plan Reboot
When selecting Manual as the split handling policy, the merge handling policy also is Manual. This setting is required and cannot be changed.
There are other options that can be changed. Table 9-3 shows the context-sensitive help for these items. This scenario keeps the default values.
Table 9-3 Information table to help explain the split handling policy
Name Context-sensitive help (F1) Associated list (F4)
Notify Method A method that is invoked in addition to a message to /dev/console to inform the operator of the need to chose which site continues after a split or merge. The method is specified as a path name, followed by optional parameters. When invoked, the last parameter is either split or merge to indicate the event.
None.
Notify Interval (seconds)
The frequency of the notification (time in seconds between messages) to inform the operator of the need to chose which site continues after a split or merge.
10..3600Default is 30s, and then increases in frequency.
Maximum Notifications
The maximum number of times that PowerHA SystemMirror prompts the operator to chose which site continues after a split or merge.
3..1000Default is infinite.
Split and Merge Action Plan
1. Reboot: Nodes on the loosing partition restart.
2. Disable Applications Auto-Start and Reboot: Nodes on the loosing partition restart. The RGs cannot be brought online until the merge finishes.
3. Disable Cluster Services Auto-Start and Reboot: Nodes on the loosing partition restart. CAA does not start. After the split condition is healed, you must run clenablepostsplit to bring the cluster back to a stable state.
1. Reboot.2. Disable Applications
Auto-Start and Reboot.3. Disable Cluster
Services Auto-Start and Reboot.
Chapter 9. Cluster partition management update 385
Example 9-58 shows the summary after confirming the manual policy configuration.
Example 9-58 Manual split merge configuration summary
Command: OK stdout: yes stderr: no
Before command completion, additional instructions may appear below.
The PowerHA SystemMirror split and merge policies have been updated.Current policies are: Split Handling Policy : Manual Merge Handling Policy : Manual Notify Method : Notify Interval (seconds) : Maximum Notifications : Split and Merge Action Plan : RebootThe configuration must be synchronized to make this change known across the cluster.
The PowerHA clmgr command provides an option to display the cluster split and merge policy, as shown in Example 9-59.
Example 9-59 The clmgr output of split merge policies enabled
# clmgr view cluster SPLIT-MERGE SPLIT_POLICY="manual"MERGE_POLICY="manual"ACTION_PLAN="reboot"TIEBREAKER=""NOTIFY_METHOD=""NOTIFY_INTERVAL=""MAXIMUM_NOTIFICATIONS=""DEFAULT_SURVIVING_SITE=""APPLY_TO_PPRC_TAKEOVER="n"
Synchronize the cluster. After the synchronization operation completes, the cluster can be activated.
9.10.3 Cluster split
Before simulating a cluster split, check its status, as described in 9.6.3, “Initial PowerHA service status for each scenario” on page 356.
In this case, we broke all communication between both nodes at 21:43:33.
Result and log on the PHA170 nodeThe following events occur:
� 21:43:33: All communication between the two nodes is broken.� 21:43:43: The PHA170 node CAA marks ADAPTER_DOWN for the PHA171 node.� 21:44:13: The PHA170 node CAA marks NODE_DOWN for the PHA171 node.� 21:44:13: The PowerHA triggers a split_merge_prompt split event.
386 IBM PowerHA SystemMirror V7.2.3 for IBM AIX and V7.2.2 for Linux
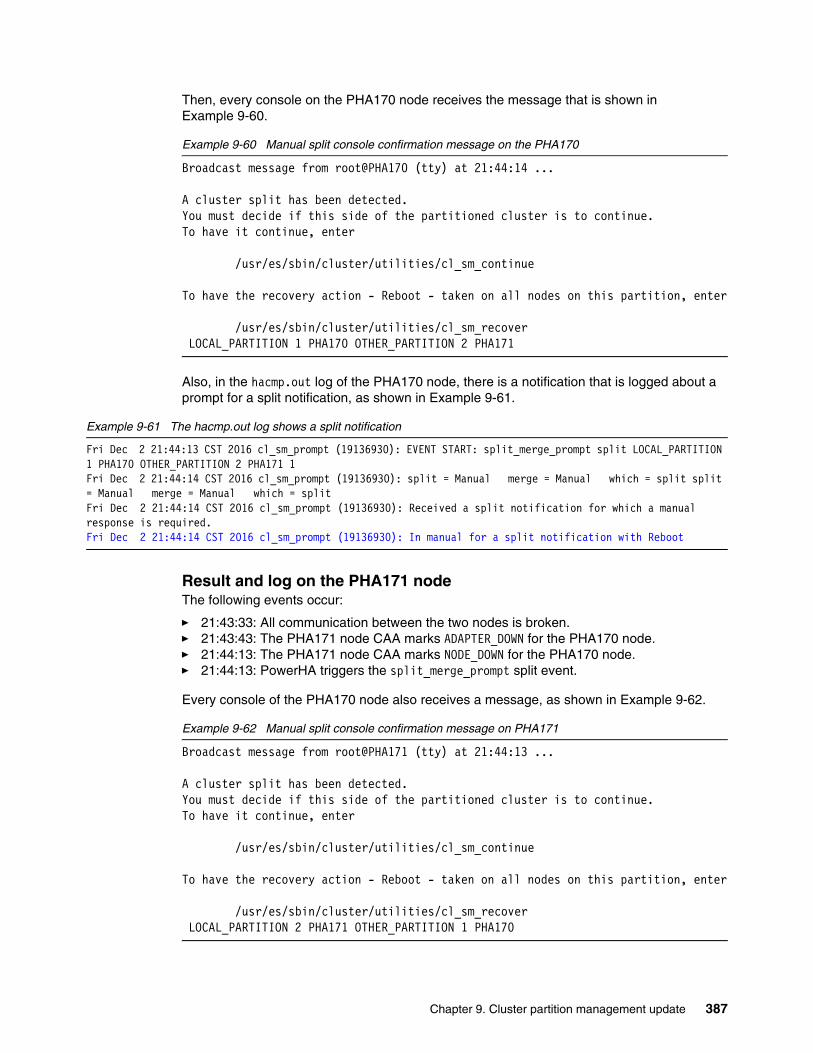
Then, every console on the PHA170 node receives the message that is shown in Example 9-60.
Example 9-60 Manual split console confirmation message on the PHA170
Broadcast message from root@PHA170 (tty) at 21:44:14 ...
A cluster split has been detected.You must decide if this side of the partitioned cluster is to continue.To have it continue, enter
/usr/es/sbin/cluster/utilities/cl_sm_continue
To have the recovery action - Reboot - taken on all nodes on this partition, enter
/usr/es/sbin/cluster/utilities/cl_sm_recover LOCAL_PARTITION 1 PHA170 OTHER_PARTITION 2 PHA171
Also, in the hacmp.out log of the PHA170 node, there is a notification that is logged about a prompt for a split notification, as shown in Example 9-61.
Example 9-61 The hacmp.out log shows a split notification
Fri Dec 2 21:44:13 CST 2016 cl_sm_prompt (19136930): EVENT START: split_merge_prompt split LOCAL_PARTITION 1 PHA170 OTHER_PARTITION 2 PHA171 1Fri Dec 2 21:44:14 CST 2016 cl_sm_prompt (19136930): split = Manual merge = Manual which = split split = Manual merge = Manual which = splitFri Dec 2 21:44:14 CST 2016 cl_sm_prompt (19136930): Received a split notification for which a manual response is required.Fri Dec 2 21:44:14 CST 2016 cl_sm_prompt (19136930): In manual for a split notification with Reboot
Result and log on the PHA171 nodeThe following events occur:
� 21:43:33: All communication between the two nodes is broken.� 21:43:43: The PHA171 node CAA marks ADAPTER_DOWN for the PHA170 node.� 21:44:13: The PHA171 node CAA marks NODE_DOWN for the PHA170 node.� 21:44:13: PowerHA triggers the split_merge_prompt split event.
Every console of the PHA170 node also receives a message, as shown in Example 9-62.
Example 9-62 Manual split console confirmation message on PHA171
Broadcast message from root@PHA171 (tty) at 21:44:13 ...
A cluster split has been detected.You must decide if this side of the partitioned cluster is to continue.To have it continue, enter
/usr/es/sbin/cluster/utilities/cl_sm_continue
To have the recovery action - Reboot - taken on all nodes on this partition, enter
/usr/es/sbin/cluster/utilities/cl_sm_recover LOCAL_PARTITION 2 PHA171 OTHER_PARTITION 1 PHA170
Chapter 9. Cluster partition management update 387
In this scenario, we run the cl_sm_recover command on the PHA170 node, as shown in Example 9-63. We also run the cl_sm_continue command on the PHA171 node.
Example 9-63 Running cl_sm recover on PHA170
# dateFri Dec 2 21:44:25 CST 2016/usr/es/sbin/cluster/utilities/cl_sm_recoverResource Class Action Response for ResolveOpQuorumTie
Example 9-64 is the output of the errpt -c command. The PHA170 node restarts after we run the cl_sm_recover command.
Example 9-64 The errpt output from the PHA170 post manual split
errpt -c4D91E3EA 1202214416 P S cluster0 A split has been detected.2B138850 1202214416 I O ConfigRM ConfigRM received Subcluster Split eventA098BF90 1202214416 P S ConfigRM The operational quorum state of the acti<...>B80732E3 1202214416 P S ConfigRM The operating system is being rebooted t<...>9DBCFDEE 1202214616 T O errdemon ERROR LOGGING TURNED ON69350832 1202214516 T S SYSPROC SYSTEM SHUTDOWN BY USER<...>
The ConfigRM service log that is shown in Example 9-65 indicates that this node restarts at 21:44:48.
Example 9-65 ConfigRM service log from PHA170
[32] 12/02/16 _CFD 21:44:48.386539 !!!!!!!!!!!!!!!!! PeerDomainRcp::haltOSExecute (method=1). !!!!!!!!!!!!!!!!!!!!![28] 12/02/16 _CFD 21:44:48.386540 ConfigRMUtils::log_error() Entered[32] 12/02/16 _CFD 21:44:48.386911 logerr: In File=../../../../../src/rsct/rm/ConfigRM/PeerDomain.C (Version=1.99.22.299 Line=23992) :CONFIGRM_REBOOTOS_ERThe operating system is being rebooted to ensure that critical resources are stopped so that another sub-domain that has operational quorum may recover these resources without causing corruption or conflict.
Note: When the cl_sm_continue command is run on one node, this node continues to survive and takes over the RG if needed. Typically, this command is run on only one of the nodes.
When the cl_sm_recover command is run on one node, this node restarts. Typically, you do not want to run this command on both nodes.
Note: To generate the IBM.ConfigRM service logs, run the following commands:
# cd /var/ct/IW/log/mc/IBM.ConfigRM# rpttr -o dct trace.* > ConfigRM.out
Then, check the ConfigRM.out file to get the relevant logs.
388 IBM PowerHA SystemMirror V7.2.3 for IBM AIX and V7.2.2 for Linux
After the PHA170 node restarts, run the cl_sm_continue command operation on the PHA171 node, as shown in Example 9-66.
Example 9-66 The cl_sm_continue command on the PHA171 node
# dateFri Dec 2 21:45:08 CST 2016# /usr/es/sbin/cluster/utilities/cl_sm_continueResource Class Action Response for ResolveOpQuorumTie
Then, the PHA171 node continues and proceeds to acquire the RG, as shown in the cluster.log file in Example 9-67.
Example 9-67 Cluster.log file from the PHA171 acquiring the resource group
Dec 2 21:45:26 PHA171 local0:crit clstrmgrES[10027332]: Fri Dec 2 21:45:26 Removing 1 from ml_idxDec 2 21:45:26 PHA171 user:notice PowerHA SystemMirror for AIX: EVENT START: split_merge_prompt quorum YES@SEQ@145@QRMNT@9@DE@11@NSEQ@8@OLD@1@NEW@0Dec 2 21:45:26 PHA171 user:notice PowerHA SystemMirror for AIX: EVENT COMPLETED: split_merge_prompt quorum YES@SEQ@145@QRMNT@9@DE@11@NSEQ@8@OLD@1@NEW@0 0Dec 2 21:45:27 PHA171 user:notice PowerHA SystemMirror for AIX: EVENT START: node_down PHA170Dec 2 21:45:27 PHA171 user:notice PowerHA SystemMirror for AIX: EVENT COMPLETED: node_down PHA170 0Dec 2 21:45:27 PHA171 user:notice PowerHA SystemMirror for AIX: EVENT START: rg_move_release PHA171 1Dec 2 21:45:27 PHA171 user:notice PowerHA SystemMirror for AIX: EVENT START: rg_move PHA171 1 RELEASEDec 2 21:45:27 PHA171 user:notice PowerHA SystemMirror for AIX: EVENT COMPLETED: rg_move PHA171 1 RELEASE 0Dec 2 21:45:27 PHA171 user:notice PowerHA SystemMirror for AIX: EVENT COMPLETED: rg_move_release PHA171 1 0Dec 2 21:45:28 PHA171 user:notice PowerHA SystemMirror for AIX: EVENT START: rg_move_fence PHA171 1Dec 2 21:45:28 PHA171 user:notice PowerHA SystemMirror for AIX: EVENT COMPLETED: rg_move_fence PHA171 1 0Dec 2 21:45:30 PHA171 user:notice PowerHA SystemMirror for AIX: EVENT START: rg_move_fence PHA171 1Dec 2 21:45:30 PHA171 user:notice PowerHA SystemMirror for AIX: EVENT COMPLETED: rg_move_fence PHA171 1 0Dec 2 21:45:30 PHA171 user:notice PowerHA SystemMirror for AIX: EVENT START: rg_move_acquire PHA171 1Dec 2 21:45:30 PHA171 user:notice PowerHA SystemMirror for AIX: EVENT START: rg_move PHA171 1 ACQUIREDec 2 21:45:30 PHA171 user:notice PowerHA SystemMirror for AIX: EVENT START: acquire_takeover_addrDec 2 21:45:31 PHA171 user:notice PowerHA SystemMirror for AIX: EVENT COMPLETED: acquire_takeover_addr 0Dec 2 21:45:33 PHA171 user:notice PowerHA SystemMirror for AIX: EVENT COMPLETED: rg_move PHA171 1 ACQUIRE 0Dec 2 21:45:33 PHA171 user:notice PowerHA SystemMirror for AIX: EVENT COMPLETED: rg_move_acquire PHA171 1 0Dec 2 21:45:33 PHA171 user:notice PowerHA SystemMirror for AIX: EVENT START: rg_move_complete PHA171 1Dec 2 21:45:34 PHA171 user:notice PowerHA SystemMirror for AIX: EVENT COMPLETED: rg_move_complete PHA171 1 0Dec 2 21:45:36 PHA171 user:notice PowerHA SystemMirror for AIX: EVENT START: node_down_complete PHA170Dec 2 21:45:36 PHA171 user:notice PowerHA SystemMirror for AIX: EVENT COMPLETED: node_down_complete PHA170 0
9.10.4 Cluster merge
In this case, the PHA170 restarts. After this restart operation completes and when the heartbeat channel is restored, you can merge this PowerHA cluster.
The steps are similar to the ones that are described in 9.8.5, “Cluster merge” on page 375.
9.10.5 Scenario summary
If you want to decide when a cluster split occurs, then use the manual policy for split and merge.
Chapter 9. Cluster partition management update 389
9.11 Scenario: Active node halt policy quarantine
This section presents a scenario for an ANHP quarantine.
9.11.1 Scenario description
Figure 9-39 shows the topology of this scenario.
Figure 9-39 Active node halt policy quarantine
There are two HMCs in this scenario. Each HMC has two network interfaces: One is used to connect to the server’s FSP adapter, and the other one is used to communicate with the PowerHA nodes. In this scenario, one node tries to shut down another node through the HMC by using the SSH protocol.
The two HMCs provide high availability (HA) functions. If one HMC fails, PowerHA uses another HMC to continue operations.
9.11.2 HMC password-less access configuration
Add the HMCs host names and their IP addresses into the /etc/hosts file on the PowerHA nodes:
172.16.15.55 HMC55172.16.15.239 HMC239
Example 9-68 shows how to set up the HMC password-less access from the PHA170 node to one HMC.
390 IBM PowerHA SystemMirror V7.2.3 for IBM AIX and V7.2.2 for Linux
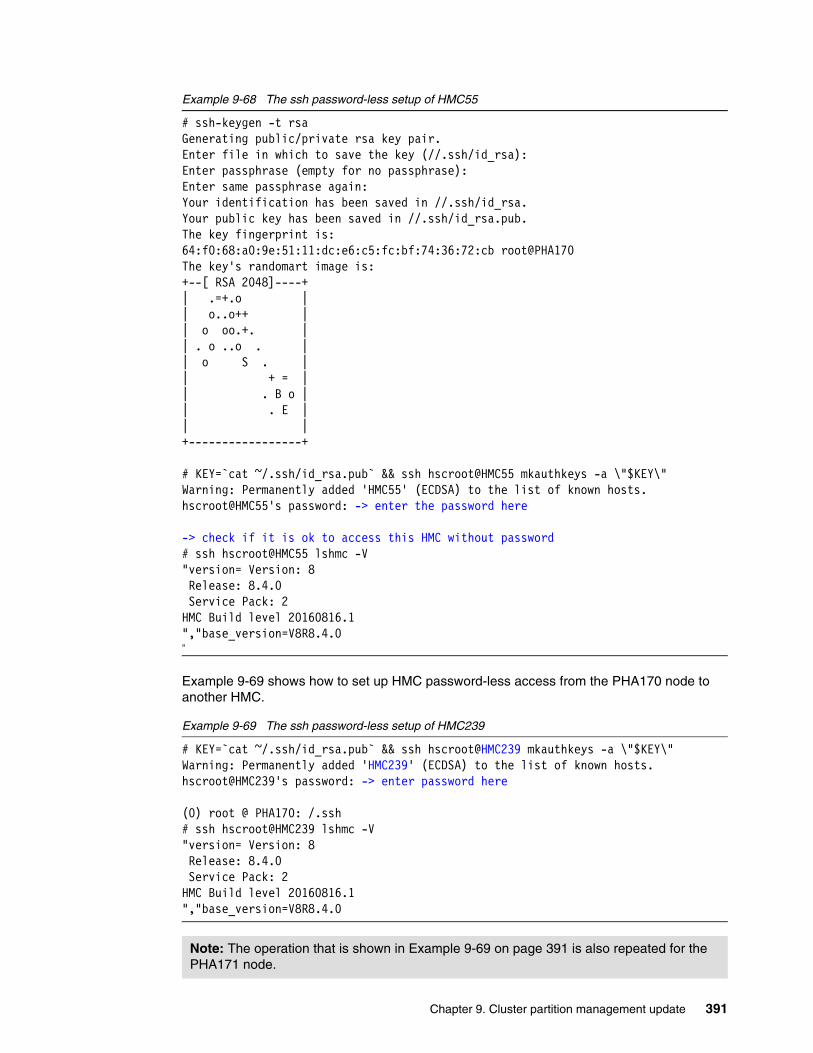
Example 9-68 The ssh password-less setup of HMC55
# ssh-keygen -t rsaGenerating public/private rsa key pair.Enter file in which to save the key (//.ssh/id_rsa): Enter passphrase (empty for no passphrase): Enter same passphrase again: Your identification has been saved in //.ssh/id_rsa.Your public key has been saved in //.ssh/id_rsa.pub.The key fingerprint is:64:f0:68:a0:9e:51:11:dc:e6:c5:fc:bf:74:36:72:cb root@PHA170The key's randomart image is:+--[ RSA 2048]----+| .=+.o || o..o++ || o oo.+. || . o ..o . || o S . || + = || . B o || . E || |+-----------------+
# KEY=`cat ~/.ssh/id_rsa.pub` && ssh hscroot@HMC55 mkauthkeys -a \"$KEY\"Warning: Permanently added 'HMC55' (ECDSA) to the list of known hosts.hscroot@HMC55's password: -> enter the password here
-> check if it is ok to access this HMC without password# ssh hscroot@HMC55 lshmc -V"version= Version: 8 Release: 8.4.0 Service Pack: 2HMC Build level 20160816.1","base_version=V8R8.4.0"
Example 9-69 shows how to set up HMC password-less access from the PHA170 node to another HMC.
Example 9-69 The ssh password-less setup of HMC239
# KEY=`cat ~/.ssh/id_rsa.pub` && ssh hscroot@HMC239 mkauthkeys -a \"$KEY\"Warning: Permanently added 'HMC239' (ECDSA) to the list of known hosts.hscroot@HMC239's password: -> enter password here
(0) root @ PHA170: /.ssh# ssh hscroot@HMC239 lshmc -V "version= Version: 8 Release: 8.4.0 Service Pack: 2HMC Build level 20160816.1","base_version=V8R8.4.0
Note: The operation that is shown in Example 9-69 on page 391 is also repeated for the PHA171 node.
Chapter 9. Cluster partition management update 391
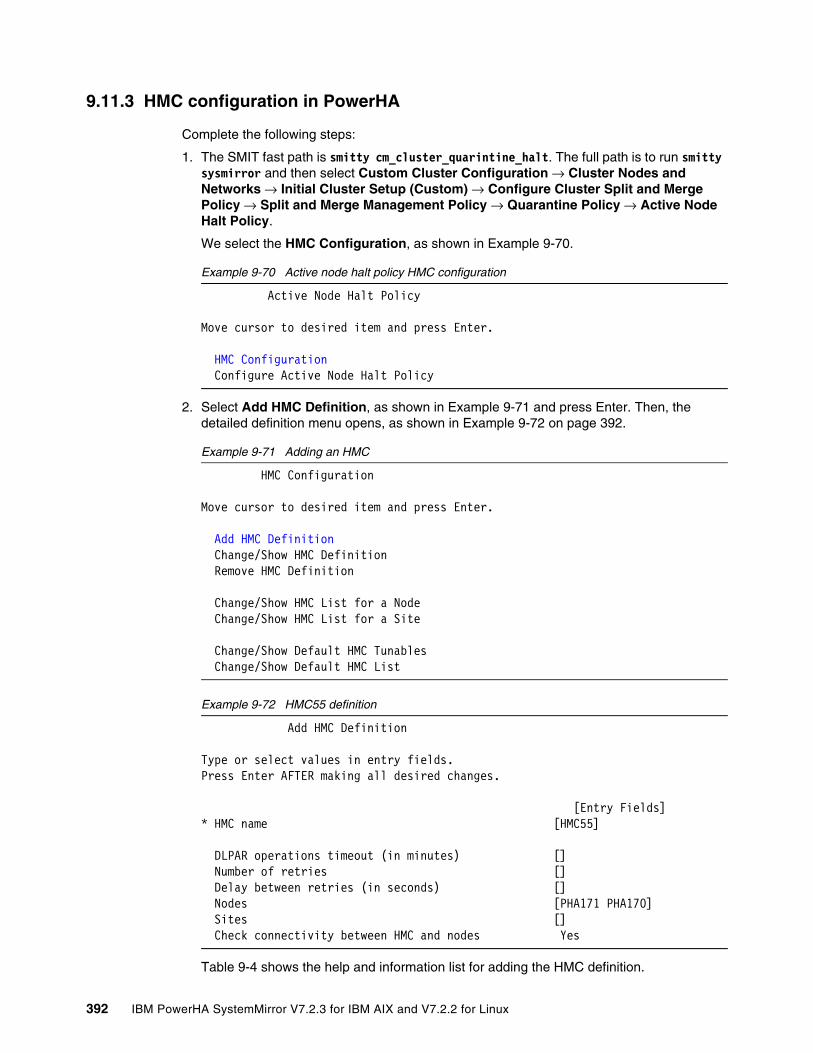
9.11.3 HMC configuration in PowerHA
Complete the following steps:
1. The SMIT fast path is smitty cm_cluster_quarintine_halt. The full path is to run smitty sysmirror and then select Custom Cluster Configuration → Cluster Nodes and Networks → Initial Cluster Setup (Custom) → Configure Cluster Split and Merge Policy → Split and Merge Management Policy → Quarantine Policy → Active Node Halt Policy.
We select the HMC Configuration, as shown in Example 9-70.
Example 9-70 Active node halt policy HMC configuration
Active Node Halt Policy
Move cursor to desired item and press Enter.
HMC Configuration Configure Active Node Halt Policy
2. Select Add HMC Definition, as shown in Example 9-71 and press Enter. Then, the detailed definition menu opens, as shown in Example 9-72 on page 392.
Example 9-71 Adding an HMC
HMC Configuration
Move cursor to desired item and press Enter.
Add HMC Definition Change/Show HMC Definition Remove HMC Definition Change/Show HMC List for a Node Change/Show HMC List for a Site Change/Show Default HMC Tunables Change/Show Default HMC List
Example 9-72 HMC55 definition
Add HMC Definition
Type or select values in entry fields.Press Enter AFTER making all desired changes. [Entry Fields]* HMC name [HMC55] DLPAR operations timeout (in minutes) [] Number of retries [] Delay between retries (in seconds) [] Nodes [PHA171 PHA170] Sites [] Check connectivity between HMC and nodes Yes
Table 9-4 shows the help and information list for adding the HMC definition.
392 IBM PowerHA SystemMirror V7.2.3 for IBM AIX and V7.2.2 for Linux

Table 9-4 Context-sensitive help and associated list for adding an HMC definition
3. Add the first HMC55 for the two PowerHA nodes and keep the default value for the other items. Upon pressing Enter, PowerHA checks whether the current node can access HMC55 without a password, as shown in Example 9-73.
Example 9-73 HMC connectivity verification
COMMAND STATUS
Command: OK stdout: yes stderr: no
Before command completion, additional instructions may appear below.
Checking HMC connectivity between "PHA171" node and "HMC55" HMC : success! Checking HMC connectivity between "PHA170" node and "HMC55" HMC : success!
Name Context-sensitive help (F1) Associated list (F4)
HMC name Enter the host name for the HMC. An IP address is also accepted here. IPv4 and IPv6 addresses are supported.
Yes (single-selection).Obtained by running the following command:/usr/sbin/rsct/bin/rmcdomainstatus -s ctrmc –a IP
Dynamic logical partitioning (DLPAR) operations timeout (in minutes)
Enter a timeout in minutes for DLPAR commands that are run on an HMC (use the -w parameter). This –w parameter exists only on the chhwres command when allocating or releasing resources. It is adjusted according to the type of resources (for memory, 1 minute per gigabyte is added to this timeout. Setting no value means that you use the default value, which is defined in the Change/Show Default HMC Tunables panel. When -1 is displayed in this field, it indicates that the default value is used.
None. This parameter is not used in an ANHP scenario.
Number of retries Enter the number of times that an HMC command is retried before the HMC is considered as non-responding. The next HMC in the list is used after this number of retries fails. Setting no value means that you use the default value, which is defined in the Change/Show Default HMC Tunables panel. When -1 is displayed in this field, it indicates that the default value is used.
None. The default value is 5.
Delay between retries (in seconds)
Enter a delay in seconds between two successive retries. Setting no value means that you use the default value, which is defined in Change/Show Default HMC Tunables panel. When -1 is displayed in this field, it indicates that the default value is used.
None. The default value is 10s.
Chapter 9. Cluster partition management update 393

4. Then, add another HMC (HMC239), as shown in Example 9-74.
Example 9-74 HMC239 definition
Add HMC Definition
Type or select values in entry fields.Press Enter AFTER making all desired changes. [Entry Fields]* HMC name [HMC239] DLPAR operations timeout (in minutes) [] Number of retries [] Delay between retries (in seconds) [] Nodes [PHA171 PHA170] Sites [] Check connectivity between HMC and nodes Yes
You can use the clmgr commands to show the current setting of the HMC, as shown in Example 9-75.
Example 9-75 The clmgrn command displaying the HMC configurations
(0) root @ PHA170: /# clmgr query hmc -vNAME="HMC55"TIMEOUT="-1" -> ‘-1’ means use default valueRETRY_COUNT="-1" -> ‘-1’ means use default valueRETRY_DELAY="-1" -> ‘-1’ means use default valueNODES="PHA171 PHA170"STATUS="UP"VERSION="V8R8.4.0.2"
NAME="HMC239"TIMEOUT="-1"RETRY_COUNT="-1"RETRY_DELAY="-1"NODES="PHA171 PHA170"STATUS="UP"VERSION="V8R8.6.0.0"
(0) root @ PHA170: /# clmgr query cluster hmcDEFAULT_HMC_TIMEOUT="10"DEFAULT_HMC_RETRY_COUNT="5"DEFAULT_HMC_RETRY_DELAY="10"DEFAULT_HMCS_LIST="HMC55 HMC239"
394 IBM PowerHA SystemMirror V7.2.3 for IBM AIX and V7.2.2 for Linux
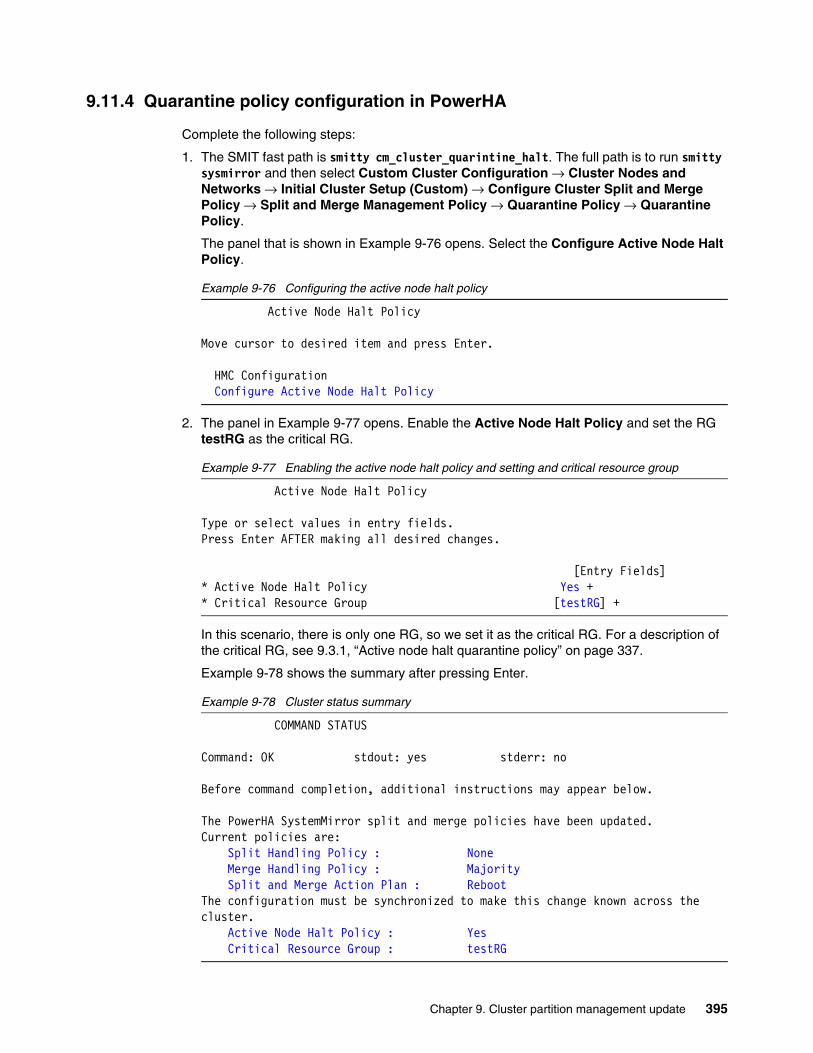
9.11.4 Quarantine policy configuration in PowerHA
Complete the following steps:
1. The SMIT fast path is smitty cm_cluster_quarintine_halt. The full path is to run smitty sysmirror and then select Custom Cluster Configuration → Cluster Nodes and Networks → Initial Cluster Setup (Custom) → Configure Cluster Split and Merge Policy → Split and Merge Management Policy → Quarantine Policy → Quarantine Policy.
The panel that is shown in Example 9-76 opens. Select the Configure Active Node Halt Policy.
Example 9-76 Configuring the active node halt policy
Active Node Halt Policy
Move cursor to desired item and press Enter.
HMC Configuration Configure Active Node Halt Policy
2. The panel in Example 9-77 opens. Enable the Active Node Halt Policy and set the RG testRG as the critical RG.
Example 9-77 Enabling the active node halt policy and setting and critical resource group
Active Node Halt Policy
Type or select values in entry fields.Press Enter AFTER making all desired changes. [Entry Fields]* Active Node Halt Policy Yes +* Critical Resource Group [testRG] +
In this scenario, there is only one RG, so we set it as the critical RG. For a description of the critical RG, see 9.3.1, “Active node halt quarantine policy” on page 337.
Example 9-78 shows the summary after pressing Enter.
Example 9-78 Cluster status summary
COMMAND STATUS
Command: OK stdout: yes stderr: no
Before command completion, additional instructions may appear below.
The PowerHA SystemMirror split and merge policies have been updated.Current policies are: Split Handling Policy : None Merge Handling Policy : Majority Split and Merge Action Plan : RebootThe configuration must be synchronized to make this change known across the cluster. Active Node Halt Policy : Yes Critical Resource Group : testRG
Chapter 9. Cluster partition management update 395
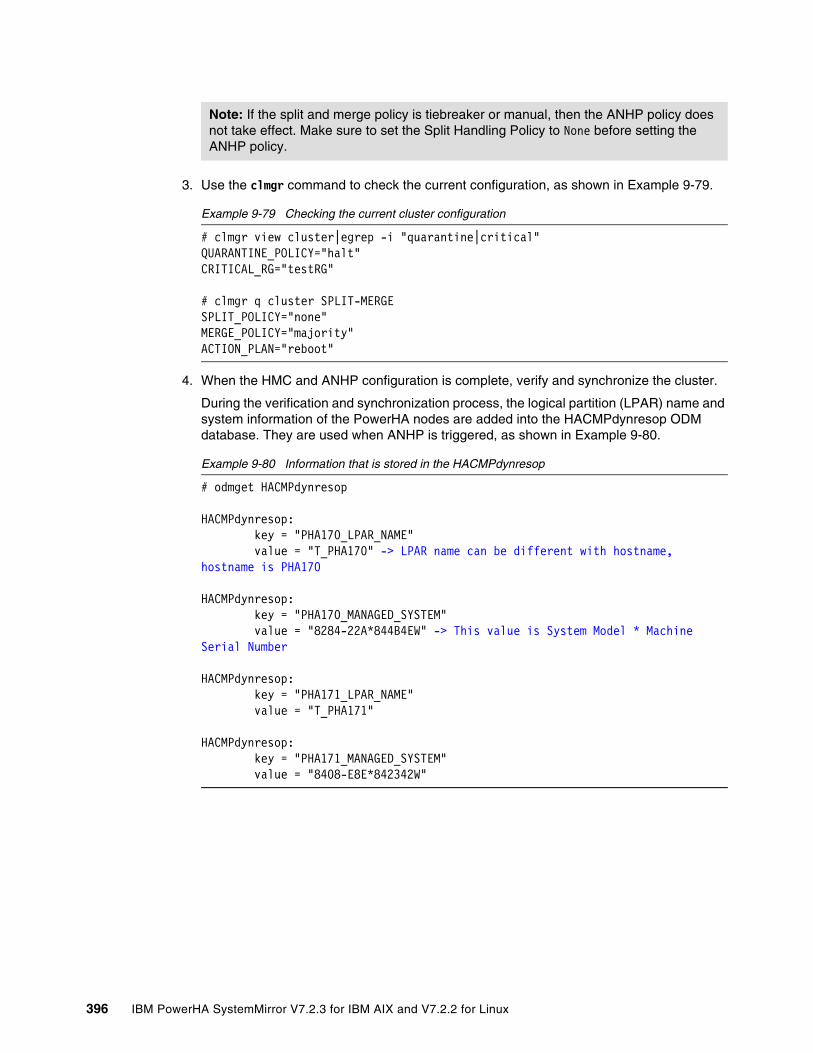
3. Use the clmgr command to check the current configuration, as shown in Example 9-79.
Example 9-79 Checking the current cluster configuration
# clmgr view cluster|egrep -i "quarantine|critical"QUARANTINE_POLICY="halt"CRITICAL_RG="testRG"
# clmgr q cluster SPLIT-MERGESPLIT_POLICY="none"MERGE_POLICY="majority"ACTION_PLAN="reboot"
4. When the HMC and ANHP configuration is complete, verify and synchronize the cluster.
During the verification and synchronization process, the logical partition (LPAR) name and system information of the PowerHA nodes are added into the HACMPdynresop ODM database. They are used when ANHP is triggered, as shown in Example 9-80.
Example 9-80 Information that is stored in the HACMPdynresop
# odmget HACMPdynresop
HACMPdynresop: key = "PHA170_LPAR_NAME" value = "T_PHA170" -> LPAR name can be different with hostname, hostname is PHA170
HACMPdynresop: key = "PHA170_MANAGED_SYSTEM" value = "8284-22A*844B4EW" -> This value is System Model * Machine Serial Number
HACMPdynresop: key = "PHA171_LPAR_NAME" value = "T_PHA171"
HACMPdynresop: key = "PHA171_MANAGED_SYSTEM" value = "8408-E8E*842342W"
Note: If the split and merge policy is tiebreaker or manual, then the ANHP policy does not take effect. Make sure to set the Split Handling Policy to None before setting the ANHP policy.
396 IBM PowerHA SystemMirror V7.2.3 for IBM AIX and V7.2.2 for Linux
9.11.5 Simulating a cluster split
Before simulating a cluster split, check the cluster’s status, as described in 9.6.3, “Initial PowerHA service status for each scenario” on page 356.
This scenario sets the Split Handling Policy to None and sets the Quarantine Policy to ANHP. The critical RG is testRG and is online on the PHA170 node currently. When the cluster split occurs, it is expected that a backup node of this RG (PHA171) takes over the RG. During this process, PowerHA tries to shut down the PHA170 node through the HMC.
In this scenario, we broke all communication between two nodes at 02:44:04.
The main steps of CAA and PowerHA on the PHA171 nodeThe following events occur:
� 02:44:04: All communication between the two nodes is broken.
� 02:44:17: The PHA171 node CAA marks ADAPTER_DOWN for the PHA170 node.
� 02:44:47: The PHA171 node CAA marks NODE_DOWN for the PHA170 node.
� 02:44:47: PowerHA triggers the split_merge_prompt split event.
� 02:44:52: PowerHA triggers the split_merge_prompt quorum event, and then PHA171 takes over the RG.
� 02:44:55: In the rg_move_acquire event, PowerHA shuts down PHA170 through the HMC.
� 02:46:35: The PHA171 node completes the RG takeover.
The main steps of CAA and PowerHA on the PHA170 nodeThe following events occur:
� 02:44:04: All communication between the two nodes is broken.� 02:44:17: The PHA170 node marks REP_DOWN for the repository disk.� 02:44:17: The PHA170 node CAA marks ADAPTER_DOWN for the PHA171 node.� 02:44:47: The PHA170 node CAA marks NODE_DOWN for the PHA171 node.� 02:44:47: PowerHA triggers a split_merge_prompt split event.� 02:44:52: PowerHA triggers a split_merge_prompt quorum event.� 02:44:55: The PHA170 node halts.
Note: You can obtain the LPAR name from AIX by running either uname -L or lparstat -i.
The requirements are as follows:
� Hardware firmware level 840 onwards
� AIX 7.1 TL4 or 7.2 onwards
� HMC V8 R8.4.0 (PTF MH01559) with a mandatory interim fix (PTF MH01560)
Here is an example output:
(0) root @ PHA170: /# hostnamePHA170# uname -L5 T_PHA170
Chapter 9. Cluster partition management update 397
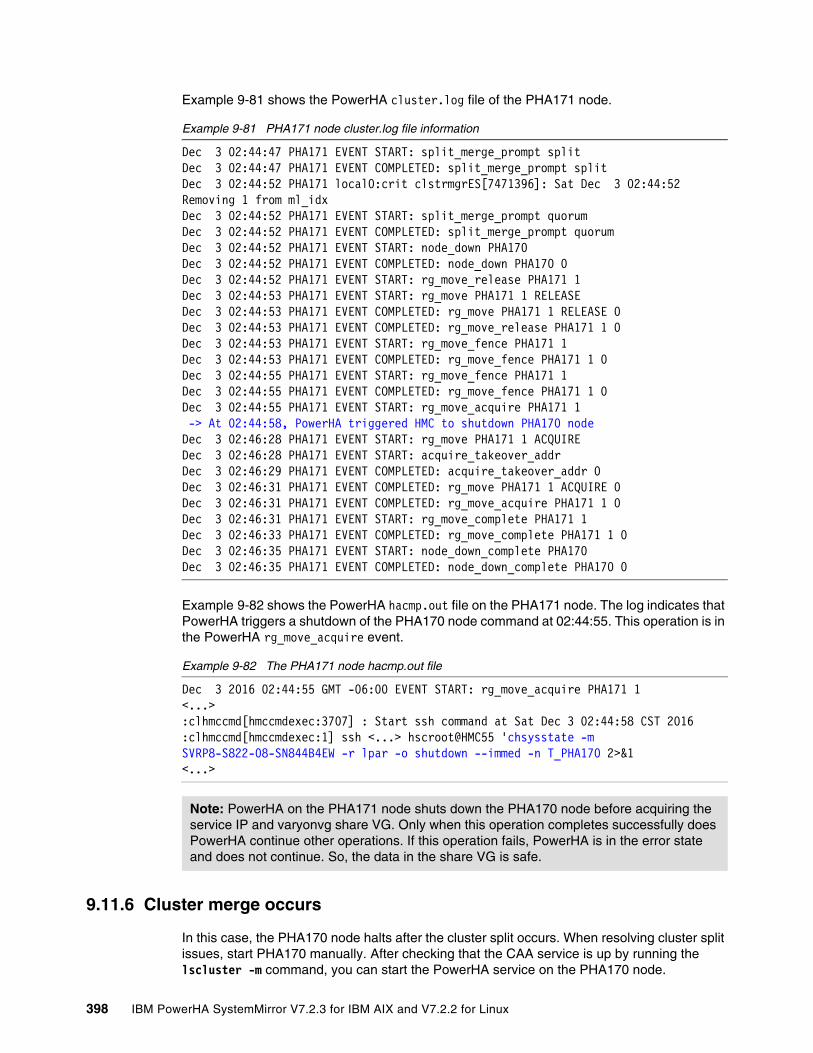
Example 9-81 shows the PowerHA cluster.log file of the PHA171 node.
Example 9-81 PHA171 node cluster.log file information
Dec 3 02:44:47 PHA171 EVENT START: split_merge_prompt splitDec 3 02:44:47 PHA171 EVENT COMPLETED: split_merge_prompt splitDec 3 02:44:52 PHA171 local0:crit clstrmgrES[7471396]: Sat Dec 3 02:44:52 Removing 1 from ml_idxDec 3 02:44:52 PHA171 EVENT START: split_merge_prompt quorum Dec 3 02:44:52 PHA171 EVENT COMPLETED: split_merge_prompt quorumDec 3 02:44:52 PHA171 EVENT START: node_down PHA170 Dec 3 02:44:52 PHA171 EVENT COMPLETED: node_down PHA170 0 Dec 3 02:44:52 PHA171 EVENT START: rg_move_release PHA171 1 Dec 3 02:44:53 PHA171 EVENT START: rg_move PHA171 1 RELEASE Dec 3 02:44:53 PHA171 EVENT COMPLETED: rg_move PHA171 1 RELEASE 0 Dec 3 02:44:53 PHA171 EVENT COMPLETED: rg_move_release PHA171 1 0 Dec 3 02:44:53 PHA171 EVENT START: rg_move_fence PHA171 1 Dec 3 02:44:53 PHA171 EVENT COMPLETED: rg_move_fence PHA171 1 0 Dec 3 02:44:55 PHA171 EVENT START: rg_move_fence PHA171 1 Dec 3 02:44:55 PHA171 EVENT COMPLETED: rg_move_fence PHA171 1 0 Dec 3 02:44:55 PHA171 EVENT START: rg_move_acquire PHA171 1 -> At 02:44:58, PowerHA triggered HMC to shutdown PHA170 nodeDec 3 02:46:28 PHA171 EVENT START: rg_move PHA171 1 ACQUIRE Dec 3 02:46:28 PHA171 EVENT START: acquire_takeover_addr Dec 3 02:46:29 PHA171 EVENT COMPLETED: acquire_takeover_addr 0 Dec 3 02:46:31 PHA171 EVENT COMPLETED: rg_move PHA171 1 ACQUIRE 0 Dec 3 02:46:31 PHA171 EVENT COMPLETED: rg_move_acquire PHA171 1 0 Dec 3 02:46:31 PHA171 EVENT START: rg_move_complete PHA171 1 Dec 3 02:46:33 PHA171 EVENT COMPLETED: rg_move_complete PHA171 1 0 Dec 3 02:46:35 PHA171 EVENT START: node_down_complete PHA170 Dec 3 02:46:35 PHA171 EVENT COMPLETED: node_down_complete PHA170 0
Example 9-82 shows the PowerHA hacmp.out file on the PHA171 node. The log indicates that PowerHA triggers a shutdown of the PHA170 node command at 02:44:55. This operation is in the PowerHA rg_move_acquire event.
Example 9-82 The PHA171 node hacmp.out file
Dec 3 2016 02:44:55 GMT -06:00 EVENT START: rg_move_acquire PHA171 1<...>:clhmccmd[hmccmdexec:3707] : Start ssh command at Sat Dec 3 02:44:58 CST 2016:clhmccmd[hmccmdexec:1] ssh <...> hscroot@HMC55 'chsysstate -m SVRP8-S822-08-SN844B4EW -r lpar -o shutdown --immed -n T_PHA170 2>&1<...>
9.11.6 Cluster merge occurs
In this case, the PHA170 node halts after the cluster split occurs. When resolving cluster split issues, start PHA170 manually. After checking that the CAA service is up by running the lscluster -m command, you can start the PowerHA service on the PHA170 node.
Note: PowerHA on the PHA171 node shuts down the PHA170 node before acquiring the service IP and varyonvg share VG. Only when this operation completes successfully does PowerHA continue other operations. If this operation fails, PowerHA is in the error state and does not continue. So, the data in the share VG is safe.
398 IBM PowerHA SystemMirror V7.2.3 for IBM AIX and V7.2.2 for Linux
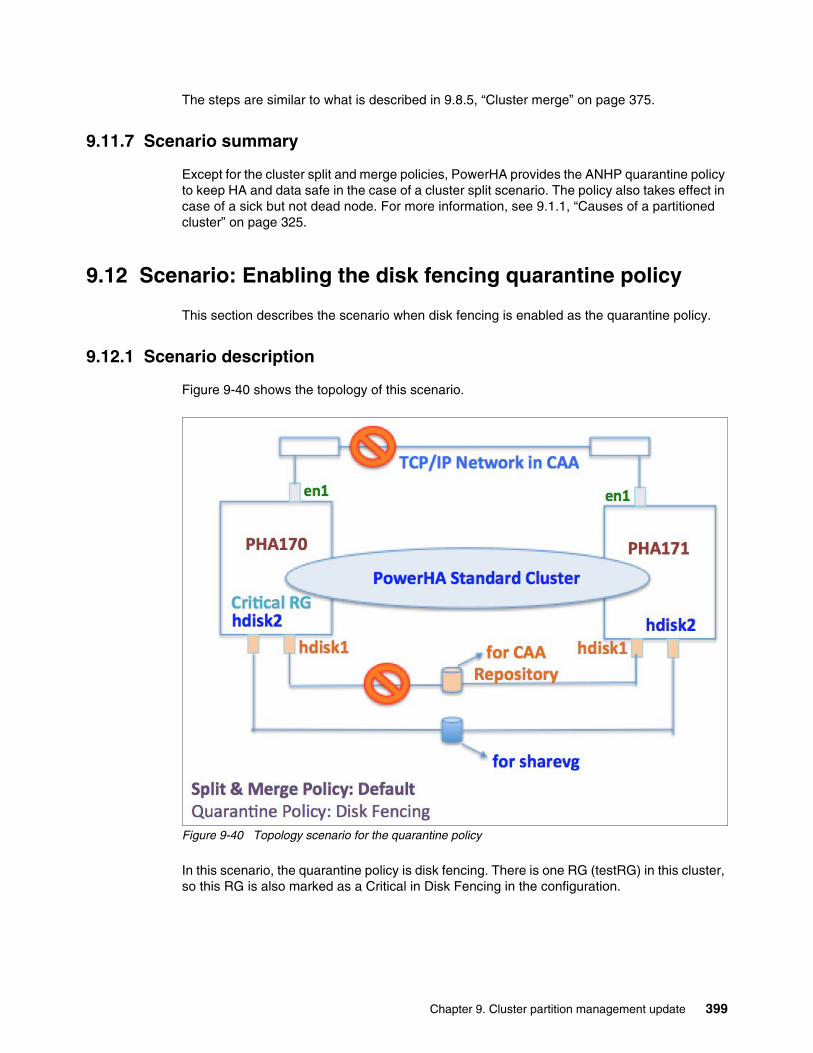
The steps are similar to what is described in 9.8.5, “Cluster merge” on page 375.
9.11.7 Scenario summary
Except for the cluster split and merge policies, PowerHA provides the ANHP quarantine policy to keep HA and data safe in the case of a cluster split scenario. The policy also takes effect in case of a sick but not dead node. For more information, see 9.1.1, “Causes of a partitioned cluster” on page 325.
9.12 Scenario: Enabling the disk fencing quarantine policy
This section describes the scenario when disk fencing is enabled as the quarantine policy.
9.12.1 Scenario description
Figure 9-40 shows the topology of this scenario.
Figure 9-40 Topology scenario for the quarantine policy
In this scenario, the quarantine policy is disk fencing. There is one RG (testRG) in this cluster, so this RG is also marked as a Critical in Disk Fencing in the configuration.
Chapter 9. Cluster partition management update 399
There is one VG (sharevg) in this RG, and there is one hdisk in this VG. You must set the parameter reserve_policy to no_reserve for all the disks if you want to enable the disk fencing policy. In our case, hdisk2 is used, so you must run the following command on each PowerHA node:
chdev -l hdisk2 -a reserve_policy=no_reserve
9.12.2 Quarantine policy configuration in PowerHA
This section describes the quarantine policy configuration in a PowerHA cluster.
Ensuring that the active node halt policy is disabled
Complete the following steps:
1. Use the SMIT fast path smitty cm_cluster_quarintine_halt, or run smitty sysmirror and then select Custom Cluster Configuration → Cluster Nodes and Networks → Initial Cluster Setup (Custom) → Configure Cluster Split and Merge Policy → Split and Merge Management Policy → Quarantine Policy → Active Node Halt Policy.
2. Example 9-83 shows the window. Select Configure Active Node Halt Policy.
Example 9-83 Configuring the active node halt policy
Active Node Halt Policy
Move cursor to desired item and press Enter.
HMC Configuration Configure Active Node Halt Policy
3. Example 9-84 shows where you can disable the ANHP.
Example 9-84 Disabling the active node halt policy
Active Node Halt Policy
Type or select values in entry fields. Press Enter AFTER making all desired changes.
[Entry Fields]* Active Node Halt Policy No +* Critical Resource Group [testRG]
Enabling the disk fencing quarantine policyUse the SMIT fast path smitty cm_cluster_quarantine_disk_dialog, or you can run smitty sysmirror and select Custom Cluster Configuration → Cluster Nodes and Networks → Initial Cluster Setup (Custom) → Configure Cluster Split and Merge Policy → Split and Merge Management Policy → Quarantine Policy → Disk Fencing.
Note: If the ANHP policy is also enabled, in case of a cluster split, ANHP takes effect first.
400 IBM PowerHA SystemMirror V7.2.3 for IBM AIX and V7.2.2 for Linux
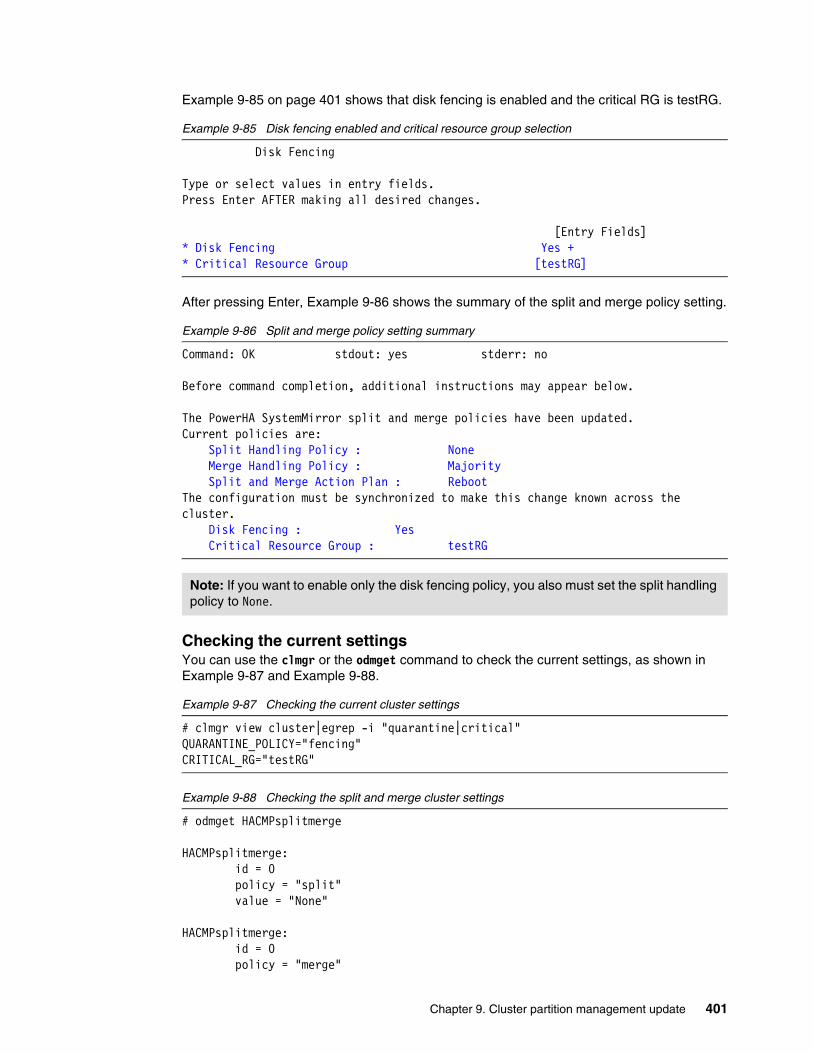
Example 9-85 on page 401 shows that disk fencing is enabled and the critical RG is testRG.
Example 9-85 Disk fencing enabled and critical resource group selection
Disk Fencing
Type or select values in entry fields.Press Enter AFTER making all desired changes. [Entry Fields]* Disk Fencing Yes +* Critical Resource Group [testRG]
After pressing Enter, Example 9-86 shows the summary of the split and merge policy setting.
Example 9-86 Split and merge policy setting summary
Command: OK stdout: yes stderr: no
Before command completion, additional instructions may appear below.
The PowerHA SystemMirror split and merge policies have been updated.Current policies are: Split Handling Policy : None Merge Handling Policy : Majority Split and Merge Action Plan : RebootThe configuration must be synchronized to make this change known across the cluster. Disk Fencing : Yes Critical Resource Group : testRG
Checking the current settingsYou can use the clmgr or the odmget command to check the current settings, as shown in Example 9-87 and Example 9-88.
Example 9-87 Checking the current cluster settings
# clmgr view cluster|egrep -i "quarantine|critical"QUARANTINE_POLICY="fencing"CRITICAL_RG="testRG"
Example 9-88 Checking the split and merge cluster settings
# odmget HACMPsplitmerge
HACMPsplitmerge: id = 0 policy = "split" value = "None"
HACMPsplitmerge: id = 0 policy = "merge"
Note: If you want to enable only the disk fencing policy, you also must set the split handling policy to None.
Chapter 9. Cluster partition management update 401
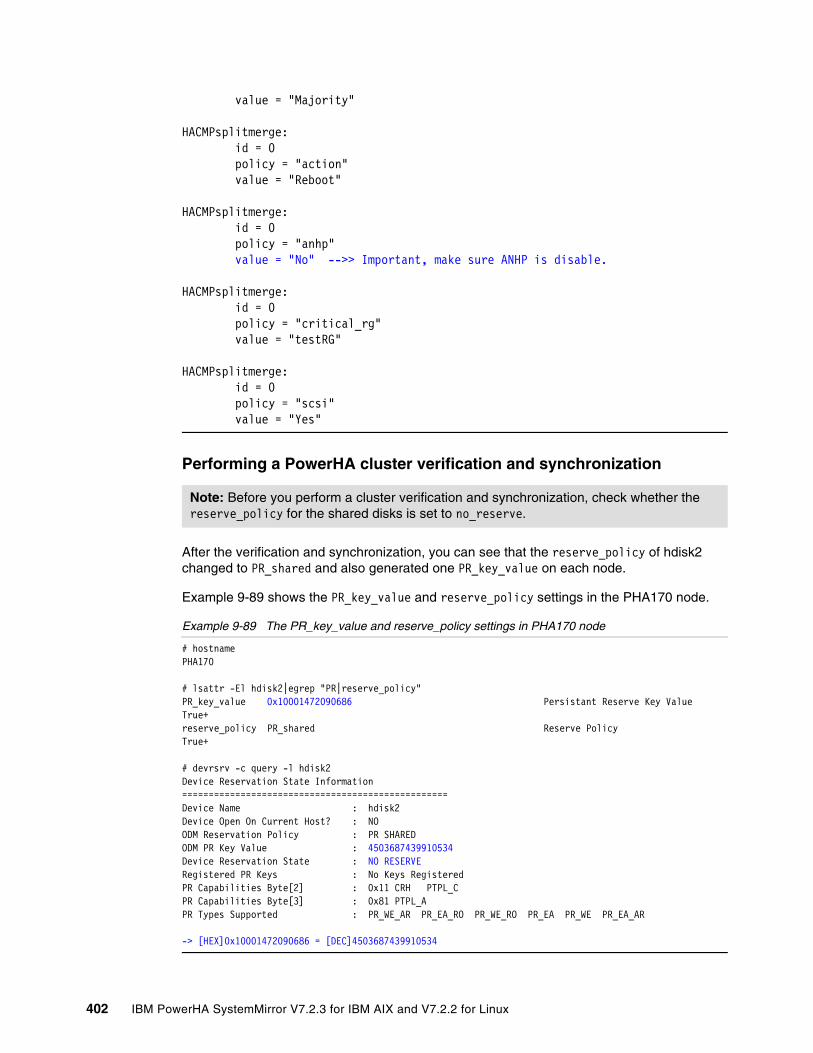
value = "Majority"
HACMPsplitmerge: id = 0 policy = "action" value = "Reboot"
HACMPsplitmerge: id = 0 policy = "anhp" value = "No" -->> Important, make sure ANHP is disable.
HACMPsplitmerge: id = 0 policy = "critical_rg" value = "testRG"
HACMPsplitmerge: id = 0 policy = "scsi" value = "Yes"
Performing a PowerHA cluster verification and synchronization
After the verification and synchronization, you can see that the reserve_policy of hdisk2 changed to PR_shared and also generated one PR_key_value on each node.
Example 9-89 shows the PR_key_value and reserve_policy settings in the PHA170 node.
Example 9-89 The PR_key_value and reserve_policy settings in PHA170 node
# hostnamePHA170
# lsattr -El hdisk2|egrep "PR|reserve_policy"PR_key_value 0x10001472090686 Persistant Reserve Key Value True+reserve_policy PR_shared Reserve Policy True+
# devrsrv -c query -l hdisk2Device Reservation State Information==================================================Device Name : hdisk2Device Open On Current Host? : NOODM Reservation Policy : PR SHAREDODM PR Key Value : 4503687439910534Device Reservation State : NO RESERVERegistered PR Keys : No Keys RegisteredPR Capabilities Byte[2] : 0x11 CRH PTPL_C PR Capabilities Byte[3] : 0x81 PTPL_A PR Types Supported : PR_WE_AR PR_EA_RO PR_WE_RO PR_EA PR_WE PR_EA_AR
-> [HEX]0x10001472090686 = [DEC]4503687439910534
Note: Before you perform a cluster verification and synchronization, check whether the reserve_policy for the shared disks is set to no_reserve.
402 IBM PowerHA SystemMirror V7.2.3 for IBM AIX and V7.2.2 for Linux
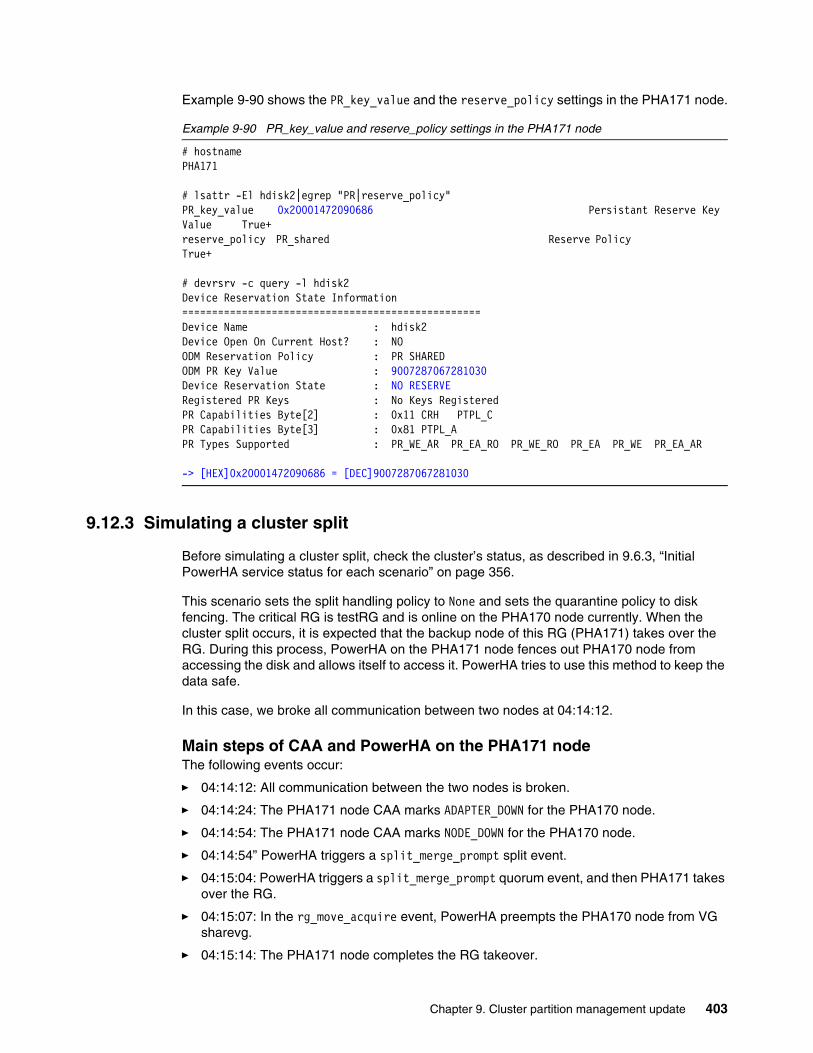
Example 9-90 shows the PR_key_value and the reserve_policy settings in the PHA171 node.
Example 9-90 PR_key_value and reserve_policy settings in the PHA171 node
# hostnamePHA171
# lsattr -El hdisk2|egrep "PR|reserve_policy"PR_key_value 0x20001472090686 Persistant Reserve Key Value True+reserve_policy PR_shared Reserve Policy True+
# devrsrv -c query -l hdisk2Device Reservation State Information==================================================Device Name : hdisk2Device Open On Current Host? : NOODM Reservation Policy : PR SHAREDODM PR Key Value : 9007287067281030Device Reservation State : NO RESERVERegistered PR Keys : No Keys RegisteredPR Capabilities Byte[2] : 0x11 CRH PTPL_C PR Capabilities Byte[3] : 0x81 PTPL_A PR Types Supported : PR_WE_AR PR_EA_RO PR_WE_RO PR_EA PR_WE PR_EA_AR
-> [HEX]0x20001472090686 = [DEC]9007287067281030
9.12.3 Simulating a cluster split
Before simulating a cluster split, check the cluster’s status, as described in 9.6.3, “Initial PowerHA service status for each scenario” on page 356.
This scenario sets the split handling policy to None and sets the quarantine policy to disk fencing. The critical RG is testRG and is online on the PHA170 node currently. When the cluster split occurs, it is expected that the backup node of this RG (PHA171) takes over the RG. During this process, PowerHA on the PHA171 node fences out PHA170 node from accessing the disk and allows itself to access it. PowerHA tries to use this method to keep the data safe.
In this case, we broke all communication between two nodes at 04:14:12.
Main steps of CAA and PowerHA on the PHA171 nodeThe following events occur:
� 04:14:12: All communication between the two nodes is broken.
� 04:14:24: The PHA171 node CAA marks ADAPTER_DOWN for the PHA170 node.
� 04:14:54: The PHA171 node CAA marks NODE_DOWN for the PHA170 node.
� 04:14:54” PowerHA triggers a split_merge_prompt split event.
� 04:15:04: PowerHA triggers a split_merge_prompt quorum event, and then PHA171 takes over the RG.
� 04:15:07: In the rg_move_acquire event, PowerHA preempts the PHA170 node from VG sharevg.
� 04:15:14: The PHA171 node completes the RG takeover.
Chapter 9. Cluster partition management update 403
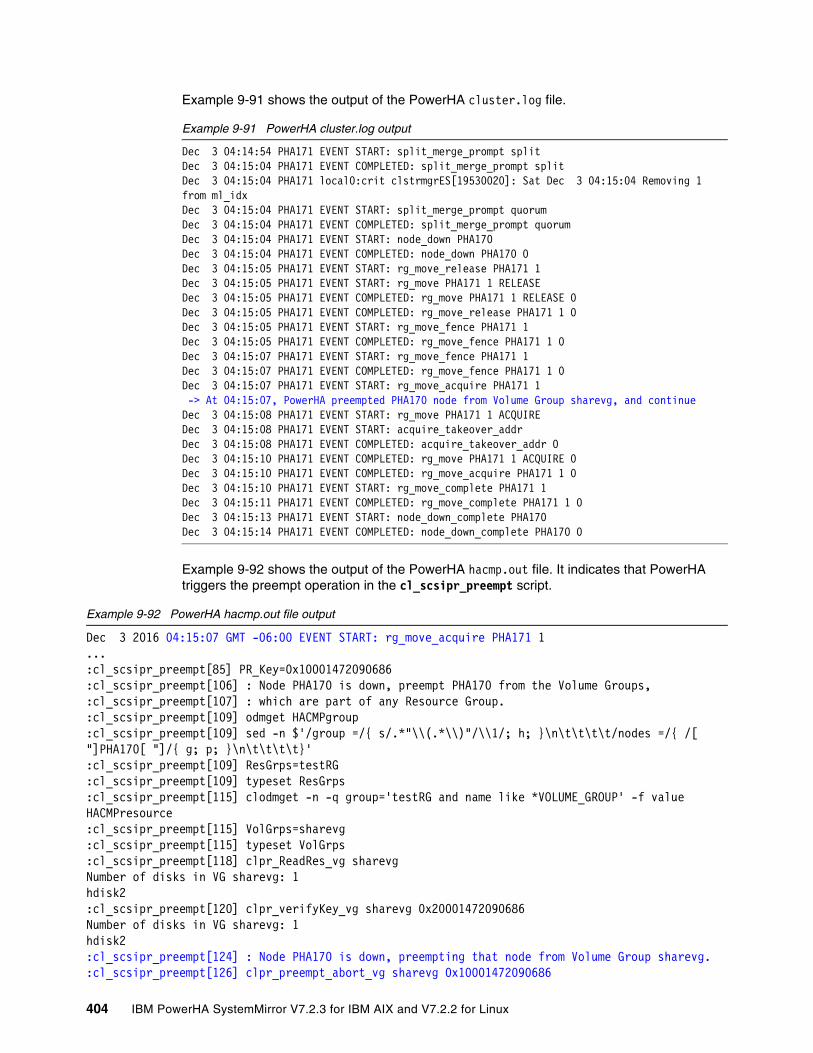
Example 9-91 shows the output of the PowerHA cluster.log file.
Example 9-91 PowerHA cluster.log output
Dec 3 04:14:54 PHA171 EVENT START: split_merge_prompt splitDec 3 04:15:04 PHA171 EVENT COMPLETED: split_merge_prompt split Dec 3 04:15:04 PHA171 local0:crit clstrmgrES[19530020]: Sat Dec 3 04:15:04 Removing 1 from ml_idxDec 3 04:15:04 PHA171 EVENT START: split_merge_prompt quorum Dec 3 04:15:04 PHA171 EVENT COMPLETED: split_merge_prompt quorum Dec 3 04:15:04 PHA171 EVENT START: node_down PHA170 Dec 3 04:15:04 PHA171 EVENT COMPLETED: node_down PHA170 0 Dec 3 04:15:05 PHA171 EVENT START: rg_move_release PHA171 1 Dec 3 04:15:05 PHA171 EVENT START: rg_move PHA171 1 RELEASE Dec 3 04:15:05 PHA171 EVENT COMPLETED: rg_move PHA171 1 RELEASE 0 Dec 3 04:15:05 PHA171 EVENT COMPLETED: rg_move_release PHA171 1 0 Dec 3 04:15:05 PHA171 EVENT START: rg_move_fence PHA171 1 Dec 3 04:15:05 PHA171 EVENT COMPLETED: rg_move_fence PHA171 1 0 Dec 3 04:15:07 PHA171 EVENT START: rg_move_fence PHA171 1 Dec 3 04:15:07 PHA171 EVENT COMPLETED: rg_move_fence PHA171 1 0 Dec 3 04:15:07 PHA171 EVENT START: rg_move_acquire PHA171 1 -> At 04:15:07, PowerHA preempted PHA170 node from Volume Group sharevg, and continueDec 3 04:15:08 PHA171 EVENT START: rg_move PHA171 1 ACQUIRE Dec 3 04:15:08 PHA171 EVENT START: acquire_takeover_addr Dec 3 04:15:08 PHA171 EVENT COMPLETED: acquire_takeover_addr 0 Dec 3 04:15:10 PHA171 EVENT COMPLETED: rg_move PHA171 1 ACQUIRE 0 Dec 3 04:15:10 PHA171 EVENT COMPLETED: rg_move_acquire PHA171 1 0 Dec 3 04:15:10 PHA171 EVENT START: rg_move_complete PHA171 1 Dec 3 04:15:11 PHA171 EVENT COMPLETED: rg_move_complete PHA171 1 0 Dec 3 04:15:13 PHA171 EVENT START: node_down_complete PHA170 Dec 3 04:15:14 PHA171 EVENT COMPLETED: node_down_complete PHA170 0
Example 9-92 shows the output of the PowerHA hacmp.out file. It indicates that PowerHA triggers the preempt operation in the cl_scsipr_preempt script.
Example 9-92 PowerHA hacmp.out file output
Dec 3 2016 04:15:07 GMT -06:00 EVENT START: rg_move_acquire PHA171 1...:cl_scsipr_preempt[85] PR_Key=0x10001472090686:cl_scsipr_preempt[106] : Node PHA170 is down, preempt PHA170 from the Volume Groups,:cl_scsipr_preempt[107] : which are part of any Resource Group.:cl_scsipr_preempt[109] odmget HACMPgroup:cl_scsipr_preempt[109] sed -n $'/group =/{ s/.*"\\(.*\\)"/\\1/; h; }\n\t\t\t\t/nodes =/{ /[ "]PHA170[ "]/{ g; p; }\n\t\t\t\t}':cl_scsipr_preempt[109] ResGrps=testRG:cl_scsipr_preempt[109] typeset ResGrps:cl_scsipr_preempt[115] clodmget -n -q group='testRG and name like *VOLUME_GROUP' -f value HACMPresource:cl_scsipr_preempt[115] VolGrps=sharevg:cl_scsipr_preempt[115] typeset VolGrps:cl_scsipr_preempt[118] clpr_ReadRes_vg sharevgNumber of disks in VG sharevg: 1hdisk2:cl_scsipr_preempt[120] clpr_verifyKey_vg sharevg 0x20001472090686Number of disks in VG sharevg: 1hdisk2:cl_scsipr_preempt[124] : Node PHA170 is down, preempting that node from Volume Group sharevg.:cl_scsipr_preempt[126] clpr_preempt_abort_vg sharevg 0x10001472090686
404 IBM PowerHA SystemMirror V7.2.3 for IBM AIX and V7.2.2 for Linux
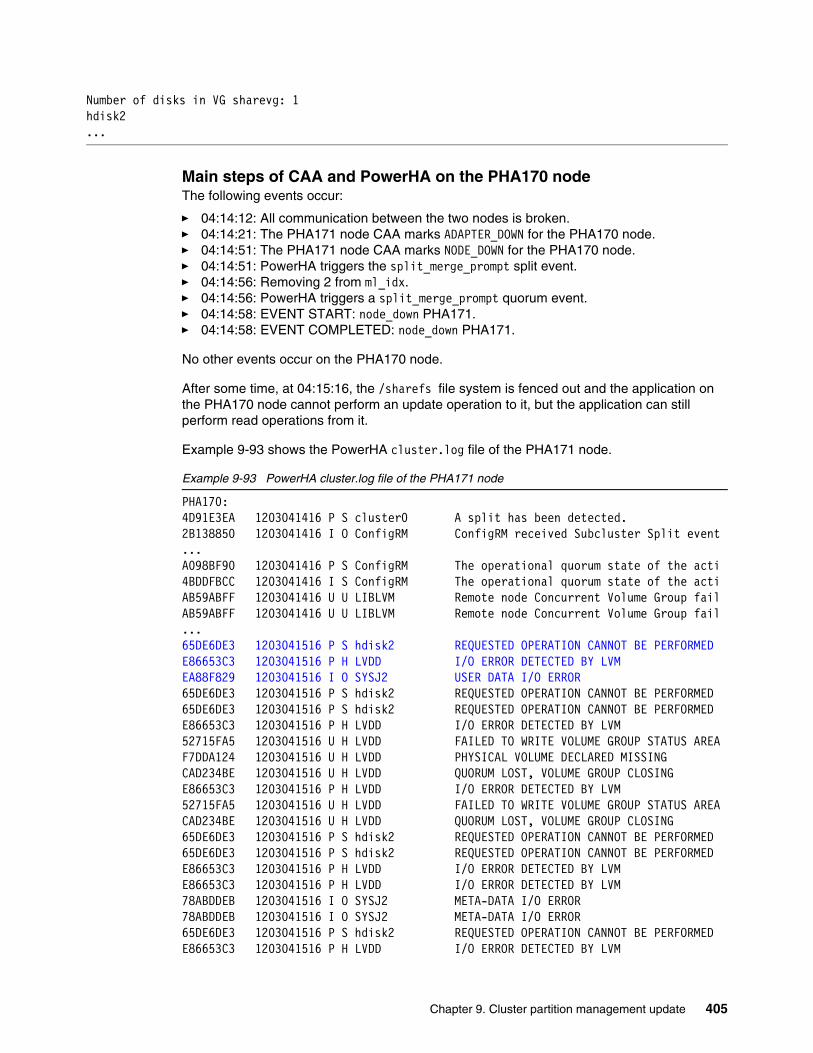
Number of disks in VG sharevg: 1hdisk2...
Main steps of CAA and PowerHA on the PHA170 nodeThe following events occur:
� 04:14:12: All communication between the two nodes is broken.� 04:14:21: The PHA171 node CAA marks ADAPTER_DOWN for the PHA170 node.� 04:14:51: The PHA171 node CAA marks NODE_DOWN for the PHA170 node.� 04:14:51: PowerHA triggers the split_merge_prompt split event.� 04:14:56: Removing 2 from ml_idx.� 04:14:56: PowerHA triggers a split_merge_prompt quorum event.� 04:14:58: EVENT START: node_down PHA171.� 04:14:58: EVENT COMPLETED: node_down PHA171.
No other events occur on the PHA170 node.
After some time, at 04:15:16, the /sharefs file system is fenced out and the application on the PHA170 node cannot perform an update operation to it, but the application can still perform read operations from it.
Example 9-93 shows the PowerHA cluster.log file of the PHA171 node.
Example 9-93 PowerHA cluster.log file of the PHA171 node
PHA170:4D91E3EA 1203041416 P S cluster0 A split has been detected.2B138850 1203041416 I O ConfigRM ConfigRM received Subcluster Split event...A098BF90 1203041416 P S ConfigRM The operational quorum state of the acti4BDDFBCC 1203041416 I S ConfigRM The operational quorum state of the actiAB59ABFF 1203041416 U U LIBLVM Remote node Concurrent Volume Group failAB59ABFF 1203041416 U U LIBLVM Remote node Concurrent Volume Group fail...65DE6DE3 1203041516 P S hdisk2 REQUESTED OPERATION CANNOT BE PERFORMEDE86653C3 1203041516 P H LVDD I/O ERROR DETECTED BY LVMEA88F829 1203041516 I O SYSJ2 USER DATA I/O ERROR65DE6DE3 1203041516 P S hdisk2 REQUESTED OPERATION CANNOT BE PERFORMED65DE6DE3 1203041516 P S hdisk2 REQUESTED OPERATION CANNOT BE PERFORMEDE86653C3 1203041516 P H LVDD I/O ERROR DETECTED BY LVM52715FA5 1203041516 U H LVDD FAILED TO WRITE VOLUME GROUP STATUS AREAF7DDA124 1203041516 U H LVDD PHYSICAL VOLUME DECLARED MISSINGCAD234BE 1203041516 U H LVDD QUORUM LOST, VOLUME GROUP CLOSINGE86653C3 1203041516 P H LVDD I/O ERROR DETECTED BY LVM52715FA5 1203041516 U H LVDD FAILED TO WRITE VOLUME GROUP STATUS AREACAD234BE 1203041516 U H LVDD QUORUM LOST, VOLUME GROUP CLOSING65DE6DE3 1203041516 P S hdisk2 REQUESTED OPERATION CANNOT BE PERFORMED65DE6DE3 1203041516 P S hdisk2 REQUESTED OPERATION CANNOT BE PERFORMEDE86653C3 1203041516 P H LVDD I/O ERROR DETECTED BY LVME86653C3 1203041516 P H LVDD I/O ERROR DETECTED BY LVM78ABDDEB 1203041516 I O SYSJ2 META-DATA I/O ERROR78ABDDEB 1203041516 I O SYSJ2 META-DATA I/O ERROR65DE6DE3 1203041516 P S hdisk2 REQUESTED OPERATION CANNOT BE PERFORMEDE86653C3 1203041516 P H LVDD I/O ERROR DETECTED BY LVM
Chapter 9. Cluster partition management update 405
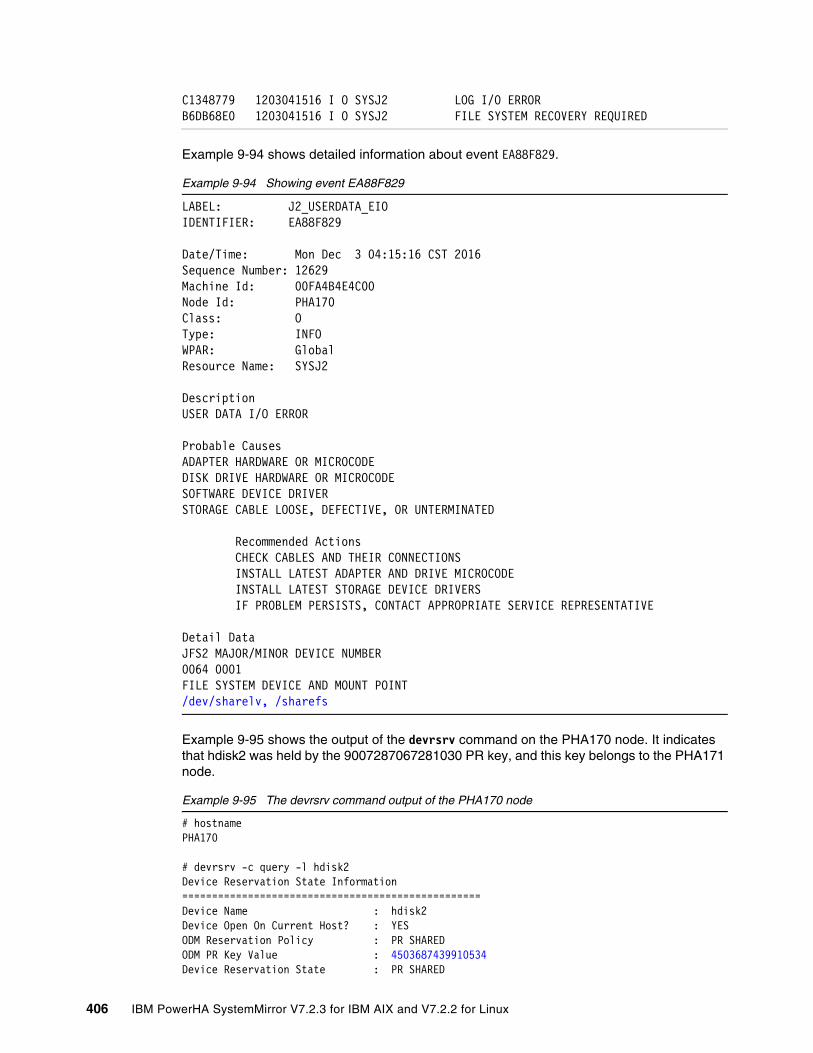
C1348779 1203041516 I O SYSJ2 LOG I/O ERRORB6DB68E0 1203041516 I O SYSJ2 FILE SYSTEM RECOVERY REQUIRED
Example 9-94 shows detailed information about event EA88F829.
Example 9-94 Showing event EA88F829
LABEL: J2_USERDATA_EIOIDENTIFIER: EA88F829
Date/Time: Mon Dec 3 04:15:16 CST 2016Sequence Number: 12629Machine Id: 00FA4B4E4C00Node Id: PHA170Class: OType: INFOWPAR: GlobalResource Name: SYSJ2
DescriptionUSER DATA I/O ERROR
Probable CausesADAPTER HARDWARE OR MICROCODEDISK DRIVE HARDWARE OR MICROCODESOFTWARE DEVICE DRIVERSTORAGE CABLE LOOSE, DEFECTIVE, OR UNTERMINATED
Recommended Actions CHECK CABLES AND THEIR CONNECTIONS INSTALL LATEST ADAPTER AND DRIVE MICROCODE INSTALL LATEST STORAGE DEVICE DRIVERS IF PROBLEM PERSISTS, CONTACT APPROPRIATE SERVICE REPRESENTATIVE
Detail DataJFS2 MAJOR/MINOR DEVICE NUMBER0064 0001 FILE SYSTEM DEVICE AND MOUNT POINT/dev/sharelv, /sharefs
Example 9-95 shows the output of the devrsrv command on the PHA170 node. It indicates that hdisk2 was held by the 9007287067281030 PR key, and this key belongs to the PHA171 node.
Example 9-95 The devrsrv command output of the PHA170 node
# hostnamePHA170
# devrsrv -c query -l hdisk2Device Reservation State Information==================================================Device Name : hdisk2Device Open On Current Host? : YESODM Reservation Policy : PR SHAREDODM PR Key Value : 4503687439910534Device Reservation State : PR SHARED
406 IBM PowerHA SystemMirror V7.2.3 for IBM AIX and V7.2.2 for Linux
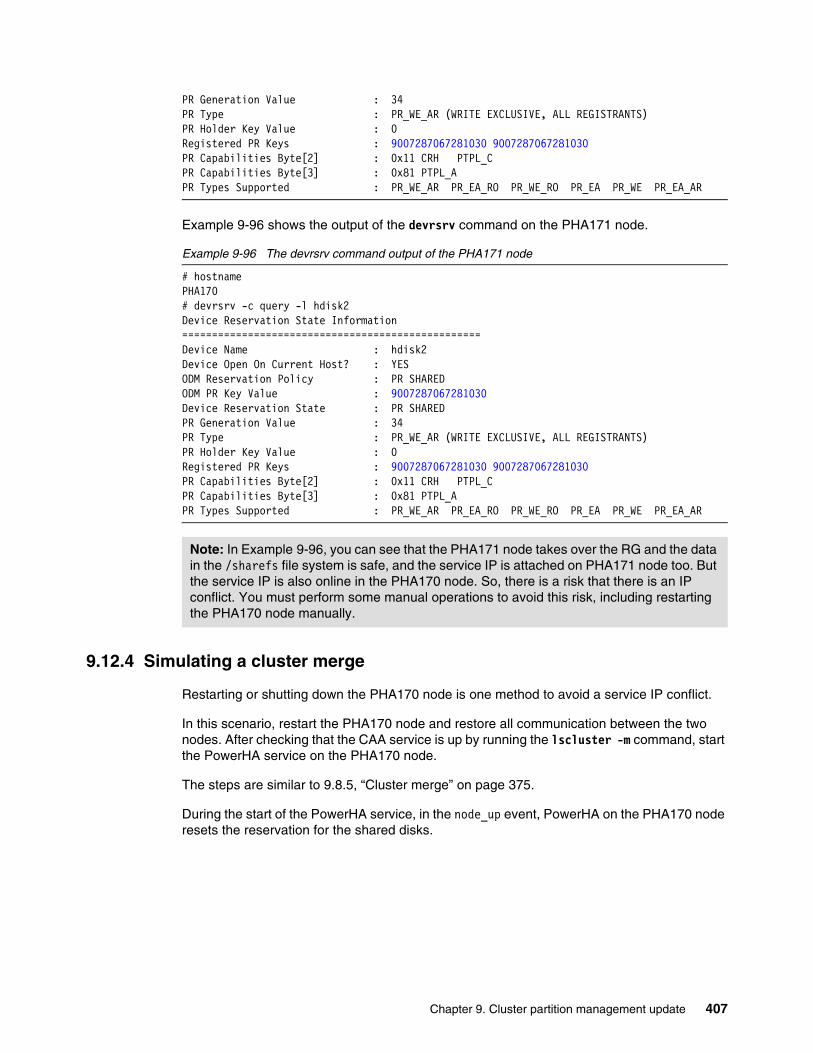
PR Generation Value : 34PR Type : PR_WE_AR (WRITE EXCLUSIVE, ALL REGISTRANTS)PR Holder Key Value : 0Registered PR Keys : 9007287067281030 9007287067281030 PR Capabilities Byte[2] : 0x11 CRH PTPL_C PR Capabilities Byte[3] : 0x81 PTPL_A PR Types Supported : PR_WE_AR PR_EA_RO PR_WE_RO PR_EA PR_WE PR_EA_AR
Example 9-96 shows the output of the devrsrv command on the PHA171 node.
Example 9-96 The devrsrv command output of the PHA171 node
# hostnamePHA170# devrsrv -c query -l hdisk2Device Reservation State Information==================================================Device Name : hdisk2Device Open On Current Host? : YESODM Reservation Policy : PR SHAREDODM PR Key Value : 9007287067281030Device Reservation State : PR SHAREDPR Generation Value : 34PR Type : PR_WE_AR (WRITE EXCLUSIVE, ALL REGISTRANTS)PR Holder Key Value : 0Registered PR Keys : 9007287067281030 9007287067281030 PR Capabilities Byte[2] : 0x11 CRH PTPL_C PR Capabilities Byte[3] : 0x81 PTPL_A PR Types Supported : PR_WE_AR PR_EA_RO PR_WE_RO PR_EA PR_WE PR_EA_AR
9.12.4 Simulating a cluster merge
Restarting or shutting down the PHA170 node is one method to avoid a service IP conflict.
In this scenario, restart the PHA170 node and restore all communication between the two nodes. After checking that the CAA service is up by running the lscluster -m command, start the PowerHA service on the PHA170 node.
The steps are similar to 9.8.5, “Cluster merge” on page 375.
During the start of the PowerHA service, in the node_up event, PowerHA on the PHA170 node resets the reservation for the shared disks.
Note: In Example 9-96, you can see that the PHA171 node takes over the RG and the data in the /sharefs file system is safe, and the service IP is attached on PHA171 node too. But the service IP is also online in the PHA170 node. So, there is a risk that there is an IP conflict. You must perform some manual operations to avoid this risk, including restarting the PHA170 node manually.
Chapter 9. Cluster partition management update 407
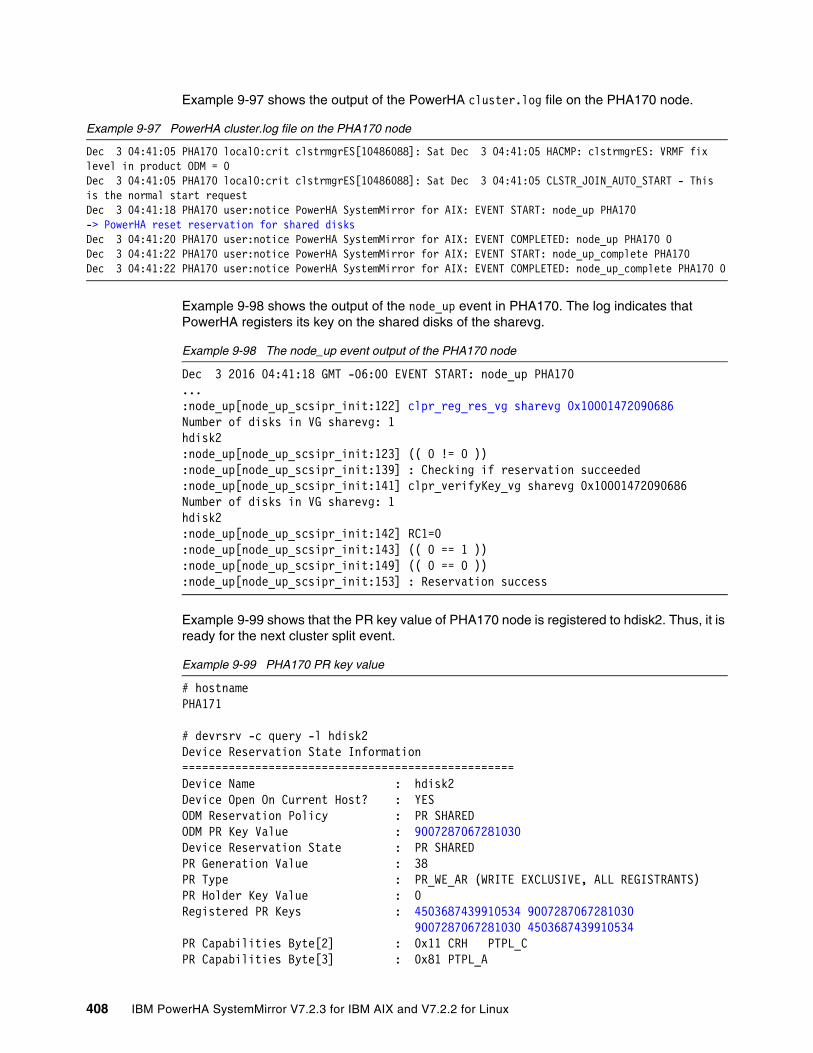
Example 9-97 shows the output of the PowerHA cluster.log file on the PHA170 node.
Example 9-97 PowerHA cluster.log file on the PHA170 node
Dec 3 04:41:05 PHA170 local0:crit clstrmgrES[10486088]: Sat Dec 3 04:41:05 HACMP: clstrmgrES: VRMF fix level in product ODM = 0Dec 3 04:41:05 PHA170 local0:crit clstrmgrES[10486088]: Sat Dec 3 04:41:05 CLSTR_JOIN_AUTO_START - This is the normal start requestDec 3 04:41:18 PHA170 user:notice PowerHA SystemMirror for AIX: EVENT START: node_up PHA170-> PowerHA reset reservation for shared disksDec 3 04:41:20 PHA170 user:notice PowerHA SystemMirror for AIX: EVENT COMPLETED: node_up PHA170 0Dec 3 04:41:22 PHA170 user:notice PowerHA SystemMirror for AIX: EVENT START: node_up_complete PHA170Dec 3 04:41:22 PHA170 user:notice PowerHA SystemMirror for AIX: EVENT COMPLETED: node_up_complete PHA170 0
Example 9-98 shows the output of the node_up event in PHA170. The log indicates that PowerHA registers its key on the shared disks of the sharevg.
Example 9-98 The node_up event output of the PHA170 node
Dec 3 2016 04:41:18 GMT -06:00 EVENT START: node_up PHA170...:node_up[node_up_scsipr_init:122] clpr_reg_res_vg sharevg 0x10001472090686Number of disks in VG sharevg: 1hdisk2:node_up[node_up_scsipr_init:123] (( 0 != 0 )):node_up[node_up_scsipr_init:139] : Checking if reservation succeeded:node_up[node_up_scsipr_init:141] clpr_verifyKey_vg sharevg 0x10001472090686Number of disks in VG sharevg: 1hdisk2:node_up[node_up_scsipr_init:142] RC1=0:node_up[node_up_scsipr_init:143] (( 0 == 1 )):node_up[node_up_scsipr_init:149] (( 0 == 0 )):node_up[node_up_scsipr_init:153] : Reservation success
Example 9-99 shows that the PR key value of PHA170 node is registered to hdisk2. Thus, it is ready for the next cluster split event.
Example 9-99 PHA170 PR key value
# hostnamePHA171
# devrsrv -c query -l hdisk2Device Reservation State Information==================================================Device Name : hdisk2Device Open On Current Host? : YESODM Reservation Policy : PR SHAREDODM PR Key Value : 9007287067281030Device Reservation State : PR SHAREDPR Generation Value : 38PR Type : PR_WE_AR (WRITE EXCLUSIVE, ALL REGISTRANTS)PR Holder Key Value : 0Registered PR Keys : 4503687439910534 9007287067281030 9007287067281030 4503687439910534 PR Capabilities Byte[2] : 0x11 CRH PTPL_C PR Capabilities Byte[3] : 0x81 PTPL_A
408 IBM PowerHA SystemMirror V7.2.3 for IBM AIX and V7.2.2 for Linux
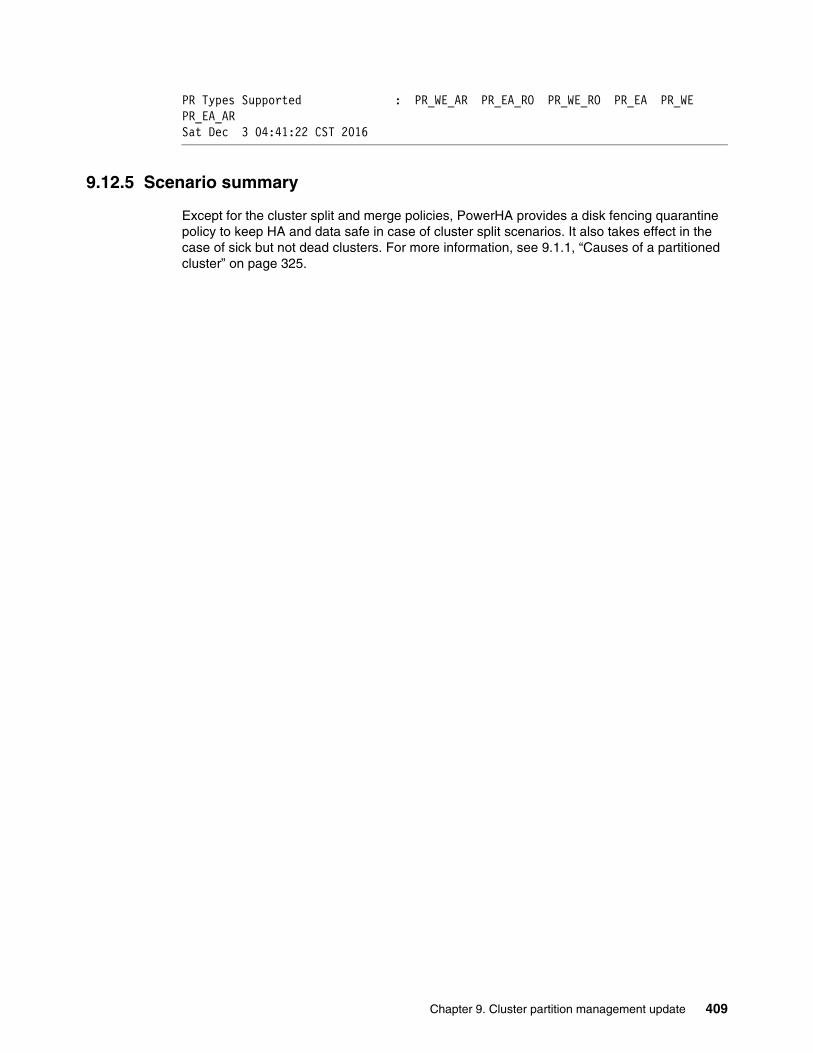
PR Types Supported : PR_WE_AR PR_EA_RO PR_WE_RO PR_EA PR_WE PR_EA_AR Sat Dec 3 04:41:22 CST 2016
9.12.5 Scenario summary
Except for the cluster split and merge policies, PowerHA provides a disk fencing quarantine policy to keep HA and data safe in case of cluster split scenarios. It also takes effect in the case of sick but not dead clusters. For more information, see 9.1.1, “Causes of a partitioned cluster” on page 325.
Chapter 9. Cluster partition management update 409

410 IBM PowerHA SystemMirror V7.2.3 for IBM AIX and V7.2.2 for Linux

Chapter 10. PowerHA SystemMirror special features
This chapter covers specific features that are new to PowerHA SystemMirror for IBM AIX for Version 7.2, Version 7.2.1., and Version 7.2.3.
This chapter covers the following topics:
� New option for starting PowerHA by using the clmgr command
� PowerHA SystemMirror V7.2.3 for AIX new functions and updates
10
© Copyright IBM Corp. 2019. All rights reserved. 411
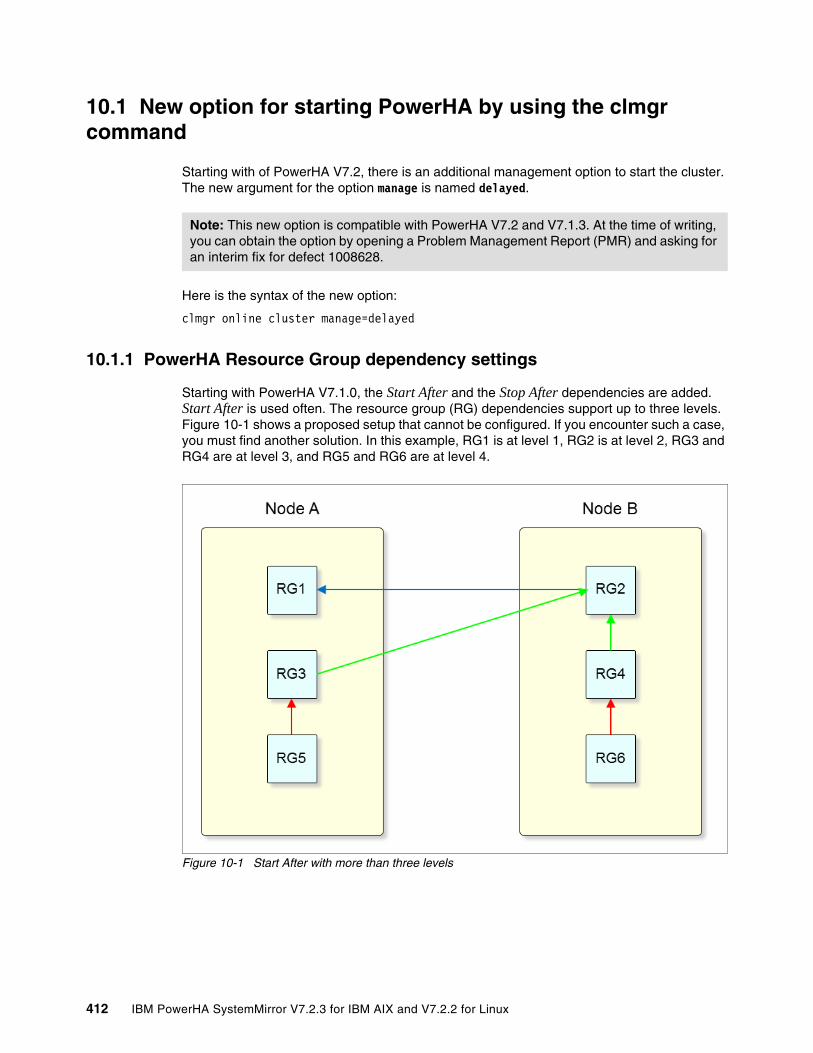
10.1 New option for starting PowerHA by using the clmgr command
Starting with of PowerHA V7.2, there is an additional management option to start the cluster. The new argument for the option manage is named delayed.
Here is the syntax of the new option:
clmgr online cluster manage=delayed
10.1.1 PowerHA Resource Group dependency settings
Starting with PowerHA V7.1.0, the Start After and the Stop After dependencies are added. Start After is used often. The resource group (RG) dependencies support up to three levels. Figure 10-1 shows a proposed setup that cannot be configured. If you encounter such a case, you must find another solution. In this example, RG1 is at level 1, RG2 is at level 2, RG3 and RG4 are at level 3, and RG5 and RG6 are at level 4.
Figure 10-1 Start After with more than three levels
Note: This new option is compatible with PowerHA V7.2 and V7.1.3. At the time of writing, you can obtain the option by opening a Problem Management Report (PMR) and asking for an interim fix for defect 1008628.
412 IBM PowerHA SystemMirror V7.2.3 for IBM AIX and V7.2.2 for Linux
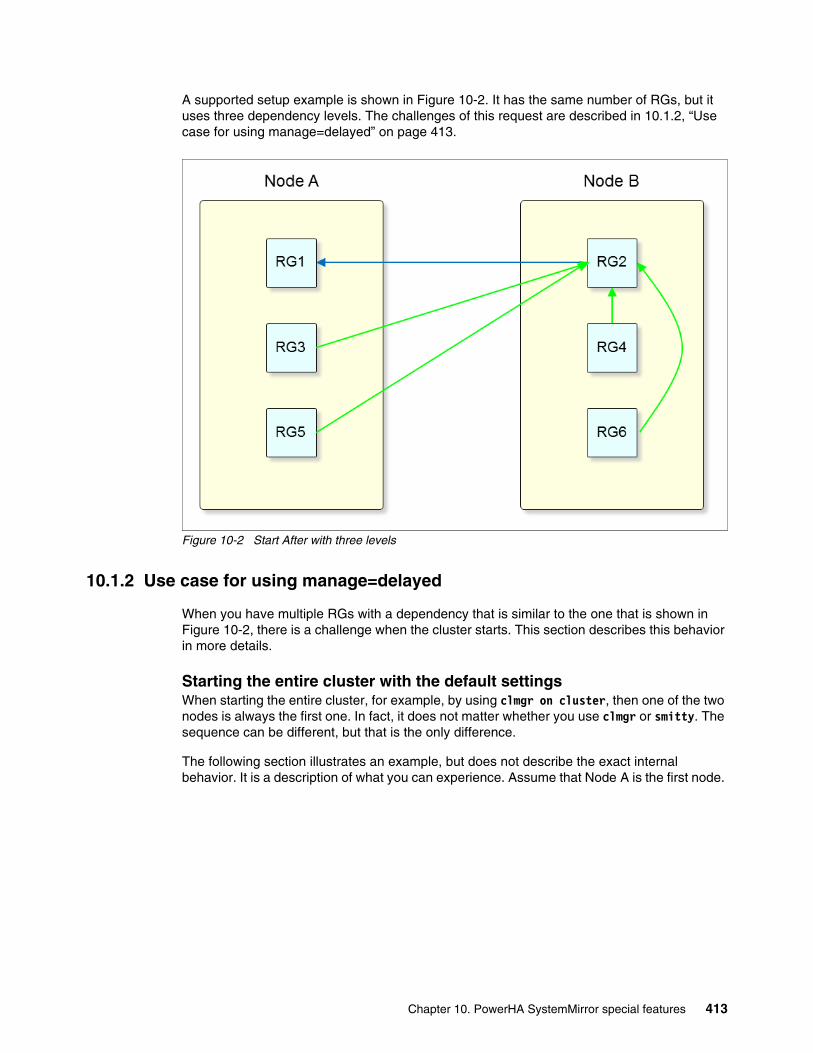
A supported setup example is shown in Figure 10-2. It has the same number of RGs, but it uses three dependency levels. The challenges of this request are described in 10.1.2, “Use case for using manage=delayed” on page 413.
Figure 10-2 Start After with three levels
10.1.2 Use case for using manage=delayed
When you have multiple RGs with a dependency that is similar to the one that is shown in Figure 10-2, there is a challenge when the cluster starts. This section describes this behavior in more details.
Starting the entire cluster with the default settingsWhen starting the entire cluster, for example, by using clmgr on cluster, then one of the two nodes is always the first one. In fact, it does not matter whether you use clmgr or smitty. The sequence can be different, but that is the only difference.
The following section illustrates an example, but does not describe the exact internal behavior. It is a description of what you can experience. Assume that Node A is the first node.
Chapter 10. PowerHA SystemMirror special features 413
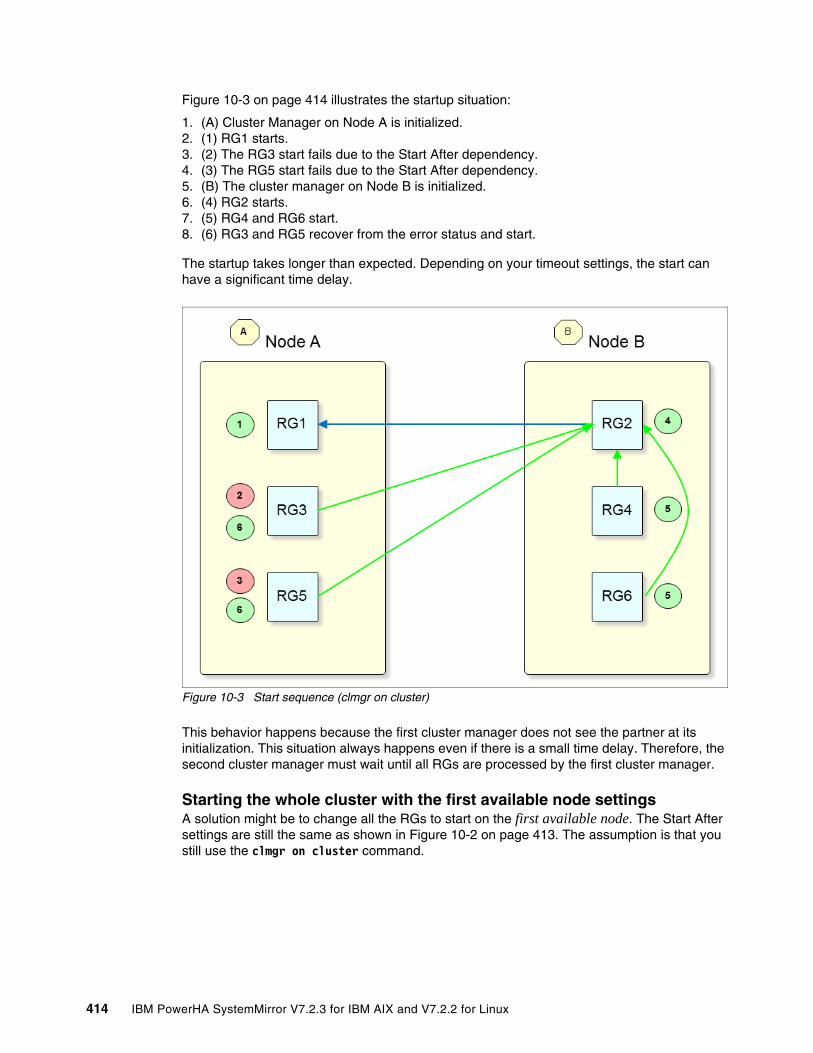
Figure 10-3 on page 414 illustrates the startup situation:
1. (A) Cluster Manager on Node A is initialized.2. (1) RG1 starts.3. (2) The RG3 start fails due to the Start After dependency.4. (3) The RG5 start fails due to the Start After dependency.5. (B) The cluster manager on Node B is initialized.6. (4) RG2 starts.7. (5) RG4 and RG6 start.8. (6) RG3 and RG5 recover from the error status and start.
The startup takes longer than expected. Depending on your timeout settings, the start can have a significant time delay.
Figure 10-3 Start sequence (clmgr on cluster)
This behavior happens because the first cluster manager does not see the partner at its initialization. This situation always happens even if there is a small time delay. Therefore, the second cluster manager must wait until all RGs are processed by the first cluster manager.
Starting the whole cluster with the first available node settingsA solution might be to change all the RGs to start on the first available node. The Start After settings are still the same as shown in Figure 10-2 on page 413. The assumption is that you still use the clmgr on cluster command.
414 IBM PowerHA SystemMirror V7.2.3 for IBM AIX and V7.2.2 for Linux
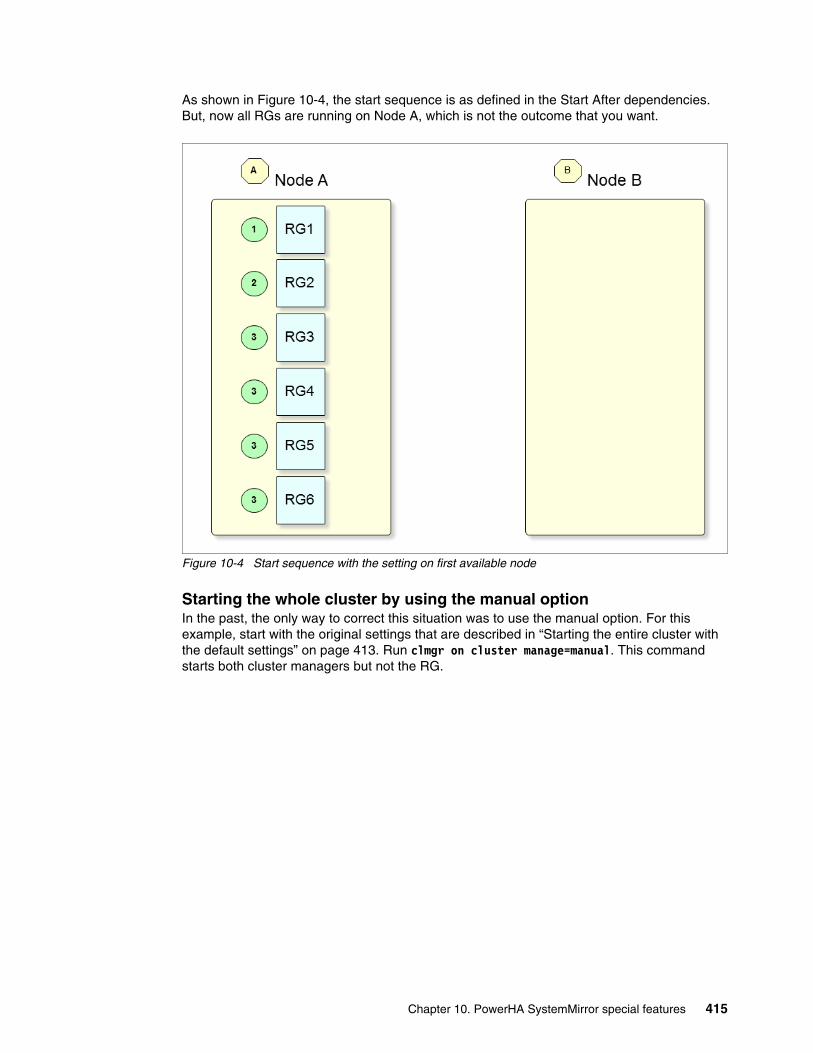
As shown in Figure 10-4, the start sequence is as defined in the Start After dependencies. But, now all RGs are running on Node A, which is not the outcome that you want.
Figure 10-4 Start sequence with the setting on first available node
Starting the whole cluster by using the manual optionIn the past, the only way to correct this situation was to use the manual option. For this example, start with the original settings that are described in “Starting the entire cluster with the default settings” on page 413. Run clmgr on cluster manage=manual. This command starts both cluster managers but not the RG.
Chapter 10. PowerHA SystemMirror special features 415
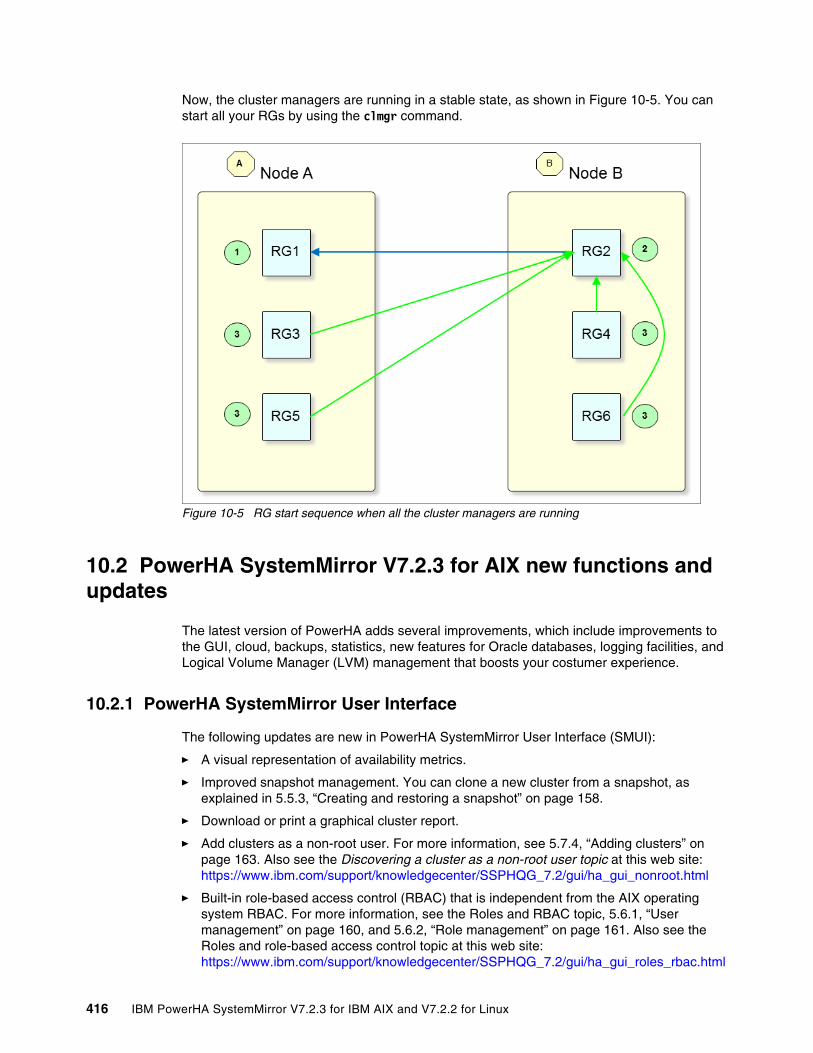
Now, the cluster managers are running in a stable state, as shown in Figure 10-5. You can start all your RGs by using the clmgr command.
Figure 10-5 RG start sequence when all the cluster managers are running
10.2 PowerHA SystemMirror V7.2.3 for AIX new functions and updates
The latest version of PowerHA adds several improvements, which include improvements to the GUI, cloud, backups, statistics, new features for Oracle databases, logging facilities, and Logical Volume Manager (LVM) management that boosts your costumer experience.
10.2.1 PowerHA SystemMirror User Interface
The following updates are new in PowerHA SystemMirror User Interface (SMUI):
� A visual representation of availability metrics.
� Improved snapshot management. You can clone a new cluster from a snapshot, as explained in 5.5.3, “Creating and restoring a snapshot” on page 158.
� Download or print a graphical cluster report.
� Add clusters as a non-root user. For more information, see 5.7.4, “Adding clusters” on page 163. Also see the Discovering a cluster as a non-root user topic at this web site: https://www.ibm.com/support/knowledgecenter/SSPHQG_7.2/gui/ha_gui_nonroot.html
� Built-in role-based access control (RBAC) that is independent from the AIX operating system RBAC. For more information, see the Roles and RBAC topic, 5.6.1, “User management” on page 160, and 5.6.2, “Role management” on page 161. Also see the Roles and role-based access control topic at this web site:https://www.ibm.com/support/knowledgecenter/SSPHQG_7.2/gui/ha_gui_roles_rbac.html
416 IBM PowerHA SystemMirror V7.2.3 for IBM AIX and V7.2.2 for Linux
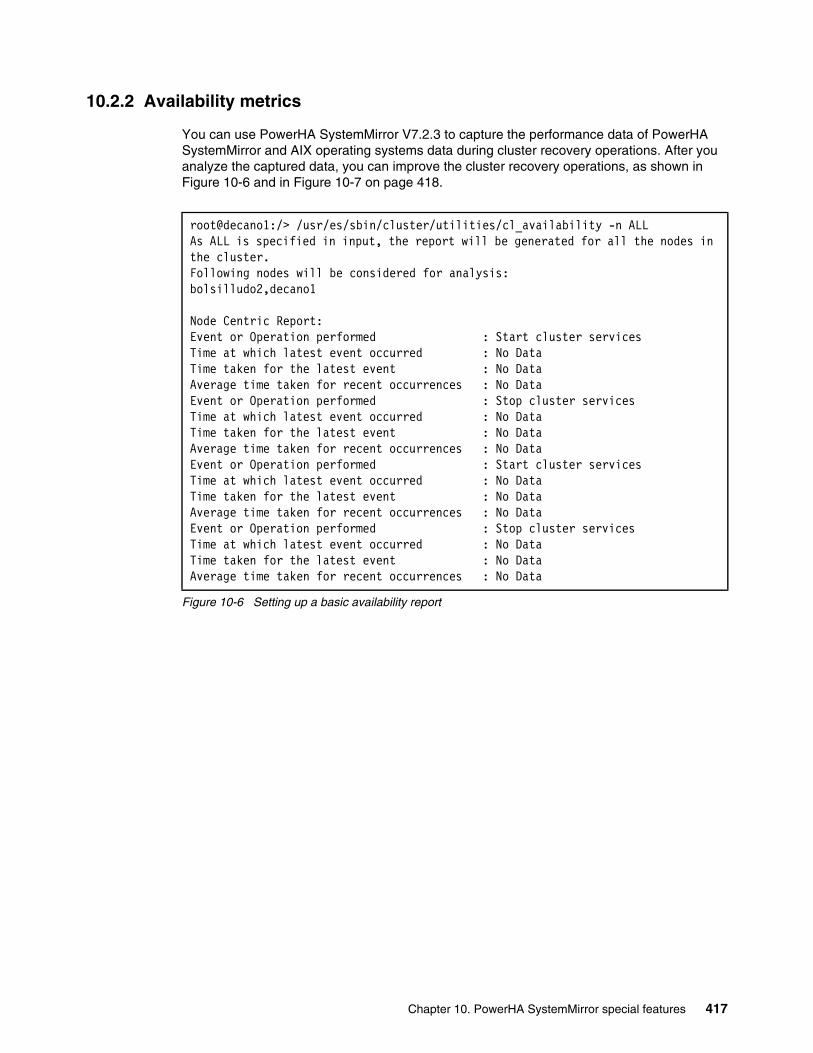
10.2.2 Availability metrics
You can use PowerHA SystemMirror V7.2.3 to capture the performance data of PowerHA SystemMirror and AIX operating systems data during cluster recovery operations. After you analyze the captured data, you can improve the cluster recovery operations, as shown in Figure 10-6 and in Figure 10-7 on page 418.
Figure 10-6 Setting up a basic availability report
root@decano1:/> /usr/es/sbin/cluster/utilities/cl_availability -n ALLAs ALL is specified in input, the report will be generated for all the nodes in the cluster.Following nodes will be considered for analysis:bolsilludo2,decano1
Node Centric Report:Event or Operation performed : Start cluster servicesTime at which latest event occurred : No DataTime taken for the latest event : No DataAverage time taken for recent occurrences : No DataEvent or Operation performed : Stop cluster servicesTime at which latest event occurred : No DataTime taken for the latest event : No DataAverage time taken for recent occurrences : No DataEvent or Operation performed : Start cluster servicesTime at which latest event occurred : No DataTime taken for the latest event : No DataAverage time taken for recent occurrences : No DataEvent or Operation performed : Stop cluster servicesTime at which latest event occurred : No DataTime taken for the latest event : No DataAverage time taken for recent occurrences : No Data
Chapter 10. PowerHA SystemMirror special features 417
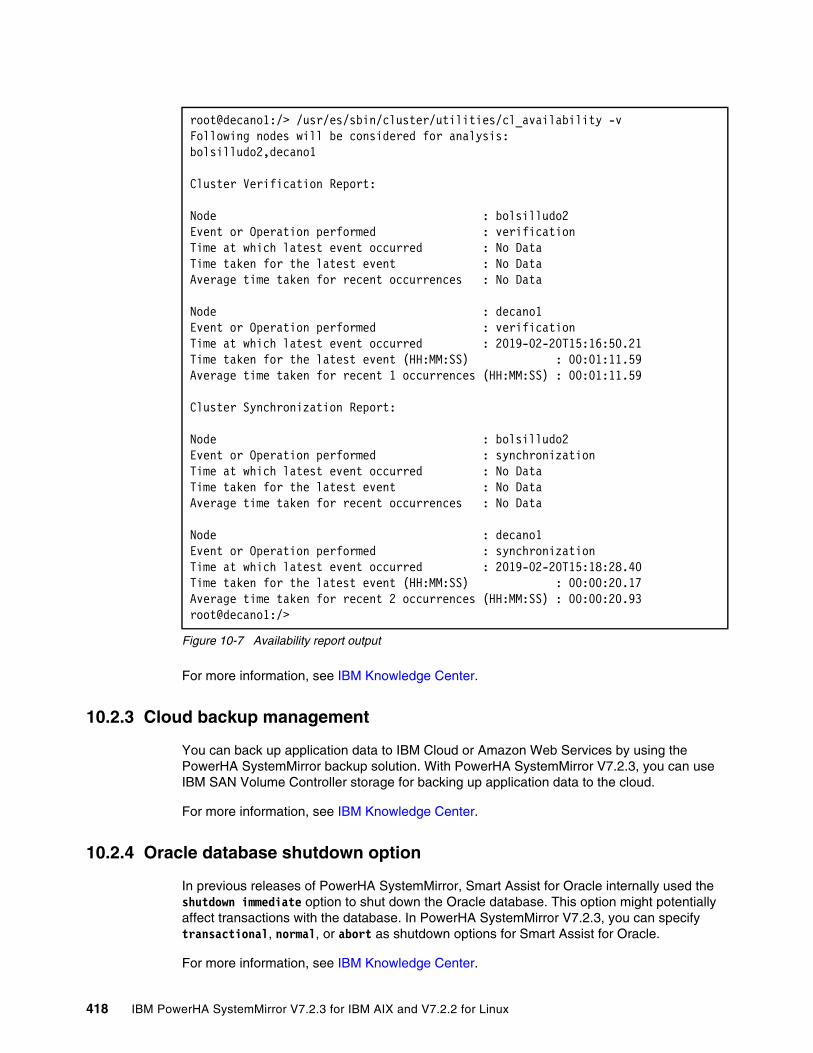
Figure 10-7 Availability report output
For more information, see IBM Knowledge Center.
10.2.3 Cloud backup management
You can back up application data to IBM Cloud or Amazon Web Services by using the PowerHA SystemMirror backup solution. With PowerHA SystemMirror V7.2.3, you can use IBM SAN Volume Controller storage for backing up application data to the cloud.
For more information, see IBM Knowledge Center.
10.2.4 Oracle database shutdown option
In previous releases of PowerHA SystemMirror, Smart Assist for Oracle internally used the shutdown immediate option to shut down the Oracle database. This option might potentially affect transactions with the database. In PowerHA SystemMirror V7.2.3, you can specify transactional, normal, or abort as shutdown options for Smart Assist for Oracle.
For more information, see IBM Knowledge Center.
root@decano1:/> /usr/es/sbin/cluster/utilities/cl_availability -vFollowing nodes will be considered for analysis:bolsilludo2,decano1
Cluster Verification Report:
Node : bolsilludo2Event or Operation performed : verificationTime at which latest event occurred : No DataTime taken for the latest event : No DataAverage time taken for recent occurrences : No Data
Node : decano1Event or Operation performed : verificationTime at which latest event occurred : 2019-02-20T15:16:50.21Time taken for the latest event (HH:MM:SS) : 00:01:11.59Average time taken for recent 1 occurrences (HH:MM:SS) : 00:01:11.59
Cluster Synchronization Report:
Node : bolsilludo2Event or Operation performed : synchronizationTime at which latest event occurred : No DataTime taken for the latest event : No DataAverage time taken for recent occurrences : No Data
Node : decano1Event or Operation performed : synchronizationTime at which latest event occurred : 2019-02-20T15:18:28.40Time taken for the latest event (HH:MM:SS) : 00:00:20.17Average time taken for recent 2 occurrences (HH:MM:SS) : 00:00:20.93root@decano1:/>
418 IBM PowerHA SystemMirror V7.2.3 for IBM AIX and V7.2.2 for Linux
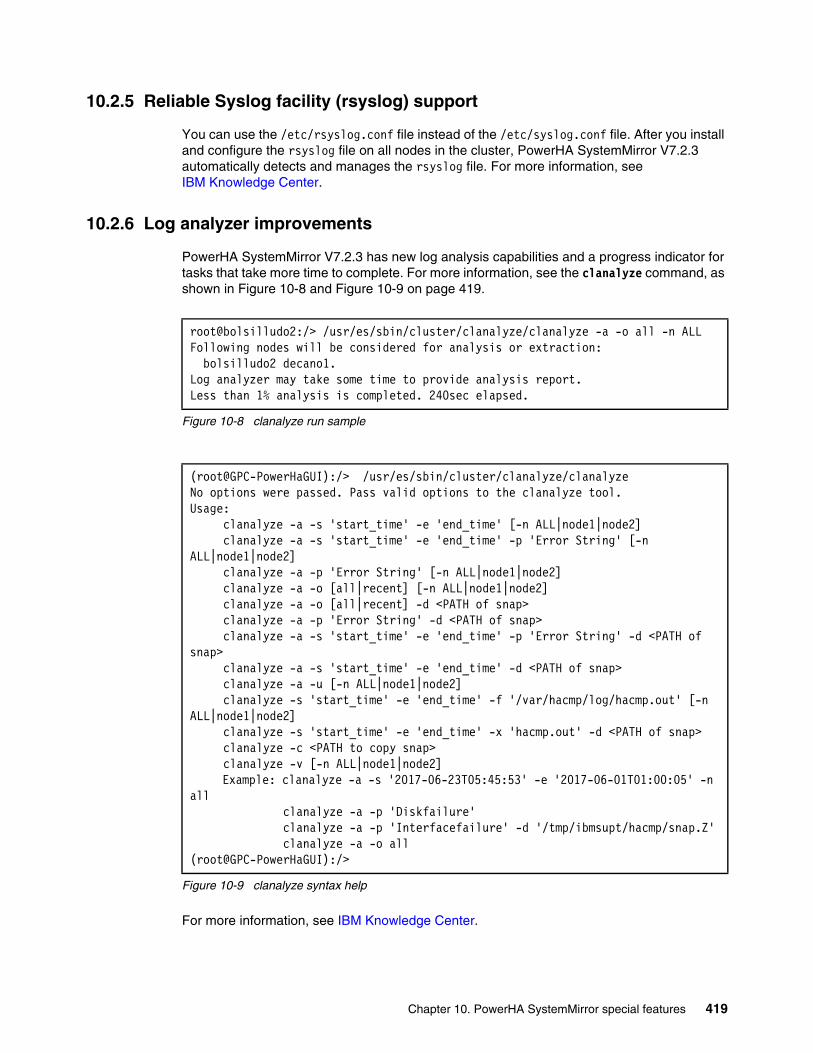
10.2.5 Reliable Syslog facility (rsyslog) support
You can use the /etc/rsyslog.conf file instead of the /etc/syslog.conf file. After you install and configure the rsyslog file on all nodes in the cluster, PowerHA SystemMirror V7.2.3 automatically detects and manages the rsyslog file. For more information, seeIBM Knowledge Center.
10.2.6 Log analyzer improvements
PowerHA SystemMirror V7.2.3 has new log analysis capabilities and a progress indicator for tasks that take more time to complete. For more information, see the clanalyze command, as shown in Figure 10-8 and Figure 10-9 on page 419.
Figure 10-8 clanalyze run sample
Figure 10-9 clanalyze syntax help
For more information, see IBM Knowledge Center.
root@bolsilludo2:/> /usr/es/sbin/cluster/clanalyze/clanalyze -a -o all -n ALLFollowing nodes will be considered for analysis or extraction: bolsilludo2 decano1.Log analyzer may take some time to provide analysis report.Less than 1% analysis is completed. 240sec elapsed.
(root@GPC-PowerHaGUI):/> /usr/es/sbin/cluster/clanalyze/clanalyzeNo options were passed. Pass valid options to the clanalyze tool.Usage: clanalyze -a -s 'start_time' -e 'end_time' [-n ALL|node1|node2] clanalyze -a -s 'start_time' -e 'end_time' -p 'Error String' [-n ALL|node1|node2] clanalyze -a -p 'Error String' [-n ALL|node1|node2] clanalyze -a -o [all|recent] [-n ALL|node1|node2] clanalyze -a -o [all|recent] -d <PATH of snap> clanalyze -a -p 'Error String' -d <PATH of snap> clanalyze -a -s 'start_time' -e 'end_time' -p 'Error String' -d <PATH of snap> clanalyze -a -s 'start_time' -e 'end_time' -d <PATH of snap> clanalyze -a -u [-n ALL|node1|node2] clanalyze -s 'start_time' -e 'end_time' -f '/var/hacmp/log/hacmp.out' [-n ALL|node1|node2] clanalyze -s 'start_time' -e 'end_time' -x 'hacmp.out' -d <PATH of snap> clanalyze -c <PATH to copy snap> clanalyze -v [-n ALL|node1|node2] Example: clanalyze -a -s '2017-06-23T05:45:53' -e '2017-06-01T01:00:05' -n all clanalyze -a -p 'Diskfailure' clanalyze -a -p 'Interfacefailure' -d '/tmp/ibmsupt/hacmp/snap.Z' clanalyze -a -o all(root@GPC-PowerHaGUI):/>
Chapter 10. PowerHA SystemMirror special features 419
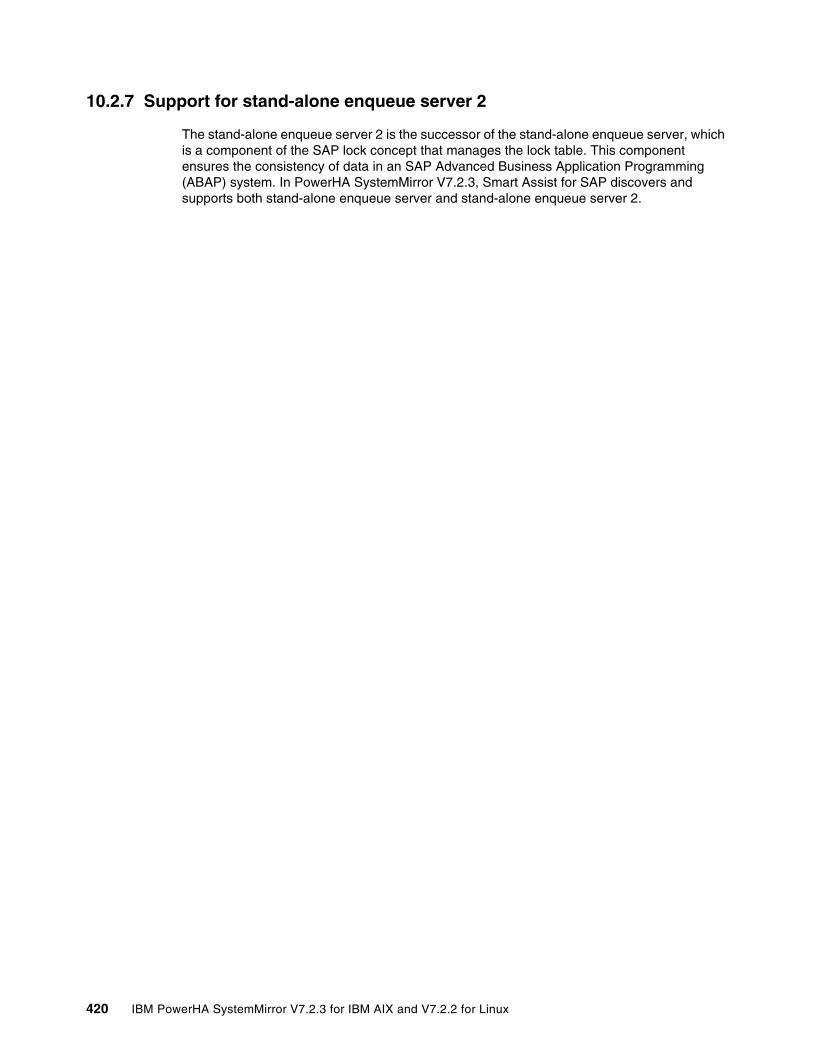
10.2.7 Support for stand-alone enqueue server 2
The stand-alone enqueue server 2 is the successor of the stand-alone enqueue server, which is a component of the SAP lock concept that manages the lock table. This component ensures the consistency of data in an SAP Advanced Business Application Programming (ABAP) system. In PowerHA SystemMirror V7.2.3, Smart Assist for SAP discovers and supports both stand-alone enqueue server and stand-alone enqueue server 2.
420 IBM PowerHA SystemMirror V7.2.3 for IBM AIX and V7.2.2 for Linux

Chapter 11. PowerHA SystemMirror V7.2.2 for Linux
This chapter describes how to install, deploy, and configure PowerHA SystemMirror for Linux.
This chapter contains the following topics:
� Architecture and planning of PowerHA SystemMirror for Linux
� Installation of PowerHA SystemMirror for Linux
� Configuring PowerHA SystemMirror for Linux
� Problem determination of PowerHA SystemMirror for Linux
11
© Copyright IBM Corp. 2019. All rights reserved. 421

11.1 Architecture and planning of PowerHA SystemMirror for Linux
For IBM POWER® processor-based servers, the Linux market has grown and many workloads have been ported and integrated with solutions such as SAP HANA and SAP NetWeaver. These workloads require resilience for business continuity, which requires high availability (HA) solutions. IBM PowerHA SystemMirror for Linux was designed for customers with HA requirements for Linux for Power Systems servers. PowerHA SystemMirror for Linux has the same look and feel as AIX, and it offers a GUI or dashboard for monitoring of AIX or Linux clusters. Customers with skills in PowerHA for AIX have all those benefits in PowerHA for Linux.
11.1.1 PowerHA for Linux architecture
Within the PowerHA architecture for Linux, its main components are Reliable Scalable Cluster Technology (RSCT), the cluster manager, clcomd, and the PowerHA clmgr command-line interface (CLI).
Figure 11-1 on page 423 shows the high-level diagram of a Linux environment for PowerHA. Unlike AIX, a Linux node with PowerHA does not have Cluster Aware AIX (CAA) because it uses RSCT services that offer the following functions:
� Topology services that use the cthats subsystem that controls the heartbeat ring and detects communication failures.
� Group Services that use the cthags subsystem that handle the events that occurred, notifies the cluster manager, and handles the calls of the cluster manager to coordinate the recovery actions decided by the cluster manager.
422 IBM PowerHA SystemMirror V7.2.3 for IBM AIX and V7.2.2 for Linux
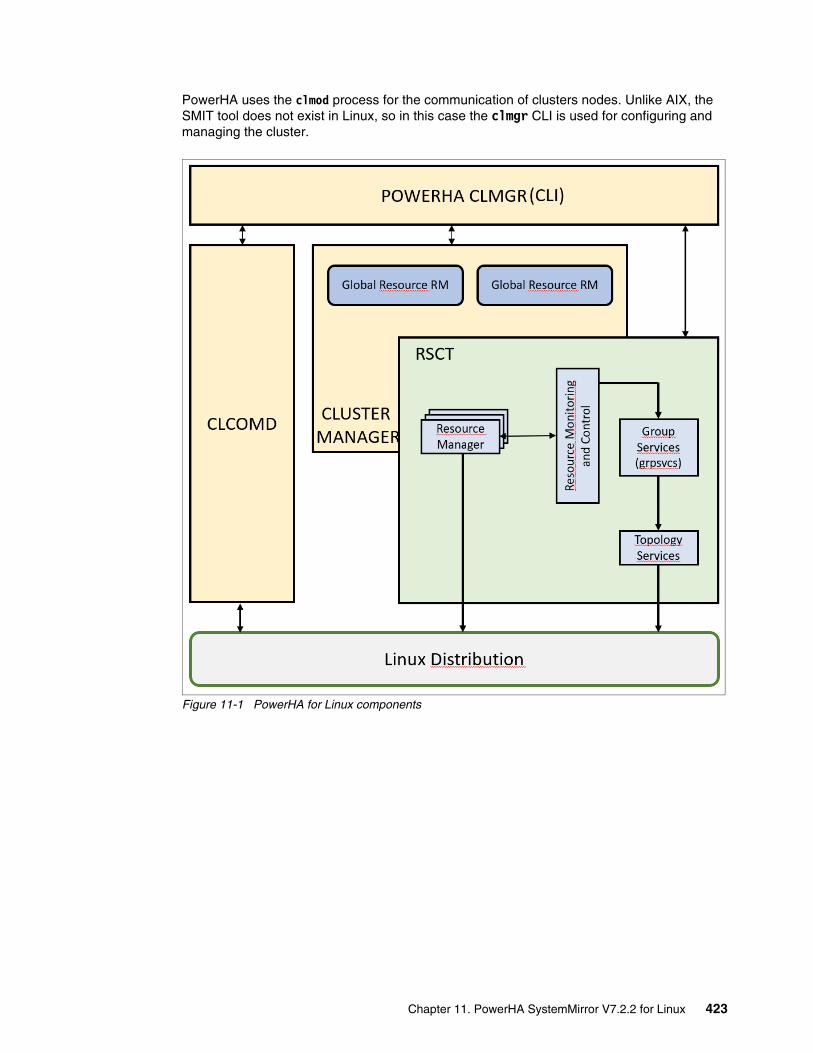
PowerHA uses the clmod process for the communication of clusters nodes. Unlike AIX, the SMIT tool does not exist in Linux, so in this case the clmgr CLI is used for configuring and managing the cluster.
Figure 11-1 PowerHA for Linux components
Chapter 11. PowerHA SystemMirror V7.2.2 for Linux 423

The PowerHA SystemMirror software supports up to four nodes in a cluster. Figure 11-2 shows that each node is identified by a unique name. In PowerHA SystemMirror, a node name and a host name must be the same, and each node is identified by a unique name. In PowerHA SystemMirror, the nodes can be Bare Metal or virtual machines (VMs).
Figure 11-2 RSCT peer domain cluster
The topology of PowerHA SystemMirror for Linux is similar to AIX to ensure that applications and its resources are kept highly available. Some of those resources are:
� Service IP labels or addresses
� Physical disks
� Volume groups (VGs)
� Logical volumes
� File systems
� Network File System (NFS)
11.1.2 Differences between PowerHA SystemMirror for AIX and Linux
Although the topology and architecture of PowerHA SystemMirror for AIX and Linux are similar, there are some differences that are highlighted in this section.
Cluster configuration changesThe changes applied to the cluster configuration by the user are immediately applied to all nodes without a manual synchronization procedure, unlike in PowerHA SystemMirror for AIX.
Split policyAs in AIX, PowerHA for Linux split events occur when a group of nodes in a cluster cannot communicate with each other, so the event splits the cluster into two or more partitions. Afterward, in PowerHA for Linux manual intervention is required.
Split policy: ManualIf the split policy is set to manual and the event happens, a verification process and manual intervention is required. You find that PENDING_QUORUM ran the lssrc -ls IBM.RecoveryRM |grep "Opera-tional Quorum State command, which indicates that a split operation occurred and manual intervention is needed. For the survivor node to take over the failed resources, run the runact command.
424 IBM PowerHA SystemMirror V7.2.3 for IBM AIX and V7.2.2 for Linux
Split policy: TiebreakerPowerHA SystemMirror for Linux uses the Normal quorum type of RSCT to create a peer domain cluster. This operation requires that at least half of the nodes are up to maintain quorum. So if the tiebreaker policy is set up, the tiebreaker is used only when there is a tie and the total number of nodes that are configured in a cluster is even. For example, if two nodes are down in a 3-node cluster, then even if a tiebreaker is configured the node that is up cannot acquire the resources.
Dependencies PowerHA SystemMirror for Linux also offers dependencies and relationships between a source resource group (RG) and one or more target resources groups. The dependencies are divided in two groups:
� Start and stop dependencies
� Location dependencies
For more information, see 11.3.1, “Configuring dependencies between resource groups” on page 454.
Stop behavior of Start After dependency for Linux In PowerHA for Linux, if two RGs have a Start After dependency, the target RG cannot be stopped while the source RG is online.
Location dependency: Anti-collocatedIn PowerHA for Linux, if the target RG with an anti-collocated dependency is brought online when the source RG is already online on a node and the intended node of the target RG is not available, the RG becomes online on the same node where source RG is also active.
Location dependency: CollocatedIn PowerHA for Linux for two RGs with collocated dependency, if any one of the RGs fails, then the PowerHA SystemMirror software does not move both the RGs to another node.
The unmanage parameterIn PowerHA for Linux, the Unmanage parameter for cluster or node level is not available in PowerHA for Linux.
11.1.3 PowerHA for Linux planning
Before starting a PowerHA for Linux installation, consider the following sections.
PowerHA SystemMirror RPM packages are used directly by the scriptThe following list shows the packages that are used directly by the script:
� powerhasystemmirror� powerhasystemmirror.adapter� powerhasystemmirror.policies� powerhasystemmirror.policies.one
Note: When the split operation happens, the PowerHA SystemMirror for AIX software broadcasts a message to all terminals indicating the split event, but this broadcast does not happen in PowerHA for Linux.
Chapter 11. PowerHA SystemMirror V7.2.2 for Linux 425
� powerhasystemmirror.policies.two� powerhasystemmirror.sappolicy
The relevant Red Hat Package Manager (RPM) is installed automatically when you run the PowerHA SystemMirror installation script installPHA, as shown in Example 11-1.
Example 11-1 RPM packages used directly by the script installPHA
itso-sles12-n1:/tmp/POWERHA7.2.2Linux/PHA7220Linux64 # rpm -qa | grep powerhaitso-sles12-n1:/tmp/POWERHA7.2.2Linux/PHA7220Linux64 # ./installPHA checking :Prerequisites packages for PowerHA SystemMirror Success: All prerequisites of PowerHA SystemMirror installed
installPHA: Installing ./Linux/ppc64le/powerhasystemmirror-7.2.2.0-17347.ppc64le.rpm
installPHA: Installing ./Linux/ppc64le/powerhasystemmirror.sappolicy-7.2.2.0-17347.ppc64le.rpm
installPHA: Installing ./Linux/ppc64le/powerhasystemmirror.policies.one-7.2.2.0-17347.ppc64le.rpm
installPHA: Installing ./Linux/ppc64le/powerhasystemmirror.policies.two-7.2.2.0-17347.ppc64le.rpm
installPHA: Installing ./Linux/ppc64le/powerhasystemmirror.adapter-7.2.2.0-17347.ppc64le.rpmitso-sles12-n1:/tmp/POWERHA7.2.2Linux/PHA7220Linux64 # rpm -qa | grep powerhapowerhasystemmirror.policies.one-7.2.2.0-17347.ppc64lepowerhasystemmirror.adapter-7.2.2.0-17347.ppc64lepowerhasystemmirror.sappolicy-7.2.2.0-17347.ppc64lepowerhasystemmirror-7.2.2.0-17347.ppc64lepowerhasystemmirror.policies.two-7.2.2.0-17347.ppc64le
RPM packages for src and RSCT for the clustering technologyIf you installed Linux productivity and service tools for IBM Power servers, the RSCT and src packages are already installed. Otherwise, the installPHA script installs these packages automatically. If you are going to uninstall PowerHA and are using the Linux productivity and service packages, you get an error when uninstalling the RSCT and src packages because they depend on the following packages:
� ibm-power-managed-rhel7 � ibm-power-nonmanaged-rhel7� ibm-power-managed-sles12� ibm-power-nonmanaged-sles12
As a best practice, do not uninstall them manually unless IBM Support instructs you to do so, as shown in Example 11-2.
Example 11-2 Uninstalling PowerHA with RSCT and src packages
itso-sles12-n1:/tmp/POWERHA7.2.2Linux/PHA7220Linux64 # ./uninstallPHAuninstallPHA: Uninstalling PHA on platform: ppc64leuninstallPHA: Uninstalling powerhasystemmirror.sappolicy-7.2.2.0-17347.ppc64leuninstallPHA: Uninstalling powerhasystemmirror.policies.two-7.2.2.0-17347.ppc64le
426 IBM PowerHA SystemMirror V7.2.3 for IBM AIX and V7.2.2 for Linux
uninstallPHA: Uninstalling powerhasystemmirror.policies.one-7.2.2.0-17347.ppc64leuninstallPHA: Uninstalling powerhasystemmirror.adapter-7.2.2.0-17347.ppc64leuninstallPHA: Uninstalling powerhasystemmirror-7.2.2.0-17347.ppc64leuninstallPHA: Uninstalling rsct.opt.storagerm-3.2.2.4-17208.ppc64leuninstallPHA: Error: Failed with return-code: 1 : rsct.opt.storagerm-3.2.2.4-17208.ppc64leuninstallPHA: Any packages failed uninstallation. See details below:uninstallPHA: Error: Failed with return-code: 1 : rsct.opt.storagerm-3.2.2.4-17208.ppc64leerror: Failed dependencies: rsct.opt.storagerm is needed by (installed) ibm-power-managed-sles12-1.3.1-0.ppc64leitso-sles12-n1:/tmp/POWERHA7.2.2Linux/PHA7220Linux64 # rpm -qa | grep rsctrsct.core-3.2.2.4-17208.ppc64lersct.core.utils-3.2.2.4-17208.ppc64lersct.basic-3.2.2.4-17208.ppc64lersct.opt.storagerm-3.2.2.4-17208.ppc64leitso-sles12-n1:/tmp/POWERHA7.2.2Linux/PHA7220Linux64 # rpm -qa | grep srcsrc-3.2.2.4-17208.ppc64le
Disk tiebreakerIf resources are defined for tiebreaker disks, disk resources must not be used to store any type of file system for Linux.
IPv6IPv6 is not supported in PowerHA SystemMirror for Linux.
FirewallAs a best practice, validate that the firewall is disabled or that the following ports are open for the correct functioning of PowerHA SystemMirror:
� 657/TCP� 657/UDP� 16191/TCP� 12143/UDP� 12347/UDP � 12348/UDP
Example 11-3 validates the firewall is opened and the ports are opened by running the systemctl status firewalld.service command.
Example 11-3 Checking the firewall status
firewall.servicep/POWERHA7.2.2Linux/PHA7220Linux64 # systemctl status firewall Loaded: not-found (Reason: No such file or directory) Active: inactive (dead)
Chapter 11. PowerHA SystemMirror V7.2.2 for Linux 427
NetworkConsider the following network considerations for PowerHA for Linux:
� Whether a node has different network interfaces in a single network. Each interface has different functions in PowerHA for Linux.
� Service IP label/address
This item is used by clients to access applications programs, and it is available only when the RG that the label or address belongs to is online.
� Persistent IP label/address
A persistent node IP label is an IP alias that can be assigned to a specific node in a cluster network. A persistent node IP label always remains on the same node and coexists in a network interface card (NIC) that already has a defined boot or service IP label. This approach is useful for accessing a particular node in a PowerHA SystemMirror cluster to run monitoring and diagnostics. In general, this network does not have high demand because it is not used for the traffic of workloads in production.
� IP address takeover (IPAT)
This technology keeps IP addresses highly available. If you plan to use IPAT, here are some best practices:
– Each network interface must have a boot IP label that is defined in the PowerHA SystemMirror.
– If you have multiple interfaces, all boot and services addresses must be defined on different subnets.
– The netmask for all IP labels in a PowerHA SystemMirror for Linux network must be the same.
Linux operating system requirementsThe nodes that you plan to make part of the cluster must be running on one of the following versions of operating systems in little-endian mode:
� SUSE Linux Enterprise Server:
– SUSE Linux Enterprise Server 12 SP1 (64-bit)
– SUSE Linux Enterprise Server 12 SP2 (64-bit)
– SUSE Linux Enterprise Server 12 SP3 (64-bit)
– SUSE Linux Enterprise Server for SAP 12 SP1 (64-bit)
– SUSE Linux Enterprise Server for SAP 12 SP2 (64-bit)
– SUSE Linux Enterprise Server for SAP 12 SP3 (64-bit)
� Red Hat Enterprise Linux:
– Red Hat Enterprise Linux (RHEL) 7.2 (64-bit)
– Red Hat Enterprise Linux (RHEL) 7.3 (64-bit)
– Red Hat Enterprise Linux (RHEL) 7.4 (64-bit)
Note: PowerHA SystemMirror V7.2.2 for Linux is not supported on SUSE Linux Enterprise Server 11 for SAP.
428 IBM PowerHA SystemMirror V7.2.3 for IBM AIX and V7.2.2 for Linux

11.2 Installation of PowerHA SystemMirror for Linux
This section shows how to install PowerHA for Linux.
11.2.1 Prerequisites
Before you install the PowerHA SystemMirror on a Linux system, you must meet the following prerequisites:
� You must have root authority to perform the installation.
� The following scripting package is required in each SUSE Linux Enterprise Server and RHEL system:
– KSH93 (ksh-93vu-18.1.ppc64le) for SUSE Linux Enterprise Server – KSH93 (ksh-20120801) for RHEL.
The downloaded files contain the source package for the ksh-93vu-18.1.src.rpm files that must be compiled to get the ksh-93vu-18.1.ppc64le.rpm files. To compile the files, run the following command:
rpmbuild --rebuild ksh-93vu-259.1.src.rpm.
� As a best practice, each distribution must a connection to the subscription service so that it can download the packages, for example, satellite for Red Hat and smt for SUSE. The repository location of each package can vary over time.
� The following packages are required in the RHEL system:
– bzip2– nfs-utils– perl-Pod-Parser– bind-utils– lsscsi– sg3_utils
� For SUSE, it is a best practice to have the following repositories:
– IBM Power SDK Tools– IBM-DLPAR-utils– IBM-DLPAR-Adv-Toolchain– IBM-DLPAR-SDK– IBM_Power_Tools– SLE-12-SP3-SAP-12.3-0– SLE-SDK12-SP3-Updates– SUSE Linux Enterprise Server12-SP3-Updates
11.2.2 Prerequisites check
If you want to validate that the prerequisites of the software are correct, you can validate them as shown in Example 11-4.
Example 11-4 Cloud: Tools (SLE_12_SP3) - Verifying that all prerequisites are met
sles12-n1:/tmp/POWERHA7.2.2Linux/PHA7220Linux64 # ./installPHA --onlyprereq checking :Prerequisites packages for PowerHA SystemMirror Success: All prerequisites of PowerHA SystemMirror installedinstallPHA: No installation only prerequisite check was performed
Chapter 11. PowerHA SystemMirror V7.2.2 for Linux 429

11.2.3 Test environment that is proposed for PowerHA installation
The following components are used for the installation:
� Hardware Management Console (HMC) Version 8 Release 8.6.0 Service Pack 2, as shown in Example 11-5 on page 430.
Example 11-5 Hardware Management Console that is used for the installation
hscroot@hmcshowroom:~> lshmc -V"version= Version: 8 Release: 8.6.0 Service Pack: 2HMC Build level 20170712.1","base_version=V8R8.6.0
� IBM Cloud PowerVC Manager V1.4.1
IBM Cloud PowerVC Manager is used to manage VMs and disk provisioning for the PowerHA cluster. IBM Cloud PowerVC Manager is a solution that you can use to automate an infrastructure as a service (IaaS) solution, as shown in Figure 11-3.
Figure 11-3 IBM Cloud PowerVC Manager V1.4.1
� For the allocation of logical unit numbers (LUNs) for the cluster, use an IBM Storwize V7000 Release 7.8.1.5 storage system (supported by OpenStack), as shown in Figure 11-4.
430 IBM PowerHA SystemMirror V7.2.3 for IBM AIX and V7.2.2 for Linux
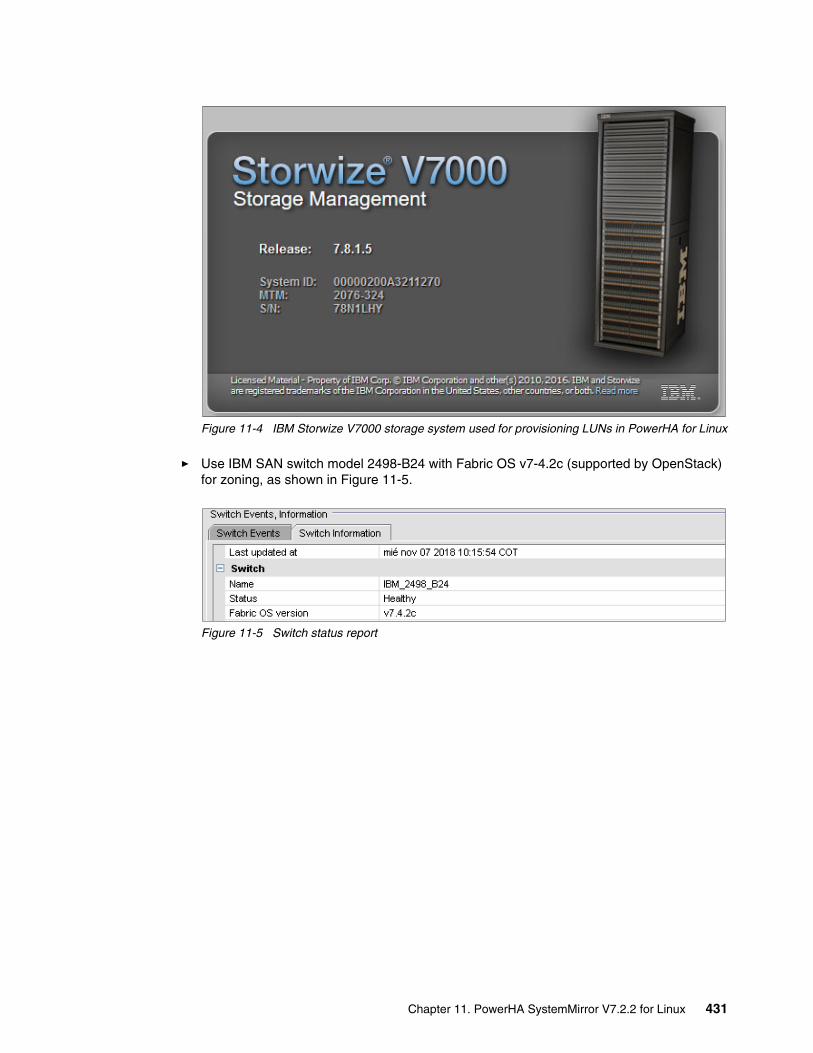
Figure 11-4 IBM Storwize V7000 storage system used for provisioning LUNs in PowerHA for Linux
� Use IBM SAN switch model 2498-B24 with Fabric OS v7-4.2c (supported by OpenStack) for zoning, as shown in Figure 11-5.
Figure 11-5 Switch status report
Chapter 11. PowerHA SystemMirror V7.2.2 for Linux 431
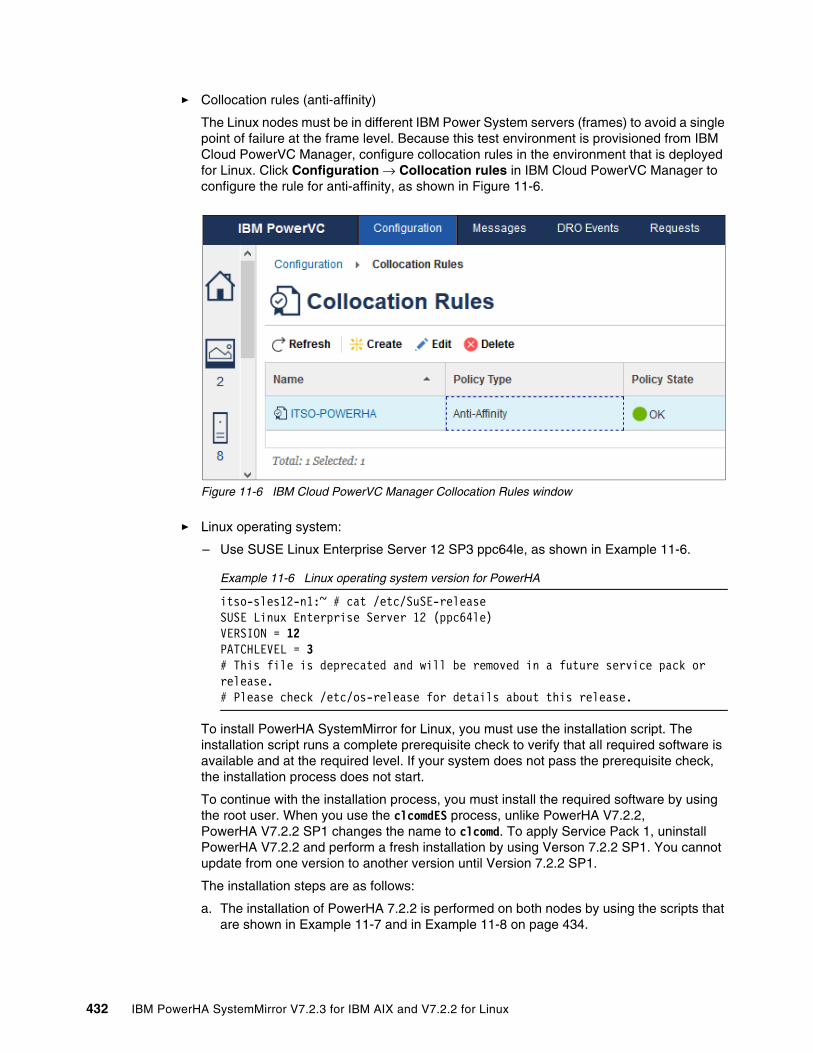
� Collocation rules (anti-affinity)
The Linux nodes must be in different IBM Power System servers (frames) to avoid a single point of failure at the frame level. Because this test environment is provisioned from IBM Cloud PowerVC Manager, configure collocation rules in the environment that is deployed for Linux. Click Configuration → Collocation rules in IBM Cloud PowerVC Manager to configure the rule for anti-affinity, as shown in Figure 11-6.
Figure 11-6 IBM Cloud PowerVC Manager Collocation Rules window
� Linux operating system:
– Use SUSE Linux Enterprise Server 12 SP3 ppc64le, as shown in Example 11-6.
Example 11-6 Linux operating system version for PowerHA
itso-sles12-n1:~ # cat /etc/SuSE-releaseSUSE Linux Enterprise Server 12 (ppc64le)VERSION = 12PATCHLEVEL = 3# This file is deprecated and will be removed in a future service pack or release.# Please check /etc/os-release for details about this release.
To install PowerHA SystemMirror for Linux, you must use the installation script. The installation script runs a complete prerequisite check to verify that all required software is available and at the required level. If your system does not pass the prerequisite check, the installation process does not start.
To continue with the installation process, you must install the required software by using the root user. When you use the clcomdES process, unlike PowerHA V7.2.2, PowerHA V7.2.2 SP1 changes the name to clcomd. To apply Service Pack 1, uninstall PowerHA V7.2.2 and perform a fresh installation by using Verson 7.2.2 SP1. You cannot update from one version to another version until Version 7.2.2 SP1.
The installation steps are as follows:
a. The installation of PowerHA 7.2.2 is performed on both nodes by using the scripts that are shown in Example 11-7 and in Example 11-8 on page 434.
432 IBM PowerHA SystemMirror V7.2.3 for IBM AIX and V7.2.2 for Linux
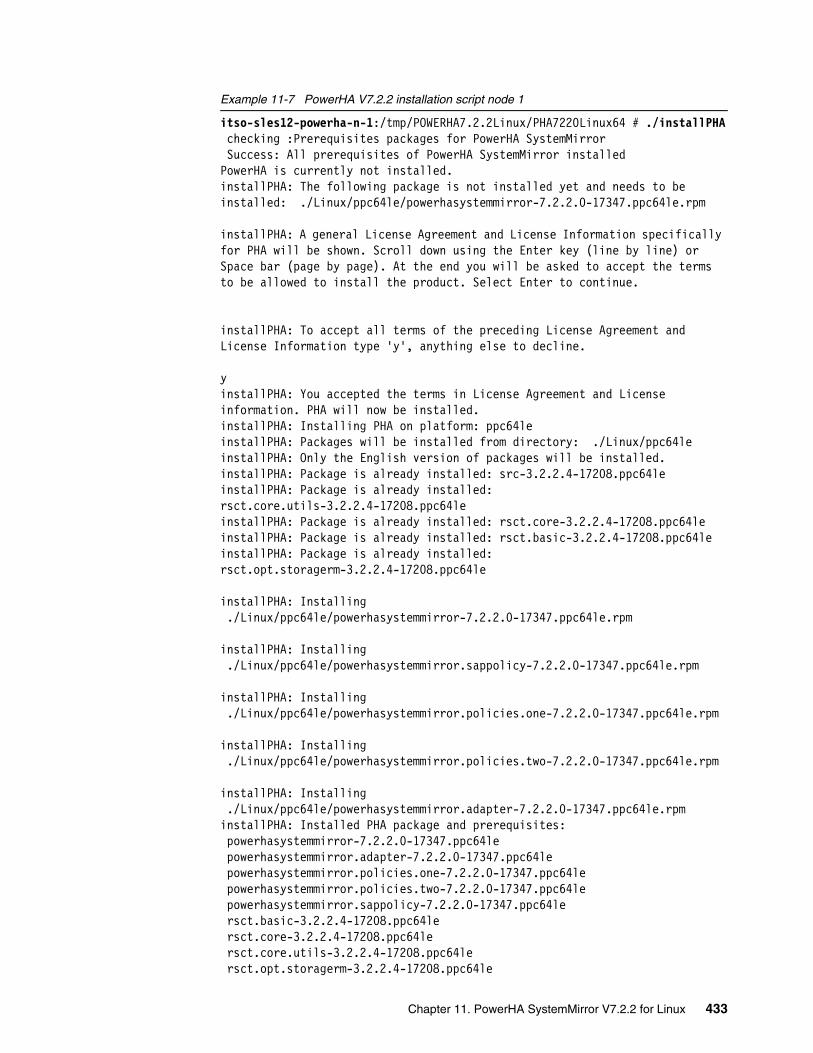
Example 11-7 PowerHA V7.2.2 installation script node 1
itso-sles12-powerha-n-1:/tmp/POWERHA7.2.2Linux/PHA7220Linux64 # ./installPHA checking :Prerequisites packages for PowerHA SystemMirror Success: All prerequisites of PowerHA SystemMirror installedPowerHA is currently not installed.installPHA: The following package is not installed yet and needs to be installed: ./Linux/ppc64le/powerhasystemmirror-7.2.2.0-17347.ppc64le.rpm
installPHA: A general License Agreement and License Information specifically for PHA will be shown. Scroll down using the Enter key (line by line) or Space bar (page by page). At the end you will be asked to accept the terms to be allowed to install the product. Select Enter to continue.
installPHA: To accept all terms of the preceding License Agreement and License Information type 'y', anything else to decline.
yinstallPHA: You accepted the terms in License Agreement and License information. PHA will now be installed.installPHA: Installing PHA on platform: ppc64leinstallPHA: Packages will be installed from directory: ./Linux/ppc64leinstallPHA: Only the English version of packages will be installed.installPHA: Package is already installed: src-3.2.2.4-17208.ppc64leinstallPHA: Package is already installed: rsct.core.utils-3.2.2.4-17208.ppc64leinstallPHA: Package is already installed: rsct.core-3.2.2.4-17208.ppc64leinstallPHA: Package is already installed: rsct.basic-3.2.2.4-17208.ppc64leinstallPHA: Package is already installed: rsct.opt.storagerm-3.2.2.4-17208.ppc64le
installPHA: Installing ./Linux/ppc64le/powerhasystemmirror-7.2.2.0-17347.ppc64le.rpm
installPHA: Installing ./Linux/ppc64le/powerhasystemmirror.sappolicy-7.2.2.0-17347.ppc64le.rpm
installPHA: Installing ./Linux/ppc64le/powerhasystemmirror.policies.one-7.2.2.0-17347.ppc64le.rpm
installPHA: Installing ./Linux/ppc64le/powerhasystemmirror.policies.two-7.2.2.0-17347.ppc64le.rpm
installPHA: Installing ./Linux/ppc64le/powerhasystemmirror.adapter-7.2.2.0-17347.ppc64le.rpminstallPHA: Installed PHA package and prerequisites: powerhasystemmirror-7.2.2.0-17347.ppc64le powerhasystemmirror.adapter-7.2.2.0-17347.ppc64le powerhasystemmirror.policies.one-7.2.2.0-17347.ppc64le powerhasystemmirror.policies.two-7.2.2.0-17347.ppc64le powerhasystemmirror.sappolicy-7.2.2.0-17347.ppc64le rsct.basic-3.2.2.4-17208.ppc64le rsct.core-3.2.2.4-17208.ppc64le rsct.core.utils-3.2.2.4-17208.ppc64le rsct.opt.storagerm-3.2.2.4-17208.ppc64le
Chapter 11. PowerHA SystemMirror V7.2.2 for Linux 433
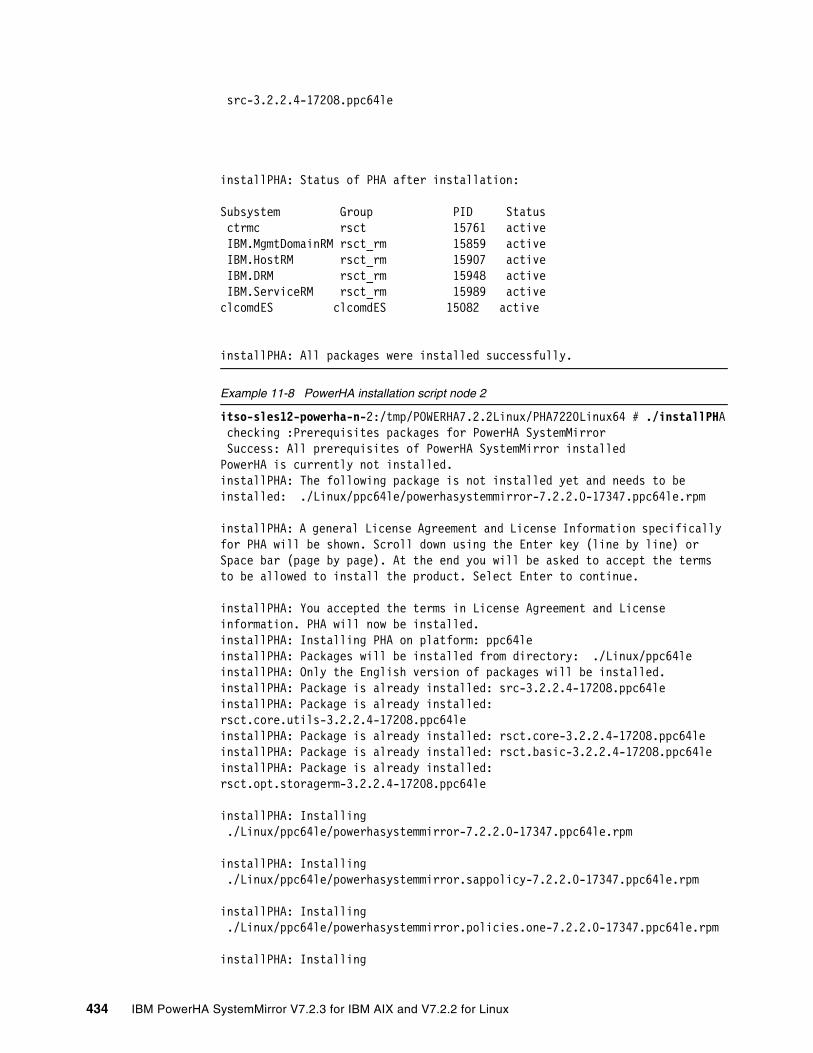
src-3.2.2.4-17208.ppc64le
installPHA: Status of PHA after installation:
Subsystem Group PID Status ctrmc rsct 15761 active IBM.MgmtDomainRM rsct_rm 15859 active IBM.HostRM rsct_rm 15907 active IBM.DRM rsct_rm 15948 active IBM.ServiceRM rsct_rm 15989 activeclcomdES clcomdES 15082 active
installPHA: All packages were installed successfully.
Example 11-8 PowerHA installation script node 2
itso-sles12-powerha-n-2:/tmp/POWERHA7.2.2Linux/PHA7220Linux64 # ./installPHA checking :Prerequisites packages for PowerHA SystemMirror Success: All prerequisites of PowerHA SystemMirror installedPowerHA is currently not installed.installPHA: The following package is not installed yet and needs to be installed: ./Linux/ppc64le/powerhasystemmirror-7.2.2.0-17347.ppc64le.rpm
installPHA: A general License Agreement and License Information specifically for PHA will be shown. Scroll down using the Enter key (line by line) or Space bar (page by page). At the end you will be asked to accept the terms to be allowed to install the product. Select Enter to continue.
installPHA: You accepted the terms in License Agreement and License information. PHA will now be installed.installPHA: Installing PHA on platform: ppc64leinstallPHA: Packages will be installed from directory: ./Linux/ppc64leinstallPHA: Only the English version of packages will be installed.installPHA: Package is already installed: src-3.2.2.4-17208.ppc64leinstallPHA: Package is already installed: rsct.core.utils-3.2.2.4-17208.ppc64leinstallPHA: Package is already installed: rsct.core-3.2.2.4-17208.ppc64leinstallPHA: Package is already installed: rsct.basic-3.2.2.4-17208.ppc64leinstallPHA: Package is already installed: rsct.opt.storagerm-3.2.2.4-17208.ppc64le
installPHA: Installing ./Linux/ppc64le/powerhasystemmirror-7.2.2.0-17347.ppc64le.rpm
installPHA: Installing ./Linux/ppc64le/powerhasystemmirror.sappolicy-7.2.2.0-17347.ppc64le.rpm
installPHA: Installing ./Linux/ppc64le/powerhasystemmirror.policies.one-7.2.2.0-17347.ppc64le.rpm
installPHA: Installing
434 IBM PowerHA SystemMirror V7.2.3 for IBM AIX and V7.2.2 for Linux

./Linux/ppc64le/powerhasystemmirror.policies.two-7.2.2.0-17347.ppc64le.rpm
installPHA: Installing ./Linux/ppc64le/powerhasystemmirror.adapter-7.2.2.0-17347.ppc64le.rpminstallPHA: Installed PHA package and prerequisites: powerhasystemmirror-7.2.2.0-17347.ppc64le powerhasystemmirror.adapter-7.2.2.0-17347.ppc64le powerhasystemmirror.policies.one-7.2.2.0-17347.ppc64le powerhasystemmirror.policies.two-7.2.2.0-17347.ppc64le powerhasystemmirror.sappolicy-7.2.2.0-17347.ppc64le rsct.basic-3.2.2.4-17208.ppc64le rsct.core-3.2.2.4-17208.ppc64le rsct.core.utils-3.2.2.4-17208.ppc64le rsct.opt.storagerm-3.2.2.4-17208.ppc64le src-3.2.2.4-17208.ppc64le
installPHA: Status of PHA after installation:
Subsystem Group PID Status ctrmc rsct 12709 active IBM.ServiceRM rsct_rm 12809 active IBM.MgmtDomainRM rsct_rm 12859 active IBM.DRM rsct_rm 12905 active IBM.HostRM rsct_rm 12946 active
installPHA: All packages were installed successfully.
b. There is no such procedure to perform a PowerHA 7.2.2 update with Service Pack 1. It is necessary to uninstall the previous version and install the version with Service Pack 1 from a fresh installation, as shown in Example 11-9 and in Example 11-10 on page 436.
Example 11-9 Installing PowerHA SystemMirror SP1: Node 1
itso-sles12-powerha-n-1:/tmp/POWERHA7.2.2Linux/PHA7220Linux64 # ./uninstallPHAuninstallPHA: Uninstalling PHA on platform: ppc64leuninstallPHA: Uninstalling powerhasystemmirror.sappolicy-7.2.2.0-17347.ppc64leuninstallPHA: Uninstalling powerhasystemmirror.policies.two-7.2.2.0-17347.ppc64leuninstallPHA: Uninstalling powerhasystemmirror.policies.one-7.2.2.0-17347.ppc64leuninstallPHA: Uninstalling powerhasystemmirror.adapter-7.2.2.0-17347.ppc64leuninstallPHA: Uninstalling powerhasystemmirror-7.2.2.0-17347.ppc64le
uninstallPHA: Uninstalling rsct.opt.storagerm-3.2.2.4-17208.ppc64leuninstallPHA: Error: Failed with return-code: 1 : rsct.opt.storagerm-3.2.2.4-17208.ppc64le
Chapter 11. PowerHA SystemMirror V7.2.2 for Linux 435
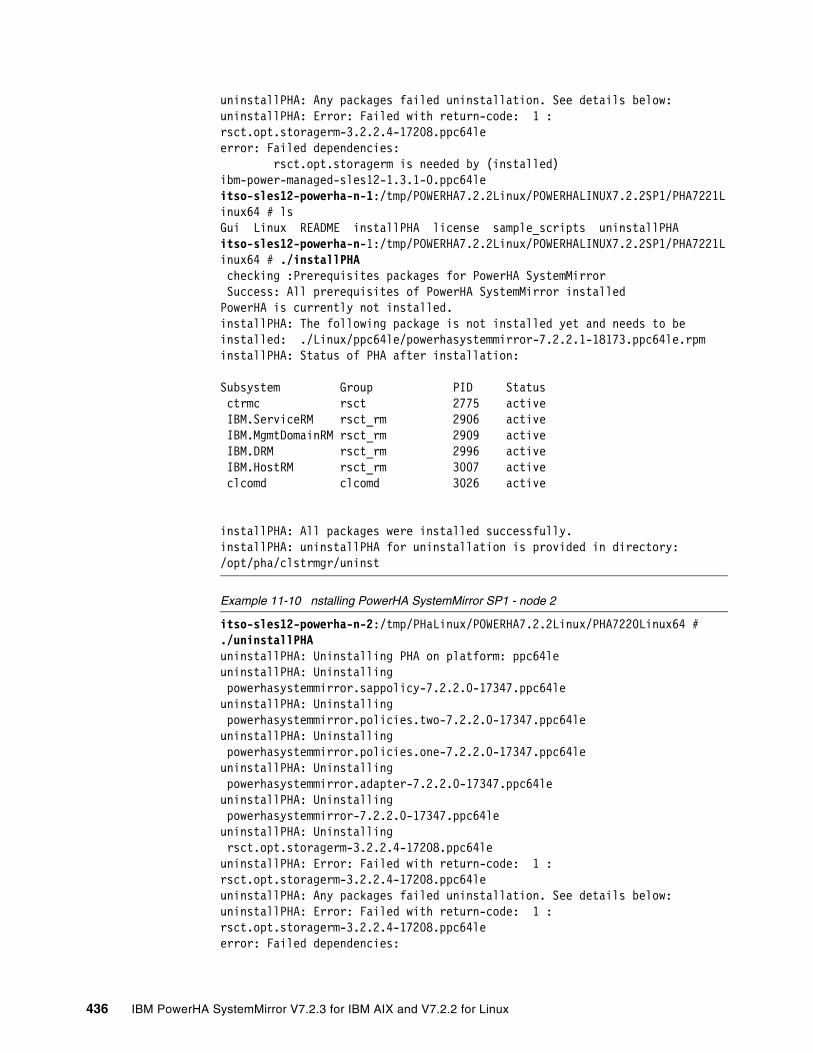
uninstallPHA: Any packages failed uninstallation. See details below:uninstallPHA: Error: Failed with return-code: 1 : rsct.opt.storagerm-3.2.2.4-17208.ppc64leerror: Failed dependencies: rsct.opt.storagerm is needed by (installed) ibm-power-managed-sles12-1.3.1-0.ppc64leitso-sles12-powerha-n-1:/tmp/POWERHA7.2.2Linux/POWERHALINUX7.2.2SP1/PHA7221Linux64 # lsGui Linux README installPHA license sample_scripts uninstallPHAitso-sles12-powerha-n-1:/tmp/POWERHA7.2.2Linux/POWERHALINUX7.2.2SP1/PHA7221Linux64 # ./installPHA checking :Prerequisites packages for PowerHA SystemMirror Success: All prerequisites of PowerHA SystemMirror installedPowerHA is currently not installed.installPHA: The following package is not installed yet and needs to be installed: ./Linux/ppc64le/powerhasystemmirror-7.2.2.1-18173.ppc64le.rpminstallPHA: Status of PHA after installation:
Subsystem Group PID Status ctrmc rsct 2775 active IBM.ServiceRM rsct_rm 2906 active IBM.MgmtDomainRM rsct_rm 2909 active IBM.DRM rsct_rm 2996 active IBM.HostRM rsct_rm 3007 active clcomd clcomd 3026 active
installPHA: All packages were installed successfully.installPHA: uninstallPHA for uninstallation is provided in directory: /opt/pha/clstrmgr/uninst
Example 11-10 nstalling PowerHA SystemMirror SP1 - node 2
itso-sles12-powerha-n-2:/tmp/PHaLinux/POWERHA7.2.2Linux/PHA7220Linux64 # ./uninstallPHAuninstallPHA: Uninstalling PHA on platform: ppc64leuninstallPHA: Uninstalling powerhasystemmirror.sappolicy-7.2.2.0-17347.ppc64leuninstallPHA: Uninstalling powerhasystemmirror.policies.two-7.2.2.0-17347.ppc64leuninstallPHA: Uninstalling powerhasystemmirror.policies.one-7.2.2.0-17347.ppc64leuninstallPHA: Uninstalling powerhasystemmirror.adapter-7.2.2.0-17347.ppc64leuninstallPHA: Uninstalling powerhasystemmirror-7.2.2.0-17347.ppc64leuninstallPHA: Uninstalling rsct.opt.storagerm-3.2.2.4-17208.ppc64leuninstallPHA: Error: Failed with return-code: 1 : rsct.opt.storagerm-3.2.2.4-17208.ppc64leuninstallPHA: Any packages failed uninstallation. See details below:uninstallPHA: Error: Failed with return-code: 1 : rsct.opt.storagerm-3.2.2.4-17208.ppc64leerror: Failed dependencies:
436 IBM PowerHA SystemMirror V7.2.3 for IBM AIX and V7.2.2 for Linux
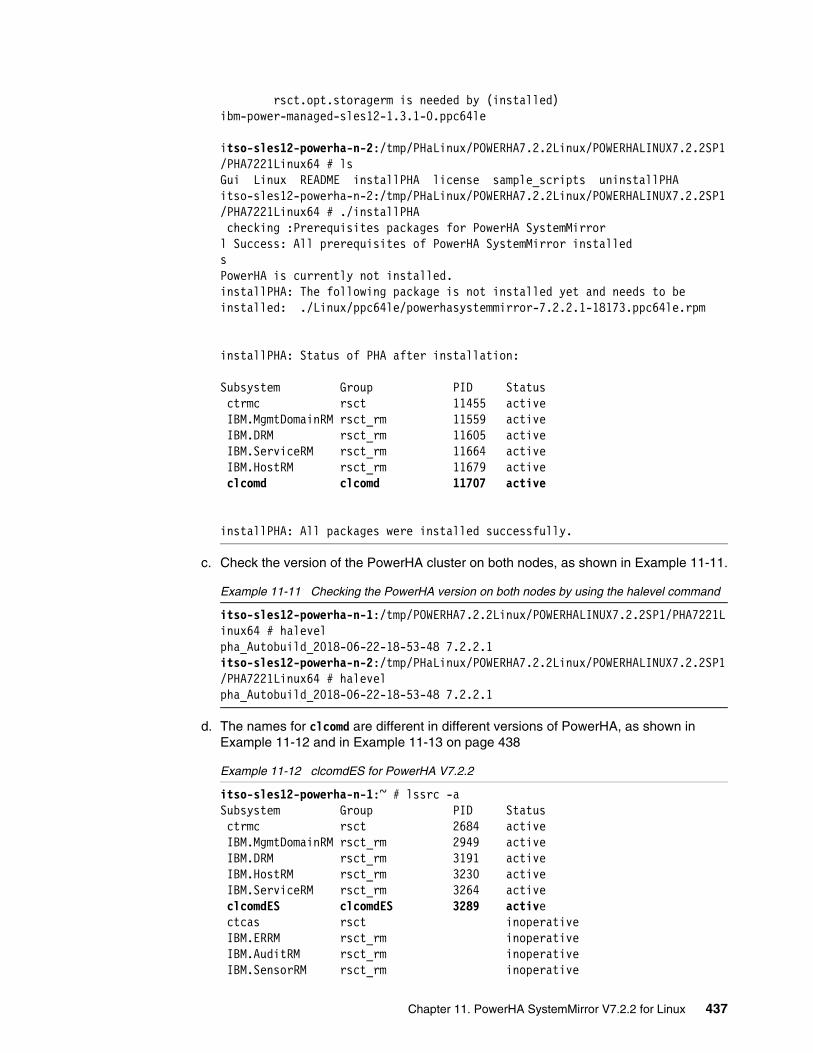
rsct.opt.storagerm is needed by (installed) ibm-power-managed-sles12-1.3.1-0.ppc64le
itso-sles12-powerha-n-2:/tmp/PHaLinux/POWERHA7.2.2Linux/POWERHALINUX7.2.2SP1/PHA7221Linux64 # lsGui Linux README installPHA license sample_scripts uninstallPHAitso-sles12-powerha-n-2:/tmp/PHaLinux/POWERHA7.2.2Linux/POWERHALINUX7.2.2SP1/PHA7221Linux64 # ./installPHA checking :Prerequisites packages for PowerHA SystemMirrorl Success: All prerequisites of PowerHA SystemMirror installedsPowerHA is currently not installed.installPHA: The following package is not installed yet and needs to be installed: ./Linux/ppc64le/powerhasystemmirror-7.2.2.1-18173.ppc64le.rpm
installPHA: Status of PHA after installation:
Subsystem Group PID Status ctrmc rsct 11455 active IBM.MgmtDomainRM rsct_rm 11559 active IBM.DRM rsct_rm 11605 active IBM.ServiceRM rsct_rm 11664 active IBM.HostRM rsct_rm 11679 active clcomd clcomd 11707 active
installPHA: All packages were installed successfully.
c. Check the version of the PowerHA cluster on both nodes, as shown in Example 11-11.
Example 11-11 Checking the PowerHA version on both nodes by using the halevel command
itso-sles12-powerha-n-1:/tmp/POWERHA7.2.2Linux/POWERHALINUX7.2.2SP1/PHA7221Linux64 # halevelpha_Autobuild_2018-06-22-18-53-48 7.2.2.1itso-sles12-powerha-n-2:/tmp/PHaLinux/POWERHA7.2.2Linux/POWERHALINUX7.2.2SP1/PHA7221Linux64 # halevelpha_Autobuild_2018-06-22-18-53-48 7.2.2.1
d. The names for clcomd are different in different versions of PowerHA, as shown in Example 11-12 and in Example 11-13 on page 438
Example 11-12 clcomdES for PowerHA V7.2.2
itso-sles12-powerha-n-1:~ # lssrc -aSubsystem Group PID Status ctrmc rsct 2684 active IBM.MgmtDomainRM rsct_rm 2949 active IBM.DRM rsct_rm 3191 active IBM.HostRM rsct_rm 3230 active IBM.ServiceRM rsct_rm 3264 active clcomdES clcomdES 3289 active ctcas rsct inoperative IBM.ERRM rsct_rm inoperative IBM.AuditRM rsct_rm inoperative IBM.SensorRM rsct_rm inoperative
Chapter 11. PowerHA SystemMirror V7.2.2 for Linux 437
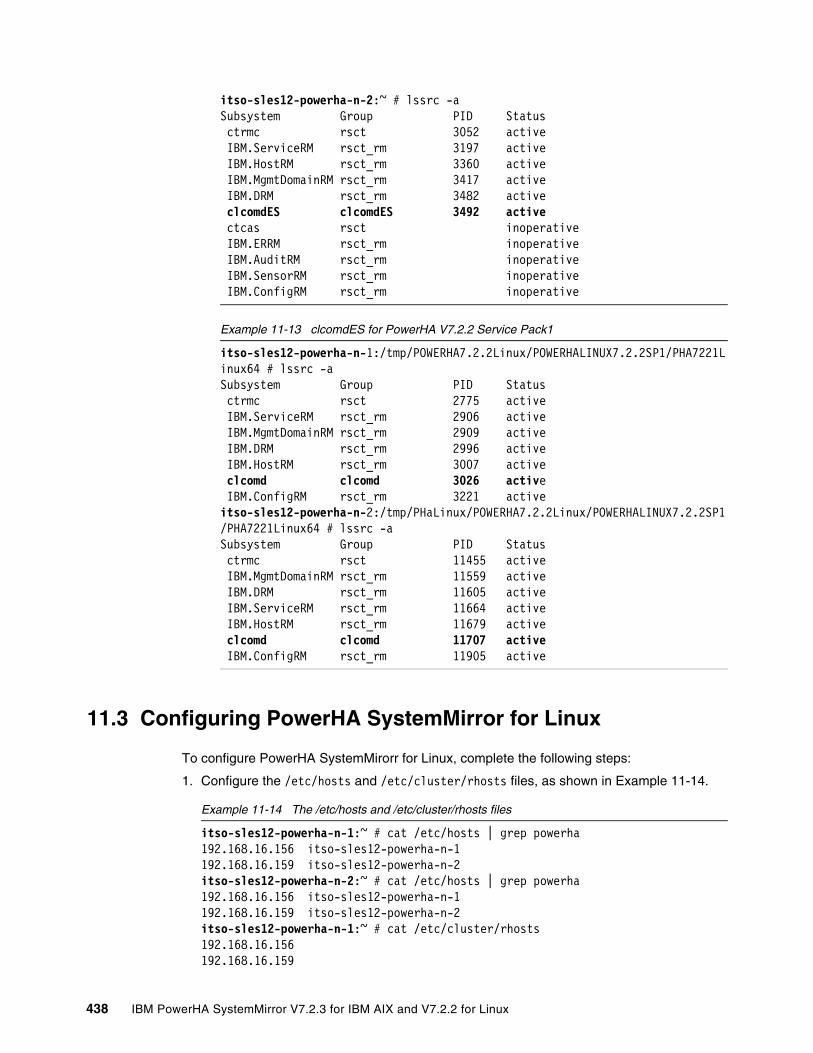
itso-sles12-powerha-n-2:~ # lssrc -aSubsystem Group PID Status ctrmc rsct 3052 active IBM.ServiceRM rsct_rm 3197 active IBM.HostRM rsct_rm 3360 active IBM.MgmtDomainRM rsct_rm 3417 active IBM.DRM rsct_rm 3482 active clcomdES clcomdES 3492 active ctcas rsct inoperative IBM.ERRM rsct_rm inoperative IBM.AuditRM rsct_rm inoperative IBM.SensorRM rsct_rm inoperative IBM.ConfigRM rsct_rm inoperative
Example 11-13 clcomdES for PowerHA V7.2.2 Service Pack1
itso-sles12-powerha-n-1:/tmp/POWERHA7.2.2Linux/POWERHALINUX7.2.2SP1/PHA7221Linux64 # lssrc -aSubsystem Group PID Status ctrmc rsct 2775 active IBM.ServiceRM rsct_rm 2906 active IBM.MgmtDomainRM rsct_rm 2909 active IBM.DRM rsct_rm 2996 active IBM.HostRM rsct_rm 3007 active clcomd clcomd 3026 active IBM.ConfigRM rsct_rm 3221 activeitso-sles12-powerha-n-2:/tmp/PHaLinux/POWERHA7.2.2Linux/POWERHALINUX7.2.2SP1/PHA7221Linux64 # lssrc -aSubsystem Group PID Status ctrmc rsct 11455 active IBM.MgmtDomainRM rsct_rm 11559 active IBM.DRM rsct_rm 11605 active IBM.ServiceRM rsct_rm 11664 active IBM.HostRM rsct_rm 11679 active clcomd clcomd 11707 active IBM.ConfigRM rsct_rm 11905 active
11.3 Configuring PowerHA SystemMirror for Linux
To configure PowerHA SystemMirorr for Linux, complete the following steps:
1. Configure the /etc/hosts and /etc/cluster/rhosts files, as shown in Example 11-14.
Example 11-14 The /etc/hosts and /etc/cluster/rhosts files
itso-sles12-powerha-n-1:~ # cat /etc/hosts | grep powerha192.168.16.156 itso-sles12-powerha-n-1192.168.16.159 itso-sles12-powerha-n-2itso-sles12-powerha-n-2:~ # cat /etc/hosts | grep powerha192.168.16.156 itso-sles12-powerha-n-1192.168.16.159 itso-sles12-powerha-n-2itso-sles12-powerha-n-1:~ # cat /etc/cluster/rhosts192.168.16.156192.168.16.159
438 IBM PowerHA SystemMirror V7.2.3 for IBM AIX and V7.2.2 for Linux
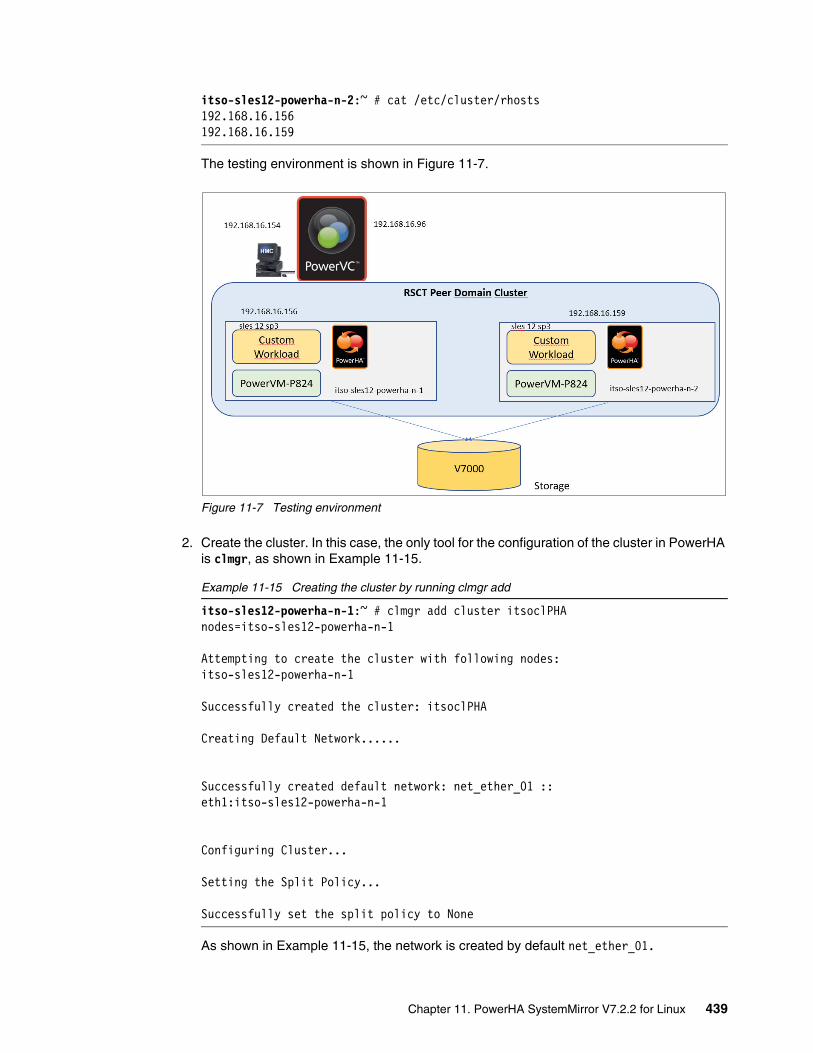
itso-sles12-powerha-n-2:~ # cat /etc/cluster/rhosts192.168.16.156192.168.16.159
The testing environment is shown in Figure 11-7.
Figure 11-7 Testing environment
2. Create the cluster. In this case, the only tool for the configuration of the cluster in PowerHA is clmgr, as shown in Example 11-15.
Example 11-15 Creating the cluster by running clmgr add
itso-sles12-powerha-n-1:~ # clmgr add cluster itsoclPHA nodes=itso-sles12-powerha-n-1
Attempting to create the cluster with following nodes:itso-sles12-powerha-n-1
Successfully created the cluster: itsoclPHA
Creating Default Network......
Successfully created default network: net_ether_01 :: eth1:itso-sles12-powerha-n-1
Configuring Cluster...
Setting the Split Policy...
Successfully set the split policy to None
As shown in Example 11-15, the network is created by default net_ether_01.
Chapter 11. PowerHA SystemMirror V7.2.2 for Linux 439
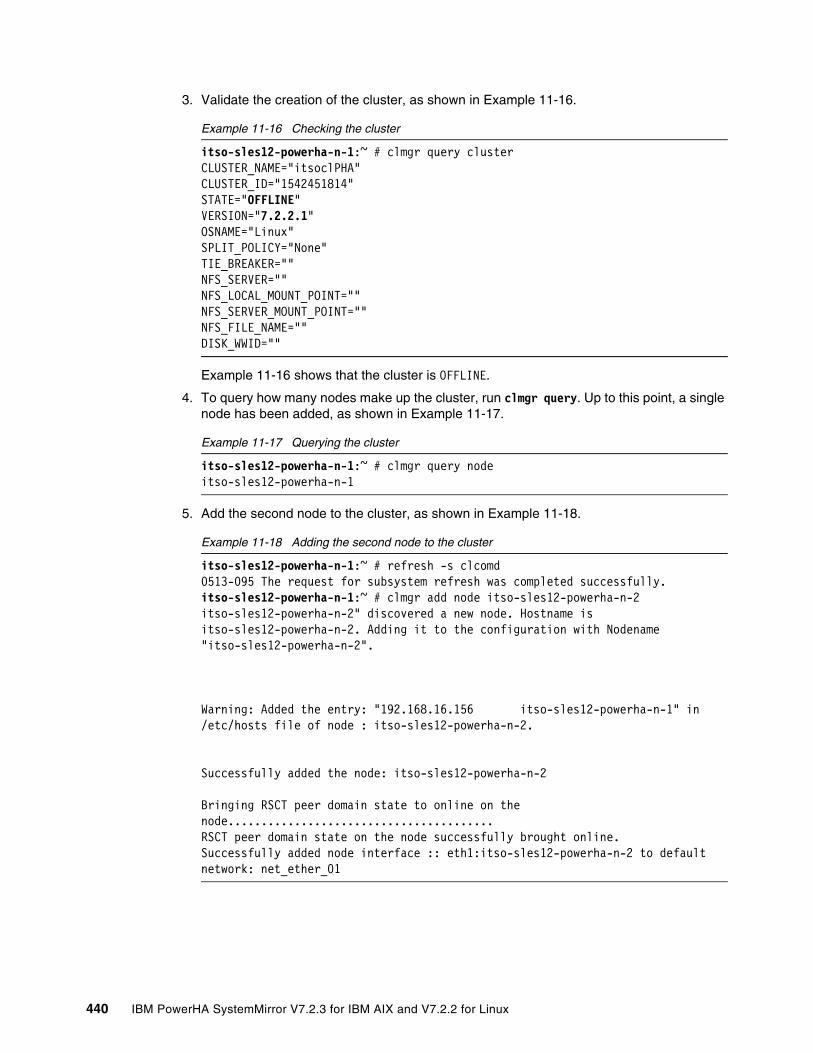
3. Validate the creation of the cluster, as shown in Example 11-16.
Example 11-16 Checking the cluster
itso-sles12-powerha-n-1:~ # clmgr query clusterCLUSTER_NAME="itsoclPHA"CLUSTER_ID="1542451814"STATE="OFFLINE"VERSION="7.2.2.1"OSNAME="Linux"SPLIT_POLICY="None"TIE_BREAKER=""NFS_SERVER=""NFS_LOCAL_MOUNT_POINT=""NFS_SERVER_MOUNT_POINT=""NFS_FILE_NAME=""DISK_WWID=""
Example 11-16 shows that the cluster is OFFLINE.
4. To query how many nodes make up the cluster, run clmgr query. Up to this point, a single node has been added, as shown in Example 11-17.
Example 11-17 Querying the cluster
itso-sles12-powerha-n-1:~ # clmgr query nodeitso-sles12-powerha-n-1
5. Add the second node to the cluster, as shown in Example 11-18.
Example 11-18 Adding the second node to the cluster
itso-sles12-powerha-n-1:~ # refresh -s clcomd0513-095 The request for subsystem refresh was completed successfully.itso-sles12-powerha-n-1:~ # clmgr add node itso-sles12-powerha-n-2itso-sles12-powerha-n-2" discovered a new node. Hostname is itso-sles12-powerha-n-2. Adding it to the configuration with Nodename "itso-sles12-powerha-n-2".
Warning: Added the entry: "192.168.16.156 itso-sles12-powerha-n-1" in /etc/hosts file of node : itso-sles12-powerha-n-2.
Successfully added the node: itso-sles12-powerha-n-2
Bringing RSCT peer domain state to online on the node........................................RSCT peer domain state on the node successfully brought online.Successfully added node interface :: eth1:itso-sles12-powerha-n-2 to default network: net_ether_01
440 IBM PowerHA SystemMirror V7.2.3 for IBM AIX and V7.2.2 for Linux
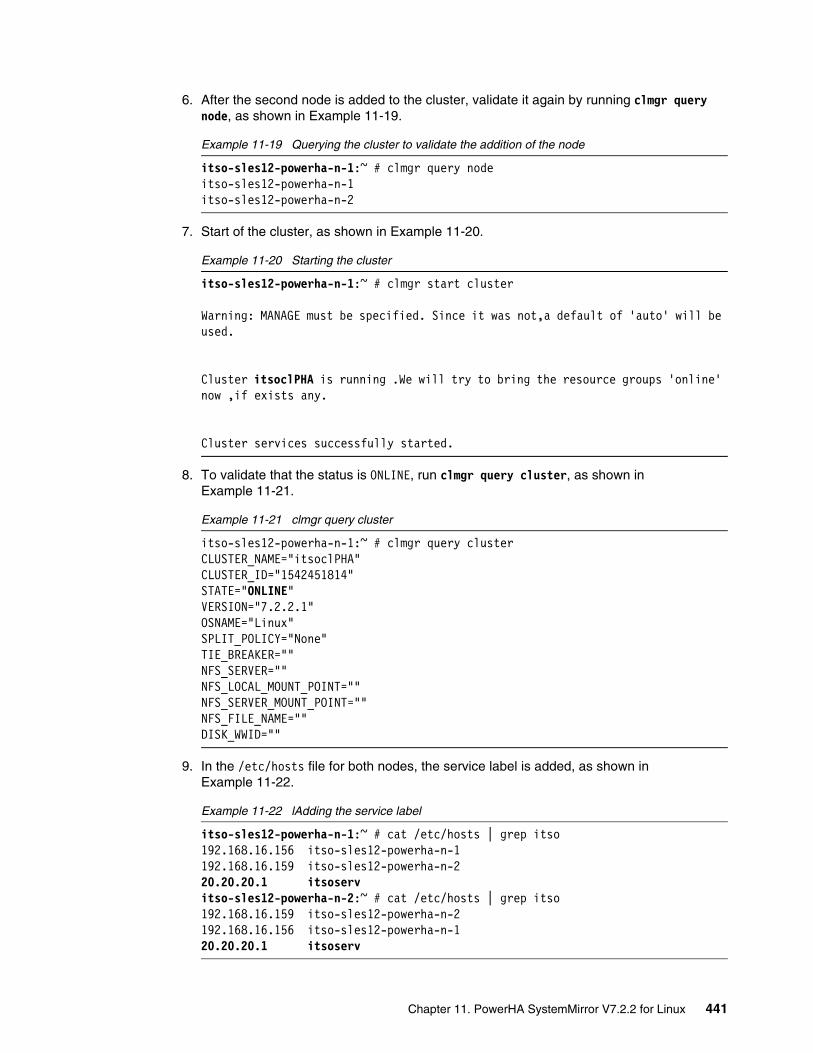
6. After the second node is added to the cluster, validate it again by running clmgr query node, as shown in Example 11-19.
Example 11-19 Querying the cluster to validate the addition of the node
itso-sles12-powerha-n-1:~ # clmgr query nodeitso-sles12-powerha-n-1itso-sles12-powerha-n-2
7. Start of the cluster, as shown in Example 11-20.
Example 11-20 Starting the cluster
itso-sles12-powerha-n-1:~ # clmgr start cluster
Warning: MANAGE must be specified. Since it was not,a default of 'auto' will be used.
Cluster itsoclPHA is running .We will try to bring the resource groups 'online' now ,if exists any.
Cluster services successfully started.
8. To validate that the status is ONLINE, run clmgr query cluster, as shown in Example 11-21.
Example 11-21 clmgr query cluster
itso-sles12-powerha-n-1:~ # clmgr query clusterCLUSTER_NAME="itsoclPHA"CLUSTER_ID="1542451814"STATE="ONLINE"VERSION="7.2.2.1"OSNAME="Linux"SPLIT_POLICY="None"TIE_BREAKER=""NFS_SERVER=""NFS_LOCAL_MOUNT_POINT=""NFS_SERVER_MOUNT_POINT=""NFS_FILE_NAME=""DISK_WWID=""
9. In the /etc/hosts file for both nodes, the service label is added, as shown in Example 11-22.
Example 11-22 lAdding the service label
itso-sles12-powerha-n-1:~ # cat /etc/hosts | grep itso192.168.16.156 itso-sles12-powerha-n-1192.168.16.159 itso-sles12-powerha-n-220.20.20.1 itsoservitso-sles12-powerha-n-2:~ # cat /etc/hosts | grep itso192.168.16.159 itso-sles12-powerha-n-2192.168.16.156 itso-sles12-powerha-n-120.20.20.1 itsoserv
Chapter 11. PowerHA SystemMirror V7.2.2 for Linux 441

10.The name of the network in the PowerHA cluster is validated, as shown in Example 11-23 on page 442.
Example 11-23 Validating the name of the network in PowerHA
itso-sles12-powerha-n-1:~ # clmgr q networknet_ether_01
11.The default network is used as shown in Example 11-23. Then, the service label is added to that network, as shown in Example 11-24.
Example 11-24 Adding an IP service label
itso-sles12-powerha-n-1:~ # clmgr add service_ip itsoserv NETWORK=net_ether_01 NETMASK=255.255.255.0
SUCCESS: Successfully created the Service IP with IP Address "20.20.20.1"A
12.The addition of the IP service label is validated, as shown in Example 11-25.
Example 11-25 Checking the IP service label
itso-sles12-powerha-n-1:~ # clmgr q service_ipitsoserv
13.The RG is created, and the IP Service label is added, as shown in Example 11-26.
Example 11-26 Creating the resource group and adding the IP service label
itso-sles12-powerha-n-1:~ # clmgr add rg itsoRG1 SERVICE_LABEL=itsoserv
WARNING: Addition of RG requires the "NODES" attribute. By default, RG gets created for all nodes in the cluster.
Creating Resource Group(s), Process can take some time depending on the resources being added.
SUCCESS:Resource Group "itsoRG1" created Successfully
14.The RG is started, and the addition of the IP Service label is validated, as shown in Example 11-27.
Example 11-27 Bringing the resource group online
itso-sles12-powerha-n-1:~ # clmgr online rg itsoRG1
Attempting to bring Resource group itsoRG1 online....
Waiting for the cluster to process the resource group online request....
Resource group online request successful.Resource group itsoRG1 is online.
-------------------------------------------------------------------------------Group Name State Node-------------------------------------------------------------------------------itsoRG1 ONLINE itso-sles12-powerha-n-1
442 IBM PowerHA SystemMirror V7.2.3 for IBM AIX and V7.2.2 for Linux
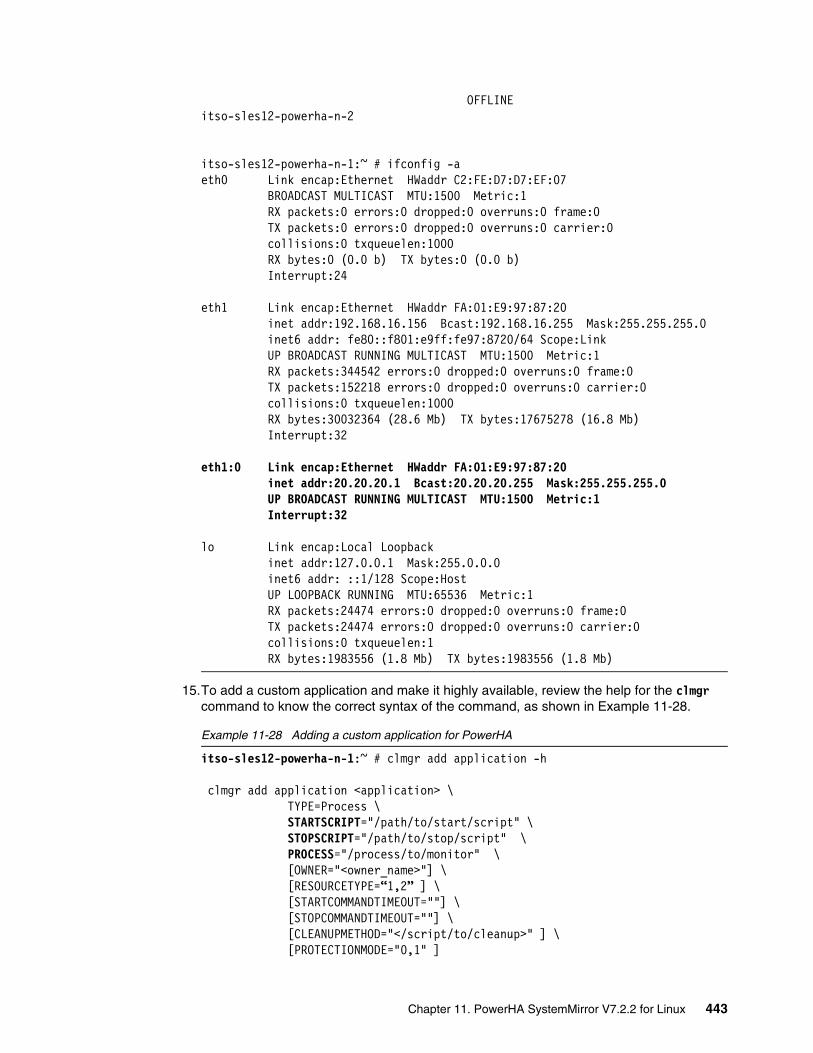
OFFLINE itso-sles12-powerha-n-2
itso-sles12-powerha-n-1:~ # ifconfig -aeth0 Link encap:Ethernet HWaddr C2:FE:D7:D7:EF:07 BROADCAST MULTICAST MTU:1500 Metric:1 RX packets:0 errors:0 dropped:0 overruns:0 frame:0 TX packets:0 errors:0 dropped:0 overruns:0 carrier:0 collisions:0 txqueuelen:1000 RX bytes:0 (0.0 b) TX bytes:0 (0.0 b) Interrupt:24
eth1 Link encap:Ethernet HWaddr FA:01:E9:97:87:20 inet addr:192.168.16.156 Bcast:192.168.16.255 Mask:255.255.255.0 inet6 addr: fe80::f801:e9ff:fe97:8720/64 Scope:Link UP BROADCAST RUNNING MULTICAST MTU:1500 Metric:1 RX packets:344542 errors:0 dropped:0 overruns:0 frame:0 TX packets:152218 errors:0 dropped:0 overruns:0 carrier:0 collisions:0 txqueuelen:1000 RX bytes:30032364 (28.6 Mb) TX bytes:17675278 (16.8 Mb) Interrupt:32
eth1:0 Link encap:Ethernet HWaddr FA:01:E9:97:87:20 inet addr:20.20.20.1 Bcast:20.20.20.255 Mask:255.255.255.0 UP BROADCAST RUNNING MULTICAST MTU:1500 Metric:1 Interrupt:32
lo Link encap:Local Loopback inet addr:127.0.0.1 Mask:255.0.0.0 inet6 addr: ::1/128 Scope:Host UP LOOPBACK RUNNING MTU:65536 Metric:1 RX packets:24474 errors:0 dropped:0 overruns:0 frame:0 TX packets:24474 errors:0 dropped:0 overruns:0 carrier:0 collisions:0 txqueuelen:1 RX bytes:1983556 (1.8 Mb) TX bytes:1983556 (1.8 Mb)
15.To add a custom application and make it highly available, review the help for the clmgr command to know the correct syntax of the command, as shown in Example 11-28.
Example 11-28 Adding a custom application for PowerHA
itso-sles12-powerha-n-1:~ # clmgr add application -h
clmgr add application <application> \ TYPE=Process \ STARTSCRIPT="/path/to/start/script" \ STOPSCRIPT="/path/to/stop/script" \ PROCESS="/process/to/monitor" \ [OWNER="<owner_name>"] \ [RESOURCETYPE=“1,2” ] \ [STARTCOMMANDTIMEOUT=""] \ [STOPCOMMANDTIMEOUT=""] \ [CLEANUPMETHOD="</script/to/cleanup>" ] \ [PROTECTIONMODE="0,1" ]
Chapter 11. PowerHA SystemMirror V7.2.2 for Linux 443
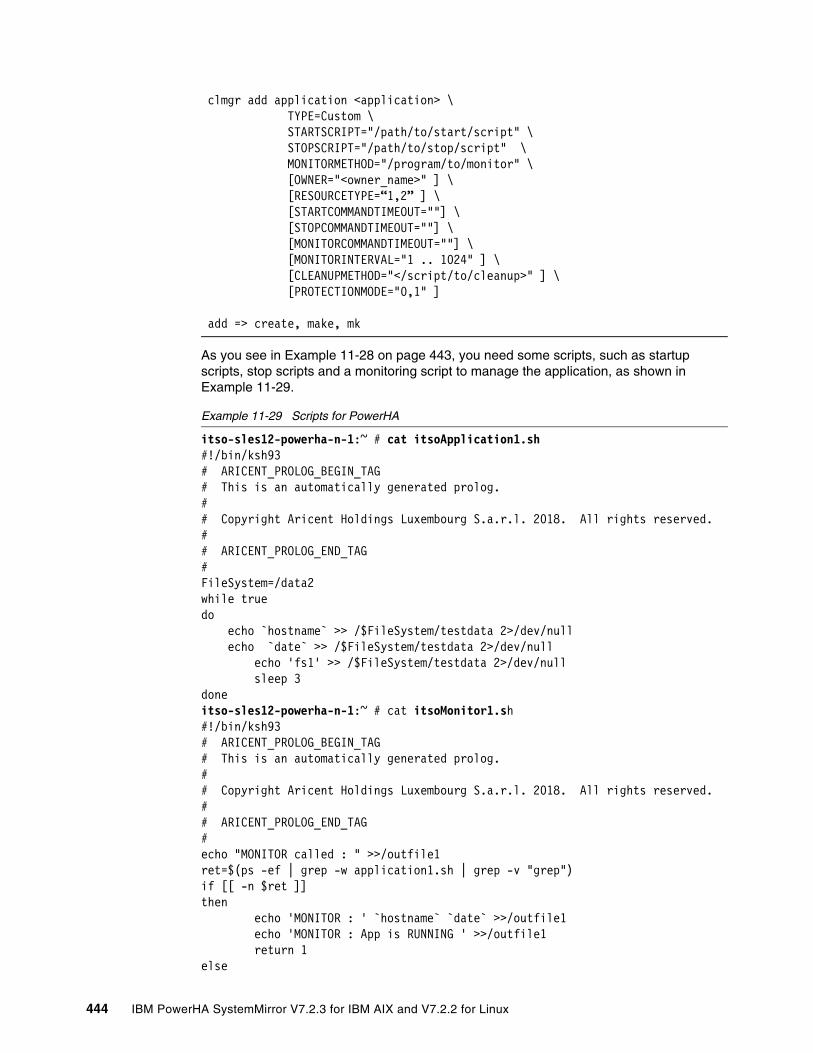
clmgr add application <application> \ TYPE=Custom \ STARTSCRIPT="/path/to/start/script" \ STOPSCRIPT="/path/to/stop/script" \ MONITORMETHOD="/program/to/monitor" \ [OWNER="<owner_name>" ] \ [RESOURCETYPE=“1,2” ] \ [STARTCOMMANDTIMEOUT=""] \ [STOPCOMMANDTIMEOUT=""] \ [MONITORCOMMANDTIMEOUT=""] \ [MONITORINTERVAL="1 .. 1024" ] \ [CLEANUPMETHOD="</script/to/cleanup>" ] \ [PROTECTIONMODE="0,1" ]
add => create, make, mk
As you see in Example 11-28 on page 443, you need some scripts, such as startup scripts, stop scripts and a monitoring script to manage the application, as shown in Example 11-29.
Example 11-29 Scripts for PowerHA
itso-sles12-powerha-n-1:~ # cat itsoApplication1.sh#!/bin/ksh93# ARICENT_PROLOG_BEGIN_TAG# This is an automatically generated prolog.## Copyright Aricent Holdings Luxembourg S.a.r.l. 2018. All rights reserved.## ARICENT_PROLOG_END_TAG#FileSystem=/data2while truedo echo `hostname` >> /$FileSystem/testdata 2>/dev/null echo `date` >> /$FileSystem/testdata 2>/dev/null echo 'fs1' >> /$FileSystem/testdata 2>/dev/null sleep 3doneitso-sles12-powerha-n-1:~ # cat itsoMonitor1.sh#!/bin/ksh93# ARICENT_PROLOG_BEGIN_TAG# This is an automatically generated prolog.## Copyright Aricent Holdings Luxembourg S.a.r.l. 2018. All rights reserved.## ARICENT_PROLOG_END_TAG#echo "MONITOR called : " >>/outfile1ret=$(ps -ef | grep -w application1.sh | grep -v "grep")if [[ -n $ret ]]then echo 'MONITOR : ' `hostname` `date` >>/outfile1 echo 'MONITOR : App is RUNNING ' >>/outfile1 return 1else
444 IBM PowerHA SystemMirror V7.2.3 for IBM AIX and V7.2.2 for Linux
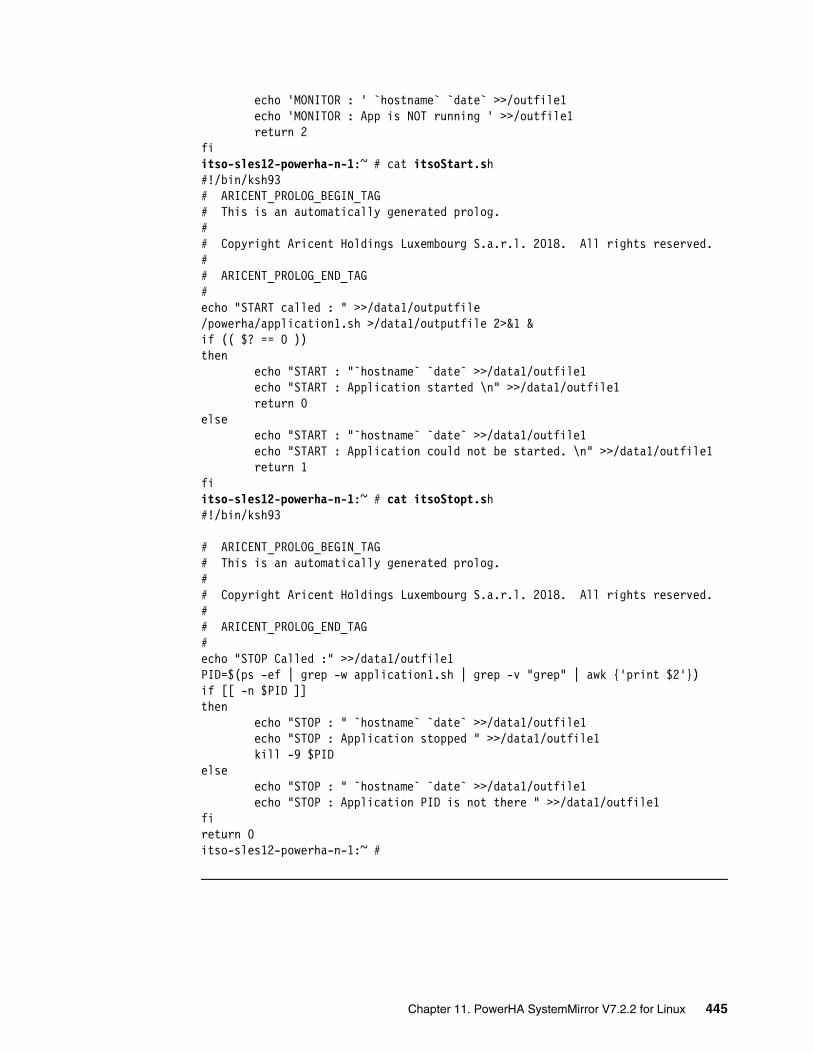
echo 'MONITOR : ' `hostname` `date` >>/outfile1 echo 'MONITOR : App is NOT running ' >>/outfile1 return 2fiitso-sles12-powerha-n-1:~ # cat itsoStart.sh#!/bin/ksh93# ARICENT_PROLOG_BEGIN_TAG# This is an automatically generated prolog.## Copyright Aricent Holdings Luxembourg S.a.r.l. 2018. All rights reserved.## ARICENT_PROLOG_END_TAG#echo "START called : " >>/data1/outputfile/powerha/application1.sh >/data1/outputfile 2>&1 &if (( $? == 0 ))then echo "START : "`hostname` `date` >>/data1/outfile1 echo "START : Application started \n" >>/data1/outfile1 return 0else echo "START : "`hostname` `date` >>/data1/outfile1 echo "START : Application could not be started. \n" >>/data1/outfile1 return 1fiitso-sles12-powerha-n-1:~ # cat itsoStopt.sh#!/bin/ksh93
# ARICENT_PROLOG_BEGIN_TAG# This is an automatically generated prolog.## Copyright Aricent Holdings Luxembourg S.a.r.l. 2018. All rights reserved.## ARICENT_PROLOG_END_TAG#echo "STOP Called :" >>/data1/outfile1PID=$(ps -ef | grep -w application1.sh | grep -v "grep" | awk {'print $2'})if [[ -n $PID ]]then echo "STOP : " `hostname` `date` >>/data1/outfile1 echo "STOP : Application stopped " >>/data1/outfile1 kill -9 $PIDelse echo "STOP : " `hostname` `date` >>/data1/outfile1 echo "STOP : Application PID is not there " >>/data1/outfile1fireturn 0itso-sles12-powerha-n-1:~ #
Chapter 11. PowerHA SystemMirror V7.2.2 for Linux 445
16.Custom scripts are added to PowerHA, as shown in Example 11-30.
Example 11-30 Creating the application for PowerHA
itso-sles12-powerha-n-1:~ # ls -l | grep itso-rwxr-xr-x 1 root root 779 Nov 15 07:41 itsoApplication1.sh-rwxr-xr-x 1 root root 925 Nov 15 07:41 itsoMonitor1.sh-rwxr-xr-x 1 root root 949 Nov 15 07:16 itsoStart.sh-rwxr-xr-x 1 root root 969 Nov 15 07:17 itsoStopt.shitso-sles12-powerha-n-1:~ # pwd/rootitso-sles12-powerha-n-1:~ # clmgr add application itsoApplication type=CUSTOM STARTSCRIPT="/root/itsoStart.sh" STOPSCRIPT="/root/itsoStopt.sh" MONITORMETHOD="/root/itsoMonitor1.sh"
SUCCESS: Application "itsoApplication" Successfully created.
17.Now, the application is added to our RG, as shown in Example 11-31.
Example 11-31 Adding the application to the resource group
itso-sles12-powerha-n-1:~ # clmgr add resource_group itsoRG2 applications=itsoApplication
WARNING: Addition of RG requires the "NODES" attribute. By default, RG gets created for all nodes in the cluster.
Creating Resource Group(s), Process can take some time depending on the resources being added.
SUCCESS:Resource Group "itsoRG2" created Successfully
18.Disks or LUNs are provisioned to environments that are managed from IBM PowerVC. For more information, see Chapter 12, “Infrastructure management with IBM PowerVC” on page 461. After the disks are provisioned, run rescan-scsi-bus.sh to recognize the new disks in the cluster, as shown in Example 11-32.
Example 11-32 Scanning new disks
itso-sles12-powerha-n-1:~ # rescan-scsi-bus.shScanning SCSI subsystem for new devicesScanning host 0 for SCSI target IDs 0 1 2 3 4 5 6 7, all LUNsitso-sles12-powerha-n-2:~ # rescan-scsi-bus.shScanning SCSI subsystem for new devicesScanning host 0 for SCSI target IDs 0 1 2 3 4 5 6 7, all LUNs
19.New disks are validated. Aliases are added to the multipath.conf file of the disks for easy identification before adding it to the cluster, as shown in Example 11-33.
Example 11-33 Disks before the addition of aliases in multipath.conf
itso-sles12-powerha-n-1:~ # multipath -ll | grep mpathmpathd (360050768028c8449c00000000000024e) dm-8 IBM,2145mpathc (360050768028c8449c00000000000024d) dm-7 IBM,2145mpathb (360050768028c8449c00000000000024c) dm-6 IBM,2145mpatha (360050768028c8449c00000000000024b) dm-5 IBM,2145itso-sles12-powerha-n-2:~ # multipath -ll | grep mpathmpathd (360050768028c8449c00000000000024e) dm-8 IBM,2145
446 IBM PowerHA SystemMirror V7.2.3 for IBM AIX and V7.2.2 for Linux
mpathc (360050768028c8449c00000000000024c) dm-7 IBM,2145mpathb (360050768028c8449c00000000000024d) dm-6 IBM,2145mpatha (360050768028c8449c00000000000024b) dm-5 IBM,2145
20.The multipath.conf file is edited, as shown in Example 11-34.
Example 11-34 The multipath.conf file for disks aliases for both nodes
itso-sles12-powerha-n-1:~ # cat /etc/multipath.confdefaults { user_friendly_names yes polling_interval 30}blacklist { devnode "^(ram|raw|loop|fd|md|dm-|sr|scd|st)[0-9]*" devnode "^(hd|xvd|vd)[a-z]*"}multipaths { # ROOTVG VOLUME multipath { wwid 360050768028c8449c000000000000212 alias ROOTVG } # DATA-1 VOLUME multipath { wwid 360050768028c8449c00000000000024b alias DATA1 } # DATA-2 VOLUME multipath { wwid 360050768028c8449c00000000000024c alias DATA2 } # DATA-3 VOLUME multipath { wwid 360050768028c8449c00000000000024d alias DATA3 } # HEARTBEAT VOLUME multipath { wwid 360050768028c8449c00000000000024e alias HEARTBEAT }}devices { device { vendor "IBM" product "2145" path_grouping_policy "group_by_prio" prio "alua" path_checker "tur" path_selector "service-time 0" failback "immediate" rr_weight "priorities" no_path_retry "fail" rr_min_io_rq 10
Chapter 11. PowerHA SystemMirror V7.2.2 for Linux 447
rr_min_io 1 dev_loss_tmo 600 fast_io_fail_tmo 5}
21.Now the multipath services are restarted, as shown in Example 11-35.
Example 11-35 Multipath before and after
Beforeitso-sles12-powerha-n-1:~ # multipath -ll | grep dmmpathd (360050768028c8449c00000000000024e) dm-8 IBM,2145mpathc (360050768028c8449c00000000000024d) dm-7 IBM,2145mpathb (360050768028c8449c00000000000024c) dm-6 IBM,2145mpatha (360050768028c8449c00000000000024b) dm-5 IBM,2145ROOTVG (360050768028c8449c000000000000212) dm-0 IBM,2145itso-sles12-powerha-n-1:~ # service multipathd restartitso-sles12-powerha-n-1:~ # service multipathd reloaditso-sles12-powerha-n-1:~ # multipath -ll | grep dmROOTVG (360050768028c8449c000000000000212) dm-0 IBM,2145DATA3 (360050768028c8449c00000000000024d) dm-7 IBM,2145HEARTBEAT (360050768028c8449c00000000000024e) dm-8 IBM,2145DATA2 (360050768028c8449c00000000000024c) dm-6 IBM,2145DATA1 (360050768028c8449c00000000000024b) dm-5 IBM,2145itso-sles12-powerha-n-2:~ # service multipathd restartitso-sles12-powerha-n-2:~ # service multipathd reloaditso-sles12-powerha-n-2:~ # multipath -ll | grep dmROOTVG (360050768028c8449c000000000000244) dm-0 IBM,2145DATA3 (360050768028c8449c00000000000024d) dm-6 IBM,2145HEARTBEAT (360050768028c8449c00000000000024e) dm-8 IBM,2145DATA2 (360050768028c8449c00000000000024c) dm-7 IBM,2145DATA1 (360050768028c8449c00000000000024b) dm-5 IBM,2145
22.We always suggest that you avoid allowing a partitioned or divided brain cluster to add a heartbeat disk to the cluster. We create one with the label HEARTBEAT, the UUID of the disk is validated and can be found with the lsrsrc IBM.Disk DeviceInfo NodeNameList command. Also, you can find the UUID with the multipath -ll command, as shown in Example 11-36 and in Example 11-37 on page 449.
Example 11-36 Validate the UUID of the heartbeat disk
itso-sles12-powerha-n-1:~ # lsrsrc IBM.Disk DeviceInfo NodeNameListResource Persistent Attributes for IBM.Diskresource 1: DeviceInfo = "UUID=360050768028c8449c00000000000024d" NodeNameList = {"Unknown_Node_Name","itso-sles12-powerha-n-1"}resource 2: DeviceInfo = "UUID=360050768028c8449c00000000000024e" NodeNameList = {"Unknown_Node_Name","itso-sles12-powerha-n-1"}resource 3: DeviceInfo = "UUID=360050768028c8449c00000000000024b" NodeNameList = {"Unknown_Node_Name","itso-sles12-powerha-n-1"}resource 4: DeviceInfo = "UUID=360050768028c8449c00000000000024c" NodeNameList = {"Unknown_Node_Name","itso-sles12-powerha-n-1"}resource 5: DeviceInfo = "UUID=360050768028c8449c00000000000024c"
448 IBM PowerHA SystemMirror V7.2.3 for IBM AIX and V7.2.2 for Linux
NodeNameList = {"itso-sles12-powerha-n-1"}resource 6: DeviceInfo = "UUID=360050768028c8449c00000000000024d" NodeNameList = {"itso-sles12-powerha-n-1"}resource 7: DeviceInfo = "UUID=360050768028c8449c00000000000024e" NodeNameList = {"itso-sles12-powerha-n-1"}resource 8: DeviceInfo = "UUID=360050768028c8449c00000000000024b" NodeNameList = {"itso-sles12-powerha-n-1"}resource 9: DeviceInfo = "UUID=360050768028c8449c000000000000212" NodeNameList = {"itso-sles12-powerha-n-1"}
Example 11-37 Validating the UUID of the heartbeat disk
itso-sles12-powerha-n-1:~ # multipath -ll | grep dmROOTVG (360050768028c8449c000000000000212) dm-0 IBM,2145DATA3 (360050768028c8449c00000000000024d) dm-7 IBM,2145HEARTBEAT (360050768028c8449c00000000000024e) dm-8 IBM,2145DATA2 (360050768028c8449c00000000000024c) dm-6 IBM,2145DATA1 (360050768028c8449c00000000000024b) dm-5 IBM,2145
23.It is noted that the configured cluster does not have a heartbeat disk. If this cluster goes into production without the configuration of this disk, it will have problems later. It is suggested for all cluster cases for PowerHA for Linux that you add this disk, as shown in Example 11-38.
Example 11-38 Cluster configuration without heartbeat disk
itso-sles12-powerha-n-1:~ # clmgr list clusterCLUSTER_NAME="itsoclPHA"CLUSTER_ID="1542451814"STATE="ONLINE"VERSION="7.2.2.1"OSNAME="Linux"SPLIT_POLICY="None"TIE_BREAKER=""NFS_SERVER=""NFS_LOCAL_MOUNT_POINT=""NFS_SERVER_MOUNT_POINT=""NFS_FILE_NAME=""DISK_WWID=""
24.The heartbeat disk is added to the cluster with the clmgr modify cluster command, as shown in Example 11-39.
Example 11-39 Adding a disk of heartbeat in PowerHA cluster
itso-sles12-powerha-n-1:~ # clmgr modify cluster SPLIT_POLICY=tiebreaker TIEBREAKER=disk DISK_WWID=360050768028c8449c00000000000024e
WARNING: More than one local sg devices are configured with WWID 360050768028c8449c00000000000024e on node itso-sles12-powerha-n-2, it is advised not to use any of t he specified disks for any other application as in case of a cluster split, tiebreaker will reserve the disk and all writes to the disk will start failing.
Chapter 11. PowerHA SystemMirror V7.2.2 for Linux 449
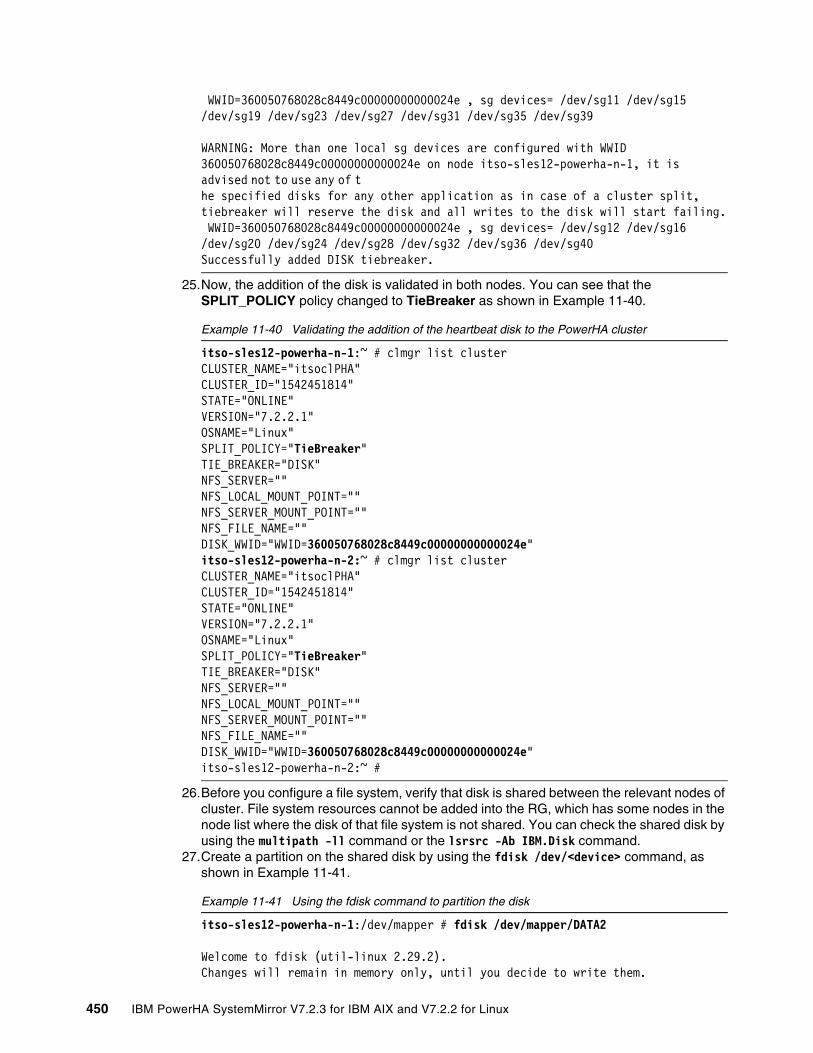
WWID=360050768028c8449c00000000000024e , sg devices= /dev/sg11 /dev/sg15 /dev/sg19 /dev/sg23 /dev/sg27 /dev/sg31 /dev/sg35 /dev/sg39
WARNING: More than one local sg devices are configured with WWID 360050768028c8449c00000000000024e on node itso-sles12-powerha-n-1, it is advised not to use any of t he specified disks for any other application as in case of a cluster split, tiebreaker will reserve the disk and all writes to the disk will start failing. WWID=360050768028c8449c00000000000024e , sg devices= /dev/sg12 /dev/sg16 /dev/sg20 /dev/sg24 /dev/sg28 /dev/sg32 /dev/sg36 /dev/sg40Successfully added DISK tiebreaker.
25.Now, the addition of the disk is validated in both nodes. You can see that the SPLIT_POLICY policy changed to TieBreaker as shown in Example 11-40.
Example 11-40 Validating the addition of the heartbeat disk to the PowerHA cluster
itso-sles12-powerha-n-1:~ # clmgr list clusterCLUSTER_NAME="itsoclPHA"CLUSTER_ID="1542451814"STATE="ONLINE"VERSION="7.2.2.1"OSNAME="Linux"SPLIT_POLICY="TieBreaker"TIE_BREAKER="DISK"NFS_SERVER=""NFS_LOCAL_MOUNT_POINT=""NFS_SERVER_MOUNT_POINT=""NFS_FILE_NAME=""DISK_WWID="WWID=360050768028c8449c00000000000024e"itso-sles12-powerha-n-2:~ # clmgr list clusterCLUSTER_NAME="itsoclPHA"CLUSTER_ID="1542451814"STATE="ONLINE"VERSION="7.2.2.1"OSNAME="Linux"SPLIT_POLICY="TieBreaker"TIE_BREAKER="DISK"NFS_SERVER=""NFS_LOCAL_MOUNT_POINT=""NFS_SERVER_MOUNT_POINT=""NFS_FILE_NAME=""DISK_WWID="WWID=360050768028c8449c00000000000024e"itso-sles12-powerha-n-2:~ #
26.Before you configure a file system, verify that disk is shared between the relevant nodes of cluster. File system resources cannot be added into the RG, which has some nodes in the node list where the disk of that file system is not shared. You can check the shared disk by using the multipath -ll command or the lsrsrc -Ab IBM.Disk command.
27.Create a partition on the shared disk by using the fdisk /dev/<device> command, as shown in Example 11-41.
Example 11-41 Using the fdisk command to partition the disk
itso-sles12-powerha-n-1:/dev/mapper # fdisk /dev/mapper/DATA2
Welcome to fdisk (util-linux 2.29.2).Changes will remain in memory only, until you decide to write them.
450 IBM PowerHA SystemMirror V7.2.3 for IBM AIX and V7.2.2 for Linux
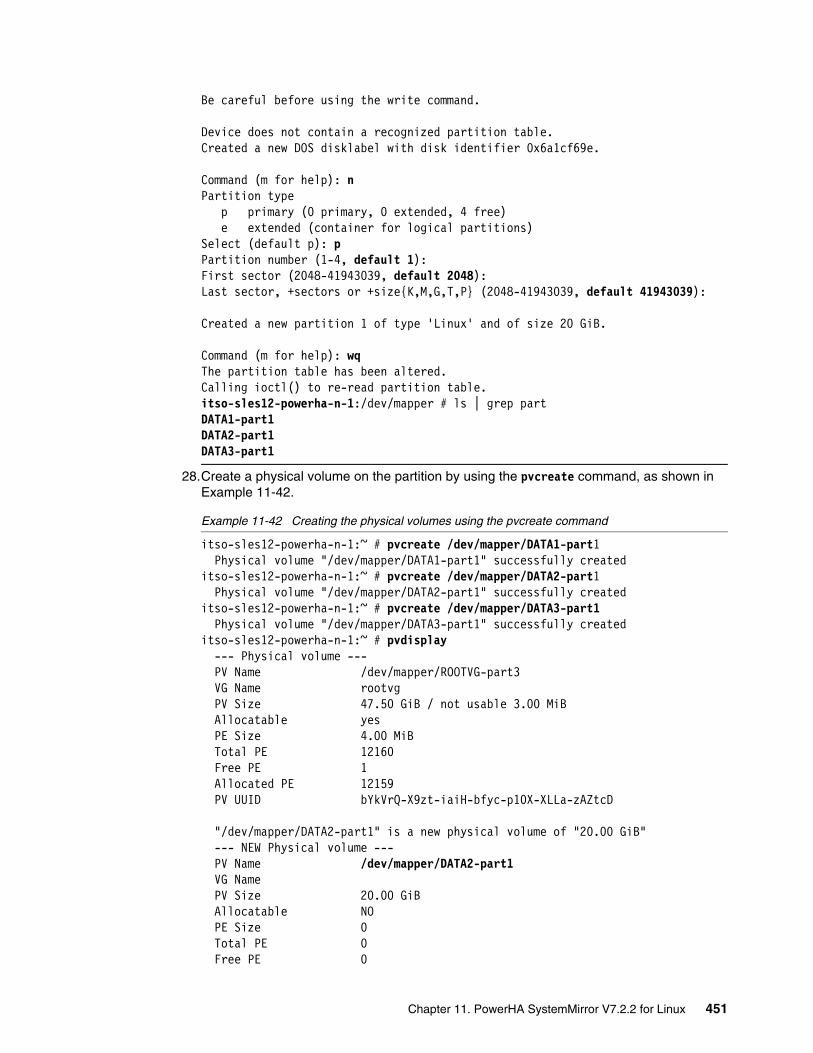
Be careful before using the write command.
Device does not contain a recognized partition table.Created a new DOS disklabel with disk identifier 0x6a1cf69e.
Command (m for help): nPartition type p primary (0 primary, 0 extended, 4 free) e extended (container for logical partitions)Select (default p): pPartition number (1-4, default 1):First sector (2048-41943039, default 2048):Last sector, +sectors or +size{K,M,G,T,P} (2048-41943039, default 41943039):
Created a new partition 1 of type 'Linux' and of size 20 GiB.
Command (m for help): wqThe partition table has been altered.Calling ioctl() to re-read partition table.itso-sles12-powerha-n-1:/dev/mapper # ls | grep partDATA1-part1DATA2-part1DATA3-part1
28.Create a physical volume on the partition by using the pvcreate command, as shown in Example 11-42.
Example 11-42 Creating the physical volumes using the pvcreate command
itso-sles12-powerha-n-1:~ # pvcreate /dev/mapper/DATA1-part1 Physical volume "/dev/mapper/DATA1-part1" successfully createditso-sles12-powerha-n-1:~ # pvcreate /dev/mapper/DATA2-part1 Physical volume "/dev/mapper/DATA2-part1" successfully createditso-sles12-powerha-n-1:~ # pvcreate /dev/mapper/DATA3-part1 Physical volume "/dev/mapper/DATA3-part1" successfully createditso-sles12-powerha-n-1:~ # pvdisplay --- Physical volume --- PV Name /dev/mapper/ROOTVG-part3 VG Name rootvg PV Size 47.50 GiB / not usable 3.00 MiB Allocatable yes PE Size 4.00 MiB Total PE 12160 Free PE 1 Allocated PE 12159 PV UUID bYkVrQ-X9zt-iaiH-bfyc-p10X-XLLa-zAZtcD
"/dev/mapper/DATA2-part1" is a new physical volume of "20.00 GiB" --- NEW Physical volume --- PV Name /dev/mapper/DATA2-part1 VG Name PV Size 20.00 GiB Allocatable NO PE Size 0 Total PE 0 Free PE 0
Chapter 11. PowerHA SystemMirror V7.2.2 for Linux 451
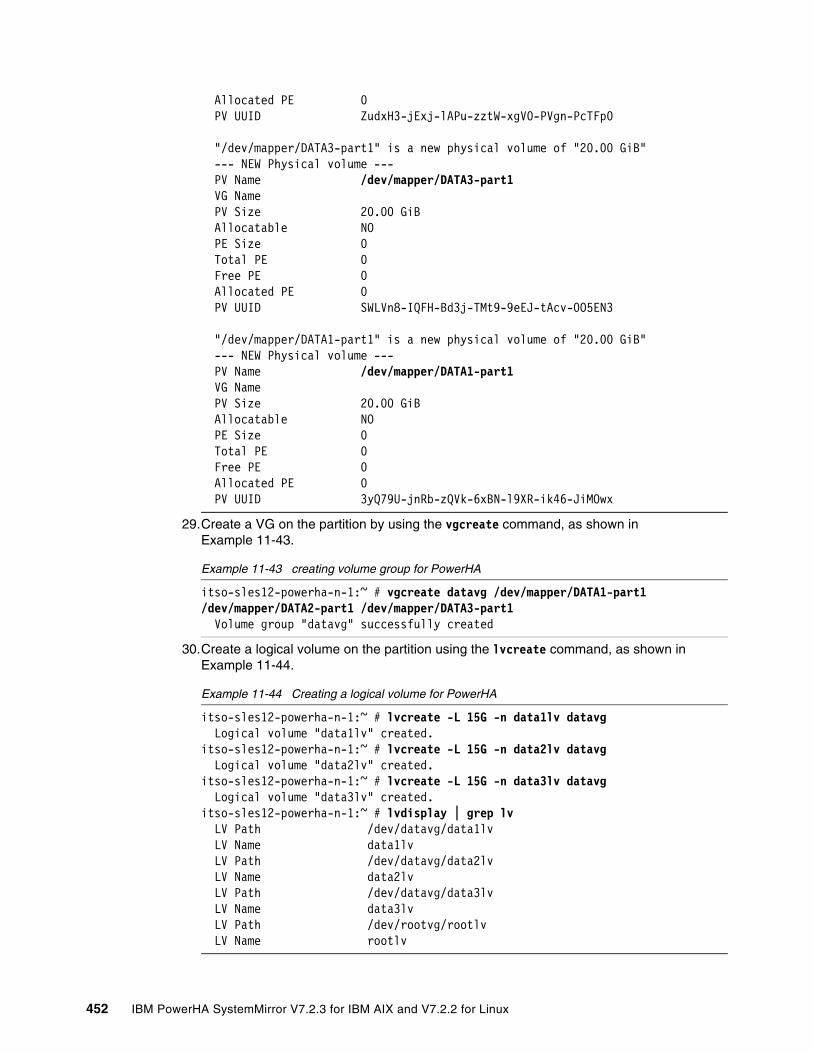
Allocated PE 0 PV UUID ZudxH3-jExj-lAPu-zztW-xgV0-PVgn-PcTFp0
"/dev/mapper/DATA3-part1" is a new physical volume of "20.00 GiB" --- NEW Physical volume --- PV Name /dev/mapper/DATA3-part1 VG Name PV Size 20.00 GiB Allocatable NO PE Size 0 Total PE 0 Free PE 0 Allocated PE 0 PV UUID SWLVn8-IQFH-Bd3j-TMt9-9eEJ-tAcv-0O5EN3
"/dev/mapper/DATA1-part1" is a new physical volume of "20.00 GiB" --- NEW Physical volume --- PV Name /dev/mapper/DATA1-part1 VG Name PV Size 20.00 GiB Allocatable NO PE Size 0 Total PE 0 Free PE 0 Allocated PE 0 PV UUID 3yQ79U-jnRb-zQVk-6xBN-l9XR-ik46-JiMOwx
29.Create a VG on the partition by using the vgcreate command, as shown in Example 11-43.
Example 11-43 creating volume group for PowerHA
itso-sles12-powerha-n-1:~ # vgcreate datavg /dev/mapper/DATA1-part1 /dev/mapper/DATA2-part1 /dev/mapper/DATA3-part1 Volume group "datavg" successfully created
30.Create a logical volume on the partition using the lvcreate command, as shown in Example 11-44.
Example 11-44 Creating a logical volume for PowerHA
itso-sles12-powerha-n-1:~ # lvcreate -L 15G -n data1lv datavg Logical volume "data1lv" created.itso-sles12-powerha-n-1:~ # lvcreate -L 15G -n data2lv datavg Logical volume "data2lv" created.itso-sles12-powerha-n-1:~ # lvcreate -L 15G -n data3lv datavg Logical volume "data3lv" created.itso-sles12-powerha-n-1:~ # lvdisplay | grep lv LV Path /dev/datavg/data1lv LV Name data1lv LV Path /dev/datavg/data2lv LV Name data2lv LV Path /dev/datavg/data3lv LV Name data3lv LV Path /dev/rootvg/rootlv LV Name rootlv
452 IBM PowerHA SystemMirror V7.2.3 for IBM AIX and V7.2.2 for Linux
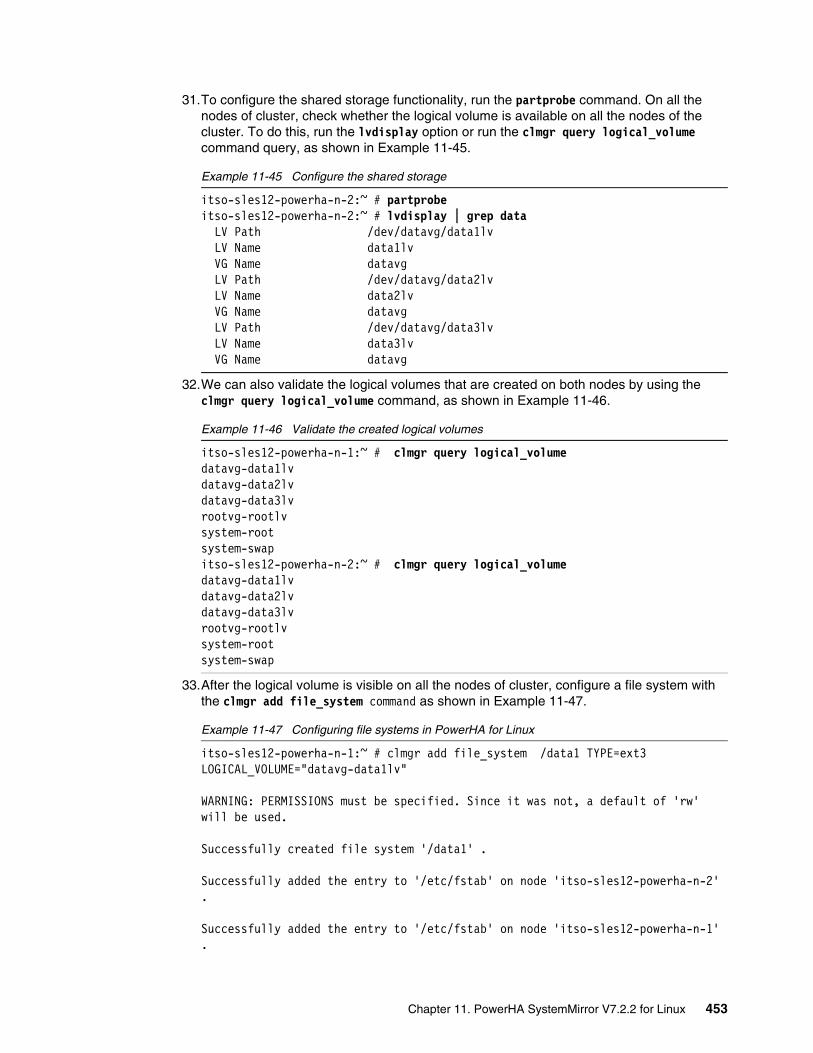
31.To configure the shared storage functionality, run the partprobe command. On all the nodes of cluster, check whether the logical volume is available on all the nodes of the cluster. To do this, run the lvdisplay option or run the clmgr query logical_volume command query, as shown in Example 11-45.
Example 11-45 Configure the shared storage
itso-sles12-powerha-n-2:~ # partprobeitso-sles12-powerha-n-2:~ # lvdisplay | grep data LV Path /dev/datavg/data1lv LV Name data1lv VG Name datavg LV Path /dev/datavg/data2lv LV Name data2lv VG Name datavg LV Path /dev/datavg/data3lv LV Name data3lv VG Name datavg
32.We can also validate the logical volumes that are created on both nodes by using the clmgr query logical_volume command, as shown in Example 11-46.
Example 11-46 Validate the created logical volumes
itso-sles12-powerha-n-1:~ # clmgr query logical_volumedatavg-data1lvdatavg-data2lvdatavg-data3lvrootvg-rootlvsystem-rootsystem-swapitso-sles12-powerha-n-2:~ # clmgr query logical_volumedatavg-data1lvdatavg-data2lvdatavg-data3lvrootvg-rootlvsystem-rootsystem-swap
33.After the logical volume is visible on all the nodes of cluster, configure a file system with the clmgr add file_system command as shown in Example 11-47.
Example 11-47 Configuring file systems in PowerHA for Linux
itso-sles12-powerha-n-1:~ # clmgr add file_system /data1 TYPE=ext3 LOGICAL_VOLUME="datavg-data1lv"
WARNING: PERMISSIONS must be specified. Since it was not, a default of 'rw' will be used.
Successfully created file system '/data1' .
Successfully added the entry to '/etc/fstab' on node 'itso-sles12-powerha-n-2' .
Successfully added the entry to '/etc/fstab' on node 'itso-sles12-powerha-n-1' .
Chapter 11. PowerHA SystemMirror V7.2.2 for Linux 453
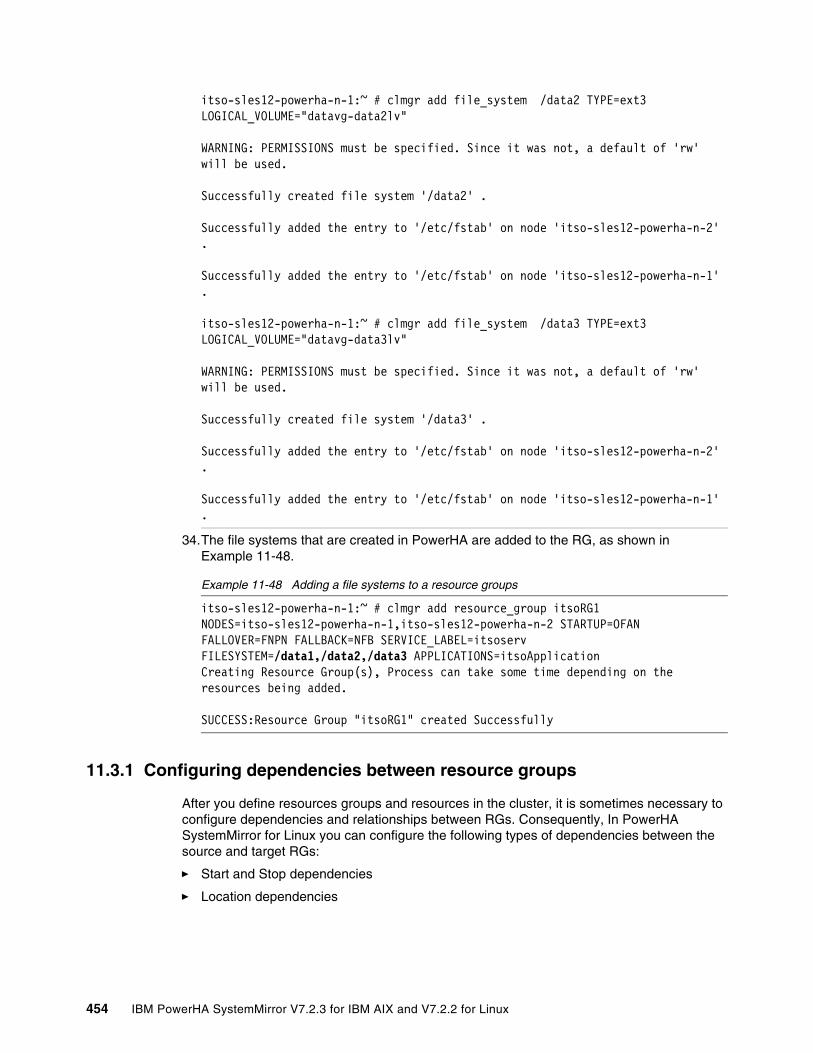
itso-sles12-powerha-n-1:~ # clmgr add file_system /data2 TYPE=ext3 LOGICAL_VOLUME="datavg-data2lv"
WARNING: PERMISSIONS must be specified. Since it was not, a default of 'rw' will be used.
Successfully created file system '/data2' .
Successfully added the entry to '/etc/fstab' on node 'itso-sles12-powerha-n-2' .
Successfully added the entry to '/etc/fstab' on node 'itso-sles12-powerha-n-1' .
itso-sles12-powerha-n-1:~ # clmgr add file_system /data3 TYPE=ext3 LOGICAL_VOLUME="datavg-data3lv"
WARNING: PERMISSIONS must be specified. Since it was not, a default of 'rw' will be used.
Successfully created file system '/data3' .
Successfully added the entry to '/etc/fstab' on node 'itso-sles12-powerha-n-2' .
Successfully added the entry to '/etc/fstab' on node 'itso-sles12-powerha-n-1' .
34.The file systems that are created in PowerHA are added to the RG, as shown in Example 11-48.
Example 11-48 Adding a file systems to a resource groups
itso-sles12-powerha-n-1:~ # clmgr add resource_group itsoRG1 NODES=itso-sles12-powerha-n-1,itso-sles12-powerha-n-2 STARTUP=OFAN FALLOVER=FNPN FALLBACK=NFB SERVICE_LABEL=itsoserv FILESYSTEM=/data1,/data2,/data3 APPLICATIONS=itsoApplicationCreating Resource Group(s), Process can take some time depending on the resources being added.
SUCCESS:Resource Group "itsoRG1" created Successfully
11.3.1 Configuring dependencies between resource groups
After you define resources groups and resources in the cluster, it is sometimes necessary to configure dependencies and relationships between RGs. Consequently, In PowerHA SystemMirror for Linux you can configure the following types of dependencies between the source and target RGs:
� Start and Stop dependencies
� Location dependencies
454 IBM PowerHA SystemMirror V7.2.3 for IBM AIX and V7.2.2 for Linux
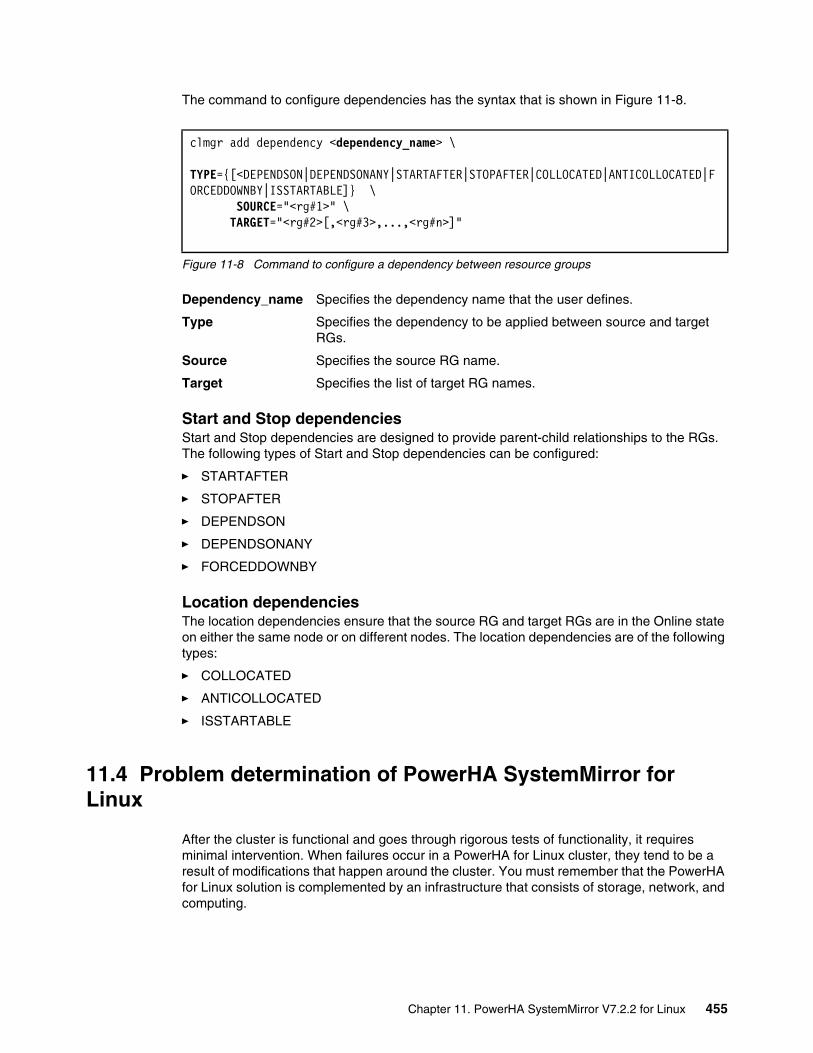
The command to configure dependencies has the syntax that is shown in Figure 11-8.
Figure 11-8 Command to configure a dependency between resource groups
Dependency_name Specifies the dependency name that the user defines.
Type Specifies the dependency to be applied between source and target RGs.
Source Specifies the source RG name.
Target Specifies the list of target RG names.
Start and Stop dependenciesStart and Stop dependencies are designed to provide parent-child relationships to the RGs. The following types of Start and Stop dependencies can be configured:
� STARTAFTER
� STOPAFTER
� DEPENDSON
� DEPENDSONANY
� FORCEDDOWNBY
Location dependenciesThe location dependencies ensure that the source RG and target RGs are in the Online state on either the same node or on different nodes. The location dependencies are of the following types:
� COLLOCATED
� ANTICOLLOCATED
� ISSTARTABLE
11.4 Problem determination of PowerHA SystemMirror for Linux
After the cluster is functional and goes through rigorous tests of functionality, it requires minimal intervention. When failures occur in a PowerHA for Linux cluster, they tend to be a result of modifications that happen around the cluster. You must remember that the PowerHA for Linux solution is complemented by an infrastructure that consists of storage, network, and computing.
clmgr add dependency <dependency_name> \ TYPE={[<DEPENDSON|DEPENDSONANY|STARTAFTER|STOPAFTER|COLLOCATED|ANTICOLLOCATED|FORCEDDOWNBY|ISSTARTABLE]} \ SOURCE="<rg#1>" \ TARGET="<rg#2>[,<rg#3>,...,<rg#n>]"
Chapter 11. PowerHA SystemMirror V7.2.2 for Linux 455
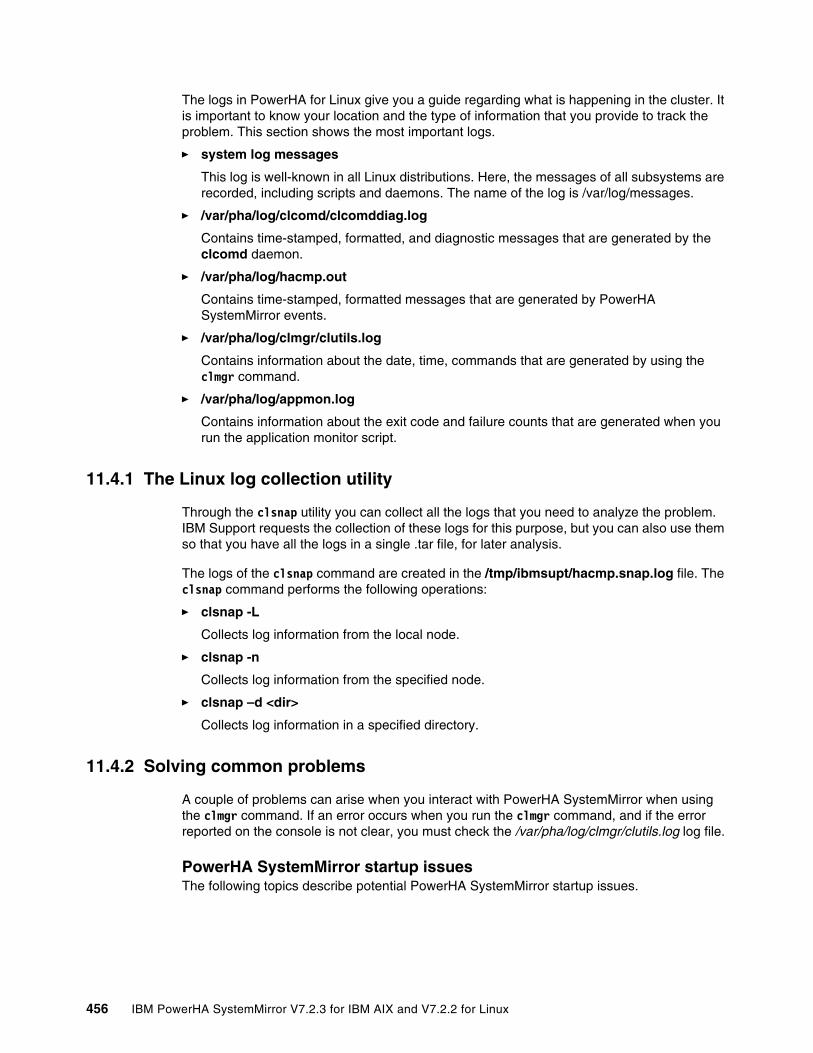
The logs in PowerHA for Linux give you a guide regarding what is happening in the cluster. It is important to know your location and the type of information that you provide to track the problem. This section shows the most important logs.
� system log messages
This log is well-known in all Linux distributions. Here, the messages of all subsystems are recorded, including scripts and daemons. The name of the log is /var/log/messages.
� /var/pha/log/clcomd/clcomddiag.log
Contains time-stamped, formatted, and diagnostic messages that are generated by the clcomd daemon.
� /var/pha/log/hacmp.out
Contains time-stamped, formatted messages that are generated by PowerHA SystemMirror events.
� /var/pha/log/clmgr/clutils.log
Contains information about the date, time, commands that are generated by using the clmgr command.
� /var/pha/log/appmon.log
Contains information about the exit code and failure counts that are generated when you run the application monitor script.
11.4.1 The Linux log collection utility
Through the clsnap utility you can collect all the logs that you need to analyze the problem. IBM Support requests the collection of these logs for this purpose, but you can also use them so that you have all the logs in a single .tar file, for later analysis.
The logs of the clsnap command are created in the /tmp/ibmsupt/hacmp.snap.log file. The clsnap command performs the following operations:
� clsnap -L
Collects log information from the local node.
� clsnap -n
Collects log information from the specified node.
� clsnap –d <dir>
Collects log information in a specified directory.
11.4.2 Solving common problems
A couple of problems can arise when you interact with PowerHA SystemMirror when using the clmgr command. If an error occurs when you run the clmgr command, and if the error reported on the console is not clear, you must check the /var/pha/log/clmgr/clutils.log log file.
PowerHA SystemMirror startup issuesThe following topics describe potential PowerHA SystemMirror startup issues.
456 IBM PowerHA SystemMirror V7.2.3 for IBM AIX and V7.2.2 for Linux
PowerHA SystemMirror failed to create the clusterWhen cluster creation fails with a message that it cannot connect to other cluster nodes, review the following information to identify a possible solution for this problem:
� Check whether the IPv4 address entries exist in the /etc/cluster/rhosts file on all nodes of cluster. If any entry was recently added or updated, refresh the Cluster Communication Daemon subsystem (clcomd) by using the refresh -s clcomd command on all nodes of a cluster. Then, try to create the cluster again.
� Check whether the Cluster Communications (clcomd) daemon process is running by using the ps -aef grep clcomd command. If the clcomd daemon process is not listed in the process table, start the clcomd daemon manually by using the startsrc -s clcomd command.
� Check and ensure that other nodes are not part of any cluster.
� Check that each hostname of the different nodes is there in the /etc/hosts file.
� Check the firewall status by running the systemctl status firewalld.service command. The firewall must be disabled, and the following ports must be opened:
– 657/tcp– 16191/tcp– 657/udp– 12143/udp– 12347/udp– 12348/udp
� To open the ports, enter the following command per port:
� Check whether the subnet configuration is correct on all interfaces for all nodes that are part of the cluster. The subnet of all the interfaces on the same node must be different. For example, the subnet eth1, eth2 and eth3 of node1 must be 10.10.10.0/24, 10.10.11.0/24, 10.10.12.0/24.
Highly available resource failed to startWhen a highly available resource fails to start, review the following information to identify possible solutions:
1. Check for messages that are generated when you run the StartCommand command for that resource in the system log file (/var/log/messages), and in the ps –ef process table. If the StartCommand command is not run, proceed with next step. Otherwise, investigate why the application is online.
2. Either more than half of the nodes in the cluster are online, or exactly half of the nodes are online and the tiebreaker function is reserved. If less than half of the nodes are online, start the additional nodes. If exactly half of the nodes are online, check the attribute of the active tiebreaker. You check the active tiebreaker by running the clmgr query cluster command.
firewall-cmd --permanent --zone=public --add-port=<port no>/<protocol>
Example: firewall-cmd --permanent --zone=public --add-port=16191/tcp
Chapter 11. PowerHA SystemMirror V7.2.2 for Linux 457

3. In some scenarios, a resource moves to the Sacrificed state when the PowerHA SystemMirror might not find a placement for the resource. PowerHA SystemMirror cannot start this resource because there is no single node on which this resource might be started. To resolve this problem, ensure that the Network that the Service IP resource in the RG uses does have at least one of the nodes included. This node must be part of the RG nodelist. To check whether different nodes are assigned on a network, run the clmgr query network command. If different nodes are assigned on the network, delete the network and add it again with correct entries of the nodes by using the clmgr add interface command. To display the detailed information about RGs and the resources, run the clRGinfo -e command. This solution might resolve the issues.
If the application resource is in Sacrificed state, check whether the RGs are not on the same node when they have AntiCollocated relationship between them. To resolve this issue, move one of the RGs to the other node.
Resource group does not startAn RG does not start. If none of resources of the RG is starting, perform the following steps:
1. Identify which of the resources must start first by evaluating the relationship status between them.
2. Check all requests against the RG, and evaluate all relationships in which the RG is defined as a source.
PowerHA SystemMirror goes to Warning StateThis topic discusses a possible cause for a cluster to be in the Warning state. If a cluster goes in the Warning state, you can check the following scenario and resolve it:
� All the nodes of a cluster are not in the Online state.
� All the nodes of a cluster are not reachable.
PowerHA SystemMirror fails to add nodeThis topic discusses a possible cause for failure while you are adding a node to the cluster.
This error occurs if you use the cloned operating system images. To fix this issue, you must reset the cluster configuration by running the /opt/rsct/install/bin/recfgct -F command on the node that is specified in the error message. This action resets the RSCT node ID.
PowerHA SystemMirror disk issuesThese topics describe potential disk and file system issues.
PowerHA SystemMirror failed to configure the tiebreaker and heartbeat diskThis topic describes the situations where PowerHA SystemMirror is unable to configure the tiebreaker/heartbeat disk.
2632-077 The following problems were detected while adding nodes to the domain.As a result, no nodes will be added to the domain.rhel72node2: 2632-068This node has the same internal identifier as rhel72node1 and cannot be included in the domain definition.
458 IBM PowerHA SystemMirror V7.2.3 for IBM AIX and V7.2.2 for Linux
In this case, confirm that the disk is shared among all the nodes by comparing the Universally Unique Identifier (UUID) of the disk on all the nodes of the cluster. Additionally, you can perform the following steps:
� Use the lsscsi command to list the Small Computer System Interface (SCSI) devices in the system.
� Check the /usr/lib/udev/scsi_id -gu <SCSI_disk#> file for all nodes to check the Disk ID attribute, and ensure that the Disk ID attribute is same across all nodes of the cluster.
PowerHA SystemMirror is not able to detect common diskThis topic describes the situations where PowerHA SystemMirror software is not able to detect the shared disk across nodes of the cluster.
Use the lsrsrc IBM.Disk command to view the common disk between nodes and ensure that the cluster is present. The lsrsrc command works only if the cluster is located in the common disk. You must select the DeviceName attribute that corresponds to the nodelist attribute, which has the total number for nodes of the cluster.
PowerHA SystemMirror resource and resource group issuesThese topics describe potential resource and RG issues.
Highly available resources are in the Failed offline stateThis case shows when high-availability resources are in failed, offline state. For example:
� Cluster node is not onlineIf a cluster node is not online, all resources that are defined on the node have Failed Offline state. In this case, the problem is not related to the resource but to a node.
To determine the issue in this case, run the Monitor command by using the following steps:
– Run the Monitor command.
– Get the return code by entering the echo $? command.
– If the return code is 3 (Failed Offline state), determine the reason for the Monitor command failure. To investigate this problem, check the system log files for all messages that are located in the /var/log/messages file that indicate a timeout for this resource. Also, confirm these points about all the scripts or binary file that are internally started by using the start scripts, stop scripts, or monitor scripts:
• Are they present at the correct path?• Do they have the required permissions?
– To reset the resource, refer to Example 11-49
Example 11-49 Reset the resource
clmgr reset application <application> [NODE=<node_name>]clmgr reset service_ip <service_ip> [NODE=<node_name>] clmgr reset file_system <file_system> [NODE=<node_name>]
Chapter 11. PowerHA SystemMirror V7.2.2 for Linux 459
PowerHA SystemMirror fallover issuesThis topic describes the potential fallover issues.
PowerHA SystemMirror fallover is not triggered after a node crash or rebootCheck whether either more than half of the nodes in the cluster are online or exactly half of the nodes are online and the tiebreaker is reserved. If less than half of the nodes are online, start additional nodes. If exactly half of the nodes are online, check the attribute of the active tiebreaker.
The possible causes are as follows:
� Either more than half of the nodes in the cluster are online, or exactly half of the nodes are online and the tiebreaker is reserved. If less than half of the nodes are online, start additional nodes. If exactly half of the nodes are online, check the attribute of the active tiebreaker by using the clmgr query cluster command.
� The split policy must be set as None and if it is set as Manual, the user intervention is required for fallover after the node restarts.
� The policy of RG must be Fallback to Home Node (FBHN), which can be checked by using the clmgr query rg command.
460 IBM PowerHA SystemMirror V7.2.3 for IBM AIX and V7.2.2 for Linux
Chapter 12. Infrastructure management with IBM PowerVC
This chapter shows how to manage the infrastructure of PowerHA cluster environments from IBM PowerVC. This chapter provides information on how to deliver or remove resources such as processor, memory, network, and storage from IBM Cloud PowerVC Manager.
In this chapter, the following topic is discussed:
� Management of virtual machines from PowerVC
12
© Copyright IBM Corp. 2019. All rights reserved. 461
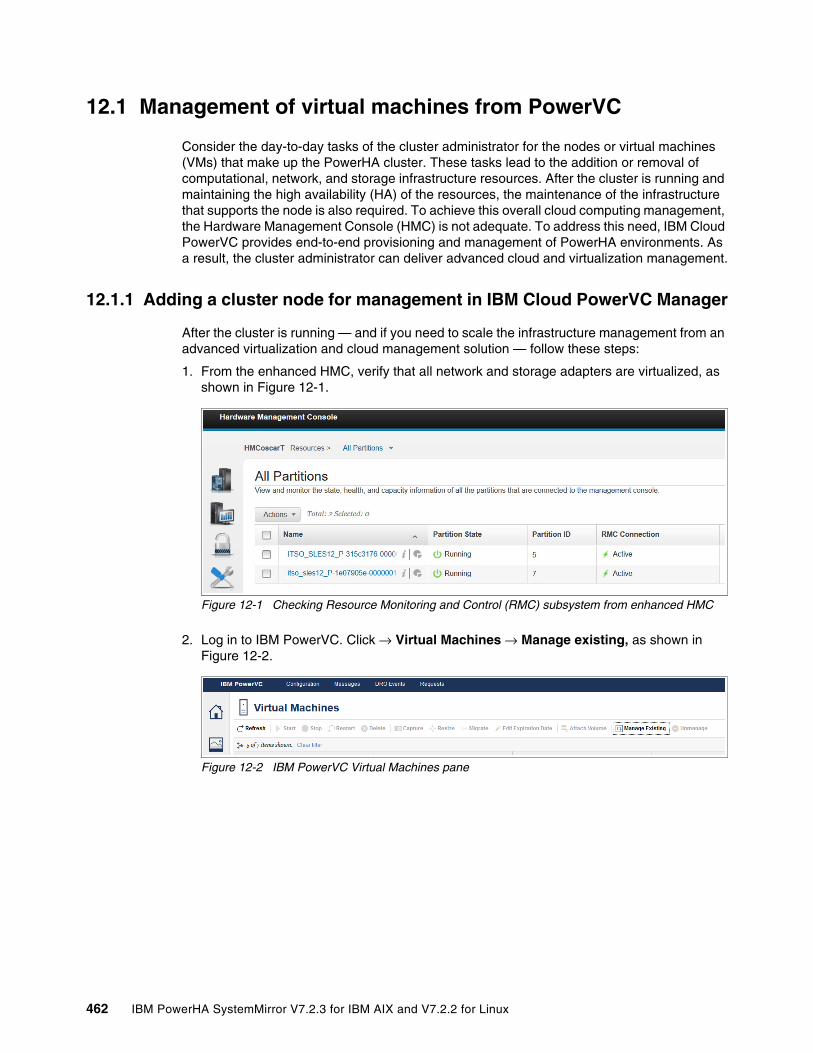
12.1 Management of virtual machines from PowerVC
Consider the day-to-day tasks of the cluster administrator for the nodes or virtual machines (VMs) that make up the PowerHA cluster. These tasks lead to the addition or removal of computational, network, and storage infrastructure resources. After the cluster is running and maintaining the high availability (HA) of the resources, the maintenance of the infrastructure that supports the node is also required. To achieve this overall cloud computing management, the Hardware Management Console (HMC) is not adequate. To address this need, IBM Cloud PowerVC provides end-to-end provisioning and management of PowerHA environments. As a result, the cluster administrator can deliver advanced cloud and virtualization management.
12.1.1 Adding a cluster node for management in IBM Cloud PowerVC Manager
After the cluster is running — and if you need to scale the infrastructure management from an advanced virtualization and cloud management solution — follow these steps:
1. From the enhanced HMC, verify that all network and storage adapters are virtualized, as shown in Figure 12-1.
Figure 12-1 Checking Resource Monitoring and Control (RMC) subsystem from enhanced HMC
2. Log in to IBM PowerVC. Click → Virtual Machines → Manage existing, as shown in Figure 12-2.
Figure 12-2 IBM PowerVC Virtual Machines pane
462 IBM PowerHA SystemMirror V7.2.3 for IBM AIX and V7.2.2 for Linux
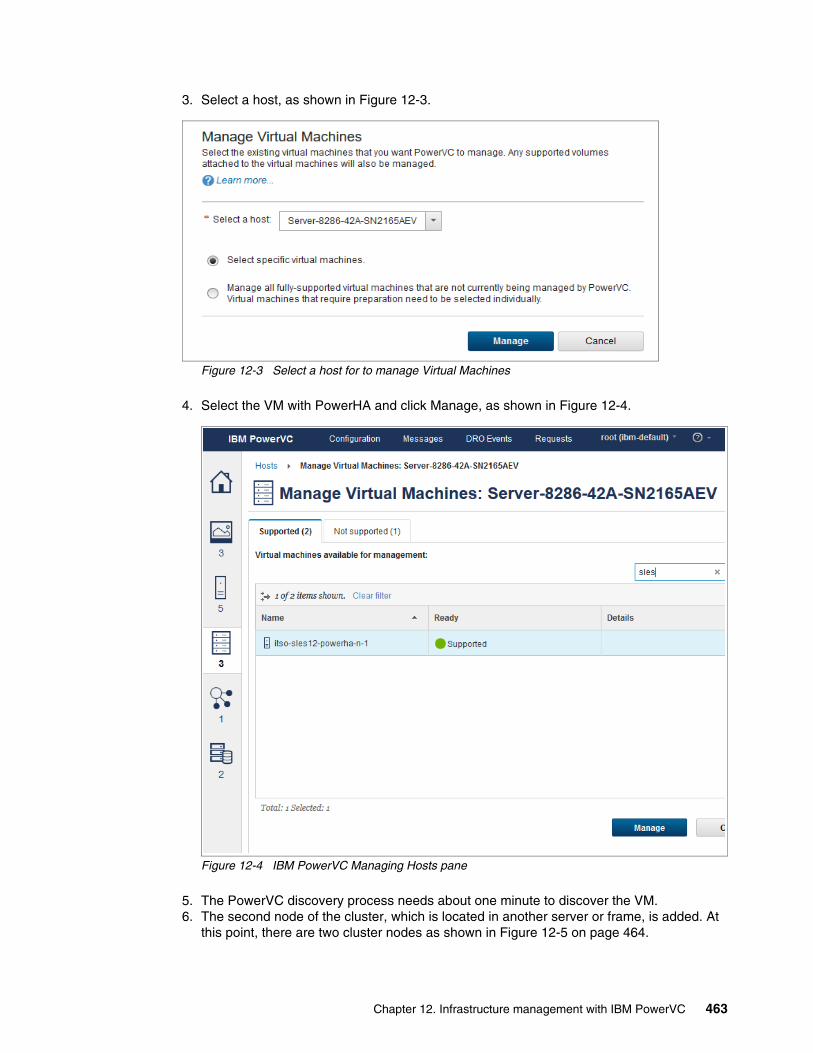
3. Select a host, as shown in Figure 12-3.
Figure 12-3 Select a host for to manage Virtual Machines
4. Select the VM with PowerHA and click Manage, as shown in Figure 12-4.
Figure 12-4 IBM PowerVC Managing Hosts pane
5. The PowerVC discovery process needs about one minute to discover the VM.6. The second node of the cluster, which is located in another server or frame, is added. At
this point, there are two cluster nodes as shown in Figure 12-5 on page 464.
Chapter 12. Infrastructure management with IBM PowerVC 463
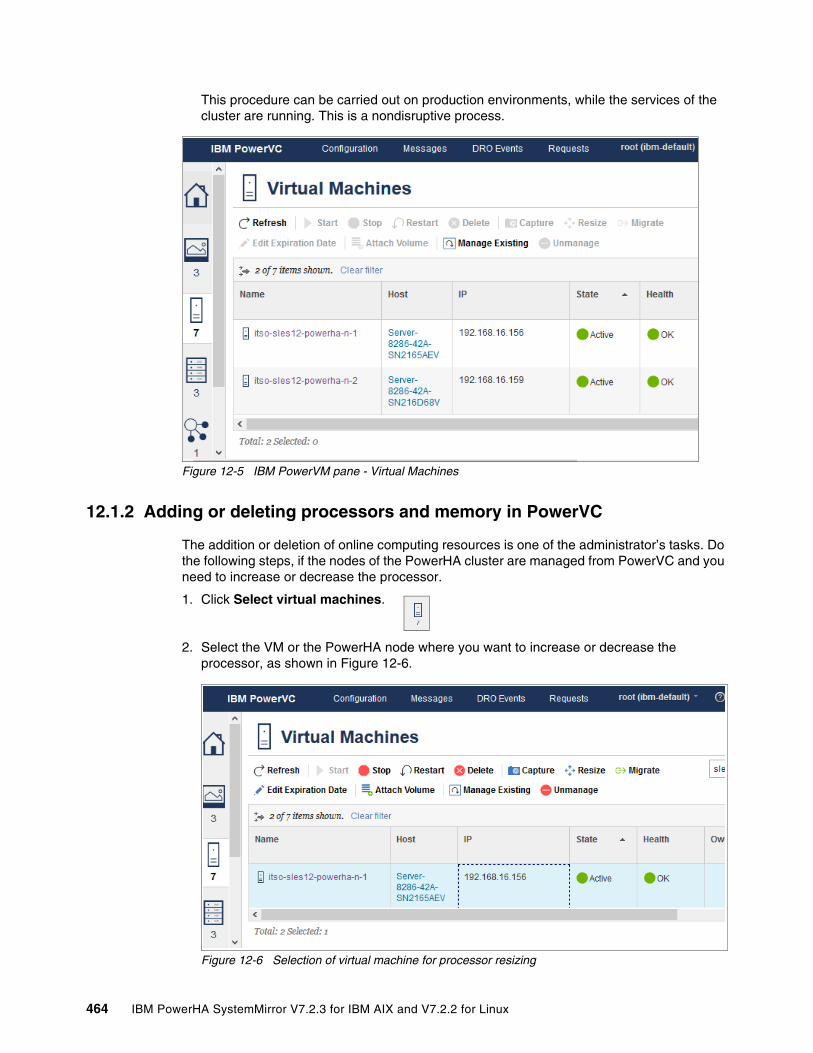
This procedure can be carried out on production environments, while the services of the cluster are running. This is a nondisruptive process.
Figure 12-5 IBM PowerVM pane - Virtual Machines
12.1.2 Adding or deleting processors and memory in PowerVC
The addition or deletion of online computing resources is one of the administrator’s tasks. Do the following steps, if the nodes of the PowerHA cluster are managed from PowerVC and you need to increase or decrease the processor.
1. Click Select virtual machines.
2. Select the VM or the PowerHA node where you want to increase or decrease the processor, as shown in Figure 12-6.
Figure 12-6 Selection of virtual machine for processor resizing
464 IBM PowerHA SystemMirror V7.2.3 for IBM AIX and V7.2.2 for Linux
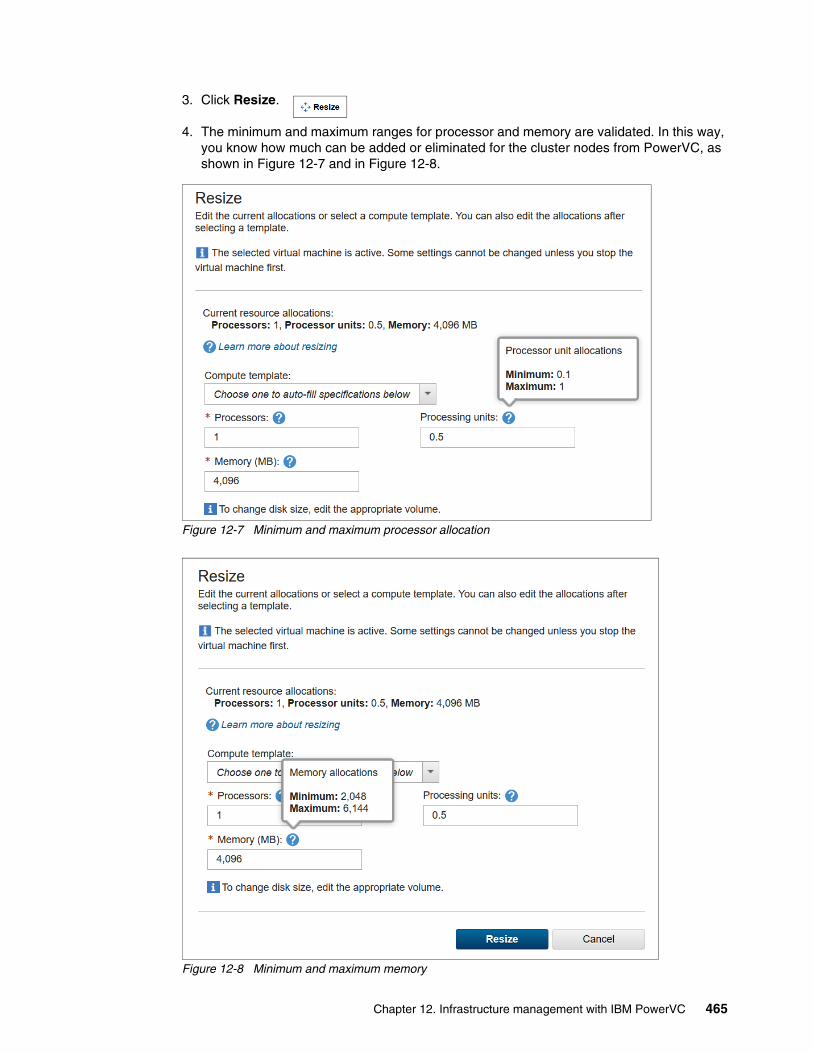
3. Click Resize.
4. The minimum and maximum ranges for processor and memory are validated. In this way, you know how much can be added or eliminated for the cluster nodes from PowerVC, as shown in Figure 12-7 and in Figure 12-8.
Figure 12-7 Minimum and maximum processor allocation
Figure 12-8 Minimum and maximum memory
Chapter 12. Infrastructure management with IBM PowerVC 465
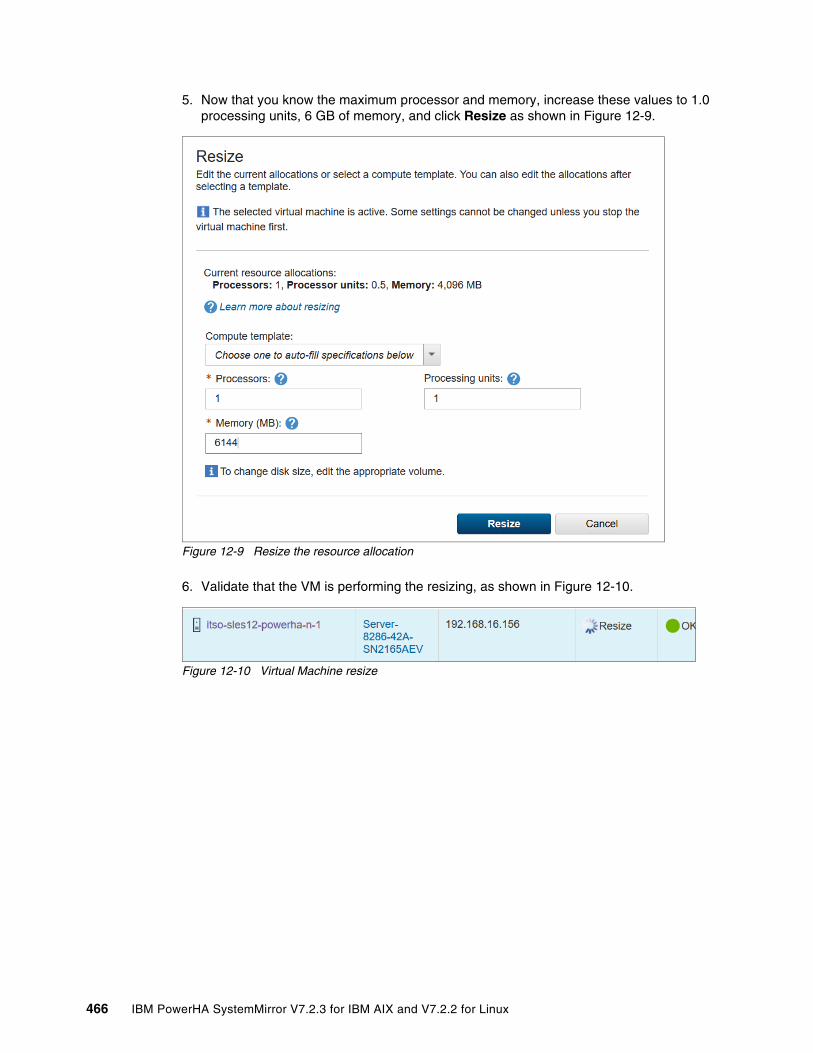
5. Now that you know the maximum processor and memory, increase these values to 1.0 processing units, 6 GB of memory, and click Resize as shown in Figure 12-9.
Figure 12-9 Resize the resource allocation
6. Validate that the VM is performing the resizing, as shown in Figure 12-10.
Figure 12-10 Virtual Machine resize
466 IBM PowerHA SystemMirror V7.2.3 for IBM AIX and V7.2.2 for Linux

7. The resources have increased as shown in Figure 12-11.
Figure 12-11 Shows the increased resource allocations
12.1.3 Add network resources in PowerVC
You might want to add virtual network adapters, so that you can add new resource groups (RGs) in PowerHA for boot, persistent, or service labels. You accomplish this goal in PowerVC without having to access the HMC. It is important to define the network object and to define the parameterization for these values:
� Virtual local area network (VLAN) ID� Type� IP address type� Subnet mask� Gateway� IP ranges
Chapter 12. Infrastructure management with IBM PowerVC 467
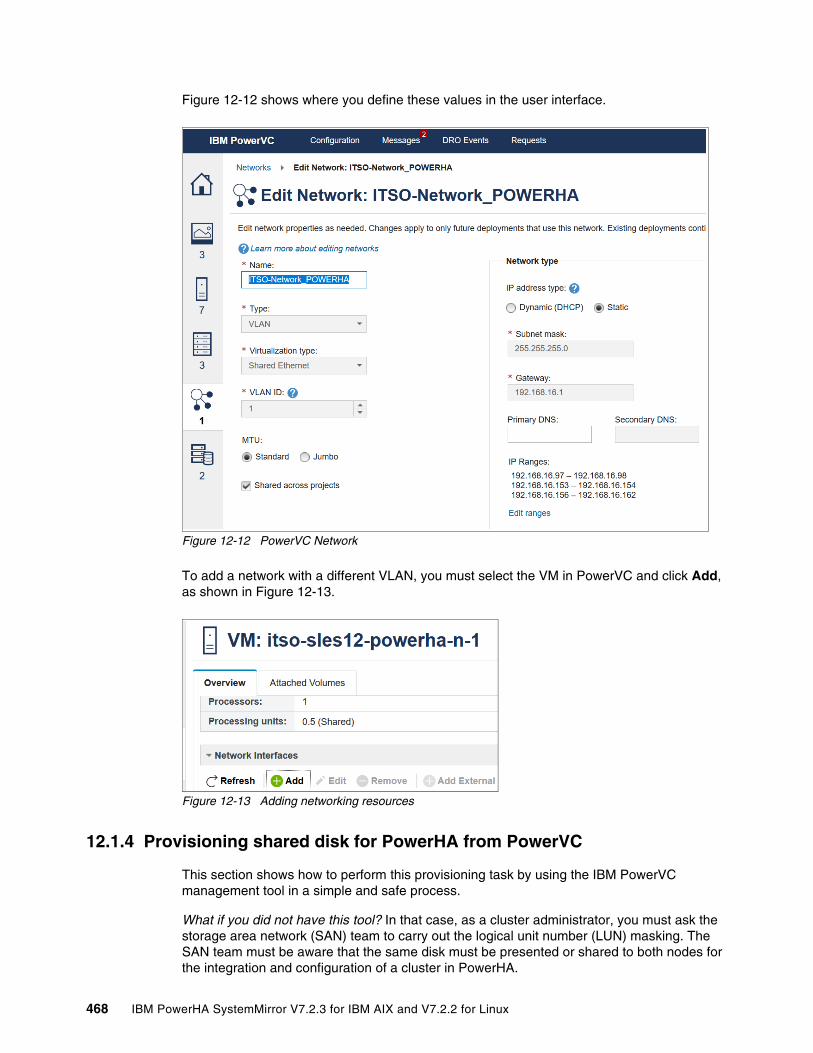
Figure 12-12 shows where you define these values in the user interface.
Figure 12-12 PowerVC Network
To add a network with a different VLAN, you must select the VM in PowerVC and click Add, as shown in Figure 12-13.
Figure 12-13 Adding networking resources
12.1.4 Provisioning shared disk for PowerHA from PowerVC
This section shows how to perform this provisioning task by using the IBM PowerVC management tool in a simple and safe process.
What if you did not have this tool? In that case, as a cluster administrator, you must ask the storage area network (SAN) team to carry out the logical unit number (LUN) masking. The SAN team must be aware that the same disk must be presented or shared to both nodes for the integration and configuration of a cluster in PowerHA.
468 IBM PowerHA SystemMirror V7.2.3 for IBM AIX and V7.2.2 for Linux
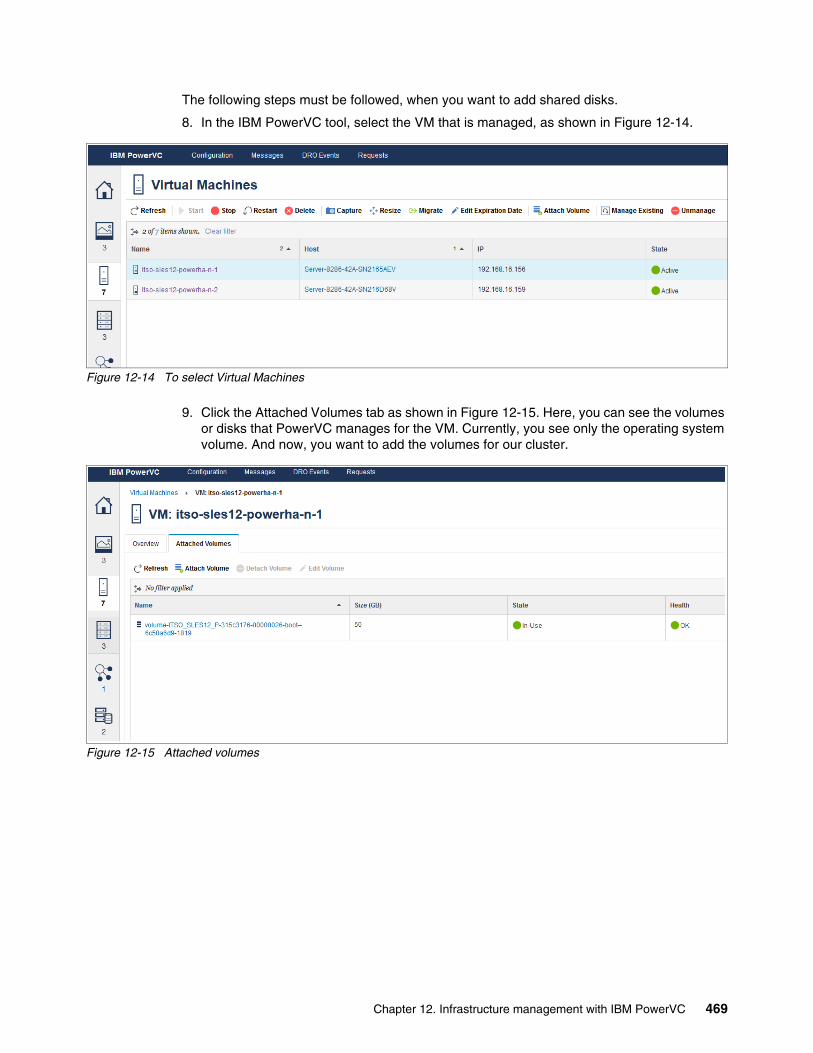
The following steps must be followed, when you want to add shared disks.
8. In the IBM PowerVC tool, select the VM that is managed, as shown in Figure 12-14.
Figure 12-14 To select Virtual Machines
9. Click the Attached Volumes tab as shown in Figure 12-15. Here, you can see the volumes or disks that PowerVC manages for the VM. Currently, you see only the operating system volume. And now, you want to add the volumes for our cluster.
Figure 12-15 Attached volumes
Chapter 12. Infrastructure management with IBM PowerVC 469
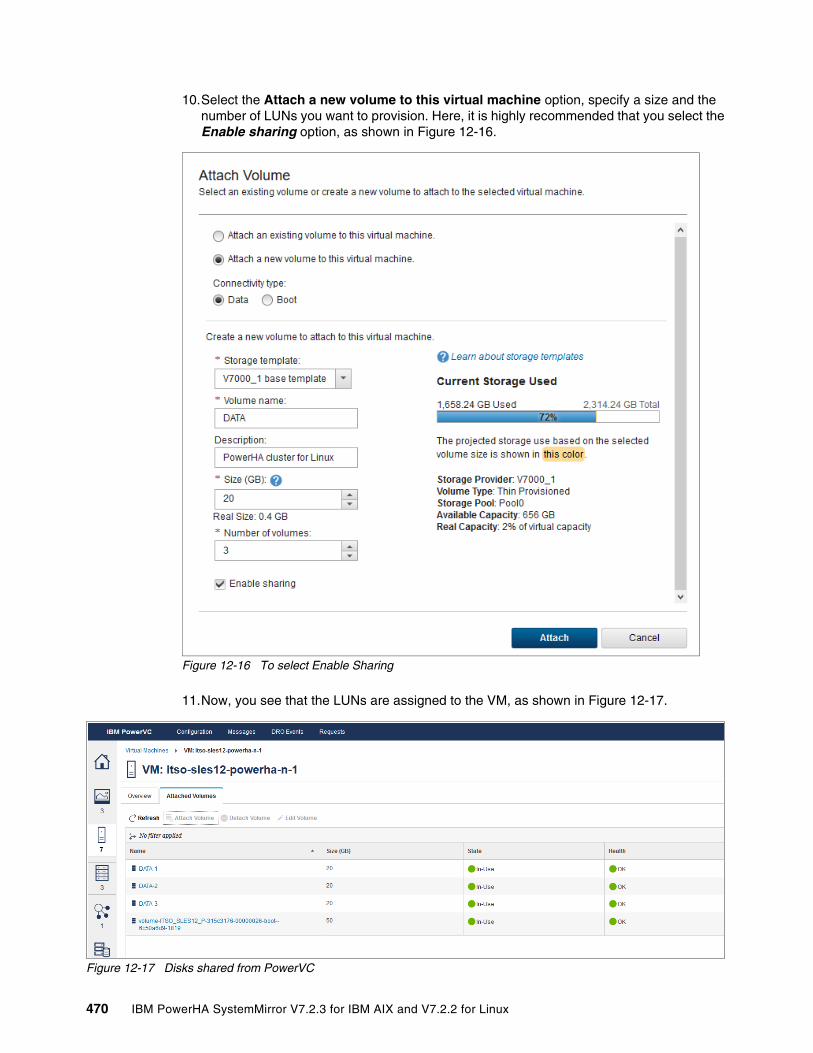
10.Select the Attach a new volume to this virtual machine option, specify a size and the number of LUNs you want to provision. Here, it is highly recommended that you select the Enable sharing option, as shown in Figure 12-16.
Figure 12-16 To select Enable Sharing
11.Now, you see that the LUNs are assigned to the VM, as shown in Figure 12-17.
Figure 12-17 Disks shared from PowerVC
470 IBM PowerHA SystemMirror V7.2.3 for IBM AIX and V7.2.2 for Linux
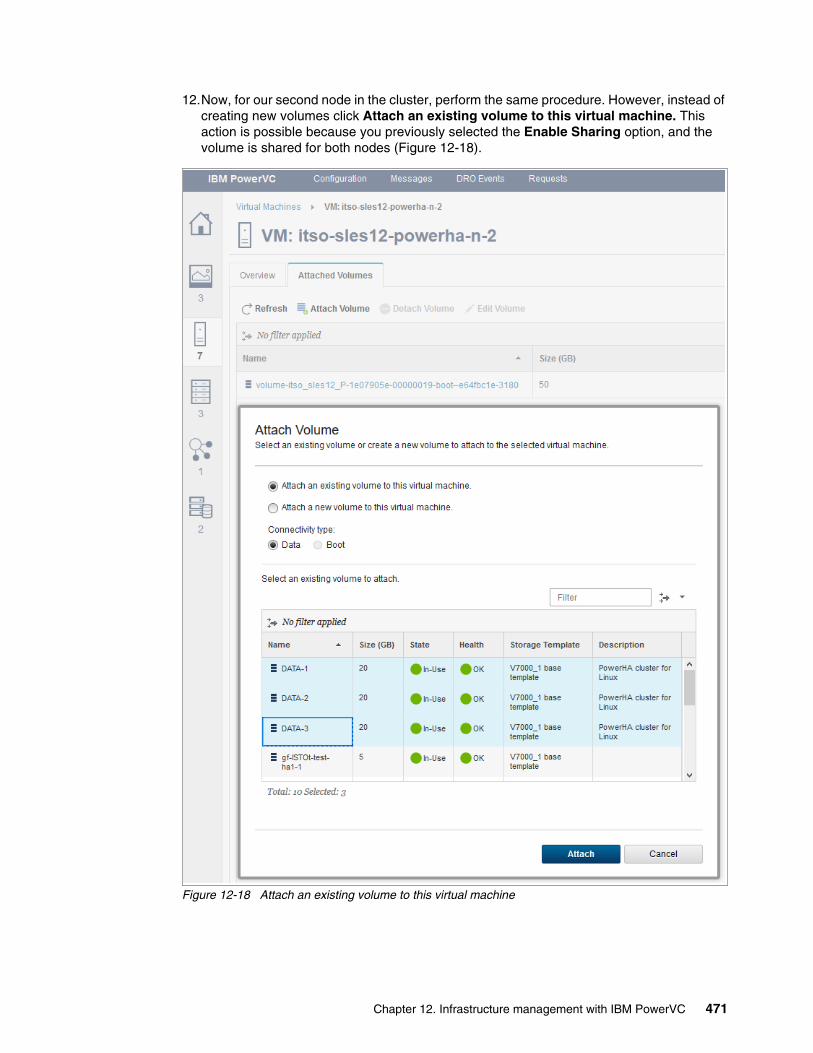
12.Now, for our second node in the cluster, perform the same procedure. However, instead of creating new volumes click Attach an existing volume to this virtual machine. This action is possible because you previously selected the Enable Sharing option, and the volume is shared for both nodes (Figure 12-18).
Figure 12-18 Attach an existing volume to this virtual machine
Chapter 12. Infrastructure management with IBM PowerVC 471
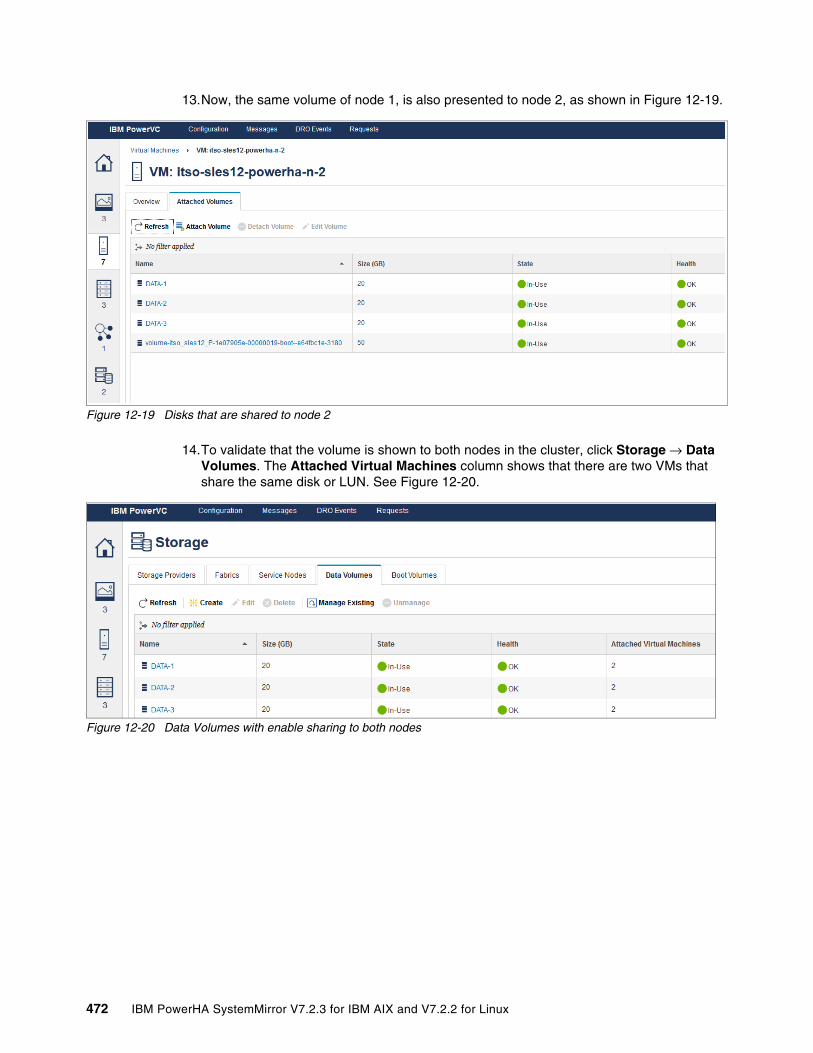
13.Now, the same volume of node 1, is also presented to node 2, as shown in Figure 12-19.
Figure 12-19 Disks that are shared to node 2
14.To validate that the volume is shown to both nodes in the cluster, click Storage → Data Volumes. The Attached Virtual Machines column shows that there are two VMs that share the same disk or LUN. See Figure 12-20.
Figure 12-20 Data Volumes with enable sharing to both nodes
472 IBM PowerHA SystemMirror V7.2.3 for IBM AIX and V7.2.2 for Linux
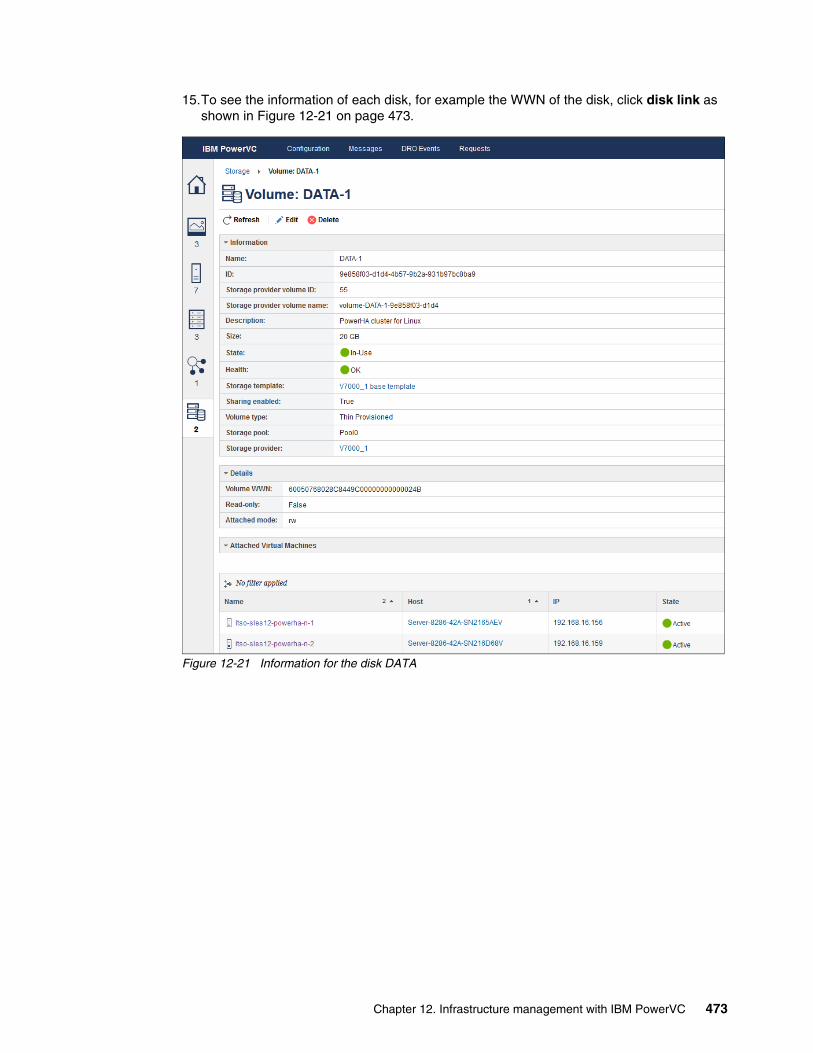
15.To see the information of each disk, for example the WWN of the disk, click disk link as shown in Figure 12-21 on page 473.
Figure 12-21 Information for the disk DATA
Chapter 12. Infrastructure management with IBM PowerVC 473
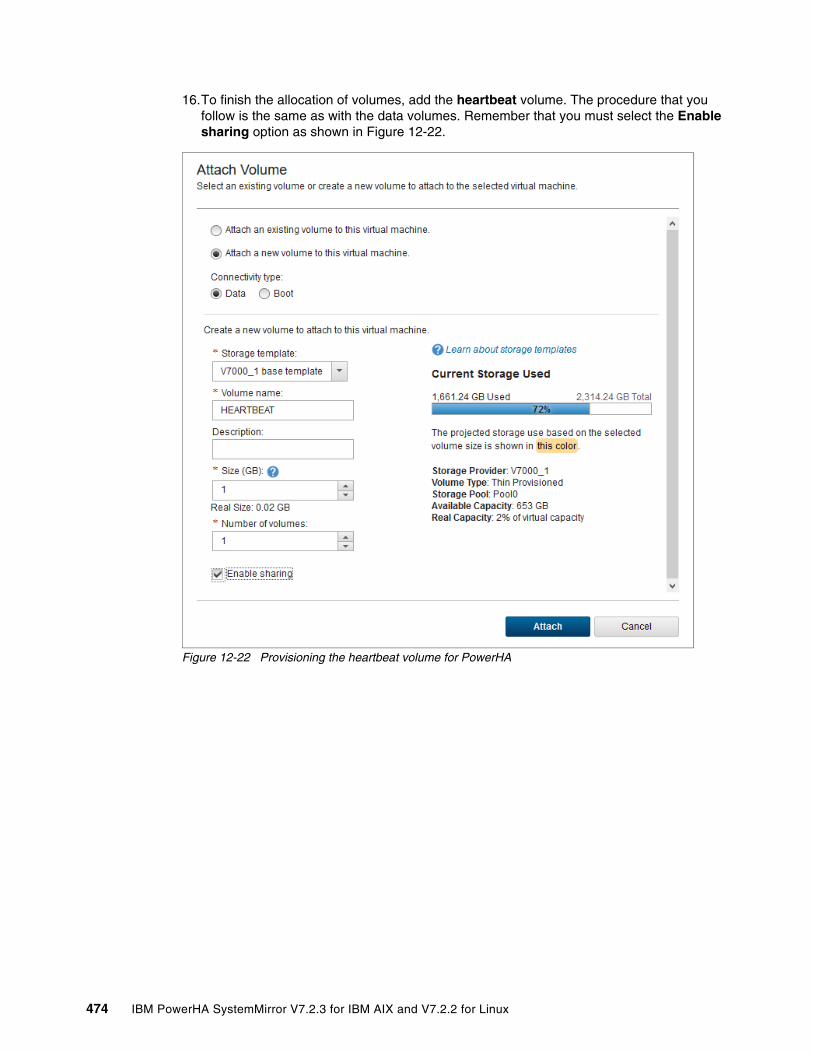
16.To finish the allocation of volumes, add the heartbeat volume. The procedure that you follow is the same as with the data volumes. Remember that you must select the Enable sharing option as shown in Figure 12-22.
Figure 12-22 Provisioning the heartbeat volume for PowerHA
474 IBM PowerHA SystemMirror V7.2.3 for IBM AIX and V7.2.2 for Linux
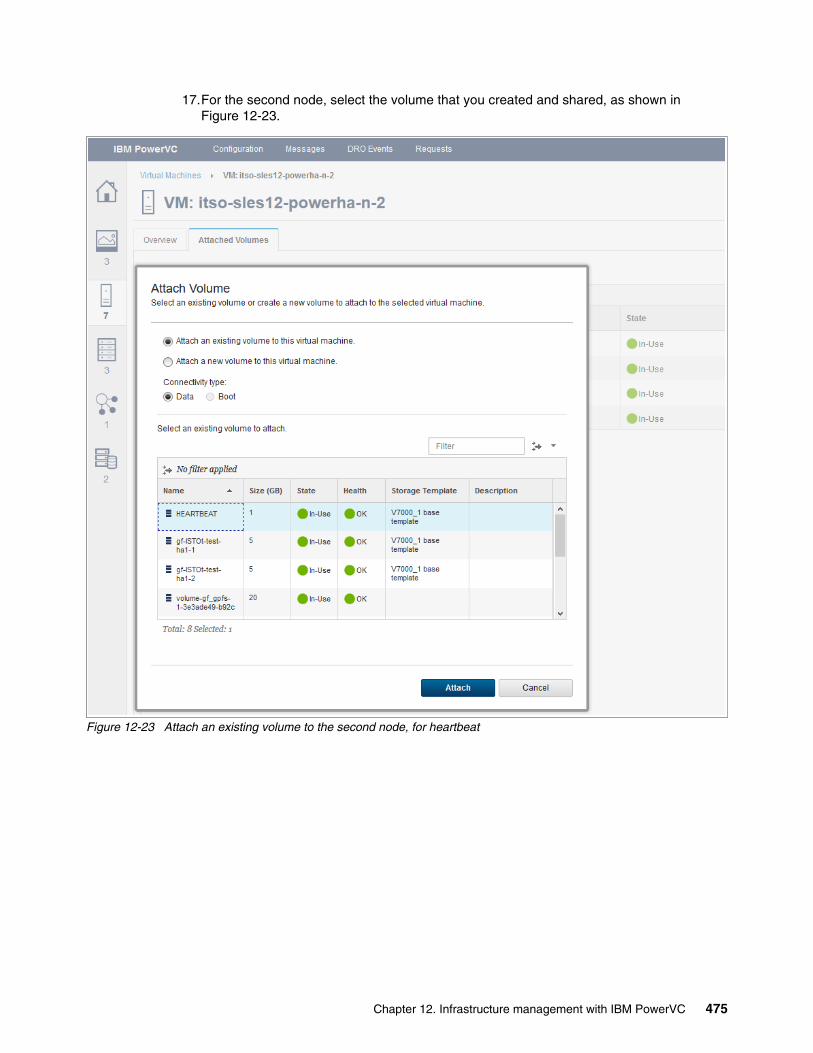
17.For the second node, select the volume that you created and shared, as shown in Figure 12-23.
Figure 12-23 Attach an existing volume to the second node, for heartbeat
Chapter 12. Infrastructure management with IBM PowerVC 475
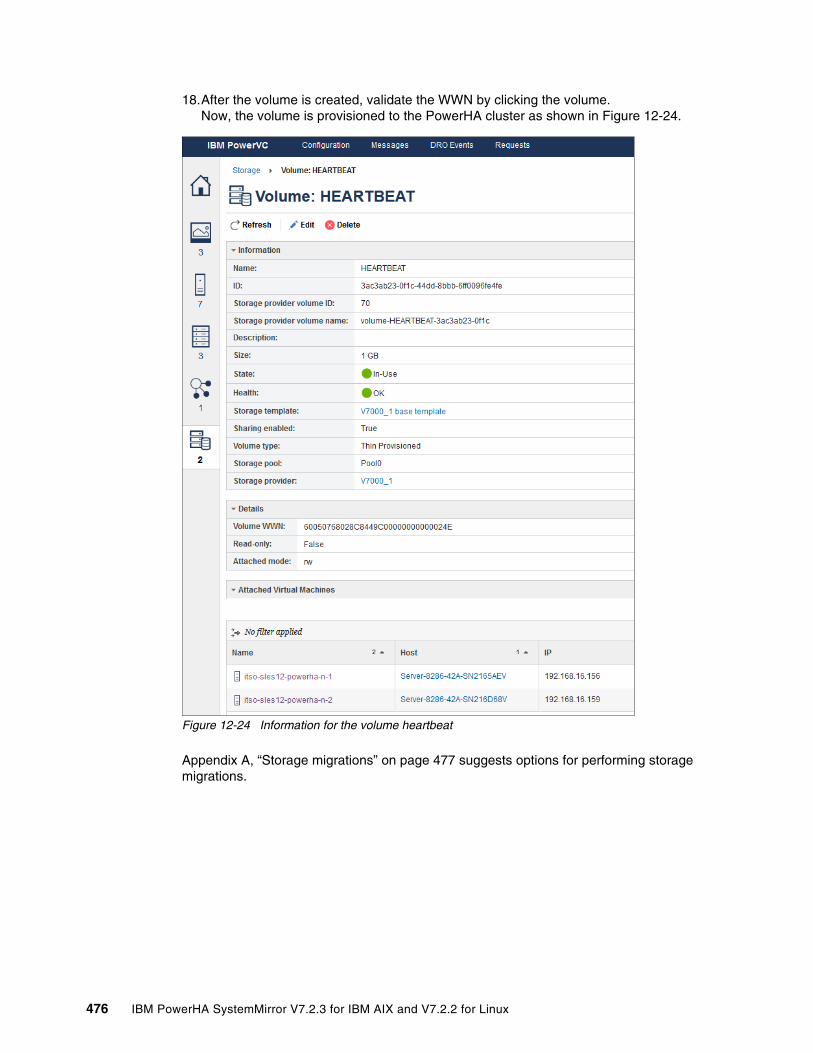
18.After the volume is created, validate the WWN by clicking the volume. Now, the volume is provisioned to the PowerHA cluster as shown in Figure 12-24.
Figure 12-24 Information for the volume heartbeat
Appendix A, “Storage migrations” on page 477 suggests options for performing storage migrations.
476 IBM PowerHA SystemMirror V7.2.3 for IBM AIX and V7.2.2 for Linux

Appendix A. Storage migrations
Naturally, customers would like to do storage migration in a PowerHA cluster without disruption to their operations. This is often possible, but not always.
This appendix discusses the following use cases:
� “The new storage can be brought online along with the existing storage”� “The new storage cannot be brought online along with the existing storage” on page 478
The new storage can be brought online along with the existing storage
This is the simplest use case. Correct use of systems facilities allows you to do nondisruptive storage migration. The basic idea is to add the new disks to an existing volume group (VG), create a new mirror of the VG on the new disks, and then remove the old disks from the VG. There are three cases to consider:
1. rootvg
A new disk or disks can be added to rootvg with the extendvg command. A new mirror of rootvg can be made with the mirrorvg command. After completion, the existing disks can be evacuated with the rmlvcopy command, and those disks removed from the VG with the reducevg command. For rootvg’s that contain only a single disk, replacepv can be a more convenient way of performing this operation.
There are two important steps that must be performed for rootvg after you complete this operation:
a. Run savebase to update the boot image.
b. Run bootlist to indicate that the new disks are to be used for the next boot operation.
The administrator must check the man pages for the mirrorvg, rmlvcopy, and reducevg to check the documented restrictions. These restrictions are not expected to apply to the common run of rootvg configurations, but a quick check in advance can avoid a problem later.
A
© Copyright IBM Corp. 2019. All rights reserved. 477
2. Shared VGs managed by PowerHA
For this type of VG, it is important to use Cluster Single Point of Control (C-SPOC) operations to change the VG to maintain a consistent image, cluster wide. That is, use the C-SPOC SMIT panels to add new disks to the VG, create new mirrors of the logical volumes, remove existing mirrors, and remove existing disks. C-SPOC takes care of any needed savebase operations. Notice that when the new mirror is created, Logical Volume Manager (LVM) must copy all of the existing partitions to the new mirror. This process can be lengthy. For shared VGs with a single disk or a few disks, it is more convenient to use the C-SPOC disk replacement operation.
3. The repository disk
Although the process of migrating the repository to a new disk is conceptually the same as the two prior cases, LVM commands must never be used on caavg_private in an attempt to accomplish this. Such attempts can easily produce the following situation:
– LVM thinks caavg_private is on one disk.– Cluster Aware AIX (CAA) thinks the repository is on another disk.
This can happen because CAA keeps information in the boot record, which is not part of the LVM image. Such situations require significant expertise to unravel in a nondisruptive manner. Most customers, when faced with the torturous series of steps required, prefer to take an outage, and do a scrub and rebuild.
The process of migrating the repository consists of first using the SMIT panels (or clmgr commands) to add a backup repository, then doing a replace repository operation. This makes the existing repository a back up. The last step is to remove the original repository disk. Because repository replacement updates the PowerHA HACMPsircol Object Data Manager (ODM), a verify and sync is necessary (depending on the software level). The way to check is to run odmget HACMPcluster | grep handle to see the handle. If the handle is 0, you know that a verify and sync is required.
If any backup repositories are defined, be sure to remove them and add the new disks.
The new storage cannot be brought online along with the existing storage
This use case can arise if the customer is actually changing the attachment mechanism for the disks, say from MultiPath I/O (MPIO) to VIOS. In this case, a reboot is unavoidable. Here are some points to keep in mind to make the reboot successful.
1. rootvg
Such a replacement of the attachment mechanism can cause the disk names to change. Then, it might be necessary to use the Hardware Management Console (HMC) to modify the boot list so that it points to the new disk.
2. Shared VGs managed by PowerHA
Since LVM finds disks by physical volume identifier (PVID), which is unaltered by the change of the attachment mechanism, this case requires no work.
3. The repository disk
Because CAA finds disks by UUID, and a change of attachment mechanism almost certainly changes the UUID, more work might be required here.
478 IBM PowerHA SystemMirror V7.2.3 for IBM AIX and V7.2.2 for Linux

CAA comes up, using the bootstrap repository, even if it cannot find the repository disk. However, if the caavg_private VG is not online, it is possible to bring it online by running clusterconf -r <hdisk name>. If that does not work, and the change of attachment mechanism changed the disk name, the chrepos command can be tried to replace the repository disk under the old name with its new name.
In the worst case, there is always the brute force solution: shut down PowerHA and CAA on all nodes, scrub the repository disk, and do a verify and sync to re-create the CAA cluster.
The important case that has not been discussed is the use of raw disks. For these, none of the statements in this appendix apply. You must consult the manufacturer of the disk attachment mechanism (for example, Oracle).
Note: On recent versions of CAA, it also tracks the PVID. If the output for the odmget -q 'name=cluster0' CuAt command shows a PVID stanza, you are fortunate. CAA finds the repository by PVID if a UUID search fails
Appendix A. Storage migrations 479

480 IBM PowerHA SystemMirror V7.2.3 for IBM AIX and V7.2.2 for Linux
Appendix B. Migrating the cluster repository disk
The following procedure is valid for clusters that are PowerHA SystemMirror v7.2.0 and later.
1. Verify the cluster level on any node in the cluster by executing the following command:
TST[root@aixdc79p:/] # halevel -s 7.2.1 SP2
The repository disk is the only disk in the caavg_private volume group (VG) and requires special procedures. You do not use Logical Volume Manager (LVM) on it. It is recommended that you run a verification on the cluster. Any errors must be addressed and corrected before you replace the repository disk.
2. To run cluster verification, which is a non-intrusive procedure, execute the clmgr verify cluster command. Confirm that the command completes normally as in this example:
Completed 70 percent of the verification checks Completed 80 percent of the verification checks Completed 90 percent of the verification checks Completed 100 percent of the verification checks Verification has completed normally.
3. The new repository disk must be the same size as the existing repository disk. In Example B-1, both disks are 5 GB. You verify this fact by running the bootinfo -s hdisk# command.
Example B-1 Verify the disk sizes
TST[root@aixdc285:/] # lspv hdisk0 00f811ec5f0952f5 rootvg active hdisk1 00f811ec68f206bd volgrp1 active hdisk2 00f811ec63beda3a vgams01 active hdisk4 00f811ec32a8dc6f caavg_private active hdisk5 00f811eca2b2d20f vgshr02 concurrent
B
Note: If errors are detected, you must correct them before you replace the repository disk.
© Copyright IBM Corp. 2019. All rights reserved. 481
hdisk3 00f9be345a22c61e volgrp1 active hdisk6 00f9be345a232b5a rootvg active hdisk7 none None hdisk8 00f9be345a249a2f None hdisk9 00f9be345a24490d vgams01 active
TST[root@aixdc285:/] # bootinfo -s hdisk4 5120 TST[root@aixdc285:/] # bootinfo -s hdisk7 5120
4. Configure the old disk with respect to the new disk as follows:
In this case, hdisk4 is the existing repository disk and hdisk7 is the new one to replace it. The two repository disks must be configured the same and then synchronized with all nodes in the cluster. However, it is recommended that you do configuration of one node first with the cfgmgr command (in this example, on aixdc285). Then, manually run the following command to put a physical volume identifier (PVID) on the disk:
chdev -l hdisk7 -a pv=yes
TST[root@aixdc285:/] # lspv |grep hdisk7 hdisk7 00f9be345a23c5db None
5. Verify that the reserve_policy on the new repository disk is set to no_reserve by running this command:
TST[root@aixdc285:/] # lsattr -El hdisk7|grep reserve reserve_policy no_reserve Reserve Policy True
If you do not see this setting, run the following command to update the setting:
chdev -l hdisk7 -a reserve_policy=no_reserve
6. On the second node — aixdc284 in this example — run the cfgmgr command to verify that a disk is configured with the same PVID.
The hdisk name does not have to, and often does not, match across the systems, as in this example. Yet, you can see that the PVID on the new disk matches the PVID on the old disk:
TST[root@aixdc284:/] # lspv |grep c5db hdisk3 00f9be345a23c5db None
7. Verify that the reserve_policy on the repository disk is set to no_reserve as follows:
TST[root@aixdc284:/] # lsattr -El hdisk3|grep reserve reserve_policy no_reserve Reserve Policy True
8. To swap the repository disk, execute the following command:
clmgr modify cluster REPOSITORY=hdisk#
where hdisk# is the name of a specific hdisk.
You can run this command on either node in the cluster. Be sure to specify the correct hdisk. For example, from node aixdc284 and hdisk3, you run this command:
TST[root@aixdc284:/] # clmgr modify cluster REPOSITORY=hdisk3 ***Warning: this operation will destroy any information currently stored on "hdisk3". Are you sure you want to proceed? (y/n) y
Note: Make a note of the PVID to use later in this procedure. The PVID’s of the old and new repository disks must match.
482 IBM PowerHA SystemMirror V7.2.3 for IBM AIX and V7.2.2 for Linux
Check that you selected the correct disk. Then, confirm this operation by entering y and pressing Enter. This process is completed in 1 to 2 minutes.
9. After completion, verify on both nodes that the new disk shows up with caavg_private as in this example:
TST[root@aixdc284:/] # lspv |grep caa hdisk3 00f9be345a23c5db caavg_private active
TST[root@aixdc285:/] # lspv |grep caa hdisk7 00f9be345a23c5db caavg_private active
10.Migrations or swaps only: Delete the original repository disk if your goal is to migrate from the original respository disk and not retain a backup repository disk.
In contrast to the stated purpose of this appendix, the default behavior in a repository disk swap is as follows:The previous repository disk automatically becomes a backup repository disk. For a migration or a swap, this behavior is not desired. You must manually remove the backup repository disk from the cluster, and then synchronize the cluster again. One approach is as follows:
a. Run the following command to verify that the original repository disk (hdisk4, in this example) is still defined as a repository candidate disk:
TST[root@aixdc284:/] # clmgr query repository hdisk3 (00f9be345a23c5db) hdisk4 (00f811ec32a8dc6f)
b. When see that the original repository disk is still listed, you run the following command to remove it:/usr/es/sbin/cluster/utilities/clmgr -f delete repository 'hdisk4'
c. Verify success by repeating the clmgr query repository command:TST[root@aixdc284:/] # clmgr query repository hdisk3 (00f9be345a23c5db)
Notice that the query output no longer shows hdisk4.
d. Run the following command to complete the removal process by synchronizing the cluster:
TST[root@aixdc284:/] # clmgr sync cluster
Upon successful cluster synchronization, the repository disk migration or swap process is complete.
Appendix B. Migrating the cluster repository disk 483

484 IBM PowerHA SystemMirror V7.2.3 for IBM AIX and V7.2.2 for Linux
Related publications
The publications listed in this section offer more detailed discussions of the topics that are covered in this book.
IBM Redbooks
The following IBM Redbooks publications provide additional information about the topic in this document. Be aware that some publications that are referenced in this list might be available in softcopy only.
� IBM PowerHA SystemMirror V7.2.1 for IBM AIX Updates, SG24-8372
� IBM PowerHA SystemMirror V7.2 for IBM AIX Updates, SG24-8278
� IBM PowerHA SystemMirror for AIX Cookbook, SG24-7739
You can search for, view, download, or order these documents and other Redbooks, Redpapers, Web Docs, draft and additional materials, at the following website:
ibm.com/redbooks
Online resources
The following websites provide further relevant information:
� IBM PowerHA SystemMirror
https://www.ibm.com/us-en/marketplace/powerha
� IBM Power Systems
https://www.ibm.com/it-infrastructure/power
� IBM PowerHA SystemMirror Version 7.2 for AIX documentation
https://ibm.co/2X0AKeI
Help from IBM
IBM Support and downloads
ibm.com/support
IBM Global Services
ibm.com/services
© Copyright IBM Corp. 2019. All rights reserved. 485

486 IBM PowerHA SystemMirror V7.2.3 for IBM AIX and V7.2.2 for Linux

ISB
N 0738457914
SG
24-8434-00
ISB
N 0738457914
SG
24-8434-00
ISB
N 0738457914
SG
24-8434-00
(0.1”spine)0.1”<
->0.169”
53<->
89 pages
(0.2”spine)0.17”<
->0.473”
90<->
249 pages
(1.5” spine)1.5”<
-> 1.998”
789 <->
1051 pages
(1.0” spine)0.875”<
->1.498”
460 <->
788 pages
(0.5” spine)0.475”<
->0.873”
250 <->
459 pages
IBM Pow
erHA SystemM
irror V7.2.3 for IBM AIX and V7.2.2 for
IBM Pow
erHA SystemM
irror V7.2.3 for IBM
AIX and V7.2.2 for Linux
IBM Pow
erHA SystemM
irror V7.2.3
IBM Pow
erHA SystemM
irror V7.2.3 for IBM AIX and V7.2.2 for Linux
ISB
N 0738457914
SG
24-8434-00
ISB
N 0738457914
SG
24-8434-00
(2.0” spine)2.0” <
-> 2.498”
1052 <->
1314 pages
(2.5” spine) 2.5”<
->nnn.n”
1315<->
nnnn pages
IBM Pow
erHA System
Mirror V7.2.3
IBM Pow
erHA SystemM
irror V7.2.3 for IBM
AIX and V7.2.2 for Linux


ibm.com/redbooks
Printed in U.S.A.
Back cover
ISBN 0738457914
SG24-8434-00
®