Embed Size (px)
Citation preview
HOL-2210-01-SDC
Virtualization 101:Introduction to vSphere
H A N D S - O N L A B S M A N U A L - 2 0 2 22 0 2 2
Table of contentsTable of contents
Lab Overview - HOL-2210-01-SDC - Virtualization 101: Introduction to vSphere 4
Virtualization.....................................................................................4
Lab Guidance ................................................................................. 15
Module 1 - Introduction to Management with vCenter Server (60 Min) 19
Introduction.................................................................................... 19
Hands-on Labs Interactive Simulation: ESXi Installation and
Configuration.................................................................................. 19
ESXi Host Client .............................................................................. 19
vCenter 7 Overview .........................................................................28
vCenter Server and Creating a Virtual Machine .................................35
Cloning Virtual Machines and Using Templates ................................. 74
Using Tagging and Search to Find Objects Quickly........................... 88
Understanding vSphere Availability and Distributed Resource
Scheduler (DRS)............................................................................ 103
vSphere 7 Fault Tolerance Provides Continuous Availability .............. 121
Monitoring Events and Creating Alarms...........................................123
Configure Shares and Resources.....................................................144
Migrating Virtual Machines with VMware vMotion ............................ 151
vSphere Monitoring and Performance .............................................164
Introduction to vSphere with Tanzu .................................................184
ESXi Install and Configure.............................................................. 186
Certification Path ...........................................................................187
Module 2 - Introduction to vSphere Networking and Security (60 Min)... 190
Introduction.................................................................................. 190
Adding and Configuring vSphere Standard Switch ...........................194
Working with the vSphere Distributed Switch ..................................231
Adding and Configuring a vSphere Distributed Switch.....................282
Using Host Lockdown Mode .......................................................... 325
Configuring the Host Services and Firewall .....................................354
User Access and Authentication Roles............................................355
Understanding Single Sign On ....................................................... 372
Adding an ESXi Host to Active Directory.........................................394
Certification Path ..........................................................................405
HOL-2210-01-SDC: Virtualization 101: Introduction to vSphere
H A N D S - O N L A B S M A N U A L | 2
Module 3 - Introduction to vSphere Storage (60 Min) 408
vSphere Storage Overview ........................................................... 408
Creating and Configuring vSphere Datastores ................................. 411
Storage vMotion .......................................................................... 460
Managing Virtual Machine Disks.....................................................470
Working with Virtual Machine Snapshots ....................................... 480
vSphere Datastore Cluster ............................................................ 500
Certification Path ......................................................................... 509
Conclusion 512
For More Information.... .................................................................512
Appendix 524
Hands-on Labs Interface ............................................................... 524
HOL-2210-01-SDC: Virtualization 101: Introduction to vSphere
H A N D S - O N L A B S M A N U A L | 3

Lab Overview - HOL-2210-01-SDC - Virtualization 101: Introduction to vSphereLab Overview - HOL-2210-01-SDC - Virtualization 101: Introduction to vSphere
[2][2]VirtualizationVirtualization
If you are not familiar with Virtualization, this lesson will give you an introduction to it.
If you are familiar with virtualization or have taken this lab previously, you can jump ahead to Module 1 - Introduction to managementModule 1 - Introduction to managementwith vCenter Serverwith vCenter Server..
[3][3]What is Virtualization:What is Virtualization:
Today's x86 computer hardware was designed to run a single operating system and a single application, leaving most machines vastlyunderutilized. Virtualization lets you run multiple virtual machines on a single physical machine, with each virtual machine sharing theresources of that one physical computer across multiple environments. Different virtual machines can run different operating systemsand multiple applications on the same physical computer.
HOL-2210-01-SDC: Virtualization 101: Introduction to vSphere
H A N D S - O N L A B S M A N U A L | 4
HOL-2210-01-SDC: Virtualization 101: Introduction to vSphere
H A N D S - O N L A B S M A N U A L | 5
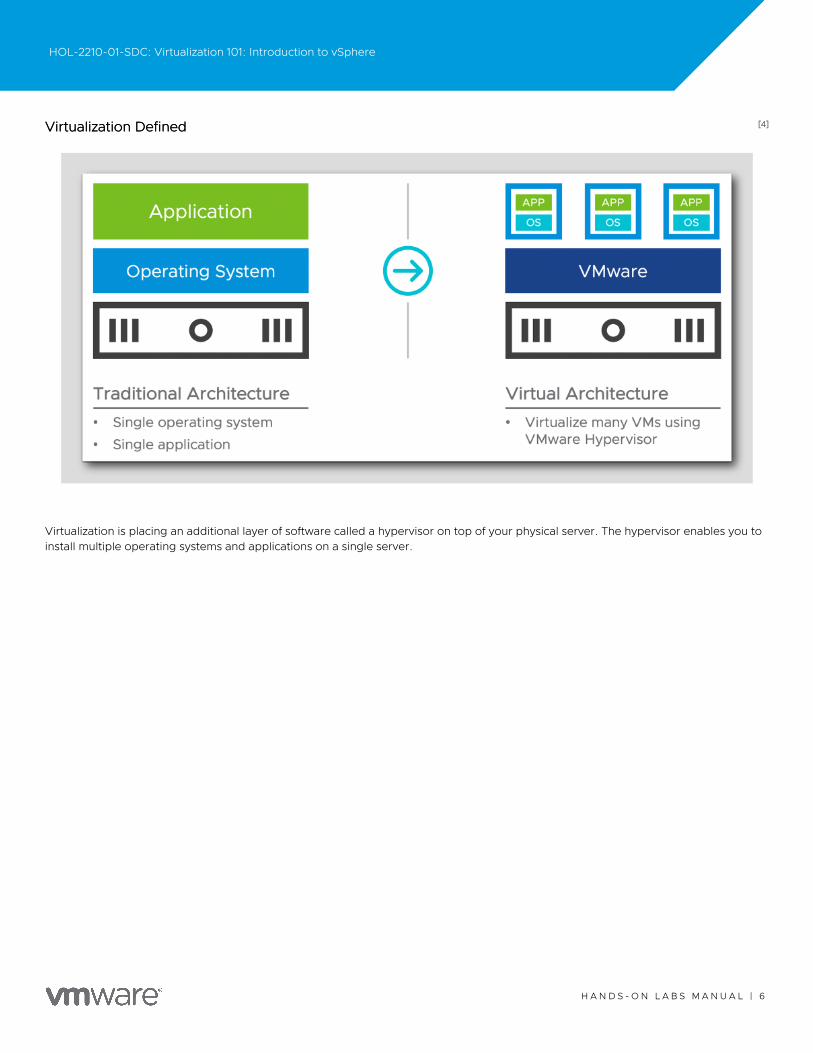
[4][4]Virtualization DefinedVirtualization Defined
Virtualization is placing an additional layer of software called a hypervisor on top of your physical server. The hypervisor enables you toinstall multiple operating systems and applications on a single server.
HOL-2210-01-SDC: Virtualization 101: Introduction to vSphere
H A N D S - O N L A B S M A N U A L | 6
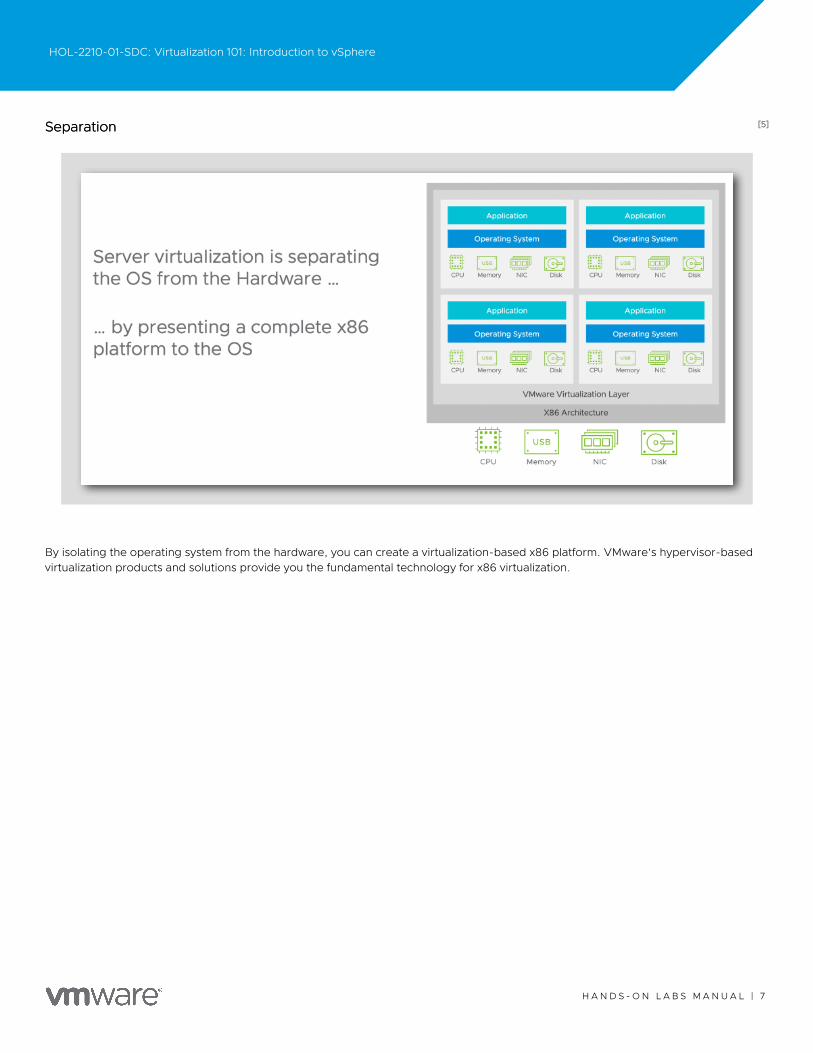
[5][5]SeparationSeparation
By isolating the operating system from the hardware, you can create a virtualization-based x86 platform. VMware's hypervisor-basedvirtualization products and solutions provide you the fundamental technology for x86 virtualization.
HOL-2210-01-SDC: Virtualization 101: Introduction to vSphere
H A N D S - O N L A B S M A N U A L | 7
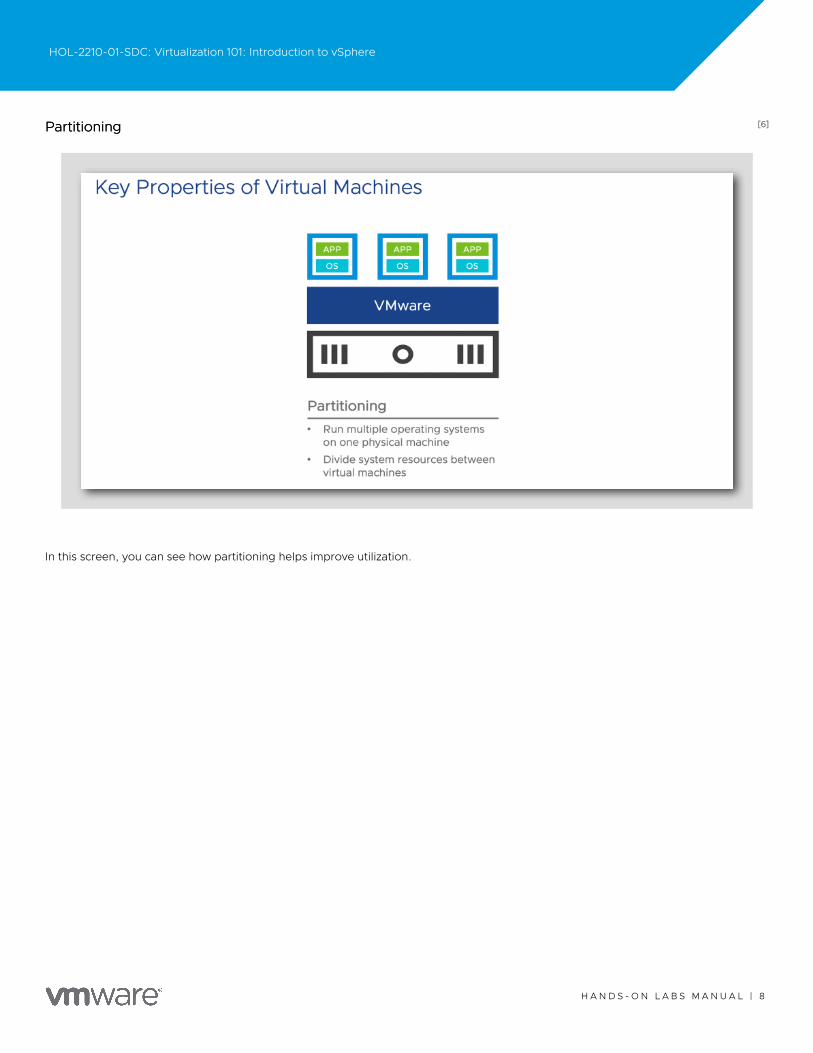
[6][6]PartitioningPartitioning
In this screen, you can see how partitioning helps improve utilization.
HOL-2210-01-SDC: Virtualization 101: Introduction to vSphere
H A N D S - O N L A B S M A N U A L | 8
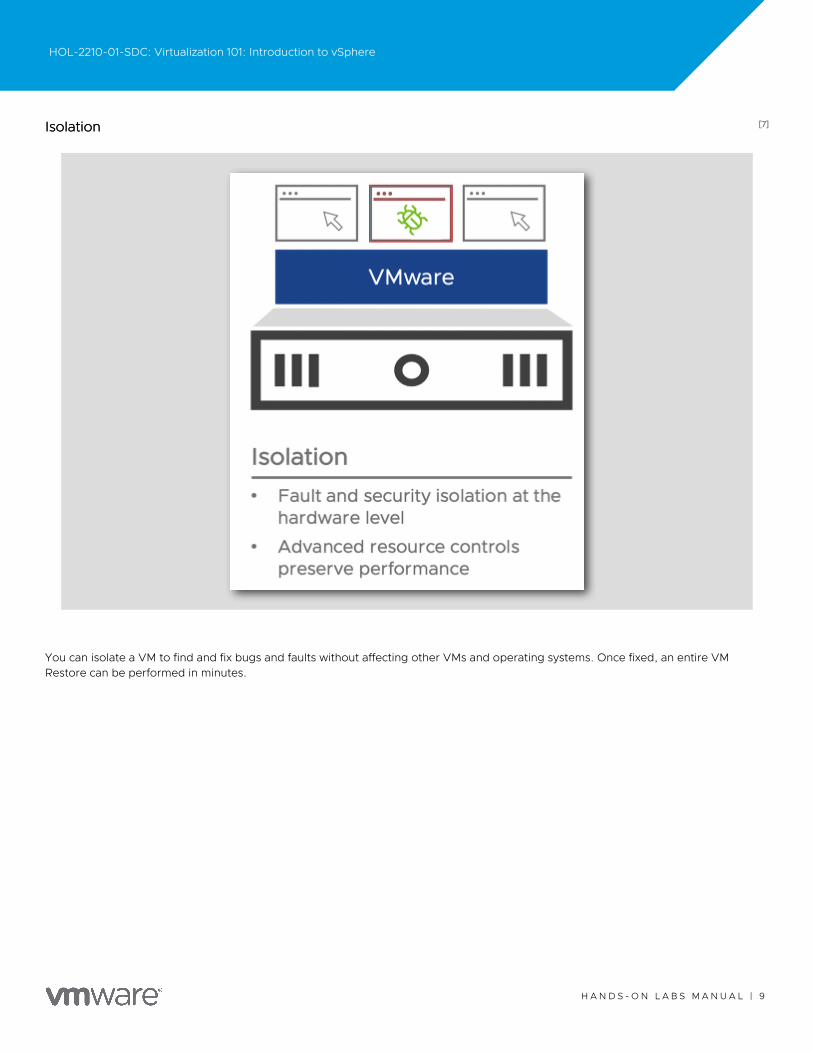
[7][7]IsolationIsolation
You can isolate a VM to find and fix bugs and faults without affecting other VMs and operating systems. Once fixed, an entire VMRestore can be performed in minutes.
HOL-2210-01-SDC: Virtualization 101: Introduction to vSphere
H A N D S - O N L A B S M A N U A L | 9
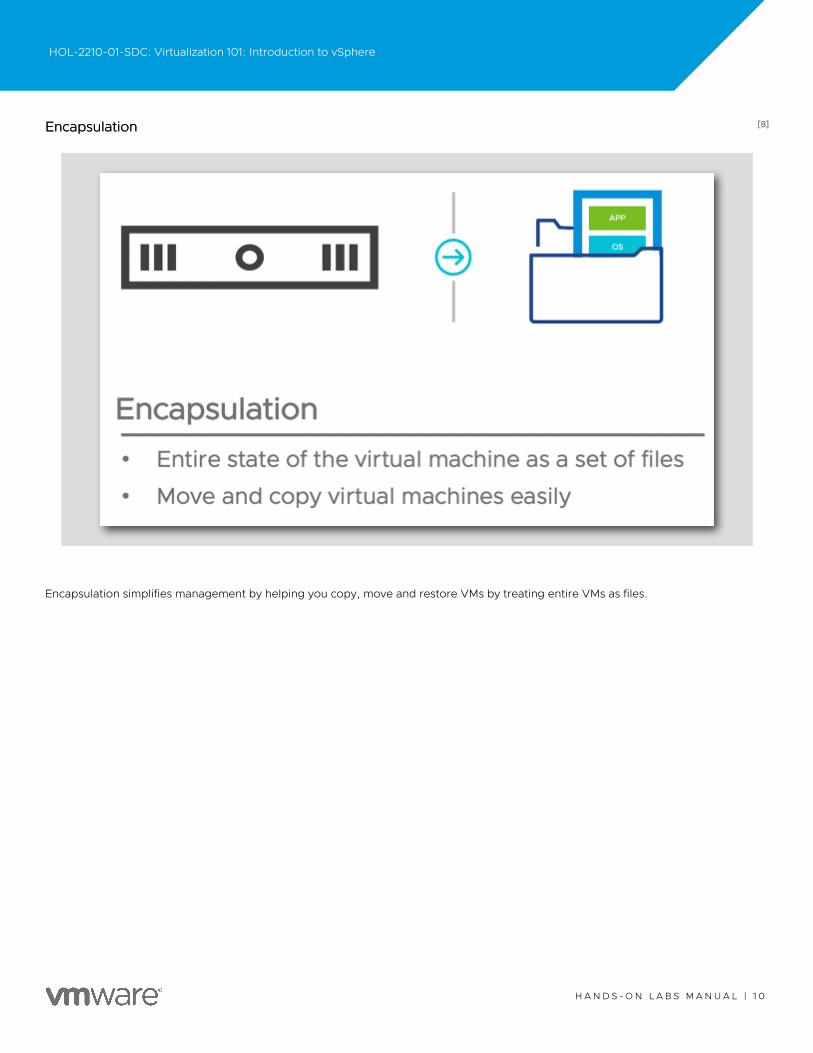
[8][8]EncapsulationEncapsulation
Encapsulation simplifies management by helping you copy, move and restore VMs by treating entire VMs as files.
HOL-2210-01-SDC: Virtualization 101: Introduction to vSphere
H A N D S - O N L A B S M A N U A L | 1 0

[9][9]Hardware IndependenceHardware Independence
VMs are not dependent on any physical hardware or vendor, making your IT more flexible and scalable.
HOL-2210-01-SDC: Virtualization 101: Introduction to vSphere
H A N D S - O N L A B S M A N U A L | 1 1
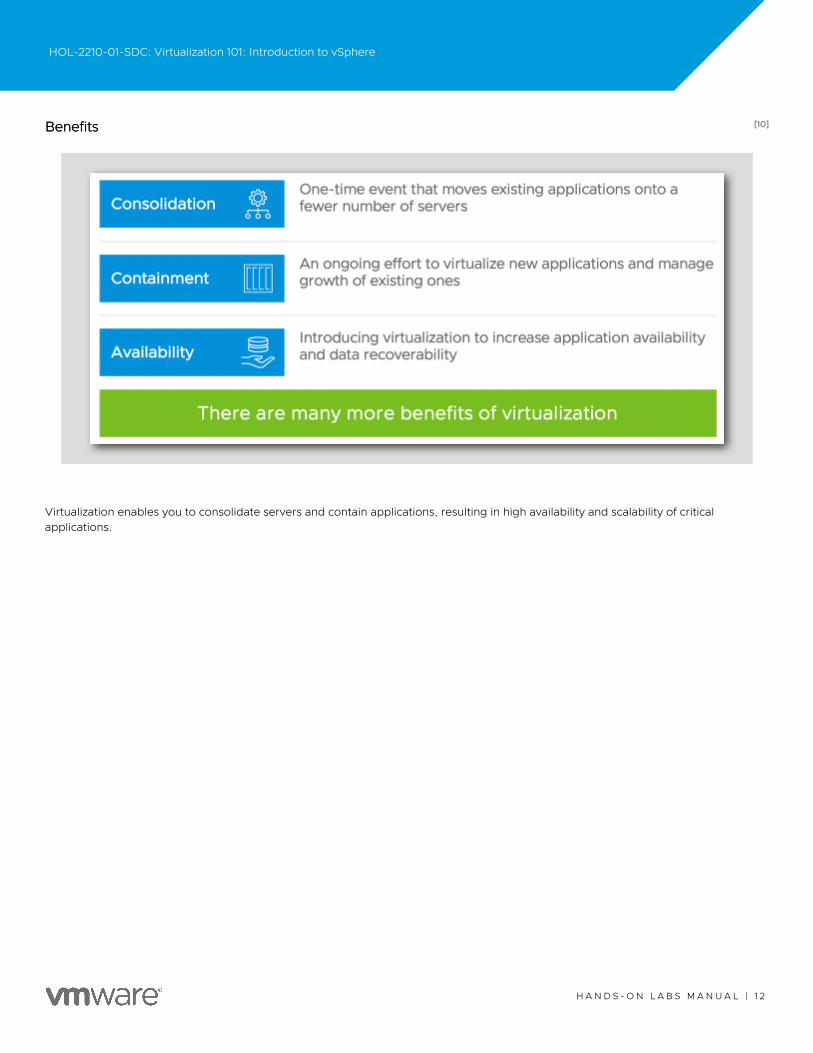
[10][10]BenefitsBenefits
Virtualization enables you to consolidate servers and contain applications, resulting in high availability and scalability of criticalapplications.
HOL-2210-01-SDC: Virtualization 101: Introduction to vSphere
H A N D S - O N L A B S M A N U A L | 1 2
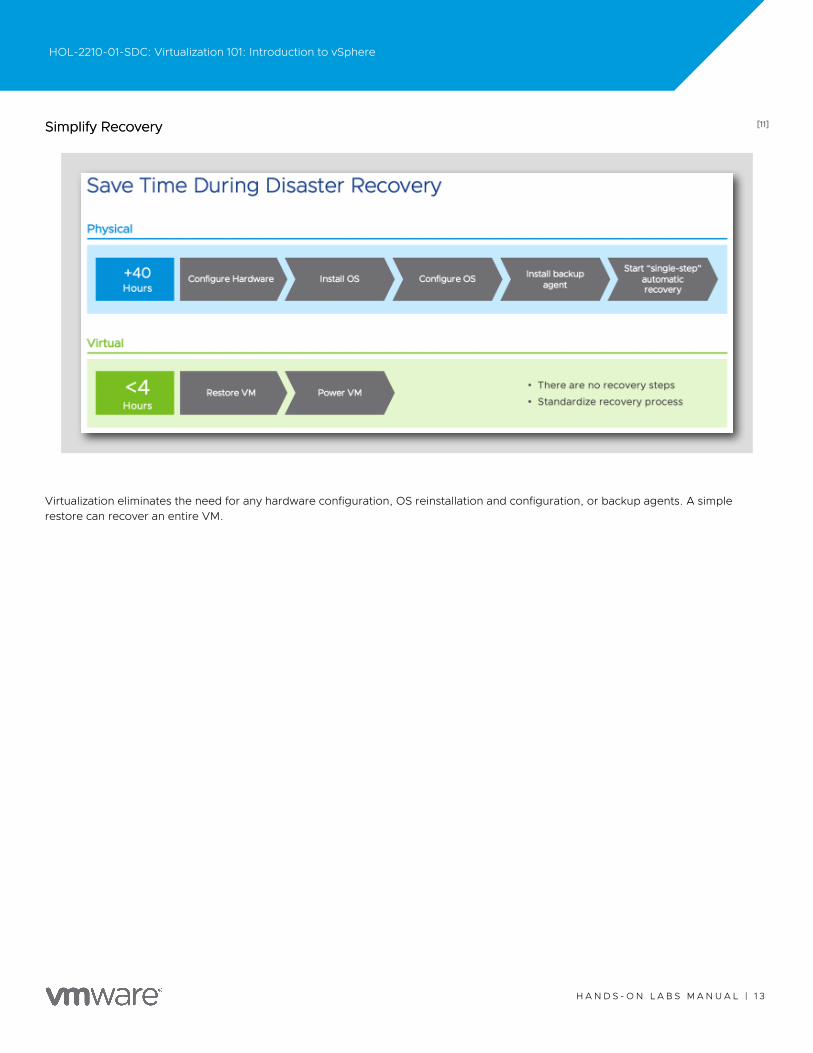
[11][11]Simplify RecoverySimplify Recovery
Virtualization eliminates the need for any hardware configuration, OS reinstallation and configuration, or backup agents. A simplerestore can recover an entire VM.
HOL-2210-01-SDC: Virtualization 101: Introduction to vSphere
H A N D S - O N L A B S M A N U A L | 1 3
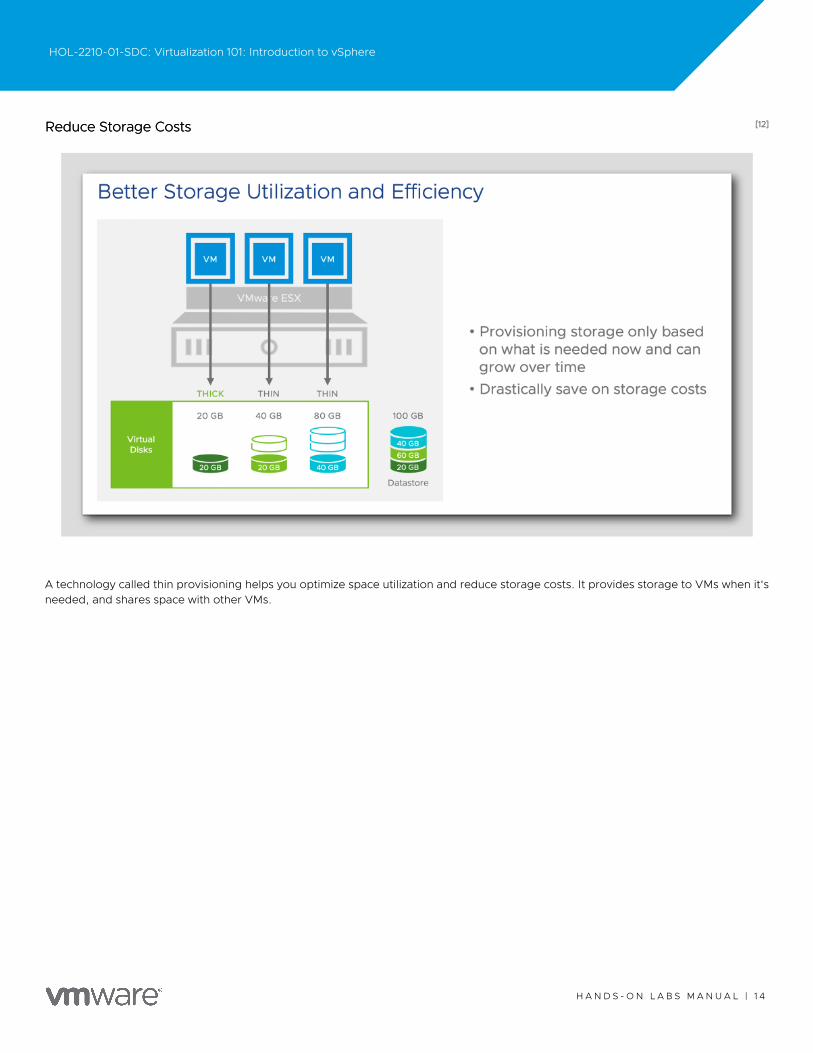
[12][12]Reduce Storage CostsReduce Storage Costs
A technology called thin provisioning helps you optimize space utilization and reduce storage costs. It provides storage to VMs when it'sneeded, and shares space with other VMs.
HOL-2210-01-SDC: Virtualization 101: Introduction to vSphere
H A N D S - O N L A B S M A N U A L | 1 4
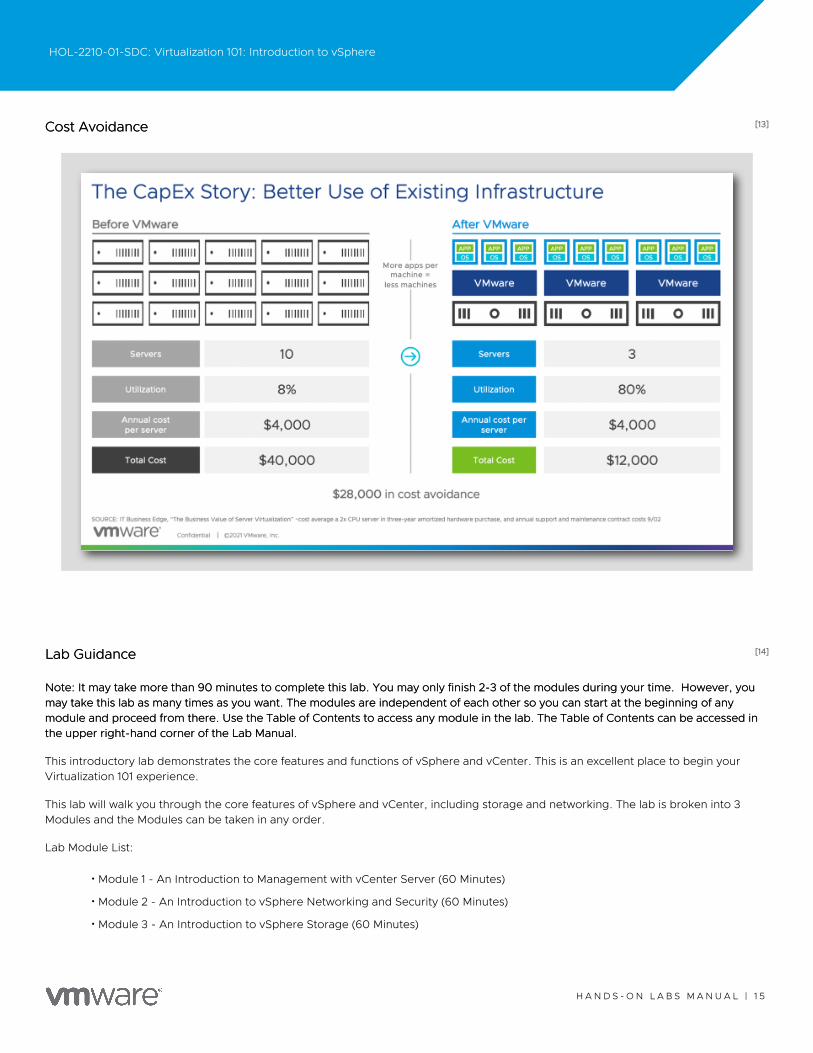
[13][13]Cost AvoidanceCost Avoidance
[14][14]Lab GuidanceLab Guidance
Note: It may take more than 90 minutes to complete this lab. You may only finish 2-3 of the modules during your time.Note: It may take more than 90 minutes to complete this lab. You may only finish 2-3 of the modules during your time. However, youHowever, youmay take this lab as many times as you want. The modules are independent of each other so you can start at the beginning of anymay take this lab as many times as you want. The modules are independent of each other so you can start at the beginning of anymodule and proceed from there. Use the Table of Contents to access any module in the lab.module and proceed from there. Use the Table of Contents to access any module in the lab. The Table of Contents can be accessed inThe Table of Contents can be accessed inthe upper right-hand corner of the Lab Manual.the upper right-hand corner of the Lab Manual.
This introductory lab demonstrates the core features and functions of vSphere and vCenter. This is an excellent place to begin yourVirtualization 101 experience.
This lab will walk you through the core features of vSphere and vCenter, including storage and networking. The lab is broken into 3Modules and the Modules can be taken in any order.
Lab Module List:
•Module 1 - An Introduction to Management with vCenter Server (60 Minutes)
•Module 2 - An Introduction to vSphere Networking and Security (60 Minutes)
•Module 3 - An Introduction to vSphere Storage (60 Minutes)
HOL-2210-01-SDC: Virtualization 101: Introduction to vSphere
H A N D S - O N L A B S M A N U A L | 1 5
Each Module will take approximately 60-90 minutes to complete, but based on your experience this could take more or less time.
We have included videos throughout the modules. To get the most out of these videos, it is recommenced that you have headphonesto hear the audio. The timing of each video is noted next to the title. In some cases, videos are included for tasks we are unable to showin a lab environment, while others are there to provide additional information. Some of these videos may contain an earlier edition ofvSphere, however, the steps and concepts are primarily the same.
Lab Captains:Lab Captains:
•Doug Baer, Staff Architect, USA
•Dave Rollins, Staff Architect, USA
•Dave Cook, Sr. Technical Marketing Architect USA
•Sandy Visoso, Content Architect, USA
•Milena Chen, Associate Content Architect, Costa Rica
This lab manual can be downloaded from the Hands-on Labs document site found here:
http://docs.hol.vmware.comhttp://docs.hol.vmware.com
This lab may be available in other languages. To set your language preference and view a localized manual deployed with your lab,utilize this document to guide you through the process:
http://docs.hol.vmware.com/announcements/nee-default-language.pdfhttp://docs.hol.vmware.com/announcements/nee-default-language.pdf
HOL-2210-01-SDC: Virtualization 101: Introduction to vSphere
H A N D S - O N L A B S M A N U A L | 1 6
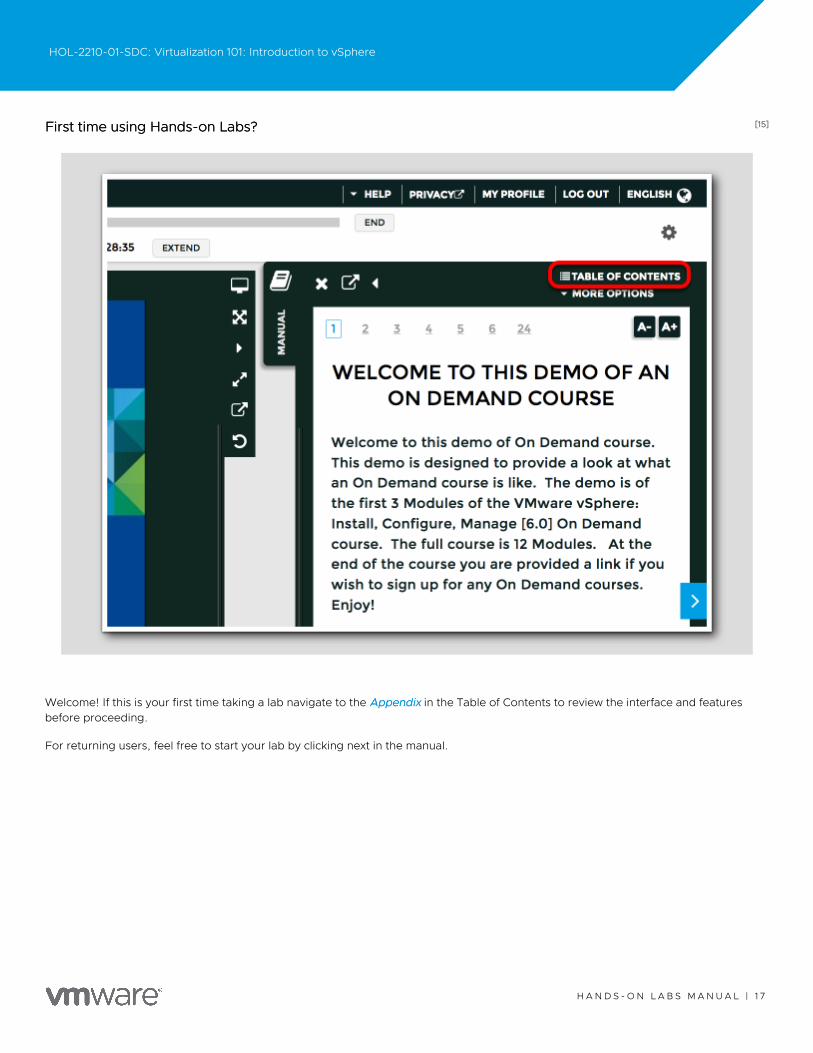
[15][15]First time using Hands-on Labs?First time using Hands-on Labs?
Welcome! If this is your first time taking a lab navigate to the AppendixAppendix in the Table of Contents to review the interface and featuresbefore proceeding.
For returning users, feel free to start your lab by clicking next in the manual.
HOL-2210-01-SDC: Virtualization 101: Introduction to vSphere
H A N D S - O N L A B S M A N U A L | 1 7
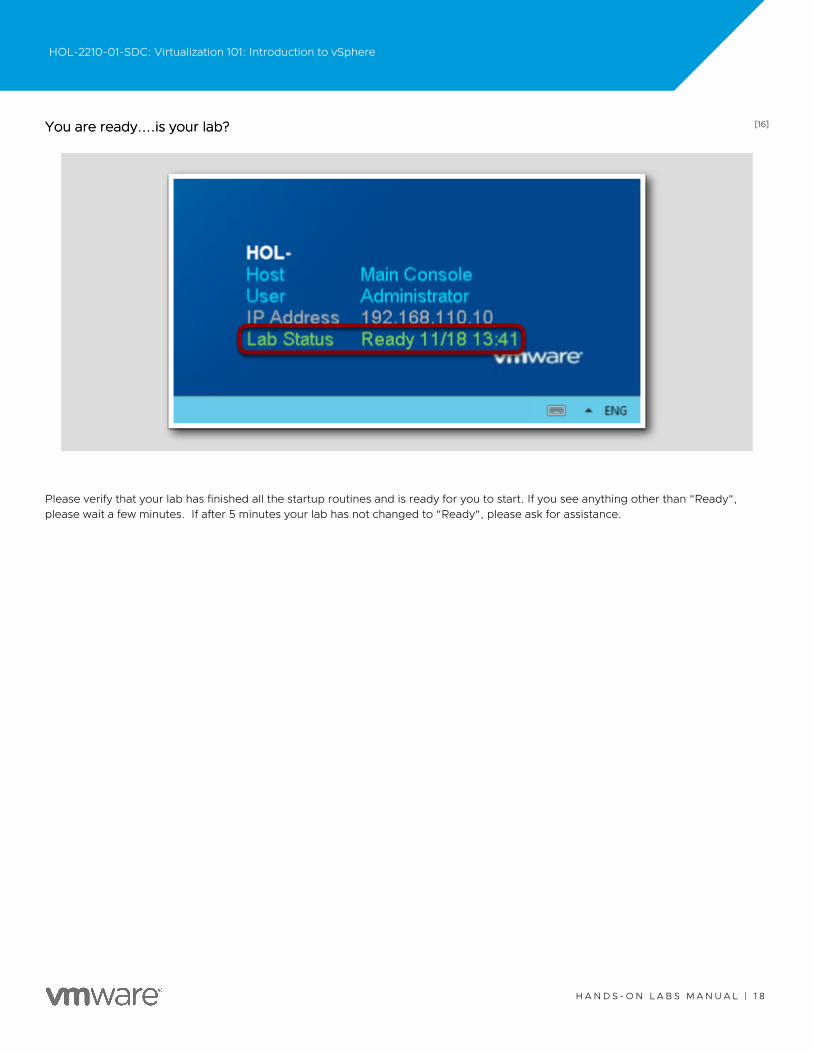
[16][16]You are ready....is your lab?You are ready....is your lab?
Please verify that your lab has finished all the startup routines and is ready for you to start. If you see anything other than "Ready",please wait a few minutes. If after 5 minutes your lab has not changed to "Ready", please ask for assistance.
HOL-2210-01-SDC: Virtualization 101: Introduction to vSphere
H A N D S - O N L A B S M A N U A L | 1 8
Module 1 - Introduction to Management with vCenter Server (60 Min)Module 1 - Introduction to Management with vCenter Server (60 Min)
[18][18]IntroductionIntroduction
This module will start with an interactive simulation of an ESXi installation. ESXi is the foundation of vSphere and is sometimes referredto as the host. After the installation, the ESXi Host Client will be reviewed. It is a web-based management tool that allows you tomanage a single ESXi host at a time.
The remainder of the module will focus on using the vSphere Client to access vCenter Server and manage your entire virtualinfrastructure using one interface. Virtual machines will be created, with more details covered on how to manage and monitor theenvironment. Lastly, you will be introduced to vSphere Platinum, which provides advanced security capabilities in vSphere incombination with VMware AppDefense.
[19][19]Hands-on Labs Interactive Simulation: ESXi Installation and ConfigurationHands-on Labs Interactive Simulation: ESXi Installation and Configuration
This part of the lab is presented as a Hands-on Labs Interactive SimulationHands-on Labs Interactive Simulation. This will allow you to experience steps which are too time-consuming or resource intensive to do live in the lab environment. In this simulation, you can use the software interface as if you areinteracting with a live environment.
1. Click here to open the interactive simulation. It will open in a new browser window or tab.
2.When finished, click the “Return to the lab” link to continue with this lab.
The lab continues to run in the background. If the lab goes into standby mode, you can resume it after completing the module.
[20][20]ESXi Host ClientESXi Host Client
The VMware Host Client is an HTML5-based client that is used to connect to and manage single ESXi hosts.
You can use the VMware Host Client to perform administrative and basic troubleshooting tasks, as well as advanced administrativetasks on your target ESXi host. You can also use the VMware Host Client to conduct emergency management when vCenter Server isnot available.
It is important to know that the VMware Host Client is different from the vSphere Web Client, regardless of their similar user interfaces.You use the vSphere Web Client to connect to vCenter Server and manage multiple ESXi hosts, whereas you use the VMware HostClient to manage a single ESXi host.
For additional details on the VMware Host Client, please see this PDF (https://docs.vmware.com/en/VMware-vSphere/7.0/vsphere-https://docs.vmware.com/en/VMware-vSphere/7.0/vsphere-esxi-host-client-1344-guide.pdfesxi-host-client-1344-guide.pdf))
This lesson will walk through some of the most frequently used features in the ESXi Host Client.
HOL-2210-01-SDC: Virtualization 101: Introduction to vSphere
H A N D S - O N L A B S M A N U A L | 1 9
[21][21]Launch ChromeLaunch Chrome
1. Click on the Chrome IconChrome Icon on the Windows Quick Launch Task Bar
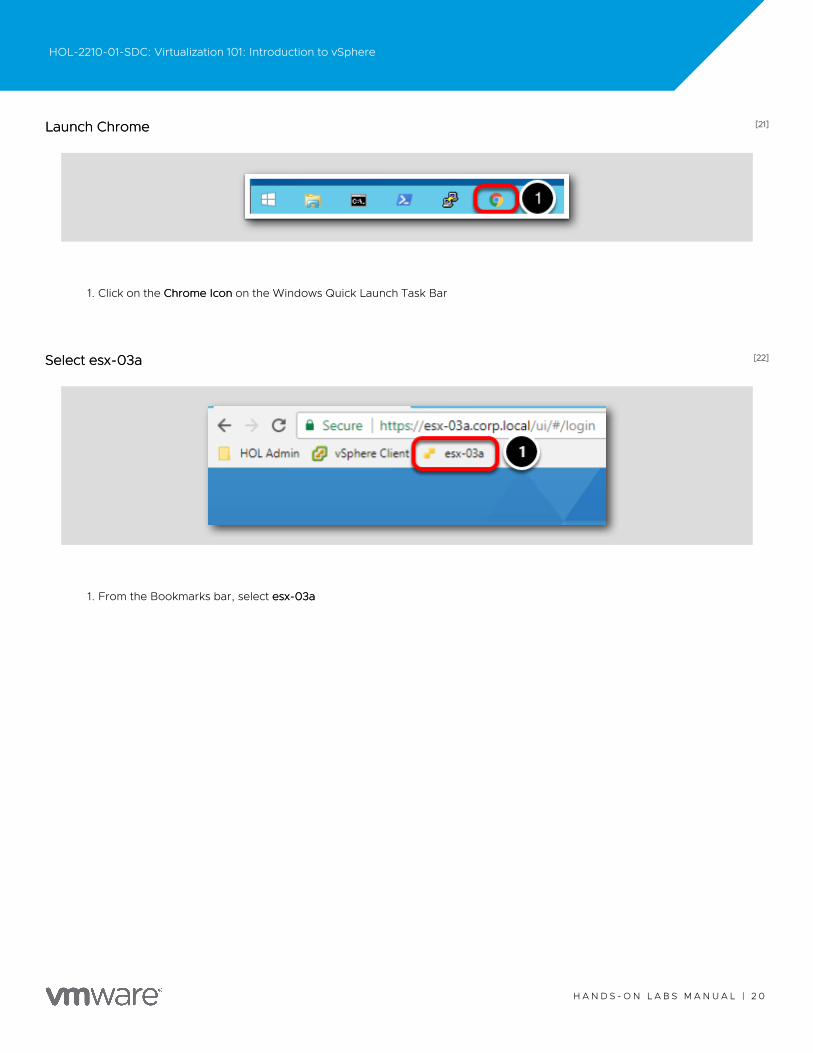
[22][22]Select esx-03aSelect esx-03a
1. From the Bookmarks bar, select esx-03aesx-03a
HOL-2210-01-SDC: Virtualization 101: Introduction to vSphere
H A N D S - O N L A B S M A N U A L | 2 0
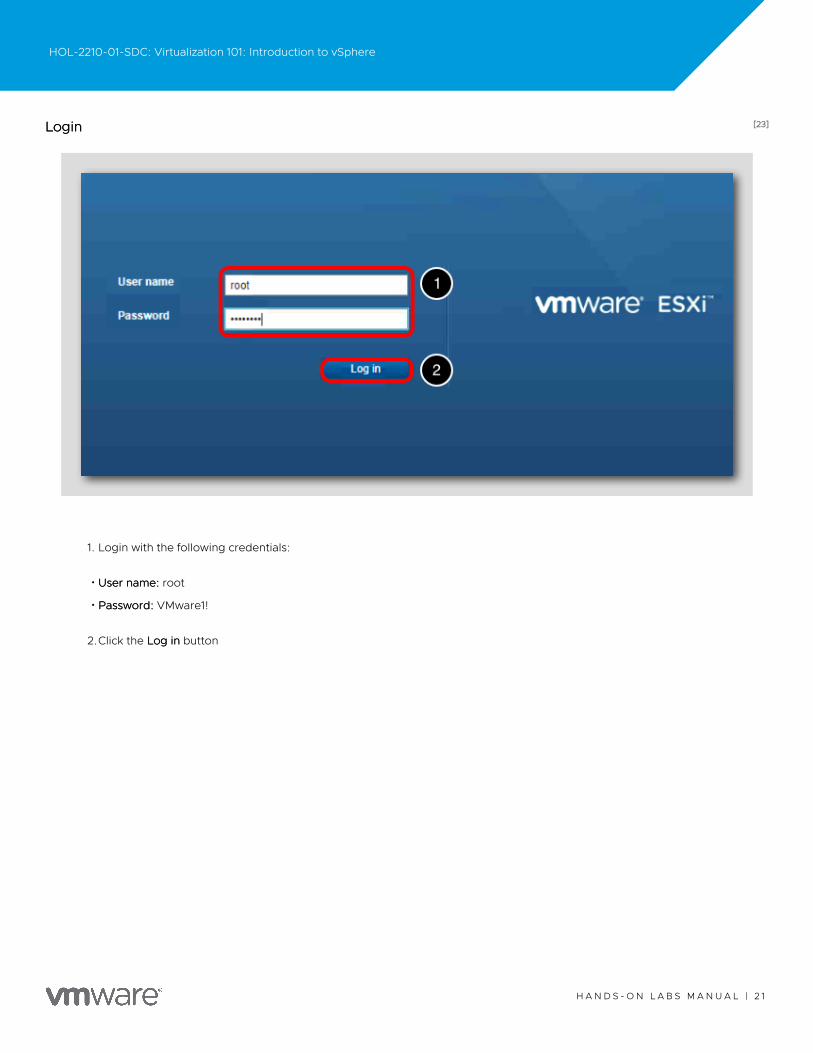
[23][23]LoginLogin
1. Login with the following credentials:
•User name:User name: root
•Password:Password: VMware1!
2.Click the Log inLog in button
HOL-2210-01-SDC: Virtualization 101: Introduction to vSphere
H A N D S - O N L A B S M A N U A L | 2 1
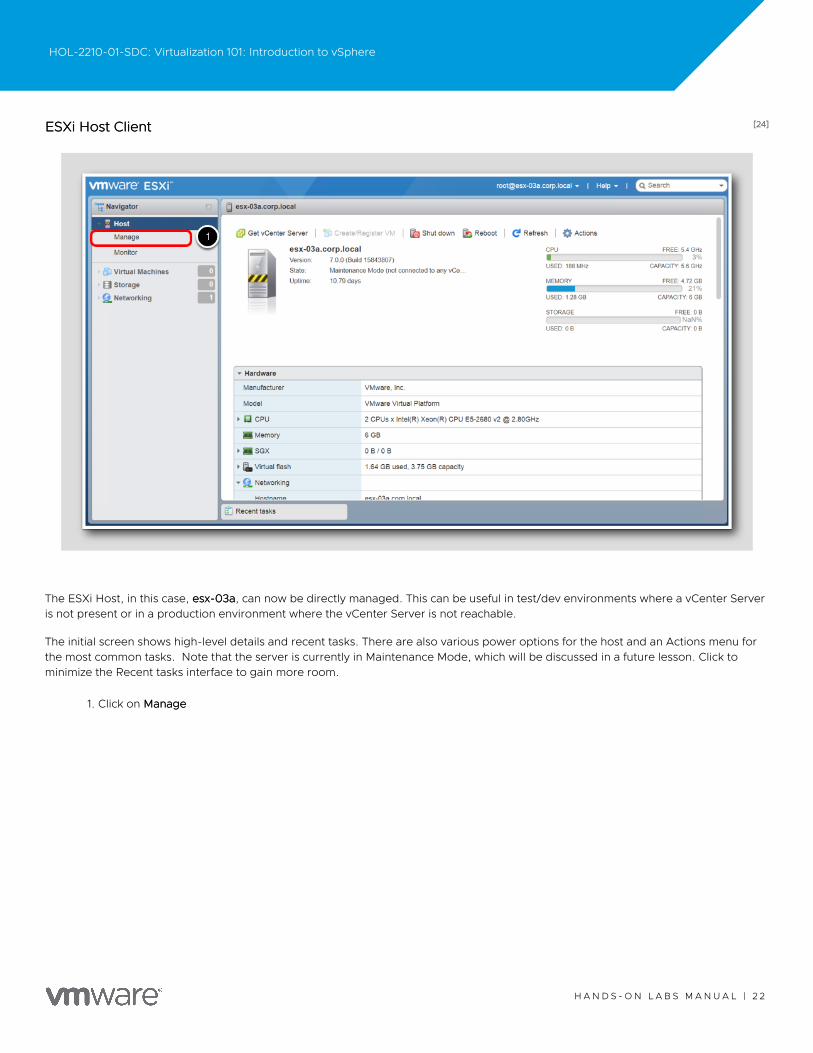
[24][24]ESXi Host ClientESXi Host Client
The ESXi Host, in this case, esx-03aesx-03a, can now be directly managed. This can be useful in test/dev environments where a vCenter Serveris not present or in a production environment where the vCenter Server is not reachable.
The initial screen shows high-level details and recent tasks. There are also various power options for the host and an Actions menu forthe most common tasks. Note that the server is currently in Maintenance Mode, which will be discussed in a future lesson. Click tominimize the Recent tasks interface to gain more room.
1. Click on ManageManage
HOL-2210-01-SDC: Virtualization 101: Introduction to vSphere
H A N D S - O N L A B S M A N U A L | 2 2
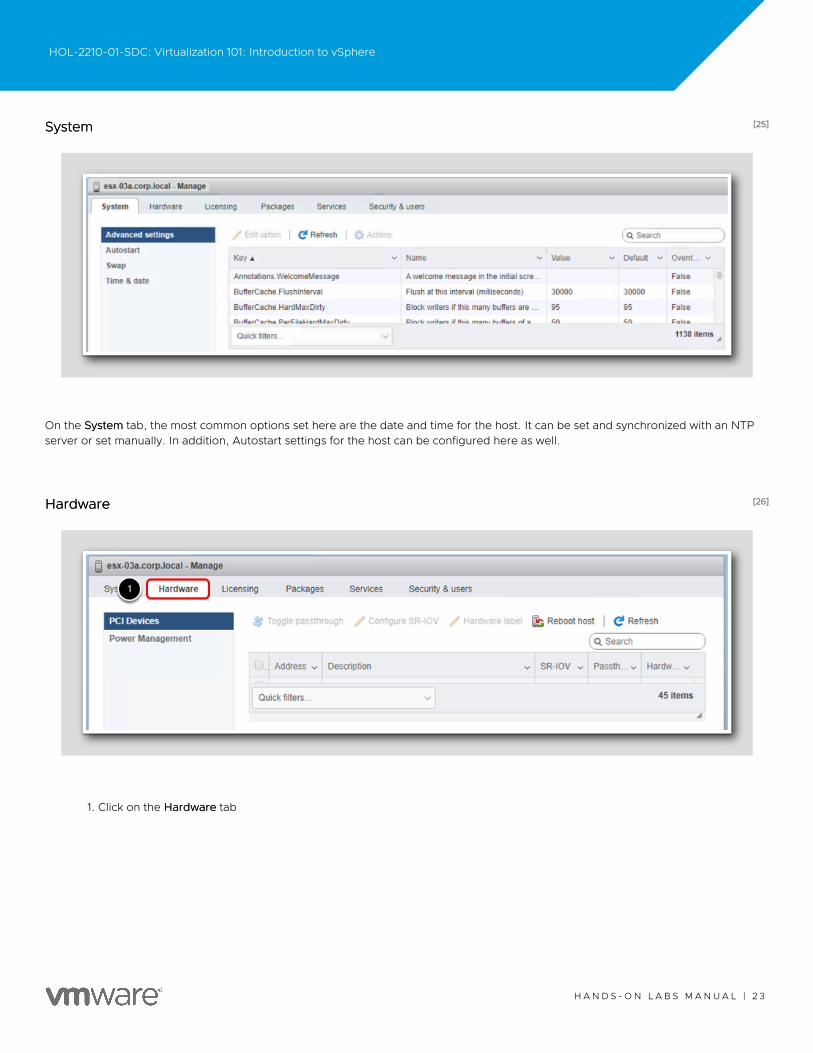
[25][25]SystemSystem
On the SystemSystem tab, the most common options set here are the date and time for the host. It can be set and synchronized with an NTPserver or set manually. In addition, Autostart settings for the host can be configured here as well.
[26][26]HardwareHardware
1. Click on the HardwareHardware tab
HOL-2210-01-SDC: Virtualization 101: Introduction to vSphere
H A N D S - O N L A B S M A N U A L | 2 3
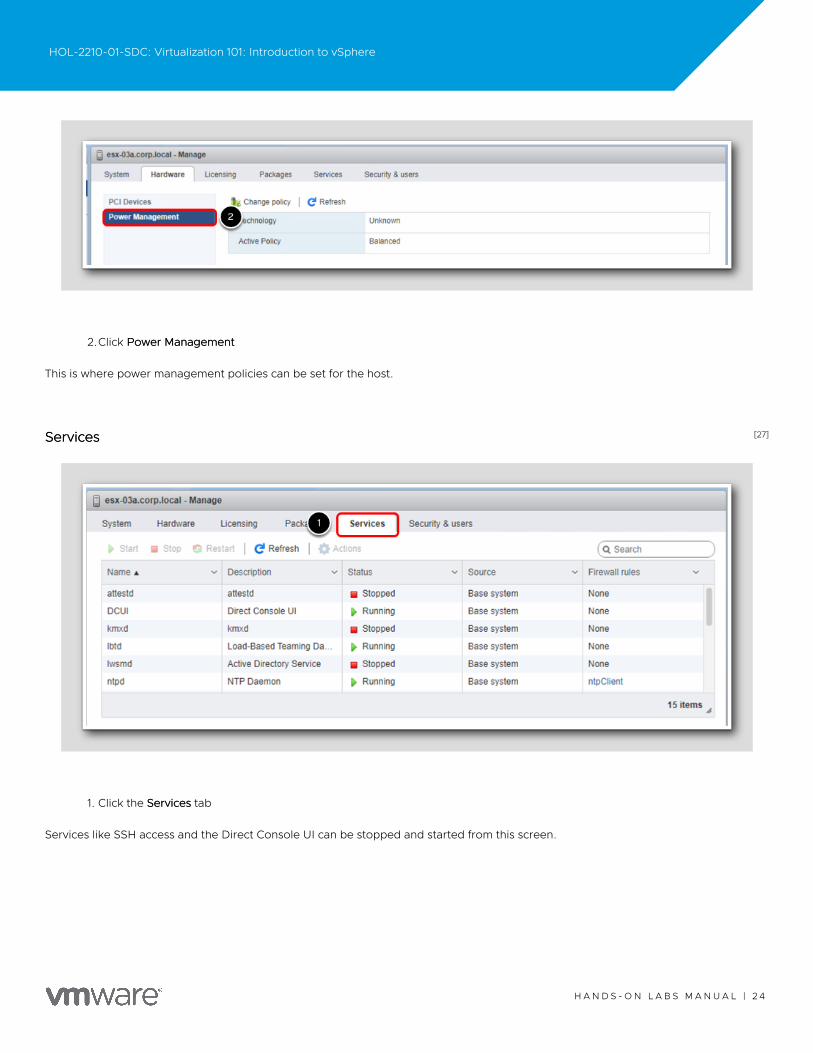
2.Click Power ManagementPower Management
This is where power management policies can be set for the host.
[27][27]ServicesServices
1. Click the ServicesServices tab
Services like SSH access and the Direct Console UI can be stopped and started from this screen.
HOL-2210-01-SDC: Virtualization 101: Introduction to vSphere
H A N D S - O N L A B S M A N U A L | 2 4
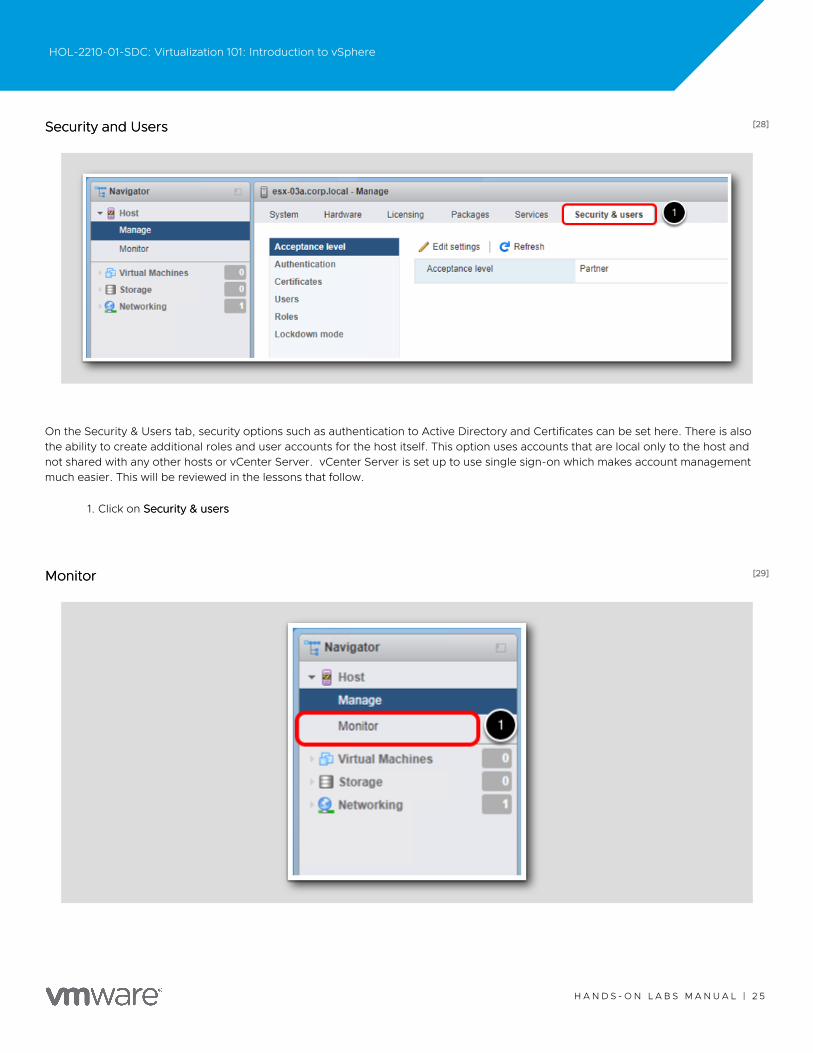
[28][28]Security and UsersSecurity and Users
On the Security & Users tab, security options such as authentication to Active Directory and Certificates can be set here. There is alsothe ability to create additional roles and user accounts for the host itself. This option uses accounts that are local only to the host andnot shared with any other hosts or vCenter Server. vCenter Server is set up to use single sign-on which makes account managementmuch easier. This will be reviewed in the lessons that follow.
1. Click on Security & usersSecurity & users
[29][29]MonitorMonitor
HOL-2210-01-SDC: Virtualization 101: Introduction to vSphere
H A N D S - O N L A B S M A N U A L | 2 5
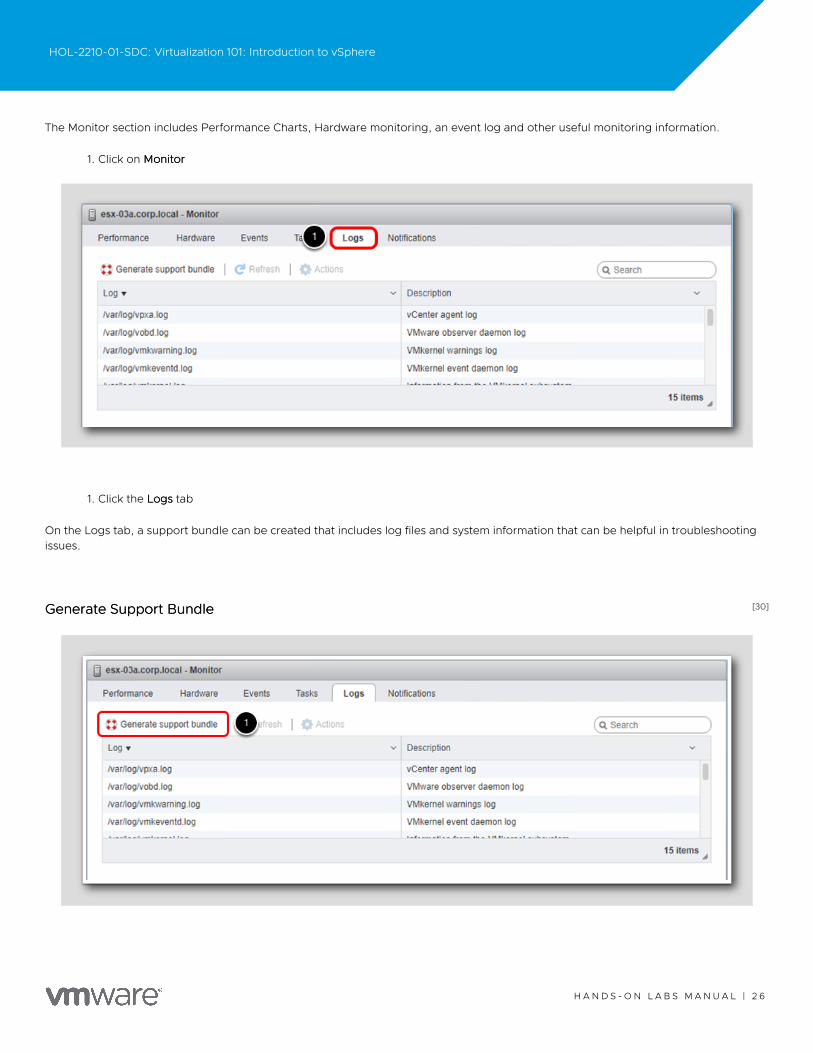
The Monitor section includes Performance Charts, Hardware monitoring, an event log and other useful monitoring information.
1. Click on MonitorMonitor
1. Click the LogsLogs tab
On the Logs tab, a support bundle can be created that includes log files and system information that can be helpful in troubleshootingissues.
[30][30]Generate Support BundleGenerate Support Bundle
HOL-2210-01-SDC: Virtualization 101: Introduction to vSphere
H A N D S - O N L A B S M A N U A L | 2 6
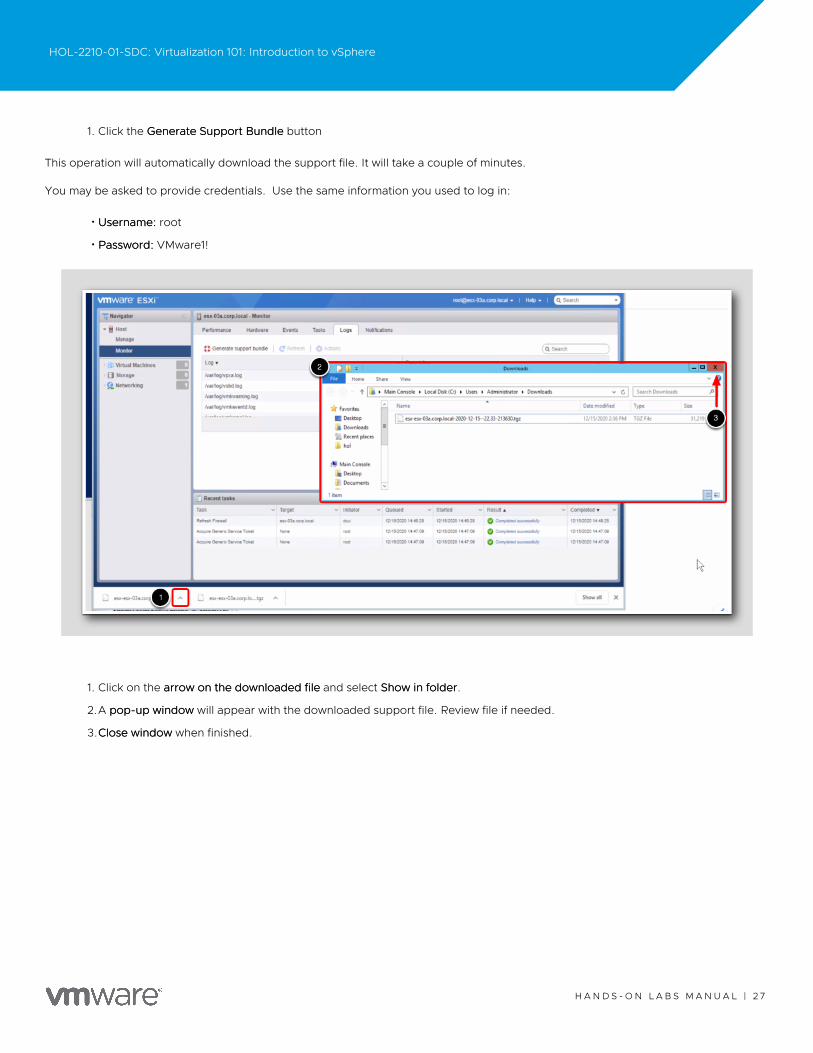
1. Click the Generate Support BundleGenerate Support Bundle button
This operation will automatically download the support file. It will take a couple of minutes.
You may be asked to provide credentials. Use the same information you used to log in:
•Username:Username: root
•Password:Password: VMware1!
1. Click on the arrow on the downloaded filearrow on the downloaded file and select Show in folderShow in folder.
2.A pop-up windowpop-up window will appear with the downloaded support file. Review file if needed.
3.Close windowClose window when finished.
HOL-2210-01-SDC: Virtualization 101: Introduction to vSphere
H A N D S - O N L A B S M A N U A L | 2 7
[31][31]VMs, Storage and NetworkingVMs, Storage and Networking
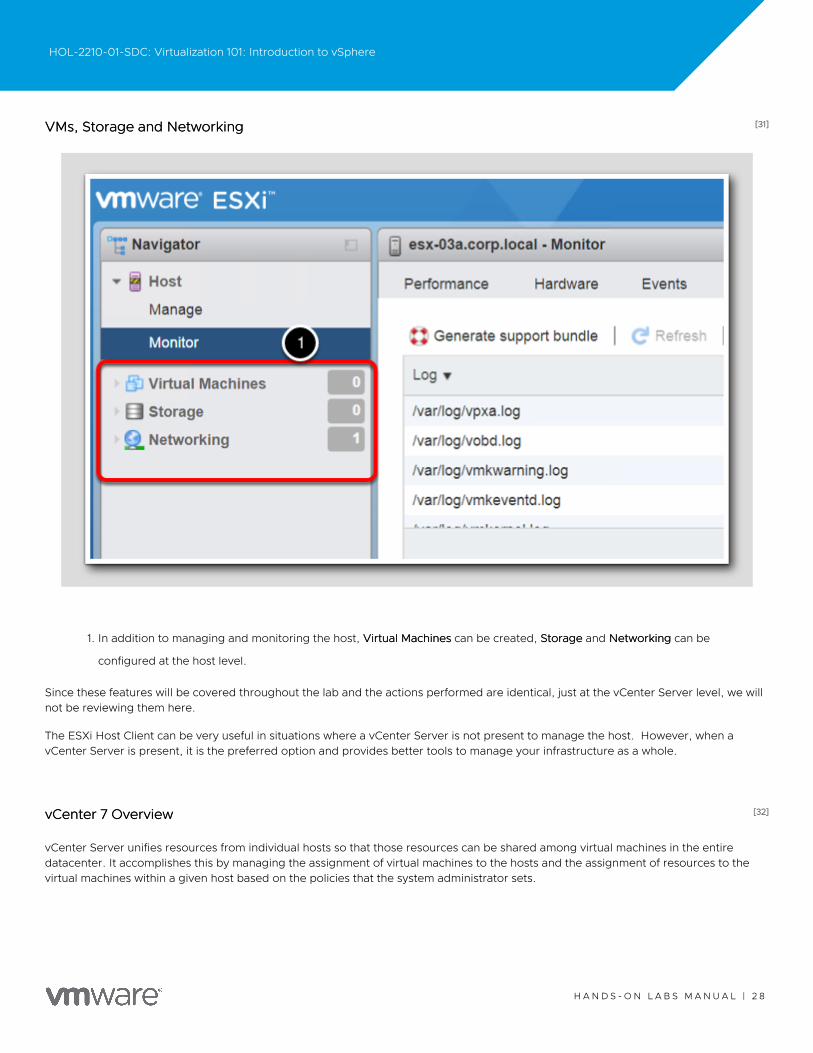
1. In addition to managing and monitoring the host, Virtual MachinesVirtual Machines can be created, StorageStorage and NetworkingNetworking can be
configured at the host level.
Since these features will be covered throughout the lab and the actions performed are identical, just at the vCenter Server level, we willnot be reviewing them here.
The ESXi Host Client can be very useful in situations where a vCenter Server is not present to manage the host. However, when avCenter Server is present, it is the preferred option and provides better tools to manage your infrastructure as a whole.
[32][32]vCenter 7 OverviewvCenter 7 Overview
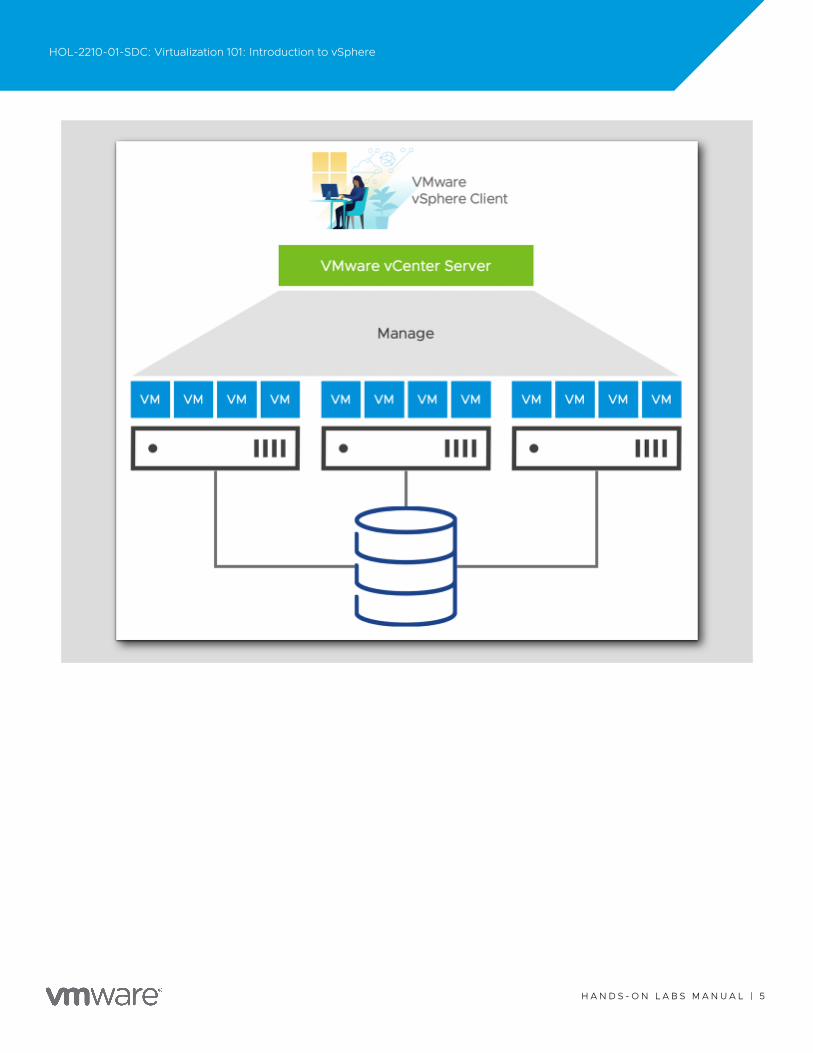
vCenter Server unifies resources from individual hosts so that those resources can be shared among virtual machines in the entiredatacenter. It accomplishes this by managing the assignment of virtual machines to the hosts and the assignment of resources to thevirtual machines within a given host based on the policies that the system administrator sets.
HOL-2210-01-SDC: Virtualization 101: Introduction to vSphere
H A N D S - O N L A B S M A N U A L | 2 8
[33][33]vSphere ComponentsvSphere Components
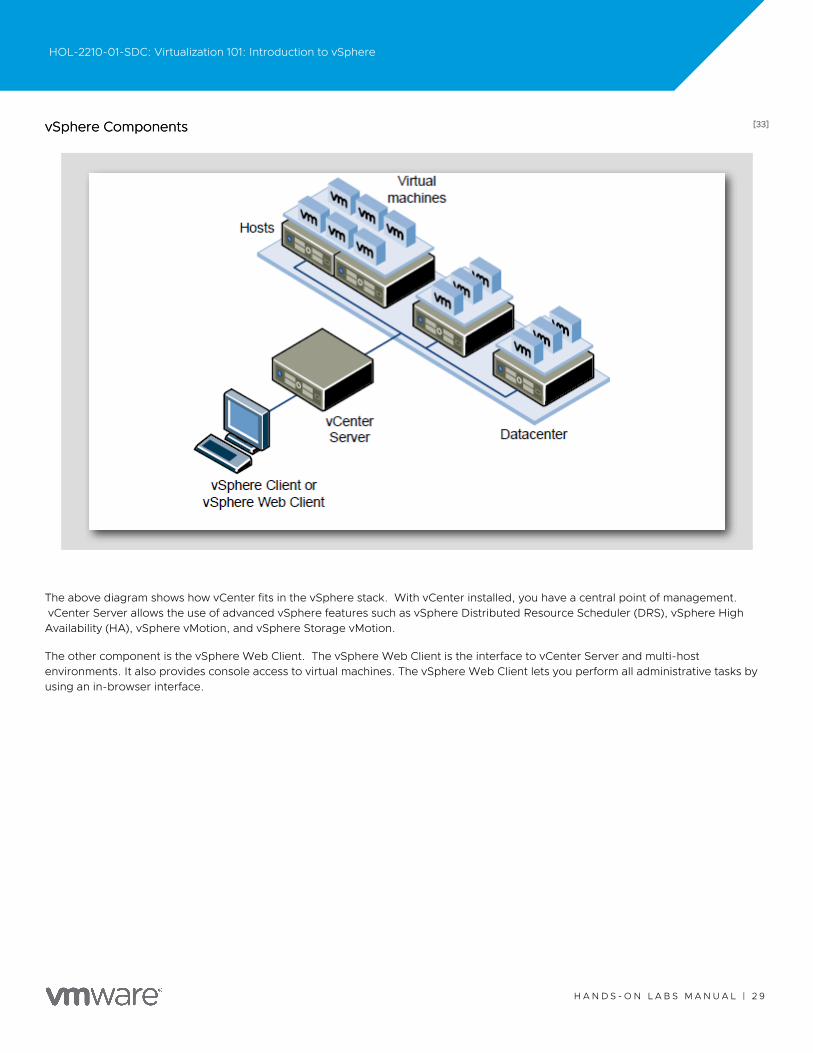
The above diagram shows how vCenter fits in the vSphere stack. With vCenter installed, you have a central point of management.vCenter Server allows the use of advanced vSphere features such as vSphere Distributed Resource Scheduler (DRS), vSphere HighAvailability (HA), vSphere vMotion, and vSphere Storage vMotion.
The other component is the vSphere Web Client. The vSphere Web Client is the interface to vCenter Server and multi-hostenvironments. It also provides console access to virtual machines. The vSphere Web Client lets you perform all administrative tasks byusing an in-browser interface.
HOL-2210-01-SDC: Virtualization 101: Introduction to vSphere
H A N D S - O N L A B S M A N U A L | 2 9
[34][34]vCenter 7 ComponentsvCenter 7 Components
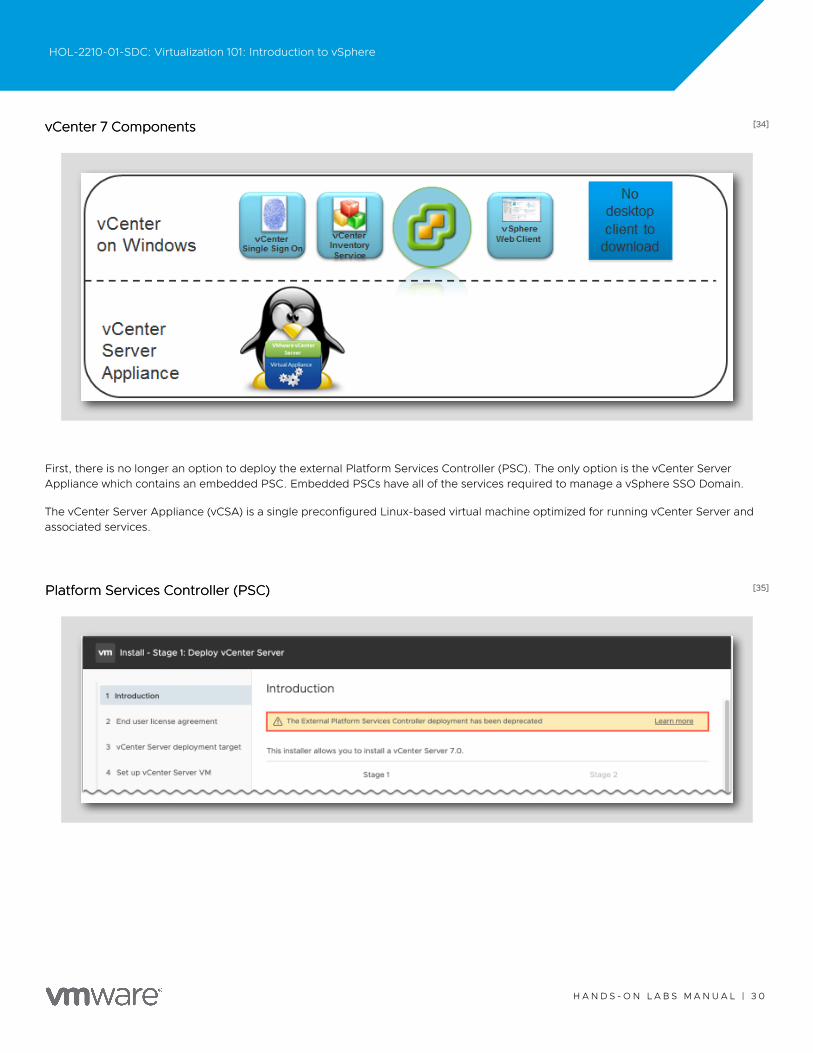
First, there is no longer an option to deploy the external Platform Services Controller (PSC). The only option is the vCenter ServerAppliance which contains an embedded PSC. Embedded PSCs have all of the services required to manage a vSphere SSO Domain.
The vCenter Server Appliance (vCSA) is a single preconfigured Linux-based virtual machine optimized for running vCenter Server andassociated services.
[35][35]Platform Services Controller (PSC)Platform Services Controller (PSC)
HOL-2210-01-SDC: Virtualization 101: Introduction to vSphere
H A N D S - O N L A B S M A N U A L | 3 0

The Platform Services Controller (PSC) includes common services that are used across the suite. These include Single Sign-On (SSO),Licensing, and the VMware Certificate Authority (VMCA). You will learn more about SSO and the VMCA in the following pages.
In vCenter Server 7, PSC convergence now happens automatically during a vCenter Server upgrade!There is no longer a need toperform an upgrade and a convergence as two separate tasks. When upgrading your vCenter Server from version 6.5 or 6.7 to 7.0, theinstaller can detect external PSCs which allows these two processes to be merged for a simplistic method of upgrading andconsolidating deprecated SSO topologiesdeprecated SSO topologies.
Once the Platform Services Controller is converged, it remains in inventory to be decommissioned by the vSphere Administrator. Theupgrade and convergence process in vCenter Server 7 does not decommission the PSC automatically.
[36][36]vCenter Single Sign OnvCenter Single Sign On
vSphere 5.1 introduced vCenter Single Sign On (SSO) as part of the vCenter Server management infrastructure. This change affects thevCenter Server installation, upgrading, and operation. Authentication by vCenter Single Sign On makes the VMware cloud infrastructureplatform more secure by allowing the vSphere software components to communicate with each other through a secure token exchangemechanism, instead of requiring each component to authenticate a user separately with a directory service like Active Directory.
HOL-2210-01-SDC: Virtualization 101: Introduction to vSphere
H A N D S - O N L A B S M A N U A L | 3 1
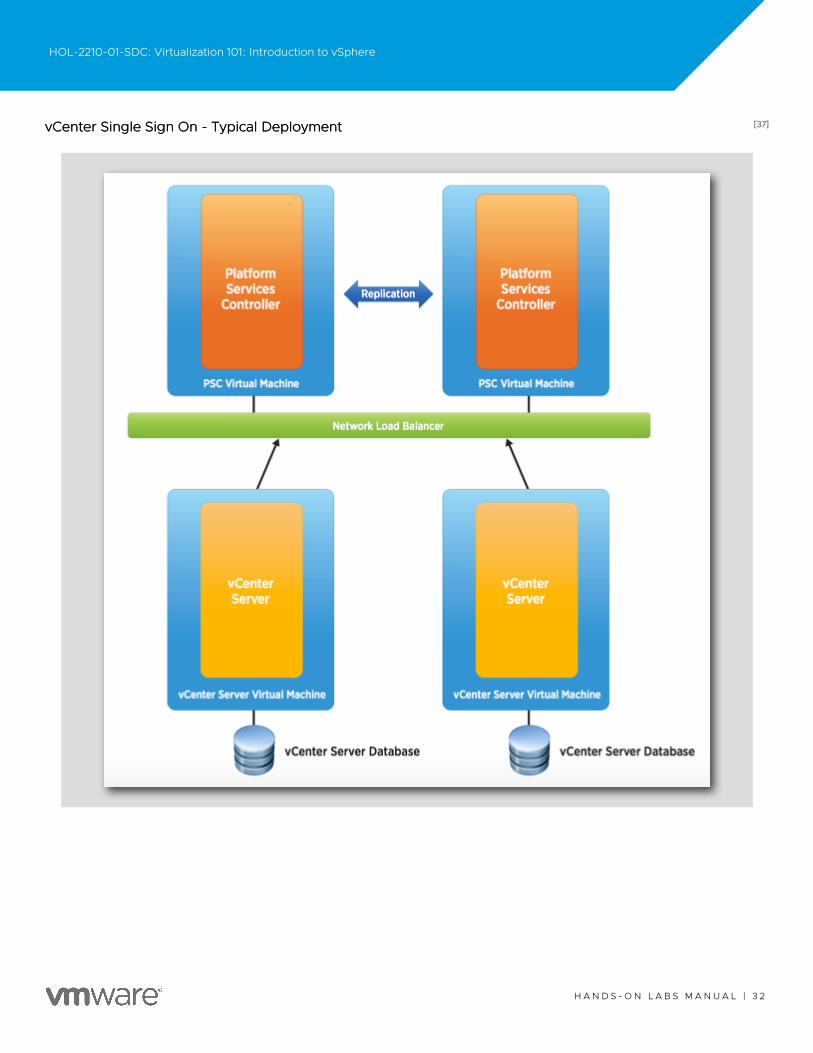
[37][37]vCenter Single Sign On - Typical DeploymentvCenter Single Sign On - Typical Deployment
HOL-2210-01-SDC: Virtualization 101: Introduction to vSphere
H A N D S - O N L A B S M A N U A L | 3 2

Starting with version 5.1, vSphere includes a vCenter Single Sign-On service as part of the vCenter Server management infrastructure.
Authentication with vCenter Single Sign-On makes vSphere more secure because the vSphere software components communicate witheach other by using a secure token exchange mechanism, and all other users also authenticate with vCenter Single Sign-On.
Starting with vSphere 6.0, vCenter Single Sign-On is either included in an embedded deployment or part of the Platform ServicesController. The Platform Services Controller contains all of the services that are necessary for the communication between vSpherecomponents including vCenter Single Sign-On, VMware Certificate Authority, VMware Lookup Service, and the licensing service. Forexample, in the image above, SSO resides within the Platform Services Controller as part of this multi-vCenter topology.
HOL-2210-01-SDC: Virtualization 101: Introduction to vSphere
H A N D S - O N L A B S M A N U A L | 3 3
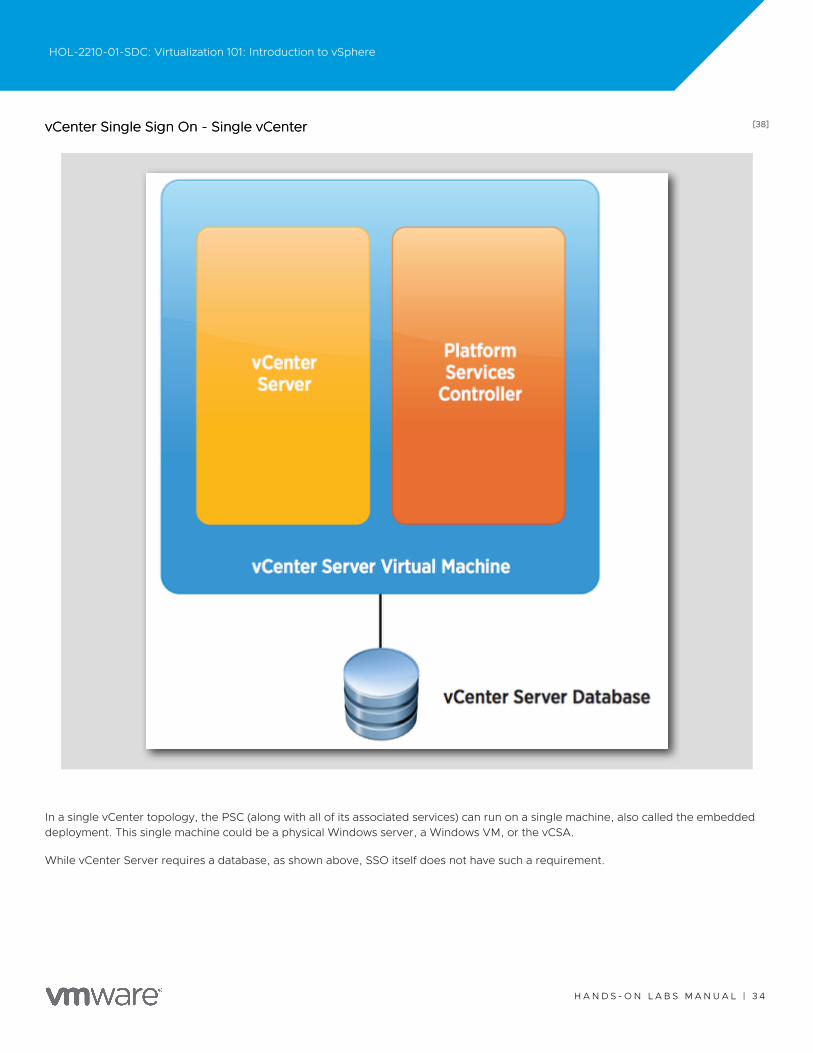
[38][38]vCenter Single Sign On - Single vCentervCenter Single Sign On - Single vCenter
In a single vCenter topology, the PSC (along with all of its associated services) can run on a single machine, also called the embeddeddeployment. This single machine could be a physical Windows server, a Windows VM, or the vCSA.
While vCenter Server requires a database, as shown above, SSO itself does not have such a requirement.
HOL-2210-01-SDC: Virtualization 101: Introduction to vSphere
H A N D S - O N L A B S M A N U A L | 3 4
[39][39]More Information on Single Sign OnMore Information on Single Sign On
The second Module in this lab, Introduction to vSphere Networking and Security covers SSO in more detail.
However, you can also refer to the vCenter 7 Deployment GuidevCenter 7 Deployment Guide for more in-depth requirements and considerations for SSOarchitecture in vCenter 7.
[40][40]vCenter Server and Creating a Virtual MachinevCenter Server and Creating a Virtual Machine
The previous lesson reviewed the ESXi Host Client, which can be used to manage one ESXi host at a time. This lesson will introduce thevSphere Client which is used to connect to vCenter Server to manage your collective infrastructure as a whole. In addition, the processof creating a virtual machine will also be covered.
The vSphere Client is the primary method for system administrators and end-users to interact with the virtual data center environmentcreated by VMware vSphere. vSphere manages a collection of objects that make up the virtual data center, including hosts, clusters,virtual machines, data storage, and networking resources.
The vSphere Client is a Web browser-based application that you can use to manage, monitor, and administer the objects that make upyour virtualized data center. You can use the vSphere Client to observe and modify the vSphere environment in the following ways.
•Viewing health, status, and performance information on vSphere objects
•Issuing management and administration commands to vSphere objects
•Creating, configuring, provisioning, or deleting vSphere objects
You can extend vSphere in different ways to create a solution for your unique IT infrastructure. You can extend the vSphere Client withadditional GUI features to support these new capabilities, with which you can manage and monitor your unique vSphere environment.
HOL-2210-01-SDC: Virtualization 101: Introduction to vSphere
H A N D S - O N L A B S M A N U A L | 3 5
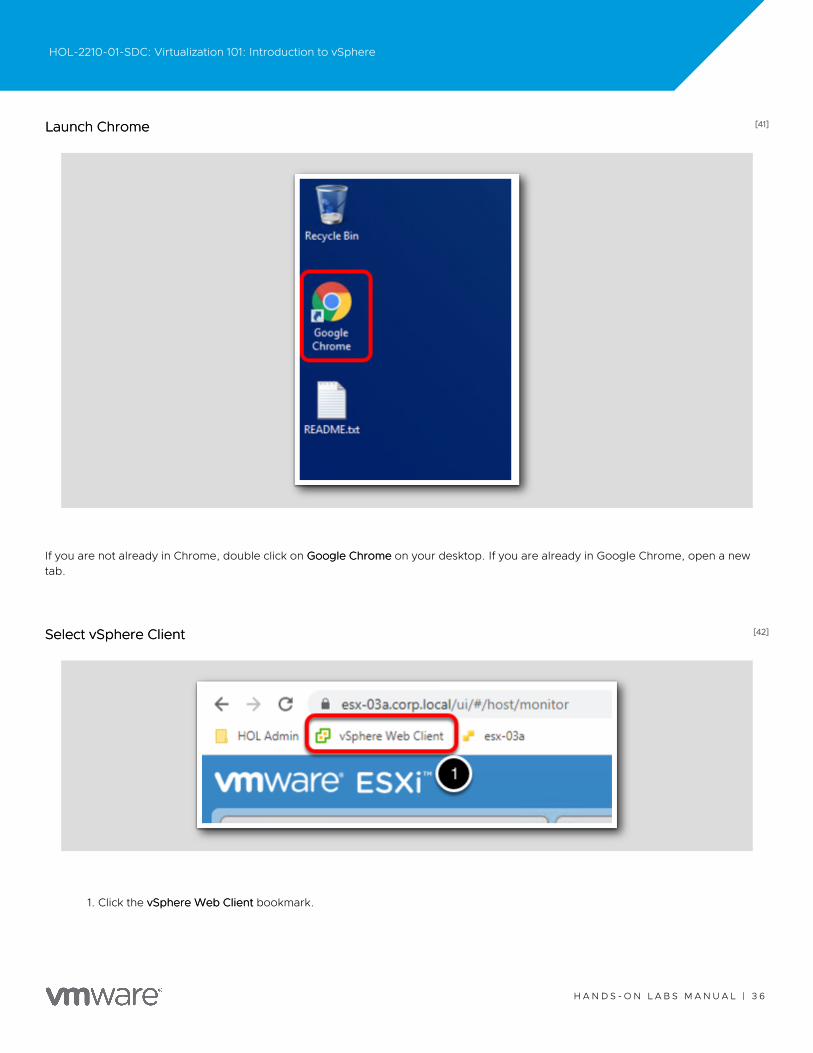
[41][41]Launch ChromeLaunch Chrome
If you are not already in Chrome, double click on Google ChromeGoogle Chrome on your desktop. If you are already in Google Chrome, open a newtab.
[42][42]Select vSphere ClientSelect vSphere Client
1. Click the vSphere Web ClientvSphere Web Client bookmark.
HOL-2210-01-SDC: Virtualization 101: Introduction to vSphere
H A N D S - O N L A B S M A N U A L | 3 6
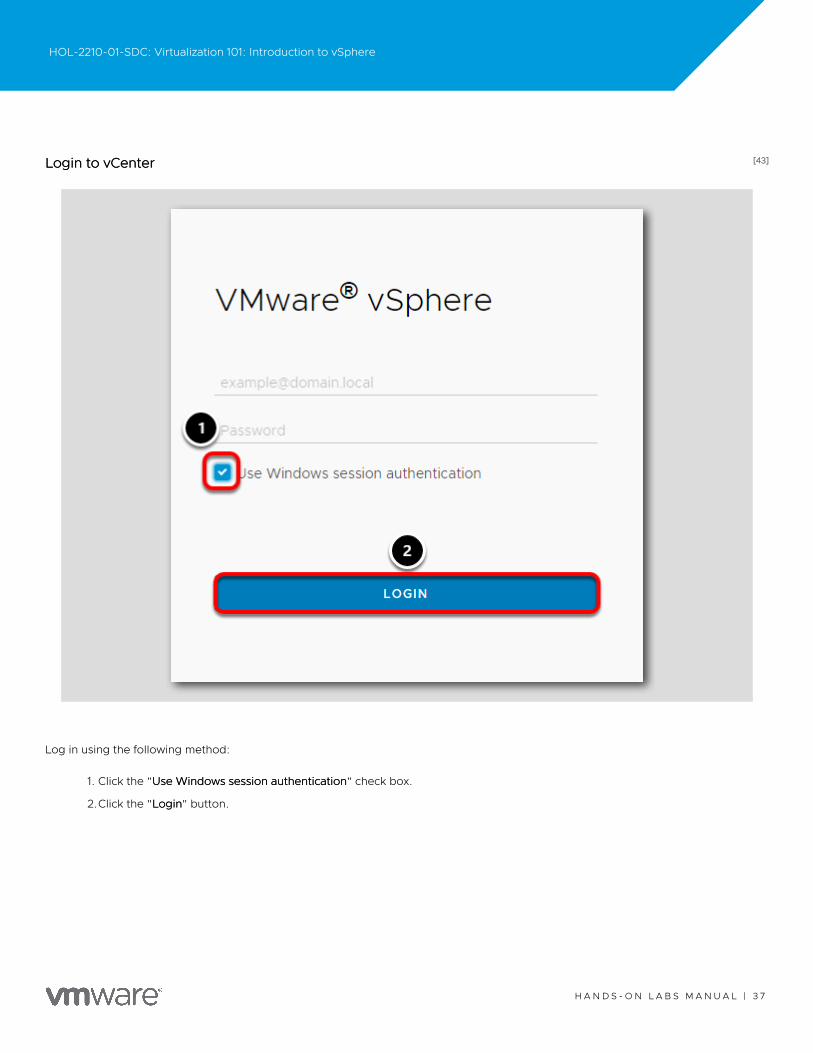
[43][43]Login to vCenterLogin to vCenter
Log in using the following method:
1. Click the "Use Windows session authenticationUse Windows session authentication" check box.
2.Click the "LoginLogin" button.
HOL-2210-01-SDC: Virtualization 101: Introduction to vSphere
H A N D S - O N L A B S M A N U A L | 3 7

[44][44]vCenter InventoryvCenter Inventory
HOL-2210-01-SDC: Virtualization 101: Introduction to vSphere
H A N D S - O N L A B S M A N U A L | 3 8

By default, you are brought to a view that shows the Hosts and Clusters attached to vCenter. Get a more complete look by viewing theGlobal Inventory Lists.
1. Click on the MenuMenu drop-down list and select Global Inventory ListsGlobal Inventory Lists.
Clicking Global Inventory Lists will take you to the inventory page where you find all the objects associated with vCenter Server systemssuch as data centers, hosts, clusters, networking, storage, and virtual machines.
HOL-2210-01-SDC: Virtualization 101: Introduction to vSphere
H A N D S - O N L A B S M A N U A L | 3 9
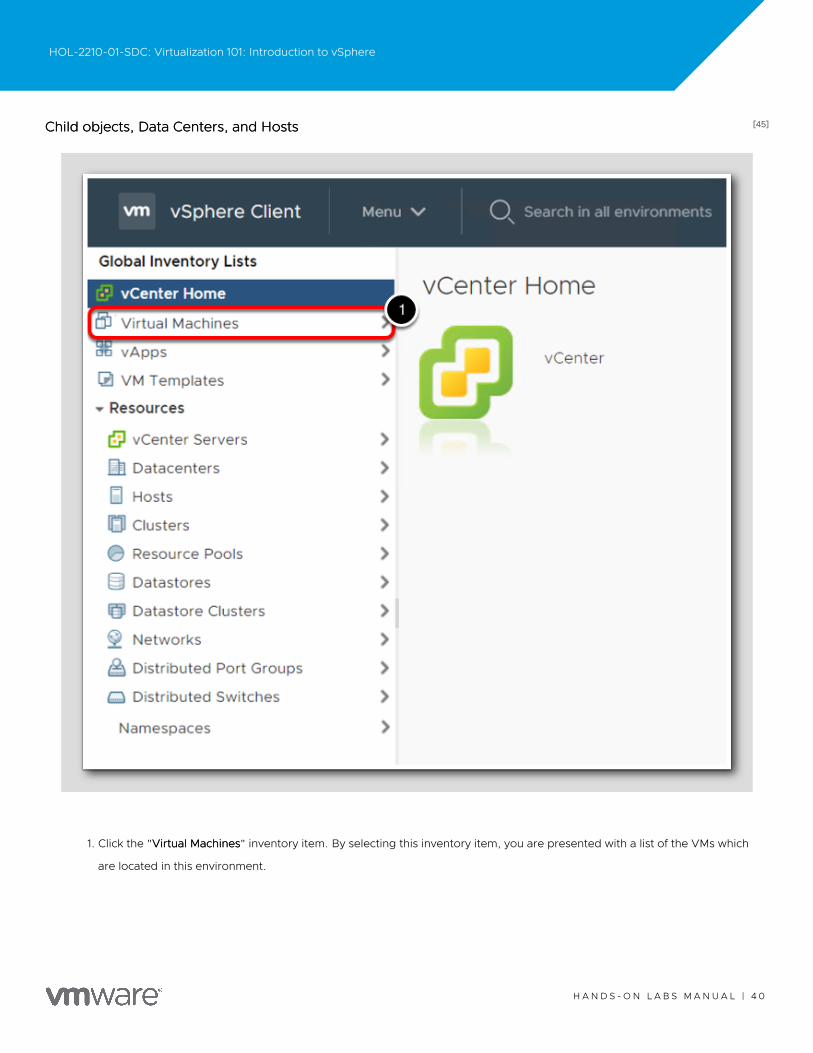
[45][45]Child objects, Data Centers, and HostsChild objects, Data Centers, and Hosts
1. Click the "Virtual MachinesVirtual Machines" inventory item. By selecting this inventory item, you are presented with a list of the VMs which
are located in this environment.
HOL-2210-01-SDC: Virtualization 101: Introduction to vSphere
H A N D S - O N L A B S M A N U A L | 4 0
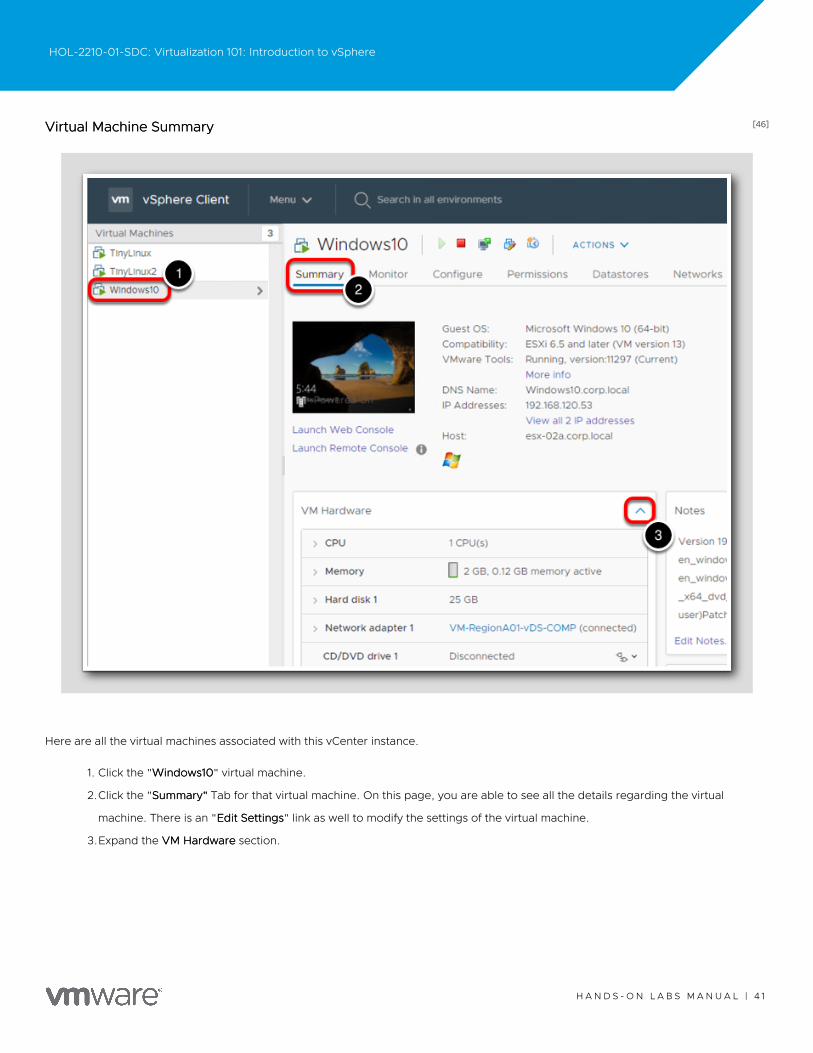
[46][46]Virtual Machine SummaryVirtual Machine Summary
Here are all the virtual machines associated with this vCenter instance.
1. Click the "Windows10Windows10" virtual machine.
2.Click the "Summary"Summary" Tab for that virtual machine. On this page, you are able to see all the details regarding the virtual
machine. There is an "Edit SettingsEdit Settings" link as well to modify the settings of the virtual machine.
3.Expand the VM HardwareVM Hardware section.
HOL-2210-01-SDC: Virtualization 101: Introduction to vSphere
H A N D S - O N L A B S M A N U A L | 4 1
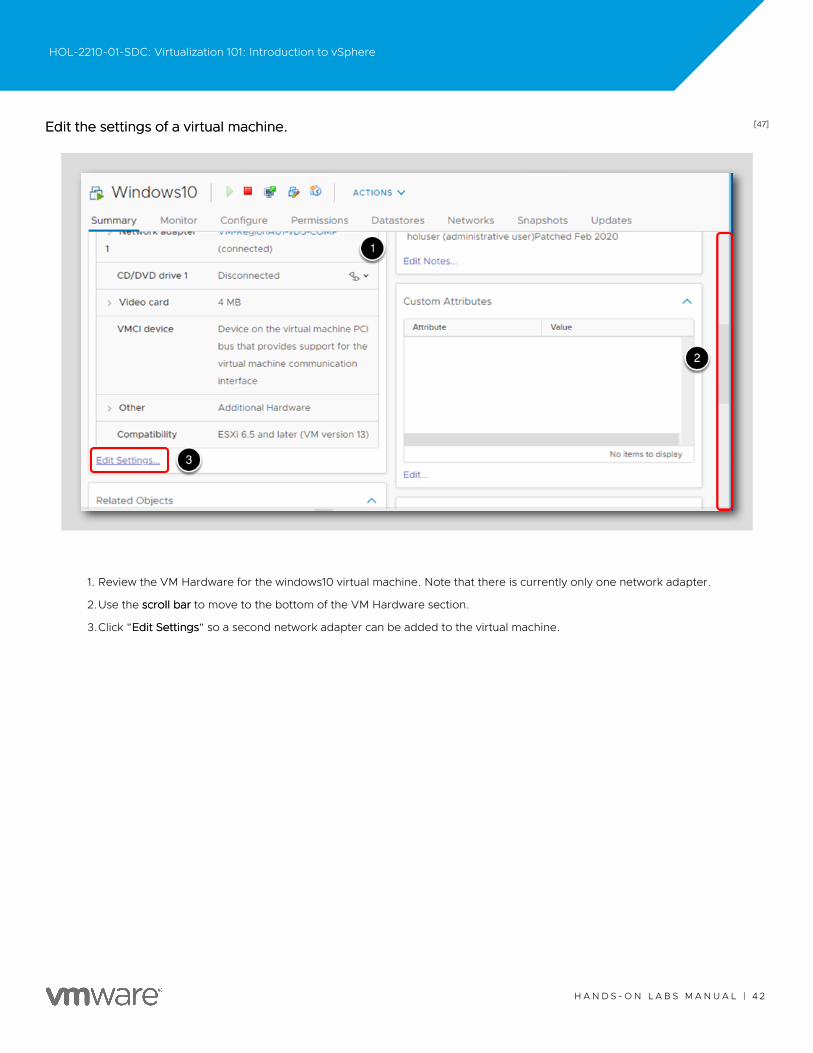
[47][47]Edit the settings of a virtual machine.Edit the settings of a virtual machine.
1. Review the VM Hardware for the windows10 virtual machine. Note that there is currently only one network adapter.
2.Use the scroll barscroll bar to move to the bottom of the VM Hardware section.
3.Click "Edit SettingsEdit Settings" so a second network adapter can be added to the virtual machine.
HOL-2210-01-SDC: Virtualization 101: Introduction to vSphere
H A N D S - O N L A B S M A N U A L | 4 2
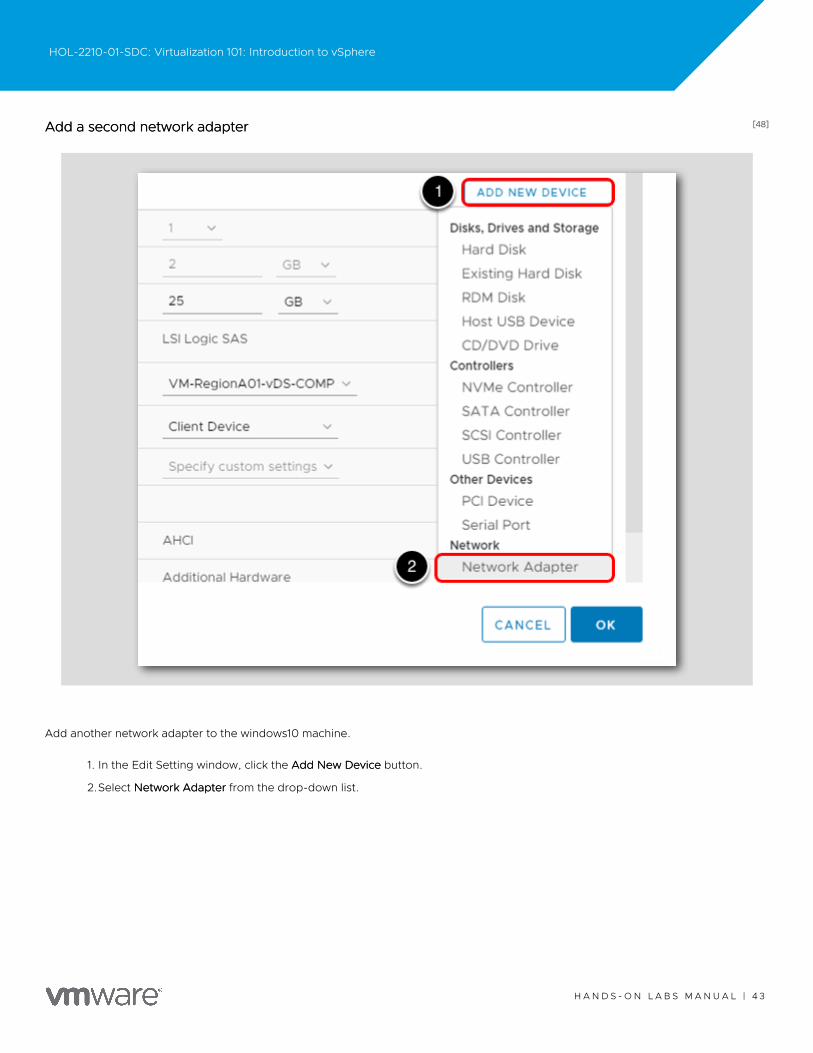
[48][48]Add a second network adapterAdd a second network adapter
Add another network adapter to the windows10 machine.
1. In the Edit Setting window, click the Add New DeviceAdd New Device button.
2.Select Network AdapterNetwork Adapter from the drop-down list.
HOL-2210-01-SDC: Virtualization 101: Introduction to vSphere
H A N D S - O N L A B S M A N U A L | 4 3
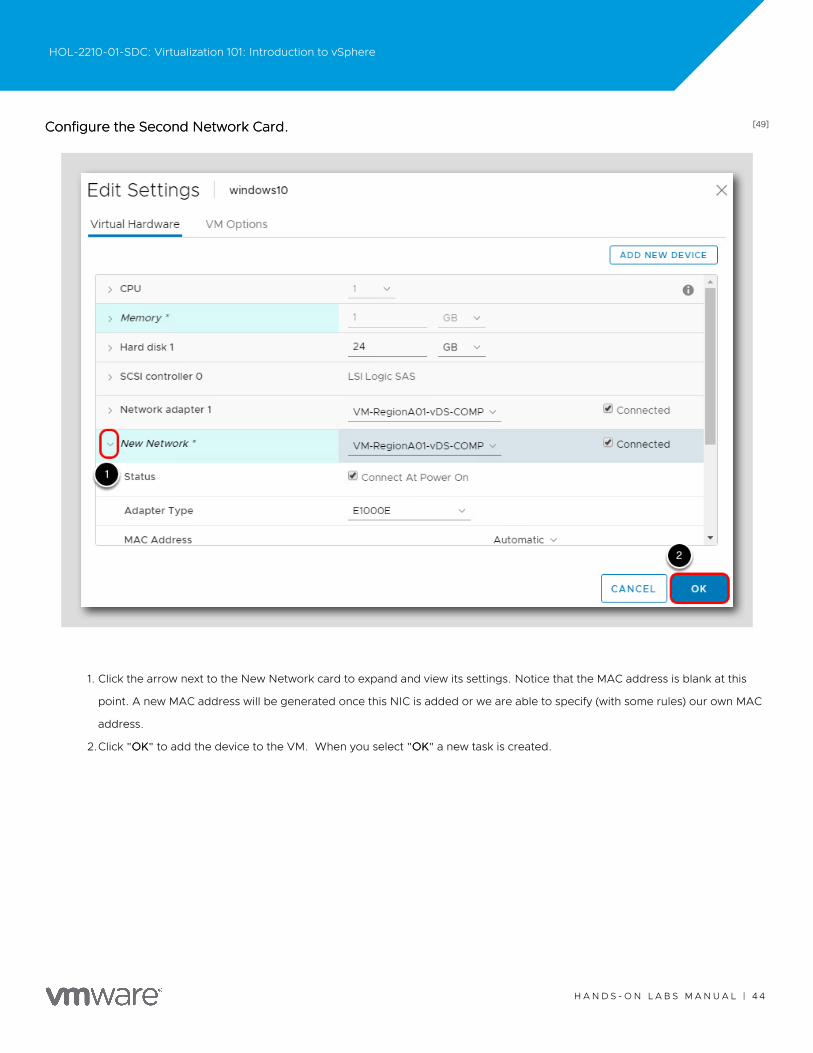
[49][49]Configure the Second Network Card.Configure the Second Network Card.
1. Click the arrow next to the New Network card to expand and view its settings. Notice that the MAC address is blank at this
point. A new MAC address will be generated once this NIC is added or we are able to specify (with some rules) our own MAC
address.
2.Click "OKOK" to add the device to the VM. When you select "OKOK" a new task is created.
HOL-2210-01-SDC: Virtualization 101: Introduction to vSphere
H A N D S - O N L A B S M A N U A L | 4 4
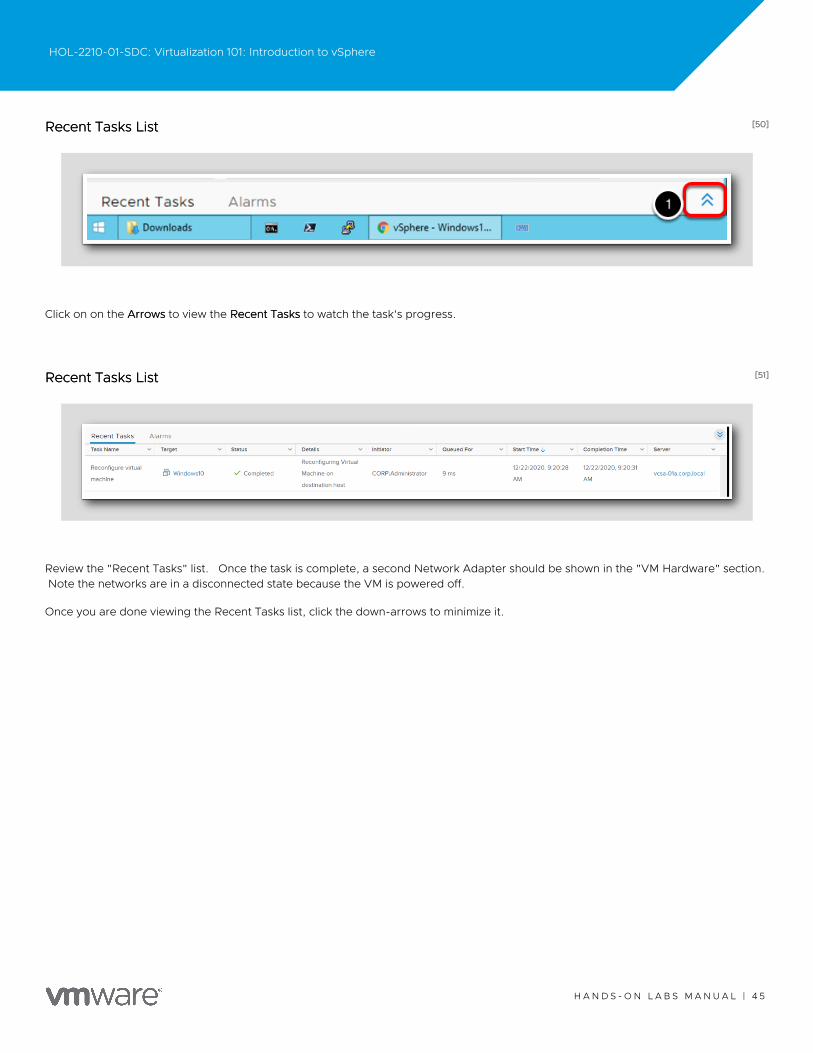
[50][50]Recent Tasks ListRecent Tasks List
Click on on the ArrowsArrows to view the Recent TasksRecent Tasks to watch the task's progress.
[51][51]Recent Tasks ListRecent Tasks List
Review the "Recent Tasks" list. Once the task is complete, a second Network Adapter should be shown in the "VM Hardware" section.Note the networks are in a disconnected state because the VM is powered off.
Once you are done viewing the Recent Tasks list, click the down-arrows to minimize it.
HOL-2210-01-SDC: Virtualization 101: Introduction to vSphere
H A N D S - O N L A B S M A N U A L | 4 5
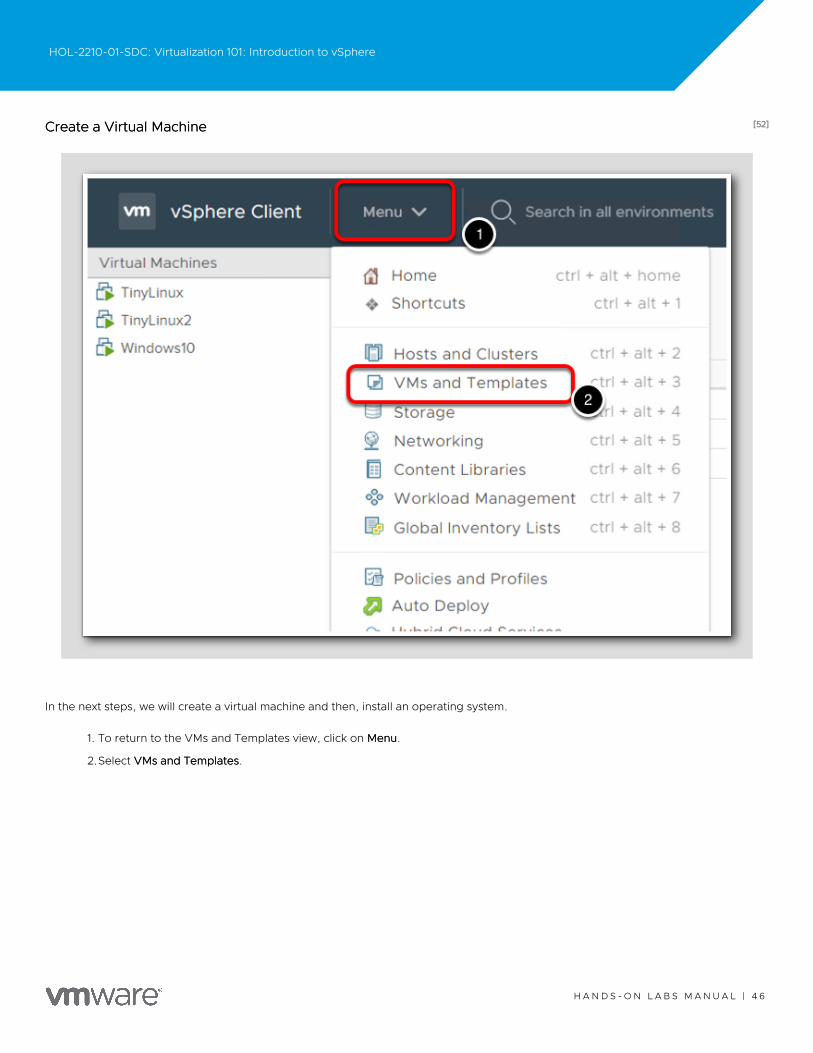
[52][52]Create a Virtual MachineCreate a Virtual Machine
In the next steps, we will create a virtual machine and then, install an operating system.
1. To return to the VMs and Templates view, click on MenuMenu.
2.Select VMs and TemplatesVMs and Templates.
HOL-2210-01-SDC: Virtualization 101: Introduction to vSphere
H A N D S - O N L A B S M A N U A L | 4 6
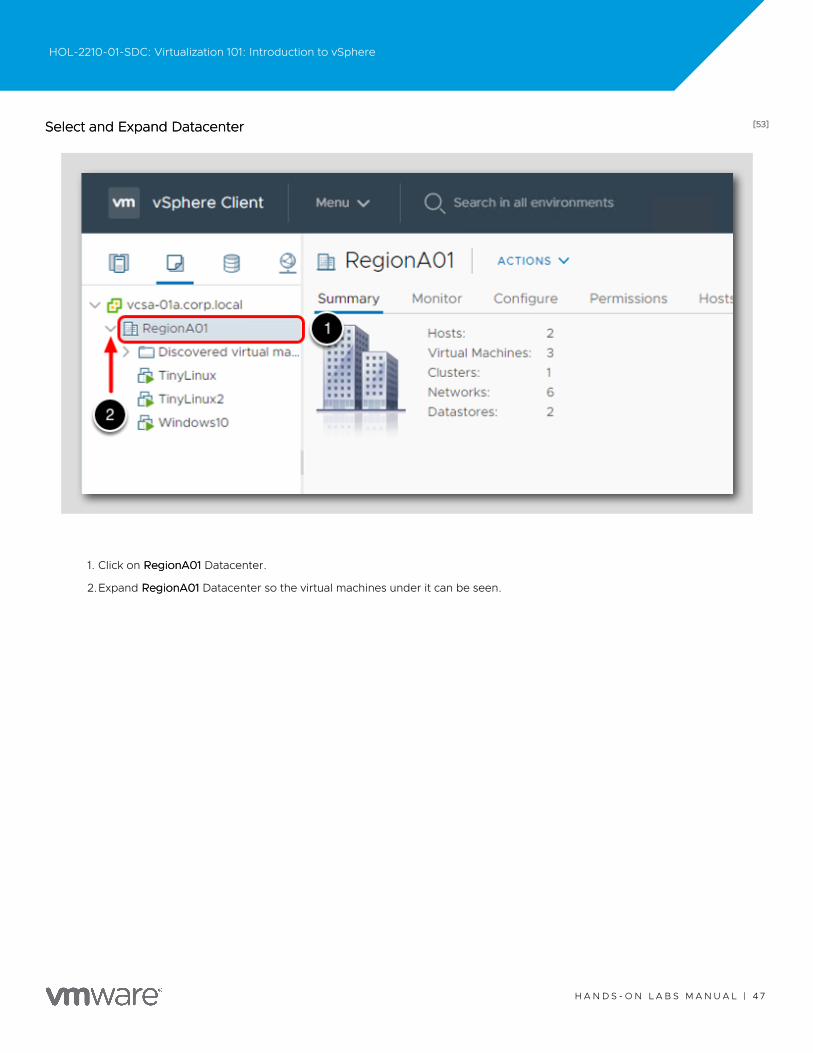
[53][53]Select and Expand DatacenterSelect and Expand Datacenter
1. Click on RegionA01RegionA01 Datacenter.
2.Expand RegionA01RegionA01 Datacenter so the virtual machines under it can be seen.
HOL-2210-01-SDC: Virtualization 101: Introduction to vSphere
H A N D S - O N L A B S M A N U A L | 4 7
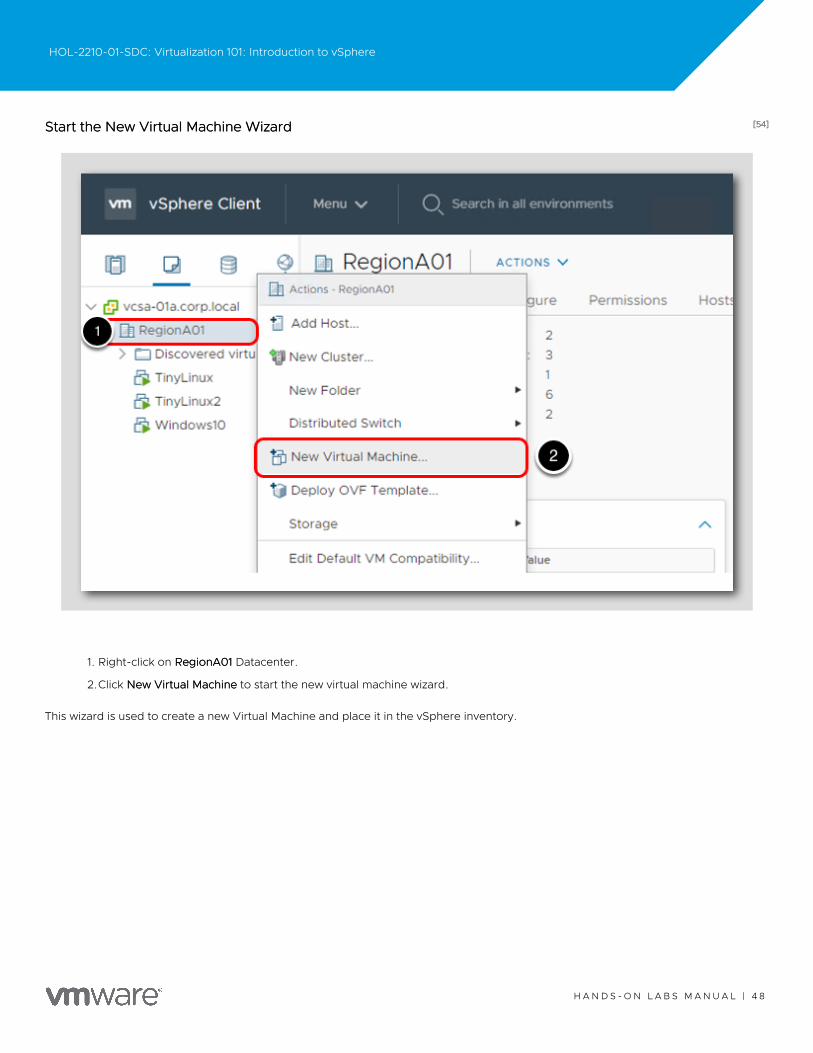
[54][54]Start the New Virtual Machine WizardStart the New Virtual Machine Wizard
1. Right-click on RegionA01RegionA01 Datacenter.
2.Click New Virtual MachineNew Virtual Machine to start the new virtual machine wizard.
This wizard is used to create a new Virtual Machine and place it in the vSphere inventory.
HOL-2210-01-SDC: Virtualization 101: Introduction to vSphere
H A N D S - O N L A B S M A N U A L | 4 8
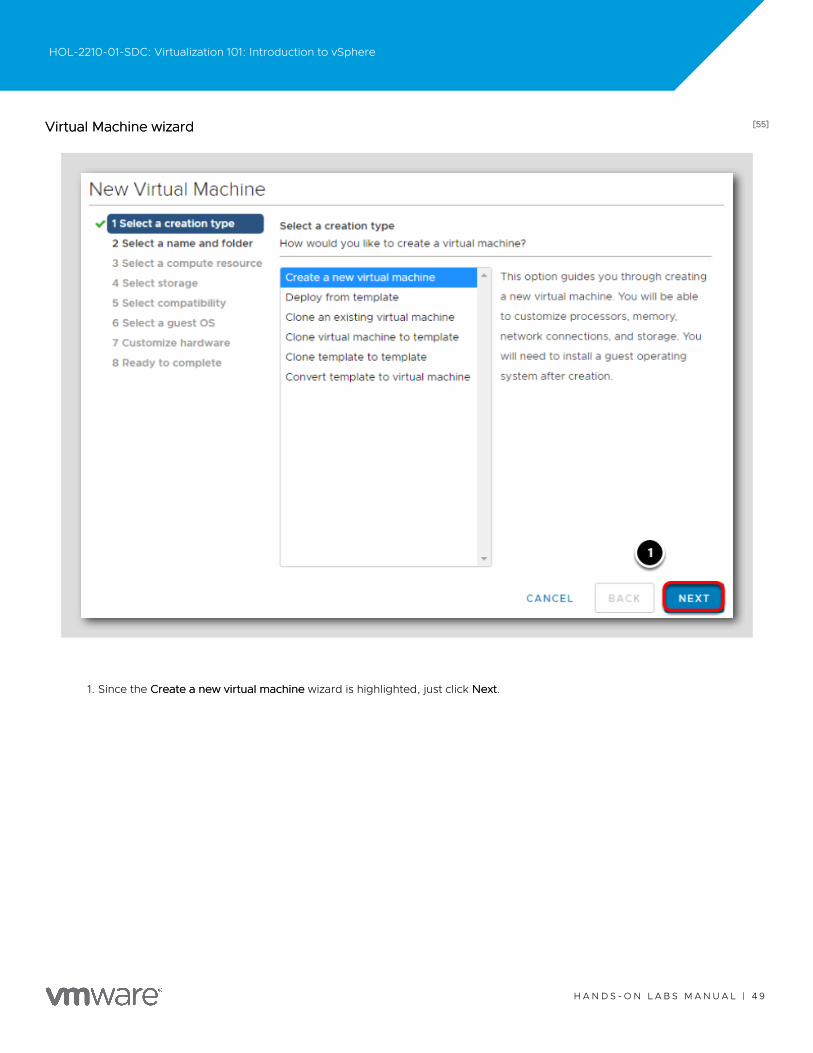
[55][55]Virtual Machine wizardVirtual Machine wizard
1. Since the Create a new virtual machineCreate a new virtual machine wizard is highlighted, just click NextNext.
HOL-2210-01-SDC: Virtualization 101: Introduction to vSphere
H A N D S - O N L A B S M A N U A L | 4 9
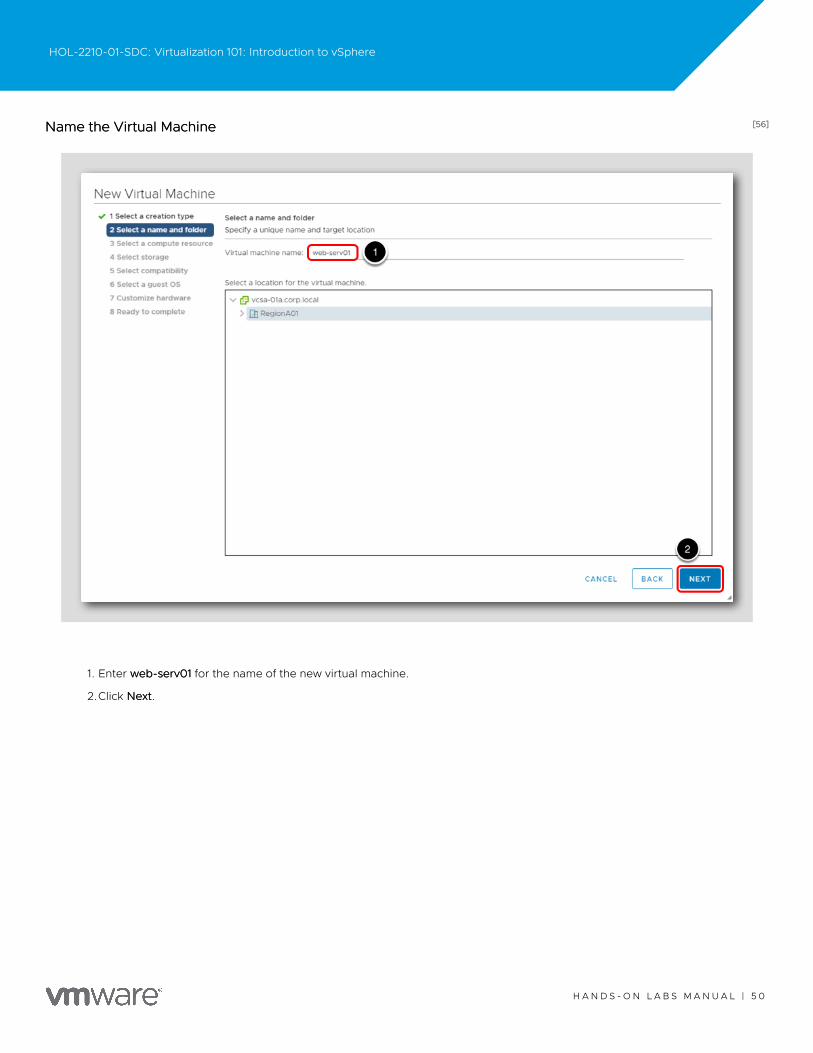
[56][56]Name the Virtual MachineName the Virtual Machine
1. Enter web-serv01web-serv01 for the name of the new virtual machine.
2.Click NextNext.
HOL-2210-01-SDC: Virtualization 101: Introduction to vSphere
H A N D S - O N L A B S M A N U A L | 5 0
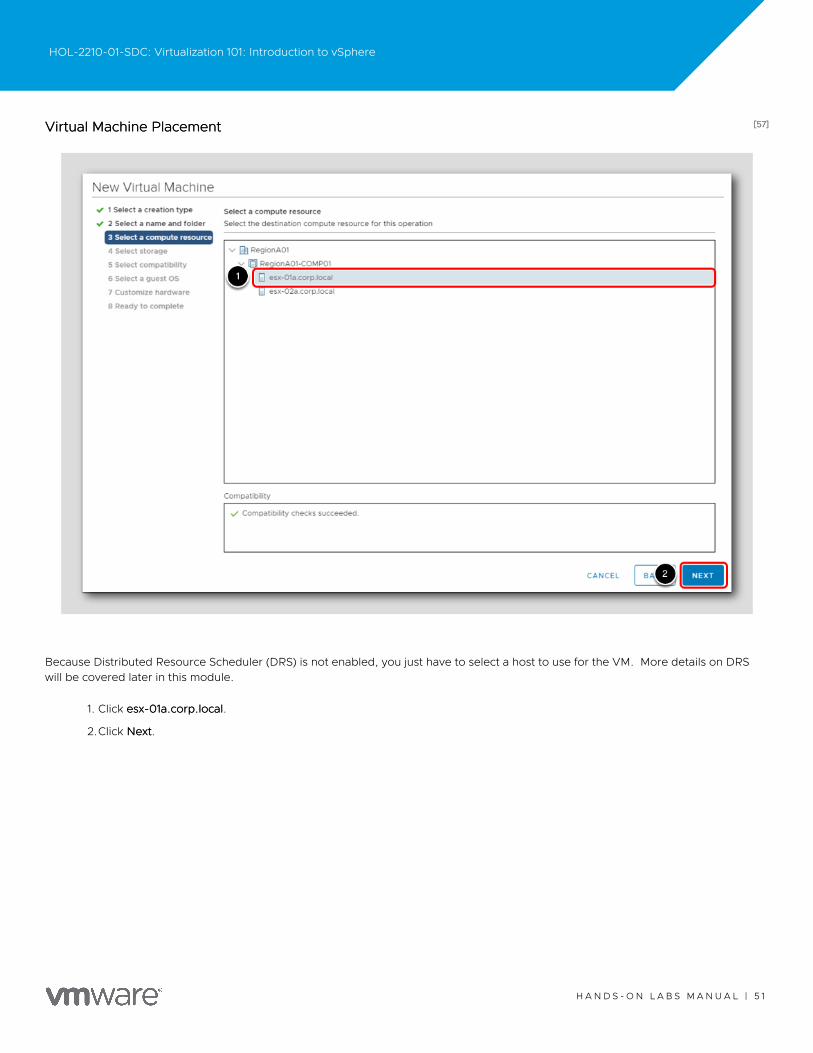
[57][57]Virtual Machine PlacementVirtual Machine Placement
Because Distributed Resource Scheduler (DRS) is not enabled, you just have to select a host to use for the VM. More details on DRSwill be covered later in this module.
1. Click esx-01a.corp.localesx-01a.corp.local.
2.Click NextNext.
HOL-2210-01-SDC: Virtualization 101: Introduction to vSphere
H A N D S - O N L A B S M A N U A L | 5 1
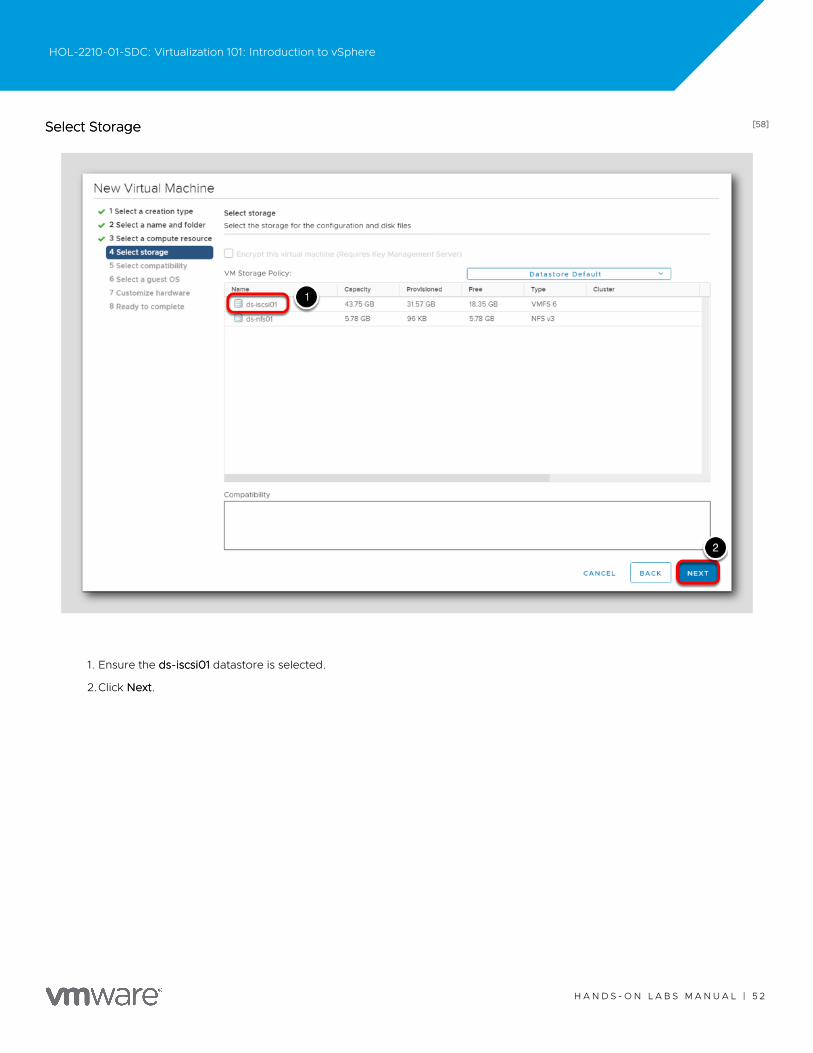
[58][58]Select StorageSelect Storage
1. Ensure the ds-iscsi01ds-iscsi01 datastore is selected.
2.Click NextNext.
HOL-2210-01-SDC: Virtualization 101: Introduction to vSphere
H A N D S - O N L A B S M A N U A L | 5 2
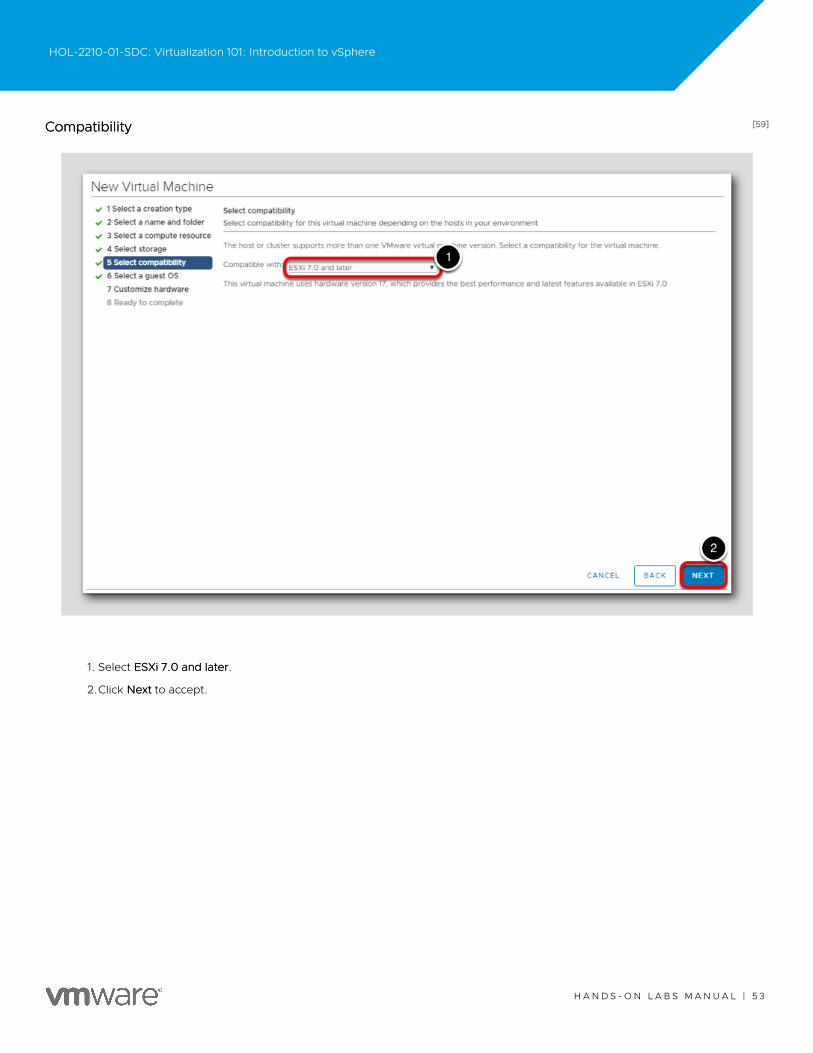
[59][59]CompatibilityCompatibility
1. Select ESXi 7.0 and laterESXi 7.0 and later.
2.Click NextNext to accept.
HOL-2210-01-SDC: Virtualization 101: Introduction to vSphere
H A N D S - O N L A B S M A N U A L | 5 3

[60][60]Guest OSGuest OS
In this step, we will be selecting what operating system we will be installing. When we select the operating system, the supportedvirtual hardware and recommended configuration is used to create the virtual machine. Keep in mind this does not create a virtualmachine with the operating system installed, but rather creates a virtual machine that is tuned appropriately for the operating systemyou have selected.
1. For the Guest OS FamilyGuest OS Family, select LinuxLinux from the drop-down menu.
2.For the Guest OS VersionGuest OS Version, select VMware Photon OS (64-bit).VMware Photon OS (64-bit).
3.Click NextNext to continue.
HOL-2210-01-SDC: Virtualization 101: Introduction to vSphere
H A N D S - O N L A B S M A N U A L | 5 4
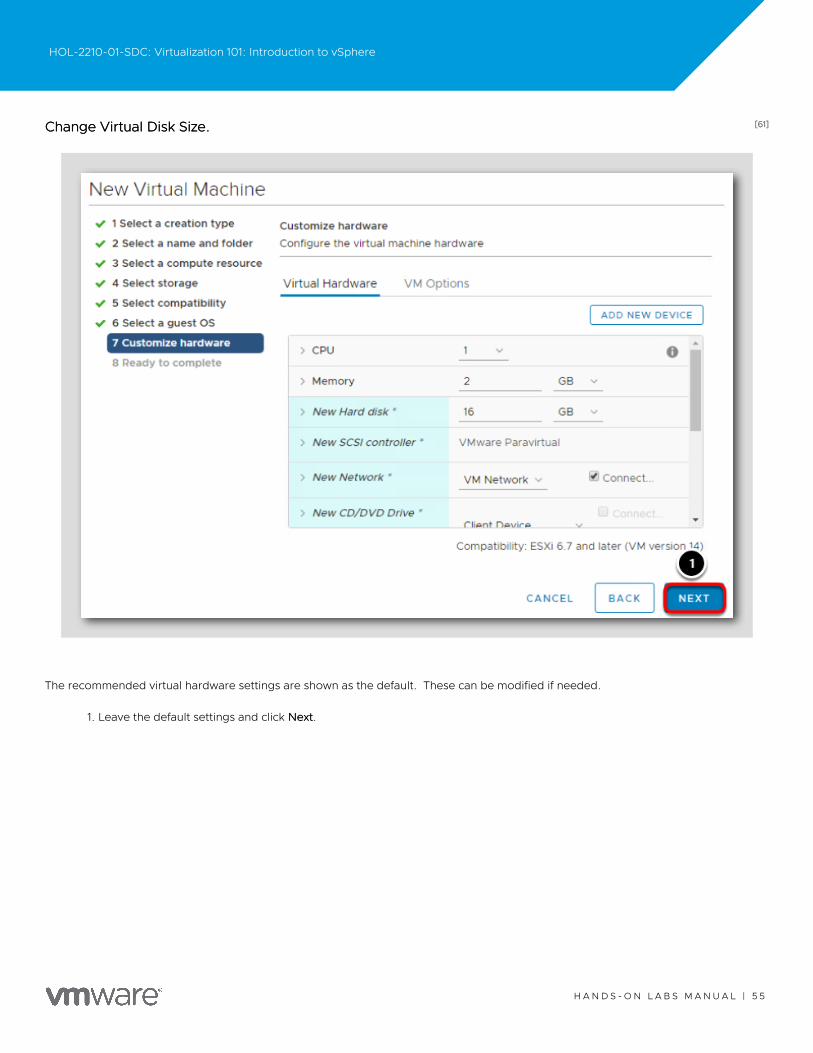
[61][61]Change Virtual Disk Size.Change Virtual Disk Size.
The recommended virtual hardware settings are shown as the default. These can be modified if needed.
1. Leave the default settings and click NextNext.
HOL-2210-01-SDC: Virtualization 101: Introduction to vSphere
H A N D S - O N L A B S M A N U A L | 5 5
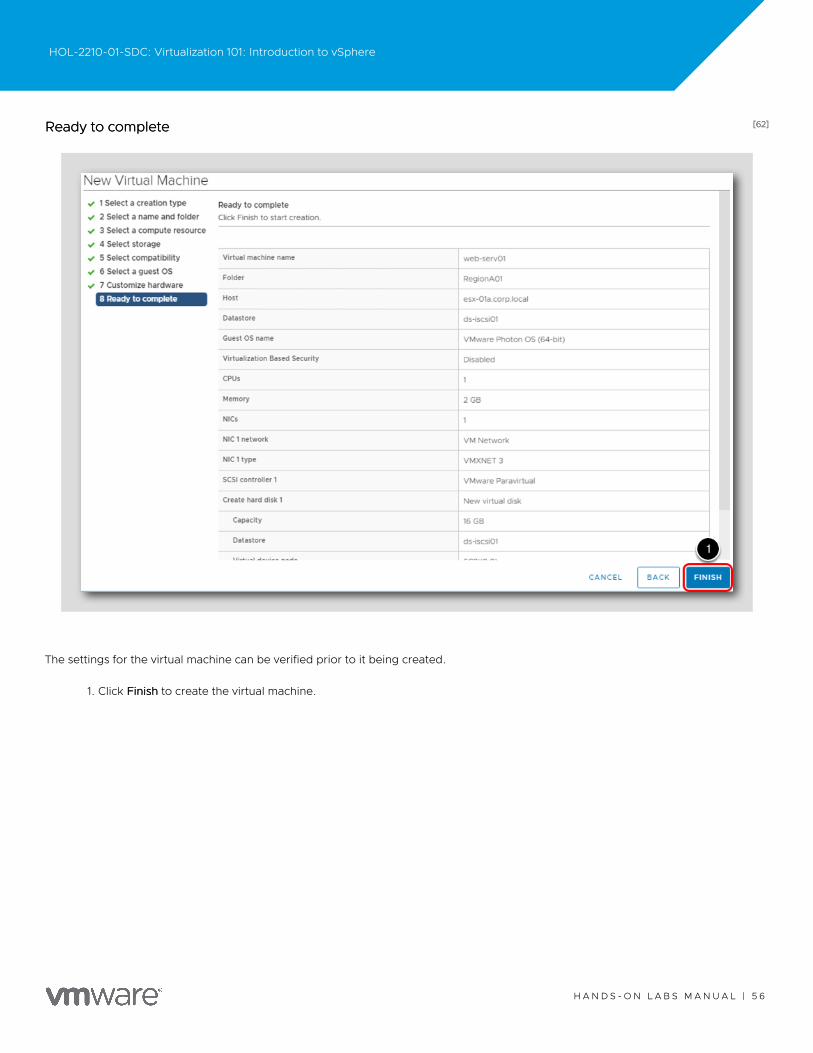
[62][62]Ready to completeReady to complete
The settings for the virtual machine can be verified prior to it being created.
1. Click FinishFinish to create the virtual machine.
HOL-2210-01-SDC: Virtualization 101: Introduction to vSphere
H A N D S - O N L A B S M A N U A L | 5 6

[63][63]Newly created virtual machineNewly created virtual machine
Congratulations on creating your first virtual machine web-serv01web-serv01!
In the next steps, Photon OS will be installed on the virtual machine.
HOL-2210-01-SDC: Virtualization 101: Introduction to vSphere
H A N D S - O N L A B S M A N U A L | 5 7
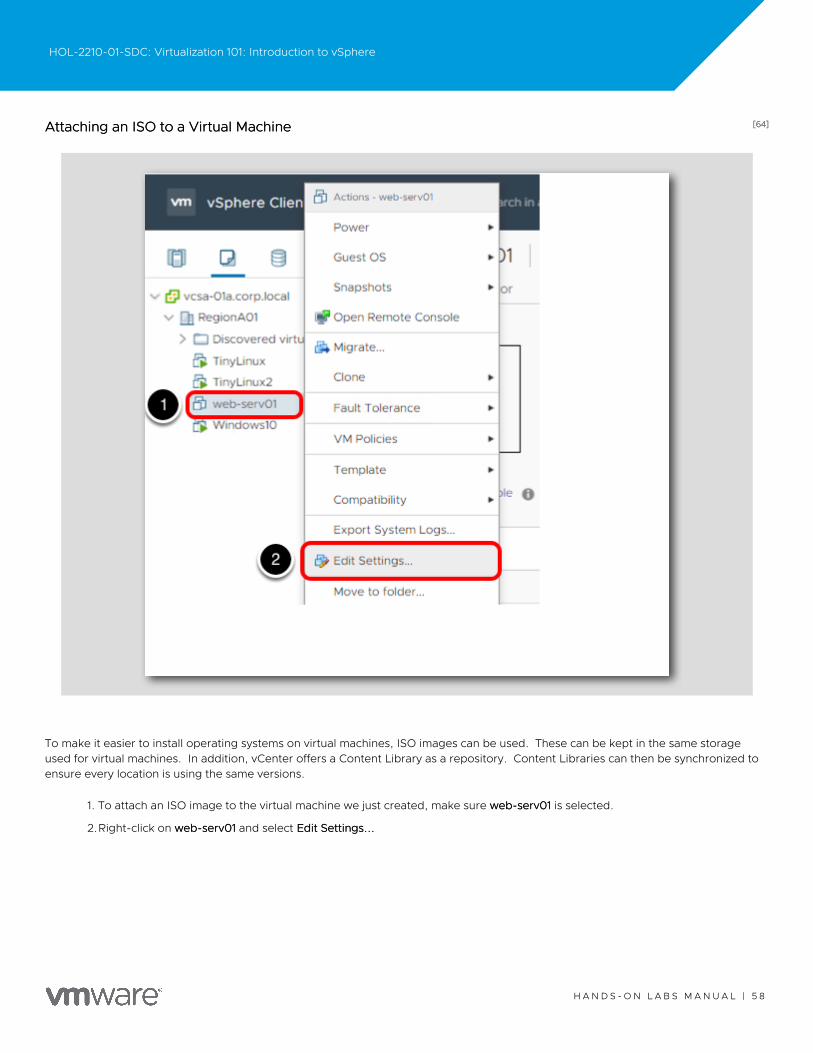
[64][64]Attaching an ISO to a Virtual MachineAttaching an ISO to a Virtual Machine
To make it easier to install operating systems on virtual machines, ISO images can be used. These can be kept in the same storageused for virtual machines. In addition, vCenter offers a Content Library as a repository. Content Libraries can then be synchronized toensure every location is using the same versions.
1. To attach an ISO image to the virtual machine we just created, make sure web-serv01web-serv01 is selected.
2.Right-click on web-serv01web-serv01 and select Edit Settings...Edit Settings...
HOL-2210-01-SDC: Virtualization 101: Introduction to vSphere
H A N D S - O N L A B S M A N U A L | 5 8
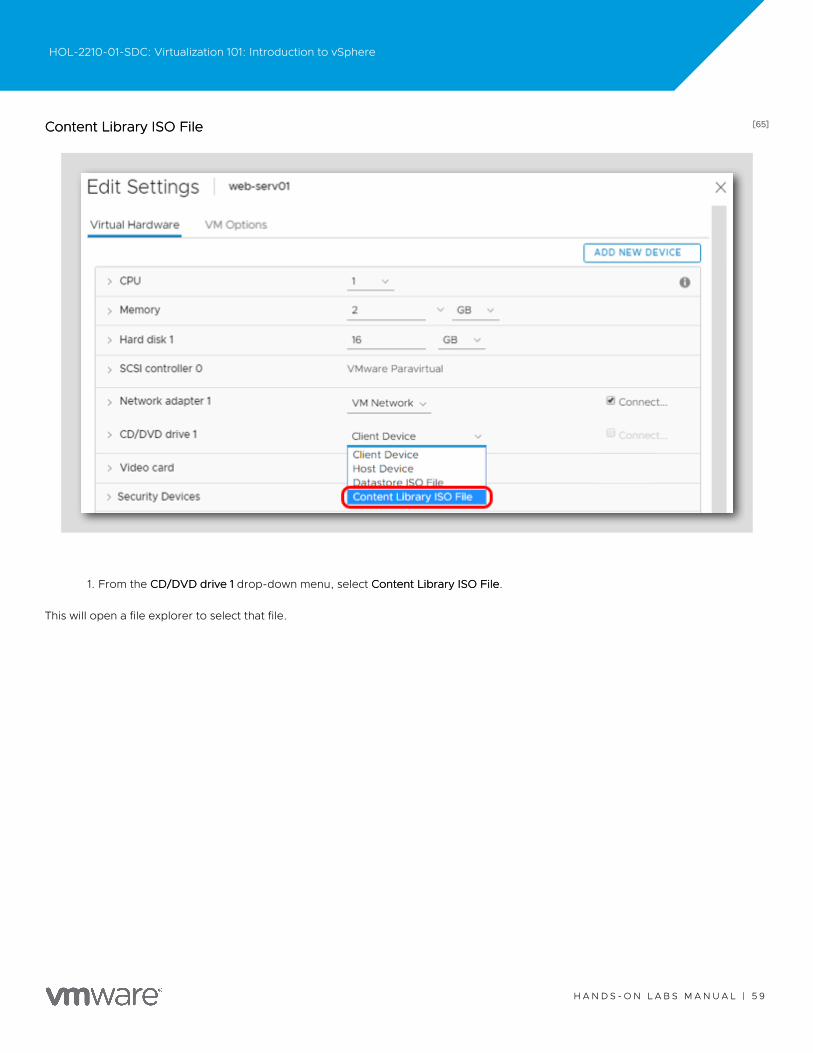
[65][65]Content Library ISO FileContent Library ISO File
1. From the CD/DVD drive 1CD/DVD drive 1 drop-down menu, select Content Library ISO FileContent Library ISO File.
This will open a file explorer to select that file.
HOL-2210-01-SDC: Virtualization 101: Introduction to vSphere
H A N D S - O N L A B S M A N U A L | 5 9
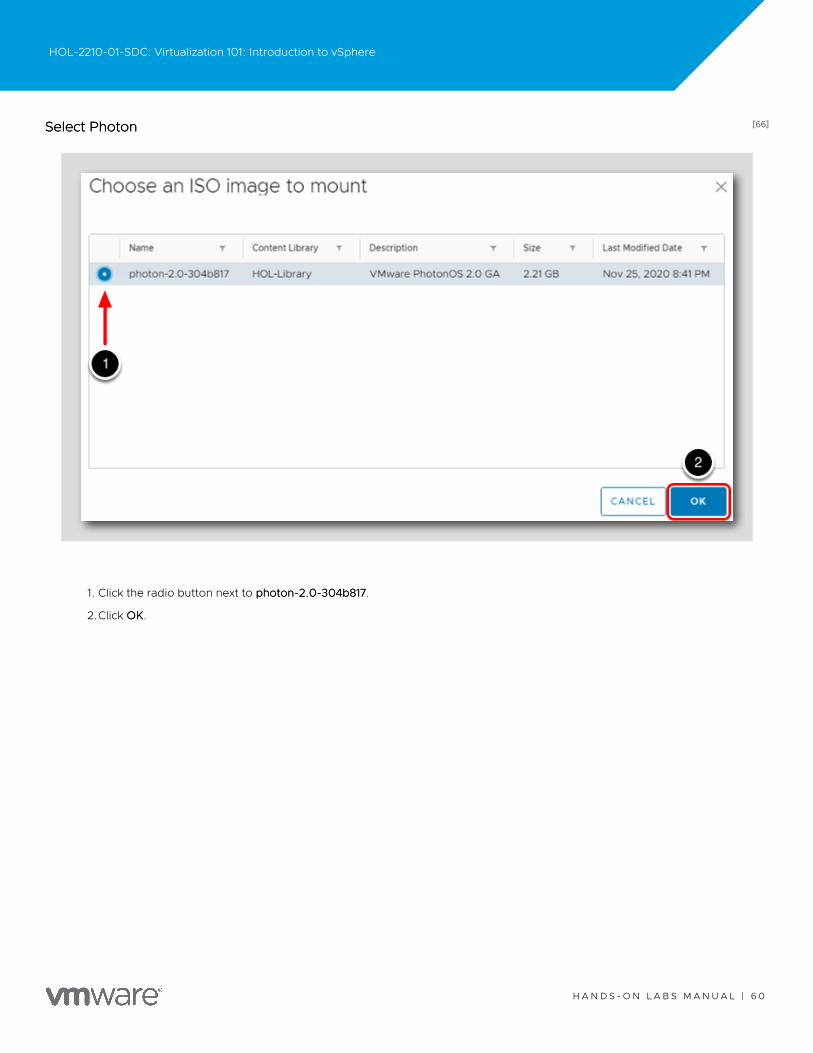
[66][66]Select PhotonSelect Photon
1. Click the radio button next to photon-2.0-304b817photon-2.0-304b817.
2.Click OKOK.
HOL-2210-01-SDC: Virtualization 101: Introduction to vSphere
H A N D S - O N L A B S M A N U A L | 6 0
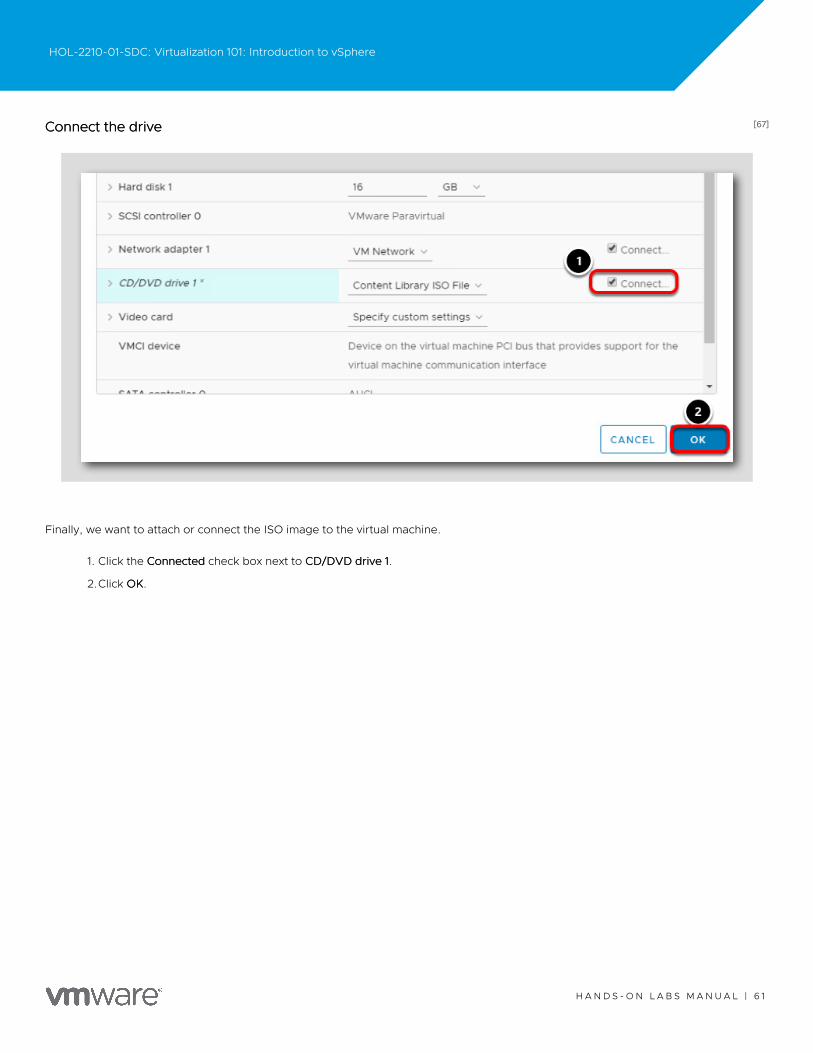
[67][67]Connect the driveConnect the drive
Finally, we want to attach or connect the ISO image to the virtual machine.
1. Click the ConnectedConnected check box next to CD/DVD drive 1CD/DVD drive 1.
2.Click OKOK.
HOL-2210-01-SDC: Virtualization 101: Introduction to vSphere
H A N D S - O N L A B S M A N U A L | 6 1
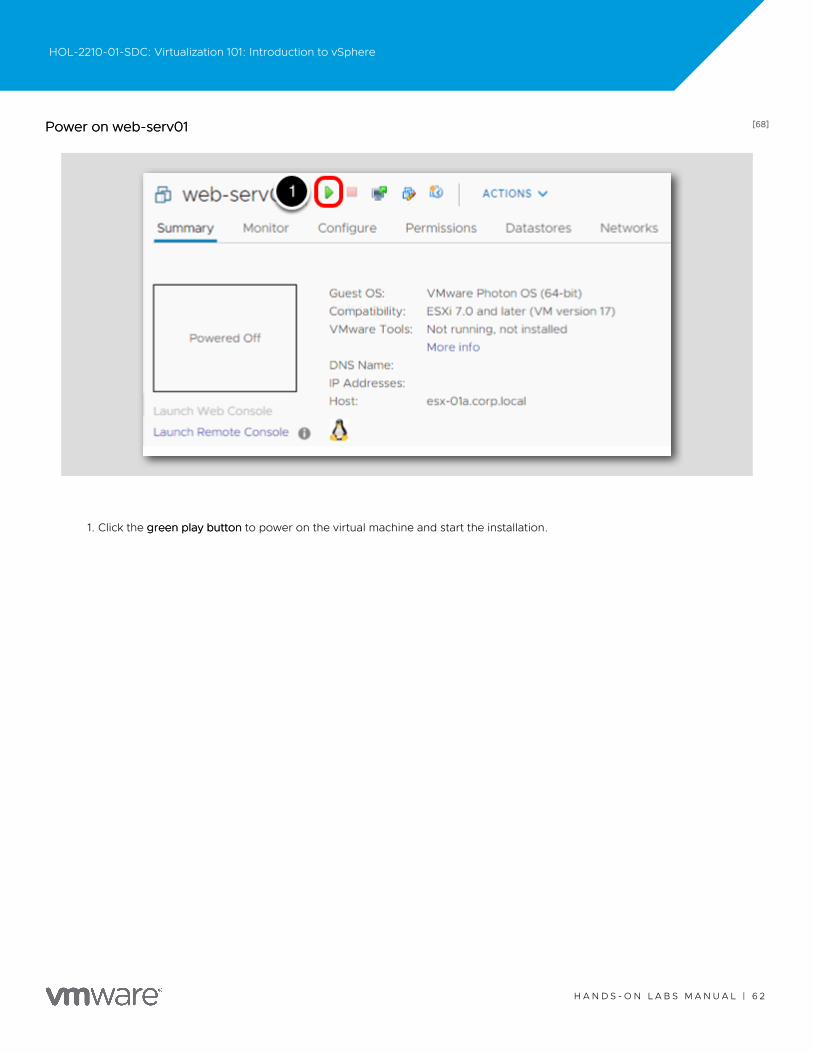
[68][68]Power on web-serv01Power on web-serv01
1. Click the green play buttongreen play button to power on the virtual machine and start the installation.
HOL-2210-01-SDC: Virtualization 101: Introduction to vSphere
H A N D S - O N L A B S M A N U A L | 6 2
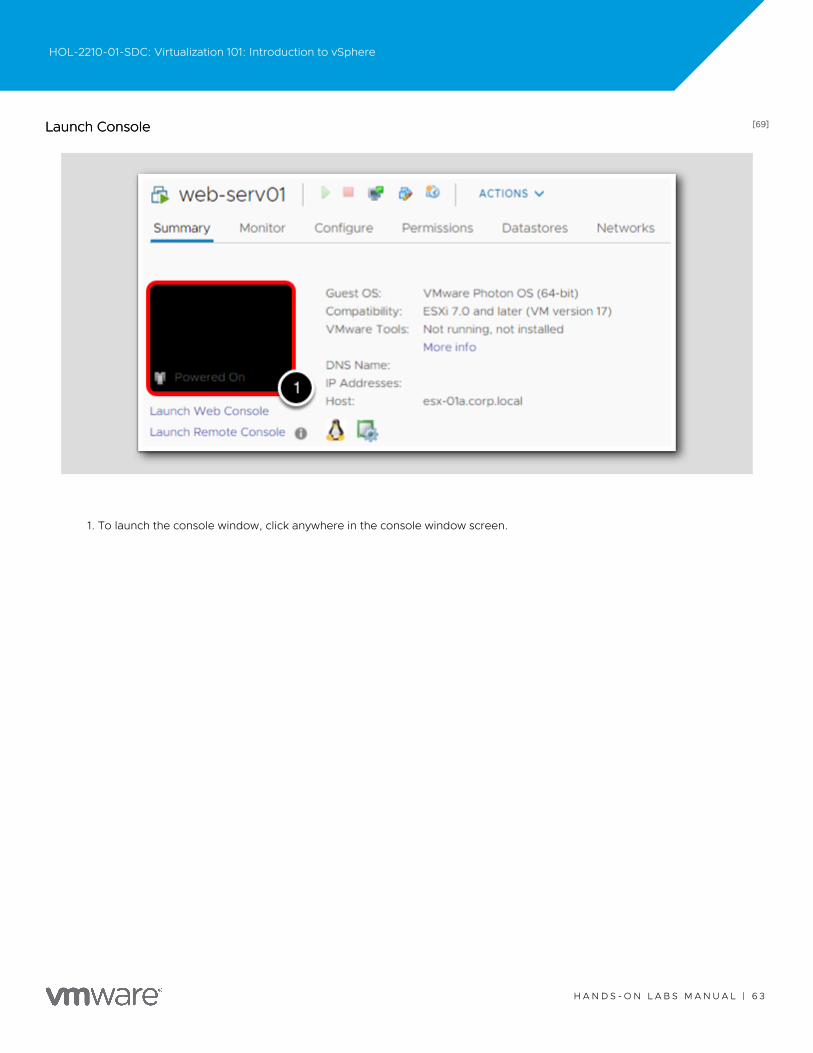
[69][69]Launch ConsoleLaunch Console
1. To launch the console window, click anywhere in the console window screen.
HOL-2210-01-SDC: Virtualization 101: Introduction to vSphere
H A N D S - O N L A B S M A N U A L | 6 3
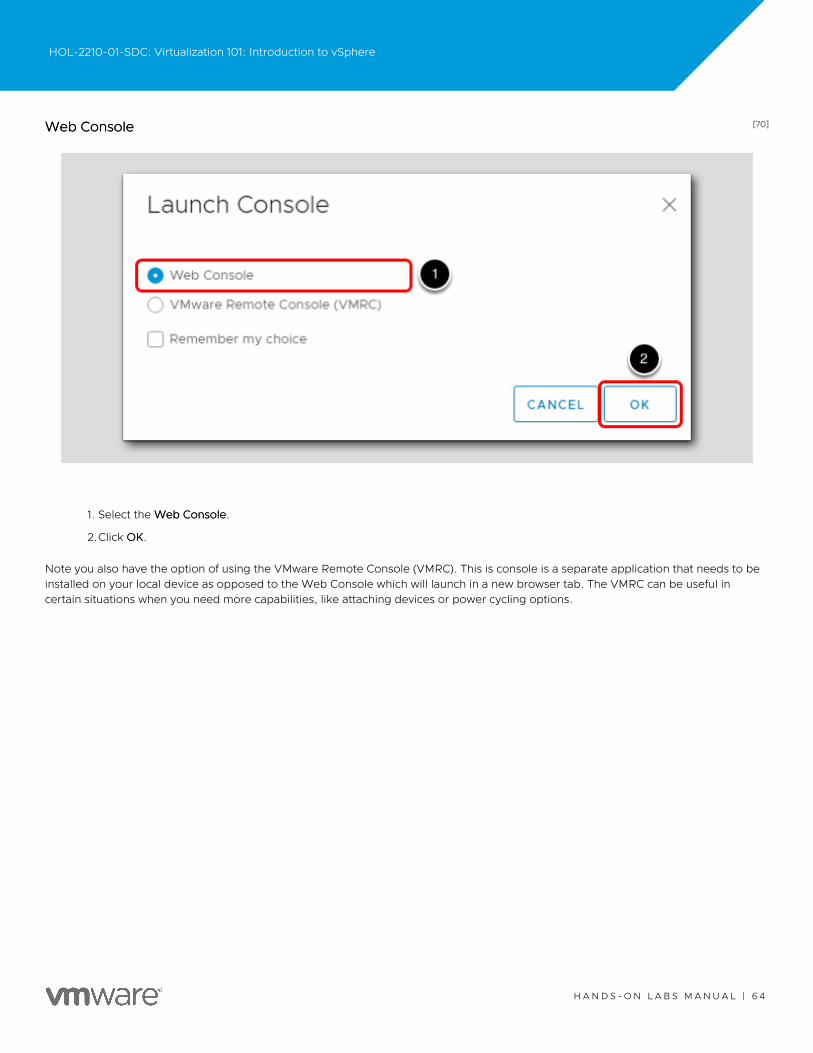
[70][70]Web ConsoleWeb Console
1. Select the Web ConsoleWeb Console.
2.Click OKOK.
Note you also have the option of using the VMware Remote Console (VMRC). This is console is a separate application that needs to beinstalled on your local device as opposed to the Web Console which will launch in a new browser tab. The VMRC can be useful incertain situations when you need more capabilities, like attaching devices or power cycling options.
HOL-2210-01-SDC: Virtualization 101: Introduction to vSphere
H A N D S - O N L A B S M A N U A L | 6 4
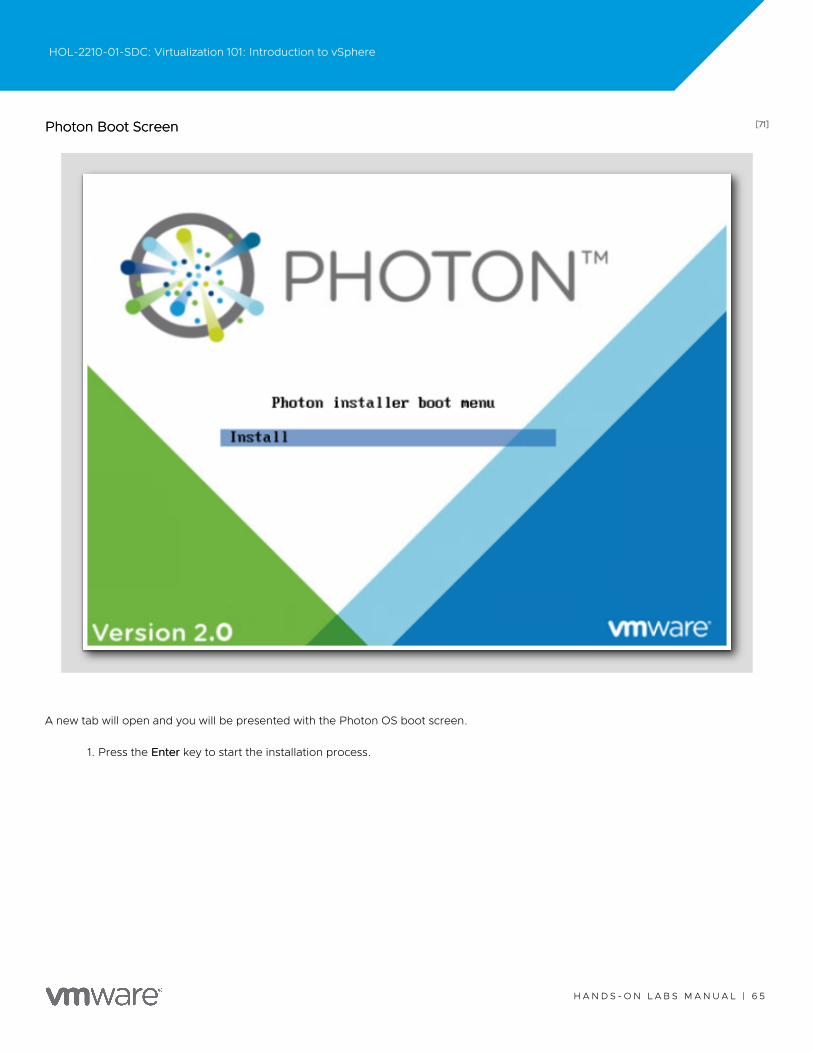
[71][71]Photon Boot ScreenPhoton Boot Screen
A new tab will open and you will be presented with the Photon OS boot screen.
1. Press the EnterEnter key to start the installation process.
HOL-2210-01-SDC: Virtualization 101: Introduction to vSphere
H A N D S - O N L A B S M A N U A L | 6 5

[72][72]License AgreementLicense Agreement
After the boot process is complete, you will be presented with a license agreement.
1. Press EnterEnter to accept.
HOL-2210-01-SDC: Virtualization 101: Introduction to vSphere
H A N D S - O N L A B S M A N U A L | 6 6

[73][73]Select DiskSelect Disk
1. Press EnterEnter to accept the selected disk and use the auto partitioning option.
HOL-2210-01-SDC: Virtualization 101: Introduction to vSphere
H A N D S - O N L A B S M A N U A L | 6 7
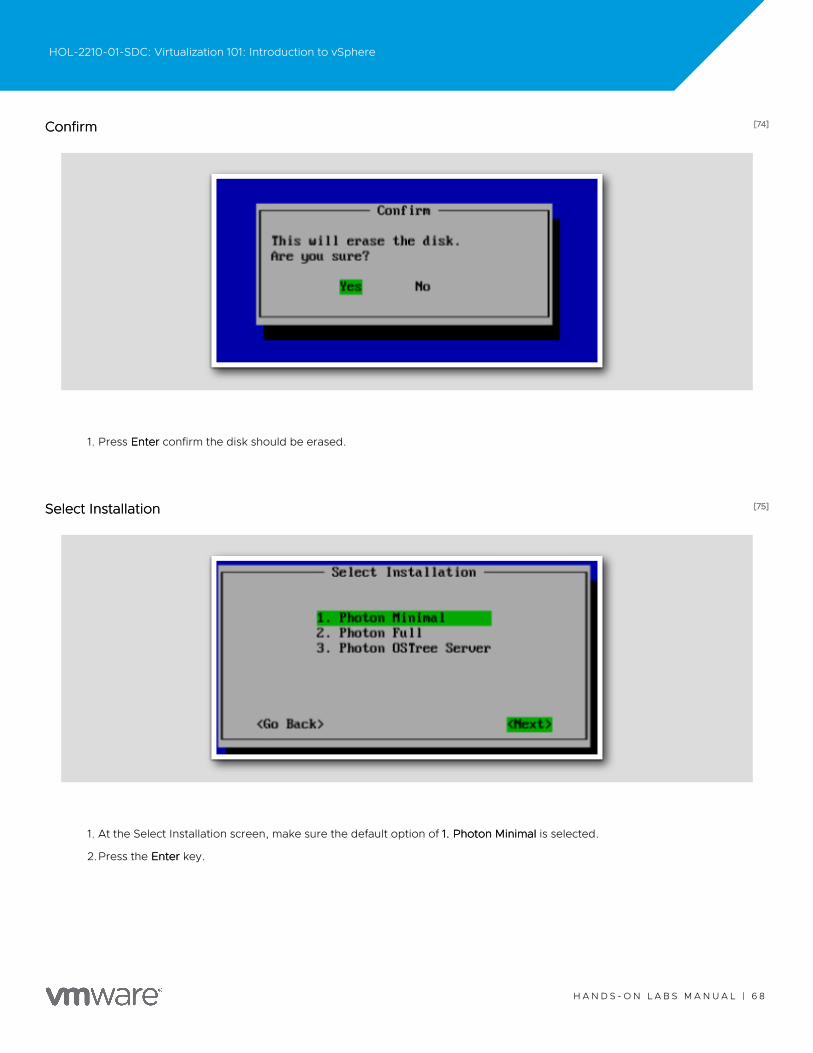
[74][74]ConfirmConfirm
1. Press EnterEnter confirm the disk should be erased.
[75][75]Select InstallationSelect Installation
1. At the Select Installation screen, make sure the default option of 1. Photon Minimal1. Photon Minimal is selected.
2.Press the EnterEnter key.
HOL-2210-01-SDC: Virtualization 101: Introduction to vSphere
H A N D S - O N L A B S M A N U A L | 6 8
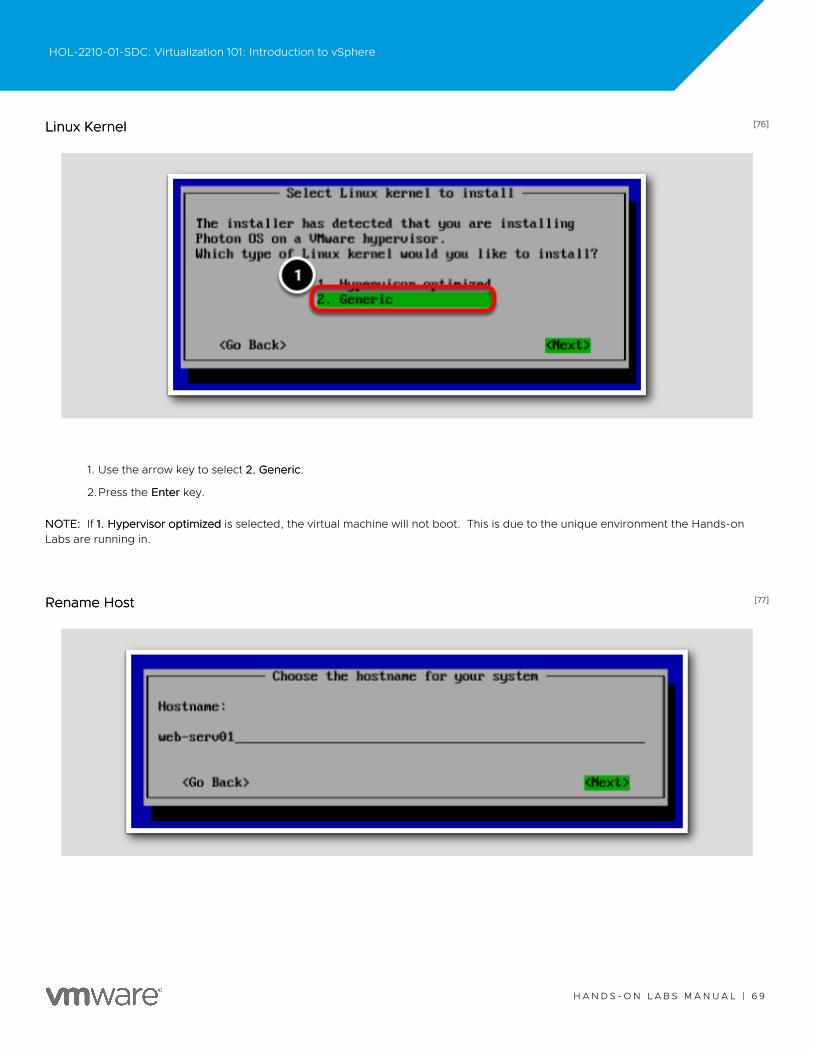
[76][76]Linux KernelLinux Kernel
1. Use the arrow key to select 2. Generic2. Generic.
2.Press the EnterEnter key.
NOTE:NOTE: If 1. Hypervisor optimized1. Hypervisor optimized is selected, the virtual machine will not boot. This is due to the unique environment the Hands-onLabs are running in.
[77][77]Rename HostRename Host
HOL-2210-01-SDC: Virtualization 101: Introduction to vSphere
H A N D S - O N L A B S M A N U A L | 6 9
1. Use the Backspace key to remove the default hostname.
2.Type web-serv01.web-serv01.
3.Press the EnterEnter key.
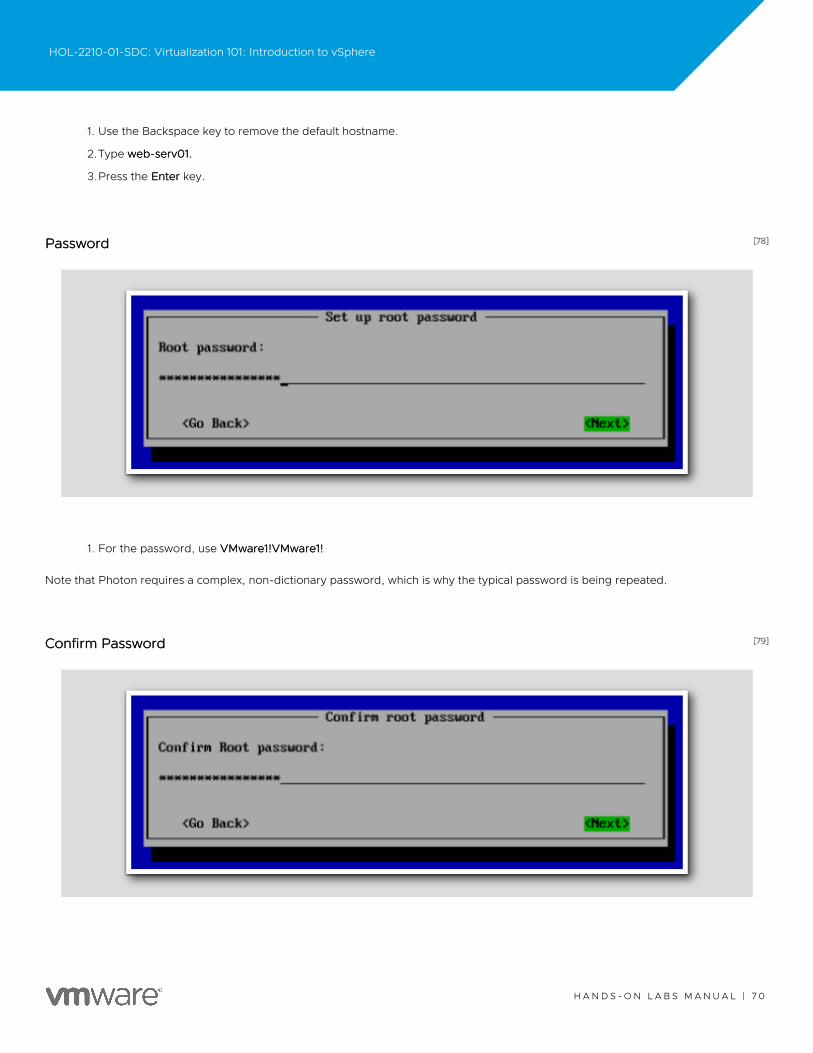
[78][78]PasswordPassword
1. For the password, use VMware1!VMware1!VMware1!VMware1!
Note that Photon requires a complex, non-dictionary password, which is why the typical password is being repeated.
[79][79]Confirm PasswordConfirm Password
HOL-2210-01-SDC: Virtualization 101: Introduction to vSphere
H A N D S - O N L A B S M A N U A L | 7 0
1. Type VMware1!VMware1!VMware1!VMware1! again to confirm the password.
2.Press the EnterEnter key.
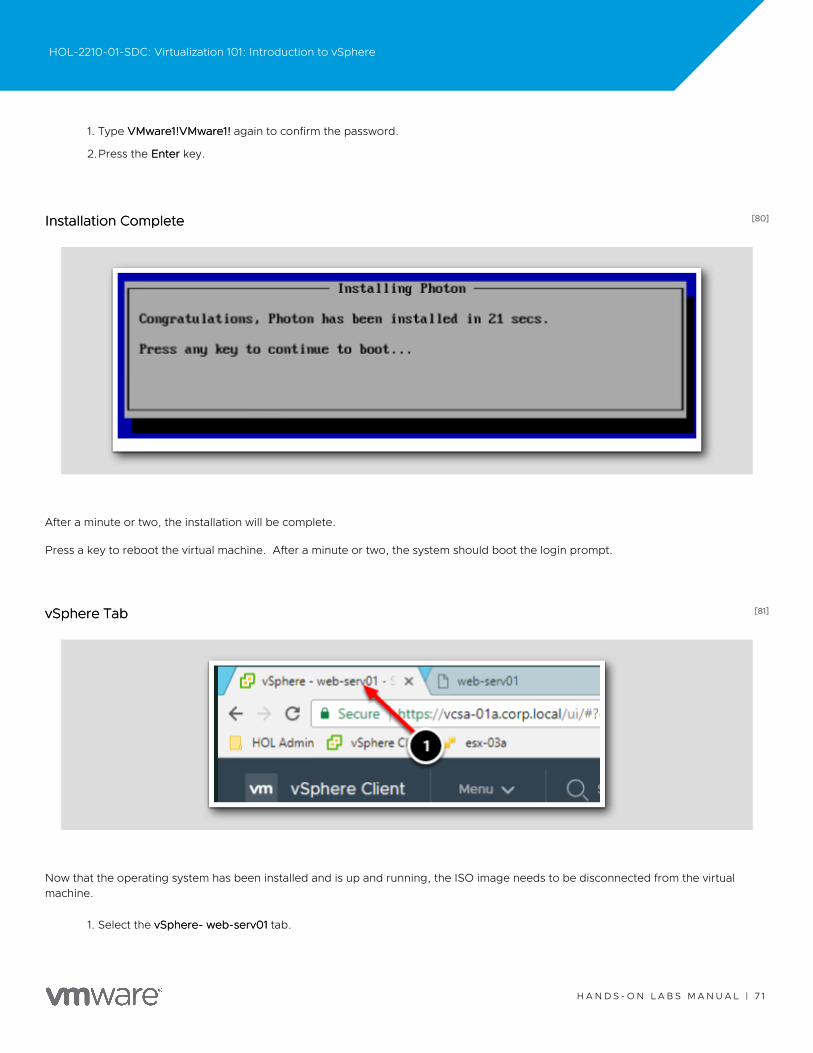
[80][80]Installation CompleteInstallation Complete
After a minute or two, the installation will be complete.
Press a key to reboot the virtual machine. After a minute or two, the system should boot the login prompt.
[81][81]vSphere TabvSphere Tab
Now that the operating system has been installed and is up and running, the ISO image needs to be disconnected from the virtualmachine.
1. Select the vSphere- web-serv01vSphere- web-serv01 tab.
HOL-2210-01-SDC: Virtualization 101: Introduction to vSphere
H A N D S - O N L A B S M A N U A L | 7 1

[82][82]Edit SettingsEdit Settings
Make sure web-serv01web-serv01 is still highlighted.
1. Right-click on web-serv01web-serv01.
2.Select Edit Settings...Edit Settings...
HOL-2210-01-SDC: Virtualization 101: Introduction to vSphere
H A N D S - O N L A B S M A N U A L | 7 2
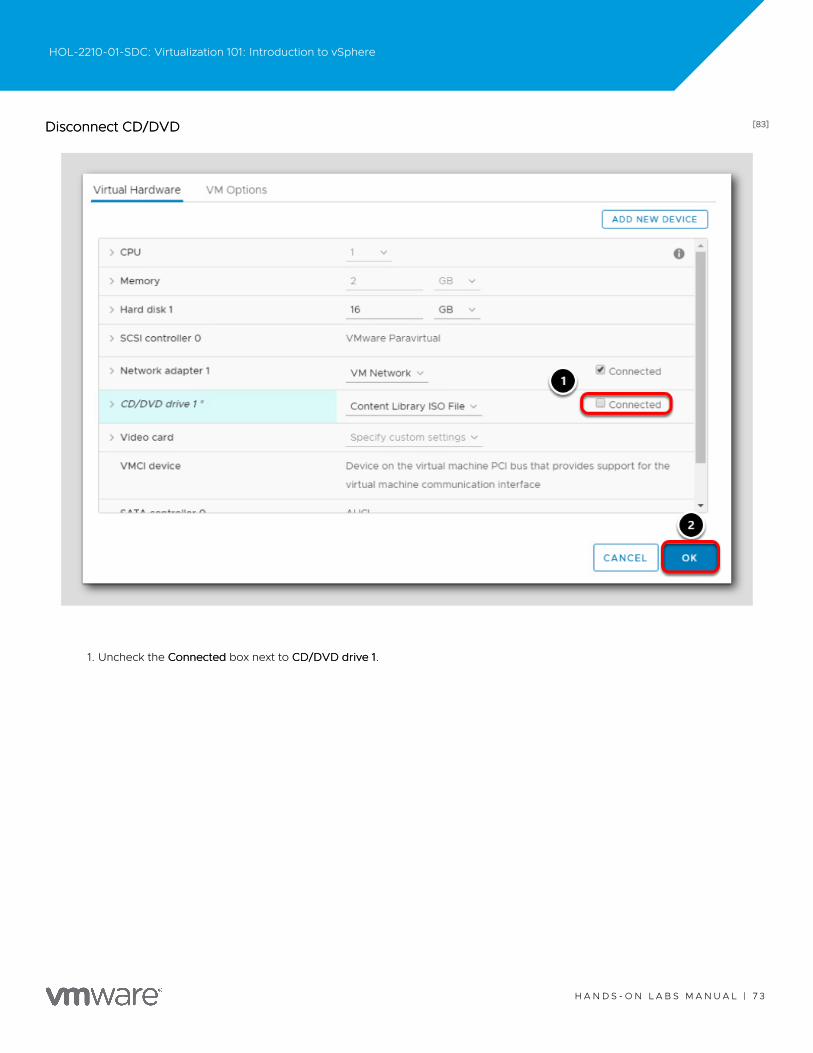
[83][83]Disconnect CD/DVDDisconnect CD/DVD
1. Uncheck the ConnectedConnected box next to CD/DVD drive 1CD/DVD drive 1.
HOL-2210-01-SDC: Virtualization 101: Introduction to vSphere
H A N D S - O N L A B S M A N U A L | 7 3
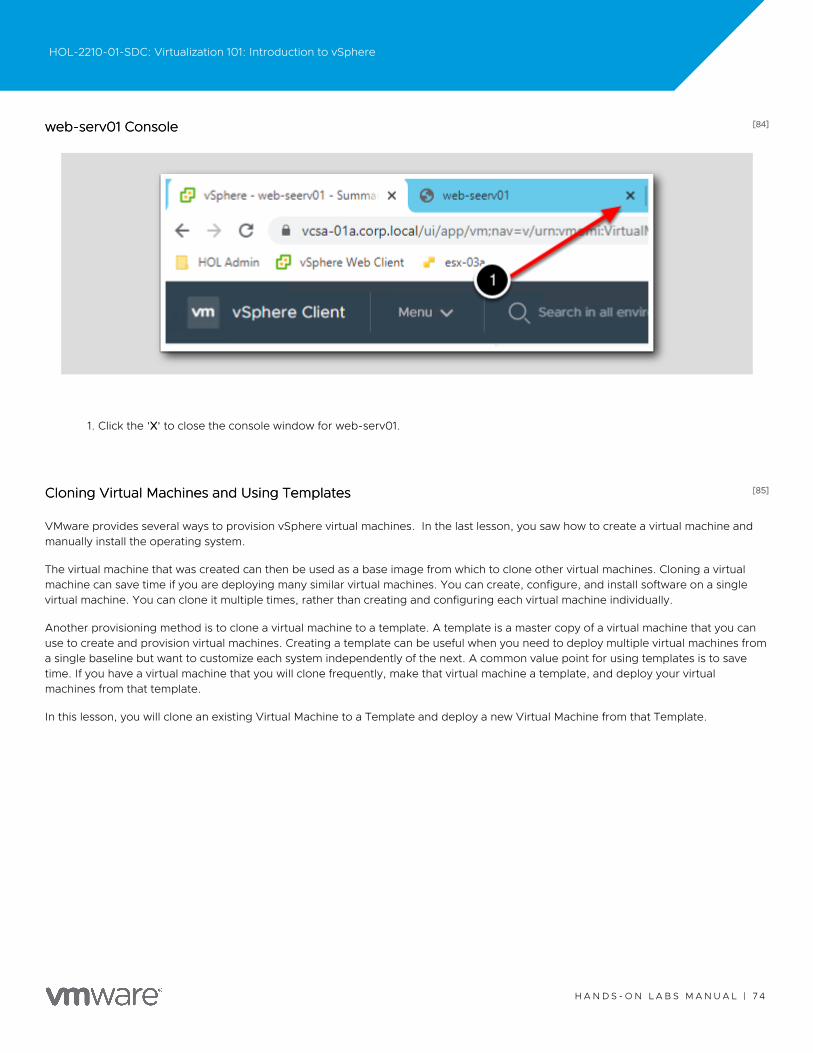
[84][84]web-serv01 Consoleweb-serv01 Console
1. Click the 'XX' to close the console window for web-serv01.
[85][85]Cloning Virtual Machines and Using TemplatesCloning Virtual Machines and Using Templates
VMware provides several ways to provision vSphere virtual machines. In the last lesson, you saw how to create a virtual machine andmanually install the operating system.
The virtual machine that was created can then be used as a base image from which to clone other virtual machines. Cloning a virtualmachine can save time if you are deploying many similar virtual machines. You can create, configure, and install software on a singlevirtual machine. You can clone it multiple times, rather than creating and configuring each virtual machine individually.
Another provisioning method is to clone a virtual machine to a template. A template is a master copy of a virtual machine that you canuse to create and provision virtual machines. Creating a template can be useful when you need to deploy multiple virtual machines froma single baseline but want to customize each system independently of the next. A common value point for using templates is to savetime. If you have a virtual machine that you will clone frequently, make that virtual machine a template, and deploy your virtualmachines from that template.
In this lesson, you will clone an existing Virtual Machine to a Template and deploy a new Virtual Machine from that Template.
HOL-2210-01-SDC: Virtualization 101: Introduction to vSphere
H A N D S - O N L A B S M A N U A L | 7 4
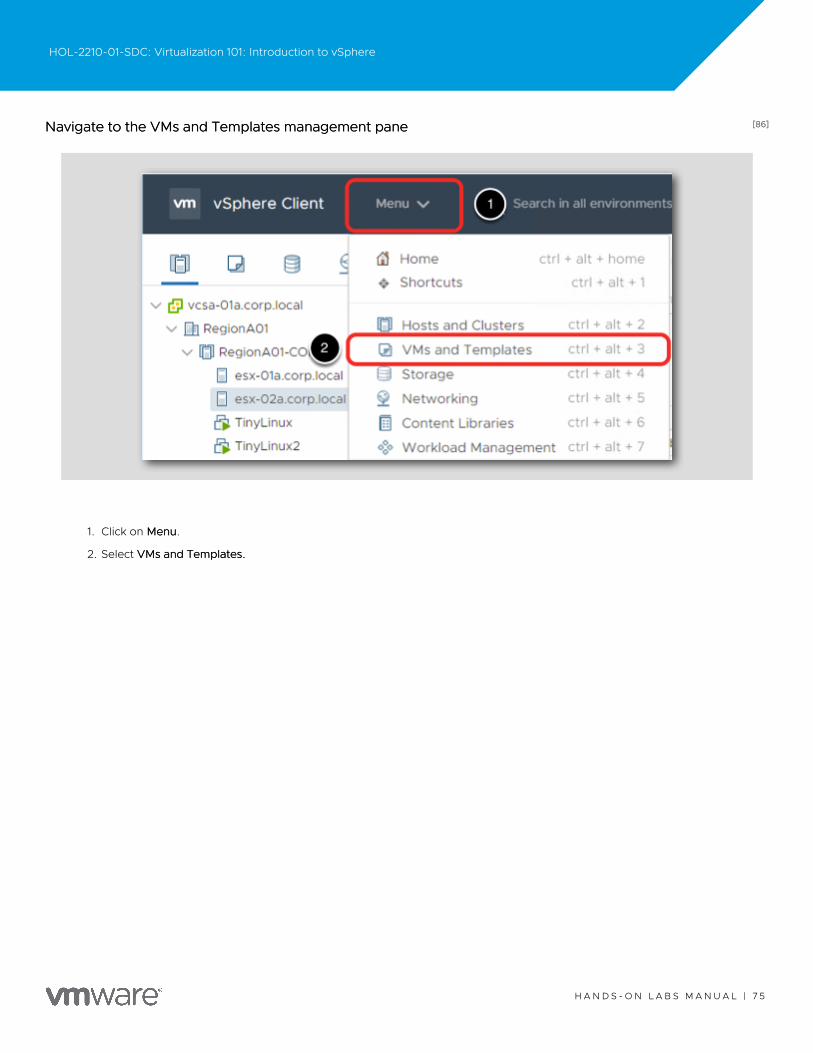
[86][86]Navigate to the VMs and Templates management paneNavigate to the VMs and Templates management pane
1. Click on MenuMenu.
2. Select VMs and Templates.VMs and Templates.
HOL-2210-01-SDC: Virtualization 101: Introduction to vSphere
H A N D S - O N L A B S M A N U A L | 7 5
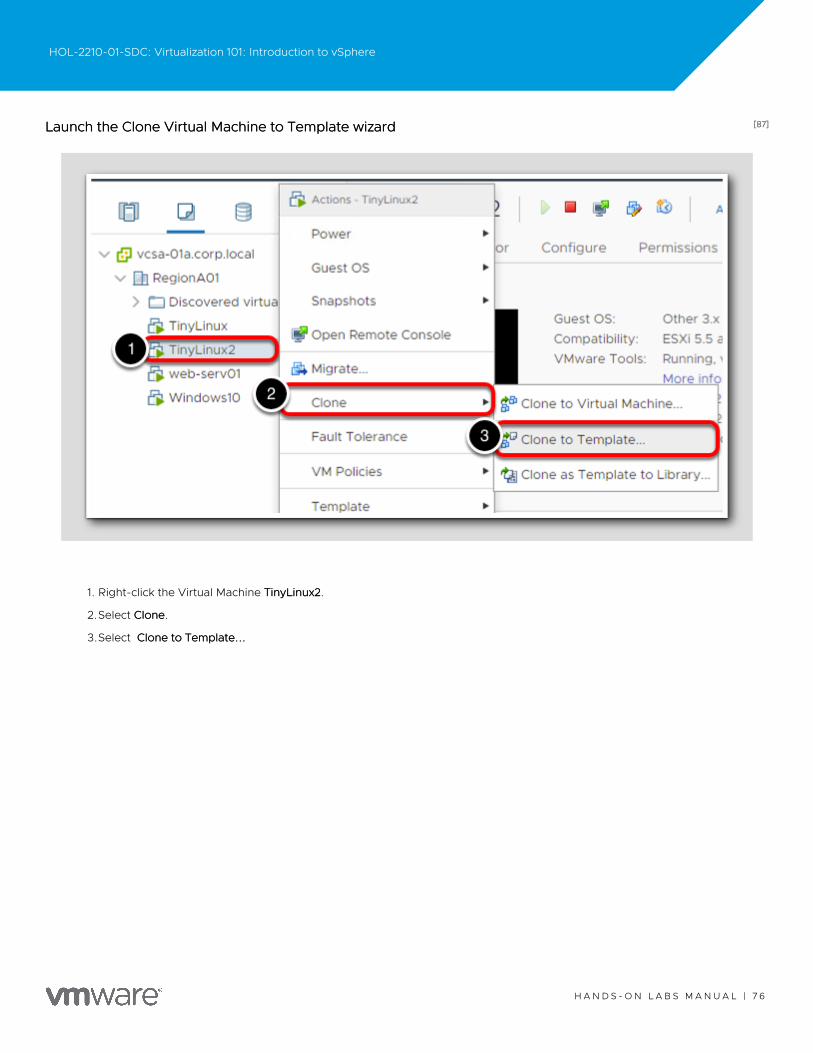
[87][87]Launch the Clone Virtual Machine to Template wizardLaunch the Clone Virtual Machine to Template wizard
1. Right-click the Virtual Machine TinyLinux2TinyLinux2.
2.Select CloneClone.
3.Select Clone to Template...Clone to Template...
HOL-2210-01-SDC: Virtualization 101: Introduction to vSphere
H A N D S - O N L A B S M A N U A L | 7 6
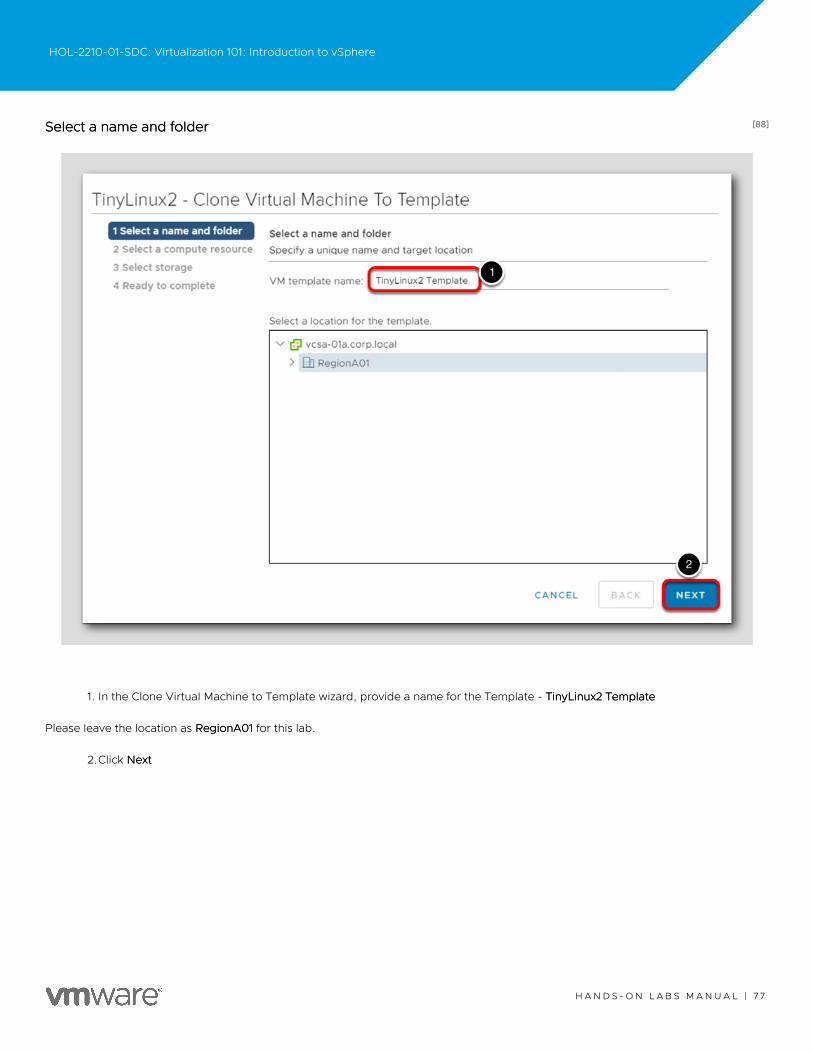
[88][88]Select a name and folderSelect a name and folder
1. In the Clone Virtual Machine to Template wizard, provide a name for the Template - TinyLinux2 TemplateTinyLinux2 Template
Please leave the location as RegionA01RegionA01 for this lab.
2.Click NextNext
HOL-2210-01-SDC: Virtualization 101: Introduction to vSphere
H A N D S - O N L A B S M A N U A L | 7 7
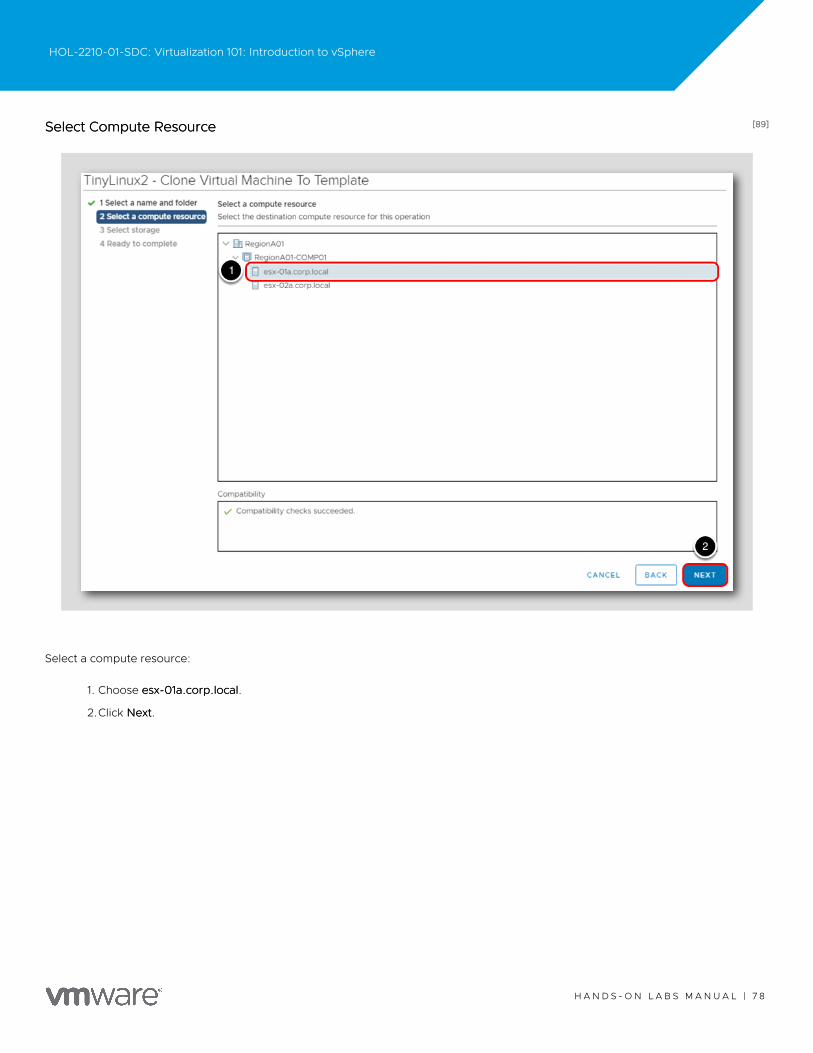
[89][89]Select Compute ResourceSelect Compute Resource
Select a compute resource:
1. Choose esx-01a.corp.localesx-01a.corp.local.
2.Click NextNext.
HOL-2210-01-SDC: Virtualization 101: Introduction to vSphere
H A N D S - O N L A B S M A N U A L | 7 8
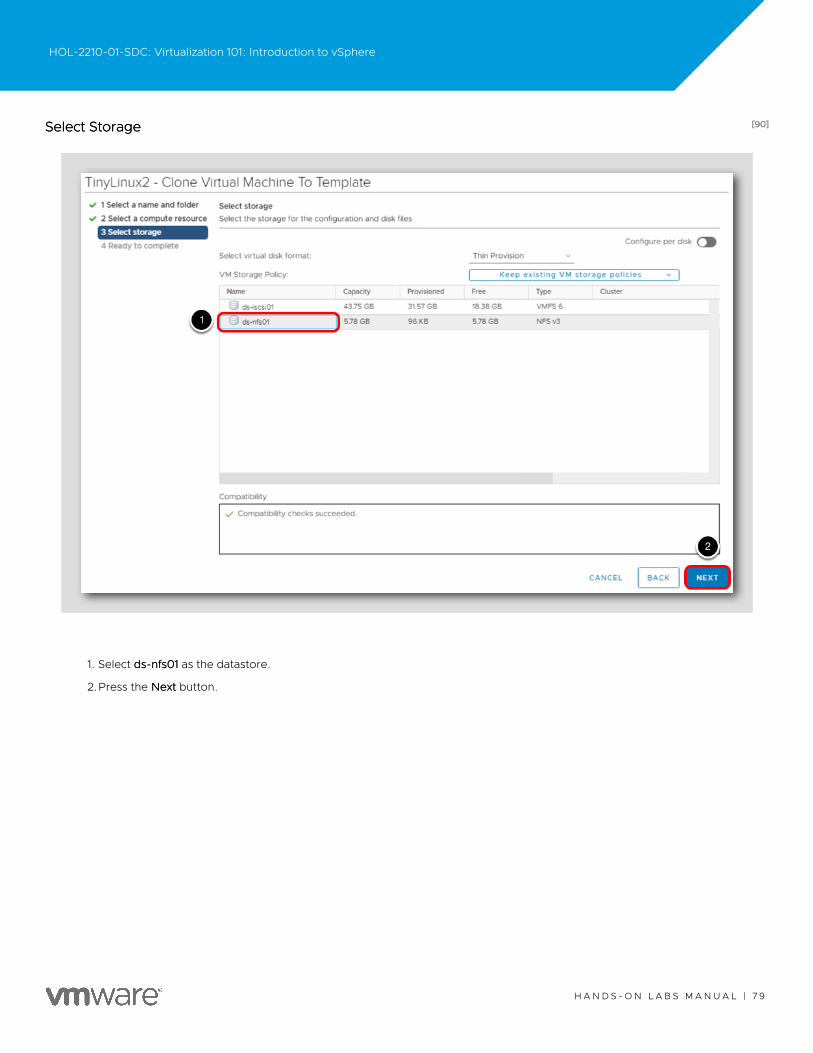
[90][90]Select StorageSelect Storage
1. Select ds-nfs01ds-nfs01 as the datastore.
2.Press the NextNext button.
HOL-2210-01-SDC: Virtualization 101: Introduction to vSphere
H A N D S - O N L A B S M A N U A L | 7 9
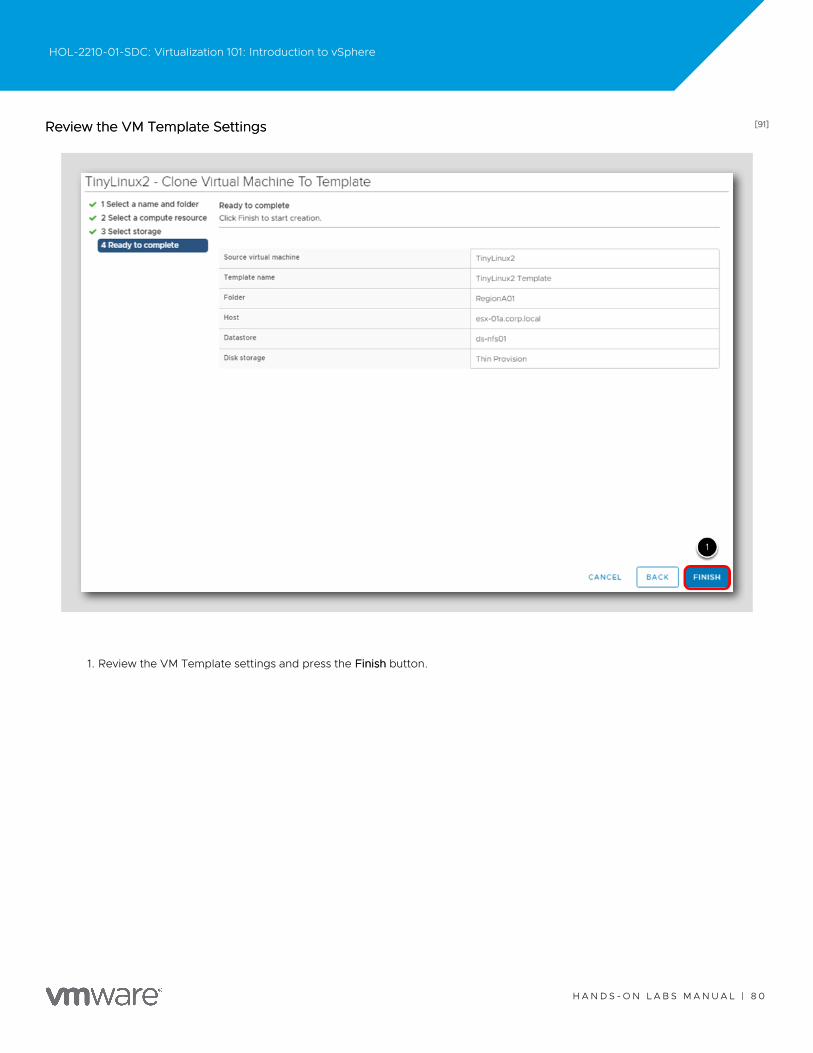
[91][91]Review the VM Template SettingsReview the VM Template Settings
1. Review the VM Template settings and press the FinishFinish button.
HOL-2210-01-SDC: Virtualization 101: Introduction to vSphere
H A N D S - O N L A B S M A N U A L | 8 0
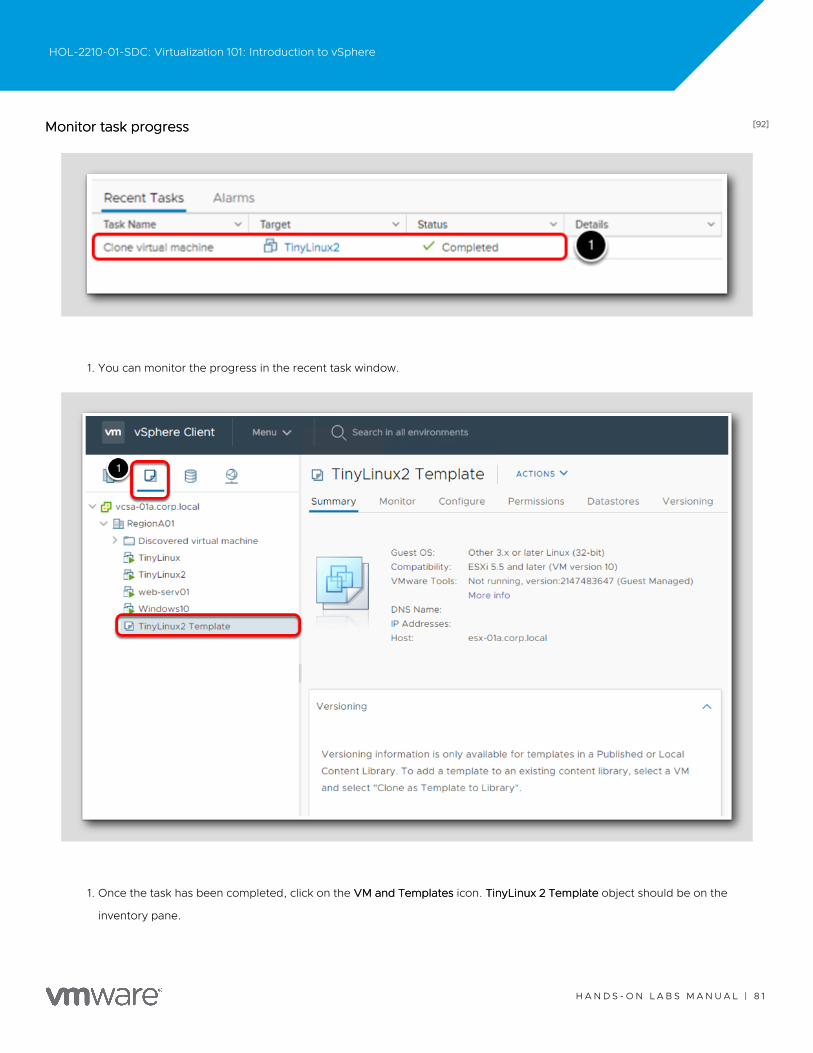
[92][92]Monitor task progressMonitor task progress
1. You can monitor the progress in the recent task window.
1. Once the task has been completed, click on the VM and TemplatesVM and Templates icon. TinyLinux 2 TemplateTinyLinux 2 Template object should be on the
inventory pane.
HOL-2210-01-SDC: Virtualization 101: Introduction to vSphere
H A N D S - O N L A B S M A N U A L | 8 1
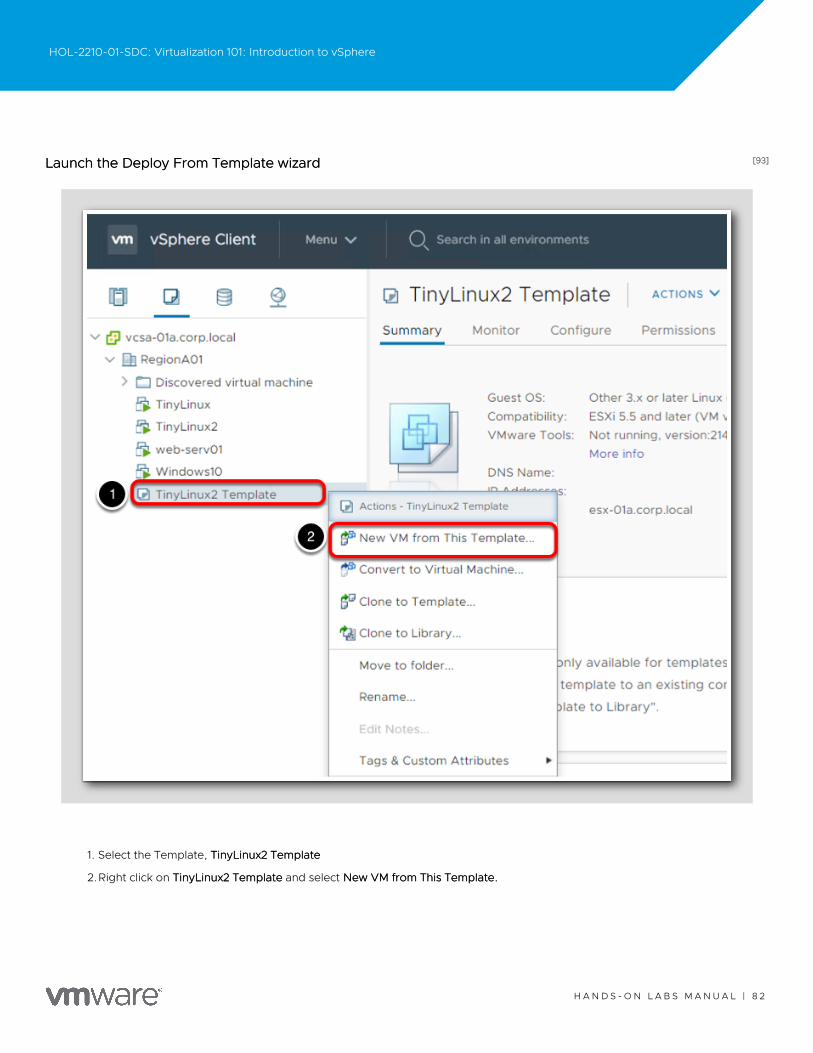
[93][93]Launch the Deploy From Template wizardLaunch the Deploy From Template wizard
1. Select the Template, TinyLinux2 TemplateTinyLinux2 Template
2.Right click on TinyLinux2 TemplateTinyLinux2 Template and select New VM from This Template.New VM from This Template.
HOL-2210-01-SDC: Virtualization 101: Introduction to vSphere
H A N D S - O N L A B S M A N U A L | 8 2
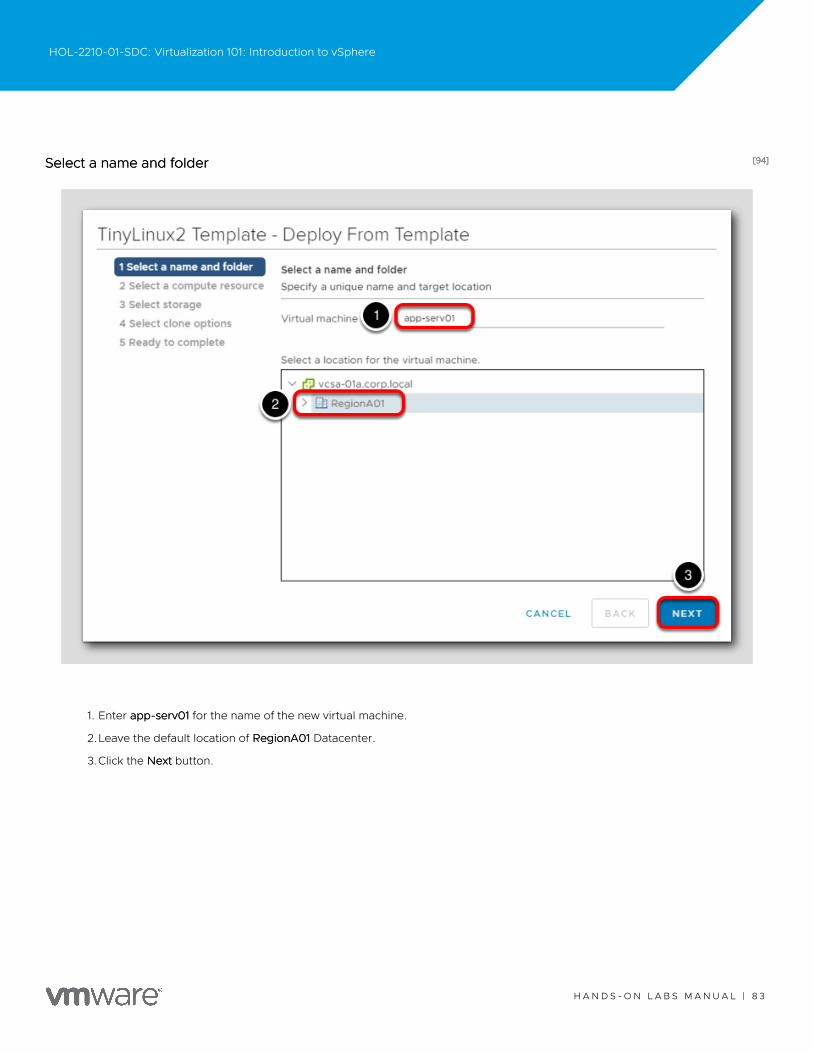
[94][94]Select a name and folderSelect a name and folder
1. Enter app-serv01app-serv01 for the name of the new virtual machine.
2.Leave the default location of RegionA01RegionA01 Datacenter.
3.Click the NextNext button.
HOL-2210-01-SDC: Virtualization 101: Introduction to vSphere
H A N D S - O N L A B S M A N U A L | 8 3
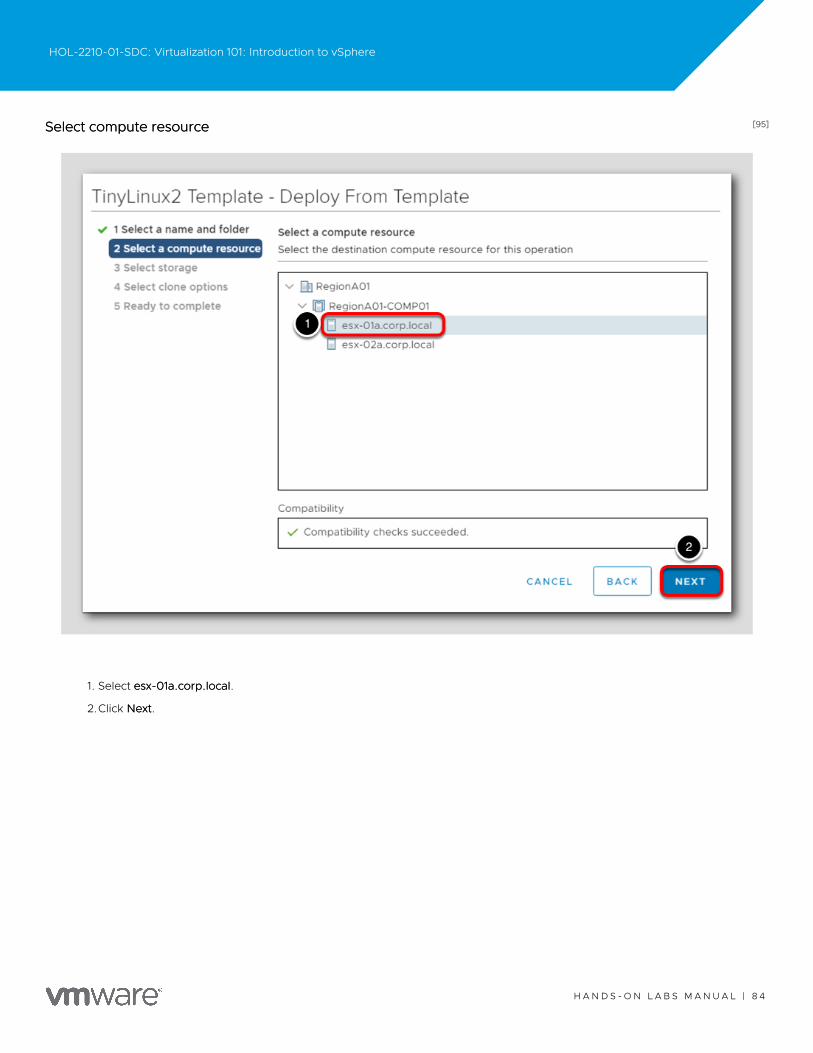
[95][95]Select compute resourceSelect compute resource
1. Select esx-01a.corp.localesx-01a.corp.local.
2.Click NextNext.
HOL-2210-01-SDC: Virtualization 101: Introduction to vSphere
H A N D S - O N L A B S M A N U A L | 8 4

[96][96]Select storageSelect storage
1. Leave the default datastore selected, ds-iscsi01ds-iscsi01.
2.Click NextNext.
HOL-2210-01-SDC: Virtualization 101: Introduction to vSphere
H A N D S - O N L A B S M A N U A L | 8 5
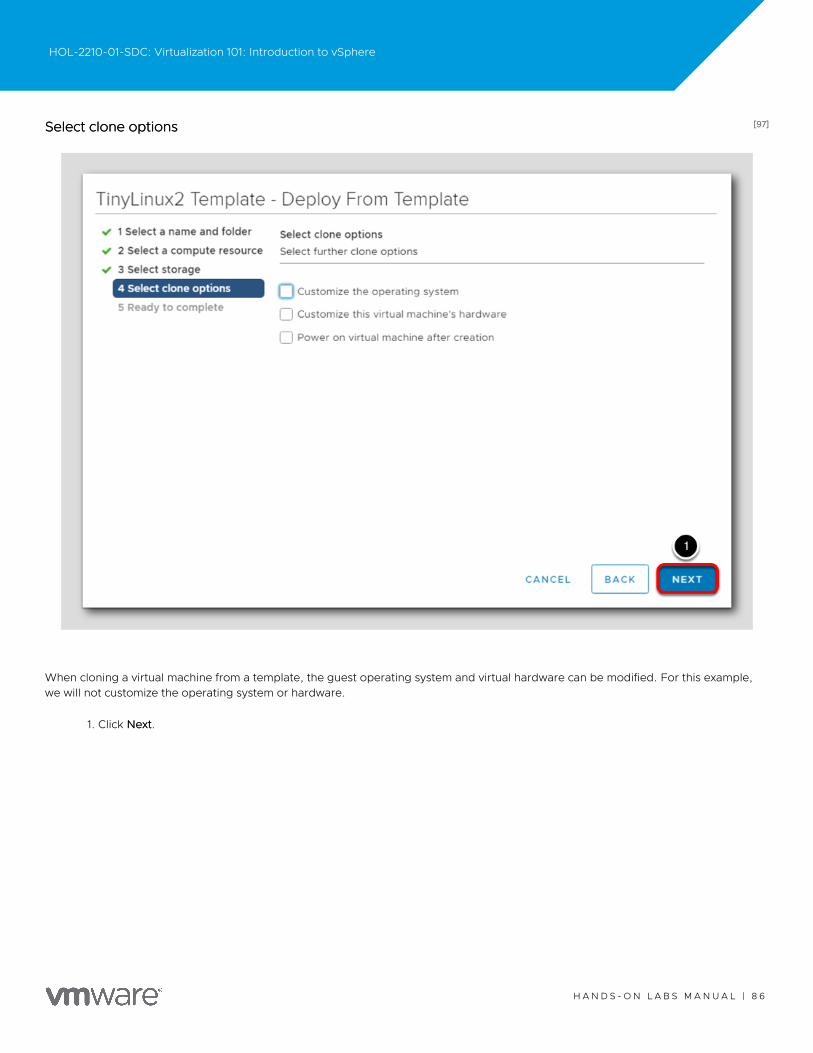
[97][97]Select clone optionsSelect clone options
When cloning a virtual machine from a template, the guest operating system and virtual hardware can be modified. For this example,we will not customize the operating system or hardware.
1. Click NextNext.
HOL-2210-01-SDC: Virtualization 101: Introduction to vSphere
H A N D S - O N L A B S M A N U A L | 8 6
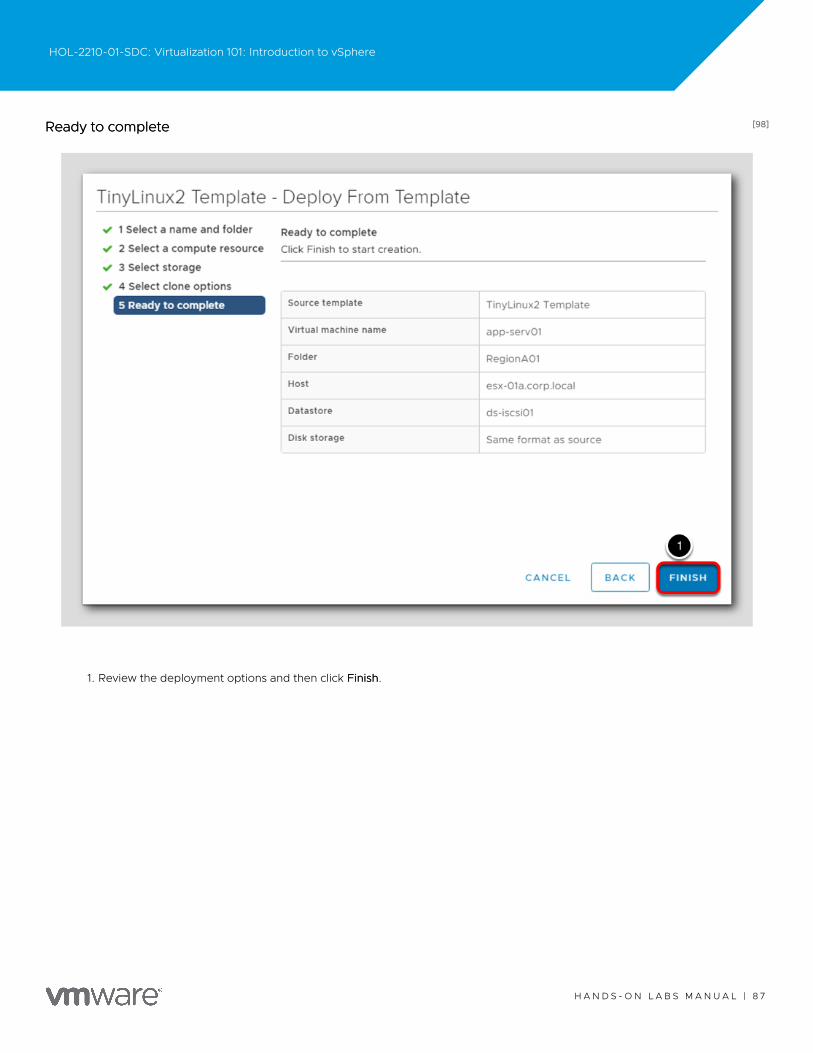
[98][98]Ready to completeReady to complete
1. Review the deployment options and then click FinishFinish.
HOL-2210-01-SDC: Virtualization 101: Introduction to vSphere
H A N D S - O N L A B S M A N U A L | 8 7
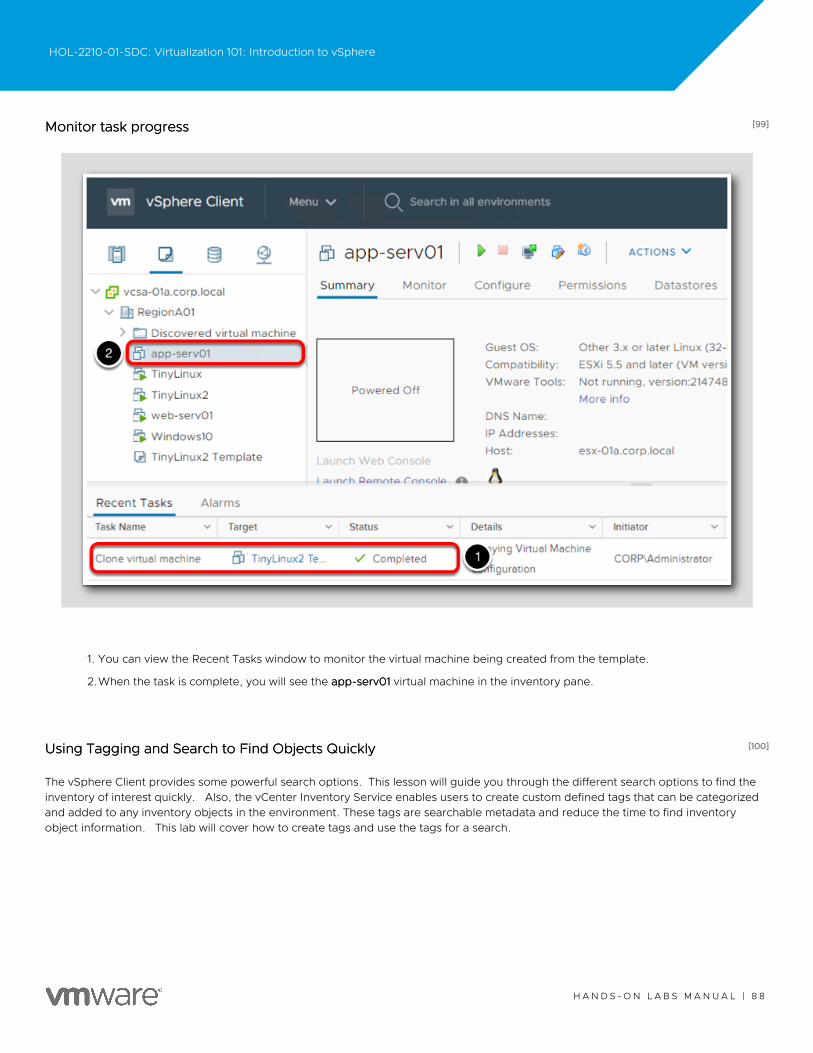
[99][99]Monitor task progressMonitor task progress
1. You can view the Recent Tasks window to monitor the virtual machine being created from the template.
2.When the task is complete, you will see the app-serv01app-serv01 virtual machine in the inventory pane.
[100][100]Using Tagging and Search to Find Objects QuicklyUsing Tagging and Search to Find Objects Quickly
The vSphere Client provides some powerful search options. This lesson will guide you through the different search options to find theinventory of interest quickly. Also, the vCenter Inventory Service enables users to create custom defined tags that can be categorizedand added to any inventory objects in the environment. These tags are searchable metadata and reduce the time to find inventoryobject information. This lab will cover how to create tags and use the tags for a search.
HOL-2210-01-SDC: Virtualization 101: Introduction to vSphere
H A N D S - O N L A B S M A N U A L | 8 8
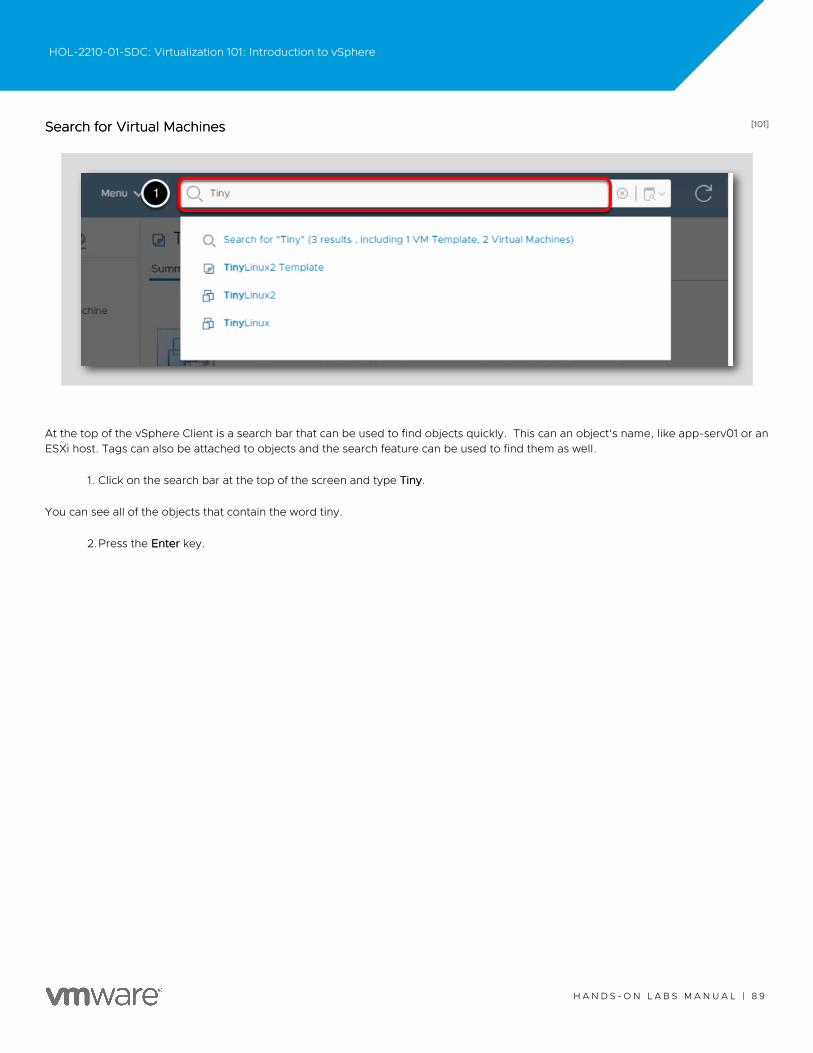
[101][101]Search for Virtual MachinesSearch for Virtual Machines
At the top of the vSphere Client is a search bar that can be used to find objects quickly. This can an object's name, like app-serv01 or anESXi host. Tags can also be attached to objects and the search feature can be used to find them as well.
1. Click on the search bar at the top of the screen and type TinyTiny.
You can see all of the objects that contain the word tiny.
2.Press the EnterEnter key.
HOL-2210-01-SDC: Virtualization 101: Introduction to vSphere
H A N D S - O N L A B S M A N U A L | 8 9
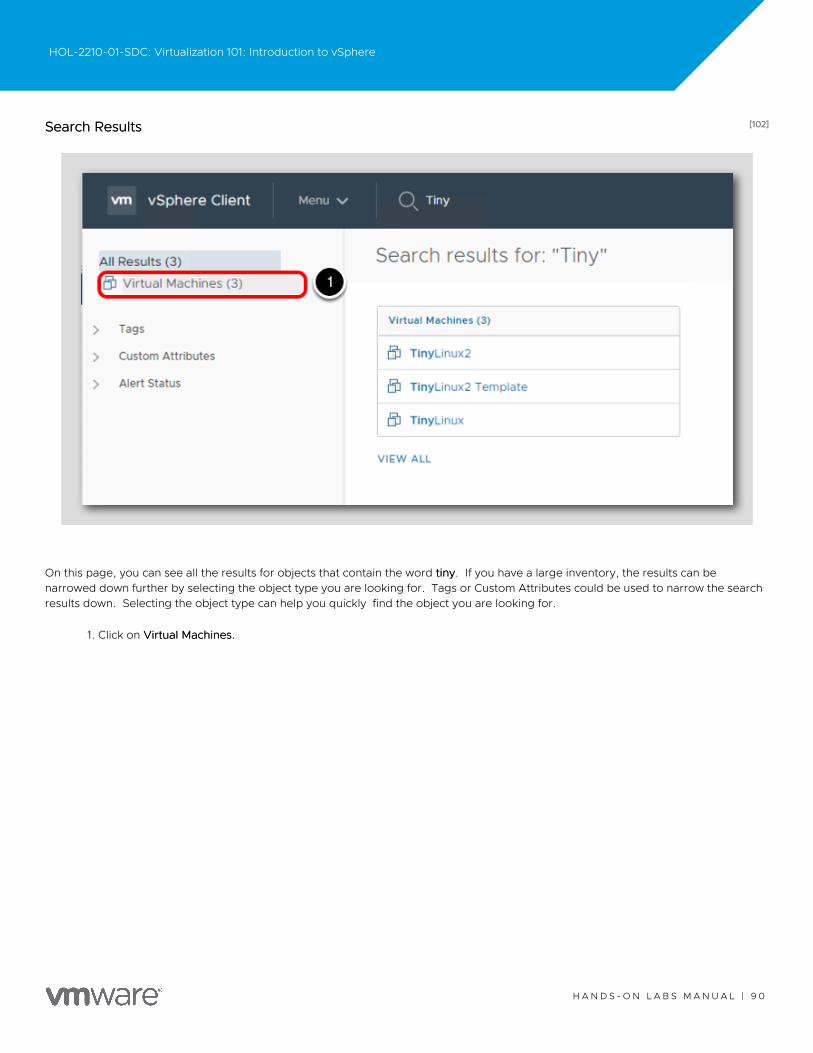
[102][102]Search ResultsSearch Results
On this page, you can see all the results for objects that contain the word tinytiny. If you have a large inventory, the results can benarrowed down further by selecting the object type you are looking for. Tags or Custom Attributes could be used to narrow the searchresults down. Selecting the object type can help you quickly find the object you are looking for.
1. Click on Virtual Machines.Virtual Machines.
HOL-2210-01-SDC: Virtualization 101: Introduction to vSphere
H A N D S - O N L A B S M A N U A L | 9 0
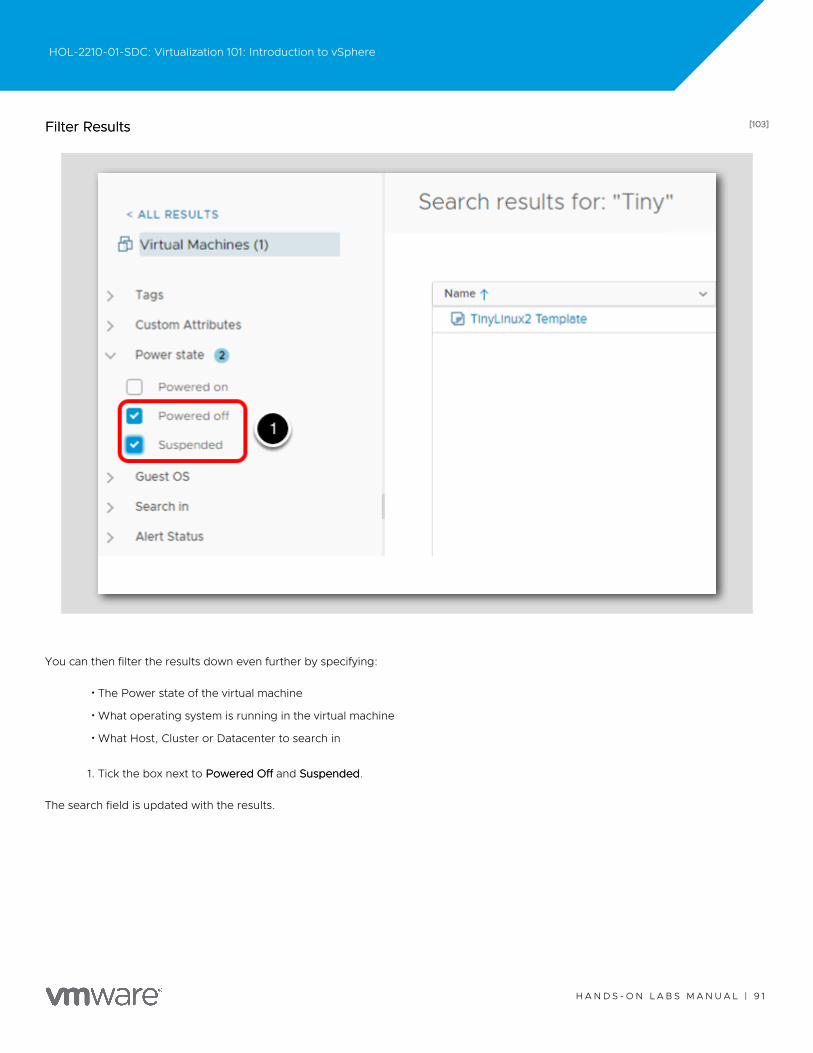
[103][103]Filter ResultsFilter Results
You can then filter the results down even further by specifying:
•The Power state of the virtual machine
•What operating system is running in the virtual machine
•What Host, Cluster or Datacenter to search in
1. Tick the box next to Powered OffPowered Off and SuspendedSuspended.
The search field is updated with the results.
HOL-2210-01-SDC: Virtualization 101: Introduction to vSphere
H A N D S - O N L A B S M A N U A L | 9 1
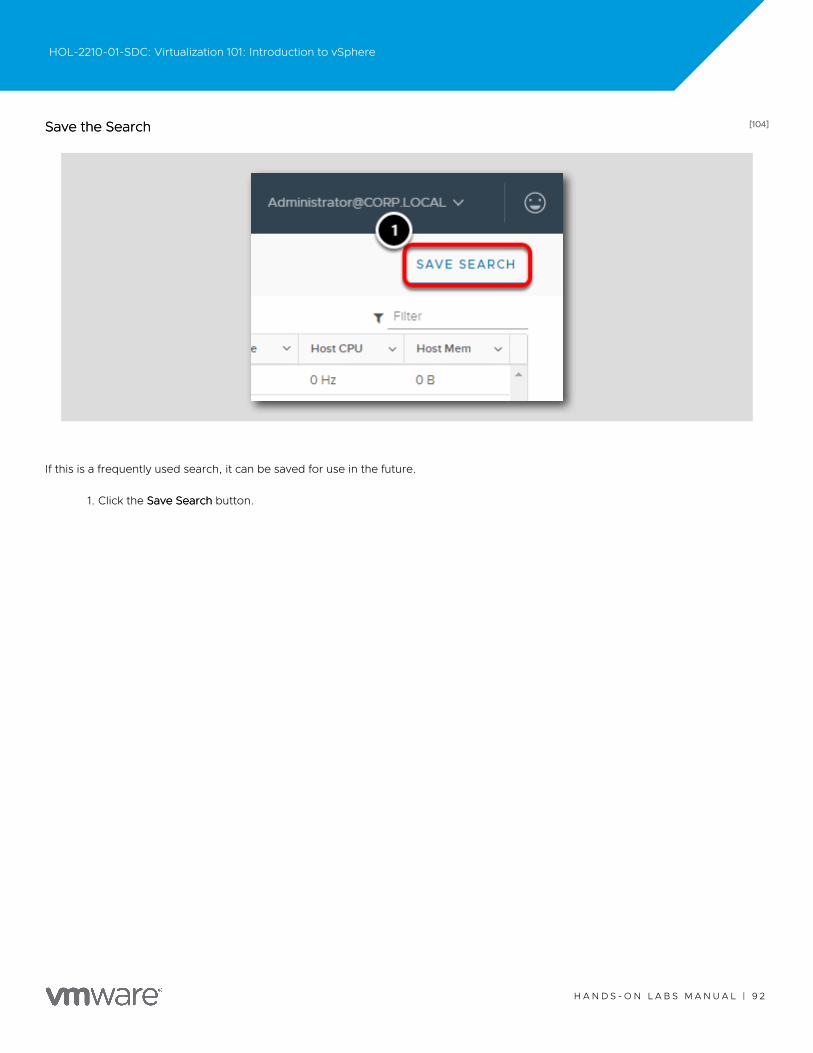
[104][104]Save the SearchSave the Search
If this is a frequently used search, it can be saved for use in the future.
1. Click the Save SearchSave Search button.
HOL-2210-01-SDC: Virtualization 101: Introduction to vSphere
H A N D S - O N L A B S M A N U A L | 9 2
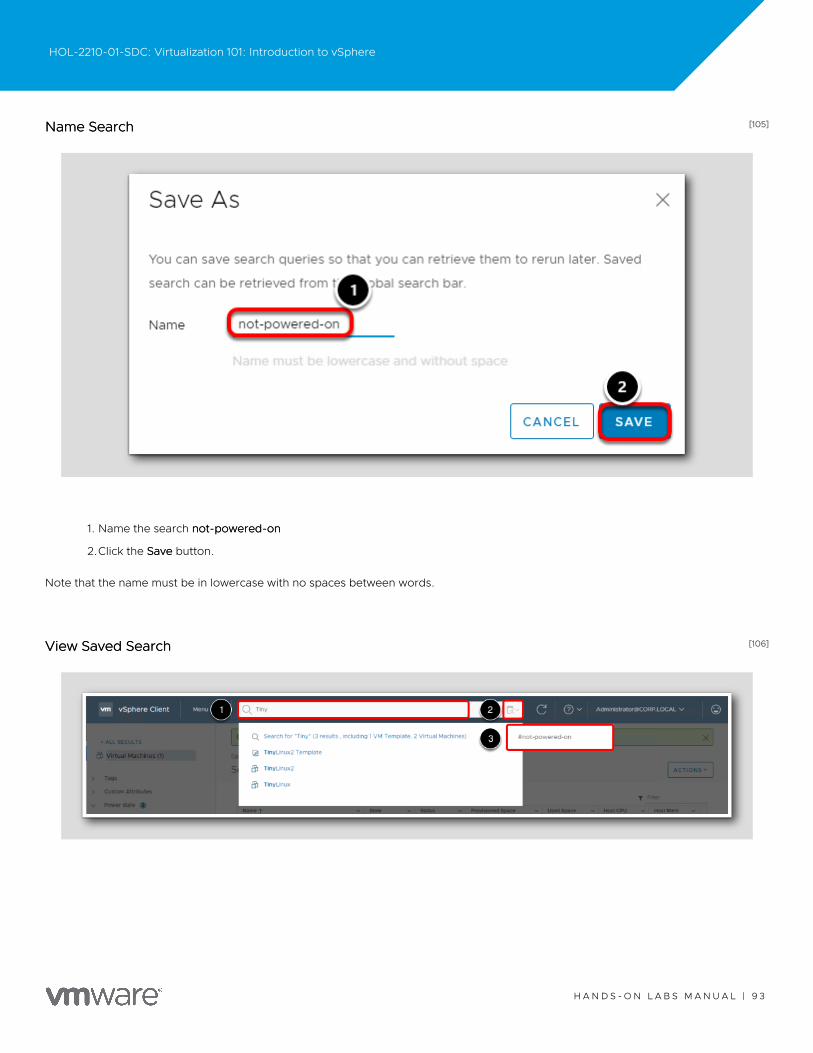
[105][105]Name SearchName Search
1. Name the search not-powered-onnot-powered-on
2.Click the SaveSave button.
Note that the name must be in lowercase with no spaces between words.
[106][106]View Saved SearchView Saved Search
HOL-2210-01-SDC: Virtualization 101: Introduction to vSphere
H A N D S - O N L A B S M A N U A L | 9 3
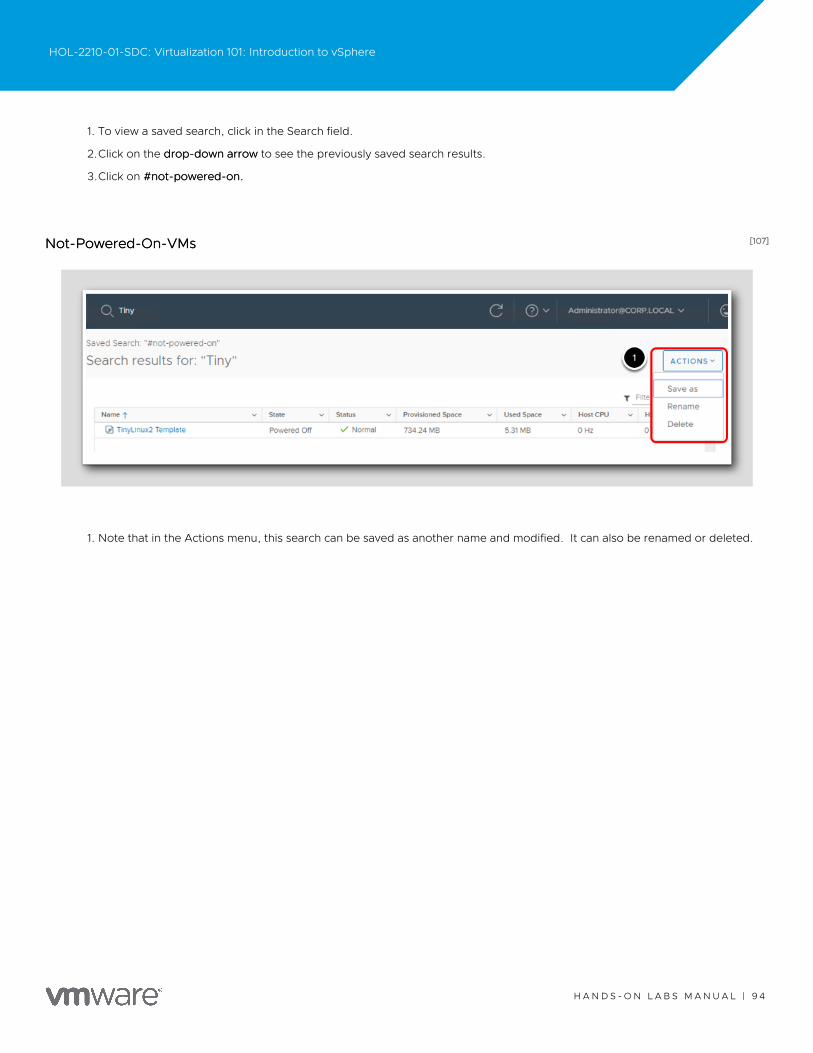
1. To view a saved search, click in the Search field.
2.Click on the drop-down arrowdrop-down arrow to see the previously saved search results.
3.Click on #not-powered-on.#not-powered-on.
[107][107]Not-Powered-On-VMsNot-Powered-On-VMs
1. Note that in the Actions menu, this search can be saved as another name and modified. It can also be renamed or deleted.
HOL-2210-01-SDC: Virtualization 101: Introduction to vSphere
H A N D S - O N L A B S M A N U A L | 9 4
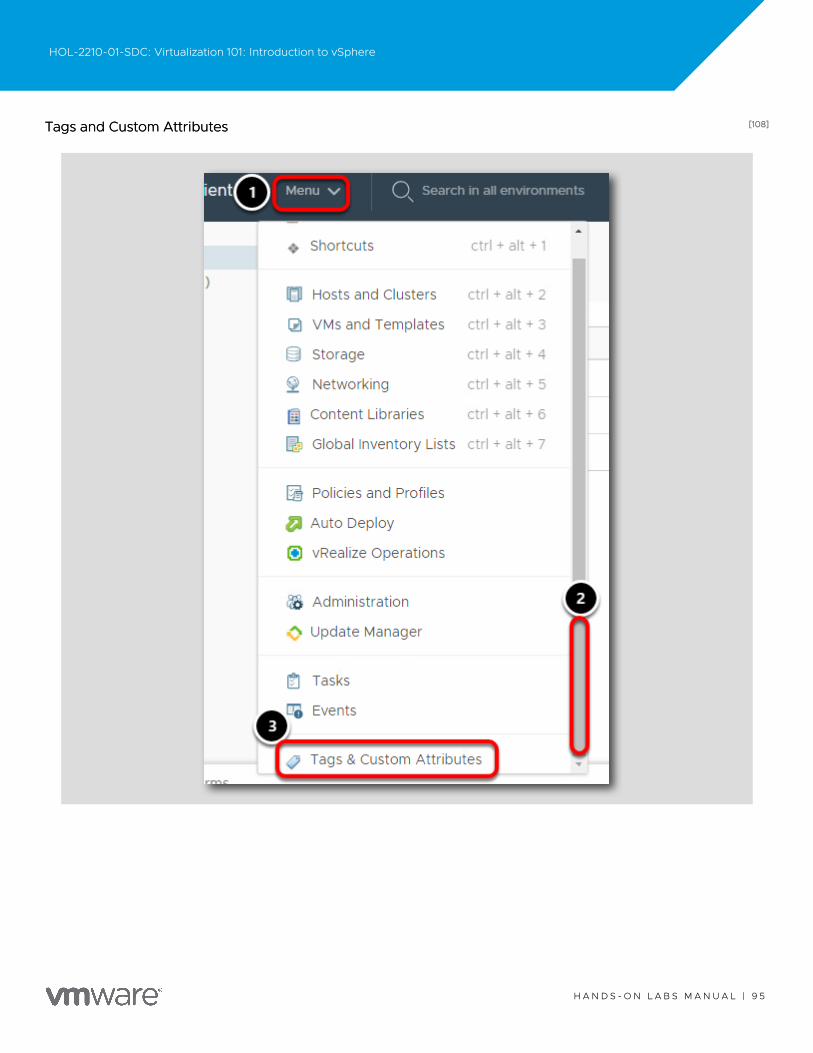
[108][108]Tags and Custom AttributesTags and Custom Attributes
HOL-2210-01-SDC: Virtualization 101: Introduction to vSphere
H A N D S - O N L A B S M A N U A L | 9 5
You use tags to add metadata to inventory objects. You can record information about your inventory objects in tags and use the tags insearches.
1. Click MenuMenu
2.Use the scroll bar to scroll to the bottom of the list.
3.Select "Tags and Custom AttributesTags and Custom Attributes"
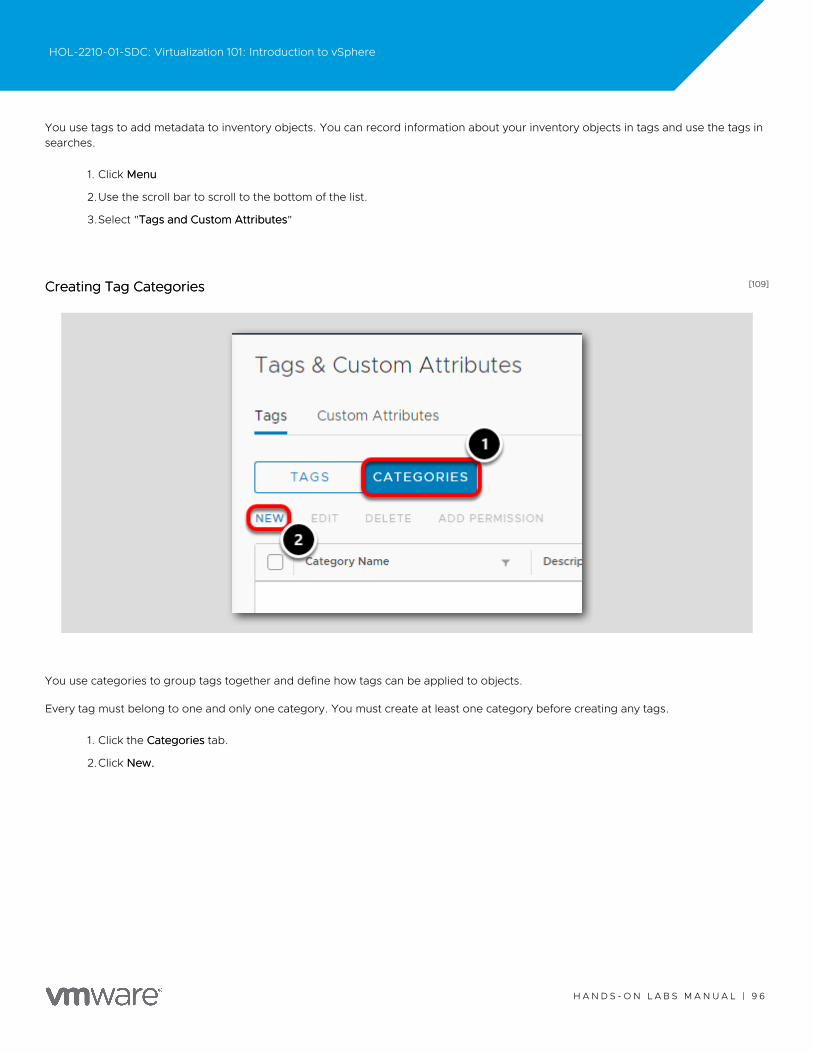
[109][109]Creating Tag CategoriesCreating Tag Categories
You use categories to group tags together and define how tags can be applied to objects.
Every tag must belong to one and only one category. You must create at least one category before creating any tags.
1. Click the CategoriesCategories tab.
2.Click New.New.
HOL-2210-01-SDC: Virtualization 101: Introduction to vSphere
H A N D S - O N L A B S M A N U A L | 9 6

[110][110]New CategoryNew Category
Associable Object Types: We will use the default which states that the new tag in this category can be assigned to all objects. Theother option is you can specify a specific object, such as virtual machines or datastores.
1. Enter "web tierweb tier" for the Category Name.
2.For a description, type All objects in the web tier.All objects in the web tier.
3.Keep the default "One tag"One tag" tags per object
4.Click "CreateCreate"
HOL-2210-01-SDC: Virtualization 101: Introduction to vSphere
H A N D S - O N L A B S M A N U A L | 9 7
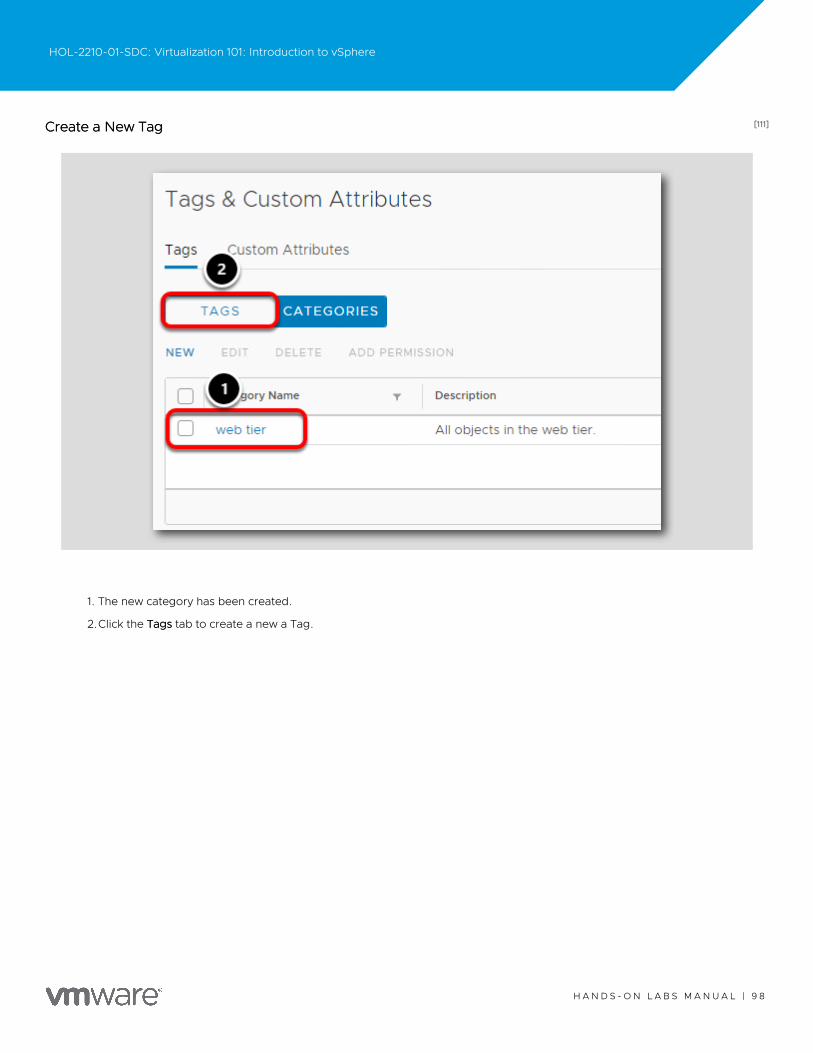
[111][111]Create a New TagCreate a New Tag
1. The new category has been created.
2.Click the TagsTags tab to create a new a Tag.
HOL-2210-01-SDC: Virtualization 101: Introduction to vSphere
H A N D S - O N L A B S M A N U A L | 9 8
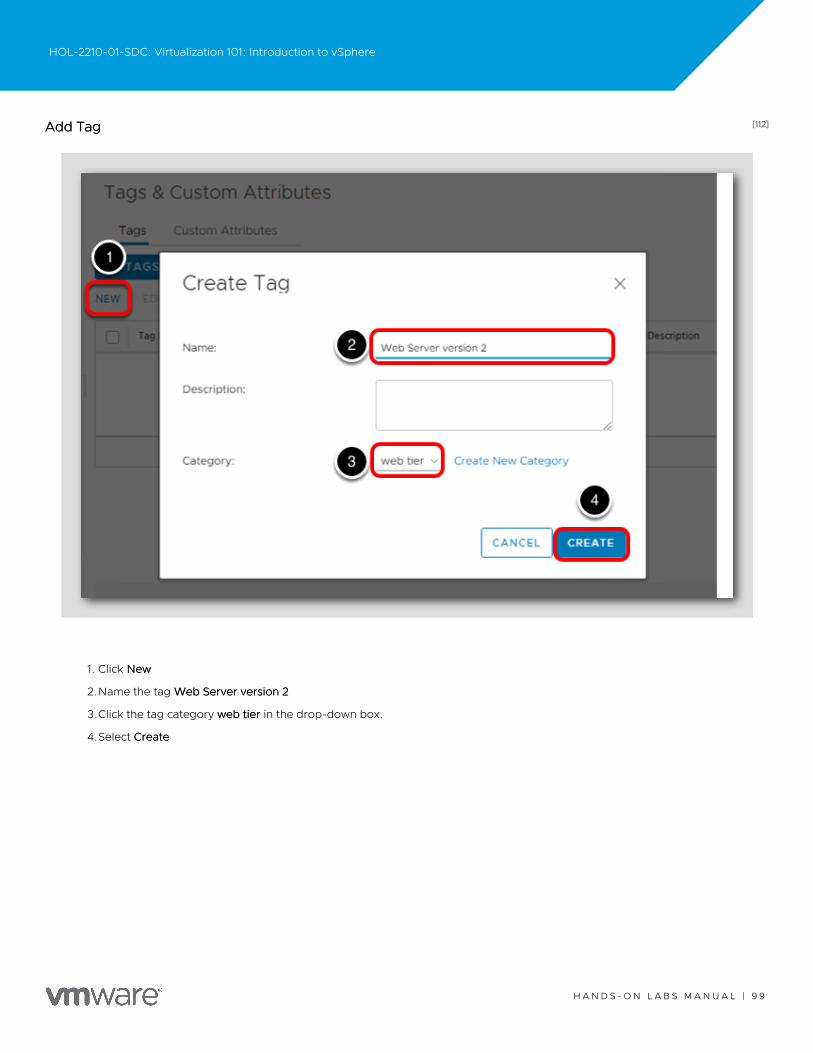
[112][112]Add TagAdd Tag
1. Click NewNew
2.Name the tag Web Server version 2Web Server version 2
3.Click the tag category web tierweb tier in the drop-down box.
4.Select CreateCreate
HOL-2210-01-SDC: Virtualization 101: Introduction to vSphere
H A N D S - O N L A B S M A N U A L | 9 9
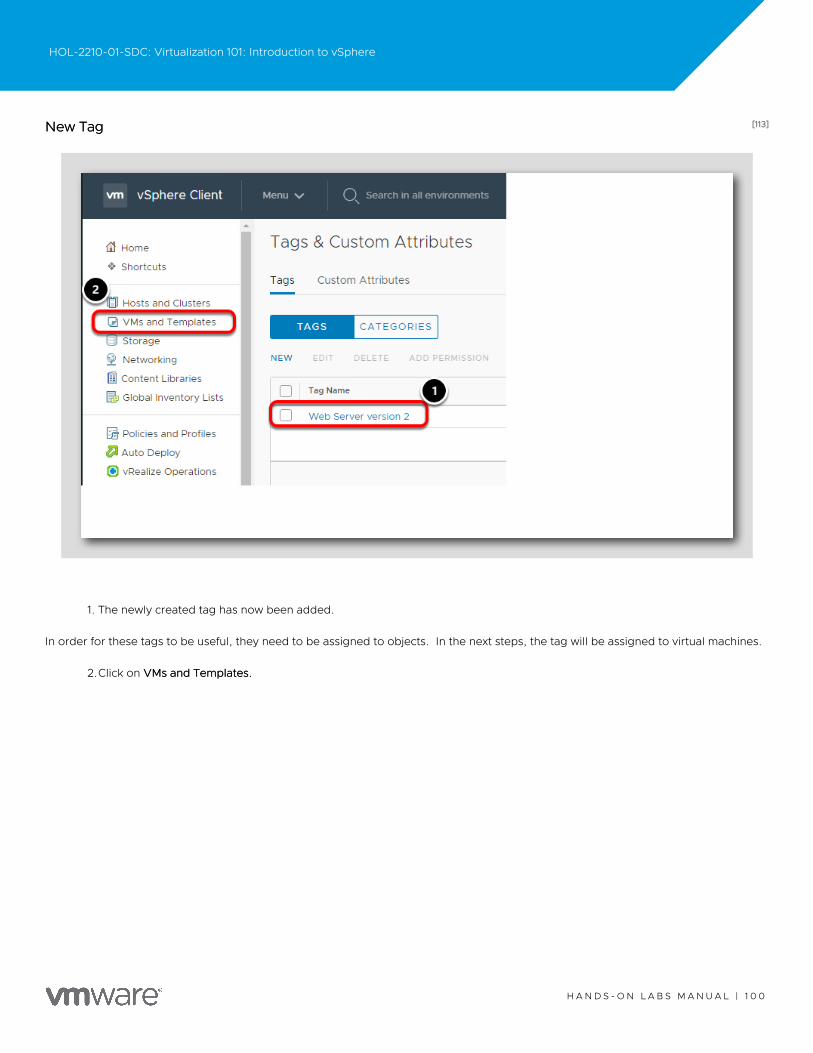
[113][113]New TagNew Tag
1. The newly created tag has now been added.
In order for these tags to be useful, they need to be assigned to objects. In the next steps, the tag will be assigned to virtual machines.
2.Click on VMs and Templates.VMs and Templates.
HOL-2210-01-SDC: Virtualization 101: Introduction to vSphere
H A N D S - O N L A B S M A N U A L | 1 0 0
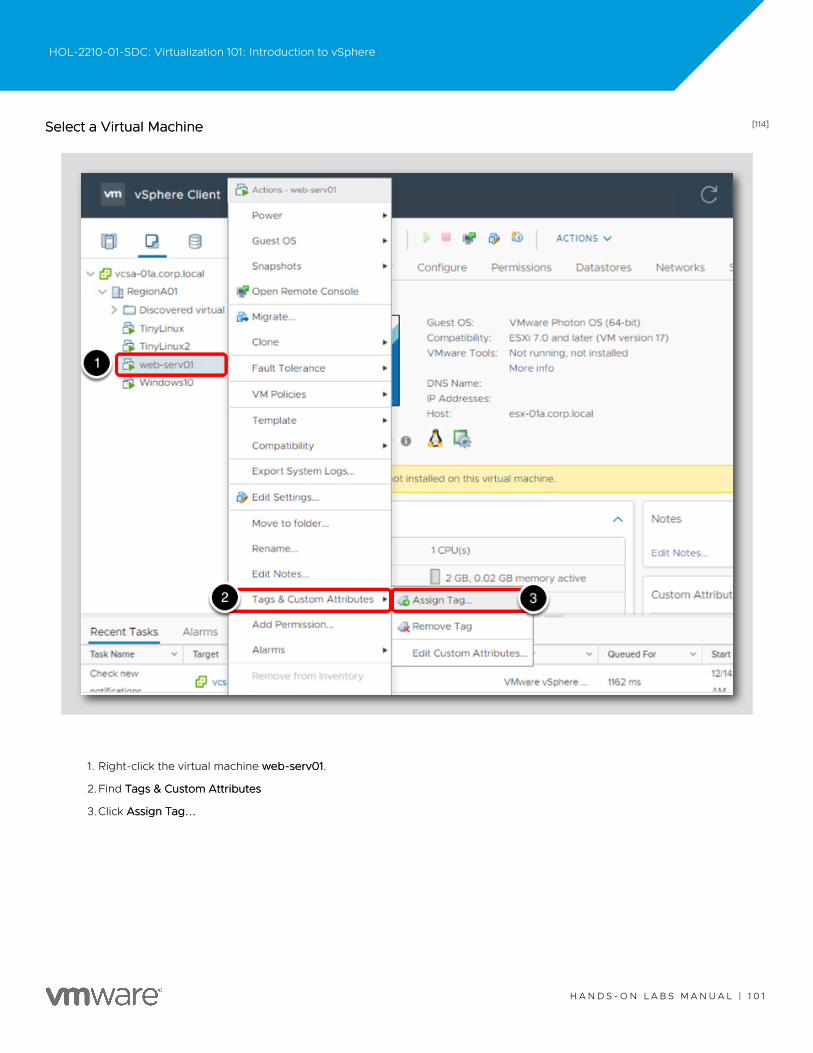
[114][114]Select a Virtual MachineSelect a Virtual Machine
1. Right-click the virtual machine web-serv01web-serv01.
2.Find Tags & Custom AttributesTags & Custom Attributes
3.Click Assign Tag...Assign Tag...
HOL-2210-01-SDC: Virtualization 101: Introduction to vSphere
H A N D S - O N L A B S M A N U A L | 1 0 1

[115][115]Assign TagAssign Tag
1. Click the Web Server version 2Web Server version 2 tag.
2.Click Assign.Assign.
[116][116]Search Using TagsSearch Using Tags
HOL-2210-01-SDC: Virtualization 101: Introduction to vSphere
H A N D S - O N L A B S M A N U A L | 1 0 2
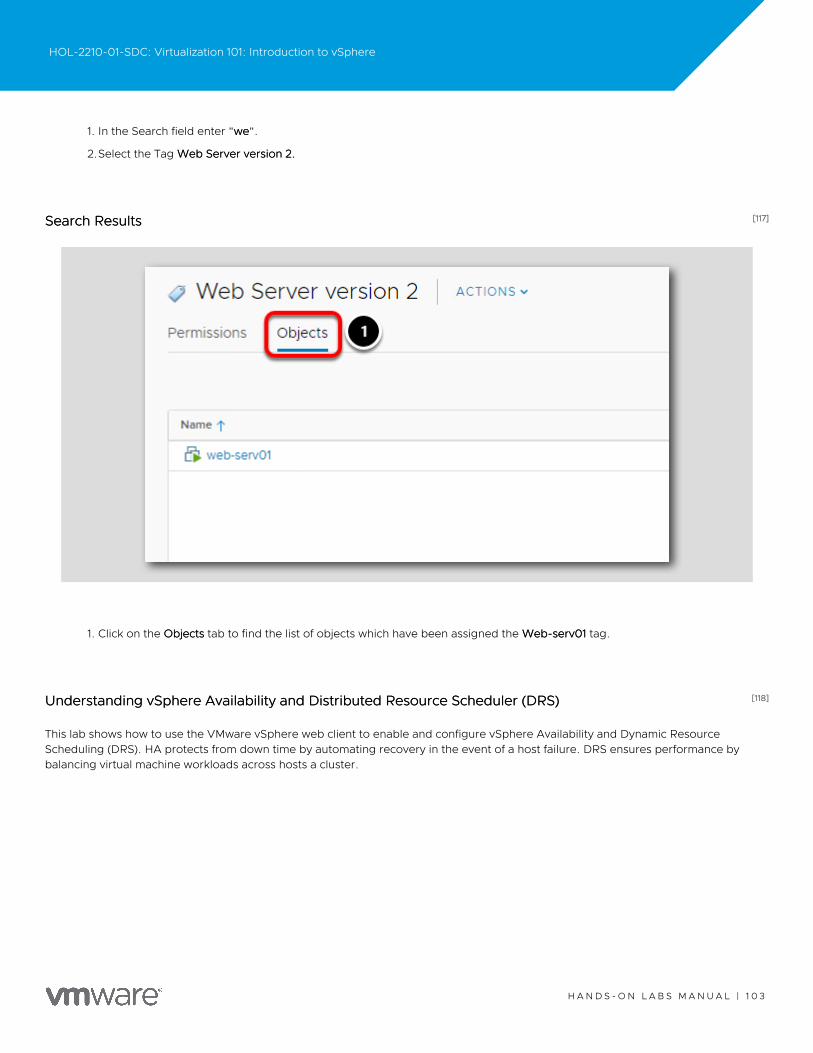
1. In the Search field enter "wewe".
2.Select the Tag Web Server version 2.Web Server version 2.
[117][117]Search ResultsSearch Results
1. Click on the ObjectsObjects tab to find the list of objects which have been assigned the Web-serv01Web-serv01 tag.
[118][118]Understanding vSphere Availability and Distributed Resource Scheduler (DRS)Understanding vSphere Availability and Distributed Resource Scheduler (DRS)
This lab shows how to use the VMware vSphere web client to enable and configure vSphere Availability and Dynamic ResourceScheduling (DRS). HA protects from down time by automating recovery in the event of a host failure. DRS ensures performance bybalancing virtual machine workloads across hosts a cluster.
HOL-2210-01-SDC: Virtualization 101: Introduction to vSphere
H A N D S - O N L A B S M A N U A L | 1 0 3
[119][119]What is vSphere Availability?What is vSphere Availability?
vSphere Availability provides high availability for virtual machines by pooling the virtual machines and the hosts they reside on into acluster. Hosts in the cluster are monitored and in the event of a failure, the virtual machines on a failed host are restarted on alternatehosts.
When you create a vSphere Availability cluster, a single host is automatically elected as the master host. The master host communicateswith vCenter Server and monitors the state of all protected virtual machines and of the slave hosts. Different types of host failures arepossible, and the master host must detect and appropriately deal with the failure. The master host must distinguish between a failedhost and one that is in a network partition or that has become network isolated. The master host uses network and datastoreheartbeating to determine the type of failure. Also note that vSphere Availability is a host function which means there is not adependency on vCenter in order to effectively fail over VMs to other hosts in the cluster.
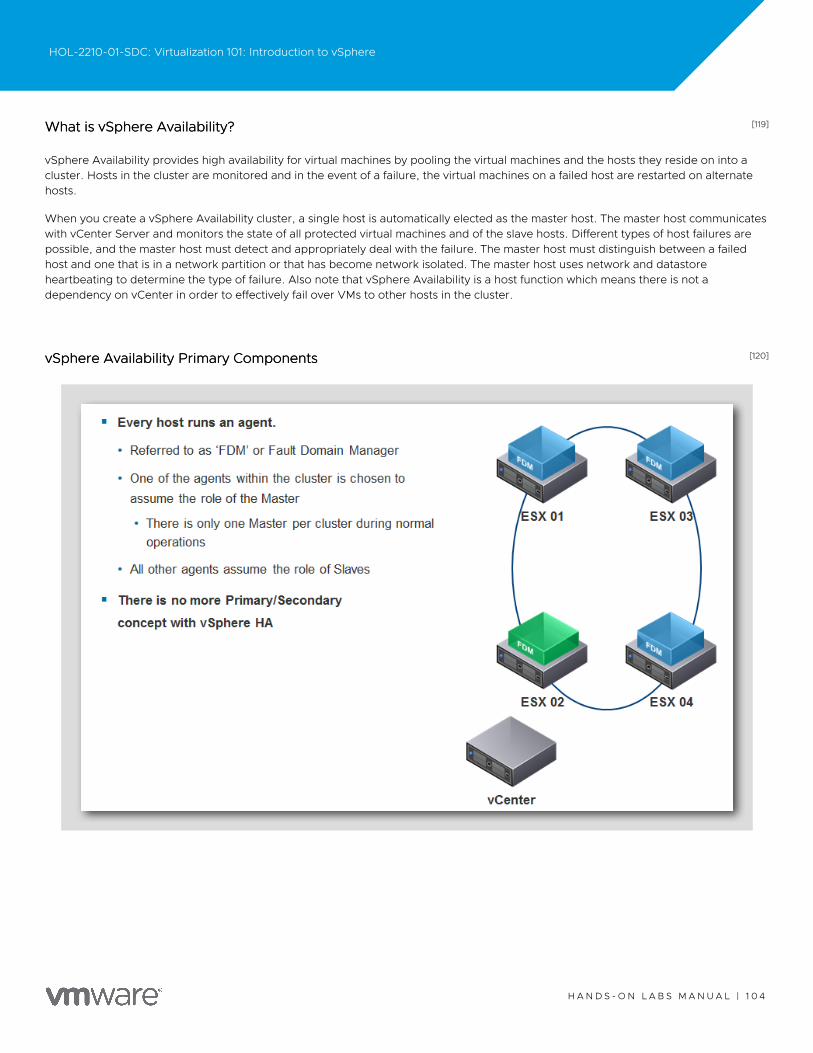
[120][120]vSphere Availability Primary ComponentsvSphere Availability Primary Components
HOL-2210-01-SDC: Virtualization 101: Introduction to vSphere
H A N D S - O N L A B S M A N U A L | 1 0 4
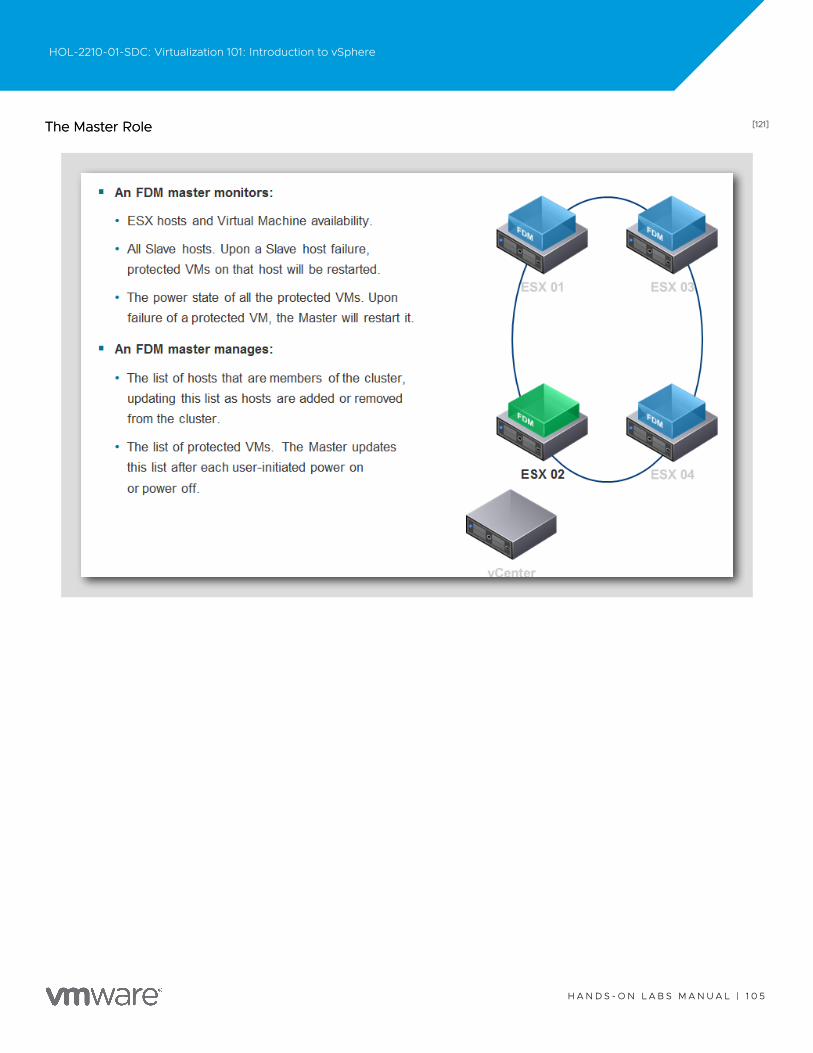
[121][121]The Master RoleThe Master Role
HOL-2210-01-SDC: Virtualization 101: Introduction to vSphere
H A N D S - O N L A B S M A N U A L | 1 0 5
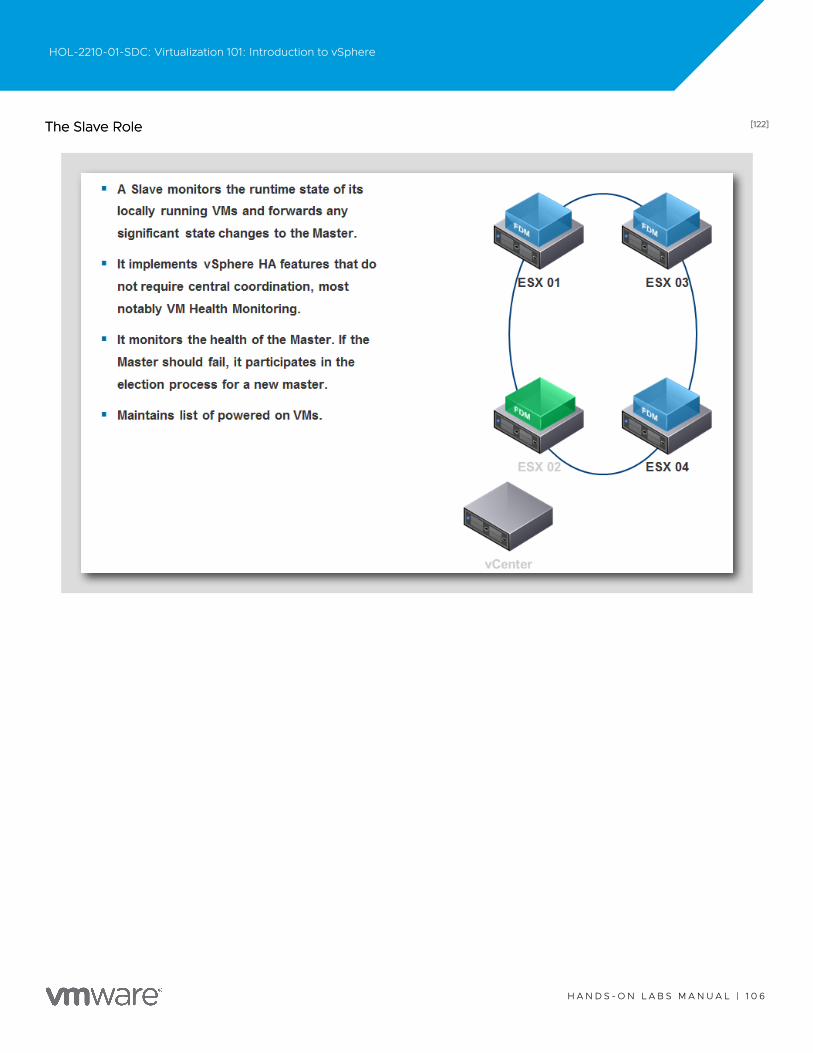
[122][122]The Slave RoleThe Slave Role
HOL-2210-01-SDC: Virtualization 101: Introduction to vSphere
H A N D S - O N L A B S M A N U A L | 1 0 6
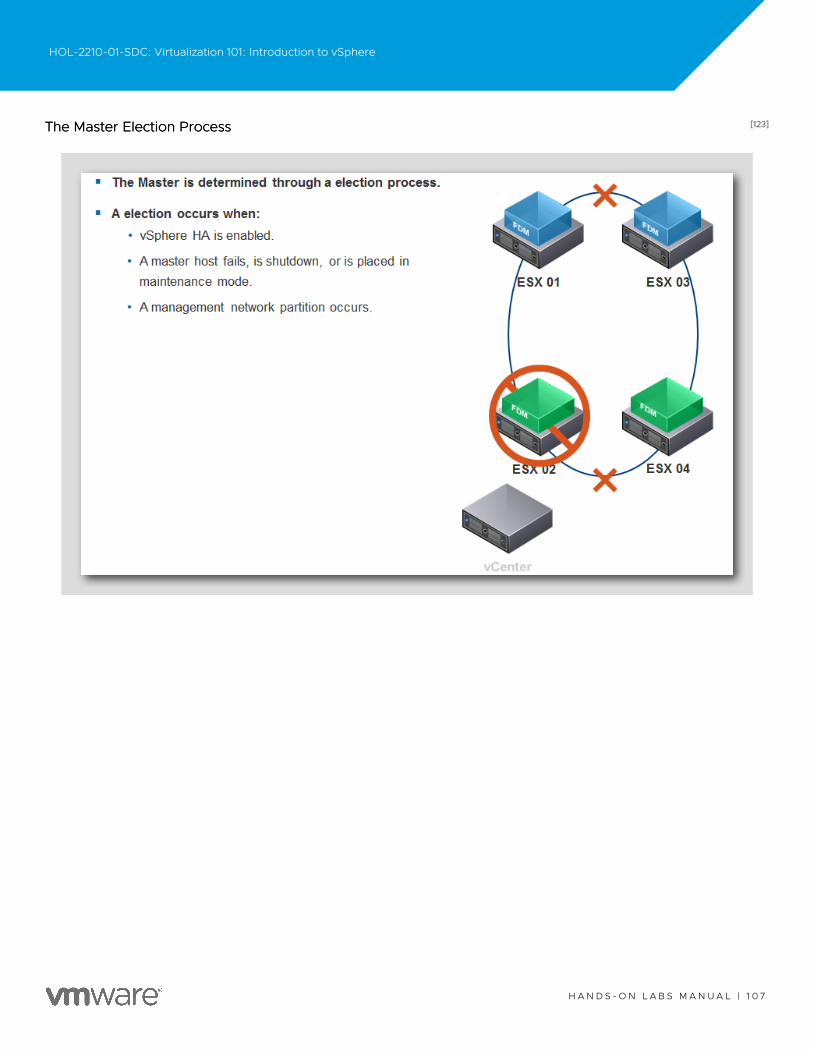
[123][123]The Master Election ProcessThe Master Election Process
HOL-2210-01-SDC: Virtualization 101: Introduction to vSphere
H A N D S - O N L A B S M A N U A L | 1 0 7
[124][124]What's New with DRS in vSphere 7 (5:47)What's New with DRS in vSphere 7 (5:47)
https://www.youtube.com/watch?v=vnuUzW7Yffohttps://www.youtube.com/watch?v=vnuUzW7Yffo
HOL-2210-01-SDC: Virtualization 101: Introduction to vSphere
H A N D S - O N L A B S M A N U A L | 1 0 8
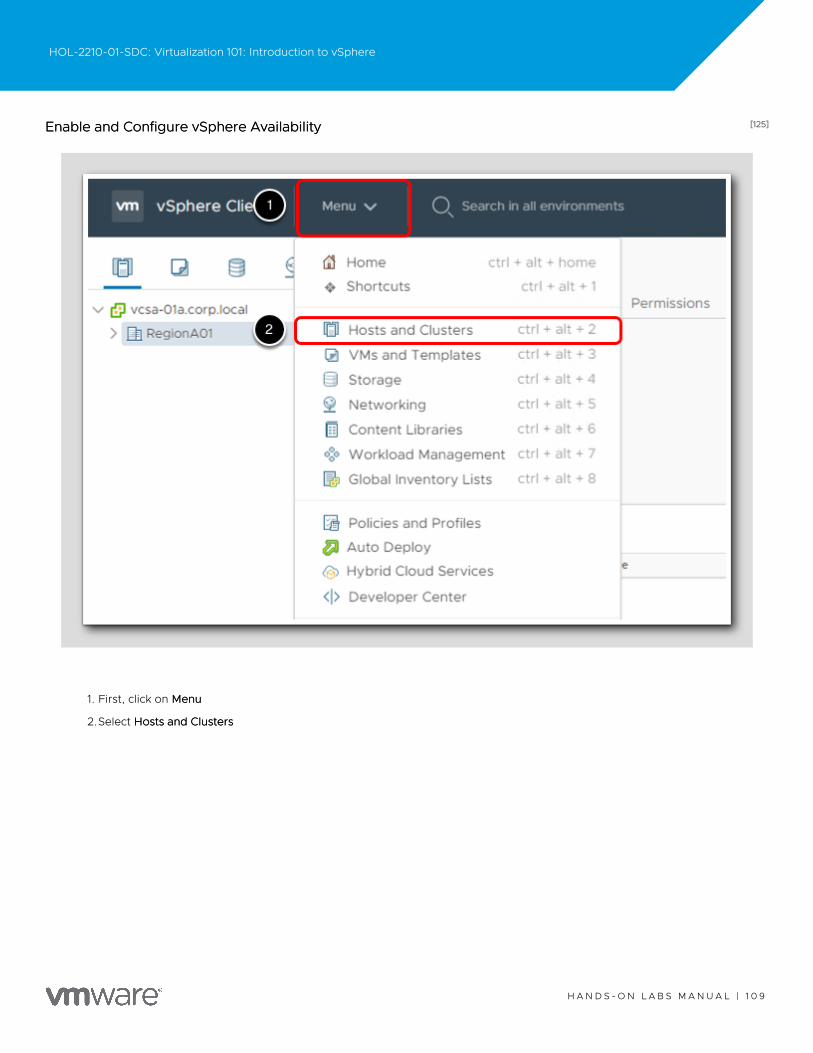
[125][125]Enable and Configure vSphere AvailabilityEnable and Configure vSphere Availability
1. First, click on MenuMenu
2.Select Hosts and ClustersHosts and Clusters
HOL-2210-01-SDC: Virtualization 101: Introduction to vSphere
H A N D S - O N L A B S M A N U A L | 1 0 9
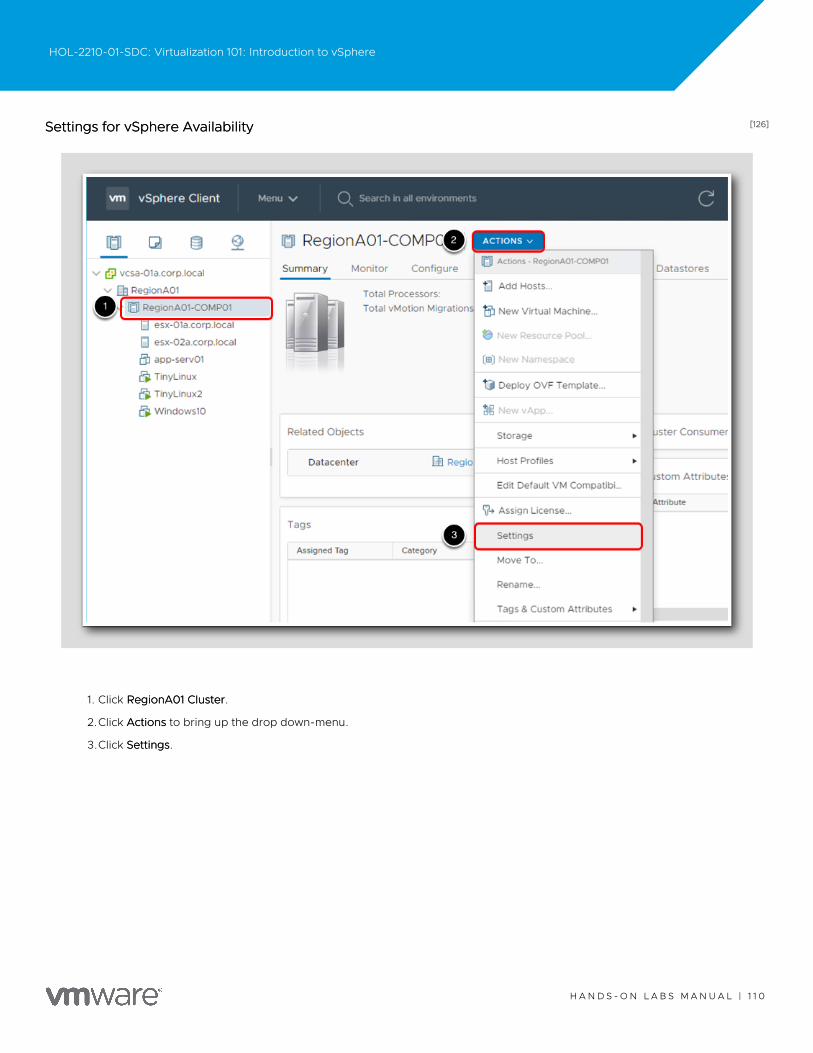
[126][126]Settings for vSphere AvailabilitySettings for vSphere Availability
1. Click RegionA01 ClusterRegionA01 Cluster.
2.Click ActionsActions to bring up the drop down-menu.
3.Click SettingsSettings.
HOL-2210-01-SDC: Virtualization 101: Introduction to vSphere
H A N D S - O N L A B S M A N U A L | 1 1 0
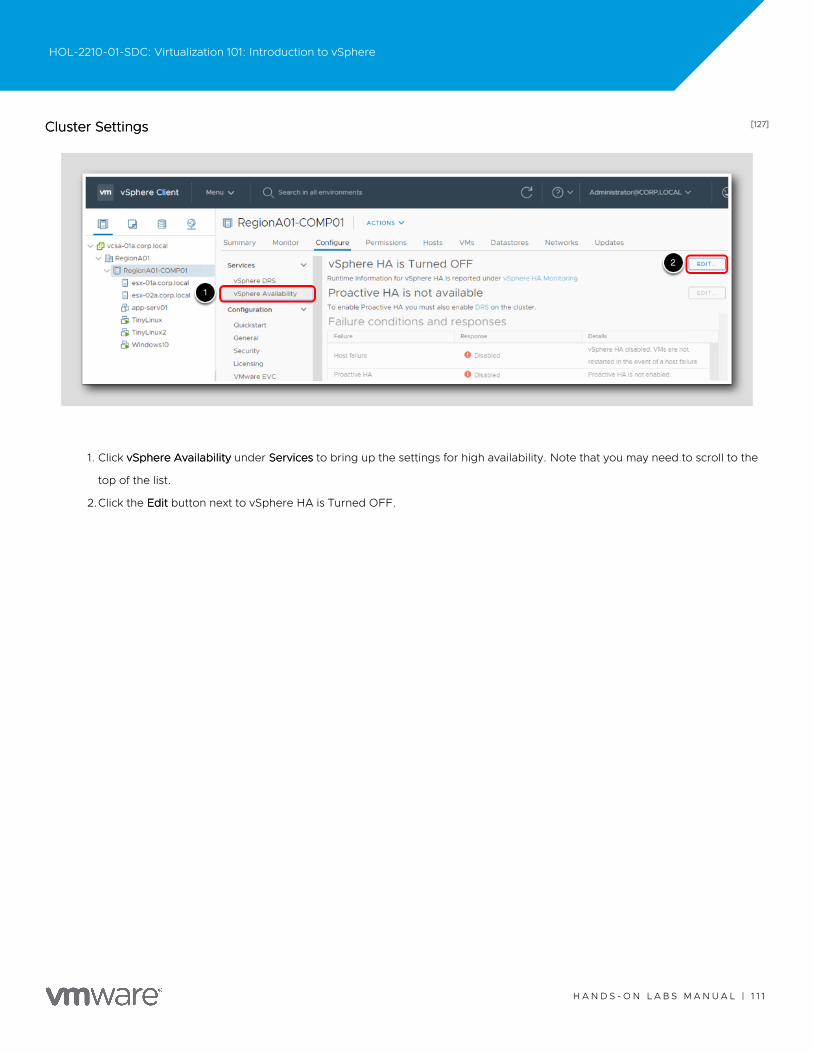
[127][127]Cluster SettingsCluster Settings
1. Click vSphere AvailabilityvSphere Availability under ServicesServices to bring up the settings for high availability. Note that you may need to scroll to the
top of the list.
2.Click the EditEdit button next to vSphere HA is Turned OFF.
HOL-2210-01-SDC: Virtualization 101: Introduction to vSphere
H A N D S - O N L A B S M A N U A L | 1 1 1
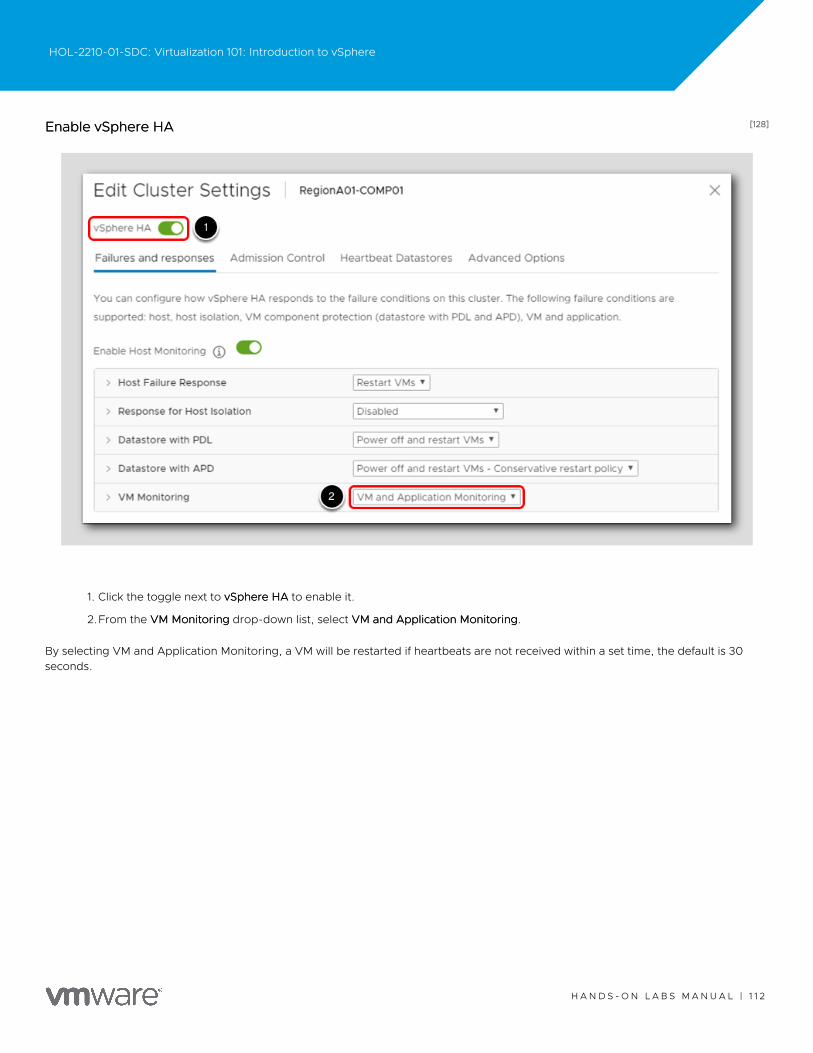
[128][128]Enable vSphere HAEnable vSphere HA
1. Click the toggle next to vSphere HAvSphere HA to enable it.
2.From the VM MonitoringVM Monitoring drop-down list, select VM and Application MonitoringVM and Application Monitoring.
By selecting VM and Application Monitoring, a VM will be restarted if heartbeats are not received within a set time, the default is 30seconds.
HOL-2210-01-SDC: Virtualization 101: Introduction to vSphere
H A N D S - O N L A B S M A N U A L | 1 1 2
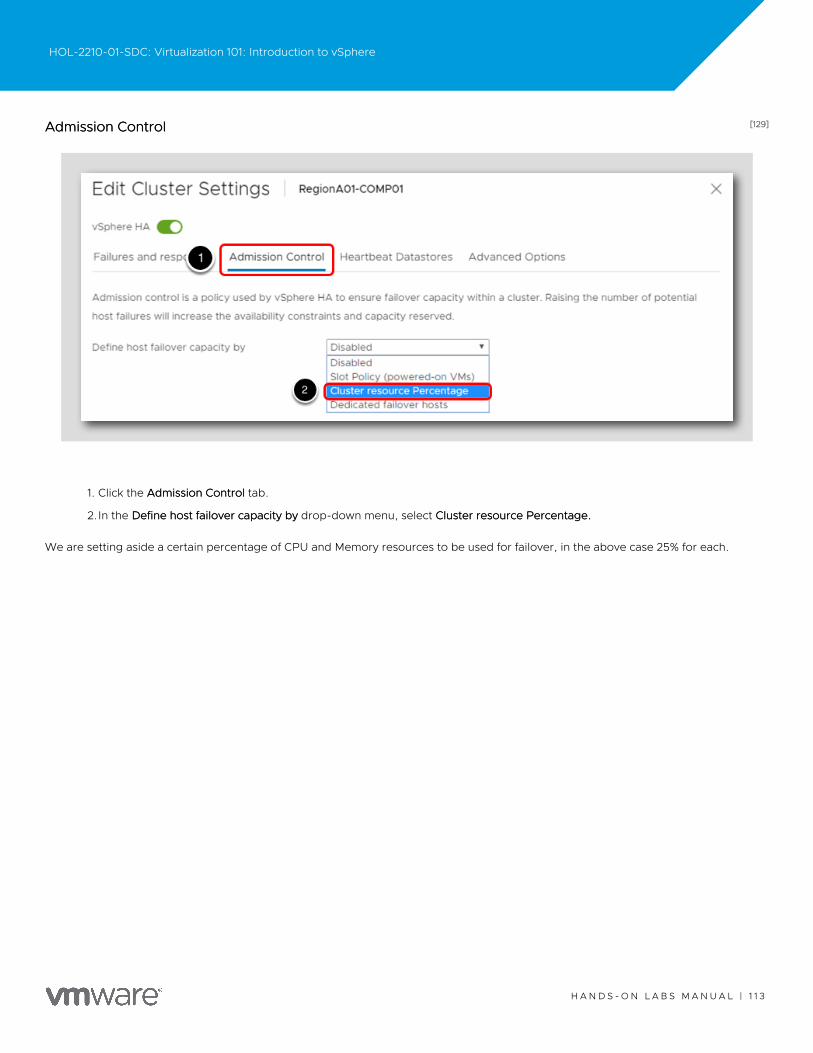
[129][129]Admission ControlAdmission Control
1. Click the Admission ControlAdmission Control tab.
2.In the Define host failover capacity byDefine host failover capacity by drop-down menu, select Cluster resource Percentage.Cluster resource Percentage.
We are setting aside a certain percentage of CPU and Memory resources to be used for failover, in the above case 25% for each.
HOL-2210-01-SDC: Virtualization 101: Introduction to vSphere
H A N D S - O N L A B S M A N U A L | 1 1 3
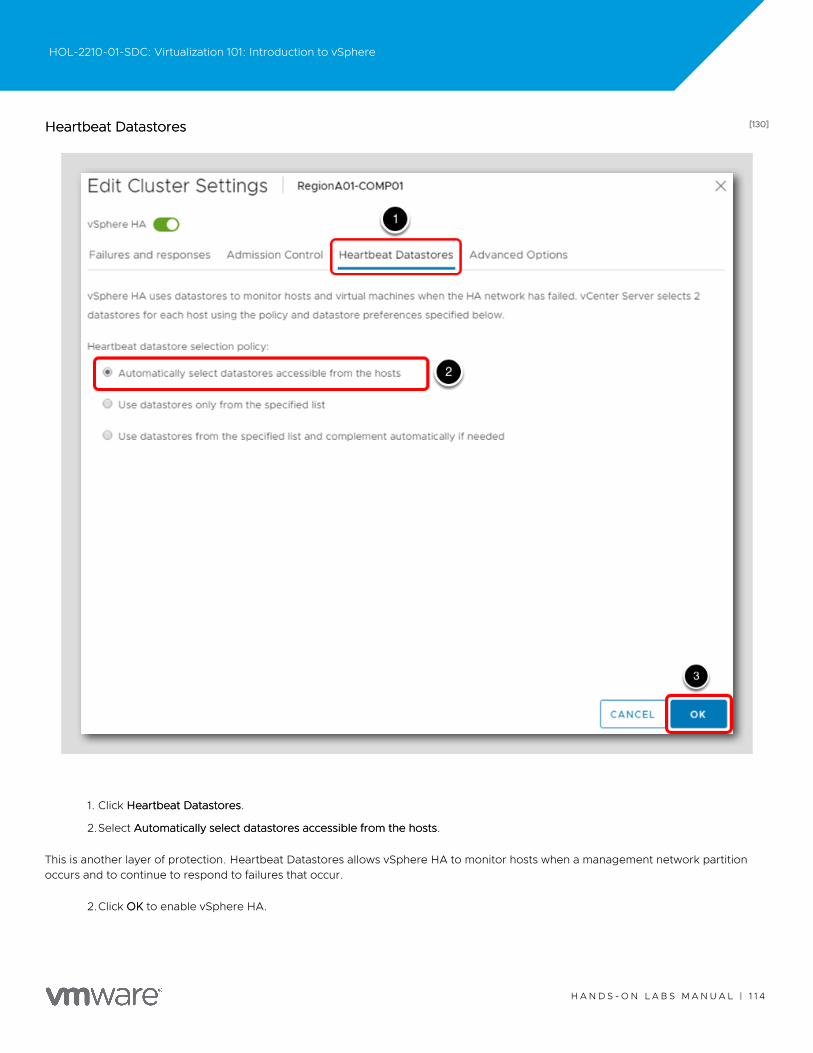
[130][130]Heartbeat DatastoresHeartbeat Datastores
1. Click Heartbeat DatastoresHeartbeat Datastores.
2.Select Automatically select datastores accessible from the hostsAutomatically select datastores accessible from the hosts.
This is another layer of protection. Heartbeat Datastores allows vSphere HA to monitor hosts when a management network partitionoccurs and to continue to respond to failures that occur.
2.Click OKOK to enable vSphere HA.
HOL-2210-01-SDC: Virtualization 101: Introduction to vSphere
H A N D S - O N L A B S M A N U A L | 1 1 4
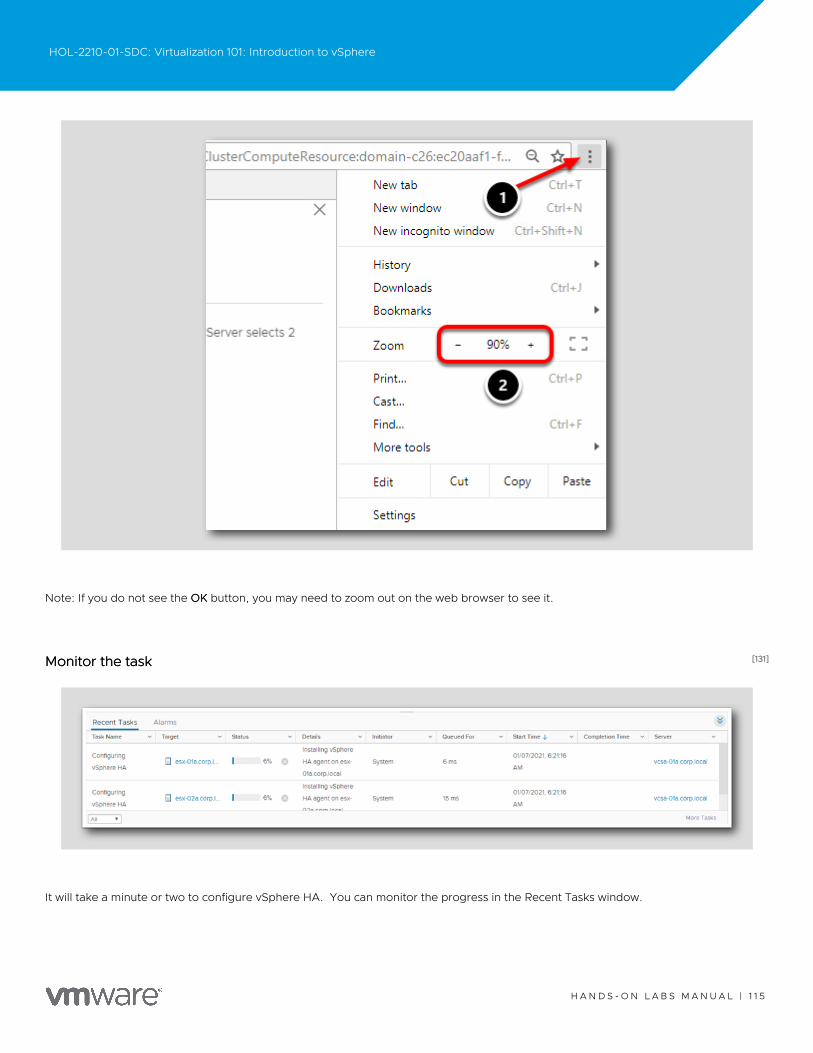
Note: If you do not see the OKOK button, you may need to zoom out on the web browser to see it.
[131][131]Monitor the taskMonitor the task
It will take a minute or two to configure vSphere HA. You can monitor the progress in the Recent Tasks window.
HOL-2210-01-SDC: Virtualization 101: Introduction to vSphere
H A N D S - O N L A B S M A N U A L | 1 1 5

Once the three tasks have been completed, you can move on to the next step.
HOL-2210-01-SDC: Virtualization 101: Introduction to vSphere
H A N D S - O N L A B S M A N U A L | 1 1 6
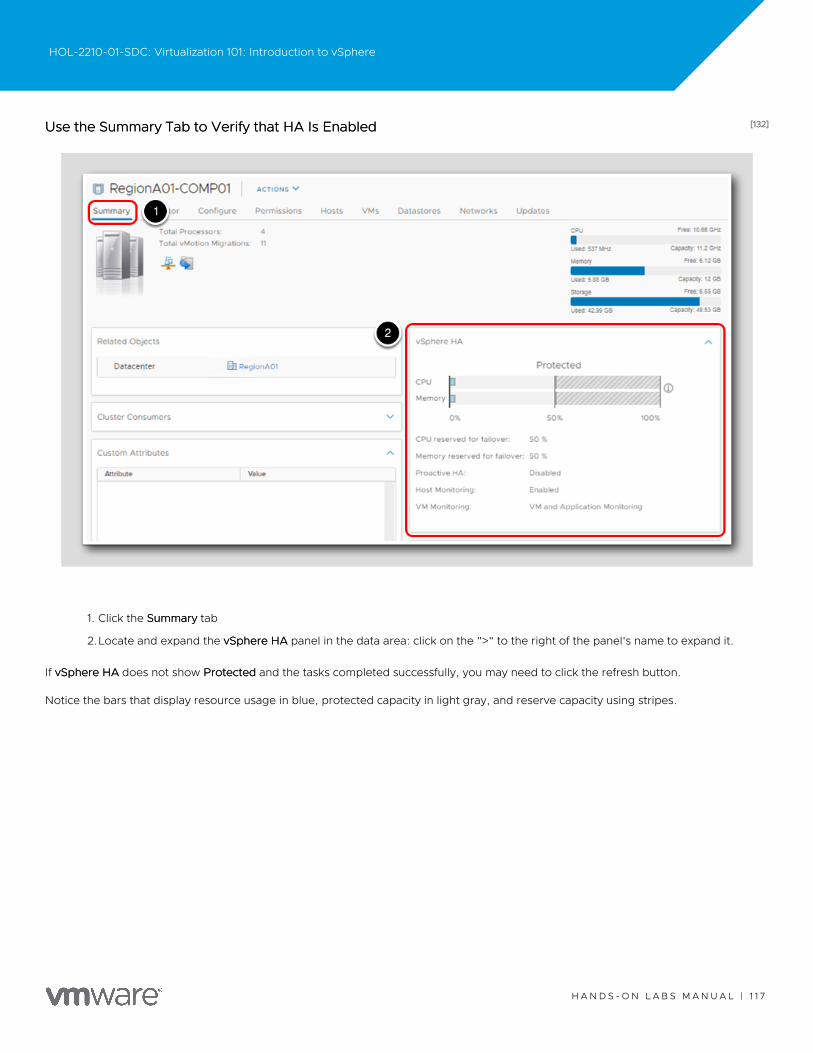
[132][132]Use the Summary Tab to Verify that HA Is EnabledUse the Summary Tab to Verify that HA Is Enabled
1. Click the SummarySummary tab
2.Locate and expand the vSphere HAvSphere HA panel in the data area: click on the ">" to the right of the panel's name to expand it.
If vSphere HAvSphere HA does not show ProtectedProtected and the tasks completed successfully, you may need to click the refresh button.
Notice the bars that display resource usage in blue, protected capacity in light gray, and reserve capacity using stripes.
HOL-2210-01-SDC: Virtualization 101: Introduction to vSphere
H A N D S - O N L A B S M A N U A L | 1 1 7
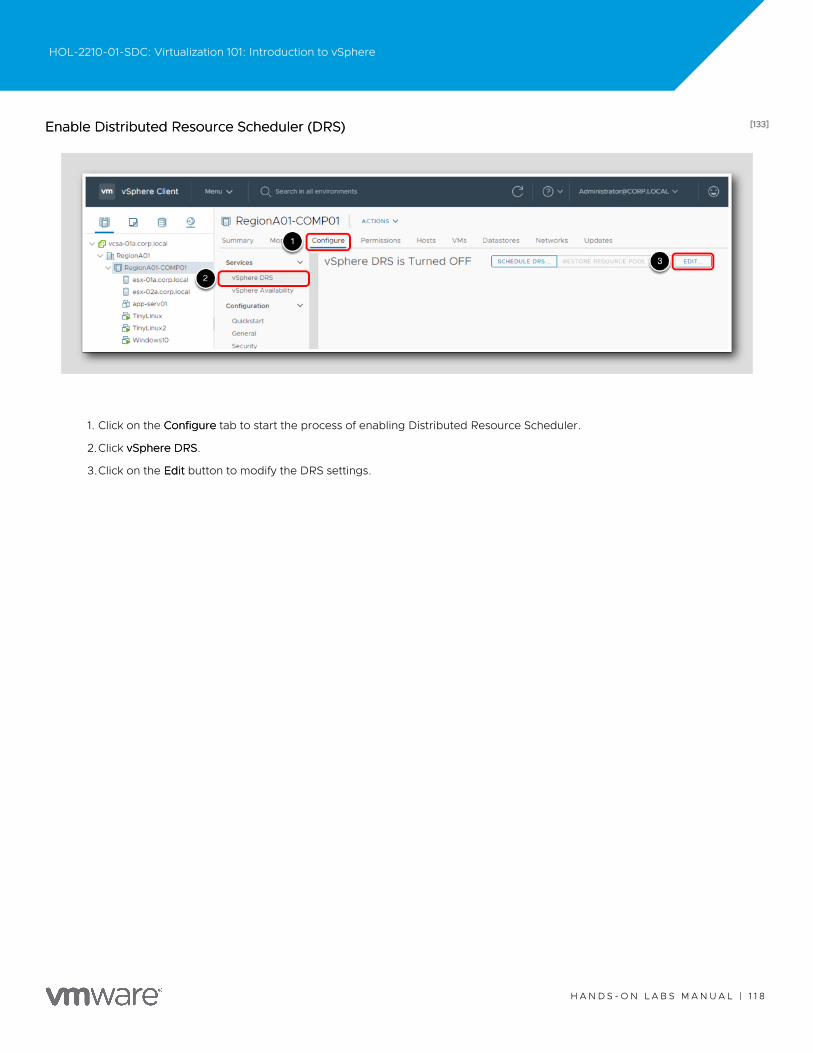
[133][133]Enable Distributed Resource Scheduler (DRS)Enable Distributed Resource Scheduler (DRS)
1. Click on the ConfigureConfigure tab to start the process of enabling Distributed Resource Scheduler.
2.Click vSphere DRSvSphere DRS.
3.Click on the EditEdit button to modify the DRS settings.
HOL-2210-01-SDC: Virtualization 101: Introduction to vSphere
H A N D S - O N L A B S M A N U A L | 1 1 8
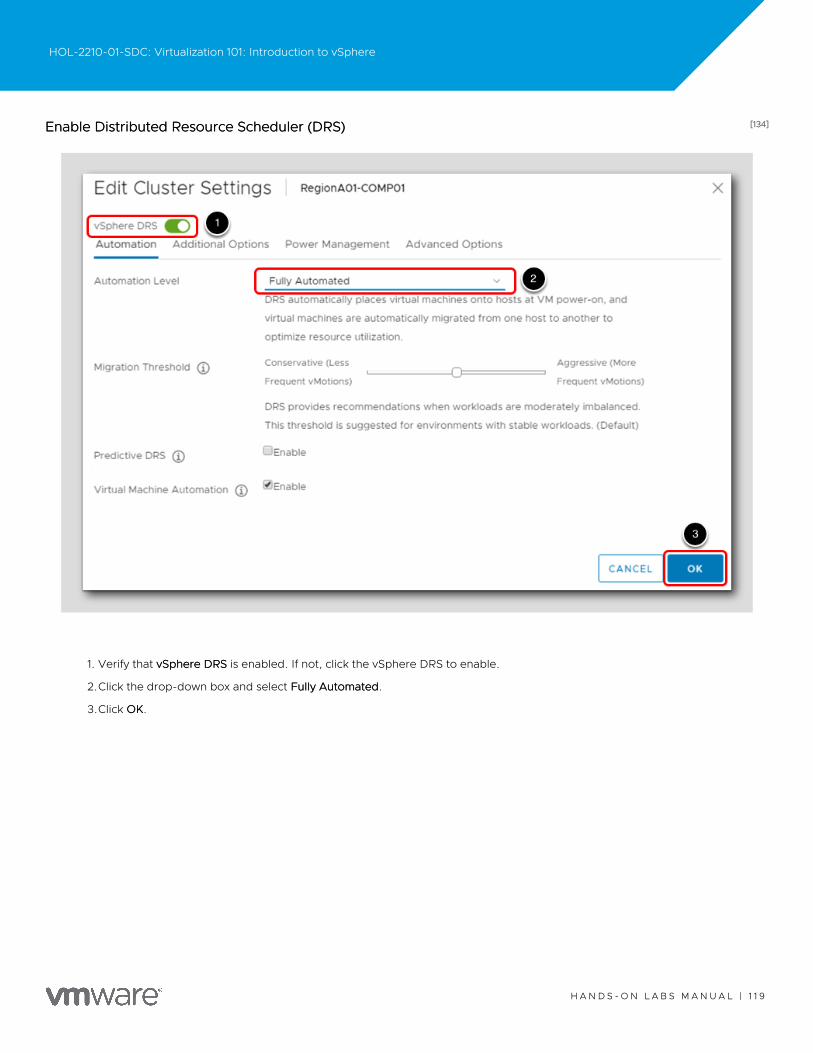
[134][134]Enable Distributed Resource Scheduler (DRS)Enable Distributed Resource Scheduler (DRS)
1. Verify that vSphere DRSvSphere DRS is enabled. If not, click the vSphere DRS to enable.
2.Click the drop-down box and select Fully AutomatedFully Automated.
3.Click OKOK.
HOL-2210-01-SDC: Virtualization 101: Introduction to vSphere
H A N D S - O N L A B S M A N U A L | 1 1 9
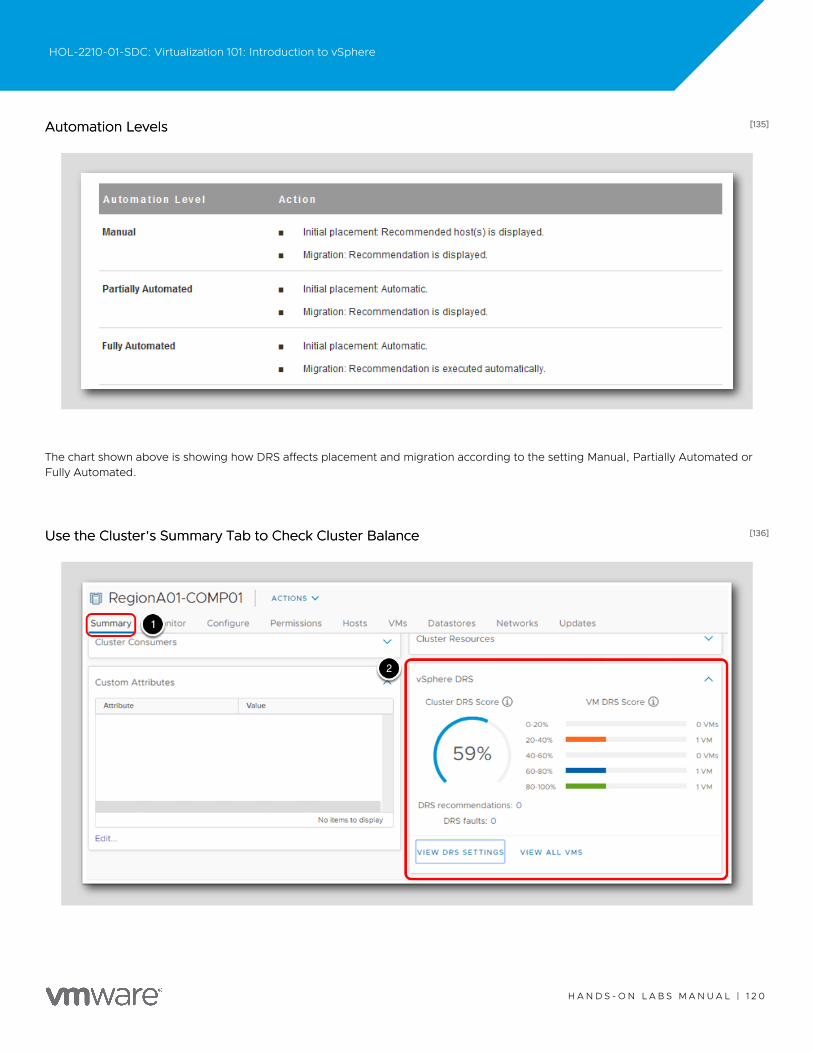
[135][135]Automation LevelsAutomation Levels
The chart shown above is showing how DRS affects placement and migration according to the setting Manual, Partially Automated orFully Automated.
[136][136]Use the Cluster's Summary Tab to Check Cluster BalanceUse the Cluster's Summary Tab to Check Cluster Balance
HOL-2210-01-SDC: Virtualization 101: Introduction to vSphere
H A N D S - O N L A B S M A N U A L | 1 2 0
1. Click the SummarySummary tab to display the current status of the cluster.
2.The Summary tab of the Cluster RegionA01-COMP01 shows the current balance of the cluster. Also shown in the DRS section
is how many recommendations or faults that have occurred with the cluster. (You may have to scroll down to see the vSphere
DRS widget).
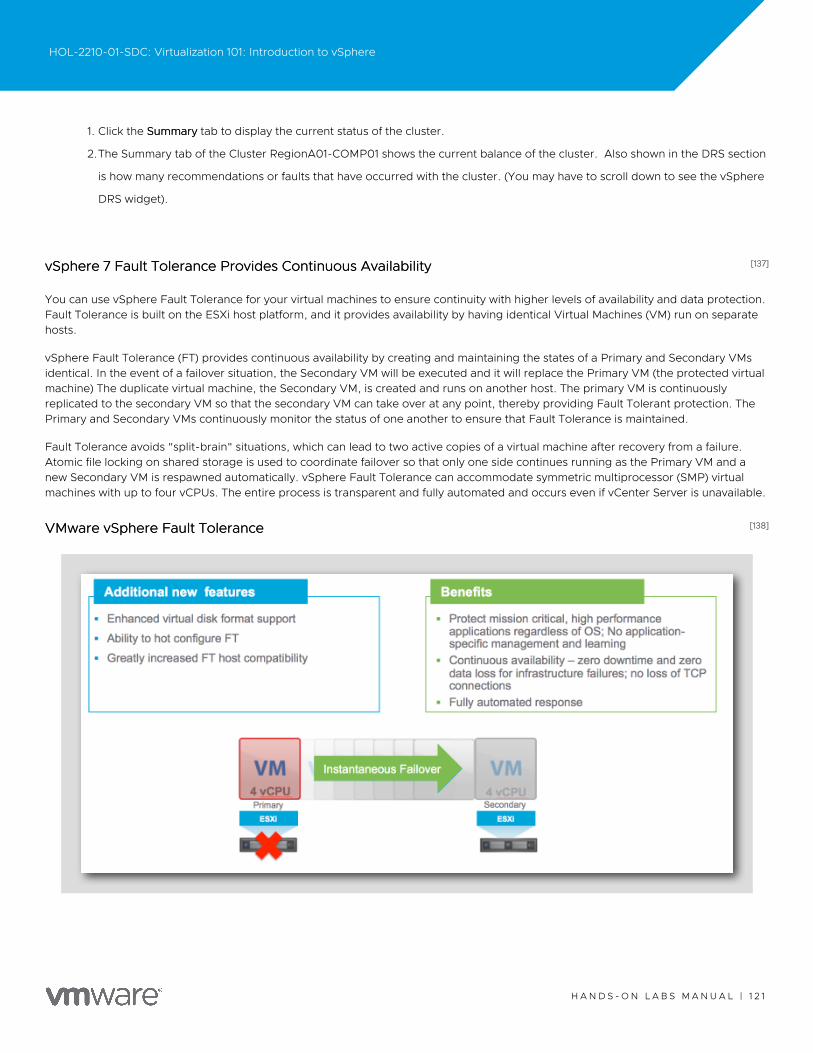
[137][137]vSphere 7 Fault Tolerance Provides Continuous AvailabilityvSphere 7 Fault Tolerance Provides Continuous Availability
You can use vSphere Fault Tolerance for your virtual machines to ensure continuity with higher levels of availability and data protection.Fault Tolerance is built on the ESXi host platform, and it provides availability by having identical Virtual Machines (VM) run on separatehosts.
vSphere Fault Tolerance (FT) provides continuous availability by creating and maintaining the states of a Primary and Secondary VMsidentical. In the event of a failover situation, the Secondary VM will be executed and it will replace the Primary VM (the protected virtualmachine) The duplicate virtual machine, the Secondary VM, is created and runs on another host. The primary VM is continuouslyreplicated to the secondary VM so that the secondary VM can take over at any point, thereby providing Fault Tolerant protection. ThePrimary and Secondary VMs continuously monitor the status of one another to ensure that Fault Tolerance is maintained.
Fault Tolerance avoids "split-brain" situations, which can lead to two active copies of a virtual machine after recovery from a failure.Atomic file locking on shared storage is used to coordinate failover so that only one side continues running as the Primary VM and anew Secondary VM is respawned automatically. vSphere Fault Tolerance can accommodate symmetric multiprocessor (SMP) virtualmachines with up to four vCPUs. The entire process is transparent and fully automated and occurs even if vCenter Server is unavailable.
[138][138]VMware vSphere Fault ToleranceVMware vSphere Fault Tolerance
HOL-2210-01-SDC: Virtualization 101: Introduction to vSphere
H A N D S - O N L A B S M A N U A L | 1 2 1
The benefits of Fault Tolerance are:
•Protect mission critical, high performance applications regardless of OS
•Continuous availability - Zero downtime, zero data loss for infrastructure failures
•Fully automated response
Several typical situations can benefit from the use of vSphere Fault Tolerance. Fault Tolerance provides a higher level of businesscontinuity than vSphere HA. When a Secondary VM is called upon to replace its Primary VM counterpart, the Secondary VMimmediately takes over the Primary VMs role with the entire state of the virtual machine preserved. Applications are already running,and data stored in memory does not need to be reentered or reloaded. Failover provided by vSphere HA restarts the virtual machinesaffected by a failure.
This higher level of continuity and the added protection of state information and data provides the following use cases where you wouldwant to implement Fault Tolerance:
•Applications which must always be available, especially applications that have long-lasting client connections that users want
to maintain during hardware failure.
•Custom applications that have no other way of doing clustering.
•Cases where high availability might be provided through custom clustering solutions, which are too complicated to configure
and maintain.
Another key use case for protecting a virtual machine with Fault Tolerance can be described as On-Demand Fault Tolerance. In thiscase, a virtual machine is adequately protected with vSphere HA during normal operation. During certain critical periods, you mightwant to enhance the protection of the virtual machine. For example, you might be running a quarter-end report which, if interrupted,might delay the availability of critical information. With vSphere Fault Tolerance, you can protect this virtual machine before running thisreport and then turn off or suspend Fault Tolerance after the report has been produced. You can use On-Demand Fault Tolerance toprotect the virtual machine during a critical time period and return the resources to normal during non-critical operation. Seethe Performance Best Practices for VMware vSpherePerformance Best Practices for VMware vSphere and vSphere 7.0 AvailabilityvSphere 7.0 Availability for more information.
[139][139]Video: Protecting Virtual Machines with FT (3:52)Video: Protecting Virtual Machines with FT (3:52)
This video shows how to protect virtual machines with VMware Fault Tolerance (FT). Due to resource constraints in the Hands-on Labsenvironment we are unable to demonstrate this live for you.
HOL-2210-01-SDC: Virtualization 101: Introduction to vSphere
H A N D S - O N L A B S M A N U A L | 1 2 2
https://www.youtube.com/watch?v=dqDGGZ_fGrAhttps://www.youtube.com/watch?v=dqDGGZ_fGrA
[140][140]Monitoring Events and Creating AlarmsMonitoring Events and Creating Alarms
vSphere includes a user-configurable events and alarms subsystem. This subsystem tracks events happening throughout vSphere andstores the data in log files and the vCenter Server database. This subsystem also enables you to specify the conditions under whichalarms are triggered. Alarms can change state from mild warnings to more serious alerts as system conditions change and can triggerautomated alarm actions. This functionality is useful when you want to be informed, or take immediate action, when certain events orconditions occur for a specific inventory object, or group of objects.
Events are records of user actions or system actions that occur on objects in vCenter Server or on a host. Actions that might bereordered as events include, but are not limited to, the following examples:
•A license key expires
•A virtual machine is powered on
•A user logs in to a virtual machine
•A host connection is lost
Event data includes details about the event such as who generated it, when it occurred, and what type of event.
Alarms are notifications that are activated in response to an event, a set of conditions, or the state of an inventory object. An alarmdefinition consists of the following elements:
HOL-2210-01-SDC: Virtualization 101: Introduction to vSphere
H A N D S - O N L A B S M A N U A L | 1 2 3
•Name and description - Provides an identifying label and description.
•Alarm type - Defines the type of object that will be monitored.
•Triggers - Defines the event, condition, or state that will trigger the alarm and defines the notification severity.
•Tolerance thresholds (Reporting) - Provides additional restrictions on condition and state triggers thresholds that must be
exceeded before the alarm is triggered.
•Actions - Defines operations that occur in response to triggered alarms. VMware provides sets of predefined actions that are
specific to inventory object types.
Alarms have the following severity levels:
•Normal – green
•Warning – yellow
•Alert – red
Alarm definitions are associated with the object selected in the inventory. An alarm monitors the type of inventory objects specified in itsdefinition.
For example, you might want to monitor the CPU usage of all virtual machines in a specific host cluster. You can select the cluster in theinventory and add a virtual machine alarm to it. When enabled, that alarm will monitor all virtual machines running in the cluster and willtrigger when any one of them meets the criteria defined in the alarm. If you want to monitor a specific virtual machine in the cluster, butnot others, you would select that virtual machine in the inventory and add an alarm to it. One easy way to apply the same alarms to agroup of objects is to place those objects in a folder and define the alarm on the folder.
In this lab, you will learn how to create an alarm and review the events that have occurred.
HOL-2210-01-SDC: Virtualization 101: Introduction to vSphere
H A N D S - O N L A B S M A N U A L | 1 2 4
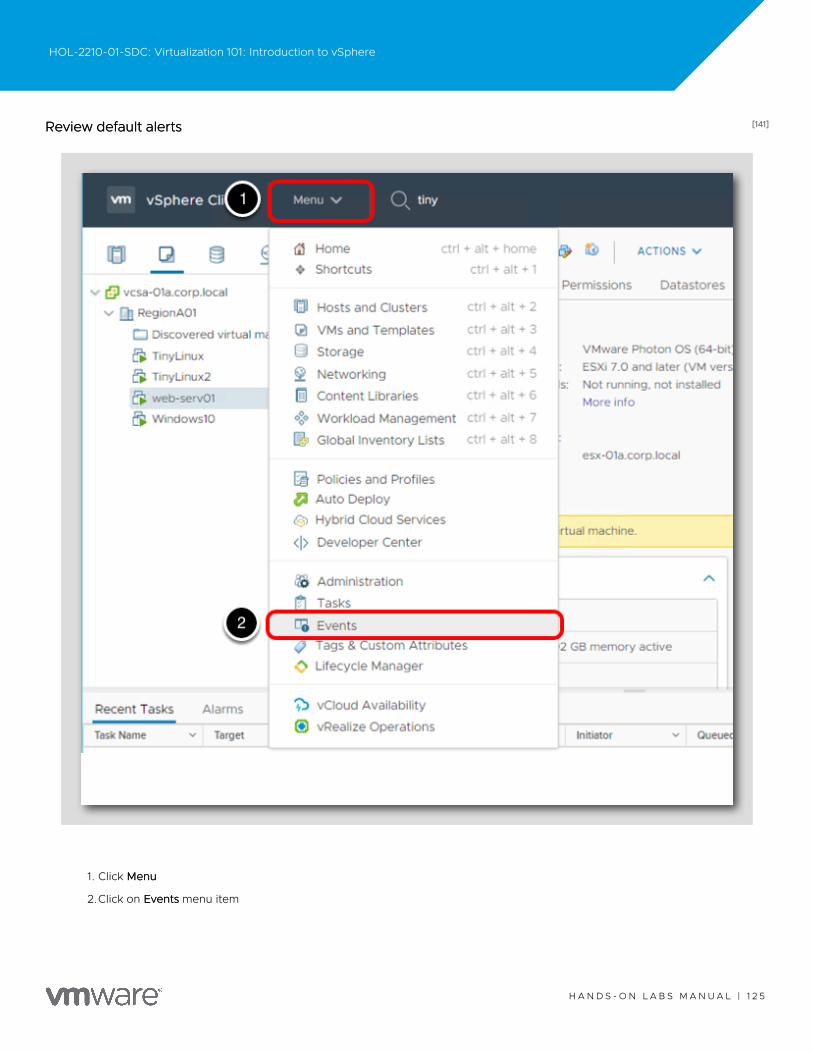
[141][141]Review default alertsReview default alerts
1. Click MenuMenu
2.Click on EventsEvents menu item
HOL-2210-01-SDC: Virtualization 101: Introduction to vSphere
H A N D S - O N L A B S M A N U A L | 1 2 5
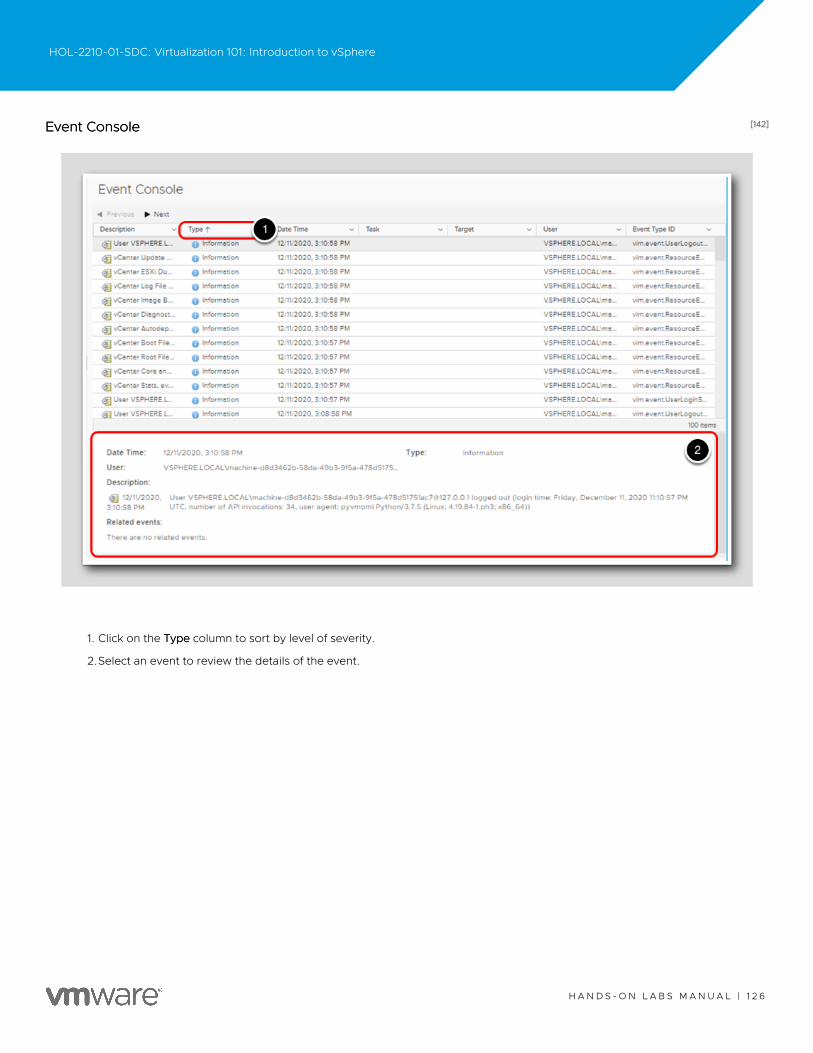
[142][142]Event ConsoleEvent Console
1. Click on the TypeType column to sort by level of severity.
2.Select an event to review the details of the event.
HOL-2210-01-SDC: Virtualization 101: Introduction to vSphere
H A N D S - O N L A B S M A N U A L | 1 2 6
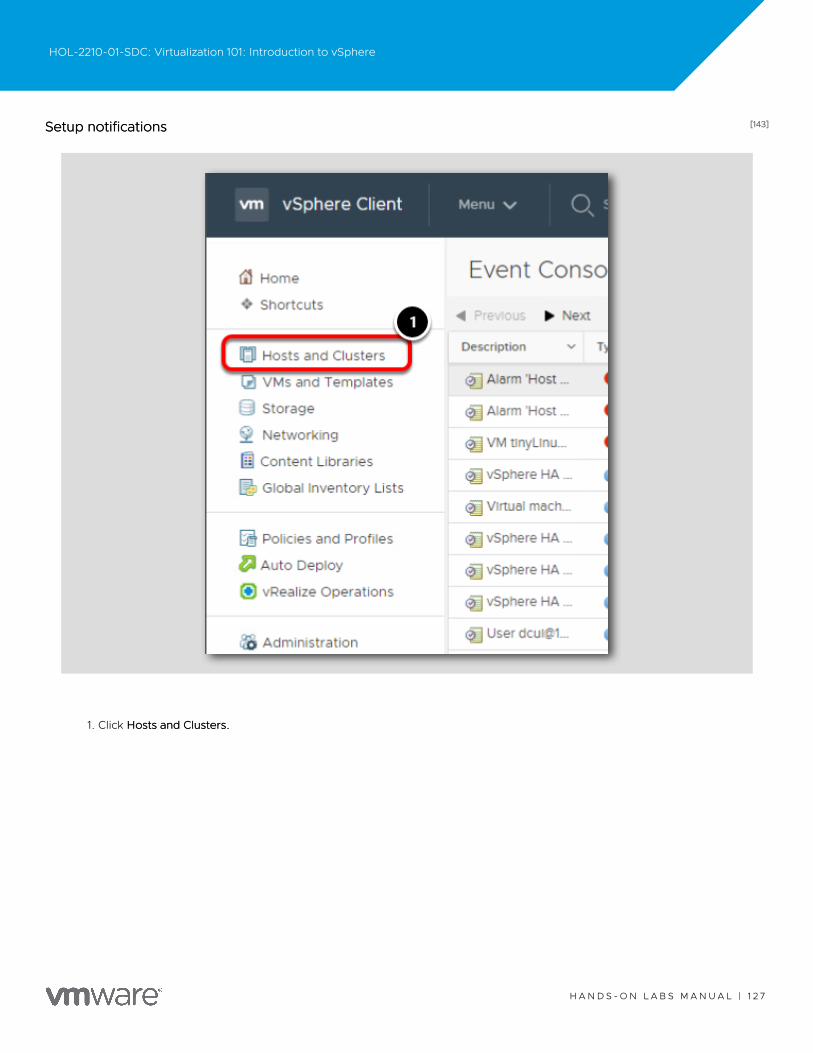
[143][143]Setup notificationsSetup notifications
1. Click Hosts and Clusters.Hosts and Clusters.
HOL-2210-01-SDC: Virtualization 101: Introduction to vSphere
H A N D S - O N L A B S M A N U A L | 1 2 7
[144][144]Setup NotificationsSetup Notifications
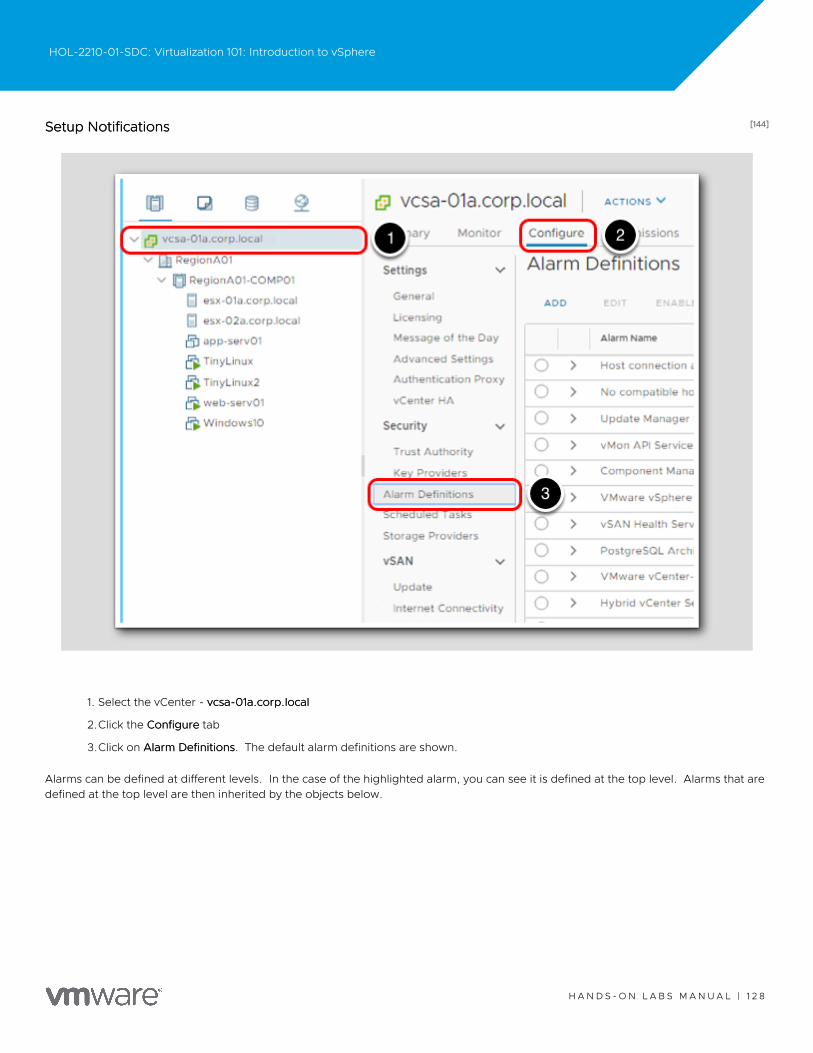
1. Select the vCenter - vcsa-01a.corp.localvcsa-01a.corp.local
2.Click the ConfigureConfigure tab
3.Click on Alarm DefinitionsAlarm Definitions. The default alarm definitions are shown.
Alarms can be defined at different levels. In the case of the highlighted alarm, you can see it is defined at the top level. Alarms that aredefined at the top level are then inherited by the objects below.
HOL-2210-01-SDC: Virtualization 101: Introduction to vSphere
H A N D S - O N L A B S M A N U A L | 1 2 8
[145][145]Alarm DefinitionsAlarm Definitions
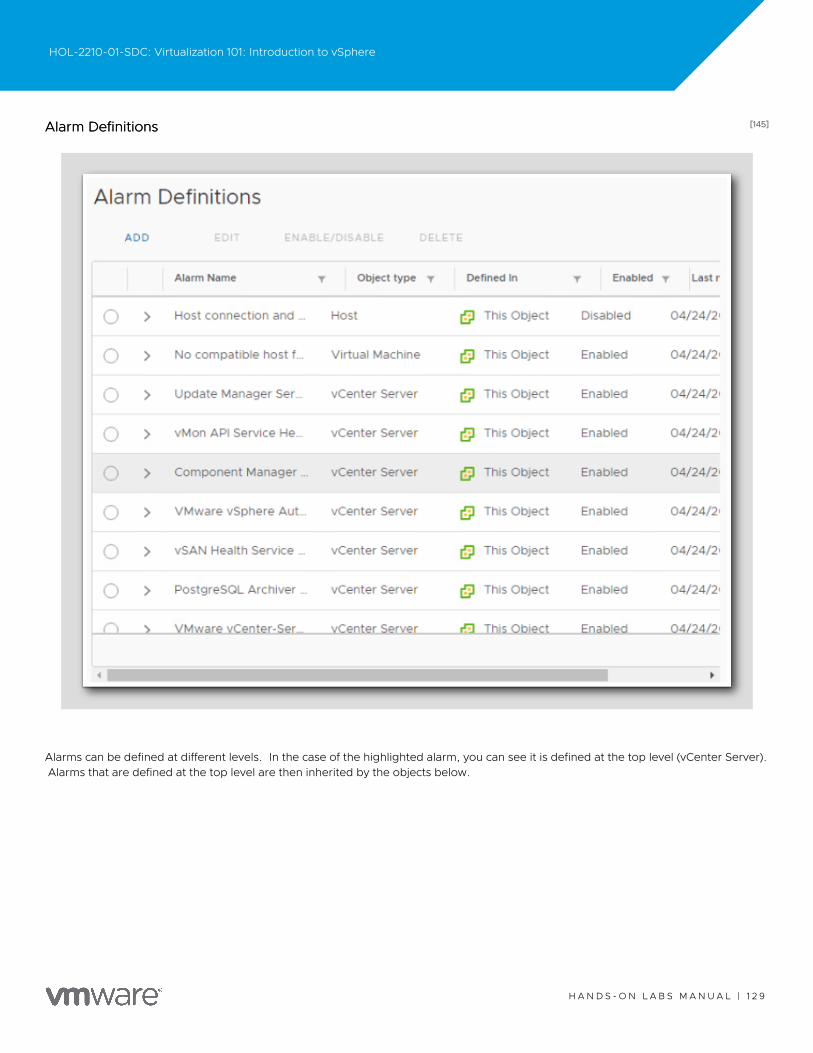
Alarms can be defined at different levels. In the case of the highlighted alarm, you can see it is defined at the top level (vCenter Server).Alarms that are defined at the top level are then inherited by the objects below.
HOL-2210-01-SDC: Virtualization 101: Introduction to vSphere
H A N D S - O N L A B S M A N U A L | 1 2 9
[146][146]Defining an AlarmDefining an Alarm
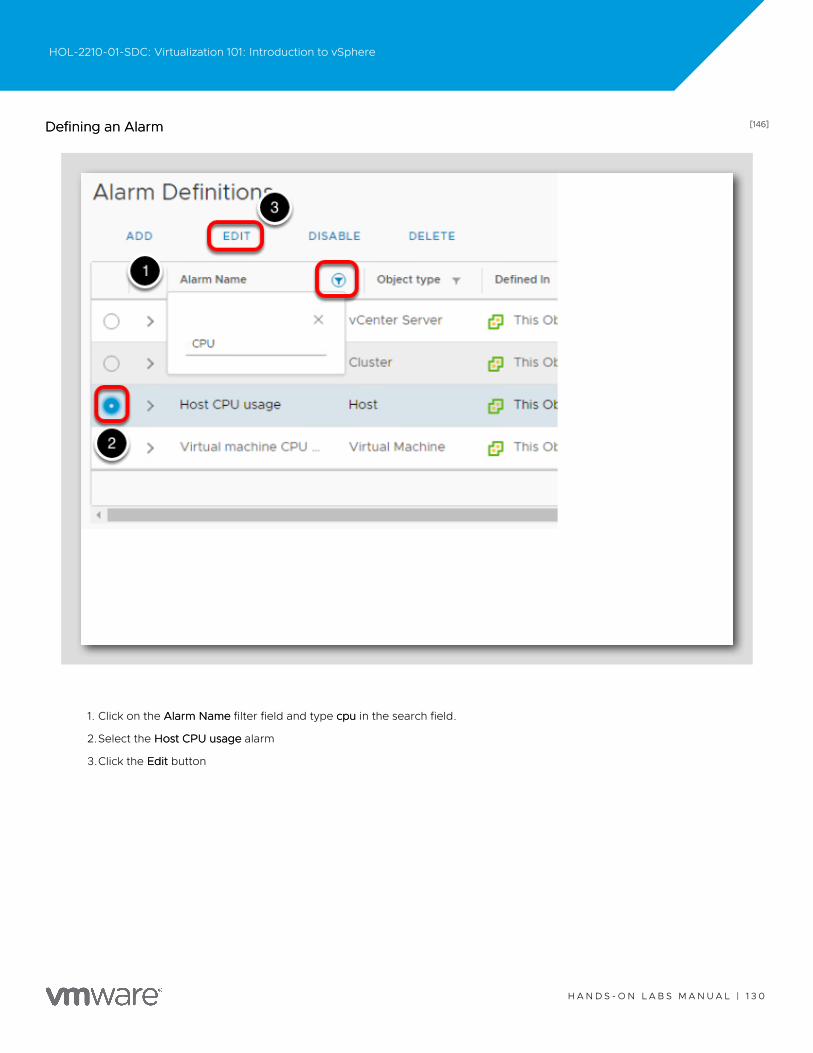
1. Click on the Alarm NameAlarm Name filter field and type cpucpu in the search field.
2.Select the Host CPU usageHost CPU usage alarm
3.Click the EditEdit button
HOL-2210-01-SDC: Virtualization 101: Introduction to vSphere
H A N D S - O N L A B S M A N U A L | 1 3 0
[147][147]Name and TargetsName and Targets
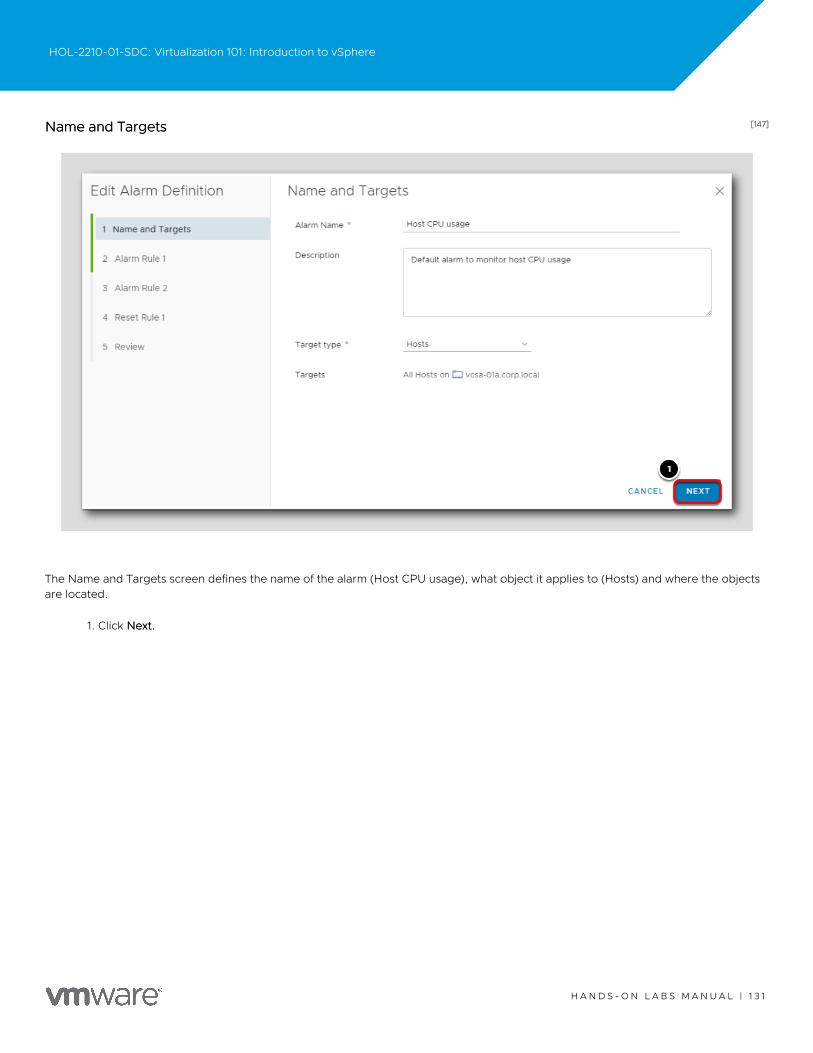
The Name and Targets screen defines the name of the alarm (Host CPU usage), what object it applies to (Hosts) and where the objectsare located.
1. Click Next.Next.
HOL-2210-01-SDC: Virtualization 101: Introduction to vSphere
H A N D S - O N L A B S M A N U A L | 1 3 1

[148][148]Alarm Rule 1Alarm Rule 1
1. Change the percentage of 75%75% to 80%80%.
2.Use the scroll bar to scroll to the bottom.
Notice this will trigger a Warning alarm.
HOL-2210-01-SDC: Virtualization 101: Introduction to vSphere
H A N D S - O N L A B S M A N U A L | 1 3 2

[149][149]Add Advanced ActionAdd Advanced Action
1. Click on Add Advanced Action.Add Advanced Action.
2.From the drop-down menu (Select an advanced action), select Enter maintenance mode.Enter maintenance mode.
3.Click NextNext
When a Host's CPU runs at or above 80% for more than 5 minutes, a Warning alarm will be triggered, and the Host will be put inMaintenance mode. Maintenance mode is covered in Module 3, but when a host is in this state, it is taken offline and any virtualmachines that are running on it will be moved to other hosts in the cluster. This lets maintenance be performed on hosts withoutsuffering downtime.
HOL-2210-01-SDC: Virtualization 101: Introduction to vSphere
H A N D S - O N L A B S M A N U A L | 1 3 3
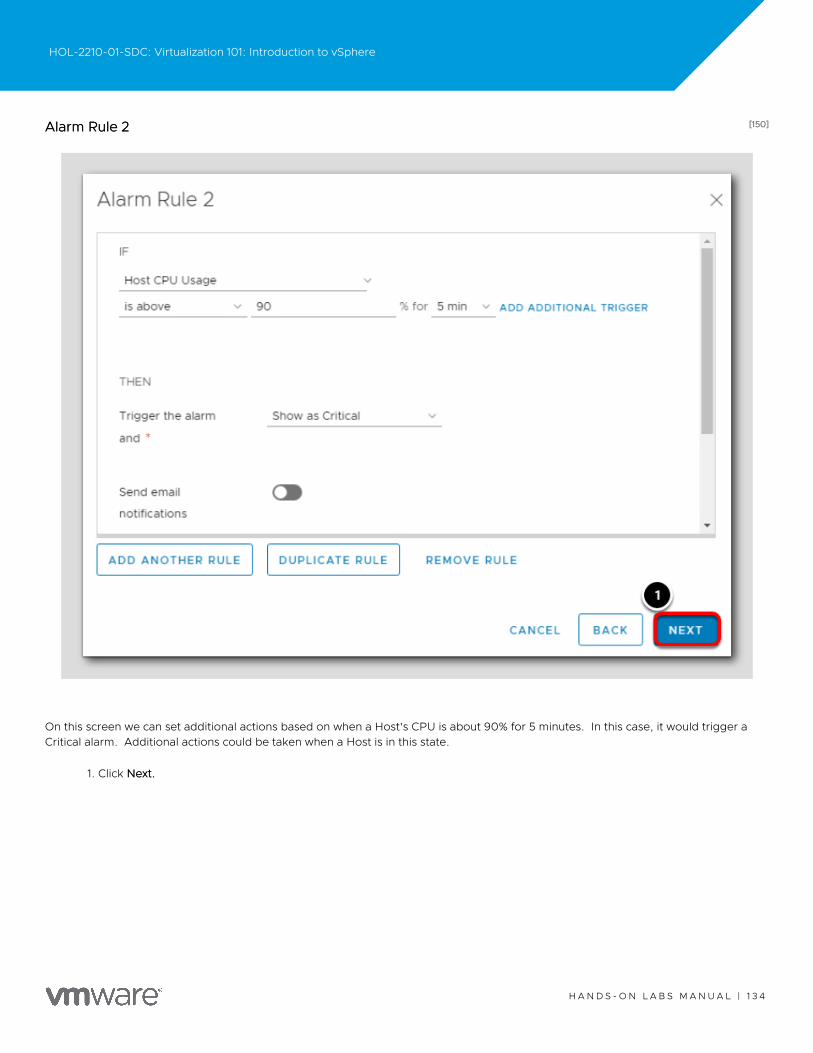
[150][150]Alarm Rule 2Alarm Rule 2
On this screen we can set additional actions based on when a Host's CPU is about 90% for 5 minutes. In this case, it would trigger aCritical alarm. Additional actions could be taken when a Host is in this state.
1. Click Next.Next.
HOL-2210-01-SDC: Virtualization 101: Introduction to vSphere
H A N D S - O N L A B S M A N U A L | 1 3 4

[151][151]Reset Rule 1Reset Rule 1
If the conditions that originally triggered the alarm are no longer present, additional actions can take place. As an example, once aHost's CPU is no longer at 80% for more than 5 minutes, an email notification could be sent.
1. Click Next.Next.
HOL-2210-01-SDC: Virtualization 101: Introduction to vSphere
H A N D S - O N L A B S M A N U A L | 1 3 5

[152][152]ReviewReview
The Review screen shows what was configured.
1. Click SaveSave to keep the changes made to the Alarm.
HOL-2210-01-SDC: Virtualization 101: Introduction to vSphere
H A N D S - O N L A B S M A N U A L | 1 3 6
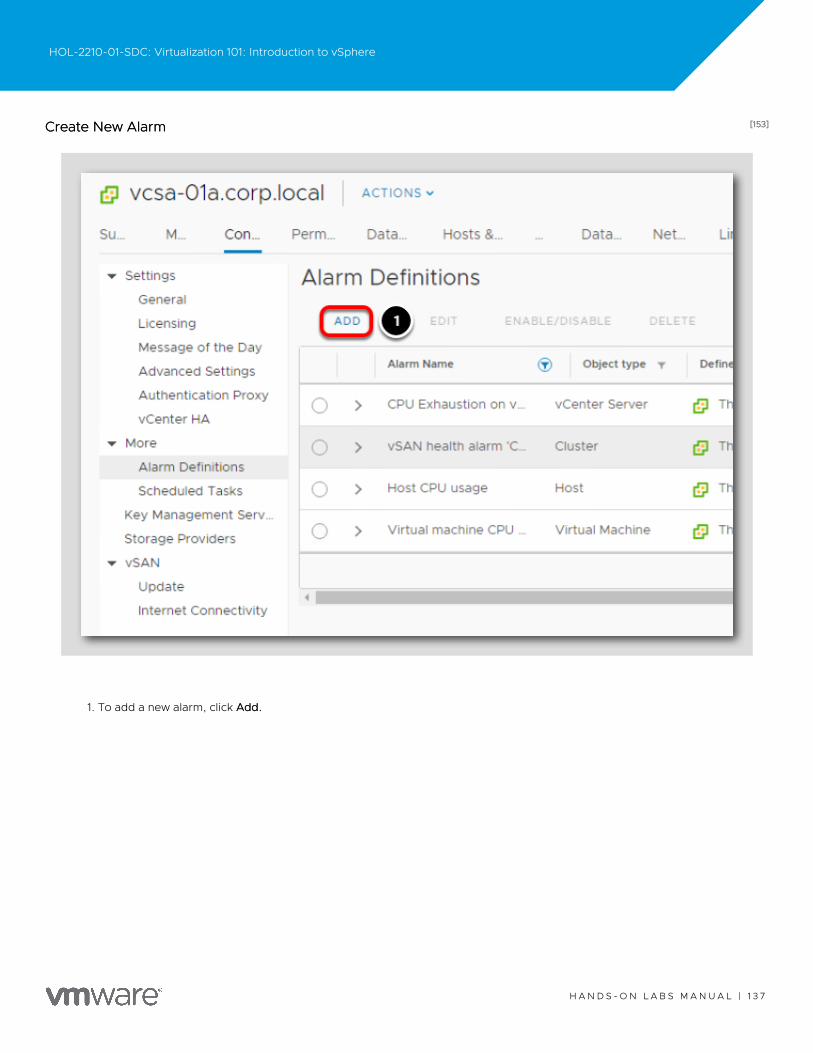
[153][153]Create New AlarmCreate New Alarm
1. To add a new alarm, click Add.Add.
HOL-2210-01-SDC: Virtualization 101: Introduction to vSphere
H A N D S - O N L A B S M A N U A L | 1 3 7
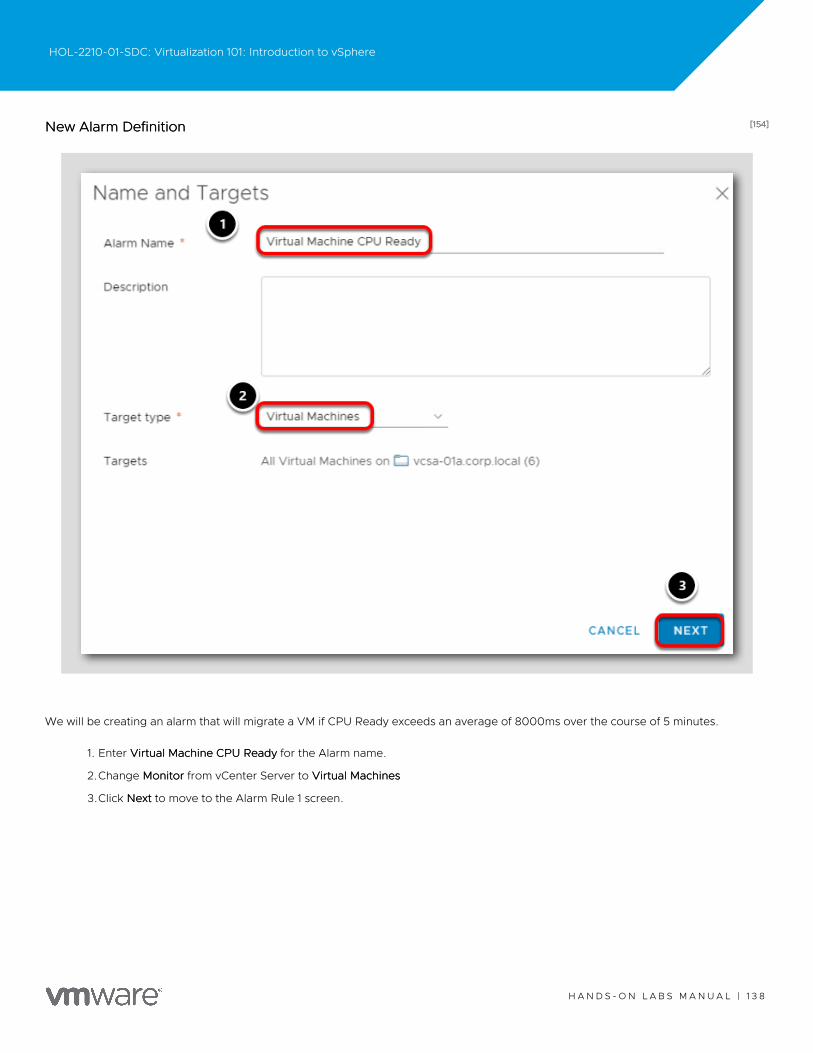
[154][154]New Alarm DefinitionNew Alarm Definition
We will be creating an alarm that will migrate a VM if CPU Ready exceeds an average of 8000ms over the course of 5 minutes.
1. Enter Virtual Machine CPU ReadyVirtual Machine CPU Ready for the Alarm name.
2.Change MonitorMonitor from vCenter Server to Virtual MachinesVirtual Machines
3.Click NextNext to move to the Alarm Rule 1 screen.
HOL-2210-01-SDC: Virtualization 101: Introduction to vSphere
H A N D S - O N L A B S M A N U A L | 1 3 8

[155][155]Define CPU Ready TimeDefine CPU Ready Time
1. Click in the field under IF and select VM CPU Ready Time.VM CPU Ready Time.
2.Change the select an operatorselect an operator filed to is above.is above.
3.Type 80008000 in the ms field
4.Use the drop-down menu to select 5 min.5 min.
5.Select Show as WarningShow as Warning in the Trigger the alarm menu.
6.Use the scroll barscroll bar to scroll to the Add advanced actions section.
HOL-2210-01-SDC: Virtualization 101: Introduction to vSphere
H A N D S - O N L A B S M A N U A L | 1 3 9
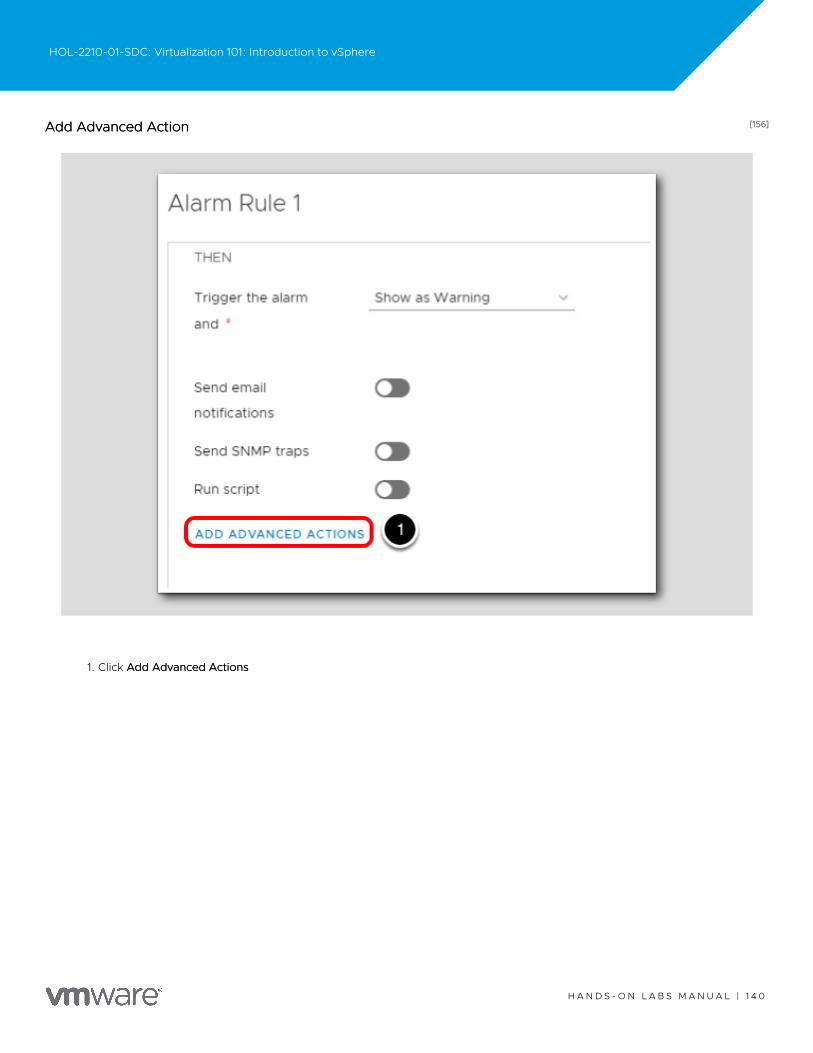
[156][156]Add Advanced ActionAdd Advanced Action
1. Click Add Advanced ActionsAdd Advanced Actions
HOL-2210-01-SDC: Virtualization 101: Introduction to vSphere
H A N D S - O N L A B S M A N U A L | 1 4 0
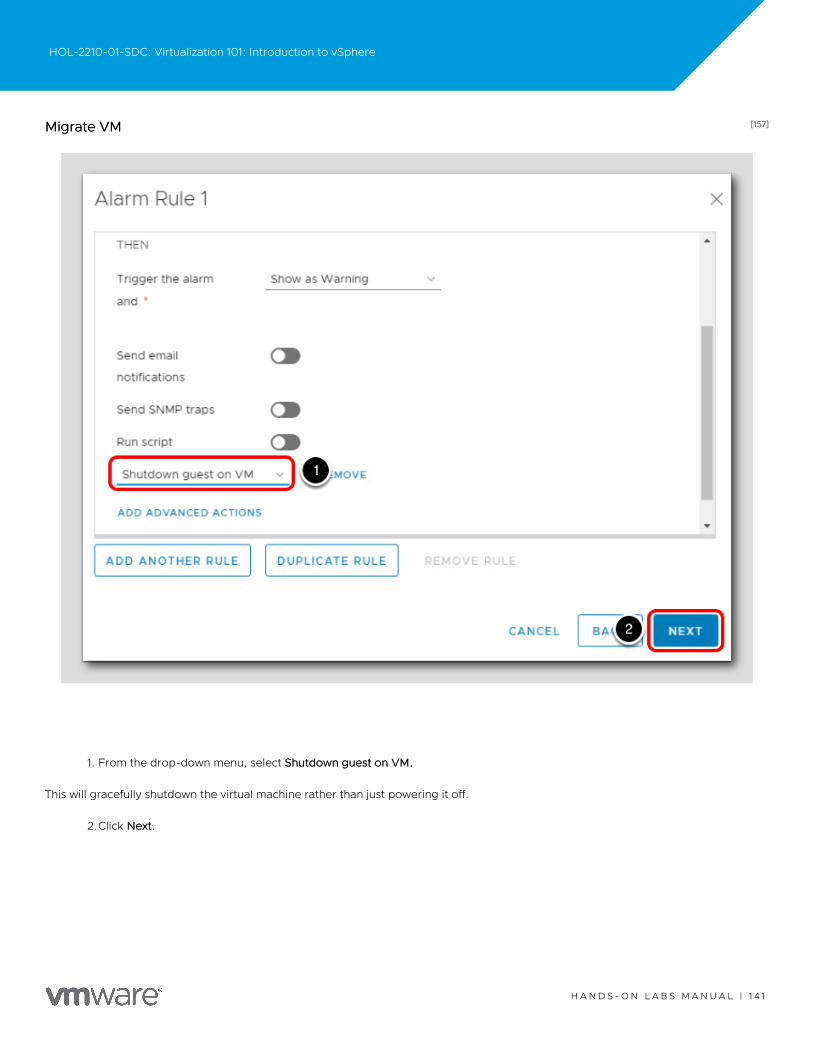
[157][157]Migrate VMMigrate VM
1. From the drop-down menu, select Shutdown guest on VM.Shutdown guest on VM.
This will gracefully shutdown the virtual machine rather than just powering it off.
2.Click Next.Next.
HOL-2210-01-SDC: Virtualization 101: Introduction to vSphere
H A N D S - O N L A B S M A N U A L | 1 4 1

[158][158]Reset Rule 1Reset Rule 1
Additional options could be specified once the conditions are clear.
1. Click NextNext
HOL-2210-01-SDC: Virtualization 101: Introduction to vSphere
H A N D S - O N L A B S M A N U A L | 1 4 2
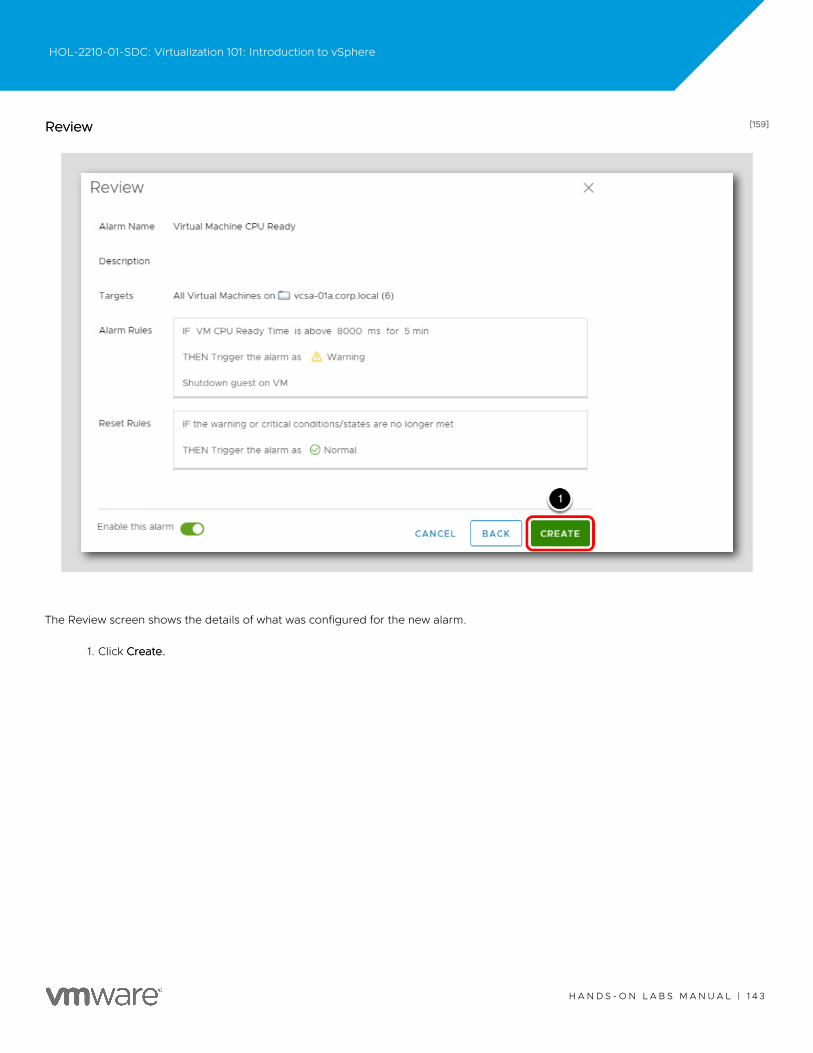
[159][159]ReviewReview
The Review screen shows the details of what was configured for the new alarm.
1. Click Create.Create.
HOL-2210-01-SDC: Virtualization 101: Introduction to vSphere
H A N D S - O N L A B S M A N U A L | 1 4 3
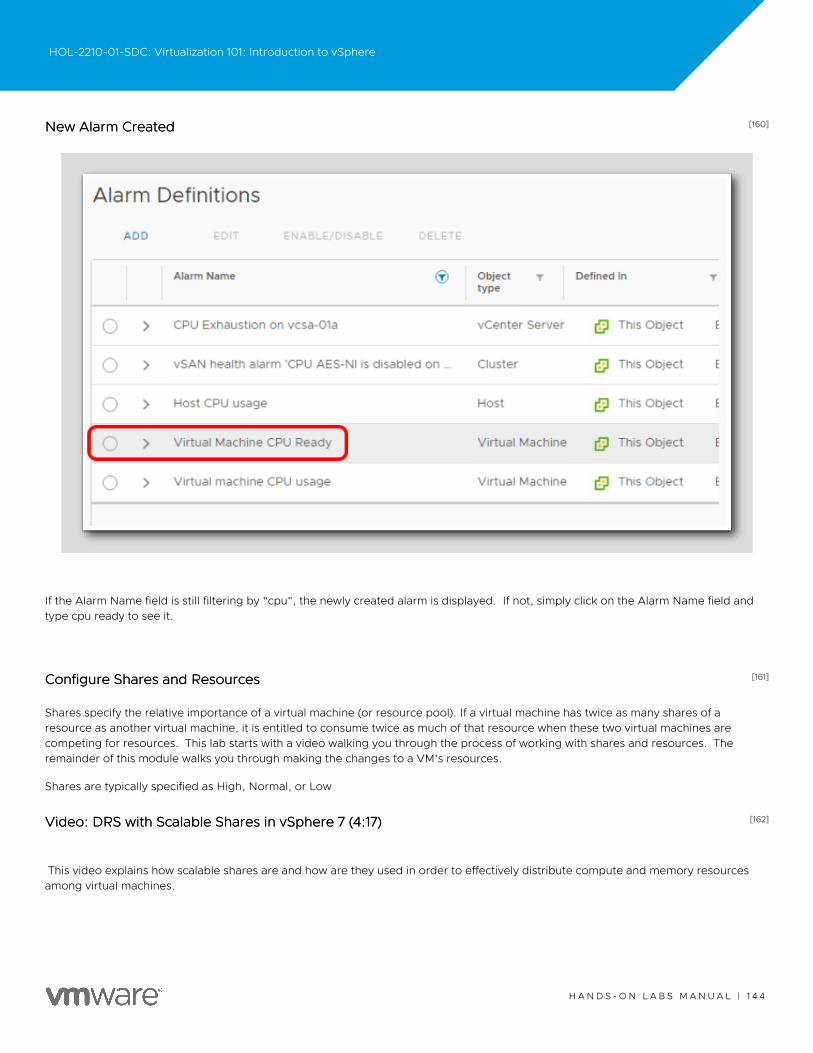
[160][160]New Alarm CreatedNew Alarm Created
If the Alarm Name field is still filtering by "cpu", the newly created alarm is displayed. If not, simply click on the Alarm Name field andtype cpu ready to see it.
[161][161]Configure Shares and ResourcesConfigure Shares and Resources
Shares specify the relative importance of a virtual machine (or resource pool). If a virtual machine has twice as many shares of aresource as another virtual machine, it is entitled to consume twice as much of that resource when these two virtual machines arecompeting for resources. This lab starts with a video walking you through the process of working with shares and resources. Theremainder of this module walks you through making the changes to a VM's resources.
Shares are typically specified as High, Normal, or Low
[162][162]Video: DRS with Scalable Shares in vSphere 7 (4:17)Video: DRS with Scalable Shares in vSphere 7 (4:17)
This video explains how scalable shares are and how are they used in order to effectively distribute compute and memory resourcesamong virtual machines.
HOL-2210-01-SDC: Virtualization 101: Introduction to vSphere
H A N D S - O N L A B S M A N U A L | 1 4 4
https://www.youtube.com/watch?v=jkp25I4R0R8https://www.youtube.com/watch?v=jkp25I4R0R8
HOL-2210-01-SDC: Virtualization 101: Introduction to vSphere
H A N D S - O N L A B S M A N U A L | 1 4 5
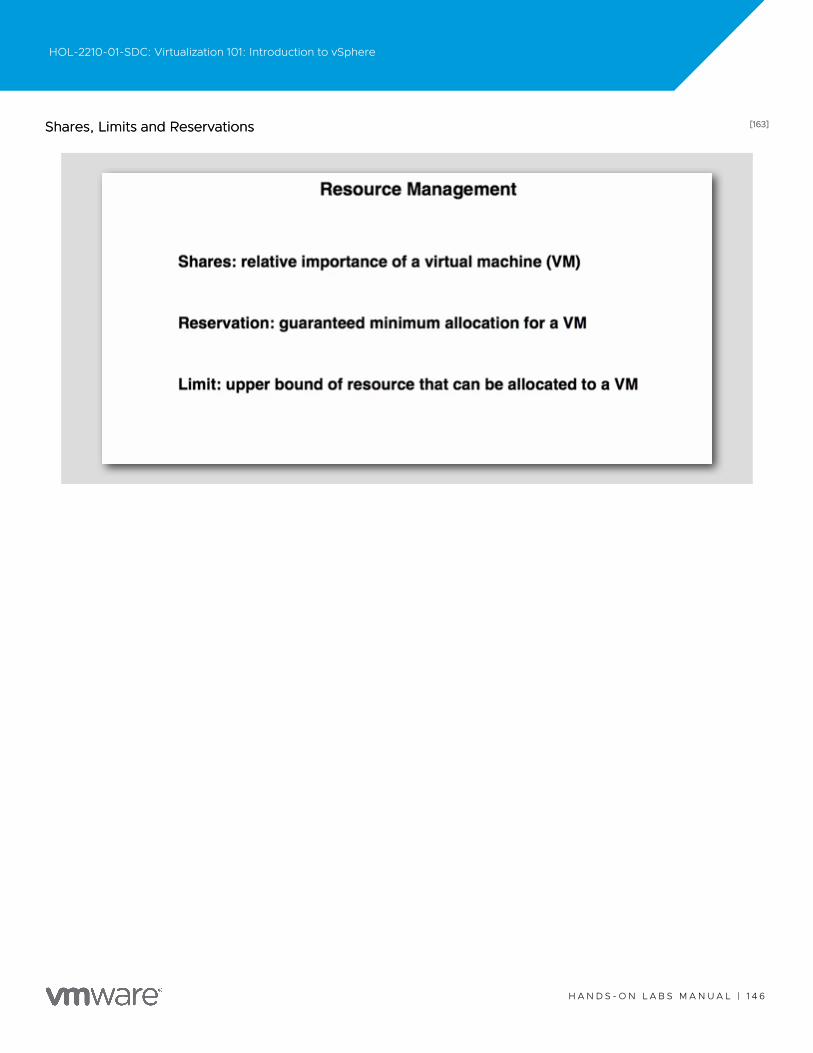
[163][163]Shares, Limits and ReservationsShares, Limits and Reservations
HOL-2210-01-SDC: Virtualization 101: Introduction to vSphere
H A N D S - O N L A B S M A N U A L | 1 4 6
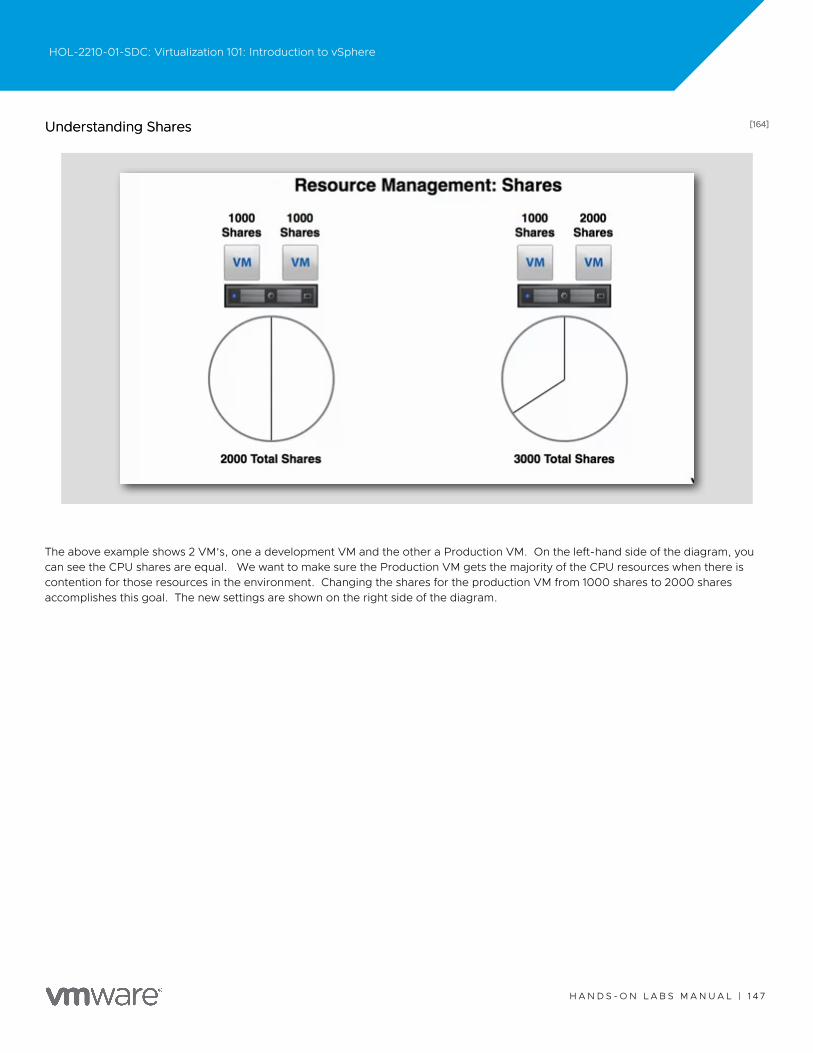
[164][164]Understanding SharesUnderstanding Shares
The above example shows 2 VM's, one a development VM and the other a Production VM. On the left-hand side of the diagram, youcan see the CPU shares are equal. We want to make sure the Production VM gets the majority of the CPU resources when there iscontention for those resources in the environment. Changing the shares for the production VM from 1000 shares to 2000 sharesaccomplishes this goal. The new settings are shown on the right side of the diagram.
HOL-2210-01-SDC: Virtualization 101: Introduction to vSphere
H A N D S - O N L A B S M A N U A L | 1 4 7
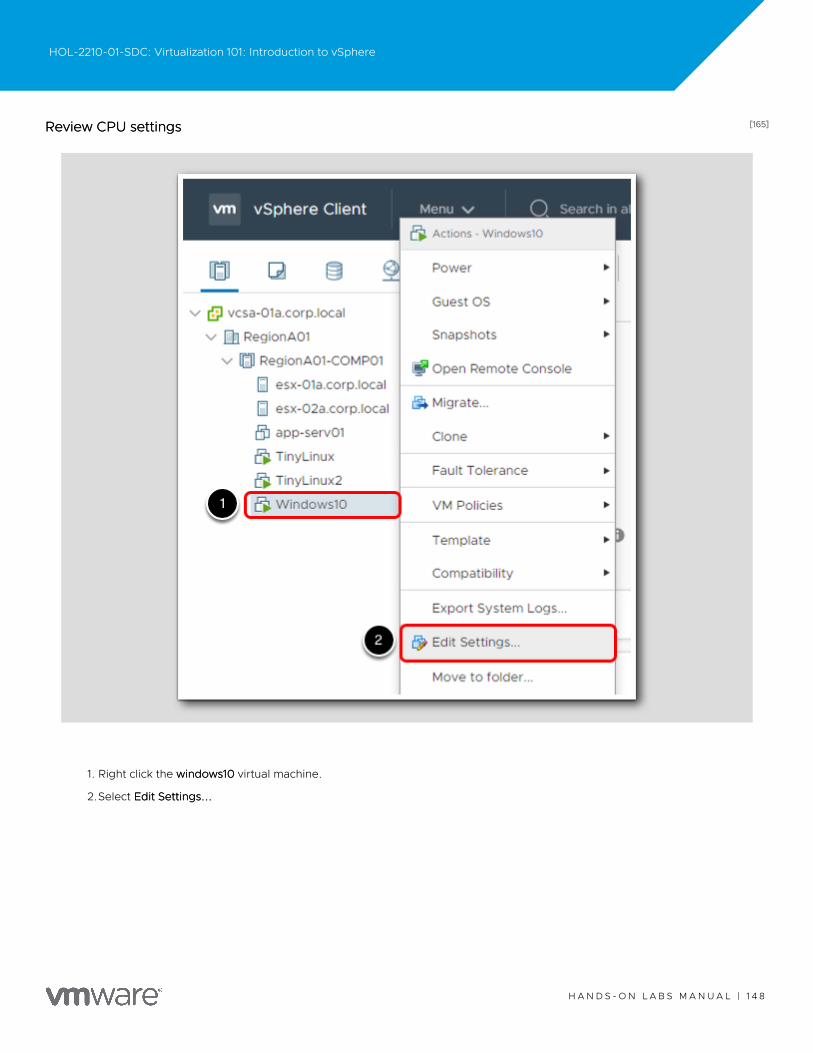
[165][165]Review CPU settingsReview CPU settings
1. Right click the windows10windows10 virtual machine.
2.Select Edit Settings...Edit Settings...
HOL-2210-01-SDC: Virtualization 101: Introduction to vSphere
H A N D S - O N L A B S M A N U A L | 1 4 8
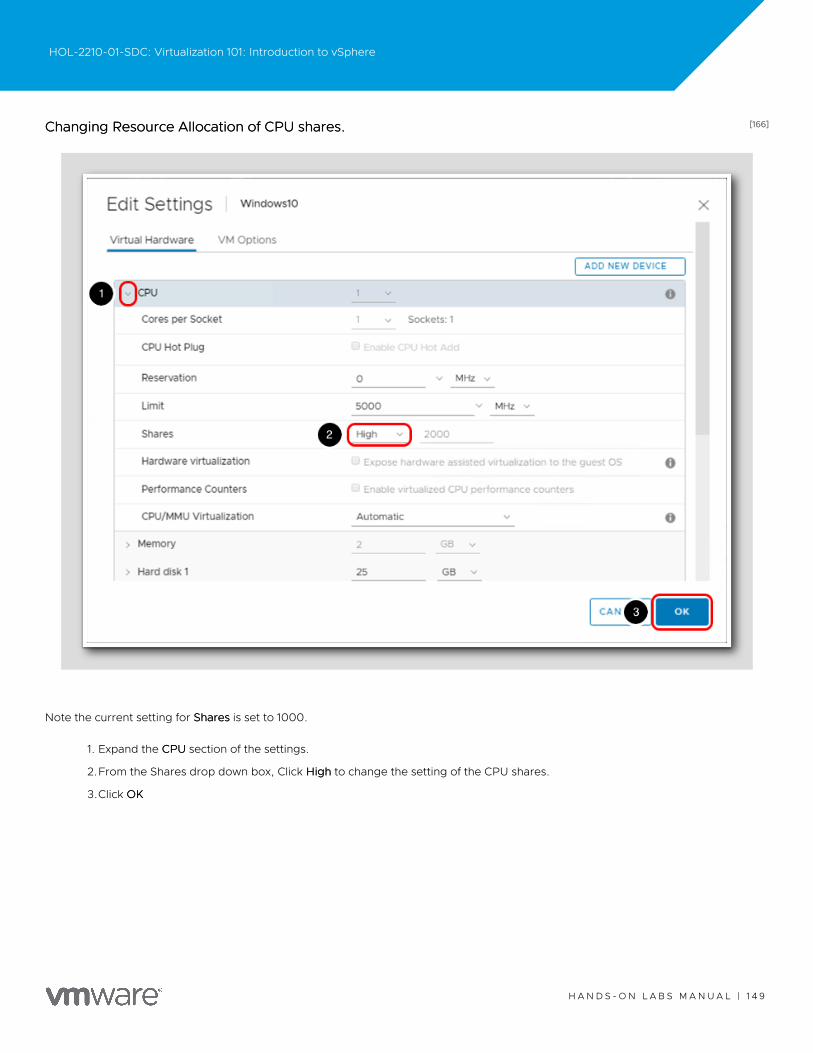
[166][166]Changing Resource Allocation of CPU shares.Changing Resource Allocation of CPU shares.
Note the current setting for SharesShares is set to 1000.
1. Expand the CPUCPU section of the settings.
2.From the Shares drop down box, Click HighHigh to change the setting of the CPU shares.
3.Click OKOK
HOL-2210-01-SDC: Virtualization 101: Introduction to vSphere
H A N D S - O N L A B S M A N U A L | 1 4 9
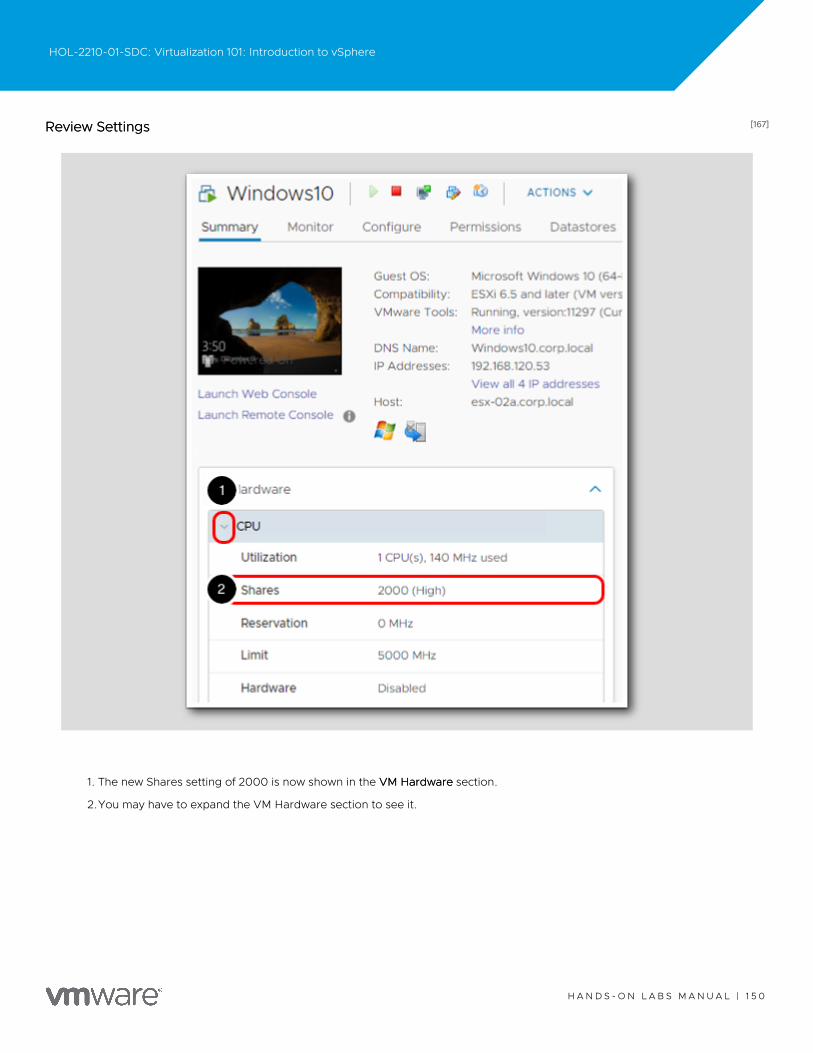
[167][167]Review SettingsReview Settings
1. The new Shares setting of 2000 is now shown in the VM HardwareVM Hardware section.
2.You may have to expand the VM Hardware section to see it.
HOL-2210-01-SDC: Virtualization 101: Introduction to vSphere
H A N D S - O N L A B S M A N U A L | 1 5 0
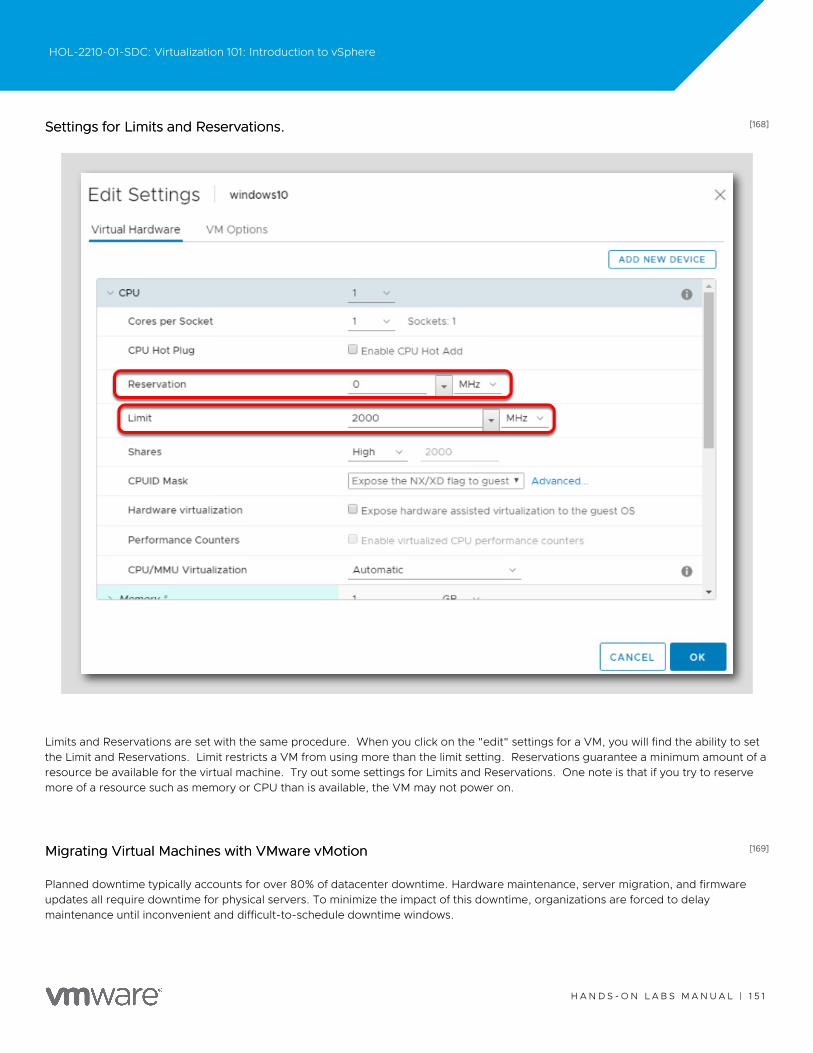
[168][168]Settings for Limits and Reservations.Settings for Limits and Reservations.
Limits and Reservations are set with the same procedure. When you click on the "edit" settings for a VM, you will find the ability to setthe Limit and Reservations. Limit restricts a VM from using more than the limit setting. Reservations guarantee a minimum amount of aresource be available for the virtual machine. Try out some settings for Limits and Reservations. One note is that if you try to reservemore of a resource such as memory or CPU than is available, the VM may not power on.
[169][169]Migrating Virtual Machines with VMware vMotionMigrating Virtual Machines with VMware vMotion
Planned downtime typically accounts for over 80% of datacenter downtime. Hardware maintenance, server migration, and firmwareupdates all require downtime for physical servers. To minimize the impact of this downtime, organizations are forced to delaymaintenance until inconvenient and difficult-to-schedule downtime windows.
HOL-2210-01-SDC: Virtualization 101: Introduction to vSphere
H A N D S - O N L A B S M A N U A L | 1 5 1
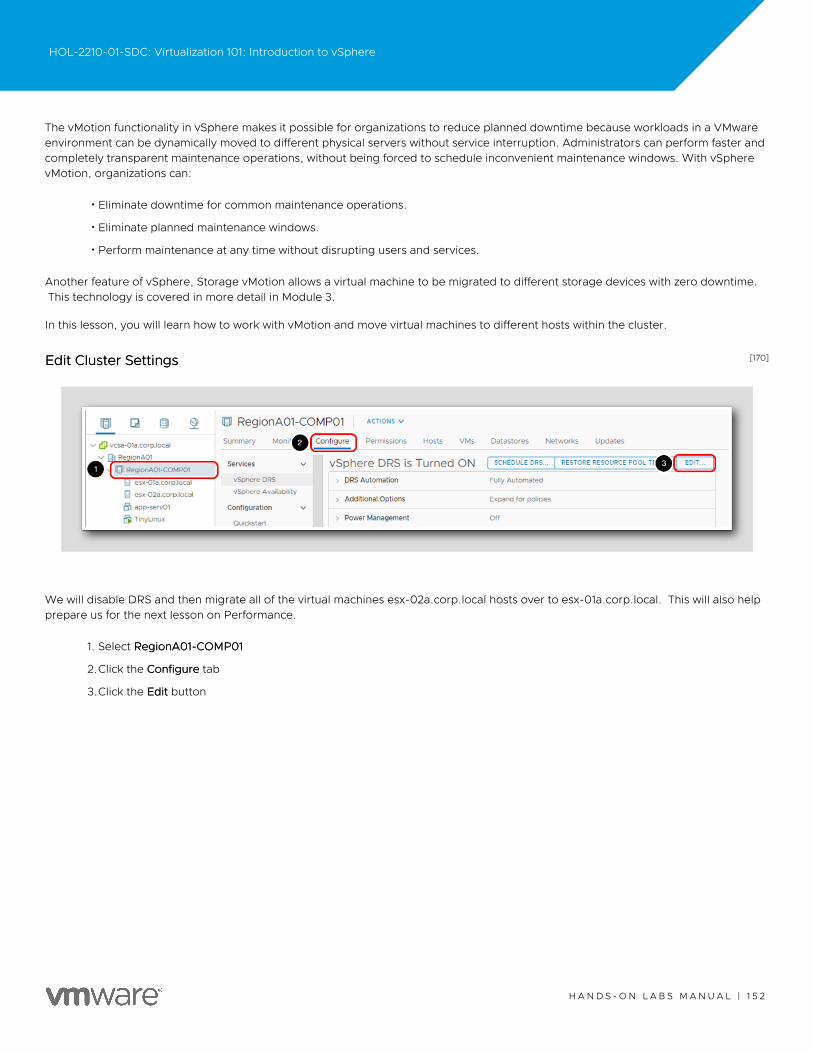
The vMotion functionality in vSphere makes it possible for organizations to reduce planned downtime because workloads in a VMwareenvironment can be dynamically moved to different physical servers without service interruption. Administrators can perform faster andcompletely transparent maintenance operations, without being forced to schedule inconvenient maintenance windows. With vSpherevMotion, organizations can:
•Eliminate downtime for common maintenance operations.
•Eliminate planned maintenance windows.
•Perform maintenance at any time without disrupting users and services.
Another feature of vSphere, Storage vMotion allows a virtual machine to be migrated to different storage devices with zero downtime.This technology is covered in more detail in Module 3.
In this lesson, you will learn how to work with vMotion and move virtual machines to different hosts within the cluster.
[170][170]Edit Cluster SettingsEdit Cluster Settings
We will disable DRS and then migrate all of the virtual machines esx-02a.corp.local hosts over to esx-01a.corp.local. This will also helpprepare us for the next lesson on Performance.
1. Select RegionA01-COMP01RegionA01-COMP01
2.Click the ConfigureConfigure tab
3.Click the EditEdit button
HOL-2210-01-SDC: Virtualization 101: Introduction to vSphere
H A N D S - O N L A B S M A N U A L | 1 5 2
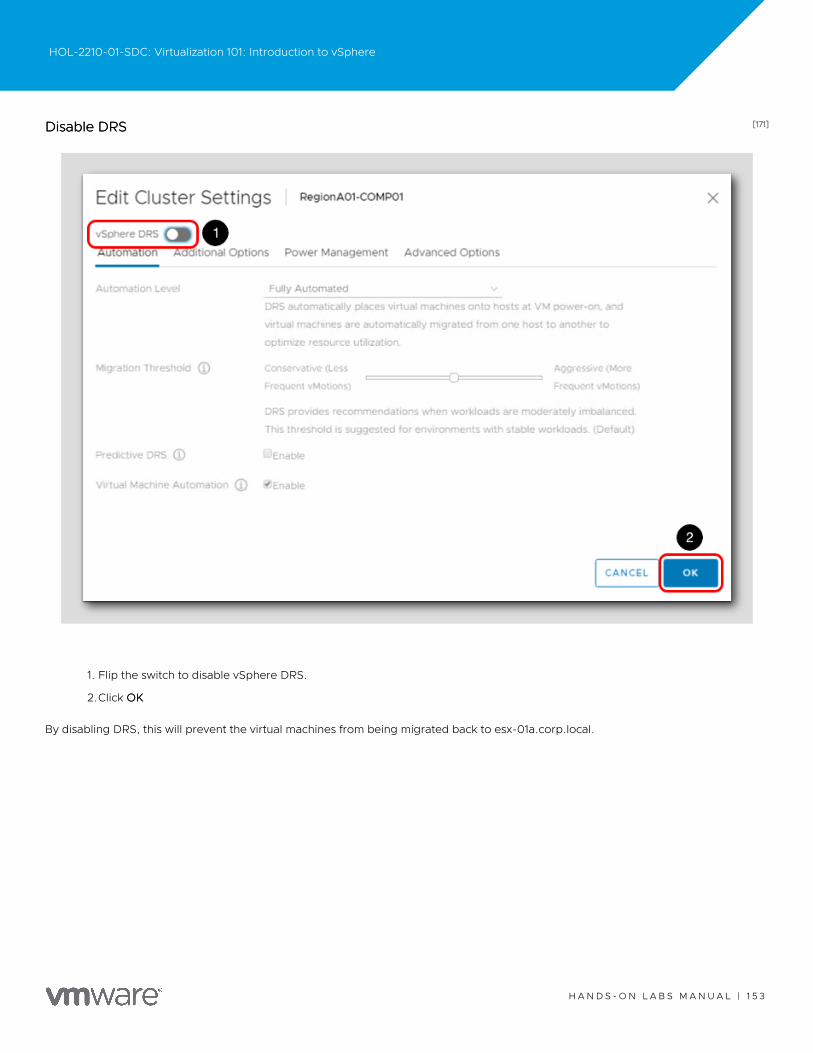
[171][171]Disable DRSDisable DRS
1. Flip the switch to disable vSphere DRS.
2.Click OKOK
By disabling DRS, this will prevent the virtual machines from being migrated back to esx-01a.corp.local.
HOL-2210-01-SDC: Virtualization 101: Introduction to vSphere
H A N D S - O N L A B S M A N U A L | 1 5 3
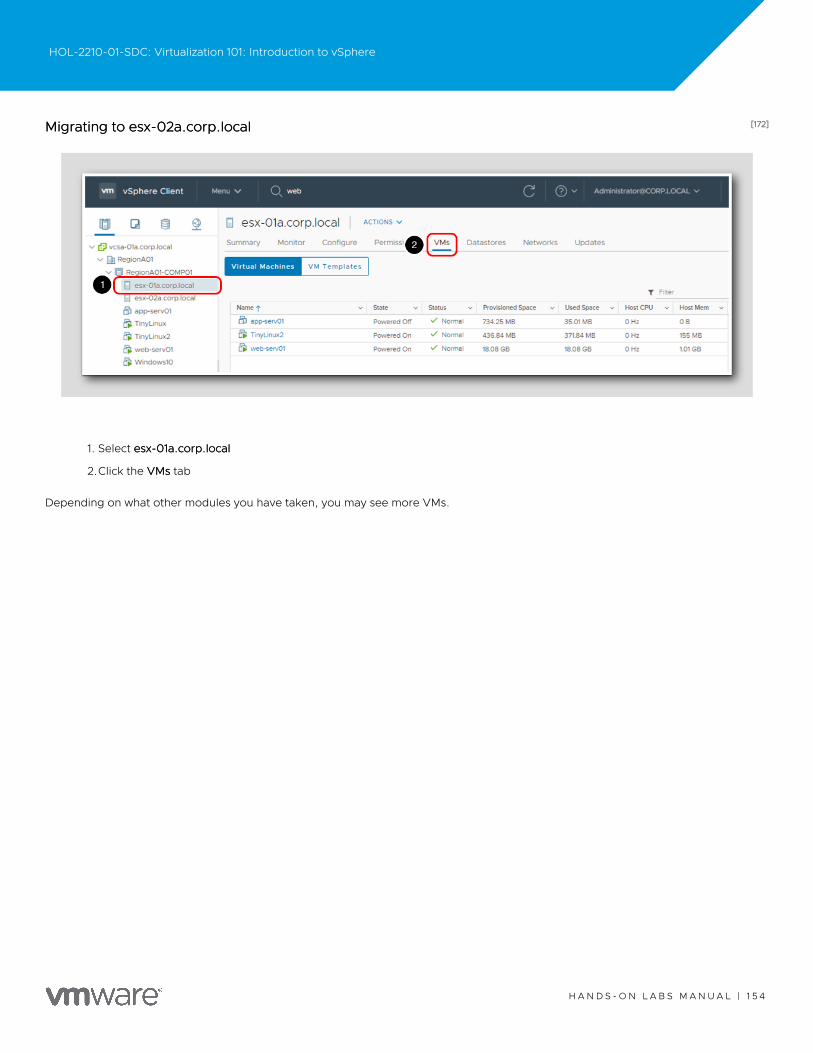
[172][172]Migrating to esx-02a.corp.localMigrating to esx-02a.corp.local
1. Select esx-01a.corp.localesx-01a.corp.local
2.Click the VMsVMs tab
Depending on what other modules you have taken, you may see more VMs.
HOL-2210-01-SDC: Virtualization 101: Introduction to vSphere
H A N D S - O N L A B S M A N U A L | 1 5 4

[173][173]Power on VMsPower on VMs
1. Look for any virtual machines that are Powered OffPowered Off and select them. Multiple virtual machines can be selected by holding the
CtrlCtrl key and clicking on them.
2.Right click and select PowerPower/Power OnPower On
Do this for every powered off virtual machine, otherwise the next step will fail.
HOL-2210-01-SDC: Virtualization 101: Introduction to vSphere
H A N D S - O N L A B S M A N U A L | 1 5 5
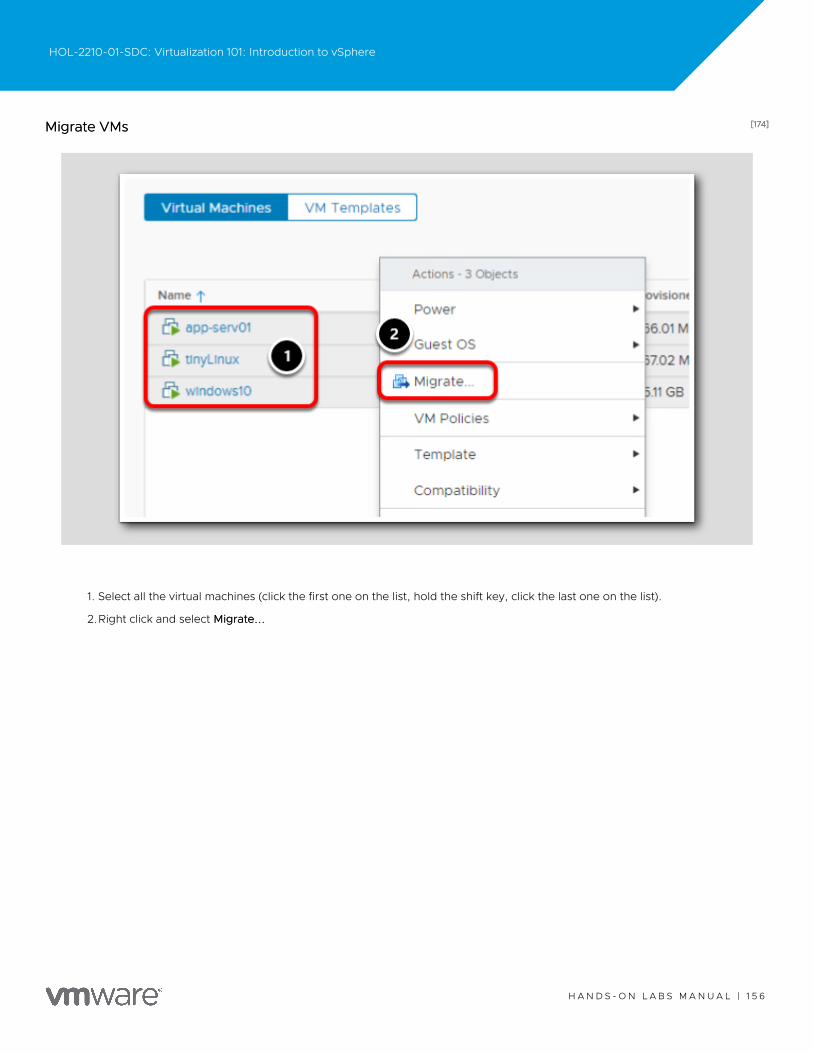
[174][174]Migrate VMsMigrate VMs
1. Select all the virtual machines (click the first one on the list, hold the shift key, click the last one on the list).
2.Right click and select Migrate...Migrate...
HOL-2210-01-SDC: Virtualization 101: Introduction to vSphere
H A N D S - O N L A B S M A N U A L | 1 5 6
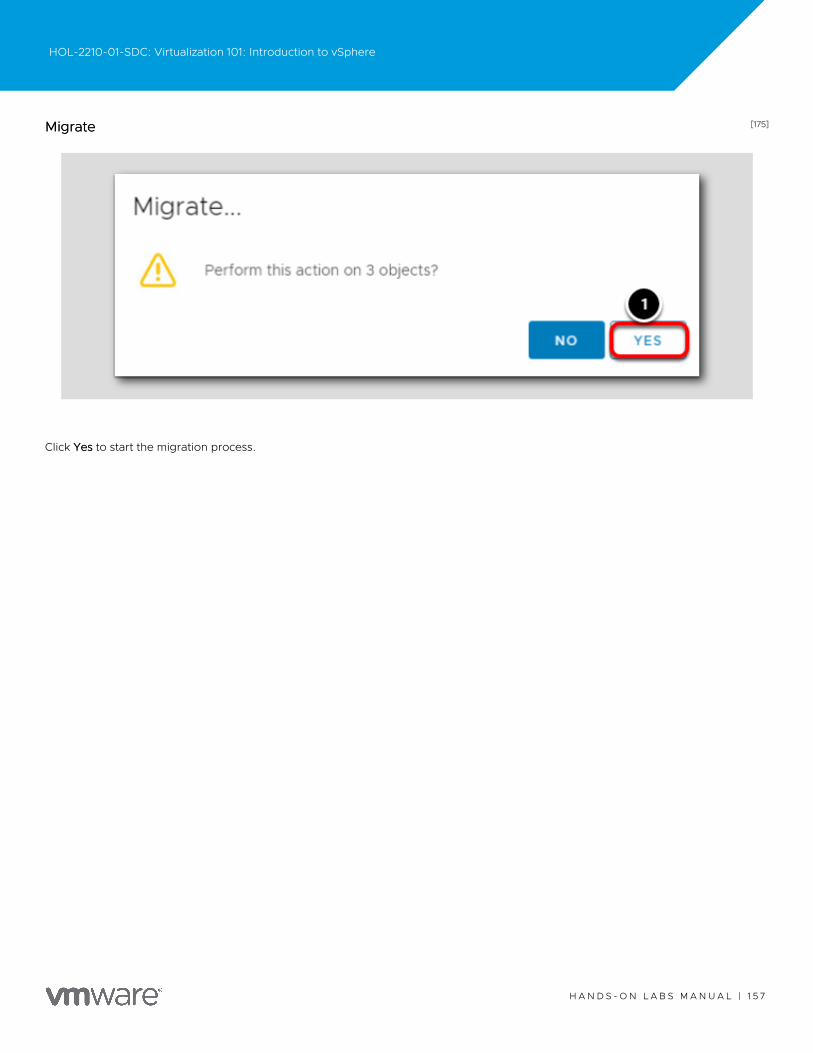
[175][175]MigrateMigrate
Click YesYes to start the migration process.
HOL-2210-01-SDC: Virtualization 101: Introduction to vSphere
H A N D S - O N L A B S M A N U A L | 1 5 7

[176][176]Migration TypeMigration Type
1. Leave the default setting and click NextNext
In addition to changing what ESXi host the virtual machine will run on (using compute resources), the virtual machine can be moved todifferent datastores (storage) if needed, A virtual machine can also be moved to a different host and storage at the same time, More onmigrating to different storage is covered in Module 3, in the Storage vMotion lesson.
HOL-2210-01-SDC: Virtualization 101: Introduction to vSphere
H A N D S - O N L A B S M A N U A L | 1 5 8
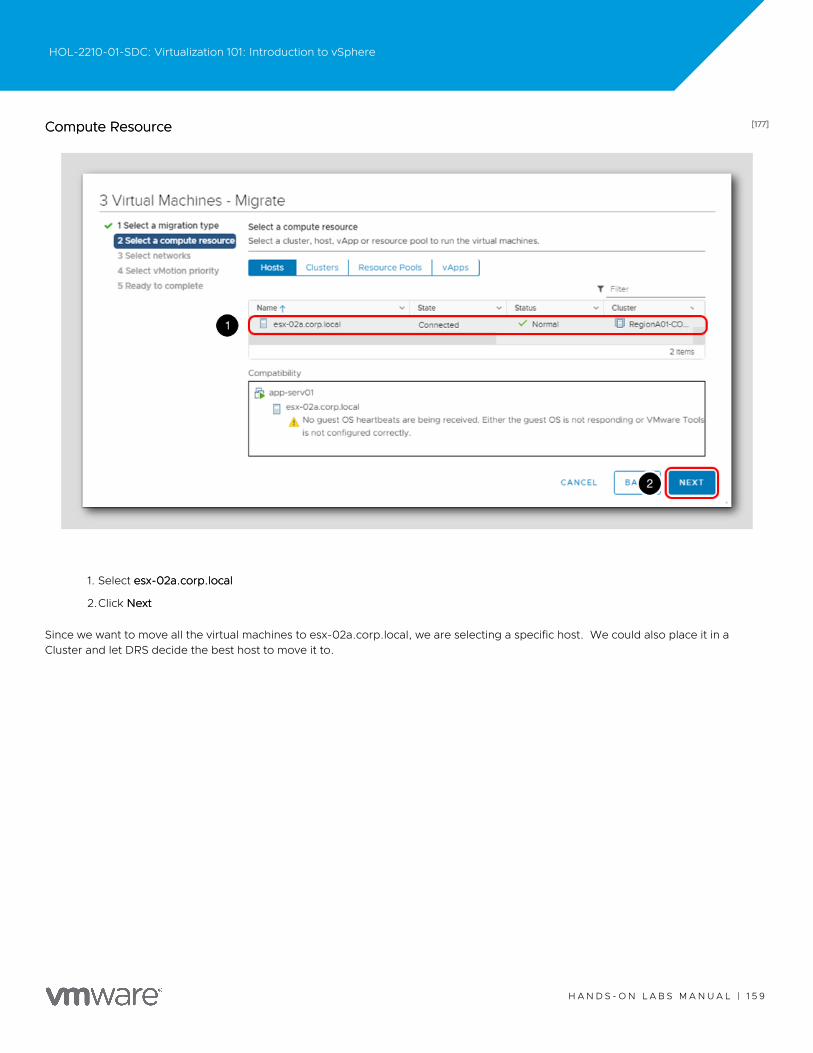
[177][177]Compute ResourceCompute Resource
1. Select esx-02a.corp.localesx-02a.corp.local
2.Click NextNext
Since we want to move all the virtual machines to esx-02a.corp.local, we are selecting a specific host. We could also place it in aCluster and let DRS decide the best host to move it to.
HOL-2210-01-SDC: Virtualization 101: Introduction to vSphere
H A N D S - O N L A B S M A N U A L | 1 5 9

[178][178]NetworksNetworks
In most cases, the network adapter will not need to be changed.
1. Click NextNext
HOL-2210-01-SDC: Virtualization 101: Introduction to vSphere
H A N D S - O N L A B S M A N U A L | 1 6 0
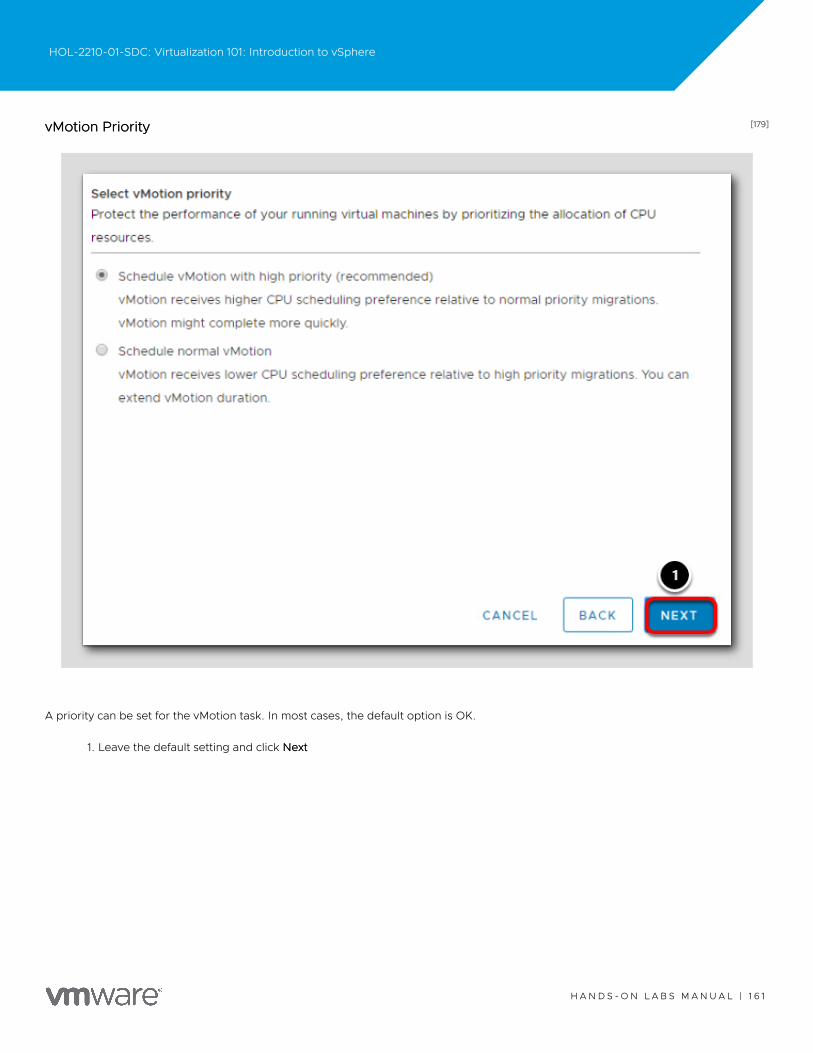
[179][179]vMotion PriorityvMotion Priority
A priority can be set for the vMotion task. In most cases, the default option is OK.
1. Leave the default setting and click NextNext
HOL-2210-01-SDC: Virtualization 101: Introduction to vSphere
H A N D S - O N L A B S M A N U A L | 1 6 1
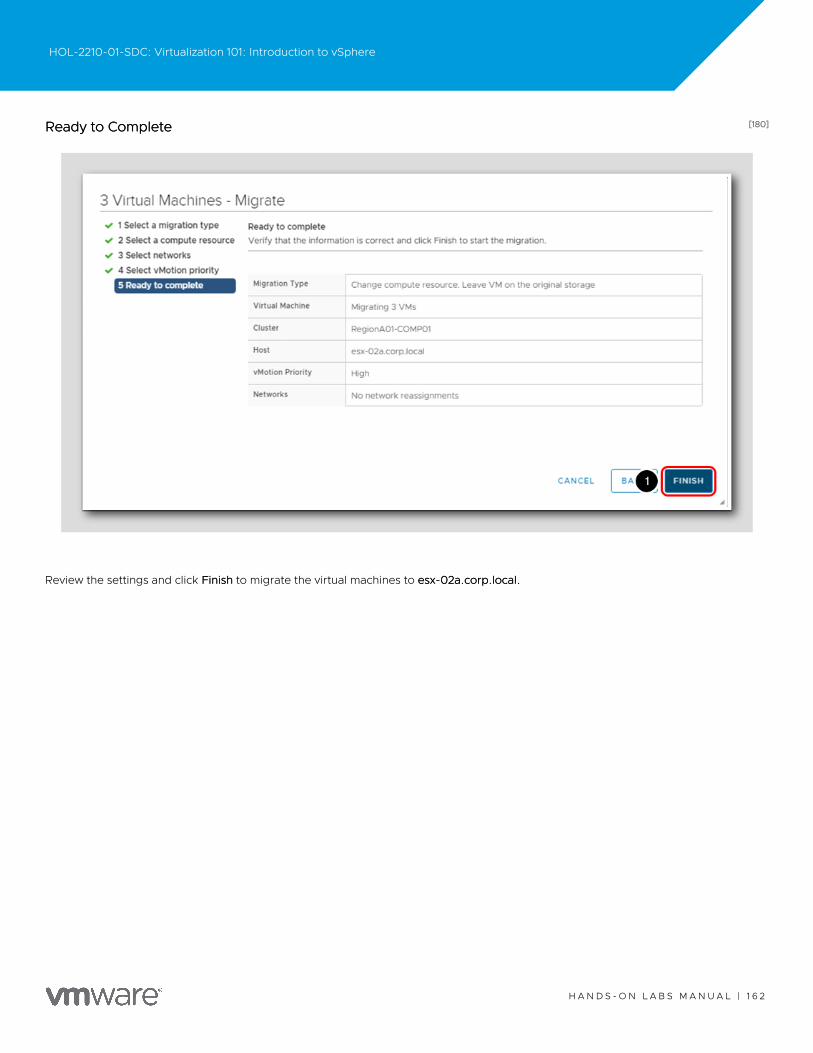
[180][180]Ready to CompleteReady to Complete
Review the settings and click FinishFinish to migrate the virtual machines to esx-02a.corp.local.esx-02a.corp.local.
HOL-2210-01-SDC: Virtualization 101: Introduction to vSphere
H A N D S - O N L A B S M A N U A L | 1 6 2

[181][181]Monitor ProgressMonitor Progress
You can monitor progress using Recent Tasks.
HOL-2210-01-SDC: Virtualization 101: Introduction to vSphere
H A N D S - O N L A B S M A N U A L | 1 6 3
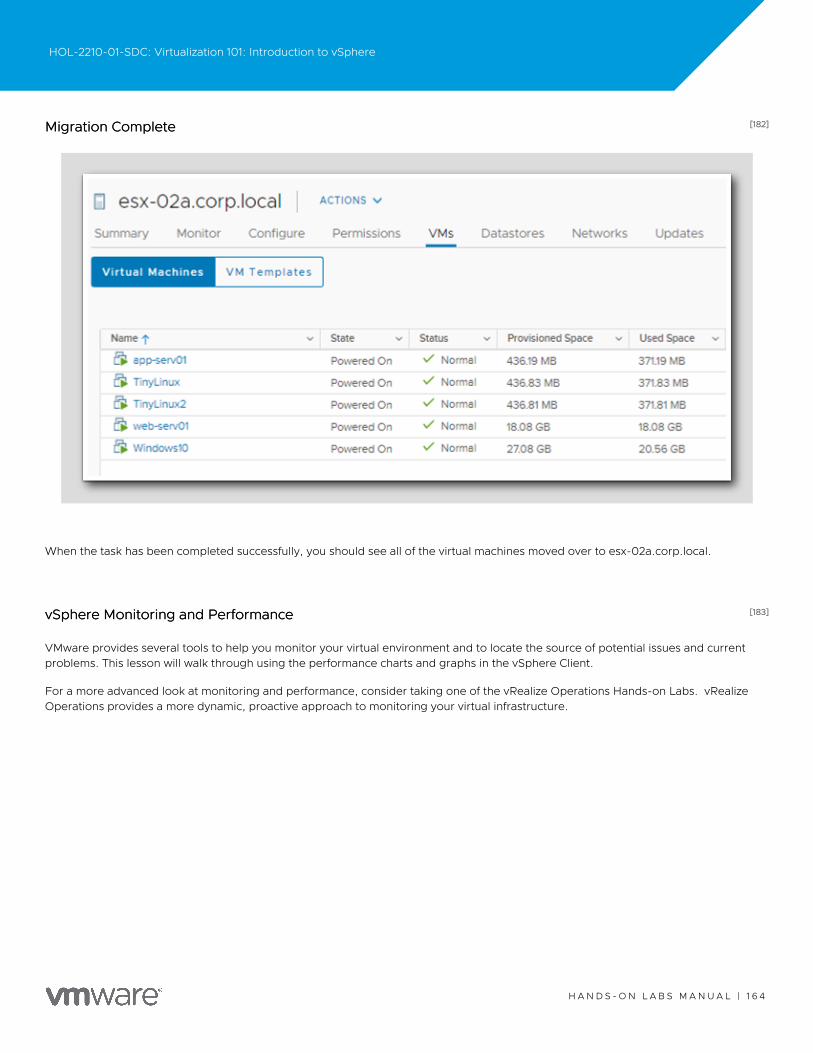
[182][182]Migration CompleteMigration Complete
When the task has been completed successfully, you should see all of the virtual machines moved over to esx-02a.corp.local.
[183][183]vSphere Monitoring and PerformancevSphere Monitoring and Performance
VMware provides several tools to help you monitor your virtual environment and to locate the source of potential issues and currentproblems. This lesson will walk through using the performance charts and graphs in the vSphere Client.
For a more advanced look at monitoring and performance, consider taking one of the vRealize Operations Hands-on Labs. vRealizeOperations provides a more dynamic, proactive approach to monitoring your virtual infrastructure.
HOL-2210-01-SDC: Virtualization 101: Introduction to vSphere
H A N D S - O N L A B S M A N U A L | 1 6 4
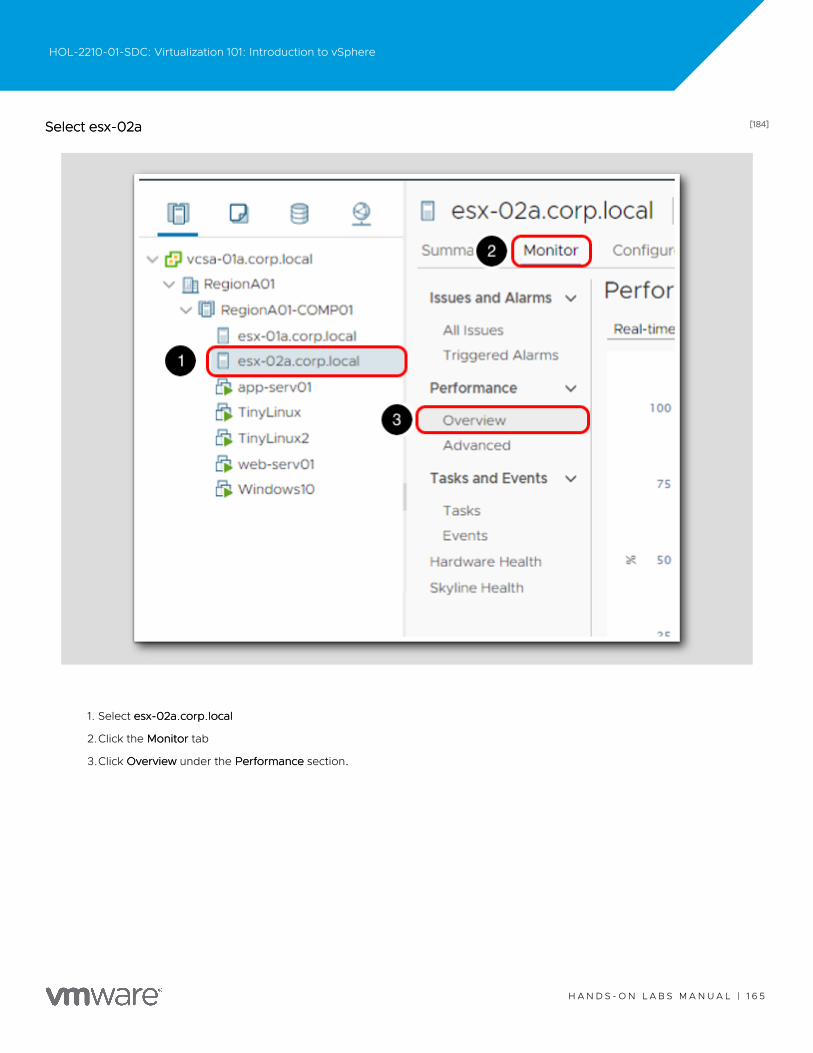
[184][184]Select esx-02aSelect esx-02a
1. Select esx-02a.corp.localesx-02a.corp.local
2.Click the MonitorMonitor tab
3.Click OverviewOverview under the PerformancePerformance section..
HOL-2210-01-SDC: Virtualization 101: Introduction to vSphere
H A N D S - O N L A B S M A N U A L | 1 6 5
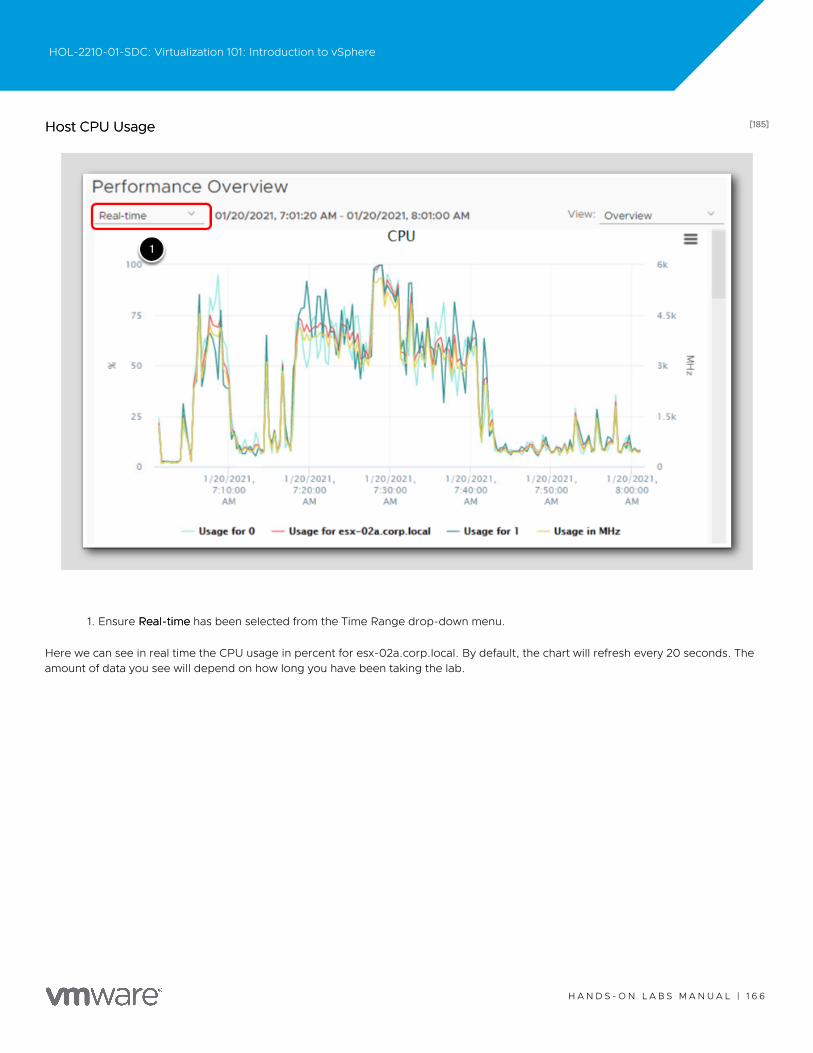
[185][185]Host CPU UsageHost CPU Usage
1. Ensure Real-timeReal-time has been selected from the Time Range drop-down menu.
Here we can see in real time the CPU usage in percent for esx-02a.corp.local. By default, the chart will refresh every 20 seconds. Theamount of data you see will depend on how long you have been taking the lab.
HOL-2210-01-SDC: Virtualization 101: Introduction to vSphere
H A N D S - O N L A B S M A N U A L | 1 6 6
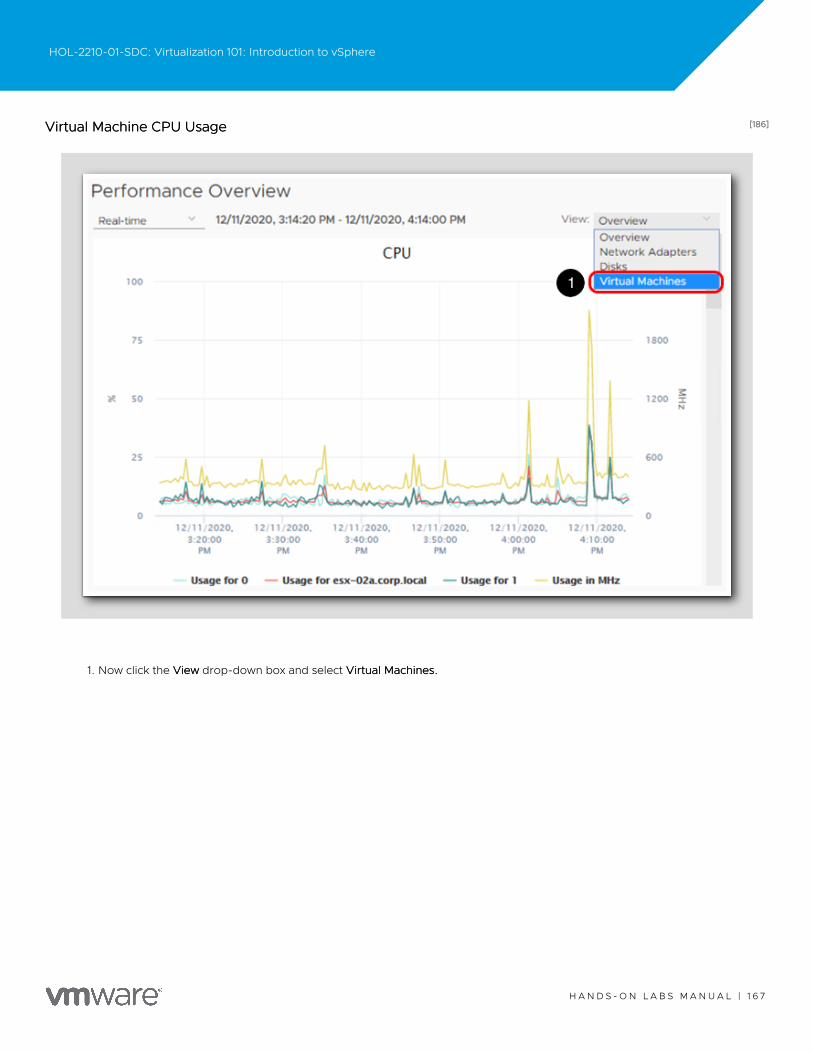
[186][186]Virtual Machine CPU UsageVirtual Machine CPU Usage
1. Now click the ViewView drop-down box and select Virtual Machines.Virtual Machines.
HOL-2210-01-SDC: Virtualization 101: Introduction to vSphere
H A N D S - O N L A B S M A N U A L | 1 6 7
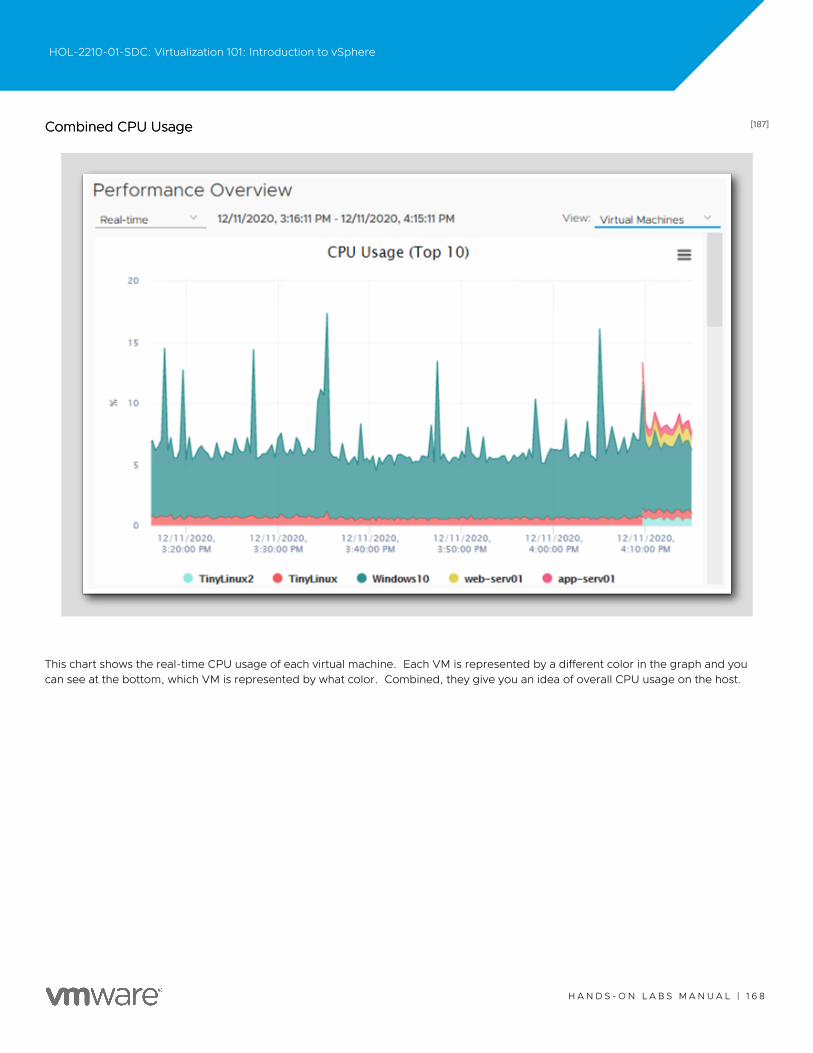
[187][187]Combined CPU UsageCombined CPU Usage
This chart shows the real-time CPU usage of each virtual machine. Each VM is represented by a different color in the graph and youcan see at the bottom, which VM is represented by what color. Combined, they give you an idea of overall CPU usage on the host.
HOL-2210-01-SDC: Virtualization 101: Introduction to vSphere
H A N D S - O N L A B S M A N U A L | 1 6 8
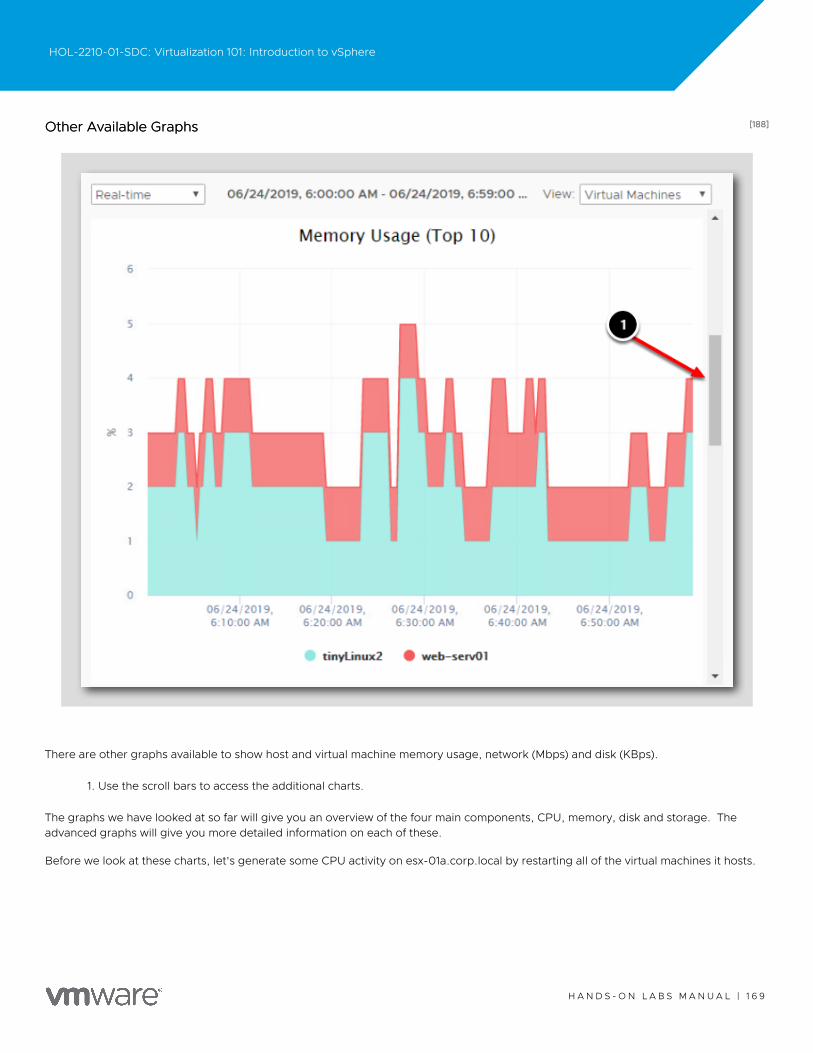
[188][188]Other Available GraphsOther Available Graphs
There are other graphs available to show host and virtual machine memory usage, network (Mbps) and disk (KBps).
1. Use the scroll bars to access the additional charts.
The graphs we have looked at so far will give you an overview of the four main components, CPU, memory, disk and storage. Theadvanced graphs will give you more detailed information on each of these.
Before we look at these charts, let's generate some CPU activity on esx-01a.corp.local by restarting all of the virtual machines it hosts.
HOL-2210-01-SDC: Virtualization 101: Introduction to vSphere
H A N D S - O N L A B S M A N U A L | 1 6 9
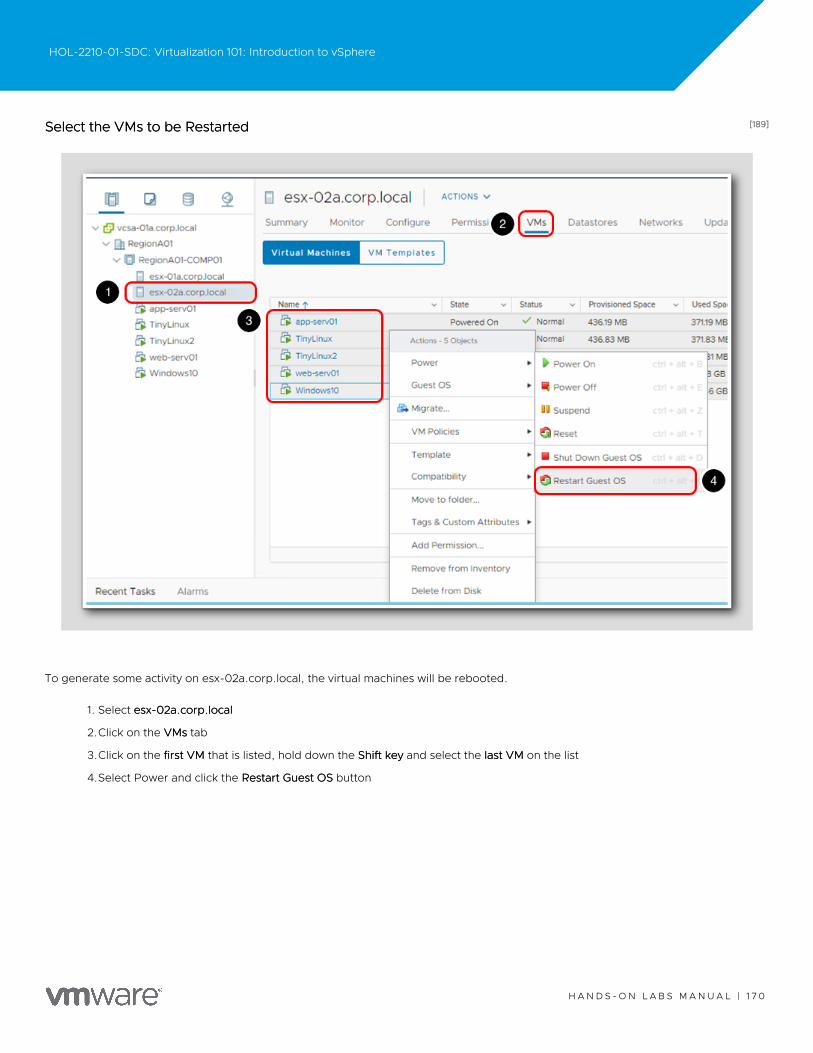
[189][189]Select the VMs to be RestartedSelect the VMs to be Restarted
To generate some activity on esx-02a.corp.local, the virtual machines will be rebooted.
1. Select esx-02a.corp.localesx-02a.corp.local
2.Click on the VMsVMs tab
3.Click on the first VMfirst VM that is listed, hold down the Shift keyShift key and select the last VMlast VM on the list
4.Select Power and click the RestartRestart Guest OSGuest OS button
HOL-2210-01-SDC: Virtualization 101: Introduction to vSphere
H A N D S - O N L A B S M A N U A L | 1 7 0
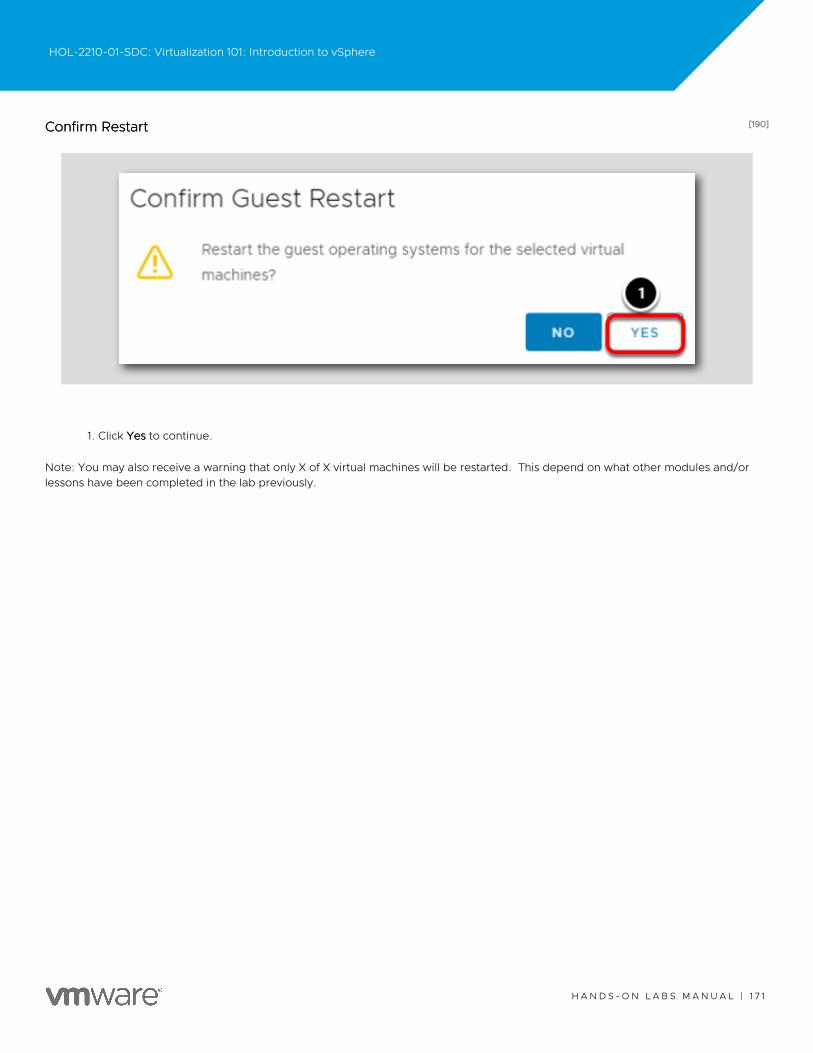
[190][190]Confirm RestartConfirm Restart
1. Click YesYes to continue.
Note: You may also receive a warning that only X of X virtual machines will be restarted. This depend on what other modules and/orlessons have been completed in the lab previously.
HOL-2210-01-SDC: Virtualization 101: Introduction to vSphere
H A N D S - O N L A B S M A N U A L | 1 7 1
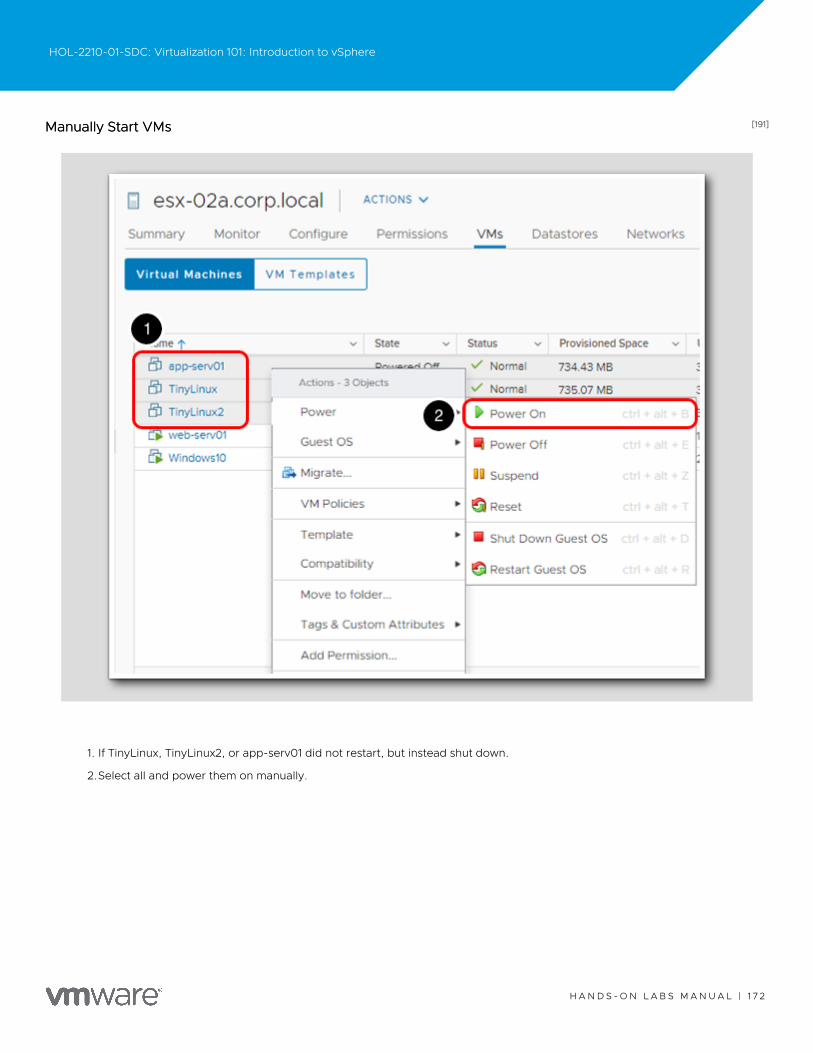
[191][191]Manually Start VMsManually Start VMs
1. If TinyLinux, TinyLinux2, or app-serv01 did not restart, but instead shut down.
2.Select all and power them on manually.
HOL-2210-01-SDC: Virtualization 101: Introduction to vSphere
H A N D S - O N L A B S M A N U A L | 1 7 2

[192][192]Monitor PerformanceMonitor Performance
1. Click on the MonitorMonitor tab.
2.Click AdvancedAdvanced in the Performance section.
HOL-2210-01-SDC: Virtualization 101: Introduction to vSphere
H A N D S - O N L A B S M A N U A L | 1 7 3

[193][193]Chart OptionsChart Options
1. Click the Chart OptionsChart Options link.
This will bring up options to customize the chart.
HOL-2210-01-SDC: Virtualization 101: Introduction to vSphere
H A N D S - O N L A B S M A N U A L | 1 7 4
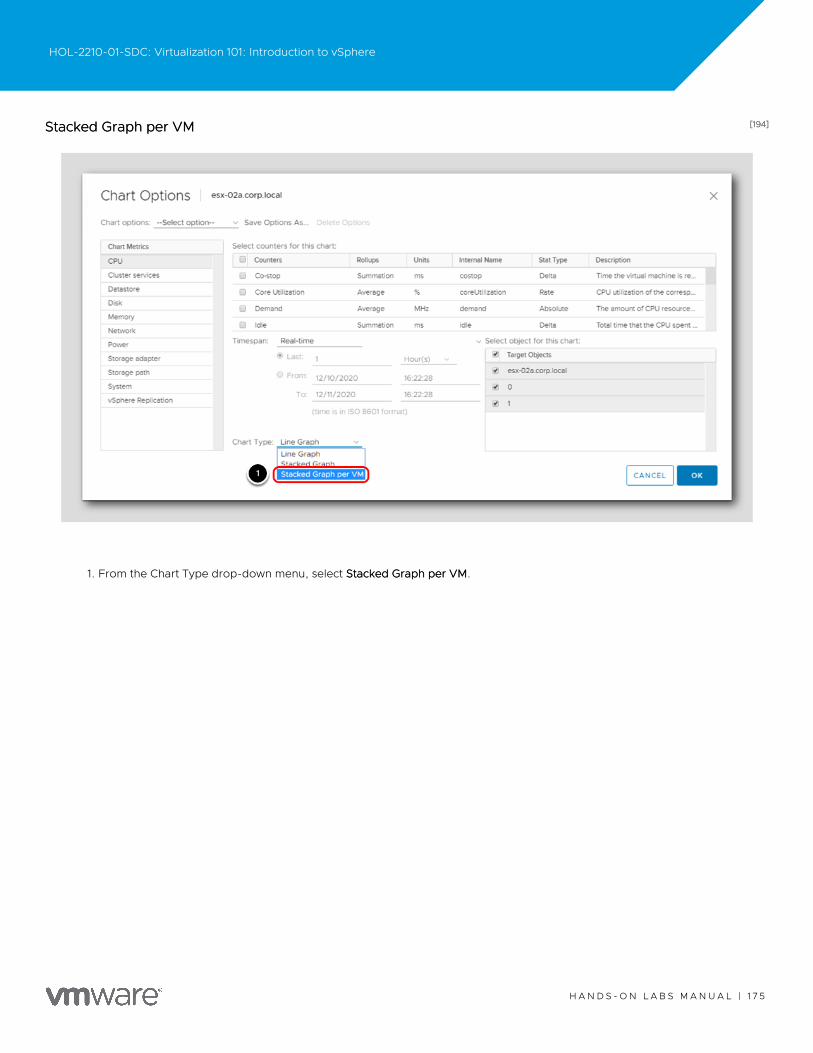
[194][194]Stacked Graph per VMStacked Graph per VM
1. From the Chart Type drop-down menu, select Stacked Graph per VMStacked Graph per VM.
HOL-2210-01-SDC: Virtualization 101: Introduction to vSphere
H A N D S - O N L A B S M A N U A L | 1 7 5

[195][195]Select ObjectsSelect Objects
1. Under the Select objects for this chart box, verify all the virtual machines are selected.
2.Click the OKOK button to see the newly customized chart.
HOL-2210-01-SDC: Virtualization 101: Introduction to vSphere
H A N D S - O N L A B S M A N U A L | 1 7 6
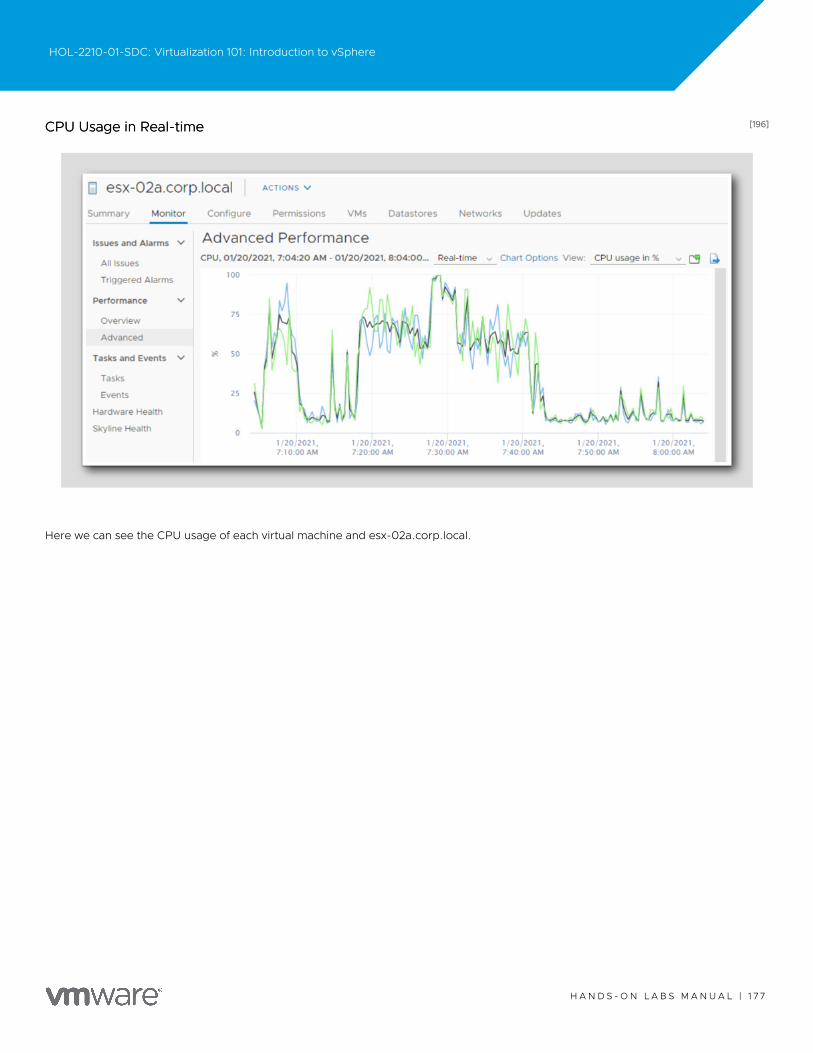
[196][196]CPU Usage in Real-timeCPU Usage in Real-time
Here we can see the CPU usage of each virtual machine and esx-02a.corp.local.
HOL-2210-01-SDC: Virtualization 101: Introduction to vSphere
H A N D S - O N L A B S M A N U A L | 1 7 7
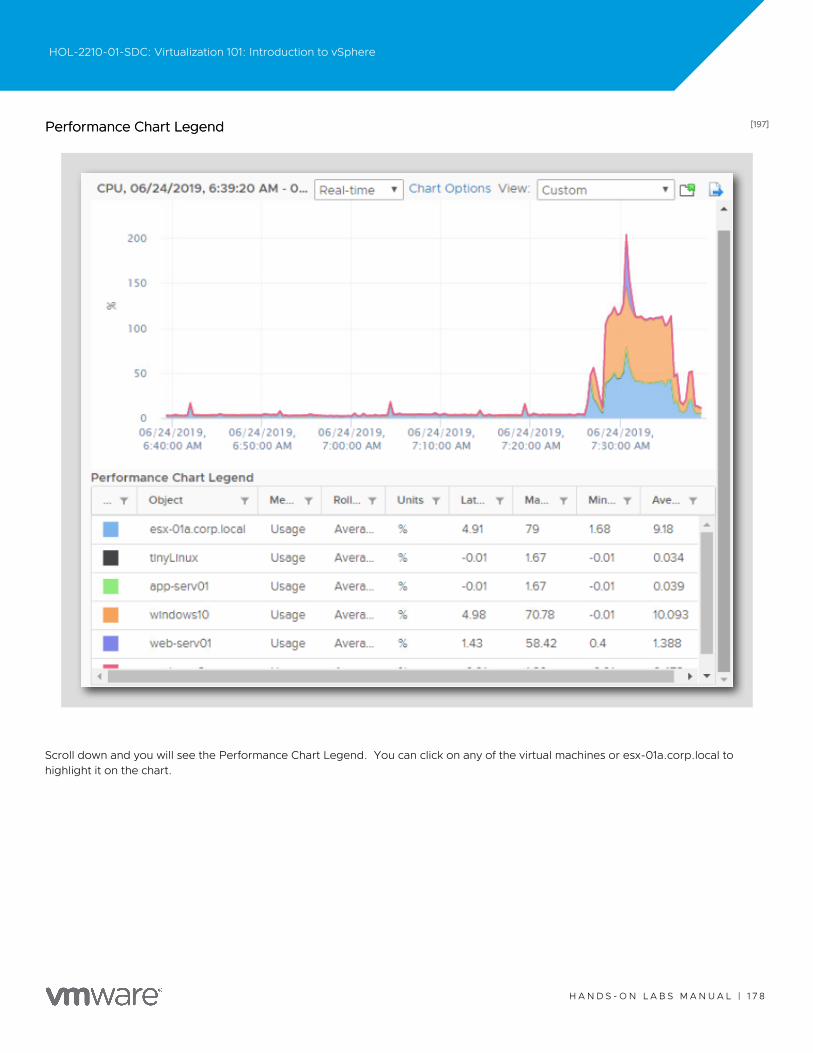
[197][197]Performance Chart LegendPerformance Chart Legend
Scroll down and you will see the Performance Chart Legend. You can click on any of the virtual machines or esx-01a.corp.local tohighlight it on the chart.
HOL-2210-01-SDC: Virtualization 101: Introduction to vSphere
H A N D S - O N L A B S M A N U A L | 1 7 8
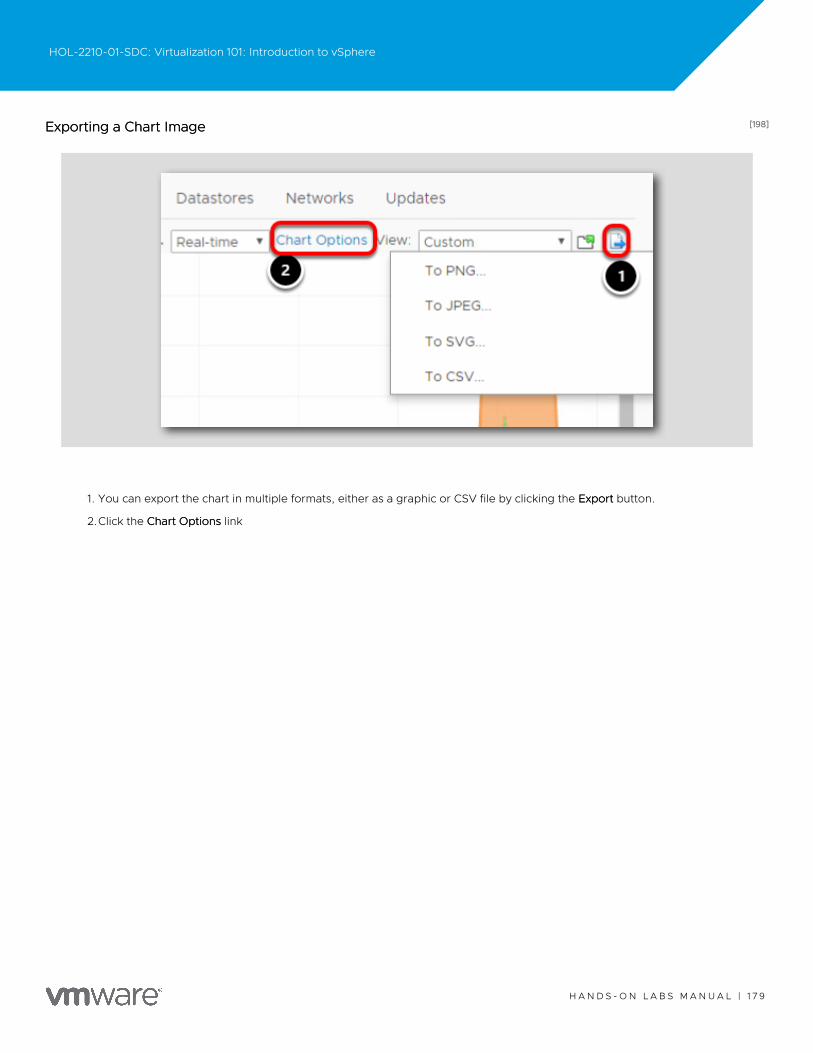
[198][198]Exporting a Chart ImageExporting a Chart Image
1. You can export the chart in multiple formats, either as a graphic or CSV file by clicking the ExportExport button.
2.Click the Chart OptionsChart Options link
HOL-2210-01-SDC: Virtualization 101: Introduction to vSphere
H A N D S - O N L A B S M A N U A L | 1 7 9
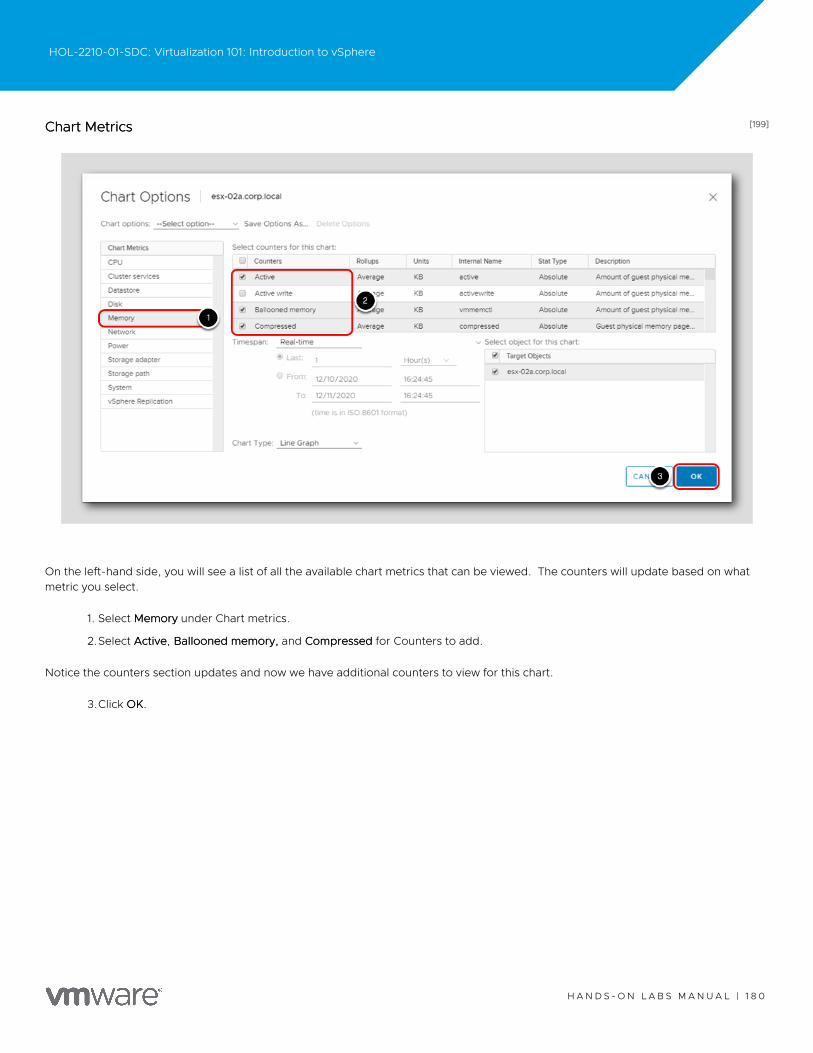
[199][199]Chart MetricsChart Metrics
On the left-hand side, you will see a list of all the available chart metrics that can be viewed. The counters will update based on whatmetric you select.
1. Select MemoryMemory under Chart metrics.
2.Select ActiveActive, Ballooned memory,Ballooned memory, and CompressedCompressed for Counters to add.
Notice the counters section updates and now we have additional counters to view for this chart.
3.Click OKOK.
HOL-2210-01-SDC: Virtualization 101: Introduction to vSphere
H A N D S - O N L A B S M A N U A L | 1 8 0
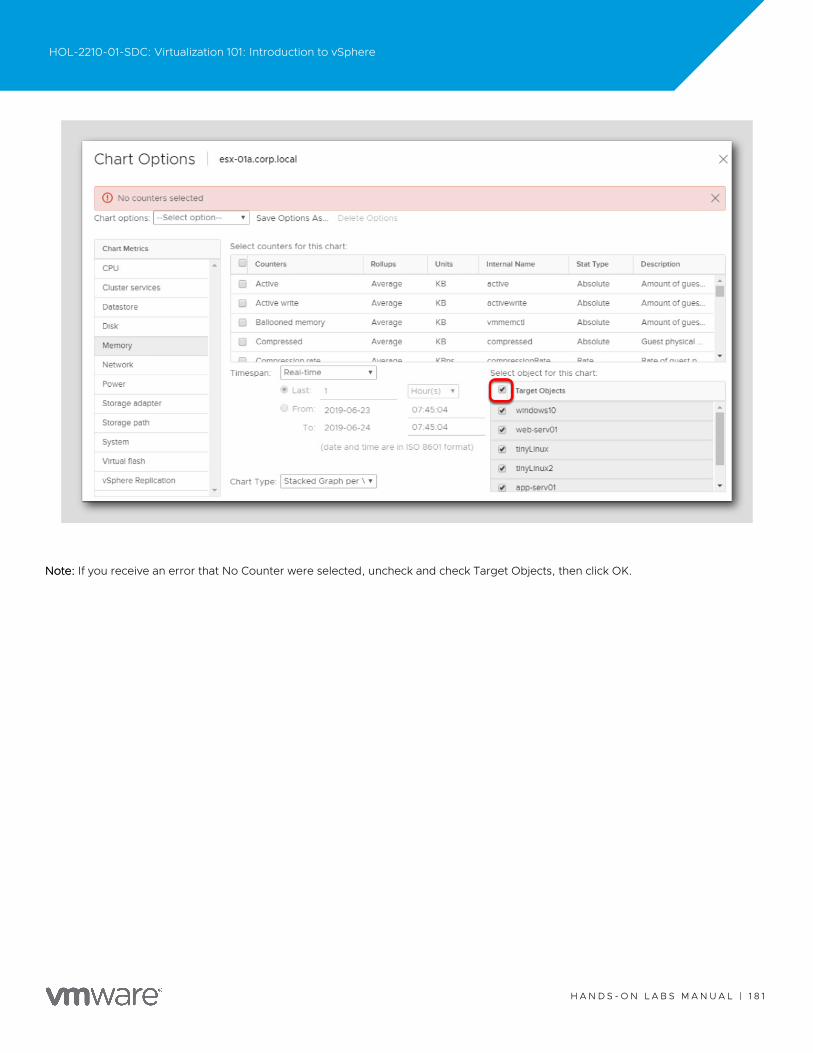
Note:Note: If you receive an error that No Counter were selected, uncheck and check Target Objects, then click OK.
HOL-2210-01-SDC: Virtualization 101: Introduction to vSphere
H A N D S - O N L A B S M A N U A L | 1 8 1
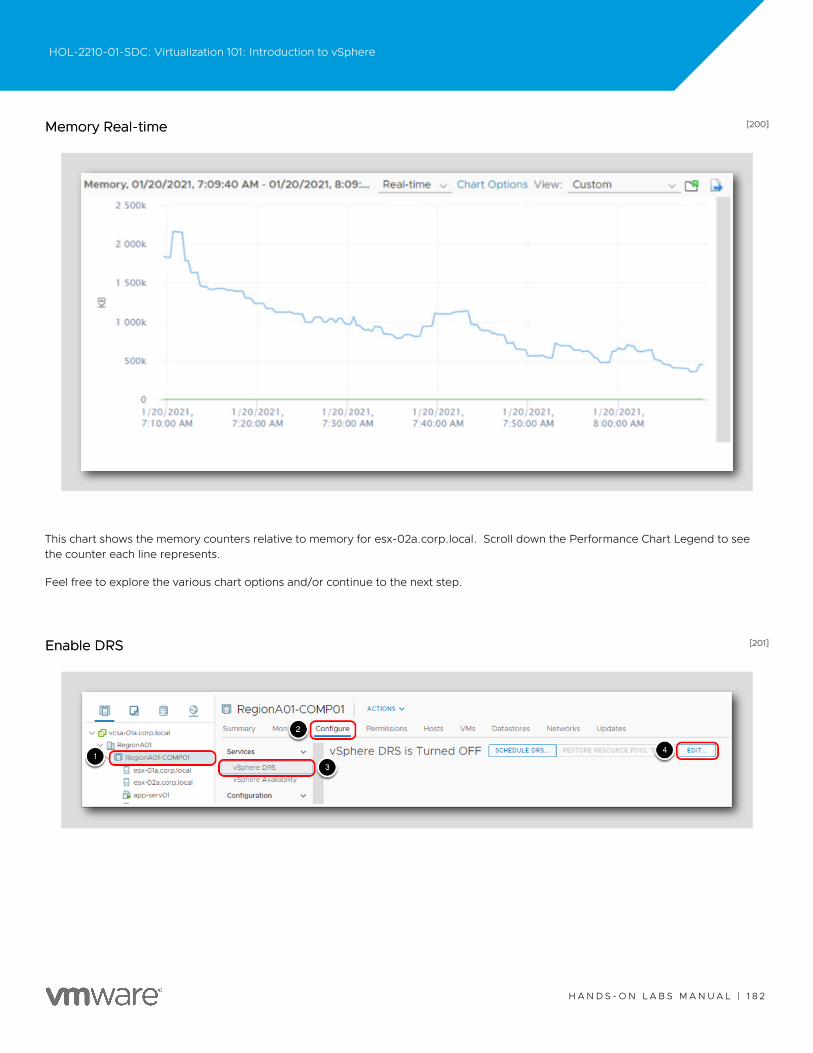
[200][200]Memory Real-timeMemory Real-time
This chart shows the memory counters relative to memory for esx-02a.corp.local. Scroll down the Performance Chart Legend to seethe counter each line represents.
Feel free to explore the various chart options and/or continue to the next step.
[201][201]Enable DRSEnable DRS
HOL-2210-01-SDC: Virtualization 101: Introduction to vSphere
H A N D S - O N L A B S M A N U A L | 1 8 2
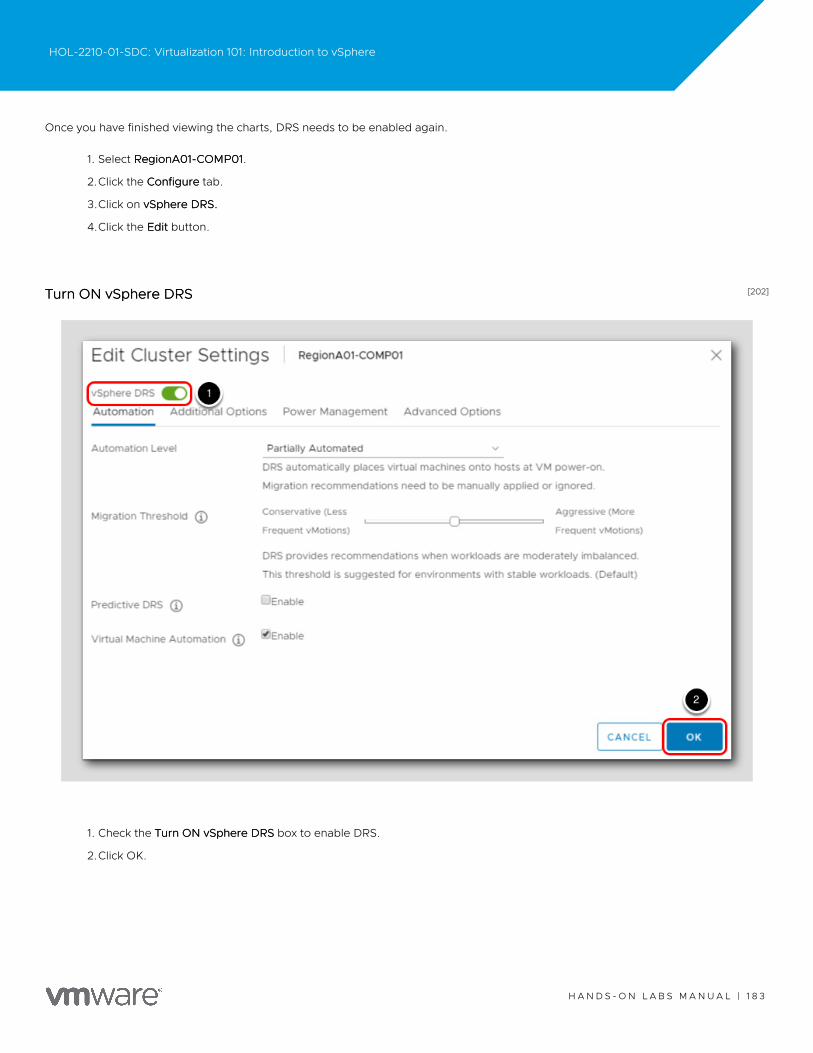
Once you have finished viewing the charts, DRS needs to be enabled again.
1. Select RegionA01-COMP01RegionA01-COMP01.
2.Click the ConfigureConfigure tab.
3.Click on vSphere DRS.vSphere DRS.
4.Click the EditEdit button.
[202][202]Turn ON vSphere DRSTurn ON vSphere DRS
1. Check the Turn ON vSphere DRSTurn ON vSphere DRS box to enable DRS.
2.Click OK.
HOL-2210-01-SDC: Virtualization 101: Introduction to vSphere
H A N D S - O N L A B S M A N U A L | 1 8 3

[203][203]Further InformationFurther Information
For more information on performance charts, you can view the vSphere Monitoring and PerformancevSphere Monitoring and Performance guide.
[204][204]Introduction to vSphere with TanzuIntroduction to vSphere with Tanzu
vSphere 7 is the biggest release of vSphere in over a decade and delivers these innovations and the rearchitecting of vSphere withnative Kubernetes that we introduced at VMworld 2019 as Project Pacific.
[205][205]Common Platform for Running both Kubernetes/Containerized Workloads and VMsCommon Platform for Running both Kubernetes/Containerized Workloads and VMs
Kubernetes is now built into vSphere which allows developers to continue using the same industry-standard tools and interfacesthey’ve been using to create modern applications. vSphere Admins also benefit because they can help manage the Kubernetesinfrastructure using the same tools and skills they have developed around vSphere. To help bridge these two worlds we’ve introduceda new vSphere construct called Namespaces, allowing vSphere Admins to create a logical set of resources, permissions, and policiesthat enable an application-centric approach.
[206][206]Agile Operations for Kubernetes ApplicationsAgile Operations for Kubernetes Applications
We are introducing a lot of value in vSphere with Tanzu for the VI admin. We deliver a new way to manage infrastructure, called‘application-focused management’ for containerized applications. This enables admins to apply policies to an entire group of objectsand organize multiple objects into a logical group and then apply policies to the entire group. For example, an administrator can applysecurity policies and storage limits to a group of containers and Kubernetes clusters that represent an application, rather than to each ofthe objects individually. This helps improve productivity and reduce errors that can be costly to identify and correct.
[207][207]VMware Cloud Foundation ServicesVMware Cloud Foundation Services
vSphere with Tanzu is available through VMware Cloud Foundation 4 with Tanzu. One key innovation available only in VMware CloudFoundation is a set of developer-facing services and a Kubernetes API surface that IT can provision, called VMware Cloud FoundationServices.
HOL-2210-01-SDC: Virtualization 101: Introduction to vSphere
H A N D S - O N L A B S M A N U A L | 1 8 4
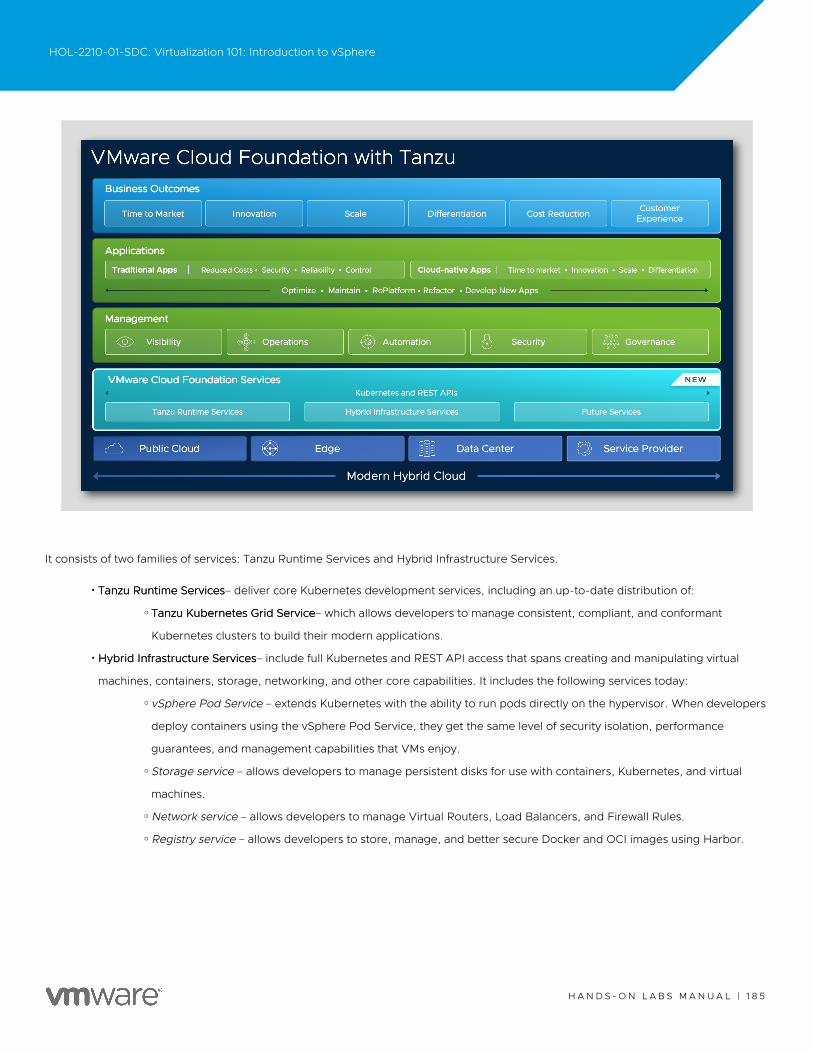
It consists of two families of services: Tanzu Runtime Services and Hybrid Infrastructure Services.
•Tanzu Runtime ServicesTanzu Runtime Services– deliver core Kubernetes development services, including an up-to-date distribution of:
◦Tanzu Kubernetes GridTanzu Kubernetes Grid ServiceService– which allows developers to manage consistent, compliant, and conformant
Kubernetes clusters to build their modern applications.
•Hybrid Infrastructure ServicesHybrid Infrastructure Services– include full Kubernetes and REST API access that spans creating and manipulating virtual
machines, containers, storage, networking, and other core capabilities. It includes the following services today:
◦vSphere Pod Service – extends Kubernetes with the ability to run pods directly on the hypervisor. When developers
deploy containers using the vSphere Pod Service, they get the same level of security isolation, performance
guarantees, and management capabilities that VMs enjoy.
◦Storage service – allows developers to manage persistent disks for use with containers, Kubernetes, and virtual
machines.
◦Network service – allows developers to manage Virtual Routers, Load Balancers, and Firewall Rules.
◦Registry service – allows developers to store, manage, and better secure Docker and OCI images using Harbor.
HOL-2210-01-SDC: Virtualization 101: Introduction to vSphere
H A N D S - O N L A B S M A N U A L | 1 8 5

[208][208]ConclusionConclusion
VMware vSphere 7 is the efficient and secure platform for the hybrid cloud. It provides a powerful, flexible, and secure foundation forbusiness agility that accelerates the digital transformation to the hybrid cloud as well as success in the digital economy.
Here are the other vSphere labs to take to get familiar with the lastest vSphere 7 release:
•HOL-2111-01-SDC - VMware vSphere - What's NewHOL-2111-01-SDC - VMware vSphere - What's New
•HOL-2113-01-SDC - vSphere with TanzuHOL-2113-01-SDC - vSphere with Tanzu
[209][209]ESXi Install and ConfigureESXi Install and Configure
Due to the environment the Hands on Labs are running in and the high I/O it would cause, we are not able to install software. Pleaseuse the following videos to walk through the process.
[210][210]Video: Installing and Configuring vSphere (4:36)Video: Installing and Configuring vSphere (4:36)
The following video will walk through the process of installing and configuring vSphere.
https://www.youtube.com/watch?v=naK5opxyKWAhttps://www.youtube.com/watch?v=naK5opxyKWA
HOL-2210-01-SDC: Virtualization 101: Introduction to vSphere
H A N D S - O N L A B S M A N U A L | 1 8 6
[211][211]Video: Overview of the DCUI (4:58)Video: Overview of the DCUI (4:58)
This video will walk you through the Direct Console User Interface (DCUI).
https://www.youtube.com/watch?v=CPsX3Sx7XpIhttps://www.youtube.com/watch?v=CPsX3Sx7XpI
[212][212]Certification PathCertification Path
Learn and Practice with Hands-On Labs to help prepare for several VMware Certifications.
HOL-2210-01-SDC: Virtualization 101: Introduction to vSphere
H A N D S - O N L A B S M A N U A L | 1 8 7

This Lab can help you study for the industry-recognized VCAP-DCV Deploy 2021 Deploy certification which validates that you know howto deploy and optimize VMware vSphere infrastructures.
HOL-2210-01-SDC: Virtualization 101: Introduction to vSphere
H A N D S - O N L A B S M A N U A L | 1 8 8

Learn More Here https://via.vmw.com/dcv_deployhttps://via.vmw.com/dcv_deploy
HOL-2210-01-SDC: Virtualization 101: Introduction to vSphere
H A N D S - O N L A B S M A N U A L | 1 8 9

Module 2 - Introduction to vSphere Networking and Security (60 Min)...Module 2 - Introduction to vSphere Networking and Security (60 Min)...
[214][214]IntroductionIntroduction
The ability to connect virtual machines through a logical switch that is part of the vSphere hypervisor is a necessity for operating systemsand applications to communicate on the physical network. Traditionally this was done through a Standard vSwitch, configuredindividually at each ESXI host in the datacenter.
Since its introduction, the vSphere Distributed Switch quickly became the recommended type of virtual switch to use for most if not alltypes of network traffic in and out of the ESXi host. This is due mostly in part to its ability to be created and managed centrally throughvCenter, as well as the advanced networking features it provides.
Let's spend some time reviewing the similarities and differences between the two types of switches.
[215][215]Types of virtual switchesTypes of virtual switches
There are two types of virtual switches in ESXi/ESX 4.x, ESXi 5.x, and ESXi 6.x, vNetwork Standard Switch and vNetwork DistributedSwitch (vDS).
[216][216]vNetwork Standard Switch (vSwitch, vSS)vNetwork Standard Switch (vSwitch, vSS)
As in VMware Infrastructure 3, the configuration of each vSwitch resides on the specific ESXi/ESX host. The VI administrators have tomanually maintain consistency of the vSwitch configuration across all ESXi/ESX hosts to ensure that they can perform operations suchas vMotion.
vSwitches are configured on each ESXi/ESX host.
[217][217]vNetwork Distributed Switch (dvSwitch, vDS)vNetwork Distributed Switch (dvSwitch, vDS)
The configuration of vDS is centralized to vCenter Server. The ESXi/ESX 4.x, ESXi 5.x, and ESXi 6.x hosts that belong to a dvSwitch donot need further configuration to be compliant.
Distributed switches provide similar functionality to vSwitches. dvPortgroups is a set of dvPorts. The vDS equivalent of portgroups is aset of ports in a vSwitch. Configuration is inherited from dvSwitch to dvPortgroup, just as from vSwitch to Portgroup.
Virtual machines, Service Console interfaces (vswif), and VMKernel interfaces can be connected to dvPortgroups just as they could beconnected to portgroups in vSwitches.
HOL-2210-01-SDC: Virtualization 101: Introduction to vSphere
H A N D S - O N L A B S M A N U A L | 1 9 0

[218][218]Comparing vNetwork Standard Switch with vNetwork Distributed SwitchComparing vNetwork Standard Switch with vNetwork Distributed Switch
These features are available with both types of virtual switches:
•Can forward L2 frames
•Can segment traffic into VLANs
•Can use and understand 802.1q VLAN encapsulation
•Can have more than one uplink (NIC Teaming)
•Can have traffic shaping for the outbound (TX) traffic
These features are available only with a Distributed Switch:
•Can shape inbound (RX) traffic
•Has a central unified management interface through vCenter Server
•Supports Private VLANs (PVLANs)
•Provides potential customization of Data and Control Planes
vSphere 5.x provides these improvements to Distributed Switch functionality:
•Increased visibility of inter-virtual machine traffic through Netflow.
•Improved monitoring through port mirroring (dvMirror).
•Support for LLDP (Link Layer Discovery Protocol), a vendor-neutral protocol.
•The enhanced link aggregation feature provides choice in hashing algorithms and also increases the limit on number of link
aggregation groups.
•Additional port security is enabled through traffic filtering support.
•Improved single-root I/O virtualization (SR-IOV) support and 40GB NIC support.
vSphere 6.x provides these improvements to Distributed Switch functionality:
•Network IO Control New support for per virtual machine Distributed vSwitch bandwidth reservations to guarantee isolation
and enforce limits on bandwidth.
•Multicast Snooping - Supports IGMP snooping for IPv4 packet and MLD snooping for IPv6 packets in VDS. Improves
performance and scale with multicast traffic.
•Multiple TCP/IP Stack for vMotion - Allows vMotion traffic a dedicated networking stack. Simplifies IP address management
with a dedicated default gateway for vMotion traffic.
[219][219]vSS vs vDS architecturevSS vs vDS architecture
Spend a few minutes reviewing the differences between the Standard vSwitchStandard vSwitch and Distributed vSwitchDistributed vSwitch architectures.
Pay special attention to how the port groups and uplinks are designed.
HOL-2210-01-SDC: Virtualization 101: Introduction to vSphere
H A N D S - O N L A B S M A N U A L | 1 9 1

[220][220]vSphere Standard Switch ArchitecturevSphere Standard Switch Architecture
HOL-2210-01-SDC: Virtualization 101: Introduction to vSphere
H A N D S - O N L A B S M A N U A L | 1 9 2
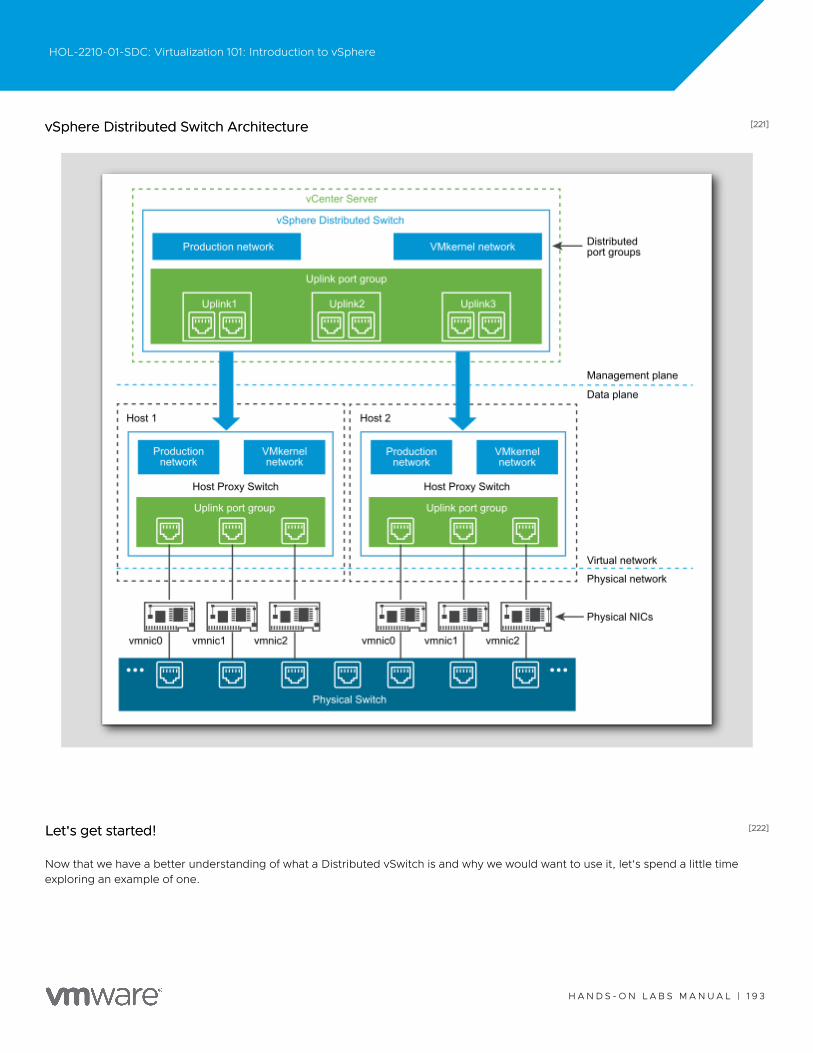
[221][221]vSphere Distributed Switch ArchitecturevSphere Distributed Switch Architecture
[222][222]Let's get started!Let's get started!
Now that we have a better understanding of what a Distributed vSwitch is and why we would want to use it, let's spend a little timeexploring an example of one.
HOL-2210-01-SDC: Virtualization 101: Introduction to vSphere
H A N D S - O N L A B S M A N U A L | 1 9 3

[223][223]Adding and Configuring vSphere Standard SwitchAdding and Configuring vSphere Standard Switch
The following lesson will walk you through the process of creating and configuring the vSphere Standard Switch.
[224][224]Adding a Virtual Machine Port Group with the vSphere ClientAdding a Virtual Machine Port Group with the vSphere Client
If you are not already logged in, launch the Chrome browser from the desktop and log in to the vSphere Web Client.
1. Click the "Use Windows session authenticationUse Windows session authentication" check box
2.Click "LoginLogin"
HOL-2210-01-SDC: Virtualization 101: Introduction to vSphere
H A N D S - O N L A B S M A N U A L | 1 9 4
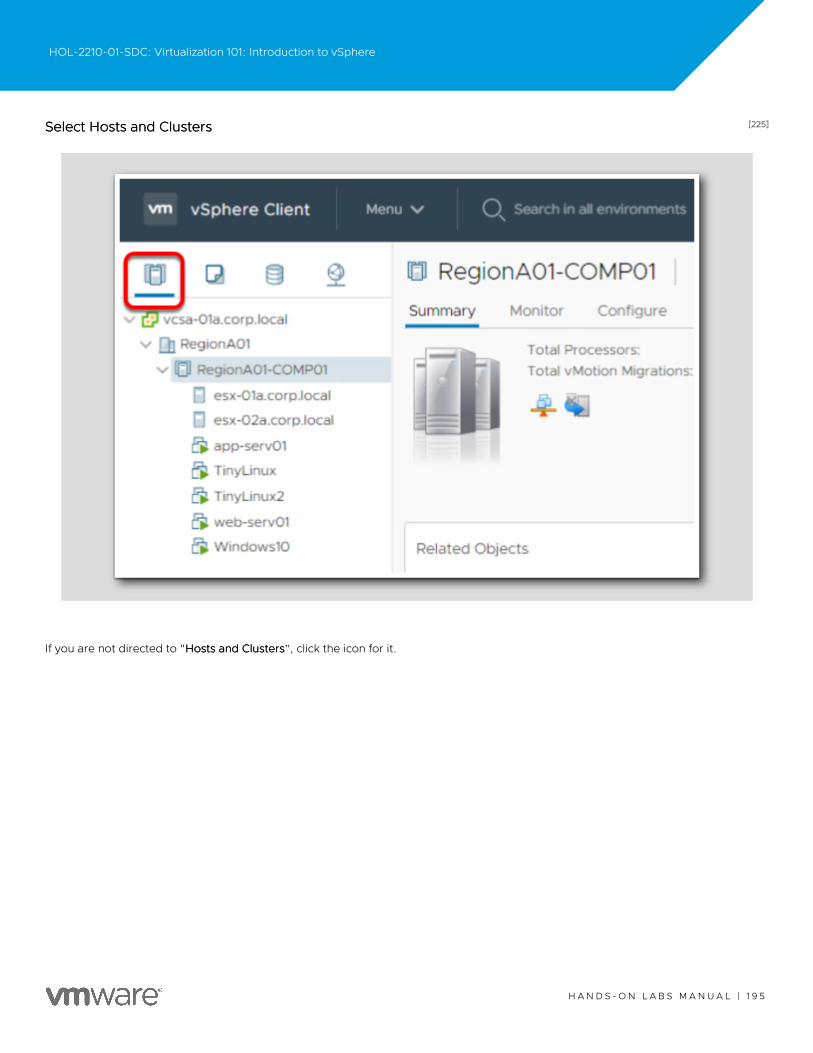
[225][225]Select Hosts and ClustersSelect Hosts and Clusters
If you are not directed to "Hosts and ClustersHosts and Clusters", click the icon for it.
HOL-2210-01-SDC: Virtualization 101: Introduction to vSphere
H A N D S - O N L A B S M A N U A L | 1 9 5
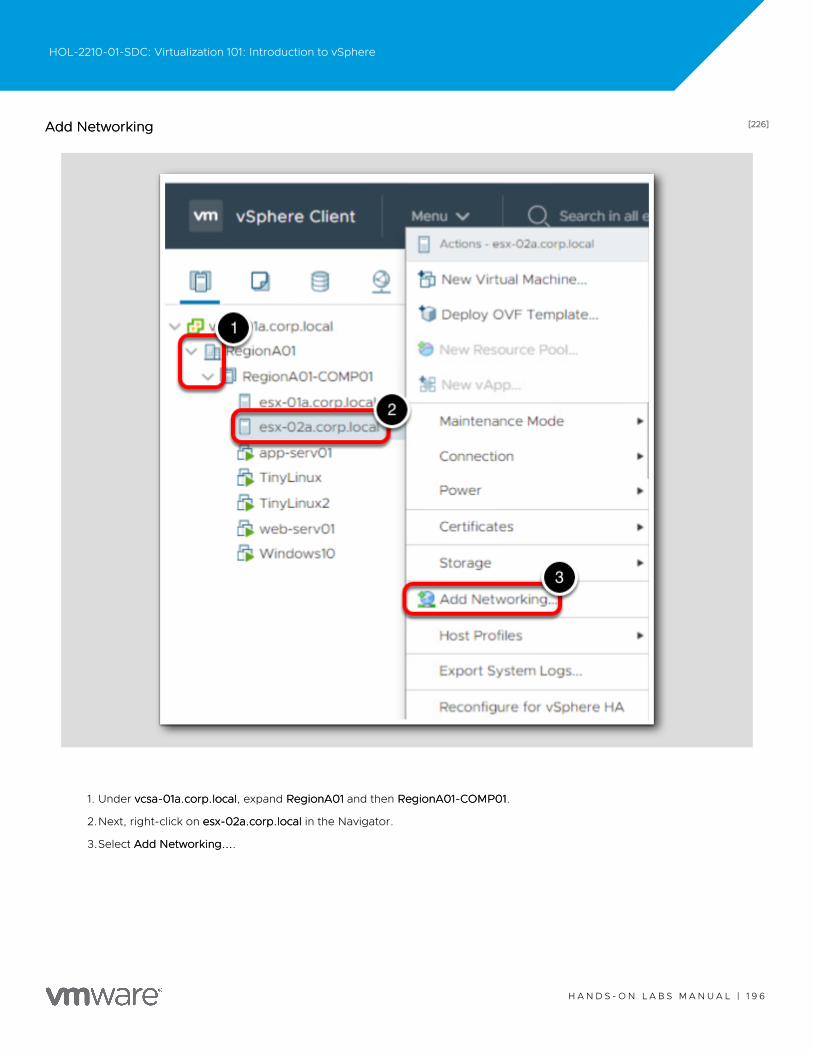
[226][226]Add NetworkingAdd Networking
1. Under vcsa-01a.corp.localvcsa-01a.corp.local, expand RegionA01RegionA01 and then RegionA01-COMP01RegionA01-COMP01.
2.Next, right-click on esx-02a.corp.localesx-02a.corp.local in the Navigator.
3.Select Add Networking...Add Networking....
HOL-2210-01-SDC: Virtualization 101: Introduction to vSphere
H A N D S - O N L A B S M A N U A L | 1 9 6

[227][227]Connection TypeConnection Type
1. When asked to select connection type, choose Virtual Machine Port Group for a Standard SwitchVirtual Machine Port Group for a Standard Switch.
2.Click NextNext.
HOL-2210-01-SDC: Virtualization 101: Introduction to vSphere
H A N D S - O N L A B S M A N U A L | 1 9 7

[228][228]Target DeviceTarget Device
1. When asked to select a target device, choose New Standard Switch.New Standard Switch. Note that a larger MTU size can be specified if needed.
2.Click NextNext.
HOL-2210-01-SDC: Virtualization 101: Introduction to vSphere
H A N D S - O N L A B S M A N U A L | 1 9 8
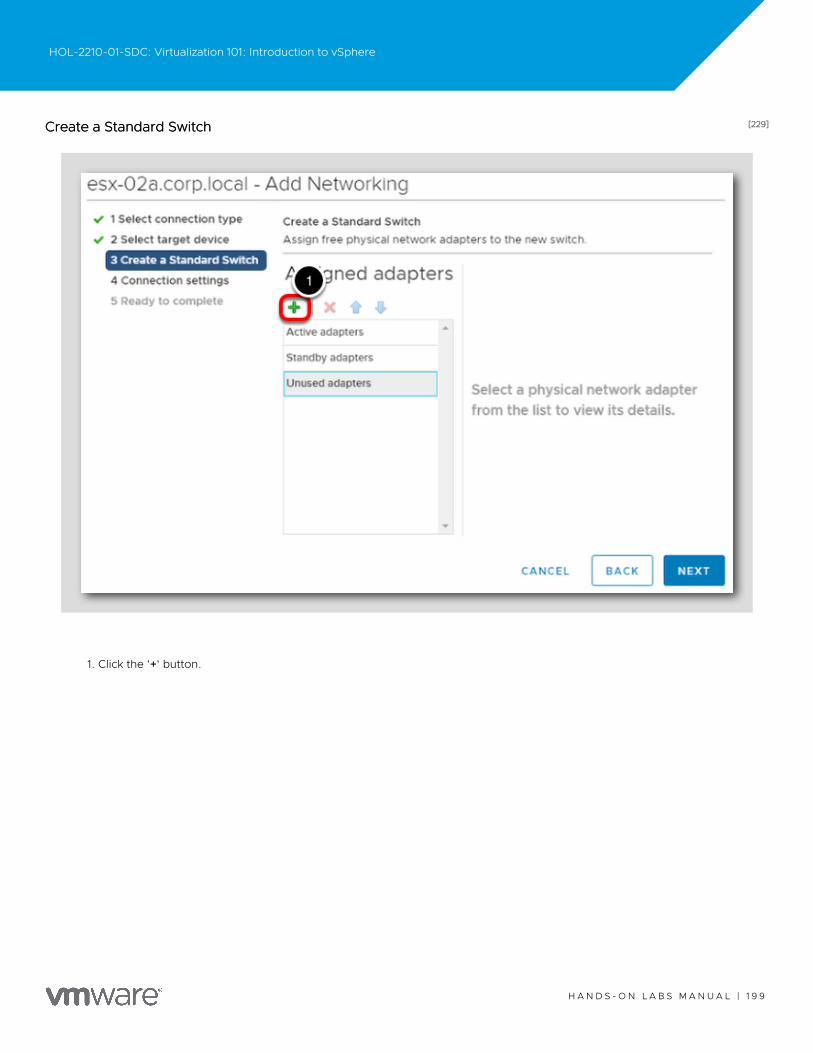
[229][229]Create a Standard SwitchCreate a Standard Switch
1. Click the '++' button.
HOL-2210-01-SDC: Virtualization 101: Introduction to vSphere
H A N D S - O N L A B S M A N U A L | 1 9 9
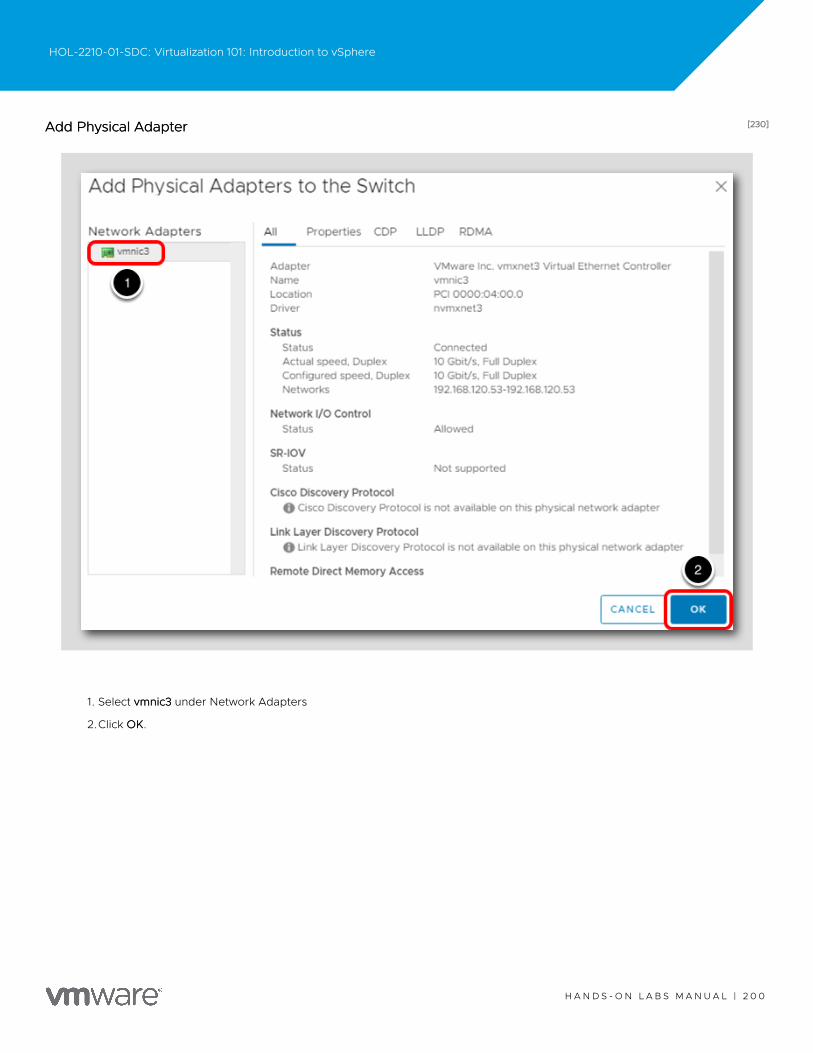
[230][230]Add Physical AdapterAdd Physical Adapter
1. Select vmnic3vmnic3 under Network Adapters
2.Click OKOK.
HOL-2210-01-SDC: Virtualization 101: Introduction to vSphere
H A N D S - O N L A B S M A N U A L | 2 0 0

[231][231]Add Physical AdapterAdd Physical Adapter
1. Click NextNext to continue.
HOL-2210-01-SDC: Virtualization 101: Introduction to vSphere
H A N D S - O N L A B S M A N U A L | 2 0 1
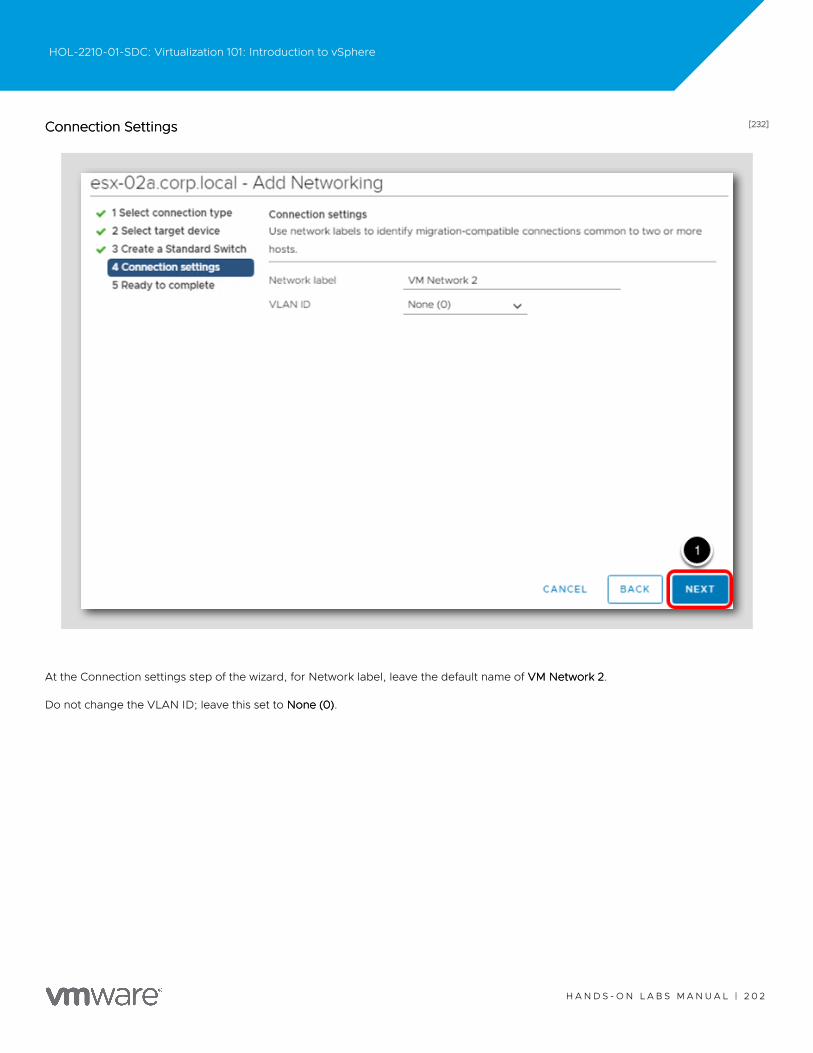
[232][232]Connection SettingsConnection Settings
At the Connection settings step of the wizard, for Network label, leave the default name of VM Network 2VM Network 2.
Do not change the VLAN ID; leave this set to None (0)None (0).
HOL-2210-01-SDC: Virtualization 101: Introduction to vSphere
H A N D S - O N L A B S M A N U A L | 2 0 2
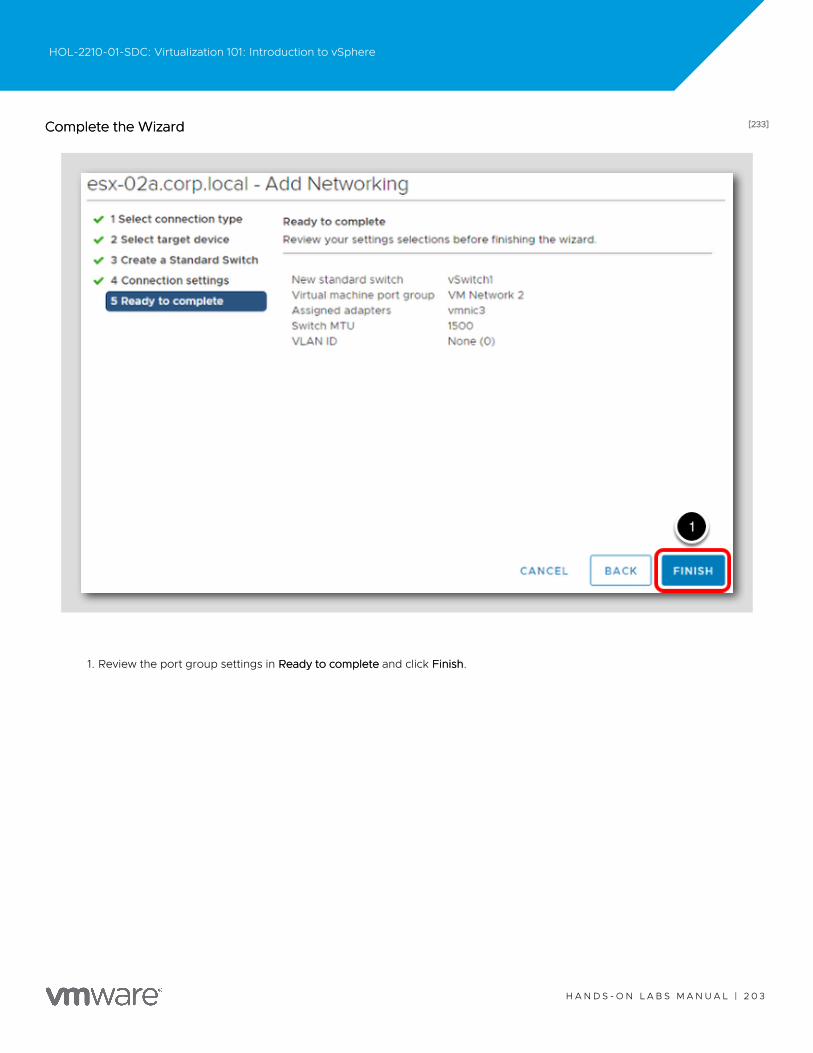
[233][233]Complete the WizardComplete the Wizard
1. Review the port group settings in Ready to completeReady to complete and click FinishFinish.
HOL-2210-01-SDC: Virtualization 101: Introduction to vSphere
H A N D S - O N L A B S M A N U A L | 2 0 3
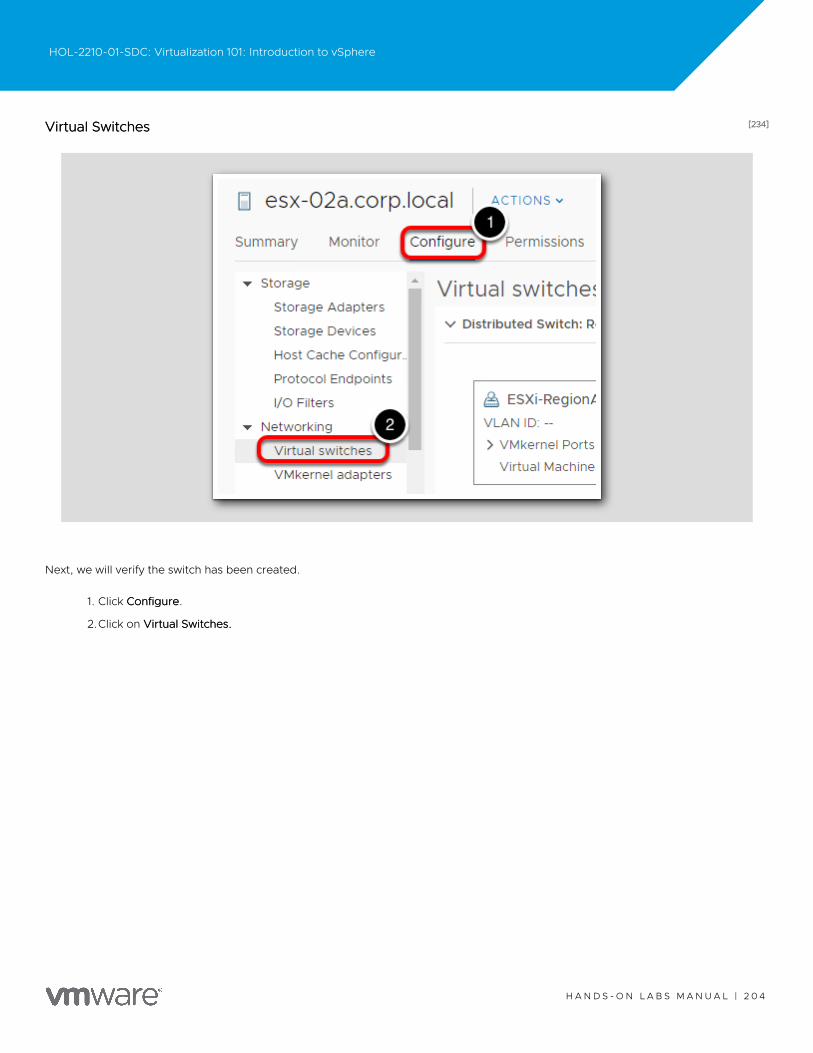
[234][234]Virtual SwitchesVirtual Switches
Next, we will verify the switch has been created.
1. Click ConfigureConfigure.
2.Click on Virtual Switches.Virtual Switches.
HOL-2210-01-SDC: Virtualization 101: Introduction to vSphere
H A N D S - O N L A B S M A N U A L | 2 0 4
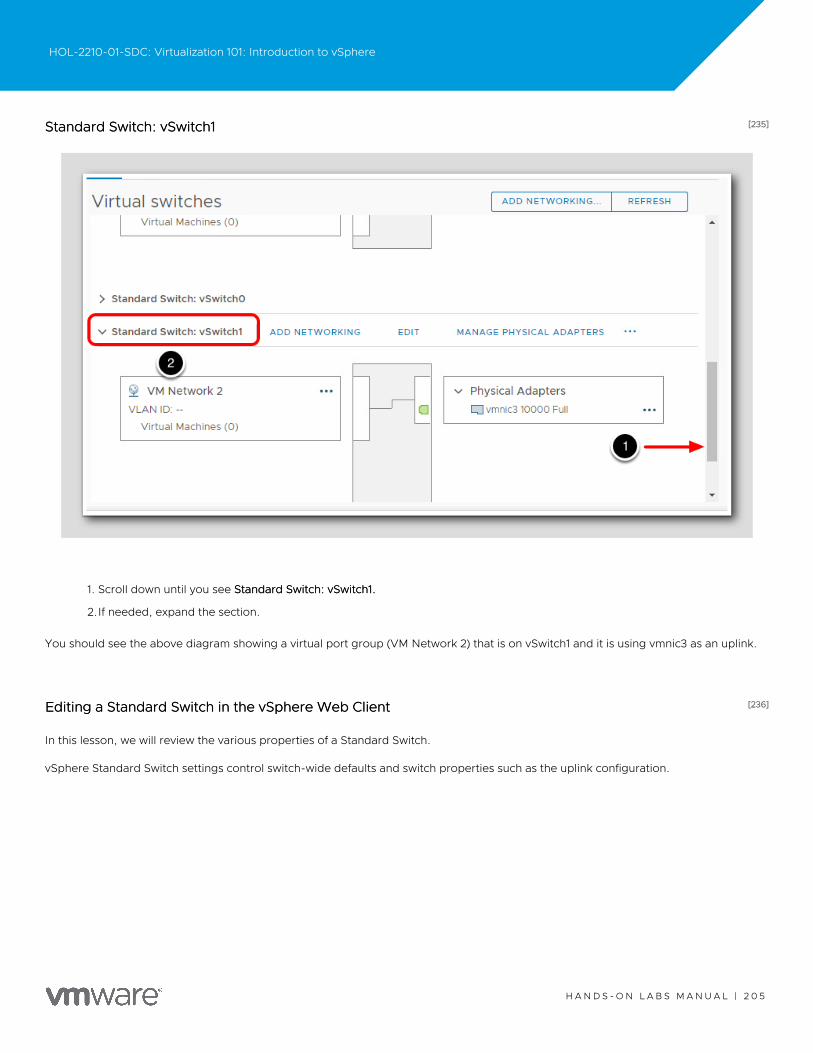
[235][235]Standard Switch: vSwitch1Standard Switch: vSwitch1
1. Scroll down until you see Standard Switch: vSwitch1.Standard Switch: vSwitch1.
2.If needed, expand the section.
You should see the above diagram showing a virtual port group (VM Network 2) that is on vSwitch1 and it is using vmnic3 as an uplink.
[236][236]Editing a Standard Switch in the vSphere Web ClientEditing a Standard Switch in the vSphere Web Client
In this lesson, we will review the various properties of a Standard Switch.
vSphere Standard Switch settings control switch-wide defaults and switch properties such as the uplink configuration.
HOL-2210-01-SDC: Virtualization 101: Introduction to vSphere
H A N D S - O N L A B S M A N U A L | 2 0 5
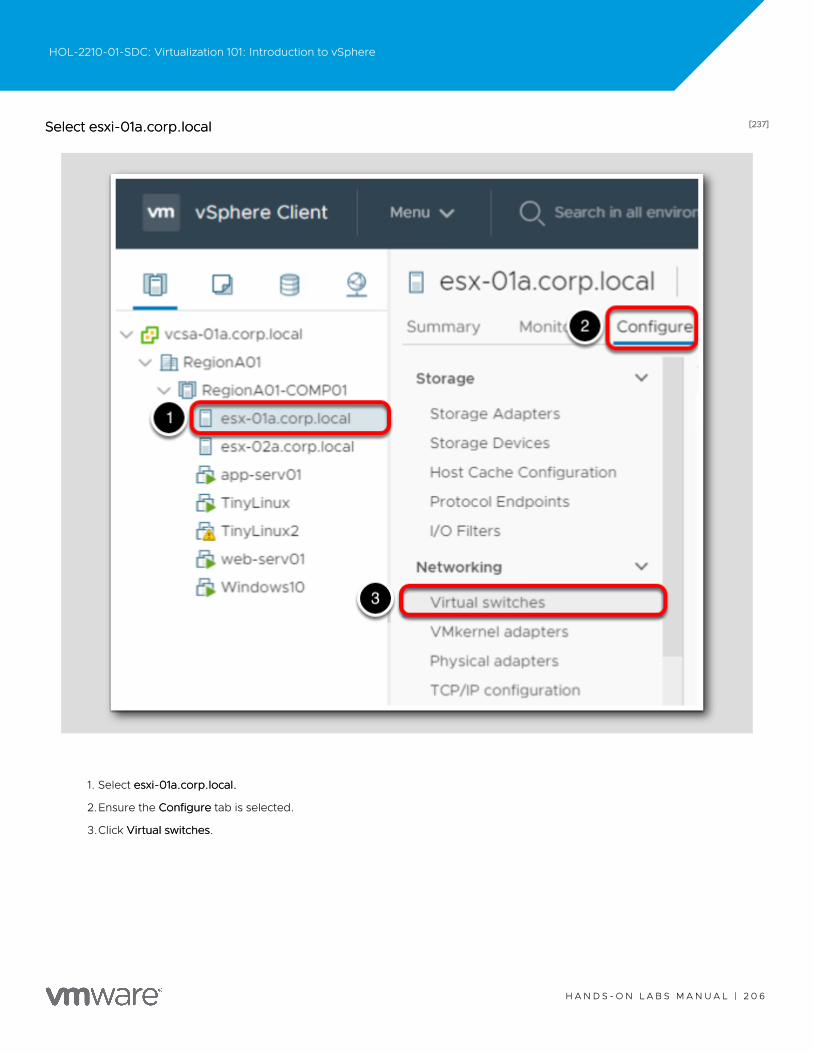
[237][237]Select esxi-01a.corp.localSelect esxi-01a.corp.local
1. Select esxi-01a.corp.local.esxi-01a.corp.local.
2.Ensure the ConfigureConfigure tab is selected.
3.Click Virtual switchesVirtual switches.
HOL-2210-01-SDC: Virtualization 101: Introduction to vSphere
H A N D S - O N L A B S M A N U A L | 2 0 6
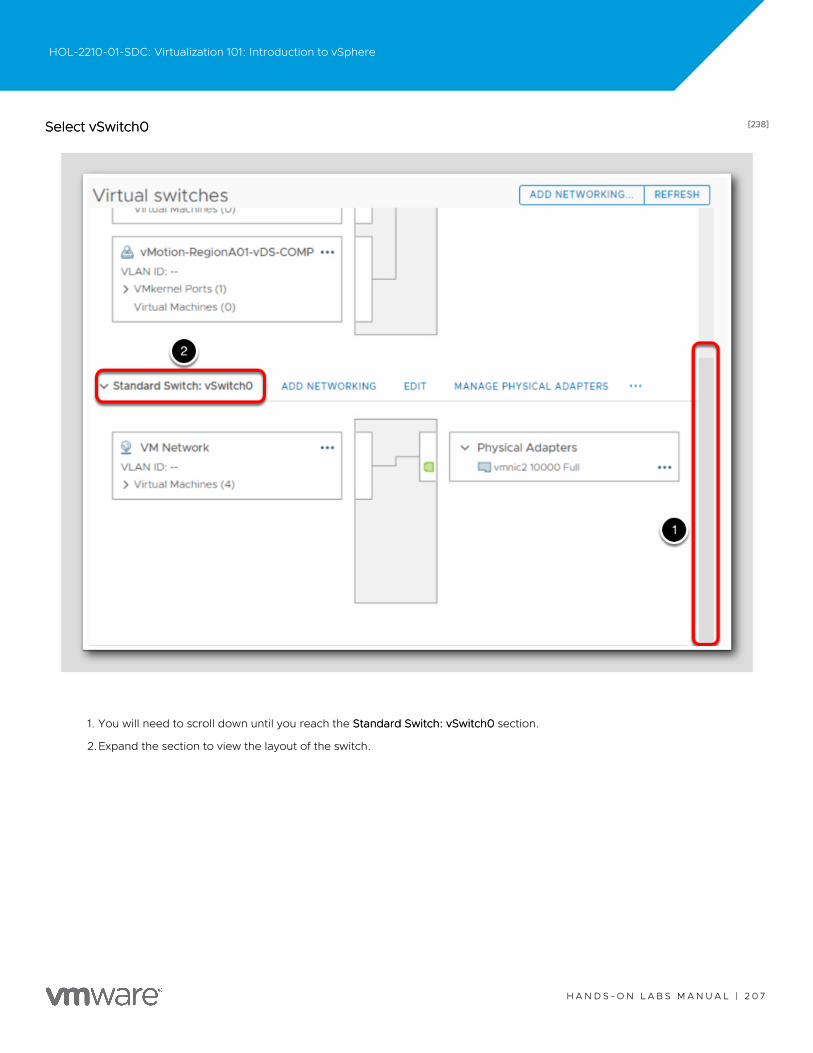
[238][238]Select vSwitch0Select vSwitch0
1. You will need to scroll down until you reach the Standard Switch: vSwitch0Standard Switch: vSwitch0 section.
2.Expand the section to view the layout of the switch.
HOL-2210-01-SDC: Virtualization 101: Introduction to vSphere
H A N D S - O N L A B S M A N U A L | 2 0 7
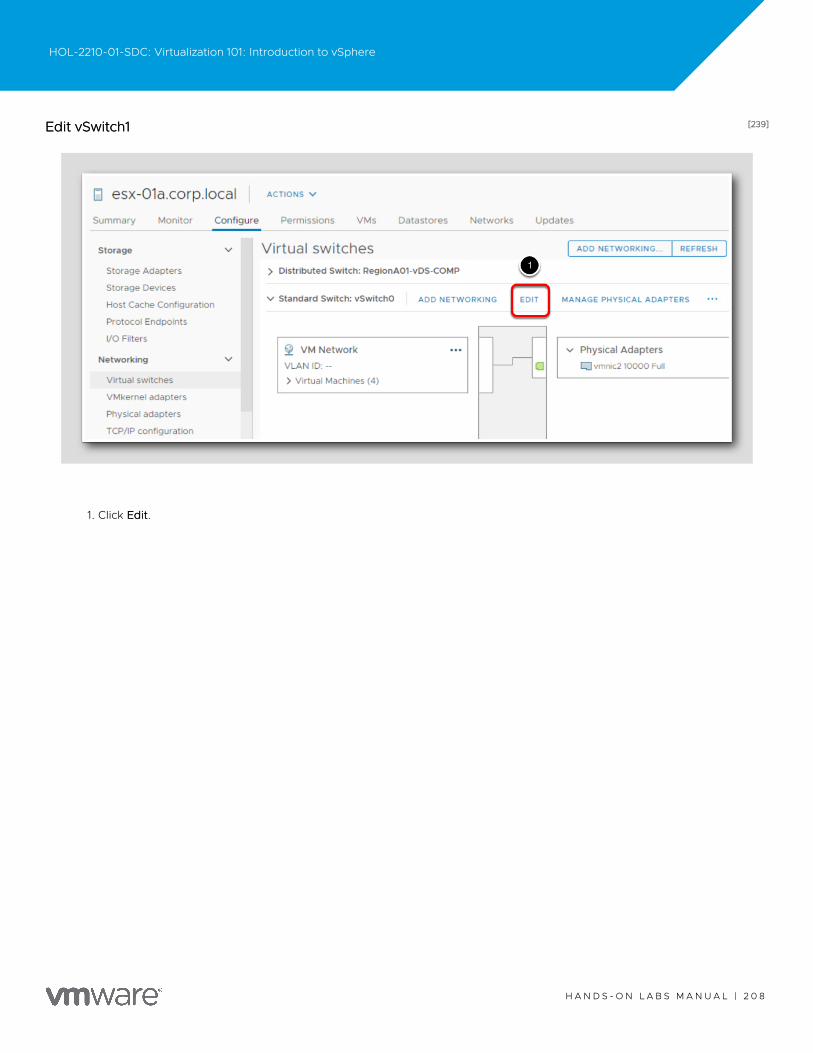
[239][239]Edit vSwitch1Edit vSwitch1
1. Click EditEdit.
HOL-2210-01-SDC: Virtualization 101: Introduction to vSphere
H A N D S - O N L A B S M A N U A L | 2 0 8
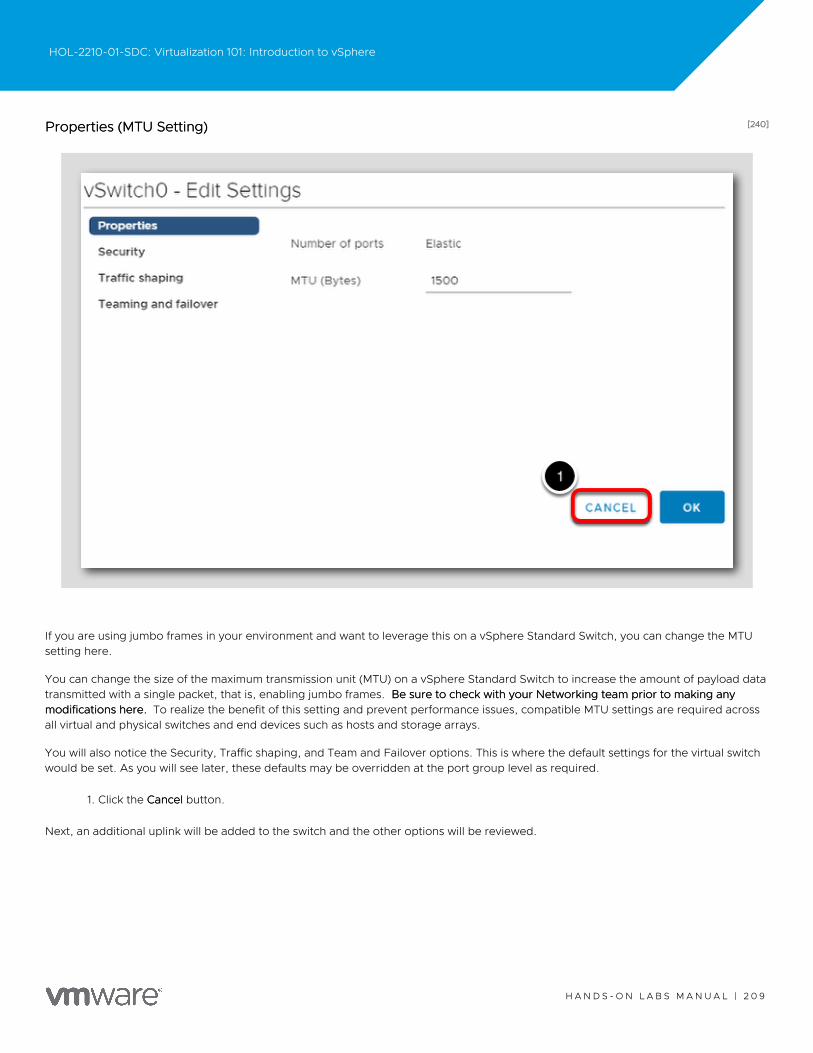
[240][240]Properties (MTU Setting)Properties (MTU Setting)
If you are using jumbo frames in your environment and want to leverage this on a vSphere Standard Switch, you can change the MTUsetting here.
You can change the size of the maximum transmission unit (MTU) on a vSphere Standard Switch to increase the amount of payload datatransmitted with a single packet, that is, enabling jumbo frames. Be sure to check with your Networking team prior to making anyBe sure to check with your Networking team prior to making anymodifications here.modifications here. To realize the benefit of this setting and prevent performance issues, compatible MTU settings are required acrossall virtual and physical switches and end devices such as hosts and storage arrays.
You will also notice the Security, Traffic shaping, and Team and Failover options. This is where the default settings for the virtual switchwould be set. As you will see later, these defaults may be overridden at the port group level as required.
1. Click the CancelCancel button.
Next, an additional uplink will be added to the switch and the other options will be reviewed.
HOL-2210-01-SDC: Virtualization 101: Introduction to vSphere
H A N D S - O N L A B S M A N U A L | 2 0 9
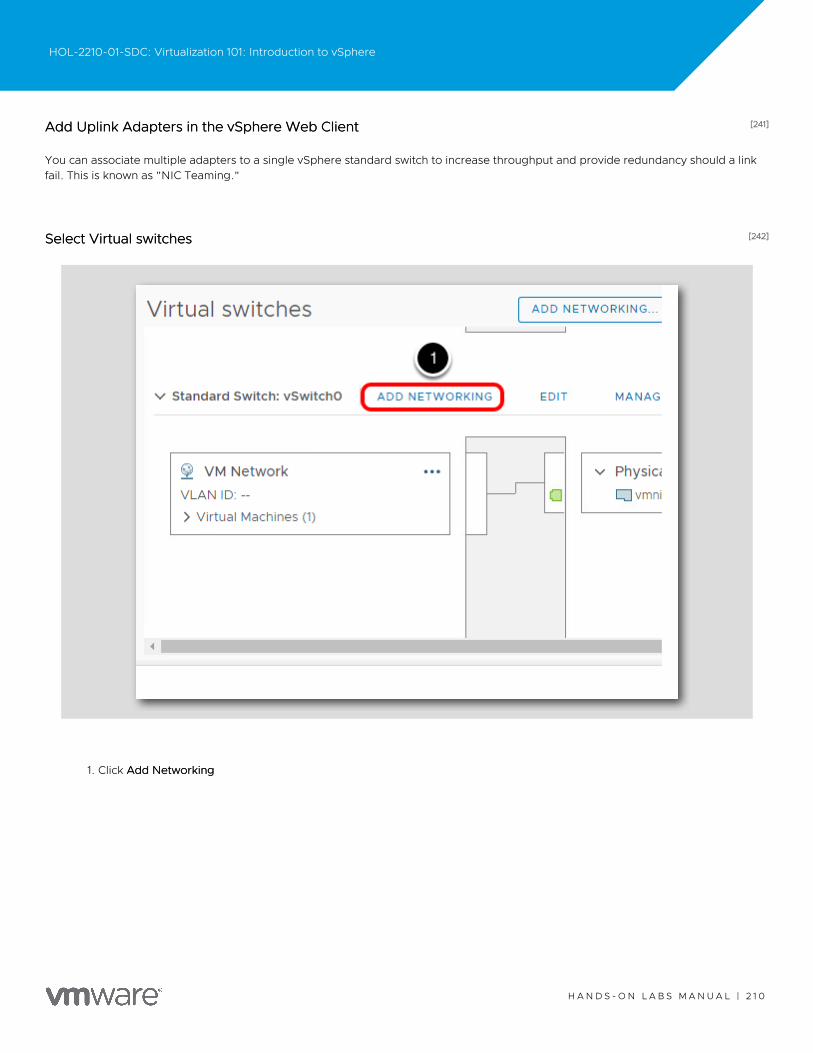
[241][241]Add Uplink Adapters in the vSphere Web ClientAdd Uplink Adapters in the vSphere Web Client
You can associate multiple adapters to a single vSphere standard switch to increase throughput and provide redundancy should a linkfail. This is known as "NIC Teaming."
[242][242]Select Virtual switchesSelect Virtual switches
1. Click Add NetworkingAdd Networking
HOL-2210-01-SDC: Virtualization 101: Introduction to vSphere
H A N D S - O N L A B S M A N U A L | 2 1 0
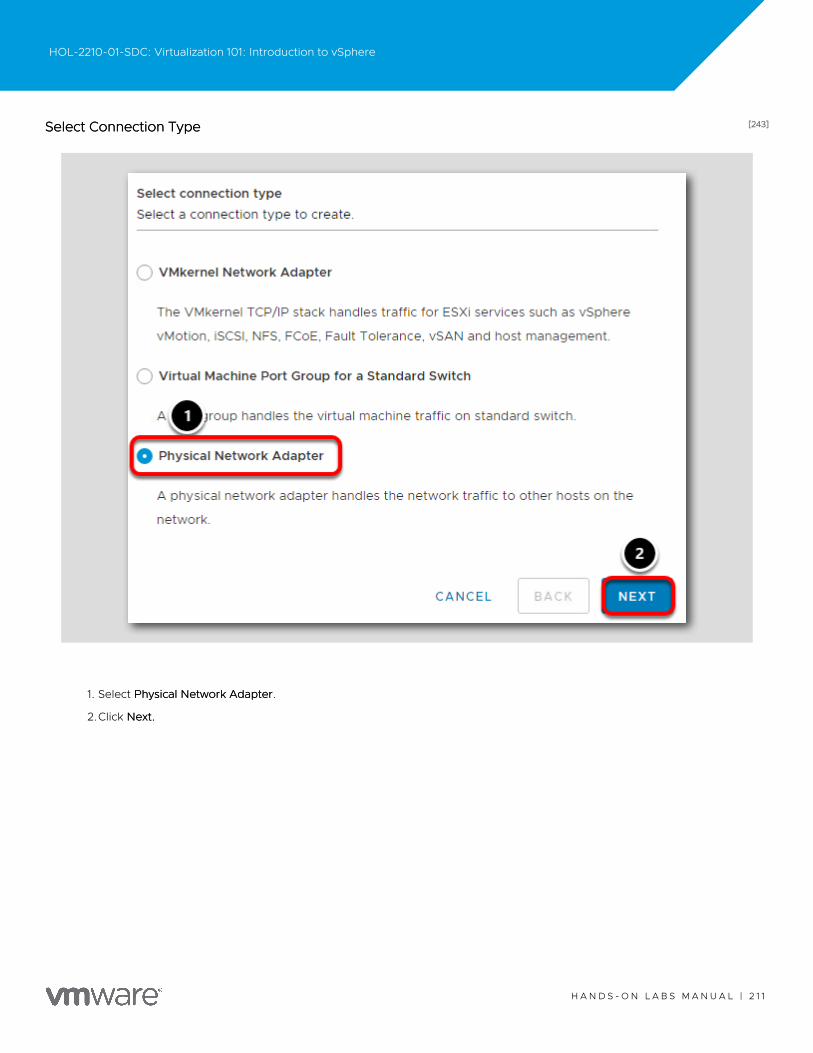
[243][243]Select Connection TypeSelect Connection Type
1. Select Physical Network AdapterPhysical Network Adapter.
2.Click Next.Next.
HOL-2210-01-SDC: Virtualization 101: Introduction to vSphere
H A N D S - O N L A B S M A N U A L | 2 1 1
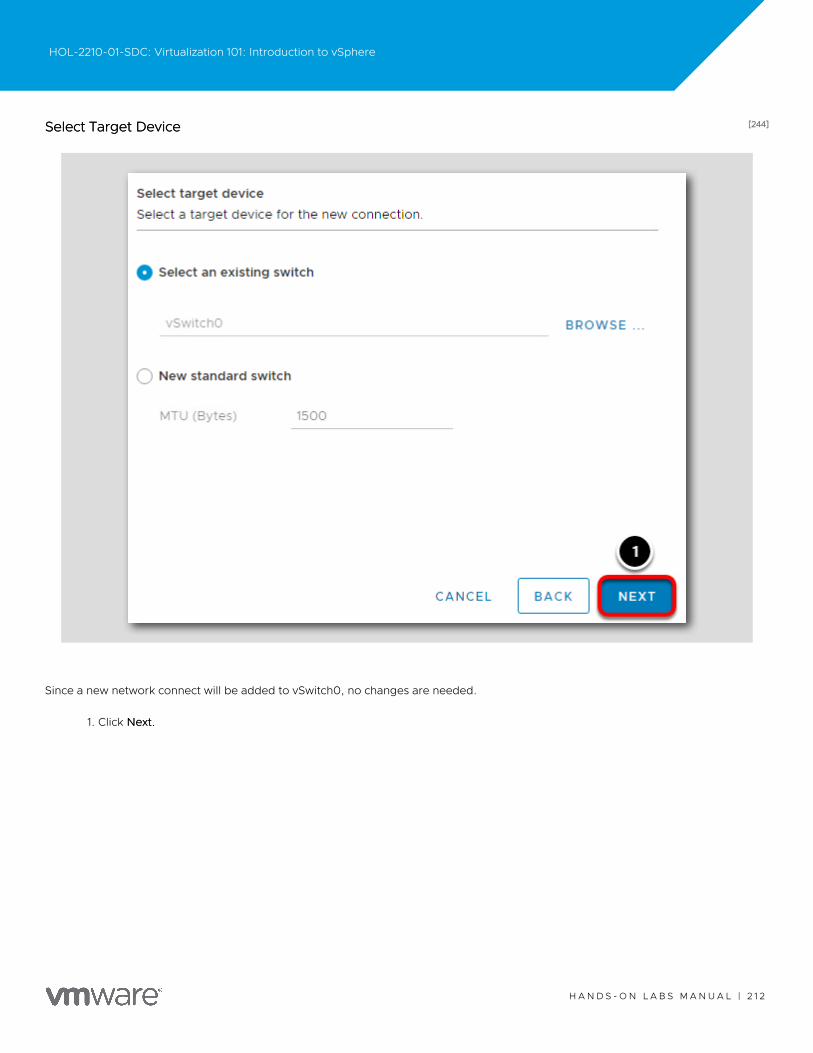
[244][244]Select Target DeviceSelect Target Device
Since a new network connect will be added to vSwitch0, no changes are needed.
1. Click Next.Next.
HOL-2210-01-SDC: Virtualization 101: Introduction to vSphere
H A N D S - O N L A B S M A N U A L | 2 1 2
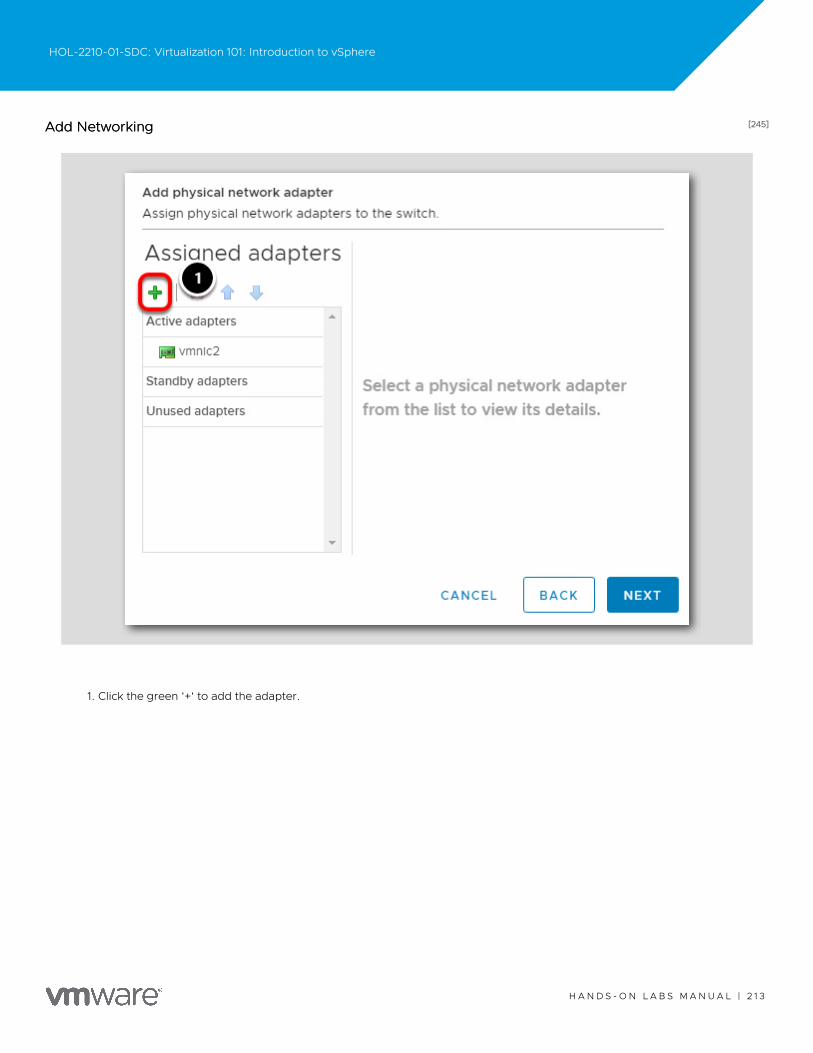
[245][245]Add NetworkingAdd Networking
1. Click the green '+' to add the adapter.
HOL-2210-01-SDC: Virtualization 101: Introduction to vSphere
H A N D S - O N L A B S M A N U A L | 2 1 3

[246][246]Add vmnic3Add vmnic3
1. Click on vmnic3vmnic3
2.Click OKOK
HOL-2210-01-SDC: Virtualization 101: Introduction to vSphere
H A N D S - O N L A B S M A N U A L | 2 1 4
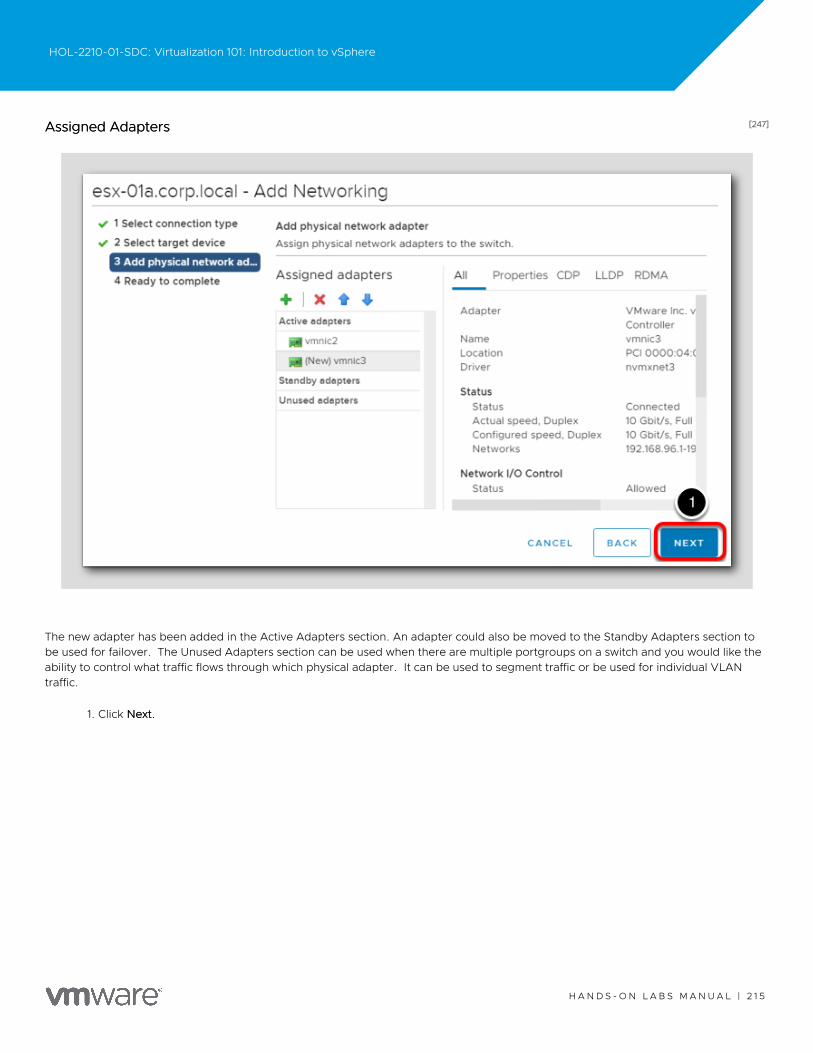
[247][247]Assigned AdaptersAssigned Adapters
The new adapter has been added in the Active Adapters section. An adapter could also be moved to the Standby Adapters section tobe used for failover. The Unused Adapters section can be used when there are multiple portgroups on a switch and you would like theability to control what traffic flows through which physical adapter. It can be used to segment traffic or be used for individual VLANtraffic.
1. Click Next.Next.
HOL-2210-01-SDC: Virtualization 101: Introduction to vSphere
H A N D S - O N L A B S M A N U A L | 2 1 5
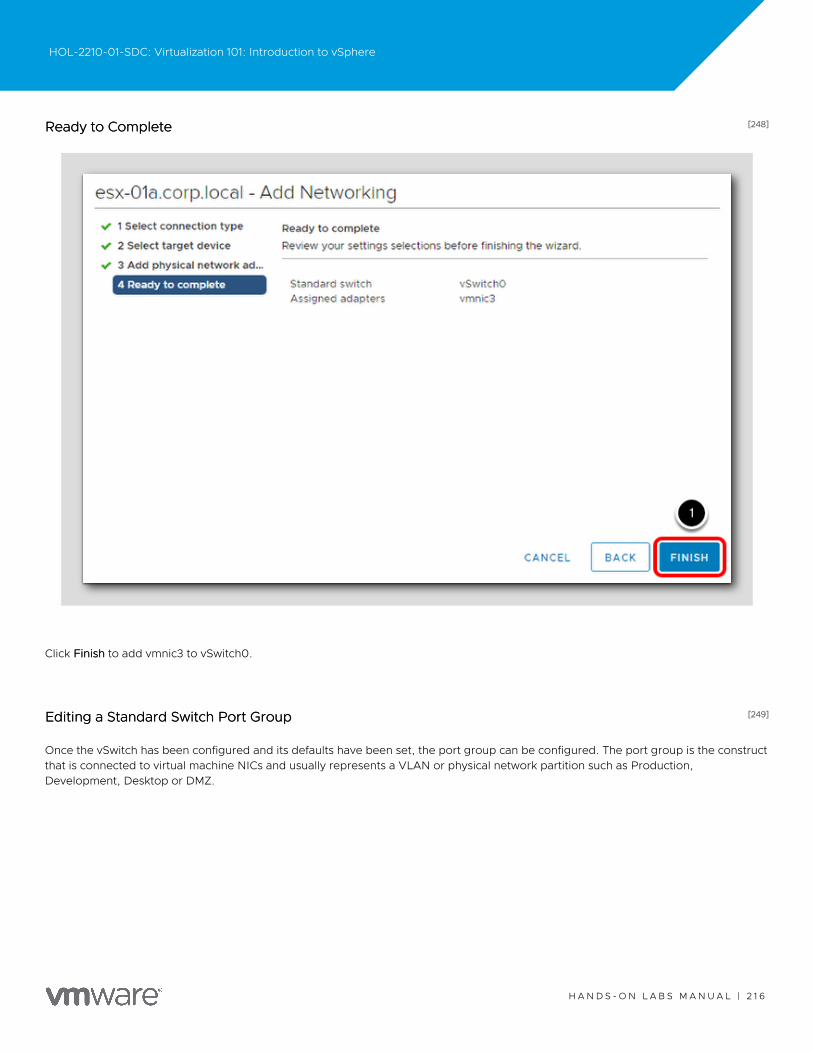
[248][248]Ready to CompleteReady to Complete
Click FinishFinish to add vmnic3 to vSwitch0.
[249][249]Editing a Standard Switch Port GroupEditing a Standard Switch Port Group
Once the vSwitch has been configured and its defaults have been set, the port group can be configured. The port group is the constructthat is connected to virtual machine NICs and usually represents a VLAN or physical network partition such as Production,Development, Desktop or DMZ.
HOL-2210-01-SDC: Virtualization 101: Introduction to vSphere
H A N D S - O N L A B S M A N U A L | 2 1 6
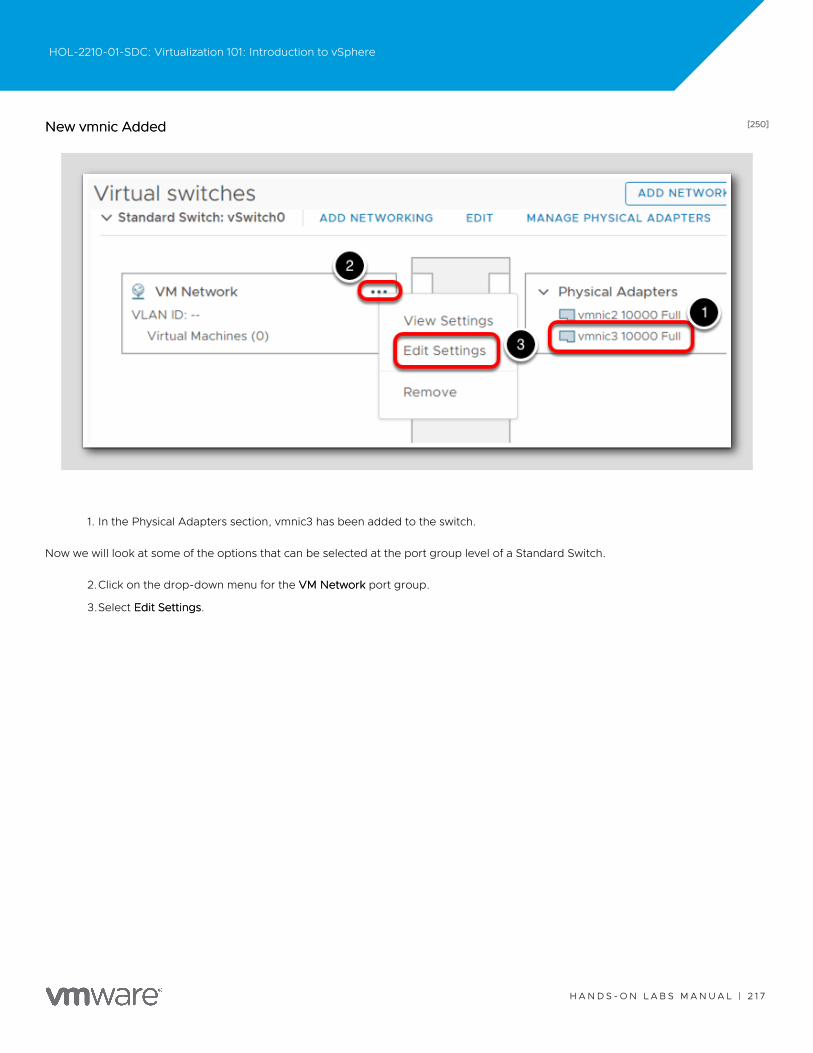
[250][250]New vmnic AddedNew vmnic Added
1. In the Physical Adapters section, vmnic3 has been added to the switch.
Now we will look at some of the options that can be selected at the port group level of a Standard Switch.
2.Click on the drop-down menu for the VM NetworkVM Network port group.
3.Select Edit SettingsEdit Settings.
HOL-2210-01-SDC: Virtualization 101: Introduction to vSphere
H A N D S - O N L A B S M A N U A L | 2 1 7

[251][251]Port Group PropertiesPort Group Properties
The Properties setting section is where the name or VLAN ID of the port group can be modified.
There is no need to modify these settings for this part of the lab.There is no need to modify these settings for this part of the lab.
1. Click Security.Security.
[252][252]Port Group SecurityPort Group Security
HOL-2210-01-SDC: Virtualization 101: Introduction to vSphere
H A N D S - O N L A B S M A N U A L | 2 1 8
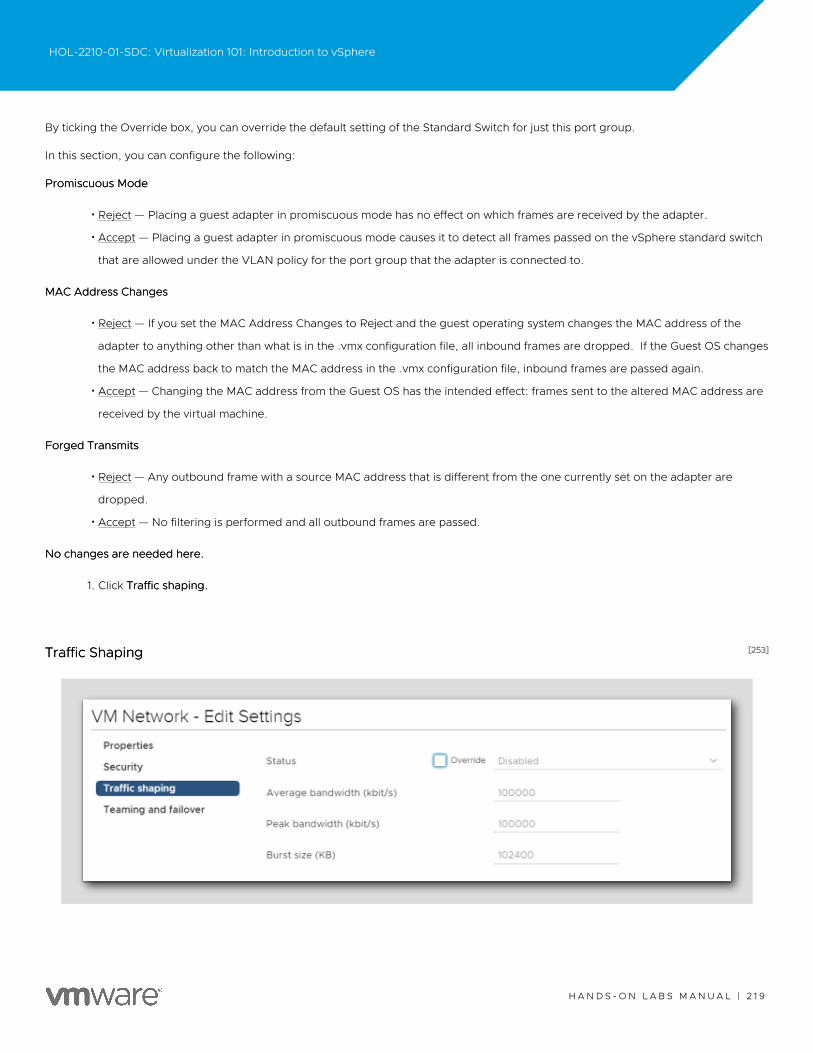
By ticking the Override box, you can override the default setting of the Standard Switch for just this port group.
In this section, you can configure the following:
Promiscuous ModePromiscuous Mode
•Reject — Placing a guest adapter in promiscuous mode has no effect on which frames are received by the adapter.
•Accept — Placing a guest adapter in promiscuous mode causes it to detect all frames passed on the vSphere standard switch
that are allowed under the VLAN policy for the port group that the adapter is connected to.
MAC Address ChangesMAC Address Changes
•Reject — If you set the MAC Address Changes to Reject and the guest operating system changes the MAC address of the
adapter to anything other than what is in the .vmx configuration file, all inbound frames are dropped. If the Guest OS changes
the MAC address back to match the MAC address in the .vmx configuration file, inbound frames are passed again.
•Accept — Changing the MAC address from the Guest OS has the intended effect: frames sent to the altered MAC address are
received by the virtual machine.
Forged TransmitsForged Transmits
•Reject — Any outbound frame with a source MAC address that is different from the one currently set on the adapter are
dropped.
•Accept — No filtering is performed and all outbound frames are passed.
No changes are needed here.No changes are needed here.
1. Click Traffic shaping.Traffic shaping.
[253][253]Traffic ShapingTraffic Shaping
HOL-2210-01-SDC: Virtualization 101: Introduction to vSphere
H A N D S - O N L A B S M A N U A L | 2 1 9
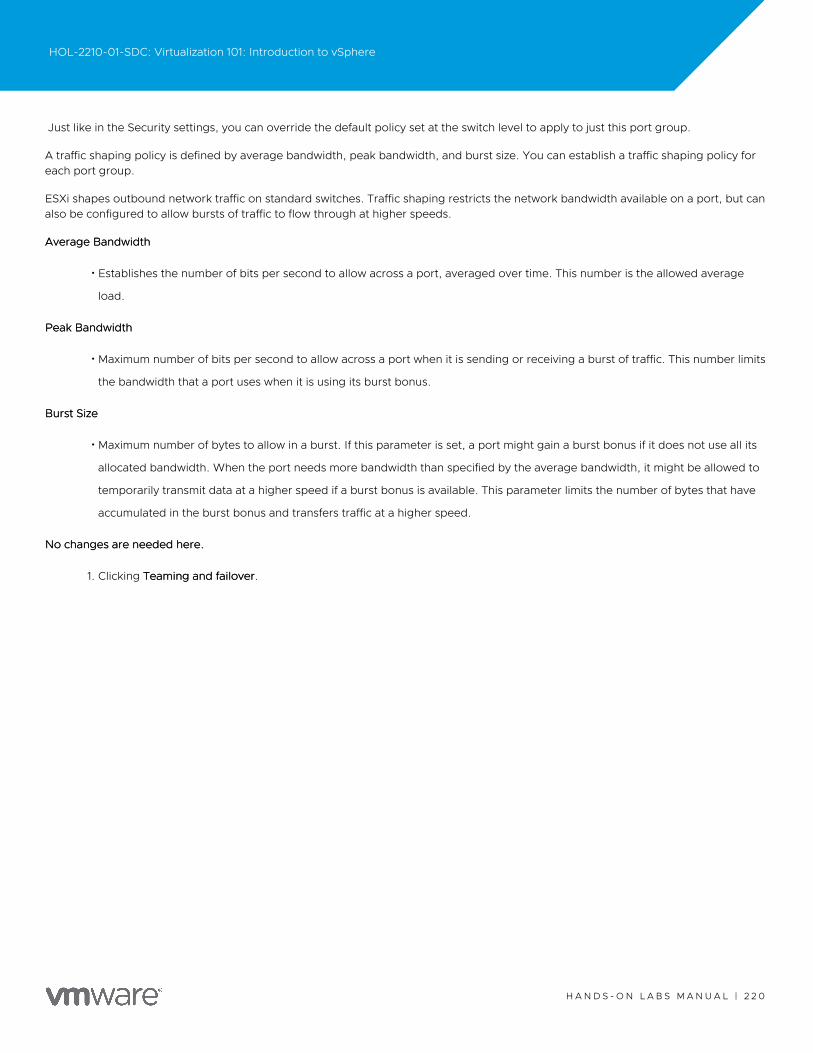
Just like in the Security settings, you can override the default policy set at the switch level to apply to just this port group.
A traffic shaping policy is defined by average bandwidth, peak bandwidth, and burst size. You can establish a traffic shaping policy foreach port group.
ESXi shapes outbound network traffic on standard switches. Traffic shaping restricts the network bandwidth available on a port, but canalso be configured to allow bursts of traffic to flow through at higher speeds.
Average BandwidthAverage Bandwidth
•Establishes the number of bits per second to allow across a port, averaged over time. This number is the allowed average
load.
Peak BandwidthPeak Bandwidth
•Maximum number of bits per second to allow across a port when it is sending or receiving a burst of traffic. This number limits
the bandwidth that a port uses when it is using its burst bonus.
Burst SizeBurst Size
•Maximum number of bytes to allow in a burst. If this parameter is set, a port might gain a burst bonus if it does not use all its
allocated bandwidth. When the port needs more bandwidth than specified by the average bandwidth, it might be allowed to
temporarily transmit data at a higher speed if a burst bonus is available. This parameter limits the number of bytes that have
accumulated in the burst bonus and transfers traffic at a higher speed.
No changes are needed here.No changes are needed here.
1. Clicking Teaming and failoverTeaming and failover.
HOL-2210-01-SDC: Virtualization 101: Introduction to vSphere
H A N D S - O N L A B S M A N U A L | 2 2 0
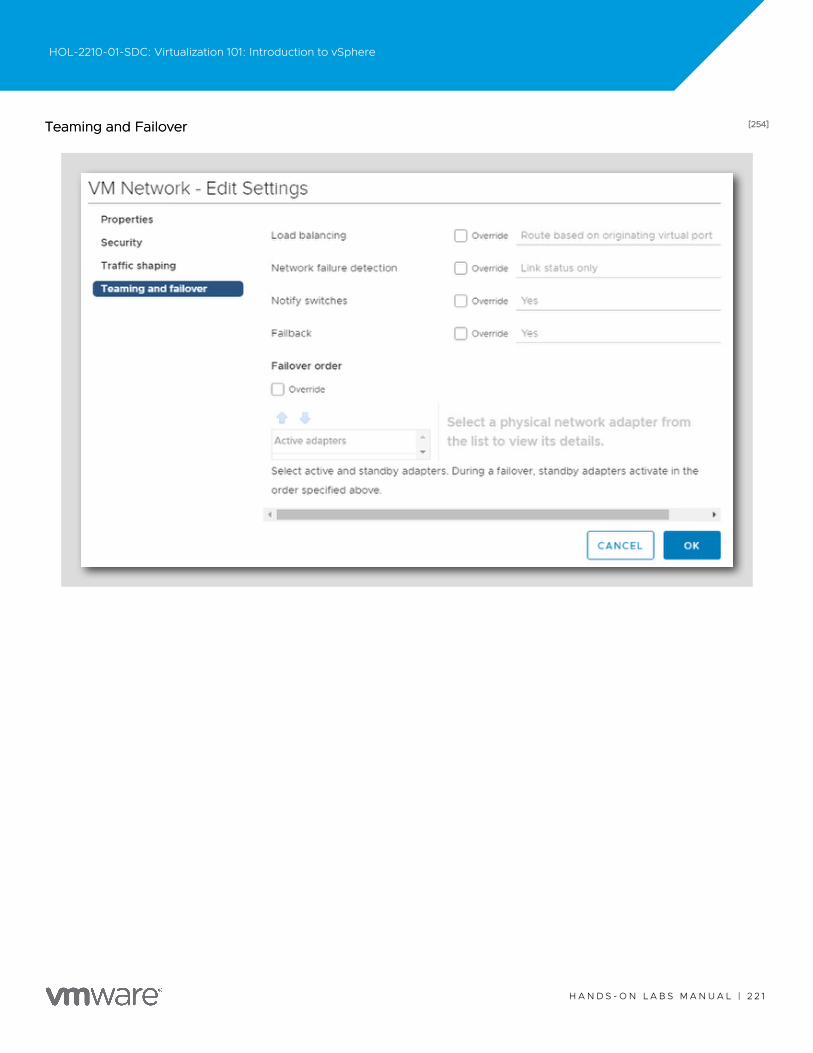
[254][254]Teaming and FailoverTeaming and Failover
HOL-2210-01-SDC: Virtualization 101: Introduction to vSphere
H A N D S - O N L A B S M A N U A L | 2 2 1
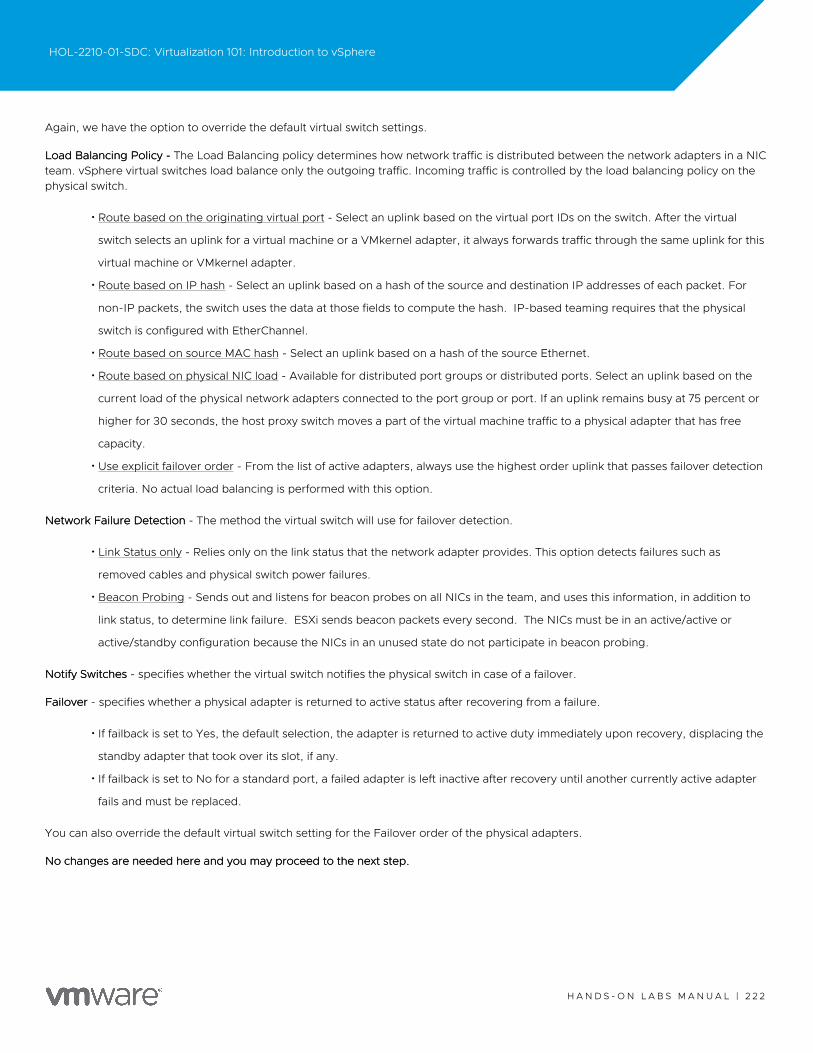
Again, we have the option to override the default virtual switch settings.
Load Balancing Policy -Load Balancing Policy - The Load Balancing policy determines how network traffic is distributed between the network adapters in a NICteam. vSphere virtual switches load balance only the outgoing traffic. Incoming traffic is controlled by the load balancing policy on thephysical switch.
•Route based on the originating virtual port - Select an uplink based on the virtual port IDs on the switch. After the virtual
switch selects an uplink for a virtual machine or a VMkernel adapter, it always forwards traffic through the same uplink for this
virtual machine or VMkernel adapter.
•Route based on IP hash - Select an uplink based on a hash of the source and destination IP addresses of each packet. For
non-IP packets, the switch uses the data at those fields to compute the hash. IP-based teaming requires that the physical
switch is configured with EtherChannel.
•Route based on source MAC hash - Select an uplink based on a hash of the source Ethernet.
•Route based on physical NIC load - Available for distributed port groups or distributed ports. Select an uplink based on the
current load of the physical network adapters connected to the port group or port. If an uplink remains busy at 75 percent or
higher for 30 seconds, the host proxy switch moves a part of the virtual machine traffic to a physical adapter that has free
capacity.
•Use explicit failover order - From the list of active adapters, always use the highest order uplink that passes failover detection
criteria. No actual load balancing is performed with this option.
Network Failure DetectionNetwork Failure Detection - The method the virtual switch will use for failover detection.
•Link Status only - Relies only on the link status that the network adapter provides. This option detects failures such as
removed cables and physical switch power failures.
•Beacon Probing - Sends out and listens for beacon probes on all NICs in the team, and uses this information, in addition to
link status, to determine link failure. ESXi sends beacon packets every second. The NICs must be in an active/active or
active/standby configuration because the NICs in an unused state do not participate in beacon probing.
Notify SwitchesNotify Switches - specifies whether the virtual switch notifies the physical switch in case of a failover.
FailoverFailover - specifies whether a physical adapter is returned to active status after recovering from a failure.
•If failback is set to Yes, the default selection, the adapter is returned to active duty immediately upon recovery, displacing the
standby adapter that took over its slot, if any.
•If failback is set to No for a standard port, a failed adapter is left inactive after recovery until another currently active adapter
fails and must be replaced.
You can also override the default virtual switch setting for the Failover order of the physical adapters.
No changes are needed here and you may proceed to the next step.No changes are needed here and you may proceed to the next step.
HOL-2210-01-SDC: Virtualization 101: Introduction to vSphere
H A N D S - O N L A B S M A N U A L | 2 2 2
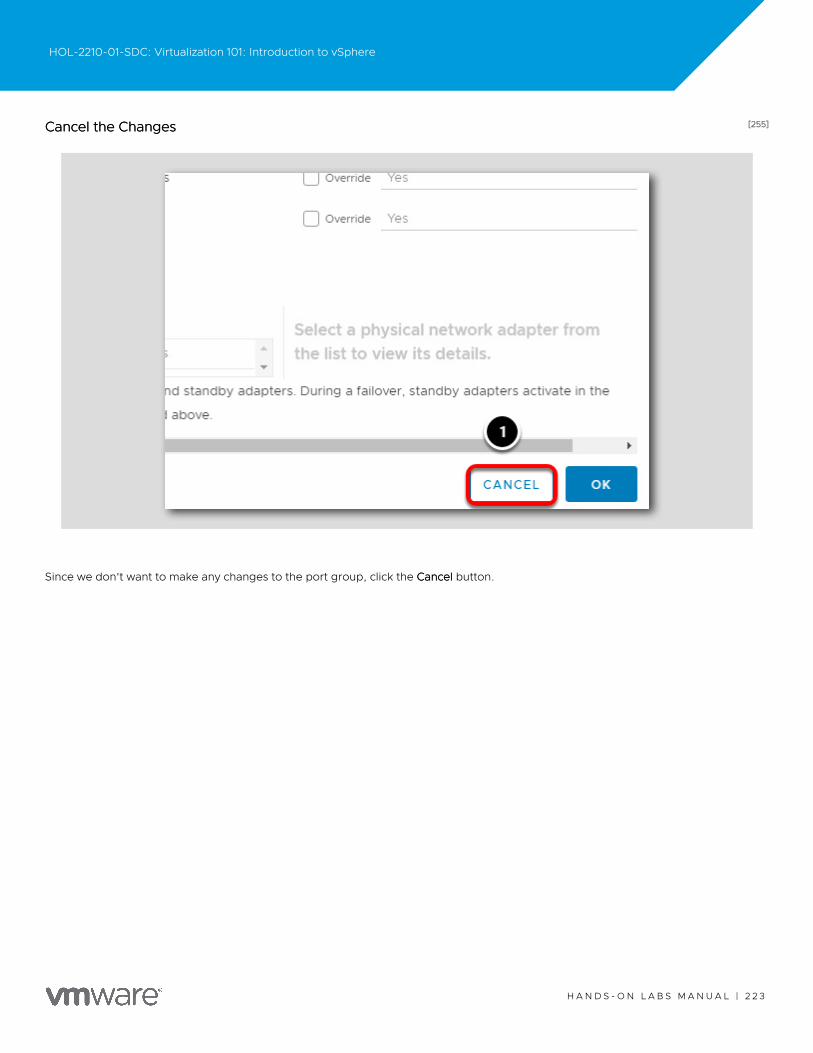
[255][255]Cancel the ChangesCancel the Changes
Since we don't want to make any changes to the port group, click the CancelCancel button.
HOL-2210-01-SDC: Virtualization 101: Introduction to vSphere
H A N D S - O N L A B S M A N U A L | 2 2 3

[256][256]Removing a Physical AdapterRemoving a Physical Adapter
1. Click Manager Physical AdaptersManager Physical Adapters for vSwitch0.
HOL-2210-01-SDC: Virtualization 101: Introduction to vSphere
H A N D S - O N L A B S M A N U A L | 2 2 4
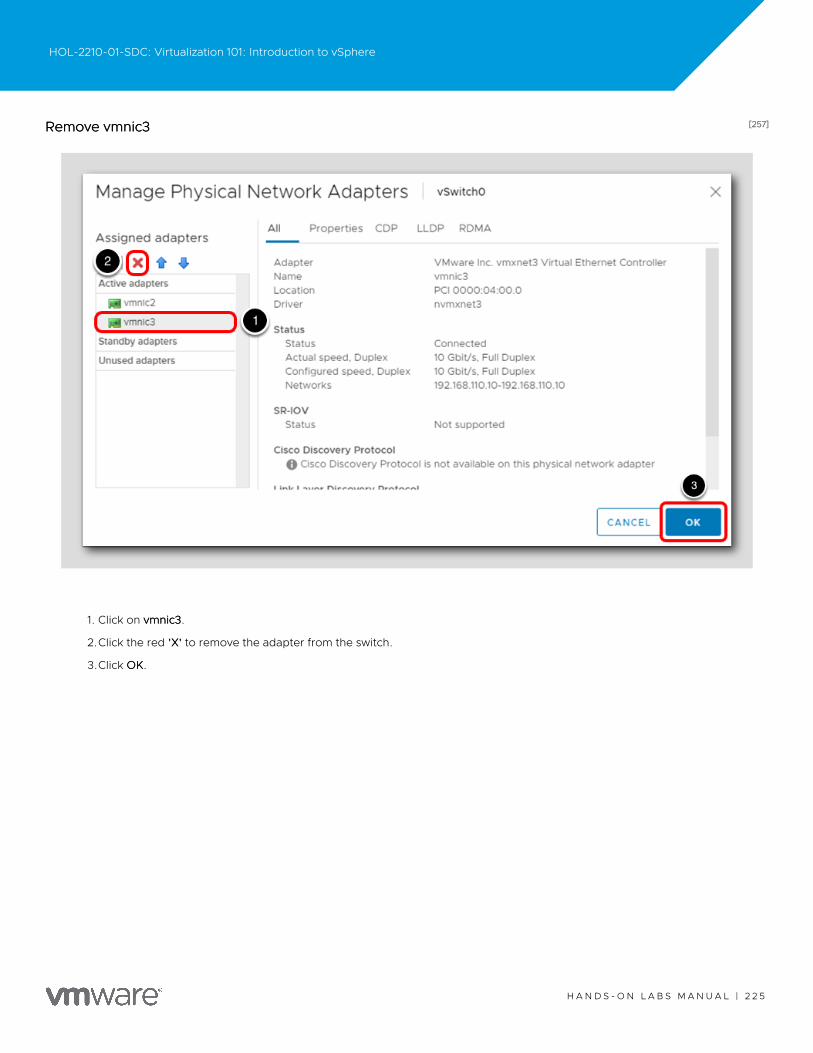
[257][257]Remove vmnic3Remove vmnic3
1. Click on vmnic3vmnic3.
2.Click the red 'X''X' to remove the adapter from the switch.
3.Click OKOK.
HOL-2210-01-SDC: Virtualization 101: Introduction to vSphere
H A N D S - O N L A B S M A N U A L | 2 2 5
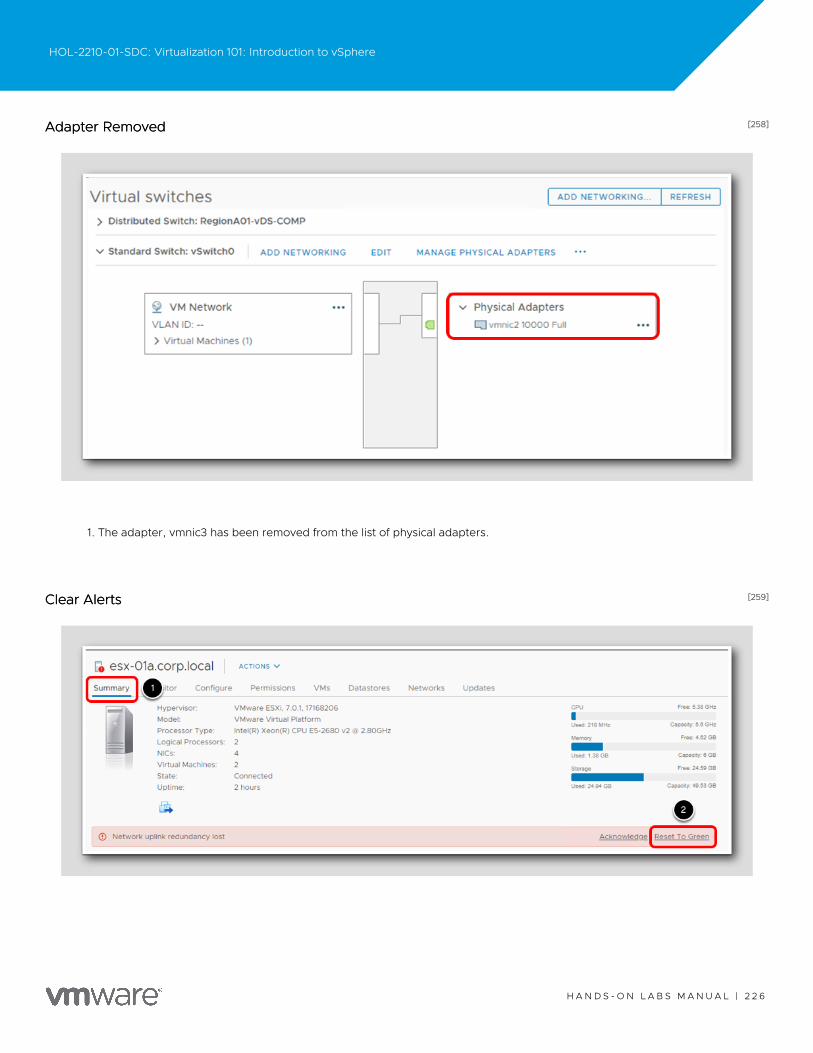
[258][258]Adapter RemovedAdapter Removed
1. The adapter, vmnic3 has been removed from the list of physical adapters.
[259][259]Clear AlertsClear Alerts
HOL-2210-01-SDC: Virtualization 101: Introduction to vSphere
H A N D S - O N L A B S M A N U A L | 2 2 6
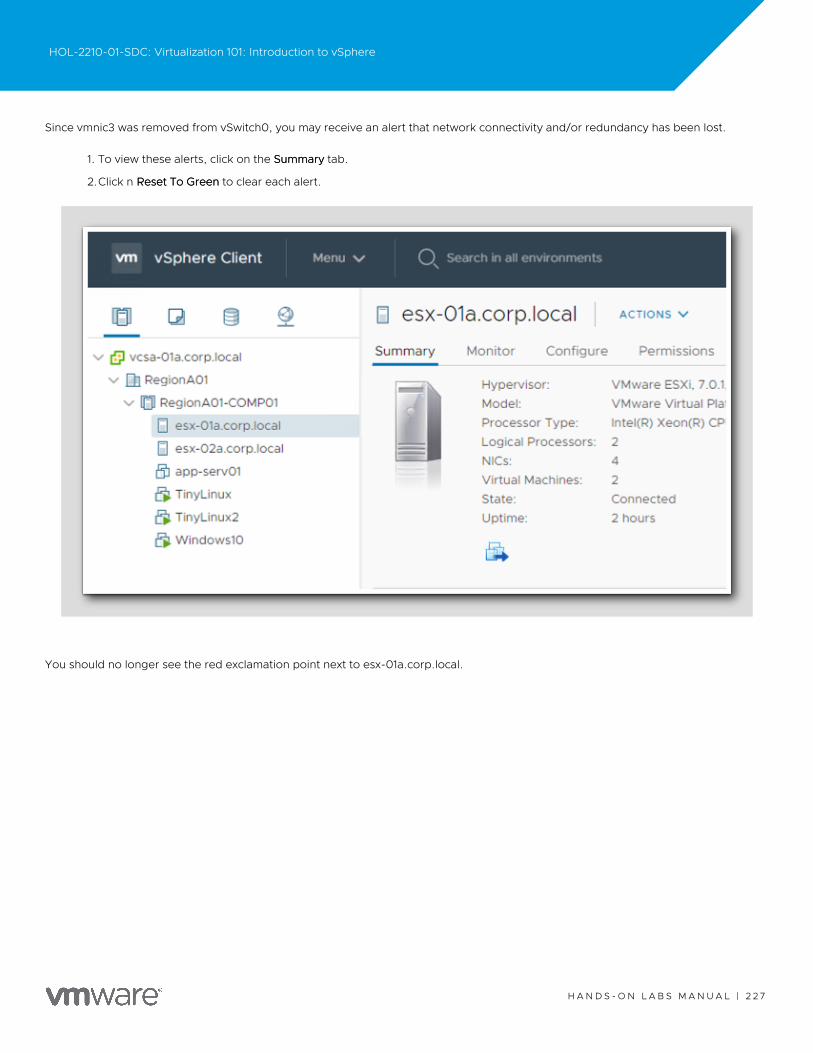
Since vmnic3 was removed from vSwitch0, you may receive an alert that network connectivity and/or redundancy has been lost.
1. To view these alerts, click on the SummarySummary tab.
2.Click n Reset To GreenReset To Green to clear each alert.
You should no longer see the red exclamation point next to esx-01a.corp.local.
HOL-2210-01-SDC: Virtualization 101: Introduction to vSphere
H A N D S - O N L A B S M A N U A L | 2 2 7
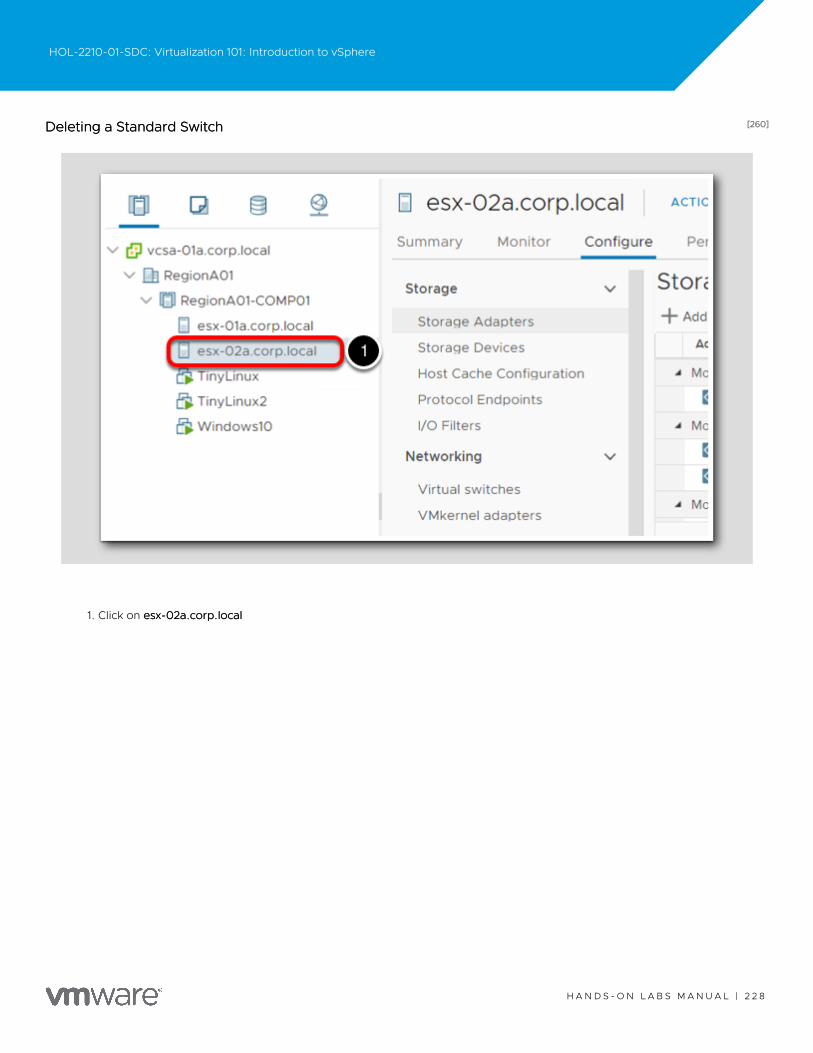
[260][260]Deleting a Standard SwitchDeleting a Standard Switch
1. Click on esx-02a.corp.localesx-02a.corp.local
HOL-2210-01-SDC: Virtualization 101: Introduction to vSphere
H A N D S - O N L A B S M A N U A L | 2 2 8

[261][261]Virtual SwitchesVirtual Switches
In preparation for the next lesson, we will delete the Standard Switch we created on esx-02a.corp.local.
1. Click the ConfigureConfigure tab.
2.Select Virtual switchesVirtual switches in the Networking section.
HOL-2210-01-SDC: Virtualization 101: Introduction to vSphere
H A N D S - O N L A B S M A N U A L | 2 2 9
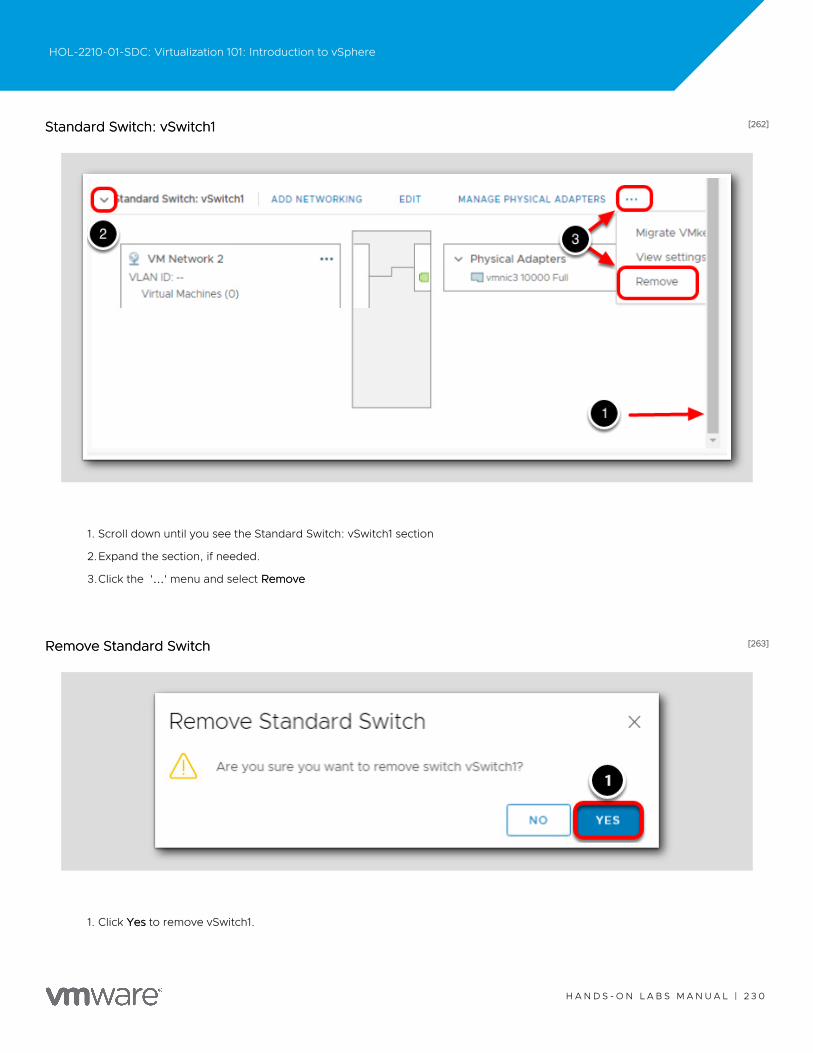
[262][262]Standard Switch: vSwitch1Standard Switch: vSwitch1
1. Scroll down until you see the Standard Switch: vSwitch1 section
2.Expand the section, if needed.
3.Click the '......' menu and select RemoveRemove
[263][263]Remove Standard SwitchRemove Standard Switch
1. Click YesYes to remove vSwitch1.
HOL-2210-01-SDC: Virtualization 101: Introduction to vSphere
H A N D S - O N L A B S M A N U A L | 2 3 0
[264][264]ConclusionConclusion
The vSphere Standard Switch is a simple virtual switch configured and managed at the host level. This switch provides access, trafficaggregation and fault tolerance by allowing multiple physical adapters to be bound to each virtual switch.
The VMware vSphere Distributed Switch builds on the capabilities of the vSS and simplifies management in large deployments byappearing as a single switch spanning multiple associated hosts. This allows changes to be made once and propagated to every hostthat is a member of the switch.
[265][265]Working with the vSphere Distributed SwitchWorking with the vSphere Distributed Switch
Before we walk through the process of building our own Distributed vSwitch, let's take a minute to explore an existing vDS.
In this lab we will see how a Distributed vSwitch compares to a Standard vSwitch, how it is configured, and how it is connected to arunning virtual machine.
HOL-2210-01-SDC: Virtualization 101: Introduction to vSphere
H A N D S - O N L A B S M A N U A L | 2 3 1
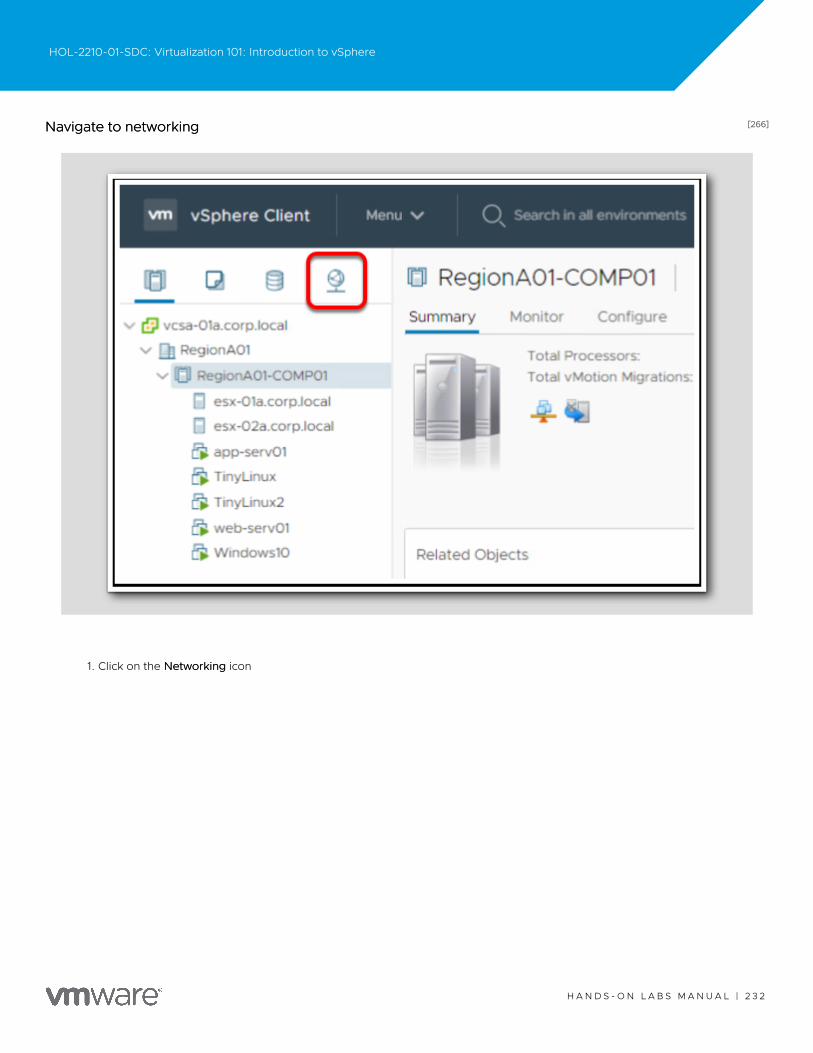
[266][266]Navigate to networkingNavigate to networking
1. Click on the NetworkingNetworking icon
HOL-2210-01-SDC: Virtualization 101: Introduction to vSphere
H A N D S - O N L A B S M A N U A L | 2 3 2
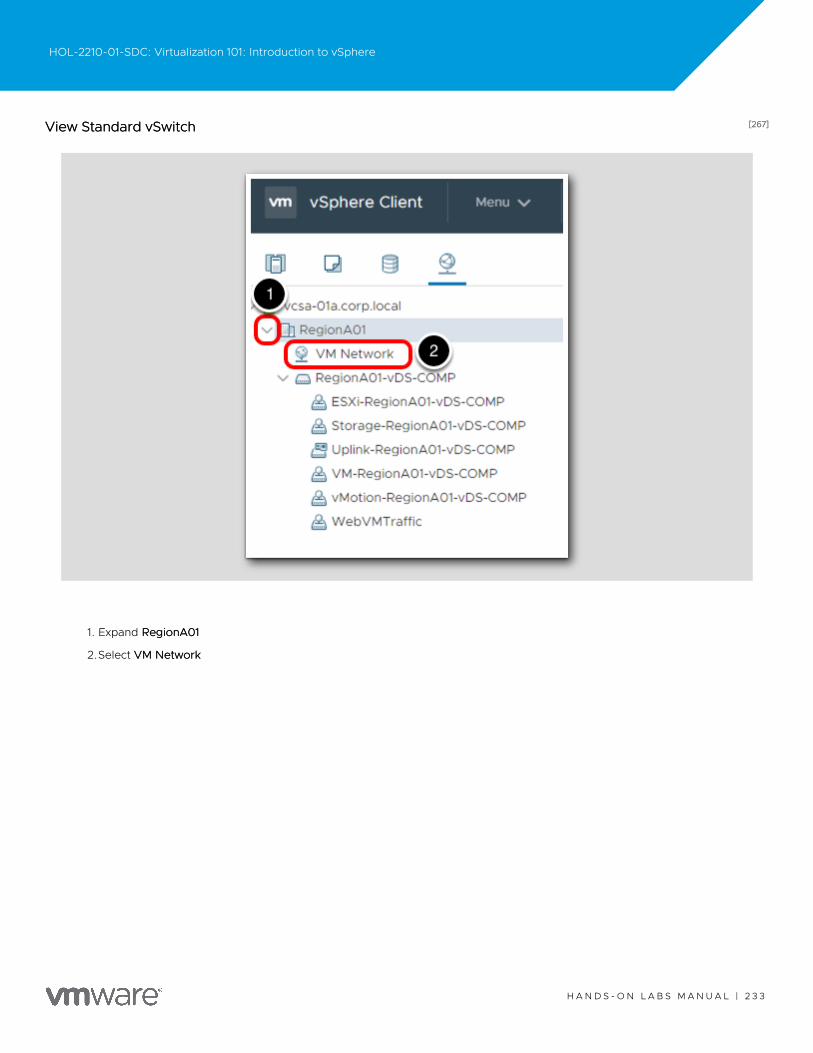
[267][267]View Standard vSwitchView Standard vSwitch
1. Expand RegionA01RegionA01
2.Select VM NetworkVM Network
HOL-2210-01-SDC: Virtualization 101: Introduction to vSphere
H A N D S - O N L A B S M A N U A L | 2 3 3
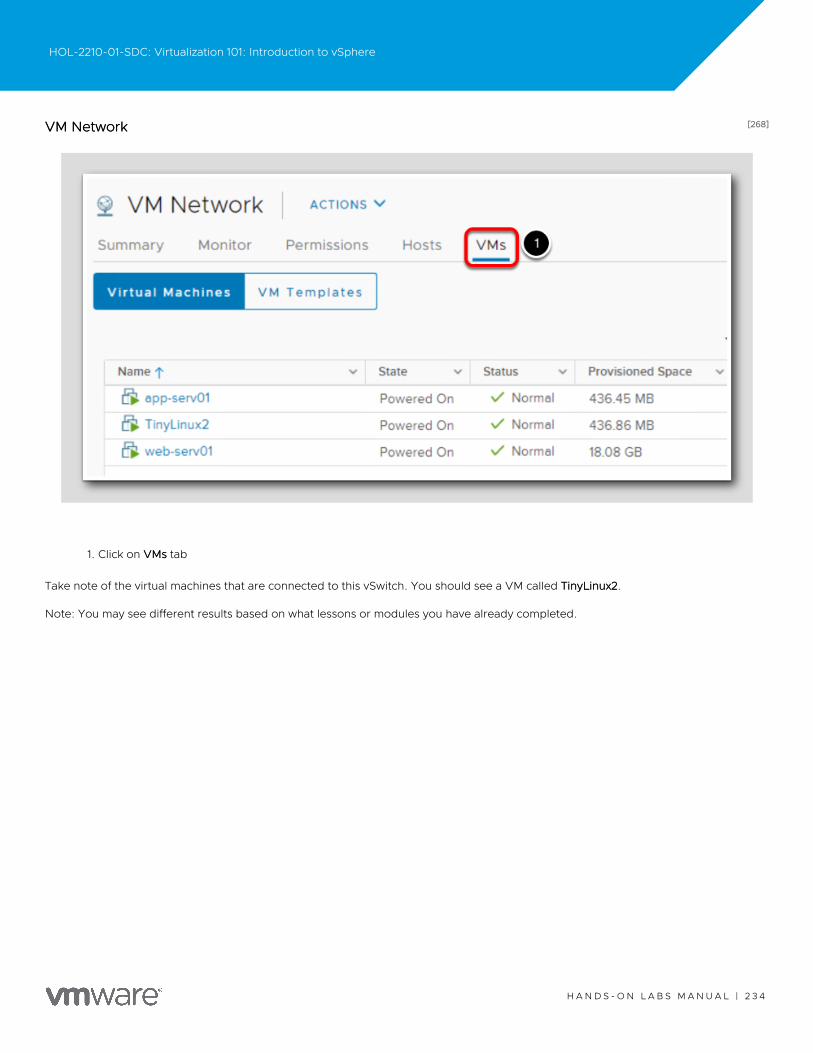
[268][268]VM NetworkVM Network
1. Click on VMsVMs tab
Take note of the virtual machines that are connected to this vSwitch. You should see a VM called TinyLinux2TinyLinux2.
Note: You may see different results based on what lessons or modules you have already completed.
HOL-2210-01-SDC: Virtualization 101: Introduction to vSphere
H A N D S - O N L A B S M A N U A L | 2 3 4

[269][269]HostsHosts
1. Click on HostsHosts tab
Take note of the hosts connected to the VM NetworkVM Network vSwtich. You should see esx-01a.corp.localesx-01a.corp.local and esx-02a.corp.localesx-02a.corp.local.
HOL-2210-01-SDC: Virtualization 101: Introduction to vSphere
H A N D S - O N L A B S M A N U A L | 2 3 5
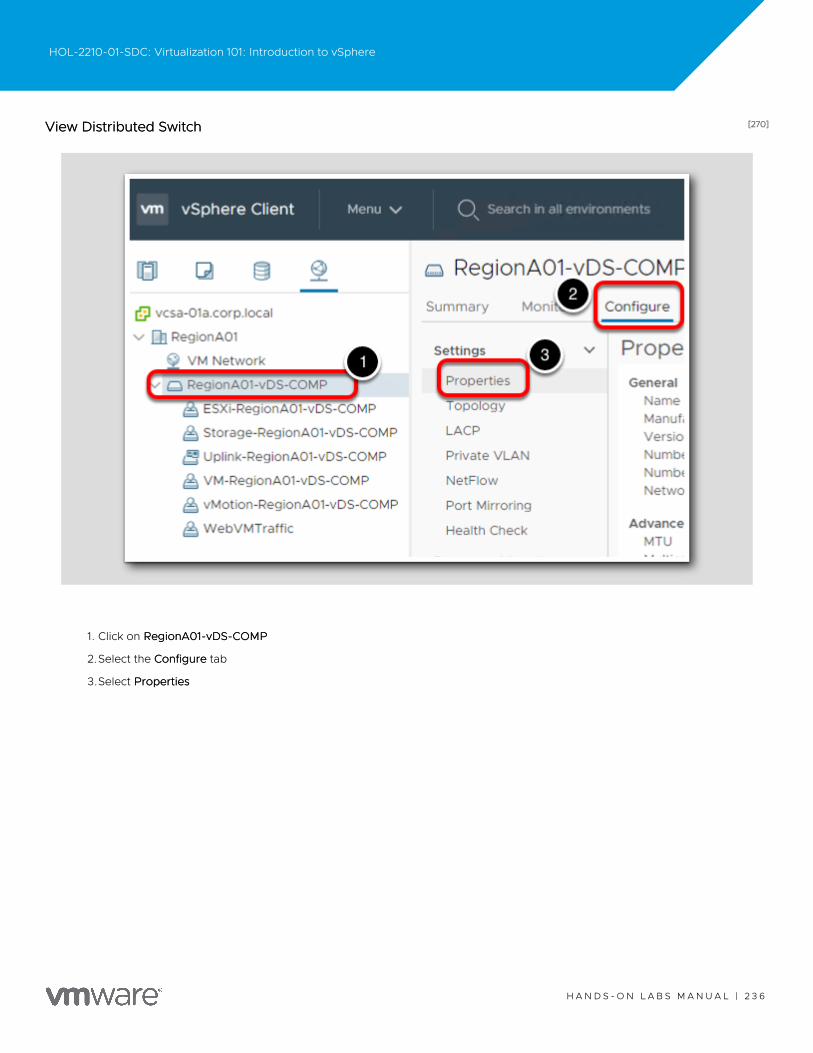
[270][270]View Distributed SwitchView Distributed Switch
1. Click on RegionA01-vDS-COMPRegionA01-vDS-COMP
2.Select the ConfigureConfigure tab
3.Select PropertiesProperties
HOL-2210-01-SDC: Virtualization 101: Introduction to vSphere
H A N D S - O N L A B S M A N U A L | 2 3 6
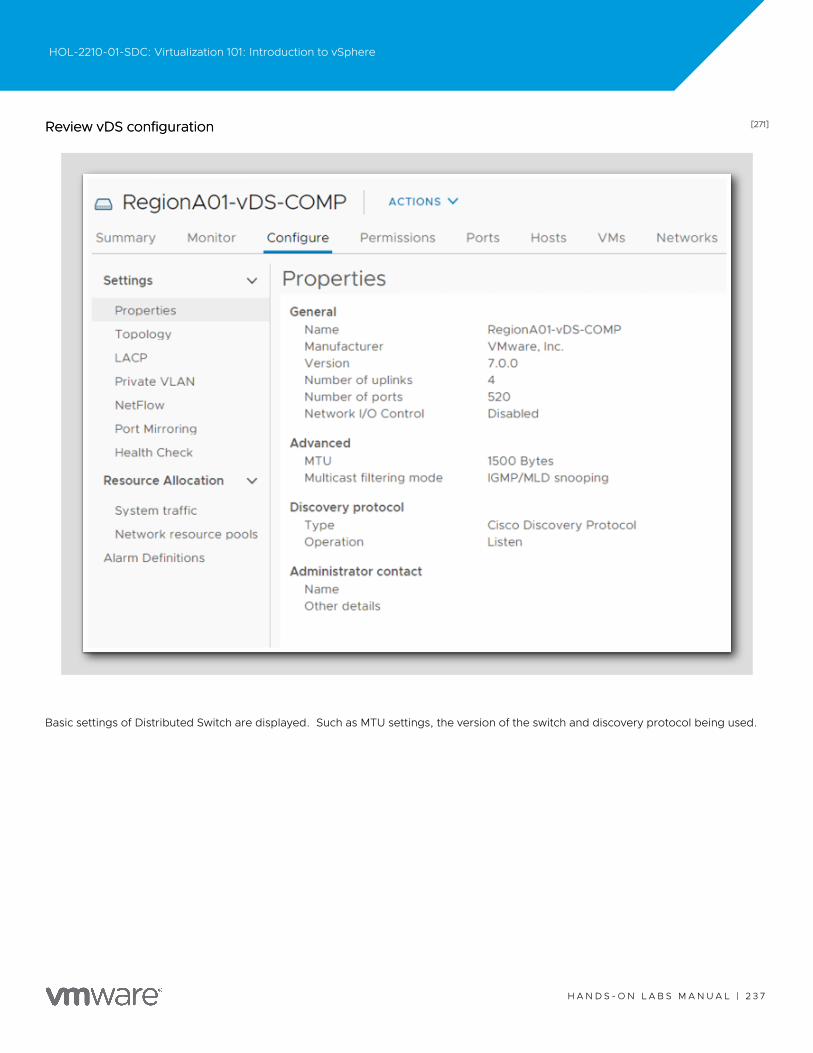
[271][271]Review vDS configurationReview vDS configuration
Basic settings of Distributed Switch are displayed. Such as MTU settings, the version of the switch and discovery protocol being used.
HOL-2210-01-SDC: Virtualization 101: Introduction to vSphere
H A N D S - O N L A B S M A N U A L | 2 3 7
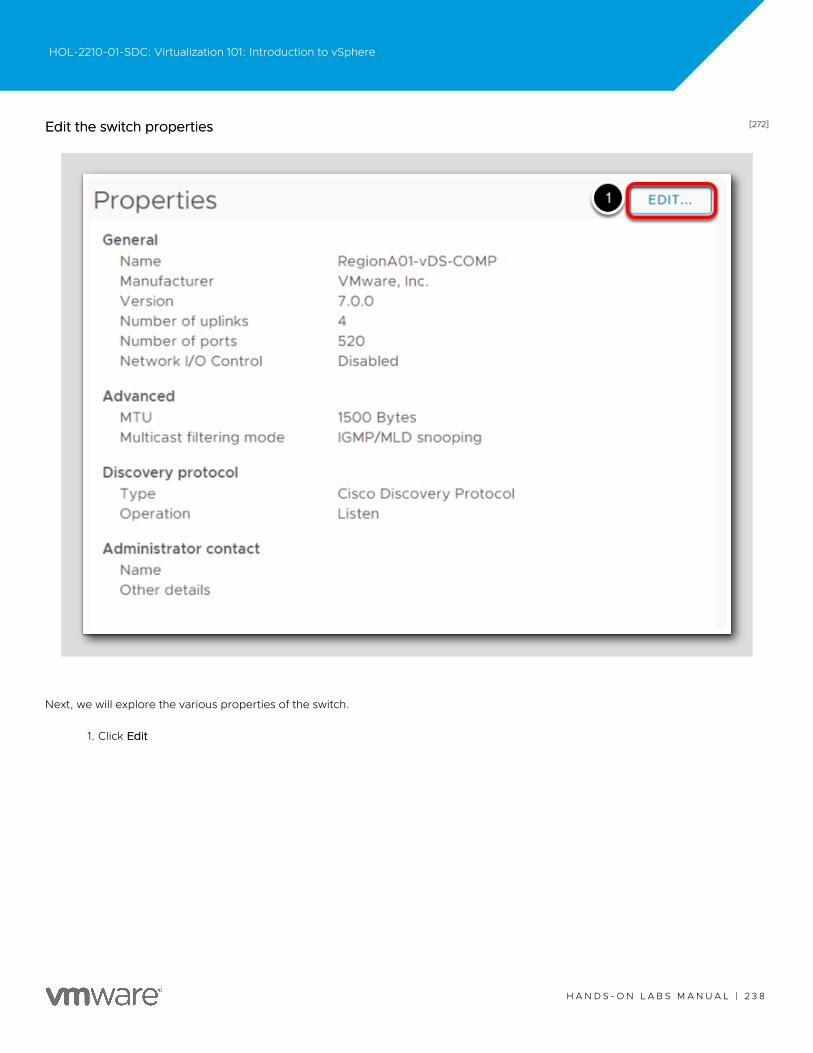
[272][272]Edit the switch propertiesEdit the switch properties
Next, we will explore the various properties of the switch.
1. Click EditEdit
HOL-2210-01-SDC: Virtualization 101: Introduction to vSphere
H A N D S - O N L A B S M A N U A L | 2 3 8
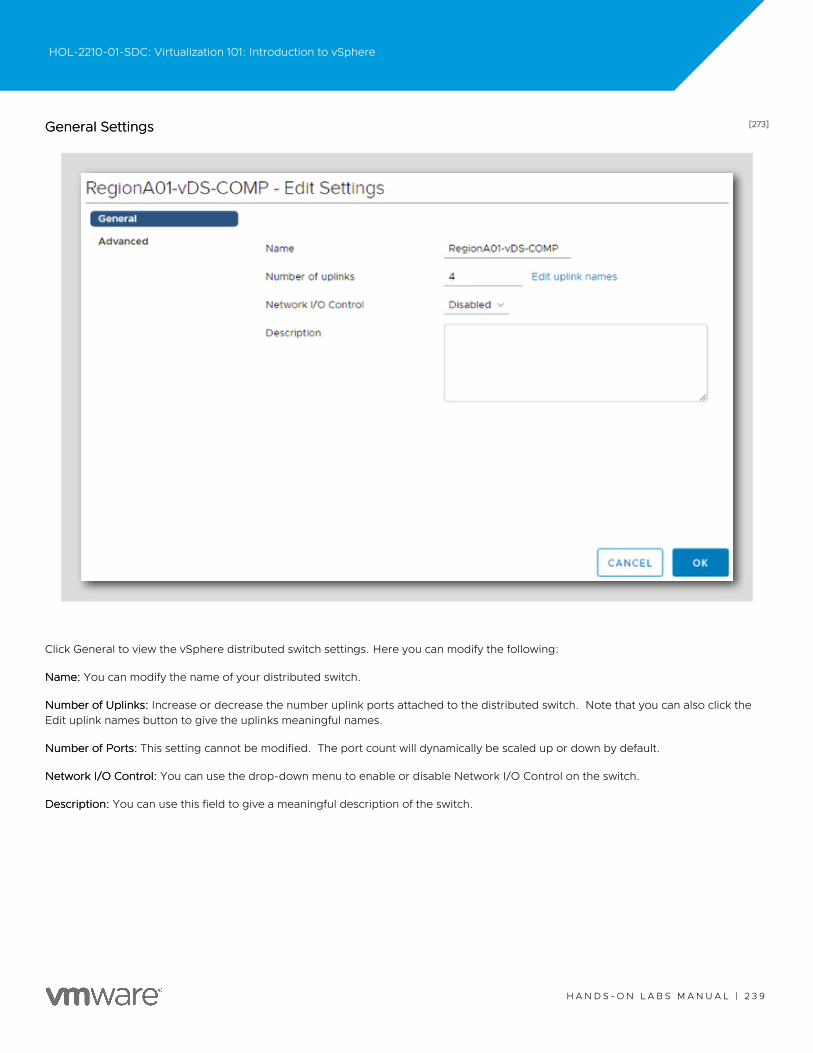
[273][273]General SettingsGeneral Settings
Click General to view the vSphere distributed switch settings. Here you can modify the following:
Name:Name: You can modify the name of your distributed switch.
Number of Uplinks:Number of Uplinks: Increase or decrease the number uplink ports attached to the distributed switch. Note that you can also click theEdit uplink names button to give the uplinks meaningful names.
Number of Ports:Number of Ports: This setting cannot be modified. The port count will dynamically be scaled up or down by default.
Network I/O Control:Network I/O Control: You can use the drop-down menu to enable or disable Network I/O Control on the switch.
Description:Description: You can use this field to give a meaningful description of the switch.
HOL-2210-01-SDC: Virtualization 101: Introduction to vSphere
H A N D S - O N L A B S M A N U A L | 2 3 9

[274][274]Advanced SettingsAdvanced Settings
HOL-2210-01-SDC: Virtualization 101: Introduction to vSphere
H A N D S - O N L A B S M A N U A L | 2 4 0

1. Click AdvancedAdvanced to view the vSphere distributed switch settings. Here you will find the following advanced settings for the
switch:
MTU (Bytes):MTU (Bytes): Maximum MTU size for the vSphere Distributed Switch. To enable jumbo frames, set a value greater than 1500 bytes.Make sure you check with your Networking team prior to modifying this setting in your environment.
Multicast filtering modeMulticast filtering mode
•Basic - The distributed switch forwards traffic that is related to a multicast group based on a MAC address generated from the
last 23 bits of the IPv4 address of the group.
•IGMP/MLD snooping - The distributed switch forwards multicast traffic to virtual machines according to the IPv4 and IPv6
addresses of subscribed multicast groups by using membership messages defined by the Internet Group Management
Protocol (IGMP) and Multicast Listener Discovery protocol.
Discovery ProtocolDiscovery Protocol
•Type - Cisco Discovery Protocol, Link Layer Discovery Protocol, or disabled.
•Operation - to Listen, Advertise, or Both.
Administrator Contact:Administrator Contact: Type the name and other details of the administrator for the distributed switch.
2.We don't want to make any changes here, just click CancelCancel.
HOL-2210-01-SDC: Virtualization 101: Introduction to vSphere
H A N D S - O N L A B S M A N U A L | 2 4 1
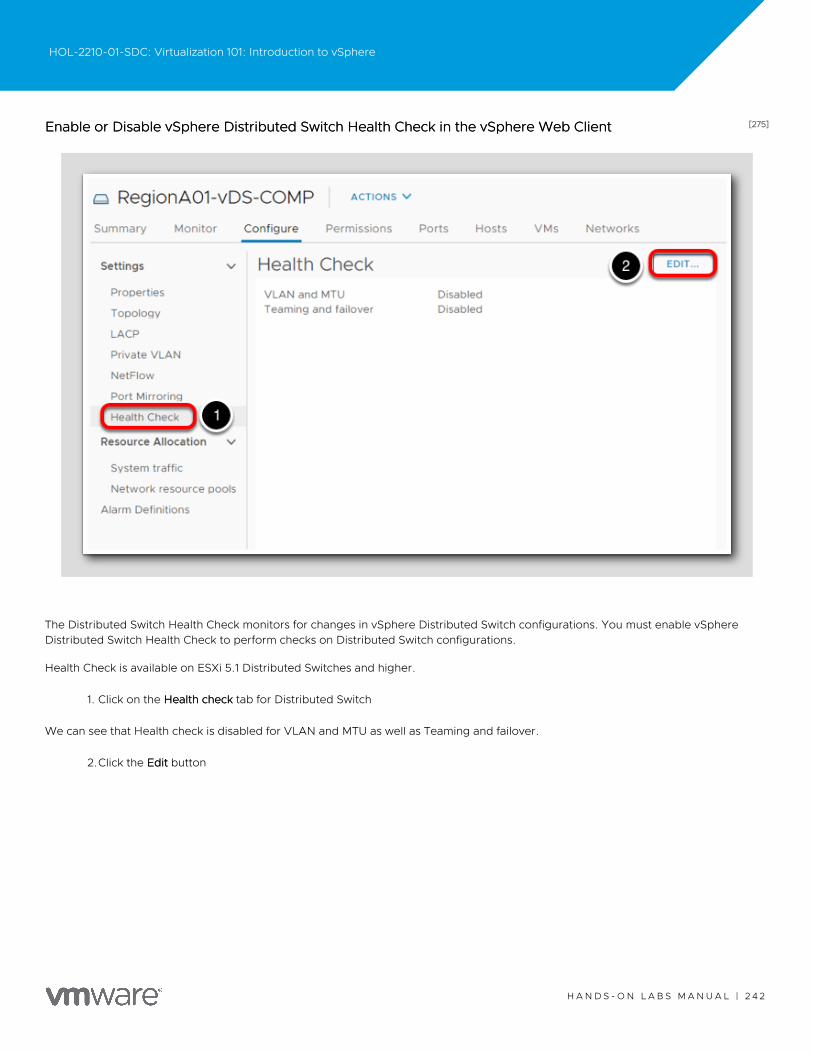
[275][275]Enable or Disable vSphere Distributed Switch Health Check in the vSphere Web ClientEnable or Disable vSphere Distributed Switch Health Check in the vSphere Web Client
The Distributed Switch Health Check monitors for changes in vSphere Distributed Switch configurations. You must enable vSphereDistributed Switch Health Check to perform checks on Distributed Switch configurations.
Health Check is available on ESXi 5.1 Distributed Switches and higher.
1. Click on the Health checkHealth check tab for Distributed Switch
We can see that Health check is disabled for VLAN and MTU as well as Teaming and failover.
2.Click the EditEdit button
HOL-2210-01-SDC: Virtualization 101: Introduction to vSphere
H A N D S - O N L A B S M A N U A L | 2 4 2
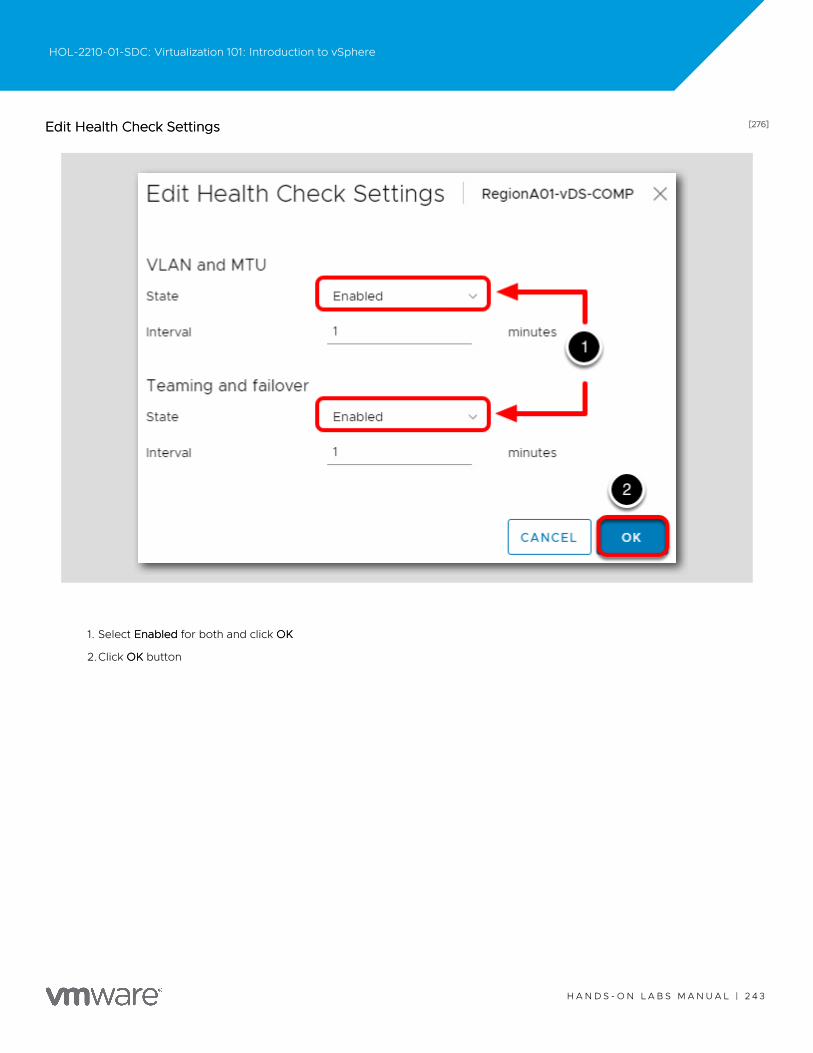
[276][276]Edit Health Check SettingsEdit Health Check Settings
1. Select EnabledEnabled for both and click OKOK
2.Click OKOK button
HOL-2210-01-SDC: Virtualization 101: Introduction to vSphere
H A N D S - O N L A B S M A N U A L | 2 4 3
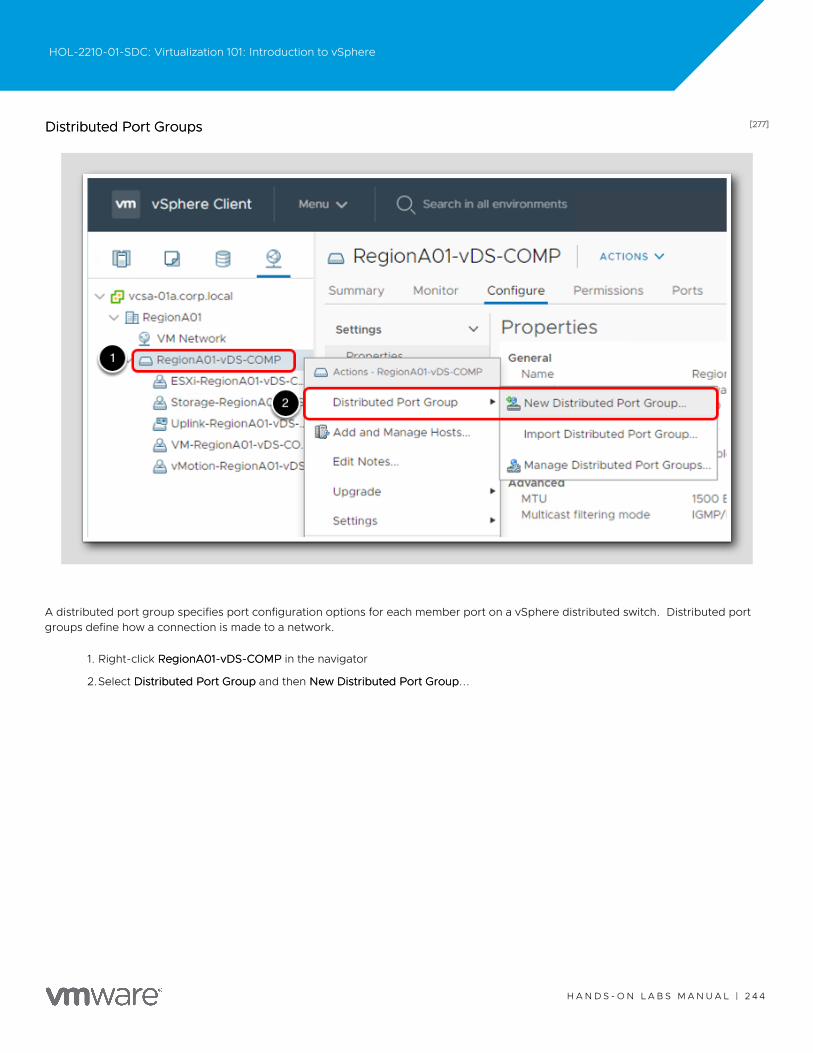
[277][277]Distributed Port GroupsDistributed Port Groups
A distributed port group specifies port configuration options for each member port on a vSphere distributed switch. Distributed portgroups define how a connection is made to a network.
1. Right-click RegionA01-vDS-COMPRegionA01-vDS-COMP in the navigator
2.Select Distributed Port GroupDistributed Port Group and then New Distributed Port GroupNew Distributed Port Group...
HOL-2210-01-SDC: Virtualization 101: Introduction to vSphere
H A N D S - O N L A B S M A N U A L | 2 4 4
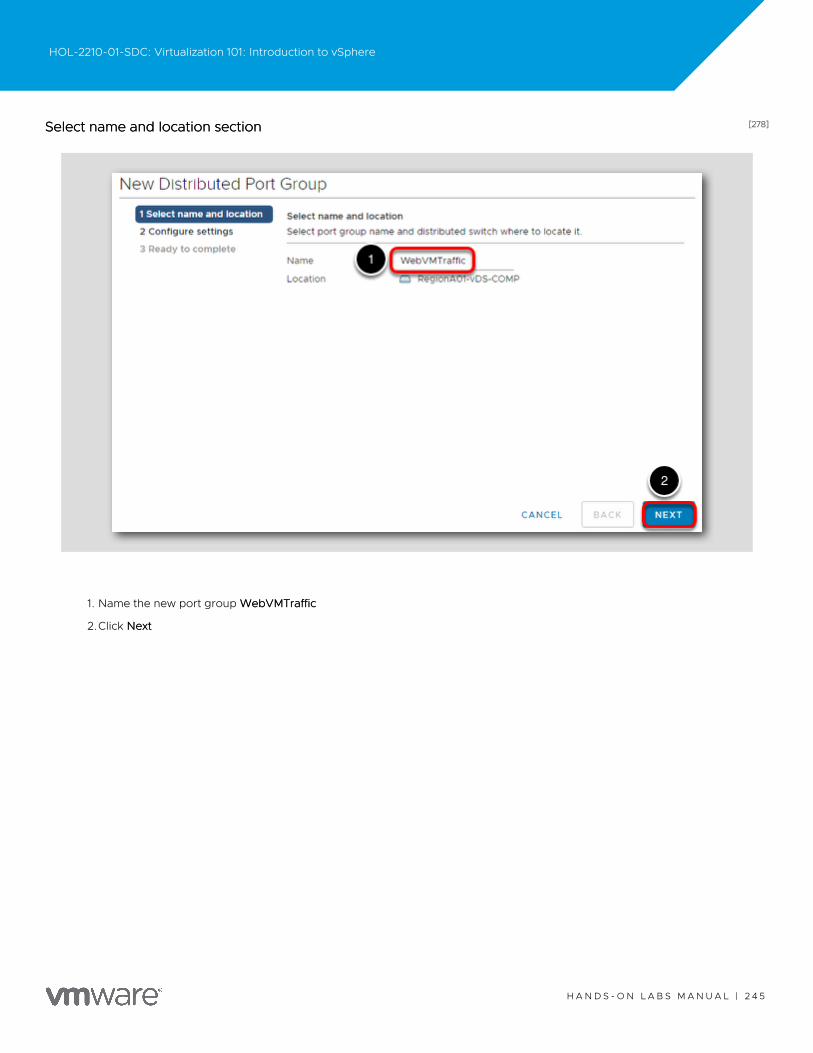
[278][278]Select name and location sectionSelect name and location section
1. Name the new port group WebVMTrafficWebVMTraffic
2.Click NextNext
HOL-2210-01-SDC: Virtualization 101: Introduction to vSphere
H A N D S - O N L A B S M A N U A L | 2 4 5

[279][279]Configure settingsConfigure settings
HOL-2210-01-SDC: Virtualization 101: Introduction to vSphere
H A N D S - O N L A B S M A N U A L | 2 4 6
When creating a Distributed Port Group, you have the following options available:
Port binding -Port binding - Choose when ports are assigned to virtual machines connected to this distributed port group.
•Static binding - Assign a port to a virtual machine when the virtual machine connects to the distributed port group.
•Ephemeral - No port binding. You can assign a virtual machine to a distributed port group with ephemeral port binding also
when connected to the host.
Port allocationPort allocation
•Elastic - The default number of ports is eight. When all ports are assigned, a new set of eight ports is created. This is the
default.
•Fixed - The default number of ports is set to eight. No additional ports are created when all ports are assigned.
Number of ports:Number of ports: Enter the number of ports on the distributed port group.
Network resource pool:Network resource pool: If you have created network pool to help control network traffic, you can select it here.
VLAN:VLAN: Use the Type drop-down menu to select VLAN options:
•None - Do not use VLAN.
•VLAN - In the VLAN ID field, enter a number between 1 and 4094.
•VLAN Trunking - Enter a VLAN trunk range.
•Private VLAN - Select a private VLAN entry. If you did not create any private VLANs, this menu is empty.
Advanced:Advanced: Select this check box to customize the policy configurations for the new distributed port group.
1. Just accept the defaults and click Next to continue.Just accept the defaults and click Next to continue.
HOL-2210-01-SDC: Virtualization 101: Introduction to vSphere
H A N D S - O N L A B S M A N U A L | 2 4 7
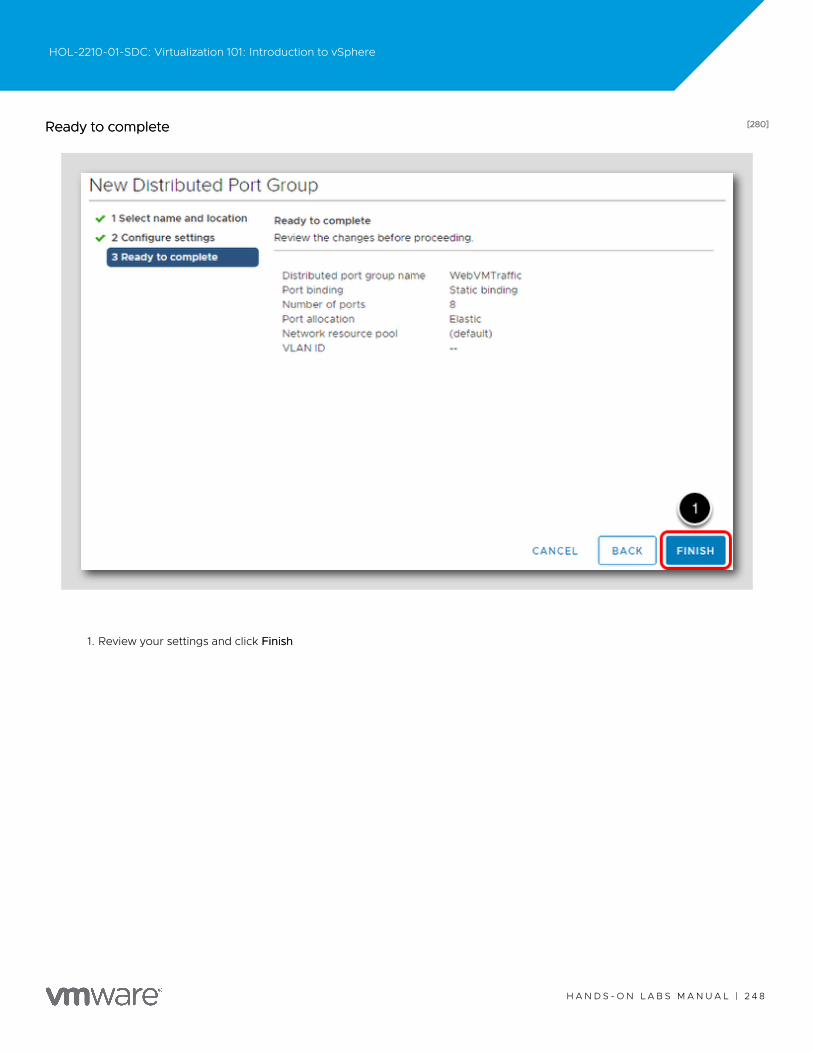
[280][280]Ready to completeReady to complete
1. Review your settings and click FinishFinish
HOL-2210-01-SDC: Virtualization 101: Introduction to vSphere
H A N D S - O N L A B S M A N U A L | 2 4 8
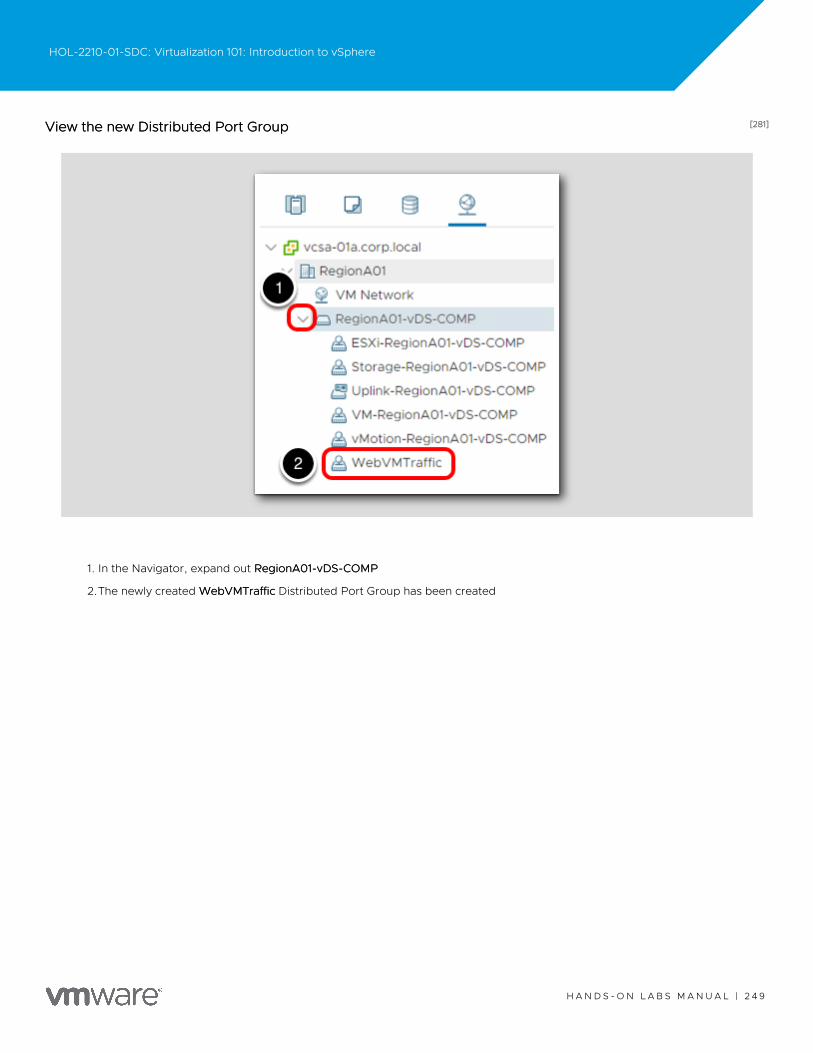
[281][281]View the new Distributed Port GroupView the new Distributed Port Group
1. In the Navigator, expand out RegionA01-vDS-COMPRegionA01-vDS-COMP
2.The newly created WebVMTrafficWebVMTraffic Distributed Port Group has been created
HOL-2210-01-SDC: Virtualization 101: Introduction to vSphere
H A N D S - O N L A B S M A N U A L | 2 4 9
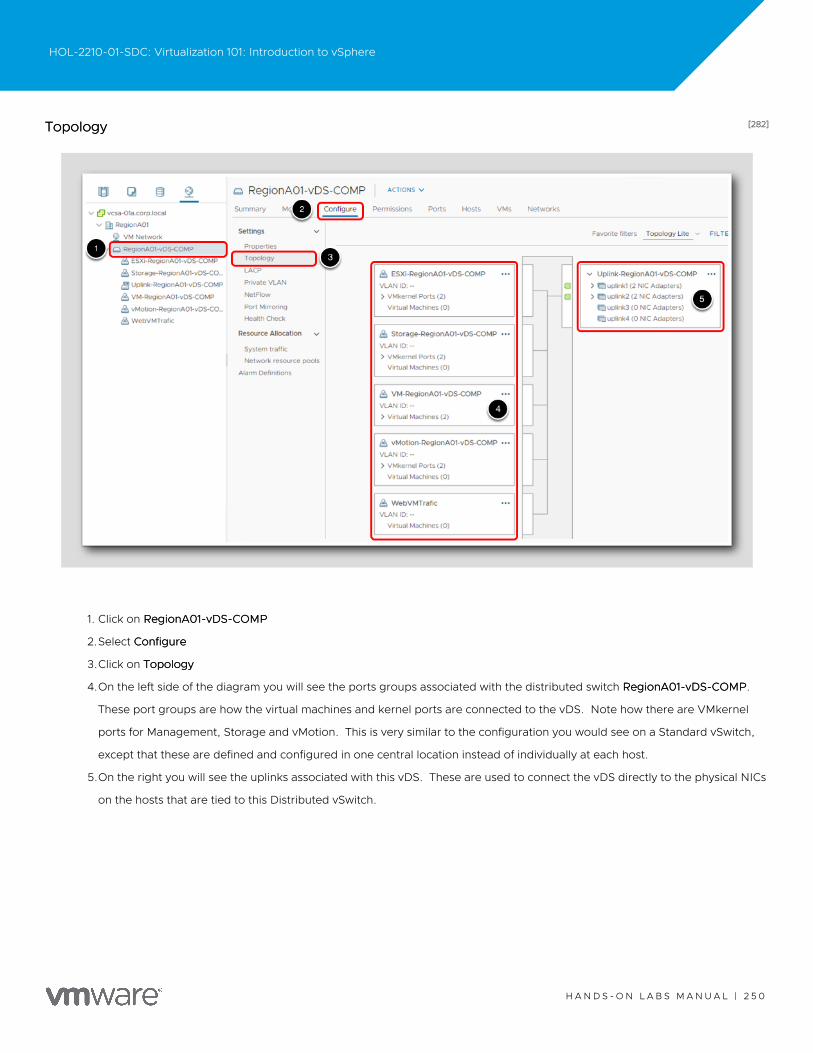
[282][282]TopologyTopology
1. Click on RegionA01-vDS-COMPRegionA01-vDS-COMP
2.Select ConfigureConfigure
3.Click on TopologyTopology
4.On the left side of the diagram you will see the ports groups associated with the distributed switch RegionA01-vDS-COMPRegionA01-vDS-COMP.
These port groups are how the virtual machines and kernel ports are connected to the vDS. Note how there are VMkernel
ports for Management, Storage and vMotion. This is very similar to the configuration you would see on a Standard vSwitch,
except that these are defined and configured in one central location instead of individually at each host.
5.On the right you will see the uplinks associated with this vDS. These are used to connect the vDS directly to the physical NICs
on the hosts that are tied to this Distributed vSwitch.
HOL-2210-01-SDC: Virtualization 101: Introduction to vSphere
H A N D S - O N L A B S M A N U A L | 2 5 0
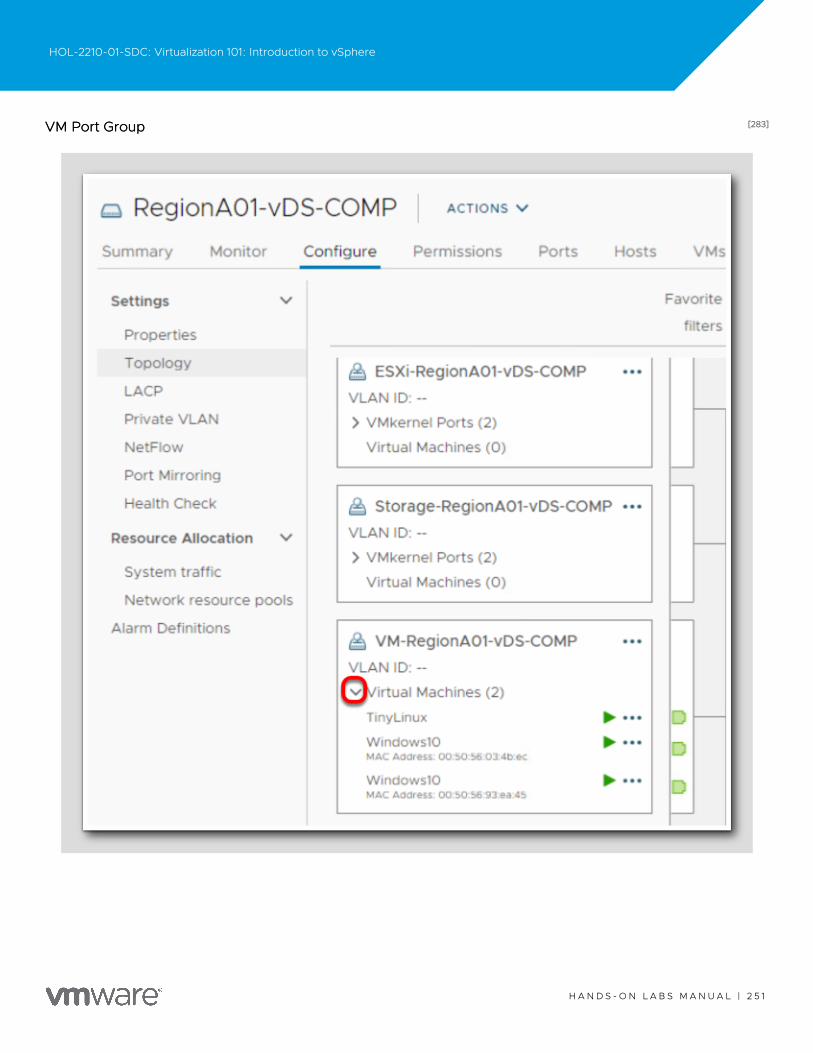
[283][283]VM Port GroupVM Port Group
HOL-2210-01-SDC: Virtualization 101: Introduction to vSphere
H A N D S - O N L A B S M A N U A L | 2 5 1
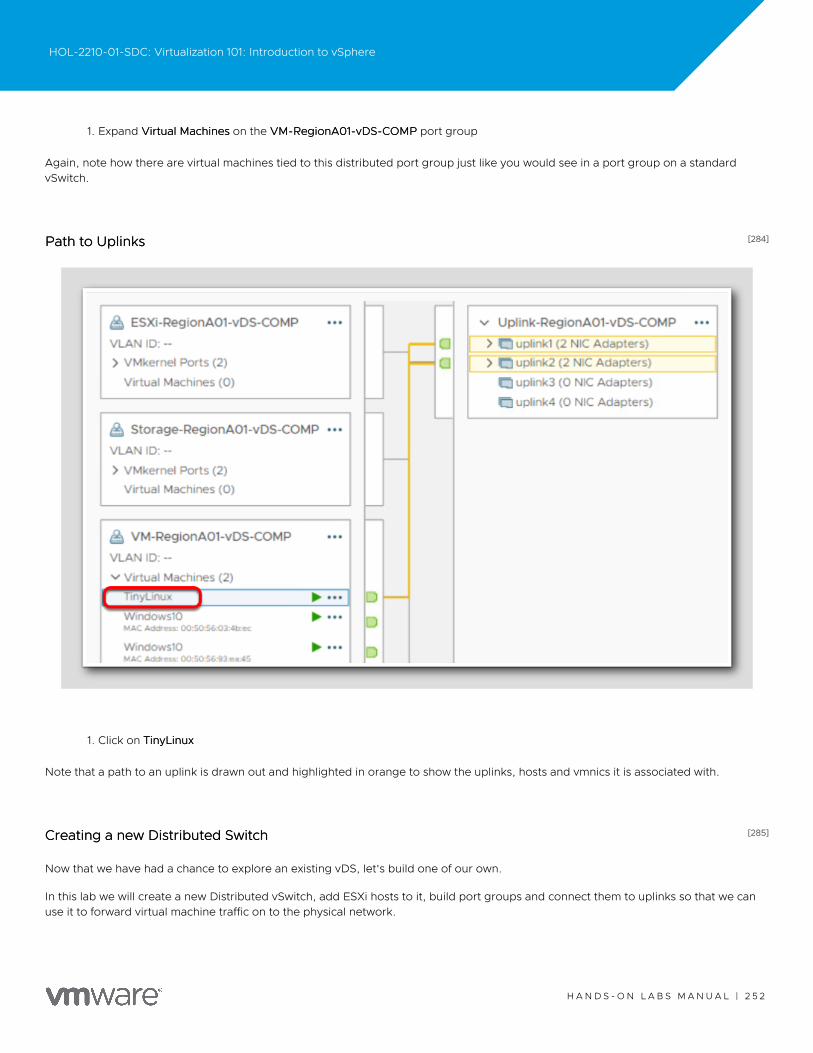
1. Expand Virtual MachinesVirtual Machines on the VM-RegionA01-vDS-COMPVM-RegionA01-vDS-COMP port group
Again, note how there are virtual machines tied to this distributed port group just like you would see in a port group on a standardvSwitch.
[284][284]Path to UplinksPath to Uplinks
1. Click on TinyLinuxTinyLinux
Note that a path to an uplink is drawn out and highlighted in orange to show the uplinks, hosts and vmnics it is associated with.
[285][285]Creating a new Distributed SwitchCreating a new Distributed Switch
Now that we have had a chance to explore an existing vDS, let's build one of our own.
In this lab we will create a new Distributed vSwitch, add ESXi hosts to it, build port groups and connect them to uplinks so that we canuse it to forward virtual machine traffic on to the physical network.
HOL-2210-01-SDC: Virtualization 101: Introduction to vSphere
H A N D S - O N L A B S M A N U A L | 2 5 2
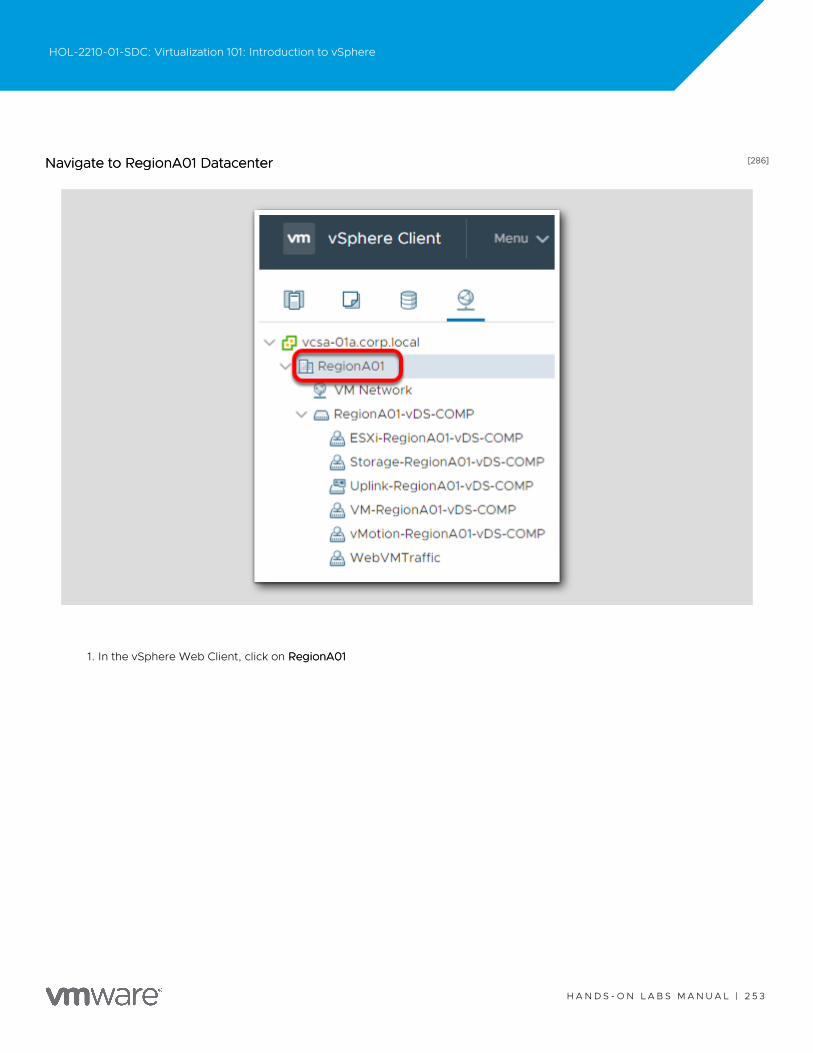
[286][286]Navigate to RegionA01 DatacenterNavigate to RegionA01 Datacenter
1. In the vSphere Web Client, click on RegionA01RegionA01
HOL-2210-01-SDC: Virtualization 101: Introduction to vSphere
H A N D S - O N L A B S M A N U A L | 2 5 3
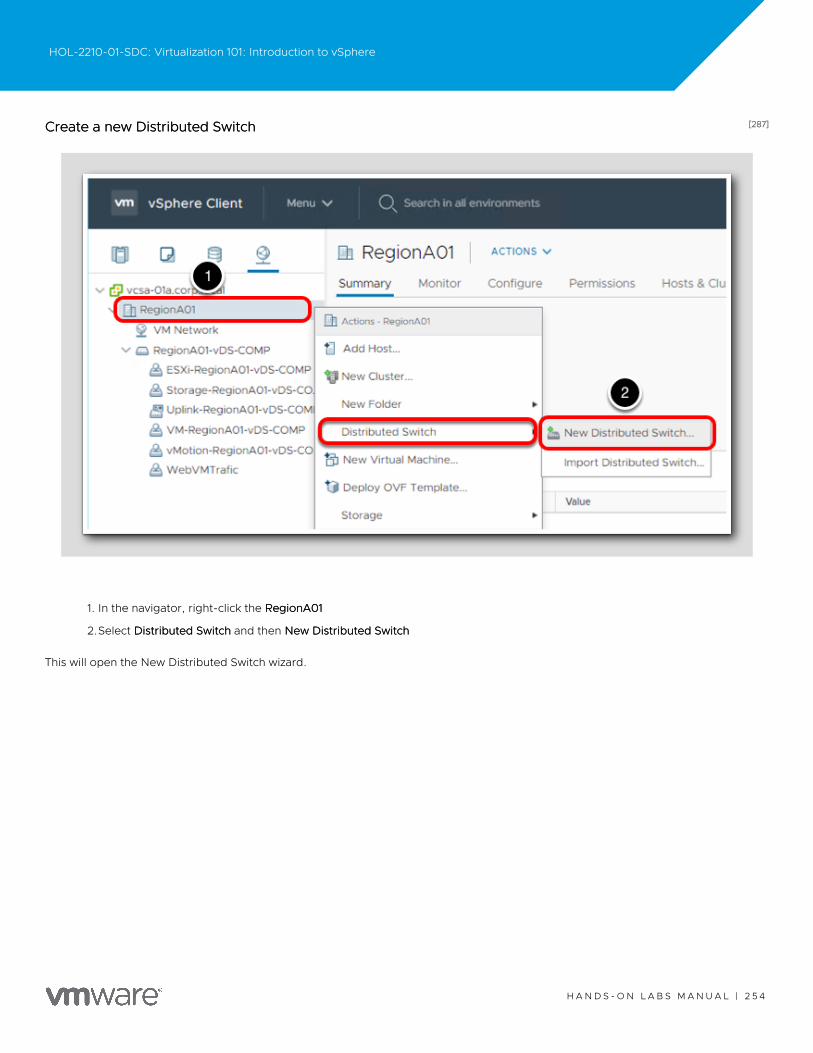
[287][287]Create a new Distributed SwitchCreate a new Distributed Switch
1. In the navigator, right-click the RegionA01RegionA01
2.Select Distributed SwitchDistributed Switch and then New Distributed SwitchNew Distributed Switch
This will open the New Distributed Switch wizard.
HOL-2210-01-SDC: Virtualization 101: Introduction to vSphere
H A N D S - O N L A B S M A N U A L | 2 5 4

[288][288]Name the Distributed SwitchName the Distributed Switch
1. Type New-vDSNew-vDS in the Name field
2.Click NextNext
HOL-2210-01-SDC: Virtualization 101: Introduction to vSphere
H A N D S - O N L A B S M A N U A L | 2 5 5
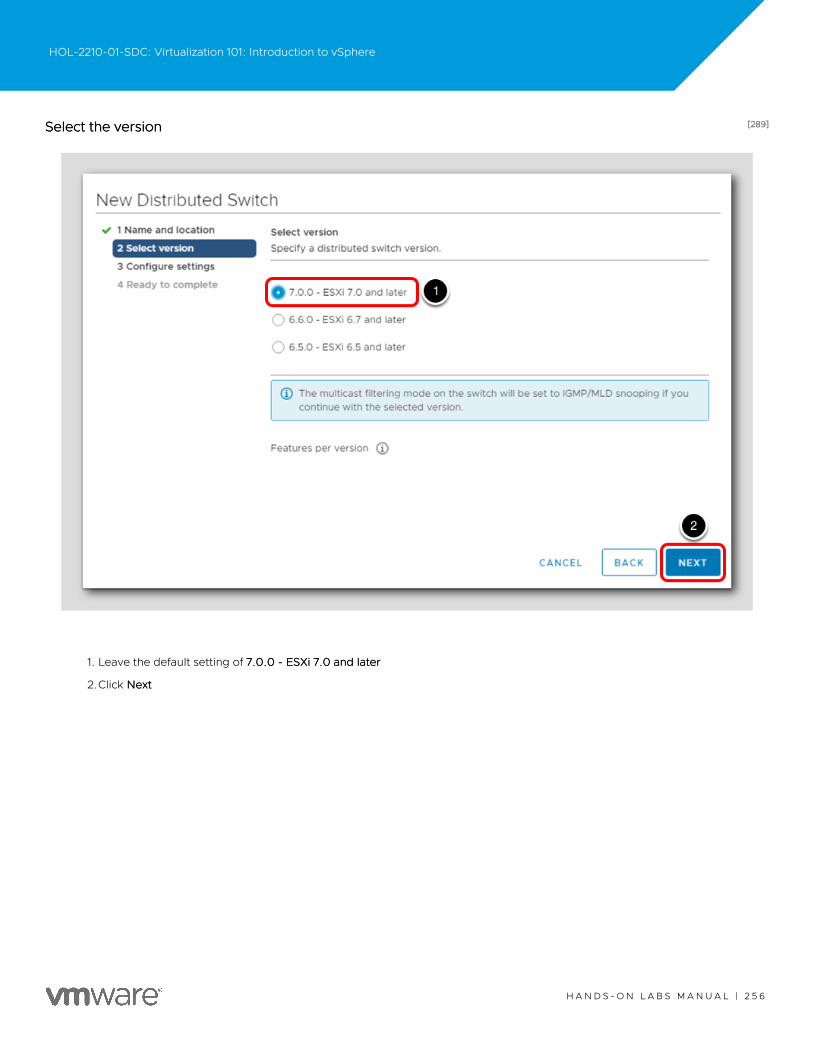
[289][289]Select the versionSelect the version
1. Leave the default setting of 7.0.0 - ESXi 7.0 and later7.0.0 - ESXi 7.0 and later
2.Click NextNext
HOL-2210-01-SDC: Virtualization 101: Introduction to vSphere
H A N D S - O N L A B S M A N U A L | 2 5 6

[290][290]Configure settingsConfigure settings
1. Leave the default options and click NextNext
HOL-2210-01-SDC: Virtualization 101: Introduction to vSphere
H A N D S - O N L A B S M A N U A L | 2 5 7
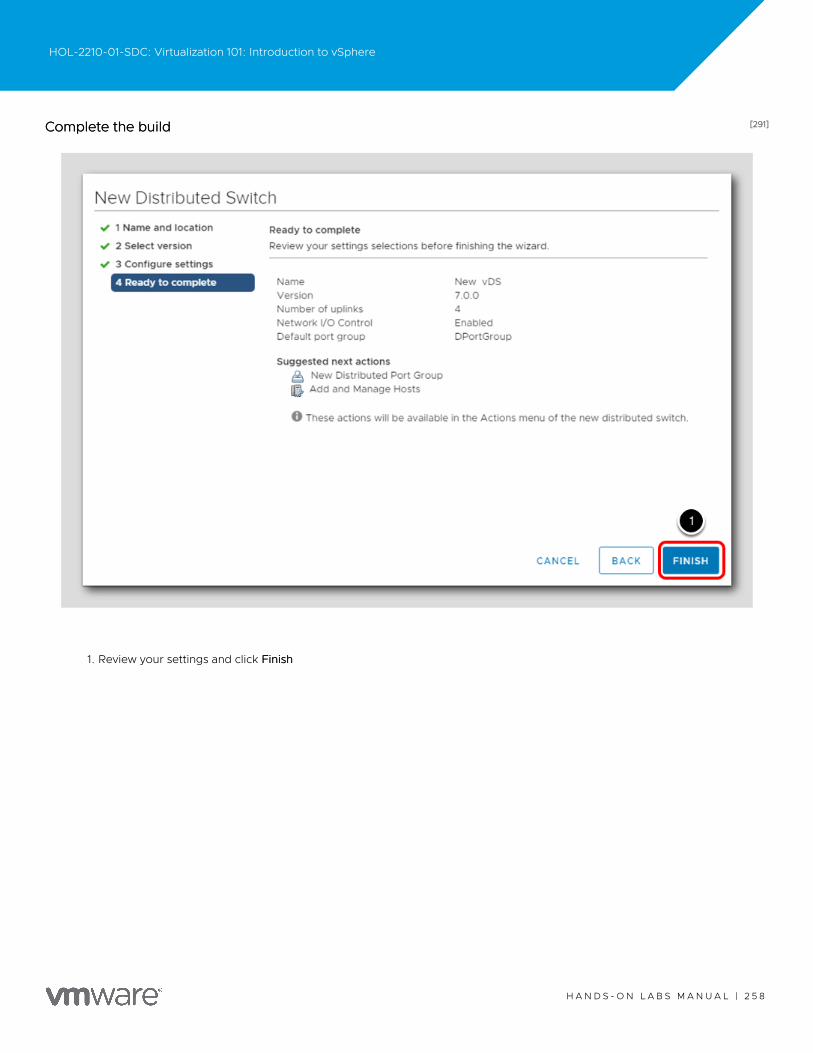
[291][291]Complete the buildComplete the build
1. Review your settings and click FinishFinish
HOL-2210-01-SDC: Virtualization 101: Introduction to vSphere
H A N D S - O N L A B S M A N U A L | 2 5 8
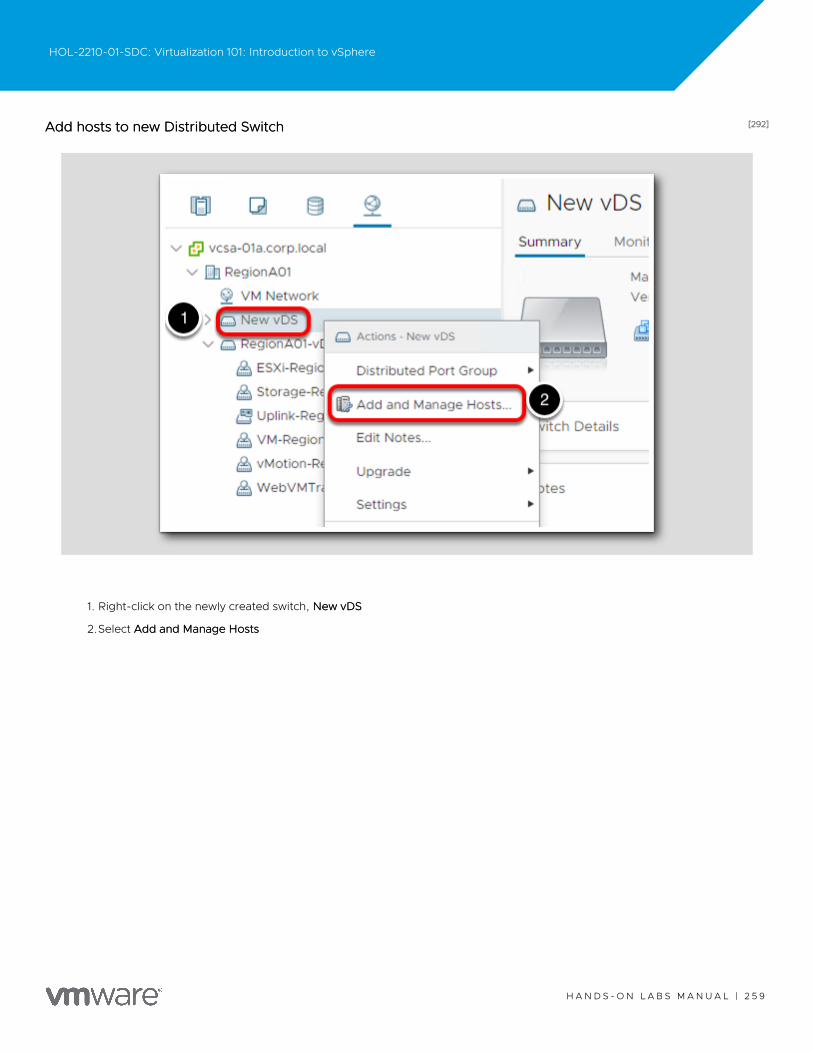
[292][292]Add hosts to new Distributed SwitchAdd hosts to new Distributed Switch
1. Right-click on the newly created switch, New vDSNew vDS
2.Select Add and Manage HostsAdd and Manage Hosts
HOL-2210-01-SDC: Virtualization 101: Introduction to vSphere
H A N D S - O N L A B S M A N U A L | 2 5 9
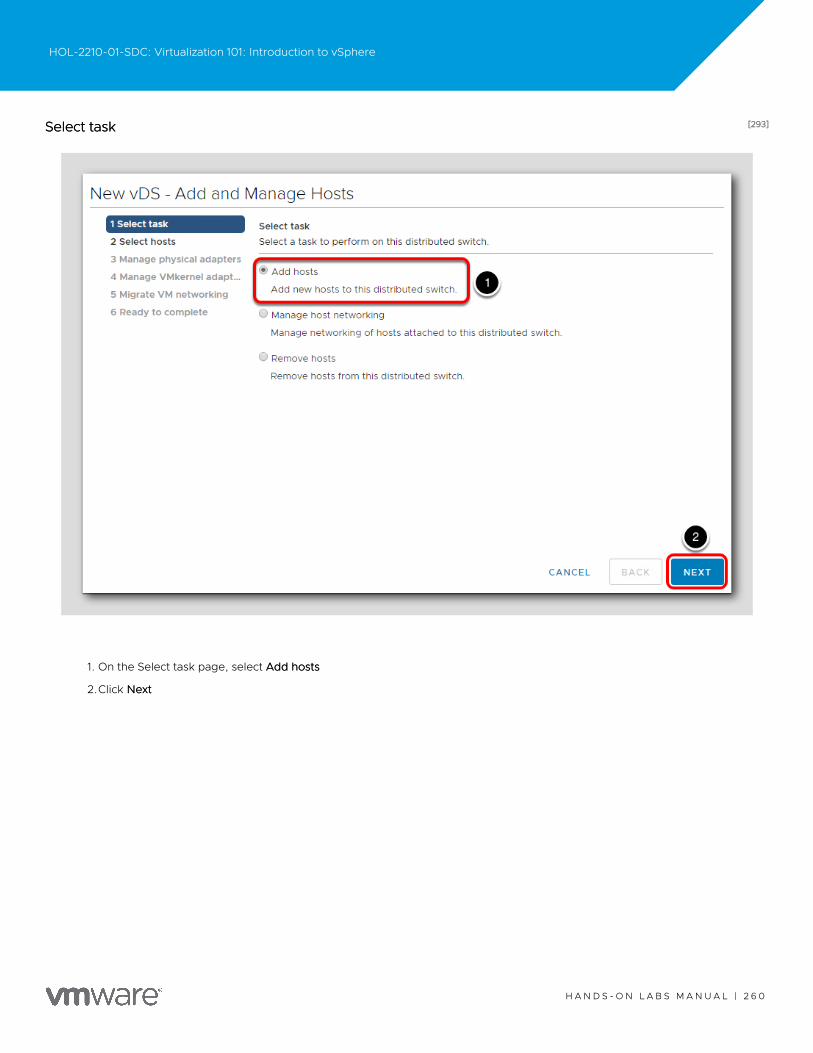
[293][293]Select taskSelect task
1. On the Select task page, select Add hostsAdd hosts
2.Click NextNext
HOL-2210-01-SDC: Virtualization 101: Introduction to vSphere
H A N D S - O N L A B S M A N U A L | 2 6 0
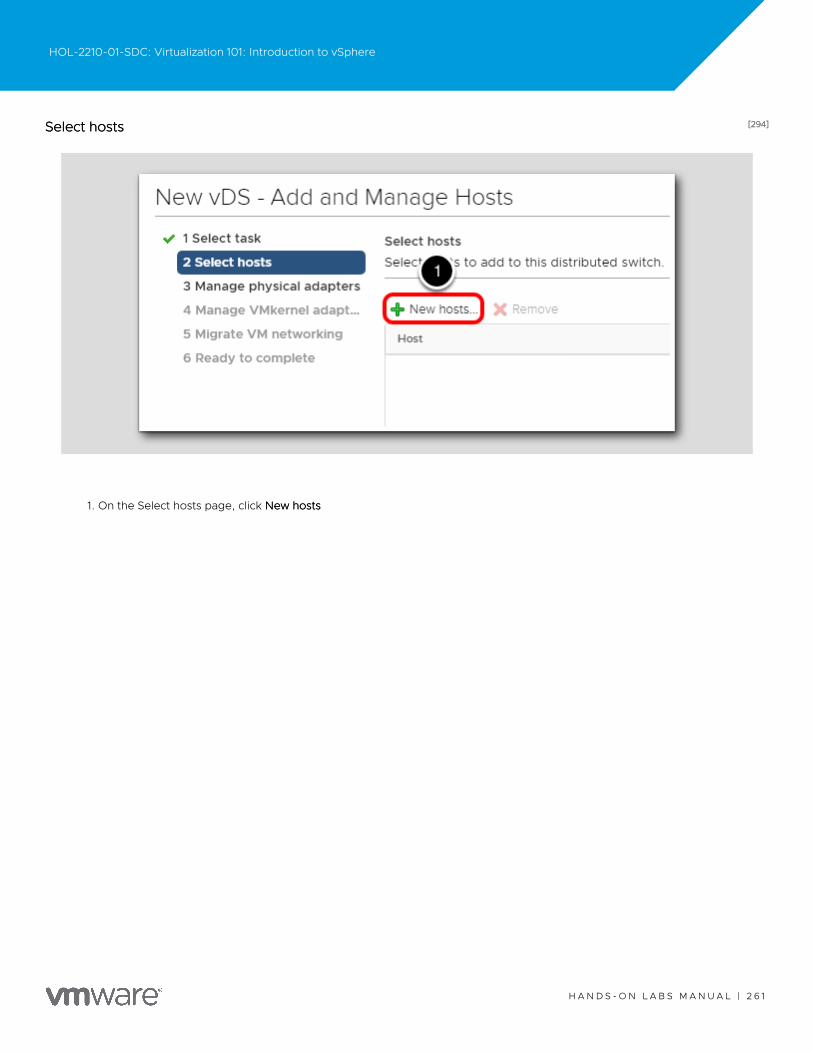
[294][294]Select hostsSelect hosts
1. On the Select hosts page, click New hostsNew hosts
HOL-2210-01-SDC: Virtualization 101: Introduction to vSphere
H A N D S - O N L A B S M A N U A L | 2 6 1

[295][295]Select New HostsSelect New Hosts
1. Click the check box on the left to select both hosts in the datacenter
2.Click OKOK
HOL-2210-01-SDC: Virtualization 101: Introduction to vSphere
H A N D S - O N L A B S M A N U A L | 2 6 2
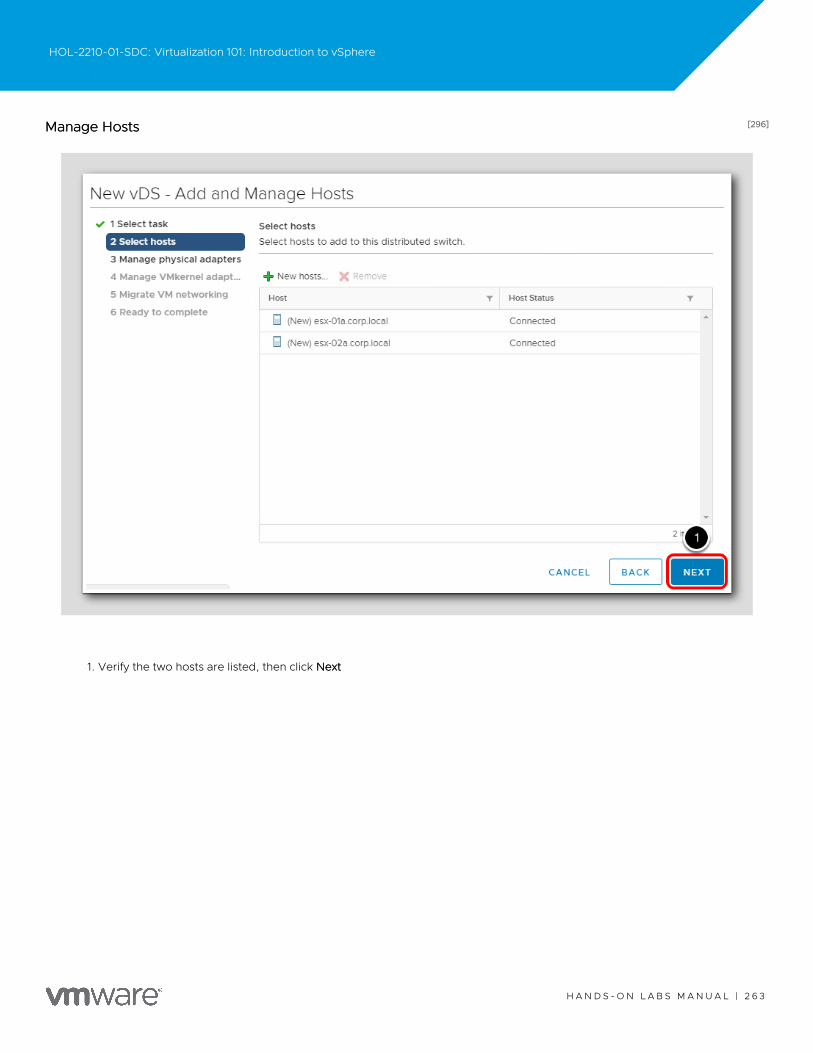
[296][296]Manage HostsManage Hosts
1. Verify the two hosts are listed, then click NextNext
HOL-2210-01-SDC: Virtualization 101: Introduction to vSphere
H A N D S - O N L A B S M A N U A L | 2 6 3
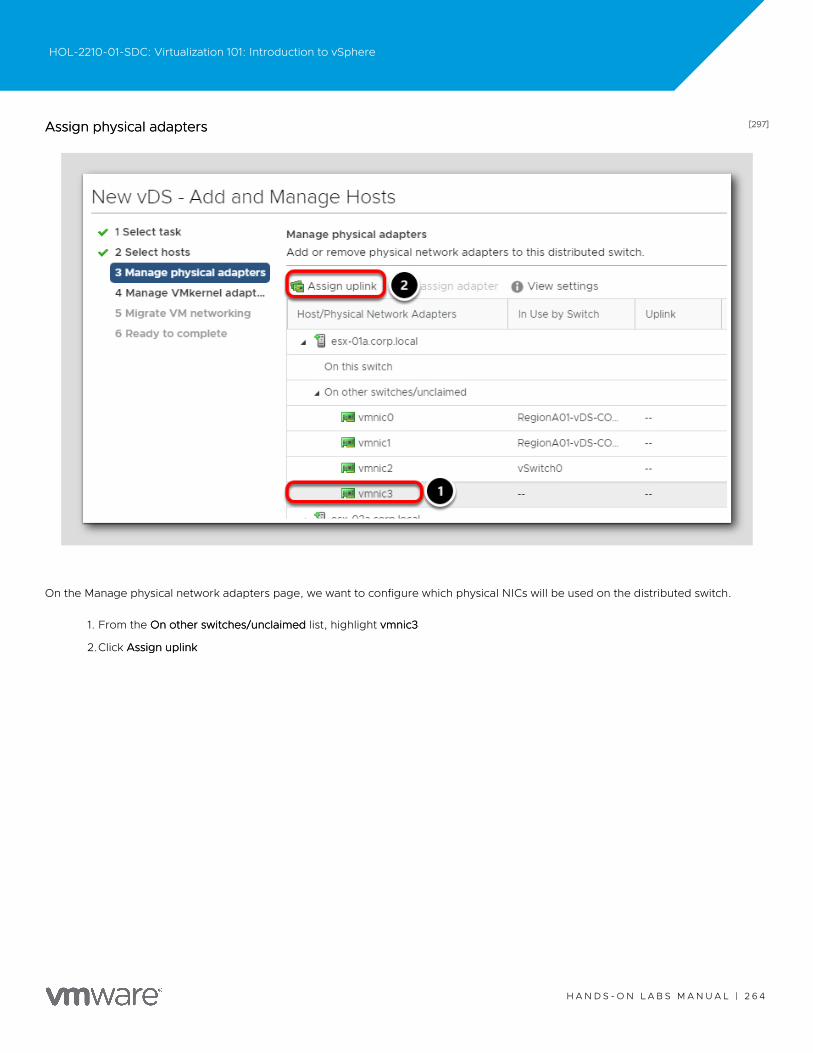
[297][297]Assign physical adaptersAssign physical adapters
On the Manage physical network adapters page, we want to configure which physical NICs will be used on the distributed switch.
1. From the On other switches/unclaimedOn other switches/unclaimed list, highlight vmnic3vmnic3
2.Click Assign uplinkAssign uplink
HOL-2210-01-SDC: Virtualization 101: Introduction to vSphere
H A N D S - O N L A B S M A N U A L | 2 6 4
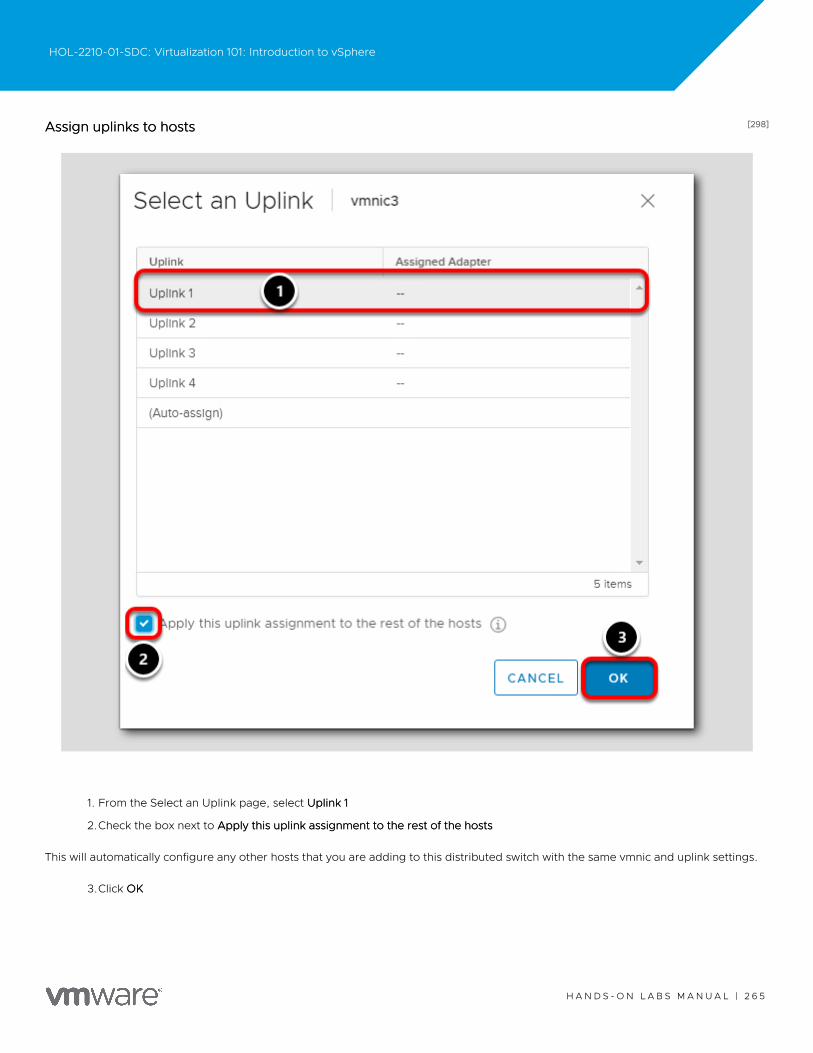
[298][298]Assign uplinks to hostsAssign uplinks to hosts
1. From the Select an Uplink page, select Uplink 1Uplink 1
2.Check the box next to Apply this uplink assignment to the rest of the hostsApply this uplink assignment to the rest of the hosts
This will automatically configure any other hosts that you are adding to this distributed switch with the same vmnic and uplink settings.
3.Click OKOK
HOL-2210-01-SDC: Virtualization 101: Introduction to vSphere
H A N D S - O N L A B S M A N U A L | 2 6 5
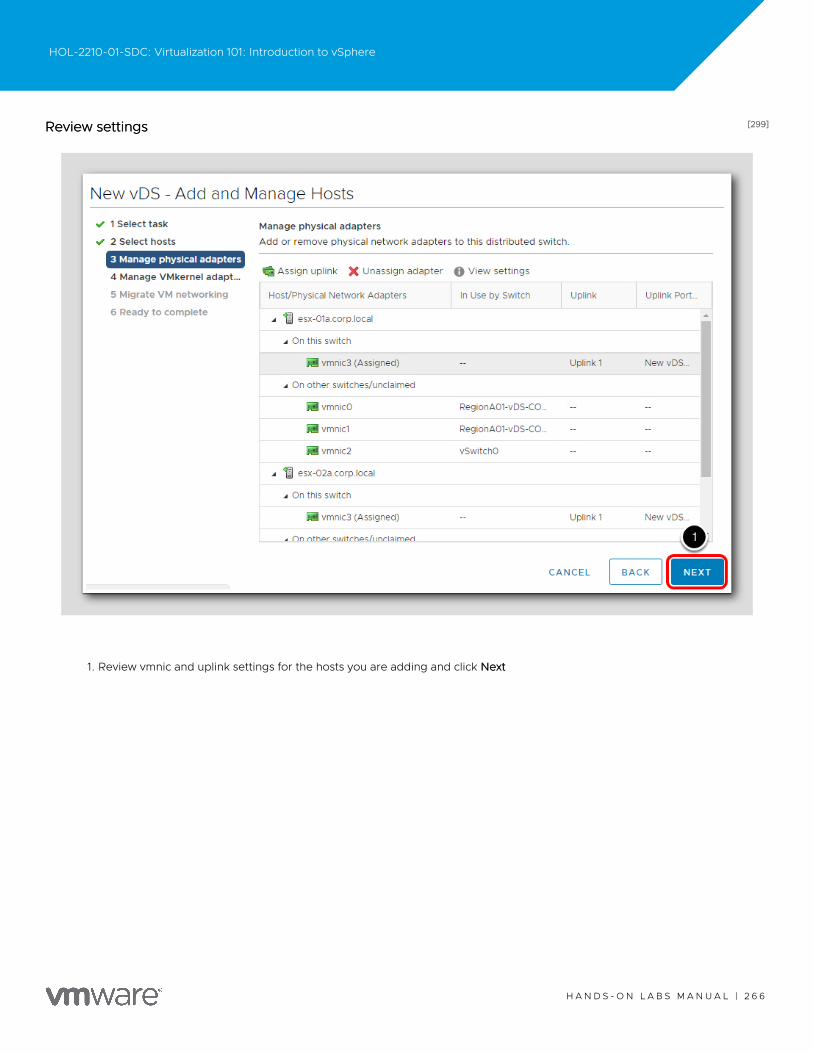
[299][299]Review settingsReview settings
1. Review vmnic and uplink settings for the hosts you are adding and click NextNext
HOL-2210-01-SDC: Virtualization 101: Introduction to vSphere
H A N D S - O N L A B S M A N U A L | 2 6 6
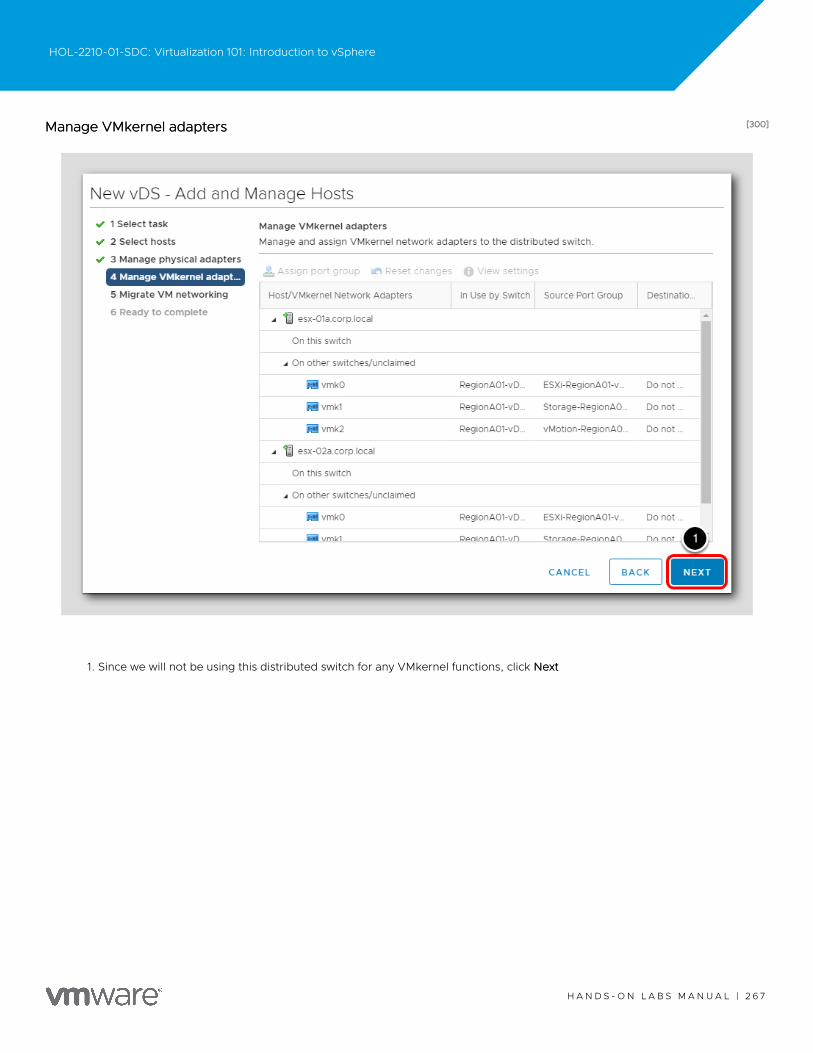
[300][300]Manage VMkernel adaptersManage VMkernel adapters
1. Since we will not be using this distributed switch for any VMkernel functions, click NextNext
HOL-2210-01-SDC: Virtualization 101: Introduction to vSphere
H A N D S - O N L A B S M A N U A L | 2 6 7
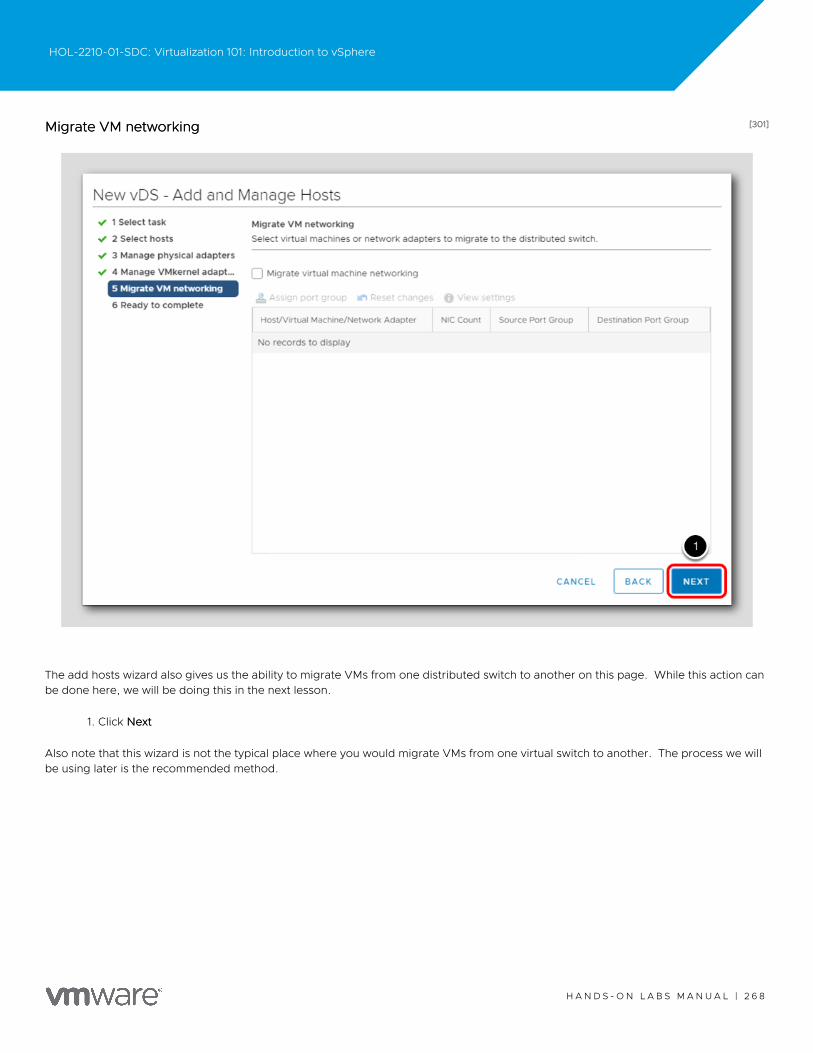
[301][301]Migrate VM networkingMigrate VM networking
The add hosts wizard also gives us the ability to migrate VMs from one distributed switch to another on this page. While this action canbe done here, we will be doing this in the next lesson.
1. Click NextNext
Also note that this wizard is not the typical place where you would migrate VMs from one virtual switch to another. The process we willbe using later is the recommended method.
HOL-2210-01-SDC: Virtualization 101: Introduction to vSphere
H A N D S - O N L A B S M A N U A L | 2 6 8
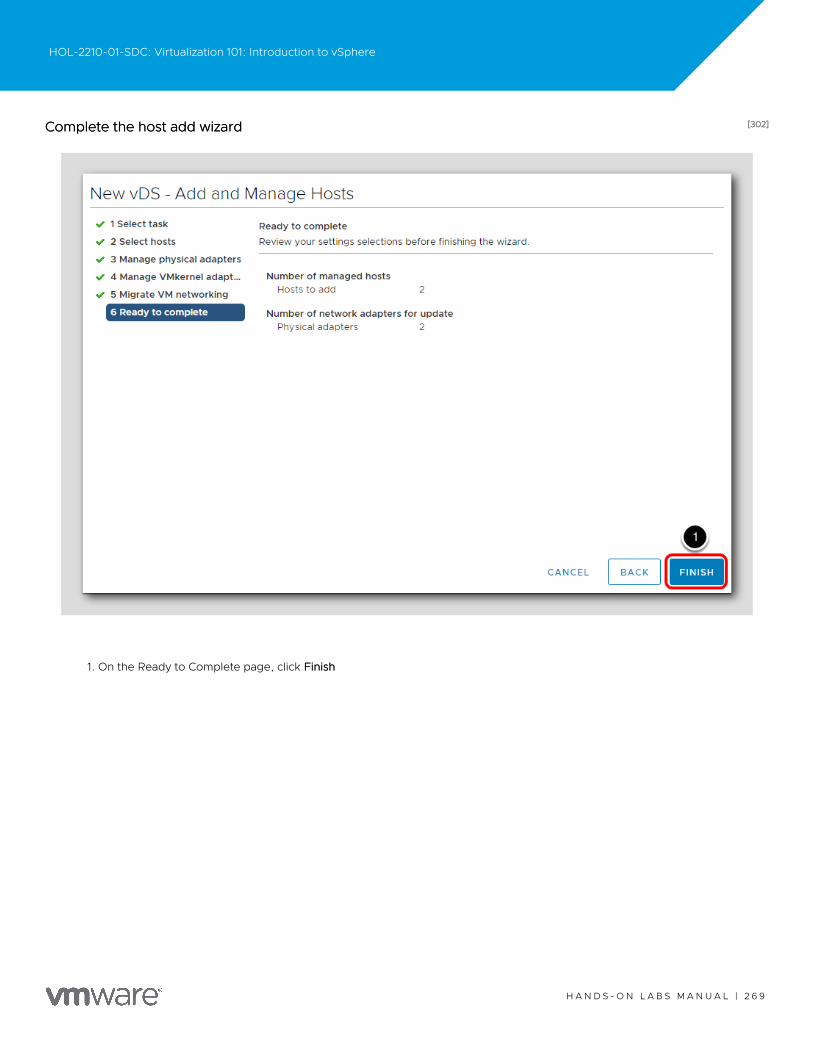
[302][302]Complete the host add wizardComplete the host add wizard
1. On the Ready to Complete page, click FinishFinish
HOL-2210-01-SDC: Virtualization 101: Introduction to vSphere
H A N D S - O N L A B S M A N U A L | 2 6 9
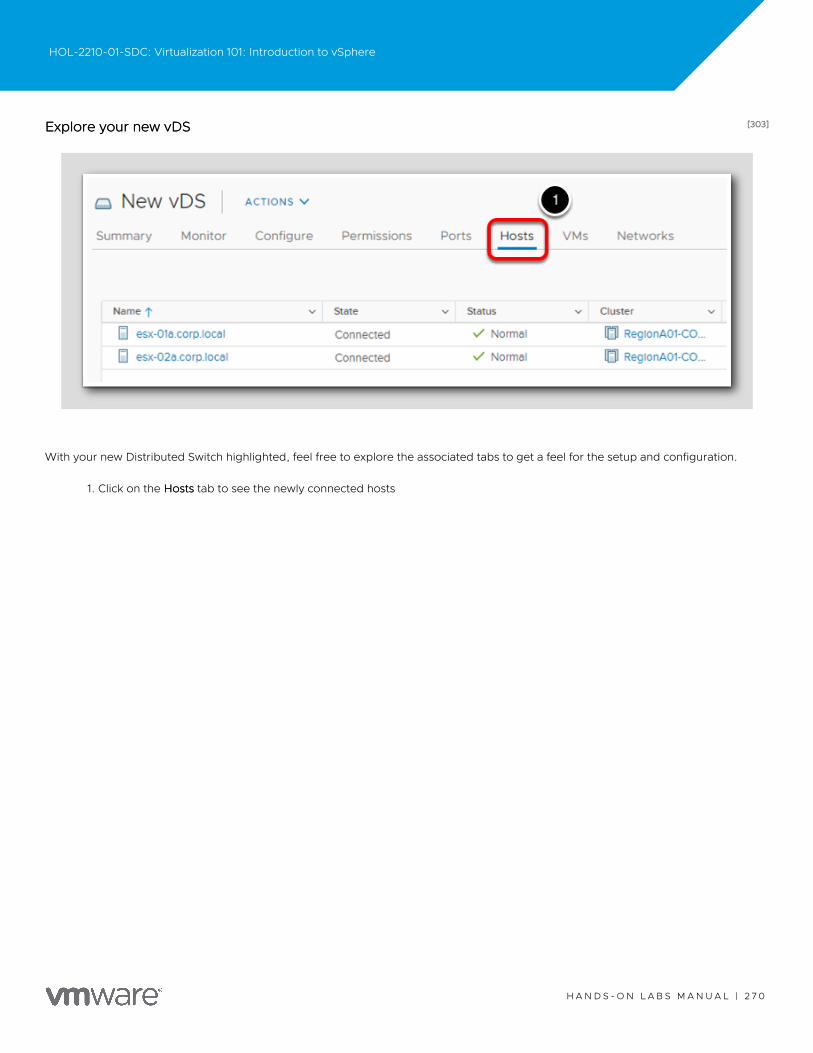
[303][303]Explore your new vDSExplore your new vDS
With your new Distributed Switch highlighted, feel free to explore the associated tabs to get a feel for the setup and configuration.
1. Click on the HostsHosts tab to see the newly connected hosts
HOL-2210-01-SDC: Virtualization 101: Introduction to vSphere
H A N D S - O N L A B S M A N U A L | 2 7 0
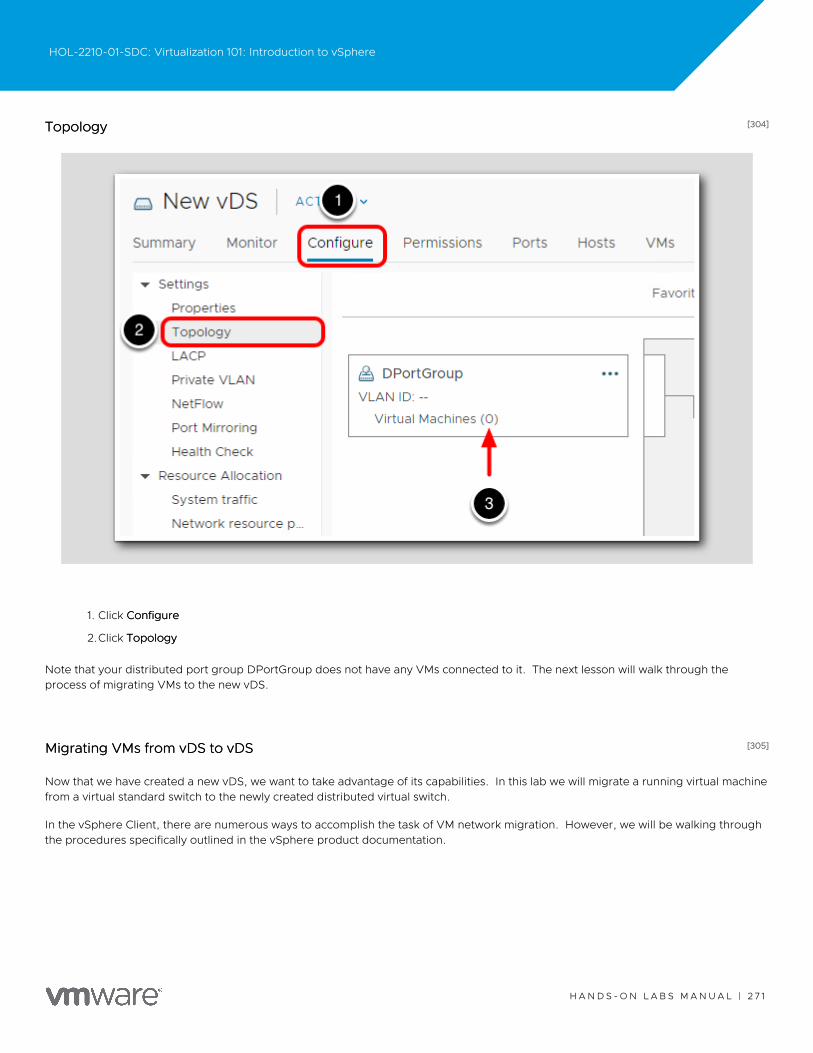
[304][304]TopologyTopology
1. Click ConfigureConfigure
2.Click TopologyTopology
Note that your distributed port group DPortGroup does not have any VMs connected to it. The next lesson will walk through theprocess of migrating VMs to the new vDS.
[305][305]Migrating VMs from vDS to vDSMigrating VMs from vDS to vDS
Now that we have created a new vDS, we want to take advantage of its capabilities. In this lab we will migrate a running virtual machinefrom a virtual standard switch to the newly created distributed virtual switch.
In the vSphere Client, there are numerous ways to accomplish the task of VM network migration. However, we will be walking throughthe procedures specifically outlined in the vSphere product documentation.
HOL-2210-01-SDC: Virtualization 101: Introduction to vSphere
H A N D S - O N L A B S M A N U A L | 2 7 1
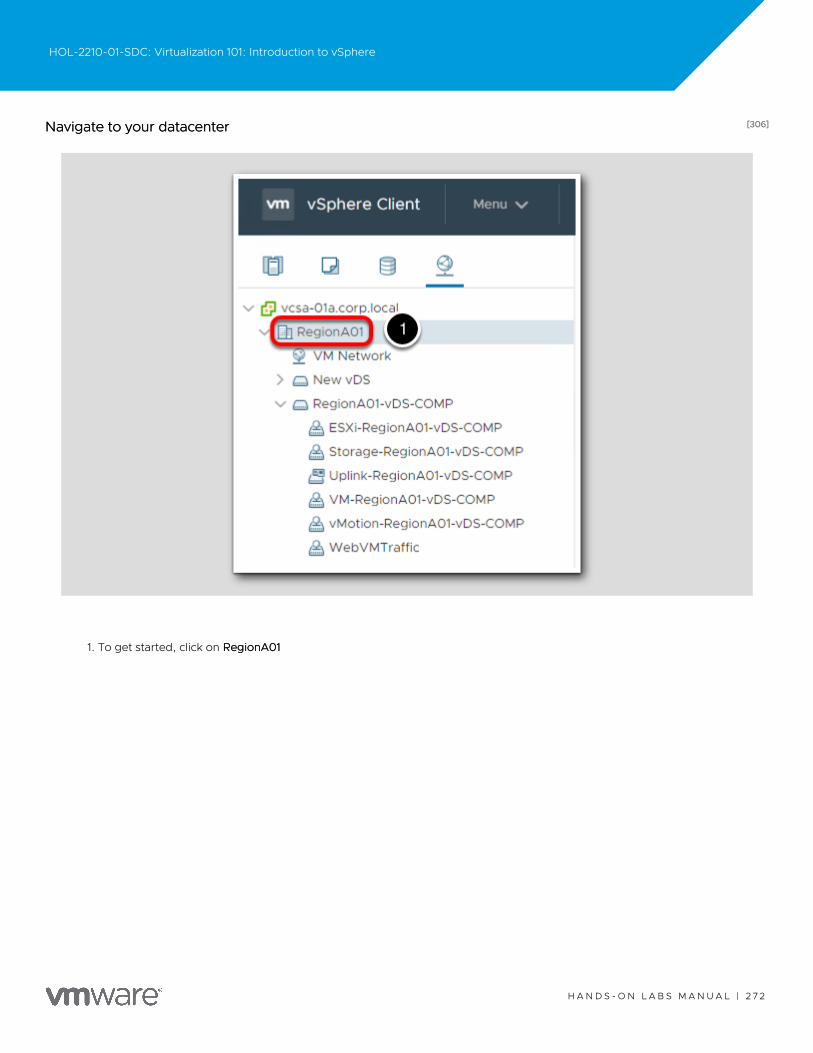
[306][306]Navigate to your datacenterNavigate to your datacenter
1. To get started, click on RegionA01RegionA01
HOL-2210-01-SDC: Virtualization 101: Introduction to vSphere
H A N D S - O N L A B S M A N U A L | 2 7 2
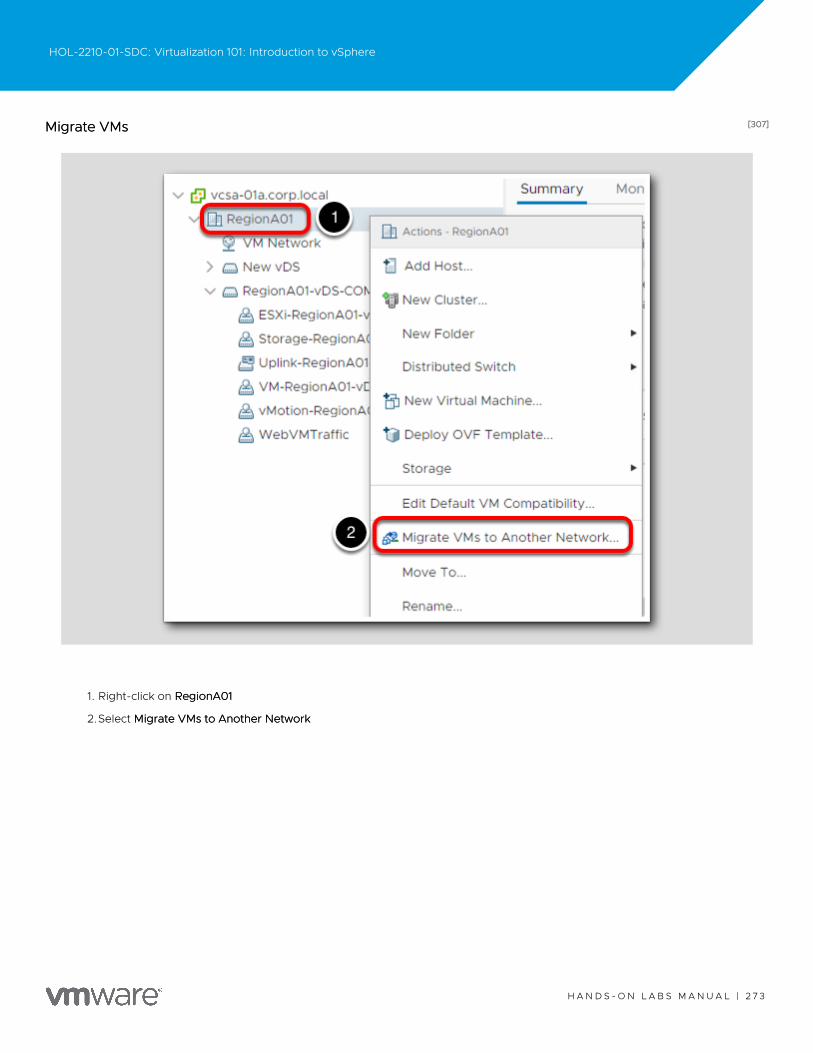
[307][307]Migrate VMsMigrate VMs
1. Right-click on RegionA01RegionA01
2.Select Migrate VMs to Another NetworkMigrate VMs to Another Network
HOL-2210-01-SDC: Virtualization 101: Introduction to vSphere
H A N D S - O N L A B S M A N U A L | 2 7 3
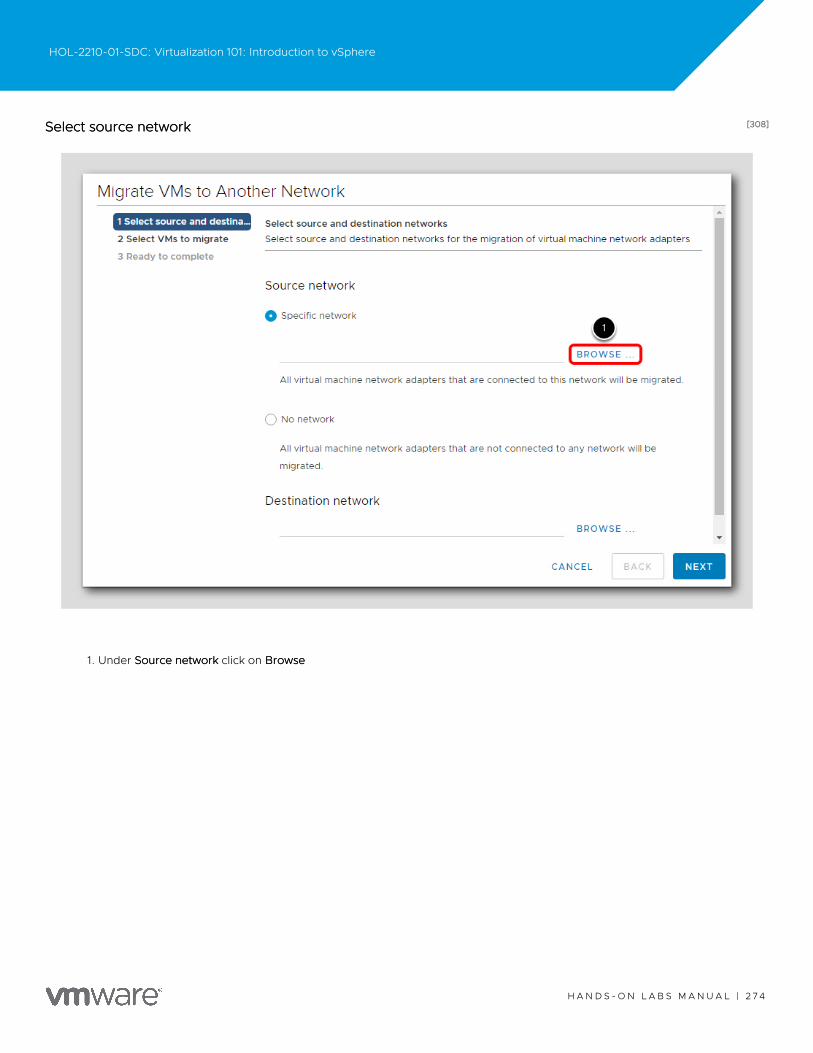
[308][308]Select source networkSelect source network
1. Under Source networkSource network click on BrowseBrowse
HOL-2210-01-SDC: Virtualization 101: Introduction to vSphere
H A N D S - O N L A B S M A N U A L | 2 7 4
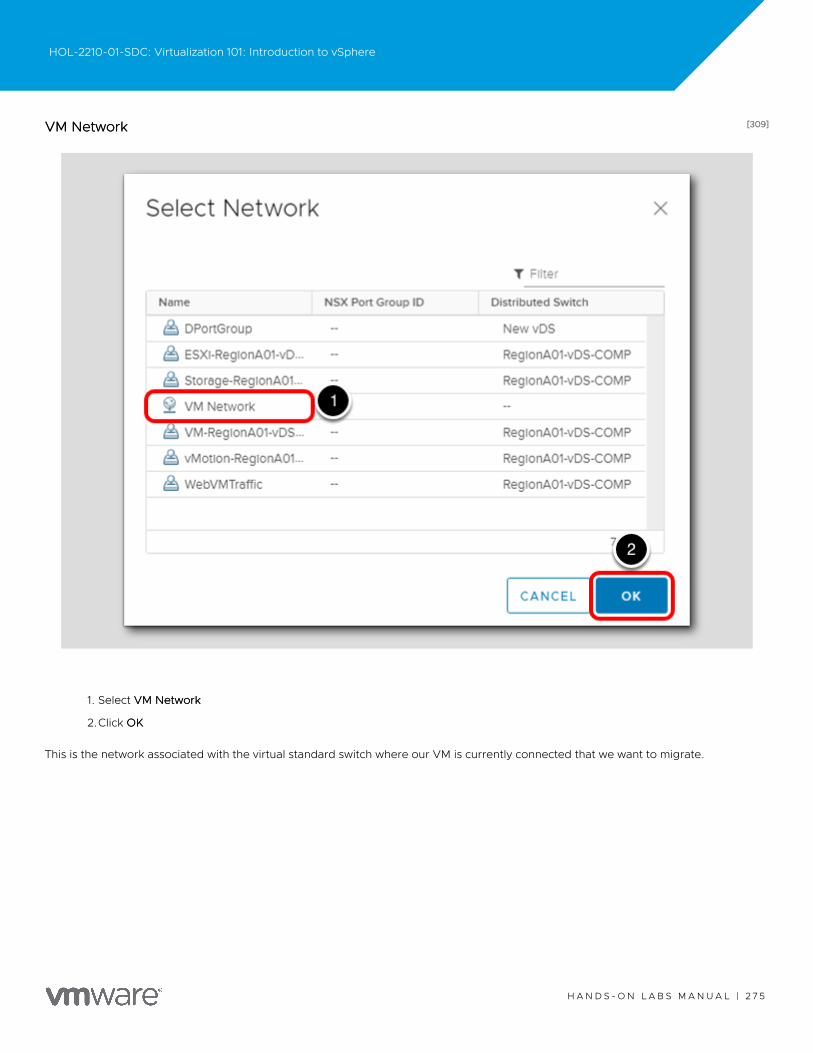
[309][309]VM NetworkVM Network
1. Select VM NetworkVM Network
2.Click OKOK
This is the network associated with the virtual standard switch where our VM is currently connected that we want to migrate.
HOL-2210-01-SDC: Virtualization 101: Introduction to vSphere
H A N D S - O N L A B S M A N U A L | 2 7 5

[310][310]Select destination networkSelect destination network
1. Under Destination network select BrowseBrowse
HOL-2210-01-SDC: Virtualization 101: Introduction to vSphere
H A N D S - O N L A B S M A N U A L | 2 7 6
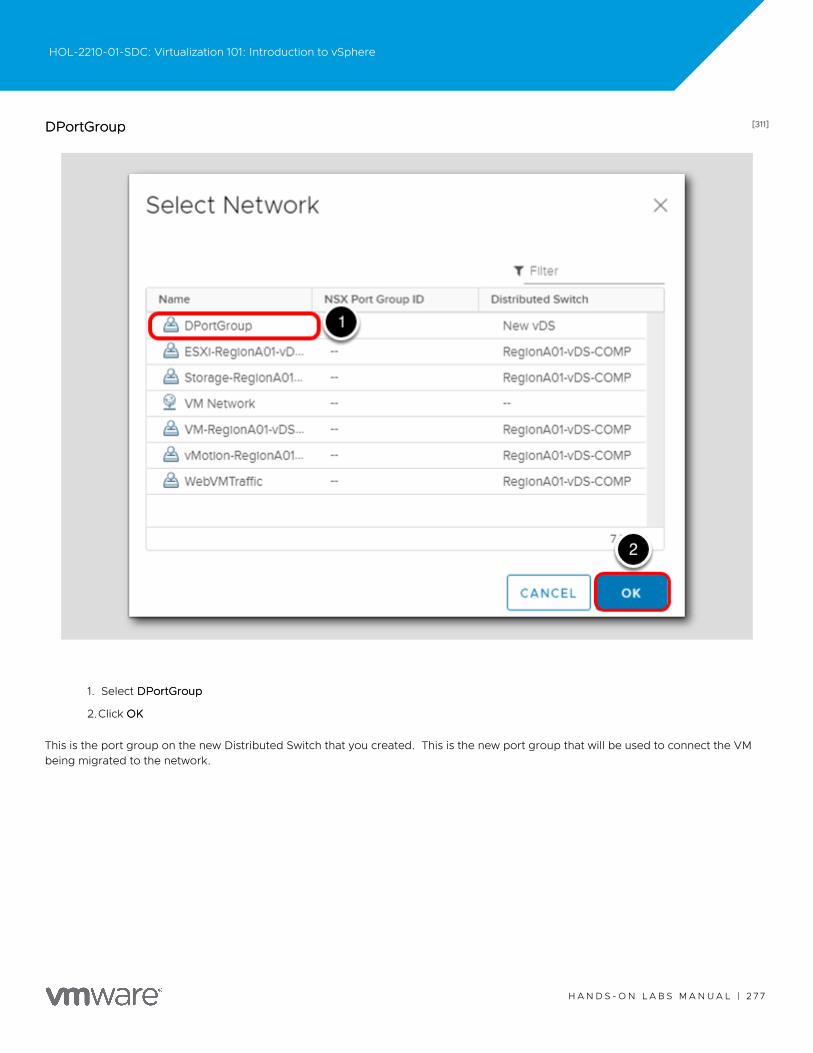
[311][311]DPortGroupDPortGroup
1. Select DPortGroupDPortGroup
2.Click OKOK
This is the port group on the new Distributed Switch that you created. This is the new port group that will be used to connect the VMbeing migrated to the network.
HOL-2210-01-SDC: Virtualization 101: Introduction to vSphere
H A N D S - O N L A B S M A N U A L | 2 7 7

[312][312]Migrate VMsMigrate VMs
1. Click NextNext
HOL-2210-01-SDC: Virtualization 101: Introduction to vSphere
H A N D S - O N L A B S M A N U A L | 2 7 8
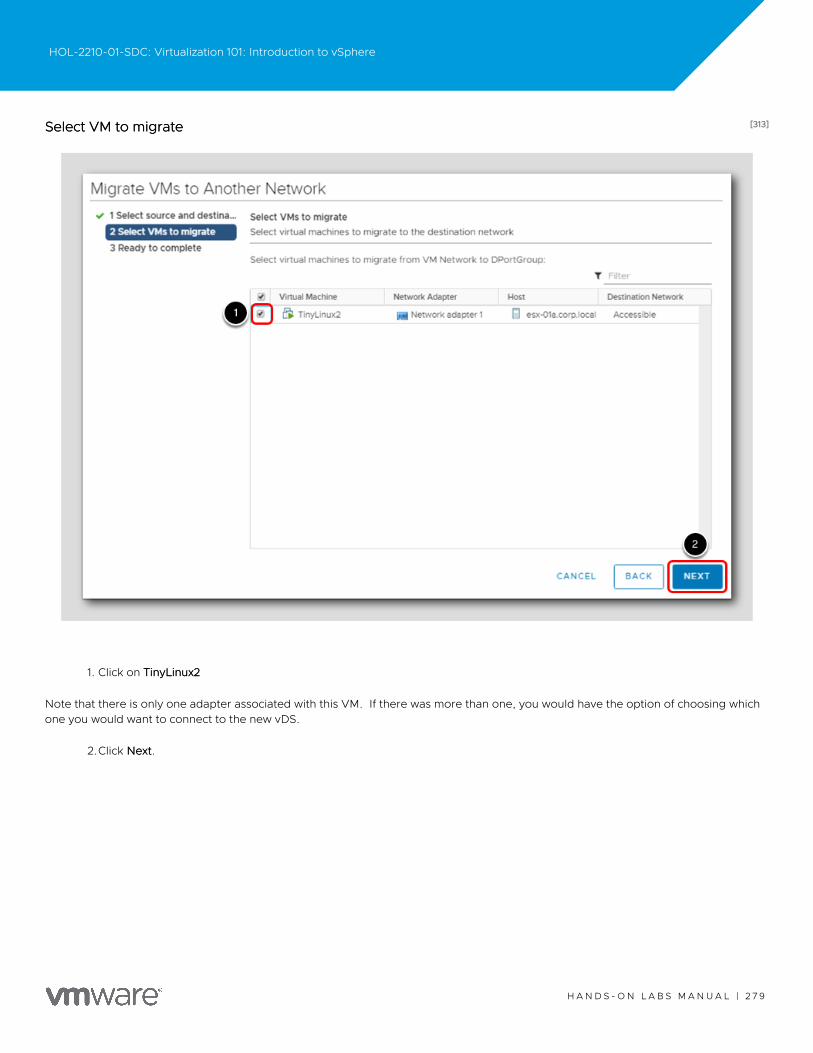
[313][313]Select VM to migrateSelect VM to migrate
1. Click on TinyLinux2TinyLinux2
Note that there is only one adapter associated with this VM. If there was more than one, you would have the option of choosing whichone you would want to connect to the new vDS.
2.Click NextNext.
HOL-2210-01-SDC: Virtualization 101: Introduction to vSphere
H A N D S - O N L A B S M A N U A L | 2 7 9
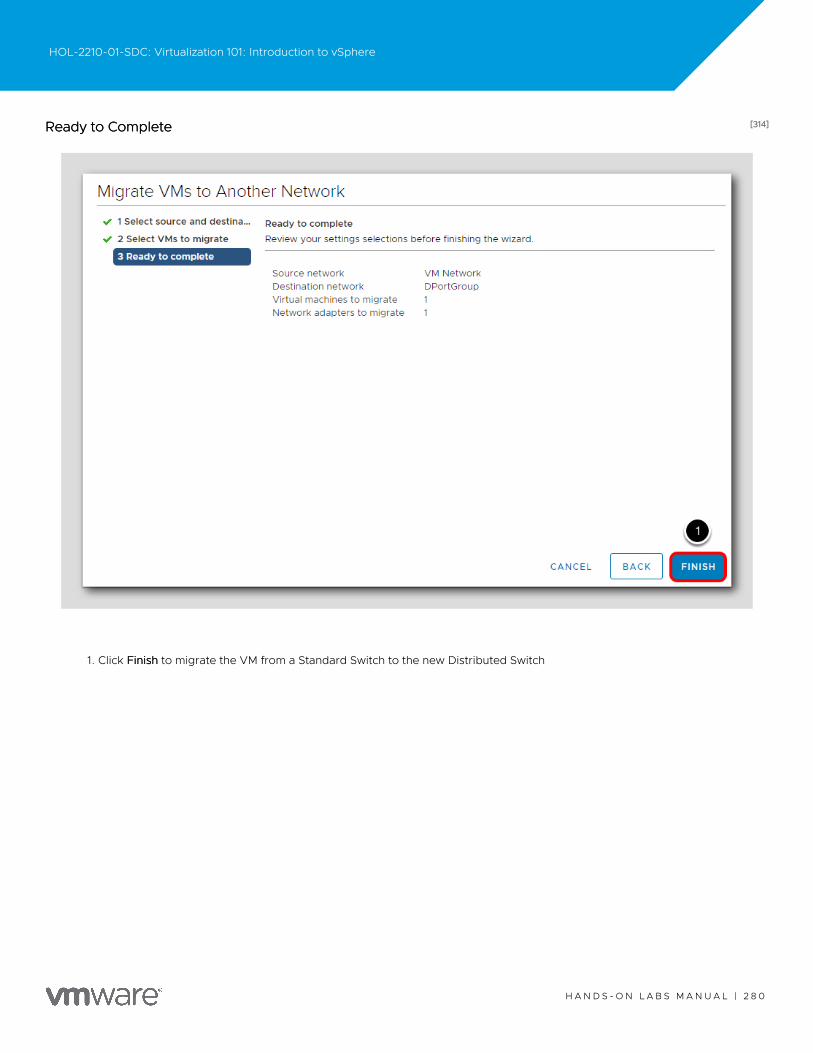
[314][314]Ready to CompleteReady to Complete
1. Click FinishFinish to migrate the VM from a Standard Switch to the new Distributed Switch
HOL-2210-01-SDC: Virtualization 101: Introduction to vSphere
H A N D S - O N L A B S M A N U A L | 2 8 0
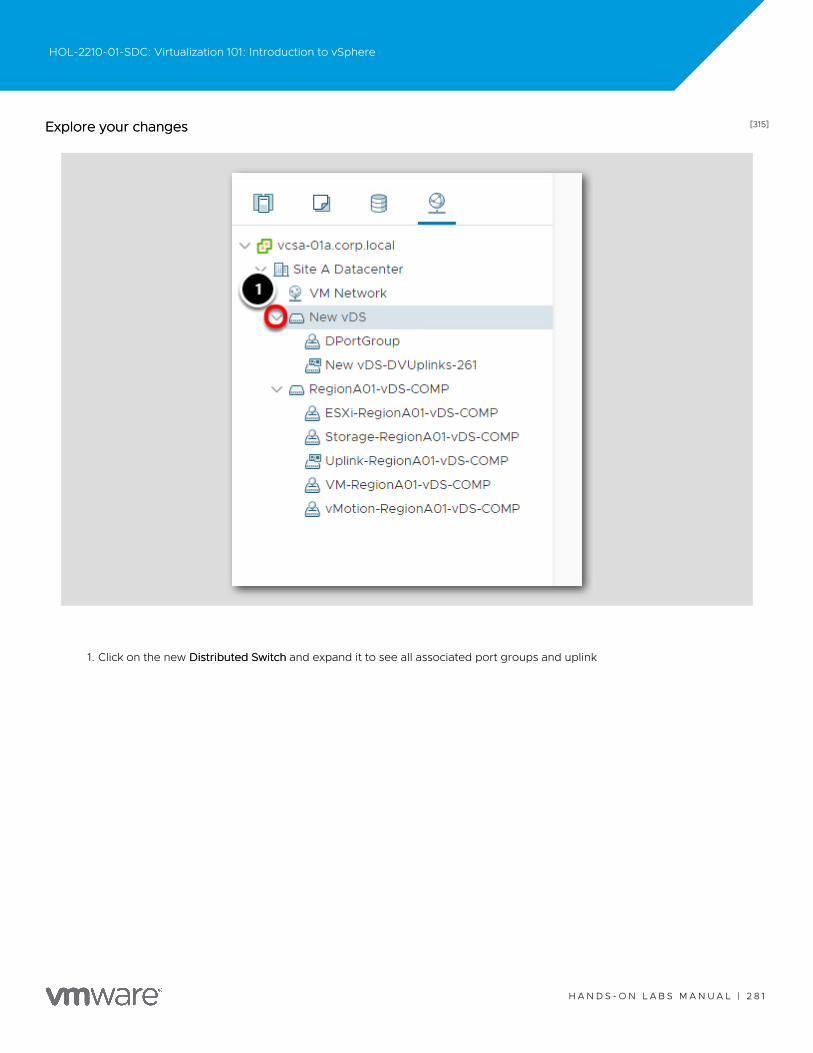
[315][315]Explore your changesExplore your changes
1. Click on the new Distributed SwitchDistributed Switch and expand it to see all associated port groups and uplink
HOL-2210-01-SDC: Virtualization 101: Introduction to vSphere
H A N D S - O N L A B S M A N U A L | 2 8 1
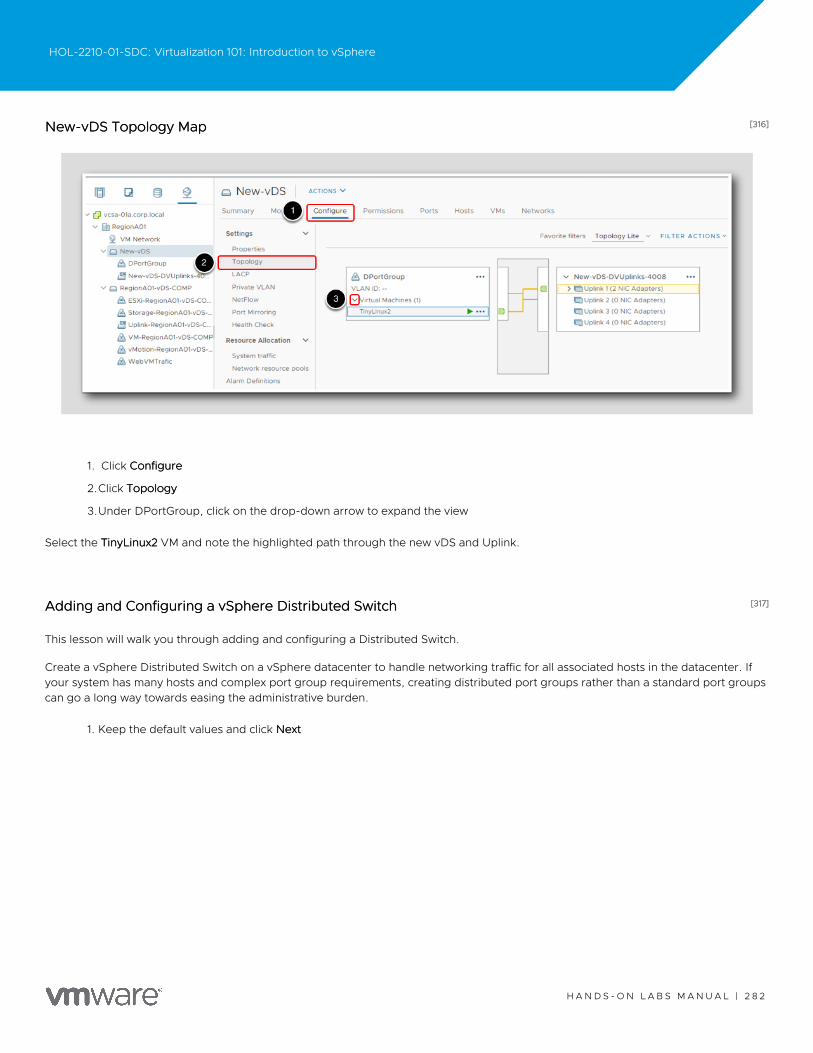
[316][316]New-vDS Topology MapNew-vDS Topology Map
1. Click ConfigureConfigure
2.Click TopologyTopology
3.Under DPortGroup, click on the drop-down arrow to expand the view
Select the TinyLinux2TinyLinux2 VM and note the highlighted path through the new vDS and Uplink.
[317][317]Adding and Configuring a vSphere Distributed SwitchAdding and Configuring a vSphere Distributed Switch
This lesson will walk you through adding and configuring a Distributed Switch.
Create a vSphere Distributed Switch on a vSphere datacenter to handle networking traffic for all associated hosts in the datacenter. Ifyour system has many hosts and complex port group requirements, creating distributed port groups rather than a standard port groupscan go a long way towards easing the administrative burden.
1. Keep the default values and click NextNext
HOL-2210-01-SDC: Virtualization 101: Introduction to vSphere
H A N D S - O N L A B S M A N U A L | 2 8 2
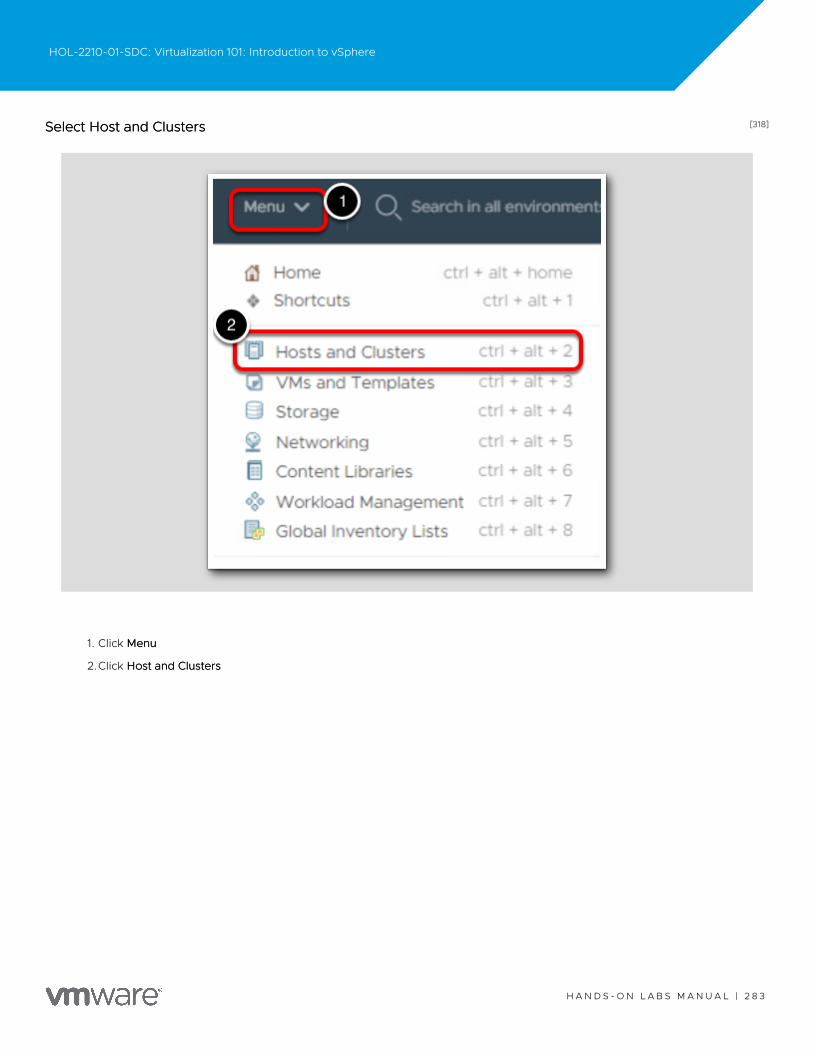
[318][318]Select Host and ClustersSelect Host and Clusters
1. Click MenuMenu
2.Click Host and ClustersHost and Clusters
HOL-2210-01-SDC: Virtualization 101: Introduction to vSphere
H A N D S - O N L A B S M A N U A L | 2 8 3
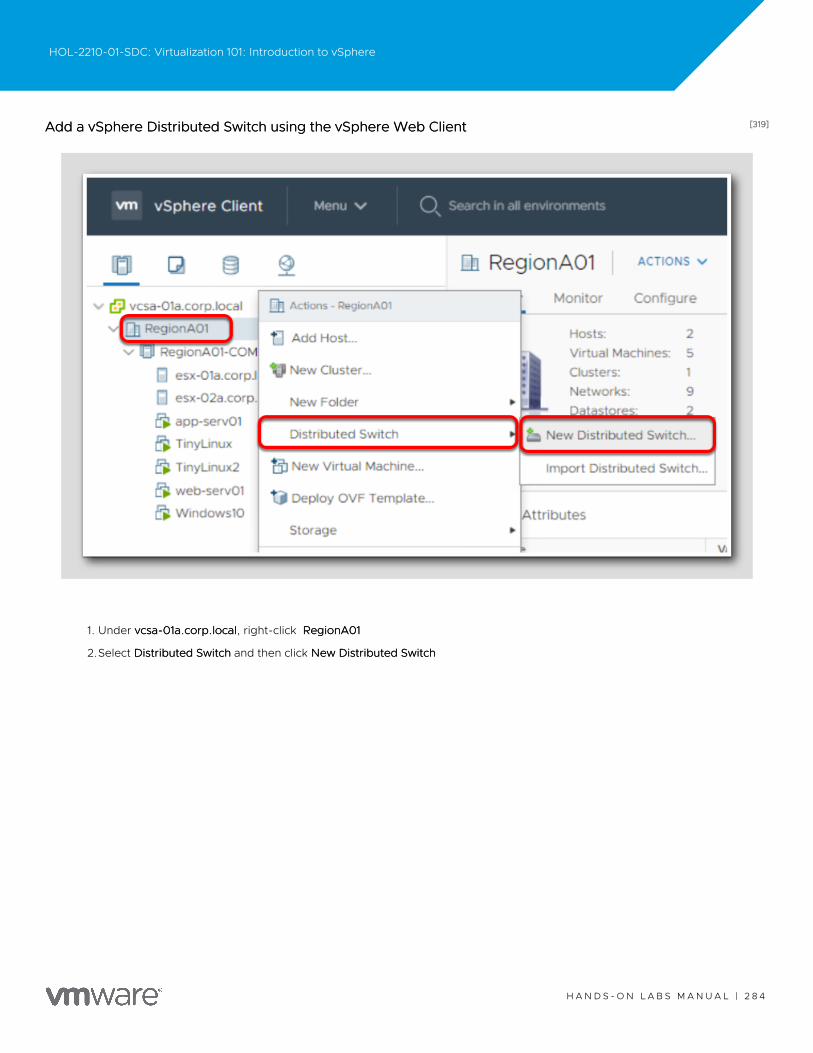
[319][319]Add a vSphere Distributed Switch using the vSphere Web ClientAdd a vSphere Distributed Switch using the vSphere Web Client
1. Under vcsa-01a.corp.localvcsa-01a.corp.local, right-click RegionA01RegionA01
2.Select Distributed SwitchDistributed Switch and then click New Distributed SwitchNew Distributed Switch
HOL-2210-01-SDC: Virtualization 101: Introduction to vSphere
H A N D S - O N L A B S M A N U A L | 2 8 4

[320][320]Name and LocationName and Location
Keep the default name for the new distributed switch.
1. Click NextNext
HOL-2210-01-SDC: Virtualization 101: Introduction to vSphere
H A N D S - O N L A B S M A N U A L | 2 8 5
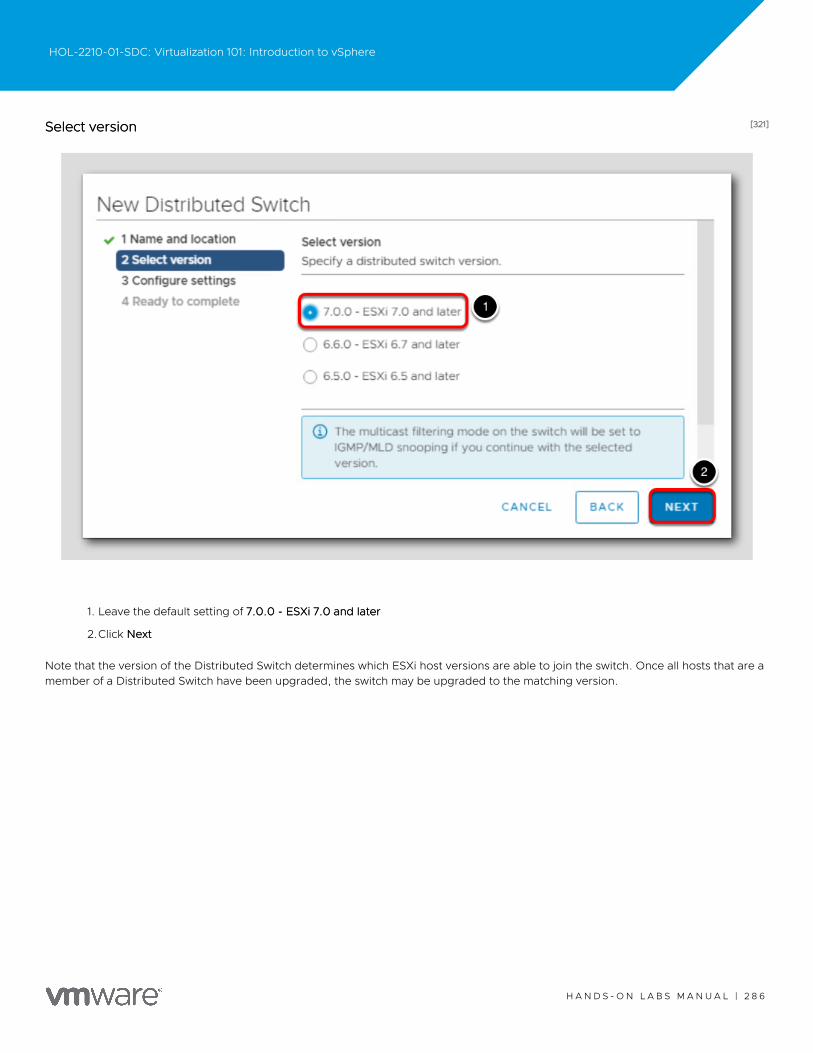
[321][321]Select versionSelect version
1. Leave the default setting of 7.0.0 - ESXi 7.0 and later7.0.0 - ESXi 7.0 and later
2.Click NextNext
Note that the version of the Distributed Switch determines which ESXi host versions are able to join the switch. Once all hosts that are amember of a Distributed Switch have been upgraded, the switch may be upgraded to the matching version.
HOL-2210-01-SDC: Virtualization 101: Introduction to vSphere
H A N D S - O N L A B S M A N U A L | 2 8 6
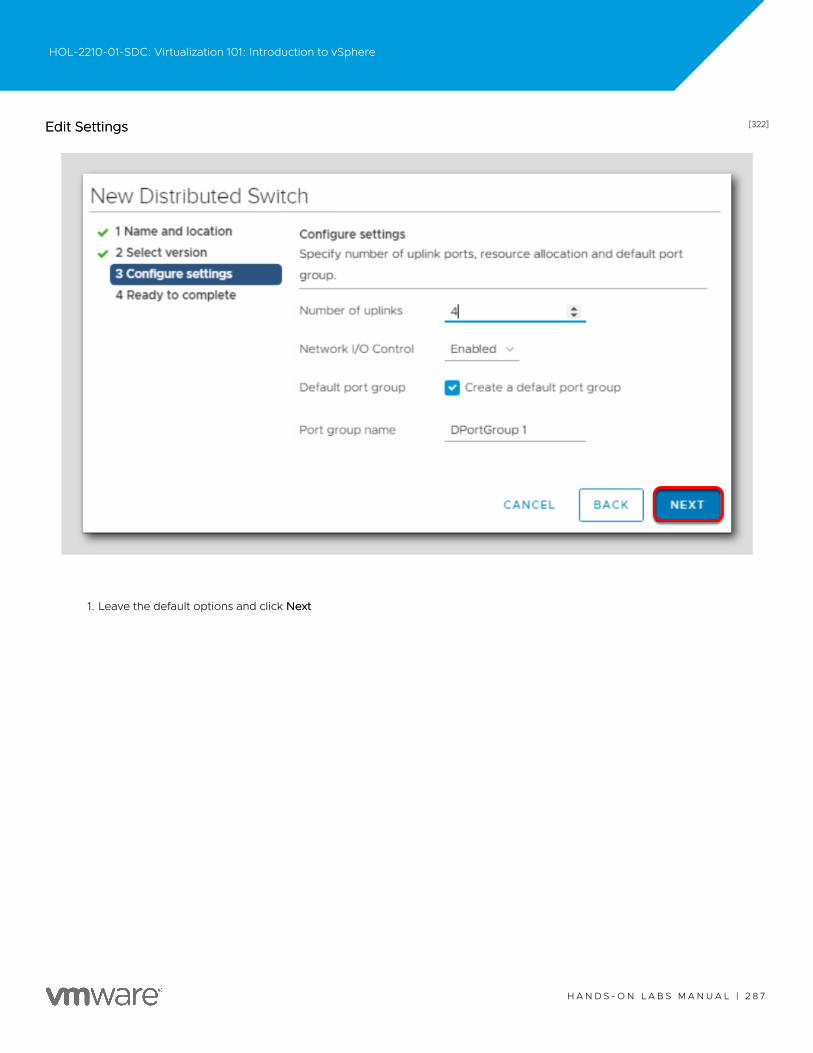
[322][322]Edit SettingsEdit Settings
1. Leave the default options and click NextNext
HOL-2210-01-SDC: Virtualization 101: Introduction to vSphere
H A N D S - O N L A B S M A N U A L | 2 8 7
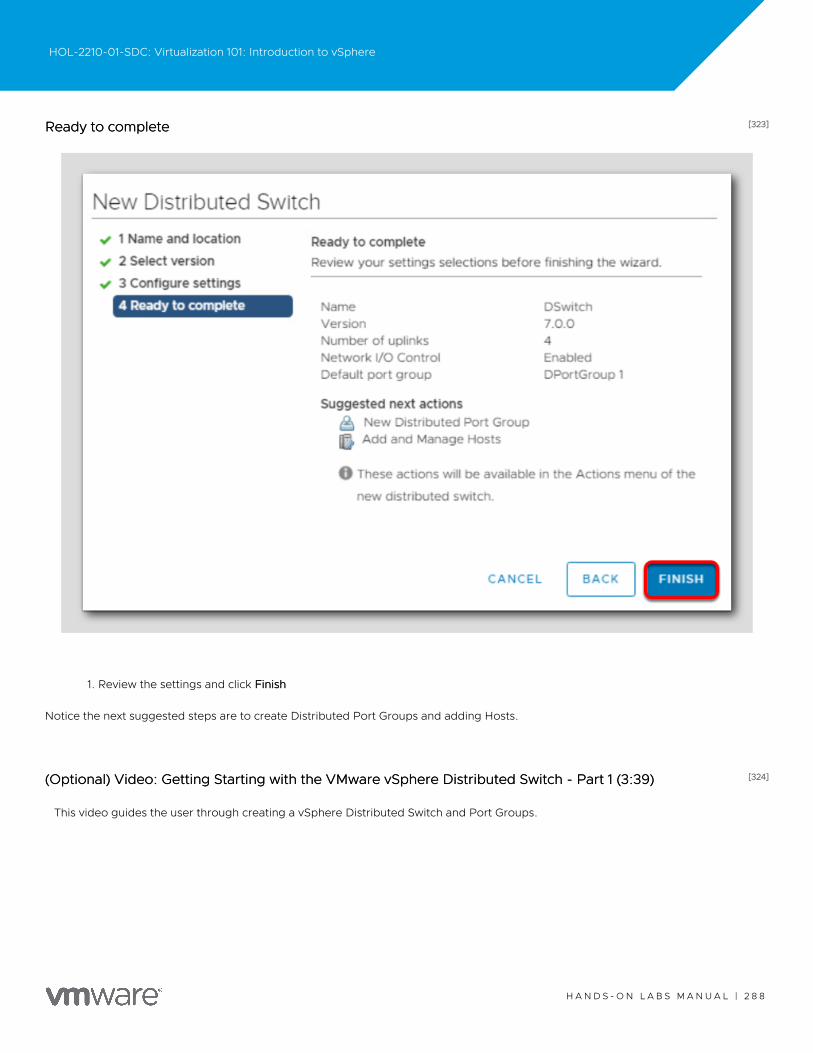
[323][323]Ready to completeReady to complete
1. Review the settings and click FinishFinish
Notice the next suggested steps are to create Distributed Port Groups and adding Hosts.
[324][324](Optional) Video: Getting Starting with the VMware vSphere Distributed Switch - Part 1 (3:39)(Optional) Video: Getting Starting with the VMware vSphere Distributed Switch - Part 1 (3:39)
This video guides the user through creating a vSphere Distributed Switch and Port Groups.
HOL-2210-01-SDC: Virtualization 101: Introduction to vSphere
H A N D S - O N L A B S M A N U A L | 2 8 8
https://www.youtube.com/watch?v=NGQ5ejGfuDYhttps://www.youtube.com/watch?v=NGQ5ejGfuDY
HOL-2210-01-SDC: Virtualization 101: Introduction to vSphere
H A N D S - O N L A B S M A N U A L | 2 8 9
[325][325](Optional) Video: Getting Starting with the VMware vSphere Distributed Switch - Part 2 (3:38)(Optional) Video: Getting Starting with the VMware vSphere Distributed Switch - Part 2 (3:38)
https://www.youtube.com/watch?v=hiu8DLSIoA0https://www.youtube.com/watch?v=hiu8DLSIoA0
This video guides the user through migrating hosts and VM's to the vSphere Distributed Switch.
HOL-2210-01-SDC: Virtualization 101: Introduction to vSphere
H A N D S - O N L A B S M A N U A L | 2 9 0
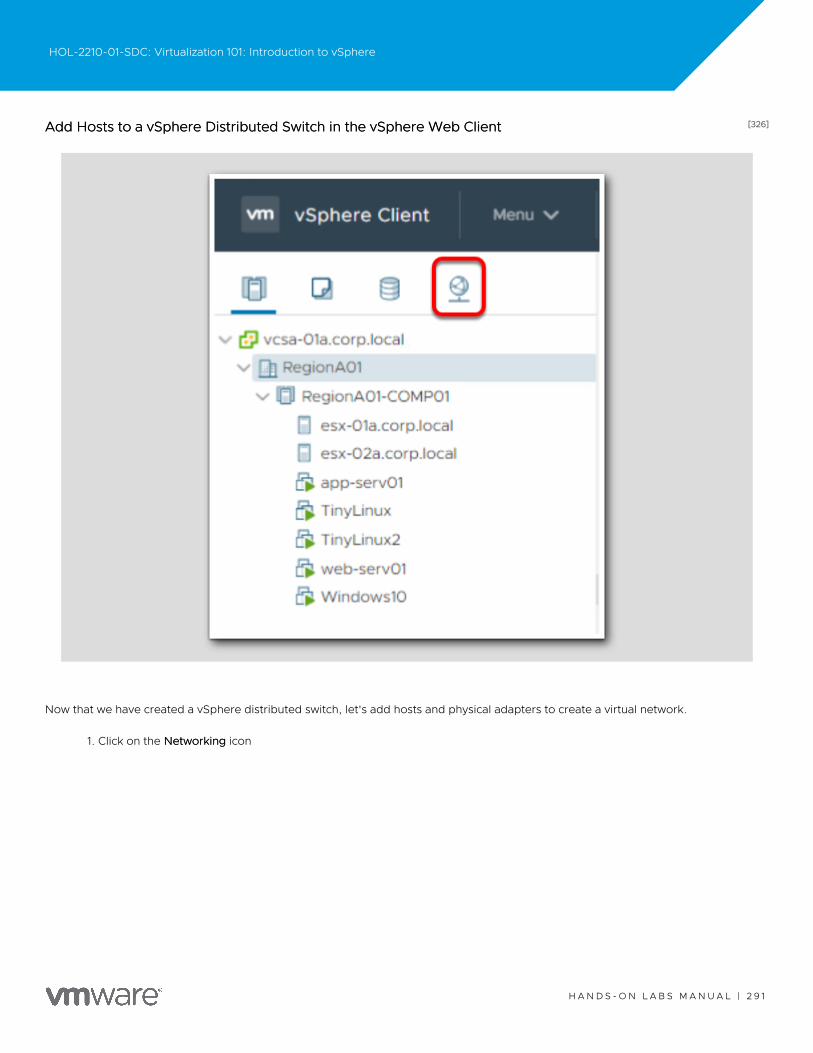
[326][326]Add Hosts to a vSphere Distributed Switch in the vSphere Web ClientAdd Hosts to a vSphere Distributed Switch in the vSphere Web Client
Now that we have created a vSphere distributed switch, let's add hosts and physical adapters to create a virtual network.
1. Click on the NetworkingNetworking icon
HOL-2210-01-SDC: Virtualization 101: Introduction to vSphere
H A N D S - O N L A B S M A N U A L | 2 9 1

[327][327]Add HostsAdd Hosts
Expand RegionA01RegionA01 until you see the Distributed Switch we just created, DSwitchDSwitch.
1. Right-click on DSwitchDSwitch
2.Select Add and Manage HostsAdd and Manage Hosts
HOL-2210-01-SDC: Virtualization 101: Introduction to vSphere
H A N D S - O N L A B S M A N U A L | 2 9 2
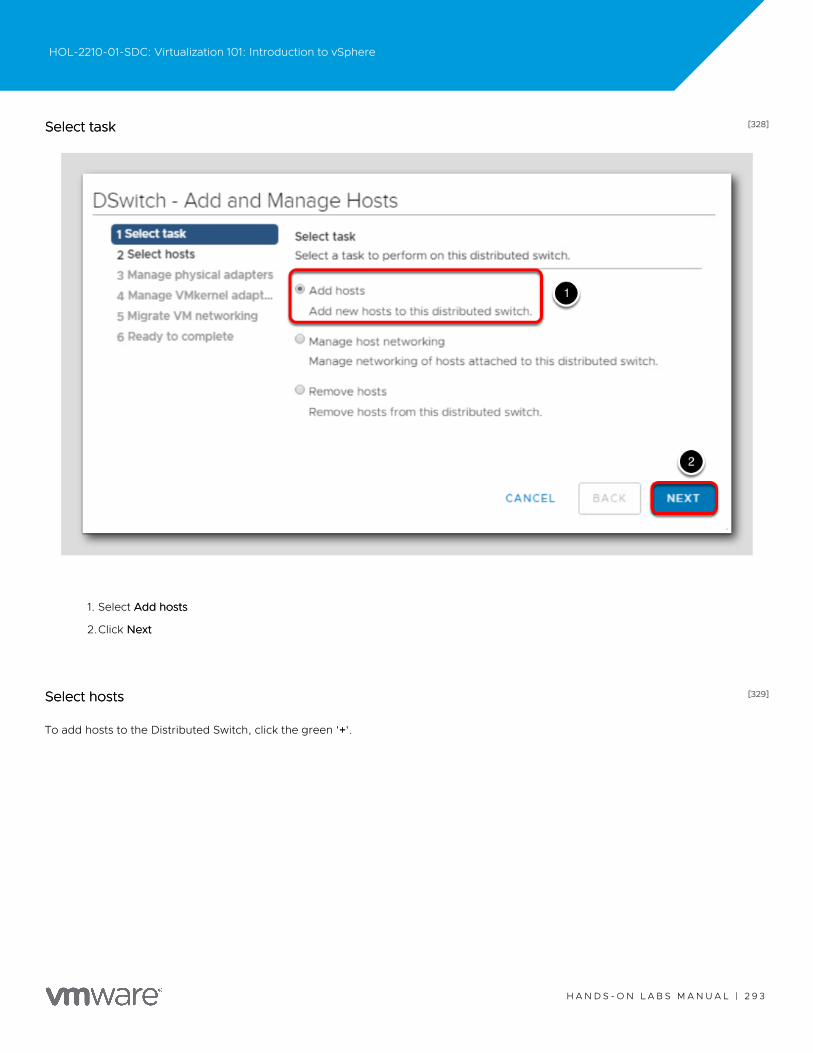
[328][328]Select taskSelect task
1. Select Add hostsAdd hosts
2.Click NextNext
[329][329]Select hostsSelect hosts
To add hosts to the Distributed Switch, click the green '++'.
HOL-2210-01-SDC: Virtualization 101: Introduction to vSphere
H A N D S - O N L A B S M A N U A L | 2 9 3

1. Click New hostsNew hosts
HOL-2210-01-SDC: Virtualization 101: Introduction to vSphere
H A N D S - O N L A B S M A N U A L | 2 9 4
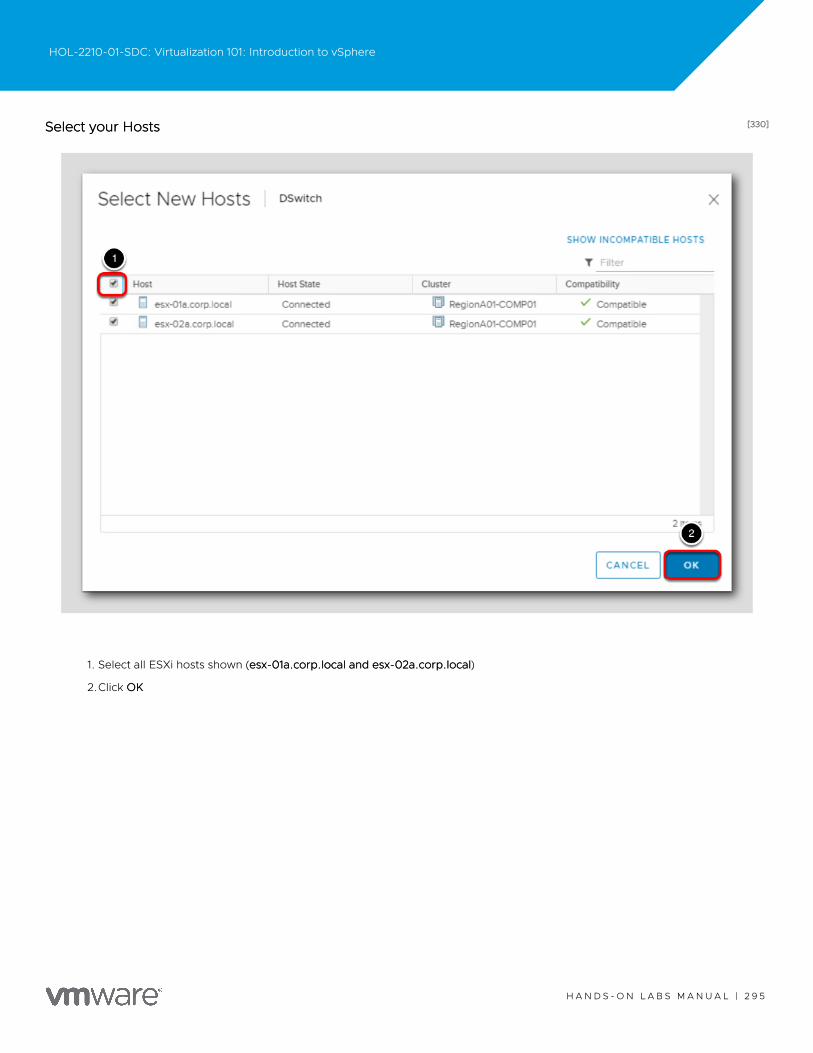
[330][330]Select your HostsSelect your Hosts
1. Select all ESXi hosts shown (esx-01a.corp.local and esx-02a.corp.localesx-01a.corp.local and esx-02a.corp.local)
2.Click OKOK
HOL-2210-01-SDC: Virtualization 101: Introduction to vSphere
H A N D S - O N L A B S M A N U A L | 2 9 5
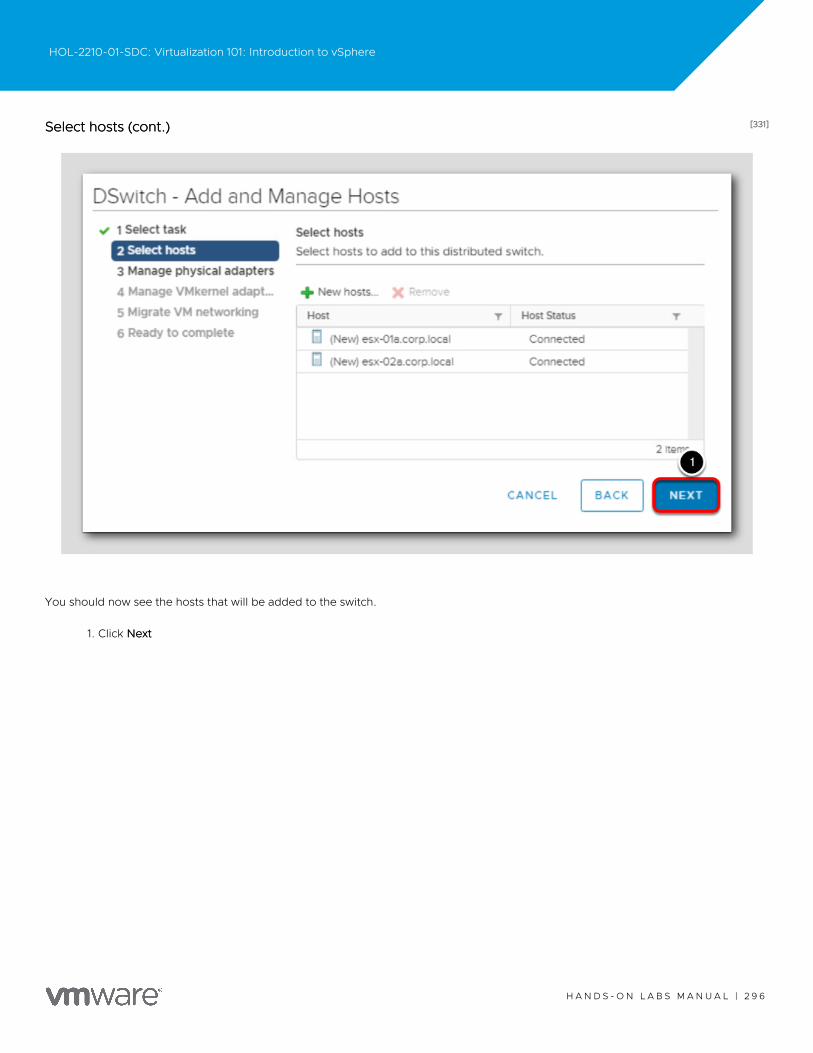
[331][331]Select hosts (cont.)Select hosts (cont.)
You should now see the hosts that will be added to the switch.
1. Click NextNext
HOL-2210-01-SDC: Virtualization 101: Introduction to vSphere
H A N D S - O N L A B S M A N U A L | 2 9 6
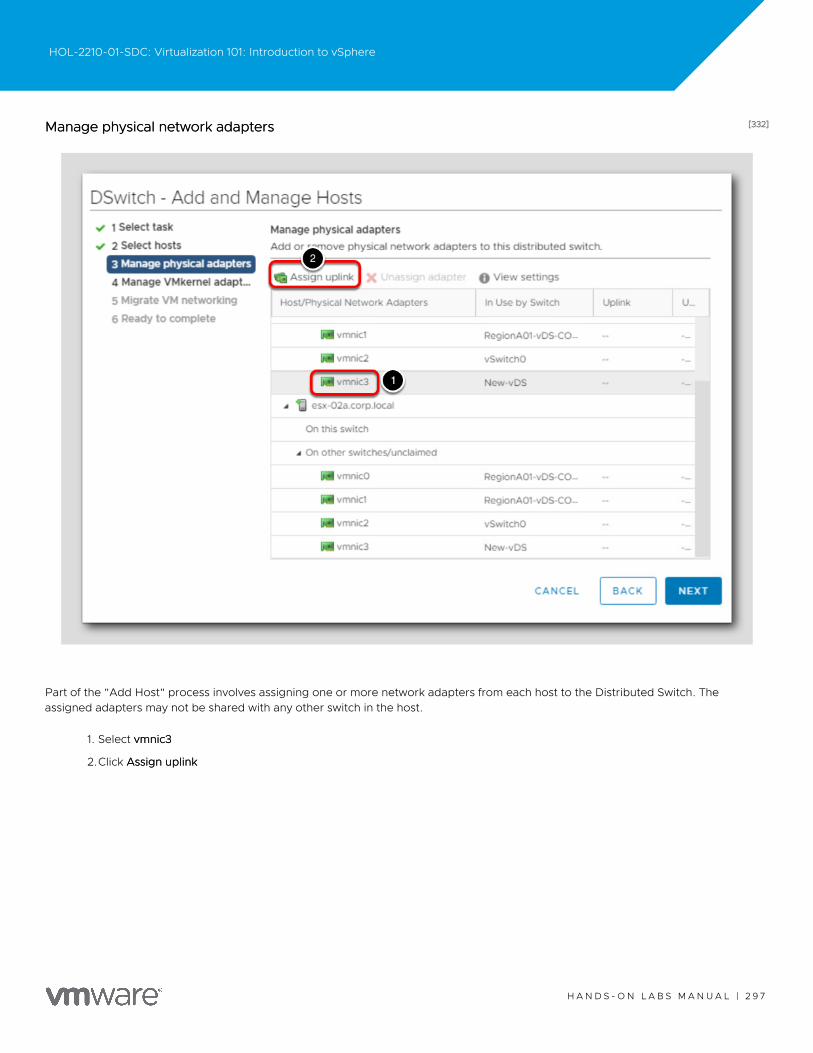
[332][332]Manage physical network adaptersManage physical network adapters
Part of the "Add Host" process involves assigning one or more network adapters from each host to the Distributed Switch. Theassigned adapters may not be shared with any other switch in the host.
1. Select vmnic3vmnic3
2.Click Assign uplinkAssign uplink
HOL-2210-01-SDC: Virtualization 101: Introduction to vSphere
H A N D S - O N L A B S M A N U A L | 2 9 7
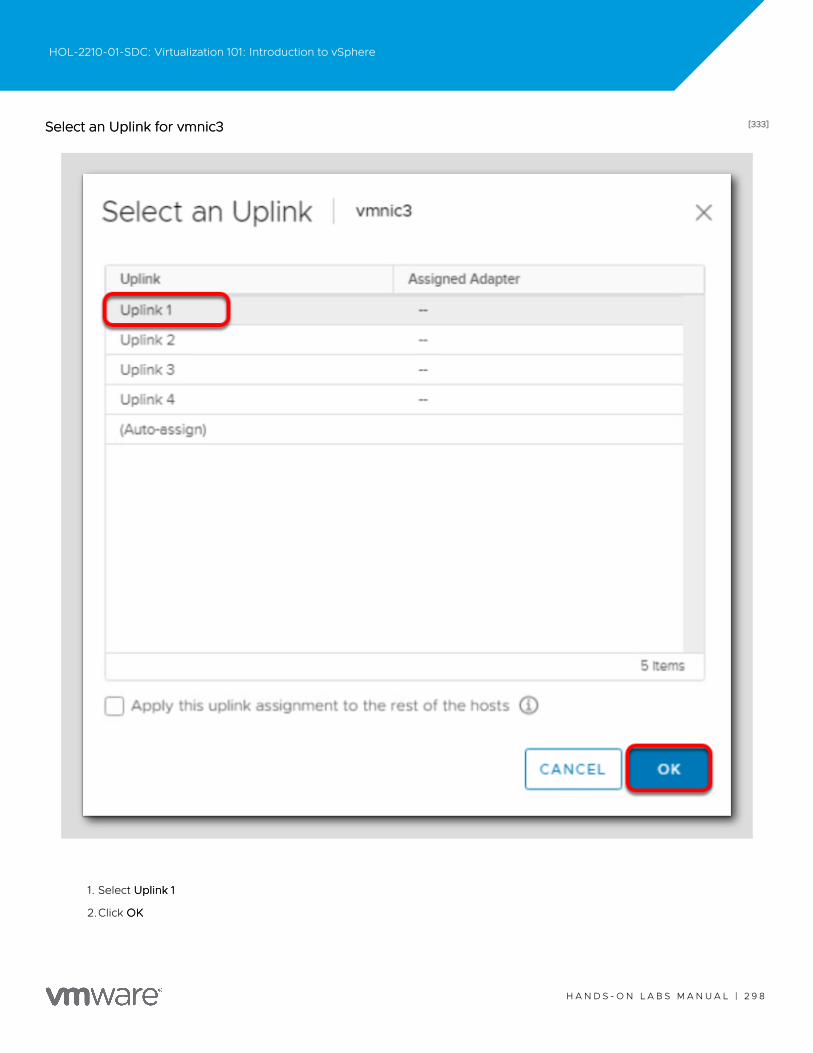
[333][333]Select an Uplink for vmnic3Select an Uplink for vmnic3
1. Select Uplink 1Uplink 1
2.Click OKOK
HOL-2210-01-SDC: Virtualization 101: Introduction to vSphere
H A N D S - O N L A B S M A N U A L | 2 9 8
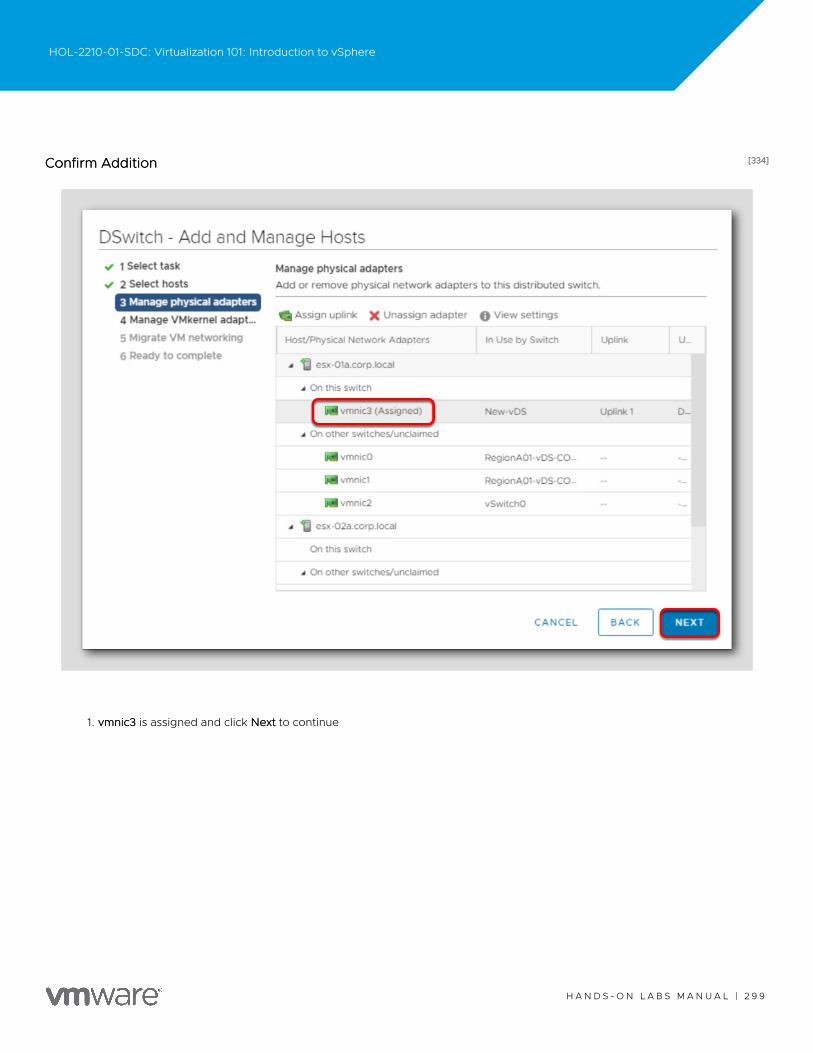
[334][334]Confirm AdditionConfirm Addition
1. vmnic3vmnic3 is assigned and click NextNext to continue
HOL-2210-01-SDC: Virtualization 101: Introduction to vSphere
H A N D S - O N L A B S M A N U A L | 2 9 9
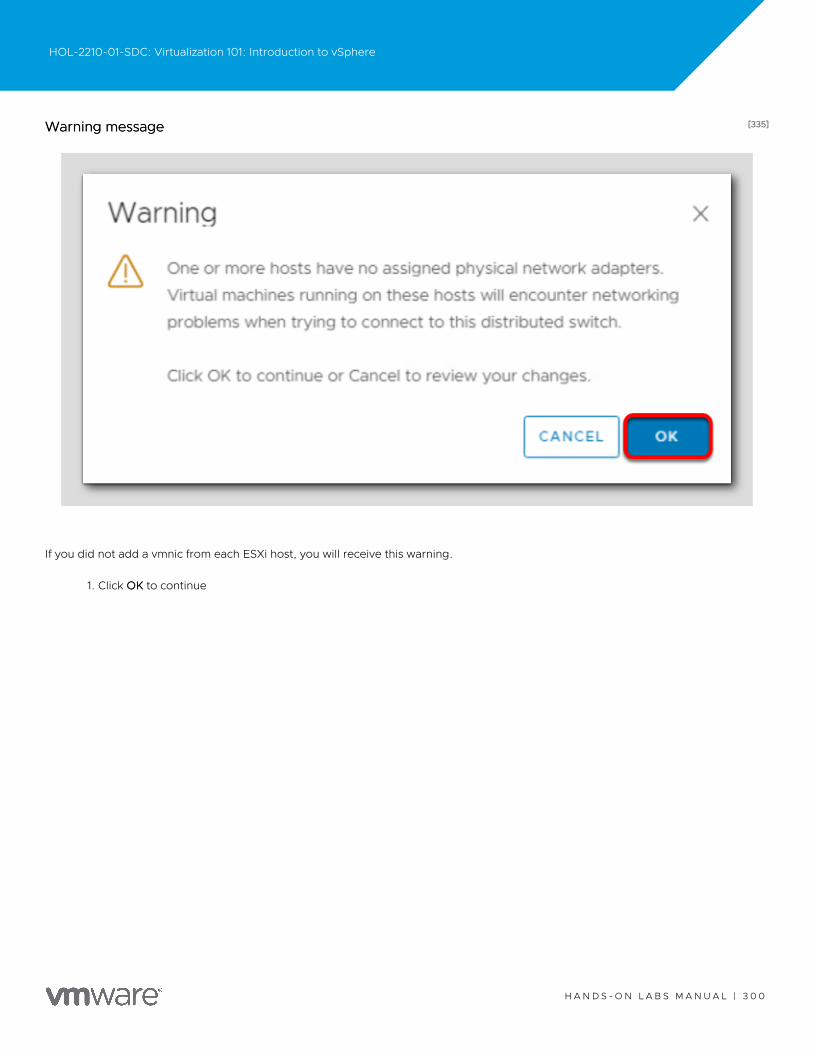
[335][335]Warning messageWarning message
If you did not add a vmnic from each ESXi host, you will receive this warning.
1. Click OKOK to continue
HOL-2210-01-SDC: Virtualization 101: Introduction to vSphere
H A N D S - O N L A B S M A N U A L | 3 0 0
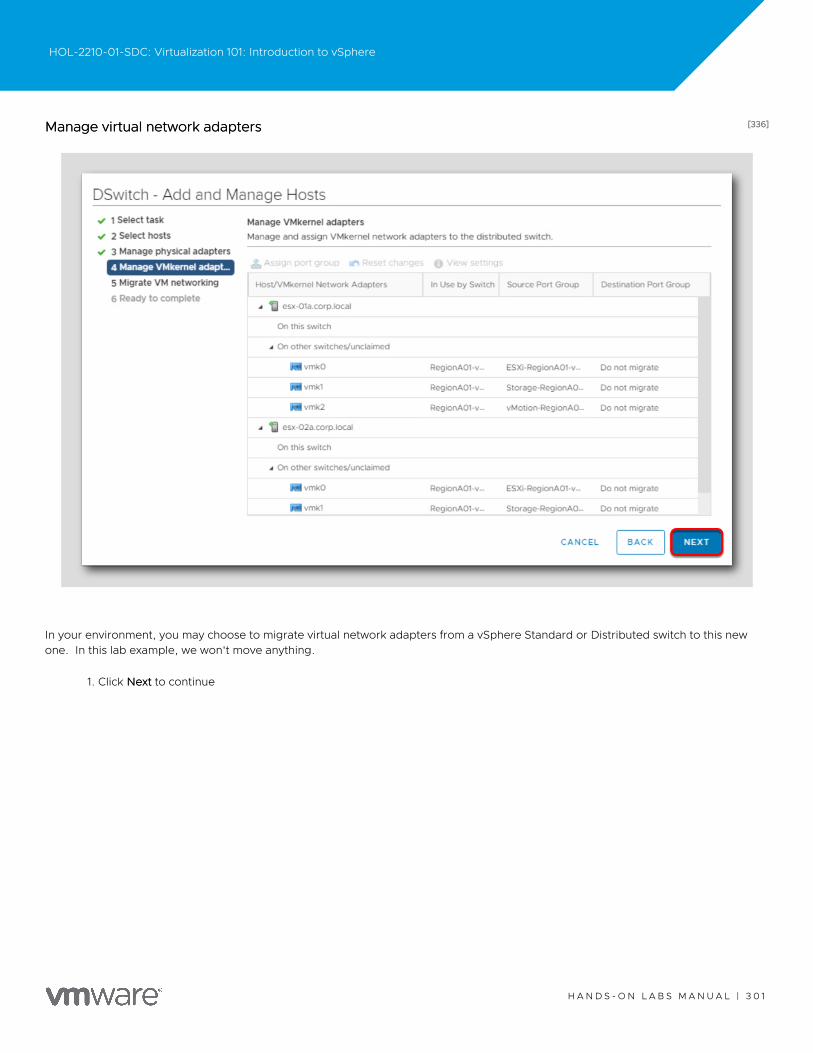
[336][336]Manage virtual network adaptersManage virtual network adapters
In your environment, you may choose to migrate virtual network adapters from a vSphere Standard or Distributed switch to this newone. In this lab example, we won't move anything.
1. Click NextNext to continue
HOL-2210-01-SDC: Virtualization 101: Introduction to vSphere
H A N D S - O N L A B S M A N U A L | 3 0 1
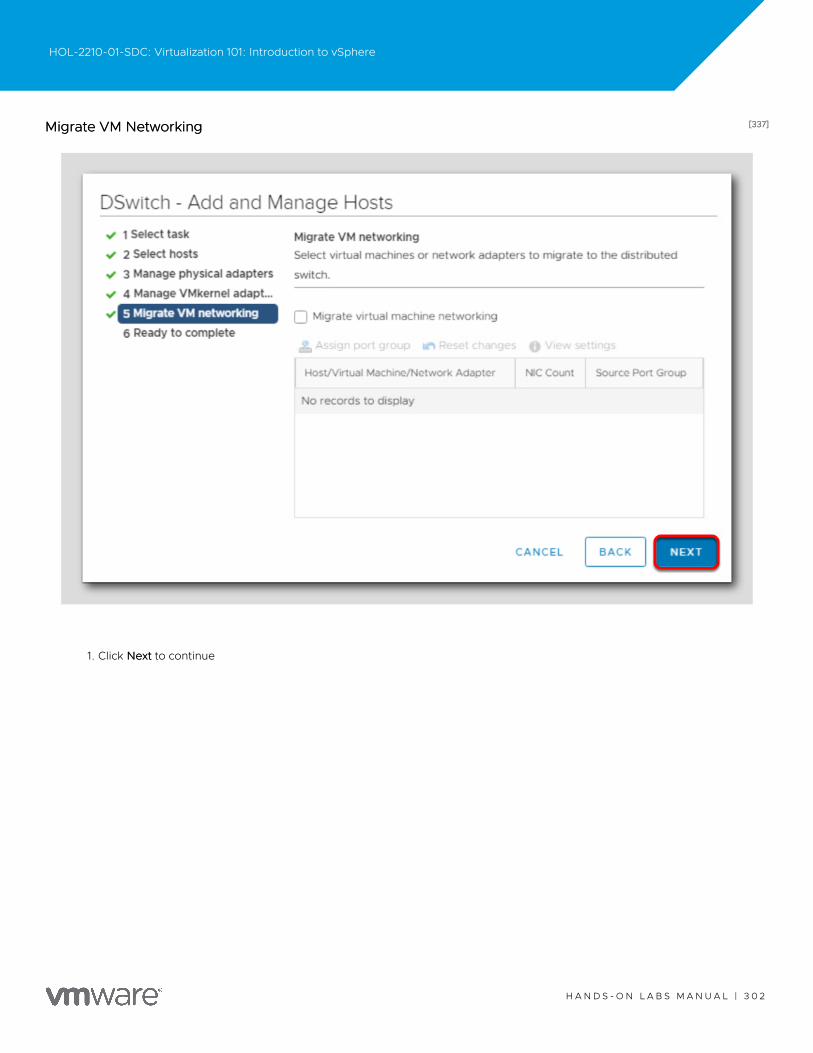
[337][337]Migrate VM NetworkingMigrate VM Networking
1. Click NextNext to continue
HOL-2210-01-SDC: Virtualization 101: Introduction to vSphere
H A N D S - O N L A B S M A N U A L | 3 0 2
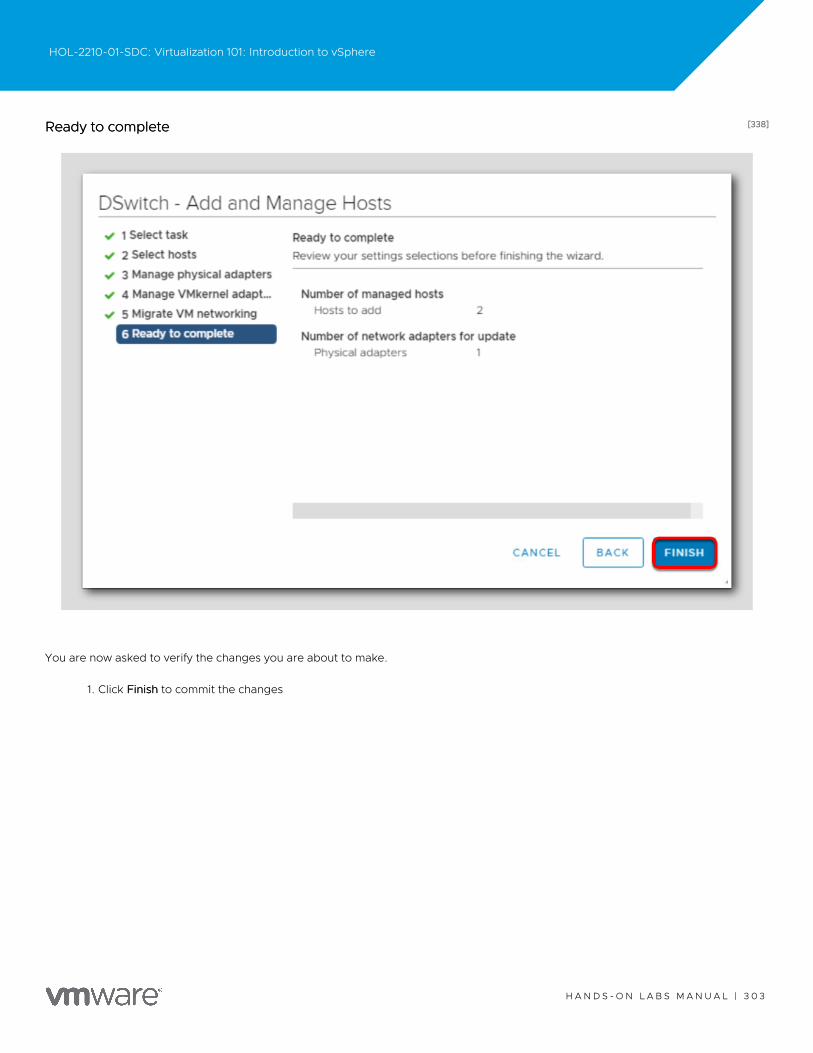
[338][338]Ready to completeReady to complete
You are now asked to verify the changes you are about to make.
1. Click FinishFinish to commit the changes
HOL-2210-01-SDC: Virtualization 101: Introduction to vSphere
H A N D S - O N L A B S M A N U A L | 3 0 3
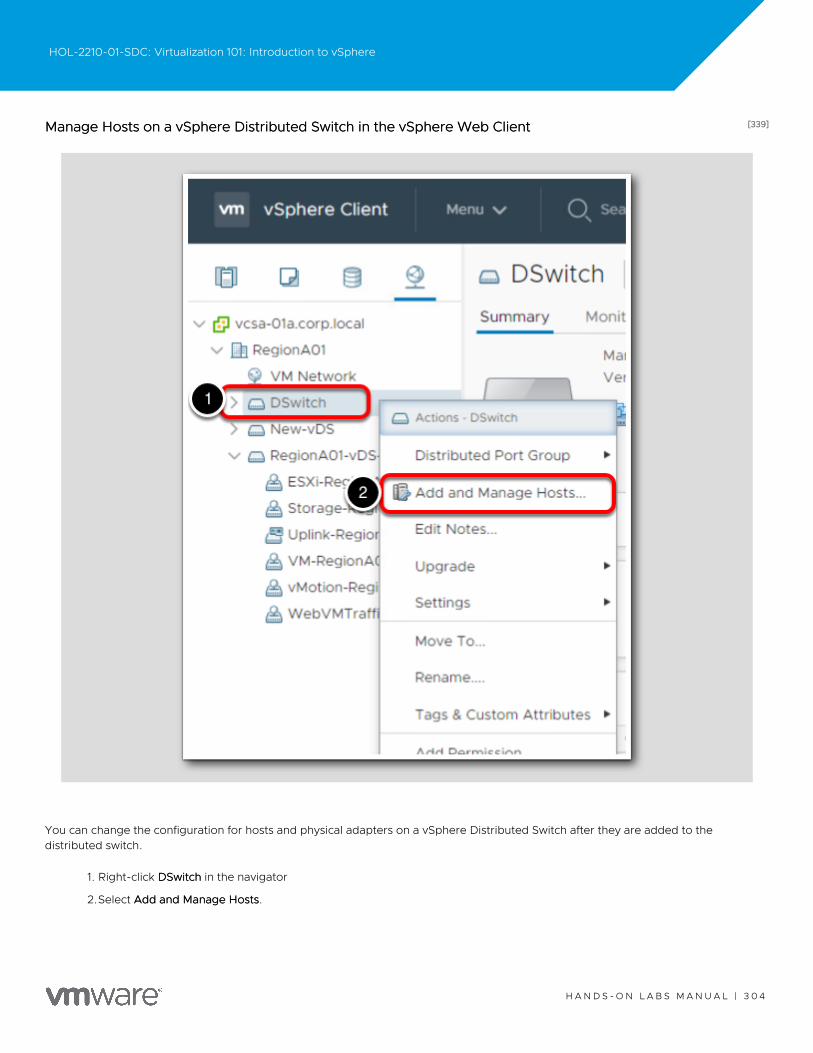
[339][339]Manage Hosts on a vSphere Distributed Switch in the vSphere Web ClientManage Hosts on a vSphere Distributed Switch in the vSphere Web Client
You can change the configuration for hosts and physical adapters on a vSphere Distributed Switch after they are added to thedistributed switch.
1. Right-click DSwitchDSwitch in the navigator
2.Select Add and Manage HostsAdd and Manage Hosts.
HOL-2210-01-SDC: Virtualization 101: Introduction to vSphere
H A N D S - O N L A B S M A N U A L | 3 0 4
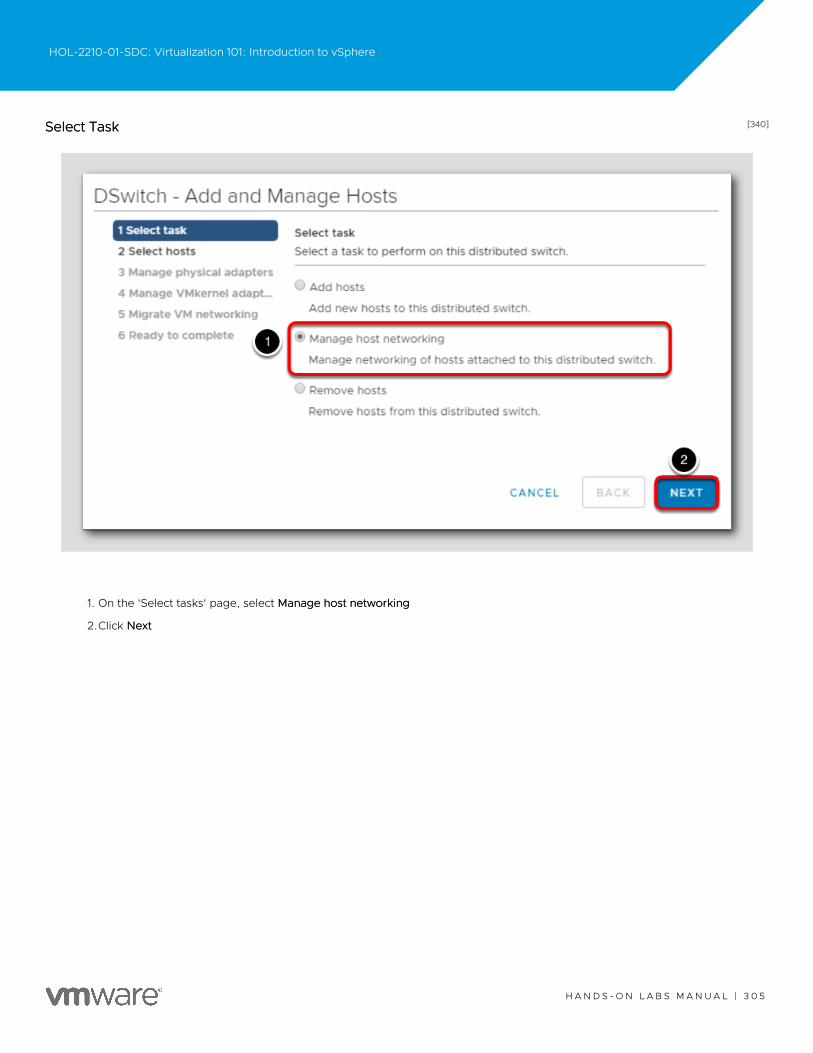
[340][340]Select TaskSelect Task
1. On the 'Select tasks' page, select Manage host networkingManage host networking
2.Click NextNext
HOL-2210-01-SDC: Virtualization 101: Introduction to vSphere
H A N D S - O N L A B S M A N U A L | 3 0 5

[341][341]Select hostsSelect hosts
1. Click the green'++' to select the hosts to work with.
HOL-2210-01-SDC: Virtualization 101: Introduction to vSphere
H A N D S - O N L A B S M A N U A L | 3 0 6

[342][342]Select member hostsSelect member hosts
1. On the "Select member hosts" page, select esx-01a.corp.localesx-01a.corp.local
2.Click OKOK
HOL-2210-01-SDC: Virtualization 101: Introduction to vSphere
H A N D S - O N L A B S M A N U A L | 3 0 7
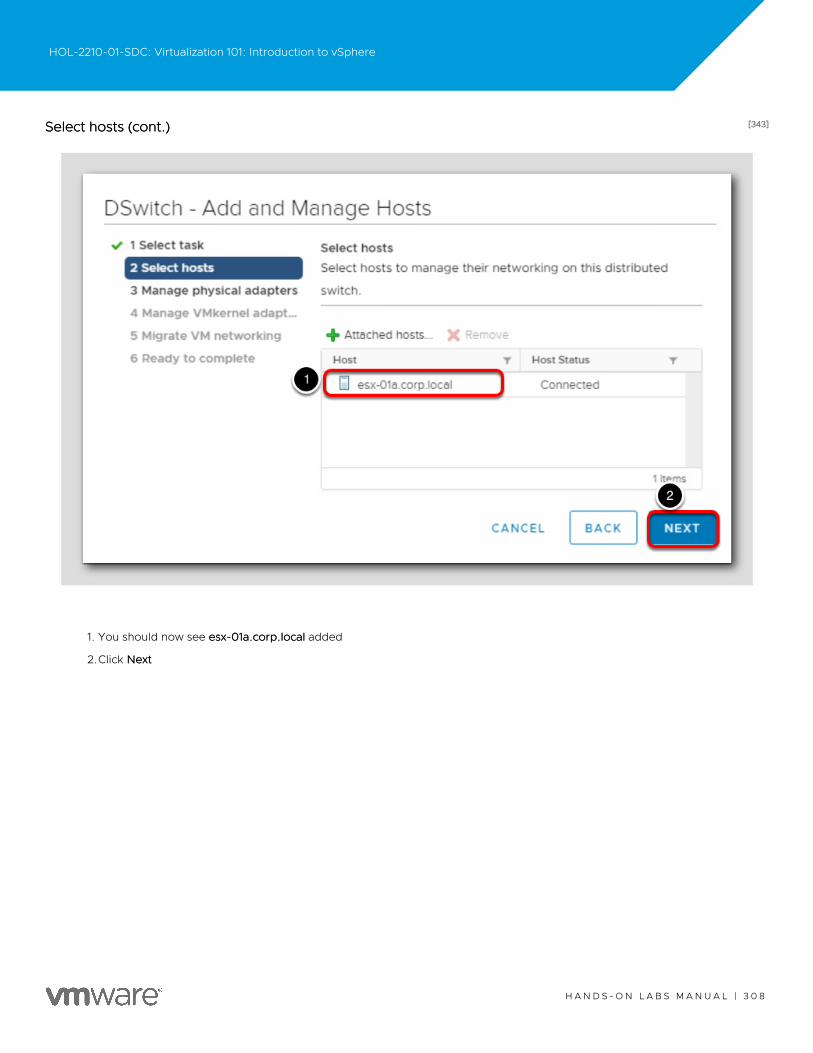
[343][343]Select hosts (cont.)Select hosts (cont.)
1. You should now see esx-01a.corp.localesx-01a.corp.local added
2.Click NextNext
HOL-2210-01-SDC: Virtualization 101: Introduction to vSphere
H A N D S - O N L A B S M A N U A L | 3 0 8
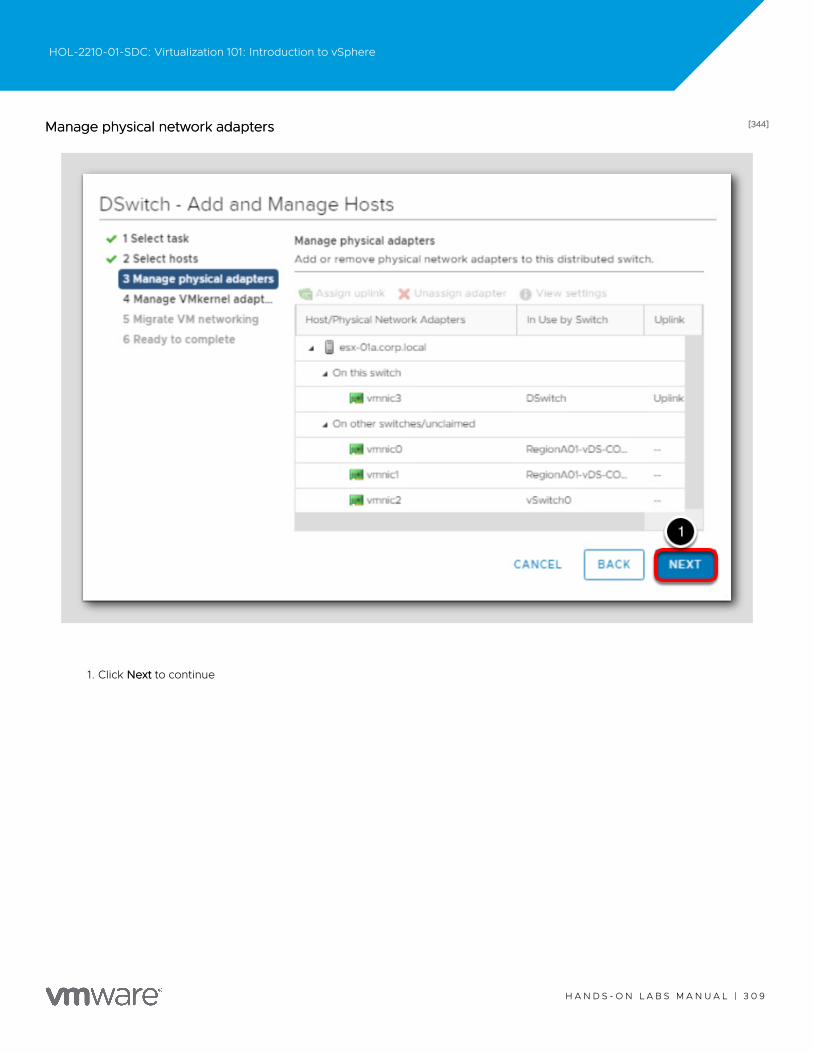
[344][344]Manage physical network adaptersManage physical network adapters
1. Click NextNext to continue
HOL-2210-01-SDC: Virtualization 101: Introduction to vSphere
H A N D S - O N L A B S M A N U A L | 3 0 9
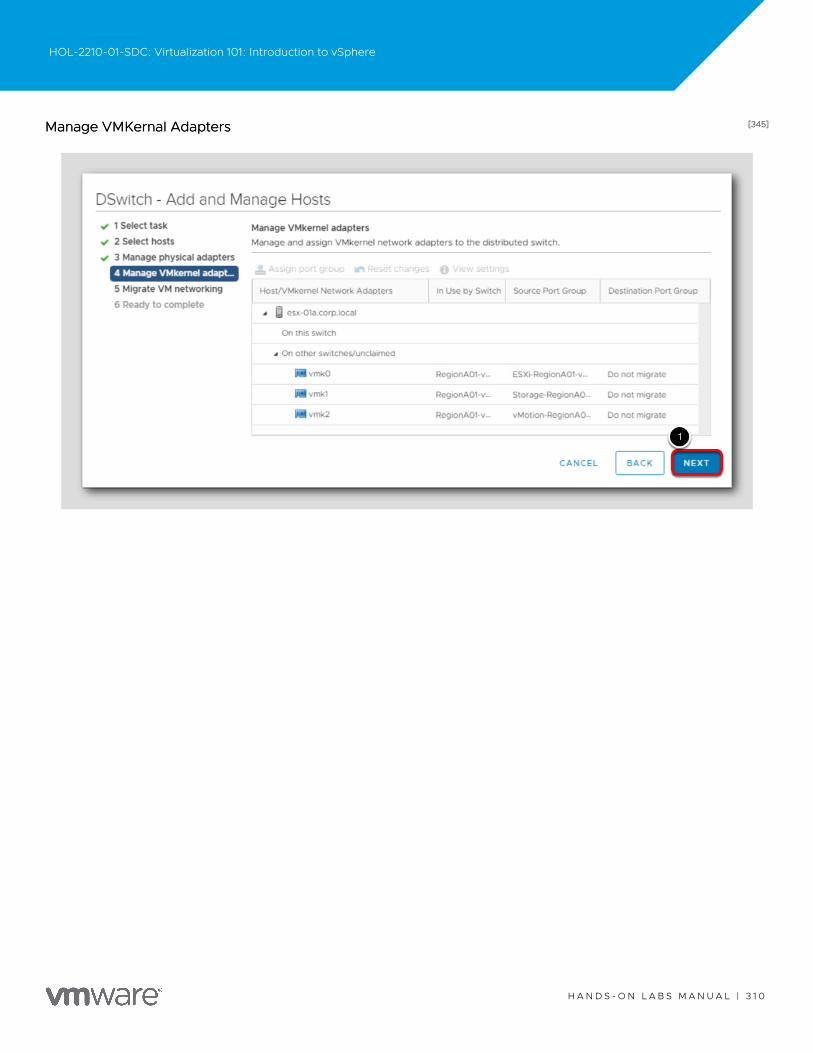
[345][345]Manage VMKernal AdaptersManage VMKernal Adapters
HOL-2210-01-SDC: Virtualization 101: Introduction to vSphere
H A N D S - O N L A B S M A N U A L | 3 1 0
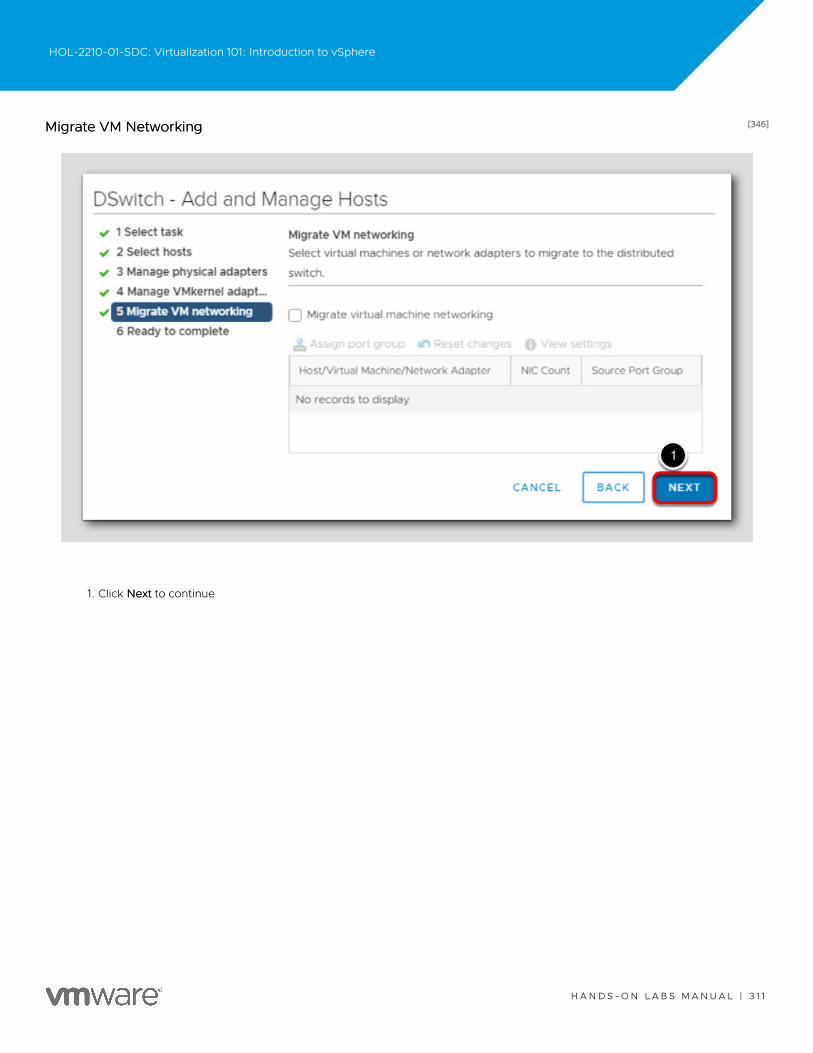
[346][346]Migrate VM NetworkingMigrate VM Networking
1. Click NextNext to continue
HOL-2210-01-SDC: Virtualization 101: Introduction to vSphere
H A N D S - O N L A B S M A N U A L | 3 1 1

[347][347]Ready to completeReady to complete
1. Click FinishFinish
HOL-2210-01-SDC: Virtualization 101: Introduction to vSphere
H A N D S - O N L A B S M A N U A L | 3 1 2
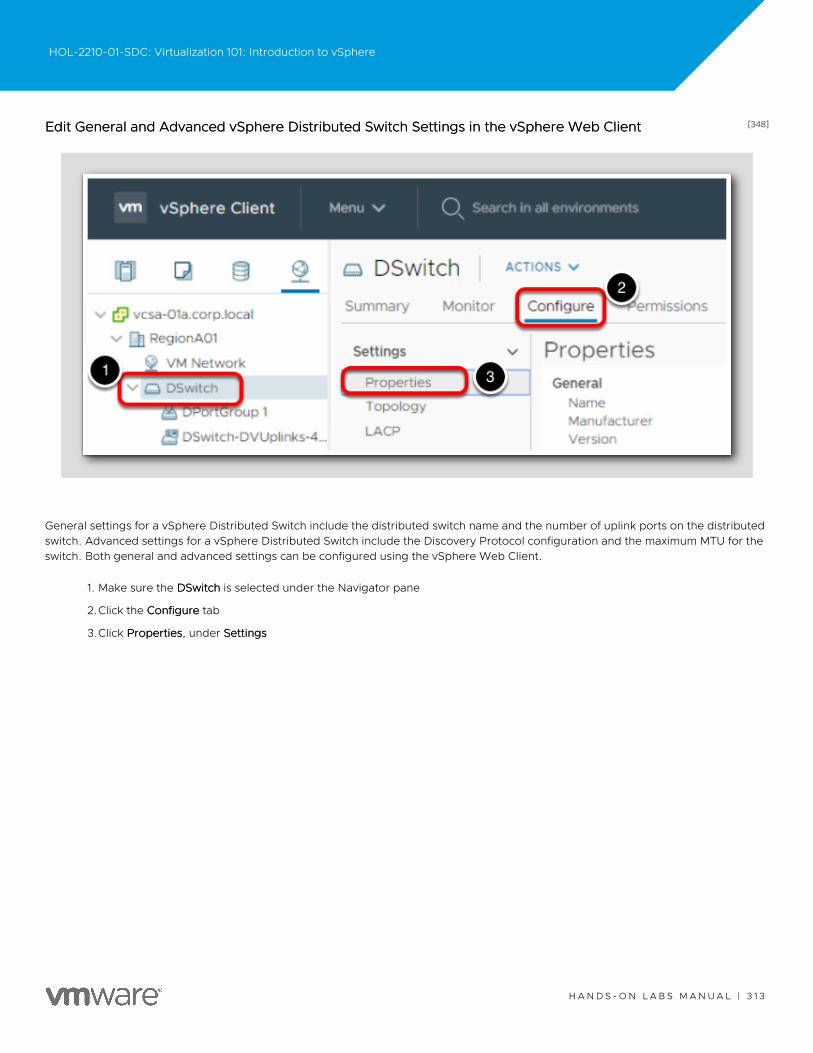
[348][348]Edit General and Advanced vSphere Distributed Switch Settings in the vSphere Web ClientEdit General and Advanced vSphere Distributed Switch Settings in the vSphere Web Client
General settings for a vSphere Distributed Switch include the distributed switch name and the number of uplink ports on the distributedswitch. Advanced settings for a vSphere Distributed Switch include the Discovery Protocol configuration and the maximum MTU for theswitch. Both general and advanced settings can be configured using the vSphere Web Client.
1. Make sure the DSwitchDSwitch is selected under the Navigator pane
2.Click the ConfigureConfigure tab
3.Click PropertiesProperties, under SettingsSettings
HOL-2210-01-SDC: Virtualization 101: Introduction to vSphere
H A N D S - O N L A B S M A N U A L | 3 1 3
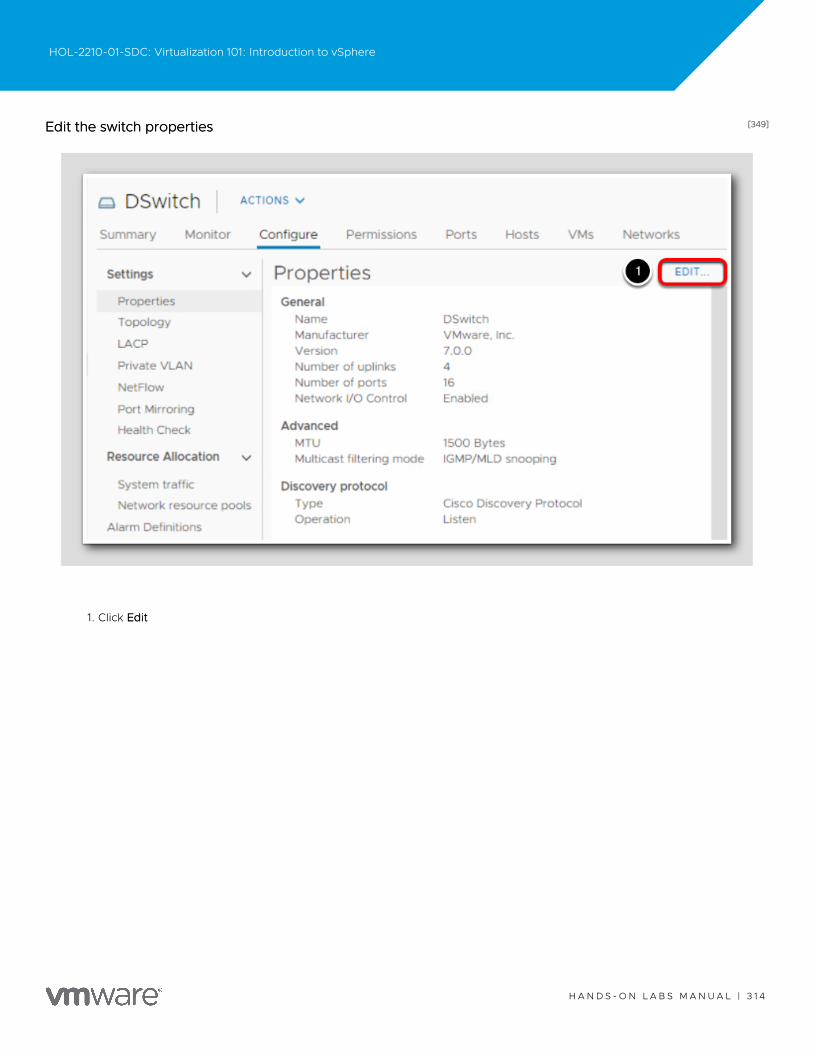
[349][349]Edit the switch propertiesEdit the switch properties
1. Click EditEdit
HOL-2210-01-SDC: Virtualization 101: Introduction to vSphere
H A N D S - O N L A B S M A N U A L | 3 1 4
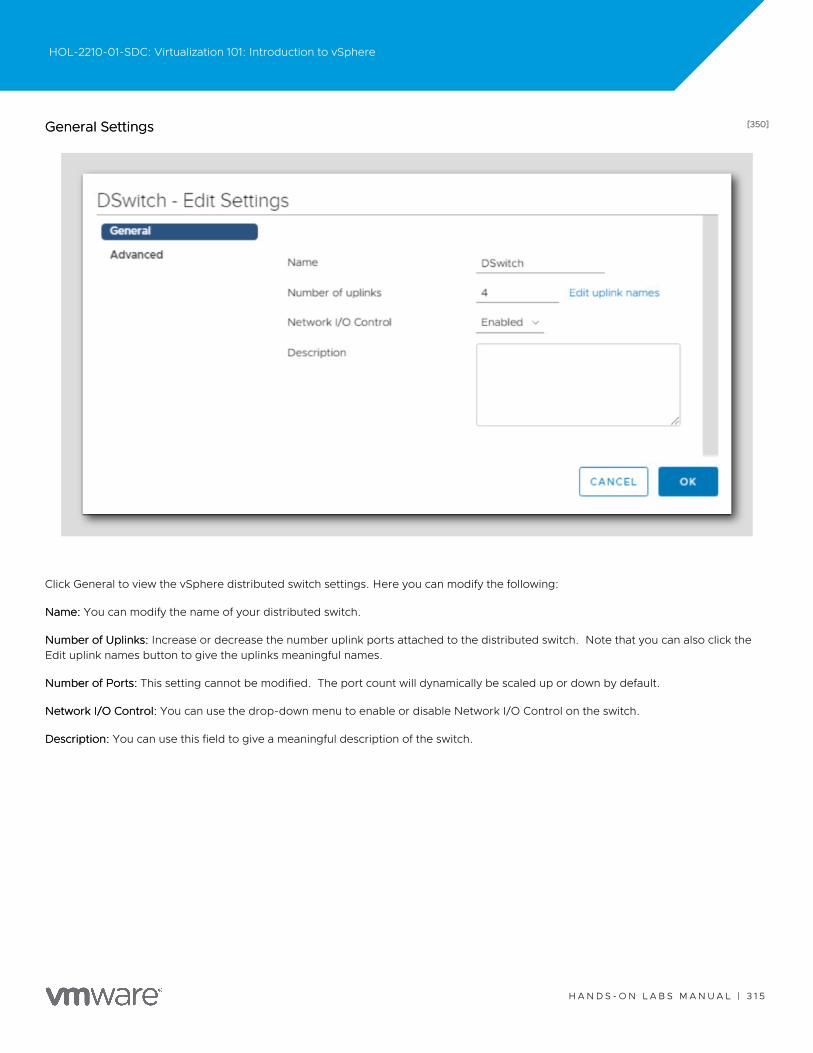
[350][350]General SettingsGeneral Settings
Click General to view the vSphere distributed switch settings. Here you can modify the following:
Name:Name: You can modify the name of your distributed switch.
Number of Uplinks:Number of Uplinks: Increase or decrease the number uplink ports attached to the distributed switch. Note that you can also click theEdit uplink names button to give the uplinks meaningful names.
Number of Ports:Number of Ports: This setting cannot be modified. The port count will dynamically be scaled up or down by default.
Network I/O Control:Network I/O Control: You can use the drop-down menu to enable or disable Network I/O Control on the switch.
Description:Description: You can use this field to give a meaningful description of the switch.
HOL-2210-01-SDC: Virtualization 101: Introduction to vSphere
H A N D S - O N L A B S M A N U A L | 3 1 5
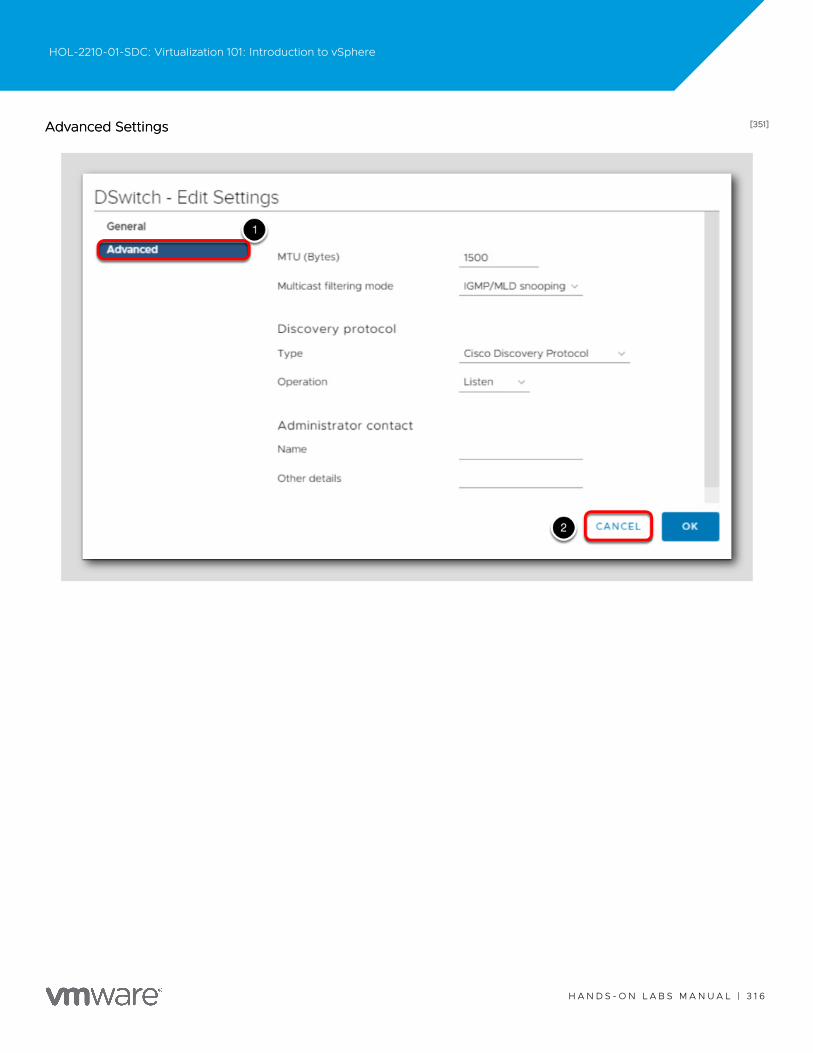
[351][351]Advanced SettingsAdvanced Settings
HOL-2210-01-SDC: Virtualization 101: Introduction to vSphere
H A N D S - O N L A B S M A N U A L | 3 1 6

1. Click Advanced to view the vSphere distributed switch settings. Here you will find the following advanced settings for the
switch:
MTU (Bytes):MTU (Bytes): Maximum MTU size for the vSphere Distributed Switch. To enable jumbo frames, set a value greater than 1500 bytes.Make sure you check with your Networking team prior to modifying this setting in your environment.
Multicast filtering modeMulticast filtering mode
•Basic - The distributed switch forwards traffic that is related to a multicast group based on a MAC address generated from the
last 23 bits of the IPv4 address of the group.
•IGMP/MLD snooping - The distributed switch forwards multicast traffic to virtual machines according to the IPv4 and IPv6
addresses of subscribed multicast groups by using membership messages defined by the Internet Group Management
Protocol (IGMP ) and Multicast Listener Discovery protocol.
Discovery ProtocolDiscovery Protocol
•Type - Cisco Discovery Protocol, Link Layer Discovery Protocol, or disabled..
•Operation - to Listen, Advertise, or Both.
Administrator Contact:Administrator Contact: Type the name and other details of the administrator for the distributed switch.
1. We don't want to make any changes here, just click CancelCancel.
HOL-2210-01-SDC: Virtualization 101: Introduction to vSphere
H A N D S - O N L A B S M A N U A L | 3 1 7
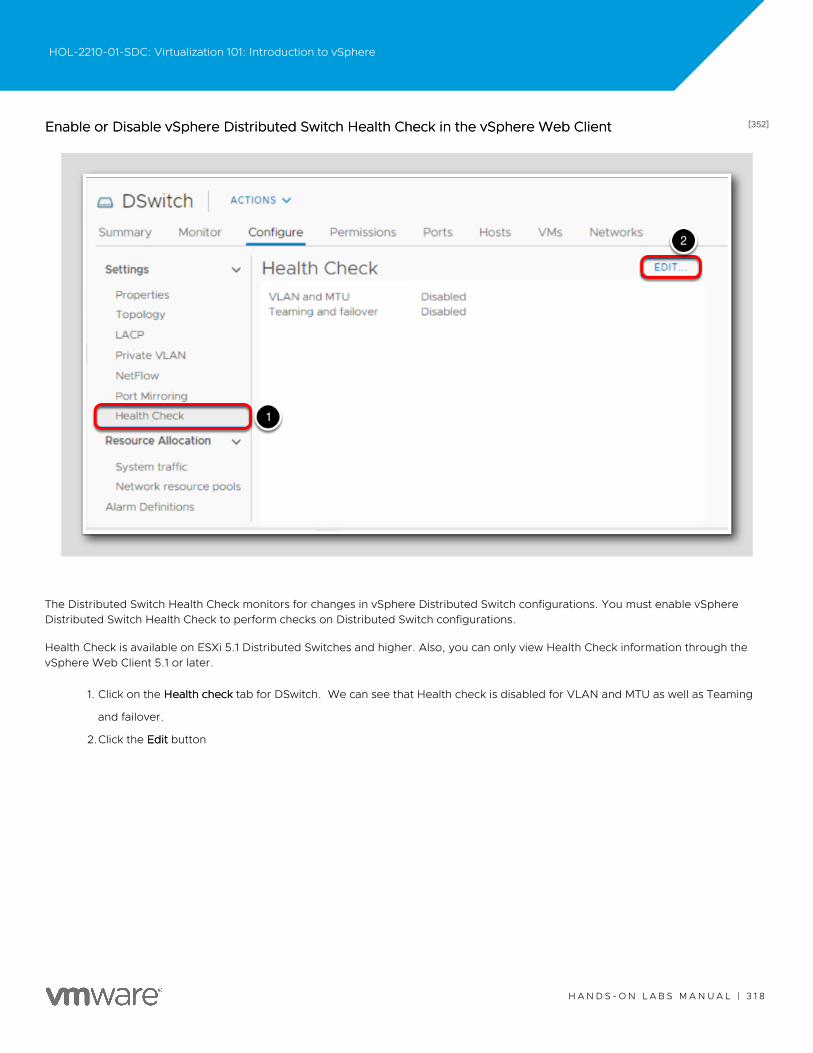
[352][352]Enable or Disable vSphere Distributed Switch Health Check in the vSphere Web ClientEnable or Disable vSphere Distributed Switch Health Check in the vSphere Web Client
The Distributed Switch Health Check monitors for changes in vSphere Distributed Switch configurations. You must enable vSphereDistributed Switch Health Check to perform checks on Distributed Switch configurations.
Health Check is available on ESXi 5.1 Distributed Switches and higher. Also, you can only view Health Check information through thevSphere Web Client 5.1 or later.
1. Click on the Health checkHealth check tab for DSwitch. We can see that Health check is disabled for VLAN and MTU as well as Teaming
and failover.
2.Click the EditEdit button
HOL-2210-01-SDC: Virtualization 101: Introduction to vSphere
H A N D S - O N L A B S M A N U A L | 3 1 8
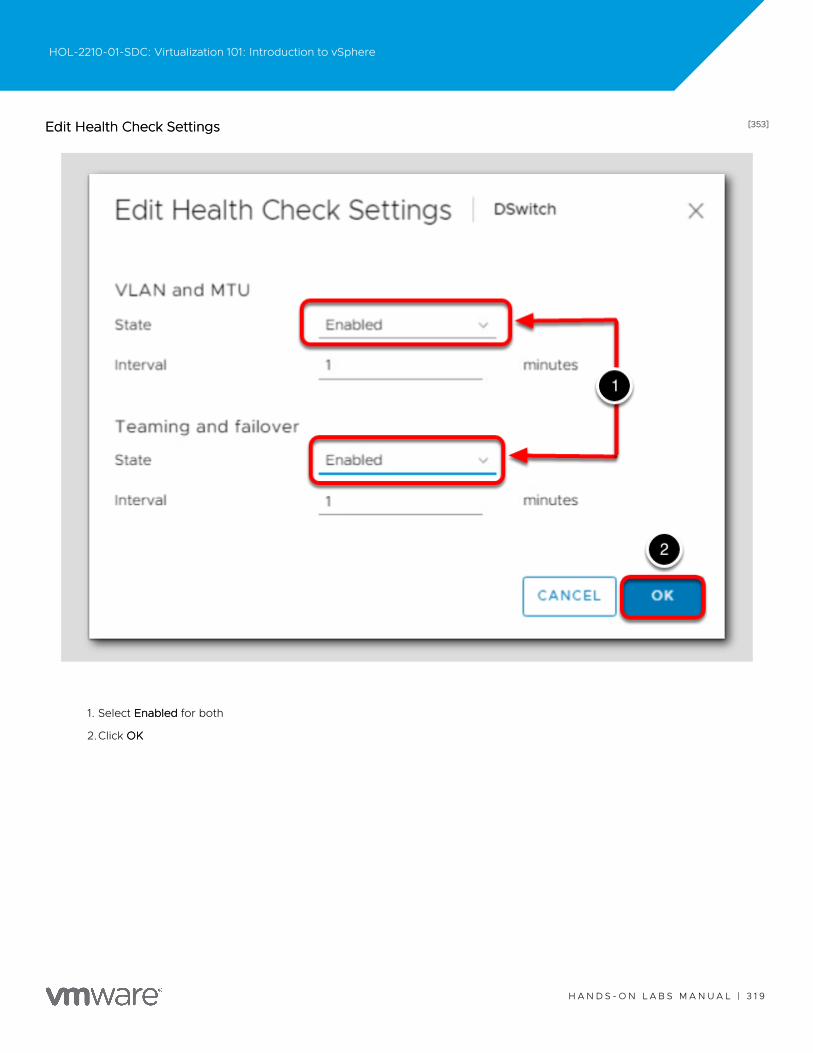
[353][353]Edit Health Check SettingsEdit Health Check Settings
1. Select EnabledEnabled for both
2.Click OKOK
HOL-2210-01-SDC: Virtualization 101: Introduction to vSphere
H A N D S - O N L A B S M A N U A L | 3 1 9
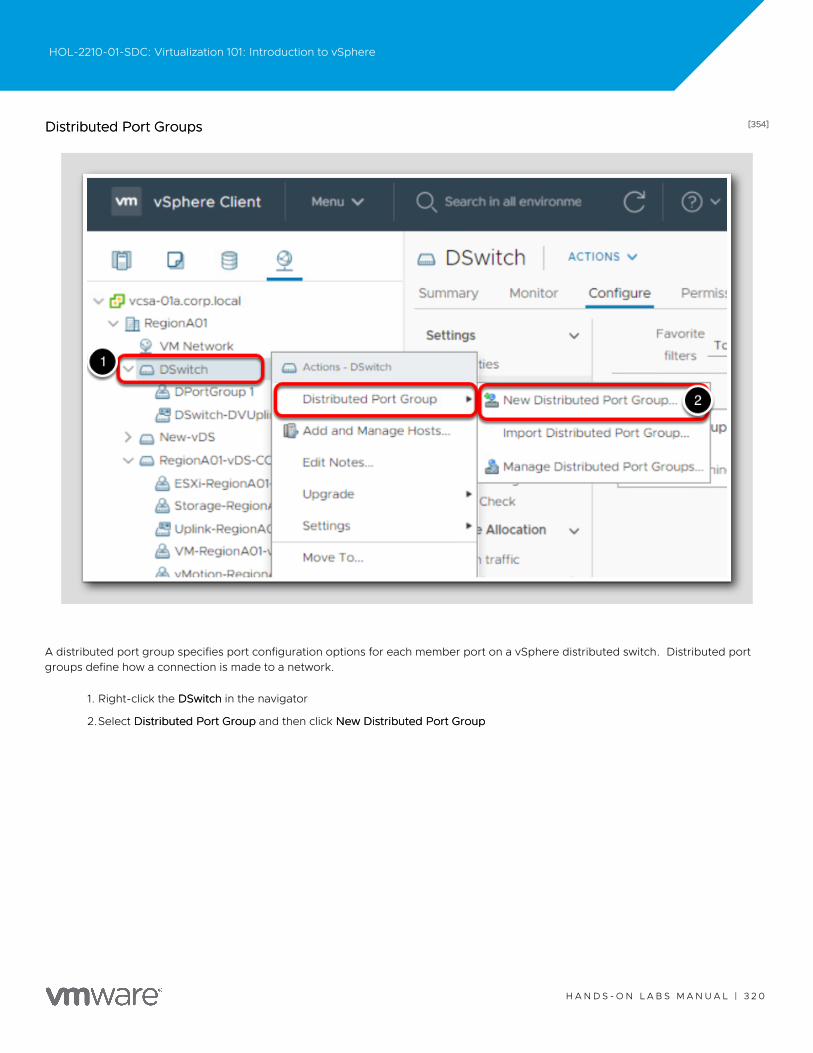
[354][354]Distributed Port GroupsDistributed Port Groups
A distributed port group specifies port configuration options for each member port on a vSphere distributed switch. Distributed portgroups define how a connection is made to a network.
1. Right-click the DSwitchDSwitch in the navigator
2.Select Distributed Port GroupDistributed Port Group and then click New Distributed Port GroupNew Distributed Port Group
HOL-2210-01-SDC: Virtualization 101: Introduction to vSphere
H A N D S - O N L A B S M A N U A L | 3 2 0
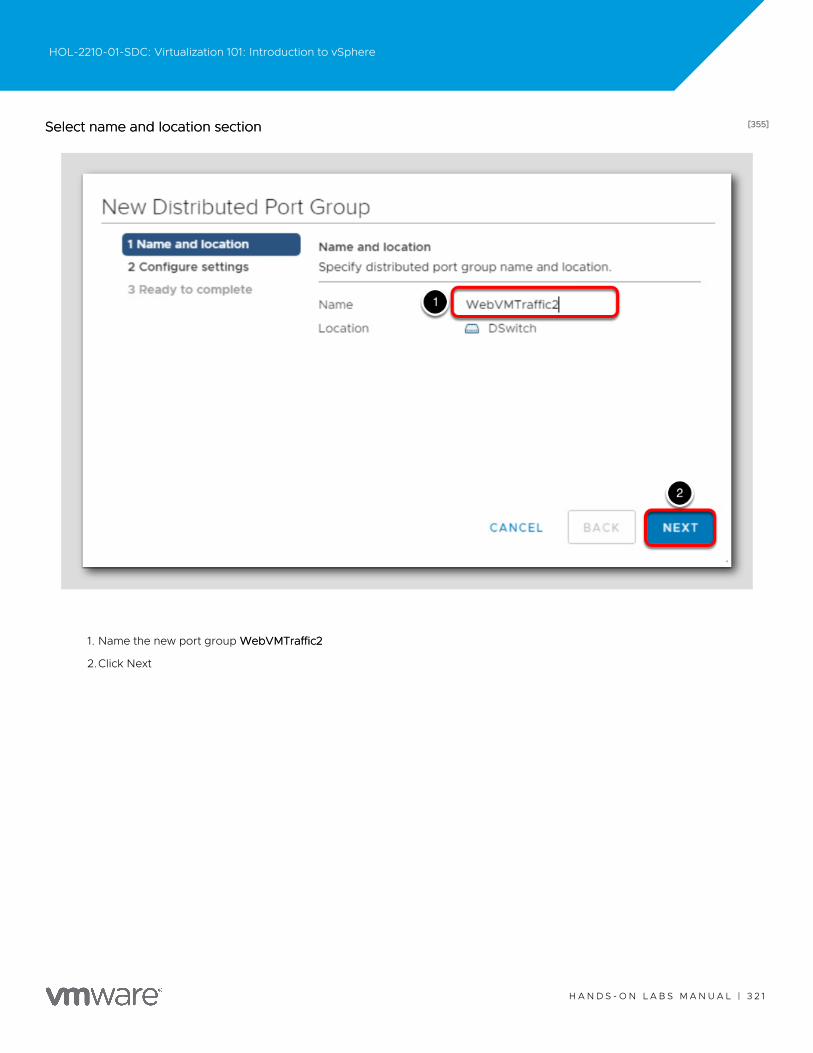
[355][355]Select name and location sectionSelect name and location section
1. Name the new port group WebVMTraffic2WebVMTraffic2
2.Click Next
HOL-2210-01-SDC: Virtualization 101: Introduction to vSphere
H A N D S - O N L A B S M A N U A L | 3 2 1
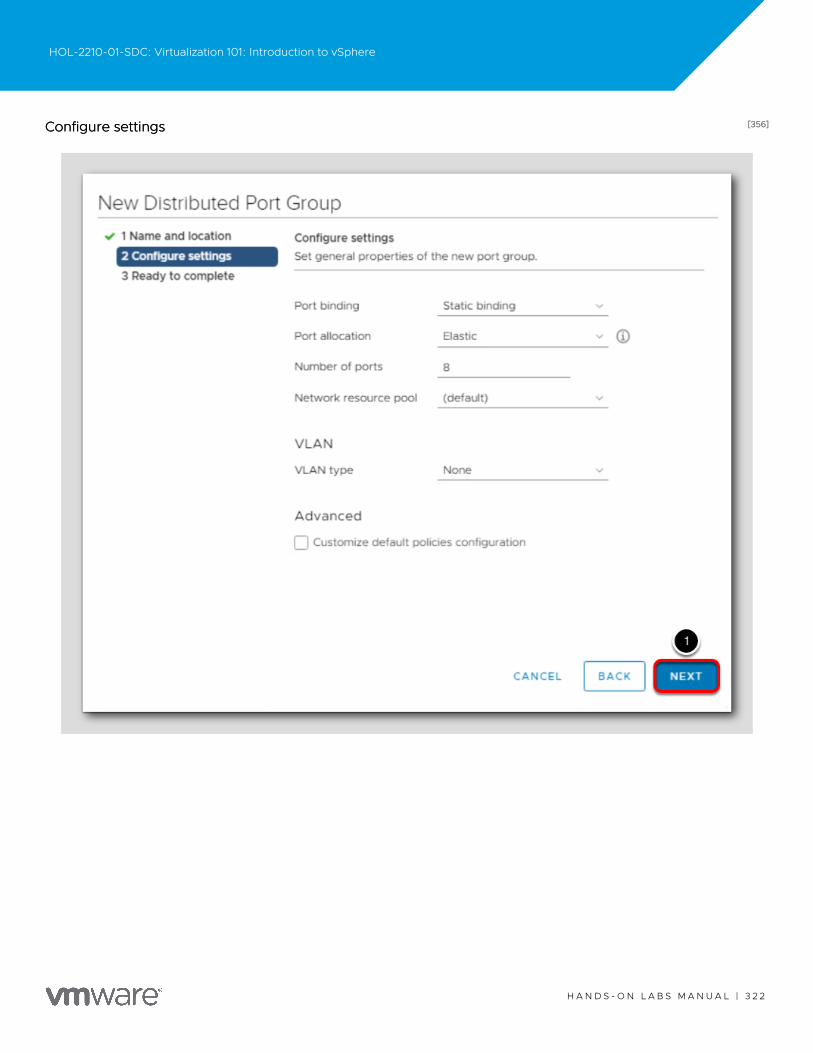
[356][356]Configure settingsConfigure settings
HOL-2210-01-SDC: Virtualization 101: Introduction to vSphere
H A N D S - O N L A B S M A N U A L | 3 2 2
1. Keep default settings and click NextNext
When creating a Distributed Port Group, you have the following options available:
Port binding -Port binding - Choose when ports are assigned to virtual machines connected to this distributed port group.
•Static binding - Assign a port to a virtual machine when the virtual machine connects to the distributed port group.
•Dynamic binding - Assign a port to a virtual machine the first time the virtual machine powers on after it is connected to the
distributed port group. Dynamic binding has been deprecated since ESXi 5.0.
•Ephemeral - No port binding. You can assign a virtual machine to a distributed port group with ephemeral port binding also
when connected to the host.
Port allocationPort allocation
•Elastic - The default number of ports is eight. When all ports are assigned, a new set of eight ports is created. This is the
default.
•Fixed - The default number of ports is set to eight. No additional ports are created when all ports are assigned.
Number of ports:Number of ports: Enter the number of ports on the distributed port group.
Network resource pool:Network resource pool: If you have created network pool to help control network traffic, you can select it here.
VLAN:VLAN: Use the Type drop-down menu to select VLAN options:
•None - Do not use VLAN.
•VLAN - In the VLAN ID field, enter a number between 1 and 4094.
•VLAN Trunking - Enter a VLAN trunk range.
•Private VLAN - Select a private VLAN entry. If you did not create any private VLANs, this menu is empty.
Advanced:Advanced: Select this check box to customize the policy configurations for the new distributed port group.
HOL-2210-01-SDC: Virtualization 101: Introduction to vSphere
H A N D S - O N L A B S M A N U A L | 3 2 3
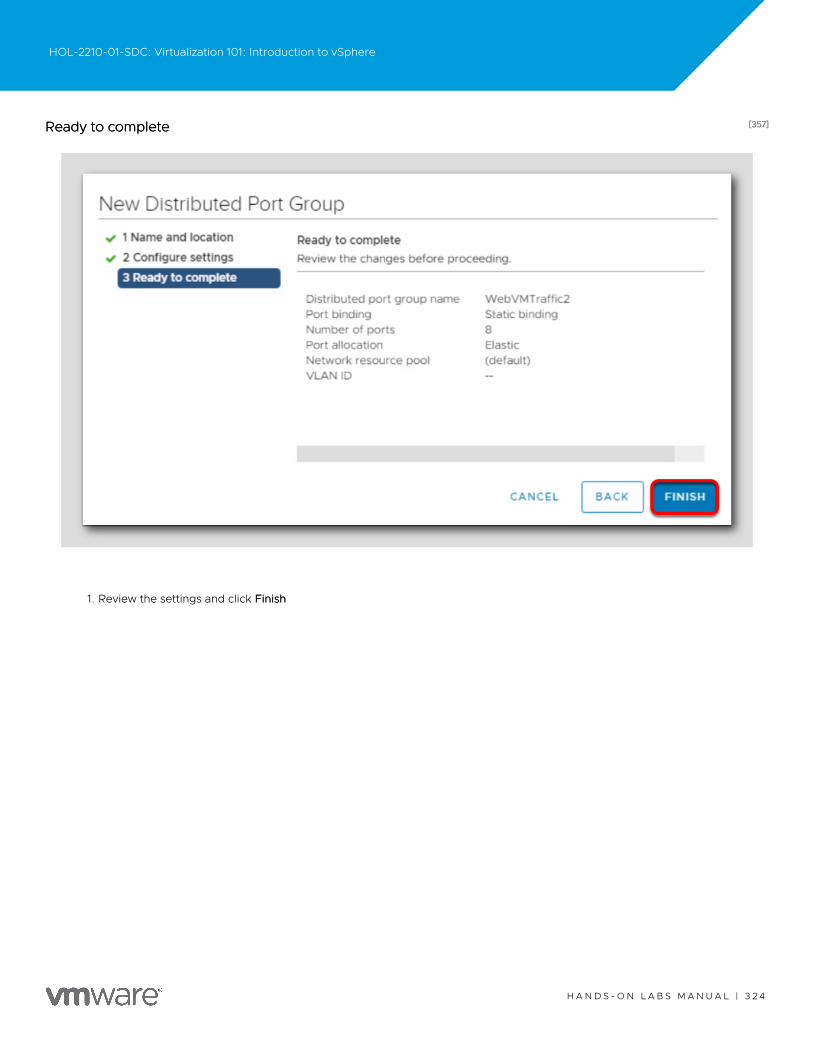
[357][357]Ready to completeReady to complete
1. Review the settings and click FinishFinish
HOL-2210-01-SDC: Virtualization 101: Introduction to vSphere
H A N D S - O N L A B S M A N U A L | 3 2 4
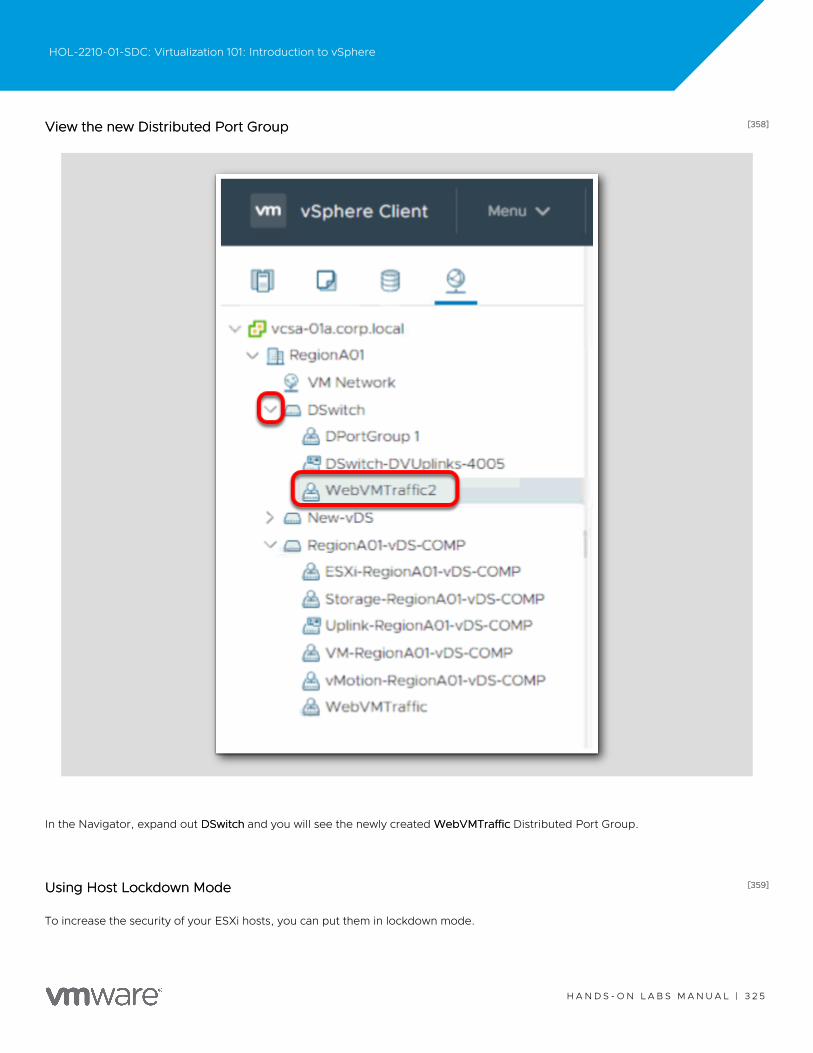
[358][358]View the new Distributed Port GroupView the new Distributed Port Group
In the Navigator, expand out DSwitchDSwitch and you will see the newly created WebVMTrafficWebVMTraffic Distributed Port Group.
[359][359]Using Host Lockdown ModeUsing Host Lockdown Mode
To increase the security of your ESXi hosts, you can put them in lockdown mode.
HOL-2210-01-SDC: Virtualization 101: Introduction to vSphere
H A N D S - O N L A B S M A N U A L | 3 2 5
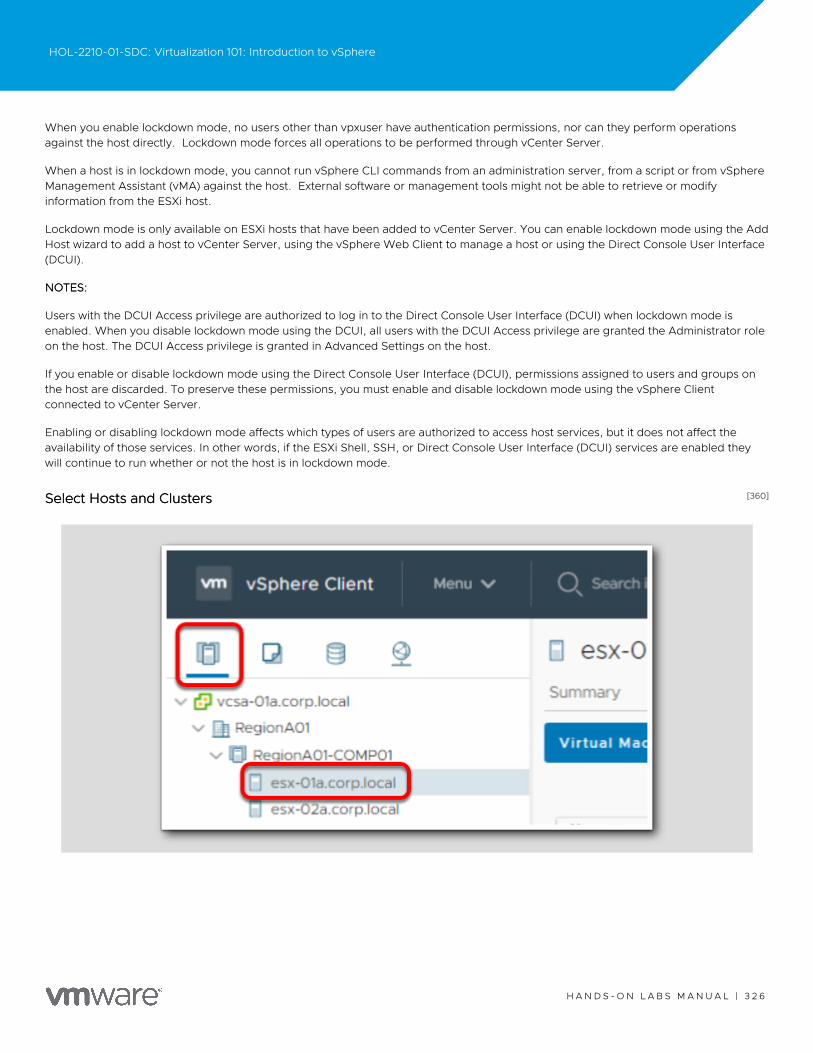
When you enable lockdown mode, no users other than vpxuser have authentication permissions, nor can they perform operationsagainst the host directly. Lockdown mode forces all operations to be performed through vCenter Server.
When a host is in lockdown mode, you cannot run vSphere CLI commands from an administration server, from a script or from vSphereManagement Assistant (vMA) against the host. External software or management tools might not be able to retrieve or modifyinformation from the ESXi host.
Lockdown mode is only available on ESXi hosts that have been added to vCenter Server. You can enable lockdown mode using the AddHost wizard to add a host to vCenter Server, using the vSphere Web Client to manage a host or using the Direct Console User Interface(DCUI).
NOTES:NOTES:
Users with the DCUI Access privilege are authorized to log in to the Direct Console User Interface (DCUI) when lockdown mode isenabled. When you disable lockdown mode using the DCUI, all users with the DCUI Access privilege are granted the Administrator roleon the host. The DCUI Access privilege is granted in Advanced Settings on the host.
If you enable or disable lockdown mode using the Direct Console User Interface (DCUI), permissions assigned to users and groups onthe host are discarded. To preserve these permissions, you must enable and disable lockdown mode using the vSphere Clientconnected to vCenter Server.
Enabling or disabling lockdown mode affects which types of users are authorized to access host services, but it does not affect theavailability of those services. In other words, if the ESXi Shell, SSH, or Direct Console User Interface (DCUI) services are enabled theywill continue to run whether or not the host is in lockdown mode.
[360][360]Select Hosts and ClustersSelect Hosts and Clusters
HOL-2210-01-SDC: Virtualization 101: Introduction to vSphere
H A N D S - O N L A B S M A N U A L | 3 2 6
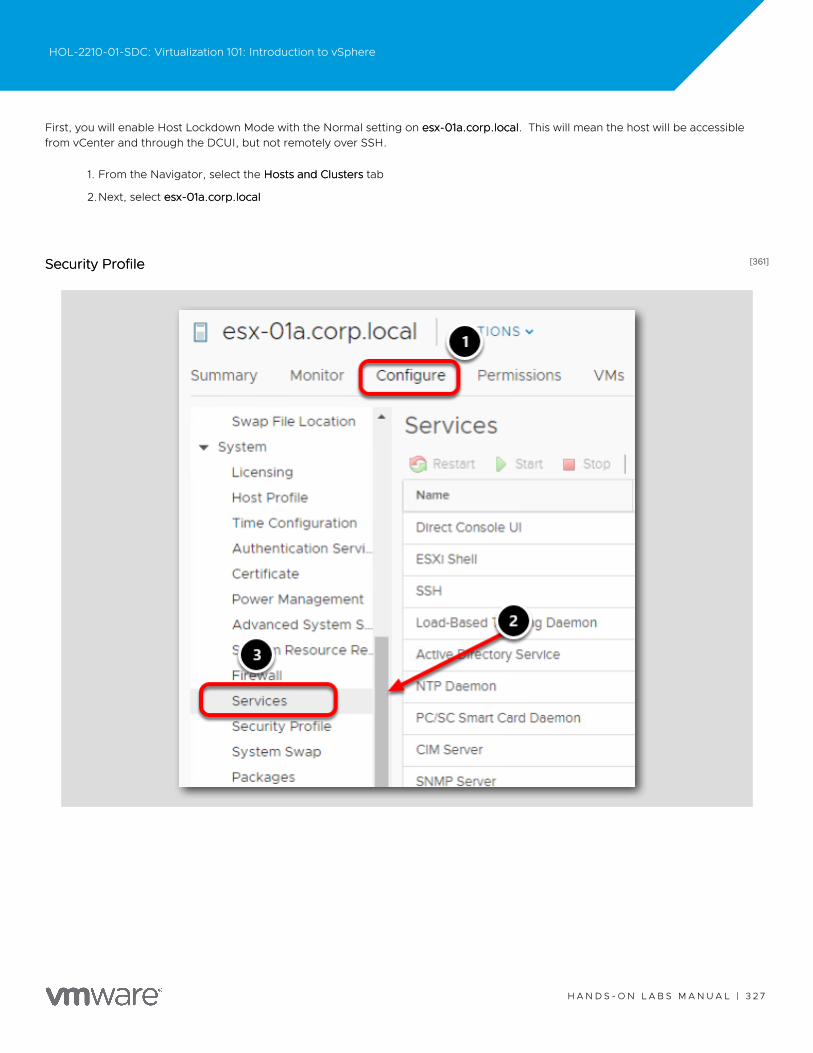
First, you will enable Host Lockdown Mode with the Normal setting on esx-01a.corp.localesx-01a.corp.local. This will mean the host will be accessiblefrom vCenter and through the DCUI, but not remotely over SSH.
1. From the Navigator, select the Hosts and ClustersHosts and Clusters tab
2.Next, select esx-01a.corp.localesx-01a.corp.local
[361][361]Security ProfileSecurity Profile
HOL-2210-01-SDC: Virtualization 101: Introduction to vSphere
H A N D S - O N L A B S M A N U A L | 3 2 7
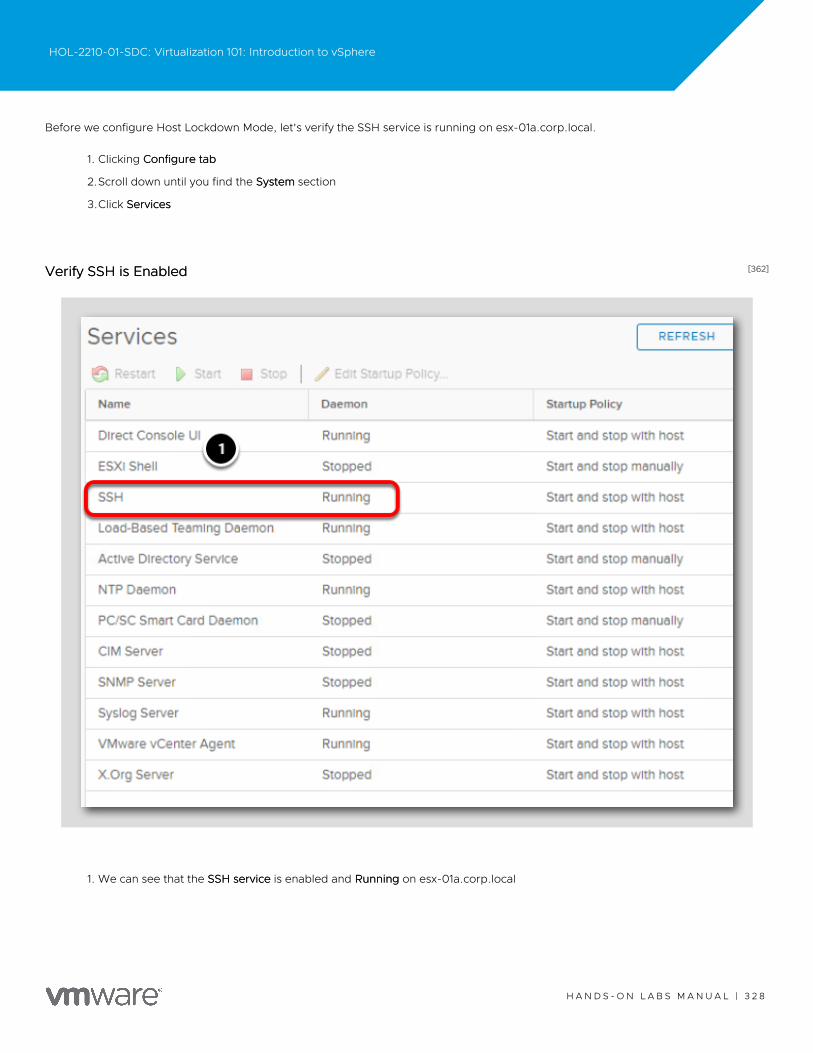
Before we configure Host Lockdown Mode, let's verify the SSH service is running on esx-01a.corp.local.
1. Clicking Configure tabConfigure tab
2.Scroll down until you find the SystemSystem section
3.Click ServicesServices
[362][362]Verify SSH is EnabledVerify SSH is Enabled
1. We can see that the SSH serviceSSH service is enabled and RunningRunning on esx-01a.corp.local
HOL-2210-01-SDC: Virtualization 101: Introduction to vSphere
H A N D S - O N L A B S M A N U A L | 3 2 8
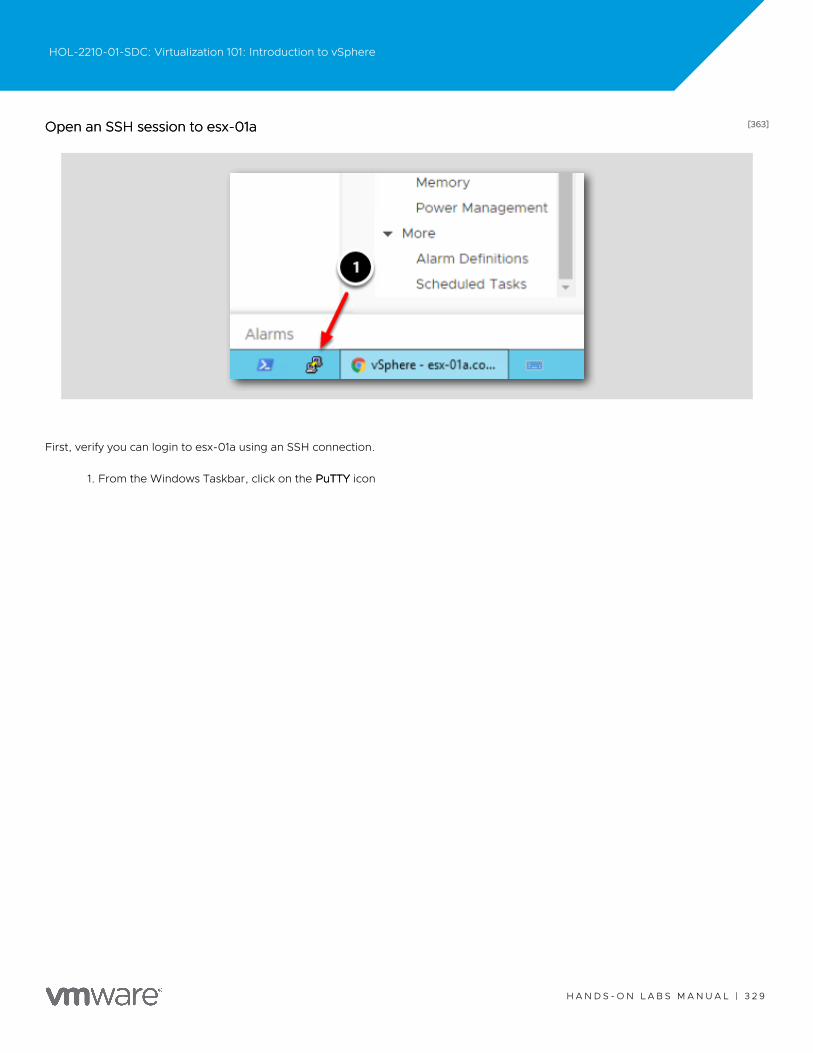
[363][363]Open an SSH session to esx-01aOpen an SSH session to esx-01a
First, verify you can login to esx-01a using an SSH connection.
1. From the Windows Taskbar, click on the PuTTYPuTTY icon
HOL-2210-01-SDC: Virtualization 101: Introduction to vSphere
H A N D S - O N L A B S M A N U A L | 3 2 9

[364][364]Connect to esx-01aConnect to esx-01a
1. Under Saved Sessions, click on esx-01a.corp.localesx-01a.corp.local
2.Click LoadLoad
3.Click the OpenOpen button
HOL-2210-01-SDC: Virtualization 101: Introduction to vSphere
H A N D S - O N L A B S M A N U A L | 3 3 0
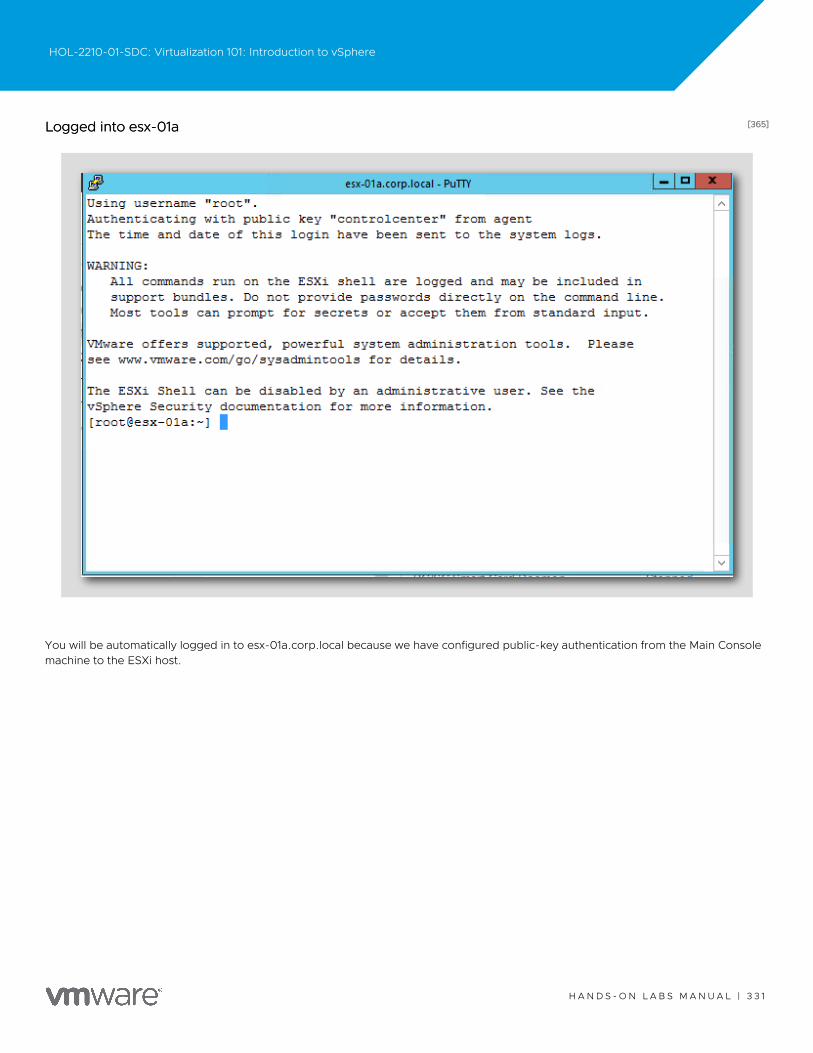
[365][365]Logged into esx-01aLogged into esx-01a
You will be automatically logged in to esx-01a.corp.local because we have configured public-key authentication from the Main Consolemachine to the ESXi host.
HOL-2210-01-SDC: Virtualization 101: Introduction to vSphere
H A N D S - O N L A B S M A N U A L | 3 3 1
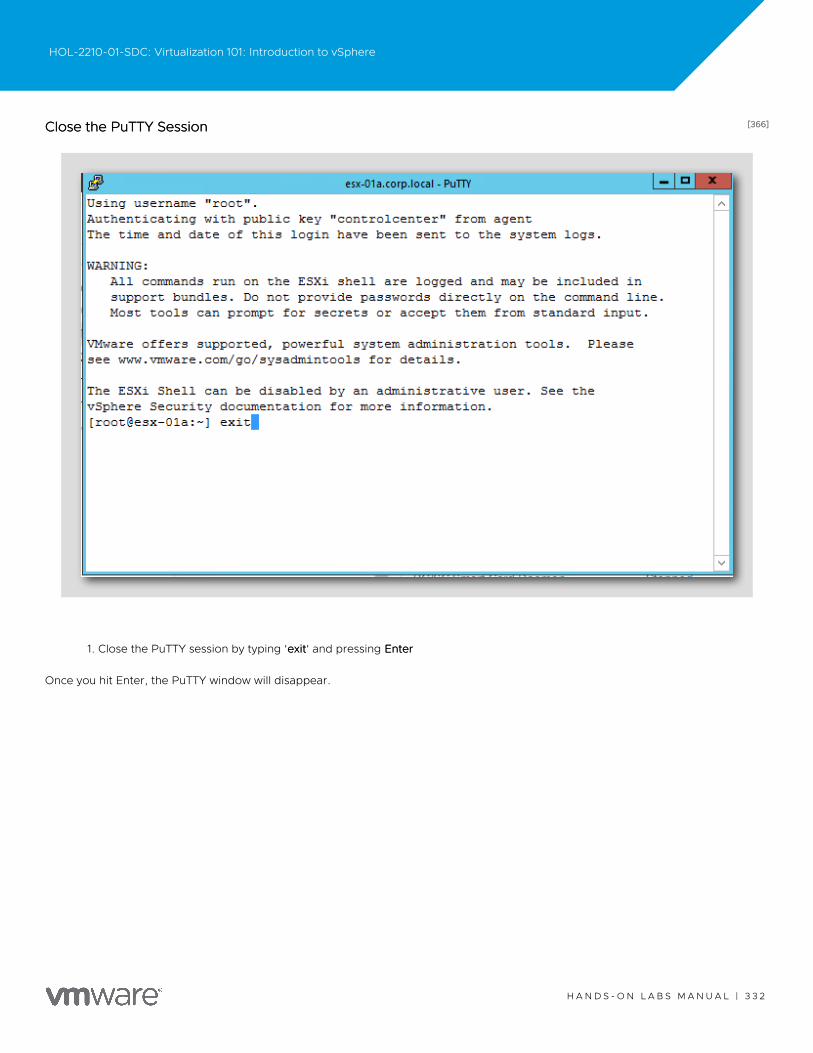
[366][366]Close the PuTTY SessionClose the PuTTY Session
1. Close the PuTTY session by typing 'exitexit' and pressing EnterEnter
Once you hit Enter, the PuTTY window will disappear.
HOL-2210-01-SDC: Virtualization 101: Introduction to vSphere
H A N D S - O N L A B S M A N U A L | 3 3 2
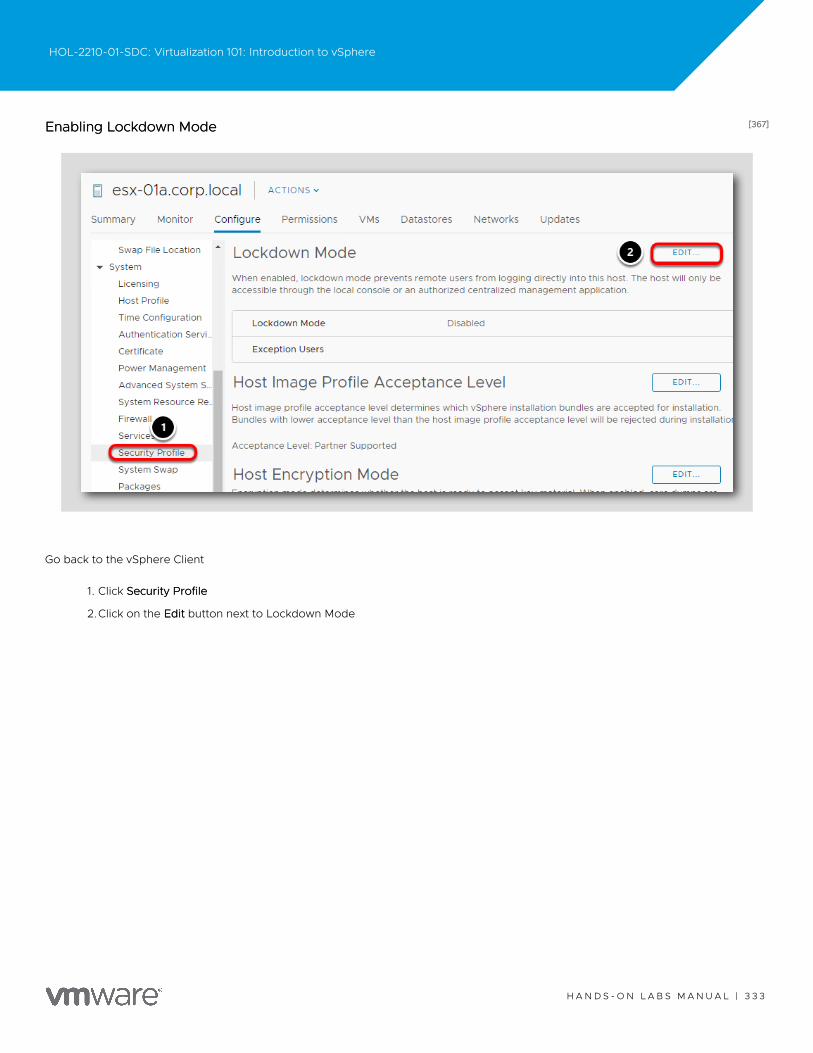
[367][367]Enabling Lockdown ModeEnabling Lockdown Mode
Go back to the vSphere Client
1. Click Security ProfileSecurity Profile
2.Click on the EditEdit button next to Lockdown Mode
HOL-2210-01-SDC: Virtualization 101: Introduction to vSphere
H A N D S - O N L A B S M A N U A L | 3 3 3
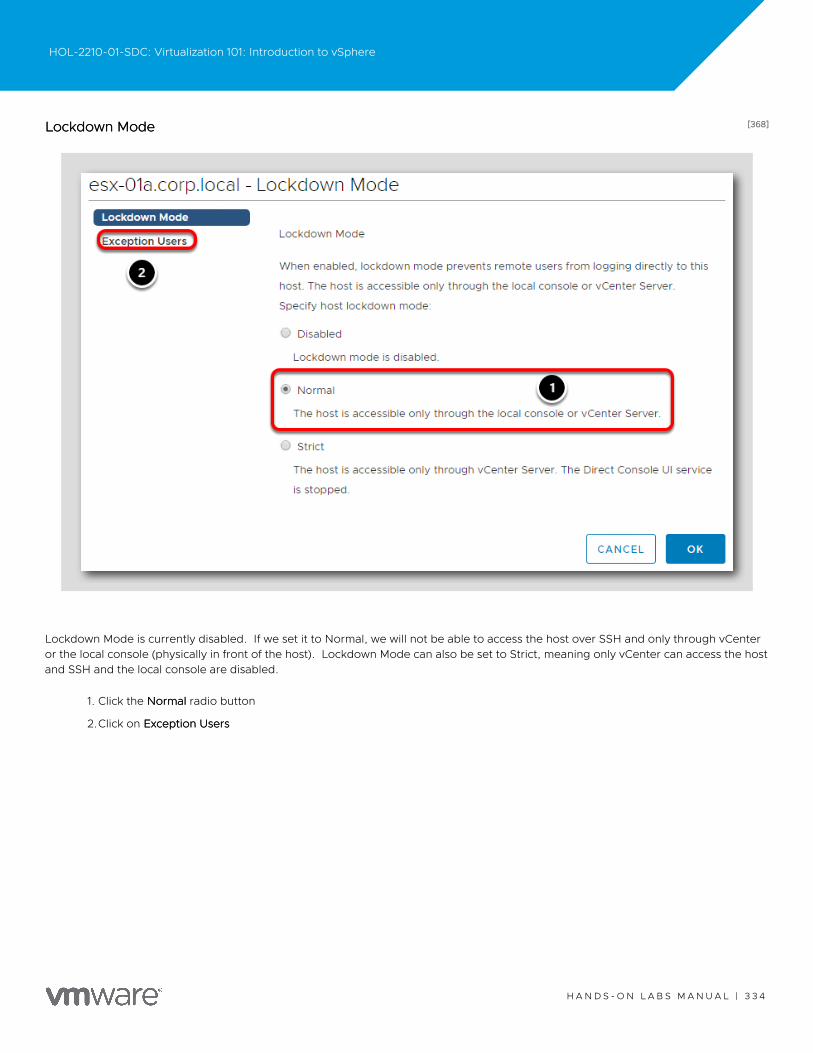
[368][368]Lockdown ModeLockdown Mode
Lockdown Mode is currently disabled. If we set it to Normal, we will not be able to access the host over SSH and only through vCenteror the local console (physically in front of the host). Lockdown Mode can also be set to Strict, meaning only vCenter can access the hostand SSH and the local console are disabled.
1. Click the NormalNormal radio button
2.Click on Exception UsersException Users
HOL-2210-01-SDC: Virtualization 101: Introduction to vSphere
H A N D S - O N L A B S M A N U A L | 3 3 4
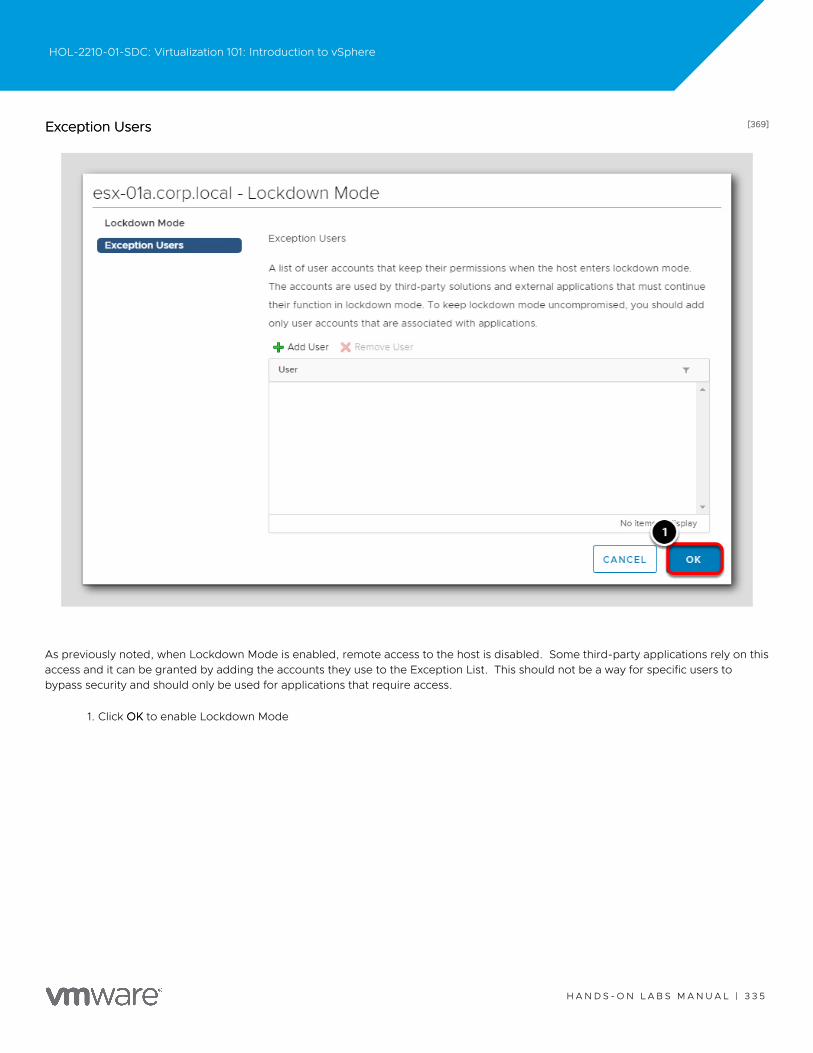
[369][369]Exception UsersException Users
As previously noted, when Lockdown Mode is enabled, remote access to the host is disabled. Some third-party applications rely on thisaccess and it can be granted by adding the accounts they use to the Exception List. This should not be a way for specific users tobypass security and should only be used for applications that require access.
1. Click OKOK to enable Lockdown Mode
HOL-2210-01-SDC: Virtualization 101: Introduction to vSphere
H A N D S - O N L A B S M A N U A L | 3 3 5
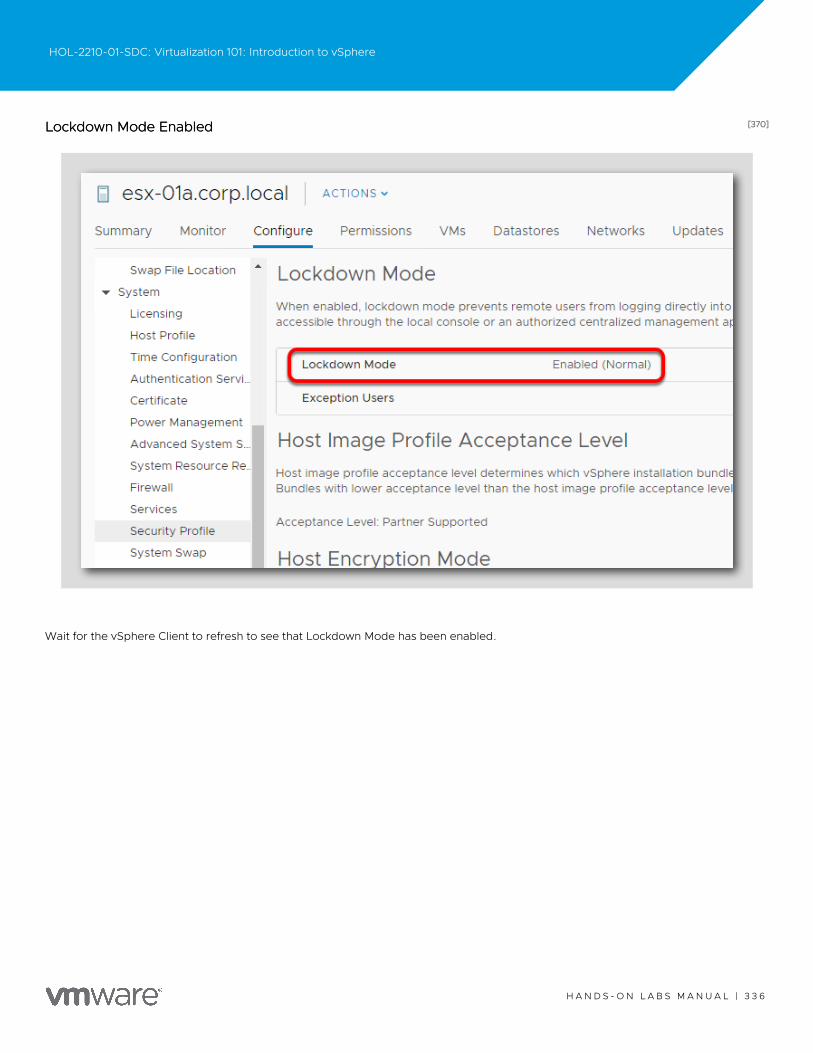
[370][370]Lockdown Mode EnabledLockdown Mode Enabled
Wait for the vSphere Client to refresh to see that Lockdown Mode has been enabled.
HOL-2210-01-SDC: Virtualization 101: Introduction to vSphere
H A N D S - O N L A B S M A N U A L | 3 3 6
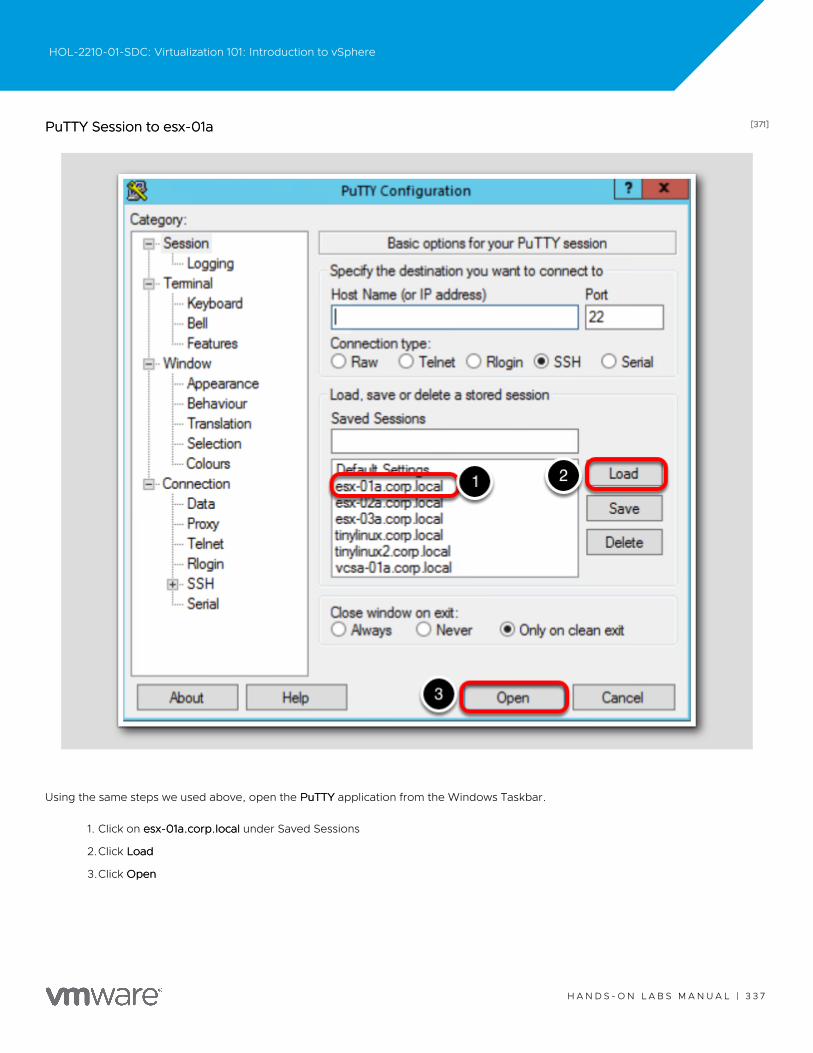
[371][371]PuTTY Session to esx-01aPuTTY Session to esx-01a
Using the same steps we used above, open the PuTTYPuTTY application from the Windows Taskbar.
1. Click on esx-01a.corp.localesx-01a.corp.local under Saved Sessions
2.Click LoadLoad
3.Click OpenOpen
HOL-2210-01-SDC: Virtualization 101: Introduction to vSphere
H A N D S - O N L A B S M A N U A L | 3 3 7
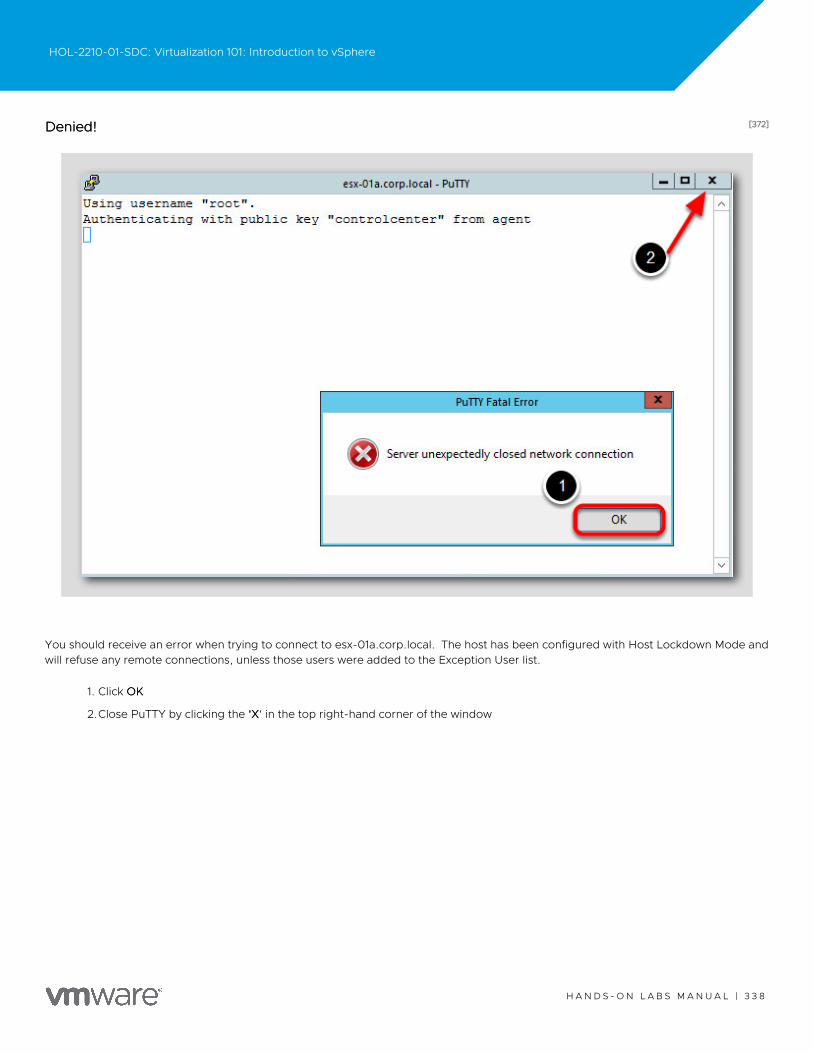
[372][372]Denied!Denied!
You should receive an error when trying to connect to esx-01a.corp.local. The host has been configured with Host Lockdown Mode andwill refuse any remote connections, unless those users were added to the Exception User list.
1. Click OKOK
2.Close PuTTY by clicking the 'X'X' in the top right-hand corner of the window
HOL-2210-01-SDC: Virtualization 101: Introduction to vSphere
H A N D S - O N L A B S M A N U A L | 3 3 8
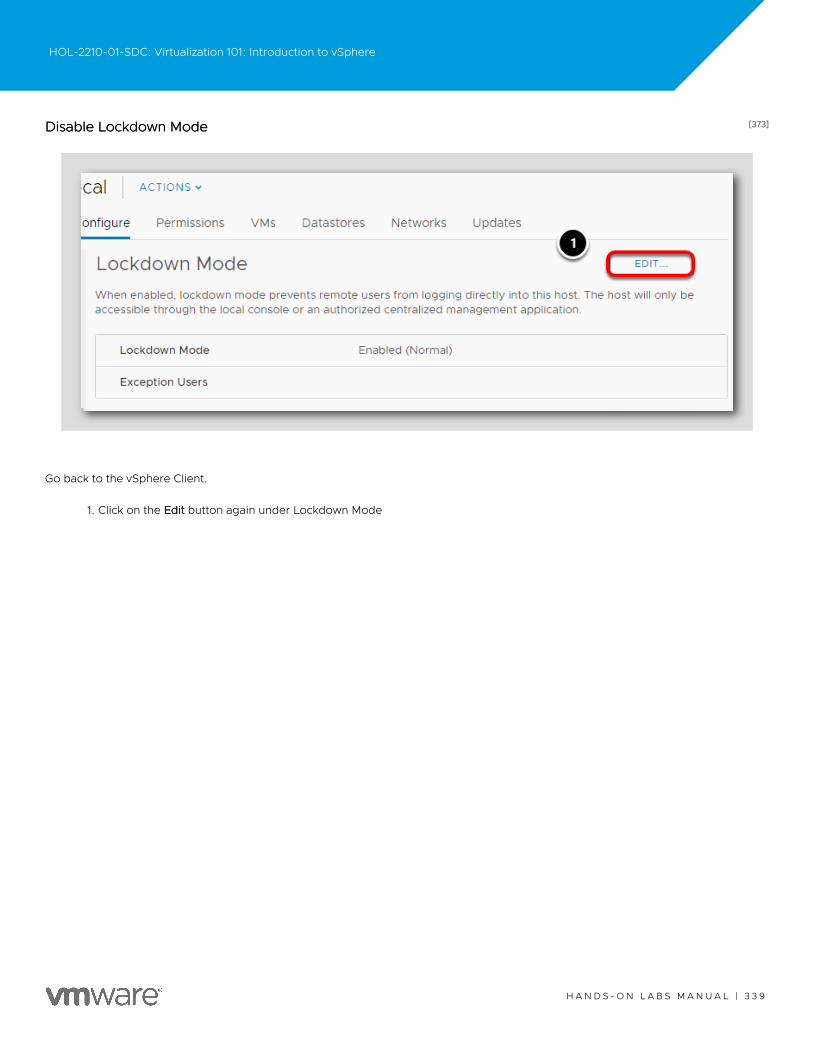
[373][373]Disable Lockdown ModeDisable Lockdown Mode
Go back to the vSphere Client.
1. Click on the EditEdit button again under Lockdown Mode
HOL-2210-01-SDC: Virtualization 101: Introduction to vSphere
H A N D S - O N L A B S M A N U A L | 3 3 9
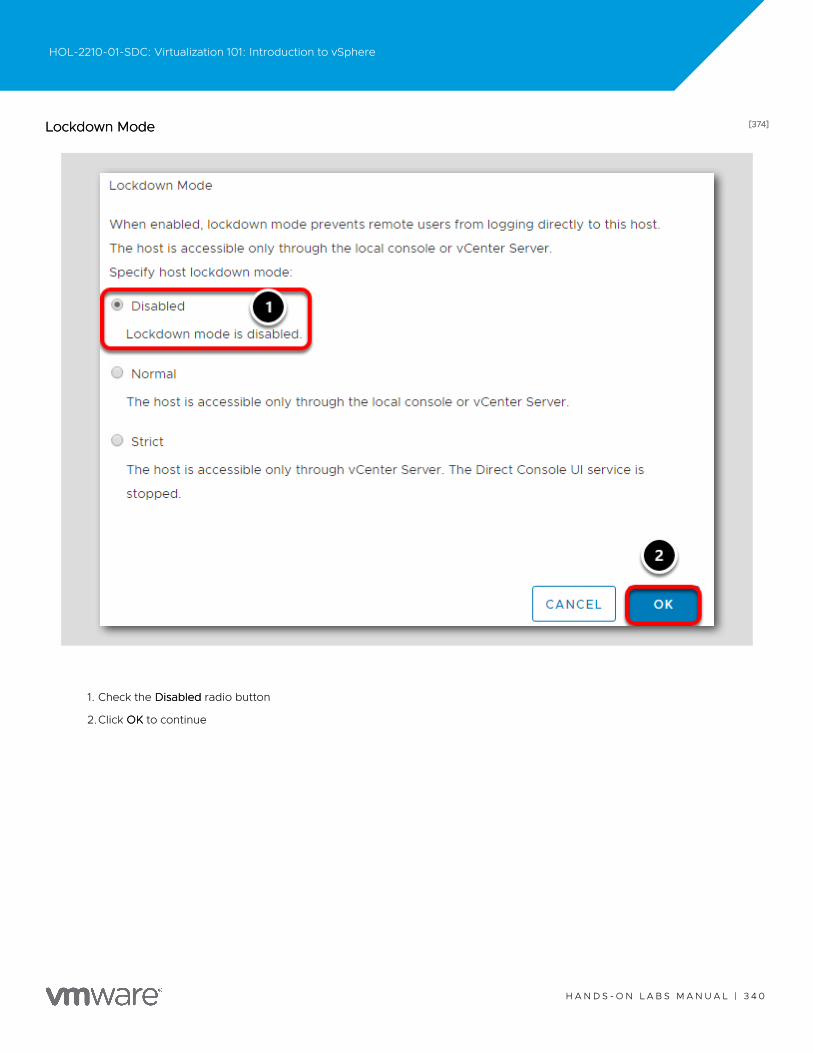
[374][374]Lockdown ModeLockdown Mode
1. Check the DisabledDisabled radio button
2.Click OKOK to continue
HOL-2210-01-SDC: Virtualization 101: Introduction to vSphere
H A N D S - O N L A B S M A N U A L | 3 4 0
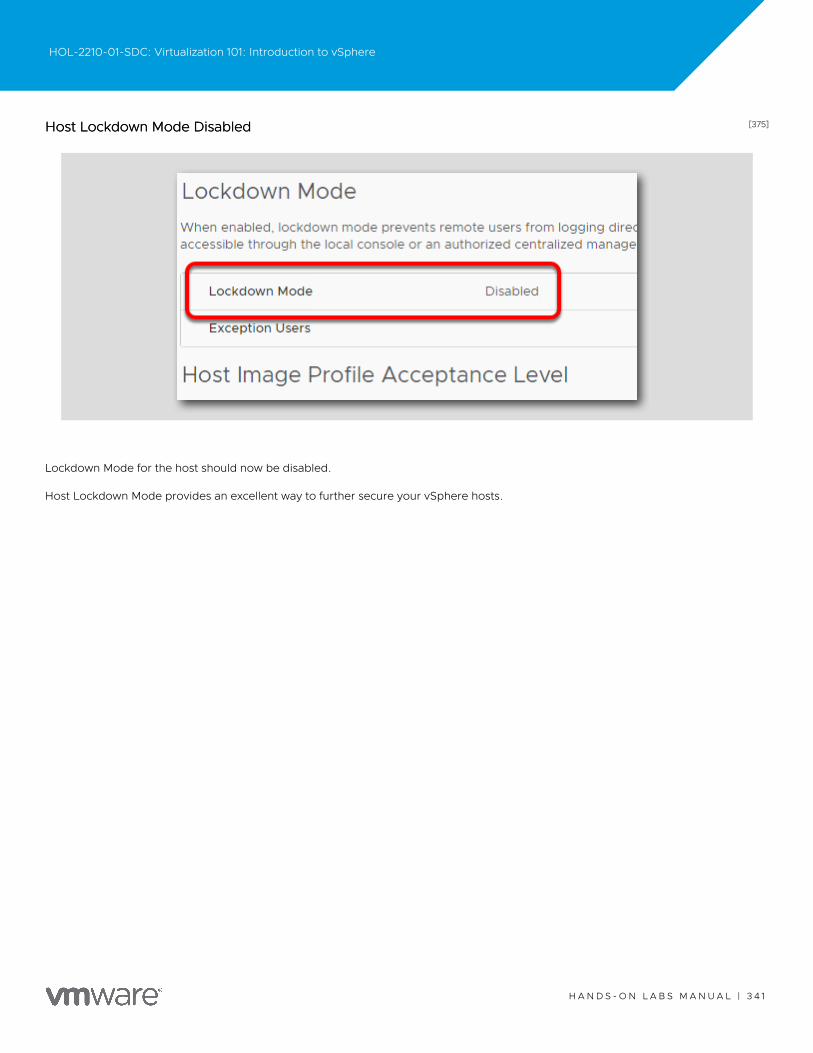
[375][375]Host Lockdown Mode DisabledHost Lockdown Mode Disabled
Lockdown Mode for the host should now be disabled.
Host Lockdown Mode provides an excellent way to further secure your vSphere hosts.
HOL-2210-01-SDC: Virtualization 101: Introduction to vSphere
H A N D S - O N L A B S M A N U A L | 3 4 1
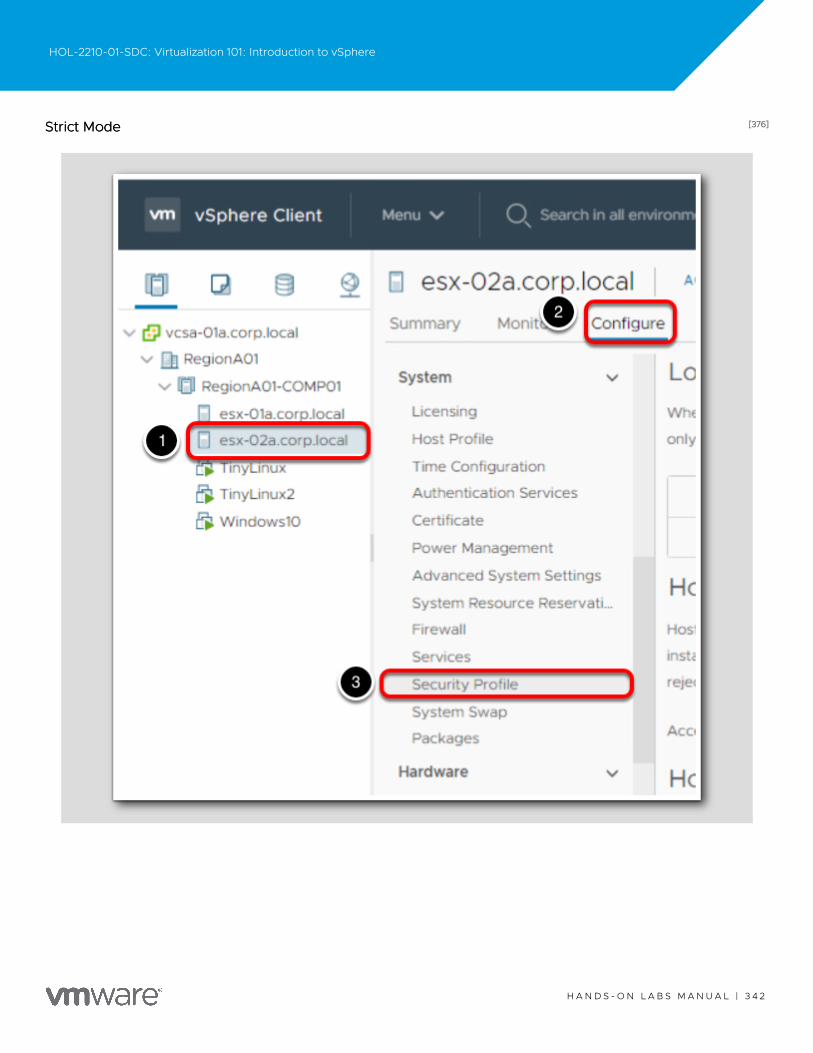
[376][376]Strict ModeStrict Mode
HOL-2210-01-SDC: Virtualization 101: Introduction to vSphere
H A N D S - O N L A B S M A N U A L | 3 4 2
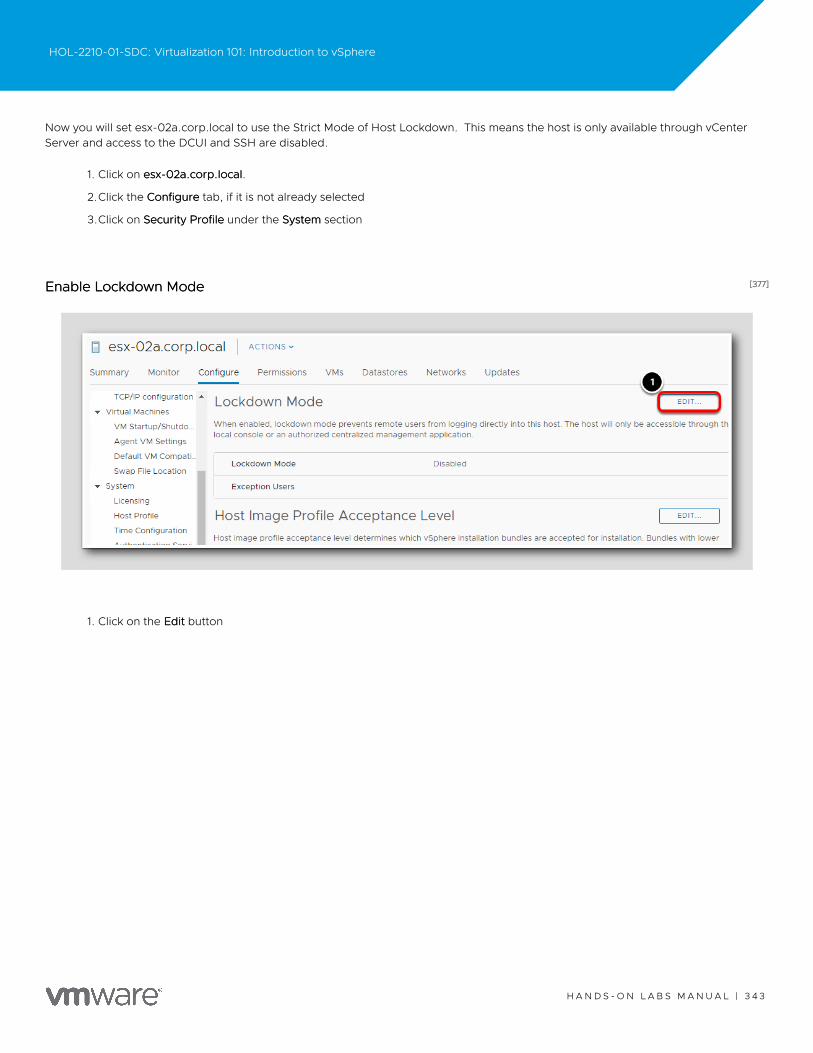
Now you will set esx-02a.corp.local to use the Strict Mode of Host Lockdown. This means the host is only available through vCenterServer and access to the DCUI and SSH are disabled.
1. Click on esx-02a.corp.localesx-02a.corp.local.
2.Click the ConfigureConfigure tab, if it is not already selected
3.Click on Security ProfileSecurity Profile under the SystemSystem section
[377][377]Enable Lockdown ModeEnable Lockdown Mode
1. Click on the EditEdit button
HOL-2210-01-SDC: Virtualization 101: Introduction to vSphere
H A N D S - O N L A B S M A N U A L | 3 4 3
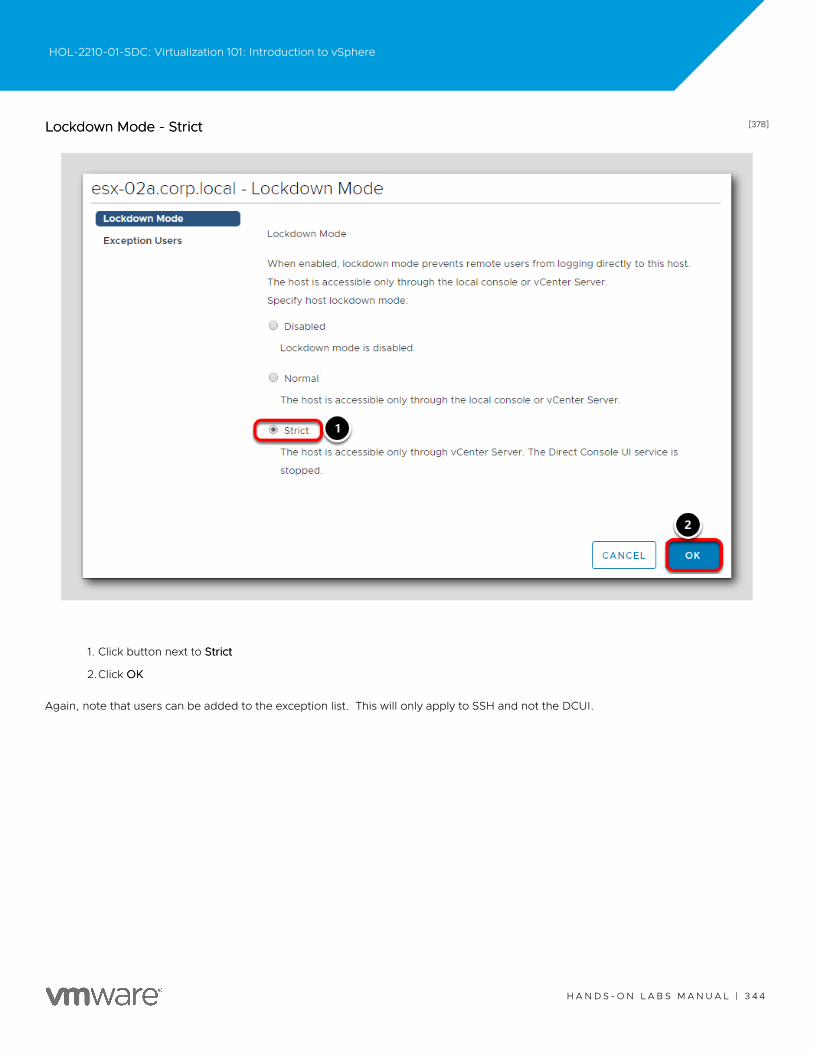
[378][378]Lockdown Mode - StrictLockdown Mode - Strict
1. Click button next to StrictStrict
2.Click OKOK
Again, note that users can be added to the exception list. This will only apply to SSH and not the DCUI.
HOL-2210-01-SDC: Virtualization 101: Introduction to vSphere
H A N D S - O N L A B S M A N U A L | 3 4 4
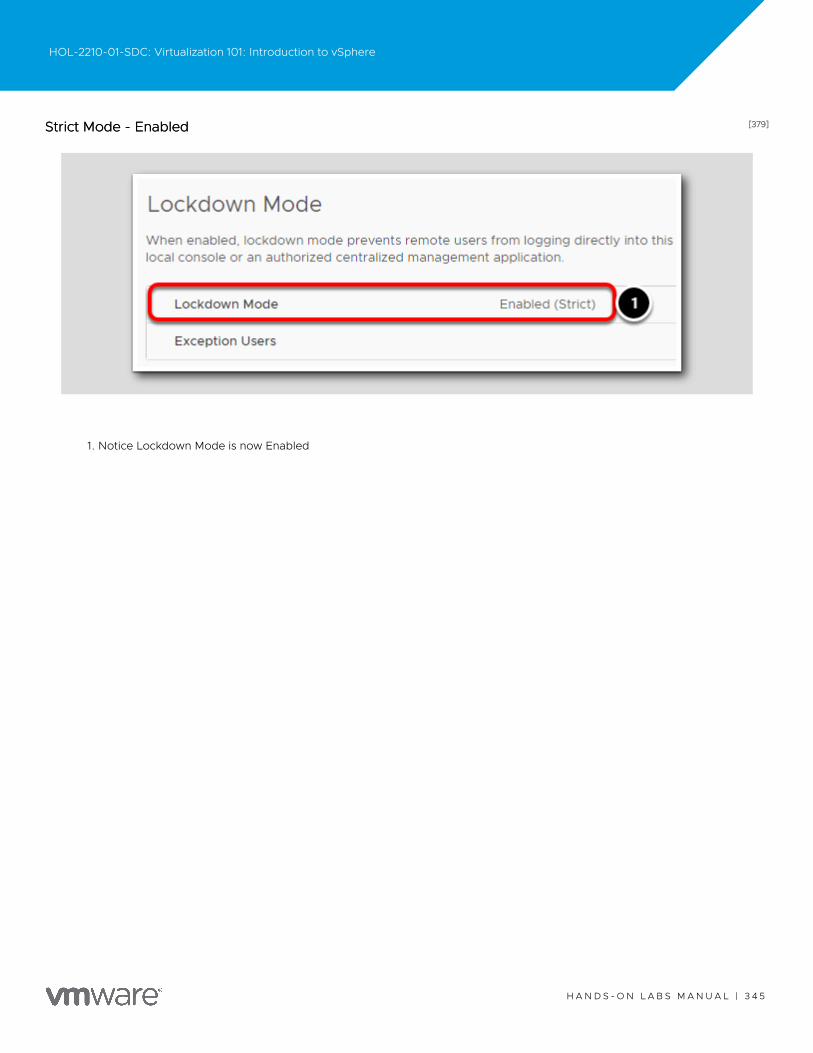
[379][379]Strict Mode - EnabledStrict Mode - Enabled
1. Notice Lockdown Mode is now Enabled
HOL-2210-01-SDC: Virtualization 101: Introduction to vSphere
H A N D S - O N L A B S M A N U A L | 3 4 5
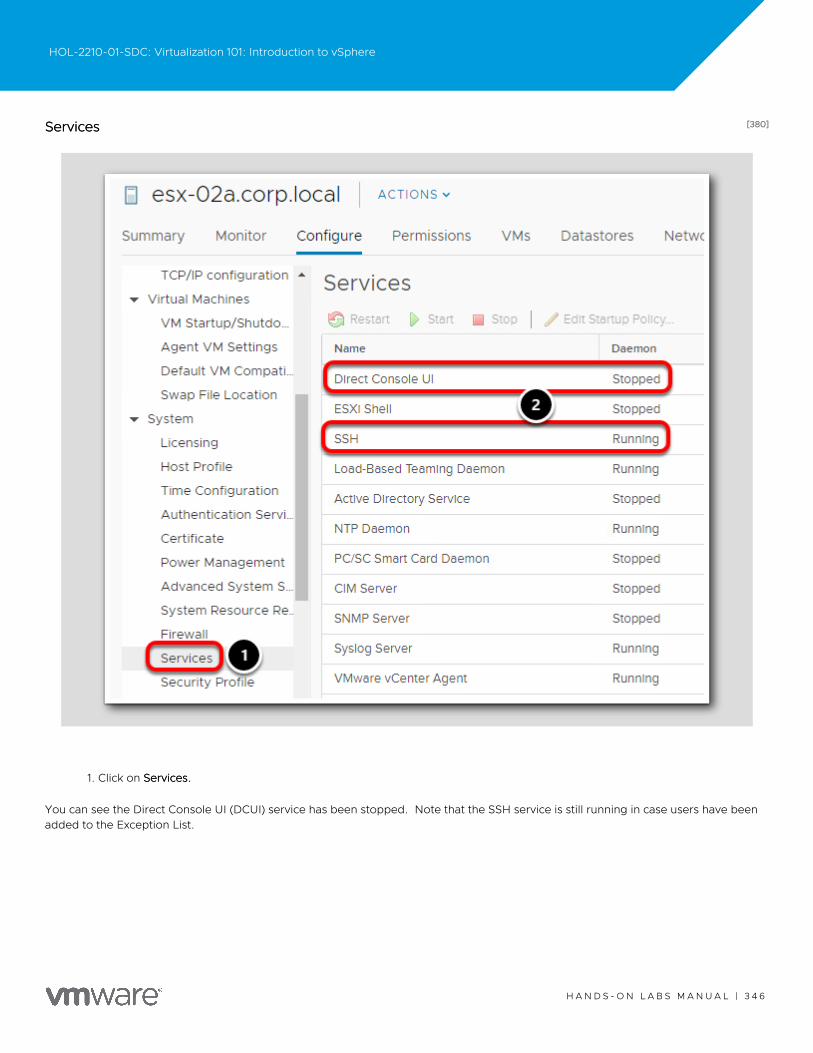
[380][380]ServicesServices
1. Click on Services.Services.
You can see the Direct Console UI (DCUI) service has been stopped. Note that the SSH service is still running in case users have beenadded to the Exception List.
HOL-2210-01-SDC: Virtualization 101: Introduction to vSphere
H A N D S - O N L A B S M A N U A L | 3 4 6
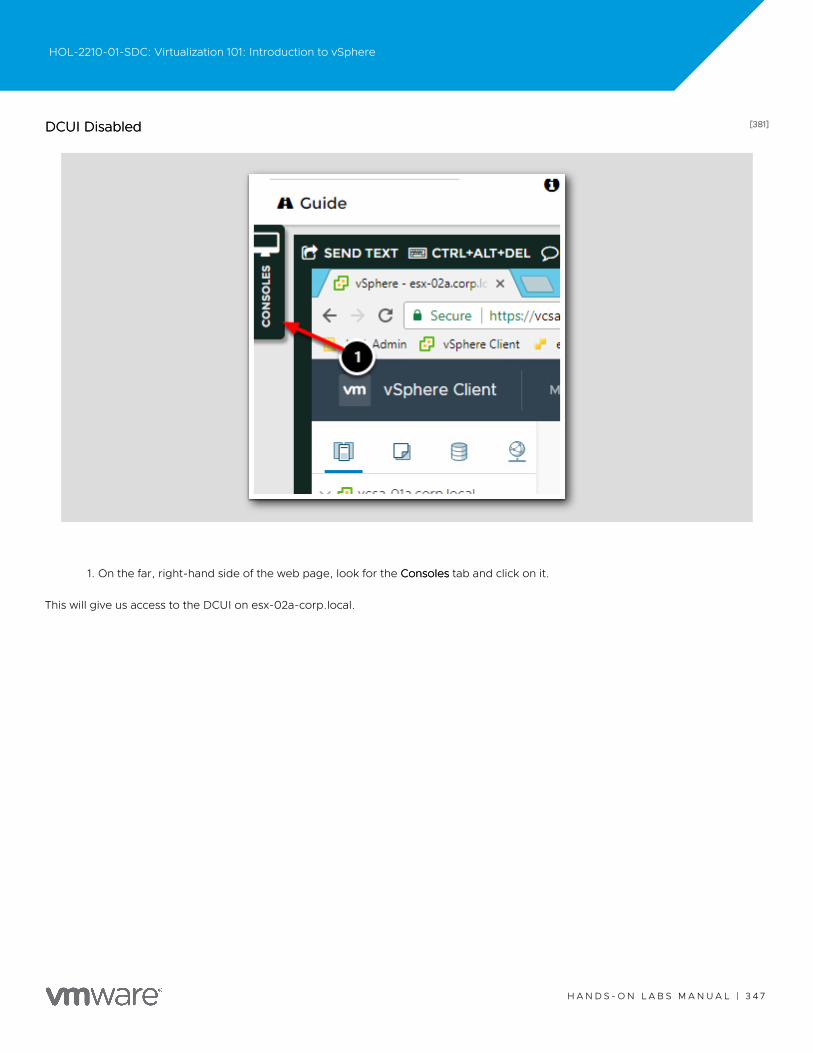
[381][381]DCUI DisabledDCUI Disabled
1. On the far, right-hand side of the web page, look for the ConsolesConsoles tab and click on it.
This will give us access to the DCUI on esx-02a-corp.local.
HOL-2210-01-SDC: Virtualization 101: Introduction to vSphere
H A N D S - O N L A B S M A N U A L | 3 4 7
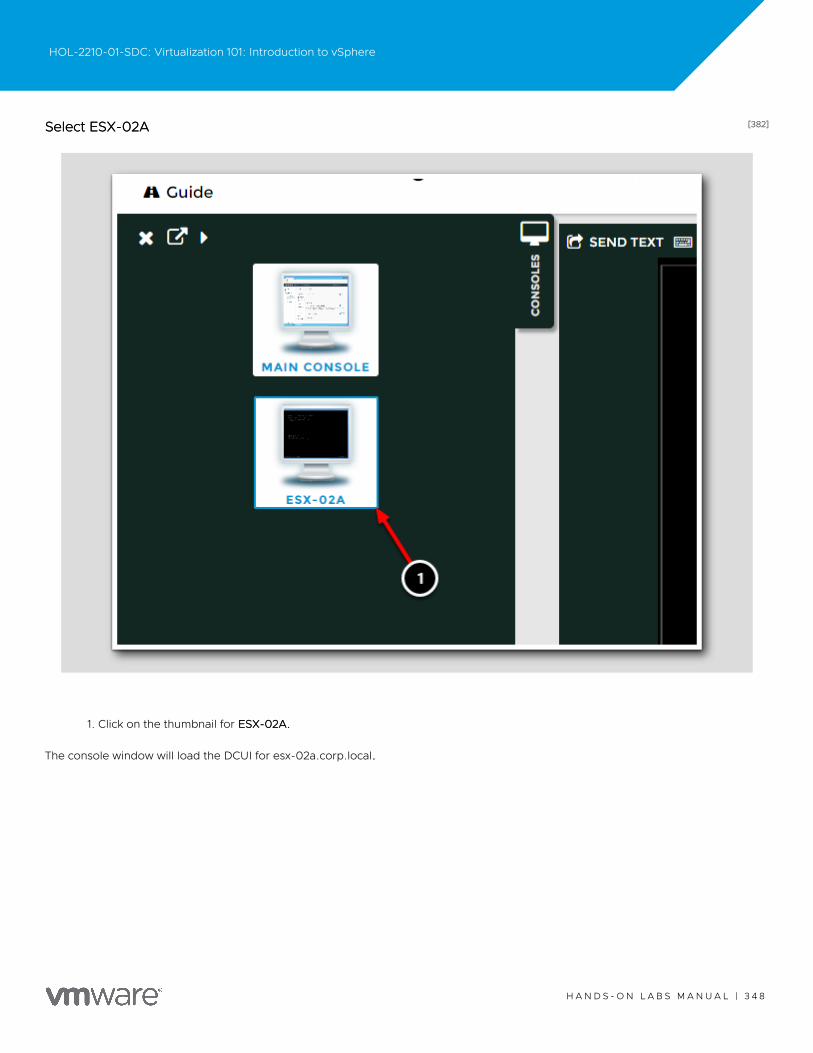
[382][382]Select ESX-02ASelect ESX-02A
1. Click on the thumbnail for ESX-02A.ESX-02A.
The console window will load the DCUI for esx-02a.corp.local..
HOL-2210-01-SDC: Virtualization 101: Introduction to vSphere
H A N D S - O N L A B S M A N U A L | 3 4 8
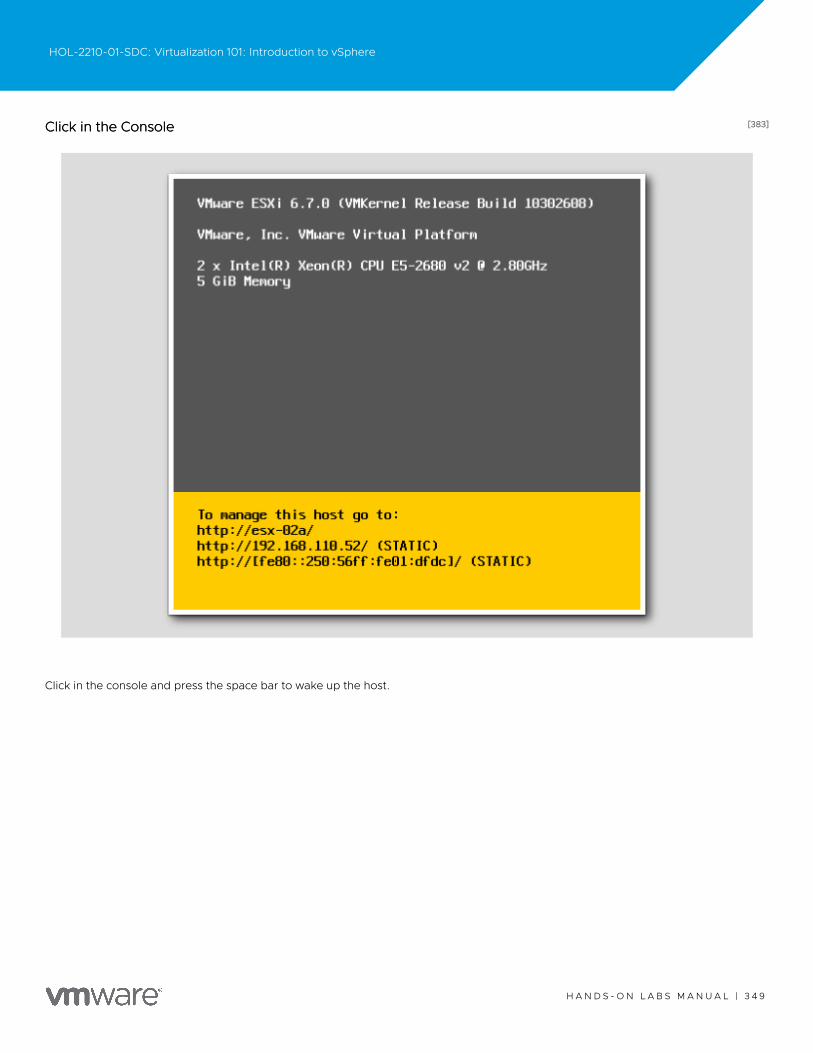
[383][383]Click in the ConsoleClick in the Console
Click in the console and press the space bar to wake up the host.
HOL-2210-01-SDC: Virtualization 101: Introduction to vSphere
H A N D S - O N L A B S M A N U A L | 3 4 9
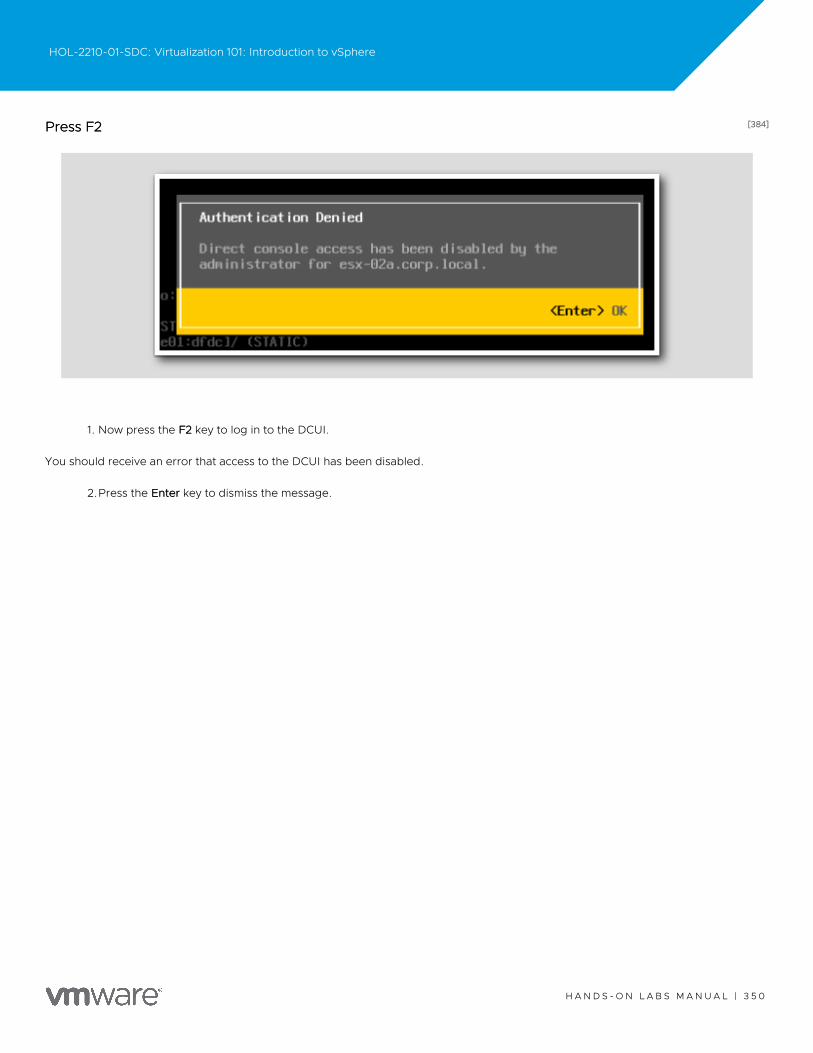
[384][384]Press F2Press F2
1. Now press the F2F2 key to log in to the DCUI.
You should receive an error that access to the DCUI has been disabled.
2.Press the EnterEnter key to dismiss the message.
HOL-2210-01-SDC: Virtualization 101: Introduction to vSphere
H A N D S - O N L A B S M A N U A L | 3 5 0
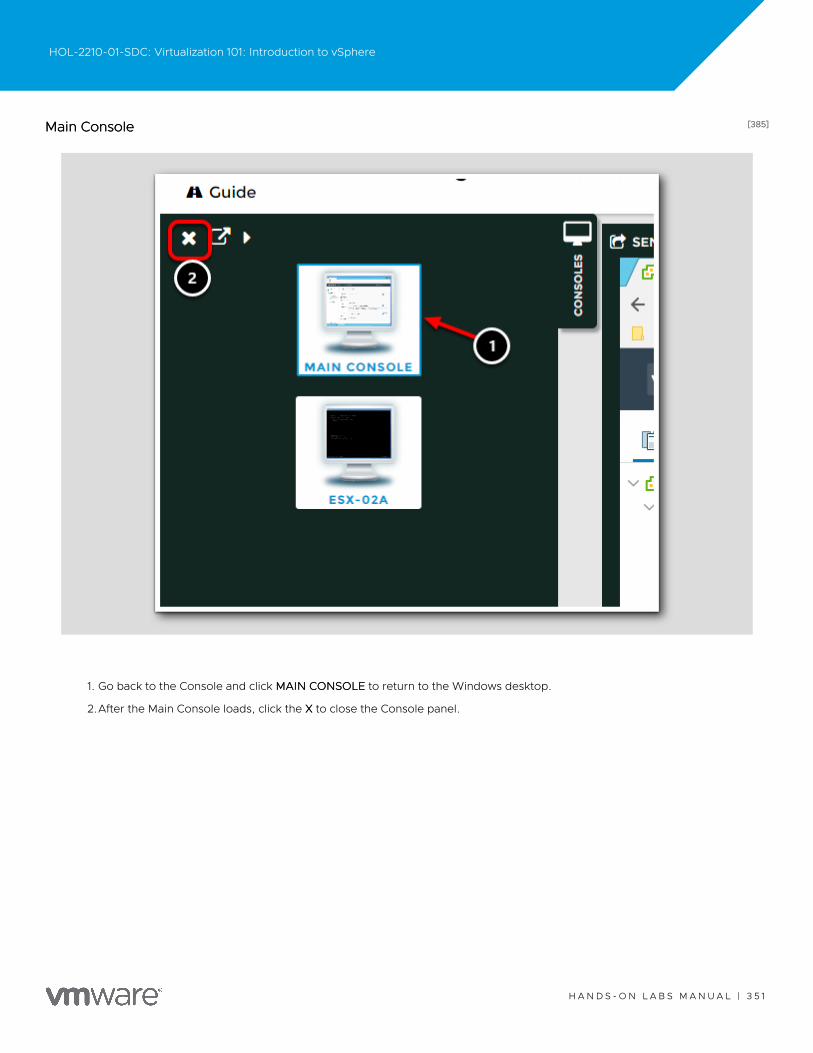
[385][385]Main ConsoleMain Console
1. Go back to the Console and click MAIN CONSOLEMAIN CONSOLE to return to the Windows desktop.
2.After the Main Console loads, click the XX to close the Console panel.
HOL-2210-01-SDC: Virtualization 101: Introduction to vSphere
H A N D S - O N L A B S M A N U A L | 3 5 1

[386][386]Disable Lockdown ModeDisable Lockdown Mode
Go back to the vSphere Client.
1. Click on Security ProfileSecurity Profile.
2.Click on the EditEdit button again under Lockdown Mode.
HOL-2210-01-SDC: Virtualization 101: Introduction to vSphere
H A N D S - O N L A B S M A N U A L | 3 5 2

[387][387]Lockdown ModeLockdown Mode
1. Check the DisabledDisabled radio button
2.Click OKOK to continue.
HOL-2210-01-SDC: Virtualization 101: Introduction to vSphere
H A N D S - O N L A B S M A N U A L | 3 5 3
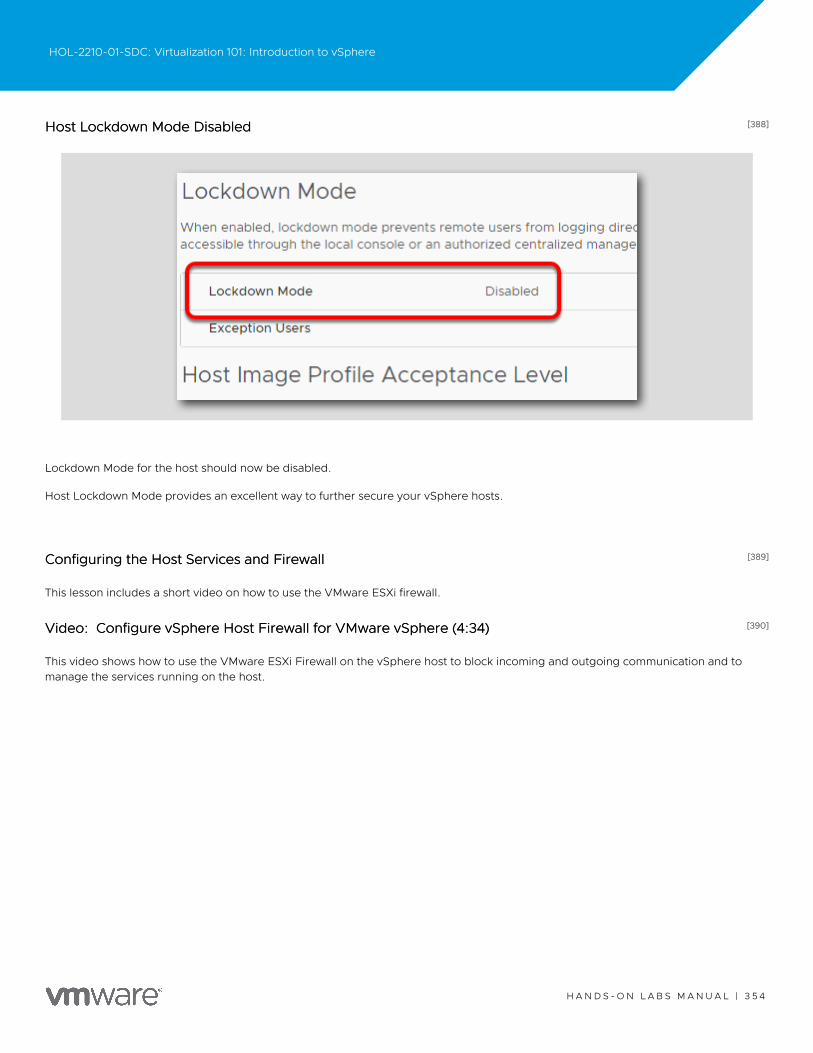
[388][388]Host Lockdown Mode DisabledHost Lockdown Mode Disabled
Lockdown Mode for the host should now be disabled.
Host Lockdown Mode provides an excellent way to further secure your vSphere hosts.
[389][389]Configuring the Host Services and FirewallConfiguring the Host Services and Firewall
This lesson includes a short video on how to use the VMware ESXi firewall.
[390][390]Video:Video: Configure vSphere Host Firewall for VMware vSphere (4:34)Configure vSphere Host Firewall for VMware vSphere (4:34)
This video shows how to use the VMware ESXi Firewall on the vSphere host to block incoming and outgoing communication and tomanage the services running on the host.
HOL-2210-01-SDC: Virtualization 101: Introduction to vSphere
H A N D S - O N L A B S M A N U A L | 3 5 4
https://www.youtube.com/watch?v=bzjsjQdnTukhttps://www.youtube.com/watch?v=bzjsjQdnTuk
[391][391]User Access and Authentication RolesUser Access and Authentication Roles
VMware recommends that you create roles to suit the access control needs of your environment. If you create or edit a role on avCenter Server system that is part of a connected group in Linked Mode, the changes that you make are propagated to all othervCenter Server systems in the group.
Linked Mode connects multiple vCenter Server systems together by using one or more Platform Services Controllers. It lets you viewand search across all linked vCenter Servers and replicate roles, permissions, licenses, policies and tags.
[392][392]Create a Role in the vSphere ClientCreate a Role in the vSphere Client
In the following steps, we will create a role in the vSphere Client that we can assign rights for the role.
HOL-2210-01-SDC: Virtualization 101: Introduction to vSphere
H A N D S - O N L A B S M A N U A L | 3 5 5

[393][393]AdministrationAdministration
1. In the vSphere Client, click on MenuMenu
2.Select AdministrationAdministration
HOL-2210-01-SDC: Virtualization 101: Introduction to vSphere
H A N D S - O N L A B S M A N U A L | 3 5 6
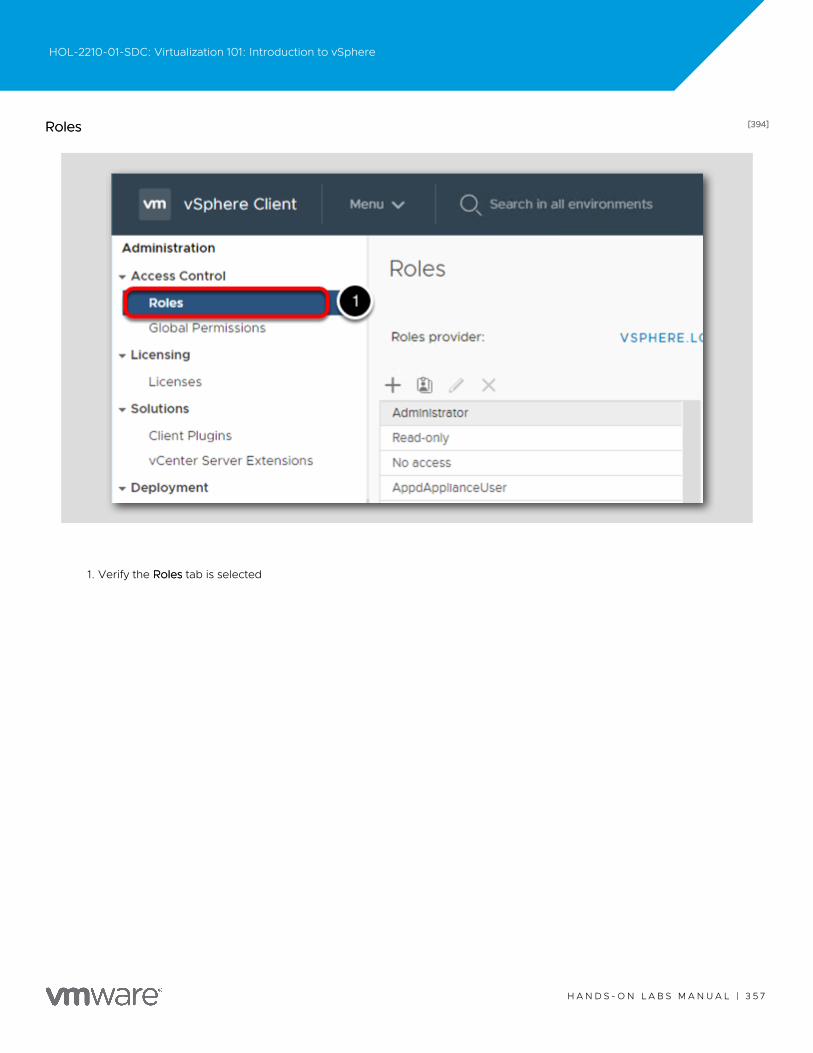
[394][394]RolesRoles
1. Verify the RolesRoles tab is selected
HOL-2210-01-SDC: Virtualization 101: Introduction to vSphere
H A N D S - O N L A B S M A N U A L | 3 5 7

[395][395]Roles OverviewRoles Overview
1. The "RolesRoles" panel shows various roles that already exist or are provided as sample to use or create roles from
2.When a role is selected, information such as Description, Usage, and Privileges will be displayed by clicking the
corresponding buttons
You can use one of the provided roles as a starting point to create your own or in some cases, it may make sense to create a new rulewith zero permissions and only add the one the role will need.
HOL-2210-01-SDC: Virtualization 101: Introduction to vSphere
H A N D S - O N L A B S M A N U A L | 3 5 8
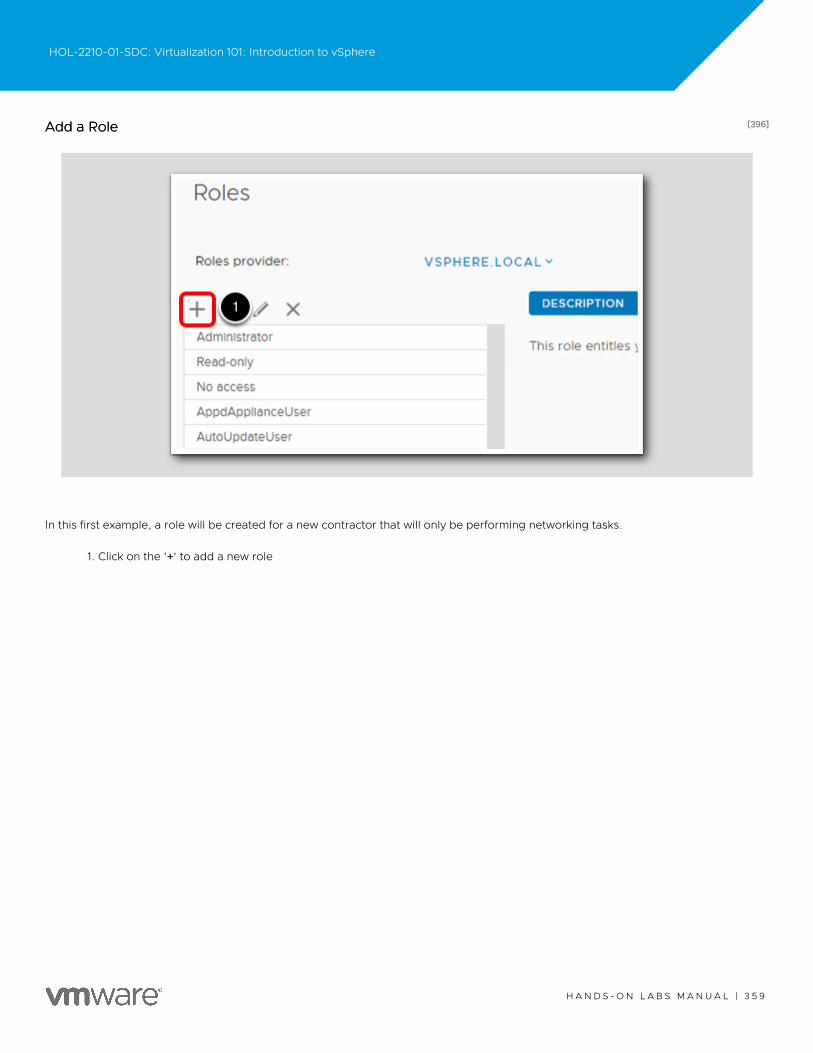
[396][396]Add a RoleAdd a Role
In this first example, a role will be created for a new contractor that will only be performing networking tasks.
1. Click on the '++' to add a new role
HOL-2210-01-SDC: Virtualization 101: Introduction to vSphere
H A N D S - O N L A B S M A N U A L | 3 5 9
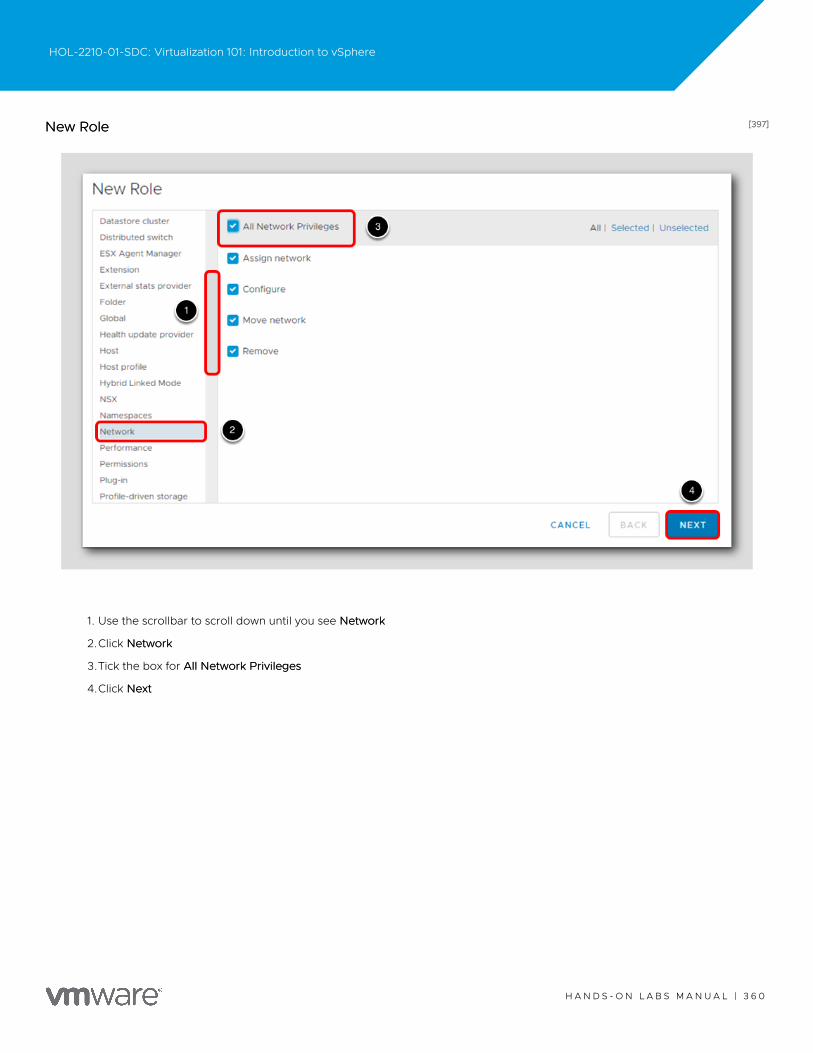
[397][397]New RoleNew Role
1. Use the scrollbar to scroll down until you see NetworkNetwork
2.Click NetworkNetwork
3.Tick the box for All Network PrivilegesAll Network Privileges
4.Click NextNext
HOL-2210-01-SDC: Virtualization 101: Introduction to vSphere
H A N D S - O N L A B S M A N U A L | 3 6 0
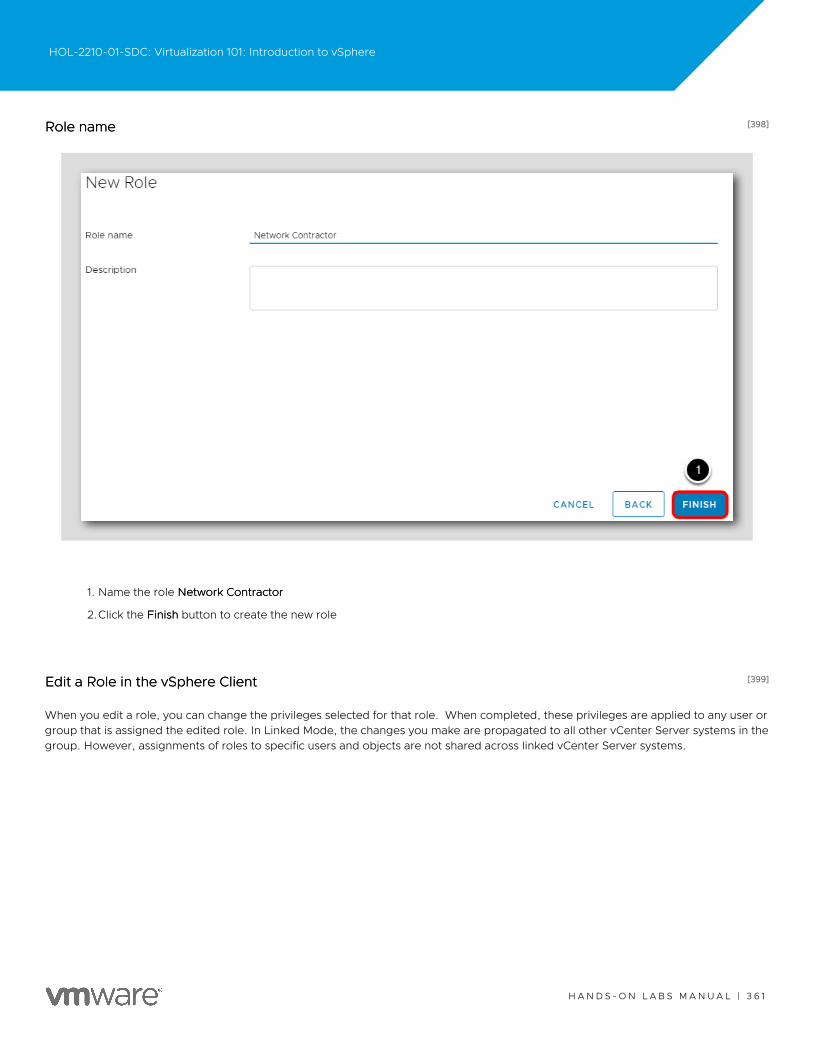
[398][398]Role nameRole name
1. Name the role Network ContractorNetwork Contractor
2.Click the FinishFinish button to create the new role
[399][399]Edit a Role in the vSphere ClientEdit a Role in the vSphere Client
When you edit a role, you can change the privileges selected for that role. When completed, these privileges are applied to any user orgroup that is assigned the edited role. In Linked Mode, the changes you make are propagated to all other vCenter Server systems in thegroup. However, assignments of roles to specific users and objects are not shared across linked vCenter Server systems.
HOL-2210-01-SDC: Virtualization 101: Introduction to vSphere
H A N D S - O N L A B S M A N U A L | 3 6 1

[400][400]Edit RoleEdit Role
Sometimes a role may need to be updated for access to additional objects or tasks in vCenter. As an example, say the NetworkContractor now needs access to the ESXi Hosts.
1. Scroll down if necessary, and click on the role Network ContractorNetwork Contractor
2.Click the pencilpencil button to edit the role
HOL-2210-01-SDC: Virtualization 101: Introduction to vSphere
H A N D S - O N L A B S M A N U A L | 3 6 2
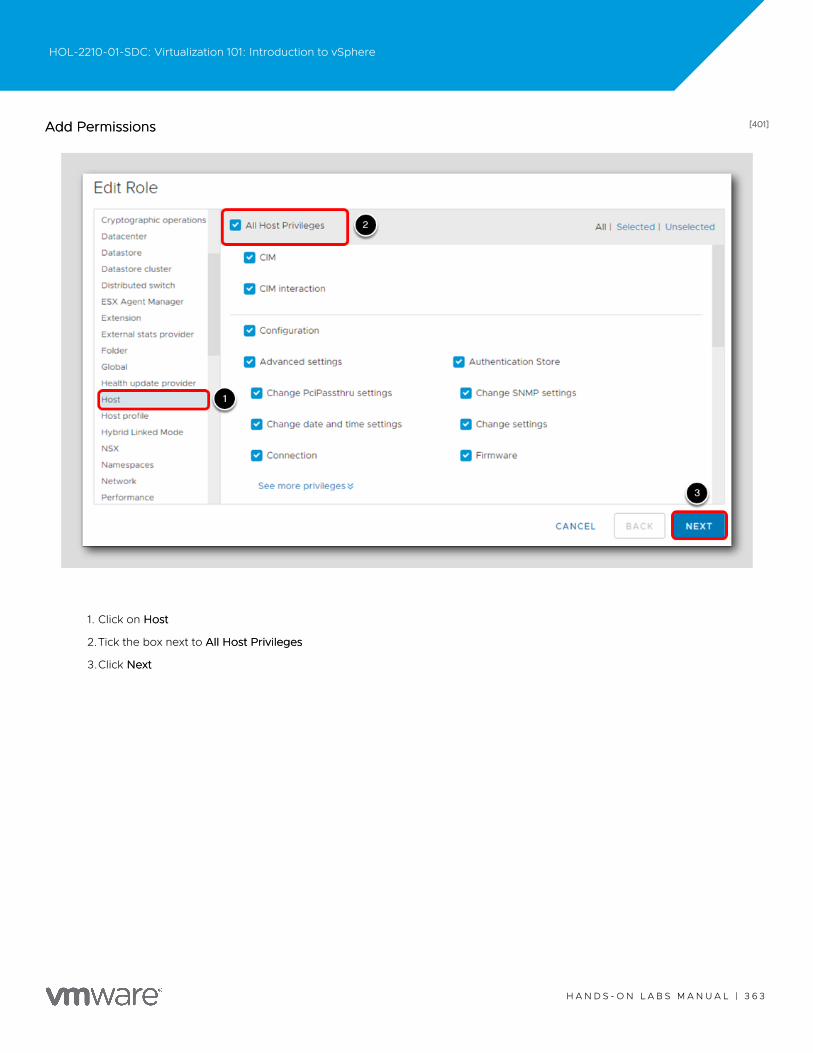
[401][401]Add PermissionsAdd Permissions
1. Click on HostHost
2.Tick the box next to All Host PrivilegesAll Host Privileges
3.Click NextNext
HOL-2210-01-SDC: Virtualization 101: Introduction to vSphere
H A N D S - O N L A B S M A N U A L | 3 6 3

[402][402]Edit RoleEdit Role
We will keep the same Role name.
1. Click Finish.Finish.
[403][403]Clone a Role in the vSphere ClientClone a Role in the vSphere Client
You can make a copy of an existing role, rename it, and edit it. When you make a copy, the new role is not applied to any users, groupsor objects -- it does not inherit anything from the parent except the settings. In Linked Mode, the changes are propagated to all othervCenter Server systems in the group, but assignments of roles to specific users and objects are not shared across linked vCenter Serversystems.
HOL-2210-01-SDC: Virtualization 101: Introduction to vSphere
H A N D S - O N L A B S M A N U A L | 3 6 4
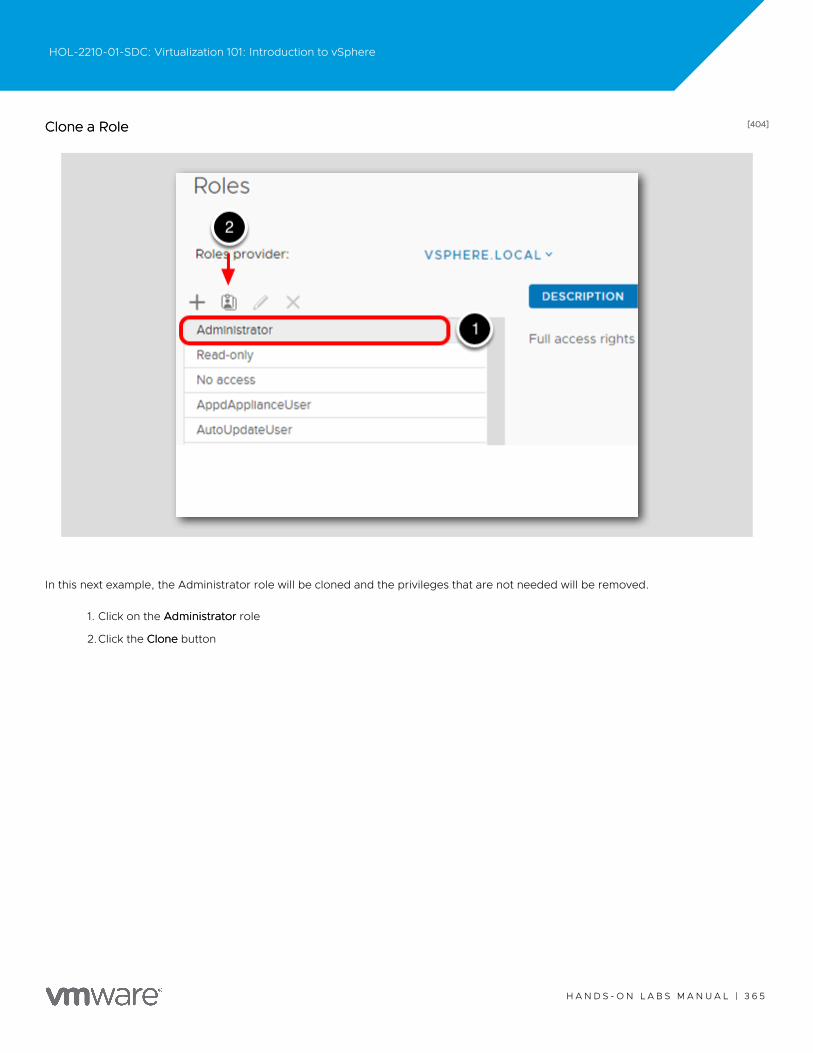
[404][404]Clone a RoleClone a Role
In this next example, the Administrator role will be cloned and the privileges that are not needed will be removed.
1. Click on the AdministratorAdministrator role
2.Click the CloneClone button
HOL-2210-01-SDC: Virtualization 101: Introduction to vSphere
H A N D S - O N L A B S M A N U A L | 3 6 5

[405][405]Clone RoleClone Role
As an example, a new vSphere Amin is hired and they only need access to the compute and storage infrastructure, with no access tonetworking components.
1. For the Role name, type vSphere AdministratorvSphere Administrator
2.In the Description field, type Full rights to all but NetworkingFull rights to all but Networking
3.Click OKOK
HOL-2210-01-SDC: Virtualization 101: Introduction to vSphere
H A N D S - O N L A B S M A N U A L | 3 6 6
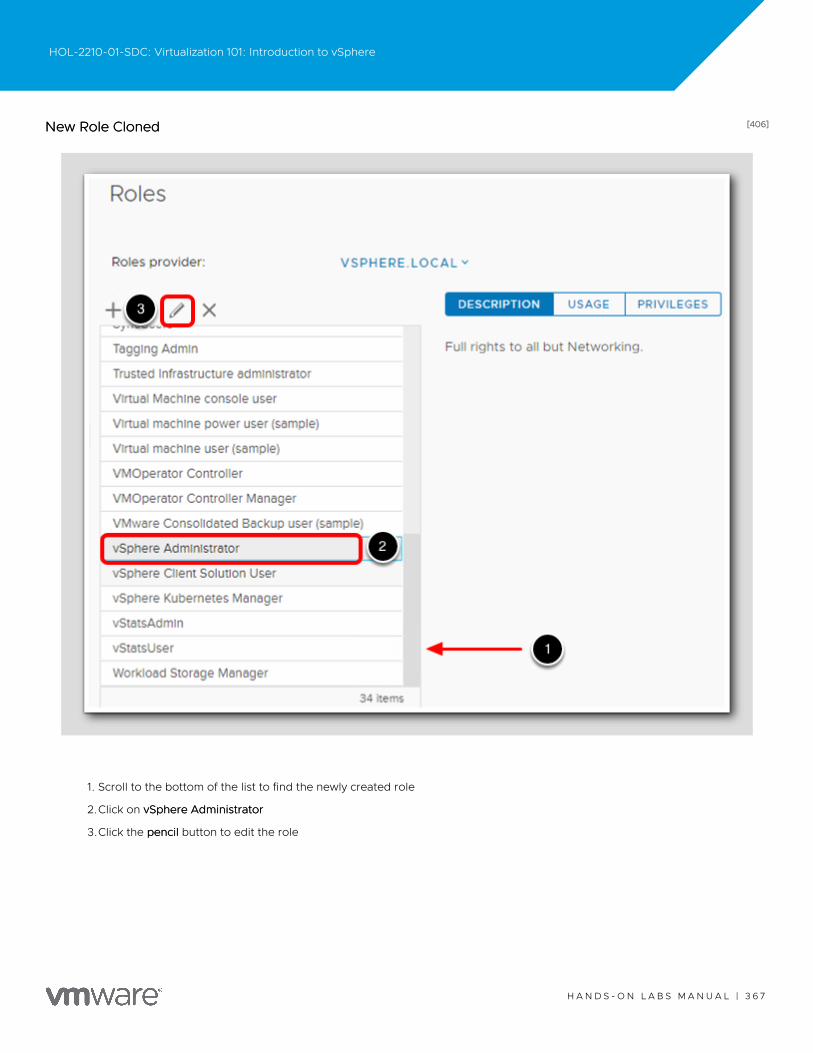
[406][406]New Role ClonedNew Role Cloned
1. Scroll to the bottom of the list to find the newly created role
2.Click on vSphere AdministratorvSphere Administrator
3.Click the pencilpencil button to edit the role
HOL-2210-01-SDC: Virtualization 101: Introduction to vSphere
H A N D S - O N L A B S M A N U A L | 3 6 7

[407][407]Edit Role - NetworkEdit Role - Network
1. Scroll down until you see NetworkNetwork
2.Click on NetworkNetwork
3.Untick All Network PrivilegesAll Network Privileges
4.Click NextNext
HOL-2210-01-SDC: Virtualization 101: Introduction to vSphere
H A N D S - O N L A B S M A N U A L | 3 6 8
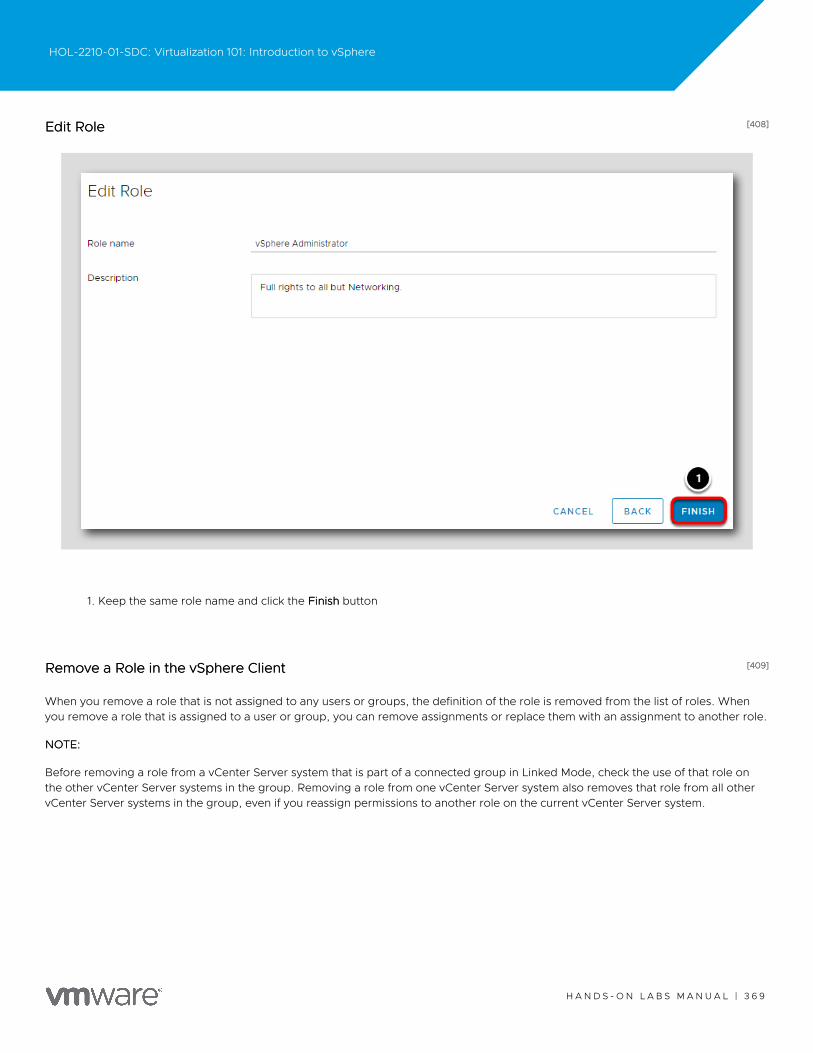
[408][408]Edit RoleEdit Role
1. Keep the same role name and click the FinishFinish button
[409][409]Remove a Role in the vSphere ClientRemove a Role in the vSphere Client
When you remove a role that is not assigned to any users or groups, the definition of the role is removed from the list of roles. Whenyou remove a role that is assigned to a user or group, you can remove assignments or replace them with an assignment to another role.
NOTE:NOTE:
Before removing a role from a vCenter Server system that is part of a connected group in Linked Mode, check the use of that role onthe other vCenter Server systems in the group. Removing a role from one vCenter Server system also removes that role from all othervCenter Server systems in the group, even if you reassign permissions to another role on the current vCenter Server system.
HOL-2210-01-SDC: Virtualization 101: Introduction to vSphere
H A N D S - O N L A B S M A N U A L | 3 6 9
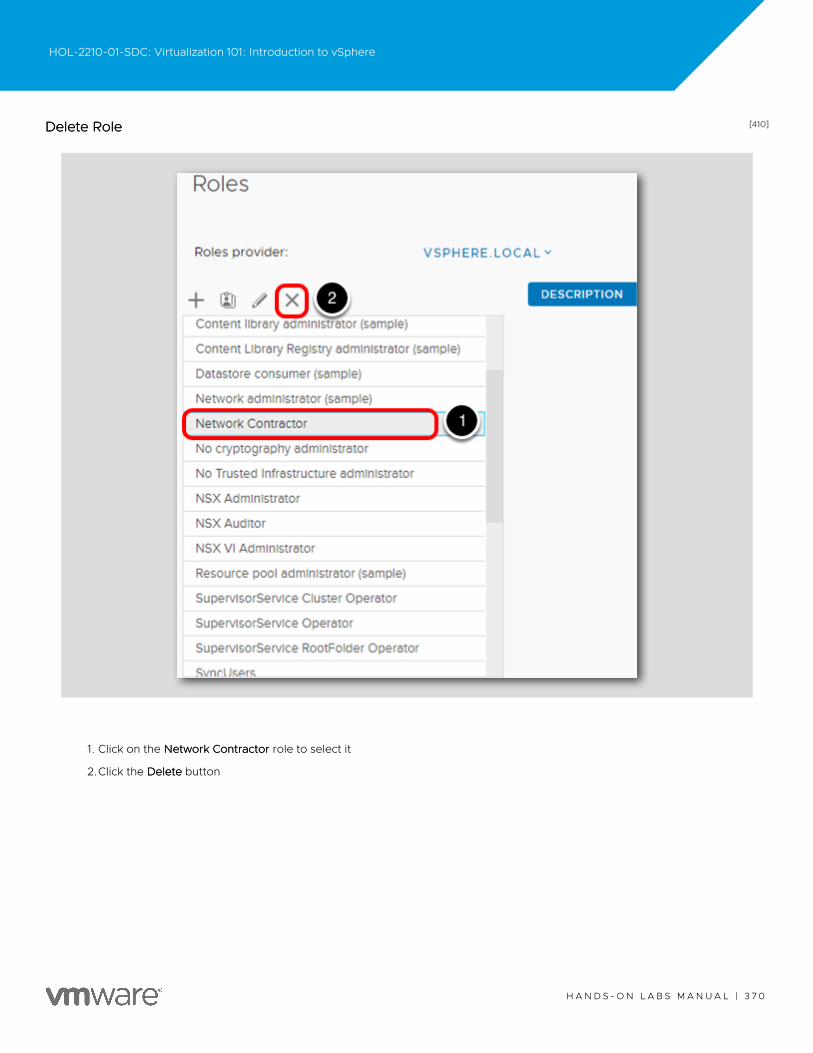
[410][410]Delete RoleDelete Role
1. Click on the Network ContractorNetwork Contractor role to select it
2.Click the DeleteDelete button
HOL-2210-01-SDC: Virtualization 101: Introduction to vSphere
H A N D S - O N L A B S M A N U A L | 3 7 0
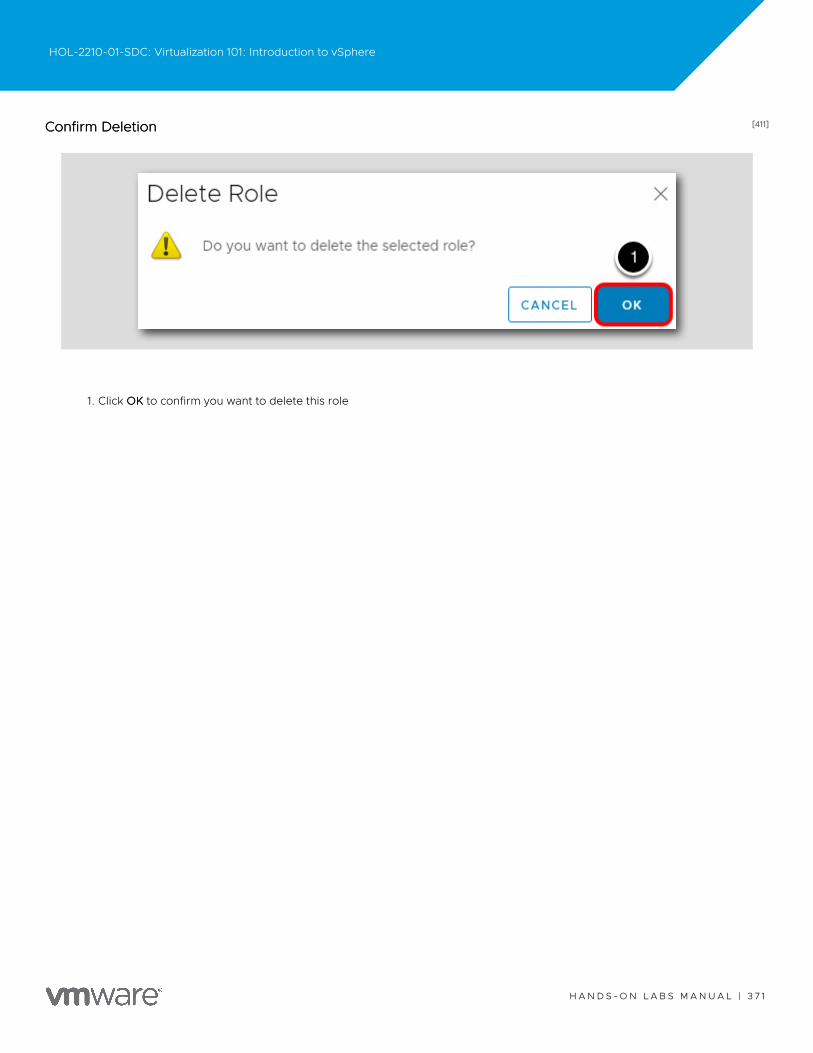
[411][411]Confirm DeletionConfirm Deletion
1. Click OKOK to confirm you want to delete this role
HOL-2210-01-SDC: Virtualization 101: Introduction to vSphere
H A N D S - O N L A B S M A N U A L | 3 7 1
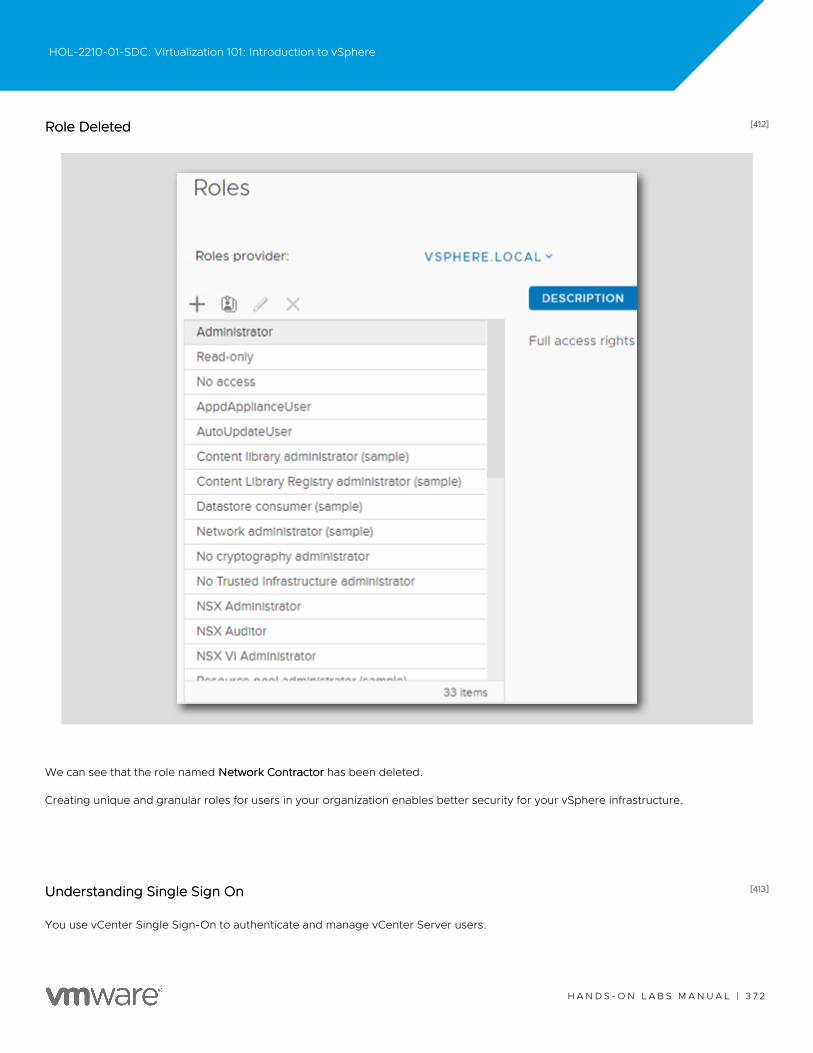
[412][412]Role DeletedRole Deleted
We can see that the role named Network ContractorNetwork Contractor has been deleted.
Creating unique and granular roles for users in your organization enables better security for your vSphere infrastructure.
[413][413]Understanding Single Sign OnUnderstanding Single Sign On
You use vCenter Single Sign-On to authenticate and manage vCenter Server users.
HOL-2210-01-SDC: Virtualization 101: Introduction to vSphere
H A N D S - O N L A B S M A N U A L | 3 7 2
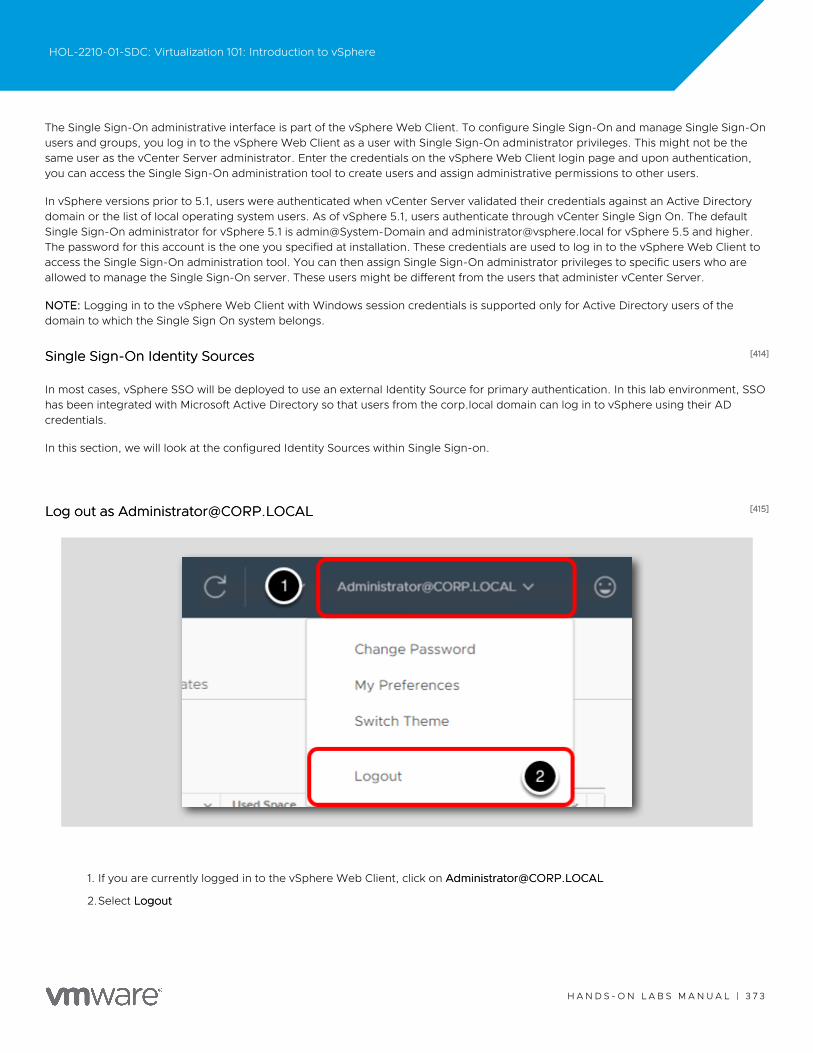
The Single Sign-On administrative interface is part of the vSphere Web Client. To configure Single Sign-On and manage Single Sign-Onusers and groups, you log in to the vSphere Web Client as a user with Single Sign-On administrator privileges. This might not be thesame user as the vCenter Server administrator. Enter the credentials on the vSphere Web Client login page and upon authentication,you can access the Single Sign-On administration tool to create users and assign administrative permissions to other users.
In vSphere versions prior to 5.1, users were authenticated when vCenter Server validated their credentials against an Active Directorydomain or the list of local operating system users. As of vSphere 5.1, users authenticate through vCenter Single Sign On. The defaultSingle Sign-On administrator for vSphere 5.1 is admin@System-Domain and [email protected] for vSphere 5.5 and higher.The password for this account is the one you specified at installation. These credentials are used to log in to the vSphere Web Client toaccess the Single Sign-On administration tool. You can then assign Single Sign-On administrator privileges to specific users who areallowed to manage the Single Sign-On server. These users might be different from the users that administer vCenter Server.
NOTE:NOTE: Logging in to the vSphere Web Client with Windows session credentials is supported only for Active Directory users of thedomain to which the Single Sign On system belongs.
[414][414]Single Sign-On Identity SourcesSingle Sign-On Identity Sources
In most cases, vSphere SSO will be deployed to use an external Identity Source for primary authentication. In this lab environment, SSOhas been integrated with Microsoft Active Directory so that users from the corp.local domain can log in to vSphere using their ADcredentials.
In this section, we will look at the configured Identity Sources within Single Sign-on.
[415][415]Log out as [email protected] out as [email protected]
1. If you are currently logged in to the vSphere Web Client, click on [email protected]@CORP.LOCAL
2.Select LogoutLogout
HOL-2210-01-SDC: Virtualization 101: Introduction to vSphere
H A N D S - O N L A B S M A N U A L | 3 7 3
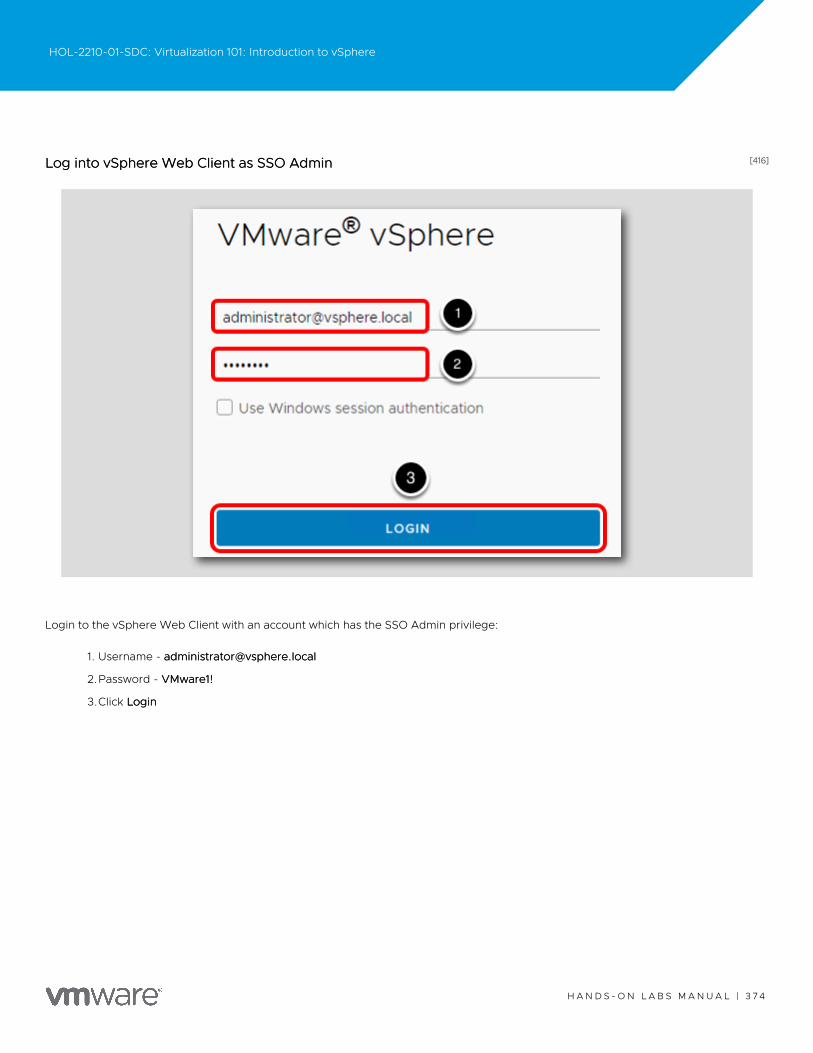
[416][416]Log into vSphere Web Client as SSO AdminLog into vSphere Web Client as SSO Admin
Login to the vSphere Web Client with an account which has the SSO Admin privilege:
1. Username - [email protected]@vsphere.local
2.Password - VMware1!VMware1!
3.Click LoginLogin
HOL-2210-01-SDC: Virtualization 101: Introduction to vSphere
H A N D S - O N L A B S M A N U A L | 3 7 4
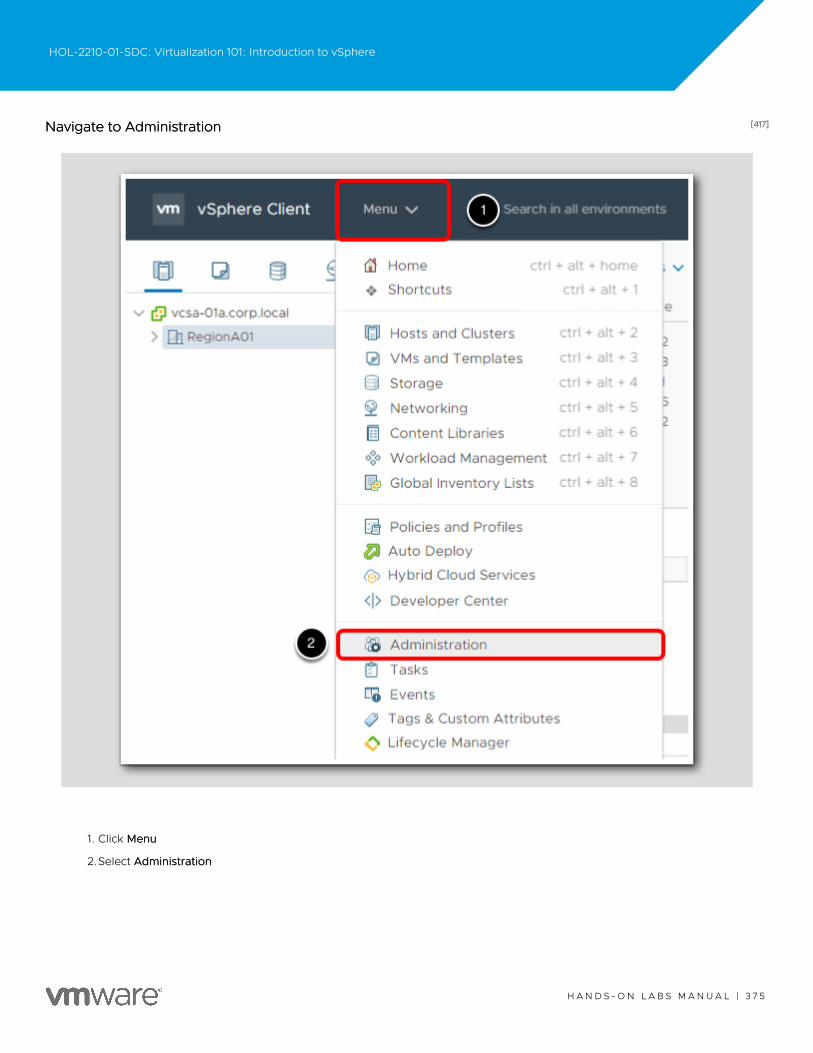
[417][417]Navigate to AdministrationNavigate to Administration
1. Click MenuMenu
2.Select AdministrationAdministration
HOL-2210-01-SDC: Virtualization 101: Introduction to vSphere
H A N D S - O N L A B S M A N U A L | 3 7 5
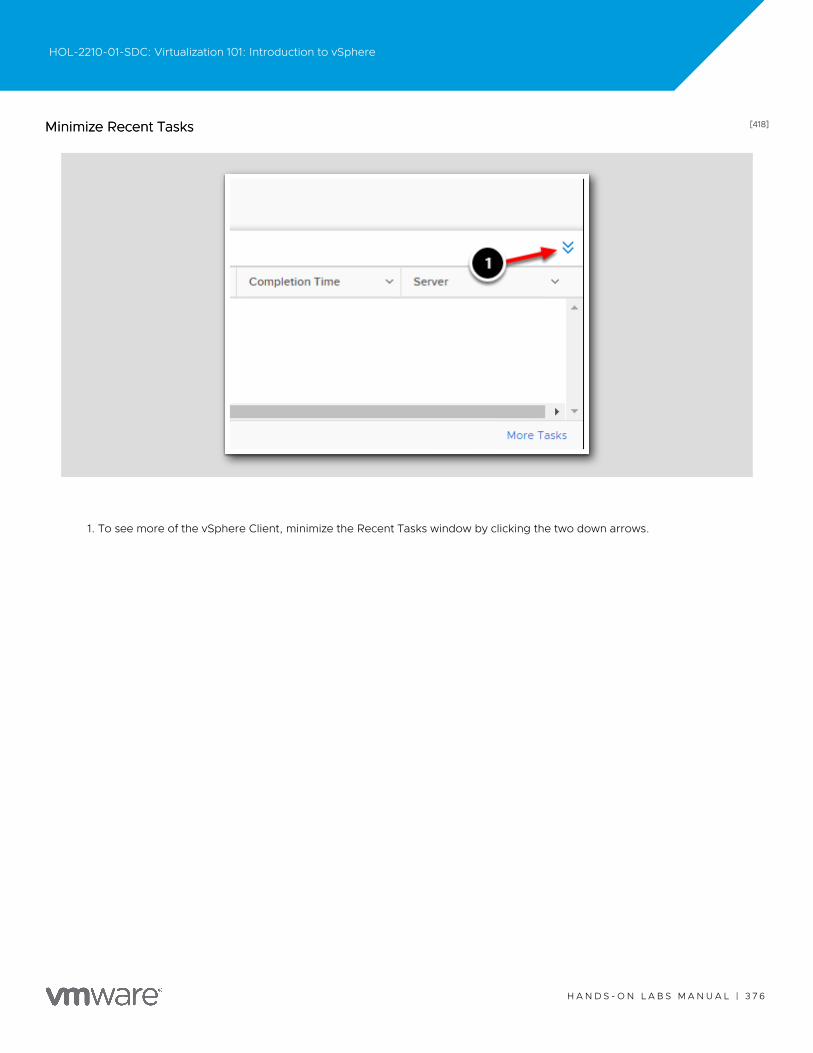
[418][418]Minimize Recent TasksMinimize Recent Tasks
1. To see more of the vSphere Client, minimize the Recent Tasks window by clicking the two down arrows.
HOL-2210-01-SDC: Virtualization 101: Introduction to vSphere
H A N D S - O N L A B S M A N U A L | 3 7 6
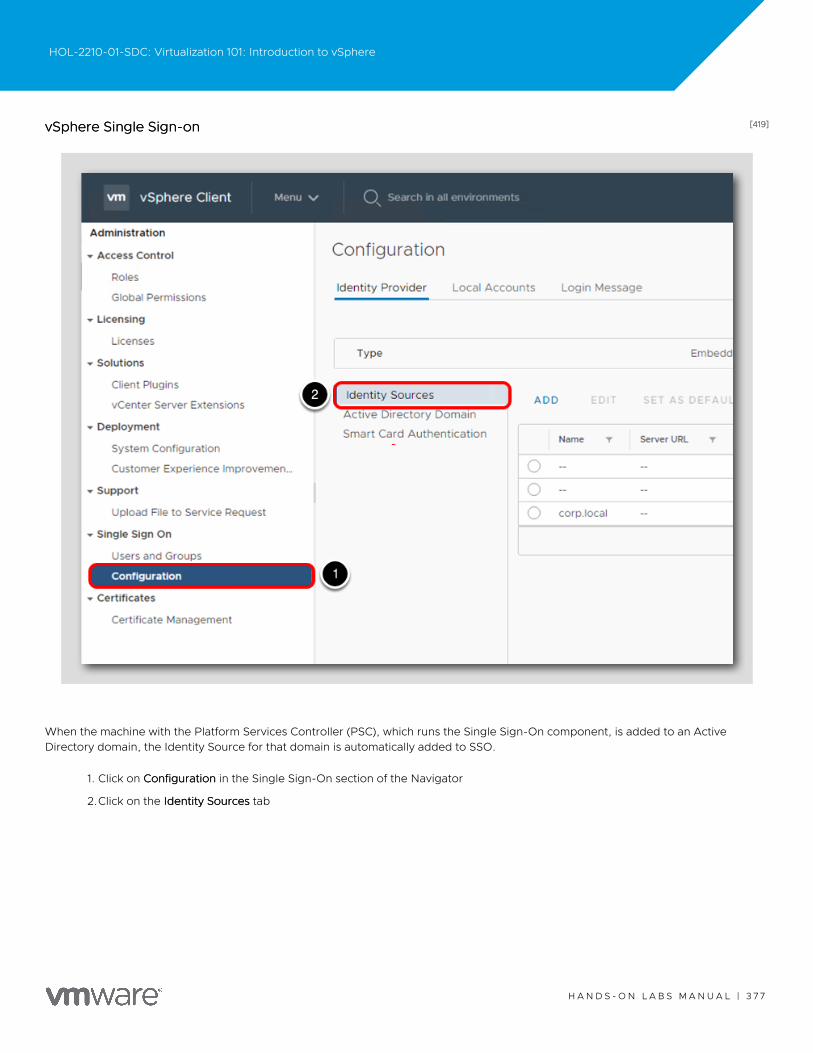
[419][419]vSphere Single Sign-onvSphere Single Sign-on
When the machine with the Platform Services Controller (PSC), which runs the Single Sign-On component, is added to an ActiveDirectory domain, the Identity Source for that domain is automatically added to SSO.
1. Click on ConfigurationConfiguration in the Single Sign-On section of the Navigator
2.Click on the Identity SourcesIdentity Sources tab
HOL-2210-01-SDC: Virtualization 101: Introduction to vSphere
H A N D S - O N L A B S M A N U A L | 3 7 7

[420][420]Identity SourcesIdentity Sources
1. Notice that the corp.localcorp.local domain is listed as an Active DirectoryActive Directory identity source
Users in the domains listed here can be granted permissions within vSphere.
[421][421]Add a vCenter Single Sign On User with the vSphere ClientAdd a vCenter Single Sign On User with the vSphere Client
In the vSphere Client, users listed on the Users tab are internal to vCenter Single Sign On. These users are not the same as localoperating system users, which are local to the operating system of the machine where Single Sign On is installed (for example,Windows). When you add a Single Sign On user with the Single Sign On administration tool, that user is stored in the Single Sign Ondatabase, which runs on the system where Single Sign On is installed. These users are part of the SSO domain, by default,"vsphere.local" -- or "System-Domain" for vSphere 5.1. Exactly one system identity source is associated with an installation of SingleSign On.
HOL-2210-01-SDC: Virtualization 101: Introduction to vSphere
H A N D S - O N L A B S M A N U A L | 3 7 8

[422][422]List Current Users and Add New UserList Current Users and Add New User
1. Click on Users and GroupsUsers and Groups under Single Sign-On
2.From the drop-down list, select vsphere.localvsphere.local for the Domain
3.On the Users tab, click the Add UserAdd User
HOL-2210-01-SDC: Virtualization 101: Introduction to vSphere
H A N D S - O N L A B S M A N U A L | 3 7 9
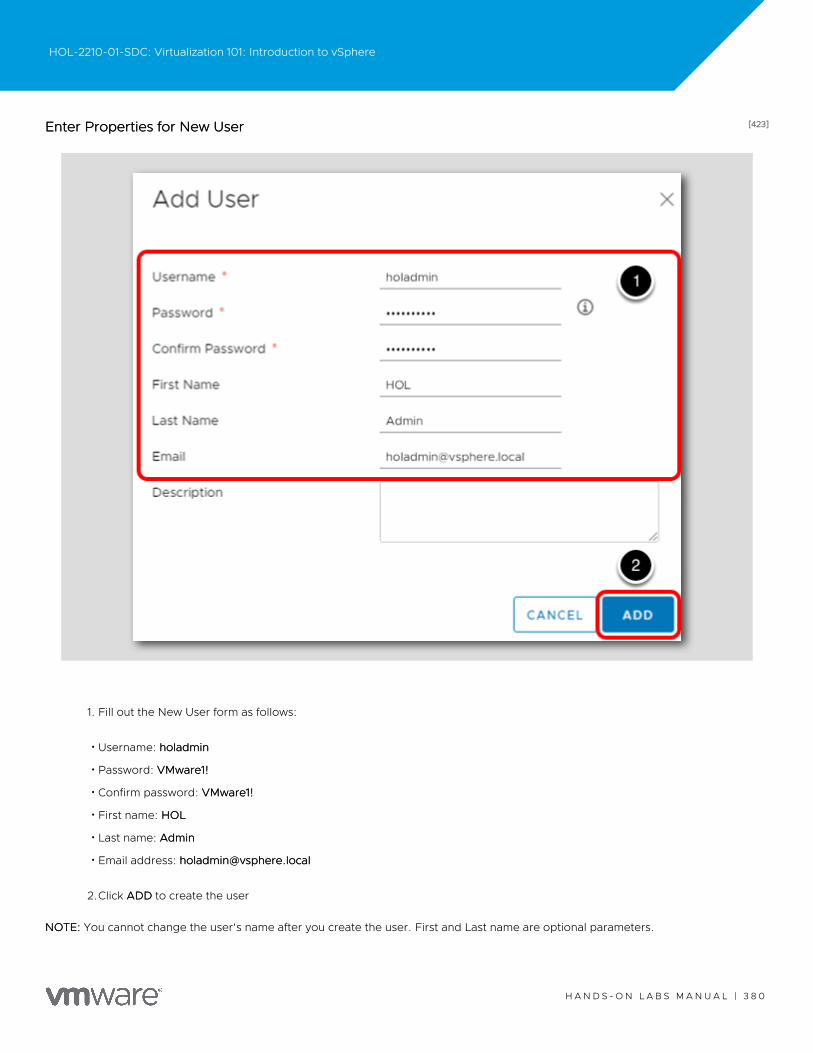
[423][423]Enter Properties for New UserEnter Properties for New User
1. Fill out the New User form as follows:
•Username: holadminholadmin
•Password: VMware1!VMware1!
•Confirm password: VMware1!VMware1!
•First name: HOLHOL
•Last name: AdminAdmin
•Email address: [email protected]@vsphere.local
2.Click ADDADD to create the user
NOTE:NOTE: You cannot change the user's name after you create the user. First and Last name are optional parameters.
HOL-2210-01-SDC: Virtualization 101: Introduction to vSphere
H A N D S - O N L A B S M A N U A L | 3 8 0
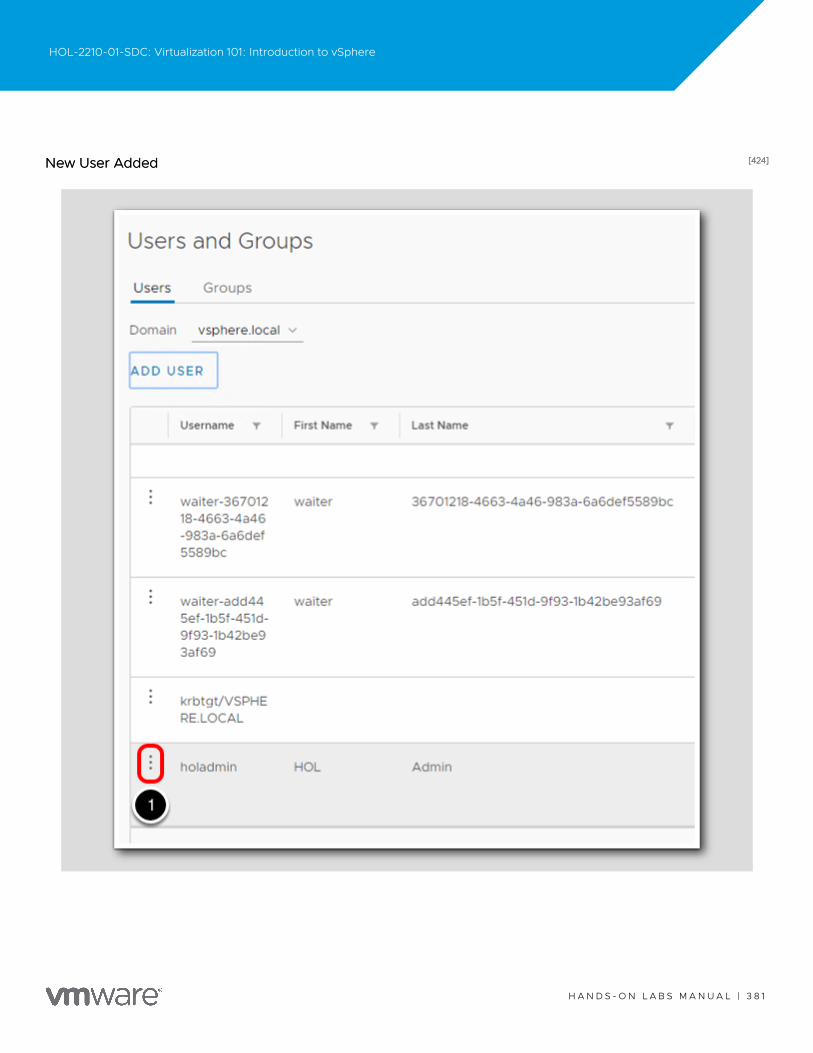
[424][424]New User AddedNew User Added
HOL-2210-01-SDC: Virtualization 101: Introduction to vSphere
H A N D S - O N L A B S M A N U A L | 3 8 1
Here we can see the new user has been added.
1. Clicking on the three dots next to the username, allows for editing, deleting or disabling the user.
[425][425]Add a vCenter Single Sign On Group with the vSphere ClientAdd a vCenter Single Sign On Group with the vSphere Client
In the vSphere Client, groups listed on the Groups tab are internal to vCenter Single Sign On. A group lets you create a container for acollection of group members called principals. When you add a Single Sign On group with the Single Sign On administration tool, thegroup is stored in the Single Sign On database. The database runs on the system where Single Sign On is installed. These groups arepart of the identity source domain vsphere.local (the default for vSphere 5.5 and higher), or System-Domain for vSphere 5.1.
Group members can be users or other groups, and a group can contain members from across multiple identity sources. After youcreate a group and add principals, you apply permissions to the group. Members of the group inherit the group permissions.
HOL-2210-01-SDC: Virtualization 101: Introduction to vSphere
H A N D S - O N L A B S M A N U A L | 3 8 2
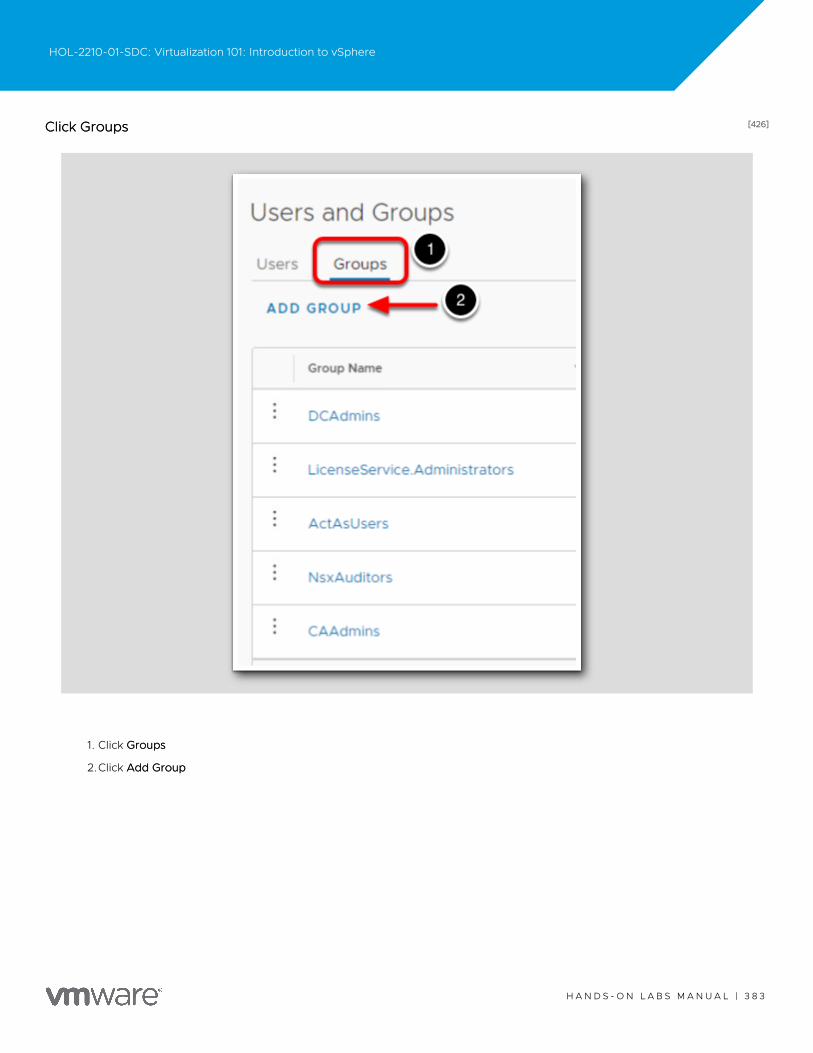
[426][426]Click GroupsClick Groups
1. Click GroupsGroups
2.Click Add GroupAdd Group
HOL-2210-01-SDC: Virtualization 101: Introduction to vSphere
H A N D S - O N L A B S M A N U A L | 3 8 3
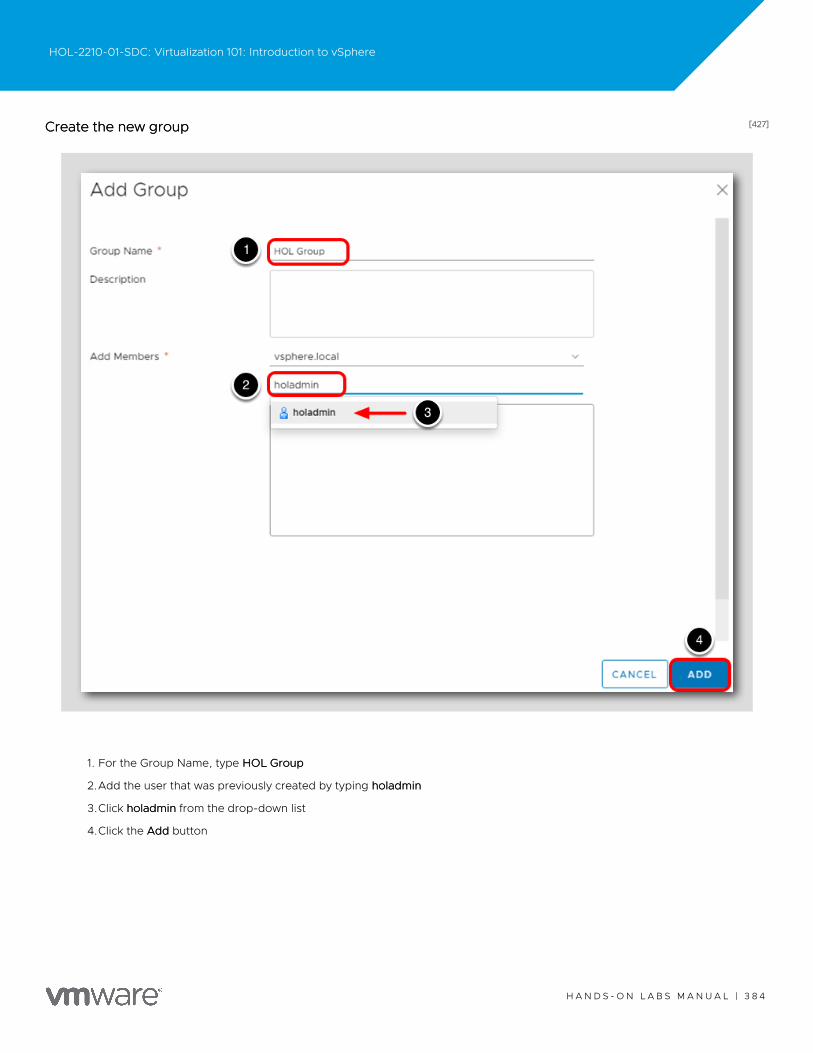
[427][427]Create the new groupCreate the new group
1. For the Group Name, type HOL GroupHOL Group
2.Add the user that was previously created by typing holadminholadmin
3.Click holadminholadmin from the drop-down list
4.Click the AddAdd button
HOL-2210-01-SDC: Virtualization 101: Introduction to vSphere
H A N D S - O N L A B S M A N U A L | 3 8 4
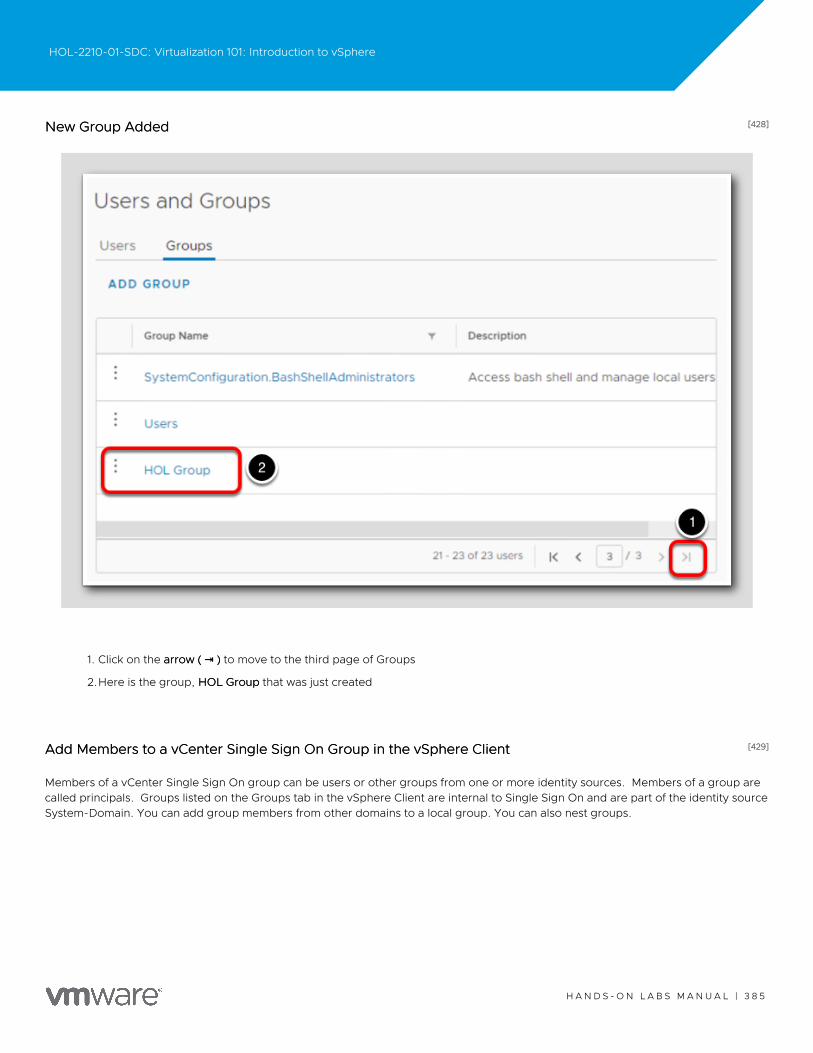
[428][428]New Group AddedNew Group Added
1. Click on the arrow ( arrow ( ⇥ ) ) to move to the third page of Groups
2.Here is the group, HOL GroupHOL Group that was just created
[429][429]Add Members to a vCenter Single Sign On Group in the vSphere ClientAdd Members to a vCenter Single Sign On Group in the vSphere Client
Members of a vCenter Single Sign On group can be users or other groups from one or more identity sources. Members of a group arecalled principals. Groups listed on the Groups tab in the vSphere Client are internal to Single Sign On and are part of the identity sourceSystem-Domain. You can add group members from other domains to a local group. You can also nest groups.
HOL-2210-01-SDC: Virtualization 101: Introduction to vSphere
H A N D S - O N L A B S M A N U A L | 3 8 5

[430][430]Return to Page 2Return to Page 2
1. Click on the leftleft arrow (arrow (<<)) to return to the second page of Groups.
[431][431]Add Members to Users and GroupsAdd Members to Users and Groups
1. Click on the AdministratorsAdministrators group under the Group Names table
Note: You may need to scroll down to see it.
HOL-2210-01-SDC: Virtualization 101: Introduction to vSphere
H A N D S - O N L A B S M A N U A L | 3 8 6
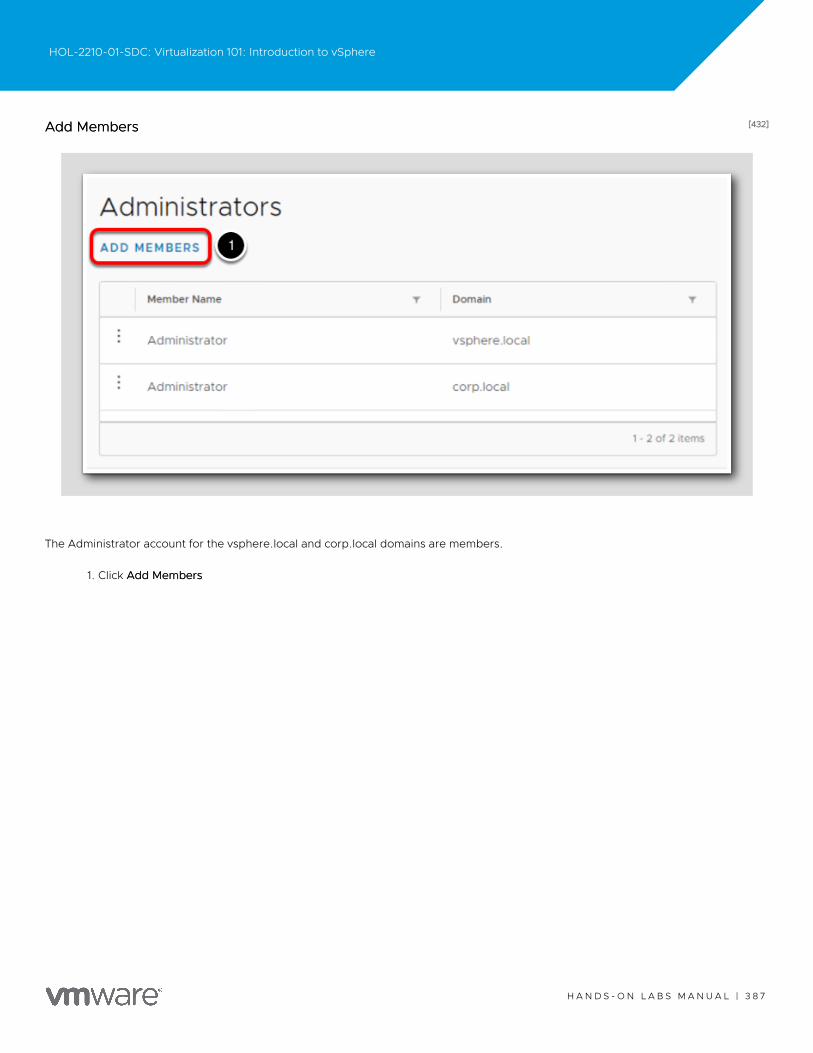
[432][432]Add MembersAdd Members
The Administrator account for the vsphere.local and corp.local domains are members.
1. Click Add MembersAdd Members
HOL-2210-01-SDC: Virtualization 101: Introduction to vSphere
H A N D S - O N L A B S M A N U A L | 3 8 7
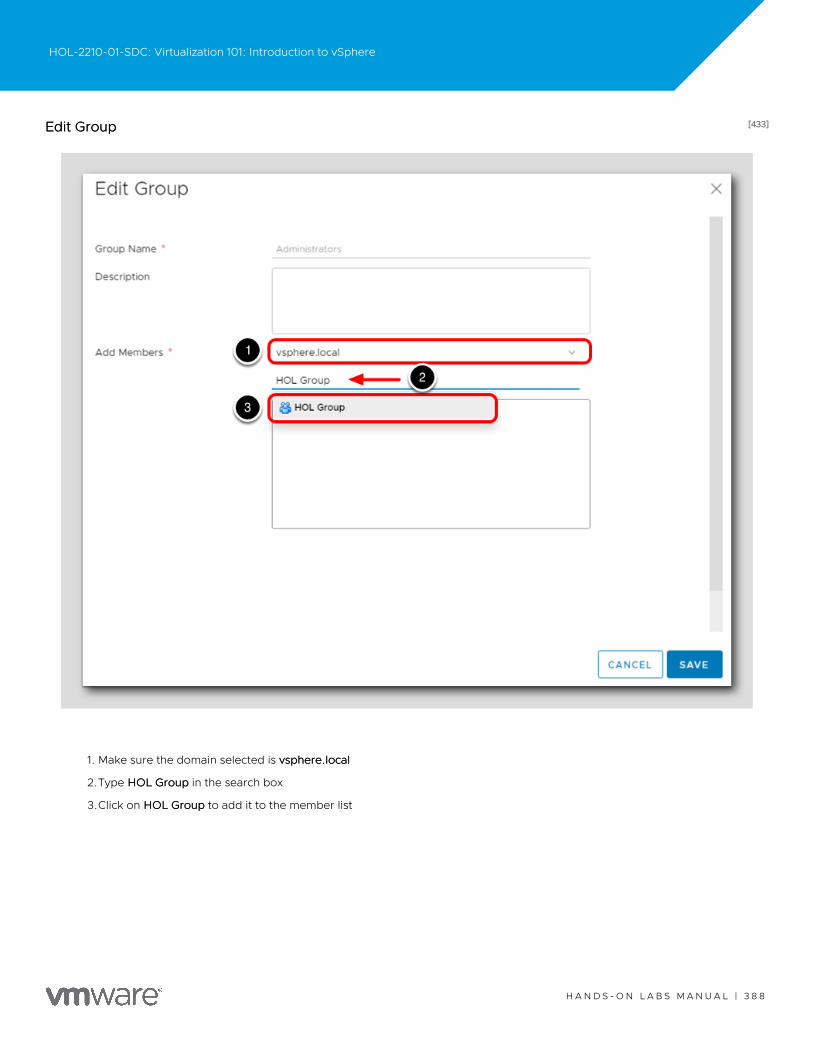
[433][433]Edit GroupEdit Group
1. Make sure the domain selected is vsphere.localvsphere.local
2.Type HOL GroupHOL Group in the search box
3.Click on HOL GroupHOL Group to add it to the member list
HOL-2210-01-SDC: Virtualization 101: Introduction to vSphere
H A N D S - O N L A B S M A N U A L | 3 8 8

1. You should see HOL GroupHOL Group added to the list.
2.Click SaveSave.
HOL-2210-01-SDC: Virtualization 101: Introduction to vSphere
H A N D S - O N L A B S M A N U A L | 3 8 9
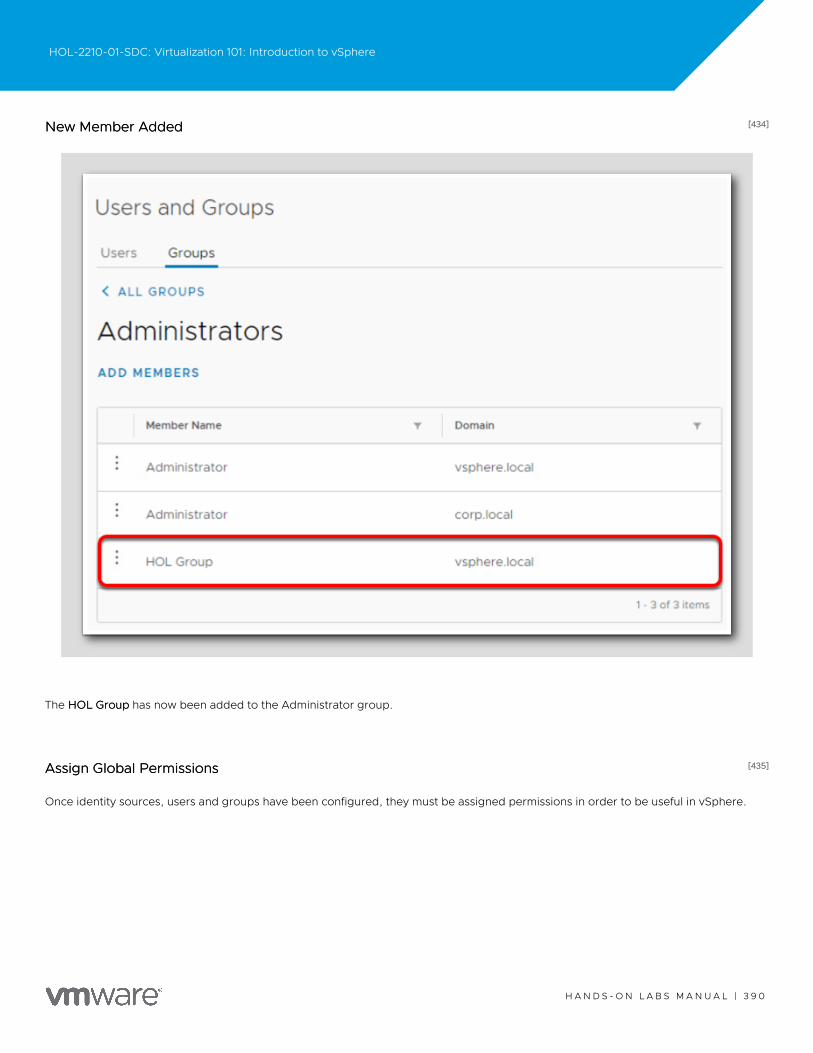
[434][434]New Member AddedNew Member Added
The HOL GroupHOL Group has now been added to the Administrator group.
[435][435]Assign Global PermissionsAssign Global Permissions
Once identity sources, users and groups have been configured, they must be assigned permissions in order to be useful in vSphere.
HOL-2210-01-SDC: Virtualization 101: Introduction to vSphere
H A N D S - O N L A B S M A N U A L | 3 9 0
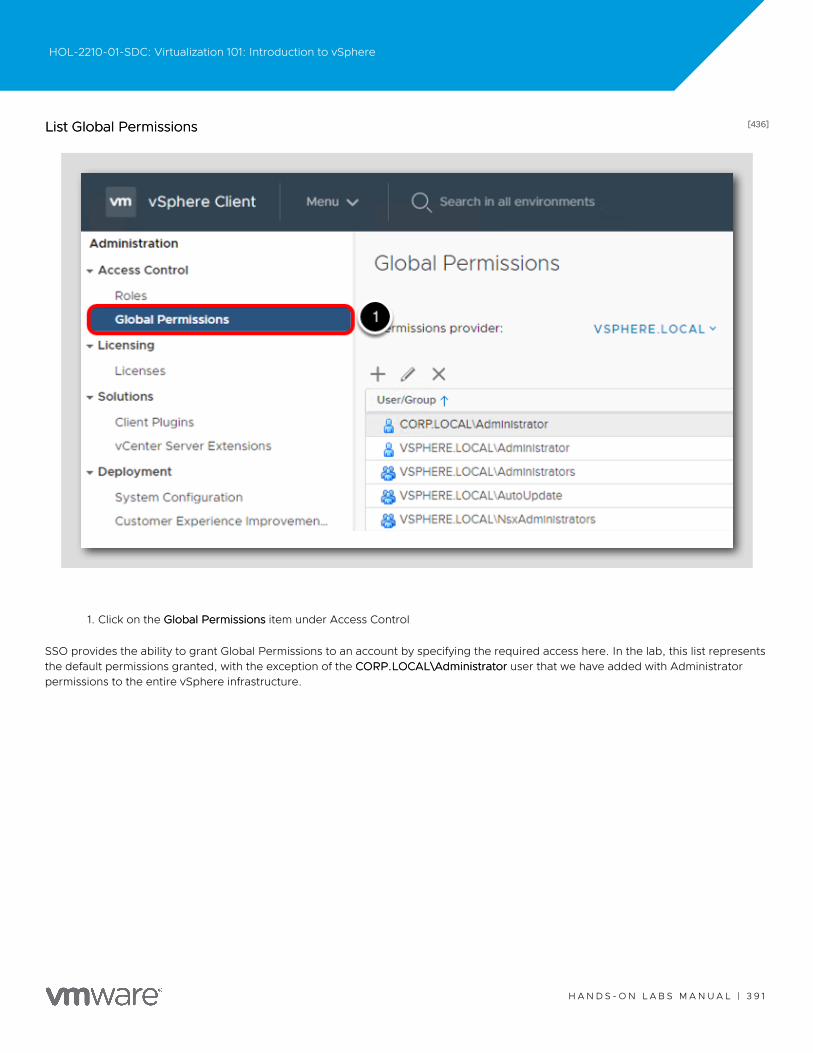
[436][436]List Global PermissionsList Global Permissions
1. Click on the Global PermissionsGlobal Permissions item under Access Control
SSO provides the ability to grant Global Permissions to an account by specifying the required access here. In the lab, this list representsthe default permissions granted, with the exception of the CORP.LOCAL\AdministratorCORP.LOCAL\Administrator user that we have added with Administratorpermissions to the entire vSphere infrastructure.
HOL-2210-01-SDC: Virtualization 101: Introduction to vSphere
H A N D S - O N L A B S M A N U A L | 3 9 1
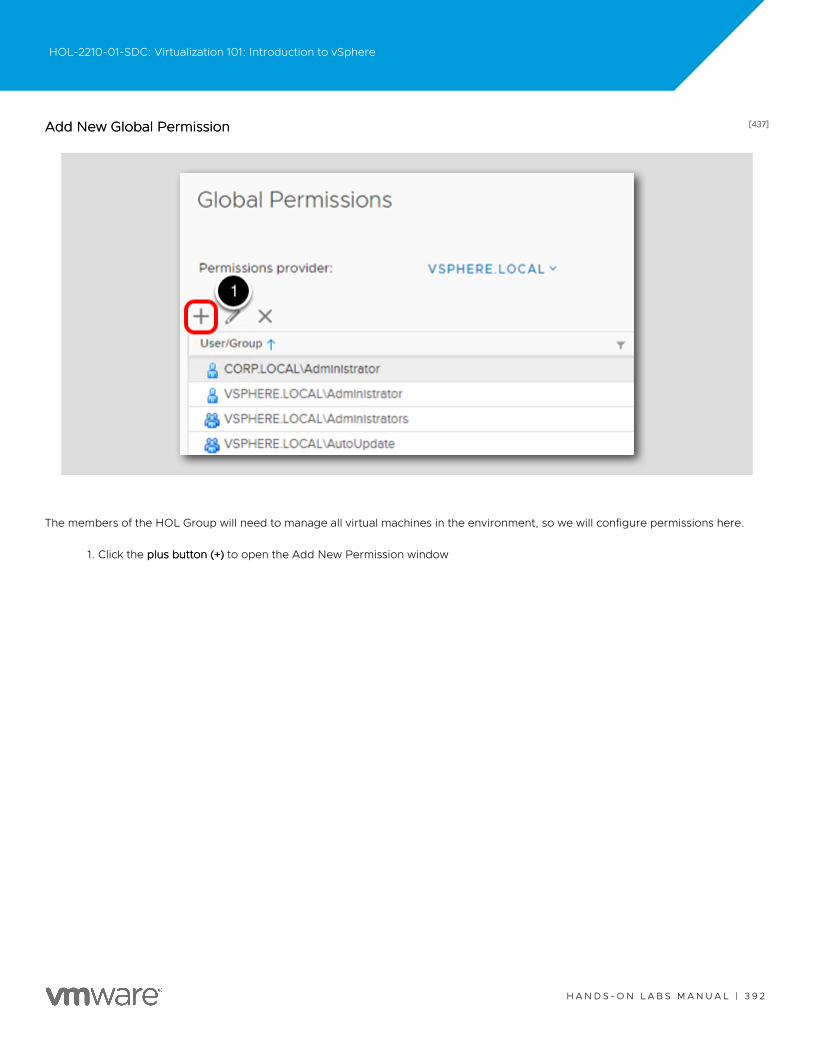
[437][437]Add New Global PermissionAdd New Global Permission
The members of the HOL Group will need to manage all virtual machines in the environment, so we will configure permissions here.
1. Click the plus buttonplus button (+)(+) to open the Add New Permission window
HOL-2210-01-SDC: Virtualization 101: Introduction to vSphere
H A N D S - O N L A B S M A N U A L | 3 9 2
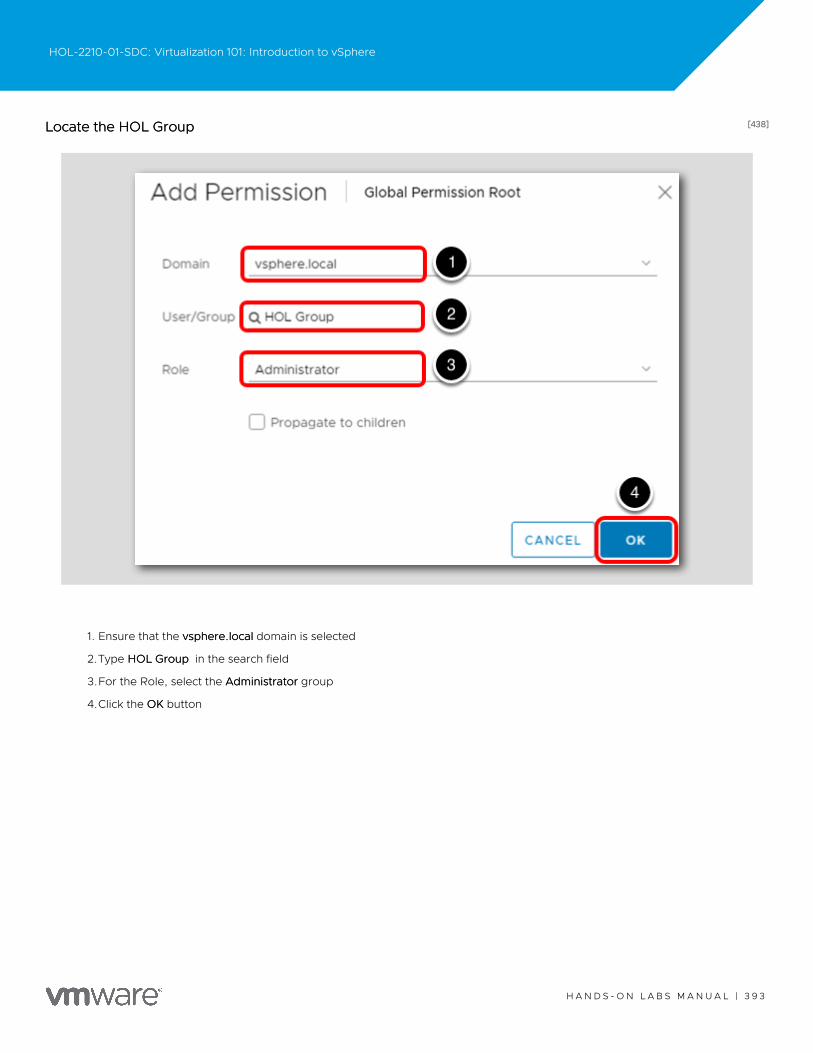
[438][438]Locate the HOL GroupLocate the HOL Group
1. Ensure that the vsphere.localvsphere.local domain is selected
2.Type HOL GroupHOL Group in the search field
3.For the Role, select the AdministratorAdministrator group
4.Click the OKOK button
HOL-2210-01-SDC: Virtualization 101: Introduction to vSphere
H A N D S - O N L A B S M A N U A L | 3 9 3
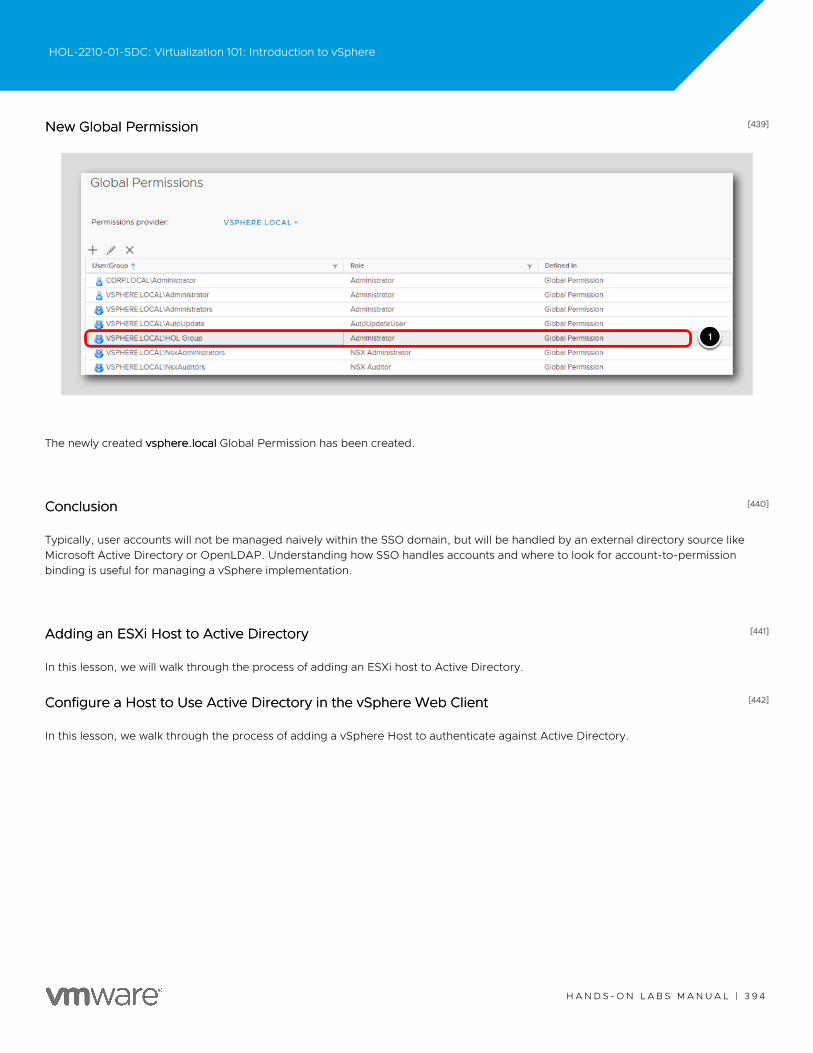
[439][439]New Global PermissionNew Global Permission
The newly created vsphere.localvsphere.local Global Permission has been created.
[440][440]ConclusionConclusion
Typically, user accounts will not be managed naively within the SSO domain, but will be handled by an external directory source likeMicrosoft Active Directory or OpenLDAP. Understanding how SSO handles accounts and where to look for account-to-permissionbinding is useful for managing a vSphere implementation.
[441][441]Adding an ESXi Host to Active DirectoryAdding an ESXi Host to Active Directory
In this lesson, we will walk through the process of adding an ESXi host to Active Directory.
[442][442]Configure a Host to Use Active Directory in the vSphere Web ClientConfigure a Host to Use Active Directory in the vSphere Web Client
In this lesson, we walk through the process of adding a vSphere Host to authenticate against Active Directory.
HOL-2210-01-SDC: Virtualization 101: Introduction to vSphere
H A N D S - O N L A B S M A N U A L | 3 9 4

[443][443]Hosts and ClustersHosts and Clusters
1. Click on MenuMenu
2.Select Hosts and ClustersHosts and Clusters
HOL-2210-01-SDC: Virtualization 101: Introduction to vSphere
H A N D S - O N L A B S M A N U A L | 3 9 5
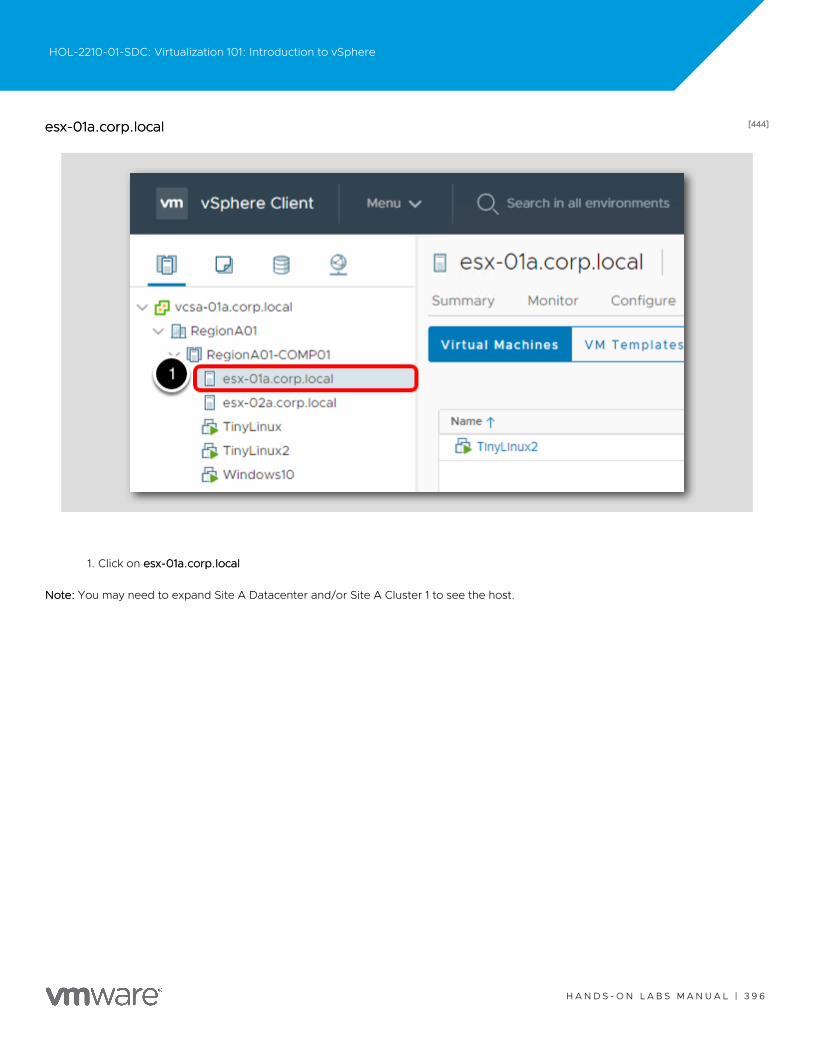
[444][444]esx-01a.corp.localesx-01a.corp.local
1. Click on esx-01a.corp.localesx-01a.corp.local
Note:Note: You may need to expand Site A Datacenter and/or Site A Cluster 1 to see the host.
HOL-2210-01-SDC: Virtualization 101: Introduction to vSphere
H A N D S - O N L A B S M A N U A L | 3 9 6
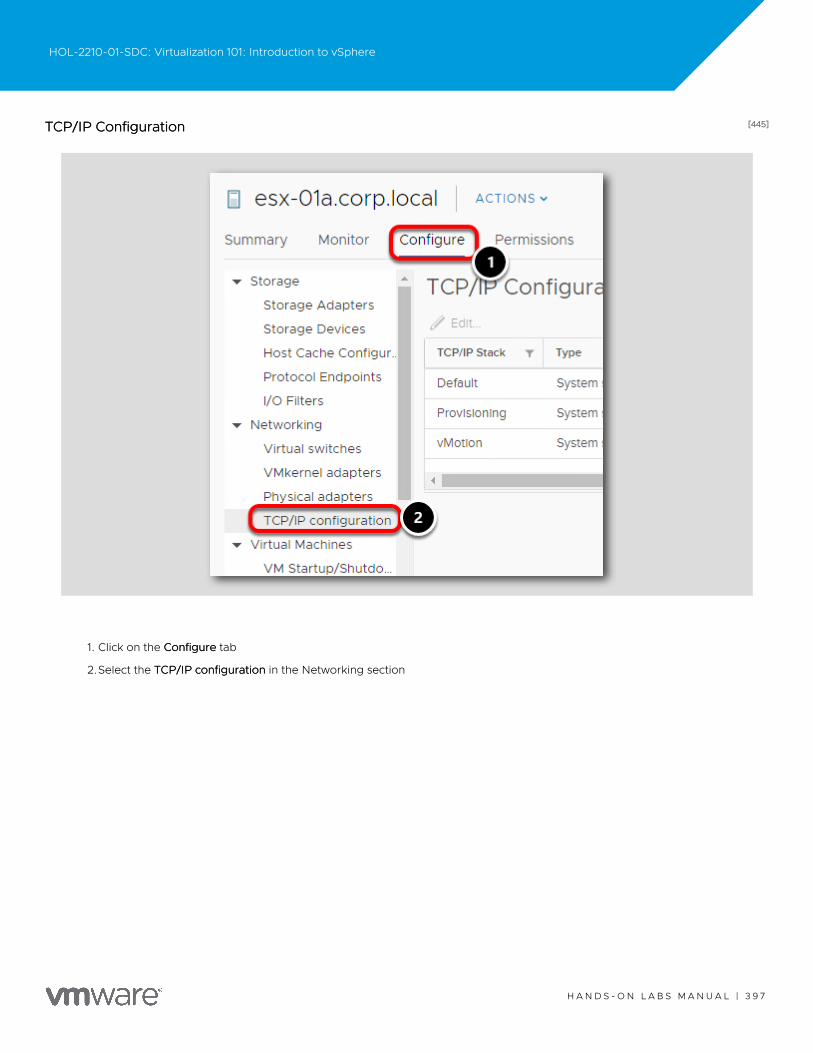
[445][445]TCP/IP ConfigurationTCP/IP Configuration
1. Click on the ConfigureConfigure tab
2.Select the TCP/IP configurationTCP/IP configuration in the Networking section
HOL-2210-01-SDC: Virtualization 101: Introduction to vSphere
H A N D S - O N L A B S M A N U A L | 3 9 7
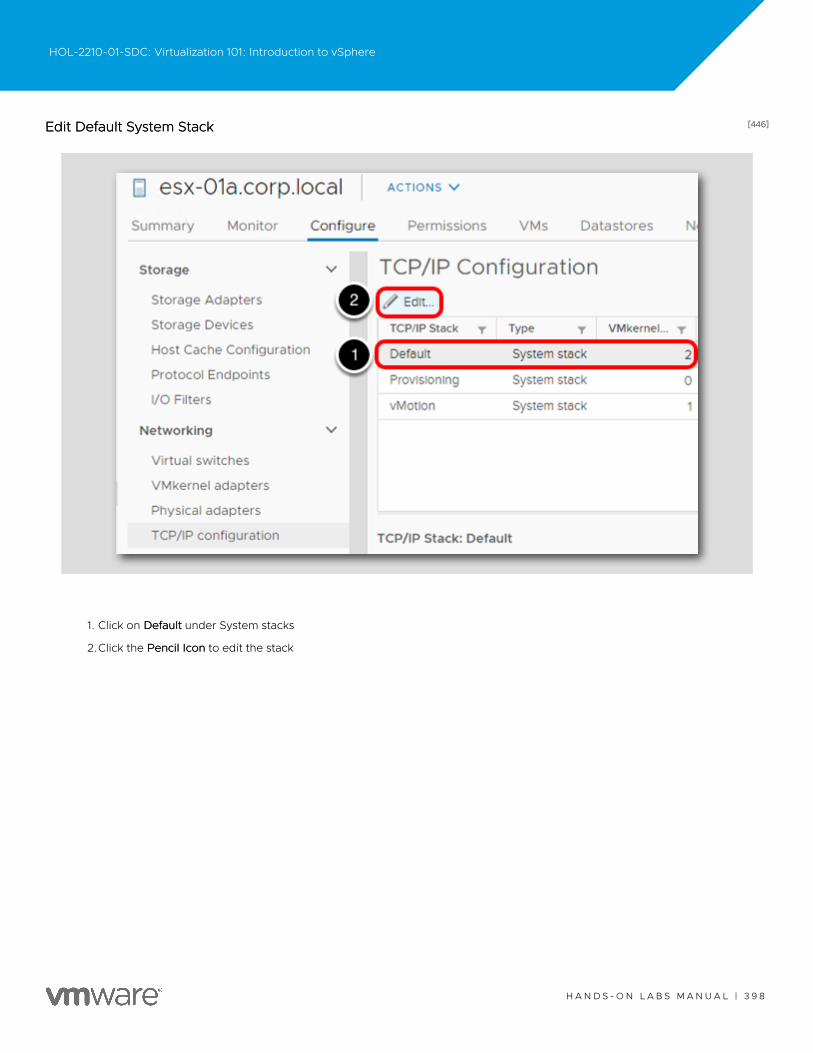
[446][446]Edit Default System StackEdit Default System Stack
1. Click on DefaultDefault under System stacks
2.Click the Pencil IconPencil Icon to edit the stack
HOL-2210-01-SDC: Virtualization 101: Introduction to vSphere
H A N D S - O N L A B S M A N U A L | 3 9 8
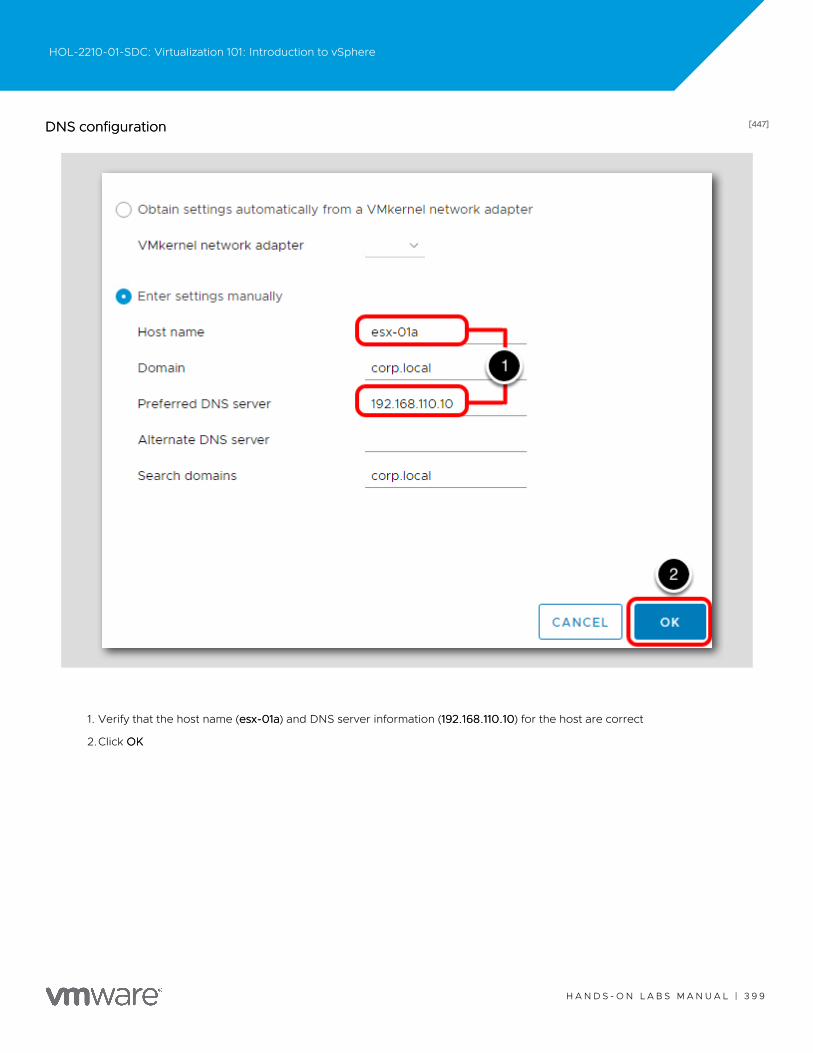
[447][447]DNS configurationDNS configuration
1. Verify that the host name (esx-01aesx-01a) and DNS server information (192.168.110.10192.168.110.10) for the host are correct
2.Click OKOK
HOL-2210-01-SDC: Virtualization 101: Introduction to vSphere
H A N D S - O N L A B S M A N U A L | 3 9 9
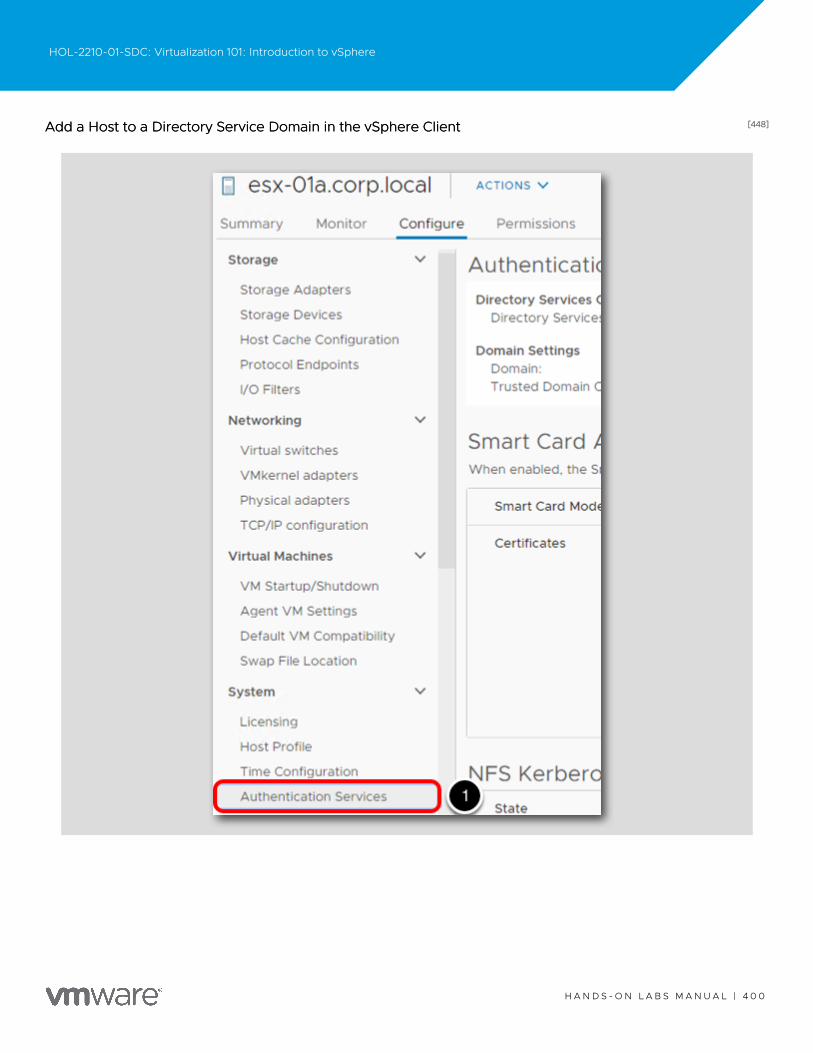
[448][448]Add a Host to a Directory Service Domain in the vSphere ClientAdd a Host to a Directory Service Domain in the vSphere Client
HOL-2210-01-SDC: Virtualization 101: Introduction to vSphere
H A N D S - O N L A B S M A N U A L | 4 0 0
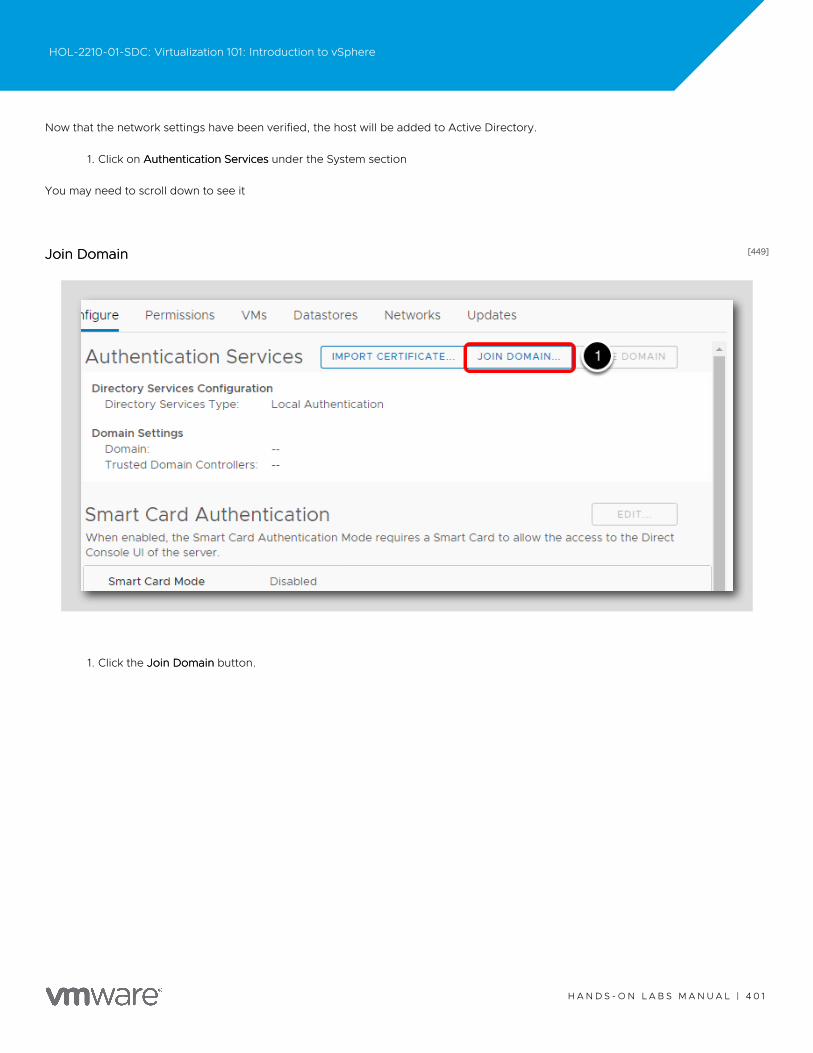
Now that the network settings have been verified, the host will be added to Active Directory.
1. Click on Authentication ServicesAuthentication Services under the System section
You may need to scroll down to see it
[449][449]Join DomainJoin Domain
1. Click the Join DomainJoin Domain button.
HOL-2210-01-SDC: Virtualization 101: Introduction to vSphere
H A N D S - O N L A B S M A N U A L | 4 0 1

[450][450]Join Domain SettingsJoin Domain Settings
1. Enter corp.localcorp.local for the Domain
2.In the Using Credentials section enter:
•Username: administratoradministrator
•Password: VMware1!VMware1!
3.Click OKOK
HOL-2210-01-SDC: Virtualization 101: Introduction to vSphere
H A N D S - O N L A B S M A N U A L | 4 0 2
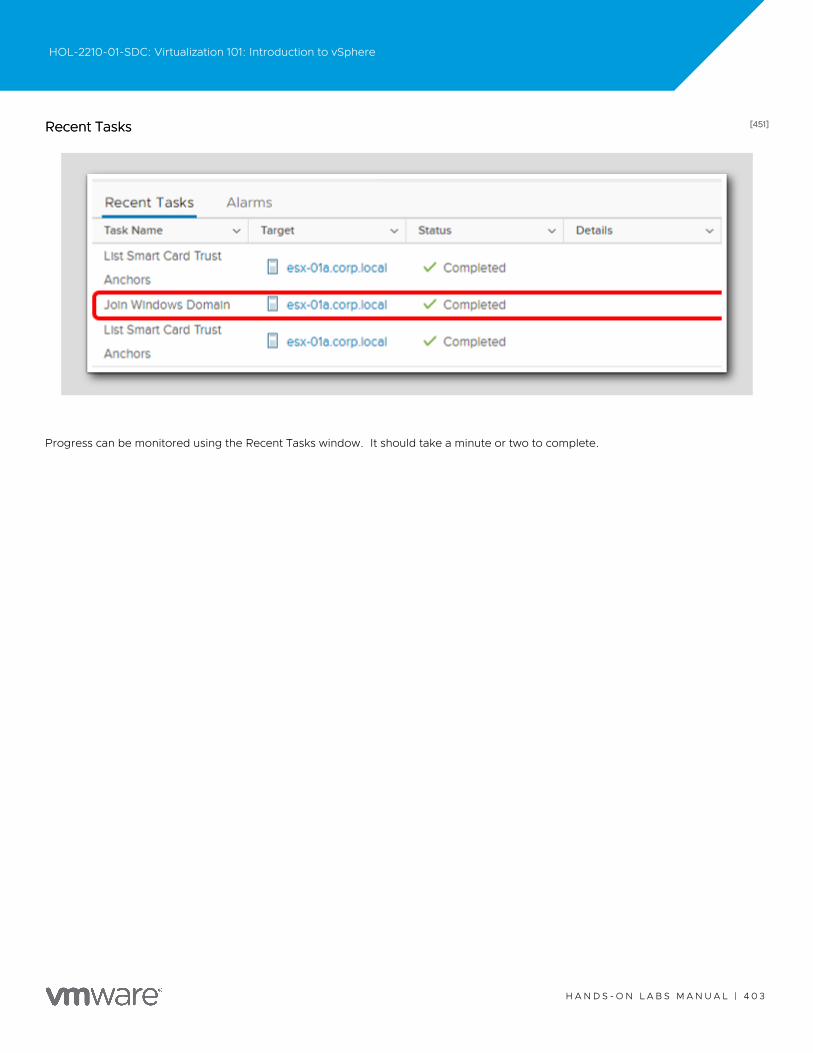
[451][451]Recent TasksRecent Tasks
Progress can be monitored using the Recent Tasks window. It should take a minute or two to complete.
HOL-2210-01-SDC: Virtualization 101: Introduction to vSphere
H A N D S - O N L A B S M A N U A L | 4 0 3

[452][452]Added to Active DirectoryAdded to Active Directory
Once the task has been completed, the Authentication Services section will update to show the host is now connected to the ActiveDirectory domain.
HOL-2210-01-SDC: Virtualization 101: Introduction to vSphere
H A N D S - O N L A B S M A N U A L | 4 0 4
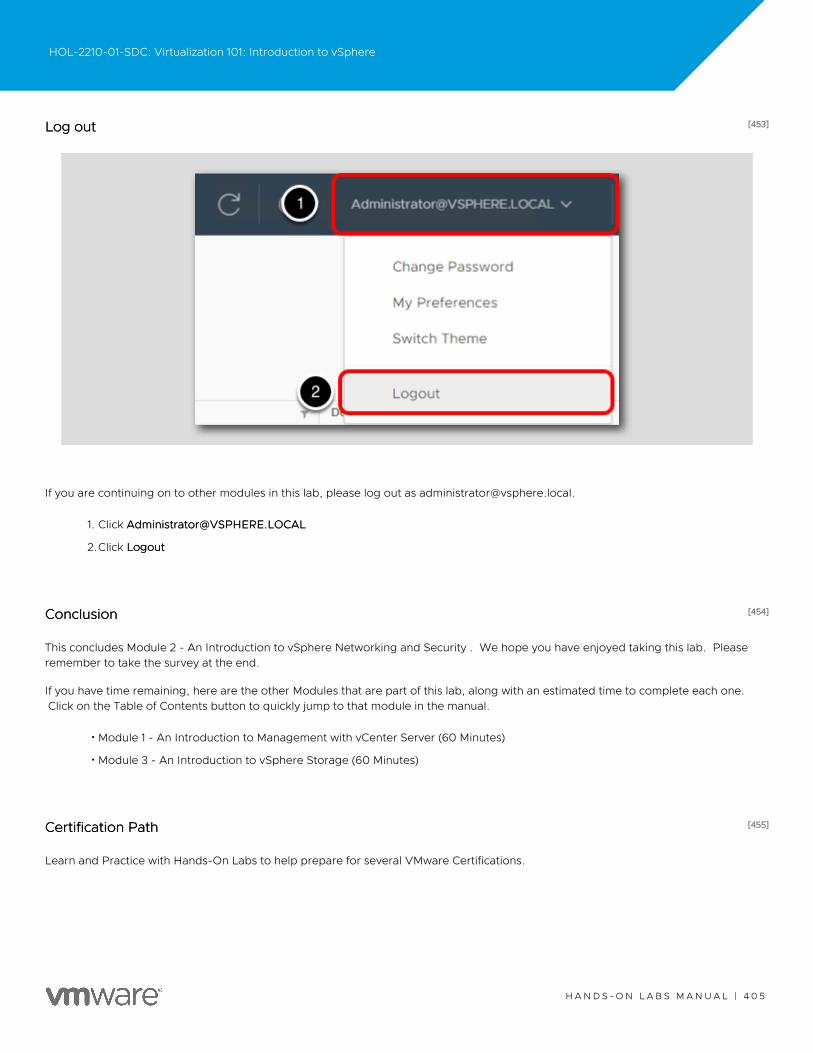
[453][453]Log outLog out
If you are continuing on to other modules in this lab, please log out as [email protected].
1. Click [email protected]@VSPHERE.LOCAL
2.Click LogoutLogout
[454][454]ConclusionConclusion
This concludes Module 2 - An Introduction to vSphere Networking and Security . We hope you have enjoyed taking this lab. Pleaseremember to take the survey at the end.
If you have time remaining, here are the other Modules that are part of this lab, along with an estimated time to complete each one.Click on the Table of Contents button to quickly jump to that module in the manual.
•Module 1 - An Introduction to Management with vCenter Server (60 Minutes)
•Module 3 - An Introduction to vSphere Storage (60 Minutes)
[455][455]Certification PathCertification Path
Learn and Practice with Hands-On Labs to help prepare for several VMware Certifications.
HOL-2210-01-SDC: Virtualization 101: Introduction to vSphere
H A N D S - O N L A B S M A N U A L | 4 0 5

This Lab can help you study for the industry-recognized VCAP-DCV Deploy 2021 Deploy certification which validates that you know howto deploy and optimize VMware vSphere infrastructures.
HOL-2210-01-SDC: Virtualization 101: Introduction to vSphere
H A N D S - O N L A B S M A N U A L | 4 0 6

Learn More Here https://via.vmw.com/dcv_deployhttps://via.vmw.com/dcv_deploy
HOL-2210-01-SDC: Virtualization 101: Introduction to vSphere
H A N D S - O N L A B S M A N U A L | 4 0 7
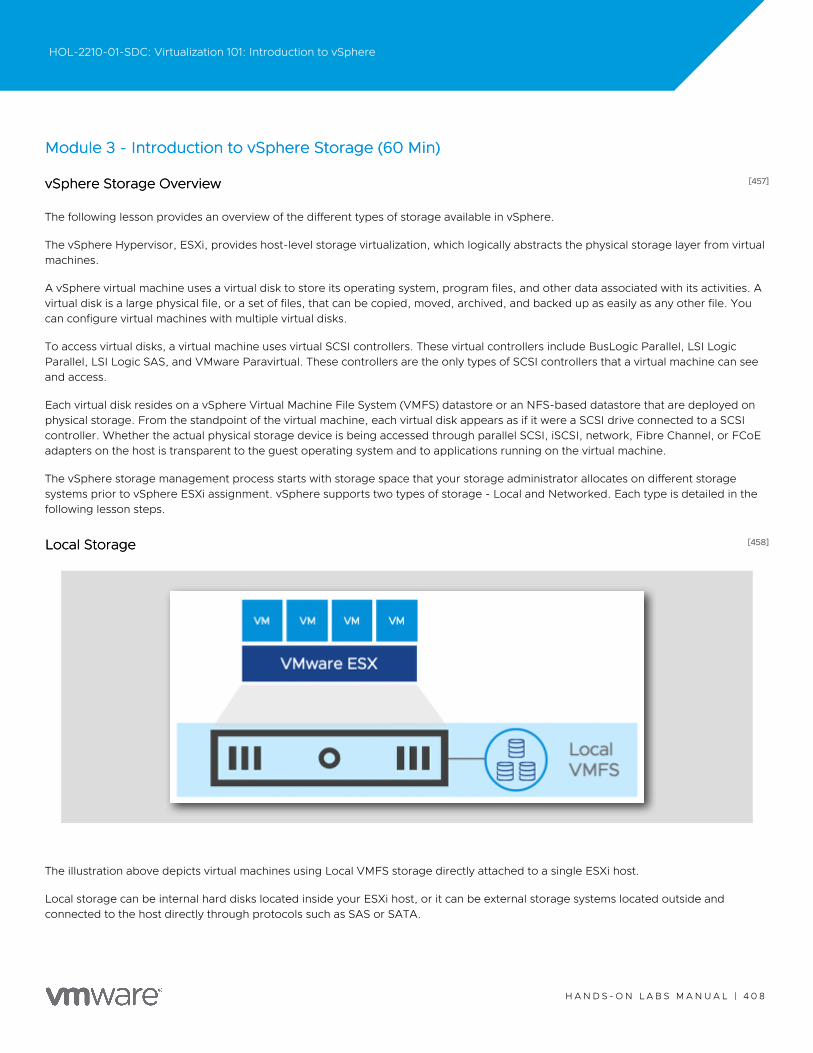
Module 3 - Introduction to vSphere Storage (60 Min)Module 3 - Introduction to vSphere Storage (60 Min)
[457][457]vSphere Storage OverviewvSphere Storage Overview
The following lesson provides an overview of the different types of storage available in vSphere.
The vSphere Hypervisor, ESXi, provides host-level storage virtualization, which logically abstracts the physical storage layer from virtualmachines.
A vSphere virtual machine uses a virtual disk to store its operating system, program files, and other data associated with its activities. Avirtual disk is a large physical file, or a set of files, that can be copied, moved, archived, and backed up as easily as any other file. Youcan configure virtual machines with multiple virtual disks.
To access virtual disks, a virtual machine uses virtual SCSI controllers. These virtual controllers include BusLogic Parallel, LSI LogicParallel, LSI Logic SAS, and VMware Paravirtual. These controllers are the only types of SCSI controllers that a virtual machine can seeand access.
Each virtual disk resides on a vSphere Virtual Machine File System (VMFS) datastore or an NFS-based datastore that are deployed onphysical storage. From the standpoint of the virtual machine, each virtual disk appears as if it were a SCSI drive connected to a SCSIcontroller. Whether the actual physical storage device is being accessed through parallel SCSI, iSCSI, network, Fibre Channel, or FCoEadapters on the host is transparent to the guest operating system and to applications running on the virtual machine.
The vSphere storage management process starts with storage space that your storage administrator allocates on different storagesystems prior to vSphere ESXi assignment. vSphere supports two types of storage - Local and Networked. Each type is detailed in thefollowing lesson steps.
[458][458]Local StorageLocal Storage
The illustration above depicts virtual machines using Local VMFS storage directly attached to a single ESXi host.
Local storage can be internal hard disks located inside your ESXi host, or it can be external storage systems located outside andconnected to the host directly through protocols such as SAS or SATA.
HOL-2210-01-SDC: Virtualization 101: Introduction to vSphere
H A N D S - O N L A B S M A N U A L | 4 0 8
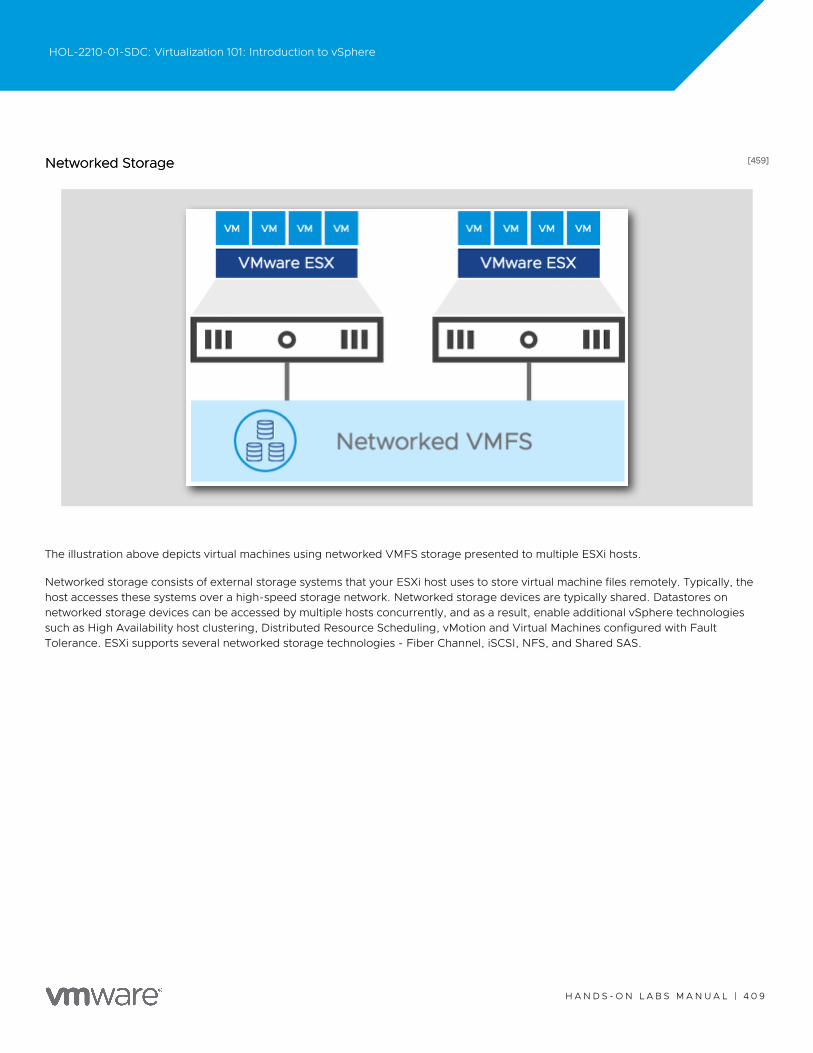
[459][459]Networked StorageNetworked Storage
The illustration above depicts virtual machines using networked VMFS storage presented to multiple ESXi hosts.
Networked storage consists of external storage systems that your ESXi host uses to store virtual machine files remotely. Typically, thehost accesses these systems over a high-speed storage network. Networked storage devices are typically shared. Datastores onnetworked storage devices can be accessed by multiple hosts concurrently, and as a result, enable additional vSphere technologiessuch as High Availability host clustering, Distributed Resource Scheduling, vMotion and Virtual Machines configured with FaultTolerance. ESXi supports several networked storage technologies - Fiber Channel, iSCSI, NFS, and Shared SAS.
HOL-2210-01-SDC: Virtualization 101: Introduction to vSphere
H A N D S - O N L A B S M A N U A L | 4 0 9
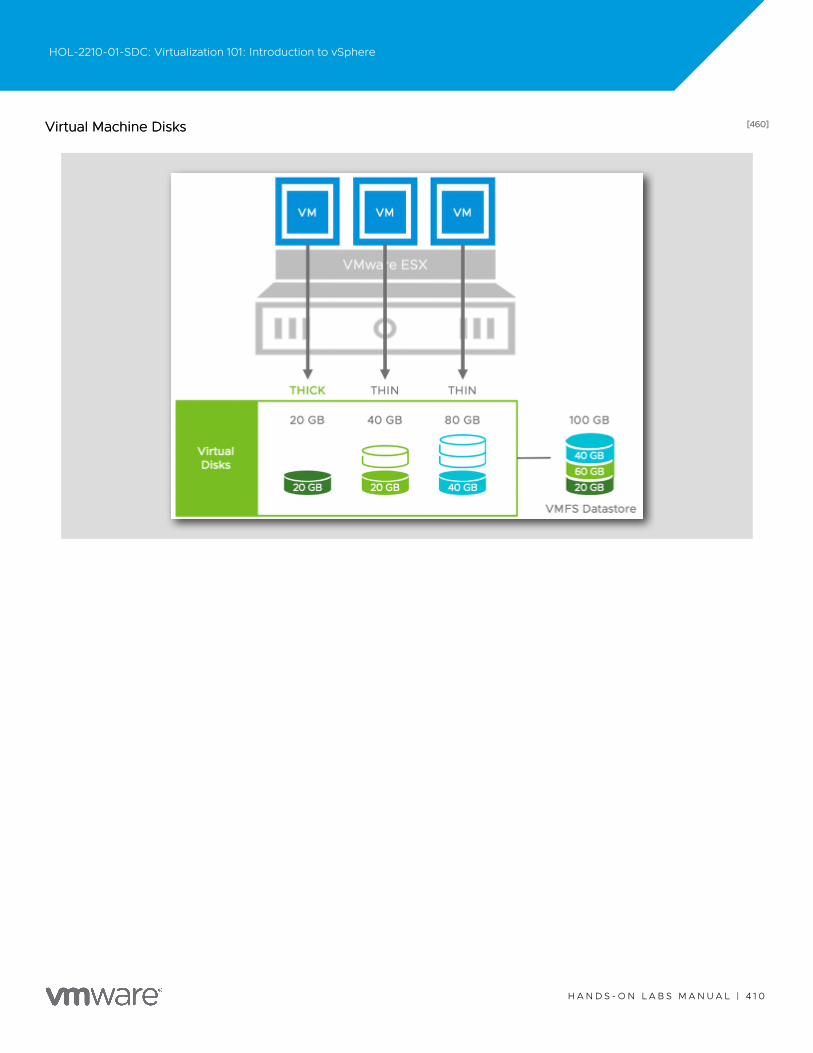
[460][460]Virtual Machine DisksVirtual Machine Disks
HOL-2210-01-SDC: Virtualization 101: Introduction to vSphere
H A N D S - O N L A B S M A N U A L | 4 1 0
The illustration above depicts virtual machines using different types of virtual disk formats against a shared VMFS Datastore.
When you perform certain virtual machine management operations, such as creating a virtual disk, cloning a virtual machine to atemplate, or migrating a virtual machine, you can specify a provisioning policy for the virtual disk file format. There are three types ofvirtual disk formats:
Thin Provision
Use this format to save storage space. For the thin disk, you provision as much datastore space as the disk would require based on thevalue that you enter for the disk size. However, the thin disk starts small and at first, uses only as much datastore space as the diskneeds for its initial operations.
Thick Provision Lazy Zeroed
Creates a virtual disk in a default thick format. Space required for the virtual disk is allocated when the virtual disk is created. Dataremaining on the physical device is not erased during creation, but is zeroed out on demand at a later time on first write from the virtualmachine.
Using the thick-provision, lazy-zeroed format does not zero out or eliminate the possibility of recovering deleted files or restoring olddata that might be present on this allocated space. You cannot convert a thick-provisioned, lazy-zeroed disk to a thin disk.
Thick Provision Eager Zeroed
A type of thick virtual disk that supports clustering features such as Fault Tolerance. Space required for the virtual disk is allocated atcreation time. In contrast to the thick-provision, lazy-zeroed format, the data remaining on the physical device is zeroed out when thevirtual disk is created. In general, it takes much longer to create disks in this format than to create other types of disks.
[461][461]Creating and Configuring vSphere DatastoresCreating and Configuring vSphere Datastores
This lesson will walk you through creating and configuring an NFS, and an iSCSI vSphere Datastore. Also adding and configuring aniSCSI software adapter.
[462][462]Launch Google Chrome web browserLaunch Google Chrome web browser
1. Click on the Chrome IconChrome Icon on the Windows Quick Launch Task Bar
HOL-2210-01-SDC: Virtualization 101: Introduction to vSphere
H A N D S - O N L A B S M A N U A L | 4 1 1
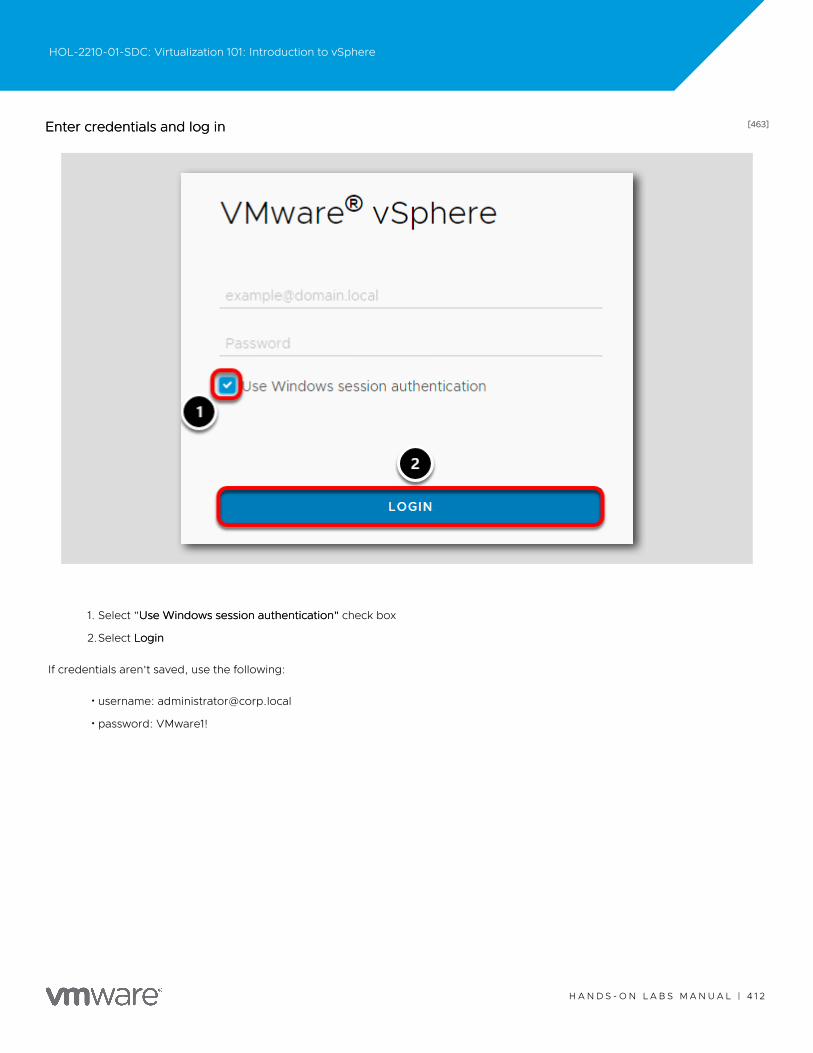
[463][463]Enter credentials and log inEnter credentials and log in
1. Select "Use Windows session authentication"Use Windows session authentication" check box
2.Select LoginLogin
If credentials aren't saved, use the following:
•username: [email protected]
•password: VMware1!
HOL-2210-01-SDC: Virtualization 101: Introduction to vSphere
H A N D S - O N L A B S M A N U A L | 4 1 2
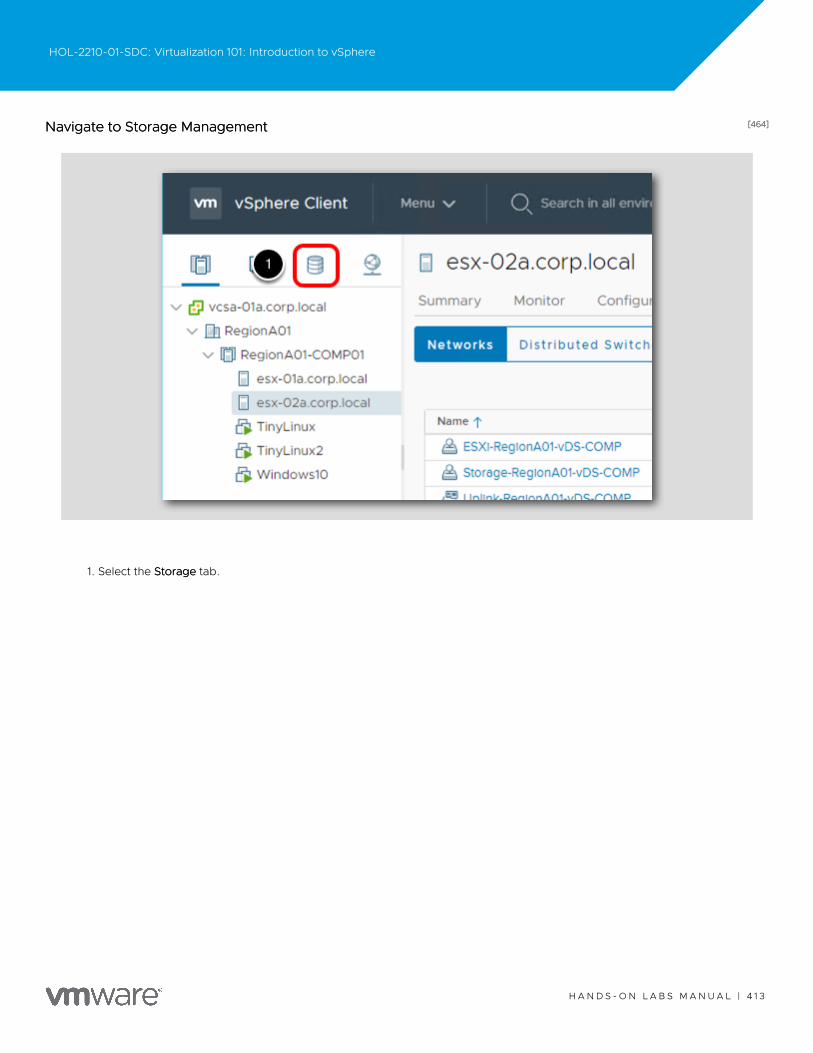
[464][464]Navigate to Storage ManagementNavigate to Storage Management
1. Select the StorageStorage tab.
HOL-2210-01-SDC: Virtualization 101: Introduction to vSphere
H A N D S - O N L A B S M A N U A L | 4 1 3
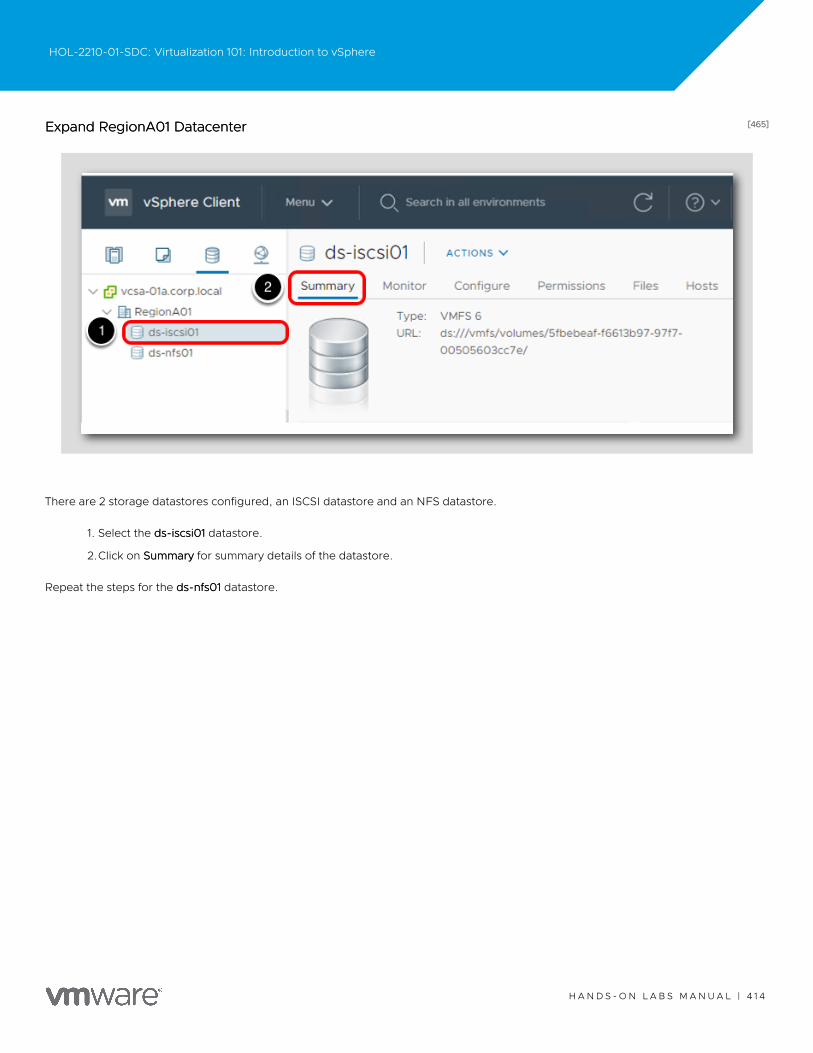
[465][465]Expand RegionA01 DatacenterExpand RegionA01 Datacenter
There are 2 storage datastores configured, an ISCSI datastore and an NFS datastore.
1. Select the ds-iscsi01ds-iscsi01 datastore.
2.Click on SummarySummary for summary details of the datastore.
Repeat the steps for the ds-nfs01ds-nfs01 datastore.
HOL-2210-01-SDC: Virtualization 101: Introduction to vSphere
H A N D S - O N L A B S M A N U A L | 4 1 4
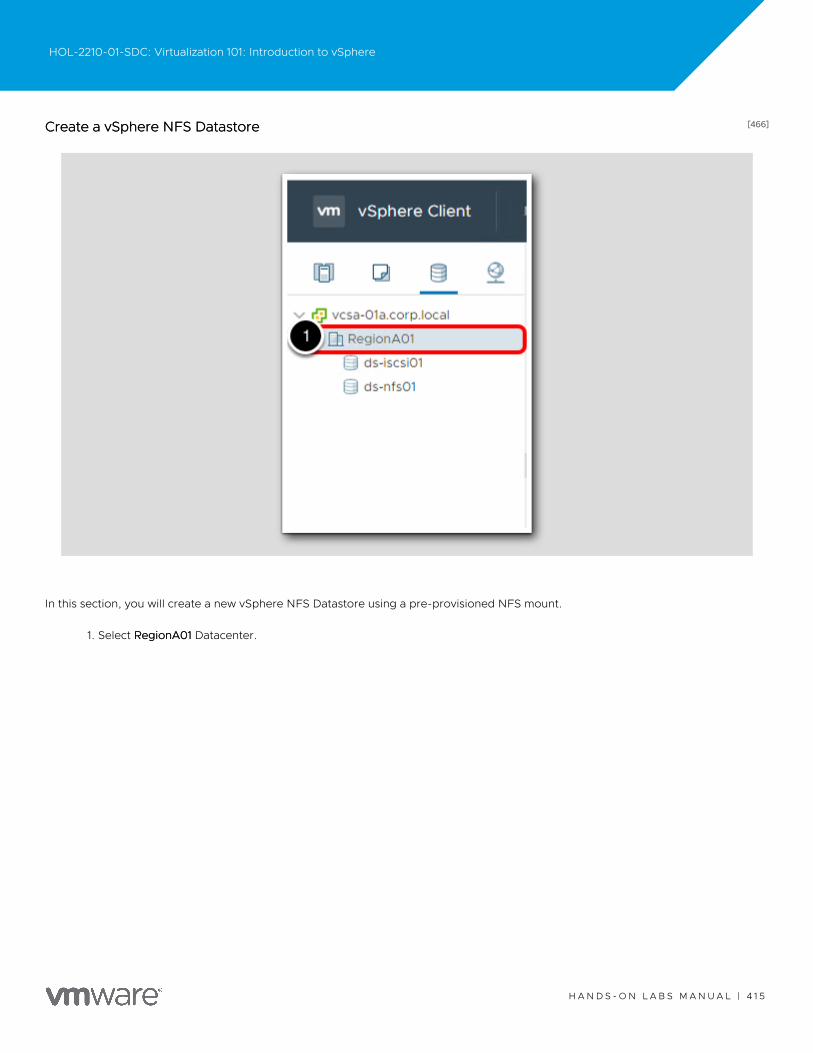
[466][466]Create a vSphere NFS DatastoreCreate a vSphere NFS Datastore
In this section, you will create a new vSphere NFS Datastore using a pre-provisioned NFS mount.
1. Select RegionA01RegionA01 Datacenter.
HOL-2210-01-SDC: Virtualization 101: Introduction to vSphere
H A N D S - O N L A B S M A N U A L | 4 1 5
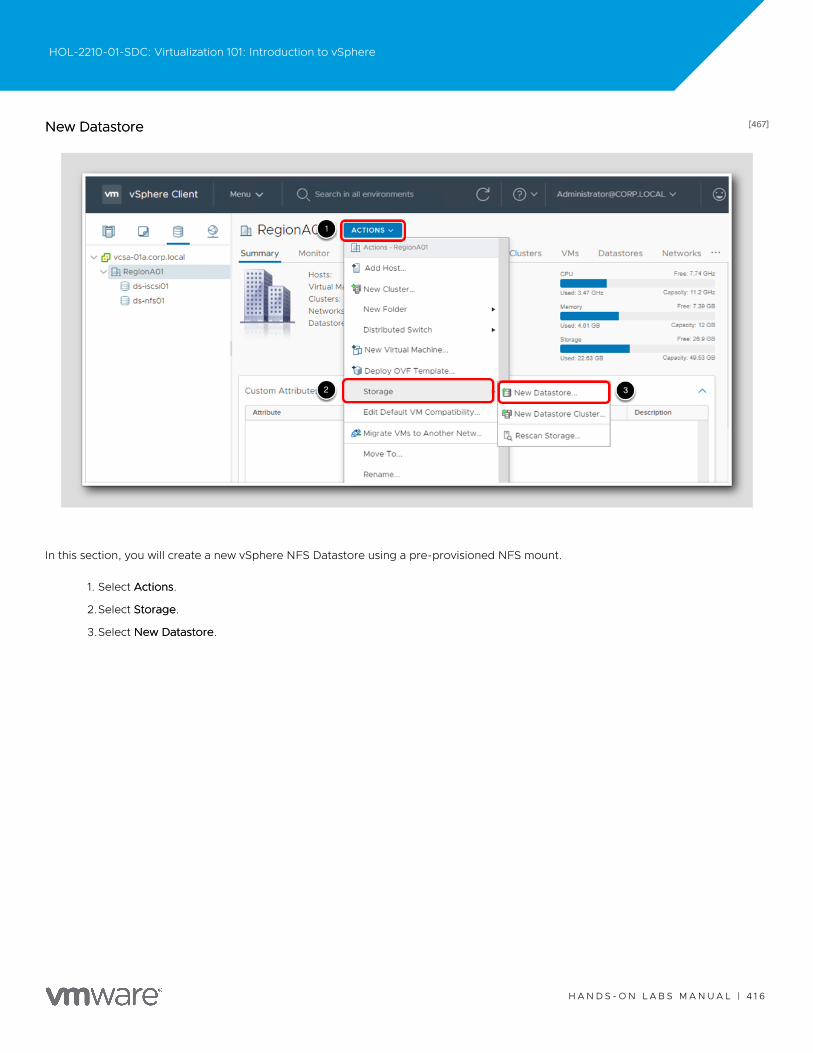
[467][467]New DatastoreNew Datastore
In this section, you will create a new vSphere NFS Datastore using a pre-provisioned NFS mount.
1. Select ActionsActions.
2.Select StorageStorage.
3.Select New DatastoreNew Datastore.
HOL-2210-01-SDC: Virtualization 101: Introduction to vSphere
H A N D S - O N L A B S M A N U A L | 4 1 6
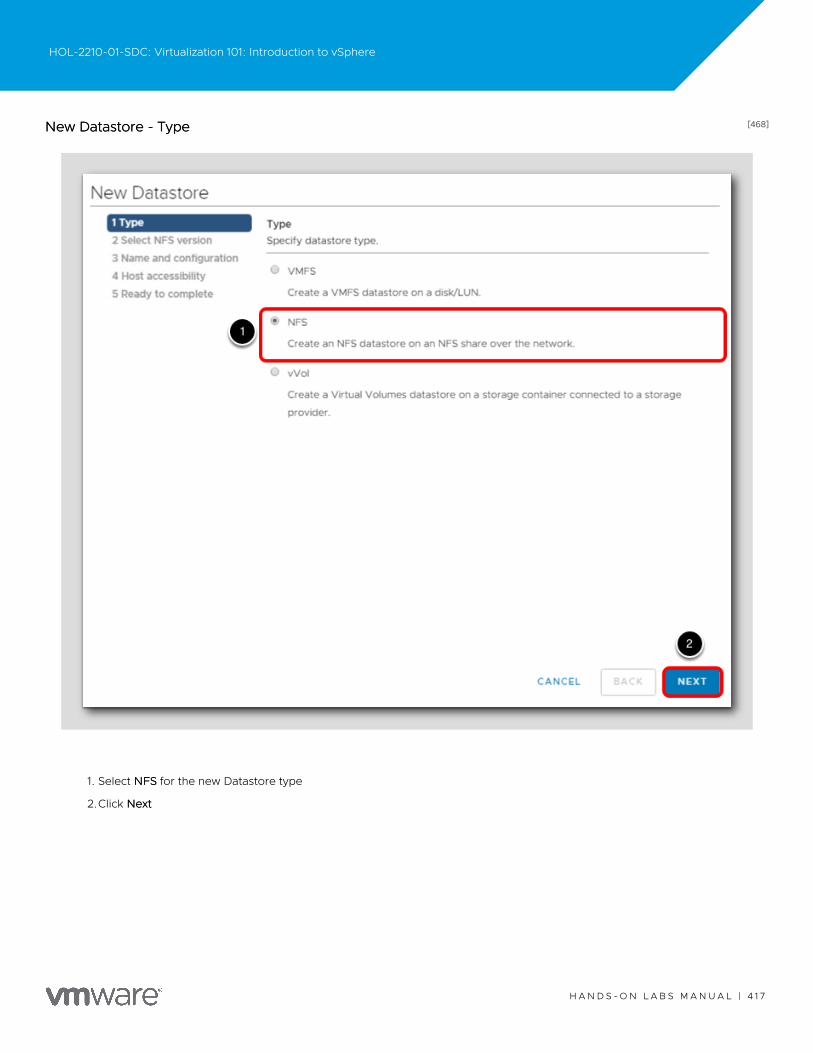
[468][468]New Datastore - TypeNew Datastore - Type
1. Select NFSNFS for the new Datastore type
2.Click NextNext
HOL-2210-01-SDC: Virtualization 101: Introduction to vSphere
H A N D S - O N L A B S M A N U A L | 4 1 7

Note: You may need to zoom out in order to see the NextNext button.
HOL-2210-01-SDC: Virtualization 101: Introduction to vSphere
H A N D S - O N L A B S M A N U A L | 4 1 8
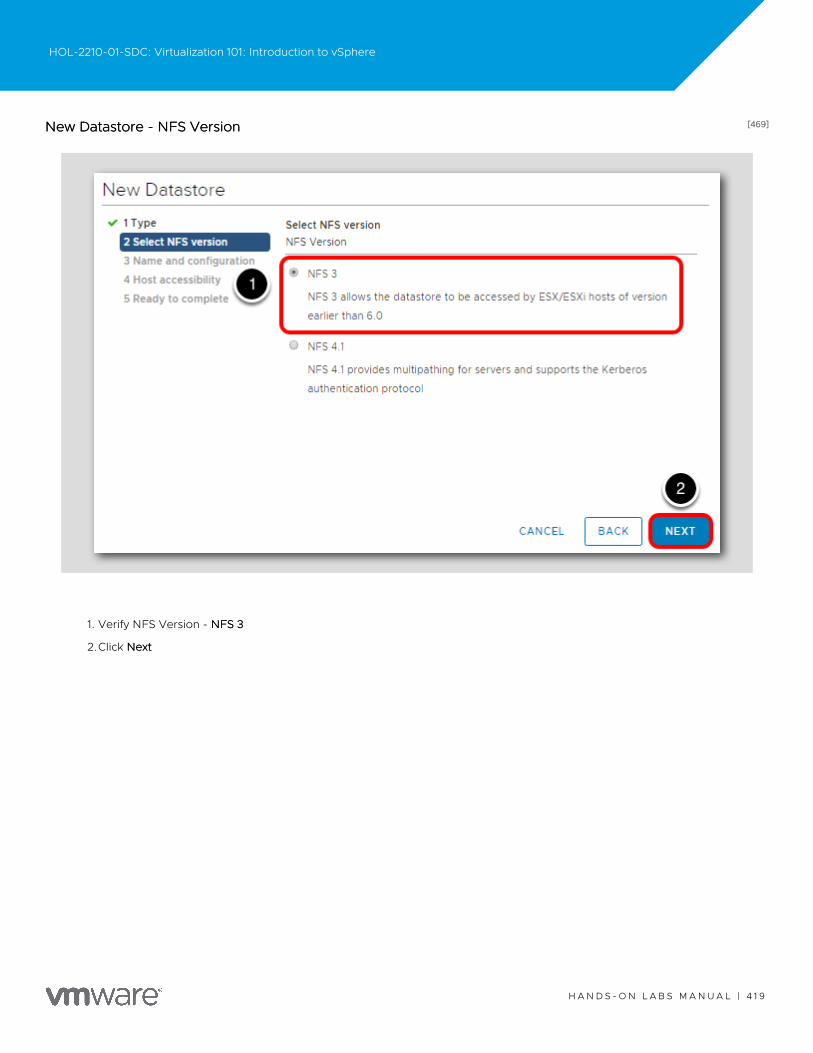
[469][469]New Datastore - NFS VersionNew Datastore - NFS Version
1. Verify NFS Version - NFS 3NFS 3
2.Click NextNext
HOL-2210-01-SDC: Virtualization 101: Introduction to vSphere
H A N D S - O N L A B S M A N U A L | 4 1 9
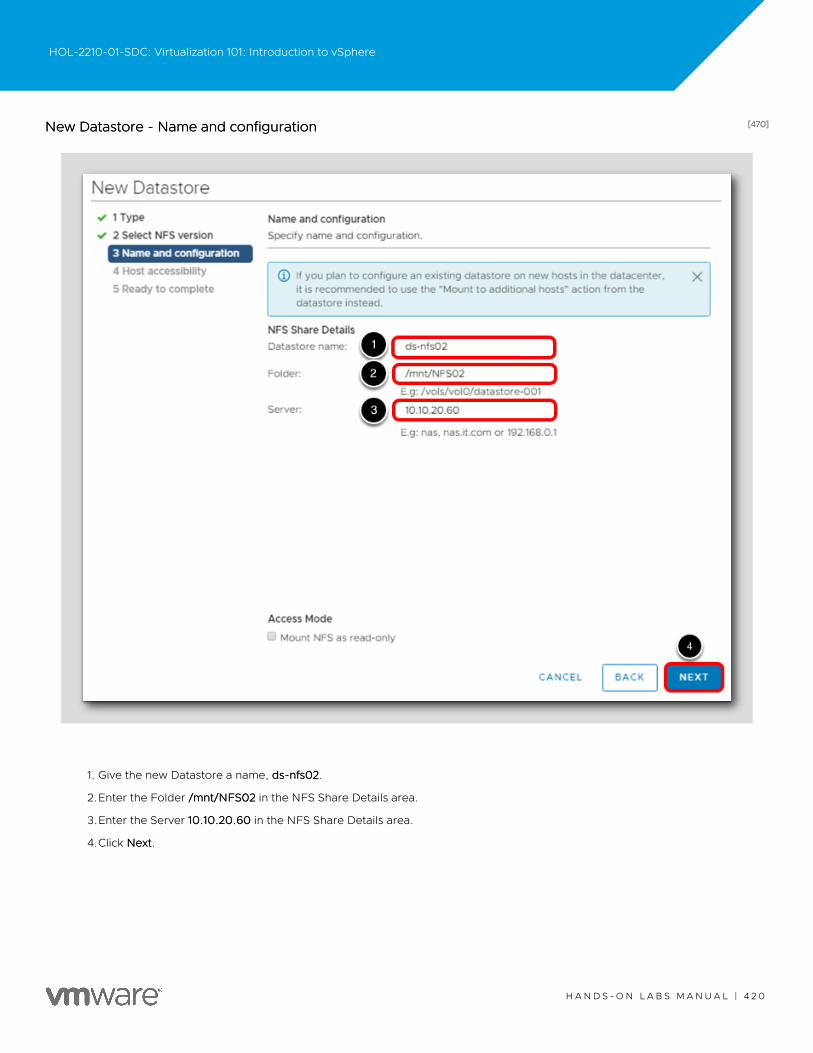
[470][470]New Datastore - Name and configurationNew Datastore - Name and configuration
1. Give the new Datastore a name, ds-nfs02ds-nfs02.
2.Enter the Folder /mnt/NFS02/mnt/NFS02 in the NFS Share Details area.
3.Enter the Server 10.10.20.6010.10.20.60 in the NFS Share Details area.
4.Click NextNext.
HOL-2210-01-SDC: Virtualization 101: Introduction to vSphere
H A N D S - O N L A B S M A N U A L | 4 2 0
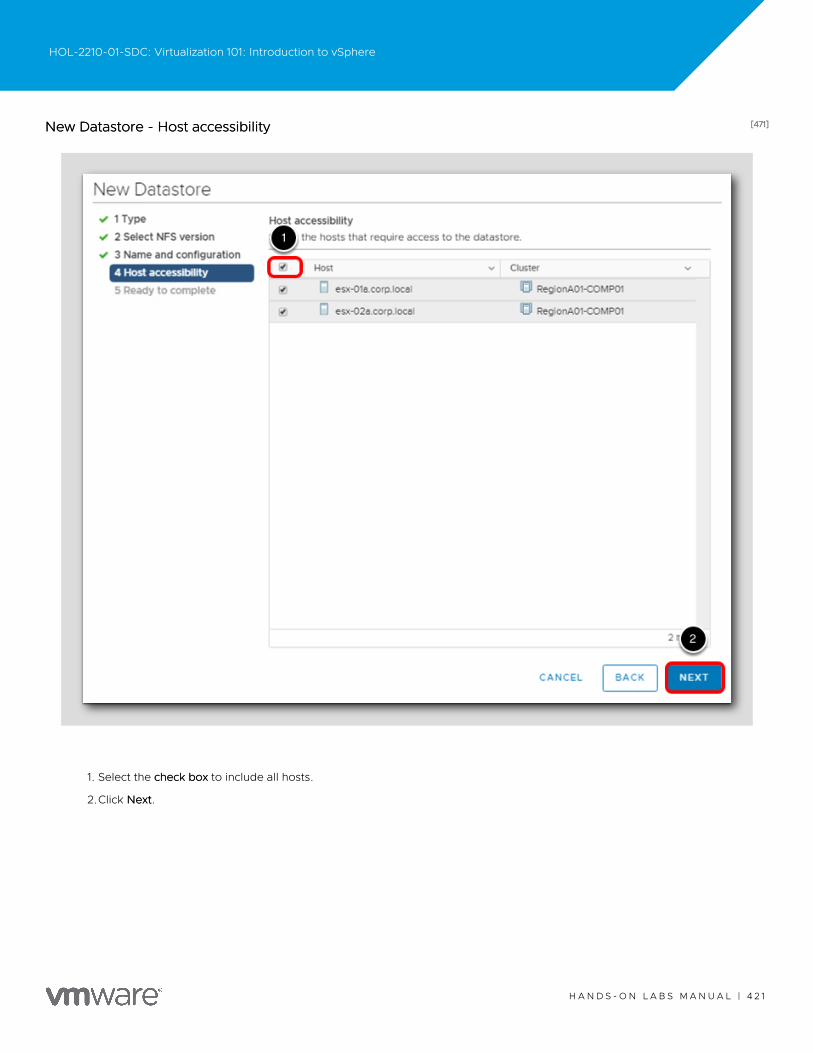
[471][471]New Datastore - Host accessibilityNew Datastore - Host accessibility
1. Select the check boxcheck box to include all hosts.
2.Click NextNext.
HOL-2210-01-SDC: Virtualization 101: Introduction to vSphere
H A N D S - O N L A B S M A N U A L | 4 2 1

[472][472]New Datastore - Ready to completeNew Datastore - Ready to complete
1. Review New Datastore configuration and click FinishFinish.
HOL-2210-01-SDC: Virtualization 101: Introduction to vSphere
H A N D S - O N L A B S M A N U A L | 4 2 2
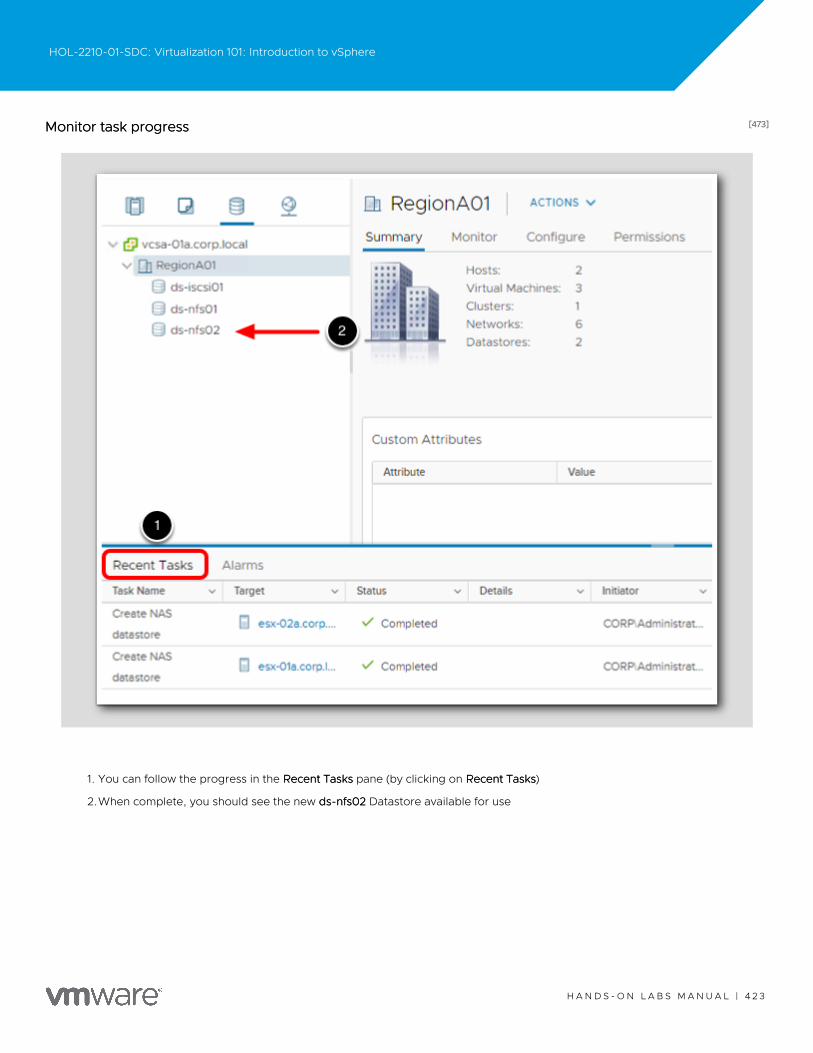
[473][473]Monitor task progressMonitor task progress
1. You can follow the progress in the Recent TasksRecent Tasks pane (by clicking on Recent TasksRecent Tasks)
2.When complete, you should see the new ds-nfs02ds-nfs02 Datastore available for use
HOL-2210-01-SDC: Virtualization 101: Introduction to vSphere
H A N D S - O N L A B S M A N U A L | 4 2 3
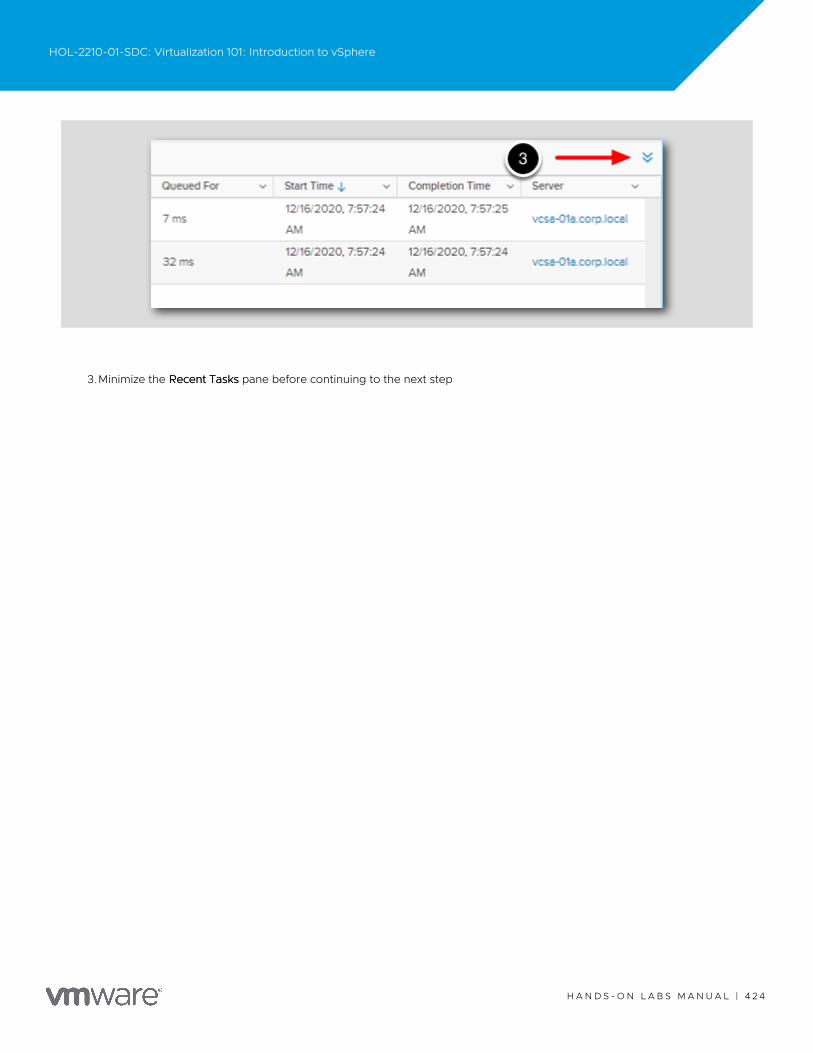
3.Minimize the Recent TasksRecent Tasks pane before continuing to the next step
HOL-2210-01-SDC: Virtualization 101: Introduction to vSphere
H A N D S - O N L A B S M A N U A L | 4 2 4
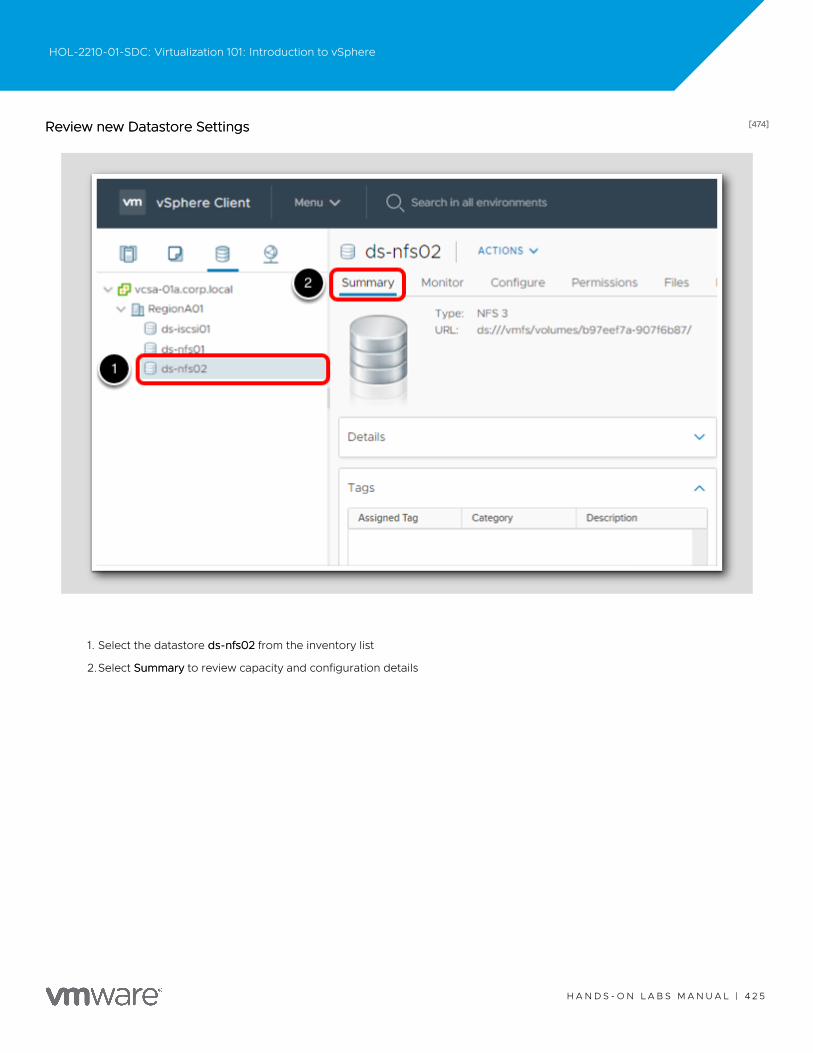
[474][474]Review new Datastore SettingsReview new Datastore Settings
1. Select the datastore ds-nfs02ds-nfs02 from the inventory list
2.Select SummarySummary to review capacity and configuration details
HOL-2210-01-SDC: Virtualization 101: Introduction to vSphere
H A N D S - O N L A B S M A N U A L | 4 2 5

[475][475]Create a vSphere iSCSI DatastoreCreate a vSphere iSCSI Datastore
1. Select RegionA01RegionA01 Datacenter.
HOL-2210-01-SDC: Virtualization 101: Introduction to vSphere
H A N D S - O N L A B S M A N U A L | 4 2 6

[476][476]New DatastoreNew Datastore
In this section, you will create a new vSphere iSCSI Datastore with a pre-provisioned iSCSI LUN.
1. Select ActionsActions.
2.Select StorageStorage.
3.Select New DatastoreNew Datastore.
HOL-2210-01-SDC: Virtualization 101: Introduction to vSphere
H A N D S - O N L A B S M A N U A L | 4 2 7

[477][477]New Datastore - TypeNew Datastore - Type
1. Verify VMFSVMFS is selected.
2.Click NextNext.
HOL-2210-01-SDC: Virtualization 101: Introduction to vSphere
H A N D S - O N L A B S M A N U A L | 4 2 8

[478][478]New Datastore - Name and Device configurationNew Datastore - Name and Device configuration
1. Give the new Datastore the name ds-iscsi02ds-iscsi02.
2.Select a Host to view the accessible disks/LUNs and select esx-01a.corp.localesx-01a.corp.local in the drop-down box.
NoteNote: Do notnot click Next just yet, proceed to the next step!
HOL-2210-01-SDC: Virtualization 101: Introduction to vSphere
H A N D S - O N L A B S M A N U A L | 4 2 9
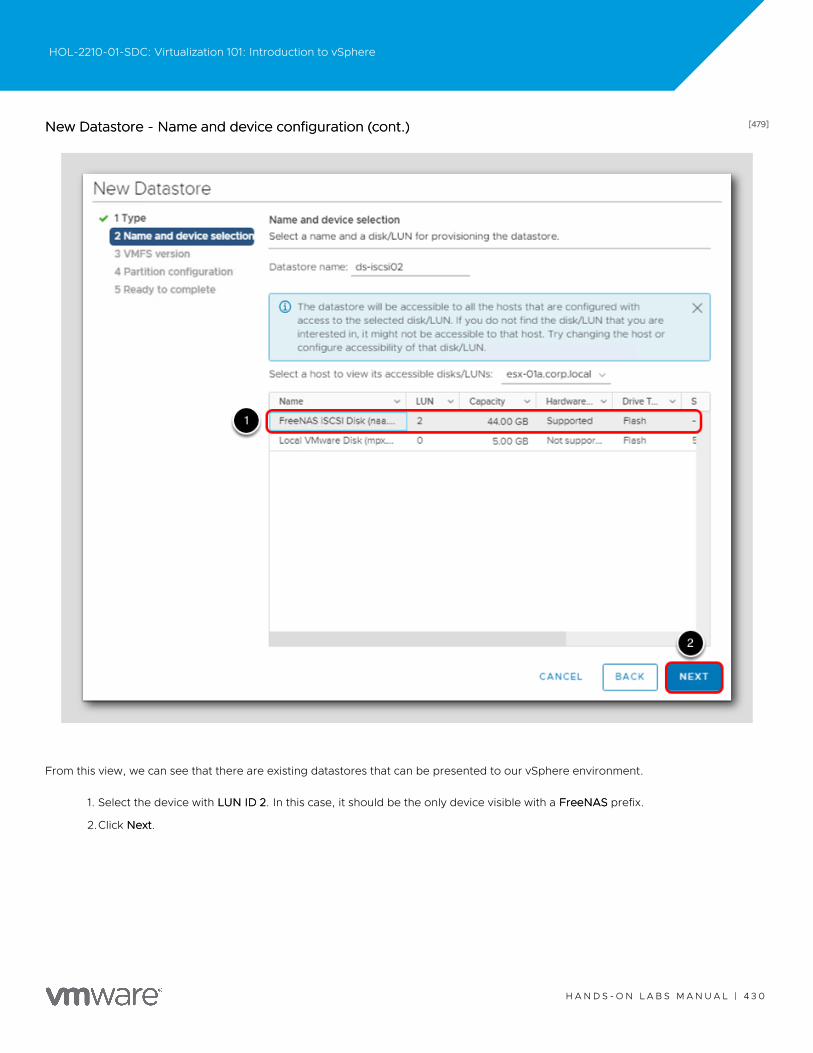
[479][479]New Datastore - Name and device configuration (cont.)New Datastore - Name and device configuration (cont.)
From this view, we can see that there are existing datastores that can be presented to our vSphere environment.
1. Select the device with LUN ID 2LUN ID 2. In this case, it should be the only device visible with a FreeNASFreeNAS prefix.
2.Click NextNext.
HOL-2210-01-SDC: Virtualization 101: Introduction to vSphere
H A N D S - O N L A B S M A N U A L | 4 3 0
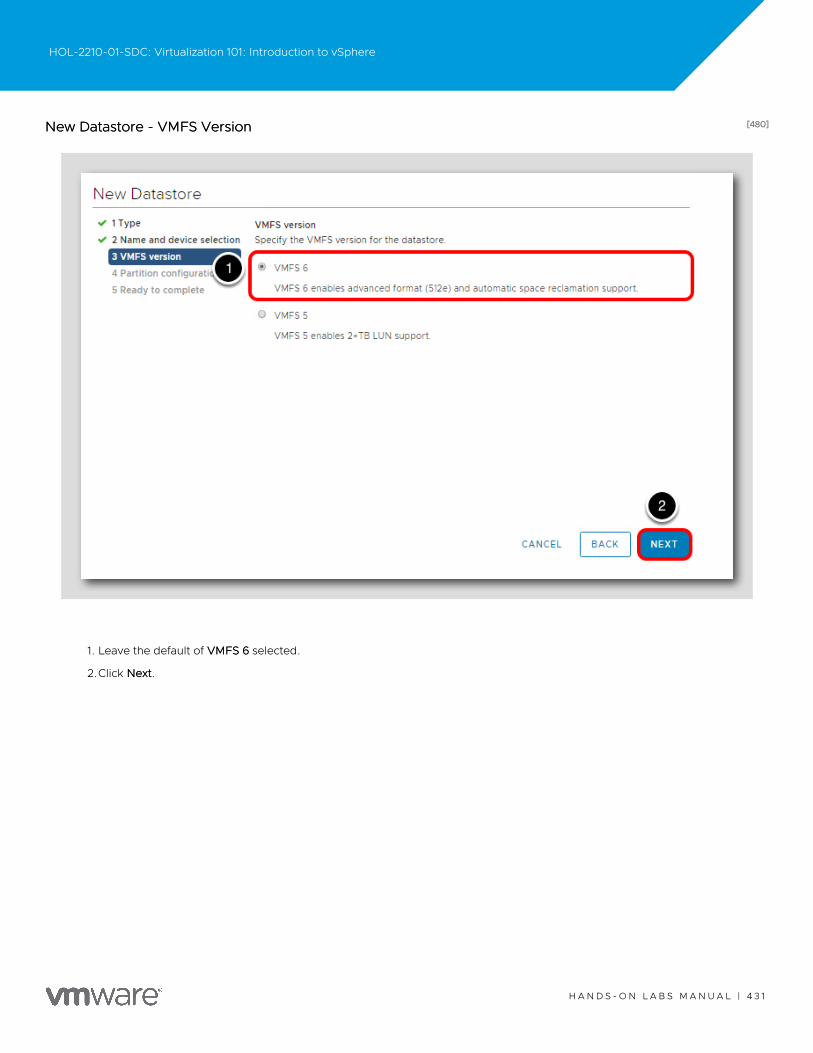
[480][480]New Datastore - VMFS VersionNew Datastore - VMFS Version
1. Leave the default of VMFS 6VMFS 6 selected.
2.Click NextNext.
HOL-2210-01-SDC: Virtualization 101: Introduction to vSphere
H A N D S - O N L A B S M A N U A L | 4 3 1
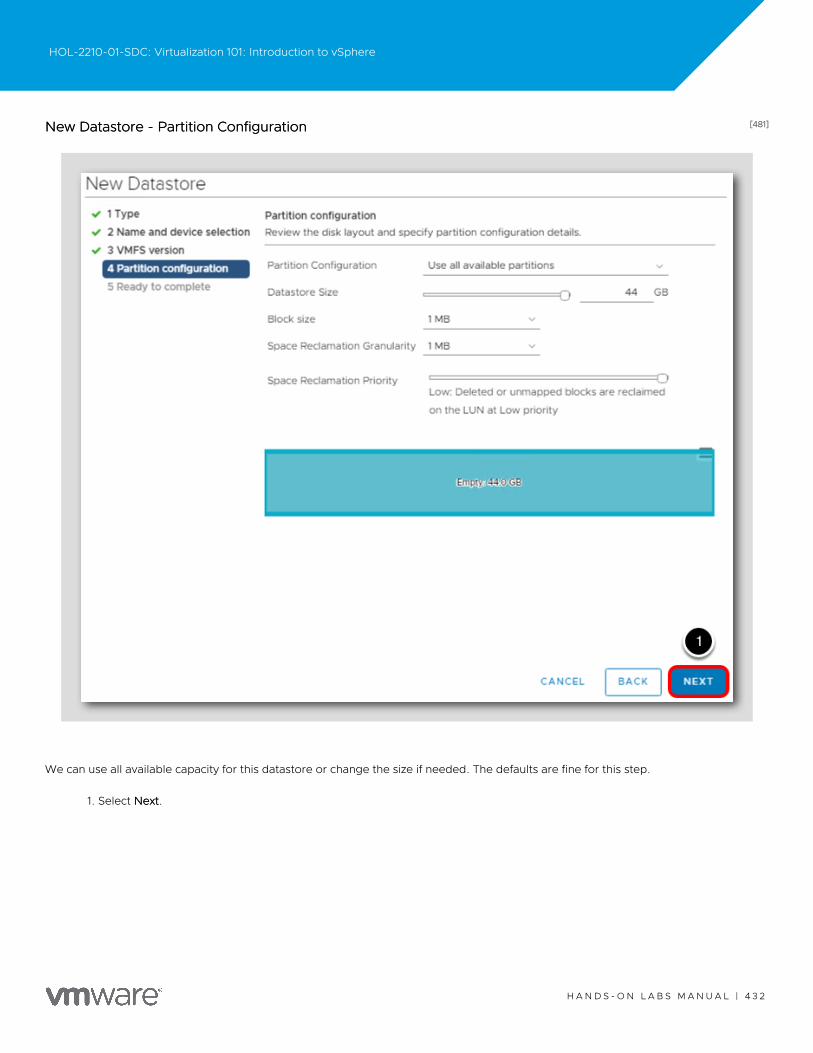
[481][481]New Datastore - Partition ConfigurationNew Datastore - Partition Configuration
We can use all available capacity for this datastore or change the size if needed. The defaults are fine for this step.
1. Select NextNext.
HOL-2210-01-SDC: Virtualization 101: Introduction to vSphere
H A N D S - O N L A B S M A N U A L | 4 3 2
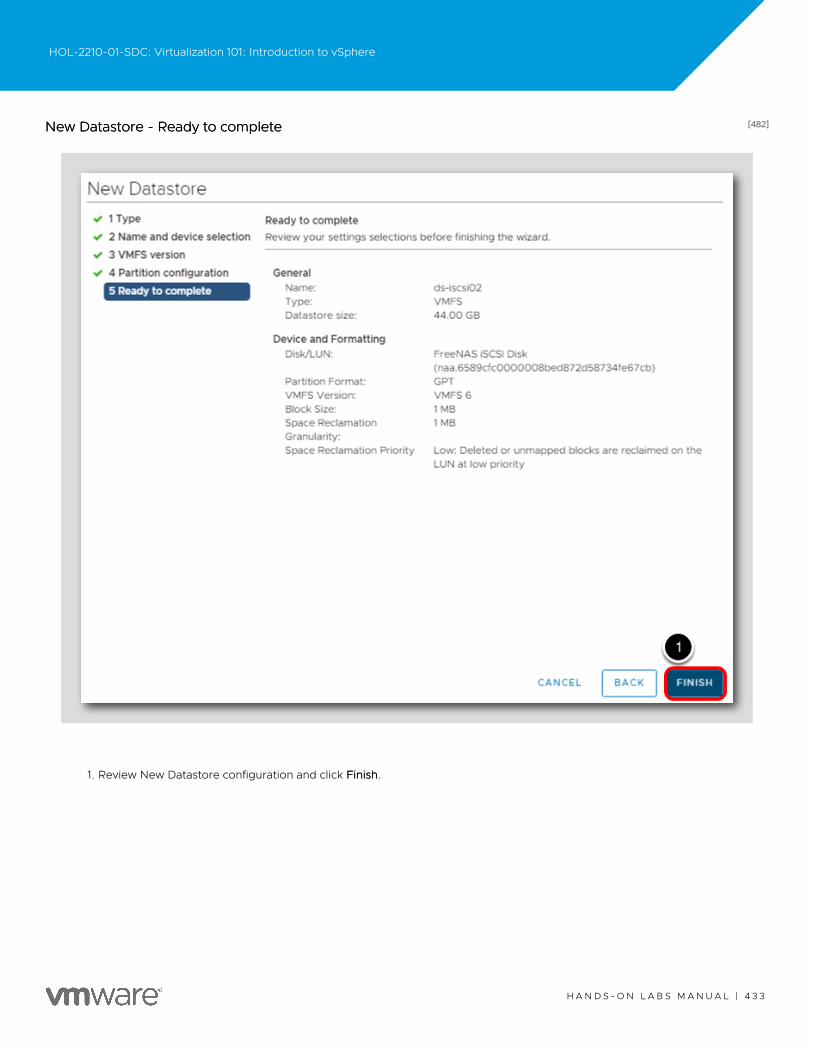
[482][482]New Datastore - Ready to completeNew Datastore - Ready to complete
1. Review New Datastore configuration and click FinishFinish.
HOL-2210-01-SDC: Virtualization 101: Introduction to vSphere
H A N D S - O N L A B S M A N U A L | 4 3 3
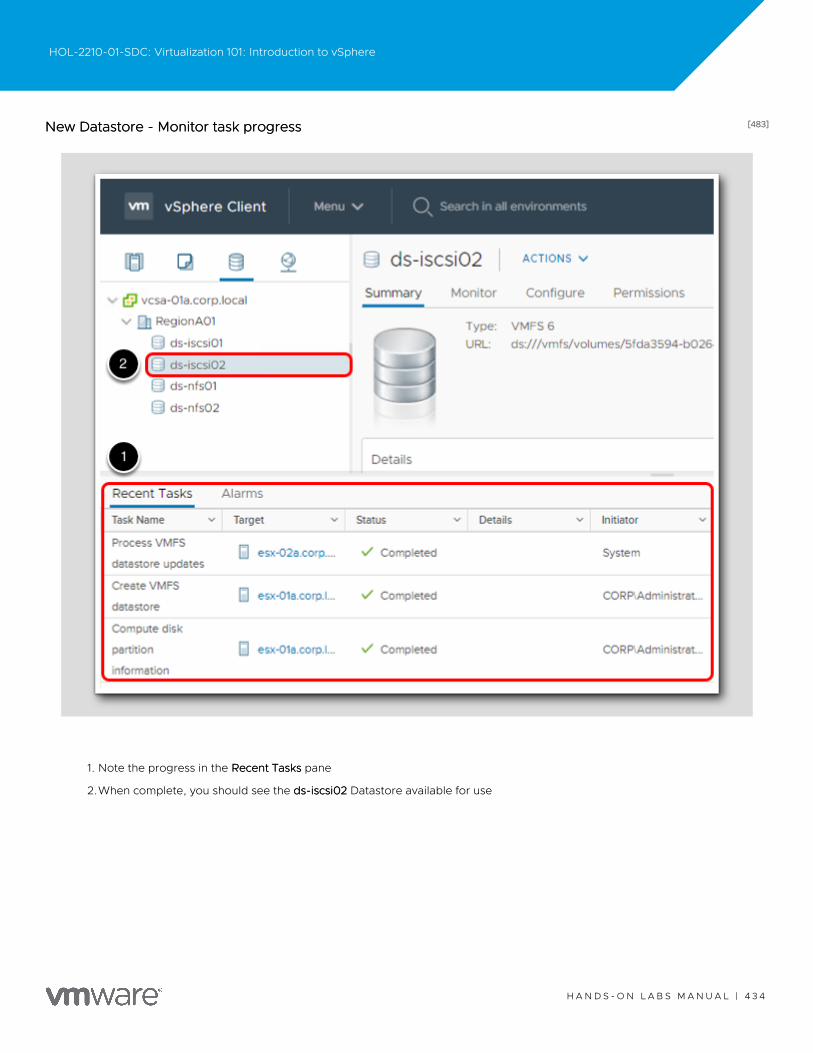
[483][483]New Datastore - Monitor task progressNew Datastore - Monitor task progress
1. Note the progress in the Recent TasksRecent Tasks pane
2.When complete, you should see the ds-iscsi02ds-iscsi02 Datastore available for use
HOL-2210-01-SDC: Virtualization 101: Introduction to vSphere
H A N D S - O N L A B S M A N U A L | 4 3 4
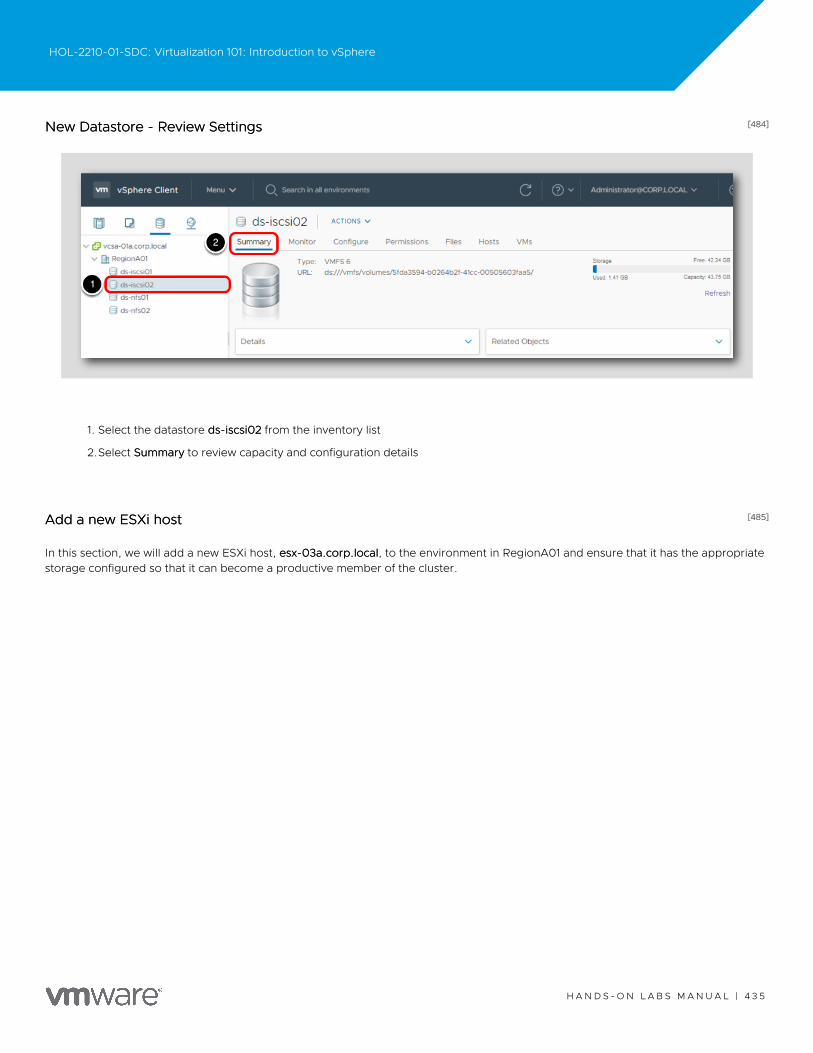
[484][484]New Datastore - Review SettingsNew Datastore - Review Settings
1. Select the datastore ds-iscsi02ds-iscsi02 from the inventory list
2.Select SummarySummary to review capacity and configuration details
[485][485]Add a new ESXi hostAdd a new ESXi host
In this section, we will add a new ESXi host, esx-03a.corp.localesx-03a.corp.local, to the environment in RegionA01 and ensure that it has the appropriatestorage configured so that it can become a productive member of the cluster.
HOL-2210-01-SDC: Virtualization 101: Introduction to vSphere
H A N D S - O N L A B S M A N U A L | 4 3 5
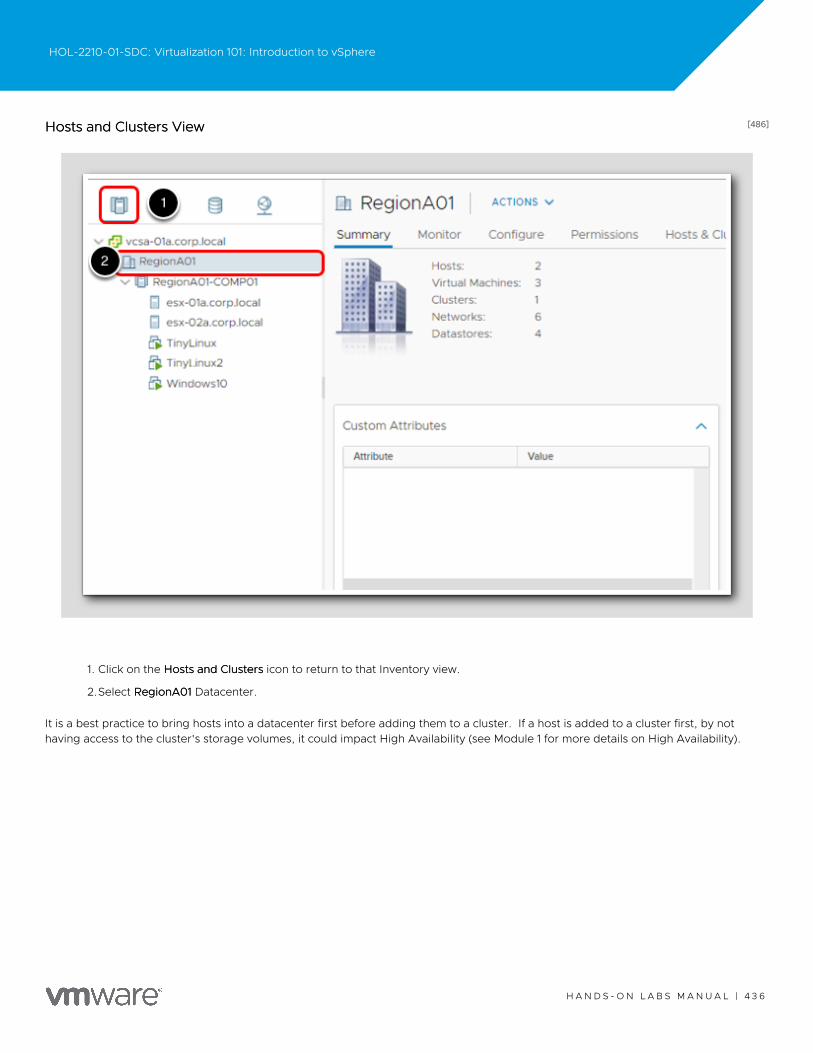
[486][486]Hosts and Clusters ViewHosts and Clusters View
1. Click on the Hosts and ClustersHosts and Clusters icon to return to that Inventory view.
2.Select RegionA01RegionA01 Datacenter.
It is a best practice to bring hosts into a datacenter first before adding them to a cluster. If a host is added to a cluster first, by nothaving access to the cluster's storage volumes, it could impact High Availability (see Module 1 for more details on High Availability).
HOL-2210-01-SDC: Virtualization 101: Introduction to vSphere
H A N D S - O N L A B S M A N U A L | 4 3 6
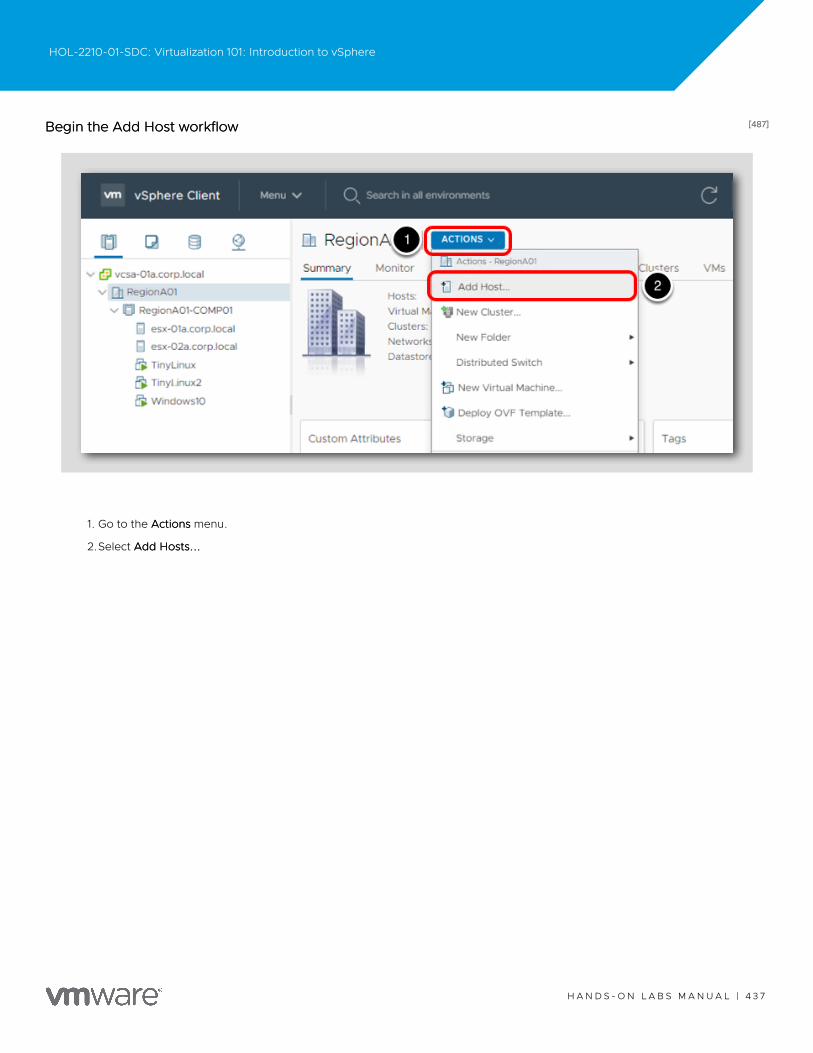
[487][487]Begin the Add Host workflowBegin the Add Host workflow
1. Go to the ActionsActions menu.
2.Select Add Hosts...Add Hosts...
HOL-2210-01-SDC: Virtualization 101: Introduction to vSphere
H A N D S - O N L A B S M A N U A L | 4 3 7
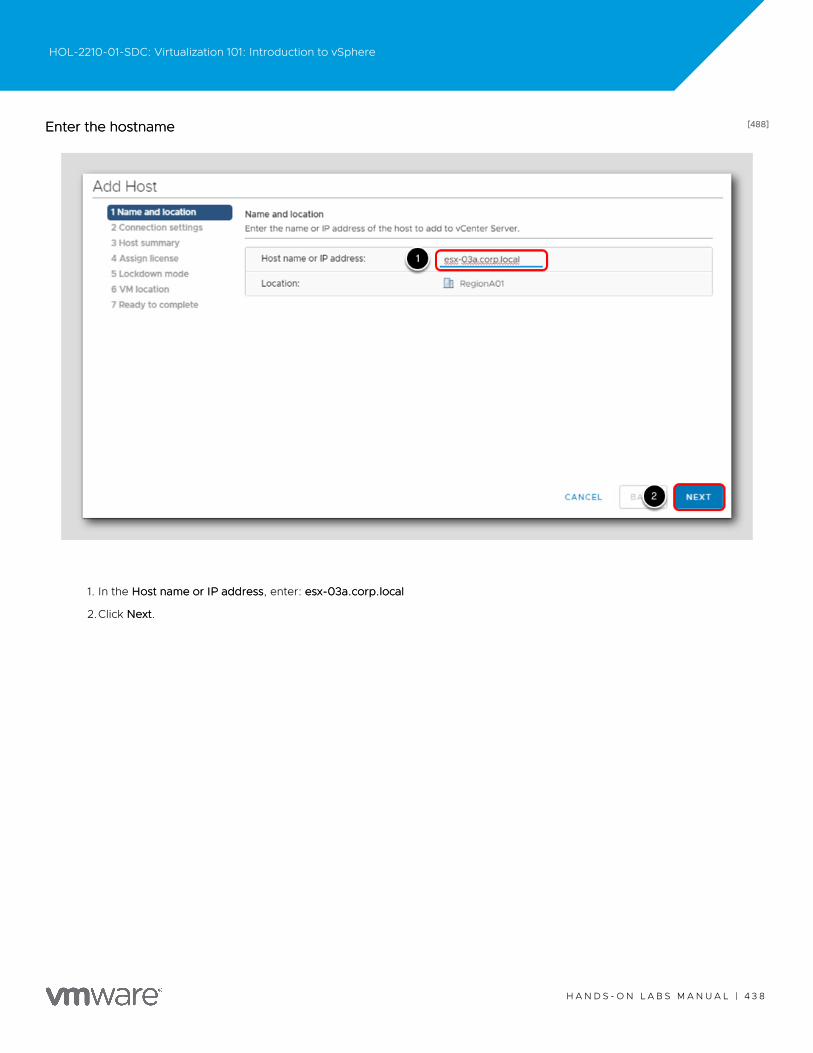
[488][488]Enter the hostnameEnter the hostname
1. In the Host name or IP addressHost name or IP address, enter: esx-03a.corp.localesx-03a.corp.local
2.Click NextNext.
HOL-2210-01-SDC: Virtualization 101: Introduction to vSphere
H A N D S - O N L A B S M A N U A L | 4 3 8
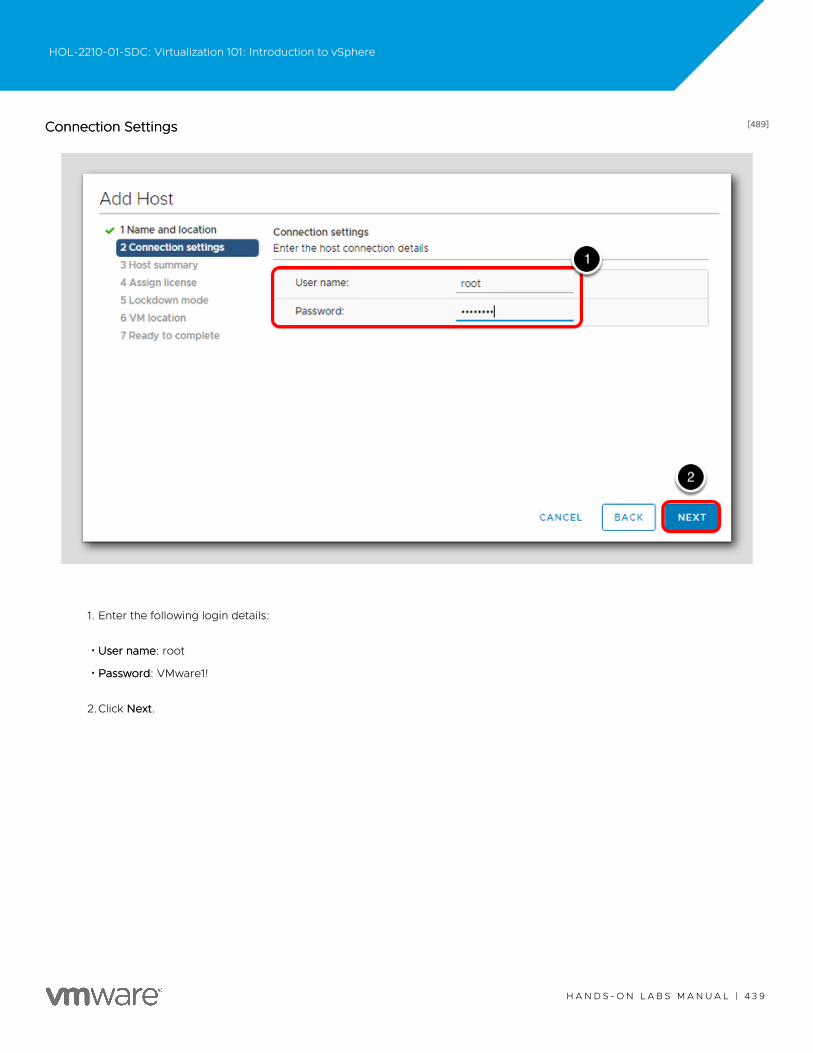
[489][489]Connection SettingsConnection Settings
1. Enter the following login details:
•User nameUser name: root
•PasswordPassword: VMware1!
2.Click NextNext.
HOL-2210-01-SDC: Virtualization 101: Introduction to vSphere
H A N D S - O N L A B S M A N U A L | 4 3 9
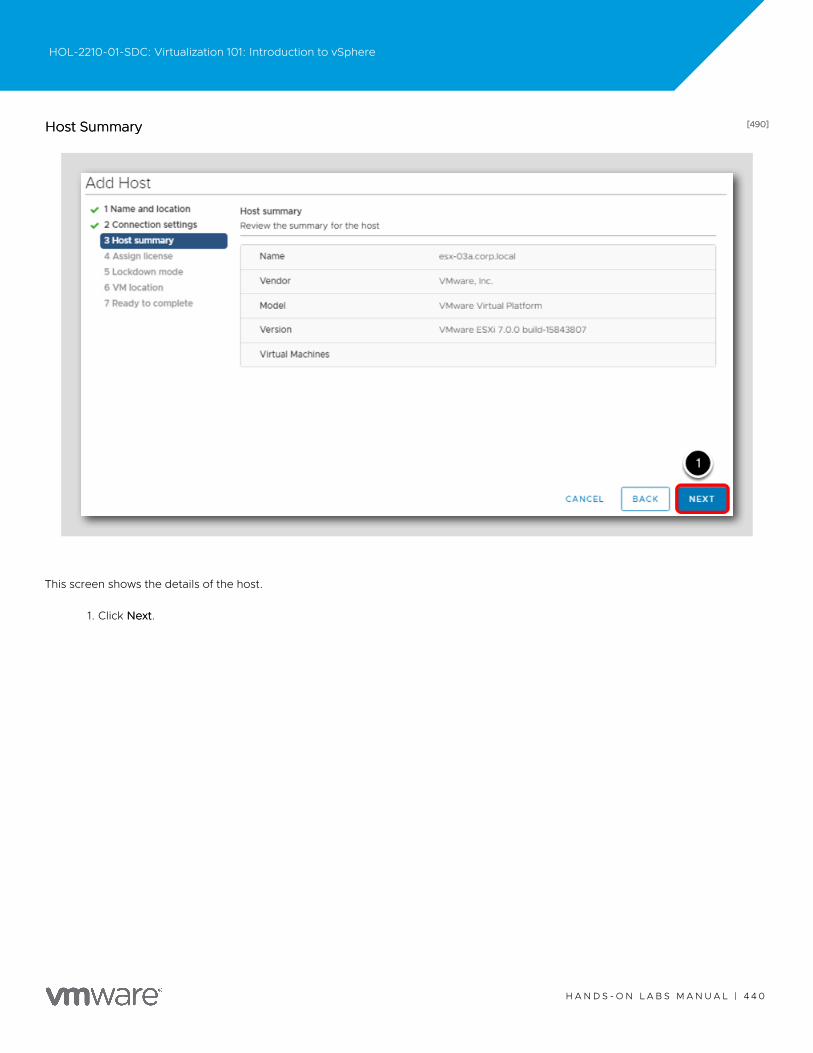
[490][490]Host SummaryHost Summary
This screen shows the details of the host.
1. Click NextNext.
HOL-2210-01-SDC: Virtualization 101: Introduction to vSphere
H A N D S - O N L A B S M A N U A L | 4 4 0
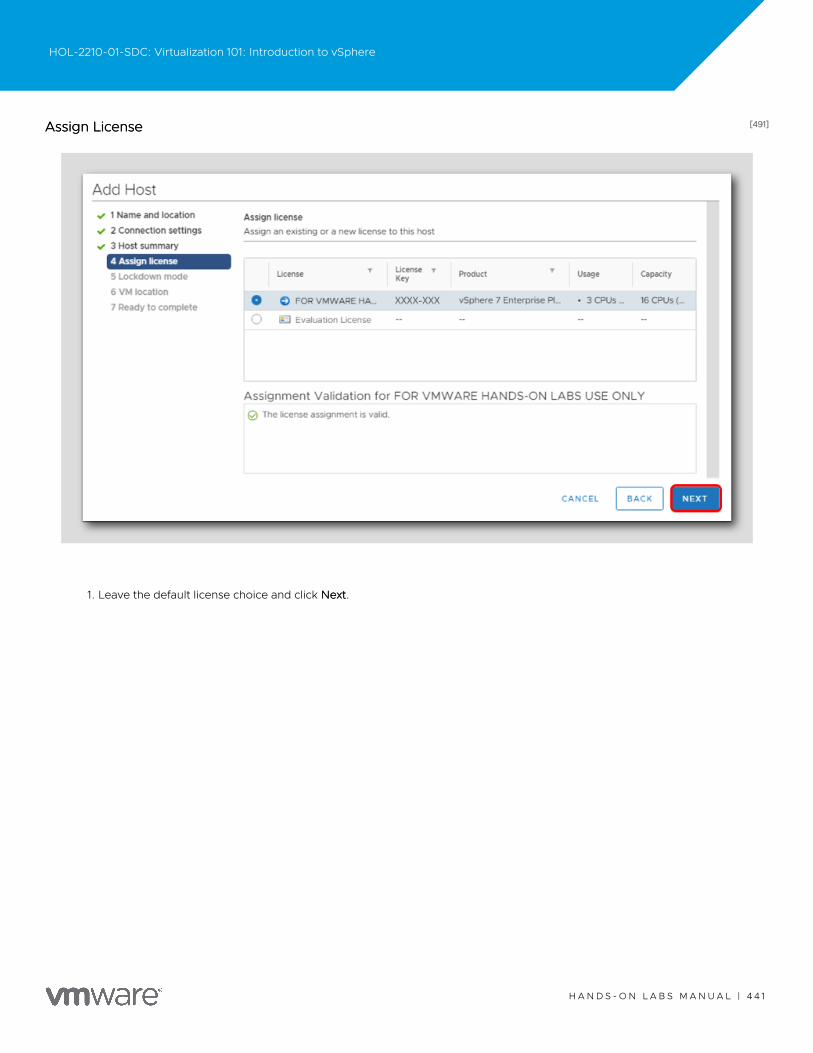
[491][491]Assign LicenseAssign License
1. Leave the default license choice and click NextNext.
HOL-2210-01-SDC: Virtualization 101: Introduction to vSphere
H A N D S - O N L A B S M A N U A L | 4 4 1
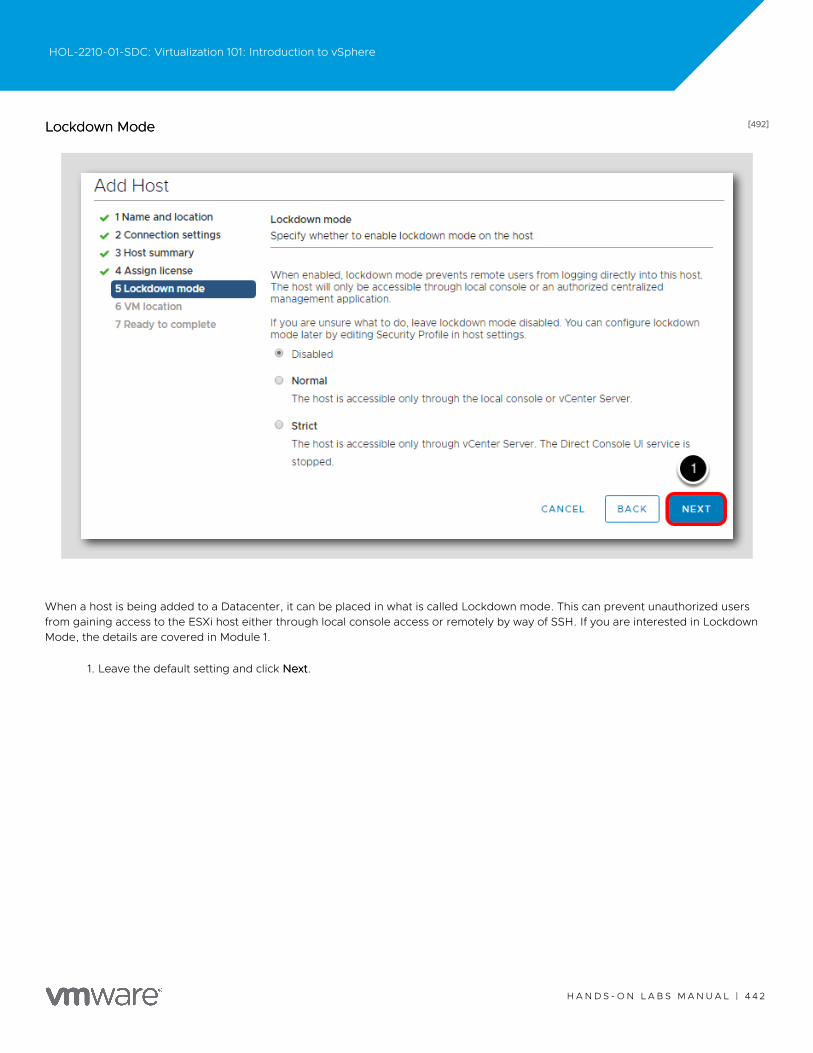
[492][492]Lockdown ModeLockdown Mode
When a host is being added to a Datacenter, it can be placed in what is called Lockdown mode. This can prevent unauthorized usersfrom gaining access to the ESXi host either through local console access or remotely by way of SSH. If you are interested in LockdownMode, the details are covered in Module 1.
1. Leave the default setting and click NextNext.
HOL-2210-01-SDC: Virtualization 101: Introduction to vSphere
H A N D S - O N L A B S M A N U A L | 4 4 2

[493][493]VM LocationVM Location
The virtual machines currently on the ESXi host being imported can be placed in either the Datacenter itself or in the default Discoveredvirtual machines folder.
1. Since there are no virtual machines on esx-03a.corp.local, leave the default setting and click NextNext.
HOL-2210-01-SDC: Virtualization 101: Introduction to vSphere
H A N D S - O N L A B S M A N U A L | 4 4 3
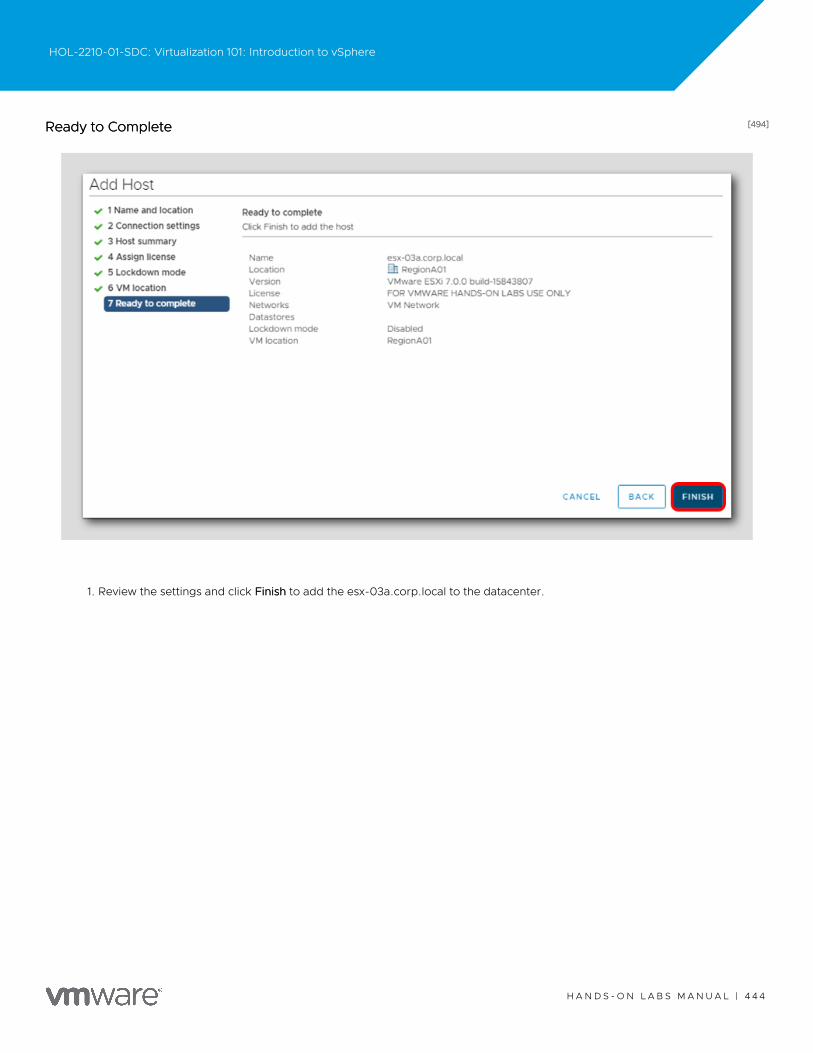
[494][494]Ready to CompleteReady to Complete
1. Review the settings and click FinishFinish to add the esx-03a.corp.local to the datacenter.
HOL-2210-01-SDC: Virtualization 101: Introduction to vSphere
H A N D S - O N L A B S M A N U A L | 4 4 4
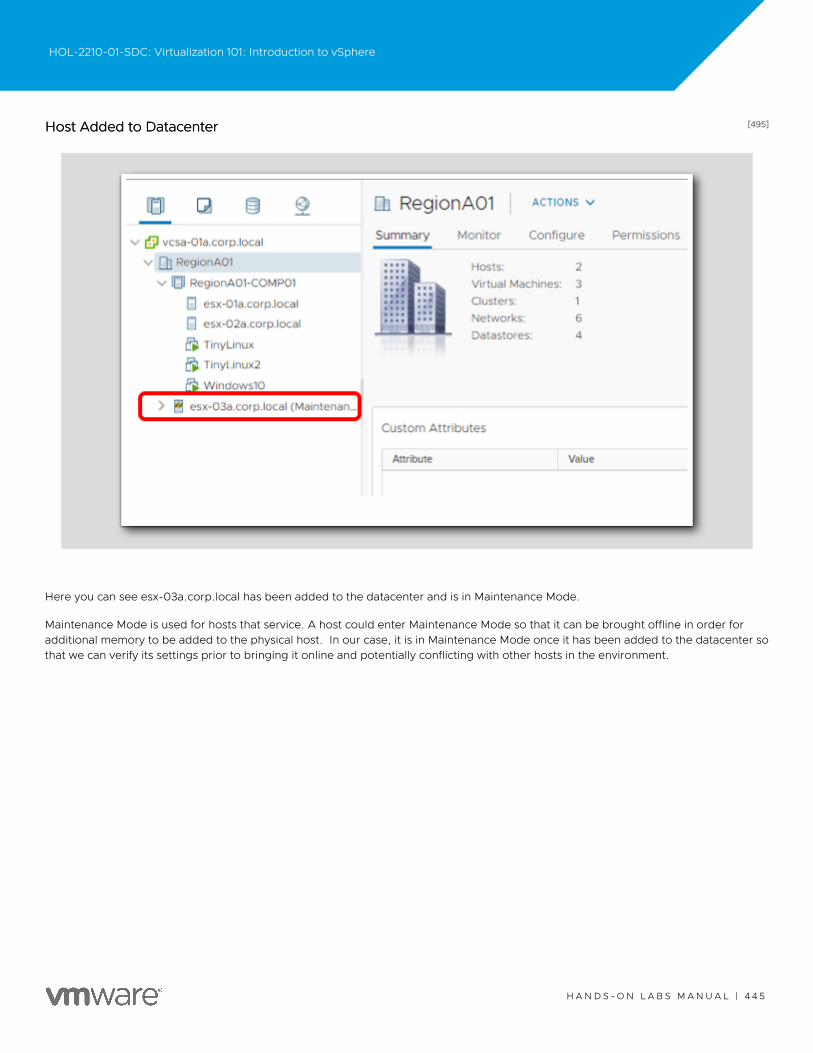
[495][495]Host Added to DatacenterHost Added to Datacenter
Here you can see esx-03a.corp.local has been added to the datacenter and is in Maintenance Mode.
Maintenance Mode is used for hosts that service. A host could enter Maintenance Mode so that it can be brought offline in order foradditional memory to be added to the physical host. In our case, it is in Maintenance Mode once it has been added to the datacenter sothat we can verify its settings prior to bringing it online and potentially conflicting with other hosts in the environment.
HOL-2210-01-SDC: Virtualization 101: Introduction to vSphere
H A N D S - O N L A B S M A N U A L | 4 4 5
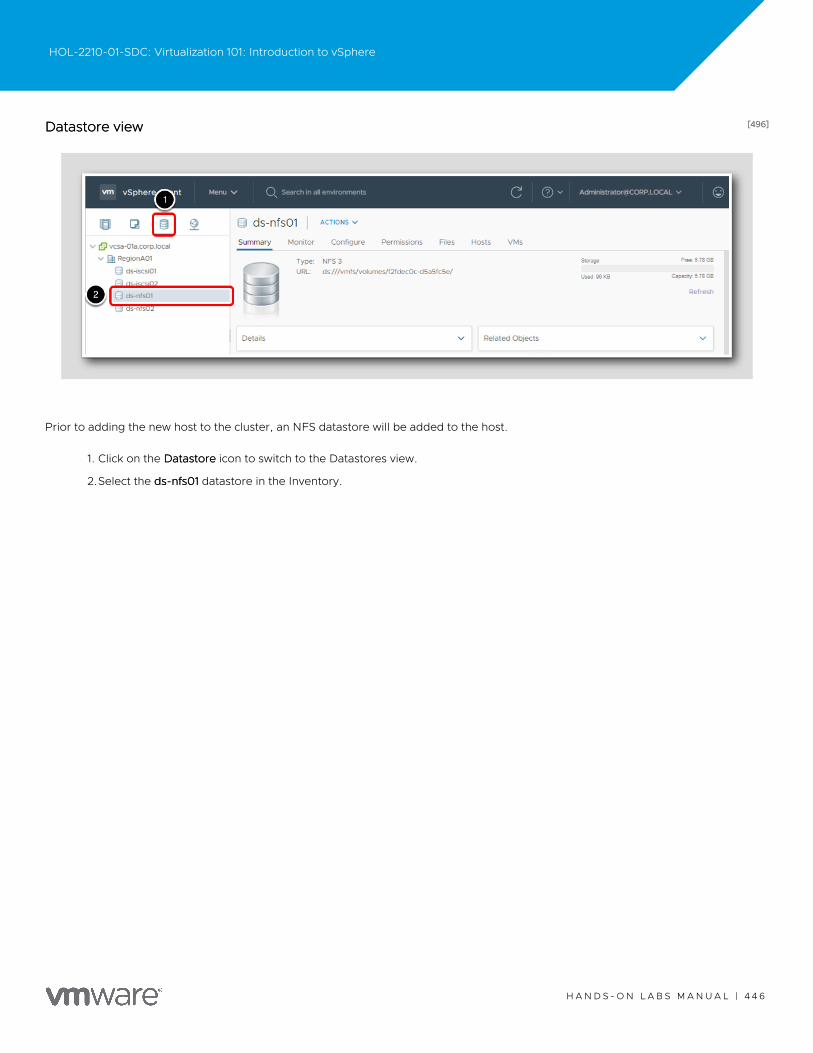
[496][496]Datastore viewDatastore view
Prior to adding the new host to the cluster, an NFS datastore will be added to the host.
1. Click on the DatastoreDatastore icon to switch to the Datastores view.
2.Select the ds-nfs01ds-nfs01 datastore in the Inventory.
HOL-2210-01-SDC: Virtualization 101: Introduction to vSphere
H A N D S - O N L A B S M A N U A L | 4 4 6
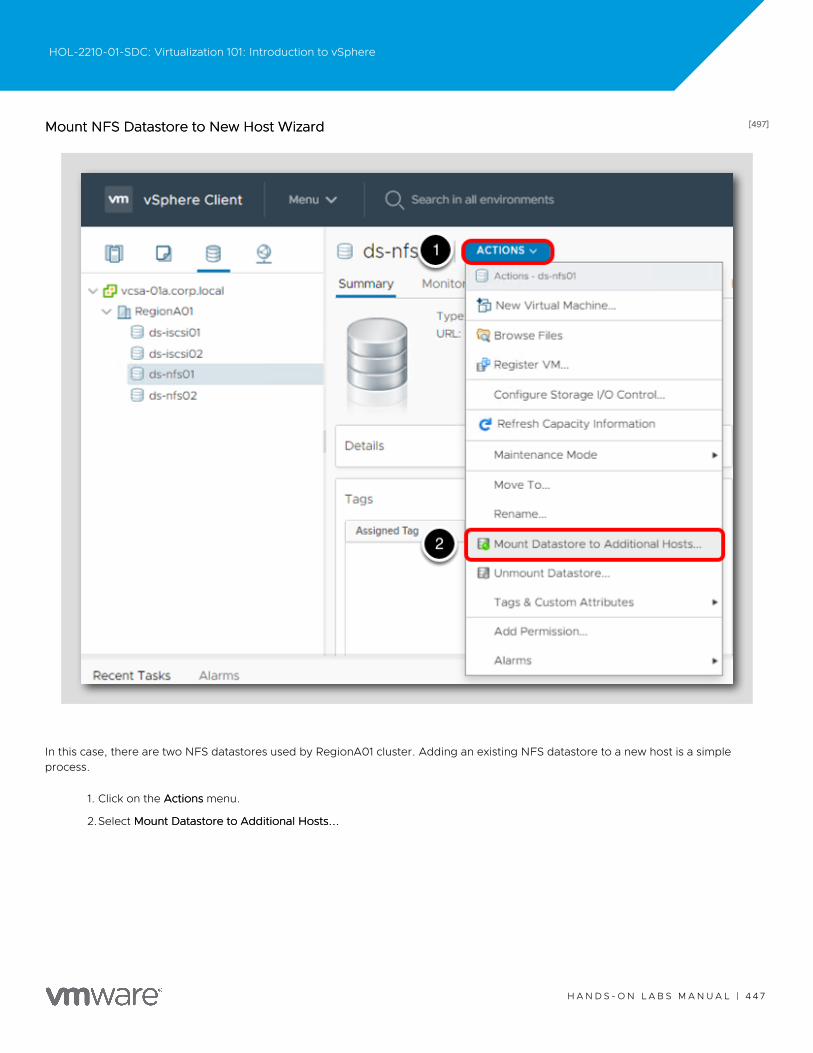
[497][497]Mount NFS Datastore to New Host WizardMount NFS Datastore to New Host Wizard
In this case, there are two NFS datastores used by RegionA01 cluster. Adding an existing NFS datastore to a new host is a simpleprocess.
1. Click on the ActionsActions menu.
2.Select Mount Datastore to Additional Hosts...Mount Datastore to Additional Hosts...
HOL-2210-01-SDC: Virtualization 101: Introduction to vSphere
H A N D S - O N L A B S M A N U A L | 4 4 7
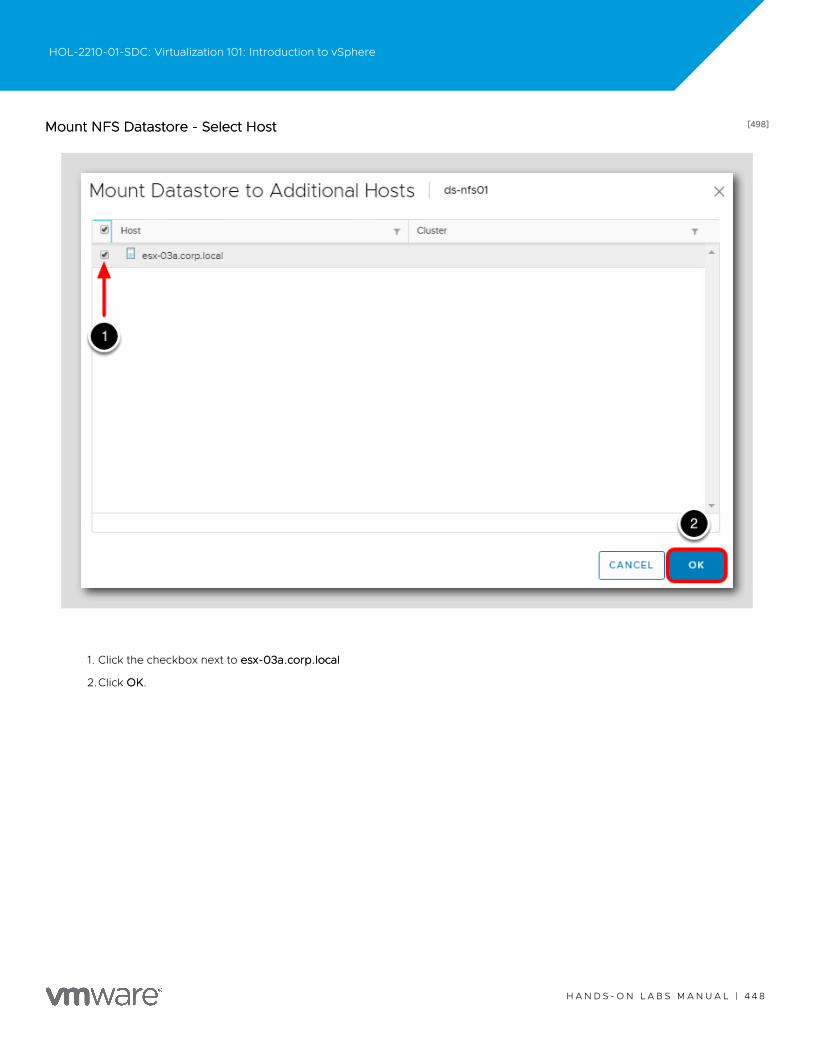
[498][498]Mount NFS Datastore - Select HostMount NFS Datastore - Select Host
1. Click the checkbox next to esx-03a.corp.localesx-03a.corp.local
2.Click OKOK.
HOL-2210-01-SDC: Virtualization 101: Introduction to vSphere
H A N D S - O N L A B S M A N U A L | 4 4 8
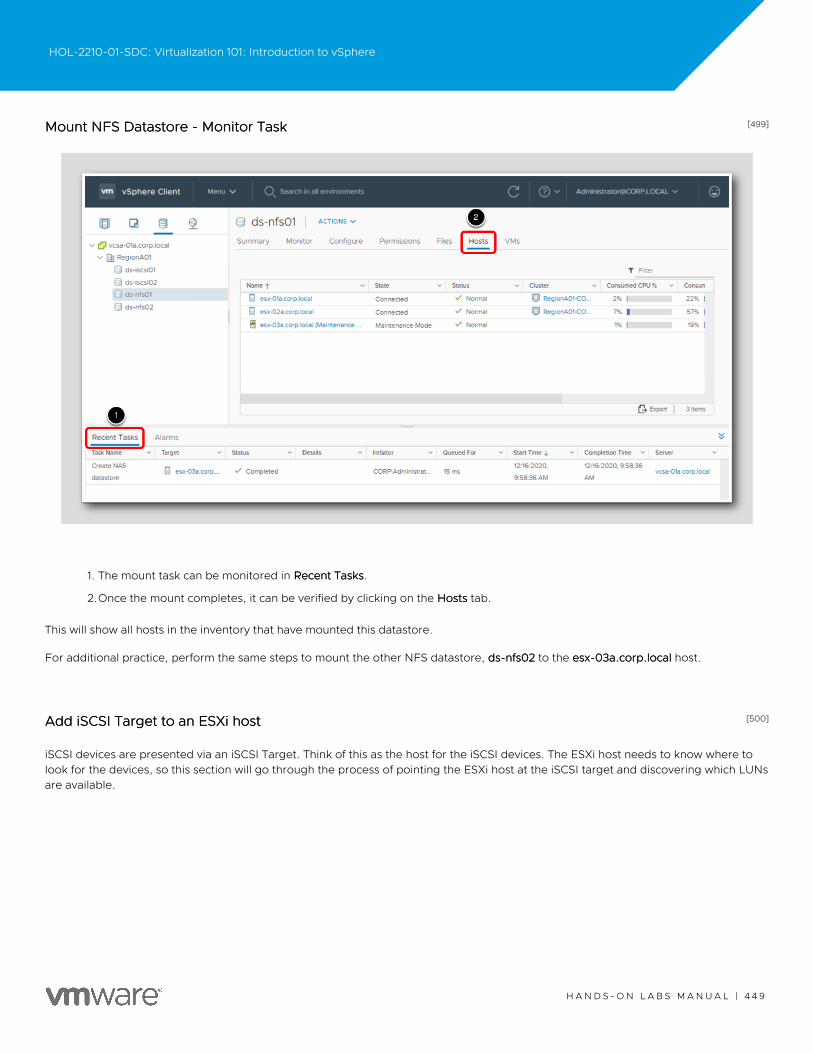
[499][499]Mount NFS Datastore - Monitor TaskMount NFS Datastore - Monitor Task
1. The mount task can be monitored in Recent TasksRecent Tasks.
2.Once the mount completes, it can be verified by clicking on the HostsHosts tab.
This will show all hosts in the inventory that have mounted this datastore.
For additional practice, perform the same steps to mount the other NFS datastore, ds-nfs02ds-nfs02 to the esx-03a.corp.localesx-03a.corp.local host.
[500][500]Add iSCSI Target to an ESXi hostAdd iSCSI Target to an ESXi host
iSCSI devices are presented via an iSCSI Target. Think of this as the host for the iSCSI devices. The ESXi host needs to know where tolook for the devices, so this section will go through the process of pointing the ESXi host at the iSCSI target and discovering which LUNsare available.
HOL-2210-01-SDC: Virtualization 101: Introduction to vSphere
H A N D S - O N L A B S M A N U A L | 4 4 9
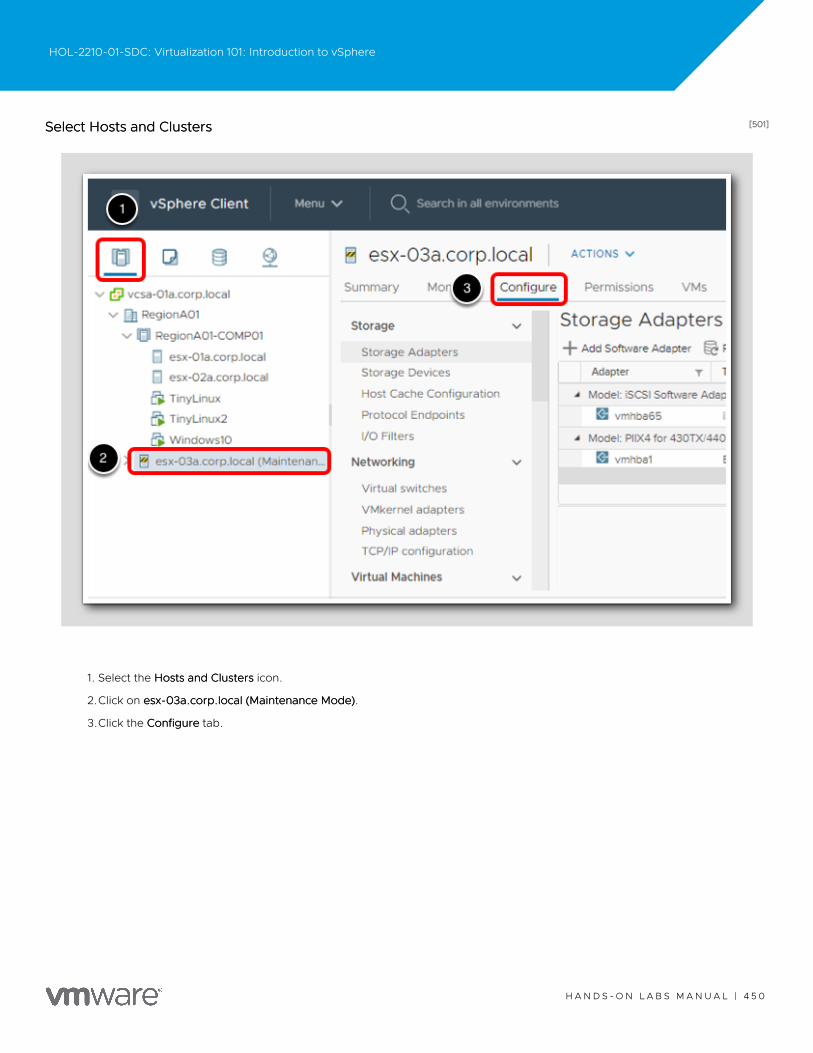
[501][501]Select Hosts and ClustersSelect Hosts and Clusters
1. Select the Hosts and ClustersHosts and Clusters icon.
2.Click on esx-03a.corp.local (Maintenance Mode)esx-03a.corp.local (Maintenance Mode).
3.Click the ConfigureConfigure tab.
HOL-2210-01-SDC: Virtualization 101: Introduction to vSphere
H A N D S - O N L A B S M A N U A L | 4 5 0
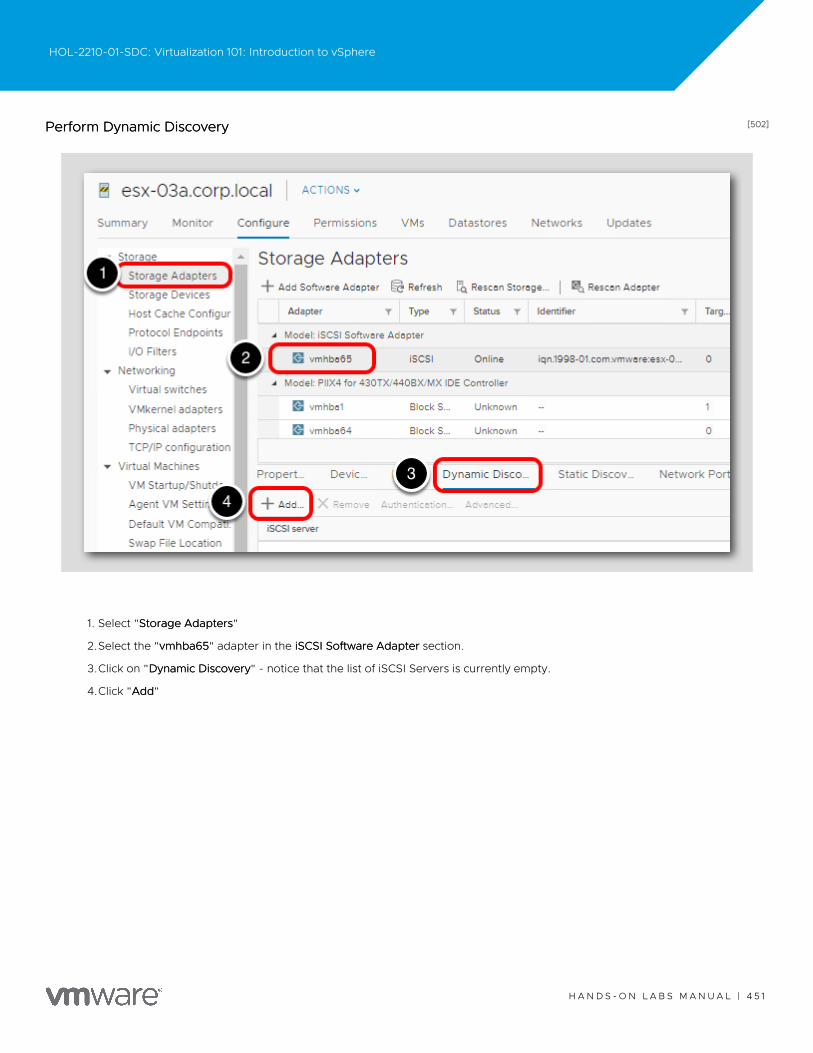
[502][502]Perform Dynamic DiscoveryPerform Dynamic Discovery
1. Select "Storage AdaptersStorage Adapters"
2.Select the "vmhba65vmhba65" adapter in the iSCSI Software AdapteriSCSI Software Adapter section.
3.Click on "Dynamic DiscoveryDynamic Discovery" - notice that the list of iSCSI Servers is currently empty.
4.Click "AddAdd"
HOL-2210-01-SDC: Virtualization 101: Introduction to vSphere
H A N D S - O N L A B S M A N U A L | 4 5 1
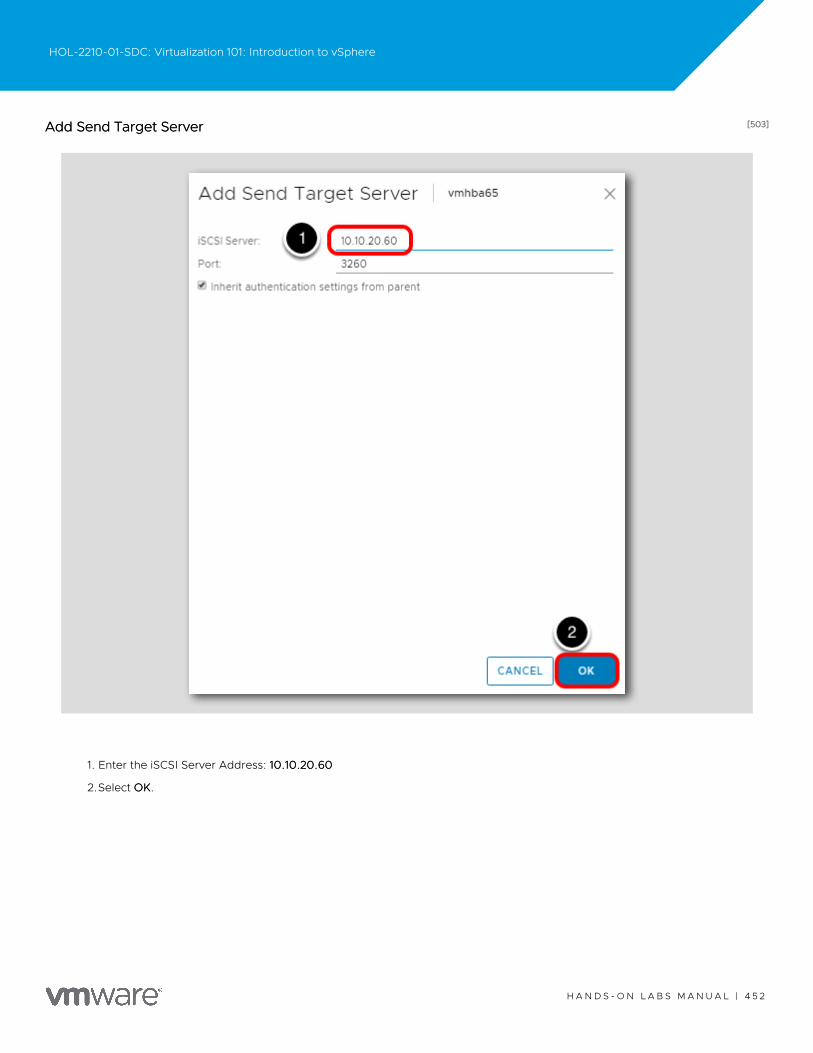
[503][503]Add Send Target ServerAdd Send Target Server
1. Enter the iSCSI Server Address: 10.10.20.6010.10.20.60
2.Select OKOK.
HOL-2210-01-SDC: Virtualization 101: Introduction to vSphere
H A N D S - O N L A B S M A N U A L | 4 5 2
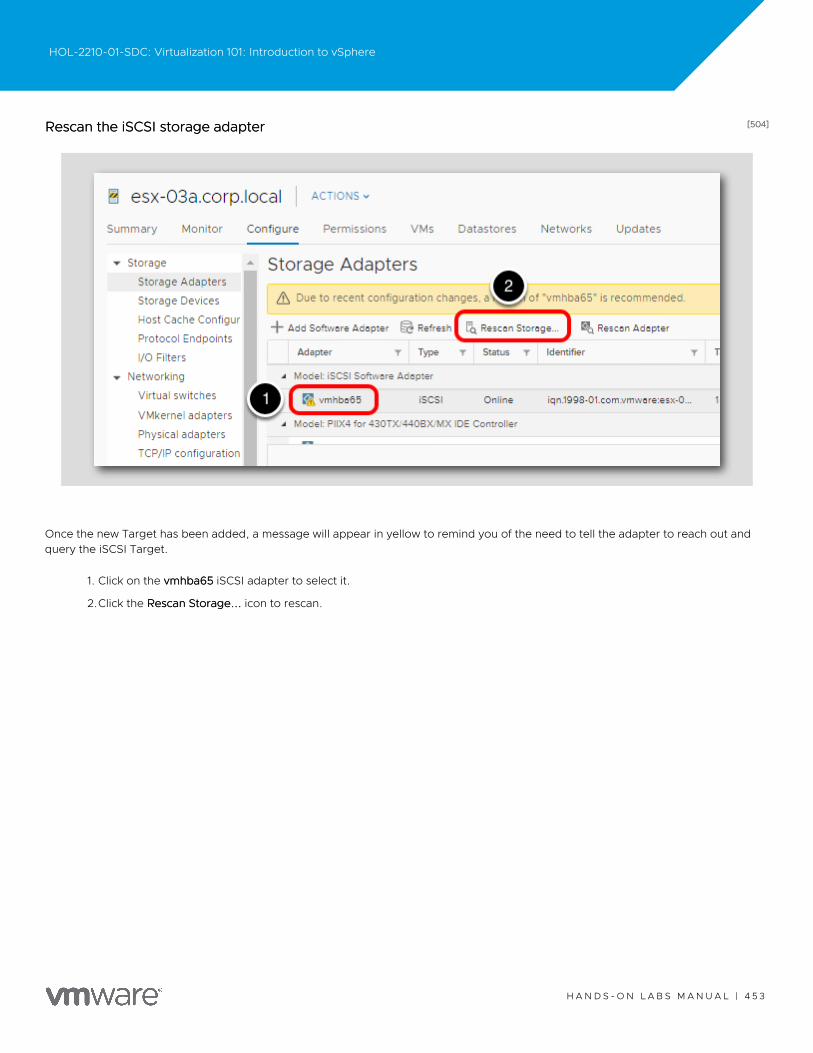
[504][504]Rescan the iSCSI storage adapterRescan the iSCSI storage adapter
Once the new Target has been added, a message will appear in yellow to remind you of the need to tell the adapter to reach out andquery the iSCSI Target.
1. Click on the vmhba65vmhba65 iSCSI adapter to select it.
2.Click the Rescan Storage...Rescan Storage... icon to rescan.
HOL-2210-01-SDC: Virtualization 101: Introduction to vSphere
H A N D S - O N L A B S M A N U A L | 4 5 3
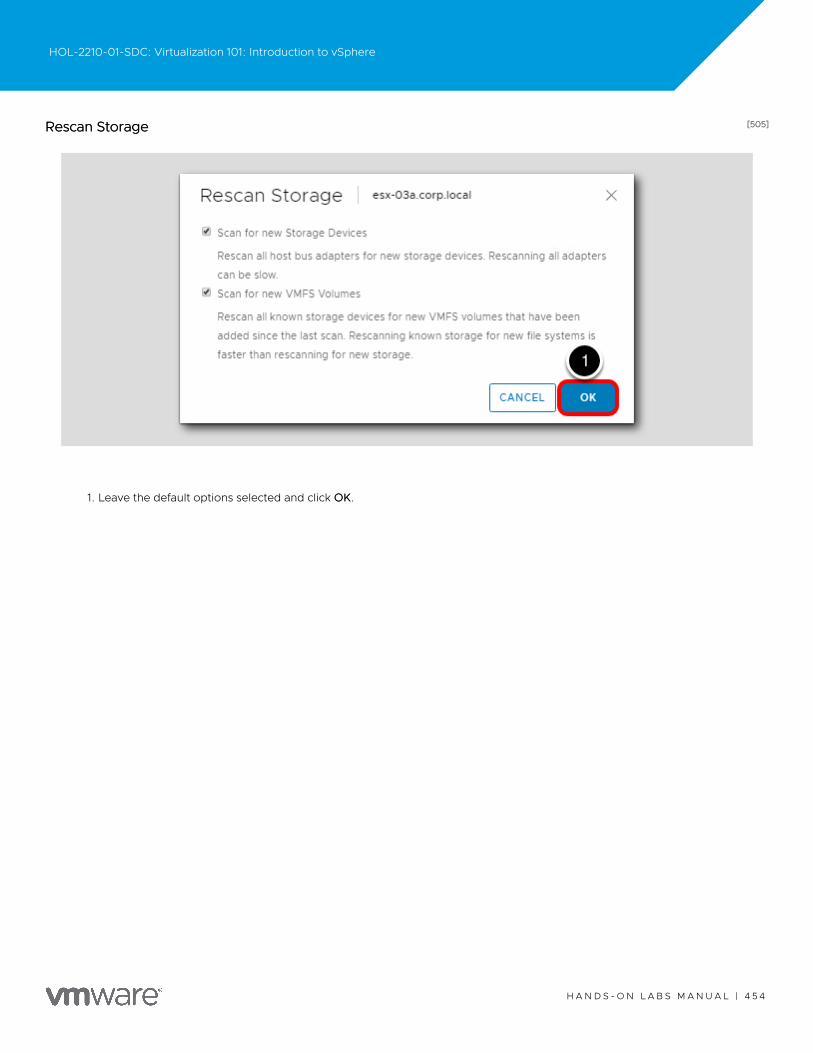
[505][505]Rescan StorageRescan Storage
1. Leave the default options selected and click OKOK.
HOL-2210-01-SDC: Virtualization 101: Introduction to vSphere
H A N D S - O N L A B S M A N U A L | 4 5 4
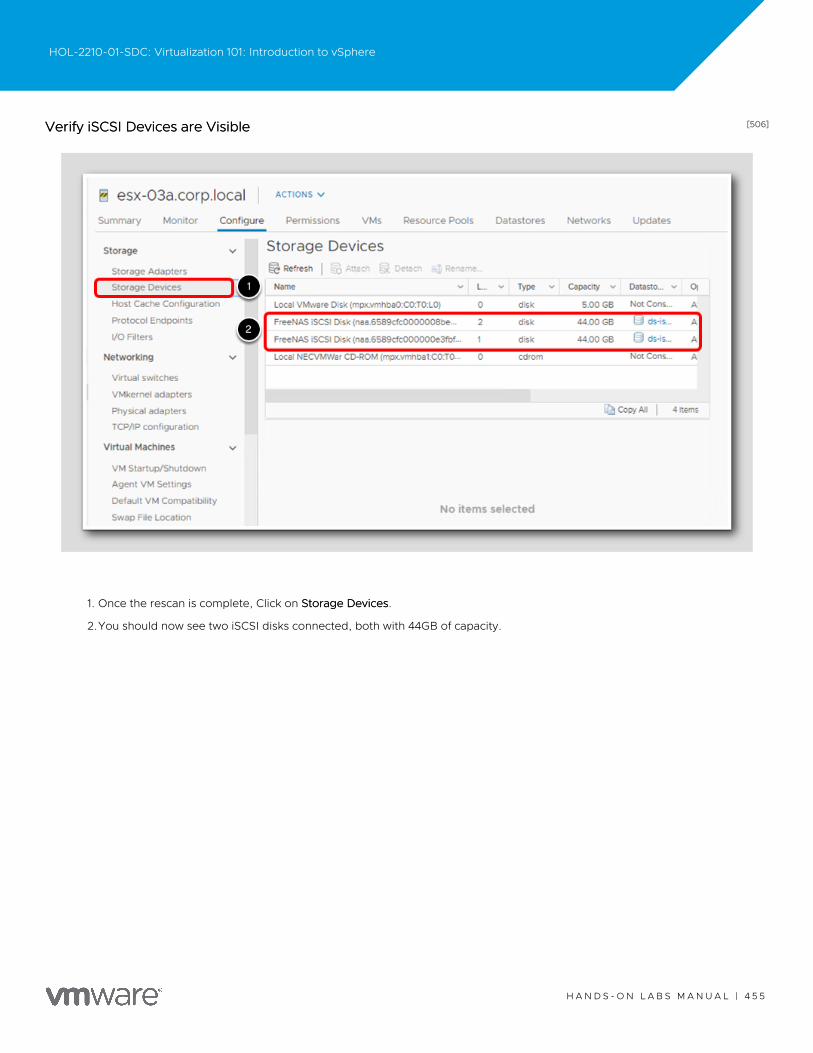
[506][506]Verify iSCSI Devices are VisibleVerify iSCSI Devices are Visible
1. Once the rescan is complete, Click on Storage DevicesStorage Devices.
2.You should now see two iSCSI disks connected, both with 44GB of capacity.
HOL-2210-01-SDC: Virtualization 101: Introduction to vSphere
H A N D S - O N L A B S M A N U A L | 4 5 5

[507][507]Verify iSCSI Datastore AvailabilityVerify iSCSI Datastore Availability
1. Click on the DatastoresDatastores tab.
Notice that the two iSCSI datastores are now visible to the esx-03a.corp.localesx-03a.corp.local host.
HOL-2210-01-SDC: Virtualization 101: Introduction to vSphere
H A N D S - O N L A B S M A N U A L | 4 5 6
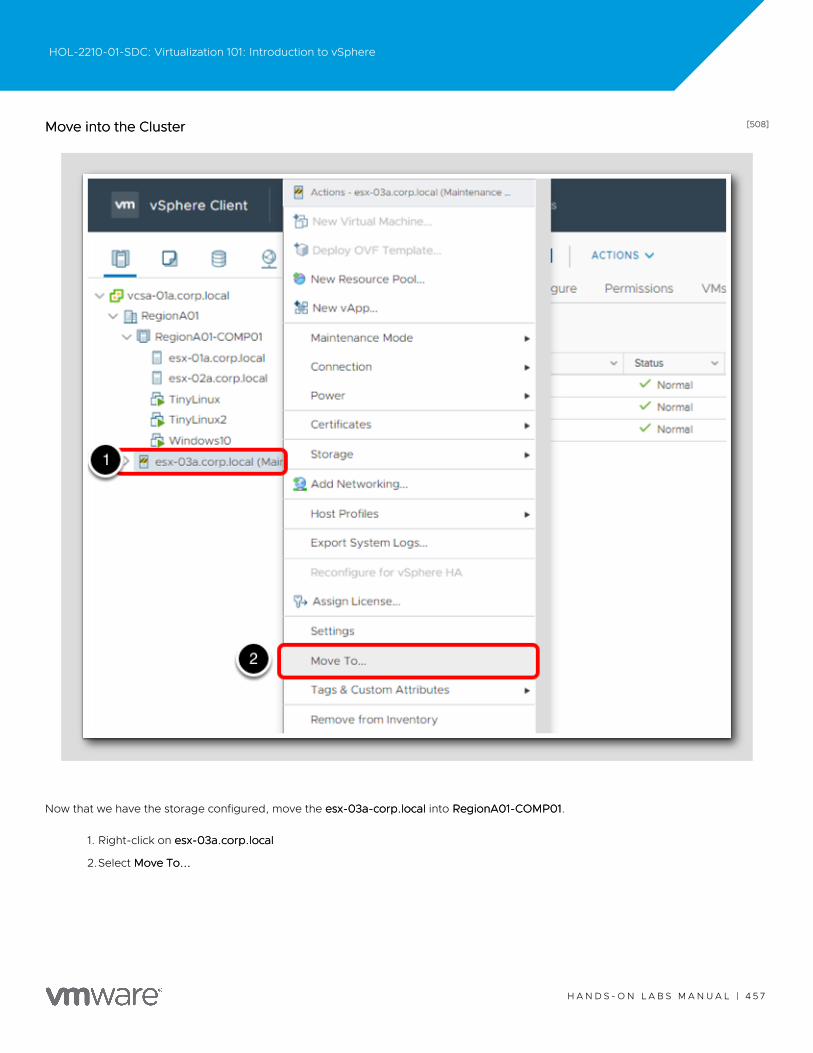
[508][508]Move into the ClusterMove into the Cluster
Now that we have the storage configured, move the esx-03a-corp.localesx-03a-corp.local into RegionA01-COMP01RegionA01-COMP01.
1. Right-click on esx-03a.corp.localesx-03a.corp.local
2.Select Move To...Move To...
HOL-2210-01-SDC: Virtualization 101: Introduction to vSphere
H A N D S - O N L A B S M A N U A L | 4 5 7
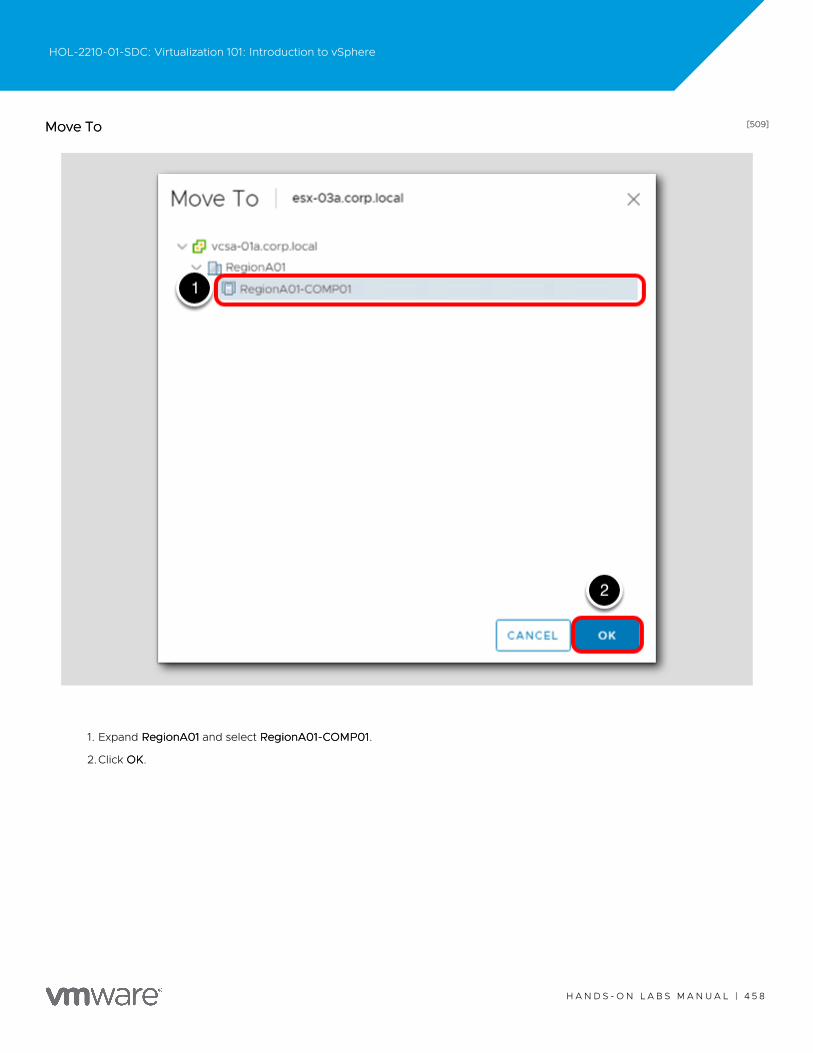
[509][509]Move ToMove To
1. Expand RegionA01RegionA01 and select RegionA01-COMP01RegionA01-COMP01.
2.Click OKOK.
HOL-2210-01-SDC: Virtualization 101: Introduction to vSphere
H A N D S - O N L A B S M A N U A L | 4 5 8
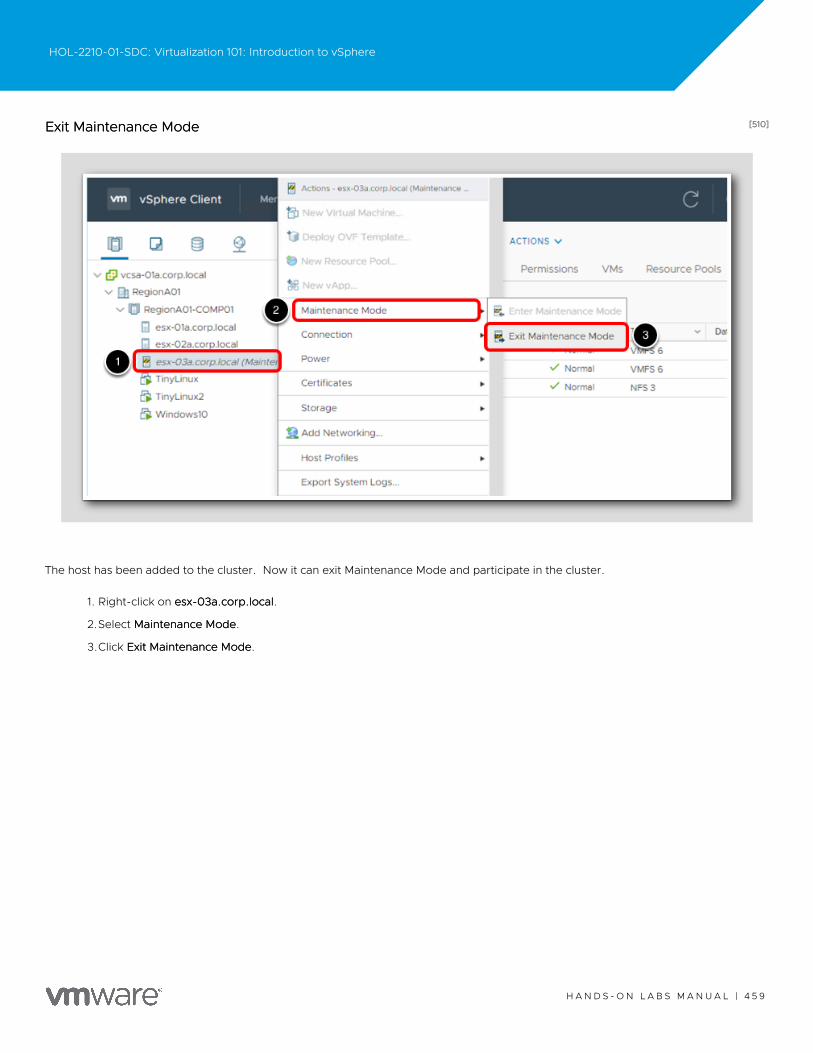
[510][510]Exit Maintenance ModeExit Maintenance Mode
The host has been added to the cluster. Now it can exit Maintenance Mode and participate in the cluster.
1. Right-click on esx-03a.corp.localesx-03a.corp.local.
2.Select Maintenance ModeMaintenance Mode.
3.Click Exit Maintenance ModeExit Maintenance Mode.
HOL-2210-01-SDC: Virtualization 101: Introduction to vSphere
H A N D S - O N L A B S M A N U A L | 4 5 9
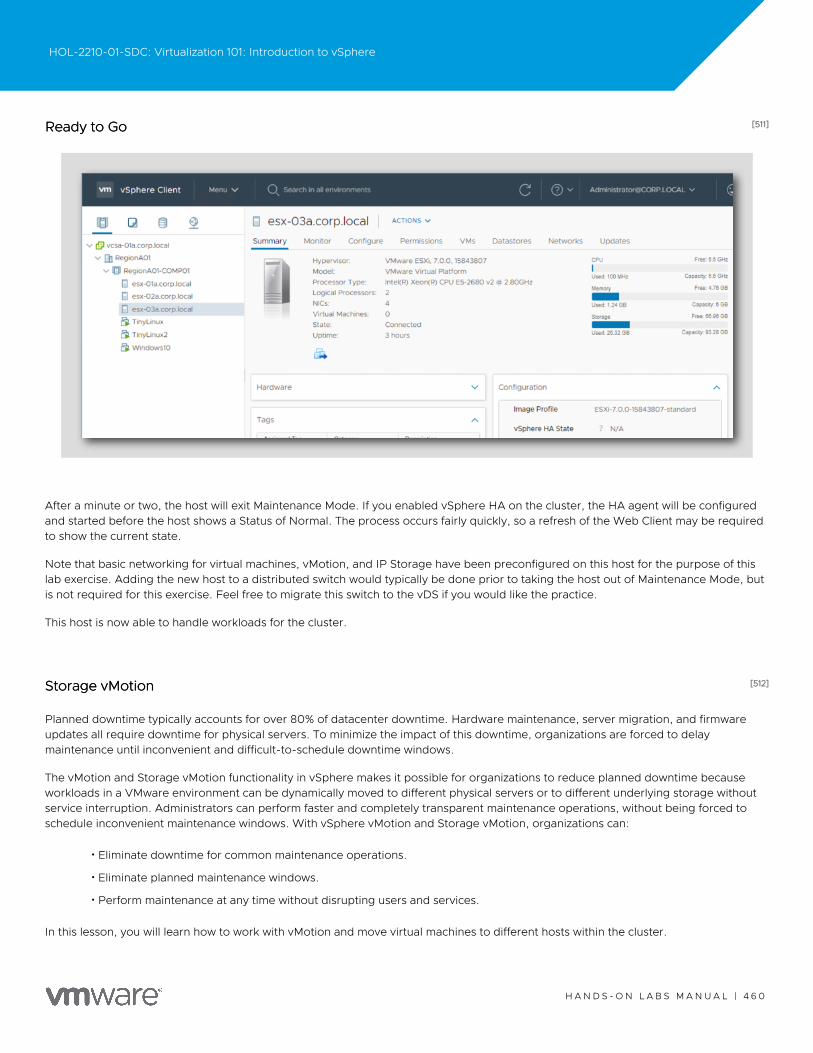
[511][511]Ready to GoReady to Go
After a minute or two, the host will exit Maintenance Mode. If you enabled vSphere HA on the cluster, the HA agent will be configuredand started before the host shows a Status of Normal. The process occurs fairly quickly, so a refresh of the Web Client may be requiredto show the current state.
Note that basic networking for virtual machines, vMotion, and IP Storage have been preconfigured on this host for the purpose of thislab exercise. Adding the new host to a distributed switch would typically be done prior to taking the host out of Maintenance Mode, butis not required for this exercise. Feel free to migrate this switch to the vDS if you would like the practice.
This host is now able to handle workloads for the cluster.
[512][512]Storage vMotionStorage vMotion
Planned downtime typically accounts for over 80% of datacenter downtime. Hardware maintenance, server migration, and firmwareupdates all require downtime for physical servers. To minimize the impact of this downtime, organizations are forced to delaymaintenance until inconvenient and difficult-to-schedule downtime windows.
The vMotion and Storage vMotion functionality in vSphere makes it possible for organizations to reduce planned downtime becauseworkloads in a VMware environment can be dynamically moved to different physical servers or to different underlying storage withoutservice interruption. Administrators can perform faster and completely transparent maintenance operations, without being forced toschedule inconvenient maintenance windows. With vSphere vMotion and Storage vMotion, organizations can:
•Eliminate downtime for common maintenance operations.
•Eliminate planned maintenance windows.
•Perform maintenance at any time without disrupting users and services.
In this lesson, you will learn how to work with vMotion and move virtual machines to different hosts within the cluster.
HOL-2210-01-SDC: Virtualization 101: Introduction to vSphere
H A N D S - O N L A B S M A N U A L | 4 6 0
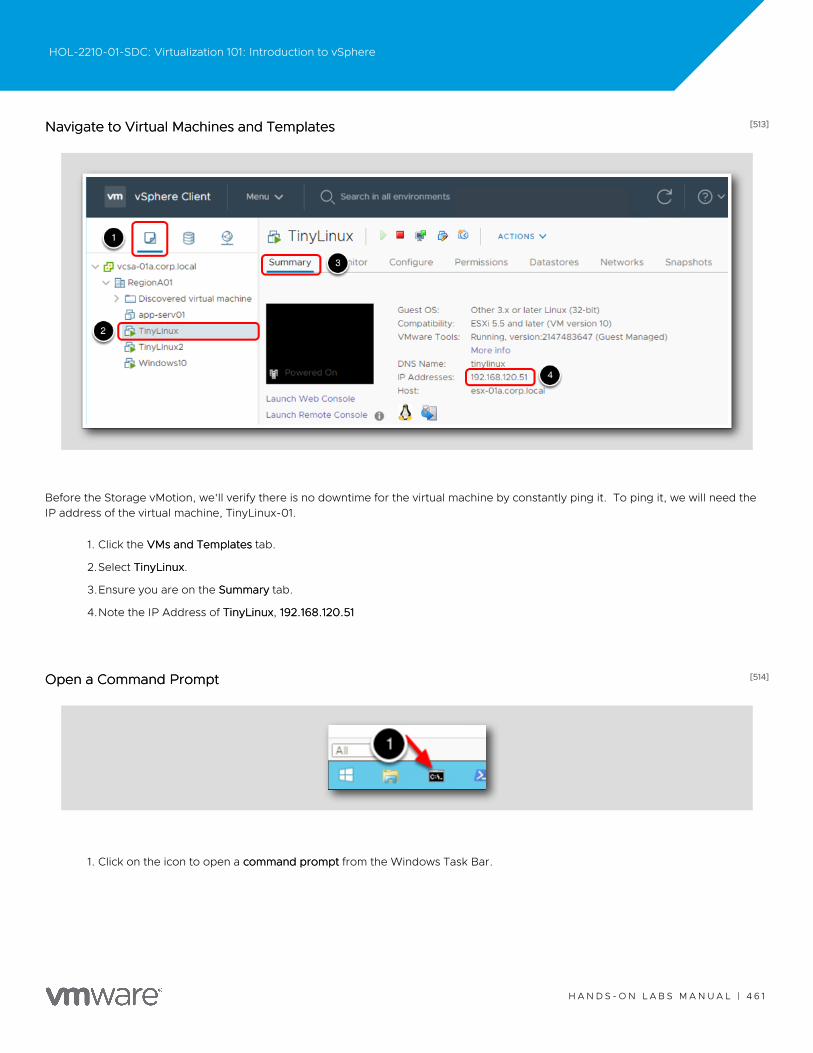
[513][513]Navigate to Virtual Machines and TemplatesNavigate to Virtual Machines and Templates
Before the Storage vMotion, we'll verify there is no downtime for the virtual machine by constantly ping it. To ping it, we will need theIP address of the virtual machine, TinyLinux-01.
1. Click the VMs and TemplatesVMs and Templates tab.
2.Select TinyLinuxTinyLinux.
3.Ensure you are on the SummarySummary tab.
4.Note the IP Address of TinyLinuxTinyLinux, 192.168.120.51192.168.120.51
[514][514]Open a Command PromptOpen a Command Prompt
1. Click on the icon to open a command promptcommand prompt from the Windows Task Bar.
HOL-2210-01-SDC: Virtualization 101: Introduction to vSphere
H A N D S - O N L A B S M A N U A L | 4 6 1
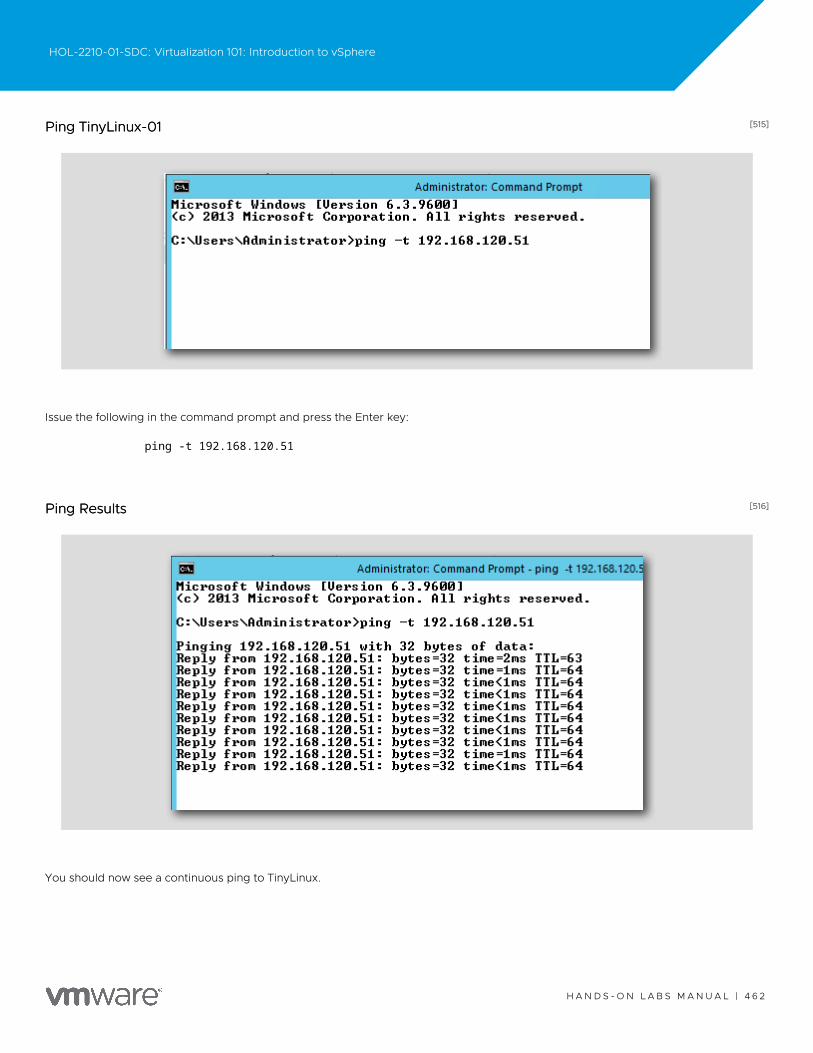
[515][515]Ping TinyLinux-01Ping TinyLinux-01
Issue the following in the command prompt and press the Enter key:
[516][516]Ping ResultsPing Results
You should now see a continuous ping to TinyLinux.
ping -t 192.168.120.51
HOL-2210-01-SDC: Virtualization 101: Introduction to vSphere
H A N D S - O N L A B S M A N U A L | 4 6 2
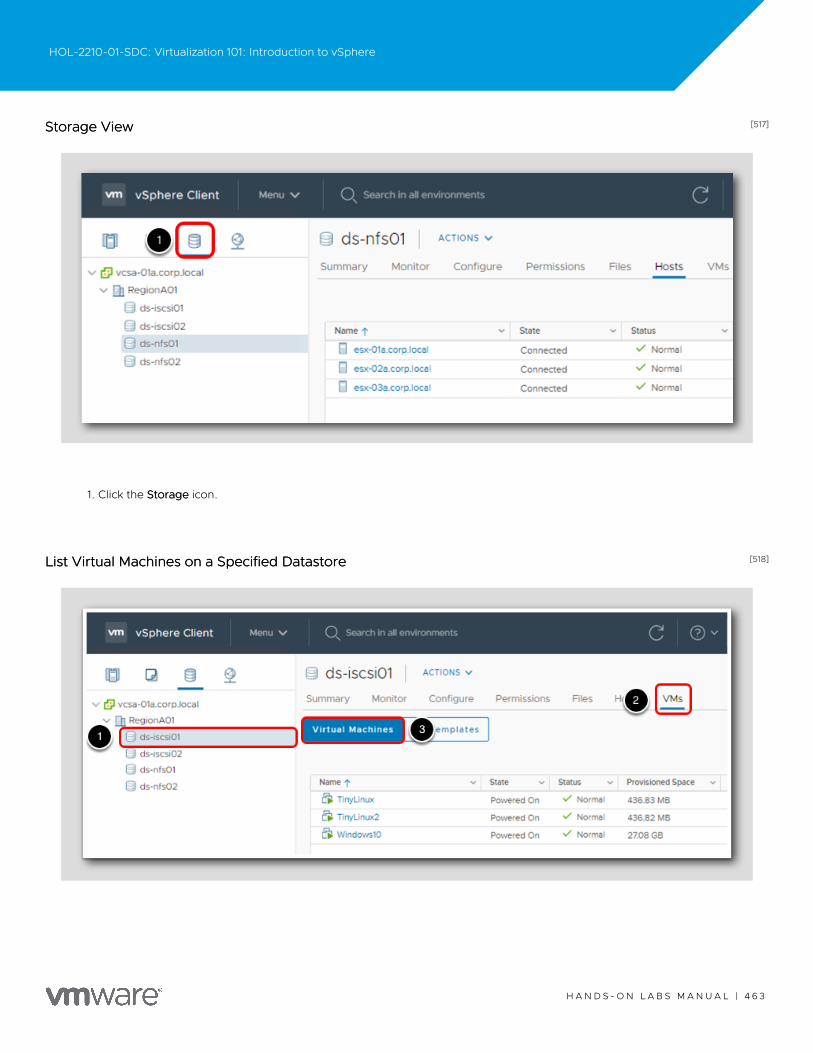
[517][517]Storage ViewStorage View
1. Click the StorageStorage icon.
[518][518]List Virtual Machines on a Specified DatastoreList Virtual Machines on a Specified Datastore
HOL-2210-01-SDC: Virtualization 101: Introduction to vSphere
H A N D S - O N L A B S M A N U A L | 4 6 3

1. Click on the ds-iscsi01ds-iscsi01 datastore object in RegionA01RegionA01 managed by the vcsa-01a.corp.localvcsa-01a.corp.local vCenter.
2.Click VMsVMs.
3.Click the Virtual MachinesVirtual Machines tab.
You should now have a list of all virtual machines on the selected datastore.
Note: depending on which lessons you have completed, the available datastores and virtual machines may be different than the images.Note: depending on which lessons you have completed, the available datastores and virtual machines may be different than the images.
[519][519]Drag and Drop Storage vMotionDrag and Drop Storage vMotion
The VM TinyLinux is initially on ds-iscsi01ds-iscsi01 and needs to be moved to ds-nfs01.ds-nfs01.
1. Click the TinyLinux VMTinyLinux VM and continue to holdhold the left mouse button while dragging the VM to the ds-nfs01ds-nfs01 datastore object. A
green + will appear near the mouse cursor (see picture) when it is pointing at objects which are suitable targets for the object
being moved. Let go of the mouse button to drop the TinyLinuxTinyLinux VM onto the ds-nfs01ds-nfs01 object. The Migrate wizard will launch
to complete the process.
HOL-2210-01-SDC: Virtualization 101: Introduction to vSphere
H A N D S - O N L A B S M A N U A L | 4 6 4
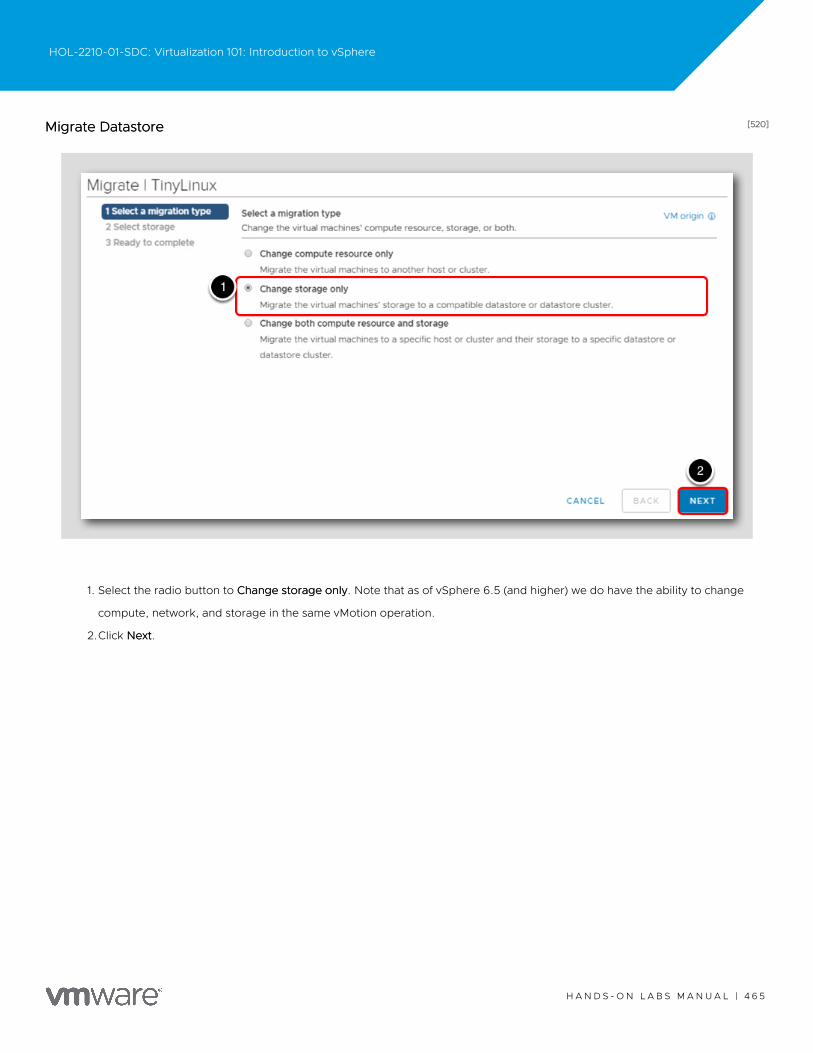
[520][520]Migrate DatastoreMigrate Datastore
1. Select the radio button to Change storage onlyChange storage only. Note that as of vSphere 6.5 (and higher) we do have the ability to change
compute, network, and storage in the same vMotion operation.
2.Click NextNext.
HOL-2210-01-SDC: Virtualization 101: Introduction to vSphere
H A N D S - O N L A B S M A N U A L | 4 6 5
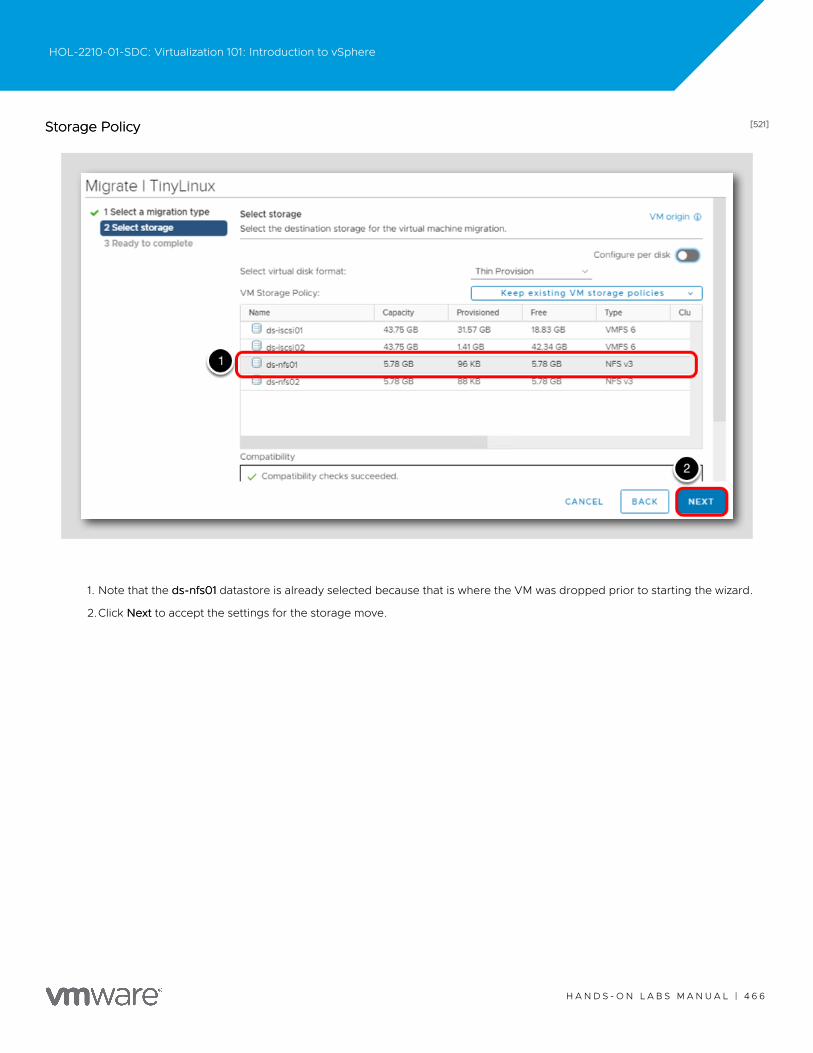
[521][521]Storage PolicyStorage Policy
1. Note that the ds-nfs01ds-nfs01 datastore is already selected because that is where the VM was dropped prior to starting the wizard.
2.Click NextNext to accept the settings for the storage move.
HOL-2210-01-SDC: Virtualization 101: Introduction to vSphere
H A N D S - O N L A B S M A N U A L | 4 6 6

[522][522]Ready to CompleteReady to Complete
1. Verify your selections on the Ready to complete screen and click FinishFinish to start the migration.
Feel free to monitor the operation within the Recent Tasks pane or move on to the next step.
HOL-2210-01-SDC: Virtualization 101: Introduction to vSphere
H A N D S - O N L A B S M A N U A L | 4 6 7
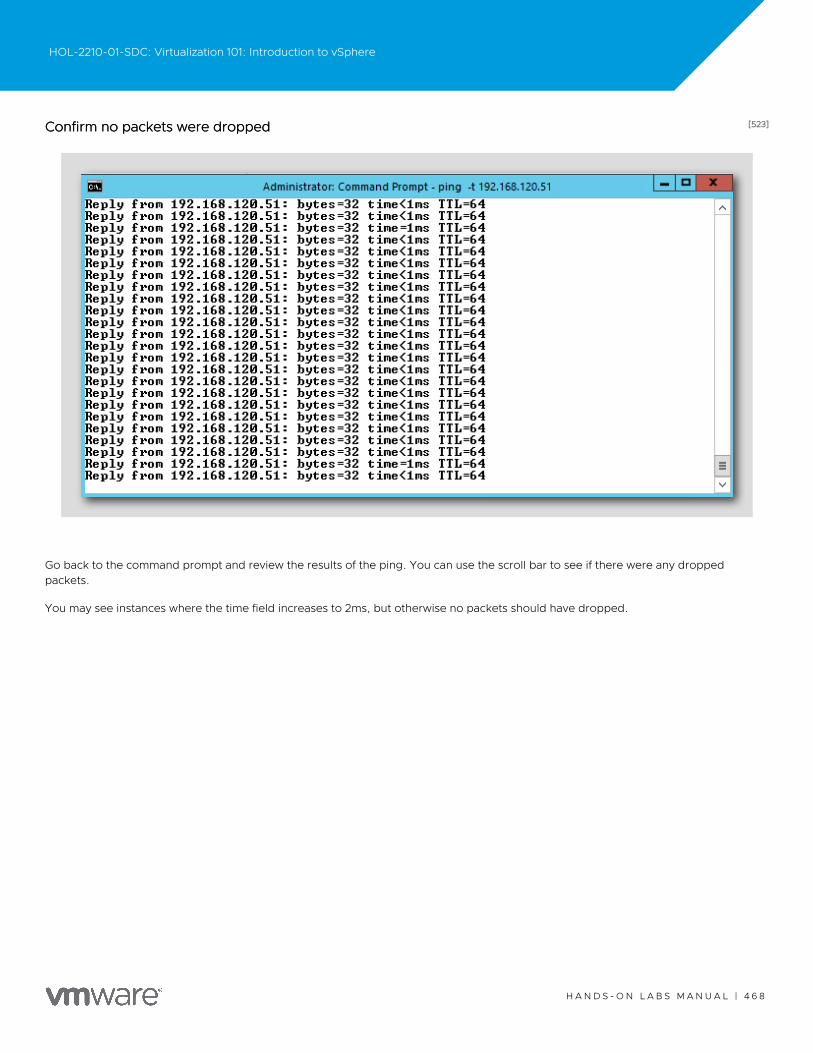
[523][523]Confirm no packets were droppedConfirm no packets were dropped
Go back to the command prompt and review the results of the ping. You can use the scroll bar to see if there were any droppedpackets.
You may see instances where the time field increases to 2ms, but otherwise no packets should have dropped.
HOL-2210-01-SDC: Virtualization 101: Introduction to vSphere
H A N D S - O N L A B S M A N U A L | 4 6 8
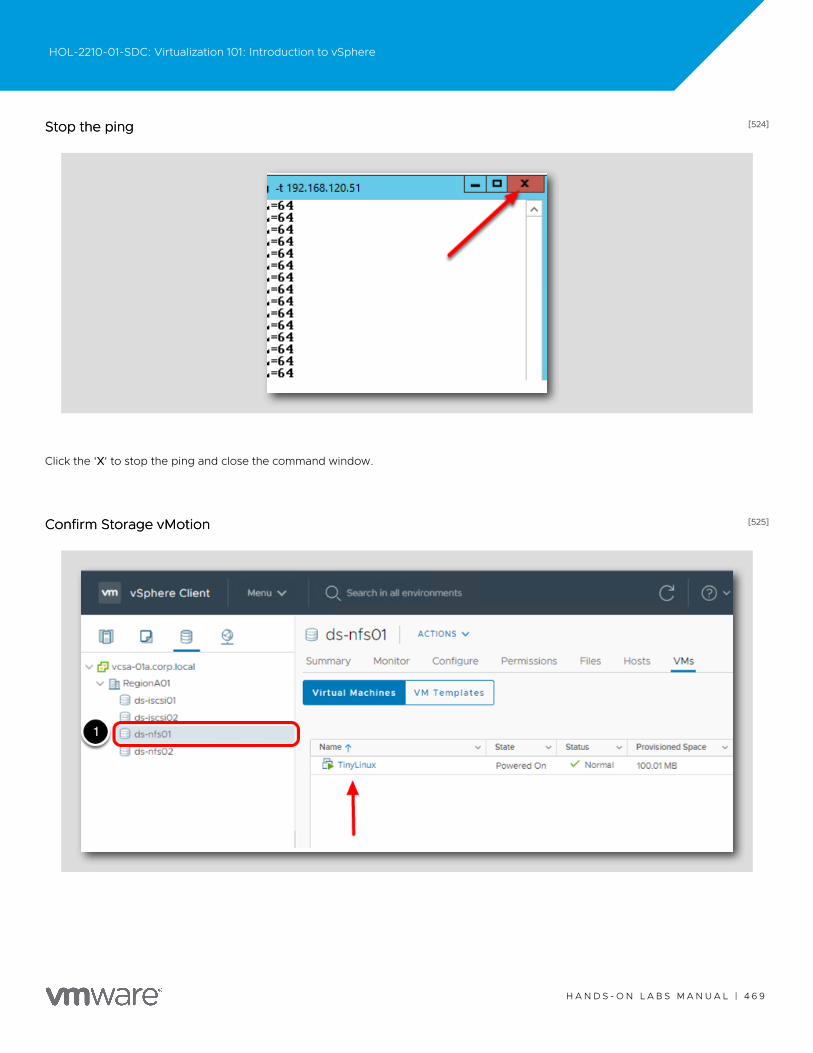
[524][524]Stop the pingStop the ping
Click the 'XX' to stop the ping and close the command window.
[525][525]Confirm Storage vMotionConfirm Storage vMotion
HOL-2210-01-SDC: Virtualization 101: Introduction to vSphere
H A N D S - O N L A B S M A N U A L | 4 6 9
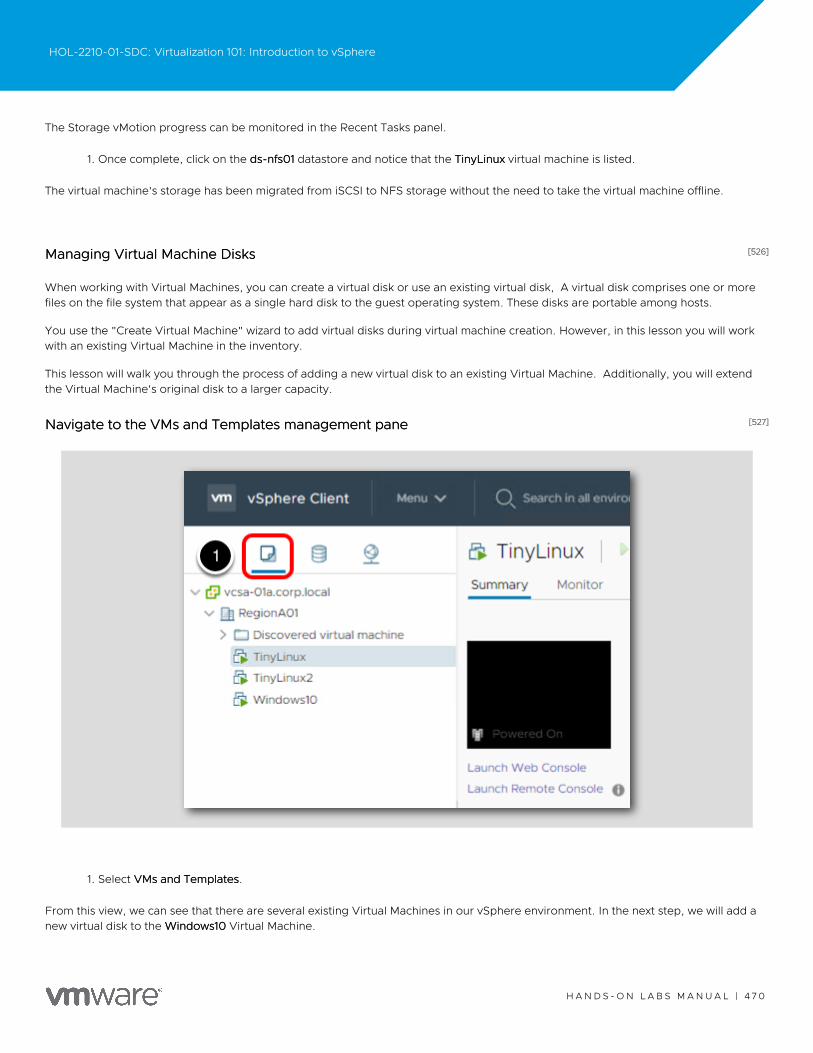
The Storage vMotion progress can be monitored in the Recent Tasks panel.
1. Once complete, click on the ds-nfs01ds-nfs01 datastore and notice that the TinyLinuxTinyLinux virtual machine is listed.
The virtual machine's storage has been migrated from iSCSI to NFS storage without the need to take the virtual machine offline.
[526][526]Managing Virtual Machine DisksManaging Virtual Machine Disks
When working with Virtual Machines, you can create a virtual disk or use an existing virtual disk, A virtual disk comprises one or morefiles on the file system that appear as a single hard disk to the guest operating system. These disks are portable among hosts.
You use the "Create Virtual Machine" wizard to add virtual disks during virtual machine creation. However, in this lesson you will workwith an existing Virtual Machine in the inventory.
This lesson will walk you through the process of adding a new virtual disk to an existing Virtual Machine. Additionally, you will extendthe Virtual Machine's original disk to a larger capacity.
[527][527]Navigate to the VMs and Templates management paneNavigate to the VMs and Templates management pane
1. Select VMs and TemplatesVMs and Templates.
From this view, we can see that there are several existing Virtual Machines in our vSphere environment. In the next step, we will add anew virtual disk to the Windows10Windows10 Virtual Machine.
HOL-2210-01-SDC: Virtualization 101: Introduction to vSphere
H A N D S - O N L A B S M A N U A L | 4 7 0
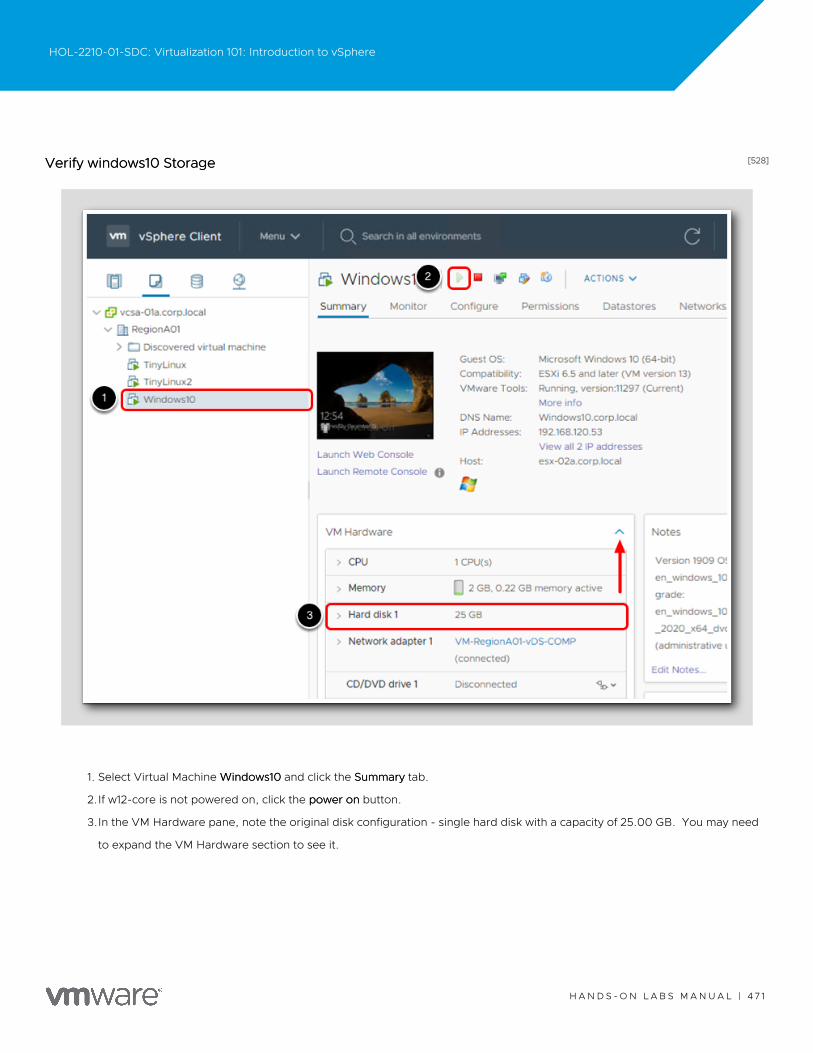
[528][528]Verify windows10 StorageVerify windows10 Storage
1. Select Virtual Machine Windows10Windows10 and click the SummarySummary tab.
2.If w12-core is not powered on, click the power onpower on button.
3.In the VM Hardware pane, note the original disk configuration - single hard disk with a capacity of 25.00 GB. You may need
to expand the VM Hardware section to see it.
HOL-2210-01-SDC: Virtualization 101: Introduction to vSphere
H A N D S - O N L A B S M A N U A L | 4 7 1
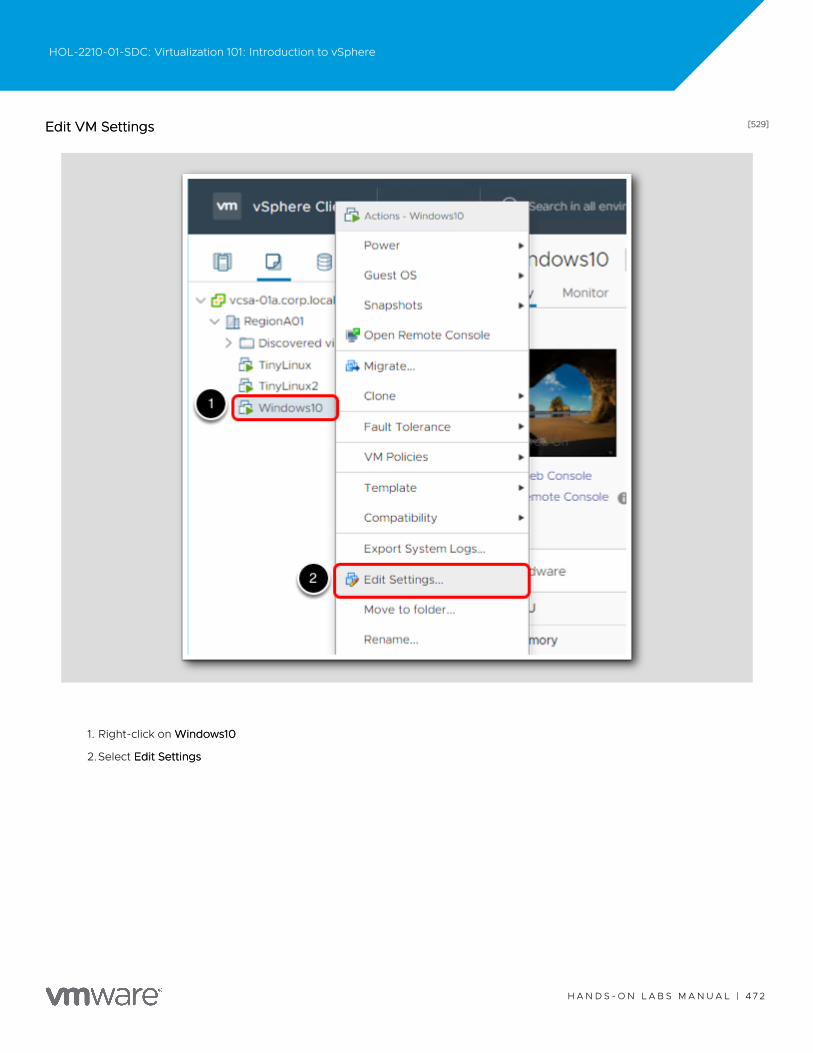
[529][529]Edit VM SettingsEdit VM Settings
1. Right-click on Windows10Windows10
2.Select Edit SettingsEdit Settings
HOL-2210-01-SDC: Virtualization 101: Introduction to vSphere
H A N D S - O N L A B S M A N U A L | 4 7 2
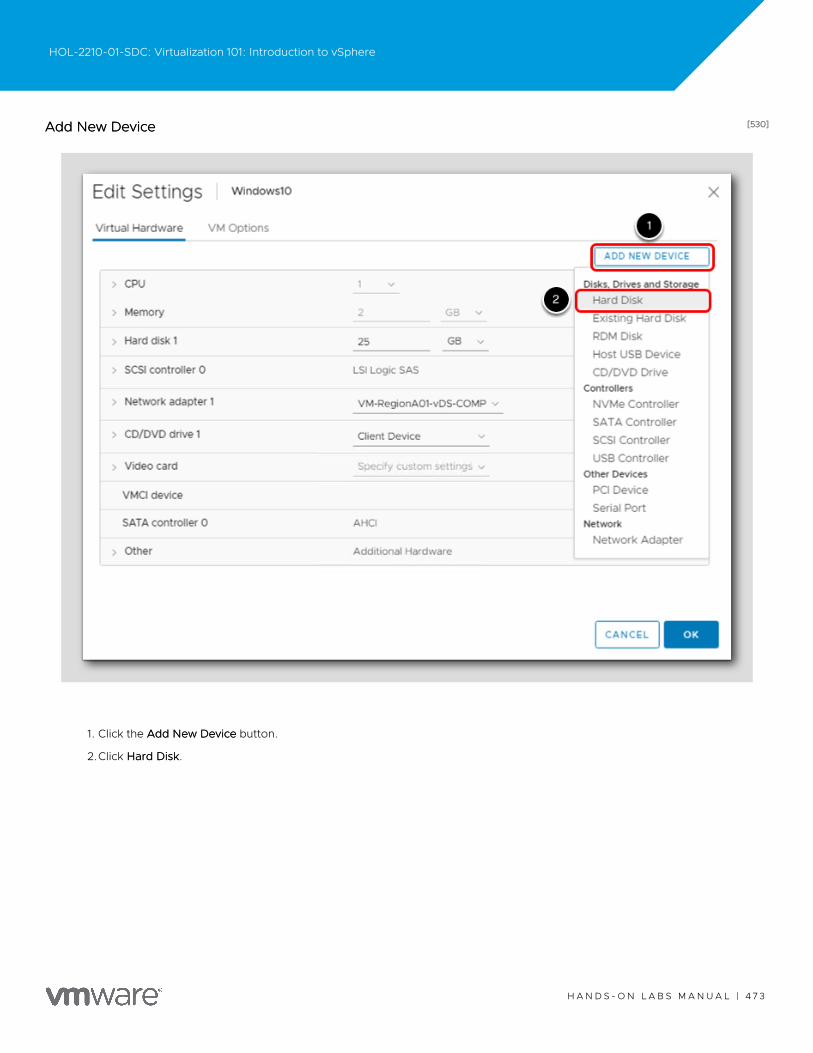
[530][530]Add New DeviceAdd New Device
1. Click the AddAdd New DeviceNew Device button.
2.Click Hard DiskHard Disk.
HOL-2210-01-SDC: Virtualization 101: Introduction to vSphere
H A N D S - O N L A B S M A N U A L | 4 7 3
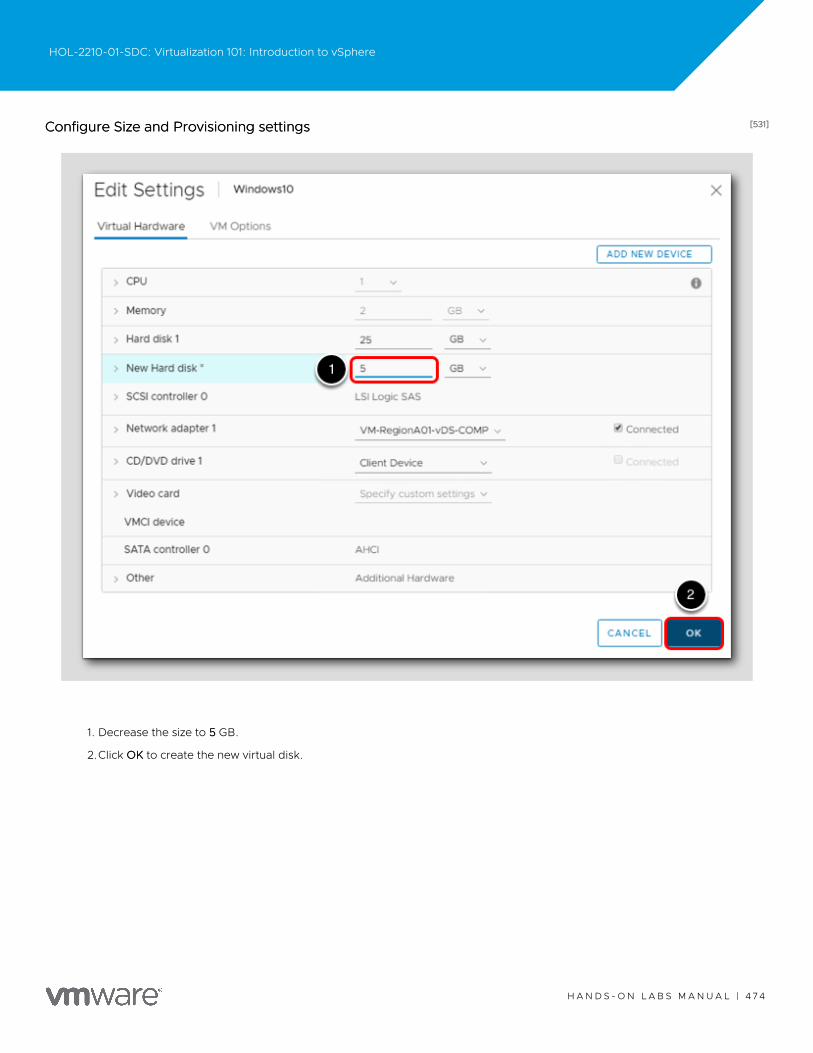
[531][531]Configure Size and Provisioning settingsConfigure Size and Provisioning settings
1. Decrease the size to 55 GB.
2.Click OKOK to create the new virtual disk.
HOL-2210-01-SDC: Virtualization 101: Introduction to vSphere
H A N D S - O N L A B S M A N U A L | 4 7 4
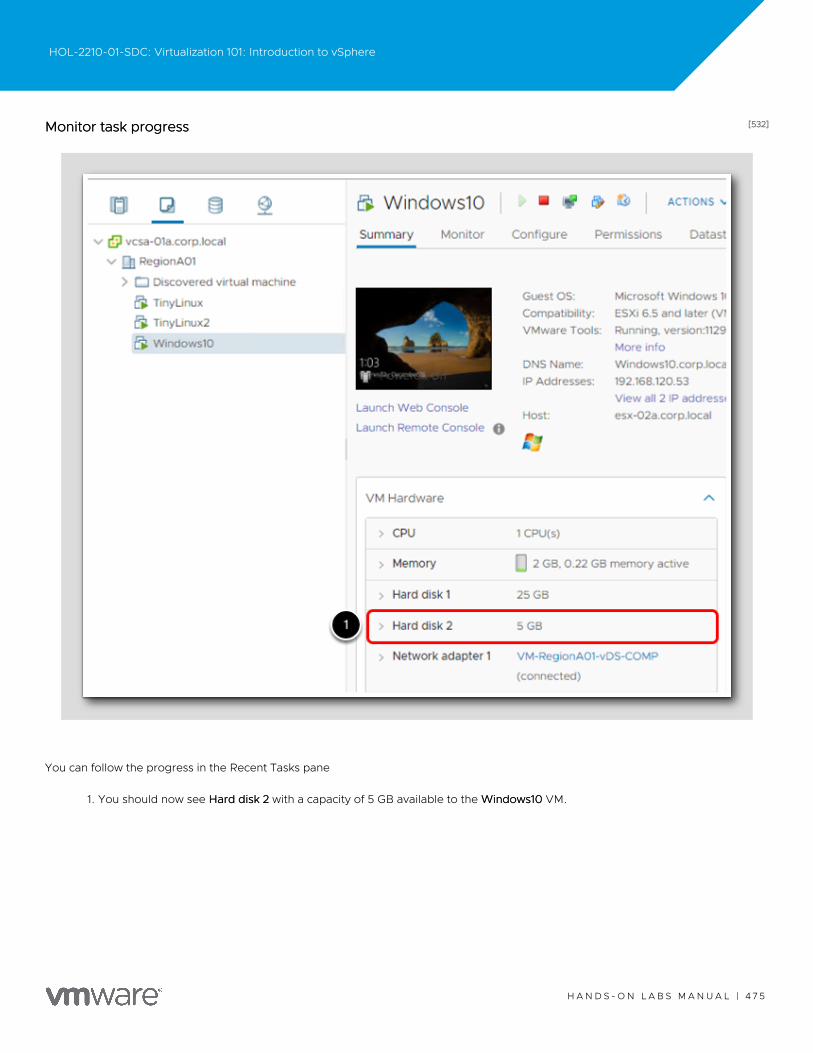
[532][532]Monitor task progressMonitor task progress
You can follow the progress in the Recent Tasks pane
1. You should now see Hard disk 2Hard disk 2 with a capacity of 5 GB available to the Windows10Windows10 VM.
HOL-2210-01-SDC: Virtualization 101: Introduction to vSphere
H A N D S - O N L A B S M A N U A L | 4 7 5
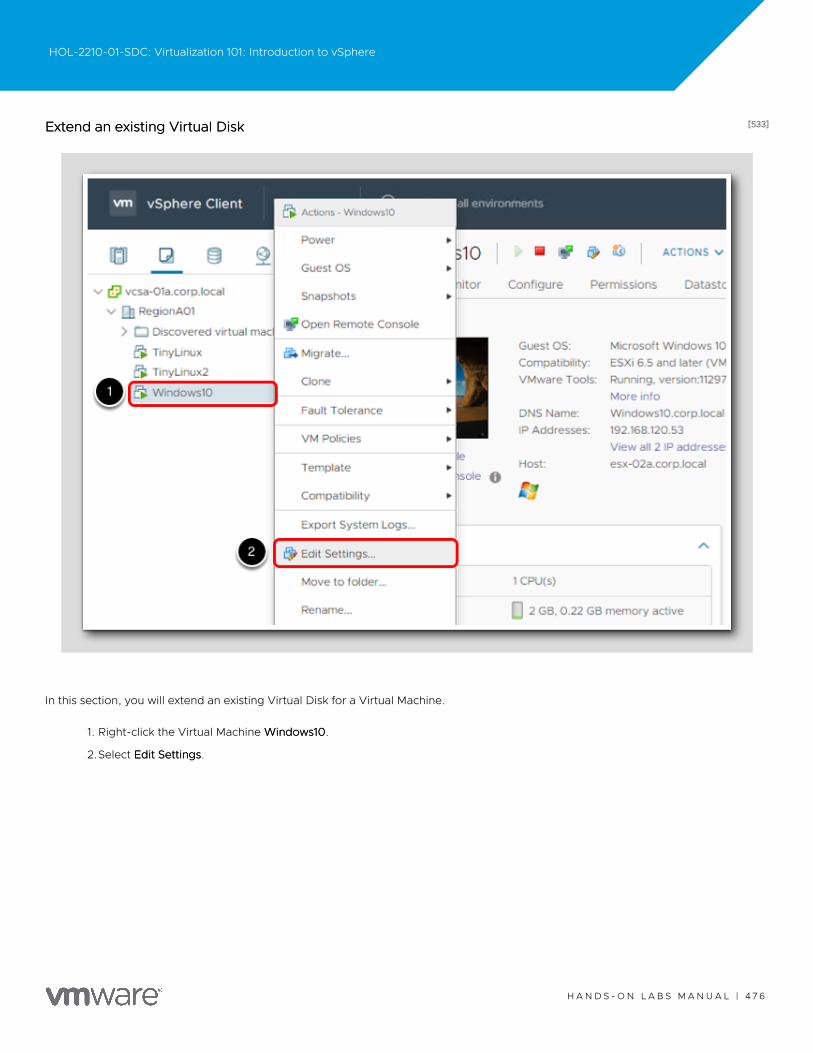
[533][533]Extend an existing Virtual DiskExtend an existing Virtual Disk
In this section, you will extend an existing Virtual Disk for a Virtual Machine.
1. Right-click the Virtual Machine Windows10Windows10.
2.Select Edit SettingsEdit Settings.
HOL-2210-01-SDC: Virtualization 101: Introduction to vSphere
H A N D S - O N L A B S M A N U A L | 4 7 6
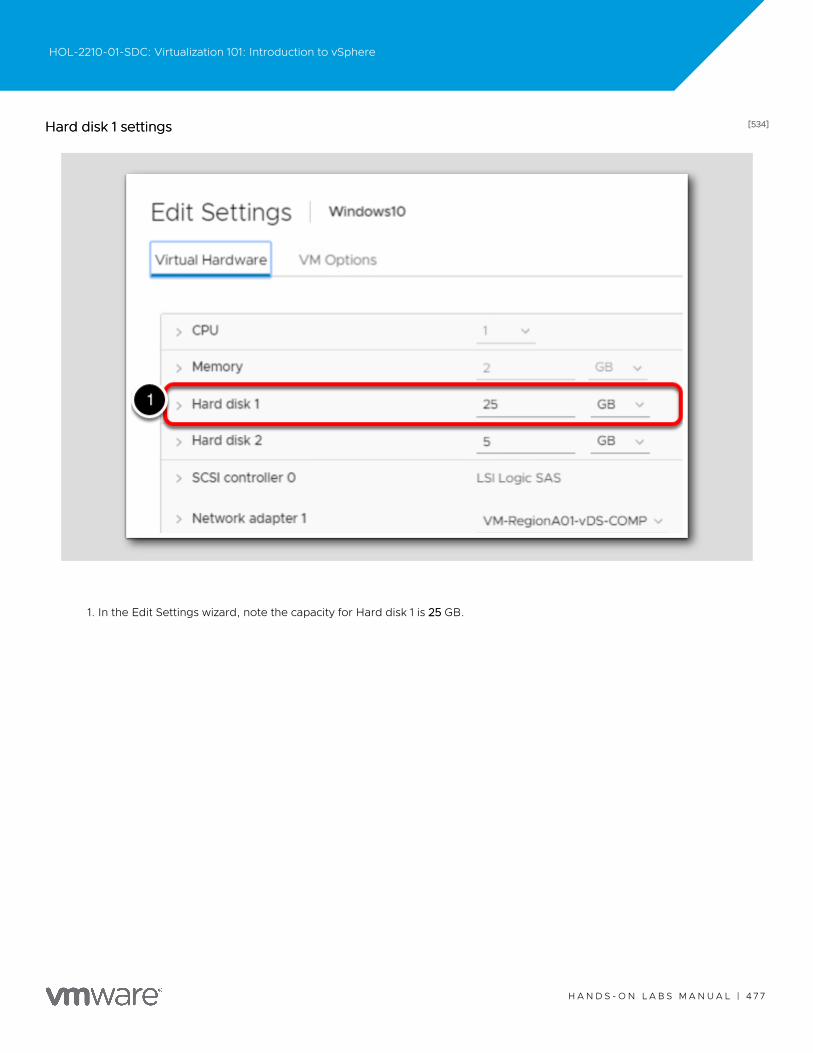
[534][534]Hard disk 1 settingsHard disk 1 settings
1. In the Edit Settings wizard, note the capacity for Hard disk 1 is 2525 GB.
HOL-2210-01-SDC: Virtualization 101: Introduction to vSphere
H A N D S - O N L A B S M A N U A L | 4 7 7

[535][535]Extend Hard disk 1Extend Hard disk 1
1. Type 3232 Hard disk 1 capacity field.
2.Click OKOK.
HOL-2210-01-SDC: Virtualization 101: Introduction to vSphere
H A N D S - O N L A B S M A N U A L | 4 7 8
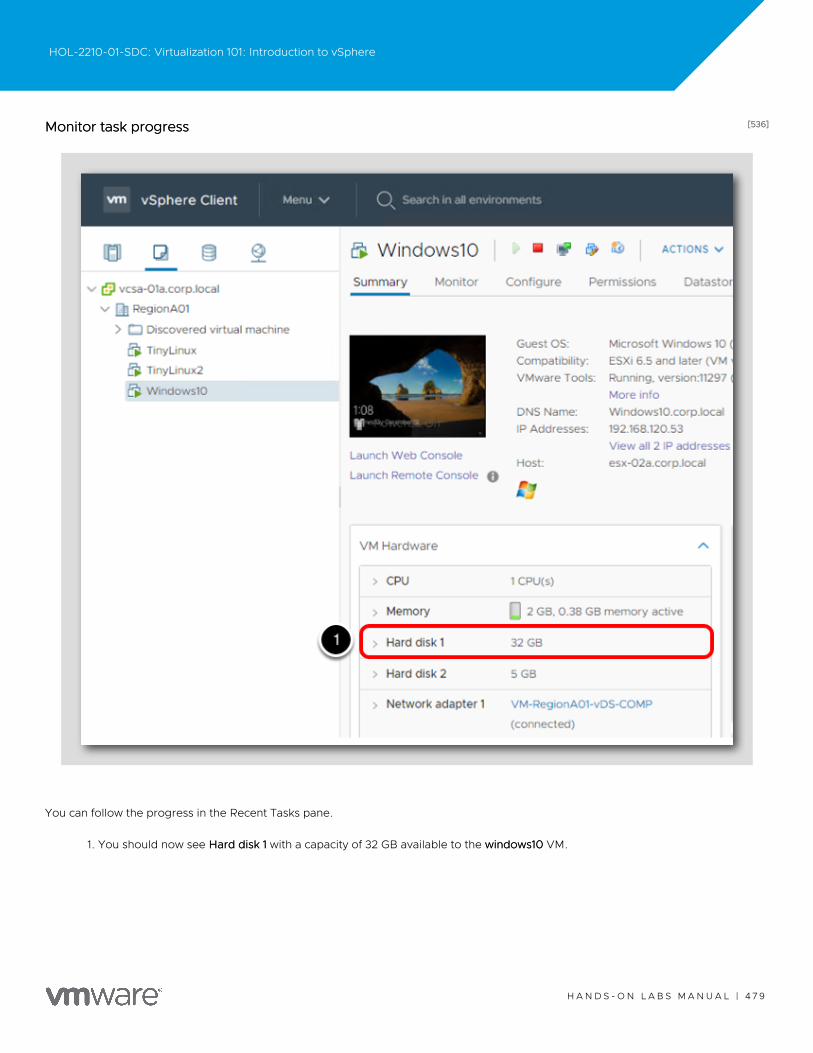
[536][536]Monitor task progressMonitor task progress
You can follow the progress in the Recent Tasks pane.
1. You should now see Hard disk 1Hard disk 1 with a capacity of 32 GB available to the windows10windows10 VM.
HOL-2210-01-SDC: Virtualization 101: Introduction to vSphere
H A N D S - O N L A B S M A N U A L | 4 7 9
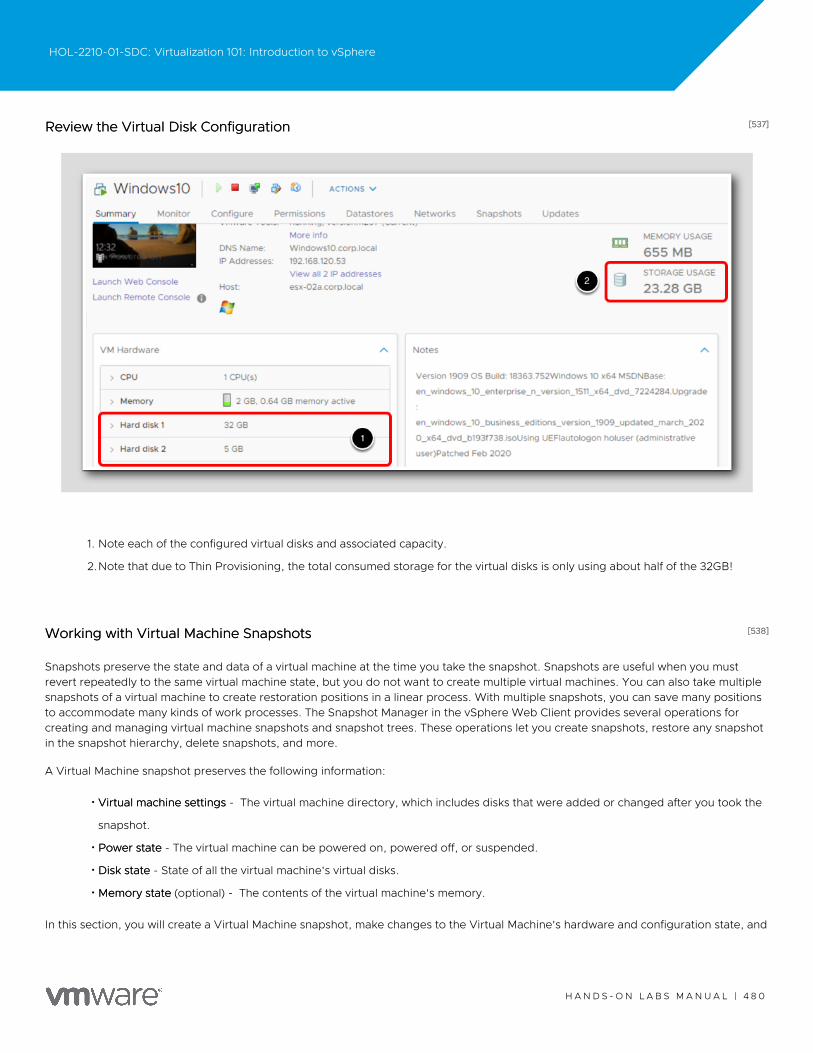
[537][537]Review the Virtual Disk ConfigurationReview the Virtual Disk Configuration
1. Note each of the configured virtual disks and associated capacity.
2.Note that due to Thin Provisioning, the total consumed storage for the virtual disks is only using about half of the 32GB!
[538][538]Working with Virtual Machine SnapshotsWorking with Virtual Machine Snapshots
Snapshots preserve the state and data of a virtual machine at the time you take the snapshot. Snapshots are useful when you mustrevert repeatedly to the same virtual machine state, but you do not want to create multiple virtual machines. You can also take multiplesnapshots of a virtual machine to create restoration positions in a linear process. With multiple snapshots, you can save many positionsto accommodate many kinds of work processes. The Snapshot Manager in the vSphere Web Client provides several operations forcreating and managing virtual machine snapshots and snapshot trees. These operations let you create snapshots, restore any snapshotin the snapshot hierarchy, delete snapshots, and more.
A Virtual Machine snapshot preserves the following information:
•Virtual machine settingsVirtual machine settings - The virtual machine directory, which includes disks that were added or changed after you took the
snapshot.
•Power statePower state - The virtual machine can be powered on, powered off, or suspended.
•Disk stateDisk state - State of all the virtual machine's virtual disks.
•Memory stateMemory state (optional) - The contents of the virtual machine's memory.
In this section, you will create a Virtual Machine snapshot, make changes to the Virtual Machine's hardware and configuration state, and
HOL-2210-01-SDC: Virtualization 101: Introduction to vSphere
H A N D S - O N L A B S M A N U A L | 4 8 0
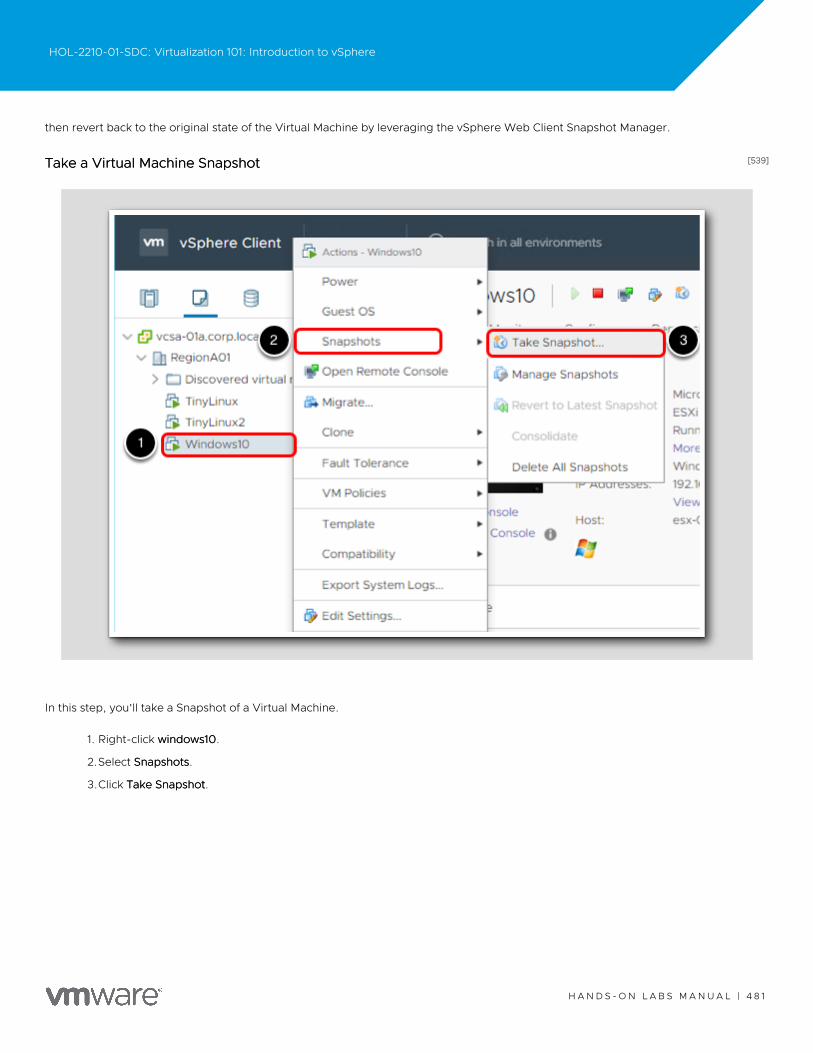
then revert back to the original state of the Virtual Machine by leveraging the vSphere Web Client Snapshot Manager.
[539][539]Take a Virtual Machine SnapshotTake a Virtual Machine Snapshot
In this step, you'll take a Snapshot of a Virtual Machine.
1. Right-click windows10windows10.
2.Select SnapshotsSnapshots.
3.Click Take SnapshotTake Snapshot.
HOL-2210-01-SDC: Virtualization 101: Introduction to vSphere
H A N D S - O N L A B S M A N U A L | 4 8 1

[540][540]Enter a Name and Description for the VM SnapshotEnter a Name and Description for the VM Snapshot
1. In the Take Snapshot window, provide a name for the Snapshot point - Snapshot #1Snapshot #1
2.Provide a description for the Snapshot point - Snapshot taken prior to VM settings changeSnapshot taken prior to VM settings change
3.Uncheck the Snapshot the virtual machine's memorySnapshot the virtual machine's memory box.
4.Click OKOK.
NoteNote: When you take a snapshot of a powered-on virtual machine, you are given the option to capture the running VMs memory state.In our case, since we are in a lab environment, this will generate unneeded I/O.
HOL-2210-01-SDC: Virtualization 101: Introduction to vSphere
H A N D S - O N L A B S M A N U A L | 4 8 2
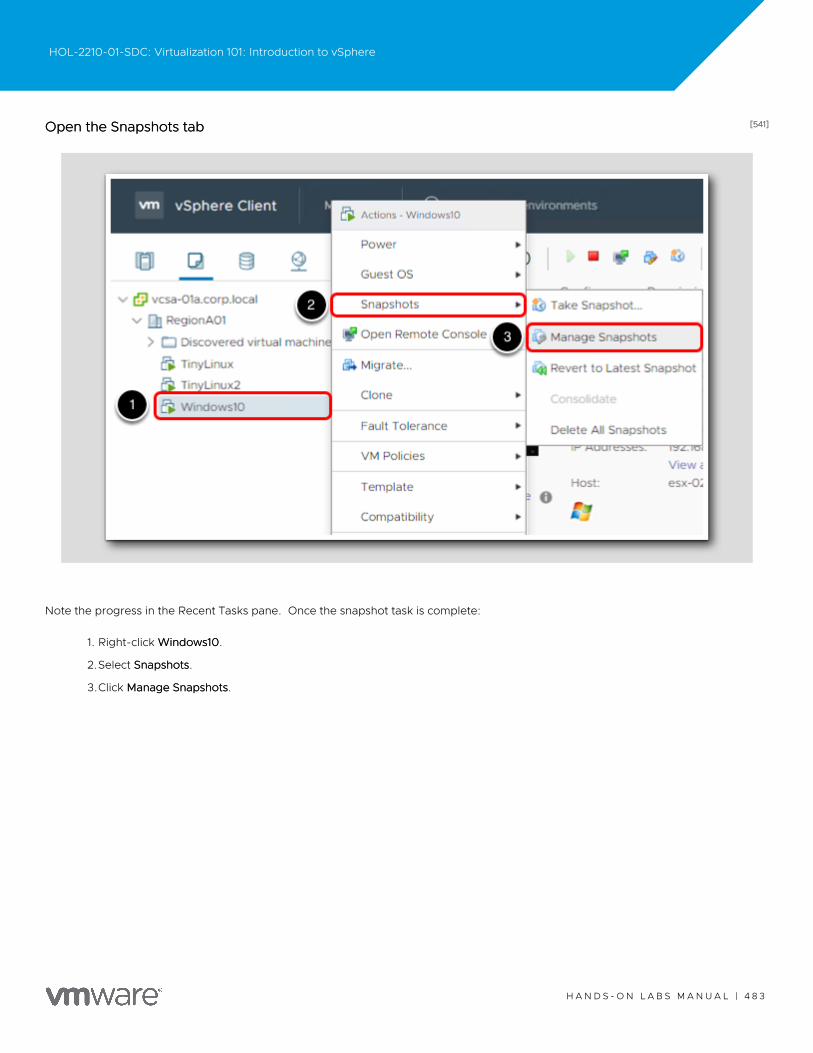
[541][541]Open the Snapshots tabOpen the Snapshots tab
Note the progress in the Recent Tasks pane. Once the snapshot task is complete:
1. Right-click Windows10Windows10.
2.Select SnapshotsSnapshots.
3.Click Manage SnapshotsManage Snapshots.
HOL-2210-01-SDC: Virtualization 101: Introduction to vSphere
H A N D S - O N L A B S M A N U A L | 4 8 3

[542][542]Snapshot DetailsSnapshot Details
Here you can view the details of the snapshot and verify it was taken.
1. Click DoneDone when you are finished viewing the details.
HOL-2210-01-SDC: Virtualization 101: Introduction to vSphere
H A N D S - O N L A B S M A N U A L | 4 8 4
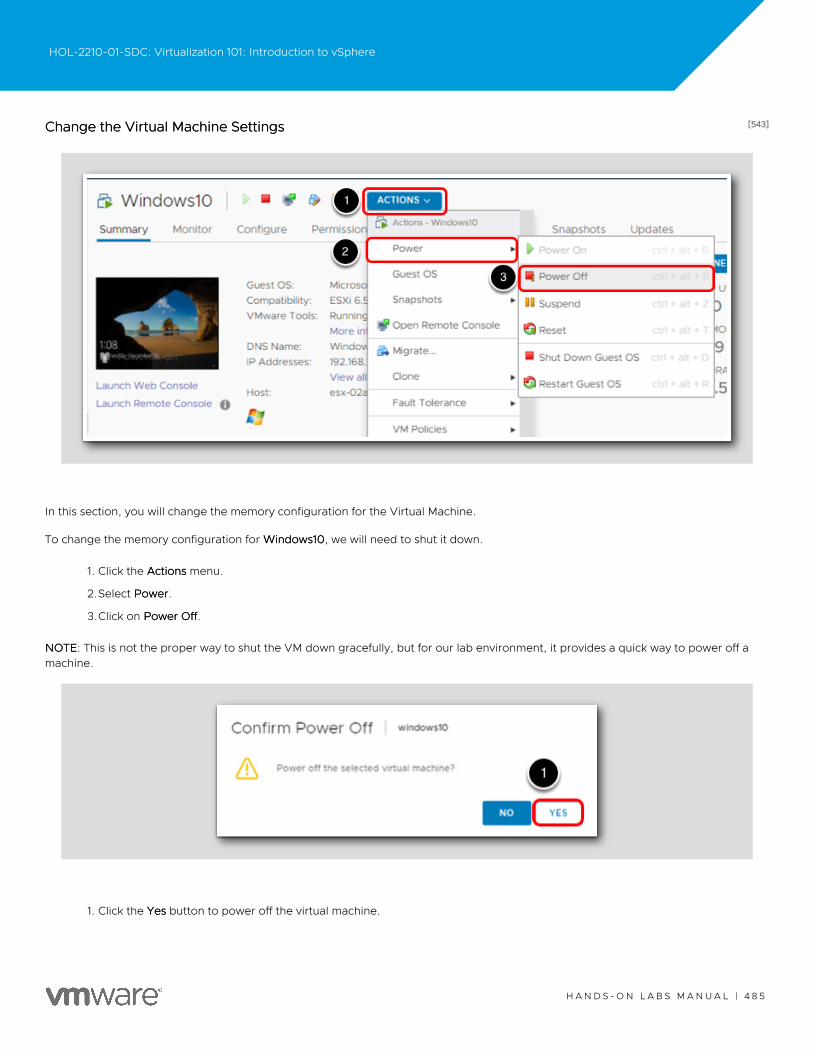
[543][543]Change the Virtual Machine SettingsChange the Virtual Machine Settings
In this section, you will change the memory configuration for the Virtual Machine.
To change the memory configuration for WWindows10indows10, we will need to shut it down.
1. Click the ActionsActions menu.
2.Select PowerPower.
3.Click on Power OffPower Off.
NOTENOTE: This is not the proper way to shut the VM down gracefully, but for our lab environment, it provides a quick way to power off amachine.
1. Click the YesYes button to power off the virtual machine.
HOL-2210-01-SDC: Virtualization 101: Introduction to vSphere
H A N D S - O N L A B S M A N U A L | 4 8 5
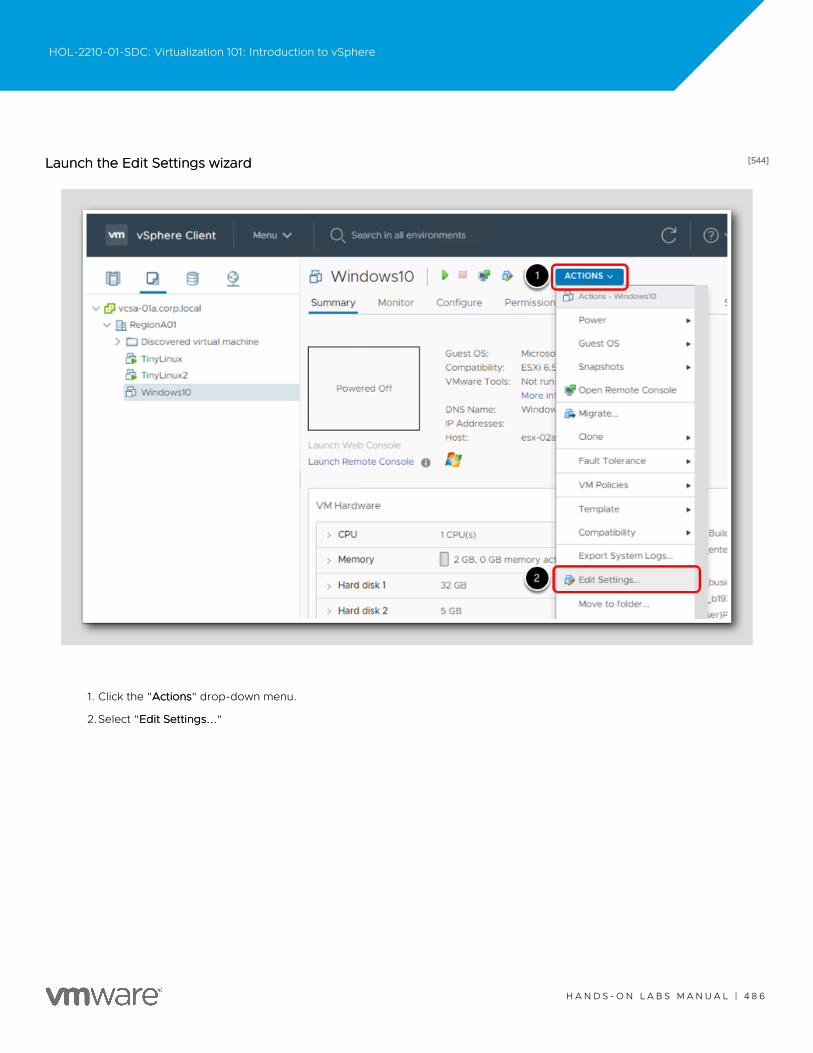
[544][544]Launch the Edit Settings wizardLaunch the Edit Settings wizard
1. Click the "ActionsActions" drop-down menu.
2.Select "Edit Settings...Edit Settings..."
HOL-2210-01-SDC: Virtualization 101: Introduction to vSphere
H A N D S - O N L A B S M A N U A L | 4 8 6

[545][545]Change the Virtual Machine's settingsChange the Virtual Machine's settings
1. In the Memory field, change this setting to "44".
HOL-2210-01-SDC: Virtualization 101: Introduction to vSphere
H A N D S - O N L A B S M A N U A L | 4 8 7
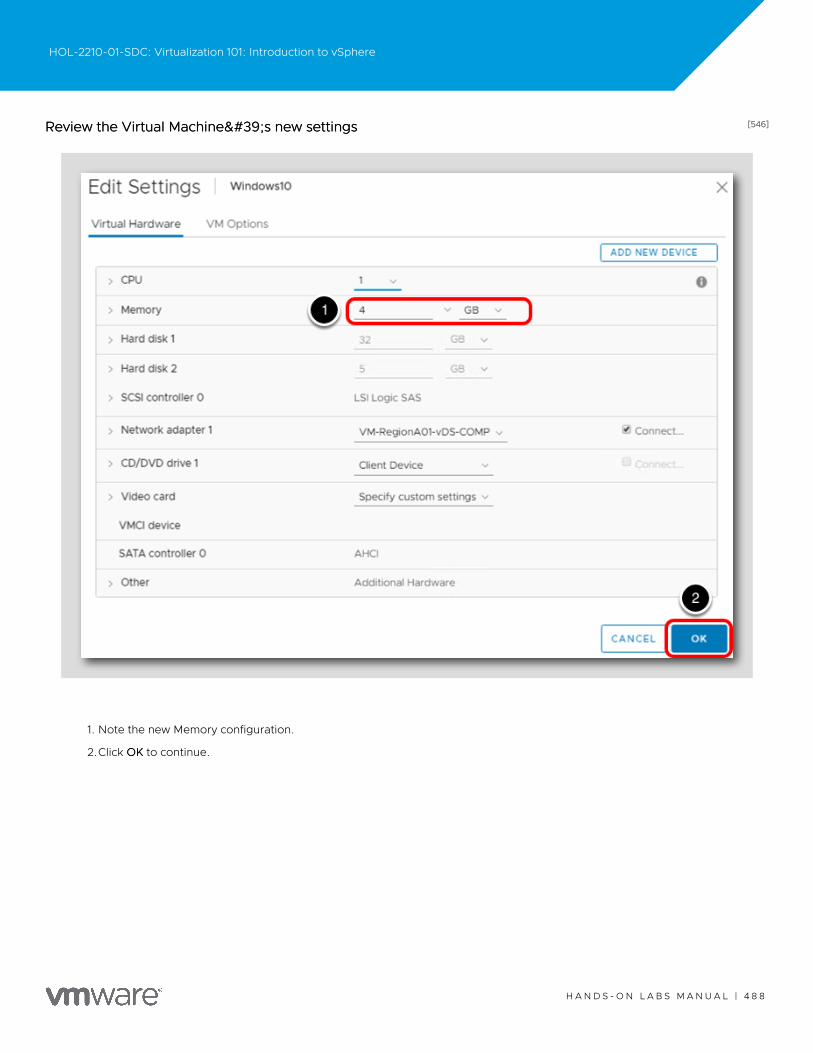
[546][546]Review the Virtual Machine's new settingsReview the Virtual Machine's new settings
1. Note the new Memory configuration.
2.Click OKOK to continue.
HOL-2210-01-SDC: Virtualization 101: Introduction to vSphere
H A N D S - O N L A B S M A N U A L | 4 8 8
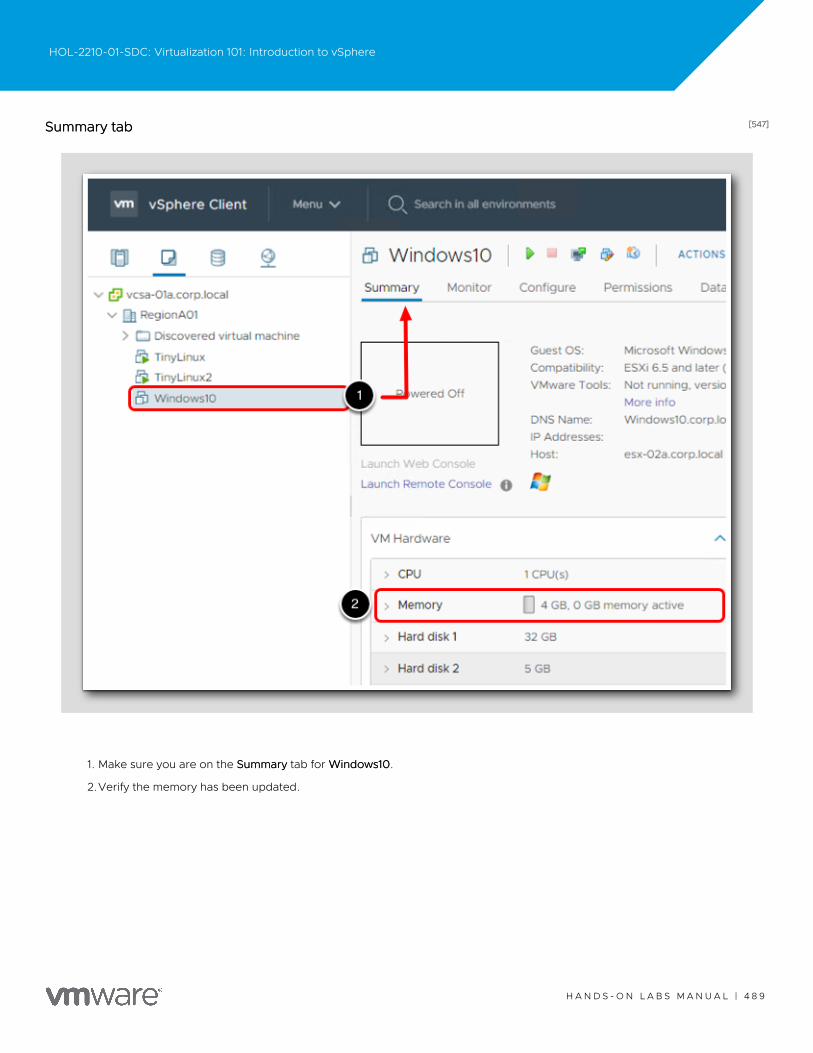
[547][547]Summary tabSummary tab
1. Make sure you are on the SummarySummary tab for WWindows10indows10.
2.Verify the memory has been updated.
HOL-2210-01-SDC: Virtualization 101: Introduction to vSphere
H A N D S - O N L A B S M A N U A L | 4 8 9
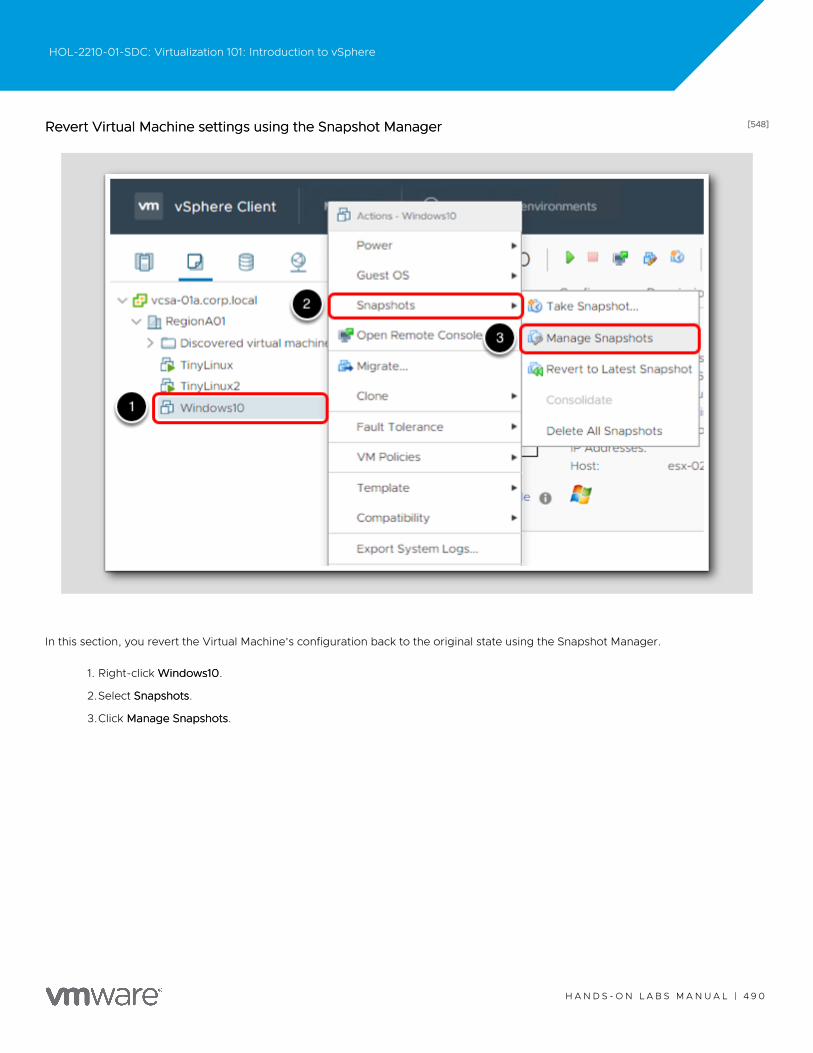
[548][548]Revert Virtual Machine settings using the Snapshot ManagerRevert Virtual Machine settings using the Snapshot Manager
In this section, you revert the Virtual Machine's configuration back to the original state using the Snapshot Manager.
1. Right-click WWindows10indows10.
2.Select SnapshotsSnapshots.
3.Click Manage SnapshotsManage Snapshots.
HOL-2210-01-SDC: Virtualization 101: Introduction to vSphere
H A N D S - O N L A B S M A N U A L | 4 9 0
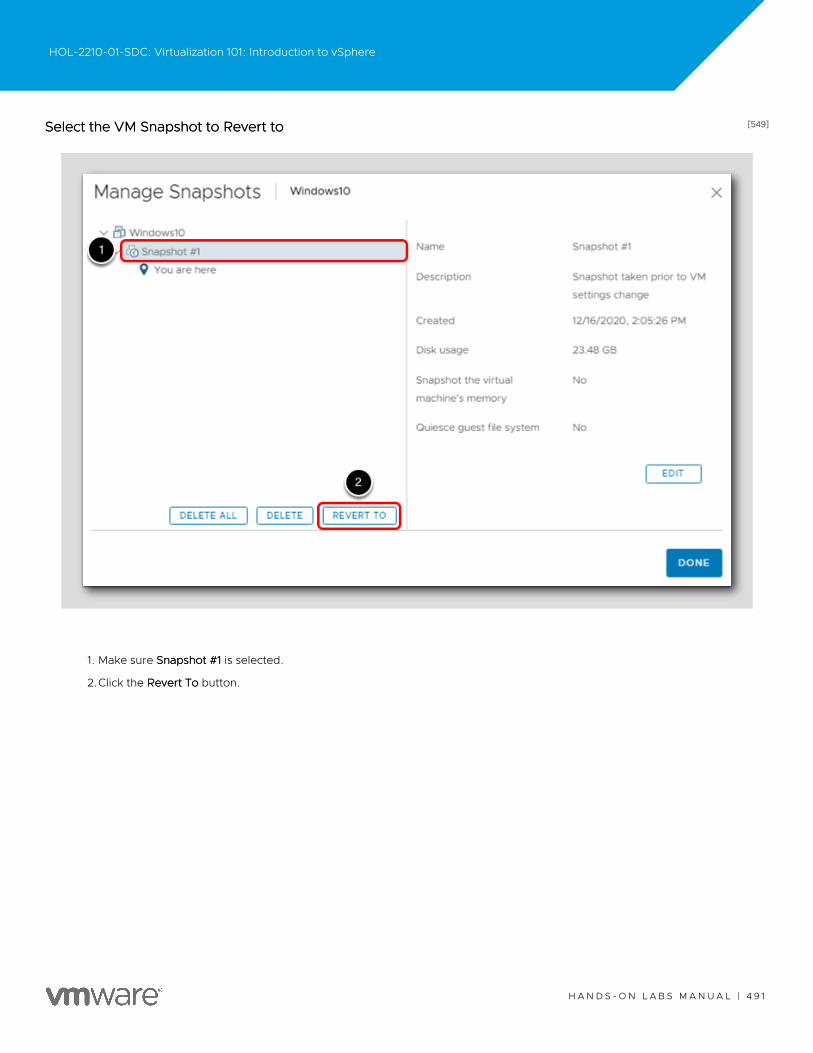
[549][549]Select the VM Snapshot to Revert toSelect the VM Snapshot to Revert to
1. Make sure Snapshot #1Snapshot #1 is selected.
2.Click the Revert ToRevert To button.
HOL-2210-01-SDC: Virtualization 101: Introduction to vSphere
H A N D S - O N L A B S M A N U A L | 4 9 1
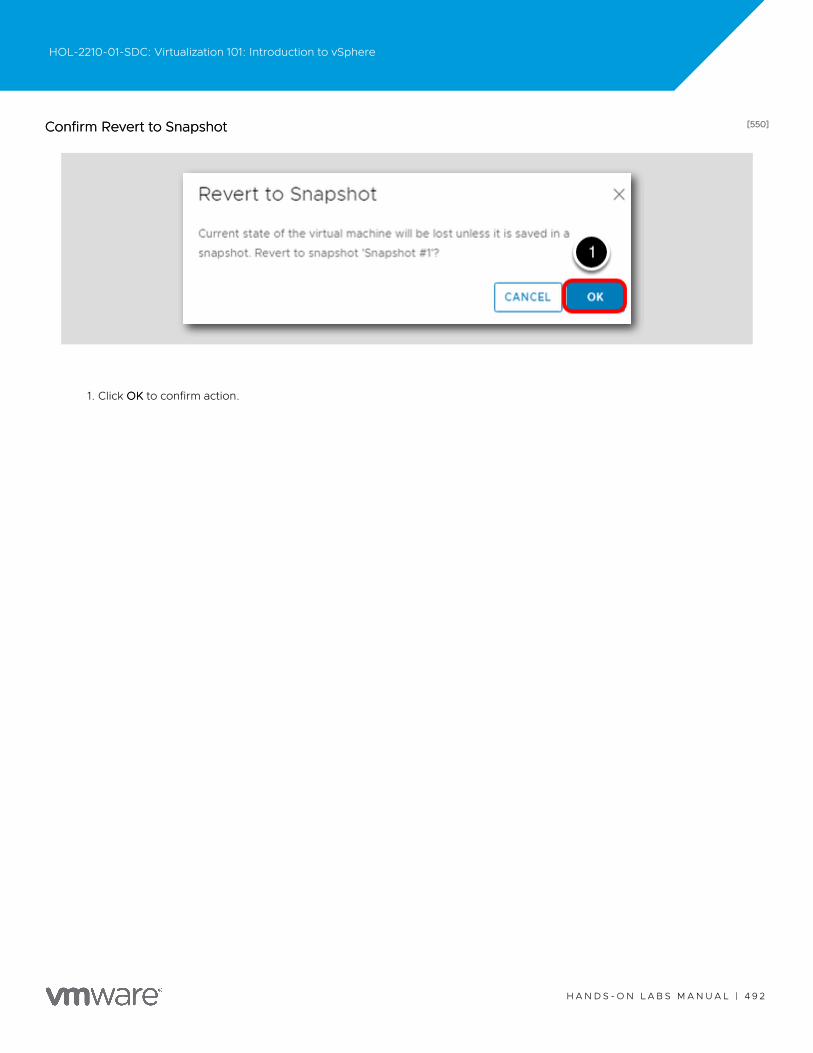
[550][550]Confirm Revert to SnapshotConfirm Revert to Snapshot
1. Click OKOK to confirm action.
HOL-2210-01-SDC: Virtualization 101: Introduction to vSphere
H A N D S - O N L A B S M A N U A L | 4 9 2
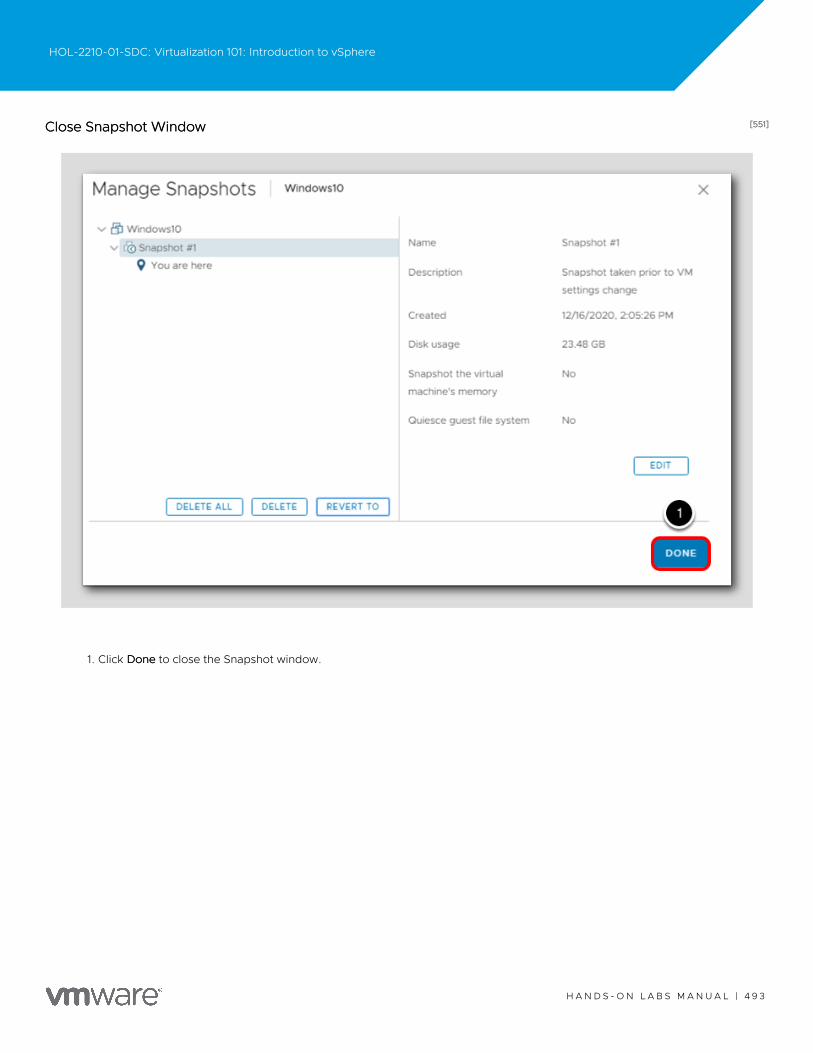
[551][551]Close Snapshot WindowClose Snapshot Window
1. Click DoneDone to close the Snapshot window.
HOL-2210-01-SDC: Virtualization 101: Introduction to vSphere
H A N D S - O N L A B S M A N U A L | 4 9 3
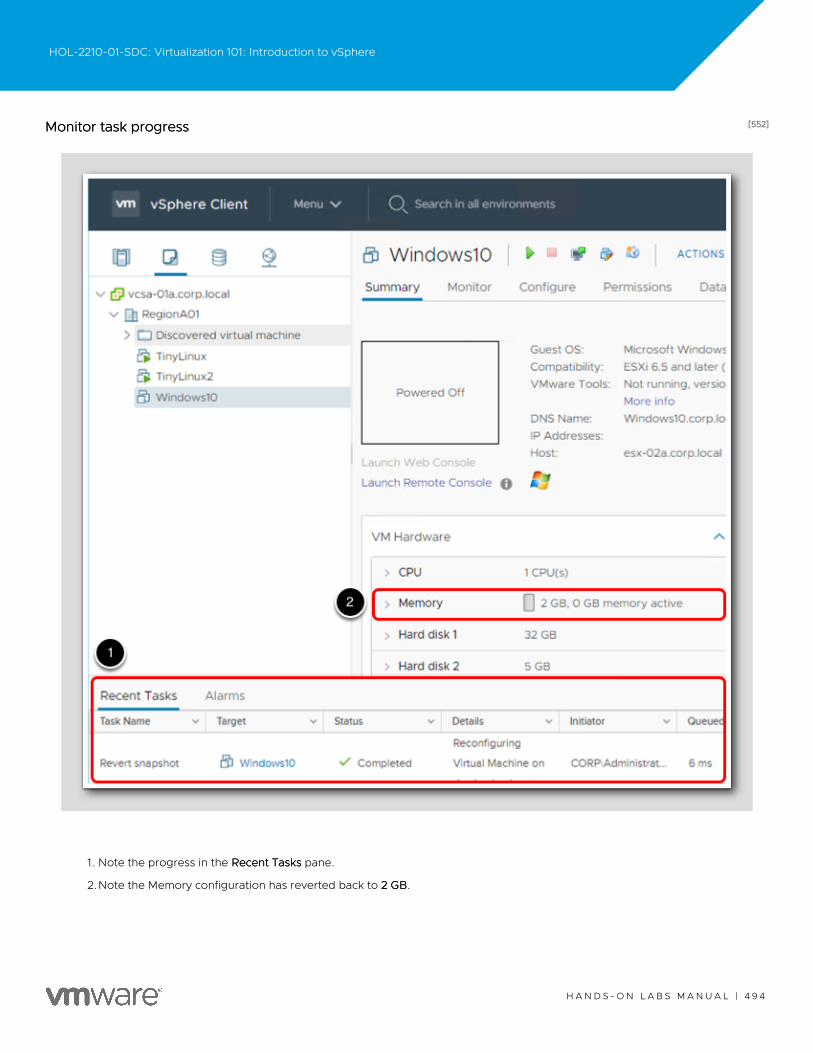
[552][552]Monitor task progressMonitor task progress
1. Note the progress in the Recent TasksRecent Tasks pane.
2.Note the Memory configuration has reverted back to 2 GB2 GB.
HOL-2210-01-SDC: Virtualization 101: Introduction to vSphere
H A N D S - O N L A B S M A N U A L | 4 9 4
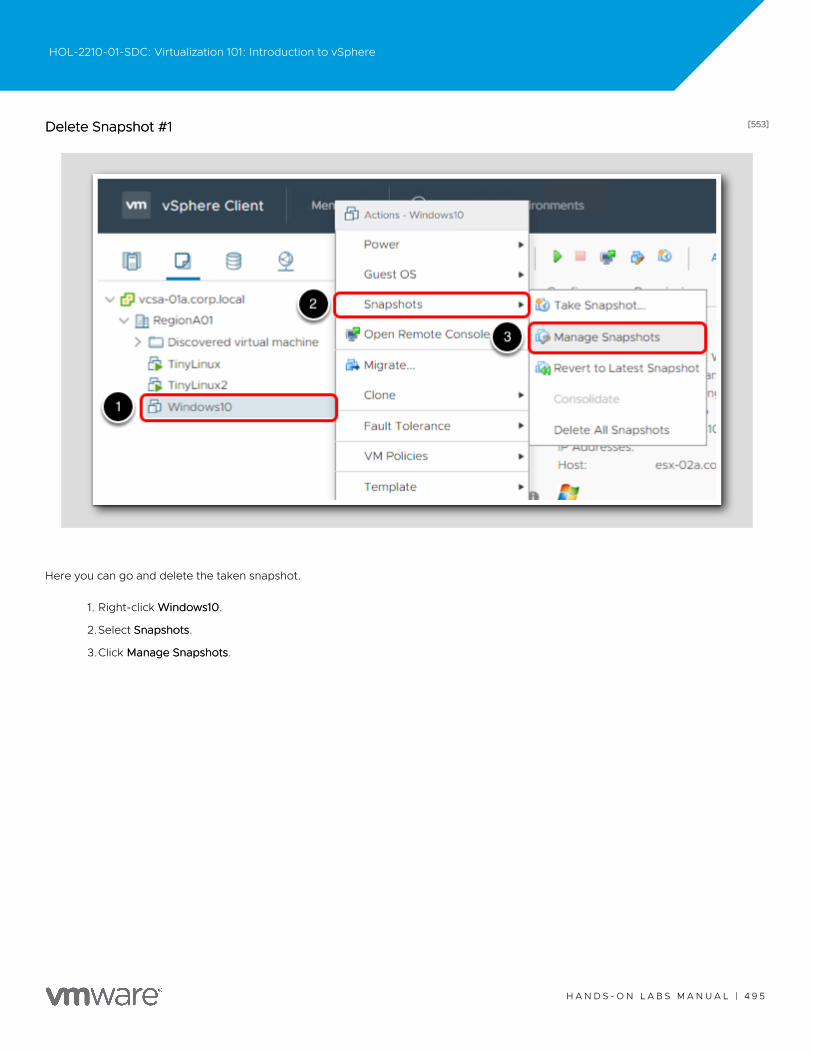
[553][553]Delete Snapshot #1Delete Snapshot #1
Here you can go and delete the taken snapshot.
1. Right-click WWindows10indows10.
2.Select SnapshotsSnapshots.
3.Click Manage SnapshotsManage Snapshots.
HOL-2210-01-SDC: Virtualization 101: Introduction to vSphere
H A N D S - O N L A B S M A N U A L | 4 9 5
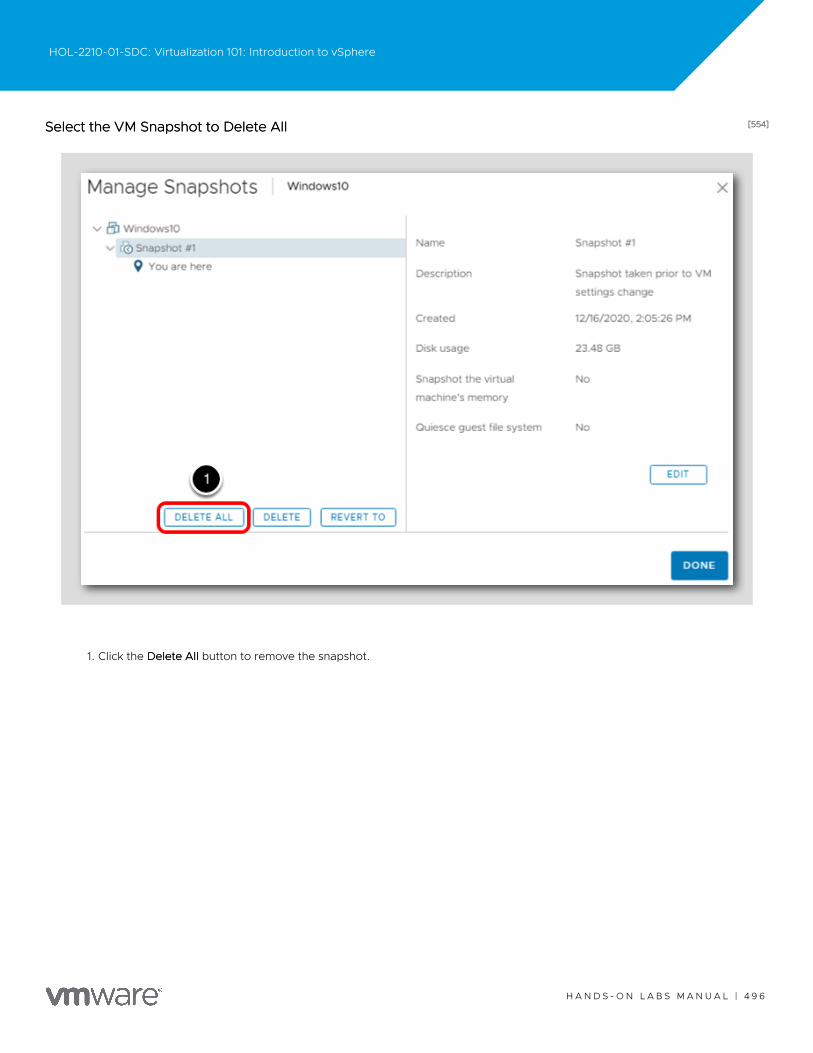
[554][554]Select the VM Snapshot to Delete AllSelect the VM Snapshot to Delete All
1. Click the Delete AllDelete All button to remove the snapshot.
HOL-2210-01-SDC: Virtualization 101: Introduction to vSphere
H A N D S - O N L A B S M A N U A L | 4 9 6

2.Click OKOK to confirm the deletion of all the snapshots.
HOL-2210-01-SDC: Virtualization 101: Introduction to vSphere
H A N D S - O N L A B S M A N U A L | 4 9 7
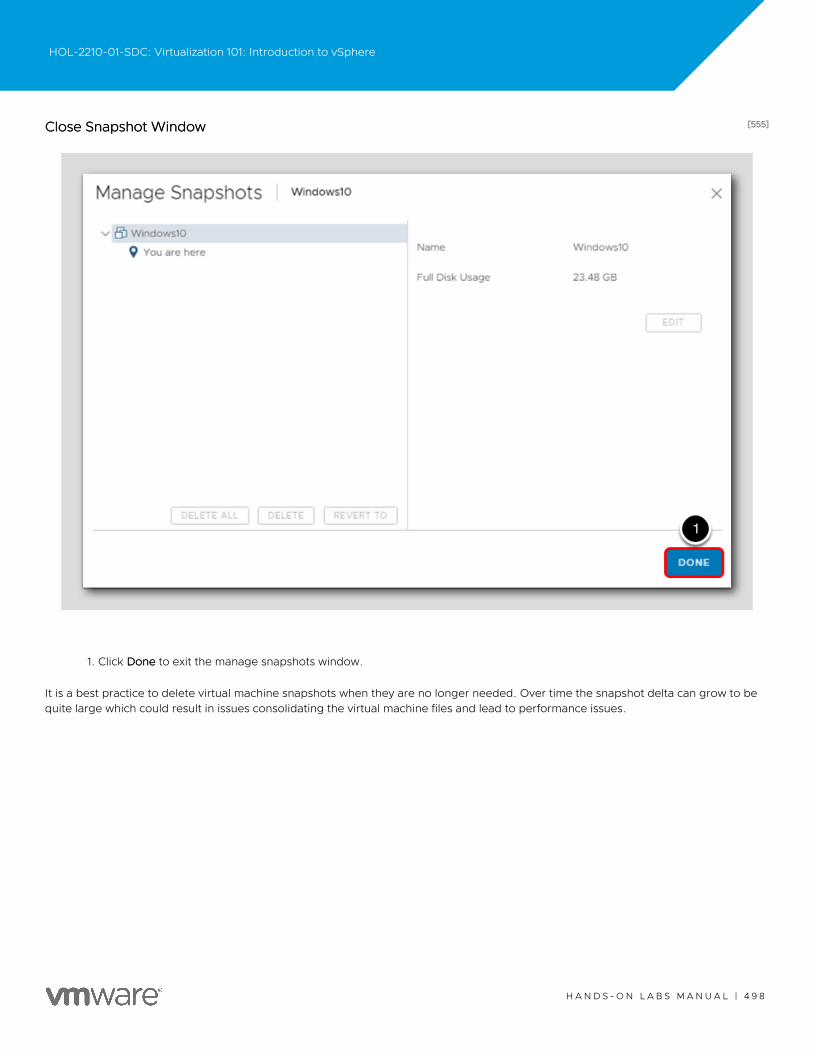
[555][555]Close Snapshot WindowClose Snapshot Window
1. Click DoneDone to exit the manage snapshots window.
It is a best practice to delete virtual machine snapshots when they are no longer needed. Over time the snapshot delta can grow to bequite large which could result in issues consolidating the virtual machine files and lead to performance issues.
HOL-2210-01-SDC: Virtualization 101: Introduction to vSphere
H A N D S - O N L A B S M A N U A L | 4 9 8
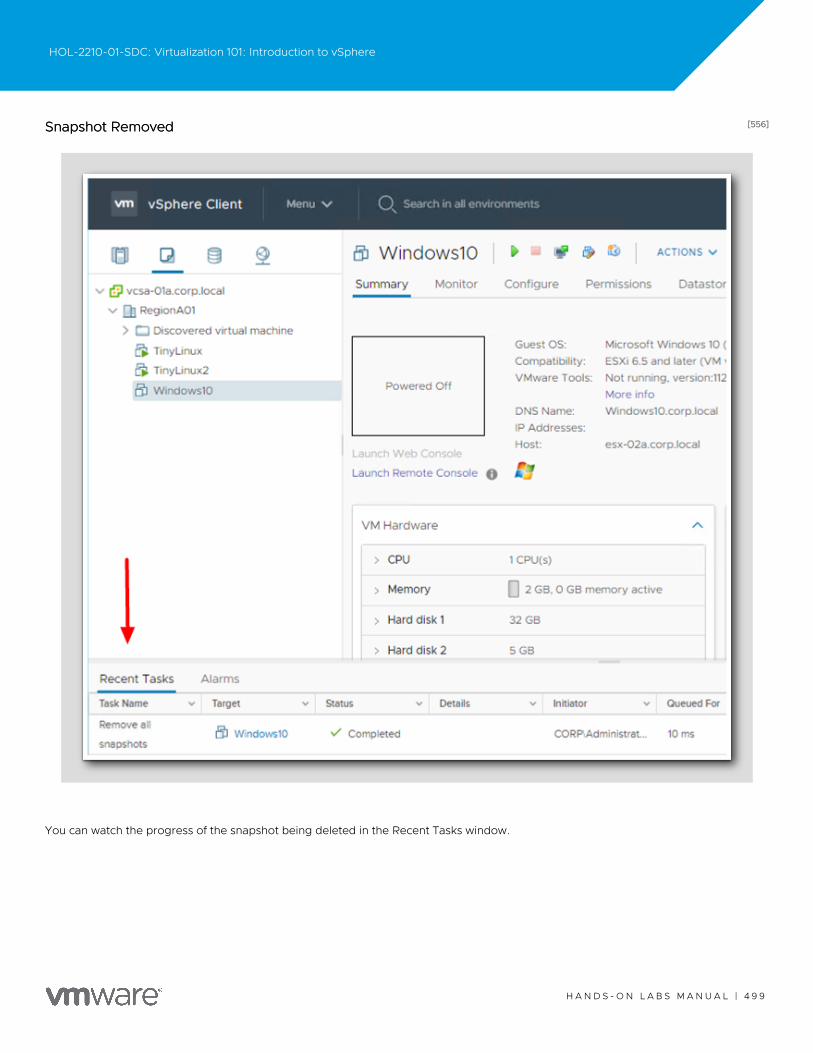
[556][556]Snapshot RemovedSnapshot Removed
You can watch the progress of the snapshot being deleted in the Recent Tasks window.
HOL-2210-01-SDC: Virtualization 101: Introduction to vSphere
H A N D S - O N L A B S M A N U A L | 4 9 9
[557][557]Video: More on Virtual Machine Snapshots (2:33)Video: More on Virtual Machine Snapshots (2:33)
https://www.youtube.com/watch?v=7AVlWifTEMMhttps://www.youtube.com/watch?v=7AVlWifTEMM
For more information on vSphere Virtual Machine Snapshots, be sure to check out this video.
[558][558]vSphere Datastore ClustervSphere Datastore Cluster
A vSphere Datastore Cluster balances I/O and storage capacity across a group of vSphere datastores. Depending on the level ofautomation desired, Storage Dynamic Resource Scheduler will place and migrate virtual machines in order to balance out datastoreutilization across the Datastore Cluster.
In this section, you will create a vSphere Datastore Cluster using two iSCSI datastores.
HOL-2210-01-SDC: Virtualization 101: Introduction to vSphere
H A N D S - O N L A B S M A N U A L | 5 0 0
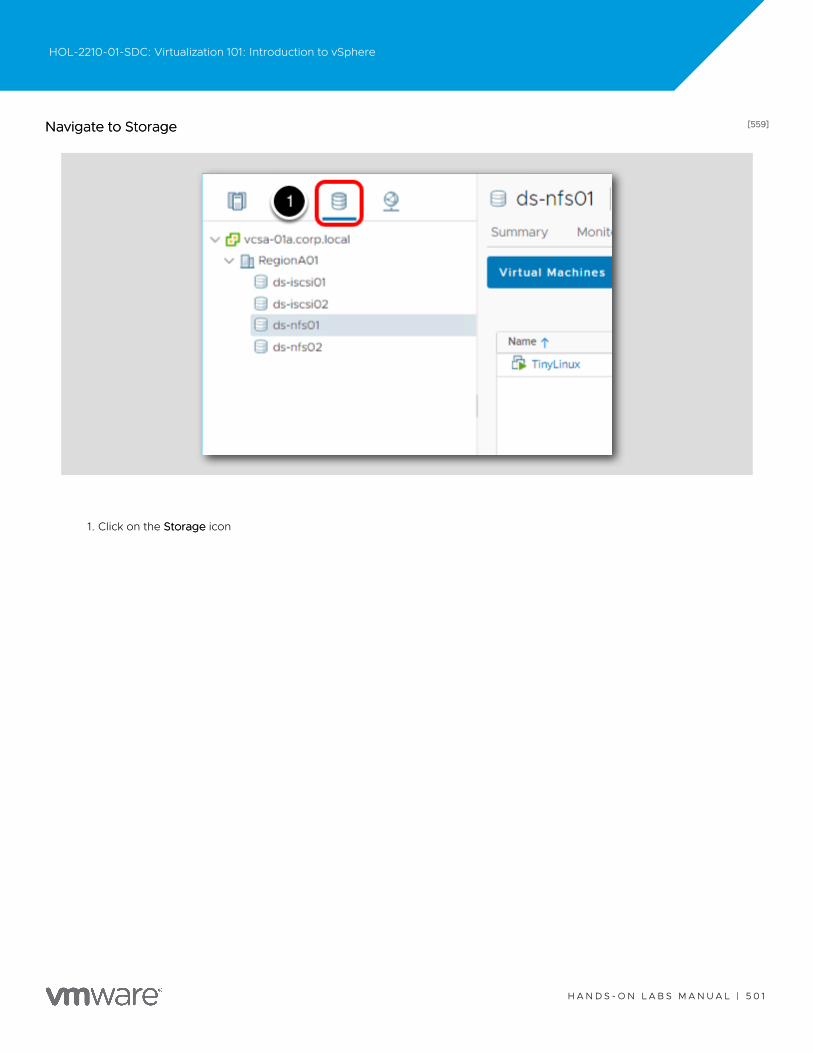
[559][559]Navigate to StorageNavigate to Storage
1. Click on the StorageStorage icon
HOL-2210-01-SDC: Virtualization 101: Introduction to vSphere
H A N D S - O N L A B S M A N U A L | 5 0 1
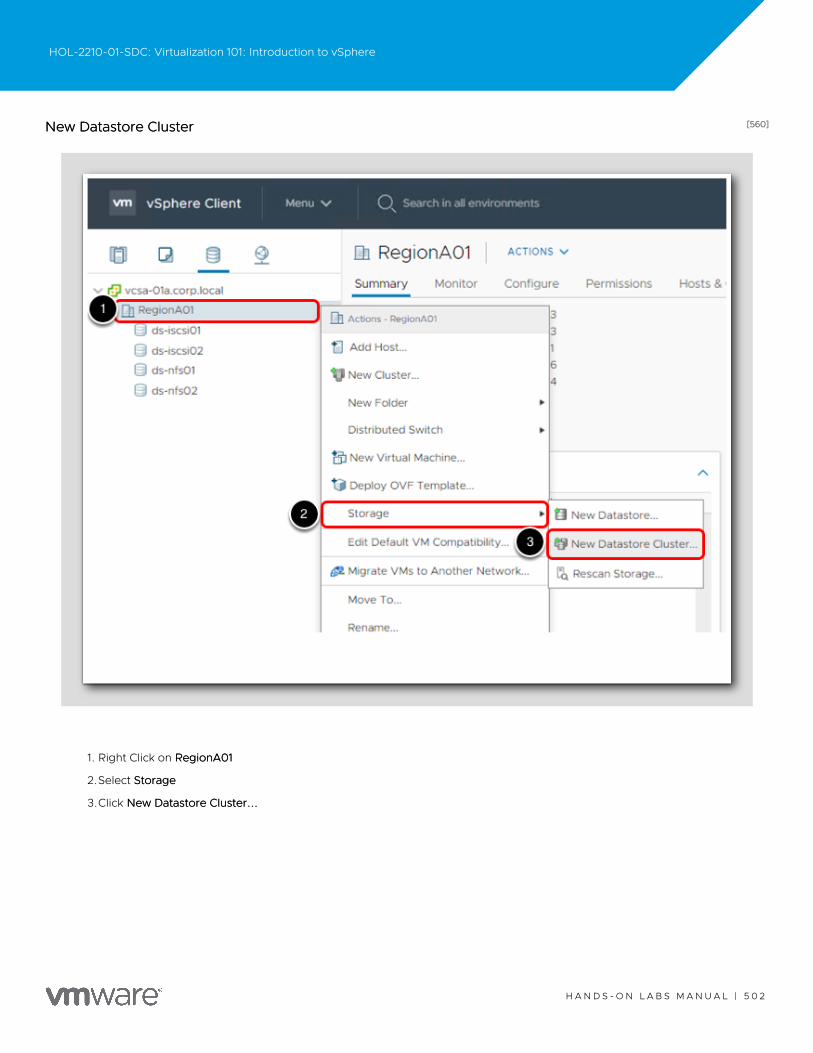
[560][560]New Datastore ClusterNew Datastore Cluster
1. Right Click on RegionA01RegionA01
2.Select StorageStorage
3.Click New Datastore Cluster...New Datastore Cluster...
HOL-2210-01-SDC: Virtualization 101: Introduction to vSphere
H A N D S - O N L A B S M A N U A L | 5 0 2
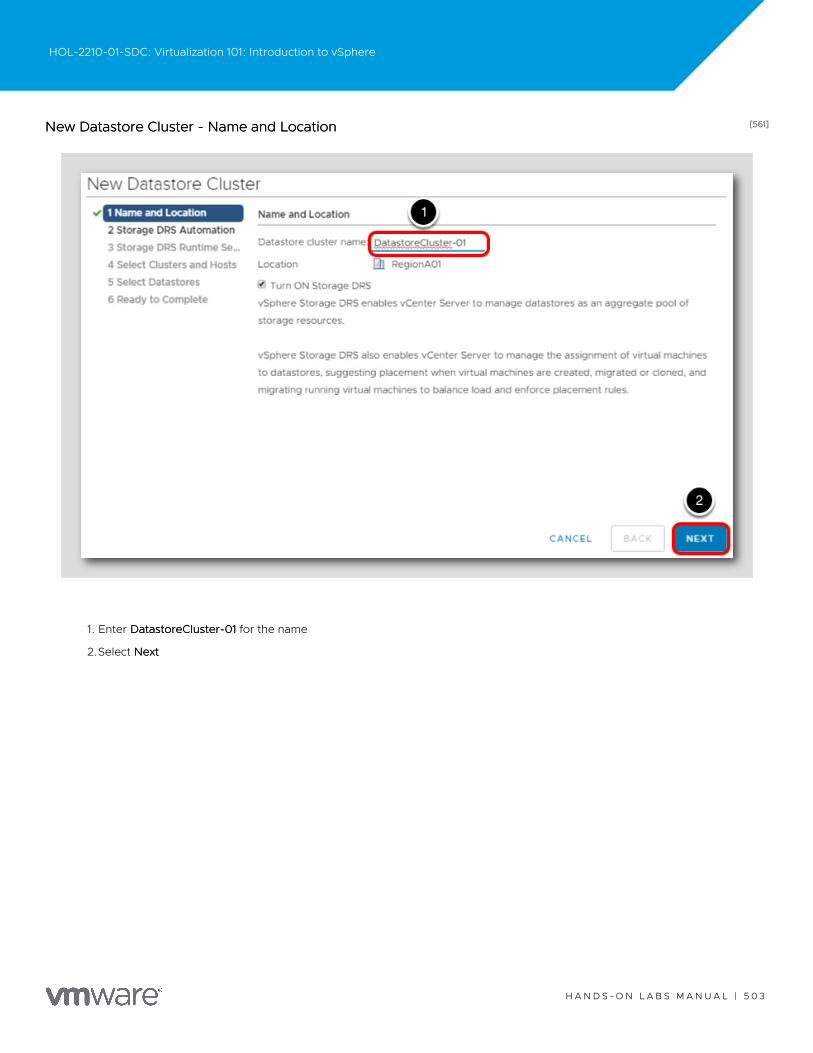
[561][561]New Datastore Cluster - Name and LocationNew Datastore Cluster - Name and Location
1. Enter DatastoreCluster-01DatastoreCluster-01 for the name
2.Select NextNext
HOL-2210-01-SDC: Virtualization 101: Introduction to vSphere
H A N D S - O N L A B S M A N U A L | 5 0 3

[562][562]New Datastore Cluster - Storage DRS AutomationNew Datastore Cluster - Storage DRS Automation
1. Leave the defaults settings and select NextNext
HOL-2210-01-SDC: Virtualization 101: Introduction to vSphere
H A N D S - O N L A B S M A N U A L | 5 0 4
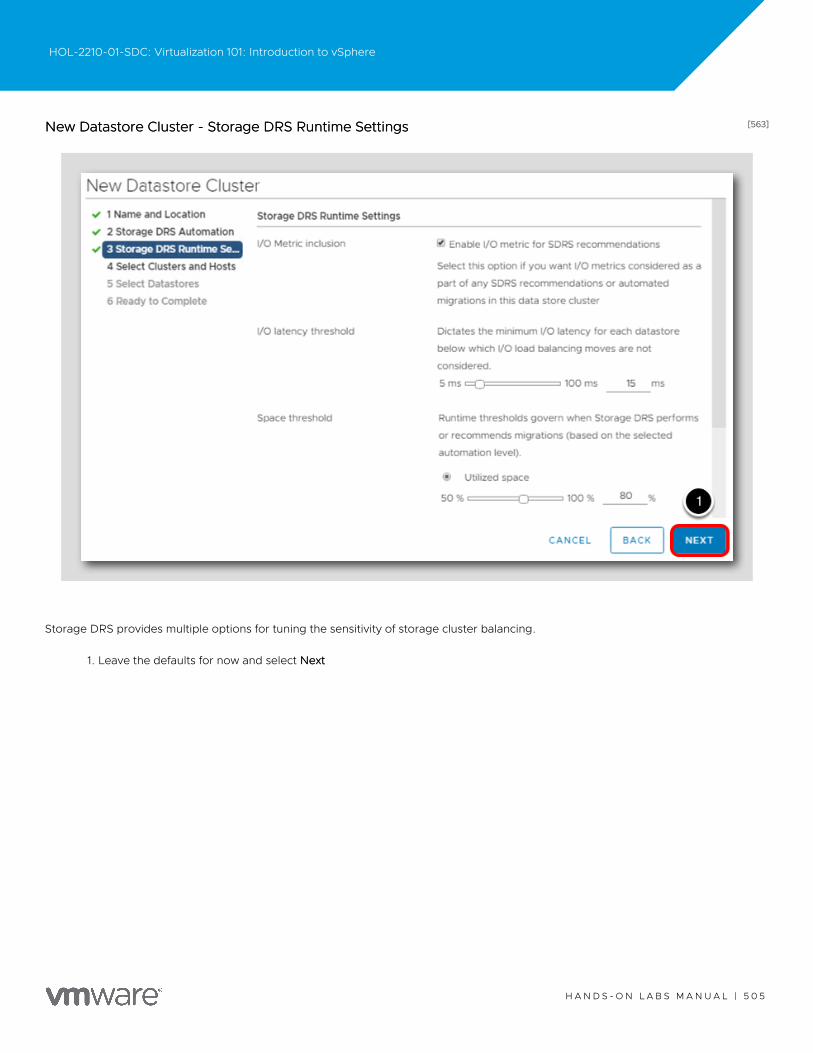
[563][563]New Datastore Cluster - Storage DRS Runtime SettingsNew Datastore Cluster - Storage DRS Runtime Settings
Storage DRS provides multiple options for tuning the sensitivity of storage cluster balancing.
1. Leave the defaults for now and select NextNext
HOL-2210-01-SDC: Virtualization 101: Introduction to vSphere
H A N D S - O N L A B S M A N U A L | 5 0 5
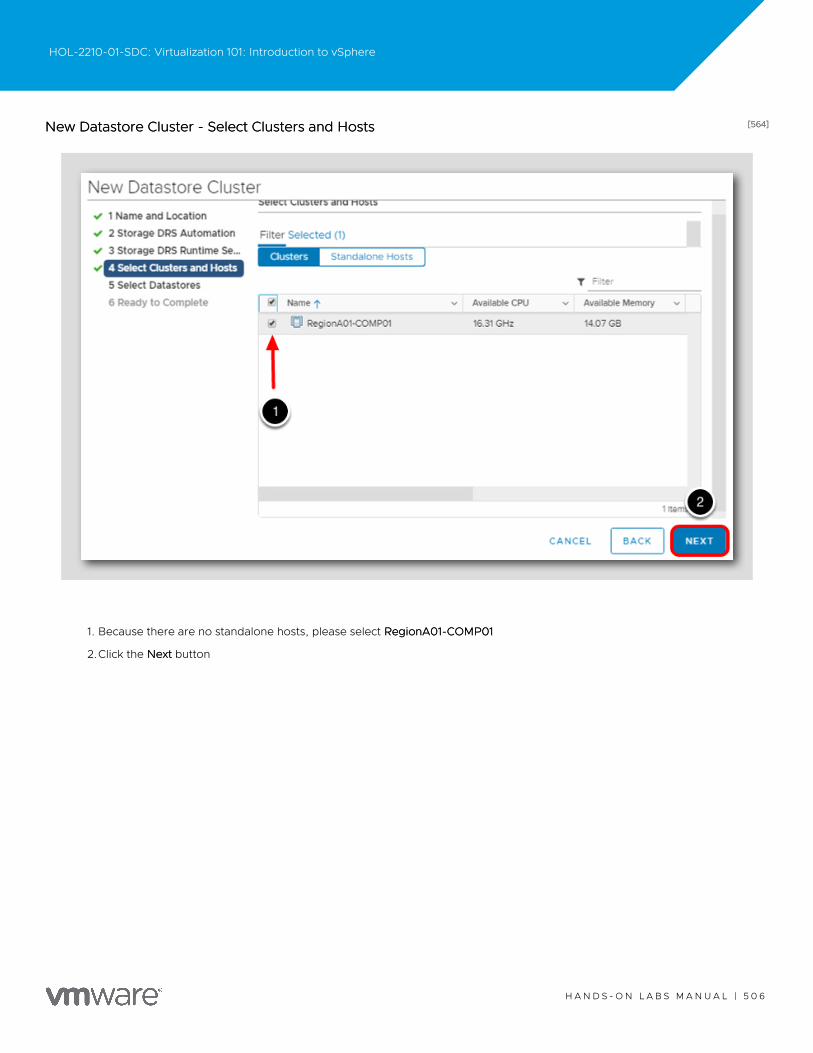
[564][564]New Datastore Cluster - Select Clusters and HostsNew Datastore Cluster - Select Clusters and Hosts
1. Because there are no standalone hosts, please select RegionA01-COMP01RegionA01-COMP01
2.Click the NextNext button
HOL-2210-01-SDC: Virtualization 101: Introduction to vSphere
H A N D S - O N L A B S M A N U A L | 5 0 6

[565][565]New Datastore Cluster - Select DatastoresNew Datastore Cluster - Select Datastores
1. Select the ds-iscsi01ds-iscsi01 and ds-iscsi02ds-iscsi02 datastores for the new Datastore Cluster
2.Click NextNext
HOL-2210-01-SDC: Virtualization 101: Introduction to vSphere
H A N D S - O N L A B S M A N U A L | 5 0 7
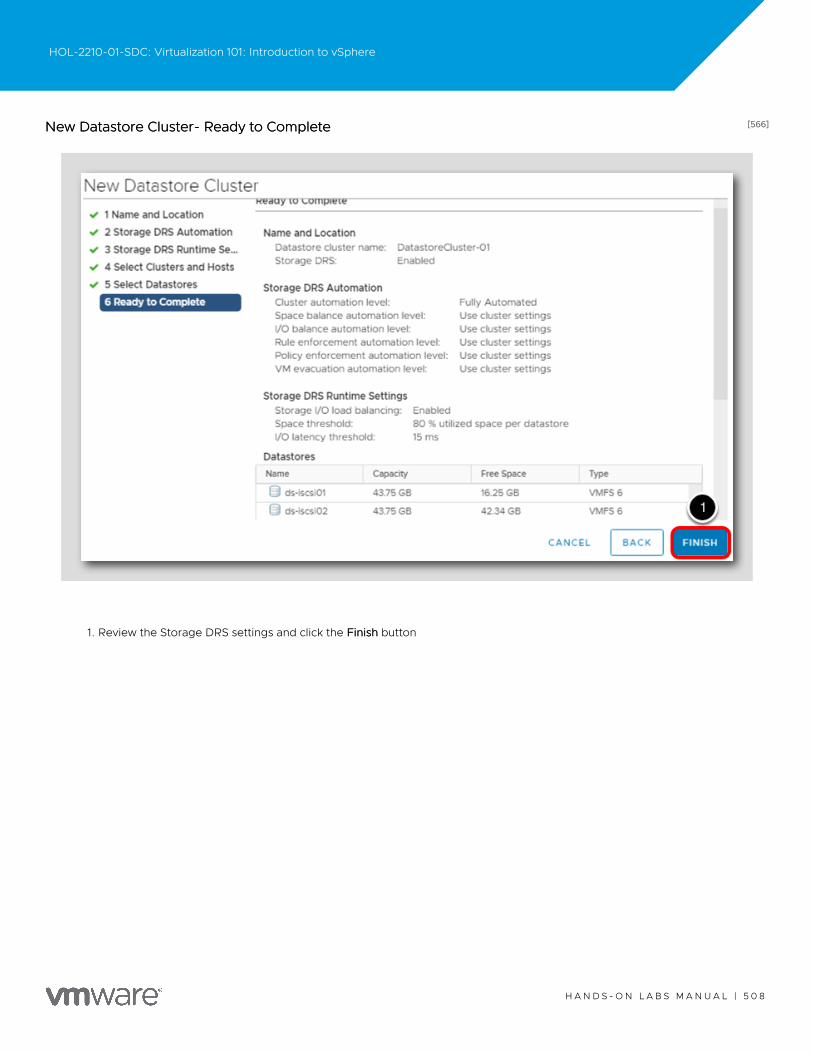
[566][566]New Datastore Cluster- Ready to CompleteNew Datastore Cluster- Ready to Complete
1. Review the Storage DRS settings and click the FinishFinish button
HOL-2210-01-SDC: Virtualization 101: Introduction to vSphere
H A N D S - O N L A B S M A N U A L | 5 0 8
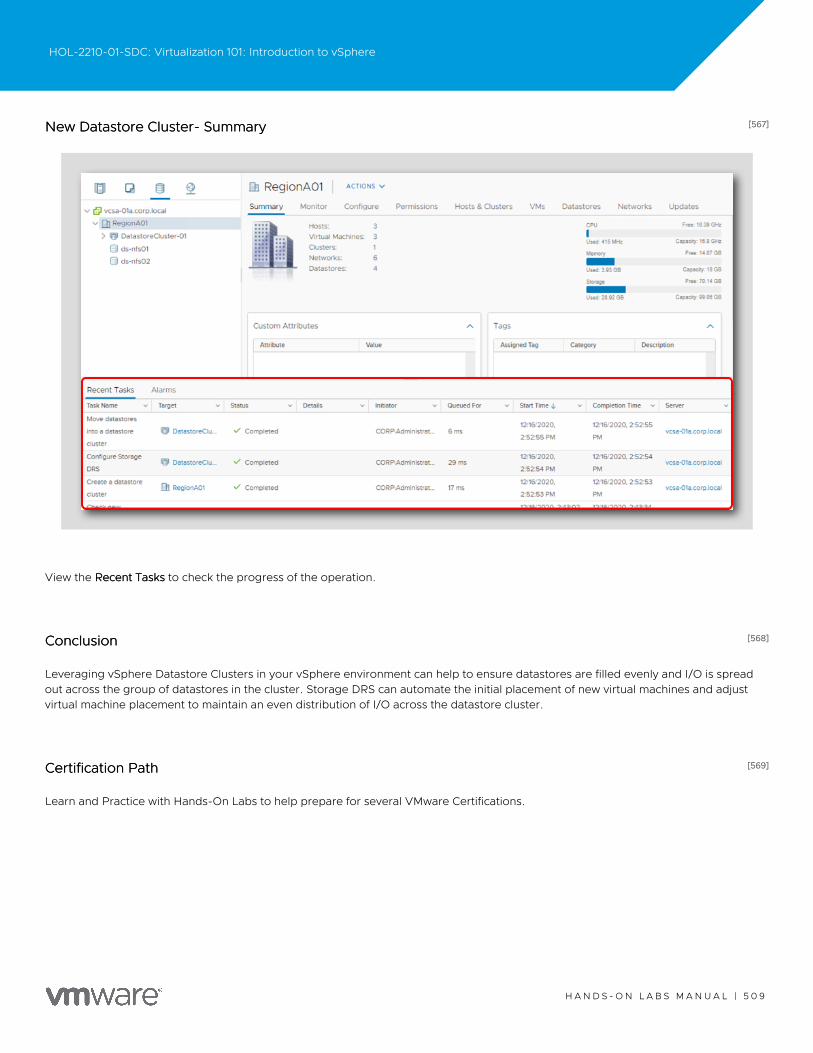
[567][567]New Datastore Cluster- SummaryNew Datastore Cluster- Summary
View the Recent TasksRecent Tasks to check the progress of the operation.
[568][568]ConclusionConclusion
Leveraging vSphere Datastore Clusters in your vSphere environment can help to ensure datastores are filled evenly and I/O is spreadout across the group of datastores in the cluster. Storage DRS can automate the initial placement of new virtual machines and adjustvirtual machine placement to maintain an even distribution of I/O across the datastore cluster.
[569][569]Certification PathCertification Path
Learn and Practice with Hands-On Labs to help prepare for several VMware Certifications.
HOL-2210-01-SDC: Virtualization 101: Introduction to vSphere
H A N D S - O N L A B S M A N U A L | 5 0 9
This Lab can help you study for the industry-recognized VCAP-DCV Deploy 2021 Deploy certification which validates that you know howto deploy and optimize VMware vSphere infrastructures.
HOL-2210-01-SDC: Virtualization 101: Introduction to vSphere
H A N D S - O N L A B S M A N U A L | 5 1 0
Learn More Here https://via.vmw.com/dcv_deployhttps://via.vmw.com/dcv_deploy
HOL-2210-01-SDC: Virtualization 101: Introduction to vSphere
H A N D S - O N L A B S M A N U A L | 5 1 1

ConclusionConclusion
[571][571]For More Information....For More Information....
This section provides supplementary documentation and videos.
[572][572]Video: How to Configure a vSphere Standard Switch (VSS) (4:22)Video: How to Configure a vSphere Standard Switch (VSS) (4:22)
https://www.youtube.com/watch?v=XpXuhK0c-f4https://www.youtube.com/watch?v=XpXuhK0c-f4
This video shows how to use the VMware vSphere web client to configure basic networking for your vSphere hosts using the vSphereStandard Switch (VSS).
HOL-2210-01-SDC: Virtualization 101: Introduction to vSphere
H A N D S - O N L A B S M A N U A L | 5 1 2
[573][573]vSphere 7 - vCenter Server High AvailabilityvSphere 7 - vCenter Server High Availability
https://www.youtube.com/watch?v=XkP6QCutw9khttps://www.youtube.com/watch?v=XkP6QCutw9k
Lightboard illustration of the vCenter Server High Availability options for each deployment type.
[574][574]Video: Configure Alarms and Notification for VMware vSphere (5:20)Video: Configure Alarms and Notification for VMware vSphere (5:20)
This video shows how to use the VMware vSphere web client to configure vCenter Server alarms and alerts and how to enable emailnotification.
HOL-2210-01-SDC: Virtualization 101: Introduction to vSphere
H A N D S - O N L A B S M A N U A L | 5 1 3
https://www.youtube.com/watch?v=8vWNVBDPcu4https://www.youtube.com/watch?v=8vWNVBDPcu4
[575][575]Video: Enable vSphere Host Lockdown Mode for VMware vSphere (4:48)Video: Enable vSphere Host Lockdown Mode for VMware vSphere (4:48)
This video shows how to secure VMware vSphere hosts with Lockdown Mode in order to limit direct access to the host console and torequire administrators manage hosts through vCenter Server.
HOL-2210-01-SDC: Virtualization 101: Introduction to vSphere
H A N D S - O N L A B S M A N U A L | 5 1 4
https://www.youtube.com/watch?v=gWIb2HHu3bEhttps://www.youtube.com/watch?v=gWIb2HHu3bE
[576][576](Optional) Video: Add VMware vSphere Hosts to Active Directory (3:40)(Optional) Video: Add VMware vSphere Hosts to Active Directory (3:40)
This video shows how to join a VMware vSphere host to a Microsoft Active Directory (AD) domain in order to allow administrators to usetheir Active Directory credentials to access and manage hosts.
HOL-2210-01-SDC: Virtualization 101: Introduction to vSphere
H A N D S - O N L A B S M A N U A L | 5 1 5
https://www.youtube.com/watch?v=H74M__Eshtwhttps://www.youtube.com/watch?v=H74M__Eshtw
[577][577]Video:Video: Configure vSphere Host Firewall for VMware vSphere (4:34)Configure vSphere Host Firewall for VMware vSphere (4:34)
This video shows how to use the VMware ESXi Firewall on the vSphere host to block incoming and outgoing communication and tomanage the services running on the host.
HOL-2210-01-SDC: Virtualization 101: Introduction to vSphere
H A N D S - O N L A B S M A N U A L | 5 1 6
https://www.youtube.com/watch?v=bzjsjQdnTukhttps://www.youtube.com/watch?v=bzjsjQdnTuk
[578][578]REFERENCE - Unlock vCenter Single Sign On Users in the vSphere Web ClientREFERENCE - Unlock vCenter Single Sign On Users in the vSphere Web Client
A vCenter Single Sign On user account might be locked when a user exceeds the allowed number of failed login attempts. After a useraccount is locked, the user cannot log in to the Single Sign On system until the account is unlocked, either manually or after a certainamount of time has elapsed.
You specify the conditions under which a user account is locked in the Single Sign On Lockout Policy. Locked user accounts appear onthe Users and Groups administration page. Users with appropriate privileges can manually unlock Single Sign On user accounts beforethe specified amount of time has elapsed. You must be a member of the Single Sign On Administrators group to unlock a Single SignOn user.
HOL-2210-01-SDC: Virtualization 101: Introduction to vSphere
H A N D S - O N L A B S M A N U A L | 5 1 7
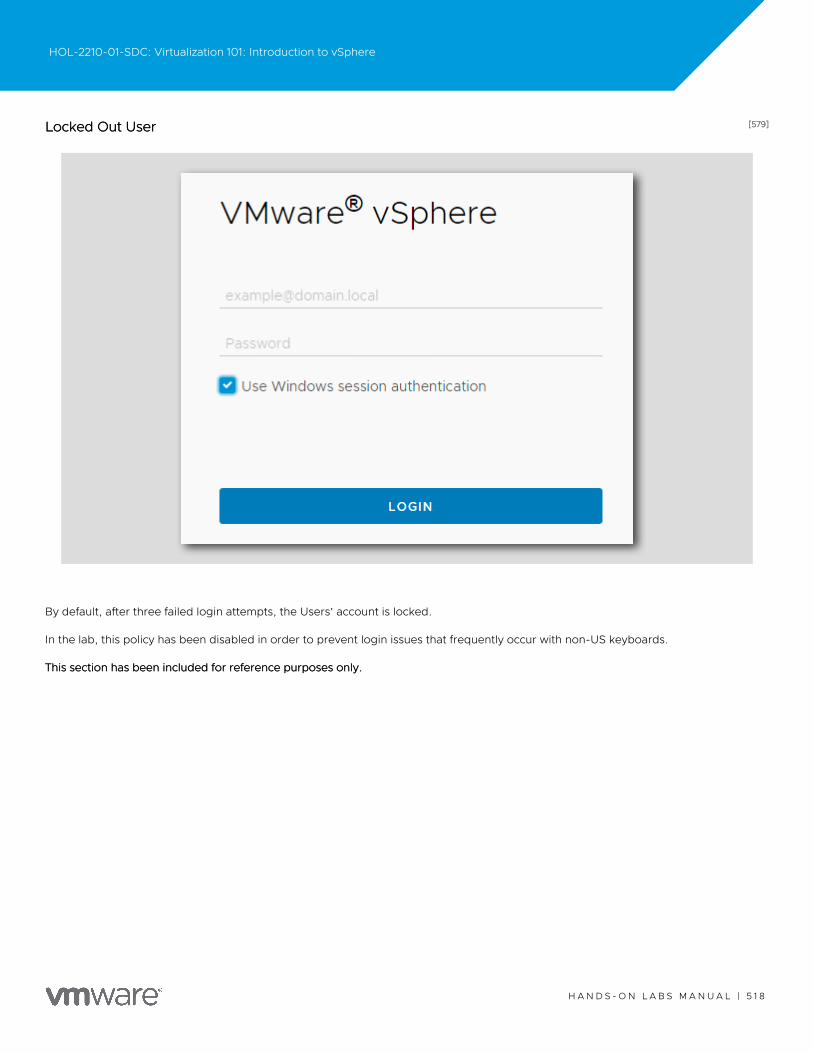
[579][579]Locked Out UserLocked Out User
By default, after three failed login attempts, the Users' account is locked.
In the lab, this policy has been disabled in order to prevent login issues that frequently occur with non-US keyboards.
This section has been included for reference purposes only.This section has been included for reference purposes only.
HOL-2210-01-SDC: Virtualization 101: Introduction to vSphere
H A N D S - O N L A B S M A N U A L | 5 1 8
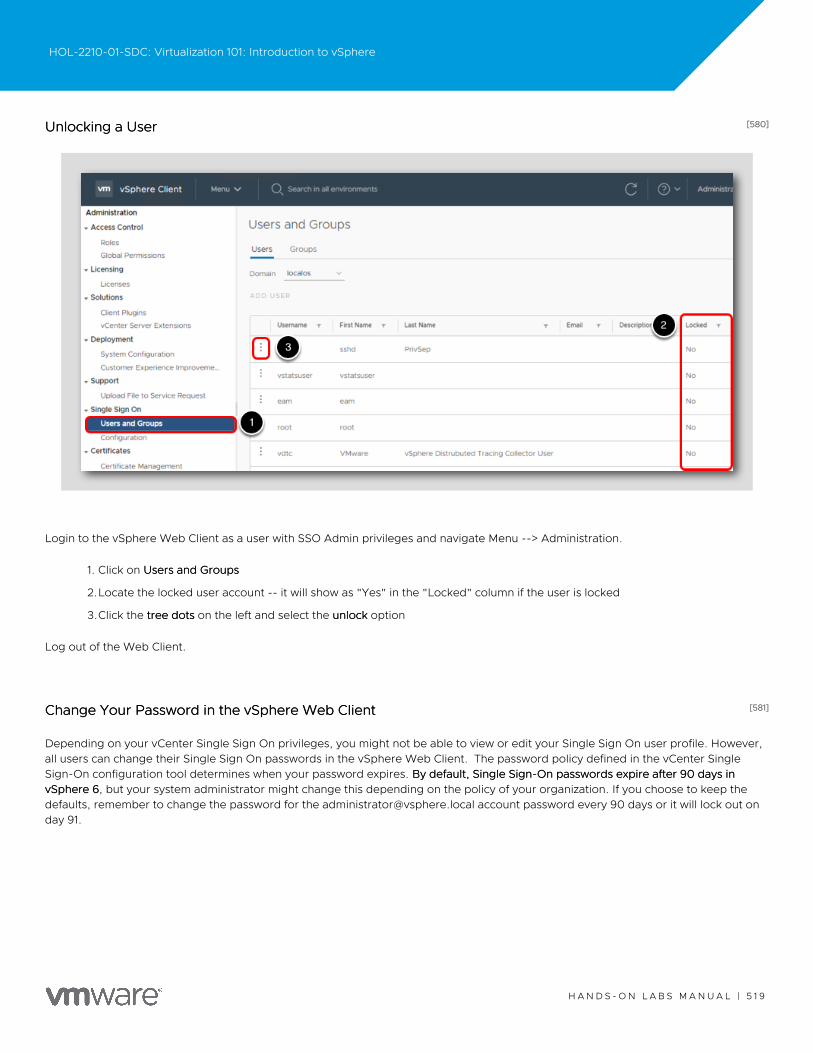
[580][580]Unlocking a UserUnlocking a User
Login to the vSphere Web Client as a user with SSO Admin privileges and navigate Menu --> Administration.
1. Click on Users and GroupsUsers and Groups
2.Locate the locked user account -- it will show as "Yes" in the "Locked" column if the user is locked
3.Click the tree dotstree dots on the left and select the unlockunlock option
Log out of the Web Client.
[581][581]Change Your Password in the vSphere Web ClientChange Your Password in the vSphere Web Client
Depending on your vCenter Single Sign On privileges, you might not be able to view or edit your Single Sign On user profile. However,all users can change their Single Sign On passwords in the vSphere Web Client. The password policy defined in the vCenter SingleSign-On configuration tool determines when your password expires. By default, Single Sign-On passwords expire after 90 days inBy default, Single Sign-On passwords expire after 90 days invSphere 6vSphere 6, but your system administrator might change this depending on the policy of your organization. If you choose to keep thedefaults, remember to change the password for the [email protected] account password every 90 days or it will lock out onday 91.
HOL-2210-01-SDC: Virtualization 101: Introduction to vSphere
H A N D S - O N L A B S M A N U A L | 5 1 9
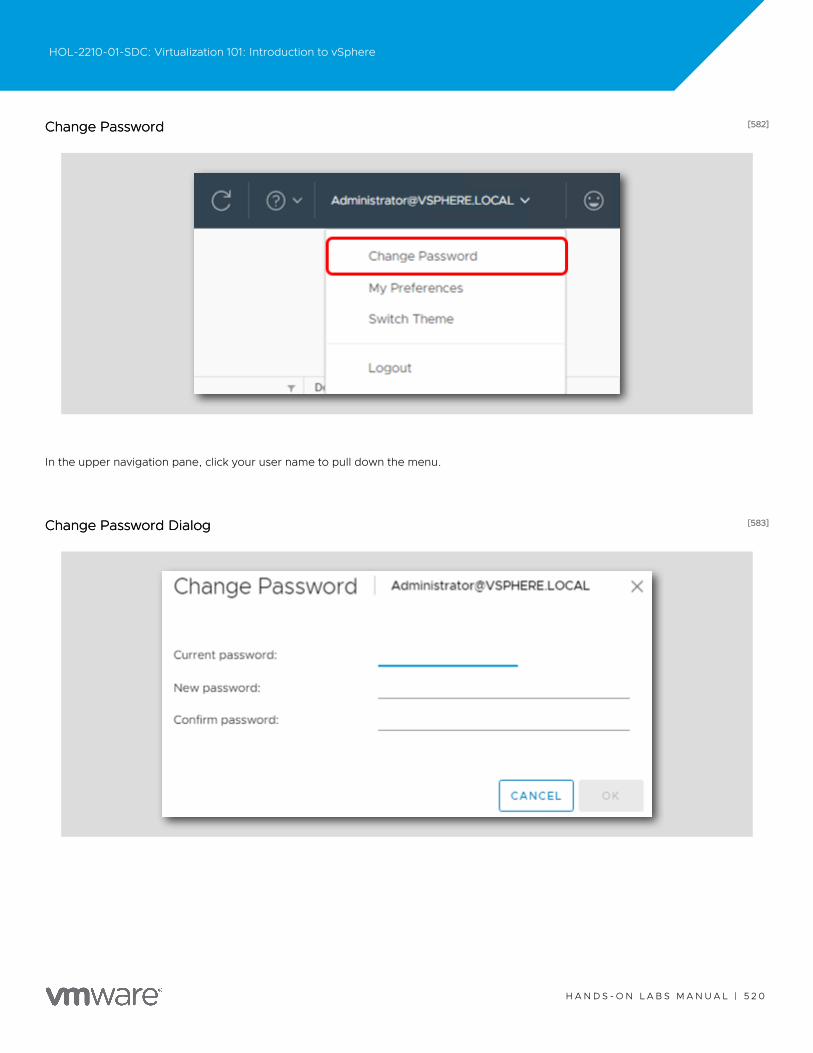
[582][582]Change PasswordChange Password
In the upper navigation pane, click your user name to pull down the menu.
[583][583]Change Password DialogChange Password Dialog
HOL-2210-01-SDC: Virtualization 101: Introduction to vSphere
H A N D S - O N L A B S M A N U A L | 5 2 0
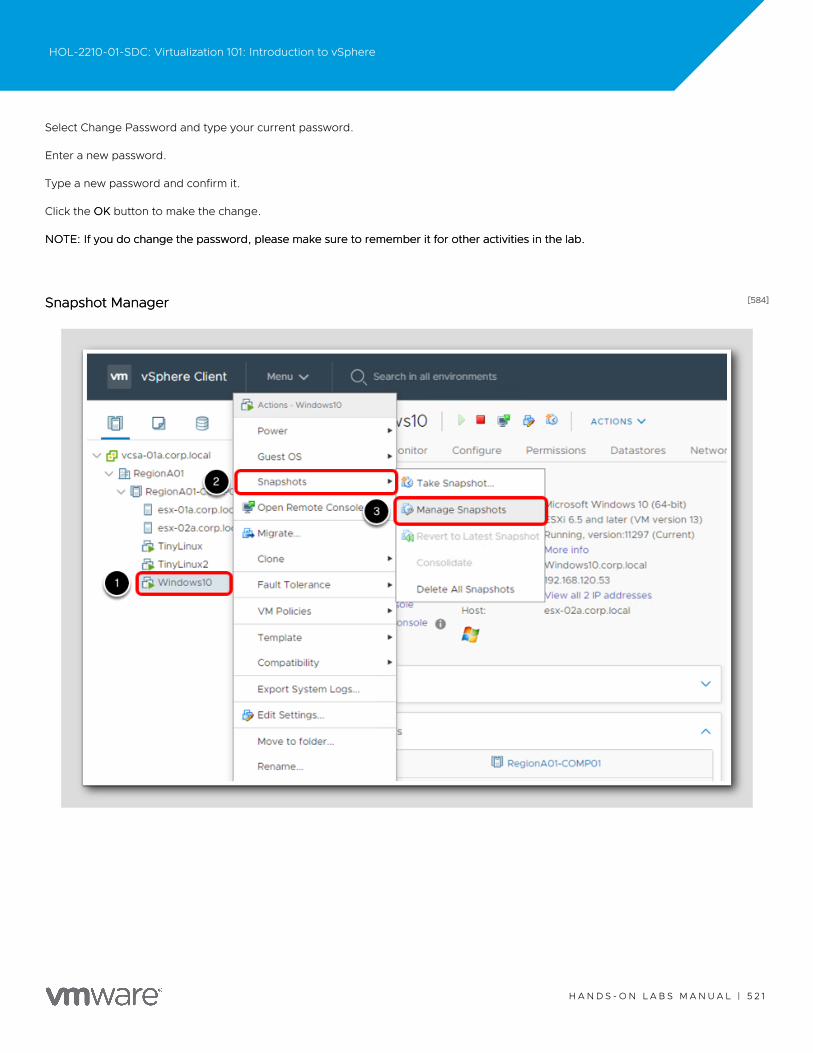
Select Change Password and type your current password.
Enter a new password.
Type a new password and confirm it.
Click the OKOK button to make the change.
NOTE: If you do change the password, please make sure to remember it for other activities in the lab.NOTE: If you do change the password, please make sure to remember it for other activities in the lab.
[584][584]Snapshot ManagerSnapshot Manager
HOL-2210-01-SDC: Virtualization 101: Introduction to vSphere
H A N D S - O N L A B S M A N U A L | 5 2 1

In this section, you revert the Virtual Machine's configuration back to the original state using the Snapshot Manager.
1. Right-click Windows10Windows10
2.Select SnapshotsSnapshots
3.Click Manage SnapshotsManage Snapshots
[585][585]What is vSphere Storage DRS? (5:08)What is vSphere Storage DRS? (5:08)
https://www.youtube.com/watch?v=z77xmaxoNechttps://www.youtube.com/watch?v=z77xmaxoNec
This animated video shows how VMware Storage DRS reduces the time and complexity of provisioning virtual machines by aggregatingdata stores into a single pool, called a datastore cluster, enabling rapid placement of virtual machines and virtual machine disks.
[586][586]Creating a Datastore Cluster with Storage DRS (3:23)Creating a Datastore Cluster with Storage DRS (3:23)
This video reviews the process of creating and managing a datastore cluster in a vSphere environment.
HOL-2210-01-SDC: Virtualization 101: Introduction to vSphere
H A N D S - O N L A B S M A N U A L | 5 2 2
https://www.youtube.com/watch?v=gATLj6pUxnkhttps://www.youtube.com/watch?v=gATLj6pUxnk
HOL-2210-01-SDC: Virtualization 101: Introduction to vSphere
H A N D S - O N L A B S M A N U A L | 5 2 3
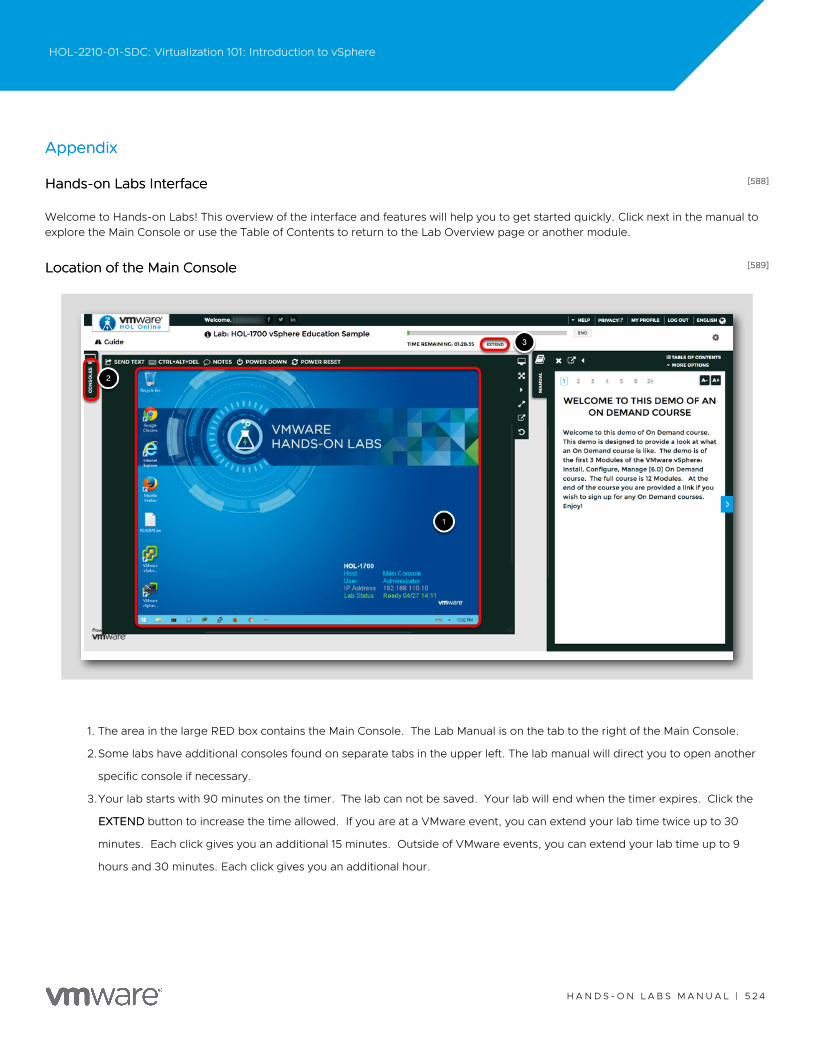
AppendixAppendix
[588][588]Hands-on Labs InterfaceHands-on Labs Interface
Welcome to Hands-on Labs! This overview of the interface and features will help you to get started quickly. Click next in the manual toexplore the Main Console or use the Table of Contents to return to the Lab Overview page or another module.
[589][589]Location of the Main ConsoleLocation of the Main Console
1. The area in the large RED box contains the Main Console. The Lab Manual is on the tab to the right of the Main Console.
2.Some labs have additional consoles found on separate tabs in the upper left. The lab manual will direct you to open another
specific console if necessary.
3.Your lab starts with 90 minutes on the timer. The lab can not be saved. Your lab will end when the timer expires. Click the
EXTENDEXTEND button to increase the time allowed. If you are at a VMware event, you can extend your lab time twice up to 30
minutes. Each click gives you an additional 15 minutes. Outside of VMware events, you can extend your lab time up to 9
hours and 30 minutes. Each click gives you an additional hour.
HOL-2210-01-SDC: Virtualization 101: Introduction to vSphere
H A N D S - O N L A B S M A N U A L | 5 2 4
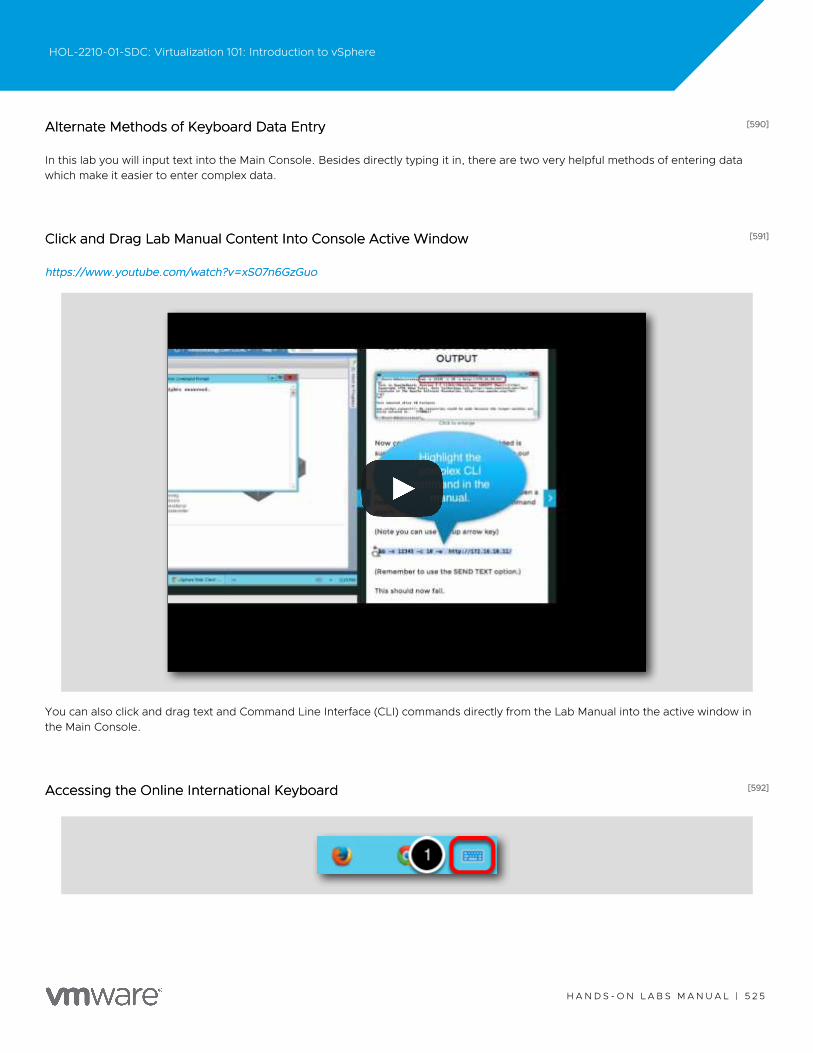
[590][590]Alternate Methods of Keyboard Data EntryAlternate Methods of Keyboard Data Entry
In this lab you will input text into the Main Console. Besides directly typing it in, there are two very helpful methods of entering datawhich make it easier to enter complex data.
[591][591]Click and Drag Lab Manual Content Into Console Active WindowClick and Drag Lab Manual Content Into Console Active Window
https://www.youtube.com/watch?v=xS07n6GzGuohttps://www.youtube.com/watch?v=xS07n6GzGuo
You can also click and drag text and Command Line Interface (CLI) commands directly from the Lab Manual into the active window inthe Main Console.
[592][592]Accessing the Online International KeyboardAccessing the Online International Keyboard
HOL-2210-01-SDC: Virtualization 101: Introduction to vSphere
H A N D S - O N L A B S M A N U A L | 5 2 5
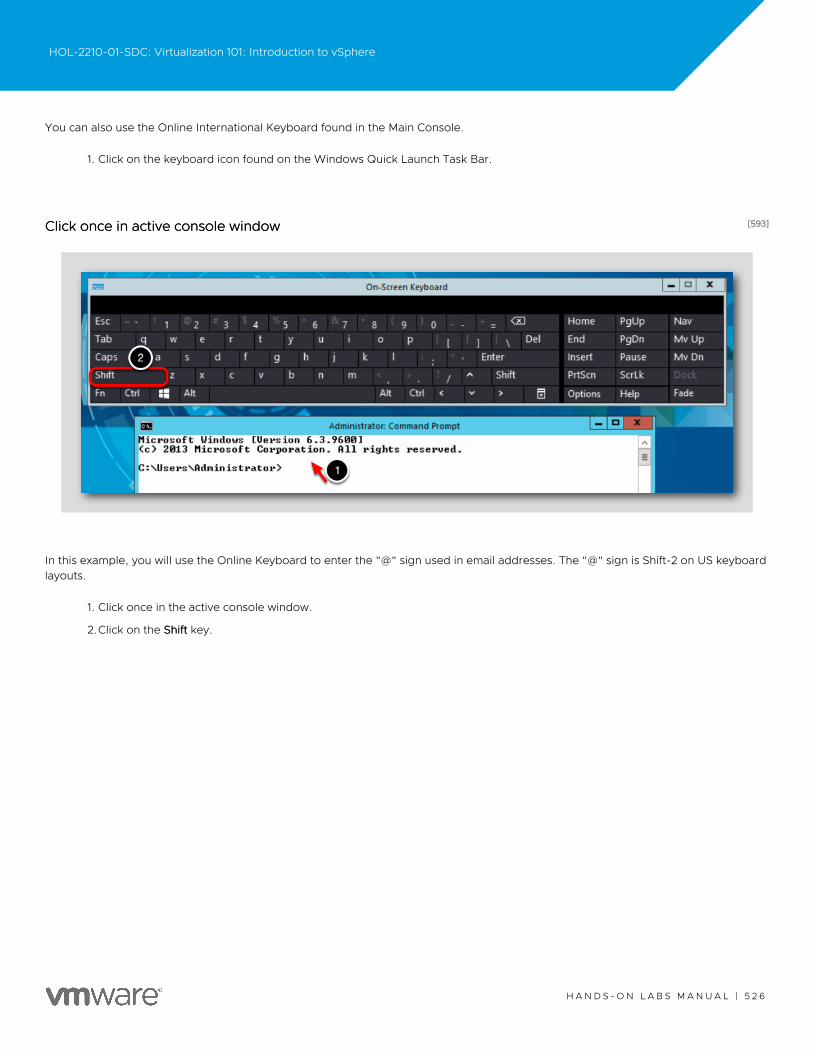
You can also use the Online International Keyboard found in the Main Console.
1. Click on the keyboard icon found on the Windows Quick Launch Task Bar.
[593][593]Click once in active console windowClick once in active console window
In this example, you will use the Online Keyboard to enter the "@" sign used in email addresses. The "@" sign is Shift-2 on US keyboardlayouts.
1. Click once in the active console window.
2.Click on the ShiftShift key.
HOL-2210-01-SDC: Virtualization 101: Introduction to vSphere
H A N D S - O N L A B S M A N U A L | 5 2 6
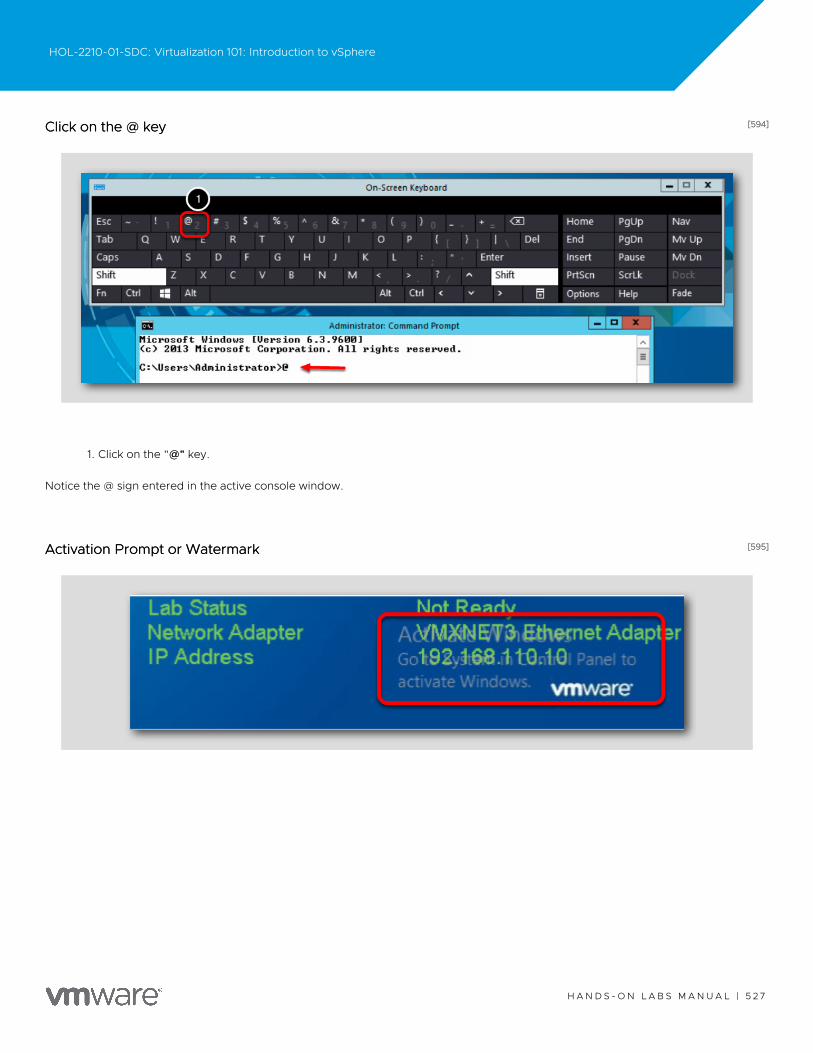
[594][594]Click on the @ keyClick on the @ key
1. Click on the "@"@" key.
Notice the @ sign entered in the active console window.
[595][595]Activation Prompt or WatermarkActivation Prompt or Watermark
HOL-2210-01-SDC: Virtualization 101: Introduction to vSphere
H A N D S - O N L A B S M A N U A L | 5 2 7

When you first start your lab you may notice a watermark on the desktop indicating that Windows is not activated.
A major benefit of virtualization allows virtual machines to be moved and run on any platform. Hands-on Labs utilizes this benefit andhosts labs from multiple datacenters. However, these datacenters may not have identical processors which triggers a Microsoftactivation check through the Internet.
Rest assured VMware and Hands-on Labs are in full compliance with Microsoft licensing requirements. The lab that you are using is aself-contained pod and does not have full access to the Internet. Without this, the Microsoft activation process fails and you see thiswatermark.
This cosmetic issue has no effect on your lab.
[596][596]Return to Lab GuidanceReturn to Lab Guidance
Use the Table of Contents to return to the Lab Overview page or another module.
HOL-2210-01-SDC: Virtualization 101: Introduction to vSphere
H A N D S - O N L A B S M A N U A L | 5 2 8

VMware, Inc. 3401 Hillview Avenue Palo Alto CA 94304 USA Tel 877-486-9273 Fax 650-427-5001 vmware.com.Copyright © 2022 VMware, Inc. All rights reserved. This product is protected by U.S. and international copyright and intellectual property laws. VMware products are covered by one ormore patents listed at vmware.com/go/patents. VMware is a registered trademark or trademark of VMware, Inc. and its subsidiaries in the United States and other jurisdictions. All othermarks and names mentioned herein may be trademarks of their respective companies. Lab SKU: HOL-2210-01-SDC Version: 20220707-170703Lab SKU: HOL-2210-01-SDC Version: 20220707-170703


