Embed Size (px)
Citation preview
Hidden Treasures: The FoxPro Foundation Classes
© 2008 Rick Borup Page 1 of 26
This paper was originally presented at the Southwest Fox conference in Mesa, Arizona inOctober, 2008. http://www.swfox.net
Hidden Treasures:The FoxPro Foundation Classes
Rick BorupInformation Technology Associates
701 Devonshire Drive, Suite 127Champaign, IL 61820
Email: [email protected]: www.ita-software.com
Blog: http://rickborup.com/blogTwitter: rickborup
OverviewThe Visual FoxPro Foundation Classes are a valuable yet often overlooked resource for the Visual FoxPro programmer. Commonly referred to as the FFC, the foundation classes provide easy access to all kinds of functionality that might otherwise be more difficult to achieve. This session introduces the foundation classes and looks at several of them in detail, with the goal of helping developers learn to use the FFC to their advantage when building applications.
Hidden Treasures: The FoxPro Foundation Classes
© 2008 Rick Borup Page 2 of 26
What are the FoxPro Foundation Classes?The Visual FoxPro Foundation Classes, or FFC for short, are a set of class libraries that ship with Visual FoxPro. The Visual FoxPro Help file describes them as “a variety of foundation classes for enhancing your Visual FoxPro Applications with little or no programming.” Each of the individual classes facilitates some particular functionality that can be useful to the VFP developer when designing solutions.
The FoxPro Foundation Classes are organized into thirty nine class libraries containing a total of one hundred twelve individual classes. Naturally, not all developers will find the all of the foundation classes useful, but with that much variety it’s virtually certain every developer will find at least something of value in the FFC.
Although all of the foundation classes are contained in visual class libraries (.vcx files), not all of the individual classes are visual in nature. Most of the classes are designed to be dropped on a form, but some are designed to be used programmatically and some can be used either way.
All of the foundation classes come with source code, meaning you can not only use them “as is”but you can also look at the source code to see how they work. Moreover, the FFC are licensed for modification and redistribution, so you can modify them—or, better yet, subclass them—to suit your needs.
FFC, XSource, Sedna, and VFPXBefore going any further, it might be helpful to review the difference between the FoxPro Foundation Classes and the other add-ons and extensions to Visual FoxPro 9.0.
The FoxPro Foundation Classes are a set of classes that provide enhanced functionality for VFP applications. They were developed by Microsoft and are installed when you install Visual FoxPro. The FFC were first introduced with Visual FoxPro 6.0.
The XSource files contain the source code for the so-called XBase tools such as the Class Browse, the Data Explorer, and many others. These tools were also developed by Microsoft and are installed with VFP as a zip file. You can find xsource.zip in C:\Program Files\Microsoft Visual FoxPro 9.0\Tools\xsource\.
Sedna’s official title is “The Sedna Add-Ons for Microsoft Visual FoxPro 9.0 SP2”. It comprises six projects developed by Microsoft to enhance VFP’s ability to interoperate with Windows Vista, the .NET framework, and more. The Sedna files are not installed with VFP but can be downloaded from Microsoft via the link on the Visual FoxPro home page.
VFPX is the umbrella name for all of the current and future projects developed by the VFP community to enhance Visual FoxPro beyond VFP 9.0 SP2. The VFPX projects are not installed with VFP; they are available for download from the VFPX section of the CodePlex website at www.codeplex.com/VFPX. For this reason, the name VFPX is used to refer both to the website and to the projects hosted there. The VFPX website is becoming an increasingly valuablecommunity resource, where you can also add your own contributions to the ongoing efforts to enhance and extend Visual FoxPro.
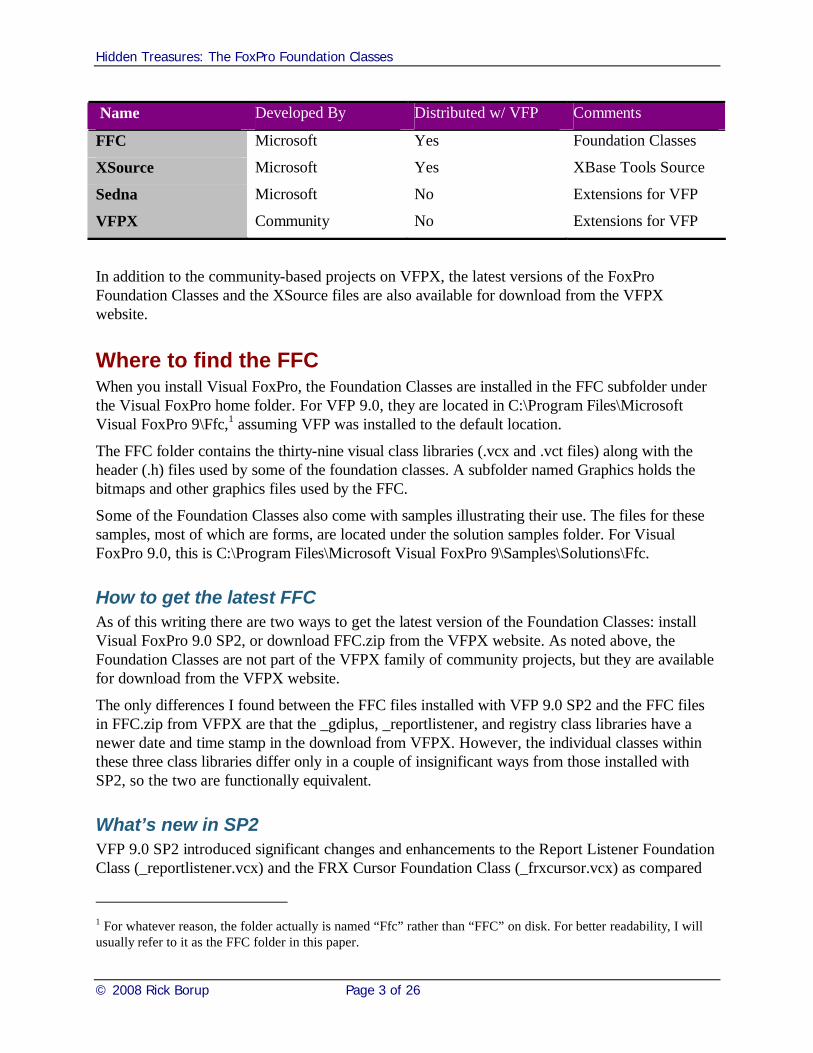
The following chart summarizes the differences between the FFC, XSource, Sedna, and VFPX.
Hidden Treasures: The FoxPro Foundation Classes
© 2008 Rick Borup Page 3 of 26
Name Developed By Distributed w/ VFP Comments
FFC Microsoft Yes Foundation Classes
XSource Microsoft Yes XBase Tools Source
Sedna Microsoft No Extensions for VFP
VFPX Community No Extensions for VFP
In addition to the community-based projects on VFPX, the latest versions of the FoxPro Foundation Classes and the XSource files are also available for download from the VFPX website.
Where to find the FFCWhen you install Visual FoxPro, the Foundation Classes are installed in the FFC subfolder under the Visual FoxPro home folder. For VFP 9.0, they are located in C:\Program Files\Microsoft Visual FoxPro 9\Ffc,1 assuming VFP was installed to the default location.
The FFC folder contains the thirty-nine visual class libraries (.vcx and .vct files) along with the header (.h) files used by some of the foundation classes. A subfolder named Graphics holds the bitmaps and other graphics files used by the FFC.
Some of the Foundation Classes also come with samples illustrating their use. The files for these samples, most of which are forms, are located under the solution samples folder. For Visual FoxPro 9.0, this is C:\Program Files\Microsoft Visual FoxPro 9\Samples\Solutions\Ffc.
How to get the latest FFCAs of this writing there are two ways to get the latest version of the Foundation Classes: install Visual FoxPro 9.0 SP2, or download FFC.zip from the VFPX website. As noted above, the Foundation Classes are not part of the VFPX family of community projects, but they are available for download from the VFPX website.
The only differences I found between the FFC files installed with VFP 9.0 SP2 and the FFC files in FFC.zip from VFPX are that the _gdiplus, _reportlistener, and registry class libraries have a newer date and time stamp in the download from VFPX. However, the individual classes within these three class libraries differ only in a couple of insignificant ways from those installed with SP2, so the two are functionally equivalent.
What’s new in SP2VFP 9.0 SP2 introduced significant changes and enhancements to the Report Listener Foundation Class (_reportlistener.vcx) and the FRX Cursor Foundation Class (_frxcursor.vcx) as compared
1 For whatever reason, the folder actually is named “Ffc” rather than “FFC” on disk. For better readability, I will usually refer to it as the FFC folder in this paper.
Hidden Treasures: The FoxPro Foundation Classes
© 2008 Rick Borup Page 4 of 26
to those found in SP1. If you use these classes in your apps and want the latest and greatest, you will want to explore the SP2 version.
Unfortunately, not all of the changes and enhancements to the Report Listener Foundation Classes and the FRX Cursor Foundation Class are documented in the SP2 Help File. For information on what’s new in SP2 in these classes, a very good place to start is Lisa Slater Nicholls’ blog post at http://tinyurl.com/5wd49v.
Exploring the FFC There are several ways to explore the FoxPro Foundation Classes, including the Class Browser, the Solution Samples, the Component Gallery, and the Visual FoxPro Help File. Before you begin exploring, it helps to know about the FFC base classes and the FFC class and class library naming conventions.
FFC base classes and naming conventionsMost of the FFC visual class libraries have names that begin with an underscore. Among them is a class library named _base.vcx. This library contains a set of classes derived directly from the Visual FoxPro base classes. The name of each individual class in _base.vcx is the same as the name of the VFP base class from which it is derived, preceded with an underscore. For example, the FFC base class _form is a subclass of the VFP form base class, _grid is a subclass of the VFP grid base class, and so on.
Most of the Foundation Classes are derived from the foundation base classes in _base.vcx. The name of each FFC class library indicates the parentage of the classes it contains. If the name of the class library begins with an underscore, the classes in that library are typically derived from the foundation base classes in _base.vcx. Conversely, if the name of the class library does not begin with an underscore, the library contains classes not derived from the foundation base classes. There are a few exceptions to this naming convention, but it applies most of the time.
VFP help fileAs with anything else in Visual FoxPro, one of the best places to begin exploring is the VFP Help File. The topic Guidelines For Using Visual FoxPro Foundation Classes is a good place to start. This topic runs about five pages and provides a good introduction to what the Foundation Classes are all about and ways you can work with them.
The Visual FoxPro Foundation Classes A-Z topic is an alphabetical listing of all one hundred twelve foundation classes. This topic is just a list of the class names—there are no descriptions here—but you can skim the list quickly to get a feeling for the variety of classes available and maybe spot a few that are of particular interest to you. Each foundation class has its own individual Help File topic, which is linked from this list.
The Component Gallery Object Members topic is also a good one to add to your Help File favorites. It provides a brief description of each foundation classes and tells you which class library the class belongs to and which Component Gallery catalog it can be found it. More information on exploring the FFC from the Component Gallery follows shortly.
Hidden Treasures: The FoxPro Foundation Classes
© 2008 Rick Borup Page 5 of 26
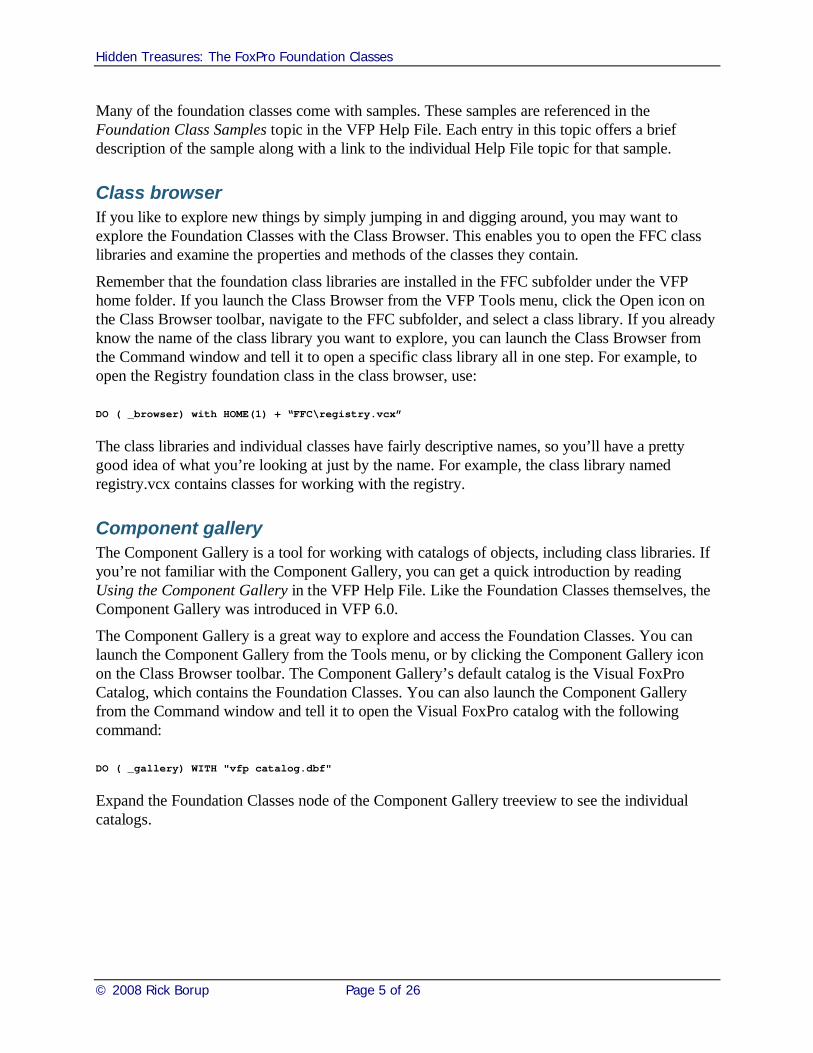
Many of the foundation classes come with samples. These samples are referenced in the Foundation Class Samples topic in the VFP Help File. Each entry in this topic offers a brief description of the sample along with a link to the individual Help File topic for that sample.
Class browserIf you like to explore new things by simply jumping in and digging around, you may want to explore the Foundation Classes with the Class Browser. This enables you to open the FFC class libraries and examine the properties and methods of the classes they contain.
Remember that the foundation class libraries are installed in the FFC subfolder under the VFP home folder. If you launch the Class Browser from the VFP Tools menu, click the Open icon on the Class Browser toolbar, navigate to the FFC subfolder, and select a class library. If you already know the name of the class library you want to explore, you can launch the Class Browser from the Command window and tell it to open a specific class library all in one step. For example, to open the Registry foundation class in the class browser, use:
DO ( _browser) with HOME(1) + “FFC\registry.vcx”
The class libraries and individual classes have fairly descriptive names, so you’ll have a pretty good idea of what you’re looking at just by the name. For example, the class library named registry.vcx contains classes for working with the registry.
Component galleryThe Component Gallery is a tool for working with catalogs of objects, including class libraries. If you’re not familiar with the Component Gallery, you can get a quick introduction by reading Using the Component Gallery in the VFP Help File. Like the Foundation Classes themselves, the Component Gallery was introduced in VFP 6.0.
The Component Gallery is a great way to explore and access the Foundation Classes. You can launch the Component Gallery from the Tools menu, or by clicking the Component Gallery icon on the Class Browser toolbar. The Component Gallery’s default catalog is the Visual FoxPro Catalog, which contains the Foundation Classes. You can also launch the Component Gallery from the Command window and tell it to open the Visual FoxPro catalog with the following command:
DO ( _gallery) WITH "vfp catalog.dbf"
Expand the Foundation Classes node of the Component Gallery treeview to see the individual catalogs.

Hidden Treasures: The FoxPro Foundation Classes
© 2008 Rick Borup Page 6 of 26
Figure 1: The Foundation Classes are found in the Visual FoxPro Catalog in the Component Gallery.
In the Component Gallery, the Foundation Classes are grouped into catalogs according to the type of functionality they provide. This catalog grouping is not the same as grouping by class library; any given catalog may very well contain classes from more than one FFC class library.
The grouping of classes into catalogs in the Component Gallery can help you find groups of classes that serve similar functions. However, it may not be as helpful if you’re hunting for a specific class, because you may have to do a bit of guessing to figure out which catalog Microsoft decided the class belongs in. (It’s kind of like wandering around an unfamiliar grocery storelooking for a specific item: are the croutons in the same aisle as the crackers, or are they five aisles over with the salad dressings?)
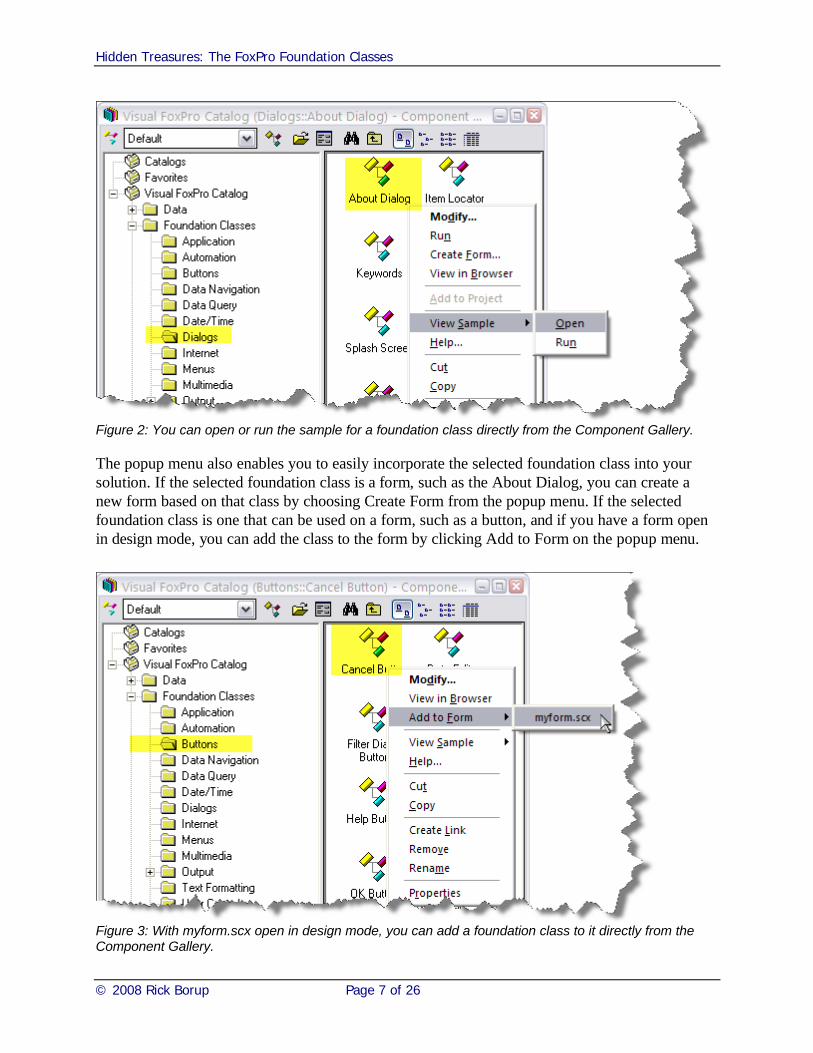
Some Foundation Classes come with a sample demonstrating how they work. For those that do, the Component Gallery gives you direct access to that sample by right-clicking on the class (not the class library) and choosing View Sample from the popup menu. From there you can select Run to run the sample and see the Foundation Class in operation, or you can select Open to open the sample in the designer so you can inspect the code and see how the sample is put together.
Hidden Treasures: The FoxPro Foundation Classes
© 2008 Rick Borup Page 7 of 26
Figure 2: You can open or run the sample for a foundation class directly from the Component Gallery.
The popup menu also enables you to easily incorporate the selected foundation class into your solution. If the selected foundation class is a form, such as the About Dialog, you can create a new form based on that class by choosing Create Form from the popup menu. If the selected foundation class is one that can be used on a form, such as a button, and if you have a form open in design mode, you can add the class to the form by clicking Add to Form on the popup menu.
Figure 3: With myform.scx open in design mode, you can add a foundation class to it directly from the Component Gallery.
Hidden Treasures: The FoxPro Foundation Classes
© 2008 Rick Borup Page 8 of 26
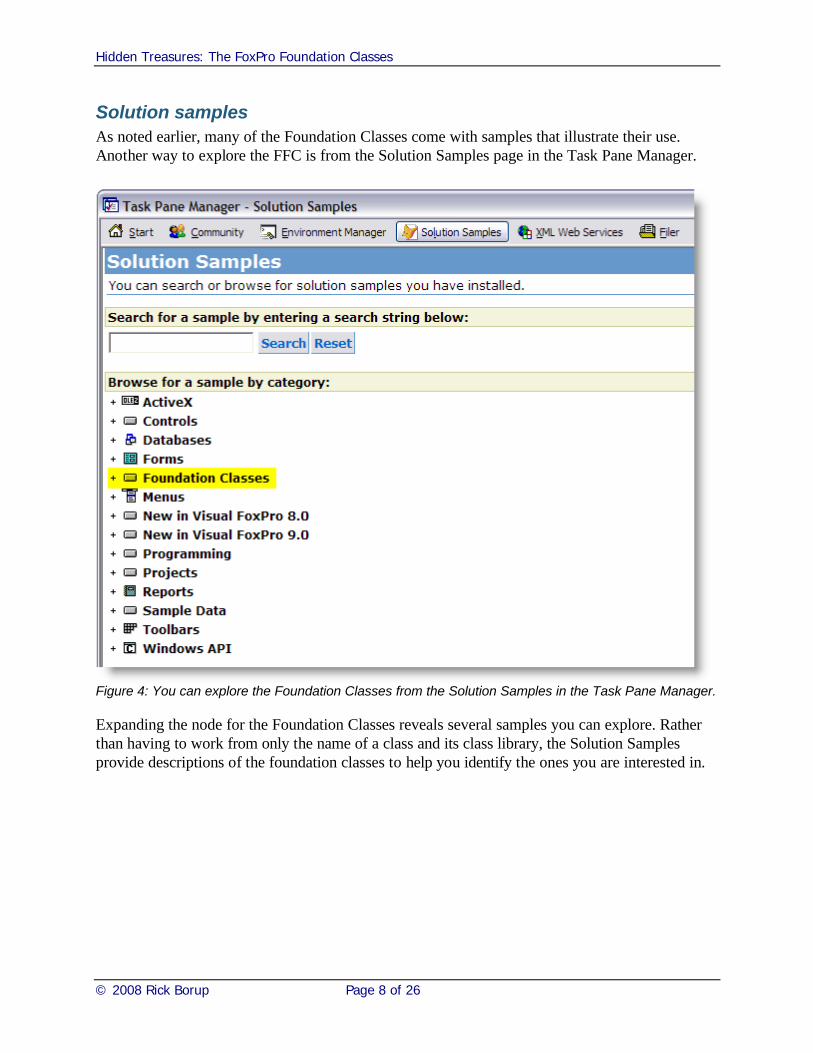
Solution samplesAs noted earlier, many of the Foundation Classes come with samples that illustrate their use. Another way to explore the FFC is from the Solution Samples page in the Task Pane Manager.
Figure 4: You can explore the Foundation Classes from the Solution Samples in the Task Pane Manager.
Expanding the node for the Foundation Classes reveals several samples you can explore. Rather than having to work from only the name of a class and its class library, the Solution Samples provide descriptions of the foundation classes to help you identify the ones you are interested in.
Hidden Treasures: The FoxPro Foundation Classes
© 2008 Rick Borup Page 9 of 26
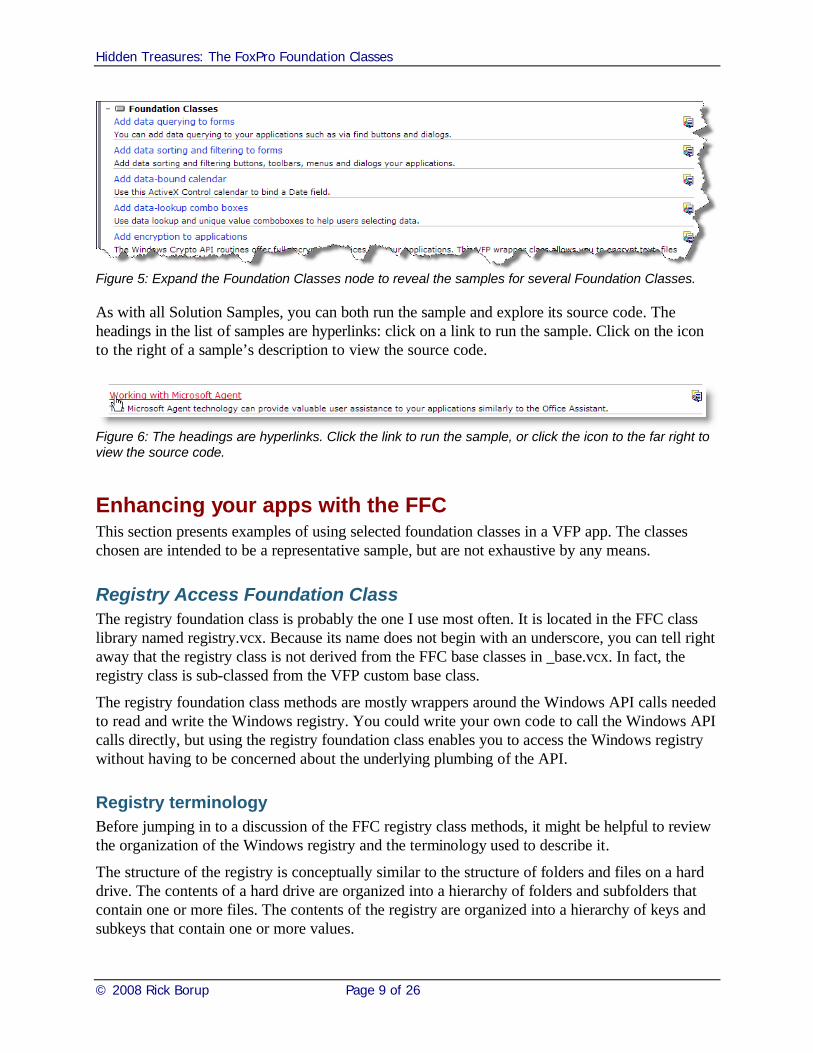
Figure 5: Expand the Foundation Classes node to reveal the samples for several Foundation Classes.
As with all Solution Samples, you can both run the sample and explore its source code. The headings in the list of samples are hyperlinks: click on a link to run the sample. Click on the icon to the right of a sample’s description to view the source code.
Figure 6: The headings are hyperlinks. Click the link to run the sample, or click the icon to the far right to view the source code.
Enhancing your apps with the FFCThis section presents examples of using selected foundation classes in a VFP app. The classes chosen are intended to be a representative sample, but are not exhaustive by any means.
Registry Access Foundation ClassThe registry foundation class is probably the one I use most often. It is located in the FFC class library named registry.vcx. Because its name does not begin with an underscore, you can tell right away that the registry class is not derived from the FFC base classes in _base.vcx. In fact, the registry class is sub-classed from the VFP custom base class.
The registry foundation class methods are mostly wrappers around the Windows API calls needed to read and write the Windows registry. You could write your own code to call the Windows API calls directly, but using the registry foundation class enables you to access the Windows registry without having to be concerned about the underlying plumbing of the API.
Registry terminologyBefore jumping in to a discussion of the FFC registry class methods, it might be helpful to review the organization of the Windows registry and the terminology used to describe it.
The structure of the registry is conceptually similar to the structure of folders and files on a hard drive. The contents of a hard drive are organized into a hierarchy of folders and subfolders that contain one or more files. The contents of the registry are organized into a hierarchy of keys and subkeys that contain one or more values.
Hidden Treasures: The FoxPro Foundation Classes
© 2008 Rick Borup Page 10 of 26
On a hard drive, the hierarchy of specific folders and subfolders that identify the location of a file is referred to as the path. In the registry, the hierarchy of specific keys and subkeys that identify the location of a value are referred to simply as the key. In both case, the reference can be written using the familiar syntax of a series of names separated by backslashes.
There are five root keys in the Windows registry. As an application software developer, you typically work with the HKEY_CURRENT_USER and HKEY_LOCAL_MACHINE root keys, which are abbreviated HKCU and HKLM respectively. Application-specific settings are typically written to an application-specific key under HKCU\Software.
The analogy to files on a hard drive may become a bit more difficult to understand when it comes to the values in a registry key. This may be especially true for Visual FoxPro developers, to whom the word value generally refers to the contents of a memory variable or a property on an object. When talking about the registry, however, the word value corresponds to the concept of a file on disk. A registry value has three attributes: the value name, the value type, and the value data. If you think of a value name as being like a file name, then the value type corresponds to the type of file (file extension) and the value data corresponds to the contents of the file.
Registry value data can one of several types. The most common type is a string, which is referred to as type REG_SZ. The SZ stands for “string zero”, meaning a null-terminated string. Unlike folders on disk, which do not have to contain any files, keys in the registry always have at least one value called the default value. The default value has value type REG_SZ and its value data is generally null, which shows up as (value not set) in the Registry Editor.
Working with the registry classTo work with the registry foundation class, first create an instance of it.
loRegistry = NEWOBJECT( "registry", "registry.vcx")
If you’re doing this in a program, it's a good idea to include the registry.h header file, which defines several constants you can use in your code. For the sake of readability, the examples that follow sometimes use defined constants from registry.h, such as HKEY_CURRENT_USER, even though the sample code is not part of a complete program. If you want to run the sample code from the command line, replace the defined constant with its value from registry.h.
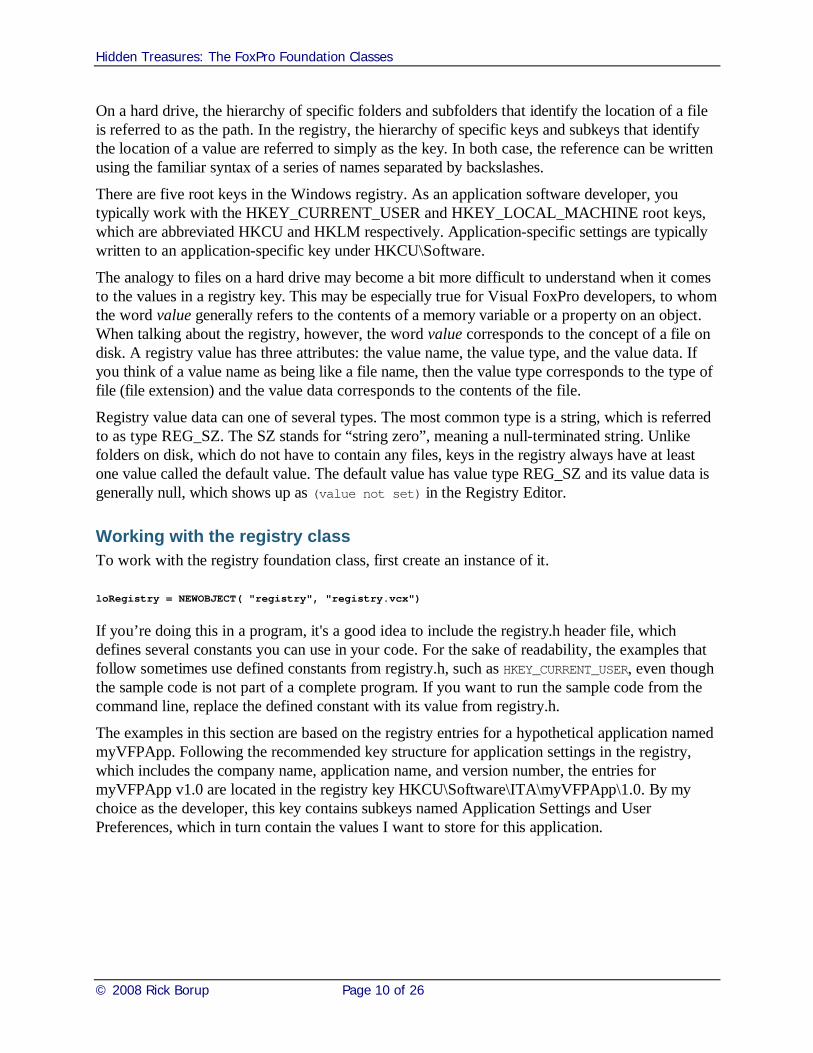
The examples in this section are based on the registry entries for a hypothetical application named myVFPApp. Following the recommended key structure for application settings in the registry, which includes the company name, application name, and version number, the entries for myVFPApp v1.0 are located in the registry key HKCU\Software\ITA\myVFPApp\1.0. By my choice as the developer, this key contains subkeys named Application Settings and User Preferences, which in turn contain the values I want to store for this application.
Hidden Treasures: The FoxPro Foundation Classes
© 2008 Rick Borup Page 11 of 26
Figure 7: The registry entries for myVFPApp v1.0 are stored in HKCU\Software\ITA\myVFPApp\1.0. The values are in subkeys Application Settings and User Preferences.
As shown in Figure 7, the Application Settings key contains two values. The AppDir value stores the location where the application is installed, and the DataDir value stores the location where the application’s data is located.
The User Preferences key is not shown, but it also contains two values, AskOnExit and PrintPreview. By design, the value data of each of these can be either Yes or No. The AskOnExit value determines whether or not the application should ask the user “Are you sure?” when terminating the app. The PrintPreview value determines whether the app displays reports in preview mode or sends them directly to the printer.
Reading the registryThe IsKey( ) method queries the registry to see if a key exists. This method is one of the simplest to use. It takes only two parameters, the name of the key, and the ID of the root key in which to look. For example, the statement
?loRegistry.IsKey("Software\ITA\myVFPApp\1.0", HKEY_CURRENT_USER)
returns True if the registry key HKCU\Software\ITA\myVFPApp\1.0 exists, or False if it doesn’t.
The GetRegKey( ) method returns the setting (the value data) from a specified value name in a specified key. The following example returns the setting of the AppDir value in the Application Settings key.
* Read a registry key value using GetRegKey()lcKey = "Software\ITA\myVFPApp\1.0\Application Settings"lcValueName = "appdir"lcValueData = ""loRegistry.GetRegKey( lcValueName, @lcValueData, lcKey, HKEY_CURRENT_USER)?lcValueData && Displays C:\Program Files\ITA\myVPFApp
Note that the return value is placed in lcValueData, which must be passed by reference. It is not necessary to use variables for the other two parameters, but I chose to do so in order to make the example more clear. The statement could have been written equally as well like this:
loRegistry.GetRegKey( “appdir”, @lcValueData, "Software\ITA\myVFPApp\1.0\Application Settings", HKEY_CURRENT_USER)
If you look at the source code for the GetRegKey( ) method in the registry class, you find that it is actually a wrapper for calls to two other methods in the same class, OpenKey( ) and GetKeyValue( ). The OpenKey( ) method opens a registry key and sets the value of a class
Hidden Treasures: The FoxPro Foundation Classes
© 2008 Rick Borup Page 12 of 26
property named nCurrentKey. The GetKeyValue( ) method relies on nCurrentKey having already been set, and reads the value data from the specified value name in that key.
The advantage of using GetRegKey( ) is you can read the value in one statement, but you could also use OpenKey( ) and GetKeyValue( ) directly if you want to.
* Read a registry key value using OpenKey() and GetKeyValue()lcKey = "Software\ITA\myVFPApp\1.0\Application Settings"loRegistry.OpenKey( lcKey, HKEY_CURRENT_USER, .F.)lcValueName = "datadir"lcValueData = ""loRegistry.GetKeyValue( lcValueName, @lcValueData)?lcValueData
Note that GetKeyValue( ) requires only two parameters because the key has already been opened. Like GetRegKey( ), the variable for the return value (lcValueData) must be passed by reference.The third parameter in the OpenKey( ) method determines whether or not the key should be created if it doesn’t already exist.
The EnumKeys( ) method populates an array with the subkeys for a specified key. The following code returns an array with two rows, one for each of the subkeys under HKCU\Software\ITA\myVFPApp\1.0.
* Enumerate the subkeys for a key using OpenKey() and EnumKeys()lcKey = "Software\ITA\myVFPApp\1.0"loRegistry.OpenKey( lcKey, HKEY_CURRENT_USER, .F.)loRegistry.EnumKeys( @laKeys)DISPLAY MEMORY LIKE laKeys
The EnumKeyValues( ) method returns an array with the value names and value data for each of the values with a specified key. The array is two-dimensional, where the first column in each row is the value name and the second column is the value data. The following code reads and displays the values in the HKCU\Software\ITA\myVFPApp\1.0\User Preferences key.
* Enumerate the values for a key using OpenKey() and EnumKeyValues()lcKey = "Software\ITA\myVFPApp\1.0\User Preferences"loRegistry.OpenKey( lcKey, HKEY_CURRENT_USER, .F.)loRegistry.EnumKeyValues( @laValues)FOR lni = 1 TO ALEN( laValues, 1)? laValues[lni,1] + " = " + laValues[lni,2]
ENDFOR
The CloseKey( ) method closes a previously opened key and resets the value of the nCurrentKey property to zero.
Writing to the registryThe SetRegKey( ) method enables you to write a value to a key, and optionally to create the key if it does not already exist.
* Create a registry key using SetRegKey()lcKey = "Software\ITA\myVFPApp\1.0\Application Settings"lcValueName = "AppDir"lcValueData = "C:\Program Files\ITA\myVFPApp"loRegistry.SetRegKey( lcValueName, lcValueData, lcKey, HKEY_CURRENT_USER, .T.)

Hidden Treasures: The FoxPro Foundation Classes
© 2008 Rick Borup Page 13 of 26
The fifth parameter passed to SetRegKey( ) determines whether or not the key should be created if it doesn’t already exist. SetRegKey( ) returns zero if successful, otherwise an error number is returned. Refer to registry.h for a list of the error numbers and their meanings.
Like GetRegKey( ), SetRegKey( ) is actually a wrapper around two other method in the registry class. SetRegKey( ) calls OpenKey( ) to open the key, then calls SetKeyValue( ) to set the value. As you’ve already guessed, you can call these two methods directly from you code if you want to.
* Create a registry key and value using OpenKey() and SetKeyValue()lcKey = "Software\ITA\myVFPApp\1.0\Application Settings"loRegistry.OpenKey( lcKey, HKEY_CURRENT_USER, .T.)lcValueName = "DataDir"lcValueData = "C:\Program Files\ITA\myVFPApp\Data"loRegistry.SetKeyValue( lcValueName, lcValueData)
Like SetRegKey( ), SetKeyValue( ) returns zero if successful, otherwise it returns an error code.
Deleting registry keys and valuesThe registry foundation class provides DeleteKey( ) and DeleteKeyValue( ) methods to delete keys and values from the registry. These methods operate much like the Get and Set methods described above. I am not including any examples for the Delete methods because I don't want to encourage you to run code that deletes anything from your own registry until you’re certain you know what you’re doing. When you’re gained confidence using the registry class, you can write your own code to create some sample registry entries and then delete them to see how these methods work.
Working with INI filesLike Rodney Dangerfield, INI files don't get any respect these days, but in my opinion they are still quite useful. INI files are easy to work with because they’re plain text files, and are therefore well suited for storing application settings when there’s a chance you—or worse, an end user—may need to manually change a setting in the field.
The registry foundation class library helps you work with INI files. It contains a subclass of the registry class named oldinireg, which provides methods for reading and writing INI files.
The examples for using this class are based on the same application settings and user preferences used in the registry examples above. If these settings were stored in an INI file, the file might benamed myVFPApp.ini and would look something like this:
[Application Settings]AppDir=C:\Program Files\ITA\myVFPAppDataDir=C:\Program Files\ITA\myVFPApp\Data[User Preferences]AskOnExit=YesPrintPreview=Yes
The structure of an INI file is quite simple: An INI file has sections, and sections contain entries. In the example above, the lines with values in square brackets are the section names. The other lines are the entry names and their corresponding values. To access an entry in an INI file, you
Hidden Treasures: The FoxPro Foundation Classes
© 2008 Rick Borup Page 14 of 26
need to supply the INI file name, the section name, the entry name, and (for writing) the entry's value.
To use the oldinireg foundation class, start by creating an instance of it.
loINI = NEWOBJECT( "oldinireg", "registry.vcx")
The methods in this class take several parameters, one of which is the name of the INI file. You need to use a fully qualified file name (drive, path, and file name) or the methods won’t work. An easy way to do this is to set up a memory variable.
lcINIFile = FULLPATH( "myVFPApp.ini")
The GetINIEntry( ) method reads the value of an entry in the INI file. It’s parameters are the INI file name, the section name, the entry name, and a place holder for the return value (but not in that order). The following code reads and displays the value of the AppDir entry from the Application Settings section of myVFPApp.ini.
* Retrieve the value of an entrylcValue = “”lcSection = "Application Settings"lcEntry = "AppDir"loINI.GetINIEntry( @lcValue, lcSection, lcEntry, lcINIFile)?lcValue
Writing an entry to an INI file is equally straightforward. The WriteINIEntry( ) method takes the same parameters as GetINIEntry( ), except you also need to supply the value to be written. The following code illustrates how to set the value of the AskOnExit entry to “No” in the User Preferences section of myVFPApp.ini.
* Set the value of an entrylcSection = "User Preferences"lcEntry = "AskOnExit"lcValue = "No"loINI.WriteINIEntry( lcValue, lcSection, lcEntry, lcINIFile)
The WriteINIEntry( ) method returns zero if successful, otherwise an error number is returned.
Working with INI files is simpler than working with the registry, which is another reason you may want to use them. But although INI files are still useful, they in no way take the place of the registry. Fortunately, the registry foundation class make it easy to work with both.
The registry foundation class library also contains three other subclasses—filereg, foxreg, and odbcreg—which you can explore on your own.
MouseOver Effects Foundation ClassThe MouseOver Effects foundation class is a user interface enhancement that adds a dynamic highlight to a control as you mouse over it on a form. The _mouseoverfx class is found in the _ui.vcx class library, and is accessible from the User Controls catalog in the Component Gallery.
Hidden Treasures: The FoxPro Foundation Classes
© 2008 Rick Borup Page 15 of 26
The MouseOver Effects class is quite easy to use. Simply drop an instance of the class on a form, then add a call to its HighlightMe( ) method in the control(s) to which you want to apply dynamic highlighting. The HighlightMe( ) method takes one parameter, which is an object reference to the control. For calls made from within a method of the control itself, simply pass THIS as the parameter.
You can see how the MouseOver Effects works by running the sample from the Component Gallery. In the sample, the call to the HighlightMe( ) method of the MouseOver Effects class is in the MouseMove( ) method of the control.
* The Command1.MouseMove( ) event code from the MouseEffects sampleLPARAMETERS nButton, nShift, nXCoord, nYCoordTHISFORM.cusMouseOverFX.HighlightMe(THIS)
While this works, it does not remove the highlight until the user moves the mouse over anothercontrol on the same form that also calls the HighlightMe( ) method. If a form has only one control that uses the MouseOver Effects class, then once highlighted, the control stays highlighted until the form is closed.
To me, it would be preferable to have the dynamic highlighting disappear when the mouse moves off the control, regardless of where it moves from there. This can be accomplished by calling the CancelHighlight( ) method from the MouseLeave( ) event. Also, calling HighlightMe( ) from the control’s MouseOver( ) event means the event fires continuously while the mouse is moving over the control. This is unnecessary, so to me it makes more sense to call HighlightMe( ) from the MouseEnter( ) event. The modified code would look like this:
* The CancelButton.MouseEnter( ) event codeLPARAMETERS nButton, nShift, nXCoord, nYCoordTHISFORM.cusMouseOverFX.HighlightMe(THIS)
* The CancelButton.MouseLeave( ) event codeLPARAMETERS nButton, nShift, nXCoord, nYCoordTHISFORM.cusMouseOverFX.CancelHighlight()
With this code in place, the cancel button is highlighted when the user moves the mouse over it, and the highlight disappears when the user moves the mouse off the control. Note that this is a change to the implementation of the class, not a change to the class itself.
The MouseOver Effects class has properties enabling you to control the width and colors of the highlight effect. The effect requires two colors, one for the top and left (highlight) and one for the bottom and right (shadow). The initial value of these colors is established in the Init( ) method of the class, which calls the GetSysColor( ) API to get the system's 3D highlight color and 3D shadow color. Unfortunately, this means you cannot override the colors by setting different valuesin the instance on your form, because when Init( ) runs it sets them to the defaults.
There are at least a couple of ways to change the highlight colors, though. One way is to set the colors explicitly before calling HighlightMe( ). This approach enables you to select different colors for different controls, should you need or want to do that. Another way would be to create a subclass of the MouseOver Effects class and either pass the colors as parameters to the Init( ) method, or add a SetHighlightColors( ) method to set the colors after Init( ) has already run.
Hidden Treasures: The FoxPro Foundation Classes
© 2008 Rick Borup Page 16 of 26
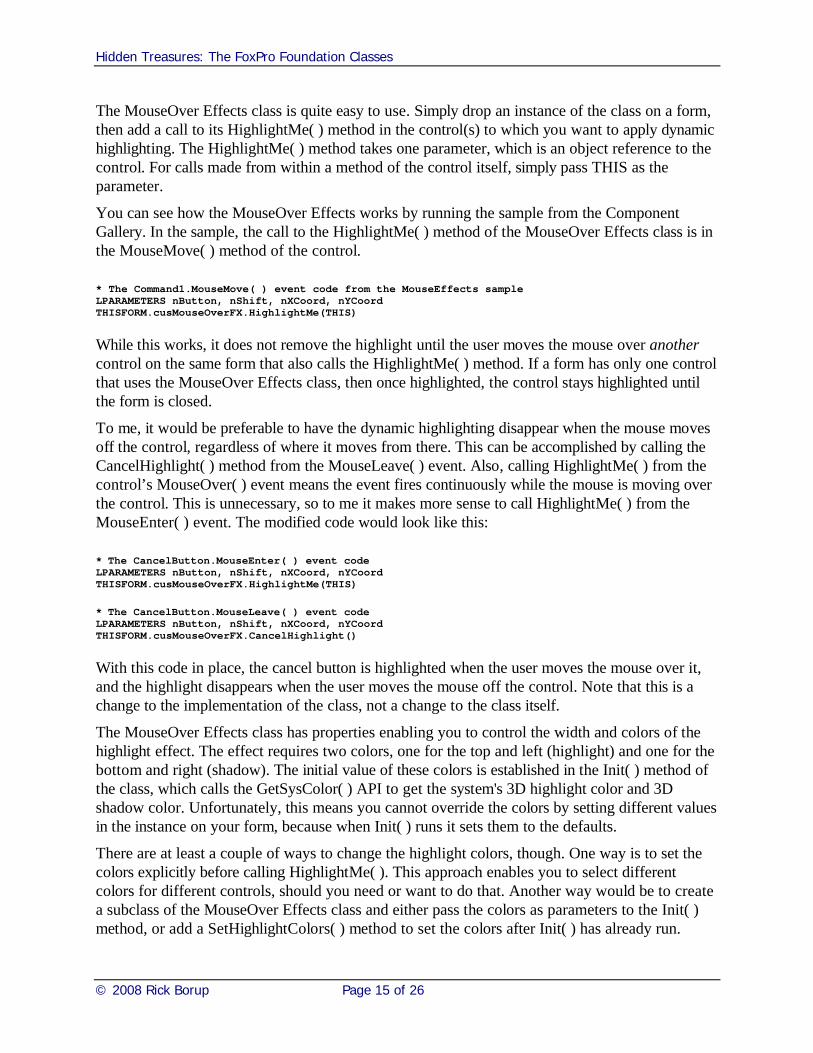
Figure 8 shows a form with a cancel button that uses the MouseOver Effects class to add dynamic highlighting. The highlight color is set to red and the shadow color is set to blue. I chose these colors because they show up well in the screenshot to illustrate the effect, even though I doubt anybody would actually use red and blue in a real application.
Figure 8: A sample form with the MouseOver Effects foundation class applied to the Cancel button. The effect is off, as shown on the left, and appears only when the mouse moves over the control, as shown on the right.
The session downloads include a form named frmMouseFX that implements this effect. The code in the Cancel button’s MouseEnter( ) event looks like this:
* The revised CancelButton.MouseEnter( ) event code.LPARAMETERS nButton, nShift, nXCoord, nYCoordWITH THISFORM._ mouseoverfx1.iHighlightcolor = RGB(255,0,0) && red.iShadowColor = RGB(0,0,255) && blue. HighlightMe(THIS)
ENDWITH
The MouseOver Effects class is not limited to command buttons; it can be applied to other types of objects as well. Check out the solution sample for more examples.
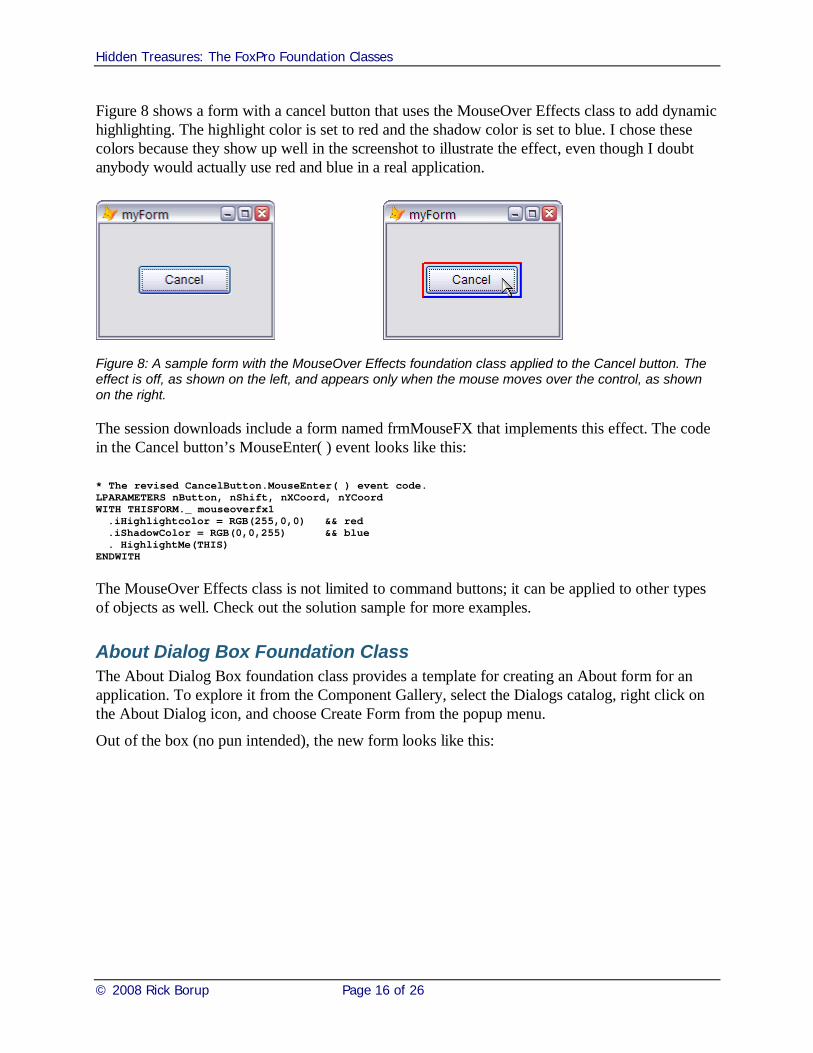
About Dialog Box Foundation ClassThe About Dialog Box foundation class provides a template for creating an About form for an application. To explore it from the Component Gallery, select the Dialogs catalog, right click on the About Dialog icon, and choose Create Form from the popup menu.
Out of the box (no pun intended), the new form looks like this:
Hidden Treasures: The FoxPro Foundation Classes
© 2008 Rick Borup Page 17 of 26
Figure 9: Before you customize it, the About Box Dialog is simply a template form.
If you open the About Dialog Box class in the Class Designer, you can see it includes an instance of the Registry foundation class. The class Init( ) method uses the Registry class to retrieve the location of msinfo.exe, which is launched from the Click( ) event of the System Info button.
The class Init( ) method also calls GetRegisteredCompany( ) and GetRegisteredOwner( ), which are stub methods to retrieve the captions for Registered Owner and Registered Company labels. Rather than changing the captions of these labels directly, change the code in the two methods to retrieve the information from wherever it is stored in your application or license manager.
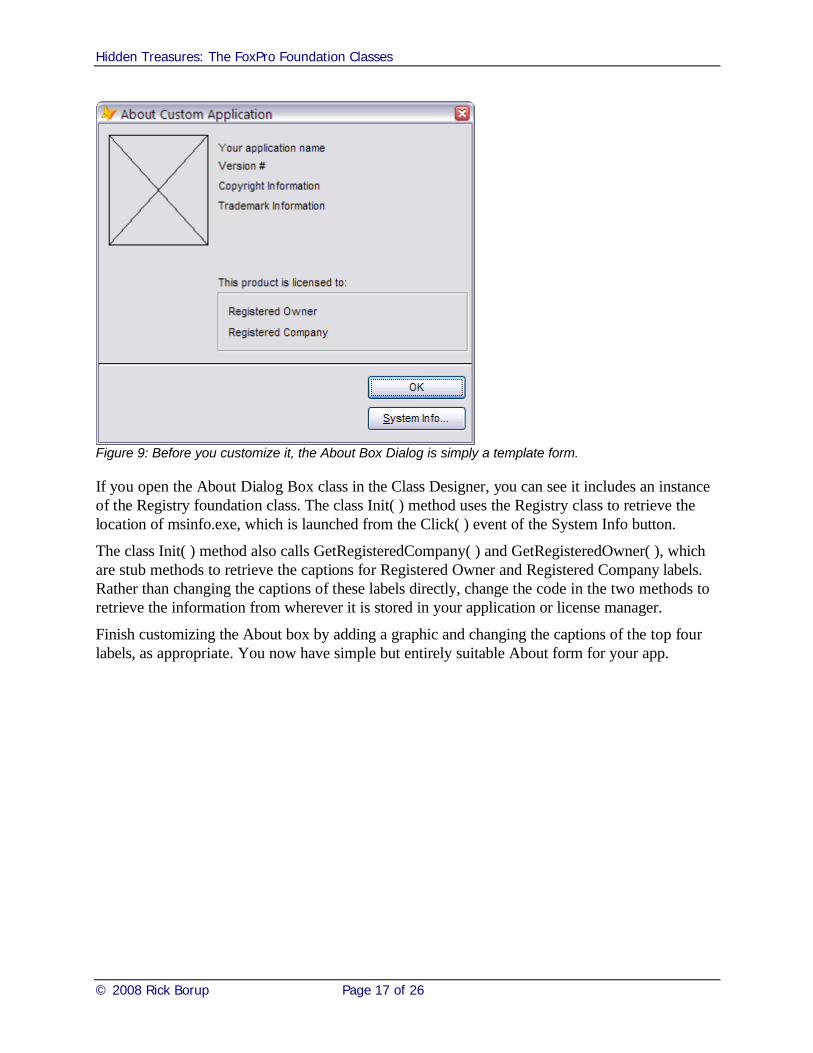
Finish customizing the About box by adding a graphic and changing the captions of the top four labels, as appropriate. You now have simple but entirely suitable About form for your app.
Hidden Treasures: The FoxPro Foundation Classes
© 2008 Rick Borup Page 18 of 26
Figure 10: The finished About Box Dialog has a plain yet polished appearance, suitable for use in an app.
Hyperlink Label Foundation ClassThe Hyperlink Label foundation class—like its two siblings, the Hyperlink Button class and the Hyperlink Image class—provides a way to launch the default web browser by clicking on thecontrol. These classes are found in the _hyperlink.vcx visual class library, and are accessible from the Internet catalog in the Component Gallery.
One thing I like to have on the About form for my apps is a link to my website. The Hyperlink Label class is ideal for this. To use this class on the About form from the previous example, simply open the form in the designer and drop an instance of the Hyperlink Label class on it.
Position the label where you want it on the form. Set the label's caption to whatever you want; for a standard website, I like to use the URL without the http:// in front of it. Then set the cTarget property to the complete URL of the website you want to open when then the label is clicked.
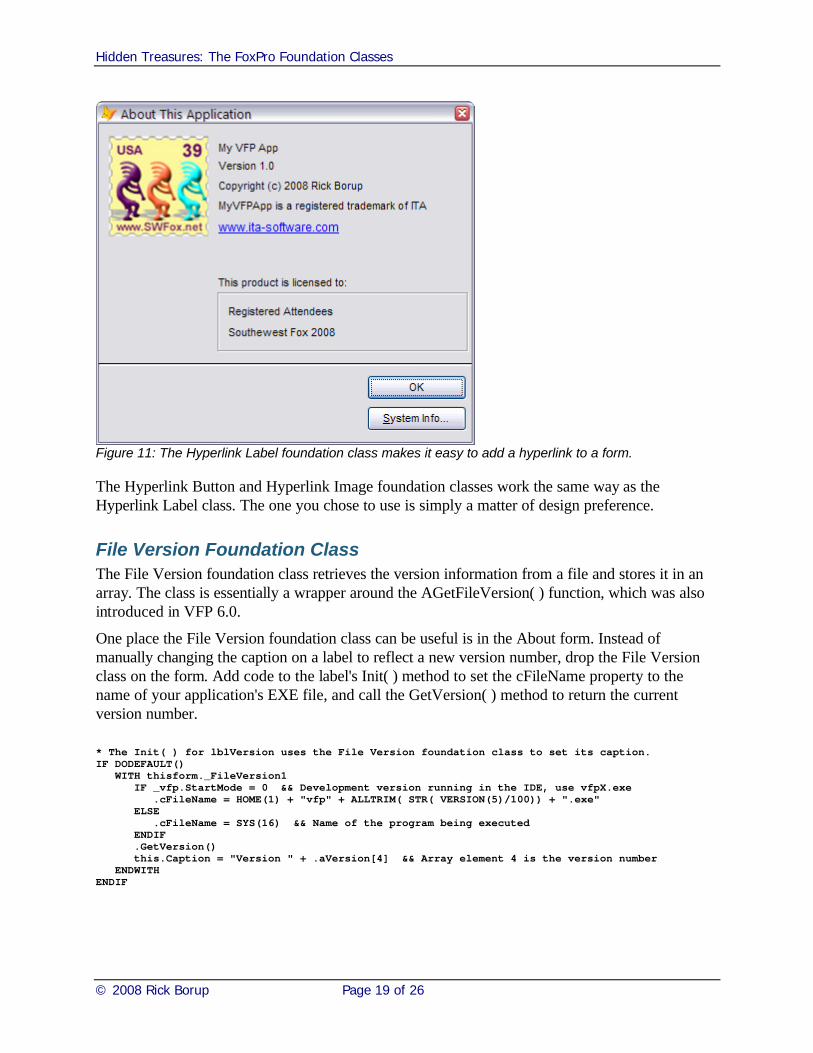
After doing this, the About form now has a hyperlink label underneath the trademark line, as shown in Figure 11. The control’s blue color and underlined caption are visual cues that it’s a hyperlink, plus the mouse pointer changes to the hand symbol when the mouse is hovered over the label. Clicking the label opens the website in the default browser.
Hidden Treasures: The FoxPro Foundation Classes
© 2008 Rick Borup Page 19 of 26
Figure 11: The Hyperlink Label foundation class makes it easy to add a hyperlink to a form.
The Hyperlink Button and Hyperlink Image foundation classes work the same way as the Hyperlink Label class. The one you chose to use is simply a matter of design preference.
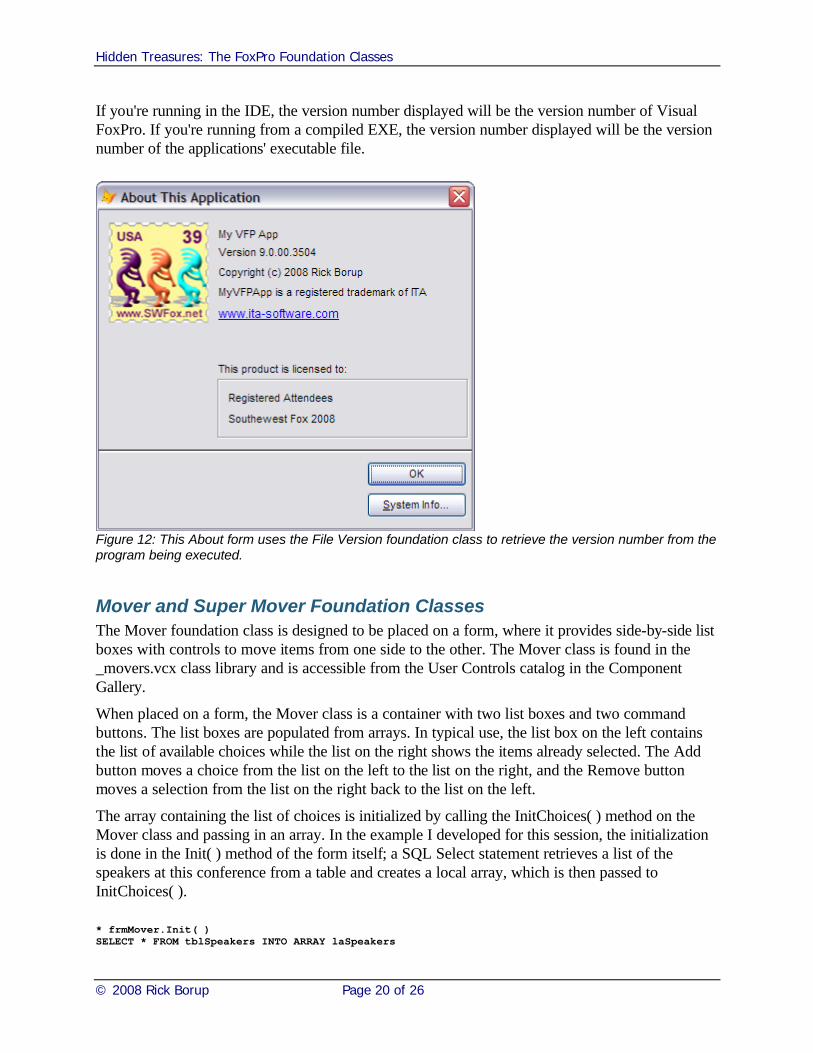
File Version Foundation ClassThe File Version foundation class retrieves the version information from a file and stores it in an array. The class is essentially a wrapper around the AGetFileVersion( ) function, which was also introduced in VFP 6.0.
One place the File Version foundation class can be useful is in the About form. Instead of manually changing the caption on a label to reflect a new version number, drop the File Version class on the form. Add code to the label's Init( ) method to set the cFileName property to the name of your application's EXE file, and call the GetVersion( ) method to return the current version number.
* The Init( ) for lblVersion uses the File Version foundation class to set its caption.IF DODEFAULT()
WITH thisform._FileVersion1IF _vfp.StartMode = 0 && Development version running in the IDE, use vfpX.exe
.cFileName = HOME(1) + "vfp" + ALLTRIM( STR( VERSION(5)/100)) + ".exe"ELSE
.cFileName = SYS(16) && Name of the program being executedENDIF.GetVersion()this.Caption = "Version " + .aVersion[4] && Array element 4 is the version number
ENDWITHENDIF
Hidden Treasures: The FoxPro Foundation Classes
© 2008 Rick Borup Page 20 of 26
If you're running in the IDE, the version number displayed will be the version number of Visual FoxPro. If you're running from a compiled EXE, the version number displayed will be the version number of the applications' executable file.
Figure 12: This About form uses the File Version foundation class to retrieve the version number from the program being executed.
Mover and Super Mover Foundation ClassesThe Mover foundation class is designed to be placed on a form, where it provides side-by-side list boxes with controls to move items from one side to the other. The Mover class is found in the _movers.vcx class library and is accessible from the User Controls catalog in the Component Gallery.
When placed on a form, the Mover class is a container with two list boxes and two command buttons. The list boxes are populated from arrays. In typical use, the list box on the left contains the list of available choices while the list on the right shows the items already selected. The Add button moves a choice from the list on the left to the list on the right, and the Remove button moves a selection from the list on the right back to the list on the left.
The array containing the list of choices is initialized by calling the InitChoices( ) method on the Mover class and passing in an array. In the example I developed for this session, the initialization is done in the Init( ) method of the form itself; a SQL Select statement retrieves a list of the speakers at this conference from a table and creates a local array, which is then passed to InitChoices( ).
* frmMover.Init( )SELECT * FROM tblSpeakers INTO ARRAY laSpeakers

Hidden Treasures: The FoxPro Foundation Classes
© 2008 Rick Borup Page 21 of 26
thisform._MOVER1.initchoices( @laSpeakers)
After adding an OK button and adjusting the height of the list boxes for a better fit, the form looks like this:
Figure 13: The Mover foundation class provides two lists and buttons for moving items from one list to the other.
Once the user has selected the desired item(s), your program needs a way to get that information back from the Mover class. The Mover class provides the GetSelection( ) method is this purpose. This method populates an array (passed by reference) with the selected items, and returns the number of items selected.
To effectively use the Mover class, you need to keep it in scope until you can call GetSelection( ) to return the results. One way to do this is to save the containing form as a class, create an instance of it when needed, and keep the instance in scope until you're done with it. You'll want to make the form modal so code execution in the calling method is suspended while the form is active. You'll also want to change the OK button so it hides the form instead of releasing it, and set the form's ControlBox property to False so the user has to use the OK button to close the form.
The session downloads include an example to demonstrate the use of the Mover class. The form itself is stored in class library myClasses.vcx as class frmMover. Also included is a program named MoverDemo.prg, which runs the form and displays the results.
* The MoverDemo program runs the Mover foundation class example.LOCAL ofrmMover, lni, lnSelected, lcMsgLOCAL ARRAY laSelected[1]laSelected = ""ofrmMover = NEWOBJECT( "frmMover", "myClasses.vcx")ofrmMover.Show()lnSelected = ofrmMover._mover1.GetSelections( @laSelected)lcMsg = "You selected " + TRANSFORM( lnSelected) + " speakers:"FOR lni = 1 TO ALEN( laSelected)lcMsg = lcMsg + CHR(13) + laSelected[lni]
ENDFOR
Hidden Treasures: The FoxPro Foundation Classes
© 2008 Rick Borup Page 22 of 26
MESSAGEBOX( lcMsg)ofrMover = null
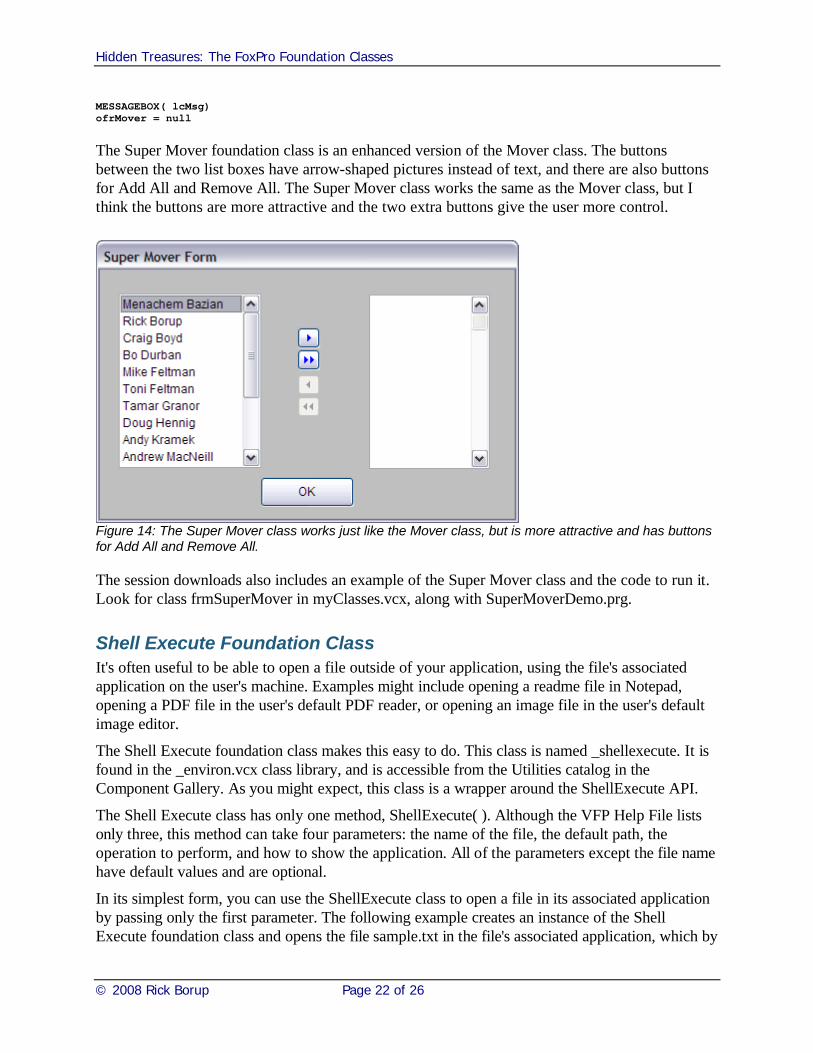
The Super Mover foundation class is an enhanced version of the Mover class. The buttons between the two list boxes have arrow-shaped pictures instead of text, and there are also buttonsfor Add All and Remove All. The Super Mover class works the same as the Mover class, but I think the buttons are more attractive and the two extra buttons give the user more control.
Figure 14: The Super Mover class works just like the Mover class, but is more attractive and has buttons for Add All and Remove All.
The session downloads also includes an example of the Super Mover class and the code to run it. Look for class frmSuperMover in myClasses.vcx, along with SuperMoverDemo.prg.
Shell Execute Foundation ClassIt's often useful to be able to open a file outside of your application, using the file's associatedapplication on the user's machine. Examples might include opening a readme file in Notepad, opening a PDF file in the user's default PDF reader, or opening an image file in the user's default image editor.
The Shell Execute foundation class makes this easy to do. This class is named _shellexecute. It is found in the _environ.vcx class library, and is accessible from the Utilities catalog in the Component Gallery. As you might expect, this class is a wrapper around the ShellExecute API.
The Shell Execute class has only one method, ShellExecute( ). Although the VFP Help File lists only three, this method can take four parameters: the name of the file, the default path, the operation to perform, and how to show the application. All of the parameters except the file name have default values and are optional.
In its simplest form, you can use the ShellExecute class to open a file in its associated application by passing only the first parameter. The following example creates an instance of the Shell Execute foundation class and opens the file sample.txt in the file's associated application, which by
Hidden Treasures: The FoxPro Foundation Classes
© 2008 Rick Borup Page 23 of 26
default is Notepad. Because a directory is not specified, the file must reside in the current directory or the class won't find it.
* Open a file in the current directory.loShellExecute = NEWOBJECT( "_shellexecute", HOME(1) + "FFC\_environ.vcx")loShellExecute.ShellExecute( "sample.txt")
If the file does not reside in the default directory, you need to tell Shell Execute where to find it. You can do this by passing a fully qualified path and file name as the first (and only) parameter, or you can pass just the file name as the first parameter and the path as the second parameter.
* Open a file in a directory in the specified path.loShellExecute.ShellExecute( "redist.txt", HOME(1))* Another way to do the same thing.loShellExecute.ShellExecute( HOME(1) + "redist.txt")
The third parameter specifies the action to be taken. If omitted, the default is "open". Other choices are "edit", "explore", "find", and "print". Not all applications can handle all options. The following example opens the file sample.txt in Notepad and prints it.
loShellExecute.ShellExecute( "sample.txt",,"print")
If you pass a folder name in the first parameter and "explore" as the third parameter, Shell Execute open the folder in Windows Explorer.
loShellExecute.ShellExecute( HOME(1),,"explore")
The optional fourth parameter determines how to show the application window. The values for this parameter are documented as defined constants in the source code for the Shell Execute class. The defined constant SW_SHOWMAXIMIZED can be used to maximize the application window.
The following example opens a PDF file and maximizes the PDF reader application. The file redist.pdf, which is simply a PDF copy of redist.txt, is included in the session downloads.
loShellExecute.ShellExecute( "redist.pdf",,,SW_SHOWMAXIMIZED)
All of these examples are included in the session downloads in program ShellExecuteDemo.prg. Note that program execution continues after calling ShellExecute( ). The demo program has a WAIT WINDOW after each command so it doesn't blow through all of the examples all at once.
Subclassing and extending the FFCSometimes you might find that a foundation class provides the basic functionality you want, but you would prefer if it worked in a different way or provided additional functionality. This being Visual FoxPro, and the FFC being classes that come with source code, you have almost unlimited possibilities to subclass and extend them.
Hidden Treasures: The FoxPro Foundation Classes
© 2008 Rick Borup Page 24 of 26
About Dialog BoxTo use an example from earlier in this paper, suppose we like the FFC About Dialog Box but would prefer that it always have the extra features such as the hyperlink label and the dynamic file version label. You might be tempted to make changes directly to your copy of the _aboutbox class in _dialogs.vcx, but of course the recommended way of doing anything like this in Visual FoxPro is to create a subclass.
To do this, simply create a class library and add the _aboutbox class to it using names of your choice. For example, to do this programmatically:
CREATE CLASSLIB myDialogsCREATE CLASS myAboutBox OF myDialogs AS _aboutbox FROM HOME(1) + "ffc\_dialogs.vcx"
The new class is opened automatically in the class designer. Make your changes and save the class.
Alternatively, if you've already made the desired changes to the About Dialog Box class and saved it as a form, you can open the form in the Form Designer and choose Save As Class from the File menu. Give the class a name and select a class library to store it in.
Either way, you now have your own subclass of the About Dialog Box. To use it, simply instantiate your class object instead of the native FFC class object.
* Create an instance of your About Dialog Box.loAboutBox = NEWOBJECT( "myAboutBox", "myDialogs")loAboutBox.Show()* Admire your work here...loAboutBox = NULL
Before using this class in your apps, you would probably want to add code to set the captions of the application name, copyright, and trademark labels from entries in the aVersion array, as has already been done for the version number label. This is left as an exercise for the reader. (I've always wanted to say that. <g>) For assistance, refer to the AGetFileVersion( ) Function topic in the VFP Help File, which explains what's in each element of the array.
Working with INI FilesIn a similar vein, I don't particularly like the order of the parameters in the OldINIReg foundation class. I tend to think about INI files from top to bottom: first the file name, then the section name, then the entry name, and finally the value. I'd like to be able the write the INI class method parameters in that order. This can be easily accomplished by creating a subclass of OldINIReg.
Start by creating a subclass of OldINIReg in your own class library.
CREATE CLASSLIB myRegistryCREATE CLASS myINIClass OF myRegistry AS oldINIReg FROM HOME(1) + "FFC\Registry.vcx"
Modify the GetIniEntry( ) method to accept the parameters in the desired order, then pass them to the default code in the expected order. Note that you need to pass the cValue parameter by reference, since it will contain the return value.
Hidden Treasures: The FoxPro Foundation Classes
© 2008 Rick Borup Page 25 of 26
*!* LPARAMETER cValue,cSection,cEntry,cINIFile && old orderLPARAMETER cINIFile, cSection, cEntry, cValue && new order* Pass the parameters to the default code in the expected order.* Be sure to pass cValue by reference as it will contain the return value.DODEFAULT( @cValue, cSection, cEntry, cINIFile)
Make the same changes to the WriteIniEntry( ) method, except you do not need to pass the cValue parameter by value.
The session download include the class library myRegistry.vcx, which contains the class myINIClass with the modifications shown above. The downloads also include myINIDemo.prg, a program to drive the new class.
These are but two examples of how you can subclass and extend the FoxPro Foundation Classes. It's really true that you are limited only by your imagination in how far you can go with this.
How the FFC are licensedIn his February 2006 Letter from the Editor,2 Visual Studio Data Program Manger Milind Lele announced that the FoxPro Foundation Classes for Visual FoxPro 9.0 SP1 were being released under the terms of a new license called the Microsoft Permissive License (Ms-PL). According to Milind: "Our goal is to encourage developers from the Visual FoxPro community to enhance these class libraries
and distribute these enhancements to their users, or share them with the general Visual FoxPro community…"
The full text of the Ms-PL can be found on the FFC Source for Visual FoxPro 9.0 SP1 download page.3 It is also included as FFC_EULA.txt in FFC.zip, the download file for the VFP 9.0 SP2 FFC on the VFPX website.
In part, the Ms-PL states that "Microsoft grants you a non-exclusive, worldwide, royalty-free copyright license to reproduce the software, prepare derivative works of the software and distribute the software or any derivative works that you create."
I am not an attorney and what I’m saying here does not constitute legal advice, but it seems clear from the above that Microsoft has made it possible (and legal) for us as developers to modify and distribute the FFC in whatever ways we want. As always, the standard caveat applies: if in doubt, seek the advice of your own legal counsel.
As noted earlier, the FFC are now available for download from the VFPX website. When you download anything from the VFPX website, you must agree to the terms of the Shared Source License for VFPX. Whether or not the VFPX license in any way conflicts, restricts, or augmentsthe FFC EULA would be another question for competent legal counsel.
2 http://msdn.microsoft.com/en-us/vfoxpro/bb190242.aspx3 http://www.microsoft.com/downloads/details.aspx?FamilyId=986ED8B1-43F3-4A8E-B4AD-2CBE5B3BACCD&displaylang=en

Hidden Treasures: The FoxPro Foundation Classes
© 2008 Rick Borup Page 26 of 26
ConclusionIn the title of this session I referred to the FFC as a "Hidden Treasure". While not exactly hidden, the FFC are not part of the core VFP product and may therefore be unknown to—or at least unexplored by—many developers. Whether or not the FFC are treasures is up to each of you to determine. The purpose of this session has been to provide enough information for you to explore the FFC on your own and to decide for yourself.
About the authorRick Borup is owner and president of Information Technology Associates, a professional software development, computer services, and information systems consulting firm he founded in 1993. Rick spent several years developing software applications for mainframe computers before turning to microcomputer database development tools in the late 1980s. He began working with FoxPro in 1991, and has worked full time in FoxPro and Visual FoxPro since 1993. He is co-author of the books Deploying Visual FoxPro Solutions and Visual FoxPro Best Practices For The Next Ten Years, and a frequent speaker at Visual FoxPro conferences and user groups. Rick is a Microsoft Certified Solution Developer (MCSD) and a Microsoft Certified Professional (MCP) in Visual FoxPro.
Copyright © 2008 by Rick Borup.
Microsoft, Windows, Visual FoxPro, and other terms are either registered trademarks or trademarks of Microsoft Corporation in the United States and/or other countries. All other trademarks are the property of their owners.


