Embed Size (px)
Citation preview
Go on Go:The Analyzed Games of Go Seigen
Go SeigenTranslation and Additional Material by Jim Z. Yu

ii
Contents
Preface v
1 A Fan’s Introduction to Go Seigen 1
2 Go Seigen-Kitani Minoru 3
3 Go Seigen-Fujisawa 63
4 Go Seigen-Sakata Eio 1 121
5 Go Seigen-Honinbo Shukaku (Takagawa) 1 175
6 Go Seigen-Honinbo Shukaku (Takagawa) 2 229
7 Go Seigen-Hashimoto 279
8 Go Seigen-Sakata Eio 2 339
9 Go Seigen-Shimamura 397
A A Short Biography of Wu Qing Yuan (Go Seigen) 447
B Japan’s Strongest Deciding Matches 453
C Honinbo Shusai Retirement Match 455
D “Greedy Sakata” 459
E Sakata’s Myoshu 463
F Razor Sakata 467
G Sakata-Shuko 471
H Possible Continuation of Ko Rule Dispute 473
iii

iv CONTENTS

Preface
This book is a collection of stories and commented games published by Jim Z. Yu on therec.games.go newsgroup in late 1993. Mr. Yu translated the games from Chinese from the book“Detailed Analysis of Wu’s Famous Games.” (Wu is Go Seigen’s Chinese name.) Because I enjoyedthe information so much, I wanted to put them in a format that would be easy to use along with a realboard to replay the games, and easy to give to friends. The original games were distributed as MGTcomputer files, and the original stories as text files.
Virtually all of the remaninder of the text is Wu’s or Yu’s, with a few exceptions. With theexception of the biographical appendix, all introductory material is by Mr. Yu. The biographicalappendix is mainly by Wu’s brother. The game commentaries are generally by Wu. However, theycontain notes made by the original Japanese editor, Mr. Katsumoto Tesshuu. Mr. Katsumoto oftenintroduces some background information at the beginning of a game, and some commentary on themoves towards the end, when Go Seigen 9 dan tends to comment less. His comments during thegames are given in italics. Some additional notes for the sake of clarrification and made by Mr. Yuand are enclosed in square brackets, “[” and “].”
I have used both Jan van der Steen’s sgf2misc utility and Daniel Bump’s sgf2tex to typesetthe games, and I typeset the stories by hand using LATEX. The original source for the games and storiescan be found on the Internet Go Archives, which are currently found at ftp.joyjoy.net/Go. Thecomplete URL for the original source code is:
ftp://ftp.joyjoy.net/Go/games/goseigen.sh.Z
Links to the LATEXsource code for this book, as well premade postscript and PDF version are availableat:
http://www.cs.arizona.edu/people/bridges/go/gobook.html
One note regarding copyright: All of the text here included here was pulled off of the InternetGo Archive, and translated from uncopyrighted Chinese books by Jim Z. Yu. Mr. Yu holds copyrighton the translations and stories in this book, and has granted the right to reproduce his material forpersonal (non-commercial) reference. Typesetting and editing was done by me, Patrick Bridges. Mychanges are available under the GNU Documentation License, v 1.0 or later, when that becomesavailable. Until then, I assert copyright over my changes, but grant permission for reproduction orediting for personal, non-commercial use.
Patrick Bridges, Fall [email protected] 8k* on NNGS
v

vi PREFACE
Chapter 1
A Fan’s Introduction to Go Seigen
He played like the birds fly: swift and light. Suddenly the position could get frozenthough, and then one would get a glimpse of the universe of variations hidden below thesky that Wu had spanned in the earlier stages.— A friend (Jan van der Steen) on Go Seigen’s (Wu) game
Go Seigen is my idol. For two simple reasons:
1. He won games
2. He won games in his unique manner. Always.
Maybe a few other professional players can qualify the above criteria. “Ancients” like KitaniMinoru and Sakata Eio, and the “super players” of the 80’s: Rin Kaiho, Otake Hideo, Kato Masao,Takemiya Masaki, Cho Chikun, and Kobayashi Koichi. And don’t forget the big man in China: NieWeiping.
These are all big winners. But none of them is as big a winner as Go Seigen. Go Seigen onceruled Japanese Go profession for one third of a century! And that was a 1/3 of century when Japanwas the only land where Go was blooming. I (Jim Yu) think it’s fair to say that a new generation ofprofessionals come out about every ten years. Then, Go Seigen would have to hold off the challengesfrom three generations of best Go players in Go history. And that he did: First there was KitaniMinoru, who, perhaps, would have been rated as great as Go Seigen had he not faded after WorldWar II. Then there was Fujisawa Kuranosuke (who later changed his name to Fujisawa Hosai), thefirst ever professional 9 dan (Go Seigen was the second) after the death of the last Meijin, Shusai.Finally, in the 50’s, Sakata Eio and Takagawa Shukaku emerged as the top challengers to Go Seigen.But none of them was able to take away the No.1 seat that belonged to Go Seigen.
And we can’t say these challengers were weak. In fact, any of them was a definition of the oppositeof “weak.” Kitani, along with Go Seigen, discovered the revolutionary “New Openings.” He mighthave been more famous of his magnificent disciples (5 of the 6 “super players of the 80’s” mentionedabove, except Rin, were his pupils), but as a player, according to Go Seigen, he was “first of [GoSeigen’s] toughest opponents.” They two together wrote the historical period called “Go-Kitani Era,”a span of about a decade before WWII.
Fujisawa probably spent his entire playing career in Go Seigen’s prime, and that produced anothermemorable rivalry. There was only one player who was strong enough and being strong *long*enough to play three 10-game series with Go Seigen, and his name was Fujisawa Kuranosuke (laterHosai). And let us not forget: Go Seigen lost only one 10-game series in his life, and that was toFujisawa (it happened during WWII; Go Seigen was unbeatable in 10-game series thereafter).
1
2 CHAPTER 1. A FAN’S INTRODUCTION TO GO SEIGEN
Sakata Eio. We know his stories – the man has won more major championships than any otherJapanese players in modern Go history. I don’t remember the exact number, but it’s close to “70 titleswhen he was 70 years old.” How could he win so many?! One has to wonder.
Takagawa Shukaku, whose first name originally was “Kaku”, without “Shu.” In Japan, onlyHoninbo title holders would add a “Shu” in their names, and Takagawa certainly deserved thishonorable character – he once won 9 straight Honinbo titles. And that was the time he startedto challenge Go Seigen. There were total of seven 3-game series, or 21 games, between the two.Takagawa lost the first 11, and what he did? He won 7 out of the next 10. That spelled “tough.”
So here we have the picture: Kitani, Fujisawa, Sakata, and Takagawa – any of them was a greatplayer who was talented enough to dominate his era. Yet it did not happen. It did not happen becauseof one man: Go Seigen. Go Seigen was the winner of winners; Go Seigen was the genius of geniuses.
Watching Go Seigen’s game always brings me pleasure. It’s not that I fully understood his movesand was thus appreciated (that, in fact, is still a long way to go); rather, the shape of his stones andthe tempo of his moves seem to always lighten me up.
Go Seigen seemed to have an extraordinary ability to simplify local (on the board) conflicts.Especially in openings. Often he would play “tenuki” moves – moves that locally ignore opponent’sprevious move – although that would lead to some local loss, globally speaking, he would gain.Because he preferred to play fewer moves at the opening corners, his games were usually on a fastpace. Quickly, middle-game fights started. That’s the kind of game I would enjoy to watch (and play,of course, if I *can*).
Going to middle game, Go Seigen was again showing extraordinary power. He settled his weakgroups quickly; he started to attack his opponent quickly. By “quickly” I don’t mean he played twiceor thrice as fast as his opponent (although he indeed often did), but I mean he could use only a fewsimple moves to start or end, again, a local conflict. Gradually, since his opponent was unable to catchup with his high efficiency, Go Seigen started to lead – a lead that he, in his prime time, would neversurrender.
Thus Go Seigen’s endgame very often became exceptionally simple. Well, endgame seems to bea phase that one cannot really simplify. If there are, say, such many unsettled boundaries, both playershave to finish them off, unless – unless it’s like in many of Go Seigen’s games, the game was overbefore the endgame started.
That’s all I can see from Go Seigen’s game. I am unable to visualize his local or global “feelings”,and I am unable to carry out his deep calculations. All I can see is a surface of his game – yet, it’s asurface that’s clear enough to reflect his manners. Go is a game full of conflicts, and if a man couldhandle all these conflicts in a simple manner *and* win – I would say, he is a genius. This genius wasGo Seigen.
This reminds me of a biography of Albert Einstein. The author convinced me that to describeEinstein, “simplicity” was the word. Einstein was a man who handled things in simple ways. I don’tknow if this book on Einstein had unconsciously helped me to understand Go Seigen, but as of today,I am convinced that, if these two geniuses of the 20th century had nothing else in common, theyshared one word: “simplicity.”
I suddenly feel sorry for being born 50 years too late. I want to play games with Go Seigen. Imight lose every game to him, but I wouldn’t care. When one gets a chance to play with a genius, it’snot just a honor. It could well change his life: something deep inside his mind could suddenly lightup... Yes, that’s why I want to play with Go Seigen; the more I would learn from him, the closer Iwould be with the truth of Go.
Go Seigen is my idol.

Chapter 2
Go Seigen-Kitani Minoru
Go Seigen was surely one of the greatest, but a giant seldom stood all by himself. Indeed, there wasat least one other giant of Showa 1 who could easily stand shoulder by shoulder with Go Seigen. Hisname was Kitani Minoru.
He might not win as many games as Go Seigen, but greatness is not determined by winning aloneeither. Youyi Chen, a friend of mine, wrote to me:
When Greatness is measured by the influence ON and OFF the board, I am afraid thatKitani Minoru was as great as Go Seigen if not greater.
The “influence” Youyi mentioned here did not just mean the “New Openings” discovered byKitani Minoru and Go Seigen, and it did not just mean the gut performance the stubborn Kitani puton when he faced Meijin Shusai in Meijin’s retirement match 2, it also meant Kitani’s influence to thefuture – do names like Otake, Ishida, Takemiya, Kato, Cho, and Kobayashi all sound familiar? Theywere all Kitani’s pupils.
That’s why, when I saw the book “Detailed Analysis on Wu’s Famous Games” (Chinese) con-tained one game between Go Seigen (Wu) and Kitani, I decided to post it as Game 1 of this “GoSeigen Series.”
The game was the first between these two giants after World War II. At the time, Go Seigen wasunanimously No. 1 after beating one opponent after another in 10-game series. Meanwhile, Kitani,who was promoted to 9-dan just a year before, was winning games too. Thus this first meet betweenthe two greats in 13 years became a big show. And it was a game in “Japan’s Strongest DecidingMatches.” At the end, Go Seigen once again came out as the winner, but no one would say Kitani wasa loser – he had established himself forever as a winner.
1Showa was Japan’s last Emperor’s title, and Showa Years spanned from 1925 to 1989. Currently, 1992 is Heisei (newEmperor’s title) Year 4.
2See Appendix C for more information on this game.
3
4 CHAPTER 2. GO SEIGEN-KITANI MINORU
Kitani Minoru, 9 danversus
Go Seigen, 9 dan
Black: Kitani Minoru, 9 danWhite: Go Seigen, 9 dan
Date: April 14-15, 1957Place: Tokyo, JapanKomi: 0
Result: W�Resign
A B C D E F G H J K L M N O P Q R S T
A B C D E F G H J K L M N O P Q R S T12345678910111213141516171819
12345678910111213141516171819
2 41
6 a5 7
3
B 1 – B 7
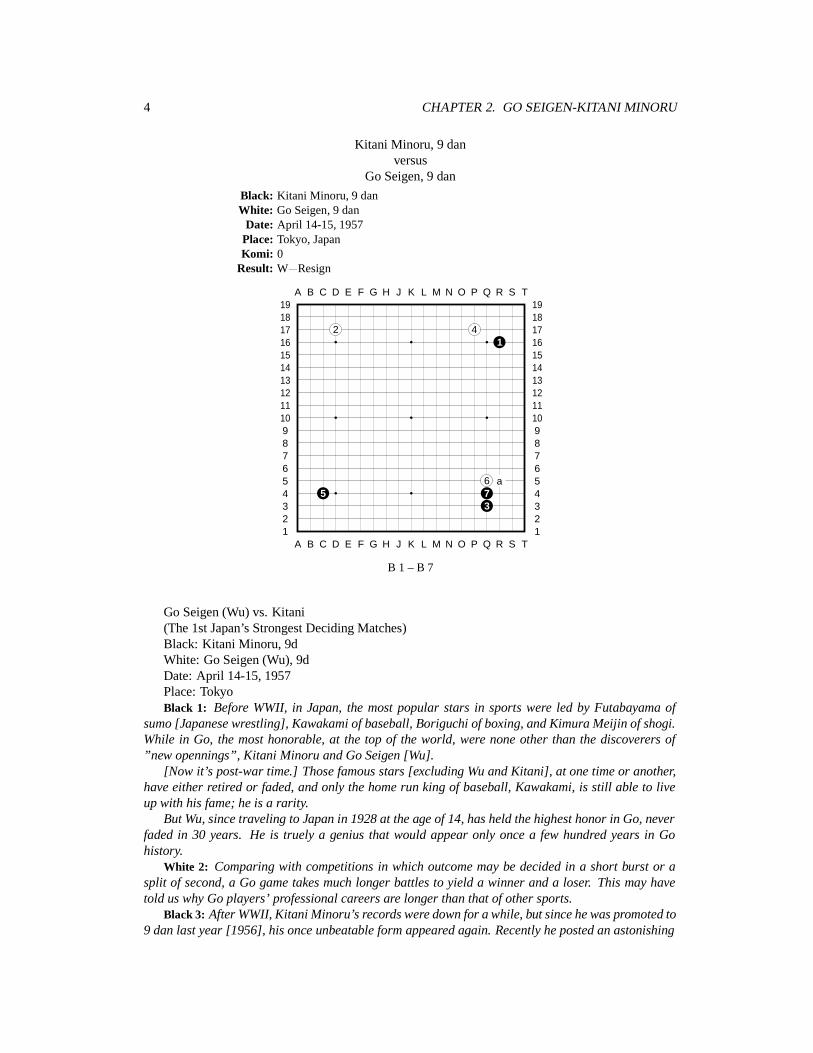
Go Seigen (Wu) vs. Kitani(The 1st Japan’s Strongest Deciding Matches)Black: Kitani Minoru, 9dWhite: Go Seigen (Wu), 9dDate: April 14-15, 1957Place: TokyoBlack 1: Before WWII, in Japan, the most popular stars in sports were led by Futabayama of
sumo [Japanese wrestling], Kawakami of baseball, Boriguchi of boxing, and Kimura Meijin of shogi.While in Go, the most honorable, at the top of the world, were none other than the discoverers of”new opennings”, Kitani Minoru and Go Seigen [Wu].
[Now it’s post-war time.] Those famous stars [excluding Wu and Kitani], at one time or another,have either retired or faded, and only the home run king of baseball, Kawakami, is still able to liveup with his fame; he is a rarity.
But Wu, since traveling to Japan in 1928 at the age of 14, has held the highest honor in Go, neverfaded in 30 years. He is truely a genius that would appear only once a few hundred years in Gohistory.
White 2: Comparing with competitions in which outcome may be decided in a short burst or asplit of second, a Go game takes much longer battles to yield a winner and a loser. This may havetold us why Go players’ professional careers are longer than that of other sports.
Black 3: After WWII, Kitani Minoru’s records were down for a while, but since he was promoted to9 dan last year [1956], his once unbeatable form appeared again. Recently he posted an astonishing
5
record of 14 wins and 5 losses. In major tournaments like the Highest Rank Deciding Matches, Hon-inbo Matches, and Tokyo Newspaper sponsored Championship Matches, he all recorded triumphs.
White 4: Is the once overwhelming ”Wu-Kitani Era” re-emerging? Gradually recovered, risinggiant Kitani Minoru, challenges Go Seigen for the first time in 13 years. This balanced struggle isindeed the most remarkable post-war battle since the Wu-Fujisawa 10-game series.
Black 5: This is the first game between Kitani 9 dan and me [me �Wu] after the War.Before the War, we had a 10-game series when we were 7 dans; later, we also played 4 games. I
remember these 4 games were three games in the Grant Meet (Nihon Kiin’s [Japanese Go Association]ranked players tournament) and one game sponsored by Yomiuri Newspaper. Finally in 1944 [duringthe War, that is], we met again in the ranked players tournament when we were 8 dans. This gamenow is my first against Mr. Kitani in 13 years.
White 6: This game is played in Tokyo Chiyoda District Kioi Street’s Fukudake Inn on April14-15, 1957. At the same time, the game between Sakata Eio 9 dan and Takagawa Honinbo 8 dan[another of Strongest Deciding Matches] is also held here. That game of theirs will end with Sakata9 dan, playing Black, winning by 4 points.
Black 7: B #7 [Q4] is Kitani 9 dan’s unique move; other players rarely play it, but Kitani 9 danhas used it a few times in openings like the 1-3-5 [R16-Q3-C4] of this game.
B doesn’t want to play B[a] so that W would play [Q4] to form the ”avalanche shape”, so [Q4]move applies the proverb ”opponent’s key point is also my key point.”
A B C D E F G H J K L M N O P Q R S T
A B C D E F G H J K L M N O P Q R S T12345678910111213141516171819
12345678910111213141516171819
8
W 8
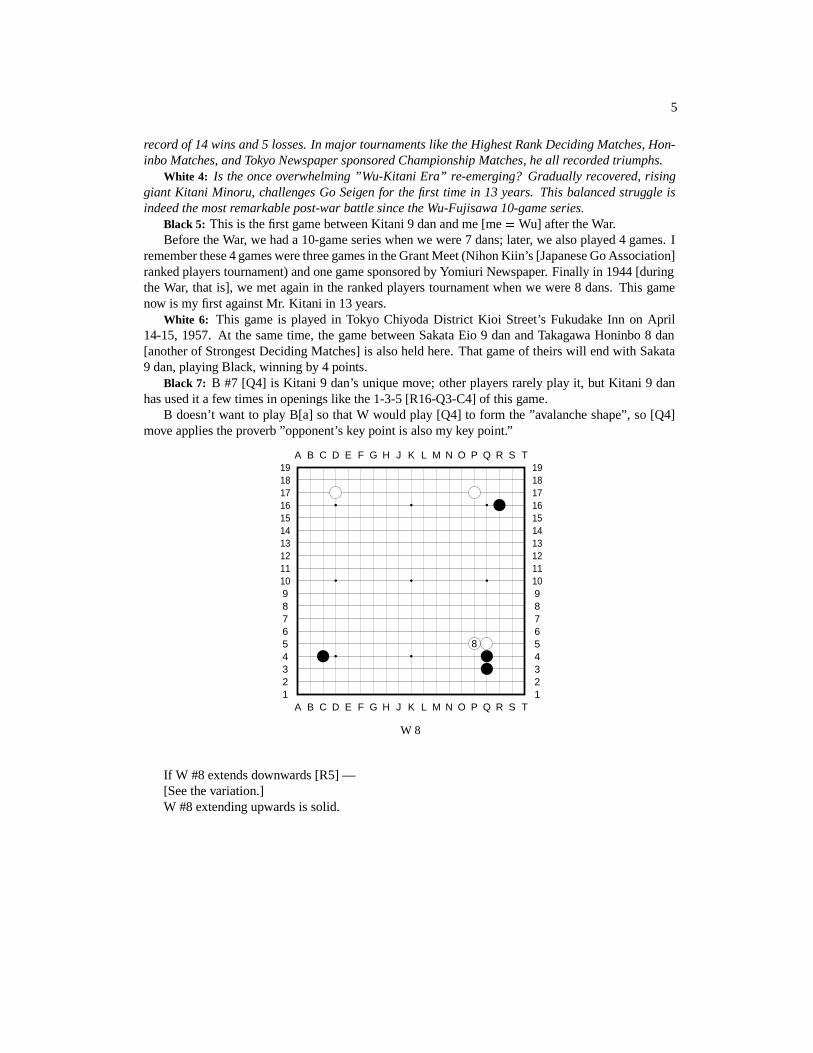
If W #8 extends downwards [R5] —[See the variation.]W #8 extending upwards is solid.
6 CHAPTER 2. GO SEIGEN-KITANI MINORU
A B C D E F G H J K L M N O P Q R S T
A B C D E F G H J K L M N O P Q R S T12345678910111213141516171819
12345678910111213141516171819
a c4 2 b
5 3 1
variation
[If W extends with [R5] instead...]Black 5: The sequence to here would be certain. Not only B will have a peek at B[a] (followed by
W[b] connecting and B[c] extending), W’s [P6] and [O6] playing on line 6 is also unsatisfactory.
A B C D E F G H J K L M N O P Q R S T
A B C D E F G H J K L M N O P Q R S T12345678910111213141516171819
12345678910111213141516171819
109
B 9 – W 10
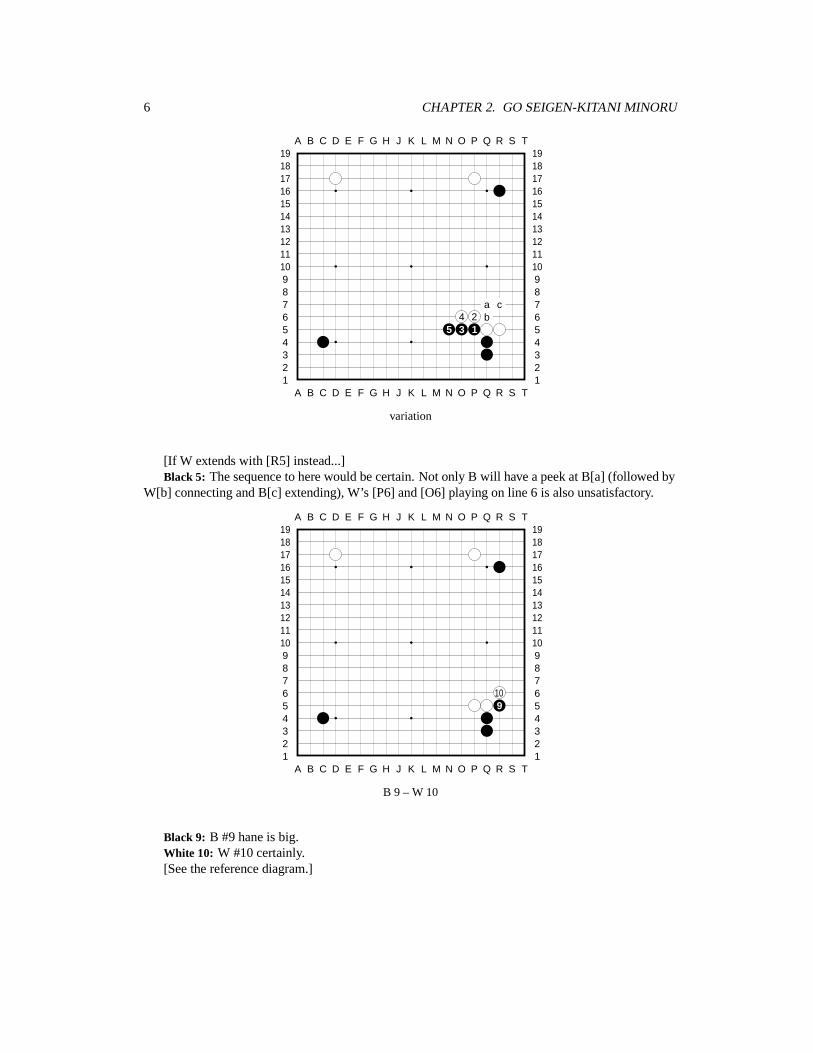
Black 9: B #9 hane is big.White 10: W #10 certainly.[See the reference diagram.]

7
A B C D E F G H J K L M N O P Q R S T
A B C D E F G H J K L M N O P Q R S T12345678910111213141516171819
12345678910111213141516171819
3 51 2 64
reference
[Japanese editor, Mr. Katsumoto, gives us another angle to look at the way two players haveplayed the corner so far.]
White 1: [This is a joseki.]Black 6: The way two players have played so far is similar to this joseki.
A B C D E F G H J K L M N O P Q R S T
A B C D E F G H J K L M N O P Q R S T12345678910111213141516171819
12345678910111213141516171819
11
B 11
B #11 —[See the variation.]
8 CHAPTER 2. GO SEIGEN-KITANI MINORU
A B C D E F G H J K L M N O P Q R S T
A B C D E F G H J K L M N O P Q R S T12345678910111213141516171819
12345678910111213141516171819
12
variation
If B plays [S4]...Black 2: The leak of W to the right is almost covered, so B [S4] is not as good as [S5], the way
actually played.
A B C D E F G H J K L M N O P Q R S T
A B C D E F G H J K L M N O P Q R S T12345678910111213141516171819
12345678910111213141516171819
12
a b
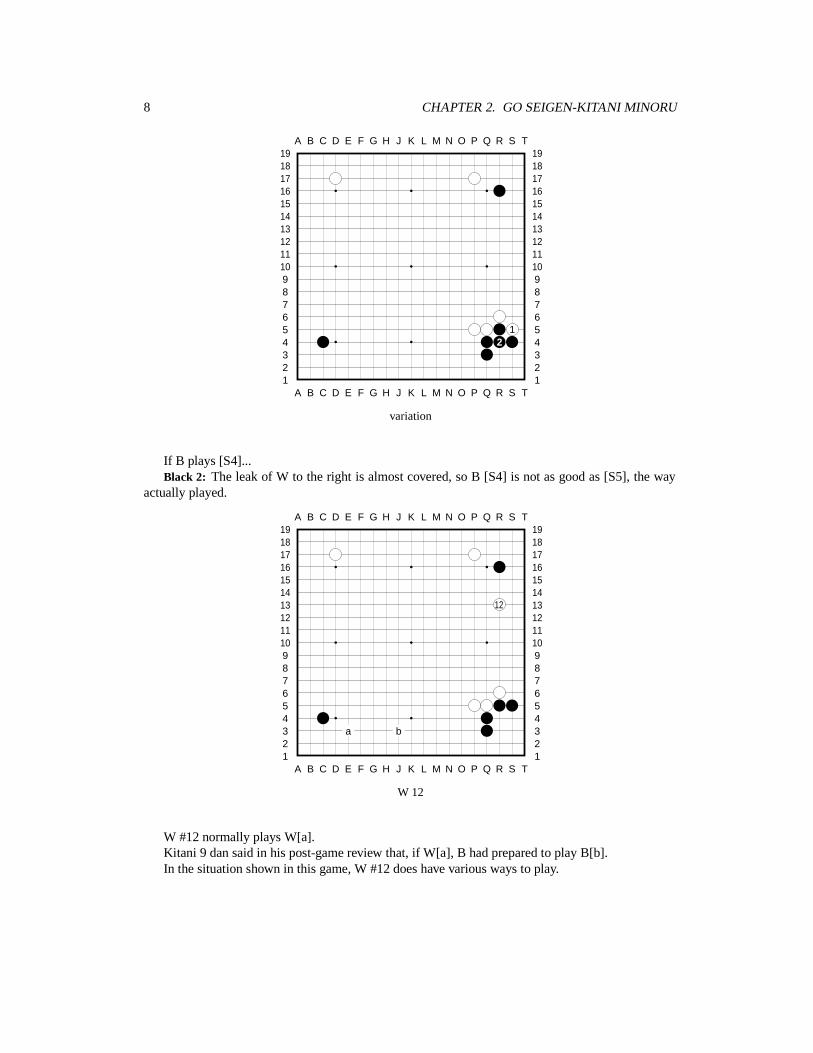
W 12
W #12 normally plays W[a].Kitani 9 dan said in his post-game review that, if W[a], B had prepared to play B[b].In the situation shown in this game, W #12 does have various ways to play.
9
A B C D E F G H J K L M N O P Q R S T
A B C D E F G H J K L M N O P Q R S T12345678910111213141516171819
12345678910111213141516171819
13
14
a
15b
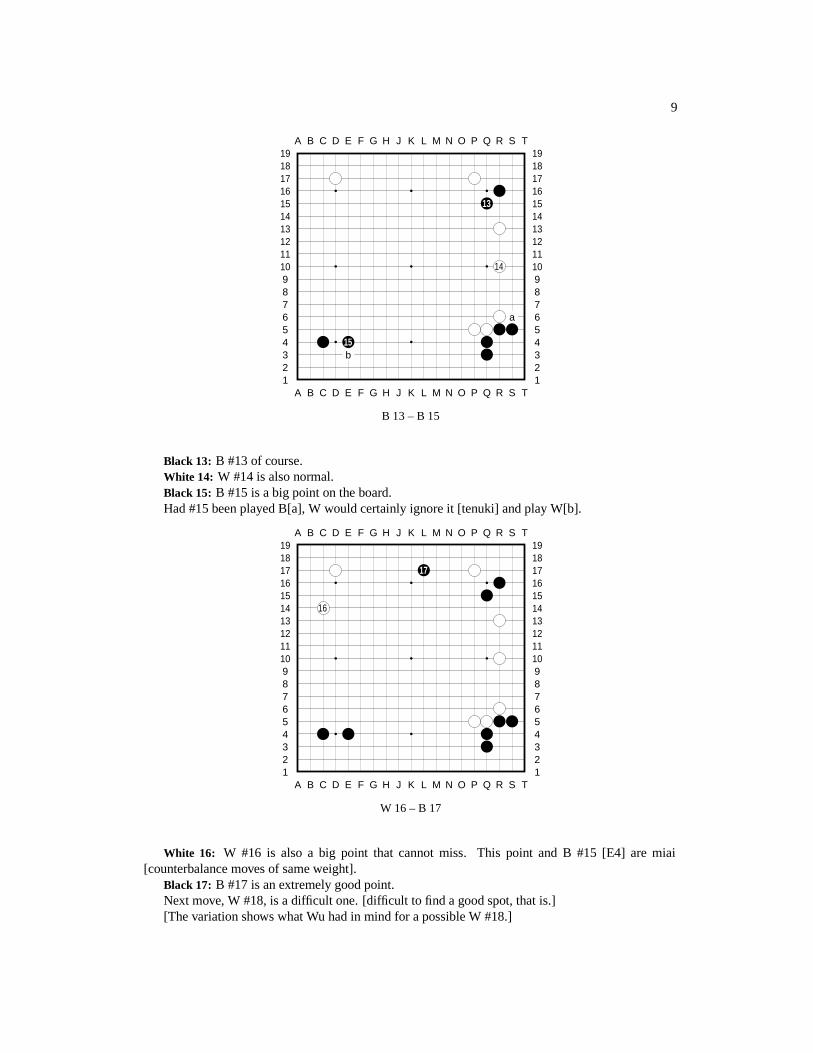
B 13 – B 15
Black 13: B #13 of course.White 14: W #14 is also normal.Black 15: B #15 is a big point on the board.Had #15 been played B[a], W would certainly ignore it [tenuki] and play W[b].
A B C D E F G H J K L M N O P Q R S T
A B C D E F G H J K L M N O P Q R S T12345678910111213141516171819
12345678910111213141516171819
17
16
W 16 – B 17
White 16: W #16 is also a big point that cannot miss. This point and B #15 [E4] are miai[counterbalance moves of same weight].
Black 17: B #17 is an extremely good point.Next move, W #18, is a difficult one. [difficult to find a good spot, that is.][The variation shows what Wu had in mind for a possible W #18.]
10 CHAPTER 2. GO SEIGEN-KITANI MINORU
A B C D E F G H J K L M N O P Q R S T
A B C D E F G H J K L M N O P Q R S T12345678910111213141516171819
12345678910111213141516171819
3 1 27
6 4 5
8
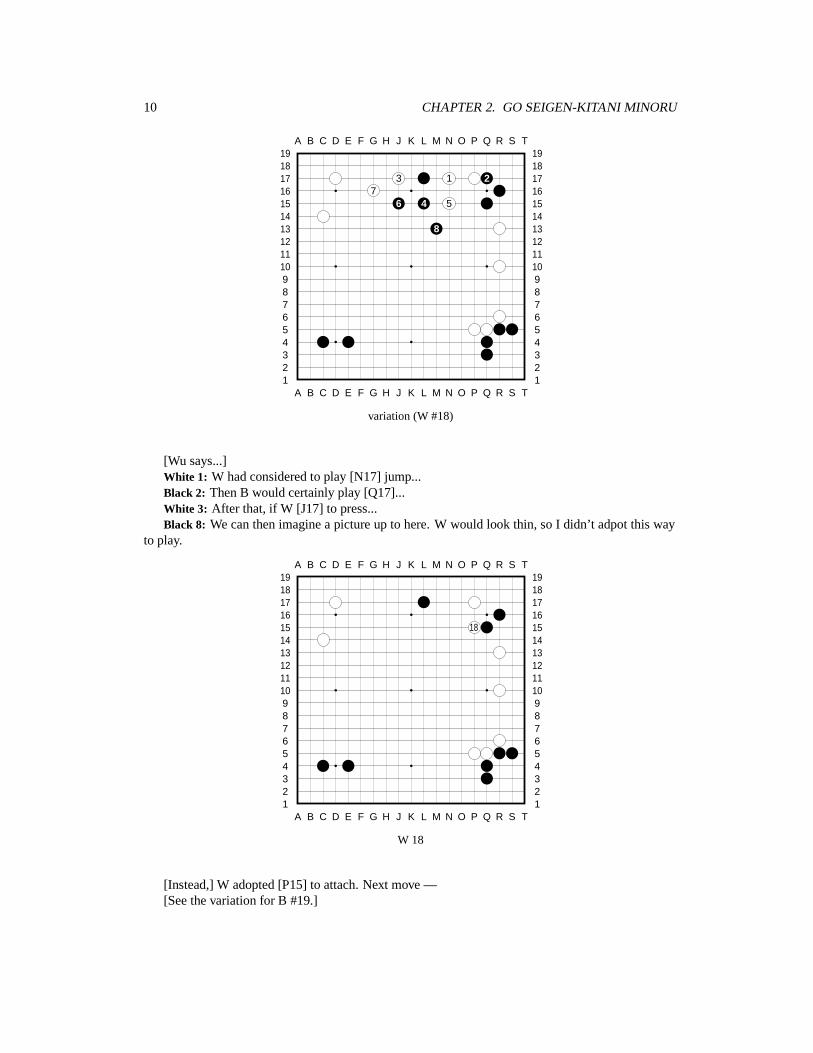
variation (W #18)
[Wu says...]White 1: W had considered to play [N17] jump...Black 2: Then B would certainly play [Q17]...White 3: After that, if W [J17] to press...Black 8: We can then imagine a picture up to here. W would look thin, so I didn’t adpot this way
to play.
A B C D E F G H J K L M N O P Q R S T
A B C D E F G H J K L M N O P Q R S T12345678910111213141516171819
12345678910111213141516171819
18
W 18
[Instead,] W adopted [P15] to attach. Next move —[See the variation for B #19.]
11
A B C D E F G H J K L M N O P Q R S T
A B C D E F G H J K L M N O P Q R S T12345678910111213141516171819
12345678910111213141516171819
21 5 4
3
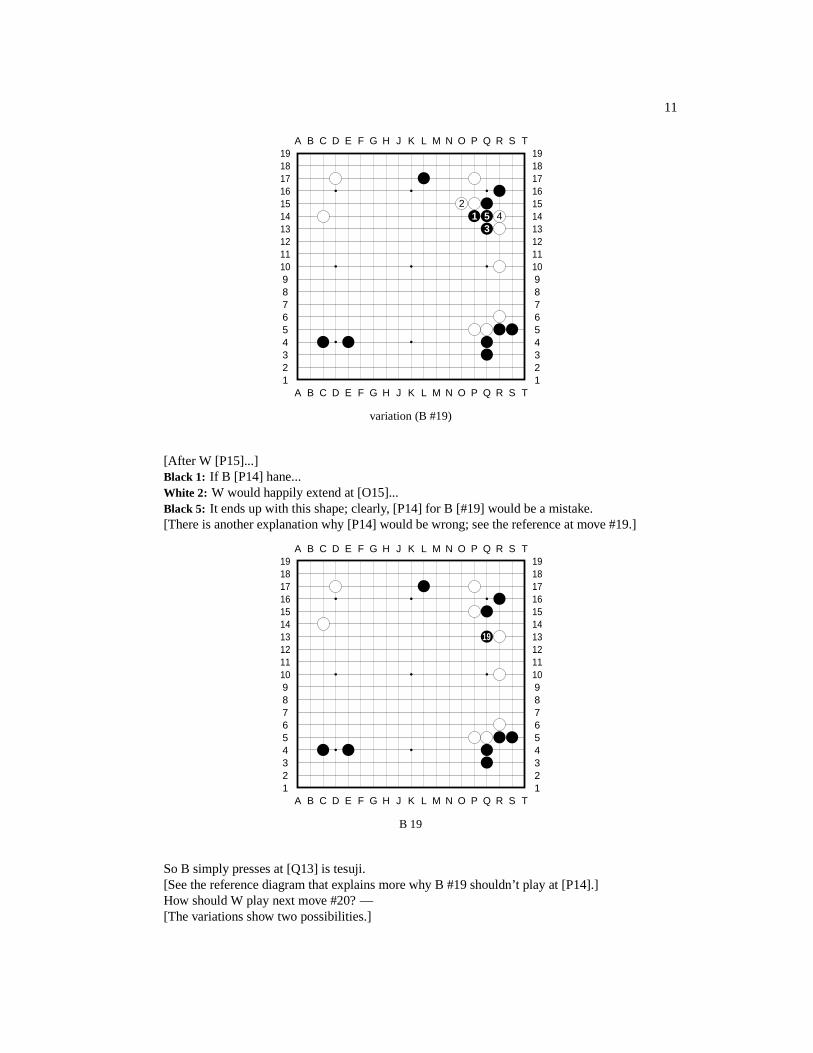
variation (B #19)
[After W [P15]...]Black 1: If B [P14] hane...White 2: W would happily extend at [O15]...Black 5: It ends up with this shape; clearly, [P14] for B [#19] would be a mistake.[There is another explanation why [P14] would be wrong; see the reference at move #19.]
A B C D E F G H J K L M N O P Q R S T
A B C D E F G H J K L M N O P Q R S T12345678910111213141516171819
12345678910111213141516171819
19
B 19
So B simply presses at [Q13] is tesuji.[See the reference diagram that explains more why B #19 shouldn’t play at [P14].]How should W play next move #20? —[The variations show two possibilities.]
12 CHAPTER 2. GO SEIGEN-KITANI MINORU
A B C D E F G H J K L M N O P Q R S T
A B C D E F G H J K L M N O P Q R S T12345678910111213141516171819
12345678910111213141516171819
ba 2
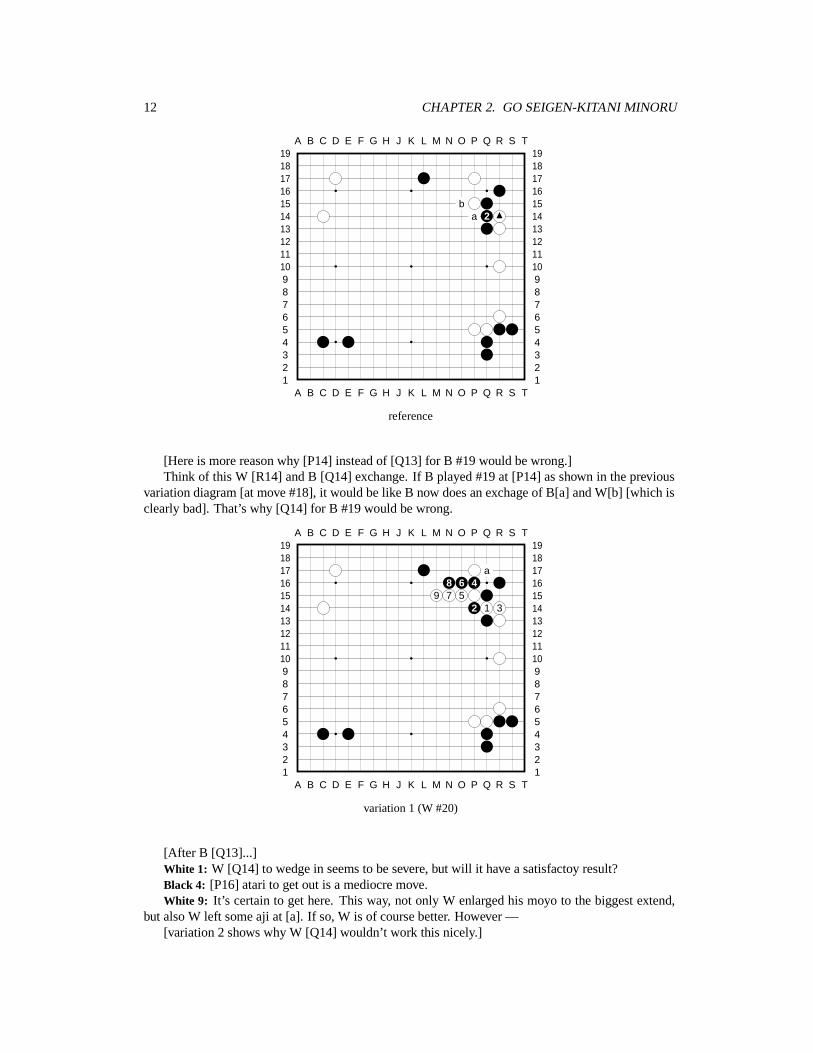
reference
[Here is more reason why [P14] instead of [Q13] for B #19 would be wrong.]Think of this W [R14] and B [Q14] exchange. If B played #19 at [P14] as shown in the previous
variation diagram [at move #18], it would be like B now does an exchage of B[a] and W[b] [which isclearly bad]. That’s why [Q14] for B #19 would be wrong.
A B C D E F G H J K L M N O P Q R S T
A B C D E F G H J K L M N O P Q R S T12345678910111213141516171819
12345678910111213141516171819
a8 6 4
9 7 52 1 3
variation 1 (W #20)
[After B [Q13]...]White 1: W [Q14] to wedge in seems to be severe, but will it have a satisfactoy result?Black 4: [P16] atari to get out is a mediocre move.White 9: It’s certain to get here. This way, not only W enlarged his moyo to the biggest extend,
but also W left some aji at [a]. If so, W is of course better. However —[variation 2 shows why W [Q14] wouldn’t work this nicely.]
13
A B C D E F G H J K L M N O P Q R S T
A B C D E F G H J K L M N O P Q R S T12345678910111213141516171819
12345678910111213141516171819
b 2
a 1
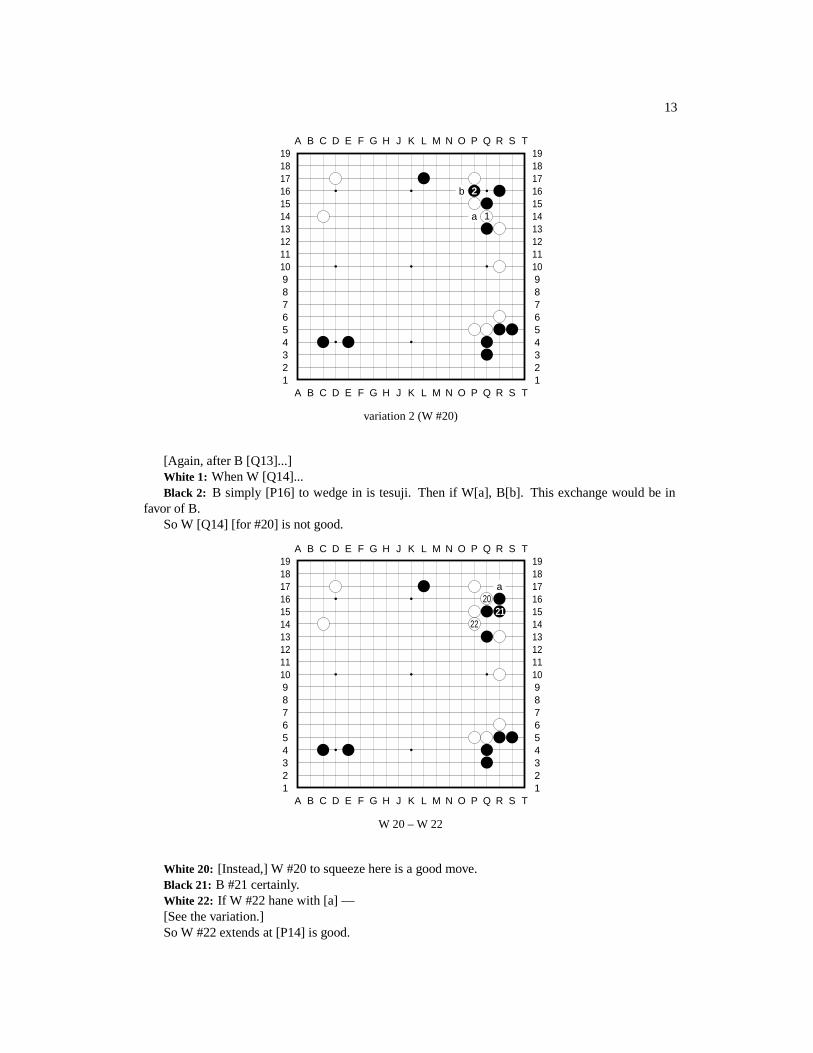
variation 2 (W #20)
[Again, after B [Q13]...]White 1: When W [Q14]...Black 2: B simply [P16] to wedge in is tesuji. Then if W[a], B[b]. This exchange would be in
favor of B.So W [Q14] [for #20] is not good.
A B C D E F G H J K L M N O P Q R S T
A B C D E F G H J K L M N O P Q R S T12345678910111213141516171819
12345678910111213141516171819
a20
2122
W 20 – W 22
White 20: [Instead,] W #20 to squeeze here is a good move.Black 21: B #21 certainly.White 22: If W #22 hane with [a] —[See the variation.]So W #22 extends at [P14] is good.
14 CHAPTER 2. GO SEIGEN-KITANI MINORU
[See the variation for B next move, #23]
A B C D E F G H J K L M N O P Q R S T
A B C D E F G H J K L M N O P Q R S T12345678910111213141516171819
12345678910111213141516171819
43
21
5
variation
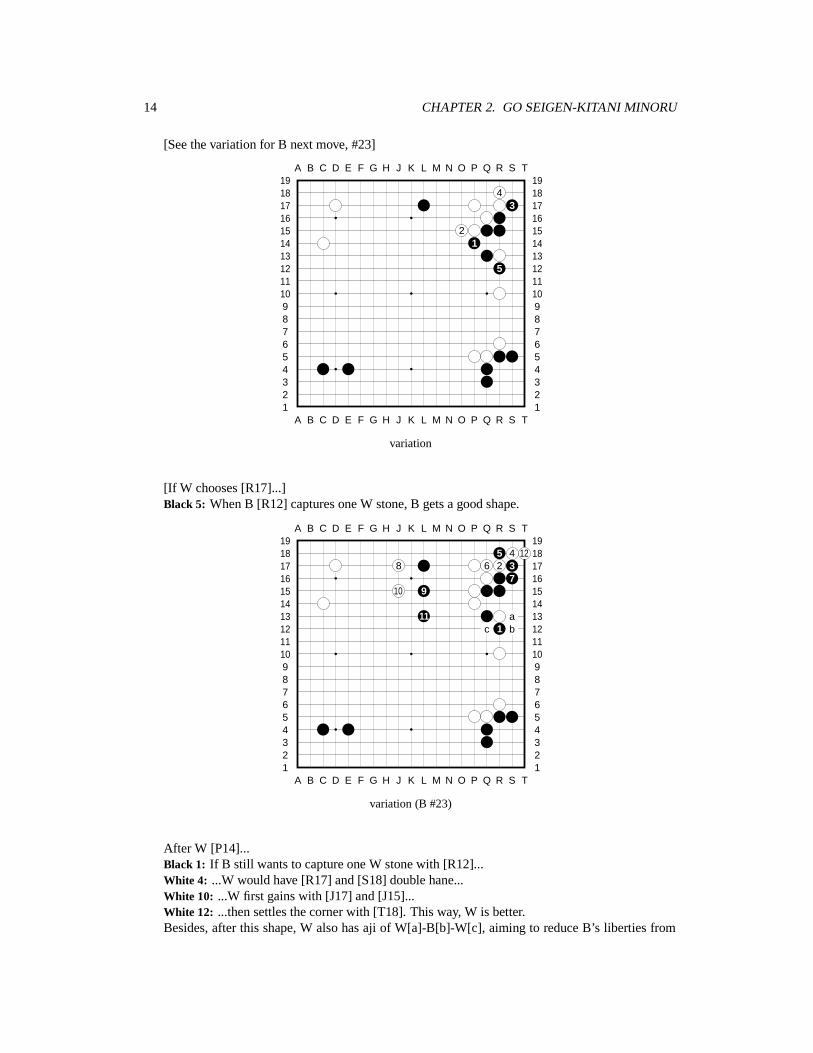
[If W chooses [R17]...]Black 5: When B [R12] captures one W stone, B gets a good shape.
A B C D E F G H J K L M N O P Q R S T
A B C D E F G H J K L M N O P Q R S T12345678910111213141516171819
12345678910111213141516171819
5 4 128 6 2 3
710 9
11 ac 1 b
variation (B #23)
After W [P14]...Black 1: If B still wants to capture one W stone with [R12]...White 4: ...W would have [R17] and [S18] double hane...White 10: ...W first gains with [J17] and [J15]...White 12: ...then settles the corner with [T18]. This way, W is better.Besides, after this shape, W also has aji of W[a]-B[b]-W[c], aiming to reduce B’s liberties from
15
outside, thus sealing B inside.
A B C D E F G H J K L M N O P Q R S T
A B C D E F G H J K L M N O P Q R S T12345678910111213141516171819
12345678910111213141516171819
2627 b 24 25
23
a
B 23 – B 27
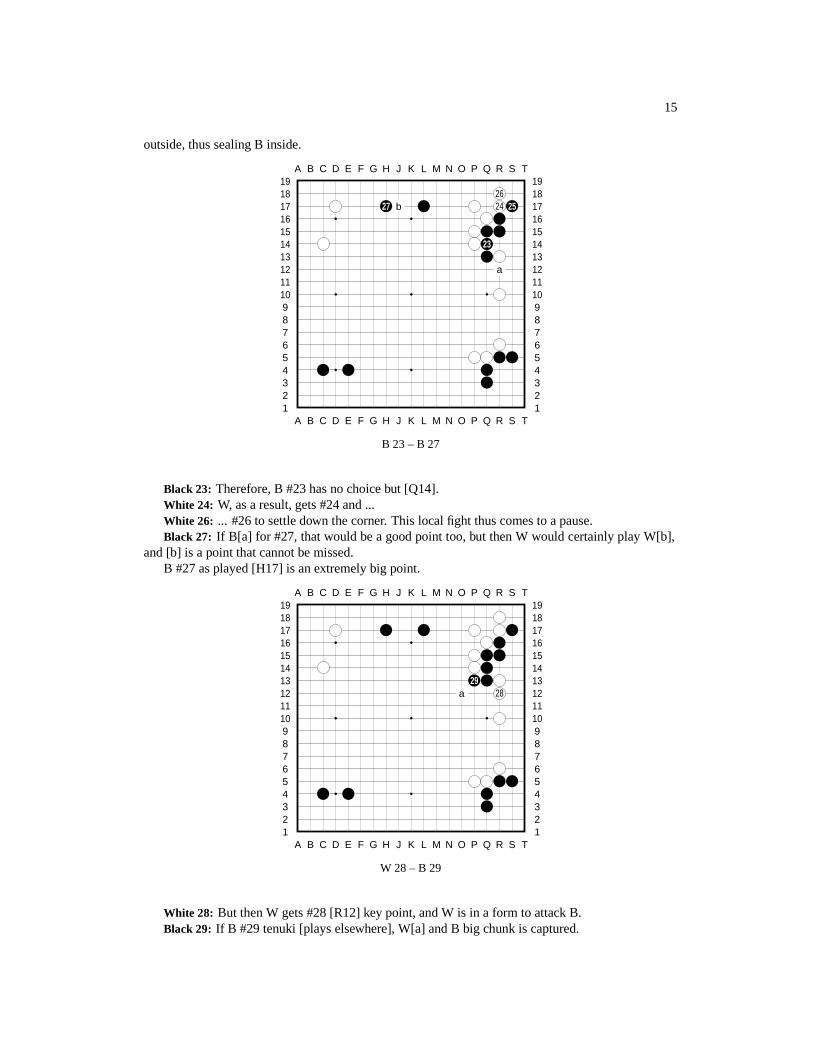
Black 23: Therefore, B #23 has no choice but [Q14].White 24: W, as a result, gets #24 and ...White 26: ... #26 to settle down the corner. This local fight thus comes to a pause.Black 27: If B[a] for #27, that would be a good point too, but then W would certainly play W[b],
and [b] is a point that cannot be missed.B #27 as played [H17] is an extremely big point.
A B C D E F G H J K L M N O P Q R S T
A B C D E F G H J K L M N O P Q R S T12345678910111213141516171819
12345678910111213141516171819
29a 28
W 28 – B 29
White 28: But then W gets #28 [R12] key point, and W is in a form to attack B.Black 29: If B #29 tenuki [plays elsewhere], W[a] and B big chunk is captured.
16 CHAPTER 2. GO SEIGEN-KITANI MINORU
A B C D E F G H J K L M N O P Q R S T
A B C D E F G H J K L M N O P Q R S T12345678910111213141516171819
12345678910111213141516171819
30
31a b
W 30 – B 31
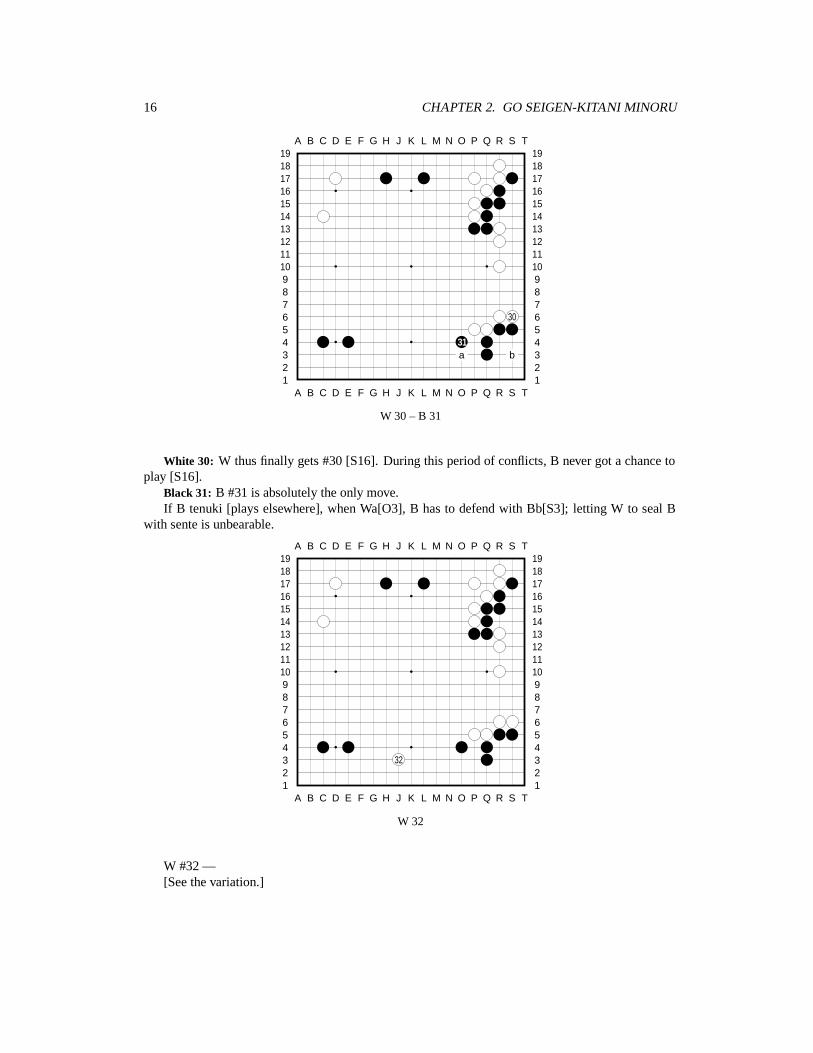
White 30: W thus finally gets #30 [S16]. During this period of conflicts, B never got a chance toplay [S16].
Black 31: B #31 is absolutely the only move.If B tenuki [plays elsewhere], when Wa[O3], B has to defend with Bb[S3]; letting W to seal B
with sente is unbearable.
A B C D E F G H J K L M N O P Q R S T
A B C D E F G H J K L M N O P Q R S T12345678910111213141516171819
12345678910111213141516171819
32
W 32
W #32 —[See the variation.]
17
A B C D E F G H J K L M N O P Q R S T
A B C D E F G H J K L M N O P Q R S T12345678910111213141516171819
12345678910111213141516171819
3 4
51
2
variation
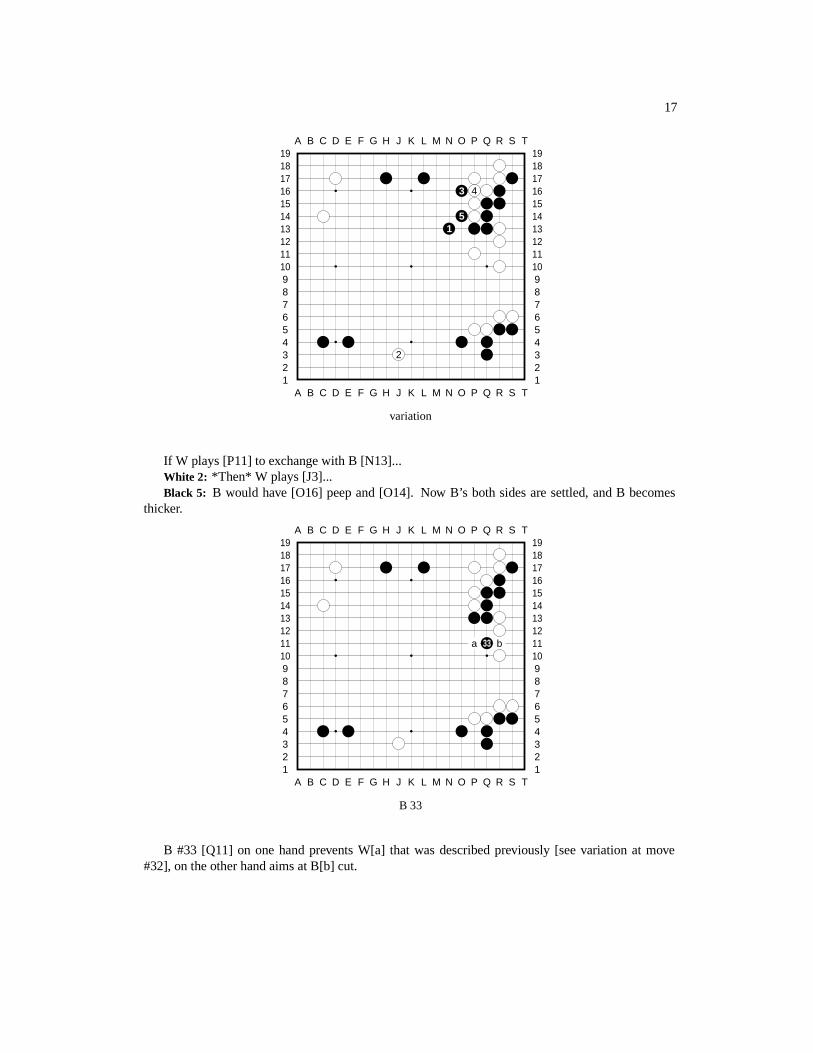
If W plays [P11] to exchange with B [N13]...White 2: *Then* W plays [J3]...Black 5: B would have [O16] peep and [O14]. Now B’s both sides are settled, and B becomes
thicker.
A B C D E F G H J K L M N O P Q R S T
A B C D E F G H J K L M N O P Q R S T12345678910111213141516171819
12345678910111213141516171819
a 33 b
B 33
B #33 [Q11] on one hand prevents W[a] that was described previously [see variation at move#32], on the other hand aims at B[b] cut.
18 CHAPTER 2. GO SEIGEN-KITANI MINORU
A B C D E F G H J K L M N O P Q R S T
A B C D E F G H J K L M N O P Q R S T12345678910111213141516171819
12345678910111213141516171819
34
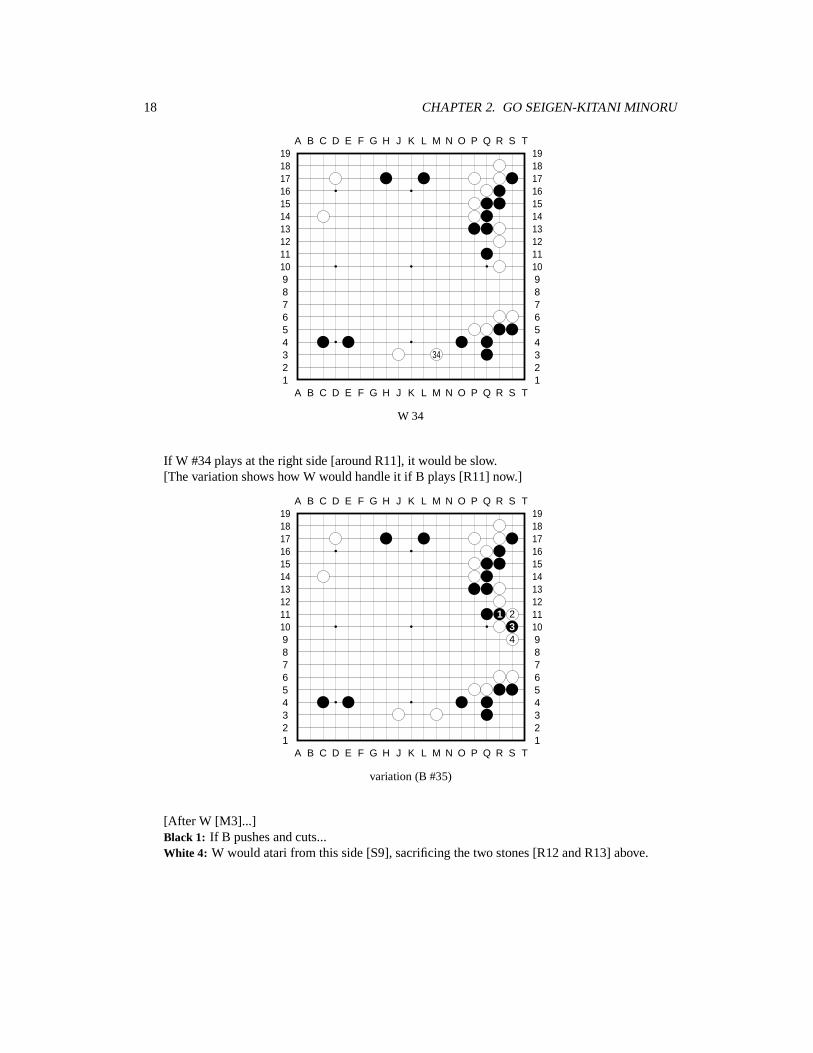
W 34
If W #34 plays at the right side [around R11], it would be slow.[The variation shows how W would handle it if B plays [R11] now.]
A B C D E F G H J K L M N O P Q R S T
A B C D E F G H J K L M N O P Q R S T12345678910111213141516171819
12345678910111213141516171819
1 234
variation (B #35)
[After W [M3]...]Black 1: If B pushes and cuts...White 4: W would atari from this side [S9], sacrificing the two stones [R12 and R13] above.
19
A B C D E F G H J K L M N O P Q R S T
A B C D E F G H J K L M N O P Q R S T12345678910111213141516171819
12345678910111213141516171819
35
B 35
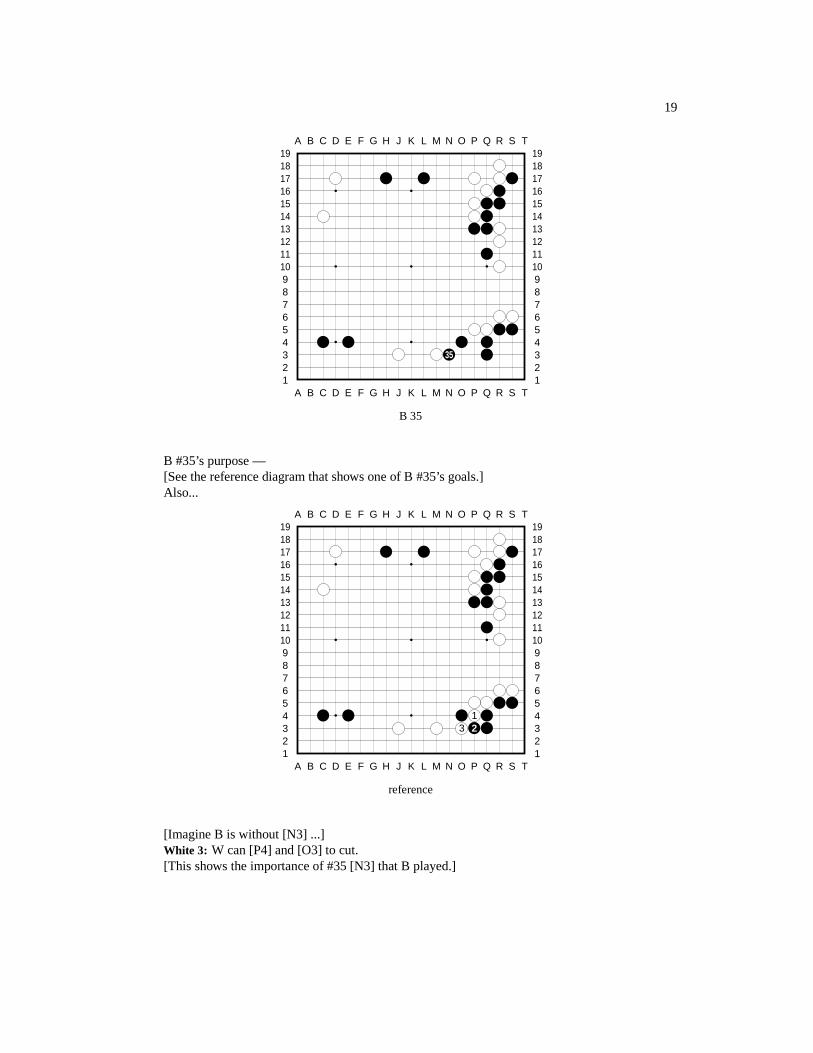
B #35’s purpose —[See the reference diagram that shows one of B #35’s goals.]Also...
A B C D E F G H J K L M N O P Q R S T
A B C D E F G H J K L M N O P Q R S T12345678910111213141516171819
12345678910111213141516171819
13 2
reference
[Imagine B is without [N3] ...]White 3: W can [P4] and [O3] to cut.[This shows the importance of #35 [N3] that B played.]
20 CHAPTER 2. GO SEIGEN-KITANI MINORU
A B C D E F G H J K L M N O P Q R S T
A B C D E F G H J K L M N O P Q R S T12345678910111213141516171819
12345678910111213141516171819
a37
36
W 36 – B 37
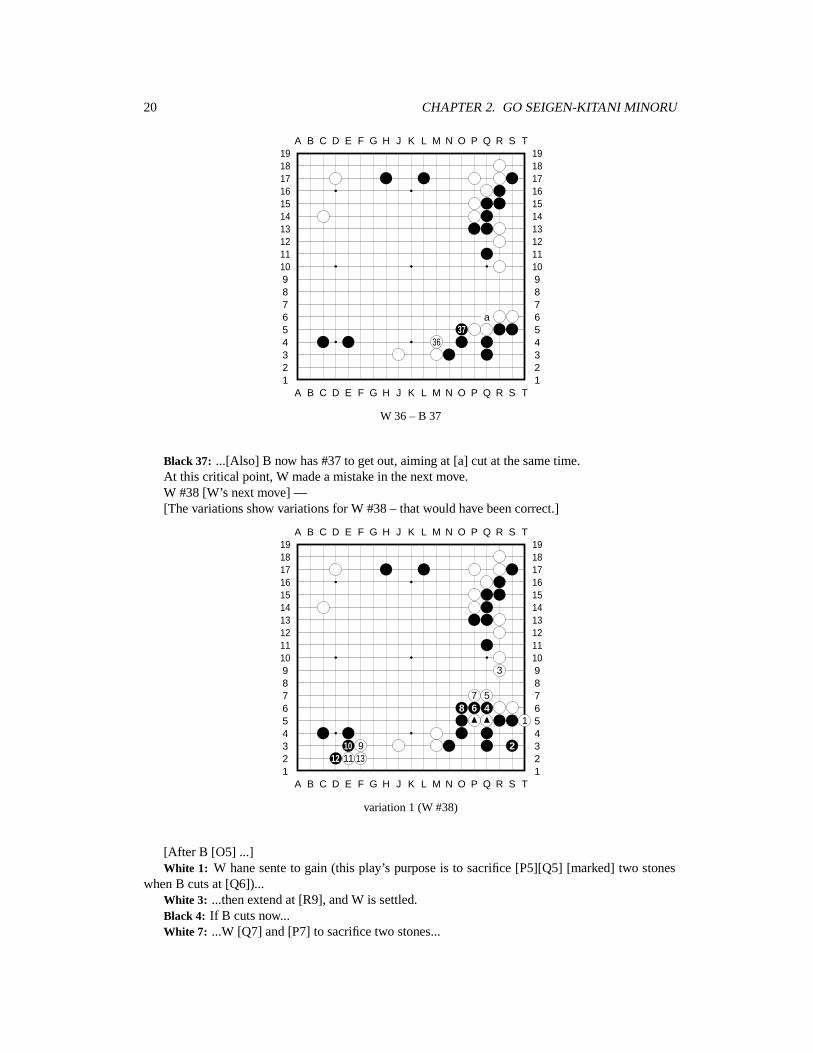
Black 37: ...[Also] B now has #37 to get out, aiming at [a] cut at the same time.At this critical point, W made a mistake in the next move.W #38 [W’s next move] —[The variations show variations for W #38 – that would have been correct.]
A B C D E F G H J K L M N O P Q R S T
A B C D E F G H J K L M N O P Q R S T12345678910111213141516171819
12345678910111213141516171819
3
7 58 6 4
1
10 9 212 11 13
variation 1 (W #38)
[After B [O5] ...]White 1: W hane sente to gain (this play’s purpose is to sacrifice [P5][Q5] [marked] two stones
when B cuts at [Q6])...White 3: ...then extend at [R9], and W is settled.Black 4: If B cuts now...White 7: ...W [Q7] and [P7] to sacrifice two stones...
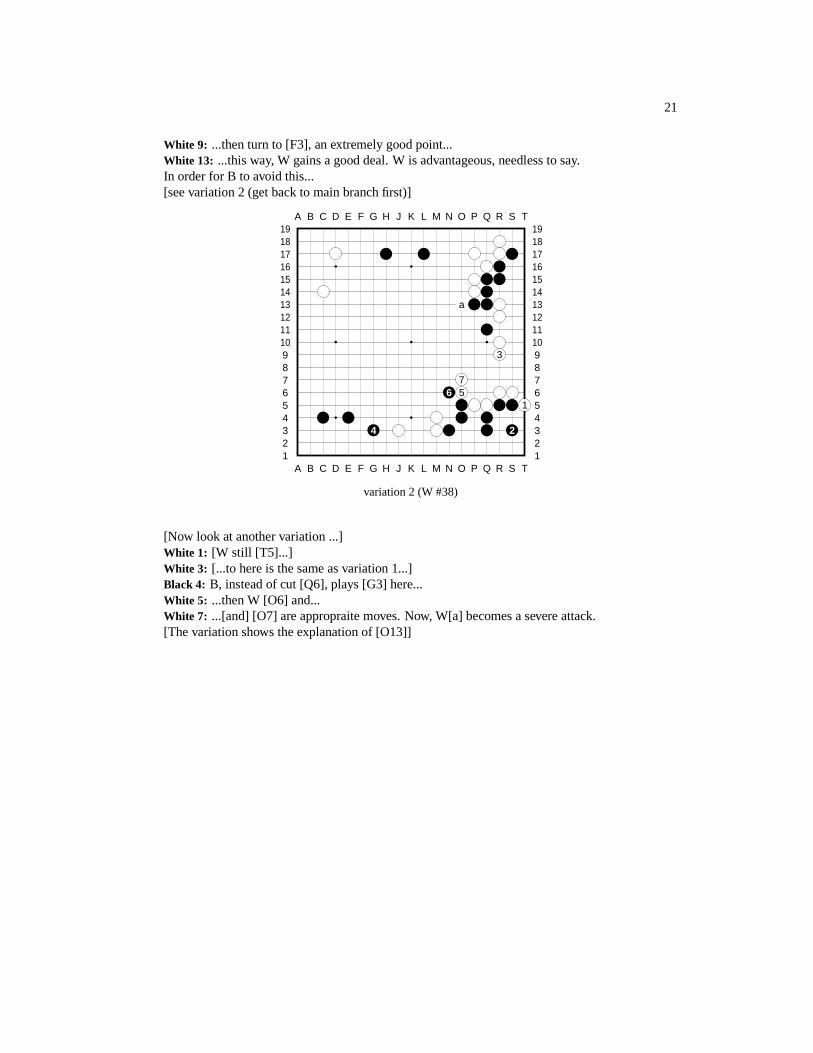
21
White 9: ...then turn to [F3], an extremely good point...White 13: ...this way, W gains a good deal. W is advantageous, needless to say.In order for B to avoid this...[see variation 2 (get back to main branch first)]
A B C D E F G H J K L M N O P Q R S T
A B C D E F G H J K L M N O P Q R S T12345678910111213141516171819
12345678910111213141516171819
a
3
76 5
1
4 2
variation 2 (W #38)
[Now look at another variation ...]White 1: [W still [T5]...]White 3: [...to here is the same as variation 1...]Black 4: B, instead of cut [Q6], plays [G3] here...White 5: ...then W [O6] and...White 7: ...[and] [O7] are appropraite moves. Now, W[a] becomes a severe attack.[The variation shows the explanation of [O13]]
22 CHAPTER 2. GO SEIGEN-KITANI MINORU
A B C D E F G H J K L M N O P Q R S T
A B C D E F G H J K L M N O P Q R S T12345678910111213141516171819
12345678910111213141516171819
No moves
A B C D E F G H J K L M N O P Q R S T
A B C D E F G H J K L M N O P Q R S T12345678910111213141516171819
12345678910111213141516171819
54 13 2
67
reference
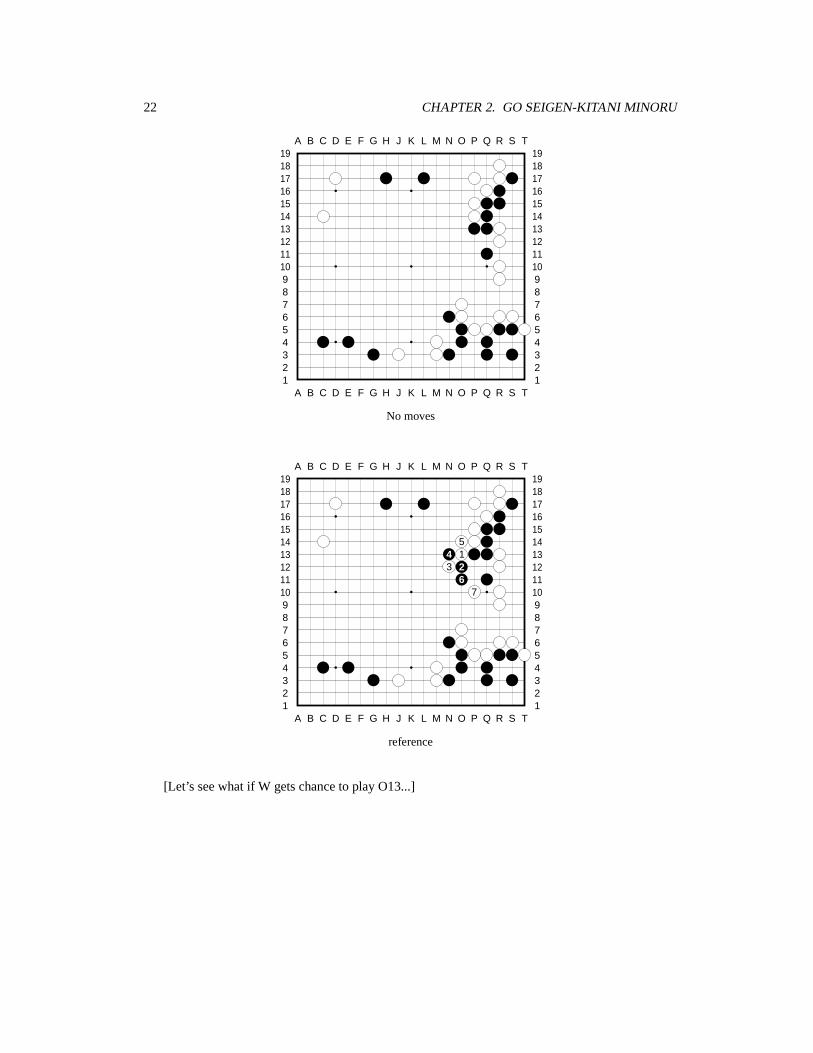
[Let’s see what if W gets chance to play O13...]
23
A B C D E F G H J K L M N O P Q R S T
A B C D E F G H J K L M N O P Q R S T12345678910111213141516171819
12345678910111213141516171819
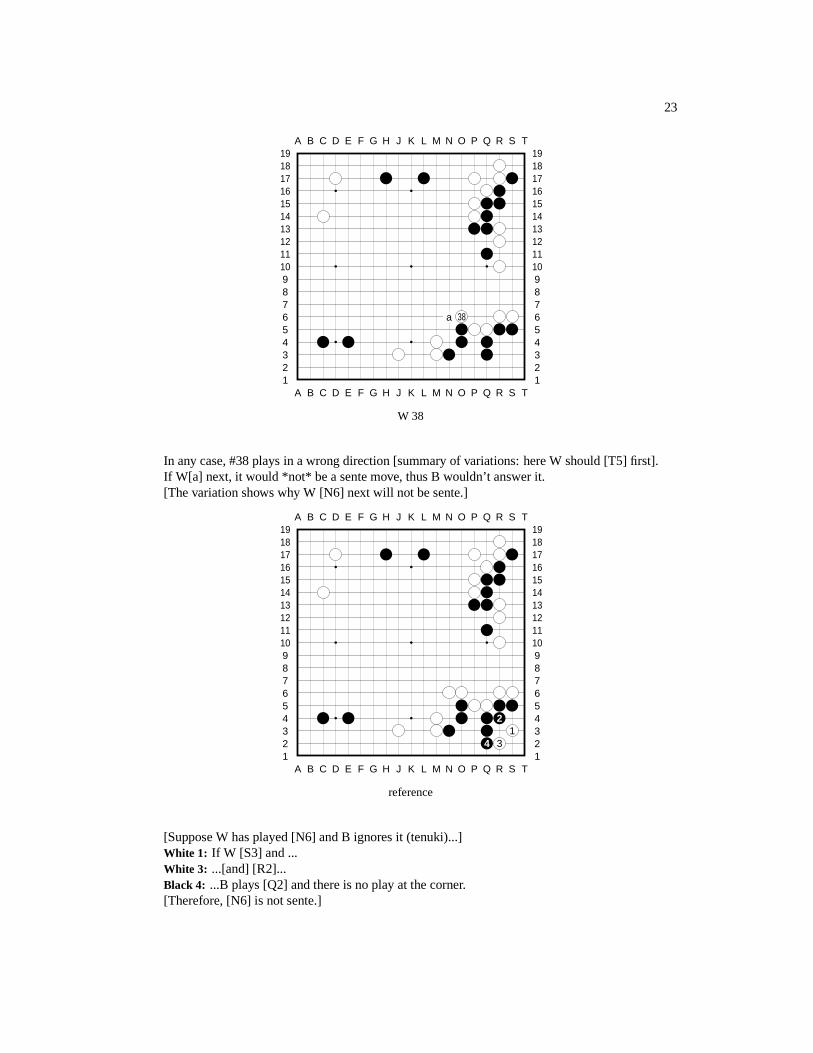
a 38
W 38
In any case, #38 plays in a wrong direction [summary of variations: here W should [T5] first].If W[a] next, it would *not* be a sente move, thus B wouldn’t answer it.[The variation shows why W [N6] next will not be sente.]
A B C D E F G H J K L M N O P Q R S T
A B C D E F G H J K L M N O P Q R S T12345678910111213141516171819
12345678910111213141516171819
21
4 3
reference
[Suppose W has played [N6] and B ignores it (tenuki)...]White 1: If W [S3] and ...White 3: ...[and] [R2]...Black 4: ...B plays [Q2] and there is no play at the corner.[Therefore, [N6] is not sente.]
24 CHAPTER 2. GO SEIGEN-KITANI MINORU
A B C D E F G H J K L M N O P Q R S T
A B C D E F G H J K L M N O P Q R S T12345678910111213141516171819
12345678910111213141516171819
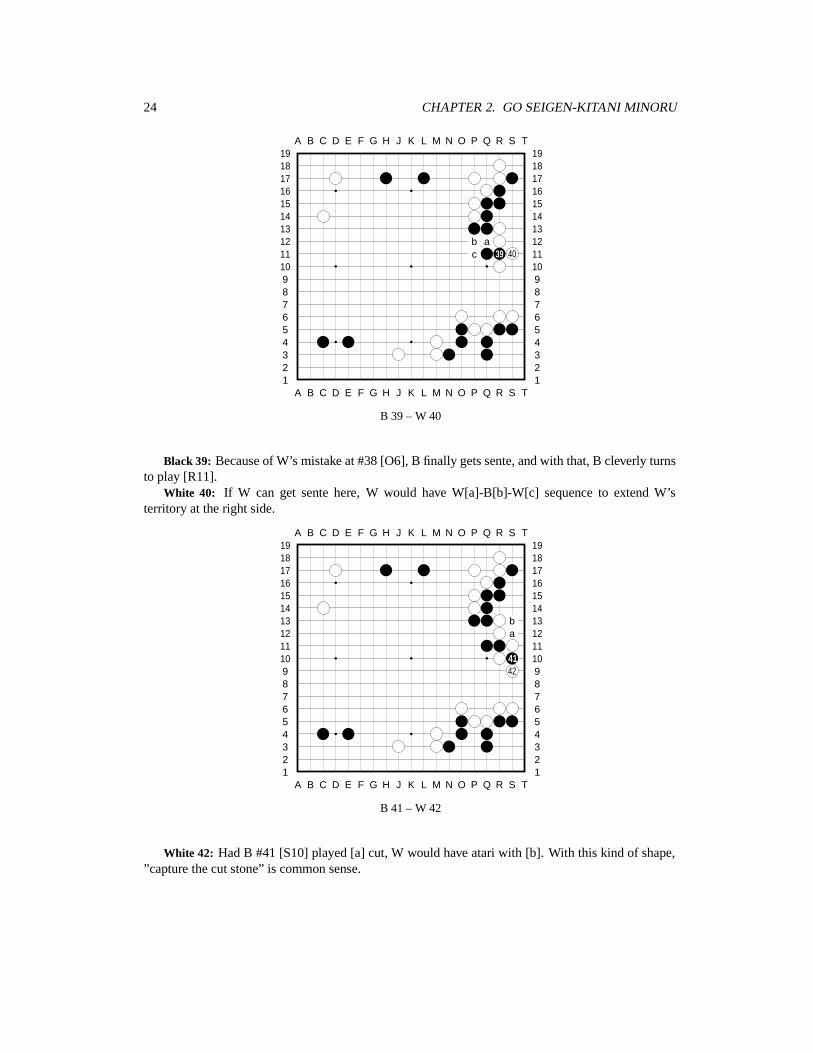
b ac 39 40
B 39 – W 40
Black 39: Because of W’s mistake at #38 [O6], B finally gets sente, and with that, B cleverly turnsto play [R11].
White 40: If W can get sente here, W would have W[a]-B[b]-W[c] sequence to extend W’sterritory at the right side.
A B C D E F G H J K L M N O P Q R S T
A B C D E F G H J K L M N O P Q R S T12345678910111213141516171819
12345678910111213141516171819
ba
4142
B 41 – W 42
White 42: Had B #41 [S10] played [a] cut, W would have atari with [b]. With this kind of shape,”capture the cut stone” is common sense.
25
A B C D E F G H J K L M N O P Q R S T
A B C D E F G H J K L M N O P Q R S T12345678910111213141516171819
12345678910111213141516171819
ca
43 b
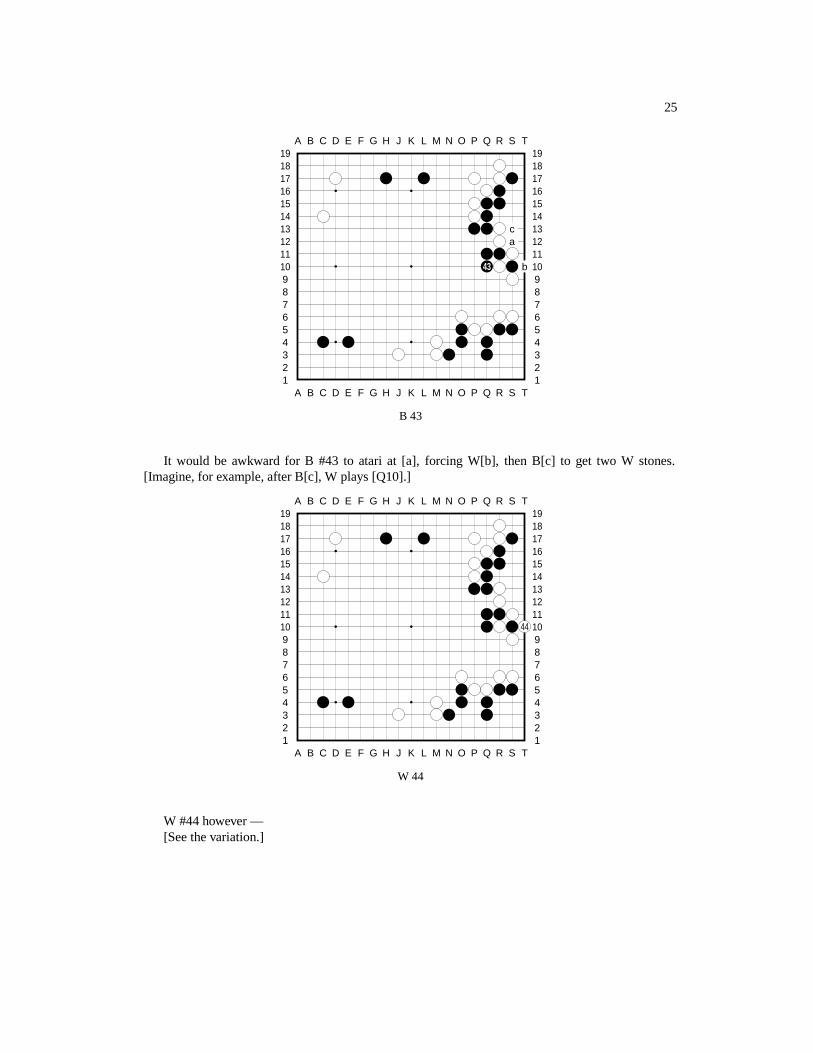
B 43
It would be awkward for B #43 to atari at [a], forcing W[b], then B[c] to get two W stones.[Imagine, for example, after B[c], W plays [Q10].]
A B C D E F G H J K L M N O P Q R S T
A B C D E F G H J K L M N O P Q R S T12345678910111213141516171819
12345678910111213141516171819
44
W 44
W #44 however —[See the variation.]
26 CHAPTER 2. GO SEIGEN-KITANI MINORU
A B C D E F G H J K L M N O P Q R S T
A B C D E F G H J K L M N O P Q R S T12345678910111213141516171819
12345678910111213141516171819
42
3
variation
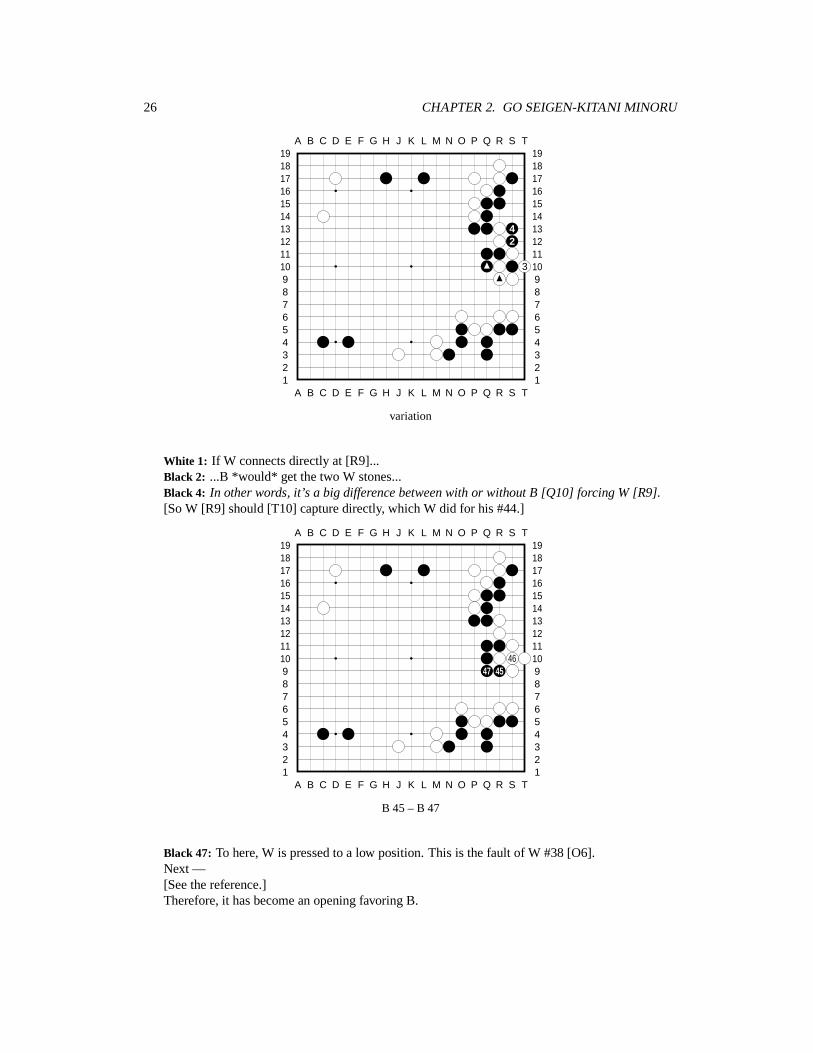
White 1: If W connects directly at [R9]...Black 2: ...B *would* get the two W stones...Black 4: In other words, it’s a big difference between with or without B [Q10] forcing W [R9].[So W [R9] should [T10] capture directly, which W did for his #44.]
A B C D E F G H J K L M N O P Q R S T
A B C D E F G H J K L M N O P Q R S T12345678910111213141516171819
12345678910111213141516171819
4647 45
B 45 – B 47
Black 47: To here, W is pressed to a low position. This is the fault of W #38 [O6].Next —[See the reference.]Therefore, it has become an opening favoring B.
27
A B C D E F G H J K L M N O P Q R S T
A B C D E F G H J K L M N O P Q R S T12345678910111213141516171819
12345678910111213141516171819
52 3
1 4
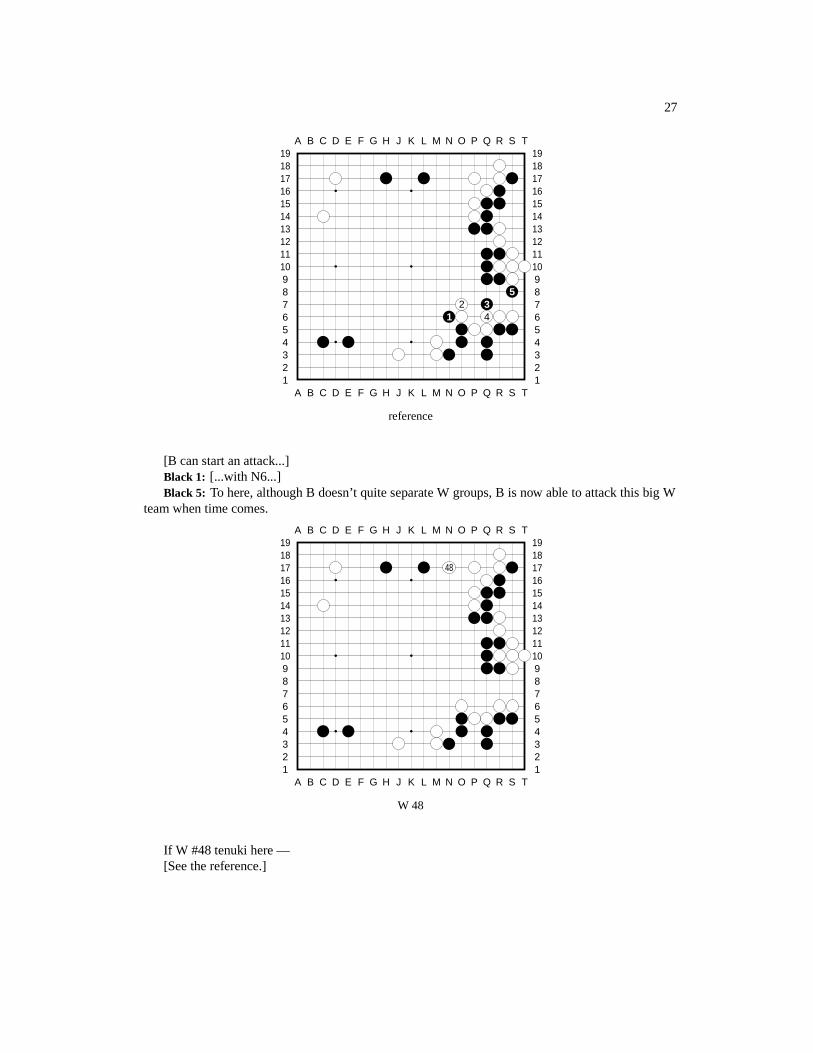
reference
[B can start an attack...]Black 1: [...with N6...]Black 5: To here, although B doesn’t quite separate W groups, B is now able to attack this big W
team when time comes.
A B C D E F G H J K L M N O P Q R S T
A B C D E F G H J K L M N O P Q R S T12345678910111213141516171819
12345678910111213141516171819
48
W 48
If W #48 tenuki here —[See the reference.]
28 CHAPTER 2. GO SEIGEN-KITANI MINORU
A B C D E F G H J K L M N O P Q R S T
A B C D E F G H J K L M N O P Q R S T12345678910111213141516171819
12345678910111213141516171819
31 2
reference
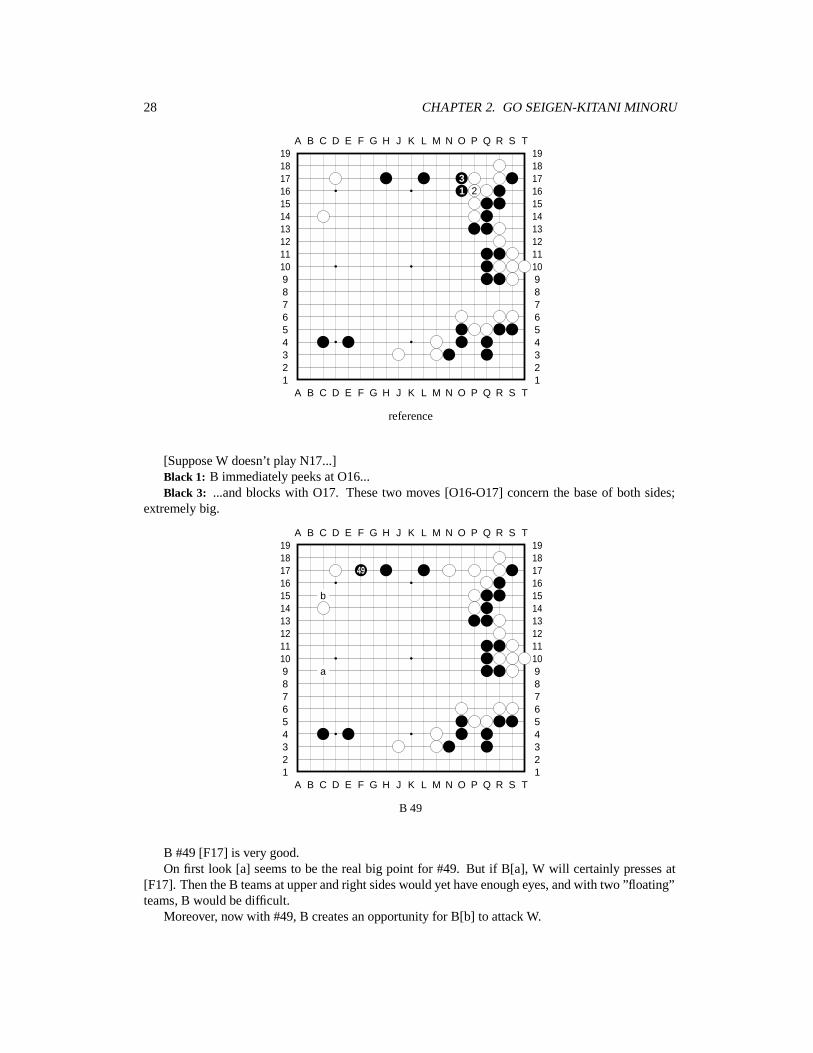
[Suppose W doesn’t play N17...]Black 1: B immediately peeks at O16...Black 3: ...and blocks with O17. These two moves [O16-O17] concern the base of both sides;
extremely big.
A B C D E F G H J K L M N O P Q R S T
A B C D E F G H J K L M N O P Q R S T12345678910111213141516171819
12345678910111213141516171819
49
b
a
B 49
B #49 [F17] is very good.On first look [a] seems to be the real big point for #49. But if B[a], W will certainly presses at
[F17]. Then the B teams at upper and right sides would yet have enough eyes, and with two ”floating”teams, B would be difficult.
Moreover, now with #49, B creates an opportunity for B[b] to attack W.
29
A B C D E F G H J K L M N O P Q R S T
A B C D E F G H J K L M N O P Q R S T12345678910111213141516171819
12345678910111213141516171819
50
d ba c52
51
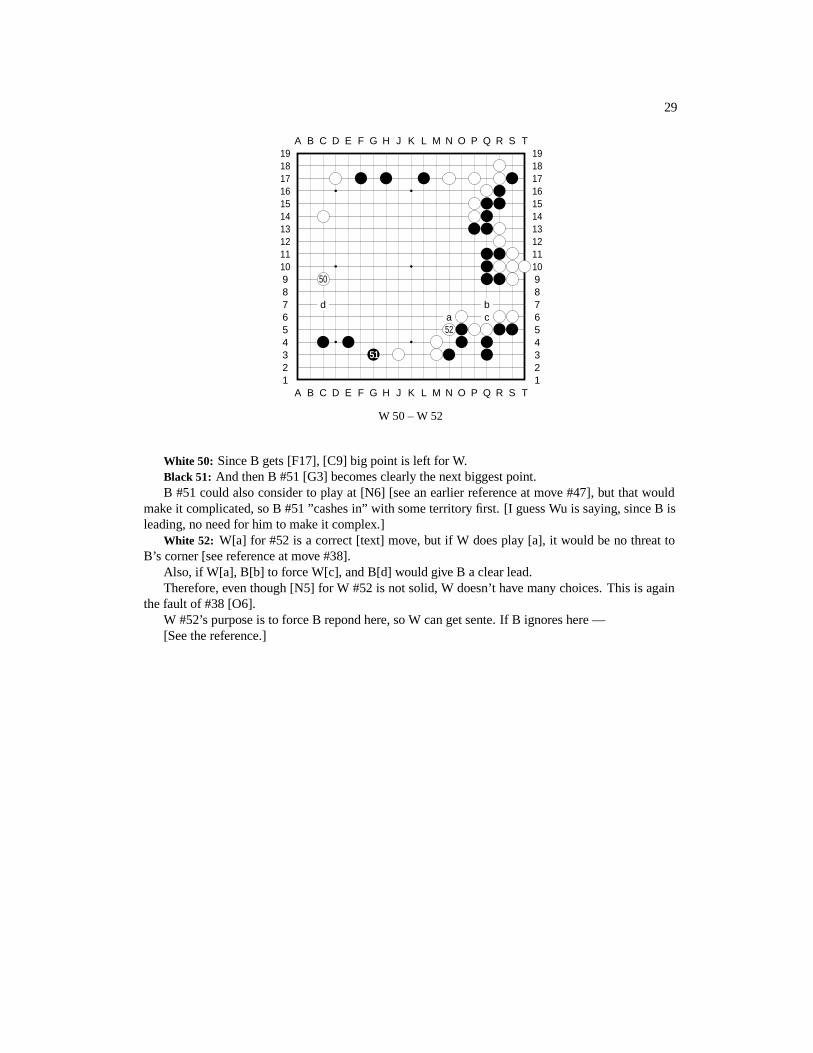
W 50 – W 52
White 50: Since B gets [F17], [C9] big point is left for W.Black 51: And then B #51 [G3] becomes clearly the next biggest point.B #51 could also consider to play at [N6] [see an earlier reference at move #47], but that would
make it complicated, so B #51 ”cashes in” with some territory first. [I guess Wu is saying, since B isleading, no need for him to make it complex.]
White 52: W[a] for #52 is a correct [text] move, but if W does play [a], it would be no threat toB’s corner [see reference at move #38].
Also, if W[a], B[b] to force W[c], and B[d] would give B a clear lead.Therefore, even though [N5] for W #52 is not solid, W doesn’t have many choices. This is again
the fault of #38 [O6].W #52’s purpose is to force B repond here, so W can get sente. If B ignores here —[See the reference.]
30 CHAPTER 2. GO SEIGEN-KITANI MINORU
A B C D E F G H J K L M N O P Q R S T
A B C D E F G H J K L M N O P Q R S T12345678910111213141516171819
12345678910111213141516171819
21
3
reference
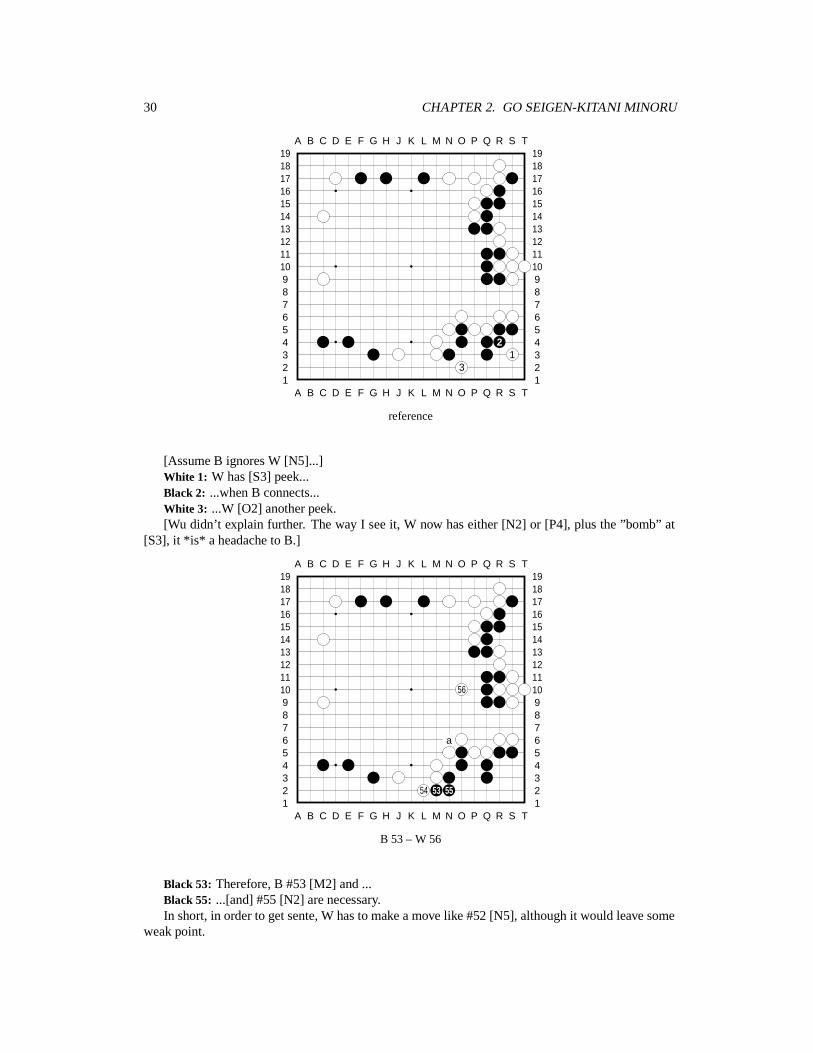
[Assume B ignores W [N5]...]White 1: W has [S3] peek...Black 2: ...when B connects...White 3: ...W [O2] another peek.[Wu didn’t explain further. The way I see it, W now has either [N2] or [P4], plus the ”bomb” at
[S3], it *is* a headache to B.]
A B C D E F G H J K L M N O P Q R S T
A B C D E F G H J K L M N O P Q R S T12345678910111213141516171819
12345678910111213141516171819
56
a
54 53 55
B 53 – W 56
Black 53: Therefore, B #53 [M2] and ...Black 55: ...[and] #55 [N2] are necessary.In short, in order to get sente, W has to make a move like #52 [N5], although it would leave some
weak point.
31
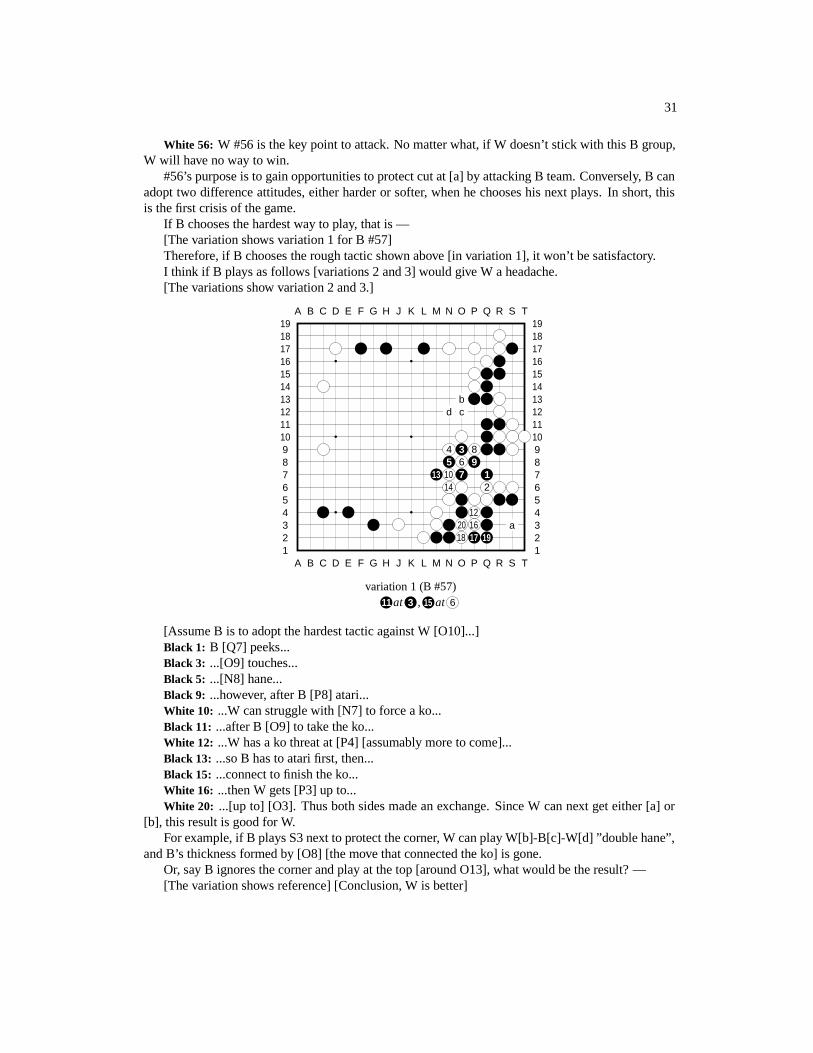
White 56: W #56 is the key point to attack. No matter what, if W doesn’t stick with this B group,W will have no way to win.
#56’s purpose is to gain opportunities to protect cut at [a] by attacking B team. Conversely, B canadopt two difference attitudes, either harder or softer, when he chooses his next plays. In short, thisis the first crisis of the game.
If B chooses the hardest way to play, that is —[The variation shows variation 1 for B #57]Therefore, if B chooses the rough tactic shown above [in variation 1], it won’t be satisfactory.I think if B plays as follows [variations 2 and 3] would give W a headache.[The variations show variation 2 and 3.]
A B C D E F G H J K L M N O P Q R S T
A B C D E F G H J K L M N O P Q R S T12345678910111213141516171819
12345678910111213141516171819
bd c
4 3 85 6 9
13 10 7 114 2
1220 16 a18 17 19
variation 1 (B #57)11 at 3 , 15 at 6
[Assume B is to adopt the hardest tactic against W [O10]...]Black 1: B [Q7] peeks...Black 3: ...[O9] touches...Black 5: ...[N8] hane...Black 9: ...however, after B [P8] atari...White 10: ...W can struggle with [N7] to force a ko...Black 11: ...after B [O9] to take the ko...White 12: ...W has a ko threat at [P4] [assumably more to come]...Black 13: ...so B has to atari first, then...Black 15: ...connect to finish the ko...White 16: ...then W gets [P3] up to...White 20: ...[up to] [O3]. Thus both sides made an exchange. Since W can next get either [a] or
[b], this result is good for W.For example, if B plays S3 next to protect the corner, W can play W[b]-B[c]-W[d] ”double hane”,
and B’s thickness formed by [O8] [the move that connected the ko] is gone.Or, say B ignores the corner and play at the top [around O13], what would be the result? —[The variation shows reference] [Conclusion, W is better]
32 CHAPTER 2. GO SEIGEN-KITANI MINORU
A B C D E F G H J K L M N O P Q R S T
A B C D E F G H J K L M N O P Q R S T12345678910111213141516171819
12345678910111213141516171819
No moves
A B C D E F G H J K L M N O P Q R S T
A B C D E F G H J K L M N O P Q R S T12345678910111213141516171819
12345678910111213141516171819
75 34 1 6
28
reference
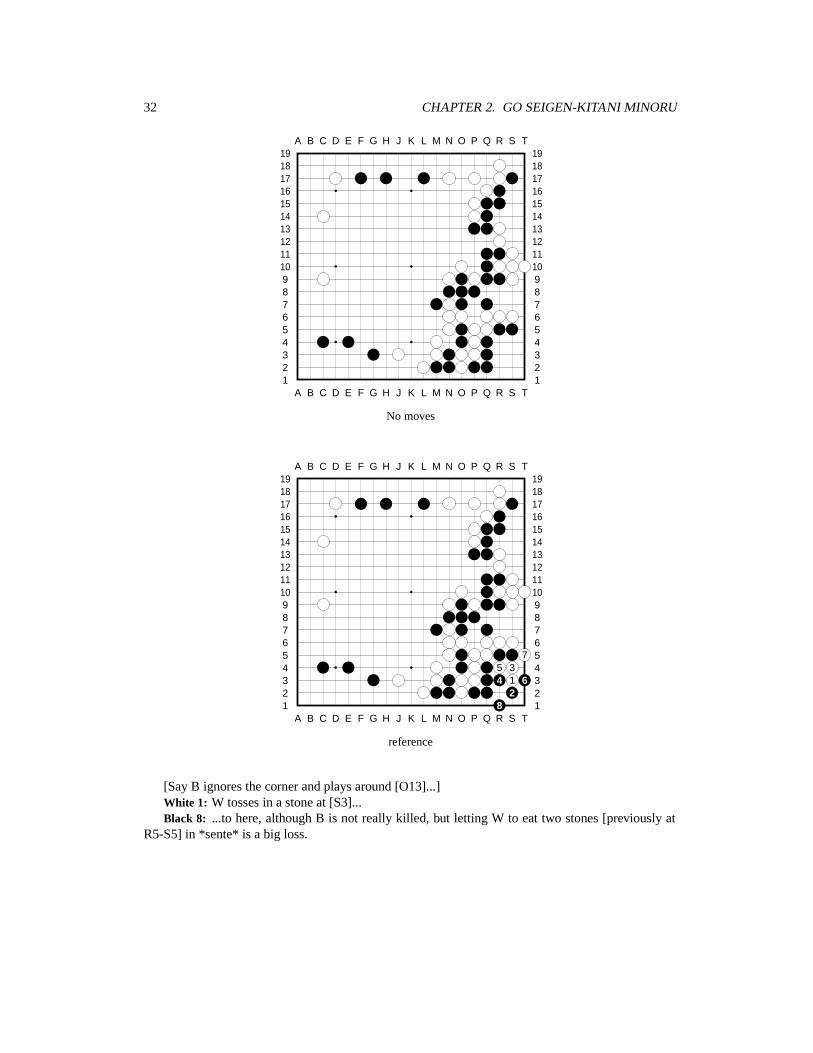
[Say B ignores the corner and plays around [O13]...]White 1: W tosses in a stone at [S3]...Black 8: ...to here, although B is not really killed, but letting W to eat two stones [previously at
R5-S5] in *sente* is a big loss.
33
A B C D E F G H J K L M N O P Q R S T
A B C D E F G H J K L M N O P Q R S T12345678910111213141516171819
12345678910111213141516171819
37 5
9 8 612 10 a
11113
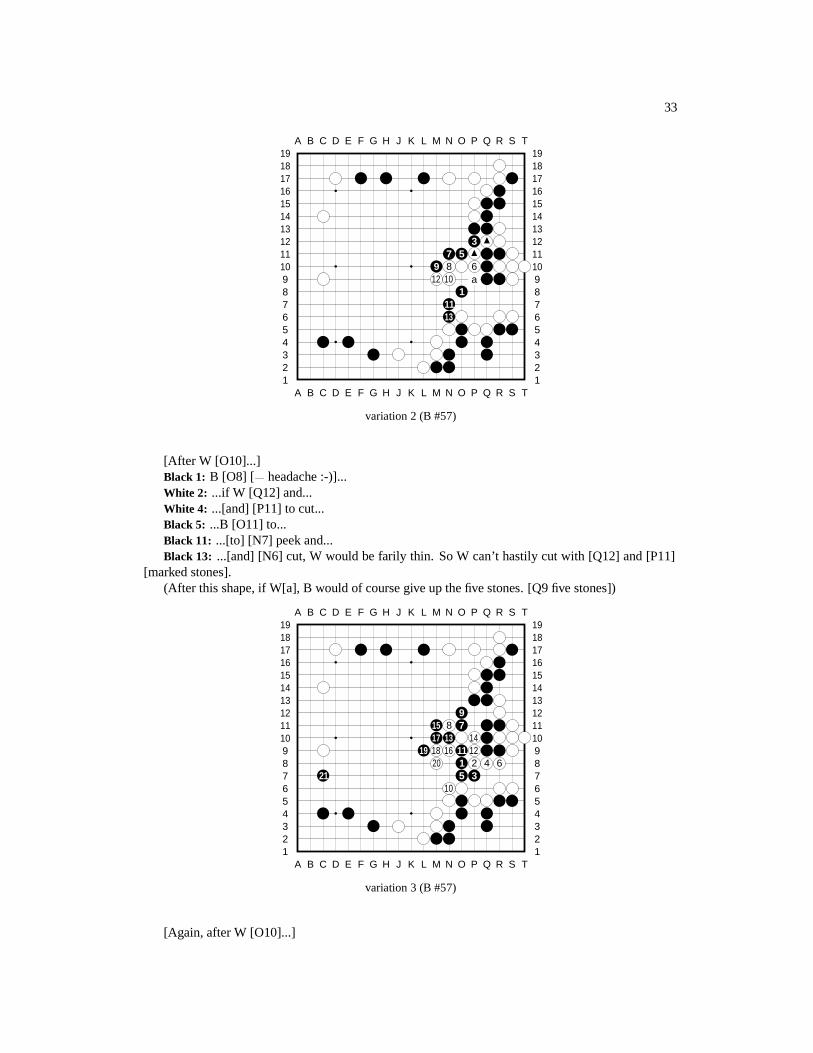
variation 2 (B #57)
[After W [O10]...]Black 1: B [O8] [� headache :-)]...White 2: ...if W [Q12] and...White 4: ...[and] [P11] to cut...Black 5: ...B [O11] to...Black 11: ...[to] [N7] peek and...Black 13: ...[and] [N6] cut, W would be farily thin. So W can’t hastily cut with [Q12] and [P11]
[marked stones].(After this shape, if W[a], B would of course give up the five stones. [Q9 five stones])
A B C D E F G H J K L M N O P Q R S T
A B C D E F G H J K L M N O P Q R S T12345678910111213141516171819
12345678910111213141516171819
915 8 717 13 14
19 18 16 11 1220 1 2 4 6
21 5 310
variation 3 (B #57)
[Again, after W [O10]...]
34 CHAPTER 2. GO SEIGEN-KITANI MINORU
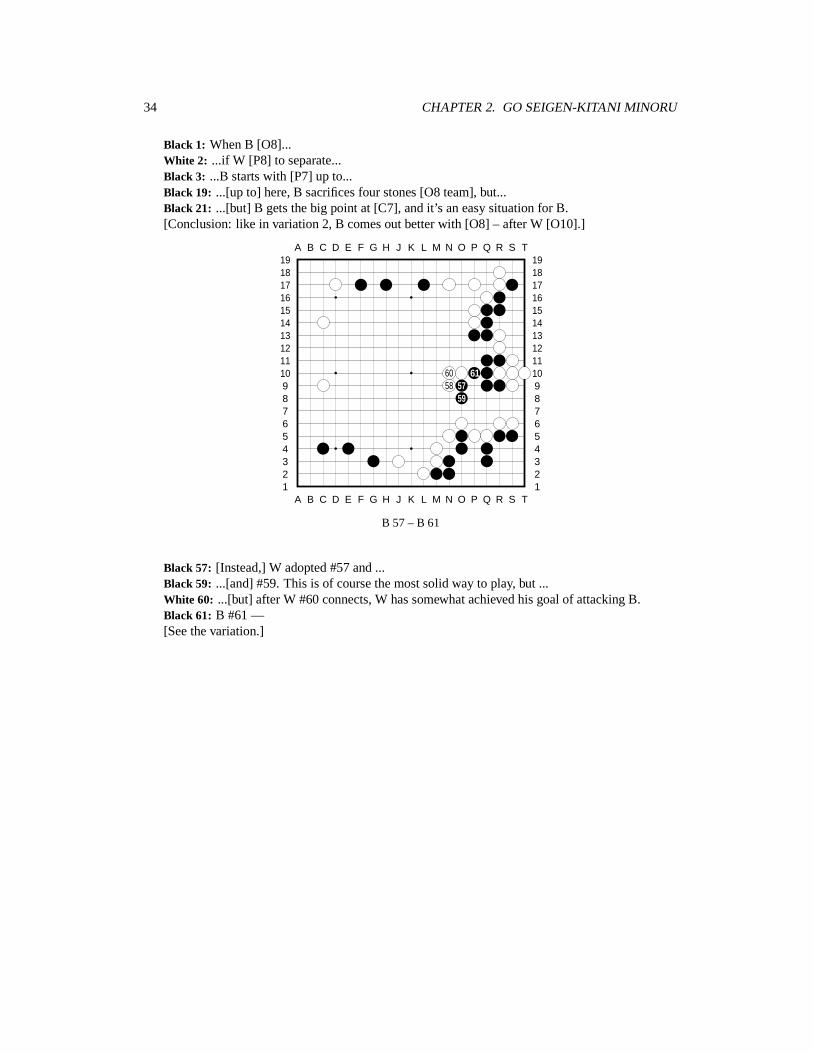
Black 1: When B [O8]...White 2: ...if W [P8] to separate...Black 3: ...B starts with [P7] up to...Black 19: ...[up to] here, B sacrifices four stones [O8 team], but...Black 21: ...[but] B gets the big point at [C7], and it’s an easy situation for B.[Conclusion: like in variation 2, B comes out better with [O8] – after W [O10].]
A B C D E F G H J K L M N O P Q R S T
A B C D E F G H J K L M N O P Q R S T12345678910111213141516171819
12345678910111213141516171819
60 6158 57
59
B 57 – B 61
Black 57: [Instead,] W adopted #57 and ...Black 59: ...[and] #59. This is of course the most solid way to play, but ...White 60: ...[but] after W #60 connects, W has somewhat achieved his goal of attacking B.Black 61: B #61 —[See the variation.]
35
A B C D E F G H J K L M N O P Q R S T
A B C D E F G H J K L M N O P Q R S T12345678910111213141516171819
12345678910111213141516171819
1314 12 9 8
11 10
7 56 4 23 1
variation
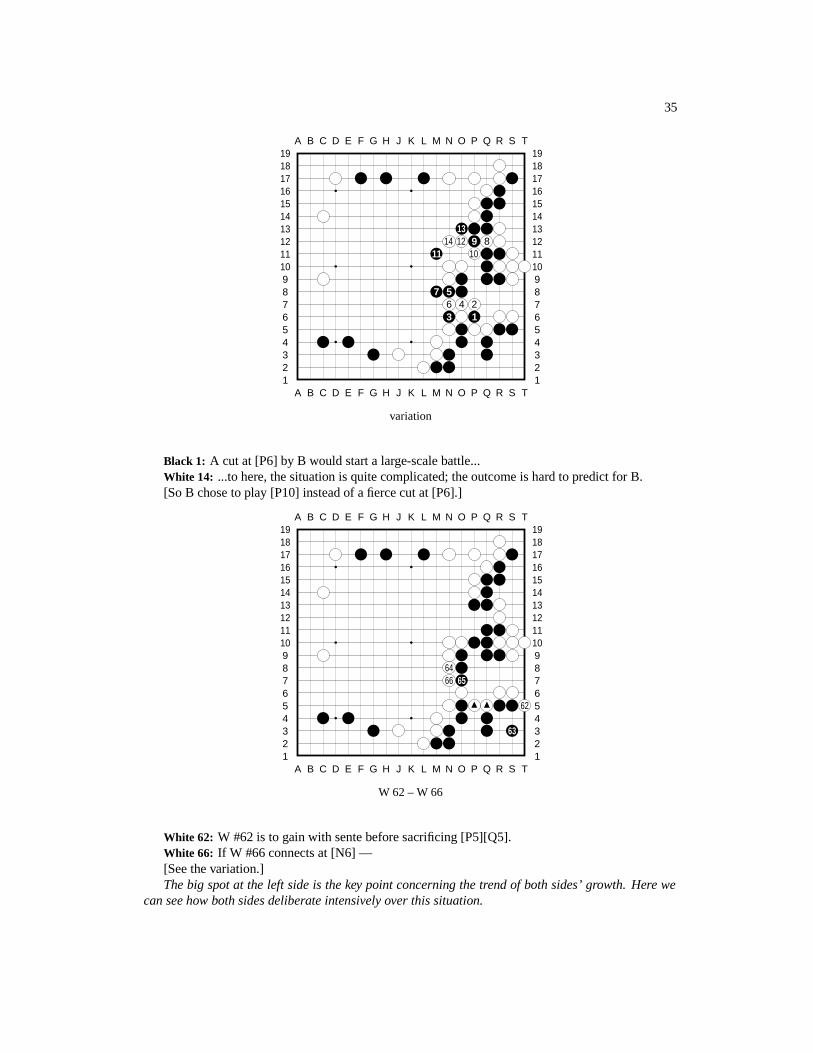
Black 1: A cut at [P6] by B would start a large-scale battle...White 14: ...to here, the situation is quite complicated; the outcome is hard to predict for B.[So B chose to play [P10] instead of a fierce cut at [P6].]
A B C D E F G H J K L M N O P Q R S T
A B C D E F G H J K L M N O P Q R S T12345678910111213141516171819
12345678910111213141516171819
6466 65
62
63
W 62 – W 66
White 62: W #62 is to gain with sente before sacrificing [P5][Q5].White 66: If W #66 connects at [N6] —[See the variation.]The big spot at the left side is the key point concerning the trend of both sides’ growth. Here we
can see how both sides deliberate intensively over this situation.
36 CHAPTER 2. GO SEIGEN-KITANI MINORU
A B C D E F G H J K L M N O P Q R S T
A B C D E F G H J K L M N O P Q R S T12345678910111213141516171819
12345678910111213141516171819
4 21 3
W 1 – B 4
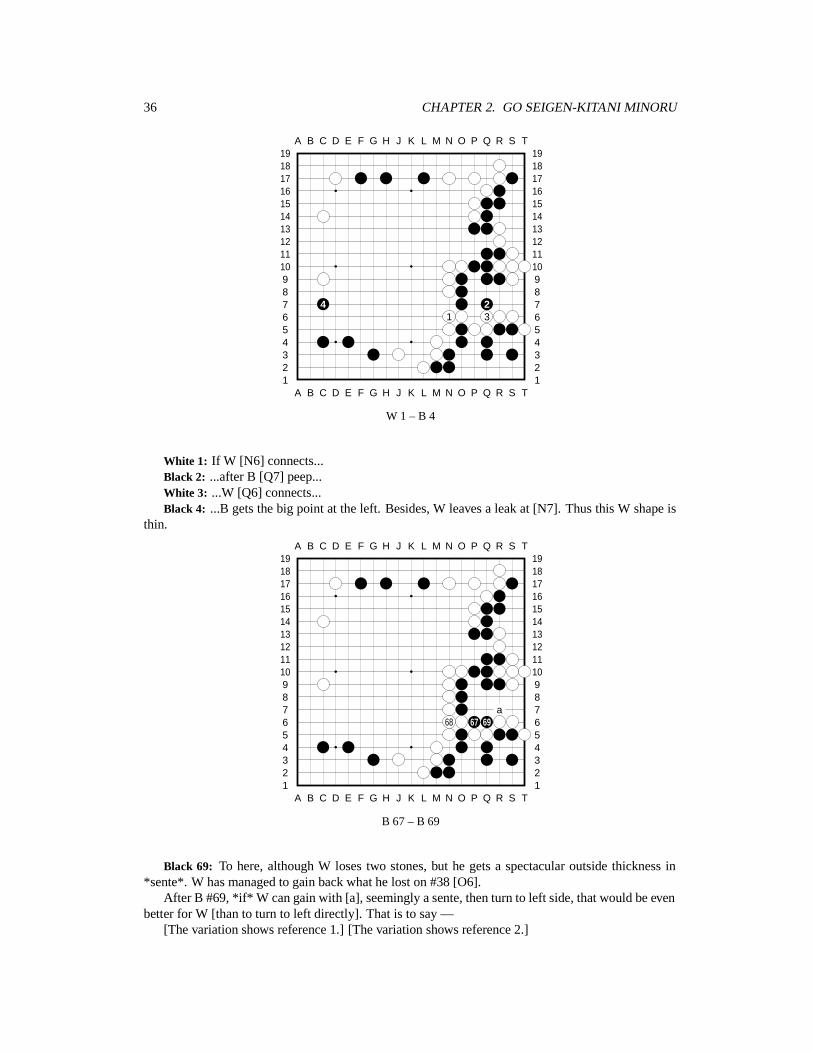
White 1: If W [N6] connects...Black 2: ...after B [Q7] peep...White 3: ...W [Q6] connects...Black 4: ...B gets the big point at the left. Besides, W leaves a leak at [N7]. Thus this W shape is
thin.
A B C D E F G H J K L M N O P Q R S T
A B C D E F G H J K L M N O P Q R S T12345678910111213141516171819
12345678910111213141516171819
a68 67 69
B 67 – B 69
Black 69: To here, although W loses two stones, but he gets a spectacular outside thickness in*sente*. W has managed to gain back what he lost on #38 [O6].
After B #69, *if* W can gain with [a], seemingly a sente, then turn to left side, that would be evenbetter for W [than to turn to left directly]. That is to say —
[The variation shows reference 1.] [The variation shows reference 2.]
37
A B C D E F G H J K L M N O P Q R S T
A B C D E F G H J K L M N O P Q R S T12345678910111213141516171819
12345678910111213141516171819
2 3 5 1
4
reference 1
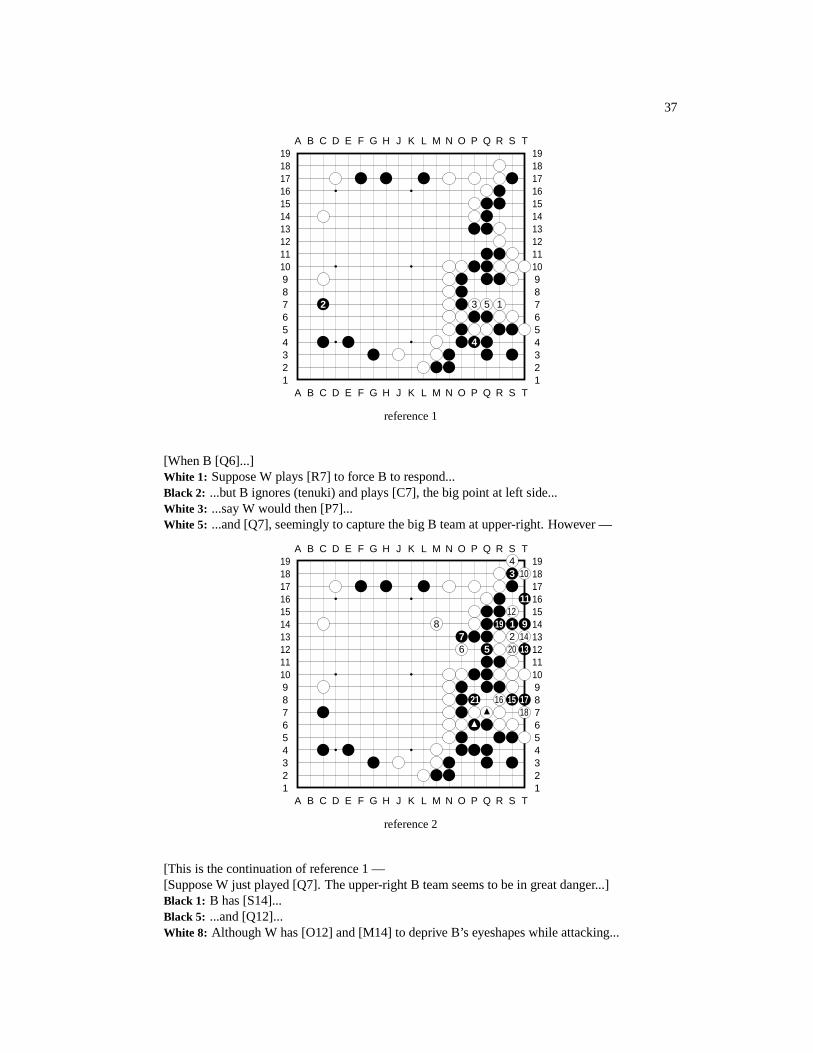
[When B [Q6]...]White 1: Suppose W plays [R7] to force B to respond...Black 2: ...but B ignores (tenuki) and plays [C7], the big point at left side...White 3: ...say W would then [P7]...White 5: ...and [Q7], seemingly to capture the big B team at upper-right. However —
A B C D E F G H J K L M N O P Q R S T
A B C D E F G H J K L M N O P Q R S T12345678910111213141516171819
123456789101112131415161718194
3 10
1112
8 19 1 97 2 146 5 20 13
21 16 15 1718
reference 2
[This is the continuation of reference 1 —[Suppose W just played [Q7]. The upper-right B team seems to be in great danger...]Black 1: B has [S14]...Black 5: ...and [Q12]...White 8: Although W has [O12] and [M14] to deprive B’s eyeshapes while attacking...
38 CHAPTER 2. GO SEIGEN-KITANI MINORU
Black 9: ...but B has [T14], and [you must see this :-)]...Black 11: [Here is one eye...]Black 15: ...[S8]!!...Black 17: ...and [T8]!!...Black 21: ...and [P8] makes a second eye! [first eye at [S15]]This way, not only B lives here completely, also he already gets the big point [C7] at the left.
Therefore, W’s hope to gain with sente at [R7] [consult main branch] is invalid.[Here are some explanantions of [S8][T8].]The beauty of [S8][T8] is that they prevent W to place a stone at [Q8]. If W does play [Q8]
[trying to deprive the eye at [P9]], W’s whole team is demolished.[I almost missed it! :-) Indeed, if W [Q8] and B [P9], then W will be unable to atari [S8][T8]
stones – either [T9] or [S7] would be ”suicide.” [S8][T8] are ”standing roosters.”]
A B C D E F G H J K L M N O P Q R S T
A B C D E F G H J K L M N O P Q R S T12345678910111213141516171819
12345678910111213141516171819
b a
70
W 70
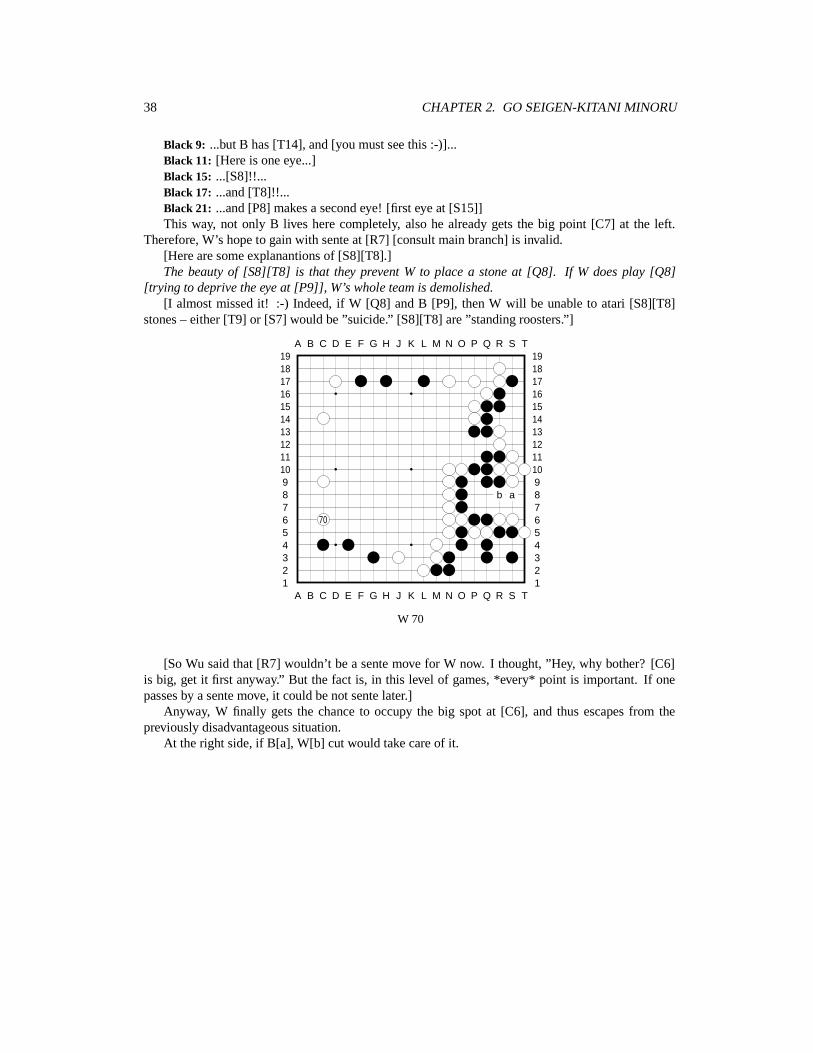
[So Wu said that [R7] wouldn’t be a sente move for W now. I thought, ”Hey, why bother? [C6]is big, get it first anyway.” But the fact is, in this level of games, *every* point is important. If onepasses by a sente move, it could be not sente later.]
Anyway, W finally gets the chance to occupy the big spot at [C6], and thus escapes from thepreviously disadvantageous situation.
At the right side, if B[a], W[b] cut would take care of it.
39
A B C D E F G H J K L M N O P Q R S T
A B C D E F G H J K L M N O P Q R S T12345678910111213141516171819
12345678910111213141516171819
73 7471 72
75
a
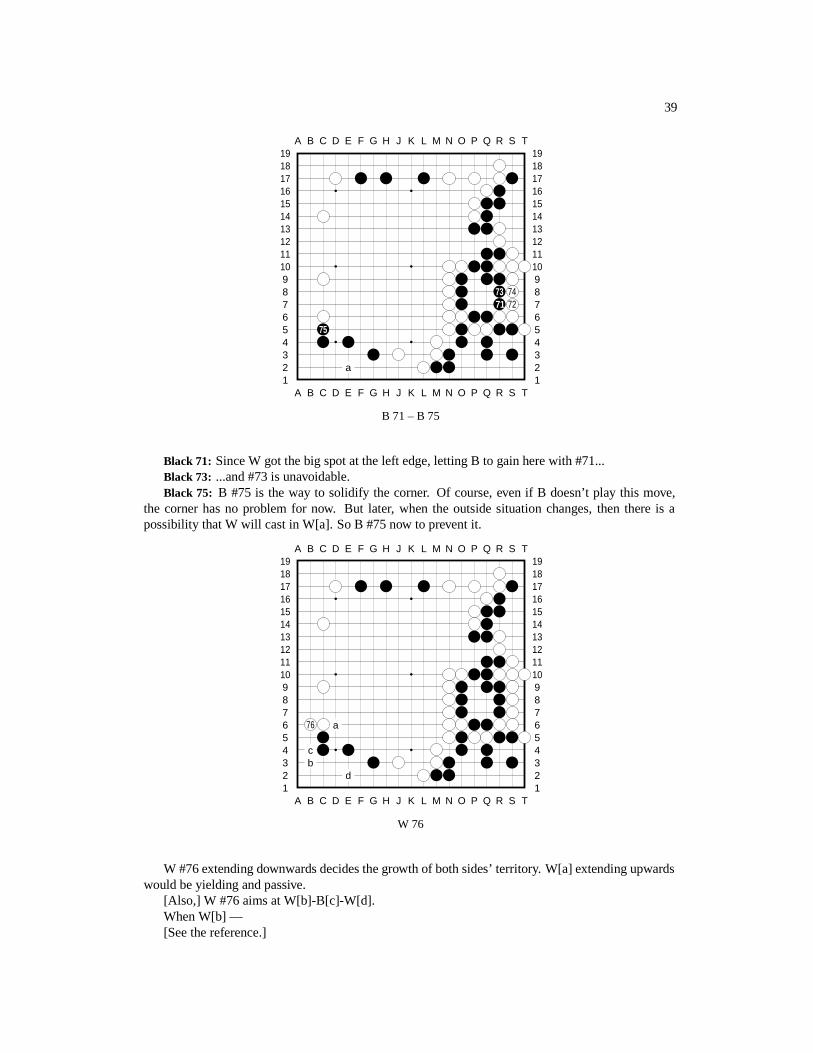
B 71 – B 75
Black 71: Since W got the big spot at the left edge, letting B to gain here with #71...Black 73: ...and #73 is unavoidable.Black 75: B #75 is the way to solidify the corner. Of course, even if B doesn’t play this move,
the corner has no problem for now. But later, when the outside situation changes, then there is apossibility that W will cast in W[a]. So B #75 now to prevent it.
A B C D E F G H J K L M N O P Q R S T
A B C D E F G H J K L M N O P Q R S T12345678910111213141516171819
12345678910111213141516171819
76 a
cb
d
W 76
W #76 extending downwards decides the growth of both sides’ territory. W[a] extending upwardswould be yielding and passive.
[Also,] W #76 aims at W[b]-B[c]-W[d].When W[b] —[See the reference.]
40 CHAPTER 2. GO SEIGEN-KITANI MINORU
A B C D E F G H J K L M N O P Q R S T
A B C D E F G H J K L M N O P Q R S T12345678910111213141516171819
12345678910111213141516171819
5 431 2
7 6
reference
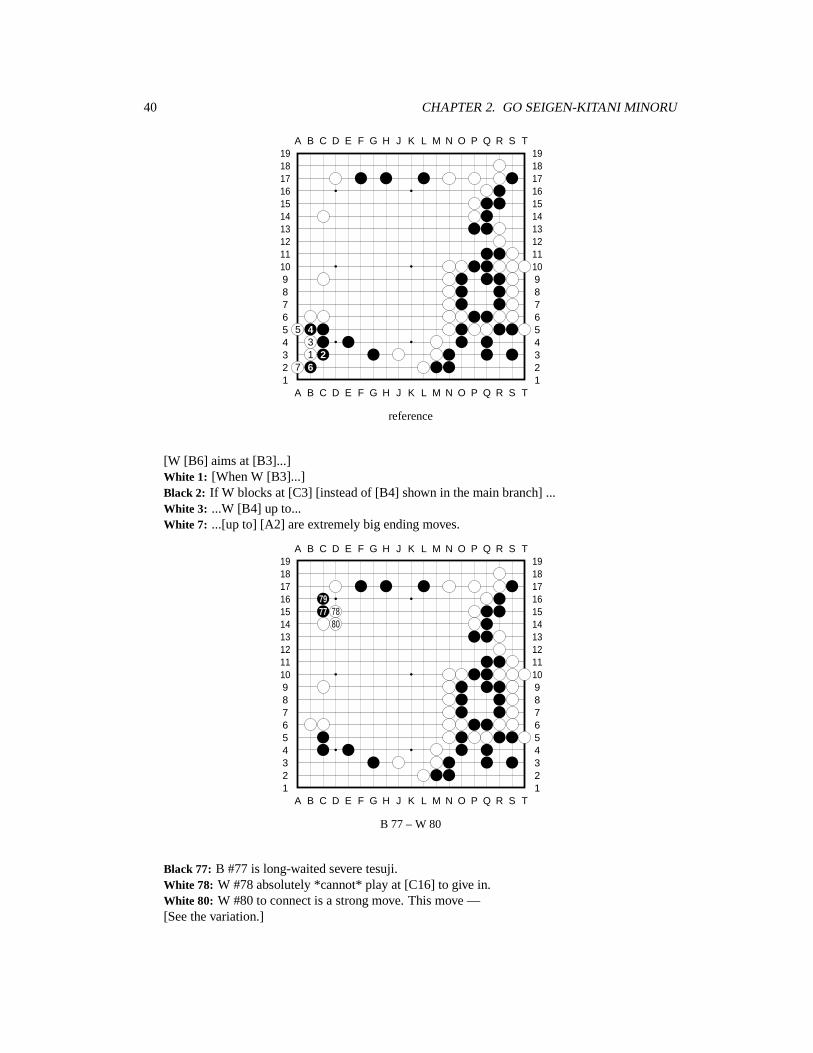
[W [B6] aims at [B3]...]White 1: [When W [B3]...]Black 2: If W blocks at [C3] [instead of [B4] shown in the main branch] ...White 3: ...W [B4] up to...White 7: ...[up to] [A2] are extremely big ending moves.
A B C D E F G H J K L M N O P Q R S T
A B C D E F G H J K L M N O P Q R S T12345678910111213141516171819
12345678910111213141516171819
7977 78
80
B 77 – W 80
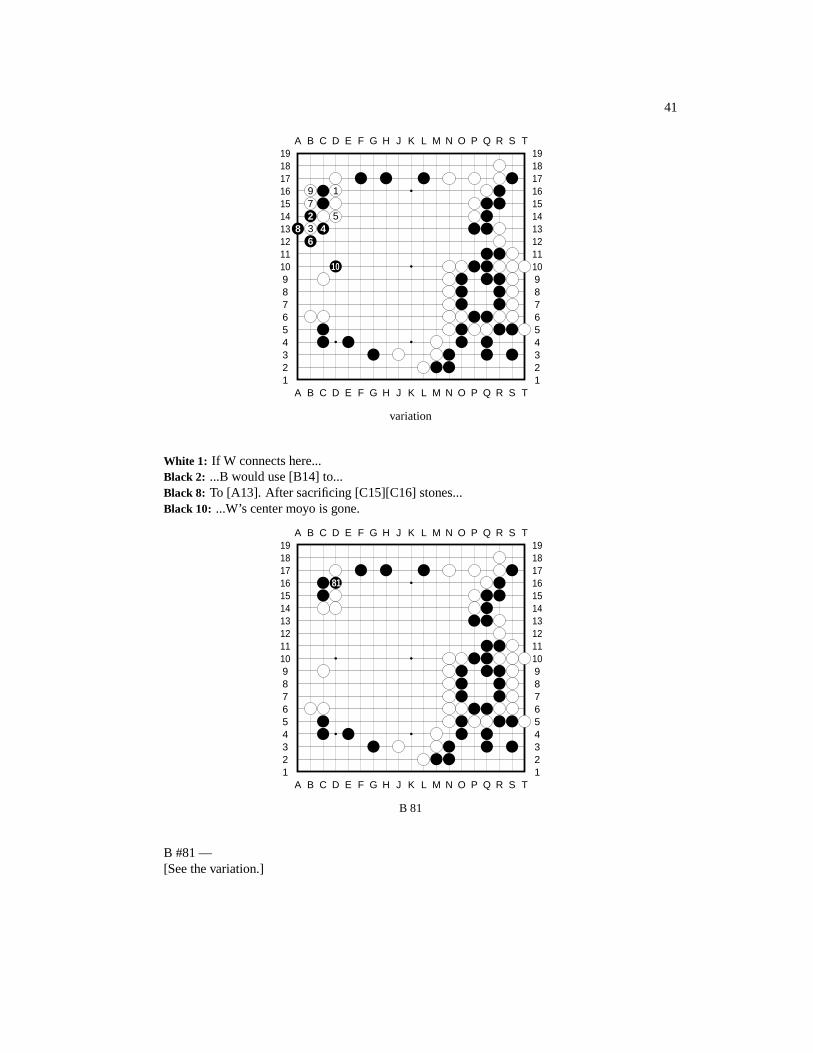
Black 77: B #77 is long-waited severe tesuji.White 78: W #78 absolutely *cannot* play at [C16] to give in.White 80: W #80 to connect is a strong move. This move —[See the variation.]
41
A B C D E F G H J K L M N O P Q R S T
A B C D E F G H J K L M N O P Q R S T12345678910111213141516171819
12345678910111213141516171819
9 172 5
8 3 46
10
variation
White 1: If W connects here...Black 2: ...B would use [B14] to...Black 8: To [A13]. After sacrificing [C15][C16] stones...Black 10: ...W’s center moyo is gone.
A B C D E F G H J K L M N O P Q R S T
A B C D E F G H J K L M N O P Q R S T12345678910111213141516171819
12345678910111213141516171819
81
B 81
B #81 —[See the variation.]
42 CHAPTER 2. GO SEIGEN-KITANI MINORU
A B C D E F G H J K L M N O P Q R S T
A B C D E F G H J K L M N O P Q R S T12345678910111213141516171819
12345678910111213141516171819c
b a1 2
6534
variation
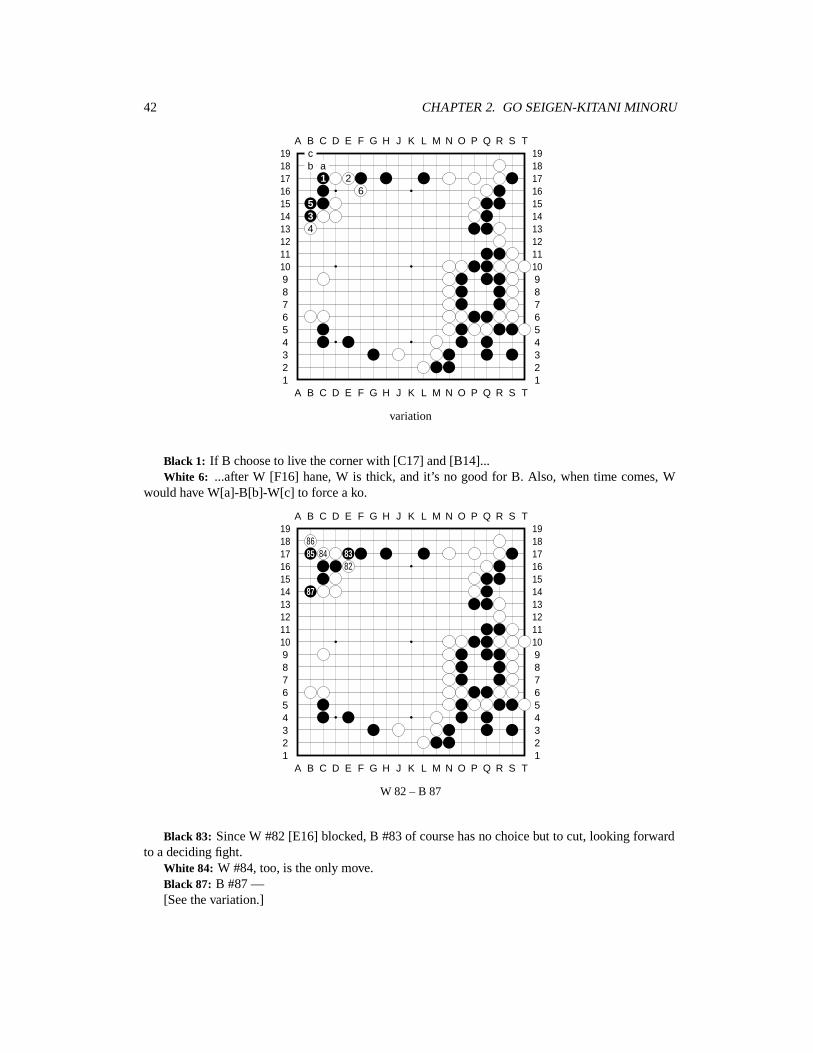
Black 1: If B choose to live the corner with [C17] and [B14]...White 6: ...after W [F16] hane, W is thick, and it’s no good for B. Also, when time comes, W
would have W[a]-B[b]-W[c] to force a ko.
A B C D E F G H J K L M N O P Q R S T
A B C D E F G H J K L M N O P Q R S T12345678910111213141516171819
12345678910111213141516171819
8685 84 83
82
87
W 82 – B 87
Black 83: Since W #82 [E16] blocked, B #83 of course has no choice but to cut, looking forwardto a deciding fight.
White 84: W #84, too, is the only move.Black 87: B #87 —[See the variation.]
43
A B C D E F G H J K L M N O P Q R S T
A B C D E F G H J K L M N O P Q R S T12345678910111213141516171819
12345678910111213141516171819
24 1
536
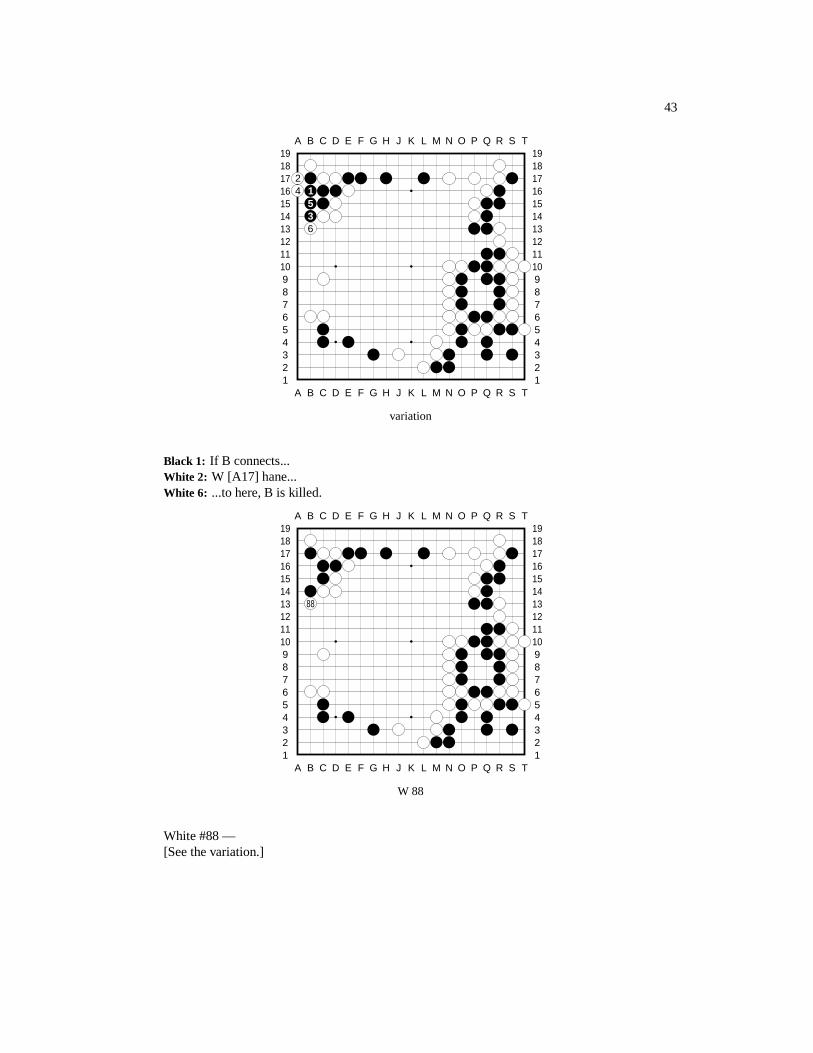
variation
Black 1: If B connects...White 2: W [A17] hane...White 6: ...to here, B is killed.
A B C D E F G H J K L M N O P Q R S T
A B C D E F G H J K L M N O P Q R S T12345678910111213141516171819
12345678910111213141516171819
88
W 88
White #88 —[See the variation.]
44 CHAPTER 2. GO SEIGEN-KITANI MINORU
A B C D E F G H J K L M N O P Q R S T
A B C D E F G H J K L M N O P Q R S T12345678910111213141516171819
1234567891011121314151617181911 10 8
4 7 691 5
2a
3
variation
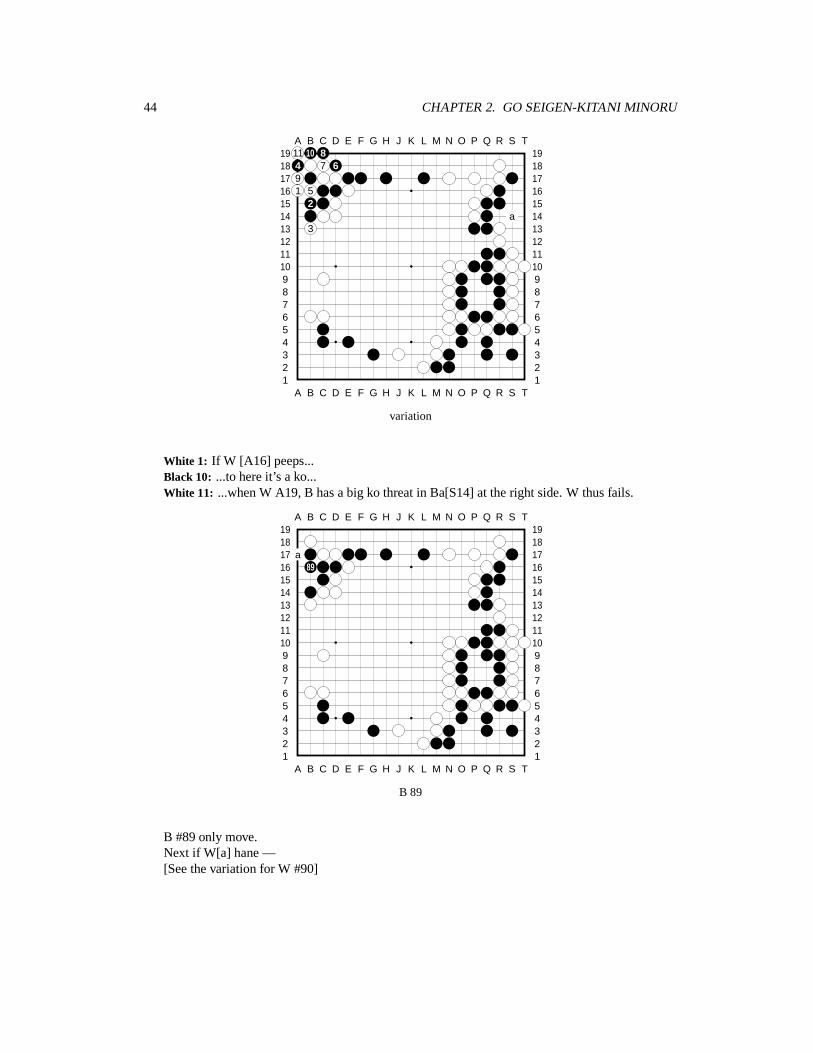
White 1: If W [A16] peeps...Black 10: ...to here it’s a ko...White 11: ...when W A19, B has a big ko threat in Ba[S14] at the right side. W thus fails.
A B C D E F G H J K L M N O P Q R S T
A B C D E F G H J K L M N O P Q R S T12345678910111213141516171819
12345678910111213141516171819
a89
B 89
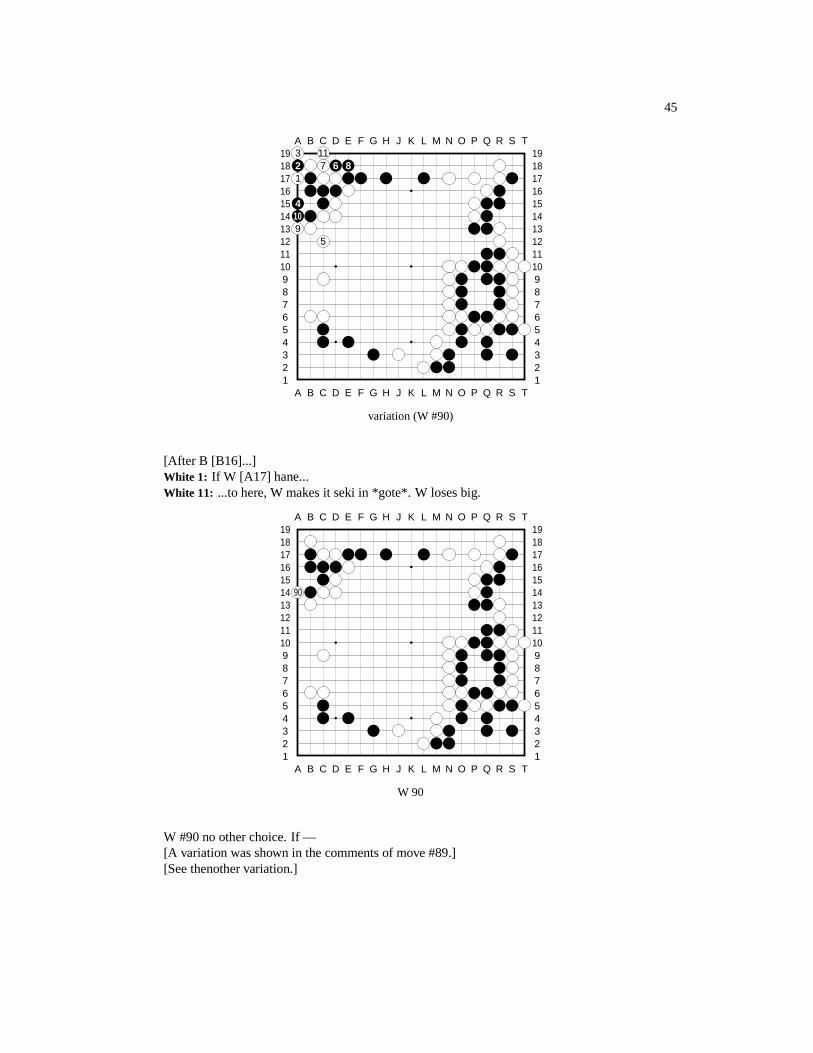
B #89 only move.Next if W[a] hane —[See the variation for W #90]
45
A B C D E F G H J K L M N O P Q R S T
A B C D E F G H J K L M N O P Q R S T12345678910111213141516171819
123456789101112131415161718193 11
2 7 6 81
4109
5
variation (W #90)
[After B [B16]...]White 1: If W [A17] hane...White 11: ...to here, W makes it seki in *gote*. W loses big.
A B C D E F G H J K L M N O P Q R S T
A B C D E F G H J K L M N O P Q R S T12345678910111213141516171819
12345678910111213141516171819
90
W 90
W #90 no other choice. If —[A variation was shown in the comments of move #89.][See thenother variation.]
46 CHAPTER 2. GO SEIGEN-KITANI MINORU
A B C D E F G H J K L M N O P Q R S T
A B C D E F G H J K L M N O P Q R S T12345678910111213141516171819
12345678910111213141516171819
1
54 86
2 73
variation
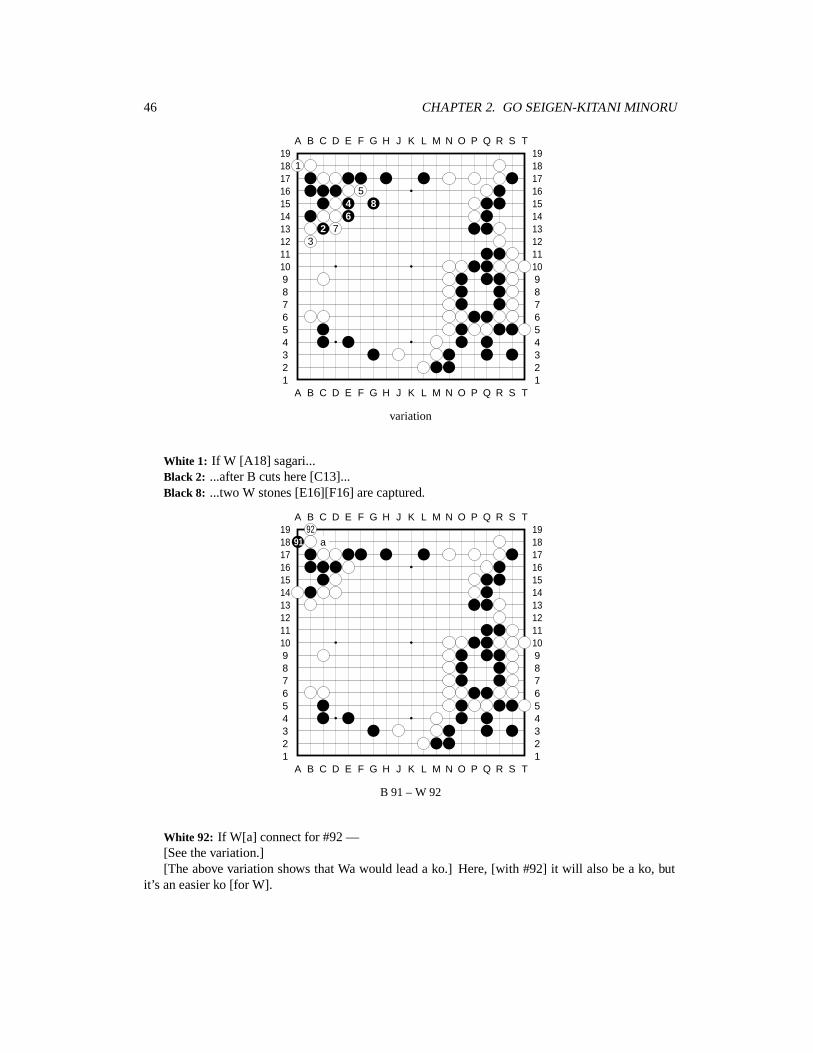
White 1: If W [A18] sagari...Black 2: ...after B cuts here [C13]...Black 8: ...two W stones [E16][F16] are captured.
A B C D E F G H J K L M N O P Q R S T
A B C D E F G H J K L M N O P Q R S T12345678910111213141516171819
1234567891011121314151617181992
91 a
B 91 – W 92
White 92: If W[a] connect for #92 —[See the variation.][The above variation shows that Wa would lead a ko.] Here, [with #92] it will also be a ko, but
it’s an easier ko [for W].
47
A B C D E F G H J K L M N O P Q R S T
A B C D E F G H J K L M N O P Q R S T12345678910111213141516171819
123456789101112131415161718192 3 4
1
variation
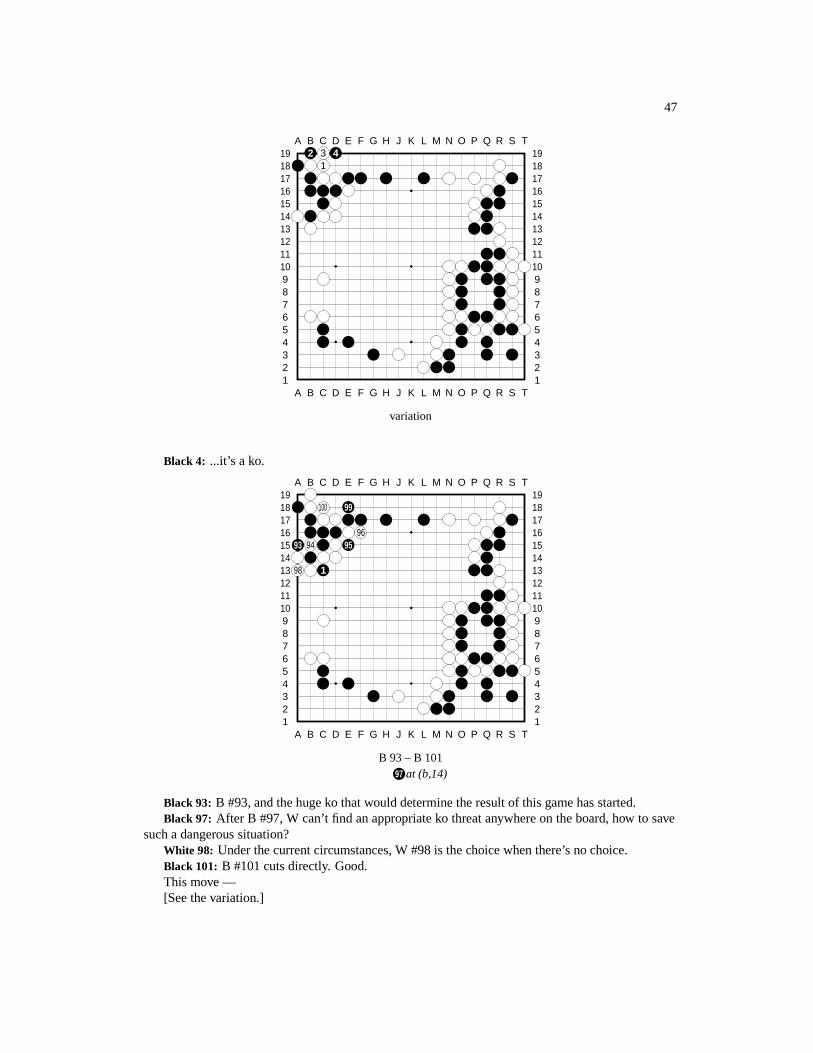
Black 4: ...it’s a ko.
A B C D E F G H J K L M N O P Q R S T
A B C D E F G H J K L M N O P Q R S T12345678910111213141516171819
12345678910111213141516171819
100 99
9693 94 95
98 1
B 93 – B 10197 at (b,14)
Black 93: B #93, and the huge ko that would determine the result of this game has started.Black 97: After B #97, W can’t find an appropriate ko threat anywhere on the board, how to save
such a dangerous situation?White 98: Under the current circumstances, W #98 is the choice when there’s no choice.Black 101: B #101 cuts directly. Good.This move —[See the variation.]
48 CHAPTER 2. GO SEIGEN-KITANI MINORU
A B C D E F G H J K L M N O P Q R S T
A B C D E F G H J K L M N O P Q R S T12345678910111213141516171819
12345678910111213141516171819
1524 1 14
4 2 12 1711 18 20 5
3 8 6 2321 9 25
26
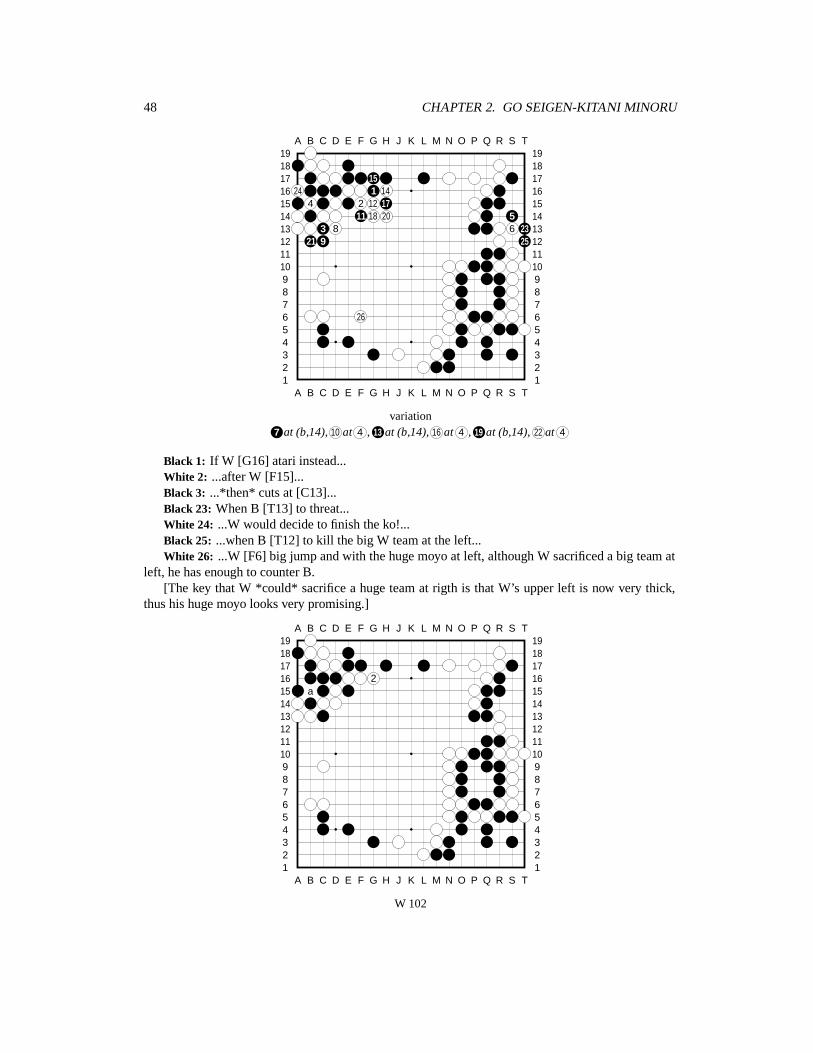
variation7 at (b,14), 10 at 4 , 13 at (b,14), 16 at 4 , 19 at (b,14), 22 at 4
Black 1: If W [G16] atari instead...White 2: ...after W [F15]...Black 3: ...*then* cuts at [C13]...Black 23: When B [T13] to threat...White 24: ...W would decide to finish the ko!...Black 25: ...when B [T12] to kill the big W team at the left...White 26: ...W [F6] big jump and with the huge moyo at left, although W sacrificed a big team at
left, he has enough to counter B.[The key that W *could* sacrifice a huge team at rigth is that W’s upper left is now very thick,
thus his huge moyo looks very promising.]
A B C D E F G H J K L M N O P Q R S T
A B C D E F G H J K L M N O P Q R S T12345678910111213141516171819
12345678910111213141516171819
2a
W 102
49
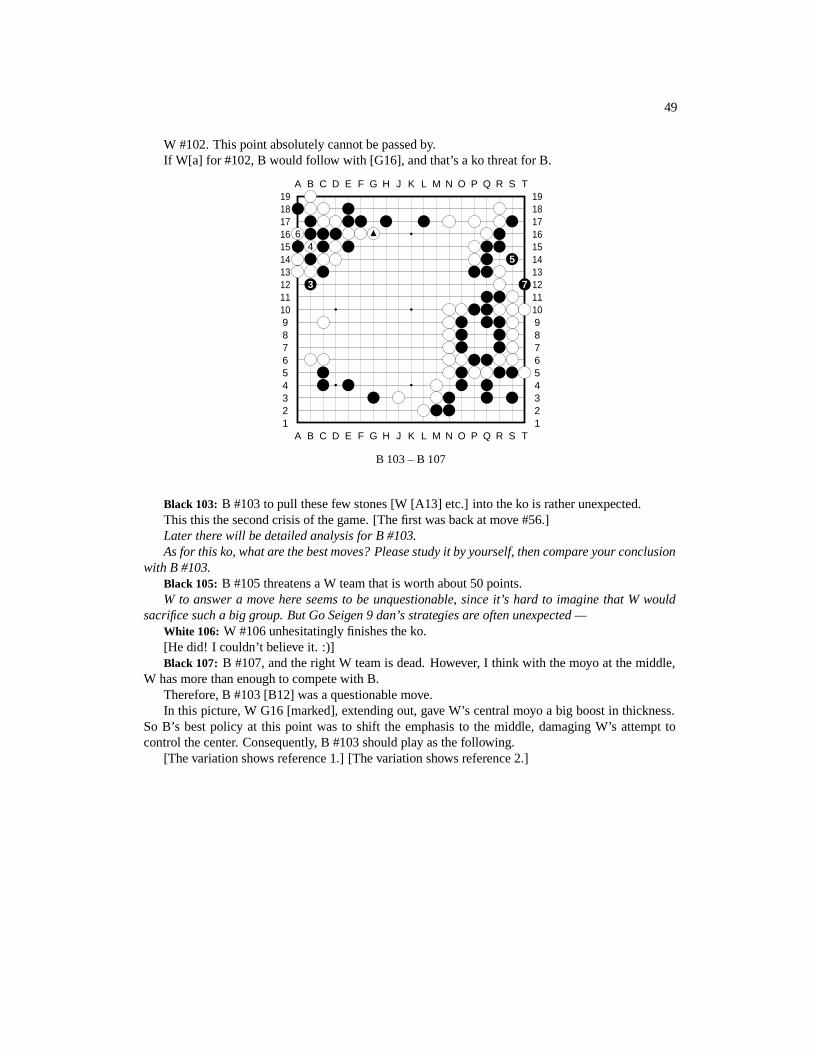
W #102. This point absolutely cannot be passed by.If W[a] for #102, B would follow with [G16], and that’s a ko threat for B.
A B C D E F G H J K L M N O P Q R S T
A B C D E F G H J K L M N O P Q R S T12345678910111213141516171819
12345678910111213141516171819
64
5
3 7
B 103 – B 107
Black 103: B #103 to pull these few stones [W [A13] etc.] into the ko is rather unexpected.This this the second crisis of the game. [The first was back at move #56.]Later there will be detailed analysis for B #103.As for this ko, what are the best moves? Please study it by yourself, then compare your conclusion
with B #103.Black 105: B #105 threatens a W team that is worth about 50 points.W to answer a move here seems to be unquestionable, since it’s hard to imagine that W would
sacrifice such a big group. But Go Seigen 9 dan’s strategies are often unexpected —White 106: W #106 unhesitatingly finishes the ko.[He did! I couldn’t believe it. :)]Black 107: B #107, and the right W team is dead. However, I think with the moyo at the middle,
W has more than enough to compete with B.Therefore, B #103 [B12] was a questionable move.In this picture, W G16 [marked], extending out, gave W’s central moyo a big boost in thickness.
So B’s best policy at this point was to shift the emphasis to the middle, damaging W’s attempt tocontrol the center. Consequently, B #103 should play as the following.
[The variation shows reference 1.] [The variation shows reference 2.]
50 CHAPTER 2. GO SEIGEN-KITANI MINORU
A B C D E F G H J K L M N O P Q R S T
A B C D E F G H J K L M N O P Q R S T12345678910111213141516171819
12345678910111213141516171819
15b 1
2 10 9 712 11 13 4
6 8a 18 3
2019 21
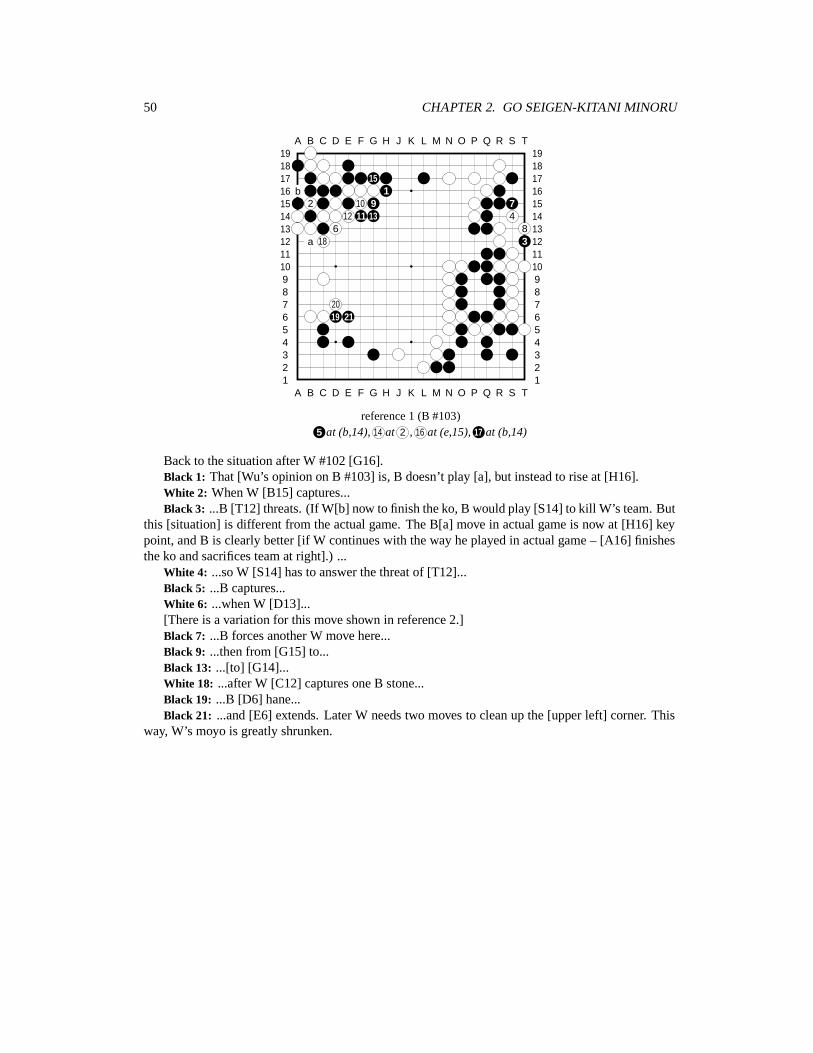
reference 1 (B #103)5 at (b,14), 14 at 2 , 16 at (e,15), 17 at (b,14)
Back to the situation after W #102 [G16].Black 1: That [Wu’s opinion on B #103] is, B doesn’t play [a], but instead to rise at [H16].White 2: When W [B15] captures...Black 3: ...B [T12] threats. (If W[b] now to finish the ko, B would play [S14] to kill W’s team. But
this [situation] is different from the actual game. The B[a] move in actual game is now at [H16] keypoint, and B is clearly better [if W continues with the way he played in actual game – [A16] finishesthe ko and sacrifices team at right].) ...
White 4: ...so W [S14] has to answer the threat of [T12]...Black 5: ...B captures...White 6: ...when W [D13]...[There is a variation for this move shown in reference 2.]Black 7: ...B forces another W move here...Black 9: ...then from [G15] to...Black 13: ...[to] [G14]...White 18: ...after W [C12] captures one B stone...Black 19: ...B [D6] hane...Black 21: ...and [E6] extends. Later W needs two moves to clean up the [upper left] corner. This
way, W’s moyo is greatly shrunken.
51
A B C D E F G H J K L M N O P Q R S T
A B C D E F G H J K L M N O P Q R S T12345678910111213141516171819
1234567891011121314151617181918
7 156 1 19 17
2 94
103
12
13
reference 2 (B #103)5 at (b,14), 8 at 2 , 11 at (b,14), 14 at 2 , 16 at 6
[Again, after W [G16]...]Black 1: [The first few moves are the same as reference 1.]White 6: Here, if W throws in at [A16] [in reference 1, it’s played at [D13].]...Black 19: ...to here, it becomes a big exchange. B is still better.
A B C D E F G H J K L M N O P Q R S T
A B C D E F G H J K L M N O P Q R S T12345678910111213141516171819
12345678910111213141516171819
b
ac
d
8
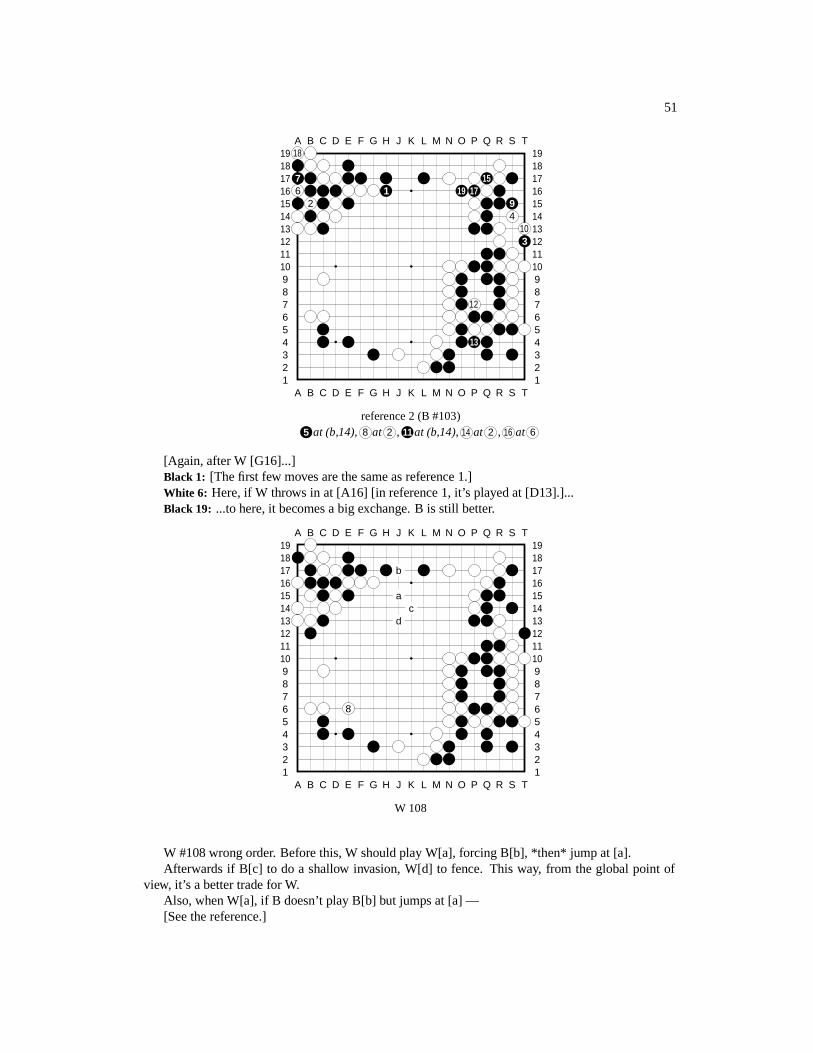
W 108
W #108 wrong order. Before this, W should play W[a], forcing B[b], *then* jump at [a].Afterwards if B[c] to do a shallow invasion, W[d] to fence. This way, from the global point of
view, it’s a better trade for W.Also, when W[a], if B doesn’t play B[b] but jumps at [a] —[See the reference.]
52 CHAPTER 2. GO SEIGEN-KITANI MINORU
A B C D E F G H J K L M N O P Q R S T
A B C D E F G H J K L M N O P Q R S T12345678910111213141516171819
12345678910111213141516171819
7 1 3 48 2 5
6 9
reference
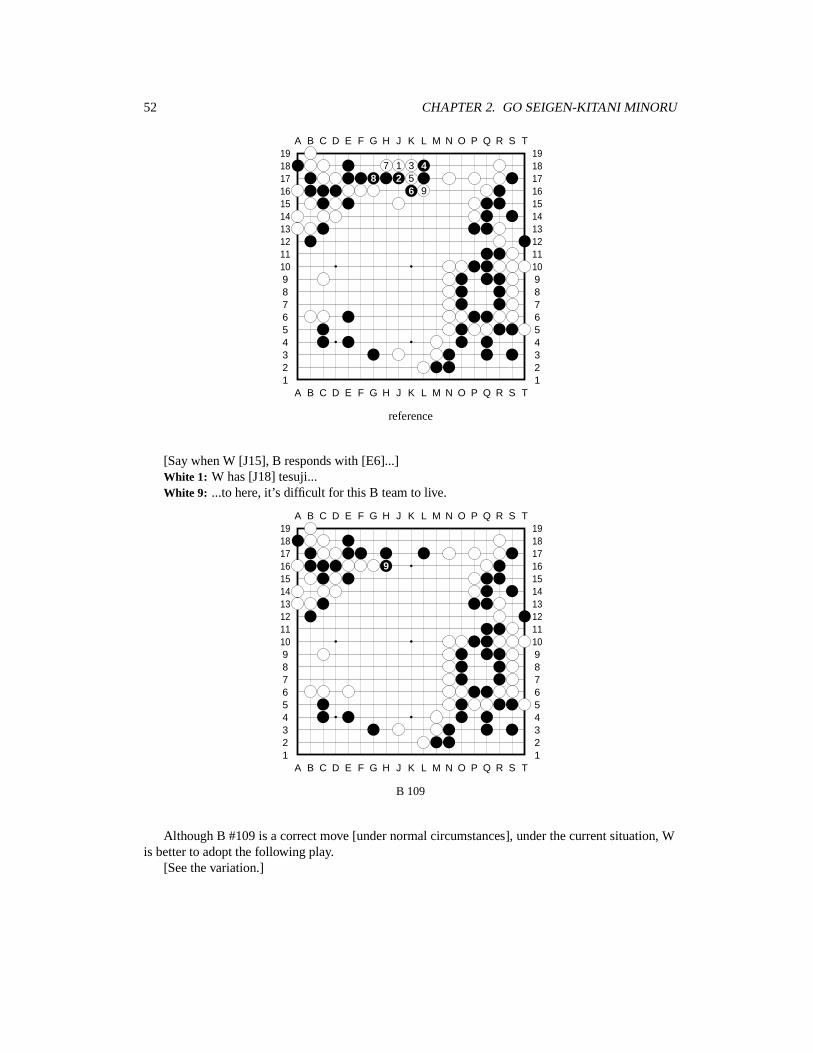
[Say when W [J15], B responds with [E6]...]White 1: W has [J18] tesuji...White 9: ...to here, it’s difficult for this B team to live.
A B C D E F G H J K L M N O P Q R S T
A B C D E F G H J K L M N O P Q R S T12345678910111213141516171819
12345678910111213141516171819
9
B 109
Although B #109 is a correct move [under normal circumstances], under the current situation, Wis better to adopt the following play.
[See the variation.]
53
A B C D E F G H J K L M N O P Q R S T
A B C D E F G H J K L M N O P Q R S T12345678910111213141516171819
12345678910111213141516171819
32
5 16 4
78
109 11
1213
variation
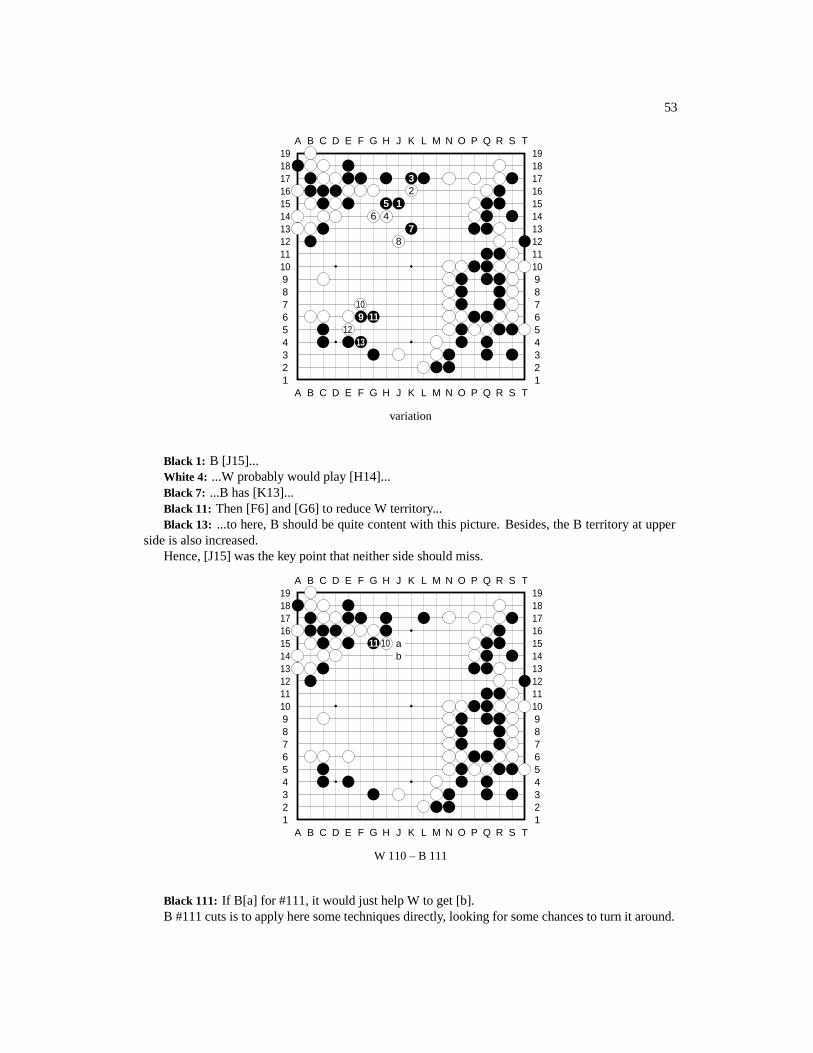
Black 1: B [J15]...White 4: ...W probably would play [H14]...Black 7: ...B has [K13]...Black 11: Then [F6] and [G6] to reduce W territory...Black 13: ...to here, B should be quite content with this picture. Besides, the B territory at upper
side is also increased.Hence, [J15] was the key point that neither side should miss.
A B C D E F G H J K L M N O P Q R S T
A B C D E F G H J K L M N O P Q R S T12345678910111213141516171819
12345678910111213141516171819
11 10 ab
W 110 – B 111
Black 111: If B[a] for #111, it would just help W to get [b].B #111 cuts is to apply here some techniques directly, looking for some chances to turn it around.
54 CHAPTER 2. GO SEIGEN-KITANI MINORU
A B C D E F G H J K L M N O P Q R S T
A B C D E F G H J K L M N O P Q R S T12345678910111213141516171819
12345678910111213141516171819
14
13 12
W 112 – W 114
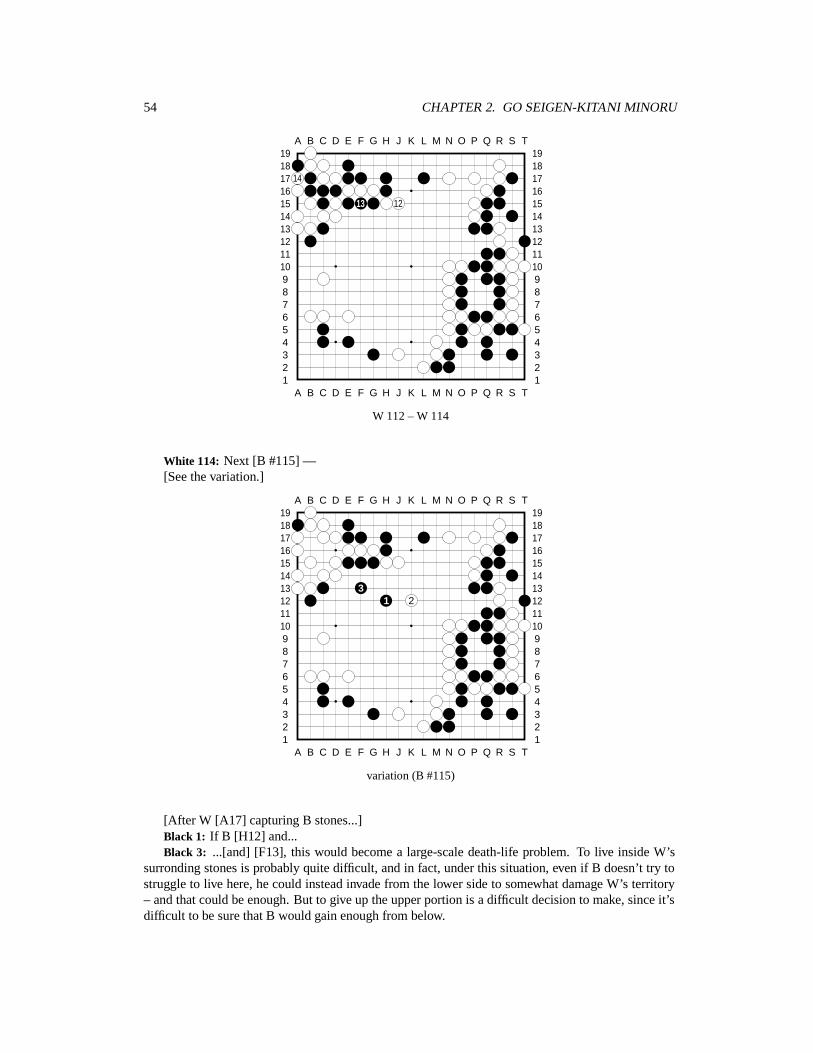
White 114: Next [B #115] —[See the variation.]
A B C D E F G H J K L M N O P Q R S T
A B C D E F G H J K L M N O P Q R S T12345678910111213141516171819
12345678910111213141516171819
31 2
variation (B #115)
[After W [A17] capturing B stones...]Black 1: If B [H12] and...Black 3: ...[and] [F13], this would become a large-scale death-life problem. To live inside W’s
surronding stones is probably quite difficult, and in fact, under this situation, even if B doesn’t try tostruggle to live here, he could instead invade from the lower side to somewhat damage W’s territory– and that could be enough. But to give up the upper portion is a difficult decision to make, since it’sdifficult to be sure that B would gain enough from below.
55
A B C D E F G H J K L M N O P Q R S T
A B C D E F G H J K L M N O P Q R S T12345678910111213141516171819
12345678910111213141516171819
ca
b15 16
17
B 115 – B 117
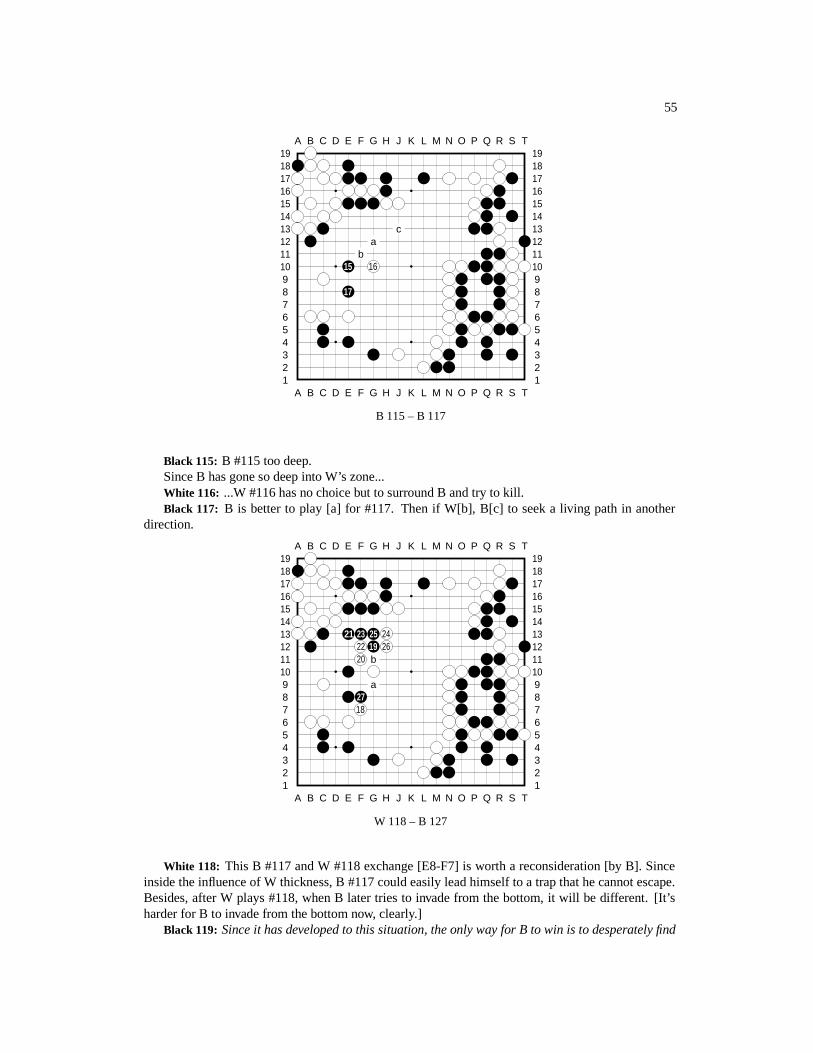
Black 115: B #115 too deep.Since B has gone so deep into W’s zone...White 116: ...W #116 has no choice but to surround B and try to kill.Black 117: B is better to play [a] for #117. Then if W[b], B[c] to seek a living path in another
direction.
A B C D E F G H J K L M N O P Q R S T
A B C D E F G H J K L M N O P Q R S T12345678910111213141516171819
12345678910111213141516171819
21 23 25 2422 19 2620 b
a2718
W 118 – B 127
White 118: This B #117 and W #118 exchange [E8-F7] is worth a reconsideration [by B]. Sinceinside the influence of W thickness, B #117 could easily lead himself to a trap that he cannot escape.Besides, after W plays #118, when B later tries to invade from the bottom, it will be different. [It’sharder for B to invade from the bottom now, clearly.]
Black 119: Since it has developed to this situation, the only way for B to win is to desperately find

56 CHAPTER 2. GO SEIGEN-KITANI MINORU
a way to save this team.On the other hand, if W fails to capture B, W would lose. Therefore W has no choice but to fight
his hardest. It’s make-or-break. As shown, an inspiring and heartbreaking fight has begun.White 120: Kitani 9 dan’s given time has completely consumed [each player is given 10 hours;
Kitani’s clock should show 9 hours 59 minutes, saving the last minute for byo-yomi], and he doesn’thave sufficient time to deliberate.
Black 127: If B #127 plays at [a], W would counter with [b].Even if W let B run away towards center, W’s right side has a metal-solid wall, and B eventually
cannot escape.
A B C D E F G H J K L M N O P Q R S T
A B C D E F G H J K L M N O P Q R S T12345678910111213141516171819
12345678910111213141516171819
3028
29
a
W 128 – W 130
White 130: When W #130, if B[a] —[See the variation.]
57
A B C D E F G H J K L M N O P Q R S T
A B C D E F G H J K L M N O P Q R S T12345678910111213141516171819
12345678910111213141516171819
10 9
86 3 15 4 2 117 12
variation (B #131)
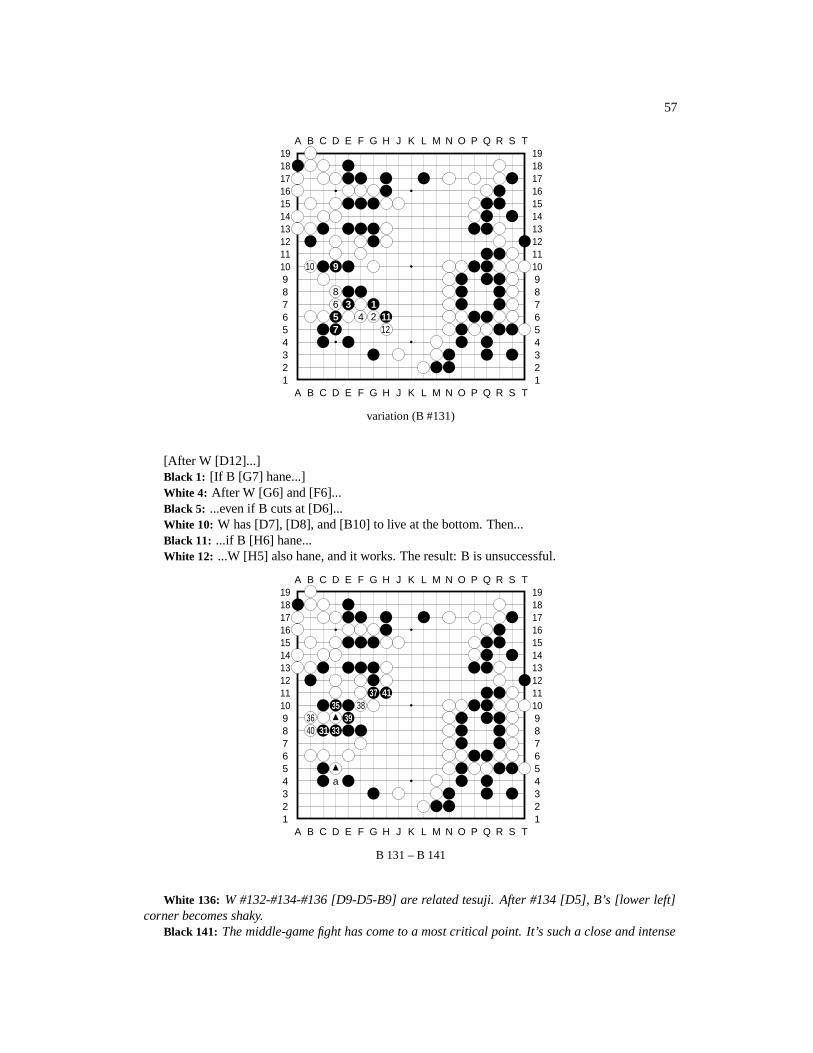
[After W [D12]...]Black 1: [If B [G7] hane...]White 4: After W [G6] and [F6]...Black 5: ...even if B cuts at [D6]...White 10: W has [D7], [D8], and [B10] to live at the bottom. Then...Black 11: ...if B [H6] hane...White 12: ...W [H5] also hane, and it works. The result: B is unsuccessful.
A B C D E F G H J K L M N O P Q R S T
A B C D E F G H J K L M N O P Q R S T12345678910111213141516171819
12345678910111213141516171819
37 4135 38
36 3940 31 33
a
B 131 – B 141
White 136: W #132-#134-#136 [D9-D5-B9] are related tesuji. After #134 [D5], B’s [lower left]corner becomes shaky.
Black 141: The middle-game fight has come to a most critical point. It’s such a close and intense
58 CHAPTER 2. GO SEIGEN-KITANI MINORU
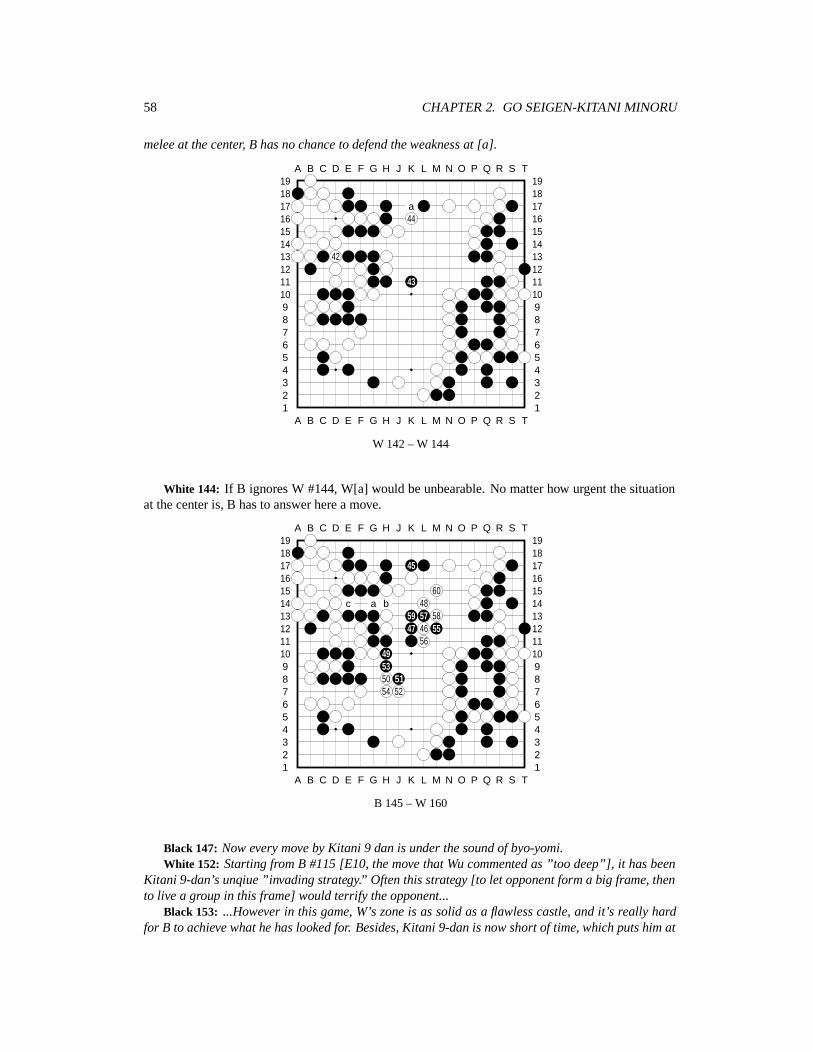
melee at the center, B has no chance to defend the weakness at [a].
A B C D E F G H J K L M N O P Q R S T
A B C D E F G H J K L M N O P Q R S T12345678910111213141516171819
12345678910111213141516171819
a44
42
43
W 142 – W 144
White 144: If B ignores W #144, W[a] would be unbearable. No matter how urgent the situationat the center is, B has to answer here a move.
A B C D E F G H J K L M N O P Q R S T
A B C D E F G H J K L M N O P Q R S T12345678910111213141516171819
12345678910111213141516171819
45
60c a b 48
59 57 5847 46 55
56495350 5154 52
B 145 – W 160
Black 147: Now every move by Kitani 9 dan is under the sound of byo-yomi.White 152: Starting from B #115 [E10, the move that Wu commented as ”too deep”], it has been
Kitani 9-dan’s unqiue ”invading strategy.” Often this strategy [to let opponent form a big frame, thento live a group in this frame] would terrify the opponent...
Black 153: ...However in this game, W’s zone is as solid as a flawless castle, and it’s really hardfor B to achieve what he has looked for. Besides, Kitani 9-dan is now short of time, which puts him at
59
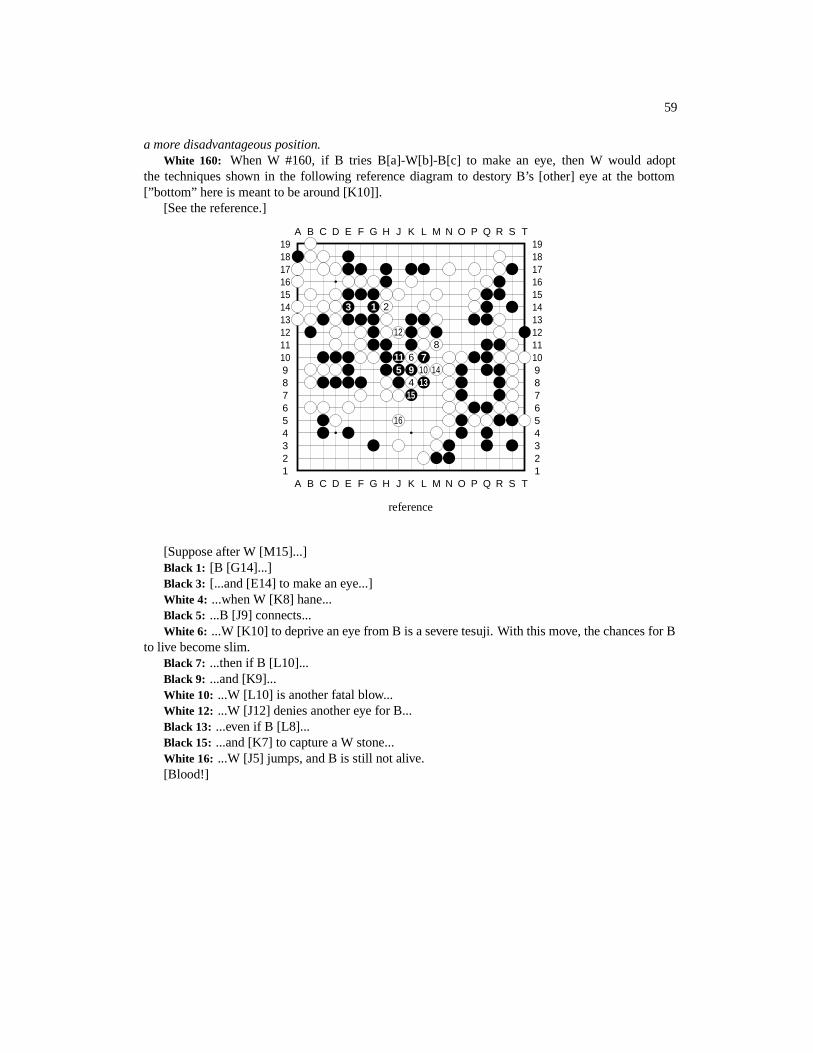
a more disadvantageous position.White 160: When W #160, if B tries B[a]-W[b]-B[c] to make an eye, then W would adopt
the techniques shown in the following reference diagram to destory B’s [other] eye at the bottom[”bottom” here is meant to be around [K10]].
[See the reference.]
A B C D E F G H J K L M N O P Q R S T
A B C D E F G H J K L M N O P Q R S T12345678910111213141516171819
12345678910111213141516171819
3 1 2
128
11 6 75 9 10 14
4 1315
16
reference
[Suppose after W [M15]...]Black 1: [B [G14]...]Black 3: [...and [E14] to make an eye...]White 4: ...when W [K8] hane...Black 5: ...B [J9] connects...White 6: ...W [K10] to deprive an eye from B is a severe tesuji. With this move, the chances for B
to live become slim.Black 7: ...then if B [L10]...Black 9: ...and [K9]...White 10: ...W [L10] is another fatal blow...White 12: ...W [J12] denies another eye for B...Black 13: ...even if B [L8]...Black 15: ...and [K7] to capture a W stone...White 16: ...W [J5] jumps, and B is still not alive.[Blood!]
60 CHAPTER 2. GO SEIGEN-KITANI MINORU
A B C D E F G H J K L M N O P Q R S T
A B C D E F G H J K L M N O P Q R S T12345678910111213141516171819
12345678910111213141516171819
a 64
6261
63b
B 161 – W 164
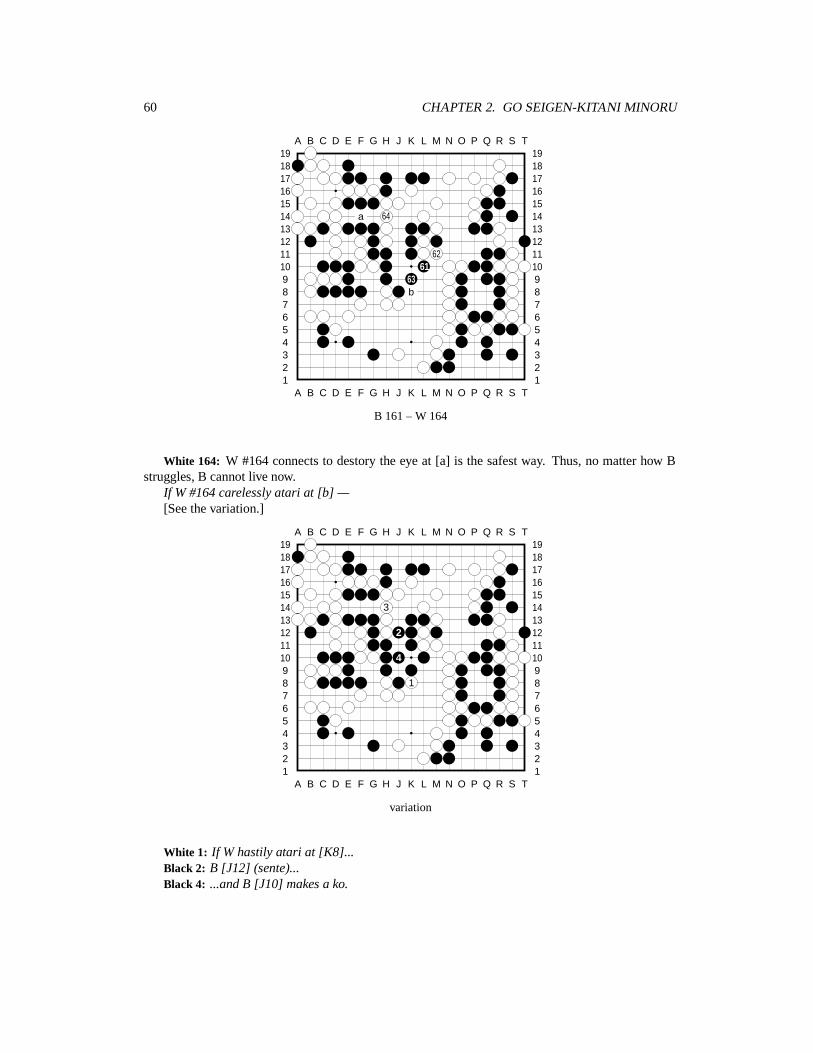
White 164: W #164 connects to destory the eye at [a] is the safest way. Thus, no matter how Bstruggles, B cannot live now.
If W #164 carelessly atari at [b] —[See the variation.]
A B C D E F G H J K L M N O P Q R S T
A B C D E F G H J K L M N O P Q R S T12345678910111213141516171819
12345678910111213141516171819
3
2
4
1
variation
White 1: If W hastily atari at [K8]...Black 2: B [J12] (sente)...Black 4: ...and B [J10] makes a ko.
61
A B C D E F G H J K L M N O P Q R S T
A B C D E F G H J K L M N O P Q R S T12345678910111213141516171819
12345678910111213141516171819
No moves
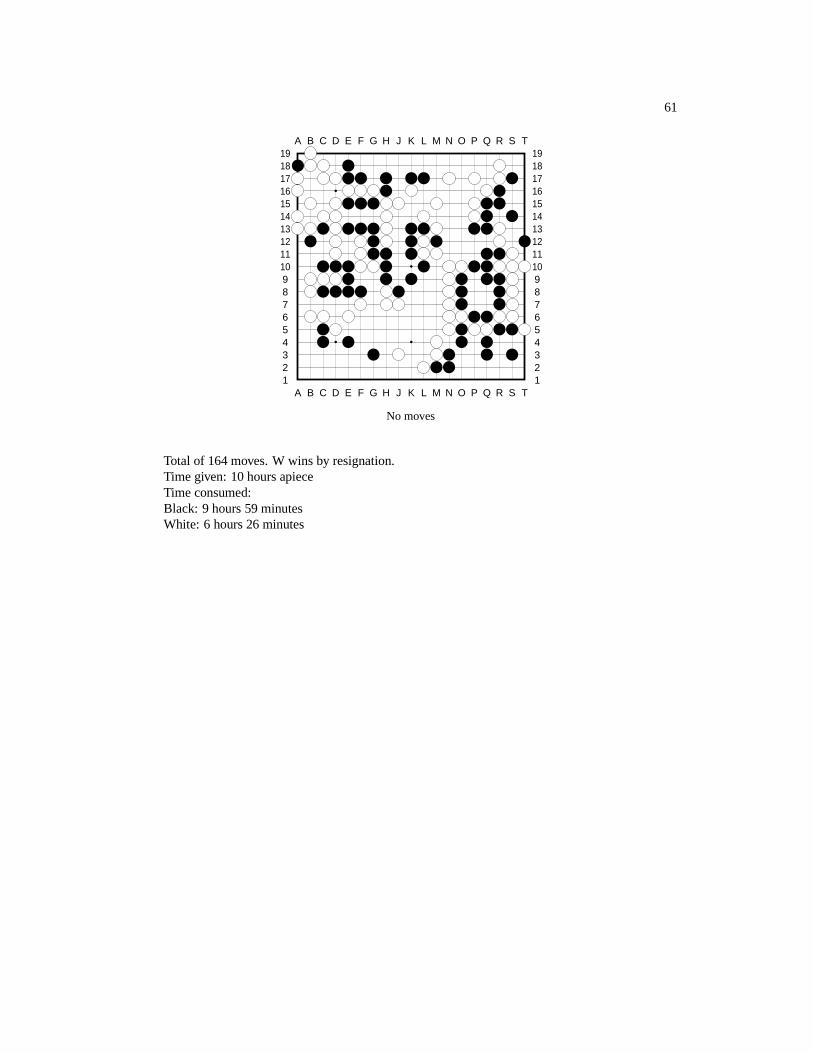
Total of 164 moves. W wins by resignation.Time given: 10 hours apieceTime consumed:Black: 9 hours 59 minutesWhite: 6 hours 26 minutes
62 CHAPTER 2. GO SEIGEN-KITANI MINORU
Chapter 3
Go Seigen-Fujisawa
Fujisawa Kuranosuke was a long-time rivial of Go Seigen. If we talk about the games between thetwo, none was more famous than their 2nd 10-game series, played in 1952. At the time, they were theonly 9-dans in Japan (thus in the entire world) – Fujisawa was the first player to be promoted to 9 danunder the Oteai system, in 1949, and Go Seigen was awarded the rank of 9-dan in 1950 (he was notbelong to Nihon Kiin, thus he couldn’t get promoted under Oteai, the Nihon Kiin rating tournament).
Today, the number of 9-dans in the world is approaching 100, if not yet reached. But before WorldWar II, the only 9-dan in the world would be the Meijin. So after the death of the last Meijin, Shusai,there was no 9-dan for a long time (about 10 years), until Nihon Kiin decided to promote her own9-dans.
Anyway, by 1950, there were suddenly two 9-dans. (Incidentially, the 2nd 9-dan promoted underthe Oteai system was Sakata Eio in 1955.) Naturally, everyone wanted to know who was better,and the two players were not shy to set up such a battle either. Finally in the end of 1951, the 2ndGo-Fujisawa 10-game series were under way, sponsored by Yomiuri Shimbon (a major Japanesenewspaper). Recall that in their 1st 10-game series in 1944, Fujisawa beat Go Seigen 6-4 (Fujisawaheld black throughout the series, since at the time, Go Seigen, still in Nihon Kiin, was an 8-dan, whileFujisawa a 6-dan).
Each player was given 13 hours in every game. The very first game probably earned a seat in Gohistory. What happened was that both players misread at a corner fight! At the end, when Go Seigenplayed one more move at that corner, Fujisawa resigned. How could they *both* misread? Probablyboth knew how important the game was, and after three days of tense fight, their feelings were not sosharp. But the 4-dan who was recording the game did not miss it! After the game, he pointed it outto the two 9-dan’s that Black (Fujisawa) could have won the fight at that corner, and maybe the gametoo. I think it would be interesting to see a 4-dan teaching two 9-dans, or rather, a relaxed playerteaching two nervous players. :-) Unfortunately I don’t remember that 4 dan’s name; believe me, hewould be an excellent kibitzer on IGS. :-)
Despite such an unlucky loss, Fujisawa was unbeaten the next three games, with 2 wins and 1 tie,thus leading the series 2-1-1. People started to think, Hmmm, after all, Fujisawa was stronger! Thenit came the turning point of the series, the fifth game. In this game, Fujisawa had a good lead but hecouldn’t hold it. When Go Seigen finally turned this game around, he turned the whole series around.He did not just win this fifth game; he won all the remaining 5 games as well.
After the 10th game, both players were interviewed by NHK (Japanese Boradcasting Association).I think the conversations were interesting:
Go Seigen said, “Since the beginning I’ve thought that luck decides to win or to lose; if one islucky, then he wins; if he’s unlucky, then he may lose.”
Many years later, when he recalled this game, he said, “One cannot win a game just because hewants to. The outside world is always disturbing. If my mind is shaken by this disturbance, I would
63
64 CHAPTER 3. GO SEIGEN-FUJISAWA
lose. Luckily at that time, eitehr before the series or during the series, I had a peaceful mind.”Then NHK’s microphone turned to Fujisawa. “Miserable loss!” He said with a bitter smile.
However, immediately, Fujisawa challenged Go Seigen again for yet another 10-game series. In fact,before their 2nd series (the one just finished), they had agreed that no matter what the outcome of theseries would be, the loser could challenge again, and the winner must accept.
A year later, Fujisawa lost again in their third 10-game series. This time by a score of 5-1 and theseries did not continue. This was a significant loss by Fujisawa. To prepare the series, he neglectedhis Nihon Kiin obligations, such as Honinbo tournament. As a result, he was heavily criticized. If hewas to go on to lose to Go Seigen, one can imagaine, the responsibility Fujisawa would have to bearmight be too heavy. And he realized so; right after the loss of the six game (the final game) of theseries, he resigned from Nihon Kiin. I would like to quote a piece from the newly published “The GoPlayer’s Almanac” by Ishi Press, 1992. On page 64, John Power writes:
Fujisawa resigned from the Nihon Ki-in and changed his given name to Hosai, a namewith Buddhist overtones more fitting for a retiree than an active player. His humiliationin the jubango [10-game series] made him a tragic figure and obscured the fact that hewas a great player. In match play, one misstep, one wrong turn can adversely affect thewhole series, and, as we have seen, Fujisawa had his share of bad luck. Nontheless, thetwo postwar matches with him are remembered as one of the highlights of Go [Seigen’s]career.
Suddenly I realized, Go Seigen’s comments that “luck decides outcome” were not merely somemodest words after his victory.
Finally, an interesting fact about Fujisawa. We know there are two famous Fujisawa’s, Kuranosuke(Hosai) and Shuko. I heard that they were uncle and nephew, and when I was younger, I had alwaysthought that Hosai was the uncle. After all, he’s older. Not until recently that I found, first he is notthat much older, but 6 years; secondly, he is the *nephew*.
By the way, Fujisawa Hosai retired this very year, 1992, while his younger uncle, Shuko, set thenew record of being the oldest player to win a major tournament (Shuko already set the record lastyear).
65
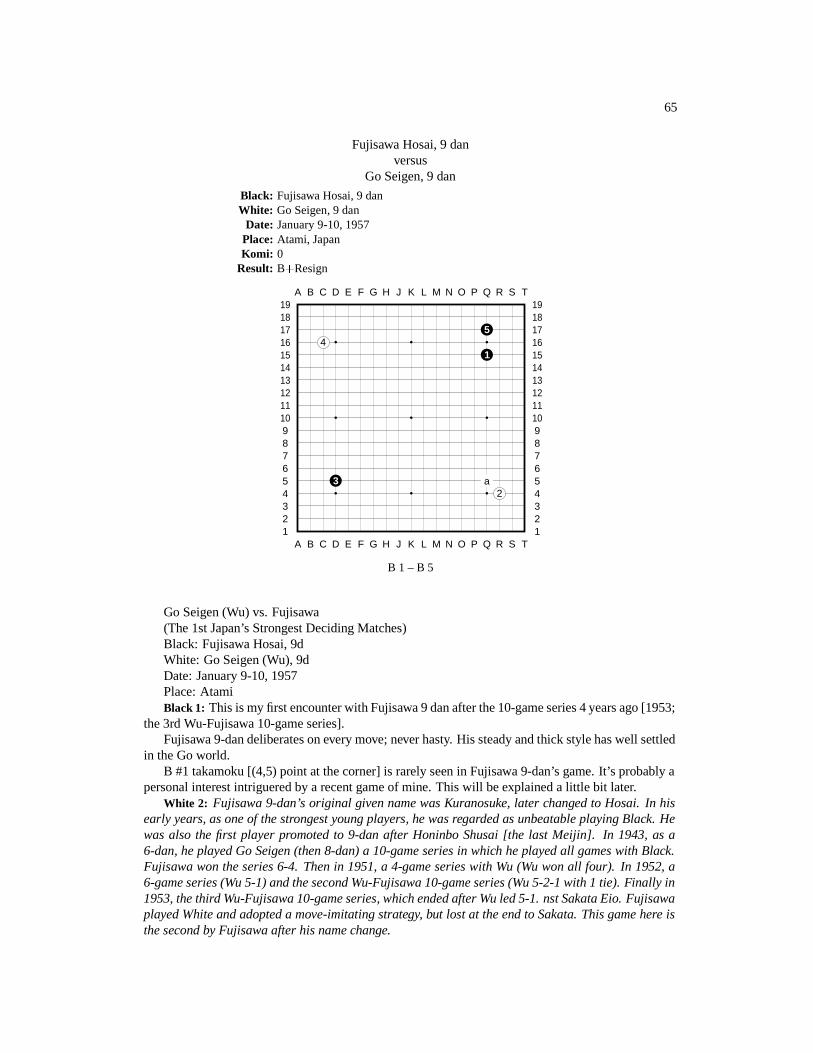
Fujisawa Hosai, 9 danversus
Go Seigen, 9 dan
Black: Fujisawa Hosai, 9 danWhite: Go Seigen, 9 dan
Date: January 9-10, 1957Place: Atami, JapanKomi: 0
Result: B�Resign
A B C D E F G H J K L M N O P Q R S T
A B C D E F G H J K L M N O P Q R S T12345678910111213141516171819
12345678910111213141516171819
54
1
3 a2
B 1 – B 5
Go Seigen (Wu) vs. Fujisawa(The 1st Japan’s Strongest Deciding Matches)Black: Fujisawa Hosai, 9dWhite: Go Seigen (Wu), 9dDate: January 9-10, 1957Place: AtamiBlack 1: This is my first encounter with Fujisawa 9 dan after the 10-game series 4 years ago [1953;
the 3rd Wu-Fujisawa 10-game series].Fujisawa 9-dan deliberates on every move; never hasty. His steady and thick style has well settled
in the Go world.B #1 takamoku [(4,5) point at the corner] is rarely seen in Fujisawa 9-dan’s game. It’s probably a
personal interest intriguered by a recent game of mine. This will be explained a little bit later.White 2: Fujisawa 9-dan’s original given name was Kuranosuke, later changed to Hosai. In his
early years, as one of the strongest young players, he was regarded as unbeatable playing Black. Hewas also the first player promoted to 9-dan after Honinbo Shusai [the last Meijin]. In 1943, as a6-dan, he played Go Seigen (then 8-dan) a 10-game series in which he played all games with Black.Fujisawa won the series 6-4. Then in 1951, a 4-game series with Wu (Wu won all four). In 1952, a6-game series (Wu 5-1) and the second Wu-Fujisawa 10-game series (Wu 5-2-1 with 1 tie). Finally in1953, the third Wu-Fujisawa 10-game series, which ended after Wu led 5-1. nst Sakata Eio. Fujisawaplayed White and adopted a move-imitating strategy, but lost at the end to Sakata. This game here isthe second by Fujisawa after his name change.
66 CHAPTER 3. GO SEIGEN-FUJISAWA
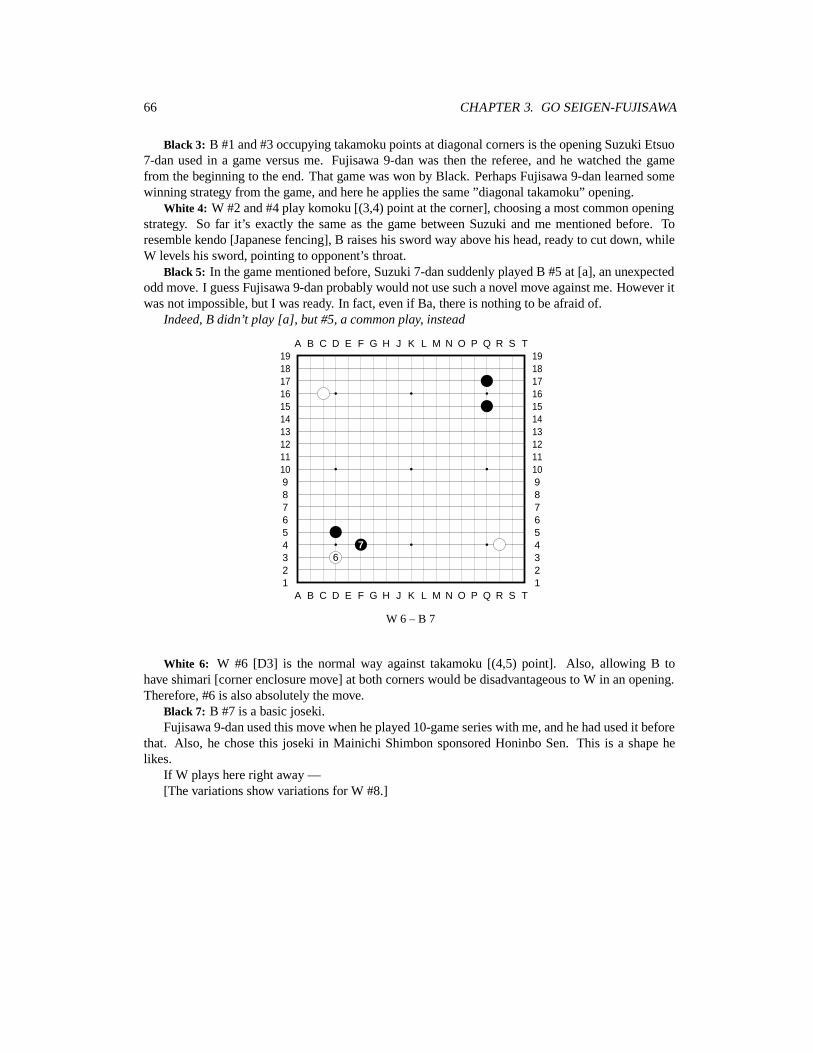
Black 3: B #1 and #3 occupying takamoku points at diagonal corners is the opening Suzuki Etsuo7-dan used in a game versus me. Fujisawa 9-dan was then the referee, and he watched the gamefrom the beginning to the end. That game was won by Black. Perhaps Fujisawa 9-dan learned somewinning strategy from the game, and here he applies the same ”diagonal takamoku” opening.
White 4: W #2 and #4 play komoku [(3,4) point at the corner], choosing a most common openingstrategy. So far it’s exactly the same as the game between Suzuki and me mentioned before. Toresemble kendo [Japanese fencing], B raises his sword way above his head, ready to cut down, whileW levels his sword, pointing to opponent’s throat.
Black 5: In the game mentioned before, Suzuki 7-dan suddenly played B #5 at [a], an unexpectedodd move. I guess Fujisawa 9-dan probably would not use such a novel move against me. However itwas not impossible, but I was ready. In fact, even if Ba, there is nothing to be afraid of.
Indeed, B didn’t play [a], but #5, a common play, instead
A B C D E F G H J K L M N O P Q R S T
A B C D E F G H J K L M N O P Q R S T12345678910111213141516171819
12345678910111213141516171819
76
W 6 – B 7
White 6: W #6 [D3] is the normal way against takamoku [(4,5) point]. Also, allowing B tohave shimari [corner enclosure move] at both corners would be disadvantageous to W in an opening.Therefore, #6 is also absolutely the move.
Black 7: B #7 is a basic joseki.Fujisawa 9-dan used this move when he played 10-game series with me, and he had used it before
that. Also, he chose this joseki in Mainichi Shimbon sponsored Honinbo Sen. This is a shape helikes.
If W plays here right away —[The variations show variations for W #8.]
67
A B C D E F G H J K L M N O P Q R S T
A B C D E F G H J K L M N O P Q R S T12345678910111213141516171819
12345678910111213141516171819
1410 16 15
12 111 3 2
13 6 4 87 5 9
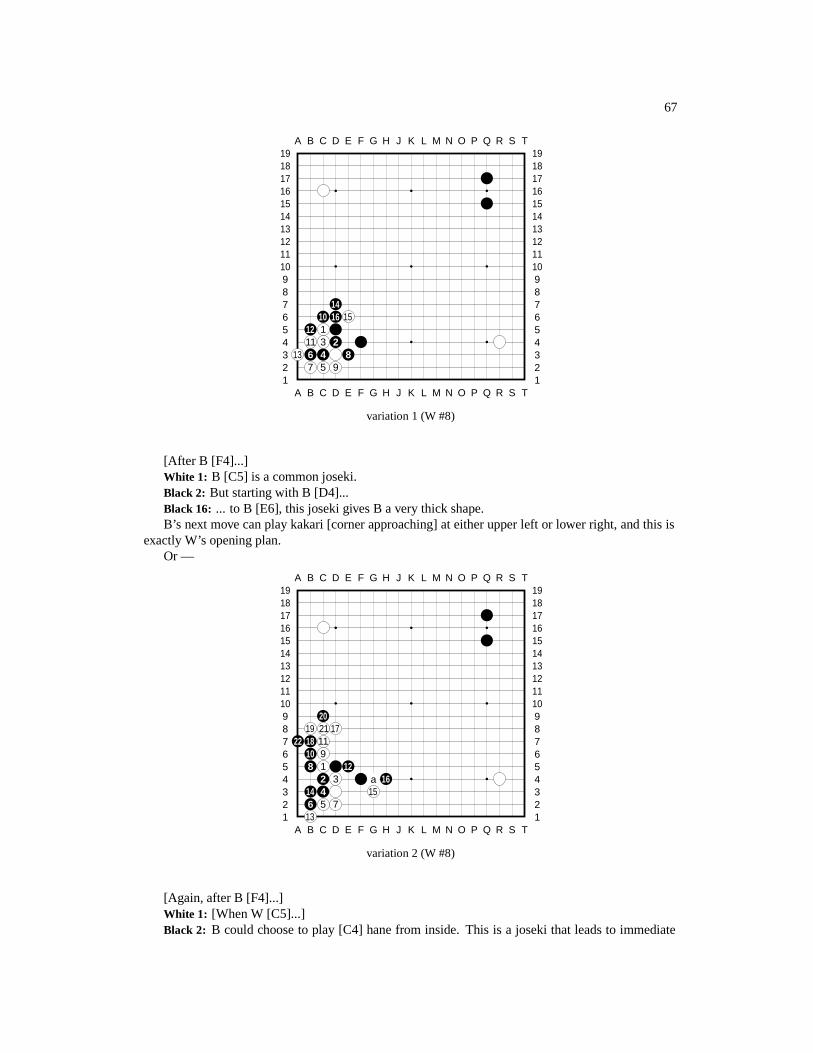
variation 1 (W #8)
[After B [F4]...]White 1: B [C5] is a common joseki.Black 2: But starting with B [D4]...Black 16: ... to B [E6], this joseki gives B a very thick shape.B’s next move can play kakari [corner approaching] at either upper left or lower right, and this is
exactly W’s opening plan.Or —
A B C D E F G H J K L M N O P Q R S T
A B C D E F G H J K L M N O P Q R S T12345678910111213141516171819
12345678910111213141516171819
2019 21 17
22 18 1110 98 1 12
2 3 a 1614 4 156 5 713
variation 2 (W #8)
[Again, after B [F4]...]White 1: [When W [C5]...]Black 2: B could choose to play [C4] hane from inside. This is a joseki that leads to immediate
68 CHAPTER 3. GO SEIGEN-FUJISAWA
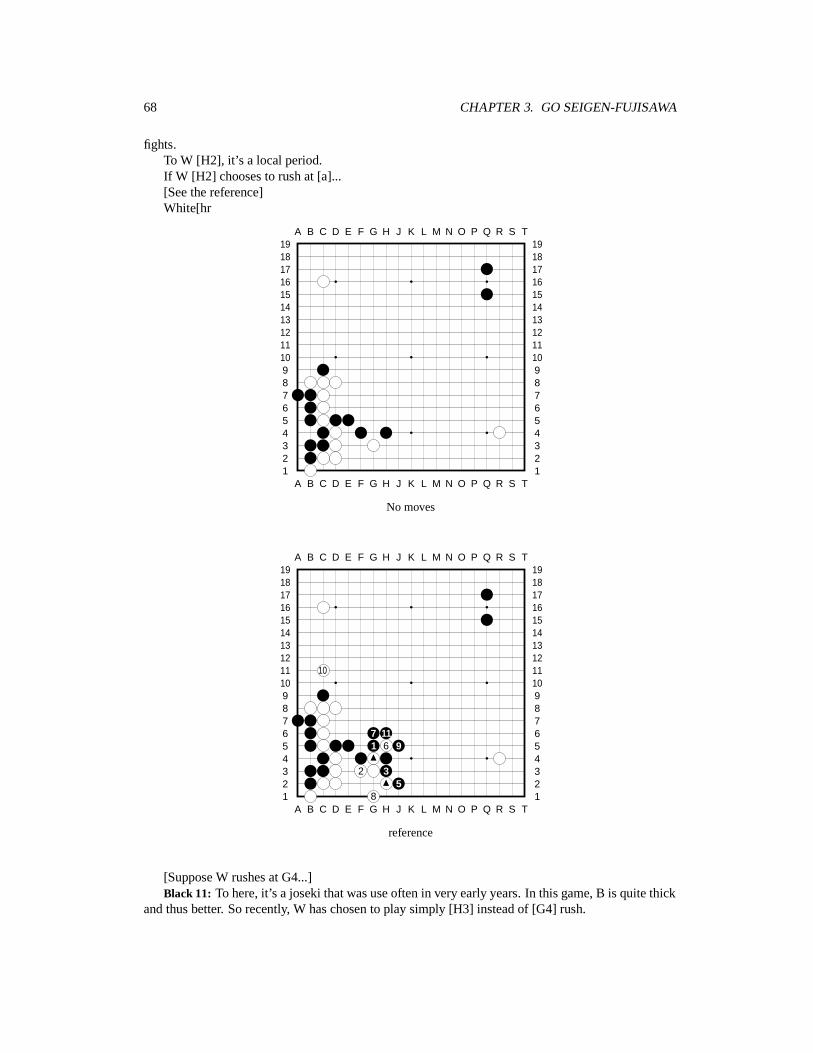
fights.To W [H2], it’s a local period.If W [H2] chooses to rush at [a]...[See the reference]White[hr
A B C D E F G H J K L M N O P Q R S T
A B C D E F G H J K L M N O P Q R S T12345678910111213141516171819
12345678910111213141516171819
No moves
A B C D E F G H J K L M N O P Q R S T
A B C D E F G H J K L M N O P Q R S T12345678910111213141516171819
12345678910111213141516171819
10
7 111 6 9
2 35
8
reference
[Suppose W rushes at G4...]Black 11: To here, it’s a joseki that was use often in very early years. In this game, B is quite thick
and thus better. So recently, W has chosen to play simply [H3] instead of [G4] rush.
69
A B C D E F G H J K L M N O P Q R S T
A B C D E F G H J K L M N O P Q R S T12345678910111213141516171819
12345678910111213141516171819
8
9
W 8 – B 9
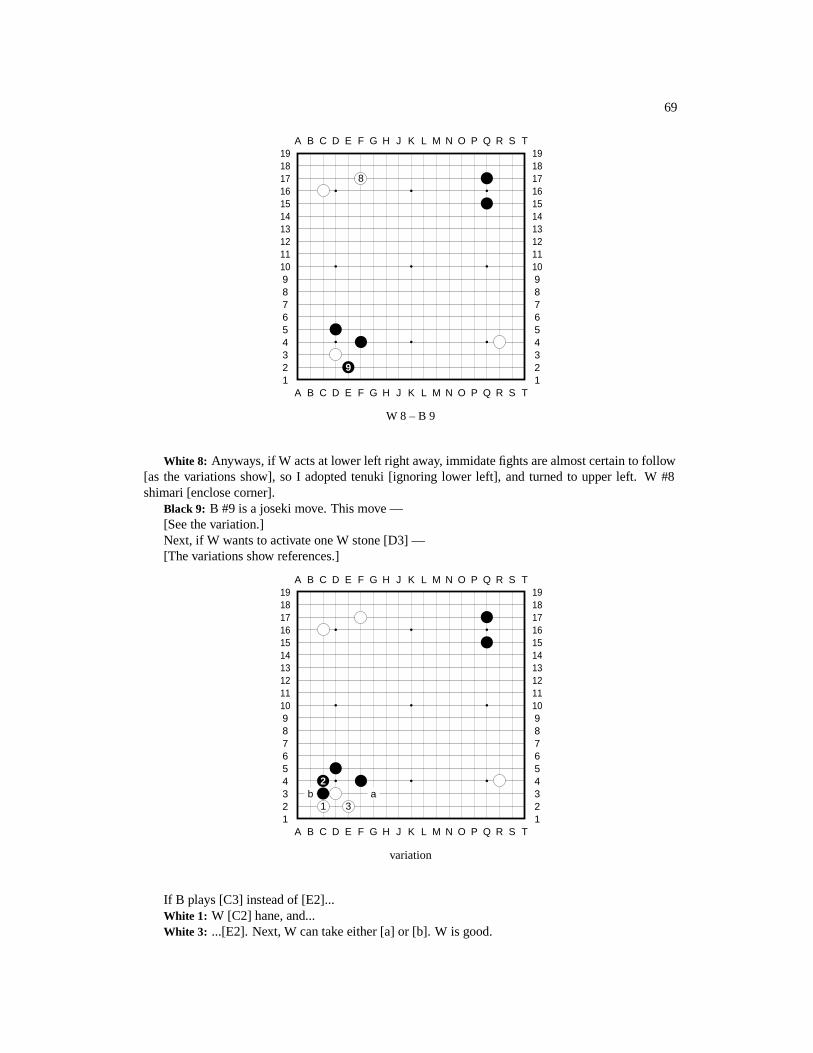
White 8: Anyways, if W acts at lower left right away, immidate fights are almost certain to follow[as the variations show], so I adopted tenuki [ignoring lower left], and turned to upper left. W #8shimari [enclose corner].
Black 9: B #9 is a joseki move. This move —[See the variation.]Next, if W wants to activate one W stone [D3] —[The variations show references.]
A B C D E F G H J K L M N O P Q R S T
A B C D E F G H J K L M N O P Q R S T12345678910111213141516171819
12345678910111213141516171819
2b a
1 3
variation
If B plays [C3] instead of [E2]...White 1: W [C2] hane, and...White 3: ...[E2]. Next, W can take either [a] or [b]. W is good.
70 CHAPTER 3. GO SEIGEN-FUJISAWA
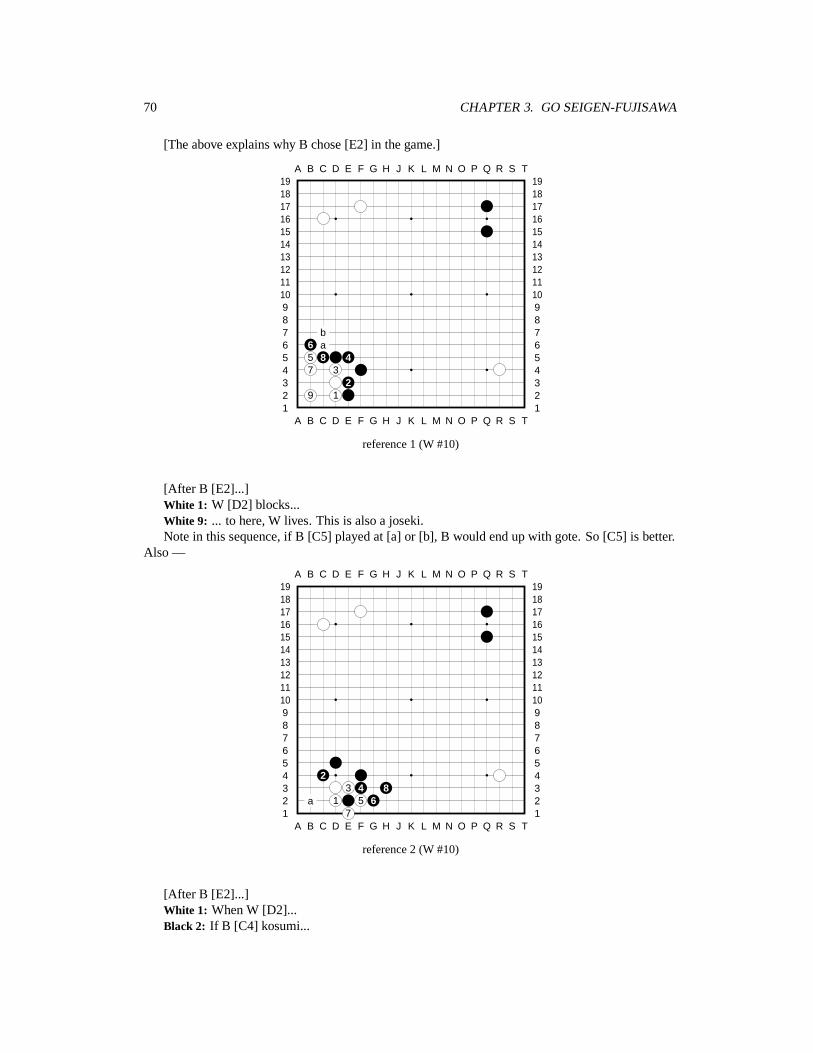
[The above explains why B chose [E2] in the game.]
A B C D E F G H J K L M N O P Q R S T
A B C D E F G H J K L M N O P Q R S T12345678910111213141516171819
12345678910111213141516171819
b6 a5 8 47 3
29 1
reference 1 (W #10)
[After B [E2]...]White 1: W [D2] blocks...White 9: ... to here, W lives. This is also a joseki.Note in this sequence, if B [C5] played at [a] or [b], B would end up with gote. So [C5] is better.
Also —
A B C D E F G H J K L M N O P Q R S T
A B C D E F G H J K L M N O P Q R S T12345678910111213141516171819
12345678910111213141516171819
23 4 8
a 1 5 67
reference 2 (W #10)
[After B [E2]...]White 1: When W [D2]...Black 2: If B [C4] kosumi...
71
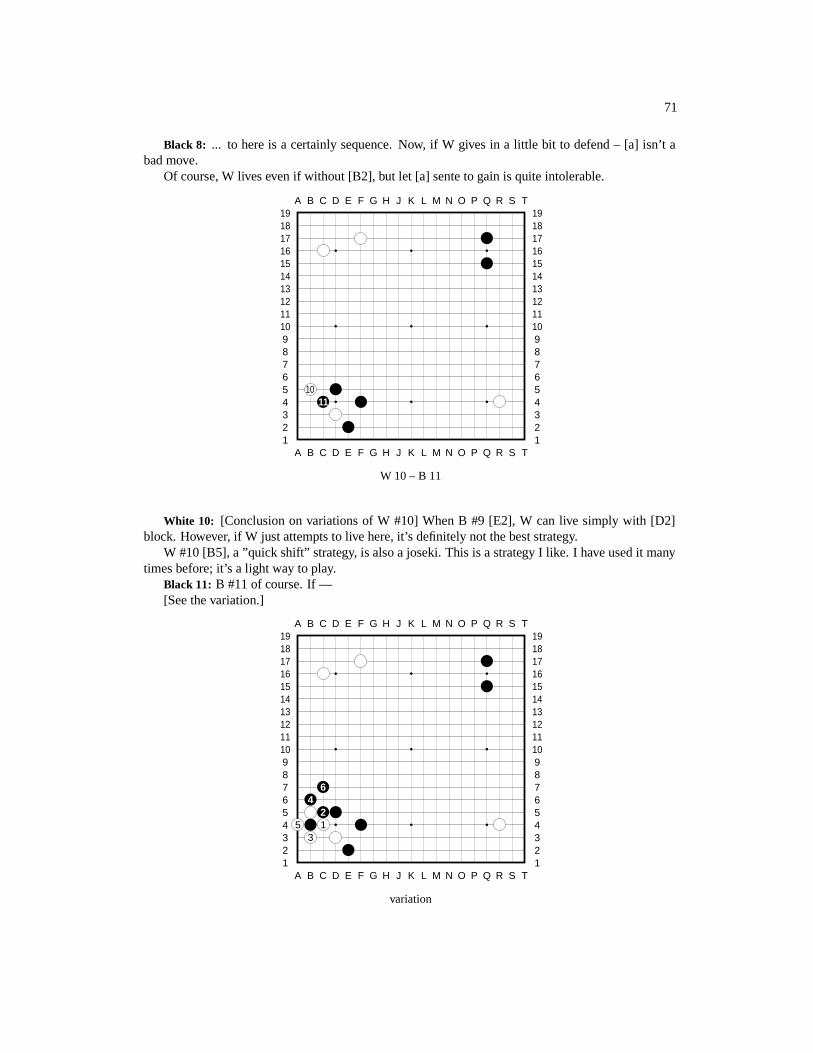
Black 8: ... to here is a certainly sequence. Now, if W gives in a little bit to defend – [a] isn’t abad move.
Of course, W lives even if without [B2], but let [a] sente to gain is quite intolerable.
A B C D E F G H J K L M N O P Q R S T
A B C D E F G H J K L M N O P Q R S T12345678910111213141516171819
12345678910111213141516171819
1011
W 10 – B 11
White 10: [Conclusion on variations of W #10] When B #9 [E2], W can live simply with [D2]block. However, if W just attempts to live here, it’s definitely not the best strategy.
W #10 [B5], a ”quick shift” strategy, is also a joseki. This is a strategy I like. I have used it manytimes before; it’s a light way to play.
Black 11: B #11 of course. If —[See the variation.]
A B C D E F G H J K L M N O P Q R S T
A B C D E F G H J K L M N O P Q R S T12345678910111213141516171819
12345678910111213141516171819
64
25 1
3
variation
72 CHAPTER 3. GO SEIGEN-FUJISAWA
If [B4] attaches (instead of [C4])...Black 6: ...To here, W lives in sente.
A B C D E F G H J K L M N O P Q R S T
A B C D E F G H J K L M N O P Q R S T12345678910111213141516171819
12345678910111213141516171819
a
12
13
W 12 – B 13
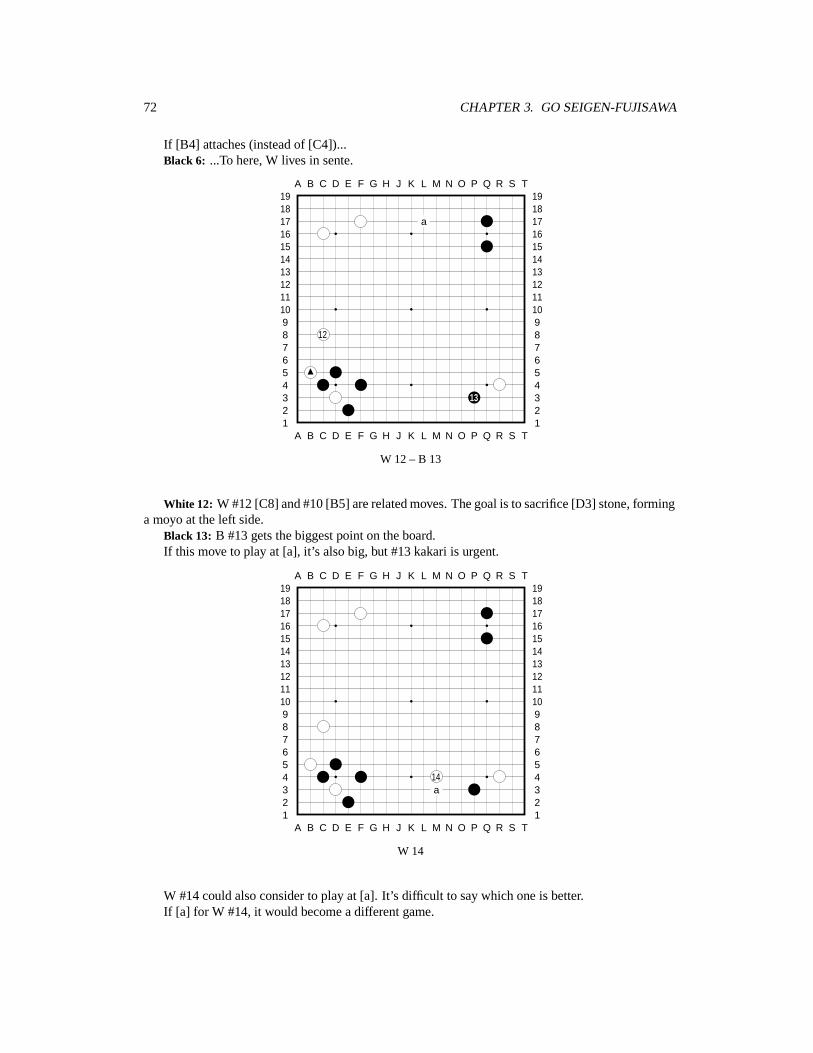
White 12: W #12 [C8] and #10 [B5] are related moves. The goal is to sacrifice [D3] stone, forminga moyo at the left side.
Black 13: B #13 gets the biggest point on the board.If this move to play at [a], it’s also big, but #13 kakari is urgent.
A B C D E F G H J K L M N O P Q R S T
A B C D E F G H J K L M N O P Q R S T12345678910111213141516171819
12345678910111213141516171819
14a
W 14
W #14 could also consider to play at [a]. It’s difficult to say which one is better.If [a] for W #14, it would become a different game.
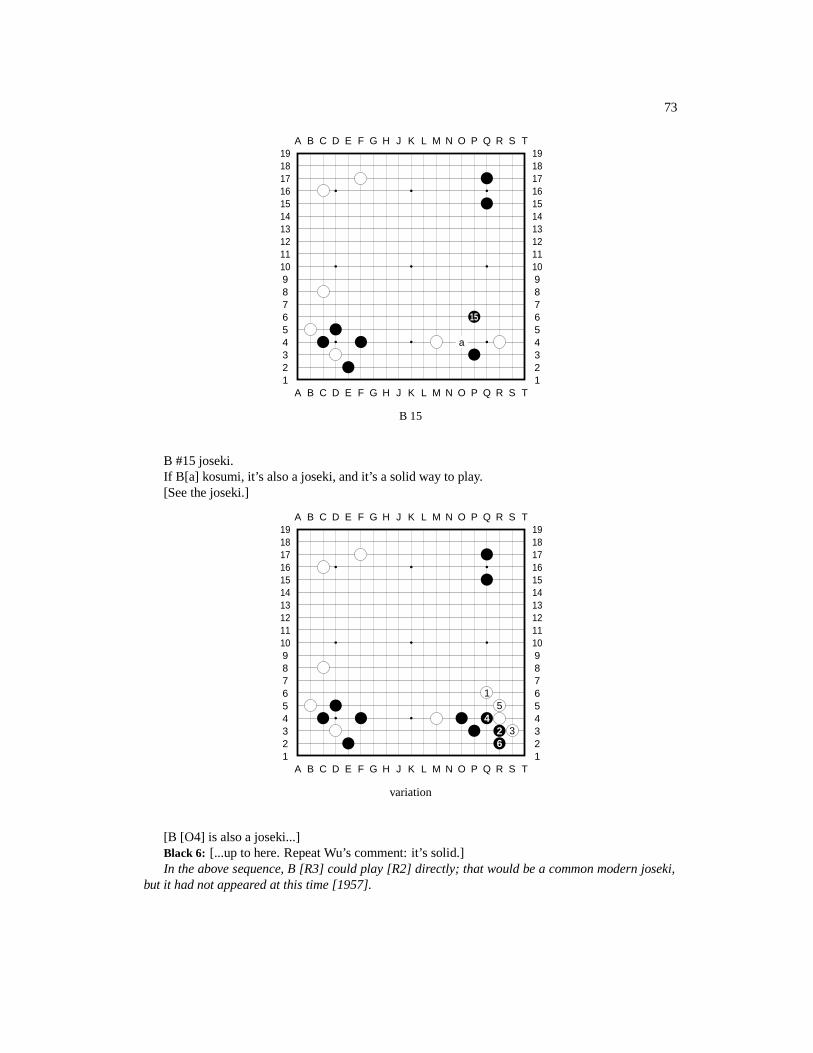
73
A B C D E F G H J K L M N O P Q R S T
A B C D E F G H J K L M N O P Q R S T12345678910111213141516171819
12345678910111213141516171819
15
a
B 15
B #15 joseki.If B[a] kosumi, it’s also a joseki, and it’s a solid way to play.[See the joseki.]
A B C D E F G H J K L M N O P Q R S T
A B C D E F G H J K L M N O P Q R S T12345678910111213141516171819
12345678910111213141516171819
15
42 36
variation
[B [O4] is also a joseki...]Black 6: [...up to here. Repeat Wu’s comment: it’s solid.]In the above sequence, B [R3] could play [R2] directly; that would be a common modern joseki,
but it had not appeared at this time [1957].
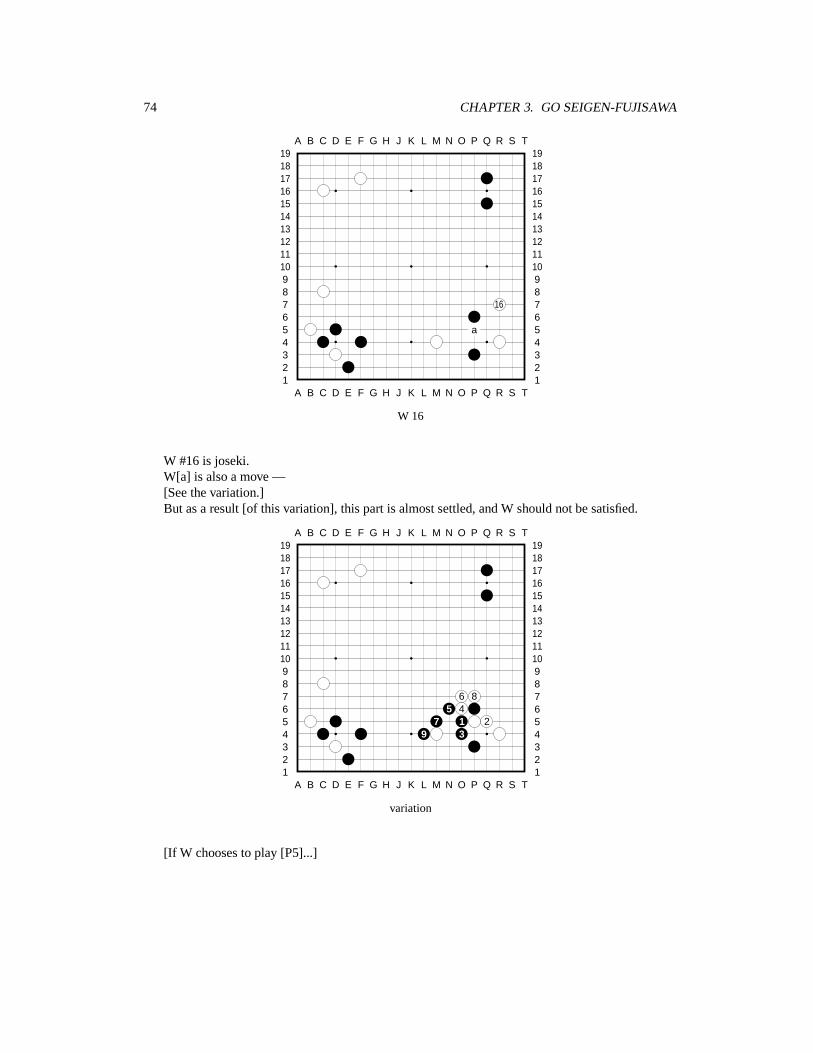
74 CHAPTER 3. GO SEIGEN-FUJISAWA
A B C D E F G H J K L M N O P Q R S T
A B C D E F G H J K L M N O P Q R S T12345678910111213141516171819
12345678910111213141516171819
16
a
W 16
W #16 is joseki.W[a] is also a move —[See the variation.]But as a result [of this variation], this part is almost settled, and W should not be satisfied.
A B C D E F G H J K L M N O P Q R S T
A B C D E F G H J K L M N O P Q R S T12345678910111213141516171819
12345678910111213141516171819
6 85 4
7 1 29 3
variation
[If W chooses to play [P5]...]
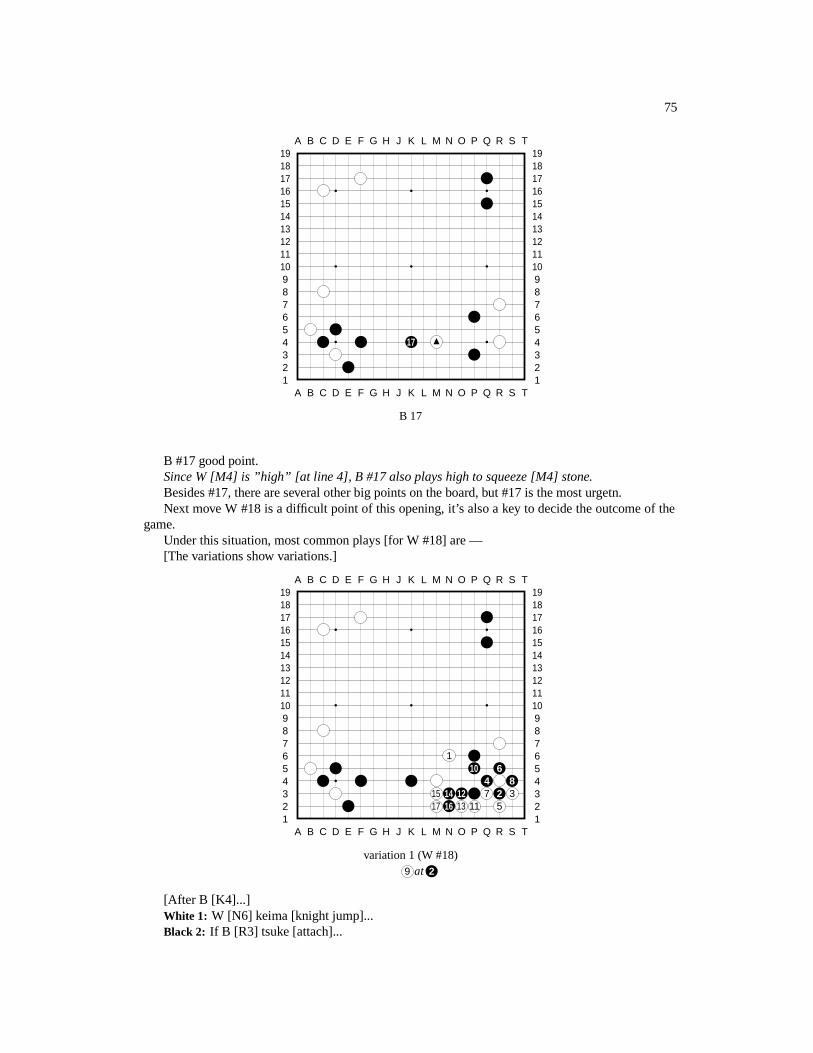
75
A B C D E F G H J K L M N O P Q R S T
A B C D E F G H J K L M N O P Q R S T12345678910111213141516171819
12345678910111213141516171819
17
B 17
B #17 good point.Since W [M4] is ”high” [at line 4], B #17 also plays high to squeeze [M4] stone.Besides #17, there are several other big points on the board, but #17 is the most urgetn.Next move W #18 is a difficult point of this opening, it’s also a key to decide the outcome of the
game.Under this situation, most common plays [for W #18] are —[The variations show variations.]
A B C D E F G H J K L M N O P Q R S T
A B C D E F G H J K L M N O P Q R S T12345678910111213141516171819
12345678910111213141516171819
110 6
4 815 14 12 7 2 317 16 13 11 5
variation 1 (W #18)9 at 2
[After B [K4]...]White 1: W [N6] keima [knight jump]...Black 2: If B [R3] tsuke [attach]...
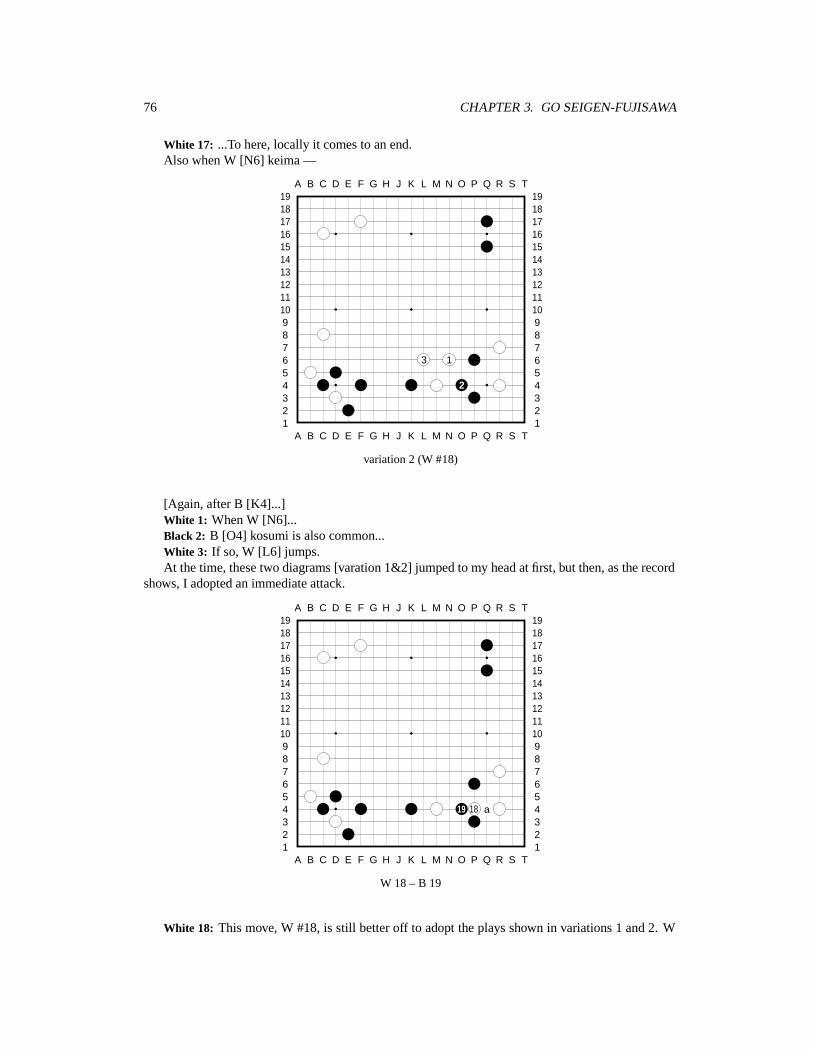
76 CHAPTER 3. GO SEIGEN-FUJISAWA
White 17: ...To here, locally it comes to an end.Also when W [N6] keima —
A B C D E F G H J K L M N O P Q R S T
A B C D E F G H J K L M N O P Q R S T12345678910111213141516171819
12345678910111213141516171819
3 1
2
variation 2 (W #18)
[Again, after B [K4]...]White 1: When W [N6]...Black 2: B [O4] kosumi is also common...White 3: If so, W [L6] jumps.At the time, these two diagrams [varation 1&2] jumped to my head at first, but then, as the record
shows, I adopted an immediate attack.
A B C D E F G H J K L M N O P Q R S T
A B C D E F G H J K L M N O P Q R S T12345678910111213141516171819
12345678910111213141516171819
19 18 a
W 18 – B 19
White 18: This move, W #18, is still better off to adopt the plays shown in variations 1 and 2. W
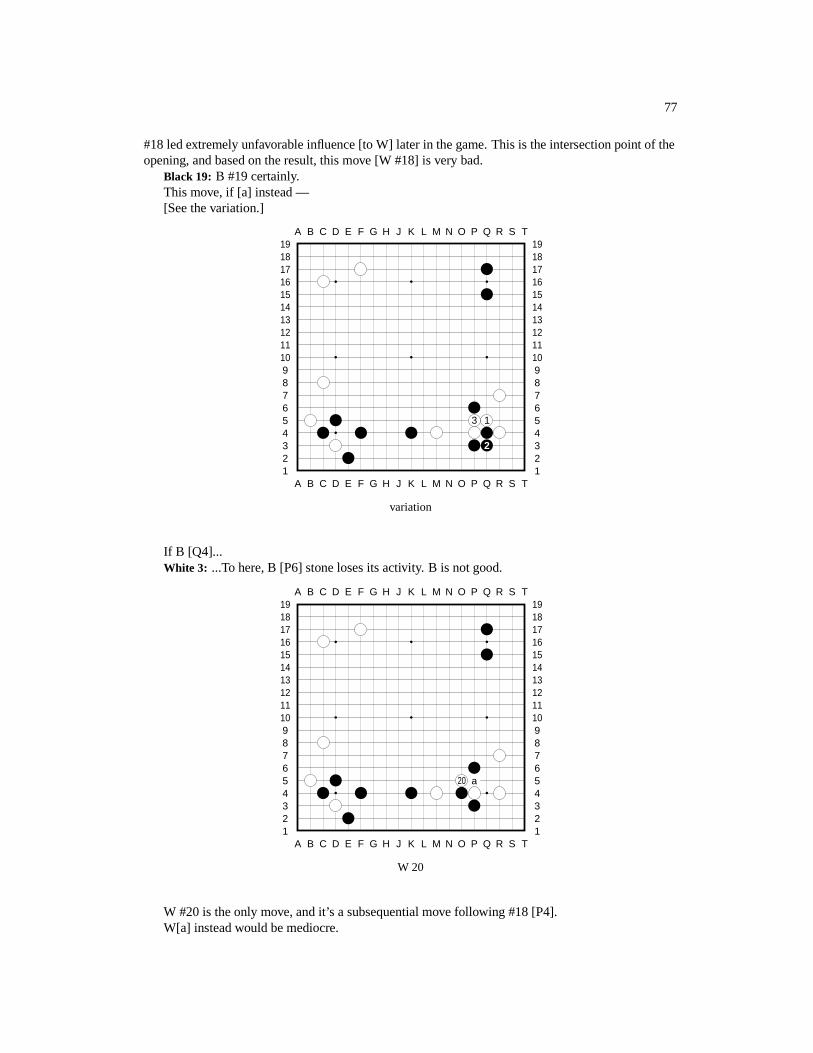
77
#18 led extremely unfavorable influence [to W] later in the game. This is the intersection point of theopening, and based on the result, this move [W #18] is very bad.
Black 19: B #19 certainly.This move, if [a] instead —[See the variation.]
A B C D E F G H J K L M N O P Q R S T
A B C D E F G H J K L M N O P Q R S T12345678910111213141516171819
12345678910111213141516171819
3 1
2
variation
If B [Q4]...White 3: ...To here, B [P6] stone loses its activity. B is not good.
A B C D E F G H J K L M N O P Q R S T
A B C D E F G H J K L M N O P Q R S T12345678910111213141516171819
12345678910111213141516171819
20 a
W 20
W #20 is the only move, and it’s a subsequential move following #18 [P4].W[a] instead would be mediocre.
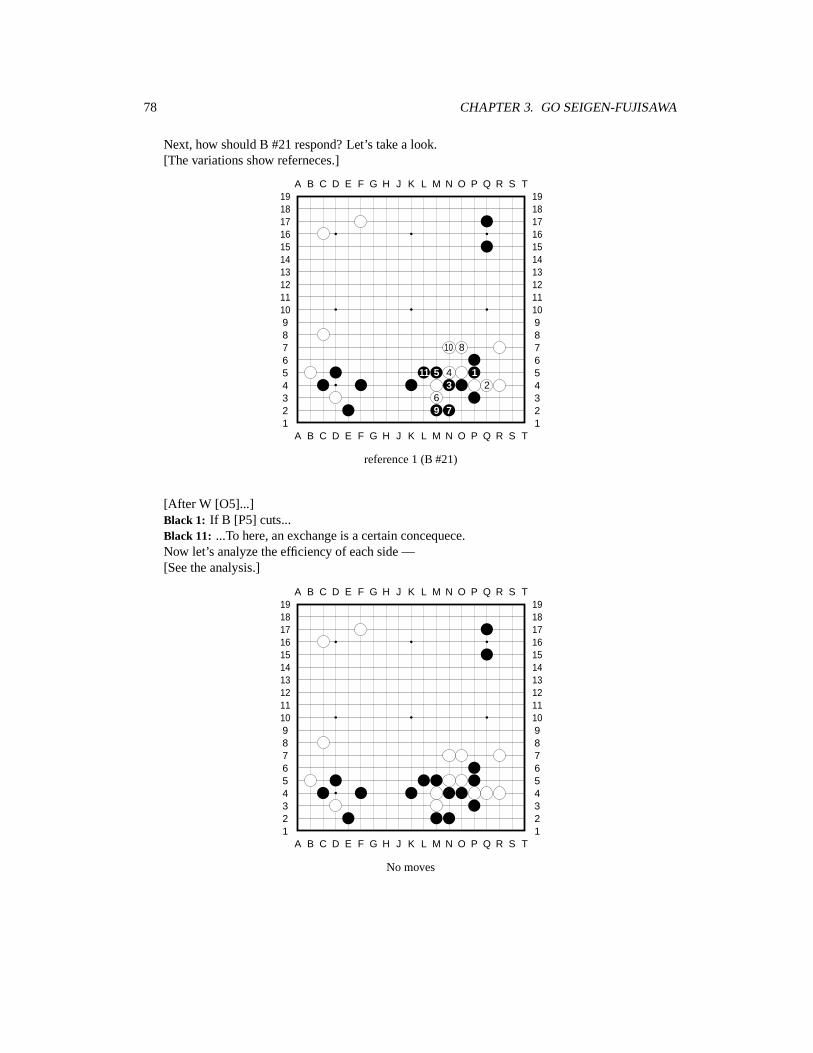
78 CHAPTER 3. GO SEIGEN-FUJISAWA
Next, how should B #21 respond? Let’s take a look.[The variations show referneces.]
A B C D E F G H J K L M N O P Q R S T
A B C D E F G H J K L M N O P Q R S T12345678910111213141516171819
12345678910111213141516171819
10 8
11 5 4 13 2
69 7
reference 1 (B #21)
[After W [O5]...]Black 1: If B [P5] cuts...Black 11: ...To here, an exchange is a certain concequece.Now let’s analyze the efficiency of each side —[See the analysis.]
A B C D E F G H J K L M N O P Q R S T
A B C D E F G H J K L M N O P Q R S T12345678910111213141516171819
12345678910111213141516171819
No moves
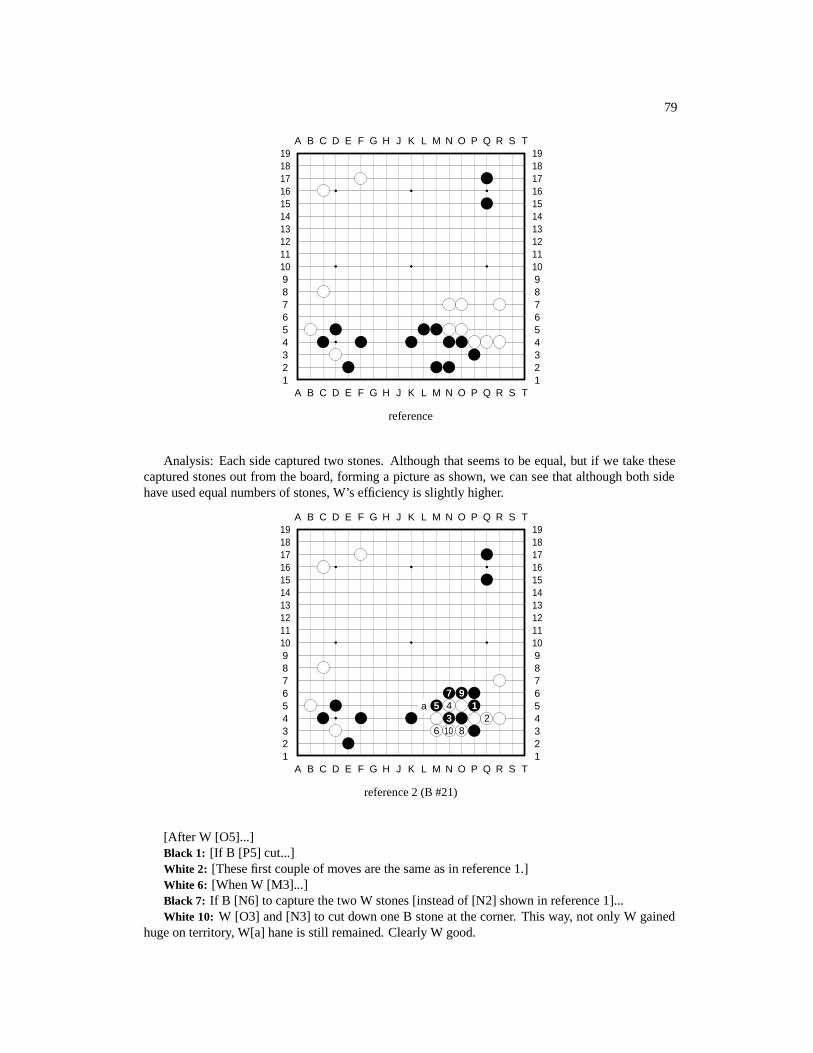
79
A B C D E F G H J K L M N O P Q R S T
A B C D E F G H J K L M N O P Q R S T12345678910111213141516171819
12345678910111213141516171819
reference
Analysis: Each side captured two stones. Although that seems to be equal, but if we take thesecaptured stones out from the board, forming a picture as shown, we can see that although both sidehave used equal numbers of stones, W’s efficiency is slightly higher.
A B C D E F G H J K L M N O P Q R S T
A B C D E F G H J K L M N O P Q R S T12345678910111213141516171819
12345678910111213141516171819
7 9a 5 4 1
3 26 10 8
reference 2 (B #21)
[After W [O5]...]Black 1: [If B [P5] cut...]White 2: [These first couple of moves are the same as in reference 1.]White 6: [When W [M3]...]Black 7: If B [N6] to capture the two W stones [instead of [N2] shown in reference 1]...White 10: W [O3] and [N3] to cut down one B stone at the corner. This way, not only W gained
huge on territory, W[a] hane is still remained. Clearly W good.
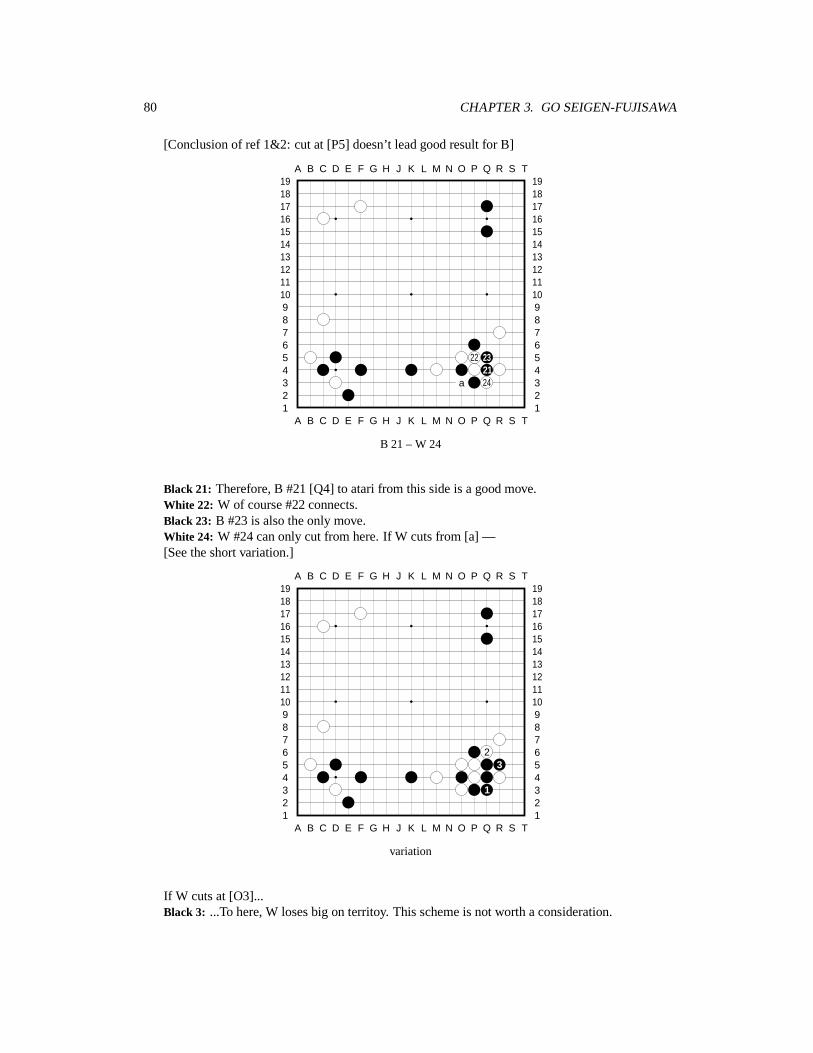
80 CHAPTER 3. GO SEIGEN-FUJISAWA
[Conclusion of ref 1&2: cut at [P5] doesn’t lead good result for B]
A B C D E F G H J K L M N O P Q R S T
A B C D E F G H J K L M N O P Q R S T12345678910111213141516171819
12345678910111213141516171819
22 2321
a 24
B 21 – W 24
Black 21: Therefore, B #21 [Q4] to atari from this side is a good move.White 22: W of course #22 connects.Black 23: B #23 is also the only move.White 24: W #24 can only cut from here. If W cuts from [a] —[See the short variation.]
A B C D E F G H J K L M N O P Q R S T
A B C D E F G H J K L M N O P Q R S T12345678910111213141516171819
12345678910111213141516171819
23
1
variation
If W cuts at [O3]...Black 3: ...To here, W loses big on territoy. This scheme is not worth a consideration.
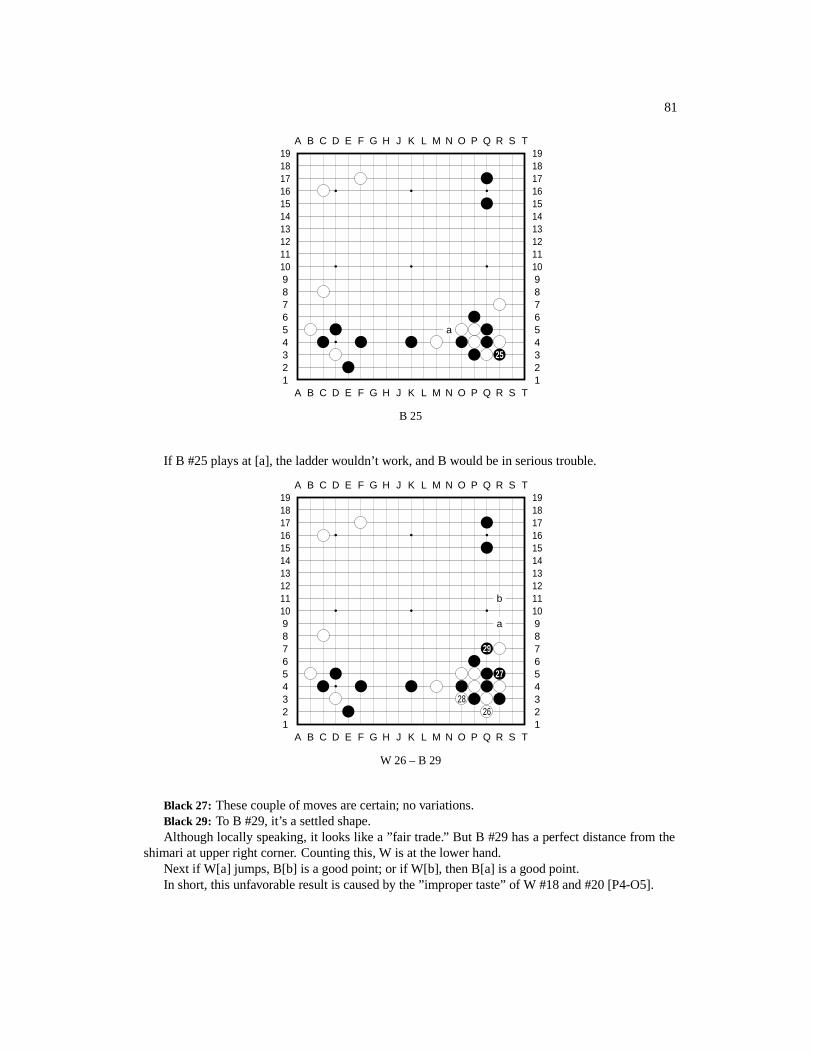
81
A B C D E F G H J K L M N O P Q R S T
A B C D E F G H J K L M N O P Q R S T12345678910111213141516171819
12345678910111213141516171819
a
25
B 25
If B #25 plays at [a], the ladder wouldn’t work, and B would be in serious trouble.
A B C D E F G H J K L M N O P Q R S T
A B C D E F G H J K L M N O P Q R S T12345678910111213141516171819
12345678910111213141516171819
b
a
29
27
2826
W 26 – B 29
Black 27: These couple of moves are certain; no variations.Black 29: To B #29, it’s a settled shape.Although locally speaking, it looks like a ”fair trade.” But B #29 has a perfect distance from the
shimari at upper right corner. Counting this, W is at the lower hand.Next if W[a] jumps, B[b] is a good point; or if W[b], then B[a] is a good point.In short, this unfavorable result is caused by the ”improper taste” of W #18 and #20 [P4-O5].
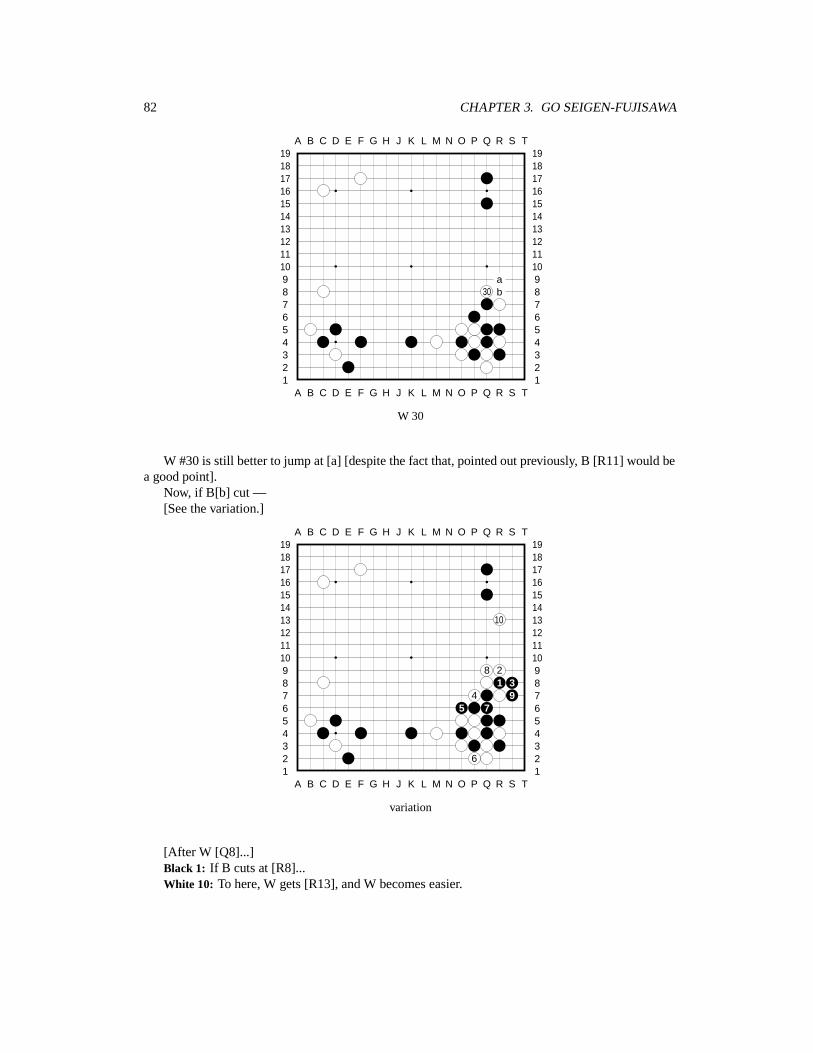
82 CHAPTER 3. GO SEIGEN-FUJISAWA
A B C D E F G H J K L M N O P Q R S T
A B C D E F G H J K L M N O P Q R S T12345678910111213141516171819
12345678910111213141516171819
a30 b
W 30
W #30 is still better to jump at [a] [despite the fact that, pointed out previously, B [R11] would bea good point].
Now, if B[b] cut —[See the variation.]
A B C D E F G H J K L M N O P Q R S T
A B C D E F G H J K L M N O P Q R S T12345678910111213141516171819
12345678910111213141516171819
10
8 21 3
4 95 7
6
variation
[After W [Q8]...]Black 1: If B cuts at [R8]...White 10: To here, W gets [R13], and W becomes easier.
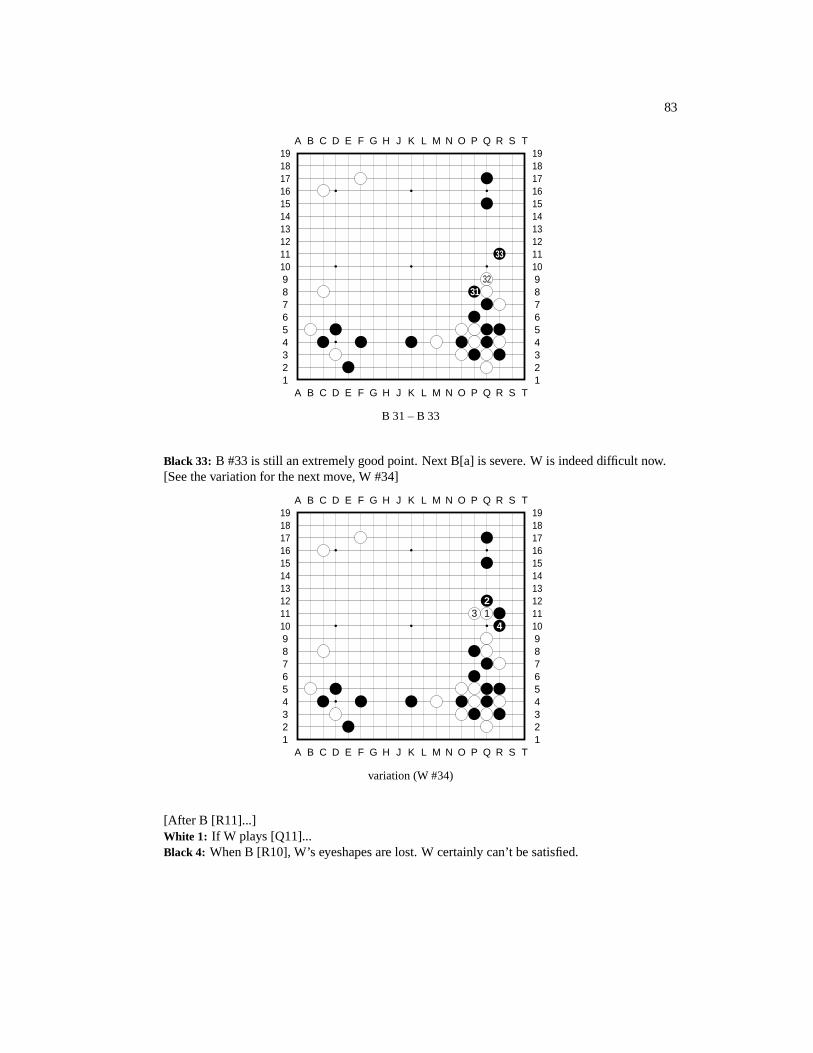
83
A B C D E F G H J K L M N O P Q R S T
A B C D E F G H J K L M N O P Q R S T12345678910111213141516171819
12345678910111213141516171819
33
3231
B 31 – B 33
Black 33: B #33 is still an extremely good point. Next B[a] is severe. W is indeed difficult now.[See the variation for the next move, W #34]
A B C D E F G H J K L M N O P Q R S T
A B C D E F G H J K L M N O P Q R S T12345678910111213141516171819
12345678910111213141516171819
23 1
4
variation (W #34)
[After B [R11]...]White 1: If W plays [Q11]...Black 4: When B [R10], W’s eyeshapes are lost. W certainly can’t be satisfied.
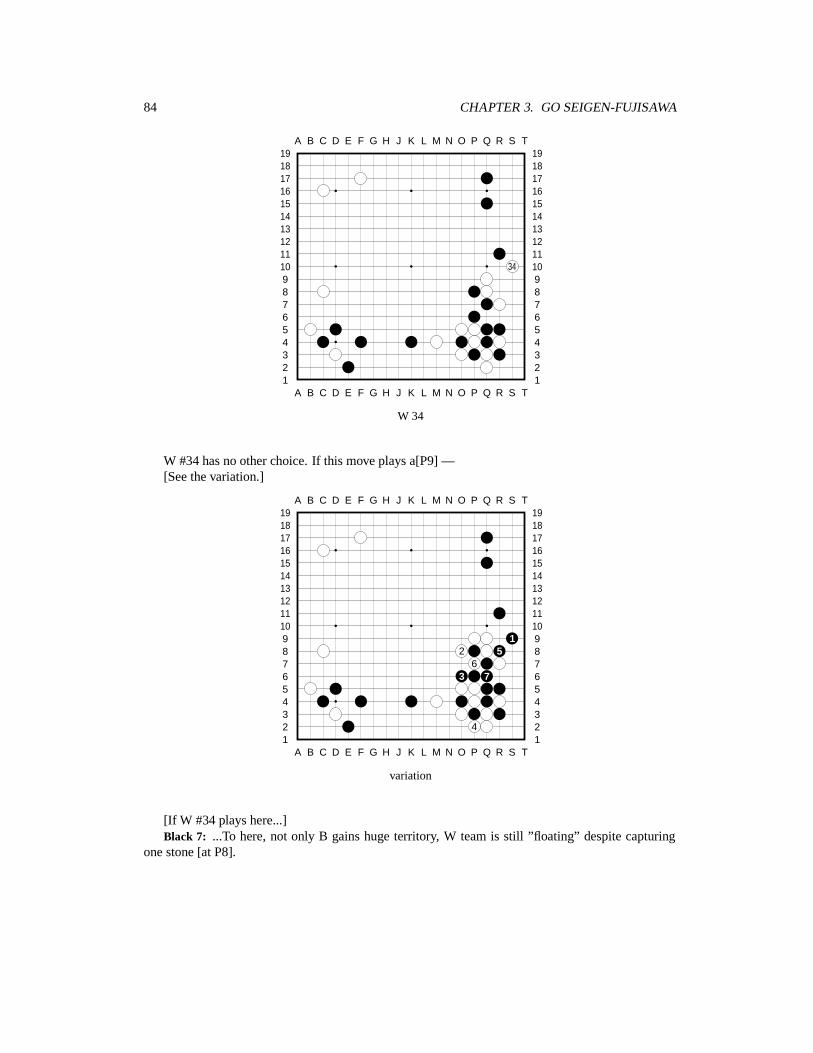
84 CHAPTER 3. GO SEIGEN-FUJISAWA
A B C D E F G H J K L M N O P Q R S T
A B C D E F G H J K L M N O P Q R S T12345678910111213141516171819
12345678910111213141516171819
34
W 34
W #34 has no other choice. If this move plays a[P9] —[See the variation.]
A B C D E F G H J K L M N O P Q R S T
A B C D E F G H J K L M N O P Q R S T12345678910111213141516171819
12345678910111213141516171819
12 5
63 7
4
variation
[If W #34 plays here...]Black 7: ...To here, not only B gains huge territory, W team is still ”floating” despite capturing
one stone [at P8].
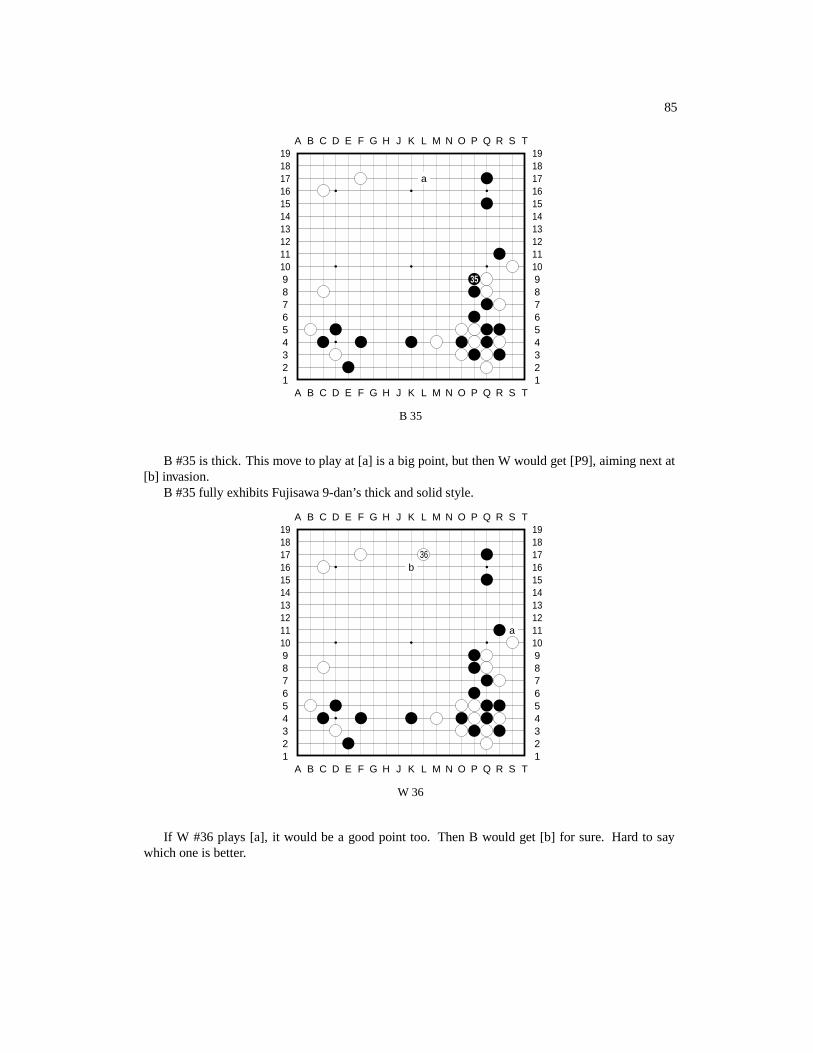
85
A B C D E F G H J K L M N O P Q R S T
A B C D E F G H J K L M N O P Q R S T12345678910111213141516171819
12345678910111213141516171819
a
35
B 35
B #35 is thick. This move to play at [a] is a big point, but then W would get [P9], aiming next at[b] invasion.
B #35 fully exhibits Fujisawa 9-dan’s thick and solid style.
A B C D E F G H J K L M N O P Q R S T
A B C D E F G H J K L M N O P Q R S T12345678910111213141516171819
12345678910111213141516171819
36b
a
W 36
If W #36 plays [a], it would be a good point too. Then B would get [b] for sure. Hard to saywhich one is better.
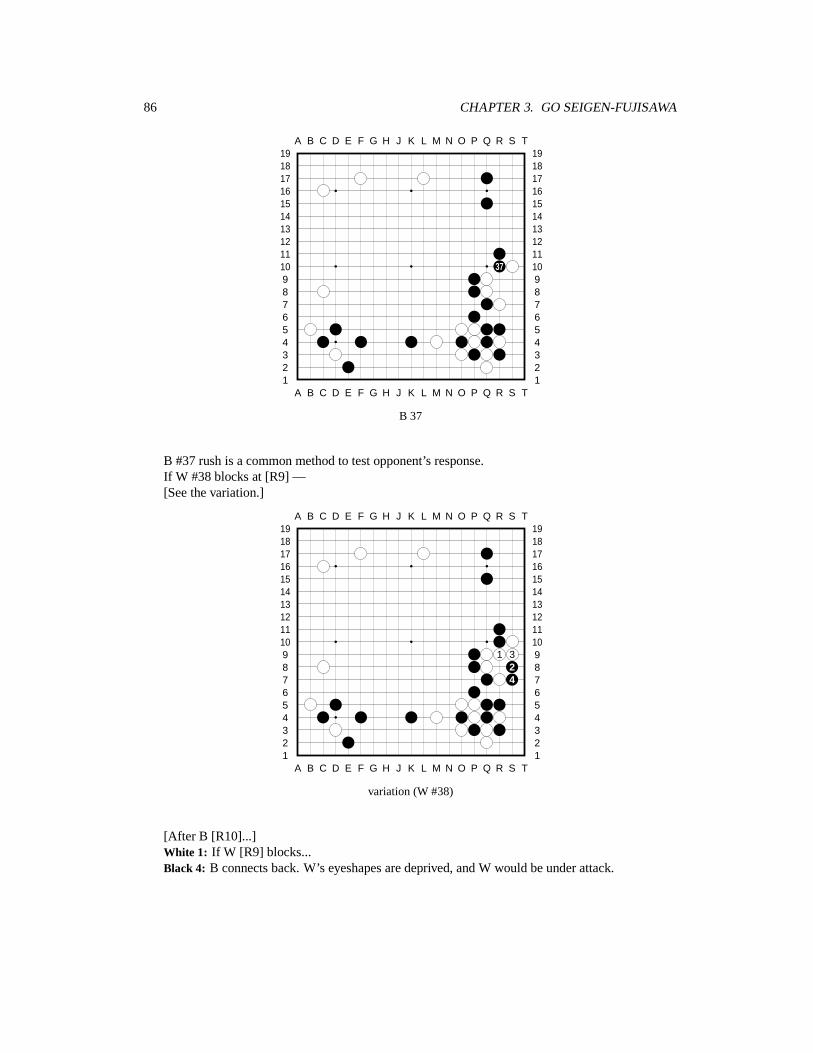
86 CHAPTER 3. GO SEIGEN-FUJISAWA
A B C D E F G H J K L M N O P Q R S T
A B C D E F G H J K L M N O P Q R S T12345678910111213141516171819
12345678910111213141516171819
37
B 37
B #37 rush is a common method to test opponent’s response.If W #38 blocks at [R9] —[See the variation.]
A B C D E F G H J K L M N O P Q R S T
A B C D E F G H J K L M N O P Q R S T12345678910111213141516171819
12345678910111213141516171819
1 324
variation (W #38)
[After B [R10]...]White 1: If W [R9] blocks...Black 4: B connects back. W’s eyeshapes are deprived, and W would be under attack.
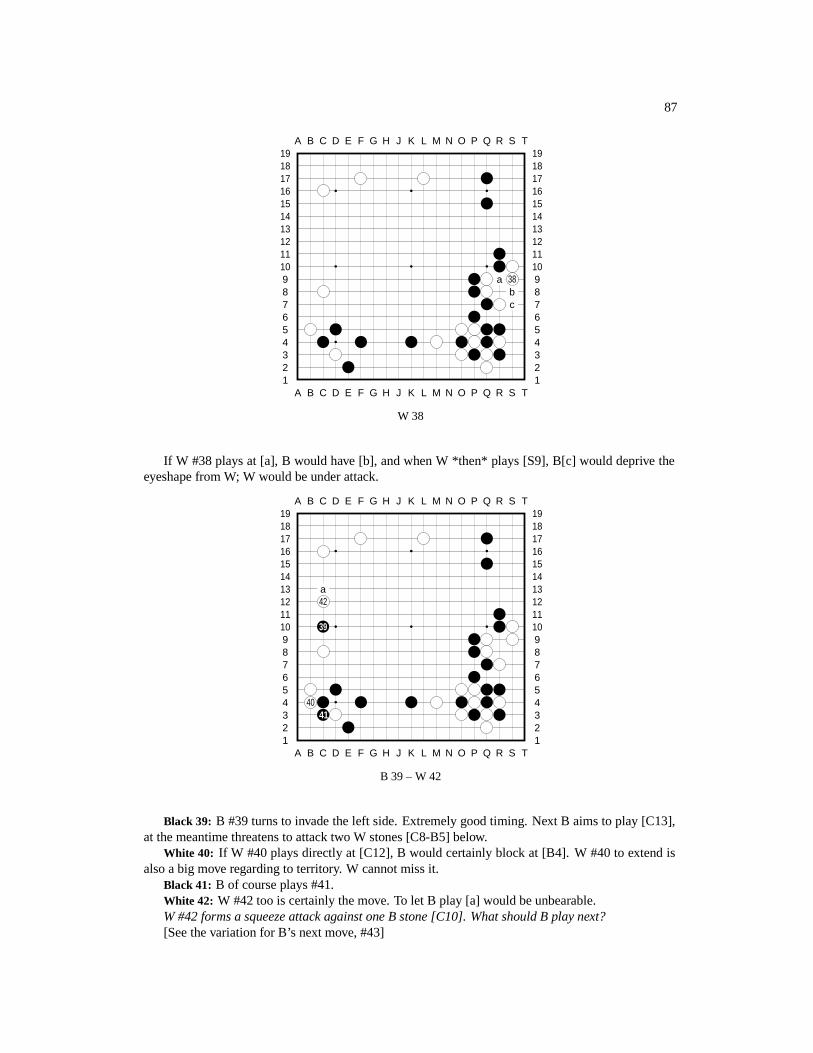
87
A B C D E F G H J K L M N O P Q R S T
A B C D E F G H J K L M N O P Q R S T12345678910111213141516171819
12345678910111213141516171819
a 38bc
W 38
If W #38 plays at [a], B would have [b], and when W *then* plays [S9], B[c] would deprive theeyeshape from W; W would be under attack.
A B C D E F G H J K L M N O P Q R S T
A B C D E F G H J K L M N O P Q R S T12345678910111213141516171819
12345678910111213141516171819
a42
39
4041
B 39 – W 42
Black 39: B #39 turns to invade the left side. Extremely good timing. Next B aims to play [C13],at the meantime threatens to attack two W stones [C8-B5] below.
White 40: If W #40 plays directly at [C12], B would certainly block at [B4]. W #40 to extend isalso a big move regarding to territory. W cannot miss it.
Black 41: B of course plays #41.White 42: W #42 too is certainly the move. To let B play [a] would be unbearable.W #42 forms a squeeze attack against one B stone [C10]. What should B play next?[See the variation for B’s next move, #43]
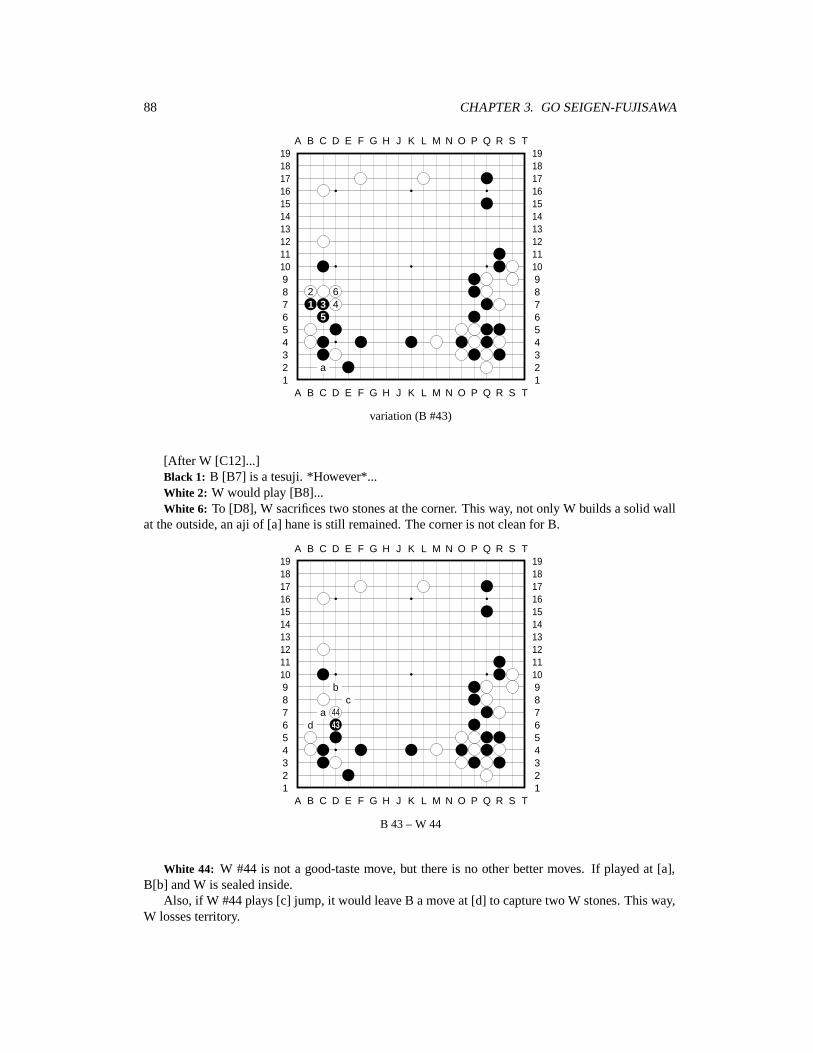
88 CHAPTER 3. GO SEIGEN-FUJISAWA
A B C D E F G H J K L M N O P Q R S T
A B C D E F G H J K L M N O P Q R S T12345678910111213141516171819
12345678910111213141516171819
2 61 3 4
5
a
variation (B #43)
[After W [C12]...]Black 1: B [B7] is a tesuji. *However*...White 2: W would play [B8]...White 6: To [D8], W sacrifices two stones at the corner. This way, not only W builds a solid wall
at the outside, an aji of [a] hane is still remained. The corner is not clean for B.
A B C D E F G H J K L M N O P Q R S T
A B C D E F G H J K L M N O P Q R S T12345678910111213141516171819
12345678910111213141516171819
bc
a 44d 43
B 43 – W 44
White 44: W #44 is not a good-taste move, but there is no other better moves. If played at [a],B[b] and W is sealed inside.
Also, if W #44 plays [c] jump, it would leave B a move at [d] to capture two W stones. This way,W losses territory.
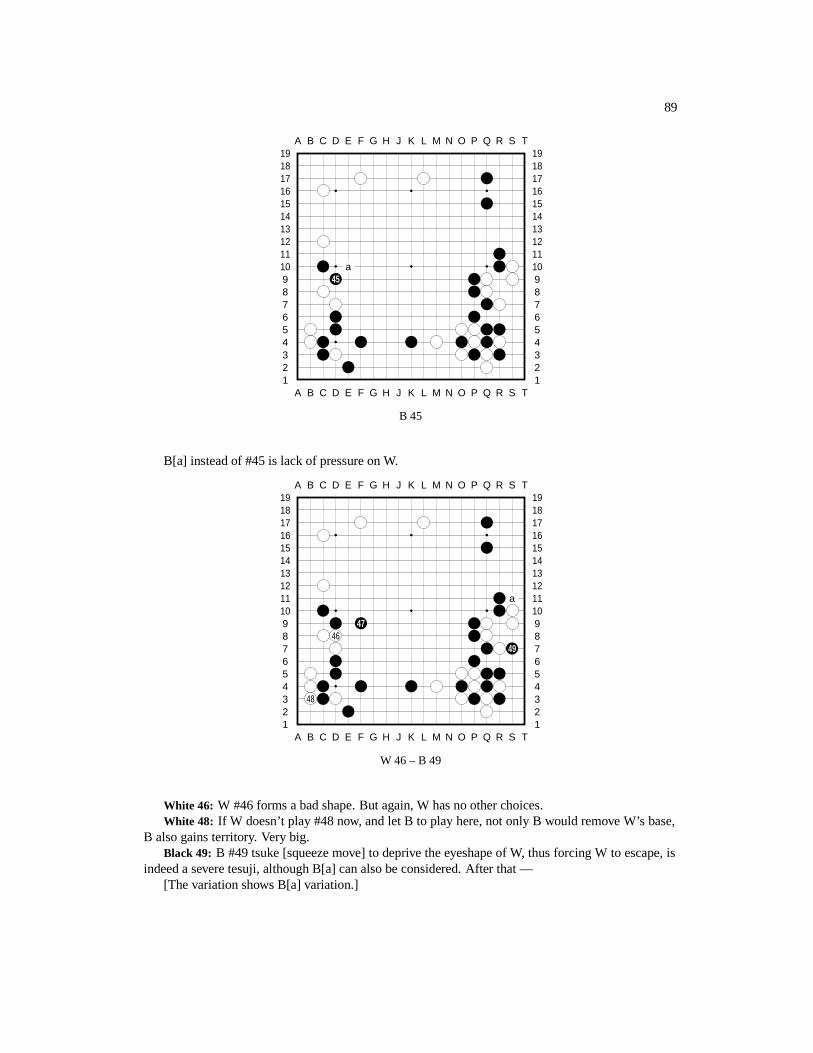
89
A B C D E F G H J K L M N O P Q R S T
A B C D E F G H J K L M N O P Q R S T12345678910111213141516171819
12345678910111213141516171819
a45
B 45
B[a] instead of #45 is lack of pressure on W.
A B C D E F G H J K L M N O P Q R S T
A B C D E F G H J K L M N O P Q R S T12345678910111213141516171819
12345678910111213141516171819
a
4746
49
48
W 46 – B 49
White 46: W #46 forms a bad shape. But again, W has no other choices.White 48: If W doesn’t play #48 now, and let B to play here, not only B would remove W’s base,
B also gains territory. Very big.Black 49: B #49 tsuke [squeeze move] to deprive the eyeshape of W, thus forcing W to escape, is
indeed a severe tesuji, although B[a] can also be considered. After that —[The variation shows B[a] variation.]
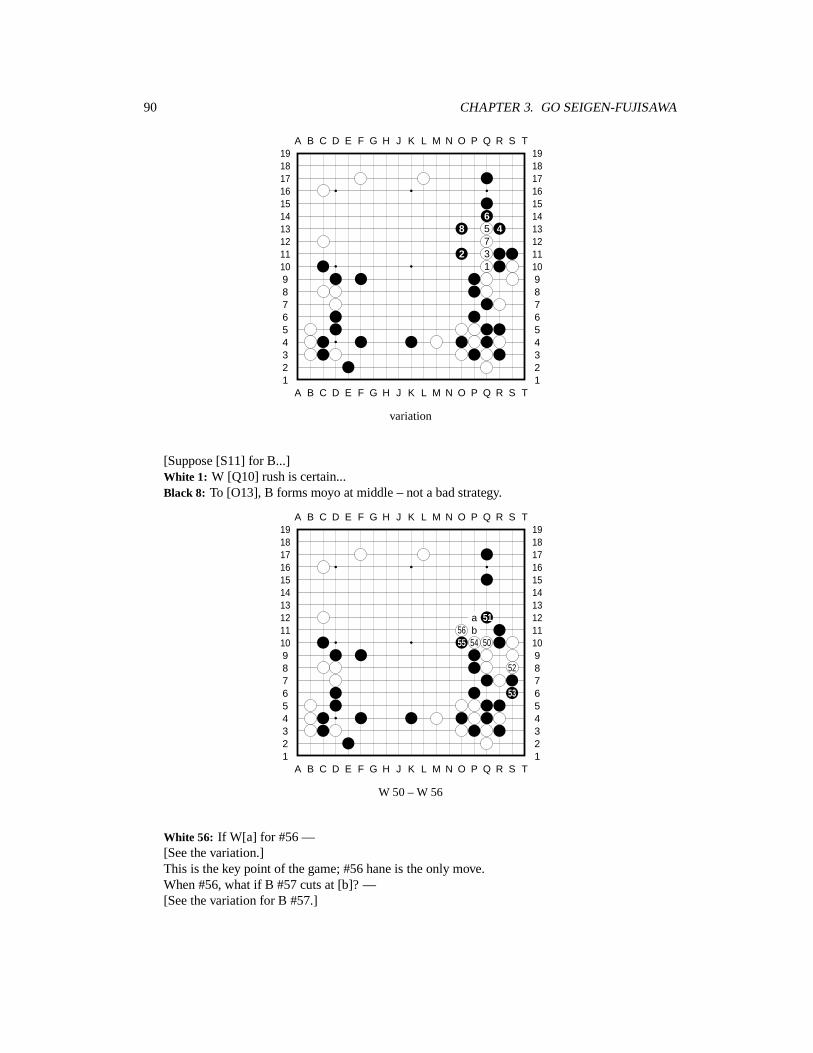
90 CHAPTER 3. GO SEIGEN-FUJISAWA
A B C D E F G H J K L M N O P Q R S T
A B C D E F G H J K L M N O P Q R S T12345678910111213141516171819
12345678910111213141516171819
68 5 4
72 3
1
variation
[Suppose [S11] for B...]White 1: W [Q10] rush is certain...Black 8: To [O13], B forms moyo at middle – not a bad strategy.
A B C D E F G H J K L M N O P Q R S T
A B C D E F G H J K L M N O P Q R S T12345678910111213141516171819
12345678910111213141516171819
a 5156 b55 54 50
52
53
W 50 – W 56
White 56: If W[a] for #56 —[See the variation.]This is the key point of the game; #56 hane is the only move.When #56, what if B #57 cuts at [b]? —[See the variation for B #57.]

91
A B C D E F G H J K L M N O P Q R S T
A B C D E F G H J K L M N O P Q R S T12345678910111213141516171819
12345678910111213141516171819
3
1 2
variation
[Suppose [P12] for W...]Black 3: After B [O11] and [N13], W is in trouble.
A B C D E F G H J K L M N O P Q R S T
A B C D E F G H J K L M N O P Q R S T12345678910111213141516171819
12345678910111213141516171819
1810 14
12 8 96 7
13 3 4 5a 1 2 11
1516
17
variation (B #57)
[When W #56 (O11)...]Black 1: If B #57 cut...White 4: ...W would atari then cut...Black 11: ...Here is a certain sequence...Black 13: ...after W #58 and B #59 exchange...White 14: ...W #70 blocks...Black 15: ...B has no way but #71 and...Black 17: ...[and] #73. Thus a semeai [capturing race]. Although B wins this semeai, but even
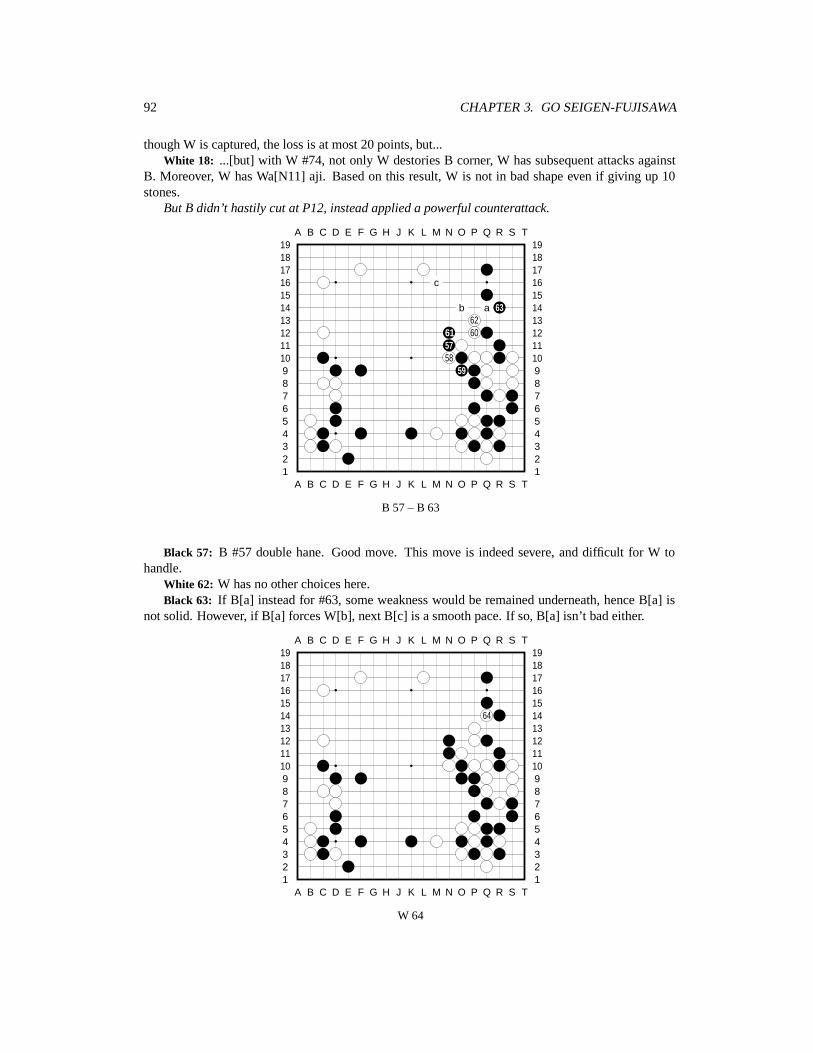
92 CHAPTER 3. GO SEIGEN-FUJISAWA
though W is captured, the loss is at most 20 points, but...White 18: ...[but] with W #74, not only W destories B corner, W has subsequent attacks against
B. Moreover, W has Wa[N11] aji. Based on this result, W is not in bad shape even if giving up 10stones.
But B didn’t hastily cut at P12, instead applied a powerful counterattack.
A B C D E F G H J K L M N O P Q R S T
A B C D E F G H J K L M N O P Q R S T12345678910111213141516171819
12345678910111213141516171819
c
b a 6362
61 605758
59
B 57 – B 63
Black 57: B #57 double hane. Good move. This move is indeed severe, and difficult for W tohandle.
White 62: W has no other choices here.Black 63: If B[a] instead for #63, some weakness would be remained underneath, hence B[a] is
not solid. However, if B[a] forces W[b], next B[c] is a smooth pace. If so, B[a] isn’t bad either.
A B C D E F G H J K L M N O P Q R S T
A B C D E F G H J K L M N O P Q R S T12345678910111213141516171819
12345678910111213141516171819
64
W 64
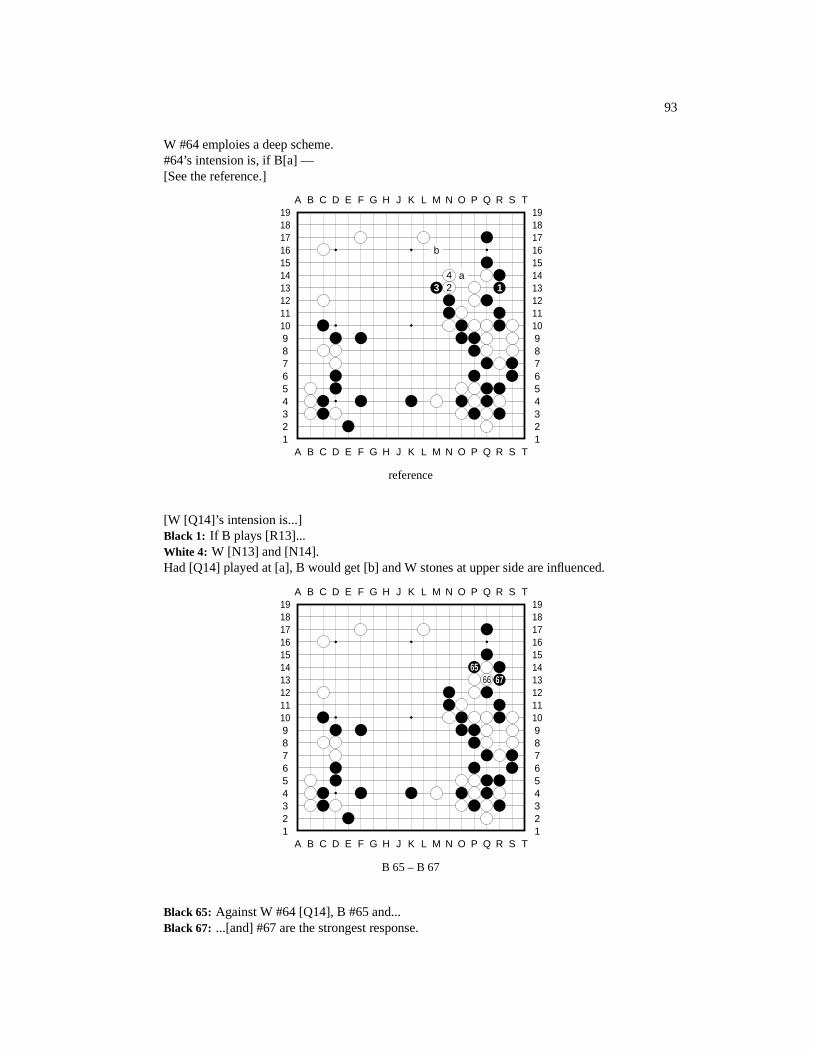
93
W #64 emploies a deep scheme.#64’s intension is, if B[a] —[See the reference.]
A B C D E F G H J K L M N O P Q R S T
A B C D E F G H J K L M N O P Q R S T12345678910111213141516171819
12345678910111213141516171819
b
4 a3 2 1
reference
[W [Q14]’s intension is...]Black 1: If B plays [R13]...White 4: W [N13] and [N14].Had [Q14] played at [a], B would get [b] and W stones at upper side are influenced.
A B C D E F G H J K L M N O P Q R S T
A B C D E F G H J K L M N O P Q R S T12345678910111213141516171819
12345678910111213141516171819
6566 67
B 65 – B 67
Black 65: Against W #64 [Q14], B #65 and...Black 67: ...[and] #67 are the strongest response.
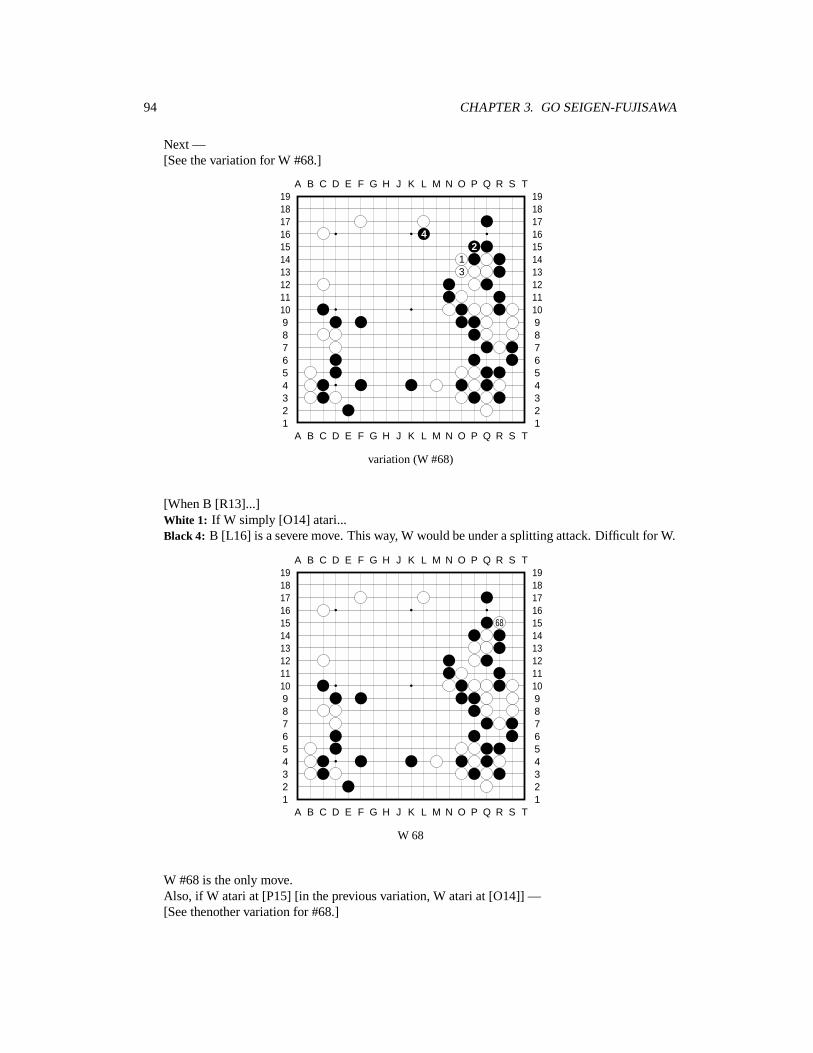
94 CHAPTER 3. GO SEIGEN-FUJISAWA
Next —[See the variation for W #68.]
A B C D E F G H J K L M N O P Q R S T
A B C D E F G H J K L M N O P Q R S T12345678910111213141516171819
12345678910111213141516171819
42
13
variation (W #68)
[When B [R13]...]White 1: If W simply [O14] atari...Black 4: B [L16] is a severe move. This way, W would be under a splitting attack. Difficult for W.
A B C D E F G H J K L M N O P Q R S T
A B C D E F G H J K L M N O P Q R S T12345678910111213141516171819
12345678910111213141516171819
68
W 68
W #68 is the only move.Also, if W atari at [P15] [in the previous variation, W atari at [O14]] —[See thenother variation for #68.]
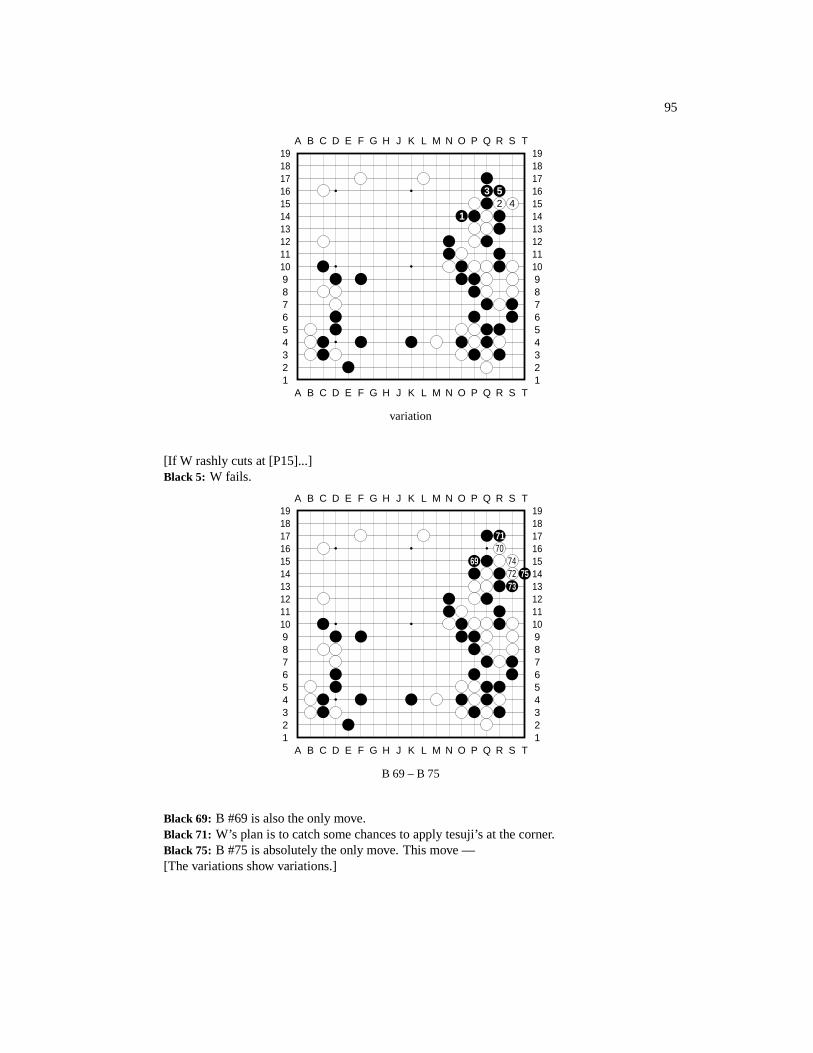
95
A B C D E F G H J K L M N O P Q R S T
A B C D E F G H J K L M N O P Q R S T12345678910111213141516171819
12345678910111213141516171819
3 52 4
1
variation
[If W rashly cuts at [P15]...]Black 5: W fails.
A B C D E F G H J K L M N O P Q R S T
A B C D E F G H J K L M N O P Q R S T12345678910111213141516171819
12345678910111213141516171819
7170
69 7472 7573
B 69 – B 75
Black 69: B #69 is also the only move.Black 71: W’s plan is to catch some chances to apply tesuji’s at the corner.Black 75: B #75 is absolutely the only move. This move —[The variations show variations.]
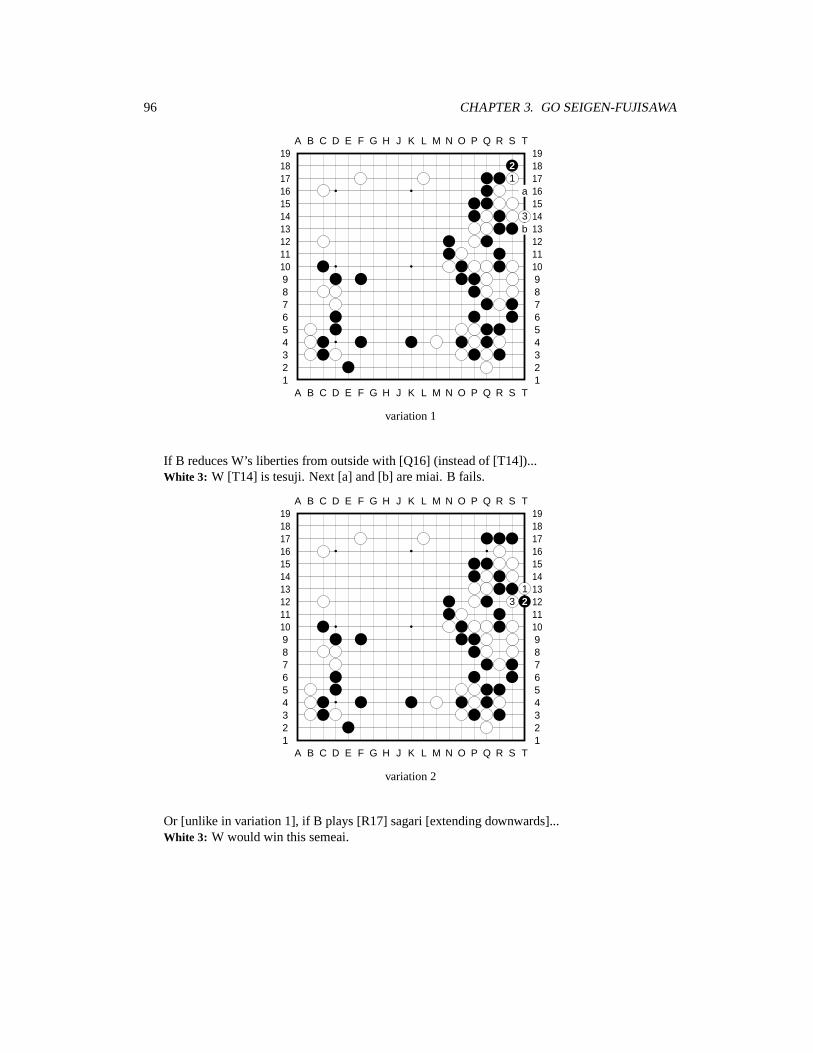
96 CHAPTER 3. GO SEIGEN-FUJISAWA
A B C D E F G H J K L M N O P Q R S T
A B C D E F G H J K L M N O P Q R S T12345678910111213141516171819
12345678910111213141516171819
21
a
3b
variation 1
If B reduces W’s liberties from outside with [Q16] (instead of [T14])...White 3: W [T14] is tesuji. Next [a] and [b] are miai. B fails.
A B C D E F G H J K L M N O P Q R S T
A B C D E F G H J K L M N O P Q R S T12345678910111213141516171819
12345678910111213141516171819
13 2
variation 2
Or [unlike in variation 1], if B plays [R17] sagari [extending downwards]...White 3: W would win this semeai.
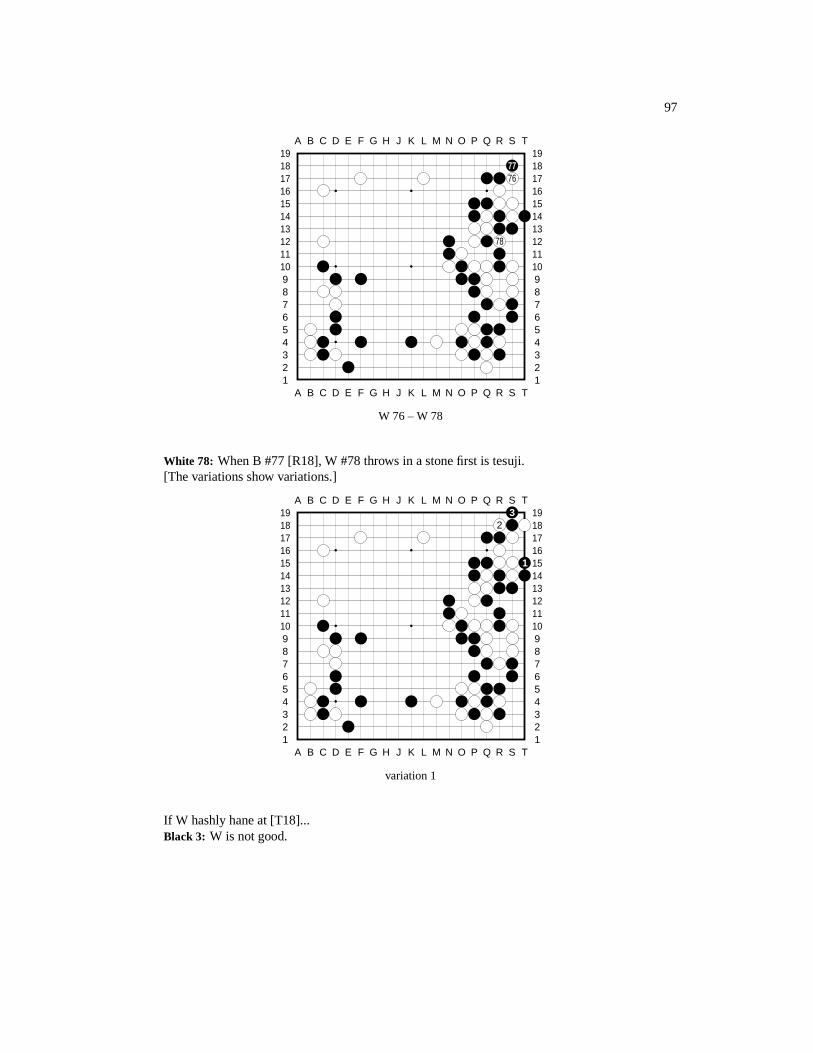
97
A B C D E F G H J K L M N O P Q R S T
A B C D E F G H J K L M N O P Q R S T12345678910111213141516171819
12345678910111213141516171819
7776
78
W 76 – W 78
White 78: When B #77 [R18], W #78 throws in a stone first is tesuji.[The variations show variations.]
A B C D E F G H J K L M N O P Q R S T
A B C D E F G H J K L M N O P Q R S T12345678910111213141516171819
123456789101112131415161718193
2
1
variation 1
If W hashly hane at [T18]...Black 3: W is not good.

98 CHAPTER 3. GO SEIGEN-FUJISAWA
A B C D E F G H J K L M N O P Q R S T
A B C D E F G H J K L M N O P Q R S T12345678910111213141516171819
12345678910111213141516171819
37
92
14 5
8 6
variation 2
Or if [T16] for W ...Black 9: To B [Q16], although W gets three B stones, W stones at the corner are unconditionally
captured. W fails.
A B C D E F G H J K L M N O P Q R S T
A B C D E F G H J K L M N O P Q R S T12345678910111213141516171819
12345678910111213141516171819
82
8079 81a
B 79 – W 82
White 80: W #80 is tesuji related to #78 [throw-in move at R12].White 82: If W[a] for #82 —[See the variation.]
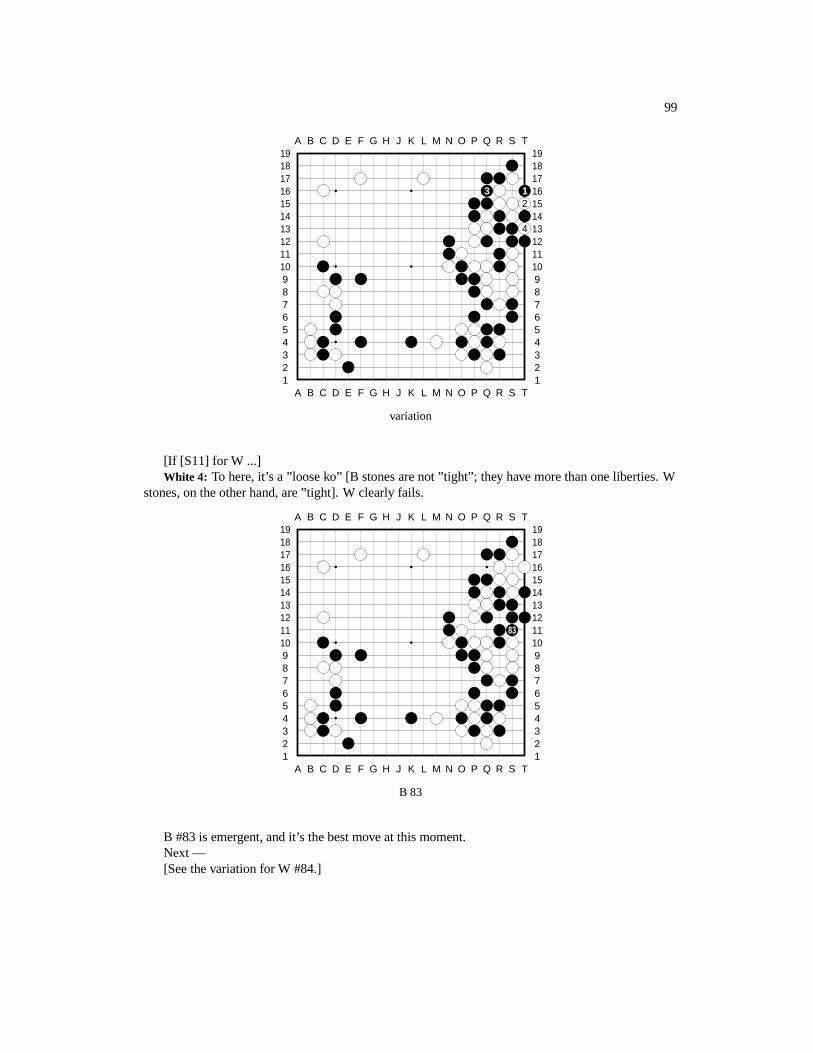
99
A B C D E F G H J K L M N O P Q R S T
A B C D E F G H J K L M N O P Q R S T12345678910111213141516171819
12345678910111213141516171819
3 12
4
variation
[If [S11] for W ...]White 4: To here, it’s a ”loose ko” [B stones are not ”tight”; they have more than one liberties. W
stones, on the other hand, are ”tight]. W clearly fails.
A B C D E F G H J K L M N O P Q R S T
A B C D E F G H J K L M N O P Q R S T12345678910111213141516171819
12345678910111213141516171819
83
B 83
B #83 is emergent, and it’s the best move at this moment.Next —[See the variation for W #84.]
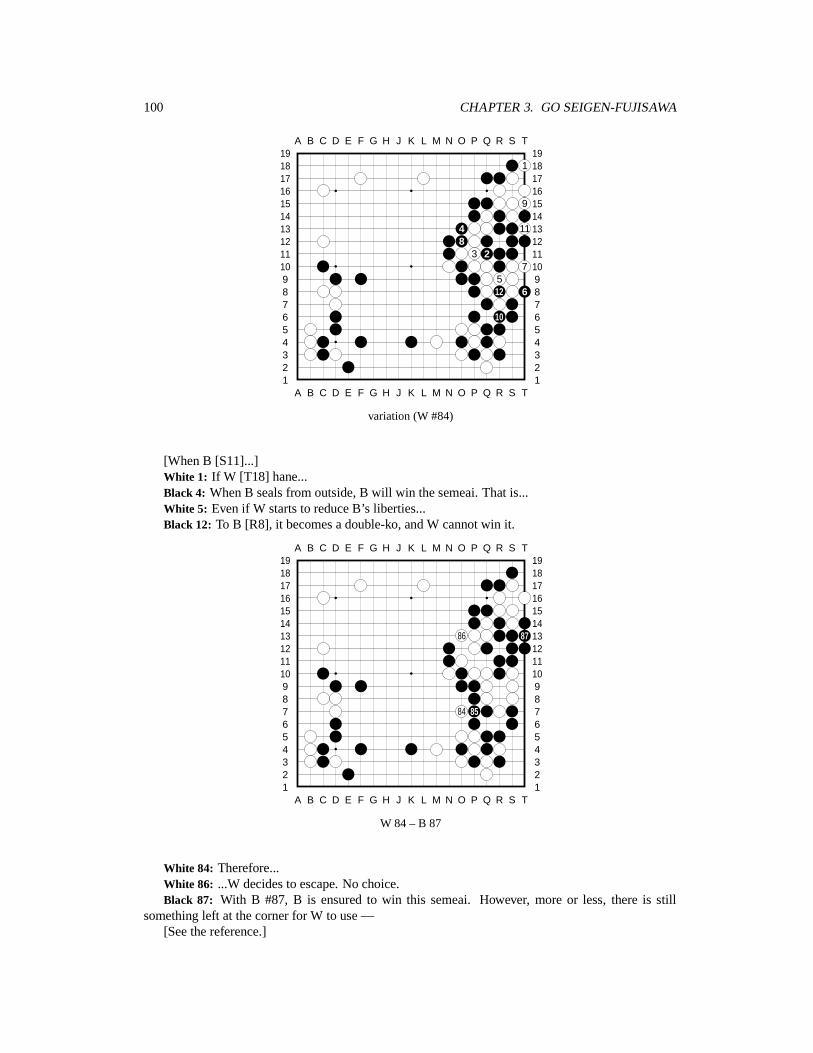
100 CHAPTER 3. GO SEIGEN-FUJISAWA
A B C D E F G H J K L M N O P Q R S T
A B C D E F G H J K L M N O P Q R S T12345678910111213141516171819
12345678910111213141516171819
1
9
4 118
3 27
512 6
10
variation (W #84)
[When B [S11]...]White 1: If W [T18] hane...Black 4: When B seals from outside, B will win the semeai. That is...White 5: Even if W starts to reduce B’s liberties...Black 12: To B [R8], it becomes a double-ko, and W cannot win it.
A B C D E F G H J K L M N O P Q R S T
A B C D E F G H J K L M N O P Q R S T12345678910111213141516171819
12345678910111213141516171819
86 87
84 85
W 84 – B 87
White 84: Therefore...White 86: ...W decides to escape. No choice.Black 87: With B #87, B is ensured to win this semeai. However, more or less, there is still
something left at the corner for W to use —[See the reference.]
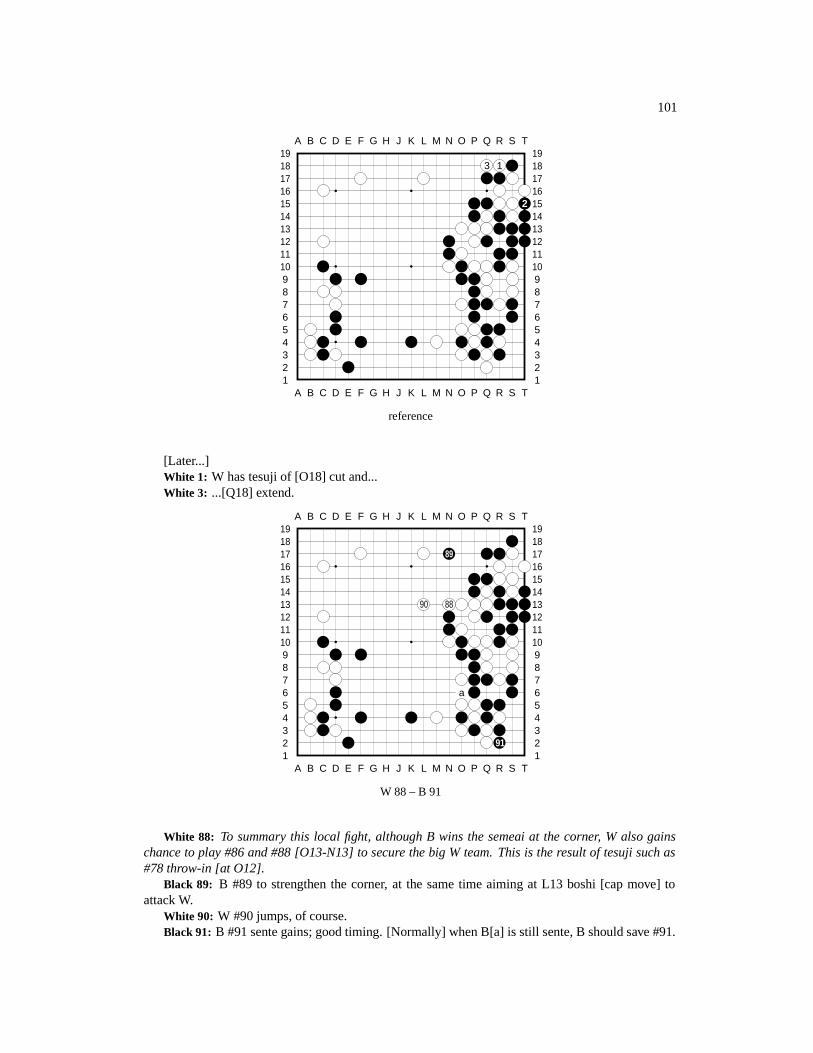
101
A B C D E F G H J K L M N O P Q R S T
A B C D E F G H J K L M N O P Q R S T12345678910111213141516171819
12345678910111213141516171819
3 1
2
reference
[Later...]White 1: W has tesuji of [O18] cut and...White 3: ...[Q18] extend.
A B C D E F G H J K L M N O P Q R S T
A B C D E F G H J K L M N O P Q R S T12345678910111213141516171819
12345678910111213141516171819
89
90 88
a
91
W 88 – B 91
White 88: To summary this local fight, although B wins the semeai at the corner, W also gainschance to play #86 and #88 [O13-N13] to secure the big W team. This is the result of tesuji such as#78 throw-in [at O12].
Black 89: B #89 to strengthen the corner, at the same time aiming at L13 boshi [cap move] toattack W.
White 90: W #90 jumps, of course.Black 91: B #91 sente gains; good timing. [Normally] when B[a] is still sente, B should save #91.
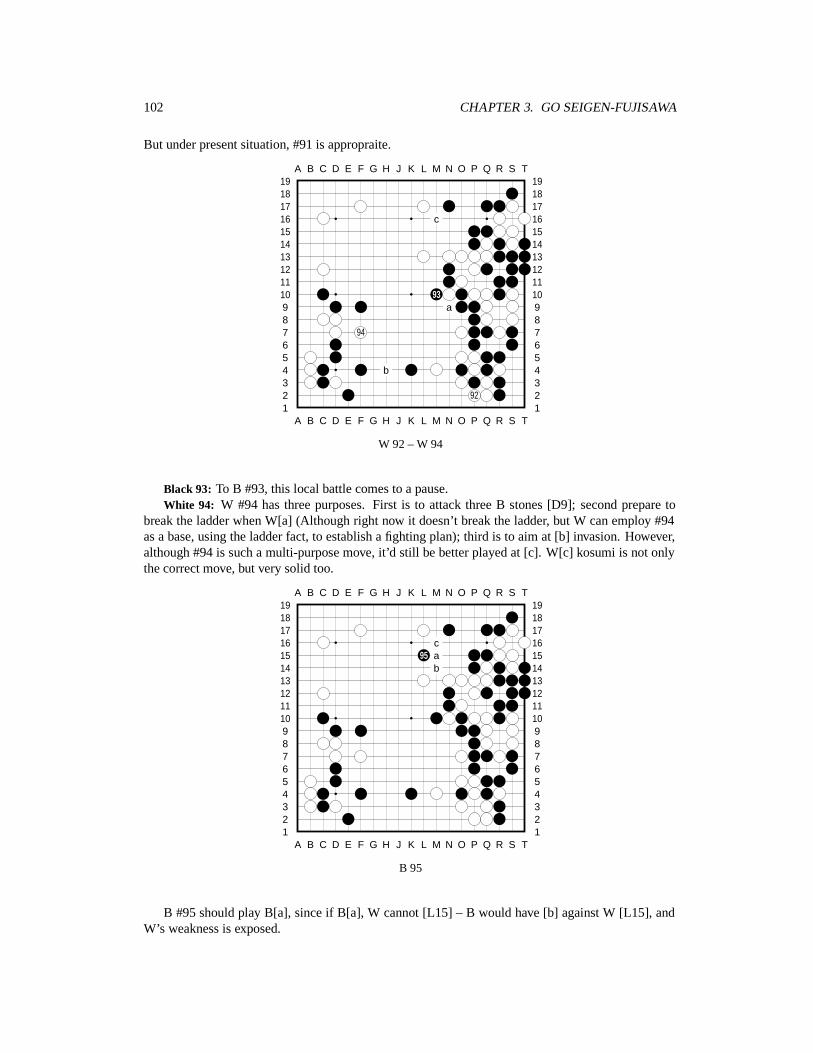
102 CHAPTER 3. GO SEIGEN-FUJISAWA
But under present situation, #91 is appropraite.
A B C D E F G H J K L M N O P Q R S T
A B C D E F G H J K L M N O P Q R S T12345678910111213141516171819
12345678910111213141516171819
c
93a
94
b
92
W 92 – W 94
Black 93: To B #93, this local battle comes to a pause.White 94: W #94 has three purposes. First is to attack three B stones [D9]; second prepare to
break the ladder when W[a] (Although right now it doesn’t break the ladder, but W can employ #94as a base, using the ladder fact, to establish a fighting plan); third is to aim at [b] invasion. However,although #94 is such a multi-purpose move, it’d still be better played at [c]. W[c] kosumi is not onlythe correct move, but very solid too.
A B C D E F G H J K L M N O P Q R S T
A B C D E F G H J K L M N O P Q R S T12345678910111213141516171819
12345678910111213141516171819
c95 a
b
B 95
B #95 should play B[a], since if B[a], W cannot [L15] – B would have [b] against W [L15], andW’s weakness is exposed.
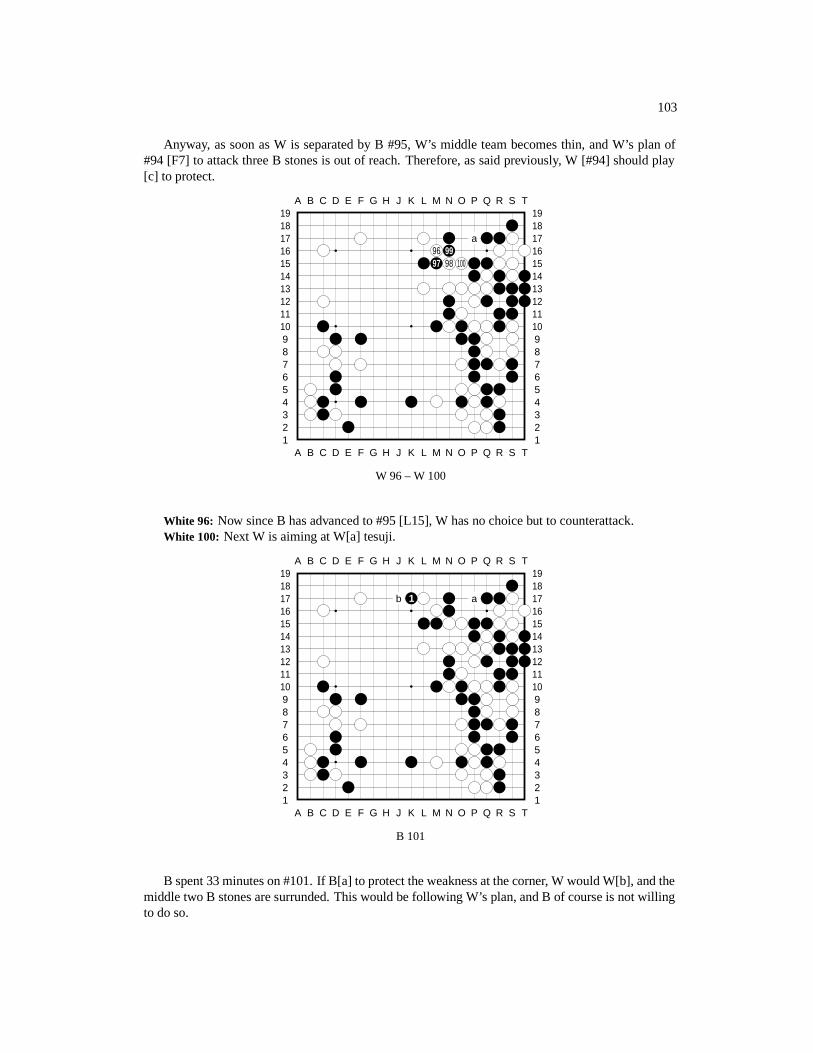
103
Anyway, as soon as W is separated by B #95, W’s middle team becomes thin, and W’s plan of#94 [F7] to attack three B stones is out of reach. Therefore, as said previously, W [#94] should play[c] to protect.
A B C D E F G H J K L M N O P Q R S T
A B C D E F G H J K L M N O P Q R S T12345678910111213141516171819
12345678910111213141516171819
a96 9997 98 100
W 96 – W 100
White 96: Now since B has advanced to #95 [L15], W has no choice but to counterattack.White 100: Next W is aiming at W[a] tesuji.
A B C D E F G H J K L M N O P Q R S T
A B C D E F G H J K L M N O P Q R S T12345678910111213141516171819
12345678910111213141516171819
b 1 a
B 101
B spent 33 minutes on #101. If B[a] to protect the weakness at the corner, W would W[b], and themiddle two B stones are surrunded. This would be following W’s plan, and B of course is not willingto do so.
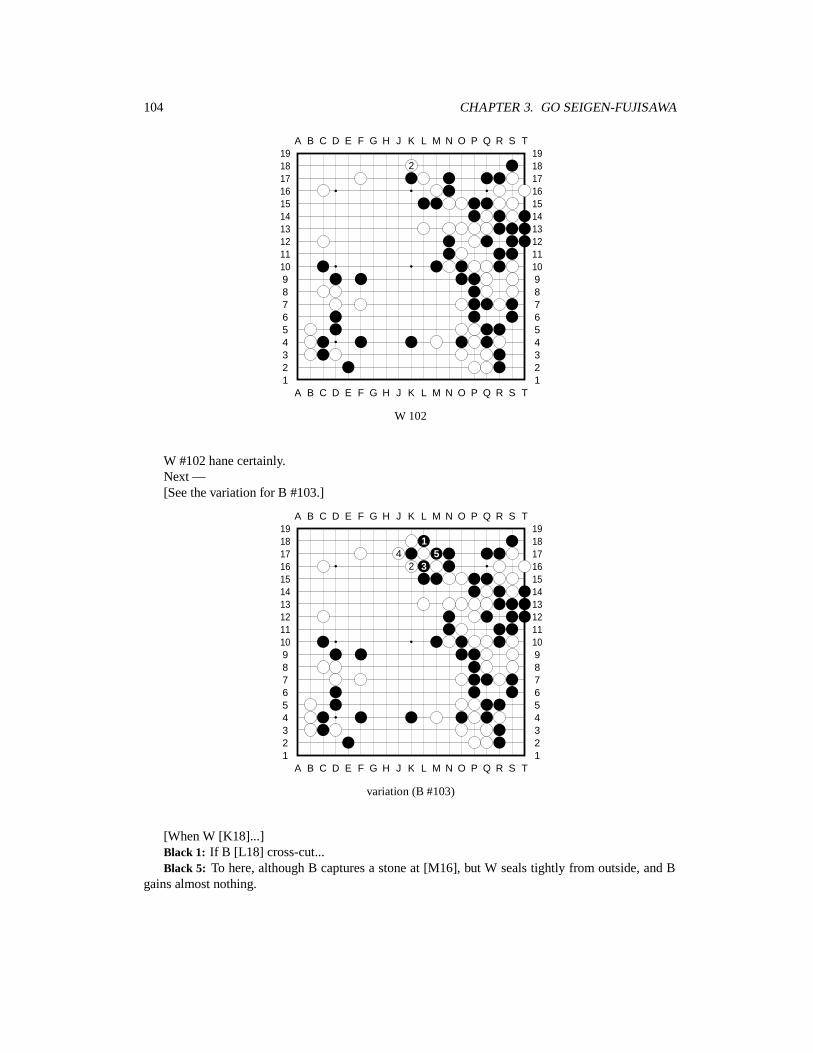
104 CHAPTER 3. GO SEIGEN-FUJISAWA
A B C D E F G H J K L M N O P Q R S T
A B C D E F G H J K L M N O P Q R S T12345678910111213141516171819
12345678910111213141516171819
2
W 102
W #102 hane certainly.Next —[See the variation for B #103.]
A B C D E F G H J K L M N O P Q R S T
A B C D E F G H J K L M N O P Q R S T12345678910111213141516171819
12345678910111213141516171819
14 5
2 3
variation (B #103)
[When W [K18]...]Black 1: If B [L18] cross-cut...Black 5: To here, although B captures a stone at [M16], but W seals tightly from outside, and B
gains almost nothing.

105
A B C D E F G H J K L M N O P Q R S T
A B C D E F G H J K L M N O P Q R S T12345678910111213141516171819
12345678910111213141516171819
5 b4 a
3
B 103 – B 105
Black 103: Therefore B #103 leads a certain sequence.Black 105: B #105 sagari prevents W[a] tesuji, while forcing W to play low; an efficient move
[#105]. Although W[b] aji is still remained at the corner, but at this moment, to emphasize the fightat middle, ignoring the corner temperorily, is strategically correct.
A B C D E F G H J K L M N O P Q R S T
A B C D E F G H J K L M N O P Q R S T12345678910111213141516171819
12345678910111213141516171819
86a 7
9
W 106 – B 109
Black 109: Since B has [a] sente, B #109 could have a big jump. This is the result of pervious fewmoves started with #103 [L16].
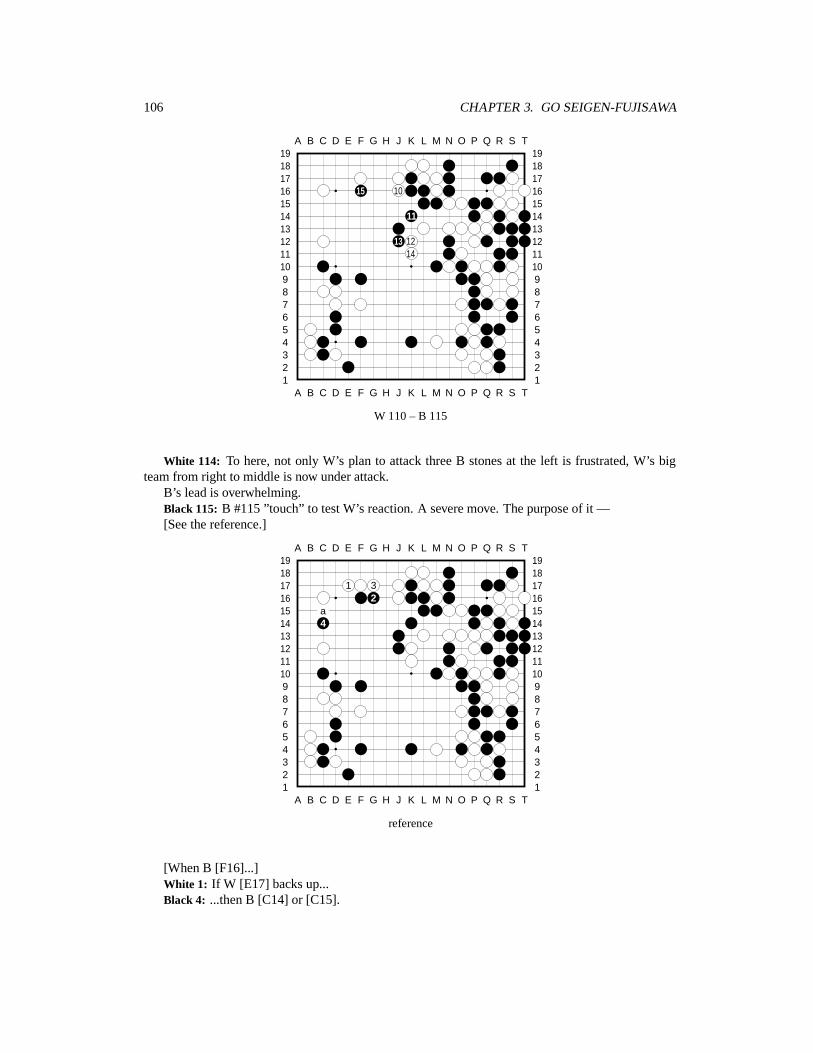
106 CHAPTER 3. GO SEIGEN-FUJISAWA
A B C D E F G H J K L M N O P Q R S T
A B C D E F G H J K L M N O P Q R S T12345678910111213141516171819
12345678910111213141516171819
15 10
11
13 1214
W 110 – B 115
White 114: To here, not only W’s plan to attack three B stones at the left is frustrated, W’s bigteam from right to middle is now under attack.
B’s lead is overwhelming.Black 115: B #115 ”touch” to test W’s reaction. A severe move. The purpose of it —[See the reference.]
A B C D E F G H J K L M N O P Q R S T
A B C D E F G H J K L M N O P Q R S T12345678910111213141516171819
12345678910111213141516171819
1 32
a4
reference
[When B [F16]...]White 1: If W [E17] backs up...Black 4: ...then B [C14] or [C15].

107
A B C D E F G H J K L M N O P Q R S T
A B C D E F G H J K L M N O P Q R S T12345678910111213141516171819
12345678910111213141516171819
1718 16
W 116 – W 118
White 116: W #116 is the only way to resist.Black 117: B #117 is tesuji.White 118: If W #118 atari from [F15] —[The variation shows the result of this careless move.]
A B C D E F G H J K L M N O P Q R S T
A B C D E F G H J K L M N O P Q R S T12345678910111213141516171819
123456789101112131415161718197 18 19 14
6 4 5 12 118 3 15
1 92 10 17 13
variation16 at 11
[If W chooses L15 ...]Black 1: B would deliver the following sequence in a hurry...Black 19: To here, it is a light ko for B, and W cannot take it.
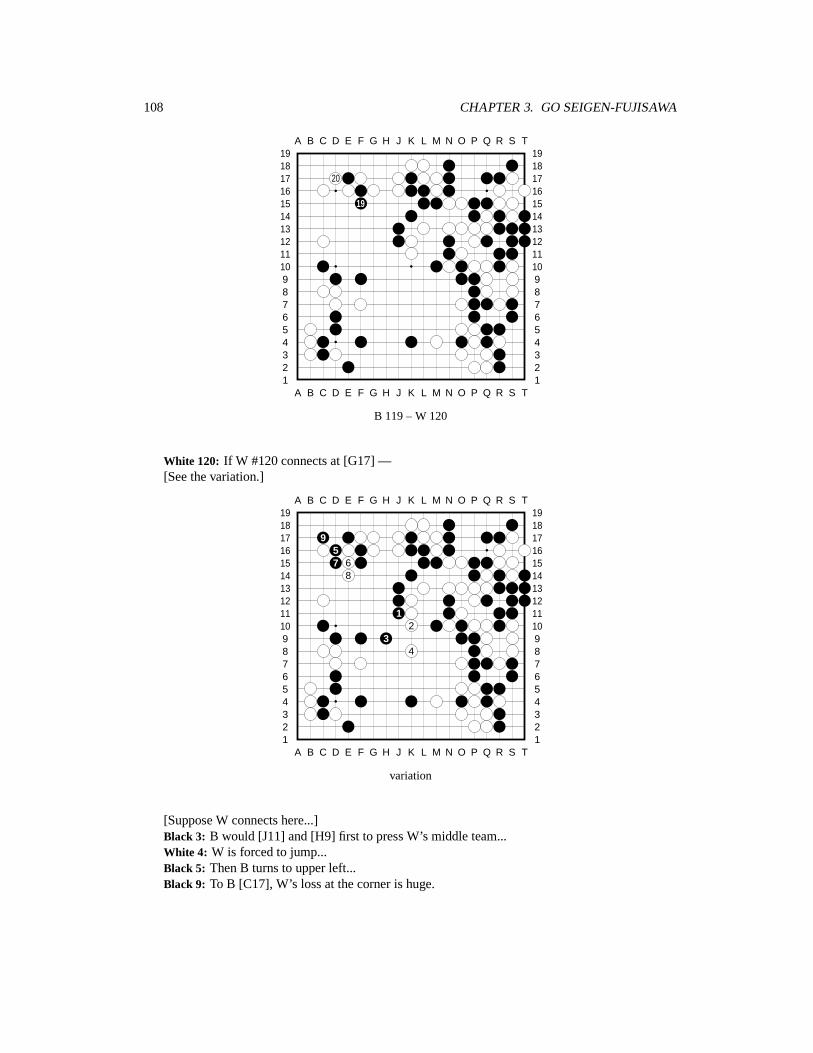
108 CHAPTER 3. GO SEIGEN-FUJISAWA
A B C D E F G H J K L M N O P Q R S T
A B C D E F G H J K L M N O P Q R S T12345678910111213141516171819
12345678910111213141516171819
20
19
B 119 – W 120
White 120: If W #120 connects at [G17] —[See the variation.]
A B C D E F G H J K L M N O P Q R S T
A B C D E F G H J K L M N O P Q R S T12345678910111213141516171819
12345678910111213141516171819
957 6
8
12
34
variation
[Suppose W connects here...]Black 3: B would [J11] and [H9] first to press W’s middle team...White 4: W is forced to jump...Black 5: Then B turns to upper left...Black 9: To B [C17], W’s loss at the corner is huge.
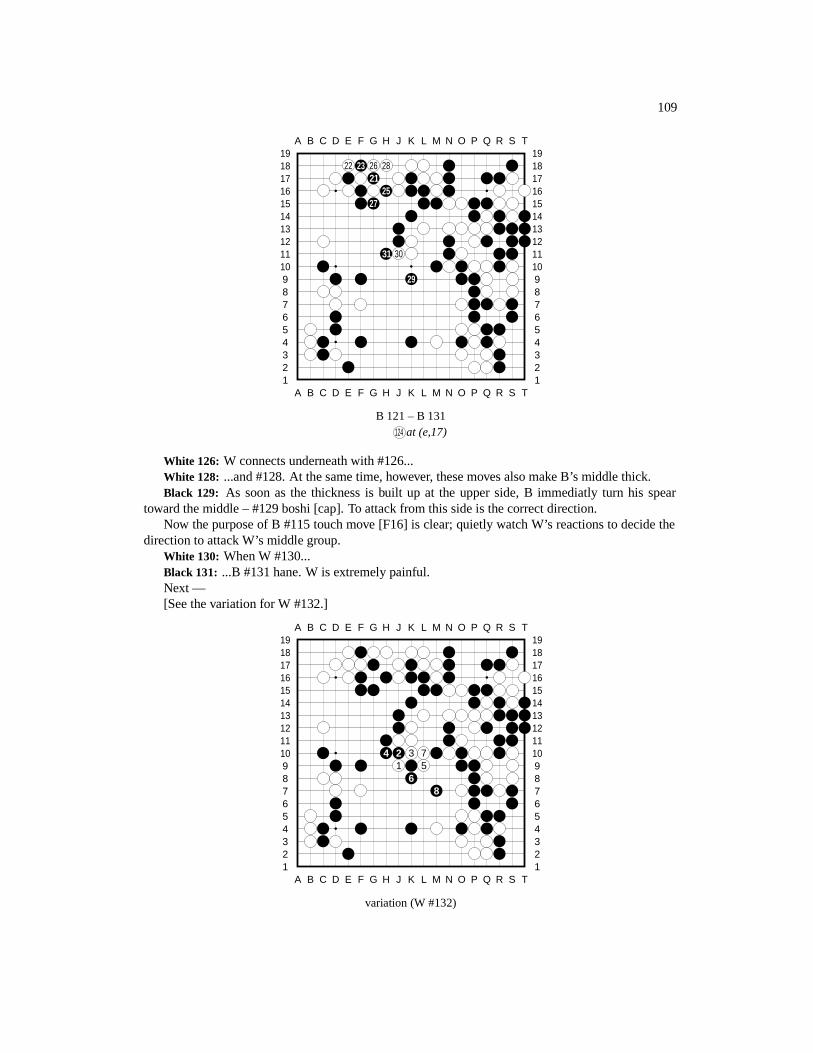
109
A B C D E F G H J K L M N O P Q R S T
A B C D E F G H J K L M N O P Q R S T12345678910111213141516171819
12345678910111213141516171819
22 23 26 2821
2527
31 30
29
B 121 – B 131124 at (e,17)
White 126: W connects underneath with #126...White 128: ...and #128. At the same time, however, these moves also make B’s middle thick.Black 129: As soon as the thickness is built up at the upper side, B immediatly turn his spear
toward the middle – #129 boshi [cap]. To attack from this side is the correct direction.Now the purpose of B #115 touch move [F16] is clear; quietly watch W’s reactions to decide the
direction to attack W’s middle group.White 130: When W #130...Black 131: ...B #131 hane. W is extremely painful.Next —[See the variation for W #132.]
A B C D E F G H J K L M N O P Q R S T
A B C D E F G H J K L M N O P Q R S T12345678910111213141516171819
12345678910111213141516171819
4 2 3 71 5
68
variation (W #132)
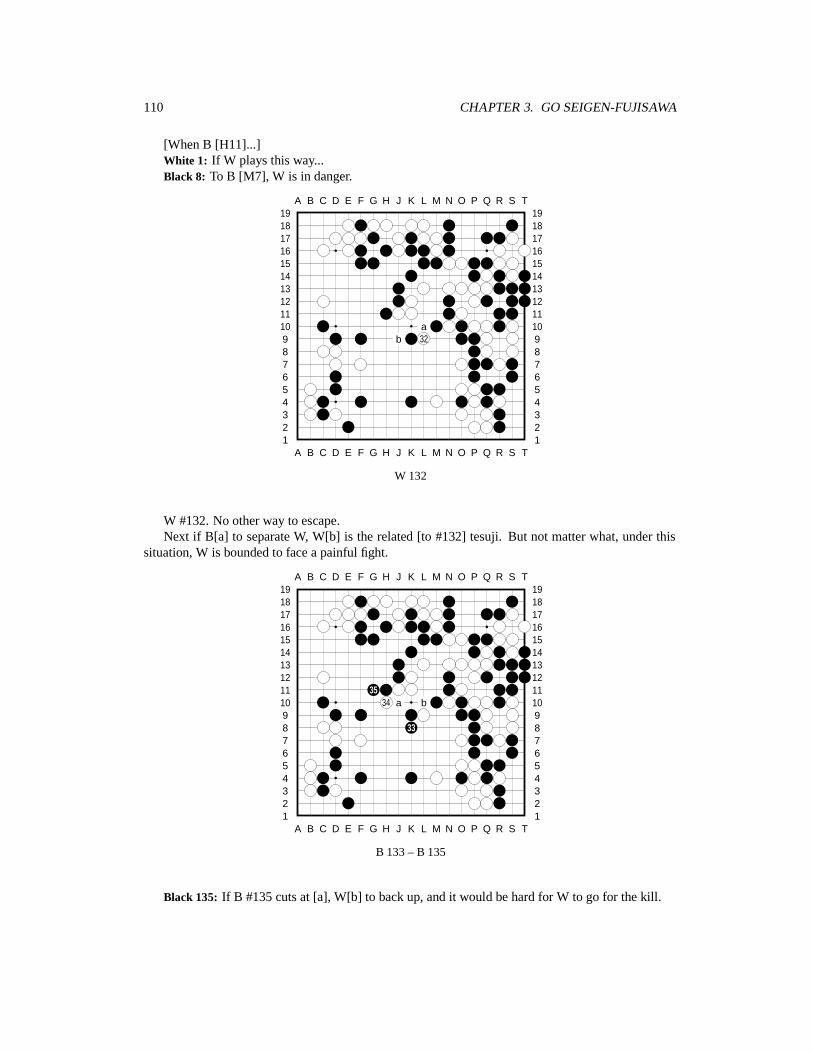
110 CHAPTER 3. GO SEIGEN-FUJISAWA
[When B [H11]...]White 1: If W plays this way...Black 8: To B [M7], W is in danger.
A B C D E F G H J K L M N O P Q R S T
A B C D E F G H J K L M N O P Q R S T12345678910111213141516171819
12345678910111213141516171819
ab 32
W 132
W #132. No other way to escape.Next if B[a] to separate W, W[b] is the related [to #132] tesuji. But not matter what, under this
situation, W is bounded to face a painful fight.
A B C D E F G H J K L M N O P Q R S T
A B C D E F G H J K L M N O P Q R S T12345678910111213141516171819
12345678910111213141516171819
3534 a b
33
B 133 – B 135
Black 135: If B #135 cuts at [a], W[b] to back up, and it would be hard for W to go for the kill.
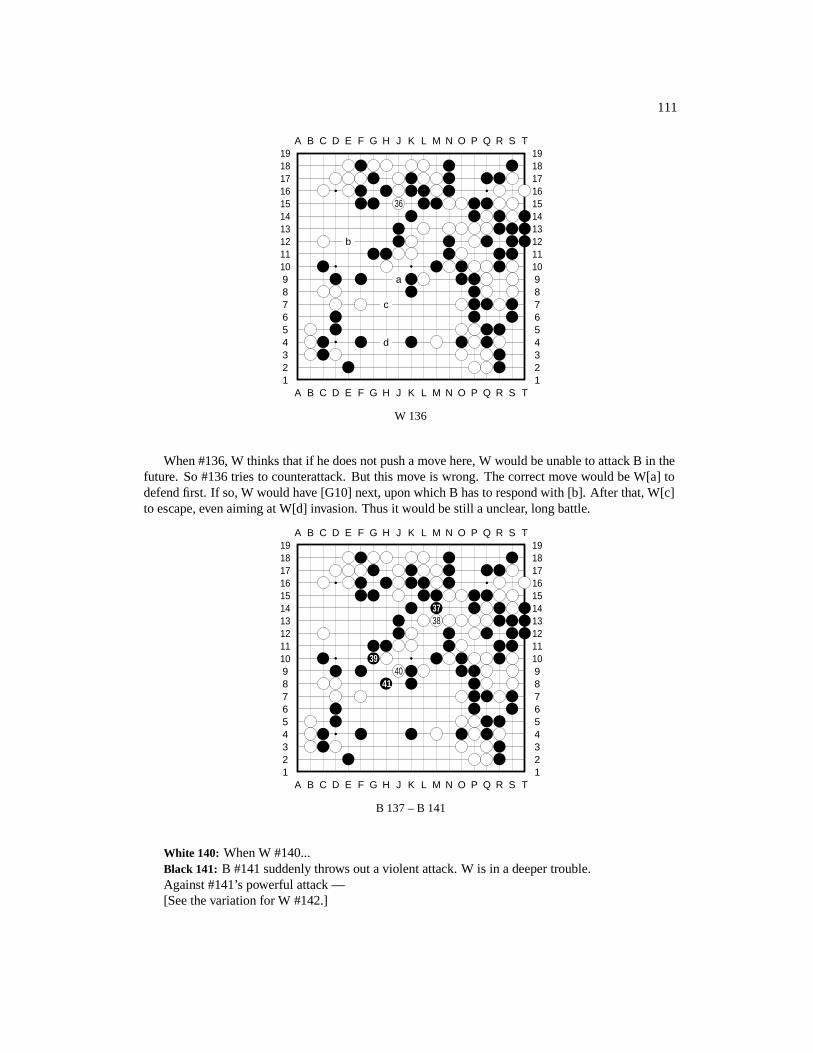
111
A B C D E F G H J K L M N O P Q R S T
A B C D E F G H J K L M N O P Q R S T12345678910111213141516171819
12345678910111213141516171819
36
b
a
c
d
W 136
When #136, W thinks that if he does not push a move here, W would be unable to attack B in thefuture. So #136 tries to counterattack. But this move is wrong. The correct move would be W[a] todefend first. If so, W would have [G10] next, upon which B has to respond with [b]. After that, W[c]to escape, even aiming at W[d] invasion. Thus it would be still a unclear, long battle.
A B C D E F G H J K L M N O P Q R S T
A B C D E F G H J K L M N O P Q R S T12345678910111213141516171819
12345678910111213141516171819
3738
3940
41
B 137 – B 141
White 140: When W #140...Black 141: B #141 suddenly throws out a violent attack. W is in a deeper trouble.Against #141’s powerful attack —[See the variation for W #142.]
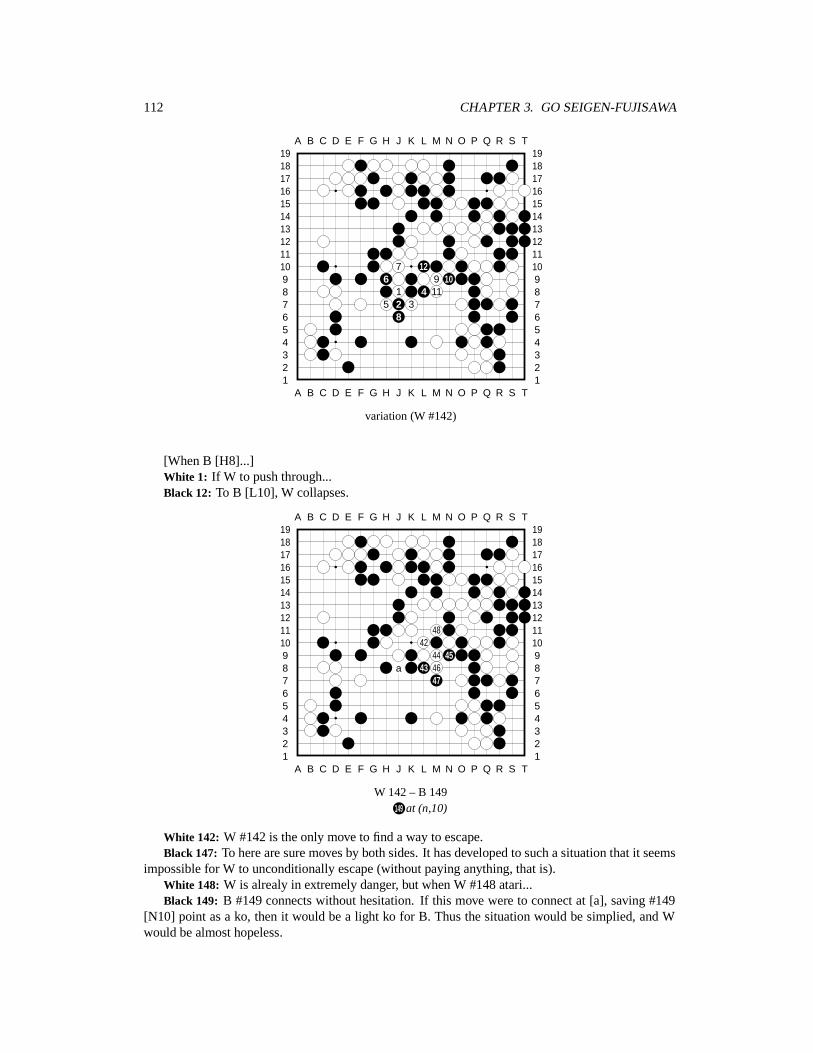
112 CHAPTER 3. GO SEIGEN-FUJISAWA
A B C D E F G H J K L M N O P Q R S T
A B C D E F G H J K L M N O P Q R S T12345678910111213141516171819
12345678910111213141516171819
7 126 9 10
1 4 115 2 3
8
variation (W #142)
[When B [H8]...]White 1: If W to push through...Black 12: To B [L10], W collapses.
A B C D E F G H J K L M N O P Q R S T
A B C D E F G H J K L M N O P Q R S T12345678910111213141516171819
12345678910111213141516171819
4842
44 45a 43 46
47
W 142 – B 149149 at (n,10)
White 142: W #142 is the only move to find a way to escape.Black 147: To here are sure moves by both sides. It has developed to such a situation that it seems
impossible for W to unconditionally escape (without paying anything, that is).White 148: W is alrealy in extremely danger, but when W #148 atari...Black 149: B #149 connects without hesitation. If this move were to connect at [a], saving #149
[N10] point as a ko, then it would be a light ko for B. Thus the situation would be simplied, and Wwould be almost hopeless.
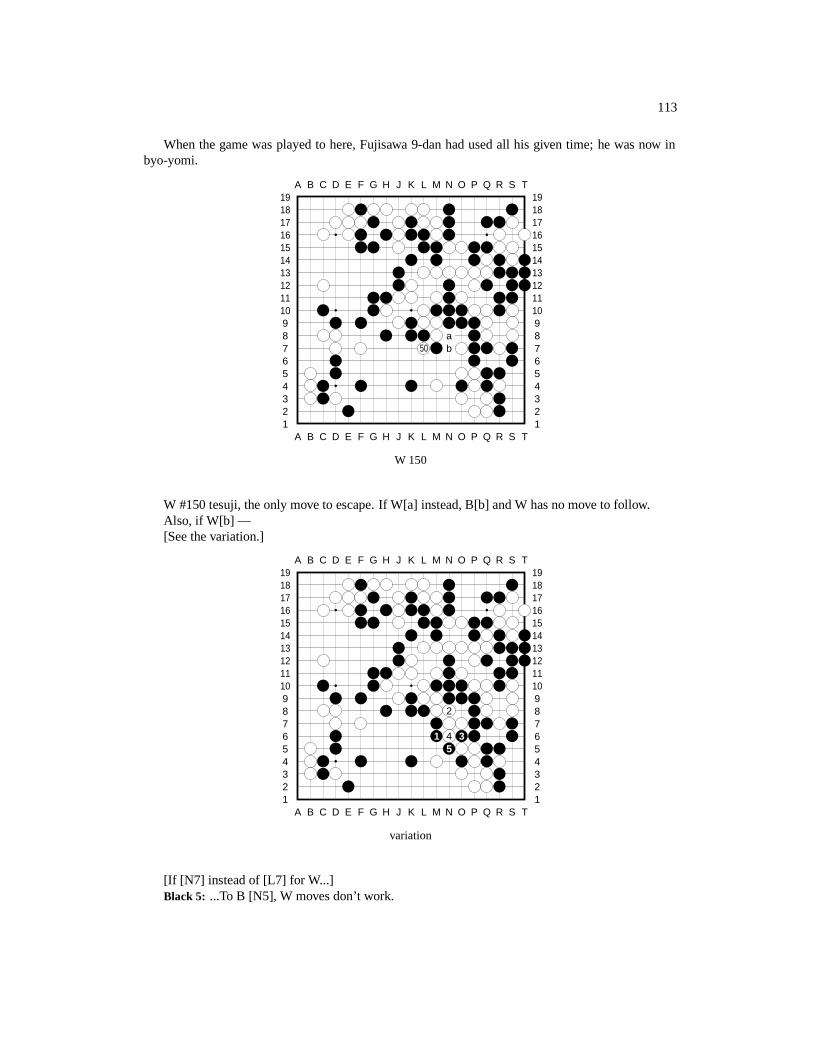
113
When the game was played to here, Fujisawa 9-dan had used all his given time; he was now inbyo-yomi.
A B C D E F G H J K L M N O P Q R S T
A B C D E F G H J K L M N O P Q R S T12345678910111213141516171819
12345678910111213141516171819
a50 b
W 150
W #150 tesuji, the only move to escape. If W[a] instead, B[b] and W has no move to follow.Also, if W[b] —[See the variation.]
A B C D E F G H J K L M N O P Q R S T
A B C D E F G H J K L M N O P Q R S T12345678910111213141516171819
12345678910111213141516171819
2
1 4 35
variation
[If [N7] instead of [L7] for W...]Black 5: ...To B [N5], W moves don’t work.
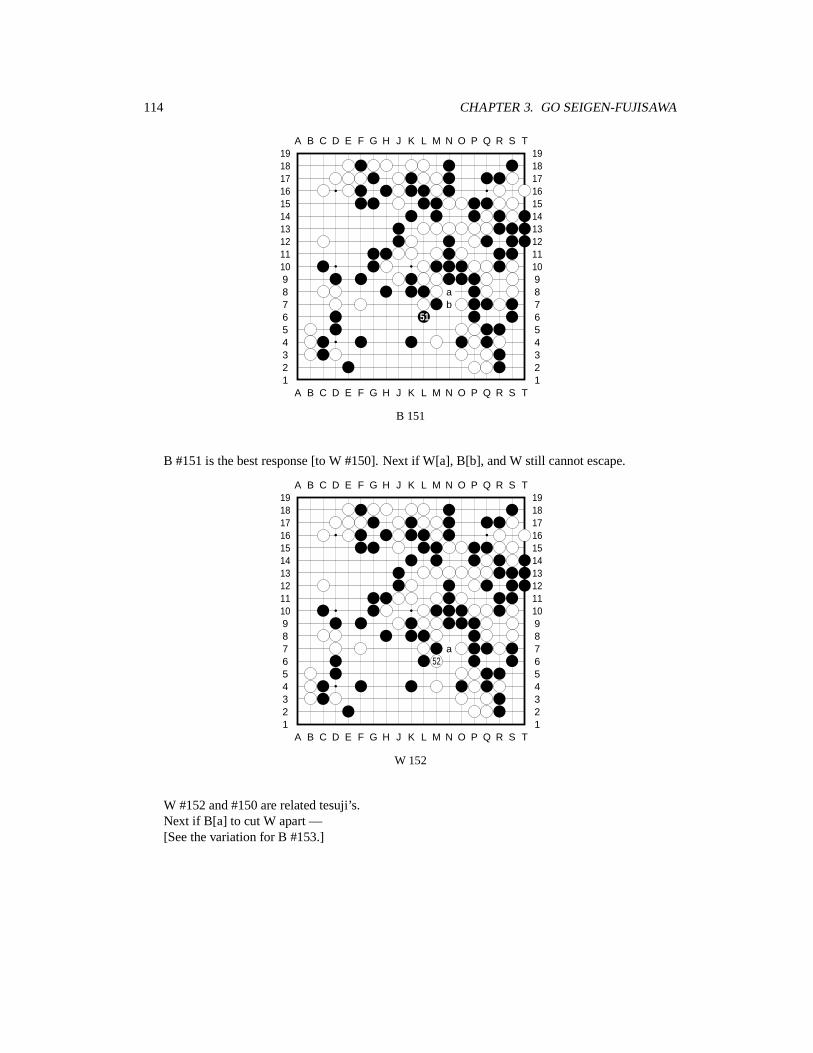
114 CHAPTER 3. GO SEIGEN-FUJISAWA
A B C D E F G H J K L M N O P Q R S T
A B C D E F G H J K L M N O P Q R S T12345678910111213141516171819
12345678910111213141516171819
ab
51
B 151
B #151 is the best response [to W #150]. Next if W[a], B[b], and W still cannot escape.
A B C D E F G H J K L M N O P Q R S T
A B C D E F G H J K L M N O P Q R S T12345678910111213141516171819
12345678910111213141516171819
a52
W 152
W #152 and #150 are related tesuji’s.Next if B[a] to cut W apart —[See the variation for B #153.]
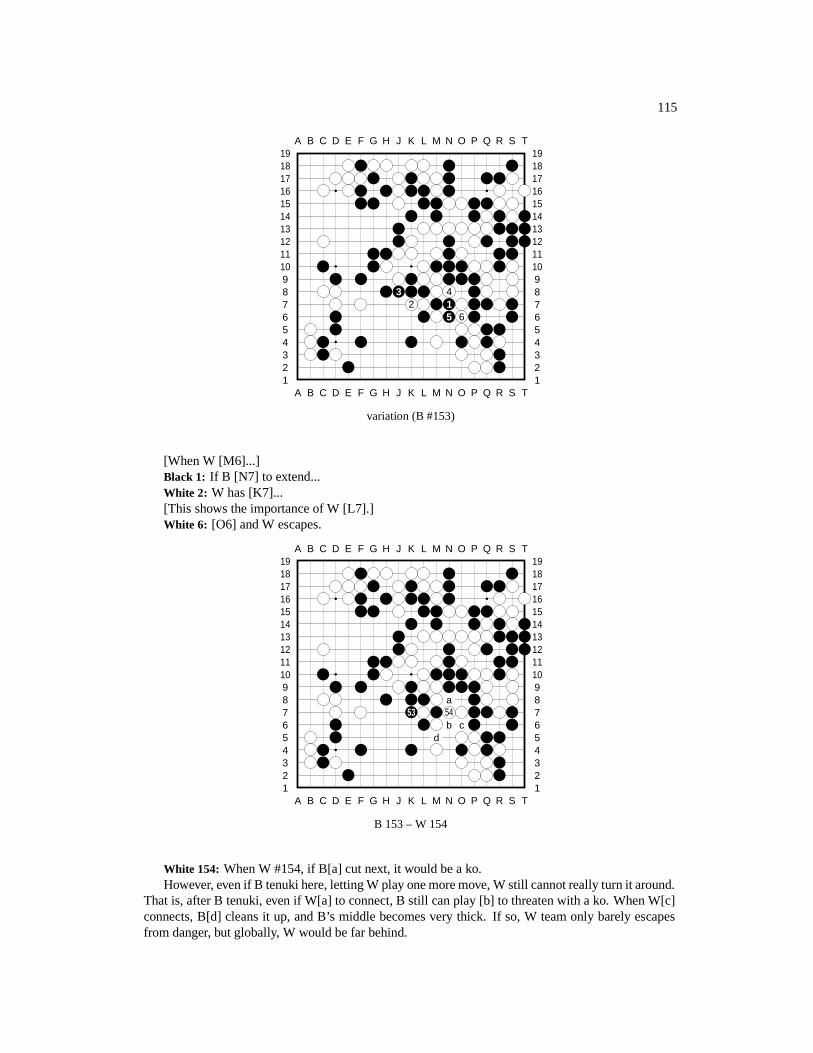
115
A B C D E F G H J K L M N O P Q R S T
A B C D E F G H J K L M N O P Q R S T12345678910111213141516171819
12345678910111213141516171819
3 42 1
5 6
variation (B #153)
[When W [M6]...]Black 1: If B [N7] to extend...White 2: W has [K7]...[This shows the importance of W [L7].]White 6: [O6] and W escapes.
A B C D E F G H J K L M N O P Q R S T
A B C D E F G H J K L M N O P Q R S T12345678910111213141516171819
12345678910111213141516171819
a53 54
b cd
B 153 – W 154
White 154: When W #154, if B[a] cut next, it would be a ko.However, even if B tenuki here, letting W play one more move, W still cannot really turn it around.
That is, after B tenuki, even if W[a] to connect, B still can play [b] to threaten with a ko. When W[c]connects, B[d] cleans it up, and B’s middle becomes very thick. If so, W team only barely escapesfrom danger, but globally, W would be far behind.
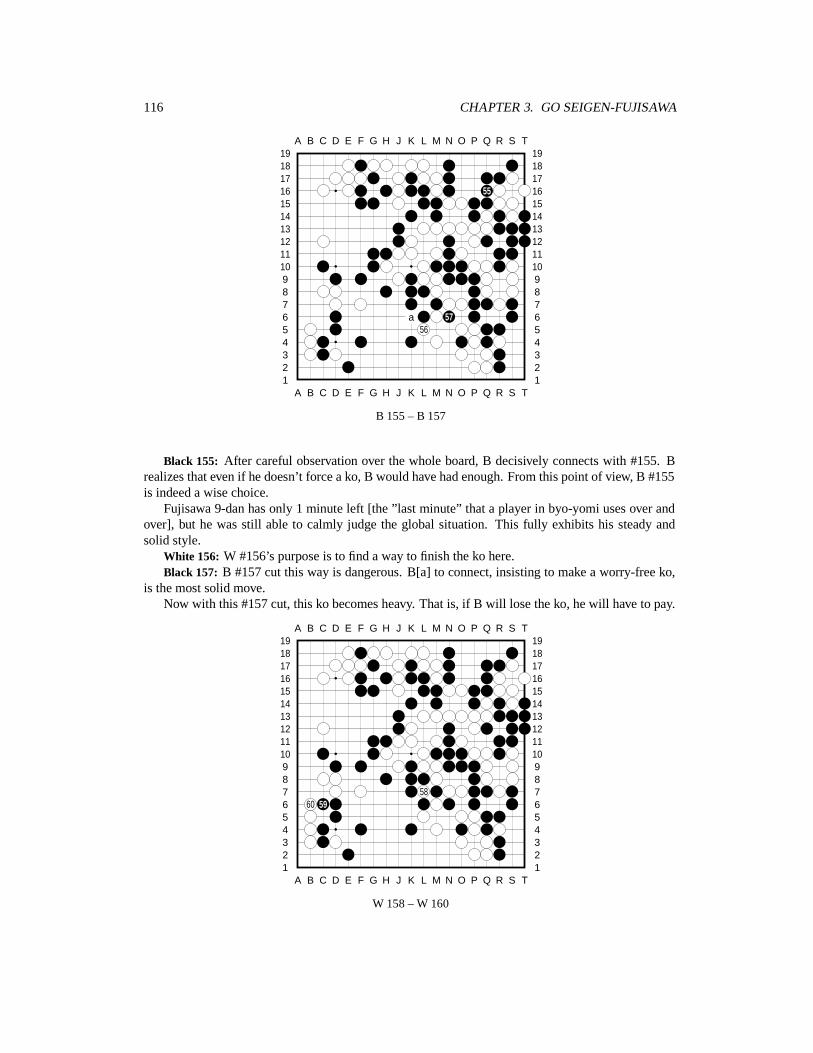
116 CHAPTER 3. GO SEIGEN-FUJISAWA
A B C D E F G H J K L M N O P Q R S T
A B C D E F G H J K L M N O P Q R S T12345678910111213141516171819
12345678910111213141516171819
55
a 5756
B 155 – B 157
Black 155: After careful observation over the whole board, B decisively connects with #155. Brealizes that even if he doesn’t force a ko, B would have had enough. From this point of view, B #155is indeed a wise choice.
Fujisawa 9-dan has only 1 minute left [the ”last minute” that a player in byo-yomi uses over andover], but he was still able to calmly judge the global situation. This fully exhibits his steady andsolid style.
White 156: W #156’s purpose is to find a way to finish the ko here.Black 157: B #157 cut this way is dangerous. B[a] to connect, insisting to make a worry-free ko,
is the most solid move.Now with this #157 cut, this ko becomes heavy. That is, if B will lose the ko, he will have to pay.
A B C D E F G H J K L M N O P Q R S T
A B C D E F G H J K L M N O P Q R S T12345678910111213141516171819
12345678910111213141516171819
5860 59
W 158 – W 160
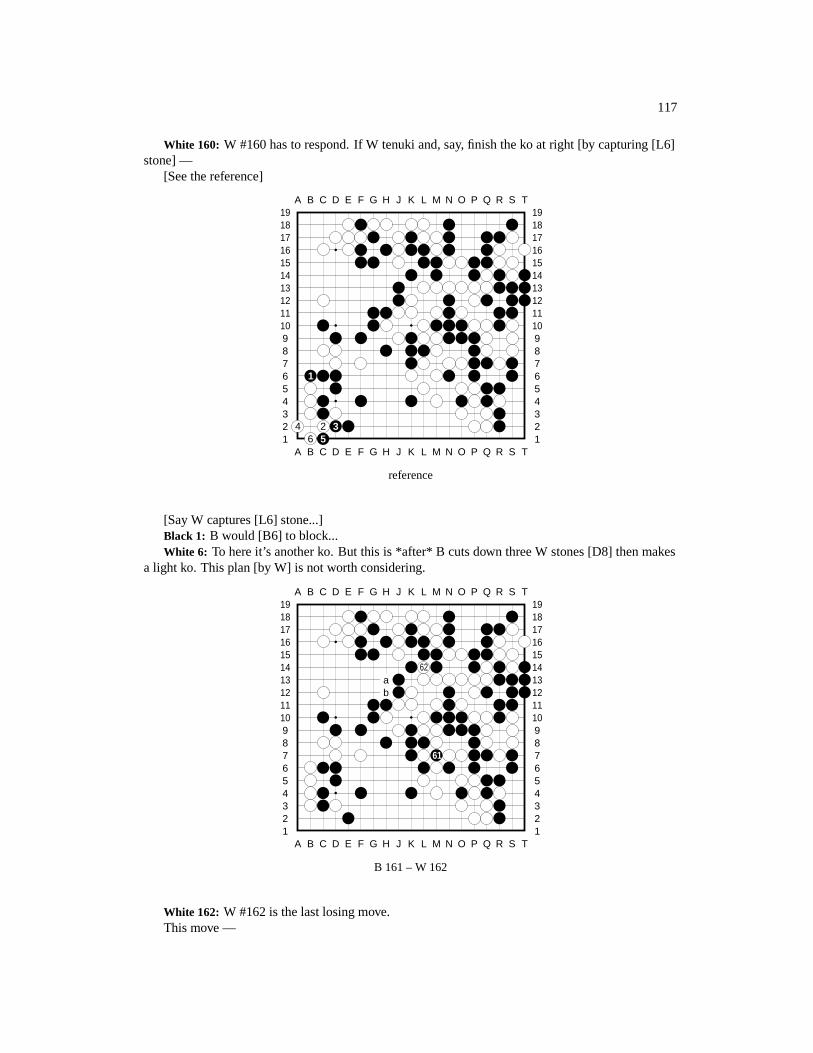
117
White 160: W #160 has to respond. If W tenuki and, say, finish the ko at right [by capturing [L6]stone] —
[See the reference]
A B C D E F G H J K L M N O P Q R S T
A B C D E F G H J K L M N O P Q R S T12345678910111213141516171819
12345678910111213141516171819
1
4 2 36 5
reference
[Say W captures [L6] stone...]Black 1: B would [B6] to block...White 6: To here it’s another ko. But this is *after* B cuts down three W stones [D8] then makes
a light ko. This plan [by W] is not worth considering.
A B C D E F G H J K L M N O P Q R S T
A B C D E F G H J K L M N O P Q R S T12345678910111213141516171819
12345678910111213141516171819
62ab
61
B 161 – W 162
White 162: W #162 is the last losing move.This move —
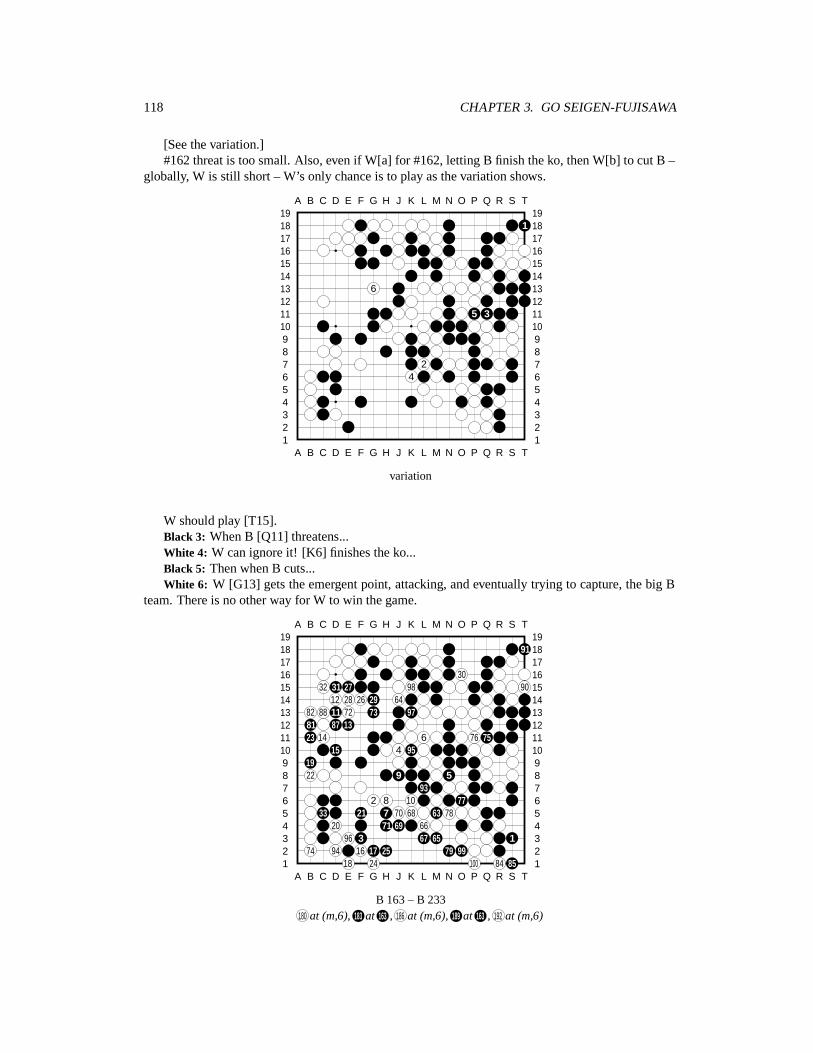
118 CHAPTER 3. GO SEIGEN-FUJISAWA
[See the variation.]#162 threat is too small. Also, even if W[a] for #162, letting B finish the ko, then W[b] to cut B –
globally, W is still short – W’s only chance is to play as the variation shows.
A B C D E F G H J K L M N O P Q R S T
A B C D E F G H J K L M N O P Q R S T12345678910111213141516171819
12345678910111213141516171819
1
6
5 3
24
variation
W should play [T15].Black 3: When B [Q11] threatens...White 4: W can ignore it! [K6] finishes the ko...Black 5: Then when B cuts...White 6: W [G13] gets the emergent point, attacking, and eventually trying to capture, the big B
team. There is no other way for W to win the game.
A B C D E F G H J K L M N O P Q R S T
A B C D E F G H J K L M N O P Q R S T12345678910111213141516171819
12345678910111213141516171819
91
3032 31 27 98 90
12 28 26 29 6482 88 11 72 73 9781 87 1323 14 6 76 75
15 4 951922 9 5
932 8 10 77
33 21 7 70 68 63 7820 71 69 66
96 3 67 65 174 94 16 17 25 79 99
18 24 100 84 85
B 163 – B 233180 at (m,6), 183 at 163 , 186 at (m,6), 189 at 163 , 192 at (m,6)
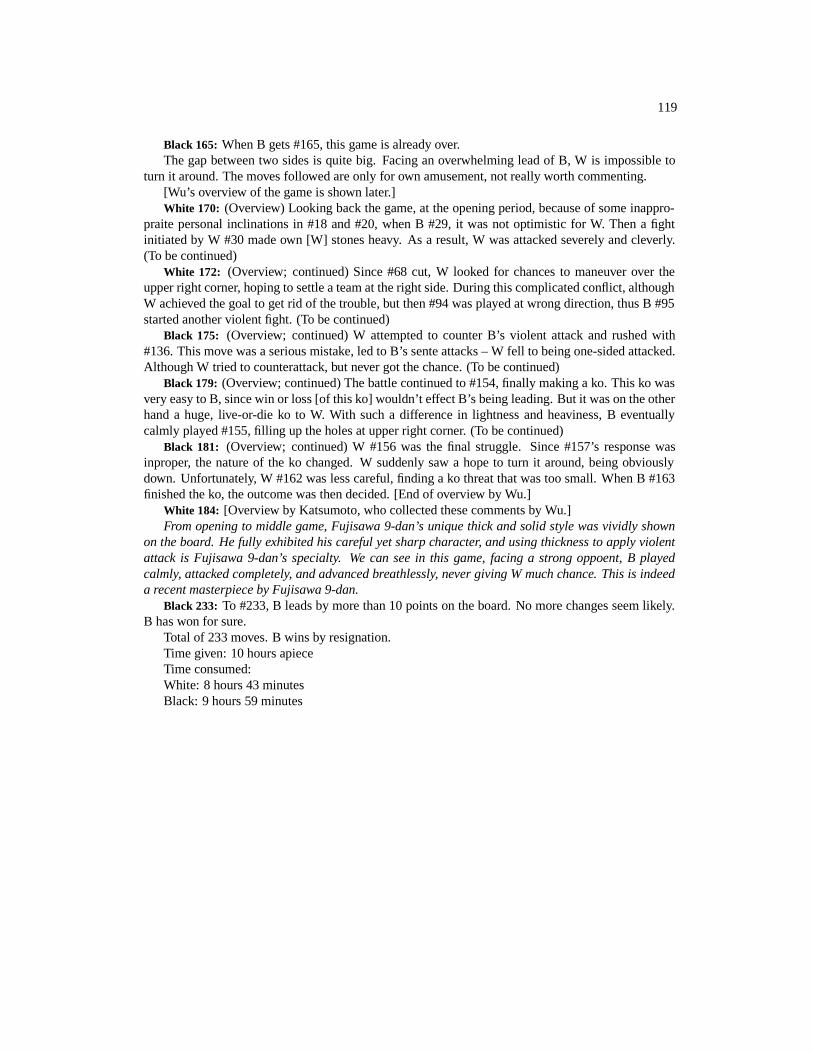
119
Black 165: When B gets #165, this game is already over.The gap between two sides is quite big. Facing an overwhelming lead of B, W is impossible to
turn it around. The moves followed are only for own amusement, not really worth commenting.[Wu’s overview of the game is shown later.]White 170: (Overview) Looking back the game, at the opening period, because of some inappro-
praite personal inclinations in #18 and #20, when B #29, it was not optimistic for W. Then a fightinitiated by W #30 made own [W] stones heavy. As a result, W was attacked severely and cleverly.(To be continued)
White 172: (Overview; continued) Since #68 cut, W looked for chances to maneuver over theupper right corner, hoping to settle a team at the right side. During this complicated conflict, althoughW achieved the goal to get rid of the trouble, but then #94 was played at wrong direction, thus B #95started another violent fight. (To be continued)
Black 175: (Overview; continued) W attempted to counter B’s violent attack and rushed with#136. This move was a serious mistake, led to B’s sente attacks – W fell to being one-sided attacked.Although W tried to counterattack, but never got the chance. (To be continued)
Black 179: (Overview; continued) The battle continued to #154, finally making a ko. This ko wasvery easy to B, since win or loss [of this ko] wouldn’t effect B’s being leading. But it was on the otherhand a huge, live-or-die ko to W. With such a difference in lightness and heaviness, B eventuallycalmly played #155, filling up the holes at upper right corner. (To be continued)
Black 181: (Overview; continued) W #156 was the final struggle. Since #157’s response wasinproper, the nature of the ko changed. W suddenly saw a hope to turn it around, being obviouslydown. Unfortunately, W #162 was less careful, finding a ko threat that was too small. When B #163finished the ko, the outcome was then decided. [End of overview by Wu.]
White 184: [Overview by Katsumoto, who collected these comments by Wu.]From opening to middle game, Fujisawa 9-dan’s unique thick and solid style was vividly shown
on the board. He fully exhibited his careful yet sharp character, and using thickness to apply violentattack is Fujisawa 9-dan’s specialty. We can see in this game, facing a strong oppoent, B playedcalmly, attacked completely, and advanced breathlessly, never giving W much chance. This is indeeda recent masterpiece by Fujisawa 9-dan.
Black 233: To #233, B leads by more than 10 points on the board. No more changes seem likely.B has won for sure.
Total of 233 moves. B wins by resignation.Time given: 10 hours apieceTime consumed:White: 8 hours 43 minutesBlack: 9 hours 59 minutes
120 CHAPTER 3. GO SEIGEN-FUJISAWA
Chapter 4
Go Seigen-Sakata Eio 1
Sakata Eio: “The Greedy” As many nicknames as Sakata Eio has, he’s probably the championof nicknames in the Go world — “Master to Make Alive”, “Razor Sakata”, “Attacking Sakata”, and“Double Champion” (on attack and defense), etc. Interestingly, his style combines good skills in bothattacking and defense, which is not easy.
Sakata’s style, as just said, is multidimentional. His extraordinary strength is unmatchable, buthis greatest characteristic probably lies in his defense instead of his offense.
“Perhaps because I am too greedy,” said Sakata, “I want everything. As a result, every move Imade, if it did not reach its greatest efficiency, I wouldn’t be satisfied. To make every move be themost efficient is to say to run in front of your opponent on every move. Thus, one or two spots wouldnaturally become thin. Under these circumstances, I would have to make alive with my upmost effort.Some say that I am a ’Master to Make Alive’; they probably mean this situation that I have to face.”
Just like Sakata said, the most efficient moves might not be the best moves. There are often timesthat some moves with certain vagueness in them are the best moves.
Sakata gave an example, “With the personality I have, it’s almost improbable to make any movethat’s has no clear meaning. Takagawa Saku 9-dan, however, can often make such moves.”
Is one’s personality related to his Go style?Sakata answered, “I think more or less it’s related. Rin Kaiho and Ishida Yoshio, for example,
are soft and warm people, and their games are never played in a harsh manner. There are exception,though: Kato Masao is another nice and warm young man, but when he plays, he always chooses thestrongest moves and shows no mercy...” 1
Sakata seems to look for trouble for himself, picking the rather difficult routes [in his games]. Asfor this point, he said,
I have three shortcomings: One, I am not good at situational judgements. Two, Idon’t know how to take advantage the komi [playing white]. Three, I am lack of ’long-distance’ strength, so I try to knock down the opponents before going into the endgames.
However, he didn’t mention his strength, and Sakata’s most remarkable strength is that when hisgroup is surrounded, he is confident to make a second eye.
Inventor of Myoshu [“Myoshu”, or spelled with the long vowels, “Myooshuu”, means an “extraor-dinary”, “excellent”, “magnificant” move, and such a move is unexpected by most people when it’sdelivered. The Chinese pinyin for the same word is “Miao4 Shou3”.]
Trying to make every stone a most efficient move would naturally leave some thinness in one’sown shapes. When shapes become thin, one has to struggle to save these weak stones. When Sataka
1See Appendix D for a game (partly) between Sakata and Kato, a famous and typical example of Sakata’s greediness.
121
122 CHAPTER 4. GO SEIGEN-SAKATA EIO 1
is attacked and surrounded by his opponents, he can mostly make alive and escape from the danger.When making alive, ordinary moves do not work easily; one has to deliver severe tesuji or evenmyoshu. Sakate has made many such moves to save unsavable big teams, and when many people sayhe’s an inventor of myoshu, they are not exaggerating. 2
Professional high-dan players’ reading skills are about the same among each other, but the sharp-ness and accuracy in Sakata’s reading makes him the best on this aspect. When people nickname him“Razor Sakata”, they are not being unreasonable.
He is able to create so many myoshu, is it because the structure of his brain different from others?What exactly is his brain made of?
Satata said, “Among the moves that I’ve made, there have been very very rare ones that I wouldconsider as myoshu. If everyone regard it as a myoshu, it’s then certainly not prepared long ago, butrather, it’s discovered during a game. When one gets in trouble or danger, he naturally works harderand ideas come out. I often have such ideas come out when they’re needed. This is my strength, andprobably my greatest strength. But on the other hand, it’s more important to win the game in a simpleand easy manner. If one gets in trouble, he would have to work very hard to solve the problems, andto win it this way is tiresome.”
2See Appendix E for a most spectacular myoshu by Sakata.
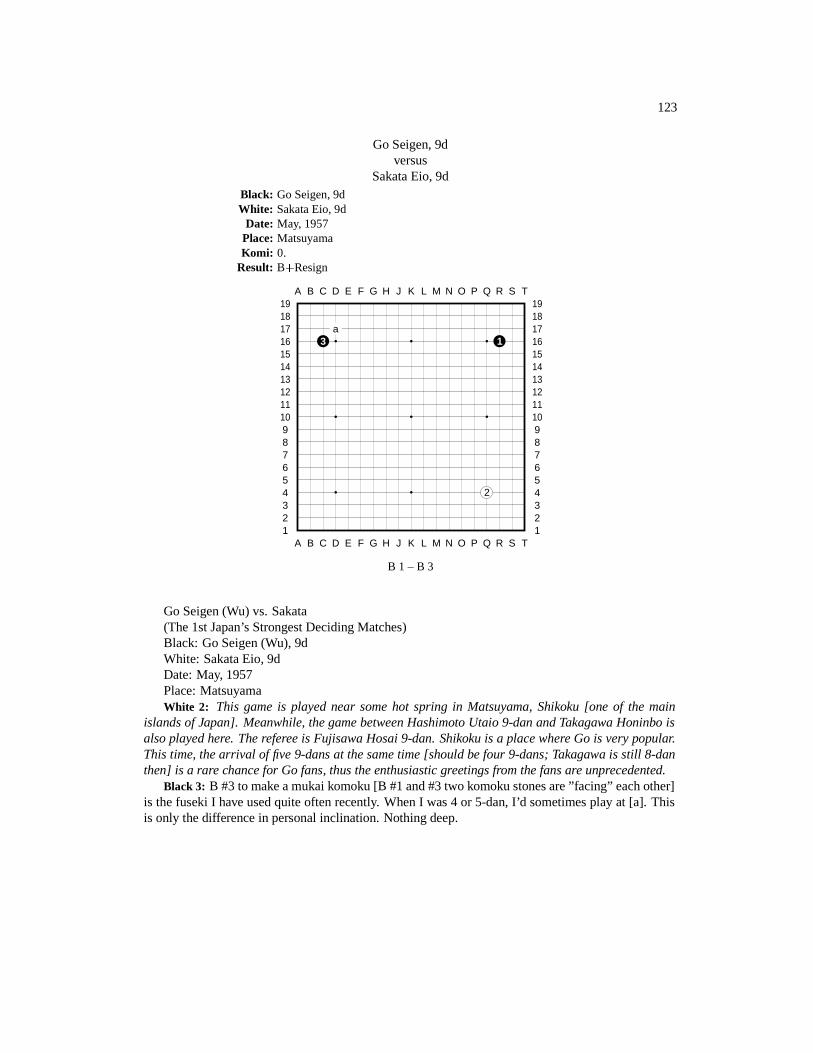
123
Go Seigen, 9dversus
Sakata Eio, 9dBlack: Go Seigen, 9dWhite: Sakata Eio, 9d
Date: May, 1957Place: MatsuyamaKomi: 0.
Result: B�Resign
A B C D E F G H J K L M N O P Q R S T
A B C D E F G H J K L M N O P Q R S T12345678910111213141516171819
12345678910111213141516171819
a3 1
2
B 1 – B 3
Go Seigen (Wu) vs. Sakata(The 1st Japan’s Strongest Deciding Matches)Black: Go Seigen (Wu), 9dWhite: Sakata Eio, 9dDate: May, 1957Place: MatsuyamaWhite 2: This game is played near some hot spring in Matsuyama, Shikoku [one of the main
islands of Japan]. Meanwhile, the game between Hashimoto Utaio 9-dan and Takagawa Honinbo isalso played here. The referee is Fujisawa Hosai 9-dan. Shikoku is a place where Go is very popular.This time, the arrival of five 9-dans at the same time [should be four 9-dans; Takagawa is still 8-danthen] is a rare chance for Go fans, thus the enthusiastic greetings from the fans are unprecedented.
Black 3: B #3 to make a mukai komoku [B #1 and #3 two komoku stones are ”facing” each other]is the fuseki I have used quite often recently. When I was 4 or 5-dan, I’d sometimes play at [a]. Thisis only the difference in personal inclination. Nothing deep.
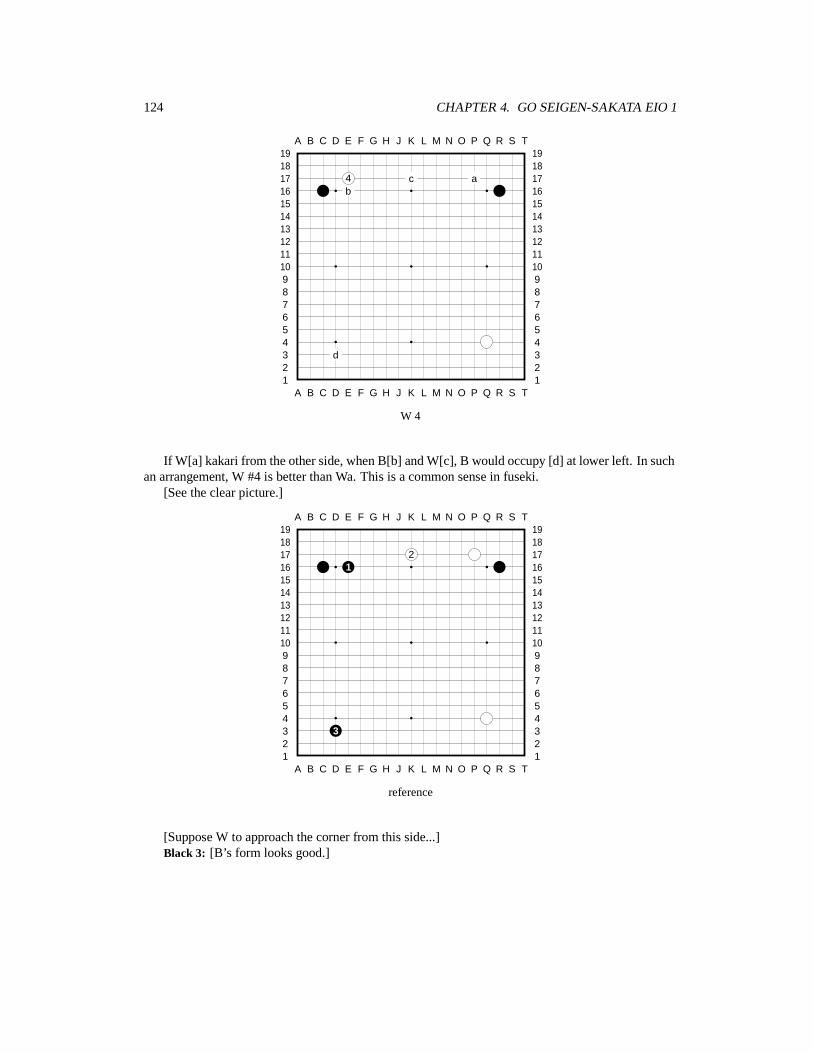
124 CHAPTER 4. GO SEIGEN-SAKATA EIO 1
A B C D E F G H J K L M N O P Q R S T
A B C D E F G H J K L M N O P Q R S T12345678910111213141516171819
12345678910111213141516171819
4 c ab
d
W 4
If W[a] kakari from the other side, when B[b] and W[c], B would occupy [d] at lower left. In suchan arrangement, W #4 is better than Wa. This is a common sense in fuseki.
[See the clear picture.]
A B C D E F G H J K L M N O P Q R S T
A B C D E F G H J K L M N O P Q R S T12345678910111213141516171819
12345678910111213141516171819
21
3
reference
[Suppose W to approach the corner from this side...]Black 3: [B’s form looks good.]
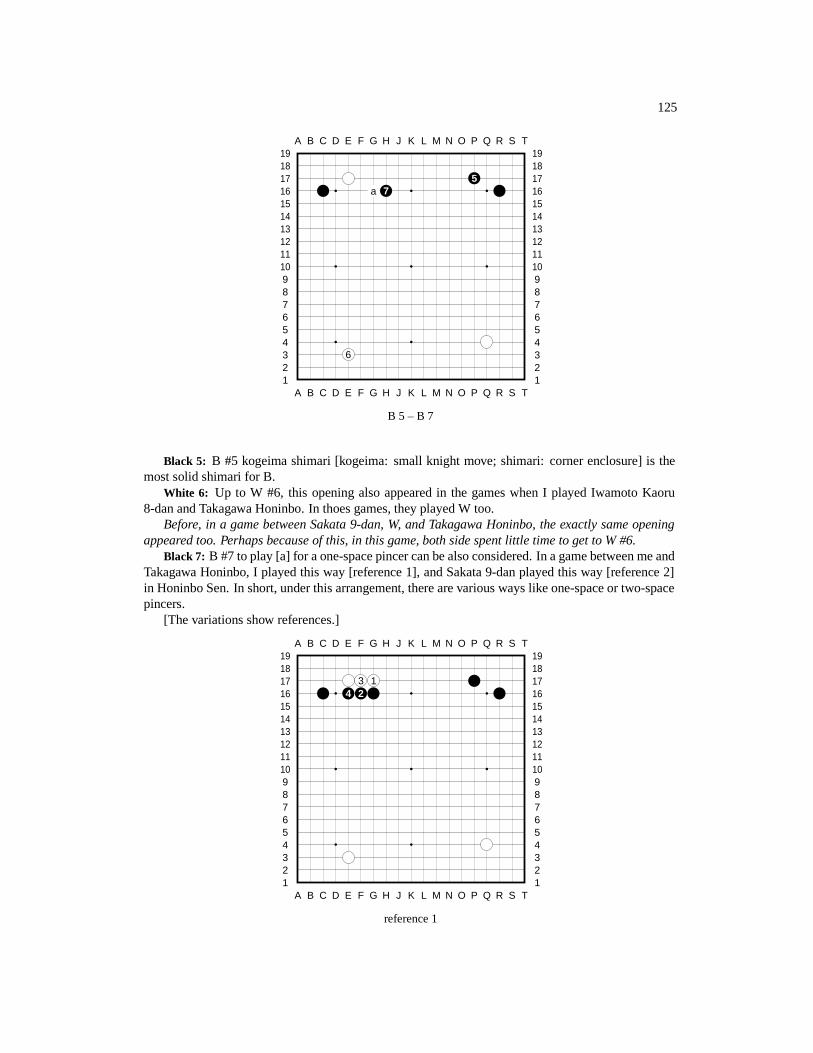
125
A B C D E F G H J K L M N O P Q R S T
A B C D E F G H J K L M N O P Q R S T12345678910111213141516171819
12345678910111213141516171819
5a 7
6
B 5 – B 7
Black 5: B #5 kogeima shimari [kogeima: small knight move; shimari: corner enclosure] is themost solid shimari for B.
White 6: Up to W #6, this opening also appeared in the games when I played Iwamoto Kaoru8-dan and Takagawa Honinbo. In thoes games, they played W too.
Before, in a game between Sakata 9-dan, W, and Takagawa Honinbo, the exactly same openingappeared too. Perhaps because of this, in this game, both side spent little time to get to W #6.
Black 7: B #7 to play [a] for a one-space pincer can be also considered. In a game between me andTakagawa Honinbo, I played this way [reference 1], and Sakata 9-dan played this way [reference 2]in Honinbo Sen. In short, under this arrangement, there are various ways like one-space or two-spacepincers.
[The variations show references.]
A B C D E F G H J K L M N O P Q R S T
A B C D E F G H J K L M N O P Q R S T12345678910111213141516171819
12345678910111213141516171819
3 14 2
reference 1
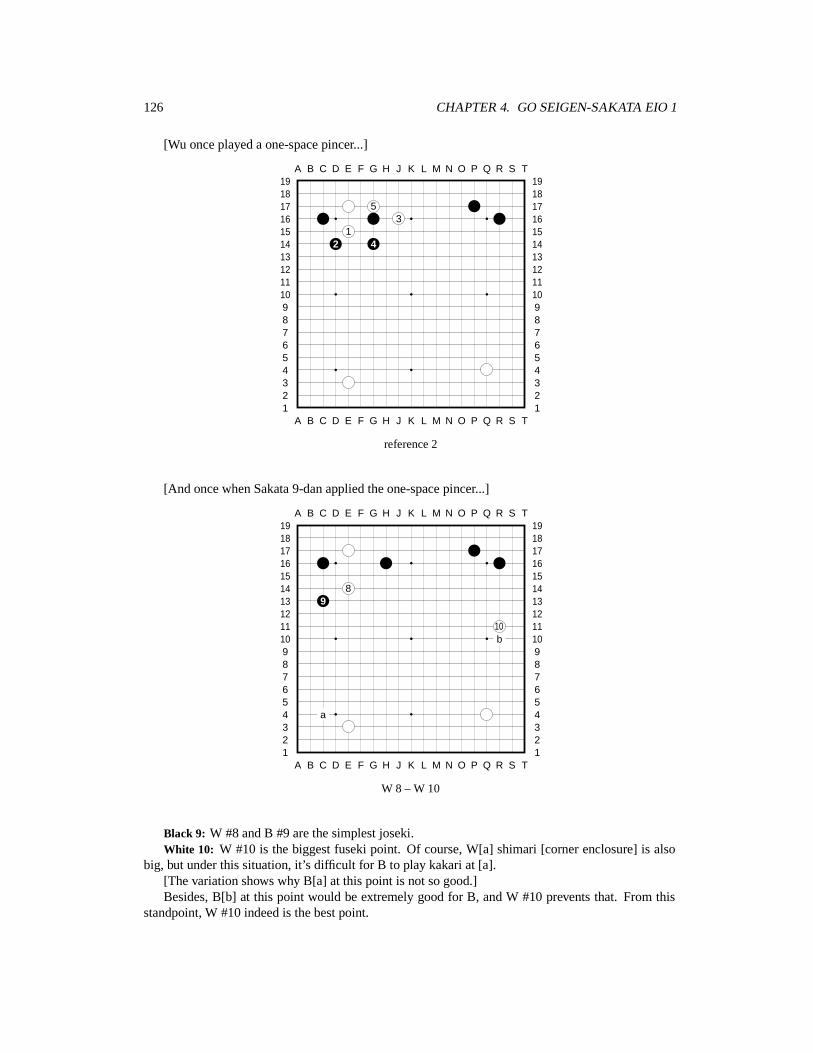
126 CHAPTER 4. GO SEIGEN-SAKATA EIO 1
[Wu once played a one-space pincer...]
A B C D E F G H J K L M N O P Q R S T
A B C D E F G H J K L M N O P Q R S T12345678910111213141516171819
12345678910111213141516171819
53
12 4
reference 2
[And once when Sakata 9-dan applied the one-space pincer...]
A B C D E F G H J K L M N O P Q R S T
A B C D E F G H J K L M N O P Q R S T12345678910111213141516171819
12345678910111213141516171819
89
10b
a
W 8 – W 10
Black 9: W #8 and B #9 are the simplest joseki.White 10: W #10 is the biggest fuseki point. Of course, W[a] shimari [corner enclosure] is also
big, but under this situation, it’s difficult for B to play kakari at [a].[The variation shows why B[a] at this point is not so good.]Besides, B[b] at this point would be extremely good for B, and W #10 prevents that. From this
standpoint, W #10 indeed is the best point.

127
A B C D E F G H J K L M N O P Q R S T
A B C D E F G H J K L M N O P Q R S T12345678910111213141516171819
12345678910111213141516171819
43 21
reference
[Suppose B approaches the lower left corner...]White 4: To here, B stones at left are forced to a low position [line 3] on both upper and lower
sides.Therefore, for W, to enclose the lower left corner is not urgent. [W played [R11] instead.]
A B C D E F G H J K L M N O P Q R S T
A B C D E F G H J K L M N O P Q R S T12345678910111213141516171819
12345678910111213141516171819
a13 12
11
B 11 – B 13
Black 11: Based on the reason described before [see reference diagram at W #10], B #11 toapproach at [C4] is not very good, so B chooses [C3] kakari.
Both [C3] and [C4] are ”low approach”, but the meaning is totally different.White 12: W #12 certainly.Black 13: Next W #14 to play W[a] would not be good because —[The variations show variations.]
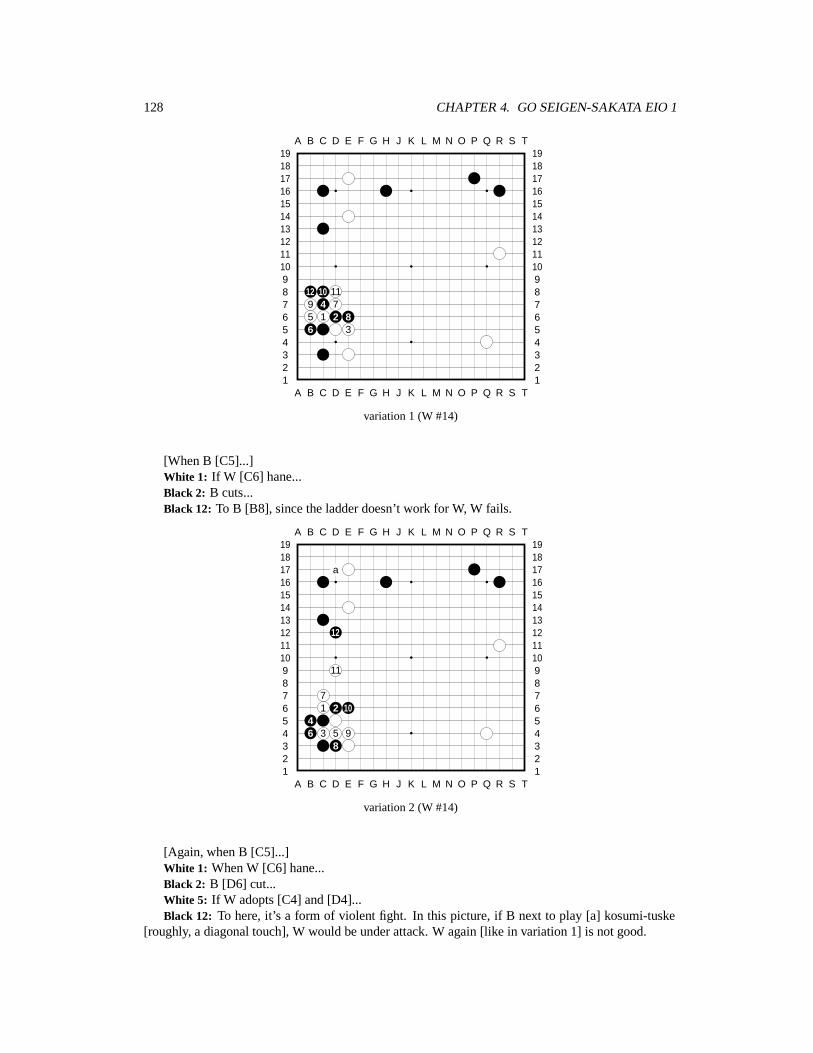
128 CHAPTER 4. GO SEIGEN-SAKATA EIO 1
A B C D E F G H J K L M N O P Q R S T
A B C D E F G H J K L M N O P Q R S T12345678910111213141516171819
12345678910111213141516171819
12 10 119 4 75 1 2 86 3
variation 1 (W #14)
[When B [C5]...]White 1: If W [C6] hane...Black 2: B cuts...Black 12: To B [B8], since the ladder doesn’t work for W, W fails.
A B C D E F G H J K L M N O P Q R S T
A B C D E F G H J K L M N O P Q R S T12345678910111213141516171819
12345678910111213141516171819
a
12
11
71 2 10
46 3 5 9
8
variation 2 (W #14)
[Again, when B [C5]...]White 1: When W [C6] hane...Black 2: B [D6] cut...White 5: If W adopts [C4] and [D4]...Black 12: To here, it’s a form of violent fight. In this picture, if B next to play [a] kosumi-tuske
[roughly, a diagonal touch], W would be under attack. W again [like in variation 1] is not good.
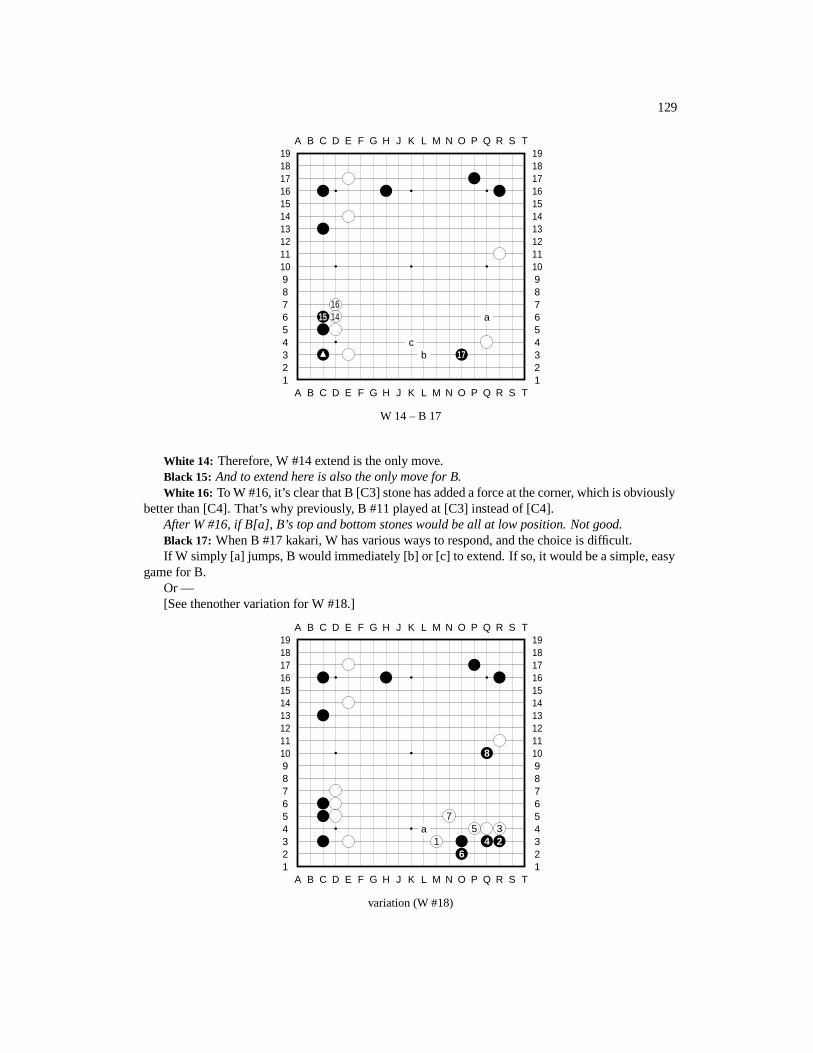
129
A B C D E F G H J K L M N O P Q R S T
A B C D E F G H J K L M N O P Q R S T12345678910111213141516171819
12345678910111213141516171819
1615 14 a
cb 17
W 14 – B 17
White 14: Therefore, W #14 extend is the only move.Black 15: And to extend here is also the only move for B.White 16: To W #16, it’s clear that B [C3] stone has added a force at the corner, which is obviously
better than [C4]. That’s why previously, B #11 played at [C3] instead of [C4].After W #16, if B[a], B’s top and bottom stones would be all at low position. Not good.Black 17: When B #17 kakari, W has various ways to respond, and the choice is difficult.If W simply [a] jumps, B would immediately [b] or [c] to extend. If so, it would be a simple, easy
game for B.Or —[See thenother variation for W #18.]
A B C D E F G H J K L M N O P Q R S T
A B C D E F G H J K L M N O P Q R S T12345678910111213141516171819
12345678910111213141516171819
8
7a 5 3
1 4 26
variation (W #18)
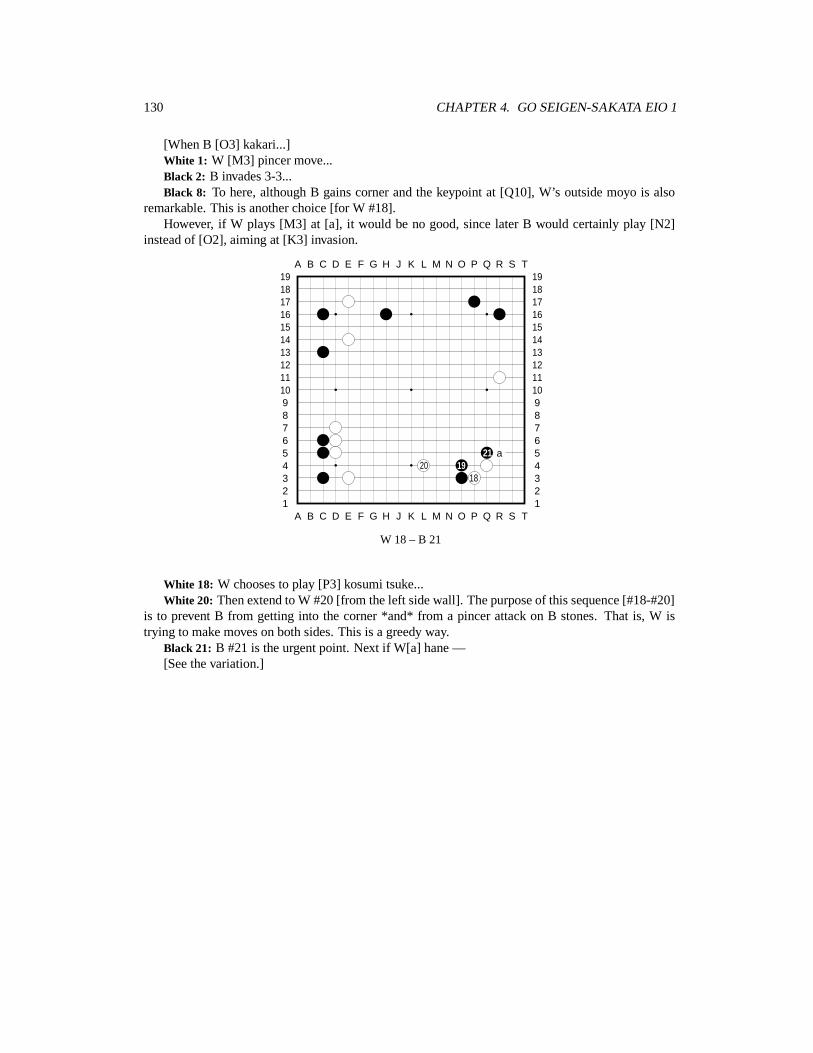
130 CHAPTER 4. GO SEIGEN-SAKATA EIO 1
[When B [O3] kakari...]White 1: W [M3] pincer move...Black 2: B invades 3-3...Black 8: To here, although B gains corner and the keypoint at [Q10], W’s outside moyo is also
remarkable. This is another choice [for W #18].However, if W plays [M3] at [a], it would be no good, since later B would certainly play [N2]
instead of [O2], aiming at [K3] invasion.
A B C D E F G H J K L M N O P Q R S T
A B C D E F G H J K L M N O P Q R S T12345678910111213141516171819
12345678910111213141516171819
21 a20 19
18
W 18 – B 21
White 18: W chooses to play [P3] kosumi tsuke...White 20: Then extend to W #20 [from the left side wall]. The purpose of this sequence [#18-#20]
is to prevent B from getting into the corner *and* from a pincer attack on B stones. That is, W istrying to make moves on both sides. This is a greedy way.
Black 21: B #21 is the urgent point. Next if W[a] hane —[See the variation.]

131
A B C D E F G H J K L M N O P Q R S T
A B C D E F G H J K L M N O P Q R S T12345678910111213141516171819
12345678910111213141516171819
ab 6 2
4 13 5
variation (W #22)
[When B [Q5]...]White 1: If W [R5] hane...Black 6: To here, if W[a] jumps, B[b] jumps, too, to reduce W’s moyo.
A B C D E F G H J K L M N O P Q R S T
A B C D E F G H J K L M N O P Q R S T12345678910111213141516171819
12345678910111213141516171819
22 2523
24
W 22 – B 25
White 22: Perhaps W is not satisfied with the way shown in variation [at node #21], so W #22 astrong hane, initiating a violent fight with B.
The reason that W plays such violently is because a ladder is good for W —Black 23: W has already seen that if B #23...White 24: When W #24, next B (#25) cannot play at [a] since the ladder doesn’t work for B.
Therefore W chose [P5] hane for #22. From a strategical standpoint, since B gained at lower leftcorner, it’s natural for W to force B to fight inside his [W’s] sphere of influence – W hopes to gain in
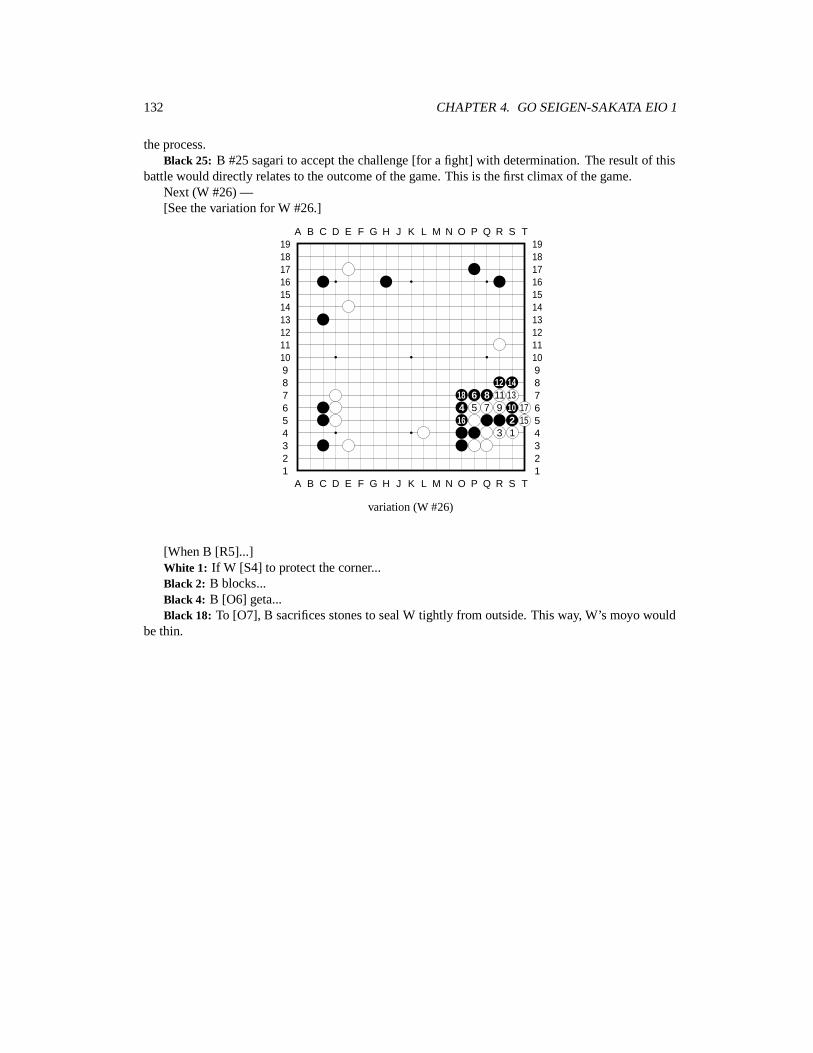
132 CHAPTER 4. GO SEIGEN-SAKATA EIO 1
the process.Black 25: B #25 sagari to accept the challenge [for a fight] with determination. The result of this
battle would directly relates to the outcome of the game. This is the first climax of the game.Next (W #26) —[See the variation for W #26.]
A B C D E F G H J K L M N O P Q R S T
A B C D E F G H J K L M N O P Q R S T12345678910111213141516171819
12345678910111213141516171819
12 1418 6 8 11 134 5 7 9 10 1716 2 15
3 1
variation (W #26)
[When B [R5]...]White 1: If W [S4] to protect the corner...Black 2: B blocks...Black 4: B [O6] geta...Black 18: To [O7], B sacrifices stones to seal W tightly from outside. This way, W’s moyo would
be thin.
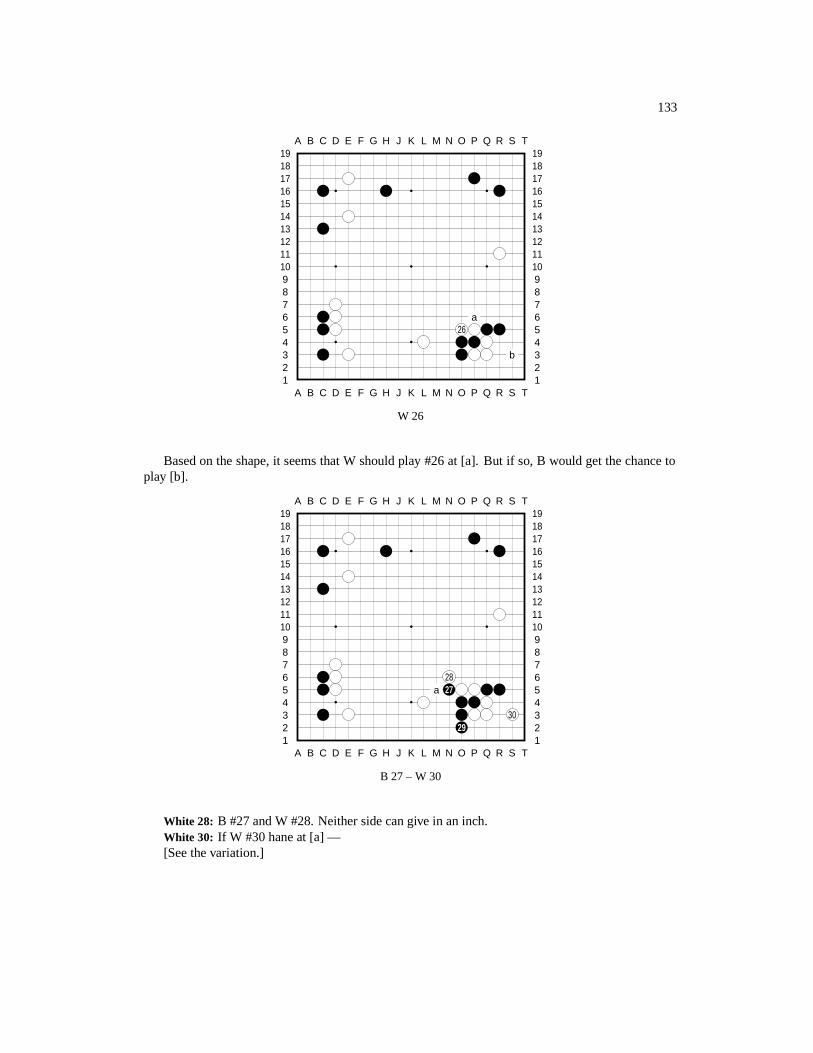
133
A B C D E F G H J K L M N O P Q R S T
A B C D E F G H J K L M N O P Q R S T12345678910111213141516171819
12345678910111213141516171819
a26
b
W 26
Based on the shape, it seems that W should play #26 at [a]. But if so, B would get the chance toplay [b].
A B C D E F G H J K L M N O P Q R S T
A B C D E F G H J K L M N O P Q R S T12345678910111213141516171819
12345678910111213141516171819
28a 27
3029
B 27 – W 30
White 28: B #27 and W #28. Neither side can give in an inch.White 30: If W #30 hane at [a] —[See the variation.]

134 CHAPTER 4. GO SEIGEN-SAKATA EIO 1
A B C D E F G H J K L M N O P Q R S T
A B C D E F G H J K L M N O P Q R S T12345678910111213141516171819
12345678910111213141516171819
92 31 4
7 5 6
variation8 at 1
[Suppose W #30 plays at M5...]Black 1: Then B #31 would kill W at the corner...Black 9: To B #39, B wins the semeai [capturing race].
A B C D E F G H J K L M N O P Q R S T
A B C D E F G H J K L M N O P Q R S T12345678910111213141516171819
12345678910111213141516171819
a
31
B 31
When B #31 extends, W to jump at [a] next is normally the shape. In this situation, however, Wcannot do so —
[See then explanation.]
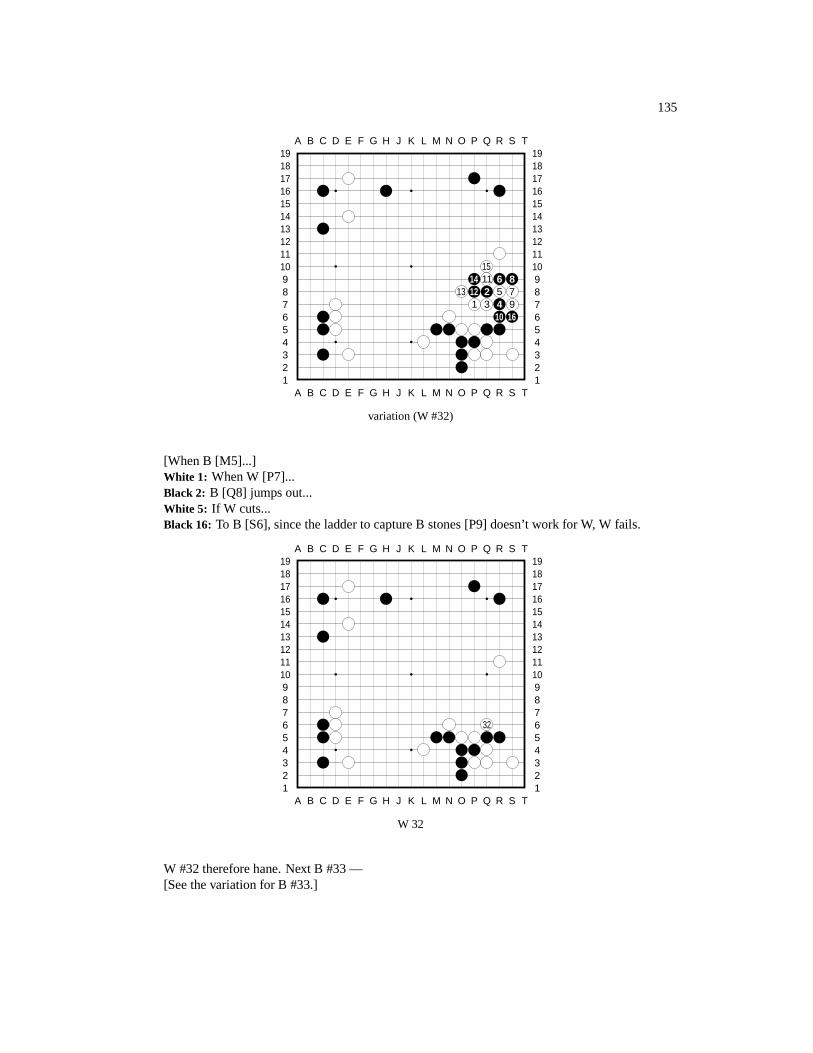
135
A B C D E F G H J K L M N O P Q R S T
A B C D E F G H J K L M N O P Q R S T12345678910111213141516171819
12345678910111213141516171819
1514 11 6 8
13 12 2 5 71 3 4 9
10 16
variation (W #32)
[When B [M5]...]White 1: When W [P7]...Black 2: B [Q8] jumps out...White 5: If W cuts...Black 16: To B [S6], since the ladder to capture B stones [P9] doesn’t work for W, W fails.
A B C D E F G H J K L M N O P Q R S T
A B C D E F G H J K L M N O P Q R S T12345678910111213141516171819
12345678910111213141516171819
32
W 32
W #32 therefore hane. Next B #33 —[See the variation for B #33.]
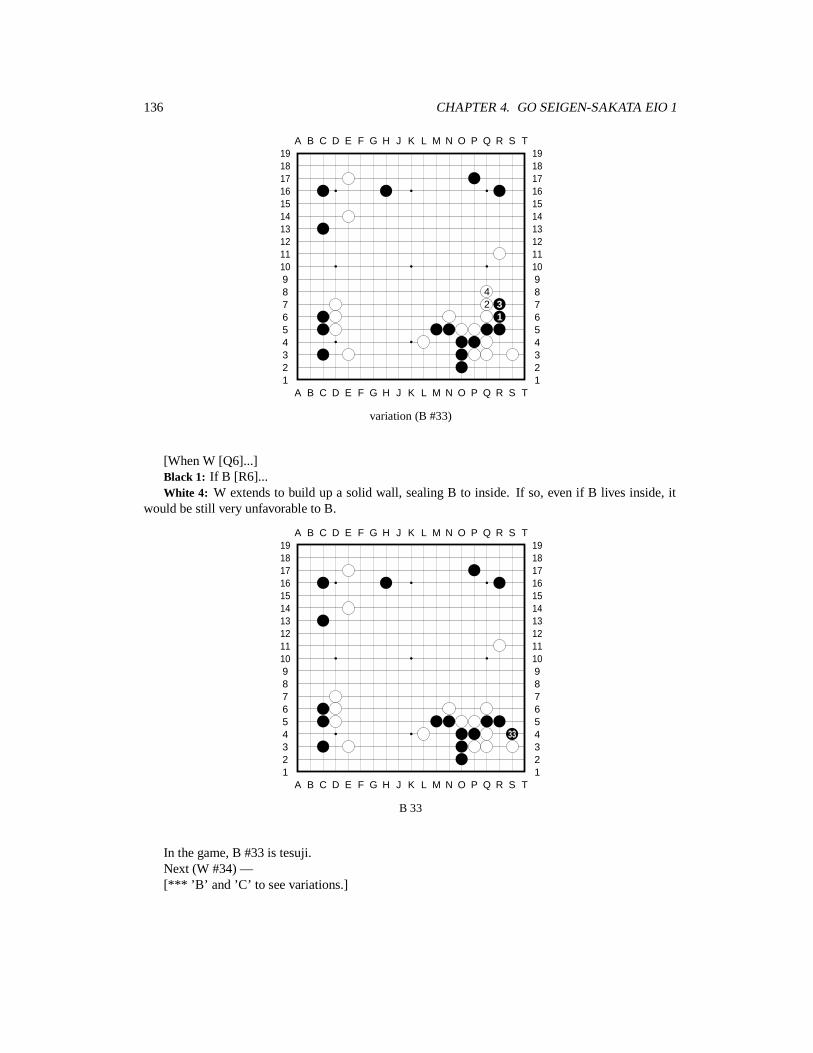
136 CHAPTER 4. GO SEIGEN-SAKATA EIO 1
A B C D E F G H J K L M N O P Q R S T
A B C D E F G H J K L M N O P Q R S T12345678910111213141516171819
12345678910111213141516171819
42 3
1
variation (B #33)
[When W [Q6]...]Black 1: If B [R6]...White 4: W extends to build up a solid wall, sealing B to inside. If so, even if B lives inside, it
would be still very unfavorable to B.
A B C D E F G H J K L M N O P Q R S T
A B C D E F G H J K L M N O P Q R S T12345678910111213141516171819
12345678910111213141516171819
33
B 33
In the game, B #33 is tesuji.Next (W #34) —[*** ’B’ and ’C’ to see variations.]
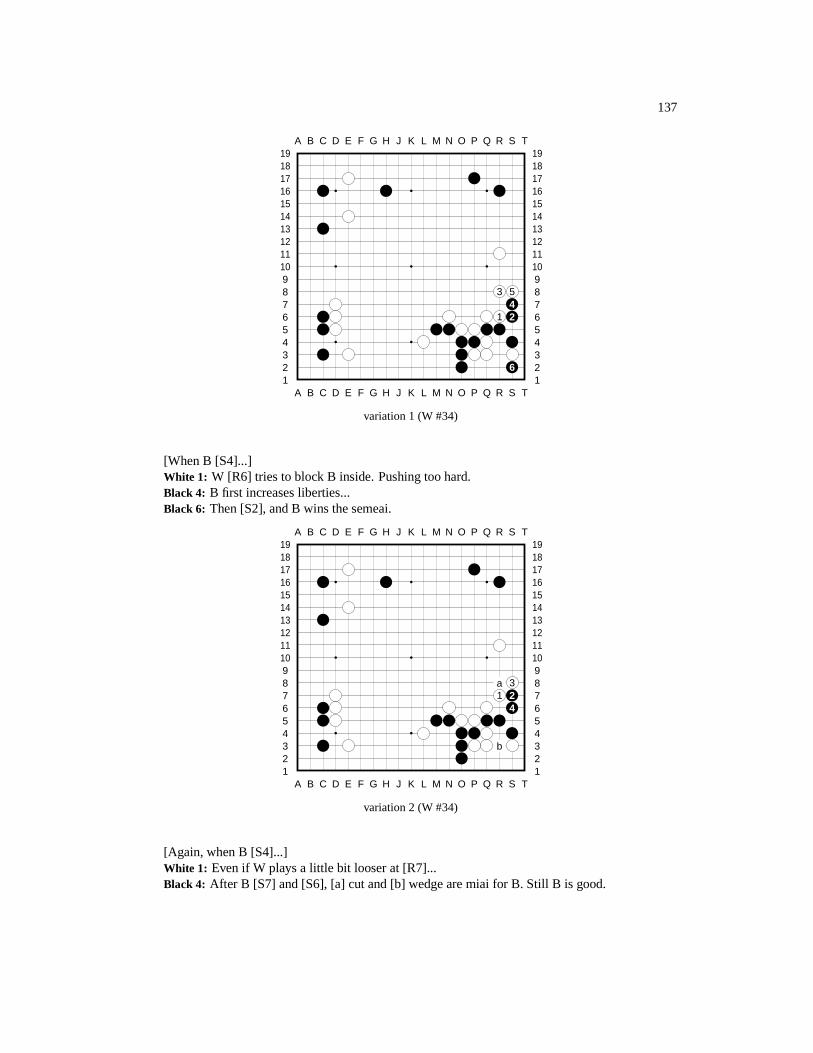
137
A B C D E F G H J K L M N O P Q R S T
A B C D E F G H J K L M N O P Q R S T12345678910111213141516171819
12345678910111213141516171819
3 54
1 2
6
variation 1 (W #34)
[When B [S4]...]White 1: W [R6] tries to block B inside. Pushing too hard.Black 4: B first increases liberties...Black 6: Then [S2], and B wins the semeai.
A B C D E F G H J K L M N O P Q R S T
A B C D E F G H J K L M N O P Q R S T12345678910111213141516171819
12345678910111213141516171819
a 31 2
4
b
variation 2 (W #34)
[Again, when B [S4]...]White 1: Even if W plays a little bit looser at [R7]...Black 4: After B [S7] and [S6], [a] cut and [b] wedge are miai for B. Still B is good.
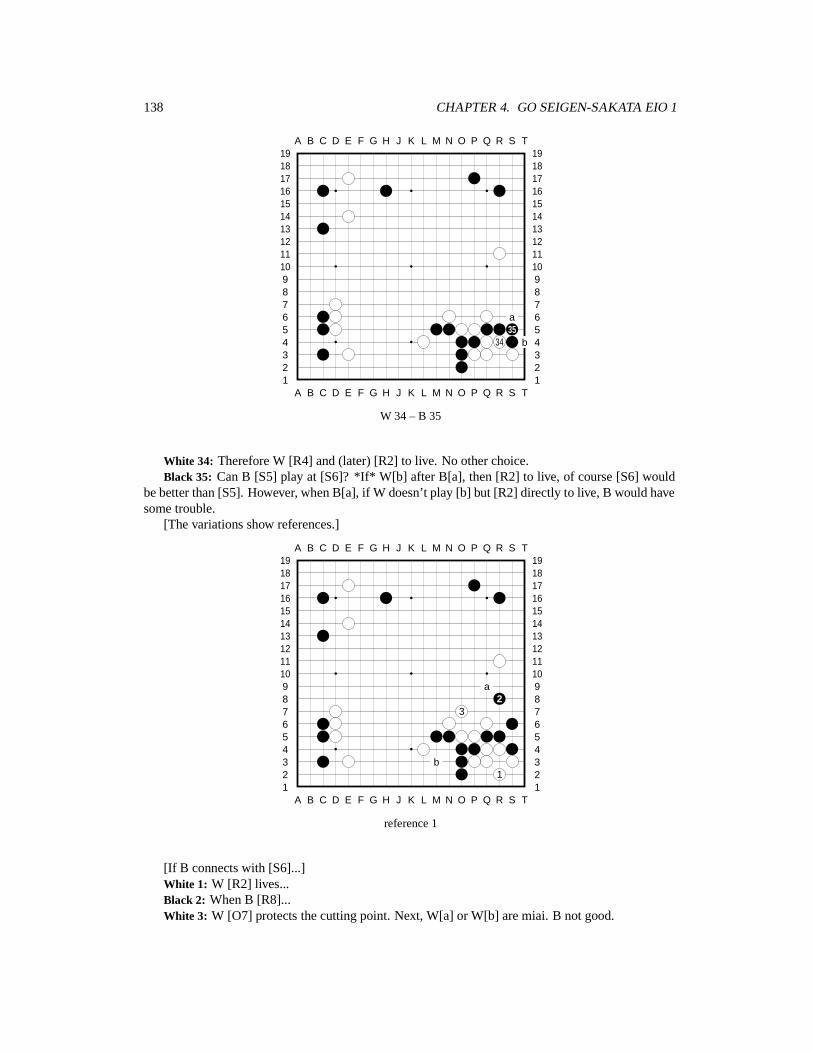
138 CHAPTER 4. GO SEIGEN-SAKATA EIO 1
A B C D E F G H J K L M N O P Q R S T
A B C D E F G H J K L M N O P Q R S T12345678910111213141516171819
12345678910111213141516171819
a35
34 b
W 34 – B 35
White 34: Therefore W [R4] and (later) [R2] to live. No other choice.Black 35: Can B [S5] play at [S6]? *If* W[b] after B[a], then [R2] to live, of course [S6] would
be better than [S5]. However, when B[a], if W doesn’t play [b] but [R2] directly to live, B would havesome trouble.
[The variations show references.]
A B C D E F G H J K L M N O P Q R S T
A B C D E F G H J K L M N O P Q R S T12345678910111213141516171819
12345678910111213141516171819
a2
3
b1
reference 1
[If B connects with [S6]...]White 1: W [R2] lives...Black 2: When B [R8]...White 3: W [O7] protects the cutting point. Next, W[a] or W[b] are miai. B not good.
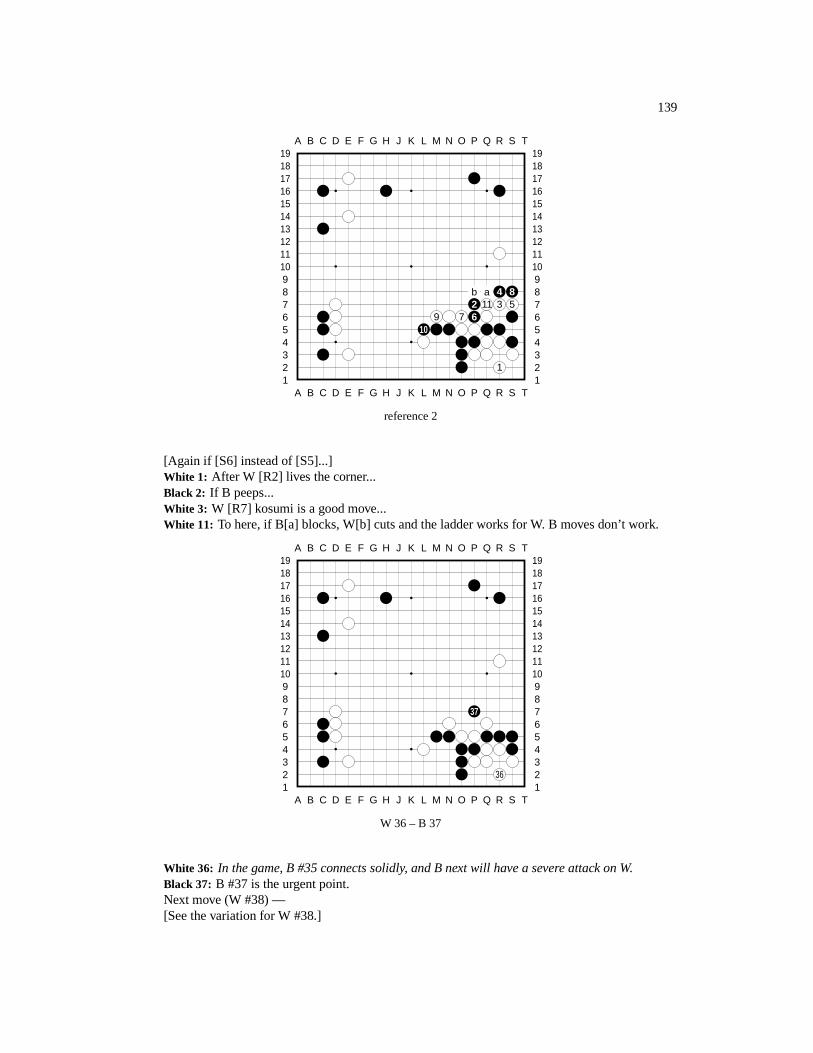
139
A B C D E F G H J K L M N O P Q R S T
A B C D E F G H J K L M N O P Q R S T12345678910111213141516171819
12345678910111213141516171819
b a 4 82 11 3 5
9 7 610
1
reference 2
[Again if [S6] instead of [S5]...]White 1: After W [R2] lives the corner...Black 2: If B peeps...White 3: W [R7] kosumi is a good move...White 11: To here, if B[a] blocks, W[b] cuts and the ladder works for W. B moves don’t work.
A B C D E F G H J K L M N O P Q R S T
A B C D E F G H J K L M N O P Q R S T12345678910111213141516171819
12345678910111213141516171819
37
36
W 36 – B 37
White 36: In the game, B #35 connects solidly, and B next will have a severe attack on W.Black 37: B #37 is the urgent point.Next move (W #38) —[See the variation for W #38.]
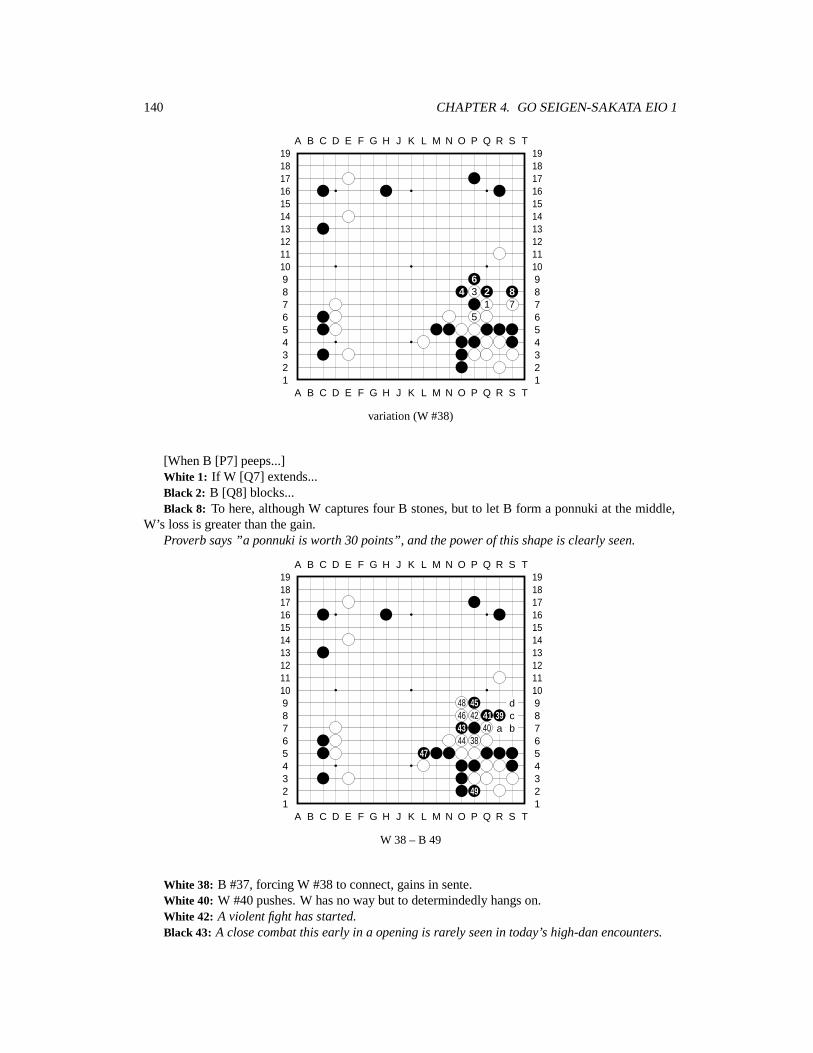
140 CHAPTER 4. GO SEIGEN-SAKATA EIO 1
A B C D E F G H J K L M N O P Q R S T
A B C D E F G H J K L M N O P Q R S T12345678910111213141516171819
12345678910111213141516171819
64 3 2 8
1 75
variation (W #38)
[When B [P7] peeps...]White 1: If W [Q7] extends...Black 2: B [Q8] blocks...Black 8: To here, although W captures four B stones, but to let B form a ponnuki at the middle,
W’s loss is greater than the gain.Proverb says ”a ponnuki is worth 30 points”, and the power of this shape is clearly seen.
A B C D E F G H J K L M N O P Q R S T
A B C D E F G H J K L M N O P Q R S T12345678910111213141516171819
12345678910111213141516171819
48 45 d46 42 41 39 c43 40 a b44 38
47
49
W 38 – B 49
White 38: B #37, forcing W #38 to connect, gains in sente.White 40: W #40 pushes. W has no way but to determindedly hangs on.White 42: A violent fight has started.Black 43: A close combat this early in a opening is rarely seen in today’s high-dan encounters.
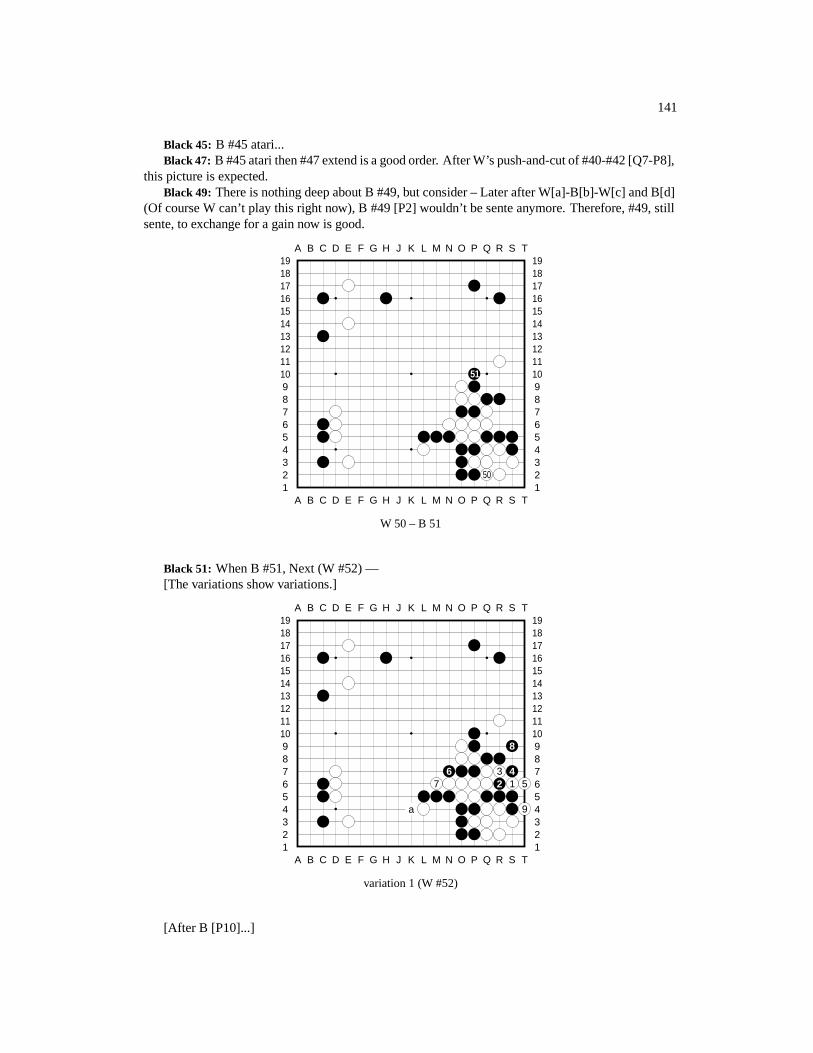
141
Black 45: B #45 atari...Black 47: B #45 atari then #47 extend is a good order. After W’s push-and-cut of #40-#42 [Q7-P8],
this picture is expected.Black 49: There is nothing deep about B #49, but consider – Later after W[a]-B[b]-W[c] and B[d]
(Of course W can’t play this right now), B #49 [P2] wouldn’t be sente anymore. Therefore, #49, stillsente, to exchange for a gain now is good.
A B C D E F G H J K L M N O P Q R S T
A B C D E F G H J K L M N O P Q R S T12345678910111213141516171819
12345678910111213141516171819
51
50
W 50 – B 51
Black 51: When B #51, Next (W #52) —[The variations show variations.]
A B C D E F G H J K L M N O P Q R S T
A B C D E F G H J K L M N O P Q R S T12345678910111213141516171819
12345678910111213141516171819
8
6 3 47 2 1 5
a 9
variation 1 (W #52)
[After B [P10]...]
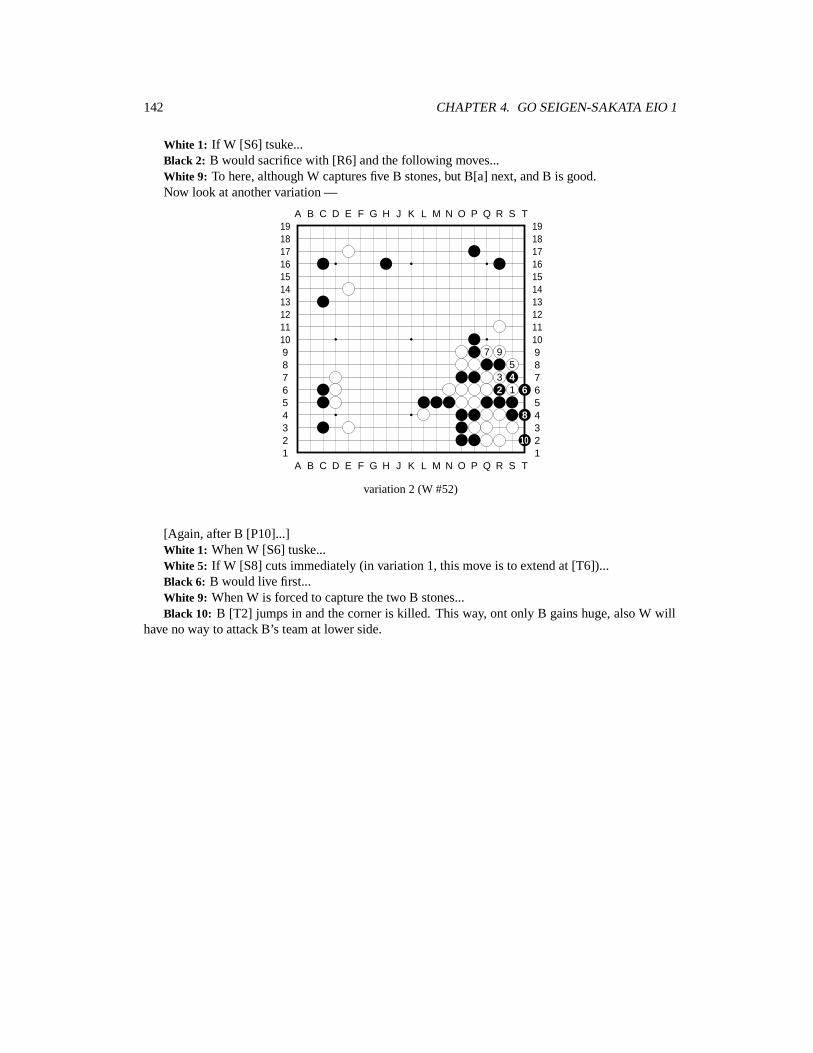
142 CHAPTER 4. GO SEIGEN-SAKATA EIO 1
White 1: If W [S6] tsuke...Black 2: B would sacrifice with [R6] and the following moves...White 9: To here, although W captures five B stones, but B[a] next, and B is good.Now look at another variation —
A B C D E F G H J K L M N O P Q R S T
A B C D E F G H J K L M N O P Q R S T12345678910111213141516171819
12345678910111213141516171819
7 95
3 42 1 6
8
10
variation 2 (W #52)
[Again, after B [P10]...]White 1: When W [S6] tuske...White 5: If W [S8] cuts immediately (in variation 1, this move is to extend at [T6])...Black 6: B would live first...White 9: When W is forced to capture the two B stones...Black 10: B [T2] jumps in and the corner is killed. This way, ont only B gains huge, also W will
have no way to attack B’s team at lower side.
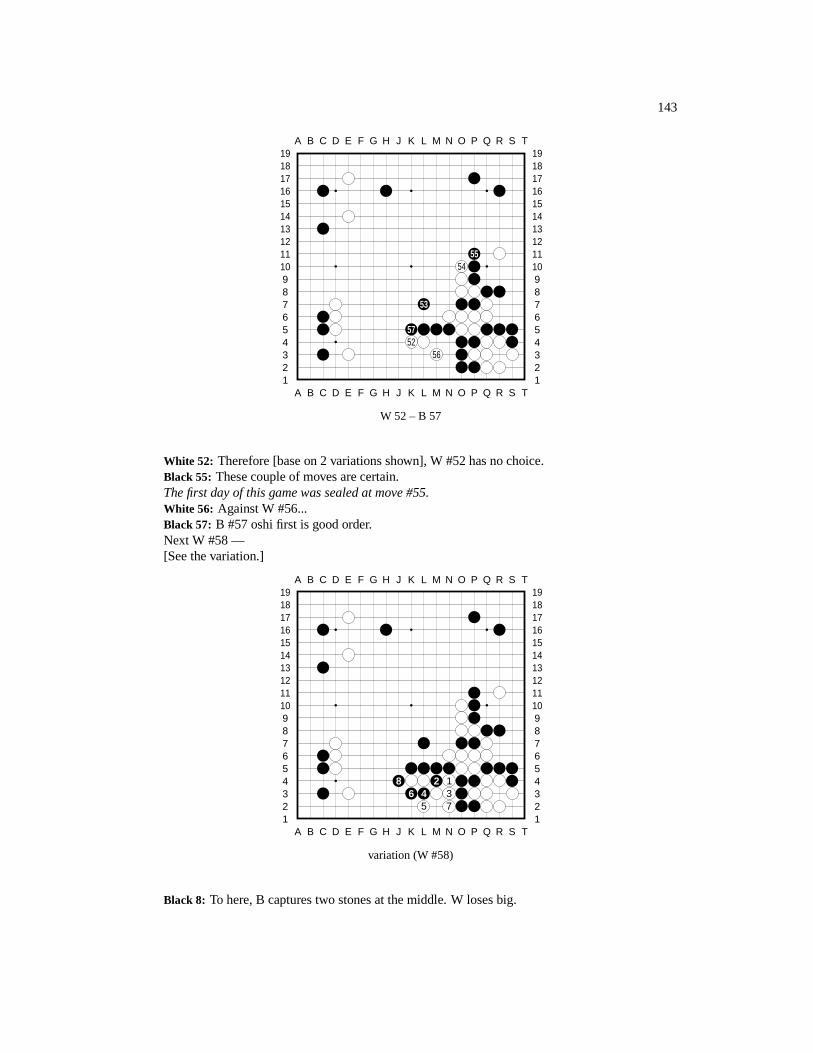
143
A B C D E F G H J K L M N O P Q R S T
A B C D E F G H J K L M N O P Q R S T12345678910111213141516171819
12345678910111213141516171819
5554
53
5752
56
W 52 – B 57
White 52: Therefore [base on 2 variations shown], W #52 has no choice.Black 55: These couple of moves are certain.The first day of this game was sealed at move #55.White 56: Against W #56...Black 57: B #57 oshi first is good order.Next W #58 —[See the variation.]
A B C D E F G H J K L M N O P Q R S T
A B C D E F G H J K L M N O P Q R S T12345678910111213141516171819
12345678910111213141516171819
8 2 16 4 3
5 7
variation (W #58)
Black 8: To here, B captures two stones at the middle. W loses big.
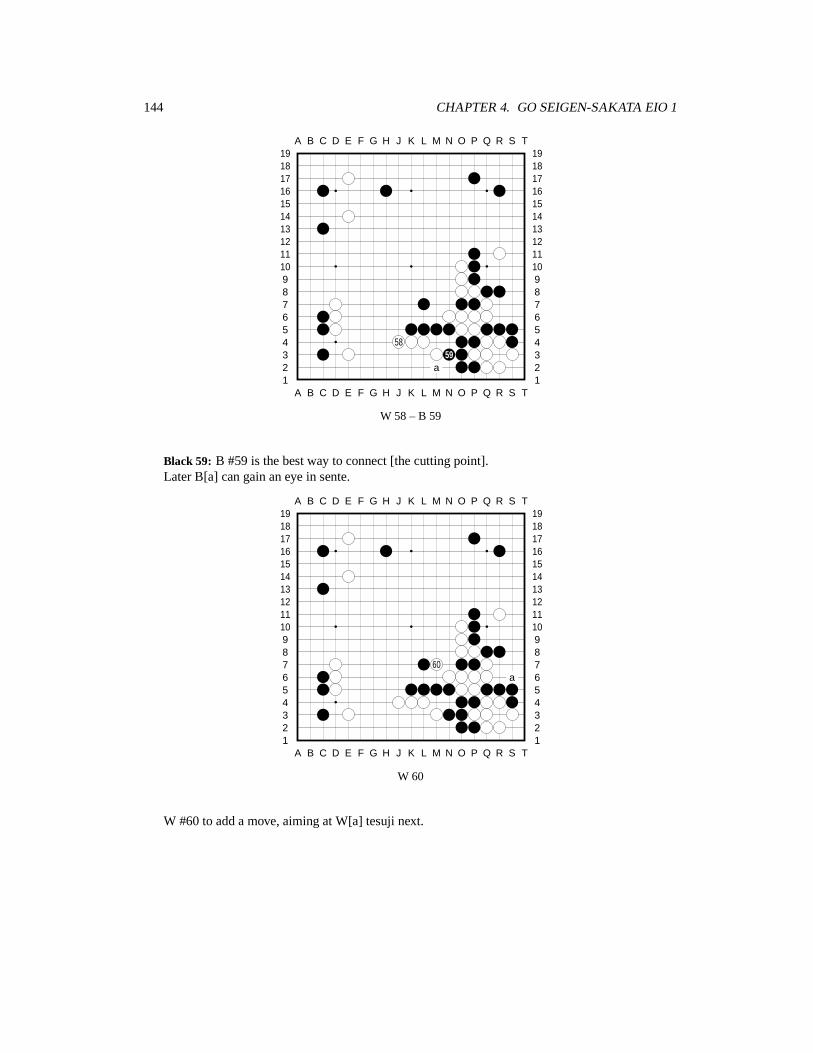
144 CHAPTER 4. GO SEIGEN-SAKATA EIO 1
A B C D E F G H J K L M N O P Q R S T
A B C D E F G H J K L M N O P Q R S T12345678910111213141516171819
12345678910111213141516171819
5859
a
W 58 – B 59
Black 59: B #59 is the best way to connect [the cutting point].Later B[a] can gain an eye in sente.
A B C D E F G H J K L M N O P Q R S T
A B C D E F G H J K L M N O P Q R S T12345678910111213141516171819
12345678910111213141516171819
60a
W 60
W #60 to add a move, aiming at W[a] tesuji next.
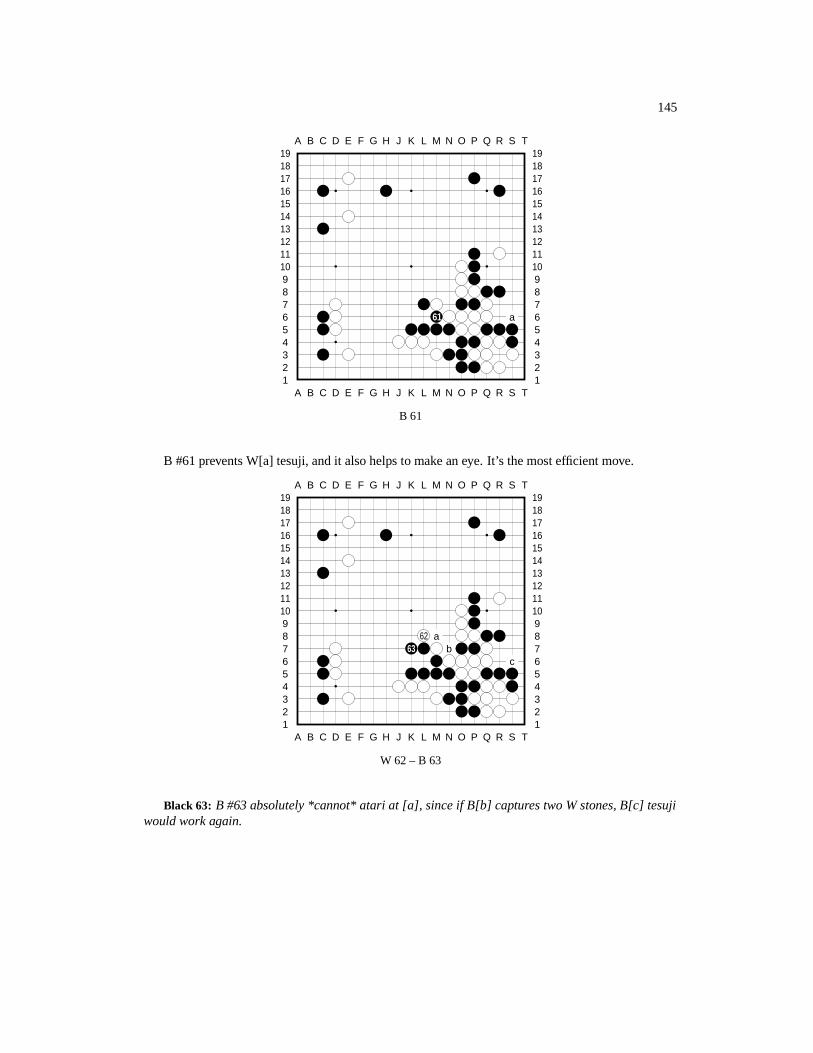
145
A B C D E F G H J K L M N O P Q R S T
A B C D E F G H J K L M N O P Q R S T12345678910111213141516171819
12345678910111213141516171819
61 a
B 61
B #61 prevents W[a] tesuji, and it also helps to make an eye. It’s the most efficient move.
A B C D E F G H J K L M N O P Q R S T
A B C D E F G H J K L M N O P Q R S T12345678910111213141516171819
12345678910111213141516171819
62 a63 b
c
W 62 – B 63
Black 63: B #63 absolutely *cannot* atari at [a], since if B[b] captures two W stones, B[c] tesujiwould work again.
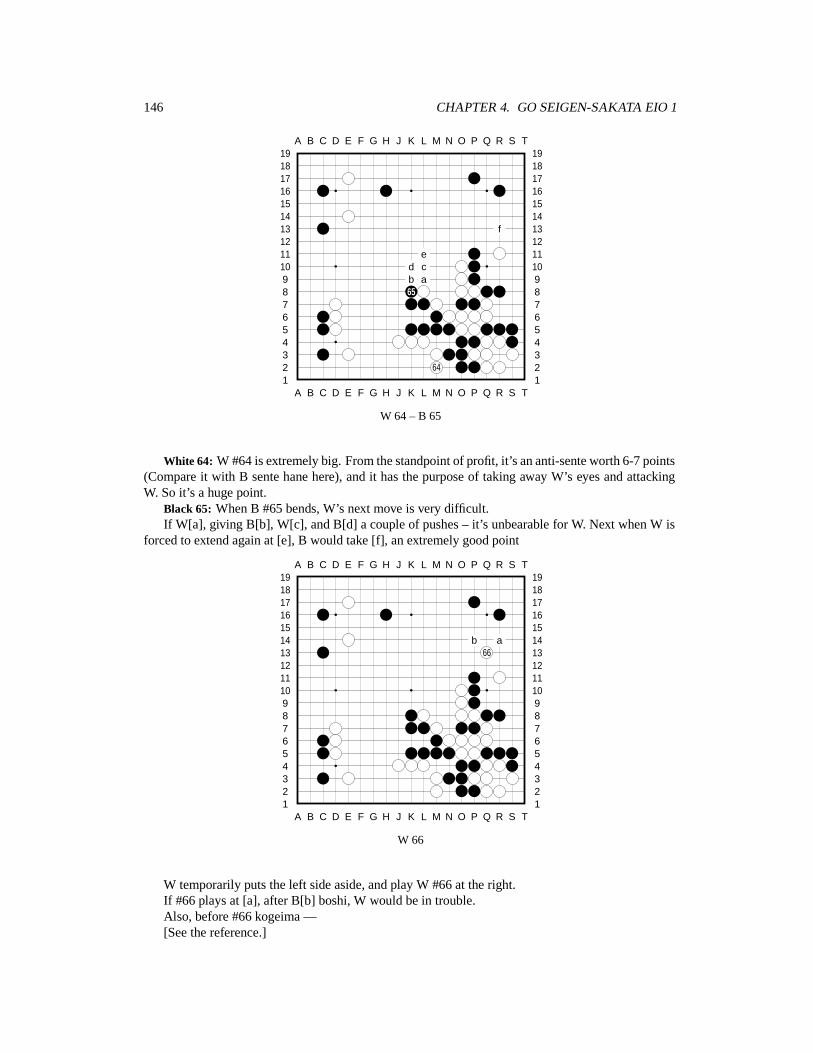
146 CHAPTER 4. GO SEIGEN-SAKATA EIO 1
A B C D E F G H J K L M N O P Q R S T
A B C D E F G H J K L M N O P Q R S T12345678910111213141516171819
12345678910111213141516171819
f
ed cb a65
64
W 64 – B 65
White 64: W #64 is extremely big. From the standpoint of profit, it’s an anti-sente worth 6-7 points(Compare it with B sente hane here), and it has the purpose of taking away W’s eyes and attackingW. So it’s a huge point.
Black 65: When B #65 bends, W’s next move is very difficult.If W[a], giving B[b], W[c], and B[d] a couple of pushes – it’s unbearable for W. Next when W is
forced to extend again at [e], B would take [f], an extremely good point
A B C D E F G H J K L M N O P Q R S T
A B C D E F G H J K L M N O P Q R S T12345678910111213141516171819
12345678910111213141516171819
b a66
W 66
W temporarily puts the left side aside, and play W #66 at the right.If #66 plays at [a], after B[b] boshi, W would be in trouble.Also, before #66 kogeima —[See the reference.]
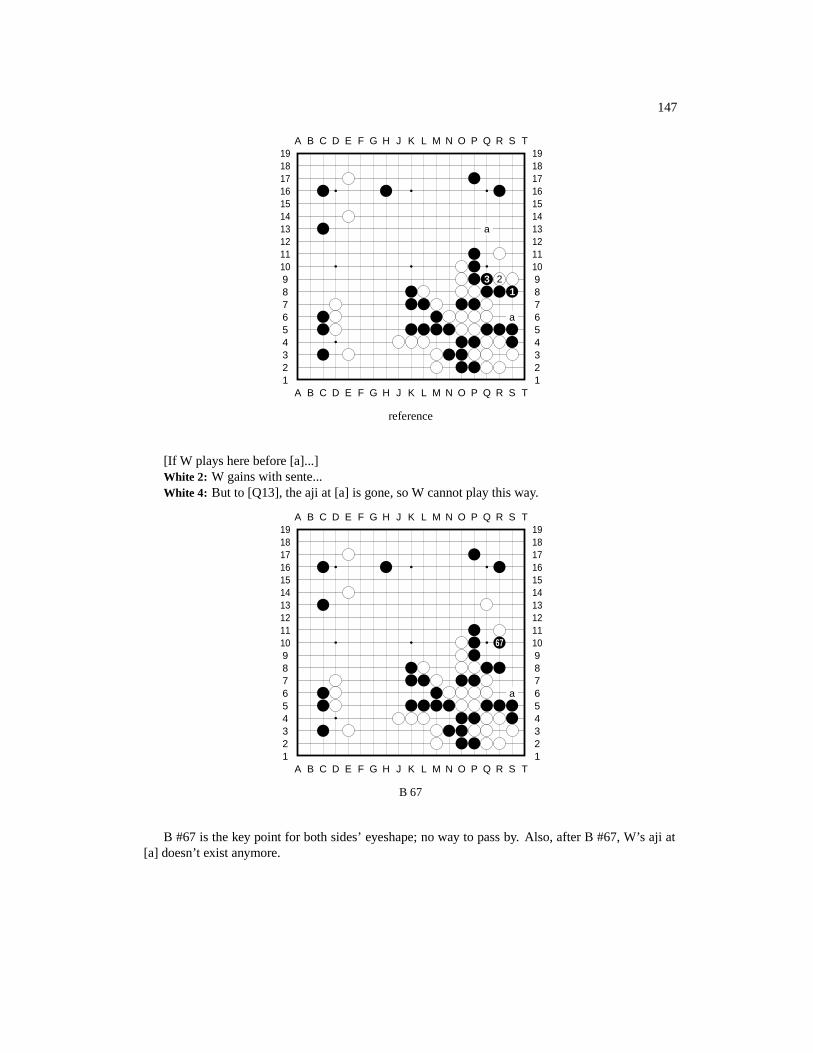
147
A B C D E F G H J K L M N O P Q R S T
A B C D E F G H J K L M N O P Q R S T12345678910111213141516171819
12345678910111213141516171819
a
3 21
a
reference
[If W plays here before [a]...]White 2: W gains with sente...White 4: But to [Q13], the aji at [a] is gone, so W cannot play this way.
A B C D E F G H J K L M N O P Q R S T
A B C D E F G H J K L M N O P Q R S T12345678910111213141516171819
12345678910111213141516171819
67
a
B 67
B #67 is the key point for both sides’ eyeshape; no way to pass by. Also, after B #67, W’s aji at[a] doesn’t exist anymore.
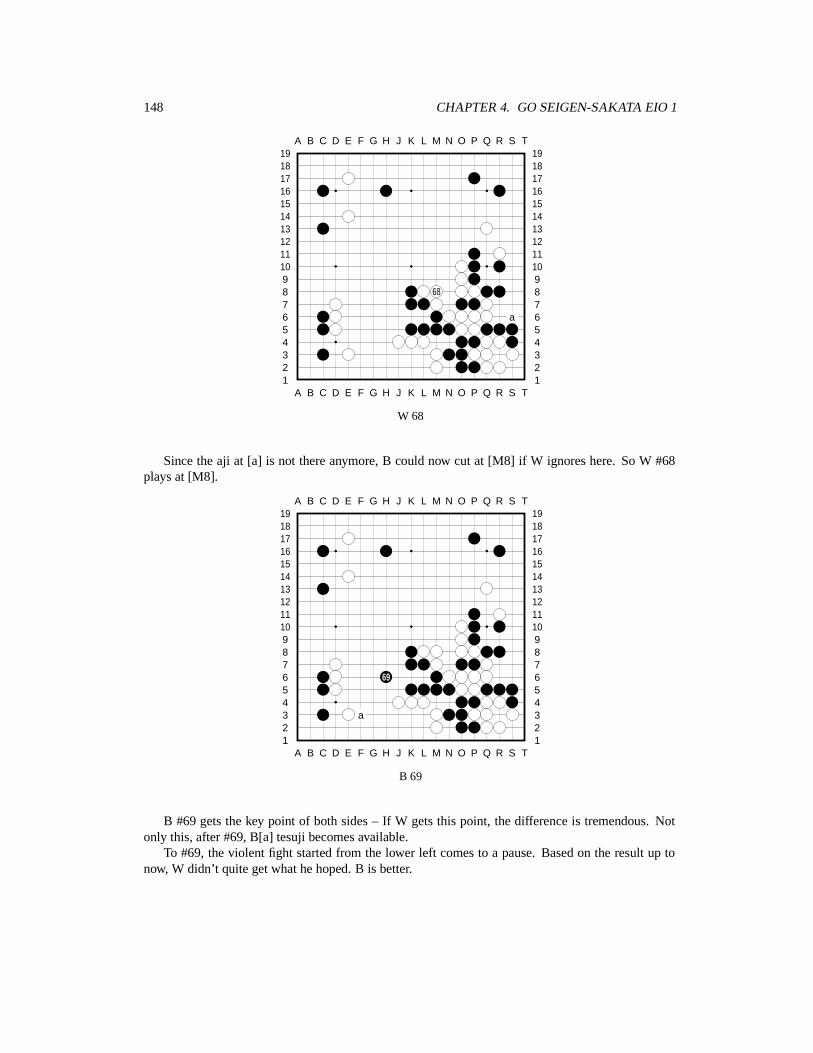
148 CHAPTER 4. GO SEIGEN-SAKATA EIO 1
A B C D E F G H J K L M N O P Q R S T
A B C D E F G H J K L M N O P Q R S T12345678910111213141516171819
12345678910111213141516171819
68
a
W 68
Since the aji at [a] is not there anymore, B could now cut at [M8] if W ignores here. So W #68plays at [M8].
A B C D E F G H J K L M N O P Q R S T
A B C D E F G H J K L M N O P Q R S T12345678910111213141516171819
12345678910111213141516171819
69
a
B 69
B #69 gets the key point of both sides – If W gets this point, the difference is tremendous. Notonly this, after #69, B[a] tesuji becomes available.
To #69, the violent fight started from the lower left comes to a pause. Based on the result up tonow, W didn’t quite get what he hoped. B is better.
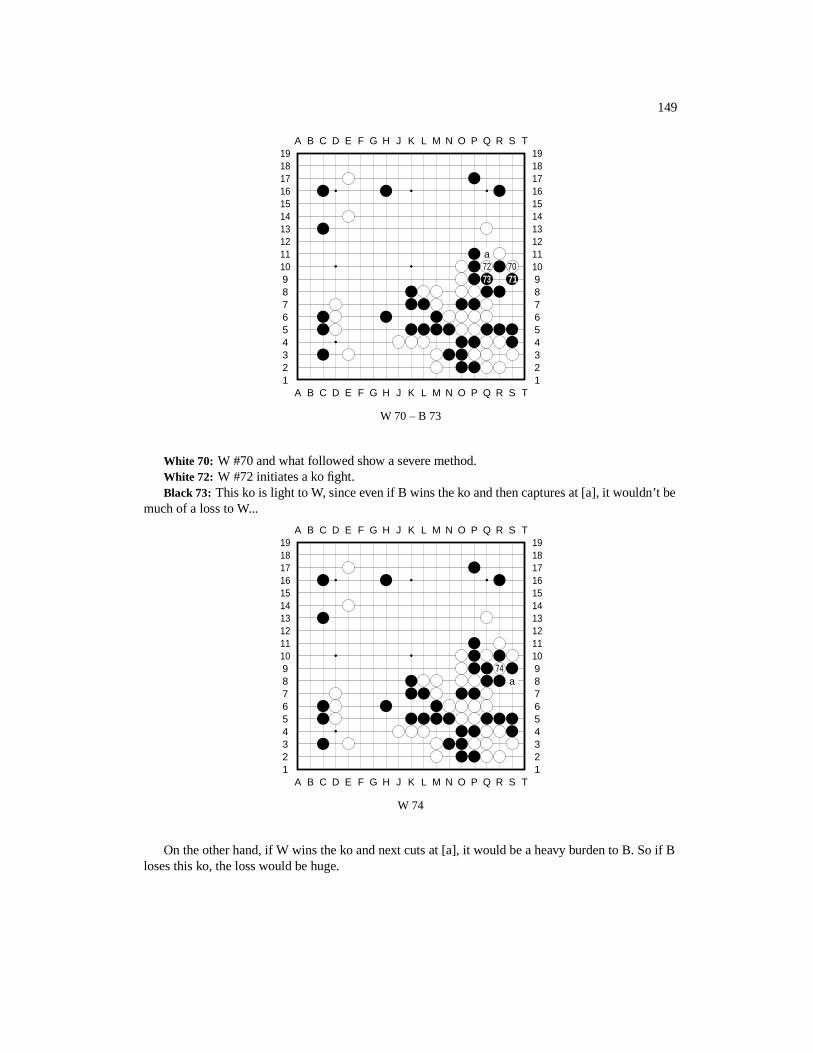
149
A B C D E F G H J K L M N O P Q R S T
A B C D E F G H J K L M N O P Q R S T12345678910111213141516171819
12345678910111213141516171819
a72 7073 71
W 70 – B 73
White 70: W #70 and what followed show a severe method.White 72: W #72 initiates a ko fight.Black 73: This ko is light to W, since even if B wins the ko and then captures at [a], it wouldn’t be
much of a loss to W...
A B C D E F G H J K L M N O P Q R S T
A B C D E F G H J K L M N O P Q R S T12345678910111213141516171819
12345678910111213141516171819
74a
W 74
On the other hand, if W wins the ko and next cuts at [a], it would be a heavy burden to B. So if Bloses this ko, the loss would be huge.

150 CHAPTER 4. GO SEIGEN-SAKATA EIO 1
A B C D E F G H J K L M N O P Q R S T
A B C D E F G H J K L M N O P Q R S T12345678910111213141516171819
12345678910111213141516171819
7879 80
77a
b
7675
B 75 – W 80
Black 75: B has to take the ko seriously, as explained before. But to W, even if he can’t win theko, he would still have chance to play two [non-ko] moves in a row to settle this W team [R11] – thisis W’s purpose to start this ko.
White 78: W #78 is a point W wants to get even if it’s not used as a ko threat. Greating timing.White 80: If W #80 to recapture at [a], B would play [S15] to get the one B stone. Then even if
W[b] cuts next, since W wouldn’t have enough ko threats, W cannot win the ko —[See the reference on the ko fight.]
A B C D E F G H J K L M N O P Q R S T
A B C D E F G H J K L M N O P Q R S T12345678910111213141516171819
12345678910111213141516171819
1
3
2
5 4 a
78
reference6 at (r,9), 9 at 3
[Say W captures at [R9] instead of [S15] (actually played)...]Black 1: B would [S15] to get the stone at the corner...White 2: When W cuts...
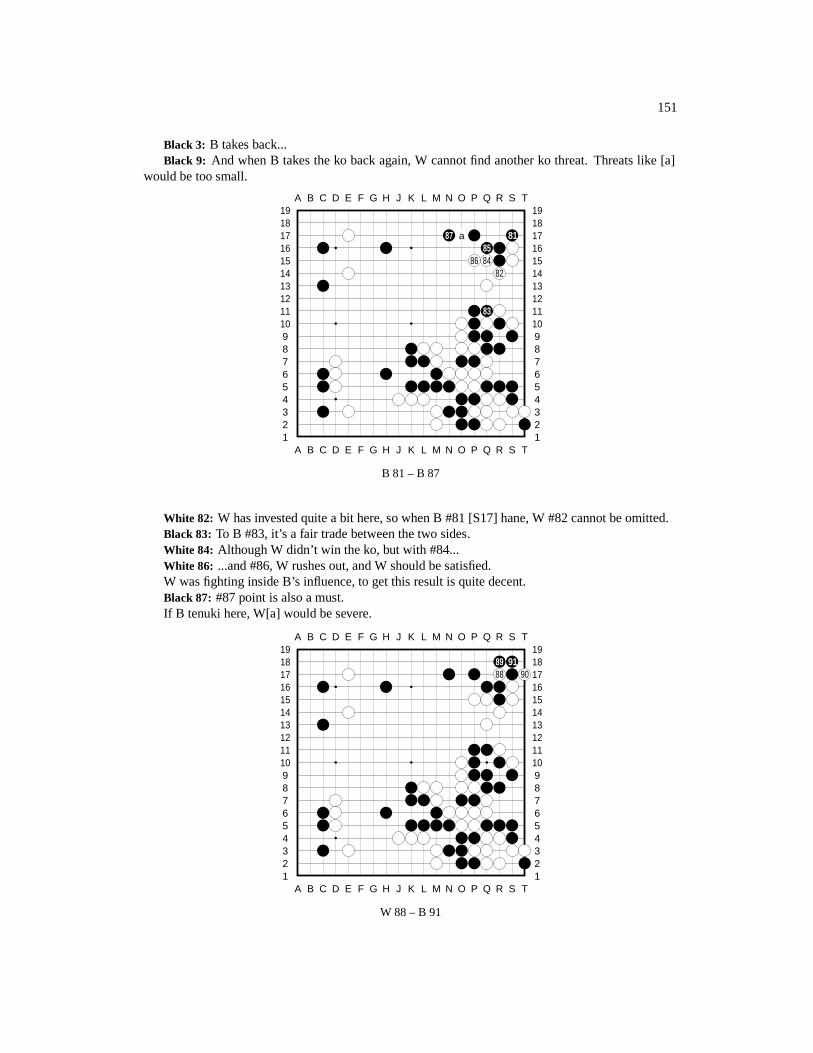
151
Black 3: B takes back...Black 9: And when B takes the ko back again, W cannot find another ko threat. Threats like [a]
would be too small.
A B C D E F G H J K L M N O P Q R S T
A B C D E F G H J K L M N O P Q R S T12345678910111213141516171819
12345678910111213141516171819
87 a 8185
86 8482
83
B 81 – B 87
White 82: W has invested quite a bit here, so when B #81 [S17] hane, W #82 cannot be omitted.Black 83: To B #83, it’s a fair trade between the two sides.White 84: Although W didn’t win the ko, but with #84...White 86: ...and #86, W rushes out, and W should be satisfied.W was fighting inside B’s influence, to get this result is quite decent.Black 87: #87 point is also a must.If B tenuki here, W[a] would be severe.
A B C D E F G H J K L M N O P Q R S T
A B C D E F G H J K L M N O P Q R S T12345678910111213141516171819
12345678910111213141516171819
89 9188 90
W 88 – B 91
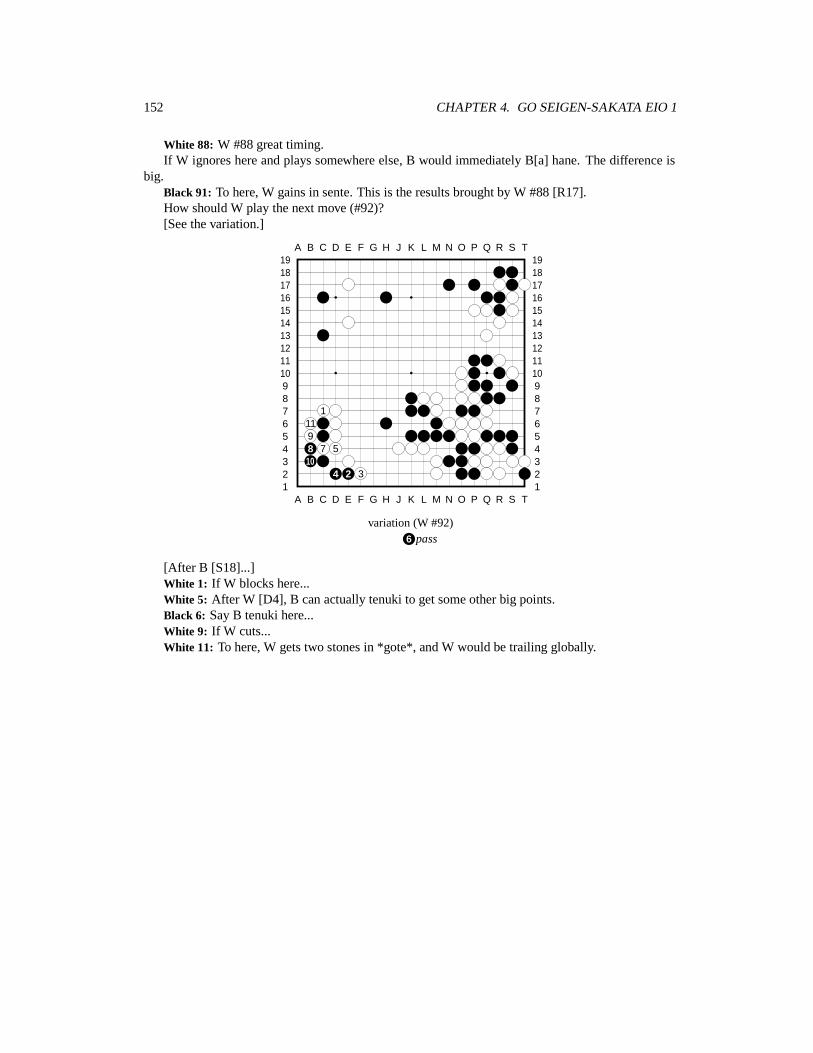
152 CHAPTER 4. GO SEIGEN-SAKATA EIO 1
White 88: W #88 great timing.If W ignores here and plays somewhere else, B would immediately B[a] hane. The difference is
big.Black 91: To here, W gains in sente. This is the results brought by W #88 [R17].How should W play the next move (#92)?[See the variation.]
A B C D E F G H J K L M N O P Q R S T
A B C D E F G H J K L M N O P Q R S T12345678910111213141516171819
12345678910111213141516171819
11198 7 510
4 2 3
variation (W #92)6 pass
[After B [S18]...]White 1: If W blocks here...White 5: After W [D4], B can actually tenuki to get some other big points.Black 6: Say B tenuki here...White 9: If W cuts...White 11: To here, W gets two stones in *gote*, and W would be trailing globally.
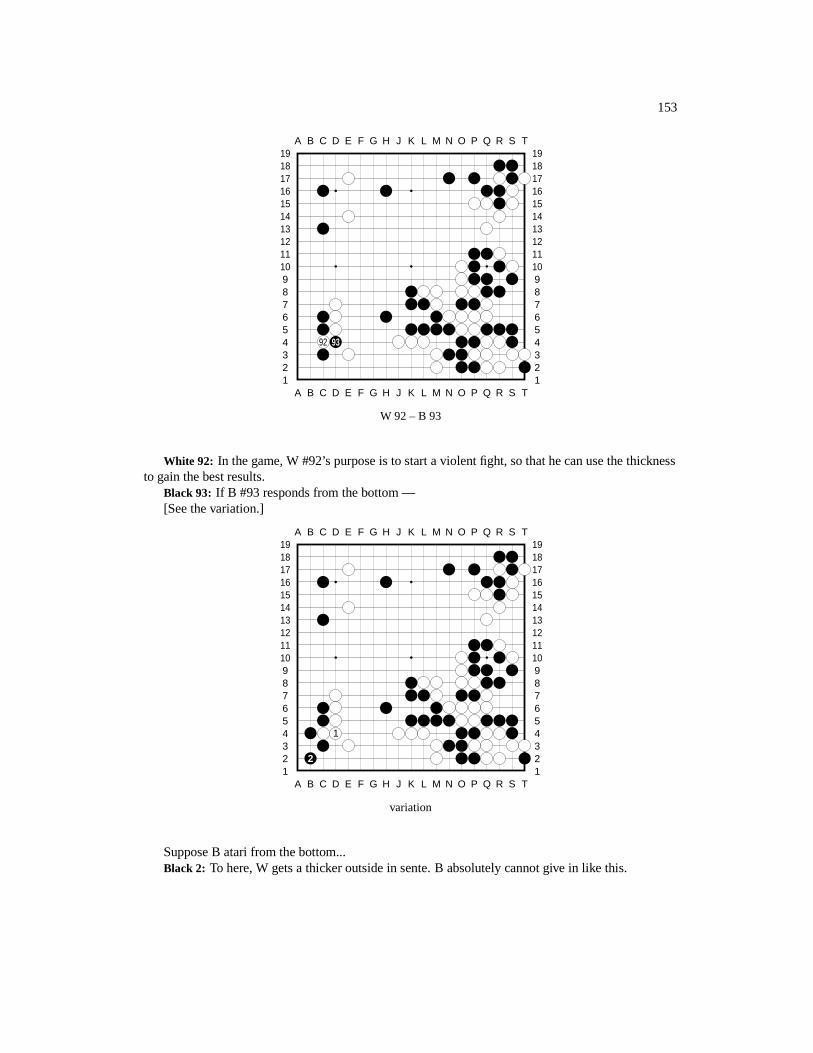
153
A B C D E F G H J K L M N O P Q R S T
A B C D E F G H J K L M N O P Q R S T12345678910111213141516171819
12345678910111213141516171819
92 93
W 92 – B 93
White 92: In the game, W #92’s purpose is to start a violent fight, so that he can use the thicknessto gain the best results.
Black 93: If B #93 responds from the bottom —[See the variation.]
A B C D E F G H J K L M N O P Q R S T
A B C D E F G H J K L M N O P Q R S T12345678910111213141516171819
12345678910111213141516171819
1
2
variation
Suppose B atari from the bottom...Black 2: To here, W gets a thicker outside in sente. B absolutely cannot give in like this.

154 CHAPTER 4. GO SEIGEN-SAKATA EIO 1
A B C D E F G H J K L M N O P Q R S T
A B C D E F G H J K L M N O P Q R S T12345678910111213141516171819
12345678910111213141516171819
9495
W 94 – B 95
White 94: When W #94 sagari...Black 95: B #95 connects. The next move for W (#96) is difficult. The conclusion —[The variations show variations.]
A B C D E F G H J K L M N O P Q R S T
A B C D E F G H J K L M N O P Q R S T12345678910111213141516171819
12345678910111213141516171819
a
135
4 102 8 9
6 7
variation 1 (W #96)
[After B [D3]...]White 1: If W blocks here directly...Black 10: To here, W [G3] gains sente and next can play [a] – this would be the strongest way
based on the resutls.
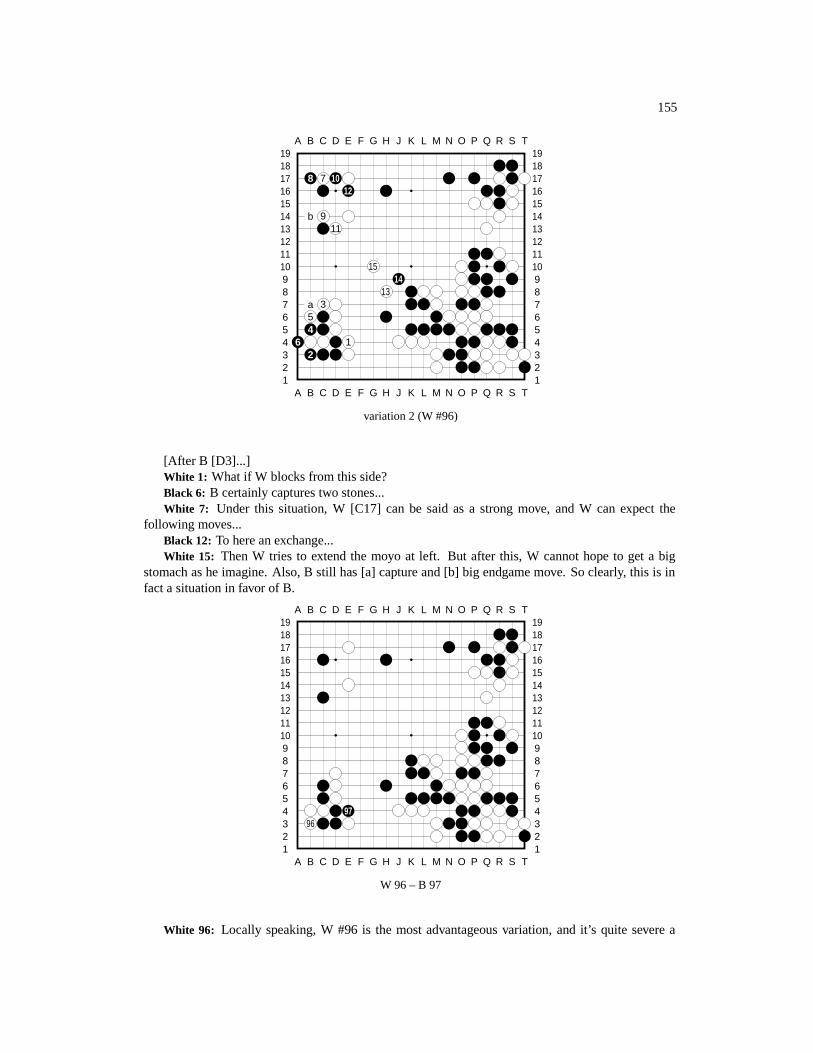
155
A B C D E F G H J K L M N O P Q R S T
A B C D E F G H J K L M N O P Q R S T12345678910111213141516171819
12345678910111213141516171819
8 7 1012
b 911
1514
13a 354
6 12
variation 2 (W #96)
[After B [D3]...]White 1: What if W blocks from this side?Black 6: B certainly captures two stones...White 7: Under this situation, W [C17] can be said as a strong move, and W can expect the
following moves...Black 12: To here an exchange...White 15: Then W tries to extend the moyo at left. But after this, W cannot hope to get a big
stomach as he imagine. Also, B still has [a] capture and [b] big endgame move. So clearly, this is infact a situation in favor of B.
A B C D E F G H J K L M N O P Q R S T
A B C D E F G H J K L M N O P Q R S T12345678910111213141516171819
12345678910111213141516171819
9796
W 96 – B 97
White 96: Locally speaking, W #96 is the most advantageous variation, and it’s quite severe a
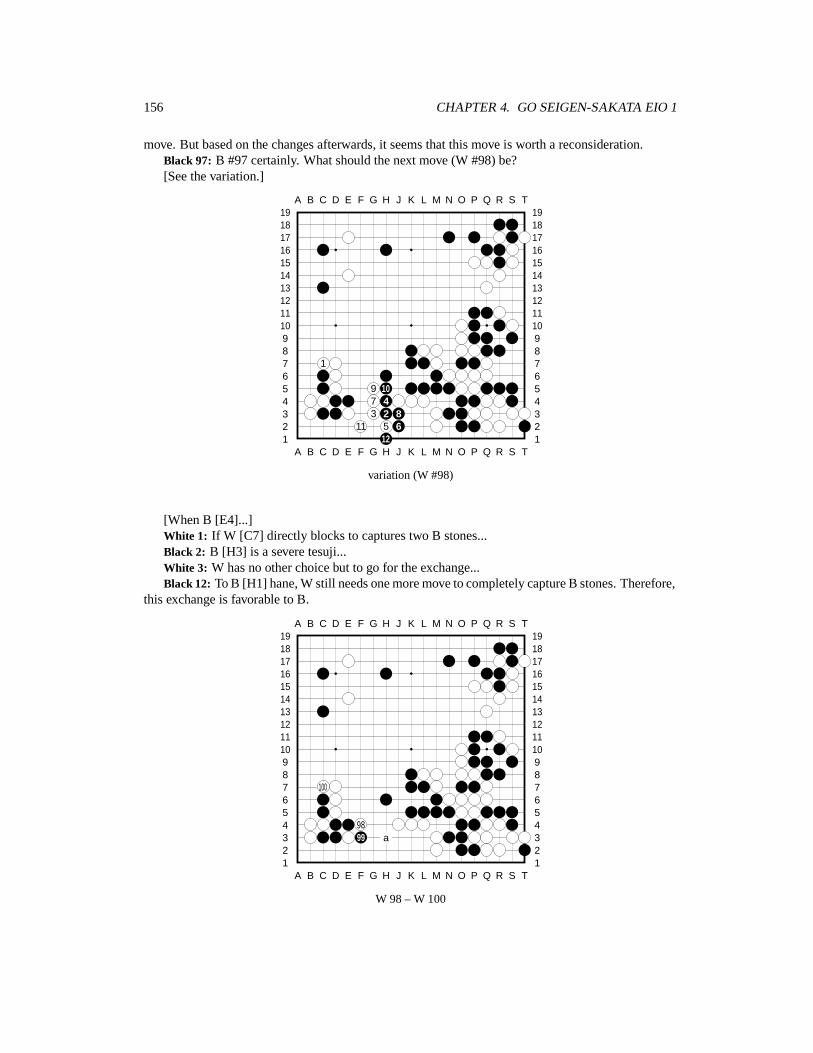
156 CHAPTER 4. GO SEIGEN-SAKATA EIO 1
move. But based on the changes afterwards, it seems that this move is worth a reconsideration.Black 97: B #97 certainly. What should the next move (W #98) be?[See the variation.]
A B C D E F G H J K L M N O P Q R S T
A B C D E F G H J K L M N O P Q R S T12345678910111213141516171819
12345678910111213141516171819
1
9 107 43 2 8
11 5 612
variation (W #98)
[When B [E4]...]White 1: If W [C7] directly blocks to captures two B stones...Black 2: B [H3] is a severe tesuji...White 3: W has no other choice but to go for the exchange...Black 12: To B [H1] hane, W still needs one more move to completely capture B stones. Therefore,
this exchange is favorable to B.
A B C D E F G H J K L M N O P Q R S T
A B C D E F G H J K L M N O P Q R S T12345678910111213141516171819
12345678910111213141516171819
100
9899 a
W 98 – W 100
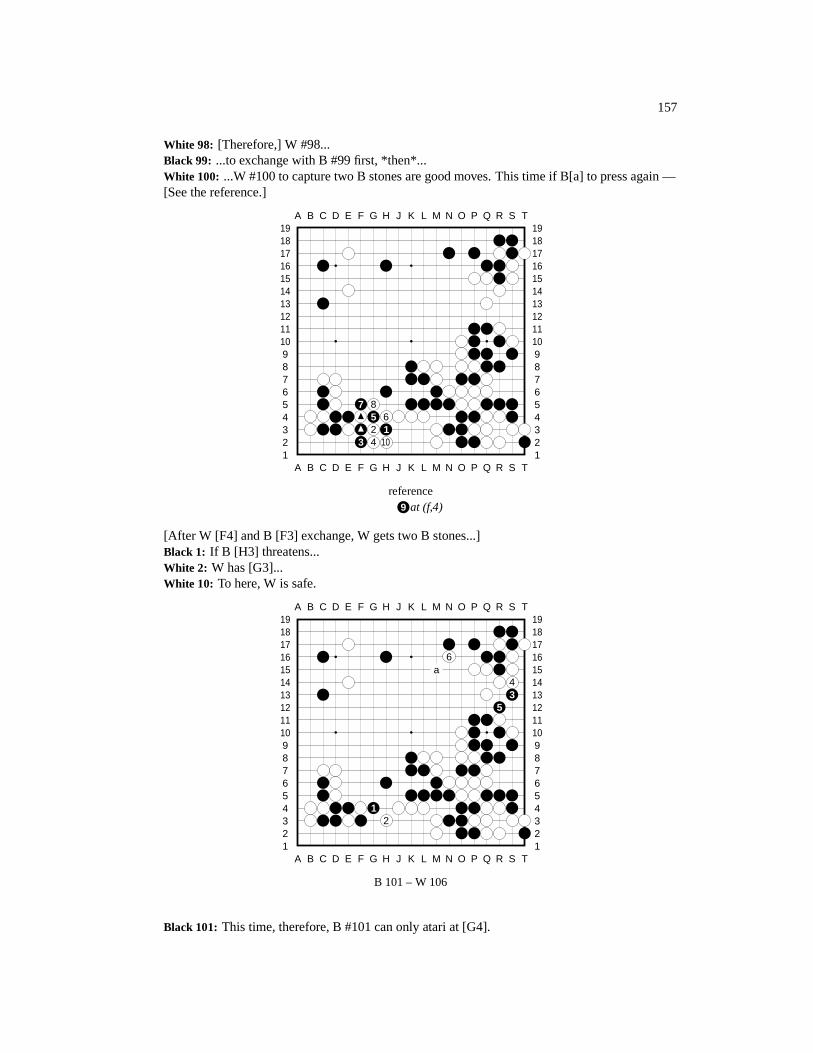
157
White 98: [Therefore,] W #98...Black 99: ...to exchange with B #99 first, *then*...White 100: ...W #100 to capture two B stones are good moves. This time if B[a] to press again —[See the reference.]
A B C D E F G H J K L M N O P Q R S T
A B C D E F G H J K L M N O P Q R S T12345678910111213141516171819
12345678910111213141516171819
7 85 62 1
3 4 10
reference9 at (f,4)
[After W [F4] and B [F3] exchange, W gets two B stones...]Black 1: If B [H3] threatens...White 2: W has [G3]...White 10: To here, W is safe.
A B C D E F G H J K L M N O P Q R S T
A B C D E F G H J K L M N O P Q R S T12345678910111213141516171819
12345678910111213141516171819
6a
43
5
12
B 101 – W 106
Black 101: This time, therefore, B #101 can only atari at [G4].
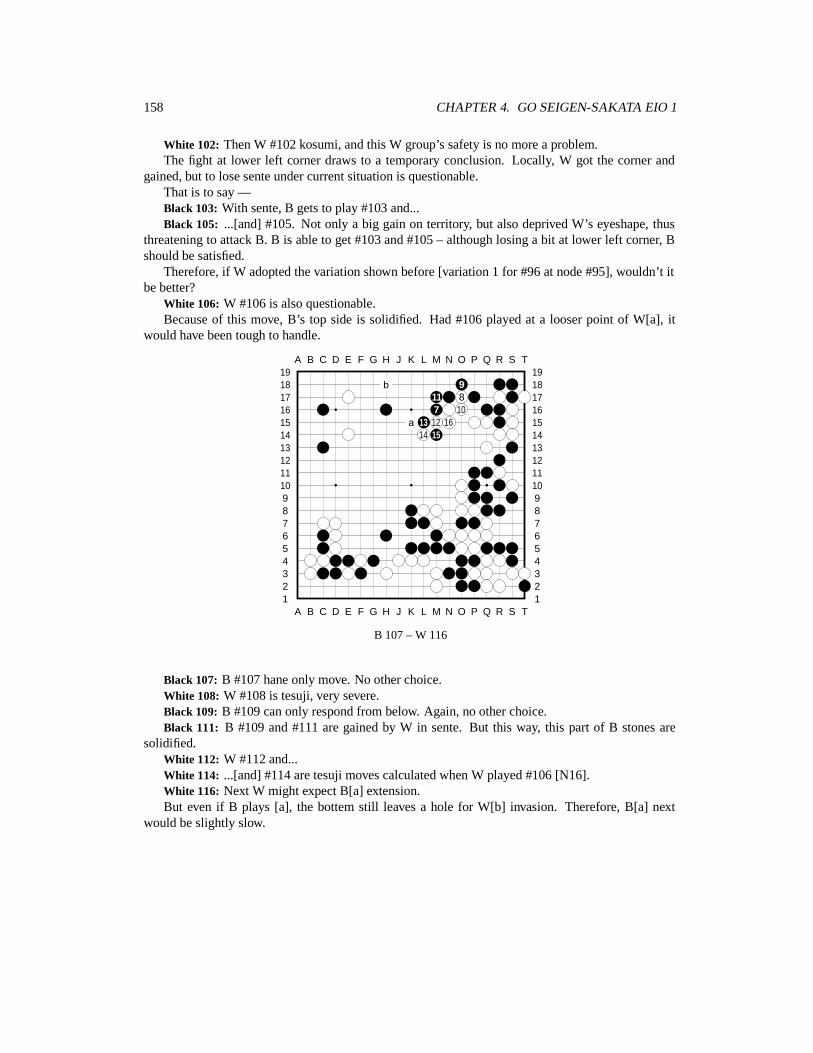
158 CHAPTER 4. GO SEIGEN-SAKATA EIO 1
White 102: Then W #102 kosumi, and this W group’s safety is no more a problem.The fight at lower left corner draws to a temporary conclusion. Locally, W got the corner and
gained, but to lose sente under current situation is questionable.That is to say —Black 103: With sente, B gets to play #103 and...Black 105: ...[and] #105. Not only a big gain on territory, but also deprived W’s eyeshape, thus
threatening to attack B. B is able to get #103 and #105 – although losing a bit at lower left corner, Bshould be satisfied.
Therefore, if W adopted the variation shown before [variation 1 for #96 at node #95], wouldn’t itbe better?
White 106: W #106 is also questionable.Because of this move, B’s top side is solidified. Had #106 played at a looser point of W[a], it
would have been tough to handle.
A B C D E F G H J K L M N O P Q R S T
A B C D E F G H J K L M N O P Q R S T12345678910111213141516171819
12345678910111213141516171819
b 911 87 10
a 13 12 1614 15
B 107 – W 116
Black 107: B #107 hane only move. No other choice.White 108: W #108 is tesuji, very severe.Black 109: B #109 can only respond from below. Again, no other choice.Black 111: B #109 and #111 are gained by W in sente. But this way, this part of B stones are
solidified.White 112: W #112 and...White 114: ...[and] #114 are tesuji moves calculated when W played #106 [N16].White 116: Next W might expect B[a] extension.But even if B plays [a], the bottem still leaves a hole for W[b] invasion. Therefore, B[a] next
would be slightly slow.
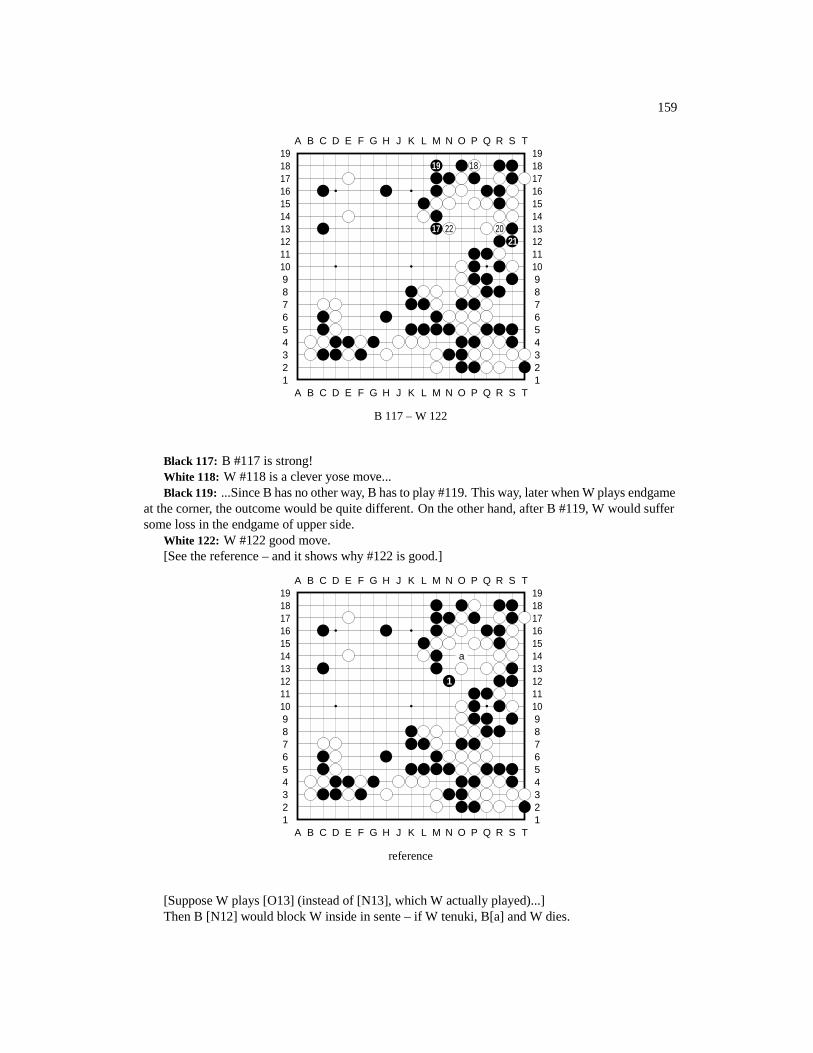
159
A B C D E F G H J K L M N O P Q R S T
A B C D E F G H J K L M N O P Q R S T12345678910111213141516171819
12345678910111213141516171819
19 18
17 22 2021
B 117 – W 122
Black 117: B #117 is strong!White 118: W #118 is a clever yose move...Black 119: ...Since B has no other way, B has to play #119. This way, later when W plays endgame
at the corner, the outcome would be quite different. On the other hand, after B #119, W would suffersome loss in the endgame of upper side.
White 122: W #122 good move.[See the reference – and it shows why #122 is good.]
A B C D E F G H J K L M N O P Q R S T
A B C D E F G H J K L M N O P Q R S T12345678910111213141516171819
12345678910111213141516171819
a
1
reference
[Suppose W plays [O13] (instead of [N13], which W actually played)...]Then B [N12] would block W inside in sente – if W tenuki, B[a] and W dies.
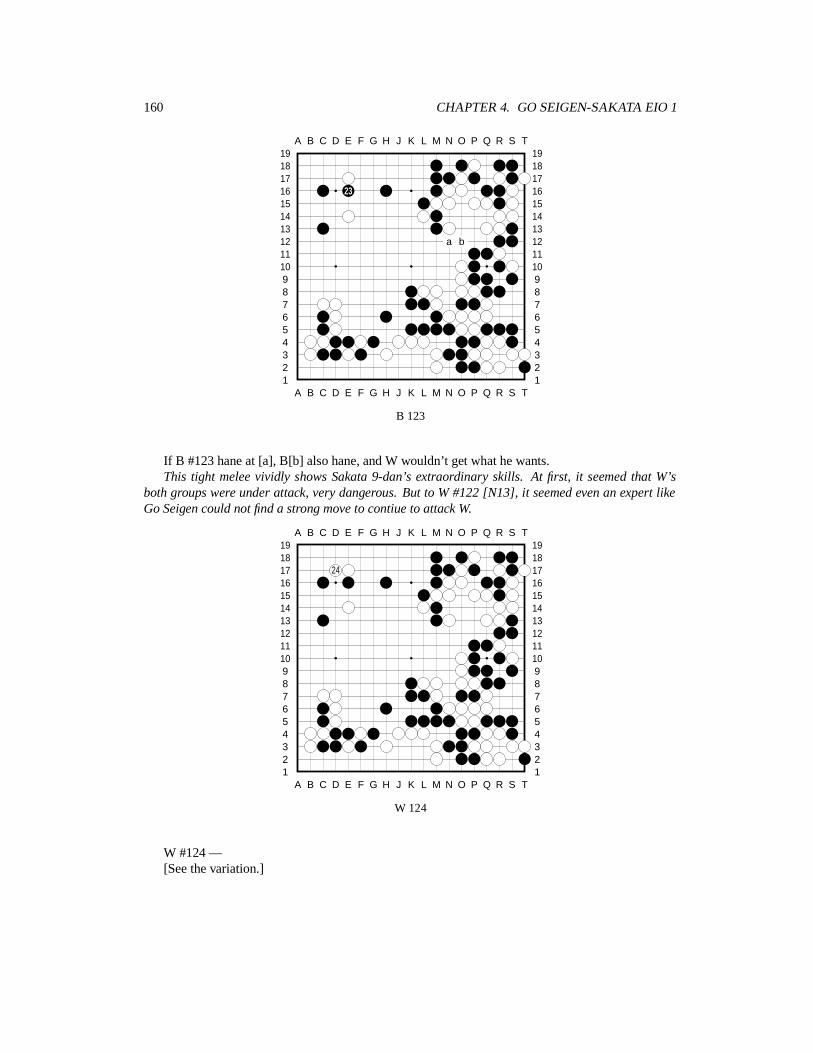
160 CHAPTER 4. GO SEIGEN-SAKATA EIO 1
A B C D E F G H J K L M N O P Q R S T
A B C D E F G H J K L M N O P Q R S T12345678910111213141516171819
12345678910111213141516171819
23
a b
B 123
If B #123 hane at [a], B[b] also hane, and W wouldn’t get what he wants.This tight melee vividly shows Sakata 9-dan’s extraordinary skills. At first, it seemed that W’s
both groups were under attack, very dangerous. But to W #122 [N13], it seemed even an expert likeGo Seigen could not find a strong move to contiue to attack W.
A B C D E F G H J K L M N O P Q R S T
A B C D E F G H J K L M N O P Q R S T12345678910111213141516171819
12345678910111213141516171819
24
W 124
W #124 —[See the variation.]

161
A B C D E F G H J K L M N O P Q R S T
A B C D E F G H J K L M N O P Q R S T12345678910111213141516171819
12345678910111213141516171819
1
variation
[If W hane at [F16] instead...]B [D17] would get the benifit at the corner.At this moment, to get the benifit at upper left corner is the central point of the fight.
A B C D E F G H J K L M N O P Q R S T
A B C D E F G H J K L M N O P Q R S T12345678910111213141516171819
12345678910111213141516171819
27 2625 28 30
29
31
B 125 – B 131
White 130: To W #130, it’s clearly seen that the previous W [P18] and B [M18] exchange ishurting W here now.
Black 131: When B #131 —[See the variation for the next move.]
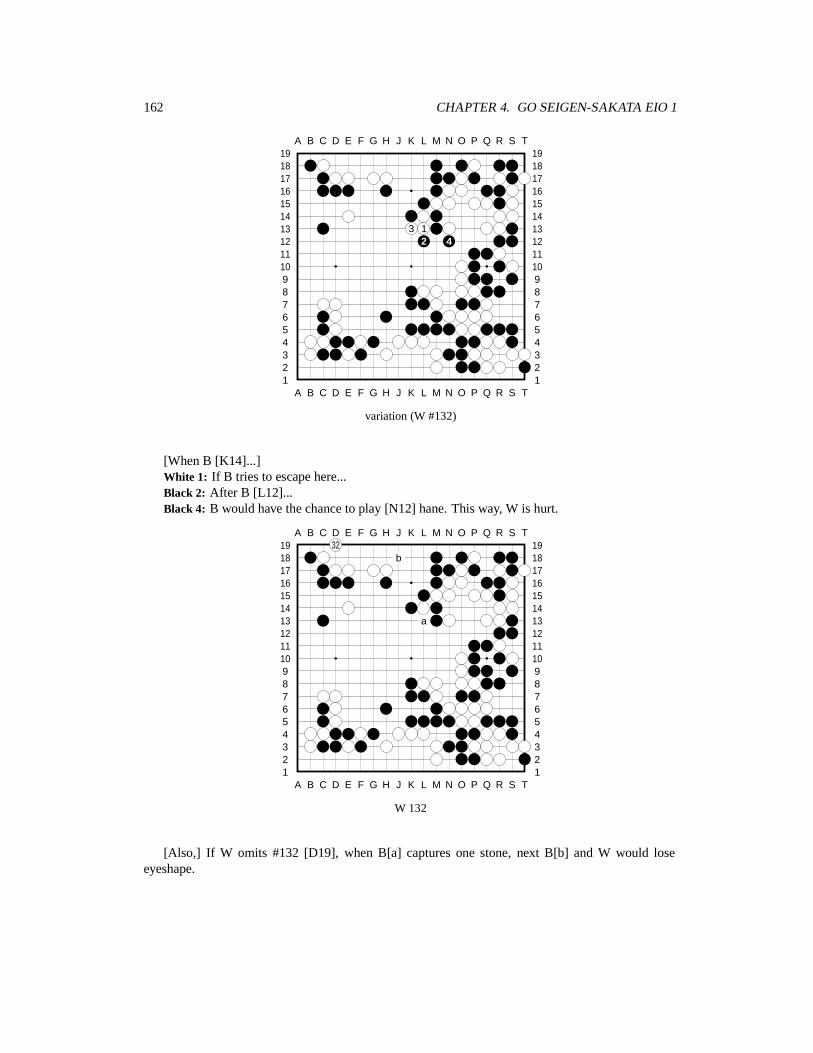
162 CHAPTER 4. GO SEIGEN-SAKATA EIO 1
A B C D E F G H J K L M N O P Q R S T
A B C D E F G H J K L M N O P Q R S T12345678910111213141516171819
12345678910111213141516171819
3 12 4
variation (W #132)
[When B [K14]...]White 1: If B tries to escape here...Black 2: After B [L12]...Black 4: B would have the chance to play [N12] hane. This way, W is hurt.
A B C D E F G H J K L M N O P Q R S T
A B C D E F G H J K L M N O P Q R S T12345678910111213141516171819
1234567891011121314151617181932
b
a
W 132
[Also,] If W omits #132 [D19], when B[a] captures one stone, next B[b] and W would loseeyeshape.
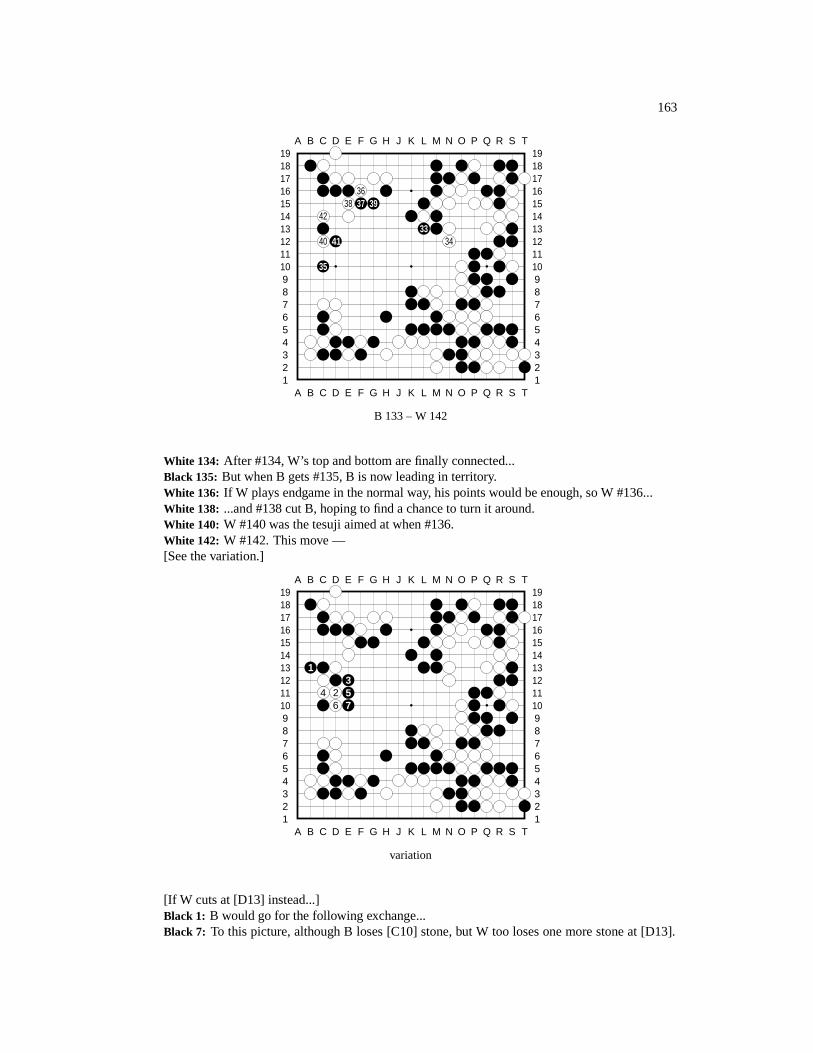
163
A B C D E F G H J K L M N O P Q R S T
A B C D E F G H J K L M N O P Q R S T12345678910111213141516171819
12345678910111213141516171819
3638 37 39
4233
40 41 34
35
B 133 – W 142
White 134: After #134, W’s top and bottom are finally connected...Black 135: But when B gets #135, B is now leading in territory.White 136: If W plays endgame in the normal way, his points would be enough, so W #136...White 138: ...and #138 cut B, hoping to find a chance to turn it around.White 140: W #140 was the tesuji aimed at when #136.White 142: W #142. This move —[See the variation.]
A B C D E F G H J K L M N O P Q R S T
A B C D E F G H J K L M N O P Q R S T12345678910111213141516171819
12345678910111213141516171819
13
4 2 56 7
variation
[If W cuts at [D13] instead...]Black 1: B would go for the following exchange...Black 7: To this picture, although B loses [C10] stone, but W too loses one more stone at [D13].
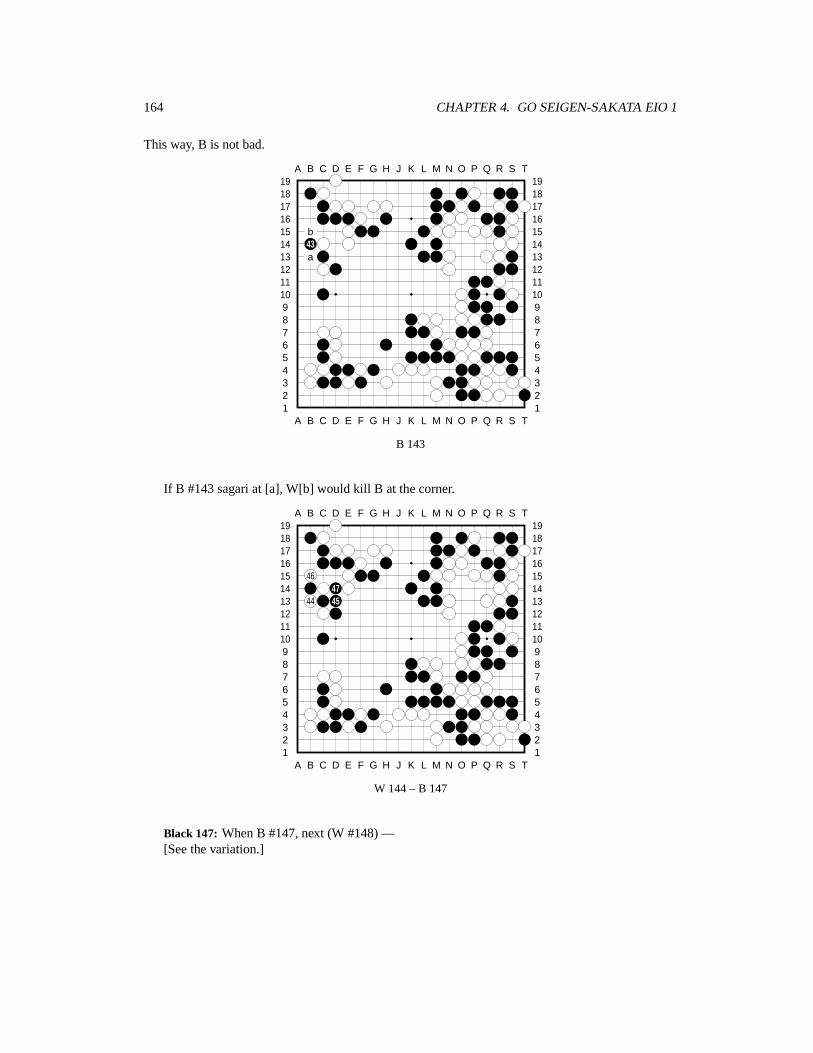
164 CHAPTER 4. GO SEIGEN-SAKATA EIO 1
This way, B is not bad.
A B C D E F G H J K L M N O P Q R S T
A B C D E F G H J K L M N O P Q R S T12345678910111213141516171819
12345678910111213141516171819
b43a
B 143
If B #143 sagari at [a], W[b] would kill B at the corner.
A B C D E F G H J K L M N O P Q R S T
A B C D E F G H J K L M N O P Q R S T12345678910111213141516171819
12345678910111213141516171819
4647
44 45
W 144 – B 147
Black 147: When B #147, next (W #148) —[See the variation.]
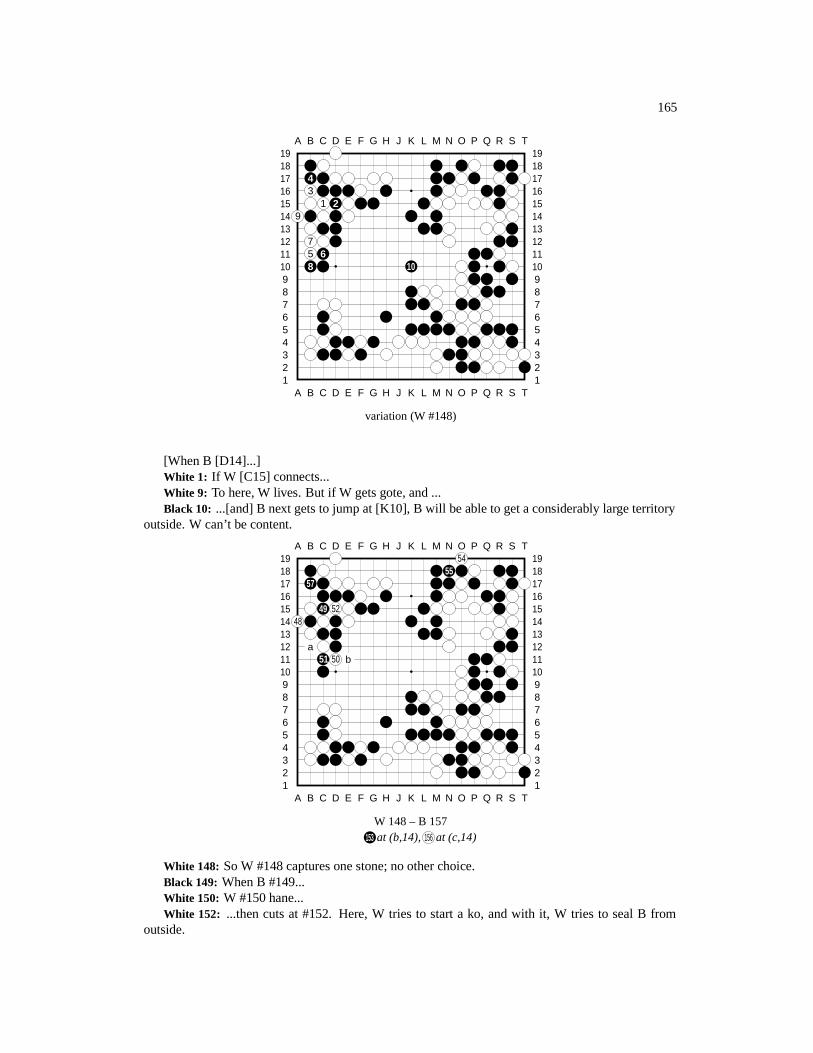
165
A B C D E F G H J K L M N O P Q R S T
A B C D E F G H J K L M N O P Q R S T12345678910111213141516171819
12345678910111213141516171819
43
1 29
75 68 10
variation (W #148)
[When B [D14]...]White 1: If W [C15] connects...White 9: To here, W lives. But if W gets gote, and ...Black 10: ...[and] B next gets to jump at [K10], B will be able to get a considerably large territory
outside. W can’t be content.
A B C D E F G H J K L M N O P Q R S T
A B C D E F G H J K L M N O P Q R S T12345678910111213141516171819
1234567891011121314151617181954
5557
49 5248
a51 50 b
W 148 – B 157153 at (b,14), 156 at (c,14)
White 148: So W #148 captures one stone; no other choice.Black 149: When B #149...White 150: W #150 hane...White 152: ...then cuts at #152. Here, W tries to start a ko, and with it, W tries to seal B from
outside.
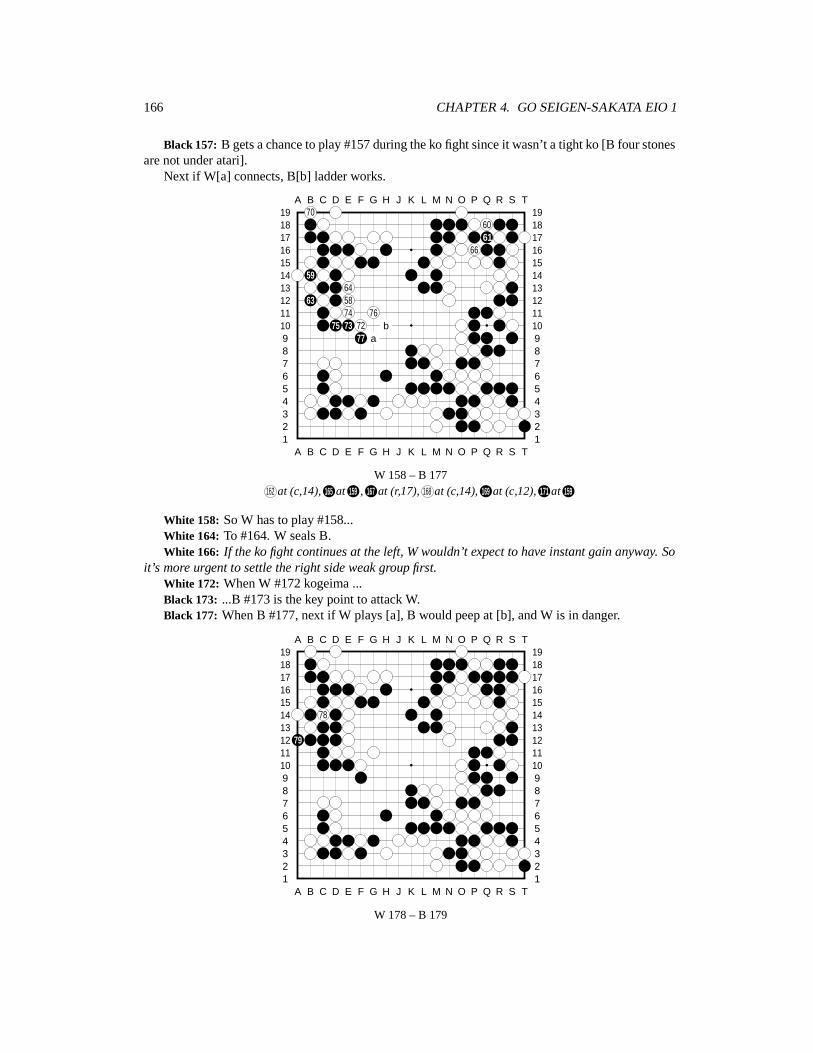
166 CHAPTER 4. GO SEIGEN-SAKATA EIO 1
Black 157: B gets a chance to play #157 during the ko fight since it wasn’t a tight ko [B four stonesare not under atari].
Next if W[a] connects, B[b] ladder works.
A B C D E F G H J K L M N O P Q R S T
A B C D E F G H J K L M N O P Q R S T12345678910111213141516171819
1234567891011121314151617181970
6061
66
5964
63 5874 76
75 73 72 b77 a
W 158 – B 177162 at (c,14), 165 at 159 , 167 at (r,17), 168 at (c,14), 169 at (c,12), 171 at 159
White 158: So W has to play #158...White 164: To #164. W seals B.White 166: If the ko fight continues at the left, W wouldn’t expect to have instant gain anyway. So
it’s more urgent to settle the right side weak group first.White 172: When W #172 kogeima ...Black 173: ...B #173 is the key point to attack W.Black 177: When B #177, next if W plays [a], B would peep at [b], and W is in danger.
A B C D E F G H J K L M N O P Q R S T
A B C D E F G H J K L M N O P Q R S T12345678910111213141516171819
12345678910111213141516171819
78
79
W 178 – B 179
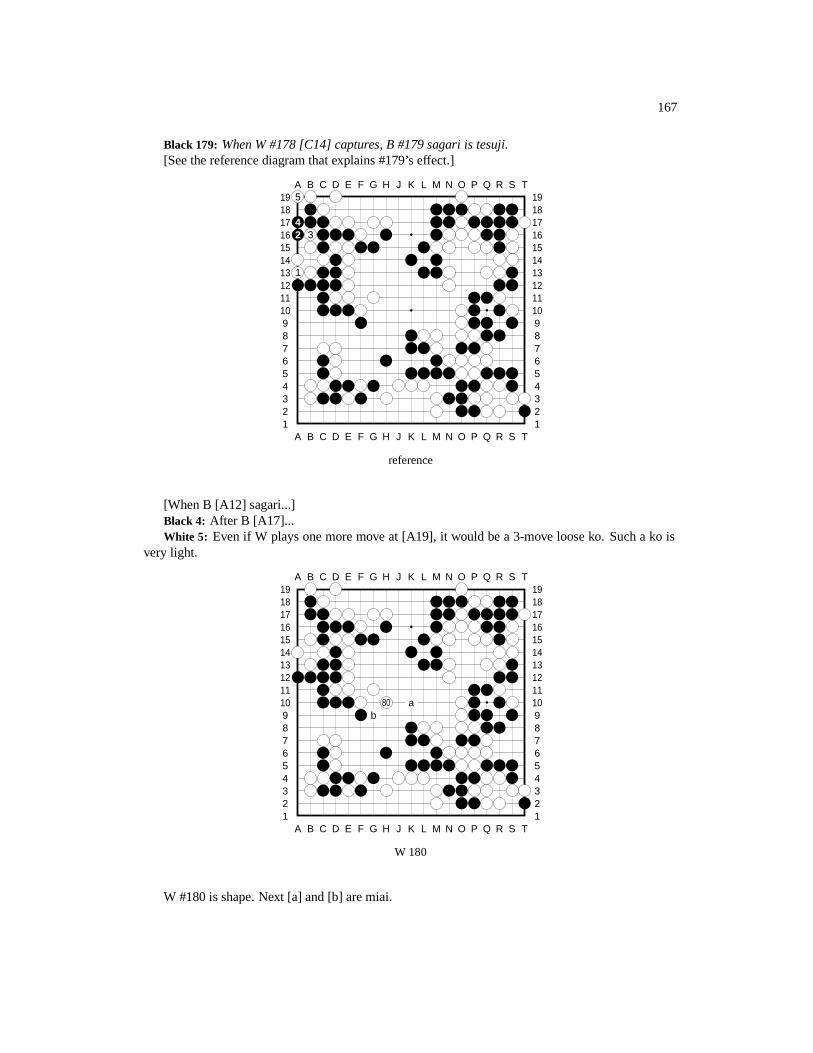
167
Black 179: When W #178 [C14] captures, B #179 sagari is tesuji.[See the reference diagram that explains #179’s effect.]
A B C D E F G H J K L M N O P Q R S T
A B C D E F G H J K L M N O P Q R S T12345678910111213141516171819
123456789101112131415161718195
42 3
1
reference
[When B [A12] sagari...]Black 4: After B [A17]...White 5: Even if W plays one more move at [A19], it would be a 3-move loose ko. Such a ko is
very light.
A B C D E F G H J K L M N O P Q R S T
A B C D E F G H J K L M N O P Q R S T12345678910111213141516171819
12345678910111213141516171819
80 ab
W 180
W #180 is shape. Next [a] and [b] are miai.
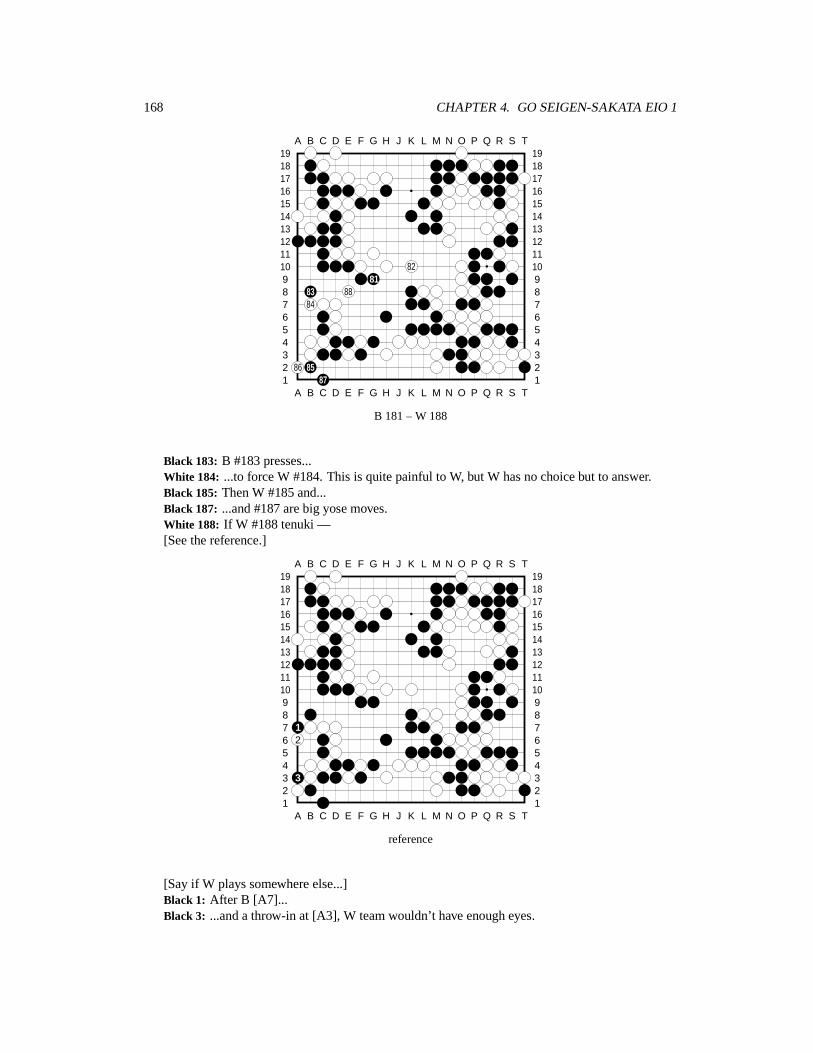
168 CHAPTER 4. GO SEIGEN-SAKATA EIO 1
A B C D E F G H J K L M N O P Q R S T
A B C D E F G H J K L M N O P Q R S T12345678910111213141516171819
12345678910111213141516171819
8281
83 8884
86 8587
B 181 – W 188
Black 183: B #183 presses...White 184: ...to force W #184. This is quite painful to W, but W has no choice but to answer.Black 185: Then W #185 and...Black 187: ...and #187 are big yose moves.White 188: If W #188 tenuki —[See the reference.]
A B C D E F G H J K L M N O P Q R S T
A B C D E F G H J K L M N O P Q R S T12345678910111213141516171819
12345678910111213141516171819
12
3
reference
[Say if W plays somewhere else...]Black 1: After B [A7]...Black 3: ...and a throw-in at [A3], W team wouldn’t have enough eyes.
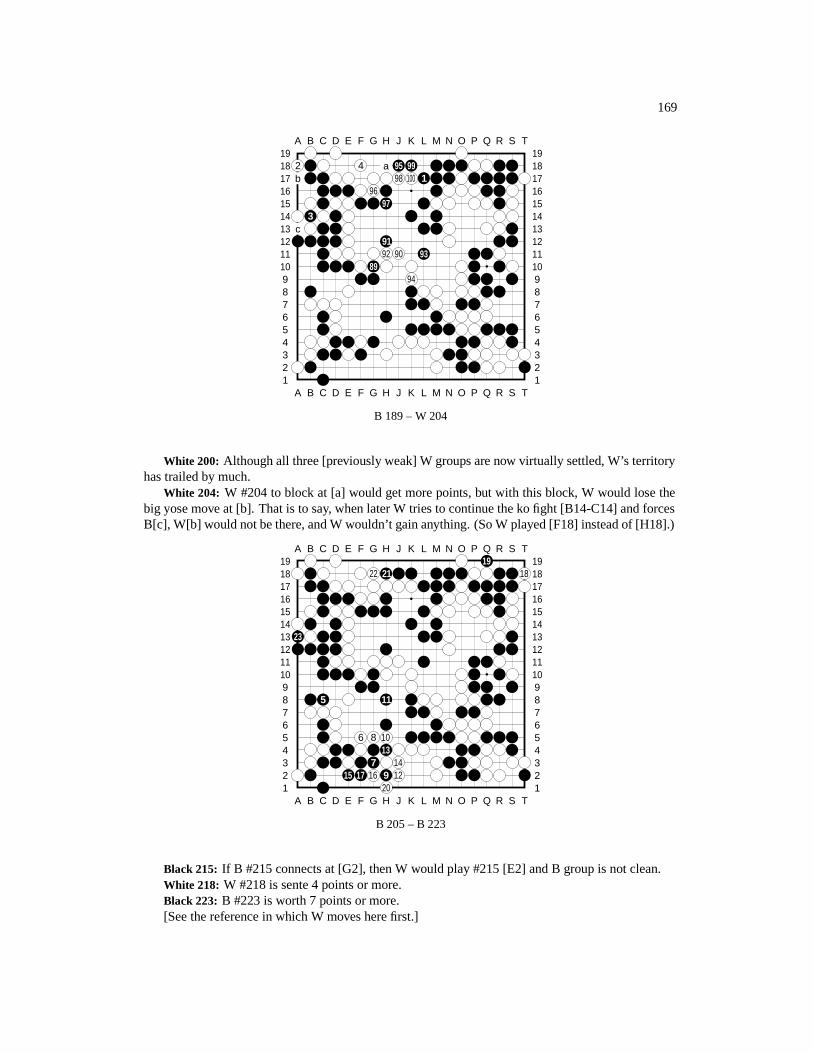
169
A B C D E F G H J K L M N O P Q R S T
A B C D E F G H J K L M N O P Q R S T12345678910111213141516171819
12345678910111213141516171819
2 4 a 95 99b 98 100 1
9697
3c
9192 90 93
8994
B 189 – W 204
White 200: Although all three [previously weak] W groups are now virtually settled, W’s territoryhas trailed by much.
White 204: W #204 to block at [a] would get more points, but with this block, W would lose thebig yose move at [b]. That is to say, when later W tries to continue the ko fight [B14-C14] and forcesB[c], W[b] would not be there, and W wouldn’t gain anything. (So W played [F18] instead of [H18].)
A B C D E F G H J K L M N O P Q R S T
A B C D E F G H J K L M N O P Q R S T12345678910111213141516171819
1234567891011121314151617181919
22 21 18
23
5 11
6 8 1013
7 1415 17 16 9 12
20
B 205 – B 223
Black 215: If B #215 connects at [G2], then W would play #215 [E2] and B group is not clean.White 218: W #218 is sente 4 points or more.Black 223: B #223 is worth 7 points or more.[See the reference in which W moves here first.]
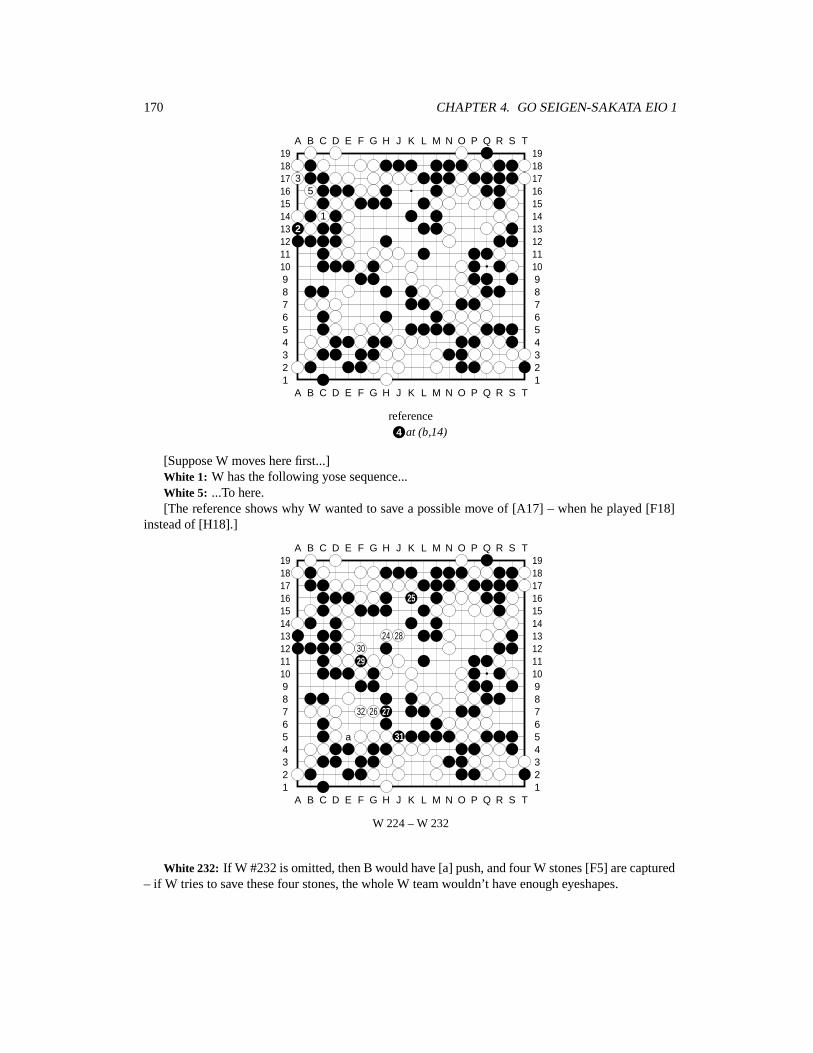
170 CHAPTER 4. GO SEIGEN-SAKATA EIO 1
A B C D E F G H J K L M N O P Q R S T
A B C D E F G H J K L M N O P Q R S T12345678910111213141516171819
12345678910111213141516171819
35
12
reference4 at (b,14)
[Suppose W moves here first...]White 1: W has the following yose sequence...White 5: ...To here.[The reference shows why W wanted to save a possible move of [A17] – when he played [F18]
instead of [H18].]
A B C D E F G H J K L M N O P Q R S T
A B C D E F G H J K L M N O P Q R S T12345678910111213141516171819
12345678910111213141516171819
25
24 283029
32 26 27
a 31
W 224 – W 232
White 232: If W #232 is omitted, then B would have [a] push, and four W stones [F5] are captured– if W tries to save these four stones, the whole W team wouldn’t have enough eyeshapes.
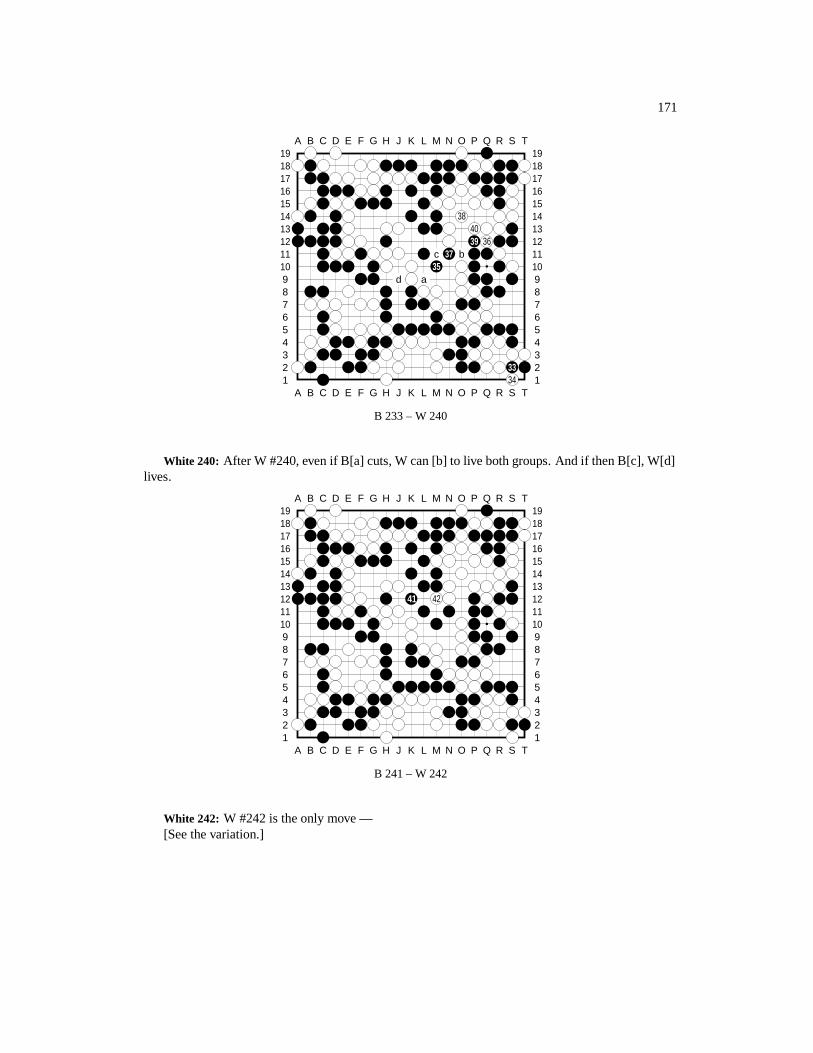
171
A B C D E F G H J K L M N O P Q R S T
A B C D E F G H J K L M N O P Q R S T12345678910111213141516171819
12345678910111213141516171819
384039 36
c 37 b35
d a
3334
B 233 – W 240
White 240: After W #240, even if B[a] cuts, W can [b] to live both groups. And if then B[c], W[d]lives.
A B C D E F G H J K L M N O P Q R S T
A B C D E F G H J K L M N O P Q R S T12345678910111213141516171819
12345678910111213141516171819
41 42
B 241 – W 242
White 242: W #242 is the only move —[See the variation.]
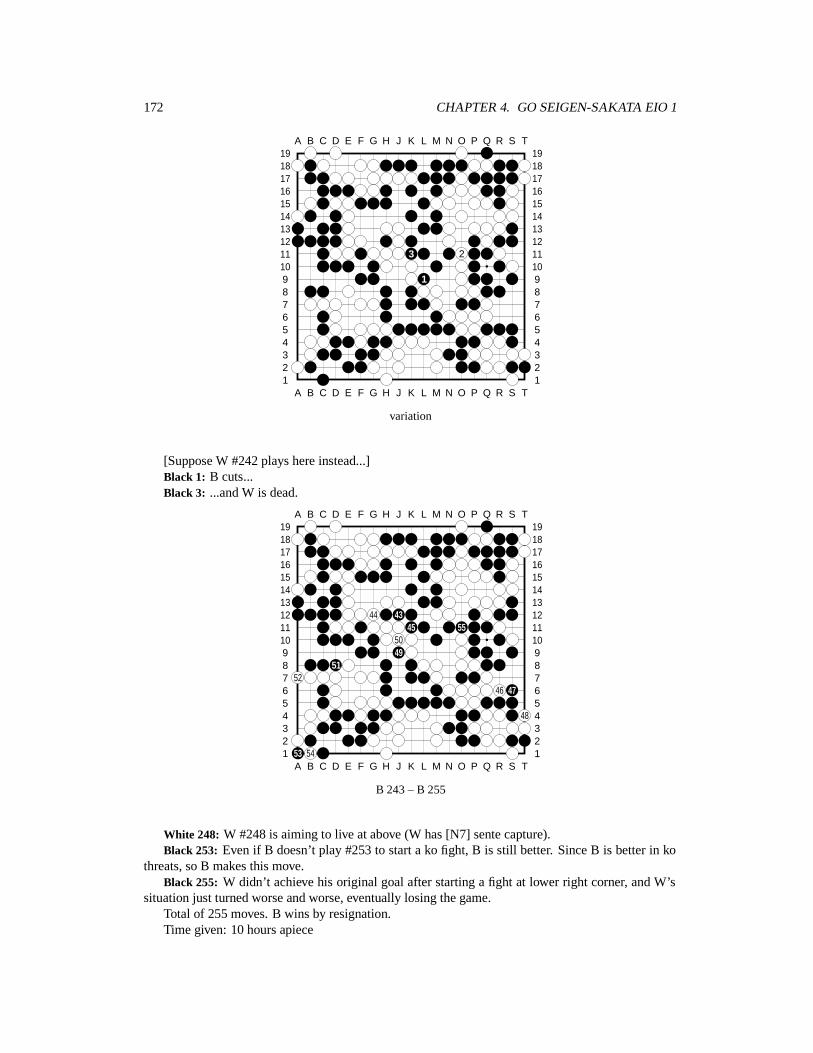
172 CHAPTER 4. GO SEIGEN-SAKATA EIO 1
A B C D E F G H J K L M N O P Q R S T
A B C D E F G H J K L M N O P Q R S T12345678910111213141516171819
12345678910111213141516171819
3 2
1
variation
[Suppose W #242 plays here instead...]Black 1: B cuts...Black 3: ...and W is dead.
A B C D E F G H J K L M N O P Q R S T
A B C D E F G H J K L M N O P Q R S T12345678910111213141516171819
12345678910111213141516171819
44 4345 55
5049
5152
46 47
48
53 54
B 243 – B 255
White 248: W #248 is aiming to live at above (W has [N7] sente capture).Black 253: Even if B doesn’t play #253 to start a ko fight, B is still better. Since B is better in ko
threats, so B makes this move.Black 255: W didn’t achieve his original goal after starting a fight at lower right corner, and W’s
situation just turned worse and worse, eventually losing the game.Total of 255 moves. B wins by resignation.Time given: 10 hours apiece

173
Time consumed:Black: 4 hours 28 minutesWhite: 9 hours 59 minutes
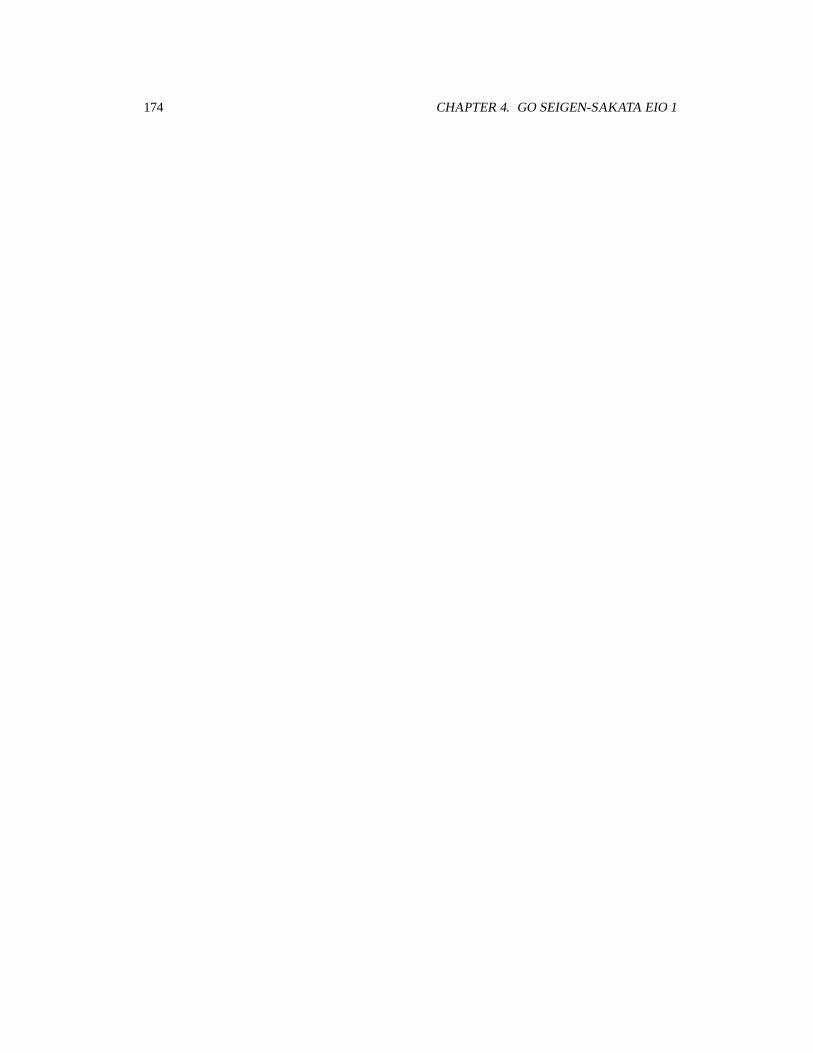
174 CHAPTER 4. GO SEIGEN-SAKATA EIO 1
Chapter 5
Go Seigen-Honinbo Shukaku(Takagawa) 1
There have been many interesting discussions in rec.games.go on the rules. Here is a famoushistorical example.
Takagawa played seven 3-game series with Go Seigen from 1952 to 1961. The 2nd game of the5th 3-game series (played in January of 1959) produced a problem concerning the go rules (Japaneserules), and it became a hot topic at that time. This problem was still not completely solved when thebook in which I read the story was published in 1987. (The current Japanese rules were revised onApril 10, 1989 and effective from May 15, 1989.)
Diagram 5.1 shows the board at move W #244 (F16) – the last move recorded. If counted as isnow, W has 55 points, B has 59 points, or a 4-point lead by B on the board. Subtract that from the4.5-point komi, it should be a 0.5-point win in favor of W.
However, B had moves remaining at the center. That is, If B[a] (M10) cut, B could force a ko(O10-O11). So if W wanted to prevent such a ko, he would have to add one more move there (insidehis territory) – then it would be a 0.5-point win for B instead. Therefore, W (Go Seigen) decided notto add this move.
Mainichi Shimbun’s reporter started an article on the game as the following:
The 2nd game of Takagawa Honinbo vs. Go Seigen 9-dan’s 3-game series ended on #244at 10:10 in the evening on the 2nd day (10th). But at this moment, a problem of whetheror not an addition of a move was necessary arose. Therefore, to be precise, this gamewas only close to the end.
Honinbo thought Wu 9-dan should add a move, but Wu 9-dan believed it was not necessary. In thegame (near the end), Go Seigen actually prepared this problem by making a ko threat at lower rightbigger, and at the end, he said, if there was any problem, they should play it out. Takagawa, however,had counted that Wu would certainly add a move, because according to Nihon Ki-in rules at that time,this move should be added.
Both Wu and Takagawa had smiles on their faces while insisting their own viewpoints, andthe atmosphere beside the board was relaxed. Not until the news was about to go public, refereeHasegawa Akira 7-dan made the final decision: “The game ends after W adds one more move.” Thatis: Takagawa (B) wins by half point.
Referee in chief Hasegawa Akira 7-dan’s “B wins by half point” decision was based on the NihonKi-in’s go rules written on October 2, 1949. At that time, in treating a possible ko like this at the endof a game, it was rigidly stated that W (in this case) had to add a move to eliminate this ko. I roughlystudied the 1989 version of Japanese rules, and it seems to me that the new version has shifted infavor of “playing out.” However, I am not an expert on rules.
175
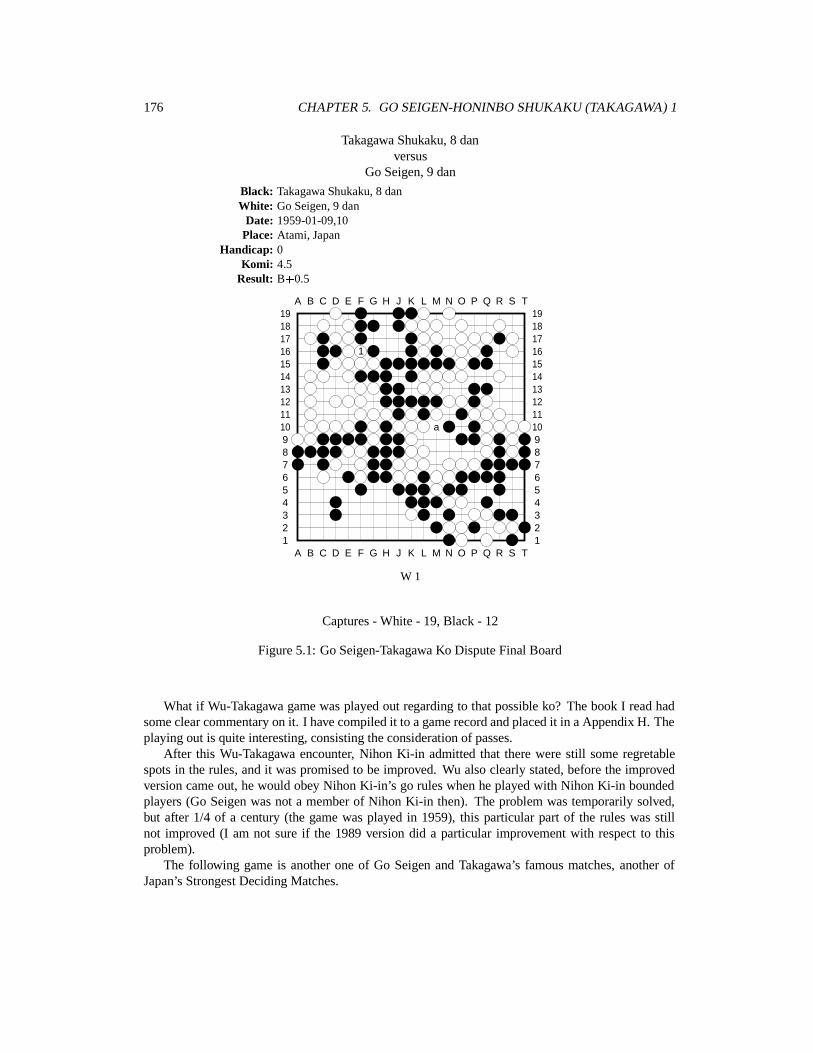
176 CHAPTER 5. GO SEIGEN-HONINBO SHUKAKU (TAKAGAWA) 1
Takagawa Shukaku, 8 danversus
Go Seigen, 9 dan
Black: Takagawa Shukaku, 8 danWhite: Go Seigen, 9 dan
Date: 1959-01-09,10Place: Atami, Japan
Handicap: 0Komi: 4.5
Result: B�0.5
A B C D E F G H J K L M N O P Q R S T
A B C D E F G H J K L M N O P Q R S T12345678910111213141516171819
12345678910111213141516171819
1
a
W 1
Captures - White - 19, Black - 12
Figure 5.1: Go Seigen-Takagawa Ko Dispute Final Board
What if Wu-Takagawa game was played out regarding to that possible ko? The book I read hadsome clear commentary on it. I have compiled it to a game record and placed it in a Appendix H. Theplaying out is quite interesting, consisting the consideration of passes.
After this Wu-Takagawa encounter, Nihon Ki-in admitted that there were still some regretablespots in the rules, and it was promised to be improved. Wu also clearly stated, before the improvedversion came out, he would obey Nihon Ki-in’s go rules when he played with Nihon Ki-in boundedplayers (Go Seigen was not a member of Nihon Ki-in then). The problem was temporarily solved,but after 1/4 of a century (the game was played in 1959), this particular part of the rules was stillnot improved (I am not sure if the 1989 version did a particular improvement with respect to thisproblem).
The following game is another one of Go Seigen and Takagawa’s famous matches, another ofJapan’s Strongest Deciding Matches.
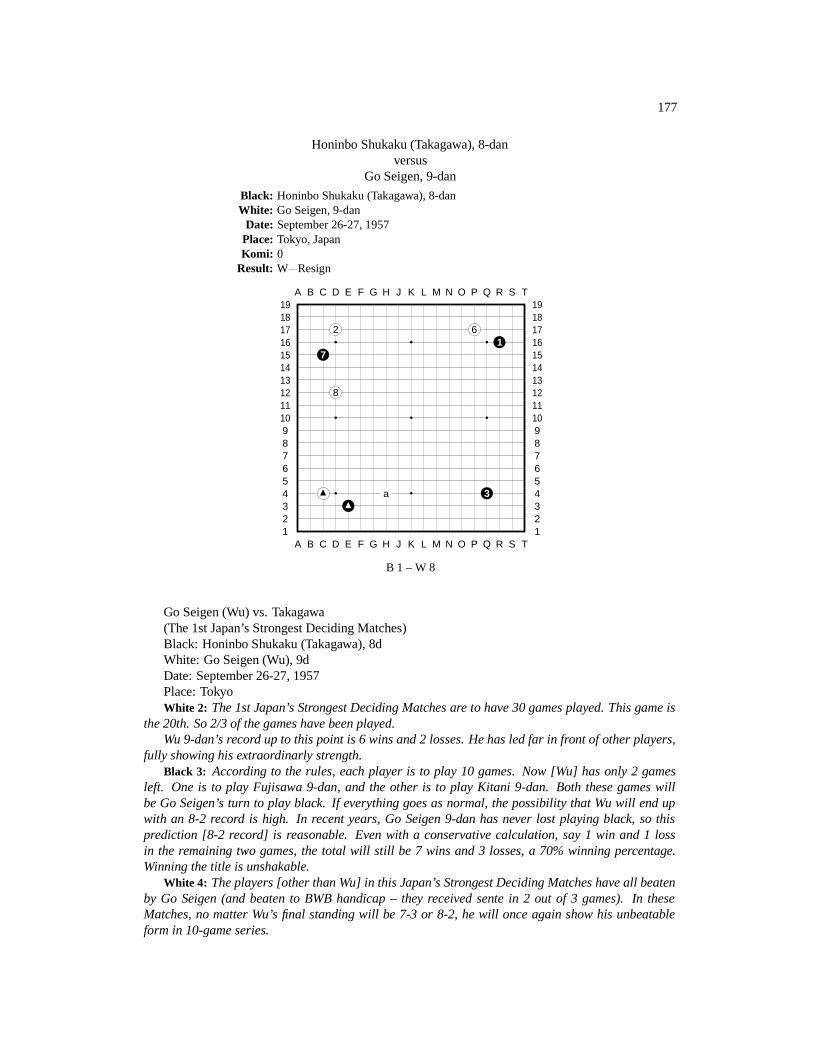
177
Honinbo Shukaku (Takagawa), 8-danversus
Go Seigen, 9-dan
Black: Honinbo Shukaku (Takagawa), 8-danWhite: Go Seigen, 9-dan
Date: September 26-27, 1957Place: Tokyo, JapanKomi: 0
Result: W�Resign
A B C D E F G H J K L M N O P Q R S T
A B C D E F G H J K L M N O P Q R S T12345678910111213141516171819
12345678910111213141516171819
2 61
7
8
a 3
B 1 – W 8
Go Seigen (Wu) vs. Takagawa(The 1st Japan’s Strongest Deciding Matches)Black: Honinbo Shukaku (Takagawa), 8dWhite: Go Seigen (Wu), 9dDate: September 26-27, 1957Place: TokyoWhite 2: The 1st Japan’s Strongest Deciding Matches are to have 30 games played. This game is
the 20th. So 2/3 of the games have been played.Wu 9-dan’s record up to this point is 6 wins and 2 losses. He has led far in front of other players,
fully showing his extraordinarly strength.Black 3: According to the rules, each player is to play 10 games. Now [Wu] has only 2 games
left. One is to play Fujisawa 9-dan, and the other is to play Kitani 9-dan. Both these games willbe Go Seigen’s turn to play black. If everything goes as normal, the possibility that Wu will end upwith an 8-2 record is high. In recent years, Go Seigen 9-dan has never lost playing black, so thisprediction [8-2 record] is reasonable. Even with a conservative calculation, say 1 win and 1 lossin the remaining two games, the total will still be 7 wins and 3 losses, a 70% winning percentage.Winning the title is unshakable.
White 4: The players [other than Wu] in this Japan’s Strongest Deciding Matches have all beatenby Go Seigen (and beaten to BWB handicap – they received sente in 2 out of 3 games). In theseMatches, no matter Wu’s final standing will be 7-3 or 8-2, he will once again show his unbeatableform in 10-game series.

178 CHAPTER 5. GO SEIGEN-HONINBO SHUKAKU (TAKAGAWA) 1
Black 5: In the beginning of this game, both side chose common fusekis. Takagawa Honinbodisplayed his simple and steady style, keeping the sente effect throughout, and after he successfullytackled tough obstacles in the middle game, he grabbed the lead.
White 6: Go Seigen 9-dan saw the unfavorable situation. He struggled by starting a ko fight, andthe picture changed. During the violent ko fight, Takagawa deliberated deeply. After a long period ofpondering, he delivered a famous and most extraordinary move, thus avoiding a local loss, and onceagain he passed an obstacle.
Black 7: However, at this very moment, Takagawa Honinbo was careless at a move that he shouldhave made a forcing move, and the game was led to tension once again. The confusing situationlasted all the way to almost the end. Suddenly, Takagawa made a strange move, and the situationsharply turned worse for him. Facing the losing situation, Takagawa started a ko fight, hoping toturn it around with it – the game became violent again. In this game, ko fights were complex andspectacular. Hopefully, the readers will not only learn how to think around a ko, but also have a tasteof the subtlety of ko.
White 8: W #8 pincer. The common belief is that when there is a structure like W [C4] and B [E3][marked], W #8 to make pincer from this side is unfavorable. This was already mentioned by ”Kisei”,the 4th Honinbo Dosaku Meijin [17th century], in his fuseki theory, and it has become a principleever since. The reason is —
[The variations show references.]But here I had my own plan, so I decided to try W #8 pincer.W #8 to play a pincer at [a] is common sense, and it’s used in many games.
A B C D E F G H J K L M N O P Q R S T
A B C D E F G H J K L M N O P Q R S T12345678910111213141516171819
12345678910111213141516171819
43
2 1
reference 1
[Suppose W makes a pincer move from this side...]White 4: To W [C7], all the W stones on left side are at low position, so W is thought to be not
good.
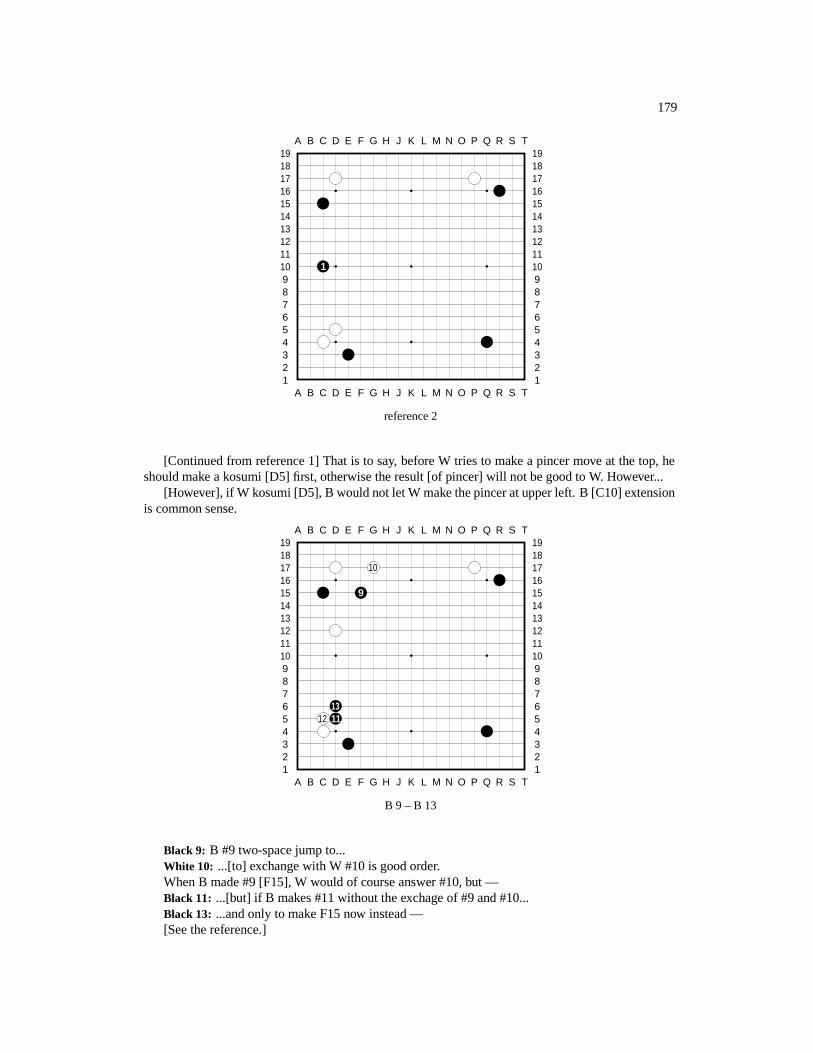
179
A B C D E F G H J K L M N O P Q R S T
A B C D E F G H J K L M N O P Q R S T12345678910111213141516171819
12345678910111213141516171819
1
reference 2
[Continued from reference 1] That is to say, before W tries to make a pincer move at the top, heshould make a kosumi [D5] first, otherwise the result [of pincer] will not be good to W. However...
[However], if W kosumi [D5], B would not let W make the pincer at upper left. B [C10] extensionis common sense.
A B C D E F G H J K L M N O P Q R S T
A B C D E F G H J K L M N O P Q R S T12345678910111213141516171819
12345678910111213141516171819
10
9
1312 11
B 9 – B 13
Black 9: B #9 two-space jump to...White 10: ...[to] exchange with W #10 is good order.When B made #9 [F15], W would of course answer #10, but —Black 11: ...[but] if B makes #11 without the exchage of #9 and #10...Black 13: ...and only to make F15 now instead —[See the reference.]
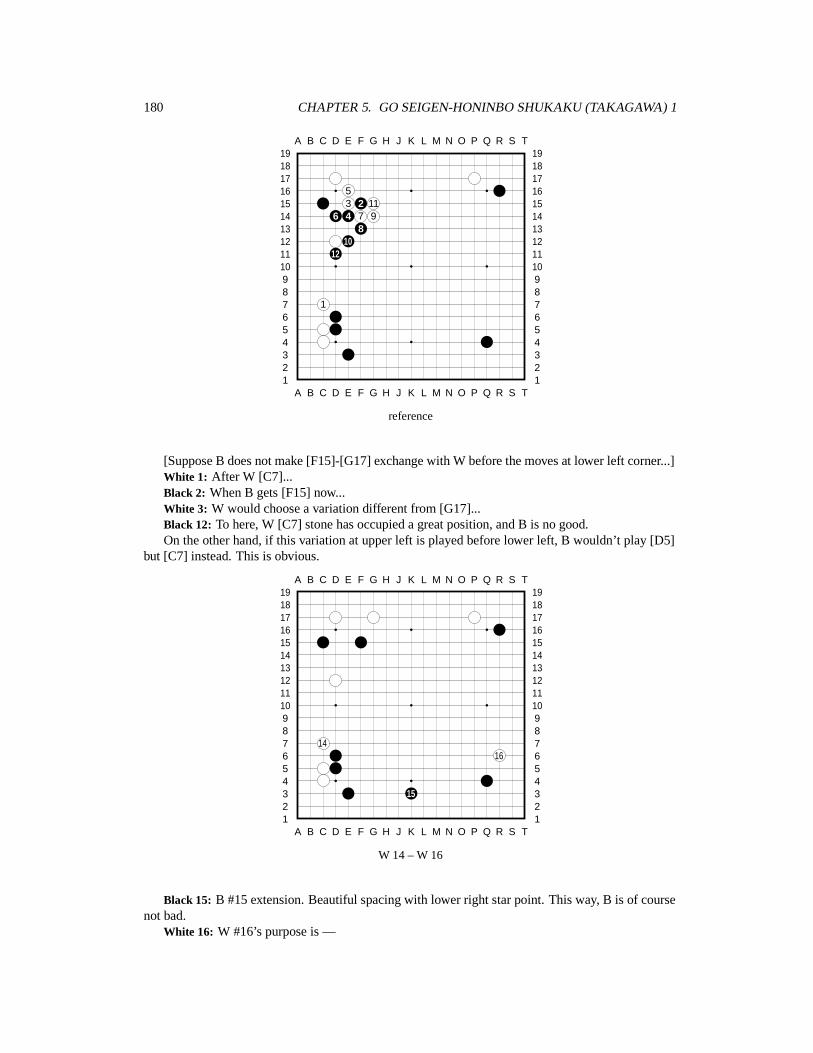
180 CHAPTER 5. GO SEIGEN-HONINBO SHUKAKU (TAKAGAWA) 1
A B C D E F G H J K L M N O P Q R S T
A B C D E F G H J K L M N O P Q R S T12345678910111213141516171819
12345678910111213141516171819
53 2 11
6 4 7 98
1012
1
reference
[Suppose B does not make [F15]-[G17] exchange with W before the moves at lower left corner...]White 1: After W [C7]...Black 2: When B gets [F15] now...White 3: W would choose a variation different from [G17]...Black 12: To here, W [C7] stone has occupied a great position, and B is no good.On the other hand, if this variation at upper left is played before lower left, B wouldn’t play [D5]
but [C7] instead. This is obvious.
A B C D E F G H J K L M N O P Q R S T
A B C D E F G H J K L M N O P Q R S T12345678910111213141516171819
12345678910111213141516171819
1416
15
W 14 – W 16
Black 15: B #15 extension. Beautiful spacing with lower right star point. This way, B is of coursenot bad.
White 16: W #16’s purpose is —
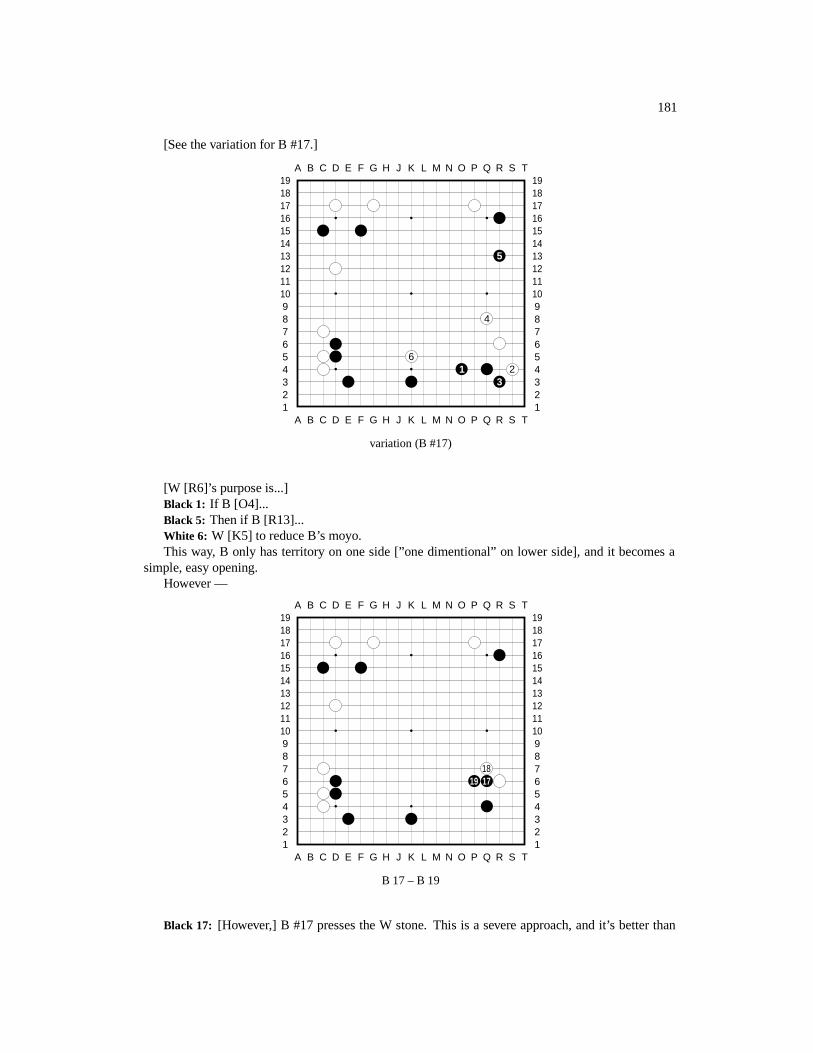
181
[See the variation for B #17.]
A B C D E F G H J K L M N O P Q R S T
A B C D E F G H J K L M N O P Q R S T12345678910111213141516171819
12345678910111213141516171819
5
4
61 2
3
variation (B #17)
[W [R6]’s purpose is...]Black 1: If B [O4]...Black 5: Then if B [R13]...White 6: W [K5] to reduce B’s moyo.This way, B only has territory on one side [”one dimentional” on lower side], and it becomes a
simple, easy opening.However —
A B C D E F G H J K L M N O P Q R S T
A B C D E F G H J K L M N O P Q R S T12345678910111213141516171819
12345678910111213141516171819
1819 17
B 17 – B 19
Black 17: [However,] B #17 presses the W stone. This is a severe approach, and it’s better than
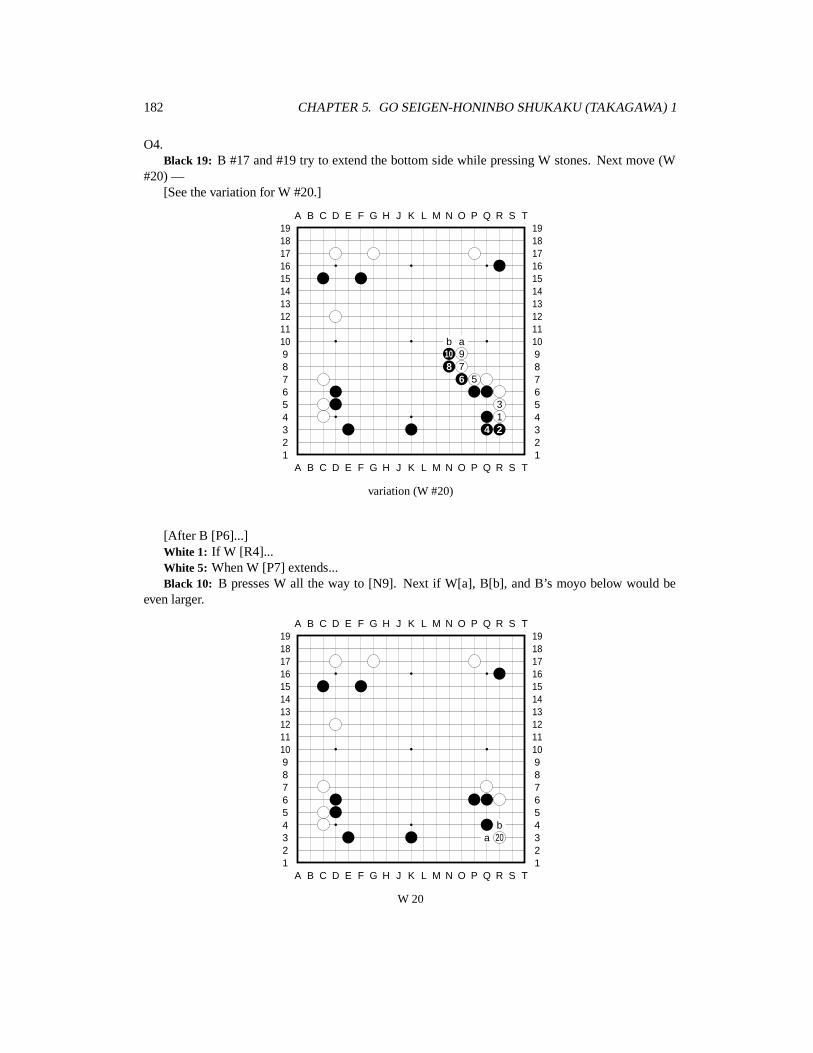
182 CHAPTER 5. GO SEIGEN-HONINBO SHUKAKU (TAKAGAWA) 1
O4.Black 19: B #17 and #19 try to extend the bottom side while pressing W stones. Next move (W
#20) —[See the variation for W #20.]
A B C D E F G H J K L M N O P Q R S T
A B C D E F G H J K L M N O P Q R S T12345678910111213141516171819
12345678910111213141516171819
b a10 98 7
6 5
31
4 2
variation (W #20)
[After B [P6]...]White 1: If W [R4]...White 5: When W [P7] extends...Black 10: B presses W all the way to [N9]. Next if W[a], B[b], and B’s moyo below would be
even larger.
A B C D E F G H J K L M N O P Q R S T
A B C D E F G H J K L M N O P Q R S T12345678910111213141516171819
12345678910111213141516171819
ba 20
W 20
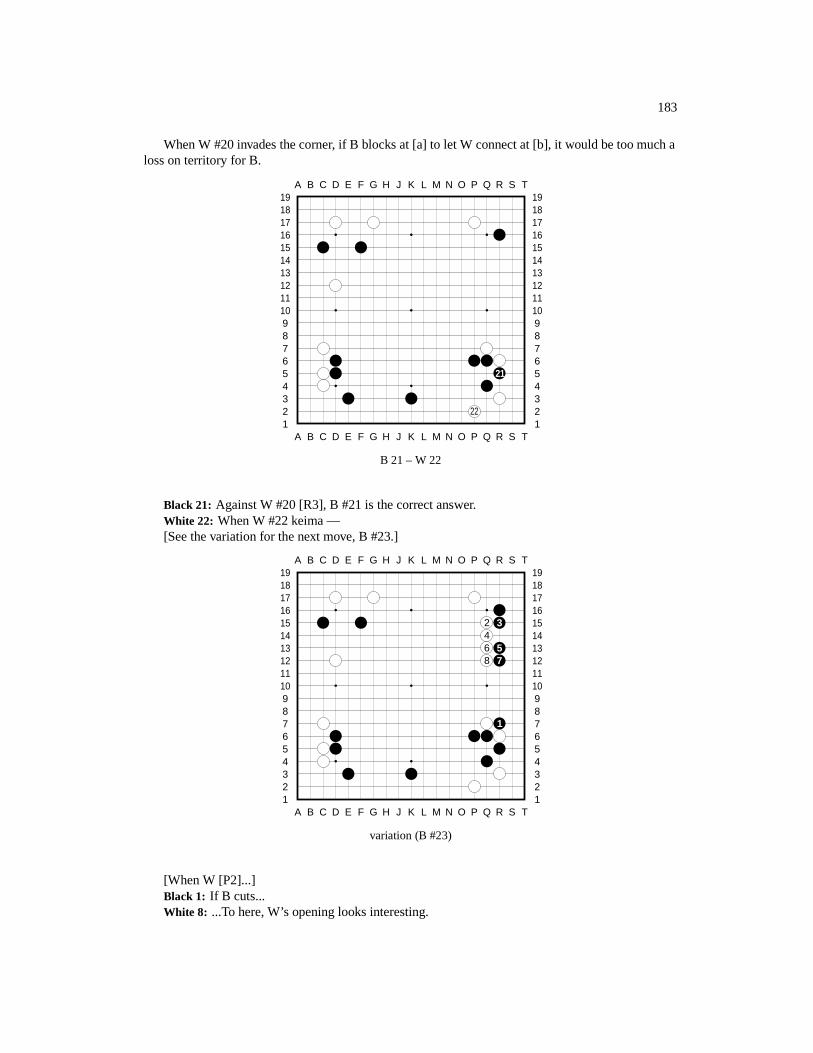
183
When W #20 invades the corner, if B blocks at [a] to let W connect at [b], it would be too much aloss on territory for B.
A B C D E F G H J K L M N O P Q R S T
A B C D E F G H J K L M N O P Q R S T12345678910111213141516171819
12345678910111213141516171819
21
22
B 21 – W 22
Black 21: Against W #20 [R3], B #21 is the correct answer.White 22: When W #22 keima —[See the variation for the next move, B #23.]
A B C D E F G H J K L M N O P Q R S T
A B C D E F G H J K L M N O P Q R S T12345678910111213141516171819
12345678910111213141516171819
2 346 58 7
1
variation (B #23)
[When W [P2]...]Black 1: If B cuts...White 8: ...To here, W’s opening looks interesting.
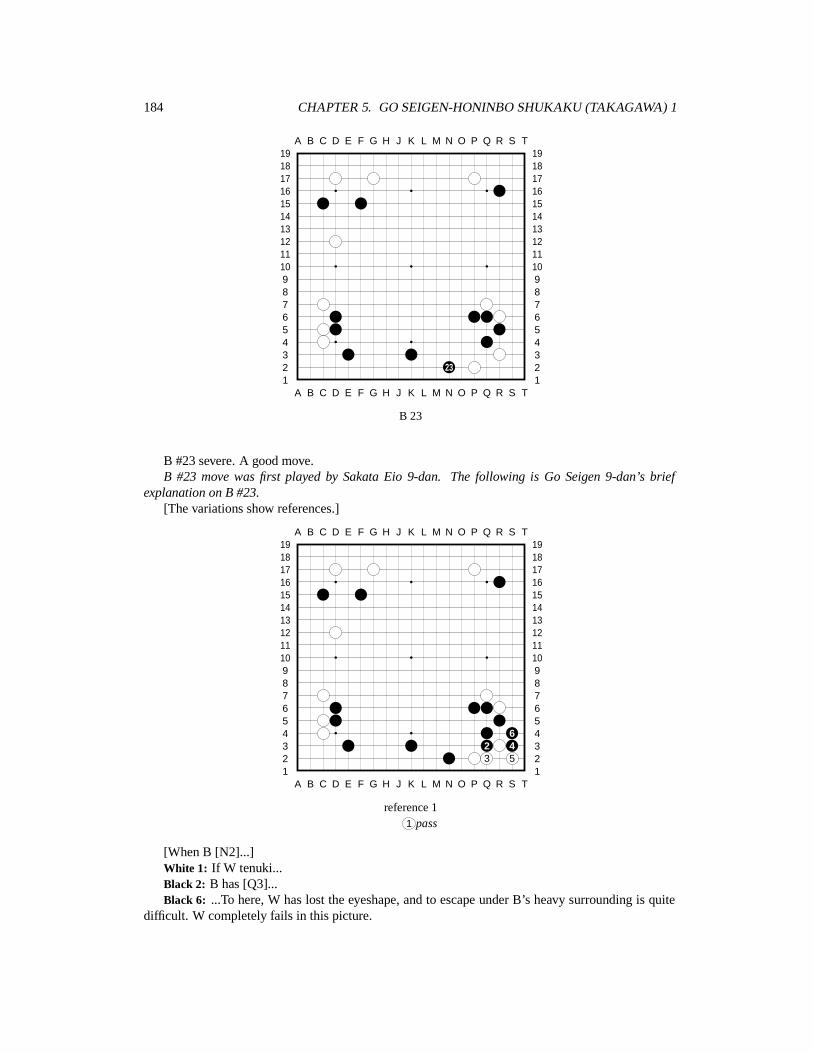
184 CHAPTER 5. GO SEIGEN-HONINBO SHUKAKU (TAKAGAWA) 1
A B C D E F G H J K L M N O P Q R S T
A B C D E F G H J K L M N O P Q R S T12345678910111213141516171819
12345678910111213141516171819
23
B 23
B #23 severe. A good move.B #23 move was first played by Sakata Eio 9-dan. The following is Go Seigen 9-dan’s brief
explanation on B #23.[The variations show references.]
A B C D E F G H J K L M N O P Q R S T
A B C D E F G H J K L M N O P Q R S T12345678910111213141516171819
12345678910111213141516171819
62 43 5
reference 11 pass
[When B [N2]...]White 1: If W tenuki...Black 2: B has [Q3]...Black 6: ...To here, W has lost the eyeshape, and to escape under B’s heavy surrounding is quite
difficult. W completely fails in this picture.
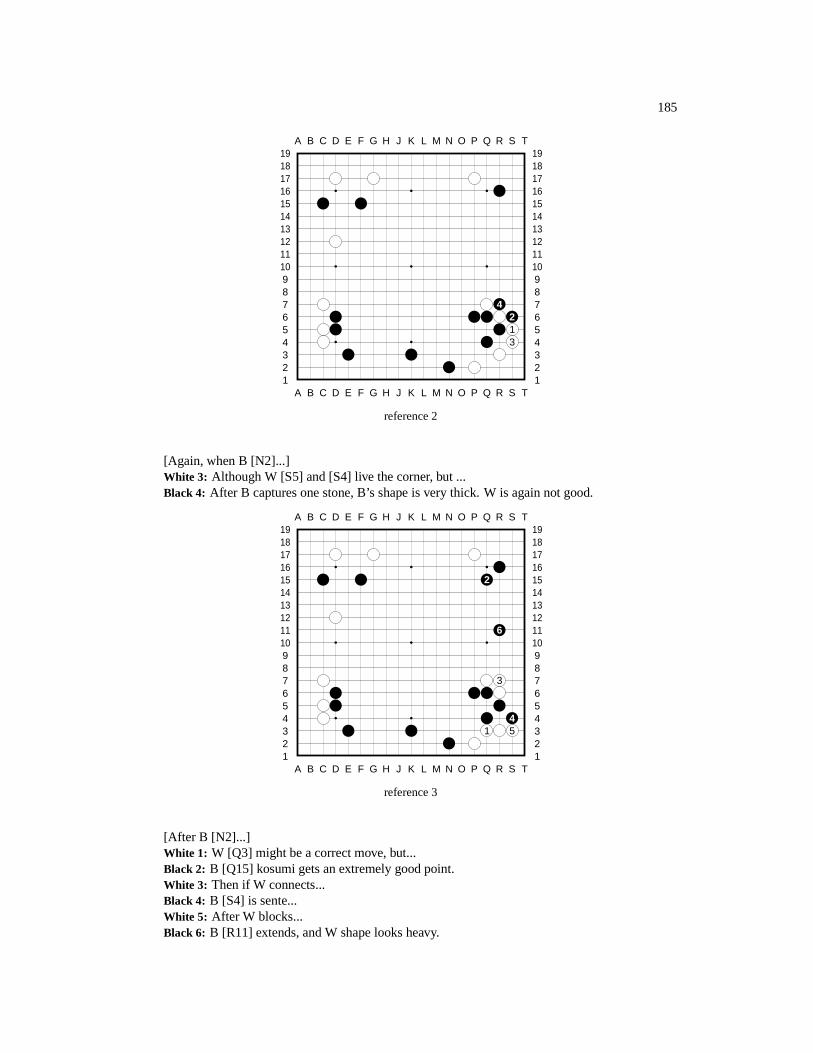
185
A B C D E F G H J K L M N O P Q R S T
A B C D E F G H J K L M N O P Q R S T12345678910111213141516171819
12345678910111213141516171819
4213
reference 2
[Again, when B [N2]...]White 3: Although W [S5] and [S4] live the corner, but ...Black 4: After B captures one stone, B’s shape is very thick. W is again not good.
A B C D E F G H J K L M N O P Q R S T
A B C D E F G H J K L M N O P Q R S T12345678910111213141516171819
12345678910111213141516171819
2
6
3
41 5
reference 3
[After B [N2]...]White 1: W [Q3] might be a correct move, but...Black 2: B [Q15] kosumi gets an extremely good point.White 3: Then if W connects...Black 4: B [S4] is sente...White 5: After W blocks...Black 6: B [R11] extends, and W shape looks heavy.
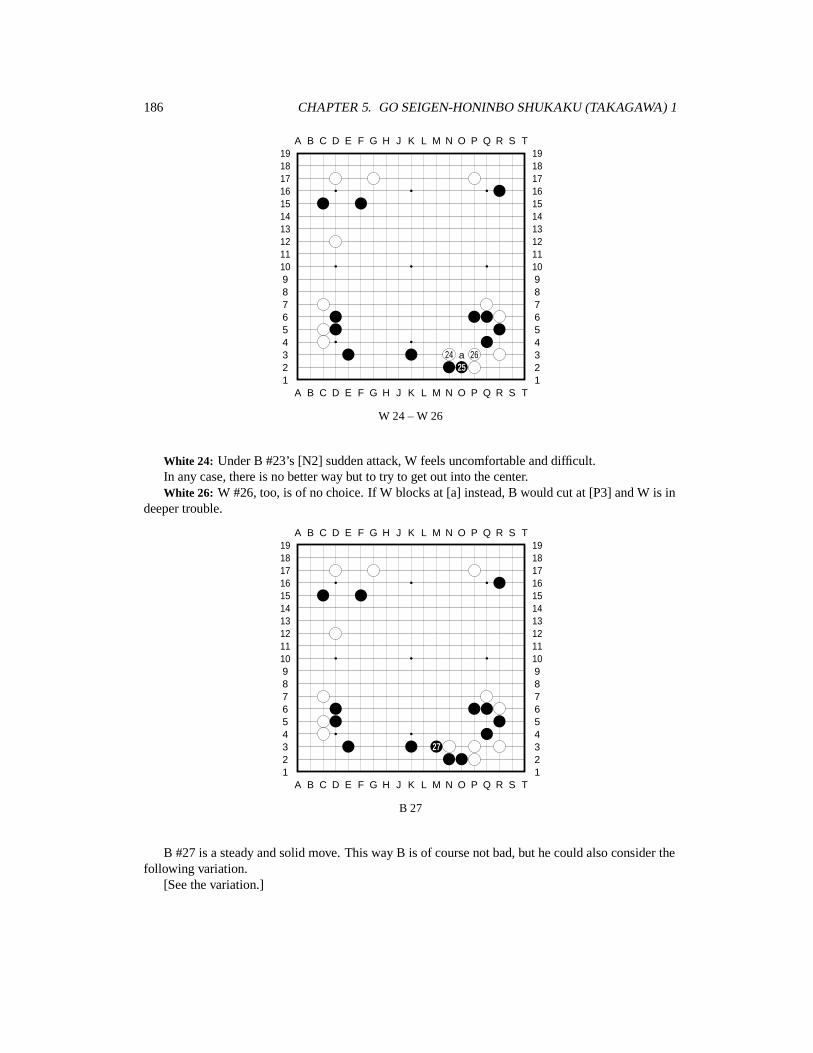
186 CHAPTER 5. GO SEIGEN-HONINBO SHUKAKU (TAKAGAWA) 1
A B C D E F G H J K L M N O P Q R S T
A B C D E F G H J K L M N O P Q R S T12345678910111213141516171819
12345678910111213141516171819
24 a 2625
W 24 – W 26
White 24: Under B #23’s [N2] sudden attack, W feels uncomfortable and difficult.In any case, there is no better way but to try to get out into the center.White 26: W #26, too, is of no choice. If W blocks at [a] instead, B would cut at [P3] and W is in
deeper trouble.
A B C D E F G H J K L M N O P Q R S T
A B C D E F G H J K L M N O P Q R S T12345678910111213141516171819
12345678910111213141516171819
27
B 27
B #27 is a steady and solid move. This way B is of course not bad, but he could also consider thefollowing variation.
[See the variation.]
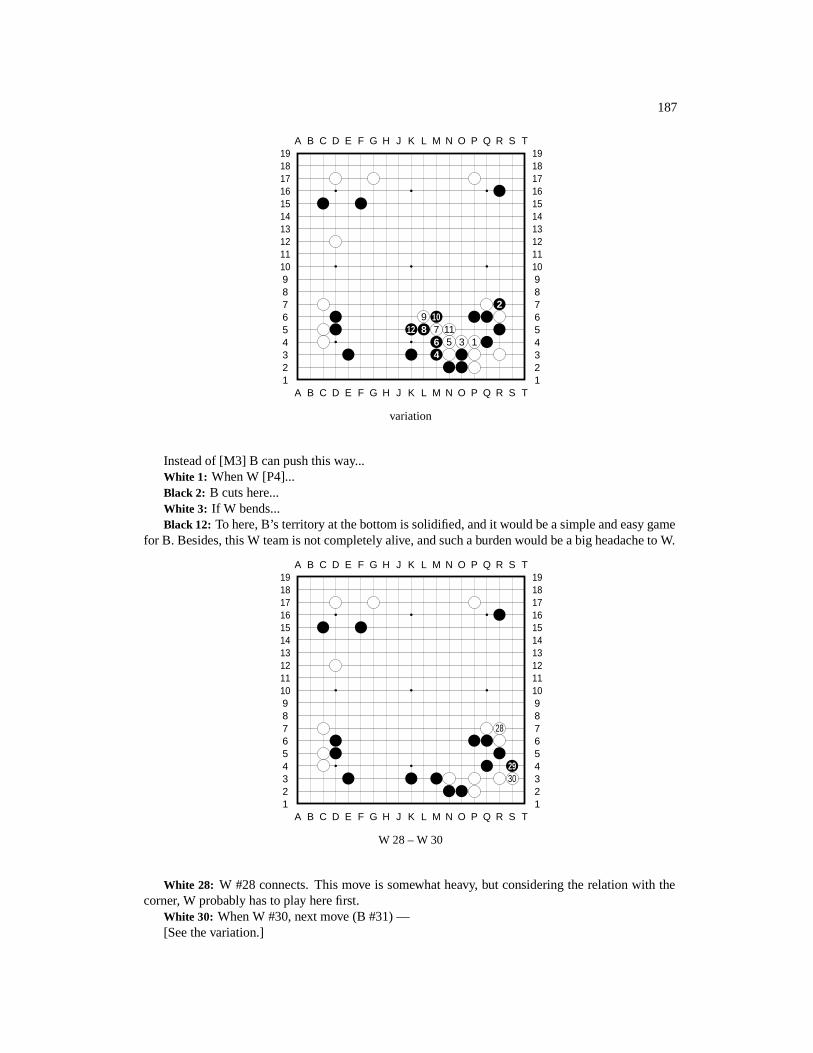
187
A B C D E F G H J K L M N O P Q R S T
A B C D E F G H J K L M N O P Q R S T12345678910111213141516171819
12345678910111213141516171819
29 10
12 8 7 116 5 3 14
variation
Instead of [M3] B can push this way...White 1: When W [P4]...Black 2: B cuts here...White 3: If W bends...Black 12: To here, B’s territory at the bottom is solidified, and it would be a simple and easy game
for B. Besides, this W team is not completely alive, and such a burden would be a big headache to W.
A B C D E F G H J K L M N O P Q R S T
A B C D E F G H J K L M N O P Q R S T12345678910111213141516171819
12345678910111213141516171819
28
2930
W 28 – W 30
White 28: W #28 connects. This move is somewhat heavy, but considering the relation with thecorner, W probably has to play here first.
White 30: When W #30, next move (B #31) —[See the variation.]
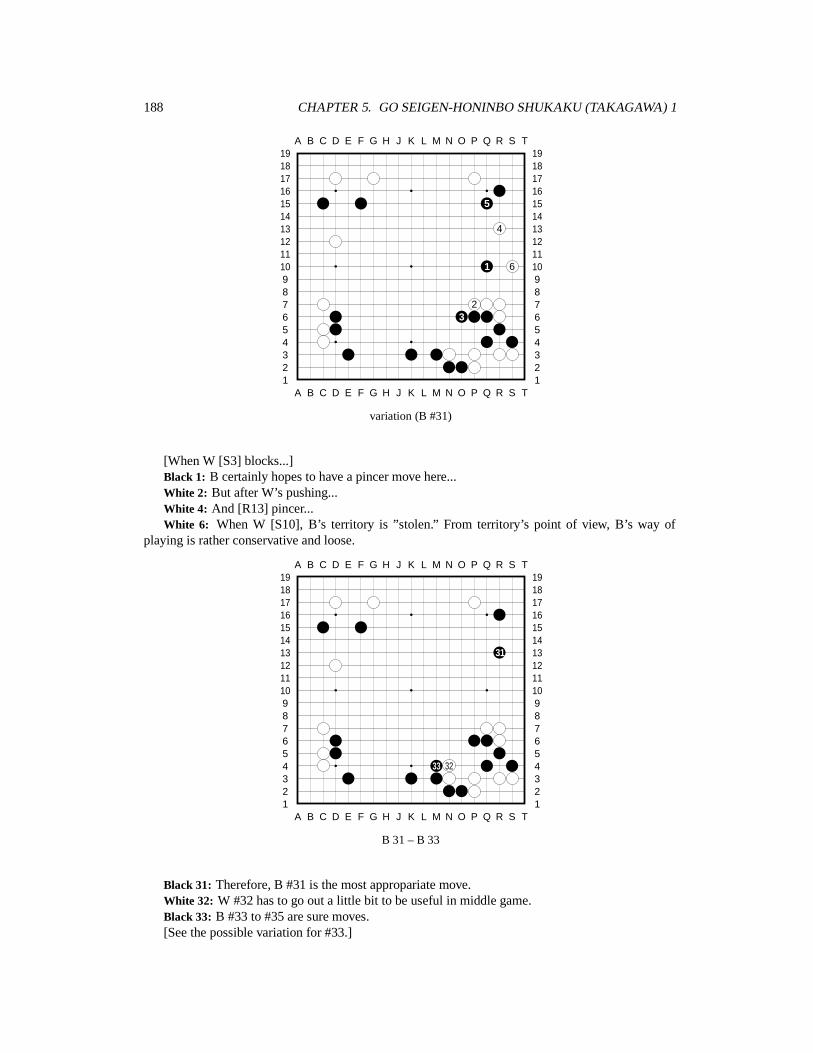
188 CHAPTER 5. GO SEIGEN-HONINBO SHUKAKU (TAKAGAWA) 1
A B C D E F G H J K L M N O P Q R S T
A B C D E F G H J K L M N O P Q R S T12345678910111213141516171819
12345678910111213141516171819
5
4
1 6
23
variation (B #31)
[When W [S3] blocks...]Black 1: B certainly hopes to have a pincer move here...White 2: But after W’s pushing...White 4: And [R13] pincer...White 6: When W [S10], B’s territory is ”stolen.” From territory’s point of view, B’s way of
playing is rather conservative and loose.
A B C D E F G H J K L M N O P Q R S T
A B C D E F G H J K L M N O P Q R S T12345678910111213141516171819
12345678910111213141516171819
31
33 32
B 31 – B 33
Black 31: Therefore, B #31 is the most appropariate move.White 32: W #32 has to go out a little bit to be useful in middle game.Black 33: B #33 to #35 are sure moves.[See the possible variation for #33.]
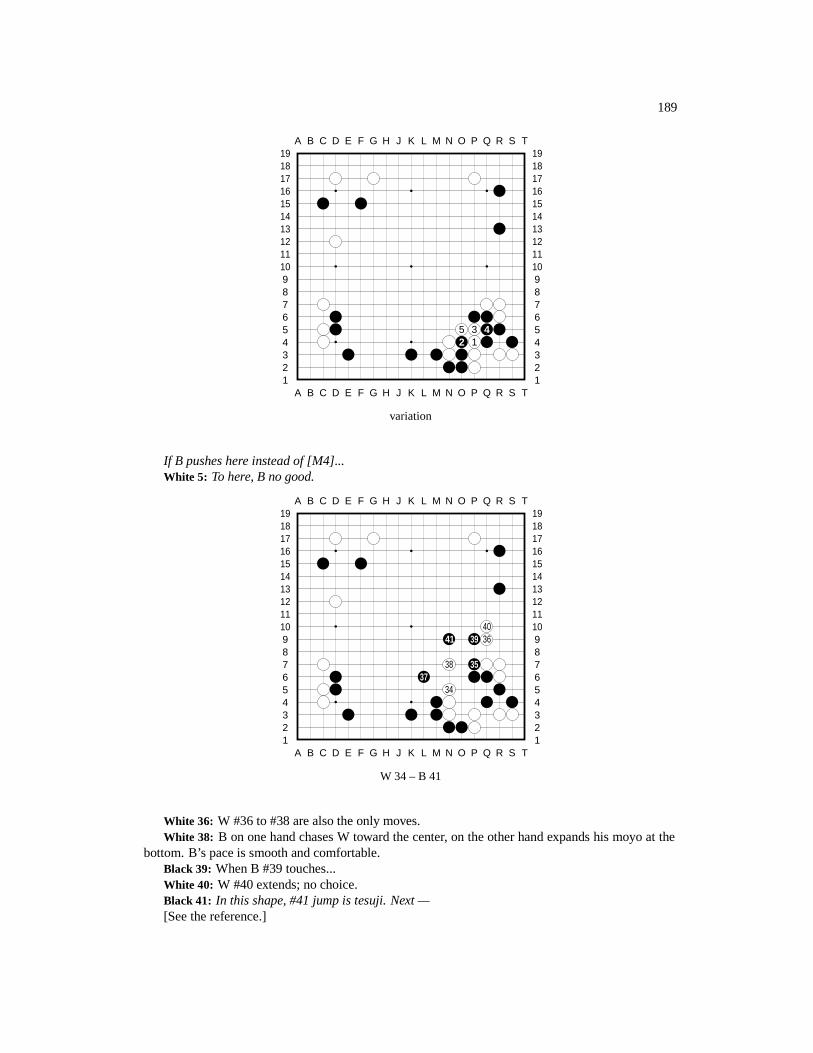
189
A B C D E F G H J K L M N O P Q R S T
A B C D E F G H J K L M N O P Q R S T12345678910111213141516171819
12345678910111213141516171819
5 3 42 1
variation
If B pushes here instead of [M4]...White 5: To here, B no good.
A B C D E F G H J K L M N O P Q R S T
A B C D E F G H J K L M N O P Q R S T12345678910111213141516171819
12345678910111213141516171819
4041 39 36
38 3537
34
W 34 – B 41
White 36: W #36 to #38 are also the only moves.White 38: B on one hand chases W toward the center, on the other hand expands his moyo at the
bottom. B’s pace is smooth and comfortable.Black 39: When B #39 touches...White 40: W #40 extends; no choice.Black 41: In this shape, #41 jump is tesuji. Next —[See the reference.]
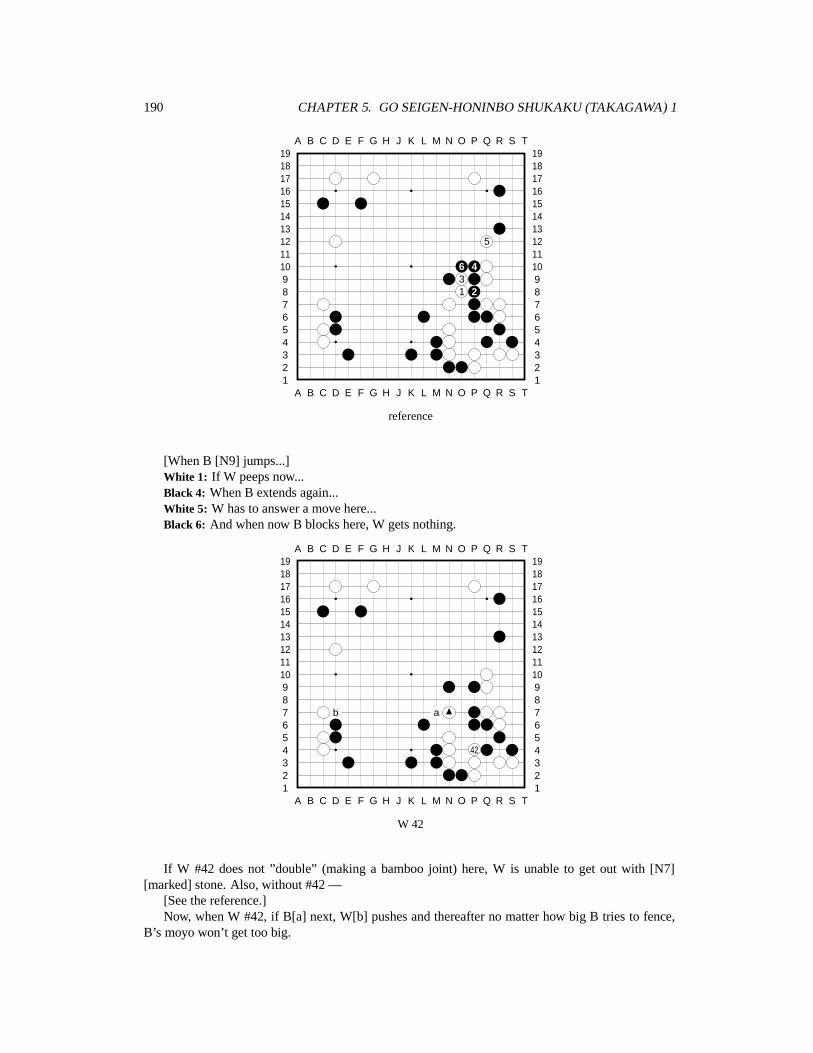
190 CHAPTER 5. GO SEIGEN-HONINBO SHUKAKU (TAKAGAWA) 1
A B C D E F G H J K L M N O P Q R S T
A B C D E F G H J K L M N O P Q R S T12345678910111213141516171819
12345678910111213141516171819
5
6 431 2
reference
[When B [N9] jumps...]White 1: If W peeps now...Black 4: When B extends again...White 5: W has to answer a move here...Black 6: And when now B blocks here, W gets nothing.
A B C D E F G H J K L M N O P Q R S T
A B C D E F G H J K L M N O P Q R S T12345678910111213141516171819
12345678910111213141516171819
b a
42
W 42
If W #42 does not ”double” (making a bamboo joint) here, W is unable to get out with [N7][marked] stone. Also, without #42 —
[See the reference.]Now, when W #42, if B[a] next, W[b] pushes and thereafter no matter how big B tries to fence,
B’s moyo won’t get too big.
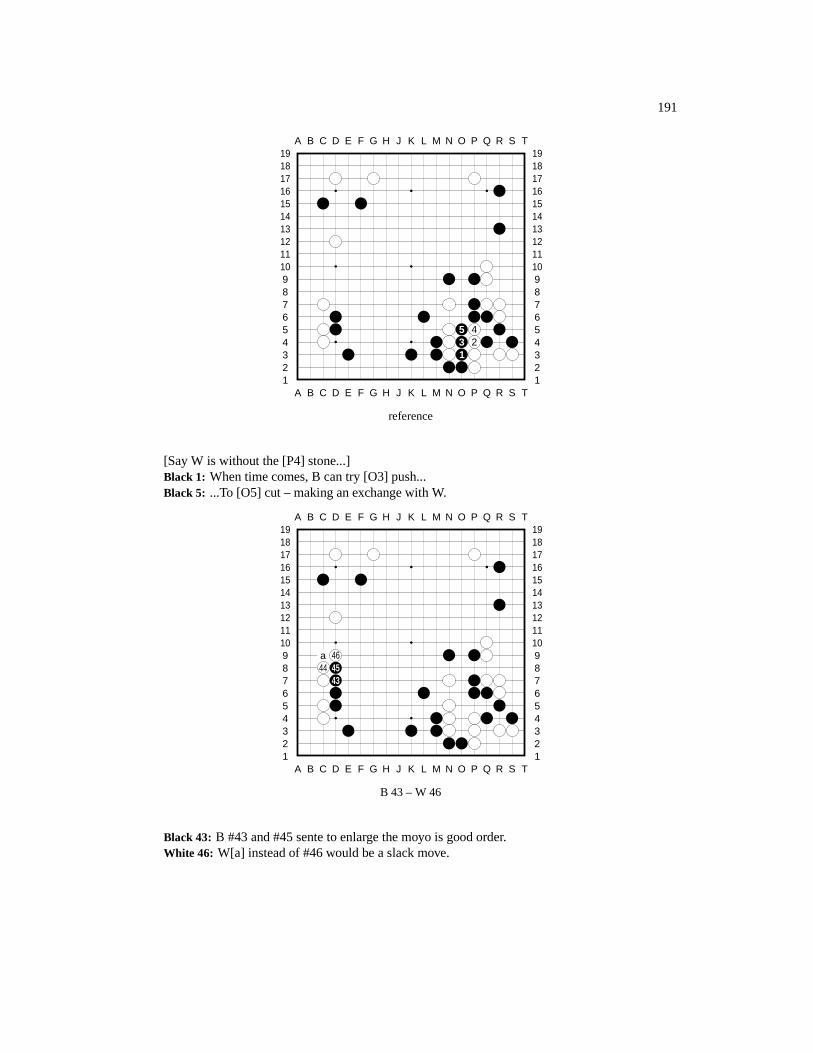
191
A B C D E F G H J K L M N O P Q R S T
A B C D E F G H J K L M N O P Q R S T12345678910111213141516171819
12345678910111213141516171819
5 43 21
reference
[Say W is without the [P4] stone...]Black 1: When time comes, B can try [O3] push...Black 5: ...To [O5] cut – making an exchange with W.
A B C D E F G H J K L M N O P Q R S T
A B C D E F G H J K L M N O P Q R S T12345678910111213141516171819
12345678910111213141516171819
a 4644 45
43
B 43 – W 46
Black 43: B #43 and #45 sente to enlarge the moyo is good order.White 46: W[a] instead of #46 would be a slack move.
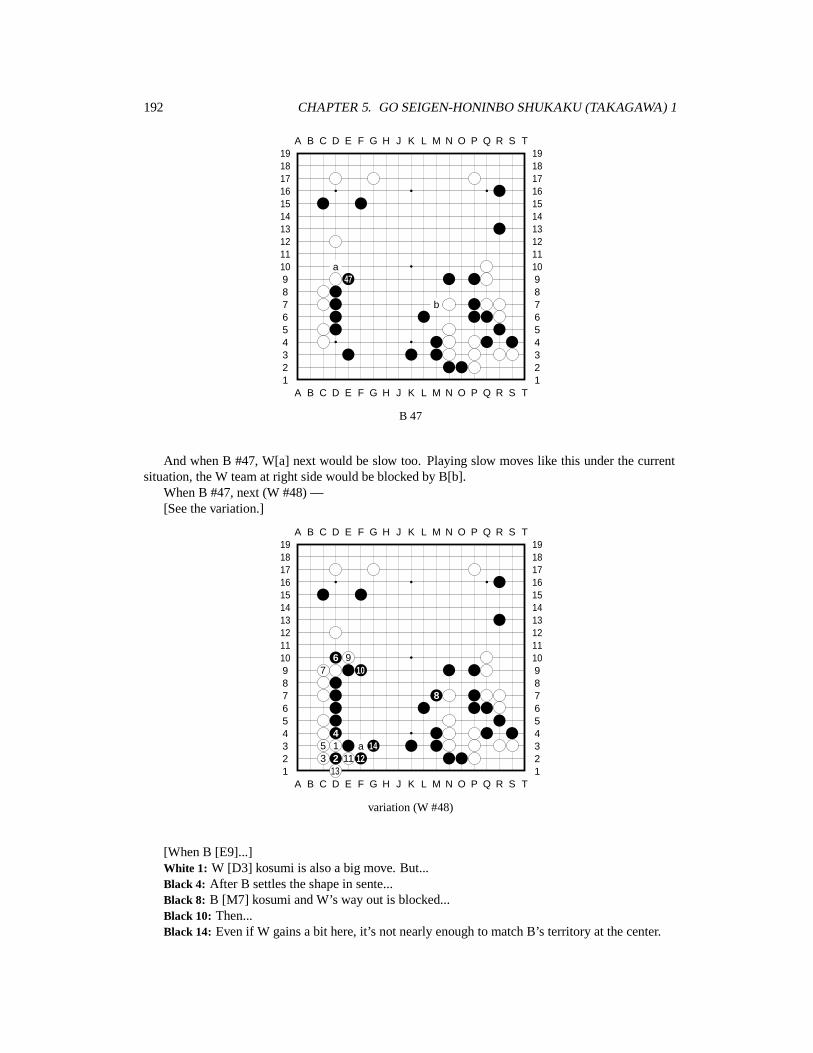
192 CHAPTER 5. GO SEIGEN-HONINBO SHUKAKU (TAKAGAWA) 1
A B C D E F G H J K L M N O P Q R S T
A B C D E F G H J K L M N O P Q R S T12345678910111213141516171819
12345678910111213141516171819
a47
b
B 47
And when B #47, W[a] next would be slow too. Playing slow moves like this under the currentsituation, the W team at right side would be blocked by B[b].
When B #47, next (W #48) —[See the variation.]
A B C D E F G H J K L M N O P Q R S T
A B C D E F G H J K L M N O P Q R S T12345678910111213141516171819
12345678910111213141516171819
6 97 10
8
45 1 a 143 2 11 12
13
variation (W #48)
[When B [E9]...]White 1: W [D3] kosumi is also a big move. But...Black 4: After B settles the shape in sente...Black 8: B [M7] kosumi and W’s way out is blocked...Black 10: Then...Black 14: Even if W gains a bit here, it’s not nearly enough to match B’s territory at the center.
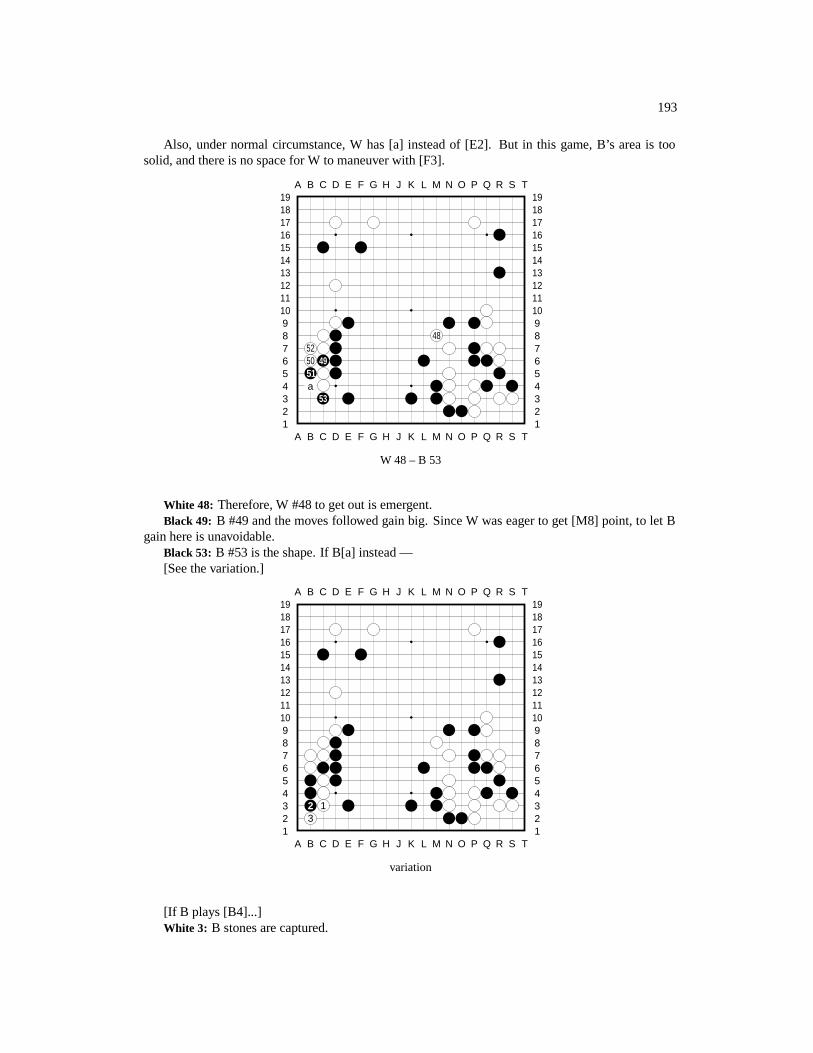
193
Also, under normal circumstance, W has [a] instead of [E2]. But in this game, B’s area is toosolid, and there is no space for W to maneuver with [F3].
A B C D E F G H J K L M N O P Q R S T
A B C D E F G H J K L M N O P Q R S T12345678910111213141516171819
12345678910111213141516171819
485250 4951a
53
W 48 – B 53
White 48: Therefore, W #48 to get out is emergent.Black 49: B #49 and the moves followed gain big. Since W was eager to get [M8] point, to let B
gain here is unavoidable.Black 53: B #53 is the shape. If B[a] instead —[See the variation.]
A B C D E F G H J K L M N O P Q R S T
A B C D E F G H J K L M N O P Q R S T12345678910111213141516171819
12345678910111213141516171819
2 13
variation
[If B plays [B4]...]White 3: B stones are captured.
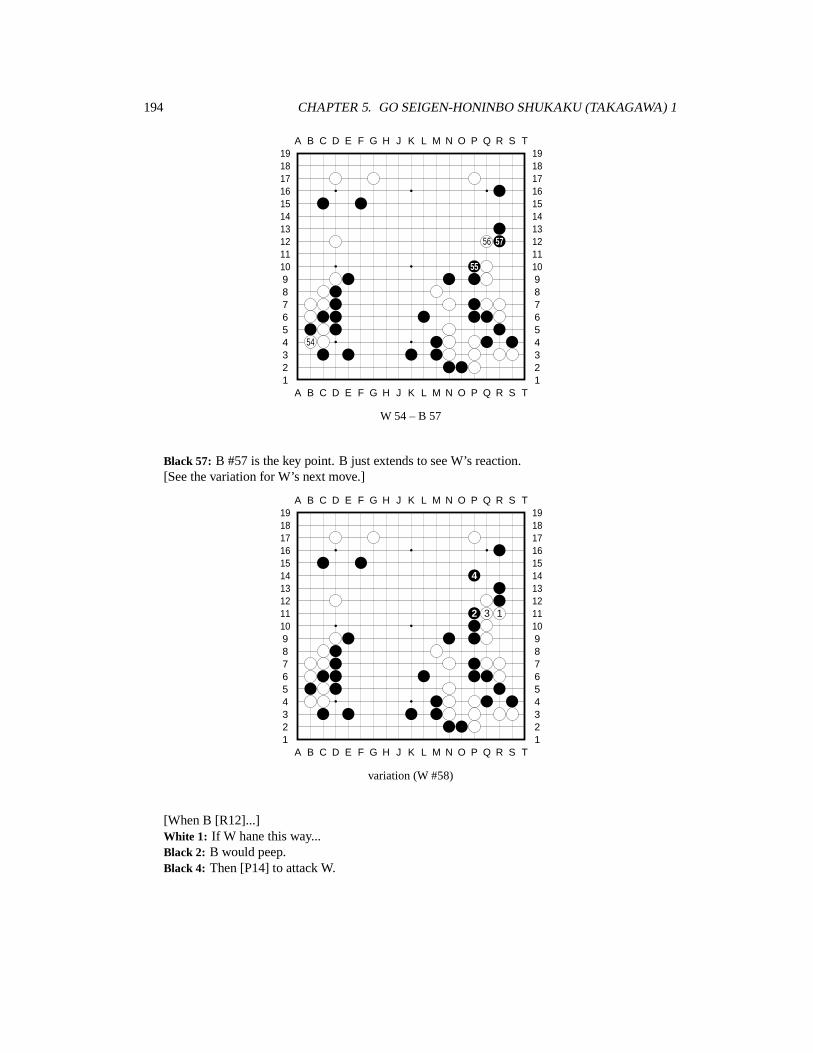
194 CHAPTER 5. GO SEIGEN-HONINBO SHUKAKU (TAKAGAWA) 1
A B C D E F G H J K L M N O P Q R S T
A B C D E F G H J K L M N O P Q R S T12345678910111213141516171819
12345678910111213141516171819
56 57
55
54
W 54 – B 57
Black 57: B #57 is the key point. B just extends to see W’s reaction.[See the variation for W’s next move.]
A B C D E F G H J K L M N O P Q R S T
A B C D E F G H J K L M N O P Q R S T12345678910111213141516171819
12345678910111213141516171819
4
2 3 1
variation (W #58)
[When B [R12]...]White 1: If W hane this way...Black 2: B would peep.Black 4: Then [P14] to attack W.
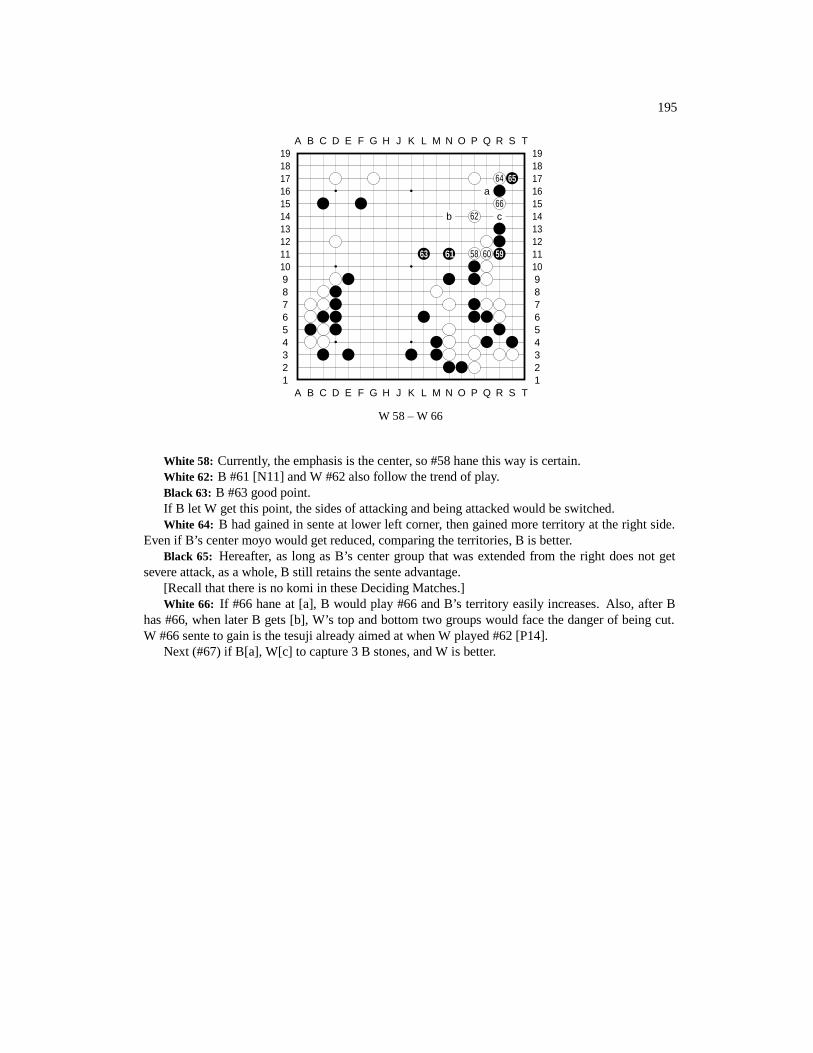
195
A B C D E F G H J K L M N O P Q R S T
A B C D E F G H J K L M N O P Q R S T12345678910111213141516171819
12345678910111213141516171819
64 65a
66b 62 c
63 61 58 60 59
W 58 – W 66
White 58: Currently, the emphasis is the center, so #58 hane this way is certain.White 62: B #61 [N11] and W #62 also follow the trend of play.Black 63: B #63 good point.If B let W get this point, the sides of attacking and being attacked would be switched.White 64: B had gained in sente at lower left corner, then gained more territory at the right side.
Even if B’s center moyo would get reduced, comparing the territories, B is better.Black 65: Hereafter, as long as B’s center group that was extended from the right does not get
severe attack, as a whole, B still retains the sente advantage.[Recall that there is no komi in these Deciding Matches.]White 66: If #66 hane at [a], B would play #66 and B’s territory easily increases. Also, after B
has #66, when later B gets [b], W’s top and bottom two groups would face the danger of being cut.W #66 sente to gain is the tesuji already aimed at when W played #62 [P14].
Next (#67) if B[a], W[c] to capture 3 B stones, and W is better.
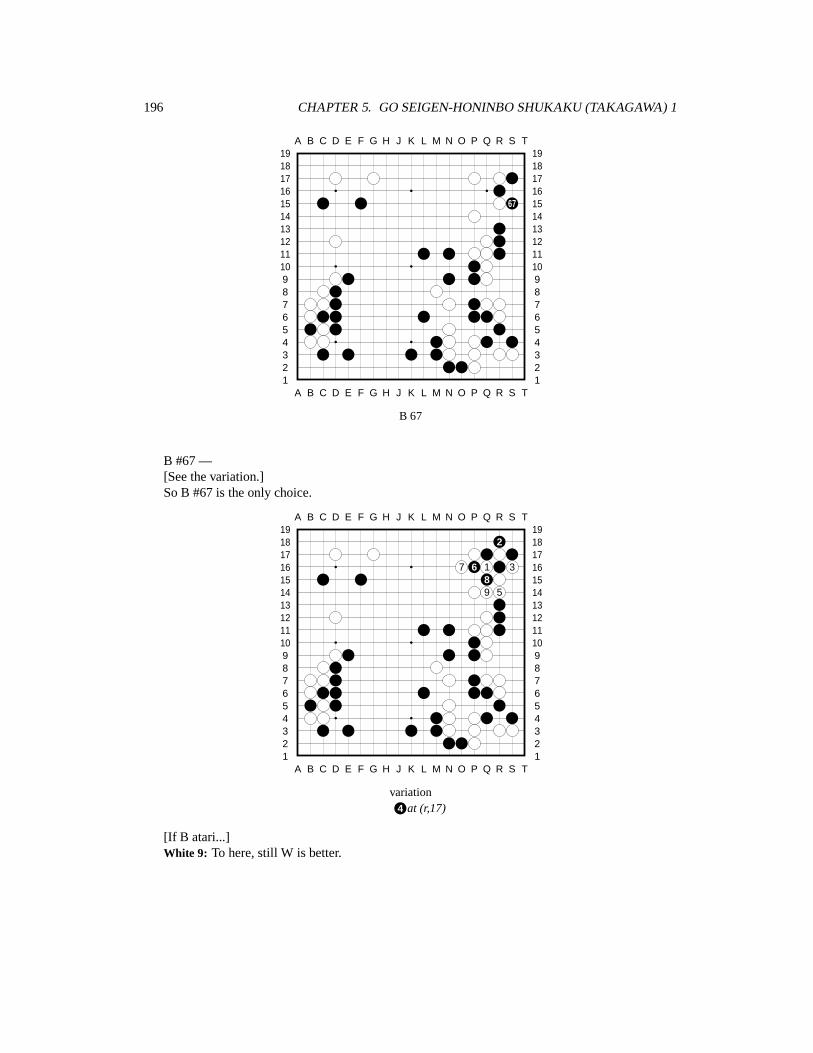
196 CHAPTER 5. GO SEIGEN-HONINBO SHUKAKU (TAKAGAWA) 1
A B C D E F G H J K L M N O P Q R S T
A B C D E F G H J K L M N O P Q R S T12345678910111213141516171819
12345678910111213141516171819
67
B 67
B #67 —[See the variation.]So B #67 is the only choice.
A B C D E F G H J K L M N O P Q R S T
A B C D E F G H J K L M N O P Q R S T12345678910111213141516171819
12345678910111213141516171819
2
7 6 1 389 5
variation4 at (r,17)
[If B atari...]White 9: To here, still W is better.
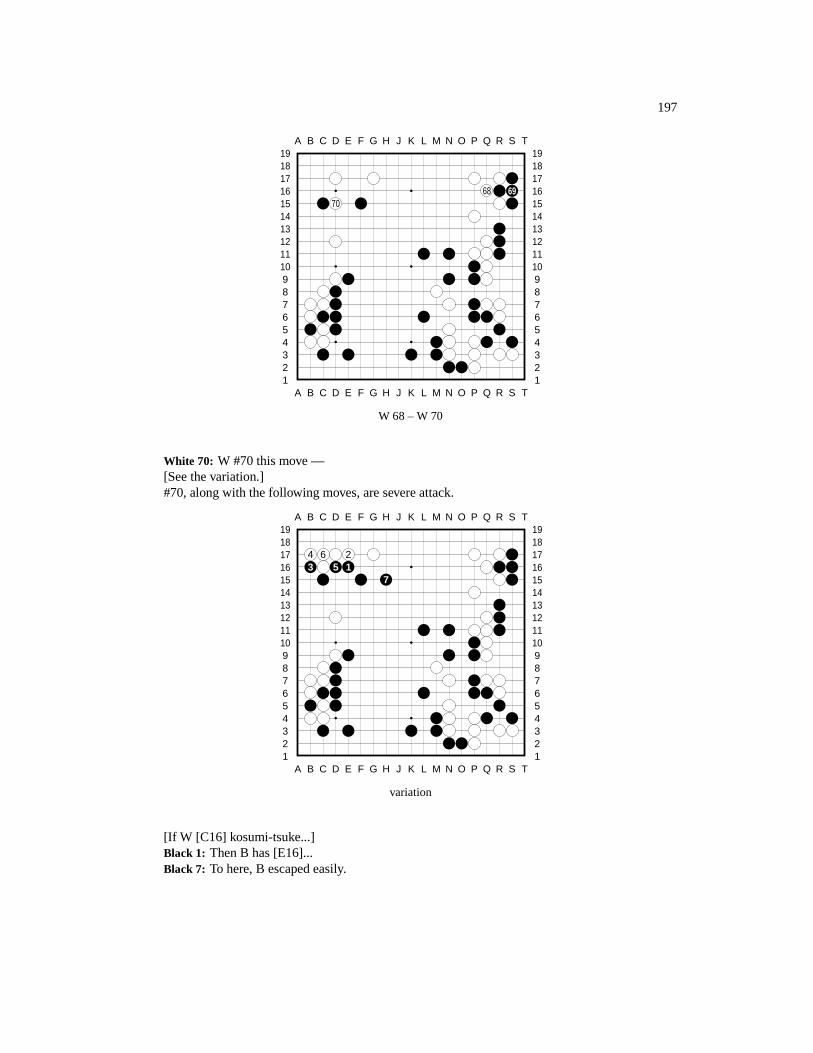
197
A B C D E F G H J K L M N O P Q R S T
A B C D E F G H J K L M N O P Q R S T12345678910111213141516171819
12345678910111213141516171819
68 6970
W 68 – W 70
White 70: W #70 this move —[See the variation.]#70, along with the following moves, are severe attack.
A B C D E F G H J K L M N O P Q R S T
A B C D E F G H J K L M N O P Q R S T12345678910111213141516171819
12345678910111213141516171819
4 6 23 5 1
7
variation
[If W [C16] kosumi-tsuke...]Black 1: Then B has [E16]...Black 7: To here, B escaped easily.
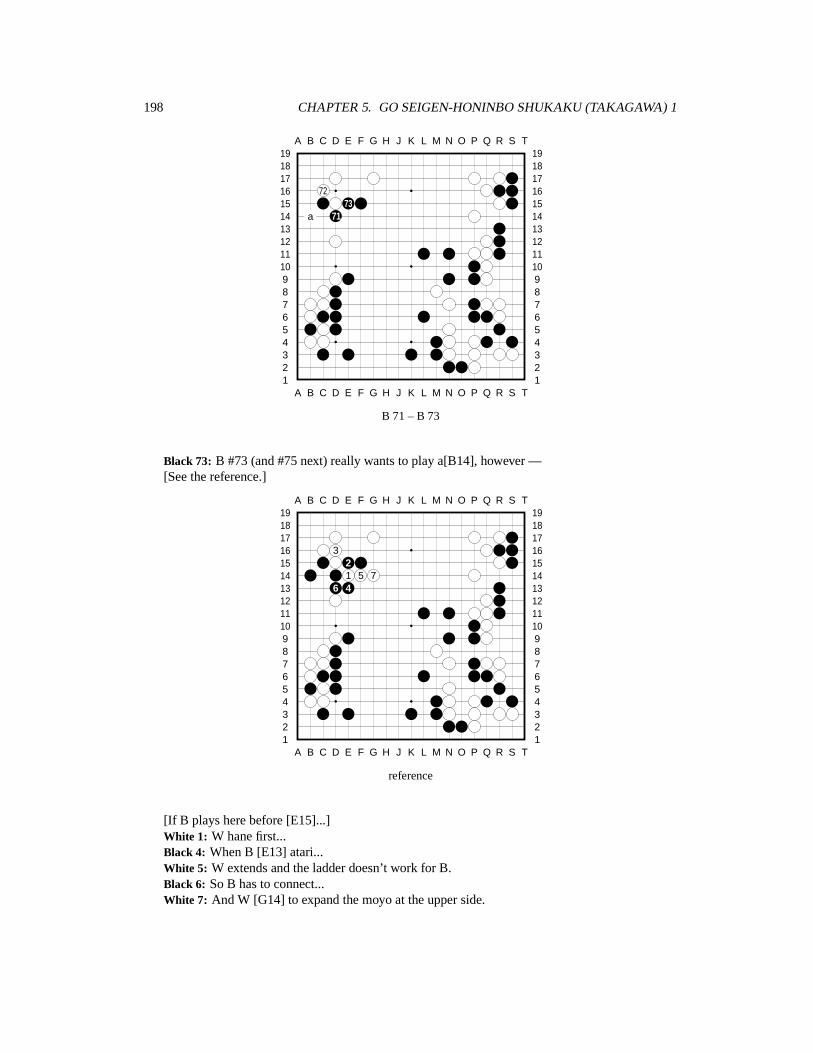
198 CHAPTER 5. GO SEIGEN-HONINBO SHUKAKU (TAKAGAWA) 1
A B C D E F G H J K L M N O P Q R S T
A B C D E F G H J K L M N O P Q R S T12345678910111213141516171819
12345678910111213141516171819
7273
a 71
B 71 – B 73
Black 73: B #73 (and #75 next) really wants to play a[B14], however —[See the reference.]
A B C D E F G H J K L M N O P Q R S T
A B C D E F G H J K L M N O P Q R S T12345678910111213141516171819
12345678910111213141516171819
321 5 7
6 4
reference
[If B plays here before [E15]...]White 1: W hane first...Black 4: When B [E13] atari...White 5: W extends and the ladder doesn’t work for B.Black 6: So B has to connect...White 7: And W [G14] to expand the moyo at the upper side.
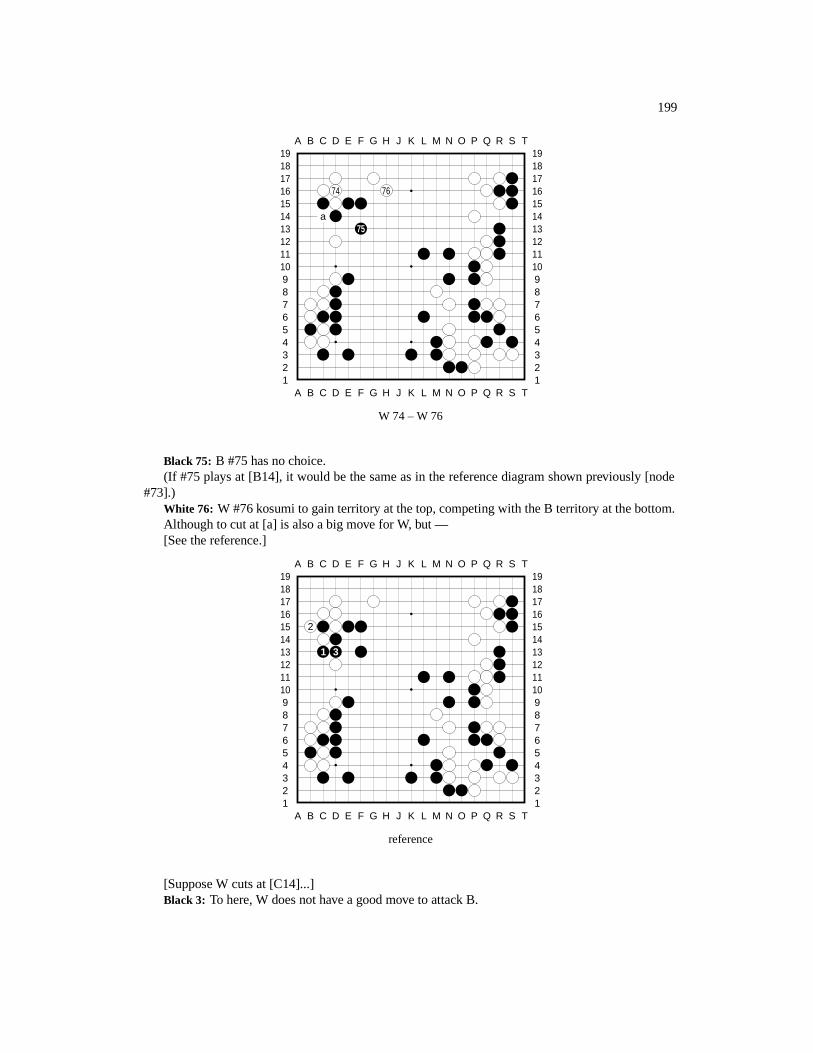
199
A B C D E F G H J K L M N O P Q R S T
A B C D E F G H J K L M N O P Q R S T12345678910111213141516171819
12345678910111213141516171819
74 76
a75
W 74 – W 76
Black 75: B #75 has no choice.(If #75 plays at [B14], it would be the same as in the reference diagram shown previously [node
#73].)White 76: W #76 kosumi to gain territory at the top, competing with the B territory at the bottom.Although to cut at [a] is also a big move for W, but —[See the reference.]
A B C D E F G H J K L M N O P Q R S T
A B C D E F G H J K L M N O P Q R S T12345678910111213141516171819
12345678910111213141516171819
2
1 3
reference
[Suppose W cuts at [C14]...]Black 3: To here, W does not have a good move to attack B.
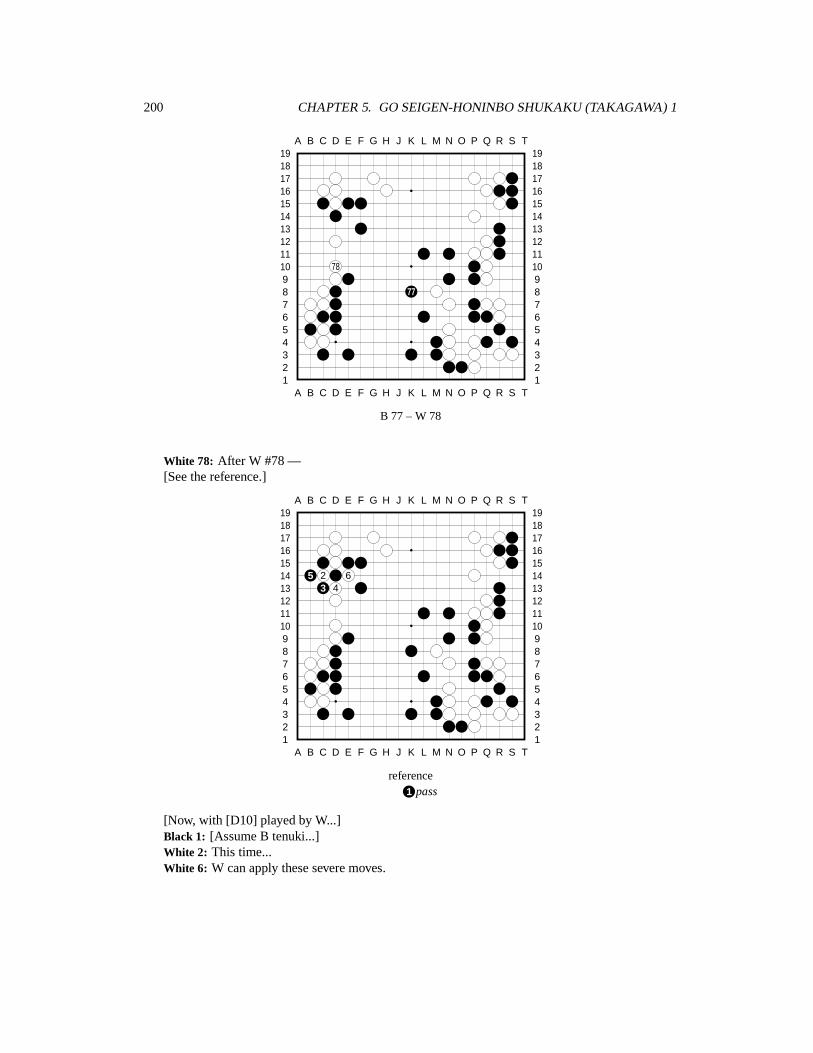
200 CHAPTER 5. GO SEIGEN-HONINBO SHUKAKU (TAKAGAWA) 1
A B C D E F G H J K L M N O P Q R S T
A B C D E F G H J K L M N O P Q R S T12345678910111213141516171819
12345678910111213141516171819
78
77
B 77 – W 78
White 78: After W #78 —[See the reference.]
A B C D E F G H J K L M N O P Q R S T
A B C D E F G H J K L M N O P Q R S T12345678910111213141516171819
12345678910111213141516171819
5 2 63 4
reference1 pass
[Now, with [D10] played by W...]Black 1: [Assume B tenuki...]White 2: This time...White 6: W can apply these severe moves.
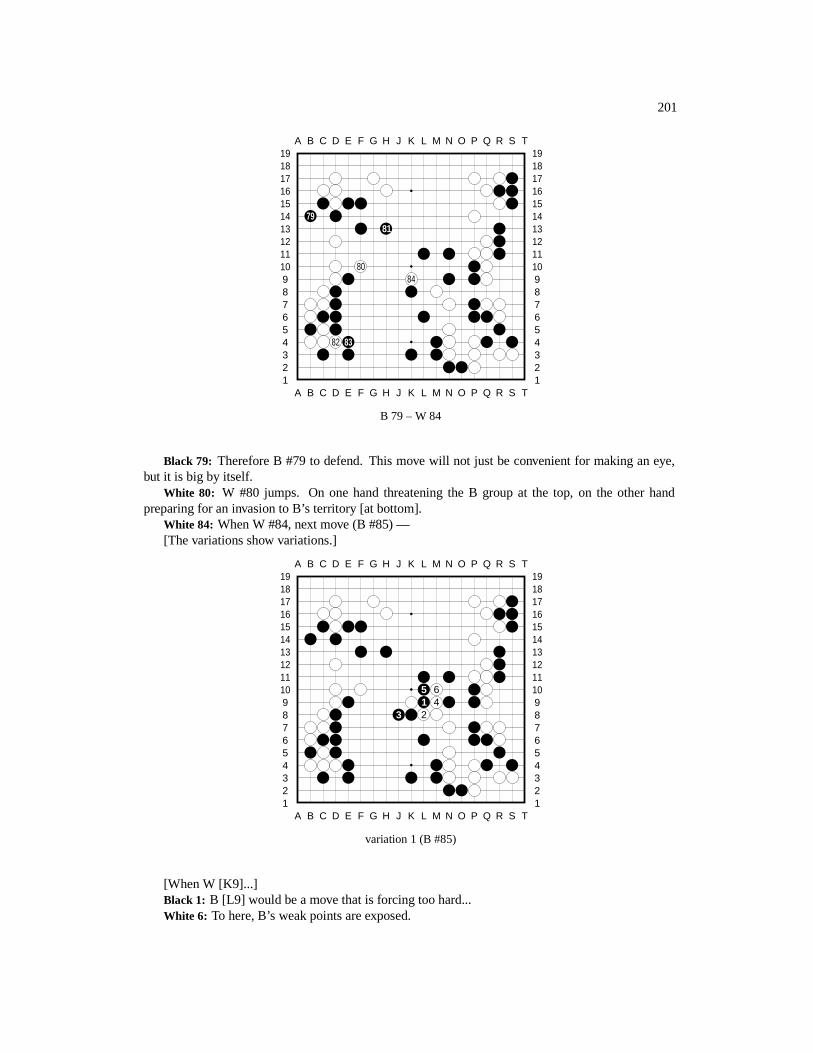
201
A B C D E F G H J K L M N O P Q R S T
A B C D E F G H J K L M N O P Q R S T12345678910111213141516171819
12345678910111213141516171819
7981
8084
82 83
B 79 – W 84
Black 79: Therefore B #79 to defend. This move will not just be convenient for making an eye,but it is big by itself.
White 80: W #80 jumps. On one hand threatening the B group at the top, on the other handpreparing for an invasion to B’s territory [at bottom].
White 84: When W #84, next move (B #85) —[The variations show variations.]
A B C D E F G H J K L M N O P Q R S T
A B C D E F G H J K L M N O P Q R S T12345678910111213141516171819
12345678910111213141516171819
5 61 4
3 2
variation 1 (B #85)
[When W [K9]...]Black 1: B [L9] would be a move that is forcing too hard...White 6: To here, B’s weak points are exposed.
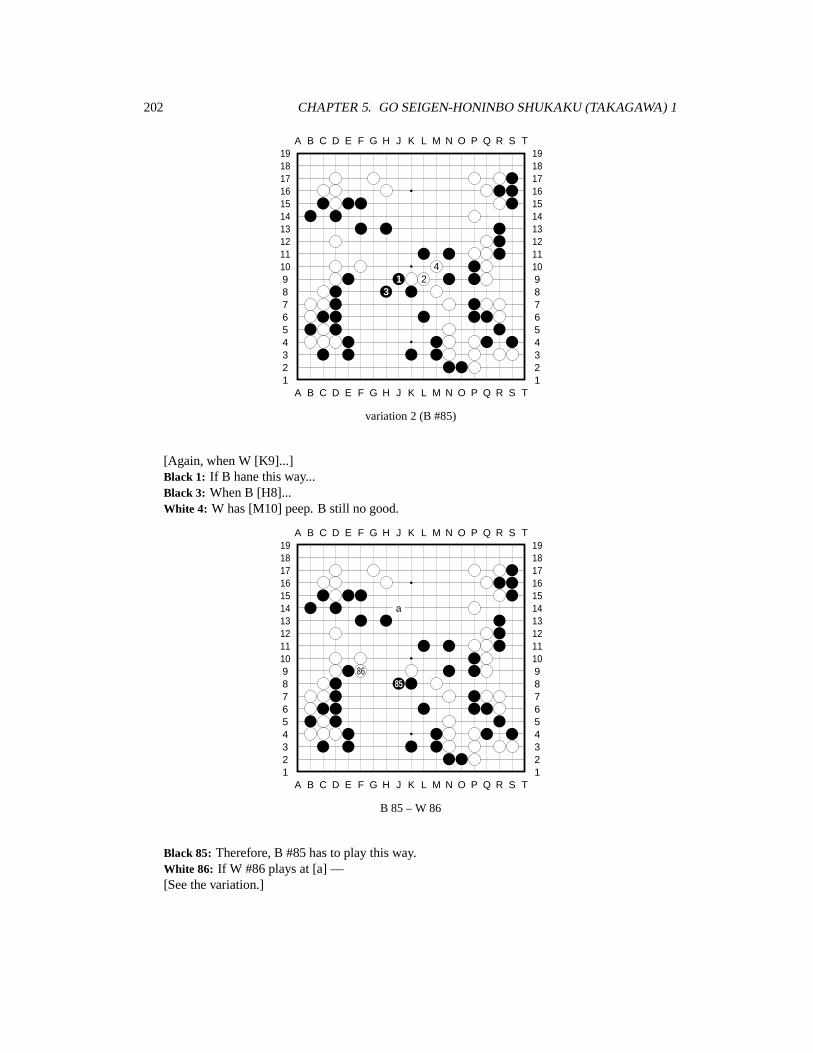
202 CHAPTER 5. GO SEIGEN-HONINBO SHUKAKU (TAKAGAWA) 1
A B C D E F G H J K L M N O P Q R S T
A B C D E F G H J K L M N O P Q R S T12345678910111213141516171819
12345678910111213141516171819
41 2
3
variation 2 (B #85)
[Again, when W [K9]...]Black 1: If B hane this way...Black 3: When B [H8]...White 4: W has [M10] peep. B still no good.
A B C D E F G H J K L M N O P Q R S T
A B C D E F G H J K L M N O P Q R S T12345678910111213141516171819
12345678910111213141516171819
a
8685
B 85 – W 86
Black 85: Therefore, B #85 has to play this way.White 86: If W #86 plays at [a] —[See the variation.]
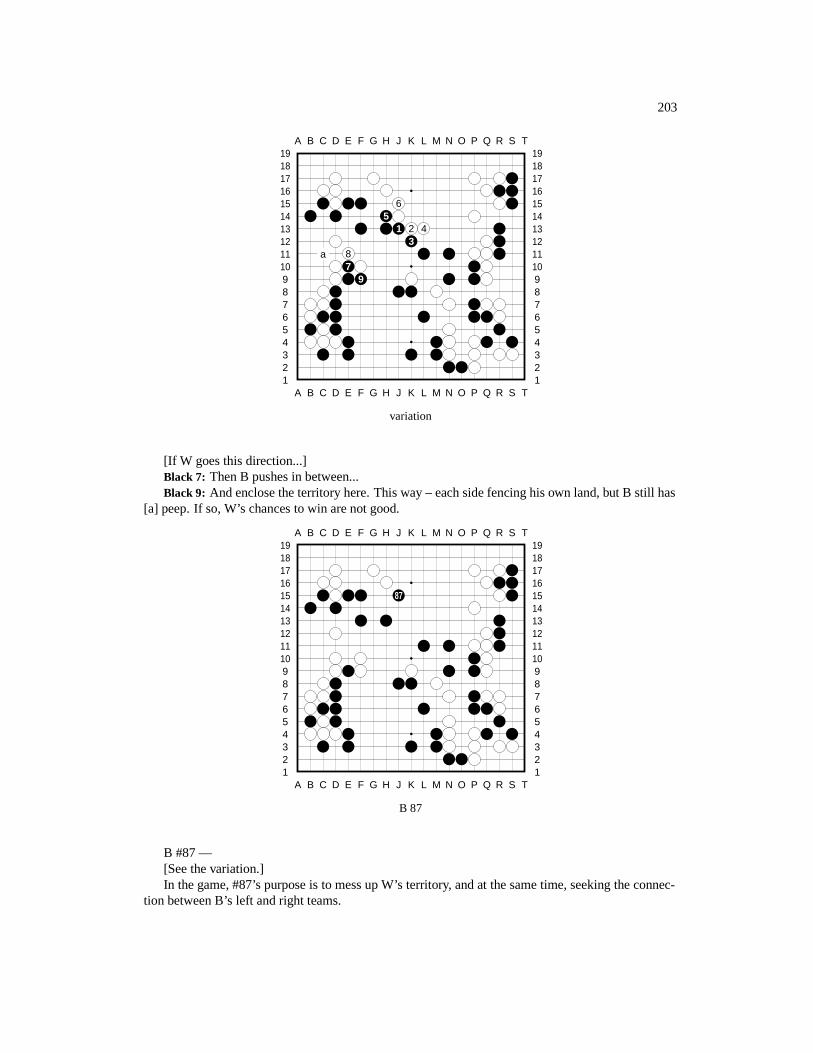
203
A B C D E F G H J K L M N O P Q R S T
A B C D E F G H J K L M N O P Q R S T12345678910111213141516171819
12345678910111213141516171819
65
1 2 43
a 87
9
variation
[If W goes this direction...]Black 7: Then B pushes in between...Black 9: And enclose the territory here. This way – each side fencing his own land, but B still has
[a] peep. If so, W’s chances to win are not good.
A B C D E F G H J K L M N O P Q R S T
A B C D E F G H J K L M N O P Q R S T12345678910111213141516171819
12345678910111213141516171819
87
B 87
B #87 —[See the variation.]In the game, #87’s purpose is to mess up W’s territory, and at the same time, seeking the connec-
tion between B’s left and right teams.
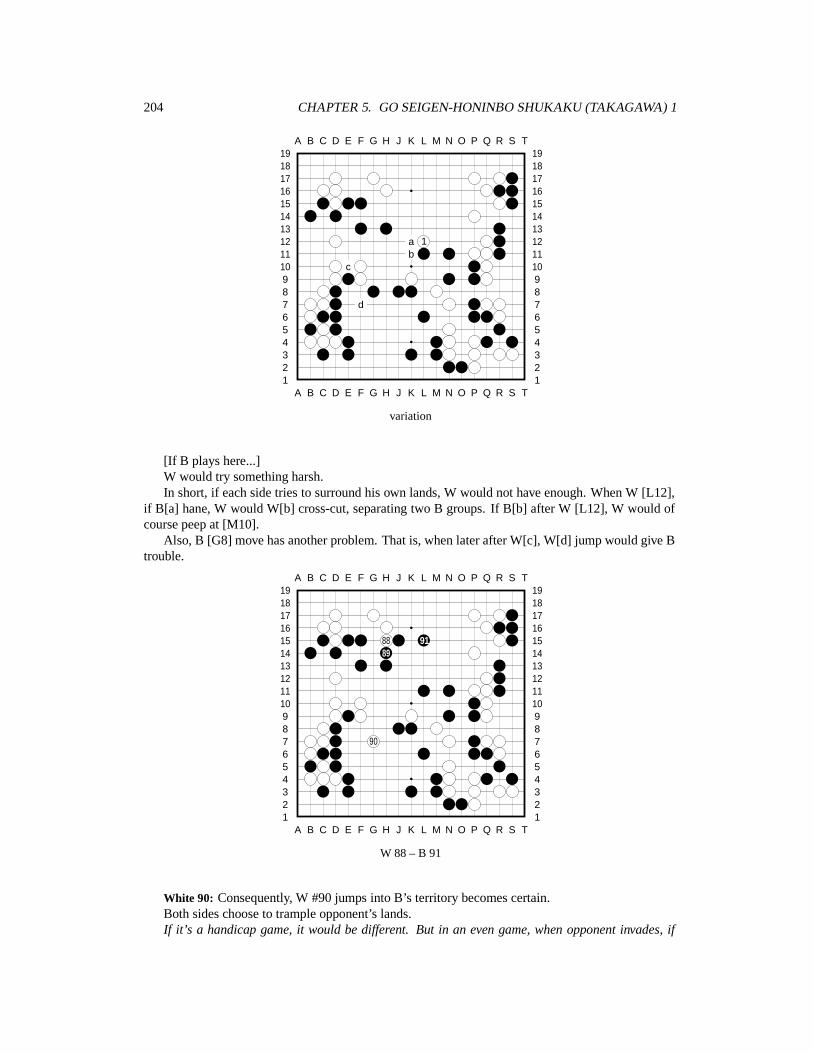
204 CHAPTER 5. GO SEIGEN-HONINBO SHUKAKU (TAKAGAWA) 1
A B C D E F G H J K L M N O P Q R S T
A B C D E F G H J K L M N O P Q R S T12345678910111213141516171819
12345678910111213141516171819
a 1b
c
d
variation
[If B plays here...]W would try something harsh.In short, if each side tries to surround his own lands, W would not have enough. When W [L12],
if B[a] hane, W would W[b] cross-cut, separating two B groups. If B[b] after W [L12], W would ofcourse peep at [M10].
Also, B [G8] move has another problem. That is, when later after W[c], W[d] jump would give Btrouble.
A B C D E F G H J K L M N O P Q R S T
A B C D E F G H J K L M N O P Q R S T12345678910111213141516171819
12345678910111213141516171819
88 9189
90
W 88 – B 91
White 90: Consequently, W #90 jumps into B’s territory becomes certain.Both sides choose to trample opponent’s lands.If it’s a handicap game, it would be different. But in an even game, when opponent invades, if
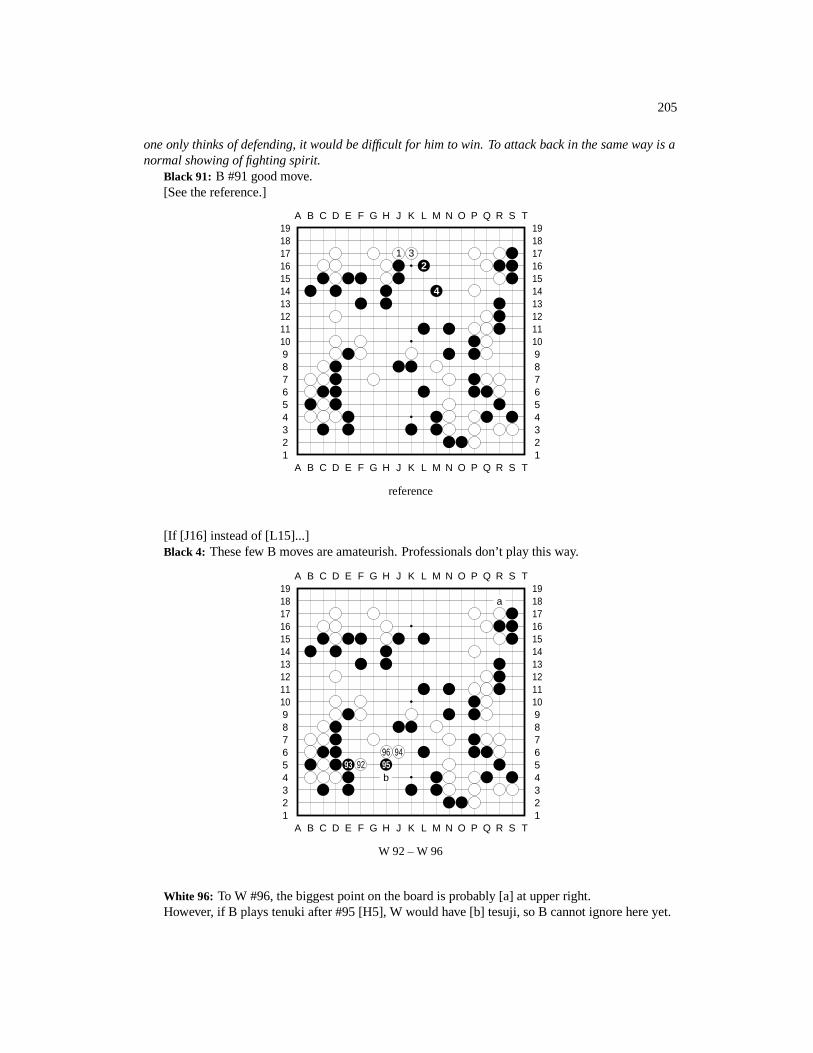
205
one only thinks of defending, it would be difficult for him to win. To attack back in the same way is anormal showing of fighting spirit.
Black 91: B #91 good move.[See the reference.]
A B C D E F G H J K L M N O P Q R S T
A B C D E F G H J K L M N O P Q R S T12345678910111213141516171819
12345678910111213141516171819
1 32
4
reference
[If [J16] instead of [L15]...]Black 4: These few B moves are amateurish. Professionals don’t play this way.
A B C D E F G H J K L M N O P Q R S T
A B C D E F G H J K L M N O P Q R S T12345678910111213141516171819
12345678910111213141516171819
a
96 9493 92 95
b
W 92 – W 96
White 96: To W #96, the biggest point on the board is probably [a] at upper right.However, if B plays tenuki after #95 [H5], W would have [b] tesuji, so B cannot ignore here yet.
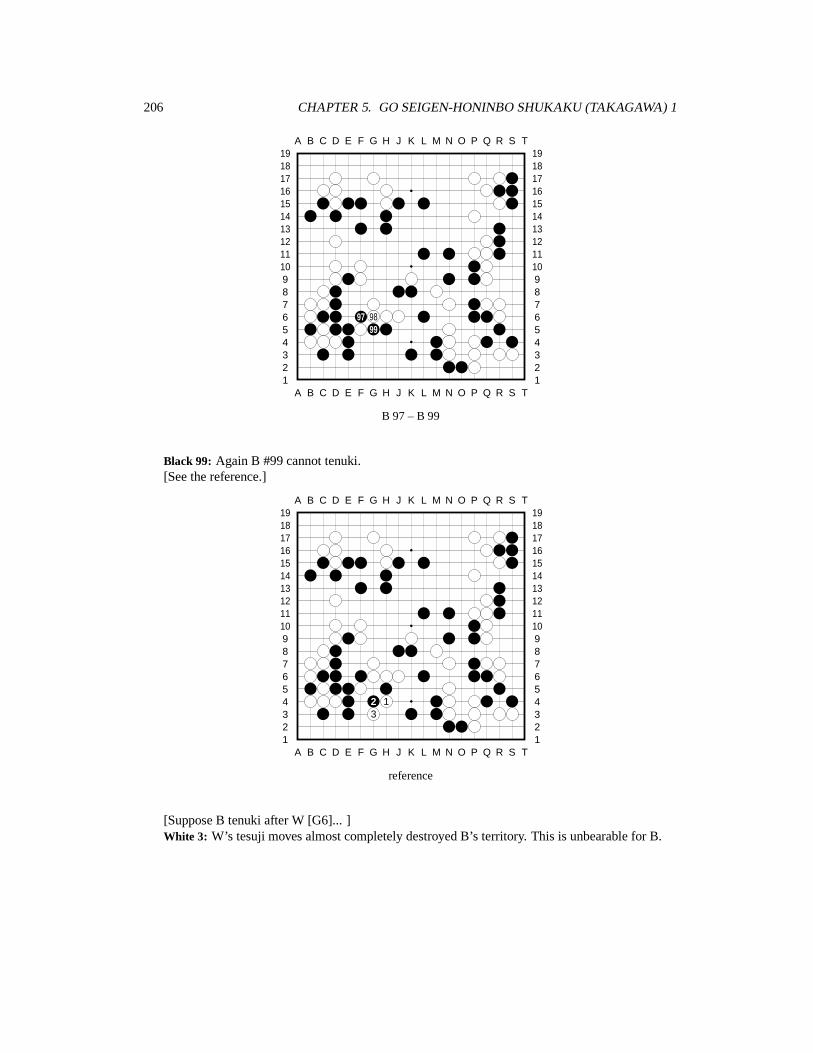
206 CHAPTER 5. GO SEIGEN-HONINBO SHUKAKU (TAKAGAWA) 1
A B C D E F G H J K L M N O P Q R S T
A B C D E F G H J K L M N O P Q R S T12345678910111213141516171819
12345678910111213141516171819
97 9899
B 97 – B 99
Black 99: Again B #99 cannot tenuki.[See the reference.]
A B C D E F G H J K L M N O P Q R S T
A B C D E F G H J K L M N O P Q R S T12345678910111213141516171819
12345678910111213141516171819
2 13
reference
[Suppose B tenuki after W [G6]... ]White 3: W’s tesuji moves almost completely destroyed B’s territory. This is unbearable for B.
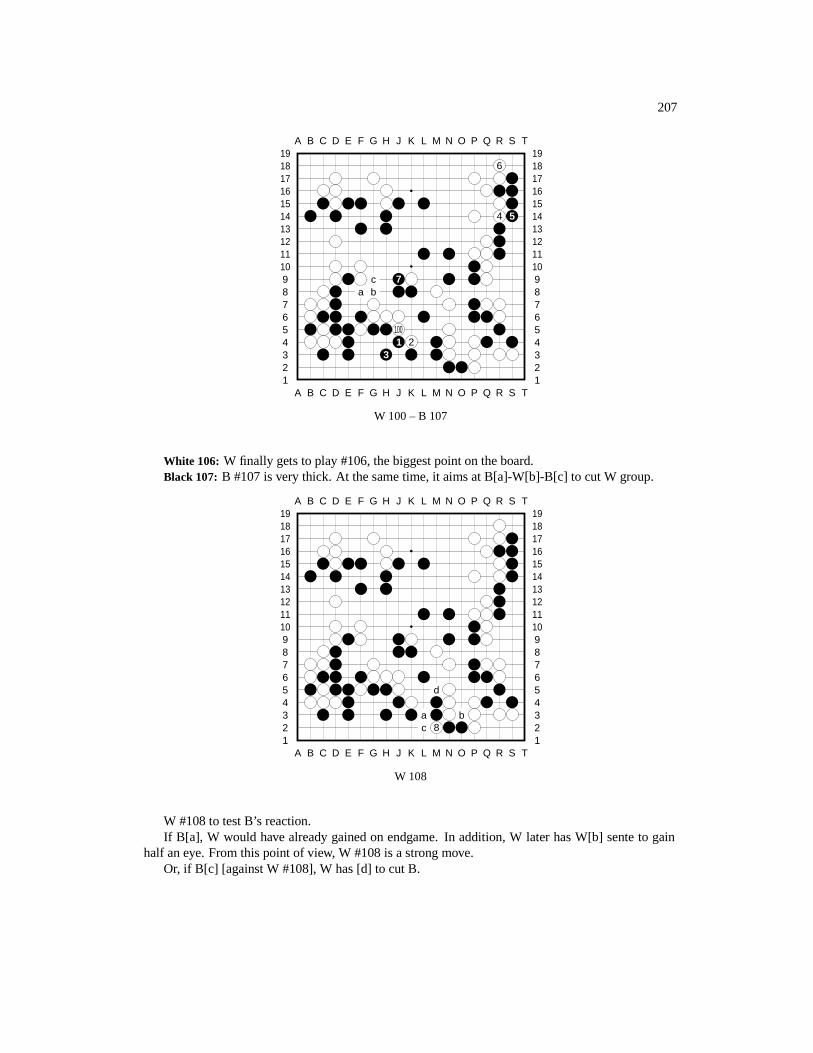
207
A B C D E F G H J K L M N O P Q R S T
A B C D E F G H J K L M N O P Q R S T12345678910111213141516171819
12345678910111213141516171819
6
4 5
c 7a b
1001 2
3
W 100 – B 107
White 106: W finally gets to play #106, the biggest point on the board.Black 107: B #107 is very thick. At the same time, it aims at B[a]-W[b]-B[c] to cut W group.
A B C D E F G H J K L M N O P Q R S T
A B C D E F G H J K L M N O P Q R S T12345678910111213141516171819
12345678910111213141516171819
d
a bc 8
W 108
W #108 to test B’s reaction.If B[a], W would have already gained on endgame. In addition, W later has W[b] sente to gain
half an eye. From this point of view, W #108 is a strong move.Or, if B[c] [against W #108], W has [d] to cut B.
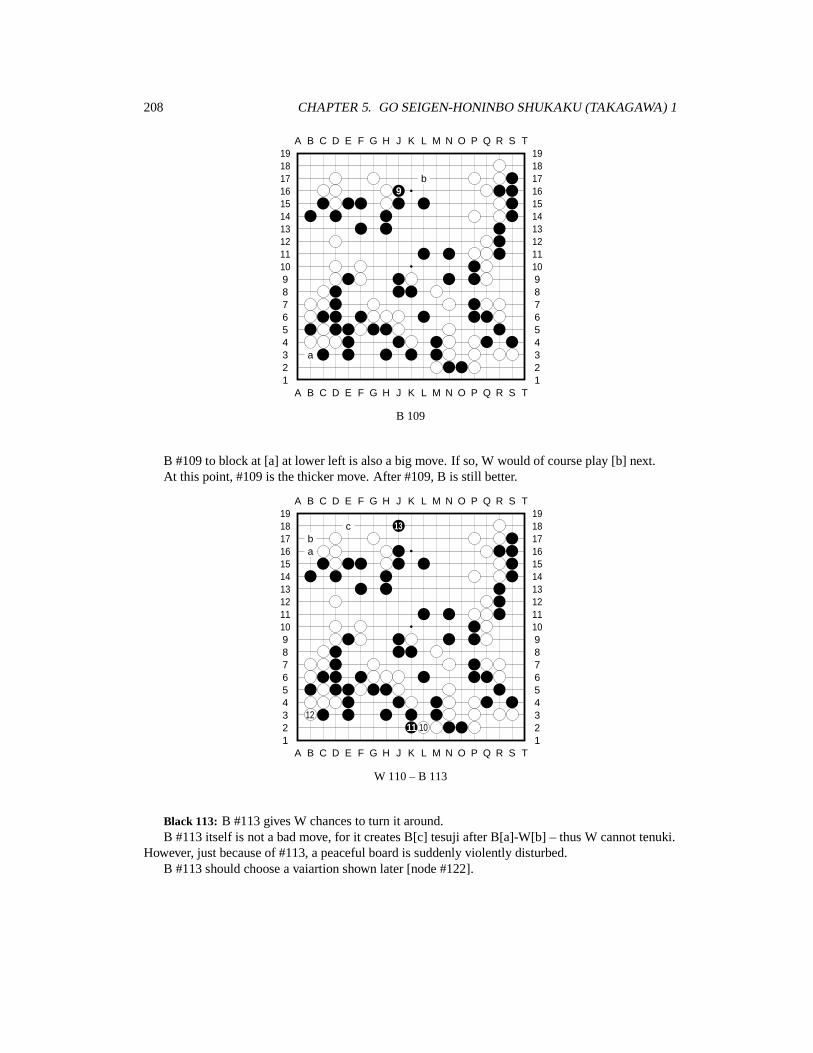
208 CHAPTER 5. GO SEIGEN-HONINBO SHUKAKU (TAKAGAWA) 1
A B C D E F G H J K L M N O P Q R S T
A B C D E F G H J K L M N O P Q R S T12345678910111213141516171819
12345678910111213141516171819
b9
a
B 109
B #109 to block at [a] at lower left is also a big move. If so, W would of course play [b] next.At this point, #109 is the thicker move. After #109, B is still better.
A B C D E F G H J K L M N O P Q R S T
A B C D E F G H J K L M N O P Q R S T12345678910111213141516171819
12345678910111213141516171819
c 13ba
1211 10
W 110 – B 113
Black 113: B #113 gives W chances to turn it around.B #113 itself is not a bad move, for it creates B[c] tesuji after B[a]-W[b] – thus W cannot tenuki.
However, just because of #113, a peaceful board is suddenly violently disturbed.B #113 should choose a vaiartion shown later [node #122].
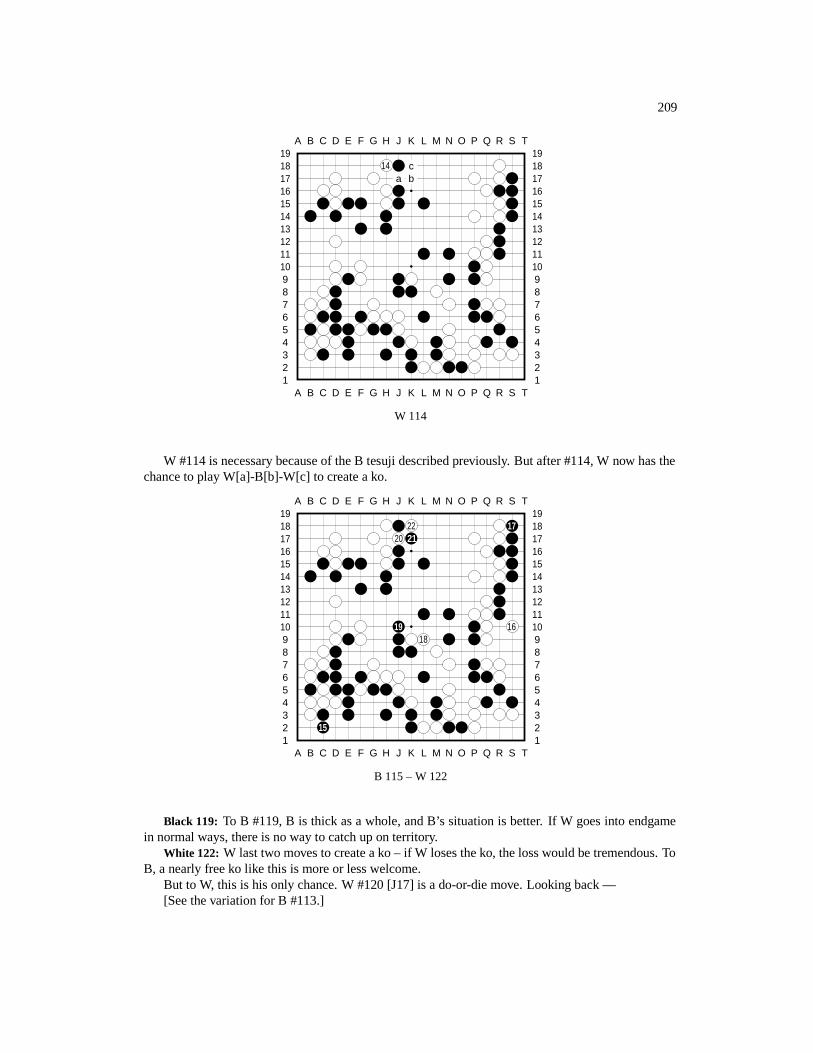
209
A B C D E F G H J K L M N O P Q R S T
A B C D E F G H J K L M N O P Q R S T12345678910111213141516171819
12345678910111213141516171819
14 ca b
W 114
W #114 is necessary because of the B tesuji described previously. But after #114, W now has thechance to play W[a]-B[b]-W[c] to create a ko.
A B C D E F G H J K L M N O P Q R S T
A B C D E F G H J K L M N O P Q R S T12345678910111213141516171819
12345678910111213141516171819
22 1720 21
19 1618
15
B 115 – W 122
Black 119: To B #119, B is thick as a whole, and B’s situation is better. If W goes into endgamein normal ways, there is no way to catch up on territory.
White 122: W last two moves to create a ko – if W loses the ko, the loss would be tremendous. ToB, a nearly free ko like this is more or less welcome.
But to W, this is his only chance. W #120 [J17] is a do-or-die move. Looking back —[See the variation for B #113.]
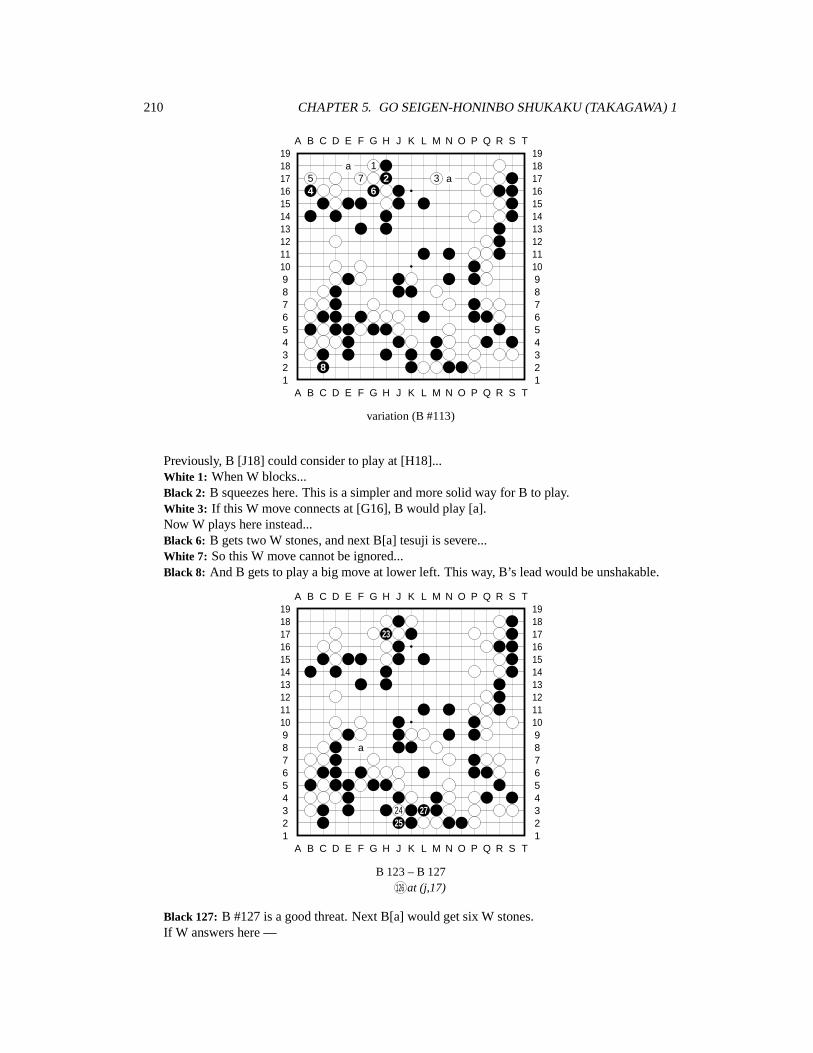
210 CHAPTER 5. GO SEIGEN-HONINBO SHUKAKU (TAKAGAWA) 1
A B C D E F G H J K L M N O P Q R S T
A B C D E F G H J K L M N O P Q R S T12345678910111213141516171819
12345678910111213141516171819
a 15 7 2 3 a4 6
8
variation (B #113)
Previously, B [J18] could consider to play at [H18]...White 1: When W blocks...Black 2: B squeezes here. This is a simpler and more solid way for B to play.White 3: If this W move connects at [G16], B would play [a].Now W plays here instead...Black 6: B gets two W stones, and next B[a] tesuji is severe...White 7: So this W move cannot be ignored...Black 8: And B gets to play a big move at lower left. This way, B’s lead would be unshakable.
A B C D E F G H J K L M N O P Q R S T
A B C D E F G H J K L M N O P Q R S T12345678910111213141516171819
12345678910111213141516171819
23
a
24 2725
B 123 – B 127126 at (j,17)
Black 127: B #127 is a good threat. Next B[a] would get six W stones.If W answers here —
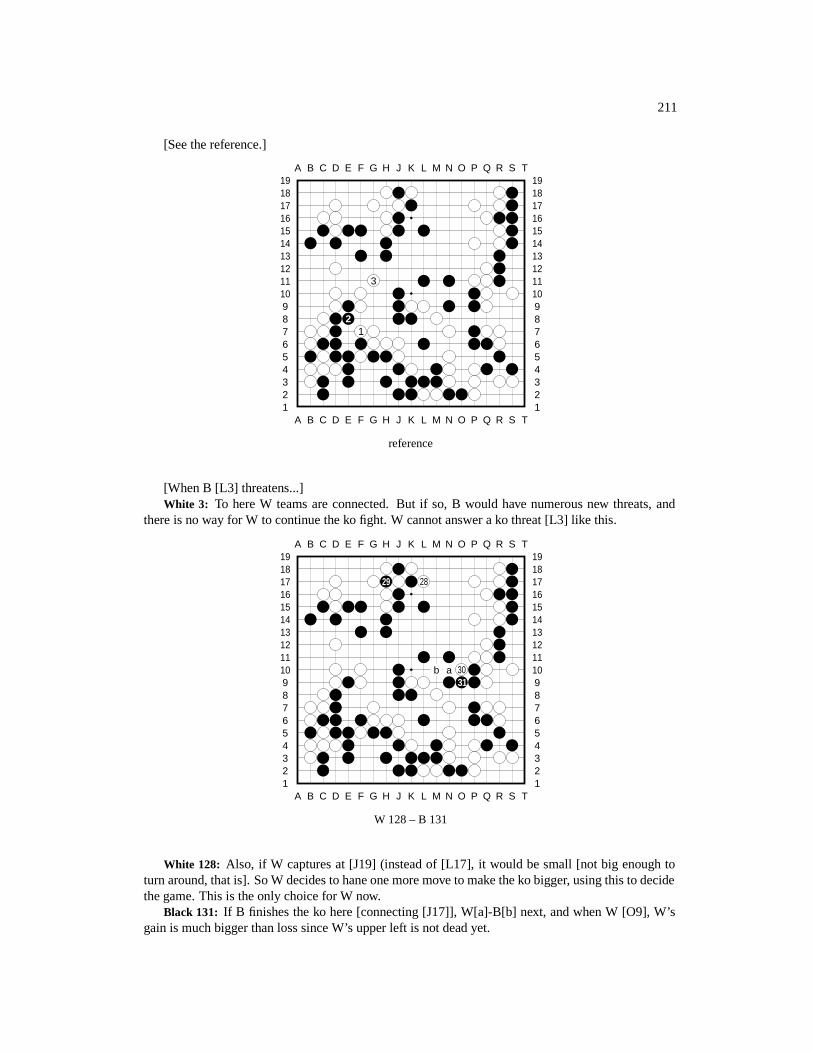
211
[See the reference.]
A B C D E F G H J K L M N O P Q R S T
A B C D E F G H J K L M N O P Q R S T12345678910111213141516171819
12345678910111213141516171819
3
21
reference
[When B [L3] threatens...]White 3: To here W teams are connected. But if so, B would have numerous new threats, and
there is no way for W to continue the ko fight. W cannot answer a ko threat [L3] like this.
A B C D E F G H J K L M N O P Q R S T
A B C D E F G H J K L M N O P Q R S T12345678910111213141516171819
12345678910111213141516171819
29 28
b a 3031
W 128 – B 131
White 128: Also, if W captures at [J19] (instead of [L17], it would be small [not big enough toturn around, that is]. So W decides to hane one more move to make the ko bigger, using this to decidethe game. This is the only choice for W now.
Black 131: If B finishes the ko here [connecting [J17]], W[a]-B[b] next, and when W [O9], W’sgain is much bigger than loss since W’s upper left is not dead yet.
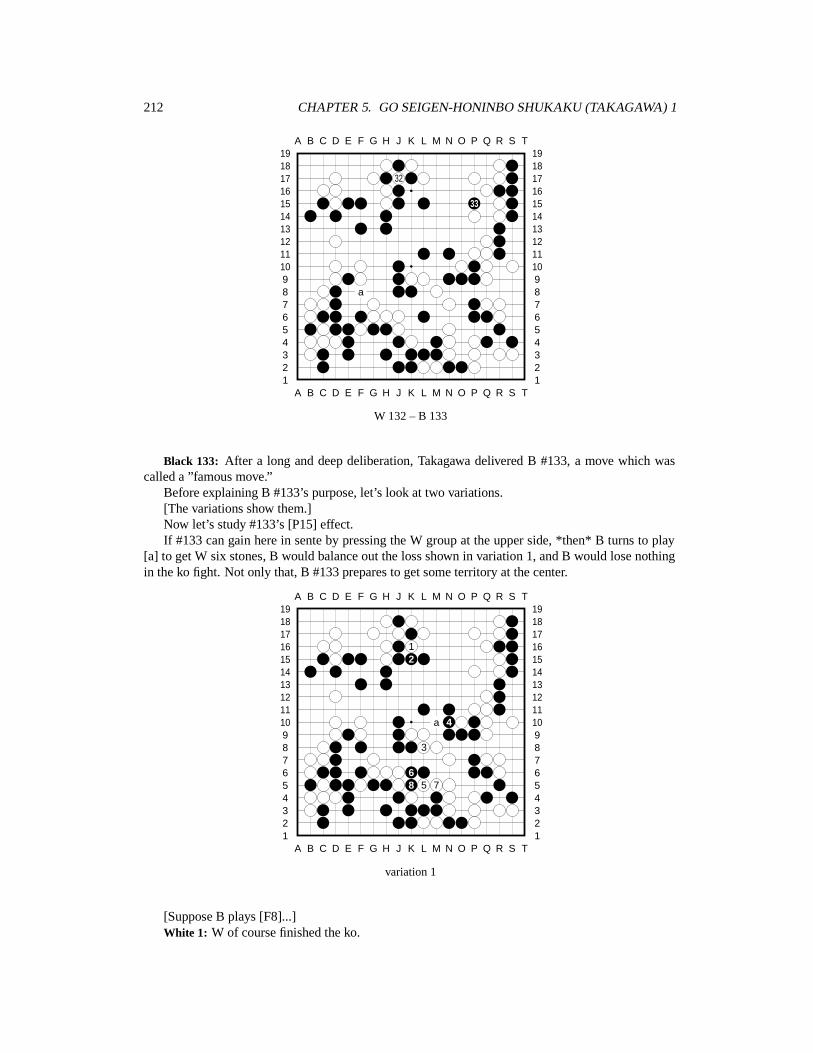
212 CHAPTER 5. GO SEIGEN-HONINBO SHUKAKU (TAKAGAWA) 1
A B C D E F G H J K L M N O P Q R S T
A B C D E F G H J K L M N O P Q R S T12345678910111213141516171819
12345678910111213141516171819
32
33
a
W 132 – B 133
Black 133: After a long and deep deliberation, Takagawa delivered B #133, a move which wascalled a ”famous move.”
Before explaining B #133’s purpose, let’s look at two variations.[The variations show them.]Now let’s study #133’s [P15] effect.If #133 can gain here in sente by pressing the W group at the upper side, *then* B turns to play
[a] to get W six stones, B would balance out the loss shown in variation 1, and B would lose nothingin the ko fight. Not only that, B #133 prepares to get some territory at the center.
A B C D E F G H J K L M N O P Q R S T
A B C D E F G H J K L M N O P Q R S T12345678910111213141516171819
12345678910111213141516171819
12
a 4
3
68 5 7
variation 1
[Suppose B plays [F8]...]White 1: W of course finished the ko.
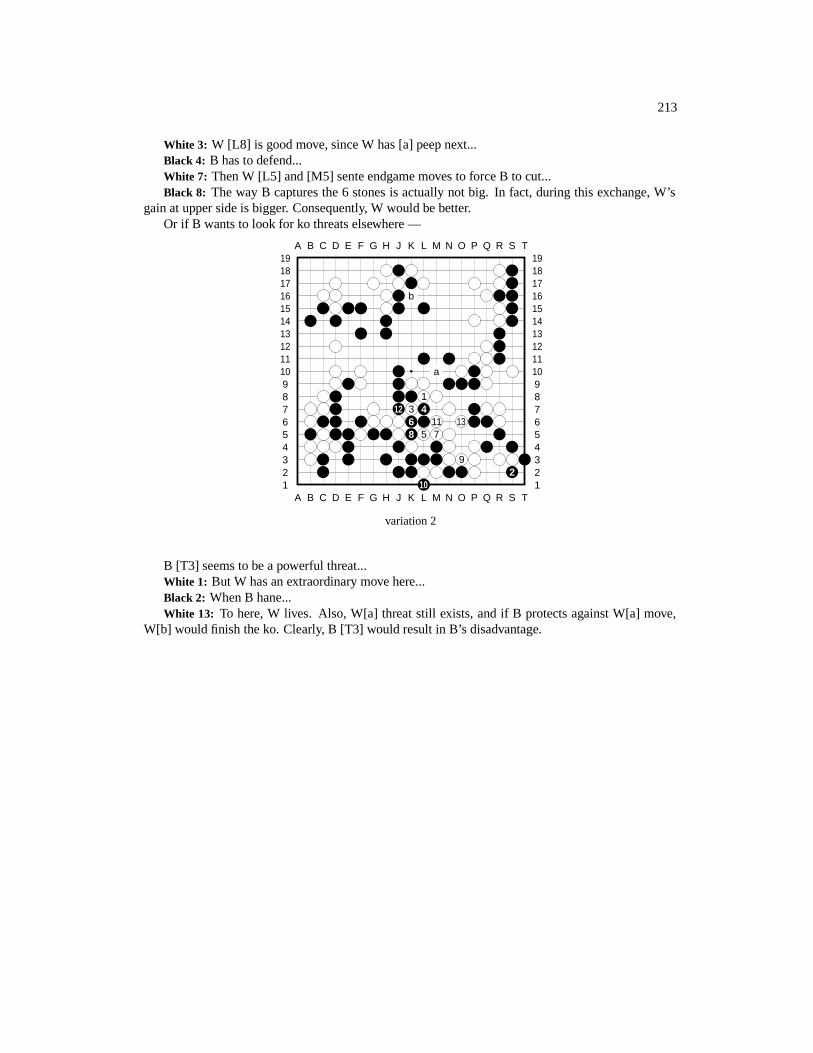
213
White 3: W [L8] is good move, since W has [a] peep next...Black 4: B has to defend...White 7: Then W [L5] and [M5] sente endgame moves to force B to cut...Black 8: The way B captures the 6 stones is actually not big. In fact, during this exchange, W’s
gain at upper side is bigger. Consequently, W would be better.Or if B wants to look for ko threats elsewhere —
A B C D E F G H J K L M N O P Q R S T
A B C D E F G H J K L M N O P Q R S T12345678910111213141516171819
12345678910111213141516171819
b
a
112 3 4
6 11 138 5 7
92
10
variation 2
B [T3] seems to be a powerful threat...White 1: But W has an extraordinary move here...Black 2: When B hane...White 13: To here, W lives. Also, W[a] threat still exists, and if B protects against W[a] move,
W[b] would finish the ko. Clearly, B [T3] would result in B’s disadvantage.
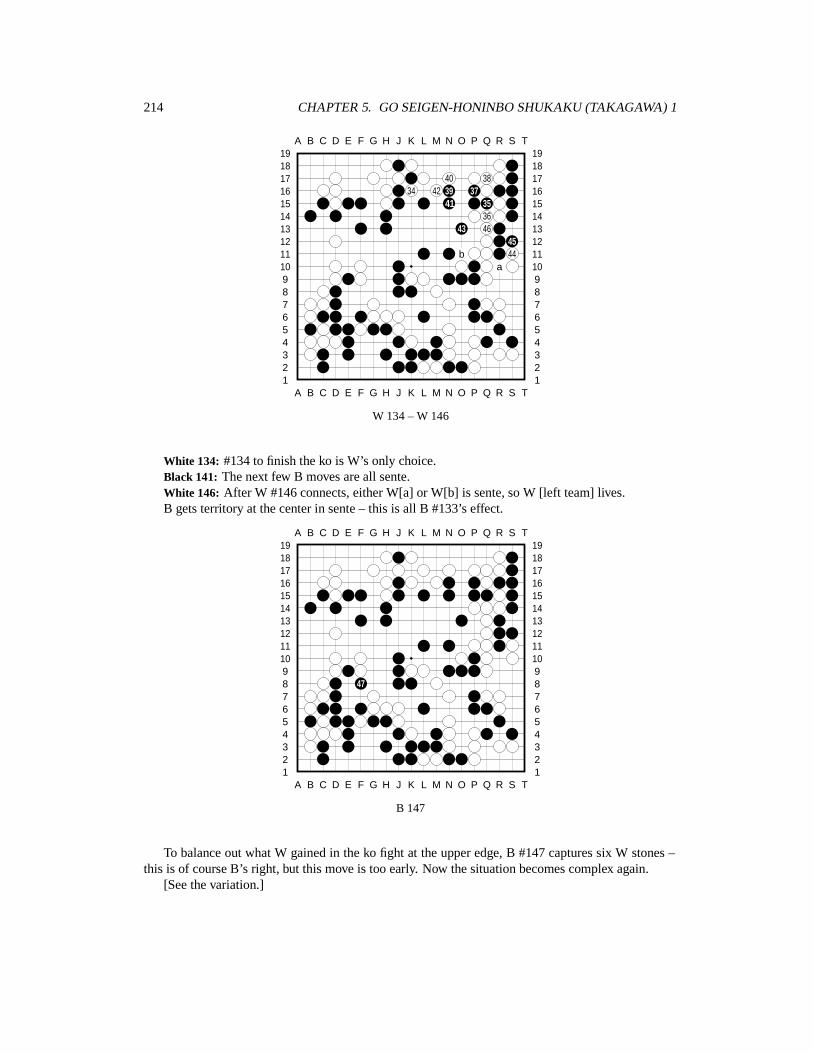
214 CHAPTER 5. GO SEIGEN-HONINBO SHUKAKU (TAKAGAWA) 1
A B C D E F G H J K L M N O P Q R S T
A B C D E F G H J K L M N O P Q R S T12345678910111213141516171819
12345678910111213141516171819
40 3834 42 39 37
41 3536
43 4645
b 44a
W 134 – W 146
White 134: #134 to finish the ko is W’s only choice.Black 141: The next few B moves are all sente.White 146: After W #146 connects, either W[a] or W[b] is sente, so W [left team] lives.B gets territory at the center in sente – this is all B #133’s effect.
A B C D E F G H J K L M N O P Q R S T
A B C D E F G H J K L M N O P Q R S T12345678910111213141516171819
12345678910111213141516171819
47
B 147
To balance out what W gained in the ko fight at the upper edge, B #147 captures six W stones –this is of course B’s right, but this move is too early. Now the situation becomes complex again.
[See the variation.]
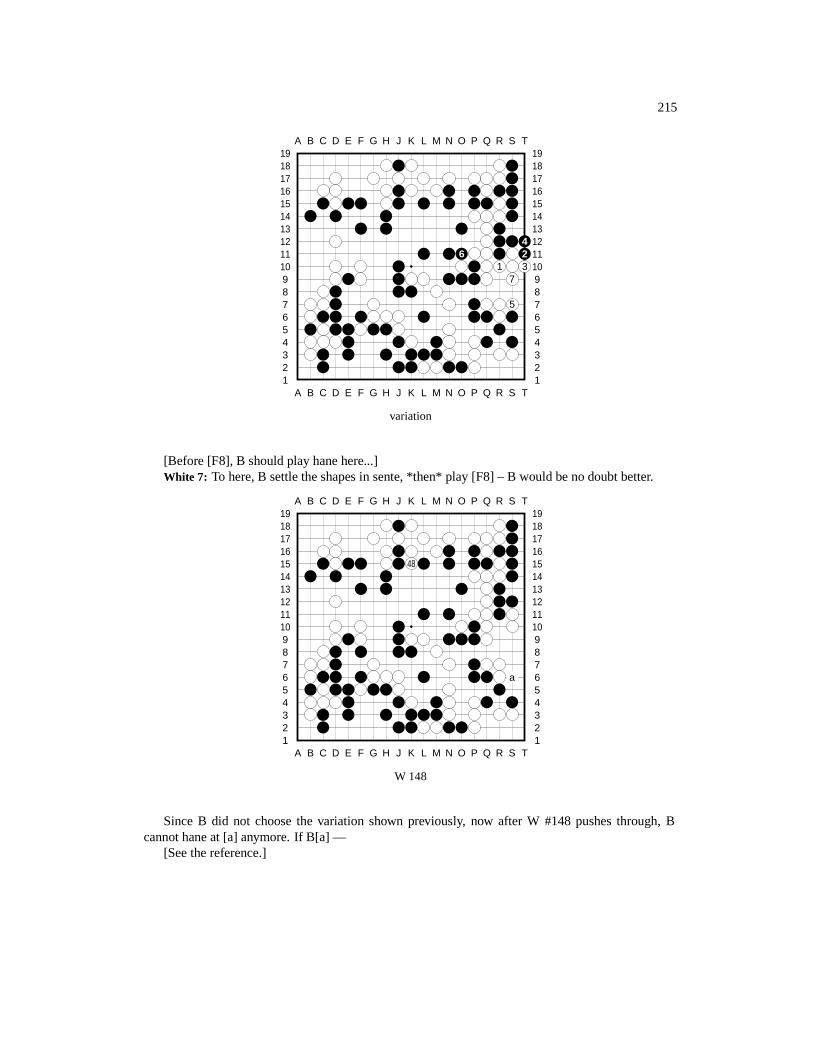
215
A B C D E F G H J K L M N O P Q R S T
A B C D E F G H J K L M N O P Q R S T12345678910111213141516171819
12345678910111213141516171819
46 2
1 37
5
variation
[Before [F8], B should play hane here...]White 7: To here, B settle the shapes in sente, *then* play [F8] – B would be no doubt better.
A B C D E F G H J K L M N O P Q R S T
A B C D E F G H J K L M N O P Q R S T12345678910111213141516171819
12345678910111213141516171819
48
a
W 148
Since B did not choose the variation shown previously, now after W #148 pushes through, Bcannot hane at [a] anymore. If B[a] —
[See the reference.]
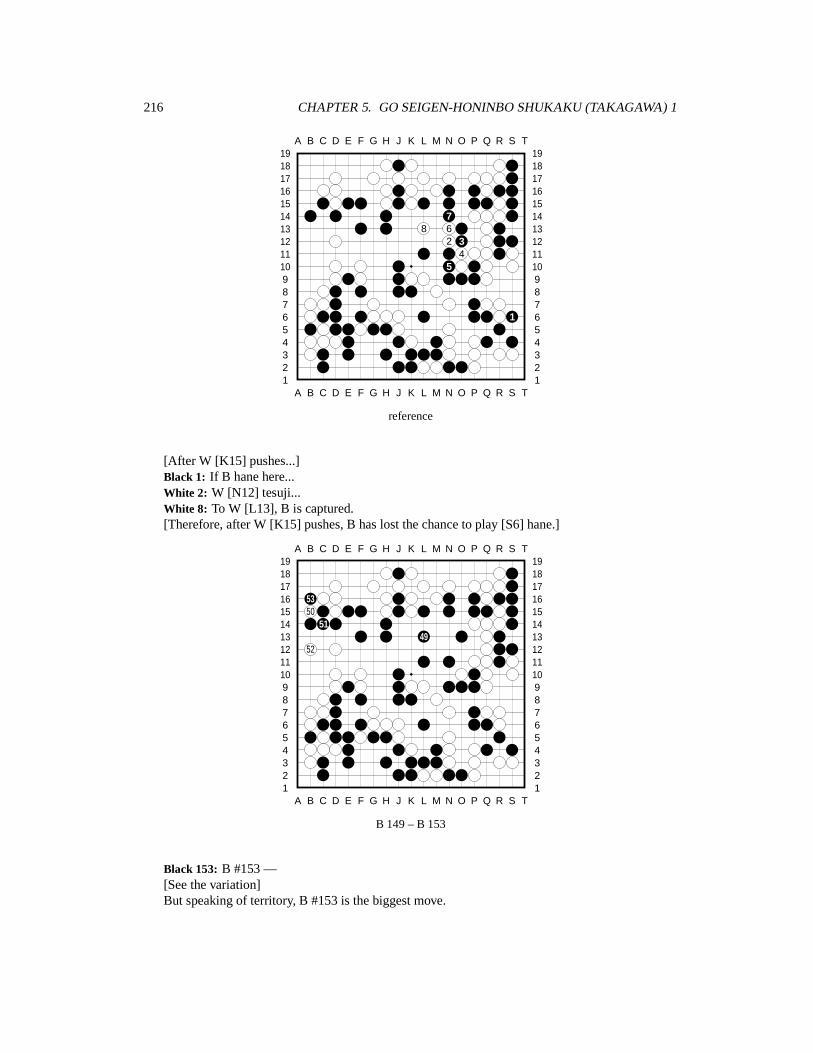
216 CHAPTER 5. GO SEIGEN-HONINBO SHUKAKU (TAKAGAWA) 1
A B C D E F G H J K L M N O P Q R S T
A B C D E F G H J K L M N O P Q R S T12345678910111213141516171819
12345678910111213141516171819
78 6
2 34
5
1
reference
[After W [K15] pushes...]Black 1: If B hane here...White 2: W [N12] tesuji...White 8: To W [L13], B is captured.[Therefore, after W [K15] pushes, B has lost the chance to play [S6] hane.]
A B C D E F G H J K L M N O P Q R S T
A B C D E F G H J K L M N O P Q R S T12345678910111213141516171819
12345678910111213141516171819
5350
5149
52
B 149 – B 153
Black 153: B #153 —[See the variation]But speaking of territory, B #153 is the biggest move.
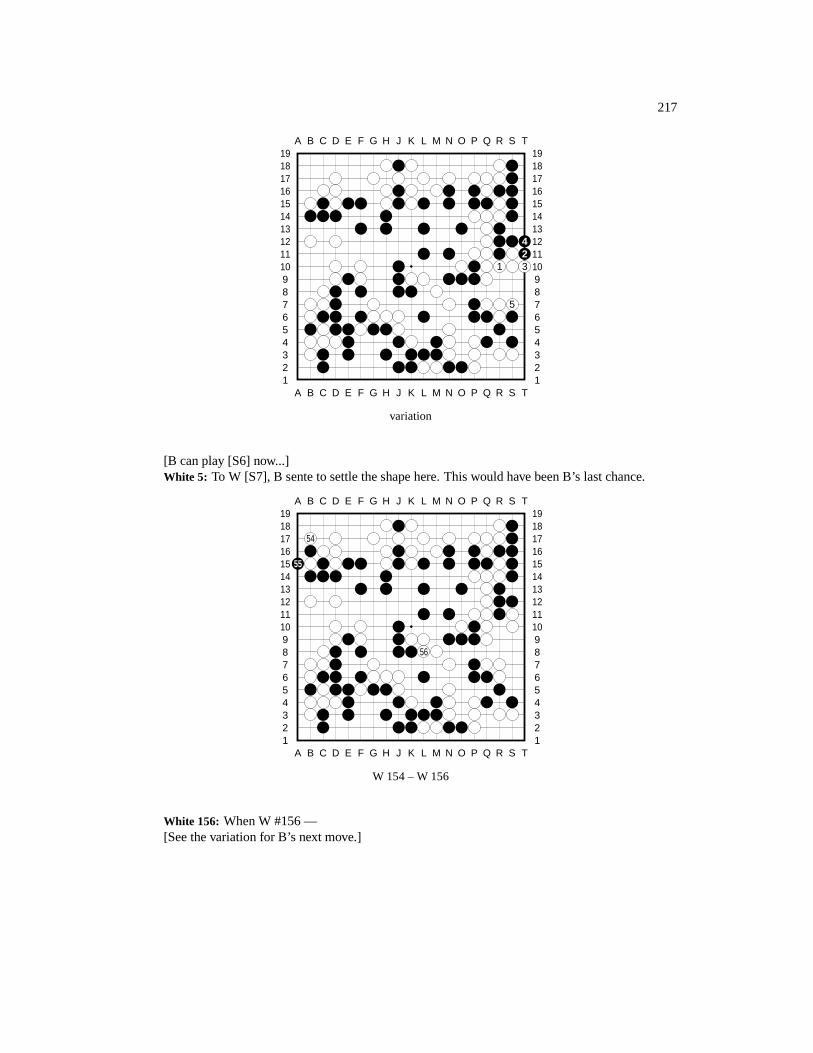
217
A B C D E F G H J K L M N O P Q R S T
A B C D E F G H J K L M N O P Q R S T12345678910111213141516171819
12345678910111213141516171819
42
1 3
5
variation
[B can play [S6] now...]White 5: To W [S7], B sente to settle the shape here. This would have been B’s last chance.
A B C D E F G H J K L M N O P Q R S T
A B C D E F G H J K L M N O P Q R S T12345678910111213141516171819
12345678910111213141516171819
54
55
56
W 154 – W 156
White 156: When W #156 —[See the variation for B’s next move.]

218 CHAPTER 5. GO SEIGEN-HONINBO SHUKAKU (TAKAGAWA) 1
A B C D E F G H J K L M N O P Q R S T
A B C D E F G H J K L M N O P Q R S T12345678910111213141516171819
12345678910111213141516171819
31
2
4
variation (B #157)
[When W [L8]...]Black 1: If B cuts down this W stone...White 4: W [R10] and [S6] to live. But if let W live this way, how much W gains would be quite
different. [This is to say, had B hane at [S6] earlier, W wouldn’t gain as much.]
A B C D E F G H J K L M N O P Q R S T
A B C D E F G H J K L M N O P Q R S T12345678910111213141516171819
12345678910111213141516171819
656462
63 6059 5861
57
B 157 – B 165
Black 157: Since B did not play #157 [S6] until now —White 158: W is able to invade B’s territory...Black 165: B #165 —[See the variation.]
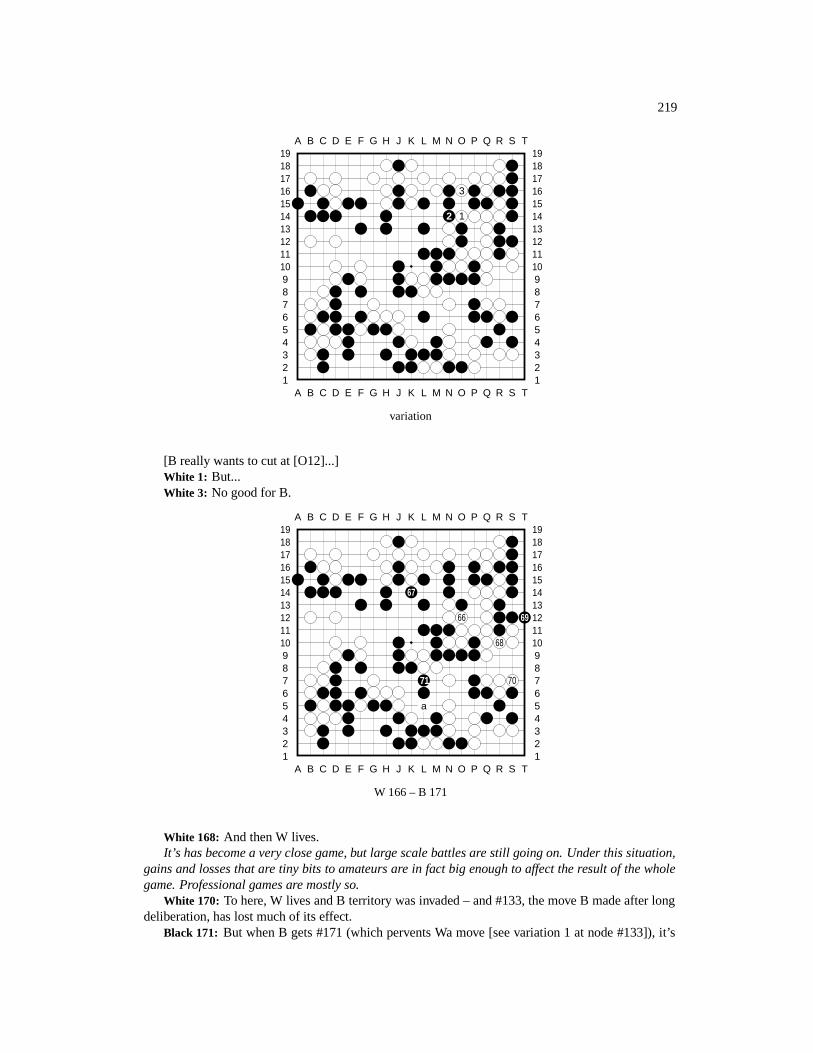
219
A B C D E F G H J K L M N O P Q R S T
A B C D E F G H J K L M N O P Q R S T12345678910111213141516171819
12345678910111213141516171819
3
2 1
variation
[B really wants to cut at [O12]...]White 1: But...White 3: No good for B.
A B C D E F G H J K L M N O P Q R S T
A B C D E F G H J K L M N O P Q R S T12345678910111213141516171819
12345678910111213141516171819
67
66 69
68
71 70
a
W 166 – B 171
White 168: And then W lives.It’s has become a very close game, but large scale battles are still going on. Under this situation,
gains and losses that are tiny bits to amateurs are in fact big enough to affect the result of the wholegame. Professional games are mostly so.
White 170: To here, W lives and B territory was invaded – and #133, the move B made after longdeliberation, has lost much of its effect.
Black 171: But when B gets #171 (which pervents Wa move [see variation 1 at node #133]), it’s
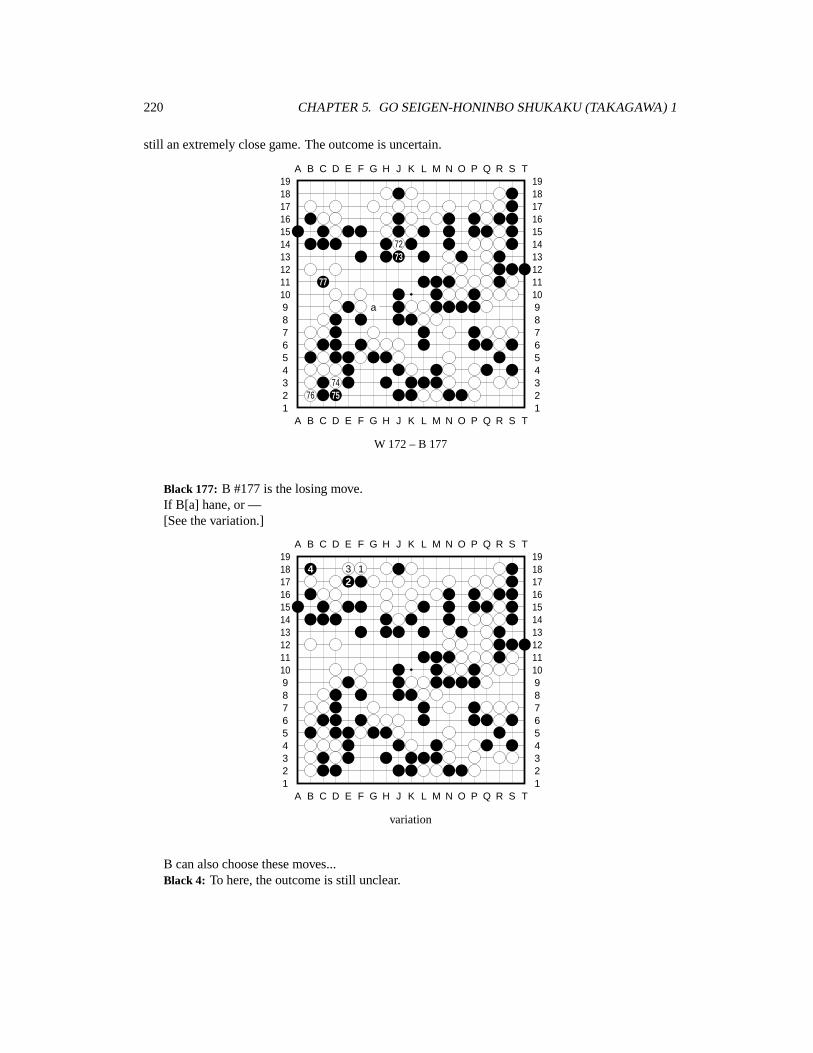
220 CHAPTER 5. GO SEIGEN-HONINBO SHUKAKU (TAKAGAWA) 1
still an extremely close game. The outcome is uncertain.
A B C D E F G H J K L M N O P Q R S T
A B C D E F G H J K L M N O P Q R S T12345678910111213141516171819
12345678910111213141516171819
7273
77
a
7476 75
W 172 – B 177
Black 177: B #177 is the losing move.If B[a] hane, or —[See the variation.]
A B C D E F G H J K L M N O P Q R S T
A B C D E F G H J K L M N O P Q R S T12345678910111213141516171819
12345678910111213141516171819
4 3 12
variation
B can also choose these moves...Black 4: To here, the outcome is still unclear.
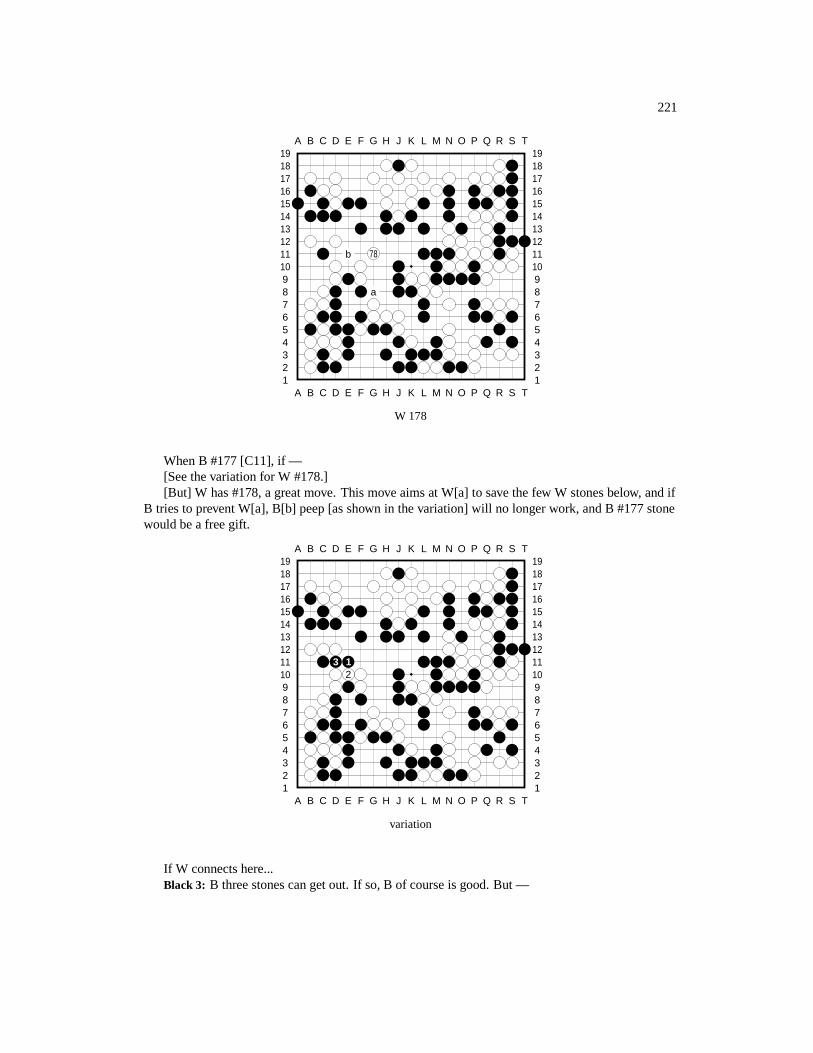
221
A B C D E F G H J K L M N O P Q R S T
A B C D E F G H J K L M N O P Q R S T12345678910111213141516171819
12345678910111213141516171819
b 78
a
W 178
When B #177 [C11], if —[See the variation for W #178.][But] W has #178, a great move. This move aims at W[a] to save the few W stones below, and if
B tries to prevent W[a], B[b] peep [as shown in the variation] will no longer work, and B #177 stonewould be a free gift.
A B C D E F G H J K L M N O P Q R S T
A B C D E F G H J K L M N O P Q R S T12345678910111213141516171819
12345678910111213141516171819
3 12
variation
If W connects here...Black 3: B three stones can get out. If so, B of course is good. But —
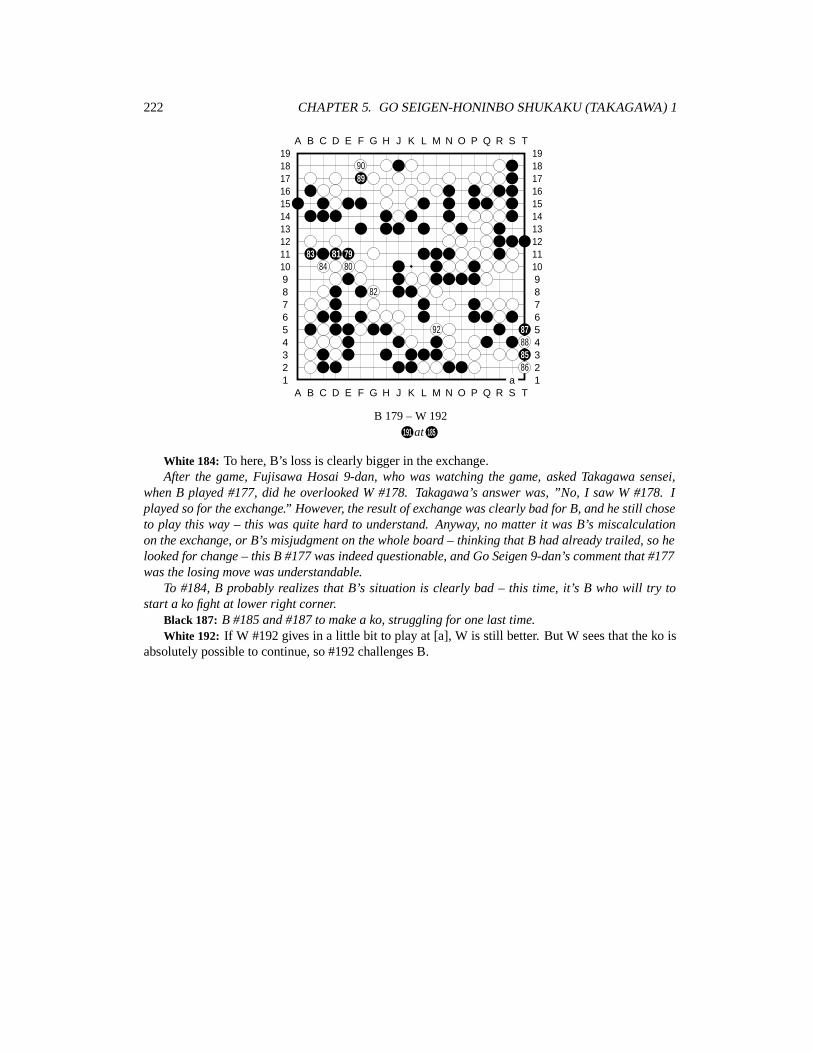
222 CHAPTER 5. GO SEIGEN-HONINBO SHUKAKU (TAKAGAWA) 1
A B C D E F G H J K L M N O P Q R S T
A B C D E F G H J K L M N O P Q R S T12345678910111213141516171819
12345678910111213141516171819
9089
83 81 7984 80
82
92 87888586
a
B 179 – W 192191 at 185
White 184: To here, B’s loss is clearly bigger in the exchange.After the game, Fujisawa Hosai 9-dan, who was watching the game, asked Takagawa sensei,
when B played #177, did he overlooked W #178. Takagawa’s answer was, ”No, I saw W #178. Iplayed so for the exchange.” However, the result of exchange was clearly bad for B, and he still choseto play this way – this was quite hard to understand. Anyway, no matter it was B’s miscalculationon the exchange, or B’s misjudgment on the whole board – thinking that B had already trailed, so helooked for change – this B #177 was indeed questionable, and Go Seigen 9-dan’s comment that #177was the losing move was understandable.
To #184, B probably realizes that B’s situation is clearly bad – this time, it’s B who will try tostart a ko fight at lower right corner.
Black 187: B #185 and #187 to make a ko, struggling for one last time.White 192: If W #192 gives in a little bit to play at [a], W is still better. But W sees that the ko is
absolutely possible to continue, so #192 challenges B.
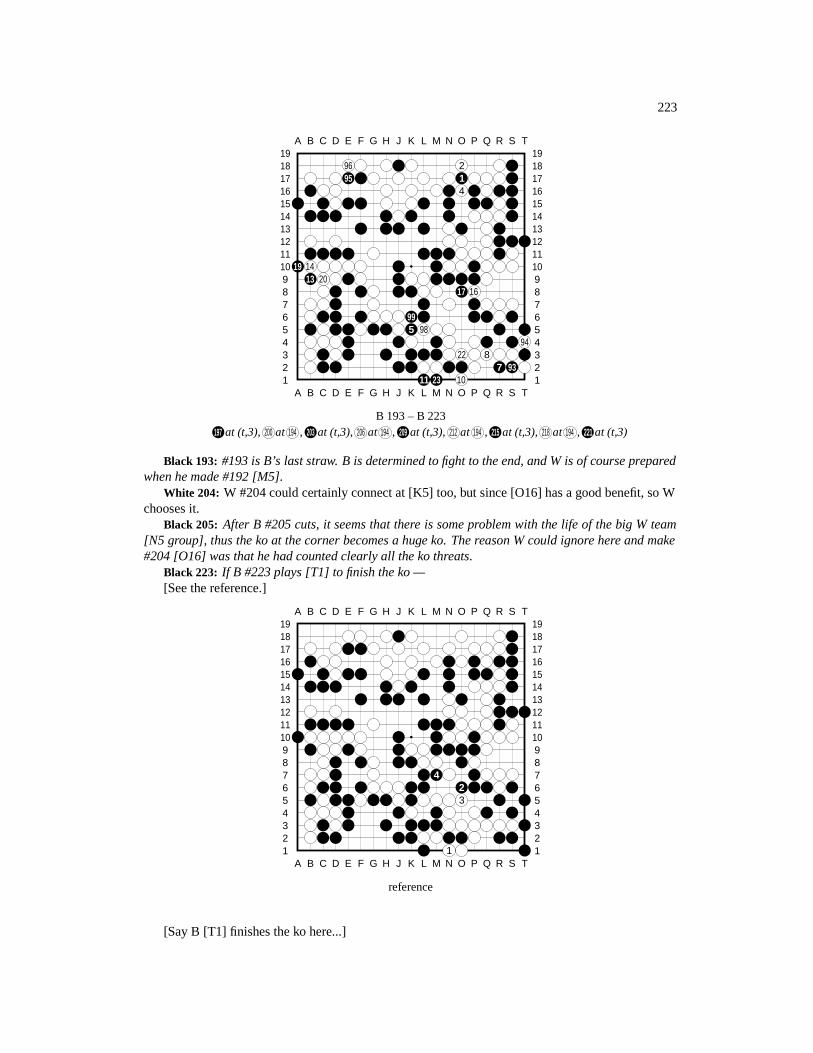
223
A B C D E F G H J K L M N O P Q R S T
A B C D E F G H J K L M N O P Q R S T12345678910111213141516171819
12345678910111213141516171819
96 295 1
4
19 1413 20
17 16
995 98
9422 8
7 9311 23 10
B 193 – B 223197 at (t,3), 200 at 194 , 203 at (t,3), 206 at 194 , 209 at (t,3), 212 at 194 , 215 at (t,3), 218 at 194 , 221 at (t,3)
Black 193: #193 is B’s last straw. B is determined to fight to the end, and W is of course preparedwhen he made #192 [M5].
White 204: W #204 could certainly connect at [K5] too, but since [O16] has a good benefit, so Wchooses it.
Black 205: After B #205 cuts, it seems that there is some problem with the life of the big W team[N5 group], thus the ko at the corner becomes a huge ko. The reason W could ignore here and make#204 [O16] was that he had counted clearly all the ko threats.
Black 223: If B #223 plays [T1] to finish the ko —[See the reference.]
A B C D E F G H J K L M N O P Q R S T
A B C D E F G H J K L M N O P Q R S T12345678910111213141516171819
12345678910111213141516171819
423
1
reference
[Say B [T1] finishes the ko here...]
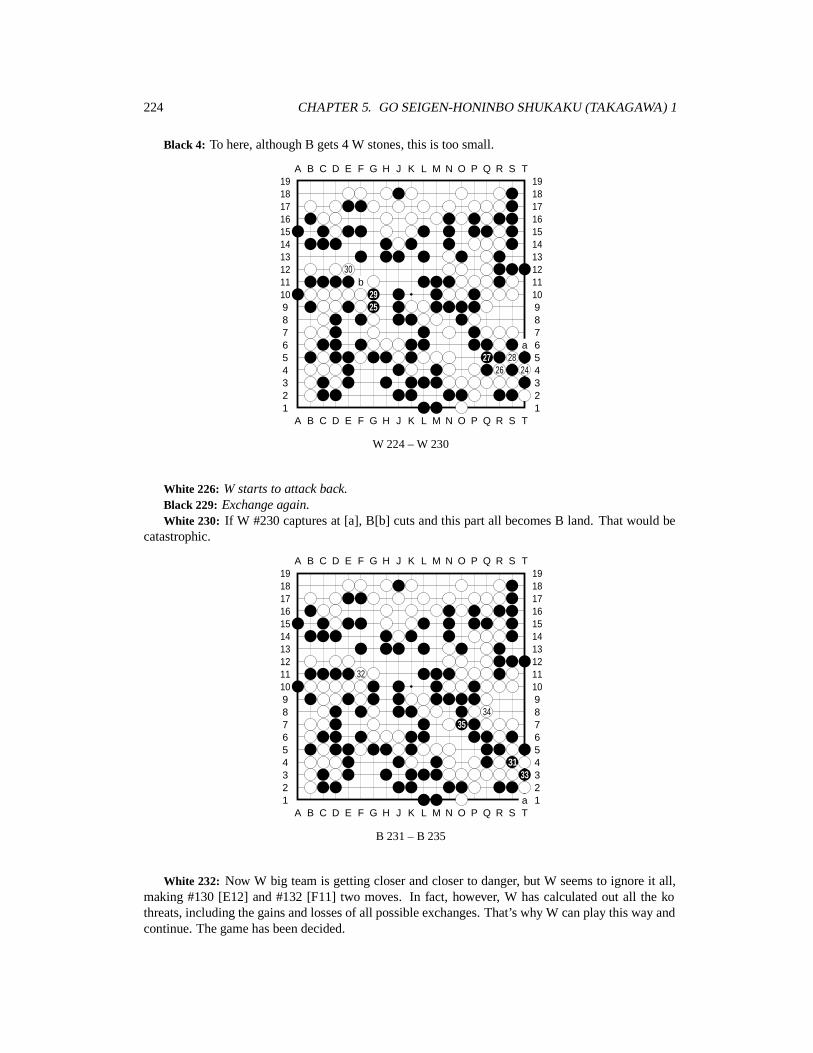
224 CHAPTER 5. GO SEIGEN-HONINBO SHUKAKU (TAKAGAWA) 1
Black 4: To here, although B gets 4 W stones, this is too small.
A B C D E F G H J K L M N O P Q R S T
A B C D E F G H J K L M N O P Q R S T12345678910111213141516171819
12345678910111213141516171819
30b
2925
a27 28
26 24
W 224 – W 230
White 226: W starts to attack back.Black 229: Exchange again.White 230: If W #230 captures at [a], B[b] cuts and this part all becomes B land. That would be
catastrophic.
A B C D E F G H J K L M N O P Q R S T
A B C D E F G H J K L M N O P Q R S T12345678910111213141516171819
12345678910111213141516171819
32
3435
3133
a
B 231 – B 235
White 232: Now W big team is getting closer and closer to danger, but W seems to ignore it all,making #130 [E12] and #132 [F11] two moves. In fact, however, W has calculated out all the kothreats, including the gains and losses of all possible exchanges. That’s why W can play this way andcontinue. The game has been decided.
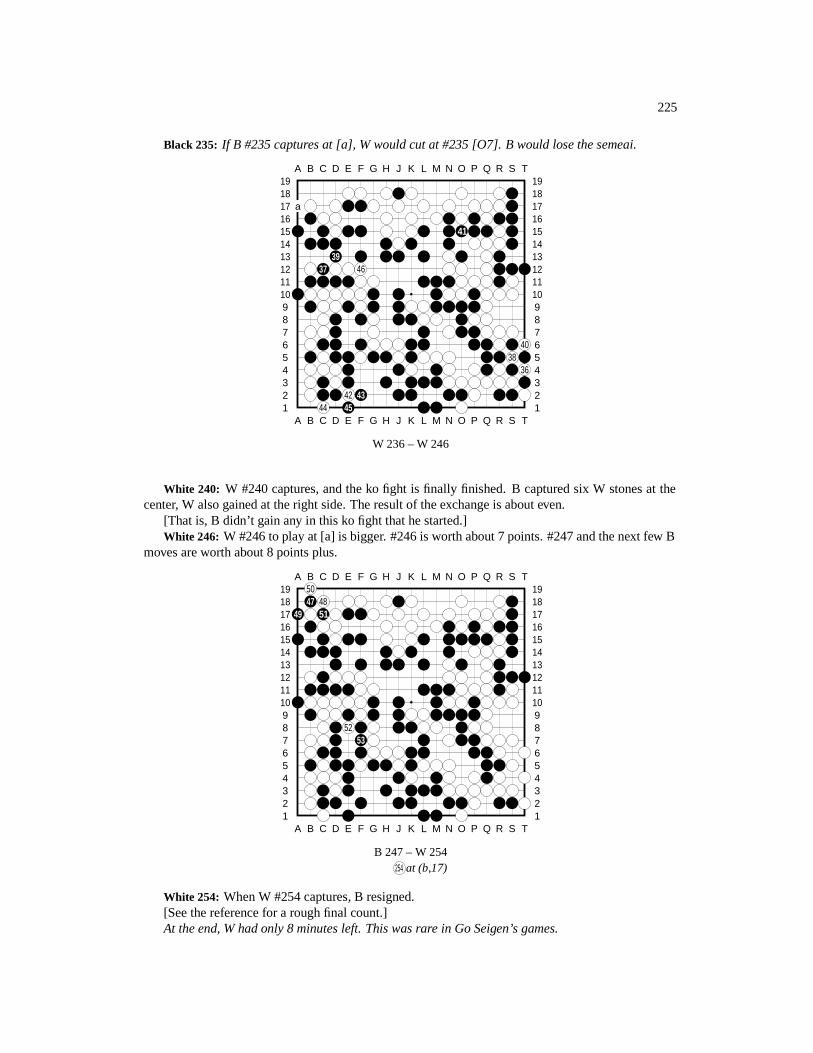
225
Black 235: If B #235 captures at [a], W would cut at #235 [O7]. B would lose the semeai.
A B C D E F G H J K L M N O P Q R S T
A B C D E F G H J K L M N O P Q R S T12345678910111213141516171819
12345678910111213141516171819
a
41
3937 46
4038
36
42 4344 45
W 236 – W 246
White 240: W #240 captures, and the ko fight is finally finished. B captured six W stones at thecenter, W also gained at the right side. The result of the exchange is about even.
[That is, B didn’t gain any in this ko fight that he started.]White 246: W #246 to play at [a] is bigger. #246 is worth about 7 points. #247 and the next few B
moves are worth about 8 points plus.
A B C D E F G H J K L M N O P Q R S T
A B C D E F G H J K L M N O P Q R S T12345678910111213141516171819
1234567891011121314151617181950
47 4849 51
5253
B 247 – W 254254 at (b,17)
White 254: When W #254 captures, B resigned.[See the reference for a rough final count.]At the end, W had only 8 minutes left. This was rare in Go Seigen’s games.

226 CHAPTER 5. GO SEIGEN-HONINBO SHUKAKU (TAKAGAWA) 1
Takagawa Kaku 9-dan [Takagawa was not promoted to 9-dan until 1960; clearly, these commentswere edited after that.] had won Honinbo title 9 straight times, and was thus awarded LifetimeHonorary Honinbo title. Go Seigen 9-dan and Takagawa 9-dan had encountered numerous times invarious matches. For example, 1949 in Wu vs. high-dan 10-game series (then Wu 8-dan, Takagawa7-dan); 1950 in Wu vs. 7-8-dan matches (then Wu 9-dan, Takagawa 7-dan); 1952 1st Wu-Takagawa3-game series (then Takagawa 7-dan, already Honinbo title holder and renamed Shukaku); 1955 2ndWu-Takagawa (8-dan) 3-game series; 1955 Wu-Takagawa 10-game series; 1956 3rd Wu-Takagawa3-game series; 1957 The 1st Japan’s Strongest Deciding Matches; 1958 4th Wu-Takagawa 3-gameseries; 1958 The 2nd Japan’s Strongest Deciding Matches; 1958 5th Wu-Takagawa 3-game series;1959 6th Wu-Takagawa 3-game series; 1960 7th Wu-Takagawa 3-game series; and 1961 The 1stMeijin Sen (Takagawa already 9-dan), etc.
A B C D E F G H J K L M N O P Q R S T
A B C D E F G H J K L M N O P Q R S T12345678910111213141516171819
1234567891011121314151617181912
1 87
1011 9
5 6
34 2
14
13
reference
B cannot win this ko at upper left corner...Black 1: So B has to connect...White 14: To here are expected endgame moves. W leads by about three points.

227
A B C D E F G H J K L M N O P Q R S T
A B C D E F G H J K L M N O P Q R S T12345678910111213141516171819
12345678910111213141516171819
No moves
Total of 254 moves. W wins by resignation.Time given: 10 hours apieceTime consumed:Black: 9 hours 53 minutesWhite: 9 hours 52 minutes
228 CHAPTER 5. GO SEIGEN-HONINBO SHUKAKU (TAKAGAWA) 1
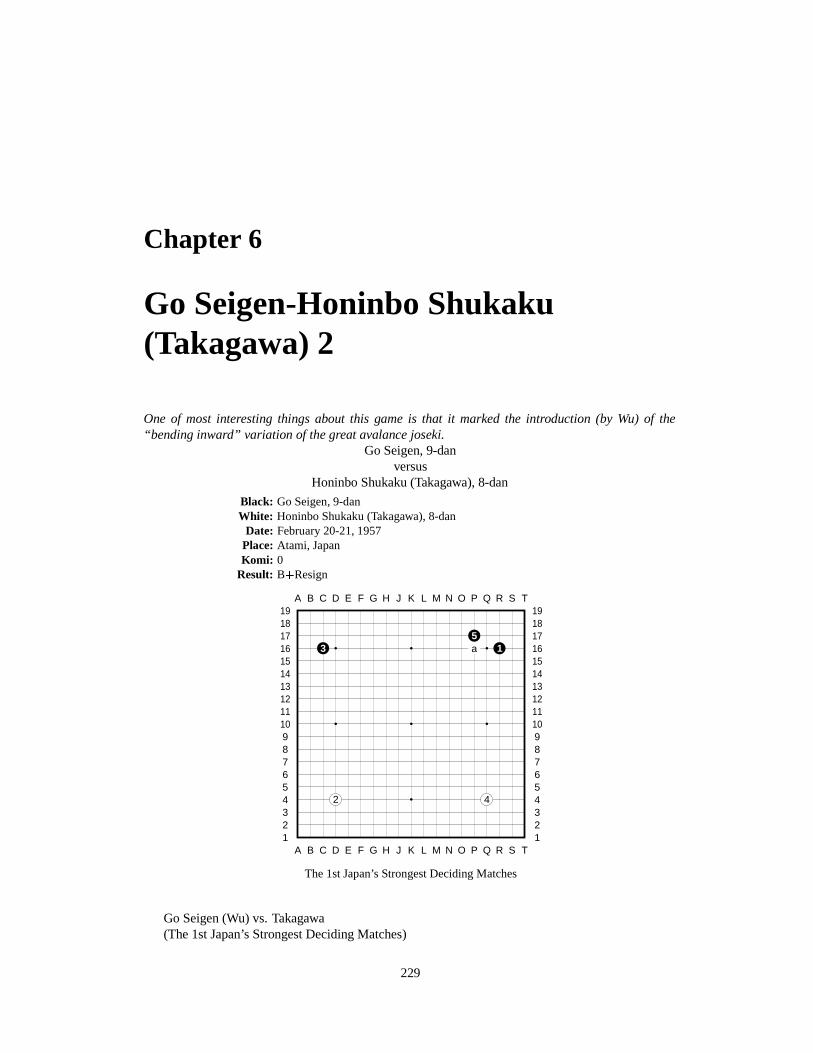
Chapter 6
Go Seigen-Honinbo Shukaku(Takagawa) 2
One of most interesting things about this game is that it marked the introduction (by Wu) of the“bending inward” variation of the great avalance joseki.
Go Seigen, 9-danversus
Honinbo Shukaku (Takagawa), 8-dan
Black: Go Seigen, 9-danWhite: Honinbo Shukaku (Takagawa), 8-dan
Date: February 20-21, 1957Place: Atami, JapanKomi: 0
Result: B�Resign
A B C D E F G H J K L M N O P Q R S T
A B C D E F G H J K L M N O P Q R S T12345678910111213141516171819
12345678910111213141516171819
53 a 1
2 4
The 1st Japan’s Strongest Deciding Matches
Go Seigen (Wu) vs. Takagawa(The 1st Japan’s Strongest Deciding Matches)
229

230 CHAPTER 6. GO SEIGEN-HONINBO SHUKAKU (TAKAGAWA) 2
Black: Go Seigen (Wu), 9dWhite: Honinbo Shukaku (Takagawa), 8dDate: February 20-21, 1957Place: AtamiBlack 1: This game between Go Seigen 9-dan and Takagawa Honinbo is the first one since their
1956 10-game series.White 2: This game was played in a hotel in Atami on February 20 and 21, 1957. On this day,
Sakata Eio 9-dan and Hashimoto Utaro 9-dan’s game was also played here. Kitani [Minoru] 9-danand Fujisawa [Hosai] 9-dan also came to watch the games. All six participants of the StrongestDeciding Matches gathered at the same place – indeed a rare opportunity.
Black 3: In this game, Go Seigen 9-dan defied the traditional way of playing the so-called ”greatavalanche” joseki, making a revolutionary new variation that shocked Japan’s Go world.
Generally speaking, new variations in josekis are made due to the following two reasons:First, based on the surrounding situation, any known joseki moves is not satisfactory. Therefore,
to fit the current situation, one decides to make a change, thus a new move.Second, contrary to the above case, one has fully studied a new move already, and he attempts to
apply it in practice on purpose; or, in a game under appropriate situation, he suddenly realizes it’stime to make this new move.
In the first case, a new move is made by chance under a special situation, therefore its applicationis quite limited.
Only the new moves made in the second case are purely new moves. The new variation Go Seigen9-dan made has a fundamentally difference in the order of moves with the way everyone had beenplaying in the most popular ”great avalanche” joseki. Strictly speaking, it’s a ”revolutionary joseki.”This joseki is extremely valuable for study, and it will be widely used hereafter.
White 4: Playing at hoshi points [stars] is what Mr. Takagawa likes. In the creation of New FusekiEra, Mr. Kitani and I had studied san-ren-sei fuseki, and we often played at hoshi points. RecentlyMr. Takagawa often chooses these openings.
Black 5: B #5 to enclose at [a] is also a beautiful move.
A B C D E F G H J K L M N O P Q R S T
A B C D E F G H J K L M N O P Q R S T12345678910111213141516171819
12345678910111213141516171819
a6
The 1st Japan’s Strongest Deciding Matches
W #6 also can approach from a lower position, point [a].W played hoshi points at the two corners at the lower side, so he tries to get a high position at the
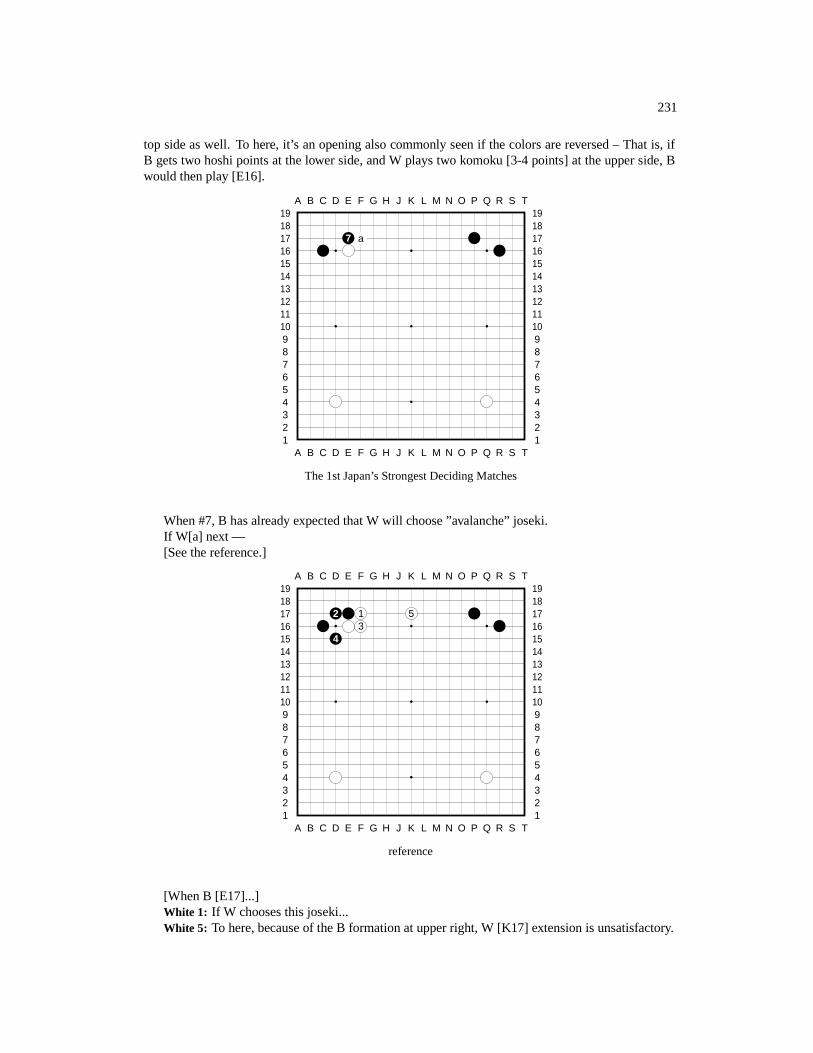
231
top side as well. To here, it’s an opening also commonly seen if the colors are reversed – That is, ifB gets two hoshi points at the lower side, and W plays two komoku [3-4 points] at the upper side, Bwould then play [E16].
A B C D E F G H J K L M N O P Q R S T
A B C D E F G H J K L M N O P Q R S T12345678910111213141516171819
12345678910111213141516171819
7 a
The 1st Japan’s Strongest Deciding Matches
When #7, B has already expected that W will choose ”avalanche” joseki.If W[a] next —[See the reference.]
A B C D E F G H J K L M N O P Q R S T
A B C D E F G H J K L M N O P Q R S T12345678910111213141516171819
12345678910111213141516171819
2 1 53
4
reference
[When B [E17]...]White 1: If W chooses this joseki...White 5: To here, because of the B formation at upper right, W [K17] extension is unsatisfactory.
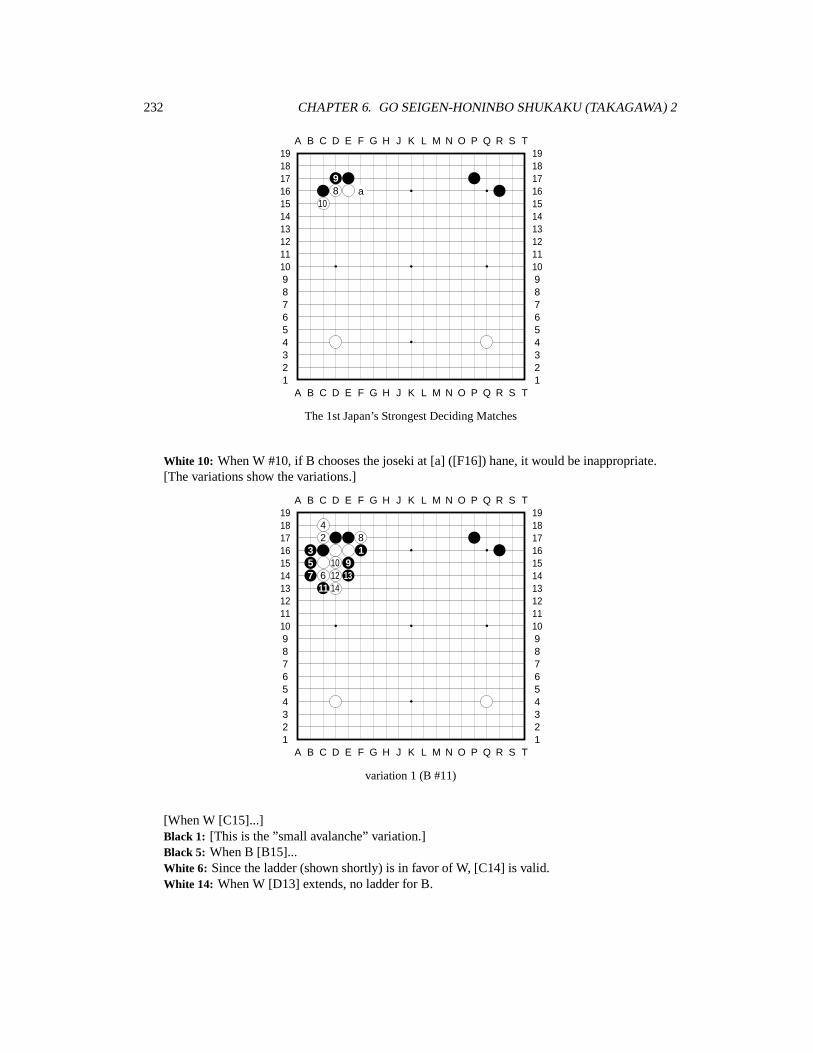
232 CHAPTER 6. GO SEIGEN-HONINBO SHUKAKU (TAKAGAWA) 2
A B C D E F G H J K L M N O P Q R S T
A B C D E F G H J K L M N O P Q R S T12345678910111213141516171819
12345678910111213141516171819
98 a
10
The 1st Japan’s Strongest Deciding Matches
White 10: When W #10, if B chooses the joseki at [a] ([F16]) hane, it would be inappropriate.[The variations show the variations.]
A B C D E F G H J K L M N O P Q R S T
A B C D E F G H J K L M N O P Q R S T12345678910111213141516171819
12345678910111213141516171819
42 8
3 15 10 97 6 12 13
11 14
variation 1 (B #11)
[When W [C15]...]Black 1: [This is the ”small avalanche” variation.]Black 5: When B [B15]...White 6: Since the ladder (shown shortly) is in favor of W, [C14] is valid.White 14: When W [D13] extends, no ladder for B.

233
A B C D E F G H J K L M N O P Q R S T
A B C D E F G H J K L M N O P Q R S T12345678910111213141516171819
12345678910111213141516171819
13 4 9 11 1415 2 10 1235
6 8
variation 2 (B #11)
[Again when W [C15]...]Black 1: [B chooses ”small avalanche” joseki...]White 6: As shown in variation 1, since the ladder doesn’t work for B, W can [C14] extend.Black 7: Then B can play this way...Black 15: But to here, two B stones [marked] are ”floating” and it’s hard to settle them well.Recently, this variation has not been used often anymore.
A B C D E F G H J K L M N O P Q R S T
A B C D E F G H J K L M N O P Q R S T12345678910111213141516171819
12345678910111213141516171819
11
12
a
The 1st Japan’s Strongest Deciding Matches
White 12: W #12 is the biggest point on the board.This move to play [a] at the lower side to form san-ren-sei is also a pretty strong formation, but W
#12 also prevents B from extending from the komoku shimari [corner enclosure] at the upper right.Therefore, #12 is the biggest point.
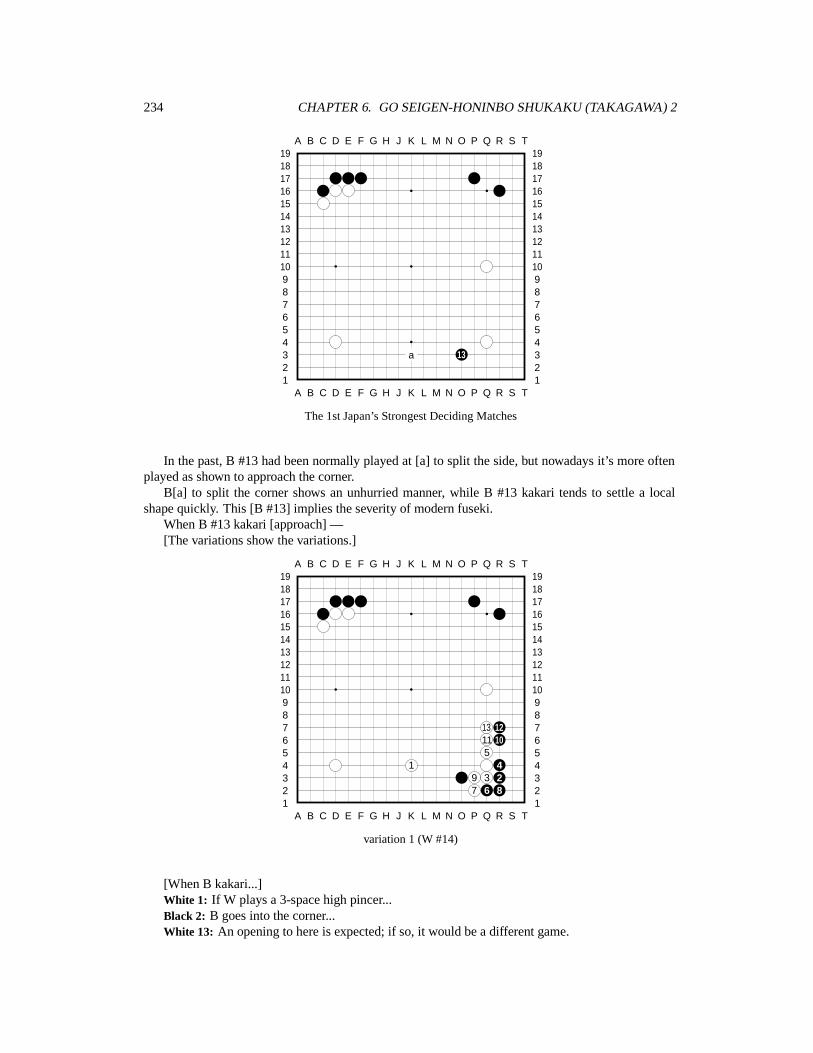
234 CHAPTER 6. GO SEIGEN-HONINBO SHUKAKU (TAKAGAWA) 2
A B C D E F G H J K L M N O P Q R S T
A B C D E F G H J K L M N O P Q R S T12345678910111213141516171819
12345678910111213141516171819
a 13
The 1st Japan’s Strongest Deciding Matches
In the past, B #13 had been normally played at [a] to split the side, but nowadays it’s more oftenplayed as shown to approach the corner.
B[a] to split the corner shows an unhurried manner, while B #13 kakari tends to settle a localshape quickly. This [B #13] implies the severity of modern fuseki.
When B #13 kakari [approach] —[The variations show the variations.]
A B C D E F G H J K L M N O P Q R S T
A B C D E F G H J K L M N O P Q R S T12345678910111213141516171819
12345678910111213141516171819
13 1211 105
1 49 3 27 6 8
variation 1 (W #14)
[When B kakari...]White 1: If W plays a 3-space high pincer...Black 2: B goes into the corner...White 13: An opening to here is expected; if so, it would be a different game.
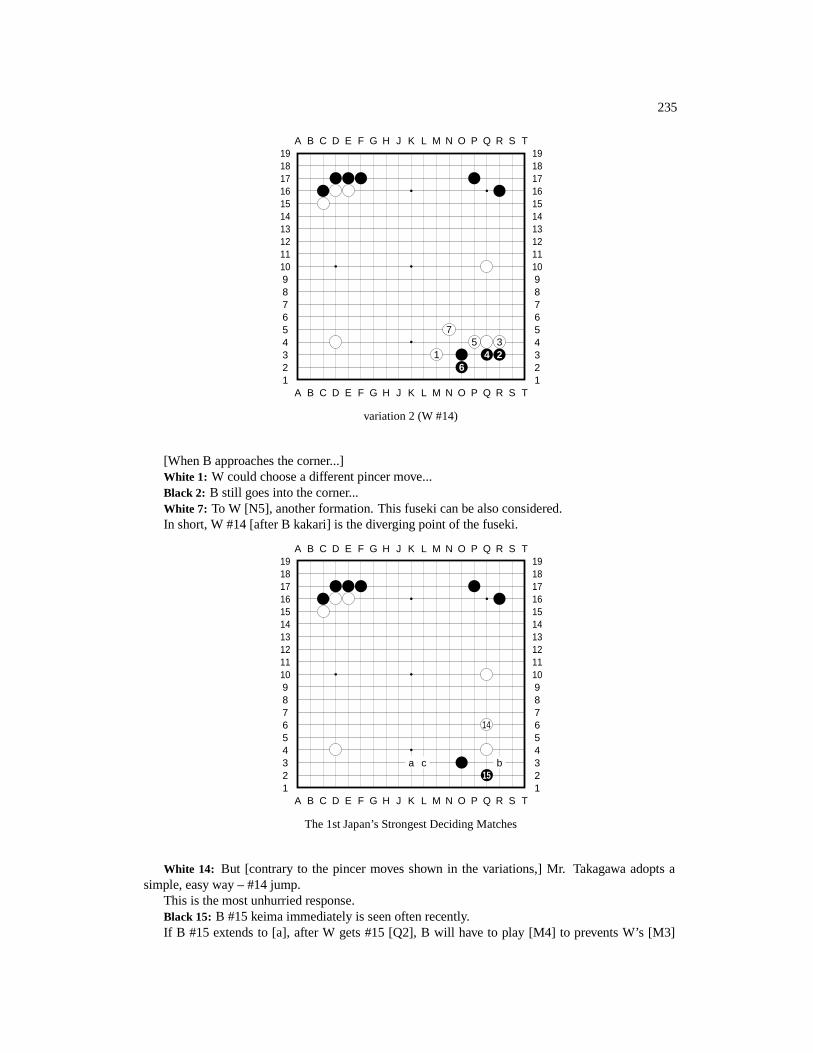
235
A B C D E F G H J K L M N O P Q R S T
A B C D E F G H J K L M N O P Q R S T12345678910111213141516171819
12345678910111213141516171819
75 3
1 4 26
variation 2 (W #14)
[When B approaches the corner...]White 1: W could choose a different pincer move...Black 2: B still goes into the corner...White 7: To W [N5], another formation. This fuseki can be also considered.In short, W #14 [after B kakari] is the diverging point of the fuseki.
A B C D E F G H J K L M N O P Q R S T
A B C D E F G H J K L M N O P Q R S T12345678910111213141516171819
12345678910111213141516171819
14
a c b15
The 1st Japan’s Strongest Deciding Matches
White 14: But [contrary to the pincer moves shown in the variations,] Mr. Takagawa adopts asimple, easy way – #14 jump.
This is the most unhurried response.Black 15: B #15 keima immediately is seen often recently.If B #15 extends to [a], after W gets #15 [Q2], B will have to play [M4] to prevents W’s [M3]
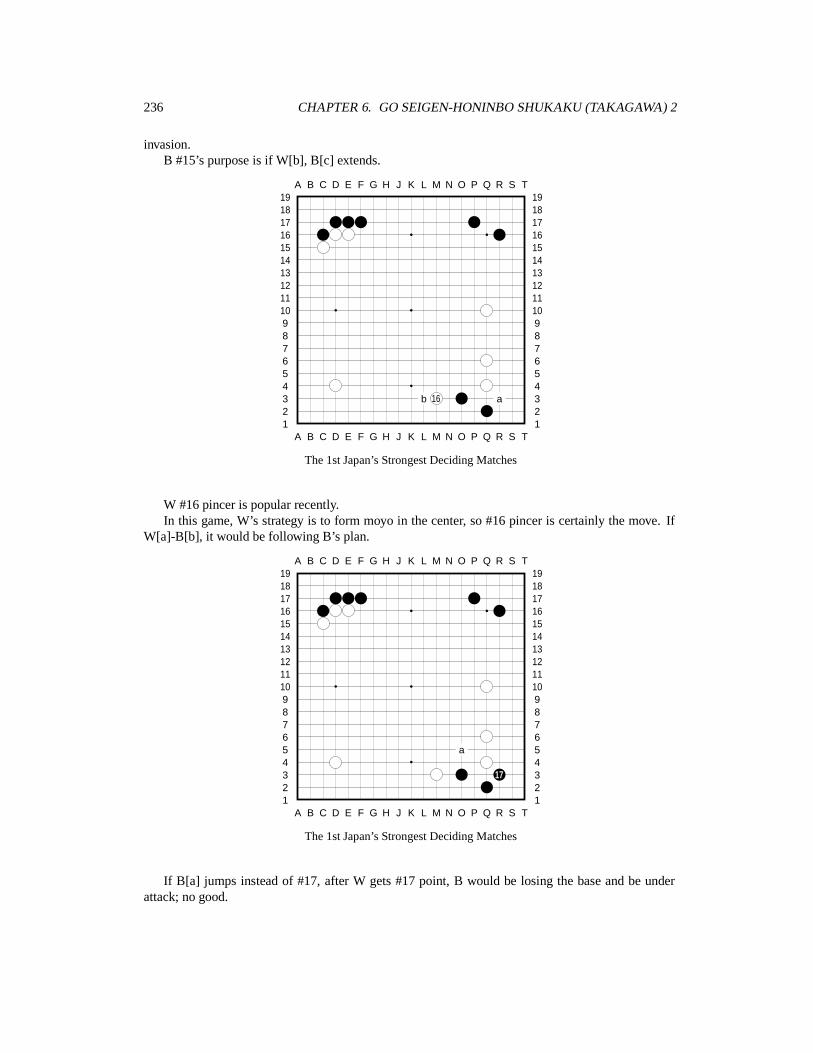
236 CHAPTER 6. GO SEIGEN-HONINBO SHUKAKU (TAKAGAWA) 2
invasion.B #15’s purpose is if W[b], B[c] extends.
A B C D E F G H J K L M N O P Q R S T
A B C D E F G H J K L M N O P Q R S T12345678910111213141516171819
12345678910111213141516171819
b 16 a
The 1st Japan’s Strongest Deciding Matches
W #16 pincer is popular recently.In this game, W’s strategy is to form moyo in the center, so #16 pincer is certainly the move. If
W[a]-B[b], it would be following B’s plan.
A B C D E F G H J K L M N O P Q R S T
A B C D E F G H J K L M N O P Q R S T12345678910111213141516171819
12345678910111213141516171819
a
17
The 1st Japan’s Strongest Deciding Matches
If B[a] jumps instead of #17, after W gets #17 point, B would be losing the base and be underattack; no good.
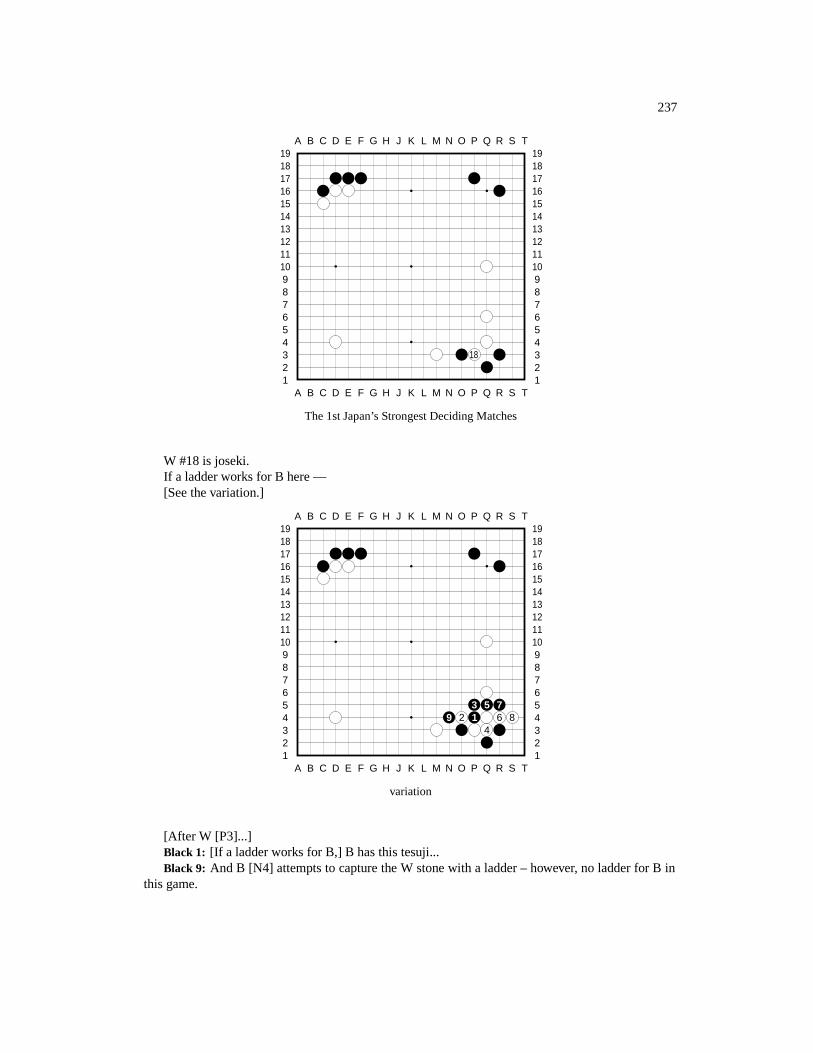
237
A B C D E F G H J K L M N O P Q R S T
A B C D E F G H J K L M N O P Q R S T12345678910111213141516171819
12345678910111213141516171819
18
The 1st Japan’s Strongest Deciding Matches
W #18 is joseki.If a ladder works for B here —[See the variation.]
A B C D E F G H J K L M N O P Q R S T
A B C D E F G H J K L M N O P Q R S T12345678910111213141516171819
12345678910111213141516171819
3 5 79 2 1 6 8
4
variation
[After W [P3]...]Black 1: [If a ladder works for B,] B has this tesuji...Black 9: And B [N4] attempts to capture the W stone with a ladder – however, no ladder for B in
this game.
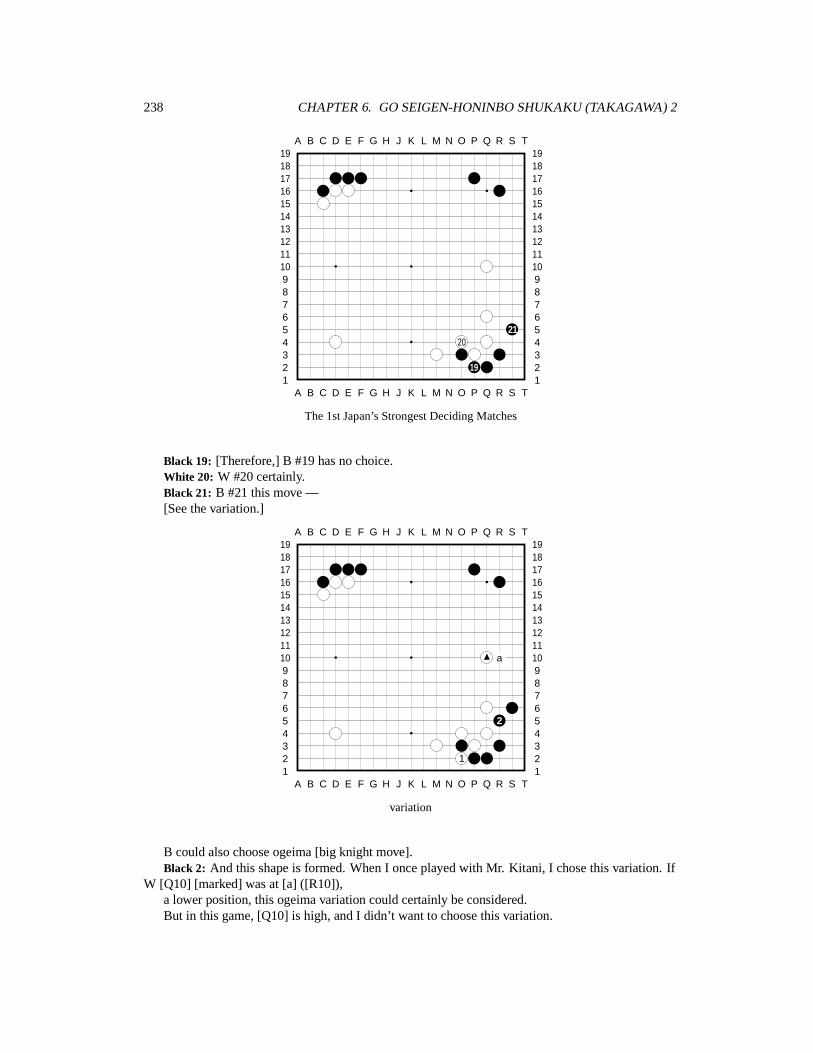
238 CHAPTER 6. GO SEIGEN-HONINBO SHUKAKU (TAKAGAWA) 2
A B C D E F G H J K L M N O P Q R S T
A B C D E F G H J K L M N O P Q R S T12345678910111213141516171819
12345678910111213141516171819
2120
19
The 1st Japan’s Strongest Deciding Matches
Black 19: [Therefore,] B #19 has no choice.White 20: W #20 certainly.Black 21: B #21 this move —[See the variation.]
A B C D E F G H J K L M N O P Q R S T
A B C D E F G H J K L M N O P Q R S T12345678910111213141516171819
12345678910111213141516171819
a
2
1
variation
B could also choose ogeima [big knight move].Black 2: And this shape is formed. When I once played with Mr. Kitani, I chose this variation. If
W [Q10] [marked] was at [a] ([R10]),a lower position, this ogeima variation could certainly be considered.But in this game, [Q10] is high, and I didn’t want to choose this variation.
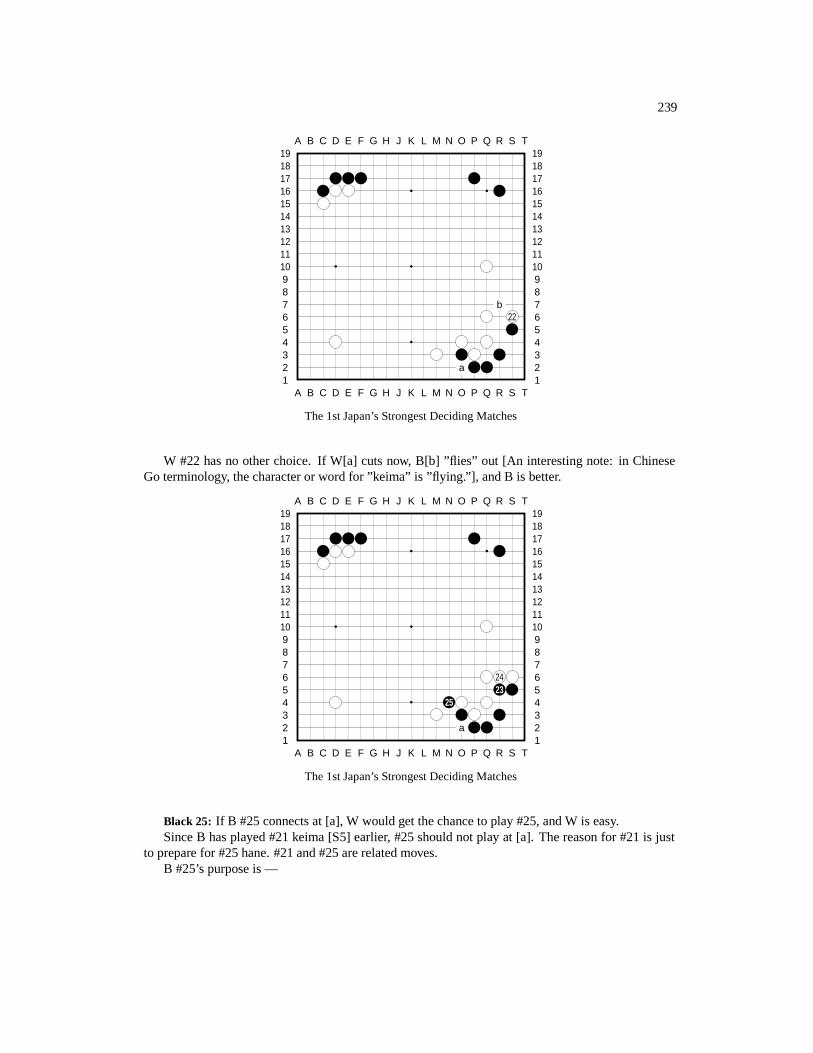
239
A B C D E F G H J K L M N O P Q R S T
A B C D E F G H J K L M N O P Q R S T12345678910111213141516171819
12345678910111213141516171819
b22
a
The 1st Japan’s Strongest Deciding Matches
W #22 has no other choice. If W[a] cuts now, B[b] ”flies” out [An interesting note: in ChineseGo terminology, the character or word for ”keima” is ”flying.”], and B is better.
A B C D E F G H J K L M N O P Q R S T
A B C D E F G H J K L M N O P Q R S T12345678910111213141516171819
12345678910111213141516171819
2423
25
a
The 1st Japan’s Strongest Deciding Matches
Black 25: If B #25 connects at [a], W would get the chance to play #25, and W is easy.Since B has played #21 keima [S5] earlier, #25 should not play at [a]. The reason for #21 is just
to prepare for #25 hane. #21 and #25 are related moves.B #25’s purpose is —
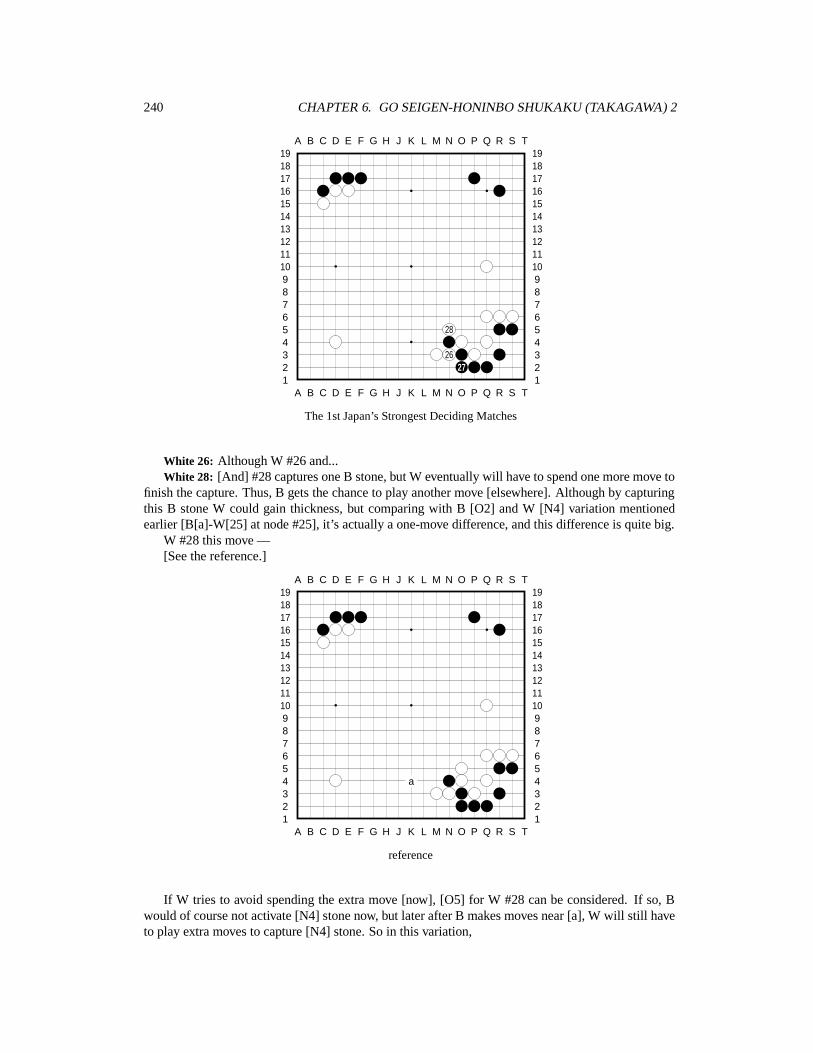
240 CHAPTER 6. GO SEIGEN-HONINBO SHUKAKU (TAKAGAWA) 2
A B C D E F G H J K L M N O P Q R S T
A B C D E F G H J K L M N O P Q R S T12345678910111213141516171819
12345678910111213141516171819
28
2627
The 1st Japan’s Strongest Deciding Matches
White 26: Although W #26 and...White 28: [And] #28 captures one B stone, but W eventually will have to spend one more move to
finish the capture. Thus, B gets the chance to play another move [elsewhere]. Although by capturingthis B stone W could gain thickness, but comparing with B [O2] and W [N4] variation mentionedearlier [B[a]-W[25] at node #25], it’s actually a one-move difference, and this difference is quite big.
W #28 this move —[See the reference.]
A B C D E F G H J K L M N O P Q R S T
A B C D E F G H J K L M N O P Q R S T12345678910111213141516171819
12345678910111213141516171819
a
reference
If W tries to avoid spending the extra move [now], [O5] for W #28 can be considered. If so, Bwould of course not activate [N4] stone now, but later after B makes moves near [a], W will still haveto play extra moves to capture [N4] stone. So in this variation,
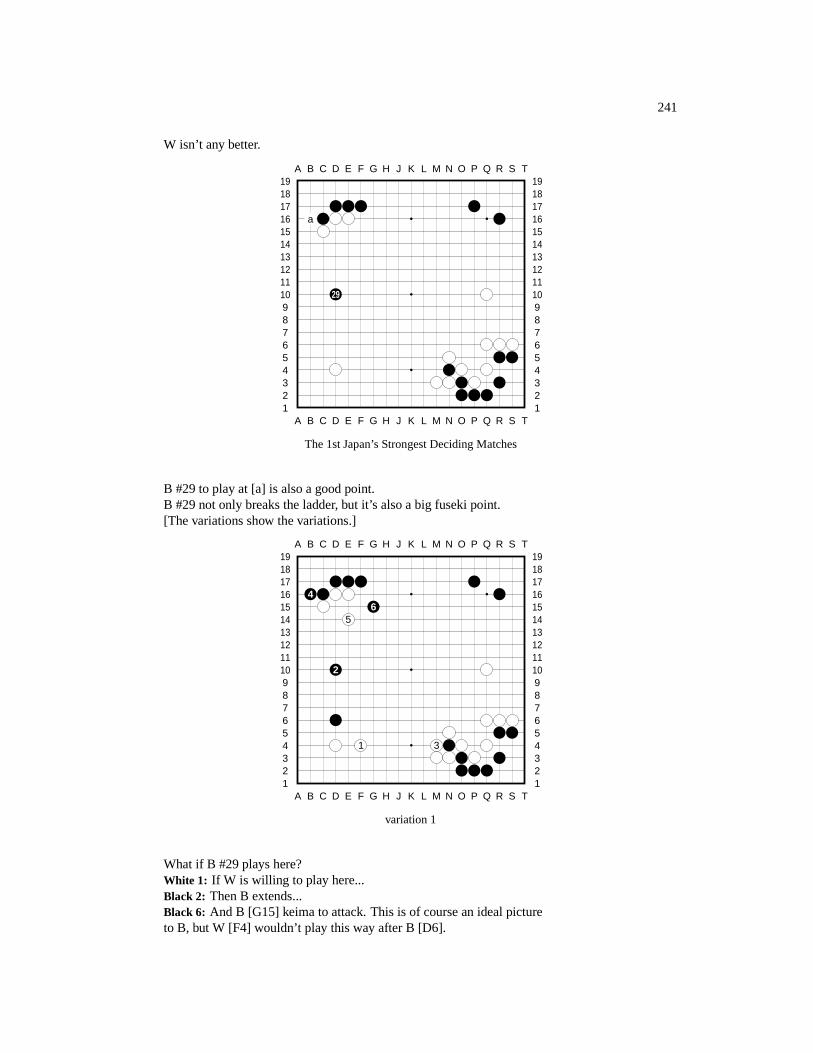
241
W isn’t any better.
A B C D E F G H J K L M N O P Q R S T
A B C D E F G H J K L M N O P Q R S T12345678910111213141516171819
12345678910111213141516171819
a
29
The 1st Japan’s Strongest Deciding Matches
B #29 to play at [a] is also a good point.B #29 not only breaks the ladder, but it’s also a big fuseki point.[The variations show the variations.]
A B C D E F G H J K L M N O P Q R S T
A B C D E F G H J K L M N O P Q R S T12345678910111213141516171819
12345678910111213141516171819
46
5
2
1 3
variation 1
What if B #29 plays here?White 1: If W is willing to play here...Black 2: Then B extends...Black 6: And B [G15] keima to attack. This is of course an ideal pictureto B, but W [F4] wouldn’t play this way after B [D6].

242 CHAPTER 6. GO SEIGEN-HONINBO SHUKAKU (TAKAGAWA) 2
A B C D E F G H J K L M N O P Q R S T
A B C D E F G H J K L M N O P Q R S T12345678910111213141516171819
12345678910111213141516171819
1
8 973
6 24 5
variation 2
[If B kakari first...]White 1: W would choose a difference approach – extend and pincer.Black 2: If B chooses double kakari...Black 4: Then going into the corner...White 9: To W [E7], B is blocked inside, and W forms a deep moyo, and W has a nice and wide
formation. This will be a great advantage for W in future fights.
A B C D E F G H J K L M N O P Q R S T
A B C D E F G H J K L M N O P Q R S T12345678910111213141516171819
12345678910111213141516171819
a
b
31
30
The 1st Japan’s Strongest Deciding Matches
White 30: W #30 of course.Black 31: If B #31 plays at [a] ([B16]), after W[b], *then* B plays #31 [D6] – if so, W[a]-B[b]
exchange simplifies the situation, and it’s in favor of B.However, W would not play this way W[b] vs. B[a].
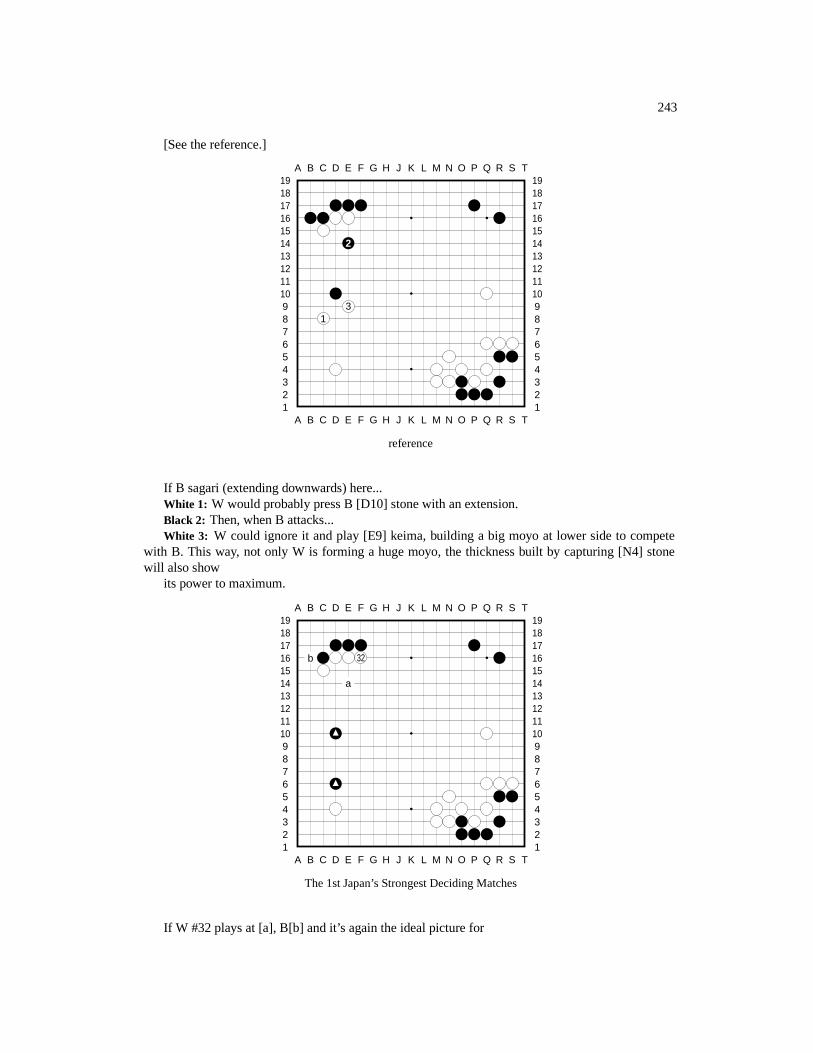
243
[See the reference.]
A B C D E F G H J K L M N O P Q R S T
A B C D E F G H J K L M N O P Q R S T12345678910111213141516171819
12345678910111213141516171819
2
31
reference
If B sagari (extending downwards) here...White 1: W would probably press B [D10] stone with an extension.Black 2: Then, when B attacks...White 3: W could ignore it and play [E9] keima, building a big moyo at lower side to compete
with B. This way, not only W is forming a huge moyo, the thickness built by capturing [N4] stonewill also show
its power to maximum.
A B C D E F G H J K L M N O P Q R S T
A B C D E F G H J K L M N O P Q R S T12345678910111213141516171819
12345678910111213141516171819
b 32
a
The 1st Japan’s Strongest Deciding Matches
If W #32 plays at [a], B[b] and it’s again the ideal picture for
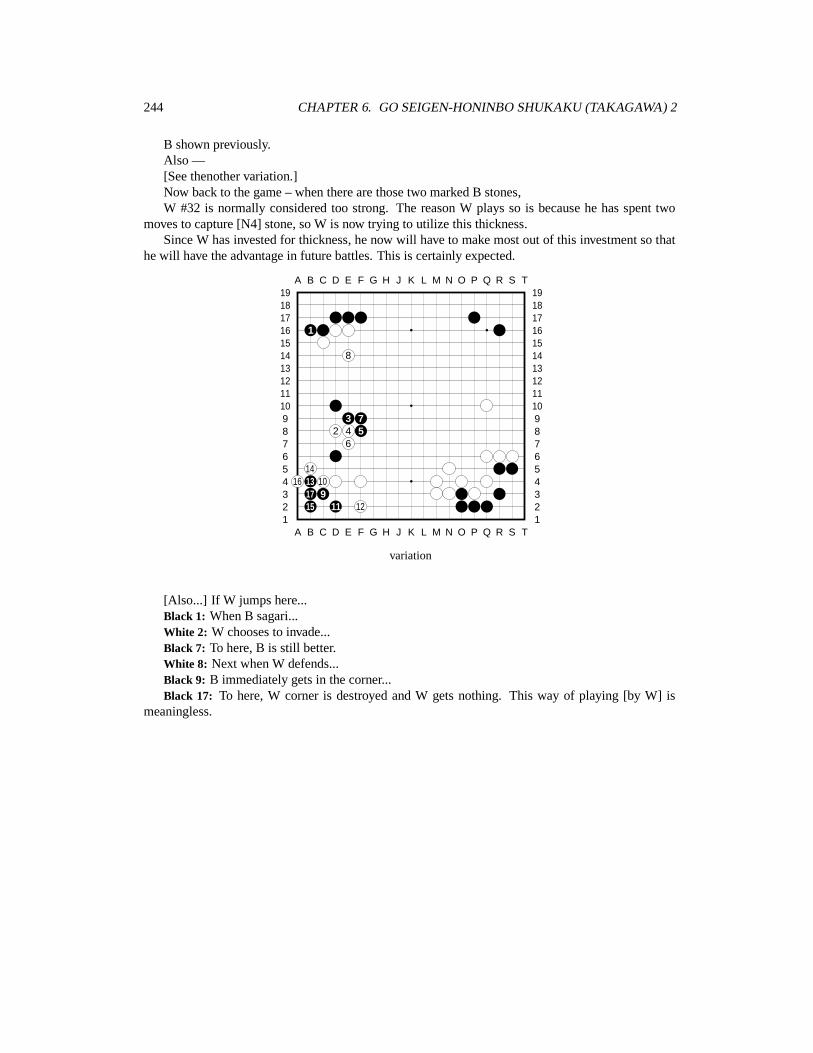
244 CHAPTER 6. GO SEIGEN-HONINBO SHUKAKU (TAKAGAWA) 2
B shown previously.Also —[See thenother variation.]Now back to the game – when there are those two marked B stones,W #32 is normally considered too strong. The reason W plays so is because he has spent two
moves to capture [N4] stone, so W is now trying to utilize this thickness.Since W has invested for thickness, he now will have to make most out of this investment so that
he will have the advantage in future battles. This is certainly expected.
A B C D E F G H J K L M N O P Q R S T
A B C D E F G H J K L M N O P Q R S T12345678910111213141516171819
12345678910111213141516171819
1
8
3 72 4 5
6
1416 13 10
17 915 11 12
variation
[Also...] If W jumps here...Black 1: When B sagari...White 2: W chooses to invade...Black 7: To here, B is still better.White 8: Next when W defends...Black 9: B immediately gets in the corner...Black 17: To here, W corner is destroyed and W gets nothing. This way of playing [by W] is
meaningless.
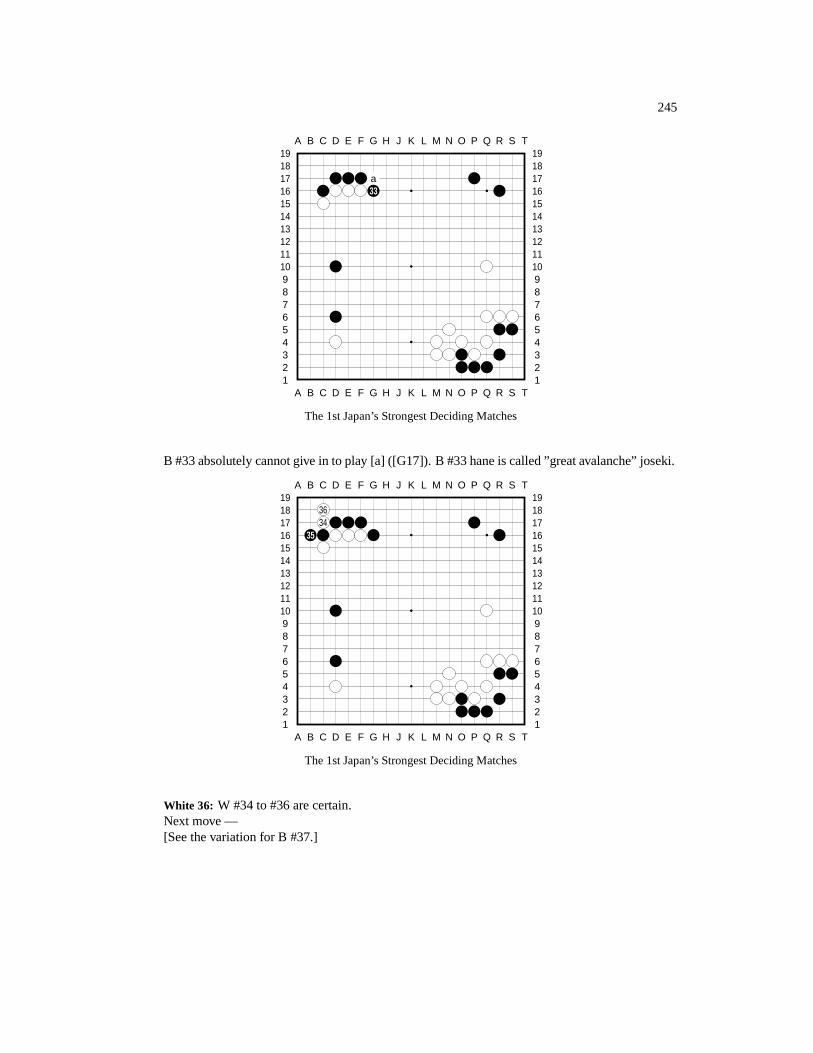
245
A B C D E F G H J K L M N O P Q R S T
A B C D E F G H J K L M N O P Q R S T12345678910111213141516171819
12345678910111213141516171819
a33
The 1st Japan’s Strongest Deciding Matches
B #33 absolutely cannot give in to play [a] ([G17]). B #33 hane is called ”great avalanche” joseki.
A B C D E F G H J K L M N O P Q R S T
A B C D E F G H J K L M N O P Q R S T12345678910111213141516171819
12345678910111213141516171819
3634
35
The 1st Japan’s Strongest Deciding Matches
White 36: W #34 to #36 are certain.Next move —[See the variation for B #37.]
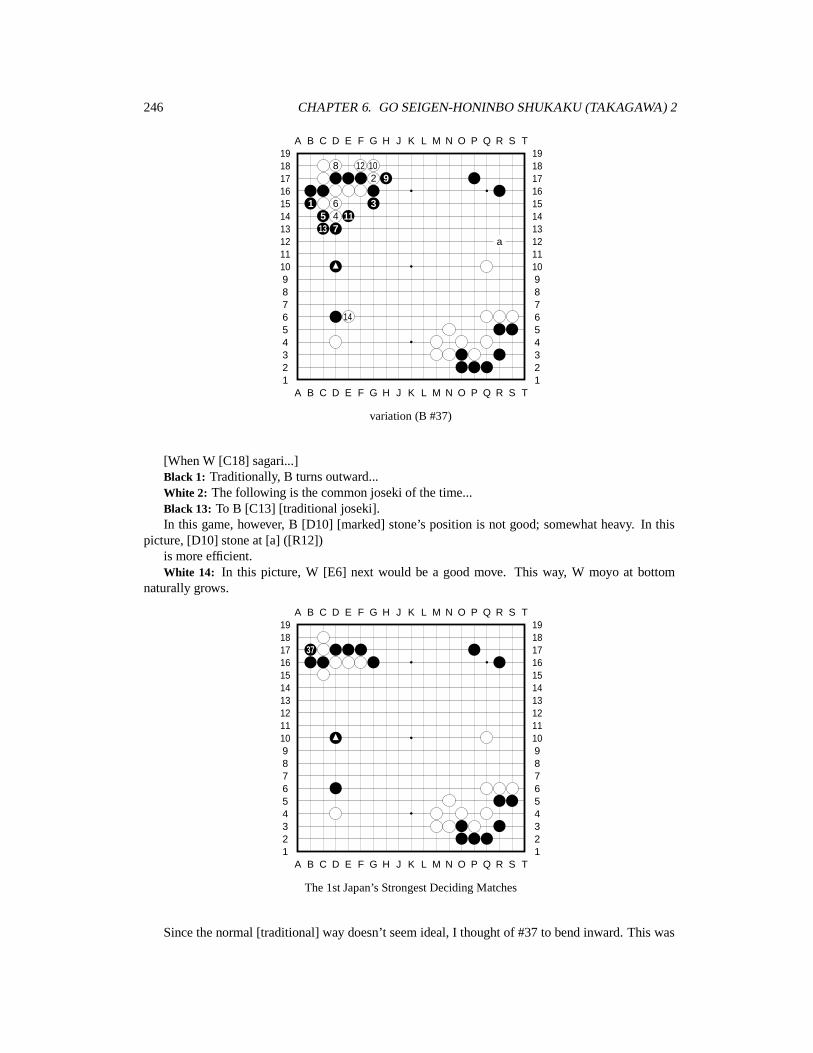
246 CHAPTER 6. GO SEIGEN-HONINBO SHUKAKU (TAKAGAWA) 2
A B C D E F G H J K L M N O P Q R S T
A B C D E F G H J K L M N O P Q R S T12345678910111213141516171819
12345678910111213141516171819
8 12 102 9
1 6 35 4 1113 7
a
14
variation (B #37)
[When W [C18] sagari...]Black 1: Traditionally, B turns outward...White 2: The following is the common joseki of the time...Black 13: To B [C13] [traditional joseki].In this game, however, B [D10] [marked] stone’s position is not good; somewhat heavy. In this
picture, [D10] stone at [a] ([R12])is more efficient.White 14: In this picture, W [E6] next would be a good move. This way, W moyo at bottom
naturally grows.
A B C D E F G H J K L M N O P Q R S T
A B C D E F G H J K L M N O P Q R S T12345678910111213141516171819
12345678910111213141516171819
37
The 1st Japan’s Strongest Deciding Matches
Since the normal [traditional] way doesn’t seem ideal, I thought of #37 to bend inward. This was
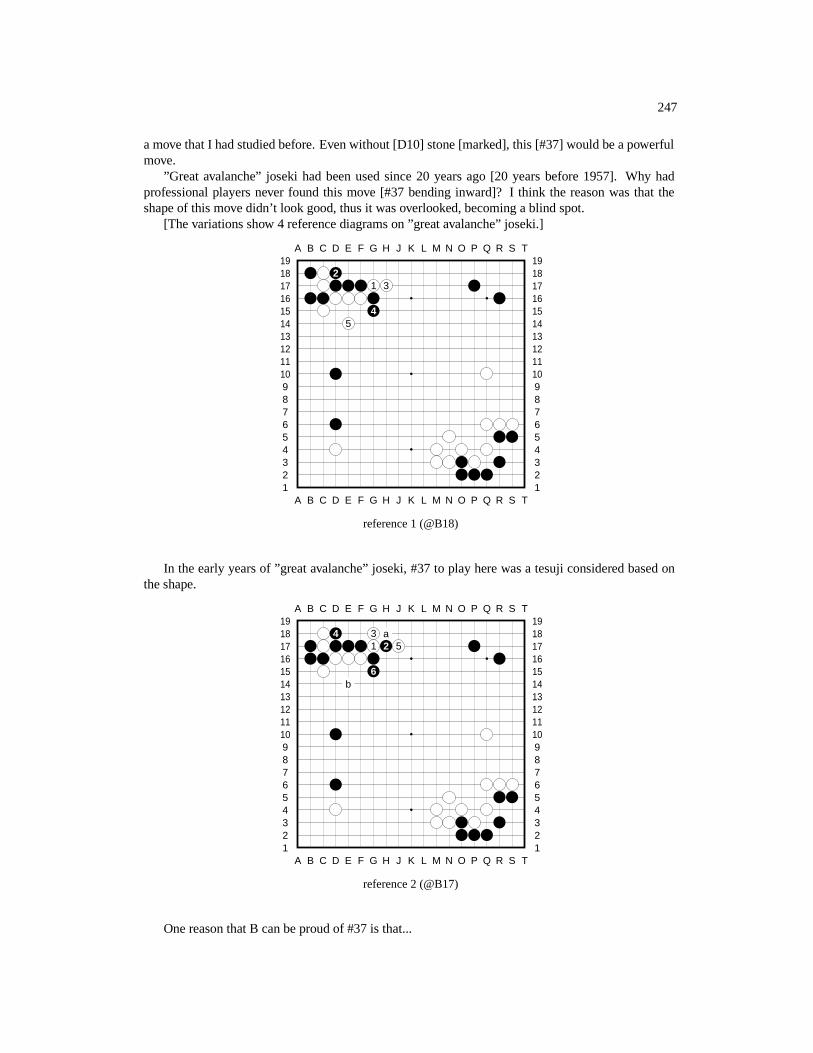
247
a move that I had studied before. Even without [D10] stone [marked], this [#37] would be a powerfulmove.
”Great avalanche” joseki had been used since 20 years ago [20 years before 1957]. Why hadprofessional players never found this move [#37 bending inward]? I think the reason was that theshape of this move didn’t look good, thus it was overlooked, becoming a blind spot.
[The variations show 4 reference diagrams on ”great avalanche” joseki.]
A B C D E F G H J K L M N O P Q R S T
A B C D E F G H J K L M N O P Q R S T12345678910111213141516171819
12345678910111213141516171819
21 3
45
reference 1 (@B18)
In the early years of ”great avalanche” joseki, #37 to play here was a tesuji considered based onthe shape.
A B C D E F G H J K L M N O P Q R S T
A B C D E F G H J K L M N O P Q R S T12345678910111213141516171819
12345678910111213141516171819
4 3 a1 2 5
6b
reference 2 (@B17)
One reason that B can be proud of #37 is that...
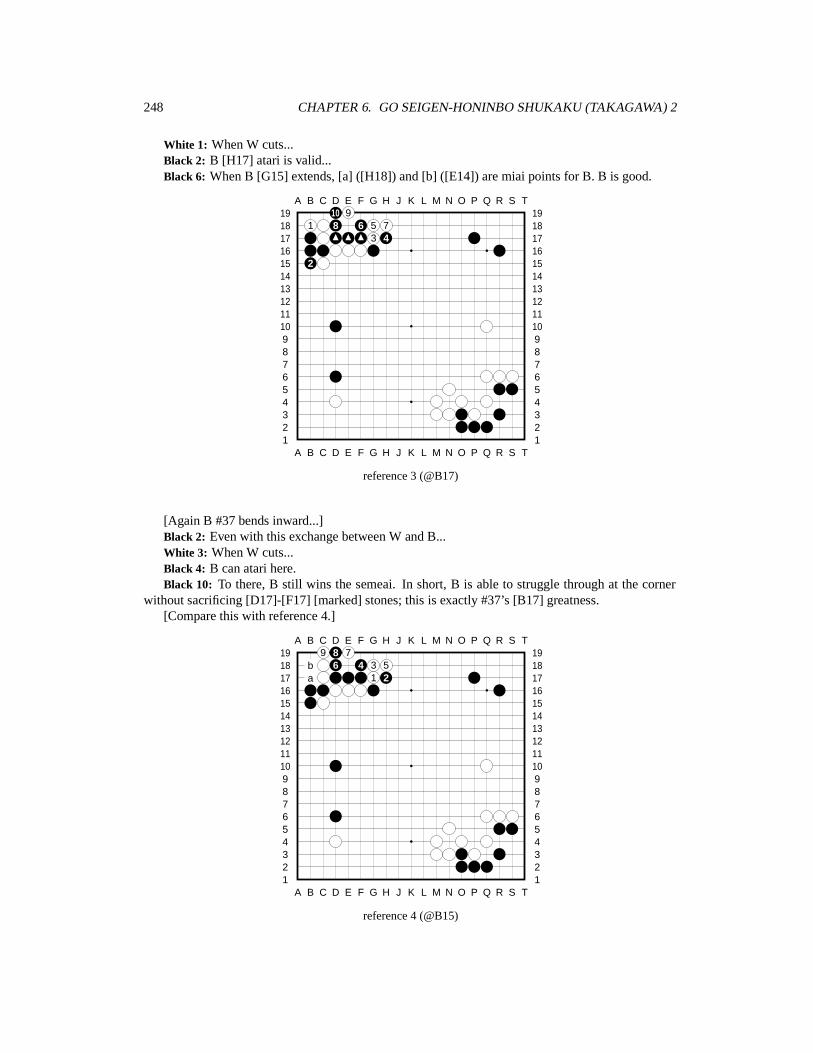
248 CHAPTER 6. GO SEIGEN-HONINBO SHUKAKU (TAKAGAWA) 2
White 1: When W cuts...Black 2: B [H17] atari is valid...Black 6: When B [G15] extends, [a] ([H18]) and [b] ([E14]) are miai points for B. B is good.
A B C D E F G H J K L M N O P Q R S T
A B C D E F G H J K L M N O P Q R S T12345678910111213141516171819
1234567891011121314151617181910 9
1 8 6 5 73 4
2
reference 3 (@B17)
[Again B #37 bends inward...]Black 2: Even with this exchange between W and B...White 3: When W cuts...Black 4: B can atari here.Black 10: To there, B still wins the semeai. In short, B is able to struggle through at the corner
without sacrificing [D17]-[F17] [marked] stones; this is exactly #37’s [B17] greatness.[Compare this with reference 4.]
A B C D E F G H J K L M N O P Q R S T
A B C D E F G H J K L M N O P Q R S T12345678910111213141516171819
123456789101112131415161718199 8 7
b 6 4 3 5a 1 2
reference 4 (@B15)
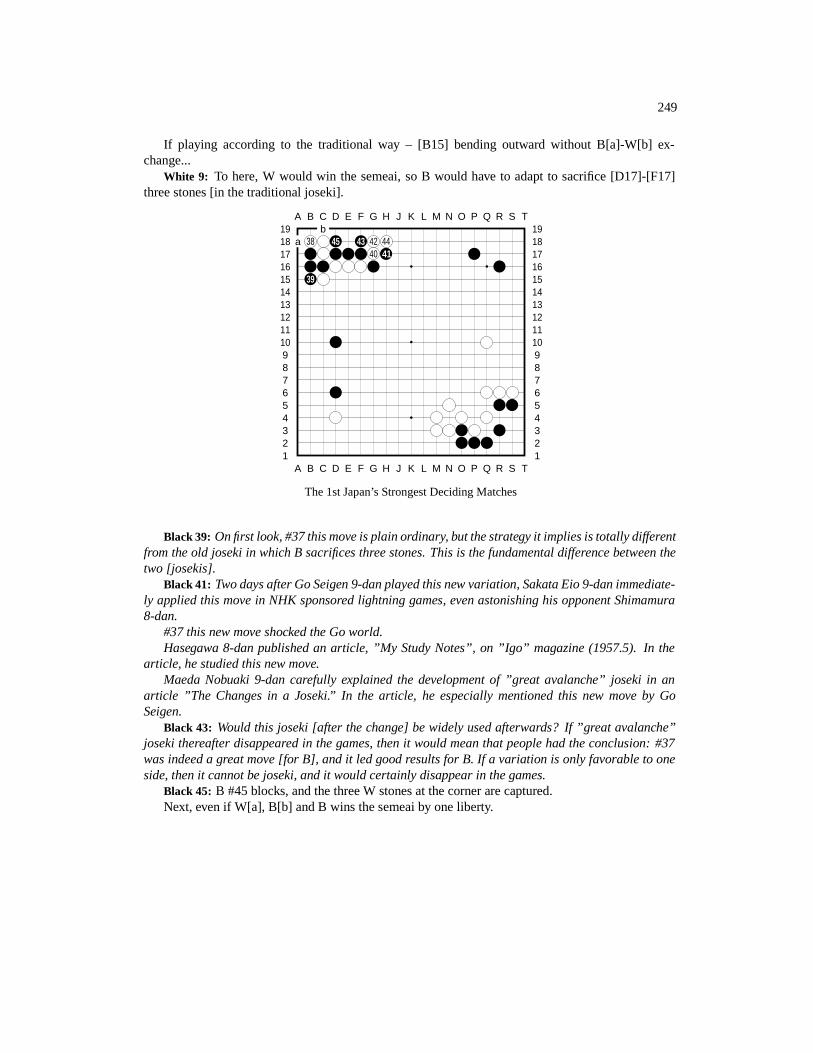
249
If playing according to the traditional way – [B15] bending outward without B[a]-W[b] ex-change...
White 9: To here, W would win the semeai, so B would have to adapt to sacrifice [D17]-[F17]three stones [in the traditional joseki].
A B C D E F G H J K L M N O P Q R S T
A B C D E F G H J K L M N O P Q R S T12345678910111213141516171819
12345678910111213141516171819b
a 38 45 43 42 4440 41
39
The 1st Japan’s Strongest Deciding Matches
Black 39: On first look, #37 this move is plain ordinary, but the strategy it implies is totally differentfrom the old joseki in which B sacrifices three stones. This is the fundamental difference between thetwo [josekis].
Black 41: Two days after Go Seigen 9-dan played this new variation, Sakata Eio 9-dan immediate-ly applied this move in NHK sponsored lightning games, even astonishing his opponent Shimamura8-dan.
#37 this new move shocked the Go world.Hasegawa 8-dan published an article, ”My Study Notes”, on ”Igo” magazine (1957.5). In the
article, he studied this new move.Maeda Nobuaki 9-dan carefully explained the development of ”great avalanche” joseki in an
article ”The Changes in a Joseki.” In the article, he especially mentioned this new move by GoSeigen.
Black 43: Would this joseki [after the change] be widely used afterwards? If ”great avalanche”joseki thereafter disappeared in the games, then it would mean that people had the conclusion: #37was indeed a great move [for B], and it led good results for B. If a variation is only favorable to oneside, then it cannot be joseki, and it would certainly disappear in the games.
Black 45: B #45 blocks, and the three W stones at the corner are captured.Next, even if W[a], B[b] and B wins the semeai by one liberty.
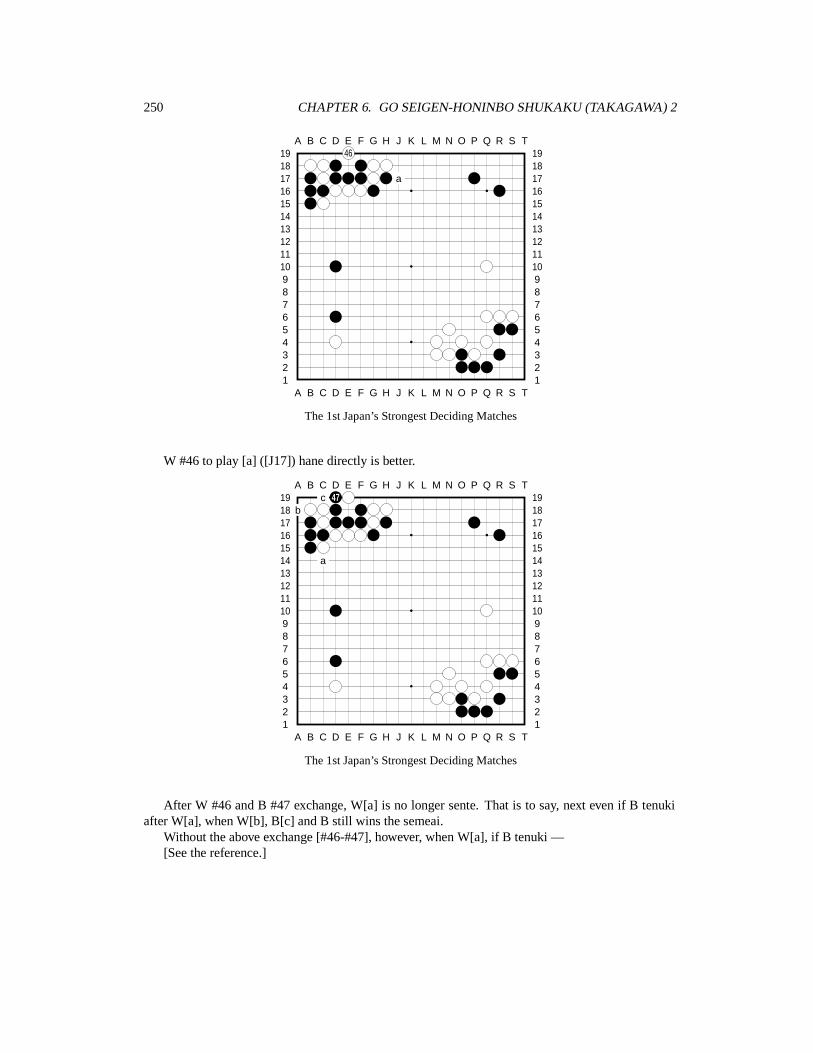
250 CHAPTER 6. GO SEIGEN-HONINBO SHUKAKU (TAKAGAWA) 2
A B C D E F G H J K L M N O P Q R S T
A B C D E F G H J K L M N O P Q R S T12345678910111213141516171819
1234567891011121314151617181946
a
The 1st Japan’s Strongest Deciding Matches
W #46 to play [a] ([J17]) hane directly is better.
A B C D E F G H J K L M N O P Q R S T
A B C D E F G H J K L M N O P Q R S T12345678910111213141516171819
12345678910111213141516171819c 47
b
a
The 1st Japan’s Strongest Deciding Matches
After W #46 and B #47 exchange, W[a] is no longer sente. That is to say, next even if B tenukiafter W[a], when W[b], B[c] and B still wins the semeai.
Without the above exchange [#46-#47], however, when W[a], if B tenuki —[See the reference.]
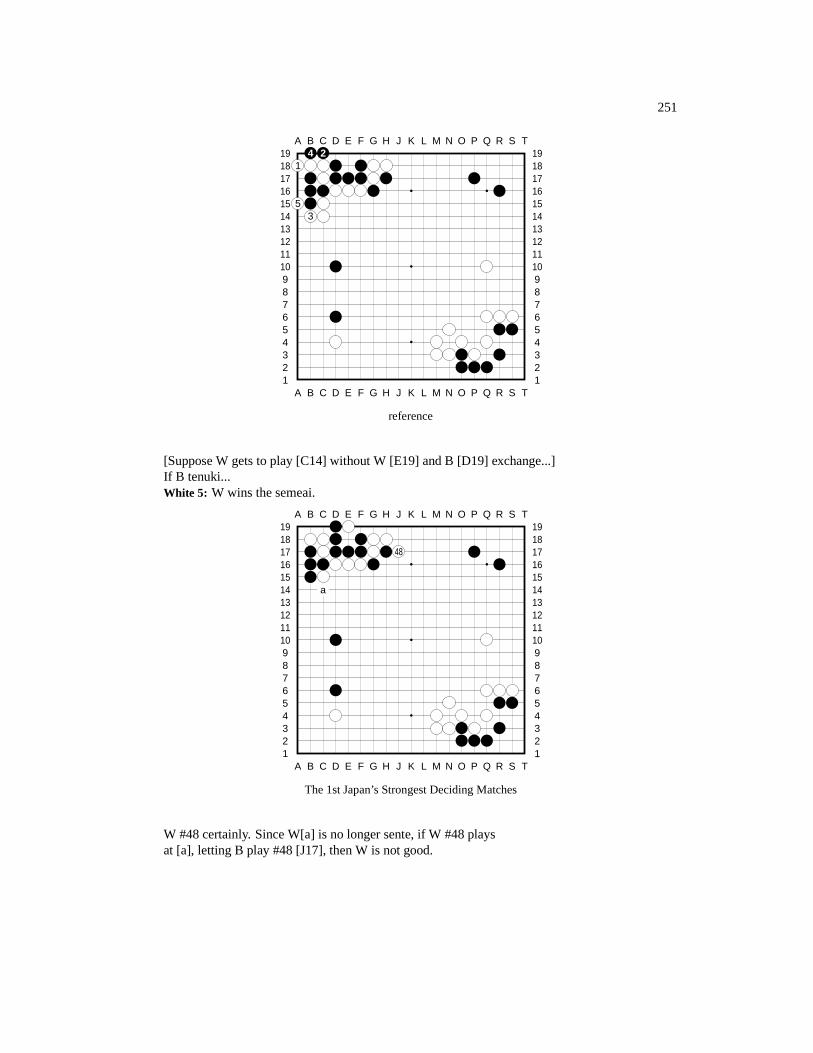
251
A B C D E F G H J K L M N O P Q R S T
A B C D E F G H J K L M N O P Q R S T12345678910111213141516171819
123456789101112131415161718194 2
1
53
reference
[Suppose W gets to play [C14] without W [E19] and B [D19] exchange...]If B tenuki...White 5: W wins the semeai.
A B C D E F G H J K L M N O P Q R S T
A B C D E F G H J K L M N O P Q R S T12345678910111213141516171819
12345678910111213141516171819
48
a
The 1st Japan’s Strongest Deciding Matches
W #48 certainly. Since W[a] is no longer sente, if W #48 playsat [a], letting B play #48 [J17], then W is not good.
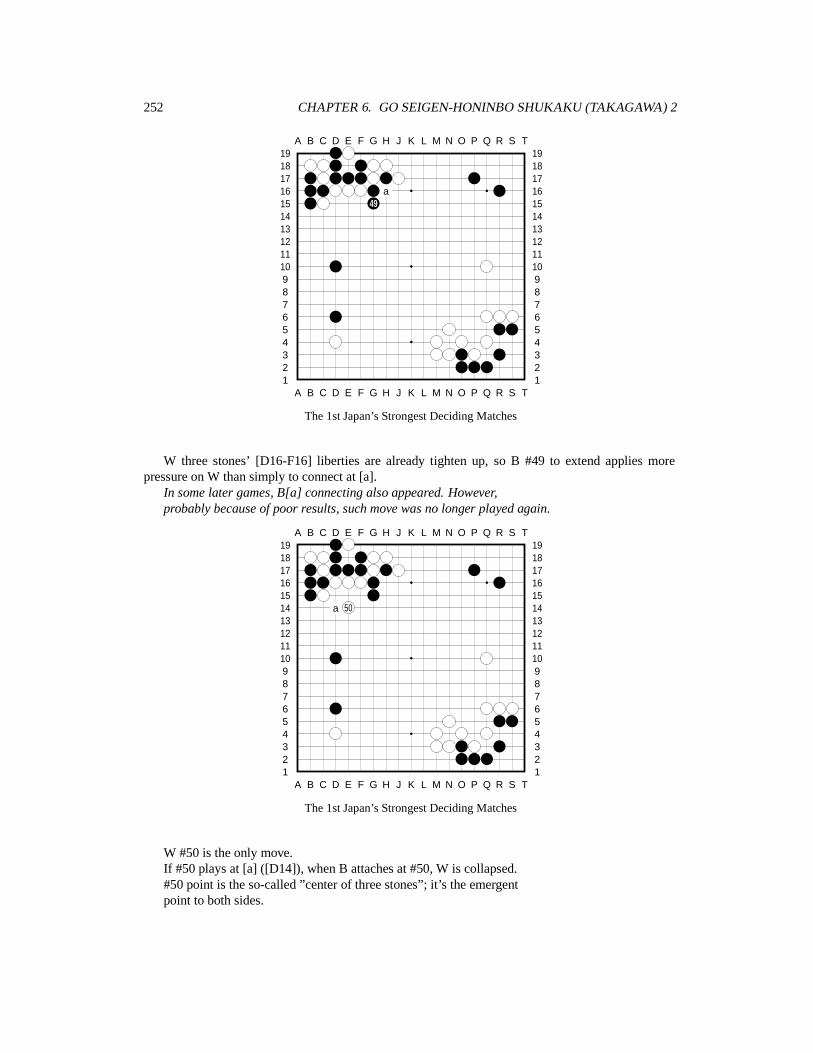
252 CHAPTER 6. GO SEIGEN-HONINBO SHUKAKU (TAKAGAWA) 2
A B C D E F G H J K L M N O P Q R S T
A B C D E F G H J K L M N O P Q R S T12345678910111213141516171819
12345678910111213141516171819
a49
The 1st Japan’s Strongest Deciding Matches
W three stones’ [D16-F16] liberties are already tighten up, so B #49 to extend applies morepressure on W than simply to connect at [a].
In some later games, B[a] connecting also appeared. However,probably because of poor results, such move was no longer played again.
A B C D E F G H J K L M N O P Q R S T
A B C D E F G H J K L M N O P Q R S T12345678910111213141516171819
12345678910111213141516171819
a 50
The 1st Japan’s Strongest Deciding Matches
W #50 is the only move.If #50 plays at [a] ([D14]), when B attaches at #50, W is collapsed.#50 point is the so-called ”center of three stones”; it’s the emergentpoint to both sides.
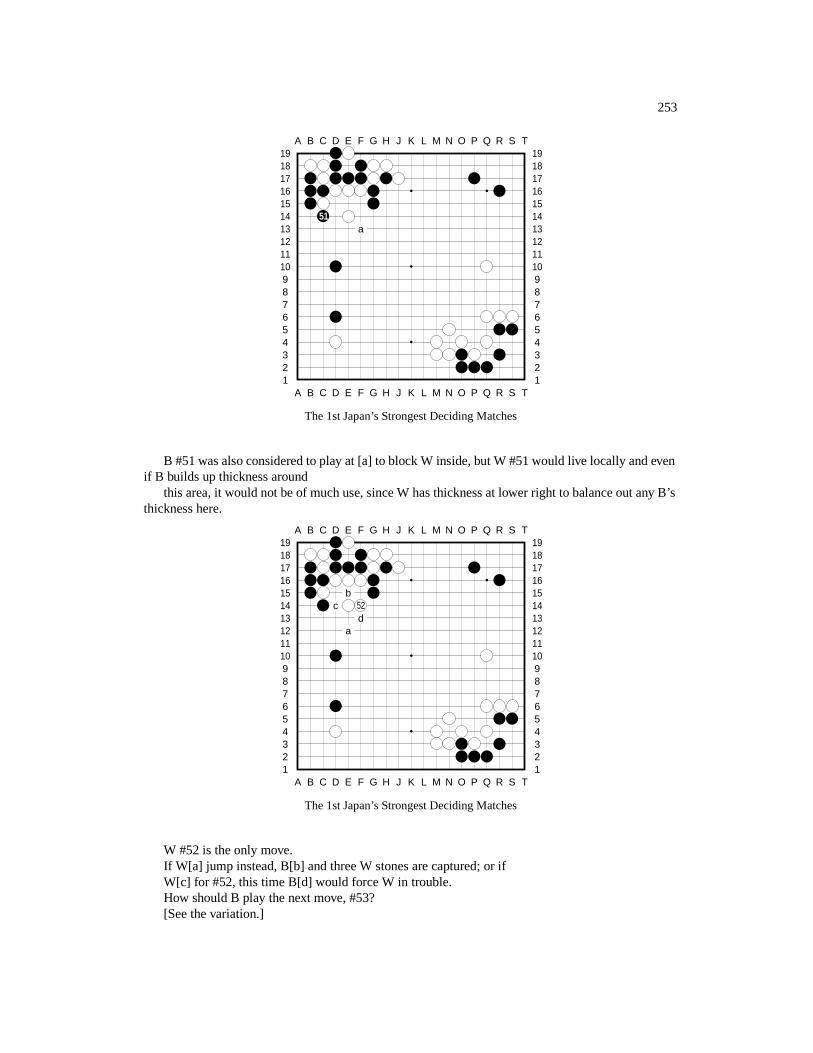
253
A B C D E F G H J K L M N O P Q R S T
A B C D E F G H J K L M N O P Q R S T12345678910111213141516171819
12345678910111213141516171819
51a
The 1st Japan’s Strongest Deciding Matches
B #51 was also considered to play at [a] to block W inside, but W #51 would live locally and evenif B builds up thickness around
this area, it would not be of much use, since W has thickness at lower right to balance out any B’sthickness here.
A B C D E F G H J K L M N O P Q R S T
A B C D E F G H J K L M N O P Q R S T12345678910111213141516171819
12345678910111213141516171819
bc 52
da
The 1st Japan’s Strongest Deciding Matches
W #52 is the only move.If W[a] jump instead, B[b] and three W stones are captured; or ifW[c] for #52, this time B[d] would force W in trouble.How should B play the next move, #53?[See the variation.]
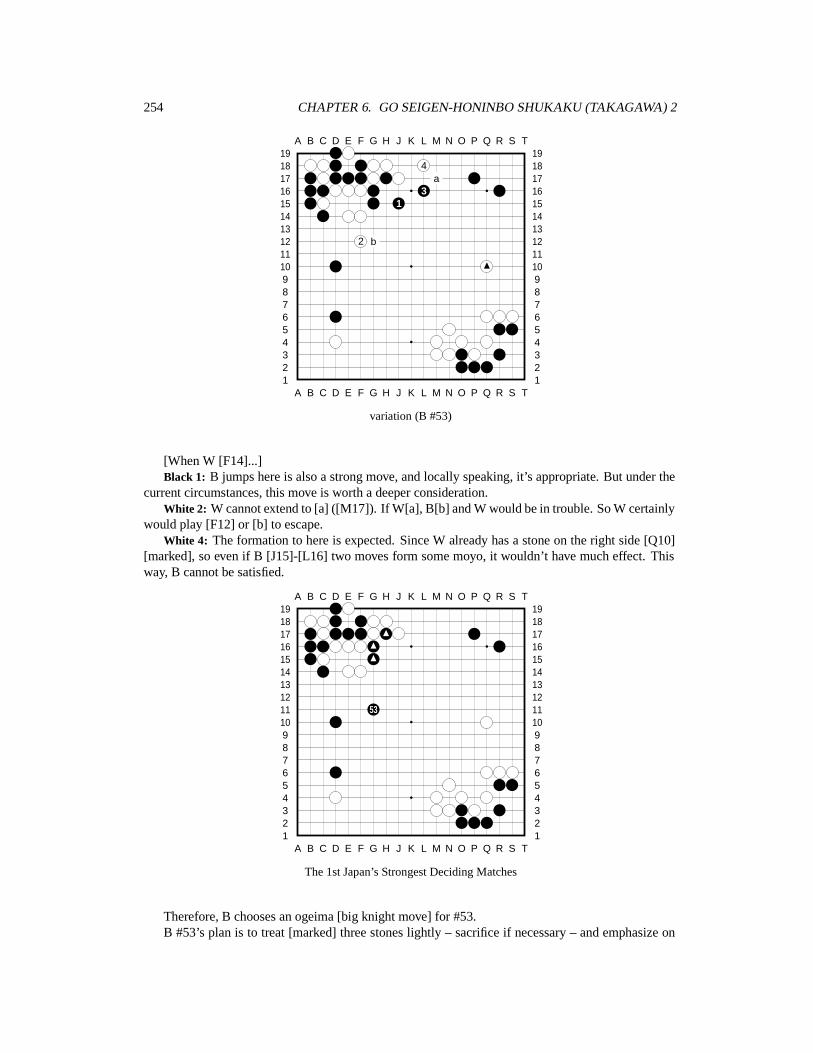
254 CHAPTER 6. GO SEIGEN-HONINBO SHUKAKU (TAKAGAWA) 2
A B C D E F G H J K L M N O P Q R S T
A B C D E F G H J K L M N O P Q R S T12345678910111213141516171819
12345678910111213141516171819
4a
31
2 b
variation (B #53)
[When W [F14]...]Black 1: B jumps here is also a strong move, and locally speaking, it’s appropriate. But under the
current circumstances, this move is worth a deeper consideration.White 2: W cannot extend to [a] ([M17]). If W[a], B[b] and W would be in trouble. So W certainly
would play [F12] or [b] to escape.White 4: The formation to here is expected. Since W already has a stone on the right side [Q10]
[marked], so even if B [J15]-[L16] two moves form some moyo, it wouldn’t have much effect. Thisway, B cannot be satisfied.
A B C D E F G H J K L M N O P Q R S T
A B C D E F G H J K L M N O P Q R S T12345678910111213141516171819
12345678910111213141516171819
53
The 1st Japan’s Strongest Deciding Matches
Therefore, B chooses an ogeima [big knight move] for #53.B #53’s plan is to treat [marked] three stones lightly – sacrifice if necessary – and emphasize on
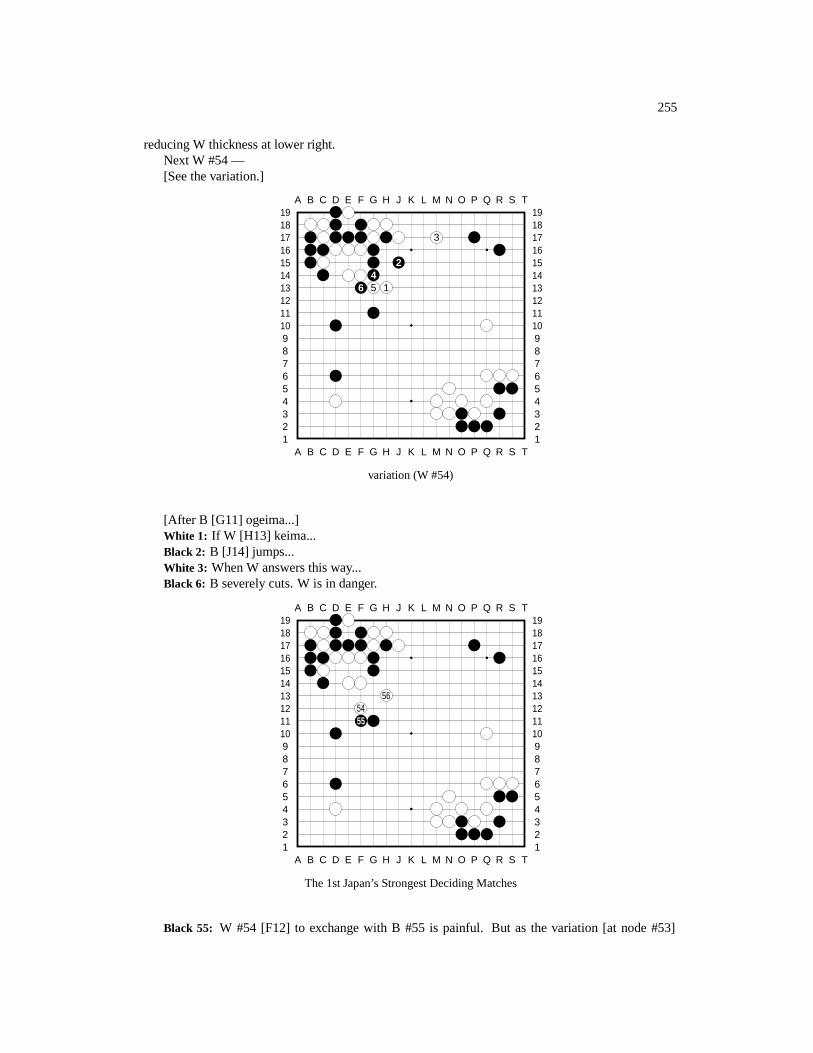
255
reducing W thickness at lower right.Next W #54 —[See the variation.]
A B C D E F G H J K L M N O P Q R S T
A B C D E F G H J K L M N O P Q R S T12345678910111213141516171819
12345678910111213141516171819
3
24
6 5 1
variation (W #54)
[After B [G11] ogeima...]White 1: If W [H13] keima...Black 2: B [J14] jumps...White 3: When W answers this way...Black 6: B severely cuts. W is in danger.
A B C D E F G H J K L M N O P Q R S T
A B C D E F G H J K L M N O P Q R S T12345678910111213141516171819
12345678910111213141516171819
565455
The 1st Japan’s Strongest Deciding Matches
Black 55: W #54 [F12] to exchange with B #55 is painful. But as the variation [at node #53]
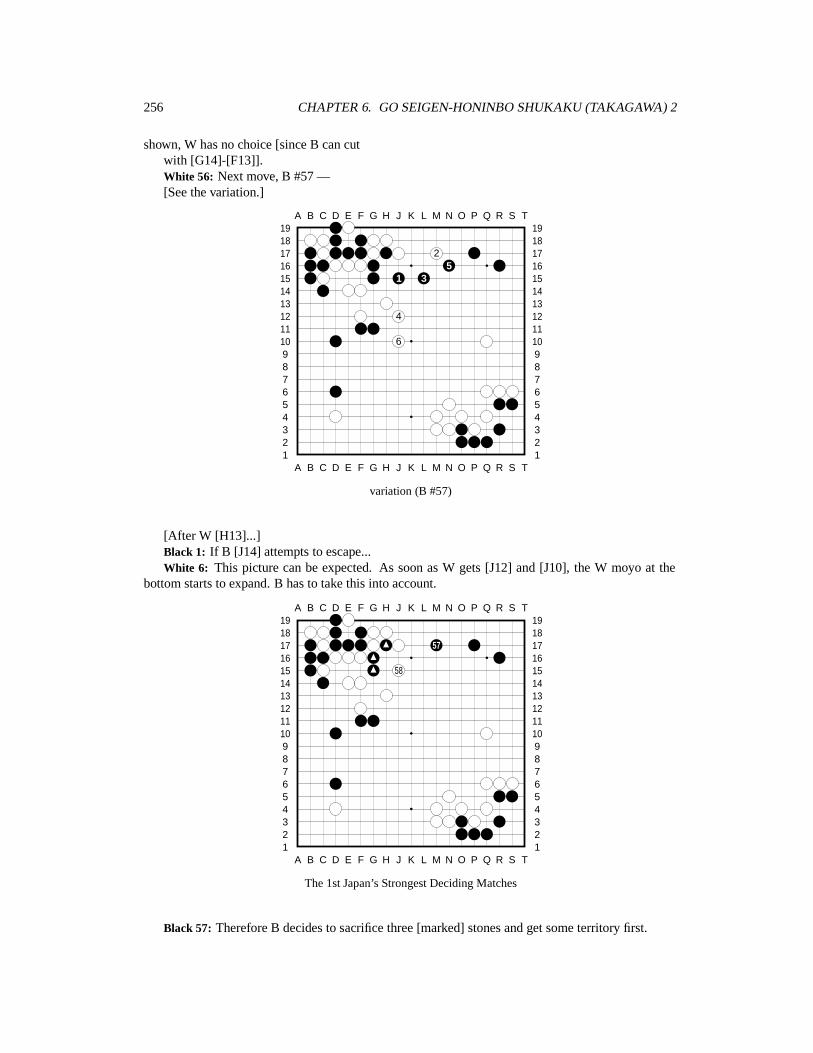
256 CHAPTER 6. GO SEIGEN-HONINBO SHUKAKU (TAKAGAWA) 2
shown, W has no choice [since B can cutwith [G14]-[F13]].White 56: Next move, B #57 —[See the variation.]
A B C D E F G H J K L M N O P Q R S T
A B C D E F G H J K L M N O P Q R S T12345678910111213141516171819
12345678910111213141516171819
25
1 3
4
6
variation (B #57)
[After W [H13]...]Black 1: If B [J14] attempts to escape...White 6: This picture can be expected. As soon as W gets [J12] and [J10], the W moyo at the
bottom starts to expand. B has to take this into account.
A B C D E F G H J K L M N O P Q R S T
A B C D E F G H J K L M N O P Q R S T12345678910111213141516171819
12345678910111213141516171819
57
58
The 1st Japan’s Strongest Deciding Matches
Black 57: Therefore B decides to sacrifice three [marked] stones and get some territory first.
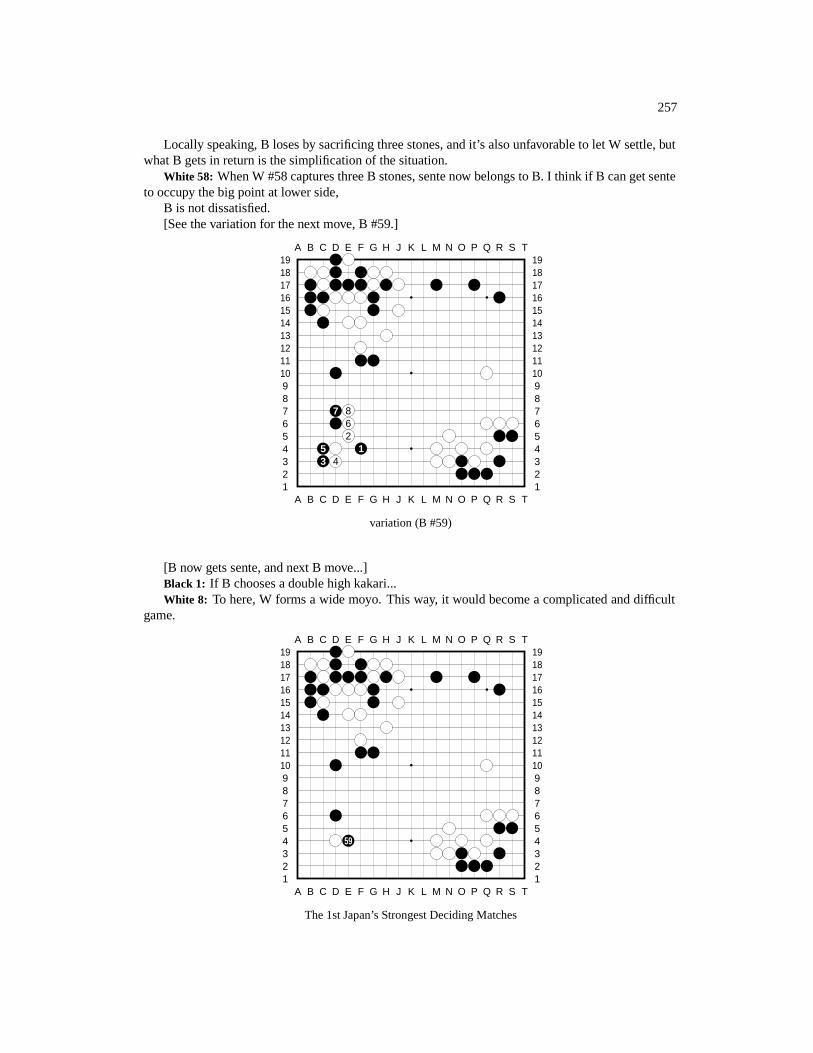
257
Locally speaking, B loses by sacrificing three stones, and it’s also unfavorable to let W settle, butwhat B gets in return is the simplification of the situation.
White 58: When W #58 captures three B stones, sente now belongs to B. I think if B can get senteto occupy the big point at lower side,
B is not dissatisfied.[See the variation for the next move, B #59.]
A B C D E F G H J K L M N O P Q R S T
A B C D E F G H J K L M N O P Q R S T12345678910111213141516171819
12345678910111213141516171819
7 862
5 13 4
variation (B #59)
[B now gets sente, and next B move...]Black 1: If B chooses a double high kakari...White 8: To here, W forms a wide moyo. This way, it would become a complicated and difficult
game.
A B C D E F G H J K L M N O P Q R S T
A B C D E F G H J K L M N O P Q R S T12345678910111213141516171819
12345678910111213141516171819
59
The 1st Japan’s Strongest Deciding Matches
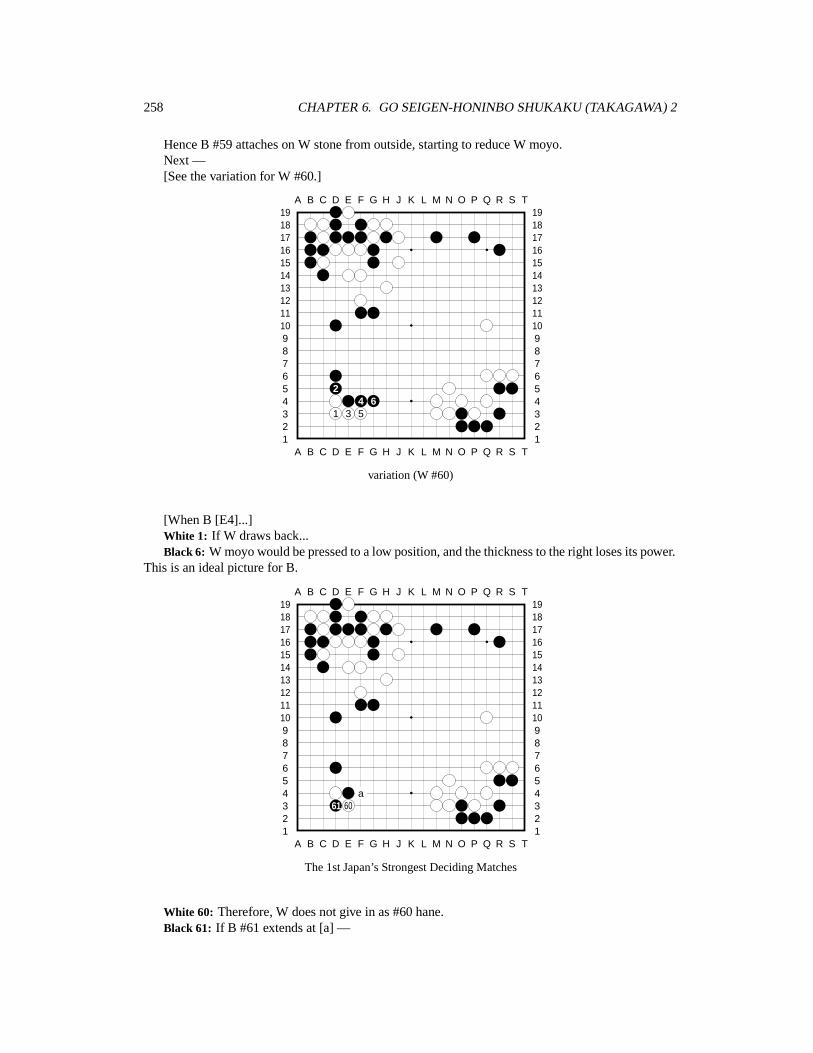
258 CHAPTER 6. GO SEIGEN-HONINBO SHUKAKU (TAKAGAWA) 2
Hence B #59 attaches on W stone from outside, starting to reduce W moyo.Next —[See the variation for W #60.]
A B C D E F G H J K L M N O P Q R S T
A B C D E F G H J K L M N O P Q R S T12345678910111213141516171819
12345678910111213141516171819
24 6
1 3 5
variation (W #60)
[When B [E4]...]White 1: If W draws back...Black 6: W moyo would be pressed to a low position, and the thickness to the right loses its power.
This is an ideal picture for B.
A B C D E F G H J K L M N O P Q R S T
A B C D E F G H J K L M N O P Q R S T12345678910111213141516171819
12345678910111213141516171819
a61 60
The 1st Japan’s Strongest Deciding Matches
White 60: Therefore, W does not give in as #60 hane.Black 61: If B #61 extends at [a] —
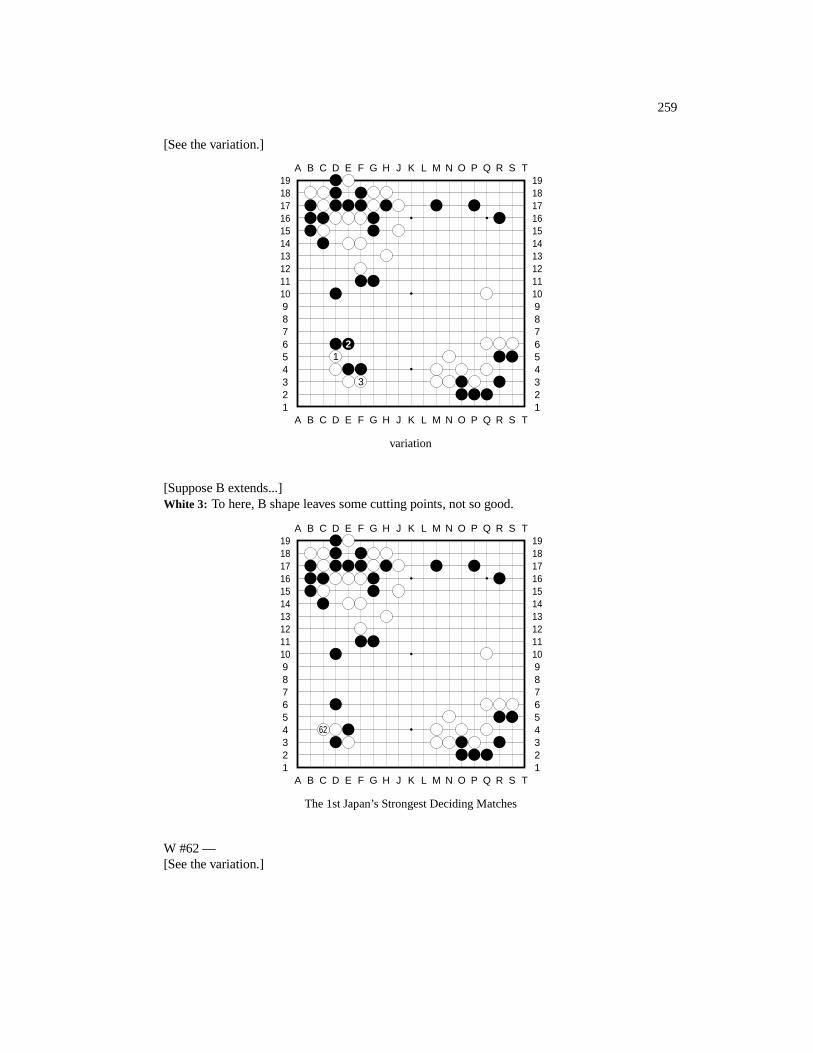
259
[See the variation.]
A B C D E F G H J K L M N O P Q R S T
A B C D E F G H J K L M N O P Q R S T12345678910111213141516171819
12345678910111213141516171819
21
3
variation
[Suppose B extends...]White 3: To here, B shape leaves some cutting points, not so good.
A B C D E F G H J K L M N O P Q R S T
A B C D E F G H J K L M N O P Q R S T12345678910111213141516171819
12345678910111213141516171819
62
The 1st Japan’s Strongest Deciding Matches
W #62 —[See the variation.]
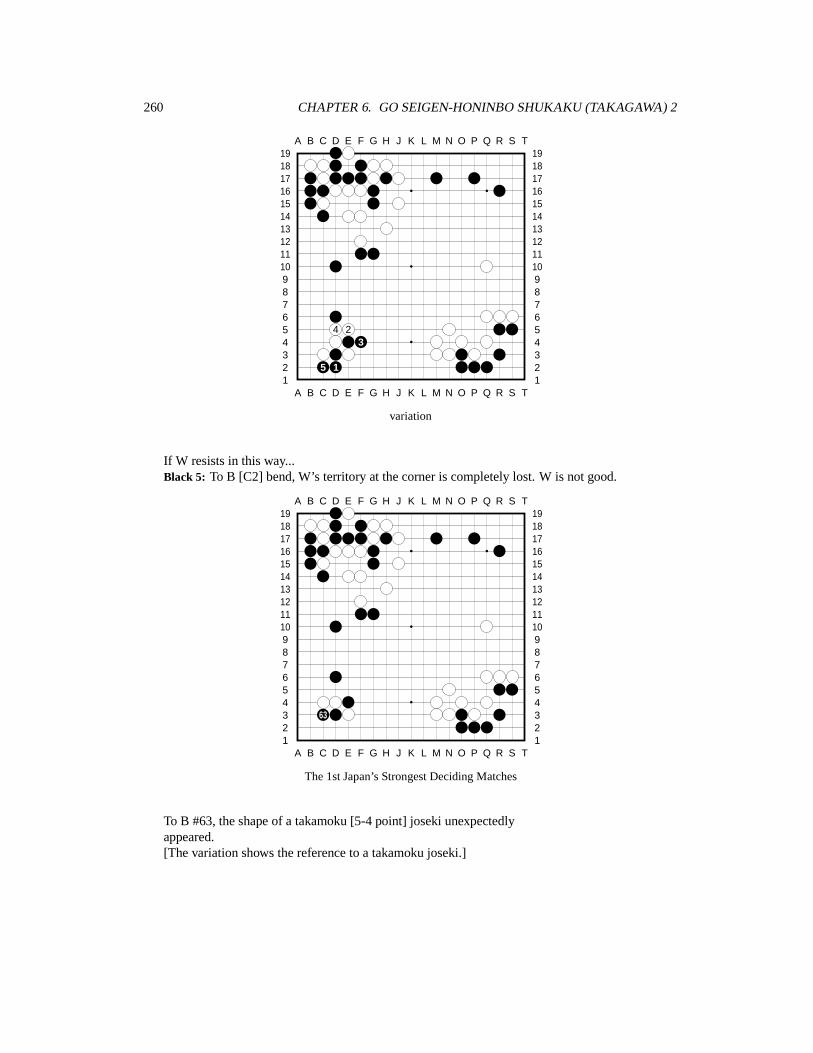
260 CHAPTER 6. GO SEIGEN-HONINBO SHUKAKU (TAKAGAWA) 2
A B C D E F G H J K L M N O P Q R S T
A B C D E F G H J K L M N O P Q R S T12345678910111213141516171819
12345678910111213141516171819
4 23
5 1
variation
If W resists in this way...Black 5: To B [C2] bend, W’s territory at the corner is completely lost. W is not good.
A B C D E F G H J K L M N O P Q R S T
A B C D E F G H J K L M N O P Q R S T12345678910111213141516171819
12345678910111213141516171819
63
The 1st Japan’s Strongest Deciding Matches
To B #63, the shape of a takamoku [5-4 point] joseki unexpectedlyappeared.[The variation shows the reference to a takamoku joseki.]
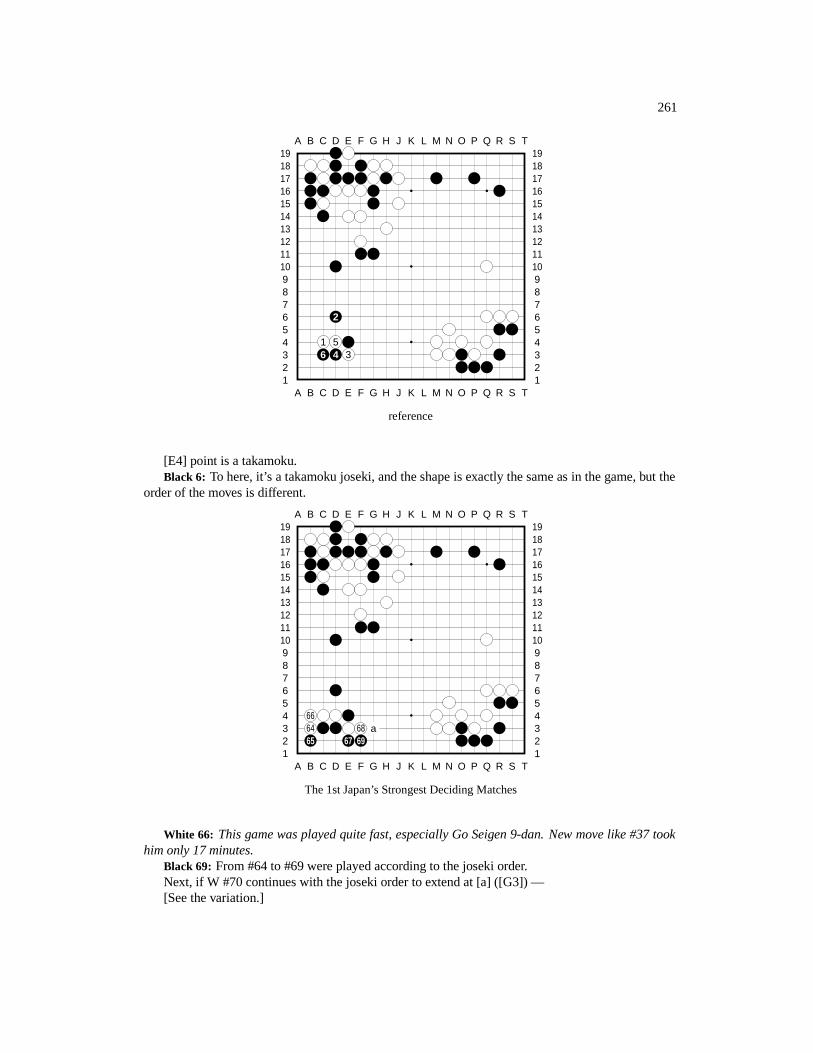
261
A B C D E F G H J K L M N O P Q R S T
A B C D E F G H J K L M N O P Q R S T12345678910111213141516171819
12345678910111213141516171819
2
1 56 4 3
reference
[E4] point is a takamoku.Black 6: To here, it’s a takamoku joseki, and the shape is exactly the same as in the game, but the
order of the moves is different.
A B C D E F G H J K L M N O P Q R S T
A B C D E F G H J K L M N O P Q R S T12345678910111213141516171819
12345678910111213141516171819
6664 68 a65 67 69
The 1st Japan’s Strongest Deciding Matches
White 66: This game was played quite fast, especially Go Seigen 9-dan. New move like #37 tookhim only 17 minutes.
Black 69: From #64 to #69 were played according to the joseki order.Next, if W #70 continues with the joseki order to extend at [a] ([G3]) —[See the variation.]

262 CHAPTER 6. GO SEIGEN-HONINBO SHUKAKU (TAKAGAWA) 2
A B C D E F G H J K L M N O P Q R S T
A B C D E F G H J K L M N O P Q R S T12345678910111213141516171819
12345678910111213141516171819
16
8 103
5 49 6 7 2
11 1 13 15a b 12 14
variation (W #70)
[To here it’s part of a joseki.]White 1: [W [G3] continues the joseki...]White 3: According to the joseki, W[a]-B[b] exchange *then* [C7] jump. But here, W to jump
directly is better.Black 10: To here, B gets one W stone.White 11: And since B has [marked] two stones [F11-G11], B doesn’t have to eat this stone now...White 15: Thus, after W [J3]...Black 16: B can turn to get [R12] big point. To get this picture, of course, B is better.
A B C D E F G H J K L M N O P Q R S T
A B C D E F G H J K L M N O P Q R S T12345678910111213141516171819
12345678910111213141516171819
70a
The 1st Japan’s Strongest Deciding Matches
[Therefore,] W #70 is the right move at the right time.Next if B[a] to extend, what would be the result?
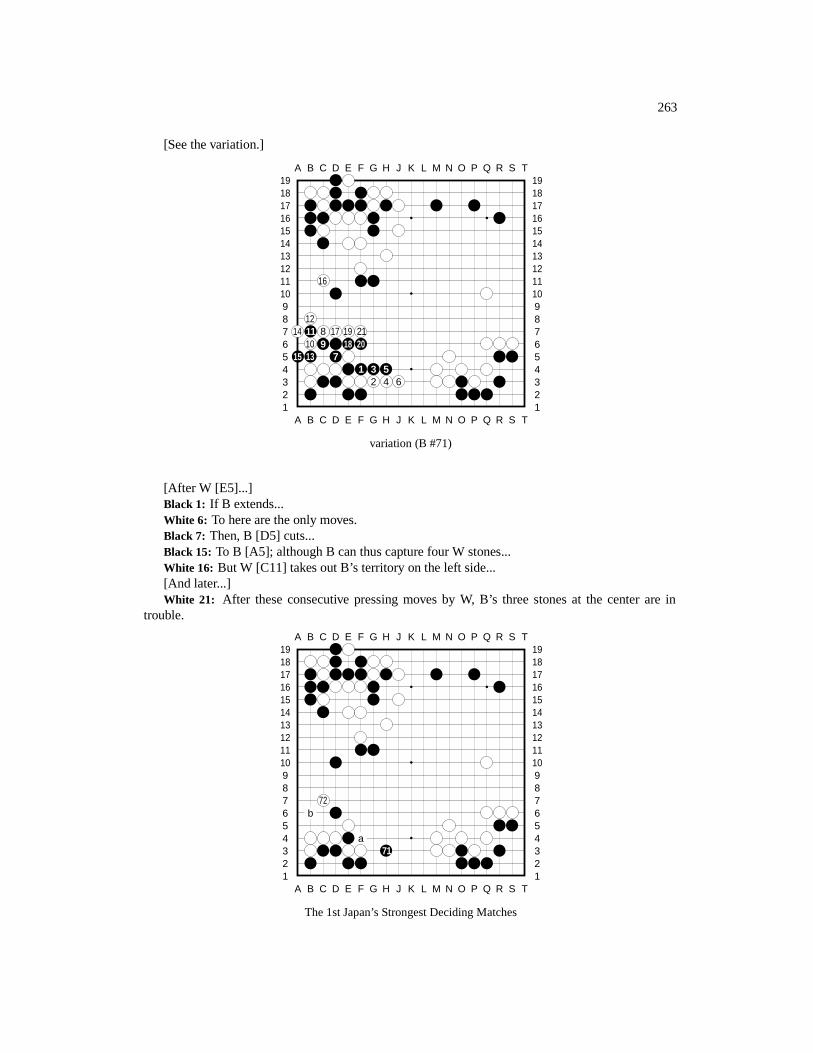
263
[See the variation.]
A B C D E F G H J K L M N O P Q R S T
A B C D E F G H J K L M N O P Q R S T12345678910111213141516171819
12345678910111213141516171819
16
1214 11 8 17 19 21
10 9 18 2015 13 7
1 3 52 4 6
variation (B #71)
[After W [E5]...]Black 1: If B extends...White 6: To here are the only moves.Black 7: Then, B [D5] cuts...Black 15: To B [A5]; although B can thus capture four W stones...White 16: But W [C11] takes out B’s territory on the left side...[And later...]White 21: After these consecutive pressing moves by W, B’s three stones at the center are in
trouble.
A B C D E F G H J K L M N O P Q R S T
A B C D E F G H J K L M N O P Q R S T12345678910111213141516171819
12345678910111213141516171819
72b
a71
The 1st Japan’s Strongest Deciding Matches
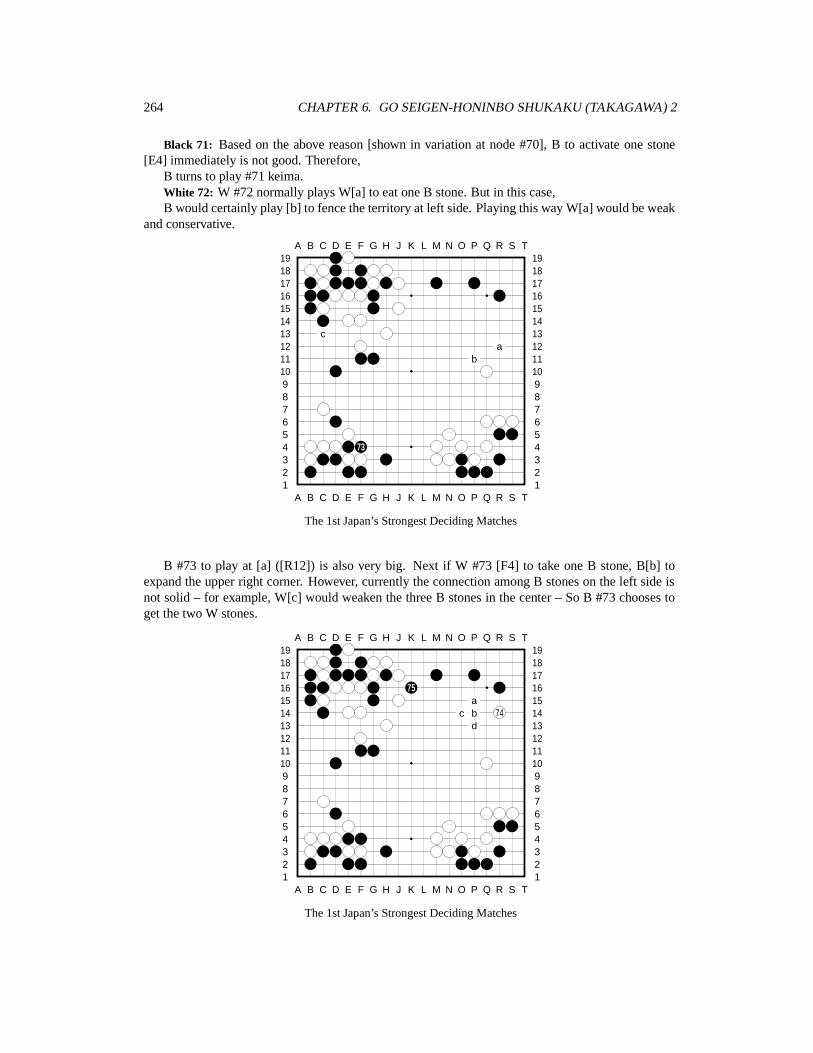
264 CHAPTER 6. GO SEIGEN-HONINBO SHUKAKU (TAKAGAWA) 2
Black 71: Based on the above reason [shown in variation at node #70], B to activate one stone[E4] immediately is not good. Therefore,
B turns to play #71 keima.White 72: W #72 normally plays W[a] to eat one B stone. But in this case,B would certainly play [b] to fence the territory at left side. Playing this way W[a] would be weak
and conservative.
A B C D E F G H J K L M N O P Q R S T
A B C D E F G H J K L M N O P Q R S T12345678910111213141516171819
12345678910111213141516171819
ca
b
73
The 1st Japan’s Strongest Deciding Matches
B #73 to play at [a] ([R12]) is also very big. Next if W #73 [F4] to take one B stone, B[b] toexpand the upper right corner. However, currently the connection among B stones on the left side isnot solid – for example, W[c] would weaken the three B stones in the center – So B #73 chooses toget the two W stones.
A B C D E F G H J K L M N O P Q R S T
A B C D E F G H J K L M N O P Q R S T12345678910111213141516171819
12345678910111213141516171819
75a
c b 74d
The 1st Japan’s Strongest Deciding Matches

265
White 74: W #74 is the last big point on the board.This game was the first game in history in which the ”bendinginward” variation of ”great avalanche” joseki was played. This revolutionary joseki had its
significance in the development of Go, therefore this is a memorable game.Black 75: If B #75 jumps at [a], then after W[b]-B[c]-W[d]; B would be helping W.Or if B #75 jumps one more space to [b] —[See the variation.]The purpose of B #75 is —[The variations show variations for W’s next move.]
A B C D E F G H J K L M N O P Q R S T
A B C D E F G H J K L M N O P Q R S T12345678910111213141516171819
1234567891011121314151617181918
16 7 13 1412 4 5 610 9 3 8
2 1 15 17
1119
variation
[Suppose B big jumps to here...]White 19: To here, although B built up thickness to the left [O16 etc.], but it’s almost useless,
while W got quite a bit of territory.
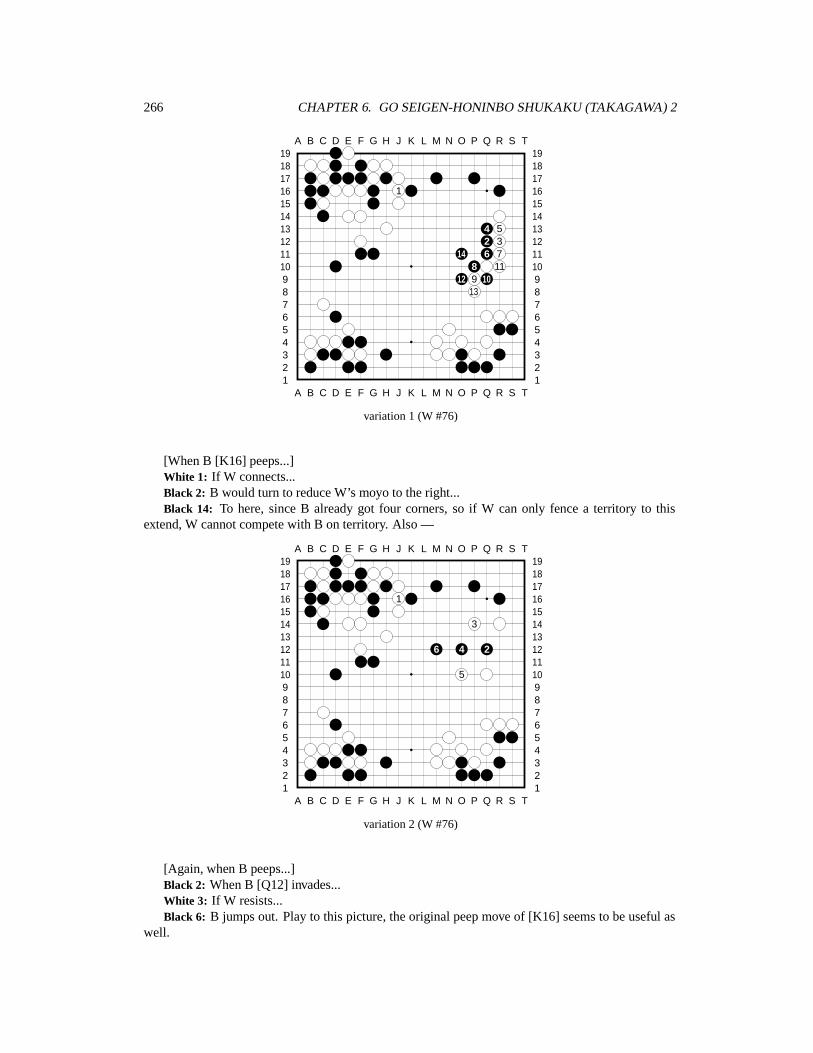
266 CHAPTER 6. GO SEIGEN-HONINBO SHUKAKU (TAKAGAWA) 2
A B C D E F G H J K L M N O P Q R S T
A B C D E F G H J K L M N O P Q R S T12345678910111213141516171819
12345678910111213141516171819
1
4 52 3
14 6 78 11
12 9 1013
variation 1 (W #76)
[When B [K16] peeps...]White 1: If W connects...Black 2: B would turn to reduce W’s moyo to the right...Black 14: To here, since B already got four corners, so if W can only fence a territory to this
extend, W cannot compete with B on territory. Also —
A B C D E F G H J K L M N O P Q R S T
A B C D E F G H J K L M N O P Q R S T12345678910111213141516171819
12345678910111213141516171819
1
3
6 4 2
5
variation 2 (W #76)
[Again, when B peeps...]Black 2: When B [Q12] invades...White 3: If W resists...Black 6: B jumps out. Play to this picture, the original peep move of [K16] seems to be useful as
well.
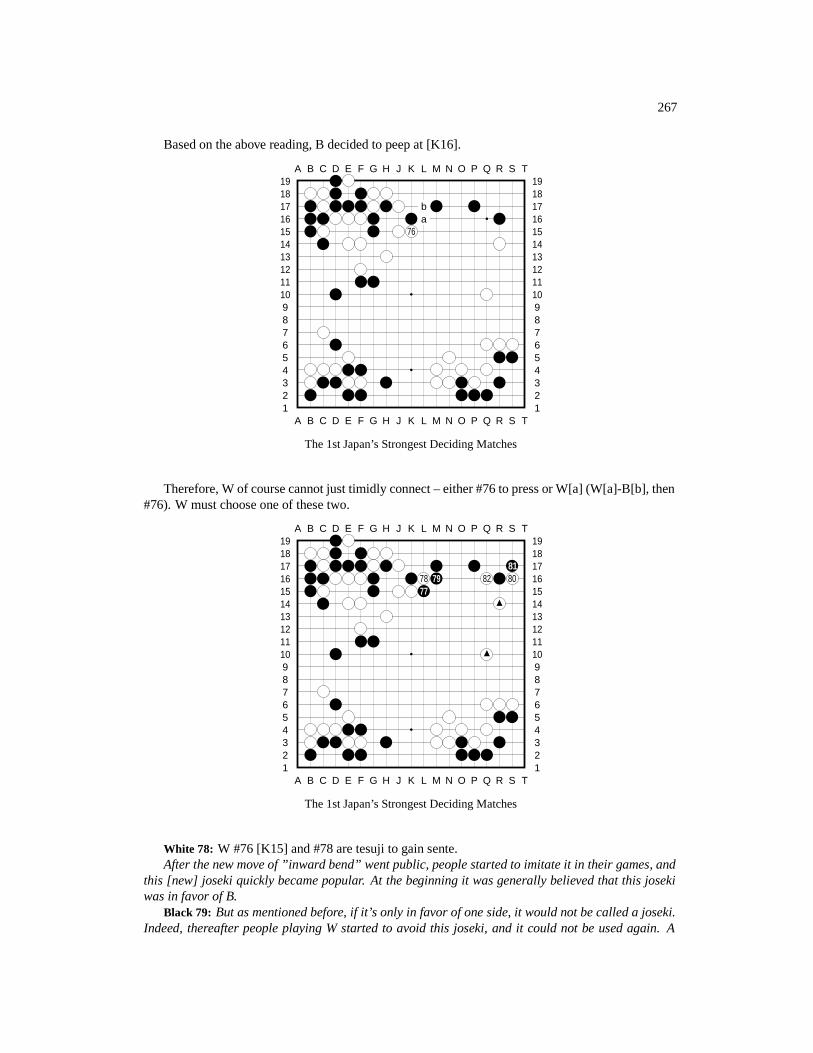
267
Based on the above reading, B decided to peep at [K16].
A B C D E F G H J K L M N O P Q R S T
A B C D E F G H J K L M N O P Q R S T12345678910111213141516171819
12345678910111213141516171819
ba
76
The 1st Japan’s Strongest Deciding Matches
Therefore, W of course cannot just timidly connect – either #76 to press or W[a] (W[a]-B[b], then#76). W must choose one of these two.
A B C D E F G H J K L M N O P Q R S T
A B C D E F G H J K L M N O P Q R S T12345678910111213141516171819
12345678910111213141516171819
8178 79 82 8077
The 1st Japan’s Strongest Deciding Matches
White 78: W #76 [K15] and #78 are tesuji to gain sente.After the new move of ”inward bend” went public, people started to imitate it in their games, and
this [new] joseki quickly became popular. At the beginning it was generally believed that this josekiwas in favor of B.
Black 79: But as mentioned before, if it’s only in favor of one side, it would not be called a joseki.Indeed, thereafter people playing W started to avoid this joseki, and it could not be used again. A
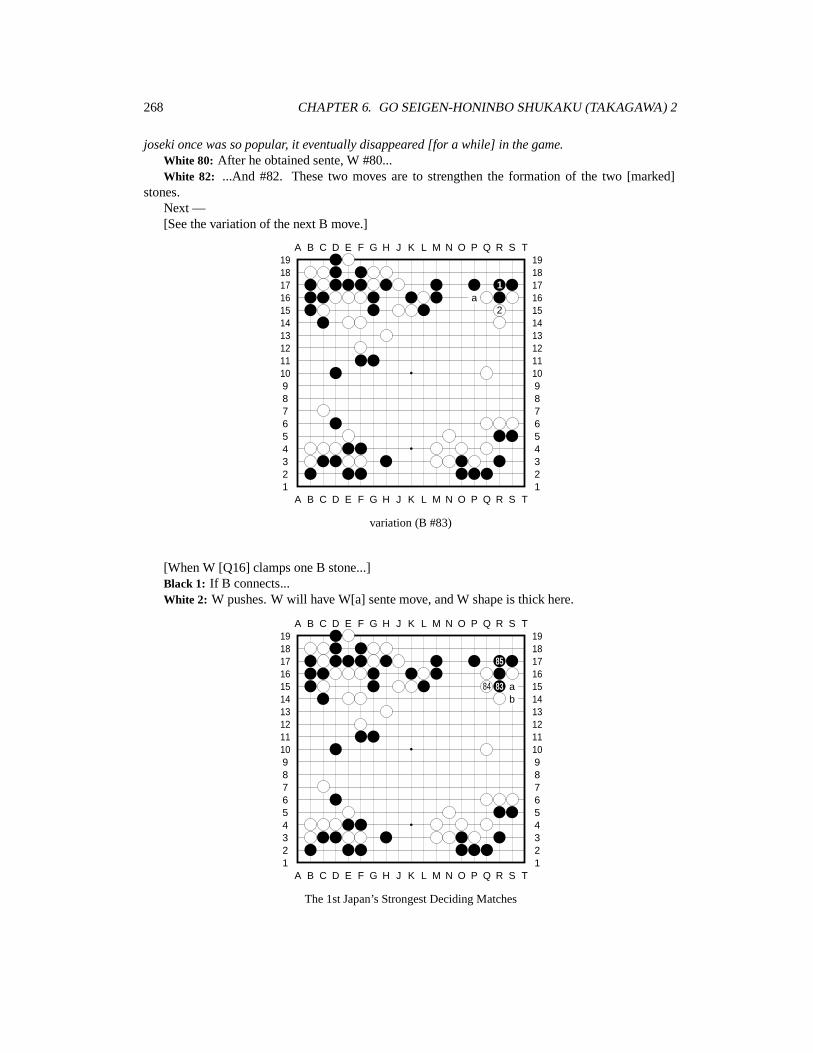
268 CHAPTER 6. GO SEIGEN-HONINBO SHUKAKU (TAKAGAWA) 2
joseki once was so popular, it eventually disappeared [for a while] in the game.White 80: After he obtained sente, W #80...White 82: ...And #82. These two moves are to strengthen the formation of the two [marked]
stones.Next —[See the variation of the next B move.]
A B C D E F G H J K L M N O P Q R S T
A B C D E F G H J K L M N O P Q R S T12345678910111213141516171819
12345678910111213141516171819
1a
2
variation (B #83)
[When W [Q16] clamps one B stone...]Black 1: If B connects...White 2: W pushes. W will have W[a] sente move, and W shape is thick here.
A B C D E F G H J K L M N O P Q R S T
A B C D E F G H J K L M N O P Q R S T12345678910111213141516171819
12345678910111213141516171819
85
84 83 ab
The 1st Japan’s Strongest Deciding Matches
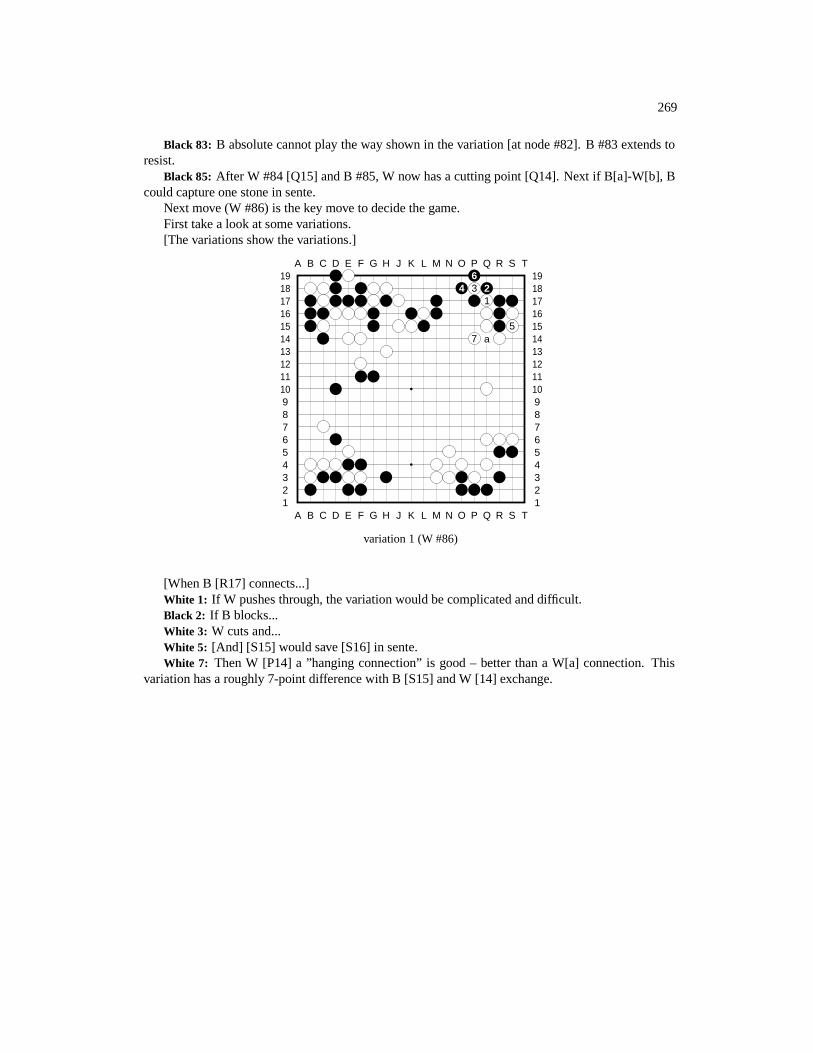
269
Black 83: B absolute cannot play the way shown in the variation [at node #82]. B #83 extends toresist.
Black 85: After W #84 [Q15] and B #85, W now has a cutting point [Q14]. Next if B[a]-W[b], Bcould capture one stone in sente.
Next move (W #86) is the key move to decide the game.First take a look at some variations.[The variations show the variations.]
A B C D E F G H J K L M N O P Q R S T
A B C D E F G H J K L M N O P Q R S T12345678910111213141516171819
123456789101112131415161718196
4 3 21
57 a
variation 1 (W #86)
[When B [R17] connects...]White 1: If W pushes through, the variation would be complicated and difficult.Black 2: If B blocks...White 3: W cuts and...White 5: [And] [S15] would save [S16] in sente.White 7: Then W [P14] a ”hanging connection” is good – better than a W[a] connection. This
variation has a roughly 7-point difference with B [S15] and W [14] exchange.
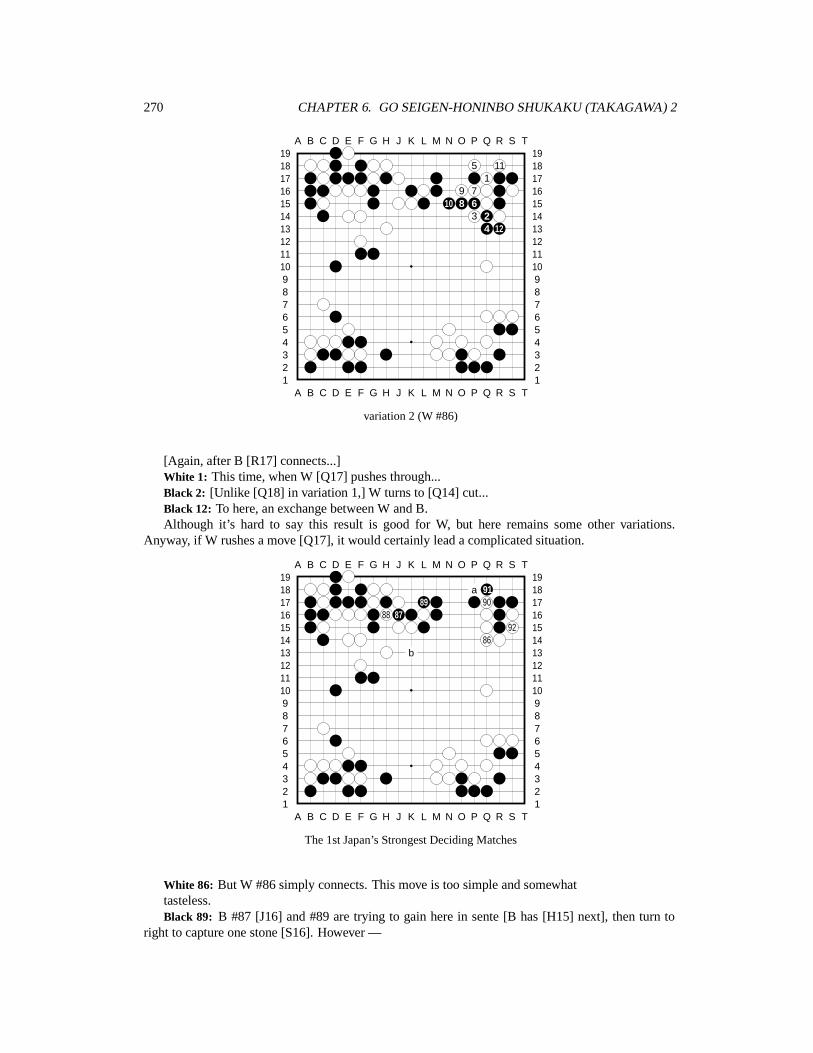
270 CHAPTER 6. GO SEIGEN-HONINBO SHUKAKU (TAKAGAWA) 2
A B C D E F G H J K L M N O P Q R S T
A B C D E F G H J K L M N O P Q R S T12345678910111213141516171819
12345678910111213141516171819
5 111
9 710 8 6
3 24 12
variation 2 (W #86)
[Again, after B [R17] connects...]White 1: This time, when W [Q17] pushes through...Black 2: [Unlike [Q18] in variation 1,] W turns to [Q14] cut...Black 12: To here, an exchange between W and B.Although it’s hard to say this result is good for W, but here remains some other variations.
Anyway, if W rushes a move [Q17], it would certainly lead a complicated situation.
A B C D E F G H J K L M N O P Q R S T
A B C D E F G H J K L M N O P Q R S T12345678910111213141516171819
12345678910111213141516171819
a 9189 90
88 8792
86b
The 1st Japan’s Strongest Deciding Matches
White 86: But W #86 simply connects. This move is too simple and somewhattasteless.Black 89: B #87 [J16] and #89 are trying to gain here in sente [B has [H15] next], then turn to
right to capture one stone [S16]. However —
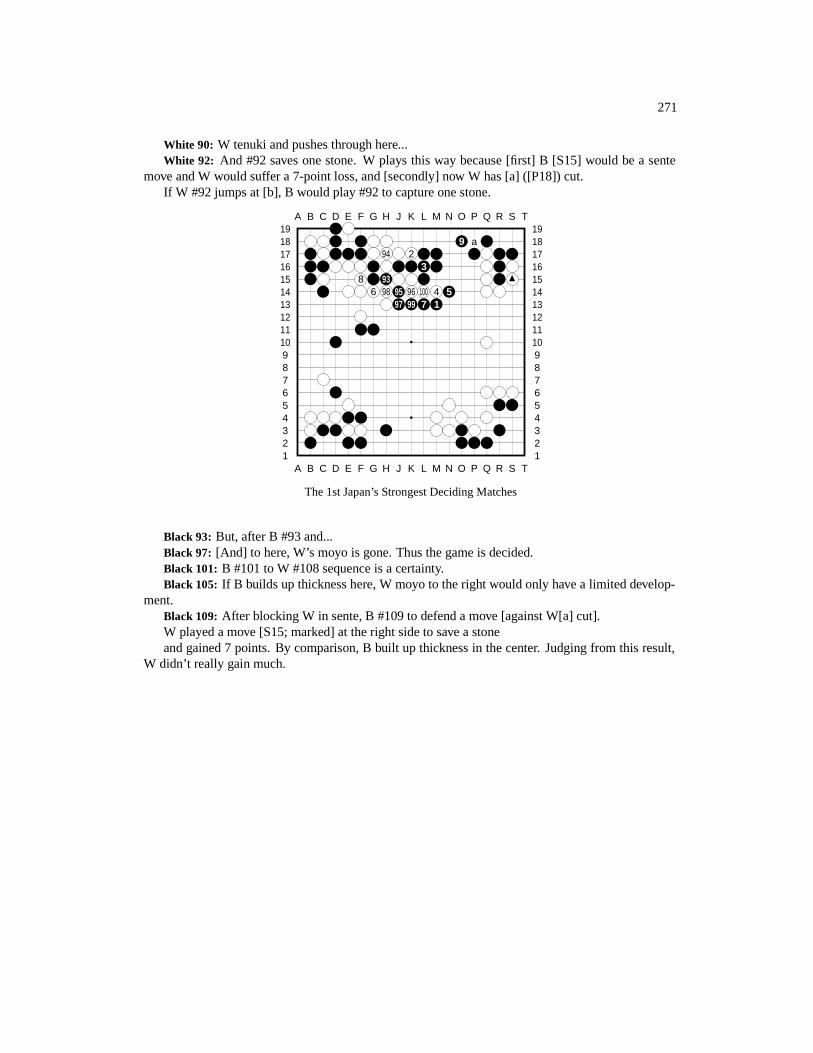
271
White 90: W tenuki and pushes through here...White 92: And #92 saves one stone. W plays this way because [first] B [S15] would be a sente
move and W would suffer a 7-point loss, and [secondly] now W has [a] ([P18]) cut.If W #92 jumps at [b], B would play #92 to capture one stone.
A B C D E F G H J K L M N O P Q R S T
A B C D E F G H J K L M N O P Q R S T12345678910111213141516171819
12345678910111213141516171819
9 a94 2
38 93
6 98 95 96 100 4 597 99 7 1
The 1st Japan’s Strongest Deciding Matches
Black 93: But, after B #93 and...Black 97: [And] to here, W’s moyo is gone. Thus the game is decided.Black 101: B #101 to W #108 sequence is a certainty.Black 105: If B builds up thickness here, W moyo to the right would only have a limited develop-
ment.Black 109: After blocking W in sente, B #109 to defend a move [against W[a] cut].W played a move [S15; marked] at the right side to save a stoneand gained 7 points. By comparison, B built up thickness in the center. Judging from this result,
W didn’t really gain much.
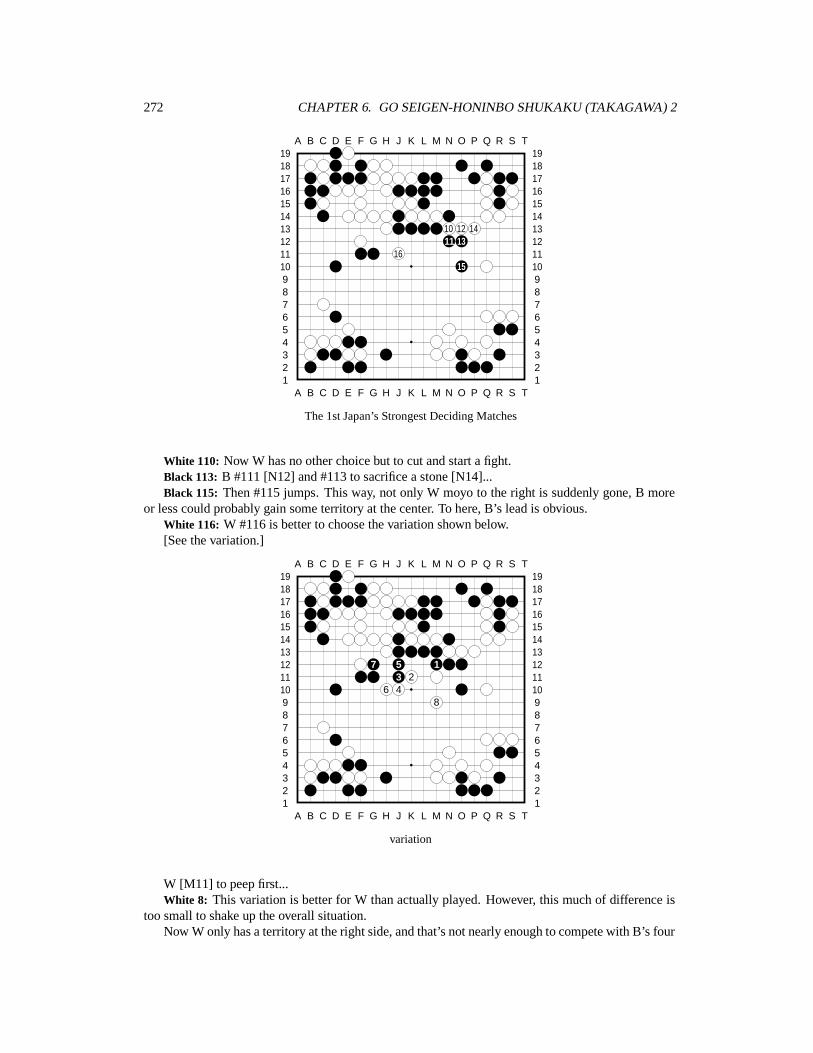
272 CHAPTER 6. GO SEIGEN-HONINBO SHUKAKU (TAKAGAWA) 2
A B C D E F G H J K L M N O P Q R S T
A B C D E F G H J K L M N O P Q R S T12345678910111213141516171819
12345678910111213141516171819
10 12 1411 13
1615
The 1st Japan’s Strongest Deciding Matches
White 110: Now W has no other choice but to cut and start a fight.Black 113: B #111 [N12] and #113 to sacrifice a stone [N14]...Black 115: Then #115 jumps. This way, not only W moyo to the right is suddenly gone, B more
or less could probably gain some territory at the center. To here, B’s lead is obvious.White 116: W #116 is better to choose the variation shown below.[See the variation.]
A B C D E F G H J K L M N O P Q R S T
A B C D E F G H J K L M N O P Q R S T12345678910111213141516171819
12345678910111213141516171819
7 5 13 2
6 48
variation
W [M11] to peep first...White 8: This variation is better for W than actually played. However, this much of difference is
too small to shake up the overall situation.Now W only has a territory at the right side, and that’s not nearly enough to compete with B’s four

273
corners. W’s thickness after capturing a stone at lower right [N4] was never fully taken advantage of.
A B C D E F G H J K L M N O P Q R S T
A B C D E F G H J K L M N O P Q R S T12345678910111213141516171819
12345678910111213141516171819
17
18 19
22
a 2021
The 1st Japan’s Strongest Deciding Matches
White 122: W #122 is a good point, eliminating the B[a] cut.The one who revived the once disappeared ”great avalanche” joseki was none other than Go
Seigen 9-dan himself. This joseki was clearly judged as advantageous to B, but recently when GoSeigen 9-dan played W, he still applied this joseki without fear , because it became
tones at the corner still had some aji.
A B C D E F G H J K L M N O P Q R S T
A B C D E F G H J K L M N O P Q R S T12345678910111213141516171819
12345678910111213141516171819
23 24
a 25
The 1st Japan’s Strongest Deciding Matches
Black 125: B #123 [H8] and #125 on one hand attack W team at the middle, aiming at B[a] on theother hand.
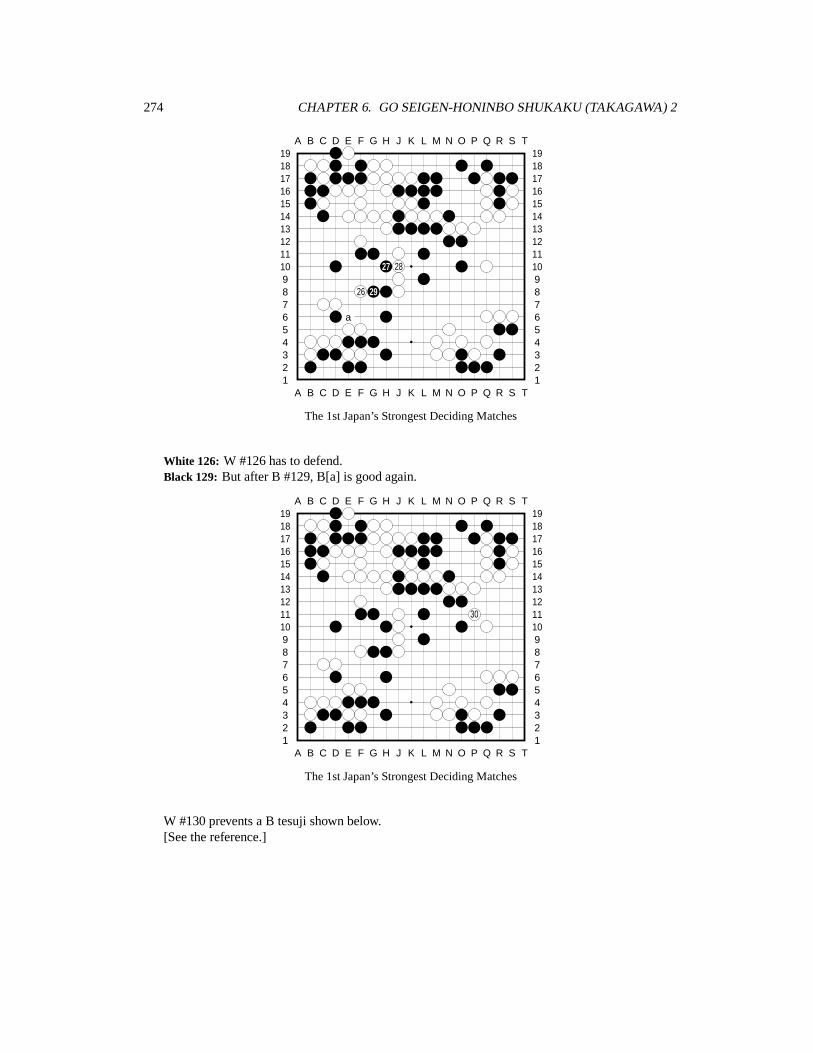
274 CHAPTER 6. GO SEIGEN-HONINBO SHUKAKU (TAKAGAWA) 2
A B C D E F G H J K L M N O P Q R S T
A B C D E F G H J K L M N O P Q R S T12345678910111213141516171819
12345678910111213141516171819
27 28
26 29
a
The 1st Japan’s Strongest Deciding Matches
White 126: W #126 has to defend.Black 129: But after B #129, B[a] is good again.
A B C D E F G H J K L M N O P Q R S T
A B C D E F G H J K L M N O P Q R S T12345678910111213141516171819
12345678910111213141516171819
30
The 1st Japan’s Strongest Deciding Matches
W #130 prevents a B tesuji shown below.[See the reference.]
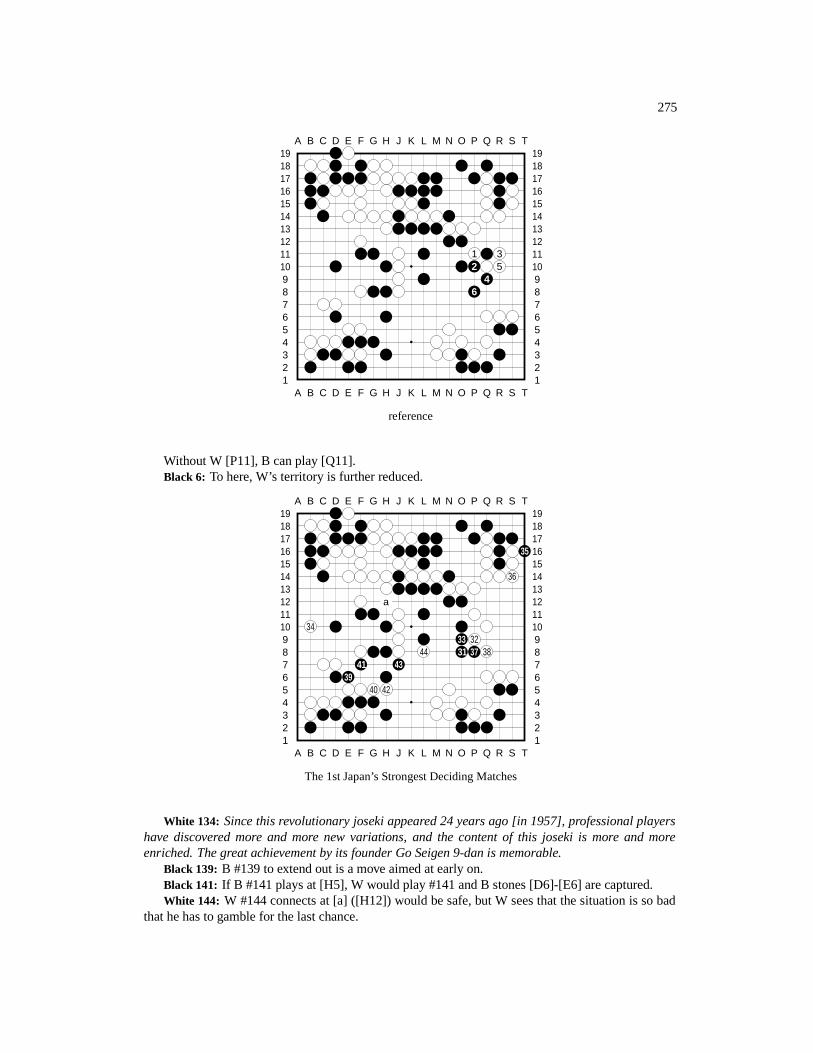
275
A B C D E F G H J K L M N O P Q R S T
A B C D E F G H J K L M N O P Q R S T12345678910111213141516171819
12345678910111213141516171819
1 32 5
46
reference
Without W [P11], B can play [Q11].Black 6: To here, W’s territory is further reduced.
A B C D E F G H J K L M N O P Q R S T
A B C D E F G H J K L M N O P Q R S T12345678910111213141516171819
12345678910111213141516171819
35
36
a
3433 32
44 31 37 3841 43
3940 42
The 1st Japan’s Strongest Deciding Matches
White 134: Since this revolutionary joseki appeared 24 years ago [in 1957], professional playershave discovered more and more new variations, and the content of this joseki is more and moreenriched. The great achievement by its founder Go Seigen 9-dan is memorable.
Black 139: B #139 to extend out is a move aimed at early on.Black 141: If B #141 plays at [H5], W would play #141 and B stones [D6]-[E6] are captured.White 144: W #144 connects at [a] ([H12]) would be safe, but W sees that the situation is so bad
that he has to gamble for the last chance.
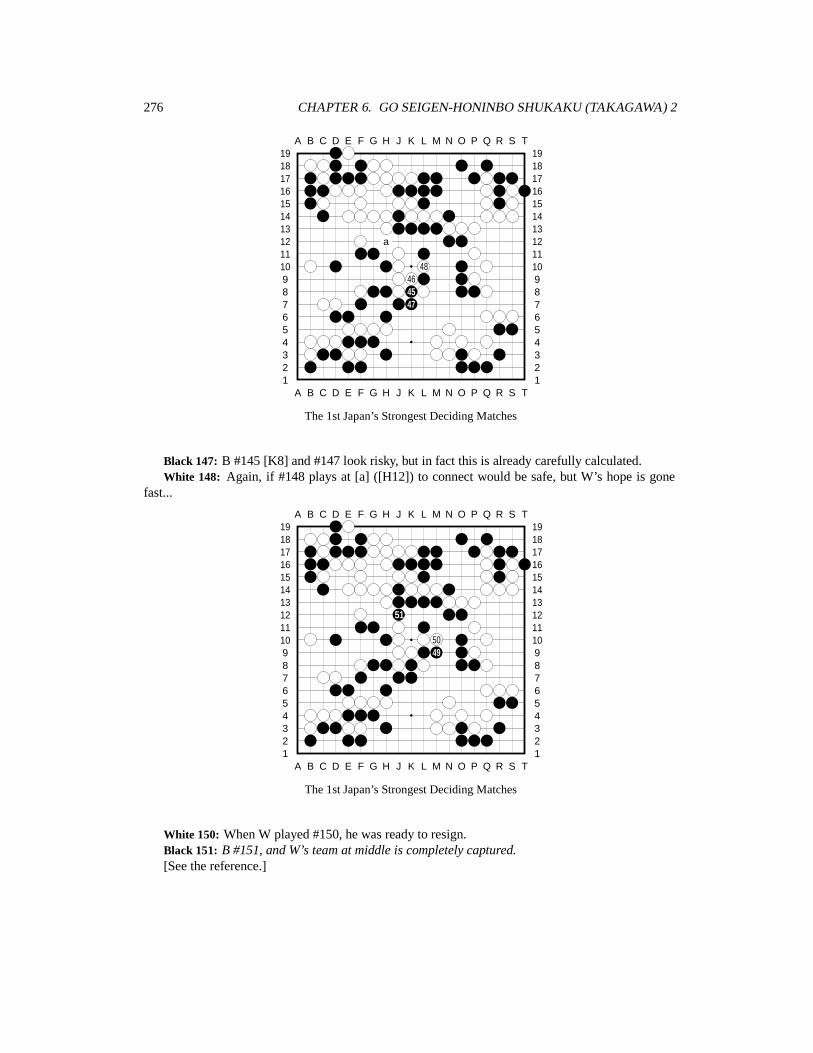
276 CHAPTER 6. GO SEIGEN-HONINBO SHUKAKU (TAKAGAWA) 2
A B C D E F G H J K L M N O P Q R S T
A B C D E F G H J K L M N O P Q R S T12345678910111213141516171819
12345678910111213141516171819
a
48464547
The 1st Japan’s Strongest Deciding Matches
Black 147: B #145 [K8] and #147 look risky, but in fact this is already carefully calculated.White 148: Again, if #148 plays at [a] ([H12]) to connect would be safe, but W’s hope is gone
fast...
A B C D E F G H J K L M N O P Q R S T
A B C D E F G H J K L M N O P Q R S T12345678910111213141516171819
12345678910111213141516171819
51
5049
The 1st Japan’s Strongest Deciding Matches
White 150: When W played #150, he was ready to resign.Black 151: B #151, and W’s team at middle is completely captured.[See the reference.]
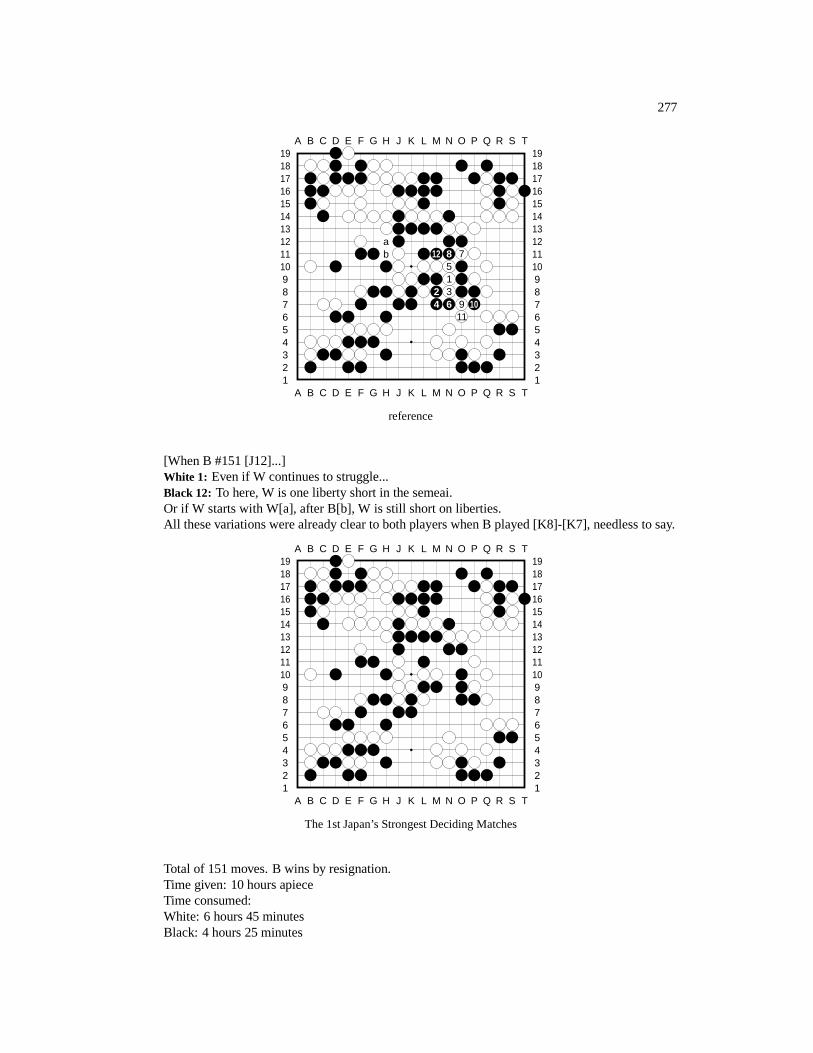
277
A B C D E F G H J K L M N O P Q R S T
A B C D E F G H J K L M N O P Q R S T12345678910111213141516171819
12345678910111213141516171819
ab 12 8 7
51
2 34 6 9 10
11
reference
[When B #151 [J12]...]White 1: Even if W continues to struggle...Black 12: To here, W is one liberty short in the semeai.Or if W starts with W[a], after B[b], W is still short on liberties.All these variations were already clear to both players when B played [K8]-[K7], needless to say.
A B C D E F G H J K L M N O P Q R S T
A B C D E F G H J K L M N O P Q R S T12345678910111213141516171819
12345678910111213141516171819
The 1st Japan’s Strongest Deciding Matches
Total of 151 moves. B wins by resignation.Time given: 10 hours apieceTime consumed:White: 6 hours 45 minutesBlack: 4 hours 25 minutes

278 CHAPTER 6. GO SEIGEN-HONINBO SHUKAKU (TAKAGAWA) 2
Chapter 7
Go Seigen-Hashimoto
Hashimoto Utaro is probably best known of two things: his leadership in the Kansai Ki’in and hislong Go career. According to the Go Player’s Almanac (Ishi Press, 1992), he probably holds theall-time longevity record for a professional (and he’s extending this record; he was born in February1907). Being a 3-time Honinbo title winner and the loser in the 1st Kisei title match (to FujisawaShuko), Hashimoto has also composed a tsume-go problem a day for several decades!
Some of his games with Go Seigen in his early years were associated with some interesting stories.In 1933, Kitani Minoru and Go Seigen spent a summer together in Nagano (Mrs. Kitani’s
hometwon). When the autumn arrived, their return to Tokyo marked the beginning of the New FusekiEra. (Of course, both players had had thoughts on new openings and had tried some new movesbefore the summer; a revolution doesn’t occur in one day or two.)
Just at this time, Yomiuri Newspaper sponsered a Japanese Go Championship to celebrate thepublication of the No. 20,000 of the newspaper. It was a knockout tournament in which sixteen 5-danor above players (i.e. perhaps all the top players at the time) participated. The winner would earnthe bonus to play a game against Meijin Honinbo Shusai (9-dan). The finalists were Go Seigen andHasahimoto Utaro.
As mentioned above, Kitani and Wu had just brought New Fuseki to the Go world, and this newstyle of playing immediately became popular. It emphasized on the global situation on the board, andthat local values should be determined by its influence to the whole board. Based on this philosophy,all kind of starting moves at the corners could be used as long as they sighted on the whole board,thus the opening moves were no longer limited to the traditional 3-4 points, and players, especiallyamateurs, were relieved from the burden of complicated josekis.
There were, naturally, traditional forces against this new current. The highest representative ofthe old style was of course Meijin Shusai. Therefore, before this final match between Go Seigen andHashimoto, the fans were earnestly hoping for a Go Seigen victory that would lead to a clash betweenthe old (Shusai) and the new (Wu).
As it turned out, Wu won the game. The president of Yomiuri (which would go on to sponser theShusai-Wu game) was so excited that he held Hashimoto’s hands and said, “Thank you so much! Youlost so wonderfully!”
“I almost exploded.” Hashimoto later said, “I was just in the pain and disappointment of losinga game, and I received such a greeting! However, the Go world was full of excitement afterwards;based on this result, I probably lost the game correctly.”
Go Seigen and Meijin’s match started later in October, 1933. It turned out to be a famous gamein which Go Seigen started the game with a 3-3, a hoshi (star point), and the tengen (center point) ashis first 3 moves.
Go Seigen had been a religious person; in 1944 he became a convert to a Buddhist sect, and heretired from Go. (Notice that was the time WWII was moving toward its final stages, and Go Seigen,
279
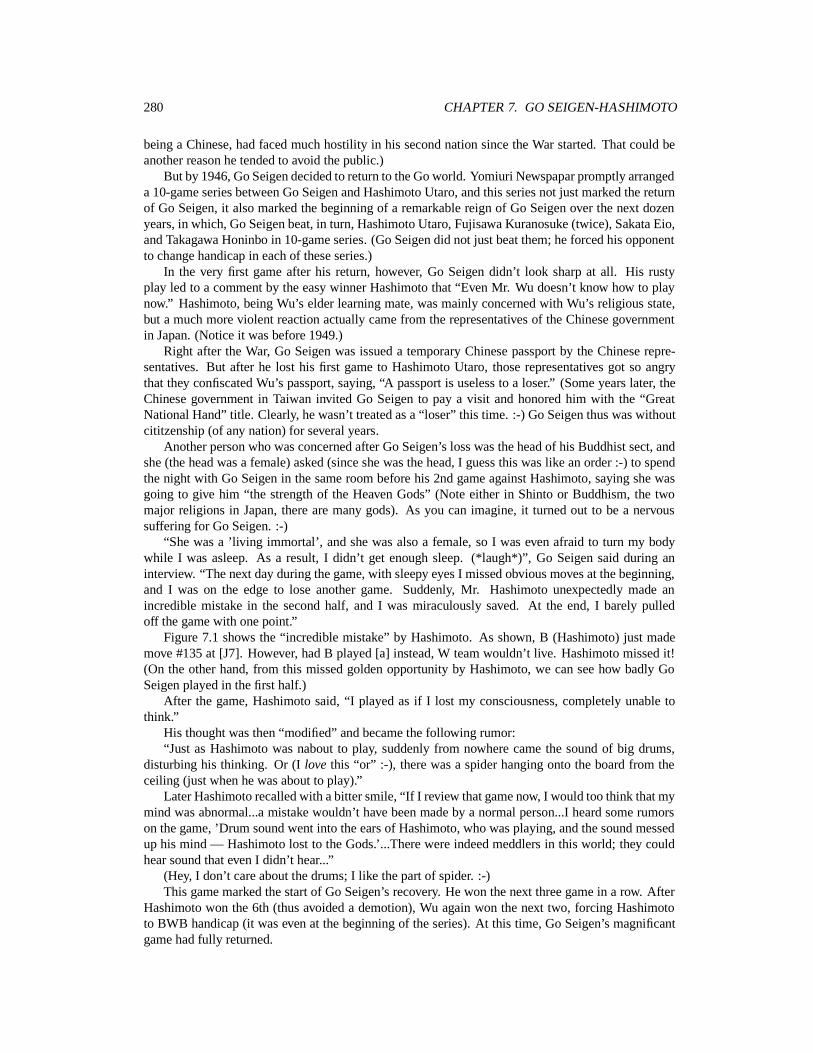
280 CHAPTER 7. GO SEIGEN-HASHIMOTO
being a Chinese, had faced much hostility in his second nation since the War started. That could beanother reason he tended to avoid the public.)
But by 1946, Go Seigen decided to return to the Go world. Yomiuri Newspapar promptly arrangeda 10-game series between Go Seigen and Hashimoto Utaro, and this series not just marked the returnof Go Seigen, it also marked the beginning of a remarkable reign of Go Seigen over the next dozenyears, in which, Go Seigen beat, in turn, Hashimoto Utaro, Fujisawa Kuranosuke (twice), Sakata Eio,and Takagawa Honinbo in 10-game series. (Go Seigen did not just beat them; he forced his opponentto change handicap in each of these series.)
In the very first game after his return, however, Go Seigen didn’t look sharp at all. His rustyplay led to a comment by the easy winner Hashimoto that “Even Mr. Wu doesn’t know how to playnow.” Hashimoto, being Wu’s elder learning mate, was mainly concerned with Wu’s religious state,but a much more violent reaction actually came from the representatives of the Chinese governmentin Japan. (Notice it was before 1949.)
Right after the War, Go Seigen was issued a temporary Chinese passport by the Chinese repre-sentatives. But after he lost his first game to Hashimoto Utaro, those representatives got so angrythat they confiscated Wu’s passport, saying, “A passport is useless to a loser.” (Some years later, theChinese government in Taiwan invited Go Seigen to pay a visit and honored him with the “GreatNational Hand” title. Clearly, he wasn’t treated as a “loser” this time. :-) Go Seigen thus was withoutcititzenship (of any nation) for several years.
Another person who was concerned after Go Seigen’s loss was the head of his Buddhist sect, andshe (the head was a female) asked (since she was the head, I guess this was like an order :-) to spendthe night with Go Seigen in the same room before his 2nd game against Hashimoto, saying she wasgoing to give him “the strength of the Heaven Gods” (Note either in Shinto or Buddhism, the twomajor religions in Japan, there are many gods). As you can imagine, it turned out to be a nervoussuffering for Go Seigen. :-)
“She was a ’living immortal’, and she was also a female, so I was even afraid to turn my bodywhile I was asleep. As a result, I didn’t get enough sleep. (*laugh*)”, Go Seigen said during aninterview. “The next day during the game, with sleepy eyes I missed obvious moves at the beginning,and I was on the edge to lose another game. Suddenly, Mr. Hashimoto unexpectedly made anincredible mistake in the second half, and I was miraculously saved. At the end, I barely pulledoff the game with one point.”
Figure 7.1 shows the “incredible mistake” by Hashimoto. As shown, B (Hashimoto) just mademove #135 at [J7]. However, had B played [a] instead, W team wouldn’t live. Hashimoto missed it!(On the other hand, from this missed golden opportunity by Hashimoto, we can see how badly GoSeigen played in the first half.)
After the game, Hashimoto said, “I played as if I lost my consciousness, completely unable tothink.”
His thought was then “modified” and became the following rumor:“Just as Hashimoto was nabout to play, suddenly from nowhere came the sound of big drums,
disturbing his thinking. Or (I love this “or” :-), there was a spider hanging onto the board from theceiling (just when he was about to play).”
Later Hashimoto recalled with a bitter smile, “If I review that game now, I would too think that mymind was abnormal...a mistake wouldn’t have been made by a normal person...I heard some rumorson the game, ’Drum sound went into the ears of Hashimoto, who was playing, and the sound messedup his mind — Hashimoto lost to the Gods.’...There were indeed meddlers in this world; they couldhear sound that even I didn’t hear...”
(Hey, I don’t care about the drums; I like the part of spider. :-)This game marked the start of Go Seigen’s recovery. He won the next three game in a row. After
Hashimoto won the 6th (thus avoided a demotion), Wu again won the next two, forcing Hashimototo BWB handicap (it was even at the beginning of the series). At this time, Go Seigen’s magnificantgame had fully returned.
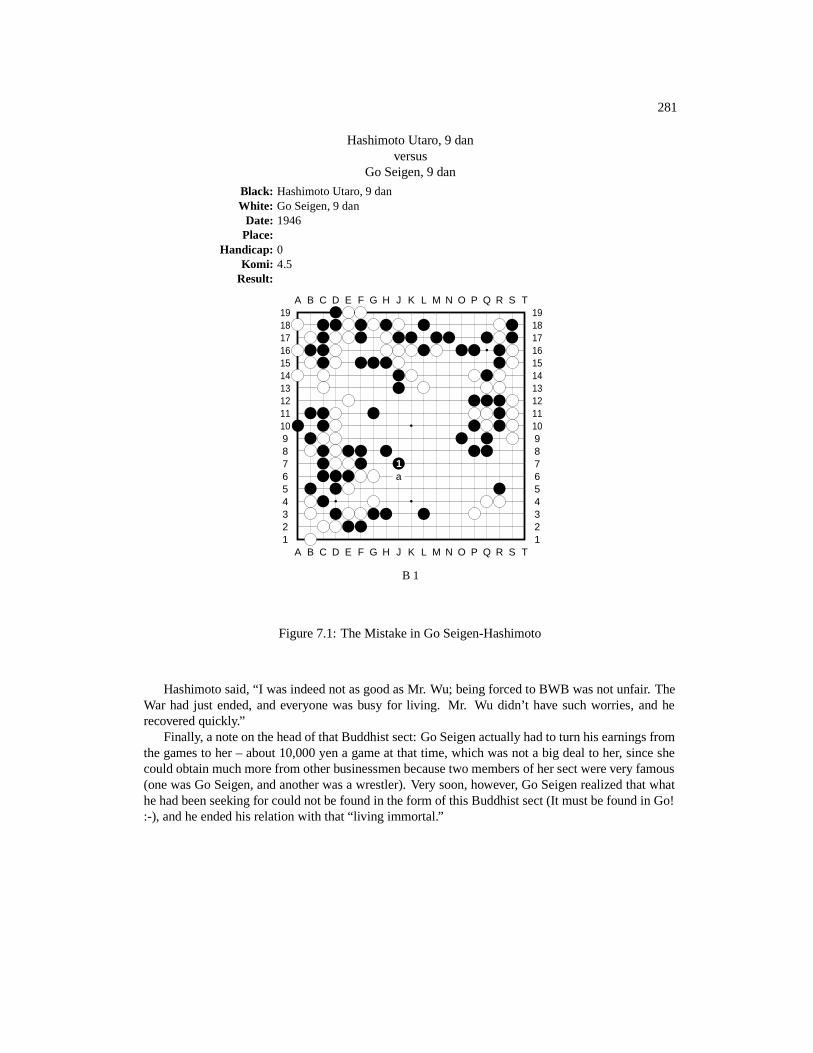
281
Hashimoto Utaro, 9 danversus
Go Seigen, 9 dan
Black: Hashimoto Utaro, 9 danWhite: Go Seigen, 9 dan
Date: 1946Place:
Handicap: 0Komi: 4.5
Result:
A B C D E F G H J K L M N O P Q R S T
A B C D E F G H J K L M N O P Q R S T12345678910111213141516171819
12345678910111213141516171819
1a
B 1
Figure 7.1: The Mistake in Go Seigen-Hashimoto
Hashimoto said, “I was indeed not as good as Mr. Wu; being forced to BWB was not unfair. TheWar had just ended, and everyone was busy for living. Mr. Wu didn’t have such worries, and herecovered quickly.”
Finally, a note on the head of that Buddhist sect: Go Seigen actually had to turn his earnings fromthe games to her – about 10,000 yen a game at that time, which was not a big deal to her, since shecould obtain much more from other businessmen because two members of her sect were very famous(one was Go Seigen, and another was a wrestler). Very soon, however, Go Seigen realized that whathe had been seeking for could not be found in the form of this Buddhist sect (It must be found in Go!:-), and he ended his relation with that “living immortal.”
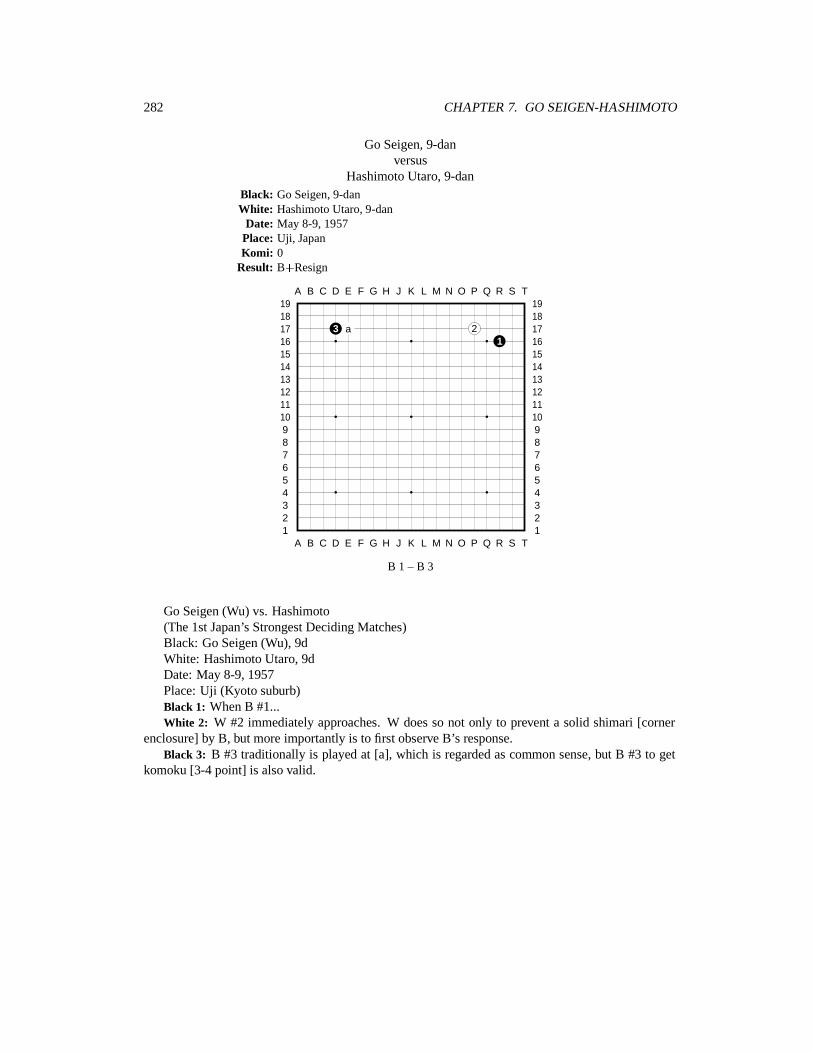
282 CHAPTER 7. GO SEIGEN-HASHIMOTO
Go Seigen, 9-danversus
Hashimoto Utaro, 9-danBlack: Go Seigen, 9-danWhite: Hashimoto Utaro, 9-dan
Date: May 8-9, 1957Place: Uji, JapanKomi: 0
Result: B�Resign
A B C D E F G H J K L M N O P Q R S T
A B C D E F G H J K L M N O P Q R S T12345678910111213141516171819
12345678910111213141516171819
3 a 21
B 1 – B 3
Go Seigen (Wu) vs. Hashimoto(The 1st Japan’s Strongest Deciding Matches)Black: Go Seigen (Wu), 9dWhite: Hashimoto Utaro, 9dDate: May 8-9, 1957Place: Uji (Kyoto suburb)Black 1: When B #1...White 2: W #2 immediately approaches. W does so not only to prevent a solid shimari [corner
enclosure] by B, but more importantly is to first observe B’s response.Black 3: B #3 traditionally is played at [a], which is regarded as common sense, but B #3 to get
komoku [3-4 point] is also valid.
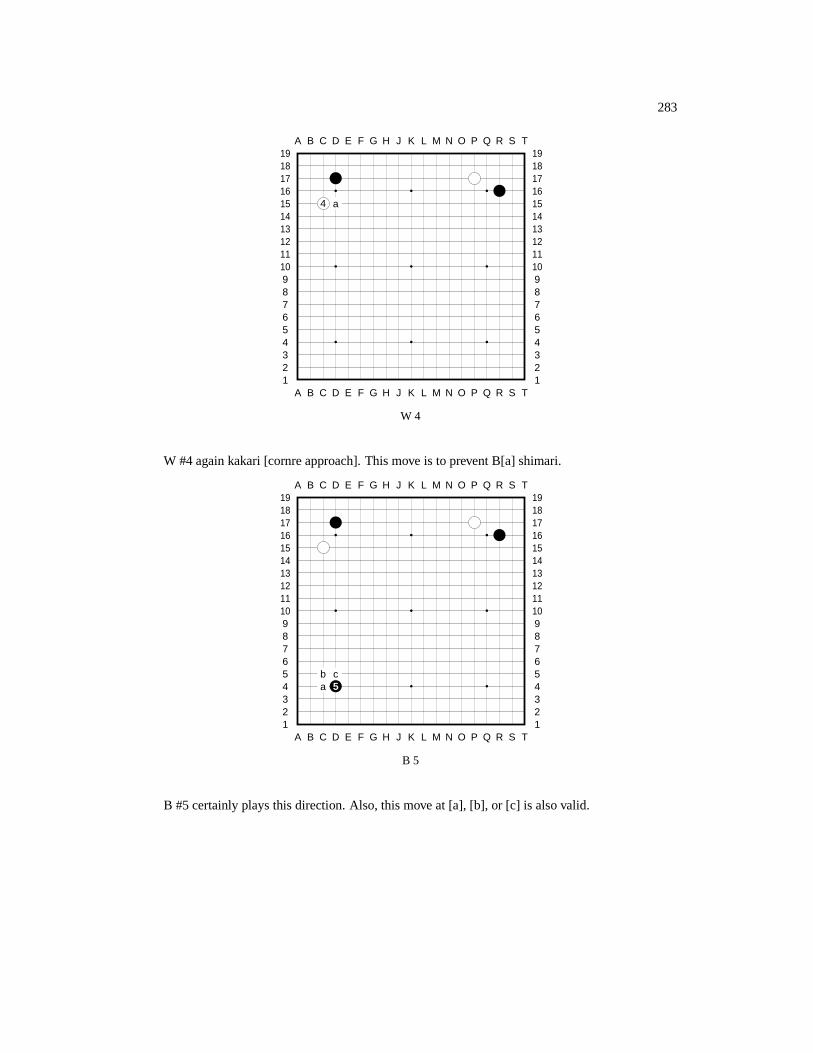
283
A B C D E F G H J K L M N O P Q R S T
A B C D E F G H J K L M N O P Q R S T12345678910111213141516171819
12345678910111213141516171819
4 a
W 4
W #4 again kakari [cornre approach]. This move is to prevent B[a] shimari.
A B C D E F G H J K L M N O P Q R S T
A B C D E F G H J K L M N O P Q R S T12345678910111213141516171819
12345678910111213141516171819
b ca 5
B 5
B #5 certainly plays this direction. Also, this move at [a], [b], or [c] is also valid.
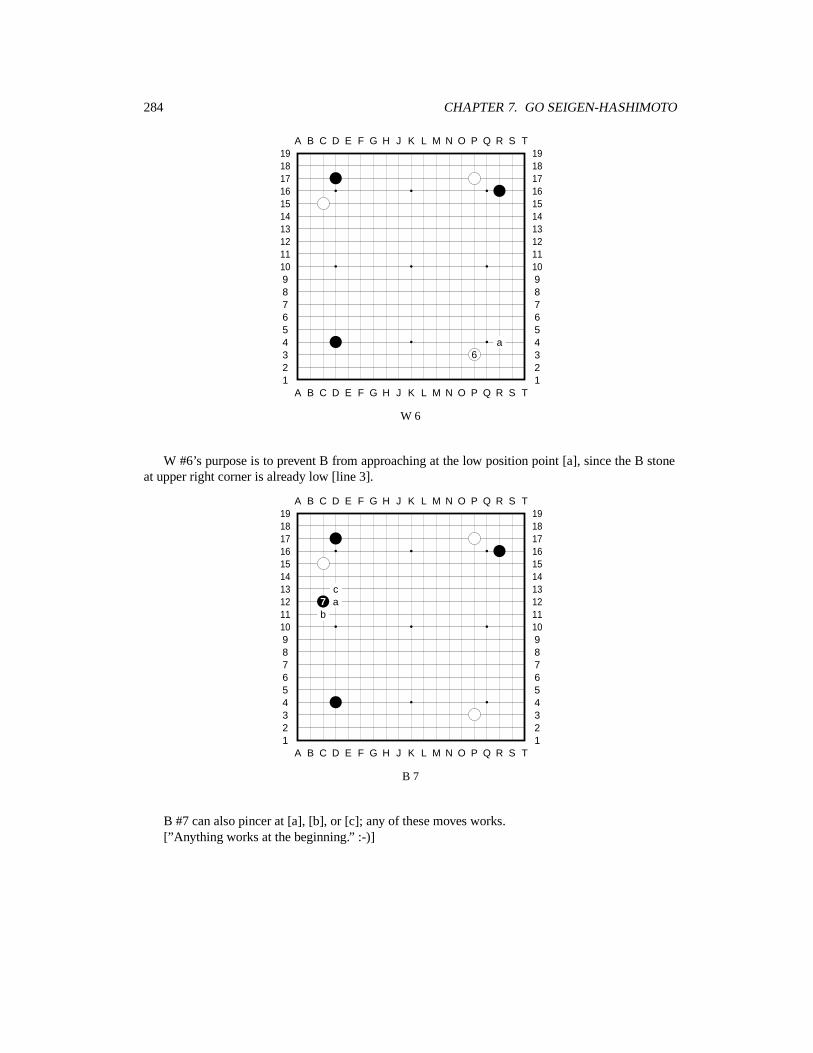
284 CHAPTER 7. GO SEIGEN-HASHIMOTO
A B C D E F G H J K L M N O P Q R S T
A B C D E F G H J K L M N O P Q R S T12345678910111213141516171819
12345678910111213141516171819
a6
W 6
W #6’s purpose is to prevent B from approaching at the low position point [a], since the B stoneat upper right corner is already low [line 3].
A B C D E F G H J K L M N O P Q R S T
A B C D E F G H J K L M N O P Q R S T12345678910111213141516171819
12345678910111213141516171819
c7 ab
B 7
B #7 can also pincer at [a], [b], or [c]; any of these moves works.[”Anything works at the beginning.” :-)]

285
A B C D E F G H J K L M N O P Q R S T
A B C D E F G H J K L M N O P Q R S T12345678910111213141516171819
12345678910111213141516171819
a8
W 8
Under this situation, W #8 has many ways to play. For example, W[a] [Q14] ogeima is alsointeresting. Also —
[See the variation.]
A B C D E F G H J K L M N O P Q R S T
A B C D E F G H J K L M N O P Q R S T12345678910111213141516171819
12345678910111213141516171819
4
2
3 1
variation
W could also consider this joseki...
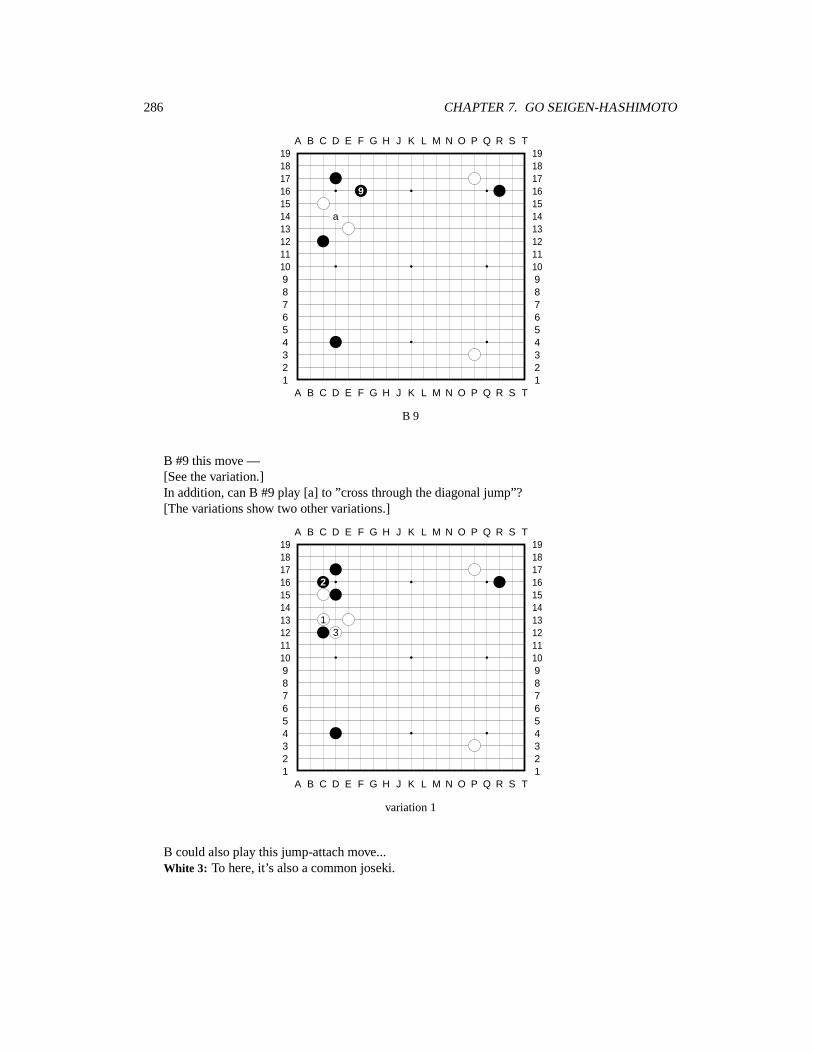
286 CHAPTER 7. GO SEIGEN-HASHIMOTO
A B C D E F G H J K L M N O P Q R S T
A B C D E F G H J K L M N O P Q R S T12345678910111213141516171819
12345678910111213141516171819
9
a
B 9
B #9 this move —[See the variation.]In addition, can B #9 play [a] to ”cross through the diagonal jump”?[The variations show two other variations.]
A B C D E F G H J K L M N O P Q R S T
A B C D E F G H J K L M N O P Q R S T12345678910111213141516171819
12345678910111213141516171819
2
13
variation 1
B could also play this jump-attach move...White 3: To here, it’s also a common joseki.
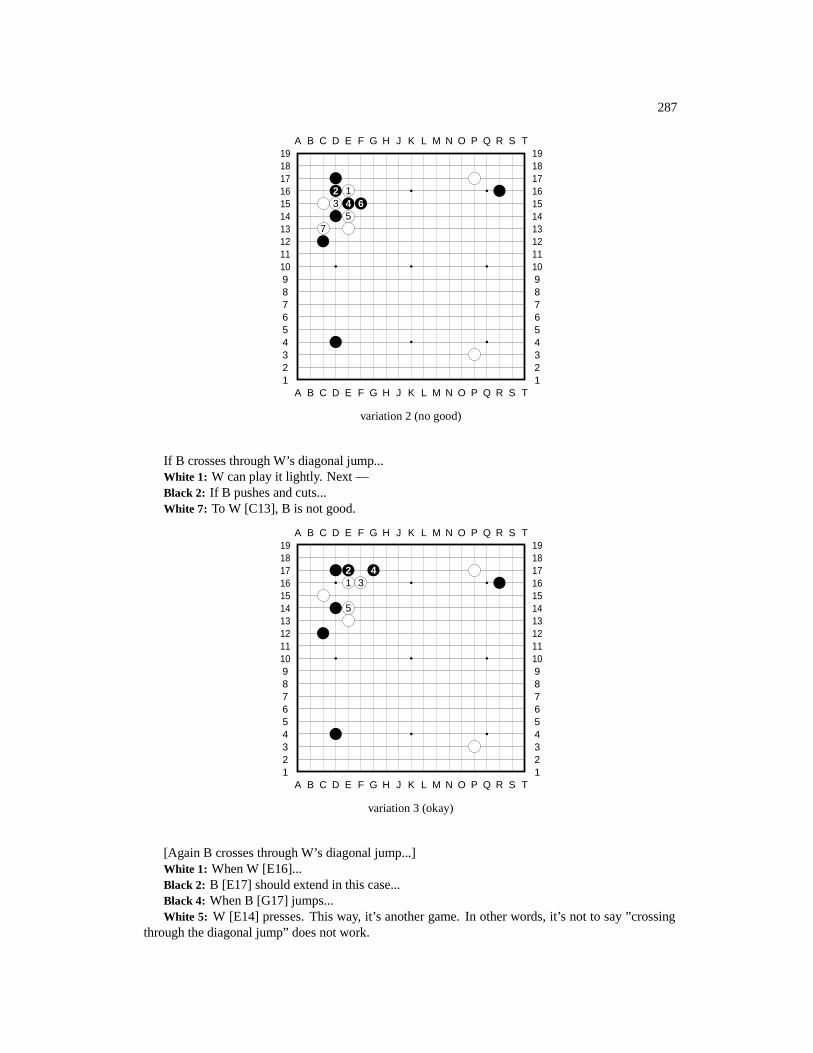
287
A B C D E F G H J K L M N O P Q R S T
A B C D E F G H J K L M N O P Q R S T12345678910111213141516171819
12345678910111213141516171819
2 13 4 6
57
variation 2 (no good)
If B crosses through W’s diagonal jump...White 1: W can play it lightly. Next —Black 2: If B pushes and cuts...White 7: To W [C13], B is not good.
A B C D E F G H J K L M N O P Q R S T
A B C D E F G H J K L M N O P Q R S T12345678910111213141516171819
12345678910111213141516171819
2 41 3
5
variation 3 (okay)
[Again B crosses through W’s diagonal jump...]White 1: When W [E16]...Black 2: B [E17] should extend in this case...Black 4: When B [G17] jumps...White 5: W [E14] presses. This way, it’s another game. In other words, it’s not to say ”crossing
through the diagonal jump” does not work.
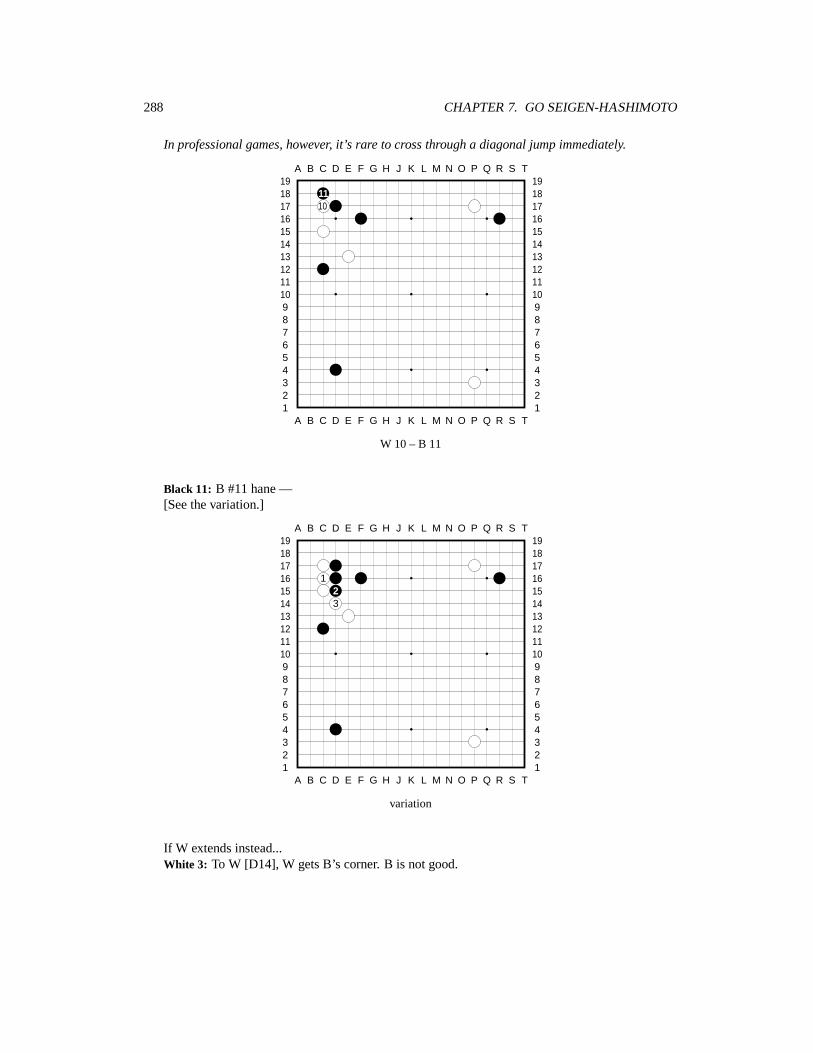
288 CHAPTER 7. GO SEIGEN-HASHIMOTO
In professional games, however, it’s rare to cross through a diagonal jump immediately.
A B C D E F G H J K L M N O P Q R S T
A B C D E F G H J K L M N O P Q R S T12345678910111213141516171819
12345678910111213141516171819
1110
W 10 – B 11
Black 11: B #11 hane —[See the variation.]
A B C D E F G H J K L M N O P Q R S T
A B C D E F G H J K L M N O P Q R S T12345678910111213141516171819
12345678910111213141516171819
123
variation
If W extends instead...White 3: To W [D14], W gets B’s corner. B is not good.
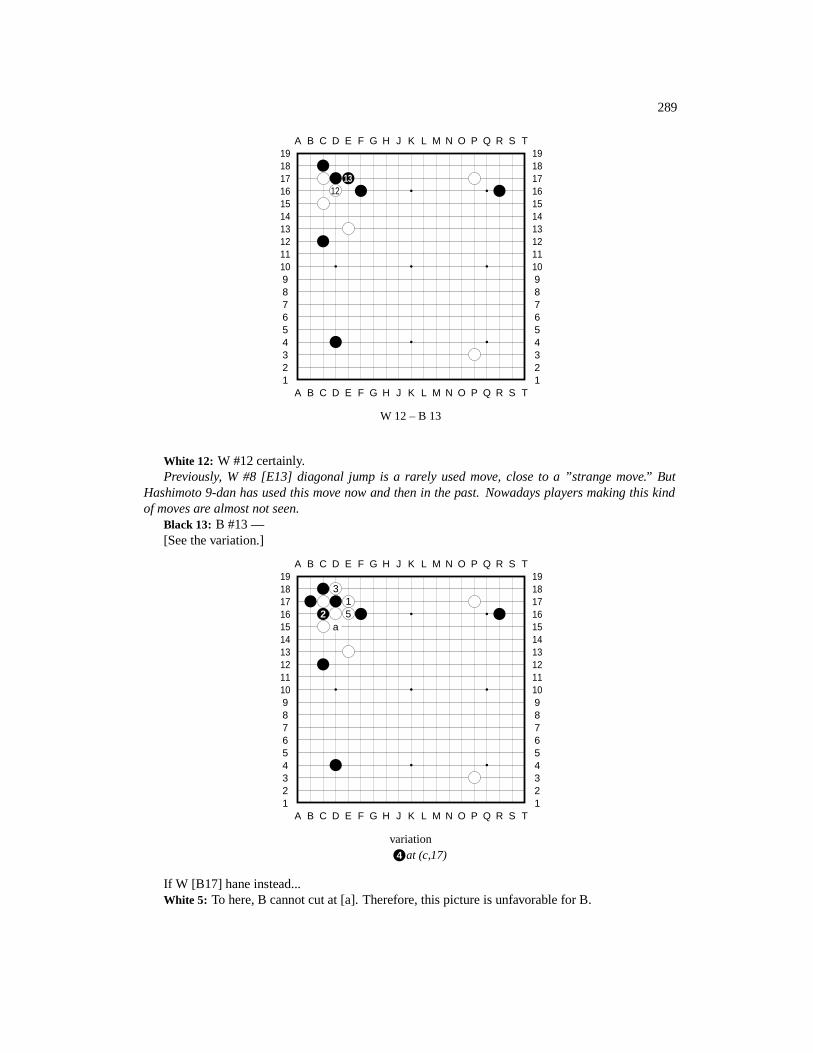
289
A B C D E F G H J K L M N O P Q R S T
A B C D E F G H J K L M N O P Q R S T12345678910111213141516171819
12345678910111213141516171819
1312
W 12 – B 13
White 12: W #12 certainly.Previously, W #8 [E13] diagonal jump is a rarely used move, close to a ”strange move.” But
Hashimoto 9-dan has used this move now and then in the past. Nowadays players making this kindof moves are almost not seen.
Black 13: B #13 —[See the variation.]
A B C D E F G H J K L M N O P Q R S T
A B C D E F G H J K L M N O P Q R S T12345678910111213141516171819
12345678910111213141516171819
31
2 5a
variation4 at (c,17)
If W [B17] hane instead...White 5: To here, B cannot cut at [a]. Therefore, this picture is unfavorable for B.
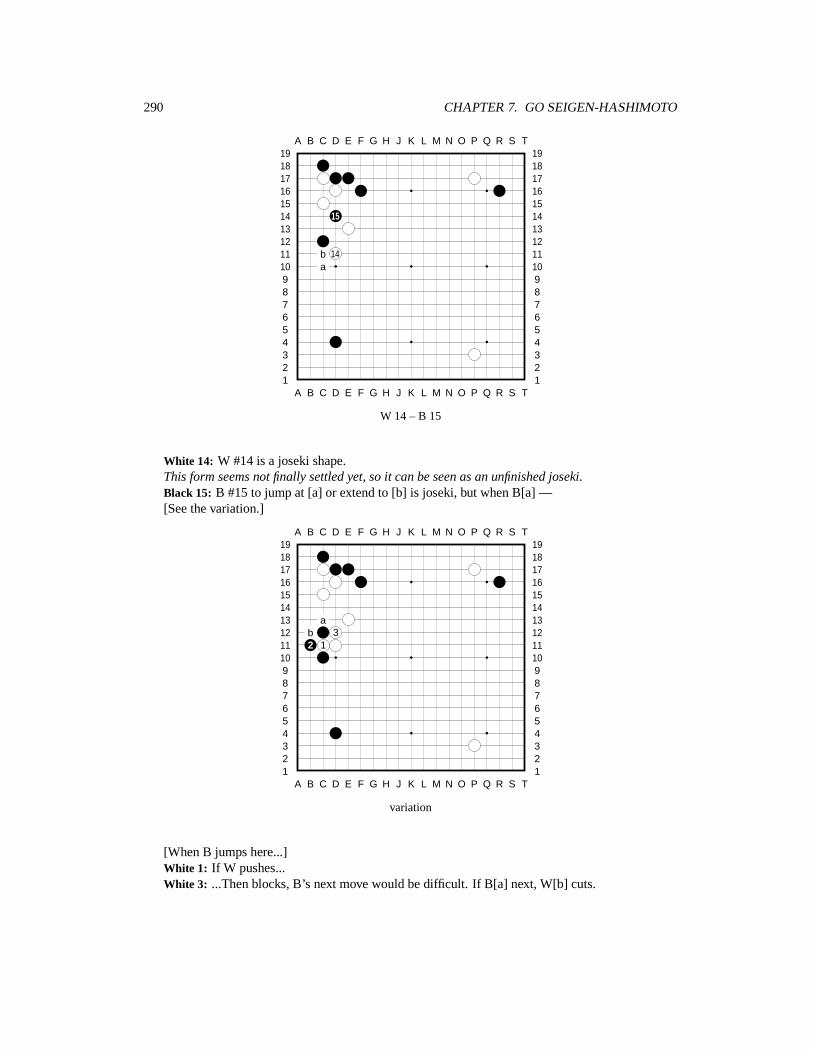
290 CHAPTER 7. GO SEIGEN-HASHIMOTO
A B C D E F G H J K L M N O P Q R S T
A B C D E F G H J K L M N O P Q R S T12345678910111213141516171819
12345678910111213141516171819
15
b 14a
W 14 – B 15
White 14: W #14 is a joseki shape.This form seems not finally settled yet, so it can be seen as an unfinished joseki.Black 15: B #15 to jump at [a] or extend to [b] is joseki, but when B[a] —[See the variation.]
A B C D E F G H J K L M N O P Q R S T
A B C D E F G H J K L M N O P Q R S T12345678910111213141516171819
12345678910111213141516171819
ab 32 1
variation
[When B jumps here...]White 1: If W pushes...White 3: ...Then blocks, B’s next move would be difficult. If B[a] next, W[b] cuts.
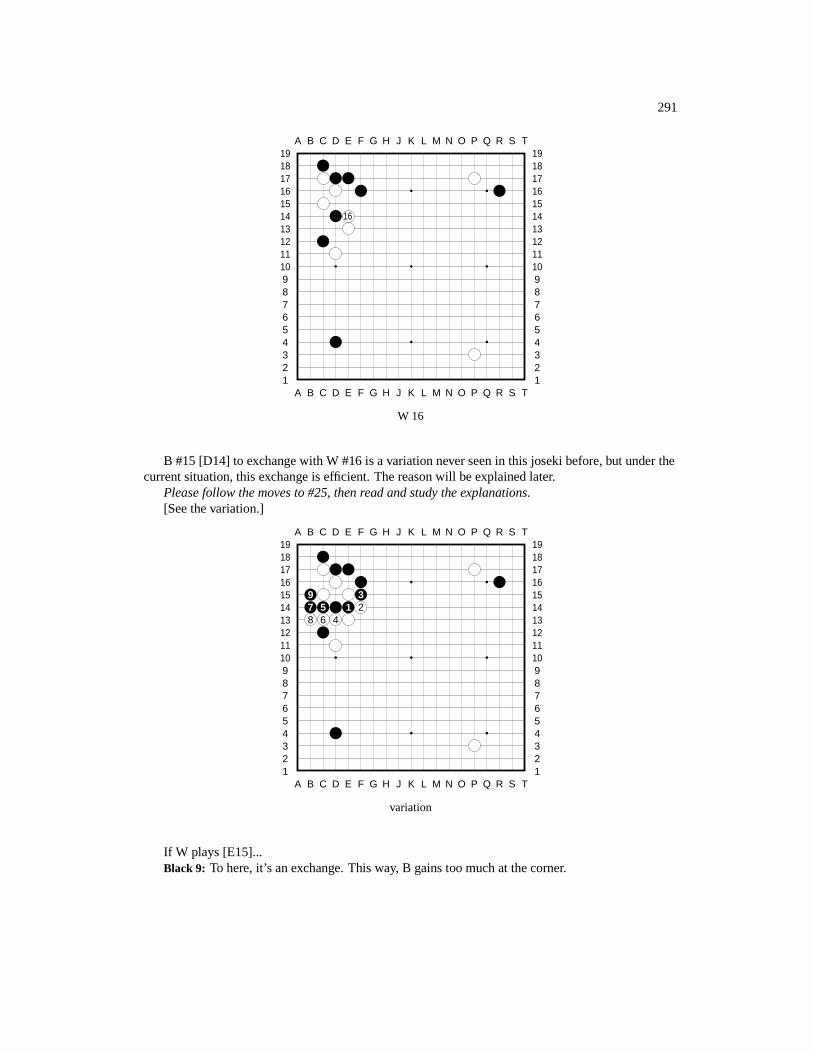
291
A B C D E F G H J K L M N O P Q R S T
A B C D E F G H J K L M N O P Q R S T12345678910111213141516171819
12345678910111213141516171819
16
W 16
B #15 [D14] to exchange with W #16 is a variation never seen in this joseki before, but under thecurrent situation, this exchange is efficient. The reason will be explained later.
Please follow the moves to #25, then read and study the explanations.[See the variation.]
A B C D E F G H J K L M N O P Q R S T
A B C D E F G H J K L M N O P Q R S T12345678910111213141516171819
12345678910111213141516171819
9 37 5 1 28 6 4
variation
If W plays [E15]...Black 9: To here, it’s an exchange. This way, B gains too much at the corner.
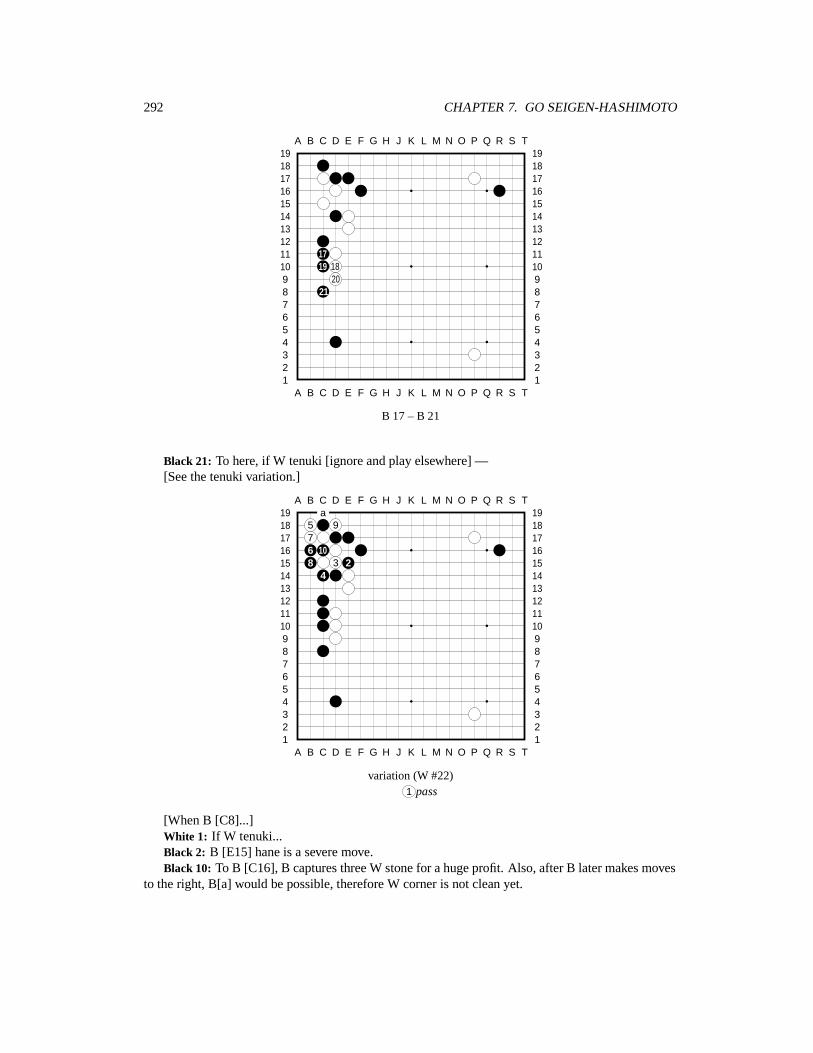
292 CHAPTER 7. GO SEIGEN-HASHIMOTO
A B C D E F G H J K L M N O P Q R S T
A B C D E F G H J K L M N O P Q R S T12345678910111213141516171819
12345678910111213141516171819
1719 18
2021
B 17 – B 21
Black 21: To here, if W tenuki [ignore and play elsewhere] —[See the tenuki variation.]
A B C D E F G H J K L M N O P Q R S T
A B C D E F G H J K L M N O P Q R S T12345678910111213141516171819
12345678910111213141516171819a
5 976 108 3 2
4
variation (W #22)1 pass
[When B [C8]...]White 1: If W tenuki...Black 2: B [E15] hane is a severe move.Black 10: To B [C16], B captures three W stone for a huge profit. Also, after B later makes moves
to the right, B[a] would be possible, therefore W corner is not clean yet.
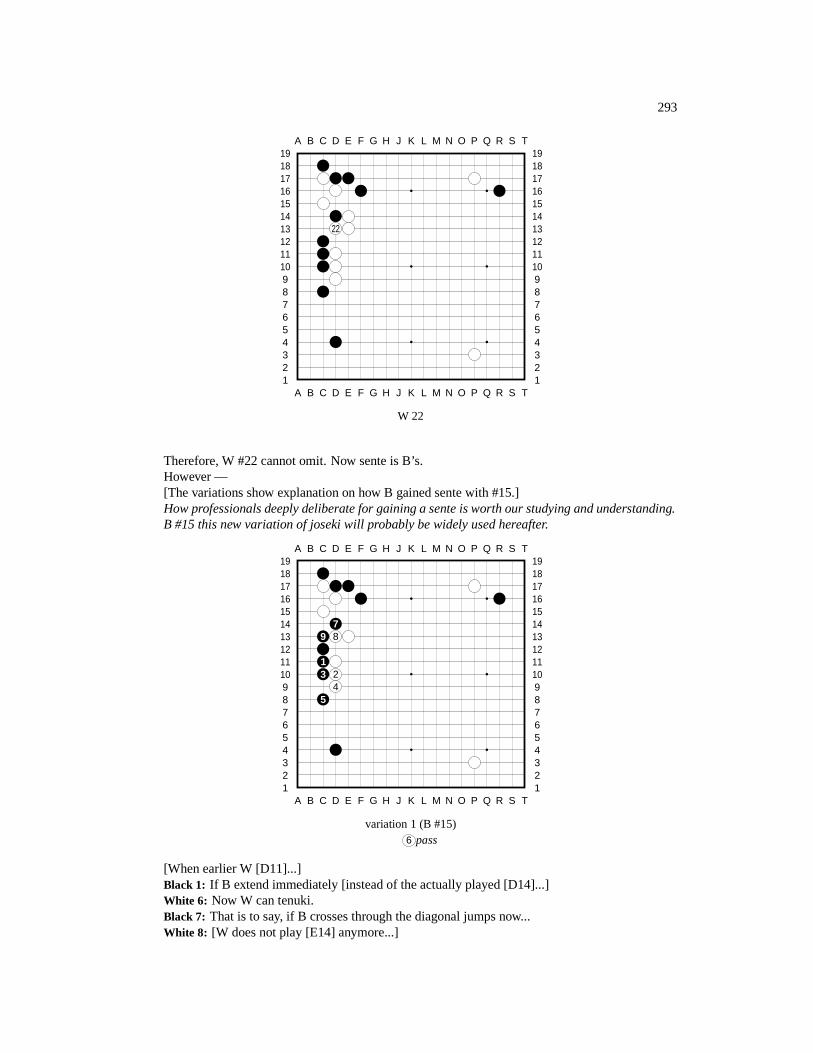
293
A B C D E F G H J K L M N O P Q R S T
A B C D E F G H J K L M N O P Q R S T12345678910111213141516171819
12345678910111213141516171819
22
W 22
Therefore, W #22 cannot omit. Now sente is B’s.However —[The variations show explanation on how B gained sente with #15.]How professionals deeply deliberate for gaining a sente is worth our studying and understanding.B #15 this new variation of joseki will probably be widely used hereafter.
A B C D E F G H J K L M N O P Q R S T
A B C D E F G H J K L M N O P Q R S T12345678910111213141516171819
12345678910111213141516171819
79 8
13 2
45
variation 1 (B #15)6 pass
[When earlier W [D11]...]Black 1: If B extend immediately [instead of the actually played [D14]...]White 6: Now W can tenuki.Black 7: That is to say, if B crosses through the diagonal jumps now...White 8: [W does not play [E14] anymore...]
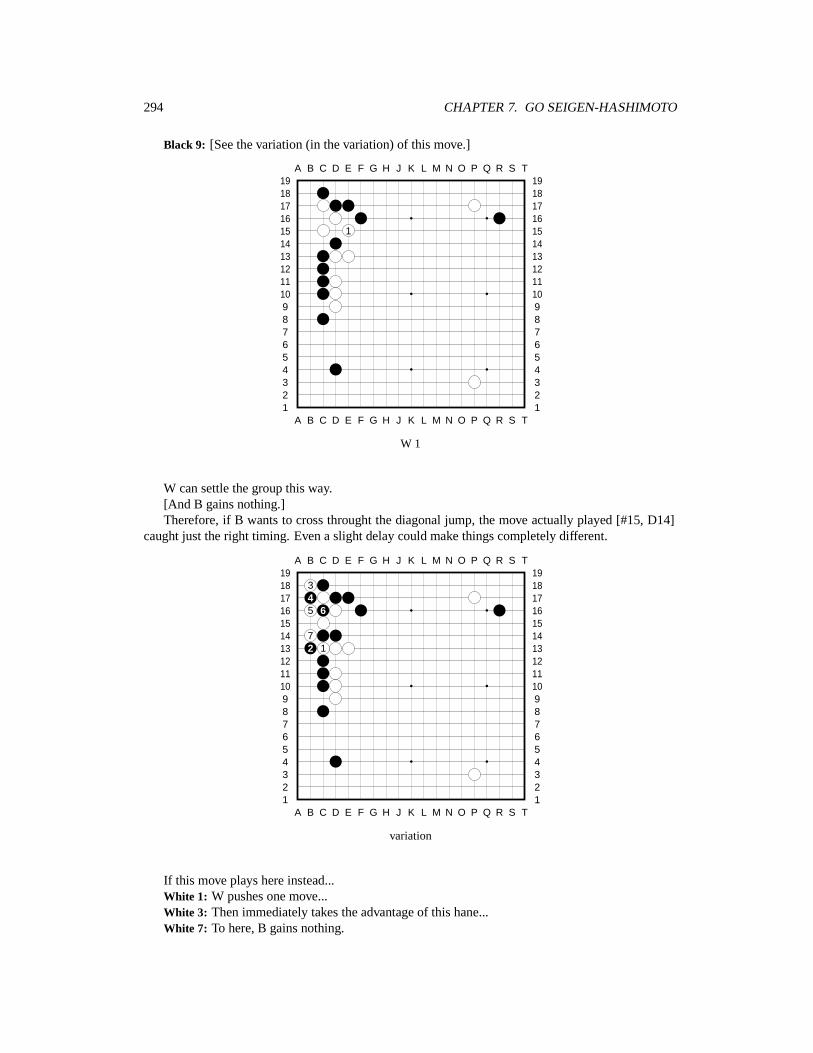
294 CHAPTER 7. GO SEIGEN-HASHIMOTO
Black 9: [See the variation (in the variation) of this move.]
A B C D E F G H J K L M N O P Q R S T
A B C D E F G H J K L M N O P Q R S T12345678910111213141516171819
12345678910111213141516171819
1
W 1
W can settle the group this way.[And B gains nothing.]Therefore, if B wants to cross throught the diagonal jump, the move actually played [#15, D14]
caught just the right timing. Even a slight delay could make things completely different.
A B C D E F G H J K L M N O P Q R S T
A B C D E F G H J K L M N O P Q R S T12345678910111213141516171819
12345678910111213141516171819
345 6
72 1
variation
If this move plays here instead...White 1: W pushes one move...White 3: Then immediately takes the advantage of this hane...White 7: To here, B gains nothing.
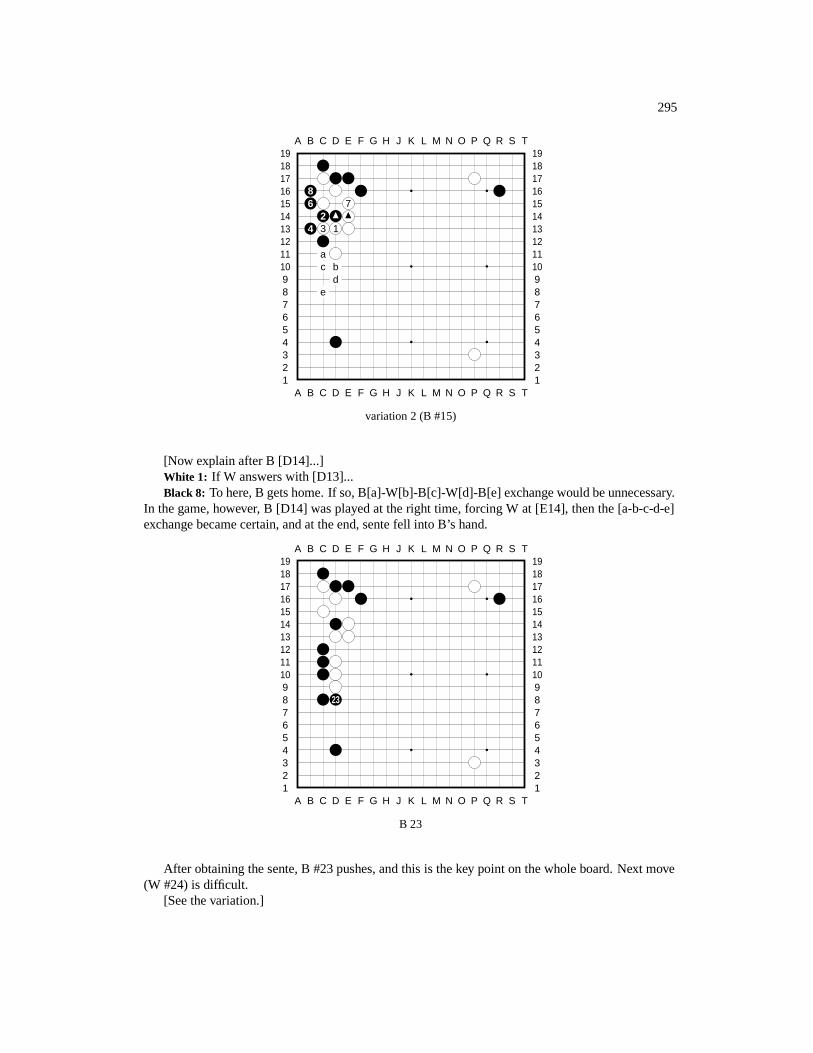
295
A B C D E F G H J K L M N O P Q R S T
A B C D E F G H J K L M N O P Q R S T12345678910111213141516171819
12345678910111213141516171819
86 7
24 3 1
ac b
de
variation 2 (B #15)
[Now explain after B [D14]...]White 1: If W answers with [D13]...Black 8: To here, B gets home. If so, B[a]-W[b]-B[c]-W[d]-B[e] exchange would be unnecessary.
In the game, however, B [D14] was played at the right time, forcing W at [E14], then the [a-b-c-d-e]exchange became certain, and at the end, sente fell into B’s hand.
A B C D E F G H J K L M N O P Q R S T
A B C D E F G H J K L M N O P Q R S T12345678910111213141516171819
12345678910111213141516171819
23
B 23
After obtaining the sente, B #23 pushes, and this is the key point on the whole board. Next move(W #24) is difficult.
[See the variation.]
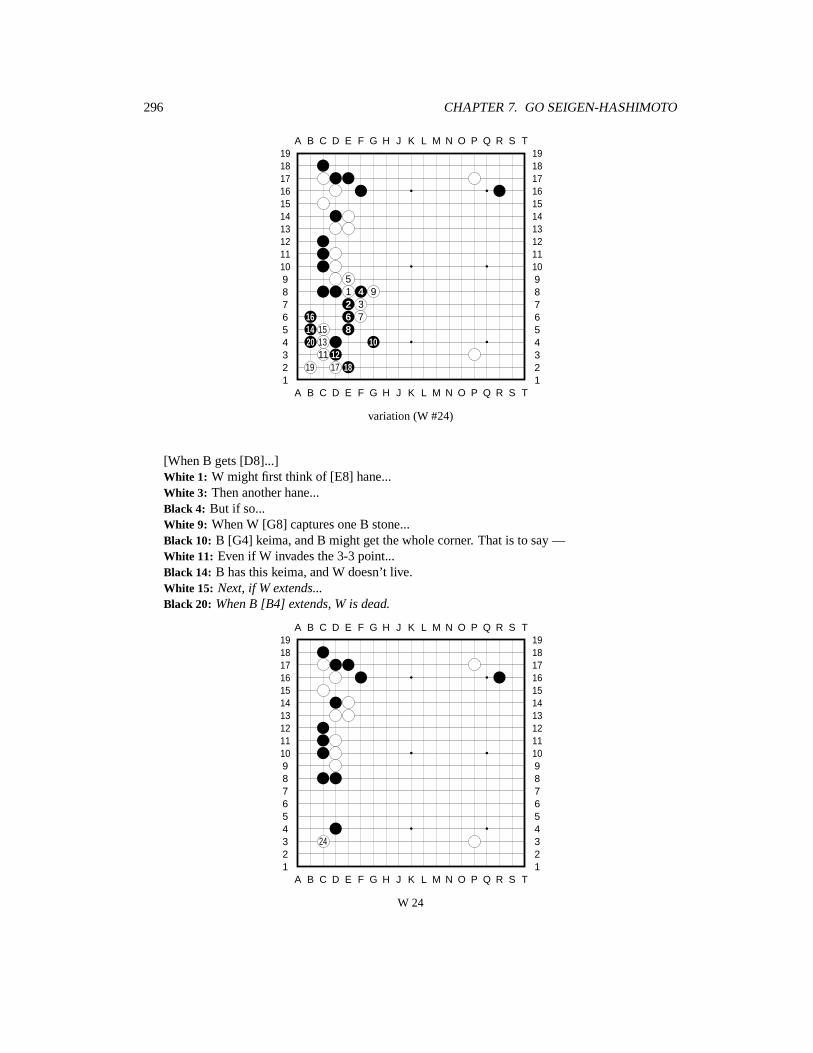
296 CHAPTER 7. GO SEIGEN-HASHIMOTO
A B C D E F G H J K L M N O P Q R S T
A B C D E F G H J K L M N O P Q R S T12345678910111213141516171819
12345678910111213141516171819
51 4 92 3
16 6 714 15 820 13 10
11 1219 17 18
variation (W #24)
[When B gets [D8]...]White 1: W might first think of [E8] hane...White 3: Then another hane...Black 4: But if so...White 9: When W [G8] captures one B stone...Black 10: B [G4] keima, and B might get the whole corner. That is to say —White 11: Even if W invades the 3-3 point...Black 14: B has this keima, and W doesn’t live.White 15: Next, if W extends...Black 20: When B [B4] extends, W is dead.
A B C D E F G H J K L M N O P Q R S T
A B C D E F G H J K L M N O P Q R S T12345678910111213141516171819
12345678910111213141516171819
24
W 24

297
Based on the above reasoning, W #24 therefore invades 3-3 immediately. This is a move byHashimoto 9-dan after a deep thinking.
[The variations show the references.]
A B C D E F G H J K L M N O P Q R S T
A B C D E F G H J K L M N O P Q R S T12345678910111213141516171819
12345678910111213141516171819
9 8 610 2 511 3 4
7 1213 14
1
reference 1
It seems that W [F3] to approach this way can also be considered.Black 1: If B protects the corner with a ”pillar” move...White 2: W could choose the following moves...White 14: To here, W seals B inside and gets a solid wall. This way, W can be satisfied. However
—
A B C D E F G H J K L M N O P Q R S T
A B C D E F G H J K L M N O P Q R S T12345678910111213141516171819
12345678910111213141516171819
98
6 7
4 112 310 5
reference 2
When W [F3] kakari [approach]...
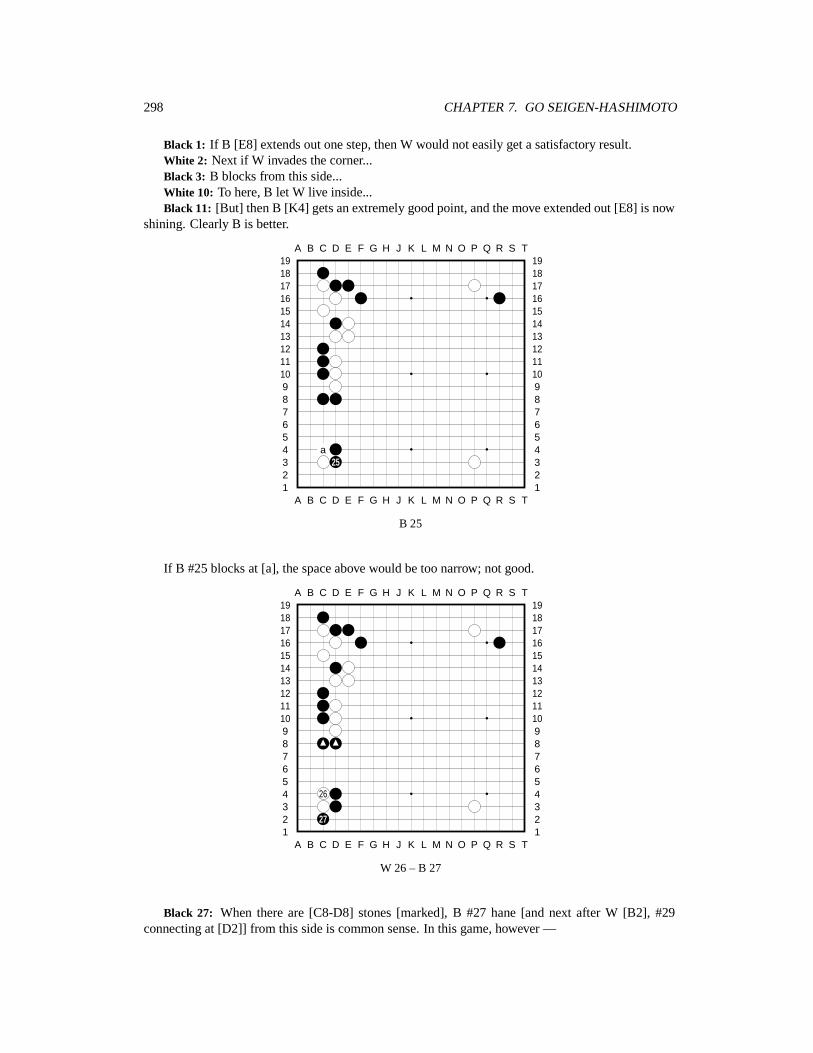
298 CHAPTER 7. GO SEIGEN-HASHIMOTO
Black 1: If B [E8] extends out one step, then W would not easily get a satisfactory result.White 2: Next if W invades the corner...Black 3: B blocks from this side...White 10: To here, B let W live inside...Black 11: [But] then B [K4] gets an extremely good point, and the move extended out [E8] is now
shining. Clearly B is better.
A B C D E F G H J K L M N O P Q R S T
A B C D E F G H J K L M N O P Q R S T12345678910111213141516171819
12345678910111213141516171819
a25
B 25
If B #25 blocks at [a], the space above would be too narrow; not good.
A B C D E F G H J K L M N O P Q R S T
A B C D E F G H J K L M N O P Q R S T12345678910111213141516171819
12345678910111213141516171819
26
27
W 26 – B 27
Black 27: When there are [C8-D8] stones [marked], B #27 hane [and next after W [B2], #29connecting at [D2]] from this side is common sense. In this game, however —
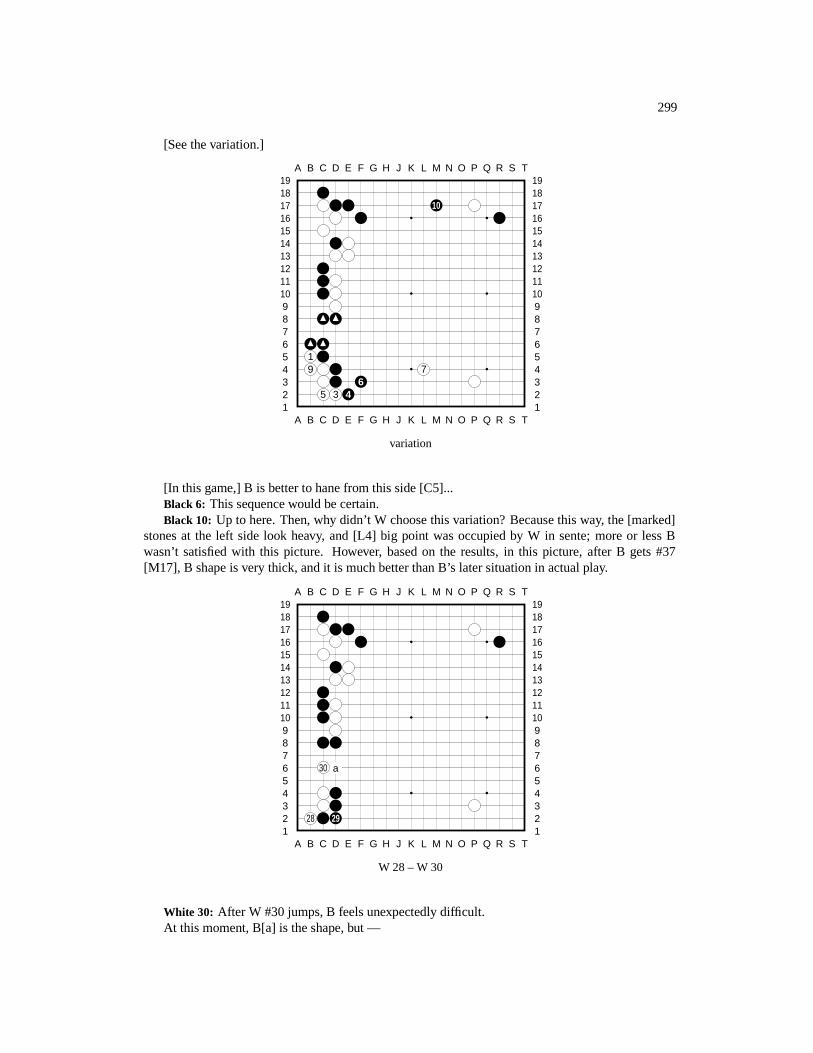
299
[See the variation.]
A B C D E F G H J K L M N O P Q R S T
A B C D E F G H J K L M N O P Q R S T12345678910111213141516171819
12345678910111213141516171819
10
19 7
65 3 4
variation
[In this game,] B is better to hane from this side [C5]...Black 6: This sequence would be certain.Black 10: Up to here. Then, why didn’t W choose this variation? Because this way, the [marked]
stones at the left side look heavy, and [L4] big point was occupied by W in sente; more or less Bwasn’t satisfied with this picture. However, based on the results, in this picture, after B gets #37[M17], B shape is very thick, and it is much better than B’s later situation in actual play.
A B C D E F G H J K L M N O P Q R S T
A B C D E F G H J K L M N O P Q R S T12345678910111213141516171819
12345678910111213141516171819
30 a
28 29
W 28 – W 30
White 30: After W #30 jumps, B feels unexpectedly difficult.At this moment, B[a] is the shape, but —
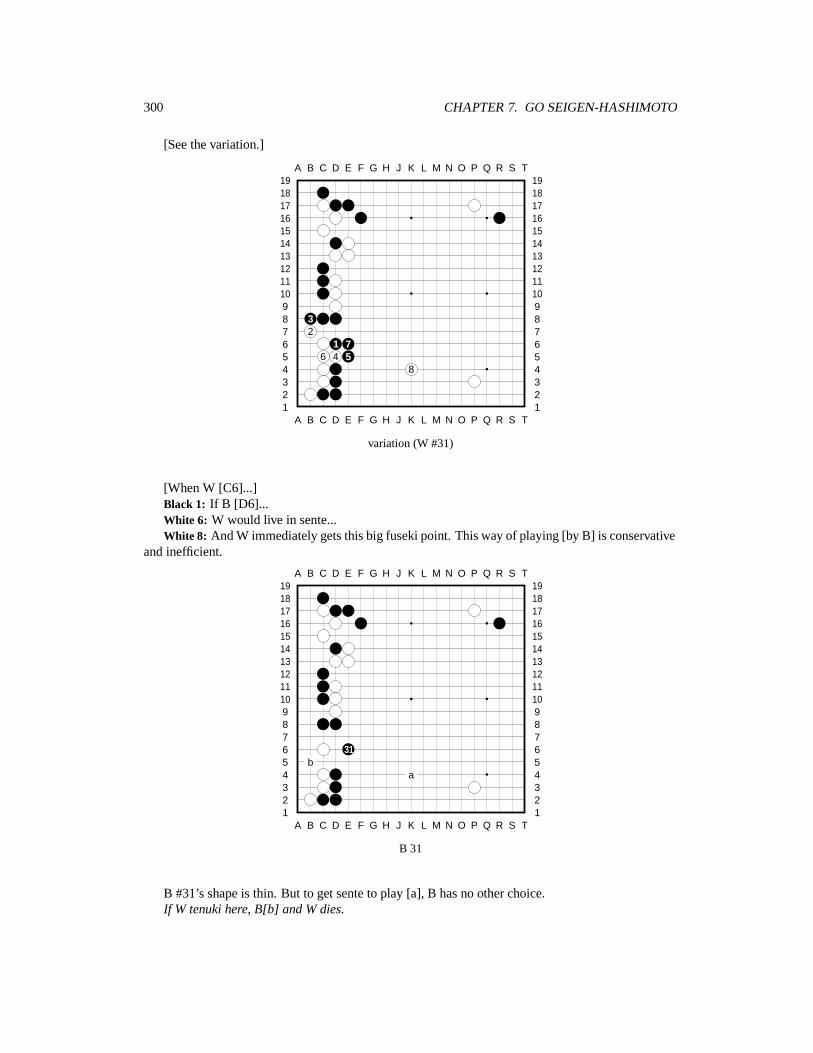
300 CHAPTER 7. GO SEIGEN-HASHIMOTO
[See the variation.]
A B C D E F G H J K L M N O P Q R S T
A B C D E F G H J K L M N O P Q R S T12345678910111213141516171819
12345678910111213141516171819
32
1 76 4 5
8
variation (W #31)
[When W [C6]...]Black 1: If B [D6]...White 6: W would live in sente...White 8: And W immediately gets this big fuseki point. This way of playing [by B] is conservative
and inefficient.
A B C D E F G H J K L M N O P Q R S T
A B C D E F G H J K L M N O P Q R S T12345678910111213141516171819
12345678910111213141516171819
31b
a
B 31
B #31’s shape is thin. But to get sente to play [a], B has no other choice.If W tenuki here, B[b] and W dies.
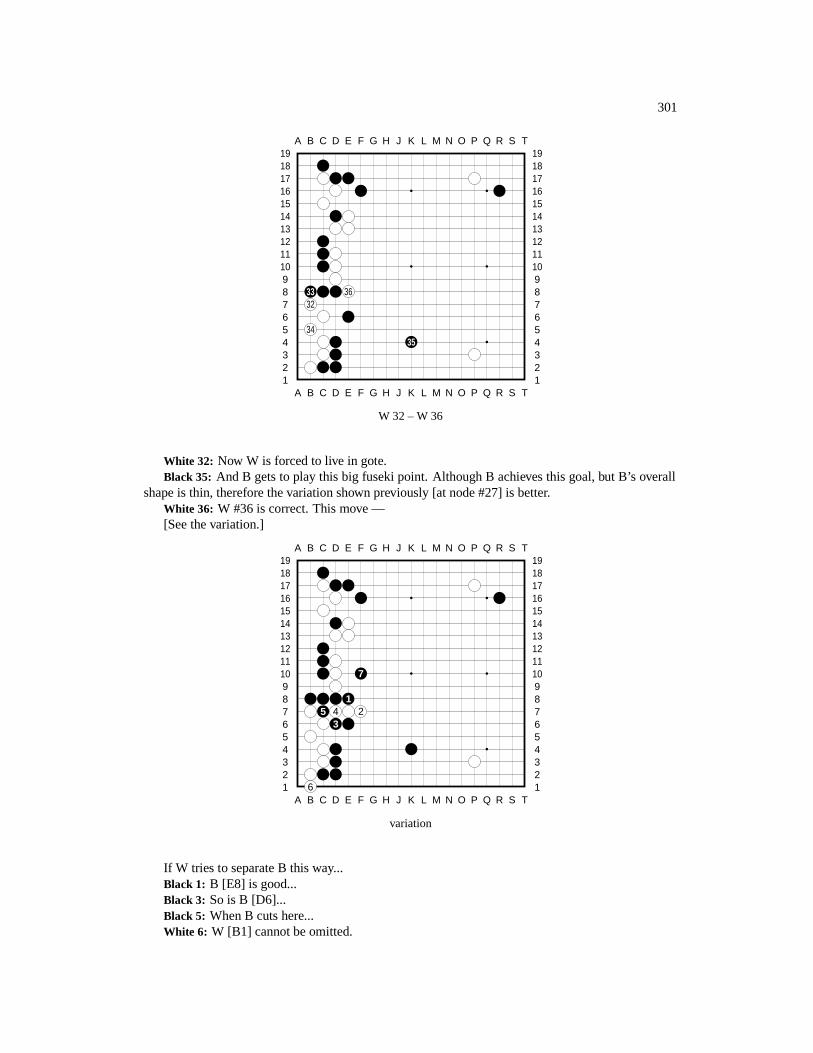
301
A B C D E F G H J K L M N O P Q R S T
A B C D E F G H J K L M N O P Q R S T12345678910111213141516171819
12345678910111213141516171819
33 3632
3435
W 32 – W 36
White 32: Now W is forced to live in gote.Black 35: And B gets to play this big fuseki point. Although B achieves this goal, but B’s overall
shape is thin, therefore the variation shown previously [at node #27] is better.White 36: W #36 is correct. This move —[See the variation.]
A B C D E F G H J K L M N O P Q R S T
A B C D E F G H J K L M N O P Q R S T12345678910111213141516171819
12345678910111213141516171819
7
15 4 2
3
6
variation
If W tries to separate B this way...Black 1: B [E8] is good...Black 3: So is B [D6]...Black 5: When B cuts here...White 6: W [B1] cannot be omitted.
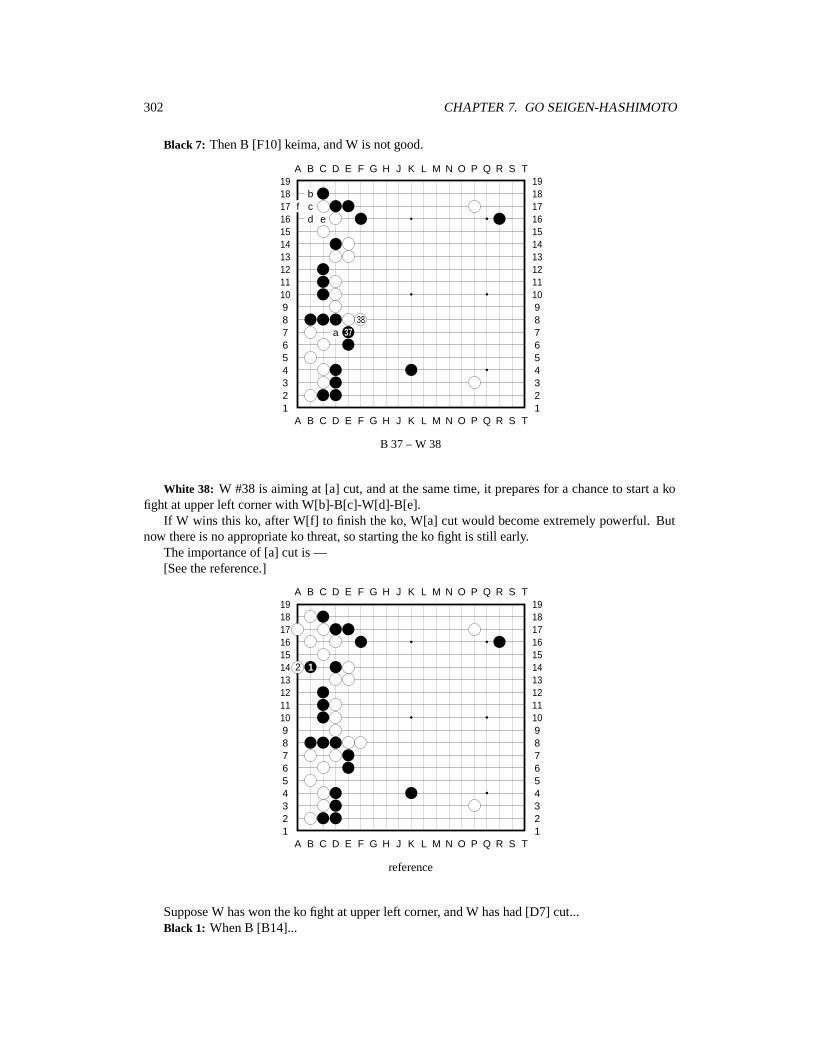
302 CHAPTER 7. GO SEIGEN-HASHIMOTO
Black 7: Then B [F10] keima, and W is not good.
A B C D E F G H J K L M N O P Q R S T
A B C D E F G H J K L M N O P Q R S T12345678910111213141516171819
12345678910111213141516171819
bf c
d e
38a 37
B 37 – W 38
White 38: W #38 is aiming at [a] cut, and at the same time, it prepares for a chance to start a kofight at upper left corner with W[b]-B[c]-W[d]-B[e].
If W wins this ko, after W[f] to finish the ko, W[a] cut would become extremely powerful. Butnow there is no appropriate ko threat, so starting the ko fight is still early.
The importance of [a] cut is —[See the reference.]
A B C D E F G H J K L M N O P Q R S T
A B C D E F G H J K L M N O P Q R S T12345678910111213141516171819
12345678910111213141516171819
2 1
reference
Suppose W has won the ko fight at upper left corner, and W has had [D7] cut...Black 1: When B [B14]...
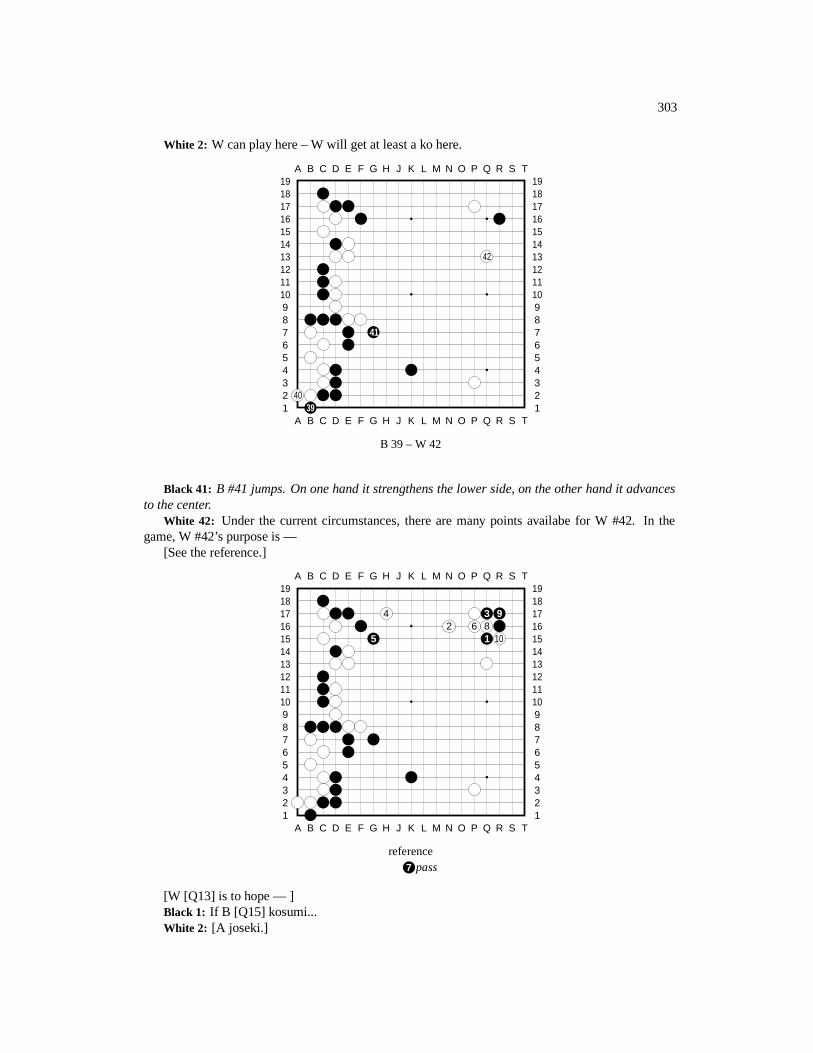
303
White 2: W can play here – W will get at least a ko here.
A B C D E F G H J K L M N O P Q R S T
A B C D E F G H J K L M N O P Q R S T12345678910111213141516171819
12345678910111213141516171819
42
41
4039
B 39 – W 42
Black 41: B #41 jumps. On one hand it strengthens the lower side, on the other hand it advancesto the center.
White 42: Under the current circumstances, there are many points availabe for W #42. In thegame, W #42’s purpose is —
[See the reference.]
A B C D E F G H J K L M N O P Q R S T
A B C D E F G H J K L M N O P Q R S T12345678910111213141516171819
12345678910111213141516171819
4 3 92 6 8
5 1 10
reference7 pass
[W [Q13] is to hope — ]Black 1: If B [Q15] kosumi...White 2: [A joseki.]
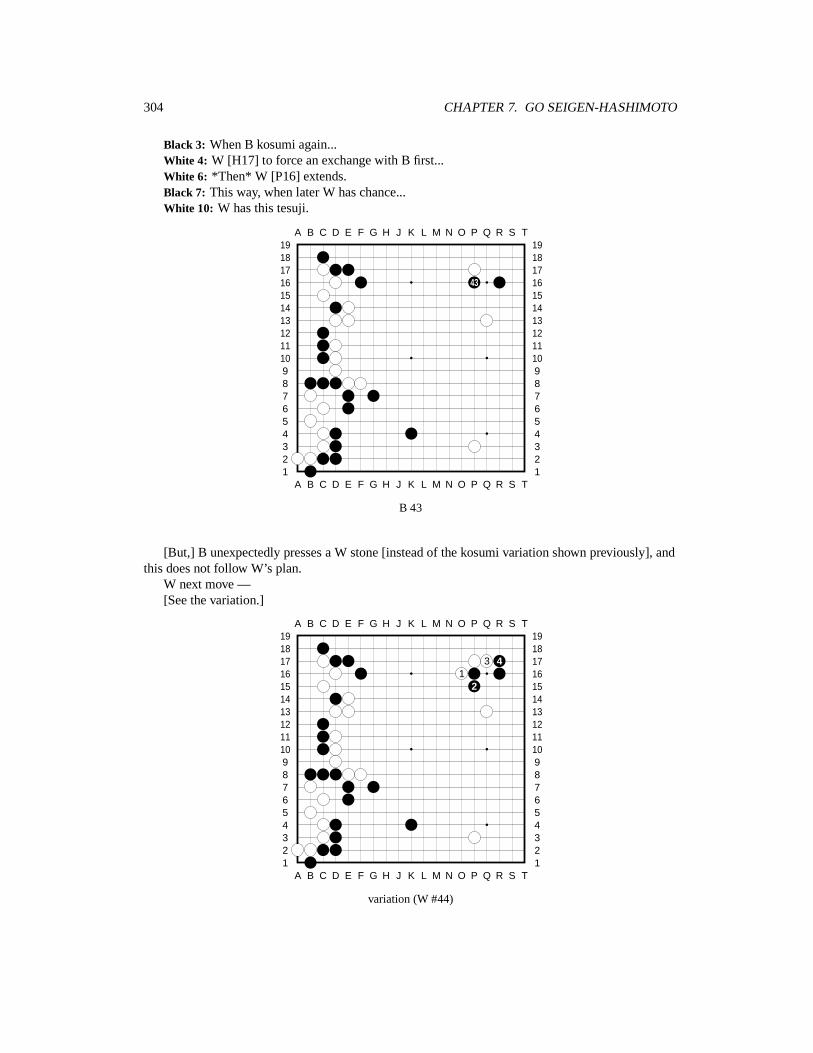
304 CHAPTER 7. GO SEIGEN-HASHIMOTO
Black 3: When B kosumi again...White 4: W [H17] to force an exchange with B first...White 6: *Then* W [P16] extends.Black 7: This way, when later W has chance...White 10: W has this tesuji.
A B C D E F G H J K L M N O P Q R S T
A B C D E F G H J K L M N O P Q R S T12345678910111213141516171819
12345678910111213141516171819
43
B 43
[But,] B unexpectedly presses a W stone [instead of the kosumi variation shown previously], andthis does not follow W’s plan.
W next move —[See the variation.]
A B C D E F G H J K L M N O P Q R S T
A B C D E F G H J K L M N O P Q R S T12345678910111213141516171819
12345678910111213141516171819
3 41
2
variation (W #44)
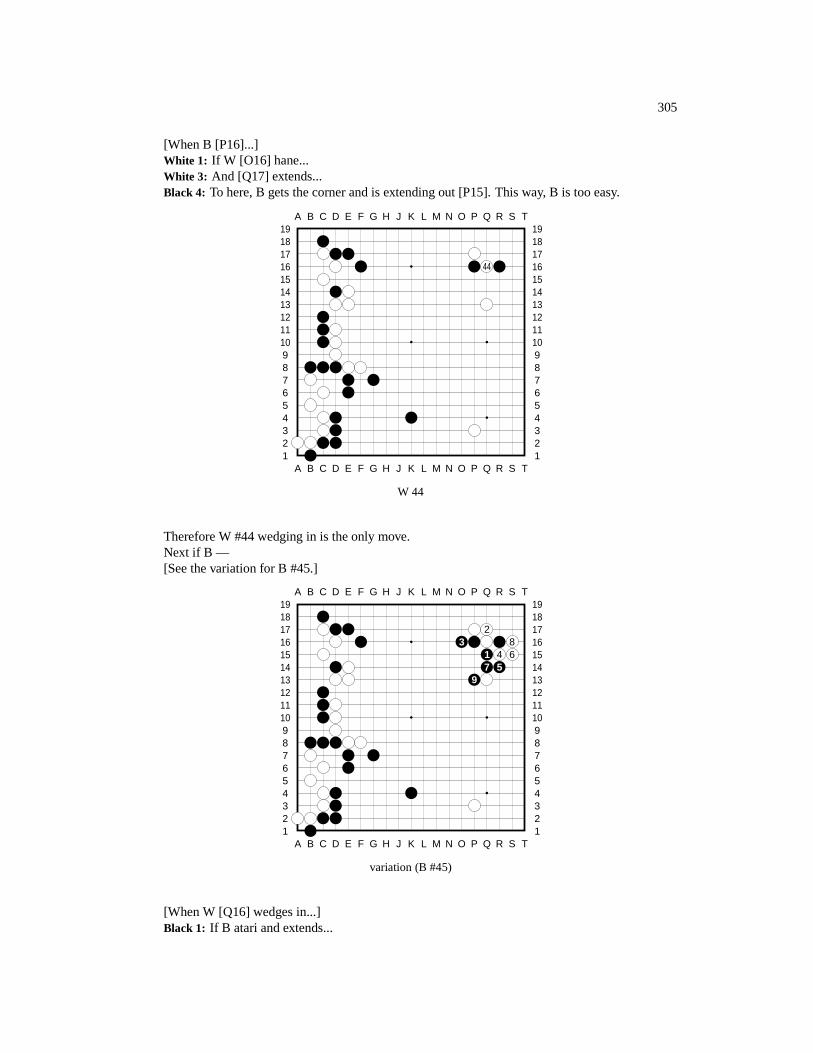
305
[When B [P16]...]White 1: If W [O16] hane...White 3: And [Q17] extends...Black 4: To here, B gets the corner and is extending out [P15]. This way, B is too easy.
A B C D E F G H J K L M N O P Q R S T
A B C D E F G H J K L M N O P Q R S T12345678910111213141516171819
12345678910111213141516171819
44
W 44
Therefore W #44 wedging in is the only move.Next if B —[See the variation for B #45.]
A B C D E F G H J K L M N O P Q R S T
A B C D E F G H J K L M N O P Q R S T12345678910111213141516171819
12345678910111213141516171819
23 8
1 4 67 5
9
variation (B #45)
[When W [Q16] wedges in...]Black 1: If B atari and extends...

306 CHAPTER 7. GO SEIGEN-HASHIMOTO
Black 9: To here, W’s profit at the corner is too large. That’s why [the unexpected] B [P16] israrely applied in the past.
A B C D E F G H J K L M N O P Q R S T
A B C D E F G H J K L M N O P Q R S T12345678910111213141516171819
12345678910111213141516171819
a46 47
45
B 45 – B 47
Black 45: But, after #45 [indeed] atari...Black 47: B has this variation for #47 [it was [O16] in the variation shown previously]. I think this
is a powerful tactic.Next if W[a] —[See the variation.]
A B C D E F G H J K L M N O P Q R S T
A B C D E F G H J K L M N O P Q R S T12345678910111213141516171819
12345678910111213141516171819
1
43
2
variation (W #48)
[When B [R17] blocks...]White 1: If W [R18] hane...
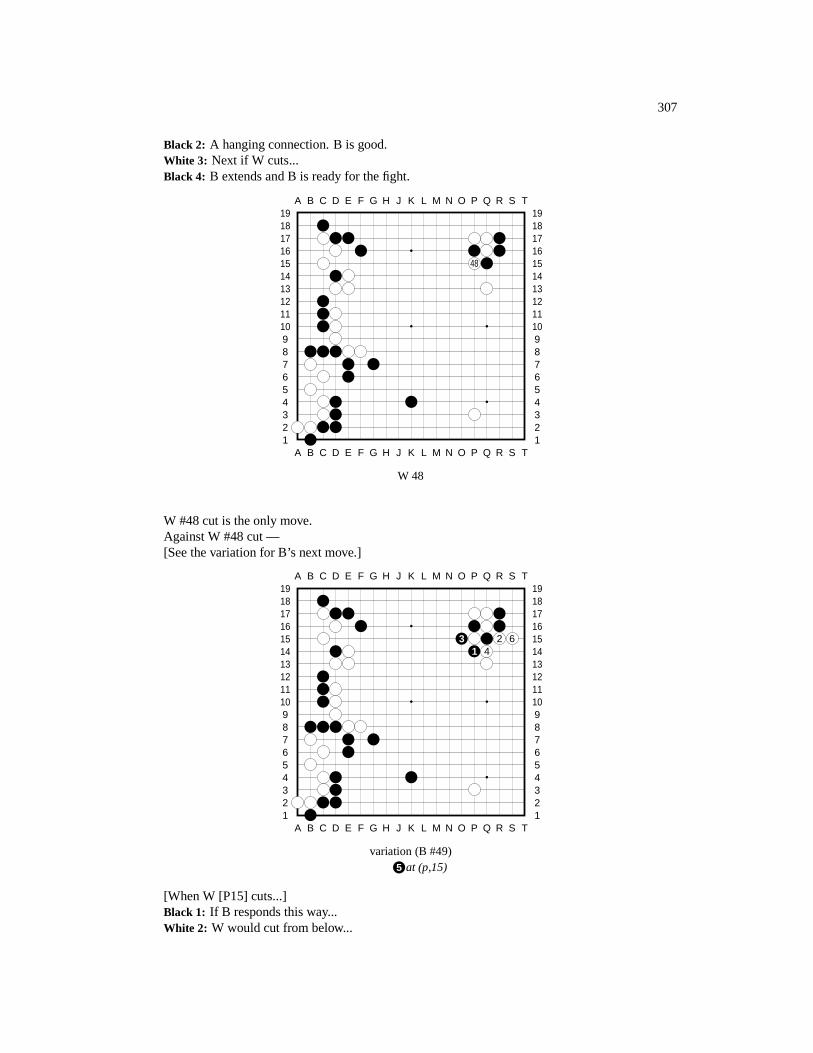
307
Black 2: A hanging connection. B is good.White 3: Next if W cuts...Black 4: B extends and B is ready for the fight.
A B C D E F G H J K L M N O P Q R S T
A B C D E F G H J K L M N O P Q R S T12345678910111213141516171819
12345678910111213141516171819
48
W 48
W #48 cut is the only move.Against W #48 cut —[See the variation for B’s next move.]
A B C D E F G H J K L M N O P Q R S T
A B C D E F G H J K L M N O P Q R S T12345678910111213141516171819
12345678910111213141516171819
3 2 61 4
variation (B #49)5 at (p,15)
[When W [P15] cuts...]Black 1: If B responds this way...White 2: W would cut from below...
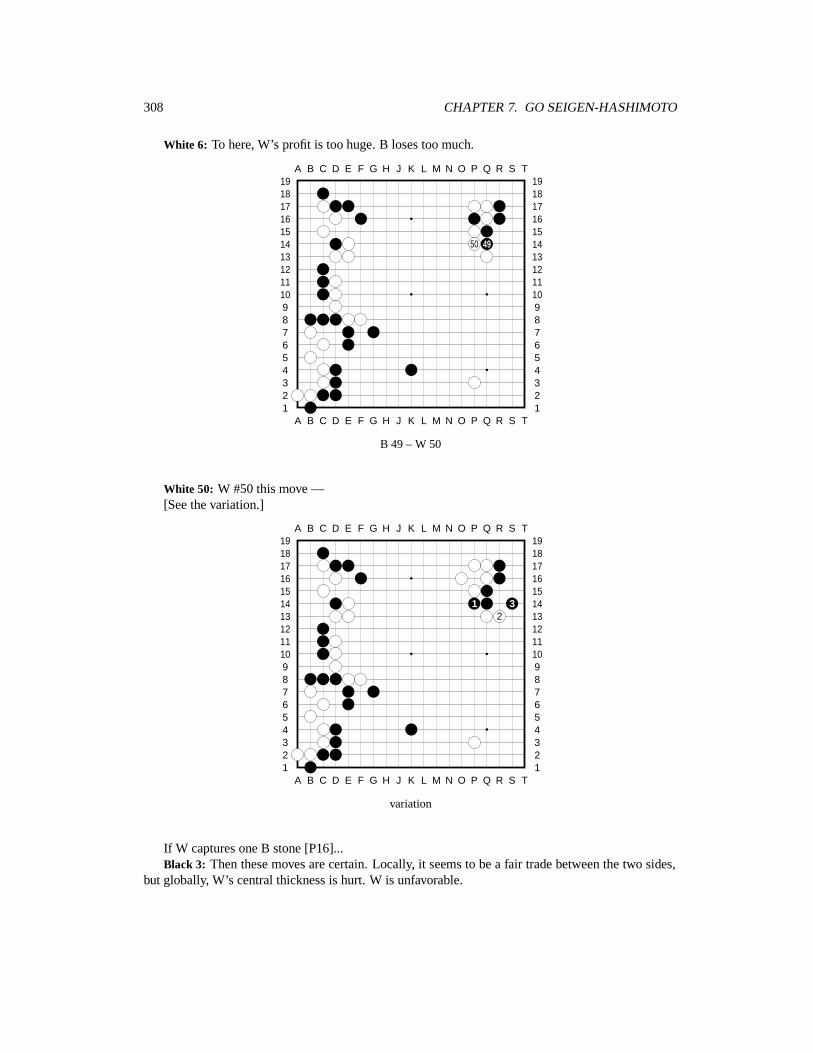
308 CHAPTER 7. GO SEIGEN-HASHIMOTO
White 6: To here, W’s profit is too huge. B loses too much.
A B C D E F G H J K L M N O P Q R S T
A B C D E F G H J K L M N O P Q R S T12345678910111213141516171819
12345678910111213141516171819
50 49
B 49 – W 50
White 50: W #50 this move —[See the variation.]
A B C D E F G H J K L M N O P Q R S T
A B C D E F G H J K L M N O P Q R S T12345678910111213141516171819
12345678910111213141516171819
1 32
variation
If W captures one B stone [P16]...Black 3: Then these moves are certain. Locally, it seems to be a fair trade between the two sides,
but globally, W’s central thickness is hurt. W is unfavorable.
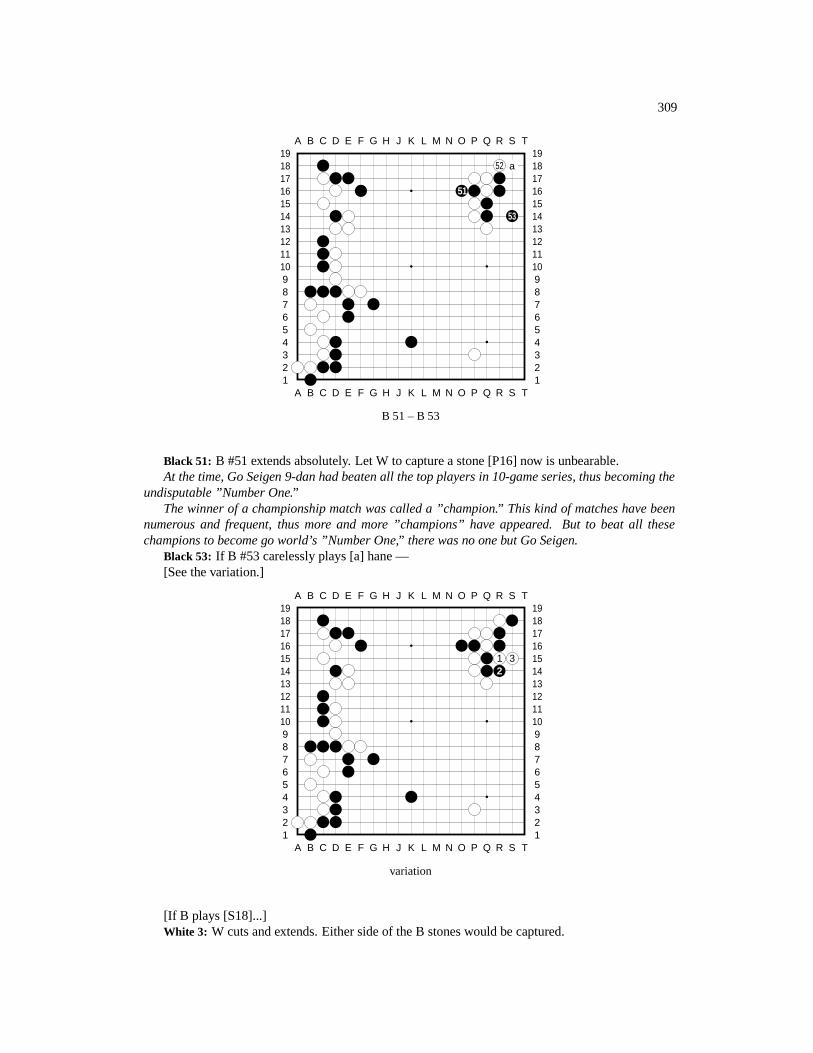
309
A B C D E F G H J K L M N O P Q R S T
A B C D E F G H J K L M N O P Q R S T12345678910111213141516171819
12345678910111213141516171819
52 a
51
53
B 51 – B 53
Black 51: B #51 extends absolutely. Let W to capture a stone [P16] now is unbearable.At the time, Go Seigen 9-dan had beaten all the top players in 10-game series, thus becoming the
undisputable ”Number One.”The winner of a championship match was called a ”champion.” This kind of matches have been
numerous and frequent, thus more and more ”champions” have appeared. But to beat all thesechampions to become go world’s ”Number One,” there was no one but Go Seigen.
Black 53: If B #53 carelessly plays [a] hane —[See the variation.]
A B C D E F G H J K L M N O P Q R S T
A B C D E F G H J K L M N O P Q R S T12345678910111213141516171819
12345678910111213141516171819
1 32
variation
[If B plays [S18]...]White 3: W cuts and extends. Either side of the B stones would be captured.
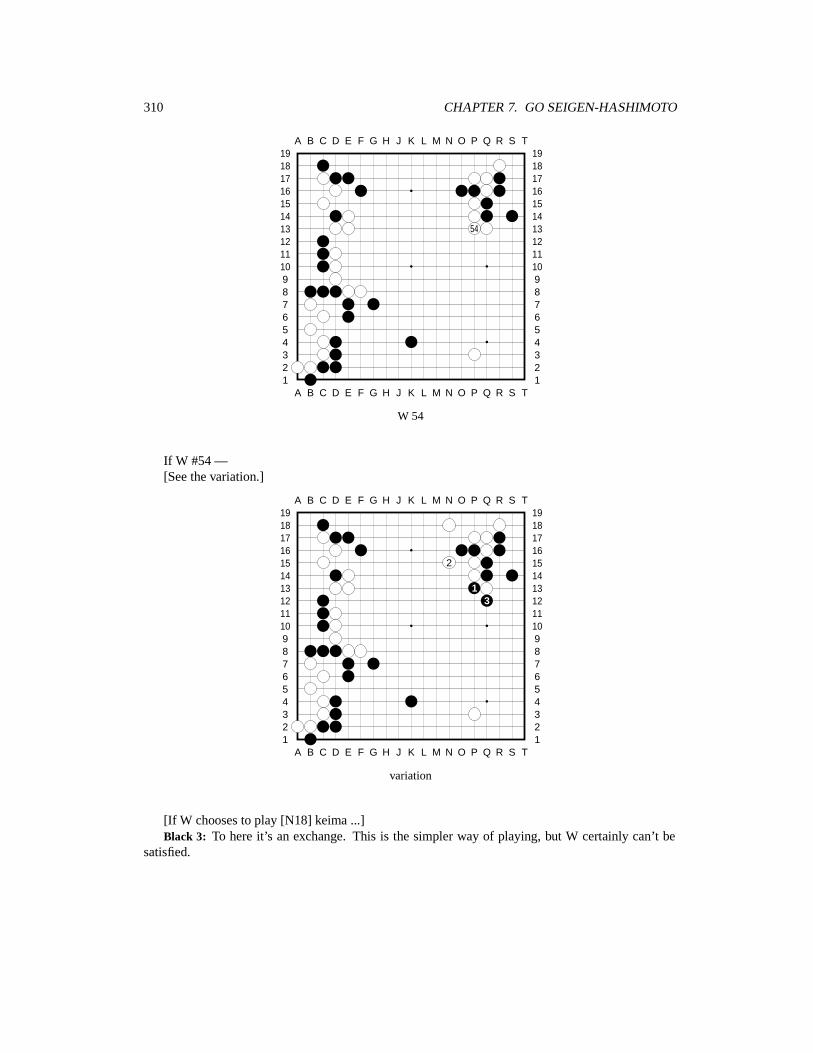
310 CHAPTER 7. GO SEIGEN-HASHIMOTO
A B C D E F G H J K L M N O P Q R S T
A B C D E F G H J K L M N O P Q R S T12345678910111213141516171819
12345678910111213141516171819
54
W 54
If W #54 —[See the variation.]
A B C D E F G H J K L M N O P Q R S T
A B C D E F G H J K L M N O P Q R S T12345678910111213141516171819
12345678910111213141516171819
2
13
variation
[If W chooses to play [N18] keima ...]Black 3: To here it’s an exchange. This is the simpler way of playing, but W certainly can’t be
satisfied.
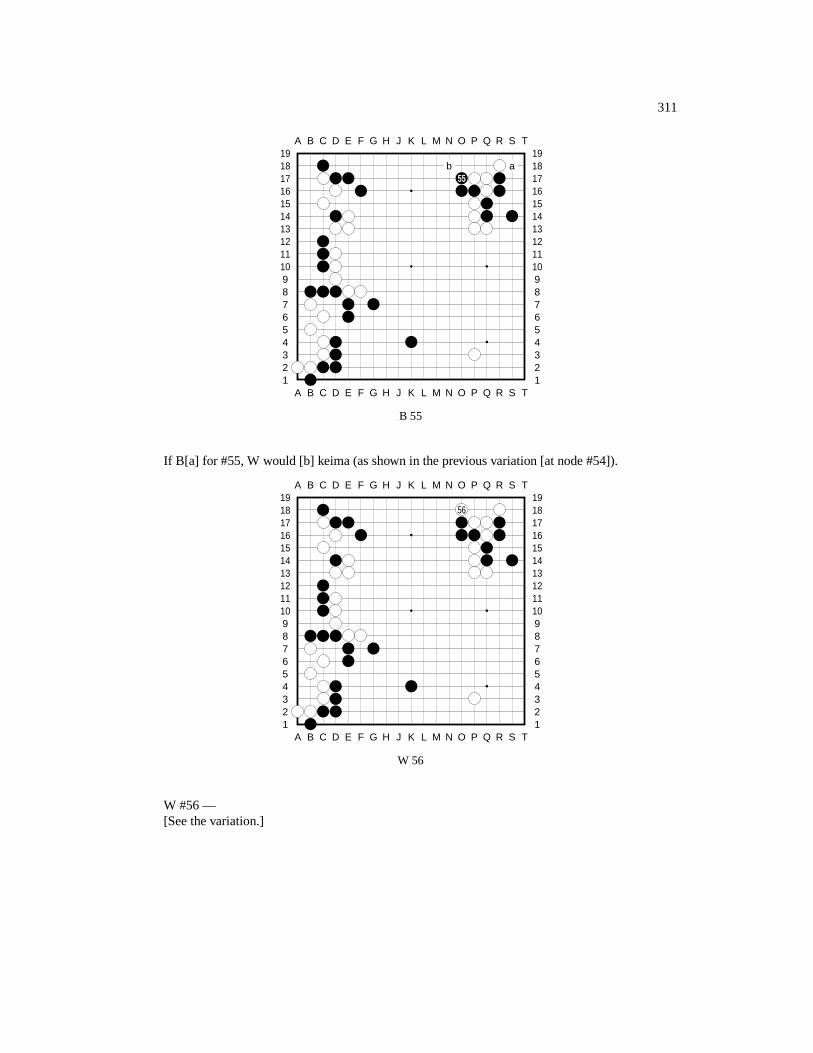
311
A B C D E F G H J K L M N O P Q R S T
A B C D E F G H J K L M N O P Q R S T12345678910111213141516171819
12345678910111213141516171819
b a55
B 55
If B[a] for #55, W would [b] keima (as shown in the previous variation [at node #54]).
A B C D E F G H J K L M N O P Q R S T
A B C D E F G H J K L M N O P Q R S T12345678910111213141516171819
12345678910111213141516171819
56
W 56
W #56 —[See the variation.]
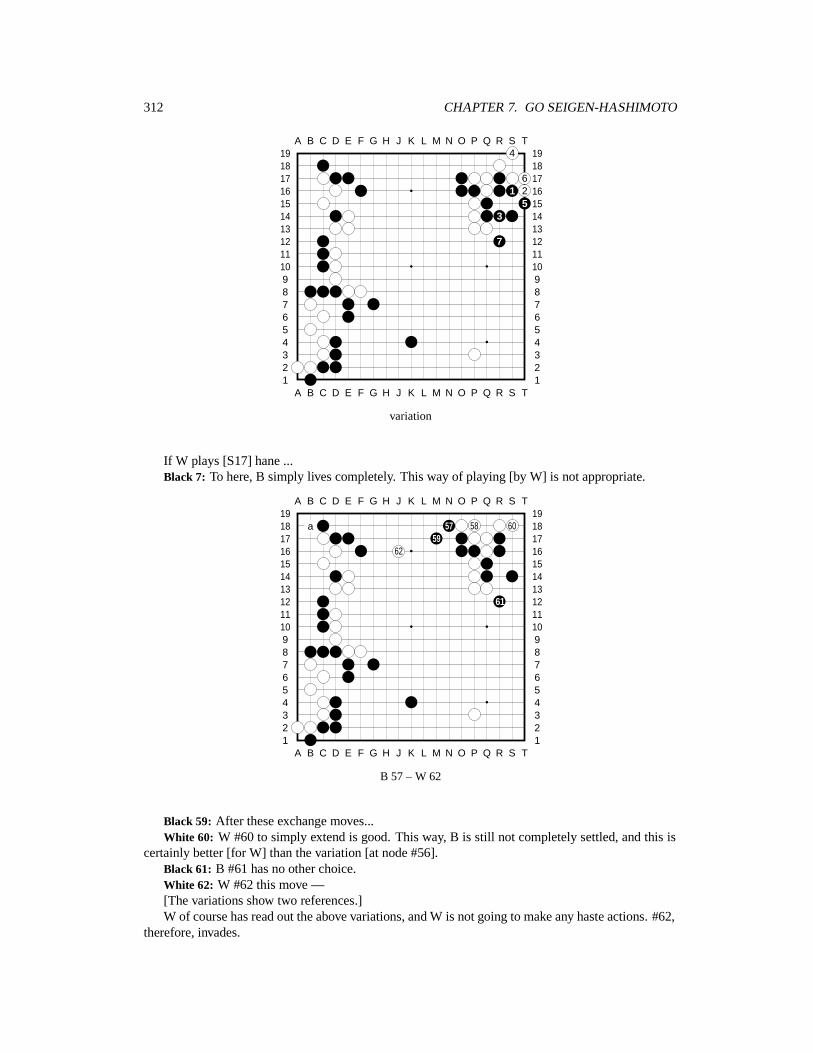
312 CHAPTER 7. GO SEIGEN-HASHIMOTO
A B C D E F G H J K L M N O P Q R S T
A B C D E F G H J K L M N O P Q R S T12345678910111213141516171819
123456789101112131415161718194
61 2
53
7
variation
If W plays [S17] hane ...Black 7: To here, B simply lives completely. This way of playing [by W] is not appropriate.
A B C D E F G H J K L M N O P Q R S T
A B C D E F G H J K L M N O P Q R S T12345678910111213141516171819
12345678910111213141516171819
a 57 58 6059
62
61
B 57 – W 62
Black 59: After these exchange moves...White 60: W #60 to simply extend is good. This way, B is still not completely settled, and this is
certainly better [for W] than the variation [at node #56].Black 61: B #61 has no other choice.White 62: W #62 this move —[The variations show two references.]W of course has read out the above variations, and W is not going to make any haste actions. #62,
therefore, invades.
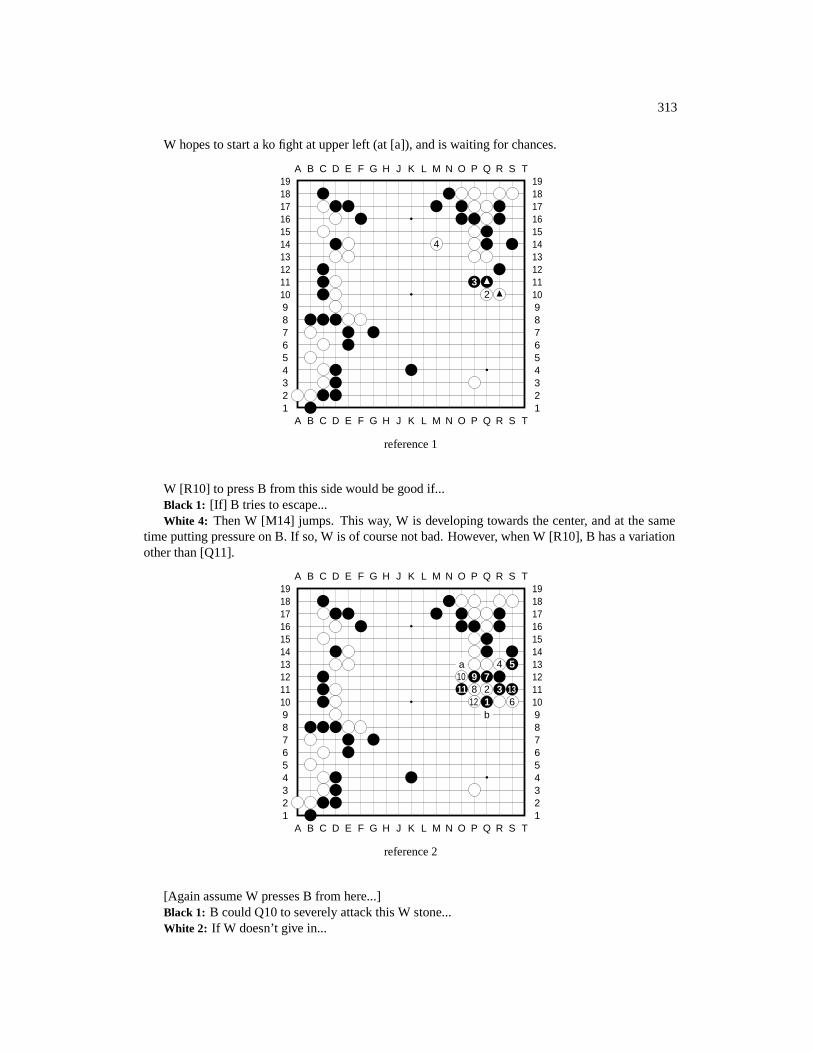
313
W hopes to start a ko fight at upper left (at [a]), and is waiting for chances.
A B C D E F G H J K L M N O P Q R S T
A B C D E F G H J K L M N O P Q R S T12345678910111213141516171819
12345678910111213141516171819
4
32
reference 1
W [R10] to press B from this side would be good if...Black 1: [If] B tries to escape...White 4: Then W [M14] jumps. This way, W is developing towards the center, and at the same
time putting pressure on B. If so, W is of course not bad. However, when W [R10], B has a variationother than [Q11].
A B C D E F G H J K L M N O P Q R S T
A B C D E F G H J K L M N O P Q R S T12345678910111213141516171819
12345678910111213141516171819
a 4 510 9 711 8 2 3 13
12 1 6b
reference 2
[Again assume W presses B from here...]Black 1: B could Q10 to severely attack this W stone...White 2: If W doesn’t give in...
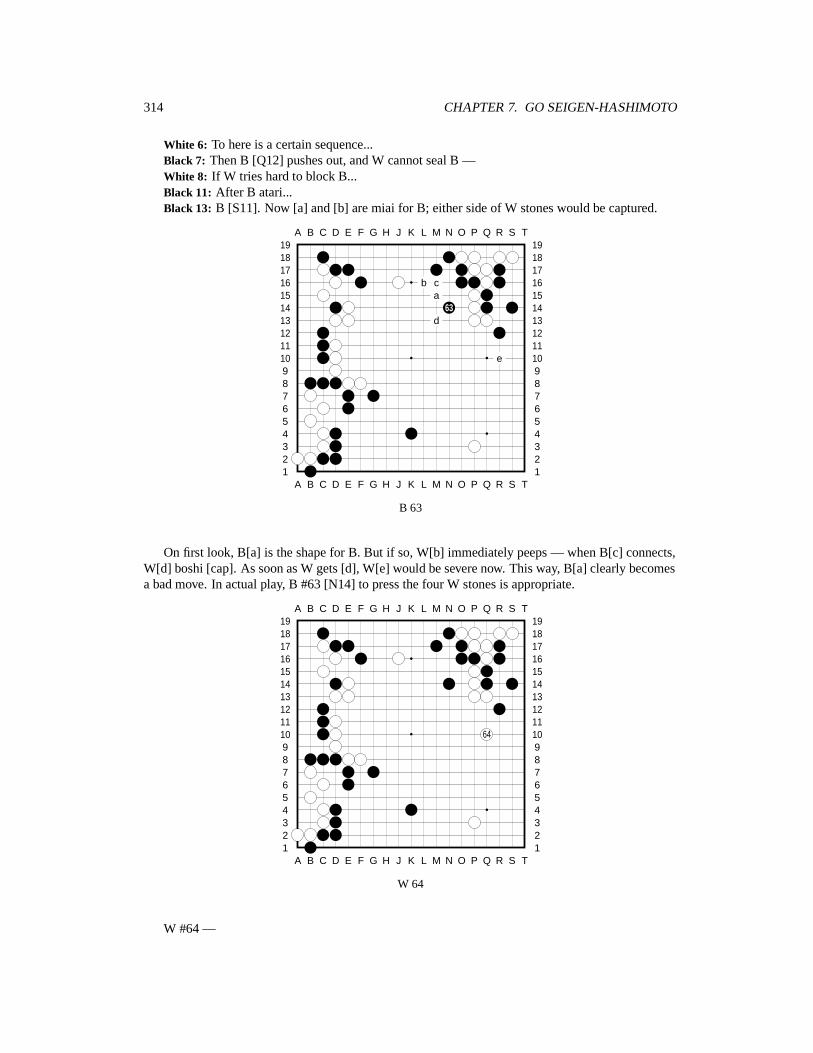
314 CHAPTER 7. GO SEIGEN-HASHIMOTO
White 6: To here is a certain sequence...Black 7: Then B [Q12] pushes out, and W cannot seal B —White 8: If W tries hard to block B...Black 11: After B atari...Black 13: B [S11]. Now [a] and [b] are miai for B; either side of W stones would be captured.
A B C D E F G H J K L M N O P Q R S T
A B C D E F G H J K L M N O P Q R S T12345678910111213141516171819
12345678910111213141516171819
b ca
63d
e
B 63
On first look, B[a] is the shape for B. But if so, W[b] immediately peeps — when B[c] connects,W[d] boshi [cap]. As soon as W gets [d], W[e] would be severe now. This way, B[a] clearly becomesa bad move. In actual play, B #63 [N14] to press the four W stones is appropriate.
A B C D E F G H J K L M N O P Q R S T
A B C D E F G H J K L M N O P Q R S T12345678910111213141516171819
12345678910111213141516171819
64
W 64
W #64 —
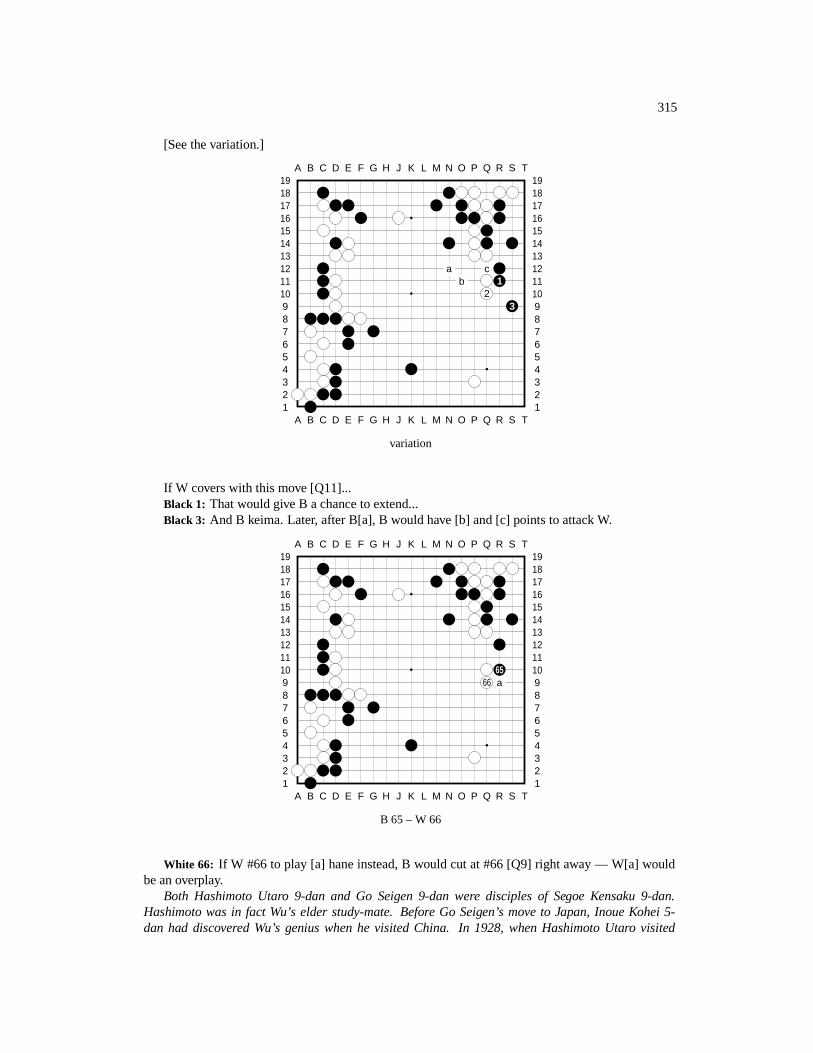
315
[See the variation.]
A B C D E F G H J K L M N O P Q R S T
A B C D E F G H J K L M N O P Q R S T12345678910111213141516171819
12345678910111213141516171819
a cb 1
23
variation
If W covers with this move [Q11]...Black 1: That would give B a chance to extend...Black 3: And B keima. Later, after B[a], B would have [b] and [c] points to attack W.
A B C D E F G H J K L M N O P Q R S T
A B C D E F G H J K L M N O P Q R S T12345678910111213141516171819
12345678910111213141516171819
6566 a
B 65 – W 66
White 66: If W #66 to play [a] hane instead, B would cut at #66 [Q9] right away — W[a] wouldbe an overplay.
Both Hashimoto Utaro 9-dan and Go Seigen 9-dan were disciples of Segoe Kensaku 9-dan.Hashimoto was in fact Wu’s elder study-mate. Before Go Seigen’s move to Japan, Inoue Kohei 5-dan had discovered Wu’s genius when he visited China. In 1928, when Hashimoto Utaro visited

316 CHAPTER 7. GO SEIGEN-HASHIMOTO
China, he played Go Seigen (then 14) two games. Wu took black (H-1) and won both – those were thefirst matches between the two; Hashimoto was 4-dan at that time. After WWII, they played each othermany times. For example the 1946 Wu-Hashimoto 10-game series; 1950 Wu-Hashimoto 3-gameseries; 1950 Wu-Hashimoto 10-game series; 1957 the First Japan’s Strongest Deciding Matches;1958 the Second Japan’s Strongest Deciding Matches; 1959 the Third Japan’s Strongest DecidingMatches; and 1961 the First Meijin Sen; etc. Go Seigen beat all the top players in 10-game series, asmentioned before, and the first 10-game series of such was started between Wu and Hashimoto.
A B C D E F G H J K L M N O P Q R S T
A B C D E F G H J K L M N O P Q R S T12345678910111213141516171819
12345678910111213141516171819
68 6769
B 67 – B 69
Black 67: B #67 a ”hanging connection” to...White 68: [To] force W #68 to block is to take into account the fact that a ladder would work for
B.Black 69: When B #69 cuts —[See the variation for W’s next move.]
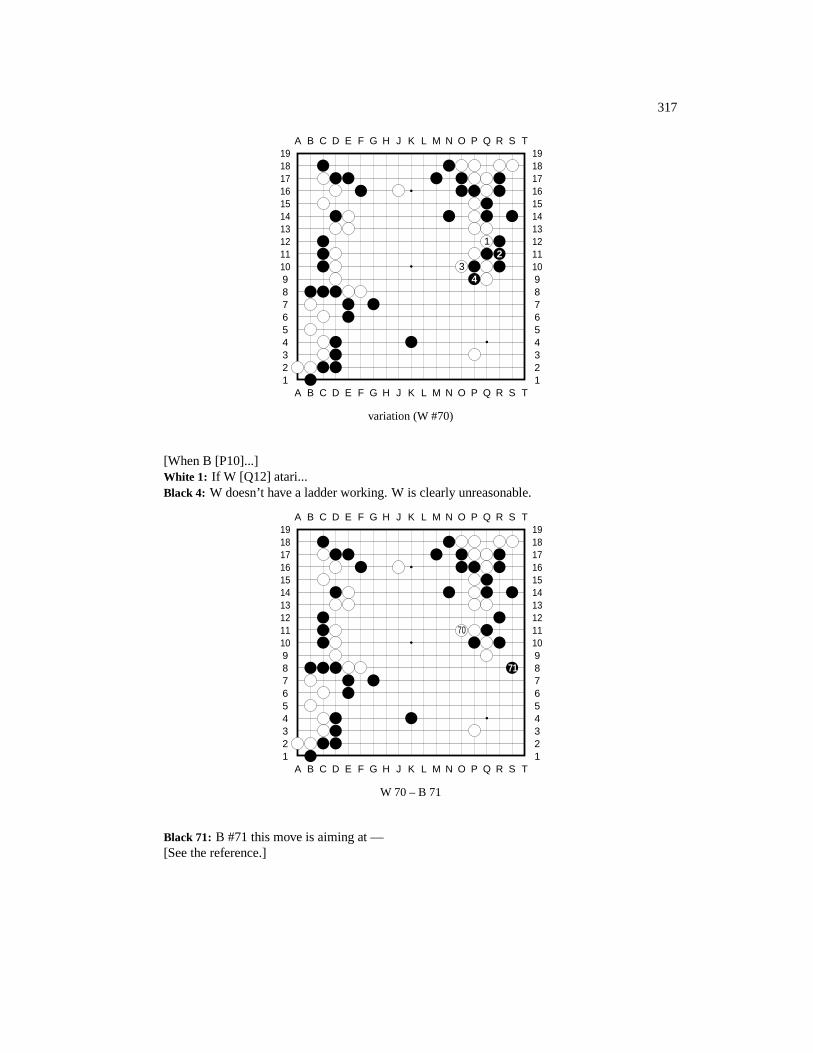
317
A B C D E F G H J K L M N O P Q R S T
A B C D E F G H J K L M N O P Q R S T12345678910111213141516171819
12345678910111213141516171819
12
34
variation (W #70)
[When B [P10]...]White 1: If W [Q12] atari...Black 4: W doesn’t have a ladder working. W is clearly unreasonable.
A B C D E F G H J K L M N O P Q R S T
A B C D E F G H J K L M N O P Q R S T12345678910111213141516171819
12345678910111213141516171819
70
71
W 70 – B 71
Black 71: B #71 this move is aiming at —[See the reference.]

318 CHAPTER 7. GO SEIGEN-HASHIMOTO
A B C D E F G H J K L M N O P Q R S T
A B C D E F G H J K L M N O P Q R S T12345678910111213141516171819
12345678910111213141516171819
6
2 43 5
reference1 pass
[The purpose of B [S8] is...]White 1: [Later, when B has chance...]Black 6: B [P9] captures the two W stones.
A B C D E F G H J K L M N O P Q R S T
A B C D E F G H J K L M N O P Q R S T12345678910111213141516171819
12345678910111213141516171819
a 72
W 72
W #72 is a difficult move.[See the variation.][Indeed,] based on the current positions, although W is thick, B is far ahead on territory.W also realizes that the chance to form territory at the center is uncertainly, so he chooses to play
#72, on one hand keeping a pressure on B team, while on the other hand waiting for a chance to play[a], using a ko fight to struggle. This strategy itself was not wrong, but based on the later result, this#72 is questionable.
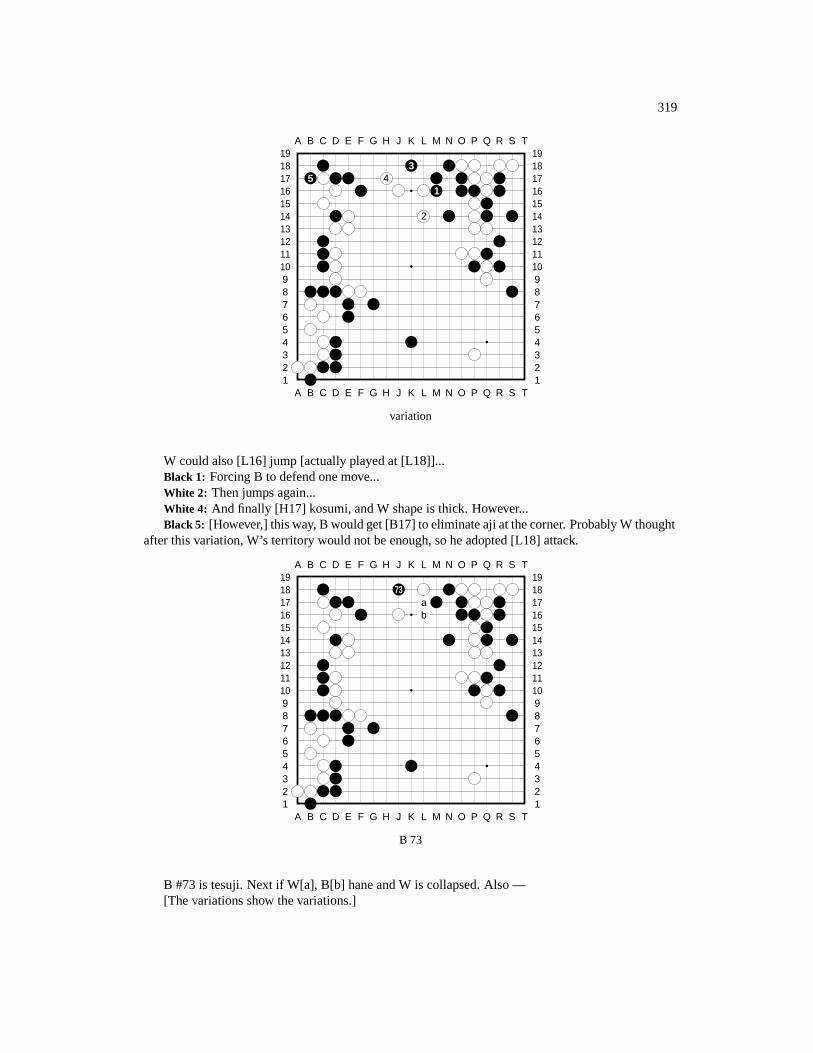
319
A B C D E F G H J K L M N O P Q R S T
A B C D E F G H J K L M N O P Q R S T12345678910111213141516171819
12345678910111213141516171819
35 4
1
2
variation
W could also [L16] jump [actually played at [L18]]...Black 1: Forcing B to defend one move...White 2: Then jumps again...White 4: And finally [H17] kosumi, and W shape is thick. However...Black 5: [However,] this way, B would get [B17] to eliminate aji at the corner. Probably W thought
after this variation, W’s territory would not be enough, so he adopted [L18] attack.
A B C D E F G H J K L M N O P Q R S T
A B C D E F G H J K L M N O P Q R S T12345678910111213141516171819
12345678910111213141516171819
73ab
B 73
B #73 is tesuji. Next if W[a], B[b] hane and W is collapsed. Also —[The variations show the variations.]
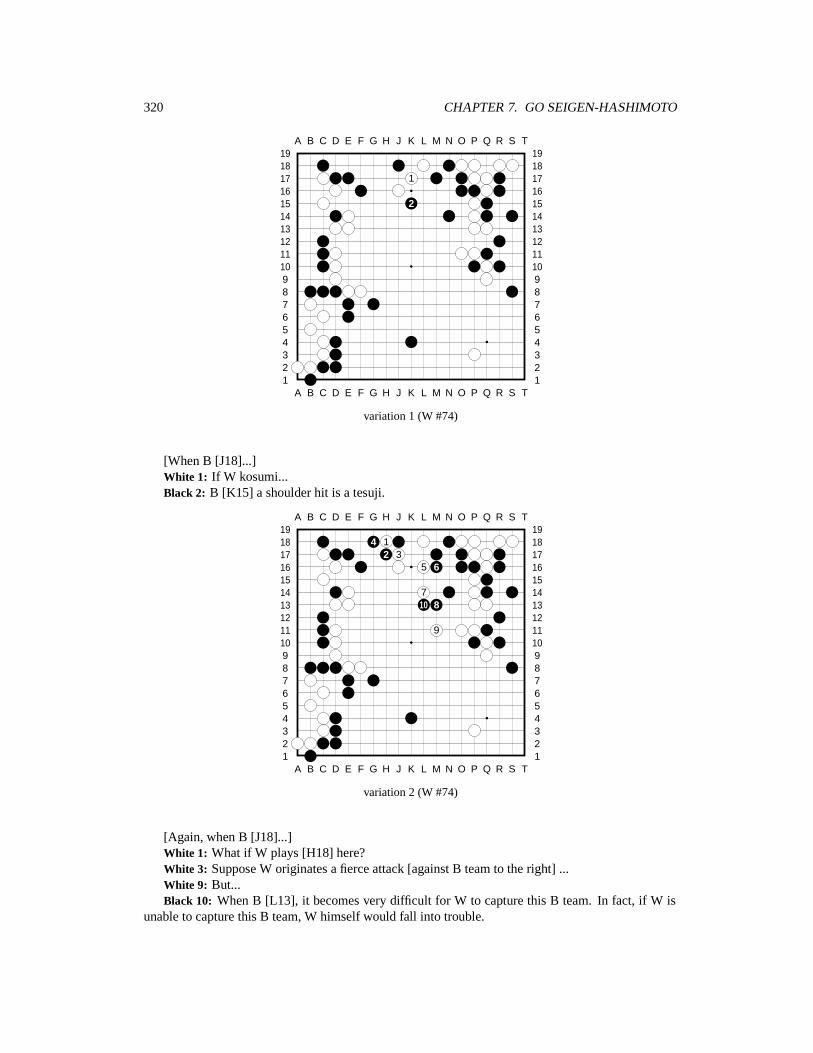
320 CHAPTER 7. GO SEIGEN-HASHIMOTO
A B C D E F G H J K L M N O P Q R S T
A B C D E F G H J K L M N O P Q R S T12345678910111213141516171819
12345678910111213141516171819
1
2
variation 1 (W #74)
[When B [J18]...]White 1: If W kosumi...Black 2: B [K15] a shoulder hit is a tesuji.
A B C D E F G H J K L M N O P Q R S T
A B C D E F G H J K L M N O P Q R S T12345678910111213141516171819
12345678910111213141516171819
4 12 3
5 6
710 8
9
variation 2 (W #74)
[Again, when B [J18]...]White 1: What if W plays [H18] here?White 3: Suppose W originates a fierce attack [against B team to the right] ...White 9: But...Black 10: When B [L13], it becomes very difficult for W to capture this B team. In fact, if W is
unable to capture this B team, W himself would fall into trouble.
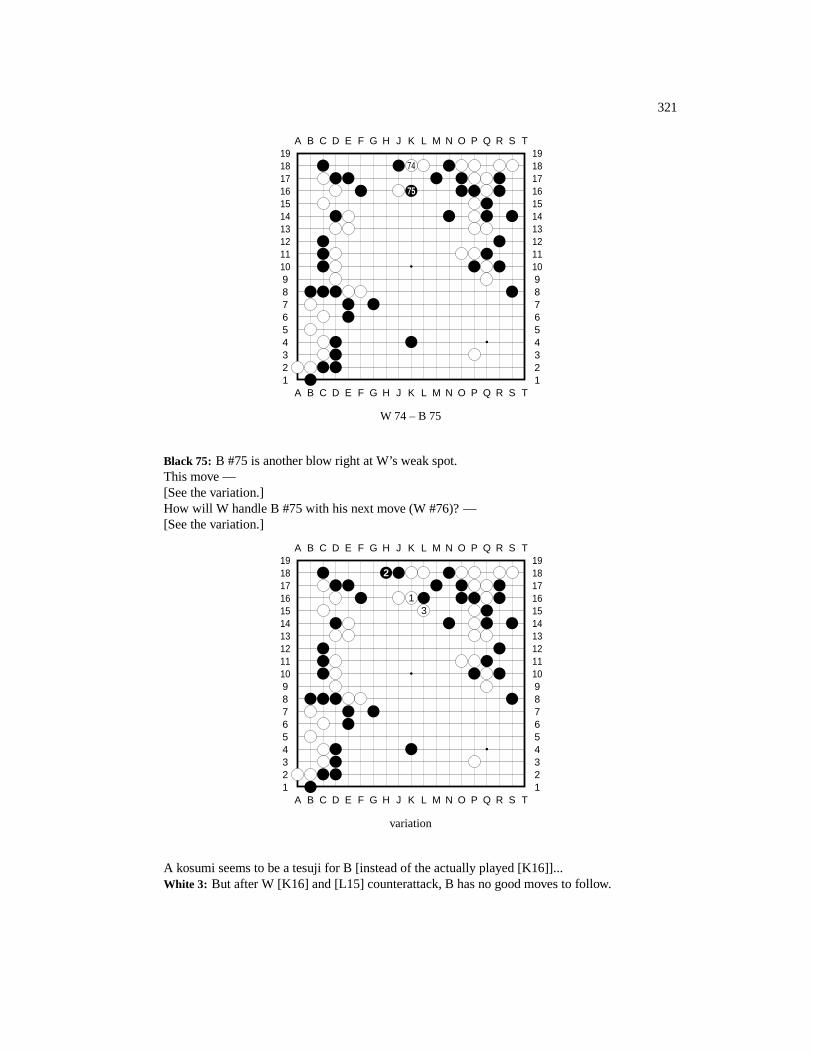
321
A B C D E F G H J K L M N O P Q R S T
A B C D E F G H J K L M N O P Q R S T12345678910111213141516171819
12345678910111213141516171819
74
75
W 74 – B 75
Black 75: B #75 is another blow right at W’s weak spot.This move —[See the variation.]How will W handle B #75 with his next move (W #76)? —[See the variation.]
A B C D E F G H J K L M N O P Q R S T
A B C D E F G H J K L M N O P Q R S T12345678910111213141516171819
12345678910111213141516171819
2
13
variation
A kosumi seems to be a tesuji for B [instead of the actually played [K16]]...White 3: But after W [K16] and [L15] counterattack, B has no good moves to follow.
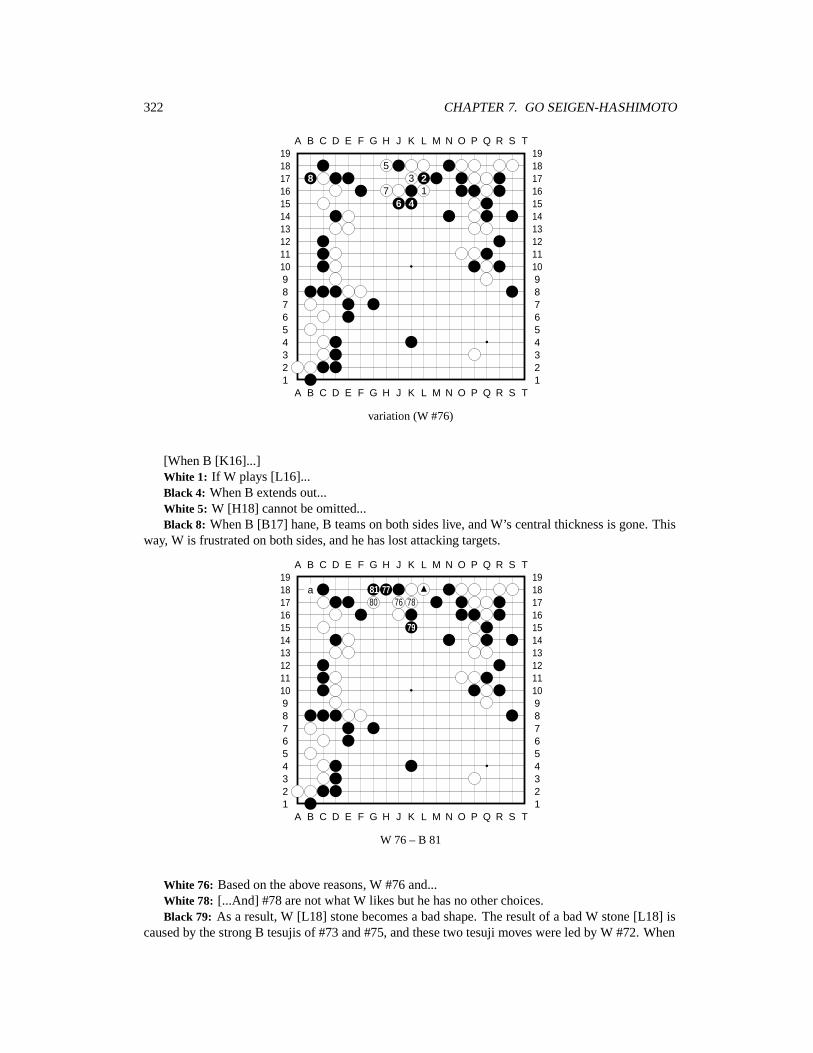
322 CHAPTER 7. GO SEIGEN-HASHIMOTO
A B C D E F G H J K L M N O P Q R S T
A B C D E F G H J K L M N O P Q R S T12345678910111213141516171819
12345678910111213141516171819
58 3 2
7 16 4
variation (W #76)
[When B [K16]...]White 1: If W plays [L16]...Black 4: When B extends out...White 5: W [H18] cannot be omitted...Black 8: When B [B17] hane, B teams on both sides live, and W’s central thickness is gone. This
way, W is frustrated on both sides, and he has lost attacking targets.
A B C D E F G H J K L M N O P Q R S T
A B C D E F G H J K L M N O P Q R S T12345678910111213141516171819
12345678910111213141516171819
a 81 7780 76 78
79
W 76 – B 81
White 76: Based on the above reasons, W #76 and...White 78: [...And] #78 are not what W likes but he has no other choices.Black 79: As a result, W [L18] stone becomes a bad shape. The result of a bad W stone [L18] is
caused by the strong B tesujis of #73 and #75, and these two tesuji moves were led by W #72. When
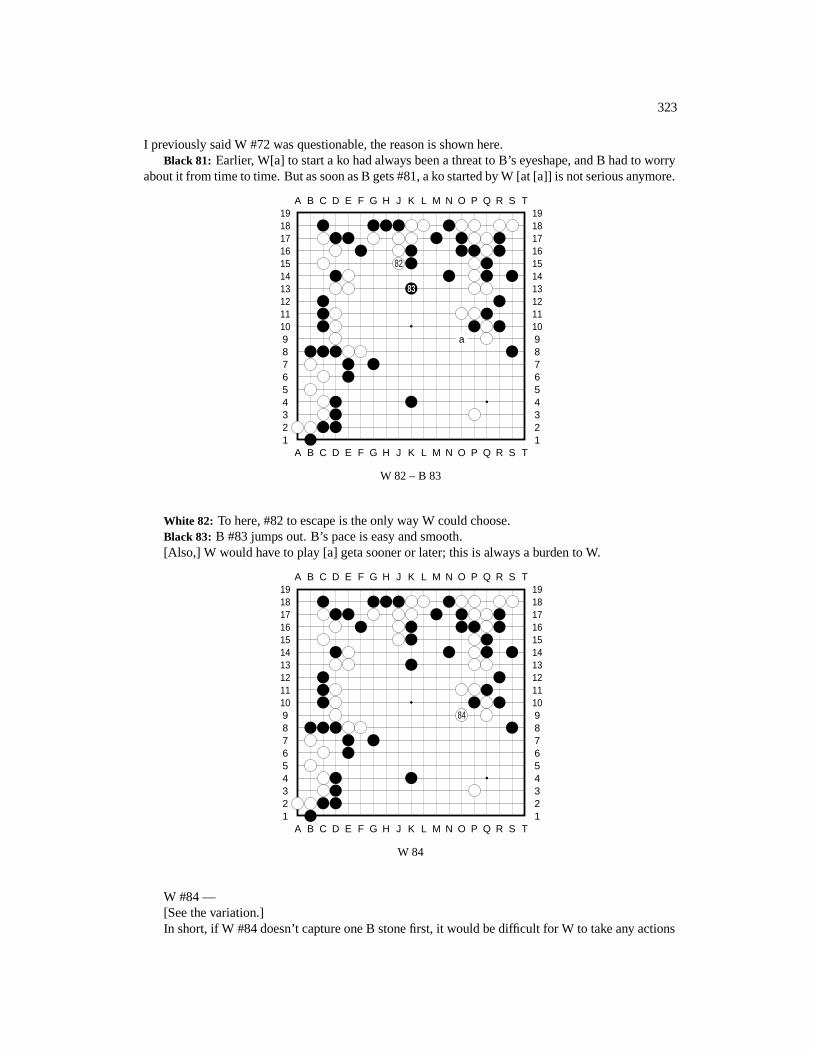
323
I previously said W #72 was questionable, the reason is shown here.Black 81: Earlier, W[a] to start a ko had always been a threat to B’s eyeshape, and B had to worry
about it from time to time. But as soon as B gets #81, a ko started by W [at [a]] is not serious anymore.
A B C D E F G H J K L M N O P Q R S T
A B C D E F G H J K L M N O P Q R S T12345678910111213141516171819
12345678910111213141516171819
82
83
a
W 82 – B 83
White 82: To here, #82 to escape is the only way W could choose.Black 83: B #83 jumps out. B’s pace is easy and smooth.[Also,] W would have to play [a] geta sooner or later; this is always a burden to W.
A B C D E F G H J K L M N O P Q R S T
A B C D E F G H J K L M N O P Q R S T12345678910111213141516171819
12345678910111213141516171819
84
W 84
W #84 —[See the variation.]In short, if W #84 doesn’t capture one B stone first, it would be difficult for W to take any actions

324 CHAPTER 7. GO SEIGEN-HASHIMOTO
[elsewhere].
A B C D E F G H J K L M N O P Q R S T
A B C D E F G H J K L M N O P Q R S T12345678910111213141516171819
12345678910111213141516171819
b2 1
a3
4
5
variation
If W wedges in with [K14]...Black 3: To B [M12]. Although B leaves two cutting points at [a] and [b], but if W cuts now, B
could capture the part from where W cuts [sacrificing the other side] — B is light here, and W has noefficient way to threaten the big B team.
White 4: And at the end, W still has to play this gate...Black 5: Thus B easily gets the chance to play [R4] kakari, and B will lead comfortably on
territory.
A B C D E F G H J K L M N O P Q R S T
A B C D E F G H J K L M N O P Q R S T12345678910111213141516171819
12345678910111213141516171819
8788 86
85
B 85 – W 88
Black 85: B #85. Normally, W would be in great danger and pain after such a hane move by B. In
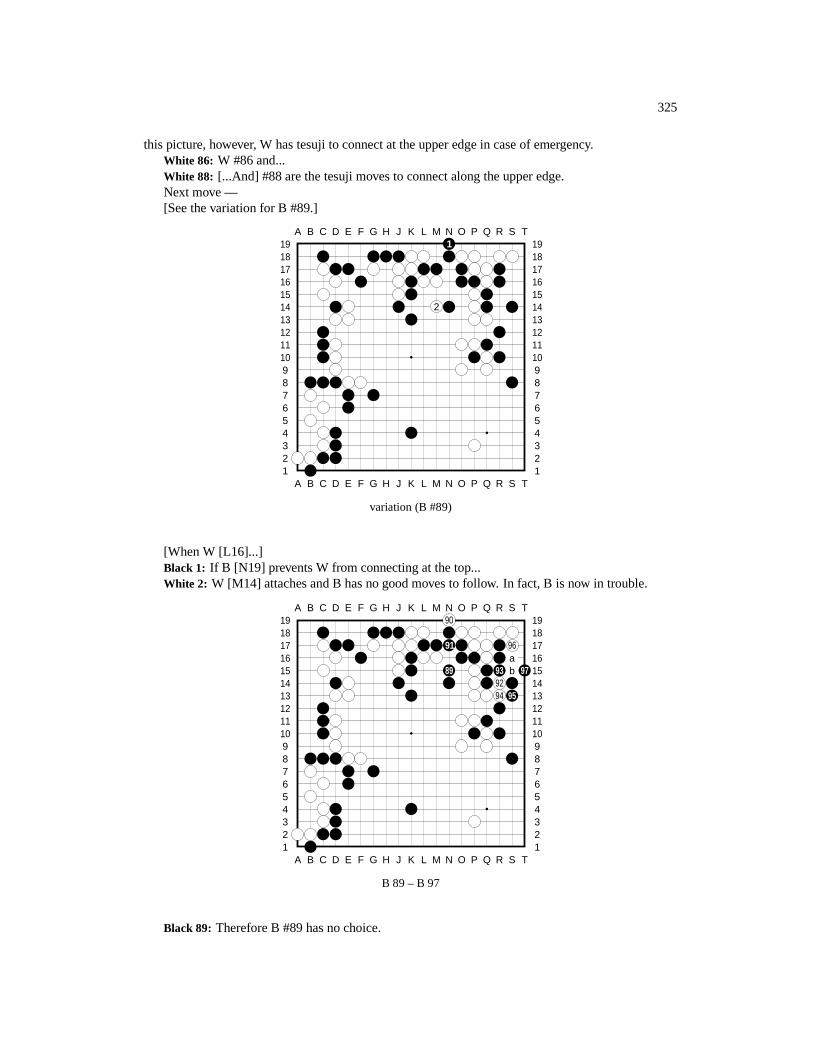
325
this picture, however, W has tesuji to connect at the upper edge in case of emergency.White 86: W #86 and...White 88: [...And] #88 are the tesuji moves to connect along the upper edge.Next move —[See the variation for B #89.]
A B C D E F G H J K L M N O P Q R S T
A B C D E F G H J K L M N O P Q R S T12345678910111213141516171819
123456789101112131415161718191
2
variation (B #89)
[When W [L16]...]Black 1: If B [N19] prevents W from connecting at the top...White 2: W [M14] attaches and B has no good moves to follow. In fact, B is now in trouble.
A B C D E F G H J K L M N O P Q R S T
A B C D E F G H J K L M N O P Q R S T12345678910111213141516171819
1234567891011121314151617181990
91 96a
89 93 b 979294 95
B 89 – B 97
Black 89: Therefore B #89 has no choice.
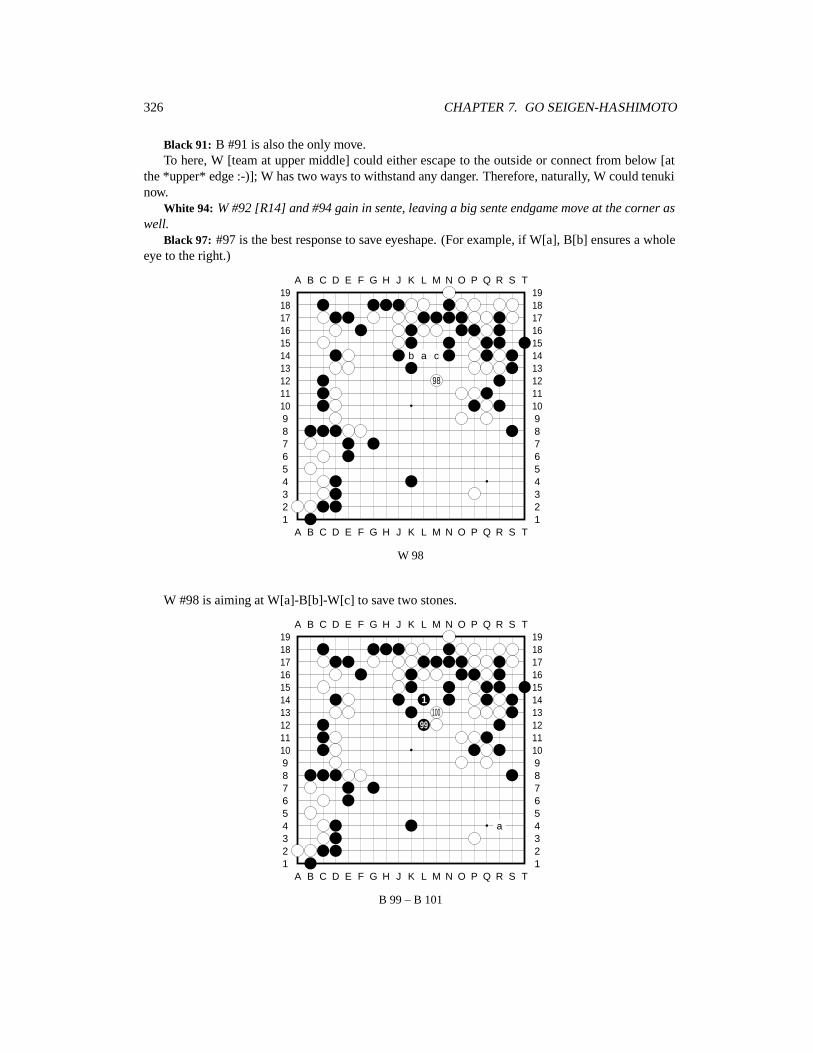
326 CHAPTER 7. GO SEIGEN-HASHIMOTO
Black 91: B #91 is also the only move.To here, W [team at upper middle] could either escape to the outside or connect from below [at
the *upper* edge :-)]; W has two ways to withstand any danger. Therefore, naturally, W could tenukinow.
White 94: W #92 [R14] and #94 gain in sente, leaving a big sente endgame move at the corner aswell.
Black 97: #97 is the best response to save eyeshape. (For example, if W[a], B[b] ensures a wholeeye to the right.)
A B C D E F G H J K L M N O P Q R S T
A B C D E F G H J K L M N O P Q R S T12345678910111213141516171819
12345678910111213141516171819
b a c
98
W 98
W #98 is aiming at W[a]-B[b]-W[c] to save two stones.
A B C D E F G H J K L M N O P Q R S T
A B C D E F G H J K L M N O P Q R S T12345678910111213141516171819
12345678910111213141516171819
1100
99
a
B 99 – B 101
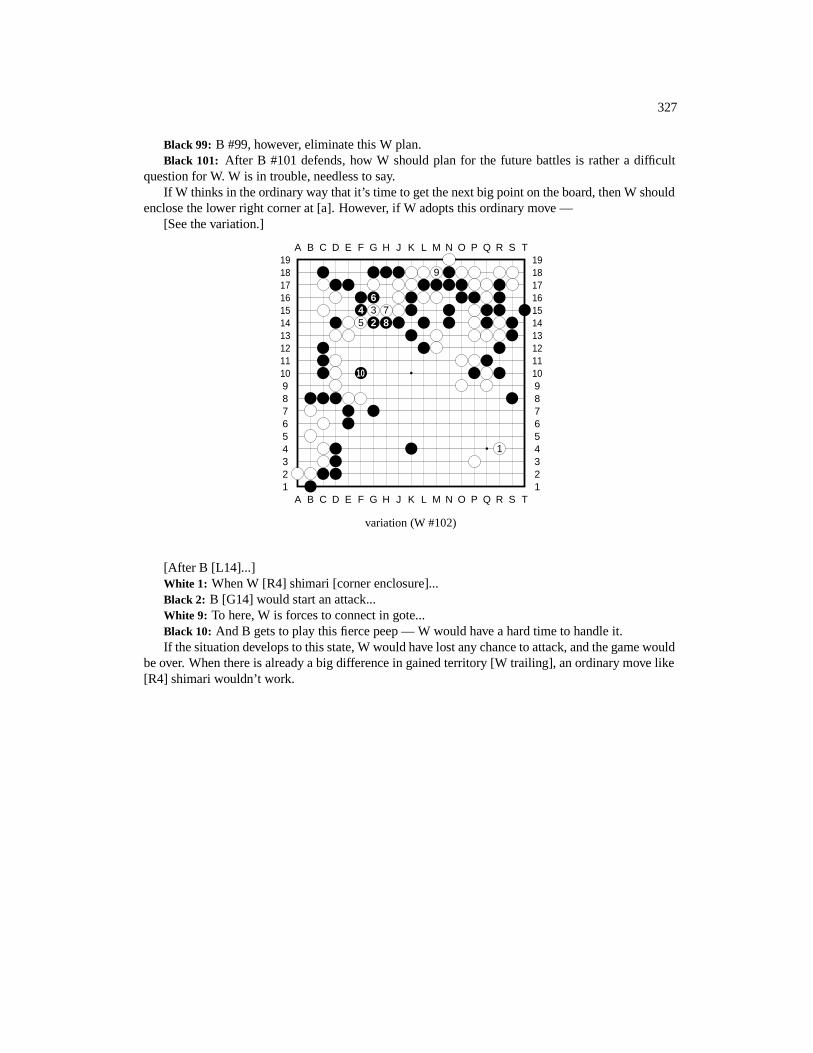
327
Black 99: B #99, however, eliminate this W plan.Black 101: After B #101 defends, how W should plan for the future battles is rather a difficult
question for W. W is in trouble, needless to say.If W thinks in the ordinary way that it’s time to get the next big point on the board, then W should
enclose the lower right corner at [a]. However, if W adopts this ordinary move —[See the variation.]
A B C D E F G H J K L M N O P Q R S T
A B C D E F G H J K L M N O P Q R S T12345678910111213141516171819
12345678910111213141516171819
9
64 3 75 2 8
10
1
variation (W #102)
[After B [L14]...]White 1: When W [R4] shimari [corner enclosure]...Black 2: B [G14] would start an attack...White 9: To here, W is forces to connect in gote...Black 10: And B gets to play this fierce peep — W would have a hard time to handle it.If the situation develops to this state, W would have lost any chance to attack, and the game would
be over. When there is already a big difference in gained territory [W trailing], an ordinary move like[R4] shimari wouldn’t work.
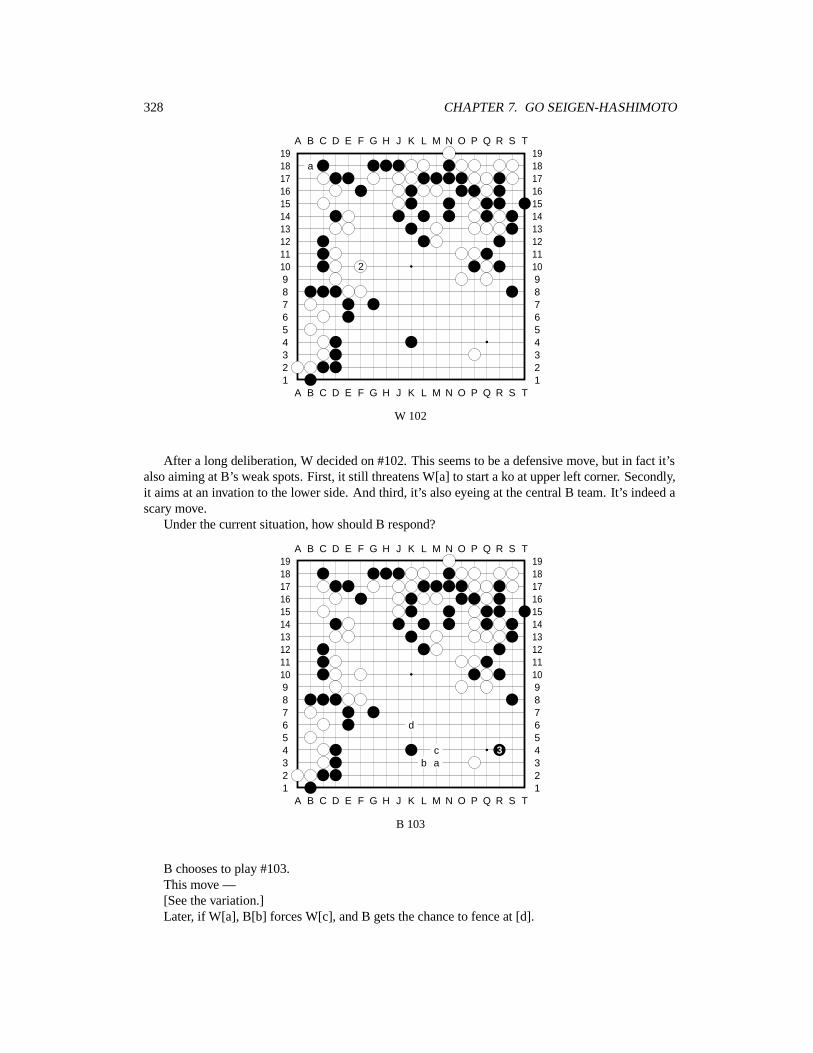
328 CHAPTER 7. GO SEIGEN-HASHIMOTO
A B C D E F G H J K L M N O P Q R S T
A B C D E F G H J K L M N O P Q R S T12345678910111213141516171819
12345678910111213141516171819
a
2
W 102
After a long deliberation, W decided on #102. This seems to be a defensive move, but in fact it’salso aiming at B’s weak spots. First, it still threatens W[a] to start a ko at upper left corner. Secondly,it aims at an invation to the lower side. And third, it’s also eyeing at the central B team. It’s indeed ascary move.
Under the current situation, how should B respond?
A B C D E F G H J K L M N O P Q R S T
A B C D E F G H J K L M N O P Q R S T12345678910111213141516171819
12345678910111213141516171819
d
c 3b a
B 103
B chooses to play #103.This move —[See the variation.]Later, if W[a], B[b] forces W[c], and B gets the chance to fence at [d].
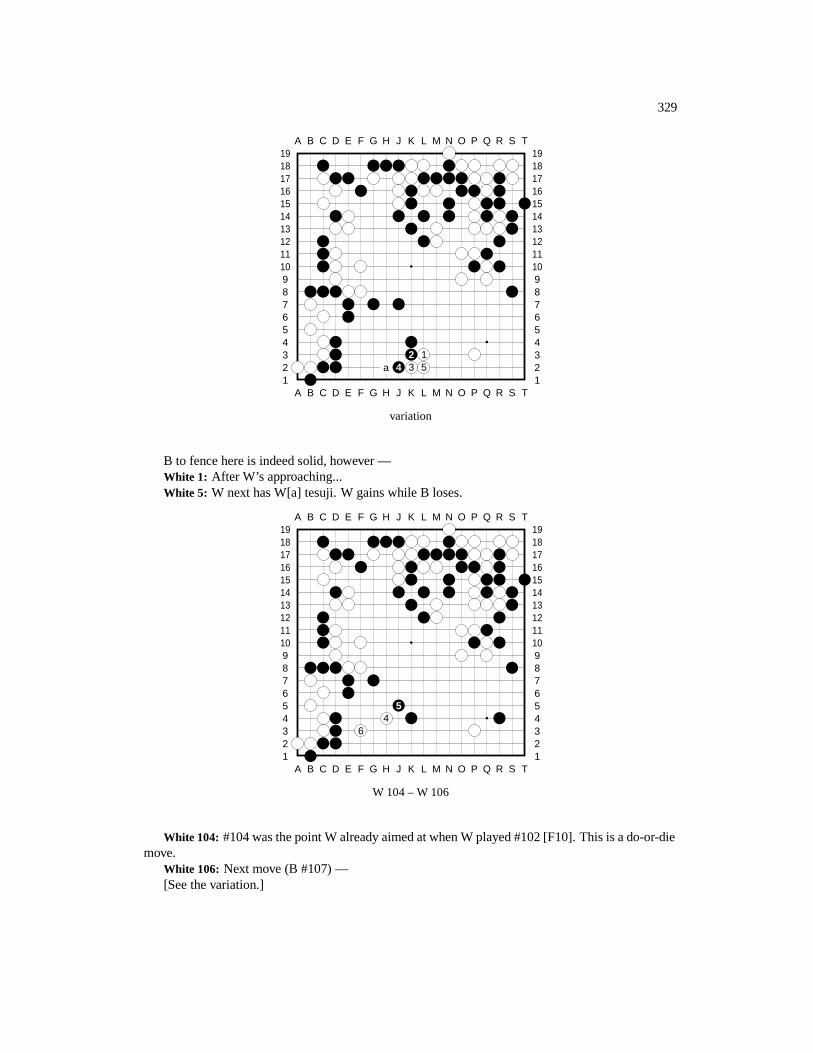
329
A B C D E F G H J K L M N O P Q R S T
A B C D E F G H J K L M N O P Q R S T12345678910111213141516171819
12345678910111213141516171819
2 1a 4 3 5
variation
B to fence here is indeed solid, however —White 1: After W’s approaching...White 5: W next has W[a] tesuji. W gains while B loses.
A B C D E F G H J K L M N O P Q R S T
A B C D E F G H J K L M N O P Q R S T12345678910111213141516171819
12345678910111213141516171819
54
6
W 104 – W 106
White 104: #104 was the point W already aimed at when W played #102 [F10]. This is a do-or-diemove.
White 106: Next move (B #107) —[See the variation.]
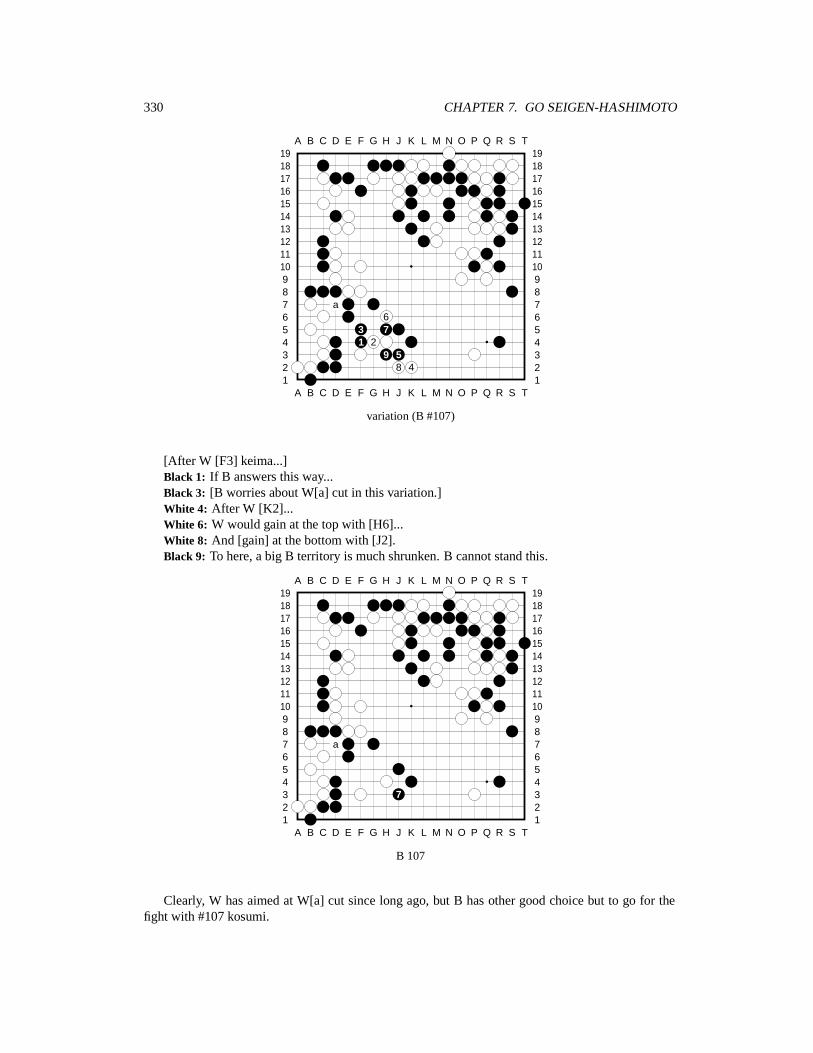
330 CHAPTER 7. GO SEIGEN-HASHIMOTO
A B C D E F G H J K L M N O P Q R S T
A B C D E F G H J K L M N O P Q R S T12345678910111213141516171819
12345678910111213141516171819
a6
3 71 2
9 58 4
variation (B #107)
[After W [F3] keima...]Black 1: If B answers this way...Black 3: [B worries about W[a] cut in this variation.]White 4: After W [K2]...White 6: W would gain at the top with [H6]...White 8: And [gain] at the bottom with [J2].Black 9: To here, a big B territory is much shrunken. B cannot stand this.
A B C D E F G H J K L M N O P Q R S T
A B C D E F G H J K L M N O P Q R S T12345678910111213141516171819
12345678910111213141516171819
a
7
B 107
Clearly, W has aimed at W[a] cut since long ago, but B has other good choice but to go for thefight with #107 kosumi.

331
A B C D E F G H J K L M N O P Q R S T
A B C D E F G H J K L M N O P Q R S T12345678910111213141516171819
12345678910111213141516171819
11 ab 10
9 8
W 108 – B 111
White 110: W #110 kosumi-tsuke, and W seems to be escaping. At this moment, if B is a little bitcareless, he could fall into W’s trap.
Black 111: B #111 is a good move. This move —[See the variation.]The reason that #111 is a good move is that it restrains W from cutting at [a].Next if W blocks at [b] —[See the variation.]
A B C D E F G H J K L M N O P Q R S T
A B C D E F G H J K L M N O P Q R S T12345678910111213141516171819
12345678910111213141516171819
5 1 42
3
variation
If B carelessly blocks W from here [H6]...White 5: Finally, W cuts here and B fails.
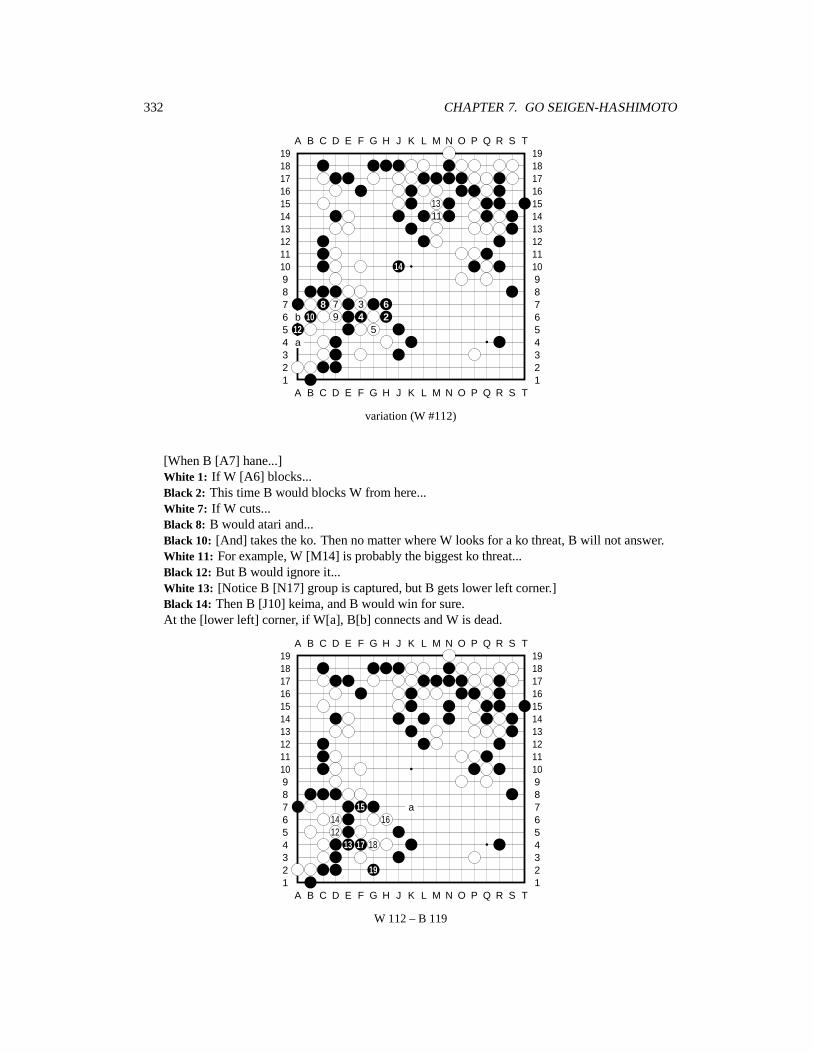
332 CHAPTER 7. GO SEIGEN-HASHIMOTO
A B C D E F G H J K L M N O P Q R S T
A B C D E F G H J K L M N O P Q R S T12345678910111213141516171819
12345678910111213141516171819
1311
14
8 7 3 6b 10 9 4 212 5a
variation (W #112)
[When B [A7] hane...]White 1: If W [A6] blocks...Black 2: This time B would blocks W from here...White 7: If W cuts...Black 8: B would atari and...Black 10: [And] takes the ko. Then no matter where W looks for a ko threat, B will not answer.White 11: For example, W [M14] is probably the biggest ko threat...Black 12: But B would ignore it...White 13: [Notice B [N17] group is captured, but B gets lower left corner.]Black 14: Then B [J10] keima, and B would win for sure.At the [lower left] corner, if W[a], B[b] connects and W is dead.
A B C D E F G H J K L M N O P Q R S T
A B C D E F G H J K L M N O P Q R S T12345678910111213141516171819
12345678910111213141516171819
15 a14 1612
13 17 18
19
W 112 – B 119
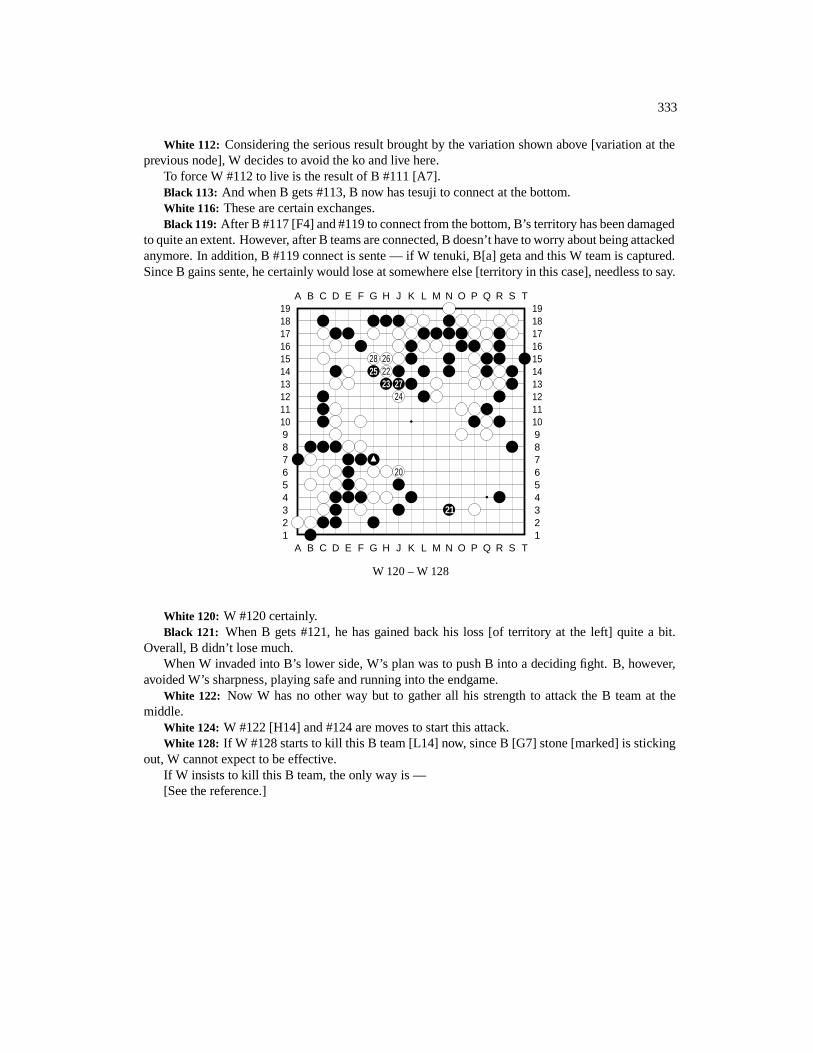
333
White 112: Considering the serious result brought by the variation shown above [variation at theprevious node], W decides to avoid the ko and live here.
To force W #112 to live is the result of B #111 [A7].Black 113: And when B gets #113, B now has tesuji to connect at the bottom.White 116: These are certain exchanges.Black 119: After B #117 [F4] and #119 to connect from the bottom, B’s territory has been damaged
to quite an extent. However, after B teams are connected, B doesn’t have to worry about being attackedanymore. In addition, B #119 connect is sente — if W tenuki, B[a] geta and this W team is captured.Since B gains sente, he certainly would lose at somewhere else [territory in this case], needless to say.
A B C D E F G H J K L M N O P Q R S T
A B C D E F G H J K L M N O P Q R S T12345678910111213141516171819
12345678910111213141516171819
28 2625 22
23 2724
20
21
W 120 – W 128
White 120: W #120 certainly.Black 121: When B gets #121, he has gained back his loss [of territory at the left] quite a bit.
Overall, B didn’t lose much.When W invaded into B’s lower side, W’s plan was to push B into a deciding fight. B, however,
avoided W’s sharpness, playing safe and running into the endgame.White 122: Now W has no other way but to gather all his strength to attack the B team at the
middle.White 124: W #122 [H14] and #124 are moves to start this attack.White 128: If W #128 starts to kill this B team [L14] now, since B [G7] stone [marked] is sticking
out, W cannot expect to be effective.If W insists to kill this B team, the only way is —[See the reference.]

334 CHAPTER 7. GO SEIGEN-HASHIMOTO
A B C D E F G H J K L M N O P Q R S T
A B C D E F G H J K L M N O P Q R S T12345678910111213141516171819
12345678910111213141516171819
1 45
a b3
9 612 10 7
11 8 2
13
reference
[If W aims to kill the B team to the right [L14]], W should play [F17]. This move creates twocutting points at [a] and [b].
White 2: Then W [L11] hane, trying to kill.Black 5: But B has [G15] and [H17].White 6: Now even if W cuts here...Black 13: To here, B escapes. [Clearly, [G7] stone that sticks out plays an important role here.]
A B C D E F G H J K L M N O P Q R S T
A B C D E F G H J K L M N O P Q R S T12345678910111213141516171819
12345678910111213141516171819
2930
a 3133
32
34 3635
B 129 – W 136
White 132: W is chasing tightly, trying his hardest to capture B team.White 136: What if W #136 this move to cut at [a]; what will the result be? —[See the variation.]
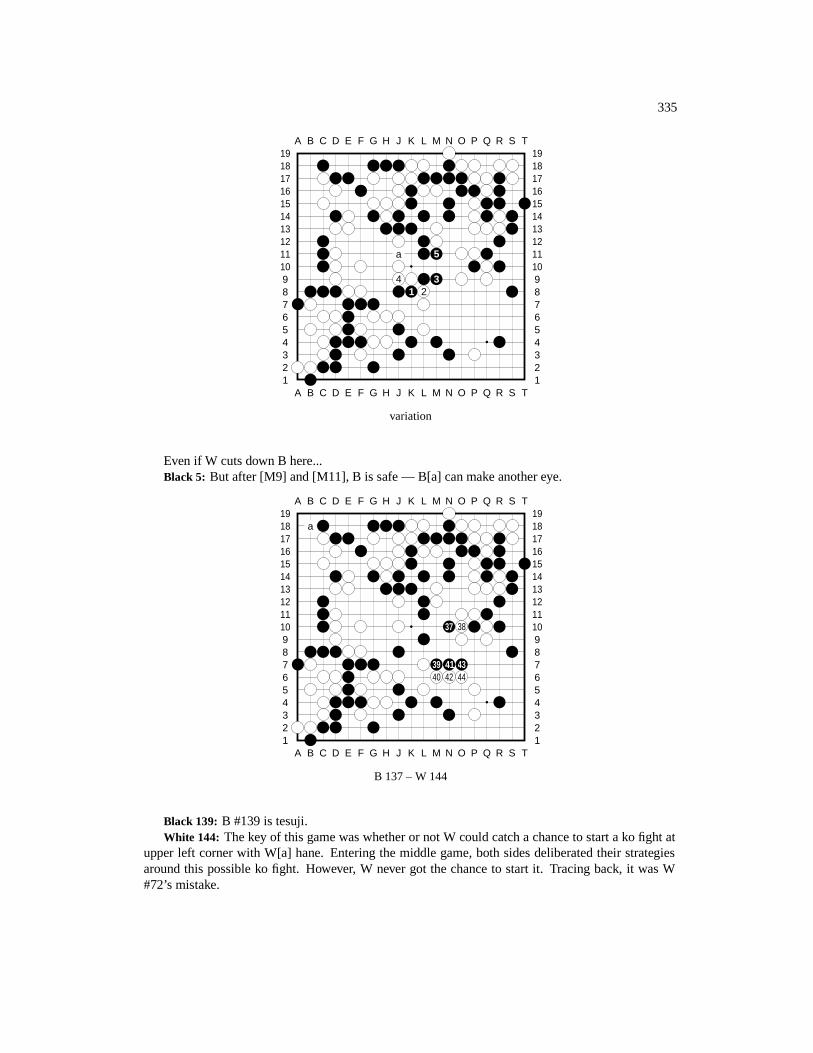
335
A B C D E F G H J K L M N O P Q R S T
A B C D E F G H J K L M N O P Q R S T12345678910111213141516171819
12345678910111213141516171819
a 5
4 31 2
variation
Even if W cuts down B here...Black 5: But after [M9] and [M11], B is safe — B[a] can make another eye.
A B C D E F G H J K L M N O P Q R S T
A B C D E F G H J K L M N O P Q R S T12345678910111213141516171819
12345678910111213141516171819
a
37 38
39 41 4340 42 44
B 137 – W 144
Black 139: B #139 is tesuji.White 144: The key of this game was whether or not W could catch a chance to start a ko fight at
upper left corner with W[a] hane. Entering the middle game, both sides deliberated their strategiesaround this possible ko fight. However, W never got the chance to start it. Tracing back, it was W#72’s mistake.
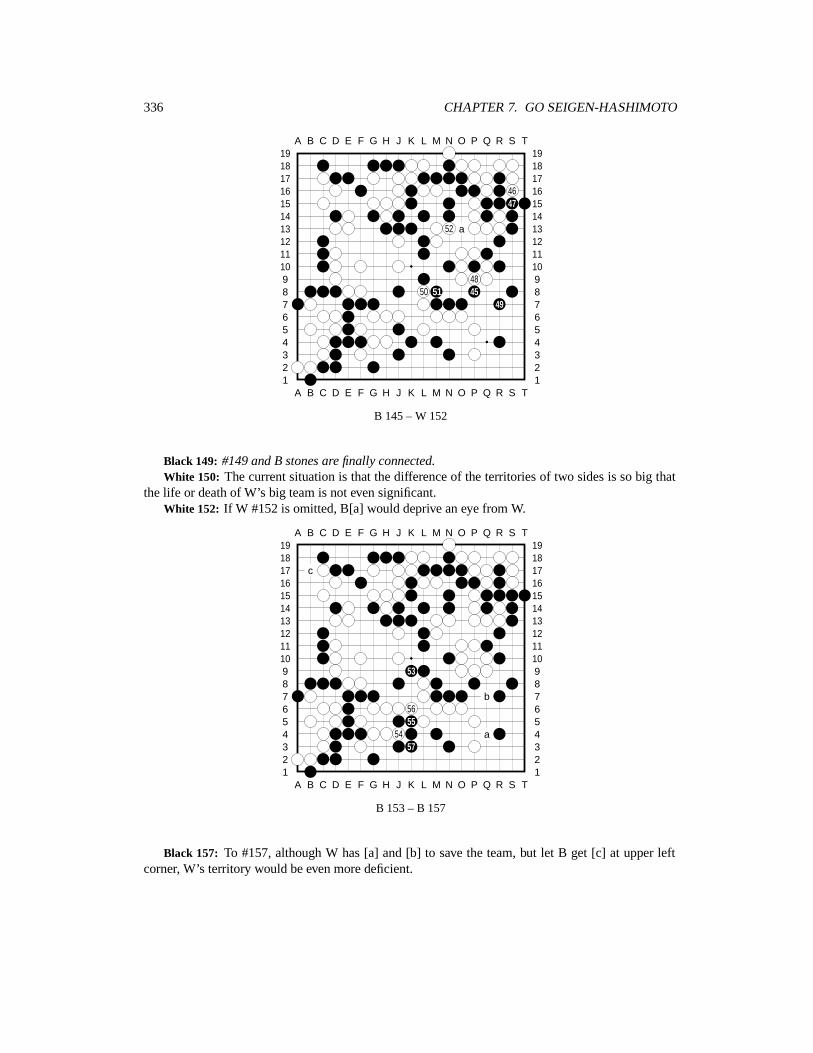
336 CHAPTER 7. GO SEIGEN-HASHIMOTO
A B C D E F G H J K L M N O P Q R S T
A B C D E F G H J K L M N O P Q R S T12345678910111213141516171819
12345678910111213141516171819
4647
52 a
4850 51 45
49
B 145 – W 152
Black 149: #149 and B stones are finally connected.White 150: The current situation is that the difference of the territories of two sides is so big that
the life or death of W’s big team is not even significant.White 152: If W #152 is omitted, B[a] would deprive an eye from W.
A B C D E F G H J K L M N O P Q R S T
A B C D E F G H J K L M N O P Q R S T12345678910111213141516171819
12345678910111213141516171819
c
53
b5655
54 a57
B 153 – B 157
Black 157: To #157, although W has [a] and [b] to save the team, but let B get [c] at upper leftcorner, W’s territory would be even more deficient.
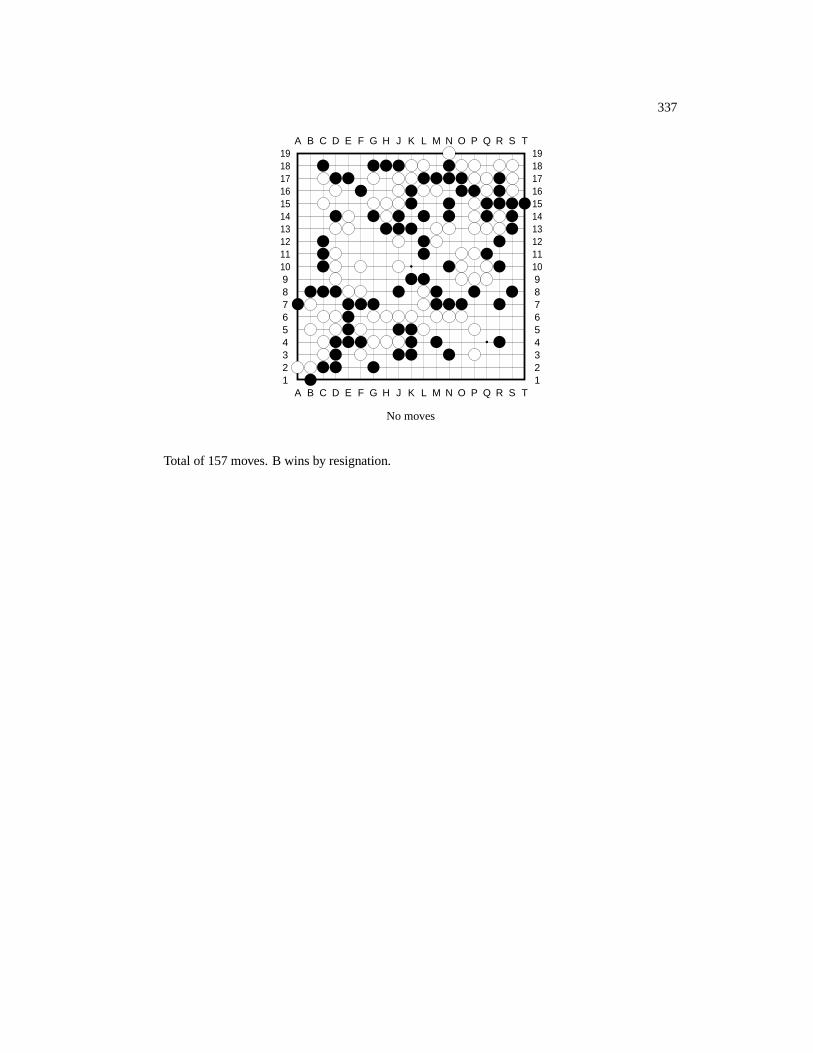
337
A B C D E F G H J K L M N O P Q R S T
A B C D E F G H J K L M N O P Q R S T12345678910111213141516171819
12345678910111213141516171819
No moves
Total of 157 moves. B wins by resignation.
338 CHAPTER 7. GO SEIGEN-HASHIMOTO
Chapter 8
Go Seigen-Sakata Eio 2
Beautiful Imagination Appendix F shows a game (partly) between Sakata, white, and KitaniMinoru, black. In the game, Sakata showed that aside the superb close-fight skills he has, he alsopossesses the imagination one needs to fight on the open field.
Sakata later said, “This was a game I won happily playing white, and I still have a good impressionof it.”
Sakata’s imagaination and skills to operate the stones are not imitatable. The above game is anexample that he is proud of.
Sakata then added, “But now I am not that good anymore. Often at key moments, I make mistakes.I become physically weaker and weaker, and one game a week is a heavy work to me.”
“By far you’ve won 58 titles; how many do you want to reach?”“At least 60.” Sakata answered, “But whether or not I will reach this goal, only God knows.”
[This number now stands at 64, far more than any other Japan’s professional player has reached.]
A Memorable Game “You have played many famous games, which one has printed deeply in yourmind?”
Sakata, “Oh, I can’t quite remember... You want me to say which game? Hmmm, it’s somewhatdifficult... Among the recent games, the Honinbo match with Ishida Yoshio [was quite memorable].”
“Was it the 1975 Honinbo Title final, the game in which you were upset by Ishida [at the end]?”“[In that game,] I forced him into a complicated fighting game, a game that I liked. I was holding
the upper hand most of the game. [However he lost the game, and thus his chanllenge to Honinbo titlethen-holder Ishida failed by a score of 4-3.] Also, finals against Rin Kaiho in the Meijin and Honinbomatches [late 60’s] were also clearly remembered. At that time, my fighting spirit never lost to thoseyoung people.”
What Sakata would never forget was his Meijin Sen final matches against Fujisawa Shuko. Afterwinning the first two matches, Sakata lost the next three.
In Game 6, Sakata had had his back on the wall. In the week long break, he studies many ancientGo records, trying to establish a new mentality and spirit. This has become a famous story. 1
Lo and behold, Sakata’s effort won him Game 6, then he went on to defeat Shuko in the decidingGame 7, thus became the 2nd Meijin Sen winner. In Game 7, white #120 (by Sakata) was a famousmyoshu, but —
Sakata said, “I myself think that my Game 6 was played better than Game 7. After I won Game6, I gained the confidence to win Game 7.”
“At that time, it was not so friendly between us [Sakata and Shuko] — Now we’re very good toeach other (laugh) —” Sakata recalled, “So we often had bloody games on the board, and neither
1See Appendix G for the first 50 moves of this game.
339

340 CHAPTER 8. GO SEIGEN-SAKATA EIO 2
wanted to give in.”“Nowadays, the young players are good friends of each other, but since the wins and losses on the
board are directly related to one’s reputation, it’s better not to be so friendly on the board.”“To be friendly privately is all right; in fact, it should be so.” Sakata continued, “But on the board,
I hope [the young players] to be not so kind to each other (laugh).”

341
Sakata Eio, 9-danversus
Go Seigen, 9-dan
Black: Sakata Eio, 9-danWhite: Go Seigen, 9-dan
Date: July 2-3, 1957Place: Toyko, JapanKomi: 0
Result: W�4
A B C D E F G H J K L M N O P Q R S T
A B C D E F G H J K L M N O P Q R S T12345678910111213141516171819
12345678910111213141516171819
2 51
c
a6 b
4 3
B 1 – W 6
Go Seigen (Wu) vs. Sakata(The 1st Japan’s Strongest Deciding Matches)Black: Sakata Eio, 9dWhite: Go Seigen (Wu), 9dDate: July 2-3, 1957Place: TokyoBlack 1: In these matches [1st Japan’s Strongest Deciding Matches], Go Seigen 9-dan and Sakata
9-dan played a total of two games. The result of the first game [posted as Game 3 of the Go Seigenseries] was that Go Seigen won by resignation on B. This game was the second match between thetwo; Wu played W.
White 2: At the beginning [of this game], in an avalanche joseki at the lower right corner, GoSeigen 9-dan’s W #24 should have captured a stone cleanly [according to the joseki], but to lure B toextend out [the stone under atari], W chose to play a move at lower left corner instead. This unusualmove, as an interesting inclination, certainly contained its speical understanding of the game, but iteventually brought W unfavorable results. Thereafter, Sakata 9-dan [B] gained with move after move,and to the middle game stage, B grabbed the lead.
Black 3: (Overview continued) From then on, Wu fought hard all over the board. Gradually hepulled it even, and the outcome of the game became uncertain. But then, because of W #132 and#134’s mistakes, B made an extraordinary move in W’s territory, and B grabbed the lead again. GoSeigen 9-dan then started a ko to struggle, and it turned out to be a favorable exchange for W. Thesituation thus turned sharply, and this time W had the lead. Finally, a big B team was invovled in a
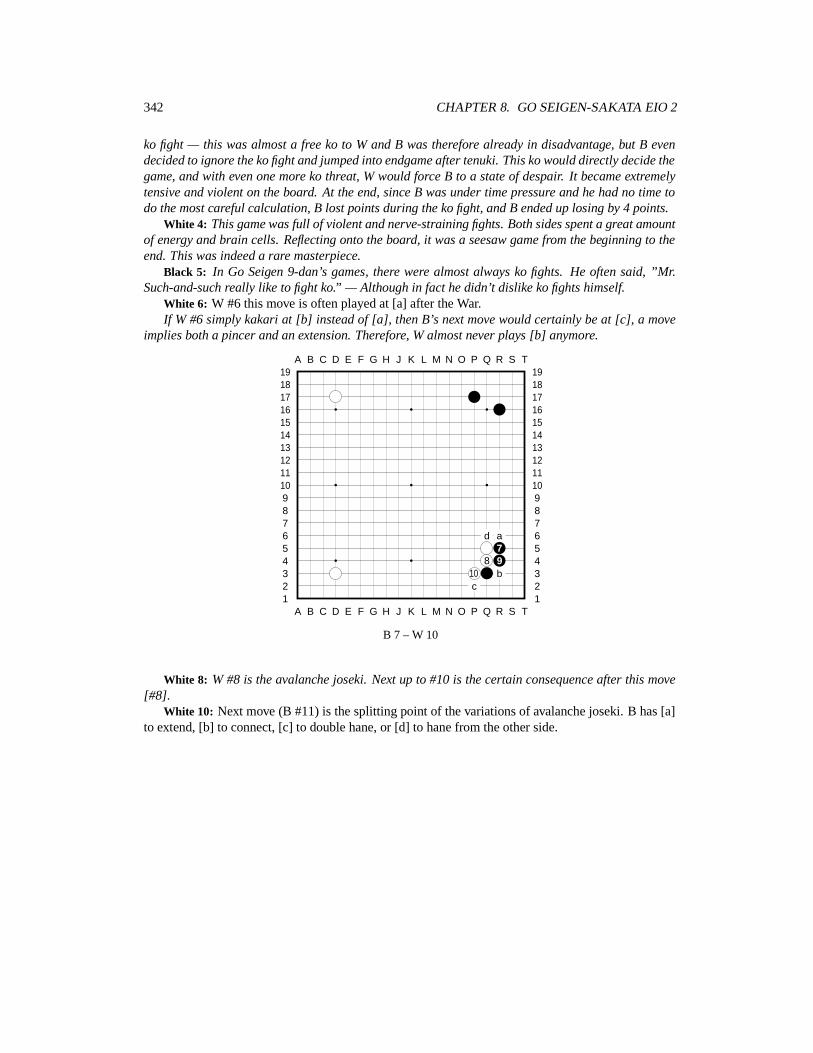
342 CHAPTER 8. GO SEIGEN-SAKATA EIO 2
ko fight — this was almost a free ko to W and B was therefore already in disadvantage, but B evendecided to ignore the ko fight and jumped into endgame after tenuki. This ko would directly decide thegame, and with even one more ko threat, W would force B to a state of despair. It became extremelytensive and violent on the board. At the end, since B was under time pressure and he had no time todo the most careful calculation, B lost points during the ko fight, and B ended up losing by 4 points.
White 4: This game was full of violent and nerve-straining fights. Both sides spent a great amountof energy and brain cells. Reflecting onto the board, it was a seesaw game from the beginning to theend. This was indeed a rare masterpiece.
Black 5: In Go Seigen 9-dan’s games, there were almost always ko fights. He often said, ”Mr.Such-and-such really like to fight ko.” — Although in fact he didn’t dislike ko fights himself.
White 6: W #6 this move is often played at [a] after the War.If W #6 simply kakari at [b] instead of [a], then B’s next move would certainly be at [c], a move
implies both a pincer and an extension. Therefore, W almost never plays [b] anymore.
A B C D E F G H J K L M N O P Q R S T
A B C D E F G H J K L M N O P Q R S T12345678910111213141516171819
12345678910111213141516171819
d a7
8 910 bc
B 7 – W 10
White 8: W #8 is the avalanche joseki. Next up to #10 is the certain consequence after this move[#8].
White 10: Next move (B #11) is the splitting point of the variations of avalanche joseki. B has [a]to extend, [b] to connect, [c] to double hane, or [d] to hane from the other side.
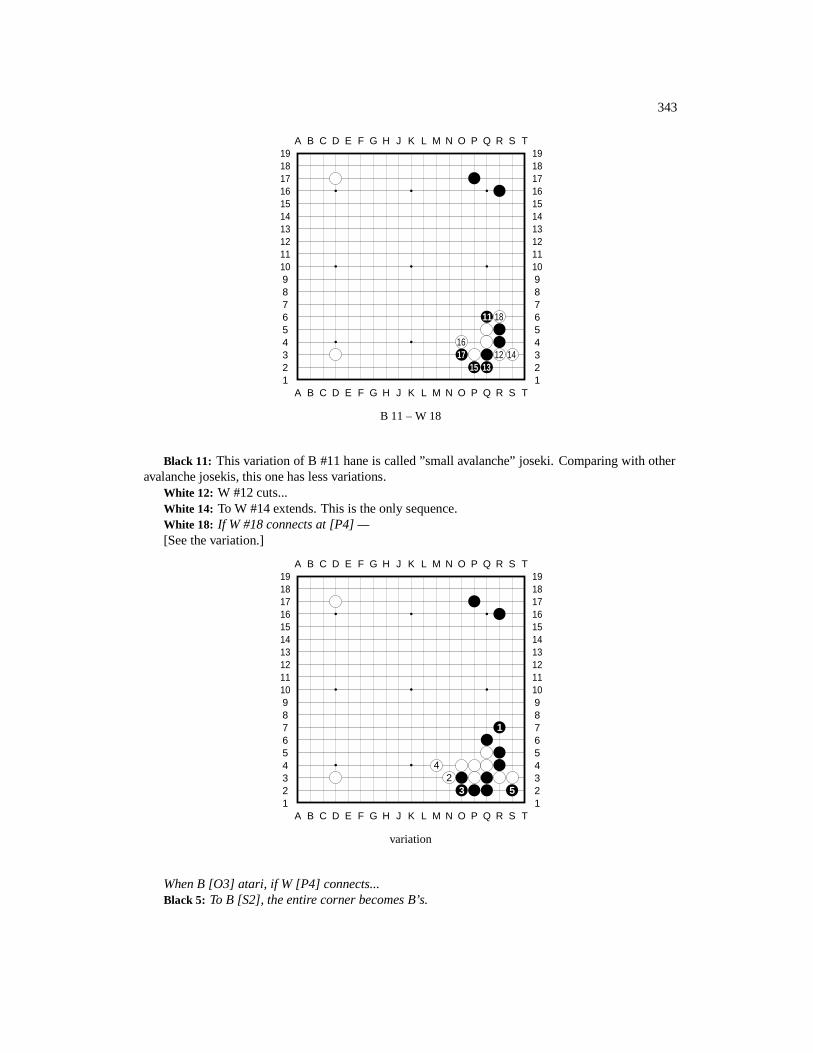
343
A B C D E F G H J K L M N O P Q R S T
A B C D E F G H J K L M N O P Q R S T12345678910111213141516171819
12345678910111213141516171819
11 18
1617 12 14
15 13
B 11 – W 18
Black 11: This variation of B #11 hane is called ”small avalanche” joseki. Comparing with otheravalanche josekis, this one has less variations.
White 12: W #12 cuts...White 14: To W #14 extends. This is the only sequence.White 18: If W #18 connects at [P4] —[See the variation.]
A B C D E F G H J K L M N O P Q R S T
A B C D E F G H J K L M N O P Q R S T12345678910111213141516171819
12345678910111213141516171819
1
42
3 5
variation
When B [O3] atari, if W [P4] connects...Black 5: To B [S2], the entire corner becomes B’s.
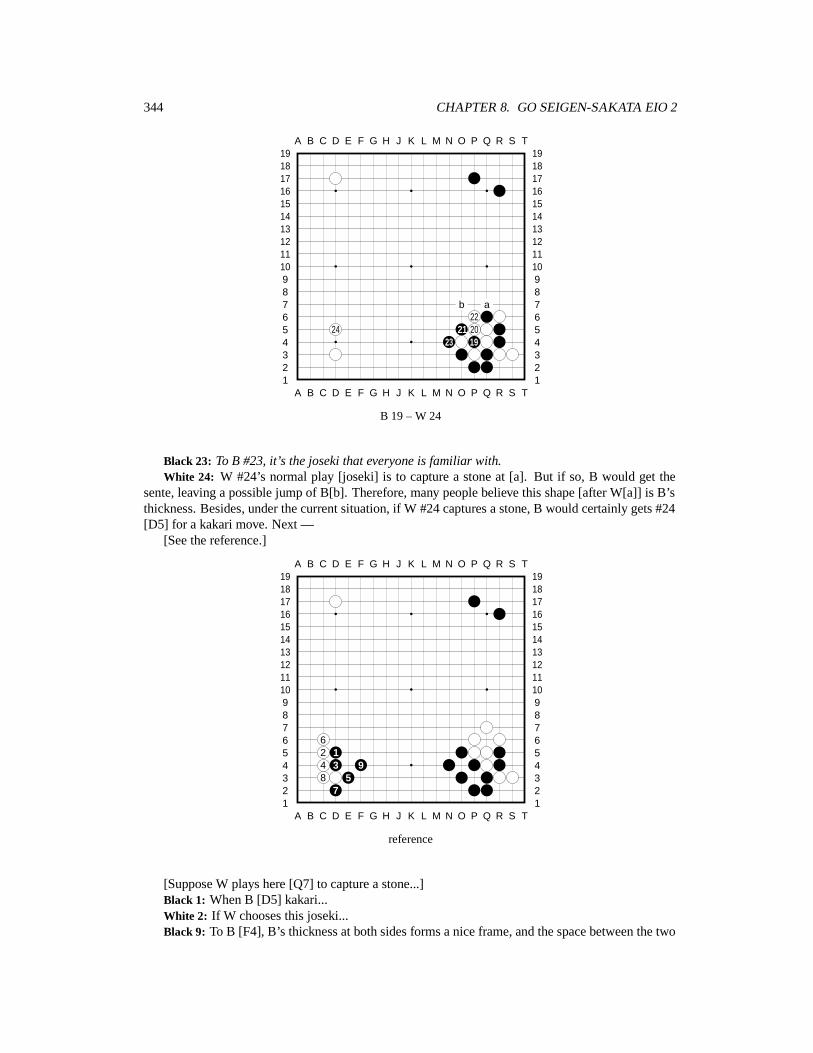
344 CHAPTER 8. GO SEIGEN-SAKATA EIO 2
A B C D E F G H J K L M N O P Q R S T
A B C D E F G H J K L M N O P Q R S T12345678910111213141516171819
12345678910111213141516171819
b a22
24 21 2023 19
B 19 – W 24
Black 23: To B #23, it’s the joseki that everyone is familiar with.White 24: W #24’s normal play [joseki] is to capture a stone at [a]. But if so, B would get the
sente, leaving a possible jump of B[b]. Therefore, many people believe this shape [after W[a]] is B’sthickness. Besides, under the current situation, if W #24 captures a stone, B would certainly gets #24[D5] for a kakari move. Next —
[See the reference.]
A B C D E F G H J K L M N O P Q R S T
A B C D E F G H J K L M N O P Q R S T12345678910111213141516171819
12345678910111213141516171819
62 14 3 98 5
7
reference
[Suppose W plays here [Q7] to capture a stone...]Black 1: When B [D5] kakari...White 2: If W chooses this joseki...Black 9: To B [F4], B’s thickness at both sides forms a nice frame, and the space between the two
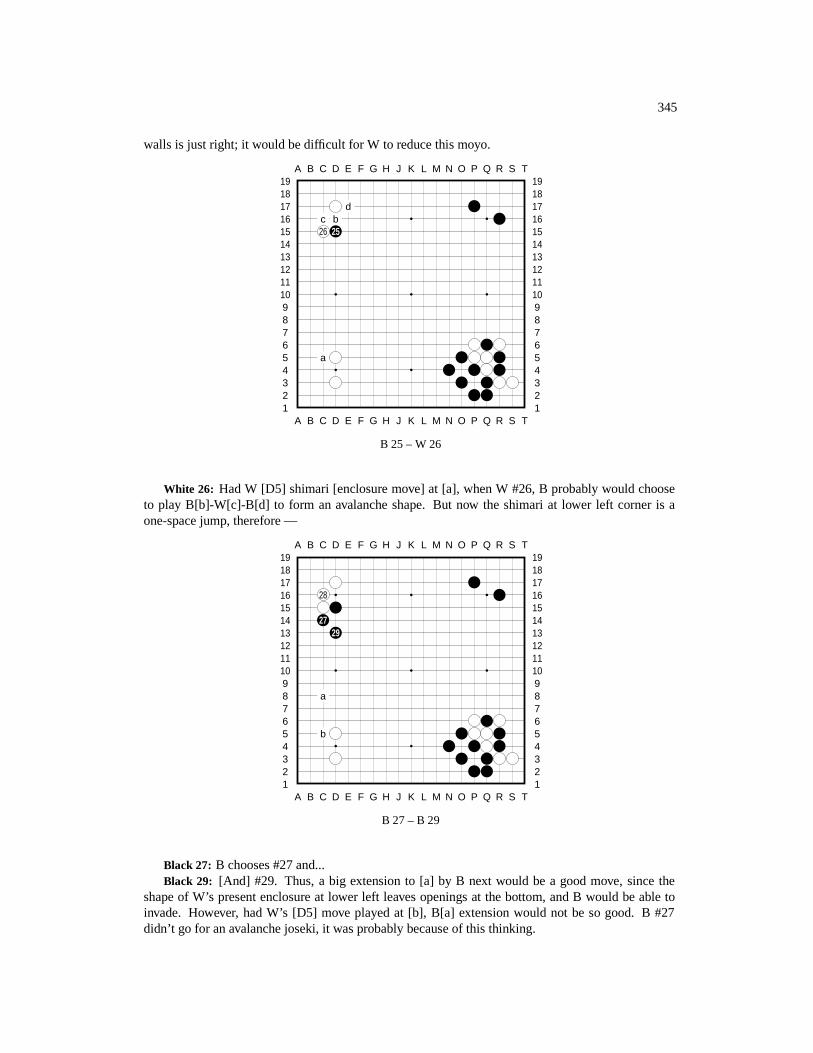
345
walls is just right; it would be difficult for W to reduce this moyo.
A B C D E F G H J K L M N O P Q R S T
A B C D E F G H J K L M N O P Q R S T12345678910111213141516171819
12345678910111213141516171819
dc b26 25
a
B 25 – W 26
White 26: Had W [D5] shimari [enclosure move] at [a], when W #26, B probably would chooseto play B[b]-W[c]-B[d] to form an avalanche shape. But now the shimari at lower left corner is aone-space jump, therefore —
A B C D E F G H J K L M N O P Q R S T
A B C D E F G H J K L M N O P Q R S T12345678910111213141516171819
12345678910111213141516171819
28
2729
a
b
B 27 – B 29
Black 27: B chooses #27 and...Black 29: [And] #29. Thus, a big extension to [a] by B next would be a good move, since the
shape of W’s present enclosure at lower left leaves openings at the bottom, and B would be able toinvade. However, had W’s [D5] move played at [b], B[a] extension would not be so good. B #27didn’t go for an avalanche joseki, it was probably because of this thinking.
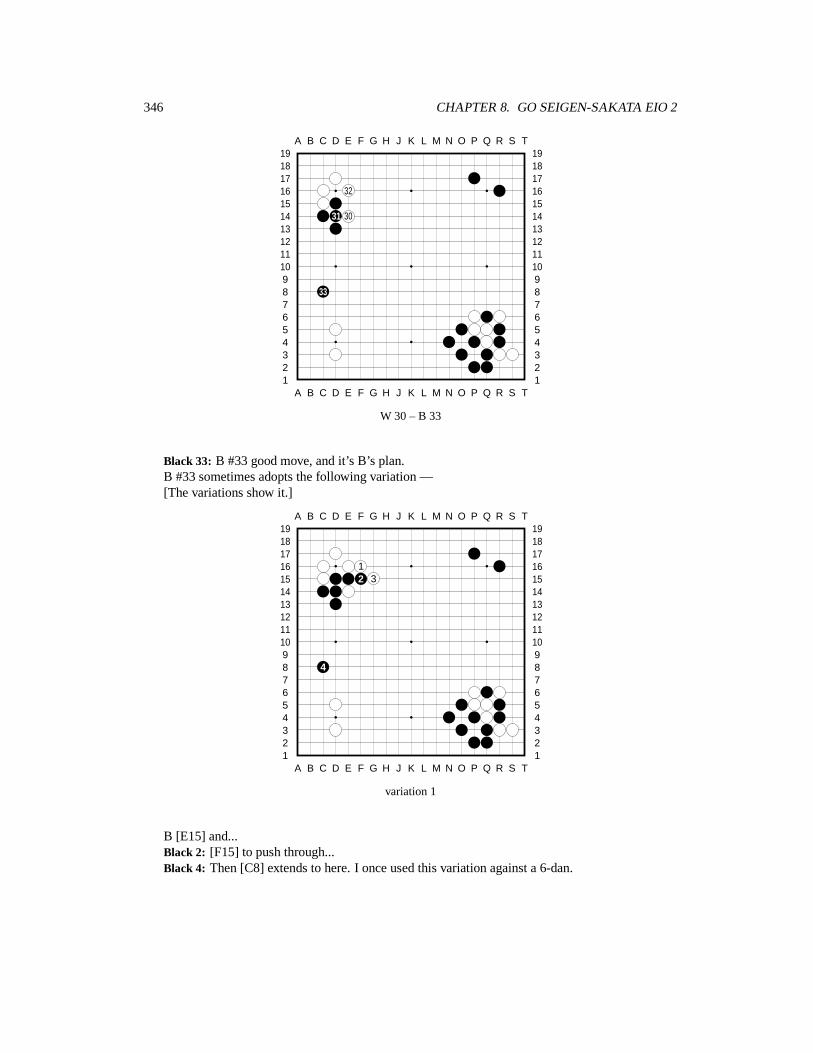
346 CHAPTER 8. GO SEIGEN-SAKATA EIO 2
A B C D E F G H J K L M N O P Q R S T
A B C D E F G H J K L M N O P Q R S T12345678910111213141516171819
12345678910111213141516171819
32
31 30
33
W 30 – B 33
Black 33: B #33 good move, and it’s B’s plan.B #33 sometimes adopts the following variation —[The variations show it.]
A B C D E F G H J K L M N O P Q R S T
A B C D E F G H J K L M N O P Q R S T12345678910111213141516171819
12345678910111213141516171819
12 3
4
variation 1
B [E15] and...Black 2: [F15] to push through...Black 4: Then [C8] extends to here. I once used this variation against a 6-dan.
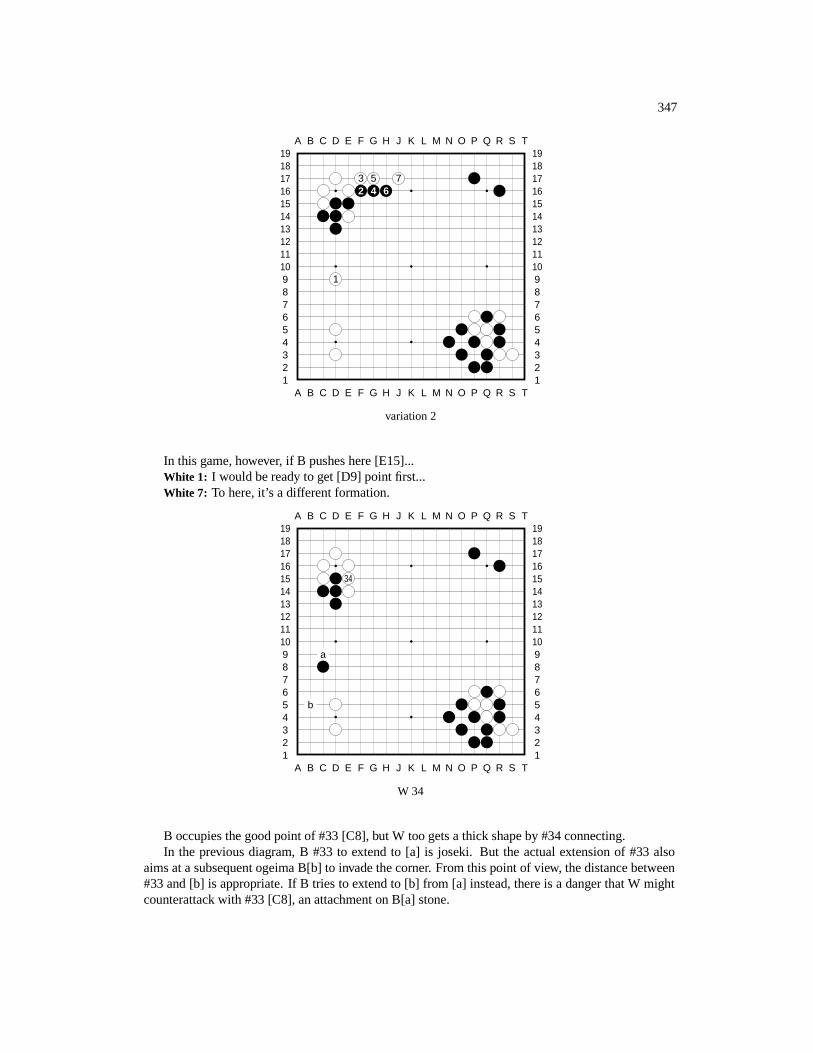
347
A B C D E F G H J K L M N O P Q R S T
A B C D E F G H J K L M N O P Q R S T12345678910111213141516171819
12345678910111213141516171819
3 5 72 4 6
1
variation 2
In this game, however, if B pushes here [E15]...White 1: I would be ready to get [D9] point first...White 7: To here, it’s a different formation.
A B C D E F G H J K L M N O P Q R S T
A B C D E F G H J K L M N O P Q R S T12345678910111213141516171819
12345678910111213141516171819
34
a
b
W 34
B occupies the good point of #33 [C8], but W too gets a thick shape by #34 connecting.In the previous diagram, B #33 to extend to [a] is joseki. But the actual extension of #33 also
aims at a subsequent ogeima B[b] to invade the corner. From this point of view, the distance between#33 and [b] is appropriate. If B tries to extend to [b] from [a] instead, there is a danger that W mightcounterattack with #33 [C8], an attachment on B[a] stone.
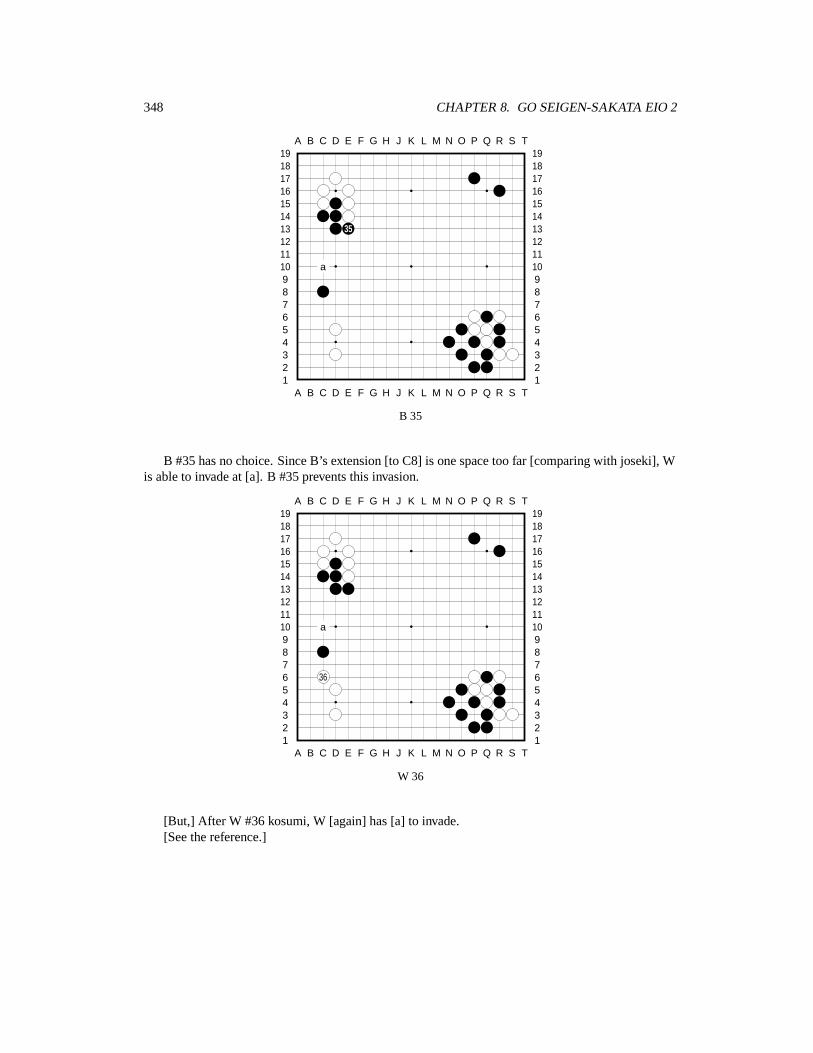
348 CHAPTER 8. GO SEIGEN-SAKATA EIO 2
A B C D E F G H J K L M N O P Q R S T
A B C D E F G H J K L M N O P Q R S T12345678910111213141516171819
12345678910111213141516171819
35
a
B 35
B #35 has no choice. Since B’s extension [to C8] is one space too far [comparing with joseki], Wis able to invade at [a]. B #35 prevents this invasion.
A B C D E F G H J K L M N O P Q R S T
A B C D E F G H J K L M N O P Q R S T12345678910111213141516171819
12345678910111213141516171819
a
36
W 36
[But,] After W #36 kosumi, W [again] has [a] to invade.[See the reference.]
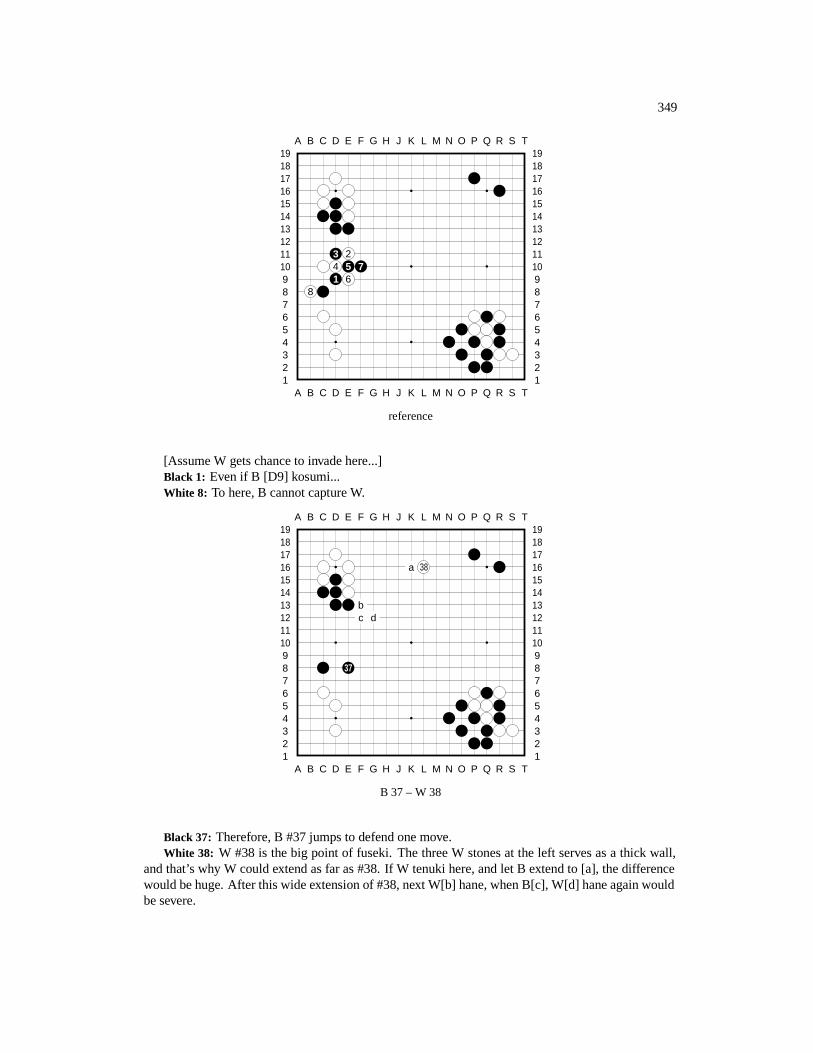
349
A B C D E F G H J K L M N O P Q R S T
A B C D E F G H J K L M N O P Q R S T12345678910111213141516171819
12345678910111213141516171819
3 24 5 71 6
8
reference
[Assume W gets chance to invade here...]Black 1: Even if B [D9] kosumi...White 8: To here, B cannot capture W.
A B C D E F G H J K L M N O P Q R S T
A B C D E F G H J K L M N O P Q R S T12345678910111213141516171819
12345678910111213141516171819
a 38
bc d
37
B 37 – W 38
Black 37: Therefore, B #37 jumps to defend one move.White 38: W #38 is the big point of fuseki. The three W stones at the left serves as a thick wall,
and that’s why W could extend as far as #38. If W tenuki here, and let B extend to [a], the differencewould be huge. After this wide extension of #38, next W[b] hane, when B[c], W[d] hane again wouldbe severe.
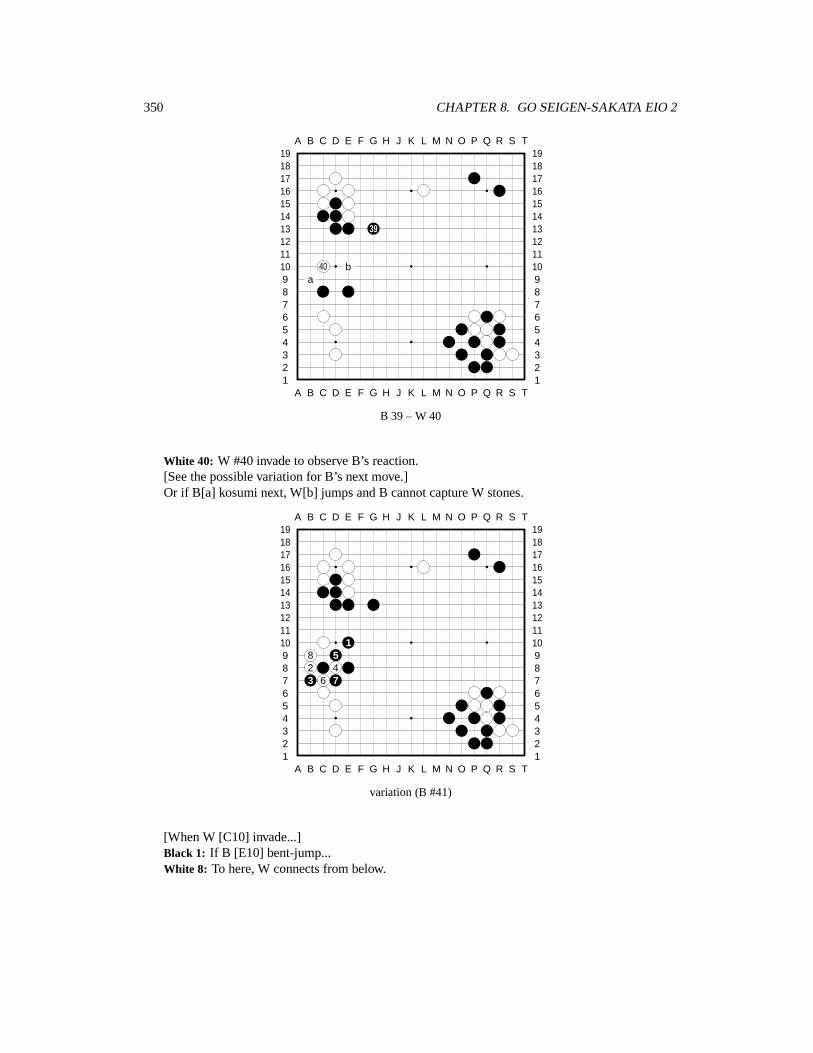
350 CHAPTER 8. GO SEIGEN-SAKATA EIO 2
A B C D E F G H J K L M N O P Q R S T
A B C D E F G H J K L M N O P Q R S T12345678910111213141516171819
12345678910111213141516171819
39
40 ba
B 39 – W 40
White 40: W #40 invade to observe B’s reaction.[See the possible variation for B’s next move.]Or if B[a] kosumi next, W[b] jumps and B cannot capture W stones.
A B C D E F G H J K L M N O P Q R S T
A B C D E F G H J K L M N O P Q R S T12345678910111213141516171819
12345678910111213141516171819
18 52 43 6 7
variation (B #41)
[When W [C10] invade...]Black 1: If B [E10] bent-jump...White 8: To here, W connects from below.
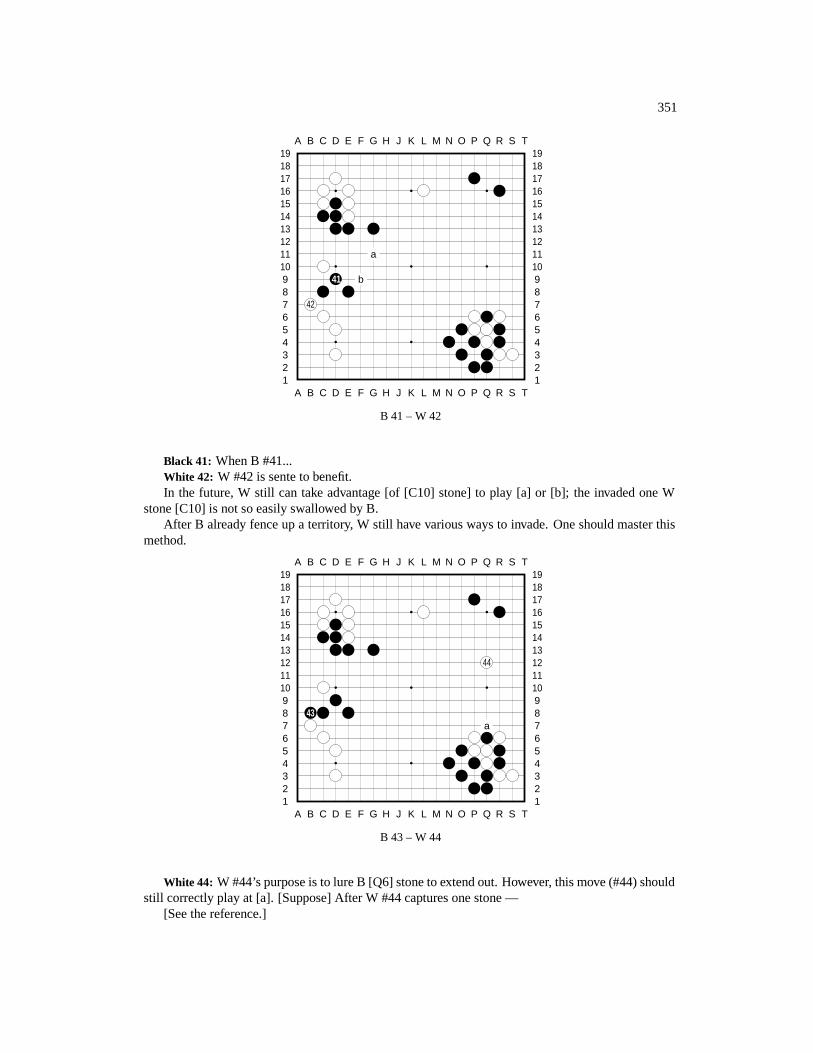
351
A B C D E F G H J K L M N O P Q R S T
A B C D E F G H J K L M N O P Q R S T12345678910111213141516171819
12345678910111213141516171819
a
41 b
42
B 41 – W 42
Black 41: When B #41...White 42: W #42 is sente to benefit.In the future, W still can take advantage [of [C10] stone] to play [a] or [b]; the invaded one W
stone [C10] is not so easily swallowed by B.After B already fence up a territory, W still have various ways to invade. One should master this
method.
A B C D E F G H J K L M N O P Q R S T
A B C D E F G H J K L M N O P Q R S T12345678910111213141516171819
12345678910111213141516171819
44
43a
B 43 – W 44
White 44: W #44’s purpose is to lure B [Q6] stone to extend out. However, this move (#44) shouldstill correctly play at [a]. [Suppose] After W #44 captures one stone —
[See the reference.]
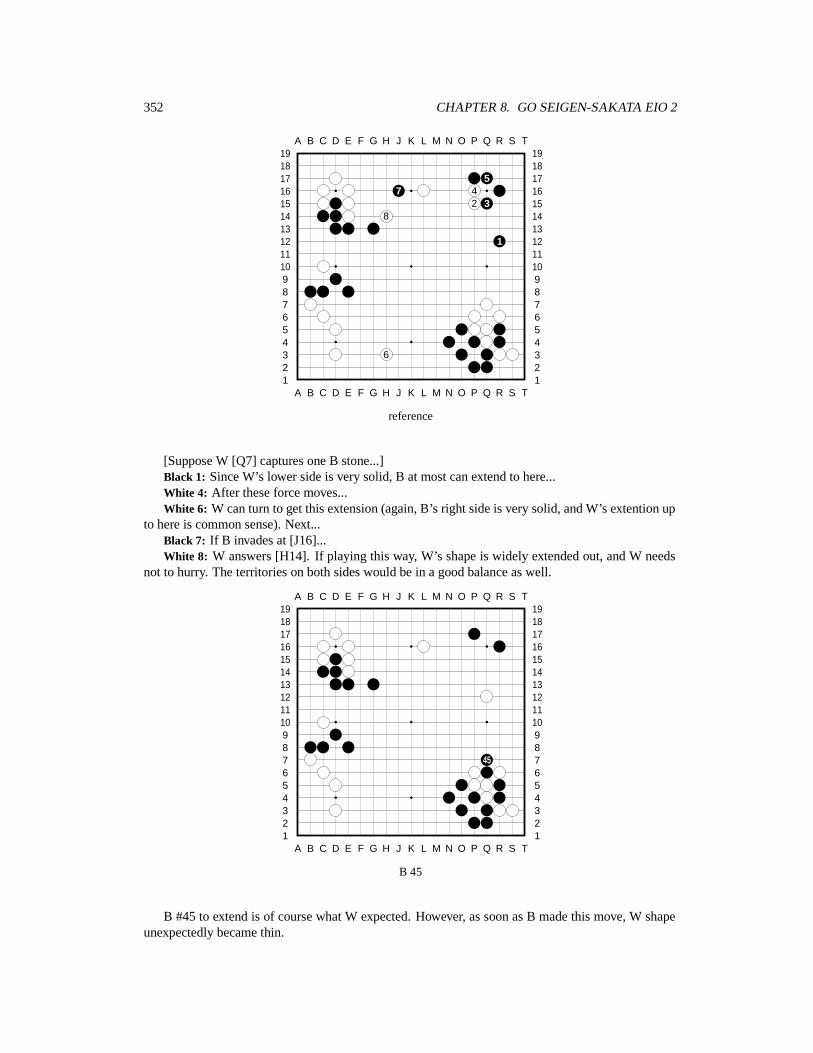
352 CHAPTER 8. GO SEIGEN-SAKATA EIO 2
A B C D E F G H J K L M N O P Q R S T
A B C D E F G H J K L M N O P Q R S T12345678910111213141516171819
12345678910111213141516171819
57 4
2 38
1
6
reference
[Suppose W [Q7] captures one B stone...]Black 1: Since W’s lower side is very solid, B at most can extend to here...White 4: After these force moves...White 6: W can turn to get this extension (again, B’s right side is very solid, and W’s extention up
to here is common sense). Next...Black 7: If B invades at [J16]...White 8: W answers [H14]. If playing this way, W’s shape is widely extended out, and W needs
not to hurry. The territories on both sides would be in a good balance as well.
A B C D E F G H J K L M N O P Q R S T
A B C D E F G H J K L M N O P Q R S T12345678910111213141516171819
12345678910111213141516171819
45
B 45
B #45 to extend is of course what W expected. However, as soon as B made this move, W shapeunexpectedly became thin.
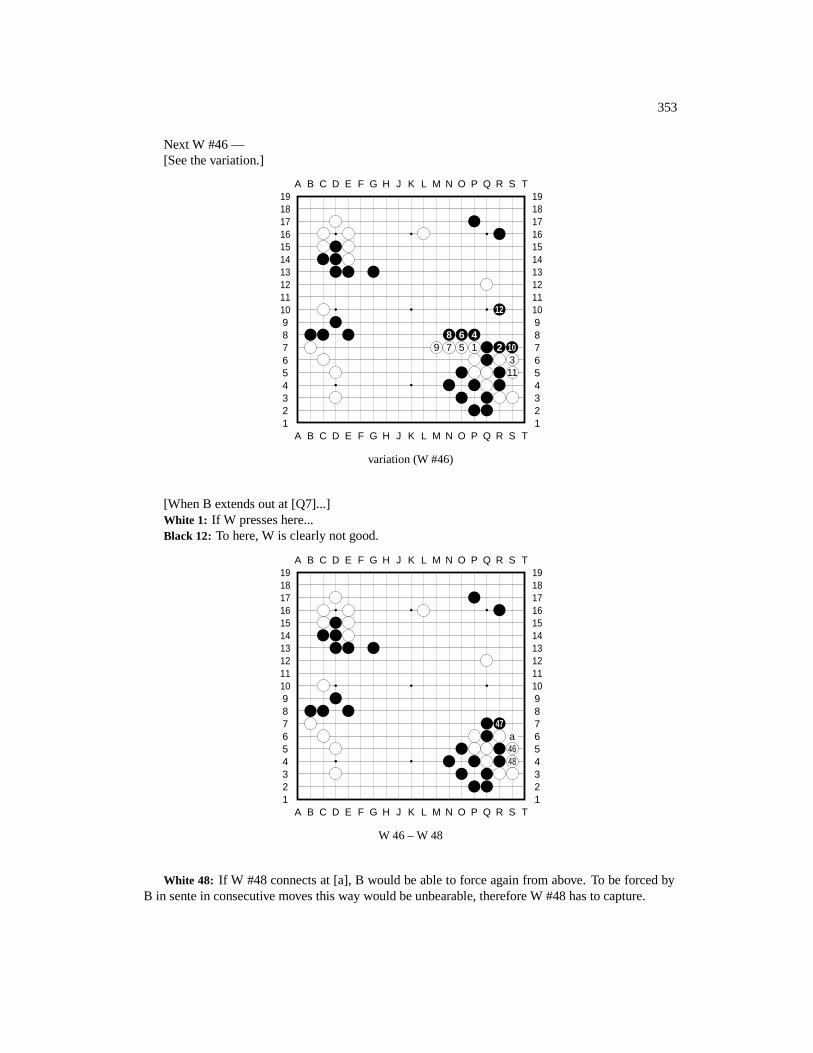
353
Next W #46 —[See the variation.]
A B C D E F G H J K L M N O P Q R S T
A B C D E F G H J K L M N O P Q R S T12345678910111213141516171819
12345678910111213141516171819
12
8 6 49 7 5 1 2 10
311
variation (W #46)
[When B extends out at [Q7]...]White 1: If W presses here...Black 12: To here, W is clearly not good.
A B C D E F G H J K L M N O P Q R S T
A B C D E F G H J K L M N O P Q R S T12345678910111213141516171819
12345678910111213141516171819
47a4648
W 46 – W 48
White 48: If W #48 connects at [a], B would be able to force again from above. To be forced byB in sente in consecutive moves this way would be unbearable, therefore W #48 has to capture.
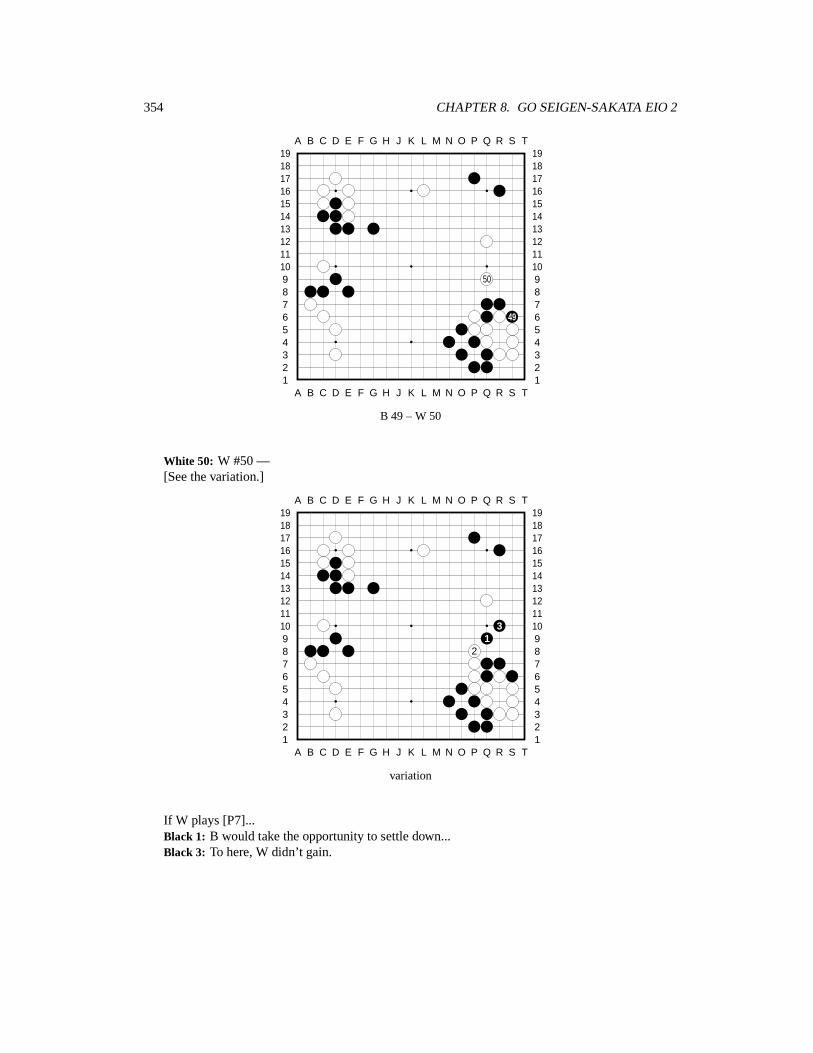
354 CHAPTER 8. GO SEIGEN-SAKATA EIO 2
A B C D E F G H J K L M N O P Q R S T
A B C D E F G H J K L M N O P Q R S T12345678910111213141516171819
12345678910111213141516171819
50
49
B 49 – W 50
White 50: W #50 —[See the variation.]
A B C D E F G H J K L M N O P Q R S T
A B C D E F G H J K L M N O P Q R S T12345678910111213141516171819
12345678910111213141516171819
31
2
variation
If W plays [P7]...Black 1: B would take the opportunity to settle down...Black 3: To here, W didn’t gain.
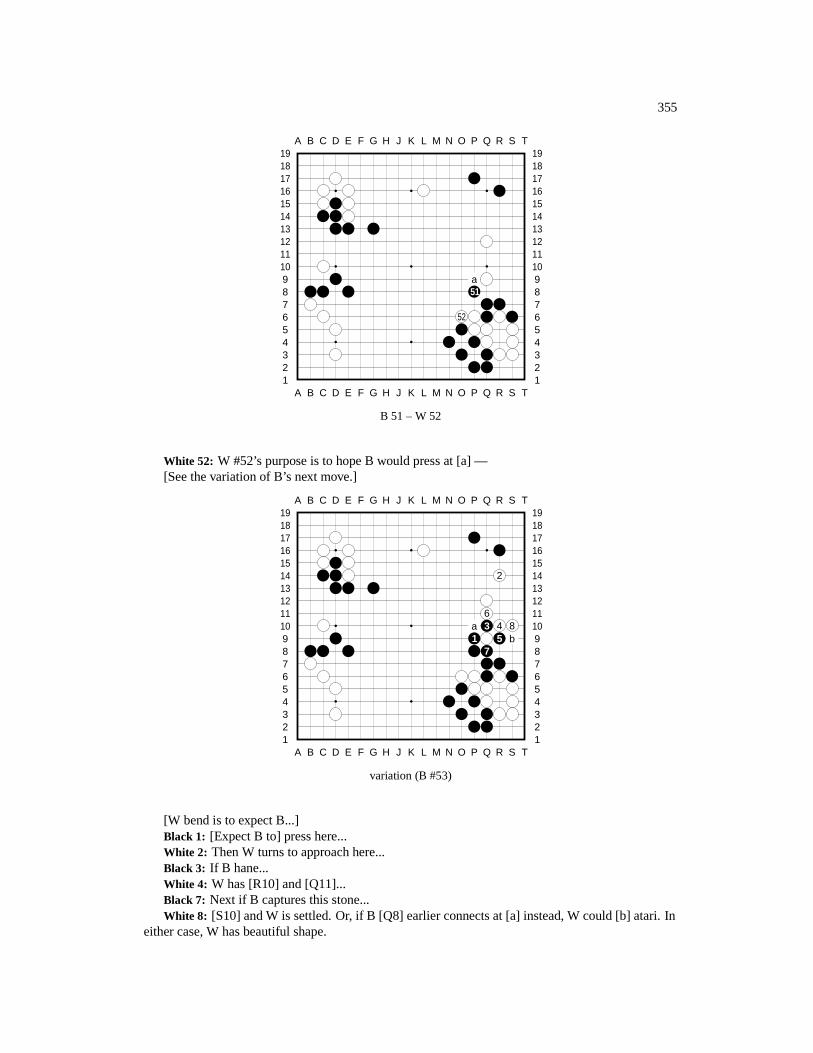
355
A B C D E F G H J K L M N O P Q R S T
A B C D E F G H J K L M N O P Q R S T12345678910111213141516171819
12345678910111213141516171819
a51
52
B 51 – W 52
White 52: W #52’s purpose is to hope B would press at [a] —[See the variation of B’s next move.]
A B C D E F G H J K L M N O P Q R S T
A B C D E F G H J K L M N O P Q R S T12345678910111213141516171819
12345678910111213141516171819
2
6a 3 4 81 5 b
7
variation (B #53)
[W bend is to expect B...]Black 1: [Expect B to] press here...White 2: Then W turns to approach here...Black 3: If B hane...White 4: W has [R10] and [Q11]...Black 7: Next if B captures this stone...White 8: [S10] and W is settled. Or, if B [Q8] earlier connects at [a] instead, W could [b] atari. In
either case, W has beautiful shape.
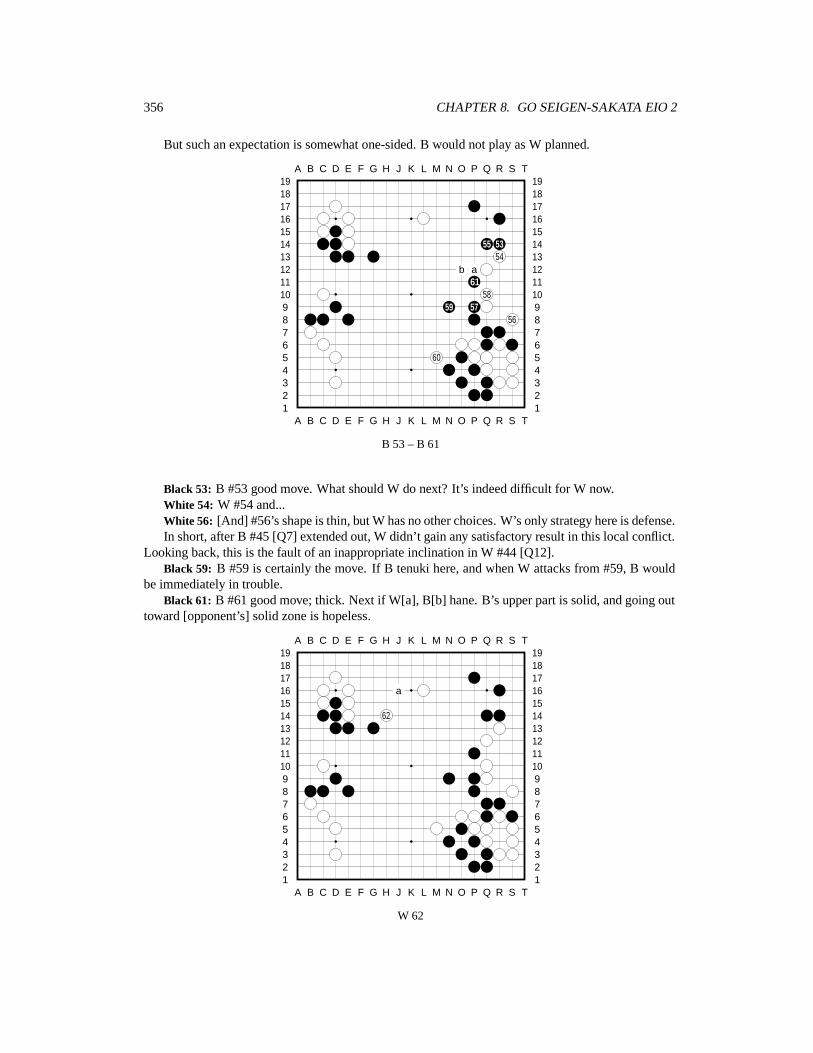
356 CHAPTER 8. GO SEIGEN-SAKATA EIO 2
But such an expectation is somewhat one-sided. B would not play as W planned.
A B C D E F G H J K L M N O P Q R S T
A B C D E F G H J K L M N O P Q R S T12345678910111213141516171819
12345678910111213141516171819
55 5354
b a61
5859 57
56
60
B 53 – B 61
Black 53: B #53 good move. What should W do next? It’s indeed difficult for W now.White 54: W #54 and...White 56: [And] #56’s shape is thin, but W has no other choices. W’s only strategy here is defense.In short, after B #45 [Q7] extended out, W didn’t gain any satisfactory result in this local conflict.
Looking back, this is the fault of an inappropriate inclination in W #44 [Q12].Black 59: B #59 is certainly the move. If B tenuki here, and when W attacks from #59, B would
be immediately in trouble.Black 61: B #61 good move; thick. Next if W[a], B[b] hane. B’s upper part is solid, and going out
toward [opponent’s] solid zone is hopeless.
A B C D E F G H J K L M N O P Q R S T
A B C D E F G H J K L M N O P Q R S T12345678910111213141516171819
12345678910111213141516171819
a
62
W 62
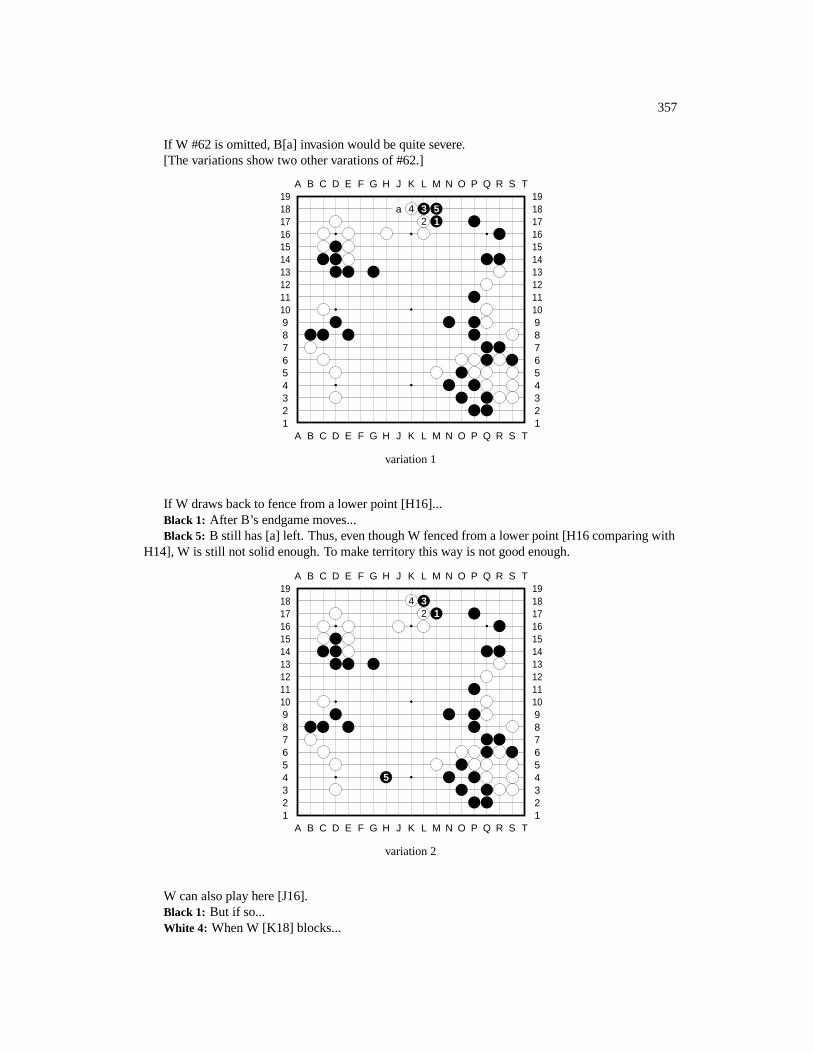
357
If W #62 is omitted, B[a] invasion would be quite severe.[The variations show two other varations of #62.]
A B C D E F G H J K L M N O P Q R S T
A B C D E F G H J K L M N O P Q R S T12345678910111213141516171819
12345678910111213141516171819
a 4 3 52 1
variation 1
If W draws back to fence from a lower point [H16]...Black 1: After B’s endgame moves...Black 5: B still has [a] left. Thus, even though W fenced from a lower point [H16 comparing with
H14], W is still not solid enough. To make territory this way is not good enough.
A B C D E F G H J K L M N O P Q R S T
A B C D E F G H J K L M N O P Q R S T12345678910111213141516171819
12345678910111213141516171819
4 32 1
5
variation 2
W can also play here [J16].Black 1: But if so...White 4: When W [K18] blocks...
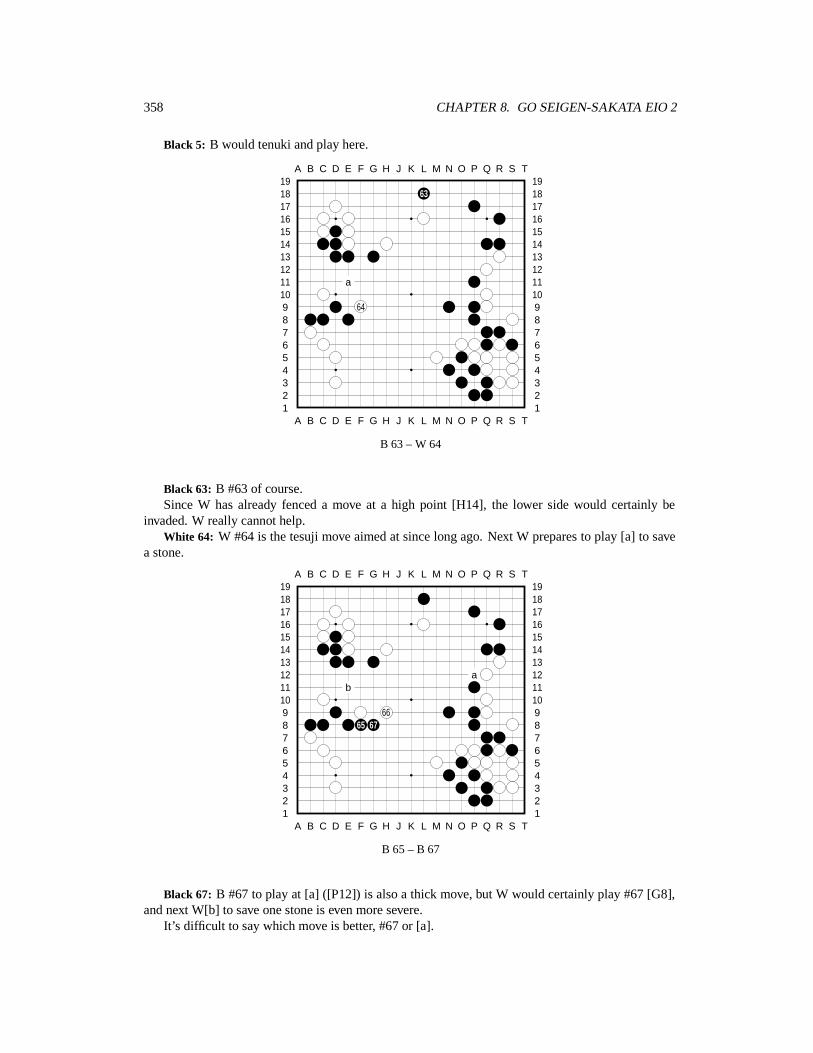
358 CHAPTER 8. GO SEIGEN-SAKATA EIO 2
Black 5: B would tenuki and play here.
A B C D E F G H J K L M N O P Q R S T
A B C D E F G H J K L M N O P Q R S T12345678910111213141516171819
12345678910111213141516171819
63
a
64
B 63 – W 64
Black 63: B #63 of course.Since W has already fenced a move at a high point [H14], the lower side would certainly be
invaded. W really cannot help.White 64: W #64 is the tesuji move aimed at since long ago. Next W prepares to play [a] to save
a stone.
A B C D E F G H J K L M N O P Q R S T
A B C D E F G H J K L M N O P Q R S T12345678910111213141516171819
12345678910111213141516171819
ab
6665 67
B 65 – B 67
Black 67: B #67 to play at [a] ([P12]) is also a thick move, but W would certainly play #67 [G8],and next W[b] to save one stone is even more severe.
It’s difficult to say which move is better, #67 or [a].
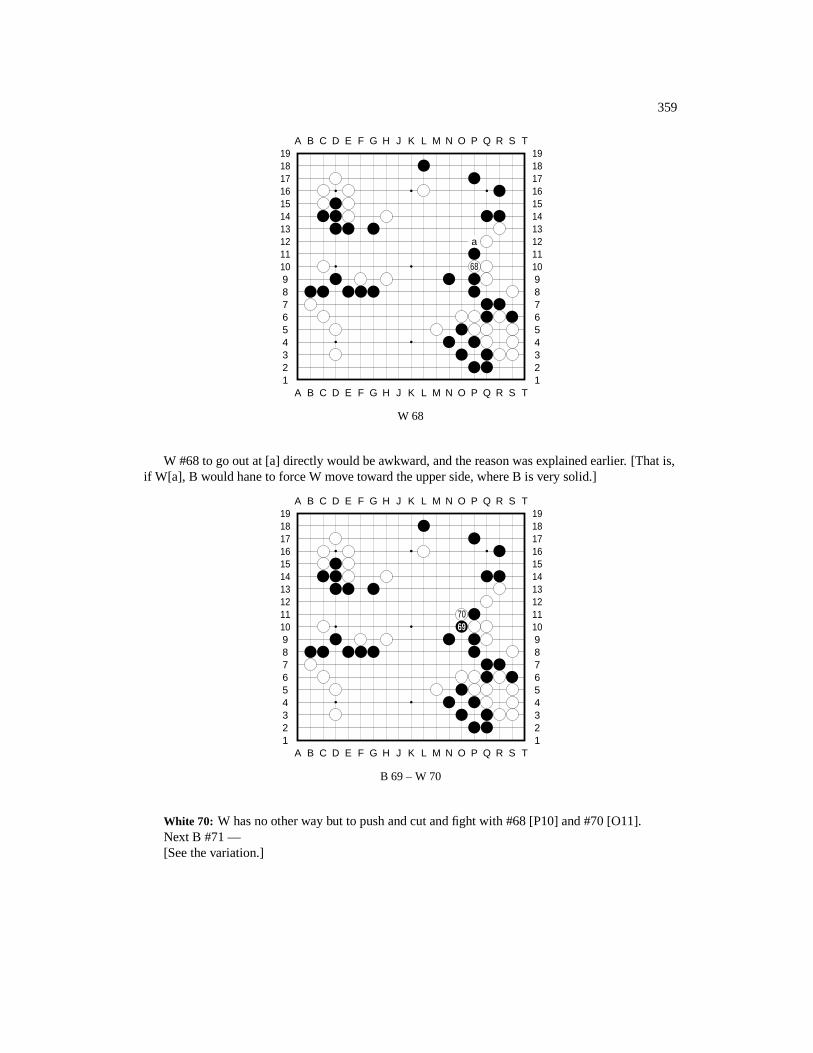
359
A B C D E F G H J K L M N O P Q R S T
A B C D E F G H J K L M N O P Q R S T12345678910111213141516171819
12345678910111213141516171819
a
68
W 68
W #68 to go out at [a] directly would be awkward, and the reason was explained earlier. [That is,if W[a], B would hane to force W move toward the upper side, where B is very solid.]
A B C D E F G H J K L M N O P Q R S T
A B C D E F G H J K L M N O P Q R S T12345678910111213141516171819
12345678910111213141516171819
7069
B 69 – W 70
White 70: W has no other way but to push and cut and fight with #68 [P10] and #70 [O11].Next B #71 —[See the variation.]
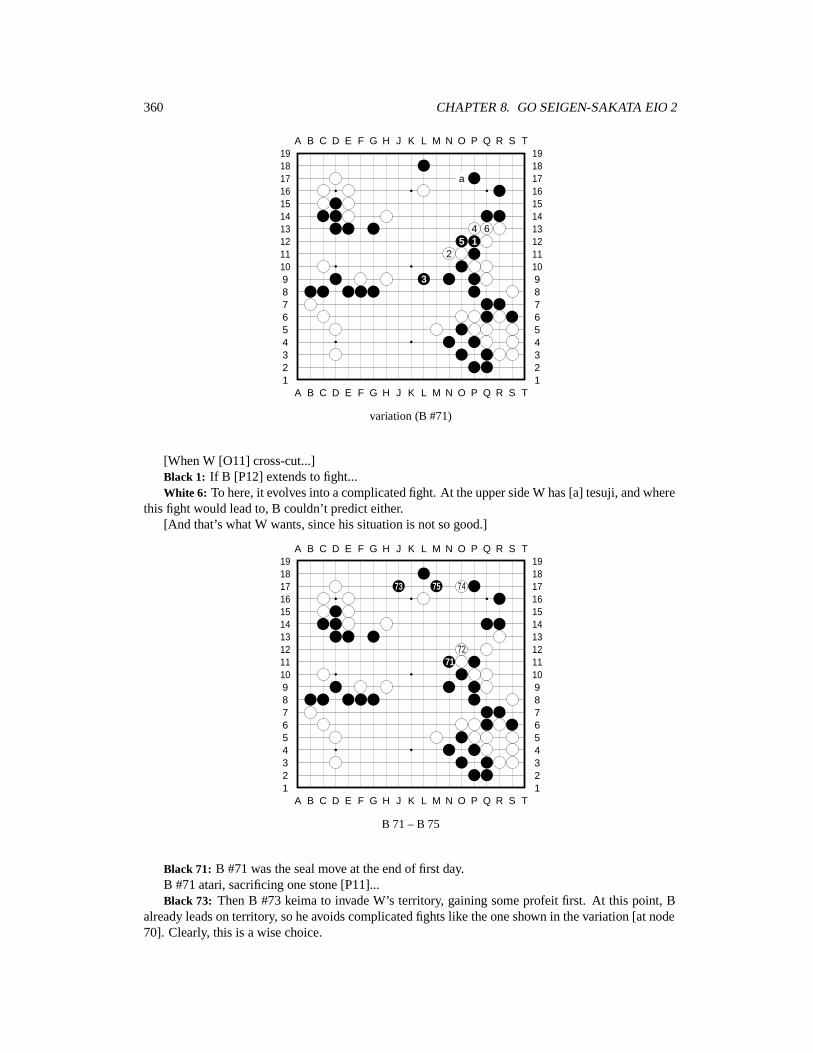
360 CHAPTER 8. GO SEIGEN-SAKATA EIO 2
A B C D E F G H J K L M N O P Q R S T
A B C D E F G H J K L M N O P Q R S T12345678910111213141516171819
12345678910111213141516171819
a
4 65 1
2
3
variation (B #71)
[When W [O11] cross-cut...]Black 1: If B [P12] extends to fight...White 6: To here, it evolves into a complicated fight. At the upper side W has [a] tesuji, and where
this fight would lead to, B couldn’t predict either.[And that’s what W wants, since his situation is not so good.]
A B C D E F G H J K L M N O P Q R S T
A B C D E F G H J K L M N O P Q R S T12345678910111213141516171819
12345678910111213141516171819
73 75 74
7271
B 71 – B 75
Black 71: B #71 was the seal move at the end of first day.B #71 atari, sacrificing one stone [P11]...Black 73: Then B #73 keima to invade W’s territory, gaining some profeit first. At this point, B
already leads on territory, so he avoids complicated fights like the one shown in the variation [at node70]. Clearly, this is a wise choice.
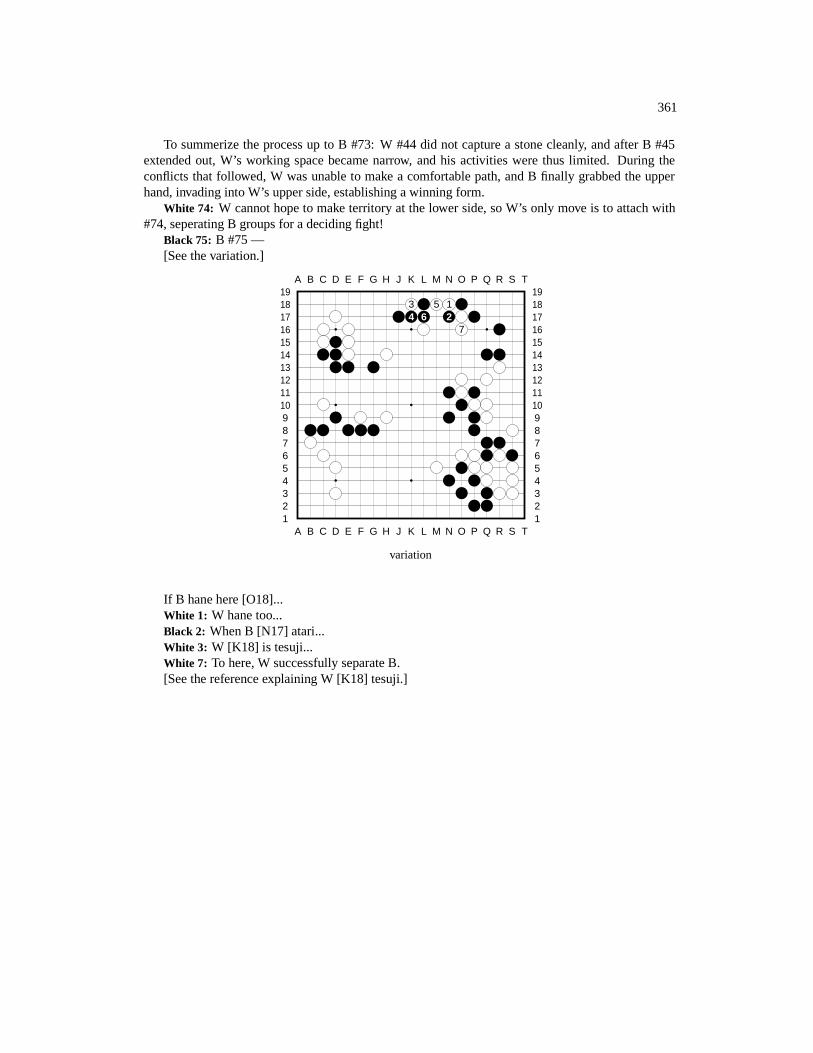
361
To summerize the process up to B #73: W #44 did not capture a stone cleanly, and after B #45extended out, W’s working space became narrow, and his activities were thus limited. During theconflicts that followed, W was unable to make a comfortable path, and B finally grabbed the upperhand, invading into W’s upper side, establishing a winning form.
White 74: W cannot hope to make territory at the lower side, so W’s only move is to attach with#74, seperating B groups for a deciding fight!
Black 75: B #75 —[See the variation.]
A B C D E F G H J K L M N O P Q R S T
A B C D E F G H J K L M N O P Q R S T12345678910111213141516171819
12345678910111213141516171819
3 5 14 6 2
7
variation
If B hane here [O18]...White 1: W hane too...Black 2: When B [N17] atari...White 3: W [K18] is tesuji...White 7: To here, W successfully separate B.[See the reference explaining W [K18] tesuji.]
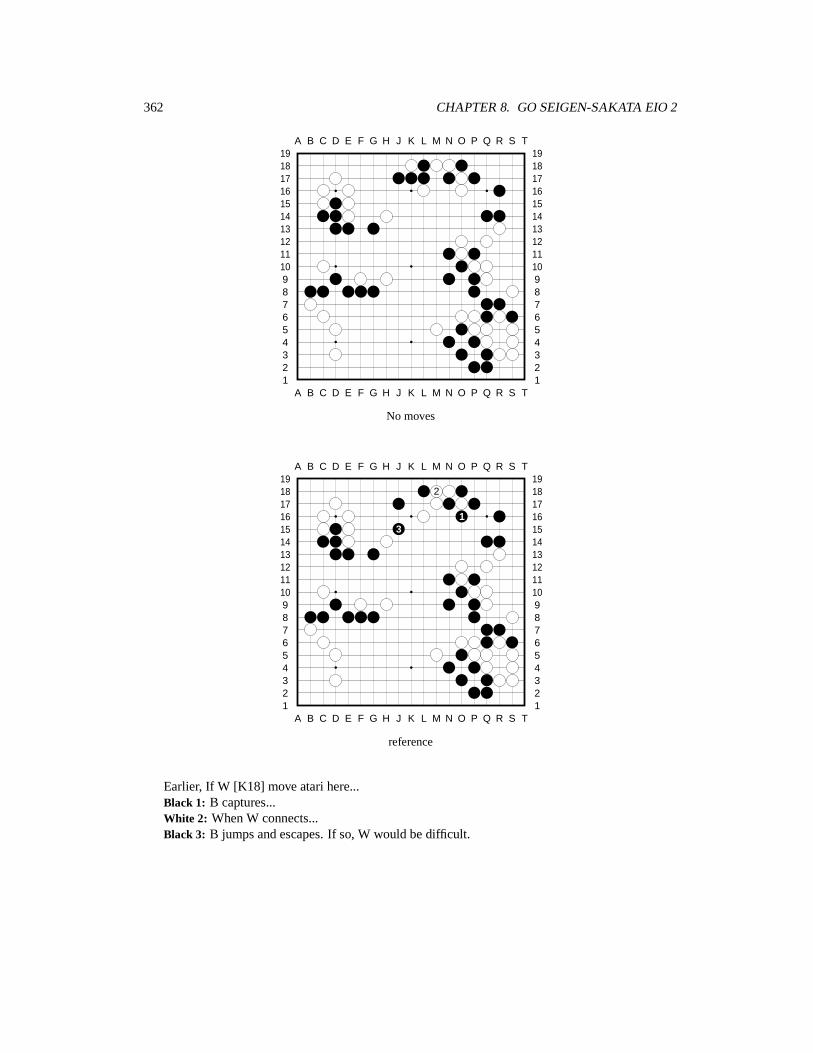
362 CHAPTER 8. GO SEIGEN-SAKATA EIO 2
A B C D E F G H J K L M N O P Q R S T
A B C D E F G H J K L M N O P Q R S T12345678910111213141516171819
12345678910111213141516171819
No moves
A B C D E F G H J K L M N O P Q R S T
A B C D E F G H J K L M N O P Q R S T12345678910111213141516171819
12345678910111213141516171819
2
13
reference
Earlier, If W [K18] move atari here...Black 1: B captures...White 2: When W connects...Black 3: B jumps and escapes. If so, W would be difficult.
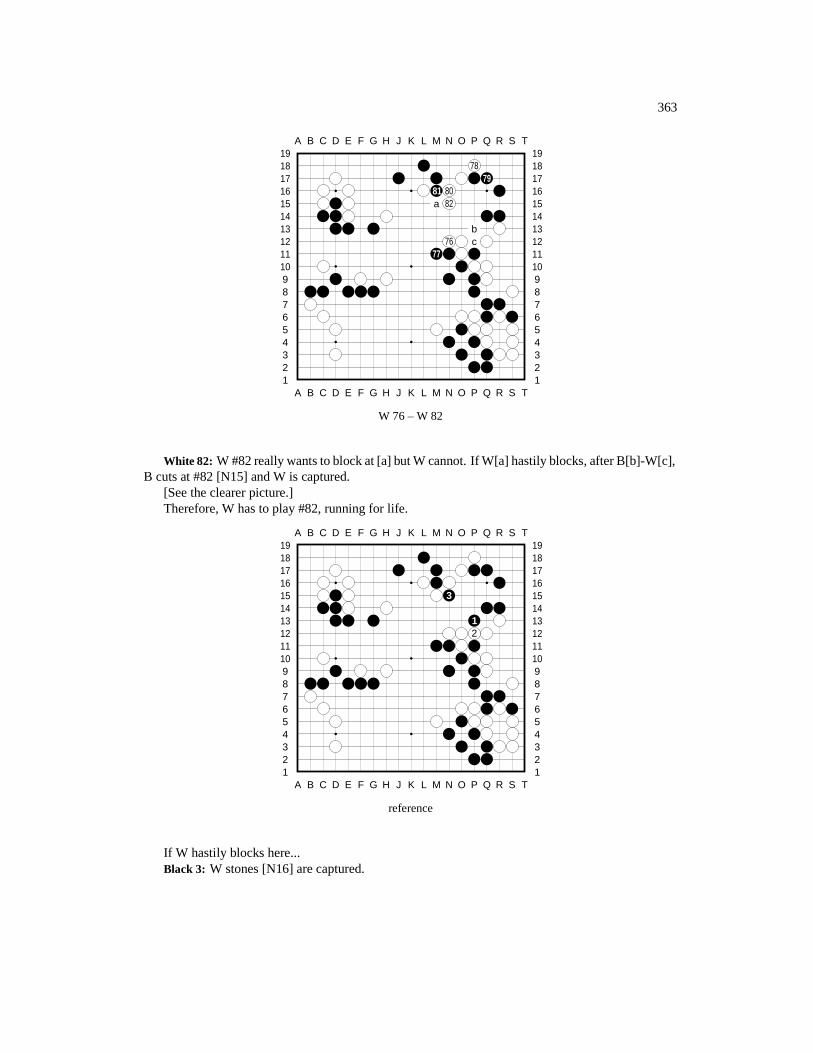
363
A B C D E F G H J K L M N O P Q R S T
A B C D E F G H J K L M N O P Q R S T12345678910111213141516171819
12345678910111213141516171819
7879
81 80a 82
b76 c
77
W 76 – W 82
White 82: W #82 really wants to block at [a] but W cannot. If W[a] hastily blocks, after B[b]-W[c],B cuts at #82 [N15] and W is captured.
[See the clearer picture.]Therefore, W has to play #82, running for life.
A B C D E F G H J K L M N O P Q R S T
A B C D E F G H J K L M N O P Q R S T12345678910111213141516171819
12345678910111213141516171819
3
12
reference
If W hastily blocks here...Black 3: W stones [N16] are captured.
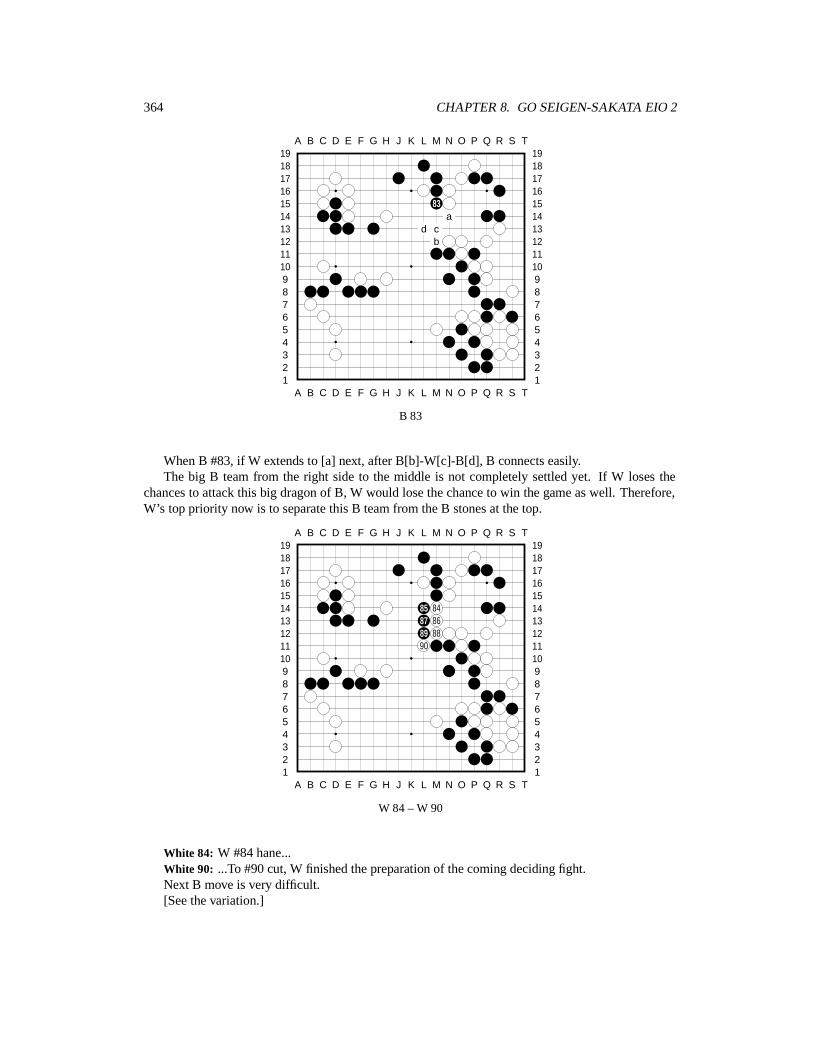
364 CHAPTER 8. GO SEIGEN-SAKATA EIO 2
A B C D E F G H J K L M N O P Q R S T
A B C D E F G H J K L M N O P Q R S T12345678910111213141516171819
12345678910111213141516171819
83a
d cb
B 83
When B #83, if W extends to [a] next, after B[b]-W[c]-B[d], B connects easily.The big B team from the right side to the middle is not completely settled yet. If W loses the
chances to attack this big dragon of B, W would lose the chance to win the game as well. Therefore,W’s top priority now is to separate this B team from the B stones at the top.
A B C D E F G H J K L M N O P Q R S T
A B C D E F G H J K L M N O P Q R S T12345678910111213141516171819
12345678910111213141516171819
85 8487 8689 8890
W 84 – W 90
White 84: W #84 hane...White 90: ...To #90 cut, W finished the preparation of the coming deciding fight.Next B move is very difficult.[See the variation.]

365
A B C D E F G H J K L M N O P Q R S T
A B C D E F G H J K L M N O P Q R S T12345678910111213141516171819
12345678910111213141516171819
1
2 6 74 3 11
12 5 8 109 1314
variation (B #91)
[When W [L11] cuts...]Black 1: If B plays [J12] to try to connect with the stones at the top...White 2: W [L10] extends...Black 7: When B [N10] connects...White 8: W [M8] is a severe move.Black 13: When B [N7] captures two W stones...White 14: W [L6] tesuji. B’s big team is now in danger. [Only one eye, it seems.]Which move is the best [for B #91]? Please consult the answer shown in the next variation diagram
[at node #91].
A B C D E F G H J K L M N O P Q R S T
A B C D E F G H J K L M N O P Q R S T12345678910111213141516171819
12345678910111213141516171819
d
cb
91a
B 91
B #91 is dubious. B’s purpose is to force W[a], then after B[b]-W[c]-B[[d], B would be able to
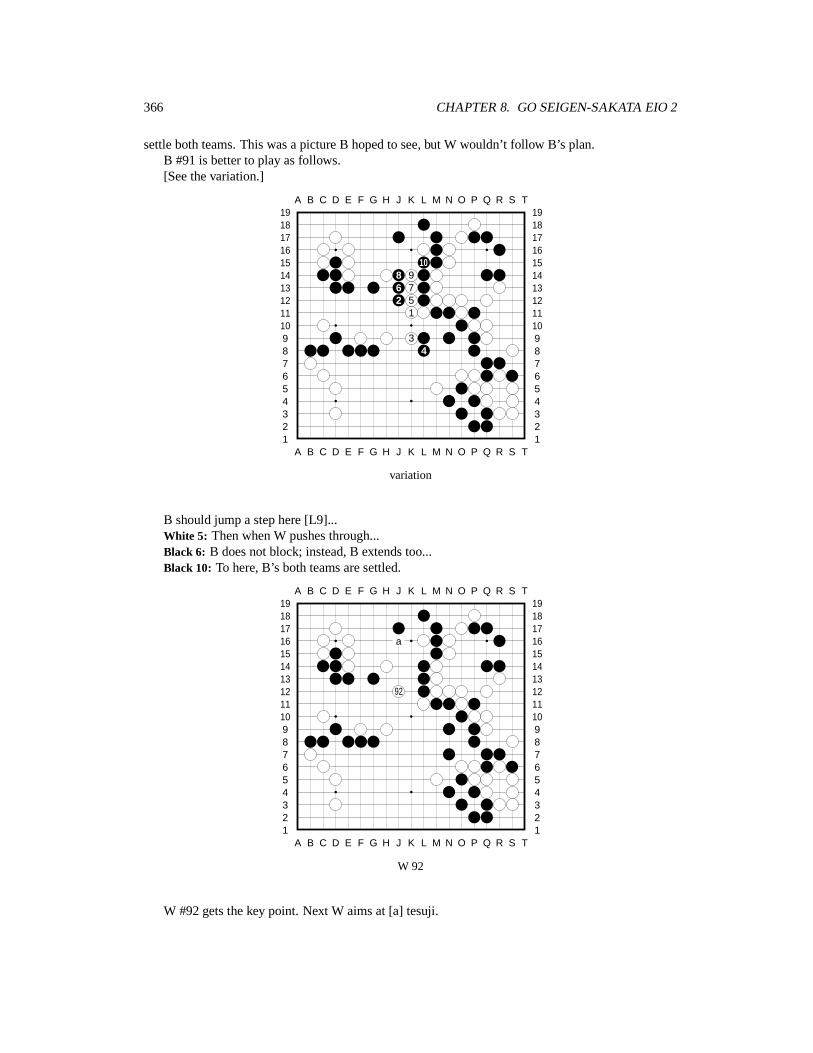
366 CHAPTER 8. GO SEIGEN-SAKATA EIO 2
settle both teams. This was a picture B hoped to see, but W wouldn’t follow B’s plan.B #91 is better to play as follows.[See the variation.]
A B C D E F G H J K L M N O P Q R S T
A B C D E F G H J K L M N O P Q R S T12345678910111213141516171819
12345678910111213141516171819
108 96 72 5
1
34
variation
B should jump a step here [L9]...White 5: Then when W pushes through...Black 6: B does not block; instead, B extends too...Black 10: To here, B’s both teams are settled.
A B C D E F G H J K L M N O P Q R S T
A B C D E F G H J K L M N O P Q R S T12345678910111213141516171819
12345678910111213141516171819
a
92
W 92
W #92 gets the key point. Next W aims at [a] tesuji.
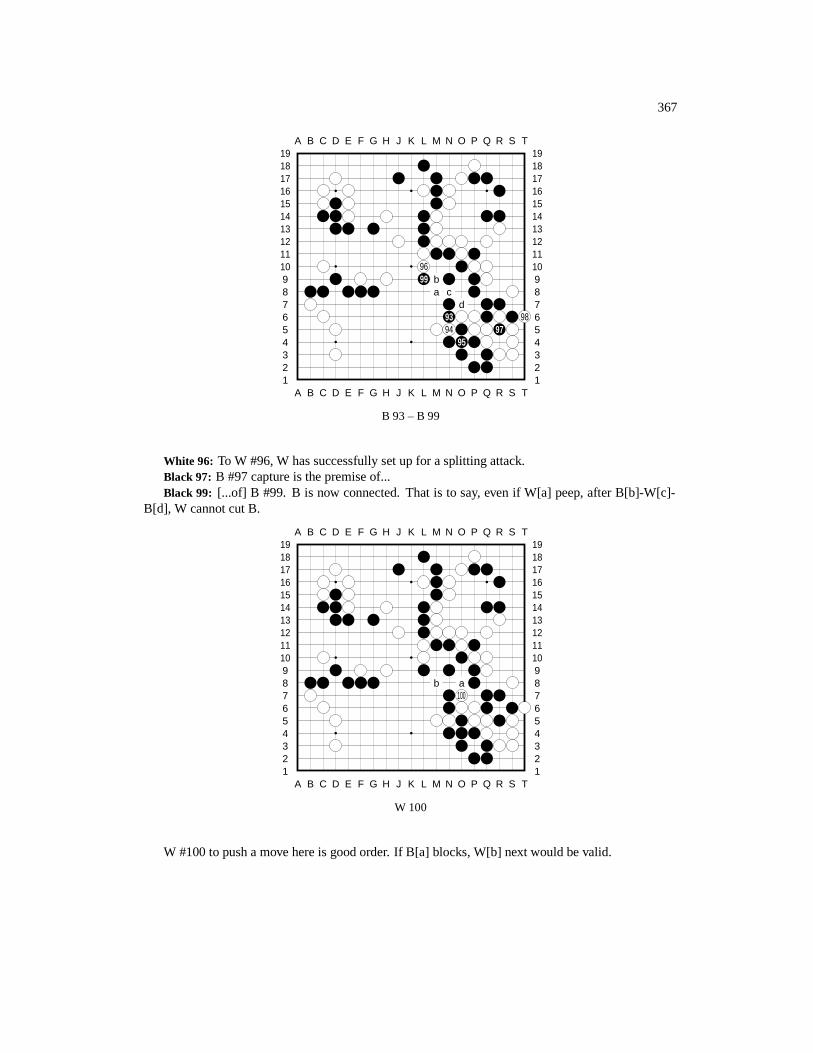
367
A B C D E F G H J K L M N O P Q R S T
A B C D E F G H J K L M N O P Q R S T12345678910111213141516171819
12345678910111213141516171819
9699 b
a cd
93 9894 97
95
B 93 – B 99
White 96: To W #96, W has successfully set up for a splitting attack.Black 97: B #97 capture is the premise of...Black 99: [...of] B #99. B is now connected. That is to say, even if W[a] peep, after B[b]-W[c]-
B[d], W cannot cut B.
A B C D E F G H J K L M N O P Q R S T
A B C D E F G H J K L M N O P Q R S T12345678910111213141516171819
12345678910111213141516171819
b a100
W 100
W #100 to push a move here is good order. If B[a] blocks, W[b] next would be valid.
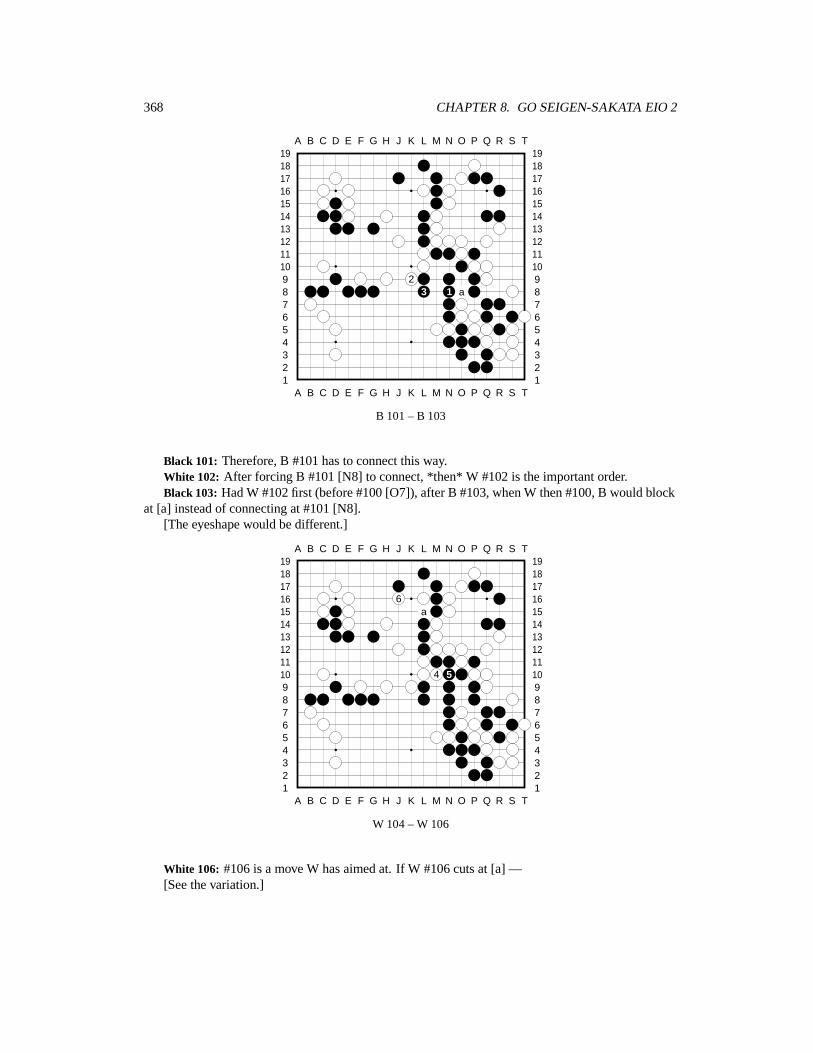
368 CHAPTER 8. GO SEIGEN-SAKATA EIO 2
A B C D E F G H J K L M N O P Q R S T
A B C D E F G H J K L M N O P Q R S T12345678910111213141516171819
12345678910111213141516171819
23 1 a
B 101 – B 103
Black 101: Therefore, B #101 has to connect this way.White 102: After forcing B #101 [N8] to connect, *then* W #102 is the important order.Black 103: Had W #102 first (before #100 [O7]), after B #103, when W then #100, B would block
at [a] instead of connecting at #101 [N8].[The eyeshape would be different.]
A B C D E F G H J K L M N O P Q R S T
A B C D E F G H J K L M N O P Q R S T12345678910111213141516171819
12345678910111213141516171819
6a
4 5
W 104 – W 106
White 106: #106 is a move W has aimed at. If W #106 cuts at [a] —[See the variation.]
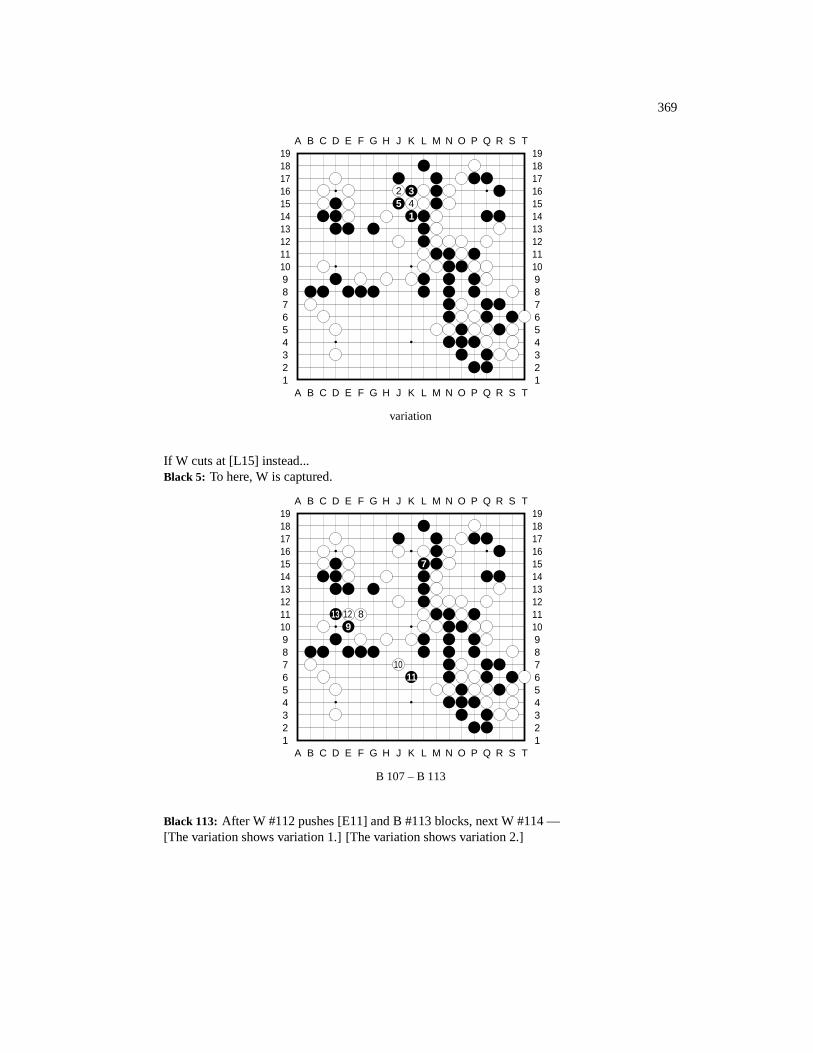
369
A B C D E F G H J K L M N O P Q R S T
A B C D E F G H J K L M N O P Q R S T12345678910111213141516171819
12345678910111213141516171819
2 35 4
1
variation
If W cuts at [L15] instead...Black 5: To here, W is captured.
A B C D E F G H J K L M N O P Q R S T
A B C D E F G H J K L M N O P Q R S T12345678910111213141516171819
12345678910111213141516171819
7
13 12 89
1011
B 107 – B 113
Black 113: After W #112 pushes [E11] and B #113 blocks, next W #114 —[The variation shows variation 1.] [The variation shows variation 2.]
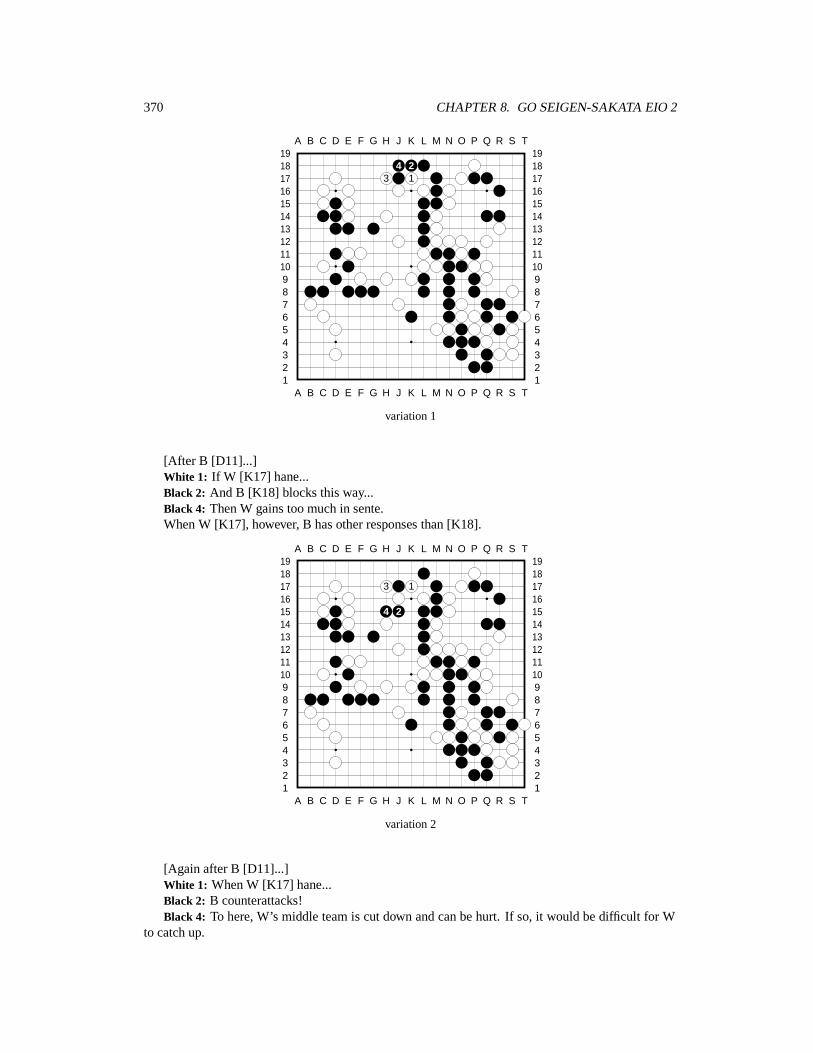
370 CHAPTER 8. GO SEIGEN-SAKATA EIO 2
A B C D E F G H J K L M N O P Q R S T
A B C D E F G H J K L M N O P Q R S T12345678910111213141516171819
12345678910111213141516171819
4 23 1
variation 1
[After B [D11]...]White 1: If W [K17] hane...Black 2: And B [K18] blocks this way...Black 4: Then W gains too much in sente.When W [K17], however, B has other responses than [K18].
A B C D E F G H J K L M N O P Q R S T
A B C D E F G H J K L M N O P Q R S T12345678910111213141516171819
12345678910111213141516171819
3 1
4 2
variation 2
[Again after B [D11]...]White 1: When W [K17] hane...Black 2: B counterattacks!Black 4: To here, W’s middle team is cut down and can be hurt. If so, it would be difficult for W
to catch up.
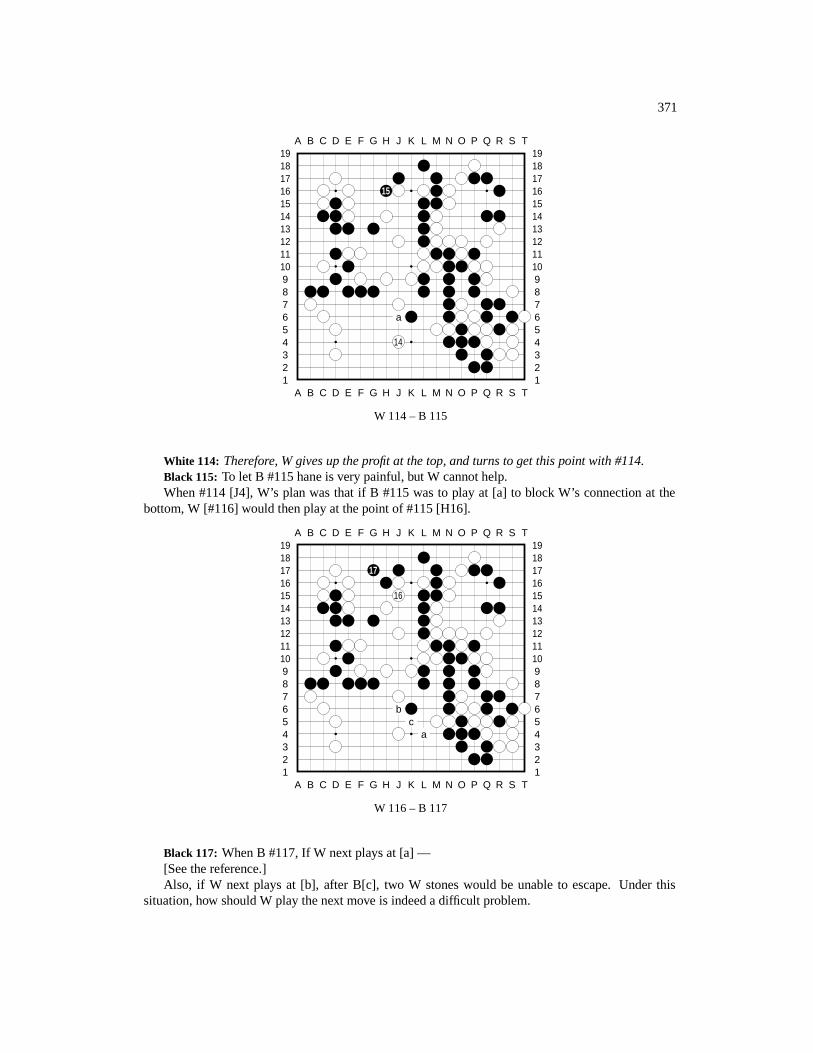
371
A B C D E F G H J K L M N O P Q R S T
A B C D E F G H J K L M N O P Q R S T12345678910111213141516171819
12345678910111213141516171819
15
a
14
W 114 – B 115
White 114: Therefore, W gives up the profit at the top, and turns to get this point with #114.Black 115: To let B #115 hane is very painful, but W cannot help.When #114 [J4], W’s plan was that if B #115 was to play at [a] to block W’s connection at the
bottom, W [#116] would then play at the point of #115 [H16].
A B C D E F G H J K L M N O P Q R S T
A B C D E F G H J K L M N O P Q R S T12345678910111213141516171819
12345678910111213141516171819
17
16
bc
a
W 116 – B 117
Black 117: When B #117, If W next plays at [a] —[See the reference.]Also, if W next plays at [b], after B[c], two W stones would be unable to escape. Under this
situation, how should W play the next move is indeed a difficult problem.
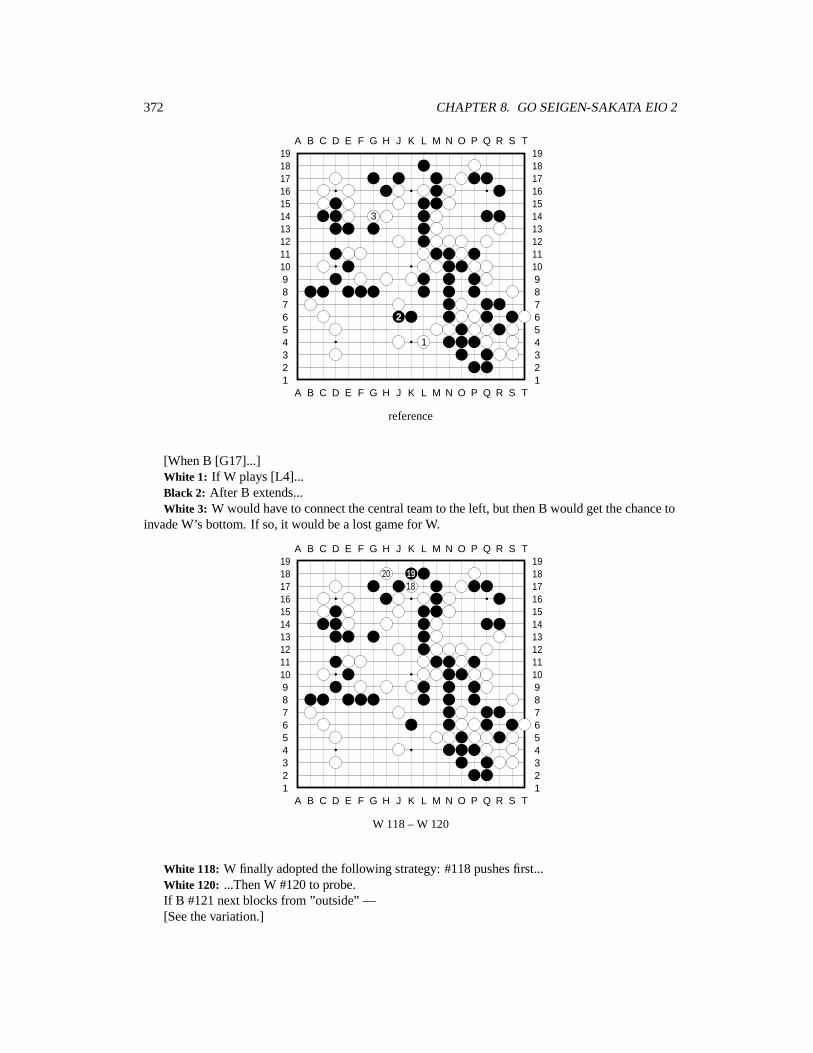
372 CHAPTER 8. GO SEIGEN-SAKATA EIO 2
A B C D E F G H J K L M N O P Q R S T
A B C D E F G H J K L M N O P Q R S T12345678910111213141516171819
12345678910111213141516171819
3
2
1
reference
[When B [G17]...]White 1: If W plays [L4]...Black 2: After B extends...White 3: W would have to connect the central team to the left, but then B would get the chance to
invade W’s bottom. If so, it would be a lost game for W.
A B C D E F G H J K L M N O P Q R S T
A B C D E F G H J K L M N O P Q R S T12345678910111213141516171819
12345678910111213141516171819
20 1918
W 118 – W 120
White 118: W finally adopted the following strategy: #118 pushes first...White 120: ...Then W #120 to probe.If B #121 next blocks from ”outside” —[See the variation.]

373
A B C D E F G H J K L M N O P Q R S T
A B C D E F G H J K L M N O P Q R S T12345678910111213141516171819
12345678910111213141516171819
1 32
4
variation (B #121)
[When W [H18] probes...]Black 1: If B blocks from outside...White 2: W [H17] squeezes...White 4: And when [G16] atari, even if W would lose the two stones, W has managed to connect
[to the left] in sente, thus W would have chance to turn to the bottom.
A B C D E F G H J K L M N O P Q R S T
A B C D E F G H J K L M N O P Q R S T12345678910111213141516171819
12345678910111213141516171819
21
22a
B 121 – W 122
White 122: If W #122 doesn’t connect in a hurry, W’s future moves would be difficult.[For instance,] if W #122 tenuki and turns to the bottom, B would cut at #122, and next B[a] tesuji
would force W into a dangerous situation.[By the way,] W’s lower right corner is alive.[See the reference on W’s lower right corner.]
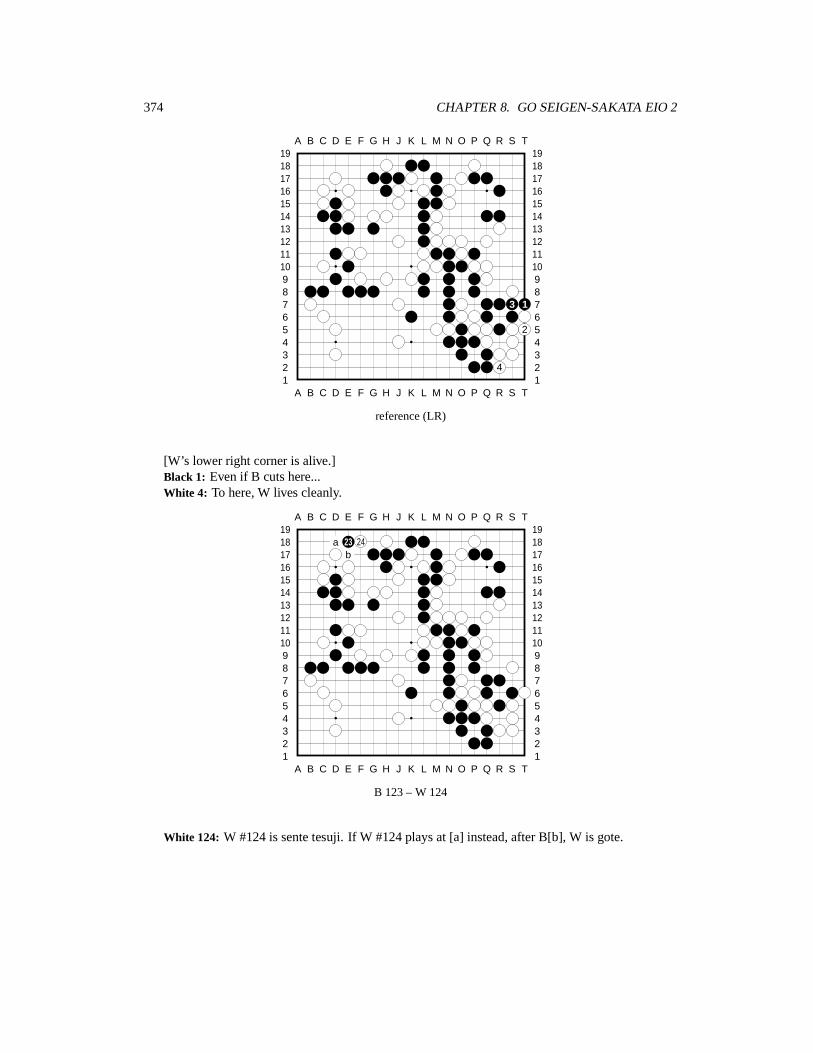
374 CHAPTER 8. GO SEIGEN-SAKATA EIO 2
A B C D E F G H J K L M N O P Q R S T
A B C D E F G H J K L M N O P Q R S T12345678910111213141516171819
12345678910111213141516171819
3 1
2
4
reference (LR)
[W’s lower right corner is alive.]Black 1: Even if B cuts here...White 4: To here, W lives cleanly.
A B C D E F G H J K L M N O P Q R S T
A B C D E F G H J K L M N O P Q R S T12345678910111213141516171819
12345678910111213141516171819
a 23 24b
B 123 – W 124
White 124: W #124 is sente tesuji. If W #124 plays at [a] instead, after B[b], W is gote.
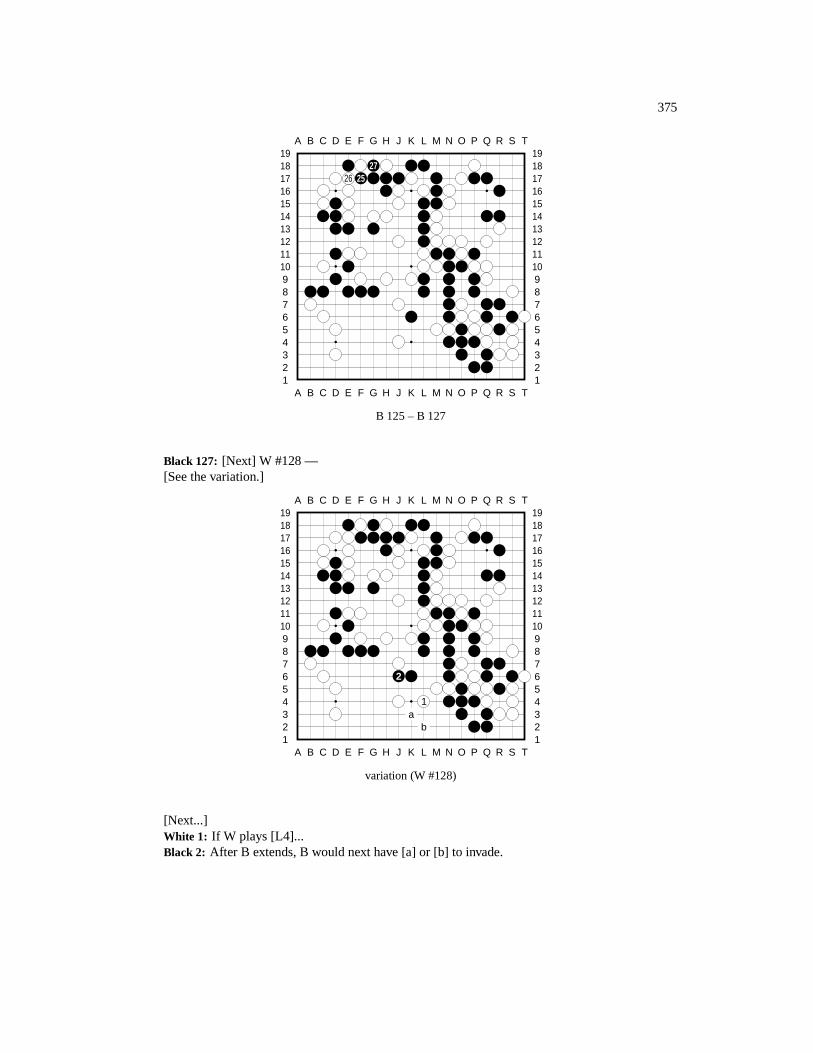
375
A B C D E F G H J K L M N O P Q R S T
A B C D E F G H J K L M N O P Q R S T12345678910111213141516171819
12345678910111213141516171819
2726 25
B 125 – B 127
Black 127: [Next] W #128 —[See the variation.]
A B C D E F G H J K L M N O P Q R S T
A B C D E F G H J K L M N O P Q R S T12345678910111213141516171819
12345678910111213141516171819
2
1a
b
variation (W #128)
[Next...]White 1: If W plays [L4]...Black 2: After B extends, B would next have [a] or [b] to invade.
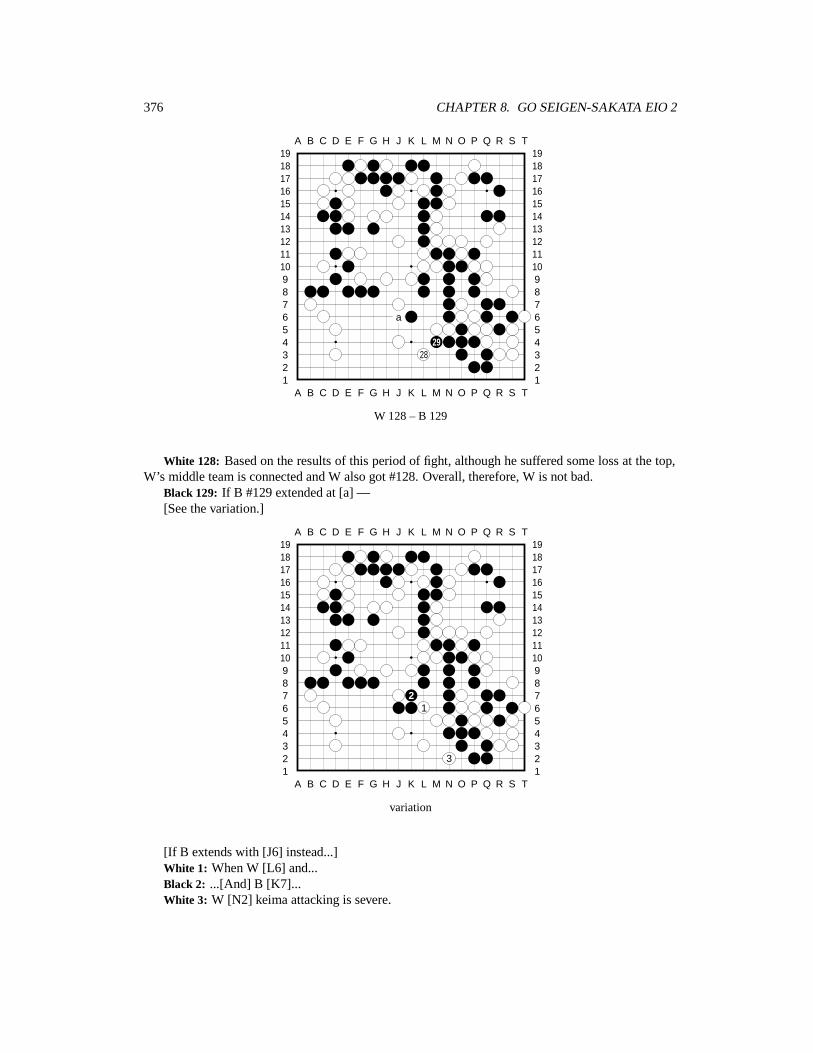
376 CHAPTER 8. GO SEIGEN-SAKATA EIO 2
A B C D E F G H J K L M N O P Q R S T
A B C D E F G H J K L M N O P Q R S T12345678910111213141516171819
12345678910111213141516171819
a
2928
W 128 – B 129
White 128: Based on the results of this period of fight, although he suffered some loss at the top,W’s middle team is connected and W also got #128. Overall, therefore, W is not bad.
Black 129: If B #129 extended at [a] —[See the variation.]
A B C D E F G H J K L M N O P Q R S T
A B C D E F G H J K L M N O P Q R S T12345678910111213141516171819
12345678910111213141516171819
21
3
variation
[If B extends with [J6] instead...]White 1: When W [L6] and...Black 2: ...[And] B [K7]...White 3: W [N2] keima attacking is severe.
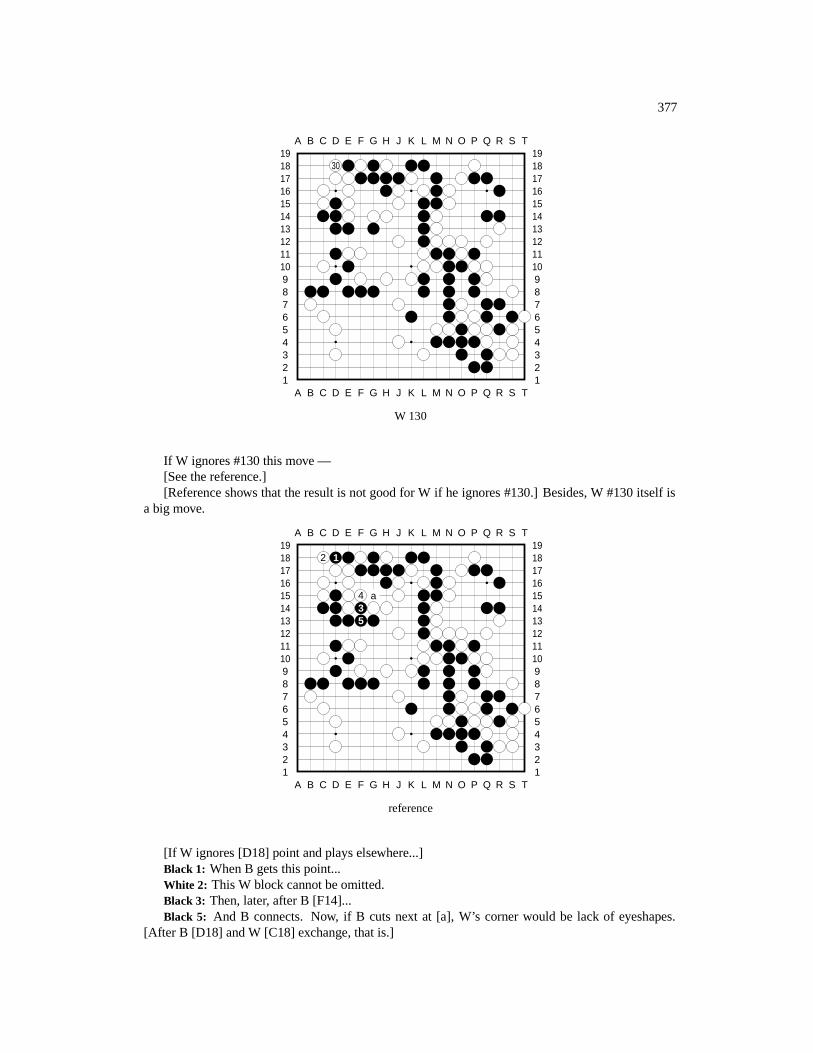
377
A B C D E F G H J K L M N O P Q R S T
A B C D E F G H J K L M N O P Q R S T12345678910111213141516171819
12345678910111213141516171819
30
W 130
If W ignores #130 this move —[See the reference.][Reference shows that the result is not good for W if he ignores #130.] Besides, W #130 itself is
a big move.
A B C D E F G H J K L M N O P Q R S T
A B C D E F G H J K L M N O P Q R S T12345678910111213141516171819
12345678910111213141516171819
2 1
4 a35
reference
[If W ignores [D18] point and plays elsewhere...]Black 1: When B gets this point...White 2: This W block cannot be omitted.Black 3: Then, later, after B [F14]...Black 5: And B connects. Now, if B cuts next at [a], W’s corner would be lack of eyeshapes.
[After B [D18] and W [C18] exchange, that is.]
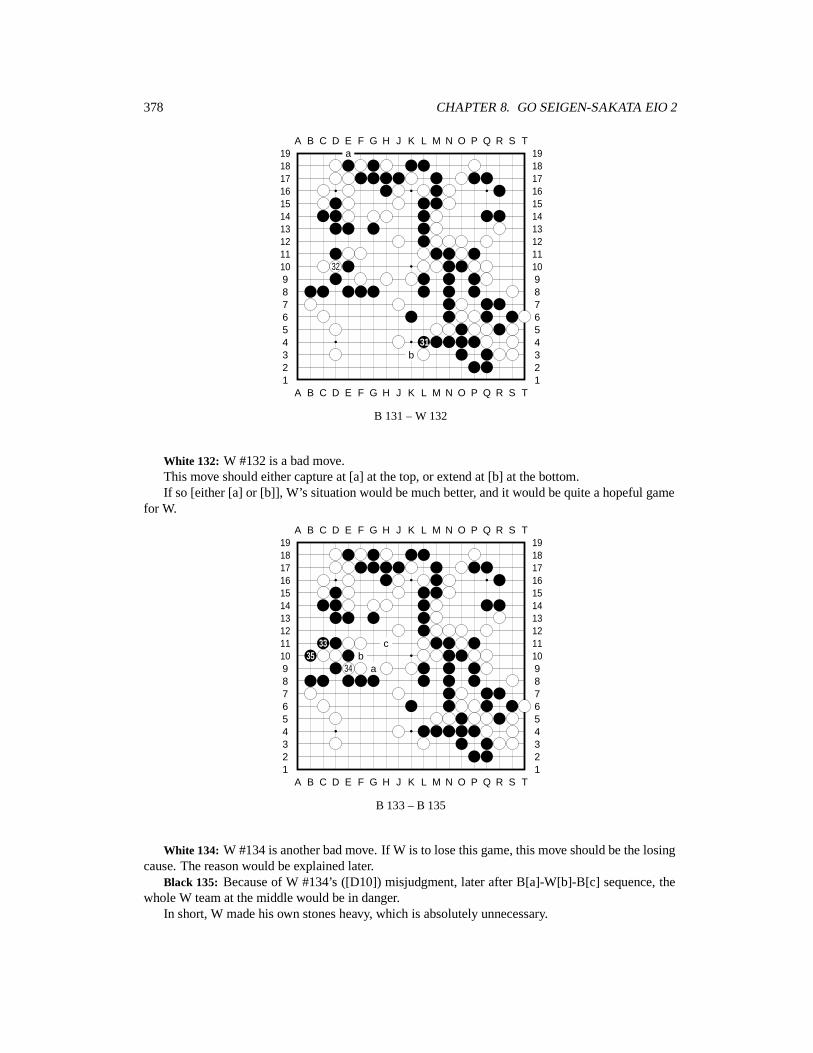
378 CHAPTER 8. GO SEIGEN-SAKATA EIO 2
A B C D E F G H J K L M N O P Q R S T
A B C D E F G H J K L M N O P Q R S T12345678910111213141516171819
12345678910111213141516171819a
32
31b
B 131 – W 132
White 132: W #132 is a bad move.This move should either capture at [a] at the top, or extend at [b] at the bottom.If so [either [a] or [b]], W’s situation would be much better, and it would be quite a hopeful game
for W.
A B C D E F G H J K L M N O P Q R S T
A B C D E F G H J K L M N O P Q R S T12345678910111213141516171819
12345678910111213141516171819
33 c35 b
34 a
B 133 – B 135
White 134: W #134 is another bad move. If W is to lose this game, this move should be the losingcause. The reason would be explained later.
Black 135: Because of W #134’s ([D10]) misjudgment, later after B[a]-W[b]-B[c] sequence, thewhole W team at the middle would be in danger.
In short, W made his own stones heavy, which is absolutely unnecessary.
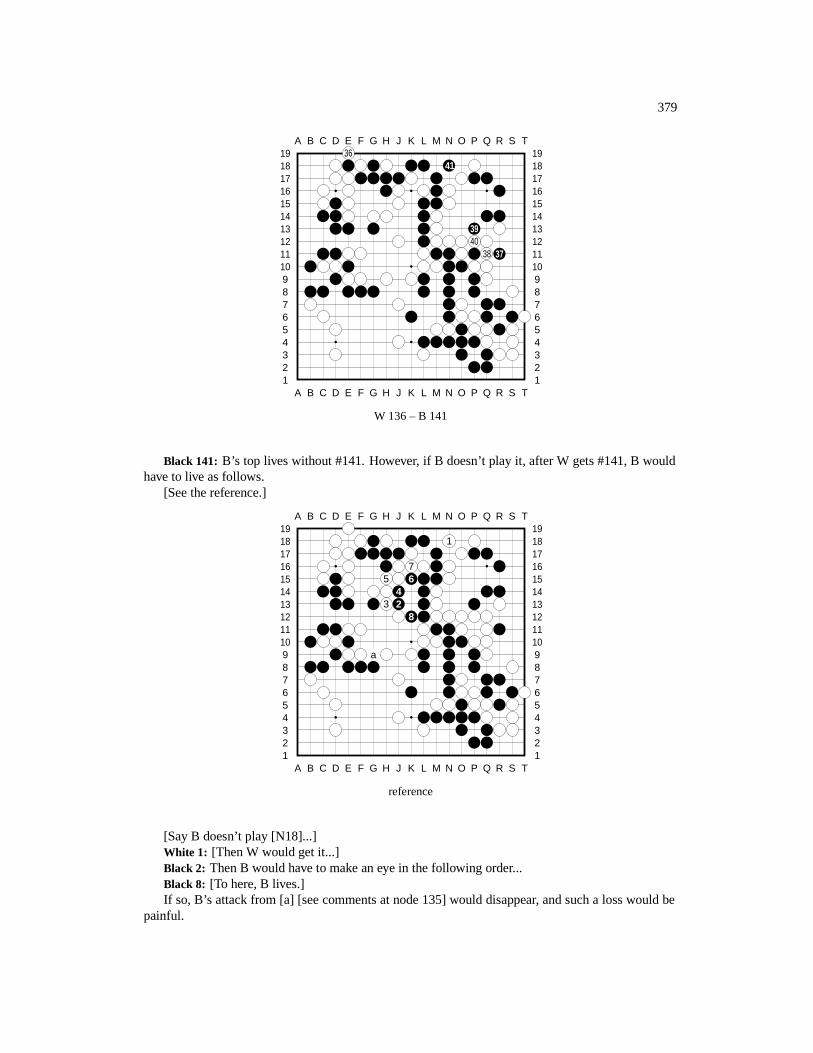
379
A B C D E F G H J K L M N O P Q R S T
A B C D E F G H J K L M N O P Q R S T12345678910111213141516171819
1234567891011121314151617181936
41
3940
38 37
W 136 – B 141
Black 141: B’s top lives without #141. However, if B doesn’t play it, after W gets #141, B wouldhave to live as follows.
[See the reference.]
A B C D E F G H J K L M N O P Q R S T
A B C D E F G H J K L M N O P Q R S T12345678910111213141516171819
12345678910111213141516171819
1
75 6
43 2
8
a
reference
[Say B doesn’t play [N18]...]White 1: [Then W would get it...]Black 2: Then B would have to make an eye in the following order...Black 8: [To here, B lives.]If so, B’s attack from [a] [see comments at node 135] would disappear, and such a loss would be
painful.
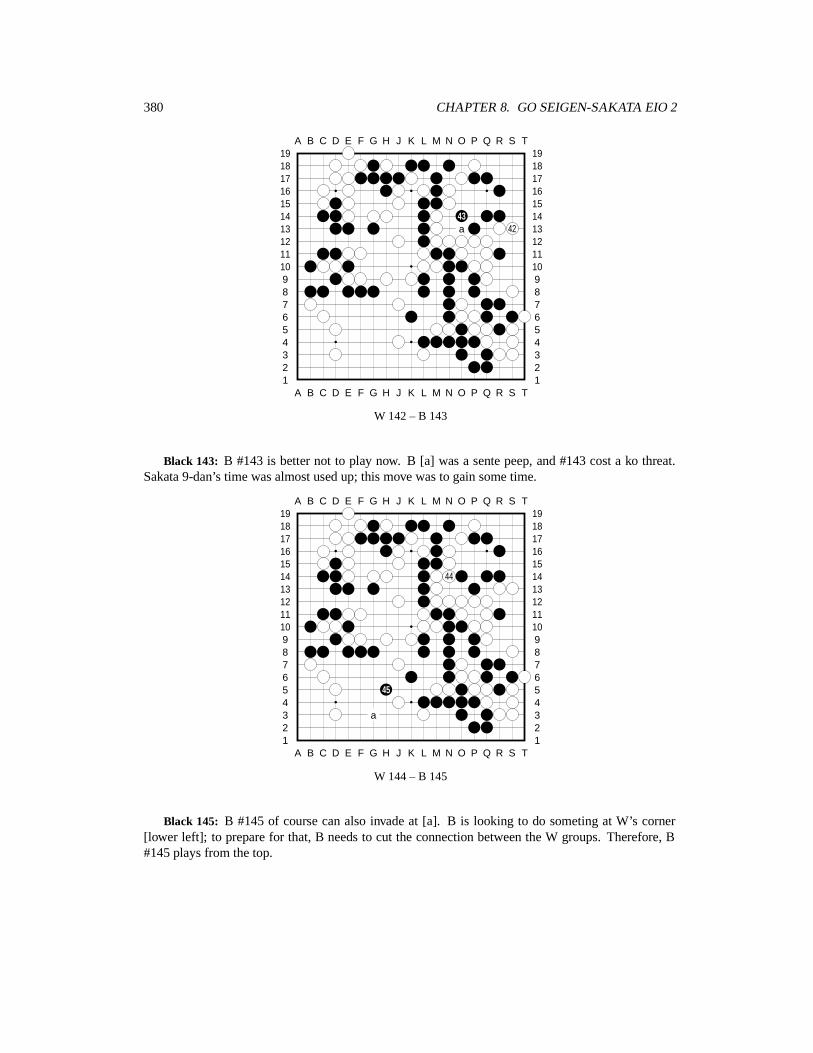
380 CHAPTER 8. GO SEIGEN-SAKATA EIO 2
A B C D E F G H J K L M N O P Q R S T
A B C D E F G H J K L M N O P Q R S T12345678910111213141516171819
12345678910111213141516171819
43a 42
W 142 – B 143
Black 143: B #143 is better not to play now. B [a] was a sente peep, and #143 cost a ko threat.Sakata 9-dan’s time was almost used up; this move was to gain some time.
A B C D E F G H J K L M N O P Q R S T
A B C D E F G H J K L M N O P Q R S T12345678910111213141516171819
12345678910111213141516171819
44
45
a
W 144 – B 145
Black 145: B #145 of course can also invade at [a]. B is looking to do someting at W’s corner[lower left]; to prepare for that, B needs to cut the connection between the W groups. Therefore, B#145 plays from the top.
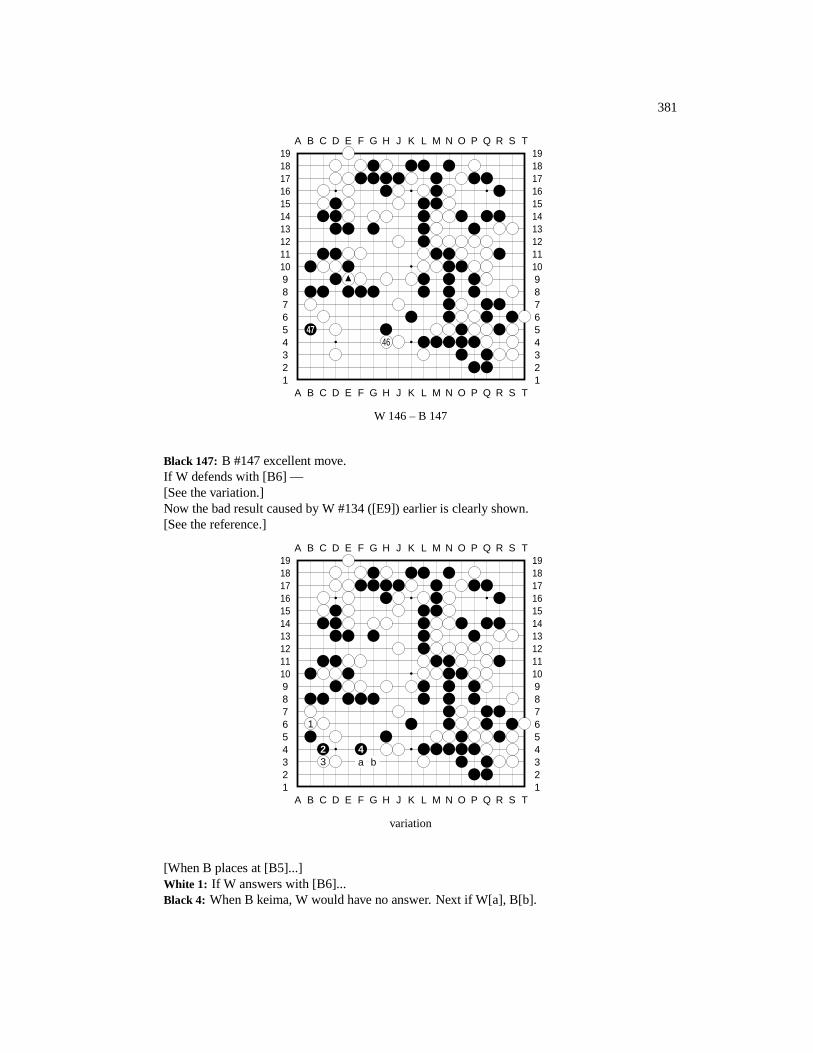
381
A B C D E F G H J K L M N O P Q R S T
A B C D E F G H J K L M N O P Q R S T12345678910111213141516171819
12345678910111213141516171819
4746
W 146 – B 147
Black 147: B #147 excellent move.If W defends with [B6] —[See the variation.]Now the bad result caused by W #134 ([E9]) earlier is clearly shown.[See the reference.]
A B C D E F G H J K L M N O P Q R S T
A B C D E F G H J K L M N O P Q R S T12345678910111213141516171819
12345678910111213141516171819
1
2 43 a b
variation
[When B places at [B5]...]White 1: If W answers with [B6]...Black 4: When B keima, W would have no answer. Next if W[a], B[b].
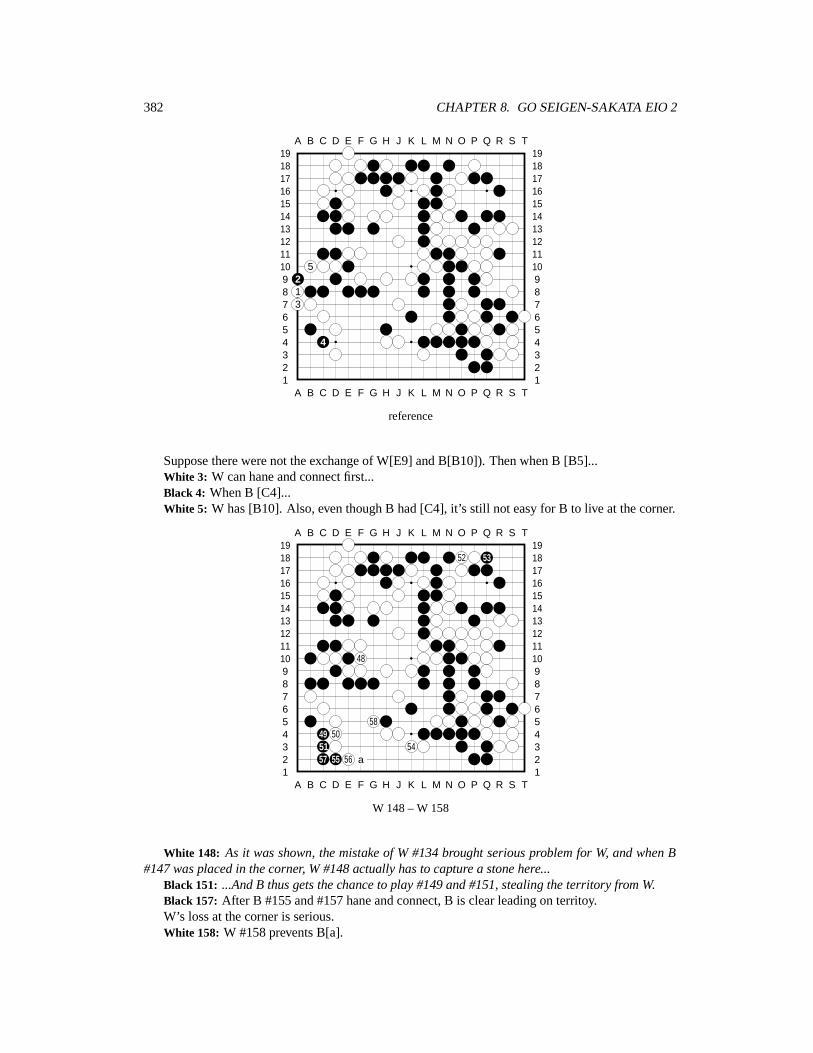
382 CHAPTER 8. GO SEIGEN-SAKATA EIO 2
A B C D E F G H J K L M N O P Q R S T
A B C D E F G H J K L M N O P Q R S T12345678910111213141516171819
12345678910111213141516171819
5213
4
reference
Suppose there were not the exchange of W[E9] and B[B10]). Then when B [B5]...White 3: W can hane and connect first...Black 4: When B [C4]...White 5: W has [B10]. Also, even though B had [C4], it’s still not easy for B to live at the corner.
A B C D E F G H J K L M N O P Q R S T
A B C D E F G H J K L M N O P Q R S T12345678910111213141516171819
12345678910111213141516171819
52 53
48
5849 5051 5457 55 56 a
W 148 – W 158
White 148: As it was shown, the mistake of W #134 brought serious problem for W, and when B#147 was placed in the corner, W #148 actually has to capture a stone here...
Black 151: ...And B thus gets the chance to play #149 and #151, stealing the territory from W.Black 157: After B #155 and #157 hane and connect, B is clear leading on territoy.W’s loss at the corner is serious.White 158: W #158 prevents B[a].
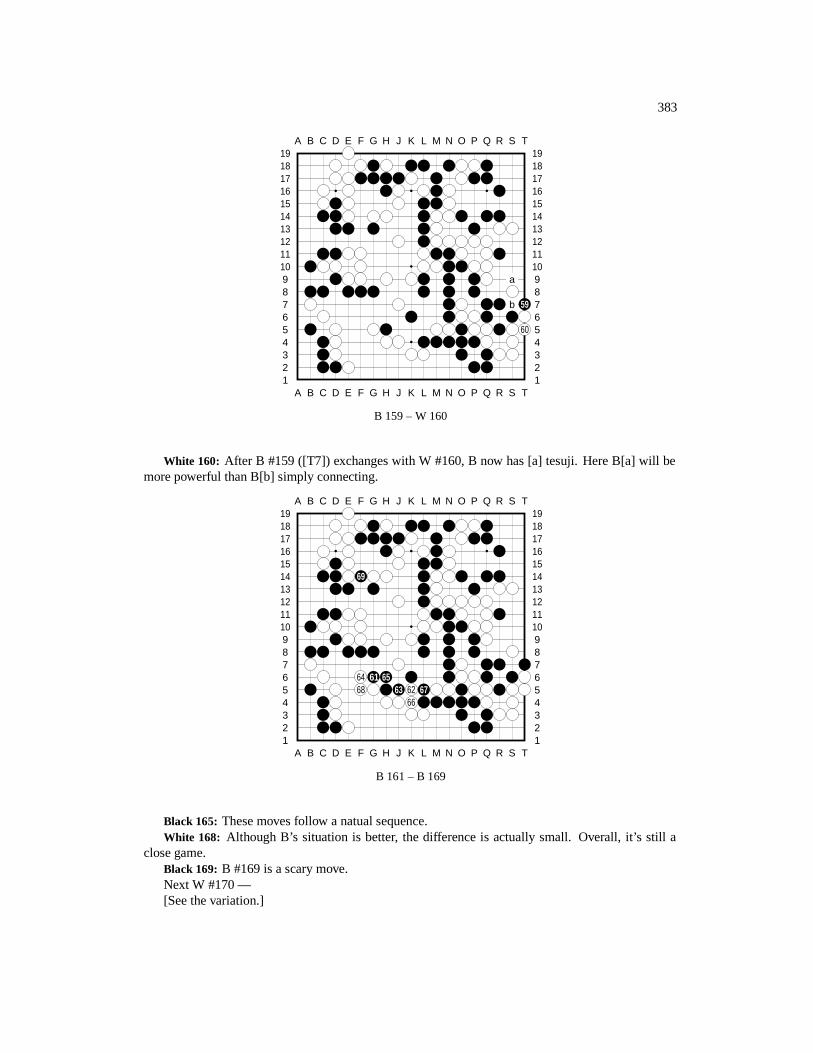
383
A B C D E F G H J K L M N O P Q R S T
A B C D E F G H J K L M N O P Q R S T12345678910111213141516171819
12345678910111213141516171819
a
b 59
60
B 159 – W 160
White 160: After B #159 ([T7]) exchanges with W #160, B now has [a] tesuji. Here B[a] will bemore powerful than B[b] simply connecting.
A B C D E F G H J K L M N O P Q R S T
A B C D E F G H J K L M N O P Q R S T12345678910111213141516171819
12345678910111213141516171819
69
64 61 6568 63 62 67
66
B 161 – B 169
Black 165: These moves follow a natual sequence.White 168: Although B’s situation is better, the difference is actually small. Overall, it’s still a
close game.Black 169: B #169 is a scary move.Next W #170 —[See the variation.]
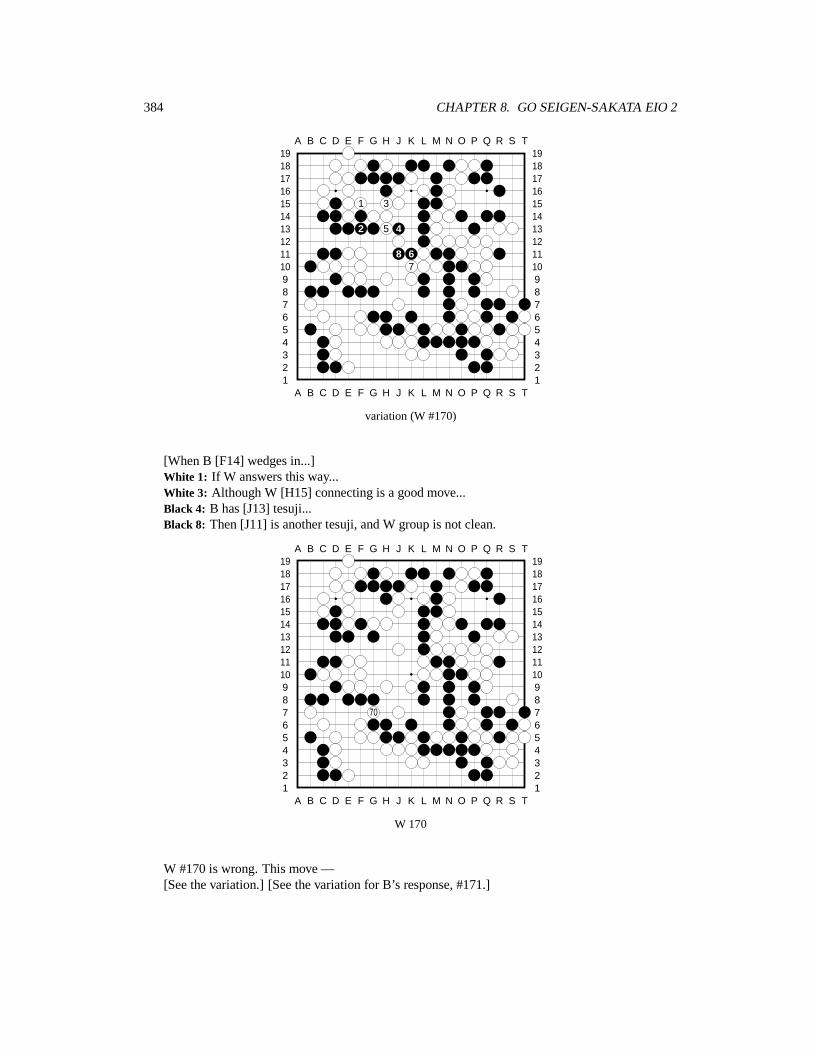
384 CHAPTER 8. GO SEIGEN-SAKATA EIO 2
A B C D E F G H J K L M N O P Q R S T
A B C D E F G H J K L M N O P Q R S T12345678910111213141516171819
12345678910111213141516171819
1 3
2 5 4
8 67
variation (W #170)
[When B [F14] wedges in...]White 1: If W answers this way...White 3: Although W [H15] connecting is a good move...Black 4: B has [J13] tesuji...Black 8: Then [J11] is another tesuji, and W group is not clean.
A B C D E F G H J K L M N O P Q R S T
A B C D E F G H J K L M N O P Q R S T12345678910111213141516171819
12345678910111213141516171819
70
W 170
W #170 is wrong. This move —[See the variation.] [See the variation for B’s response, #171.]

385
A B C D E F G H J K L M N O P Q R S T
A B C D E F G H J K L M N O P Q R S T12345678910111213141516171819
12345678910111213141516171819
12
variation
W [J11] to extend here is the best play.Black 1: Next if B [F13] to cut the connection of B teams [between upper left and middle] ...White 2: W [H12] bend can live at the middle. (Eventually it will be a ”bent-four” at the middle,
which is an alive shape.)
A B C D E F G H J K L M N O P Q R S T
A B C D E F G H J K L M N O P Q R S T12345678910111213141516171819
12345678910111213141516171819
6
21 4
3 5
variation (B #171)
When W [G7] wedges in...Black 1: If B [H7] blocks here...White 6: To [J10], W easily lives. If so, of course W would be good. However —

386 CHAPTER 8. GO SEIGEN-SAKATA EIO 2
A B C D E F G H J K L M N O P Q R S T
A B C D E F G H J K L M N O P Q R S T12345678910111213141516171819
12345678910111213141516171819
72 74
73
a 7675 78
77 7971
B 171 – B 179
Black 171: [However,] B #171 to push is a good move.White 172: Now W has to play #172 and...White 174: [And] #174 to connect.W stones at the middle suddenly become thin.Black 179: After B #179 captures a stone, B[a] next is a tesuji.If W wants to avoid such a trouble [of B[a]], W could answer a move here. However, although
it’s still close, W is shorthand already.
A B C D E F G H J K L M N O P Q R S T
A B C D E F G H J K L M N O P Q R S T12345678910111213141516171819
12345678910111213141516171819
8182
80
W 180 – W 182
White 180: So W #180 challenges B.White 182: If W #182 wants to avoid this ko fight —[See the variation.]
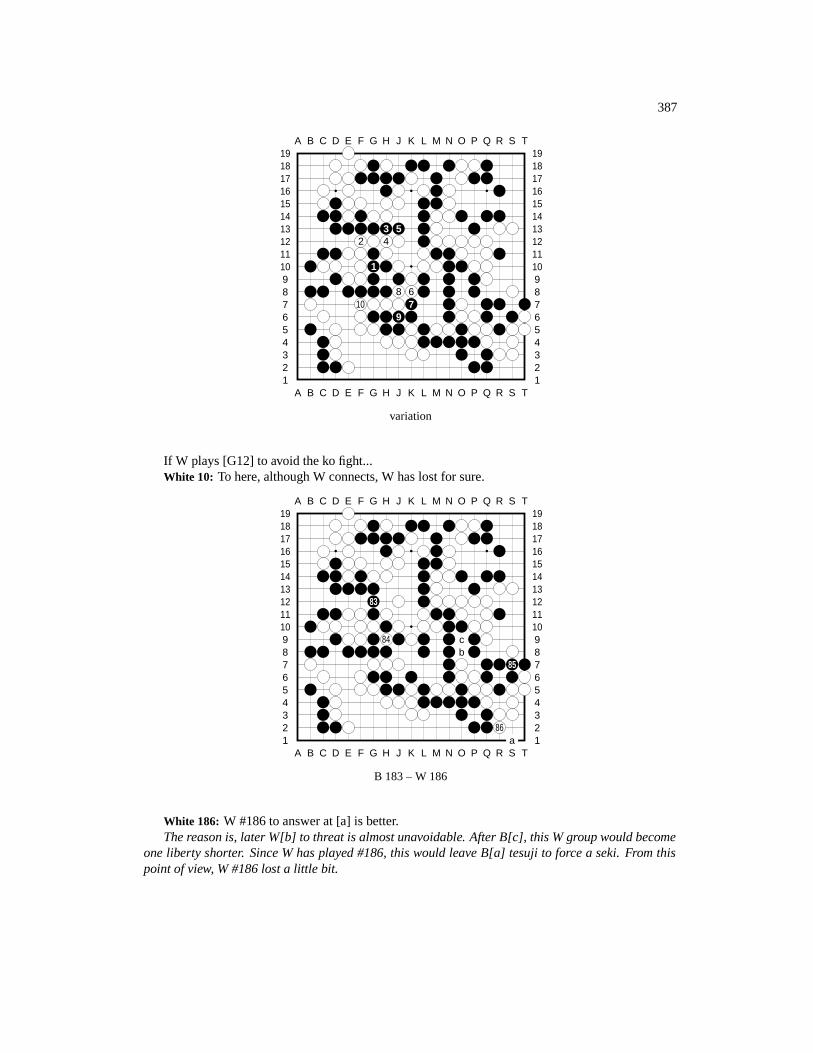
387
A B C D E F G H J K L M N O P Q R S T
A B C D E F G H J K L M N O P Q R S T12345678910111213141516171819
12345678910111213141516171819
3 52 4
1
8 610 7
9
variation
If W plays [G12] to avoid the ko fight...White 10: To here, although W connects, W has lost for sure.
A B C D E F G H J K L M N O P Q R S T
A B C D E F G H J K L M N O P Q R S T12345678910111213141516171819
12345678910111213141516171819
83
84 cb
85
86a
B 183 – W 186
White 186: W #186 to answer at [a] is better.The reason is, later W[b] to threat is almost unavoidable. After B[c], this W group would become
one liberty shorter. Since W has played #186, this would leave B[a] tesuji to force a seki. From thispoint of view, W #186 lost a little bit.
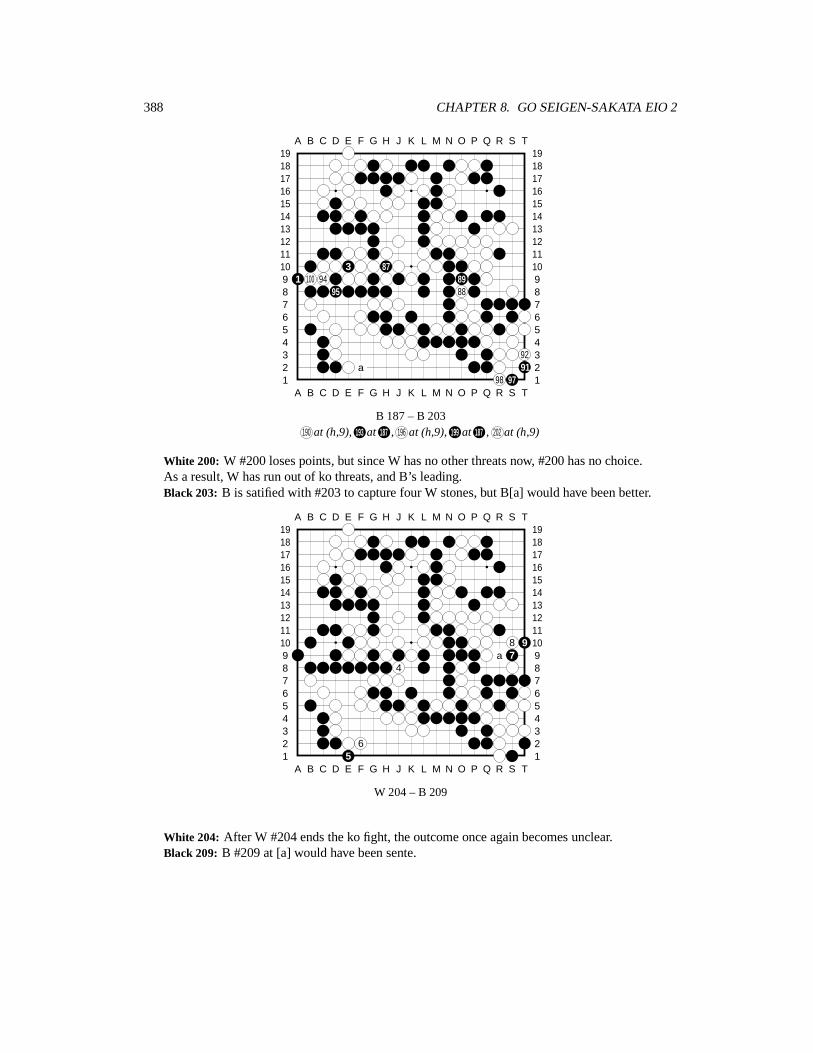
388 CHAPTER 8. GO SEIGEN-SAKATA EIO 2
A B C D E F G H J K L M N O P Q R S T
A B C D E F G H J K L M N O P Q R S T12345678910111213141516171819
12345678910111213141516171819
3 871 100 94 89
95 88
92a 91
98 97
B 187 – B 203190 at (h,9), 193 at 187 , 196 at (h,9), 199 at 187 , 202 at (h,9)
White 200: W #200 loses points, but since W has no other threats now, #200 has no choice.As a result, W has run out of ko threats, and B’s leading.Black 203: B is satified with #203 to capture four W stones, but B[a] would have been better.
A B C D E F G H J K L M N O P Q R S T
A B C D E F G H J K L M N O P Q R S T12345678910111213141516171819
12345678910111213141516171819
8 9a 7
4
65
W 204 – B 209
White 204: After W #204 ends the ko fight, the outcome once again becomes unclear.Black 209: B #209 at [a] would have been sente.
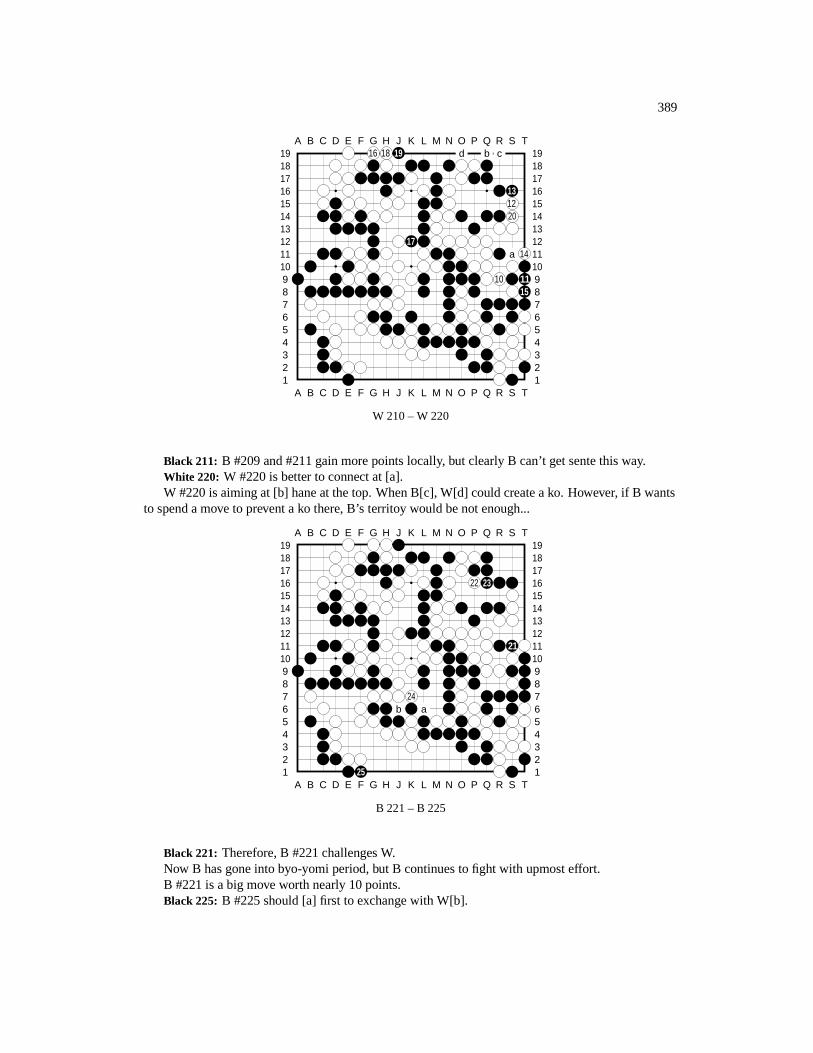
389
A B C D E F G H J K L M N O P Q R S T
A B C D E F G H J K L M N O P Q R S T12345678910111213141516171819
1234567891011121314151617181916 18 19 d b c
131220
17a 14
10 1115
W 210 – W 220
Black 211: B #209 and #211 gain more points locally, but clearly B can’t get sente this way.White 220: W #220 is better to connect at [a].W #220 is aiming at [b] hane at the top. When B[c], W[d] could create a ko. However, if B wants
to spend a move to prevent a ko there, B’s territoy would be not enough...
A B C D E F G H J K L M N O P Q R S T
A B C D E F G H J K L M N O P Q R S T12345678910111213141516171819
12345678910111213141516171819
22 23
21
24b a
25
B 221 – B 225
Black 221: Therefore, B #221 challenges W.Now B has gone into byo-yomi period, but B continues to fight with upmost effort.B #221 is a big move worth nearly 10 points.Black 225: B #225 should [a] first to exchange with W[b].
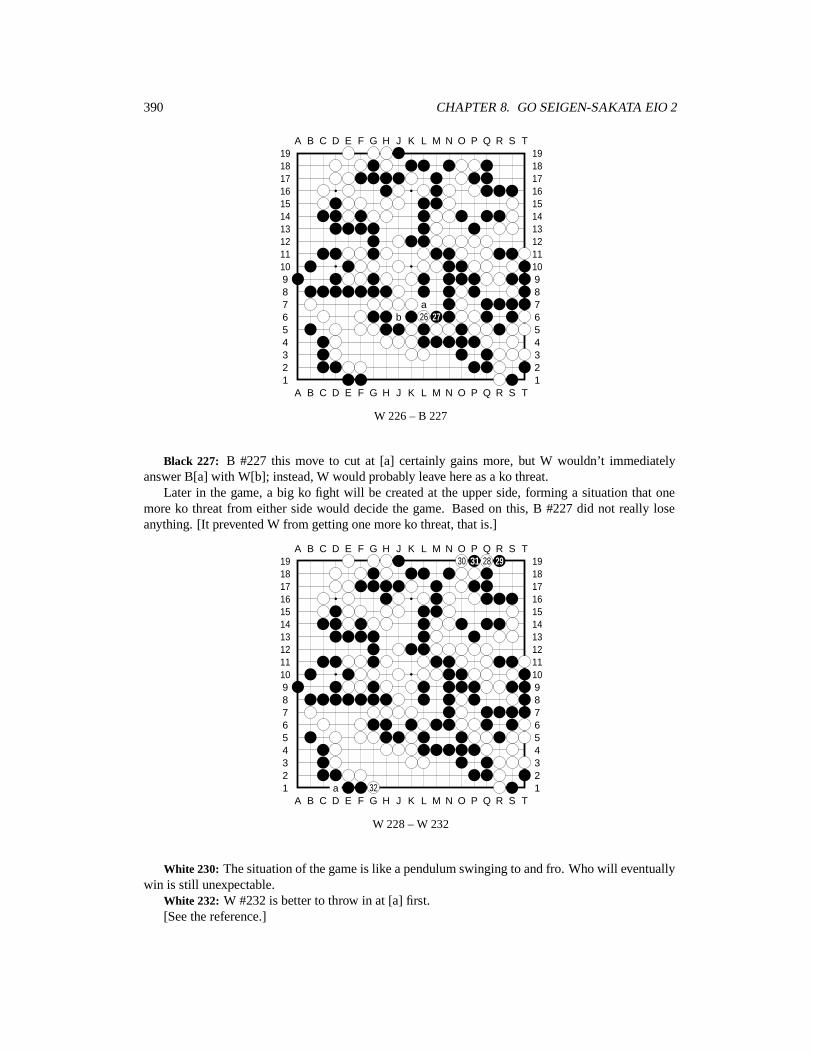
390 CHAPTER 8. GO SEIGEN-SAKATA EIO 2
A B C D E F G H J K L M N O P Q R S T
A B C D E F G H J K L M N O P Q R S T12345678910111213141516171819
12345678910111213141516171819
ab 26 27
W 226 – B 227
Black 227: B #227 this move to cut at [a] certainly gains more, but W wouldn’t immediatelyanswer B[a] with W[b]; instead, W would probably leave here as a ko threat.
Later in the game, a big ko fight will be created at the upper side, forming a situation that onemore ko threat from either side would decide the game. Based on this, B #227 did not really loseanything. [It prevented W from getting one more ko threat, that is.]
A B C D E F G H J K L M N O P Q R S T
A B C D E F G H J K L M N O P Q R S T12345678910111213141516171819
1234567891011121314151617181930 31 28 29
a 32
W 228 – W 232
White 230: The situation of the game is like a pendulum swinging to and fro. Who will eventuallywin is still unexpectable.
White 232: W #232 is better to throw in at [a] first.[See the reference.]
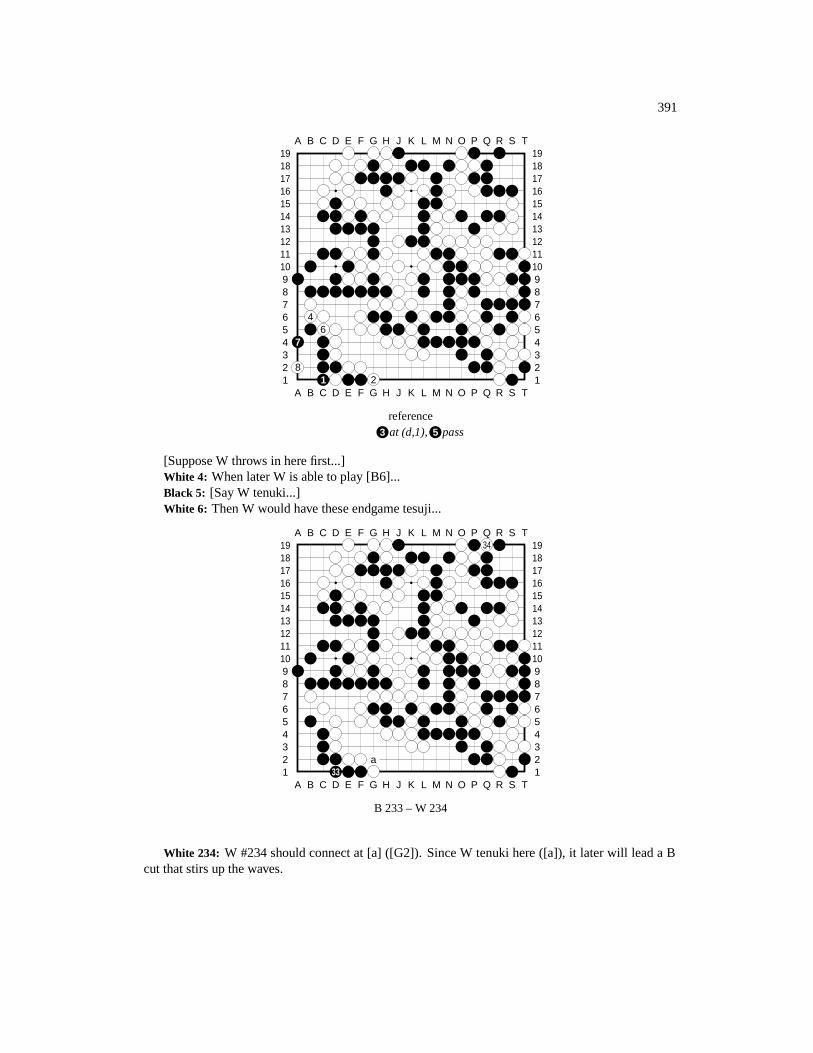
391
A B C D E F G H J K L M N O P Q R S T
A B C D E F G H J K L M N O P Q R S T12345678910111213141516171819
12345678910111213141516171819
46
7
81 2
reference3 at (d,1), 5 pass
[Suppose W throws in here first...]White 4: When later W is able to play [B6]...Black 5: [Say W tenuki...]White 6: Then W would have these endgame tesuji...
A B C D E F G H J K L M N O P Q R S T
A B C D E F G H J K L M N O P Q R S T12345678910111213141516171819
1234567891011121314151617181934
a33
B 233 – W 234
White 234: W #234 should connect at [a] ([G2]). Since W tenuki here ([a]), it later will lead a Bcut that stirs up the waves.
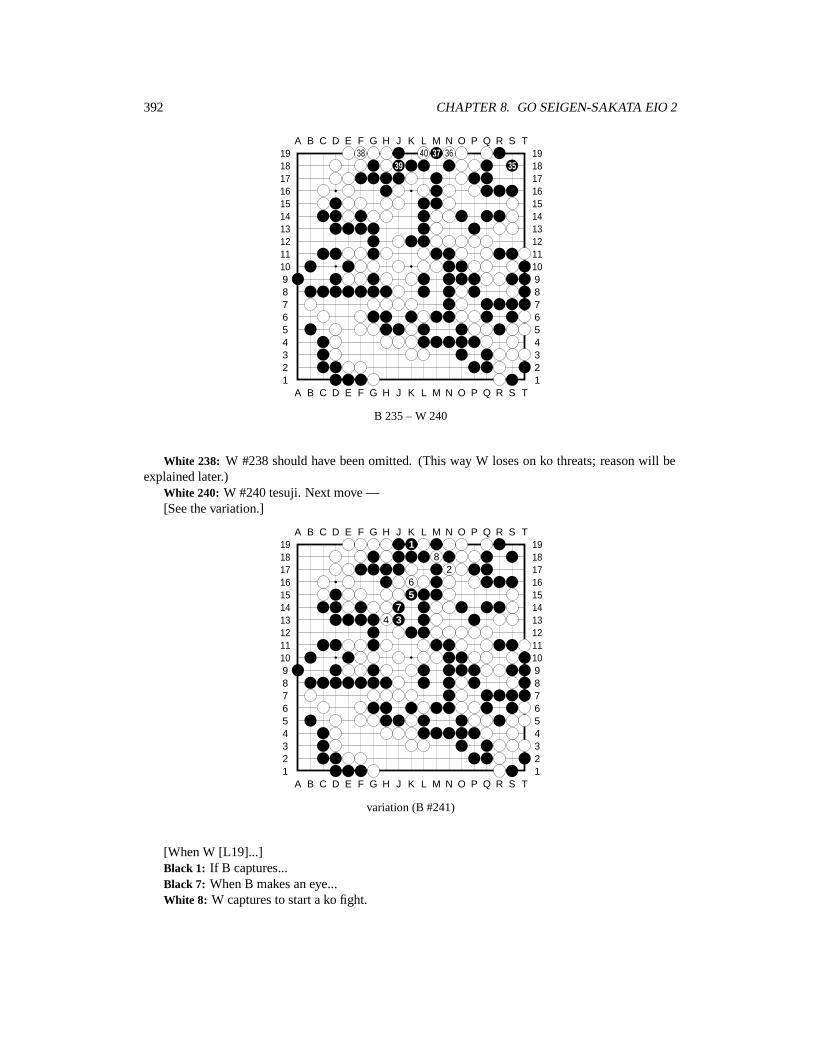
392 CHAPTER 8. GO SEIGEN-SAKATA EIO 2
A B C D E F G H J K L M N O P Q R S T
A B C D E F G H J K L M N O P Q R S T12345678910111213141516171819
1234567891011121314151617181938 40 37 36
39 35
B 235 – W 240
White 238: W #238 should have been omitted. (This way W loses on ko threats; reason will beexplained later.)
White 240: W #240 tesuji. Next move —[See the variation.]
A B C D E F G H J K L M N O P Q R S T
A B C D E F G H J K L M N O P Q R S T12345678910111213141516171819
123456789101112131415161718191
82
65
74 3
variation (B #241)
[When W [L19]...]Black 1: If B captures...Black 7: When B makes an eye...White 8: W captures to start a ko fight.
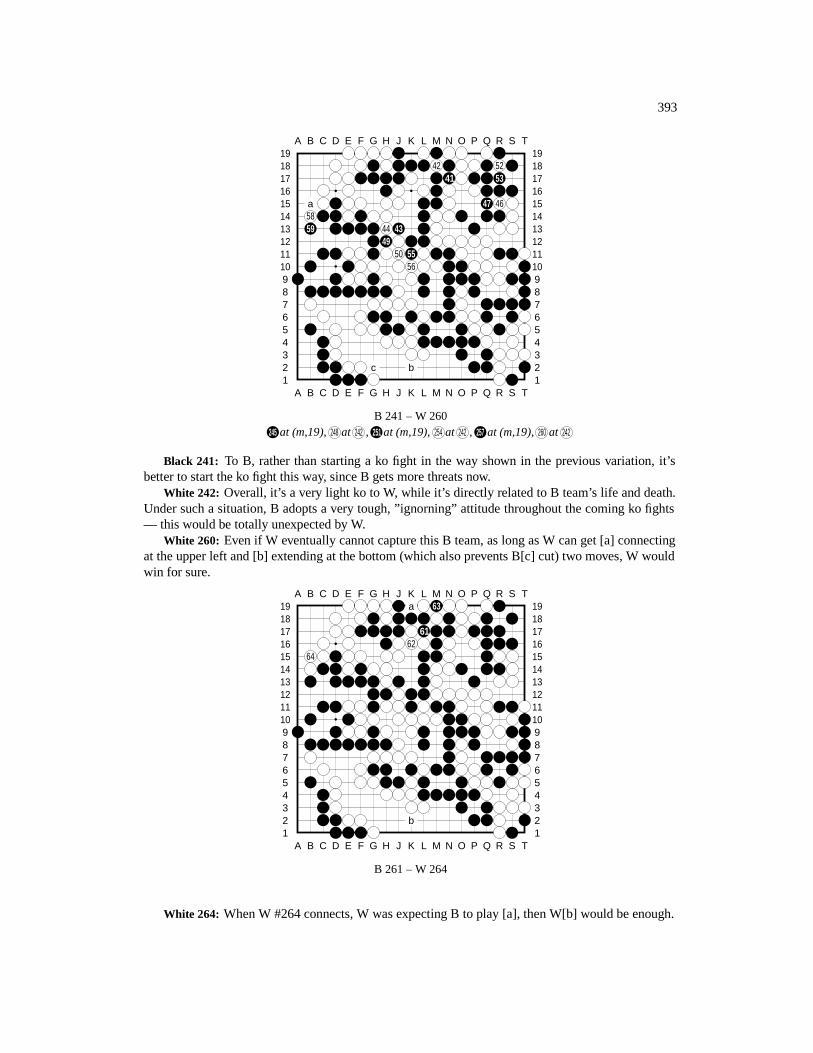
393
A B C D E F G H J K L M N O P Q R S T
A B C D E F G H J K L M N O P Q R S T12345678910111213141516171819
12345678910111213141516171819
42 5241 53
a 47 465859 44 43
4950 55
56
c b
B 241 – W 260245 at (m,19), 248 at 242 , 251 at (m,19), 254 at 242 , 257 at (m,19), 260 at 242
Black 241: To B, rather than starting a ko fight in the way shown in the previous variation, it’sbetter to start the ko fight this way, since B gets more threats now.
White 242: Overall, it’s a very light ko to W, while it’s directly related to B team’s life and death.Under such a situation, B adopts a very tough, ”ignorning” attitude throughout the coming ko fights— this would be totally unexpected by W.
White 260: Even if W eventually cannot capture this B team, as long as W can get [a] connectingat the upper left and [b] extending at the bottom (which also prevents B[c] cut) two moves, W wouldwin for sure.
A B C D E F G H J K L M N O P Q R S T
A B C D E F G H J K L M N O P Q R S T12345678910111213141516171819
12345678910111213141516171819a 63
6162
64
b
B 261 – W 264
White 264: When W #264 connects, W was expecting B to play [a], then W[b] would be enough.
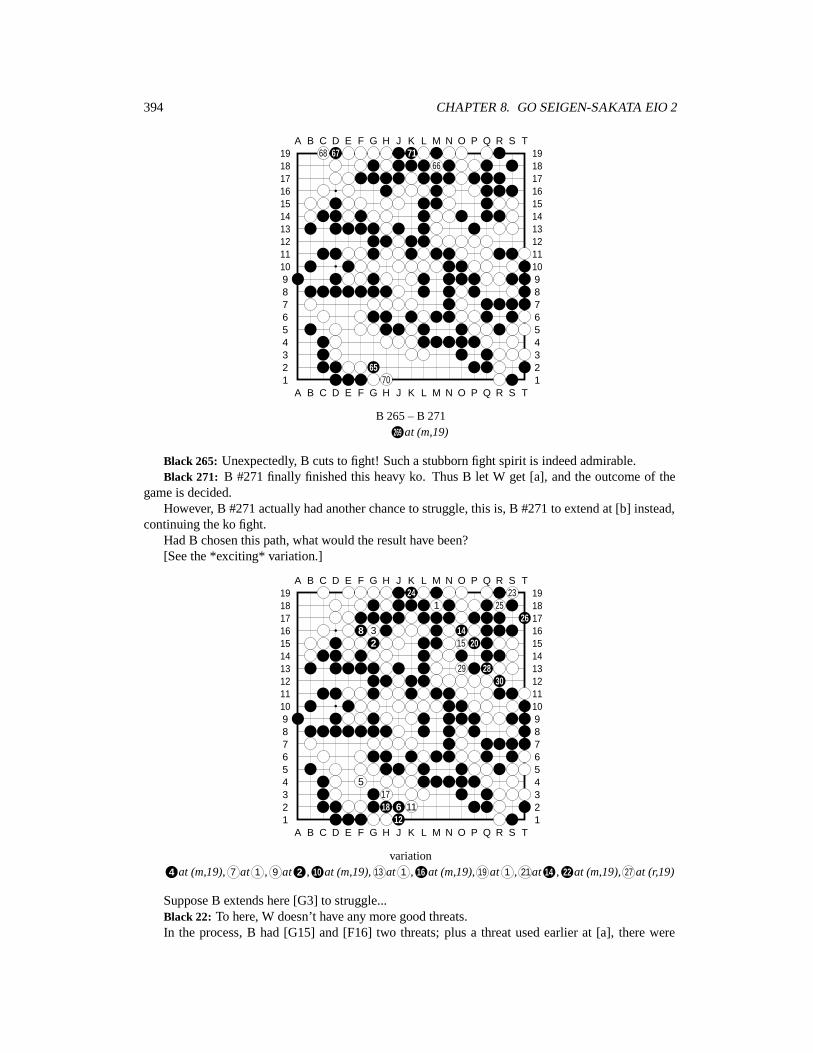
394 CHAPTER 8. GO SEIGEN-SAKATA EIO 2
A B C D E F G H J K L M N O P Q R S T
A B C D E F G H J K L M N O P Q R S T12345678910111213141516171819
1234567891011121314151617181968 67 71
66
6570
B 265 – B 271269 at (m,19)
Black 265: Unexpectedly, B cuts to fight! Such a stubborn fight spirit is indeed admirable.Black 271: B #271 finally finished this heavy ko. Thus B let W get [a], and the outcome of the
game is decided.However, B #271 actually had another chance to struggle, this is, B #271 to extend at [b] instead,
continuing the ko fight.Had B chosen this path, what would the result have been?[See the *exciting* variation.]
A B C D E F G H J K L M N O P Q R S T
A B C D E F G H J K L M N O P Q R S T12345678910111213141516171819
1234567891011121314151617181924 23
1 2526
8 3 142 15 20
29 2830
51718 6 11
12
variation4 at (m,19), 7 at 1 , 9 at 2 , 10 at (m,19), 13 at 1 , 16 at (m,19), 19 at 1 , 21at 14 , 22 at (m,19), 27 at (r,19)
Suppose B extends here [G3] to struggle...Black 22: To here, W doesn’t have any more good threats.In the process, B had [G15] and [F16] two threats; plus a threat used earlier at [a], there were

395
three ko threats for B that were led by W #238 [Go to node 238 for reference]. This is why W #238was said to be not good.
Next —White 23: This is the only ko threat left for W...Black 24: [B goes ahead to finish this heavy ko...]Black 30: To here, it’s a semeai. Although yet another ko fight [P14] is invovled, but this time, it’s
a favorable ko fight to B. If so, the game would be turned around.
A B C D E F G H J K L M N O P Q R S T
A B C D E F G H J K L M N O P Q R S T12345678910111213141516171819
1234567891011121314151617181993
944 73 96 1375 2 8 6
11 10 5 76
97 7724
20 25 1222 23 82 8521 74 18 8690 7815 79 84
99 100 8091 72 87 73 81
88 14 16 17 83
W 272 – B 327289 at (r,5), 292 at 286 , 295 at (r,5), 298 at 286 , 301 at (r,5), 309 at 286 , 319 at (j,13), 326 at 302 , 327 at (q,19)
White 272: [The spectacular variation did not appear in the real game. Now, after W gets #272,the game is decided.]
White 284: The ko [M19] was very light to W; almost ”worry-free”. Therefore, B was already ina huge disadvantage. Yet, B even dared to ignore it [when B played [G2] cut], stubbornly to continuethe ko fight. No one would have expected so. Had Sakata 9-dan had more time to ponder, he probablywould have found the way shown in the variation to continue this struggle.
Black 293: Sakata 9-dan engaged in such a complicated and enormous fight in the last minute [thatis, byo-yomi period], and he refused to gave in even an inch. Such a fighting spirit was astonishing.Alas, he could not help the shortage of game time, and this fighting spirit was unable to hold to theend. In short, in a match between two unmatchable top players in the world, the winning chanceturned hands throughout the game. This was indeed a rare masterpiece.
Black 301: Toward end of the game, a ko fight in which one more ko threat from either side woulddecide the game appeared. In professional matches, ko threats are normally counted clearly before ako fight is started. In this game, however, the result of the ko fight was unclear until almost the end;this was extremely rare. Perhaps because of the limit of the game clock, the players were unable tocarry out throughout and accurate calculations; this could not have been helped.
Black 311: Go Seigen 9-dan often only spent half of the given time in his games. In this game,however, he had only nine minutes left at the end. This also spelled a complicated and difficult game.
White 320: After the war (WWII), Go Seigen and Sakata Eio played many time in major competi-tions. For example, Go Seigen vs. High Dans series (Sakata Eio was then 7-dan) in 1949 (Wu won byresignation on white); Go Seigen 9-dan vs. Sakata Eio 8-dan 6-game series in 1953 (Even; Wu 1 win,1 jigo, and 4 losses); Go Seigen 9-dan vs. Sakata Eio 8-dan 10-game series in 1953 (Wu 6 wins, 2losses); and in 1957 the 1st Japan’s Strongest Deciding Matches, 1958 the 2nd Japan’s Strongest De-
396 CHAPTER 8. GO SEIGEN-SAKATA EIO 2
ciding Matches, 1959 the 3rd Japan’s Strongest Deciding Matches, and 1961 the 1st Meijin Matches,they also matched many time.
Total of 327 moves. W wins by 4 points.Time given: 10 hours apieceTime consumed:Black: 9 hours 59 minutesWhite: 9 hours 51 minutes
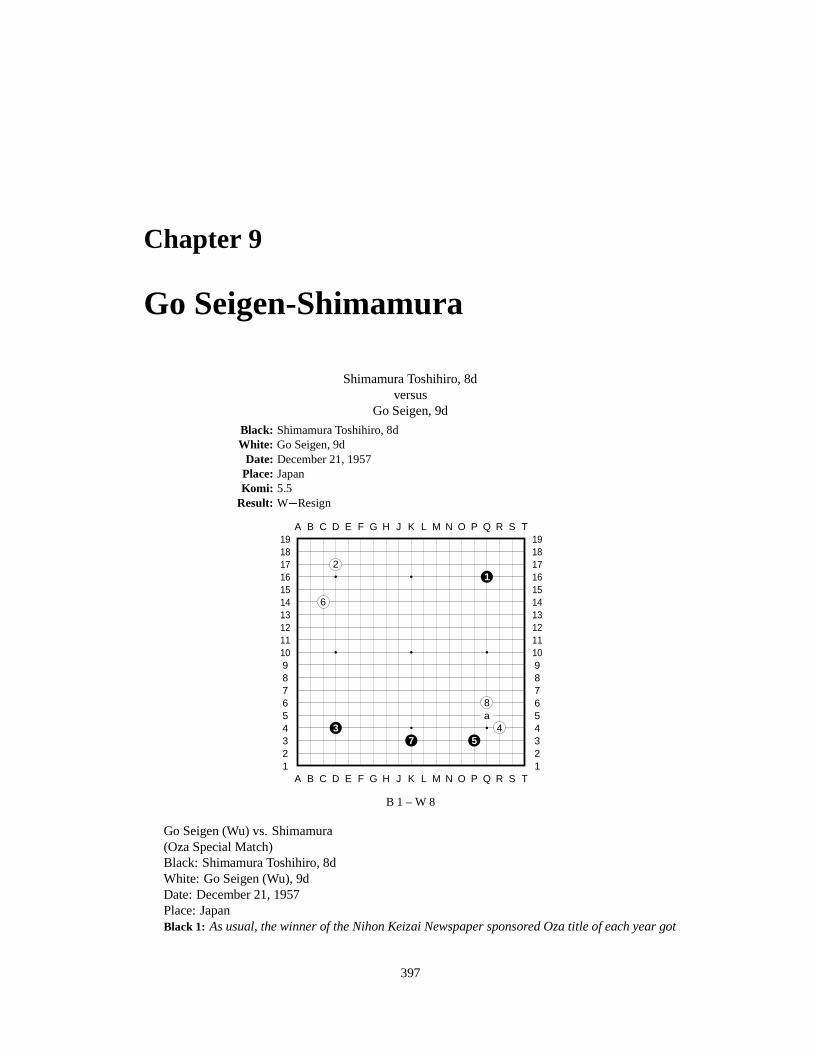
Chapter 9
Go Seigen-Shimamura
Shimamura Toshihiro, 8dversus
Go Seigen, 9d
Black: Shimamura Toshihiro, 8dWhite: Go Seigen, 9d
Date: December 21, 1957Place: JapanKomi: 5.5
Result: W�Resign
A B C D E F G H J K L M N O P Q R S T
A B C D E F G H J K L M N O P Q R S T12345678910111213141516171819
12345678910111213141516171819
21
6
8a
3 47 5
B 1 – W 8
Go Seigen (Wu) vs. Shimamura(Oza Special Match)Black: Shimamura Toshihiro, 8dWhite: Go Seigen (Wu), 9dDate: December 21, 1957Place: JapanBlack 1: As usual, the winner of the Nihon Keizai Newspaper sponsored Oza title of each year got
397
398 CHAPTER 9. GO SEIGEN-SHIMAMURA
to play Go Seigen 9-dan for a special match.The 3-game title matches of 1956 Oza were played between Shimamura Toshihiro 8-dan and
Kansai Ki-in’s Handa Dogen 8-dan. Shimamura 8-dan defeated Handa 8-dan two straight, winningthe Oza title, and as pre-arranged, he earned the chance to play a special game with Go Seigen9-dan.
White 2: Durning last year’s [1956] various games, the most notable player, besides Go Seigen9-dan, was probably Shimamura 8-dan. This showed his extraordinary strength.
In the ”Hightest Dan” matches, Shimamura 8-dan won the title with a 6-2 score, and he wouldsoon meet the title holder of 1957, Kitani Minoru 9-dan. In the Honinbo league play, althoughlosing to Fujisawa Hosai 9-dan and Kitani Minoru 9-dan, he was still leading overall. Also, withan outstanding record in the preliminary round of ”Japan’s Strongest Deciding Matches”, he hadqualified for the semi-final round.
Showing such a tremendous strength in various big matches and keeping a steady record – suchplayers were rare.
Black 3: Shimamura 8-dan was just in such a good condition when he met Go Seigen 9-dan in thisgame. Recently, the two had not met, so this was a game that people had looked forward to.
White 4: Three years ago, Shimamura 8-dan had met Go Seigen 9-dan in the Yomiuri Newspapersponsored ”Wu vs Selected 7 or 8 Dan” tournament. Thereafter, Shimamura 8-dan gradually becamea star in the go world. This game was the first time since their last meet, and the Shimamura 8-danof 3 years later had been different.
Black 5: B #1 and #3 occupied the two hoshi points at the diagonal corners, as if they were a2-stone game setup. This is an favorite opening of Shimamura 8-dan.
White 6: Shimamura 8-dan’s style was that of ”steady” type. No matter how his oppenent triedto irritate him, he treated it calmly. Making steady moves and approaching opponent gradually werehis favorite strategies. He was a player of lasting fights.
In this game, however, B had to give a komi of 5.5 points, the biggest komi among all the games[of that time]. Perhaps because of this, or because this was the first game with Go Seigen 9-dan aftera long time and he eagerly tried to show the strength he had accumulated – in short, in this game,he showed a style that was different from his normally steady and cautious approaches; instead, heplayed aggressively. As a result, however, because of his big misread, he lost a big group when thegame was still in the opening period.
Black 7: From the watchers’ point of view, this game was probably over by then. But in reality itwas not so simple. The death of a big group didn’t necessarily decide the outcome of the whole game.Because of the inspiring struggle by Shimamura 8-dan, the game became less optimistic for W. Theviolent fights continued, and for a while, it became an unclear game.
White 8: Even though having captured a group of the opponent, it was not the case that onecould sleep the rest of the way. One shall see this point in Go Seigen 9-dan’s clear and straightcommentary.
One can also learn from this game that to eventually win a game, how much obstacle one has toovercome.
W #8 to play at [a] kosumi would be solid. Which way is better, keima [#8] or kosumi [a],depends on the surrounding situation. This difference resembles the difference between big knightcorner enclosure and small knight corner enclosure. W #8 in the game was to look for changes, andit’s a move of imagination.
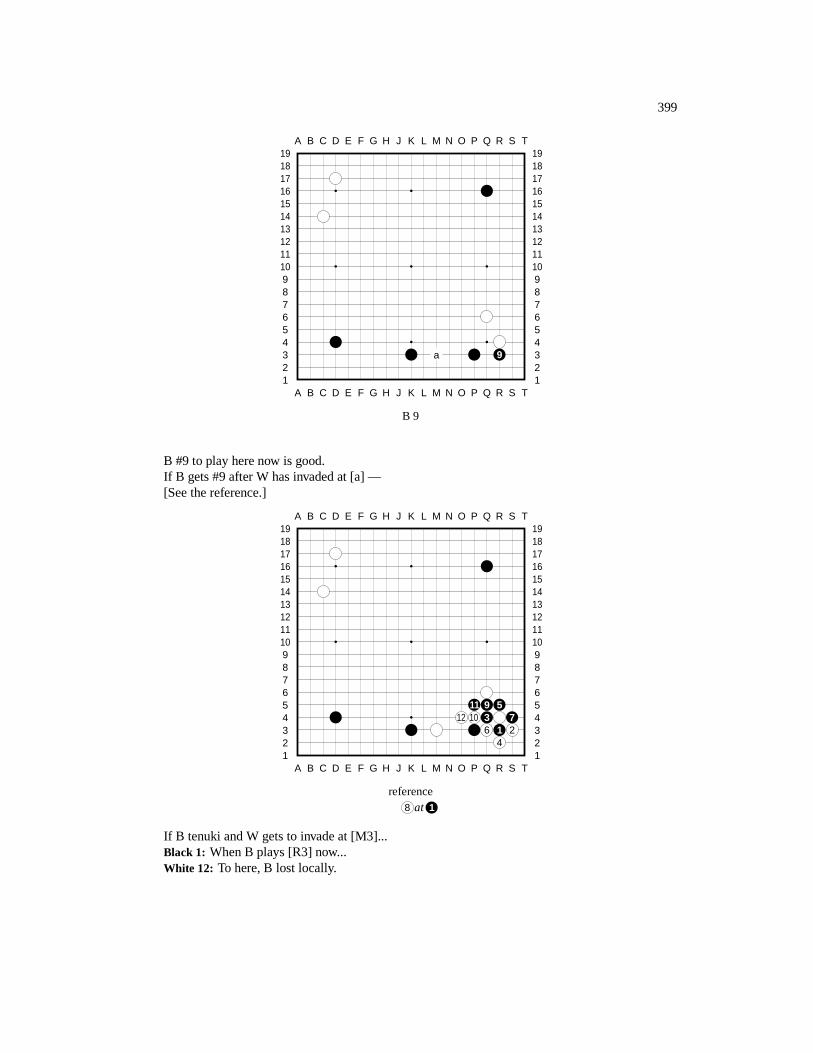
399
A B C D E F G H J K L M N O P Q R S T
A B C D E F G H J K L M N O P Q R S T12345678910111213141516171819
12345678910111213141516171819
a 9
B 9
B #9 to play here now is good.If B gets #9 after W has invaded at [a] —[See the reference.]
A B C D E F G H J K L M N O P Q R S T
A B C D E F G H J K L M N O P Q R S T12345678910111213141516171819
12345678910111213141516171819
11 9 512 10 3 7
6 1 24
reference8 at 1
If B tenuki and W gets to invade at [M3]...Black 1: When B plays [R3] now...White 12: To here, B lost locally.
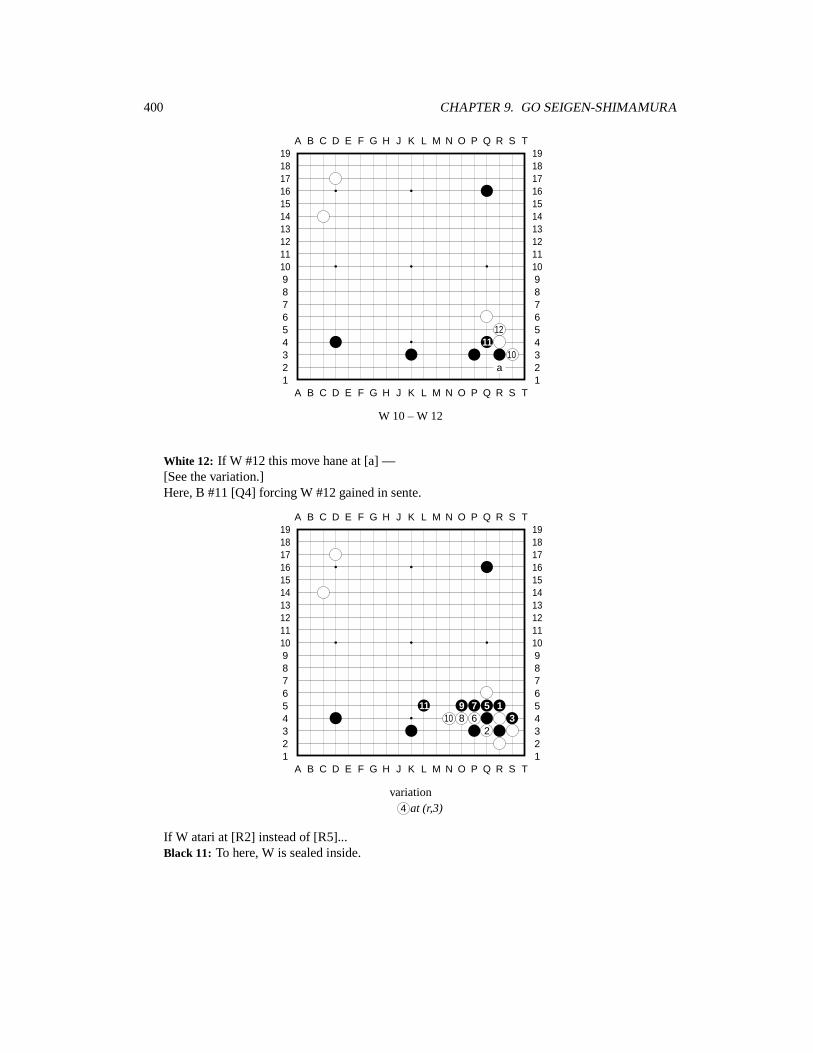
400 CHAPTER 9. GO SEIGEN-SHIMAMURA
A B C D E F G H J K L M N O P Q R S T
A B C D E F G H J K L M N O P Q R S T12345678910111213141516171819
12345678910111213141516171819
1211
10a
W 10 – W 12
White 12: If W #12 this move hane at [a] —[See the variation.]Here, B #11 [Q4] forcing W #12 gained in sente.
A B C D E F G H J K L M N O P Q R S T
A B C D E F G H J K L M N O P Q R S T12345678910111213141516171819
12345678910111213141516171819
11 9 7 5 110 8 6 3
2
variation4 at (r,3)
If W atari at [R2] instead of [R5]...Black 11: To here, W is sealed inside.
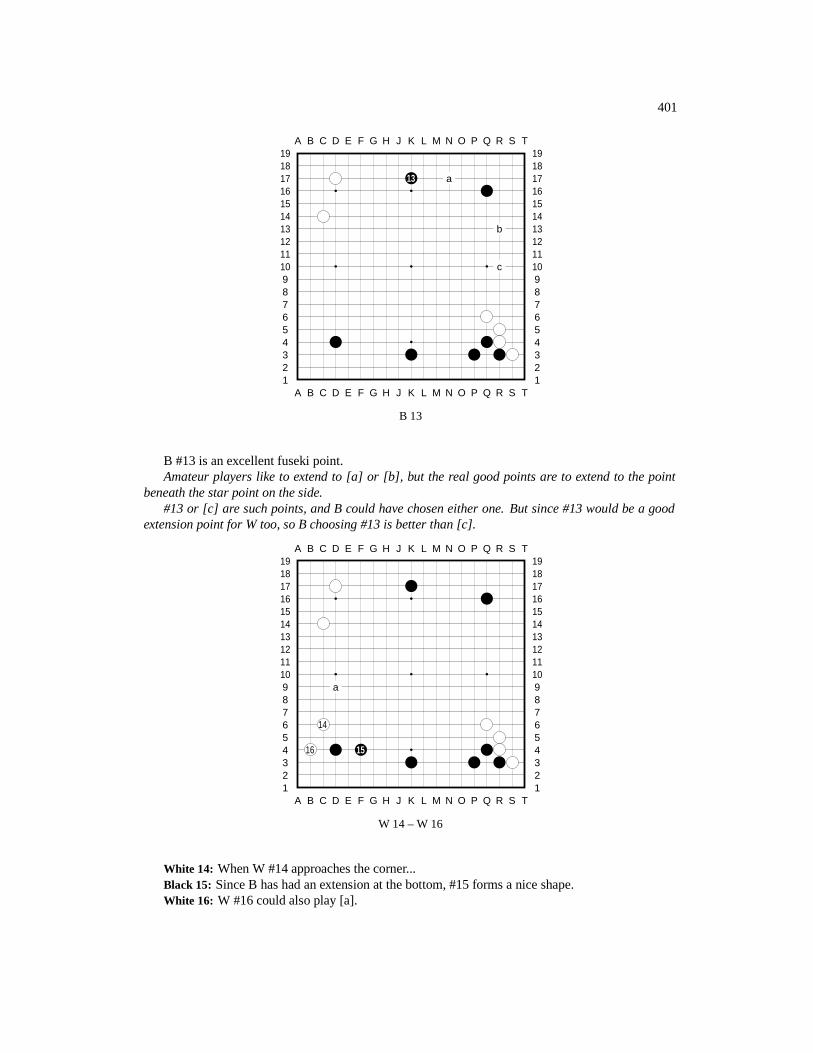
401
A B C D E F G H J K L M N O P Q R S T
A B C D E F G H J K L M N O P Q R S T12345678910111213141516171819
12345678910111213141516171819
13 a
b
c
B 13
B #13 is an excellent fuseki point.Amateur players like to extend to [a] or [b], but the real good points are to extend to the point
beneath the star point on the side.#13 or [c] are such points, and B could have chosen either one. But since #13 would be a good
extension point for W too, so B choosing #13 is better than [c].
A B C D E F G H J K L M N O P Q R S T
A B C D E F G H J K L M N O P Q R S T12345678910111213141516171819
12345678910111213141516171819
a
14
16 15
W 14 – W 16
White 14: When W #14 approaches the corner...Black 15: Since B has had an extension at the bottom, #15 forms a nice shape.White 16: W #16 could also play [a].

402 CHAPTER 9. GO SEIGEN-SHIMAMURA
A B C D E F G H J K L M N O P Q R S T
A B C D E F G H J K L M N O P Q R S T12345678910111213141516171819
12345678910111213141516171819
a
bc 18
17
B 17 – W 18
White 18: W #18 is just the right distance from the big knight corner enclosure at the top. Had itbeen a small knight corner enclosure at the top ([C14] at [a]), #18 playing at [b] would be the rightposition.
No matter what, after W #16 and B #17 exchange ([B4]-[C3]), W could not tenuki here. WithoutW #18 or W[b], B[c] would be severe.
A B C D E F G H J K L M N O P Q R S T
A B C D E F G H J K L M N O P Q R S T12345678910111213141516171819
12345678910111213141516171819
19 a
B 19
B #19 to play at [a] would be a passive approach. Since B has the burden of 5.5 komi, #19 choosesthe biggest extension.
[Also,] when the opponent is a big knight enclosure, to approach to the biggest extend like this isaggressive and positive.
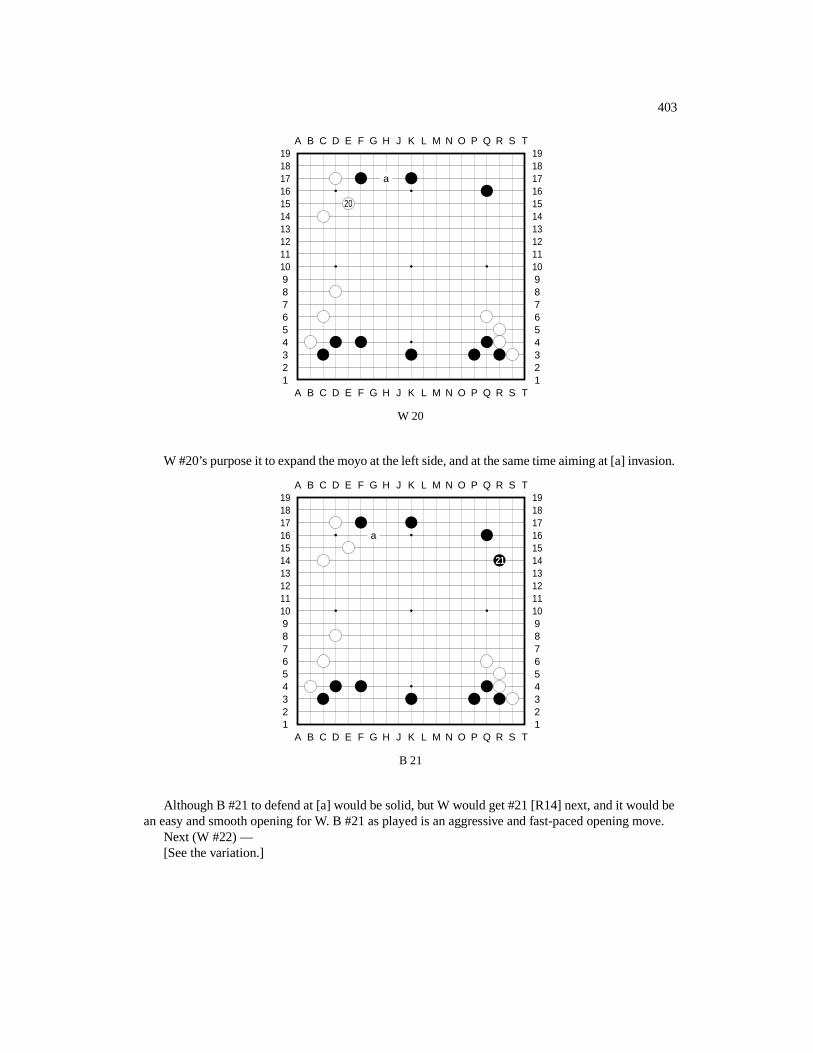
403
A B C D E F G H J K L M N O P Q R S T
A B C D E F G H J K L M N O P Q R S T12345678910111213141516171819
12345678910111213141516171819
a
20
W 20
W #20’s purpose it to expand the moyo at the left side, and at the same time aiming at [a] invasion.
A B C D E F G H J K L M N O P Q R S T
A B C D E F G H J K L M N O P Q R S T12345678910111213141516171819
12345678910111213141516171819
a
21
B 21
Although B #21 to defend at [a] would be solid, but W would get #21 [R14] next, and it would bean easy and smooth opening for W. B #21 as played is an aggressive and fast-paced opening move.
Next (W #22) —[See the variation.]
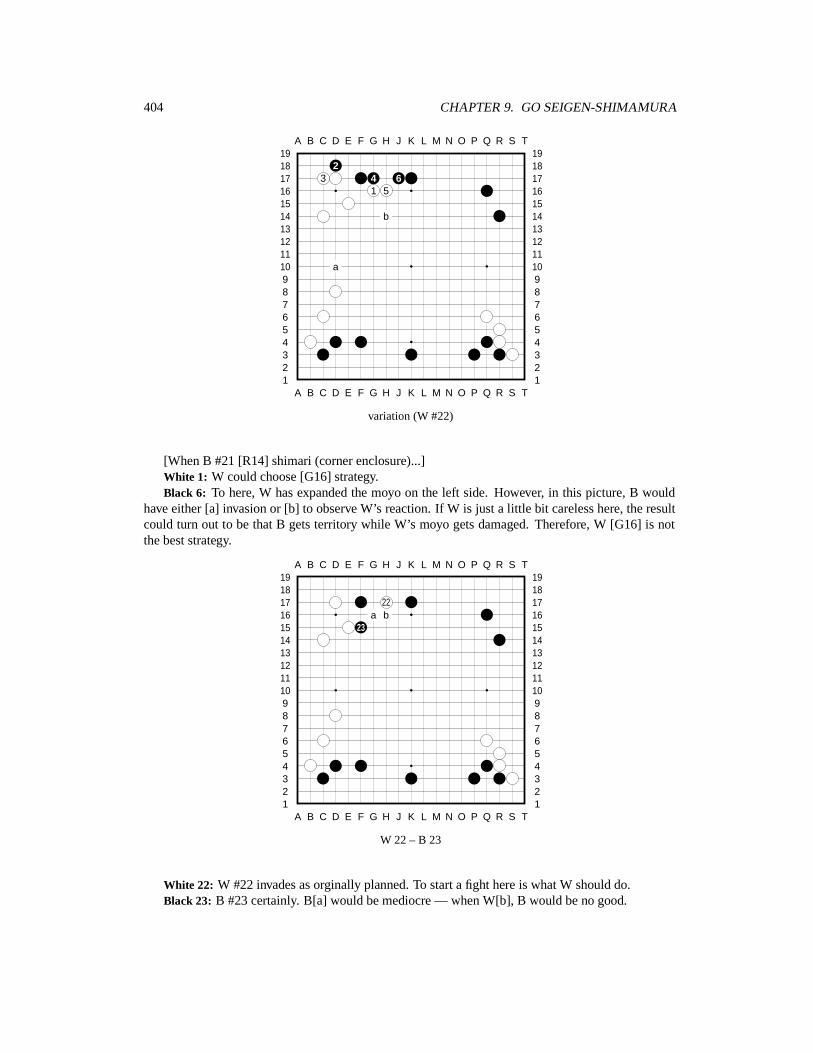
404 CHAPTER 9. GO SEIGEN-SHIMAMURA
A B C D E F G H J K L M N O P Q R S T
A B C D E F G H J K L M N O P Q R S T12345678910111213141516171819
12345678910111213141516171819
23 4 6
1 5
b
a
variation (W #22)
[When B #21 [R14] shimari (corner enclosure)...]White 1: W could choose [G16] strategy.Black 6: To here, W has expanded the moyo on the left side. However, in this picture, B would
have either [a] invasion or [b] to observe W’s reaction. If W is just a little bit careless here, the resultcould turn out to be that B gets territory while W’s moyo gets damaged. Therefore, W [G16] is notthe best strategy.
A B C D E F G H J K L M N O P Q R S T
A B C D E F G H J K L M N O P Q R S T12345678910111213141516171819
12345678910111213141516171819
22a b
23
W 22 – B 23
White 22: W #22 invades as orginally planned. To start a fight here is what W should do.Black 23: B #23 certainly. B[a] would be mediocre — when W[b], B would be no good.
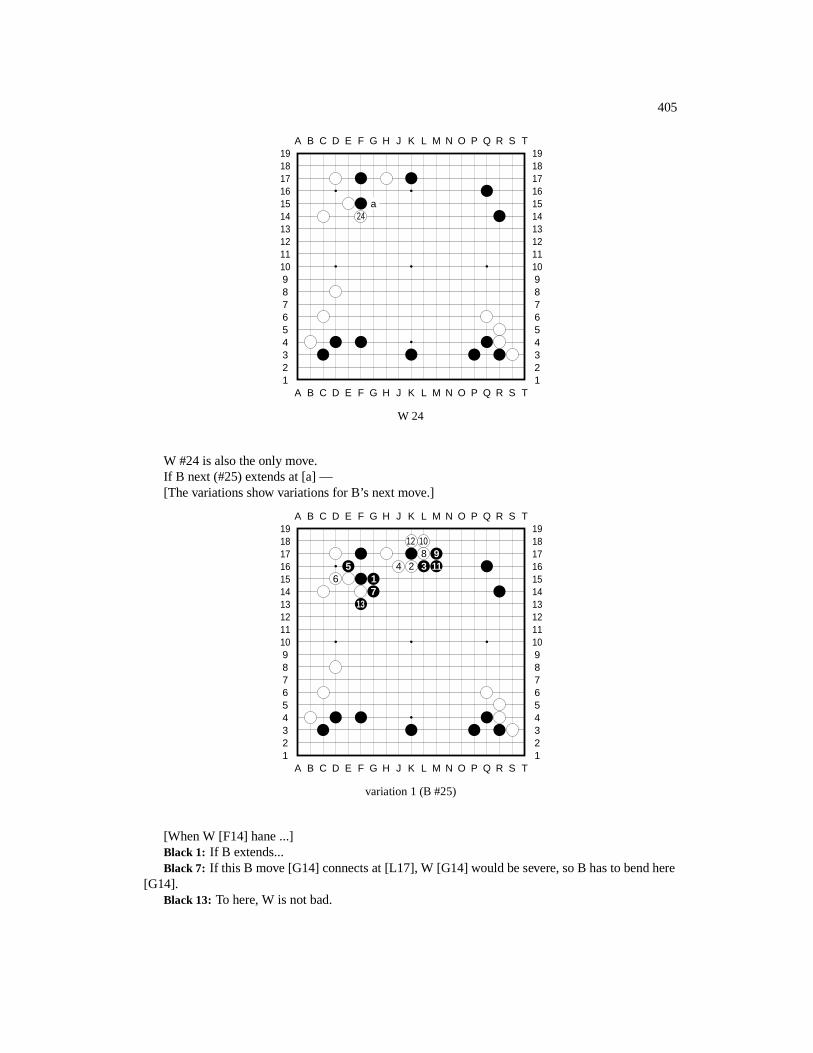
405
A B C D E F G H J K L M N O P Q R S T
A B C D E F G H J K L M N O P Q R S T12345678910111213141516171819
12345678910111213141516171819
a24
W 24
W #24 is also the only move.If B next (#25) extends at [a] —[The variations show variations for B’s next move.]
A B C D E F G H J K L M N O P Q R S T
A B C D E F G H J K L M N O P Q R S T12345678910111213141516171819
12345678910111213141516171819
12 108 9
5 4 2 3 116 1
713
variation 1 (B #25)
[When W [F14] hane ...]Black 1: If B extends...Black 7: If this B move [G14] connects at [L17], W [G14] would be severe, so B has to bend here
[G14].Black 13: To here, W is not bad.
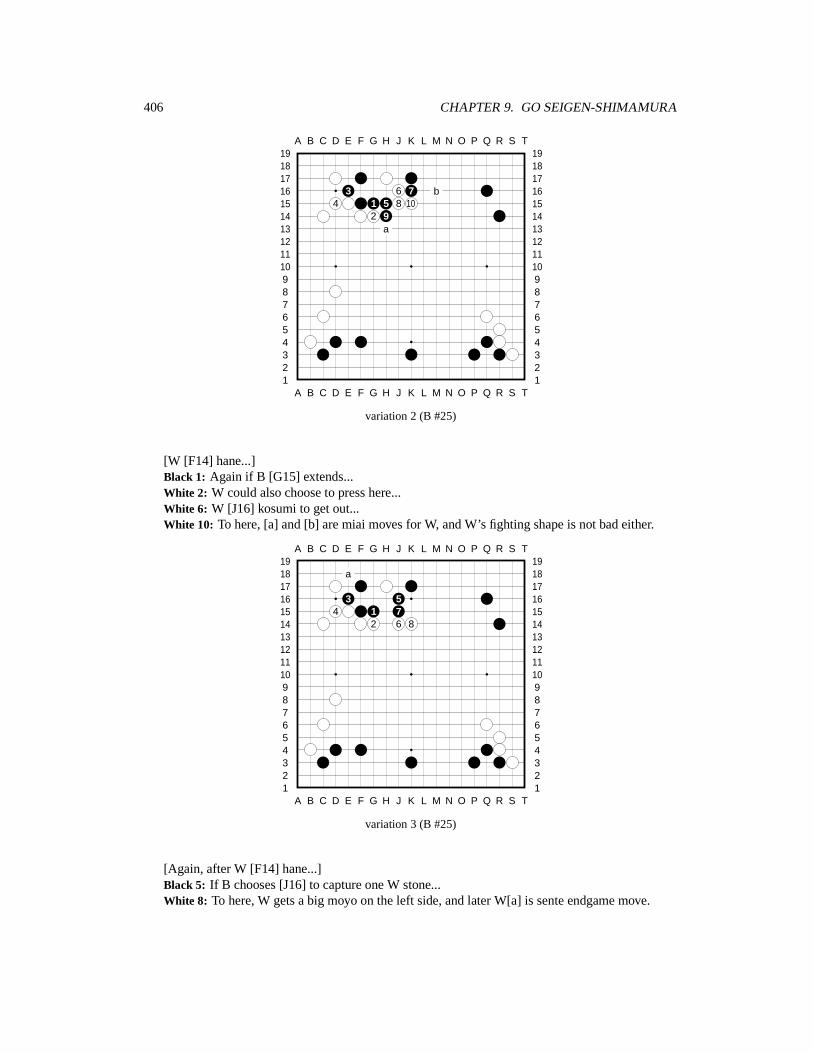
406 CHAPTER 9. GO SEIGEN-SHIMAMURA
A B C D E F G H J K L M N O P Q R S T
A B C D E F G H J K L M N O P Q R S T12345678910111213141516171819
12345678910111213141516171819
3 6 7 b4 1 5 8 10
2 9a
variation 2 (B #25)
[W [F14] hane...]Black 1: Again if B [G15] extends...White 2: W could also choose to press here...White 6: W [J16] kosumi to get out...White 10: To here, [a] and [b] are miai moves for W, and W’s fighting shape is not bad either.
A B C D E F G H J K L M N O P Q R S T
A B C D E F G H J K L M N O P Q R S T12345678910111213141516171819
12345678910111213141516171819
a
3 54 1 7
2 6 8
variation 3 (B #25)
[Again, after W [F14] hane...]Black 5: If B chooses [J16] to capture one W stone...White 8: To here, W gets a big moyo on the left side, and later W[a] is sente endgame move.
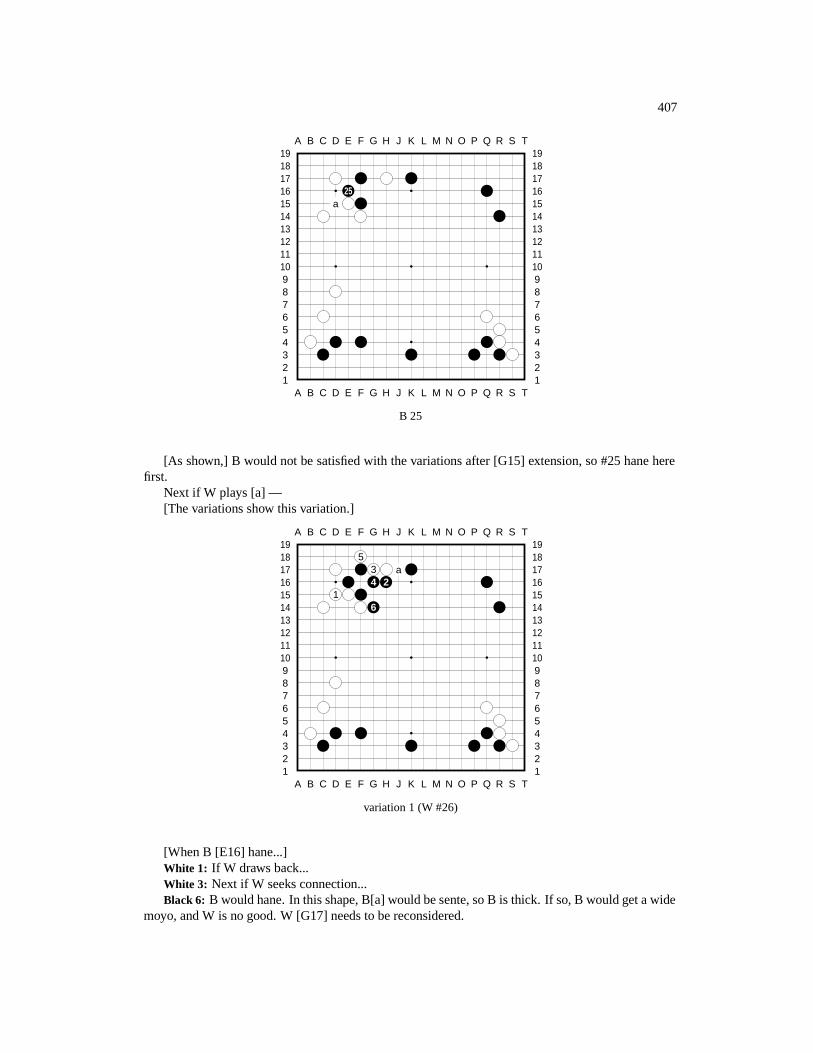
407
A B C D E F G H J K L M N O P Q R S T
A B C D E F G H J K L M N O P Q R S T12345678910111213141516171819
12345678910111213141516171819
25a
B 25
[As shown,] B would not be satisfied with the variations after [G15] extension, so #25 hane herefirst.
Next if W plays [a] —[The variations show this variation.]
A B C D E F G H J K L M N O P Q R S T
A B C D E F G H J K L M N O P Q R S T12345678910111213141516171819
12345678910111213141516171819
53 a4 2
16
variation 1 (W #26)
[When B [E16] hane...]White 1: If W draws back...White 3: Next if W seeks connection...Black 6: B would hane. In this shape, B[a] would be sente, so B is thick. If so, B would get a wide
moyo, and W is no good. W [G17] needs to be reconsidered.
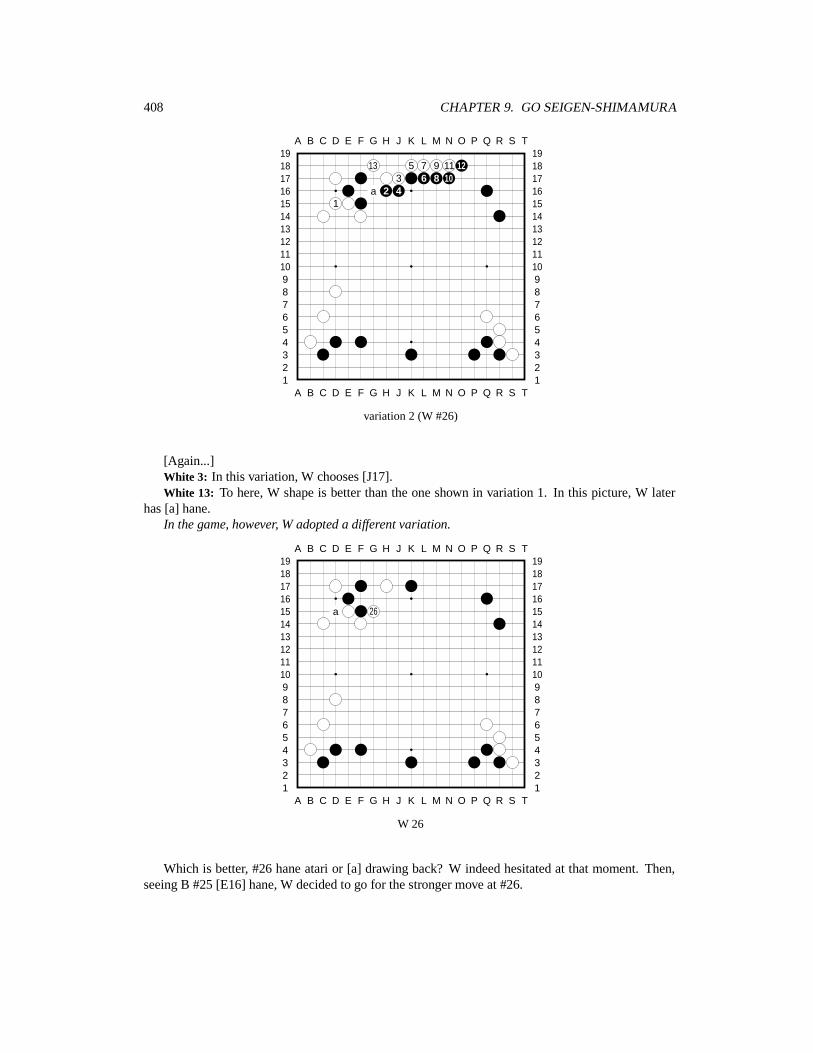
408 CHAPTER 9. GO SEIGEN-SHIMAMURA
A B C D E F G H J K L M N O P Q R S T
A B C D E F G H J K L M N O P Q R S T12345678910111213141516171819
12345678910111213141516171819
13 5 7 9 11 123 6 8 10
a 2 41
variation 2 (W #26)
[Again...]White 3: In this variation, W chooses [J17].White 13: To here, W shape is better than the one shown in variation 1. In this picture, W later
has [a] hane.In the game, however, W adopted a different variation.
A B C D E F G H J K L M N O P Q R S T
A B C D E F G H J K L M N O P Q R S T12345678910111213141516171819
12345678910111213141516171819
a 26
W 26
Which is better, #26 hane atari or [a] drawing back? W indeed hesitated at that moment. Then,seeing B #25 [E16] hane, W decided to go for the stronger move at #26.
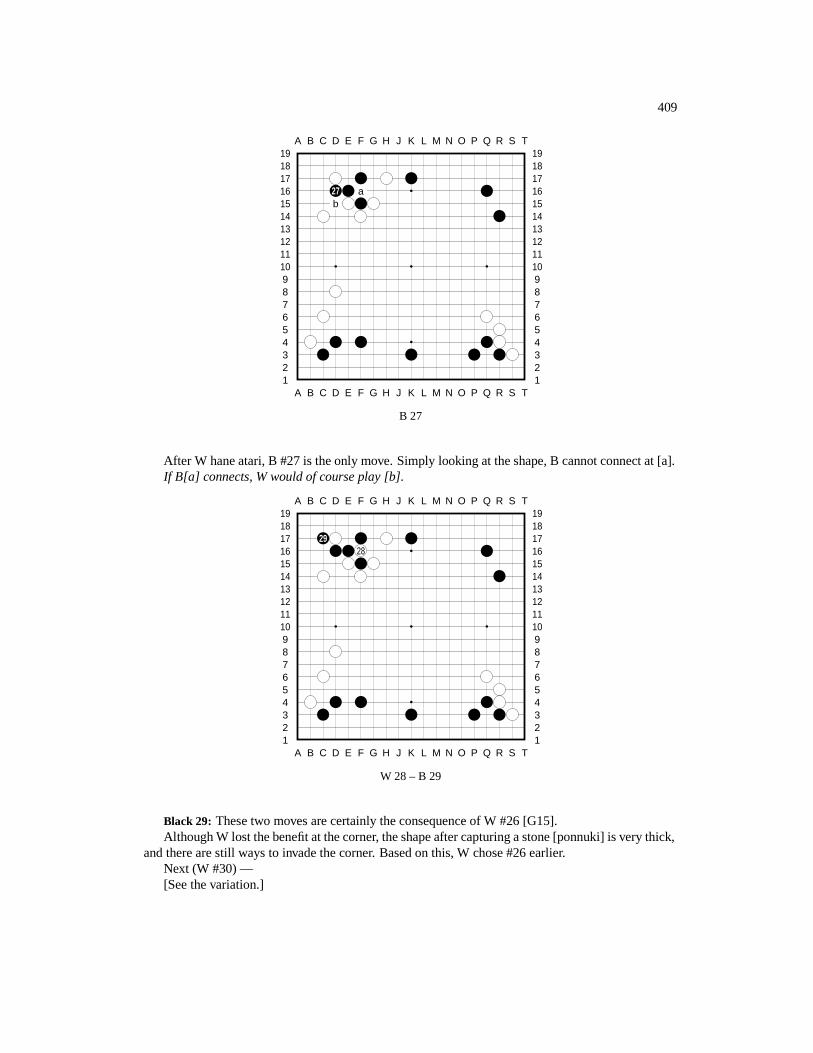
409
A B C D E F G H J K L M N O P Q R S T
A B C D E F G H J K L M N O P Q R S T12345678910111213141516171819
12345678910111213141516171819
27 ab
B 27
After W hane atari, B #27 is the only move. Simply looking at the shape, B cannot connect at [a].If B[a] connects, W would of course play [b].
A B C D E F G H J K L M N O P Q R S T
A B C D E F G H J K L M N O P Q R S T12345678910111213141516171819
12345678910111213141516171819
2928
W 28 – B 29
Black 29: These two moves are certainly the consequence of W #26 [G15].Although W lost the benefit at the corner, the shape after capturing a stone [ponnuki] is very thick,
and there are still ways to invade the corner. Based on this, W chose #26 earlier.Next (W #30) —[See the variation.]
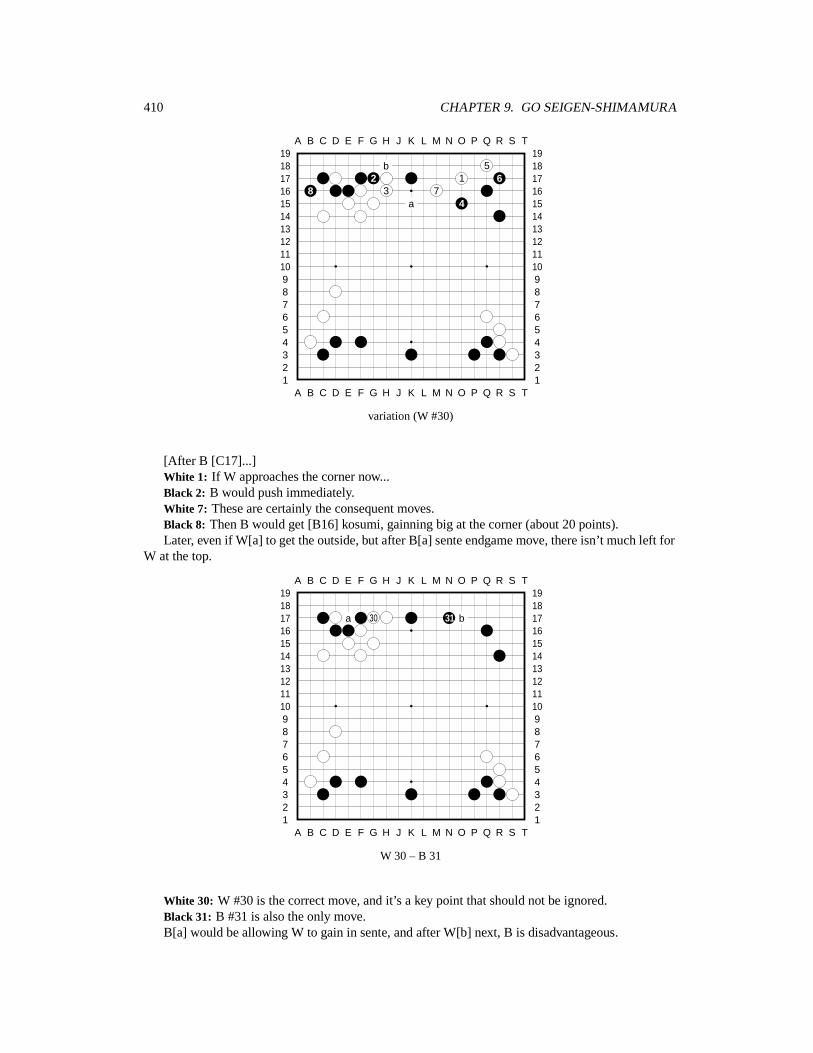
410 CHAPTER 9. GO SEIGEN-SHIMAMURA
A B C D E F G H J K L M N O P Q R S T
A B C D E F G H J K L M N O P Q R S T12345678910111213141516171819
12345678910111213141516171819
b 52 1 6
8 3 7a 4
variation (W #30)
[After B [C17]...]White 1: If W approaches the corner now...Black 2: B would push immediately.White 7: These are certainly the consequent moves.Black 8: Then B would get [B16] kosumi, gainning big at the corner (about 20 points).Later, even if W[a] to get the outside, but after B[a] sente endgame move, there isn’t much left for
W at the top.
A B C D E F G H J K L M N O P Q R S T
A B C D E F G H J K L M N O P Q R S T12345678910111213141516171819
12345678910111213141516171819
a 30 31 b
W 30 – B 31
White 30: W #30 is the correct move, and it’s a key point that should not be ignored.Black 31: B #31 is also the only move.B[a] would be allowing W to gain in sente, and after W[b] next, B is disadvantageous.
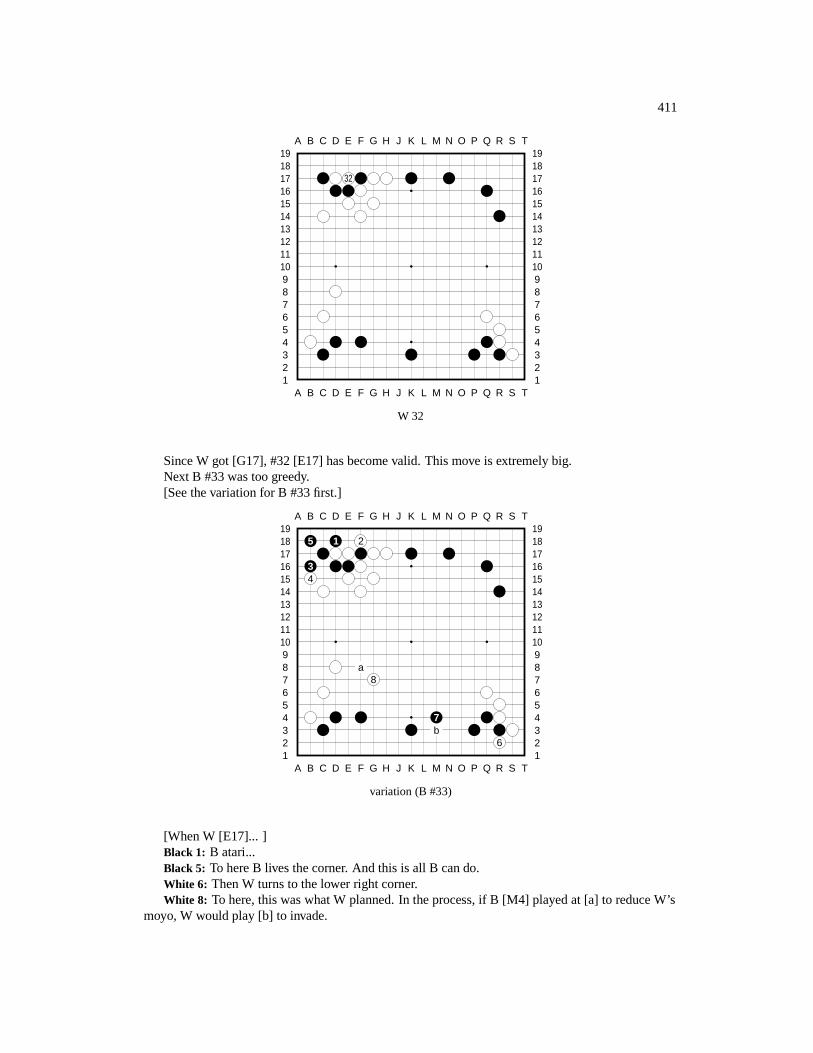
411
A B C D E F G H J K L M N O P Q R S T
A B C D E F G H J K L M N O P Q R S T12345678910111213141516171819
12345678910111213141516171819
32
W 32
Since W got [G17], #32 [E17] has become valid. This move is extremely big.Next B #33 was too greedy.[See the variation for B #33 first.]
A B C D E F G H J K L M N O P Q R S T
A B C D E F G H J K L M N O P Q R S T12345678910111213141516171819
12345678910111213141516171819
5 1 2
34
a8
7b
6
variation (B #33)
[When W [E17]... ]Black 1: B atari...Black 5: To here B lives the corner. And this is all B can do.White 6: Then W turns to the lower right corner.White 8: To here, this was what W planned. In the process, if B [M4] played at [a] to reduce W’s
moyo, W would play [b] to invade.
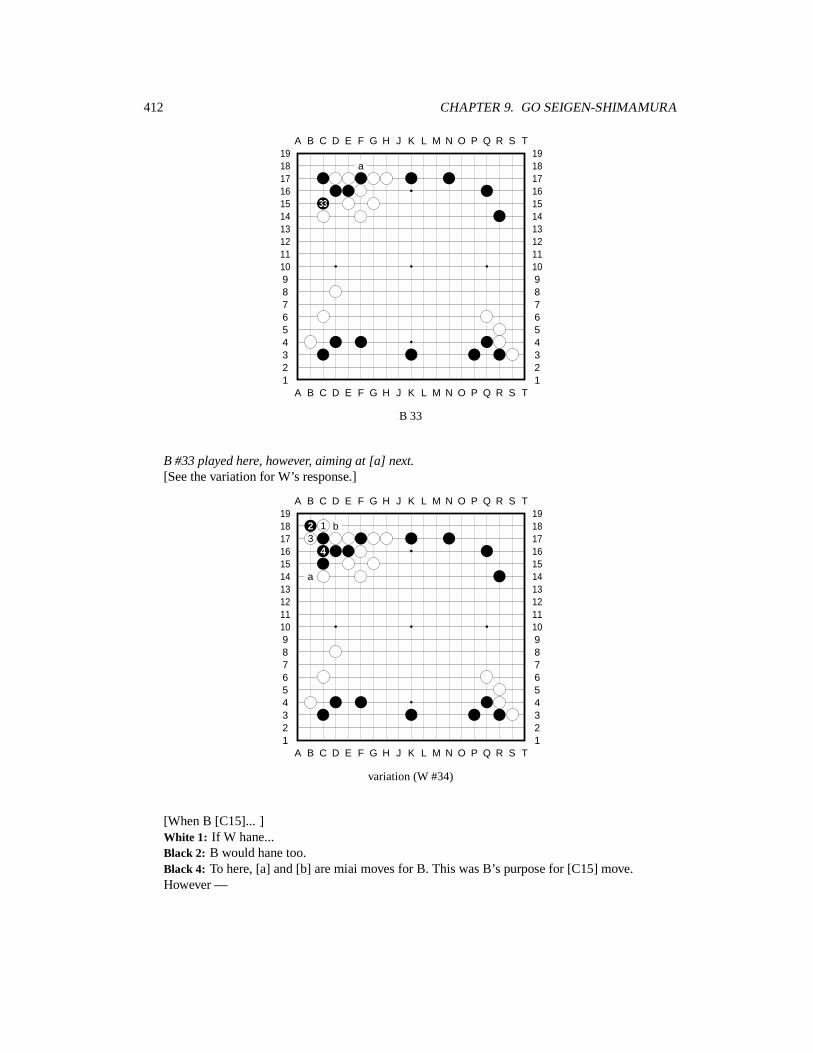
412 CHAPTER 9. GO SEIGEN-SHIMAMURA
A B C D E F G H J K L M N O P Q R S T
A B C D E F G H J K L M N O P Q R S T12345678910111213141516171819
12345678910111213141516171819
a
33
B 33
B #33 played here, however, aiming at [a] next.[See the variation for W’s response.]
A B C D E F G H J K L M N O P Q R S T
A B C D E F G H J K L M N O P Q R S T12345678910111213141516171819
12345678910111213141516171819
2 1 b3
4
a
variation (W #34)
[When B [C15]... ]White 1: If W hane...Black 2: B would hane too.Black 4: To here, [a] and [b] are miai moves for B. This was B’s purpose for [C15] move.However —
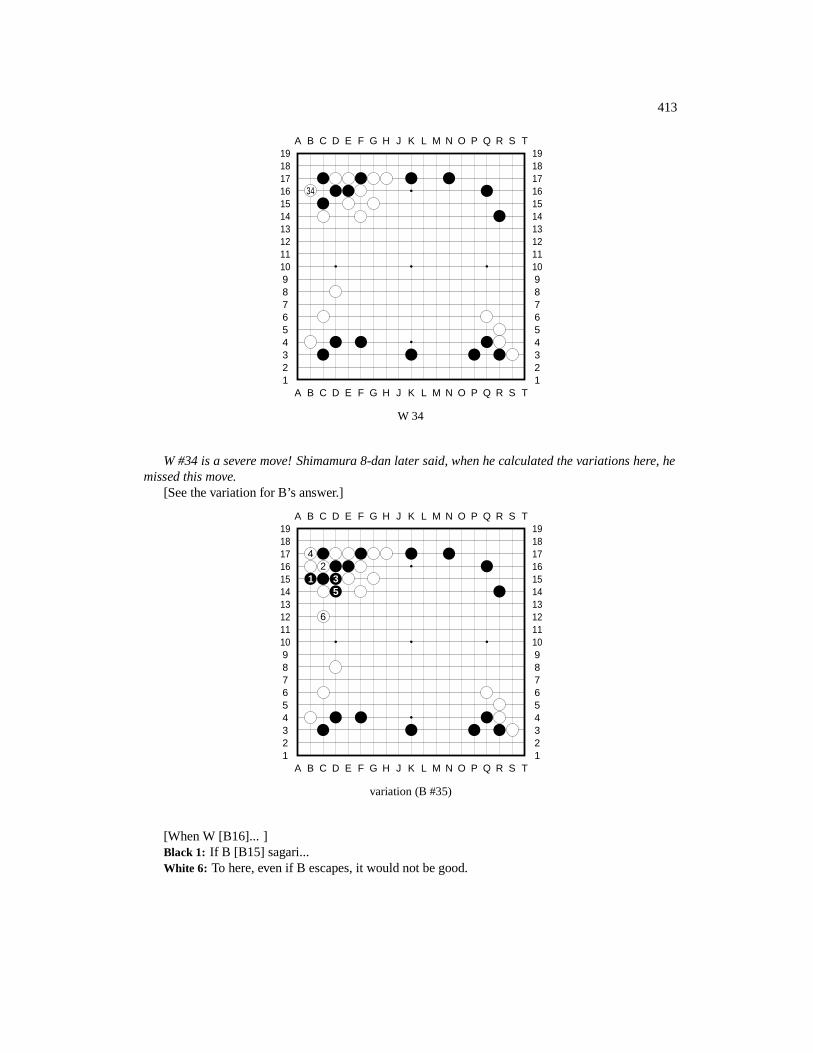
413
A B C D E F G H J K L M N O P Q R S T
A B C D E F G H J K L M N O P Q R S T12345678910111213141516171819
12345678910111213141516171819
34
W 34
W #34 is a severe move! Shimamura 8-dan later said, when he calculated the variations here, hemissed this move.
[See the variation for B’s answer.]
A B C D E F G H J K L M N O P Q R S T
A B C D E F G H J K L M N O P Q R S T12345678910111213141516171819
12345678910111213141516171819
42
1 35
6
variation (B #35)
[When W [B16]... ]Black 1: If B [B15] sagari...White 6: To here, even if B escapes, it would not be good.
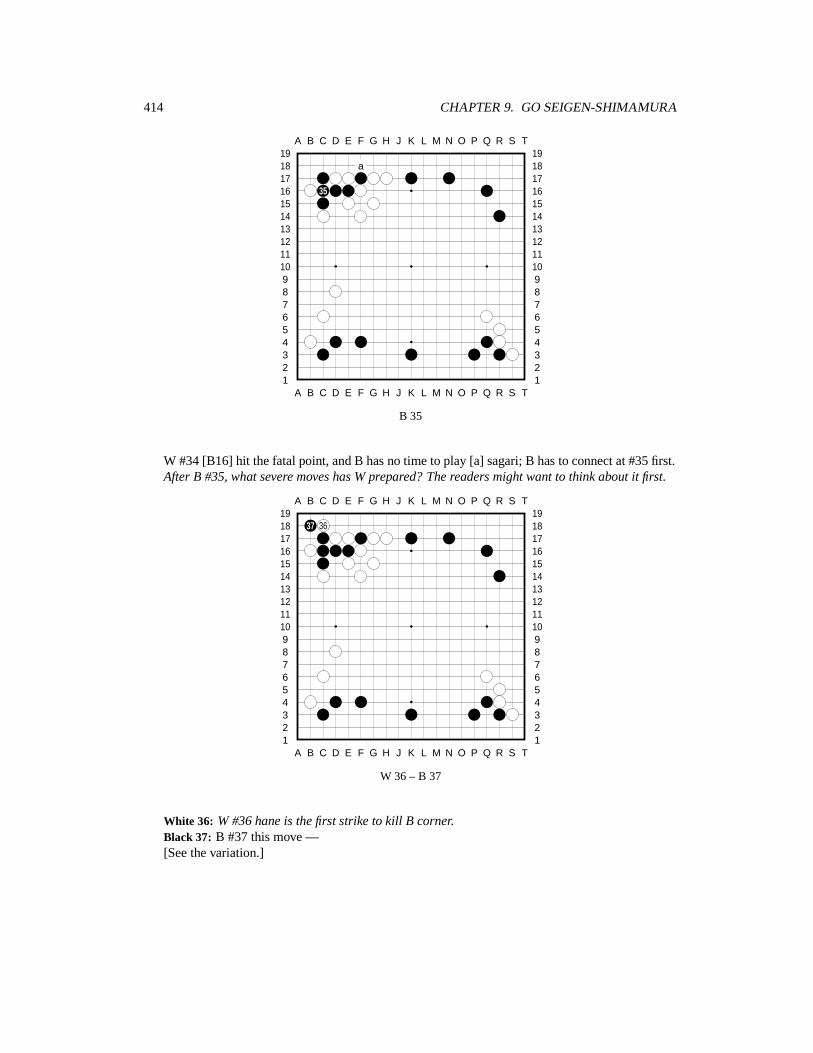
414 CHAPTER 9. GO SEIGEN-SHIMAMURA
A B C D E F G H J K L M N O P Q R S T
A B C D E F G H J K L M N O P Q R S T12345678910111213141516171819
12345678910111213141516171819
a
35
B 35
W #34 [B16] hit the fatal point, and B has no time to play [a] sagari; B has to connect at #35 first.After B #35, what severe moves has W prepared? The readers might want to think about it first.
A B C D E F G H J K L M N O P Q R S T
A B C D E F G H J K L M N O P Q R S T12345678910111213141516171819
12345678910111213141516171819
37 36
W 36 – B 37
White 36: W #36 hane is the first strike to kill B corner.Black 37: B #37 this move —[See the variation.]
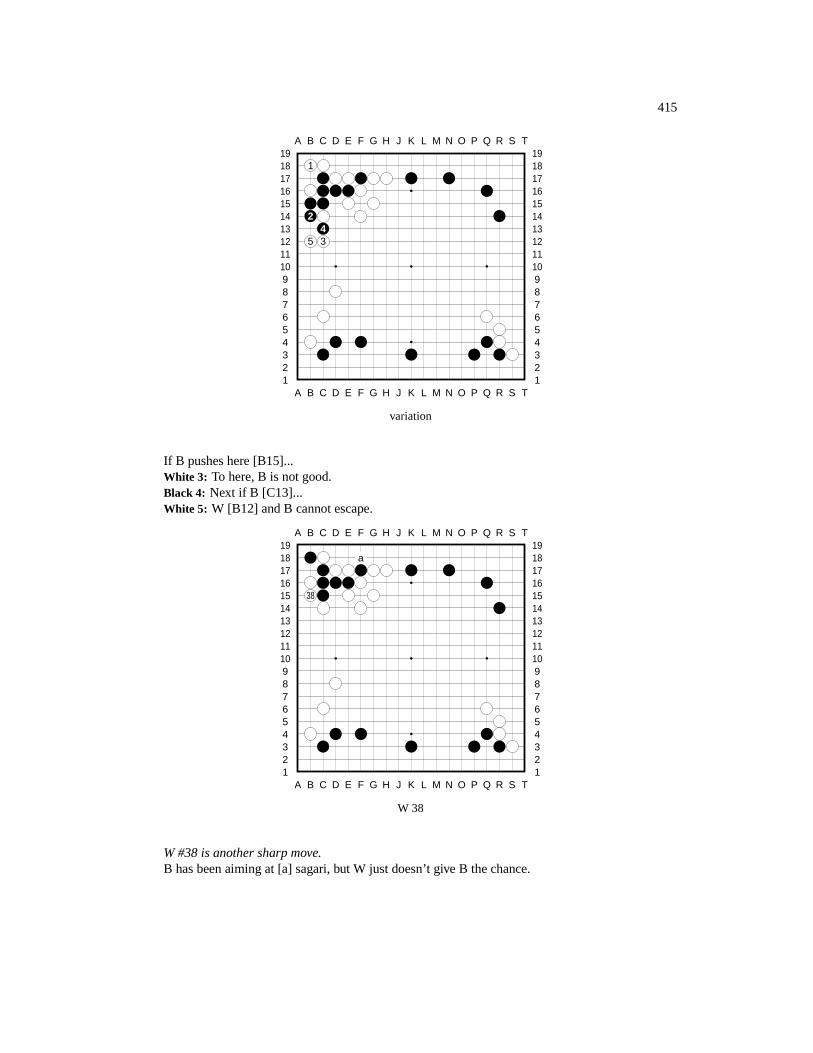
415
A B C D E F G H J K L M N O P Q R S T
A B C D E F G H J K L M N O P Q R S T12345678910111213141516171819
12345678910111213141516171819
1
24
5 3
variation
If B pushes here [B15]...White 3: To here, B is not good.Black 4: Next if B [C13]...White 5: W [B12] and B cannot escape.
A B C D E F G H J K L M N O P Q R S T
A B C D E F G H J K L M N O P Q R S T12345678910111213141516171819
12345678910111213141516171819
a
38
W 38
W #38 is another sharp move.B has been aiming at [a] sagari, but W just doesn’t give B the chance.
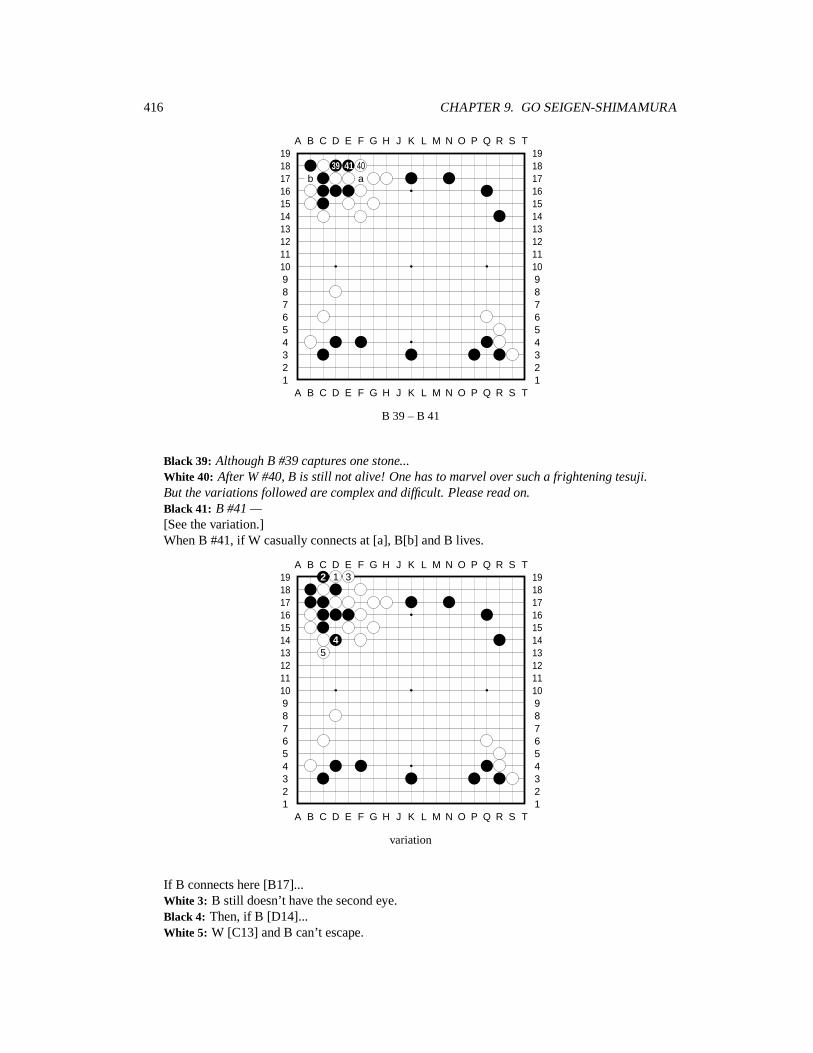
416 CHAPTER 9. GO SEIGEN-SHIMAMURA
A B C D E F G H J K L M N O P Q R S T
A B C D E F G H J K L M N O P Q R S T12345678910111213141516171819
12345678910111213141516171819
39 41 40b a
B 39 – B 41
Black 39: Although B #39 captures one stone...White 40: After W #40, B is still not alive! One has to marvel over such a frightening tesuji.But the variations followed are complex and difficult. Please read on.Black 41: B #41 —[See the variation.]When B #41, if W casually connects at [a], B[b] and B lives.
A B C D E F G H J K L M N O P Q R S T
A B C D E F G H J K L M N O P Q R S T12345678910111213141516171819
123456789101112131415161718192 1 3
45
variation
If B connects here [B17]...White 3: B still doesn’t have the second eye.Black 4: Then, if B [D14]...White 5: W [C13] and B can’t escape.
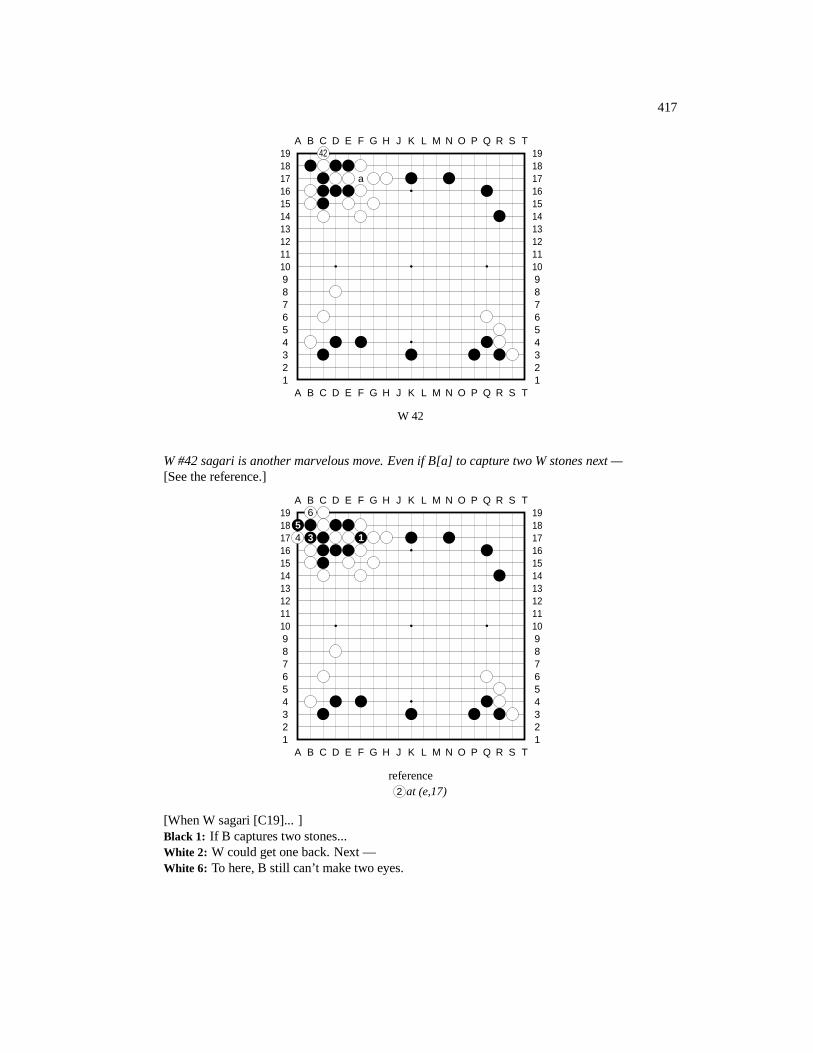
417
A B C D E F G H J K L M N O P Q R S T
A B C D E F G H J K L M N O P Q R S T12345678910111213141516171819
1234567891011121314151617181942
a
W 42
W #42 sagari is another marvelous move. Even if B[a] to capture two W stones next —[See the reference.]
A B C D E F G H J K L M N O P Q R S T
A B C D E F G H J K L M N O P Q R S T12345678910111213141516171819
123456789101112131415161718196
54 3 1
reference2 at (e,17)
[When W sagari [C19]... ]Black 1: If B captures two stones...White 2: W could get one back. Next —White 6: To here, B still can’t make two eyes.
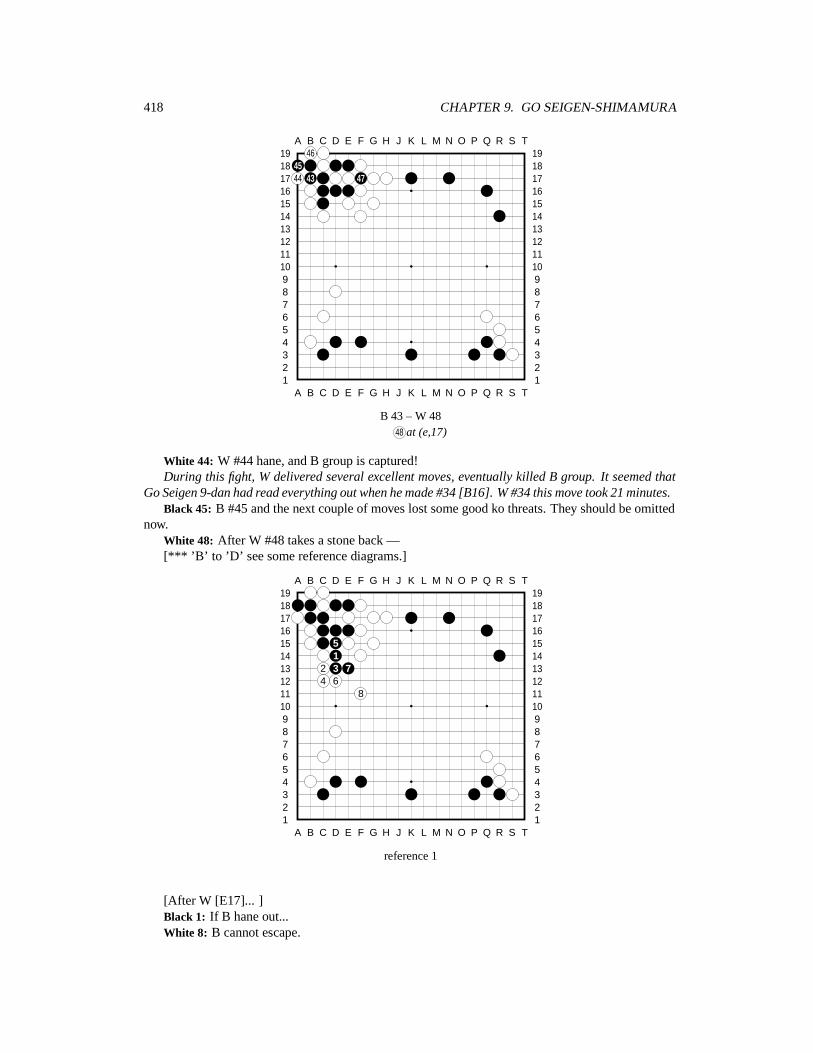
418 CHAPTER 9. GO SEIGEN-SHIMAMURA
A B C D E F G H J K L M N O P Q R S T
A B C D E F G H J K L M N O P Q R S T12345678910111213141516171819
1234567891011121314151617181946
4544 43 47
B 43 – W 4848 at (e,17)
White 44: W #44 hane, and B group is captured!During this fight, W delivered several excellent moves, eventually killed B group. It seemed that
Go Seigen 9-dan had read everything out when he made #34 [B16]. W #34 this move took 21 minutes.Black 45: B #45 and the next couple of moves lost some good ko threats. They should be omitted
now.White 48: After W #48 takes a stone back —[*** ’B’ to ’D’ see some reference diagrams.]
A B C D E F G H J K L M N O P Q R S T
A B C D E F G H J K L M N O P Q R S T12345678910111213141516171819
12345678910111213141516171819
51
2 3 74 6
8
reference 1
[After W [E17]... ]Black 1: If B hane out...White 8: B cannot escape.
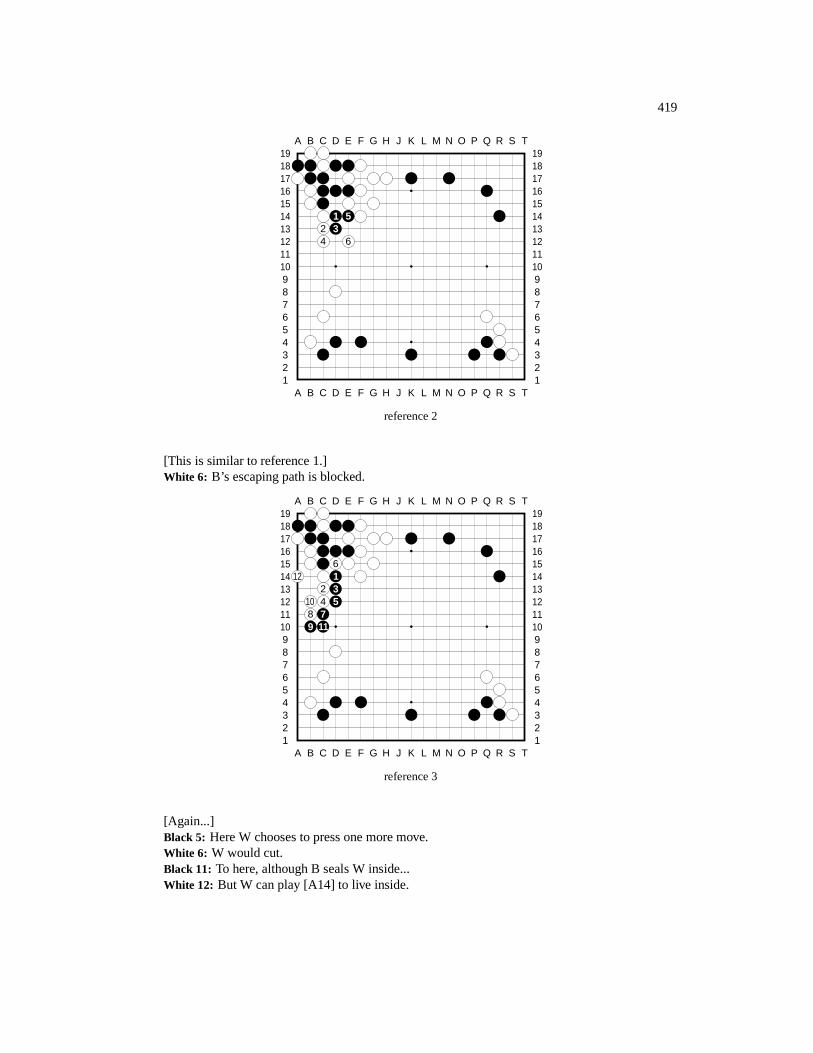
419
A B C D E F G H J K L M N O P Q R S T
A B C D E F G H J K L M N O P Q R S T12345678910111213141516171819
12345678910111213141516171819
1 52 34 6
reference 2
[This is similar to reference 1.]White 6: B’s escaping path is blocked.
A B C D E F G H J K L M N O P Q R S T
A B C D E F G H J K L M N O P Q R S T12345678910111213141516171819
12345678910111213141516171819
612 1
2 310 4 58 79 11
reference 3
[Again...]Black 5: Here W chooses to press one more move.White 6: W would cut.Black 11: To here, although B seals W inside...White 12: But W can play [A14] to live inside.
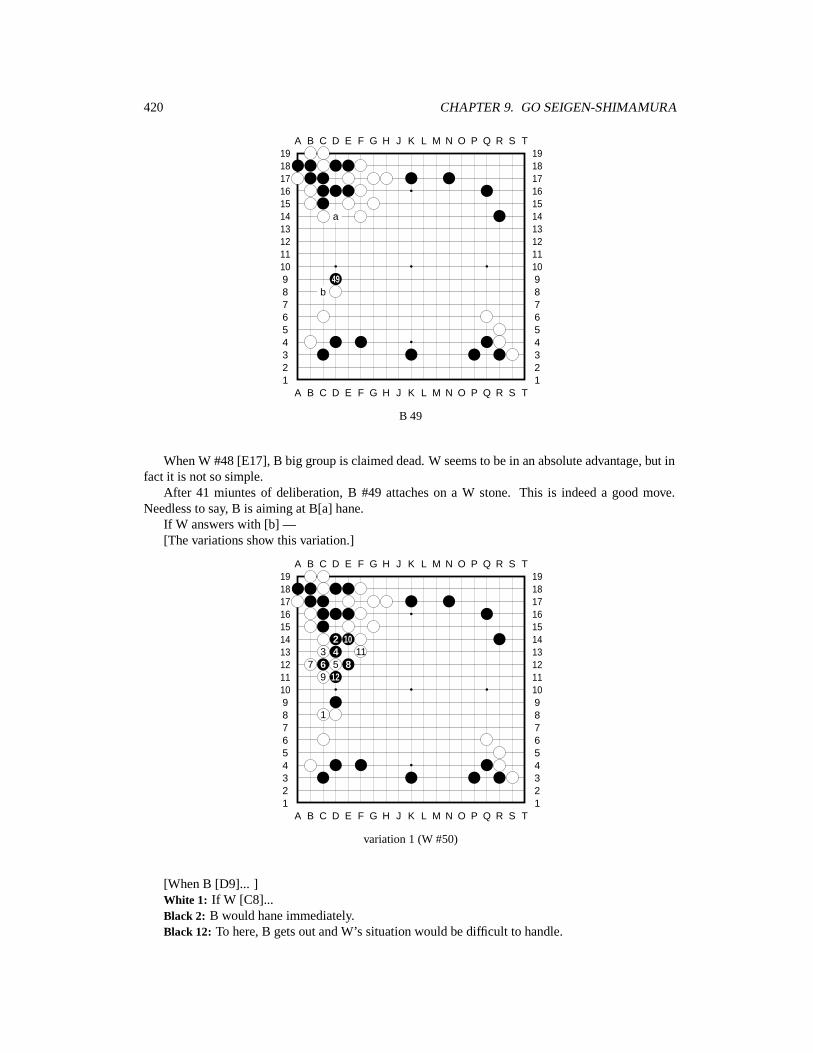
420 CHAPTER 9. GO SEIGEN-SHIMAMURA
A B C D E F G H J K L M N O P Q R S T
A B C D E F G H J K L M N O P Q R S T12345678910111213141516171819
12345678910111213141516171819
a
49b
B 49
When W #48 [E17], B big group is claimed dead. W seems to be in an absolute advantage, but infact it is not so simple.
After 41 miuntes of deliberation, B #49 attaches on a W stone. This is indeed a good move.Needless to say, B is aiming at B[a] hane.
If W answers with [b] —[The variations show this variation.]
A B C D E F G H J K L M N O P Q R S T
A B C D E F G H J K L M N O P Q R S T12345678910111213141516171819
12345678910111213141516171819
2 103 4 11
7 6 5 89 12
1
variation 1 (W #50)
[When B [D9]... ]White 1: If W [C8]...Black 2: B would hane immediately.Black 12: To here, B gets out and W’s situation would be difficult to handle.
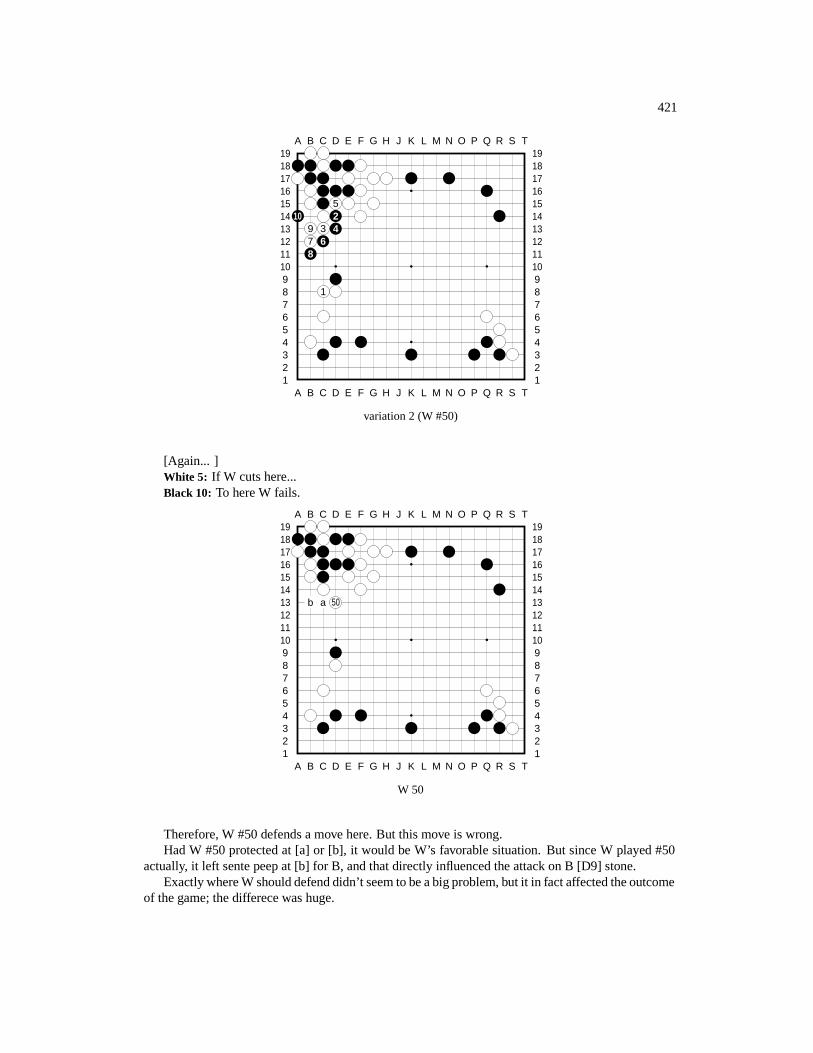
421
A B C D E F G H J K L M N O P Q R S T
A B C D E F G H J K L M N O P Q R S T12345678910111213141516171819
12345678910111213141516171819
510 2
9 3 47 68
1
variation 2 (W #50)
[Again... ]White 5: If W cuts here...Black 10: To here W fails.
A B C D E F G H J K L M N O P Q R S T
A B C D E F G H J K L M N O P Q R S T12345678910111213141516171819
12345678910111213141516171819
b a 50
W 50
Therefore, W #50 defends a move here. But this move is wrong.Had W #50 protected at [a] or [b], it would be W’s favorable situation. But since W played #50
actually, it left sente peep at [b] for B, and that directly influenced the attack on B [D9] stone.Exactly where W should defend didn’t seem to be a big problem, but it in fact affected the outcome
of the game; the differece was huge.
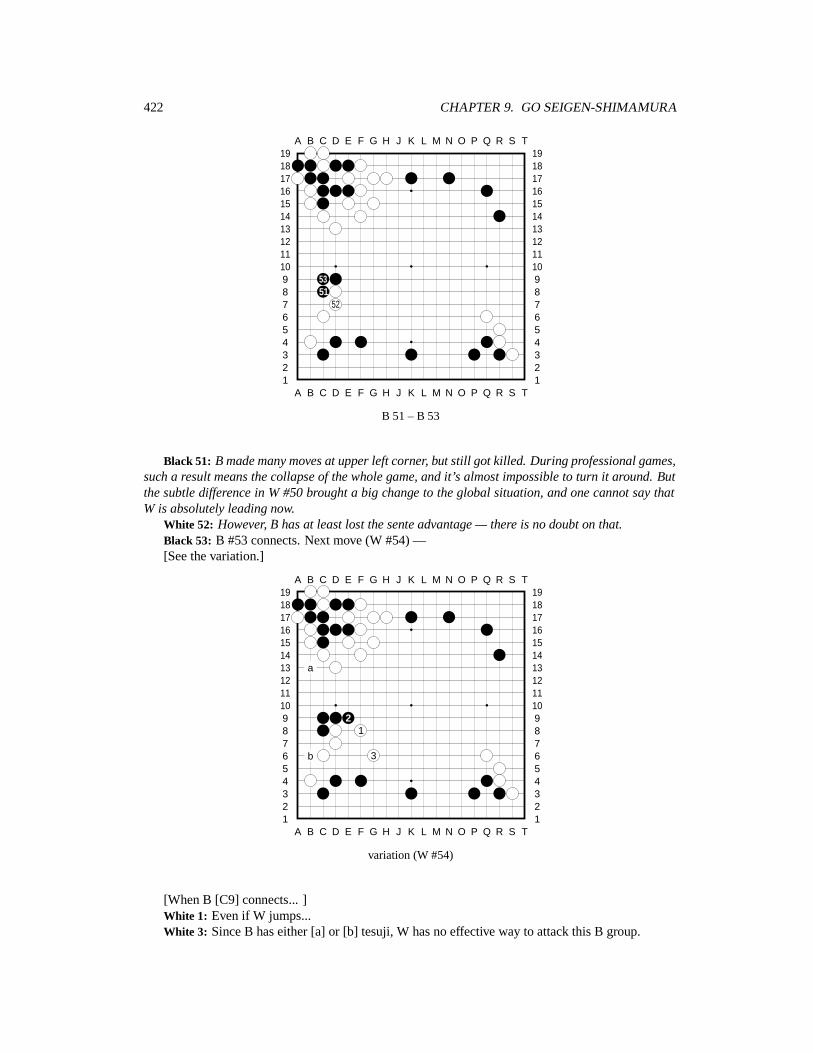
422 CHAPTER 9. GO SEIGEN-SHIMAMURA
A B C D E F G H J K L M N O P Q R S T
A B C D E F G H J K L M N O P Q R S T12345678910111213141516171819
12345678910111213141516171819
5351
52
B 51 – B 53
Black 51: B made many moves at upper left corner, but still got killed. During professional games,such a result means the collapse of the whole game, and it’s almost impossible to turn it around. Butthe subtle difference in W #50 brought a big change to the global situation, and one cannot say thatW is absolutely leading now.
White 52: However, B has at least lost the sente advantage — there is no doubt on that.Black 53: B #53 connects. Next move (W #54) —[See the variation.]
A B C D E F G H J K L M N O P Q R S T
A B C D E F G H J K L M N O P Q R S T12345678910111213141516171819
12345678910111213141516171819
a
21
b 3
variation (W #54)
[When B [C9] connects... ]White 1: Even if W jumps...White 3: Since B has either [a] or [b] tesuji, W has no effective way to attack this B group.
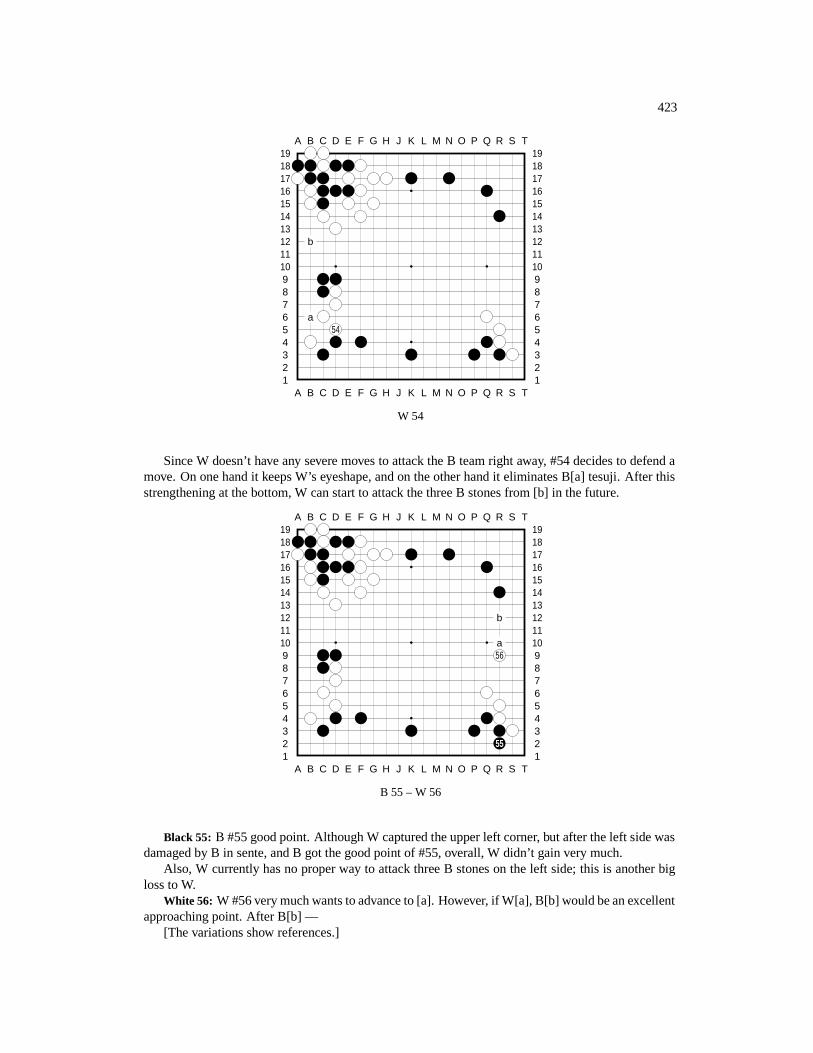
423
A B C D E F G H J K L M N O P Q R S T
A B C D E F G H J K L M N O P Q R S T12345678910111213141516171819
12345678910111213141516171819
b
a54
W 54
Since W doesn’t have any severe moves to attack the B team right away, #54 decides to defend amove. On one hand it keeps W’s eyeshape, and on the other hand it eliminates B[a] tesuji. After thisstrengthening at the bottom, W can start to attack the three B stones from [b] in the future.
A B C D E F G H J K L M N O P Q R S T
A B C D E F G H J K L M N O P Q R S T12345678910111213141516171819
12345678910111213141516171819
b
a56
55
B 55 – W 56
Black 55: B #55 good point. Although W captured the upper left corner, but after the left side wasdamaged by B in sente, and B got the good point of #55, overall, W didn’t gain very much.
Also, W currently has no proper way to attack three B stones on the left side; this is another bigloss to W.
White 56: W #56 very much wants to advance to [a]. However, if W[a], B[b] would be an excellentapproaching point. After B[b] —
[The variations show references.]
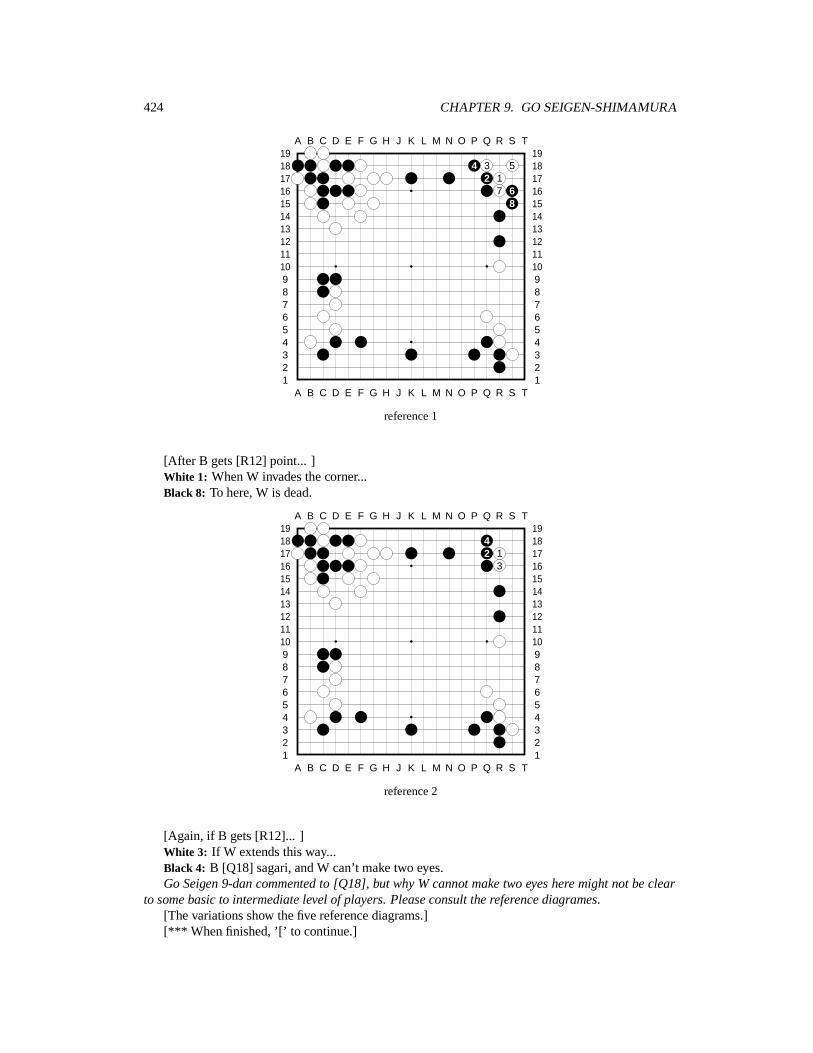
424 CHAPTER 9. GO SEIGEN-SHIMAMURA
A B C D E F G H J K L M N O P Q R S T
A B C D E F G H J K L M N O P Q R S T12345678910111213141516171819
12345678910111213141516171819
4 3 52 1
7 68
reference 1
[After B gets [R12] point... ]White 1: When W invades the corner...Black 8: To here, W is dead.
A B C D E F G H J K L M N O P Q R S T
A B C D E F G H J K L M N O P Q R S T12345678910111213141516171819
12345678910111213141516171819
42 1
3
reference 2
[Again, if B gets [R12]... ]White 3: If W extends this way...Black 4: B [Q18] sagari, and W can’t make two eyes.Go Seigen 9-dan commented to [Q18], but why W cannot make two eyes here might not be clear
to some basic to intermediate level of players. Please consult the reference diagrames.[The variations show the five reference diagrams.][*** When finished, ’[’ to continue.]
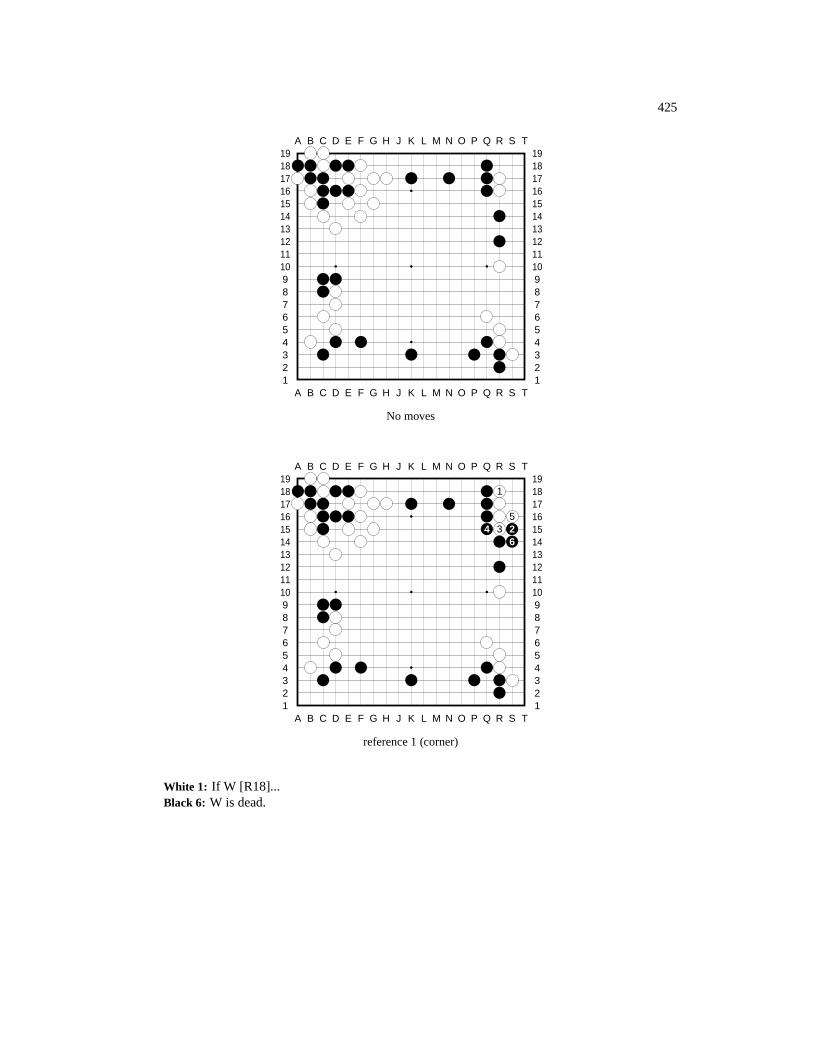
425
A B C D E F G H J K L M N O P Q R S T
A B C D E F G H J K L M N O P Q R S T12345678910111213141516171819
12345678910111213141516171819
No moves
A B C D E F G H J K L M N O P Q R S T
A B C D E F G H J K L M N O P Q R S T12345678910111213141516171819
12345678910111213141516171819
1
54 3 2
6
reference 1 (corner)
White 1: If W [R18]...Black 6: W is dead.
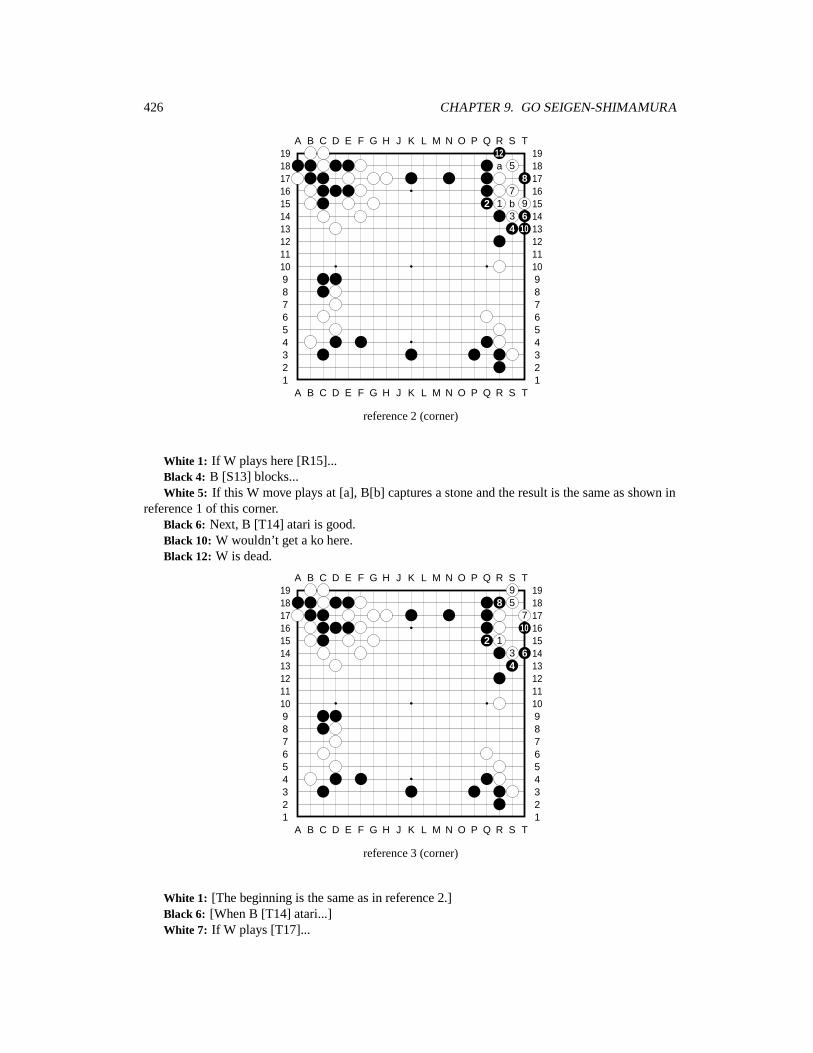
426 CHAPTER 9. GO SEIGEN-SHIMAMURA
A B C D E F G H J K L M N O P Q R S T
A B C D E F G H J K L M N O P Q R S T12345678910111213141516171819
1234567891011121314151617181912
a 58
72 1 b 9
3 64 10
reference 2 (corner)
White 1: If W plays here [R15]...Black 4: B [S13] blocks...White 5: If this W move plays at [a], B[b] captures a stone and the result is the same as shown in
reference 1 of this corner.Black 6: Next, B [T14] atari is good.Black 10: W wouldn’t get a ko here.Black 12: W is dead.
A B C D E F G H J K L M N O P Q R S T
A B C D E F G H J K L M N O P Q R S T12345678910111213141516171819
123456789101112131415161718199
8 5710
2 13 64
reference 3 (corner)
White 1: [The beginning is the same as in reference 2.]Black 6: [When B [T14] atari...]White 7: If W plays [T17]...
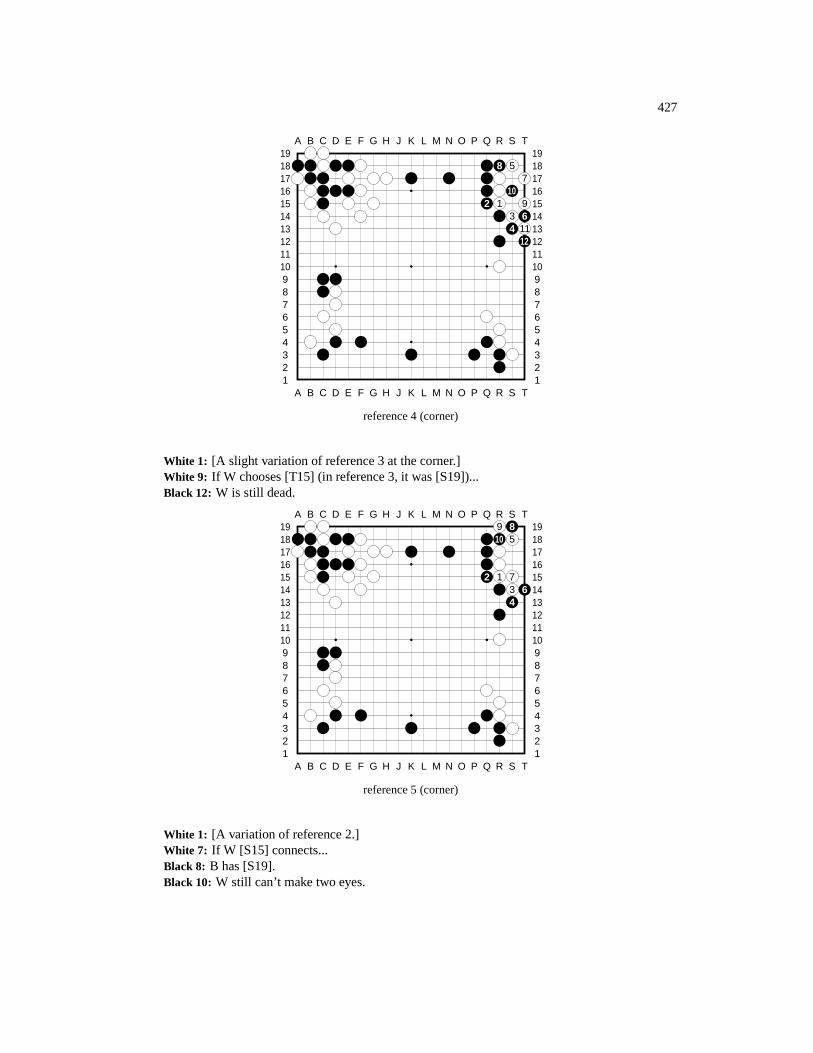
427
A B C D E F G H J K L M N O P Q R S T
A B C D E F G H J K L M N O P Q R S T12345678910111213141516171819
12345678910111213141516171819
8 57
102 1 9
3 64 11
12
reference 4 (corner)
White 1: [A slight variation of reference 3 at the corner.]White 9: If W chooses [T15] (in reference 3, it was [S19])...Black 12: W is still dead.
A B C D E F G H J K L M N O P Q R S T
A B C D E F G H J K L M N O P Q R S T12345678910111213141516171819
123456789101112131415161718199 8
10 5
2 1 73 64
reference 5 (corner)
White 1: [A variation of reference 2.]White 7: If W [S15] connects...Black 8: B has [S19].Black 10: W still can’t make two eyes.
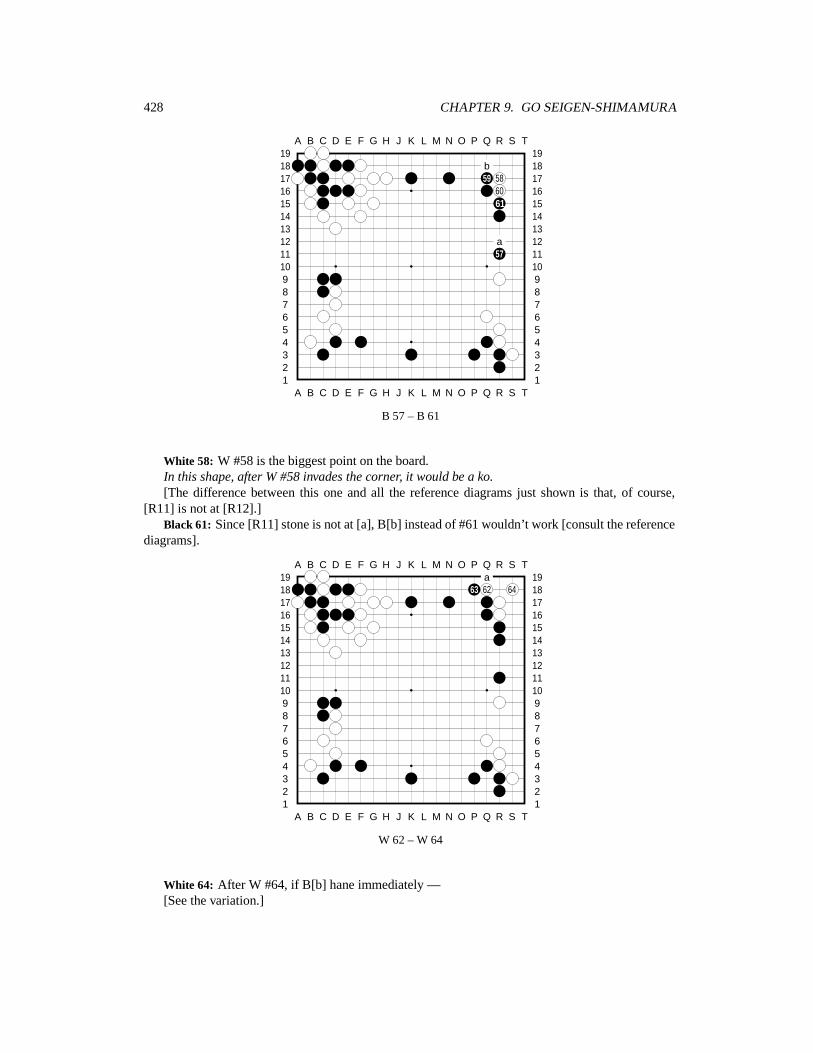
428 CHAPTER 9. GO SEIGEN-SHIMAMURA
A B C D E F G H J K L M N O P Q R S T
A B C D E F G H J K L M N O P Q R S T12345678910111213141516171819
12345678910111213141516171819
b59 58
6061
a57
B 57 – B 61
White 58: W #58 is the biggest point on the board.In this shape, after W #58 invades the corner, it would be a ko.[The difference between this one and all the reference diagrams just shown is that, of course,
[R11] is not at [R12].]Black 61: Since [R11] stone is not at [a], B[b] instead of #61 wouldn’t work [consult the reference
diagrams].
A B C D E F G H J K L M N O P Q R S T
A B C D E F G H J K L M N O P Q R S T12345678910111213141516171819
12345678910111213141516171819a
63 62 64
W 62 – W 64
White 64: After W #64, if B[b] hane immediately —[See the variation.]
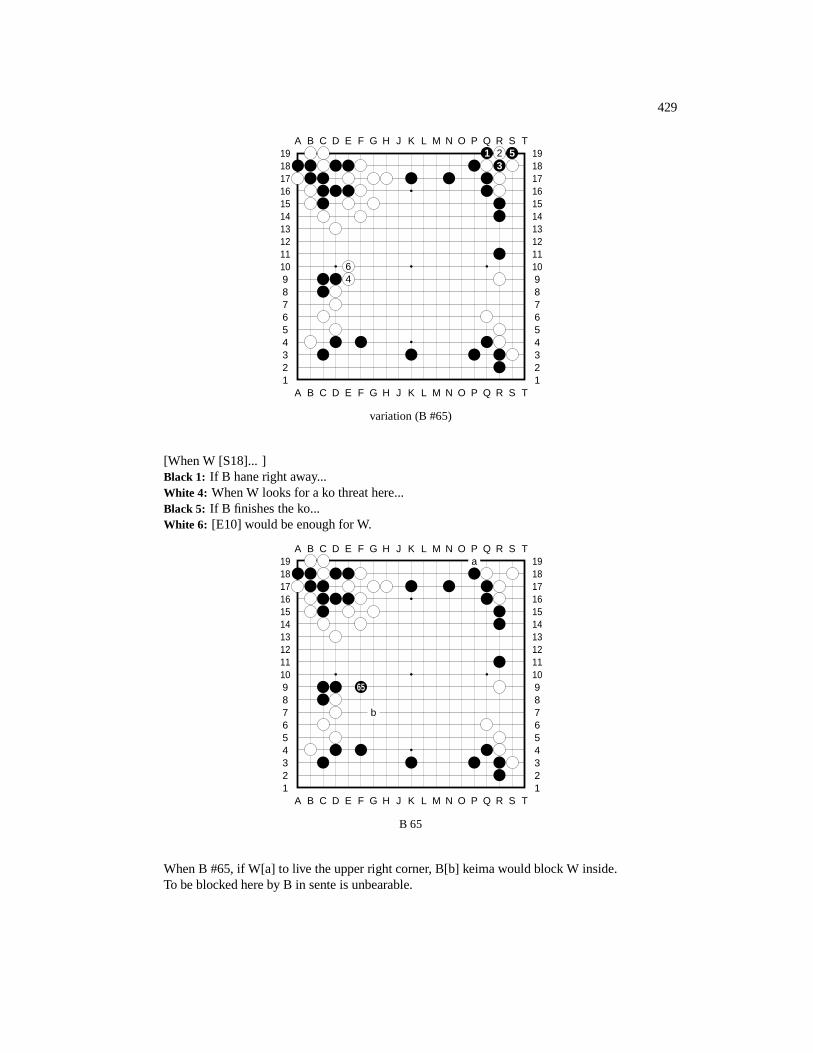
429
A B C D E F G H J K L M N O P Q R S T
A B C D E F G H J K L M N O P Q R S T12345678910111213141516171819
123456789101112131415161718191 2 5
3
64
variation (B #65)
[When W [S18]... ]Black 1: If B hane right away...White 4: When W looks for a ko threat here...Black 5: If B finishes the ko...White 6: [E10] would be enough for W.
A B C D E F G H J K L M N O P Q R S T
A B C D E F G H J K L M N O P Q R S T12345678910111213141516171819
12345678910111213141516171819a
65
b
B 65
When B #65, if W[a] to live the upper right corner, B[b] keima would block W inside.To be blocked here by B in sente is unbearable.
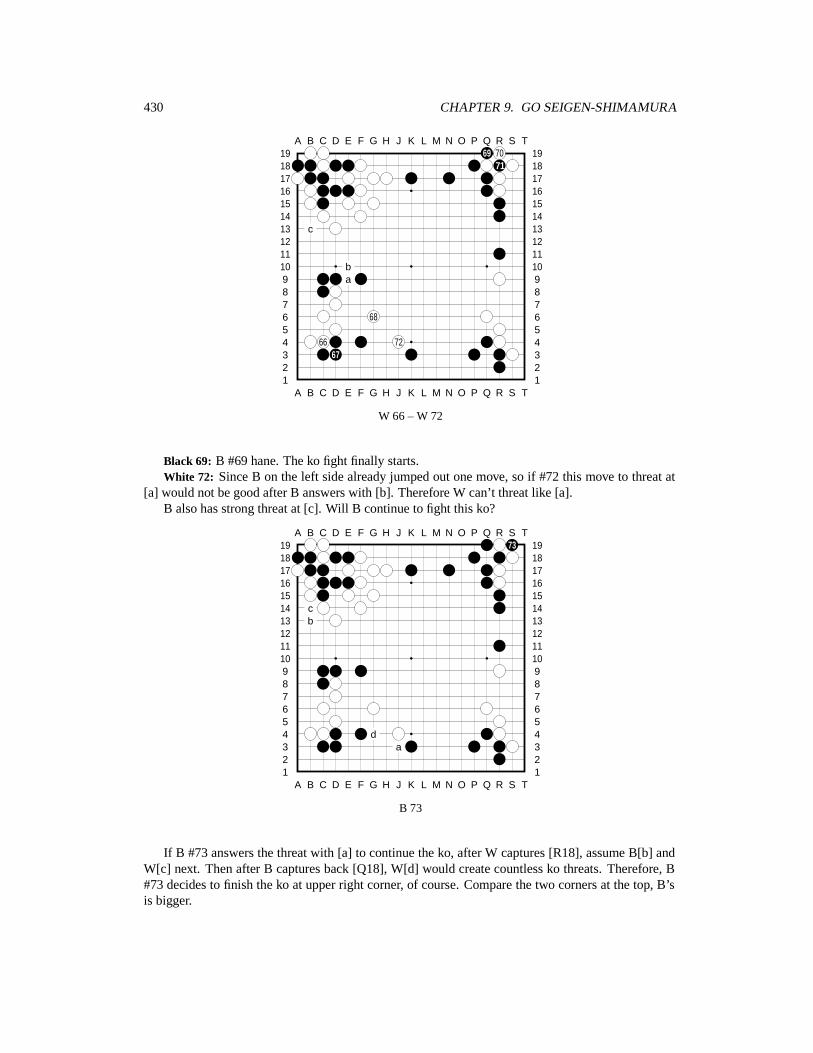
430 CHAPTER 9. GO SEIGEN-SHIMAMURA
A B C D E F G H J K L M N O P Q R S T
A B C D E F G H J K L M N O P Q R S T12345678910111213141516171819
1234567891011121314151617181969 70
71
c
ba
68
66 7267
W 66 – W 72
Black 69: B #69 hane. The ko fight finally starts.White 72: Since B on the left side already jumped out one move, so if #72 this move to threat at
[a] would not be good after B answers with [b]. Therefore W can’t threat like [a].B also has strong threat at [c]. Will B continue to fight this ko?
A B C D E F G H J K L M N O P Q R S T
A B C D E F G H J K L M N O P Q R S T12345678910111213141516171819
1234567891011121314151617181973
cb
da
B 73
If B #73 answers the threat with [a] to continue the ko, after W captures [R18], assume B[b] andW[c] next. Then after B captures back [Q18], W[d] would create countless ko threats. Therefore, B#73 decides to finish the ko at upper right corner, of course. Compare the two corners at the top, B’sis bigger.
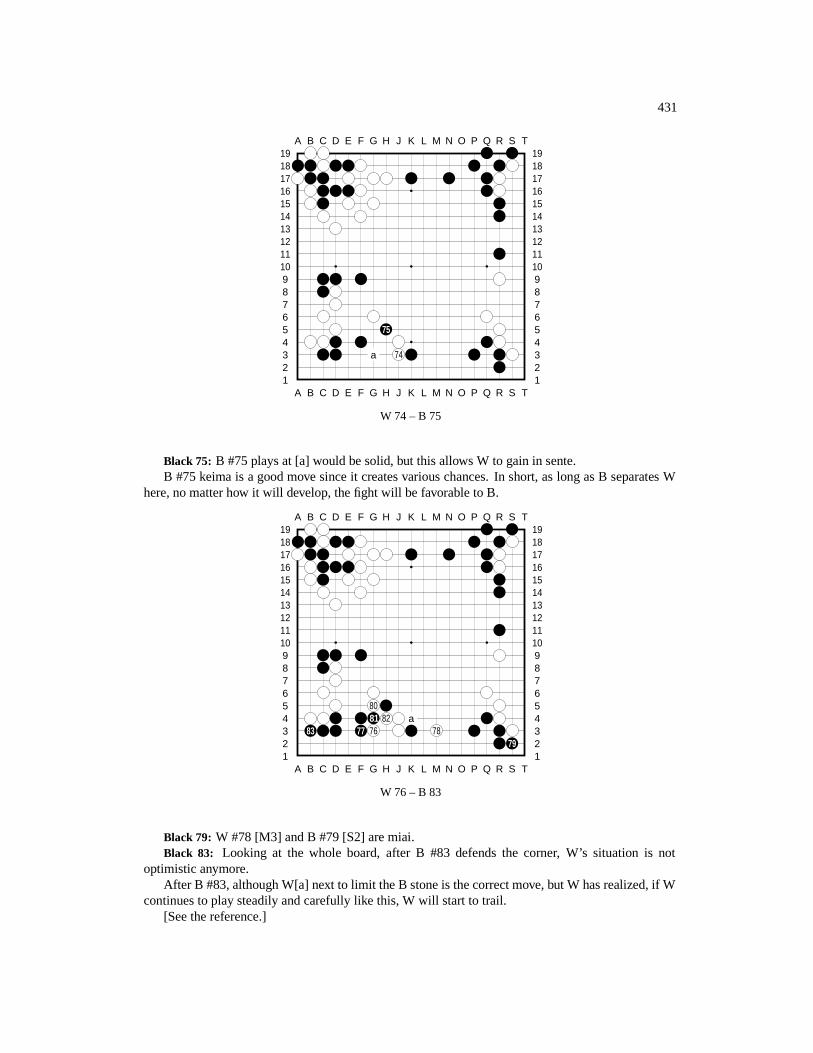
431
A B C D E F G H J K L M N O P Q R S T
A B C D E F G H J K L M N O P Q R S T12345678910111213141516171819
12345678910111213141516171819
75
a 74
W 74 – B 75
Black 75: B #75 plays at [a] would be solid, but this allows W to gain in sente.B #75 keima is a good move since it creates various chances. In short, as long as B separates W
here, no matter how it will develop, the fight will be favorable to B.
A B C D E F G H J K L M N O P Q R S T
A B C D E F G H J K L M N O P Q R S T12345678910111213141516171819
12345678910111213141516171819
8081 82 a
83 77 76 7879
W 76 – B 83
Black 79: W #78 [M3] and B #79 [S2] are miai.Black 83: Looking at the whole board, after B #83 defends the corner, W’s situation is not
optimistic anymore.After B #83, although W[a] next to limit the B stone is the correct move, but W has realized, if W
continues to play steadily and carefully like this, W will start to trail.[See the reference.]
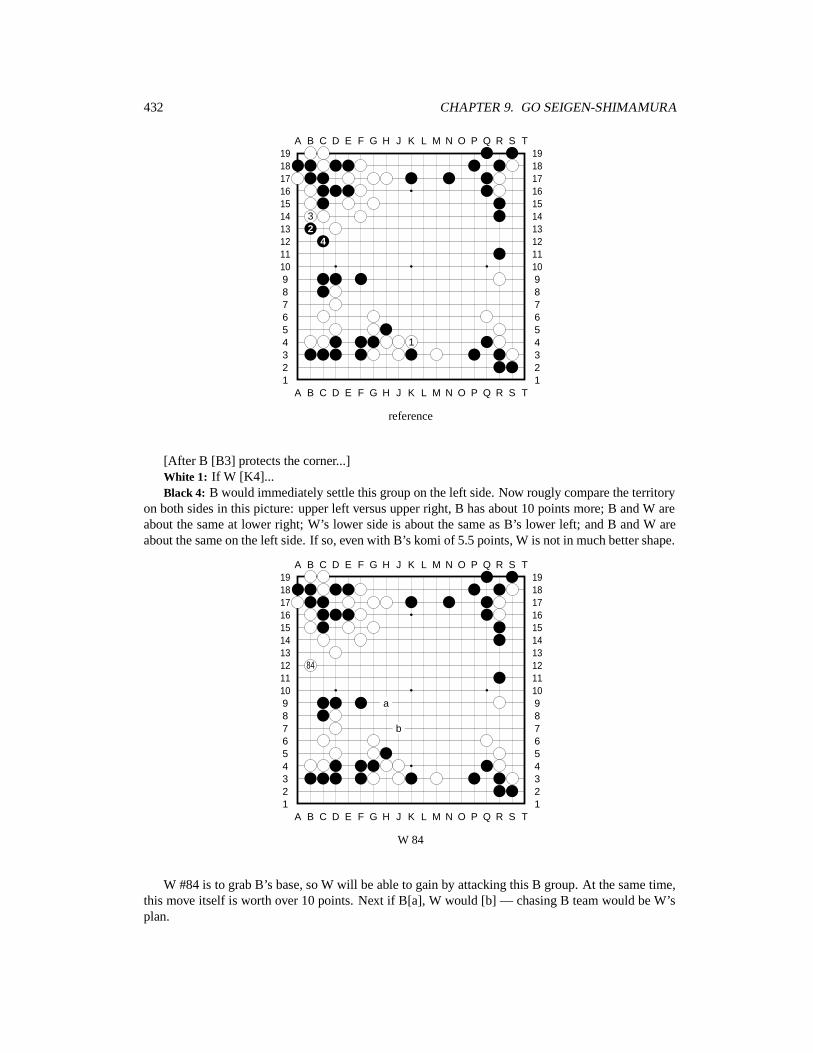
432 CHAPTER 9. GO SEIGEN-SHIMAMURA
A B C D E F G H J K L M N O P Q R S T
A B C D E F G H J K L M N O P Q R S T12345678910111213141516171819
12345678910111213141516171819
32
4
1
reference
[After B [B3] protects the corner...]White 1: If W [K4]...Black 4: B would immediately settle this group on the left side. Now rougly compare the territory
on both sides in this picture: upper left versus upper right, B has about 10 points more; B and W areabout the same at lower right; W’s lower side is about the same as B’s lower left; and B and W areabout the same on the left side. If so, even with B’s komi of 5.5 points, W is not in much better shape.
A B C D E F G H J K L M N O P Q R S T
A B C D E F G H J K L M N O P Q R S T12345678910111213141516171819
12345678910111213141516171819
84
a
b
W 84
W #84 is to grab B’s base, so W will be able to gain by attacking this B group. At the same time,this move itself is worth over 10 points. Next if B[a], W would [b] — chasing B team would be W’splan.

433
A B C D E F G H J K L M N O P Q R S T
A B C D E F G H J K L M N O P Q R S T12345678910111213141516171819
12345678910111213141516171819
a92 b
91
88 87 9089 8685
B 85 – W 92
Black 87: B of course starts from the bottom, and W is ready for it.White 88: W #88 tesuji.In shapes like this, a kosumi attachment is normally the urgent point.Black 91: When B #91...White 92: W #92 jumps to separate two B groups, and W is racing against B stones toward the
center.Next if B[a], W[b] of course. But B cannot play so conservatively for safety’s sake.
A B C D E F G H J K L M N O P Q R S T
A B C D E F G H J K L M N O P Q R S T12345678910111213141516171819
12345678910111213141516171819
93 9495 a
b
B 93 – B 95
Black 93: If B hurries to settle the left side, it would be falling into W’s plan, so B #93 starts fromthe right side.
Black 95: Next (W #96) if W[a], B[b] hane to attack three W stones.
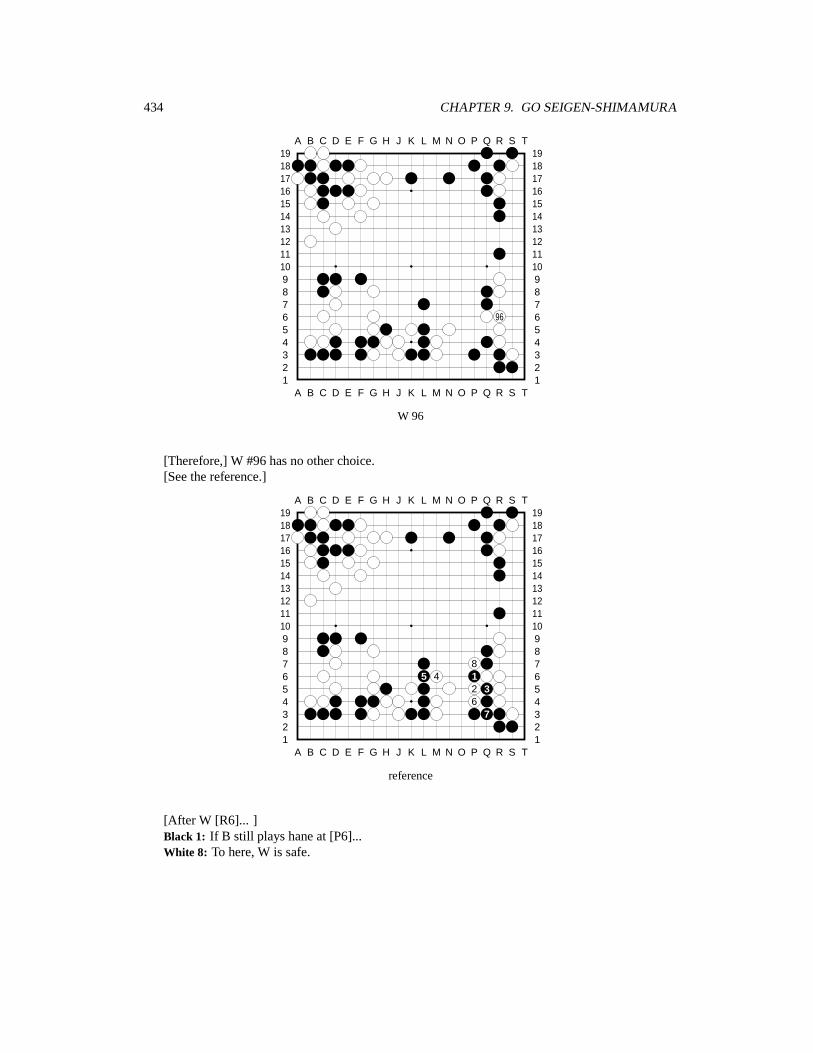
434 CHAPTER 9. GO SEIGEN-SHIMAMURA
A B C D E F G H J K L M N O P Q R S T
A B C D E F G H J K L M N O P Q R S T12345678910111213141516171819
12345678910111213141516171819
96
W 96
[Therefore,] W #96 has no other choice.[See the reference.]
A B C D E F G H J K L M N O P Q R S T
A B C D E F G H J K L M N O P Q R S T12345678910111213141516171819
12345678910111213141516171819
85 4 1
2 36
7
reference
[After W [R6]... ]Black 1: If B still plays hane at [P6]...White 8: To here, W is safe.
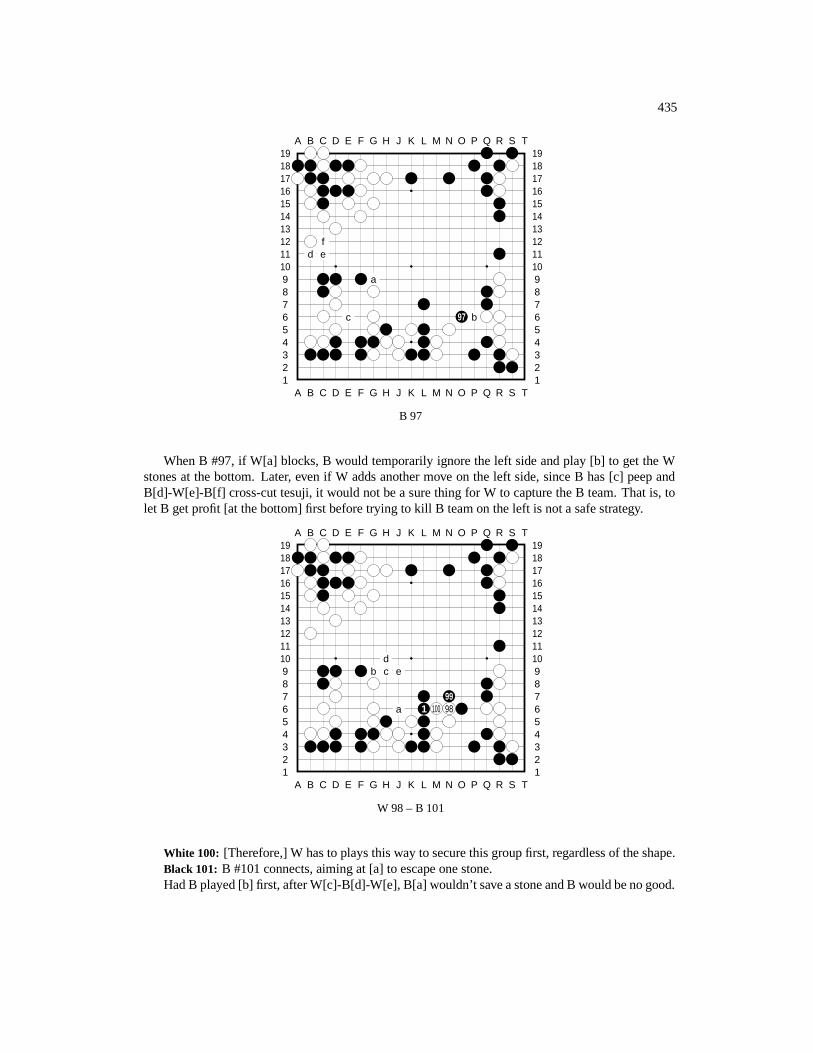
435
A B C D E F G H J K L M N O P Q R S T
A B C D E F G H J K L M N O P Q R S T12345678910111213141516171819
12345678910111213141516171819
fd e
a
c 97 b
B 97
When B #97, if W[a] blocks, B would temporarily ignore the left side and play [b] to get the Wstones at the bottom. Later, even if W adds another move on the left side, since B has [c] peep andB[d]-W[e]-B[f] cross-cut tesuji, it would not be a sure thing for W to capture the B team. That is, tolet B get profit [at the bottom] first before trying to kill B team on the left is not a safe strategy.
A B C D E F G H J K L M N O P Q R S T
A B C D E F G H J K L M N O P Q R S T12345678910111213141516171819
12345678910111213141516171819
db c e
99a 1 100 98
W 98 – B 101
White 100: [Therefore,] W has to plays this way to secure this group first, regardless of the shape.Black 101: B #101 connects, aiming at [a] to escape one stone.Had B played [b] first, after W[c]-B[d]-W[e], B[a] wouldn’t save a stone and B would be no good.

436 CHAPTER 9. GO SEIGEN-SHIMAMURA
A B C D E F G H J K L M N O P Q R S T
A B C D E F G H J K L M N O P Q R S T12345678910111213141516171819
12345678910111213141516171819
8a 3 5
2 4b 7 6
W 102 – W 108
White 106: To W #106, W is connected.Black 107: B has been aiming at #107.White 108: W #108 turns to attack. This is just the right timing.Next (#109) if B[a], W would [b] — B is not good.
A B C D E F G H J K L M N O P Q R S T
A B C D E F G H J K L M N O P Q R S T12345678910111213141516171819
12345678910111213141516171819
9
B 109
B #109 is a powerful tesuji. Next —[See the variation.]
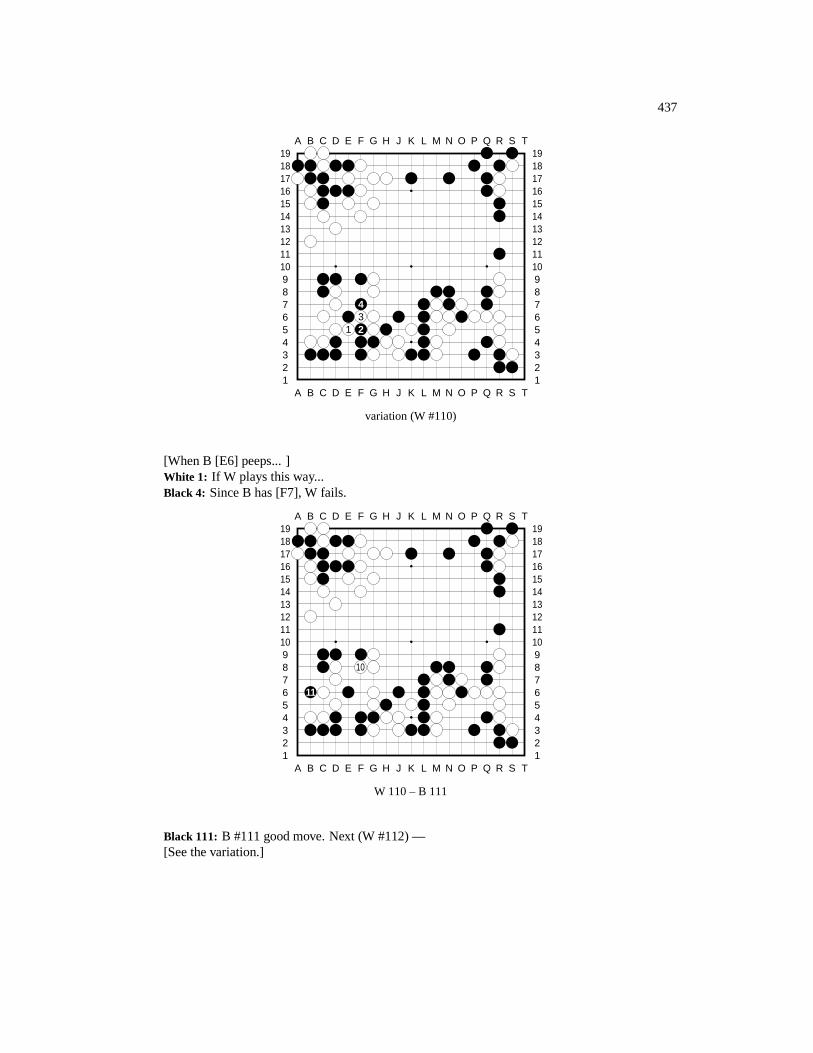
437
A B C D E F G H J K L M N O P Q R S T
A B C D E F G H J K L M N O P Q R S T12345678910111213141516171819
12345678910111213141516171819
43
1 2
variation (W #110)
[When B [E6] peeps... ]White 1: If W plays this way...Black 4: Since B has [F7], W fails.
A B C D E F G H J K L M N O P Q R S T
A B C D E F G H J K L M N O P Q R S T12345678910111213141516171819
12345678910111213141516171819
10
11
W 110 – B 111
Black 111: B #111 good move. Next (W #112) —[See the variation.]
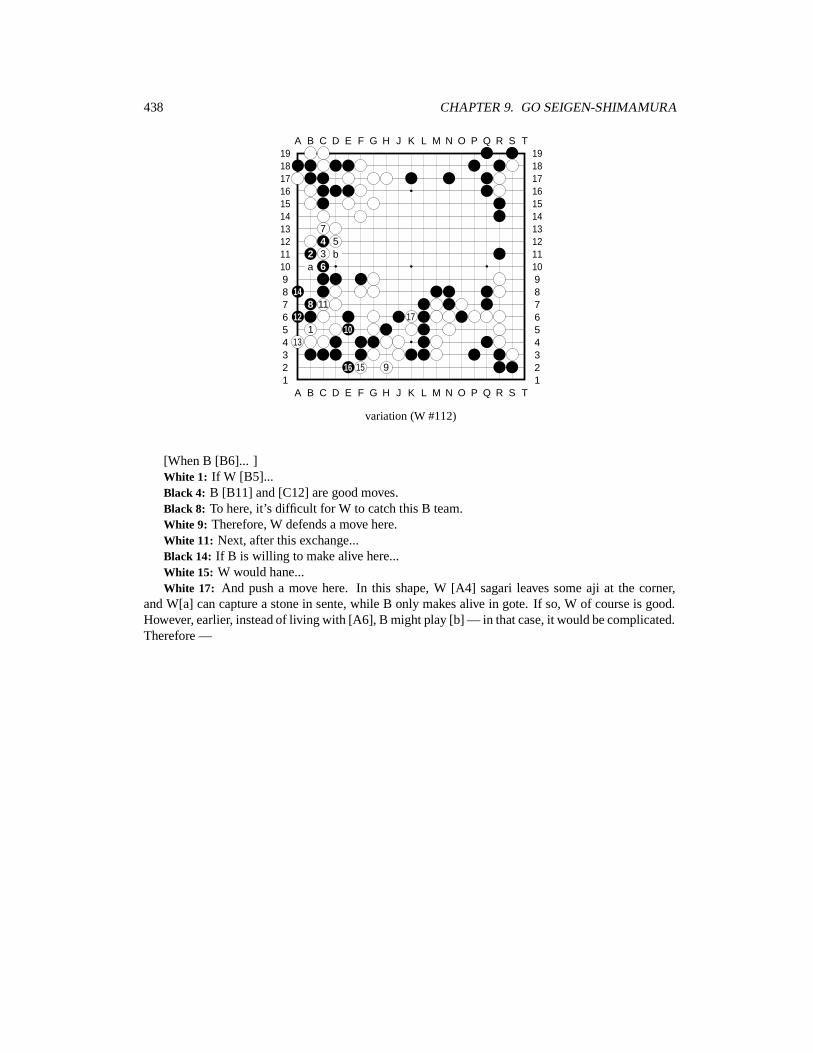
438 CHAPTER 9. GO SEIGEN-SHIMAMURA
A B C D E F G H J K L M N O P Q R S T
A B C D E F G H J K L M N O P Q R S T12345678910111213141516171819
12345678910111213141516171819
74 5
2 3 ba 6
148 11
12 171 10
13
16 15 9
variation (W #112)
[When B [B6]... ]White 1: If W [B5]...Black 4: B [B11] and [C12] are good moves.Black 8: To here, it’s difficult for W to catch this B team.White 9: Therefore, W defends a move here.White 11: Next, after this exchange...Black 14: If B is willing to make alive here...White 15: W would hane...White 17: And push a move here. In this shape, W [A4] sagari leaves some aji at the corner,
and W[a] can capture a stone in sente, while B only makes alive in gote. If so, W of course is good.However, earlier, instead of living with [A6], B might play [b] — in that case, it would be complicated.Therefore —
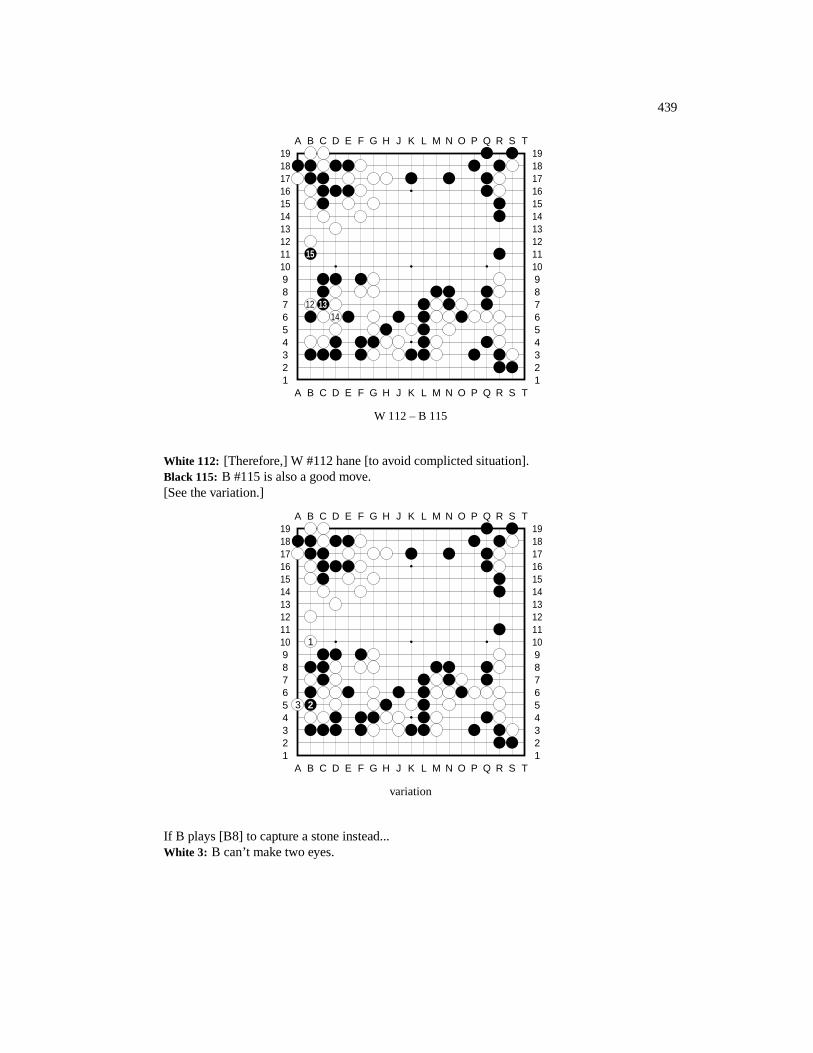
439
A B C D E F G H J K L M N O P Q R S T
A B C D E F G H J K L M N O P Q R S T12345678910111213141516171819
12345678910111213141516171819
15
12 1314
W 112 – B 115
White 112: [Therefore,] W #112 hane [to avoid complicted situation].Black 115: B #115 is also a good move.[See the variation.]
A B C D E F G H J K L M N O P Q R S T
A B C D E F G H J K L M N O P Q R S T12345678910111213141516171819
12345678910111213141516171819
1
3 2
variation
If B plays [B8] to capture a stone instead...White 3: B can’t make two eyes.
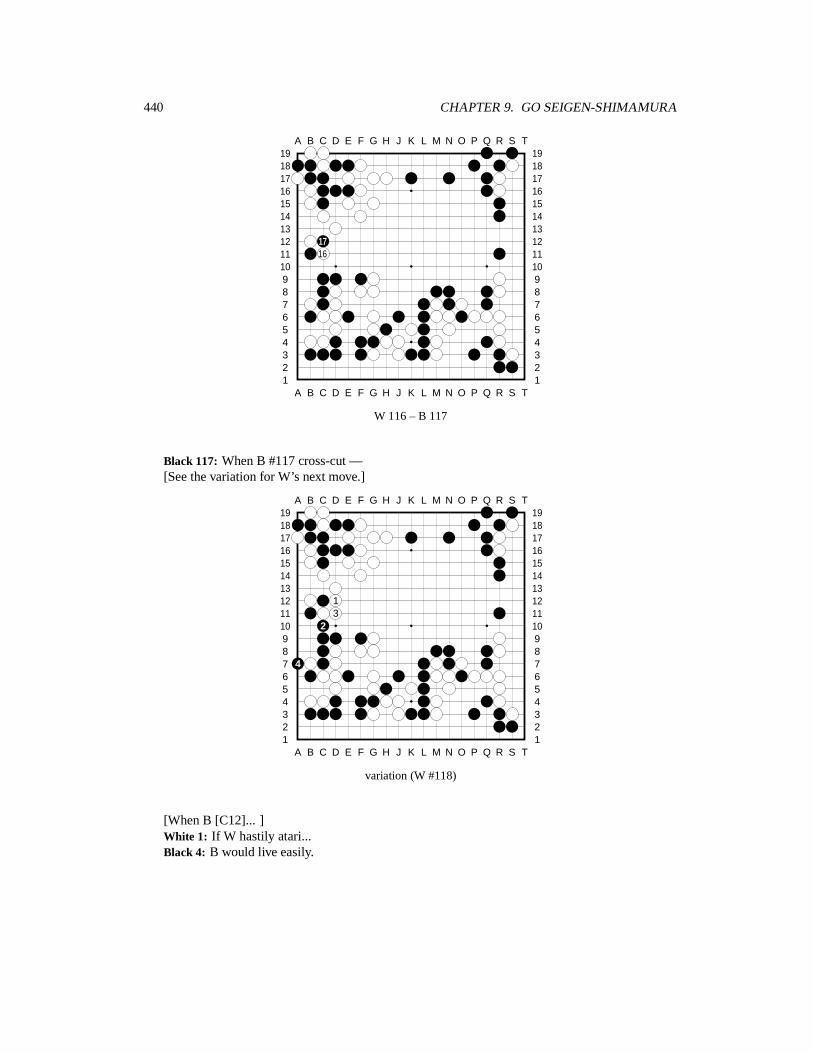
440 CHAPTER 9. GO SEIGEN-SHIMAMURA
A B C D E F G H J K L M N O P Q R S T
A B C D E F G H J K L M N O P Q R S T12345678910111213141516171819
12345678910111213141516171819
1716
W 116 – B 117
Black 117: When B #117 cross-cut —[See the variation for W’s next move.]
A B C D E F G H J K L M N O P Q R S T
A B C D E F G H J K L M N O P Q R S T12345678910111213141516171819
12345678910111213141516171819
13
2
4
variation (W #118)
[When B [C12]... ]White 1: If W hastily atari...Black 4: B would live easily.
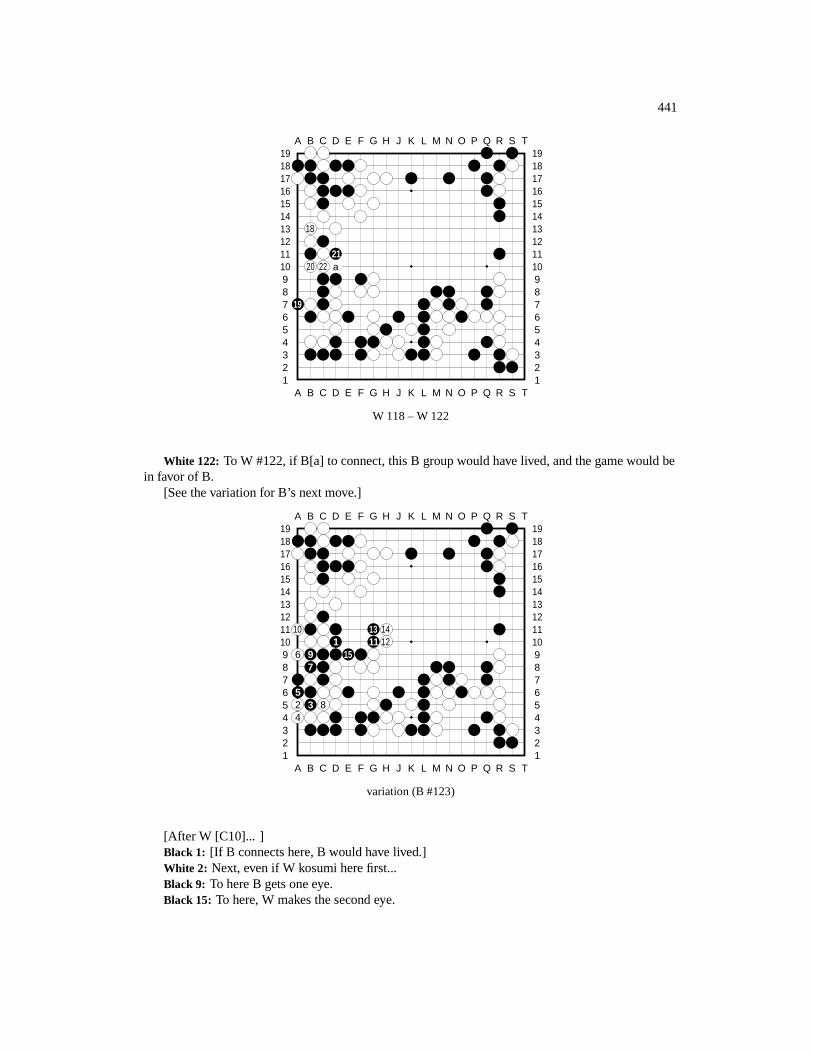
441
A B C D E F G H J K L M N O P Q R S T
A B C D E F G H J K L M N O P Q R S T12345678910111213141516171819
12345678910111213141516171819
18
2120 22 a
19
W 118 – W 122
White 122: To W #122, if B[a] to connect, this B group would have lived, and the game would bein favor of B.
[See the variation for B’s next move.]
A B C D E F G H J K L M N O P Q R S T
A B C D E F G H J K L M N O P Q R S T12345678910111213141516171819
12345678910111213141516171819
10 13 141 11 12
6 9 157
52 3 84
variation (B #123)
[After W [C10]... ]Black 1: [If B connects here, B would have lived.]White 2: Next, even if W kosumi here first...Black 9: To here B gets one eye.Black 15: To here, W makes the second eye.

442 CHAPTER 9. GO SEIGEN-SHIMAMURA
A B C D E F G H J K L M N O P Q R S T
A B C D E F G H J K L M N O P Q R S T12345678910111213141516171819
12345678910111213141516171819
24
23
B 123 – W 124
Black 123: [In the game, however,] B #123 is an overplay.White 124: After W gets #124, this B team is now in danger.Go Seigen 9-dan says, B’s situation on the board is not that bad, but since B has had a big group
killed earlier, and that might have affected Shimamura 8-dan psychologically. Did he feel that he hadto struggle to the end and thus became hasty here?
After W #124, although B is in danger now, it’s not to say that B has no way to live. Let’s look atGo Seigen 9-dan’s analysis.
[See the reference.]
A B C D E F G H J K L M N O P Q R S T
A B C D E F G H J K L M N O P Q R S T12345678910111213141516171819
12345678910111213141516171819
24
18 1516 14 13
11 17 25123 20 22 7
19 21 23 a b61 2 10 845
reference9 at 1
After W [E9]...Black 1: B can start from here...
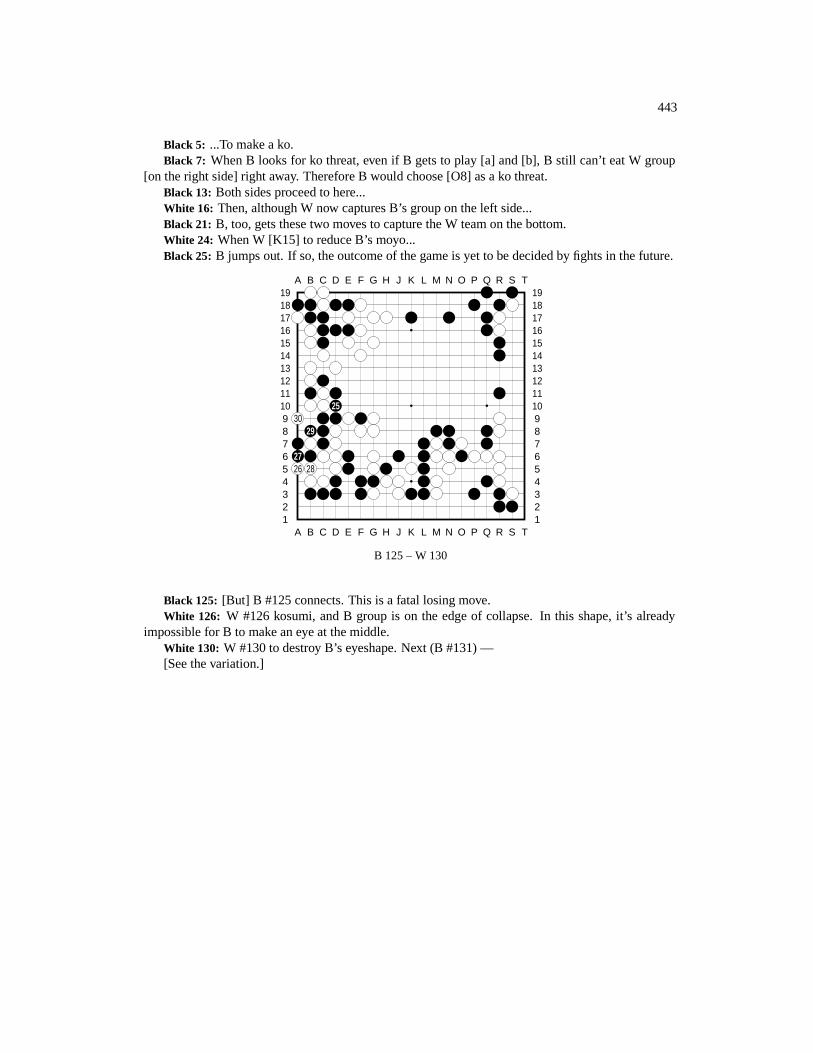
443
Black 5: ...To make a ko.Black 7: When B looks for ko threat, even if B gets to play [a] and [b], B still can’t eat W group
[on the right side] right away. Therefore B would choose [O8] as a ko threat.Black 13: Both sides proceed to here...White 16: Then, although W now captures B’s group on the left side...Black 21: B, too, gets these two moves to capture the W team on the bottom.White 24: When W [K15] to reduce B’s moyo...Black 25: B jumps out. If so, the outcome of the game is yet to be decided by fights in the future.
A B C D E F G H J K L M N O P Q R S T
A B C D E F G H J K L M N O P Q R S T12345678910111213141516171819
12345678910111213141516171819
2530
29
2726 28
B 125 – W 130
Black 125: [But] B #125 connects. This is a fatal losing move.White 126: W #126 kosumi, and B group is on the edge of collapse. In this shape, it’s already
impossible for B to make an eye at the middle.White 130: W #130 to destroy B’s eyeshape. Next (B #131) —[See the variation.]
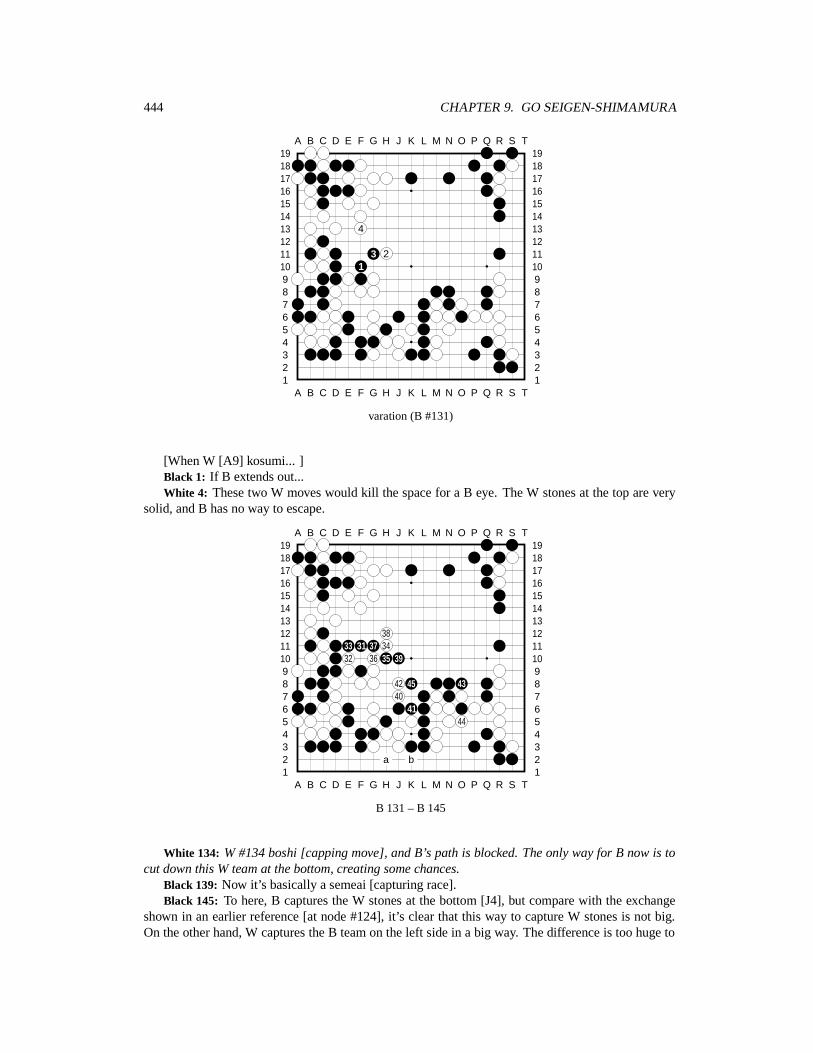
444 CHAPTER 9. GO SEIGEN-SHIMAMURA
A B C D E F G H J K L M N O P Q R S T
A B C D E F G H J K L M N O P Q R S T12345678910111213141516171819
12345678910111213141516171819
4
3 21
varation (B #131)
[When W [A9] kosumi... ]Black 1: If B extends out...White 4: These two W moves would kill the space for a B eye. The W stones at the top are very
solid, and B has no way to escape.
A B C D E F G H J K L M N O P Q R S T
A B C D E F G H J K L M N O P Q R S T12345678910111213141516171819
12345678910111213141516171819
3833 31 37 3432 36 35 39
42 45 4340
4144
a b
B 131 – B 145
White 134: W #134 boshi [capping move], and B’s path is blocked. The only way for B now is tocut down this W team at the bottom, creating some chances.
Black 139: Now it’s basically a semeai [capturing race].Black 145: To here, B captures the W stones at the bottom [J4], but compare with the exchange
shown in an earlier reference [at node #124], it’s clear that this way to capture W stones is not big.On the other hand, W captures the B team on the left side in a big way. The difference is too huge to
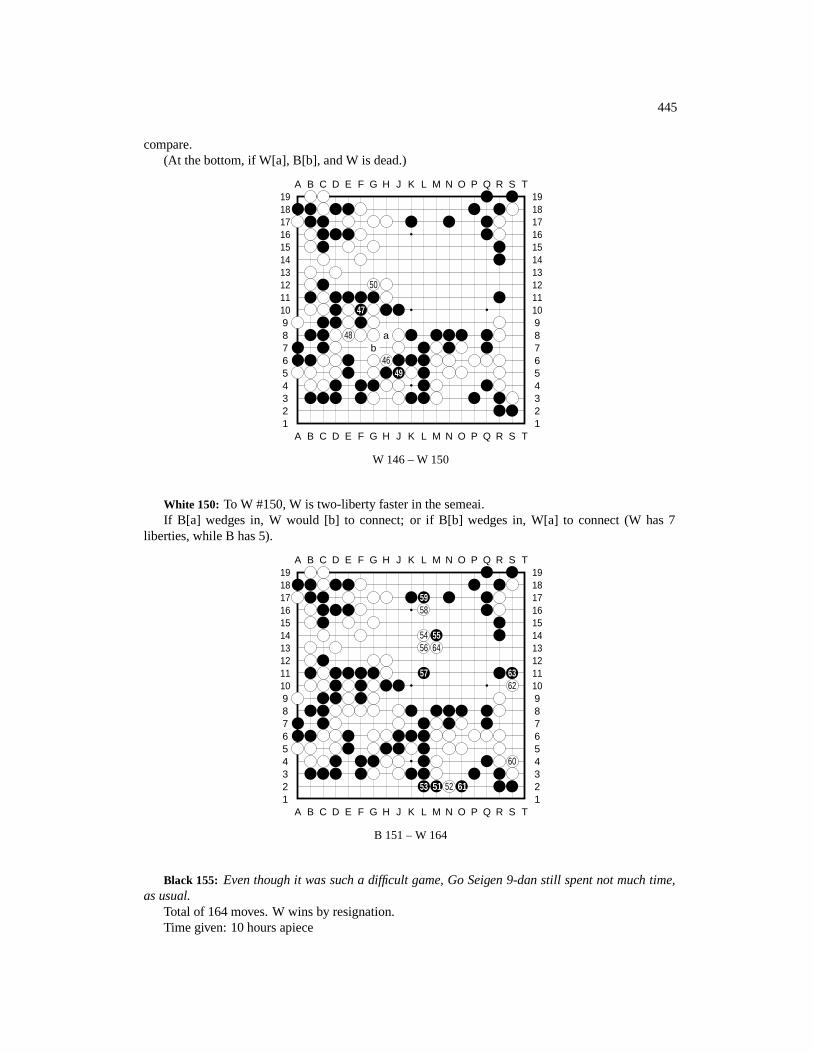
445
compare.(At the bottom, if W[a], B[b], and W is dead.)
A B C D E F G H J K L M N O P Q R S T
A B C D E F G H J K L M N O P Q R S T12345678910111213141516171819
12345678910111213141516171819
50
47
48 ab
4649
W 146 – W 150
White 150: To W #150, W is two-liberty faster in the semeai.If B[a] wedges in, W would [b] to connect; or if B[b] wedges in, W[a] to connect (W has 7
liberties, while B has 5).
A B C D E F G H J K L M N O P Q R S T
A B C D E F G H J K L M N O P Q R S T12345678910111213141516171819
12345678910111213141516171819
5958
54 5556 64
57 6362
60
53 51 52 61
B 151 – W 164
Black 155: Even though it was such a difficult game, Go Seigen 9-dan still spent not much time,as usual.
Total of 164 moves. W wins by resignation.Time given: 10 hours apiece
446 CHAPTER 9. GO SEIGEN-SHIMAMURA
Time consumed:Black: 7 hours 26 minutesWhite: 4 hours 40 minutes
Appendix A
A Short Biography of Wu Qing Yuan(Go Seigen)
There was a Chinese father who once said many years ago, “I will pass my calligraphic skills to myoldest son; my writing skills to my second oldest son; my go skills to my youngest son.”
His youngest son was Go Seigen.And the following brief biography of Go Seigen was written by this lucky father’s second oldest
son, Wu Yan, a writer who now lives in China. (His oldest son, by the way, lives in America.)In this translation, I (Jim Yu) have used “Wu Qing Yuan” (his name in Chinese pinyin) instead
of “Go Seigen” since I feel that’s how his brother would like it to be translated. In particular, MrWu Yan, his brother and the author, constantly referred him as “Qing Yuan”, a brotherly calling thatcannot be replaced by “Seigen”, I feel. Please get used to one of the greatest names in go history inhis mother language: Wu Qing Yuan!
I also made some notes for some explanations that I felt necessary. They are enclosed by squarebrackets (’[’ and ’]’).
Wu Qing Yuan, also named Wu Quan, was born in a big family of Fuzhou [a city in southesternChina] in 1914. Our father once studied abroad in Japan, with a major in laws. After he returned toChina, he became a small officer for the government in Beijing [then controlled by warlords]. Oneday, he suddenly took out board and stones, and he started to teach us go. Quickly we all learned howto play, so we began to match against our father. Not before long, we caught up with him, and soonafter, Qing Yuan became the strongest among us. Father then took out some go records, replaying forus game by game.
Qing Yuan became addictive to go records as soon as he touched them. Early in the morning, hestarted to replay the records right after he got up. Without reminding, he would not go to the diningroom. And in the night, he’d forget to go to bed – he just replayed the game records all day long.From then on, he became the center around our go board: He replayed the games, while father, eldestbrother and me looked on. At first, all he replayed were some ancient Chinese games, played bysuch famous ancient players like Huang, Shi, and Fan. Later, father also took out the go records hebrought back from Japan, such as Honinbo Dosaku’s games. These were treasures to Qing Yuan, andhe started to study them day and night, eagerly hoping to finish them in a few days. Approximatelyin over half a year, Qing Yuan had mastered almost all the basic go skills. [Wu was not even ten yearsold by then.]
Among the Fuzhou people in Beijing, there was a famous Fuzhou go player named Lin. Atthat time, Qing Yuan’s go skills had been known among relatives and friends. To test Qing Yuan’sstrength, they made an appointment with Lin and took Qing Yuan to play him. Lin was destroyed inthe middle game fight, and Qing Yuan’s name was immediately spreaded out among Fuzhou people.
447
448 APPENDIX A. A SHORT BIOGRAPHY OF WU QING YUAN (GO SEIGEN)
Father saw that Qing Yuan’s go future was bright, so he subscribed some newest published Japanesego games for Qing Yuan. Qing Yuan was a small kid with small hands, while the go record bookswere big and thick. He held the game books with his left hand and played on the board with his righthand, from morning to evening everyday. After days and nights, the shape of his left index fingerchanged, bending backwards. At that time, probably no other Chinese player was studying Japanesegame records as deeply as he.
There was a tea shop on a big street in the western city of Beijing. In the tea shop, there were goboards and stones available for go players and fans, and here became a meeting place for the players.Famous players like Wang, Gu, and Liu often visited here to meet go friends. In the summer of 1923,one day, our father took three of us to that tea shop to play go. Father was the same age as Liu, andLiu once taught father some go. Father respected him very much. After a few games with Wang, Gu,and Liu in the tea shop, Qing Yuan started to become famous in Beijing.
In 1924, father unfortunately died of tuberculosis. At that time, Qing Yuan was only 11. Afterfuneral affairs, our biggest challenge was how to survive the rest of the way. Eldest brother had justfinished one year in high school, and now he had to dropped out. I was only 12 years old, but I alreadyunderstood that our family had fallen into a serious situation, and miserable days were ahead. QingYuan realized the situation too, but he continued to focus on go records, deeply studying the game.One day, my uncle came to visit us, and when he saw that Qing Yuan was concentrating on a go recordin front of the table, he shouted harshly, “Don’t play go all the time! Playing go is useless! Will yoube able to make a life with go?!” “Yes, I can!” Qing Yuan answered without hesitation. “Yes, I willmake a life with go!” My uncle was shocked to speechless by such an determined answer, and he leftwith a few sarcastic laughs.
At the time, the family was survived by selling some old stuff (mainly books and paintings). 1925was the year when Duan [a warlord] was in power of the government. Duan liked to play go. Afamous go player, Gu, was a protege under Duan, and Gu often played go with Duan to earn anincome. Mother saw a road from this. Hoping to get help from Duan, she took Qing Yuan to visit Gu,asking him to recommend Qing Yuan to Duan. Duan had long heard of Qing Yuan’s name, and hehad wanted to see him. So Gu generously accepted mother’s request.
Duan was happy to see Qing Yuan, and he started to pay Qing Yuan 100 yuan a month (a highsalary at that time). Nice words came from friends and relatives, and my uncle couldn’t even sayanything more. Thus our family’s income was insured.
Thereafter, Qing Yuan went to Duan’s private house in the eastern city every morning. Duan’s gowas pretty strong, and so was his desire to win. So his proteges usually let him win. An exceptionwas his eldest son, who almost beat his father every time. And each time after losing to his son,Duan would angrily shout, “Only you know how to play!” After Qing Yuan was invited to the house,Duan at first only asked him to play with other go players, and he watched on from the side. Later,he became interested, so he asked the others to yield him the seat. Qing Yuan was only a kid, andhe did’t know to care if his opponent was happy or not – if he could win, he would. After losing toQing Yuan a few times, Duan didn’t play him again. But the 100 yuan monthly salary was still paidas usual.
After Qing Yuan gained fame, he started to have contacts with other famous people like the gov-ernment officers. At that time, mentioning a person’s full name in social intercourse was consideredimpolite, and was thus a kind of taboo. Although Qing Yuan was still a kid, the others had startedto treat him like an adult. [Notice by far his full name was actually Wu Quan, although the authorhas called him Qing Yuan.] A friend of Gu, therefore, created a new name, “Qing Yuan”, for himbased on his old name “Quan”. [“Quan” means spring, fountain; “Qing Yuan” literally means clearand pure source of water.] From then on, the two characters of “Wu Quan” were replaced by the threecharacters of “Wu Qing Yuan”. [What did this have to do with name calling taboo? Well, habitually,Chinese people are not comfortable to call a person by one character unless they are referring them-selves or someone in love. So, with “Wu Quan”, one would either call him “Wu Quan”, his full name,a “taboo”, or call him “Quan” which was just one character – neither was very good. With “Wu Qing
449
Yuan”, however, it was not a problem since everyone could call him “Qing Yuan”, which was not hisfull name, yet it contained two characters.]
After Duan left the government [either resigned or forced to resign], Qing Yuan no longer hadthat 100 yuan monthly salary. Our family once again fell into financial trouble. By this time, QingYuan had got to know a Japanese antiques merchant named Yamasaki through playing go. This manrecognized Qing Yuan’s go talent, and he intended to ask Qing Yuan to go to Japan, so he encouragedQing Yuan to learn Japanese from his wife. As a result, Qing Yuan went to Yamasaki’s home to learnJapanese everyday.
In 1926, Japanese 6-dan player Iwamoto Kaoru came to Beijing. He played two games with QingYuan: first game was a 3-stone game, and Qing Yuan won it; second game was a 2-stone game,and Qing Yuan lost by one stone [2 points]. After Iwamoto Kaoru went back to Japan, he started tomention Qing Yuan’s talent in the go world. Soon after, a famous player Inoue Kohei 5-dan came toBeijing to test Qing Yuan’s strength. He played three games with Qing Yuan, and Qing Yuan wonthem all. [The number of games mentioned here, against either Iwamoto or Inoue, are somewhatdifferent from the history record.] Inoue Kohei then returned to Japan and reported Qing Yuan’sstrength to Nihon Ki-in. Later, the famed Segoe Kensaku 7-dan started to have correspondings withYamasaki, discussing a possible trip to Japan by Qing Yuan.
In October, 1928, Qing Yuan arrived at Japan. Okura Kishichiro, director of Nihon Ki-in of thattime, had promised to support Qing Yuan 200 yen a month, and since our mother and our eldestbrother when to Japan with Qing Yuan as well, another 100 yen was added, and the term was twoyears. After two years, whether or not Qing Yuan would be able to hold his position in Japan, that is,whether or not he would be accepted as a Nihon Ki-in member, would be decided by the progress inhis go.
Qing Yuan seldom talked much and he did not incline to play around. His life was simple, quiet,and he did not care about money. He simply concentrated on go. He sat in meditation every day, andI asked him, “What is good of meditation?” He answered, “The top Japanese players are as strongas I am. To beat them, I have to be able to have a clear mind at the key moments. Meditation is anexercise to train such a clear mind.”
Nihon Ki-in sent out a committee to decided Qing Yuan’s rank. The committee consisted of sevenmembers: Honinbo Shusai (9-dan), Iwaasa Kei (7-dan), Segoe Kensaku (7-dan), Suzuki Tamejiro (7-dan), Kato Shin (6-dan), Iwamoto Kaoru (6-dan), and Onoda Chiyotaro (6-dan). The committeethen chose Shinohara Masami (4-dan), Murashima Yoshikatsu (4-dan), Maeda Nobuaki (4-dan),Hashimoto Utaro (4-dan), Onoda Chiyotaro (6-dan), Kitani Minoru (4-dan), and Honinbo Shusaiseven players to play against Qing Yuan. Qing Yuan first beat Shinohara Masami, Honinbo Shusai,and Murashima Yoshikatsu in the first three games, and the committee awarded him a 3-dan diploma.The ranking system was more strict at that time than now, and a 3-dan of that time was equivalent toa 5-dan nowadays. After being awarded a 3-dan rank, Qing Yuan continued to play against the otherfour chosen players. At the end, he won all but the game against Kitani Minoru. Qing Yuan believedthat Kitani Minoru was the first tough opponent he met.
Qing Yuan then officially became Nihon Ki-in’s player, and since 1930, when he was 16 yearsold, he started to participate the twice-a-year Oteai tournament of Nihon Ki-in. In this year’s springsession, Qing Yuan went 7-1, losing only to Kitani Minoru, and he earned 100 yen and a gold medalfor his 3rd place finish. 100 yen at that time was about equivalent to today’s [1980s] 200,000 yen.In the autumn session of the same year, he went undefeated, gaining the highest total points and thusa 1st place. This time, the prize was 300 yen, and he was promoted to 4-dan. In 1931, Qing Yuanwent 6-2 and a 4th-place finish in the spring session, and went undefeated and a 1st-place finish inthe autumn session. By this time, Qing Yuan’s life had become financially insured, so he helped histhree younger sisters in Beijing to go to Tokyo.
To have a settled life was the condition for him to be concentrated on go, and to have strongopponents constantly for years was the condition for him to improve. With both conditions satisfied,he was able to study go hard all day long. Segoe Kensaku said, “I was a neighbor of Wu family for 10
450 APPENDIX A. A SHORT BIOGRAPHY OF WU QING YUAN (GO SEIGEN)
years, and I knew he deeply studied go at home anytime. He was a genius, but he worked harder thanthe others too.” Segoe then added, “Although he was my student, I seldom gave him advices. His goskills were mostly developed by himself.”
At this time, Qing Yuan’s fame had spread all over Japan, and from time to time there were manyinvitations from various parties to ask him to teach go.
In 1931, Qing Yuan participated the Tokyo Times newspaper sponsered tournament. This was asingle elimination tournament. Qing Yuan triumphed consecutively, defeating 18 opponents in a row.Times Newspaper posted his games consecutively for about half a year, and his winning streak drew agreat attention from the go world in Japan. During this tournament, every game’s winner earned 180yen, and since Qing Yuan won every game of his, money flowed in like water. He, however, turnedall his income to mother, and he never spent much on himself. He was then 18 years old, and Tokyohappened to be a place full of sexual attractions. Right across the street from Ki-in, for example, therewas a big dancing theater. There were many Japanese players who often drank, gambled, and playedwith women, and many Japanese were proud of these behaviors, believing that this showed men’s reallook. In such an environment, Qing Yuan was able to keep himself away from miscellaneous thoughts.He only had go in his mind, studying go with diligence. This was indeed rare and admirable.
During the 1932 spring session of the Oteai tournament, he again won all of his games, gainingthe 1st place; during the autumn session of the same year, he lost only to Kojima and won the 2ndplace. In 1933, then 19 years old, Qing Yuan was promoted to 5-dan. In the spring session of thesame year, he won 2nd place, then in the autumn session, he shared the 1st place with Kitani Minoru.In the same year, the Yomiuri Newspaper sponsored a Japanese Go Championship tournament. QingYuan defeated rivals Kitani Minoru and Hashimoto Utaro, winning the tournament and the bonus toplay Meijin Shusai. In this game, Qing Yuan of course held black, and he played the first move at the3-3 point of upper right corner. This kind of move was a taboo in the Honinbo family. The secondblack stone was played at the hoshi [star] point at lower left, and black’s third move was at tengen[10-10]. This new style of playing shocked the go world. Howerver, Honinbo Shusai himself knewwell about Qing Yuan’s strength, and he played carefully. A few times Qing Yuan delivered movesthat were difficult to handle, and Shusai adjourned the game frequently. As a result, the game lasteduntil January of the next year, a total of 3 months. During this period, Qing Yuan also participatedthe Oteai autumn session and other newspaper sponsored games of total of 11 games. At the end,Shusai won the game by 2 points. Rumors said, Shusai won because his student Maeda Nobuakidiscovered a myoshu, i.e. white 160. Many people thought, it was unfair that Shusai frequentlyrequested adjournment [it was white player’s right at that time] and studied it later with his students.Consequently, Nihon Ki-in set a rule that each game should be finished on the same day without anydelay. [The author failed to mention “sealing moves.”]
In 1934, Qing Yuan was promoted to 6-dan. After winning all his games in 1935 spring session ofOteai, however, he suddenly became ill, and he was unable to participate the autumn session. In 1936,he played in the spring session after newly recovered from his illness, winning 2nd place. Then heparticipated in a newspaper sponsored tournament. To round 14, his body could not hold up anymore,and he forfeited the remaining games under doctor’s advice. He skipped the autumn session as well.In April of the same year [1936], he officially naturalized to become a Japanese citizen, changingname to Go Izumi. [“Go Izumi” are the two characters for “Wu Quan”, his old name. In Japanese,Kanji (Chinese characters) have two ways of reading: one is based on its (original) Chinese sound,another is based on its Japanese sound. In this case, “Go” is based on Chinese sound while “Izumi” isa Japanese word. He chose so to show that he was semi-Chinese and semi-Japanese. Later, however,people returned to call him Go Seigen (Wu Qing Yuan) since that was the way they were used to.]
Because of the illness, he rested in the hospital for a year and three months. During this recoveringperiod, he wrote a collection of his thoughts entitled “Mo Chou Collection” [“Mo Chou” literallymeans “not to worry”], and it was published in 1940. In this collection, there were experiences ongo skills. For example, “Go should improve day by day; if no progress, there is retreat [like sailingagainst current].” Also, there were thoughts which flowed out when he was quietly resting. For
451
instance, he believed that reading ancient poetry was a good way to improve one’s mind.During the time when Qing Yuan was in the hospital, Honinbo Shusai announced his retirement,
and he played Kitani Minoru a “retirement match.” At the end, Kitani won the game. A naturalconsequece of this result might be that Kitani Minoru would be regarded as the No.1 in the go worldafter Honinbo Shusai retired. However, people knew that there was still Wu Qing Yuan. The real No.1title had to be decided between the two on the board. Thus, Yomuri Newspaper staged a Kitani-Wu10-game series. This series started at the end of September of this year [1939], and it lasted till Juneof 1941, with Qing Yuan winning the series by a score of 6-4. During this 10-game series, there weretimes when people threw stones to Qing Yuan’s house, and there were threatening letters, saying ifQing Yuan defeated Kitani, he would have to be careful about his life. Qing Yuan showed the letterto Segoe Kensaku. Mr Segoe thought that Qing Yuan should take it seriously; if he was to win theseries, he might well be in danger. Nevertheless, Qing Yuan regarded go as his second life, and he didnot give in. He won the series at last.
In February 1942, Qing Yuan got married with a college student Nagahara, and he moved inNagahara’s house. In this year’s Nihon Ki-in high-dan competition, he won the 1st prize with a 5-1score. In August 1946, he started the 10-game series with Hashimoto Utaro. The series lasted only 8games, when Hashimoto resigned after trailing 6-2. In 1948, he started another 10-game series withIwamoto Kaoru. This time, it lasted only 6 games, when Iwamoto resigned after Qing Yuan led theseries 5-1.
In 1950, when he was 36, Qing Yuan was promoted to 9-dan. The 50’s were Qing Yuan’s goldenyears, when he defeated all the top rivals in a series of spectacular 10-game series. And he stoodalone at the top of other big matches. That era was called Wu Qing Yuan Era, and until today, peoplein the go world are still admiring Qing Yuan’s glorious record of that time.
In 1951, Qing Yuan couple was invited by the Taipei Go Association and they visited Taiwan. LinHai Feng (Rin Kaiho) was then only a 10-year-old boy, but he was already a famous player in Taipei.Qing Yuan gave him 6 stones in a game and won by 1 point. After the game, some asked Qing Yuan,how was the kid’s future? Qing Yuan answered, “Based on a professional player’s standard, he canreach 6 to 7 dan. Whether or not he can go further is determined by how hard he works by himself. Ifhe wants to go to Japan to learn go, the earlier the better.” Therefore, Lin’s family decided to ask LinHai Feng to go to Japan, and they asked Qing Yuan to be his teacher. Later Lin Hai Feng became atop player in Japan. There was an era called Lin Hai Feng Era. [Again, Lin is Rin Kaiho.]
In 1961, Qing Yuan was 47 years old. He displayed once again his prime form, winning the 3rdJapan’s Strongest Deciding Matches. [Shared the title with Sakata Eio.] This was the last gloriousvictory in his magnificant career. One afternoon in August of this year, he was hit by a motorcyclewhen he walked across a street. Several bones were broken, and his brain was damaged. Afteremergency rescue, his life was saved. After that, he stayed in hospital for over a year. Havingexperienced such a hit, he no longer had the energy to recover to his top form. The next year, hesuffered nervous disorder caused by the brain concussion, and for that he had to stay in hospital foranother long period of time. Even so, he managed to win 2nd places in the Meijin matches in 1963and again in 1964 [league plays]. In 1965 the 4th Meijin matches, he finally showed sign of falling,and he could no longer compete with the new comers. This year’s Meijin title was grabbed by hisstudent Lin Hai Feng. The Wu Qing Yuan Era in the go history finally left for good. What followedwere a new generation of players such as Lin Hai Feng (Rin Kaiho), Otake Hideo, Ishida Yoshio, andCho Chikun.

452 APPENDIX A. A SHORT BIOGRAPHY OF WU QING YUAN (GO SEIGEN)
Appendix B
Japan’s Strongest Deciding Matches
Seven of these eight games of Go Seigen were played during the 1st Japan’s Strongest DecidingMatches. This article is an overview of these matches.
The following is a translation of the Chinese translation of a piece by a Japanese 5-dan. My notesare given in the square brackets. In the translation, “Wu” is used to replace “Go Seigen”.
When Wu defeated Takagawa Kaku 8-dan, who had won 5 consecutive Honinbo titles, there wasno legitimate 10-games series opponent for him left. Since the first 10-game series, Wu had facedKitani Minoru 7-dan, Karigane Junichi 8-dan, and Fujisawa Kuranosuke 6-dan of the prewar era,Hashimoto Utaro 8-dan, Honinbo Kunwa (Iwamoto Kun 8-dan), Honinbo Shou (Hashimoto Utaro8-dan, 2nd time), Fujisawa Kuranosuke 9-dan (2nd and 3rd time), Sakata Eio 8-dan, and HoninboShukaku (Takagawa Kaku 8-dan) of the postwar era. It seemed that 10-game series was unable tocontinue. Therefore, at the end of 1957 (Showa Year 32) [My other records show that it should be atthe beginning of 1957], Yomiuri Shimbun initiated and sponsored a championship tournament called“Japan’s Strongest Deciding Matches.”
These matches were also called “Top Six Matches.” Participants included all the 9-dans of thetime. That is, Wu and Nihon Kiin’s Kitani Minoru and Sakata Eio; also, the “homeless” FujisawaHosai (Kuranosuke) who left Nihon Kiin after losing to Wu in their 10-game series. Besides them[9-dans, which should also include Hashimoto Utaro], there was five consecutive Honinbo title holderTakagawa Kaku 8-dan. Participants were the strongest players who could be invited. Although thesematches were not named “Meijin Sen”, the fans all regarded it as the actual Meijin Sen.
According to the rules of these matches, there was no komi, and it was a double round-robin inwhich each pair of players were to play two games against each other (playing black by turn). ByApril of 1959 (Showa Year 34) [should be 1958 (Showa Year 33)], all matches, a total of 30, werefinished. Among them, there were some historical matches such as Wu and Kitani Minoru’s rematchafter 12 years [should be 13 years], and Wu’s new version of “big avalanche joseki.”
To Wu, these opponents all had been beaten by him into “sente handicaps” [These special handi-caps were used in Wu’s 10-game series. At the start of each series, both Wu and his opponent wouldplay like normal even games (players play black by turn). But when one of them had a net lead of 4games in the series (it was almost always the case that Wu had such a lead), the trailing player wouldreceive a “sente handicap” (It’s called BWB handicap) in which he would have sente (black stone) intwo out of three games. Then, if this trailing player would net 4 more losses, his “sente handicap”would become “long-sente”, i.e. he would always play black. Of course, if he could net 4 wins afterbeing handicapped, he would be promoted to play even games again (that, however, didn’t happento any of the opponents of Wu; Wu usually beat them with white too).], and now he had to agree toplay with them in normal even games. One could understand that Wu might have different ideas, buteventually, Wu never suggested anything different from the rules.
Finally, these 1st Deciding Matches ended with Wu winning by a record of 8 wins and 2 losses.
453
454 APPENDIX B. JAPAN’S STRONGEST DECIDING MATCHES
In the 2nd Matches [in 1959], Sakata won by a record of 8 wins, 1 loss, and 1 tie; Kitani and Wuwon 2nd and 3rd places, respectively. In the 3rd Matches [in 1961], the leading Wu lost his finale toSakata, thus tying Sakata for the 1st place. [That was the point that Wu started to fade. In the Augustof the same year, 1961, Wu was injured (including his brain) by a motorcycle in a traffic accident. Hisbody would eventually recover, but his prime time was over.]
Appendix C
Honinbo Shusai Retirement Match
The last Meijin, Shusai, played only two official games in his last ten years. The first was in 1933-34against Go Seigen, who shocked the Go world with a “3-3, star, tengen” opening. In the game, eachside was given 24 hours, and one of the traditional rules was that each session would end around 4o’clock in the afternoon when it was white’s turn (Meijin, of course, played white). This is of courseunfair by today’s standard, since it would mean that white can spend whole night (actually, maybethe next few entire days) to consider his next move. But at that time, the rule was to “show respect towhite.” Go Seigen went on to lose the game by 2 points, and people started to talk about the unfairnessof this traditional rule.
Five years later, in 1938, Kitani Minoru was awarded the chance to play Meijin’s last game, hisretirement match. Kitani strongly requested to apply “sealed play” rule; that is, by the end of a session,no matter whose turn it is, he shall deliberate this move out, put it under seal, and this move cannotbe opened until the next session. At first, conservative officials was so shocked by Kitani’s decisionthat they refused to accept it, but stubborn Kitani was not going to give in – he threatened to give upthe right to play! Finally, Kitani won the battle, and “sealed play” rule was applied officially the firsttime in history. This victory of Kitani was probably bigger than the one he won on the board – after34 hours spent by Kitani and nearly 20 hours spent by Meijin (each was given 40 hours), Kitani wonthe game by 5 points.
On Meijin’s side, however, this was truly a sad ending to his long career. Once being called“Invincible Meijin”, he found, at the end, that the traditional force he represented was no longer“invincible” under the attack by the new generation of Kitani Minoru and Go Seigen. Meijin died in1940. This sadness was beautifully shown in Kawabata Yasunai’s classic novel “Meijin” (or “Masterof Go”). This book is highly recommended to everyone who plays go.
455
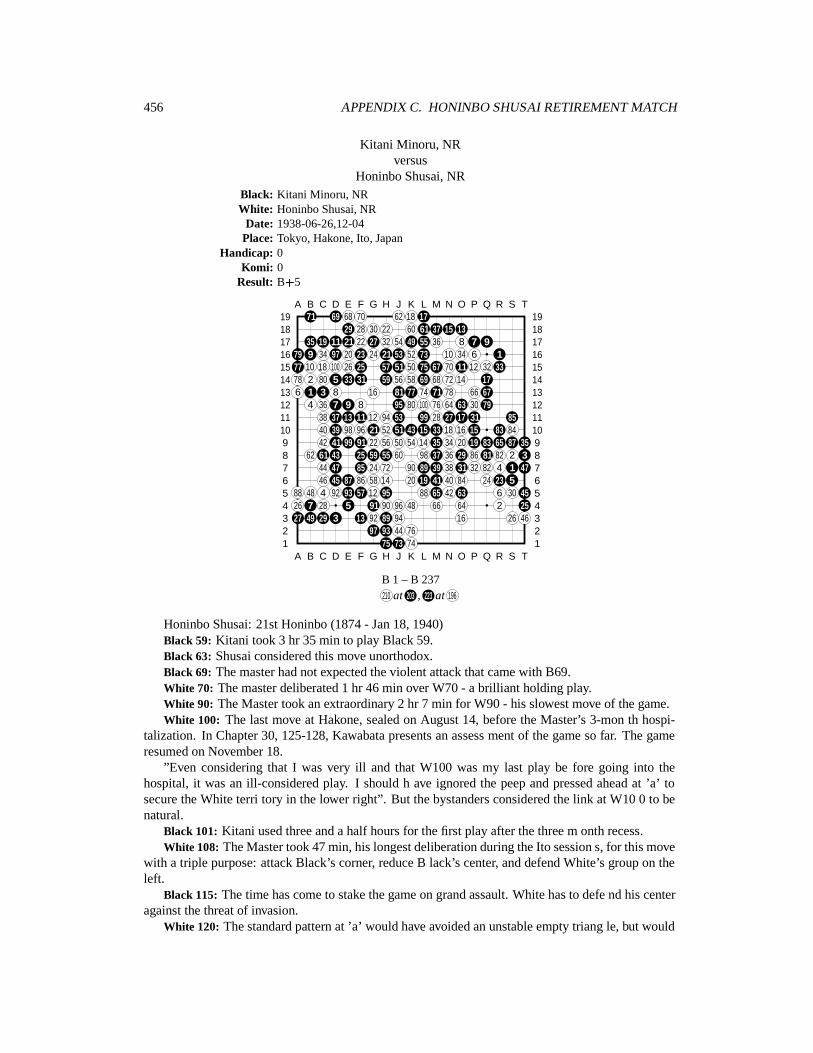
456 APPENDIX C. HONINBO SHUSAI RETIREMENT MATCH
Kitani Minoru, NRversus
Honinbo Shusai, NRBlack: Kitani Minoru, NRWhite: Honinbo Shusai, NR
Date: 1938-06-26,12-04Place: Tokyo, Hakone, Ito, Japan
Handicap: 0Komi: 0
Result: B�5
A B C D E F G H J K L M N O P Q R S T
A B C D E F G H J K L M N O P Q R S T12345678910111213141516171819
1234567891011121314151617181971 69 68 70 62 18 17
29 28 30 22 60 61 37 15 1335 19 11 21 22 27 32 54 49 55 36 8 7 9
79 9 34 97 20 23 24 21 53 52 73 10 34 6 177 10 18 100 26 25 57 51 50 75 67 70 11 12 32 3378 2 80 5 33 31 59 56 58 69 68 72 14 176 1 3 8 16 81 77 74 71 78 66 67
4 36 7 9 8 95 80 100 76 64 63 30 7938 37 13 11 12 94 53 99 28 27 17 31 8540 39 98 96 21 52 51 43 15 33 18 16 15 83 8442 41 99 91 22 56 50 54 14 35 34 20 19 83 65 87 35
62 61 43 25 59 55 60 98 37 36 29 86 81 82 2 344 47 85 24 72 90 89 39 38 31 32 82 4 1 4746 45 87 86 58 14 20 19 41 40 84 24 23 5
88 48 4 92 93 57 12 95 88 65 42 63 6 30 4526 7 28 5 91 90 96 48 66 64 2 2527 49 29 3 13 92 89 94 16 26 46
97 93 44 7675 73 74
B 1 – B 237210 at 203 , 223 at 196
Honinbo Shusai: 21st Honinbo (1874 - Jan 18, 1940)Black 59: Kitani took 3 hr 35 min to play Black 59.Black 63: Shusai considered this move unorthodox.Black 69: The master had not expected the violent attack that came with B69.White 70: The master deliberated 1 hr 46 min over W70 - a brilliant holding play.White 90: The Master took an extraordinary 2 hr 7 min for W90 - his slowest move of the game.White 100: The last move at Hakone, sealed on August 14, before the Master’s 3-mon th hospi-
talization. In Chapter 30, 125-128, Kawabata presents an assess ment of the game so far. The gameresumed on November 18.
”Even considering that I was very ill and that W100 was my last play be fore going into thehospital, it was an ill-considered play. I should h ave ignored the peep and pressed ahead at ’a’ tosecure the White terri tory in the lower right”. But the bystanders considered the link at W10 0 to benatural.
Black 101: Kitani used three and a half hours for the first play after the three m onth recess.White 108: The Master took 47 min, his longest deliberation during the Ito session s, for this move
with a triple purpose: attack Black’s corner, reduce B lack’s center, and defend White’s group on theleft.
Black 115: The time has come to stake the game on grand assault. White has to defe nd his centeragainst the threat of invasion.
White 120: The standard pattern at ’a’ would have avoided an unstable empty triang le, but would
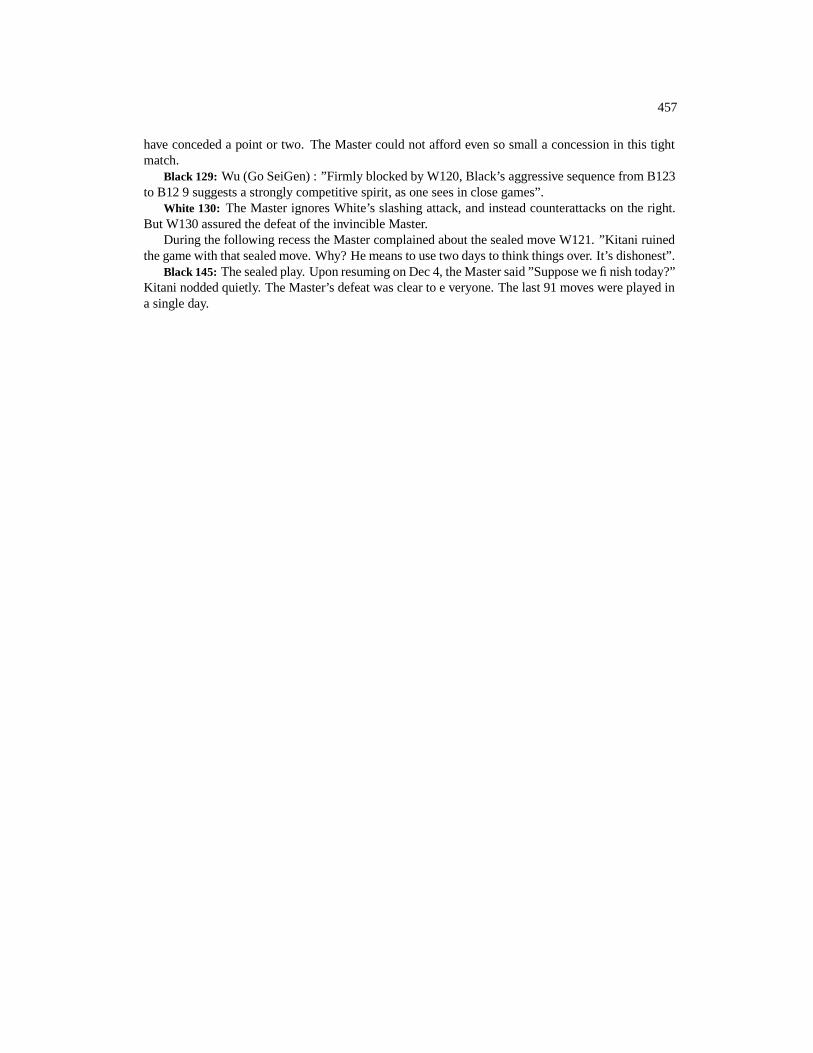
457
have conceded a point or two. The Master could not afford even so small a concession in this tightmatch.
Black 129: Wu (Go SeiGen) : ”Firmly blocked by W120, Black’s aggressive sequence from B123to B12 9 suggests a strongly competitive spirit, as one sees in close games”.
White 130: The Master ignores White’s slashing attack, and instead counterattacks on the right.But W130 assured the defeat of the invincible Master.
During the following recess the Master complained about the sealed move W121. ”Kitani ruinedthe game with that sealed move. Why? He means to use two days to think things over. It’s dishonest”.
Black 145: The sealed play. Upon resuming on Dec 4, the Master said ”Suppose we fi nish today?”Kitani nodded quietly. The Master’s defeat was clear to e veryone. The last 91 moves were played ina single day.

458 APPENDIX C. HONINBO SHUSAI RETIREMENT MATCH
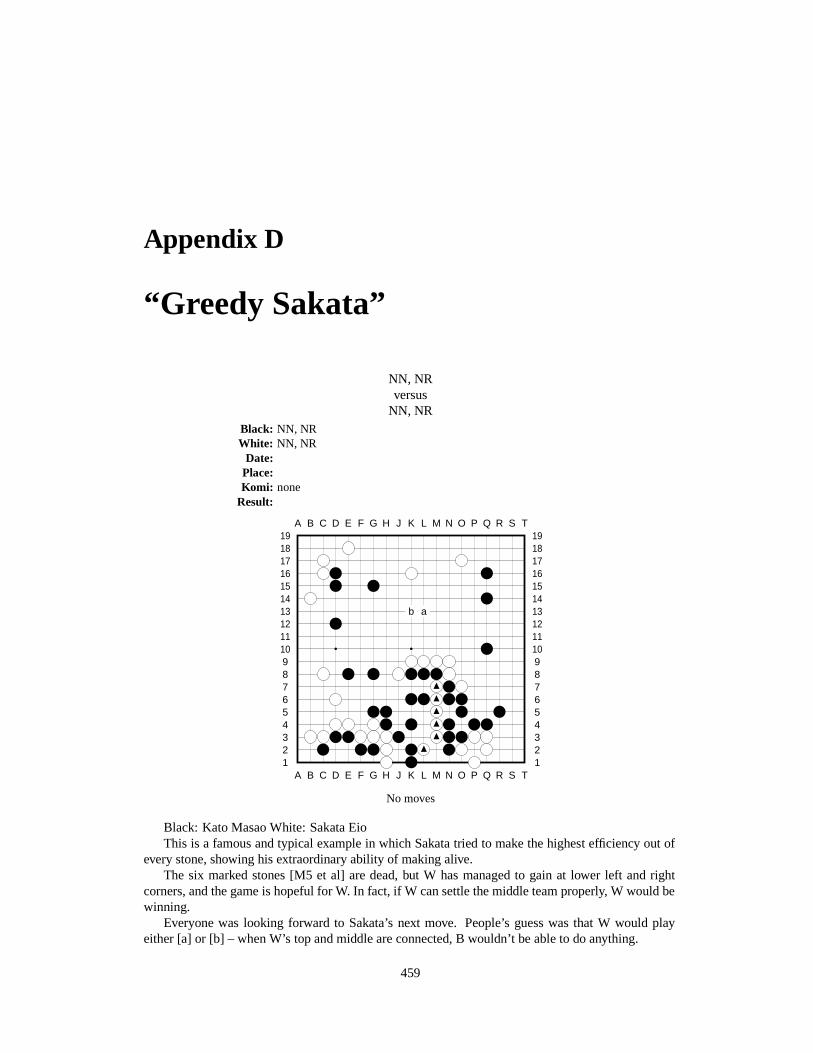
Appendix D
“Greedy Sakata”
NN, NRversus
NN, NRBlack: NN, NRWhite: NN, NR
Date:Place:Komi: none
Result:
A B C D E F G H J K L M N O P Q R S T
A B C D E F G H J K L M N O P Q R S T12345678910111213141516171819
12345678910111213141516171819
b a
No moves
Black: Kato Masao White: Sakata EioThis is a famous and typical example in which Sakata tried to make the highest efficiency out of
every stone, showing his extraordinary ability of making alive.The six marked stones [M5 et al] are dead, but W has managed to gain at lower left and right
corners, and the game is hopeful for W. In fact, if W can settle the middle team properly, W would bewinning.
Everyone was looking forward to Sakata’s next move. People’s guess was that W would playeither [a] or [b] – when W’s top and middle are connected, B wouldn’t be able to do anything.
459
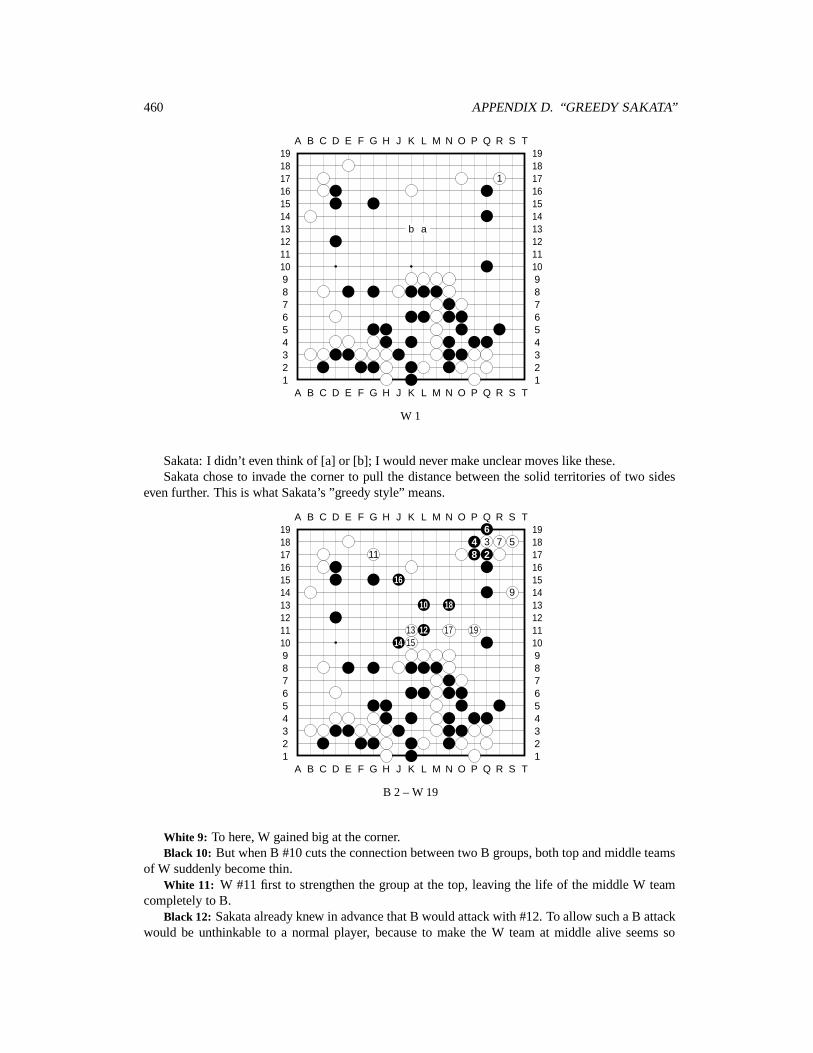
460 APPENDIX D. “GREEDY SAKATA”
A B C D E F G H J K L M N O P Q R S T
A B C D E F G H J K L M N O P Q R S T12345678910111213141516171819
12345678910111213141516171819
1
b a
W 1
Sakata: I didn’t even think of [a] or [b]; I would never make unclear moves like these.Sakata chose to invade the corner to pull the distance between the solid territories of two sides
even further. This is what Sakata’s ”greedy style” means.
A B C D E F G H J K L M N O P Q R S T
A B C D E F G H J K L M N O P Q R S T12345678910111213141516171819
123456789101112131415161718196
4 3 7 511 8 2
169
10 18
13 12 17 1914 15
B 2 – W 19
White 9: To here, W gained big at the corner.Black 10: But when B #10 cuts the connection between two B groups, both top and middle teams
of W suddenly become thin.White 11: W #11 first to strengthen the group at the top, leaving the life of the middle W team
completely to B.Black 12: Sakata already knew in advance that B would attack with #12. To allow such a B attack
would be unthinkable to a normal player, because to make the W team at middle alive seems so
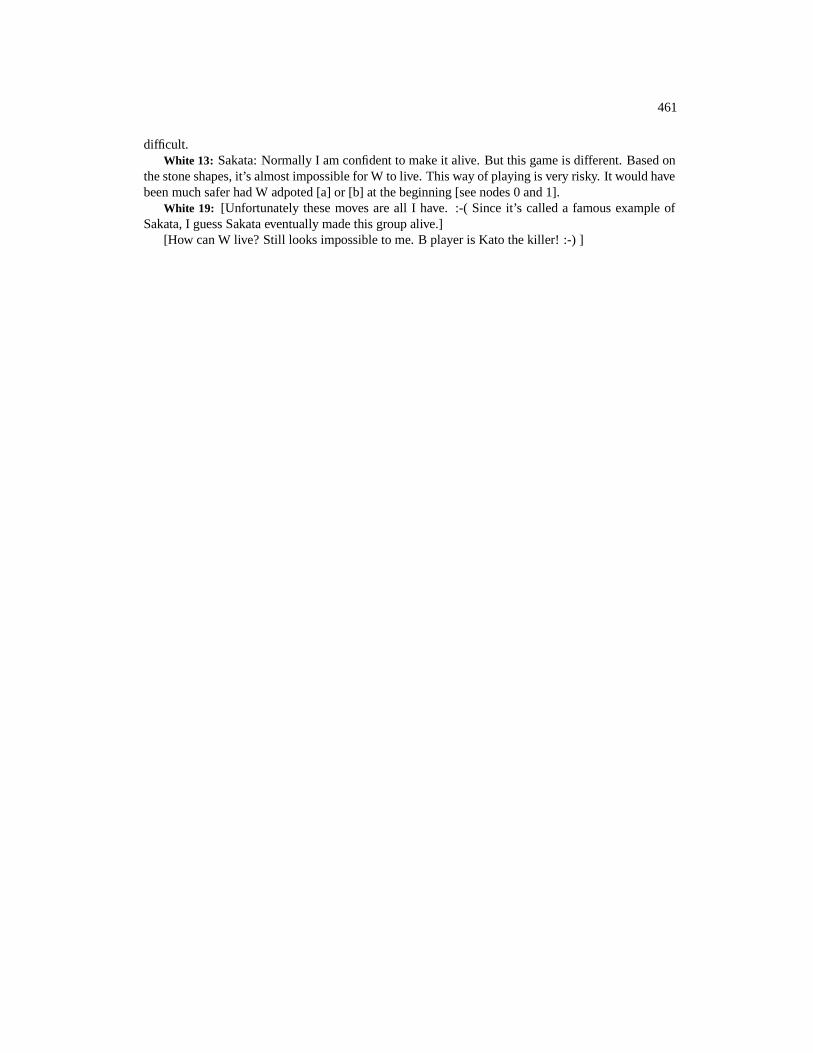
461
difficult.White 13: Sakata: Normally I am confident to make it alive. But this game is different. Based on
the stone shapes, it’s almost impossible for W to live. This way of playing is very risky. It would havebeen much safer had W adpoted [a] or [b] at the beginning [see nodes 0 and 1].
White 19: [Unfortunately these moves are all I have. :-( Since it’s called a famous example ofSakata, I guess Sakata eventually made this group alive.]
[How can W live? Still looks impossible to me. B player is Kato the killer! :-) ]

462 APPENDIX D. “GREEDY SAKATA”
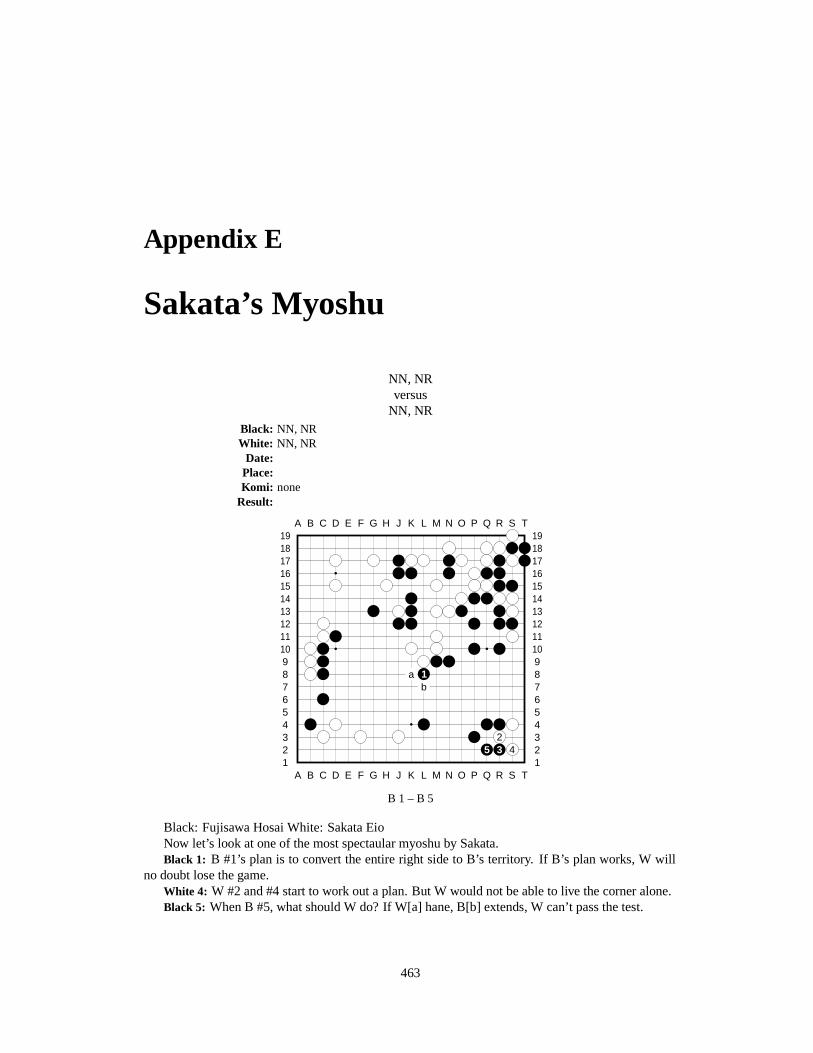
Appendix E
Sakata’s Myoshu
NN, NRversus
NN, NRBlack: NN, NRWhite: NN, NR
Date:Place:Komi: none
Result:
A B C D E F G H J K L M N O P Q R S T
A B C D E F G H J K L M N O P Q R S T12345678910111213141516171819
12345678910111213141516171819
a 1b
25 3 4
B 1 – B 5
Black: Fujisawa Hosai White: Sakata EioNow let’s look at one of the most spectaular myoshu by Sakata.Black 1: B #1’s plan is to convert the entire right side to B’s territory. If B’s plan works, W will
no doubt lose the game.White 4: W #2 and #4 start to work out a plan. But W would not be able to live the corner alone.Black 5: When B #5, what should W do? If W[a] hane, B[b] extends, W can’t pass the test.
463
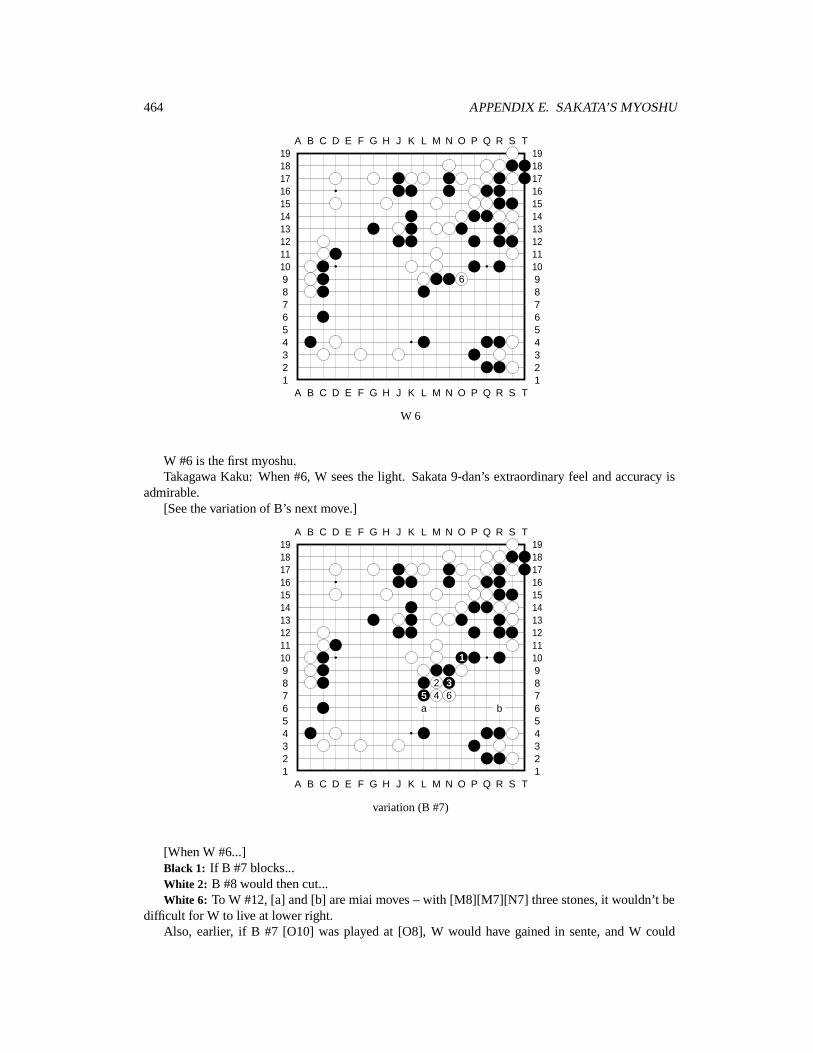
464 APPENDIX E. SAKATA’S MYOSHU
A B C D E F G H J K L M N O P Q R S T
A B C D E F G H J K L M N O P Q R S T12345678910111213141516171819
12345678910111213141516171819
6
W 6
W #6 is the first myoshu.Takagawa Kaku: When #6, W sees the light. Sakata 9-dan’s extraordinary feel and accuracy is
admirable.[See the variation of B’s next move.]
A B C D E F G H J K L M N O P Q R S T
A B C D E F G H J K L M N O P Q R S T12345678910111213141516171819
12345678910111213141516171819
1
2 35 4 6a b
variation (B #7)
[When W #6...]Black 1: If B #7 blocks...White 2: B #8 would then cut...White 6: To W #12, [a] and [b] are miai moves – with [M8][M7][N7] three stones, it wouldn’t be
difficult for W to live at lower right.Also, earlier, if B #7 [O10] was played at [O8], W would have gained in sente, and W could
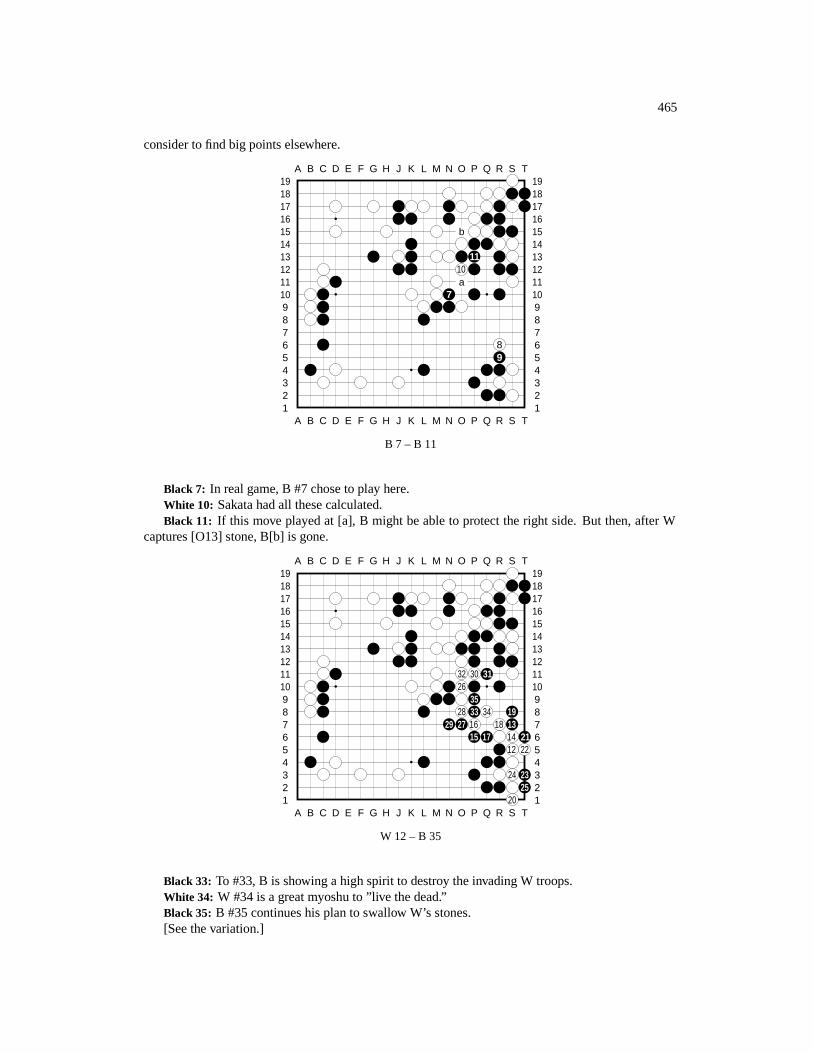
465
consider to find big points elsewhere.
A B C D E F G H J K L M N O P Q R S T
A B C D E F G H J K L M N O P Q R S T12345678910111213141516171819
12345678910111213141516171819
b
1110a
7
89
B 7 – B 11
Black 7: In real game, B #7 chose to play here.White 10: Sakata had all these calculated.Black 11: If this move played at [a], B might be able to protect the right side. But then, after W
captures [O13] stone, B[b] is gone.
A B C D E F G H J K L M N O P Q R S T
A B C D E F G H J K L M N O P Q R S T12345678910111213141516171819
12345678910111213141516171819
32 30 3126
3528 33 34 19
29 27 16 18 1315 17 14 21
12 22
24 2325
20
W 12 – B 35
Black 33: To #33, B is showing a high spirit to destroy the invading W troops.White 34: W #34 is a great myoshu to ”live the dead.”Black 35: B #35 continues his plan to swallow W’s stones.[See the variation.]

466 APPENDIX E. SAKATA’S MYOSHU
A B C D E F G H J K L M N O P Q R S T
A B C D E F G H J K L M N O P Q R S T12345678910111213141516171819
12345678910111213141516171819
a5
4 3 21
b
variation
If B #35 captures here...White 5: To here, [a] and [b] are miai moves to W, and W’s lower right wouldn’t die.
A B C D E F G H J K L M N O P Q R S T
A B C D E F G H J K L M N O P Q R S T12345678910111213141516171819
12345678910111213141516171819
4342 44
403841 36 37
39
W 36 – W 44
White 36: But W #36 is severe!White 44: After W #44, B [Q13] group is captured! B collapses.When W #6 [O9], Sakata had calculated all the variation clearly. This is indeed an astonishing
feat. And this is only one example; Sakata had many others. Unbelievable.
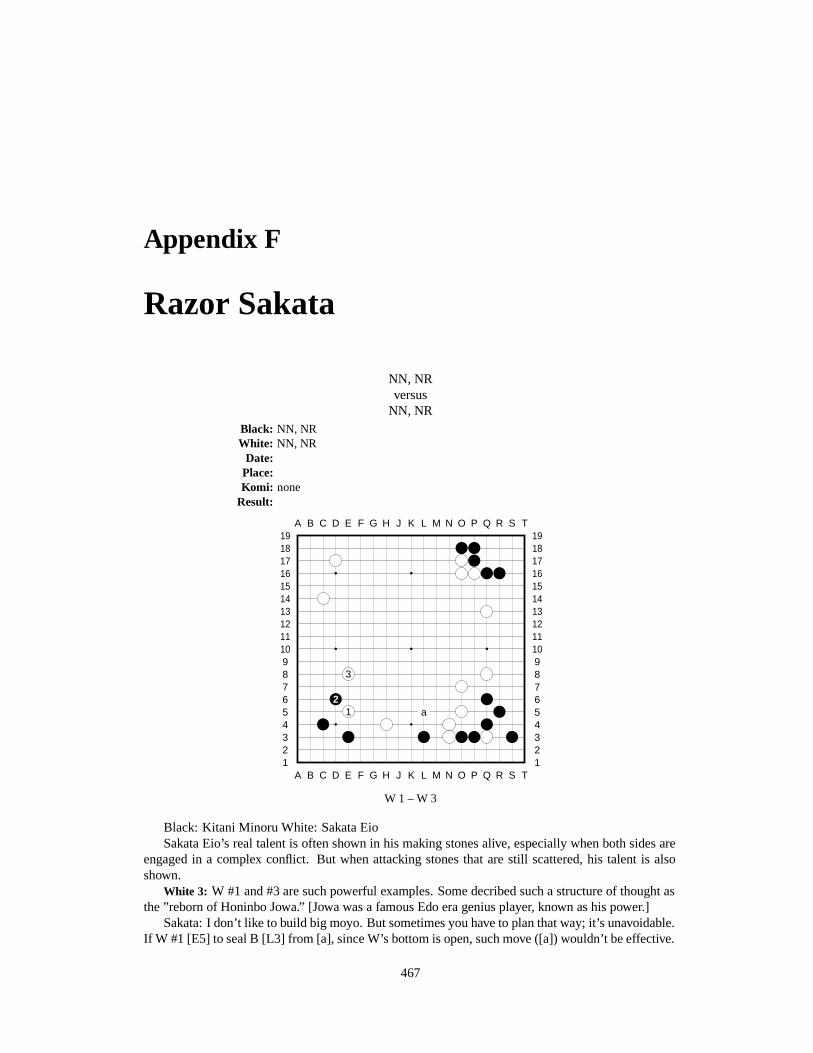
Appendix F
Razor Sakata
NN, NRversus
NN, NRBlack: NN, NRWhite: NN, NR
Date:Place:Komi: none
Result:
A B C D E F G H J K L M N O P Q R S T
A B C D E F G H J K L M N O P Q R S T12345678910111213141516171819
12345678910111213141516171819
3
21 a
W 1 – W 3
Black: Kitani Minoru White: Sakata EioSakata Eio’s real talent is often shown in his making stones alive, especially when both sides are
engaged in a complex conflict. But when attacking stones that are still scattered, his talent is alsoshown.
White 3: W #1 and #3 are such powerful examples. Some decribed such a structure of thought asthe ”reborn of Honinbo Jowa.” [Jowa was a famous Edo era genius player, known as his power.]
Sakata: I don’t like to build big moyo. But sometimes you have to plan that way; it’s unavoidable.If W #1 [E5] to seal B [L3] from [a], since W’s bottom is open, such move ([a]) wouldn’t be effective.
467

468 APPENDIX F. RAZOR SAKATA
So W shifts to play left side first; W #1 and #3 are trying to save a move at [a].Sakata is again showing his greedy pursue of highest efficiency.
A B C D E F G H J K L M N O P Q R S T
A B C D E F G H J K L M N O P Q R S T12345678910111213141516171819
12345678910111213141516171819
7 64 5
8
B 4 – B 8
Black 8: [The variations show two variations of this move.]
A B C D E F G H J K L M N O P Q R S T
A B C D E F G H J K L M N O P Q R S T12345678910111213141516171819
12345678910111213141516171819
4
87 2 36 5 1
910 1112 13
variation 1
If B #8 extends here...White 13: To here, although two W stones [E7-E8] are captured, W is able to destory B’s once-
solid shimari [corner enclosure] at lower left. Also, W’s shape now looks very good, so W can besatisfied.
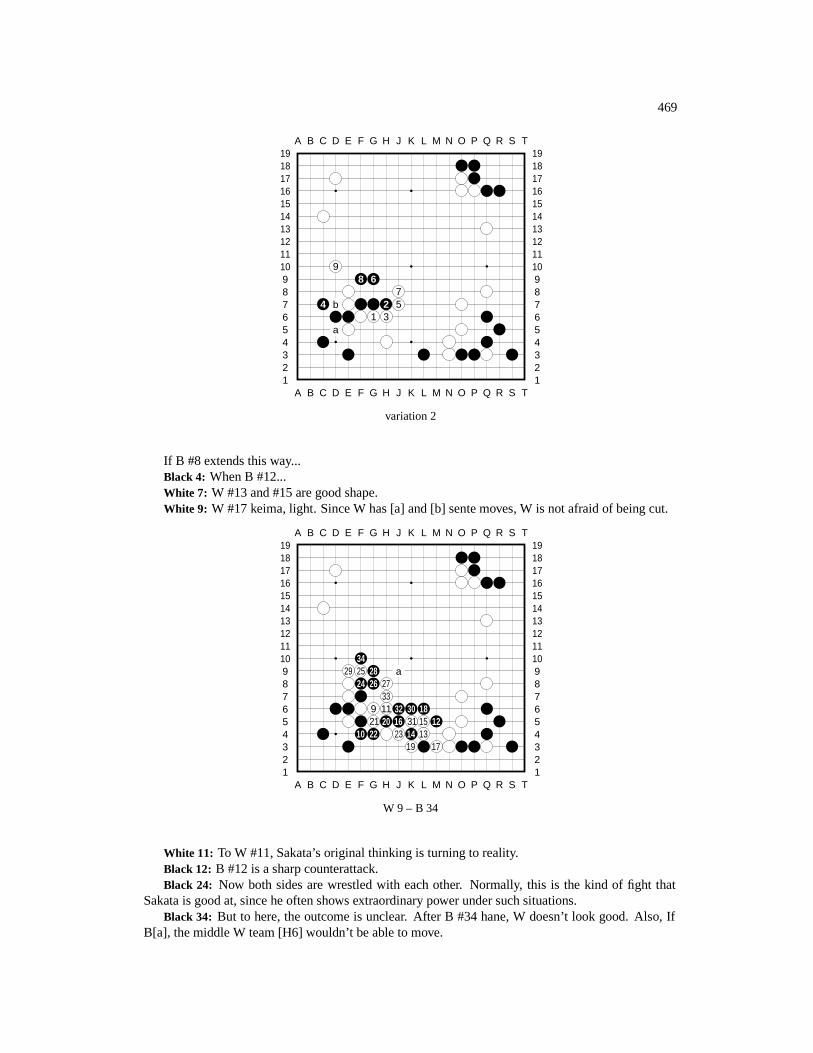
469
A B C D E F G H J K L M N O P Q R S T
A B C D E F G H J K L M N O P Q R S T12345678910111213141516171819
12345678910111213141516171819
98 6
74 b 2 5
1 3a
variation 2
If B #8 extends this way...Black 4: When B #12...White 7: W #13 and #15 are good shape.White 9: W #17 keima, light. Since W has [a] and [b] sente moves, W is not afraid of being cut.
A B C D E F G H J K L M N O P Q R S T
A B C D E F G H J K L M N O P Q R S T12345678910111213141516171819
12345678910111213141516171819
3429 25 28 a
24 26 2733
9 11 32 30 1821 20 16 31 15 12
10 22 23 14 1319 17
W 9 – B 34
White 11: To W #11, Sakata’s original thinking is turning to reality.Black 12: B #12 is a sharp counterattack.Black 24: Now both sides are wrestled with each other. Normally, this is the kind of fight that
Sakata is good at, since he often shows extraordinary power under such situations.Black 34: But to here, the outcome is unclear. After B #34 hane, W doesn’t look good. Also, If
B[a], the middle W team [H6] wouldn’t be able to move.
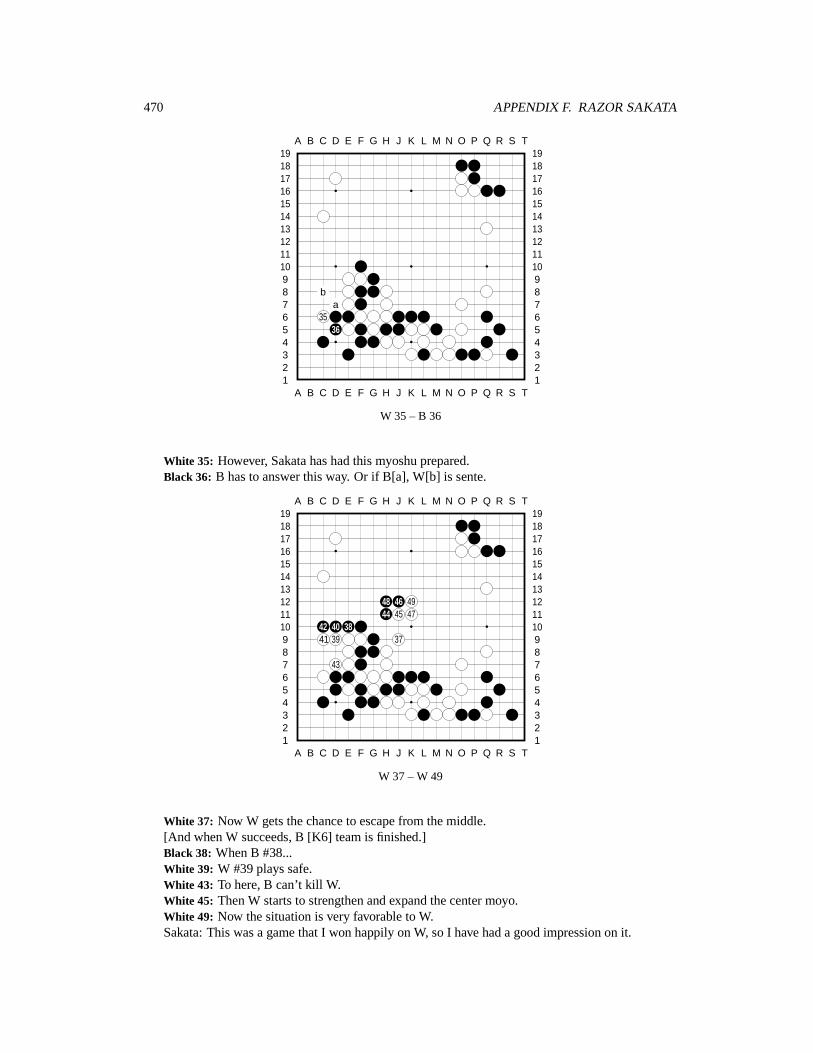
470 APPENDIX F. RAZOR SAKATA
A B C D E F G H J K L M N O P Q R S T
A B C D E F G H J K L M N O P Q R S T12345678910111213141516171819
12345678910111213141516171819
ba
3536
W 35 – B 36
White 35: However, Sakata has had this myoshu prepared.Black 36: B has to answer this way. Or if B[a], W[b] is sente.
A B C D E F G H J K L M N O P Q R S T
A B C D E F G H J K L M N O P Q R S T12345678910111213141516171819
12345678910111213141516171819
48 46 4944 45 47
42 40 3841 39 37
43
W 37 – W 49
White 37: Now W gets the chance to escape from the middle.[And when W succeeds, B [K6] team is finished.]Black 38: When B #38...White 39: W #39 plays safe.White 43: To here, B can’t kill W.White 45: Then W starts to strengthen and expand the center moyo.White 49: Now the situation is very favorable to W.Sakata: This was a game that I won happily on W, so I have had a good impression on it.
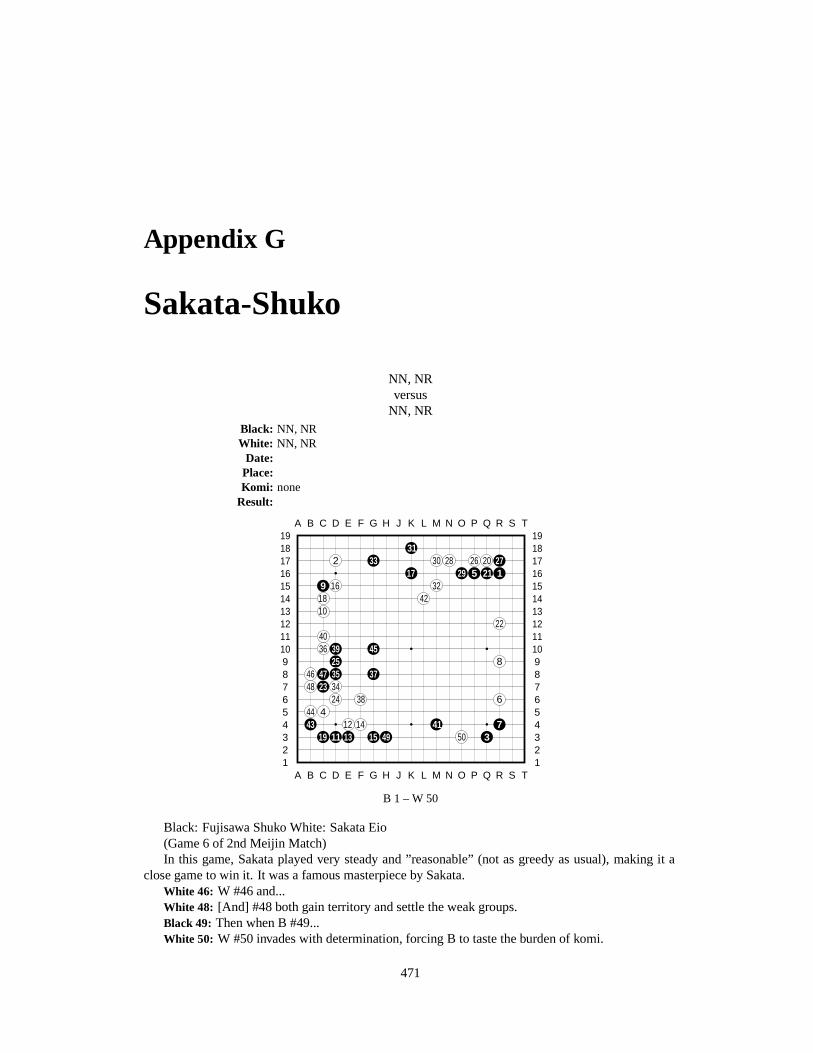
Appendix G
Sakata-Shuko
NN, NRversus
NN, NRBlack: NN, NRWhite: NN, NR
Date:Place:Komi: none
Result:
A B C D E F G H J K L M N O P Q R S T
A B C D E F G H J K L M N O P Q R S T12345678910111213141516171819
12345678910111213141516171819
312 33 30 28 26 20 27
17 29 5 21 19 16 3218 4210
224036 39 45
25 846 47 35 3748 23 34
24 38 644 443 12 14 41 7
19 11 13 15 49 50 3
B 1 – W 50
Black: Fujisawa Shuko White: Sakata Eio(Game 6 of 2nd Meijin Match)In this game, Sakata played very steady and ”reasonable” (not as greedy as usual), making it a
close game to win it. It was a famous masterpiece by Sakata.White 46: W #46 and...White 48: [And] #48 both gain territory and settle the weak groups.Black 49: Then when B #49...White 50: W #50 invades with determination, forcing B to taste the burden of komi.
471

472 APPENDIX G. SAKATA-SHUKO
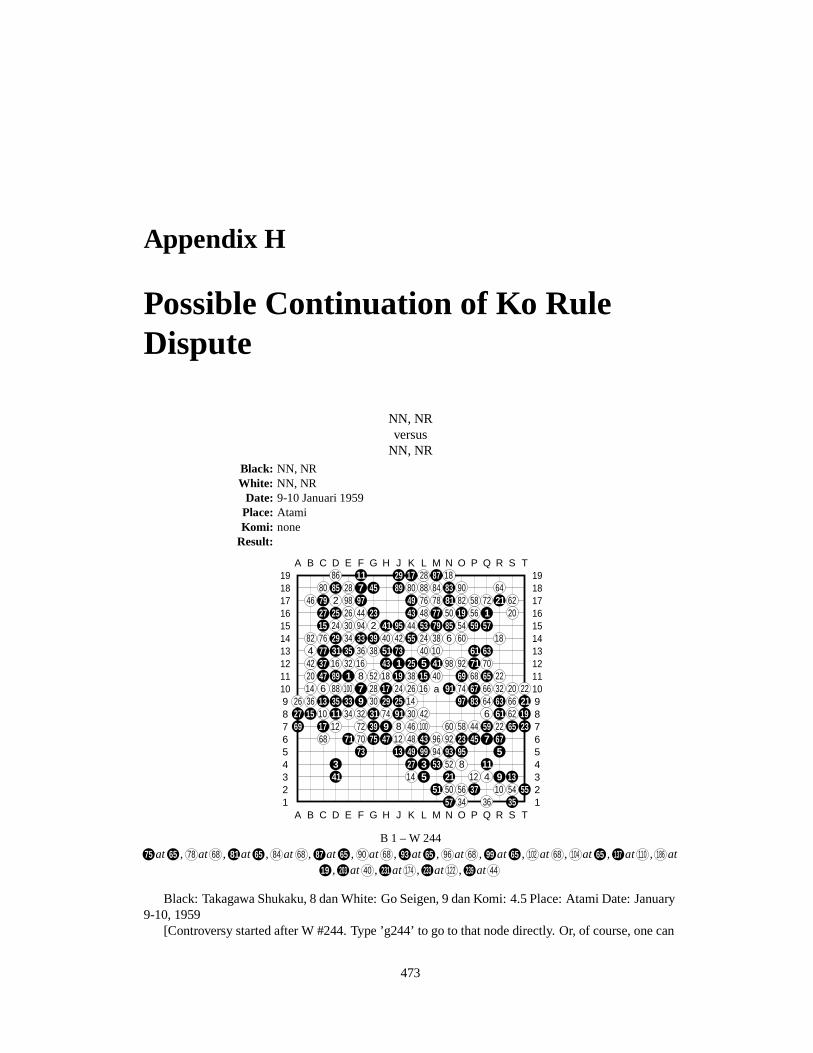
Appendix H
Possible Continuation of Ko RuleDispute
NN, NRversus
NN, NRBlack: NN, NRWhite: NN, NR
Date: 9-10 Januari 1959Place: AtamiKomi: none
Result:
A B C D E F G H J K L M N O P Q R S T
A B C D E F G H J K L M N O P Q R S T12345678910111213141516171819
1234567891011121314151617181986 11 29 17 28 87 18
80 85 28 7 45 89 80 88 84 83 90 6446 79 2 98 97 49 76 78 81 82 58 72 21 62
27 25 26 44 23 43 48 77 50 19 56 1 2015 24 30 94 2 41 95 44 53 79 85 54 59 57
82 76 29 34 33 39 40 42 55 24 38 6 60 184 77 31 35 36 38 51 73 40 10 61 6342 37 16 32 16 43 1 25 5 41 98 92 71 7020 47 89 1 8 52 18 19 38 15 40 69 68 65 2214 6 88 100 7 28 17 24 26 16 a 91 74 67 66 32 20 22
26 36 13 35 33 9 30 29 25 14 97 83 64 63 66 2127 15 10 11 34 32 31 74 91 30 42 6 61 62 1969 17 12 72 39 9 8 46 100 60 58 44 59 22 65 23
68 71 70 75 47 12 48 43 96 92 23 45 7 6773 13 49 99 94 93 95 5
3 27 3 53 52 8 1141 14 5 21 12 4 9 13
51 50 56 37 10 54 5557 34 36 35
B 1 – W 24475 at 65 , 78 at 68 , 81 at 65 , 84 at 68 , 87 at 65 , 90 at 68 , 93 at 65 , 96 at 68 , 99 at 65 , 102 at 68 , 104 at 65 , 137 at 110 , 186 at
19 , 203 at 40 , 231 at 174 , 233 at 122 , 239 at 44
Black: Takagawa Shukaku, 8 dan White: Go Seigen, 9 dan Komi: 4.5 Place: Atami Date: January9-10, 1959
[Controversy started after W #244. Type ’g244’ to go to that node directly. Or, of course, one can
473
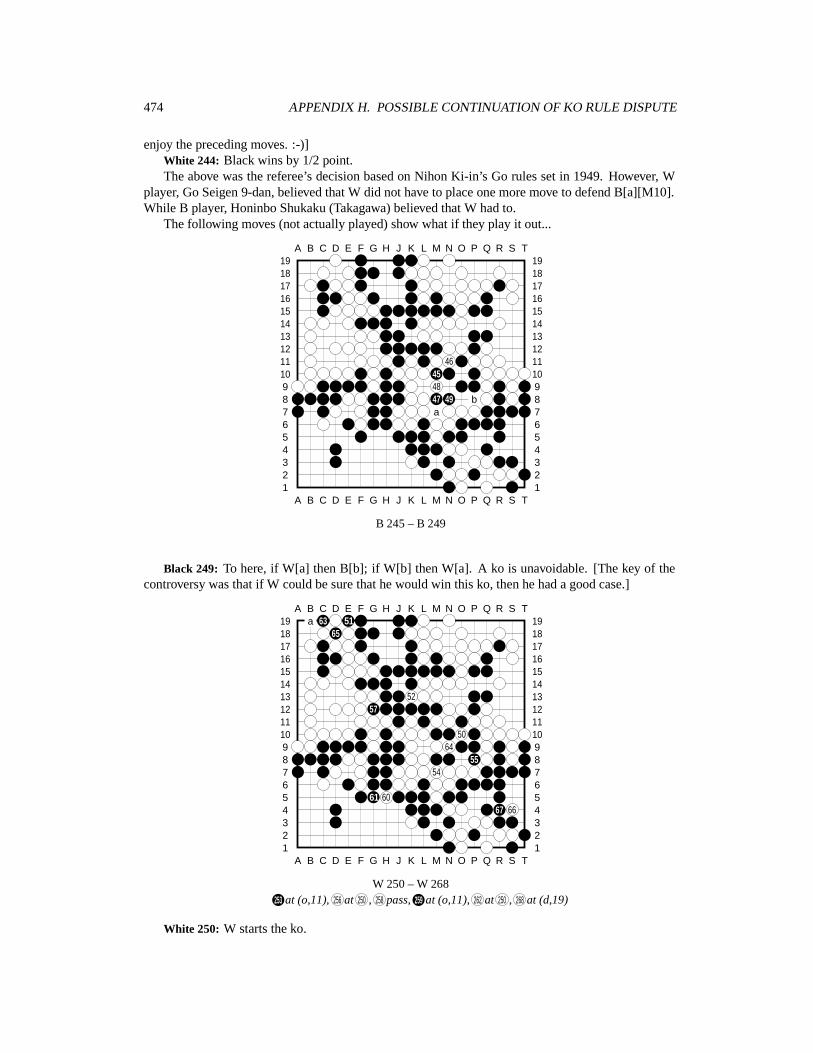
474 APPENDIX H. POSSIBLE CONTINUATION OF KO RULE DISPUTE
enjoy the preceding moves. :-)]White 244: Black wins by 1/2 point.The above was the referee’s decision based on Nihon Ki-in’s Go rules set in 1949. However, W
player, Go Seigen 9-dan, believed that W did not have to place one more move to defend B[a][M10].While B player, Honinbo Shukaku (Takagawa) believed that W had to.
The following moves (not actually played) show what if they play it out...
A B C D E F G H J K L M N O P Q R S T
A B C D E F G H J K L M N O P Q R S T12345678910111213141516171819
12345678910111213141516171819
46454847 49 ba
B 245 – B 249
Black 249: To here, if W[a] then B[b]; if W[b] then W[a]. A ko is unavoidable. [The key of thecontroversy was that if W could be sure that he would win this ko, then he had a good case.]
A B C D E F G H J K L M N O P Q R S T
A B C D E F G H J K L M N O P Q R S T12345678910111213141516171819
12345678910111213141516171819a 63 51
65
5257
5064
5554
61 6067 66
W 250 – W 268253 at (o,11), 256 at 250 , 258 pass, 259 at (o,11), 262 at 250 , 268 at (d,19)
White 250: W starts the ko.
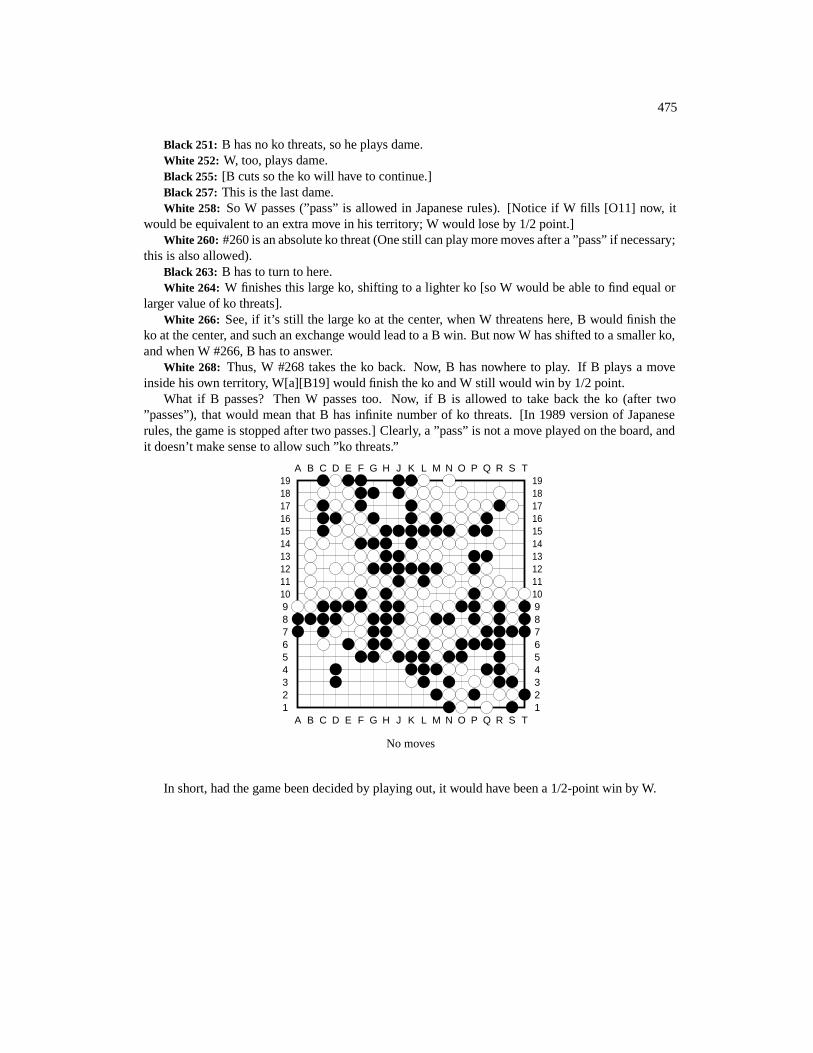
475
Black 251: B has no ko threats, so he plays dame.White 252: W, too, plays dame.Black 255: [B cuts so the ko will have to continue.]Black 257: This is the last dame.White 258: So W passes (”pass” is allowed in Japanese rules). [Notice if W fills [O11] now, it
would be equivalent to an extra move in his territory; W would lose by 1/2 point.]White 260: #260 is an absolute ko threat (One still can play more moves after a ”pass” if necessary;
this is also allowed).Black 263: B has to turn to here.White 264: W finishes this large ko, shifting to a lighter ko [so W would be able to find equal or
larger value of ko threats].White 266: See, if it’s still the large ko at the center, when W threatens here, B would finish the
ko at the center, and such an exchange would lead to a B win. But now W has shifted to a smaller ko,and when W #266, B has to answer.
White 268: Thus, W #268 takes the ko back. Now, B has nowhere to play. If B plays a moveinside his own territory, W[a][B19] would finish the ko and W still would win by 1/2 point.
What if B passes? Then W passes too. Now, if B is allowed to take back the ko (after two”passes”), that would mean that B has infinite number of ko threats. [In 1989 version of Japaneserules, the game is stopped after two passes.] Clearly, a ”pass” is not a move played on the board, andit doesn’t make sense to allow such ”ko threats.”
A B C D E F G H J K L M N O P Q R S T
A B C D E F G H J K L M N O P Q R S T12345678910111213141516171819
12345678910111213141516171819
No moves
In short, had the game been decided by playing out, it would have been a 1/2-point win by W.