Embed Size (px)
Citation preview
SystemOperating Manual
FUJITSU CELSIUS H760

Congratulations on your purchase of an innovativeproduct from Fujitsu.
The latest information about our products, tips, updates etc. can be foundon the Internet at: "http://www.fujitsu.com/fts/"
You can find driver updates at: "http://support.ts.fujitsu.com/download"
Should you have any technical questions, please contact:
• our Hotline/Service Desk ("http://support.ts.fujitsu.com/contact/servicedesk")• Your sales partner• Your sales officeWe hope you enjoy working with your new Fujitsu system!


Published by / Contact address in the EU
Fujitsu Technology Solutions GmbH
Mies-van-der-Rohe-Straße 8
80807 Munich, Germany
"http://www.fujitsu.com/fts/"
Copyright© Fujitsu Technology Solutions GmbH 2016. All rights reserved.
Publication Date05/2016
Order No.: A26391-K450-Z320-1-7619, edition 1
FUJITSU CELSIUS H760
Operating Manual
Innovative technology 7
Ports and operating elements 9
Important notes 12
First-time setup of your device 16
Working with the notebook 19
Security functions 48
Connecting external devices 56
Removing and installing componentsduring servicing 63
Settings in BIOS Setup Utility 70
Troubleshooting and tips 73
Technical data 81
Manufacturer’s notes 84
Index 92
RemarksInformation on the product description meets the design specifications of Fujitsu andis provided for comparison purposes. Several factors may cause the actual results todiffer. Technical data is subject to change without prior notification. Fujitsu rejects anyresponsibility with regard to technical or editorial mistakes or omissions.
TrademarksFujitsu, the Fujitsu logo and CELSIUS are registered trademarks of Fujitsu Limitedor its subsidiaries in the USA and other countries.
Microsoft and Windows are trademarks or registered trademarks of MicrosoftCorporation in the USA and/or other countries.
SATA is a product name of SATA-IO.
Intel is a trademark of the Intel Corporation in the USA and/or other countries.
NVIDIA and Optimus are trademarks or registered trademarks of NVIDIA Corporation inthe USA and/or other countries. NVIDIA trademarks may only be used publicly with thepermission of NVIDIA and no passage of this document may be interpreted as such apermission. A fair use of the NVIDIA trademarks in the advertising for and marketing ofNVIDIA products requires a correspondingly explicit acknowledgement.
SD, SDHC and SDXC logos are trademarks or registered trademarks of SD-3C,LLC in the USA and/or other countries.
The Bluetooth® word mark and logos are registered trademarks of Bluetooth SIG, Inc.
DVI is a registered trademark or unregistered trademark of the Digital Display Working Group.
USB Type-C™ is a trademark of the USB Implementers Forum.
Other product names and company names mentioned are trademarks or registeredtrademarks of the corresponding companies or trademark owners.
CopyrightNo part of this publication may be copied, reproduced or translated withoutthe prior written consent of Fujitsu.
No part of this publication may be saved or transferred by any electronic meanswithout the written approval of Fujitsu.
Contents
ContentsInnovative technology . . . . . . . . . . . . . . . . . . . . . . . . . . . . . . . . . . . . . . . . . . . . . . . . . . . . . . . . . . . . . . . . . 7Further information . . . . . . . . . . . . . . . . . . . . . . . . . . . . . . . . . . . . . . . . . . . . . . . . . . . . . . . . . . . . . . . . . . . . . . 7Notational conventions . . . . . . . . . . . . . . . . . . . . . . . . . . . . . . . . . . . . . . . . . . . . . . . . . . . . . . . . . . . . . . . . . . 8
Ports and operating elements . . . . . . . . . . . . . . . . . . . . . . . . . . . . . . . . . . . . . . . . . . . . . . . . . . . . . . . . . . 9
Important notes . . . . . . . . . . . . . . . . . . . . . . . . . . . . . . . . . . . . . . . . . . . . . . . . . . . . . . . . . . . . . . . . . . . . . . . . 12Safety notes . . . . . . . . . . . . . . . . . . . . . . . . . . . . . . . . . . . . . . . . . . . . . . . . . . . . . . . . . . . . . . . . . . . . . . . . . . . . 12Additional safety notes for devices with wireless components . . . . . . . . . . . . . . . . . . . . . . . . . . . . . . . 13Energy saving . . . . . . . . . . . . . . . . . . . . . . . . . . . . . . . . . . . . . . . . . . . . . . . . . . . . . . . . . . . . . . . . . . . . . . . . . . 13
Energy saving under Windows . . . . . . . . . . . . . . . . . . . . . . . . . . . . . . . . . . . . . . . . . . . . . . . . . . . . . . . 13Travelling with your notebook . . . . . . . . . . . . . . . . . . . . . . . . . . . . . . . . . . . . . . . . . . . . . . . . . . . . . . . . . . . . 14
Before you travel . . . . . . . . . . . . . . . . . . . . . . . . . . . . . . . . . . . . . . . . . . . . . . . . . . . . . . . . . . . . . . . . . . . 14Notebook: transporting . . . . . . . . . . . . . . . . . . . . . . . . . . . . . . . . . . . . . . . . . . . . . . . . . . . . . . . . . . . . . . . 14
Cleaning the notebook . . . . . . . . . . . . . . . . . . . . . . . . . . . . . . . . . . . . . . . . . . . . . . . . . . . . . . . . . . . . . . . . . . 15
First-time setup of your device . . . . . . . . . . . . . . . . . . . . . . . . . . . . . . . . . . . . . . . . . . . . . . . . . . . . . . . . . 16Unpacking and checking the device . . . . . . . . . . . . . . . . . . . . . . . . . . . . . . . . . . . . . . . . . . . . . . . . . . . . . . 16Selecting a location . . . . . . . . . . . . . . . . . . . . . . . . . . . . . . . . . . . . . . . . . . . . . . . . . . . . . . . . . . . . . . . . . . . . . 17Mains adapter connecting . . . . . . . . . . . . . . . . . . . . . . . . . . . . . . . . . . . . . . . . . . . . . . . . . . . . . . . . . . . . . . . 17Switching on the device for the first time . . . . . . . . . . . . . . . . . . . . . . . . . . . . . . . . . . . . . . . . . . . . . . . . . . 18
Working with the notebook . . . . . . . . . . . . . . . . . . . . . . . . . . . . . . . . . . . . . . . . . . . . . . . . . . . . . . . . . . . . 19Status indicators . . . . . . . . . . . . . . . . . . . . . . . . . . . . . . . . . . . . . . . . . . . . . . . . . . . . . . . . . . . . . . . . . . . . . . . . 19Switching on the notebook . . . . . . . . . . . . . . . . . . . . . . . . . . . . . . . . . . . . . . . . . . . . . . . . . . . . . . . . . . . . . . . 21Notebook: switching off . . . . . . . . . . . . . . . . . . . . . . . . . . . . . . . . . . . . . . . . . . . . . . . . . . . . . . . . . . . . . . . . . . 21Keyboard . . . . . . . . . . . . . . . . . . . . . . . . . . . . . . . . . . . . . . . . . . . . . . . . . . . . . . . . . . . . . . . . . . . . . . . . . . . . . . . 22
Separate number block . . . . . . . . . . . . . . . . . . . . . . . . . . . . . . . . . . . . . . . . . . . . . . . . . . . . . . . . . . . . . . 24Key combinations . . . . . . . . . . . . . . . . . . . . . . . . . . . . . . . . . . . . . . . . . . . . . . . . . . . . . . . . . . . . . . . . . . . 24Country and keyboard settings . . . . . . . . . . . . . . . . . . . . . . . . . . . . . . . . . . . . . . . . . . . . . . . . . . . . . . . 26
Application keys . . . . . . . . . . . . . . . . . . . . . . . . . . . . . . . . . . . . . . . . . . . . . . . . . . . . . . . . . . . . . . . . . . . . . . . . 26Touchpad and touchpad buttons . . . . . . . . . . . . . . . . . . . . . . . . . . . . . . . . . . . . . . . . . . . . . . . . . . . . . . . . . . 27
Moving the pointer . . . . . . . . . . . . . . . . . . . . . . . . . . . . . . . . . . . . . . . . . . . . . . . . . . . . . . . . . . . . . . . . . . 27Selecting an item . . . . . . . . . . . . . . . . . . . . . . . . . . . . . . . . . . . . . . . . . . . . . . . . . . . . . . . . . . . . . . . . . . . . 27Executing commands . . . . . . . . . . . . . . . . . . . . . . . . . . . . . . . . . . . . . . . . . . . . . . . . . . . . . . . . . . . . . . . . 27Dragging items . . . . . . . . . . . . . . . . . . . . . . . . . . . . . . . . . . . . . . . . . . . . . . . . . . . . . . . . . . . . . . . . . . . . . . 28
LCD screen . . . . . . . . . . . . . . . . . . . . . . . . . . . . . . . . . . . . . . . . . . . . . . . . . . . . . . . . . . . . . . . . . . . . . . . . . . . . 28Camera . . . . . . . . . . . . . . . . . . . . . . . . . . . . . . . . . . . . . . . . . . . . . . . . . . . . . . . . . . . . . . . . . . . . . . . . . . . . . . . . 29Rechargeable battery . . . . . . . . . . . . . . . . . . . . . . . . . . . . . . . . . . . . . . . . . . . . . . . . . . . . . . . . . . . . . . . . . . . 30
Charging, caring for and maintaining the battery . . . . . . . . . . . . . . . . . . . . . . . . . . . . . . . . . . . . . . . 30Removing and installing the battery . . . . . . . . . . . . . . . . . . . . . . . . . . . . . . . . . . . . . . . . . . . . . . . . . . . 31
Module . . . . . . . . . . . . . . . . . . . . . . . . . . . . . . . . . . . . . . . . . . . . . . . . . . . . . . . . . . . . . . . . . . . . . . . . . . . . . . . . . 32Removing a module . . . . . . . . . . . . . . . . . . . . . . . . . . . . . . . . . . . . . . . . . . . . . . . . . . . . . . . . . . . . . . . . . 33Installing a module . . . . . . . . . . . . . . . . . . . . . . . . . . . . . . . . . . . . . . . . . . . . . . . . . . . . . . . . . . . . . . . . . . 33
Optical drive . . . . . . . . . . . . . . . . . . . . . . . . . . . . . . . . . . . . . . . . . . . . . . . . . . . . . . . . . . . . . . . . . . . . . . . . . . . . 34Handling data carriers . . . . . . . . . . . . . . . . . . . . . . . . . . . . . . . . . . . . . . . . . . . . . . . . . . . . . . . . . . . . . . . 34CD/DVD indicator . . . . . . . . . . . . . . . . . . . . . . . . . . . . . . . . . . . . . . . . . . . . . . . . . . . . . . . . . . . . . . . . . . . 34Inserting or removing a data carrier . . . . . . . . . . . . . . . . . . . . . . . . . . . . . . . . . . . . . . . . . . . . . . . . . . . 35Manual removal (emergency removal) . . . . . . . . . . . . . . . . . . . . . . . . . . . . . . . . . . . . . . . . . . . . . . . . 35
Removing and fitting the dust removal cover (ventilation slot cover) . . . . . . . . . . . . . . . . . . . . . . . . . 36Using the power-management features . . . . . . . . . . . . . . . . . . . . . . . . . . . . . . . . . . . . . . . . . . . . . . . . . . . 38Memory cards . . . . . . . . . . . . . . . . . . . . . . . . . . . . . . . . . . . . . . . . . . . . . . . . . . . . . . . . . . . . . . . . . . . . . . . . . . 39
Fujitsu 3
Contents
Supported formats . . . . . . . . . . . . . . . . . . . . . . . . . . . . . . . . . . . . . . . . . . . . . . . . . . . . . . . . . . . . . . . . . . 39Inserting the memory card . . . . . . . . . . . . . . . . . . . . . . . . . . . . . . . . . . . . . . . . . . . . . . . . . . . . . . . . . . . 39Removing the memory card . . . . . . . . . . . . . . . . . . . . . . . . . . . . . . . . . . . . . . . . . . . . . . . . . . . . . . . . . . 39
Loudspeakers and microphones . . . . . . . . . . . . . . . . . . . . . . . . . . . . . . . . . . . . . . . . . . . . . . . . . . . . . . . . . . 40SIM card . . . . . . . . . . . . . . . . . . . . . . . . . . . . . . . . . . . . . . . . . . . . . . . . . . . . . . . . . . . . . . . . . . . . . . . . . . . . . . . 40
Inserting the SIM card . . . . . . . . . . . . . . . . . . . . . . . . . . . . . . . . . . . . . . . . . . . . . . . . . . . . . . . . . . . . . . . 40Removing the SIM card . . . . . . . . . . . . . . . . . . . . . . . . . . . . . . . . . . . . . . . . . . . . . . . . . . . . . . . . . . . . . . 41
Wireless LAN/Bluetooth/UMTS/LTE radio components . . . . . . . . . . . . . . . . . . . . . . . . . . . . . . . . . . . . . 41Switching the wireless components on and off . . . . . . . . . . . . . . . . . . . . . . . . . . . . . . . . . . . . . . . . . 41Setting up WLAN access . . . . . . . . . . . . . . . . . . . . . . . . . . . . . . . . . . . . . . . . . . . . . . . . . . . . . . . . . . . . 42Access via UMTS/LTE . . . . . . . . . . . . . . . . . . . . . . . . . . . . . . . . . . . . . . . . . . . . . . . . . . . . . . . . . . . . . . . 42
Ethernet and LAN . . . . . . . . . . . . . . . . . . . . . . . . . . . . . . . . . . . . . . . . . . . . . . . . . . . . . . . . . . . . . . . . . . . . . . . 42Switching between automatic graphics (NVIDIA Optimus Technology) and use of 3D graphicsexclusively . . . . . . . . . . . . . . . . . . . . . . . . . . . . . . . . . . . . . . . . . . . . . . . . . . . . . . . . . . . . . . . . . . . . . . . . . . . . . 43Your Port Replicator (optional) . . . . . . . . . . . . . . . . . . . . . . . . . . . . . . . . . . . . . . . . . . . . . . . . . . . . . . . . . . . 44
Ports on the Port Replicator . . . . . . . . . . . . . . . . . . . . . . . . . . . . . . . . . . . . . . . . . . . . . . . . . . . . . . . . . . 44Connecting the notebook to the Port Replicator . . . . . . . . . . . . . . . . . . . . . . . . . . . . . . . . . . . . . . . 45Connecting the mains adapter to the Port Replicator . . . . . . . . . . . . . . . . . . . . . . . . . . . . . . . . . . . 46Switching on the notebook via the port replicator . . . . . . . . . . . . . . . . . . . . . . . . . . . . . . . . . . . . . . . 46Switching off notebook via Port Replicator . . . . . . . . . . . . . . . . . . . . . . . . . . . . . . . . . . . . . . . . . . . . . 46Disconnecting the notebook from the Port Replicator . . . . . . . . . . . . . . . . . . . . . . . . . . . . . . . . . . 47
Security functions . . . . . . . . . . . . . . . . . . . . . . . . . . . . . . . . . . . . . . . . . . . . . . . . . . . . . . . . . . . . . . . . . . . . . 48Configuring the palm vein sensor . . . . . . . . . . . . . . . . . . . . . . . . . . . . . . . . . . . . . . . . . . . . . . . . . . . . . . . . . 48Configuring the fingerprint sensor . . . . . . . . . . . . . . . . . . . . . . . . . . . . . . . . . . . . . . . . . . . . . . . . . . . . . . . . 49Using the Security Lock . . . . . . . . . . . . . . . . . . . . . . . . . . . . . . . . . . . . . . . . . . . . . . . . . . . . . . . . . . . . . . . . . 49Configuring password protection in BIOS Setup Utility . . . . . . . . . . . . . . . . . . . . . . . . . . . . . . . . . . . . . . 50
Protecting BIOS Setup Utility (supervisor and user password) . . . . . . . . . . . . . . . . . . . . . . . . . . . 50Password protection for booting of the operating system . . . . . . . . . . . . . . . . . . . . . . . . . . . . . . . 51
Password protection for the hard disk . . . . . . . . . . . . . . . . . . . . . . . . . . . . . . . . . . . . . . . . . . . . . . . . . . . . . 52Activating hard disk protection . . . . . . . . . . . . . . . . . . . . . . . . . . . . . . . . . . . . . . . . . . . . . . . . . . . . . . . . 52Deactivating hard disk protection . . . . . . . . . . . . . . . . . . . . . . . . . . . . . . . . . . . . . . . . . . . . . . . . . . . . . 52
Boot from Removable Media . . . . . . . . . . . . . . . . . . . . . . . . . . . . . . . . . . . . . . . . . . . . . . . . . . . . . . . . . . . . 53Owner Information (device-dependent) . . . . . . . . . . . . . . . . . . . . . . . . . . . . . . . . . . . . . . . . . . . . . . . . . . . . 53SmartCard reader . . . . . . . . . . . . . . . . . . . . . . . . . . . . . . . . . . . . . . . . . . . . . . . . . . . . . . . . . . . . . . . . . . . . . . . 54
Inserting the SmartCard . . . . . . . . . . . . . . . . . . . . . . . . . . . . . . . . . . . . . . . . . . . . . . . . . . . . . . . . . . . . . 54Trusted Platform Module (TPM) (device-dependent) . . . . . . . . . . . . . . . . . . . . . . . . . . . . . . . . . . . . . . . 55
Enabling TPM . . . . . . . . . . . . . . . . . . . . . . . . . . . . . . . . . . . . . . . . . . . . . . . . . . . . . . . . . . . . . . . . . . . . . . . 55Disabling TPM . . . . . . . . . . . . . . . . . . . . . . . . . . . . . . . . . . . . . . . . . . . . . . . . . . . . . . . . . . . . . . . . . . . . . . 55
Connecting external devices . . . . . . . . . . . . . . . . . . . . . . . . . . . . . . . . . . . . . . . . . . . . . . . . . . . . . . . . . . . 56Connecting an external monitor . . . . . . . . . . . . . . . . . . . . . . . . . . . . . . . . . . . . . . . . . . . . . . . . . . . . . . . . . . 57Connecting USB devices . . . . . . . . . . . . . . . . . . . . . . . . . . . . . . . . . . . . . . . . . . . . . . . . . . . . . . . . . . . . . . . . 58
USB port with charging function (USB Type-C™) . . . . . . . . . . . . . . . . . . . . . . . . . . . . . . . . . . . . . . . 59USB port with charging function (Anytime USB charge) . . . . . . . . . . . . . . . . . . . . . . . . . . . . . . . . . 60Connecting an external SATA hard disk (eSATA) (port replicator only) . . . . . . . . . . . . . . . . . . . . 61Safe removal of eSATA and USB devices . . . . . . . . . . . . . . . . . . . . . . . . . . . . . . . . . . . . . . . . . . . . . 61
Connecting external audio devices . . . . . . . . . . . . . . . . . . . . . . . . . . . . . . . . . . . . . . . . . . . . . . . . . . . . . . . 62Microphone port/Line In . . . . . . . . . . . . . . . . . . . . . . . . . . . . . . . . . . . . . . . . . . . . . . . . . . . . . . . . . . . . . . 62Headphone port . . . . . . . . . . . . . . . . . . . . . . . . . . . . . . . . . . . . . . . . . . . . . . . . . . . . . . . . . . . . . . . . . . . . . 62
Removing and installing components during servicing . . . . . . . . . . . . . . . . . . . . . . . . . . . . . . . . . 63Notes on installing and removing boards and components . . . . . . . . . . . . . . . . . . . . . . . . . . . . . . . . . . 63Preparing to remove components . . . . . . . . . . . . . . . . . . . . . . . . . . . . . . . . . . . . . . . . . . . . . . . . . . . . . . . . 64
4 Fujitsu
Contents
Installing and removing memory expansion . . . . . . . . . . . . . . . . . . . . . . . . . . . . . . . . . . . . . . . . . . . . . . . . 64Removing a cover . . . . . . . . . . . . . . . . . . . . . . . . . . . . . . . . . . . . . . . . . . . . . . . . . . . . . . . . . . . . . . . . . . . 65Removing memory modules . . . . . . . . . . . . . . . . . . . . . . . . . . . . . . . . . . . . . . . . . . . . . . . . . . . . . . . . . . 65Installing a memory module . . . . . . . . . . . . . . . . . . . . . . . . . . . . . . . . . . . . . . . . . . . . . . . . . . . . . . . . . . 65Attaching the cover . . . . . . . . . . . . . . . . . . . . . . . . . . . . . . . . . . . . . . . . . . . . . . . . . . . . . . . . . . . . . . . . . . 66
Removing and installing the hard disk . . . . . . . . . . . . . . . . . . . . . . . . . . . . . . . . . . . . . . . . . . . . . . . . . . . . 67Removing a cover . . . . . . . . . . . . . . . . . . . . . . . . . . . . . . . . . . . . . . . . . . . . . . . . . . . . . . . . . . . . . . . . . . . 67Removing a hard disk . . . . . . . . . . . . . . . . . . . . . . . . . . . . . . . . . . . . . . . . . . . . . . . . . . . . . . . . . . . . . . . 68Installing a hard disk . . . . . . . . . . . . . . . . . . . . . . . . . . . . . . . . . . . . . . . . . . . . . . . . . . . . . . . . . . . . . . . . . 68Attaching the cover . . . . . . . . . . . . . . . . . . . . . . . . . . . . . . . . . . . . . . . . . . . . . . . . . . . . . . . . . . . . . . . . . . 69
Finishing component removal . . . . . . . . . . . . . . . . . . . . . . . . . . . . . . . . . . . . . . . . . . . . . . . . . . . . . . . . . . . . 69
Settings in BIOS Setup Utility . . . . . . . . . . . . . . . . . . . . . . . . . . . . . . . . . . . . . . . . . . . . . . . . . . . . . . . . . . 70Starting the BIOS Setup Utility . . . . . . . . . . . . . . . . . . . . . . . . . . . . . . . . . . . . . . . . . . . . . . . . . . . . . . . . . . . 70Operating BIOS Setup Utility . . . . . . . . . . . . . . . . . . . . . . . . . . . . . . . . . . . . . . . . . . . . . . . . . . . . . . . . . . . . . 71Exiting BIOS Setup Utility . . . . . . . . . . . . . . . . . . . . . . . . . . . . . . . . . . . . . . . . . . . . . . . . . . . . . . . . . . . . . . . . 72
Exit Saving Changes - save changes and exit BIOS Setup Utility . . . . . . . . . . . . . . . . . . . . . . . 72Exit Discarding Changes – Discard changes and exit BIOS Setup Utility . . . . . . . . . . . . . . . . . 72Load Setup Defaults – Copy Standard Entries . . . . . . . . . . . . . . . . . . . . . . . . . . . . . . . . . . . . . . . . . 72Discard Changes – Discard changes without exiting the BIOS Setup Utility . . . . . . . . . . . . . . . 72Save Changes - save changes without exiting the BIOS Setup Utility . . . . . . . . . . . . . . . . . . . . 72Save Changes and Power Off . . . . . . . . . . . . . . . . . . . . . . . . . . . . . . . . . . . . . . . . . . . . . . . . . . . . . . . 72
Troubleshooting and tips . . . . . . . . . . . . . . . . . . . . . . . . . . . . . . . . . . . . . . . . . . . . . . . . . . . . . . . . . . . . . . 73Help if problems occur . . . . . . . . . . . . . . . . . . . . . . . . . . . . . . . . . . . . . . . . . . . . . . . . . . . . . . . . . . . . . . . . . . . 73Restoring the hard disk contents under Windows . . . . . . . . . . . . . . . . . . . . . . . . . . . . . . . . . . . . . . . . . . 74The notebook’s date or time is incorrect . . . . . . . . . . . . . . . . . . . . . . . . . . . . . . . . . . . . . . . . . . . . . . . . . . . 74The notebook’s LCD screen remains blank . . . . . . . . . . . . . . . . . . . . . . . . . . . . . . . . . . . . . . . . . . . . . . . . 74The LCD screen is difficult to read . . . . . . . . . . . . . . . . . . . . . . . . . . . . . . . . . . . . . . . . . . . . . . . . . . . . . . . . 75The external monitor remains blank . . . . . . . . . . . . . . . . . . . . . . . . . . . . . . . . . . . . . . . . . . . . . . . . . . . . . . 75The external monitor is blank or the image is unstable . . . . . . . . . . . . . . . . . . . . . . . . . . . . . . . . . . . . . 75The notebook cannot be started . . . . . . . . . . . . . . . . . . . . . . . . . . . . . . . . . . . . . . . . . . . . . . . . . . . . . . . . . . 76The notebook stops working . . . . . . . . . . . . . . . . . . . . . . . . . . . . . . . . . . . . . . . . . . . . . . . . . . . . . . . . . . . . . 76The printer does not print . . . . . . . . . . . . . . . . . . . . . . . . . . . . . . . . . . . . . . . . . . . . . . . . . . . . . . . . . . . . . . . . 77The wireless connection to a network does not work . . . . . . . . . . . . . . . . . . . . . . . . . . . . . . . . . . . . . . . 77SmartCard reader is not recognised. . . . . . . . . . . . . . . . . . . . . . . . . . . . . . . . . . . . . . . . . . . . . . . . . . . . . . . 77SmartCard PIN forgotten . . . . . . . . . . . . . . . . . . . . . . . . . . . . . . . . . . . . . . . . . . . . . . . . . . . . . . . . . . . . . . . . 77User and/or supervisor SmartCard lost . . . . . . . . . . . . . . . . . . . . . . . . . . . . . . . . . . . . . . . . . . . . . . . . . . . 78SmartCard lost . . . . . . . . . . . . . . . . . . . . . . . . . . . . . . . . . . . . . . . . . . . . . . . . . . . . . . . . . . . . . . . . . . . . . . . . . 78Acoustic warnings . . . . . . . . . . . . . . . . . . . . . . . . . . . . . . . . . . . . . . . . . . . . . . . . . . . . . . . . . . . . . . . . . . . . . . . 78Error messages on the screen . . . . . . . . . . . . . . . . . . . . . . . . . . . . . . . . . . . . . . . . . . . . . . . . . . . . . . . . . . . 79
Technical data . . . . . . . . . . . . . . . . . . . . . . . . . . . . . . . . . . . . . . . . . . . . . . . . . . . . . . . . . . . . . . . . . . . . . . . . . 81Notebook . . . . . . . . . . . . . . . . . . . . . . . . . . . . . . . . . . . . . . . . . . . . . . . . . . . . . . . . . . . . . . . . . . . . . . . . . . . . . . . 81Rechargeable battery . . . . . . . . . . . . . . . . . . . . . . . . . . . . . . . . . . . . . . . . . . . . . . . . . . . . . . . . . . . . . . . . . . . 82Mains adapter 150W . . . . . . . . . . . . . . . . . . . . . . . . . . . . . . . . . . . . . . . . . . . . . . . . . . . . . . . . . . . . . . . . . . . . 83Port Replicator (optional) . . . . . . . . . . . . . . . . . . . . . . . . . . . . . . . . . . . . . . . . . . . . . . . . . . . . . . . . . . . . . . . . 83
Manufacturer’s notes . . . . . . . . . . . . . . . . . . . . . . . . . . . . . . . . . . . . . . . . . . . . . . . . . . . . . . . . . . . . . . . . . . 84Disposal and recycling . . . . . . . . . . . . . . . . . . . . . . . . . . . . . . . . . . . . . . . . . . . . . . . . . . . . . . . . . . . . . . . . . . 84Declarations of Conformity . . . . . . . . . . . . . . . . . . . . . . . . . . . . . . . . . . . . . . . . . . . . . . . . . . . . . . . . . . . . . . . 84CE marking . . . . . . . . . . . . . . . . . . . . . . . . . . . . . . . . . . . . . . . . . . . . . . . . . . . . . . . . . . . . . . . . . . . . . . . . . . . . 85
Radio frequencies used . . . . . . . . . . . . . . . . . . . . . . . . . . . . . . . . . . . . . . . . . . . . . . . . . . . . . . . . . . . . . . 86Other certification markings . . . . . . . . . . . . . . . . . . . . . . . . . . . . . . . . . . . . . . . . . . . . . . . . . . . . . . . . . . . . . . 86
Fujitsu 5
Contents
Regulatory notices . . . . . . . . . . . . . . . . . . . . . . . . . . . . . . . . . . . . . . . . . . . . . . . . . . . . . . . . . . . . . . . . . . . . . . 86Regulatory information for notebooks without radio device . . . . . . . . . . . . . . . . . . . . . . . . . . . . . . 86DOC (Industry CANADA) notices . . . . . . . . . . . . . . . . . . . . . . . . . . . . . . . . . . . . . . . . . . . . . . . . . . . . . 88FCC regulatory information for notebooks with radio device . . . . . . . . . . . . . . . . . . . . . . . . . . . . . 90
Index . . . . . . . . . . . . . . . . . . . . . . . . . . . . . . . . . . . . . . . . . . . . . . . . . . . . . . . . . . . . . . . . . . . . . . . . . . . . . . . . . . 92
6 Fujitsu
Innovative technology
Innovative technology... and ergonomic design make your device a reliable and convenient companion.
The device boots very quickly, is ready for immediate use and offers a particularlylong operating time because of its high capacity battery.
With the user-friendly "BIOS Setup Utility" you can control your notebook’s hardware and betterprotect your system against unauthorised access by using the powerful password properties.
Information on the connections and user components of your notebook canbe found in "Ports and operating elements", Page 9.
Further informationThe Windows drivers for your device can be found on our Internet site.The factory installation of your device does not support any other operatingsystem. Fujitsu Technology Solutions accepts no liability whatsoeverif any other operating system is used.
Software oriented components of these instructions refer to Microsoft products,if they come within the scope of the delivery.
If you install other software products, pay attention to the operatinginstructions of the manufacturer.
Fujitsu 7
Innovative technology
Notational conventionsPay particular attention to text marked with this symbol. Failure to observethese warnings could pose a risk to health, damage the device or leadto loss of data. The warranty will be invalidated if the device becomesdefective through failure to observe these warnings.Indicates important information for the proper use of the device.
► Indicates an activity that must be performedIndicates a result
This font indicates data entered using the keyboard in a program dialogue or atthe command line, e.g. your password (Name123) or a command used tostart a program (start.exe)
This font indicates information that is displayed on the screen by a program, e.g.:Installation is complete.
This font Indicates
• terms and texts used in a software interface, e.g.: Click on Save• names of programs or files, e.g. Windows or setup.exe.
"This font" Indicates
• cross-references to another section, e.g. "Safety information"• cross-references to an external source, e.g. a web address: For more
information, go to "http://www.fujitsu.com/fts/"• Names of CDs, DVDs and titles or designations for other materials,
e.g.: "CD/DVD Drivers & Utilities" or "Safety/Regulations" manualKey indicates a key on the keyboard, e.g: F10
This font indicates terms and texts that are emphasised or highlighted, e.g.: Donot switch off the device
8 Fujitsu
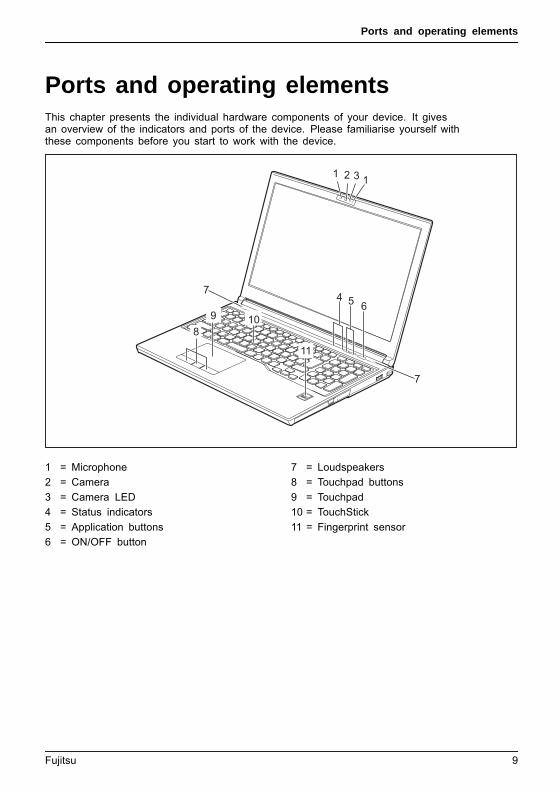
Ports and operating elements
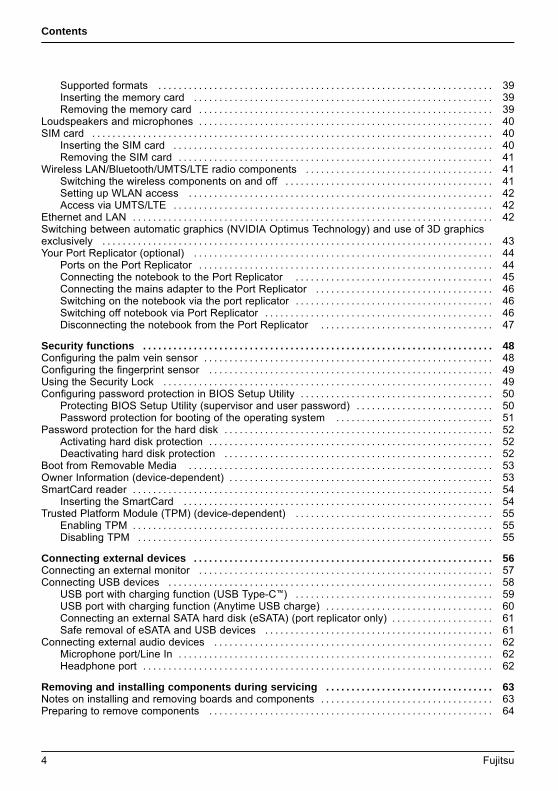
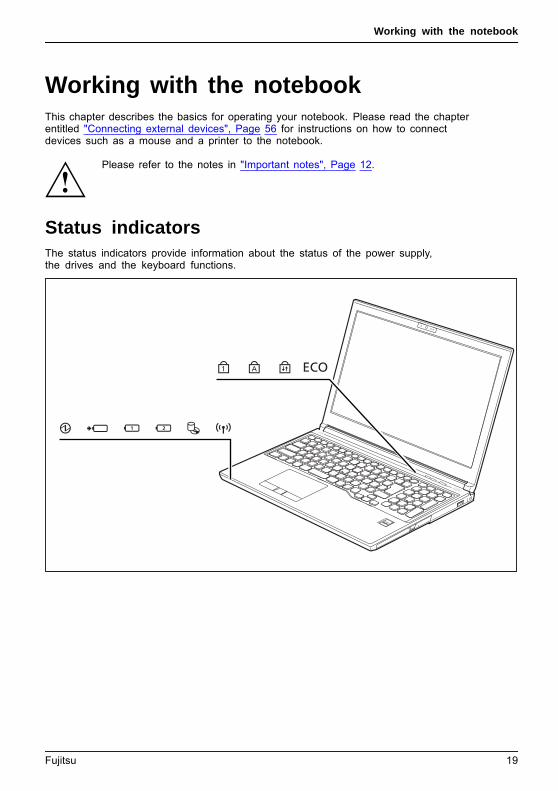
Ports and operating elementsThis chapter presents the individual hardware components of your device. It givesan overview of the indicators and ports of the device. Please familiarise yourself withthese components before you start to work with the device.
1 2 3
7
74 5 6
89
11
10
1
1 = Microphone2 = Camera3 = Camera LED4 = Status indicators5 = Application buttons6 = ON/OFF button
7 = Loudspeakers8 = Touchpad buttons9 = Touchpad10 = TouchStick11 = Fingerprint sensor
Fujitsu 9
Ports and operating elements
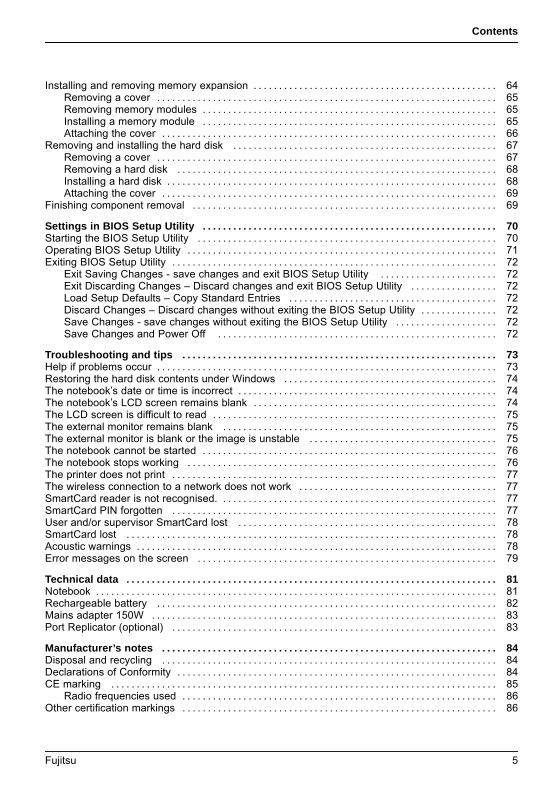
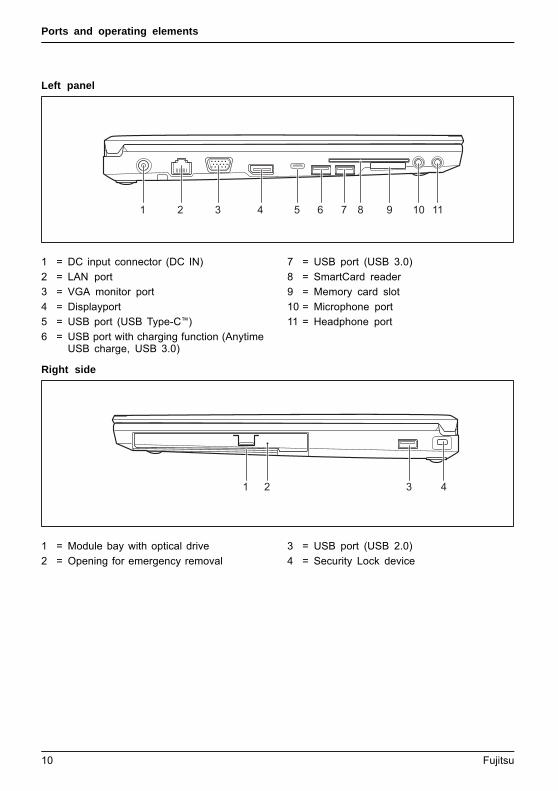
Left panel
1 2 3 4 5 8 9 10 116 7
1 = DC input connector (DC IN)2 = LAN port3 = VGA monitor port4 = Displayport5 = USB port (USB Type-C™)6 = USB port with charging function (Anytime
USB charge, USB 3.0)
7 = USB port (USB 3.0)8 = SmartCard reader9 = Memory card slot10 = Microphone port11 = Headphone port
Right side
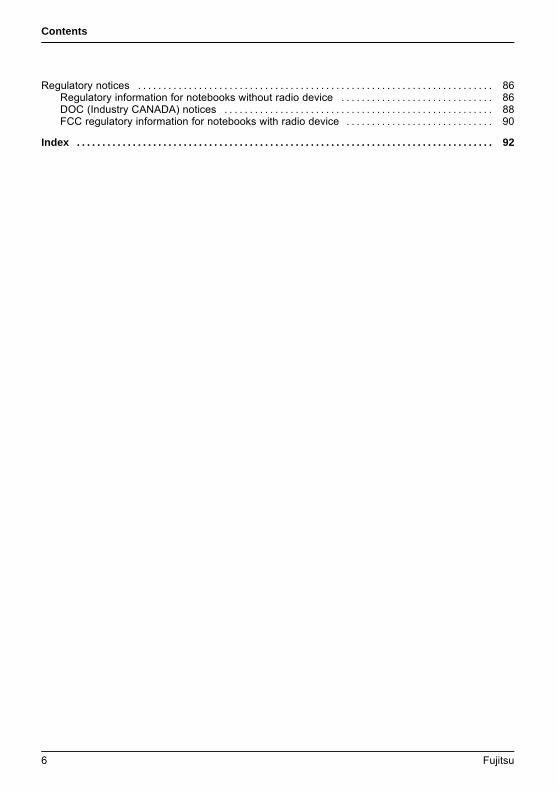
1 2 3 4
1 = Module bay with optical drive2 = Opening for emergency removal
3 = USB port (USB 2.0)4 = Security Lock device
10 Fujitsu
Ports and operating elements
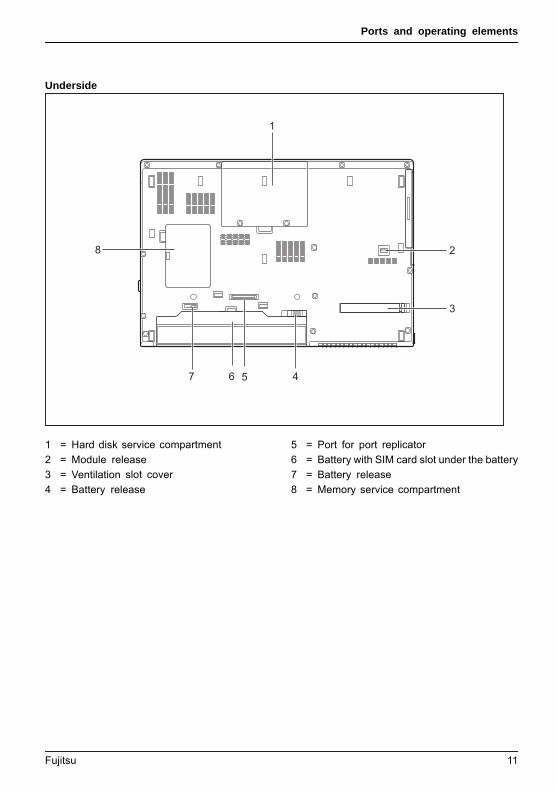
Underside
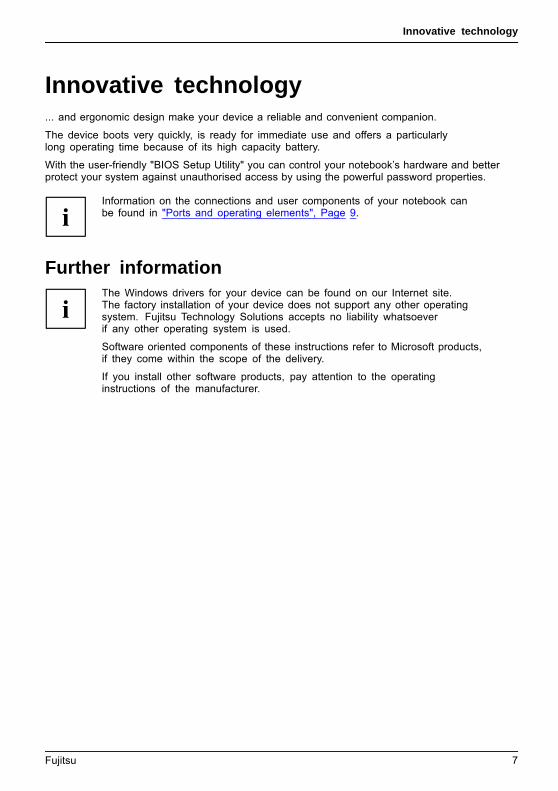
467
2
1
8
3
5
1 = Hard disk service compartment2 = Module release3 = Ventilation slot cover4 = Battery release
5 = Port for port replicator6 = Battery with SIM card slot under the battery7 = Battery release8 = Memory service compartment
Fujitsu 11
Important notes
Important notesImportantnotesNotes
This chapter contains essential safety information which must be followedwhen working with your notebook. Other notes also provide useful informationwhich will help you with your notebook.
Safety notesSafetynotesNotes
Please follow the safety notes provided in the "Safety/Regulations" manualas well as the safety notes given below.
Please pay special attention to the sections in the manual markedwith the symbol on the left.
When connecting and disconnecting cables, observe the relevantnotes in this operating manual.
Read the information on the ambient conditions in the "Technical data",Page 81 and "First-time setup of your device", Page 16 before preparing yournotebook for use and switching it on for the first time.
When cleaning the device, please observe the relevant notes in thesection "Cleaning the notebook", Page 15.
Pay attention to the additional safety notes for devices with wireless componentsprovided in the "Safety/Regulations" manual.
Please refer to the notes in the chapter "Removing and installingcomponents during servicing", Page 63.
This notebook complies with the relevant safety regulations for data processingequipment. If you have questions about using your notebook in a particular area,please contact your sales outlet or our Hotline/Service Desk.
12 Fujitsu
Important notes
Additional safety notes for devices withwireless componentsWirelesscomponent:WirelessLAN:Bluetooth,safetynotes
If a wireless component (Wireless LAN, Bluetooth, UMTS, LTE) is incorporated into your notebook,you must be sure to observe the following safety notes when using your notebook:
• Switch off the wireless components when you are in an aircraft or driving in a car.• Switch off the wireless components when you are in a hospital, an operating
room or near a medical electronics system. The transmitted radio wavescan impair the operation of medical devices.
• Switch off the wireless components when you let the device get near flammablegases or into hazardous environments (e.g. petrol station, paintshops), as thetransmitted radio waves can cause an explosion or a fire.
For information on how to switch wireless components on and off, see chapter"Switching the wireless components on and off", Page 41.
Energy savingNotesEnergyEnergysaving
Switch the notebook off when it is not in use. Switch off external, connected devices if youare not using them. If you use the energy saving functions, the notebook uses less energy.You will then be able to work for longer before having to recharge the battery.
Energy efficiency is increased and the environmental impact is reduced.You save money while protecting the environment.
Energy saving under Windows► Make use of the power management features (see ""Using the power-management features",
Page 38").
Fujitsu 13
Important notes
Travelling with your notebookMobileoperationNotesTransportationNotebook
Please observe the points listed below when travelling with your notebook.
Before you travel► Back up important data stored on your hard disk.
NotebookTravel,notebook
► Switch off the wireless component for data security reasons. With data traffic via a wirelessconnection, it is also possible for unauthorised third parties to receive data.
Information on activating data encryption is provided in the documentationfor your wireless component.
► If you wish to use your notebook during a flight, first check with the flightattendants if it is OK to do so.
When travelling in other countries► If you are travelling abroad, check that the mains adapter can be operated with the
local mains voltage. If this is not the case, obtain the appropriate mains adapter foryour notebook. Do not use any other voltage converter!
► Check whether the local mains voltage and the power cable are compatible. If this isnot the case, buy a power cable that matches the local conditions.
► Enquire with the corresponding government office of the country you will betravelling in as to whether you may operate the wireless component integrated inyour notebook there (see also "CE marking", Page 85).
Notebook: transportingProtect the notebook from severe shocks and extreme temperatures(e.g. direct sunlight in a car).
► If your device has an optical drive, remove all data media (e.g. CD, DVD) from the drives.TransportationNotebook
► Switch the notebook off.► Unplug the mains adapter and all external devices from the power socket.► Disconnect the mains adapter cable and the data cables for all external devices.► Close the LCD screen.► To protect against damaging jolts and bumps, use a notebook carrying
case to transport your notebook.
14 Fujitsu

Important notes
Cleaning the notebookDo not clean any interior parts yourself; leave this job to a service technician.
Only use cleaning products designed for computers. Normal householdcleaners and polishes can damage the markings on the keyboard and thedevice, the paintwork or the notebook itself.
Ensure that no liquid enters the notebook.
The LCD screen very sensitive to scratches. Only clean the displaysurface with a very soft, slightly damp cloth.
► Switch the notebook off.CleaningNotesNotebookKeyboardTouchpadLCDscreen
► In order to prevent accidentially switching the device on, remove the power cable from the mainsadaptor and remove the battery (see "Removing and installing the battery", Page 31).The surface can be cleaned with a dry cloth. If particularly dirty, use a cloth which hasbeen moistened in mild domestic detergent and then carefully wrung out.You can use disinfectant wipes to clean the keyboard and the touchpad.
Ensure that no liquid enters the device.
Fujitsu 15
First-time setup of your device
First-time setup of your deviceFirst-timesetupGettingstarted
Please read the chapter "Important notes", Page 12.
If your device is equipped with a Windows operating system, the necessaryhardware drivers and supplied software are already pre-installed.
Before you switch on the device for the first time, connect it to the mains voltageusing the mains adapter, see "Mains adapter connecting", Page 17. The mainsadapter must be connected during the entire installation process.
A system test is performed when your device is first switched on. Various messagescan appear. The display may remain dark for a short time or may flicker.
Please follow the instructions on the screen.
NEVER switch off your device during the first-time setup process.
When the device is delivered, the battery is located in the battery compartment. The batterymust be charged if you want to operate your device using the battery.
When used on the move, the built-in battery provides the device with the necessary power. Youcan increase the operating time by using the available energy-saving functions.
For instructions on how to connect external devices (e.g. mouse, printer) to yourdevice, please refer to the operating manual for your device.
Unpacking and checking the deviceShould you discover any damage that occurred during transportation,notify your local sales outlet immediately!
► Unpack all the individual parts.PackagingTransport
► Check your device for any visible damage which may have occurred during transportation.
You may need the packaging in the future, if you need to transport your device.
16 Fujitsu
First-time setup of your device
Selecting a locationSelectinga locationDeviceMainsadapter
Select a suitable location for the device before setting it up. Followthe instructions below when doing so:
• Never place the device or the mains adapter on a heat-sensitive surface.The surface could be damaged as a result.
• Never place the device on a soft surface (e.g. carpeting, upholstered furniture,bed). This can block the air vents and cause overheating and damage.
• The underside of the device heats up during normal operation. Prolonged contactwith the skin may become unpleasant or even result in burns.
• Place the device on a stable, flat, non-slippery surface. Please note that therubber feet of the device may mark certain types of delicate surfaces.
• Keep other objects at least 100 mm / 3.97" away from the device andits mains adapter to ensure adequate ventilation.
• Never cover the ventilation slots of the device.• Do not expose the device to extreme environmental conditions. Protect
the device from dust, humidity, and heat.
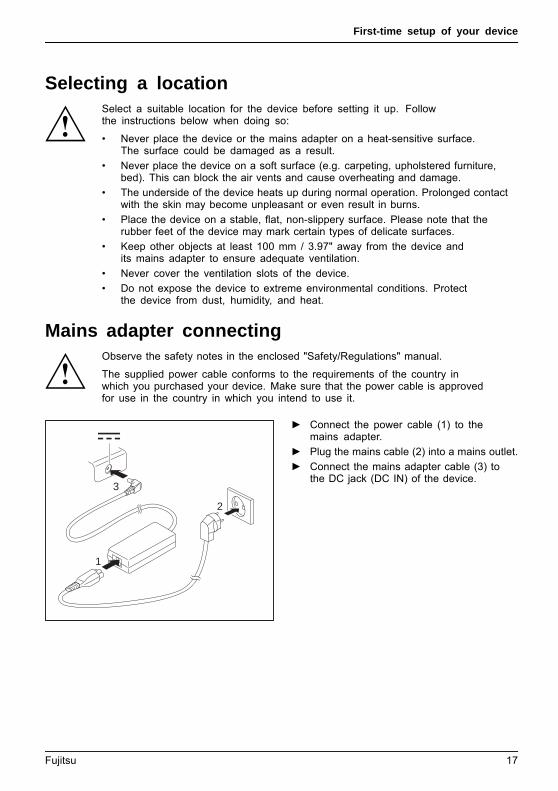
Mains adapter connectingPreparingforoperationMainsadapter
Observe the safety notes in the enclosed "Safety/Regulations" manual.
The supplied power cable conforms to the requirements of the country inwhich you purchased your device. Make sure that the power cable is approvedfor use in the country in which you intend to use it.
3
1
2
► Connect the power cable (1) to themains adapter.
► Plug the mains cable (2) into a mains outlet.► Connect the mains adapter cable (3) to
the DC jack (DC IN) of the device.
Fujitsu 17
First-time setup of your device
Switching on the device for the first timeSwitchingon for thefirst time
When you switch on the device for the first time, the supplied software isinstalled and configured. Because this procedure must not be interrupted,you should set aside enough time for it to be fully completed and connectthe device to the mains using the mains adapter.
During the installation process, DO NOT restart the device unlessyou are requested to do so!
To make it easier to use your device for the first time, the operating systemis pre-installed on the hard disk.
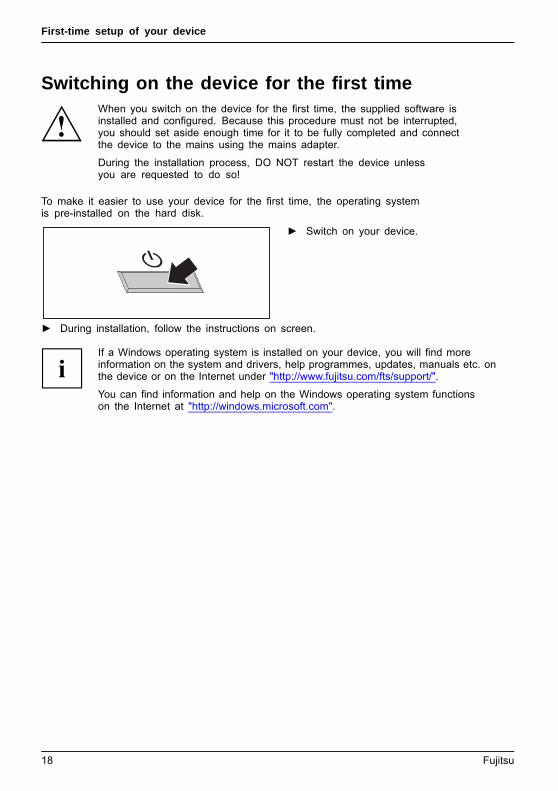
► Switch on your device.
► During installation, follow the instructions on screen.
If a Windows operating system is installed on your device, you will find moreinformation on the system and drivers, help programmes, updates, manuals etc. onthe device or on the Internet under "http://www.fujitsu.com/fts/support/".
You can find information and help on the Windows operating system functionson the Internet at "http://windows.microsoft.com".
18 Fujitsu
Working with the notebook
Working with the notebookNotebook,operationNotebook
This chapter describes the basics for operating your notebook. Please read the chapterentitled "Connecting external devices", Page 56 for instructions on how to connectdevices such as a mouse and a printer to the notebook.
Please refer to the notes in "Important notes", Page 12.
Status indicatorsStatusindicatorpanel
The status indicators provide information about the status of the power supply,the drives and the keyboard functions.
Fujitsu 19
Working with the notebook
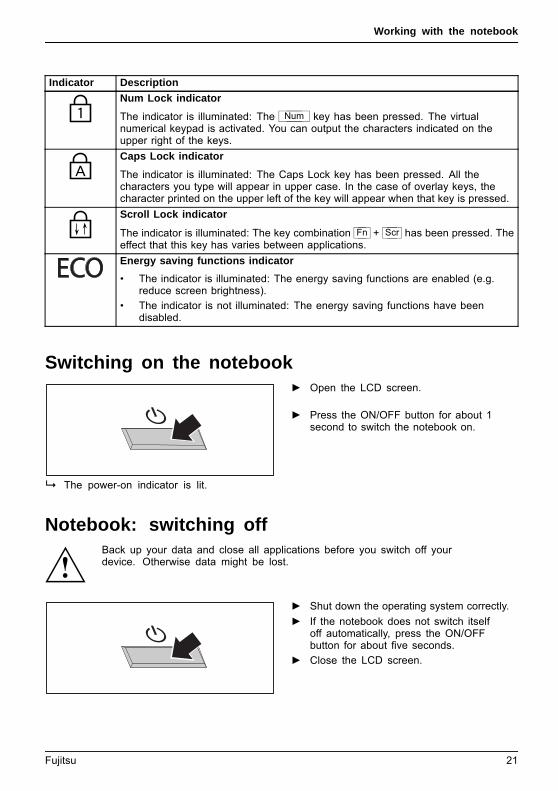
Indicator DescriptionPower-on indicatorPower-onindicatorIndicator
• The indicator is illuminated: The notebook is switched on.• The indicator flashes (1 second on/1 second off): The notebook is in power
saving mode.• The indicator is not illuminated: The notebook is switched off or is in
Save-to-Disk mode.Battery charging indicator• The indicator lights up green: The mains adapter is connected and the installed
battery or batteries are already fully charged, or no battery is installed.• The indicator lights up orange: The mains adapter is connected and the
installed battery or batteries are being charged.• The indicator flashes orange: The mains adapter is connected and the installed
battery or batteries cannot be charged (the battery is too hot for charging).• The indicator flashes red (1 second on/1 second off): A fault has occurred.• The indicator is not lit: The mains adapter is not connected.
Please note: If the mains adapter is connected when the state of charge of thebattery is more than 90%, charging will not be started. When the state of chargeof the battery is less than 90%, the battery will be charged to 100% as soonas the mains adapter is connected.
Battery indicator (first and second rechargeable battery)• The indicator is lit green: The battery charge is between 51% and 100%
of its maximum.• The indicator slowly flashes green (1 second on/5 seconds off): The notebook
is in suspend mode and power is being supplied by the first battery. The batterycharge is between 51 % and 100 % of its maximum.
• The indicator is lit orange: The AC adapter is connected and the battery isbeing charged. The battery charge is between 13 % and 50 % of its maximum.
• The indicator slowly flashes orange (1 second on/5 seconds off): The notebookis in suspend mode and power is being supplied by the battery. The batterycharge is between 13 % and 50 % of its maximum.
• The indicator flashes orange (for four seconds after installing the battery): Thebattery charge level is being checked.
• The indicator is lit red: The AC adapter is connected and the battery is beingcharged. The battery charge is between 0 % and 12 % of its maximum.
• The indicator slowly flashes red (1 second on/5 seconds off): The notebookis in suspend mode and power is being supplied by the battery. The batterycharge is between 0 % and 12 % of its maximum.
• The indicator flashes red (1 second on/1 second off): A fault has occurred.• The indicator is not lit: The battery is not installed or is completely discharged.Drive indicatorIndicatorCD/DVDindicator
The indicator is illuminated: The hard disk drive or the CD/DVD in the optical driveof the notebook is being accessed.Radio components indicator• The indicator is lit: The radio components are switched on.• The indicator is not lit: The radio components are switched off.
20 Fujitsu
Working with the notebook
Indicator DescriptionNum Lock indicatorIndicatorNumLock
The indicator is illuminated: The Num key has been pressed. The virtualnumerical keypad is activated. You can output the characters indicated on theupper right of the keys.Caps Lock indicatorIndicatorCapsLock
The indicator is illuminated: The Caps Lock key has been pressed. All thecharacters you type will appear in upper case. In the case of overlay keys, thecharacter printed on the upper left of the key will appear when that key is pressed.Scroll Lock indicatorIndicatorScrollLockIndicatorScrollLock
The indicator is illuminated: The key combination Fn + Scr has been pressed. Theeffect that this key has varies between applications.Energy saving functions indicator• The indicator is illuminated: The energy saving functions are enabled (e.g.
reduce screen brightness).• The indicator is not illuminated: The energy saving functions have been
disabled.
Switching on the notebook► Open the LCD screen.
Switchingon
► Press the ON/OFF button for about 1second to switch the notebook on.
The power-on indicator is lit.
Notebook: switching offBack up your data and close all applications before you switch off yourdevice. Otherwise data might be lost.
► Shut down the operating system correctly.Notebook
► If the notebook does not switch itselfoff automatically, press the ON/OFFbutton for about five seconds.
► Close the LCD screen.
Fujitsu 21
Working with the notebook
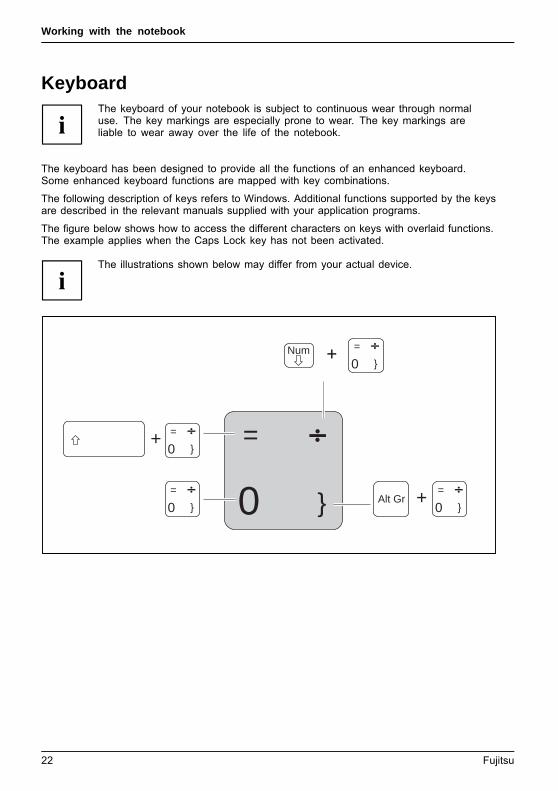
KeyboardKeyboardNumerickeypadNumerickeypadButtons
The keyboard of your notebook is subject to continuous wear through normaluse. The key markings are especially prone to wear. The key markings areliable to wear away over the life of the notebook.
The keyboard has been designed to provide all the functions of an enhanced keyboard.Some enhanced keyboard functions are mapped with key combinations.
The following description of keys refers to Windows. Additional functions supported by the keysare described in the relevant manuals supplied with your application programs.
The figure below shows how to access the different characters on keys with overlaid functions.The example applies when the Caps Lock key has not been activated.
The illustrations shown below may differ from your actual device.
0
=
}
+
+
Num
Alt Gr
=
0 }
=
0 }
=
0 }=
0 }
22 Fujitsu
Working with the notebook
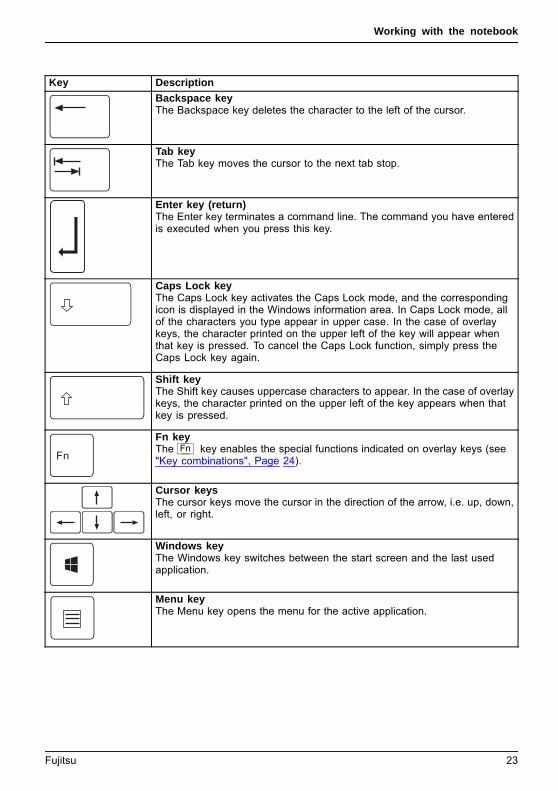
Key DescriptionBackspace keyThe Backspace key deletes the character to the left of the cursor.BackspaceBackspace
Tab keyThe Tab key moves the cursor to the next tab stop.Tabkey
Enter key (return)The Enter key terminates a command line. The command you have enteredis executed when you press this key.EnterkeyReturnEnterLinefeed
Caps Lock keyThe Caps Lock key activates the Caps Lock mode, and the correspondingicon is displayed in the Windows information area. In Caps Lock mode, allof the characters you type appear in upper case. In the case of overlaykeys, the character printed on the upper left of the key will appear whenthat key is pressed. To cancel the Caps Lock function, simply press theCaps Lock key again.ShiftkeyCapsLock
Shift keyThe Shift key causes uppercase characters to appear. In the case of overlaykeys, the character printed on the upper left of the key appears when thatkey is pressed.ShiftkeyShift
Fn keyThe Fn key enables the special functions indicated on overlay keys (see"Key combinations", Page 24).Fnkey
Cursor keysThe cursor keys move the cursor in the direction of the arrow, i.e. up, down,left, or right.CursorkeysCursorcontrol
Windows keyThe Windows key switches between the start screen and the last usedapplication.Windowskey
Menu keyThe Menu key opens the menu for the active application.
Fujitsu 23
Working with the notebook
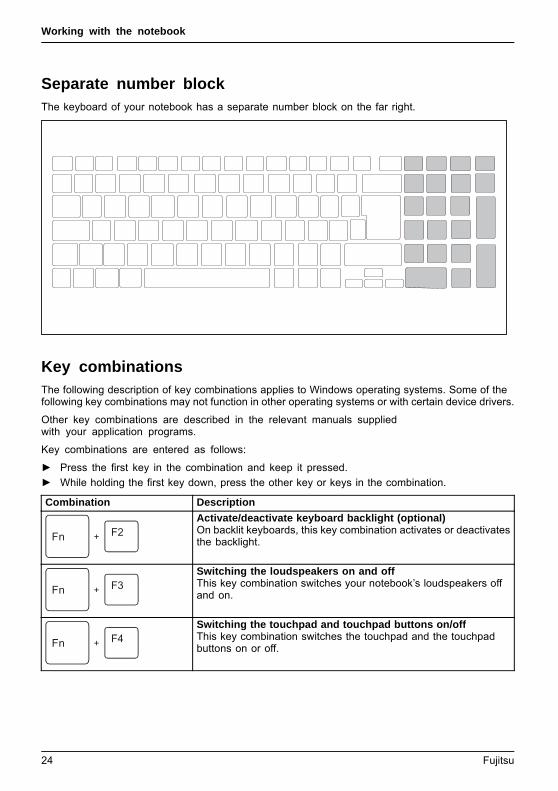
Separate number blockNumerickeypadSeparatenumerickeypadNumLock
The keyboard of your notebook has a separate number block on the far right.
Key combinationsKeycombinations
The following description of key combinations applies to Windows operating systems. Some of thefollowing key combinations may not function in other operating systems or with certain device drivers.
Other key combinations are described in the relevant manuals suppliedwith your application programs.
Key combinations are entered as follows:
► Press the first key in the combination and keep it pressed.► While holding the first key down, press the other key or keys in the combination.
Combination DescriptionActivate/deactivate keyboard backlight (optional)On backlit keyboards, this key combination activates or deactivatesthe backlight.Fn+F2keyboardbacklightkeyboardbacklight
Switching the loudspeakers on and offThis key combination switches your notebook’s loudspeakers offand on.Fn+F3LoudspeakersLoudspeakers
Switching the touchpad and touchpad buttons on/offThis key combination switches the touchpad and the touchpadbuttons on or off.Fn+F4TouchpadTouchpadbuttonsTouchpad
24 Fujitsu
Working with the notebook
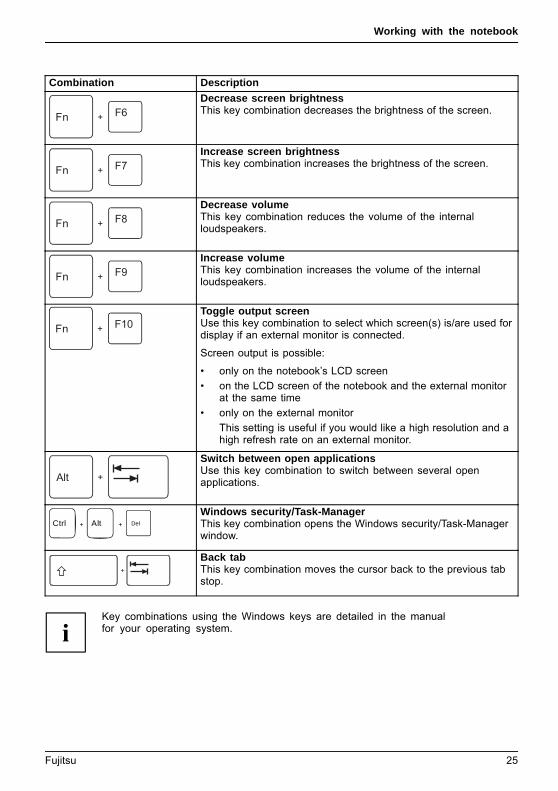
Combination DescriptionDecrease screen brightnessThis key combination decreases the brightness of the screen.Fn+F6LCDscreenScreenbrightness
Increase screen brightnessThis key combination increases the brightness of the screen.Fn+F7Screenbrightness
Decrease volumeThis key combination reduces the volume of the internalloudspeakers.Fn+F8Volume
Increase volumeThis key combination increases the volume of the internalloudspeakers.Fn+F9Volume
Toggle output screenUse this key combination to select which screen(s) is/are used fordisplay if an external monitor is connected.
Screen output is possible:
• only on the notebook’s LCD screen• on the LCD screen of the notebook and the external monitor
at the same time• only on the external monitor
This setting is useful if you would like a high resolution and ahigh refresh rate on an external monitor.
Fn+F10Toggleoutputscreen
Switch between open applicationsUse this key combination to switch between several openapplications.Alt+Tab
AltCtrl Del+ +
Windows security/Task-ManagerThis key combination opens the Windows security/Task-Managerwindow.Ctrl+Alt+Del
Back tabThis key combination moves the cursor back to the previous tabstop.Shift+TabBacktab
Key combinations using the Windows keys are detailed in the manualfor your operating system.
Fujitsu 25
Working with the notebook
Country and keyboard settings► Change the country and keyboard settings as described in the documentation for your operating
system.
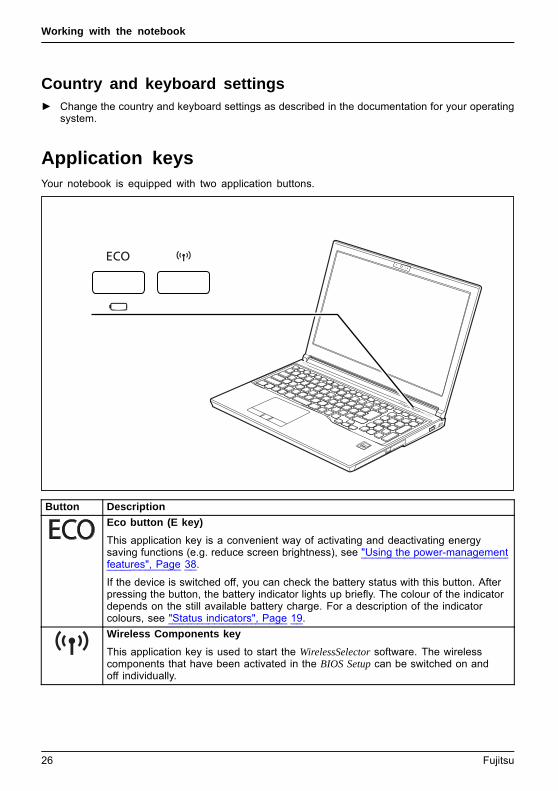
Application keysApplicationkeys
Your notebook is equipped with two application buttons.
Button DescriptionEco button (E key)This application key is a convenient way of activating and deactivating energysaving functions (e.g. reduce screen brightness), see "Using the power-managementfeatures", Page 38.
If the device is switched off, you can check the battery status with this button. Afterpressing the button, the battery indicator lights up briefly. The colour of the indicatordepends on the still available battery charge. For a description of the indicatorcolours, see "Status indicators", Page 19.Wireless Components keyThis application key is used to start the WirelessSelector software. The wirelesscomponents that have been activated in the BIOS Setup can be switched on andoff individually.
26 Fujitsu
Working with the notebook
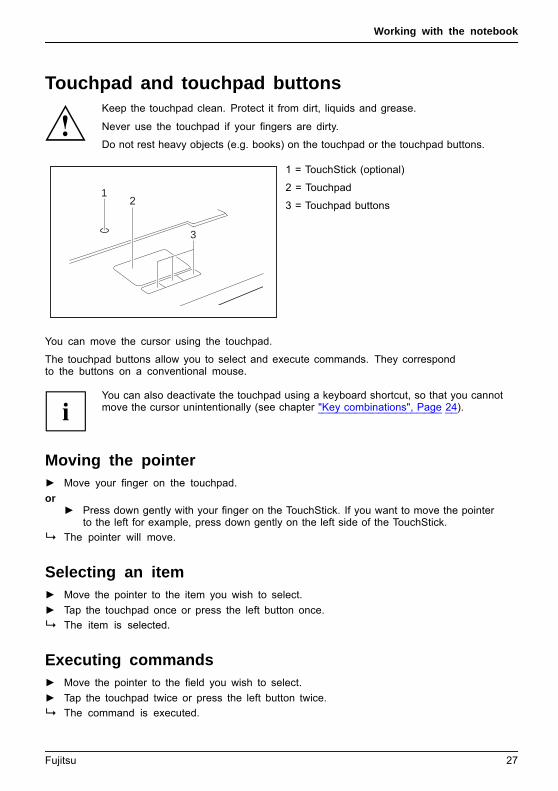
Touchpad and touchpad buttonsKeep the touchpad clean. Protect it from dirt, liquids and grease.TouchpadTouchpad
Never use the touchpad if your fingers are dirty.
Do not rest heavy objects (e.g. books) on the touchpad or the touchpad buttons.
1
3
1 = TouchStick (optional)
2 = Touchpad
3 = Touchpad buttons
You can move the cursor using the touchpad.
The touchpad buttons allow you to select and execute commands. They correspondto the buttons on a conventional mouse.
You can also deactivate the touchpad using a keyboard shortcut, so that you cannotmove the cursor unintentionally (see chapter "Key combinations", Page 24).
Moving the pointer► Move your finger on the touchpad.
Touchpad
or► Press down gently with your finger on the TouchStick. If you want to move the pointer
to the left for example, press down gently on the left side of the TouchStick.The pointer will move.
Selecting an item► Move the pointer to the item you wish to select.
Touchpad
► Tap the touchpad once or press the left button once.The item is selected.
Executing commands► Move the pointer to the field you wish to select.
Touchpad
► Tap the touchpad twice or press the left button twice.The command is executed.
Fujitsu 27
Working with the notebook
Dragging items► Move the pointer to the item you wish to select.► Select the desired object and keep the left button pressed.► Drag the object to the desired position.► Lift your finger from the touchpad.
or► Lift your finger from the TouchStick.The item will be moved.
LCD screenLCDscreenNotes
High-quality LCD screens (TFT) are installed in Fujitsu notebooks. For technical reasons,these screens are manufactured for a particular resolution. An optimum and sharp image canonly be ensured with the resolution intended for the particular screen. A screen resolutionwhich differs from the specification can result in an unclear image.
The resolution of your notebook’s screen is set to the optimum at the factory.
With the present standards of production technology, absolutely flawless screen imagescannot be guaranteed. There may be a few constantly light or dark pixels (pictureelements) on the screen. The maximum permitted number of such faulty pixels isspecified in the international standard ISO 9241-307 (Class II).
Example:A screen with an HD resolution of 1366 x 768 has 1366 x 768 = 1049088 pixels. Each pixel consistsof three subpixels (red, green and blue), making a total of about 3 million subpixels. According to ISO9241-307 (class II), a maximum of 2 light and 2 dark pixels and in addition 5 light or 10 dark subpixelsor an equivalent mix (1 light subpixel counts as 2 dark subpixels) are allowed to be defective.
Pixel A pixel consists of 3 subpixels, normally red, green andblue. A pixel is the smallest element that can be generatedby complete functionality of the display.
Subpixel A subpixel is a separately addressable internal structurewithin a pixel that enhances the pixel function.
Cluster A cluster contains two or more defective pixels orsubpixels in a 5 x 5 pixel block.
Background lightingLCD screens are operated with background lighting. The luminosity of the backgroundlighting can decrease during the period of use of the notebook. However, youcan set the brightness of your screen individually.
Synchronising the display on the LCD screen and an external monitorFor more information, please refer to the chapter "Key combinations", Page 24under "Display output, switch between".
28 Fujitsu
Working with the notebook
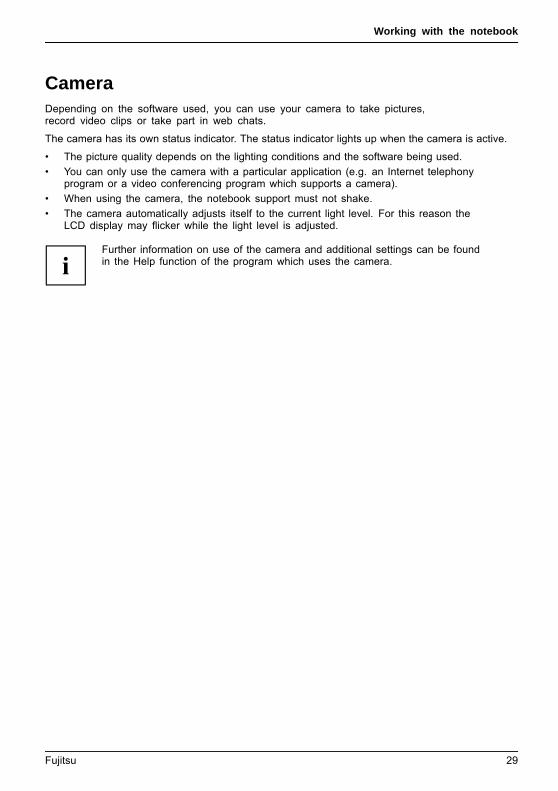
CameraCamera
Depending on the software used, you can use your camera to take pictures,record video clips or take part in web chats.
The camera has its own status indicator. The status indicator lights up when the camera is active.
• The picture quality depends on the lighting conditions and the software being used.• You can only use the camera with a particular application (e.g. an Internet telephony
program or a video conferencing program which supports a camera).• When using the camera, the notebook support must not shake.• The camera automatically adjusts itself to the current light level. For this reason the
LCD display may flicker while the light level is adjusted.
Further information on use of the camera and additional settings can be foundin the Help function of the program which uses the camera.
Fujitsu 29
Working with the notebook
Rechargeable batteryRechargeablebatteryBatteryLife,batteryRechargeablebatteryRechargeablebattery
When not plugged into a mains socket, the notebook runs on its built-in battery. Youcan increase the life of the battery by caring for the battery properly. The averagebattery life is around 500 charge/discharge cycles.
You can extend the battery life by taking advantage of the available energy saving functions.
Charging, caring for and maintaining the batteryBatteryBattery
The notebook battery can only be charged when the ambient temperature isbetween 5°C / 41°F and max. 35°C / 95°F.
You can charge the battery by connecting the notebook to the mains adapter(see "Mains adapter connecting", Page 17).
Please note that the battery will not be charged if the battery status is between90% and 100%. If the battery status is less than 90% and the mains adapter isconnected, the battery will be charged to 100%.
If the battery status is low, you will hear a warning alarm. If you do not connectthe mains adapter within approximately five minutes of the warning alarm describedabove, your notebook will switch off automatically.
monitoring the battery charging levelBatteryBatterystatusmeter
Windows also has a "Battery status meter" in the taskbar for monitoring the battery capacity. Whenyou place the mouse pointer on the battery symbol, the system displays the battery status.
Battery storageBatteryBatterySelf-discharge,batteryChargingcapacity,battery
Store battery packs in a dry environment at a temperature between 0°C / 32°F and 30°C / 86°F. Thelower the temperature at which the batteries are stored, the lower the rate of self-discharge.
If you will be storing batteries for a longer period (longer than two months),the battery charge level should be approx. 30 %. To prevent exhaustivedischarge which would permanently damage the battery, check the levelof charge of the battery at regular intervals.
To be able to make use of the optimal charging capacity of the batteries, the batteryshould be completely discharged and then fully recharged.
If you do not use the batteries for long periods, remove them from thenotebook. Never store the batteries in the device.
30 Fujitsu
Working with the notebook
Removing and installing the batteryOnly use batteries which have been approved by Fujitsu for your notebook.
Never use force when fitting or removing a battery.
Make sure that no foreign bodies get into the battery connections.
Never store a battery for longer periods in the discharged state. Thiscan make it impossible to recharge.
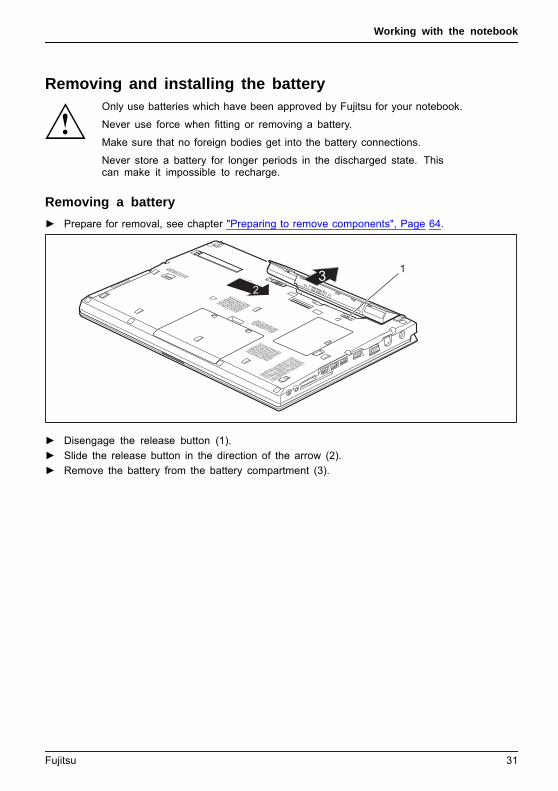
Removing a battery► Prepare for removal, see chapter "Preparing to remove components", Page 64.
23 1
► Disengage the release button (1).► Slide the release button in the direction of the arrow (2).► Remove the battery from the battery compartment (3).
Fujitsu 31
Working with the notebook
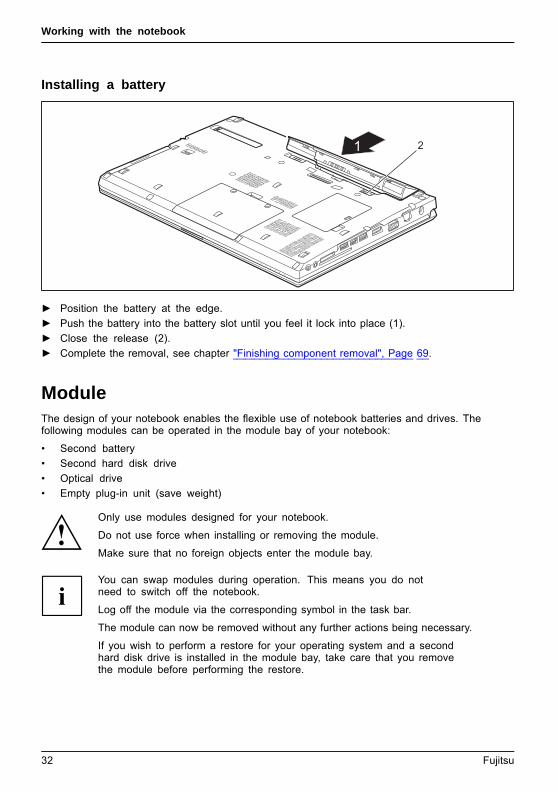
Installing a battery
1 2
► Position the battery at the edge.► Push the battery into the battery slot until you feel it lock into place (1).► Close the release (2).► Complete the removal, see chapter "Finishing component removal", Page 69.
ModuleModulebayModules
The design of your notebook enables the flexible use of notebook batteries and drives. Thefollowing modules can be operated in the module bay of your notebook:
• Second battery• Second hard disk drive• Optical drive• Empty plug-in unit (save weight)
Only use modules designed for your notebook.
Do not use force when installing or removing the module.
Make sure that no foreign objects enter the module bay.
You can swap modules during operation. This means you do notneed to switch off the notebook.
Log off the module via the corresponding symbol in the task bar.
The module can now be removed without any further actions being necessary.
If you wish to perform a restore for your operating system and a secondhard disk drive is installed in the module bay, take care that you removethe module before performing the restore.
32 Fujitsu
Working with the notebook
Removing a module
2
1
ModuleDriveWeightSaver
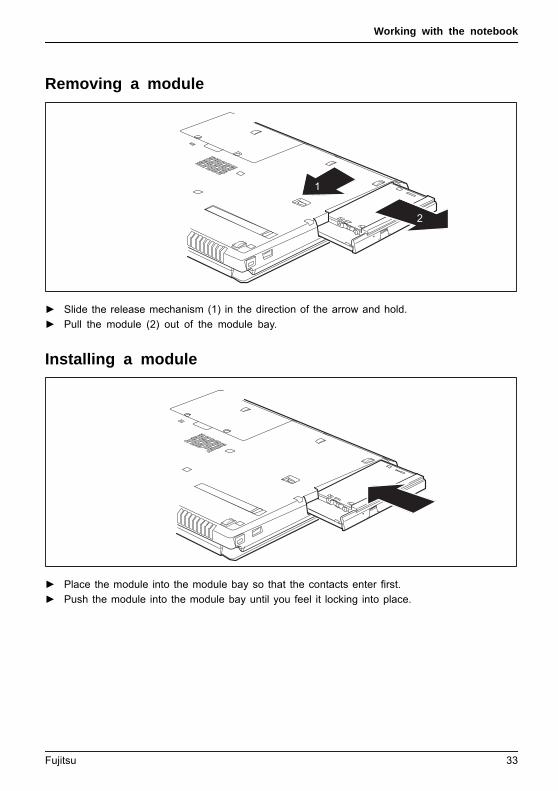
► Slide the release mechanism (1) in the direction of the arrow and hold.► Pull the module (2) out of the module bay.
Installing a module
2
► Place the module into the module bay so that the contacts enter first.► Push the module into the module bay until you feel it locking into place.
Fujitsu 33
Working with the notebook
Optical driveOpticaldrive
This product contains a light emitting diode, classification according to IEC 608251:2007: LASER CLASS 1, and must therefore not be opened.
Handling data carriersHandling
Observe the following guidelines when handling data carriers:
• Avoid touching the surface of a data carrier. Only handle data carriers by their edges.• Always store data carriers in their cases. This will protect the data carrier against
being covered in dust, scratched or damaged in any other way.• Protect your data carriers against dust, mechanical vibrations and direct sunlight.• Avoid storing a data carrier in areas subject to high temperatures or humidity.You can use data carriers with a diameter of 8 cm / 3.15" or 12 cm / 4.7" in the drive.
When using a data carrier of lesser quality, vibrations and reading errors may occur.
CD/DVD indicatorCD/DVDindicator
The CD/DVD indicator flashes when a data carrier is inserted. The indicator goes out whenthe drive is ready for reading. The indicator lights up when the drive is being accessed.You may only remove the data carrier when the indicator is unlit.
If the CD/DVD indicator does not go out after a data carrier has been inserted, butinstead continues to flash, this means that the drive cannot access the data carrier.
Either the data carrier is damaged or dirty or you are using a datacarrier that the drive cannot read.
34 Fujitsu
Working with the notebook
Inserting or removing a data carrierInsertingRemoving
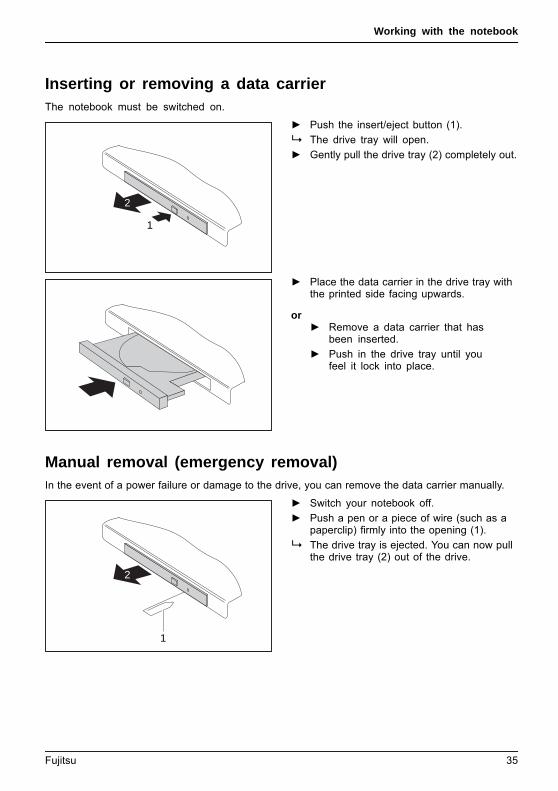
The notebook must be switched on.
2
1
► Push the insert/eject button (1).The drive tray will open.
► Gently pull the drive tray (2) completely out.
► Place the data carrier in the drive tray withthe printed side facing upwards.
or► Remove a data carrier that has
been inserted.► Push in the drive tray until you
feel it lock into place.
Manual removal (emergency removal)CD/DVD:ManualremovalofdatacarrierEmergencyremovalofdatacarrier
In the event of a power failure or damage to the drive, you can remove the data carrier manually.
1
2
► Switch your notebook off.► Push a pen or a piece of wire (such as a
paperclip) firmly into the opening (1).The drive tray is ejected. You can now pullthe drive tray (2) out of the drive.
Fujitsu 35
Working with the notebook
Removing and fitting the dust removal cover(ventilation slot cover)
In order to ensure optimum cooling of the components in your notebook, youshould periodically clean the ventilation slot of the heatsink.
This ensures optimum fan performance. You can achieve the best cleaningresults with a small hand-held vacuum cleaner.
If necessary, you can also use a dry brush to release dust from the ventilation slots.
Do not use any cleaning liquids! Ensure that no liquid enters the device.
To avoid overheating of the device, do not remove the ventilation slotcover when the device is switched on.
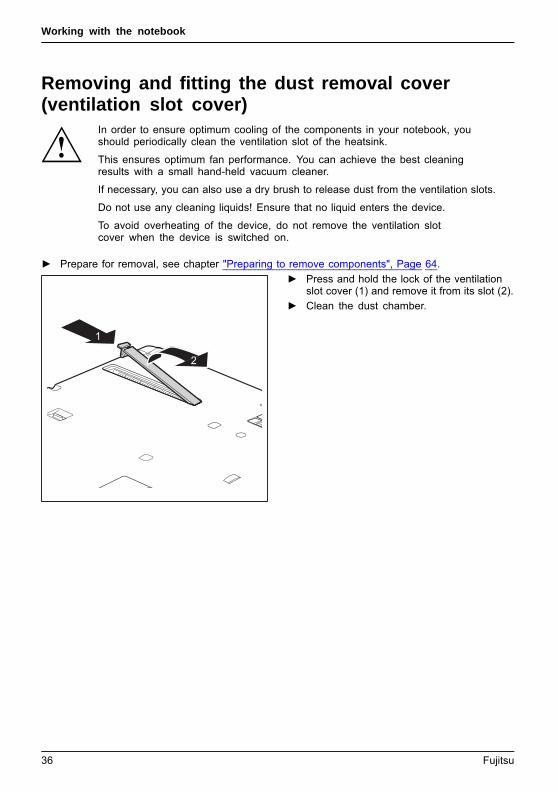
► Prepare for removal, see chapter "Preparing to remove components", Page 64.
1
2
► Press and hold the lock of the ventilationslot cover (1) and remove it from its slot (2).
► Clean the dust chamber.
36 Fujitsu
Working with the notebook
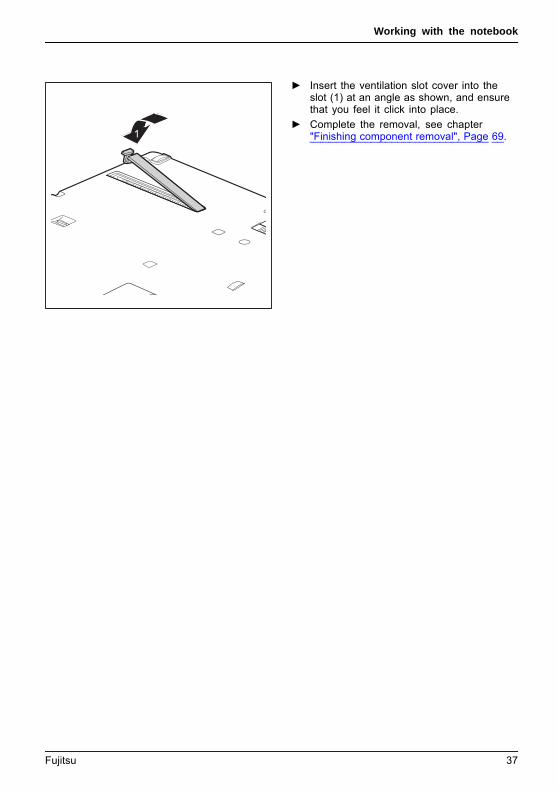
1
► Insert the ventilation slot cover into theslot (1) at an angle as shown, and ensurethat you feel it click into place.
► Complete the removal, see chapter"Finishing component removal", Page 69.
Fujitsu 37

Working with the notebook
Using the power-management featuresPowerPowerBattery
The notebook uses less power when the available power-management features are used. Youwill then be able to work longer when using the battery before having to recharge it.
Power efficiency is increased and environmental pollution reduced. Bychoosing the best power options, you can make significant savings andat the same time help protect the environment.
When you close the LCD screen, depending on the setting in Windows, thenotebook automatically enters a power saving mode.
The recommended settings for the Windows energy saving functions are predefined as "FujitsuComputer EcoSettings" in the Power Options of the Control Panel and can be displayed there.
► Select the power management functions in your Control Panel.
If you need further information about an option, you can get help with mostsettings by pressing F1 to open the Microsoft Help.
When the notebook is in power-saving mode, the following must be remembered:
During power saving mode, open files are held in the main memoryor in a swap file on the hard disk.
Never turn off your notebook while it is in a power saving mode. If the built-in battery isnearly empty, close the open files and do not go into power saving mode.
If you do not intend to use your notebook for a long period of time:
► Exit power saving mode if necessary via the mouse or keyboard or by switching on thenotebook.
► Close all opened programs and completely shut down the notebook.
38 Fujitsu
Working with the notebook
Memory cardsSlot
Your notebook is equipped with an integrated memory card reader.
Observe the manufacturer’s instructions when handling the memory cards.Memorycard
Supported formatsYour notebook supports the following formats:
• Secure Digital (SDTM card)• SDHC• SDXC
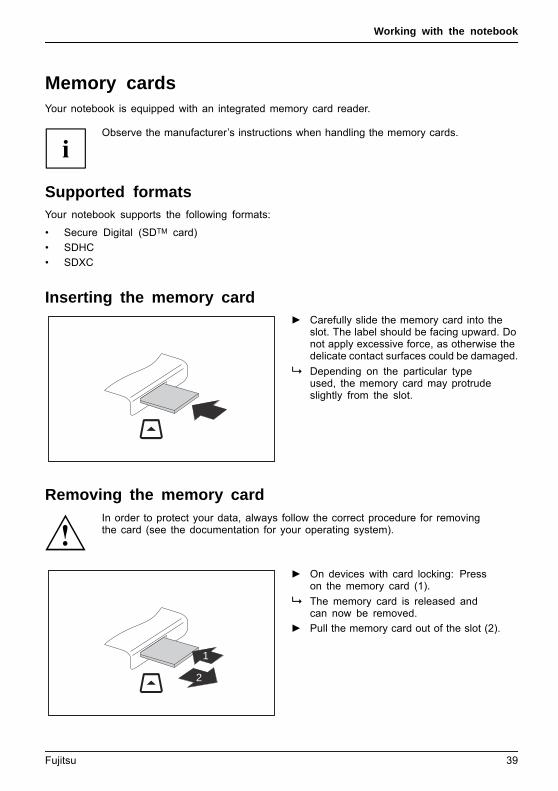
Inserting the memory card► Carefully slide the memory card into the
slot. The label should be facing upward. Donot apply excessive force, as otherwise thedelicate contact surfaces could be damaged.Memorycard
Depending on the particular typeused, the memory card may protrudeslightly from the slot.
Removing the memory cardMemorycard
In order to protect your data, always follow the correct procedure for removingthe card (see the documentation for your operating system).
1
2
► On devices with card locking: Presson the memory card (1).Memorycard
The memory card is released andcan now be removed.
► Pull the memory card out of the slot (2).
Fujitsu 39
Working with the notebook
Loudspeakers and microphonesMicrophoneLoudspeakersVolumecontrol
You will find information about the exact position of speakers and microphones inchapter "Ports and operating elements", Page 9.
Please refer to chapter "Key combinations", Page 24 for information on setting the volumeand also enabling/disabling the loudspeakers using key combinations.
If you attach an external microphone, the built-in microphone is disabled.
When you connect headphones or external speakers, the built-in speakers are disabled.
Information on connecting headphones and a microphone can be foundin "Connecting external devices", Page 56.
SIM cardA SIM Card (Subscriber Identity Module) is a chip card which is inserted in a mobile telephone ornotebook to enable access to a mobile radio network in conjunction with an installed UMTS module.
Follow the instructions supplied by the provider of the SIM card.
The SIM card slot is located in the battery compartment and can onlybe accessed when the battery is removed.
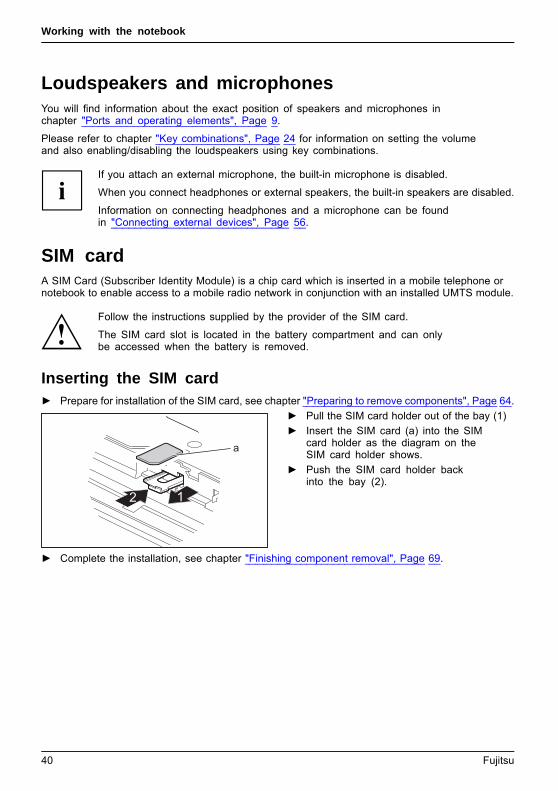
Inserting the SIM card► Prepare for installation of the SIM card, see chapter "Preparing to remove components", Page 64.
2 1
a
► Pull the SIM card holder out of the bay (1)► Insert the SIM card (a) into the SIM
card holder as the diagram on theSIM card holder shows.
► Push the SIM card holder backinto the bay (2).
► Complete the installation, see chapter "Finishing component removal", Page 69.
40 Fujitsu
Working with the notebook
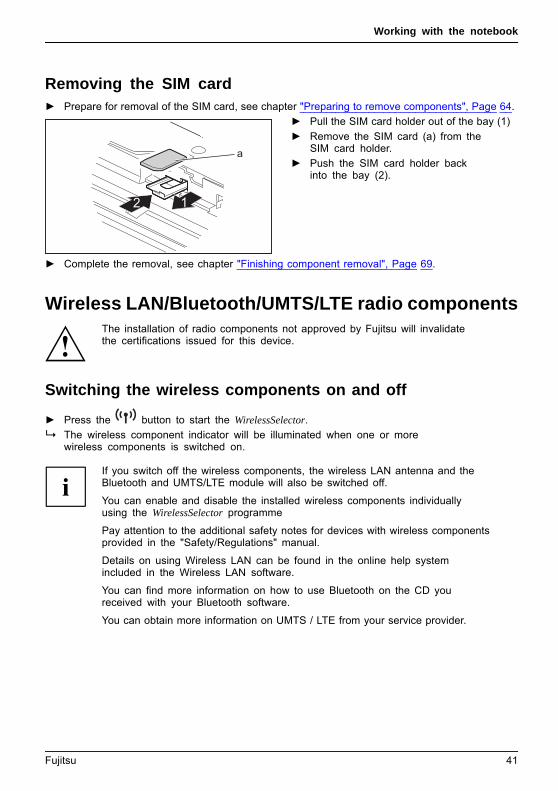
Removing the SIM card► Prepare for removal of the SIM card, see chapter "Preparing to remove components", Page 64.
2 1
a
► Pull the SIM card holder out of the bay (1)► Remove the SIM card (a) from the
SIM card holder.► Push the SIM card holder back
into the bay (2).
► Complete the removal, see chapter "Finishing component removal", Page 69.
Wireless LAN/Bluetooth/UMTS/LTE radio componentsThe installation of radio components not approved by Fujitsu will invalidatethe certifications issued for this device.
Switching the wireless components on and off
► Press the button to start the WirelessSelector.The wireless component indicator will be illuminated when one or morewireless components is switched on.
If you switch off the wireless components, the wireless LAN antenna and theBluetooth and UMTS/LTE module will also be switched off.
You can enable and disable the installed wireless components individuallyusing the WirelessSelector programme
Pay attention to the additional safety notes for devices with wireless componentsprovided in the "Safety/Regulations" manual.
Details on using Wireless LAN can be found in the online help systemincluded in the Wireless LAN software.
You can find more information on how to use Bluetooth on the CD youreceived with your Bluetooth software.
You can obtain more information on UMTS / LTE from your service provider.
Fujitsu 41
Working with the notebook
Setting up WLAN access• Requirement: A WLAN must be available and you must have the
corresponding access information.
Information on configuring the WLAN access can be found in thedocumentation for your operating system.
Access via UMTS/LTEYou can purchase the accessories for UMTS/LTE reception from your retaileror your Fujitsu Technology Solutions dealer.
If you have ordered a UMTS/LTE module, your device will alreadybe prepared when you receive it.
You will find information on establishing the connection with the UMTS/LTEnetwork in the documentation for the hardware you plan to use.
Your device can connect with the Internet via UMTS/LTE. To do this, use oneof the following types of connection:
• USB donglea USB stick with your mobile phone provider’s SIM card
• a mobile end-device (e.g. mobile phone) with Bluetooth connection• a mobile end-device (e.g. mobile phone) with data cable
Ethernet and LANEthernetLAN
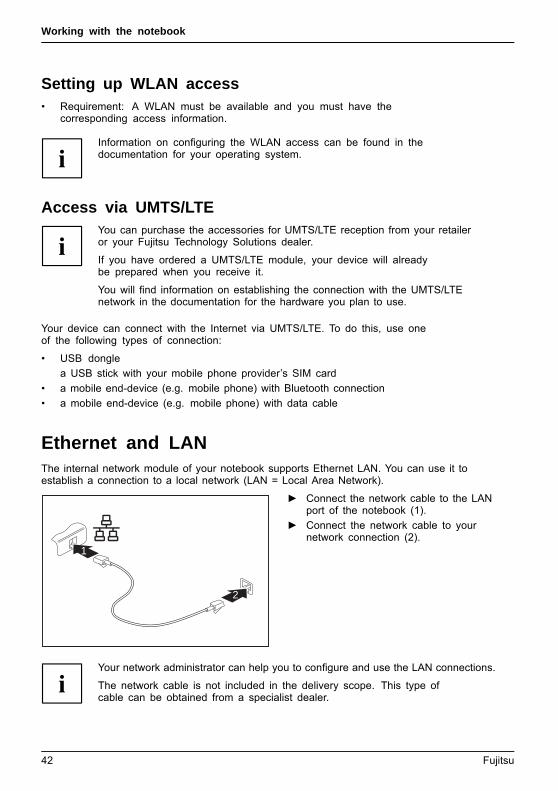
The internal network module of your notebook supports Ethernet LAN. You can use it toestablish a connection to a local network (LAN = Local Area Network).
2
1
► Connect the network cable to the LANport of the notebook (1).
► Connect the network cable to yournetwork connection (2).
Your network administrator can help you to configure and use the LAN connections.
The network cable is not included in the delivery scope. This type ofcable can be obtained from a specialist dealer.
42 Fujitsu
Working with the notebook
Switching between automatic graphics(NVIDIA Optimus Technology) and use of3D graphics exclusively
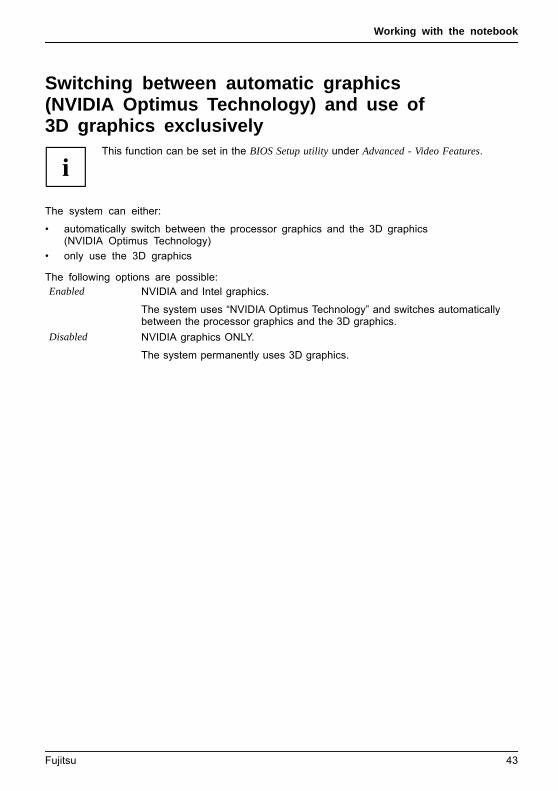
This function can be set in the BIOS Setup utility under Advanced - Video Features.
The system can either:
• automatically switch between the processor graphics and the 3D graphics(NVIDIA Optimus Technology)
• only use the 3D graphics
The following options are possible:Enabled NVIDIA and Intel graphics.
The system uses “NVIDIA Optimus Technology” and switches automaticallybetween the processor graphics and the 3D graphics.
Disabled NVIDIA graphics ONLY.
The system permanently uses 3D graphics.
Fujitsu 43
Working with the notebook
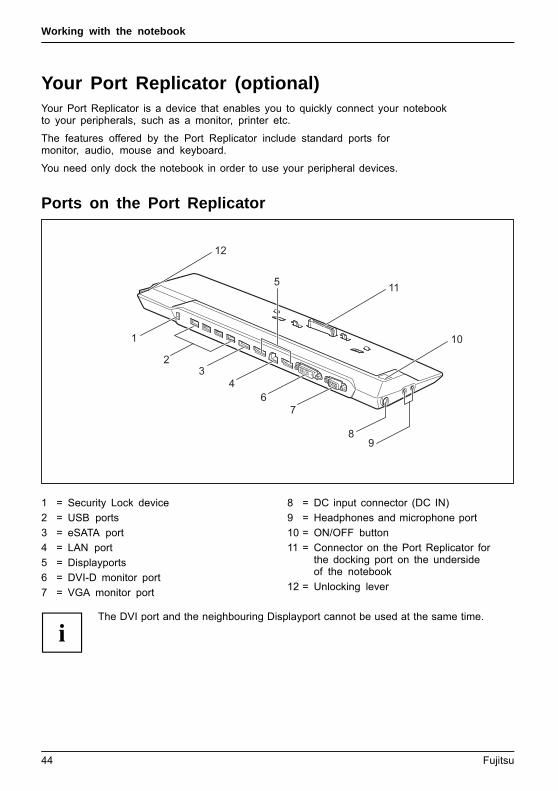
Your Port Replicator (optional)Your Port Replicator is a device that enables you to quickly connect your notebookto your peripherals, such as a monitor, printer etc.
The features offered by the Port Replicator include standard ports formonitor, audio, mouse and keyboard.
You need only dock the notebook in order to use your peripheral devices.
Ports on the Port ReplicatorPortReplicatorPorts
11
1
23
46
7
89
12
10
5
1 = Security Lock device2 = USB ports3 = eSATA port4 = LAN port5 = Displayports6 = DVI-D monitor port7 = VGA monitor port
8 = DC input connector (DC IN)9 = Headphones and microphone port10 = ON/OFF button11 = Connector on the Port Replicator for
the docking port on the undersideof the notebook
12 = Unlocking lever
The DVI port and the neighbouring Displayport cannot be used at the same time.
44 Fujitsu
Working with the notebook
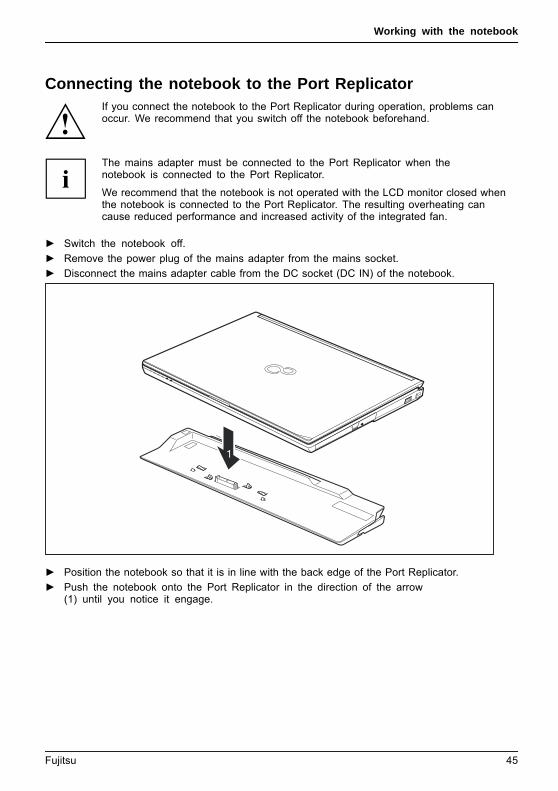
Connecting the notebook to the Port ReplicatorIf you connect the notebook to the Port Replicator during operation, problems canoccur. We recommend that you switch off the notebook beforehand.
The mains adapter must be connected to the Port Replicator when thenotebook is connected to the Port Replicator.
We recommend that the notebook is not operated with the LCD monitor closed whenthe notebook is connected to the Port Replicator. The resulting overheating cancause reduced performance and increased activity of the integrated fan.
PortReplicator
► Switch the notebook off.► Remove the power plug of the mains adapter from the mains socket.► Disconnect the mains adapter cable from the DC socket (DC IN) of the notebook.
1
► Position the notebook so that it is in line with the back edge of the Port Replicator.► Push the notebook onto the Port Replicator in the direction of the arrow
(1) until you notice it engage.
Fujitsu 45
Working with the notebook
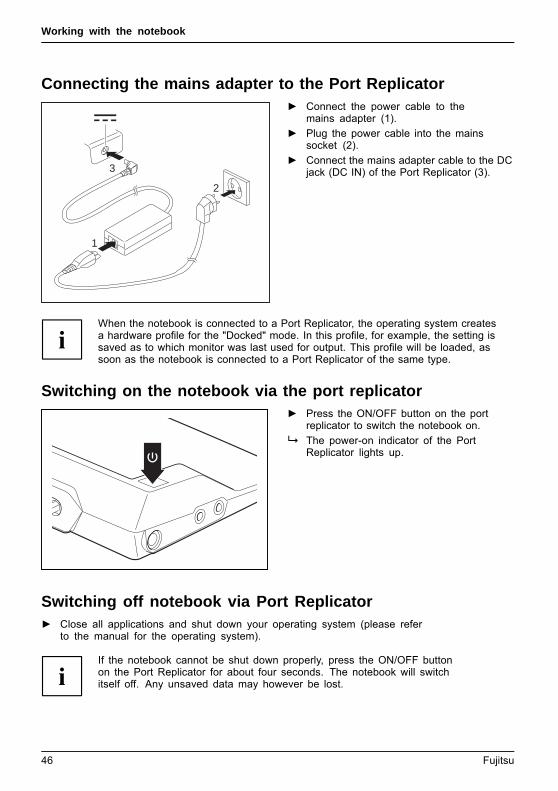
Connecting the mains adapter to the Port Replicator
3
1
2
► Connect the power cable to themains adapter (1).
► Plug the power cable into the mainssocket (2).
► Connect the mains adapter cable to the DCjack (DC IN) of the Port Replicator (3).
When the notebook is connected to a Port Replicator, the operating system createsa hardware profile for the "Docked" mode. In this profile, for example, the setting issaved as to which monitor was last used for output. This profile will be loaded, assoon as the notebook is connected to a Port Replicator of the same type.
Switching on the notebook via the port replicator► Press the ON/OFF button on the port
replicator to switch the notebook on.The power-on indicator of the PortReplicator lights up.
Switching off notebook via Port Replicator► Close all applications and shut down your operating system (please refer
to the manual for the operating system).
If the notebook cannot be shut down properly, press the ON/OFF buttonon the Port Replicator for about four seconds. The notebook will switchitself off. Any unsaved data may however be lost.
46 Fujitsu
Working with the notebook
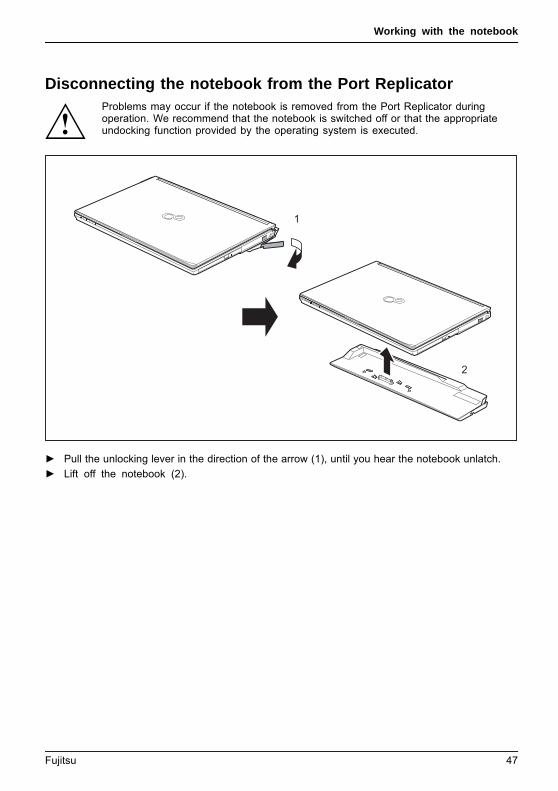
Disconnecting the notebook from the Port ReplicatorProblems may occur if the notebook is removed from the Port Replicator duringoperation. We recommend that the notebook is switched off or that the appropriateundocking function provided by the operating system is executed.
1
2
► Pull the unlocking lever in the direction of the arrow (1), until you hear the notebook unlatch.► Lift off the notebook (2).
Fujitsu 47
Security functions
Security functionsSecurityfunctions
Your notebook has several security features that you can use to secure yoursystem from unauthorised access.
This chapter explains how to use each function, and what the benefits are.
Please remember that in some cases, for example, forgetting your password,you may be locked out and unable to access your data. Therefore,please note the following information:
• Make regular backups to external data carriers such as external harddrives, CDs, DVDs or Blu-ray Discs.
• Some security functions need you to choose passwords. Make a noteof the passwords and keep them in a safe place.
If you forget your passwords you will need to contact the our ServiceDesk. Deletion or resetting of passwords is not covered by your warrantyand a charge will be made for assistance.
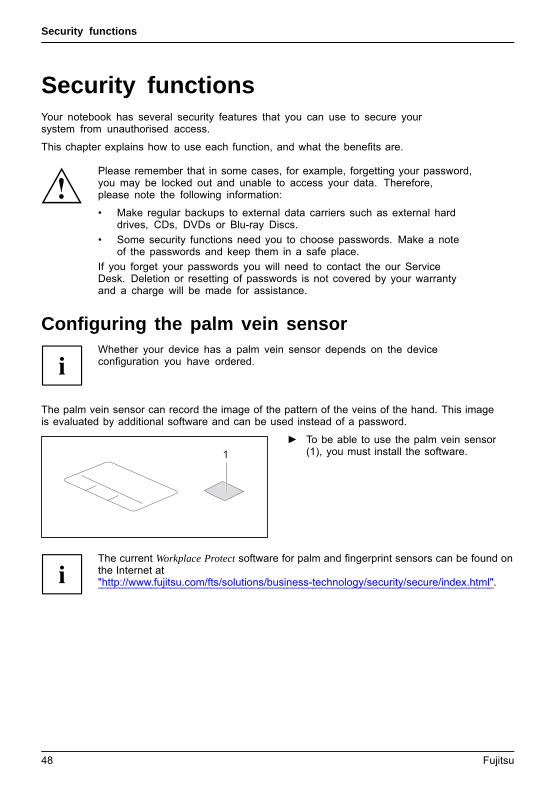
Configuring the palm vein sensorPalmveinsensorPalmveinsensor
Whether your device has a palm vein sensor depends on the deviceconfiguration you have ordered.
The palm vein sensor can record the image of the pattern of the veins of the hand. This imageis evaluated by additional software and can be used instead of a password.
1► To be able to use the palm vein sensor
(1), you must install the software.
The current Workplace Protect software for palm and fingerprint sensors can be found onthe Internet at"http://www.fujitsu.com/fts/solutions/business-technology/security/secure/index.html".
48 Fujitsu
Security functions
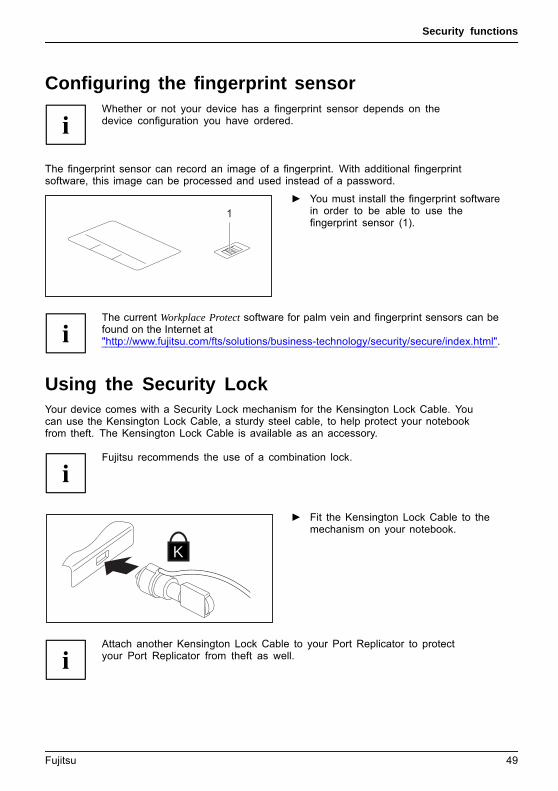
Configuring the fingerprint sensorFingerprintsensorFingerprintsensor
Whether or not your device has a fingerprint sensor depends on thedevice configuration you have ordered.
The fingerprint sensor can record an image of a fingerprint. With additional fingerprintsoftware, this image can be processed and used instead of a password.
1► You must install the fingerprint software
in order to be able to use thefingerprint sensor (1).
The current Workplace Protect software for palm vein and fingerprint sensors can befound on the Internet at"http://www.fujitsu.com/fts/solutions/business-technology/security/secure/index.html".
Using the Security LockYour device comes with a Security Lock mechanism for the Kensington Lock Cable. Youcan use the Kensington Lock Cable, a sturdy steel cable, to help protect your notebookfrom theft. The Kensington Lock Cable is available as an accessory.
Fujitsu recommends the use of a combination lock.
K
► Fit the Kensington Lock Cable to themechanism on your notebook.UsingtheKensingtonLockCableSecurityLockMechanicalbackupAnti-theftprotection
Attach another Kensington Lock Cable to your Port Replicator to protectyour Port Replicator from theft as well.
Fujitsu 49
Security functions
Configuring password protection in BIOS Setup UtilityBefore using the various options for password protection in the BIOS Setup utilityto increase data security, please observe the following:
Make a note of the passwords and keep them in a safe place. If you forget yoursupervisor password you will not be able to access your notebook. Deletion of thepassword is not covered by your warranty and a charge will be made for assistance.Passwordprotection
Your password can be up to eight characters long and contain letters and numbers.No distinction is made between uppercase and lowercase.
Protecting BIOS Setup Utility (supervisor and user password)If you have opened these operating instructions on the screen, werecommend that you print them out. You cannot call the instructions ontothe screen while you are setting up the password.
BIOSSetupUtility
The supervisor password and the user password both prevent unauthorised use of the BIOS SetupUtility. With the aid of the supervisor password you can access all of the functions of the BIOSSetup Utility, while the user password will only give you access to some of the functions. Youcan only set up a user password if a supervisor password has already been assigned.
Please refer to section "Settings in BIOS Setup Utility", Page 70 for a descriptionof how to call up and operate the BIOS-Setup-Utility.
Assigning the supervisor and user passwords► Start the BIOS Setup Utility and go to the Security menu.► Select the Set Supervisor Password field and press the Enter key.
With Enter new Password: you are asked to enter a password.► Enter the password and press the Enter key.
Confirm new Password requires you to confirm the password.► Enter the password again and press the Enter key.
Changes have been saved is a confirmation that the new password has been saved.► To set the user password, select Set User Password and proceed exactly as
when configuring the supervisor password.If you do not want to change any other settings, you can exit BIOS Setup Utility.
► In the Exit menu, select the option Save Changes & Exit.► Select Yes and press the Enter key.
PasswordSupervisorpasswordUserpassword
The notebook is then rebooted and the new password comes into effect. It will now be necessaryto first enter your supervisor or user password in order to open the BIOS Setup Utility. Pleasenote that the user password only provides access to a few of the BIOS settings.
50 Fujitsu
Security functions
Changing the supervisor or user passwordYou can only change the supervisor password when you have logged into theBIOS Setup Utility with the supervisor password.PasswordSupervisorpasswordUserpassword
► Call the BIOS Setup Utility and go to the Security menu.► When changing the password, proceed exactly as for password assignment.
Removing passwordsTo remove a password (without setting a new password) perform the following steps:PasswordSupervisorpasswordUserpassword
► Start the BIOS Setup Utility and go to the Security menu.► Highlight the Set Supervisor Password or Set User Password field and press the Enter key.
You will be requested to enter the current password by the Enter Current Password prompt.You will be requested to enter a new password by the Enter New Password prompt.
► Press the Enter key twice.► In the Exit menu, select the option Save Changes & Exit.► Select Yes and press the Enter key.
The notebook will now reboot with the password removed.Removing the supervisor password simultaneously deactivates the user password.
Password protection for booting of the operating systemWith the supervisor password you have set in the BIOS Setup Utility (seesection "Assigning the supervisor and user passwords", Page 50), you canalso prevent starting of the operating system.Operatingsystem
Activating system protection► Start the BIOS Setup Utility and go to the Security menu.
Operatingsystem
► Select the Password on Boot option and press the Enter key.► Select the desired option (Disabled, First Boot or Every Boot) and press the Enter key► Select the Save Changes & Exit option under Exit.
The notebook reboots. You will be prompted to enter your password (the supervisor password).
Deactivating system protection► Start the BIOS Setup Utility and go to the Security menu.
Operatingsystem
► Select the Password on Boot option and press the Enter key.► Select the Disabled option and press the Enter key.
If you do not want to change any other settings, you can exit BIOS Setup Utility.► Select the Save Changes & Exit option under Exit.
The notebook will reboot. The system is no longer password-protected.
Fujitsu 51
Security functions
Password protection for the hard diskPasswordprotection:
The hard disk password prevents unauthorised access to the hard disk drivesand is checked internally each time the system is booted. The prerequisite forthis is that you have assigned at least the supervisor password.
Activating hard disk protection► Call up the BIOS Setup and select the Security menu.
If you have not assigned BIOS passwords yet, define the supervisor and, if desired,the user password now (see "Security functions", Page 48).
► Mark the Hard Disk Security field and press the Enter key.► In the Drive0 area mark the Set Master Password field and press the Enter key.
Enter new Password then appears and you are asked to enter a password.► Enter the password and press the Enter key.
Confirm new Password requires you to confirm the password.► Enter the password again and press the Enter key.
Setup Notice: Changes have been saved is displayed to confirm that thenew password has been saved.
► To assign the password for the second hard disk (Drive1), go to the Drive1 area andselect the field Set Master Password, then proceed in exactly the same way as forsetting up the password for the first hard disk (Drive0).The field Password Entry on Boot is set to Enabled by default. You can exit the BIOSSetup once you have finished changing the settings.
► From the Exit menu, choose the option Exit Saving Changes.► Press the Enter key and select Yes.
The notebook reboots and your hard disk is now protected with a password. The systemwill ask you to enter the password when the notebook is restarted again.
Deactivating hard disk protectionTo cancel a password without setting a new one, proceed as follows:
► Call up the BIOS Setup and select the Security menu.► Mark the Hard Disk Security field and press the Enter key.► In the Drive0 area mark the Set Master Password field and press the Enter key.
You will be initially requested to enter the old password by the Enter current Password prompt.You will then be requested to enter a new password by the Enter new Password prompt.
► After entering the password, press the Enter key three times.► From the Exit menu, choose the option Exit Saving Changes.► Press the Enter key and select Yes.
The notebook reboots, and password protection for the hard disk is cancelled.► To cancel the password for the second hard disk (Drive1), go to the Drive1 area
and select the field Set Master Password, then proceed in exactly the same way asfor cancelling the password for the first hard disk (Drive0).
52 Fujitsu
Security functions
Boot from Removable MediaWith this BIOS feature, you can manage/control unauthorised booting of an operatingsystem from external media (e.g. USB stick, USB CD-ROM drive etc.) We recommendthat you configure the hard disk as the first boot medium in order to prevent accessto your system by boot CDs and bootable media.
The condition for this BIOS feature is that you have assigned atleast the supervisor password.
► Call up the BIOS Setup and select the Security menu.► Highlight the Boot from Removable Media field and press the Enter key.► Select the entry All (if you want everyone to be allowed to boot) or Supervisor Only (if you
only want the supervisor to be authorised to do this) and press the Enter key.If you do not want to change any other settings you can exit the BIOS Setup.
► From the Exit menu, choose the option Exit Saving Changes.► Press the Enter key and select Yes.
The notebook will restart and the settings will be adopted.
Owner Information (device-dependent)The BIOS feature Owner Information enables you to enter up to 80 characters of textwhich is displayed in the bottom left corner of the screen before the operating systemboots up. You could use this feature for example to put your name and telephonenumber on the notebook in case it is lost or stolen.
Requirements:
• You have been assigned at least the supervisor password.• In the BOOT menu, the Boot time diagnostic screen option is set to enabled.
► Call up the BIOS Setup and select the Security menu.► Highlight the Owner Information field and press the Enter key.► Add the text you would like to enter under Set Owner Information.
Setup Notice: Changes have been saved is displayed to confirm that the text has been saved.► From the Exit menu, choose the option Exit Saving Changes.► Press the Enter key and select Yes.
The notebook will restart and the Owner Information will be adopted.
Fujitsu 53
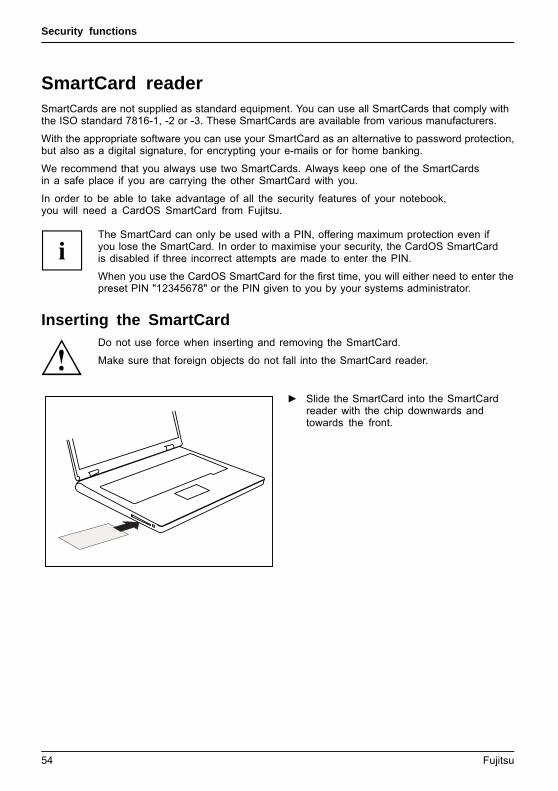
Security functions
SmartCard readerSecurityfunctions,Securityfunctions
SmartCards are not supplied as standard equipment. You can use all SmartCards that comply withthe ISO standard 7816-1, -2 or -3. These SmartCards are available from various manufacturers.
With the appropriate software you can use your SmartCard as an alternative to password protection,but also as a digital signature, for encrypting your e-mails or for home banking.
We recommend that you always use two SmartCards. Always keep one of the SmartCardsin a safe place if you are carrying the other SmartCard with you.
In order to be able to take advantage of all the security features of your notebook,you will need a CardOS SmartCard from Fujitsu.
The SmartCard can only be used with a PIN, offering maximum protection even ifyou lose the SmartCard. In order to maximise your security, the CardOS SmartCardis disabled if three incorrect attempts are made to enter the PIN.
When you use the CardOS SmartCard for the first time, you will either need to enter thepreset PIN "12345678" or the PIN given to you by your systems administrator.
Inserting the SmartCardDo not use force when inserting and removing the SmartCard.
Make sure that foreign objects do not fall into the SmartCard reader.
► Slide the SmartCard into the SmartCardreader with the chip downwards andtowards the front.
54 Fujitsu
Security functions
Trusted Platform Module (TPM) (device-dependent)TPMTrustedPlatformModule
To use the TPM, you must activate the TPM in the BIOS Setup before the softwareis installed. The condition for this is that you have assigned at least the supervisorpassword (see "Security functions", Page 48).
Enabling TPM• Requirement: You have set a supervisor password, see "Security functions", Page 48.► Call up the BIOS Setup and select the Security menu.► Mark the TPM Security Chip Setting field and press the Enter key.► Select Enabled to activate the TPM.
Once you have activated the TPM the Clear Security Chip option appears.Select Clear Security Chip to delete the holder in the TPM. By clicking on Enabled,all secret keys (e.g. SRK - Storage Root Keys, AIK - Attestation Identity Keysetc.) generated by applications are deleted.
Please note that you will then no longer be able to access the data you haveencrypted with the keys based on that holder.
► From the Exit menu, choose the option Exit Saving Changes.► Press the Enter key and select Yes.
The notebook will restart, and TPM will be enabled after the reboot.
Disabling TPM• Requirement: You have set a supervisor password, see "Security functions", Page 48.► Call up the BIOS Setup and select the Security menu.► Mark the TPM Security Chip Setting field and press the Enter key.► Select Disabled to deactivate the TPM.► From the Exit menu, choose the option Exit Saving Changes.► Press the Enter key and select Yes.
Your notebook will now restart and TPM will be disabled.
Fujitsu 55

Connecting external devices
Connecting external devicesAlways refer to the safety information provided in "Important notes", Page 12 beforeconnecting or disconnecting any devices to or from your notebook.
Always read the documentation supplied with the device you wish to connect.
Never connect or disconnect cables during a thunderstorm.
Never pull at a cable when disconnecting it. Always grasp the plug.
With some devices such as USB devices, it is not necessary to switch offthe notebook and the device before connecting/disconnecting. For moreinformation about whether or not devices need to be switched off, please referto the documentation supplied with the external device.
Some of the external devices require special drivers (see the operatingsystem and external device documentation).
56 Fujitsu
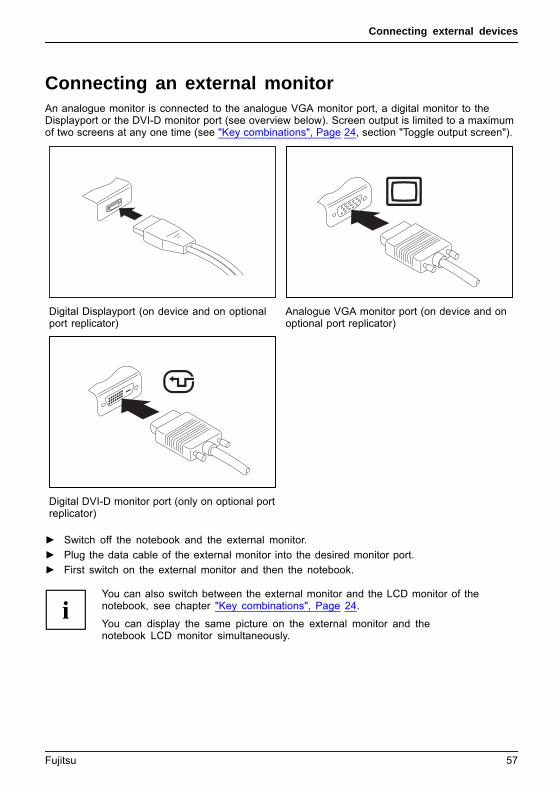
Connecting external devices
Connecting an external monitorAn analogue monitor is connected to the analogue VGA monitor port, a digital monitor to theDisplayport or the DVI-D monitor port (see overview below). Screen output is limited to a maximumof two screens at any one time (see "Key combinations", Page 24, section "Toggle output screen").MonitorVGAconnectionsocketMonitorportMonitorport
Digital Displayport (on device and on optionalport replicator)
Analogue VGA monitor port (on device and onoptional port replicator)
Digital DVI-D monitor port (only on optional portreplicator)
► Switch off the notebook and the external monitor.► Plug the data cable of the external monitor into the desired monitor port.► First switch on the external monitor and then the notebook.
You can also switch between the external monitor and the LCD monitor of thenotebook, see chapter "Key combinations", Page 24.
You can display the same picture on the external monitor and thenotebook LCD monitor simultaneously.
Fujitsu 57
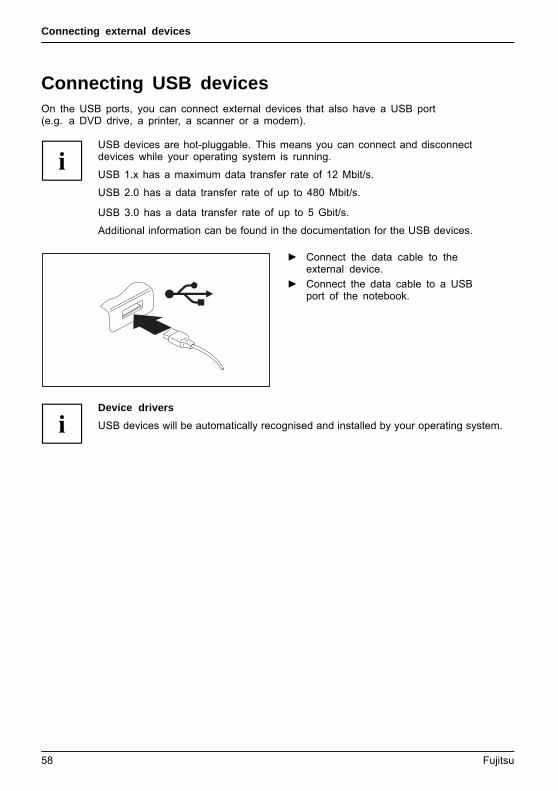
Connecting external devices
Connecting USB devicesUSBports
On the USB ports, you can connect external devices that also have a USB port(e.g. a DVD drive, a printer, a scanner or a modem).
USB devices are hot-pluggable. This means you can connect and disconnectdevices while your operating system is running.
USB 1.x has a maximum data transfer rate of 12 Mbit/s.
USB 2.0 has a data transfer rate of up to 480 Mbit/s.
USB 3.0 has a data transfer rate of up to 5 Gbit/s.
Additional information can be found in the documentation for the USB devices.
► Connect the data cable to theexternal device.
► Connect the data cable to a USBport of the notebook.
Device driversUSB devices will be automatically recognised and installed by your operating system.
58 Fujitsu
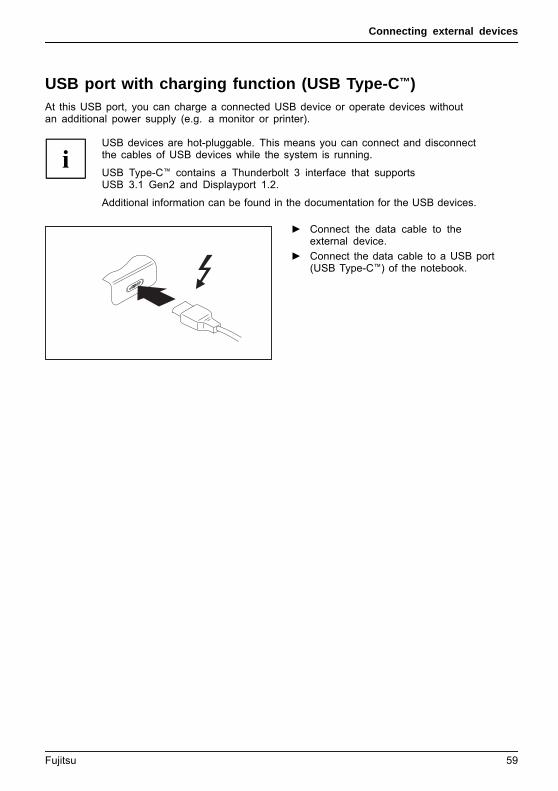
Connecting external devices
USB port with charging function (USB Type-C™)USB3.1Type-C
At this USB port, you can charge a connected USB device or operate devices withoutan additional power supply (e.g. a monitor or printer).
USB devices are hot-pluggable. This means you can connect and disconnectthe cables of USB devices while the system is running.
USB Type-C™ contains a Thunderbolt 3 interface that supportsUSB 3.1 Gen2 and Displayport 1.2.
Additional information can be found in the documentation for the USB devices.
► Connect the data cable to theexternal device.
► Connect the data cable to a USB port(USB Type-C™) of the notebook.
Fujitsu 59

Connecting external devices
USB port with charging function (Anytime USB charge)You can use this USB port to charge or supply power to a connected USB device (e.g.to charge a PDA or a mobile phone or to connect a USB lamp).
Charging is also possible when the notebook is switched off, if the Anytime USB Charge functionis activated in the Advanced menu of the BIOS Setup Utility. If the setting AC is selected,the device will only be charged when the mains adapter is connected.
Please refer to section "Settings in BIOS Setup Utility", Page 70 for a descriptionof how to call up and operate the BIOS-Setup-Utility.USBchargingfunction
It is recommended that the notebook be operated with the power supply connectedwhenever the USB port with charging function is in use, as this function will drainthe battery more quickly if an external USB device is being charged.
The power supply unit must already be connected when the notebook isswitched off, as otherwise the USB charging function will be disabled andthe connected USB devices will not be charged.
Some USB devices (e.g. mobile telephones) require a driver in order to utilise theUSB charging function. In this case the USB charging function will not work when thenotebook is switched off, as no drivers are active when the notebook is switched off.
► Connect the data cable to theexternal device.
► Connect the data cable to a USB port(Anytime USB charge) of the notebook.
60 Fujitsu
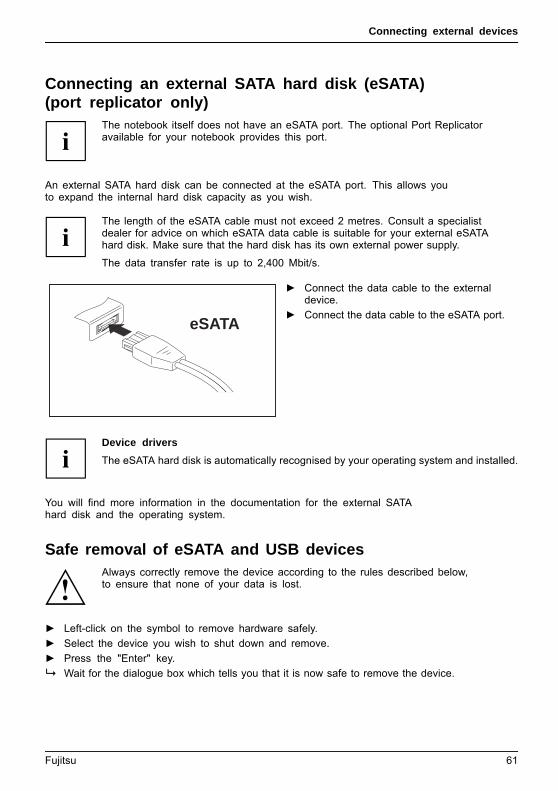
Connecting external devices
Connecting an external SATA hard disk (eSATA)(port replicator only)
The notebook itself does not have an eSATA port. The optional Port Replicatoravailable for your notebook provides this port.
An external SATA hard disk can be connected at the eSATA port. This allows youto expand the internal hard disk capacity as you wish.
The length of the eSATA cable must not exceed 2 metres. Consult a specialistdealer for advice on which eSATA data cable is suitable for your external eSATAhard disk. Make sure that the hard disk has its own external power supply.
The data transfer rate is up to 2,400 Mbit/s.
eSATA
► Connect the data cable to the externaldevice.
► Connect the data cable to the eSATA port.
Device driversThe eSATA hard disk is automatically recognised by your operating system and installed.
You will find more information in the documentation for the external SATAhard disk and the operating system.
Safe removal of eSATA and USB devicesAlways correctly remove the device according to the rules described below,to ensure that none of your data is lost.
► Left-click on the symbol to remove hardware safely.► Select the device you wish to shut down and remove.► Press the "Enter" key.
Wait for the dialogue box which tells you that it is now safe to remove the device.
Fujitsu 61
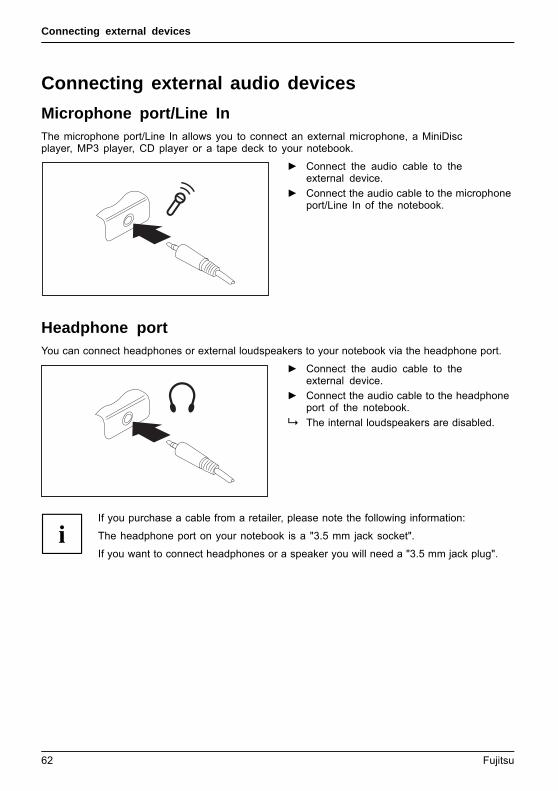
Connecting external devices
Connecting external audio devicesMicrophone port/Line InAudiodevices,connectingAudioportsMicrophone,connecting
The microphone port/Line In allows you to connect an external microphone, a MiniDiscplayer, MP3 player, CD player or a tape deck to your notebook.
► Connect the audio cable to theexternal device.
► Connect the audio cable to the microphoneport/Line In of the notebook.
Headphone portConnectingaudiodevicesAudioportsConnectingheadphones
You can connect headphones or external loudspeakers to your notebook via the headphone port.
► Connect the audio cable to theexternal device.
► Connect the audio cable to the headphoneport of the notebook.The internal loudspeakers are disabled.
If you purchase a cable from a retailer, please note the following information:
The headphone port on your notebook is a "3.5 mm jack socket".
If you want to connect headphones or a speaker you will need a "3.5 mm jack plug".
62 Fujitsu
Removing and installing components during servicing
Removing and installing componentsduring servicing
Only qualified technicians should repair your notebook. Unauthorisedopening or incorrect repair may greatly endanger the user (electric shock,fire risk) and will invalidate your warranty.Components
Servicing
After consulting the Hotline/Service Desk, you may remove and install thecomponents described in this chapter yourself.
If you remove and install components without consulting the Hotline/ServiceDesk, then the warranty of your notebook will be voided.
Notes on installing and removing boardsand components• Switch the notebook off and pull the power plug out of the mains socket.• Always remove the battery.• Take care when you use the locking mechanisms on the battery and any other component.• Never use sharp objects such as screwdrivers, scissors or knives as leverage to remove covers.
NotesBoardESD
Boards with electrostatic sensitive devices (ESD) are marked with the labelshown.
When handling boards fitted with ESDs, you must always observe the followingpoints:
• You must always discharge static build up (e.g. by touching a groundedobject) before working.
• The equipment and tools you use must be free of static charges.• Remove the power plug from the mains supply before inserting or removing
boards containing ESDs.• Always hold boards with ESDs by their edges.• Never touch pins or conductors on boards fitted with ESDs.
Fujitsu 63
Removing and installing components during servicing
Preparing to remove componentsIf you are going to remove or change system components, prepare for the removal as follows:
Please observe the safety information in chapter "Important notes", Page 12.
Remove the power plug from the mains outlet !
► Switch the device off.
The device must not be in energy-saving mode !
► Close the LCD screen.► Remove all the cables from the device.► Turn the device over and place it on a stable, flat and clean surface. If necessary, lay an
anti-slip cloth on this surface to prevent the device from being scratched.► Remove the battery (see "Removing a battery", Page 31).
Installing and removing memory expansionMemorymoduleMainmemoryRemovingmemorySystemexpansionSystemexpansion
If you are asked by the Hotline/Service Desk to remove and install the memoryexpansion yourself, proceed as follows:
Please observe the safety information in chapter "Important notes", Page 12.
When installing/removing memory modules, the battery must be removed fromthe notebook and the notebook must not be connected to the power supply,see "Preparing to remove components", Page 64.
Only use memory expansion modules that have been approved for yournotebook (see "Technical data", Page 81).
Never use force when installing or removing a memory extension.
Make sure that foreign objects do not fall into the memory extension compartment.
You must open the service compartment to remove or install a memory module. On some devices,opening the compartment may expose other components. These components should be removedand replaced only by authorised specialists. Therefore, be sure to observe the following:
Individual components can become very hot during operation. Therefore, werecommend that you wait one hour after switching off the notebook before removingor installing memory modules. Otherwise, there is a risk of suffering burns!
As some components are exposed that are sensitive to static electricity, please takenote of chapter "Notes on installing and removing boards and components", Page 63.
64 Fujitsu
Removing and installing components during servicing
Removing a cover
1
► Open the cover and take it off the notebook (1).
Removing memory modules
32
1
1
► Carefully push the two mountingclips outwards (1).MemoryexpansionMemorymodule
The memory module snaps upwards (2).► Pull the memory module out of its slot
in the direction of the arrow (3).
Installing a memory module
2
a
1
► Insert the memory module with the contactsand the recess (a) facing the slot (1).MemoryexpansionMemorymodule
► Carefully push the memory moduledownwards until you feel it clickinto place (2).
Fujitsu 65
Removing and installing components during servicing
Attaching the cover
1
► Place the cover in the correct slot (1).
66 Fujitsu
Removing and installing components during servicing
Removing and installing the hard diskRemoving a cover► Remove the battery (see Chapter "Removing a battery", Page 31).
1 1
2
► Remove the screws (1).
Keep the screws in a safe place. If you are removing more than one component atthe same time, store the screws for the individual components separately from eachother. If you install the wrong screws, components may be damaged.
► Lift the cover off the notebook (2).
Fujitsu 67

Removing and installing components during servicing
Removing a hard disk
1
► Remove the hard disk from the hard disk compartment (1).
Installing a hard disk
1
► Place the hard disk into the hard disk compartment (1).
68 Fujitsu
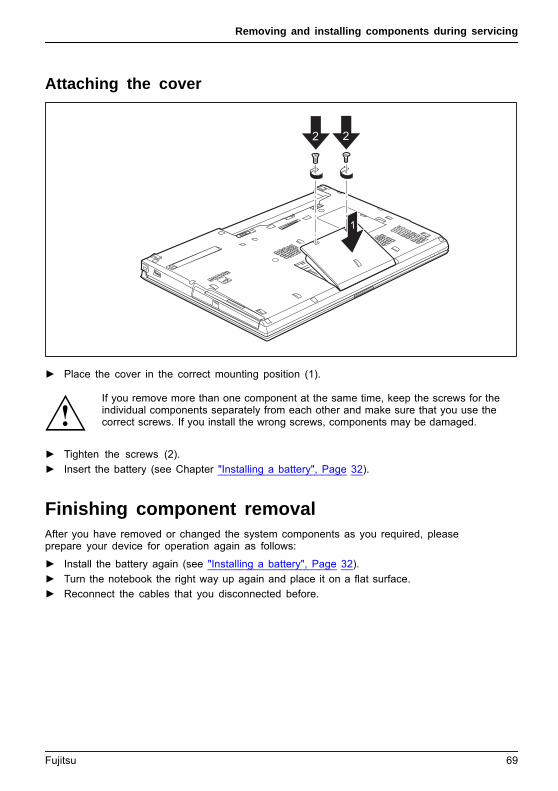
Removing and installing components during servicing
Attaching the cover
2 2
1
► Place the cover in the correct mounting position (1).
If you remove more than one component at the same time, keep the screws for theindividual components separately from each other and make sure that you use thecorrect screws. If you install the wrong screws, components may be damaged.
► Tighten the screws (2).► Insert the battery (see Chapter "Installing a battery", Page 32).
Finishing component removalAfter you have removed or changed the system components as you required, pleaseprepare your device for operation again as follows:
► Install the battery again (see "Installing a battery", Page 32).► Turn the notebook the right way up again and place it on a flat surface.► Reconnect the cables that you disconnected before.
Fujitsu 69
Settings in BIOS Setup Utility
Settings in BIOS Setup UtilityBIOSSetupUtilitySystemsettings,BIOSSetupUtilityConfiguration,BIOSSetupUtilitySetupSystemconfigurationHardwareconfiguration
The BIOS Setup Utility allows you to set the system functions and the hardwareconfiguration for the notebook.
When it is delivered, the notebook is set to factory default settings. You canchange these settings in BIOS Setup Utility. Any changes you make take effect assoon as you save and exit the BIOS Setup Utility.
The BIOS Setup Utility program contains the following menus:
About Displays information relating to the BIOS, processor and notebookSystem Advanced system settingsAdvanced Configuration of various hardware components, such as mouse, keyboard,
processorSecurity Password settings and security functionsBoot Configuration of the start-up sequenceExit Exits the BIOS Setup Utility
Starting the BIOS Setup Utility► Reboot the device (switch off/on or reboot the operating system).
BIOSSetupUtility
Depending on the Fast Boot setting in the BIOS Setup utility, the followinginformation may appear on the screen during start:<F2> BIOS Setup <F12> Boot Menu
► Press the function key F2 .► If a password has been assigned, enter the password and press the Enter key.
If you have forgotten the password, contact your system administratoror contact our customer service centre.
The BIOS Setup Utility starts.
70 Fujitsu
Settings in BIOS Setup Utility
Operating BIOS Setup UtilityBIOSSetupUtility
Press the F1 key to display help on the operation of the BIOS Setup Utility. The descriptionof the individual settings is shown in the right-hand window of the BIOS Setup Utility.
With the F9 key you can load the default settings of the BIOS Setup Utility.
► Use the cursor keys ← or → to select the menu you wish to access to make changes.The menu is displayed on the screen.
► Select the option you want to change with the cursor keys ↑ or ↓ .► Press the Enter key.► Press the ESC key to exit the selected menu.► For future reference, make a note of the changes you have made (for example, in this manual).
Fujitsu 71
Settings in BIOS Setup Utility
Exiting BIOS Setup UtilityBIOSSetupUtility
You need to select the desired option in the Exit menu and activate it by pressing the Enter key:
Exit Saving Changes - save changes and exit BIOS Setup Utility► To save the current menu settings and exit the BIOS Setup Utility, select Exit Saving Changes and Yes.
The notebook is rebooted and the new settings come into effect.
Exit Discarding Changes – Discard changes andexit BIOS Setup Utility► To discard the changes, select Exit Discarding Changes and Yes.
The settings in place when BIOS Setup Utility was called remain effective. BIOSSetup Utility is terminated and the notebook is rebooted.
Load Setup Defaults – Copy Standard Entries► To copy the standard entries for all menus of the BIOS Setup Utility,
choose Load Setup Defaults and Yes.
Discard Changes – Discard changes without exitingthe BIOS Setup Utility► To discard the changes you have made, select Discard Changes and Yes.
The settings in place when BIOS Setup Utility was called remain effective.You can now make additional settings in the BIOS Setup Utility.
► If you want to exitBIOS Setup Utilitywith these settings, select Exit Saving Changes and Yes.
Save Changes - save changes without exitingthe BIOS Setup Utility► To save the changes, select Save Changes and Yes.
The changes are saved. You can now make additional settings in the BIOS Setup Utility.► If you want to exit BIOS Setup Utility with these settings, choose Exit Saving Changes and Yes.
Save Changes and Power Off► To save the changes and switch off your device, select Save Changes and Power Off and Yes.
The changes are saved. Your device is shut down.
72 Fujitsu
Troubleshooting and tips
Troubleshooting and tipsTroubleshootingTipsFaultTroubleshooting
Follow the safety notes in the "Safety/Regulations" manual whenconnecting or disconnecting cables.
If a fault occurs, try to correct it as described. If you fail to correct the problem, proceed as follows:
► Make a note of the steps and the circumstances that led to the fault. Alsomake a note of any error messages displayed.
► Switch the notebook off.► Please contact the Hotline/Service Desk.
The telephone numbers can be found at: "http://support.ts.fujitsu.com/contact/servicedesk".Have the following information ready when you call:
• The model name and serial number of the notebook. The serial number islocated on a sticker on the underside of the notebook.
• Notes of any messages that appear on the screen and information on acoustic signals.• Any changes you have made to the hardware or software since
receiving the notebook.• Any changes you have made to the BIOS Setup settings since receiving the notebook.• Your system configuration and all peripheral devices connected to your system.• Your sales contract.
Our notebooks have been designed primarily with mobile applications in mind. Thismeans that considerable effort has been made to optimise components and equipmentin terms of weight, space and energy requirements. Depending on the particularconfiguration you have purchased, it is possible that functionality may be slightly reducedcompared to a desktop PC if you are running processor-intensive gaming software, e.g.games with intensive 3D graphics. Updating your hardware with drivers which have notbeen approved by Fujitsu Technology Solutions may result in performance losses, datalosses or malfunction of the equipment. A list of approved drivers and current BIOSversions can be downloaded from: "http://support.ts.fujitsu.com/Download/Index.asp"
Help if problems occurShould you encounter a problem with your computer that you cannot resolve yourself:
► Note the ID number of your device. The ID number is found on the type ratingplate on the back or underside of the casing.
► Contact the Service Desk responsible for your country for clarification of the problem:"http://support.ts.fujitsu.com/contact/servicedesk". When you do this, please haveready the ID number and serial number of your system.
Fujitsu 73
Troubleshooting and tips
Restoring the hard disk contents under WindowsHarddisk:Operatingsystem,restoring
You can use the "Windows Recovery CD" (optionally available) and the "Drivers & UtilitiesCD/DVD" to reinstall the operating system.
The instructions are provided on the case of the Recovery CD.
During the reinstall process your personal files and any installed programswill be deleted. We advise you to backup your files to an external harddrive, or CD / DVD disk before you start.
► Switch the notebook on.Depending on the Fast Boot setting in the BIOS Setup utility, the followinginformation may appear on the screen during start:<ESC>Diagnostic screen <F12>Boot Menu <F2>BIOS Setup
► When this message appears, press the function key F12 .► Insert the "Windows Recovery CD" into the optical drive.► Select CD-ROM and press the Enter key.► Follow the instructions on the screen.
After the installation you must install all the drivers again. Some installed hardwarecomponents will not be correctly supported until this has been done.
► Insert the "Drivers & Utilities" CD/DVD into the optical drive. The CD starts automatically.► Click on the Desk Update button.► Select Automatic driver installation (Express) and click on Start installation.► Follow the instructions on the screen.► Restart your notebook when the driver installation is completed.
The notebook’s date or time is incorrectTimenotcorrectTimenotcorrectIncorrectdate/timeDateisincorrect
Cause TroubleshootingTime and date are incorrect. ► With the BIOS-Setup-Utility, you can set the
date and time in the main menu.If the time and date are still set incorrectly afterswitching on the notebook.
► Please contact your sales outlet or ourHotline/Service Desk.
The notebook’s LCD screen remains blankLCDscreenLCDscreenistoodark
Cause TroubleshootingMonitor is switched off. ► Press a key or touch the touchpad.External monitor or television set connected. ► Press the key combination to switch the
screen output, see "Key combinations",Page 24.
74 Fujitsu
Troubleshooting and tips
The LCD screen is difficult to readLCDscreenLCDscreen
Cause TroubleshootingReflected glare ► Turn the notebook or alter the tilt of the LCD
screen.► Increase the brightness of the screen.
The external monitor remains blankMonitor
Cause TroubleshootingMonitor is switched off. ► Switch the external monitor on.Power saving has been activated (monitor isblank).
► Press any key to continue.
Brightness is set to dark. ► Adjust the brightness of the monitor.Screen output is set to the notebook’s LCDscreen
► Press the key combination to switch thescreen output, see "Key combinations",Page 24.
The external monitor’s power cable or datacable is not connected properly.
► Switch off the external monitor and thenotebook.
► Check whether the power cable is pluggedproperly into the external monitor and intothe power socket.
► Check whether the data cable is properlyconnected to the notebook and the externalmonitor (if it is plugged in with a connector).
► Switch on the external monitor and thenotebook.
The external monitor is blank or the image is unstableScreenMonitor
Cause TroubleshootingThe wrong external monitor has been selectedor the wrong screen resolution has been set forthe application program.
► Terminate the application program inWindows by pressing Alt + F4 . If thefault persists after closing the program, usethe key combination for switching the screenoutput (see "Key combinations", Page 24) toswitch over to the notebook’s LCD screen.Change the following setting:
► Set the screen resolution: Set the screenresolution as described in the documentationfor your operating system.
► Select monitor: Select monitor 1 or 2 asdescribed in the documentation for youroperating system.
Fujitsu 75

Troubleshooting and tips
The notebook cannot be startedNotebook
Cause TroubleshootingThe battery is not installed correctly. ► Check whether the battery is installed
correctly in its compartment.► Switch the notebook on.
The battery is dead. ► Charge the battery.
or► Insert a charged battery.
or► Connect the mains adapter to the
notebook.The power adapter is not connected correctly. ► Check whether the mains adapter is
connected correctly to the notebook.► Switch the notebook on.
The notebook stops workingNotebookEnergysavingmode
Cause TroubleshootingNotebook is in energy saving mode. ► Leave energy saving mode.An application programme has caused themalfunction.
► Close the application program or restartthe notebook (by restarting the operatingsystem or switching the device off and backon again).
The battery is dead. ► Charge the battery.
or► Insert a charged battery.
or► Connect the mains adapter to the
notebook.
76 Fujitsu
Troubleshooting and tips
The printer does not printPrinterdoesnotprint
Cause TroubleshootingThe printer is not switched on. ► Make sure that the printer is switched
on and ready for operation (refer to thedocumentation supplied with the printer).
The printer is not connected correctly. ► Check that the data cable connectingthe notebook to the printer is properlyconnected.
The printer driver is faulty or not correctlyinstalled, or it is the wrong printer driver.
► Check that the data cable connectingthe notebook to the printer is properlyconnected.
► Check whether the correct printer driver isloaded (refer to the printer documentation).
The wireless connection to a network does not workThewirelessconnectiontoanetworkdoesnotwork
Cause TroubleshootingThe wireless component is disabled. ► Switch the wireless component on (see
"Switching the wireless components on andoff", Page 41).
The wireless component is enabled. Despitethis, the wireless connection to a network doesnot work.
► Check whether the wireless connection isswitched on via the software.
► Further information on using the wirelesscomponent can be found in the help files.
SmartCard reader is not recognised.Cause TroubleshootingChip card inserted incorrectly. ► Make sure you have inserted your
SmartCard into the SmartCard readerwith the chip facing upwards/downwards(device-dependent).
► Check whether the SmartCard you are usingis supported. Your SmartCard must complywith the ISO standard 7816-1, -2, -3 and -4.
SmartCard PIN forgottenCause TroubleshootingPIN forgotten ► If you are working in a network, contact your
system administrator, who can unlock yournotebook with a Supervisor PIN.
Fujitsu 77
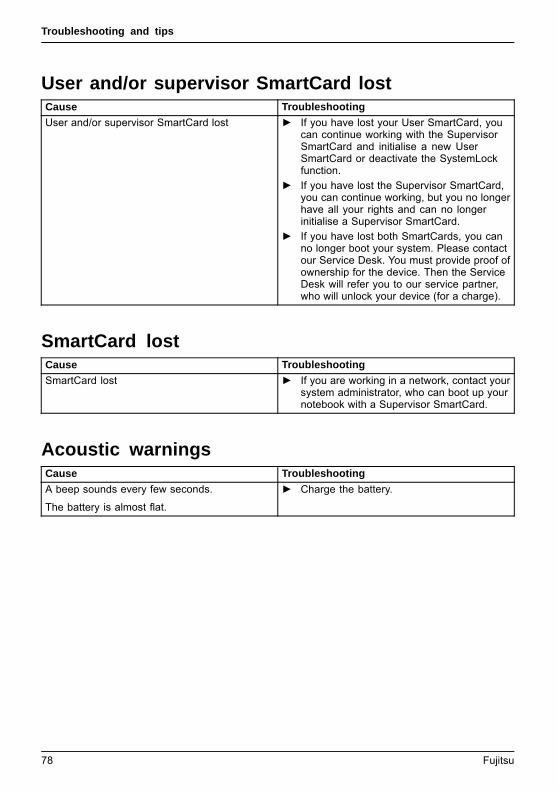
Troubleshooting and tips
User and/or supervisor SmartCard lostCause TroubleshootingUser and/or supervisor SmartCard lost ► If you have lost your User SmartCard, you
can continue working with the SupervisorSmartCard and initialise a new UserSmartCard or deactivate the SystemLockfunction.
► If you have lost the Supervisor SmartCard,you can continue working, but you no longerhave all your rights and can no longerinitialise a Supervisor SmartCard.
► If you have lost both SmartCards, you canno longer boot your system. Please contactour Service Desk. You must provide proof ofownership for the device. Then the ServiceDesk will refer you to our service partner,who will unlock your device (for a charge).
SmartCard lostCause TroubleshootingSmartCard lost ► If you are working in a network, contact your
system administrator, who can boot up yournotebook with a Supervisor SmartCard.
Acoustic warningsAcousticerrormessagesErrors
Cause TroubleshootingA beep sounds every few seconds.
The battery is almost flat.
► Charge the battery.
78 Fujitsu

Troubleshooting and tips
Error messages on the screenErrormessagesonthescreenErrormessage:
This section describes the error messages generated by the BIOS Setup. Error messages displayedby the operating system or programmes are described in the relevant documentation.
If the error message appears repeatedly, despite troubleshooting measures, pleasecontact the place of purchase or our customer service centre.
Error message/cause ResolutionCMOS battery bad
If the error message occurs repeatedly, thebuffer battery in the notebook is flat.
► Contact your sales outlet or our customerservice centre.
System CMOS checksum bad - default configurationused
The system configuration information isincorrect.
► Switch the notebook off.► Switch the notebook on.► Press the function key F2 to access the
BIOS Setup.► In the BIOS Setup, select the Exit menu.► Select the entry Load Setup Defaults.► Select OK and press the Enter key.
Extended memory failed at offset: xxxx Failing Bits:zzzz zzzz
When testing the extended memory an error hasresulted at the address xxxx.
► Check whether the additional memorymodule has been inserted correctly.
Failure Fixed Disk n
The settings of the hard disk drive are incorrect.
► Start the BIOS Setup (Primary Mastersubmenu) and select the correct settings.
Keyboard controller error ► Switch the notebook off using with theON/OFF button.
► Wait 3 - 5 seconds and switch on thenotebook again.
Keyboard error If you are using an external keyboard:
► Check the connection and reboot thenotebook.
nn Stuck key ► Make sure that no key is pressed.Operating system not found ► Check in the BIOS Setup whether your hard
disk has been set correctly.► Make sure that the operating system is
installed on the corresponding drive.Press <F1> to resume, <F2> to SETUP
This error message appears if an error occursduring the self-test before starting the operatingsystem.
► Press the F1 function key to start theoperating system.
► Press the function key F2 to access theBIOS Setup.
Fujitsu 79
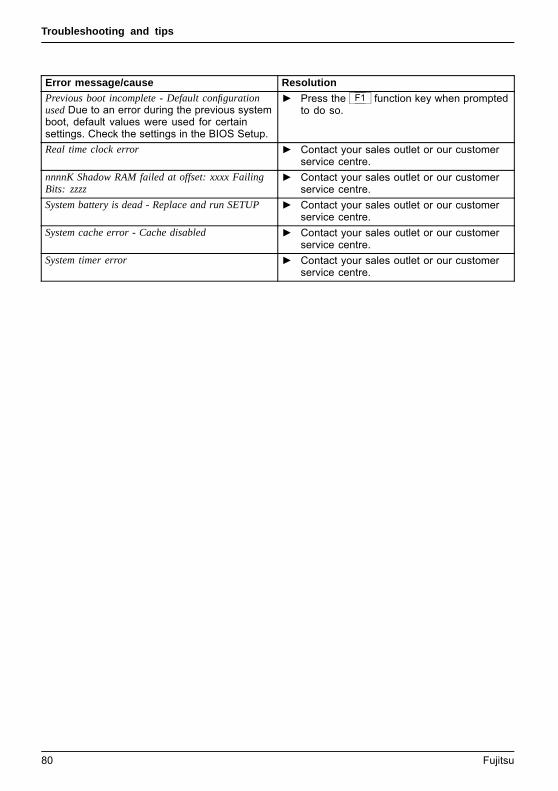
Troubleshooting and tips
Error message/cause ResolutionPrevious boot incomplete - Default configurationused Due to an error during the previous systemboot, default values were used for certainsettings. Check the settings in the BIOS Setup.
► Press the F1 function key when promptedto do so.
Real time clock error ► Contact your sales outlet or our customerservice centre.
nnnnK Shadow RAM failed at offset: xxxx FailingBits: zzzz
► Contact your sales outlet or our customerservice centre.
System battery is dead - Replace and run SETUP ► Contact your sales outlet or our customerservice centre.
System cache error - Cache disabled ► Contact your sales outlet or our customerservice centre.
System timer error ► Contact your sales outlet or our customerservice centre.
80 Fujitsu
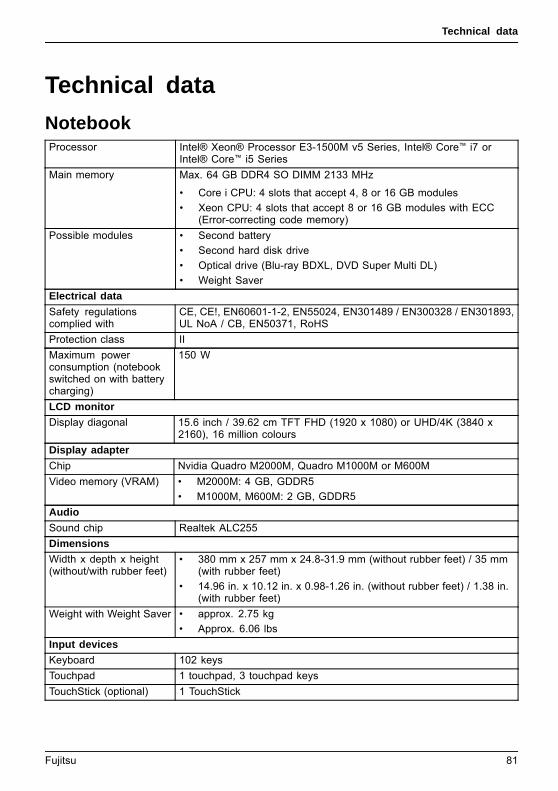
Technical data
Technical dataNotebookTechnicaldata
Processor Intel® Xeon® Processor E3-1500M v5 Series, Intel® Core™ i7 orIntel® Core™ i5 Series
Main memory Max. 64 GB DDR4 SO DIMM 2133 MHz
• Core i CPU: 4 slots that accept 4, 8 or 16 GB modules• Xeon CPU: 4 slots that accept 8 or 16 GB modules with ECC
(Error-correcting code memory)Possible modules • Second battery
• Second hard disk drive• Optical drive (Blu-ray BDXL, DVD Super Multi DL)• Weight Saver
Electrical dataSafety regulationscomplied with
CE, CE!, EN60601-1-2, EN55024, EN301489 / EN300328 / EN301893,UL NoA / CB, EN50371, RoHS
Protection class IIMaximum powerconsumption (notebookswitched on with batterycharging)
150 W
LCD monitorDisplay diagonal 15.6 inch / 39.62 cm TFT FHD (1920 x 1080) or UHD/4K (3840 x
2160), 16 million coloursDisplay adapterChip Nvidia Quadro M2000M, Quadro M1000M or M600MVideo memory (VRAM) • M2000M: 4 GB, GDDR5
• M1000M, M600M: 2 GB, GDDR5AudioSound chip Realtek ALC255DimensionsWidth x depth x height(without/with rubber feet)
• 380 mm x 257 mm x 24.8-31.9 mm (without rubber feet) / 35 mm(with rubber feet)
• 14.96 in. x 10.12 in. x 0.98-1.26 in. (without rubber feet) / 1.38 in.(with rubber feet)
Weight with Weight Saver • approx. 2.75 kg• Approx. 6.06 lbs
Input devicesKeyboard 102 keysTouchpad 1 touchpad, 3 touchpad keysTouchStick (optional) 1 TouchStick
Fujitsu 81
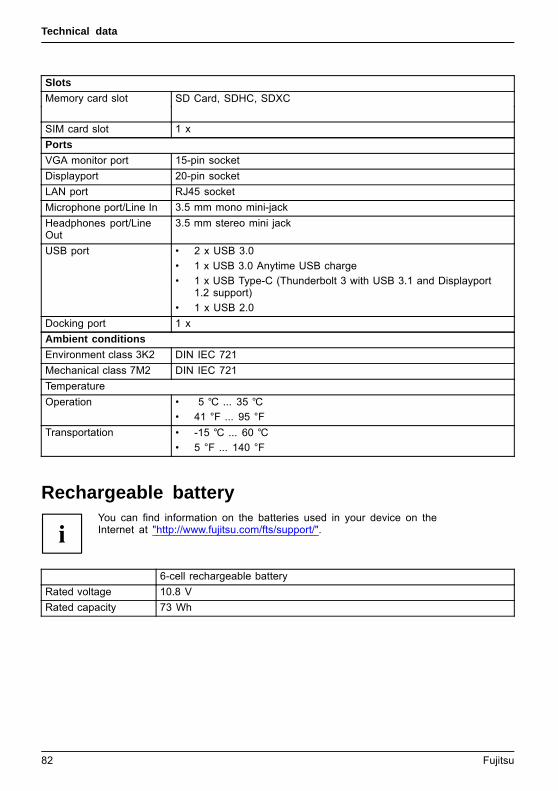
Technical data
SlotsMemory card slot SD Card, SDHC, SDXC
SIM card slot 1 xPortsVGA monitor port 15-pin socketDisplayport 20-pin socketLAN port RJ45 socketMicrophone port/Line In 3.5 mm mono mini-jackHeadphones port/LineOut
3.5 mm stereo mini jack
USB port • 2 x USB 3.0• 1 x USB 3.0 Anytime USB charge• 1 x USB Type-C (Thunderbolt 3 with USB 3.1 and Displayport
1.2 support)• 1 x USB 2.0
Docking port 1 xAmbient conditionsEnvironment class 3K2 DIN IEC 721Mechanical class 7M2 DIN IEC 721TemperatureOperation • 5 ℃ ... 35 ℃
• 41 °F ... 95 °FTransportation • -15 ℃ ... 60 ℃
• 5 °F ... 140 °F
Rechargeable batteryYou can find information on the batteries used in your device on theInternet at "http://www.fujitsu.com/fts/support/".
6-cell rechargeable batteryRated voltage 10.8 VRated capacity 73 Wh
82 Fujitsu

Technical data
Mains adapter 150WTechnicaldata
Rated voltage 100 V to 240 V (automatic)Max. rated current 7.89 A
An additional mains adapter or power cable can be ordered at any time.
Port Replicator (optional)Electrical dataSafety regulationscomplied with
CE, CB
Protection class IIDimensions/weightWidth x depth x height(front/back)
• 395 mm x 107 mm x 8.4/29 mm• 15.55 in. x 4.21 in. x 0.33/1.14 in.
Weight • approx. 600 g• approx. 1.32 lbs
PortsLAN port RJ45 socketVGA port 15-pin socketDisplayport 20-pin socketDVI-D port 1 xMicrophone port 3.5 mm mono mini-jackHeadphones port 3.5 mm mono mini-jackUSB port 3 x USB 3.0, 1 x USB 3.0 Anytime USB chargeeSATA port 1 xDocking port 144-pinAmbient conditionsEnvironment classDIN IEC 721
3K2
Mechanical classDIN IEC 721
7M2
Temperature:Operation • 5 °C ... 35 °C
• 41 °F ... 95 °FTransportation • -15 °C ... 60 °C
• 5 °F ... 140 °F
Fujitsu 83
Manufacturer’s notes
Manufacturer’s notesDisposal and recyclingNotes
You can find information on this subject on your notebook or on our website("http://www.fujitsu.com/fts/about/fts/environment-care/").
Declarations of ConformityDeclarationofconformity
The "Declarations of Conformity" for the device can be found on the Internet at:"http://globalsp.ts.fujitsu.com/sites/certificates/default.aspx".
Fujitsu Technology Solutions hereby declares that your device is in compliance with theessential requirements and other relevant provisions of Directive 1999/5/EC.
84 Fujitsu
Manufacturer’s notes
CE markingCEmarkingCEmarkingNotesElectromagneticcompatibilityLowvoltagedirective
The shipped version of this device complies with the requirements of EC directives 2004/108/EC"Electromagnetic compatibility", 2006/95/EC "Low voltage directive", 2011/65/EU "RoHS directive"and 2009/125/EC "ecodesign directive" (from 20/04/2016: 2014/30/EC "ElectromagneticCompatibility" and 2014/35/EC "Low Voltage Directive").CE marking for devices with wireless componentThis equipment complies with the requirements of Directive 1999/5/EC of the European Parliamentand Commission from 9 March, 1999 governing Radio and Telecommunications Equipmentand mutual recognition of conformity.
CE nnnn (!) ; nnnn: For digits and exclamation mark (!), see label on the product.
The product complies with the legal limits for SAR in the EU.
You can find more information and declarations of conformity on the Internet at:"http://globalsp.ts.fujitsu.com/sites/certificates".
This equipment can be used in the following countries:Belgium Bulgaria Denmark GermanyEstonia Finland France GreeceUK Ireland Iceland ItalyLatvia Liechtenstein Lithuania LuxembourgMalta Netherlands Norway AustriaPoland Portugal Rumania SwedenSwitzerland Slovakia Slovenia SpainCzech Republic Hungary Cyprus CroatiaTurkeyRestrictions for use in France: Outdoor use of WLAN in 5 GHz band is not allowed.
Contact the corresponding government office in the respective country for current information onpossible operating restrictions. If your country is not included in the list, then please contactthe corresponding supervisory authority as to whether the use of this product is permitted inyour country.
The CE conformity declaration covers accessories (e.g. mains adapters, batteries, cable adapters)and software (e.g. module drivers, module firmware and operating system). The software usedand affecting compliance is purchased by the module vendors and is under their sole control.
Fujitsu 85
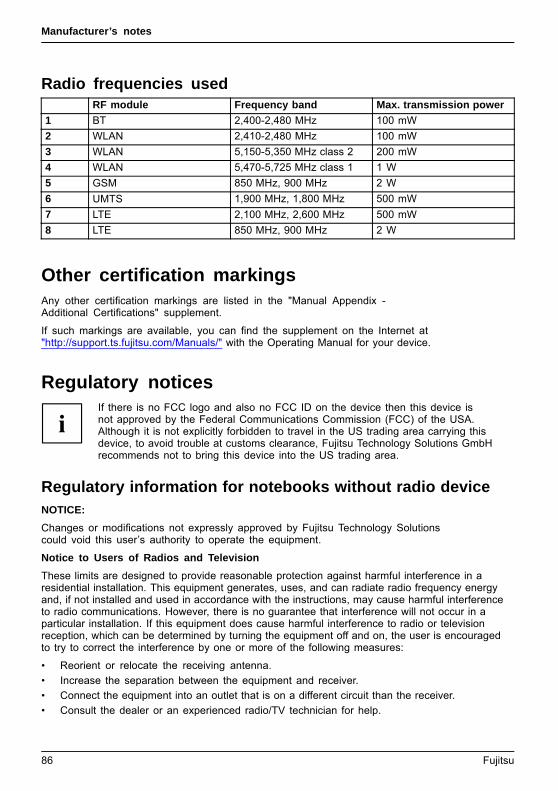
Manufacturer’s notes
Radio frequencies usedRF module Frequency band Max. transmission power
1 BT 2,400-2,480 MHz 100 mW2 WLAN 2,410-2,480 MHz 100 mW3 WLAN 5,150-5,350 MHz class 2 200 mW4 WLAN 5,470-5,725 MHz class 1 1 W5 GSM 850 MHz, 900 MHz 2 W6 UMTS 1,900 MHz, 1,800 MHz 500 mW7 LTE 2,100 MHz, 2,600 MHz 500 mW8 LTE 850 MHz, 900 MHz 2 W
Other certification markingsCertificationmarkings
Any other certification markings are listed in the "Manual Appendix -Additional Certifications" supplement.
If such markings are available, you can find the supplement on the Internet at"http://support.ts.fujitsu.com/Manuals/" with the Operating Manual for your device.
Regulatory noticesIf there is no FCC logo and also no FCC ID on the device then this device isnot approved by the Federal Communications Commission (FCC) of the USA.Although it is not explicitly forbidden to travel in the US trading area carrying thisdevice, to avoid trouble at customs clearance, Fujitsu Technology Solutions GmbHrecommends not to bring this device into the US trading area.
Regulatory information for notebooks without radio deviceRegulatoryinformation
NOTICE:Changes or modifications not expressly approved by Fujitsu Technology Solutionscould void this user’s authority to operate the equipment.
Notice to Users of Radios and TelevisionThese limits are designed to provide reasonable protection against harmful interference in aresidential installation. This equipment generates, uses, and can radiate radio frequency energyand, if not installed and used in accordance with the instructions, may cause harmful interferenceto radio communications. However, there is no guarantee that interference will not occur in aparticular installation. If this equipment does cause harmful interference to radio or televisionreception, which can be determined by turning the equipment off and on, the user is encouragedto try to correct the interference by one or more of the following measures:
• Reorient or relocate the receiving antenna.• Increase the separation between the equipment and receiver.• Connect the equipment into an outlet that is on a different circuit than the receiver.• Consult the dealer or an experienced radio/TV technician for help.
86 Fujitsu
Manufacturer’s notes
Notice to Users of the US Telephone NetworkYour notebook may be supplied with an internal modem which complies with Part 68 of theFCC rules. On this notebook is a label that contains the FCC Registration Number and theRinger Equivalence Number (REN) for this equipment among other information. If requested,the user must provide their telephone company with the following information:
1. The telephone number to which the notebook is connected.2. The Ringer Equivalence Number (REN) for this equipment.3. The equipment requires a standard modular jack type USOC RJ-11C
which is FCC Part 68 compliant.4. The FCC Registration Number.This equipment is designed to be connected to the telephone network or premises wiring usinga standard modular jack type USOC RJ-11C which is FCC Part 68 compliant and a line cordbetween the modem and the telephone network with a minimum of 26AWG.
The REN is used to determine the number of devices that you may connect to your telephoneline and still have all of those devices ring when your number is called. Too many deviceson one line may result in failure to ring in response to an incoming call. In most, but not all,areas the sum of the RENs of all of the devices should not exceed five (5). To be certainof the number of devices you may connect to your line, as determined by the RENs, contactyour local telephone company. If this equipment causes harm to the telephone network, yourtelephone company may discontinue your service temporarily. If possible, they will notify youin advance. If advance notice is not practical they will notify you as soon as possible. Youwill also be advised of your right to file a complaint with the FCC.
This fax modem also complies with fax branding requirements per FCC Part 68.
Your telephone company will probably ask you to disconnect this equipment from the telephonenetwork until the problem is corrected and you are sure that the equipment is not malfunctioning.This equipment may not be used on coin-operated telephones provided by your telephonecompany. Connection to party lines is subject to state tariffs. Contact your state’s public utilitycommission, public service commission or corporation commission for more information.
This equipment includes automatic dialing capability. When programming and/ormaking test calls to emergency numbers:
• Remain on the line and briefly explain to the dispatcher the reason for the call.• Perform such activities in off-peak hours, such as early morning or late evening.FCC rules prohibit the use of non-hearing aid compatible telephones in thefollowing locations or applications:
• All public or semi-public coin-operated or credit card telephones.• Elevators, highways, tunnels (automobile, subway, railroad or pedestrian) where a
person with impaired hearing might be isolated in an emergency.• Places where telephones are specifically installed to alert emergency authorities
such as fire, police or medical assistance personnel.• Hospital rooms, residential health care facilities, convalescent homes and prisons.• Hotel, motel or apartment lobbies.• Stores where telephones are used by patrons to order merchandise.
Fujitsu 87

Manufacturer’s notes
• Public transportation terminals where telephones are used to call taxis orto reserve lodging or rental cars.
• In hotel and motel rooms as at least ten percent of the rooms must contain hearingaid-compatible telephones or jacks for plug-in hearing aid compatible telephones whichwill be provided to hearing impaired customers on request.
DOC (Industry CANADA) noticesDOC(INDUSTRYCANADA)NOTICES
Notice to Users of Radios and TelevisionThis Class B digital apparatus meets all requirements of Canadian Interference-Causing EquipmentRegulations.
CET appareil numérique de la class B respecte toutes les exigence du Réglementsur le matérial brouilleur du Canada.
Notice to Users of the Canadian Telephone NetworkNOTICE:This equipment meets the applicable Industry Canada Terminal Equipment TechnicalSpecifications. This is confirmed by the registration number. The abbreviation, IC, beforethe registration number signifies that registration was performed based on a Declaration ofConformity indicating that Industry Canada technical specifications were met. It does notimply that Industry Canada approved the equipment. Before connecting this equipment toa telephone line the user should ensure that it is permissible to connect this equipment tothe local telecommunication facilities. The user should be aware that compliance with thecertification standards does not prevent service degradation in some situations.
Repairs to telecommunication equipment should be made by a Canadian authorisedmaintenance facility. Any repairs or alterations not expressly approved by Fujitsu orany equipment failures may give the telecommunication company cause to request theuser to disconnect the equipment from the telephone line.
NOTICE:The Ringer Equivalence Number (REN) for this terminal equipment is 0.0. The REN assignedto each terminal equipment provides an indication of the maximum number of terminalsallowed to be connected to a telephone interface. The termination on an interface mayconsist of any combination of devices subject only to the requirement that the sum of theRinger Equivalence Numbers of all the devices does not exceed five.
CAUTION:For safety, users should ensure that the electrical ground of the power utility, thetelephone lines and the metallic water pipes are connected together. Users should NOTattempt to make such connections themselves but should contact the appropriate electricinspection authority or electrician. This may be particularly important in rural areas.
Avis Aux Utilisateurs Du Réseau Téléphonique CanadienAVIS : Le présent matériel est conforme aux spécifications techniques d’Industrie Canadaapplicables au matériel terminal. Cette conformité est confirmée par le numéro d’enregistrement.Le sigle IC, placé devant le numéro d’enregistrement, signifie que l’enregistrement s’est effectuéconformément à une déclaration de conformité et indique que les spécifications techniquesd’Industrie Canada ont été respectées. Il n’implique pas qu’Industrie Canada a approuvé le matériel.
88 Fujitsu
Manufacturer’s notes
Avant de connecter cet équipement à une ligne téléphonique, l’utilisateur doit vérifiers’il est permis de connecter cet équipement aux installations de télécommunicationslocales. L’utilisateur est averti que même la conformité aux normes de certification nepeut dans certains cas empêcher la dégradation du service.
Les réparations de l’équipement de télécommunications doivent être effectuées par un service demaintenance agréé au Canada. Toute réparation ou modification, qui n’est pas expressémentapprouvée par Fujitsu, ou toute défaillance de l’équipement peut entraîner la compagnie detélécommunications à exiger que l’utilisateur déconnecte l’équipement de la ligne téléphonique.
AVIS : L’indice d’équivalence de la sonnerie (IES) du présent matériel est de 0.0. L’IESassigné à chaque dispositif terminal indique le nombre maximal de terminaux qui peuventêtre raccordés à une interface téléphonique. La terminaison d’une interface peut consisteren une combinaison quelconque de dispositifs, à la seule condition que la somme d’indicesd’équivalence de la sonnerie de tous les dispositifs n’excède pas 5.
AVERTISSEMENT:Pour assurer la sécurité, les utilisateurs doivent vérifier que la prise de terre du serviced’électricité, les lignes télphoniques et les conduites d’eau métalliques sont connectéesensemble. Les utilisateurs NE doivent PAS tenter d’établir ces connexions eux-mêmes,mais doivent contacter les services d’inspection d’installations électriques appropriésou un électricien. Ceci peut être particulièrement important en régions rurales.
UL NoticeThis unit requires an AC adapter to operate. Only use a UL Listed Class 2 adapter.The correct output rating is indicated on the AC adapter label. Refer to the illustrationbelow for the correct AC Adapter output polarity:
CAUTION:To reduce the risk of fire, use only 26AWG or larger telecommunications line cord.
For Authorized Repair Technicians Only
CAUTION:For continued protection against risk of fire, replace only with thesame type and rating fuse.
WARNING:Danger of explosion if Lithium (CMOS) battery is incorrectly replaced. Replace onlywith the same or equivalent type recommended by the manufacturer.
Dispose of used batteries according to the manufacturer’s instructions.
Fujitsu 89

Manufacturer’s notes
FCC regulatory information for notebooks with radio deviceRegulatoryinformation
Federal Communications Commission statementThis device complies with Part 15 of FCC Rules. Operation is subject to the followingtwo conditions: (1) this device may not cause interference, and
(2) this device must accept any interference, including interference that maycause undesired operation of this device.
FCC Interference StatementThis equipment has been tested and found to comply with the limits for a Class B digitaldevice, pursuant to Part 15 of the FCC Rules. These limits are designed to provide reasonableprotection against harmful interference in a residential installation. This equipment generates,uses, and can radiate radio frequency energy. If not installed and used in accordance withthe instructions, it may cause harmful interference to radio communications.
However, there is no guarantee that interference will not occur in a particular installation.
If this equipment does cause harmful interference to radio or television reception, whichcan be determined by turning the equipment off and on, the user is encouraged to try tocorrect the interference by one or more of the following measures:
1. Reorient or relocate the receiving antenna.2. Increase the distance between the equipment and the receiver.3. Connect the equipment to an outlet on a circuit different from the one the receiver is connected to.4. Consult the dealer or an experienced radio/TV technician for help.Please note the following regulatory information related to the optional radio device.
FCC Radio Frequency Exposure statementThis radio device has been evaluated under FCC Bulletin OET 65C and found compliant with therequirements as set forth in CFR 47 Sections 2.1091, 2.1093, and 15.247 (b) (4) addressing RFExposure from radio frequency devices. The radiated output power of this radio device is far belowthe FCC radio frequency exposure limits. Nevertheless, this device shall be used in such a mannerthat the potential for human contact during normal operation is minimized. When using this device, acertain separation distance between antenna and nearby persons must be maintained to ensure RFexposure compliance. In order to comply with RF exposure limits established in the ANSI C95.1standards, the distance between the antennas and the user should not be less than 20 cm (8 inches).
Regulatory Notes and StatementsRadio device, health and authorisation for useRadio-frequency electromagnetic energy is emitted from the wireless devices. The energy levelsof these emissions, however, are far much less than the electromagnetic energy emissions fromwireless devices such as mobile phones. Radio devices are safe for use by consumers becausethey operate within the guidelines found in radio frequency safety standards and recommendations.
The use of the radio devices may be restricted in some situations or environments, such as:
• on board an airplane, or• in an explosive environment, or• in situations where the interference risk to other devices or services is
perceived or identified as harmful.In cases in which the policy regarding use of radio devices in specific environments is notclear (e.g., airports, hospitals, chemical/oil/gas industrial plants, private buildings), obtainauthorization to use these devices prior to operating the equipment.
90 Fujitsu

Manufacturer’s notes
Regulatory Information/DisclaimersInstallation and use of this radio device must be in strict accordance with the instructions includedin the user documentation provided with the product. Any changes or modifications made to thisdevice that are not expressly approved by the manufacturer may void the user’s authority to operatethe equipment. The manufacturer is not responsible for any radio or television interference causedby unauthorized modification of this device, or the substitution or attachment of connecting cablesand equipment other than those specified by the manufacturer. It is the responsibility of the userto correct any interference caused by such unauthorized modification, substitution or attachment.The manufacturer and its authorized resellers or distributors will assume no liability for any damageor violation of government regulations arising from failure to comply with these guidelines.
Export restrictionsThis product or software contains encryption code which may not be exported ortransferred from the US or Canada without an approved US Department of Commerceexport license. This device complies with Part 15 of FCC Rules, as well as ICES 003 B/ NMB 003 B. Operation is subject to the following two conditions:
(1) this device may not cause harmful interference, and
(2) this device must accept any interference received, including interferencethat may cause undesirable operation.
Modifications not expressly authorised by Fujitsu Technology Solutions mayinvalidate the user’s right to operate this equipment.
Fujitsu 91
Index
IndexAAcoustic error messages 78Alt + Tab 25Anti-theft protection 49Application keys 26Audio devices, connecting 62Audio ports 62
BBack tab 25Backspace 23Battery
battery life 30caring for and maintaining 30charge level 30, 38charging 30self-discharge 30storage 30
Battery status meter 30BIOS Setup Utility
calling 70exiting 72operating 71protecting with password 50settings 70
Bluetooth, safety notes 13Board 63Buttons 22
CCamera 29Caps Lock 23
indicator 21CD/DVD indicator 20, 34CD/DVD:
manual emergency removal 35CE marking 85Certification markings 86Charging capacity, battery 30Cleaning 15Components
installing / removing 63Configuration, BIOS Setup Utility 70Connecting audio devices 62Connecting headphones 62Ctrl+Alt+Del 25Cursor control 23Cursor keys 23
DDate is incorrect 74Declaration of conformity 84Device
setting up 17DOC (INDUSTRY CANADA) NOTICES 88Drive
Removing 33
EElectromagnetic compatibility 85Emergency removal of data carrier 35Energy
energy saving 13Energy saving 13Energy saving mode
leaving 76Enter 23Enter key 23Error message:
on the screen 79Error messages on the screen 79Errors
Acoustic warnings 78ESD 63Ethernet LAN 42
FFault
correction 73Fingerprint sensor 49
configure 49First-time setup 16Fn key 23Fn+F10 25Fn+F2 24Fn+F3 24Fn+F4 24Fn+F6 25Fn+F7 25Fn+F8 25Fn+F9 25
GGetting started 16
HHandling
data carriers 34
92 Fujitsu
Index
Hard disk:restoring the contents 74
Hardware configuration 70
IImportant notes 12Incorrect date/time 74Indicator
Caps Lock 21CD/DVD 20Num Lock 21Power-on indicator 20Scroll Lock 21
Insertinga data carrier 35
KKey combinations 24Keyboard 22
cleaning 15keyboard backlight
Activate 24Deactivate 24
LLCD screen
cleaning 15decrease brightness 25difficult to read 75notes 28reflected glare 75remains blank 74
LCD screen is too dark 74Life, battery 30Line feed 23Loudspeakers 40
switch off 24switch on 24
Low voltage directive 85
MMain memory
see Adding memory 64Mains adapter
connecting 17setting up 17
Manual removal of data carrier 35Mechanical backup 49Memory card
handling 39inserting 39
removing 39Memory expansion
installing 65removing 65
Memory moduleimportant notes 64installing 65removing 65
Microphone 40Microphone, connecting 62Mobile operation 14Module
Removing 33Module bay 32Modules 32Monitor
connecting 57drifting display 75remains blank 75
Monitor portsee VGA connection socket 57
NNotebook
before you travel 14cannot be started 76cleaning 15stops working 76switching off 21transporting 14using 19
Notebook, operation 19Notes 12
boards 63CE marking 85cleaning 15disposal / recycling 84energy saving 13LCD screen 28Safety 12transport 14
Num Lockindicator 21, 24
Numeric keypad 22see Separate numeric keypad 24
OOperating system
activating system protection 51cancel system protection 51protecting with password 51
Operating system, restoring 74
Fujitsu 93
Index
Optical drive 34
PPackaging 16Palm vein sensor 48
Configuring 48Password
changing 51entering 50removing 51
Password protection 50Password protection:
hard disk 52Port Replicator
Connecting a notebook 45Ports 44
PortsPort Replicator 44
Powerpower consumption 38power-management features 38
Power-on indicator 20Preparing for operation 17Printer does not print 77
RRechargeable battery 30
see Battery 30Regulatory information
notebooks with radio device 90Notebooks without radio device 86
Removinga data carrier 35
Removing memorysee Adding memory 64
Return 23
SSafety notes 12Screen
no screen display 75Screen brightness
decrease 25increase 25
Scroll Lockindicator 21
Security functions 48SystemLock 54
Security functions,SmartCard 54
Security Lock 49Selecting a location 17
Self-discharge, battery 30Separate numeric keypad 24Servicing 63Setup
see BIOS Setup Utility 70Shift 23Shift + Tab 25Shift key 23Slot
Memory cards 39Status indicator panel 19Supervisor password
changing 51entering 50removing 51
Switching onthe notebook 21
Switching on for the first time 18System configuration 70System expansion 64
see Adding memory 64System settings, BIOS Setup Utility 70
TTab key 23Technical data
Mains adapter 83notebook 81
The wireless connection to a networkdoes not work 77
Time not correct 74Tips 73Toggle output screen 25Touchpad 24, 27
buttons 27cleaning 15executing commands 27moving the pointer 27selecting an item 27switch off 24
Touchpad buttons 24TPM 55Transport
Transport damage 16Transportation 14Travel, notebook 14Troubleshooting 73Trusted Platform Module 55
UUSB 3.1 Type-C 59USB charging function 60
94 Fujitsu
Index
USB ports 58User password
changing 51entering 50removing 51
Using the Kensington Lock Cable 49
VVGA connection socket 57Volume
decrease 25increase 25
Volume control 40
WWeight Saver
Removing 33Windows key 23Wireless component:
safety notes 13Wireless LAN:
safety notes 13
Fujitsu 95


