Embed Size (px)
Citation preview
FS-100DVCPROHD DVCPRO25 DVCPRO/DV
Quick Start Guide
Release 1.0Part Number: MANL-1037-03

Contact Focus Enhancements
Support for Europe, Middle East, and Africa
Office Hours: Monday through Friday8:00 AM to 5:00PM (Central Time)
Email: [email protected]
Telephone: +1 763-398-1658
Fax: +1 763-571-7688
Address: Focus Enhancements, Inc.1370 Dell AvenueCampbell, CA. 95008www.focusinfo.com
Office Hours: Monday through Friday9:00 AM to 5:00PM
Email: [email protected]
Telephone: +49 4307 - 83 58 58
Fax: +49 4307 - 83 58 99
Address: COMOComputer & Motion GmbHA Focus Enhancements CompanyLise-Meitner-Str.1524223 Raisdorf / Germanywww.focusinfo.com
Quick Start Guide
Quick Start GuideFollow these instructions to unpack, configure, and use your FS-100 Direct to Edit® Recorder. Complete information about the FS-100 is available in the FS-100 User Guide.
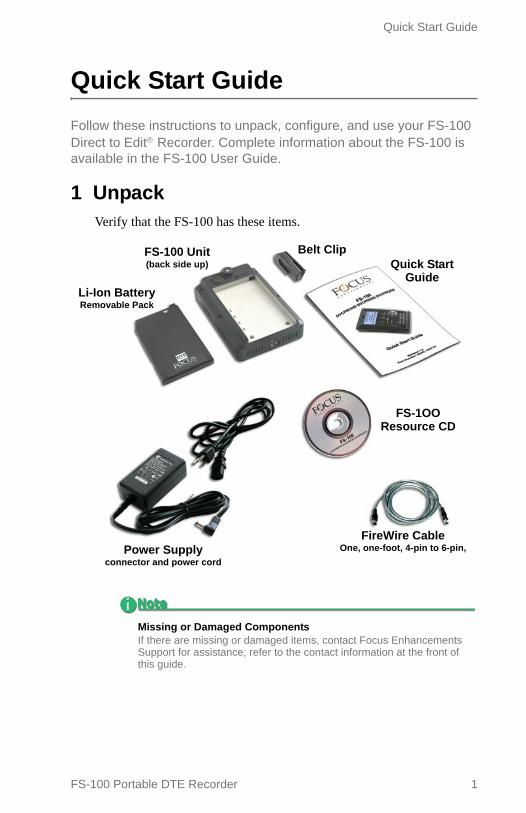
1 UnpackVerify that the FS-100 has these items.
Missing or Damaged ComponentsIf there are missing or damaged items, contact Focus Enhancements Support for assistance; refer to the contact information at the front of this guide.
FS-100 Unit(back side up)
Belt ClipQuick Start
Guide
FireWire CableOne, one-foot, 4-pin to 6-pin, Power Supply
connector and power cord
FS-1OOResource CD
Li-Ion BatteryRemovable Pack
FS-100 Portable DTE Recorder 1
Quick Start Guide
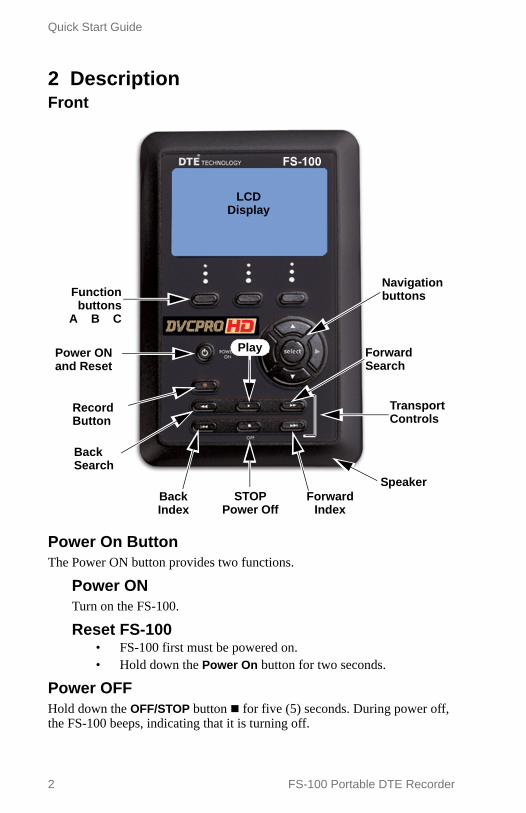
2 Description Front
Power On ButtonThe Power ON button provides two functions.
Power ON Turn on the FS-100.
Reset FS-100• FS-100 first must be powered on. • Hold down the Power On button for two seconds.
Power OFFHold down the OFF/STOP button for five (5) seconds. During power off, the FS-100 beeps, indicating that it is turning off.
LCDDisplay
Functionbuttons
A B C
Speaker
RecordButton
Power ONand Reset
STOPPower Off
ForwardIndex
TransportControls
Forward Search
Navigation buttons
Back Search
Play
BackIndex
2 FS-100 Portable DTE Recorder
Quick Start Guide
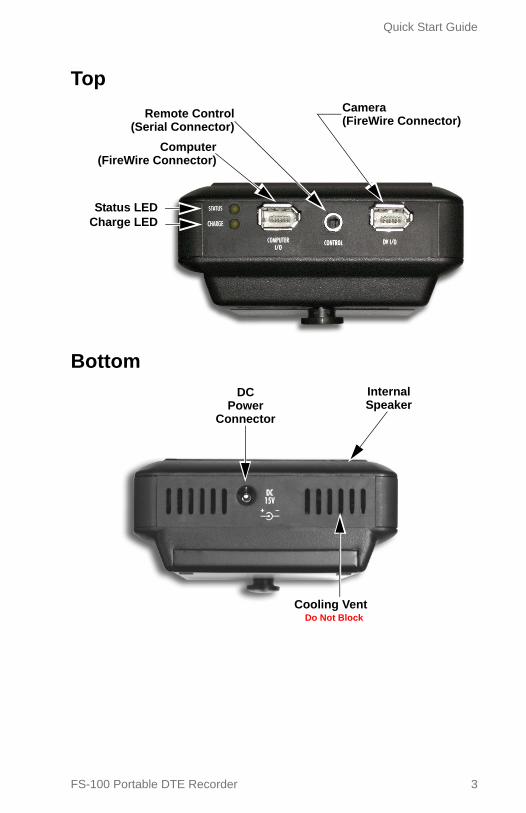
Top
Bottom
Computer(FireWire Connector)
Remote Control(Serial Connector)
Camera (FireWire Connector)
Status LEDCharge LED
Cooling VentDo Not Block
DCPower
Connector
Internal Speaker
FS-100 Portable DTE Recorder 3
Quick Start Guide
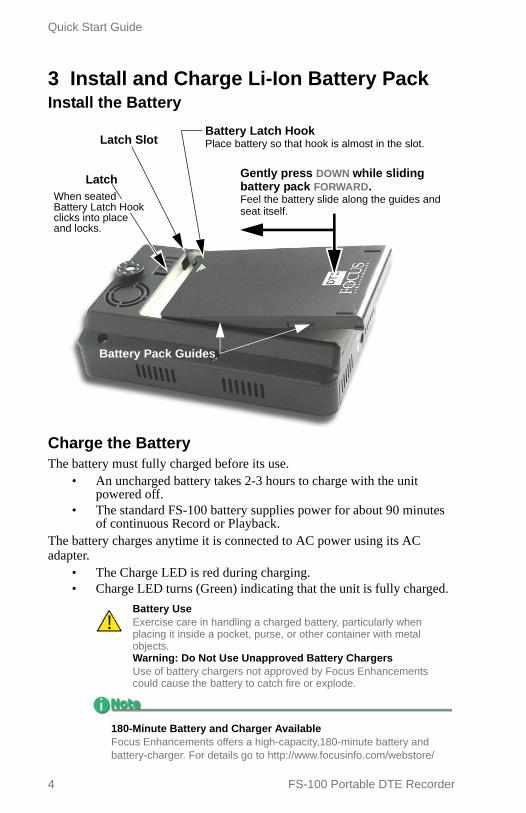
3 Install and Charge Li-Ion Battery PackInstall the Battery
Charge the BatteryThe battery must fully charged before its use.
• An uncharged battery takes 2-3 hours to charge with the unit powered off.
• The standard FS-100 battery supplies power for about 90 minutes of continuous Record or Playback.
The battery charges anytime it is connected to AC power using its AC adapter.
• The Charge LED is red during charging.• Charge LED turns (Green) indicating that the unit is fully charged.
Battery UseExercise care in handling a charged battery, particularly when placing it inside a pocket, purse, or other container with metal objects. Warning: Do Not Use Unapproved Battery ChargersUse of battery chargers not approved by Focus Enhancements could cause the battery to catch fire or explode.
180-Minute Battery and Charger AvailableFocus Enhancements offers a high-capacity,180-minute battery and battery-charger. For details go to http://www.focusinfo.com/webstore/
Battery Latch Hook Place battery so that hook is almost in the slot.
Gently press DOWN while sliding battery pack FORWARD. Feel the battery slide along the guides and seat itself.
Battery Pack Guides
Latch Slot
LatchWhen seatedBattery Latch Hookclicks into placeand locks.
4 FS-100 Portable DTE Recorder

Quick Start Guide
4 Configure FS-100Use the FS-100 Navigation buttons to locate and set the following parameters.
Welcome Screen
Home Screen
FS-100 Portable DTE Recorder 5
Quick Start Guide
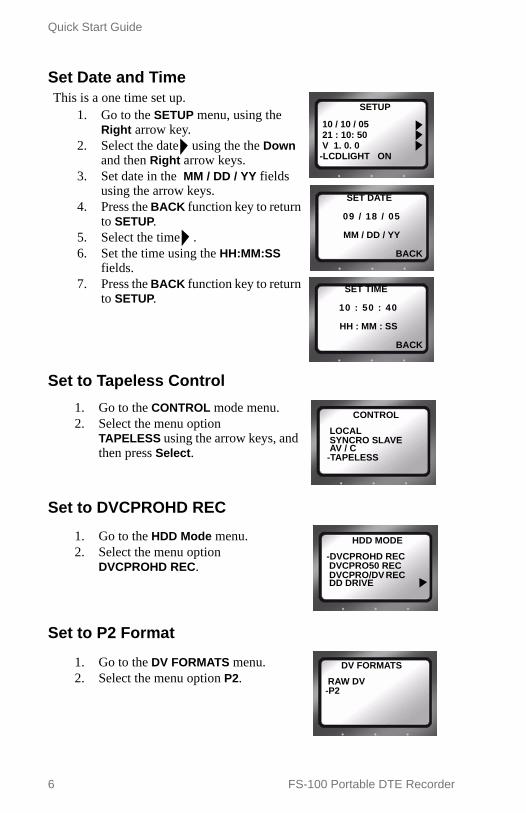
Set Date and Time
Set to Tapeless Control
Set to DVCPROHD REC
Set to P2 Format
SETUP
10 / 10 / 05 21 : 10: 50 V 1. 0. 0 -LCDLIGHT ON
This is a one time set up.1. Go to the SETUP menu, using the
Right arrow key.2. Select the date using the the Down
and then Right arrow keys.3. Set date in the MM / DD / YY fields
using the arrow keys.4. Press the BACK function key to return
to SETUP.5. Select the time . 6. Set the time using the HH:MM:SS
fields.7. Press the BACK function key to return
to SETUP.
SET DATE
09 / 18 / 05
MM / DD / YY
BACK
SET TIME
10 : 50 : 40
HH : MM : SS
BACK
1. Go to the CONTROL mode menu.2. Select the menu option
TAPELESS using the arrow keys, and then press Select.
CONTROL LOCAL SYNCRO SLAVE AV / C -TAPELESS
1. Go to the HDD Mode menu.2. Select the menu option
DVCPROHD REC.
HDD MODE-DVCPROHD REC DVCPRO50 REC DVCPRO/DV REC DD DRIVE
1. Go to the DV FORMATS menu.2. Select the menu option P2.
DV FORMATS RAW DV-P2
6 FS-100 Portable DTE Recorder
Quick Start Guide
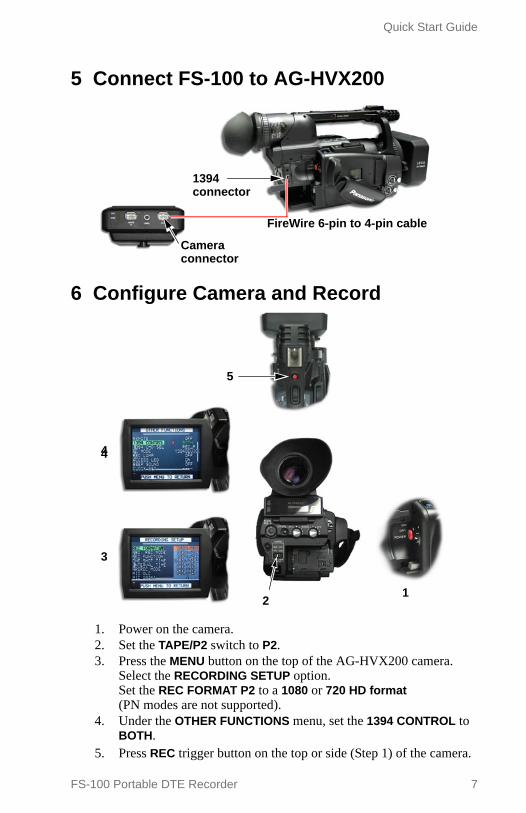
5 Connect FS-100 to AG-HVX200
6 Configure Camera and Record
1. Power on the camera. 2. Set the TAPE/P2 switch to P2. 3. Press the MENU button on the top of the AG-HVX200 camera.
Select the RECORDING SETUP option. Set the REC FORMAT P2 to a 1080 or 720 HD format (PN modes are not supported).
4. Under the OTHER FUNCTIONS menu, set the 1394 CONTROL to BOTH.
5. Press REC trigger button on the top or side (Step 1) of the camera.
FireWire 6-pin to 4-pin cable
1394connector
Cameraconnector
1
3
2
5
44
FS-100 Portable DTE Recorder 7
Quick Start Guide
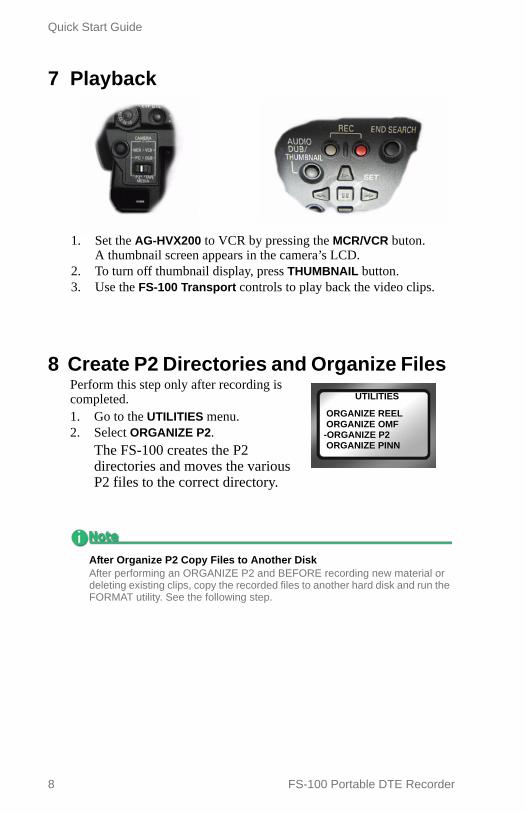
7 Playback
8 Create P2 Directories and Organize Files
After Organize P2 Copy Files to Another DiskAfter performing an ORGANIZE P2 and BEFORE recording new material or deleting existing clips, copy the recorded files to another hard disk and run the FORMAT utility. See the following step.
1. Set the AG-HVX200 to VCR by pressing the MCR/VCR buton. A thumbnail screen appears in the camera’s LCD.
2. To turn off thumbnail display, press THUMBNAIL button.3. Use the FS-100 Transport controls to play back the video clips.
UTILITIES
ORGANIZE REEL ORGANIZE OMF -ORGANIZE P2 ORGANIZE PINN
Perform this step only after recording is completed. 1. Go to the UTILITIES menu. 2. Select ORGANIZE P2.
The FS-100 creates the P2 directories and moves the various P2 files to the correct directory.
8 FS-100 Portable DTE Recorder
Quick Start Guide
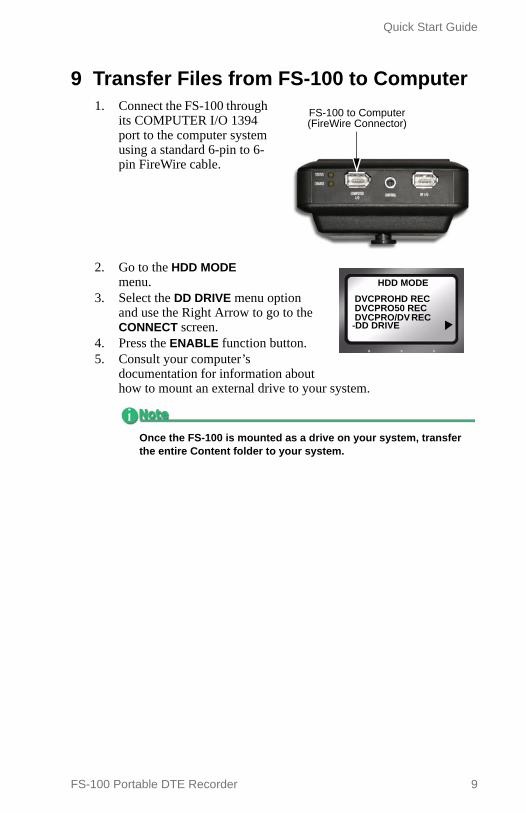
9 Transfer Files from FS-100 to Computer1. Connect the FS-100 through
its COMPUTER I/O 1394 port to the computer system using a standard 6-pin to 6-pin FireWire cable.
2. Go to the HDD MODE menu.
3. Select the DD DRIVE menu option and use the Right Arrow to go to the CONNECT screen.
4. Press the ENABLE function button. 5. Consult your computer’s
documentation for information about how to mount an external drive to your system.
Once the FS-100 is mounted as a drive on your system, transfer the entire Content folder to your system.
FS-100 to Computer(FireWire Connector)
HDD MODE DVCPROHD REC DVCPRO50 REC DVCPRO/DV REC -DD DRIVE
FS-100 Portable DTE Recorder 9

Quick Start Guide
10 FS-100 Portable DTE Recorder


Release 1.0 Part Number: MANL-1037-03


![J`XZ SVXZ_d #_U Z__Z_Xd, #% >Z_ZdeVcd ]`dV SVceY](https://img.dokumen.tips/doc/110x75/6324fee8e491bcb36c0a1539/jxz-svxzd-u-zzxd-zzdevcd-dv-svcey.jpg)


