Embed Size (px)
Citation preview

Version: 9.0 September 2012 Doc P/N: PSP-9.0-1-W
FreeFlow Web Services Print Service Provider User Guide
©2012 Xerox Corporation. All Rights Reserved. Xerox® and XEROX and Design®, FreeFlow®, FreeFlow Process Manager® and FreeFlow Output Manager® are trademarks of Xerox Corporation in the United States and/or other counties. Other company trademarks are also acknowledged. Adaptec®, the Adaptec logo, SCSlSelect®, and EZ-SCSI® are trademarks of Adaptec, Inc. Adobe PDFL - Adobe PDF Library Copyright © 1987-2008 Adobe Systems Incorporated. Adobe®, the Adobe logo, Acrobat®, the Acrobat logo, Acrobat Reader®, Distiller®, Adobe PDF JobReady™, and PostScript®, and the PostScript logo are either registered trademarks or trademarks of Adobe Systems Incorporated in the United States and/or other countries. All instances of the name PostScript in the text are references to the PostScript language as defined by Adobe Systems Incorporated unless otherwise stated. The name PostScript also is used as a product trademark for Adobe Systems' implementation of the PostScript language interpreter, and other Adobe products. Copyright 1987 - 2008 Adobe Systems Incorporated and its licensors. All rights reserved. Autologic® is a registered trademark of Autologic Information International, Inc. Compaq® and QVision® are registered United States Patent and Trademark Office, for Compaq Computer Corporation. DEC, DEC RAID, and Redundant Array of Independent Disks are registered trademarks of Digital Equipment Corporation. Dundas - This software contains material that is (c) 1997-2000 DUNDAS SOFTWARE LTD., all rights reserved. Imaging Technology provided under license by Accusoft Corporation. ImageGear © 1997 by AccuSoft Corporation. All Rights Reserved. Intel® and Pentium® are registered trademarks of Intel Corporation. Novell® and NetWare® are registered trademarks of Novell, Inc. in the United States and other countries. Oracle® is a registered trademark of Oracle Corporation Redwood City, California ScanFix® Image Optimizer and ImagXpress are either registered marks or trademarks of Pegasus Imaging Corp. Copyright © 1997-2008 Pegasus Imaging Corp. All rights reserved. SonyTM and Storage by SonyTM are trademarks of Sony. PANTONE ™ and other Pantone, Inc. trademarks are the property of Pantone Inc. Preps™ is a registered trademark of Creo Inc. All rights reserved. Quark® and QuarkXpress® are registered trademarks of Quark, Inc. StorageView™ is a trademark of CMD Technology, Inc. TIFF® is a registered trademark of Aldus Corporation. Windows®, Windows XP®, Windows Server® 2003, and Internet Explorer are trademarks of Microsoft Corporation; Microsoft® and MS-DOS® are registered trademarks of Microsoft Corporation. Portions Copyright © 2001 artofcode LLC. This software is based in part on the work of the Independent JPEG Group. Portions Copyright © 2001 URW++. All Rights Reserved. This product includes software developed by the Apache Software Foundation. Copyright © 1999-2008 The Apache Software Foundation. All rights reserved. This software is based in part on the work of Graeme W. Gill.© Bitstream Inc. 2011. All rights reserved. Includes Adobe® PDF Libraries and Adobe Normalizer technology The Graphics Interchange Format © is the Copyright property of CompuServe Incorporated. GIFSM is a Service Mark property of CompuServe Incorporated. Portions contain an implementation of the LZW algorithm licensed under U.S. Patent 4,558,302. Parts of this software Copyright © 2004-2006 Enterprise Distributed Technologies Ltd. All Rights Reserved. Parts of this software Copyright © 1995-2003, The Cryptix Foundation Limited. All Rights Reserved. Parts of this software are a SSLv3/TLS implementation written by Eric Rescorla and licensed by Claymore Systems, Inc. All Rights Reserved. Parts of this software Copyright © 2002, Lee David Painter and Contributors. Contributions made by Brett Smith, Richard Pernavas, Erwin Bolwidt. Parts of this software Copyright © 1995-2005, Jean-loup Gailly and Mark Adler. All other product names and services mentioned in this publication are trademarks of their respective companies. They are used throughout this publication for the benefit of those companies, and are not intended to convey endorsement or other affiliation with the publication. Companies, names, and data used in examples herein are fictitious unless otherwise noted.Printed in the United States of America. Changes are periodically made to this document. Changes, technical inaccuracies, and typographic errors will be corrected in subsequent editions. Document Version: 1.0
Print Service Provider User Guide iii
Table of Contents
1: Introduction 1
FreeFlow Web Services ........................................................................... 1
The Print Service Provider Guide ........................................................... 1
2: Web Services User Overview 3
Accessing Web Services ......................................................................... 3
Accessing Web Services locally ....................................................................................................... 3
Status Icons ...................................................................................................................................... 3
Frequently Used Terminology ................................................................. 4
Navigating Web Services.................................................................................................................. 4
Logging Out of Web Services ........................................................................................................... 4
Conventions Used in Web Services ....................................................... 4
Managing Queues ............................................................................................................................ 4
Using Web Services Features ................................................................. 5
Managing Attachments ..................................................................................................................... 6
Multiple Language Support ............................................................................................................... 7
Generating and Editing Job Tickets .................................................................................................. 9
3: System Setup 11
Basic ........................................................................................................ 11
Contact Details ............................................................................................................................... 11
General ........................................................................................................................................... 11
Time Zone ....................................................................................................................................... 13
Region and Languages ................................................................................................................... 13
Terms and Conditions ..................................................................................................................... 14
Home Page Customization ............................................................................................................. 14
Users ........................................................................................................ 17
Managing Print Service Provider Users .......................................................................................... 17
Table of Contents
iv FreeFlow Web Services
Print Service Provider User Privileges ............................................................................................ 18
Advanced ................................................................................................ 19
CRM ................................................................................................................................................ 19
Numbering ...................................................................................................................................... 19
Email ............................................................................................................................................... 20
Fonts ............................................................................................................................................... 21
User Types ..................................................................................................................................... 21
Job Expiration ................................................................................................................................. 23
Customized Fields .......................................................................................................................... 23
Account Groups .............................................................................................................................. 24
Billing .............................................................................................................................................. 25
Integrations ............................................................................................. 25
Credit Card Integration ................................................................................................................... 25
HTML or Word Documents ............................................................................................................. 26
Defining Data Export ....................................................................................................................... 26
Integrating Web Services with Other Systems ............................................................................... 27
4: Print Settings 29
Defining Production Parameters ........................................................... 29
Setting Image Resolution Warning ................................................................................................. 29
Setting Size Difference ................................................................................................................... 29
Output Devices ....................................................................................... 30
Managing Output Devices .............................................................................................................. 30
Adding Output Devices ................................................................................................................... 30
General Tab .................................................................................................................................... 30
Defining Output Device Channels .................................................................................................. 31
Defining Print Imposition ................................................................................................................. 32
Defining Press Setup Parameters for Pricing Calculation .............................................................. 35
Setting Speed and Waste ............................................................................................................... 35
Defining Labor Charges .................................................................................................................. 36
Defining Click Charges ................................................................................................................... 36
Managing the Stock Library .................................................................. 37
Importing and Exporting Stock ............................................................. 37
Searching the Stock Library .................................................................. 37
Setting Paper Sizes ................................................................................ 38
Print Service Provider User Guide v
Defining Shipping ................................................................................... 39
Defining Carriers ............................................................................................................................. 39
Defining Shipping Methods ............................................................................................................. 39
Defining Shipping Method Groups .................................................................................................. 41
5: Account Setup 43
Account Setup Overview ....................................................................... 43
Using the Accounts Pane ............................................................................................................... 43
Creating a New Account ........................................................................ 44
Defining General Settings for a New Account ................................................................................ 44
Defining Users for a New Account .................................................................................................. 45
Defining the Account Checkout Process ........................................................................................ 45
Managing Accounts ............................................................................... 46
Managing Account Access ............................................................................................................. 46
Modifying Account Preferences ...................................................................................................... 46
Selecting Shipping Method Groups for the Account ....................................................................... 51
Managing Users .............................................................................................................................. 52
Defining User Groups Settings ....................................................................................................... 53
Managing the Account Departments .............................................................................................. 54
Defining the Account Cost Centers ................................................................................................ 55
Defining Email Notification Settings ................................................................................................ 55
Customizing Order Fields at the Account Level ............................................................................. 56
6: Store Setup 59
Catalog Overview ................................................................................... 59
Superstore Catalogs ....................................................................................................................... 60
HTML Catalogs ............................................................................................................................... 62
Creating and Managing Superstore Catalogs ...................................... 62
Managing Superstores .................................................................................................................... 63
Creating a Superstore ..................................................................................................................... 63
Adding Products to a Superstore .................................................................................................... 64
Applying a Layout Theme to a Superstore ..................................................................................... 65
Defining the Items Area .................................................................................................................. 67
Defining the Cross Sale Area ......................................................................................................... 68
Defining the Navigation Pane ......................................................................................................... 68
Table of Contents
vi FreeFlow Web Services
Adding Messages ........................................................................................................................... 69
Previewing the Superstore or Category .......................................................................................... 69
Creating and Managing HTML Catalogs ............................................... 69
Managing HTML Catalogs .............................................................................................................. 70
Creating an HTML Catalog ............................................................................................................. 70
Exporting an HTML Catalog ........................................................................................................... 72
Sending an HTML Catalog by Email .............................................................................................. 72
Managing the Cross Sales Library ........................................................ 73
Managing Cross Sales .................................................................................................................... 73
Creating and Populating Cross Sales ............................................................................................. 73
Managing the Image Library .................................................................. 74
Managing Folders ........................................................................................................................... 74
Managing Images ........................................................................................................................... 74
Managing the Database Library ............................................................ 76
Adding a Database to the Library ................................................................................................... 76
Checking a Database ..................................................................................................................... 76
Deleting a Database ....................................................................................................................... 76
Updating a Database ...................................................................................................................... 76
7: Job Business Flow 77
General Overview ................................................................................... 77
Joblets ..................................................................................................... 78
Managing Joblets ............................................................................................................................ 79
Editing a Joblet ............................................................................................................................... 79
Joblet Types ................................................................................................................................... 80
Job Types ................................................................................................ 82
How Many Job Types to Create? ................................................................................................... 83
Managing Job Types ...................................................................................................................... 83
Creating a Simple Job Type ........................................................................................................... 84
Job Type Groups ............................................................................................................................ 91
Templates ................................................................................................ 91
Template Types .............................................................................................................................. 91
Template Creation .......................................................................................................................... 92
Template Structure ......................................................................................................................... 92
Creating a New Template ............................................................................................................... 92

Print Service Provider User Guide vii
Managing Templates ...................................................................................................................... 95
Creating Variable Data Templates ........................................................ 99
Select Variable Data Fields ............................................................................................................ 99
Defining Variable Data Field Properties ......................................................................................... 99
Arrange Fields .............................................................................................................................. 106
8: Pricing 109
Introduction ........................................................................................... 109
Pricing Overview .................................................................................. 109
Concepts ....................................................................................................................................... 109
Pricing Process Overview ............................................................................................................. 111
Setup ...................................................................................................... 112
Set-up Tax Packages ................................................................................................................... 112
Set-up Job Type Pricing ............................................................................................................... 115
Setting-up Intent Pricing ............................................................................................................... 116
Setting-up Manual Pricing ............................................................................................................ 119
Price Management ................................................................................ 119
Manually Pricing a Job .................................................................................................................. 119
Checking and Modifying Job Pricing ............................................................................................ 119
Checking and Modifying Order Pricing ......................................................................................... 120
Line Item Library ................................................................................... 120
Types of Line Items ...................................................................................................................... 120
Managing the Line Item Library .................................................................................................... 121
9: Production Management 123
Production Queue Overview ............................................................... 123
Managing Jobs in the Production Queue ........................................... 124
Managing the Production Queue Job List .................................................................................... 124
The Job Details Panel ................................................................................................................... 124
Viewing and Editing Job Properties .............................................................................................. 125
Attaching Files to the Job ............................................................................................................. 126
Viewing and Modifying a Job’s Trim and Bleed Parameters ........................................................ 126
Editing Job Imposition ................................................................................................................... 126
Manual Impose ............................................................................................................................. 128
Table of Contents
viii FreeFlow Web Services
Ganging Jobs for Production ........................................................................................................ 130
Printing Book Assembly Jobs on More Than One Output Device ................................................ 131
Creating a Job Ticket .................................................................................................................... 132
Managing Notifications and Alerts ..................................................... 132
Producing Jobs .................................................................................... 133
Outsourcing Jobs to a Partner Print Service Provider .................................................................. 133
Changing the Status of a Job ....................................................................................................... 135
Approving a Job for Printing ......................................................................................................... 135
Delivery Queue ..................................................................................... 135
Delivery Queue Overview ............................................................................................................. 135
Managing the Jobs for Delivery Panel .......................................................................................... 136
Managing Delivery in the Batch Order Panel ............................................................................... 136
Managing the Shipped Deliveries Panel ....................................................................................... 138
Track Jobs ............................................................................................. 139
Searching for Jobs ........................................................................................................................ 139
Managing Tracked Jobs ............................................................................................................... 141
10: Managing Site Customization 145
Creating Skins ...................................................................................... 145
Accessing The Skin Editor ............................................................................................................ 146
Customizing the Login Page ......................................................................................................... 146
Customizing the Site Frame ......................................................................................................... 146
Customizing the Launch Pad ........................................................................................................ 147
Customizing the Email Banner ..................................................................................................... 147
Customizing the Catalog Banner .................................................................................................. 148
Saving and Previewing Views ...................................................................................................... 148
Editing Skin Elements .......................................................................... 148
Uploading Images ......................................................................................................................... 149
Editing the Final Design ................................................................................................................ 149
Accessing the Style Sheet Window .................................................... 149
Uploading Designs ............................................................................... 150
Converting HTML Pages to .mht Files .......................................................................................... 151
Activating Page Elements .................................................................... 151
Selecting Languages .................................................................................................................... 152
Specifying First Page After Login ................................................................................................. 152

Print Service Provider User Guide ix
Defining User Privilege Views ...................................................................................................... 153
Managing the Skin Library ................................................................... 153
Assigning Skins to Print Buyers .................................................................................................... 153
Designating a Default Skin ........................................................................................................... 153
Accessing the Skin Library ................................................................. 154
Duplicating Skins ................................................................................. 154
11: Direct Marketing Links 155
DirectSmile Image Generator .............................................................. 155
Creating a Template with a DirectSmile Image ............................................................................ 155
Ordering a Job from a Template with a DirectSmile Image. ......................................................... 157
XMPie PersonalEffect ........................................................................... 157
Importing an XMPie PersonalEffect Template to the Web Services System ............................... 157
Ordering From a Template ........................................................................................................... 158
Uploading a Database File ........................................................................................................... 158
Restrictions and Known Limitations .............................................................................................. 158
12: Excel Pricing 161
Settings in Web Services ..................................................................... 161
Assigning Excel Pricing to a Print Buyer ...................................................................................... 161
Excel Pricing File Format ..................................................................... 162
Understanding the File Format ..................................................................................................... 162
Excel Pricing with the Book Assembly Module ............................................................................. 166
Excel Programming and Useful Excel Functions .............................. 167
IF Function .................................................................................................................................... 167
Vlookup Function .......................................................................................................................... 167
MATCH ......................................................................................................................................... 168
INDEX ........................................................................................................................................... 168
DGET Function ............................................................................................................................. 168
VBA ............................................................................................................................................... 168
13: Book Assembly 169
Book Assembly Definitions ................................................................. 169

Table of Contents
x FreeFlow Web Services
Binding Styles ............................................................................................................................... 169
Components ................................................................................................................................. 169
Book Assembly Pricing ................................................................................................................. 169
Defining a Book Assembly Job Type ................................................. 170
Defining Binding Properties .......................................................................................................... 170
Defining Component Properties ................................................................................................... 171
Defining a Book Assembly Preview .................................................... 172
Preparation ................................................................................................................................... 173
Producing a Book Assembly Job ....................................................... 175
14: Integrations Guide 177
Introduction ........................................................................................... 177
Who Should Use This Guide ........................................................................................................ 177
Overview ....................................................................................................................................... 177
LDAP ...................................................................................................... 178
Overview ....................................................................................................................................... 178
LDAP Configuration ...................................................................................................................... 179
User Management ................................................................................. 180
General ......................................................................................................................................... 180
Overview ....................................................................................................................................... 181
Integration Flow ............................................................................................................................ 181
Configuring the User Authentication Definition ............................................................................. 182
Authentication server response structure ..................................................................................... 182
Multisite Compatibility ................................................................................................................... 186
Appendix ....................................................................................................................................... 186
Data Export ........................................................................................... 187
Introduction ................................................................................................................................... 187
Hot Folder Configuration............................................................................................................... 187
Writing a Connector ...................................................................................................................... 201
Freeflow Connectivity .......................................................................... 203
Introduction ................................................................................................................................... 203
Process Manager Integration ....................................................................................................... 204
Process Manager Manifest Integration ......................................................................................... 207
Output Manager Integration .......................................................................................................... 210
JMF Service .................................................................................................................................. 213

Print Service Provider User Guide xi
Print Manager – Advanced Print Path .......................................................................................... 214
VIPP Emitter Integration ............................................................................................................... 216
Print from DocuShare Integration ................................................................................................. 217
FreeFlow Repository Integration .................................................................................................. 219
XMPie PersonalEffect ........................................................................... 221
XMPie PersonalEffect Integration ................................................................................................. 221
Installing XMPie PersonalEffect ................................................................................................... 222
Web Services and XMPie PersonalEffect Integration .................................................................. 222
Importing an XMPie PersonalEffect Template to the Web Services System ............................... 223
Restrictions and Known Limitations .............................................................................................. 224
DirectSmile ............................................................................................ 225
Overview ....................................................................................................................................... 225
Prerequisites ................................................................................................................................. 225
Installation process ....................................................................................................................... 225
Enabling DirectSmile .................................................................................................................... 225
Job Ordering Workflow ................................................................................................................. 226
Credit Card ............................................................................................ 226
Introduction ................................................................................................................................... 226
Integrating with the Credit Card Vendor ....................................................................................... 226
Enabling Credit Cards for Web Services Accounts ...................................................................... 229
Verifying Print Buyer Workflow via Credit Card ............................................................................ 229
Adding Credit Card Vendors to Web Services ............................................................................. 229
15: Web Services Order Center User Guide 231
Introduction ........................................................................................... 231
Overview ....................................................................................................................................... 231
Configuration ........................................................................................ 232
Define Accounts ............................................................................................................................ 232
Set up Account Groups ................................................................................................................. 232
Add CSR Users ............................................................................................................................ 233
Configure Web Services Order Center Email ............................................................................... 233
Configure Web Services Order Center Settings ........................................................................... 234
Sales ...................................................................................................... 237
Creating a Simple Quote .............................................................................................................. 237
Performing Additional Actions on the Quote................................................................................. 240
Progressing from Quotes to Orders .............................................................................................. 244
Table of Contents
xii FreeFlow Web Services
Invoicing and Billing ............................................................................ 249
Handling Deposits ......................................................................................................................... 249
Handling Invoices ......................................................................................................................... 252
Handling Credit Notes ................................................................................................................... 254
Handling Receipts ......................................................................................................................... 257
Managing Your Business and Production ......................................... 259
The Dashboard ............................................................................................................................. 260
The Commercial Queue ................................................................................................................ 261
The Artwork Queue ....................................................................................................................... 262
The Activities Screen .................................................................................................................... 266
The Billing Manager ...................................................................................................................... 266
Production Pricing ............................................................................... 267
Pricing Concepts ........................................................................................................................... 267
Setting Up Production Pricing ....................................................................................................... 270
Index 279

Print Service Provider User Guide 1
1 Introduction
In This Chapter
FreeFlow Web Services ........................................................................ 1 The Print Service Provider Guide ......................................................... 1
FreeFlow Web Services FreeFlow Web Services™ is a Business Flow Automation solution that allows you to create, customize, order, print, and deliver print jobs in one streamlined operation.
Web Services enables you to respond to changing market conditions, as well as leverage new business opportunities by providing you with the following features: • Personalized, on-demand, printing capabilities – integrate independent and data-based variable
information to create variable data jobs and campaigns. • Advanced reprint abilities – access jobs and templates for reprinting or updating print material. • Advanced tracking abilities – you and your customers can track orders from the moment they enter
your organization, until they arrive at their final destination. • Simplified production and ordering process – generate jobs, receive automated pre-flighting, and
create soft proofs prior to ordering. Make use of pre-press capabilities, output management, delivery, and billing abilities. The entire process is designed to reduce the number of interactions with your customers.
• An open system - communicate with your customers’ system and with your own peripheral systems; you can receive orders from any environment including branded websites, emails, intranet, procurement systems, or print drivers, as well as interact with other systems that provide diverse services.
The Print Service Provider Guide The Print Service Provider guide provides you with instructions for managing the administration and production workflows, with the purpose of: • Introducing Web Services software features. • Entering and organizing data that is processed by Web Services, allowing you to provide automatic
price generation and enabling job production. • Assisting your organization in configuring Web Services printing, account, and system settings. • Enabling quick implementation of Web Services so you can improve and enhance your business.
Before working with the guide, we recommend that you complete the comprehensive Customer Driven Deployment Program (CDDP) and gain the implementation skills that will enable you to begin working with your customers.

Introduction
2 FreeFlow Web Services

Print Service Provider User Guide 3
2 Web Services User Overview
In This Chapter
Accessing Web Services ....................................................................... 3 Frequently Used Terminology ............................................................... 4 Conventions Used in Web Services ...................................................... 4 Using Web Services Features .............................................................. 5
The Web Services User Overview describes terminology, conventions, and features used in FreeFlow Web Services.
Accessing Web Services Web Services runs on the Windows operating system. As a Print Service Provider user, you can access Web Services either via the internet (World Wide Web), or on an intranet, by typing a Uniform Resource Locator (URL) into an Internet Explorer browser address field. Print Buyers can access the Print Buyer application site using either Internet Explorer, Mozilla Firefox, or Apple Safari browsers.
To access Web Services in a browser 1 Open an Internet browser window. 2 Type the Web Services URL into the browser address text field, for example: http://x.x.x.x/Web
Services/ 3 Press Enter on your keyboard; Web Services is accessed.
NOTE: Disable your browser Pop-up Blocker to ensure that Web Services’s various windows and dialog boxes are able to appear.
Accessing Web Services locally Use the WEB SERVICES TOOLBOX to perform the following tasks: • Start Web Services – start running the Internet Information server and the Web Services processes. • Stop Web Services – stop running the Internet Information server and the Web Services processes. • Restart Web Services – stop and restart the Internet Information server and the Web Services
processes. • Log Window – open the system feedback window. A full record of all past actions, and their
execution times, available to facilitate application trouble shooting. • Task Manager – open the Windows Task Manager. • Explorer – open Windows Explorer.
Status Icons The status icons, located on the Status Bar at the bottom-right corner of the desktop, indicate the operational modes of the system:
– indicates the system is operating; both the Internet Information server and Web Services are running.
– indicates the system is in the process of becoming operational or shutting down.
– indicates the system is not operating correctly; either the Internet Information server or Web Services is down. The CONNECTION FAILURE prompt appears.
The linked image cannot be displayed. The file may have been moved, renamed, or deleted. Verify that the link points to the correct file and location.
The linked image cannot be displayed. The file may have been moved, renamed, or deleted. Verify that the link points to the correct file and location.
The linked image cannot be displayed. The file may have been moved, renamed, or deleted. Verify that the link points to the correct file and location.
Web Services User Overview
4 FreeFlow Web Services
Frequently Used Terminology The following list describes Web Services Print Service Provider user interface terminology: • Screen – refers to the entire monitor screen, including the operating system toolbars. • Window – part of the screen; opens by clicking any of the Workflow or Administration tabs in the Web
Services taskbar. • Panel – part of a window; can contain sub-panels. • Sub-panel – part of a panel. • Pane – a large box, usually located on the left side of the window. • Operation Button – used for performing various operations; appears in a panel or a sub-panel, or
below a pane.
Navigating Web Services After logging in to Web Services, do not use the browser toolbar buttons. Click the selected menu to refresh the display, and use the menus, ribbons, and ribbon menus to navigate within Web Services. PREVIOUS and NEXT buttons appear when the option to return to a previous window or to move to a following window exists.
If you want the application open in more then one browser window, do not open another browser tab; open another browser window instead.
Logging Out of Web Services Use Web Services’s log out link and not the window’s CLOSE control, or browser FILE menu, to log out of the application.
Conventions Used in Web Services Web Services uses several interface conventions. These conventions are documented below, and are referred to throughout the documentation.
Managing Queues Queues are used in Web Services to display the current status of jobs. You can view and edit jobs in each queue by clicking icons in the queue columns, or in the Job Details pane.
All queues have the following features and tools: • Search Filter – a dropdown list containing an alphabetically ordered list of search criteria. • Value Definition Filters – a dropdown list containing definitions to filter the search as follows:
Filter Definition < Less than
> Greater than
<= Less than or equal to
>= Greater than or equal to
<> Not equal to
= Equal to
Like Similar to
• Column selection • Job sorting according to column
The linked image cannot be displayed. The file may have been moved, renamed, or deleted. Verify that the link points to the correct file and location.

Using Web Services Features
Print Service Provider User Guide 5
• Job repositioning • Job details viewing and editing
Displaying and Hiding Queue Columns Queues show job information according to the columns that are displayed. You can select which columns to display or hide.
To display and hide queue columns: 1 Click Column Selection; the COLUMN SELECTION dialog box appears, and the number of selected
check boxes corresponds with the number of columns displayed in the queue. 2 Select or clear check boxes to display or hide columns. 3 Click OK.
NOTE:
• Adding more than ten columns can distort the view of the individual columns. • When the PAYMENT METHOD column is selected, the payment method appears as PO, CC, or
EDD. For more information, refer to Defining Pricing Settings (on page 49). • PROCESS indicates that the processing of the job(s) has not yet been completed.
Sorting Jobs You can sort information in queues according to columns. Click a column heading to arrange queue information in alphabetical, ascending or descending order; an arrow appears in the column header, indicating the directional order in the column.
Repositioning Jobs When a job enters a queue, the job is positioned according to the system-assigned job number. You can reposition the job within the queue.
To move jobs up or down one row: 1 Select one or more job rows and click or
NOTE: To select more than one job, press the Ctrl key and select each job or press the Shift key and select the first and the last of a group of jobs.
2 Repeat Step 1 until the job is queued as you want it.
To move a job to the top or to the bottom of the queue: • Select the job and click ; the job moves to the bottom of the queue. • Select the job and click ; the job moves to the top of the queue.
To restore the queue to the original status: Click Default Sort; the jobs appear in the original queue positions (lowest number at the top and the highest number at the bottom).
To update the queue with new jobs: Click the Refresh button; new jobs entered to the system appear in the queue.
Using Web Services Features You can use several features within Web Services to store or modify information, all of which can be accessed from various locations within the application.
The linked image cannot be displayed. The file may have been moved, renamed, or deleted. Verify that the link points to the correct file and location.
The linked image cannot be displayed. The file may have been moved, renamed, or deleted. Verify that the link points to the correct file and location.The linked image cannot be displayed. The file may have been moved, renamed, or deleted. Verify that the link points to the correct file and location.
The linked image cannot be displayed. The file may have been moved, renamed, or deleted. Verify that the link points to the correct file and location.
The linked image cannot be displayed. The file may have been moved, renamed, or deleted. Verify that the link points to the correct file and location.
The linked image cannot be displayed. The file may have been moved, renamed, or deleted. Verify that the link points to the correct file and location.

Web Services User Overview
6 FreeFlow Web Services
Managing Attachments You can upload files to jobs and download attached files to any folder in your system.
Uploading Files Click Upload Files or Upload Images; the UPLOAD FILE dialog box appears. • To upload a single file, click the Upload a single file radio button, and complete the instructions in the
UPLOAD FILE dialog box. • To upload multiple files, click the Upload multiple files, using FTP Multi-file Upload radio button,
and complete the instructions in the UPLOAD FILE dialog box.
NOTE: To work with the FTP Multi-file Upload option, you must enable and activate the FTP functionality on your server. To enable FTP Upload, navigate to SYSTEM SETUP -> BASIC -> GENERAL -> FILE UPLOAD. For more information, refer to Allowing FTP Uploads (on page 12).
Downloading Files 1 Select a target file and click Attachment; the DOWNLOAD FILE dialog box appears. 2 Complete the instructions in the DOWNLOAD FILE dialog box. 3 Click Close.
Importing and Exporting Database Files You can use database files when you need to create variable data jobs containing many parameters, or when you populate lists of users, addresses, stock, and other database elements.
IMPORT – import an Excel file from within or outside the system.
EXPORT – create an Excel file of the data contained in an associated list.
To import a database list: 1 Click Import; the IMPORT dialog box appears. 2 Browse to the target file and choose one of the following options:
o Select File Format – select the file type and encoding values in the dropdown lists. o Upload, Using a Custom Scheme – select a customer scheme option in the dropdown list.
3 Click Start Uploading; the IMPORT DATABASE dialog box appears.
To prevent the first row of data appearing in the printed job, select the First Row Contains Field Names checkbox.
To map fields: Choose one of the following options in the SCHEME dropdown list: • New Scheme – define a new field mapping scheme. • Last Used – map according to the scheme that was last used.
To define a new mapping scheme: 1 Select New Scheme from the dropdown list. 2 Map the names with valid field names in the dropdown lists. 3 Click Next; the IMPORT FINISHED dialog box appears.
NOTE:
• Problematic names, for example Login Name, where a login name already exists, appear with the icon, and the MESSAGE column contains an explanation.
• The Link to Import Report File link accesses an Excel file worksheet containing the imported names. You can edit the Excel file.
The linked image cannot be displayed. The file may have been moved, renamed, or deleted. Verify that the link points to the correct file and location.
The linked image cannot be displayed. The file may have been moved, renamed, or deleted. Verify that the link points to the correct file and location.
The linked image cannot be displayed. The file may have been moved, renamed, or deleted. Verify that the link points to the correct file and location.
Using Web Services Features
Print Service Provider User Guide 7
4 Click Close.
To create a new database mapping scheme: 1 Click the Scheme link; the SCHEME MANAGEMENT dialog box appears. 2 Select New Scheme and click Save As; the SAVE AS dialog box appears. 3 Type a new scheme name and click OK; the new scheme name appears in the list. 4 Click Close.
To export an internal system list: 1 Click Export; the EXPORT dialog box appears. 2 Select the file type and encoding in the dropdown lists, and click Export; the DOWNLOAD FILE dialog
box appears. 3 Complete the instructions in the dialog box, and save the file in a folder.
Multiple Language Support Multiple language support is a new feature that has been added to Web Services to allow Print Service Providers to support Print Buyers logging in to Web Services in their own language. This allows Print Service Providers to provide better service to their Print Buyers and correspond with their customers in their preferred language.
Multiple language support is currently supported as follows: • Localized Customized Fields (on page 7) • Localized Ordering Sequence (on page 8) • Localized Credit Card Display Name (on page 8) • Outgoing Emails Localized per User (on page 8)
Localized Customized Fields Any changes to the default values of Customized Fields can also be localized.
Workflow: 1 Print Service Provider Enables Customized Fields (SYSTEM SETUP -> ADVANCED -> CUSTOMIZED
FIELDS) and then makes changes to the various Field Captions and/or Field Types.
NOTE: Only make changes to System Customized Fields when logged in with the Default System language.
2 The Print Service Provider Exports the Translation Files (SYSTEM SETUP -> BASIC -> REGION AND LANGUAGES). A zip file is created containing an Excel file for each enabled language. The Excel files contain the name, default value and current translation of each Customized Field. One file per language is created no matter how many Regions are enabled that use that language.
3 The files are translated as needed by the Print Service Provider into the target language(s) and saved (only the last column in each excel file is editable).
4 The Print Service Provider creates a zip file archive with all the updated translated Excel files. 5 The Print Service Provider Imports the Translation Files (SYSTEM SETUP -> BASIC -> REGION AND
LANGUAGES). The files are checked for errors (such as empty translated fields) and then imported into Web Services. If an error is detected in any of the Excel files then none of the files are imported.
NOTE:
Customized Fields can also be localized per ACCOUNT. The workflow is identical to the above, except:
• The Account level Customized Fields are located at ACCOUNTS -> ACCOUNT SETUP -> CUSTOMIZED FIELDS.
• The Export and Import links are located at ACCOUNTS -> ACCOUNT SETUP -> PREFERENCES.
The linked image cannot be displayed. The file may have been moved, renamed, or deleted. Verify that the link points to the correct file and location.

Web Services User Overview
8 FreeFlow Web Services
Localized Ordering Sequence Any changes to the default values of the Ordering Sequence names and the text messages in the Print Buyer Ordering Sequence wizard can also be localized. The Ordering Sequence wizard consists of up to 6 steps: • Upload File • Job Specification • File Report • Preview • Summary • Job Details
The Ordering Sequence names are defined at the system level for Job Types (PRINT SETTINGS -> JOB BUSINESS FLOW -> JOB TYPE LIBRARY) and at the account level for Templates (ACCOUNTS -> STORE SETUP -> TEMPLATES).
Workflow: The workflow is identical to the workflow for Localized Customized Fields (on page 7) and uses the same exported Excel file, except that 8 fields are added to the exported Excel file per Job Type / Template as follows: • The 6 Order Sequence field names. • File Report Message (default text: I want the Print Provider to resolve these problems). • Preview Message (default text: I have reviewed the proof and accept it).
NOTE:
• All 8 fields are added PER Job Type / Template. For example, if there are currently 10 Job Types defined in the system, the exported Excel file will contain an additional 80 fields - 8 fields for each Job Type.
• The Job Type / Template name is added to the field names in the exported Excel file for reference. For example, Brochure - Upload File, Brochure - File Report, etc.
Localized Credit Card Display Name Any changes to the default values of the Credit Card vendor names can now also be localized. The text entered in the Caption field is displayed to the Print Buyer as the payment option at checkout.
To configure Credit Card vendors with a Caption, navigate to SYSTEM SETUP -> INTEGRATIONS -> CREDIT CARD.
NOTE: This feature requires the Web Services Credit Card license.
Workflow: The workflow is identical to the workflow for Localized Customized Fields (on page 7) and uses the same exported Excel file, with the addition of: • The Caption field for each payment option. • The PO (Purchase Order) field (localization of this field is only implemented on the Print Buyer side).
Outgoing Emails Localized per User Outgoing Emails can now be localized on a per user basis instead of always being sent in the system default language. • Users created in the system (ACCOUNTS -> ACCOUNT SETUP -> USERS) have an extra field in their
contact information called Preferred Language. Any Emails sent to this user will use this language setting.
• If Guest Workflow is enabled (ACCOUNTS -> ACCOUNT SETUP -> PREFERENCES) the anonymous users logging in to Web Services will receive Emails in the same language as they placed their order in.
Using Web Services Features
Print Service Provider User Guide 9
• Email events can be individually enabled and the CONTACTS: properties can be edited for each event. Emails are sent according to the User's Preferred Language setting, and the OTHER EMAIL property now has a Preferred Language field also. The CONTACTS: properties apply to the Email events in the following locations: o ACCOUNTS -> ACCOUNT SETUP -> EMAIL o SYSTEM SETUP -> ADVANCED -> EMAIL
• The Administrator's Email field (ACCOUNTS -> ACCOUNT SETUP -> COST CENTERS) has a Preferred Language field also.
NOTE: Only system enabled languages (SYSTEM SETUP -> BASIC -> REGION AND LANGUAGES) appear as options when selecting a Preferred Language.
Generating and Editing Job Tickets The Job Ticket is a document containing information detailing job production, finishing, delivery, and pricing. The Job Ticket can be printed out and completed by the various people in the print production process.
A JOB TICKET can be generated, viewed, and edited from either the PRODUCTION or PRINTING windows, or from any active Job Tracking status window.
NOTE:
• The Job Ticket is created as either an MS Word document or a concise HTML document. This setting is configured on the system level (SYSTEM SETUP -> INTEGRATIONS -> EXTENSION MODULES)
• For Job Tickets in MS Word format: ensure that no job information data links are deleted from within the MS Word document.
• Job Ticket notes that are internal, or those that are either from, or for the Print Buyer, are entered manually.
To create a Job Ticket: 1 Select a job, and click either the Create Job Ticket icon or the Job Ticket button (depending on
the location within the GUI); the JOB TICKET CREATION dialog box appears. 2 For MS Word documents (only), select one or more of the following data options to include in the Job
Ticket: o Production o Finishing o Delivery o Pricing Information
3 Click OK and: o (For HTML Job Tickets) the HTML page opens in a new browser window. o (For MS Word Job Tickets) the DOWNLOAD FILE window appears. Complete the instructions for
downloading the Job Ticket to a suitable location.
The linked image cannot be displayed. The file may have been moved, renamed, or deleted. Verify that the link points to the correct file and location.

Web Services User Overview
10 FreeFlow Web Services
Print Service Provider User Guide 11
3 System Setup
In This Chapter
Basic .................................................................................................... 11 Users ................................................................................................... 17 Advanced ............................................................................................ 19 Integrations ......................................................................................... 25
This chapter describes how you configure the application system settings when initiating FreeFlow Web Services for the first time, and periodically, as the need arises. Some system settings are configured as system defaults on a global level, such as the system language, and company contact data, whereas other settings can be adjusted at the account level after the system has been configured, such as Print Buyer account email settings.
Basic Contact Details You can define your Web Services site Contact Us information, such as telephone numbers and email addresses. The information you define provides a choice of options your Print Buyers can use to correspond directly with your organization.
To define contact information: 1 Select SYSTEM SETUP -> BASIC -> CONTACT DETAILS; the CONTACT INFORMATION window appears. 2 Insert the information details in the fields. 3 Click Save.
General You configure General properties when you initiate the application for the first time, or when you perform periodic application system maintenance. These settings are the default system parameters suited to your organization’s daily operational business needs.
To define the system properties in the SYSTEM PROPERTIES window, select SYSTEM SETUP -> BASIC -> GENERAL; the SYSTEM PROPERTIES window appears, and includes the following parameter settings: • SERVER ADDRESS (on page 12) – the DNS name (URL) of your server. • CONNECTIONS (on page 12) – whether to use a Secure Connection (SSL). • FILE UPLOAD (on page 12) – allowing FTP for multiple file uploads. • REMOTE SUPPORT (on page 12) – whether the Web Services Support Department has access to your
server system options to assist with system complications and service difficulties. • CALENDAR OPTIONS (on page 13) – your company’s working days and hours. • PDF PREVIEW (on page 13) – whether to include footers or watermarks in your Print Buyer’s PDF
preview. • MAXIMUM PASSWORD AGE (on page 13) – whether passwords ever expire and after how long.
System Setup
12 FreeFlow Web Services
Server Address 1 Enter the DNS name of the Web Services server in the Server Address field of the SYSTEM
PROPERTIES window. 2 Click Save.
Connections You can enable Secure Sockets Layer (SSL) server security features on your Web Services server, which enables server security features that verify incoming Print Buyer identity and content integrity, and provides network transmission encryption to accommodate Print Buyers with content-sensitive print jobs on your ‘certified as secure’ site (SSL certification is required to enable SSL.).
To set up SSL: 1 Acquire and install a valid server certificate to establish SSL communications on your system.
NOTE: Only one server certificate can be attached to a web site.
2 Ensure the Use Secure Connection check box is selected (CONNECTIONS sub-panel, in the SYSTEM PROPERTIES window) to enable the server on which you want to use SSL to be assigned to port 443 (the default port for secure communications).
3 Ensure that port 443 is open for both inbound and outbound connections in case a Firewall is configured on a local network.
4 Click Save.
File Upload You can determine whether or not to allow users to upload multiple files with File Transfer Protocol (FTP) and define the FTP port. You can also determine whether or not those Print Buyers require authentication if FTP upload is allowed.
To allow FTP uploads: 1 On the FILE UPLOAD sub-panel, in the SYSTEM PROPERTIES window, select the Allow FTP Upload
option. 2 Type a valid FTP port value in the FTP PORT VALUE field (the default port is 21). 3 (Optional) Select the Requires Authentication check box and type the user name and password
needed in the respective fields (this must be a valid user name and password of an existing user on the Web Services server itself).
4 Click Save.
Remote Support You can authorize and enable FreeFlow Web Services Support to access your server system options remotely for assistance with any system complications and service difficulties.
To enable remote Web Services support: 1 On the REMOTE SUPPORT sub-panel, in the SYSTEM PROPERTIES window, select the Allow Remote
Support option. 2 Enter the Remote IP and Password of the Web Services server in fields. 3 Click Save.
Basic
Print Service Provider User Guide 13
Calendar Options You can specify your company’s operational hours and days for providing print production and services.
To define calendar and work hours: 1 On the CALENDAR OPTIONS sub-panel in the SYSTEM PROPERTIES window, use the dropdown lists to
define your company’s Work Start Time and Work End Time. 2 Select the appropriate Weekend Days when your print services are unavailable. 3 Click Save.
PDF Preview PDF Previews provide both you and your Print Buyers the ability to view the job before it is actually produced, which is useful for verifying the accuracy of the job. Footers and watermarks appear in the PDF preview, which are especially provided to prevent Print Buyers from using the preview as a means of printing the job on printers other than those in your system or organization. 1 On the PDF PREVIEW sub-panel, click the Footer File dropdown box and choose one of the following
options: o None - if you do not want to add a footer to the PDF preview. o SampleFooter.pdf – a sample footer option. Click the Footer File link to add additional footer file options to the dropdown menu.
2 Select the Enable Watermark check box to add a watermark to the PDF: a Type a value in the Watermark Text field. b Define the Font settings for the text.
NOTE: When you clear the Watermark check box, the system-defined watermark cannot be used at the Account level.
3 Click Save.
Maximum Password Age Select the MAXIMUM PASSWORD AGE for all passwords used in the system: • Passwords Never Expire
OR • Passwords Expire after a specified number of days (default 30).
Time Zone 1 Select SYSTEM SETUP -> BASIC -> TIME ZONE. 2 Select the local time zone of your business from the dropdown list. 3 (Optional) Enable Daylight Saving if applicable. 4 Click Save.
Region and Languages Define your Web Services default language and the languages available to Print Buyers when they access the Web Services home page. The Print Service Provider also defines the default language and region for Web Services and sets the other languages and regions that are also available to Print Buyers to choose from.
System Setup
14 FreeFlow Web Services
To define languages: 1 Select SYSTEM SETUP -> BASIC -> REGION AND LANGUAGES. 2 In the DEFAULT LANGUAGES dropdown list, select the default language and region for Web Services. 3 On the LANGUAGES AVAILABLE ON CUSTOMER INTERFACE panel, enable the languages and regions you
want to support. Only enabled languages and regions are available for the user to select before log in. 4 Click Save.
NOTE:
Each region can be individually enabled and has the following predefined regional settings: • Language • Measurement Units • Date Format • Time Format • Price Format
Editable Settings The following settings can only be edited for the default region and are then automatically assigned to the other regions as read-only: • System Currency • Price Decimal Places • Products Price Rounding rules
Terms and Conditions You can define the Terms and Conditions for your Print Buyers to accept before they place their job orders.
NOTE: Use HTML conventions when applying character and paragraph formatting to Terms and Conditions text. Text is saved in HTML format.
To define Terms and Conditions: 1 Select SYSTEM SETUP -> BASIC -> TERMS AND CONDITIONS. 2 In the LANGUAGE list, select a language. 3 Type the valid text within the TEXT pane. 4 Click Save. 5 Repeat steps 2 through 4 to define the terms and conditions in other languages.
Home Page Customization You can customize home page elements, including the GUI link settings, home page text, and images. The home page serves as the login page.
To customize home page elements, select SYSTEM SETUP -> BASIC -> HOME PAGE CUSTOMIZATION; the HOME PAGE CUSTOMIZATION window appears, and includes the following customizable settings: • The Customize Link (on page 15) • The Logout Link (on page 15) • The FAQ Link (on page 15) • The Help Link (on page 16) • The Contact Us Link (on page 16) • Home Page Text (on page 16) • Home Page Images (on page 17)

Basic
Print Service Provider User Guide 15
The Customize Link You can create a button link to a customized window containing text and images designed for your Print Buyers’ use. Alternatively, you can define the button to direct Print Buyers to an external 'Customize' Page option to enable your Print Buyers access to an external web page.
To define the Customize link: 1 Select SYSTEM SETUP -> BASIC -> HOME PAGE CUSTOMIZATION -> CUSTOMIZE; the CUSTOMIZE LINK
dialog box appears. 2 In the CUSTOMIZE LINK dialog box, select one of the following option buttons:
o Do not use Customize Page – to not display the CUSTOMIZE PAGE link on the home page. o Use System 'Customize' Page – to display the CUSTOMIZE PAGE link and connect it to a
customized page. i From the LANGUAGE list, select a language. ii In the TITLE field, type a name for the customized window and button. iii In the TEXT field, type a message (such as Terms and Conditions) and click OK.
o Use External 'Customize' Page – to link your Print Buyers to an external web page. i From the LANGUAGE list, select a language. ii In the TITLE field, type a name for the customized window and button. iii In the URL field, enter the external web page’s URL address and click OK.
3 In the HOME PAGE CUSTOMIZATION window, click Save.
NOTE: Select Always on top to make sure the CUSTOMIZED PAGE window, when open, remains open over the HOME PAGE window.
The Logout Link You can define whether your Print Buyers, after logging out, are automatically redirected back to your LOGIN window, or to a different web site.
NOTE: By default, Print Buyers are automatically redirected back to your LOGIN window.
To define the Logout link: 1 Select SYSTEM SETUP -> BASIC -> HOME PAGE CUSTOMIZATION -> LOGOUT; the EXTERNAL HOME PAGE
LINKS dialog box appears. 2 Select the Use External URL check box to direct your Print Buyers to an external website. 3 Define the Login and Logout URLs 4 Click OK.
The FAQ Link The FAQ button accesses the Web Services FAQ (Frequently Asked Questions) page, which contains a collection of commonly asked questions about Web Services, and the respective answers. You can provide your Print Buyers access to the Web Services FAQ page(s) or any other page(s), and present the page(s) either within your Web Services home page (as a panel) or as an independent, floating window.
NOTE: Only page files located externally to the Web Services server can be displayed within an independent floating window.
To access the FAQ link: 1 Select SYSTEM SETUP -> BASIC -> HOME PAGE CUSTOMIZATION -> FAQ; the FAQ PAGE dialog box
appears. 2 In the FAQ PAGE dialog box, select one of the following option buttons:
o Do not use FAQ page if you do not want the FAQ Page link to be displayed on the home page.

System Setup
16 FreeFlow Web Services
o Use System FAQ Page for your Print Buyers to access the Web Services FAQ pages. o Use External FAQ Page to link your Print Buyers to an external web page; insert the target URL
in the field. 3 Click OK.
NOTE: Click Always on top to make sure the FAQ PAGE window, when open, remains open over the HOME PAGE window.
The Help Link You can customize your Web Services online Help.You can provide your Print Buyers with access to the Web Services online Help files that are located within the application, or to an external Help system on the Internet. Additionally, you can configure the Help to appear either within your Web Services home page (as a panel) or as an independent, floating window. Alternatively, you can ‘hide’ the Help button altogether, effectively disabling Help access.
NOTE: Only web pages that are located on the Web Services server can be placed inside the Web Services window.
To customize Help: 1 Select SYSTEM SETUP - BASIC -> HOME PAGE CUSTOMIZATION -> HELP; the HELP dialog box appears. 2 In the HELP dialog box, select one of the following option buttons:
o Do not use Help if you do not want the Help button to be displayed on the home page, or o Show System Help for your Print Buyers to access the Web Services Help pages, or o Use External Help to link your Print Buyers to external Help pages; insert the target URL in the
field 3 Click OK.
NOTE: Click Always on top to make sure the HELP window, when open, remains open over the Web Services window.
The Contact Us Link You can define the target of the CONTACT US link. Generally used to access Web Services’s CONTACT US site information page, you can define the CONTACT US link to target a different URL address on the internet, such as your own organization’s web site.
To define the Contact Us link: 1 Select SYSTEM SETUP -> BASIC -> HOME PAGE CUSTOMIZATION -> CONTACT US; the CONTACT US PAGE
dialog box appears. 2 In the CONTACT US PAGE dialog box, select one of the following option buttons:
o Do not use Contact Us Page – do not display the Contact Us link on the home page. o Use System Contact Us Page – use the system Contact Us page. o Use External Contact Us Page – enter the target URL in the field.
3 Click OK.
NOTE: Click Always on top to make sure the CONTACT US PAGE window, when open, remains open over the Web Services window.
Home Page Text You can define and edit home page text, including the language, main title, subtitle and body text.
Users
Print Service Provider User Guide 17
To define Home Page text: 1 Select SYSTEM SETUP -> BASIC -> HOME PAGE CUSTOMIZATION, and in the SELECT LANGUAGE TO EDIT
dropdown list, select the home page text language. 2 In the MAIN TITLE field, type the text you want to appear as the title for the home page. 3 Type the text that you want to appear as the subtitle and body of the home page, in their respective
fields, and click Save.
NOTE: You can have more languages added to the SELECT LANGUAGE TO EDIT list. For more information regarding languages, refer to your local distributor.
Home Page Images You can define two separate home page image areas; the Print Service Provider logo and the home page image. Make sure images to be used are located in the system IMAGES LIBRARY. For further information about uploading images, refer to Managing Attachments (on page 6).
To define Home Page images: 1 Select SYSTEM SETUP -> BASIC -> HOME PAGE CUSTOMIZATION, and in the CUSTOMIZATION dialog box,
click one of the three image areas; the IMAGE CUSTOMIZATION folder appears. 2 Upload the image required and select it. 3 Click Save.
Users Managing Print Service Provider Users You can define which members of your company are authorized to be operators of your Web Services system and create a user account for each employee, giving them their respective user privileges.
To define system users, select SYSTEM SETUP -> USERS; the PRINT SERVICE PROVIDER USERS window appears, listing the current users.
To define a new User: 1 In the PRINT SERVICE PROVIDER USERS window, click Add. 2 Insert the FIRST NAME and LAST NAME field values. 3 In the LOGIN NAME field, accept the default, or insert a login name. 4 In the PASSWORD field, insert a password. 5 In USER TYPE dropdown list, select one of the following User Type options:
o System Admin o Operator o Manager o Manager Advanced (Web Services Order Center only) For more information regarding Print Service Provider user types and their system privileges, refer to Print Service Provider User Privileges (on page 18).
6 (This step is only for Manager and Manager Advanced user types): Assign the user to an Account Group. The user will only have privileges to accounts that are members of this Account Group. See Account Groups (on page 24) for more information.
7 (Optional) Enter an IP Filter to restrict access for this user. The user will only be able to log on from a computer with this IP address. Use an asterisk where the number can be anything (for example, entering 123.23.43.* will allow login from any IP address that begins with 123.23.43).
8 Enter the user's Email address.
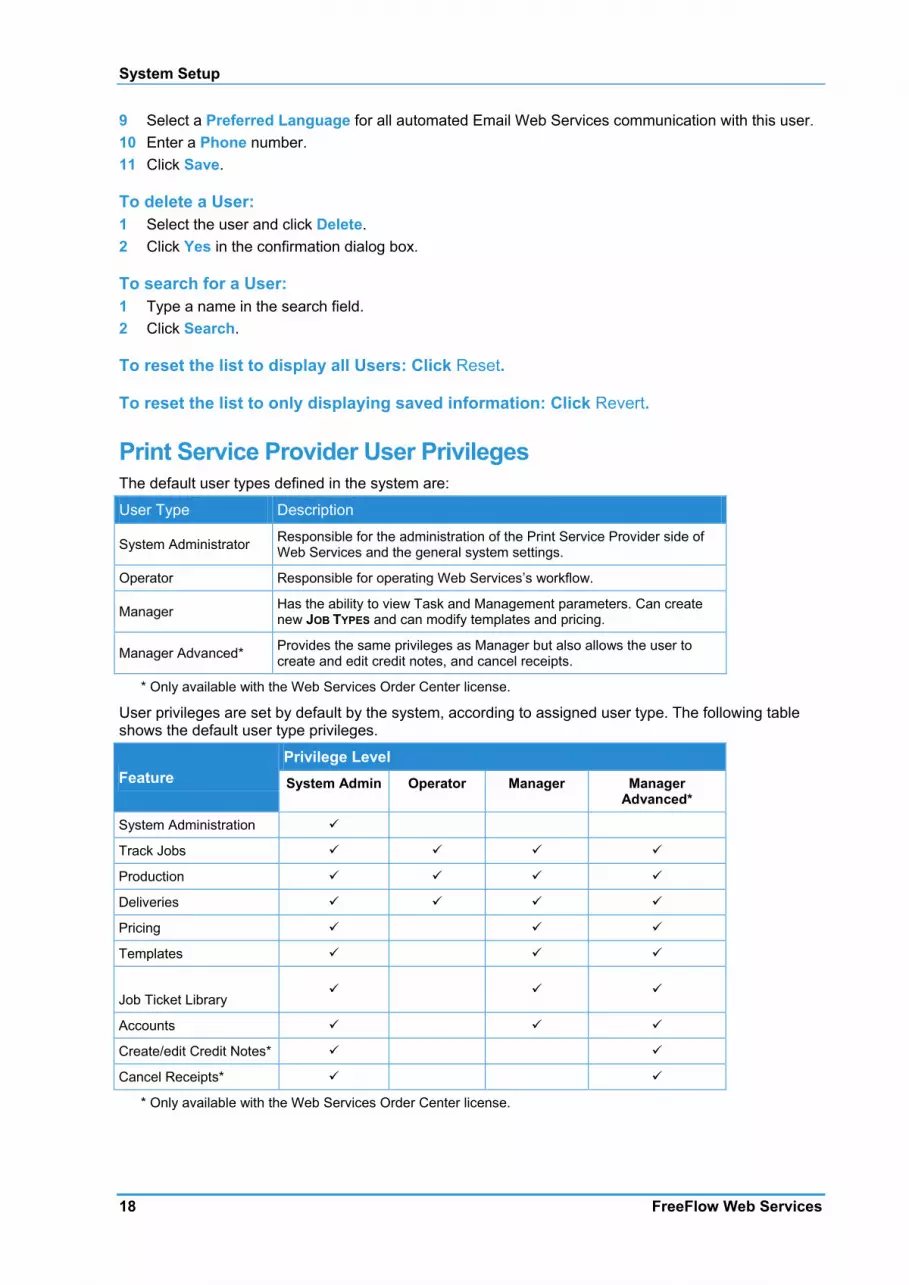
System Setup
18 FreeFlow Web Services
9 Select a Preferred Language for all automated Email Web Services communication with this user. 10 Enter a Phone number. 11 Click Save.
To delete a User: 1 Select the user and click Delete. 2 Click Yes in the confirmation dialog box.
To search for a User: 1 Type a name in the search field. 2 Click Search.
To reset the list to display all Users: Click Reset.
To reset the list to only displaying saved information: Click Revert.
Print Service Provider User Privileges The default user types defined in the system are:
User Type Description
System Administrator Responsible for the administration of the Print Service Provider side of Web Services and the general system settings.
Operator Responsible for operating Web Services’s workflow.
Manager Has the ability to view Task and Management parameters. Can create new JOB TYPES and can modify templates and pricing.
Manager Advanced* Provides the same privileges as Manager but also allows the user to create and edit credit notes, and cancel receipts.
* Only available with the Web Services Order Center license.
User privileges are set by default by the system, according to assigned user type. The following table shows the default user type privileges.
Feature Privilege Level System Admin Operator Manager Manager
Advanced*
System Administration
Track Jobs
Production
Deliveries
Pricing
Templates
Job Ticket Library
Accounts
Create/edit Credit Notes*
Cancel Receipts*
* Only available with the Web Services Order Center license.
Advanced
Print Service Provider User Guide 19
Advanced CRM
NOTE: This feature requires the Web Services Order Center license.
Use the CRM window to modify the follow-up and validity time periods for quotes and orders, and to modify the email attachment format.
To modify the Follow-up and Validity periods: Set the follow-up and validity time periods for quotes (and orders): 1 Navigate to SYSTEM SETUP -> ADVANCED -> CRM. 2 In the DEFAULT FOLLOW UP field, type the default time period by which follow-up is expected. The
default is 3 days. 3 In the DEFAULT VALID UNTIL field, type the time period after which the quote is no longer considered
valid. The default is 30 days. 4 Click Save.
NOTE: The date for a specific quote can be changed on the General page of the quote details. When the quote is converted to an order, the order dates are reset regardless of what was set in the quote.
To modify the Email Attachment Format: It is optional to convert the Word documents into PDF format when quotes/orders/billing documents are sent by email to a customer. The documents will still be displayed to the CSR as Word documents that the CSR can modify, and the conversion to PDF will take place when the CSR sends the documents to the customer. To enable Word document convertion to PDF format, perform the following steps: 1 Navigate to SYSTEM SETUP -> ADVANCED -> CRM. 2 Under the Email attachment format, select Send attached documents as PDF (applies to Quote,
Order and Billing documents) checkbox.
Numbering
NOTE: Fully enabling this feature requires the Web Services Order Center license. Without Web Services Order Center, only the ORDER Prefix and Starting Number fields can be modified.
All quote, order and billing documents are uniquely numbered. These numbers are used to identify the objects in the system and the documents that are sent to the customers at different stages of the sales process. Each document number has an alphabetic prefix that indicates the document type (for example, QUO for quotes) and different document types are numbered independently of each other. The prefixes and the starting number of each counter can be customized and the same counter can be used for several objects, according to the system limitations.
To customize document numbering: 1 Navigate to SYSTEM SETUP -> ADVANCED -> NUMBERING. 2 Modify the prefixes in each of the prefix fields as required. 3 Change the starting numbers for each of the objects in the STARTING NUMBER fields as required. 4 To separate the prefix and numbering of web-submitted orders, select the Use separate numbering
definitions for online and offline orders check box; the ONLINE ORDER NUMBER prefix and starting number fields are then enabled.
5 To combine the prefix and counter of receipts and deposits, select the Use Receipt numbering definitions for Deposit check box; the DEPOSIT NUMBER prefix and starting number fields are then disabled.
System Setup
20 FreeFlow Web Services
6 To combine the prefix and counter of the invoices and credit notes, select the Use Invoice numbering for Credit Notes check box; the CREDIT NOTES prefix and starting number fields are then disabled.
NOTE: • The numbering of existing quotes, orders and billing documents is not influenced by changes in
numbering. • Numbering prefixes are NOT case sensitive (e.g. INV is the same as inv). Changing only the
case of a prefix and then resetting the numbering could result in errors.
Document Type Default Prefix Other Options
Quotes QUO
Orders OSR
Online orders OSR Use a separate counter, with a default OWB prefix.
Invoices INV
Receipts RCT
Deposits DEP Use the same counter and prefix as receipts.
Credit notes CDT Use the same counter and prefix as invoices.
Email You can direct job notification emails to one or several users in Print Buyers organization as well as service provider users in your own organization. Notification emails are an effective, automated method of notifying of a specific job’s general status which may require a ‘warning’. Notification categories such as ‘Job Arrived at the Pre-Press Queue’ or ‘Job Price Changed’, or ‘Job Arrived at the Print Buyer Approval Queue’ are sent.
NOTE: You can set system email settings as a default for all your Print Buyers in the EMAIL window, as described in this section. Alternatively, email settings defined in the ACCOUNTS CUSTOMERS window are for specific Print Buyers.
To set up an email account for notification: 1 Select SYSTEM SETUP -> ADVANCED -> EMAIL; the EMAIL window appears. 2 In the EMAIL ACCOUNT panel, define the following field values:
a SMTP Server – The name of your SMTP server. b (Optional) Enable the My Server requires authentication checkbox and enter the ACCOUNT
NAME and PASSWORD necessary for authentication. c (Optional) Enter an Email Address for Testing the account and click Send Test Email.
3 Select which events should trigger email notification. You can direct email notification for the following specific job events: o PRICE FAILURE – Notifies that the system is not configured correctly to generate a price, due to
several possible reasons. For example, an output device wrongly configured, or a parameter missing from the job description.
o JOB ARRIVED AT THE ARTWORK QUEUE – Notifies that the job is at the artwork queue. o JOB ARRIVED AT THE PRODUCTION QUEUE – Notifies that the job is at the production queue. o ORDER CONFIRMATION – Notifies that an order has been placed. o JOB PRICE CHANGED – Notifies that a quoted price has been changed. o JOB SHIPPED – Notifies that a job has been shipped. o INVENTORY BELOW MINIMUM LEVEL – Notifies that the number of copies of an item in the inventory
has dropped below the minimum set level. o PREORDER JOB EXPIRATION – Notifies that a job remains in the Saved Jobs, Approval Queue, or
Advanced
Print Service Provider User Guide 21
Shopping Cart for longer than the allotted time, and is about to expire. o SHIPPED JOB EXPIRATION – Notifies that a shipped job remains in the shipped status for longer
than the allotted time, and is about to expire. o JOB ARRIVED AT THE PRINT BUYER APPROVAL QUEUE – Notifies that a job has arrived at the Print
Buyer Approval queue. o JOB APPROVED / REJECTED AT THE PRINT BUYER APPROVAL QUEUE – Notifies that a job has been
approved or rejected at the Print Buyer Approval queue. 4 For each event enabled, click the Contacts link to configure the email options. In the dialog box that
opens, configure that event as follows: a Select a SENDER option; or select Other Email and enter the sender's email address. b Select the target RECIPIENTS and/or manually enter an email address in the Other Email text box
and select the Preferred Language for sending emails to that address. c Click OK; all settings are saved, and the dialog box closes.
5 In the EMAIL window, click Save.
Fonts You can verify the fonts and font parameters supported by Web Services.
Font parameters include: • FONT NAME – Specifies the font name. • FONT FAMILY – Specifies the font family type. • FONT TYPE – Specifies if a ‘true’ or ‘open’ font type. • FILE NAME – Specifies the name of the font file. • COMMENTS – Notifies of administrator comments defined for the font.
To access the FONTS window, select SYSTEM SETUP -> ADVANCED -> FONTS; the FONTS window appears, containing the following elements: • AVAILABLE FONTS table – Lists the fonts supported in the Web Services system. • REFRESH button – Scans the system and updates the AVAILABLE FONTS list with new font additions. • IMPOSITION MARKS FONT dropdown list – Lists fonts used for imposition marks.
NOTE: The system supports both True Type and Open Type fonts. If Open Type fonts are chosen and the job has a font that does not support the Open Type format, the system embeds the True Type font.
User Types Only a Print Service Provider user with System Admin privileges can set the default Print Buyer user privileges.
To change Print Buyer user privileges: 1 Select SYSTEM SETUP -> ADVANCED -> USER TYPES. 2 Clear or select the check boxes to assign or remove privileges. See Print Buyer User Privileges (on
page 22) for more information. o To restore the privilege defaults, click Reset Defaults. o To revert back to the last saved configuration, click Revert.
3 Click Save.

System Setup
22 FreeFlow Web Services
Print Buyer User Privileges The default user types defined in the system are:
User Type Description
Administrator
Full user abilities, including account administration. The Administrator can design jobs, send jobs to the SHOPPING CART, and place orders. In addition, the Administrator is responsible for determining the user privileges of all members of the Print Buyer organization.
Supervisor Full user abilities except access to account administration. The Supervisor can design jobs, send jobs to the SHOPPING CART, and place orders.
Designer Responsible for designing simple jobs and jobs based on variable data and variable data fields.
Super User Creates jobs using templates, FORM EDITOR, and variable data. Can order jobs.
User Creates jobs using templates, FORM EDITOR, and variable data. Cannot order jobs.
Guest New or occasional users who can create jobs based on PRINT ACCOUNT catalogs.
Custom As a default, creates jobs using templates, FORM EDITOR, and variable data. Cannot order jobs. Custom allows the Print Buyer to create an additional user type with specific abilities.
User privileges are set by default by the system, according to assigned user type. The following table shows the default user type privileges.
Feature Privilege Level
Administrator Supervisor Designer Super User User Guest Custom
User Administration
Account Administration
Manage Template Library
View Jobs of other Users*
Place an Order/Get Quote
Upload Job Content
Edit Job Properties
Use Form Editor
Use Variable Data
Use Variable Data Archive
Send MailToPrint
Download Plugins
View Address

Advanced
Print Service Provider User Guide 23
Feature Privilege Level
Administrator Supervisor Designer Super User User Guest Custom
Book
Edit Contact Details
*other users from the same Account.
Job Expiration You can define time periods for automatic job expiration, at which point jobs are automatically deleted from the system, to prevent the accumulation of jobs that are no longer required. This option removes jobs from the queue that are no longer valid, or have lapsed due to Print Buyer indecision. This function serves to reduce system ‘cluttering’, and maximizes Web Services’s ability to perform at top speed.
You can apply these definitions to jobs in any of the following statuses: • Jobs not yet ordered:
o Design o Print buyer Approval o Shopping Cart
• Jobs already ordered: o Shipped o Received
To define expiration dates: 1 Select SYSTEM SETUP -> ADVANCED -> JOB EXPIRATION; the JOB EXPIRATION SETTINGS window
appears. 2 In the PRE-ORDER JOBS EXPIRATION and SHIPPED JOBS EXPIRATION dropdown lists, select how many
days a job remains in the system prior to being deleted, and the number of days a warning appears prior to the deletion.
3 Click Save.
Customized Fields You can customize fields used for Print Buyer contact information, address information, account information, and order forms throughout the system. You can also change the order in which fields appear in the various views, deem them as ‘mandatory’ fields, assign dialog boxes, choose whether they are to be ‘free text’, or ‘dropdown’ list boxes, and choose the panels where these items are to appear.
To customize fields: 1 Navigate to SYSTEM SETUP -> ADVANCED -> CUSTOMIZED FIELDS; the CUSTOMIZE FIELDS window
appears. 2 In the CUSTOMIZE FIELDS window, select Enable Customize Fields. 3 Select one of the following tabs:
o Contact Information – customize Print Buyer user Contact Information fields located throughout the system.
o Address – customize Print Buyer user address fields located throughout the system. o Account Information – customize the Print Buyer user Account Information fields located on the
Accounts GENERAL INFO panel. o Order – customize the fields on the Print Buyer Order forms located throughout the system.

System Setup
24 FreeFlow Web Services
4 Select a field row, and do one or more of the following: o Click Move Up or Move Down to edit the field’s panel location. o Select the VISIBLE check box to define that a field will be visible in the system. o Select the MANDATORY check box to define that a field is marked as mandatory for data entry. o In the FIELD CAPTION column, customize the field name. o In the FIELD TYPE column, choose Free Text or Dropdown List. If you choose the dropdown list
option, edit the list: i Click Edit List; the CUSTOM FIELD OPTIONS dialog box appears. ii Click the Add new Custom Field Option link, and type a value in the resulting field. iii Click Add; the newly added value is listed in the dialog box. iv Repeat Steps 2 and 3 for additional field options, and click Done.
5 Click Save.
For information regarding customizing fields at the account level, refer to Customizing Order Fields at the Account Level (on page 56).
Account Groups
NOTE: This feature requires the Web Services Order Center license.
The Account Groups feature provides the Print Service Provider with an additional option for managing accounts and categorizing them into different group types for different purposes such as billing, reports and activities. The Print Service Provider also assigns CSRs to an Account Group that only contains the accounts that CSR will handle, thus isolating the CSR from accounts handled by other CSRs and limiting the CSRs ability to modify other account information.
To manage account groups, navigate to SYSTEM SETUP -> ADVANCED -> ACCOUNT GROUPS.
NOTE: • Create an Account Group for each CSR that you plan on adding as a system user. • Accounts can be included in more than one Account Group if necessary.
To add a new account group: 1 Click the New button. 2 Enter a Group Name and Description. 3 Select one or more accounts in the NOT A MEMBER: list box and click the Add arrow. The accounts are
moved to the MEMBER: list box.
NOTE: To select more than one account, press the Ctrl key while selecting an additional account.
4 Click Save.
To delete an account group: 1 Select the Account Group in the list and click the Delete button. 2 Click Yes in the confirmation dialog box that opens.
To duplicate an existing account group: 1 Select the Account Group in the list and click the Duplicate button. A new group is created with the
same description and group members. 2 Enter a Group Name and update the Description if necessary. 3 Update the group membership if necessary by selecting accounts in one of the list boxes and clicking
the Add or Remove arrow as appropriate. 4 Click Save.
Integrations
Print Service Provider User Guide 25
To edit an existing account group: 1 Select the Account Group in the list. 2 Update the Group Name and Description if necessary. 3 Update the group membership if necessary by selecting accounts in one of the list boxes and clicking
the Add or Remove arrow as appropriate. 4 Click Save.
Billing
NOTE: This feature requires the Web Services Order Center license.
Use the Billing window to modify invoice settings and define the list of banks from which you will accept checks.
To Define Invoice Settings: 1 Navigate to SYSTEM SETUP -> ADVANCED -> BILLING. 2 To enable the automatic creation of invoices and receipts for all the online orders made using online
payment, select the Create an Invoice and Receipt for Web created orders with online payment check box .
3 To issue the invoices to a parent account instead of to the account that generated the order, select the Allow issuing invoice for parent account check box.
4 Click Save.
To Define the Banks List: Define the list of banks from which you accept checks. This list is used to select the name of the bank when a payment is made. 1 Navigate to SYSTEM SETUP -> ADVANCED -> BILLING. 2 Click the Add button under the Banks list. In the empty row that is added to the list, type in the banks
name. 3 To remove a bank, select the bank and click Remove. 4 Click Save.
NOTE: To enable the Bank Check payment option for an account, at least one bank must be defined in the Bank list, otherwise the Billing documents cannot be confirmed.
Integrations Credit Card Integration The FreeFlow Web Services Credit Card module enables Print Buyers to pay for the Print Service Provider's services through the use of an online payment vendor.
NOTE: The Credit Card feature is only available with the Web Services Credit Card license.
Currently, FreeFlow Web Services supports Credit Cards through the following payment services: • Authorize.Net (www.authorize.net) • PayPal (www.paypal.com) • SaferPay (www.saferpay.com) • DebiTech (www.dibspayment.com)

System Setup
26 FreeFlow Web Services
• Moneris (www.moneris.com) • ePDQ (www.barclaycard.co.uk) • Atos (www.atosworldline.com http://www.atosworldline.com.) • ChinaBank (www.chinabank.com.cn http://www.chinabank.com.cn)
You can enable Print Buyers to pay for your services through a credit card service. Online Payment is available depending on licensing authorization.
NOTE: Before configuring Web Services, you must have opened an account with one or more of the supported Credit Card vendors.
To integrate with a Credit Card vendor: 1 Navigate to SYSTEM SETUP -> INTEGRATION -> CREDIT CARD; the CREDIT CARD window appears. 2 Select a payment vendor, click on the Enabled checkbox. 3 Update the Caption field if necessary and fill in the account information and then click Save.
NOTE: • The Caption field is the vendor name displayed to the Print Buyer during checkout. • Any changes to the default value of the Caption field can also be localized. See Localized Credit
Card Display Name (on page 8) for more information.
For more information on integrating with a Credit Card vendor, see the Integrations Guide on page 177.
HTML or Word Documents Print Service Providers can now select between Word and HTML for generating the following documents: • Job Tickets • Quotes and Orders
The Word option produces a Word document including all the relevant information (as in previous versions of Web Services), while the HTML option produces an HTML page with the relevant information. The HTML documents can also be customized.
To configure which option to use in Web Services: 1 Navigate to SYSTEM SETUP -> INTEGRATIONS -> EXTENSION MODULES. 2 In the DOCUMENT EXTENSIONS frame, select either Word or HTML for Job Tickets and then for Quotes
/ Orders. 3 Click Save.
Defining Data Export You can integrate your Web Services system with peripheral systems within your organization specifically designed and dedicated to perform tasks which enhance your services, such as accounting or estimation software systems. An XML file with job or order data can be transferred through the Web Services server to the other systems when the following events occur in Web Services: • GET QUOTE – a Print Buyer has clicked Get Quote in the Web Services SHOPPING CART. • JOB ORDER – a Print Buyer has placed an order. • EDIT IMPOSITION – a Print Service Provider operator has clicked Edit Imposition in the PRODUCTION
QUEUE. • JOB SHIPPED – a Print Service Provider operator has clicked Approve Delivery in the DELIVERY
QUEUE. • CONFIRM BILLING DOCUMENT - a Print Service Provider operator has clicked the Confirm button in the
Web Services GUI. This link is only available with the Web Services Order Center license, and applies to all billing documents: receipts, invoices, credit notes and deposits.
• JOB APPROVED - a Print Service Provider operator has clicked Approve in the PRODUCTION QUEUE.
Integrations
Print Service Provider User Guide 27
You define the integration with external systems in the Web Services LINKS window. To access the Web Services LINKS window, select SYSTEM SETUP > INTEGRATION; the Web Services LINKS window appears.
To enable a link: • In the Web Services LINKS window, select the ENABLE check box adjacent to the system link to be
enabled. • In the FOLDER PATH field, define a path to a folder in which to store the XML file. • Click Save.
Integrating Web Services with Other Systems You can integrate your Web Services application to with other systems located within your overall system.
To integrate with another system: • Select SYSTEM SETUP -> INTEGRATION -> EXTERNAL SYSTEMS; the EXTERNAL SYSTEMS window
appears. • In the SYSTEMS list, select a system; the right panel shows either an Enable check box or data fields. • Select the Enable check box (when provided) and type the valid data received from the external
system organization into the fields and click OK.
See the Integrations Guide on page 177 for more details.


Print Service Provider User Guide 29
4 Print Settings
In This Chapter
Defining Production Parameters ......................................................... 29 Output Devices .................................................................................... 30 Managing the Stock Library ................................................................ 37 Importing and Exporting Stock ............................................................ 37 Searching the Stock Library ................................................................ 37 Setting Paper Sizes ............................................................................. 38 Defining Shipping ................................................................................ 39
This chapter describes how you define your print settings and service provision parameters. Options and defaults presented here include print output methods available, stock, setup and imposition options, finishing options and shipping alternatives.
Defining Production Parameters You can define the level at which Web Services issues a warning for problems with image resolution and the size of uploaded files.
Setting Image Resolution Warning The default image resolution DPI value is the minimum image resolution a Print Buyer is required to use, when uploading a file to the system. When an uploaded file contains images with a resolution lower than the value set in the system, Web Services issues a warning message.
To set the minimum acceptable DPI: 1 Navigate to PRINT SETTINGS -> PRODUCTION -> PARAMETERS. 2 In the FILE UPLOAD panel, type the minimum acceptable DPI threshold in the Warn User when image
resolution is below: field. 3 Click Save.
Setting Size Difference You can set the maximum possible size difference between a job type’s properties and the job ticket. When a Print Buyer orders a job, the job type, subtype, and job size are defined. If an uploaded file’s dimensions differ from those defined in the system’s job subtype (by exceeding the percentage value set in the system), the job subtype changes from DEFINED to CUSTOM, and Web Services issues a warning message.
To set the size difference: 1 Select PRINT SETTINGS -> PRODUCTION -> PARAMETERS. 2 In the FILE UPLOAD panel, type the maximum acceptable size difference between job type properties
and the properties of uploaded files. 3 Click Save.
Print Settings
30 FreeFlow Web Services
Output Devices You can define the output devices that are used in the system. Assign names for the output devices logically, either relating the device(s) to a folder to which jobs are transferred and stored (for later processing), or relating to an output device especially configured to receive and print jobs automatically.
Managing Output Devices You define output devices by first accessing the OUTPUT DEVICES window. To access the OUTPUT DEVICES window, select PRINT SETTINGS -> PRODUCTION -> OUTPUT DEVICES.
The OUTPUT DEVICES list shows all of the output devices currently defined in your system. In the OUTPUT DEVICES list, you can perform the following actions: • Add devices • Delete devices • Rename devices
Adding Output Devices You can add output devices to the system.
To add an output device: 1 In the OUTPUT DEVICES window, click Add; the ADD DEVICE dialog box appears. 2 Type a name and select the device group to which the device will be added. 3 In the DEVICE GROUP dropdown list, select Copier, Digital, or Offset.
If you select Digital, in the MACHINE TYPE dropdown list, select one of the preset device options, or Custom.
4 Click OK.
General Tab To define general output device parameters: 1 In the OUTPUT DEVICES window, select a device in the OUTPUT DEVICES list. 2 In the General view, in the DEVICE DESCRIPTION field, type a name for the device. 3 In the QUALITY dropdown list, choose either Cost Effective or Highest Quality. 4 (Optional) Select Automatically approve all Jobs for Printing to approve all jobs for automated
printing. When selected, jobs sent to production arrive at the PRODUCTION QUEUE and are automatically approved and sent to the PRINTING QUEUE.
5 In the PRESS SHEET SIZES sub-panel, select the sheet sizes supported by the output device. 6 In the COLORS sub-panel, select which color options the output device supports. The options are:
o B/W – black and white o Process – cyan, magenta, yellow and black o Spot – special colors (such as PMS colors)
7 In the COLOR UNITS dropdown list, select the maximum number of color units supported by the output device.
8 Click OK.
Output Devices
Print Service Provider User Guide 31
Defining Output Device Channels You can define the format and the transmission protocol of data transferred by FreeFlow Web Services. You can print job files directly to an output device or to a ‘storage’ folder for later processing.
The system output device channel options include: • PDF SPOOL – specifies the output is a PostScript file • FOLDER BALANCE – specifies the output is a PDF file • PPML (Personalized Print Markup Language) – specifies the output is XML-based printer language
for variable data printing (defined by PODi) • VDX – specifies the output is variable data format for KODAK devices • VPS – specifies the output is variable data format for Creo devices • JMF OVER HTTP – specifies the output is a PDF document sent using HTTP protocol
To transfer a job in PostScript format: 1 In the OUTPUT DEVICES window, click the Output Channels tab. 2 Select an output device, and in the right panel, select PDF Spool (using Acrobat Reader). 3 In the DEVICE NAME dropdown list, select a device. 4 In the PRINT METHOD dropdown list, select a PostScript level. 5 (Optional) Click Print Test Page to send a test page to print. 6 Click OK.
To transfer a job in PDF format: 1 In the OUTPUT DEVICES window, click the Output Channels tab. 2 Select an output device, and in the right panel, select Folder Balance. 3 (Optional) In the PRODUCE JDF OUTPUT dropdown list, select a job definition format option. 4 Select the Send Production file with JDF option and in the LOCAL FOLDER PATH field, and define the
path. 5 Select or clear the Device supports multi-queue system option. You can add, edit, and delete
queues by clicking the Device supports multi-queue system link. 6 To transfer jobs to Macintosh computer platforms, select the Macintosh Target option; the system
compresses the job name to less than 30 characters. 7 In the FOLDER TYPE dropdown list, select one of the following methods to store jobs:
o Local – specifies an absolute folder path within the local server. o FTP – specify the full ftp path for transferring jobs via the Internet to any remote computer (i.e.
format: ftp://www.print-service-provider.com) and enter, User name, and password values o Network – specifies the transfer of jobs to any computer within the local network (the network
server directory must be specified as the following: \ …).
NOTE: You can define computer IP address, User name, and password values for the FTP or Network option, when either is selected.
8 In the FOLDER PATH field, define a full folder path (according to the folder type method chosen). 9 Click Send a Test File and confirm the subsequent confirmation messages. 10 Click OK.
To transfer a variable data format job: 1 In the OUTPUT DEVICES window, click the Output Channels tab. 2 Select an output device, and in the right panel, select one of the following variable data formats:
o PPML o VDX
Print Settings
32 FreeFlow Web Services
o VPS 3 To transfer jobs to Macintosh computer platforms, select the Macintosh Target option; the system
compresses the job name to less than 30 characters. 4 In the FOLDER TYPE dropdown list, select one of the following methods to store jobs:
o Local – specifies an absolute folder path within the local server. o FTP – specifies the full ftp path for transferring jobs via the Internet to any remote computer (i.e.
format: ftp://www.print-service-provider.com). o Network – specifies the transfer of jobs to any computer within the local network (the network
server directory must be specified as the following: \ …).
NOTE: You can define computer IP address, User name, and password values for the FTP or Network option, when either is selected.
5 In the FOLDER PATH field, define a full folder path (according to the folder type method chosen). o For PPML: In the RESOURCES PATH field, define the full resources path. o For VPS:
i In the RESOURCES PATH field, define the full resources path. ii In the IMPOSITION dropdown list, define the imposition parameters.
6 (Optional) Click Send a Test File. 7 Click OK.
To transfer a job in PDF format over the HTTP protocol: 1 In the OUTPUT DEVICES window, click the Output Channels tab. 2 Select an output device, and in the right panel, select JMF over HTTP. 3 Select or clear the Device supports multi-queue system option.
NOTE: You can add, edit, and delete queues by clicking the Device supports multi-queue system link.
4 Define IP ADDRESS and PORT field values. 5 In the PRODUCE JDF OUTPUT dropdown list, select an output device. 6 Click OK.
Removing Output Devices You can remove output devices using the following: 1 In the OUTPUT DEVICES window, select the output device to remove. 2 Click Delete and Yes; the device is removed from the list.
Defining Print Imposition You can define print imposition orientation and optimization, depending on the selected output device. The system automatically imposes job pages into signatures (a unit of job arrangement within the imposition). You can impose jobs manually if the job is not defined to be automatically imposed by the system. Choose whether to use a color bar, determine both margin and color bar positioning, and the dimensions for each sheet size.
To define print imposition: 1 In the OUTPUT DEVICE window, click Imposition. 2 In the IMPOSITION PREFERENCES dropdown list, choose Impose all Jobs. 3 If you want the jobs arriving at this device to be un-imposed, choose Do not impose. 4 Click Imposition Settings; the EDIT IMPOSITION dialog box appears showing the selected output
device, the press sheet size, and the following imposition option fields:

Output Devices
Print Service Provider User Guide 33
o IMPOSITION METHOD – sets if the job is printed Same-Up or Multiple-Up o WORK STYLE – defines if the job is printed on one side of the press sheet, or both sides, and how
the front of the press sheet relates to the back o PAGE ORDER – the page order in which the job is imposed o PAGE ROTATION – the rotation of pages on the print sheet o ALIGNMENT – the alignment of the printed area to the center or edges of the press sheet o FILL POLICY – the option of using entire sheet or the exact amount of items to print per sheet
NOTE: A graphic representation of a print sheet appears next to each imposition option field in the EDIT IMPOSITION dialog box. When you select an imposition option, the graphic representation updates, displaying how the imposition option impacts on the printing..
5 In the IMPOSITION METHOD dropdown list, choose one of the following methods: o Same-Up – the printing of data on the same side of a sheet. o Multiple-Up – the printing of two or more pages of data on the same side of a sheet, for example,
2-up, 3-up or 4 up. The print sheet graphic representation updates to reflect the chosen imposition method option.
6 In the WORK STYLE dropdown list, select one of the following styles: o Simplex – printing on one side of the sheet only. o Perfecting – printing both sides of a sheet of paper in the same pass through the press. o Work and Tumble – different pages are assembled so that they are on one plate. One side is
printed and the sheet is turned from front to rear so that you are using the opposite edge as the gripper edge and then the second side is printed. The product is then cut apart to make two finished items.
o Work and Back – printing one side of a sheet with one set of plates, then the other side of the sheet with a set of different plates.
o Work and Turn – different pages are assembled so that they are on one plate. One side is printed and then the sheet is turned over so that you are using the same gripper edge and then the second side is printed. The product is then cut apart to make two finished items
The print sheet graphic representation updates to the selected work style option. 7 In the PAGE ORDER dropdown list, select one of the following options:
o Not Specified – no specification to page order. o Cut & Stack – sheets are cut to specification, then stacked one on top of the other. o Saddle-stitched – binds the pages of a section where the folded pages are stitched through the
fold from the outside, using a wire staple. o Perfect Bound – sheets ground or trimmed at the spine and are held to the cover by glue. This
creates a squared off back. The print sheet graphic representation updates to reflect the selected page order option.
8 In the PAGE ROTATION dropdown list, select one of the following options: o Do Not Rotate o Rotate 90° o Best Fit The print sheet graphic representation updates to reflect the selected page rotation option.
9 In the ALIGNMENT dropdown list, select a print alignment option. 10 In the FILL POLICY dropdown list, choose one of the following options:
o Full – fills the entire print sheet. o Exact – prints the sheet with the exact of specified print, saving printer-usage costs and ink. The print sheet graphic representation updates to reflect the chosen fill policy option.

Print Settings
34 FreeFlow Web Services
To set the press sheet margins and gutters: In the MARGINS AND GUTTERS tab: 1 Enter values for the 4 Margin fields. 2 Enter values in the Horizontal Gutters and Vertical Gutters fields.
NOTE: You can override the values which appear on this tab which are inherited from the system default (set in the PRODUCTION PROPERTIES window).
To set the press sheet bleeds: If a file is uploaded without bleeds defined, Web Services can set set the bleeds automatically. To let Web Services automatically set the bleeds: 1 Enable the If Bleeds are not defined in the file checkbox. 2 Type values in the four BLEED fields. 3 Select which option to use for the bleeds:
o Locate bleeds inside job page size o Scale up job page size by the defined amounts
To add labels and marks to the press sheet: On the LABELS AND MARKS tab, select one or more of the following options: • Job Info – displays the job number, Print Buyer name, date of production, and other valid job data. • Crop Marks and Folding Info – displays crop marks, indicated by solid lines, fold marks, indicated
by a dashed line at the location of each fold. 'In' or 'Out' above the dashed line refers to the fold direction and a number under the line reflects the fold order.
• Registration Marks – by default, displays four registration marks located on each edge of the press sheet.
• Gutters, Job Width and Height – displays the gutters, job width, and height values. • Color Bar and Separation Names – displays CMYK and gray scale color bars and separation
names that appear according to the separation color.
To set custom color bar elements: 1 On the CUSTOM COLOR BAR tab, in the COLOR BAR FILE dropdown list, select a color bar option.
To add additional color bar files to the dropdown list: o Click the Color Bar File link; the COLOR BAR FILES dialog box appears. o Upload files to your Web Services system. For more information about uploading files, refer to Uploading Files.
2 Select the Alignment for the color bar. 3 Type the color bar dimensions Dimensions fields.
To set an ICC profile: On the ICC PROFILE tab, in the CONVERT RGB TO CMYK VIA ICC PROFILE dropdown list, select an ICC profile for converting RGB to CMYK. Alternatively, select None.
NOTE: You can upload ICC Profile files by clicking the Convert RGB to CMYK via ICC Profile link.
Click OK to save the print imposition settings and close the EDIT IMPOSITION dialog box.
Defining Third-party Imposition Jobs You can define jobs to be imposed by a third-party application.

Output Devices
Print Service Provider User Guide 35
To define a job to be imposed by a third-party device: 1 In the OUTPUT DEVICES list, select Manual_Impose; the MANUAL IMPOSE panel appears. 2 Click the Output Channels tab. 3 (Optional) In the PRODUCE JDF OUTPUT dropdown list, select a job definition format option; the SEND
PRODUCTION FILE WITH JDF checkbox is active; select the Send Production file with JDF option and in the LOCAL FOLDER PATH field, define the path.
4 Select or clear the Device supports multi-queue system option.
NOTE: You can add, edit, and delete queues by clicking the Device supports multi-queue system link.
5 To transfer jobs to Macintosh computer platforms, select the Macintosh Target option; the system compresses the job name to less than 30 characters.
6 In the FOLDER TYPE dropdown list, select one of the following methods to store jobs: o Local – specifies an absolute folder path within the local server. o FTP – specifies the full ftp path for transferring jobs via the Internet to any remote computer (i.e.
format: ftp://www.print-provider.com). o Network – specifies the transfer of jobs to any computer within the local network (the network
server directory must be specified as the following: \ …).
NOTE: You can define computer IP address, User name, and password values for the FTP or Network option, when either is selected.
7 In the FOLDER PATH field, define a full folder path (according to the folder type method chosen). 8 Click Send a Test File and confirm the subsequent confirmation messages. 9 Click OK.
Defining Press Setup Parameters for Pricing Calculation You can define Setup Time, Pass Setup Time, and Print Head Setup Time configurations.
NOTE: These settings are required for calculating pricing based on production costs. If you plan to calculate pricing based on price lists, these settings are not required.
To define press setup 1 In the OUTPUT DEVICE window, click Press Setup. 2 In the SETUP TIME field, define the minutes needed for the initial output device setup. 3 In the PASS SETUP TIME field, define the minutes needed for setting up one pass through the device. 4 For offset devices, define the minutes needed to set up each print head per pass in the PRINT HEAD
SETUP TIME box, and click OK.
Setting Speed and Waste You can configure speed and waste definitions according to whether the device is offset, digital, or copier.
To set speed and waste parameters for offset devices: 1 In the OUTPUT DEVICE window, click Speed and Waste. 2 In the OUTPUT DEVICE list, select the offset output device. 3 In the RUN LENGTH field, define the number of copies required. 4 In the SPEED field, define the amount of sheets to run per hour. 5 In the WASTE field, define the approximate percentage of run sheet waste (derived from output device
adjustments, run sheet examination, or other waste factors). 6 Click Add for additional job runs; define the parameters in the resulting fields.
Print Settings
36 FreeFlow Web Services
7 In the PRODUCTION FACTORS sub-panel, define speed and waste factors in the PROCESS COLOR, SPOT COLOR, and PAPER WEIGHT fields. (Optional) Click Add for additional weights to be added to the job; define the parameters in the resulting fields.
8 Click OK.
To define speed and waste parameters for digital devices or copiers: 1 In the OUTPUT DEVICE window, click Speed and Waste. 2 Select the digital output device from the OUTPUT DEVICE list. 3 In the PAPER WEIGHT and SPEED by PAPER SIZE fields, define the required parameters. 4 (Optional) Click Add to add more runs to the job; define the parameters in the resulting fields. 5 In the PRODUCTION FACTORS sub-panel, define the Process Color, Spot Color, and Duplex Mode
speed factors. 6 Click OK.
Defining Labor Charges You can define labor and mark-up charges used to calculate the production cost of a job.
To define a digital labor charge: 1 In the OUTPUT DEVICES window, click Labor Charge. 2 In the OUTPUT DEVICE list, select the digital output device. 3 In the panel fields, define the following values:
o Mark-up percentage o Labor expenses per hour o Minimum labor charge per minute
4 Click OK.
To define an offset labor charge: 1 In the OUTPUT DEVICES window, click Labor Charge. 2 In the OUTPUT DEVICE list, select the offset output device. 3 In the panel fields, define the following values:
o Mark-up percentage o Plate fee o Labor expenses per hour o Minimum labor charge per minutes o Process wash-up cost (in monetary terms) o Spot wash-up costs (in monetary terms)
4 Click OK.
Defining Click Charges You can use external devices for digital print jobs, and calculate the cost per click in the production costs.
To define a click charge: 1 In the OUTPUT DEVICES window, select a digital output device in the OUTPUT DEVICES list. 2 Click the Click Charge tab. 3 In the panel fields, define the following values:

Managing the Stock Library
Print Service Provider User Guide 37
o Mark-up percentage o Color page ‘click’ costs o Black and white page ‘click’ costs
4 Click OK.
Managing the Stock Library You can list here the paper stock used for printing and non-paper products that you sell, such as mugs or pens. Use the STOCK LIBRARY to do the following: • Import and export stock • Search for STOCK LIBRARY items • Add, duplicate, edit, or delete STOCK LIBRARY items
You define stock by first accessing the STOCK LIBRARY window.
To access the STOCK LIBRARY window, select PRINT SETTINGS -> PRODUCTION -> STOCK LIBRARY; the STOCK LIBRARY window appears listing the available stock items.
Importing and Exporting Stock You can import your stock list from a text or comma separated value (CSV) file. In addition, you can export your stock list to a file.
To import a file of stock item: 1 In the STOCK LIBRARY window, click Import Stock. 2 In the STOCK IMPORT dialog box, define the file path, or browse to the file to be imported. 3 Select the file type and encoding, and click Start Uploading; the IMPORT DATABASE window appears.
o To erase the current information and use only the data from the imported file, select Overwrite database.
o To keep the current information and add the data from the imported file, select Add to existing database.
4 Map the stock item names to the provided fields, and click Next and OK.
To export a file of stock item: 1 In the STOCK LIBRARY window, click Export Stock. 2 In the EXPORT STOCK dialog box, select the file type and encoding. 3 Click Export; in the DOWNLOAD FILE dialog box, click the link to be exported. 4 Save the file in the required location.
Searching the Stock Library You can define search filters to populate the STOCK LIBRARY list. The STOCK LIBRARY is organized in columns according to categories.
Stock Library Categories
Categories Definition
Catalog ID Catalog identification number.
Stock Item Name Name of the stock item.
Type General material type.
Vendor Vendor name.

Print Settings
38 FreeFlow Web Services
Stock Library Categories Front Coating Front coating method.
Back Coating Back coating method.
Texture Finishing texture.
Color Stock color.
Weight (gsm) Stock weight in grams per square meter.
Size Stock size.
In Stock Stock availability.
Type Details Specific stock material definition.
Media Set Count Information on the number of sheets in a set. For example for tabs.
Cost Print Service Provider’s expenses per pre-defined range.
Price Print Buyer’s expenses per pre-defined range.
Price Units Price of a single unit of measurement type for providing pricing calculation basis. For example, a unit of weight, such as a kilogram.
Multi Price Indicates whether there is more than one range of pricing per stock item.
To search a Stock Library item: 1 In the STOCK LIBRARY window, select the stock type in the SEARCH list; the value definition filter box
(located to the right of the SEARCH list) updates, listing the relevant filters. 2 In the value definition filter dropdown list, select a value definition filter. 3 In the text field, define the relevant search information. 4 Click Search; the search results are displayed.
To add a new Stock Library item: 1 In the STOCK LIBRARY window, click New. 2 In the NEW PAPER dialog box, define the new stock properties, and click OK.
NOTE: You can use the Edit List link to edit properties from the drop-down list.
To duplicate a Stock Library item: 1 In the STOCK LIBRARY window, select the library stock item to duplicate. 2 Click Duplicate; the selected item is duplicated and added to the bottom of the list.
To edit a Stock Library item: 1 In the STOCK LIBRARY window, select the item to edit. 2 Click Edit, edit the stock properties in the EDIT ITEM dialog box, and click OK.
To delete a Stock Library item: 1 In the STOCK LIBRARY window, select the item to delete. 2 Click Delete and Yes; the selected item is deleted.
Setting Paper Sizes You can define parent and run sheet sizes, sizes for job stock, and create custom sheet sizes or modify existing sizes. You define paper sizes by first accessing the PAPER SIZE window.

Defining Shipping
Print Service Provider User Guide 39
To access the PAPER SIZE window, select PRINT SETTINGS > PRODUCTION > PAPER SIZES; the PAPER SIZE window appears listing the available stock items.
To modify paper size: 1 In the PAPER SIZE window, select the paper size; the size name, width, and height appear in the
CUSTOM PAPER SIZE fields.
NOTE: Paper size width and height are in metric or imperial standard measurements, depending on the user language selected.
2 In the WIDTH and HEIGHT fields, define new size parameters. 3 Click OK.
To define a custom size: 1 In the PAPER SIZE window, click New Size; 2 In the CUSTOM PAPER SIZE fields, define a name and the size parameters, and click OK.
To delete paper size: 1 In the PAPER SIZE window, select the paper size to delete. 2 Click Delete; after confirming the paper is not being used in any job, click Yes.
NOTE: Avoid deleting paper sizes used in output devices, STOCK LIBRARY definitions, and the JOB TICKET LIBRARY. When used paper sizes in these locations have been deleted, an error message indicating the paper size no longer exists appears upon attempted use. Existing paper stock of the deleted size is not utilized and remains in stock.
Defining Shipping You can coordinate transport and delivery of goods to Print Buyers as you complete print jobs.
Defining Carriers Upon completion of a job’s production process, you can configure whether the job is to be collected by the Print Buyer or his agent, or you can select an international or local carrier to ship the job.
To define carriers 1 Select PRINT SETTINGS > SHIPPING; the CARRIERS window appears. 2 Select the carrier(s) available in your system, and click OK.
Defining Shipping Methods You can integrate with local and international carriers, set your shipping prices, and enable the reception of online shipping costs.
To define a new shipping method: 1 Select PRINT SETTINGS > SHIPPING > SHIPPING METHODS; the SHIPPING METHODS window appears. 2 Click Add; a new NEW SHIPPING METHOD name entry appears in the left panel. 3 In the SHIPPING METHOD DESCRIPTION field, type the shipping method name. 4 In the CARRIER dropdown list, select a carrier, or choose one of the following options:
o Pick-up by Customer – no carrier is assigned; you can choose to enable or disable pricing. o Custom – a previously assigned carrier will ship the job.
5 In the PRICING MODULE dropdown list, select a pricing module; the panel below the list updates with fields or tabs.

Print Settings
40 FreeFlow Web Services
o Weight/Volume – shipment pricing is based on weight or volume. o Online – shipment pricing is based on an online quotation from the carrier. (Only available for the
participating carriers.) o Direct Mail – shipment pricing is based on the number of copies being shipped.
Setting the Weight/Volume pricing module: For pricing set by weight: 1 On the BY WEIGHT tab, select the Enabled check box; define the DESCRIPTION field value, and in the
UNIT dropdown list, select the units of weight. 2 (Optional):
o To add a location zone, click the Add Zone From Library link; the ZONE LIBRARY appears. Select the zone and define the DETAILS field values. Click Add.
o To add extra location fields, click . 3 To define specific shipping locations, type field values in the From and To fields.
To cover all locations, select Everywhere. 4 Click the Tax tab; the SELECT TAX PACKAGE dropdown list appears. 5 Assign a tax package suited to the carrier and the shipping region, as defined in PRINT SETTING >
PRICING > TAX LIBRARY. For information about defining tax packages in the TAX LIBRARY, refer to Tax Package (on page 111).
For pricing set by volume: 1 On the BY VOLUME tab, select the Enabled check box; edit the DESCRIPTION field as required. 2 (Optional):
o To add a location zone, click the Add Zone From Library link; the ZONE LIBRARY appears. Select the zone and define the DETAILS field values. Click Add.
o To add extra location fields, click . 3 To define specific shipping locations, type field values in the From and To fields.
To cover all locations, select Everywhere. 4 Click the Tax tab; the SELECT TAX PACKAGE dropdown list appears. 5 Assign to the shipping method a tax package suited to the carrier and the shipping region, as defined
in PRINT SETTING > PRICING > TAX LIBRARY. For information about defining tax packages in the TAX LIBRARY, refer to Tax Package (on page 111).
NOTE: When you set (enable) pricing by both weight and volume, the system always defaults to the method with the highest fee.
Setting the Online pricing module: 1 Select the Enabled check box; define the Description field value, and in the DELIVERY METHOD
dropdown list, select delivery method. 2 (Optional) Type a markup percentage and a handling fee value in the fields provided. 3 Verify the user parameters for the following fields:
o Key, Password, Account and Meter Number (FedEx) o Account (shipper) number, Access key, Username and Password (UPS)
4 In the SELECT TAX PACKAGE dropdown list, assign a package suited to the carrier and the shipping region, as defined in PRINT SETTING > PRICING > TAX LIBRARY. For information about defining tax packages in the TAX LIBRARY, refer to Tax Package (on page 111).
Setting the Direct Mail pricing module: 1 Select the Enabled check box; edit the DESCRIPTION field as required. 2 To add a markup, select the Use Mark-up check box; type a markup percentage and define the fields.
The linked image cannot be displayed. The file may have been moved, renamed, or deleted. Verify that the link points to the correct file and location.
The linked image cannot be displayed. The file may have been moved, renamed, or deleted. Verify that the link points to the correct file and location.

Defining Shipping
Print Service Provider User Guide 41
3 (Optional) To add a new range, click ; define the fields in the new range. 4 In the SELECT TAX PACKAGE dropdown list, assign to the shipping method a tax package suited to the
carrier and the shipping region, as defined in PRINT SETTING > PRICING > TAX LIBRARY. For information about defining tax packages in the TAX LIBRARY, refer to Tax Package (on page 111).
5 Click Save.
Defining Shipping Method Groups Define specific shipping method groups for locality and convenience, to be made available for your Print Buyers during the job ordering procedure. After shipping method groups are defined, the options chosen appear in the ACCOUNTS -> ACCOUNT SETUP -> GENERAL INFO -> DEFAULT SHIPPING METHOD dropdown list, available for selection. For information on shipping methods on the ACCOUNT level, refer to Selecting Shipping Method Groups for the Account (on page 51).
To define a new Shipping Method Group: 1 Select PRINT SETTINGS -> SHIPPING -> SHIPPING METHOD GROUPS; the SHIPPING METHODS GROUPS
window appears. 2 Click Add; a list of shipping methods and associated carriers appears in the center pane.
3 Select a shipping method and carrier, and click ; the shipping method and carrier is moved to the Group Shipping Methods pane.
4 Repeat the previous Step for each additional shipping method and carrier. 5 Click OK.
The linked image cannot be displayed. The file may have been moved, renamed, or deleted. Verify that the link points to the correct file and location.
The linked image cannot be displayed. The file may have been moved, renamed, or deleted. Verify that the link points to the correct file and location.

Print Settings
42 FreeFlow Web Services
Print Service Provider User Guide 43
5 Account Setup
In This Chapter
Account Setup Overview ..................................................................... 43 Creating a New Account ..................................................................... 44 Managing Accounts ............................................................................. 46
When you start working with a Print Buyer, one of your first tasks is setting up an account for this buyer. You can also modify the account for an existing Print Buyer. Various account settings affect the look and feel of the Web Services Graphic User Interface (GUI). In addition, some Print Buyer’s work environments and ordering workflows require certain account settings.
Account Setup Overview This section describes the Account Setup window and how to use it.
To access and use the Account Setup Window: 1 Navigate to ACCOUNTS -> ACCOUNT SETUP. By default, GENERAL INFO is selected on the ACCOUNT
SETUP ribbon, and the ACCOUNT SETUP - GENERAL INFO window is displayed. The window includes the ACCOUNTS pane (left side of the window), and the GENERAL INFO window (right side of the window).
2 You create new accounts from window. For more information, see Creating a New Account (on page 44).
3 You manage accounts from this window. To do so, select the ACCOUNT SETUP ribbon option that is appropriate to the action that you want to perform, and from the ACCOUNTS pane, select the relevant account. For more information on managing accounts, see Managing Accounts (on page 46).
NOTE: The order in which you perform the two tasks in Step 3 is insignificant. That is, you can first select an account or you can first select a ribbon option.
Using the Accounts Pane In the ACCOUNTS pane, you can perform the following activities: • Search for accounts:
a Type the name of the account that you want to search for in the NAME field and click Search. The ACCOUNTS SETUP - GENERAL INFO window displays the requested account information. The title of the Account pane changes to ACCOUNTS (FILTERED).
b Click Reset to restore the ACCOUNTS pane to list all accounts. • Import accounts: You can import accounts into the ACCOUNT SETUP window. Click . and in the
IMPORT dialog box that appears, select the file that contains the accounts that you want to import. For more information on uploading files, see Uploading Files.
• Export accounts: You can export the accounts listed in the ACCOUNTS pane to a database file.
a Click ; the EXPORT ACCOUNT dialog box appears. b Select the Users check box to include information on the account users in the exported file. c To define the file format: select the FILE TYPE and the ENCODING from the respective dropdown
lists. d Click Export; the system creates the account according to your settings. A zip file is also created. e In the DOWNLOAD FILE window, save the account files.
The linked image cannot be displayed. The file may have been moved, renamed, or deleted. Verify that the link points to the correct file and location.
The linked image cannot be displayed. The file may have been moved, renamed, or deleted. Verify that the link points to the correct file and location.

Account Setup
44 FreeFlow Web Services
• Delete an account: Select the account that you want to delete and click . A confirmation message appears and you are requested to confirm the delete.
• Select an account to view additional account details, and/or modify account settings. You can view general account settings in the ACCOUNT SETUP - GENERAL INFO window, and you can view and modify additional account settings by selecting one of the ACCOUNT SETUP ribbon options. For more information, see Managing Accounts (on page 46).
• Create a new account by clicking Add. For more information, see Creating a New Account (on page 44).
Creating a New Account Before you start working with a new Print Buyer, you need to create an account for this buyer, and define basic settings: • Defining General Settings for a New Account (on page 44). • Defining Users for a New Account (on page 45). • Defining the Account Checkout Process (on page 45).
Additional account settings are either optional or required for certain ordering workflows and work environments. For information of these options, see Managing Accounts (on page 46).
Defining General Settings for a New Account To define general information for a new account: 1 Navigate to ACCOUNTS -> ACCOUNT SETUP -> GENERAL INFO; the ACCOUNT SETUP - GENERAL INFO
window is displayed. The window includes the ACCOUNTS pane (left side of the window), and the GENERAL INFO pane (right side of the window).
2 In the ACCOUNTS pane, click Add; New Account # is added to the ACCOUNTS pane, where # is the account ID number that is automatically assigned by the system.
3 In the GENERAL INFO window, fill in mandatory Print Buyer information: a Type a customer name in the Account Name field (mandatory step); this name replaces the
default system name New Account # that was automatically entered by the system. b If relevant, from the PARENT ACCOUNT dropdown list, select one of the following options:
None—(default) if the Parent Account feature is not necessary. This Account is Parent—assign this account as a parent of other accounts.
4 To allow account access to the system, make sure the Disable Account check box is clear. (By default, all new accounts are enabled.)
5 Define general contact information on the CONTACT INFORMATION tab: a Fill in the mandatory first name, last name and email fields. b Fill in the other contact fields. c To add the account address:
i Click Edit Address; the EDIT ADDRESS dialog box appears. ii Fill in the address fields and click OK; the address appears beneath the EDIT ADDRESS link
and in the ADDRESS BOOK. 6 Click the ACCOUNT INFORMATION tab, and fill in the following account information fields—Address,
City, Telephone number. 7 On the SHIPPING AND BILLING tab, define the default shipping and billing information for this account.
o If you entered an address in the CONTACT INFORMATION tab (Step 5 in this procedure), the account name and address are automatically entered into the SHIPPING AND BILLING tab. However, you can define another name and address that will be used as the shipping and/or billing information for this account.
o If you did not enter an address in the CONTACT INFORMATION tab, or if you want to define other
The linked image cannot be displayed. The file may have been moved, renamed, or deleted. Verify that the link points to the correct file and location.

Creating a New Account
Print Service Provider User Guide 45
shipping and billing addresses, perform the following steps: To define the shipping address, click Shipping Address; the ADDRESS BOOK appears. Fill in
the shipping contact and address details, and click Save. To define the billing address, click Billing Address; the ADDRESS BOOK appears. Fill in the
billing contact and address details, and click Save. 8 On the SHIPPING AND BILLING tab, select the default shipping method. 9 Click OK to save the settings.
Defining Users for a New Account To define users for a new account: 1 In the ACCOUNTS > ACCOUNT SETUP ribbon, select Users. 2 On the USERS pane, click Add to create a user.
To define an Admin user for the account: 1 Fill in the Login Name, User Type (Admin) and Password. 2 Fill in the Contact Information. 3 Select a Preferred Language for sending emails to this user. 4 Click Save.
To define additional users: 1 Fill in the Login Name, User Type and Password. 2 Fill in the Contact Information. 3 Select a Preferred Language for sending emails to this user. 4 Click Save.
See User Privileges (on page 21) for the default privileges available to each type of user (select SYSTEM SETUP -> ADVANCED -> USER TYPES to display these user types and their privileges.)
NOTE:
When you define additional users, it is important that you consider the following factors:
• By default, only those users defined as Administrator, Supervisor or Designer user types have Upload File privileges.
• It is highly recommended that you not change the default privileges for each user type; making such changes will impact those user types for all Print Buyer accounts.
• A Supervisor is a Print Buyer with privileges to order and approve jobs and create new templates. The only thing that a Supervisor cannot do is manage users.
To add users more efficiently, you can import a CSV file containing the users’ details, as follows:
1 Click (Export Users) under the User’s area to export a CSV file to your desktop. Select the CSV file type and click Export. Using this file will ensure that you provide correctly structured information.
2 Edit the file and fill in the details of the users. Mandatory fields are customer, login, password and privilege. It can also contain other information such as cost center and department.You can copy and paste information into this CSV file from an existing Excel sheet of users, if one exists.
3 Click (Import Users) to import the final CSV file and view the user’s details.
You can define additional user information. For information, see Managing Users (on page 52).
Defining the Account Checkout Process Defining the checkout process is one of the basic steps that you need to perform when you create a Print Buyer account. The checkout process consists of the steps that the Print Buyer follows after clicking CHECKOUT in the SHOPPING CART and until the end of the ordering process. The process covers
The linked image cannot be displayed. The file may have been moved, renamed, or deleted. Verify that the link points to the correct file and location.
The linked image cannot be displayed. The file may have been moved, renamed, or deleted. Verify that the link points to the correct file and location.

Account Setup
46 FreeFlow Web Services
information that will be presented to the Print Buyer concerning shipping, billing, payment and confirmation requirements.
To define the checkout process: 1 Navigate to ACCOUNTS -> ACCOUNT SETUP -> CHECKOUT. The ACCOUNTS CHECKOUT window appears. 2 By default, all the items in the Checkout window are selected. Clear the check boxes of items that
should not be presented to the Print Buyer in the Shipping Details, Order Details, and Confirmation checkout steps.
3 Click Save when done.
Managing Accounts You can start working with the account after defining the basic account settings (for details on basic account settings, see Creating a New Account (on page 44)). However, there are additional account settings that you can modify. These include accounts preferences, which have default settings that are used if you do not change them, and additional account settings that you might have to change, depending on your work environment, and the ordering workflows that you use.
This section includes the following procedures: • Managing Account Access (on page 46). • Modifying Account Preferences (on page 46). • Selecting Shipping Method Groups for the Account (on page 51). • Managing Users (on page 52). • Defining User Groups Settings (on page 53). • Managing the Account Departments (on page 54). • Defining the Account Cost Centers (on page 55). • Defining Email Notification Settings (on page 55). • Customizing Order Fields at the Account Level (on page 56).
Managing Account Access To manage account access to the system: Select ACCOUNTS -> ACCOUNT SETUP. The GENERAL INFO ribbon option is selected by default and the ACCOUNT SETUP - GENERAL INFO window appears. • To allow access to the system, make sure the Disable Account check box is clear.(By default, all
new accounts are enabled.) • To temporarily deny access to the system, select the Disable Account check box. To restore access,
clear the Disable Account check box.
• To delete an account from the system, select the account and click (Delete icon). A customer delete confirmation message appears, requesting that you confirm that you want to delete this Print Buyer from the system.
Modifying Account Preferences You can use the predefined system account preferences, or you can modify preferences to meet your specific account and workflow needs. Some preferences are account-related, and some preferences are workflow-related. If you want to use a specific ordering workflow, you may be instructed to make necessary preference adjustments.
The linked image cannot be displayed. The file may have been moved, renamed, or deleted. Verify that the link points to the correct file and location.

Managing Accounts
Print Service Provider User Guide 47
To modify the account preferences: 1 Navigate to ACCOUNTS > ACCOUNT SETUP -> PREFERENCES. The ACCOUNT SETUP - PREFERENCES
window appears. 2 Modify the preferences as needed. You can define the following account preferences:
o Defining Account Utilities (on page 47) o Defining the PDF Preview (on page 13). o Defining Self Registration Details (on page 48). o Defining Pricing Settings (on page 49). o Setting the Account Job-ordering Windows (on page 50). o Defining Account Branding (on page 51).
Defining Account Utilities This section describes the UTILITIES panel of the PREFERENCES window, where you define workflow-related parameters.
To enable the account with the Print Driver and Selective Upload: In the UTILITIES panel of the ACCOUNT SETUP - PREFERENCES window, do the following: 1 To allow the Print Buyer to create variable (personalized and/or VDP database) templates, select
Enable Selective Upload in the UTILITIES panel.
NOTE: SELECTIVE UPLOAD allows you to define text strings and images as personalized information, to be displayed with a different value every time a job is ordered. If you do not select this option, the Print Buyer cans still order personalized or variable database jobs; however, the Print Buyer will be prevented from creating these templates.
2 To allow the Print Buyer to print jobs using a local print driver, select Enable Print Driver in the UTILITIES panel.
3 To determine from which job types the Print Buyer can select when the Print Buyer clicks Print Document from My Computer in the launch pad and from the print driver, select a group of job types in the JOB TYPE GROUP field in the UTILITIES panel.
To define the account userflow: In the UTILITIES panel of the ACCOUNT SETUP - PREFERENCES window, do the following: 1 Select Force Terms and Conditions confirmation before ordering if you want account users to
select the confirm terms and conditions check box before the ordering process can be completed. 2 Select Enable sharing of typed data in identical template field to allow account users to modify
multiple items in VI templates, using the same data that was entered for the first template. 3 Select Allow Ordering Jobs Without Content to allow account users to order jobs without attaching
a content file. 4 Select Allow file attachment to allow account users to attach missing files or additional files to a job
before the job is sent to production.
NOTE:
When the Allow file attachment check box is selected, a content file can be attached to the job:
• From the JOB PROPERTIES window, before the job is sent by the account user to the SHOPPING CART.
• From the JOB PROPERTIES window that you and the account user can access from the TRACK JOBS window.
If a content file was not included with the order, the account user can forward the file separately, and you can attach the file during the production stage.

Account Setup
48 FreeFlow Web Services
5 From the Default Shipping/Billing Address dropdown list, choose one of the following options: o Use Account Default—the default address is used, as defined in the ACCOUNTS -> ACCOUNT
SETUP -> GENERAL INFO -> SHIPPING AND BILLING tab. o As entered by User—the address is defined by the account user during the job-ordering
procedure.
To set authentication parameters: In the UTILITIES panel of the ACCOUNT SETUP - PREFERENCES window, do the following: 1 To require accounts to change their passwords on a regular basis, select the Maximum Password
Age: Days option button and fill in the DAYS field. (Default is that password never expires.) 2 To require accounts to use a complex password, select the Force Complex Password Security
check box; your account must create a password that complies with the following rules: o The password must be at least seven characters long. o The password must contain characters from three of the following four categories:
English uppercase characters (A through Z). English lowercase characters (a through z). Digits (0 through 9). Special characters (e.g., !, $, #, %).
o The account user password is stored in encrypted form in the database.
PDF Preview PDF Previews provide both you and your Print Buyers the ability to view the job before it is actually produced, which is useful for verifying the accuracy of the job. Footers and watermarks appear in the PDF preview, which are especially provided to prevent Print Buyers from using the preview as a means of printing the job on printers other than those in your system or organization. 1 On the PDF PREVIEW sub-panel, click the Footer File dropdown box and choose one of the following
options: o None - if you do not want to add a footer to the PDF preview. o SampleFooter.pdf – a sample footer option. Click the Footer File link to add additional footer file options to the dropdown menu.
2 Select the Enable Watermark check box to add a watermark to the PDF: a Type a value in the Watermark Text field. b Define the Font settings for the text.
NOTE: When you clear the Watermark check box, the system-defined watermark cannot be used at the Account level.
3 Click Save.
Defining Self Registration Details The SELF REGISTRATION feature is useful for new and occasional user situations. This feature allows users that access your home page to enter the site without a user name and password, and perform activities that you have defined for such users. This "guest" is required to register during the checkout process, and complete the order through the CREDIT CARD service.
To enable a workflow for a guest user (occasional user): 1 In the SELF REGISTRATION panel of the ACCOUNT SETUP - PREFERENCES window, select Enable Guest
Workflow to allow a guest user to access the system; the GUEST ACCESS PATH field appears. 2 Type the URL that directs the guest user to the system home page.

Managing Accounts
Print Service Provider User Guide 49
3 When you want supervisor approval each time a guest enters the system, select the Approval Required checkbox.
NOTE: SEND AN EMAIL MESSAGE EACH TIME A USER HAS REGISTERED is automatically selected if you select APPROVAL REQUIRED.
a Click the Contacts link; the APPROVAL EMAIL CONTACT dialog box appears. b Type the email address of the person in your organization who oversees guest usage of the
system; an email message is sent to this address, and the approver can approve or decline each new guest user that registers into the system.
4 When you do not require supervisor approval but want to receive an email each time a user registers, select the Send an email message each time a user has registered check box, and clear the Approval Required check box. a Click the Contacts link; the APPROVAL EMAIL CONTACT dialog box appears. b Type the email address of the person in your organization who oversees guest usage of the
system; an email message is sent to this address informing that a guest user has registered into the system.
Defining Pricing Settings In the PRICING panel of the ACCOUNT SETUP - PREFERENCES window, you define various pricing settings for each account.
To define the account pricing mode: You can define specific pricing for an account. From the Account Pricing Model dropdown list, select one of the following options: • Not defined at this level—you do not want to activate a different pricing model for this account, and
want the system to scan to the next pricing model in the pricing hierarchy for activation. • Excel—to activate a specific pricing model, and base the pricing on an Excel-based data sheet (see
below). • Excel, including Book Assembly Jobs—to activate a specific pricing model, and base the pricing
on an Excel-based data sheet that includes Book Assembly job pricing (see below).
To work with one of the Excel pricing options: 1 After selecting one of the Excel options in the ACCOUNT PRICING MODEL dropdown list, an EXCEL FILE
link and dropdown box appear. 2 Select an Excel file from the Excel File dropdown list. To add Excel files to the Excel File dropdown
list: a Click the Excel File link; the FILE UPLOAD dialog box appears with a list of currently uploaded
Excel files. b Click the Upload Files button, upload one or more valid XLS files, and click Continue: the new
files appear in the FILE UPLOAD dialog box. See Uploading Files (on page 6) for more information. c Select the new file and click the Select File button; the new file appears in the EXCEL FILE
dropdown list. 3 Click Save.
To define pricing options: You can set the pricing options that the account user encounters during the job-ordering process: • Hide Price from User—prevent the user that is ordering jobs from seeing the price after requesting a
quote. • Allow Ordering Unpriced Jobs—enable job-ordering, even when there is a problem with the
system-generated pricing. • Disable Shipping Price—you and the account users will not see the shipping price. The system

Account Setup
50 FreeFlow Web Services
ignores the shipping price; the shipping price and taxes are not added to the total price, and are not included when the cost is exported to an Excel file.
• Force Cost Center—require the user that is ordering jobs to include a cost center name during the job-ordering procedure.
• Force Reference Code—require the user that is ordering jobs to include a reference code during the job-ordering procedure.
To define shipping and account taxes: Taxes are defined at the system level. When your account users have specific tax-definition needs, you can select a tax for each account, at the account level. For more information about defining taxes, refer to the Pricing Process Overview (on page 111).
Select an option from the ACCOUNT TAX dropdown list.
To define payment methods: In the ordering process, account users select the payment method that is most suitable to their business from among the payments systems that you support. You can provide your account users with one or all of the following payment methods: • PURCHASE ORDER (PO) is the standard payment method:
a Select PO (Purchase Order); the Force PO Number option is activated, and PO (PURCHASE ORDER) is added to the Default Payment Method dropdown list.
b To require account users to type the job's PO number during the ordering process, select Force PO Number.
• Various [CREDIT CARD VENDOR] checkboxes can be enabled to allow account users to pay for your services through a Credit Card vendor. Only integrated Credit Card vendors are displayed as checkbox options (SYSTEM SETUP -> INTEGRATIONS -> CREDIT CARD). For further information, refer to the Integrations Guide on page 177. Select one or more Credit Card vendors which are then activated as a payment option and added to the Default Payment Method dropdown list.
NOTE: The Credit Card options are only available with the FreeFlow Web Services Credit Card license.
To define the default payment method: You can define a default payment method that will be used for all the account’s ordering processes, unless another method is selected. The various ordering processes include SHOPPING CART, CATALOG, MAILTOPRINT, and PRINT DRIVER. • When only one option is listed in the Default Payment Method dropdown, this option is automatically
the default payment method. • When there is more than one option in the Default Payment Method dropdown list, you need to
select the default payment method.
To define an account discount: You can define a permanent discount for this account that will automatically be applied when calculating quotes. In the DISCOUNT field, type the discount value.
Setting the Account Job-ordering Windows In the GUI panel of the ACCOUNT SETUP - PREFERENCES window you define the windows that appear when the account users order jobs.
To define the windows that the account accesses when creating a job: 1 From the Default Order Jobs Page dropdown list, choose the job page option that will appear when
Managing Accounts
Print Service Provider User Guide 51
the account user enters the system. o Launch Pad—provide the account user with direct access to the job-ordering and job tracking
functions. o Template View—provide the account user with a list of template options for job-ordering.
2 From the Default Template View dropdown list, select one of the default template views. This view will appear when an account user wants to initiate a job based on a template. For more information see Catalog Overview (on page 59). o Root Folder—set the top folder in the template library as the folder that the account user
accesses when creating a job from a template. o Specific Folder—the Folder link appears, allowing you to access the CHOOSE FOLDER dialog
box. Select the folder that the account user accesses when creating a job based on a template. o Catalog—select a specific catalog in the template library as the catalog that the account user
accesses when creating a job from a template. Select a catalog from the CATALOG dropdown list.
Defining Account Branding In the BRANDING panel of the ACCOUNT SETUP - PREFERENCES window you define the appearance of the account pages.
To define branding options: 1 In the BRANDING panel, select an option from the Customer Logos dropdown list:
o Use System Default—use the PRINT PROVIDER LOGO as defined in SYSTEM SETUP -> BASIC -> HOME PAGE CUSTOMIZATION. For more information see Customizing the Home Page (on page 14).
o Select one of the listed logos.
NOTE:
CUSTOMER LOGOS allow you to add a unique account logo to the top left corner of the account window. This is advantageous when a specific account decides that the standard Web Services look-and-feel is adequate, and the addition of the account's logo is sufficient. To add logos to the CUSTOMER LOGOS dropdown list, click the Customer Logos link and download additional images.
2 From the Browser Title dropdown list, choose one of the following options: o Print Service Provider Name o Customer Name The value that you set in Browser Title determines the name that appears in the following locations: o The tooltip that appears over the APPLICATION icon in the notification area located on the
bottom-right of the screen. o Browser name that appears in the title bar.
3 From the Skin dropdown list, select one of the SKIN options: o Default—the system default skin as defined in STORE ASSETS -> SKINS. For more information,
refer to Editing the Final Design (on page 149). o System Standard—the Web Services skin. o Skin—select a personalized skin for the account application.
4 Type a URL for the branded HOME PAGE.
Selecting Shipping Method Groups for the Account You can select groups of shipping methods from among the available shipping method groups that are defined in the system. These groups are then available to the account users during the job ordering process, and the account user can select the shipping method to be used for a specific job order. For more information on shipping method groups, refer to Defining Carriers (on page 39).

Account Setup
52 FreeFlow Web Services
To enable shipping methods selection: 1 Select ACCOUNTS -> ACCOUNT SETUP -> GENERAL INFO, and click Shipping Method Groups; the
SHIPPING METHOD GROUPS panel appears. 2 Do one of the following:
To select all shipping methods: a Select the All Shipping Methods check box; all the shipping methods are available to account
users. b From the Default Shipping Method dropdown list, select a default shipping method. This method
will be used whenever a shipping method is not selected for a particular job order.
NOTE: If you do not select a default shipping method, the system uses the system default method.
To select a shipping group: c Clear the All Shipping Methods check box. d In the Default Shipping Method field, select a shipping method. e The available shipping groups become active. Select the shipping method groups that you want to
make available to the account. f From the Default Shipping Method dropdown list, select a default shipping method.
3 Click OK to save the settings.
Managing Users This section describes additional settings that you can define for your account users, in addition to the basic user settings that you defined when you created the account. For information on defining users for a new account, see Defining Users for a New Account (on page 45).
Managing users includes the following activities: • Adding, disabling and deleting users. • Modifying basic user settings. • Assigning users to account cost centers. • Assigning users to account departments. • Customizing the user’s job-ordering windows.
To manage users: 1 Select ACCOUNTS > ACCOUNT SETUP > USERS; the USERS window appears.. 2 To add a new users, click Add on the USERS pane. 3 To modify basic user settings for an existing user, select the user from the USERS pane, and make the
necessary changes.
NOTE: For information on user types and other basic user settings, see Defining Users for a New Account (on page 45).
4 Select the Disable User Account check box to temporarily disable this user from accessing the account.
5 To delete a use from the account, select the user and click the DELETE icon. 6 Click Save to changes, or define additional user information.
To define additional user information: 1 By default, when you define the account users, the user address is defined as the account address.
However, you can modify the user’s address:

Managing Accounts
Print Service Provider User Guide 53
a Click the Edit Address link in the CONTACT INFORMATION panel; the EDIT ADDRESS window appears.
b Modify the fields, as needed. c Click Save.
2 Click the Cost Center Assign link to assign the user to a cost center; the COST CENTER ASSIGNMENT dialog box appears. Cost centers are defined in ACCOUNTS > ACCOUNT SETUP > COST CENTERS. For more information on cost centers, see Defining the Account Cost Centers (on page 55). You can assign an account user to one or more cost centers. During the ordering process, the price order is deducted from the assigned cost center. If the user has more than one cost center, the user selects the cost center to be used for this order. The selected COST CENTER budget is updated accordingly. To assign cost center(s): a In the ACCOUNT’S COST CENTERS list, select a cost center or several cost centers from among the
cost centers that are defined for this account. To assign all cost centers, select the All cost Centers check box.
b Use the Add or Add All button to assign selected cost center(s); the cost center(s) appear in the USER ASSIGNED COST CENTERS list.
c Use the Remove or Remove All button to remove selected cost center(s) from the USER ASSIGNED COST CENTERS list.
d Click Close to save the settings and close the dialog box. 3 Type an IP address in the IP FILTER field to allow the user to access the system only from a specific
computer. 4 From the Order Jobs Page dropdown list, select one of the following options:
o Use Customer Default—the account user accesses the default ORDER JOBS page, as defined in account PREFERENCES. For more information, see Setting the Account Job-ordering Windows (on page 50).
o Launch Pad—the account user accesses the Launch Pad when logging into the system. o Template—the account user accesses the template view when logging into the system.
5 From the Template View dropdown list, select one of the following options: o Use Customer Default—the account user accesses the default TEMPLATE view, as defined in
PREFERENCES, when logging into the system. o Root Folder—the top folder in the TEMPLATE list is the folder that the account user accesses
when initiating a job from the template library. o Specific Folder—select a specific folder in the TEMPLATE list as the folder that the account user
accesses when initiating a job from the template library. When SPECIFIC FOLDER is selected, a FOLDER link appears, enabling you to access the CHOOSE FOLDER dialog box.
o Catalog—select a specific catalog from the TEMPLATE list as the catalog that the account user accesses when initiating a job from the template library. When CATALOG is selected, the USER CATALOG dropdown list appears and you can select a catalog.
6 To assign the user to account department(s), select an options from the Department dropdown list: o None— if you do not want to assign the user to a department. o Choose one of the listed departments. You can add departments to the Department dropdown
list.For more information on departments, see Managing the Account Departments (on page 54). 7 Click Save to save modified user settings, or Revert to cancel your changes.
Defining User Groups Settings You can create groups of users within the account organization. A user can belong to more than one user group.
Account Setup
54 FreeFlow Web Services
To manage user groups: 1 Select Accounts > Account Setup > User Groups; the ACCOUNT SETUP - USER GROUPS window
appears. 2 To add a user group:
a In the USER GROUPS pane, click Add; NEW GROUP # appears in the USER GROUPS list and in the GROUP NAME field on the GENERAL tab.
b On the GENERAL tab, type a name in the GROUP NAME field. c If necessary, type a description.
3 To remove a user group: a Select a user group. b Click Delete; the user group is removed from the list.
To manage the users of a user group: 1 Select a user group. 2 Click the USERS tab; the USERS view appears and is populated with all the users in the account. 3 To add a user from the users list to the GROUP USERS list, double-click the user name, or select a user
name and click Add; the user name is transferred to the GROUP USERS list. 4 To remove a user from the GROUP USERS list, double-click the user name, or select the user name and
click Remove; the user name is removed from the GROUP USERS list. 5 Click OK to save the settings.
Managing the Account Departments You can define departments in your account organization, and assign users to each department. Departments are intended for internal use of the account users and have no consequence in regards to your print business.
To manage departments: 1 For the account for which you want to define departments, select ACCOUNTS -> ACCOUNT SETUP ->
DEPARTMENTS; the DEPARTMENTS window appears. The window lists the departments and the number of users assigned to each department.
2 To add a new department, type its name in the DEPARTMENT NAME field, and click Add; the new department is added to the DEPARTMENTS NAME list.
NOTE: You can import and export lists of departments into the DEPARTMENTS window, using the Import and Export links. For more information on importing and exporting databases, see Importing and Exporting Database Files (on page 6).
3 To delete a department, select the department and click Delete; the department is deleted from the DEPARTMENTS NAME list.
4 To change a department name, select the department and type its new name in the DEPARTMENT NAME field and click Update. The updated department name appears in the DEPARTMENT NAME list.
To assign account users to departments: 1 For the account for which you want to assign users, select ACCOUNTS -> ACCOUNT SETUP -> USERS;
the USERS window appears. 2 On the GENERAL tab of the USERS window:
a On the USERS pane, select the user that you want to assign. b Select a department from the Department dropdown list. c Click OK to save.
3 Repeat Step 2 for each account user that you want to assign to account departments.

Managing Accounts
Print Service Provider User Guide 55
Defining the Account Cost Centers You can create and manage cost centers, and you can charge orders to specific cost centers by assigning a budget. When you create a cost center: • The price of all the orders charged to the cost center is deducted from the cost center’s budget. • An administrator is notified by email when the budget reaches a predefined minimum level. • The application prevents users from charging orders that will exceed the cost center’s remaining
budget. In such cases, the user either has to postpone the order until the budget is updated, charge the order to another cost center, or pay with a credit card.
NOTE: Using cost centers allows account users to define an economic framework through which groups of users can order jobs. Therefore, cost centers are intended for the internal use of your account users, and have no consequence regarding your business.
To add a cost center to an account: 1 Select ACCOUNTS -> ACCOUNT SETUP -> COST CENTERS; the COST CENTERS window appears. 2 In the COST CENTERS pane, click Add; the ADD COST CENTER dialog box appears. 3 Type a cost center name and a cost center code; click OK. The new cost center name and code
appear in the COST CENTERS pane, and in the COST CENTER NAME and COST CENTER CODE fields of the COST CENTERS window.
4 In the ADMINISTRATOR’S EMAIL field, type the email address of the Print Service Provider who receives notification concerning the specific cost center.
5 (Optional). Fill in additional information about the cost center in the DESCRIPTION field. 6 Additional cost center fields refer to its budget (see To enable a cost center budget below). 7 Click Save to save the cost center.
To enable a cost center budget: 1 Select the account and cost center. 2 By default the Enable Budget check box is selected. If it is not selected, select it; the SET BUDGET
button appears. 3 Type a budget name. 4 Click Set Budget; the SET COST CENTER BUDGET dialog box appears. 5 Type an amount in the TOTAL BUDGET field and click OK; the sum appears as the TOTAL. The USED
BUDGET and REMAINING BUDGET amounts are automatically updated. 6 Type an amount in the COST CENTER MINIMUM BUDGET field. 7 Click Save to save the settings.
To manage cost centers: 1 Select an account in the ACCOUNTS pane, and then select a cost center in the COST CENTERS pane. 2 To delete the cost center:
a Click Delete; the DELETE COST CENTER dialog box appears. b Click Yes to confirm.
3 Modify cost center information, as needed.
Defining Email Notification Settings You can send email notifications from a specific source in your organization to one or more sources in the account organization. This section describes how to define email notifications at the account level.
NOTE: You can set the email notification settings as a default for all your accounts in SYSTEM SETUP -> ADVANCED -> EMAIL.

Account Setup
56 FreeFlow Web Services
You can send email notifications when the following application events occur: • Order Confirmation—informing that you have received the order. • Job Price Changed—informing that you changed the quoted price. • Job Shipped—informing the account that you shipped the specific job. • Inventory Below Minimum Level—informing your organization and the account organization that the
number of copies of a specific item in the inventory has dropped below the minimum set level. • Preorder Jobs Expiration—informing that the specific pre-ordered order has overstayed the allotted
queue time and has been automatically deleted. • Shipped Job Expiration—informing that the specific shipped order has overstayed the allotted queue
time and has been automatically deleted. • Job Arrived at the Print Buyer Approval Queue—informing that the job has arrived at the account
APPROVAL queue.
To define the account email notifications: 1 Select ACCOUNTS > ACCOUNT SETUP -> EMAIL; the EMAIL dialog box appears.
NOTE: Default email notifications settings are set at the system level in SYSTEM SETUP -> ADVANCED -> EMAIL. To use these defaults for the selected account, select the Use System Default Email Settings check box in the EMAIL window. When you create a new account, this check box is selected by default,
2 Select the check box of the event for which you want to send out a notification, and click its Contacts link; the EMAIL dialog box appears.
3 In the SENDER panel, select a Sender option button or click Other Email and type a valid email address.
4 In the RECIPIENTS panel, select the recipients of the email message and/or type an email address into the OTHER EMAIL field.
5 Repeat Step 2 to Step 4 for each notification event. 6 Click OK to save all settings and close the EMAIL dialog box. 7 In the EMAIL window, click OK to save the settings.
Customizing Order Fields at the Account Level The Web Services system allows you to customize order information fields at the account level.
NOTE: You can customize fields at the account level only if you enabled this option at the system level.
At the system level, you can: • Enable customizing fields at the account level. • Define the default customized fields for all accounts.
To customize fields at the system level: 1 Select System Setup > Advanced > Customized Fields. 2 Select the Enable Custom Fields check box, 3 Define default account fields, and define which fields are mandatory. For more information on
customizing fields at the system level, see Customized Fields (on page 23).
After you enabled customizing fields at the system level, you can customize order information fields for each of your accounts. At the account level, you can select the USE SYSTEM DEFAULT SETTINGS FOR ORDER INFORMATION check box and use the default settings that were defined at the system level, or you can customize fields for a specific account.
To customize the order information fields: 1 Select ACCOUNTS -> ACCOUNT SETUP -> CUSTOMIZED FIELDS; the CUSTOMIZE FIELDS - ORDER

Managing Accounts
Print Service Provider User Guide 57
INFORMATION window appears. If selected, clear the Use System Default Settings for Order Information check box, and perform the following tasks in the window:
NOTE: If you defined order fields at the system level (SYSTEM SETUP -> ADVANCED -> CUSTOMIZED FIELDS), they appear in the CUSTOMIZE FIELDS - ORDER INFORMATION window at the account level. However, you can edit the fields.
o To edit a field caption, type the new caption in the FIELD CAPTION field. o To change the order of fields, select the field that you want to move, and click Move Up or Move
Down until the field is located at the new destination. o To hide a field from the account user’s view, clear the field’s Visible check box. To add a field to
the user’s view, select the check box. o To make a field a mandatory field, select the field’s Mandatory check box. To make the field a
non-mandatory field, clear the check box. o To define a field as a dropdown list field:
i From the Field Type dropdown list, choose DROPDOWN MENU; the Edit List button appears. ii To add options to the menu: click Edit List. The CUSTOM FIELD OPTIONS window appears. iii Click Add New Custom Field Option, and add an option name into the field. iv Click Add; the option name is added to the CUSTOM FIELD OPTIONS list. v Continue adding options, as needed. vi Click Done to save the menu options and return to the CUSTOMIZE FIELDS - ORDER
INFORMATION window. o To define a field as a free text field, from the Field Type dropdown list, choose FREE TEXT.
2 Click Save to save all settings. 3 To reset the settings, click Revert. 4 To restore the default settings, click Revert.
NOTE: Any changes to the default values of Customized Fields can also be localized. See Localized Customized Fields (on page 7) for more information.

Account Setup
58 FreeFlow Web Services

Print Service Provider User Guide 59
6 Store Setup
In This Chapter
Catalog Overview ................................................................................ 59 Creating and Managing Superstore Catalogs ..................................... 62 Creating and Managing HTML Catalogs ............................................. 69 Managing the Cross Sales Library ...................................................... 73 Managing the Image Library ............................................................... 74 Managing the Database Library .......................................................... 76
FreeFlow Web Services provides you with the capability to set-up an online store front for your customers to browse and use for ordering print products. This chapter describes how to set-up store fronts for your Print Buyers. • Catalog Overview (on page 59) – an overview of the types of catalogs supported by Web Services
and their characteristics. • Creating and Managing Superstore Catalogs (on page 62) – define Superstore catalogs. • Creating and Managing HTML Catalogs (on page 69) – define and manage HTML catalogs. • Managing the Cross Sales Library (on page 73) - promote the sales volume by connecting offers of
related products to product categories. • Managing the Image Library (on page 74) - manage a library of image assets for variable information
jobs. • Managing the Database Library (on page 76) - manage a library of variable information database files.
For information regarding managing the template library, refer to Job Business Flow (on page 77).
Catalog Overview One of the main objectives of FreeFlow Web Services is to enable Print Buyers to place orders online. For this purpose you create catalogs. A catalog is an organized collection of products that is used by the print buyer to locate and order print.
Web Services includes two types of catalogs: • SUPERSTORE - displayed to the Print Buyer after logging into the application. The Superstore catalog
can be organized into hierarchical categories and enables ordering jobs from templates or by uploading the Print Buyers’ designs. The Superstore provides powerful navigation tools and a customizable look and feel. When ordering from a Superstore the print buyer places the products in a shopping cart and then checks out the contents of the shopping cart to place the order.
• HTML - a flat collection of templates that can be displayed to the Print Buyer after logging into the application, sent in an email, or embedded in a web site. When ordering through an HTML catalog, the print buyer orders one job at a time without using the shopping cart.
You can define different catalogs for different Print Buyer accounts and for different users.
NOTE: When you add a template to a catalog, the application creates a link to the template and places it in the catalog. Therefore, the same template can be used several times in different catalogs, without duplicating it.

Store Setup
60 FreeFlow Web Services
Superstore Catalogs The Superstore catalog provides the capability to create a large variety of store fronts with different look and feel, hierarchy and functionality.
The Superstore catalog has the following features: • Enables ordering from templates and by uploading files. • Customizable look and feel, including the catalog grid, backgrounds and text display. • Hierarchical category structure – you have full control over the structure of a Superstore. You can
place the templates into a flat list or you can organize the catalog into categories that will assist the print buyer navigation and enhance the ordering experience. Think of the Superstore as a supermarket and the categories as aisles and shelves on which the products are organized.
• Enhanced navigation tools – a display of "bread crumbs" showing the Print Buyer through which hierarchy he arrived at the current category, and an optional navigation pane that can be used either for direct links to categories, or for filtering long lists of products.
• Capability to display messages that can be used for marketing promotion, seasons greetings, or instructional information.
• Capability to display and manage a list of items on hold prior to placing them in the shopping cart. • Capability to promote sale of products related to the category that the Print Buyer is browsing.
Superstore Look and Feel The look and feel of a Superstore or its categories is defined by using a layout theme. The application contains a library of layout themes that you can use or modify, or you can create a layout theme from scratch. The same theme can be applied to all the categories of a Superstore, or you can have a different theme for each and every category. When a new Superstore is created a default layout theme is applied to the Superstore and all of its categories.
A layout theme controls the following aspects of a Superstore design: • Panel layout – the items that the panel contains and the relationships between them. • List structure – the grid structure of the categories, products and cross sale items. • Background – the background of the categories, products and cross sale items. • Item display formats – the format of the individual categories, products and cross sale items boxes.
Panel Layout The application arrives with a number of predefined panel layouts. The layouts are color coded and a legend is provided.
The panel layout comprises a combination of the items listed below. Only the items area is mandatory and appears in all the layouts. • Navigation pane – this section will be used by the Print Buyer to navigate within the catalog you are
preparing. • Message – you can use this area to add marketing messages and announcements to promote a
specific campaign. • Shopping Cart – a summary of the shopping cart that accompanies the Print Buyer when ordering a
printed job. • Items Area – this section displays the products your offer to the Print Buyer. You can divide it to few
sub-categories to accommodate different users' requirements or different templates and job types that you offer the Print Buyer.
• Cross Sale – you can use this section to promote products related the to category that the Print Buyer is browsing.
NOTE: The grid structure of the Items area and the Cross Sale area in the thumbnail images, is only an indication of possibilities. This structure can be modified in the wizard.

Catalog Overview
Print Service Provider User Guide 61
List Structure You can define the grid structure (number of rows and columns) of: • Categories • Products • Cross Sale
For each of the areas, you can control the following attributes: • The number of items in a row (number of columns). • Item Height – the item height is pre-determined, according to one of three predefined sizes: small,
medium, and large. Select the Custom option, if you want to type a customized height value. • The number of rows.
You have to define the structure for the categories, and apply this structure to the products and cross sale areas.
NOTE:
When defining the number of rows of categories and number of rows of products, consider the following points to ensure that you allow enough rows:
• The number of category and product rows actually displayed in the Superstore might be automatically adjusted to keep the total balanced. For example, if two rows are defined for categories and two rows for products, but the Superstore display requires only one subcategory row instead of two, an extra (third) product row will be displayed.
• If a catalog has many sub-categories in some of its categories, and if the number of categories and products exceeds the number of allocated cells in the layout, the Superstore will generate an additional page to display the categories and products that did not appear on the first page. These will be seen by the Print Buyer only if the Print Buyer advances to the next page.
To reduce the chances of subcategories moving to a second page, allocate a larger number of rows to the subcategories. This way, if a category requires more subcategory rows, they will be available; and if not, the rows will be used by products.
Item Background You can assign different backgrounds to the categories, products and cross sale items. The application arrives with a number of backgrounds and you can upload your own background images.
If you are preparing backgrounds with no specific layout in mind, we recommend image width of 500 pixels and image height of 200 pixels. This is a generic size that would provide good results.
If you are preparing backgrounds for a specific layout, it is best to create backgrounds in the exact required size. The height of the background image should be 60, 120, or 240, unless you plan a custom height. The width of the background is variable and depends on the number of items in one row.
The item area width is 610 pixels and the gap between the items is 10 pixels, if N is the number of items in a row:
Item width = (610 - 10 x (N-1)) / N
Therefore:
Number of items Background width 2 300 pixels
3 197 pixels
4 145 pixels
5 114 pixels
6 94 pixels

Store Setup
62 FreeFlow Web Services
Items Layout and Details You can define the layout of each category, product and cross sale item. The layout controls the position of the following items: • Item title – a title style text string that can display an attribute of the category or product according to
your selection. • Item description – a description style text string that can display one or two attributes of the category
or product according to your selection. • Thumbnail – the category or product thumbnail. • Upload File and Select buttons.
For each of the item types you can also define the following parameters: • Thumbnail size – selected out of a list of three predefined sizes or defined as a custom size. • Title – the attribute that is displayed in the Title field. • Text field 1 – the first attribute that is displayed in the Description field. • Text field 2 – the second attribute that is displayed in the Description field. • Links to sub-categories – a parameter that appears for the category items and controls whether and
how many links to sub-categories are displayed in the category item.
HTML Catalogs An HTML catalog is a collection of templates that can be saved in HTML format. HTML catalogs are flat (have no hierarchy) and enable ordering jobs one at a time, without using a shopping cart.
HTML catalogs can be created and managed by you or by the Print Buyer and can be used in the following ways: • You can define that a Print Buyer will see the HTML catalog as the ordering page, after logging into
the application. • You can embed an HTML catalog into another website, such as the corporate website of the Print
Buyer. • You can send an HTML catalog in an email message.
The main benefits of using HTML catalogs are: • The ability to initiate an order from outside the application, with or without the need to log-in. • The simple ordering flow (without using the shopping cart) makes it especially suitable for occasional
users, who don’t need to order more than one job at a time. • The HTML catalog, when used outside the application without a login, provides a fully anonymous
ordering flow. I.e., a Print Buyer can order a job from the HTML catalog and pay with a credit card, without registration or logging in.
Creating and Managing Superstore Catalogs The following sections describe how to create and define a Superstore catalog: • Managing Superstores (on page 63) • Creating a Superstore (on page 63) • Adding Products to a Superstore (on page 64) • Applying a Layout Theme to a Superstore (on page 65)

Creating and Managing Superstore Catalogs
Print Service Provider User Guide 63
Managing Superstores You can rename, delete, copy, and move Superstores and categories. Tot simplify the explanation the tasks below address categories, but they can be applied to a Superstore as well, unless indicated otherwise.
NOTE: If you are copying or moving a Superstore or category between accounts, the only thing that will be moved is the structure and the layout, without the products or queries.
Moving a Category 1 Select a category.
2 Click (Cut).
3 Find the Superstore or category into which you want to move the selected category and click (Paste); the category is moved from the original location to the new one.
Copying a Category 1 Select a category.
2 Click (Copy).
3 Find the Superstore or category into which you want to copy the selected category and click (Paste); a copy of the original category is created in the new location.
Renaming a Category 1 Select a category. 2 Click (Rename); the RENAME CATALOG dialog box appears. 3 Type the new name. 4 Click OK; the dialog box closes and the category is renamed.
Deleting a Category 1 Select a category. 2 Click (Delete); a confirmation dialog box appears. 3 Click Yes; the dialog box closes and the category is deleted.
Creating a Superstore You start by creating a new Superstore. In most cases you would then create categories, and then populate the Superstore and its categories with products - templates and job types. When the Superstore structure is complete you can define its layout, look and feel. This sequence is not mandatory - you can start with the layout and then move to create and populate categories. 1 Select ACCOUNTS -> STORE SETUP; the CATALOGS view is displayed. 2 In the accounts list on the right side of the title bar, select an account. 3 In the CATALOGS pane, click New Catalog; the ADD CATALOG dialog box appears. 4 Type a catalog name and in the CATALOG LAYOUT list, make sure that Superstore is selected. 5 Click OK; the new Superstore appears in the CATALOGS list and the GENERAL INFORMATION dialog box
appears. 6 Complete the GENERAL INFORMATION fields and click OK. The Internal Title appears as the Superstore
name to the Print Buyer. 7 Create a category:
The linked image cannot be displayed. The file may have been moved, renamed, or deleted. Verify that the link points to the correct file and location.
The linked image cannot be displayed. The file may have been moved, renamed, or deleted. Verify that the link points to the correct file and location.
The linked image cannot be displayed. The file may have been moved, renamed, or deleted. Verify that the link points to the correct file and location.
The linked image cannot be displayed. The file may have been moved, renamed, or deleted. Verify that the link points to the correct file and location.
The linked image cannot be displayed. The file may have been moved, renamed, or deleted. Verify that the link points to the correct file and location.
The linked image cannot be displayed. The file may have been moved, renamed, or deleted. Verify that the link points to the correct file and location.
Store Setup
64 FreeFlow Web Services
a Select the catalog or category to which you want to add categories and click (New Category); the GENERAL INFORMATION dialog box appears.
b Type the category name, internal title and description. c Click Change to add a category thumbnail; the CATEGORIES image bank appears. d Select an image or upload a new one. For more information about uploading images, refer to
Uploading Images (on page 75). e Click Add; the category is added to the Superstore.
8 Add more categories as required.
NOTE: There is no limit to the number of categories you can add, or to the number of hierarchy levels.
Adding Products to a Superstore You add job types and templates to the Superstore and its categories. The Print Buyers can order print jobs based on the templates, or upload their own designs when ordering from job types.
You have the following two options for adding job types and templates to Superstores: • Add Products - manually select the job types and templates that you want to place into a specific
Superstore or category. • Add Query - automatically populate a Superstore or category with templates. The query can either
add to a Superstore all the templates located in a specific folder, or find all the templates that fulfill certain criteria and add them to a Superstore.
Defining Superstore Content Using the Add Products Option To populate the Superstore with job types or templates: 1 Select a Superstore or category in the CATALOGS list. 2 Click the Content tab; the CONTENT view appears. 3 Click Add Products; the ADD PRODUCTS dialog box appears. 4 Add job types:
a Select the Job Type radio button; all the enabled job types appear in the products list. b Select one or more job types and click >; the job types appear in the PRODUCTS IN list.
5 Add templates: a Select the Templates radio button; all the templates of the account appear in the products list. b Select one or more templates and click >; the templates appear in the PRODUCTS IN list.
6 Click OK to save the settings and close the dialog box; the job type and templates appear in the CONTENT list.
Defining Superstore Content Using the Add Queries Option When Print Buyers navigate a Superstore, the system can automatically populate the Superstore with templates. To dynamically populate a Superstore with templates: 1 Select a Superstore or category in the CATALOGS list; the CONTENT view appears. 2 Click Add Query; the QUERY DETAILS dialog box appears. 3 Create a folder content query:
a Type a query label into the LABEL field. b Leave My Account selected in the ACCOUNT list.
NOTE: Use the Parent Account option if you want the query to use templates of all the accounts in the same parent account.
The linked image cannot be displayed. The file may have been moved, renamed, or deleted. Verify that the link points to the correct file and location.
Creating and Managing Superstore Catalogs
Print Service Provider User Guide 65
c Select an option in the FOLDER list. i All - when selected indicates that the query will be defined by criteria. ii Root Folder - the templates are collected from the root folder and all the folders in it. iii Any of the customer’s template folders.
d Click OK; the query appears in the CONTENT list. 4 Define a search by criteria query:
a Type a query label into the LABEL field. b Leave My Account selected in the ACCOUNT list. c Leave All selected in the FOLDER list. d Create an explicit search criteria:
i Select a field name in the FIELD list. The values of this field will be compared to the search criteria.
ii Select an operator in the THAT list. This operator defines which values will be fulfil the criteria. iii Select EXPLICIT in the TYPE list. This indicates that the criteria is based on an explicit value. iv Type the value in the VALUE field. This is the value to which the field values are compared.
EXAMPLE:
To find all the templates which have "marketing" as a keyword, the following search should be defined: • Field: Keywords • That: Like • Type: Explicit • Value: marketing
e Create a user driven search criteria: i Select a field name in the FIELD list. ii Select an operator in the THAT list. iii Select User Driven in the TYPE list; the Value text box becomes a list with the attributes of a
user. This indicates that the criteria is based on the data of the Print Buyer user that navigates the Superstore.
iv Select one of the attributes in the VALUE list.
EXAMPLE:
To find all the templates which were authored by the logged-in Print Buyer user, the following search should be defined:
• Field: Author • That: Like • Type: User Driven • Value: Last Name
f Click OK; the query appears in the CONTENT list.
Removing Items from the Content List Select an item in the CONTENT list and click Remove; the item is removed from the list.
Applying a Layout Theme to a Superstore A Superstore can have a single layout theme applied to it and all of its categories, or a different layout theme applied to each category. The layout themes can be selected from a number of predefined layout themes, modified or created according to need.
Store Setup
66 FreeFlow Web Services
Applying a Pre-defined Layout Theme to a Superstore 1 Select a Superstore or category in the CATALOG list. 2 Click the Layout tab; the LAYOUT view appears with an image of the default layout. 3 Click Select; the SELECT LAYOUT THEME dialog box appears. 4 Select a layout theme and click Select; the layout theme image appears in the LAYOUT view.
Managing Layouts 1 Select a Superstore or category in the CATALOG list. 2 Click the Layout tab; the LAYOUT view appears with an image of the default layout. 3 To edit a layout:
a Select the theme to edit and click Edit; the LAYOUT WIZARD appears. b To work with the LAYOUT WIZARD, see Using the Edit Layout Theme Wizard (on page 66).
NOTE:
When editing layouts, note the following:
• You cannot edit the default layout. • The layout you are editing may be assigned to several Superstores, editing it will affect all these
Superstores. If you are not sure about the effect of the change, it might be better to create another layout based on this layout and change the new layout.
4 To create a layout based on an existing layout: a Select the layout to serve as a base and click Copy and Edit; the LAYOUT WIZARD appears. b To work with the LAYOUT WIZARD, see Using the Edit Layout Theme Wizard (on page 66).
5 To delete a layout, select a layout and click Delete; the layout is deleted.
Using the Edit Layout Theme Wizard You can use the LAYOUT WIZARD to design the layout for a Superstore. The wizard has five steps and concludes with the THEME SUMMARY. If any of the steps are not completed, the wizard returns you to the incomplete step before you exit the wizard. 1 Access the Layout management screen:
a Select a Superstore or category in the CATALOG list. b Click the Layout tab; the LAYOUT view appears with an image of the default layout. c Click Select; the SELECT LAYOUT dialog box appears.
2 Click New; the CREATE NEW LAYOUT dialog box appears in the STEP 1: SELECT PANEL LAYOUT view. 3 Select a panel layout:
a Select a layout. b Click Next; STEP 2: DEFINE LIST STRUCTURE view appears.
4 Define the list structure: a For the categories area structure, define the number of items in row, item size and number of
rows. b For the products area structure, select the Use Categories area structure check box, or define
the number of items in row, item size and number of rows. c For the cross sale area structure, select the Use Categories area structure check box, or define
the number of items in row, item size and number of rows. d Click Next; STEP 3: SELECT ITEMS BACKGROUND view appears.
5 Select the items background: a Upload more images, if required. For more information about uploading images, refer to
Uploading Images (on page 75). b Select a background image and click > adjacent to CATEGORY ITEMS; the image appears in the
Creating and Managing Superstore Catalogs
Print Service Provider User Guide 67
CATEGORY ITEMS pane. c Select a background image and click > adjacent to PRODUCT ITEMS; the image appears in the
PRODUCT ITEMS pane. d Select a background image and click > adjacent to CROSS SALE ITEMS; the image appears in the
CROSS SALE ITEMS pane. e Click Next; STEP 4: SELECT ITEM LAYOUT view appears.
6 Select a layout for the items: a Select an ITEM LAYOUT image and click the > button adjacent to CATEGORY ITEMS; the image
appears in the CATEGORY ITEMS pane. b Select an ITEM LAYOUT image and click the > button adjacent to PRODUCT ITEMS; the image
appears in the PRODUCT ITEMS pane. c Select an ITEM LAYOUT image and click the > button adjacent to CROSS SALE ITEMS; the image
appears in the CROSS SALE ITEMS pane. d Click Next; STEP 5: DEFINE ITEMS DETAILS view appears.
7 Define the detailed contents of the items: a Define the category items:
i Make sure that the check box of the image is selected, if you want it displayed. Select the image size, and type the height and width if you selected a custom size.
ii Make sure that the check box of the title is selected, if you want it displayed. Choose the field to display in the title, usually it would be the category NAME.
iii Make sure that the check box of the first text field is selected, if you want it displayed. Choose the field to display in the title, usually it would be the category DESCRIPTION.
iv Select the check box of the second text field, if you want it displayed. Choose the field to display in the title.
v Select the Include links to sub categories check box. Select the number of links to display. b Repeat the process for product items, with the exception of the INCLUDE LINKS. c Repeat the process for cross sale items (if relevant for this layout), with the exception of the
INCLUDE LINKS. d Click Next; LAYOUT SUMMARY view appears.
8 Define layout summary: a Click Change... PANEL LAYOUT to upload a thumbnail image of the newly created layout theme.
This image will help you identify this layout in the future. For more information about uploading images, refer to Uploading Images (on page 75).
b Type a name for the new layout theme. c Type a description for the new layout theme. d Type the keywords that identify the new layout theme.
9 Click Finish; the dialog box closes, the new layout is added to the list.
NOTE: If a step was not completed, the wizard returns you to that step before allowing you to complete the procedure.
Defining the Items Area You can define the titles that introduce each item list area, including the category, template, and job type lists. A category can inherit the settings of its parent category or Superstore, in which case you have to select the Use Parent category setting check box. 1 Click the Items Area tab; the ITEMS AREA view appears. 2 Clear the Use parent category setting check box. 3 Type a title for the categories section of the items area. 4 Type a title for the templates section of the items area.
Store Setup
68 FreeFlow Web Services
5 Type a title for the job types section of the items area.
NOTE: If the category contains job types (enabling the Print Buyers to upload their own designs), you can decide to let the user initiate the upload process from the category item, without selecting the category. The ADD UPLOAD BUTTON check box controls this behavior.
6 Select Add Upload button at category level check box and type the button caption. 7 Click Save
Defining the Cross Sale Area You can define the content of the category cross sale area, and add cross sale items to a category. Cross Sale items are stored in folders located in the CROSS SALE library. For more information on the CROSS SALES LIBRARY, see Managing the Cross Sales Library (on page 73). 1 Click the Cross Sale tab; the CROSS SALE view appears. 2 Clear the Use parent category settings check box. 3 Type a cross sale title. 4 Click Select; the CROSS SALE LIBRARY dialog box appears displaying the cross sale folders of this
account.
NOTE: You can access the CROSS SALES LIBRARY, and create additional cross sale folders. You can also edit cross sale folders or create new ones, directly from this dialog box. For more information on managing cross sales, see Managing the Cross Sales Library (on page 73).
5 Select a cross sale folder containing suitable items; on the right hand side of the dialog box you can see the contents of the selected cross sale.
6 Verify that the correct cross sale is selected and click Select; the dialog box closes and the cross sale appears in the CROSS SALE view.
7 Click Save.
To remove the cross sale items from the CROSS SALE list, click Remove.
Defining the Navigation Pane You can define the format and content of the navigation pane. 1 Click the Navigation tab; the NAVIGATION view appears. 2 Clear the Use parent category settings check box. 3 Select one of the following options:
o Select Hide Pane, if you don’t want to display the NAVIGATION pane to the Print Buyer. o Select Category Panel, if you want to display the NAVIGATION pane with direct links to categories. o Select ‘Narrow By’ Panel, if you want to display the Navigation pane with filters that enable
narrowing down the list of displayed products. 4 If you selected CATEGORY PANEL, select the links to be displayed out of the following options:
o Select Root level categories, if you want to display links to the first level of categories in the Superstore.
o Select Current level categories, if you want to display links to all the categories that are at the same level as the category that the Print Buyer is viewing.
o Select All categories and sub categories, if you want to display links to all the categories in the Superstore.
5 If you selected ‘NARROW BY’ PANEL, select the options that you want to provide to your customer for filtering. The possible options are filtering by: o Author o Keywords o Reference Code o Subject
Creating and Managing HTML Catalogs
Print Service Provider User Guide 69
Adding Messages You can select a single message to be displayed to the Print Buyers, or a number of messages that are displayed in rotation. The messages can be in image (JPEG, GIF, animated GIF, PNG) or HTML format. 1 Click the Message tab; the MESSAGE view appears. 2 Clear the Use parent category setting check box. 3 Click Select; the SELECT MESSAGE dialog box appears and displays a message list. 4 To add messages to the list, if not required, continue to Step 5:
a Click New; the NEW MESSAGE dialog box appears. b To add an image:
i Select the Image option and click OK; the MARKETING dialog box appears. ii Upload message images to the MARKETING dialog box. For more information about uploading
images, refer to Uploading Images (on page 75). iii Click Select Image; the image is added to the SELECT MESSAGE message list.
NOTE:
The width of messages that appear in the items area should be 610 pixels. The width of messages that appear on the right, below the shopping cart panel, should be 190 pixels. There is no height limitation, but the recommended height is 100-200 pixels, both for messages that appear in the items area and those that appear on the right.
c To add an html message: i Select the URL option and click OK; the NEW URL dialog box appears. ii Type a message NAME and URL. iii Click OK; the dialog box closes and an HTML message is added to the list.
5 To select from the existing list of messages: a Select one or more Select check boxes of messages that you want to appear in the message
pane. b Click Select; the dialog box is closed and the messages selected.
Previewing the Superstore or Category You can preview the created catalog, to check its structure, layout and contents. 1 Click the Preview link; the PREVIEW dialog box appears. 2 Check the Superstore by navigating the categories. 3 Click Close to close the window.
Creating and Managing HTML Catalogs The following sections describe how to create and define a Superstore catalog: • Managing HTML Catalogs (on page 70) • Creating an HTML Catalog (on page 70) • Exporting an HTML Catalog (on page 72) • Sending an HTML Catalog by Email (on page 72)
NOTE: The instructions in this section presume that you are creating an HTML catalog, adding templates, setting-up its properties, and exporting it, in a sequence. If you are performing one of the stages on a previously created HTML catalog, make sure to select the appropriate catalog before referring to the instructions in the stage.
Store Setup
70 FreeFlow Web Services
Managing HTML Catalogs You can rename or delete an HTML catalog.
Renaming a Catalog 1 Select an HTML catalog.
2 Click (Rename); the RENAME CATALOG dialog box appears. 3 Type the new name. 4 Click OK; the dialog box closes and the catalog is renamed.
Deleting a Catalog 1 Select an HTML catalog.
2 Click (Delete); a confirmation dialog box appears. 3 Click Yes; the dialog box closes and the catalog is deleted.
Creating an HTML Catalog 1 Select ACCOUNTS -> STORE SETUP; the CATALOGS view is displayed. 2 In the accounts list on the right side of the title bar, select an account. 3 Click New Catalog; the ADD CATALOG dialog box appears. 4 Type a catalog name and in the CATALOG LAYOUT list, select HTML Catalog. 5 Click OK; the new catalog appears in the catalogs list.
Adding Templates to an HTML Catalog 1 Click Add Templates; the CHOOSE TEMPLATE dialog box appears, displaying the templates of the
selected account. 2 Navigate to a template and click Select; the template appears in the CATALOG NAME panel. 3 Repeat Step 2 for each additional template and click Close.
To delete a template from an HTML catalog, select the template and click Remove Template.
Setting HTML Catalog Template Parameters The panel on the right hand side of the catalog list displays the HTML catalog preview. This panel displays the templates contained in the catalog and their properties, as they will be displayed in the exported HTML catalog. The preview does not display the price as will be displayed in the HTML catalog, if defined. 1 Click the Edit link that appears under each HTML catalog template; the template setup dialog box
appears. 2 Select the Max number of copies allowed per order, to limit the number of copies that a user can
order from this template when using the catalog.
NOTE: The selection of maximum number of copies in the HTML catalog does not affect the number of copies that can be ordered from the template outside the HTML catalog.
3 To display the FORMAT field, select the Format check box. The default information that appears in this field is the name of the job type on which the template is based. a To change the text that appears in the FORMAT field, type a different text string. b To revert back to the default text, click the format Default button.
4 To display the template size that appear in the SIZE field, select the Size check box. a To change the text that appears in the SIZE field, type a different text string.
The linked image cannot be displayed. The file may have been moved, renamed, or deleted. Verify that the link points to the correct file and location.
The linked image cannot be displayed. The file may have been moved, renamed, or deleted. Verify that the link points to the correct file and location.
Creating and Managing HTML Catalogs
Print Service Provider User Guide 71
NOTE: The text in the size field does not change the size of the template.
b To revert back to the default size details, click the size Default button. 5 The template description field displays, by default, the template name. To change the default text that
appears in the DESCRIPTION field, type a different text string. 6 Click OK to save the changes; the new parameters appear in the catalog template details.
Defining a Catalog’s Properties You can control the job-ordering workflow of the HTML catalog by defining the catalog’s properties: 1 Click Properties; the CATALOG PROPERTIES window appears. 2 Define the DISPLAY PARAMETERS.
a Define the thumbnail size and the number of items in one row. b Type a message that will appear at the top of the HTML catalog.
3 Define the WORKFLOW PARAMETERS: a Select an APPROVAL option:
i To have the job sent to be approved before an order is placed, select The job requires supervisor approval... radio button.
NOTE: Each template can have SUPERVISOR APPROVAL BY-PASS rules specified in the WORKFLOW POLICY settings. If these rules have been set, they will override the supervisor approval setting of the HTML catalog. For more information about setting WORKFLOW POLICY, refer to Managing the Workflow Policy of a Template (on page 97).
ii Type the approver’s email address or click the Address Book link, and select an address from the ADDRESS BOOK.
b Define the login settings: i To require users of this HML catalog to log-in when using the HTML catalog outside the
application, select the Ask for User Login check box.
NOTE: When the Ask for User Login check box is clear, any user with access to the HTML catalog can order a job. The application, however, requires every job to be connected to a specific user, therefore, you must select a default login profile, which will be connected to all the jobs ordered from this HTML catalog.
ii If you want the users to order from this catalog without log-in (anonymously), clear the Ask for User Login check box, and select a default login profile from the DEFAULT LOGIN PROFILE list. The DEFAULT LOGIN PROFILE list features all of the account users, displaying their user type, login name, and first and last names.
c Define the variable information settings: This option defines the default data populating the templates, and is intended to save the user time in filling the data, reducing the chances to make mistakes. Select the appropriate option in the FORM EDITOR DEFAULT VALUES list: The last entry – the variable data templates will be automatically populated by the variable
data that was entered when the variable data templates were last used. The recent entries – the application collects the variable data entered into each template,
when it was ordered from the HTML catalog. When ordering the Print Buyer can select out of these records, or type other data.
The original design – the default text in the variable data fields will be the same text that was entered into the templates in the design stage.
d Define the order parameters: i To allow the Print Buyer to change the system-generated name of a job, select the Allow Job
Name Modification check box. ii To display the REFERENCE CODE input field during the job-ordering procedure, select the

Store Setup
72 FreeFlow Web Services
Show the Reference Code Input Field check box. iii Type a Default Reference Code, if required. iv To display the COST CENTER input field during the job-ordering procedure, select the Show
Cost Center check box.
NOTE: In ORDER PARAMETERS, you can select to display the reference code and cost center input fields. However, you enforce the use of these fields in ACCOUNTS -> ACCOUNTS SETUP -> PREFERENCES -> PRICING. For more information, refer to Defining Pricing Settings (on page 49).
e Define the DELIVERY parameters: i To allow the Print Buyer request a shipping date other than the default, select the Allow
Shipping Date Modification check box. ii Select the default number of days from order confirmation to order shipping. iii To allow the Print Buyer to change the default shipping address, select the Allow Shipping
Address Modification check box. When the Allow Shipping Address Modification option is selected, two more options are enabled for selection: ALWAYS APPROVE SHIPPING ADDRESS – select this option if you want the Print Buyer to verify
and confirm the shipping address. DISABLE ADDRESS BOOK ACCESS – select this option to prevent the Print Buyer from choosing
the shipping address from the address book.
NOTE: It is strongly recommended to disable address book access when using the HTML catalog for B2C (business to consumer) applications.
f To enable template Print Buyers to view a job price during the ordering procedure, select the Show Price to the User check box.
g To send the catalogs to Print Buyers by email, type the email addresses or select the addresses from the address book. For more information, refer to Sending an HTML Catalog by Email (on page 72).
h Click OK to save the settings.
Exporting an HTML Catalog 1 Select an HTML catalog in the catalogs list. 2 Click Export HTML; the EXPORT HTML PROPERTIES dialog box appears. 3 Define the properties, if required. For more information about HTML catalog properties, refer to
Defining a Catalog’s Properties (on page 71). 4 Click Export HTML; the EXPORT CATALOG HTML dialog box appears.
a Right-click the catalog link; a pop-up menu appears. b Select the Save Target As... option; the Save As dialog box appears. c Browse to a location to save the catalog and type a catalog name. d Click Save; the catalog is saved to the required location and the dialog box closes.
5 Click Close in the EXPORT CATALOG HTML dialog box.
You can use the HTML catalog for embedding in the Print Buyer’s or other website.
Sending an HTML Catalog by Email 1 Select a catalog in the catalog list. 2 Click Send MailToPrint; the SEND MAILTOPRINT PROPERTIES window appears. 3 Define the properties, if required. For more information about HTML catalog properties, refer to
Defining a Catalog’s Properties (on page 71). 4 Type the email addresses into the RECIPIENT EMAIL field, or select from address book.
Managing the Cross Sales Library
Print Service Provider User Guide 73
5 Click Send MailToPrint; the catalog is mailed to all of the email recipients.
To initiate the order from the email message, the recipients select a template and click the Start Order link located beneath the template.
Managing the Cross Sales Library You can add a CROSS SALE panel to your customer’s catalog. The CROSS SALE panel displays products that you want to promote and have a relationship to products that appear in the ITEM TEMPLATES panel.
To access the image library, select ACCOUNTS -> STORE SETUP, select the required account and click Cross Sales.
Managing Cross Sales You can delete and duplicate cross sales.
Duplicating a Cross Sale 1 Select a cross sale. 2 Click Duplicate; the cross sale is duplicated with an automatically generated name, and a dialog box
confirming the duplication appears. 3 Click OK; the dialog box closes. 4 To rename the duplicated cross sale:
a Click the General tab. b Type a new name in the CROSS SALE NAME box. c Click Save.
Deleting a Cross Sale 1 Select a cross sale. 2 Click Delete; a confirmation dialog box appears. 3 Click Yes; the dialog box closes and the cross sale is deleted.
Creating and Populating Cross Sales 1 Click New...; the EDIT CROSS SALE dialog box appears. 2 Click the General tab; the GENERAL view appears. 3 Type a cross sale name, description and additional information as required. 4 Click the Content tab; the CONTENT view appears. 5 Populate the cross sale with products, using Add Products and Add Query options.
For more information about adding products, refer to Defining Superstore Content Using the Add Products Option (on page 64). For more information about adding queries, refer to Defining Superstore Content Using the Add Queries Option (on page 64).
6 Click OK to save the settings and close the dialog box; the products appear in the CROSS SALE content list.
Removing a Product from a Cross Sale 1 Select a cross sale; the cross sale CONTENT view is displayed. 2 Select a product in the products list and click Remove; the item is removed from the list.
Store Setup
74 FreeFlow Web Services
Managing the Image Library The image library is used for storing image files to be used in variable data templates and jobs. In addition, the image library can be used for providing images to be used as folder icons.
The supported image formats are: JPG, JPEG, PDF, TIF, TIFF, EPS, and PS.
To access the image library, select ACCOUNTS -> STORE SETUP, select the required account and click Image Library.
Managing Folders When you create a new account, the system automatically generates a General folder in the account. You can create more folders in the image library to keep the images organized. There is only one level of folders in the image library.
Creating a New Folder 1 Click (New Folder); the NEW FOLDER dialog box appears. 2 Type the folder name. 3 Click OK; the dialog box closes and a new folder is created and added to the list of folders.
Renaming a Folder 1 Select a folder. 2 Click (Rename); the RENAME FOLDER dialog box appears. 3 Type the new name. 4 Click OK; the dialog box closes and the folder is renamed.
Deleting a Folder 1 Select a folder. 2 Click (Delete); a confirmation dialog box appears. 3 Click Yes; the dialog box closes and the folder is deleted.
Managing Images You can copy, move, delete and rename images. Most of the operations in the image library can be performed on several images at once. To select several images use the Shift or Ctrl keys on your keyboard.
Changing the Image Display Mode You can display the images as a list or as thumbnails. • To display a thumbnail view, click (View thumbnails); the view is changed to thumbnails. • To display a list view, click (View list); the view is changed to list.
Moving One or More Images Between Folders 1 Select one or more images. 2 Click (Cut); the (Paste) button is enabled. 3 Find the folder into which you want to move the image and click (Paste); the images are moved
from the original location to the new one.
The linked image cannot be displayed. The file may have been moved, renamed, or deleted. Verify that the link points to the correct file and location.
The linked image cannot be displayed. The file may have been moved, renamed, or deleted. Verify that the link points to the correct file and location.
The linked image cannot be displayed. The file may have been moved, renamed, or deleted. Verify that the link points to the correct file and location.
The linked image cannot be displayed. The file may have been moved, renamed, or deleted. Verify that the link points to the correct file and location.
The linked image cannot be displayed. The file may have been moved, renamed, or deleted. Verify that the link points to the correct file and location.
The linked image cannot be displayed. The file may have been moved, renamed, or deleted. Verify that the link points to the correct file and location. The linked image cannot be displayed. The file may have been moved, renamed, or deleted. Verify that the link points to the correct file and location.
The linked image cannot be displayed. The file may have been moved, renamed, or deleted. Verify that the link points to the correct file and location.

Managing the Database Library
Print Service Provider User Guide 75
Creating a Copy of One or More Images in Another Folder 1 Select one or more images. 2 Click (Copy); the (Paste) button is enabled. 3 Find the folder into which you want to copy the image and click (Paste); a copy of the original
images is created in the new location.
Renaming an Image 1 Select an image. 2 Click (Rename); the RENAME IMAGE dialog box appears. 3 Type the new name. 4 Click OK; the dialog box closes and the image is renamed.
Deleting One or More Images 1 Select one or more images. 2 Click (Delete); a confirmation dialog box appears. 3 Click Yes; the dialog box closes and the images are deleted.
Downloading One or More Images 1 Select one or more images. 2 Click (Download image(s)); a DOWNLOAD FILE dialog box appears.
NOTE: When only one image is selected, the dialog box contains two links – one to download the file in its original format, and one to download the file as a ZIP file. When more than one image is selected, the dialog box contains only one link for downloading the images as a ZIP file.
3 Right-click on the appropriate link; a pop-up menu appears. 4 Click Save Target As; a SAVE AS dialog box appears. 5 Browse to the location where you want to save the images and click Save.; the image (or the ZIP file)
is saved to the disk. 6 Click Close to close the DOWNLOAD FILE dialog box.
Uploading Images 1 Select the folder to which you want to upload the images. 2 Click Upload Images; the UPLOAD FILE dialog box opens. 3 To upload a single file:
a Click Browse and select the image to upload. b Click Continue; the image is uploaded. c Click Close, to close the upload dialog box; the image is added to the image library.
4 To upload multiple files: a Select the Upload multiple files option. b Click Continue; the FTP Upload dialog box opens. c Click Page and select Open FTP Site in Windows Explorer; the Windows Explorer opens. d Drag and drop the images to be uploaded to the FTP window. e Close the Windows Explorer and the FTP Upload dialog boxes.
The linked image cannot be displayed. The file may have been moved, renamed, or deleted. Verify that the link points to the correct file and location.
The linked image cannot be displayed. The file may have been moved, renamed, or deleted. Verify that the link points to the correct file and location.
The linked image cannot be displayed. The file may have been moved, renamed, or deleted. Verify that the link points to the correct file and location.
The linked image cannot be displayed. The file may have been moved, renamed, or deleted. Verify that the link points to the correct file and location.
The linked image cannot be displayed. The file may have been moved, renamed, or deleted. Verify that the link points to the correct file and location.
The linked image cannot be displayed. The file may have been moved, renamed, or deleted. Verify that the link points to the correct file and location.

Store Setup
76 FreeFlow Web Services
Managing the Database Library You can store variable data files of CSV and TXT format in the database library. You can connect these uploaded files to several variable data templates as an archive. When you update a database, the archive of all the connected templates is automatically updated. For more information about using a stored database in a template, refer to Job Business Flow (on page 77).
To access the image library, select ACCOUNTS -> STORE SETUP, select the required account and click Databases.
Adding a Database to the Library 1 Click New; the UPLOAD ASSET dialog box appears. 2 Browse to a valid file, select the file format, and click OK; the file appears in the list. 3 Change the database name, if required. 4 Type a description. 5 Modify the database scheme, if required:
a If the first row of the database contains the field names, select First Row Contains Field Names check box. This indicates to the application not to treat the first row as a record in the database.
b If you need to change the title of any of the fields, type a new name for the field in the CAPTION column.
6 Click Save; the changes are saved.
Checking a Database You can check which templates are linked to a database. 1 Select a database. 2 Click Linked Templates; the list of linked templates appears. 3 Select one of the templates; the attributes of the template appear on the right.
Deleting a Database 1 Select a database. 2 Click Delete; a confirmation dialog box appears. 3 Click Yes; the dialog box closes and the database is deleted.
Updating a Database To update a database you upload a new database to replace it. It is important to make sure that you upload a database with the same number and format of fields. 1 Select a database. 2 Click Edit; the UPLOAD ASSET dialog box appears. 3 Browse to a valid file, select the file format, and click OK; a message confirming the successful upload
appears. 4 Click OK; the database is replaced and updated in all the connected templates.

Print Service Provider User Guide 77
7 Job Business Flow
In This Chapter
General Overview ............................................................................... 77 Joblets ................................................................................................. 78 Job Types ............................................................................................ 82 Templates ........................................................................................... 91 Creating Variable Data Templates ...................................................... 99
This chapter describes the Job Business Flow infrastructure of FreeFlow Web Services. This infrastructure enables you to define joblets, job types, job type groups, and templates.
This chapter is composed of the following sections: • General Overview (on page 77) – provides an overview of the Job Business Flow concept and
entities. • Joblets (on page 78) – provides an overview of joblets and detailed instructions on joblet
management. • Job Types (on page 82) – provides an overview of job types and job type groups, detailed instructions
on job type management and creation, and instructions on job type groups management. • Templates (on page 91) – provides an overview of templates and detailed instructions on template
creation and management. • Creating Variable Data Templates (on page 99) – provides an overview and detailed instructions on
creation of variable data templates, use of the Selective Upload tool and the Form Editor.
General Overview Your Print Buyers use Web Services to order print jobs. To help them order jobs in an effective and convenient way, you have to define: • The types of jobs that you, as a Print Service Provider, can produce. • The possible printing and finishing options for these jobs. • The time frame for producing these jobs. • The allowed ordering quantities. • The job pricing.
You begin by defining which joblets and joblet options you support, either in your printing facility or by outsourcing to other facilities. A joblet is an entity that specifies the options related to a specific printing or finishing feature. For example, print colors, page size or folding. Using the joblets, you control which options are made available to the Print Buyer when ordering a specific job type.
Once the joblets are set-up, you can define job types. A job type defines a set of characteristics for a job type that your facility provides, such as business cards, brochures, or postcards. Job types help the Print Buyer to define what he needs to order, without having to make too many decisions. They also enable you to define response times, quantities, and pricing, and most importantly the production flow on the back-end.
Print Buyers supply content (upload files) and use the job types to define the properties of the job to be printed with this content.
A template is created by uploading content (a file) and attaching a job type to it. Templates are useful when repeated orders of the same content are expected. By creating a template, you can limit the printing option selections to what is required for this specific template, further simplifying the ordering process for the Print Buyer. For example, if Print Buyers need to repeatedly order a the same brochure, they can use

Job Business Flow
78 FreeFlow Web Services
one of the following options: • Every time they need to order the brochure, they would upload the brochure and select all the
appropriate printing options. • Order the brochure once, and then every time they need it again, track the previously ordered job and
re-order it. • Create a template of the brochure. The template can be added to the catalog of items for ordering and
every time they need it, they can order it from the catalog without having to upload the content again or to specify printing options.
You use the Job Type Groups if you wish to limit the Print Buyer’s access to specific job types. For further information on job type groups, refer to Job Type Groups (on page 91).
Joblets The system arrives with a number of predefined joblets, on top of which you can define more joblets as required. Each joblet is responsible for a specific printing attribute or finishing process, and for each you can define specific options and customize names and icons.
You need to disable (or remove) joblets that are not pertinent for your business, add missing joblets, and for each joblet specify all the possible options. For example, if you print only black & white and process color jobs, make sure you have only black & white and process color options specified. If, in addition, you print jobs using black with one spot color, add this option as well.
You can customize the name and icon of the joblet options as it is displayed to the Print Buyer. Furthermore, you can decide to have the same option twice with different names and icons. For example, you can have two options for process color, one called "CMYK" and used in job types intended for professional audiences, and another called "Full color" and used in business cards.
It is possible to customize the description of each joblet - this description becomes the default option explanation to be displayed to the Print Buyer during ordering.
When you define the job types, you will select which joblets and joblet options are appropriate for each job type.
Joblet Name Description Mandatory
Lamination Defines the sides and lamination type options. For more information, refer to Lamination (on page 80).
Number of Pages Determines the minimum and maximum number of pages in a job. For more information, refer to Number of Pages (on page 81).
Yes
Paper Determines the paper types that are available to a job type. For more information, refer to Paper (on page 81). Yes
Folding Determines the folding options. For more information, refer to Folding (on page 81).
Binding Determines the type of binding and binding options. For more information, refer to Binding (on page 81).
Page size Determines the job page size. For more information, refer to Page Size (on page 82). Yes
Colors Determines whether a job is single or double sided and the printing colors. For more information, refer to Colors (on page 82).
Yes
Collating Determines whether collating is active or not active. For more information, refer to Collating (on page 82).
Drilling Determines the drilling parameters, such as the number, position, and size of the holes. For more information, refer to Drilling (on page 82).
Joblets
Print Service Provider User Guide 79
Joblet Name Description Mandatory
Numbering Determines numbering parameters such as the type of numbering and where the numbers appear. For more information, refer to Numbering (on page 82).
Printing Quality Determines the printing quality, which can also affect the type of printing device chosen for a job. For more information, refer to Printing Quality.
Managing Joblets To access the Joblets library, select PRINT SETTINGS -> JOB BUSINESS FLOW -> JOBLET LIBRARY; the Joblets library appears. Use this library to manage joblets.
Renaming a Joblet 1 In the JOBLET library, select a joblet. 2 Click Rename; a RENAME JOBLET dialog box opens. 3 Type the new name and click OK; the joblet is renamed.
Deleting a Joblet You can only delete joblets that you have added (marked as Generic in the Type column). 1 In the JOBLET library, select a generic joblet. 2 Click Delete; a REMOVE JOBLET dialog box opens. If the joblet is in use in job types and templates, a
list of job types and templates and a checkbox for permanently removing the joblet from these entities appears.
3 Select the Permanently remove check box. 4 Click Yes; the joblet is deleted and removed from all the job types and templates using it.
Disabling a Joblet 1 Clear the enable checkbox of the joblet; a DISABLE JOBLET dialog box opens. If the joblet is in use in
job types and templates, a list of job types and templates and a checkbox for temporarily disabling the joblet in these entities appears.
2 Select the Temporarily disable checkbox. 3 Click Yes; the joblet is disabled in the library and hidden in all the job types and templates using it.
Creating a New Joblet 1 In the JOBLET library, click New; the CREATE GENERIC JOBLET dialog box appears. 2 Type the joblet name and click OK; the dialog box closes, a new joblet is created and opened.
Editing a Joblet 1 In the JOBLET library, select a joblet. 2 Click Edit; the joblet editing window is displayed with the OPTIONS tab selected.
Changing a Joblet Description 1 Click Description; the DESCRIPTION tab is displayed. 2 Type a description text. 3 Click Save to save the changes.
Job Business Flow
80 FreeFlow Web Services
Adding a Joblet Option 1 Click Options; the OPTIONS tab is displayed. 2 Click Add; a new option is added to the bottom of the list. 3 Type a name for the option. 4 Type or select the appropriate values. 5 Click Change Thumbnail to add an icon to the option; the THUMBNAILS dialog box opens. 6 Select an image or upload a new image. 7 Click Save to save the changes.
Enabling a Joblet Option 1 Select the check box of the option; the option is enabled in all the job types and templates using it. 2 Click Save to save the changes.
Disabling a Joblet Option 1 Clear the check box of the option; a confirmation dialog box opens. 2 Click Yes to confirm; the option is disabled and hidden in all the job types and templates using it. 3 Click Save to save the changes.
Deleting a Joblet Option 1 Select an option. 2 Click Delete; a confirmation dialog box opens. 3 Click Yes to confirm; the option is removed from the joblet and from all the job types and templates
using it.
Changing the Sequence of Joblet Options 1 Select an option. 2 Click Move Up or Move Down; the option is moved up or down in the list. 3 Click Save to save the changes.
Joblet Types The following section lists the joblets in the system and their descriptions.
Lamination The Lamination joblet determines the type of lamination and whether the lamination is applied to one or both sides of the print job. You can change the name of the option sides and type options as they are displayed to the Print Buyer.
Lamination sides options
Option Description
Sides
On what sides of the print job is the lamination applied. Valid values are: • Front • Back • Both
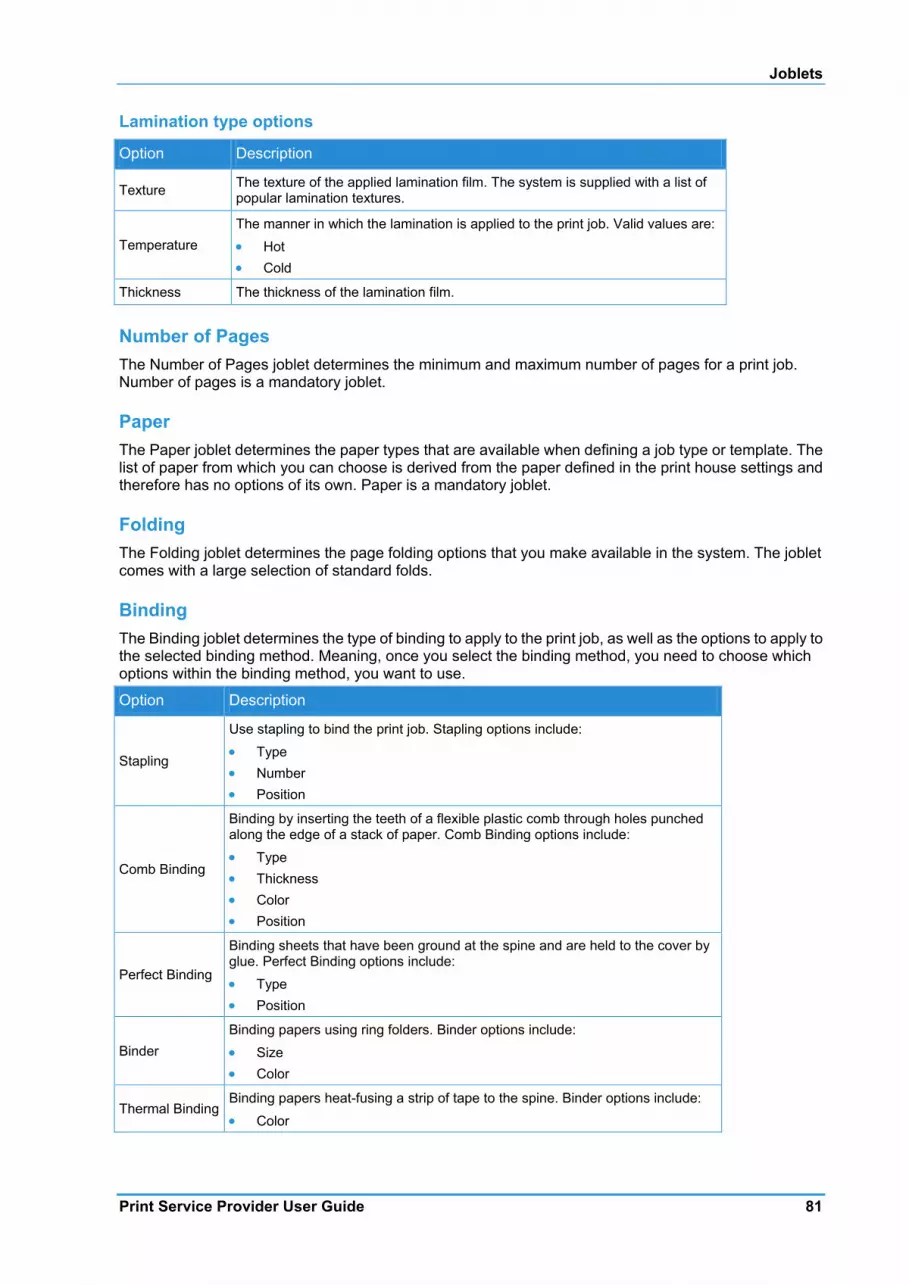
Joblets
Print Service Provider User Guide 81
Lamination type options
Option Description
Texture The texture of the applied lamination film. The system is supplied with a list of popular lamination textures.
Temperature The manner in which the lamination is applied to the print job. Valid values are: • Hot • Cold
Thickness The thickness of the lamination film.
Number of Pages The Number of Pages joblet determines the minimum and maximum number of pages for a print job. Number of pages is a mandatory joblet.
Paper The Paper joblet determines the paper types that are available when defining a job type or template. The list of paper from which you can choose is derived from the paper defined in the print house settings and therefore has no options of its own. Paper is a mandatory joblet.
Folding The Folding joblet determines the page folding options that you make available in the system. The joblet comes with a large selection of standard folds.
Binding The Binding joblet determines the type of binding to apply to the print job, as well as the options to apply to the selected binding method. Meaning, once you select the binding method, you need to choose which options within the binding method, you want to use.
Option Description
Stapling
Use stapling to bind the print job. Stapling options include: • Type • Number • Position
Comb Binding
Binding by inserting the teeth of a flexible plastic comb through holes punched along the edge of a stack of paper. Comb Binding options include: • Type • Thickness • Color • Position
Perfect Binding
Binding sheets that have been ground at the spine and are held to the cover by glue. Perfect Binding options include: • Type • Position
Binder Binding papers using ring folders. Binder options include:
• Size • Color
Thermal Binding Binding papers heat-fusing a strip of tape to the spine. Binder options include:
• Color

Job Business Flow
82 FreeFlow Web Services
Page Size The Page Size joblet determines the dimensions of the flat page size, meaning the size of the page before folding is applied. Page Size is a mandatory joblet.
Colors The Colors joblet determines the colors that are available for each side of the print job. Colors is a mandatory joblet.
Option Description
Side
The side to which the color definitions apply. Valid values are:
• Front • Back • Both
Color
The colors that are available for each side. Valid values are:
• Black and White (B&W) • Color • Spot Colors
Collating Determines whether collating is active or not active. The Collating joblet has no other options.
Drilling Determines whether or not drilling is supported in the job and if so, which parameters are used.
Option Description
Number of holes
Drill radius
Position The location where the holes are drilled. Valid values are: • Top • Left • Bottom • Right
Numbering Determines numbering parameters such as the type of numbering and where the numbers appear.
Job Types You create job types to define a set of characteristics for typical jobs that your facility provides and to specify the production flow of these types of jobs after they are ordered and arrive at the print house. The Print Buyers use the job types to define what they need to order, without having to make too many decisions.
In the job type library you can manage two classes of job types for simple and non-paper jobs. • Simple job type class – intended for single component and single file jobs, such as letterheads,
business cards, postcards, etc. • Non-paper job type class – intended for items such as pens or mugs, that can be either with or without
print.
Job Types
Print Service Provider User Guide 83
There is also an add-on module (Book Assembly) for handling multi-component job types. Book Assembly is managed in a separate screen and discussed in a separate chapter. For more information about Book Assembly, refer to Book Assembly (on page 169).
The main benefits of using job types are: • A simplified and streamlined print buying experience. • The ability to automate the business flow and provide business oriented pricing.
To summarize, job types are presets of job attributes both for the Print Buyer and for your back-end. The following examples help explain the concept of job types and their importance.
How Many Job Types to Create? At the minimum, you need to create a job type for every standard job that your business provides, such as business cards, brochures or postcards. In some cases, you might want to create two (or more) job types for the same type of job. For example, you might want to create two job types for postcards. One type would be for a marketing communications department where the Print Buyer is a professional designer. For this kind of user you would want to provide a large spectrum of options and you would use professional terminology such as CMYK or Process color, provide a list of actual paper stock items, etc. The second postcard job type would be for a B2C application where the Print Buyer has limited or no knowledge of printing terms and options. For this job type you would provide much more limited options, use simple terms like ‘full color’, and provide 2-3 paper options which you might call "thick, glossy paper" or "cream-colored recycled paper".
Managing Job Types To access the Job Type library, select PRINT SETTINGS -> JOB BUSINESS FLOW -> JOB TYPE LIBRARY; the Job Type library appears. Use this library to manage Job Types.
Renaming a Job Type 1 In the Job Type library, select a job type. 2 Click Edit; the job type editing opens with the GENERAL PROPERTIES tab selected. 3 Type the new name in the JOB TYPE NAME text box and click Save; the job type is renamed. 4 Click Back to Job Type Library to return to the job type library screen.
Deleting a Job Type 1 In the JOB TYPE library, select a job type. 2 Click Delete; a REMOVE JOB TYPE dialog box opens. If the job type is in use in templates, a list of
templates and a checkbox for permanently removing the job type and the templates appears. 3 Select the PERMANENTLY REMOVE check box. 4 Click Yes; the job type and all the connected templates are deleted.
Disabling a Job Type 1 Select the disable check box of the job type; a confirmation dialog box opens. 2 Click Yes; the job type is disabled and removed from all the Superstore catalogs.
Duplicating a Job Type Duplicating job types is useful for quickly creating job types that are similar to existing job types. 1 In the Job Type library, select a job type. 2 Click Duplicate; a duplicate of the job type is created and added to the bottom of the list.
NOTE: The name of the new job type is based on the original job type with a number extension.

Job Business Flow
84 FreeFlow Web Services
Editing a Job Type 1 In the JOB TYPE library, select a job type. 2 Click Edit; the job type editing window opens.
Refer to the Creating a Simple Job Type (on page 84) for detailed information.
Creating a Simple Job Type 1 In the JOB TYPE library, click New; the CREATE JOB TYPE dialog box appears. 2 Type the job type name. 3 Select the Simple (single component Job Type) and click OK; the dialog box closes, a new job type
is created and opened in the editing window.
NOTE: For creating non-paper job types follow the same process. The only difference is that non-paper job types have no mandatory joblets, and the only joblets available for adding to the intent are colors – in case printing is required, paper – for selecting a stock item, and any of the joblets that you created.
Adding General Information to a Job Type Use the General Properties tab to add general information to the job type. 1 Click the General Properties tab. 2 Click Change Thumbnail to add an icon to the job type; the THUMBNAILS dialog box opens. 3 Select an image or upload a new image. 4 Type a description (helps identify the job type during job ordering and template creation). 5 Type a subject and a reference code, if required. 6 Type keywords. 7 Type the notes (the production and finishing notes will appear in the job ticket of jobs based on this job
type).
Intent This section defines the intent options for the print job - i.e. which colors it is printed with, on which paper, what the page size is, and how many pages it contains. In addition, it describes folding, lamination, binding, numbering, etc. All these intent options are specified using the joblets.
A standard print job must always have a color, paper, page size and number of pages specification. Therefore, the intent of a simple job type is automatically populated by these joblets. Other joblets are optional and have to be selected manually. For each of the joblets you must specify the default option and you can add other options for the Print Buyer to choose from.
The joblets in the intent section appear to the Print Buyer during ordering as a wizard stage called Job Specification. Job Specification comprises steps with options to choose from, hence the joblets are called here "steps". The Job Specification stage can be customized by controlling the intent section in the following way: • The name and instruction text of each step can be modified. • The sequence of the steps can be changed. • The steps can be broken into several wizard pages by adding tabs (the name of each tab can be
modified as well). • The individual steps can be made invisible to the Print Buyer. A step can be made invisible only if it
has a default option. When a step is invisible, the Print Buyer cannot change the default selection.
To define intent Click the Intent tab or click Continue in the GENERAL PROPERTIES tab.
Job Types
Print Service Provider User Guide 85
Adding Joblets If more joblets are required perform the following: 1 Click Add Joblet; the ADD JOBLETS dialog box opens.
The ADD JOBLETS dialog box displays a list of all the joblets in the system. Joblets that are already in the intent list of the job type appear grayed out.
2 Select the check boxes of the joblets that you want to enable for this job type. 3 Click OK; the dialog box closes and the joblets are added to the intent list.
Choosing the Printing Sides and Colors Use this joblet to define whether the job will be printed on one side of the paper or both, and which colors it will be printed with. 1 Select the Colors joblet and click Edit; the EDIT JOBLET PROPERTY dialog box opens. 2 Type a step name and description if you want them to differ from the joblet default. 3 Select the check boxes of those printing side options that are appropriate for your product. 4 Select the option that you consider standard for the product and click Set as Default. 5 Select the check boxes of those printing color options that are appropriate for your product. 6 Select the option that you consider standard for the product and click Set as Default. 7 Click Save; the dialog box closes. The default and additional options appear in the intent list.
Selecting the Printing Stock Use this joblet to define a list of papers for the Print Buyer to choose from. 1 Select the Select Stock joblet and click Edit. 2 Edit the Step Name and Description if you want them to differ from the default. 3 Click Add Paper; the PAPER dialog box opens. 4 Select the paper for the product and click OK; the dialog box closes and the paper is added to the list. 5 Update the DISPLAY NAME for the paper. The Display name is what the Print Buyer will see instead of
the more "technical" name of the paper. 6 Repeat steps 4 and 5 for more paper options as needed. 7 If more than one paper has been added, choose one to be the default paper. Select one of the papers
and click Set as Default. 8 Click OK; the dialog box closes. The default and additional options appear in the intent list.
Choosing the Page Sizes Use this joblet to define which page sizes are appropriate for the job. 1 Select the Page Size joblet and click Edit; the EDIT JOBLET PROPERTY dialog box opens. 2 Type a step name and description if you want them to differ from the joblet default. 3 Select the check boxes of the page size options that are appropriate for your product. 4 Select the option that you consider standard for the product and click Set as Default. 5 Click Save; the dialog box closes. The default and additional options appear in the intent list.
Choosing the Number of Pages Use this joblet to define the number of pages that is appropriate for the job. This property can be defined as a range. 1 Select the Number of Pages joblet and click Edit; the EDIT JOBLET PROPERTY dialog box opens. 2 Type a step name and description if you want them to differ from the joblet default. 3 Type the number of minimum and maximum pages allowed for this job type. 4 Click Save; the dialog box closes.
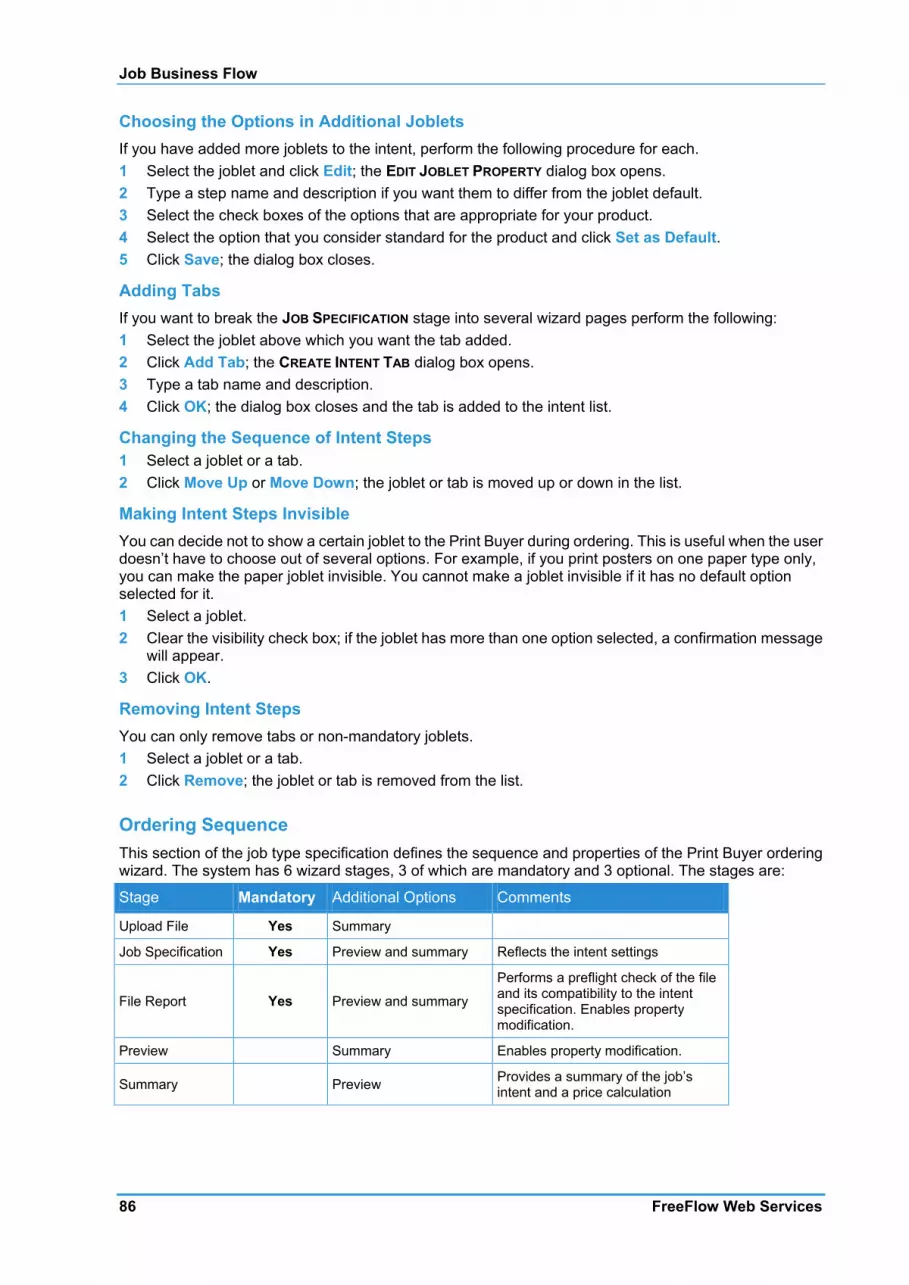
Job Business Flow
86 FreeFlow Web Services
Choosing the Options in Additional Joblets If you have added more joblets to the intent, perform the following procedure for each. 1 Select the joblet and click Edit; the EDIT JOBLET PROPERTY dialog box opens. 2 Type a step name and description if you want them to differ from the joblet default. 3 Select the check boxes of the options that are appropriate for your product. 4 Select the option that you consider standard for the product and click Set as Default. 5 Click Save; the dialog box closes.
Adding Tabs If you want to break the JOB SPECIFICATION stage into several wizard pages perform the following: 1 Select the joblet above which you want the tab added. 2 Click Add Tab; the CREATE INTENT TAB dialog box opens. 3 Type a tab name and description. 4 Click OK; the dialog box closes and the tab is added to the intent list.
Changing the Sequence of Intent Steps 1 Select a joblet or a tab. 2 Click Move Up or Move Down; the joblet or tab is moved up or down in the list.
Making Intent Steps Invisible You can decide not to show a certain joblet to the Print Buyer during ordering. This is useful when the user doesn’t have to choose out of several options. For example, if you print posters on one paper type only, you can make the paper joblet invisible. You cannot make a joblet invisible if it has no default option selected for it. 1 Select a joblet. 2 Clear the visibility check box; if the joblet has more than one option selected, a confirmation message
will appear. 3 Click OK.
Removing Intent Steps You can only remove tabs or non-mandatory joblets. 1 Select a joblet or a tab. 2 Click Remove; the joblet or tab is removed from the list.
Ordering Sequence This section of the job type specification defines the sequence and properties of the Print Buyer ordering wizard. The system has 6 wizard stages, 3 of which are mandatory and 3 optional. The stages are:
Stage Mandatory Additional Options Comments
Upload File Yes Summary
Job Specification Yes Preview and summary Reflects the intent settings
File Report Yes Preview and summary
Performs a preflight check of the file and its compatibility to the intent specification. Enables property modification.
Preview Summary Enables property modification.
Summary Preview Provides a summary of the job’s intent and a price calculation

Job Types
Print Service Provider User Guide 87
Stage Mandatory Additional Options Comments
Job Details Preview and summary
Enables the Print Buyer to modify the automatically created job name, enter cost center information and reference code information. Enables properties modification.
The ordering sequence section provides you with the tools to control the Print Buyer’s experience and to create highly customized applications for special markets or Print Buyers. You have the following customization options: • The name of each stage can be modified. Any changes from the default names can also be localized
- for more information, see Localized Ordering Sequence (on page 8). • The optional stages can be enabled. • Some of the stage properties can be modified. • A preview and/or a summary can be displayed in-line with some of the stages. • The sequence of the stages can be modified with the following limitation - the Upload File and Job
Specification must precede the File Report stage.
NOTE: While it is possible to place a Preview before a file has been uploaded, it is not recommended, since the Print Buyer will see an empty rectangle where a preview is supposed to be.
File Report The File Report stage cannot be disabled, but it can be modified and even hidden from the Print Buyer. It provides you with the following options: • Specify the resolution threshold. If the job contains images with resolution lower than the specified
threshold, a warning will be issued. • Specify whether RGB images will trigger a warning. • Specify whether missing fonts will trigger a warning. • Specify whether the File Report will be displayed. • Specify whether the user will be allowed to continue if problems are encountered, and if yes, the
phrasing of the warning message that the user will have to confirm in order to continue.
Preview The Preview stage enables you to specify whether the displayed preview will be in JPG or PDF format and whether the user will be required to confirm the preview in order to continue.
Job Details The Job Details stage enables you to specify if the user will have the option to modify the job name, whether to display the cost center and reference code fields and whether these fields are mandatory.
Quote before Upload Scenario You can utilize the Ordering Sequence to create different scenarios. The following example for a quote before upload scenario is provided to give you some understanding of how to harness this feature to the needs of your Print Buyers.
To create a Quote then Upload scenario do the following:
Stage Enable Additional Options
Job Specification Yes Summary
Upload File Yes
File Report Yes
Preview Optional

Job Business Flow
88 FreeFlow Web Services
Stage Enable Additional Options
Summary Optional
Job Details Optional
The Print Buyer will be able to define the intent and immediately check the price. If the price is satisfactory the Print Buyer can upload the file and continue the ordering process.
To define the ordering sequence 1 Click the Ordering Sequence tab or click Continue in the INTENT tab. 2 Select the check boxes of the stages you want to enable. 3 Change the sequence of the stages by using the Move Up and Move Down buttons. 4 Select the Preview and Summary check boxes for each stage where they are required.
NOTE: Make sure that the Preview, as a separate stage or as a part of one of the stages, does not appear before the Upload File stage.
Adjusting the File Report Parameters 1 Select the File Report stage and click Edit; the FILE REPORT dialog box opens. 2 Type a stage name if you want it to differ from the default. 3 Define the minimum acceptable image resolution. 4 Define whether to warn the user when the file contains RGB images. 5 Define whether to warn the user when fonts are missing. 6 Define whether to display the File Report to the Print Buyer. 7 Define whether to enable the Print Buyer to continue ordering when problems are encountered. 8 Modify the phrasing of the message that the user has to confirm if allowed to continue ordering a job
with problems. 9 Click OK; the dialog box closes.
Adjusting the Preview Parameters Perform the following procedure if a preview stage is required. 1 Select the Preview stage and click Edit; the PREVIEW dialog box opens. 2 Type a stage name and description if you want them to differ from the default. 3 Select the type of preview to display, JPG or PDF. 4 Define whether to force the Print Buyer to confirm the preview before continuing to order. 5 Modify the phrasing of the confirmation message. 6 Click OK; the dialog box closes.
Adjusting the Job Details Parameters Perform the following procedure if the Job Details stage is required. 1 Select the Job Details stage and click Edit; the JOB DETAILS dialog box opens. 2 Update the Step Name if you want it to differ from the default. 3 Select the display Job Name check box if you want to let the Print Buyer modify the automatically
generated job name. 4 Select the display Cost Center check box if the Print Buyer has to select a cost center and select the
mandatory checkbox if necessary. 5 Select the display Reference Code check box if the Print Buyer has to provide a reference code and
select the mandatory checkbox if necessary. 6 Click OK; the dialog box closes.
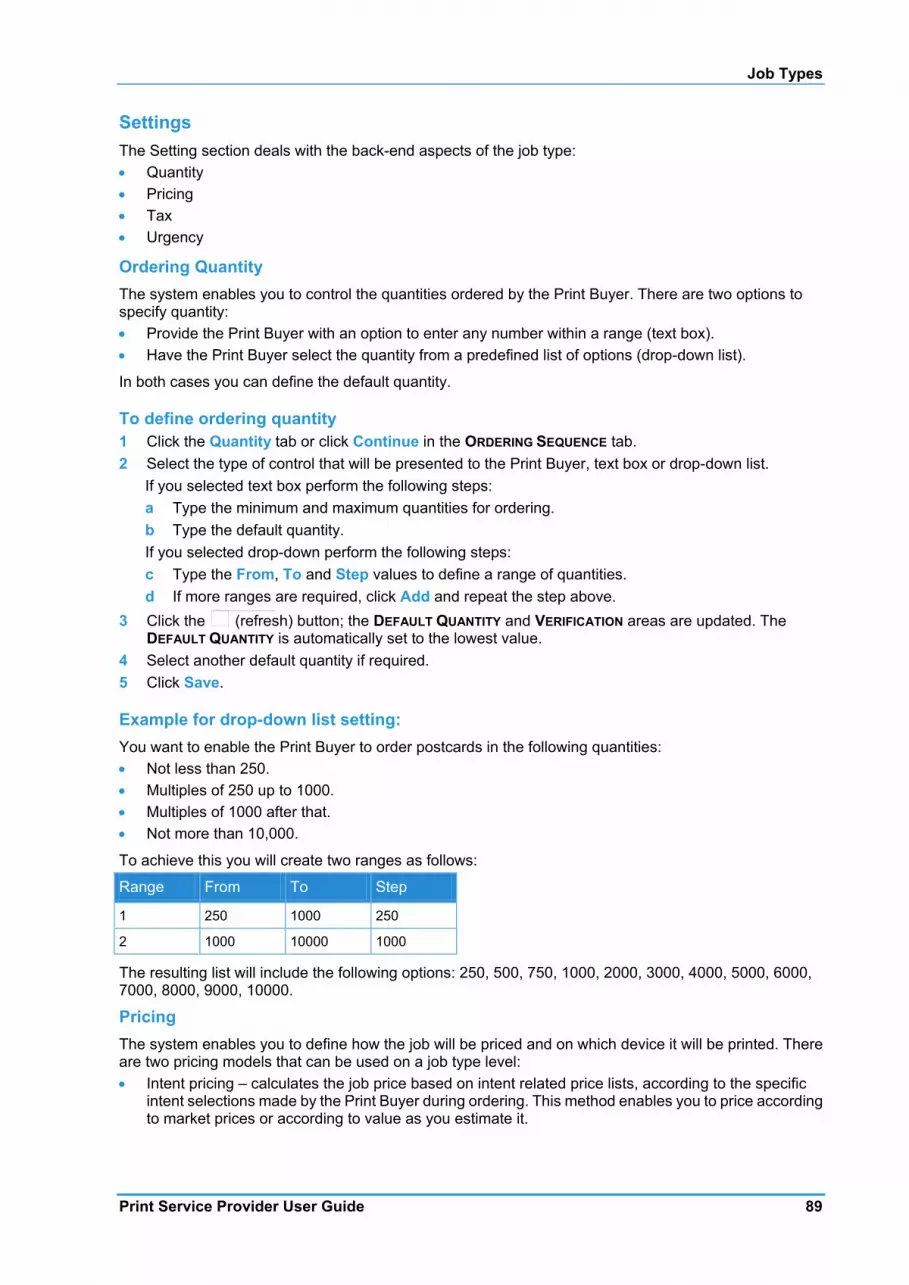
Job Types
Print Service Provider User Guide 89
Settings The Setting section deals with the back-end aspects of the job type: • Quantity • Pricing • Tax • Urgency
Ordering Quantity The system enables you to control the quantities ordered by the Print Buyer. There are two options to specify quantity: • Provide the Print Buyer with an option to enter any number within a range (text box). • Have the Print Buyer select the quantity from a predefined list of options (drop-down list).
In both cases you can define the default quantity.
To define ordering quantity 1 Click the Quantity tab or click Continue in the ORDERING SEQUENCE tab. 2 Select the type of control that will be presented to the Print Buyer, text box or drop-down list.
If you selected text box perform the following steps: a Type the minimum and maximum quantities for ordering. b Type the default quantity. If you selected drop-down perform the following steps: c Type the From, To and Step values to define a range of quantities. d If more ranges are required, click Add and repeat the step above.
3 Click the (refresh) button; the DEFAULT QUANTITY and VERIFICATION areas are updated. The DEFAULT QUANTITY is automatically set to the lowest value.
4 Select another default quantity if required. 5 Click Save.
Example for drop-down list setting: You want to enable the Print Buyer to order postcards in the following quantities: • Not less than 250. • Multiples of 250 up to 1000. • Multiples of 1000 after that. • Not more than 10,000.
To achieve this you will create two ranges as follows:
Range From To Step
1 250 1000 250
2 1000 10000 1000
The resulting list will include the following options: 250, 500, 750, 1000, 2000, 3000, 4000, 5000, 6000, 7000, 8000, 9000, 10000.
Pricing The system enables you to define how the job will be priced and on which device it will be printed. There are two pricing models that can be used on a job type level: • Intent pricing – calculates the job price based on intent related price lists, according to the specific
intent selections made by the Print Buyer during ordering. This method enables you to price according to market prices or according to value as you estimate it.
The linked image cannot be displayed. The file may have been moved, renamed, or deleted. Verify that the link points to the correct file and location.
Job Business Flow
90 FreeFlow Web Services
• Manual – does not calculate the price. When ordering the Print Buyer will see N/A (not available).
For more information about pricing, refer to Pricing (on page 109).
Print Time Settings Web Services provides an option to define standard production times for different job types. Jobs that are ordered to be printed in the standard time frame are priced as defined in the pricing section. There is also an option for the Print Buyer to request a job to be printed earlier in which case you can charge premium prices. You can define two levels of urgency - Express and Urgent, define the time frame for each urgency level and the surcharge percentage. You can also decide to inherit the default system level settings.
For more information about urgency, refer to Defining Print Settings (on page 29).
To define print time settings 1 To access the print time settings click the Tax and Urgency tab or click Continue in the PRICING tab. 2 To define specific settings, select Define print time settings radio button. 3 Select up to how many days and hours is the urgent printing time and type the surcharge in percent. 4 Select up to how many days and hours is the express printing time and type the surcharge in percent. 5 Select up to how many days and hours is the regular printing time. 6 Click Save.
Example: You have 12 hour work days, from 8 a.m. to 8 p.m. You have set-up the following print times for printing restaurant menus: • Urgent - 5 hours, surcharge 50% • Express - 1 day, surcharge 25% • Regular - 2 days
Let’s see what happens to the pricing of 1000 menus ordered on Monday 6p.m. The regular printing price for this job is 100$. • The user requested the order to be ready for Wednesday 8 a.m. Since the requested printing time is
more than 1 day (which is the specification for urgent) it is a regular job and will be charged 100$. • The user requested the order to be ready for Tuesday 4 p.m. This is more than 5 hours (urgent) and
less than 1 day (express), therefore it is considered an express job and will be charged 125$(100$+ 25% surcharge).
• The user requested the order to be ready for Tuesday 10 a.m. This is less than 5 hours (urgent) and will be charged 150$(100$+ 50% surcharge).
Define Tax Settings The system enables you to define a tax per job type. The requirement to define a job type specific tax is particular to some countries. In most countries you would want to use the default system tax settings.
For more information about taxes, refer to Set-up Tax Packages (on page 112).
The job type can inherit the system level tax settings or you can define a specific tax for this job type. 1 To access the tax settings click the Tax and Urgency tab or click Continue in the PRICING tab. 2 To define specific settings, select Define tax settings radio button. 3 Select the appropriate tax package. 4 Click Save. 5 Click Back to Job Type Library.
NOTE: When the job type is ready to be used, don’t forget to clear the disable check box of the job type in the job type library.
Templates
Print Service Provider User Guide 91
Job Type Groups In some cases, you might want to limit the users of a Print Buyer account to the use of some job types (especially if you are creating account-specific applications). This is accomplished by creating groups of job types and assigning these groups to Print Buyer accounts.
If you don’t use the Job Type Groups option, the Print Buyers of an account will be able to see and use all of the job types in the system.
To create job type groups 1 Select PRINT SETTINGS -> JOB BUSINESS FLOW -> JOB TYPE GROUPS; the JOB TYPE GROUPS window
opens. 2 Click New Group; the NEW GROUP dialog box opens. 3 Type a group name and click OK; the dialog box is closed and the group is added to the list. The new
group is automatically selected. 4 Add job types to the group:
a Select one or more job types from the JOB TYPES list.
NOTE: Use the Shift and Ctrl keys on the keyboard for multiple selection.
b Click Add; the selected job types are added to the selected group and displayed in the list on the right.
5 Remove job types from the group: a Select one or more job types from the JOB TYPES list. b Click Remove; the selected job types are removed from the selected group.
Templates The most common use of Web Services is for ordering repeat work and variable information work. This is achieved by using job templates. The template is similar to a job that is kept in a repository for the Print Buyer to order from. Unlike a job, a template has no quantity attached to it and no shipping information.
Templates are account related, so each Print Buyer account has its own template repository.
Template Types Templates generally fall into one of the following templates types: • Static—these are templates that have non-changing print information. They produce documents that
look the same every time. For example, letterhead stationery and brochure templates are generally static type template.
• Personalized—these templates are generally used where a single set of variable values is needed. For example, this template is useful when individuals order their own business cards. In the business card example, the file that is provided by the Print Buyer to build the template would include the business card design, and the fields (name, title, contact info, and so on). The Print Buyer user would provide the individual values when placing an order.
• VDP (variable data printing)—in contrast to personalized templates that use a single set of variable data, VDP templates utilize multiple sets of variable data that is provided in a variable data file during ordering. For example, such a template would enable a user to place a single job order for business cards for an entire department.
• Archive—are VDP templates with a variable data file permanently connected to them. When the Print Buyer orders such a template, the list of variable data records is displayed and the user can choose which of the records to print.

Job Business Flow
92 FreeFlow Web Services
• Book Assembly—templates based on composite Book Assembly job types. For more information, refer to Book Assembly (on page 169).
• Inventory—static templates that have been marked as inventory. For more information about inventory templates, refer to Enabling a Template for Inventory (on page 98).
Template Creation You, as the Print Service Provider, can create templates for your Print Buyers. You can also allow your Print Buyers to create templates. When the Print Buyer creates a template, the options to define ordering sequence, quantity, pricing and tax are hidden.
NOTE: For templates created by the Print Buyer to be added to Superstore catalogs, the Superstore must use dynamic category population by queries, and the Print Buyer should place the templates into predefined folders.
There are two ways to create templates: • Create a new template in the template repository. • Save an existing job as template.
Template Structure A template has similar properties to a job type - you can define intent, ordering sequence, quantity, pricing, tax and urgency for a template in much the same way as a job. A template has several sections that do not exist in a job type - content, file report and variable information.
Content To create a template you must upload a content file.
Intent When creating a template you start from the intent options of the job type and limit the printing option selections to what is required for this specific template, further simplifying the ordering process for the Print Buyer.
NOTE: The intent of a template is always a subset of the intent of the job type it is based on. A template cannot contain a joblet or a joblet option that does not exist in the job type.
File Report The application runs a preflight process on the content file and compares it to the intent. It provides a report of the problems found in the file and any mismatch between the file and job type.
Creating a New Template 1 In the TEMPLATE repository, click Create a new Template; the CHOOSE JOB TYPE dialog box appears. 2 Select the job type on which the template will be based and click Select; the dialog box closes, a new
template is created and opened in the editing window.
NOTE: The template is created in the same template repository folder that was selected when CREATE A NEW TEMPLATE was clicked.
Adding General Information to a Template Use the GENERAL PROPERTIES tab to add general information to the template. 1 Click the General Properties tab. 2 Click Change Thumbnail to add an icon to the template; the THUMBNAILS dialog box opens.

Templates
Print Service Provider User Guide 93
3 Select an image or upload a new image. 4 Type a description (helps identify the template in the Superstore catalog). 5 Type a subject, ISBN number, author name and reference code, if required. 6 Type keywords (can be used for Superstore queries). 7 Type the notes (the production and finishing notes will appear in the job ticket of jobs based on this job
type). 8 Click Save & Continue.
Upload File At this point you have to upload the content of the template. 1 Click the Browse... button; the CHOOSE FILE dialog box opens. 2 Navigate to the file to be uploaded, select it and click Open. 3 Click Save & Continue; if the file format requires it (e.g. if you uploaded a file format other than PDF),
the PRINTING OPTIONS tab might be displayed.
NOTE: If you encounter problems while uploading Microsoft Word or PowerPoint files, refer to the Troubleshooting guide for additional information.
4 If necessary, choose the appropriate printing options for your file. 5 Click Save & Continue; the INTENT tab is displayed.
Specifying the Intent Use the INTENT tab to specify the job intent options of the template and the additional options for the Print Buyer to choose from.
Note the following points: • The intent tab is based on the intent of the job type on which the template is based. You cannot add to
the template joblets or options that do not exist in the job type. • All the template intent joblets are automatically invisible - this means that the default options are
selected for the Print Buyer automatically and cannot be changed. If you want to open specific options for the Print Buyer to choose from - make these joblets visible.
• The colors, page size and number of pages are usually based on the template content. Verify that the correct options are selected as default. It is recommended to leave these joblets invisible.
For additional information regarding the intent tab refer to Specifying the Intent (on page 93) in the Job Type section.
When you finish specifying the template intent click Save & Continue; the FILE REPORT tab appears.
Using the File Report If the system encounters preflight or mismatch problems the FILE REPORT screen will be displayed. If the FILE REPORT is not displayed, continue on to the next section - Variable Information (on page 94). 1 Click the Click here to review these problems link; the detailed file report appears. 2 View the file report and look for the warning icons. 3 Handle the warnings as described below. 4 When you are done click Save & Continue.
Size Mismatch If you encountered a size mismatch, the reason could be: • For some reason the size was not identified by the system: go back to the intent and choose the
correct size as default. • You chose the wrong job type: create the template again using the correct job type.
Job Business Flow
94 FreeFlow Web Services
• You uploaded the wrong file: upload another file. • The uploaded file has the correct information but the external dimensions are wrong due to
orientation, crop or bleed problems: use the Crop & Bleed button to indicate the correct data. • A size is missing in the job type definition: fix the job type and start again.
You also have the options to keep the file properties and ignore the job type intent specification or to keep the job intent and ignore the file properties. Both options are not recommended when building templates.
Color Mismatch If you encountered a color mismatch the reason could be: • For some reason the color was not identified by the system: go back to the intent and choose the
correct color as default. • You chose the wrong job type: create the template again using the correct job type. • You uploaded the wrong file: upload another file. • A color is missing in the job type definition: fix the job type and start again.
You have the option to keep the file properties and ignore the job type intent specification, this is not recommended when building templates.
There is also a case where you might want to keep the job intent and ignore the file properties. For example, if you uploaded a process color file and the template color intent is black only. You might decide to create a black only template out of a color file. Practically it is a valid option, but it might be confusing to your Print Buyers, since the preview shows the actual file content and not the intent, so the Print Buyers will always see a color preview while printing a black only job.
Number of Pages Mismatch If you encountered a number of pages mismatch, the reason could be: • You chose the wrong job type: create the template again using the correct job type. • You uploaded the wrong file: upload another file. • The number of pages in the job type definition was not defined correctly: fix the job type and start
again.
Non-embedded Fonts If the fonts are not embedded in the file, it is best to create the file again with embedded fonts and upload it again. If you proceed with non-embedded fonts, the system will try to find the appropriate fonts on the server and if it doesn’t find them it will substitute them with the most appropriate font.
Low Resolution Images If you continue with low resolution images, the printed job will have quality problems. The only way to address this is to fix the file and upload again.
RGB Images If you continue with RGB images, the system will convert the RGB images to CMYK according to its built-in algorithm and ICC profile. The printed job might have quality problems compared to the expectations of the Print Buyer. The only way to address this is to fix the file and upload again.
Variable Information You can define whether the template is static, personalized or VDP.
For personalized and VDP templates you will create the variable data fields by using the Selective Upload feature and then define the properties of these fields and the relationship between them by using the Form Editor. 1 If you are creating a static template, select Static (if it isn’t selected). 2 Click Save & Continue to continue to the ORDERING SEQUENCE stage.
If you want to create a variable data template refer to Creating Variable Data Templates (on page 99).
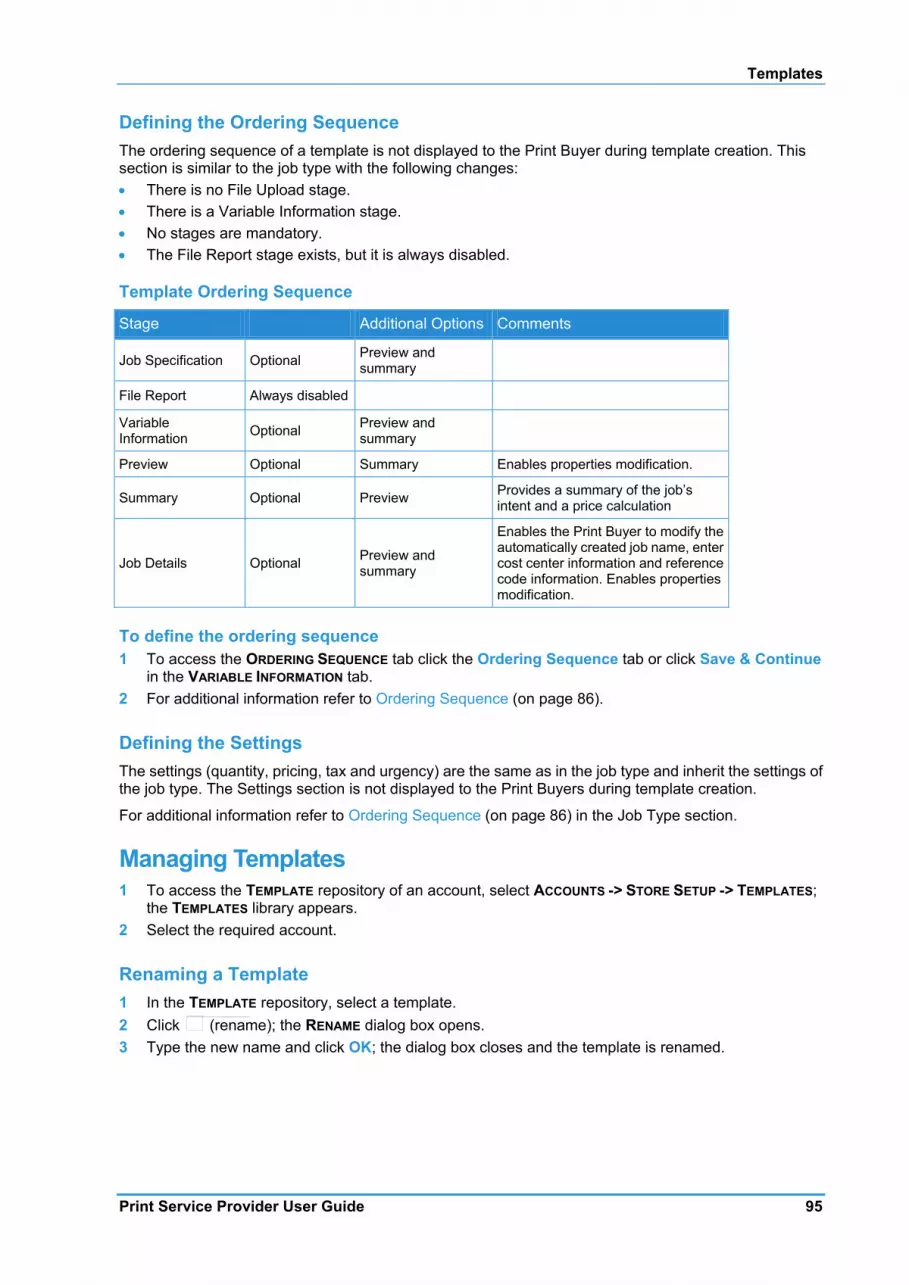
Templates
Print Service Provider User Guide 95
Defining the Ordering Sequence The ordering sequence of a template is not displayed to the Print Buyer during template creation. This section is similar to the job type with the following changes: • There is no File Upload stage. • There is a Variable Information stage. • No stages are mandatory. • The File Report stage exists, but it is always disabled.
Template Ordering Sequence
Stage Additional Options Comments
Job Specification Optional Preview and summary
File Report Always disabled
Variable Information Optional Preview and
summary
Preview Optional Summary Enables properties modification.
Summary Optional Preview Provides a summary of the job’s intent and a price calculation
Job Details Optional Preview and summary
Enables the Print Buyer to modify the automatically created job name, enter cost center information and reference code information. Enables properties modification.
To define the ordering sequence 1 To access the ORDERING SEQUENCE tab click the Ordering Sequence tab or click Save & Continue
in the VARIABLE INFORMATION tab. 2 For additional information refer to Ordering Sequence (on page 86).
Defining the Settings The settings (quantity, pricing, tax and urgency) are the same as in the job type and inherit the settings of the job type. The Settings section is not displayed to the Print Buyers during template creation.
For additional information refer to Ordering Sequence (on page 86) in the Job Type section.
Managing Templates 1 To access the TEMPLATE repository of an account, select ACCOUNTS -> STORE SETUP -> TEMPLATES;
the TEMPLATES library appears. 2 Select the required account.
Renaming a Template 1 In the TEMPLATE repository, select a template. 2 Click (rename); the RENAME dialog box opens. 3 Type the new name and click OK; the dialog box closes and the template is renamed.
The linked image cannot be displayed. The file may have been moved, renamed, or deleted. Verify that the link points to the correct file and location.

Job Business Flow
96 FreeFlow Web Services
Deleting a Template 1 In the TEMPLATE repository, select a template.
2 Click (delete); a confirmation dialog box appears. 3 Click Yes; the template is deleted.
Copying a Template Templates can be duplicated in the same account or copied to another account. When the template is copied to the same account its name must be changed. 1 Select one or more templates (using the Shift and Ctrl keys on your keyboard).
2 Click (copy); the templates are copied to the clipboard and the (paste) button is enabled.
3 Navigate to the account or folder in which you want to place the templates and click (paste); a duplicate copy of the templates is created in the new location.
NOTE: If the template was copied to the same account, the name of the new template is based on the original template with a number extension.
Moving a Template Templates can be moved to another folder in the same account or to another account. 1 Select one or more templates (using the Shift and Ctrl keys on your keyboard).
2 Click (cut) the templates are copied to the clipboard and the (paste) button is enabled.
3 Navigate to the account or folder in which you want to place the copy the templates and click (paste); the templates are moved to the new location.
Editing a Template 1 In the TEMPLATE repository, select a template. 2 Click Edit Properties; the template editing window opens.
For detailed information refer to the Creating a New Template (on page 92).
Adding an Archive to a Template 1 In the TEMPLATE repository, select a template. 2 Click Edit Properties and select the Variable Information tab. 3 Click Manage Archive; the MANAGE TEMPLATE ARCHIVE dialog box opens. 4 To manually create a database:
a Click New; a record is added. b Type the text data in the text fields and select or upload images in the image fields. c Repeat for all the records.
5 To import a database: a Click Import Database; the UPLOAD VARIABLE DATA DATABASE dialog box appears.If a warning
regarding an existing database appears, select Overwrite Database or Add to Database. b Find the database (CSV format) on your disk and click Open. c Click Next. d If the database contains a first row with the fields names, select the check box indicating so. e Map the fields of the database to the fields of the template. f Click Next; the database is imported and the records appear in the MANAGE TEMPLATE ARCHIVE
dialog box. 6 Click Save; the dialog box closes, the database archive is attached to the template.
The linked image cannot be displayed. The file may have been moved, renamed, or deleted. Verify that the link points to the correct file and location.
The linked image cannot be displayed. The file may have been moved, renamed, or deleted. Verify that the link points to the correct file and location.
The linked image cannot be displayed. The file may have been moved, renamed, or deleted. Verify that the link points to the correct file and location.
The linked image cannot be displayed. The file may have been moved, renamed, or deleted. Verify that the link points to the correct file and location.
The linked image cannot be displayed. The file may have been moved, renamed, or deleted. Verify that the link points to the correct file and location.The linked image cannot be displayed. The file may have been moved, renamed, or deleted. Verify that the link points to the correct file and location.
The linked image cannot be displayed. The file may have been moved, renamed, or deleted. Verify that the link points to the correct file and location.

Templates
Print Service Provider User Guide 97
Managing the Workflow Policy of a Template By default, the user goes directly to the Shopping Cart when ordering a Book Assembly job. To require the user to enter additional information, or to review (and approve) a preview of the job do the following: 1 In the template repository, select a template. 2 Click Workflow Policy; the WORKFLOW POLICY dialog box opens. 3 To require a preview of the job during ordering, enable the Require Preview checkbox and select the
type of preview, JPG or PDF. You can also require the user to accept the preview in order to continue by enabling the specified checkbox.
4 To require a REFERENCE CODE during ordering, enable the Force Reference Code checkbox. 5 To require additional INPUT FIELDS during ordering, enable one or more of the relevant checkboxes:
Job Name, Reference Code and/or Cost Center.
Managing the Access Rights of a Template 1 In the TEMPLATE repository, select a template. 2 Click User Access; the USER ACCESS dialog box opens with the GROUPS tab selected. 3 To manage the access rights per group:
a Select the GROUPS tab (if it is not selected). b Select a group name in the list on the left. c Click Assign (No Access) if the users of this group are not to be allowed to order this template
from the template repository view or to manage it in the repository. d Click Assign (Order only) if the users of this group will be allowed to order this template from the
template repository view but not to manage it in the repository. 4 To manage the access rights per user:
a Select the Users tab. b Select a user name in the list on the left. c Click Assign (No Access) if the users of this group are not to be allowed to order this template
from the template repository view or to manage it in the repository. d Click Assign (Order only) if the users of this group will be allowed to order this template from the
template repository view but not to manage it in the repository.
Sending a Template as MailToPrint 1 In the TEMPLATE repository, select a template. 2 Click MailToPrint; the Send MAILTOPRINT PROPERTIES dialog box opens. 3 Define the MailToPrint properties:
a Define whether the job needs to be approved by a supervisor or if it is created after the customer approves the job - in this case, you can also select whether the price is shown or not.
b Select whether to show the reference code input field. c Select whether to require the user to login. d Define how many times the email message can be used for ordering. e Select the maximum number of copies to be ordered via the email message. f Type the message subject. g Type the recipient email, or choose from the address book. h Select the default login profile. i Type the default reference code. j Type the message header.
4 Click Send MailToPrint; a confirmation message is displayed and an email is sent to the specified email address.
Job Business Flow
98 FreeFlow Web Services
5 Click OK to close the confirmation message. 6 Click Close to close the SEND MAILTOPRINT PROPERTIES dialog box.
Enabling a Template for Inventory By enabling a template for inventory, you enable a Print Buyer to print jobs for storage rather than immediately delivery. By working with the inventory templates, you can produce larger numbers of job copies than are immediately needed and therefore reduce production costs while maintaining the ability to ship jobs immediately, when the need arises.
NOTE: Only static and Book Assembly templates can be inventory-enabled.
To create an inventory template: 1 In the TEMPLATE repository, select a template.
o For Book Assembly templates: Select the Enable Inventory for this template check box; the INVENTORY INFORMATION link appears
o For Static templates: Click Edit Properties -> Variable Information tab and select the Enable Inventory for this template check box; the INVENTORY INFORMATION link appears.
2 Click the Inventory Information link; the INVENTORY INFORMATION dialog box appears.
NOTE: At this stage, you can define the physical location of the inventory in your warehouse. If, however, you have an inventory of this template already in storage, you can adjust the settings to reflect the current status.
3 Complete the fields with valid data. 4 Click OK to save the settings and to close the dialog box.
Managing Inventory Information In the Inventory Information dialog box you can define: • Number of copies in Customer Inventory – this field keeps track of the current number of copies in the
inventory, based on the ordering to and from inventory by the Print Buyer. This number is updated automatically, but you can initialize it to reflect the starting situation of your inventory.
• Number of copies in Risk Inventory – you have the flexibility to print more copies to inventory than ordered by the Print Buyer and collect the money for printing these copies when the Print Buyer orders prints for inventory and you move these copies from the risk inventory to the Print Buyer’s inventory without printing. The Print Buyer does not see this quantity in the inventory.
• The total number of copies – provides you with the real inventory information. This data is not displayed to the Print Buyer.
• The inventory location. • The minimum number of copies in inventory – when the customer inventory level reaches this number
an automatic notification message is issued to the Print Buyer.
Creating a New Template from an Existing Job The simplest way to create a new template, is by saving an existing job as template. This feature is especially useful for your Print Buyers. 1 Navigate to TASKS -> TRACK JOBS; the SEARCH window appears. 2 Find the required job using the search or open one of the status specific queues. 3 Click Save as Template; the SAVE AS TEMPLATE dialog box opens. 4 Type the template attributes. 5 Select the folder in which you want the template to be saved, you can create a folder at this point, if
required. 6 Click OK; a template is created and saved in the selected location.
Creating Variable Data Templates
Print Service Provider User Guide 99
You can now open this template and modify any of its parameters. For detailed information refer to Creating a New Template (on page 92).
NOTE: The created template belongs to the same Print Buyer account which was used to order the job.
Creating Variable Data Templates 1 Select an existing static template or create a new one. 2 Select the Variable Information tab. 3 Select Personalize or VDP template type; the SELECTIVE UPLOAD and FORM EDITOR buttons are
enabled.
Select Variable Data Fields To create a variable data template in Web Services, you start with a high quality file which is uploaded to the application and converted into PDF format. You use the Selective Upload feature to identify all of the text strings and images that are to be converted into variable data fields. 1 Click Selective Upload; a warning message is displayed. 2 Click Yes; a MODIFY PDF dialog box opens. 3 Select the variable fields. 4 For creating text fields follow the procedure Selecting Variable Text Fields (on page 99). 5 For creating image fields follow the procedure Selecting Variable Image Fields (on page 99). 6 Click OK in the MODIFY PDF window; the SELECTIVE UPLOAD FONT REPORT window is displayed. 7 Ensure the correct fonts are chosen. 8 Click OK in the SELECTIVE UPLOAD window; the SELECTIVE UPLOAD window closes and the FORM
EDITOR opens.
NOTE: Each time you use Selective Upload in a template, the specifications you previously defined for the template in the Form Editor are lost. Therefore, when you use Form Editor on a relatively small file, it is recommended that you define every single field, so that later on, you do not need to use Selective Upload again to make changes.
Selecting Variable Text Fields
1 In the MODIFY PDF dialog, select (Select Text area) from the field selection list. 2 In the PDF display, select the text string that will become a single variable data field. It is important to
decide in advance how to break down the fields (for example, whether to define a single, full name field, or to define two separate fields for first name and last name).
3 In the SELECTED FIELDS dialog box, specify the field name. For example, in the PDF select John Smith, and in the Selected Fields window, specify Full Name as the name of the field.
Selecting Variable Image Fields 1 In the MODIFY PDF window, select (Select Graphic/Image area) from the text selection tool. 2 In the PDF display, select the image that will become a variable data field. 3 In the SELECTED FIELDS dialog box, specify the field name.
Defining Variable Data Field Properties Use the Form Editor to specify: • Text alignment and boundaries properties. • Font properties.
The linked image cannot be displayed. The file may have been moved, renamed, or deleted. Verify that the link points to the correct file and location.
The linked image cannot be displayed. The file may have been moved, renamed, or deleted. Verify that the link points to the correct file and location.

Job Business Flow
100 FreeFlow Web Services
• Properties that govern the behavior of fields during ordering. • Properties that control the display of fields in the printed job.
To define the basic field properties 1 In the DEFINE FIELDS tab of the VARIABLE INFORMATION window, click the Form Editor button (if it
didn’t open automatically); the FORM EDITOR window opens, along with a LAYOUT PREVIEW dialog box. 2 For each field adjust the settings as necessary. Refer to the detailed tasks below. 3 If necessary access the ADVANCE OPTIONS area. Refer to the detailed tasks below. 4 Click OK in the FORM EDITOR; the FORM EDITOR is closed and the DEFINE FIELDS tab in the VARIABLE
INFORMATION is displayed again.
Text Fields Form Editor enables to define text fields’ input rules and behavior, alignment and boundaries, and font properties.
Defining Input Restrictions on Fields You can define several input restrictions on fields: • No restrictions. • A field is mandatory. • A field is mandatory and its value must differ from the default value. • A field’s value must be changed or be left empty.
To mark a field as mandatory 1 Select the field. 2 Select Input Field text cannot be Blank in the FIELD INPUT list.
To mark a field as mandatory and different from the default 1 Select the field. 2 Select Input Field text must be changed and cannot be Blank in the FIELD INPUT list.
To mark a field as must be changed or left empty 1 Select the field. 2 Select Input Field text must be changed or empty in the FIELD INPUT list.
Defining Non-Editable Fields Non-editable fields are used for captions. The caption has to be made variable in order to be able to move it on the template according to values of other fields, but requires no input from the user during ordering. 1 Select the field. 2 Select the Non-Editable check box.
Defining Non-Printable Fields Non-printable fields are used for data collection. 1 Select the field. 2 Select the Do not print this field check box.
Defining User Moveable Fields User moveable fields can be interactively moved by the Print Buyer during ordering. 1 Select the field. 2 Select the User moveable check box.
Creating Variable Data Templates
Print Service Provider User Guide 101
Defining Pinned Fields Pinned fields are useful in cases when a template contains some fields that are to be updated manually for a certain job, and other fields that will be uploaded from a database. You need to mark the manually updated fields as Pinned, the application will enable the Print Buyer to type the values of Pinned fields and will then enable to upload a variable database to the other fields. 1 Select the field. 2 Select the Pinned check box.
Defining the Target Audience of a Field The target audience of a field enables to make a field visible or invisible according to the user type viewing the variable data form. 1 Select the field. 2 Select the appropriate option in the VIEW BY list.
Defining Field Format Field format rules warn the user when the data entered is not formatted correctly, and in some cases corrects the typed data. The formats are: • Special formats for phone numbers and zip codes. • Special formats for emails. • ALL UPPER CASE, all lower case, Sentence case or Initial Caps. • Limit the acceptable characters. • Other, custom, formats.
NOTE: The field format correction and warning is applied only to manual entry of data using the variable data form (job personalization).
1 Select the field. 2 Select the required format from the FIELD FORMAT list. 3 Or click Field Format link for more options.
Defining Drop-down Menu Fields Drop-down lists are used to simplify the user's interaction with the application, to improve accuracy of data input and to reduce costly mistakes.
There are two types of drop-down lists – simple and complex.
NOTE: It is important to remember that while the drop-down lists have many benefits, changing them (adding, editing or removing values) requires editing the template. Therefore, it is preferable not to create drop-down lists for fields which values might need to be changed by users.
Simple drop-down lists are used to limit the number of options for a specific variable field, and at the same time to facilitate fast and accurate entry of data when creating the print Job. A common example would be to prepare a drop-down list of titles: Mr., Mrs., Dr., etc.
Complex drop-down lists are used in cases when the values of several fields are interdependent. In such a case you can create a drop-down list on one field (the leading field), and connect each value in drop-down list to a set of values in other fields. I.e. a change in one field will cause a pre-defined change in other fields as well. A common example of such a case would be a company with offices in several locations. When ordering a business card or letterhead, an employee has only to select a location and the appropriate address, city, fax, etc. will be filled in automatically.
Job Business Flow
102 FreeFlow Web Services
To define a simple drop-down menu: 1 Select the field. 2 Select Dropdown Menu in the FIELD TYPE list; to the right of the FIELD TYPE appear a drop-down icon
and two new buttons: ADD LIST and LIST MANAGEMENT. 3 Click Add List; the ADD LIST dialog box appears. 4 Enter several values, use comma as a separator between the values. 5 Click OK to save the list and close the window.
To define a complex drop-down menu: To simplify this task it will be presented through an example. For the sake of the example we will assume that you have a leading field called Office Name and two fields connected to it: Office Address and Office Fax.
The instructions below are for creating the table manually. You can also import a table that you have created in Excel. 1 Select the field. 2 Select Dropdown Menu in the FIELD TYPE list; to the right of the FIELD TYPE appear a drop-down icon
and two new buttons: ADD LIST and LIST MANAGEMENT. 3 Click List Management; the LIST MANAGEMENT dialog box appears. 4 Click Add Table; the NEW TABLE dialog box opens. 5 Type the table name (Office) and click OK. 6 Create the primary column:
a Select the name of the leading field (Office Name) in the list.
NOTE: You will be creating several columns of values, each column connected to one field. Generally, you can create the columns in any sequence you wish, and then define which of these columns is the primary (leading) field. It is, however, more convenient to start with the leading field and then add the fields dependent on it.
b Type the first value in the empty text field (New York). c Click Add Row; another row is added to this column. d Type another value (London), continue adding rows and values as necessary. e Select the radio button above the Office Name column to indicate that this is the PRIMARY COLUMN
(leading field). 7 Create connected fields:
a Click Add Column; another column is added to the table. The new column has the same number of rows as the primary column.
b Select the name of a field to be changed based on the value of the primary column in the list (Office Address in our example), and type the values for this field for each of the values in the primary column.
c Add a column for another connected field (Office Fax). 8 Click OK to save the table and close the window.
NOTE: Look at the field names: the leading field has a drop-down list icon. All the connected fields are marked with a lock icon and have the same color rectangle marking that they belong to the same drop-down list group. Had the form contained more than one drop-down list field, each group would have been marked by a different color.
Defining Composite Fields Composite fields are used when you have a paragraph that is not variable and inside it variable strings, the length of which affects the flow of text in the paragraph.
A good example would be a direct mail campaign for a supermarket, promoting a specific product in the supermarket according to the preferences of the recipient:

Creating Variable Data Templates
Print Service Provider User Guide 103
"In our fruit department you will find fresh pineapples every day!"
The sentence in this example is the "composite" field, while the name of the department and the product are its children fields. Most of the standard field properties can be applied to the children fields. 1 Select the field. 2 Select Composite from the FIELD TYPE list; the COMPOSITE properties are displayed. 3 Select the children fields:
a Select the word or words you want to become one field and click (Word Selection); the selected string is highlighted and a field is added to the list under the composite field.
b Repeat for additional strings. 4 Click Save.
Image Fields Form Editor enables to define image fields’ input rules and behavior, and alignment and boundaries.
Defining Input Restrictions on Fields You can define several input restrictions on image fields: • No restrictions. • A field is mandatory (an image must be selected). • A field is mandatory and its value must differ from the default value (default image must be changed
and an image must be selected. • A field’s value must be changed (default image must be changed).
To mark a field as mandatory 1 Select the field. 2 Select An Image Must Be Selected in the FIELD INPUT list.
To mark a field as mandatory and different from the default 1 Select the field. 2 Select Default Image Must Be Changed and an Image Must Be Selected in the FIELD INPUT list.
To mark a field as must be changed 1 Select the field. 2 Select Default Image Must Be Changed in the FIELD INPUT list.
Defining Non-Editable Fields 1 Select the field. 2 Select the Non-Editable check box.
Defining Non-Printable Fields Non-printable fields are used for data collection. 1 Select the field. 2 Select the Do not print this field check box.
Defining User Moveable Fields 1 Select the field. 2 Select the User moveable check box.
The linked image cannot be displayed. The file may have been moved, renamed, or deleted. Verify that the link points to the correct file and location.
Job Business Flow
104 FreeFlow Web Services
Defining Pinned Fields 1 Select the field. 2 Select the Pinned check box.
Defining the Target Audience of a Field 1 Select the field. 2 Select the appropriate option in the VIEW BY list.
Controlling the Image Upload Policy You can define several image upload options: • Do not allow image upload – will force the user to select an image from the available selection. • Allow upload to the job folder – the user will be able to upload the image, but it will be available only for
this job. • Allow upload to the personal folder – the user will be able to upload the image to a personal folder,
hence only he will be able to use this image while ordering in the future. • Allow upload to the selected folder – the user will be able to upload the image to a predefined folder in
the public library. • Use access to the public image library – the user will be able to upload the image to any folder in the
public image library.
To define the policy 1 Select the field. 2 Select the required IMAGE UPLOAD option.
Controlling the Image Selection GUI You can control whether the images for selection will be displayed during ordering as a drop-down list or as a slider control. 1 Select the field. 2 Select the required IMAGE SELECTION GUI option.
Enabling the Image Editor When the Image Editor is enabled, the user after uploading an image can crop, scale or rotate it as needed using the interactive Image Editor tool. 1 Select the field. 2 Select the Use Image Editor check box.
Advanced Options In many cases of generic designs for personalization, specific values used in the Job can affect the design. The Form Editor Advanced options are designed to deal with these situations.
Advanced Properties Example In this example each one of the employees for whom a business card should be printed, requires different data fields. One doesn't have a mobile phone, another doesn't have a mobile or email.
Name Title Tel Mobile Email
Janice Jones President 444-555123 422-555345 [email protected]
John Smith Vice President 444-555125 422-555348 [email protected]
James Cook Supervisor 444-555321
Carol Donaldson Project Manager 444-555327 [email protected]
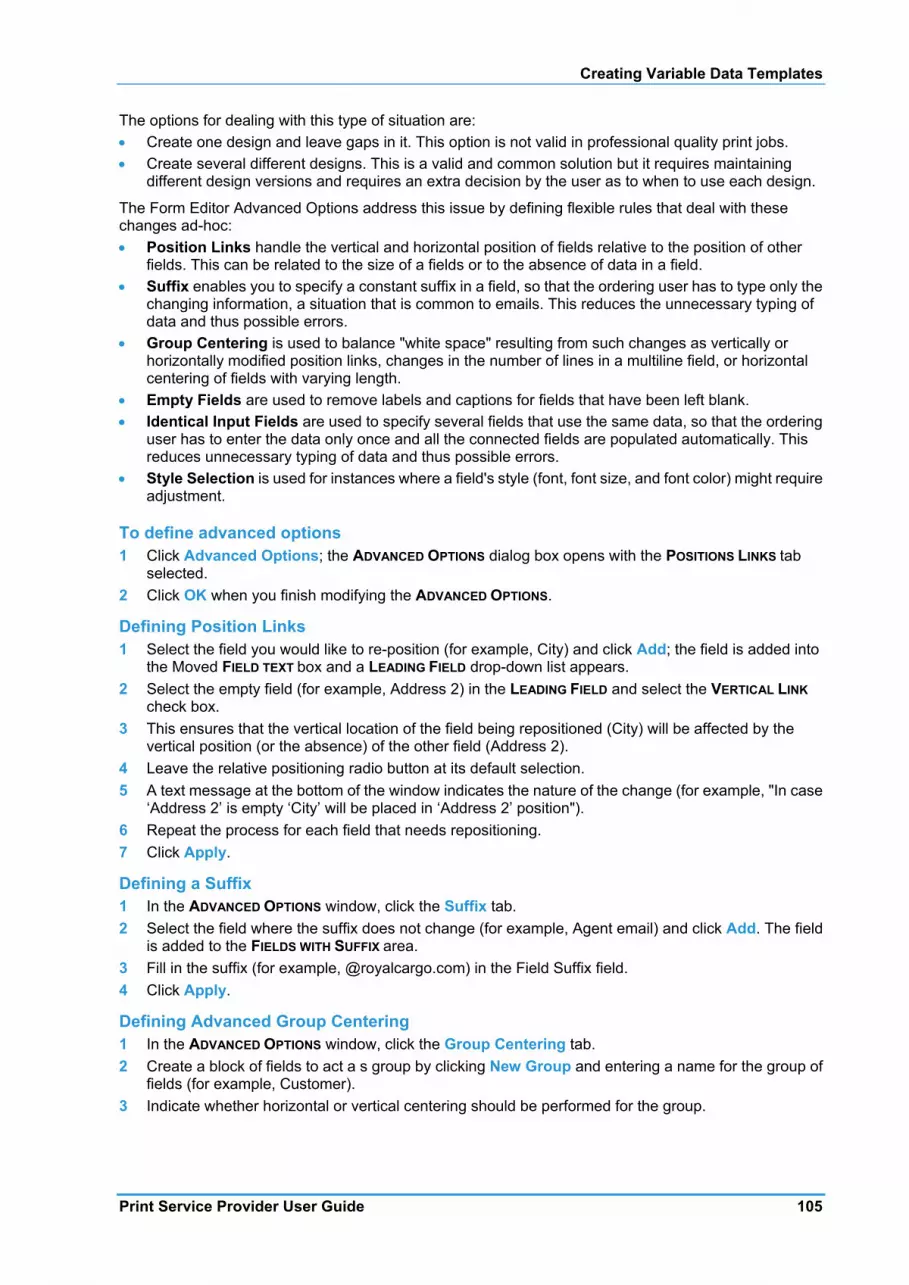
Creating Variable Data Templates
Print Service Provider User Guide 105
The options for dealing with this type of situation are: • Create one design and leave gaps in it. This option is not valid in professional quality print jobs. • Create several different designs. This is a valid and common solution but it requires maintaining
different design versions and requires an extra decision by the user as to when to use each design.
The Form Editor Advanced Options address this issue by defining flexible rules that deal with these changes ad-hoc: • Position Links handle the vertical and horizontal position of fields relative to the position of other
fields. This can be related to the size of a fields or to the absence of data in a field. • Suffix enables you to specify a constant suffix in a field, so that the ordering user has to type only the
changing information, a situation that is common to emails. This reduces the unnecessary typing of data and thus possible errors.
• Group Centering is used to balance "white space" resulting from such changes as vertically or horizontally modified position links, changes in the number of lines in a multiline field, or horizontal centering of fields with varying length.
• Empty Fields are used to remove labels and captions for fields that have been left blank. • Identical Input Fields are used to specify several fields that use the same data, so that the ordering
user has to enter the data only once and all the connected fields are populated automatically. This reduces unnecessary typing of data and thus possible errors.
• Style Selection is used for instances where a field's style (font, font size, and font color) might require adjustment.
To define advanced options 1 Click Advanced Options; the ADVANCED OPTIONS dialog box opens with the POSITIONS LINKS tab
selected. 2 Click OK when you finish modifying the ADVANCED OPTIONS.
Defining Position Links 1 Select the field you would like to re-position (for example, City) and click Add; the field is added into
the Moved FIELD TEXT box and a LEADING FIELD drop-down list appears. 2 Select the empty field (for example, Address 2) in the LEADING FIELD and select the VERTICAL LINK
check box. 3 This ensures that the vertical location of the field being repositioned (City) will be affected by the
vertical position (or the absence) of the other field (Address 2). 4 Leave the relative positioning radio button at its default selection. 5 A text message at the bottom of the window indicates the nature of the change (for example, "In case
‘Address 2’ is empty ‘City’ will be placed in ‘Address 2’ position"). 6 Repeat the process for each field that needs repositioning. 7 Click Apply.
Defining a Suffix 1 In the ADVANCED OPTIONS window, click the Suffix tab. 2 Select the field where the suffix does not change (for example, Agent email) and click Add. The field
is added to the FIELDS WITH SUFFIX area. 3 Fill in the suffix (for example, @royalcargo.com) in the Field Suffix field. 4 Click Apply.
Defining Advanced Group Centering 1 In the ADVANCED OPTIONS window, click the Group Centering tab. 2 Create a block of fields to act a s group by clicking New Group and entering a name for the group of
fields (for example, Customer). 3 Indicate whether horizontal or vertical centering should be performed for the group.
Job Business Flow
106 FreeFlow Web Services
4 For each field that will be in the group, select the field and click Add. 5 Click Apply.
The application calculates the enclosing rectangle for the fields in the group and the vertical or horizontal center of the rectangle. When a job is ordered, the application checks the existing fields in the order, recalculates the enclosing rectangle and aligns the new vertical or horizontal center to the original point. It then positions the text accordingly.
Handling Empty Fields 1 In the ADVANCED OPTIONS window, click the Empty Fields tab. 2 For each field whose label should be removed if the field is empty, select the field and click Add. The
field is added to the EMPTY FIELDS DEFINITIONS area. 3 When done, click Apply.
Handling Identical Input Fields 1 In the ADVANCED OPTIONS window, click the Identical Input Fields tab. 2 Click New Group and enter a name for the field (for example, Customer Name). 3 For each field sharing identical information with another field, select the field and click Add. 4 When done, click on Apply.
Defining Advanced Style Selection 1 In the ADVANCED OPTIONS window, click the Style Selection tab. 2 To adjust a style item for a group of fields:
a Click Add Group. The ADD GROUP dialog box appears. b Specify the GROUP NAME (for example, Customer). c Select the type of item (Font, Font Size, or Color) in the GROUP TYPE drop down box. and click OK
in the ADD GROUP dialog box. d Add fields to the group by selecting each field and clicking Add. e Select the allowable style item values (for example, select the allowable fonts if you selected Font
from the drop down list) for the fields in the group. f Repeat this for each group and style combination.
Arrange Fields You have the option to change the sequence of the variable data fields and to break the variable data form that is filled by the Print Buyer during ordering (when dealing with personalized templates) into several wizard pages. The ability to break the form into several pages is important in the following circumstances: • The form contains a large number of variable data fields. • The template has several pages with variable data fields on each page. • The variable data fields have different context. For example in a real estate direct mail postcard some
fields are for the real estate agent, some fields for the advertised property, and some for the recipient.
The splitting of the form to several tabs can be done manually or in case of multi-page templates—automatically.
Changing the Sequence of Fields 1 Select the Arrange Fields tab or click Save & Continue in the VARIABLE DATA tab. 2 Use the Move Up and Move Down buttons to change the sequence of the variable information fields. 3 Click Save & Continue to continue to the Ordering Sequence stage.

Creating Variable Data Templates
Print Service Provider User Guide 107
Splitting Fields into Several Tabs If you want to split the variable information form into several tabs, decide if the split will be logical or by pages.
To split manually: 1 Select the field which you want moved to the next tab and click Add Tab; the CREATE VI TAB dialog
box opens. 2 Type the tab name and description and click OK; a tab line is added.
To split automatically: Click Split Steps by Pages; the list of variable information fields is broken into several tabs according to the number of pages in the template. The sequence of steps is changed automatically, if required.

Print Service Provider User Guide 109
8 Pricing
In This Chapter
Introduction ....................................................................................... 109 Pricing Overview ............................................................................... 109 Setup ................................................................................................. 112 Price Management ............................................................................ 119 Line Item Library ............................................................................... 120
Introduction This chapter describes the pricing and tax calculation features of Web Services. It provides an overview, explanation of concepts and step-by-step instructions for performing all the pricing related tasks.
The chapter is composed of the following sections: • Pricing Overview (on page 109) – a comprehensive overview of pricing concepts and options. • Setup (on page 111) – describes how to define settings that enable the system to automatically
generate a price and to display it online to the Print Buyer. • Price Management (on page 119) – describes tools to manage the pricing data and to view and
modify the pricing of jobs and orders. • Line Item Library (on page 111) – provides an overview of the line item library and general library
management tasks.
Pricing Overview Web Services provides a comprehensive feature for pricing jobs and orders. Whenever the Print Buyer is viewing the job summary or clicking Get Quote in the shopping cart, the pricing mechanism is activated to calculate the job price. Then, during the checkout process, after the shipping details are supplied, the pricing mechanism is activated again to calculate the order price which includes the urgency surcharges, discount, shipping price, and taxes.
Concepts The pricing feature introduces some basic concepts. While understanding these concepts might not be critical for daily operation of the application, you may find them beneficial for getting the maximum benefit out of the pricing mechanism.
Calculation Model A calculation model is an algorithm that calculates a job’s pricing and production data. The calculation model contains a planner component, an estimation model and a decision component.
The system is supplied with the following job pricing calculation models: • Intent • Manual • Excel (part of an optional module)
You select the job calculation model when defining job type and template pricing, or in case of Excel pricing, when setting up an account.
A separate calculation model is supplied for order pricing.

Pricing
110 FreeFlow Web Services
Intent Calculation Model The intent calculation model plans the job’s production and calculates the job’s pricing based on the intent selections made by the Print Buyer.
Manual Calculation Model The manual calculation model plans the job’s production, but does not provide an automatic price. You will need to provide the price manually when a job is created.
Excel Calculation Model (Optional) The Excel calculation model calculates the price according to an Excel spreadsheet that you provide. The Excel calculation model is part of the optional Data Export module.
For more information, refer to Excel Pricing (on page 161).
Planner Component The planner component is the first part of the job pricing calculation model. It is an algorithm that checks the job’s intent and the output devices available to produce the job, filters only those devices that match the color, page size, and quality intent of the job, and generates several production plans for producing the job.
When you are defining the job type and template pricing, you can set-up parameters for the planner component. These parameters are the output devices and imposition parameters for printing the job type or template. This data will limit the planner component to check for possible production options only among predefined devices and imposition options, otherwise the planner will search all available devices and generate the production plans automatically.
Production Plan A set of data generated by the planner component that includes imposition constraints and output device selection. In most cases several production plans are generated for each job.
Estimation Model An algorithm that calculates the price of a job for each specific production plan, based on the calculation model used.
Result Matrix A pricing table generated by the estimation model for each production plan. Comprises a list of result line items with their quantities, associated cost and price.
Decision Component An algorithm that chooses the most appropriate production plan from the list of available plans. The decision is made according to the following parameters: • Cheapest cost, if pricing by press sheets or area, otherwise... • The first device and press sheet size in the list.
Line Item A basic pricing unit in the system which is used to calculate all the prices in the system.
A line item includes: • Pricing units. • Base cost. • Cost per number of units. • Base price. • Price per number of units.
The pricing units supported by the system, for intent pricing line items, are: copies, sheets, total pages, square inch, and square cm.
Pricing Overview
Print Service Provider User Guide 111
In addition the application manages line items for taxes, shipping, etc. These line items have other units, such as per cent (%) and weight.
Result Line Item A line item is generated by the estimation model, when creating the result matrix.
Line Item Library The line item library stores all of the line items in the system. Working directly in the line item library is, therefore, very efficient and convenient. It is, however, also very risky, as you might, by accident, change the wrong line item, or change the right line item, but not realize the full extent of the resulting effect. Be sure you are well familiar with the line item library and the objects it affects, before you make modifications.
Tax Package A component comprising one or more taxes that need to be applied to a job, an order or a shipping cost. When the tax package comprises more than one tax (for example in US or Canada), the tax package will also include information on how the individual taxes are calculated.
The individual taxes can be limited to geographical areas to accommodate local tax regulations.
Pricing Process Overview The pricing process comprises the following stages: • Setup (on page 111) – you set-up all the data and parameters required for pricing. • Job Pricing (on page 112) – the application automatically calculates the price of jobs. • Order Pricing (on page 112) – the application automatically calculates the price of orders. • Price Management (on page 112) – you view and modify the line items, job and order prices as
necessary.
Setup The following section provides information on how to set-up taxes and job pricing.
Order Pricing Setup The following settings have to be performed for the order pricing to function properly: • Define the system-wide urgency surcharges in PRINT SETTINGS -> PRICING -> BUSINESS. For additional
information, refer to Managing Output Devices (on page 30). • Define all the applicable taxes in PRINT SETTINGS -> PRICING -> TAX LIBRARY. • Define the shipping methods’ pricing and tax (if shipping tax is required) in PRINT SETTINGS ->
SHIPPING -> SHIPPING METHODS. For additional information, refer to Defining Shipping Methods (on page 39) .
• Define the tax and discount in ACCOUNT -> ACCOUNT SETUP -> PREFERENCES. An account can inherit the system default tax, or you can define an account level tax. For additional information, refer to Modifying Account Preferences (on page 46).
• Define the urgency and tax for job types that should not inherit the system settings. For additional information, refer to Job Business Flow (on page 77).
• Define the urgency and tax in templates that should not inherit the settings of the job type. For additional information, refer to Job Business Flow (on page 77).
Job Pricing Setup The following settings have to be performed for the job pricing to function properly: • Define the job type pricing – you can use either intent-based or manual calculation model. • Define the template pricing – a template can inherit the pricing setup of the job type, or you can define
for it specific pricing. This way you can provide different price lists for different accounts, based on

Pricing
112 FreeFlow Web Services
your contractual agreements. • Define an Excel based pricing model for an account (optional).
Job Pricing The job pricing mechanism is activated whenever the Print Buyer views the job summary or clicks Get Quote in the shopping cart.
NOTE: When a job is in the shopping cart, there are still no shipping details (date, method and address) attached to it. Therefore, the system cannot calculate shipping related data at this stage. I.e. it does not display taxes, shipping cost or urgency surcharges in the shopping cart.
The job pricing calculation is applied by the system hierarchically, as follows: 1 Use job level pricing (manual) if it has been defined, otherwise... 2 Use template pricing if it has been defined, otherwise... 3 Use Excel pricing if it has been defined for an account, otherwise... 4 Use job type pricing if it has been defined, otherwise... 5 Price Not Available is displayed.
Order Pricing The order pricing mechanism is activated during the checkout process, after the shipping details are supplied. It calculates the final job price (in case urgency surcharge needs to be applied) and the order price which includes the discount, shipping price and taxes.
Order Tax Hierarchy The tax calculation is applied hierarchically. The system checks if a tax was specified at the first level, if it was – the tax calculation is performed, if not it checks if a tax was specified at the next level, as follows: 1 Use job tax, if it has been defined, otherwise... 2 Use template tax, if it has been defined, otherwise... 3 Use job type tax, if it has been defined, otherwise... 4 Use account tax, if it has been defined, otherwise... 5 Use system tax.
Price Management Price management is performed in several places: • In the job tracking area you can view and modify the pricing data of jobs and orders (based on job
status limitations). • In the line items library you can view and modify the line items and result line items. • In the production queue you can view and modify the pricing data of jobs
Setup The following section provides information on how to set-up taxes and job pricing.
Set-up Tax Packages In order to be able to assign taxes to specific objects such as job types, templates or accounts, you first need to create tax packages. In many cases you would need only one tax package, containing a single tax.
This section provides a tax overview and describes how to create: • A single-tax package
Setup
Print Service Provider User Guide 113
• A multiple-tax package • An area-independent tax • An area-dependent tax
Area-dependent Taxes You can define area-dependent taxes. There are two area dependency options: • Dependent on Delivery Address is appropriate for situations when the tax is related to the shipping
destination of an order. • In some countries the tax is related to the primary business location of the Print Buyer, in which case
Dependent on Billing Address should be selected.
The same area definition rules apply to both area-dependent taxes.
Multiple Tax Calculation Usually when multiple taxes are applied to a product, each tax is calculated on the base product price and then added to the total.
Example:
Product selling price $100.00
Tax A 5% $5.00
Tax B 10% $10.00
Total Price $115.00
Sometimes the tax regulations require to apply one tax on top of the sub-total of the product selling price plus another tax. For example in the Quebec and Prince Edward Island provinces of Canada, the PST (Provincial Sale Tax) is charged based on the total of the selling price plus GST (Goods and Services Tax).
Example:
Product selling price $100.00
Tax GST 5% $5.00
Sub-total $105.00
PST 10% $10.50
Total Price $115.50
Managing the Tax Packages Use the tax packages library to create, edit and delete tax packages.
Creating a Single-tax Package 1 Select PRINT SETTINGS -> PRICING -> TAX PACKAGES; the tax packages library appears. 2 Click New in the TAX PACKAGE list on the left; a new tax package is added to the list. 3 Type the tax package name and description. 4 Click Save; the tax package name is updated in the list on the left. 5 Click Add Tax; the TAX LIBRARY dialog box appears. You can choose an existing tax from the library
or create a new one: o To create a new tax refer to the Creating a Simple Tax (on page 114) task or Creating an
Area-dependent Tax (on page 115) task. o To add an existing tax select a tax name from the list and click Add.
6 Click Save.

Pricing
114 FreeFlow Web Services
Creating a Multiple-tax Package 1 Select PRINT SETTINGS -> PRICING -> TAX LIBRARY; the TAX LIBRARY appears. 2 Click New in the TAX PACKAGE list on the left; a new tax package is added to the list. 3 Type the tax package name and description. 4 Click Save; the tax package name is updated in the list on the left. 5 Click Add Tax; the TAX LIBRARY dialog box appears. You can choose an existing tax from the library
or create a new one: o To create a new tax refer to the Creating a Simple Tax (on page 114) task or Creating an
Area-dependent Tax (on page 115) task. o To add an existing tax select a tax name from the list and click Add.
6 Add more taxes.
7 If the sequence of applying the taxes is important, use the buttons (move up and move down), to change the sequence of the taxes.
8 If there is a need to include one or more of the first taxes in the subtotal on top of which the next tax is calculated, select the Include in sub total checkbox for these taxes.
9 Click Save.
Setting a Default Tax Package Every customer account and job type automatically uses the default tax package, unless you select a different tax package. 1 Select PRINT SETTINGS -> PRICING -> TAX LIBRARY; the tax packages library appears. 2 Select a tax package from the list on the left. 3 Click Set as Default; the selected package is marked as SYSTEM DEFAULT.
Duplicating a Tax Package Duplicating a tax package is a fast way to create a new package that is similar in some aspects to an existing one. 1 Select PRINT SETTINGS -> PRICING -> TAX LIBRARY; the tax packages library appears. 2 Select a tax package from the list on the left.
3 Click (duplicate); a copy of the selected package is created and added to the list.
Deleting a Tax Package Duplicating a tax package is a fast way to create a new package that is similar in some aspects to an existing one. 1 Select PRINT SETTINGS -> PRICING -> TAX LIBRARY; the tax packages library appears. 2 Select a tax package from the list on the left.
3 Click (delete); a confirmation message is displayed. 4 Click Yes; the tax package is deleted.
Managing Taxes Creating a Simple Tax 1 Select a tax package or create a new one and click Add Tax to open the TAX LIBRARY dialog box. 2 Click New in the TAX LIBRARY dialog box; a NEW TAX dialog box appears. 3 Type the tax name and description. 4 Type the tax percentage. 5 Click OK; the dialog box is closed and the tax is added to the package you created.
The linked image cannot be displayed. The file may have been moved, renamed, or deleted. Verify that the link points to the correct file and location.
The linked image cannot be displayed. The file may have been moved, renamed, or deleted. Verify that the link points to the correct file and location.
The linked image cannot be displayed. The file may have been moved, renamed, or deleted. Verify that the link points to the correct file and location.
Setup
Print Service Provider User Guide 115
Creating a dependent Tax 1 Select a tax package or create a new one and click Add Tax to open the TAX LIBRARY dialog box. 2 Click New in the TAX LIBRARY; a NEW TAX dialog box appears. 3 Type the tax name and description. 4 Type the tax percentage. 5 Enable the Apply Rule checkbox. 6 Select the Include option for the created tax to be applied when certain conditions are met, or the
Exclude option for the created tax to be applied when certain conditions are not met. 7 Fill in the Field Name for Web Services to check, and the Field Value that must be met. 8 Click OK; the dialog box is closed and the tax is added to the package you created.
Removing a Tax from a Package 1 Select a tax package. 2 Select a tax in the package. 3 Click Remove; a confirmation message appears. 4 Click Yes; the tax is removed from the list.
Editing a Tax 1 Select a tax package. 2 Select a tax in the package. 3 Click Edit Tax; a confirmation message appears. 4 Click Yes; the EDIT TAX dialog box opens. 5 Modify the tax as required. 6 Click OK; the dialog box closes.
Deleting a Tax 1 Select a tax package. 2 Click Add Tax; the TAX LIBRARY dialog box opens. 3 Select a tax from the list. 4 Click Delete; a confirmation dialog box opens. 5 Click Yes; the tax is deleted from the library and from all the tax packages containing it. 6 Click Cancel; the dialog box closes.
Duplicating a Tax 1 Select a tax package. 2 Click Add Tax; the TAX LIBRARY dialog box opens. 3 Select a tax from the list. 4 Click Duplicate; a duplicate of the tax is created. 5 Click Cancel; the dialog box closes.
Set-up Job Type Pricing This section provides information on the following subjects: • Setting-up intent-based pricing for a job type or template. • Setting-up manual pricing for a job type or template.
Pricing
116 FreeFlow Web Services
Selecting a Job Type 1 Select PRINT SETTINGS -> JOB BUSINESS FLOW -> JOB TYPE LIBRARY; the JOB TYPE LIBRARY appears. 2 In the JOB TYPE LIBRARY, select a job type. 3 Click Edit; the job type editing opens with the GENERAL PROPERTIES tab selected.
Selecting a Template 1 Select ACCOUNTS -> STORE SETUP -> TEMPLATES; the TEMPLATES repository appears. 2 Select an account and a template. 3 Click Edit Properties; the template editing opens with the GENERAL PROPERTIES tab selected.
Setting-up Intent Pricing 1 Select the Settings tab; the SETTINGS tab appears with the QUANTITY tab selected. 2 Select the Pricing tab; the PRICING tab appears. 3 Select the Use New Settings option. 4 Select Intent Pricing in the CALCULATION MODEL list; the system creates an empty price list (line item)
for every single intent option of the job type. 5 Define production parameters
a Define quantity ranges: i If you want to define different production parameters for different quantity ranges (for example
a digital device for short runs and an offset device for long runs), click Add Quantity; another quantity range is added to the PLANNER area.
ii Type the values in the FROM and TO fields. b Connect a device to a quantity range:
i In the PLANNER section, click Choose Device(s); the DEVICE AND IMPOSITION dialog box opens.
ii Select the output device, press sheet size and imposition parameters. iii Click OK to save the changes and close the dialog box. iv Click Add Device to add more device options to this range.
6 Create a price list for the base product: a Select the Enabled checkbox; the line item information to its right becomes enabled. b Select the type of units for pricing (copies is the most common option). c Add quantity ranges:
i If you want to define different prices for different quantity ranges (the price per unit goes down when larger quantities are ordered), click New Range; another quantity range is added to the Planner area.
ii Type the values in the From and To fields. d Define the pricing for each quantity range:
i Type the fixed cost for the base product. ii Type the variable cost and the number of units to which it applies. iii Type the fixed price for the base product. iv Type the variable price for the number of units indicated above.
e Click Save; the line item is saved in the line item library and the line item number is updated. 7 Define price lists for each intent option that you want to price:
a Click to expand the option. b Repeat all the sub-steps of creating a price list (Step 6 above).
You have finished setting-up intent-based pricing.
The linked image cannot be displayed. The file may have been moved, renamed, or deleted. Verify that the link points to the correct file and location.
Setup
Print Service Provider User Guide 117
Intent Pricing Examples To clarify the use of intent pricing, let’s look at some examples.
Postcards Job Type You want to offer postcard printing: • Page Size: 8.5"x5.5" (default); 5"x7" • Colors: Full color (default); Black & white • Paper: 14 pt. Gloss Cover (default); 14 pt. Matte Cover • Number of Pages: 2 • Folding: no folding (default); simple fold
Pricing considerations: • There is no base price for the product. • Page size does not affect pricing, the price for both sizes of postcards is the same. • Full color printing is the base price for color postcards. • Black & white printing is the base price for black & white postcards. • Paper price is included in the base price. • No folding is included in the base price. • Simple fold has an additional pricing.
From To Fixed Variable Units
Base Price – disabled
Page Size, 8.5" x 5.5" – disabled
Page Size, 7" x 5" – disabled
Colors, Full color
1 1000 Cost: $3 Cost:$20 per 100 Price:$15 Price:$50
1001 10000 Cost: $3 Cost:$20 per 100 Price:$10 Price:$40
Colors, Black & white
1 1000 Cost: $3 Cost:$10 per 100 Price:$10 Price:$30
1001 10000 Cost: $3 Cost:$10 per 100 Price:$5 Price:$20
Paper, 14 pt. Gloss Cover – disabled
Paper, 14 pt. Matte Cover – disabled
Folding, no folding – disabled
Folding, Simple fold
1 Infinity Cost: $10 Cost:$5 per 100 Price:$20 Price:$8
Document Duplication Job Type You want to offer document duplication: • Page Size: 8.5"x11" (default); Legal • Colors: Black & white (default); Full color
Pricing
118 FreeFlow Web Services
• Paper: 100# Hi-gloss coated stock (default); 100# uncoated text stock • Number of Pages: 1-200 • Binding: corner stapling (default); binder; spiral binding; thermal binding
Pricing considerations: • There is no base price for the product. • Page size does not affect pricing. • Full color printing is the base price for color documents, the pricing unit is clicks. • Black & white printing is the base price for black & white documents, the pricing unit is clicks. • Paper price is calculated separately. • Corner stapling is included in the base price. • Binder, spiral binding, and thermal binding are calculated separately per copy.
From To Fixed Variable Unit: Copies
Base Price – disabled
Page Size, 8.5" x 5.5" – disabled
Page Size, 7" x 5" – disabled
Colors, Full color
1 Infinity Cost: $0 Cost:$0.05 per 1 click Price:$10 Price:$0.15
Colors, Black & white
1 Infinity Cost: $0 Cost:$0.015 per 1 click Price:$5 Price:$0.10
Paper, 100# Hi-gloss coated stock
1 Infinity Cost: $1 Cost:$0.05 per 5 sheets Price:$5 Price:$0.08
Paper, 100# uncoated text stock
1 Infinity Cost: $1 Cost:$0.04 per 5 sheets Price:$5 Price:$0.07
Binding, corner stapling – disabled
Binding, spiral binding
1 100 Cost: $4 Cost:$5 per 10 copies Price:$10 Price:$8
101 Infinity Cost: $3 Cost:$4 per 10 copies Price:$5 Price:$7
Binding, binder
1 100 Cost: $10 Cost:$0.92 per 1 copy Price:$20 Price:$2
101 Infinity Cost: $7.50 Cost:$0.85 per 1 copy Price:$15 Price:$1.5
Binding, thermal binding
1 100 Cost: $2 Cost:$3 per 10 copies
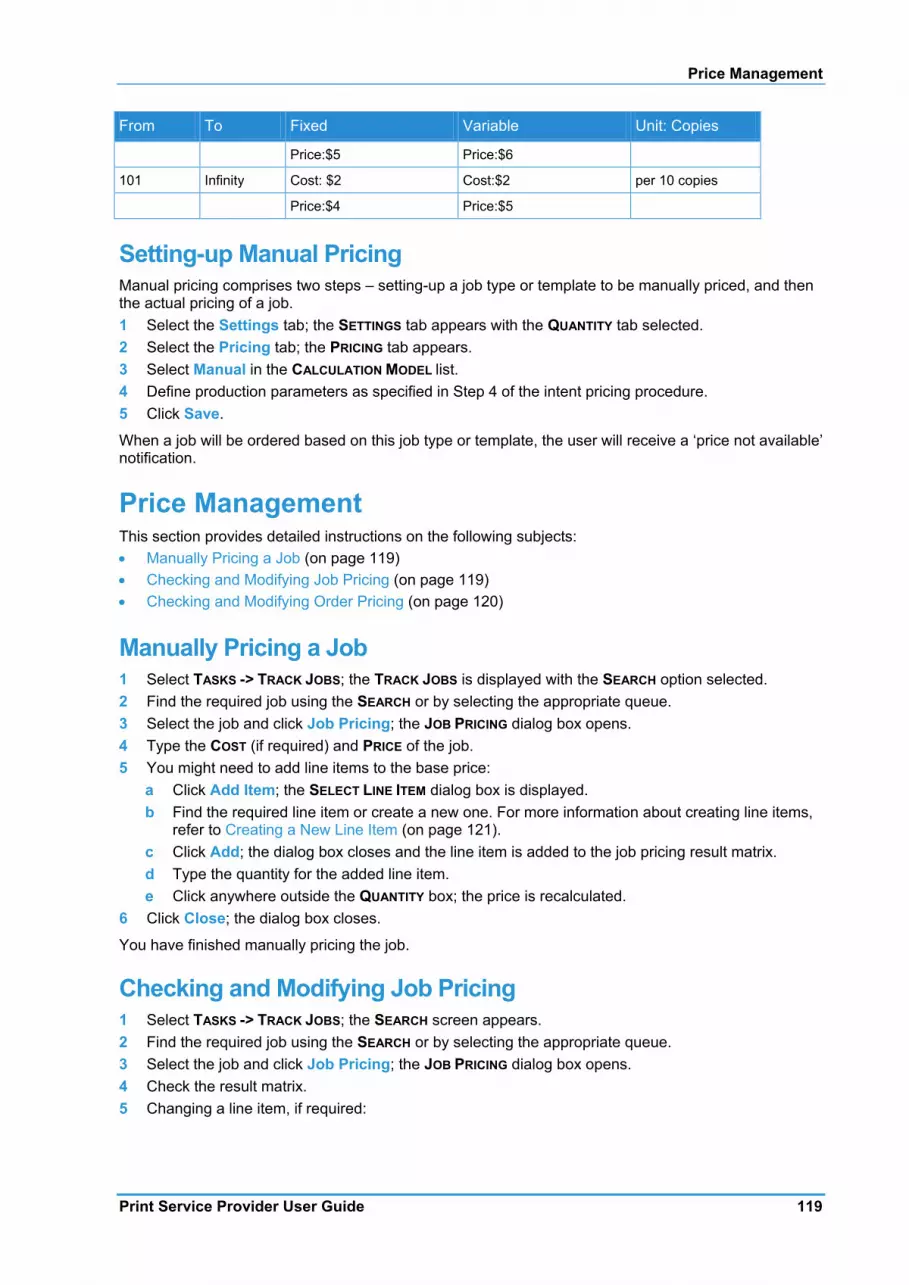
Price Management
Print Service Provider User Guide 119
From To Fixed Variable Unit: Copies Price:$5 Price:$6
101 Infinity Cost: $2 Cost:$2 per 10 copies Price:$4 Price:$5
Setting-up Manual Pricing Manual pricing comprises two steps – setting-up a job type or template to be manually priced, and then the actual pricing of a job. 1 Select the Settings tab; the SETTINGS tab appears with the QUANTITY tab selected. 2 Select the Pricing tab; the PRICING tab appears. 3 Select Manual in the CALCULATION MODEL list. 4 Define production parameters as specified in Step 4 of the intent pricing procedure. 5 Click Save.
When a job will be ordered based on this job type or template, the user will receive a ‘price not available’ notification.
Price Management This section provides detailed instructions on the following subjects: • Manually Pricing a Job (on page 119) • Checking and Modifying Job Pricing (on page 119) • Checking and Modifying Order Pricing (on page 120)
Manually Pricing a Job 1 Select TASKS -> TRACK JOBS; the TRACK JOBS is displayed with the SEARCH option selected. 2 Find the required job using the SEARCH or by selecting the appropriate queue. 3 Select the job and click Job Pricing; the JOB PRICING dialog box opens. 4 Type the COST (if required) and PRICE of the job. 5 You might need to add line items to the base price:
a Click Add Item; the SELECT LINE ITEM dialog box is displayed. b Find the required line item or create a new one. For more information about creating line items,
refer to Creating a New Line Item (on page 121). c Click Add; the dialog box closes and the line item is added to the job pricing result matrix. d Type the quantity for the added line item. e Click anywhere outside the QUANTITY box; the price is recalculated.
6 Click Close; the dialog box closes.
You have finished manually pricing the job.
Checking and Modifying Job Pricing 1 Select TASKS -> TRACK JOBS; the SEARCH screen appears. 2 Find the required job using the SEARCH or by selecting the appropriate queue. 3 Select the job and click Job Pricing; the JOB PRICING dialog box opens. 4 Check the result matrix. 5 Changing a line item, if required:

Pricing
120 FreeFlow Web Services
a Click the number link for the line item that has to be changed; the EDIT LINE ITEM dialog box opens. b Modify the line item as needed. For more information about creating line items, refer to Editing
JBF Option, Design and Custom Line Items (on page 121). c Click Save; the dialog box closes and the line item is updated.
6 You might need to add line items to the base price. For more information about adding a line item, refer to Editing JBF Option, Design and Custom Line Items (on page 121).
7 Click Close; the dialog box closes and the data is saved.
Checking and Modifying Order Pricing 1 Select TASKS -> TRACK JOBS; the SEARCH screen appears. 2 Find the required job using the SEARCH or by selecting the appropriate queue. 3 Select the job and click Order Pricing; the ORDER PRICING dialog box opens. 4 Check the result matrix. 5 Change a line item, if required:
a Click the number link for the line item that has to be changed; the EDIT LINE ITEM dialog box opens. b Modify the line item as needed. For more information about adding a line item, refer to Editing JBF
Option, Design and Custom Line Items (on page 121). c Click Save; the dialog box closes and the line item is updated.
6 You might need to add line items to the base price. For more information about adding a line item, refer to Editing JBF Option, Design and Custom Line Items (on page 121).
7 Click Close; the dialog box closes and the data is saved.
Line Item Library The line item library stores all of the line items in the system. Working directly in the line item library is, therefore, very efficient and convenient. It is, however, also very risky, as you might, by accident, change the wrong line item, or change the right line item, but not realize the full extent of the resulting effect. Be sure you are well familiar with the line item library and the objects it affects, before you make modifications.
Types of Line Items There are line items of several types, each with its particular characteristics.
Setup Line Items Some of the line items are generated as part of the system and pricing setup process. • JBF Option – a JBF Option line item is created for each intent pricing option of a job type or template
pricing. • Tax – a tax line item is created for each tax in the application. • Discount – a discount line item is created for each account in the application. • Urgency – two urgency line items are created for the system level setting, and for each job type and
template that have specific urgency settings. • Delivery – a delivery line item is created for every shipping method in the application. • Custom – line items that you create for pricing additional services that are not intent related. For
example, spelling. • Design – line items that you create for additional design services, such as designer time or proofs.

Line Item Library
Print Service Provider User Guide 121
Result Line Items • Calculated Job – a calculated job line item is created for each job in the system. • Book Assembly Job – the Book Assembly job line item is created for every Book Assembly job
ordered. • Excel Price – an Excel line item is created for every job that is priced using Excel. • Manual Price – the Manual Price line item has no pricing data - it returns a Price N/A for every
manually priced job.
Managing the Line Item Library To access the line item library select PRINT SETTINGS -> PRICING -> LINE ITEMS.
Searching for a Line Item You can search for line items by type and criteria. 1 Select line item Type if you want to search for line items of a specific type only. 2 Select the search criteria from the list. 3 Select the comparison operator. 4 Type the textual criterion in the text box. 5 Click Search; the system performs the search and shows the result in the list. 6 To reset the library to the full list:
a Select All in the TYPE list, Line item # and All in the comparison operator list. b Click Search; the full list is displayed.
Creating a New Line Item You can create line items of custom, design, and discount types.
1 Click (Create New Line Item); the EDIT LINE ITEM dialog box opens. 2 To create a custom or design line item, select Custom or Design in the type list. For more information
about editing line items, refer to Editing JBF Option, Design and Custom Line Items (on page 121). 3 To create a discount line item, select Discount from the TYPE list; the dialog box display is refreshed
and changed. For more information about editing discount line items, refer to Editing Discount Line Items (on page 122).
4 Click Save; the line item is created and the dialog box closed.
Editing Line Items Editing line items differs according to the type of line item. The following instructions are provided per line item type.
Editing JBF Option, Design and Custom Line Items 1 Find the line item to be changed and click Edit; the EDIT LINE ITEM dialog box opens. 2 Select the units from the UNIT list. 3 Add quantity ranges:
a If you want to define different prices for different quantity ranges (the price per unit goes down when larger quantities are ordered), click New Range; another quantity range is added to the PLANNER area.
b Type the values in the FROM and TO fields. 4 Define the pricing for each quantity range:
a Type the fixed cost for the base product. b Type the variable cost and the number of units to which it applies.
The linked image cannot be displayed. The file may have been moved, renamed, or deleted. Verify that the link points to the correct file and location.

Pricing
122 FreeFlow Web Services
c If you want to use markup for the price calculation, select the Use markup check box and type the percent; the price is automatically updated.
d If you didn’t use markup, type the fixed and variable price for the base product. 5 Click Save; the line item is saved and the dialog box closed.
Editing Tax Line Items 1 Find the line item to be changed and click Edit. 2 Modify the tax description and level, if required. 3 Click Save; the line item is saved and the dialog box closed.
Editing Discount Line Items 1 Find the line item to be changed and click Edit. 2 Modify the discount description and level, if required. 3 Click Save; the line item is saved and the dialog box closed.
Editing Urgency Line Items 1 Find the line item to be changed and click Edit. 2 Modify the line item description and level, if required. 3 Click Save; the line item is saved and the dialog box closed.
NOTE:
Remember that if you are changing the system level urgency line items, the change will affect all the job types and templates that inherit these settings from the system. System level urgency settings are called ‘Express Delivery Surcharge’ and ‘Urgent Delivery Surcharge’, as opposed to specific job type or template line items that have names like ‘Express Surcharge for Poster’.
Editing Delivery Line Items Delivery type line items are associated with Fedex, US Postal Service, UPS and direct mailing line item types. 1 Find the line item to be changed and click Edit. 2 Modify the line item data. For more information about editing shipping method pricing, refer to
Defining Shipping Methods (on page 39). 3 Click Save; the line item is saved and the dialog box closed.
Editing Calculated Job Line Items 1 Find the line item to be changed and click Edit. 2 To view the result matrix related to this job, click the Detailed Pricing link; the JOB PRICING dialog box
opens. a For more information about this screen, refer to Checking and Modifying Job Pricing (on page
119). b Click Close.
3 Click Save; the line item is saved and the dialog box closed.
Print Service Provider User Guide 123
9 Production Management
In This Chapter
Production Queue Overview ............................................................. 123 Managing Jobs in the Production Queue .......................................... 124 Managing Notifications and Alerts .................................................... 132 Producing Jobs ................................................................................. 133 Delivery Queue ................................................................................. 135 Track Jobs ......................................................................................... 139
Your Print Buyers initiate print jobs on the Print Buyer side of the FreeFlow Web Services system. After the Print Buyer prints the job, and the job quote is ready, the job is transferred to the Print Service Provider side of the system and appears in your PRODUCTION QUEUE window. In the PRODUCTION QUEUE window, you can do various activities with the job, before approving the job for production. After the job is approved, it enters the DELIVERY window where you can view and edit shipping information, print shipping labels, and approve jobs for delivery.
This chapter is composed of the following sections: • Production Queue Overview (on page 123) • Managing Jobs in the Production Queue (on page 124) • Managing Notifications and Alerts (on page 132) • Producing Jobs (on page 133) • Delivery Queue (on page 135) • Track Jobs (on page 139)
Production Queue Overview The PRODUCTION QUEUE window displays all the jobs that were ordered by Print Buyers, and that are waiting for your approval before routing to actual production. New jobs that enter the production queue are automatically placed at the end of the queue.
When you select a job in the production queue job list, its details are displayed in the job’s details panel. From the job’s details panel you can preview the job, and access various dialog boxes that allow you to perform needed tasks and adjustments. For example, examine and change imposition parameters, and reroute jobs to different output devices. One of the main tasks that you perform is creating the job ticket. The PRODUCTION QUEUE window, and the activities that you can perform are described in detail in the following sections.
When the job is ready to be printed, you send it to the output device. The approved job is removed from the production queue, enters the delivery queue and the printing queue.
To access the Production Queue window: 1 From the Web Services menu, select TASKS -> PRODUCTION; the PRODUCTION QUEUE window
appears. All the ordered jobs are listed in the production queue job list on the left side of the window. By default, the first job in the list is selected, and its information is displayed in the job’s details panel on the right side of the window.
2 Click to select another job in the list; the job’s details panel is updated accordingly. To quickly locate a job in the list, use the Search option. For details, see Managing the Production Queue Job List (on page 124).
3 Using the options in job’s details panel, you can edit job parameters, and perform production-related activities, as explained in this chapter.
Production Management
124 FreeFlow Web Services
Managing Jobs in the Production Queue Managing the Production Queue Job List When a new job enters the production queue, it automatically enters the end of the production queue job list. The following information is displayed for each job in the list: • A job thumbnail. • The JOB #, JOB NAME, COPIES, REQ. DATE (if requested), ACCOUNT name, OUTPUT DEVICE (if defined). • The VI Type column indicates if the job contains variable information. • The column indicates if the job contains mismatched information. An alert is created if there is a
mismtach problem. For details, see Alerts in Managing Notifications and Alerts (on page 132). • The Integration Type column indicates the type of integration that was utilized, if integration was used
in the job. • The Output Format column indicates the job output format. For example, PPML. • The Pricing problem column indicates if there is a pricing problem with this job. An alert is created if
there is a problem. For details, see Alerts in Managing Notifications and Alerts (on page 132). • The Imposition status column indicates if there is an imposition problem with this job. An alert is
created if there is a problem. For details, see Alerts in Managing Notifications and Alerts (on page 132).
You can perform the following activities in the production queue job list: • Filter jobs in the queue, using the SEARCH option. • Change the order of the jobs in the queue, using the up and down arrows. When the queue is viewed
with the DEFAULT SORT, you can move jobs up and down the queue, and move jobs to the beginning or end of the queue.
• Refresh the queue to show newly added jobs.
The Job Details Panel The job’s details panel displays the details of the job that is selected in the production queue job list. Using the icons and buttons in the job’s details panel, you access dialog boxes that allow you to view additional job parameters, and perform necessary changes. For example, edit imposition parameters, and create a job ticket.
Icons and buttons that appear at the top of the job’s details panel allow you to perform job modification tasks: • Job Properties icon. For details, see Viewing and Editing Job Properties (on page 142). • Attach files icon. For details, see Attaching Files to the Job (on page 126). • Queue selection icon. Enabled only when the selected output device has multiple queues. In this
case, you can select another queue. • Trim & Bleed Editor icon. For details, see Viewing and Modifying a Job’s Trim and Bleed Parameters
(on page 126). • Device and Imposition icon. For details, see Editing Job Imposition (on page 126). • Gang jobs using Layout Maker icon. For details, see Ganging Jobs for Production (on page 130). • Edit Layout icon. For details, see Layout Maker Overview (on page 130). • Split Composite job icon. Relevant if you used the gang jobs option. For details, see Printing Book
Assembly Jobs on More Than One Output Device (on page 131). • Open Job ticket icon. For details, see Creating a Job Ticket (on page 132). • Outsource button. For details, see Outsourcing Jobs to a Partner Print Service Provider (on page
133). • Move to button. For details, see Changing the Status of a Job (on page 135). • Approve button. For details, see Approving a Job for Printing (on page 135).

Managing Jobs in the Production Queue
Print Service Provider User Guide 125
The job’s details panel contains additional job information, and allows you to perform administrative job tasks: • The job # and description appear in the title. • If there are problems with the job, an alert is created, and the alert icon appears below the title. For
details, see Managing Notifications and Alerts (on page 132). • JOB DETAILS information:
o COLORS—the type of colors, as defined in the job order. For example, Process colors. o PAPER—the type of paper, as defined in the job order. o PAGES—the number of pages, as defined in the job order. o QUANTITY—the number of copies to be printed, as defined in the job order. o REFERENCE CODE—a job reference number that you can enter. The code can be useful for your
records.
• Click (PDF Preview icon) to see a preview of the job. • Click (Edit note icon) to open the EDIT NOTE FOR JOB # window. The note that is associated with
the job, can contain information from the Print Buyer, which you can see; information for the Print Buyer that you enter in this window; and/or an internal note that cannot be viewed by the Print Buyer.
• Click (Preflight icon) to open the FILE UPLOAD REPORT window, which displays preflight problems. For example, color, font or image problems. You can also preview the job from this window.
• Click (Info message icon) to open the JOB REPORT window. The font and image report of the original file, and the imposition file are provided. Imposition problems are also listed.
NOTE: When there is an imposition problem, the INFO MESSAGE icon appears as a red alert icon, and the JOB REPORT window reports the problem.
• IMPOSITION—job imposition and layout information, including a thumbnail of the imposition file, an Imposition icon to display the PDF of the imposed job, Device Queue icon (appears only if the device output has a queue).
• ORDER—job order information, including the Order # (and how many jobs in the order), Customer name, User name, Price, Order Date, and Shipping Date.
• PRESS SHEETS PLANNED/ACTUAL—shows the planned and actual number of press sheets in the job.
NOTE: When working with specific types of output devices, you can use the DEVICE QUEUES option to create workflows that direct jobs to hot folders that are associated with these devices.
Viewing and Editing Job Properties To view and edit job properties: 1 Select the job that you want to view or edit in the production queue job list. The job’s details panel is
updated with the parameters of the selected job. 2 Click (Job Properties icon) in the job’s details panel. The Job properties dialog box appears. 3 The Job properties dialog box contains several tabs, depending on the type of job:
o For an Upload File job, the following tabs appear: Job Details, Upload File, Job Specification, File Report, and Pricing.
o For a Static Template job, the following tabs appear: Job Details, Job Specification, and Pricing. o For a VI Template job, the following tabs appear: Job Details, Job Specification, Variable
Information, and Pricing. 4 In the Job Properties dialog box, you can change the default properties of a template or override Print
Buyer property settings. That is, you can modify a problematic file or resolve a mismatch problem. For details on mismatch problems, refer to Managing Notifications and Alerts (on page 132).
5 You can view and edit job properties on these tabs. For more information on editing job properties, refer to Defining Print Imposition (on page 32).
The linked image cannot be displayed. The file may have been moved, renamed, or deleted. Verify that the link points to the correct file and location.
The linked image cannot be displayed. The file may have been moved, renamed, or deleted. Verify that the link points to the correct file and location.
The linked image cannot be displayed. The file may have been moved, renamed, or deleted. Verify that the link points to the correct file and location.
The linked image cannot be displayed. The file may have been moved, renamed, or deleted. Verify that the link points to the correct file and location.
The linked image cannot be displayed. The file may have been moved, renamed, or deleted. Verify that the link points to the correct file and location.

Production Management
126 FreeFlow Web Services
Attaching Files to the Job You can modify files that have been attached to the job. For example, you can download an attached variable information database, modify the file, and then upload the modified database. Or you can edit an original Adobe Photoshop file to correct something in the file, and upload the corrected file.
NOTE: You can also attach new files to the job, but this is not the main use of this option in the Production queue window. For information about attaching files, refer to Managing Attachments (on page 6).
To attach files to a job: 1 Select the job in the production queue job list. The job’s details panel is updated with the job’s details.
2 Click (Attach files icon) in the job’s details panel. The ATTACHMENTS dialog box appears. 3 The dialog box lists files that are attached to the job. Using the icons in this window, you can download
the attachment that you want to modify, and you can rename or delete an attachment. From this window you can also open a folder for the files that you will download.
4 If you downloaded attachments, perform the necessary changes, and save the files. 5 To reattach the modified files to the job, click the Upload Files button. The UPLOAD FILE dialog box:
a Select Upload a single file; click Browse to select the file. b Select Upload multiple files using FTP Mutli-file Upload; the FTP window appears. Upload the
files in this window. c Click Continue.
For information about attaching files, refer to Uploading Files (on page 6).
Viewing and Modifying a Job’s Trim and Bleed Parameters You can view job crop and bleed parameters, and perform necessary modifications. For example, if the job was prepared on an incorrect page size, you need to modify the crop marks, or if the bleed marks are inside the final job size, you need to scale the job size so that the bleed marks are outside the final job size.
To modify crop and bleed parameters: 1 Select the Job and click (Trim & Bleed icon); the EDIT TRIM AND BLEED window appears. 2 Modify the trim and bleeds as needed, and click OK when you are done.
For more information on trim and bleed parameters, refer to Defining Print Imposition (on page 32).
Editing Job Imposition You can edit the imposition of jobs in the production queue. The imposition parameters override any parameters set at the system level. For system level settings, refer to Defining Print Imposition (on page 32).
To edit general imposition parameters: 1 Click (Device & Imposition icon); the DEVICE AND IMPOSITION dialog box appears. 2 From the Output Device dropdown list, select an output device (if one is not selected), or select
another device instead of the one that was defined at the system level. 3 From the Press Sheet dropdown list, select a new press sheet size. 4 From the Orientation dropdown list, choose Landscape or Portrait. 5 Define Imposition parameters:
a From the Imposition Method dropdown list, choose Same-Up or Multiple-Up. b From the Work Style dropdown list, select one of the options.
The linked image cannot be displayed. The file may have been moved, renamed, or deleted. Verify that the link points to the correct file and location.
The linked image cannot be displayed. The file may have been moved, renamed, or deleted. Verify that the link points to the correct file and location.
The linked image cannot be displayed. The file may have been moved, renamed, or deleted. Verify that the link points to the correct file and location.
Managing Jobs in the Production Queue
Print Service Provider User Guide 127
6 Define page layout and binding parameters: a From the Page Order dropdown list, select one of the options. b From the Page Rotation dropdown list, select one of the options. c From the Alignment dropdown list, select one of the options. d From the Fill Policy dropdown list, choose Exact or Fill to define how the page imposition on the
press sheet. 7 Click OK when done, or continue to edit other imposition parameters. Refer to the following
procedures.
To set the press sheet margins and gutters: In the MARGINS AND GUTTERS tab: 1 Enter values for the 4 Margin fields. 2 Enter values in the Horizontal Gutters and Vertical Gutters fields.
To set the press sheet bleeds: If a file is uploaded without bleeds defined, Web Services can set set the bleeds automatically. To let Web Services automatically set the bleeds: 1 Enable the If Bleeds are not defined in the file checkbox. 2 Type values in the four BLEED fields. 3 Select which option to use for the bleeds:
o Locate bleeds inside job page size o Scale up job page size by the defined amounts
To add labels and marks to the press sheet: On the LABELS AND MARKS tab of the EDIT IMPOSITION dialog box, you define what labels and marks you want printed on the press sheet. Select the relevant check boxes: • Job Info—for example, job number, account name, date of production. • Crop Marks and Folding Info—crop marks are indicated by solid lines, and fold marks are indicated
by dashed lines at the location of each fold. The word IN or OUT above the dashed line refers to the fold direction, and the number under the line is the fold order.
• Registration Marks—by default, there are four registration marks located on each corner of the press sheet.
• Gutters, Job Width and Height • Color Bar and Separation Names
Click OK when done, or continue to edit other imposition parameters. Refer to the following procedures.
To edit custom color bar elements: 1 Click the CUSTOM COLOR BAR tab of the EDIT IMPOSITION dialog box. 2 From the Color Bar File dropdown list, select a color bar option. 3 Web Services provides horizontal and vertical color bars for gray scale and CMYK colors, and you
can add these files to the COLOR BAR FILE dropdown list: a Click the Color Bar File link; the COLOR BAR FILES dialog box appears. b Select the relevant TIFF file, and click Upload Images. For more information, refer to Uploading
Files (on page 6). 4 To define the color bar position and dimensions, fill in the ALIGNMENT and DIMENSIONS fields.
NOTE: After editing the imposition in the EDIT IMPOSITION dialog box, the job is moves to the head of the production queue job list.
5 Click OK when done, or continue to edit other imposition parameters. Refer to the following procedures.

Production Management
128 FreeFlow Web Services
To edit the ICC Profile: 1 Click the ICC PROFILE tab of the EDIT IMPOSITION dialog box. 2 From the Convert RGB to CMYK via ICC Profile dropdown file, select an ICC profile to be used
when creating the imposed file. For more information, refer to Adding ICC Profiles to the System. 3 To add ICC profiles to the dropdown list:
a Click the Convert RGB to CMYK via ICC Profile link; the ICC PROFILES dialog box appears. b Upload ICC profiles into your Web Services system. For information on uploading files, refer to
Uploading Files (on page 6). 4 Click OK when done, or continue to edit other imposition parameters. Refer to the following
procedures.
To view the imposed job: 1 Select the job in the production queue job list. 2 Click (Imposition icon) in the IMPOSITION section of the job’s details panel; a high-resolution PDF
image of the imposed file appears. 3 On the PDF image of the imposed file, view the crop, registration and fold marks, job page
dimensions, gutters, job information, and the embedded color bar, if they were selected on the LABELS AND MARKS tab of the EDIT IMPOSITION dialog box.
Manual Impose MANUAL IMPOSE is used for saving the job as a non-imposed PDF, and the imposition is done by a third party imposition tool. MANUAL IMPOSE is also automatically selected when the PDF cannot be imposed by the system, in which case, the following icon appears instead of the JOB INFO thumbnail:
The MANUAL IMPOSE option is accessed from the OUTPUT DEVICE dropdown list in the DEVICE AND IMPOSITION dialog box.
After approval, a manually imposed job is transferred to a folder that the Print Service Provider has specified in the OUTPUT DEVICES window (for more information, refer to the Defining Print Imposition (on page 32).
Imposition Schemes This section illustrates the different imposition schemes.
The linked image cannot be displayed. The file may have been moved, renamed, or deleted. Verify that the link points to the correct file and location.
The linked image cannot be displayed. The file may have been moved, renamed, or deleted. Verify that the link points to the correct file and location.
Managing Jobs in the Production Queue
Print Service Provider User Guide 129
Vertical Orientation
Horizontal Orientation
The linked image cannot be displayed. The file may have been moved, renamed, or deleted. Verify that the link points to the correct file and location.
The linked image cannot be displayed. The file may have been moved, renamed, or deleted. Verify that the link points to the correct file and location.
Production Management
130 FreeFlow Web Services
Close Up View
NOTE: When MANUAL IMPOSE is selected, the IMPOSITION PROOF icon provides you with a high-resolution preview of one job page.
Ganging Jobs for Production You can print more than one job on a single press sheet using with the LAYOUT MAKER option. The advantage of ganging jobs is to reduce production costs by considering the following two factors: • Maximize the utilization of the press sheet. • Minimize the amount of cutting and stacking.
To create a layout, you select a base job in the production queue, and select the LAYOUT MAKER option. The system automatically selects additional jobs from the production queue that can are candidates to be added to the layout job, according to the following criteria: • The base job can have one or two pages (two pages are either two one-sided pages or a double-sided
page). • Jobs that are the same size as the base job. • The number of pages in the additional jobs must be equal to, or smaller than, the base job.
From the list of jobs that are selected by the system, you select the jobs that you want to gang, as explained in this section.
Layout Maker Overview The LAYOUT MAKER window is divided into two panels: • Layout information panel—displays the layout information. • Job information panel—displays the various jobs that are suitable to be included in the layout.
The LAYOUT MAKER window provides the following information, which is necessary for maximizing the effectiveness of this option:
The linked image cannot be displayed. The file may have been moved, renamed, or deleted. Verify that the link points to the correct file and location.
Managing Jobs in the Production Queue
Print Service Provider User Guide 131
• PAPER SIZE—size of the press sheet that is defined for the job. This size is used to calculate the additional jobs that can be printed on the sheet.
• JOB SIZE—size of the selected base job. Jobs that are added to the layout must be the same size. • UNITS ON PAGE—total number of units, of the selected jobs, that can be printed on a press sheet. • NUMBER OF PRESS SHEETS—number of press sheets required in this layout job. • UTILIZATION—a percentage that indicates the utilization of the press sheet. The percentage changes
according to the jobs that are selected for the layout.
NOTE: When selecting jobs to be included in the layout, it is recommended that you do not combine jobs with different bleed settings.
Printing Jobs Using the Layout Maker
To create a layout using Layout Maker: 1 Select a job in the production queue job list that can serve as the basis of the layout (the base job).
2 Click (Gang jobs using Layout Maker icon) in the job’s details panel; the LAYOUT MAKER window appears. The layout # in the window title is automatically updated by the system.
3 From the list of jobs, select the jobs that you want to gang; these are the jobs that will be included in the layout. When selecting jobs, consider the utilization factor because you want to add jobs that will provide the greatest page utilization.
4 In the Layout name box, type the layout name. 5 To preview the layout, click Preview Layout; a PDF preview of the layout appears. 6 To create a layout, click Create Layout; the jobs appear as a combined layout job in the production
queue job list. The job’s details panel is updated, and shows a composite job.
To edit a layout using Layout Maker: 1 If a job already has a layout, you can edit the layout. Select the job that contains a layout.
2 Click (Edit Layout icon) in the job’s details panel; the LAYOUT MAKER window appears. 3 Modify the layout, as needed. For example, you can add or remove jobs to/from the layout.
NOTE: When a layout is in the production queue, you cannot edit the job imposition.
Printing Book Assembly Jobs on More Than One Output Device When jobs contain multiple files and components, you can produce the files and components on more than one output device, using the SPLIT COMPOSITE JOB option. In this option you can define exception impositions for different components of the book. For example, you might want the black and white pages to be printed on one printer, and the color pages on another.
NOTE: You can only use the Split Composite job option on Book Assembly jobs.
To print multiple files on different output devices: 1 Select a Book Assembly job.
2 Click (Split composite job icon) in the job’s details panel; the SPLIT PDF dialog box appears, showing the various composite job files.
3 Select the check box of the job component that you want to split: color pages, tab, cover and/or B/W pages.
4 Choose one of the two splitting color options, according to component type, color channels, or color content of the files:
The linked image cannot be displayed. The file may have been moved, renamed, or deleted. Verify that the link points to the correct file and location.
The linked image cannot be displayed. The file may have been moved, renamed, or deleted. Verify that the link points to the correct file and location.
The linked image cannot be displayed. The file may have been moved, renamed, or deleted. Verify that the link points to the correct file and location.
Production Management
132 FreeFlow Web Services
o Split Colors (By Definition of the Print Provider according to the Color Channels)—the system splits off color pages from all components for which you specified color channels in the component definition.
o Split Colors (By Content exclude B/W pages from Color component)—the system splits the job according to the color content of the job pages. If the job contains color and B/W pages, it is split into two parts: color pages and B/W pages.
5 From the Blank Pages dropdown list, select the option that will define how blank pages are displayed in the split job.
6 Click OK to save the changes and close the dialog box.
Creating a Job Ticket A job ticket is a file that contains detailed job information about production, finishing, delivery, and pricing. The job ticket file can be printed and used on the production floor. The DATE and SIGNATURE fields, in the printed job ticket pages are left empty, to be completed by the relevant personnel on the production floor.
To create a job ticket:
1 Select a job and click (Create Job Ticket icon); the JOB TICKET CREATION dialog box appears. 2 For Word documents:
a Select the Job Ticket Pages check boxes of the pages that you want to include in the job ticket: Production, Finishing, Delivery, Pricing Information.
b Click OK in the JOB TICKET CREATION dialog box; the DOWNLOAD FILE panel appears. c On the DOWNLOAD FILE panel, click the JOBTICKET[JOB #].DOC link to download the job ticket file,
and then save the job ticket as a Microsoft Word file. Alternatively, click and save the zip file of the job ticket, and extract the file on your computer.
d After saving the job ticket file, you can print out copies. 3 For HTML Documents:
a Click OK in the JOB TICKET CREATION dialog box. The Job Ticket displays in a new browser window.
b Print or save the Job Ticket from the browser FILE menu (press the Alt key if the menu is not visible by default).
Managing Notifications and Alerts NOTIFICATIONS and ALERTS are indicators that can appear in specific columns in the production queue job list. NOTIFICATIONS are viewed only when specific columns are present in the list, and they provide information that is not critical to the continuation of the job processing.
NOTE: For more information on managing columns in a queue, refer to Displaying and Hiding Queue Columns (on page 5).
ALERTS contain information that is critical to the continuation of the job processing. You need to view the alert, and address the problems that it raises. The alert information includes steps for processing the problem to which you are being alerted. To ensure that you view and process the ALERTS, ALERTS appear also in the job’s details panel. After the ALERT is viewed and acknowledged, it is classified as a HANDLED ALERT.
Notification
Notification Description
Job Thumbnail Thumbnail image of the job’s front page.
PDF Preview Access a high-resolution PDF preview of the job. When the job is part of a combined job, access an imposition proof.
The linked image cannot be displayed. The file may have been moved, renamed, or deleted. Verify that the link points to the correct file and location.

Producing Jobs
Print Service Provider User Guide 133
Notification Description
Hidden Price The Print Buyer who ordered the job cannot see the job price.
Print Driver The job was created using the Print Driver ordering workflow.
iForm The job was created from an iForm.
Variable Data The job contains variable data, as indicated in the VI column of the production queue job list.
Combined Job The job has been imposed with one or more other jobs using LAYOUT MAKER. See details in Ganging Jobs for Production (on page 130).
Book Assembly This is a Book Assembly job.
Blank Files The job does not contain data.
Jobs to Inventory The job will be printed and stored as inventory.
Job from Inventory The job will be shipped from inventory.
Alerts
Alert Description
Job Properties Mismatch
There is a disparity between the job properties and the uploaded file parameters. When you click a Mismatch icon, the MISMATCHING PARAMETERS dialog box appears. You can match the job properties with the uploaded file parameter. For more information, refer to Viewing and Editing Job Properties (on page 142)
Price Problem There are pricing problems. When you click the alert, the JOB PRICING dialog box appears, and you can modify the price, discount, express charges, and tax. The JOB PRICING dialog box also allows you to notify your Print Buyers of these modifications. For more information, refer to Pricing (on page 109).
No Production File The job does not contain data.
File Preflight Problem The following information is missing from the job: fonts, low res images, or RGB images.
View Print Buyer Note An alert is created whenever there is a note from the Print Buyer. The note must be viewed and acted upon.
General Problem There was a problem with the job during preflight or imposition, or when creating the low-res image.
Producing Jobs When a job is ready for production, you can complete one of the following tasks: • Outsourcing Jobs to a Partner Print Service Provider (on page 133). • Changing the Status of a Job (on page 135). • Approving a Job for Printing (on page 135).
Outsourcing Jobs to a Partner Print Service Provider When the job will not be printed in your print house, you can still accept the responsibility for producing the job by forwarding it to another Print Service Provider. Working with the OUTSOURCE option, you can outsource a job from the Web Services system, directly to a partner Print Service Provider, by sending an email message containing links to the imposed file and job ticket.
This section explains the workflow that the Print Service Provider does to outsource a job, and the workflow that the partner Print Service Provider does to print the outsourced job.
Production Management
134 FreeFlow Web Services
Print Service Provider Workflow
To outsource to a partner Print Service Provider: 1 Click the target job that you want to send to the partner Print Service Provider. 2 In the job’s details panel, click Outsource; the OUTSOURCE JOB dialog box appears. 3 For a new partner Print Service Provider:
a Click New Print Provider; the NEW PRINT PROVIDER DETAILS dialog box appears. b Type the partner Print Service Provider’s details and click OK.
4 From the Print Provider Name dropdown list, select a partner Print Service Provider; the partner’s details appear in the SELECT PARTNER PRINT PROVIDER panel.
5 In the JOB SHIPPING panel, choose where you want the partner Print Service Provider to send the job upon completion: o Ship to Customer—send the finished job directly to the Print Buyer. o Ship to me by date—the completed job will be returned to you; click the Select Date link to set a
time limit for returning the job to you. 6 Click Outsource Job; the OUTSOURCE EMAIL SENT message appears, informing that an OUTSOURCE
EMAIL SENT message was sent to the partner Print Service Provider. 7 Click OK; the PRODUCTION QUEUE window appears. 8 The job is transferred to your PRINTING QUEUE window, and the icon indicates that the job is waiting
to be accepted by the partner Print Service Provider. 9 In the TRACK JOBS window, select the target job that has been outsourced. 10 Click the Outsourcing Information link; the OUTSOURCING INFORMATION dialog box appears.
OUTSOURCING INFORMATION is an initial status report of the job that is sent to the partner Print Service Provider.
11 Click OK to close the dialog box.
NOTE: An OUTSOURCE EMAIL message is sent, and the partner Print Service Provider is requested to click ACCEPT to indicate that the job is accepted and will be produced. The partner Print Service Provider is also requested to click SHIPPED when the job is completed..
Partner Print Service Provider Workflow After the OUTSOURCE EMAIL message is sent, you as the partner Print Service Provider, receive the email message with the job details. You can view the job’s PDF, the imposition job PDF and the job ticket. Perform the following tasks: 1 To accept the job and start the printing process, click Accept. You and the Print Service Provider who
sent the job receive an email message notifying that the job has been accepted, and that the printing process started. The job appears in the JOBS FOR DELIVERY list of the DELIVERY window.
2 Print the job, and then ship the job (either directly to the Print Buyer or back to the Print Service Provider that sent you the job).
3 Click the Job Shipped button in the email message that you received. The Print Service Provider receives a message notifying that the job has been shipped, and that the jobs status can be changed in the DELIVERY window.
The linked image cannot be displayed. The file may have been moved, renamed, or deleted. Verify that the link points to the correct file and location.
Delivery Queue
Print Service Provider User Guide 135
Changing the Status of a Job Sometimes there is a need to change the status of a job. For example, if the job status was changed outside the Web Services system, or if a job in the PRODUCTION QUEUE window is a job that does need to be printed (that is, the final output of this job is not a printed item). In such cases, you need to change the job status within the Web Services system, in the PRODUCTION QUEUE window. • Click the Move To button; the MOVE JOB dialog box appears. • Select Delivery queue. For information on the delivery queue, see Delivery Queue (on page 135).
NOTE: When you APPROVE a job within the PRODUCTION QUEUE window, there is no need to select the DELIVERY QUEUE option in the MOVE JOB dialog box.
Approving a Job for Printing Before approving a job for production, it is recommended that you view the job imposition scheme, review the job ticket, re-impose the job if necessary and/or impose the job together with other jobs (refer to Ganging Jobs for Production (on page 130)). When the job is ready for production, and will not be outsourced to a partner Print Service Provider, you can approve the job for production.
To approve a job for production: 1 Select the target job in the production queue job list. 2 Click Approve in the job’s details panel; the job is removed from the PRODUCTION QUEUE window.
The job is sent to the output device (or the hot folder of a specific output device), and moves from the PRODUCTION QUEUE window to the PRINTING QUEUE window. The job is also added to the DELIVERY window, where its status is automatically changed to READY FOR DELIVERY.
NOTE: If you APPROVE a job that is not ready for printing, a note appears to inform you which job parameter is not defined. You can either confirm that you want to approve the job, or cancel the approval.
3 After the job is approved and removed from the PRODUCTION QUEUE window, you can view the job in the DELIVERY window; for details, see Delivery Queue (on page 135).
NOTE: In some cases, it is preferable to view the job in the DELIVERY window, rather than the PRINTING QUEUE window.
4 If the job print is not managed by Web Services, select Move To... and select the folder to which you want to move the job (for example, the DELIVERY window). After the job is printed and ready for delivery, continue to the delivery tasks. For details, see Delivery Queue (on page 135).
Delivery Queue Delivery Queue Overview After the job is approved for printing in the PRODUCTION QUEUE window, the job enters the DELIVERY window. For details on approving jobs, see Approving a Job for Printing (on page 135).
The DELIVERY window options allow you to process the delivery of your printed jobs. You can view and edit shipping information, print shipping labels, and approve jobs for delivery.
To access the Delivery window: 1 From the Web Services menu, select TASKS -> DELIVERY; the DELIVERY window appears. All the jobs
that were approved for printing are listed in the JOBS FOR DELIVERY panel on the left side of the window. By default, the first job in the list is selected, and its job information is displayed in the BATCH ORDER panel on the right side of the window.
2 Click to select another job in the JOBS FOR DELIVERY panel; the BATCH ORDER panel is updated accordingly. To quickly locate a job, use the Search option. For details, see Managing the Jobs for Delivery Panel (on page 136).
Production Management
136 FreeFlow Web Services
The DELIVERY window contains three panels: • Jobs for Delivery panel—this is the main panel in the DELIVERY window; it lists jobs that have been
printed and are waiting to be delivered. From here you select jobs that you want to approve for delivery.
• Batch Order panel—displays the job that is selected in the JOBS FOR DELIVERY panel, and the other jobs in the same order for the same Print Buyer. From here you can update shipping and carrier information, including shipping cost, and approve the printed job for shipping. The other jobs that are also listed may have a different job status than the selected job. For example, the BATCH ORDER panel can include a job that has not yet entered the DELIVERY window, as indicated by its job status. Displaying the information on all the jobs in this order allows you to handle the shipment of the order more efficiently. For example, you can decide to approve delivery only when all the jobs are ready to be shipped.
• Shipped Deliveries panel—lists the shipped jobs for a selected period (last day, week, or month). An email notification is sent to the Print buyer, who can track the job in the Print Buyer’s Shipping queue.
Managing the Jobs for Delivery Panel The following parameters are displayed for each job in the JOBS FOR DELIVERY panel: • A job thumbnail. • Job #. • Job name. • Customer. • Req.Date, if requested.
You can perform the following activities in the JOBS FOR DELIVERY panel: • By default, the jobs are listed according to JOB #, in ascending order. However, you can sort the list
according to the other parameters. Click the column of the parameter that you want to use for sorting the list.
• Determine which columns will appear in the list, using the COLUMN SELECTION option. In the COLUMN SELECTION dialog box, select or clear the check boxes of the column options, and click OK.
• Filter jobs in the list, using the SEARCH option.
NOTE: For details on using the SEARCH option, refer to Managing Queues (on page 4).
Managing Delivery in the Batch Order Panel When a job is selected in the JOBS FOR DELIVERY panel, its information is displayed in the BATCH ORDER panel. The system automatically searches for other jobs that were ordered by the same Print Buyer, and displays these jobs in the BATCH ORDER panel.
The following parameters are displayed for each job in the BATCH ORDER panel: • JOB #, ORDER #, and COPIES. • Shipping information: SHIPPING ADDRESS, SHIPPING DATE, PACKAGE NUMBER and DELIVERY LABEL. • Carrier information: CARRIER, and TRACKING # (a tracking # is provided by carriers that allow you to
connect to their online tracking service). • Status.
NOTE: Because all the jobs that were ordered by this Print Buyer are listed, some jobs might have a status other than READY FOR SHIPPING.
In the BATCH ORDER panel, you can perform the following activities: • Sort the jobs by clicking on the column that you want to use for sorting. • View the status of all the jobs in this order: Printing, Ready for Shipping, or Delivered. • Select the job(s) that you want to ship.
Delivery Queue
Print Service Provider User Guide 137
• Print shipping labels. • Calculate shipping costs.
Creating a Delivery Package From the BATCH ORDER panel, you can create a delivery package for the jobs that are delivered in this order.
To create a delivery package: 1 Select the job for which you want to create a delivery package. You can select multiple jobs to bundle
together while holding down the CTRL key.
NOTE: • All jobs selected must belong to the same Batch Order. • The shipping method must be the same for all jobs selected. • The shipping address must be the same for all jobs selected.
2 Click Create Delivery Package; the Create Delivery Package dialog box opens. 3 Modify the shipping address if necessary:
a Click the Shipping Address link; the EDIT ADDRESS dialog box appears. b Type the appropriate information in the address fields. c Click OK to save changes.
4 Modify the shipping method if necessary: a Click the Shipping Method link; the SELECT SHIPPING METHOD dialog box appears. b From the Shipping Method dropdown list, select a shipping method. c Click OK to save changes.
5 Select the LABEL OPTION. o The 'Get a delivery label by placing a shipment request with an online carrier' option is only
available for UPS or FedEx online Shipping Methods. o The 'Create a generic delivery label' - Web Services creates a word document.
6 Use the shipping calculator to estimate the shipping cost based on the shipping method and the weight and size. Update the WEIGHT if necessary, enter the CARTON SIZE and then click Estimate Price.
7 (Optional) Override the Actual Cost by selecting the checkbox and entering the new cost in the text box.
8 Click Create Delivery.
The dialog box closes and a package number is automatically generated for the Tracking Number, and the job information is updated in the Delivery Queue.
Separating a Single Job into Multiple Packages To separate a single job into multiple packages: 1 Select a Job.
2 Click the Job's Edit icon to open the DELIVERY INFORMATION dialog box. a Enable the Override Tracking # checkbox and manually enter the Tracking Numbers in the text
box. Separate the numbers with a comma. b Click OK.
3 The dialog box closes and a package number is automatically generated for each of the Tracking Numbers. The Job information is updated in the Delivery Queue with View Package # and View Tracking # links that open a dialog box to display the package and tracking information.
The linked image cannot be displayed. The file may have been moved, renamed, or deleted. Verify that the link points to the correct file and location.

Production Management
138 FreeFlow Web Services
Approving Jobs for Delivery After the job is printed and its shipping information has been verified, you can approve the job for delivery.
To approve a job for delivery: 1 In the BATCH ORDER panel you can see which job in the batch order can be approved for delivery, as
indicated by its job status—READY FOR SHIPPING. If there are additional jobs in the order that are ready for delivery, press the <CTRL> key to select multiple jobs.
NOTE: If you want to deliver the jobs as a batch order, and not all the jobs are ready for shipping, wait until all the jobs are ready.
2 Click Approve Selected Deliveries; the selected job(s) moves from the JOBS FOR DELIVERY panel to the SHIPPED DELIVERIES panel.
NOTE: Jobs that are approved for delivery will also appear in the Print Buyer’s SHIPPING window.
Viewing Carrier Tracking Status Some carriers have an online tracking service that allows you to track your job using the job’s TRACKING #, which was provided by the carrier. Using the TRACKING #, you can connect to the carrier’s service from the BATCH ORDER panel, and view the job’s shipping status.
To view carrier tracking status: 1 Click the TRACKING # of the job that you want to track; the carrier’s TRACK SHIPMENTS window appears. 2 Navigate to the job and view the results. You can see whether the job is in the shipping process, or
has already been delivered.
Managing the Shipped Deliveries Panel The SHIPPED DELIVERIES panel lists jobs that were approved for delivery; these jobs are no longer listed in the JOBS FOR DELIVERY panel and in the BATCH ORDER panel. In the SHIPPED DELIVERIES panel, you can track shipped jobs. If there are other jobs in this order, you can view their status in the BATCH ORDER panel.
The following information is displayed in the SHIPPED DELIVERIES panel: • JOB #, ORDER #, and COPIES. • Shipping information: SHIPPING ADDRESS, and SHIPPING DATE. • Carrier information: CARRIER, and TRACKING # (if provided). • ACCOUNT name.
When a job is shipped by a carrier that provides online tracking service, you can click the TRACKING # to view the job’s shipping status from within the carrier’s system. For details, see Managing the Jobs for Delivery Panel (on page 136).
NOTE: The Print Buyer can track the job in Print Buyer’s Shipping queue after the shipping email notification is received. When the Print Buyer receives the job, the Print Buyer clicks RECEIVED. The job enters the Print Buyer’s Received queue and the job status automatically changes to RECEIVED.
In the SHIPPED DELIVERIES panel, you can perform the following activities: • List jobs according to different delivery periods, and different sorting options. • Return a job for delivery approval. • View delivery labels.
Track Jobs
Print Service Provider User Guide 139
To list jobs according to delivery period and sorting options: • Delivery period—the jobs listed in the SHIPPED DELIVERIES panel are according to the last delivery
period that was selected. You can select another delivery period: From the Shipped in the Last dropdown list, select DAY, WEEK or MONTH. The list is updated accordingly.
• Sorting—you can sort the job list according to each of the job parameters. Click the column that you want to use for sorting the list.
To return a job for delivery approval: Sometimes you want to return a job for delivery approval after it was approved for delivery. For example, if the job has not yet been delivered and you realize that additional jobs in this order have not been approved for delivery, and you want to deliver them as a batch. 1 In the SHIPPED FOR DELIVERIES panel, select the job that you want to return for delivery approval. 2 Click Back to Approval. The job is removed from the SHIPPED FOR DELIVERIES panel, and returns to
the JOBS FOR DELIVERY panel and the BATCH ORDER panel. 3 Process the job delivery. For details, see Managing Delivery in the Batch Order Panel (on page 136).
To view delivery labels: From the SHIPPED FOR DELIVERIES panel, you can view and print the job’s delivery labels. You might want to do this if the job was ruined during packing, or if you want to verify the shipping address. 1 Click View Label of the job that you want to view; the EDIT FILE window appears. 2 Click the link of the delivery label file. The file is either saved as a Word document or an HTML
document. 3 If needed, reprint the delivery label file.
Track Jobs The status of a job in the Web Services system is determined by specific actions performed by a Print Buyer or by the Print Service Provider. Using the various options in the Web Services system, you can perform actions that are job-status specific. For example, after the job is printed, it enters the production queue. In the PRODUCTION QUEUE window, you can perform activities that are relevant to this job status, as described in Managing Jobs in the Production Queue (on page 124). However, sometimes you want to track jobs regardless of their status. The Web Services job tracking feature makes it easy for you to track jobs. You can track a job even if you don’t know its current status, and you can track a job that is not located in a specific queue.
In the TRACK JOBS - SEARCH window, you can display all the job queues in the system; starting from Design, through Ready to Order, Printing, Shipping and Received. For example, you might want to search for all the jobs that were shipped to a specific Print Buyer by a specific date. You can also display jobs that were deleted.
In addition, there are various job modifications that you can perform from the TRACK JOBS window. For example, create a job ticket, and modify the job and order pricing.
This section describes the activities that can be performed in the TRACK JOBS window: • Searching for Jobs (on page 139). • Managing Tracked Jobs (on page 141).
Searching for Jobs This section explains how to search for jobs, and how to define what information is displayed for each job.

Production Management
140 FreeFlow Web Services
Defining Job Search Criteria The Web Services system allows you to define search criteria, and perform the search on all job statuses. Alternatively, you can select one of the predefined job statuses to only track jobs that have the selected job status (there no need to define a search criteria).
To track jobs using a search criteria: On the Web Services main menu, select TASKS -> TRACK JOBS; the TRACK JOBS - SEARCH window appears. In this window, you specify the criteria to be used for the search. The window displays four search fields (status, search field, operator, value) that are used to define the search criteria. You can perform a simple search or an advanced search.
To perform a simple search: 1 From the STATUS dropdown list, select the job status that you want to search for. By default ALL is
selected. 2 From the SEARCH dropdown list, select the job field that will be the search criteria. The job fields are
divided into categories, such as Job, Pricing, and Order, to make it easier to locate the various fields. 3 In the operator field, select the operator (for example, =, <=) to be used when comparing the search
criteria to the value. 4 In the value field, type the value that will be compared to the search criteria, using the selected
operator. 5 Click Search. The list of jobs that conform to your search definition is populated by the system and
displayed in the Track Jobs - Job List window. To modify the information that is displayed for each job, see Defining and Saving Job Search Information (on page 141).
To perform an advanced search: You can narrow down your search by using ADVANCED SEARCH to define sets of multiple criteria: 1 Click Advanced search; the ADVANCED SEARCH dialog box appears. 2 From the STATUS dropdown list, select the job status that you want to search for. By default ALL is
selected. 3 You can specify up to three sets of search criteria. For each set of criteria, perform the same steps as
those performed in the simple search. The implied relationship between multiple sets of search criteria is AND.
4 Click OK in the ADVANCED SEARCH dialog box. 5 Click Search in the TRACK JOBS - SEARCH window. The list of jobs that conform to ALL your search
criteria is populated by the system and displayed in the window. To modify the information that is displayed for each job, see Defining and Saving Job Search Information (on page 141).
You can perform various job modifications, as described in Managing Tracked Jobs (on page 141).
To track jobs conforming to predefined status: When you select TASKS -> TRACK JOBS, the TRACK JOBS - SEARCH window shows ALL in the STATUS field. However, you can display jobs that conform to a predefined status without defining search criteria. 1 On the Web Services main menu, select TASKS -> TRACK JOBS. 2 On the TRACK JOBS ribbon, click the link of the type of jobs that you want to display (for example,
Saved Jobs, Ready to Order, Shipped). The list of jobs that conform to the selected type of job is populated by the system and displayed in the window.
3 After the jobs that you want to track are displayed in the window, you can modify the information that is displayed for each job. For more information, refer to Defining and Saving Job Search Information (on page 141). In addition, you can perform various job modifications, as described in Managing Tracked Jobs (on page 141).

Track Jobs
Print Service Provider User Guide 141
Defining and Saving Job Search Information After searching for the jobs that you want to track, you can modify the information that is displayed for each job, and save the tracked jobs in an Excel file.
The displayed information for each job depends on the information that was defined the last time that the TRACK JOBS window was displayed. The job information includes: JOB #, STATUS, JOB TYPE, JOB NAME and CREATION DATE. However, you can select other job fields.
To define the job information and save results: 1 To define what job information is displayed for each job:
a Click Column selection. b In the COLUMN SELECTION window, select the columns to be displayed in the TRACK JOBS window. c Click OK.
2 To save the list of tracked jobs in an Excel file: a Click Excel Report. b In the COLUMN SELECTION window, select the columns to that you want to save in the Excel file. c Click Create Excel File. d After the system creates the Excel file, you are requested to specify where to save the report.
3 After the jobs that you want to track are displayed in the window, you can perform various job modifications, as described in Managing Tracked Jobs (on page 141).
Managing Tracked Jobs This section describes the job modifications that you can perform in the TRACK JOBS window, after the tracked jobs are displayed: • Viewing Job Details (on page 141). • Changing Job Status (on page 141). • Deleting a Job (on page 142). • Viewing and Editing the Job Properties (on page 142). • Viewing and Editing the Job Pricing (on page 142). • Viewing and Editing the Job Ticket (on page 142). • Viewing and Editing the Order Pricing (on page 142). • Saving a Job as a Template (on page 143). • Searching for an Order (on page 143).
NOTE: The available job modification options depend on the job status. For example, searching for an order is not available for jobs that are ready to be ordered.
Viewing Job Details The bottom panel of the TRACK JOBS - JOB LIST window displays the details of the job that is selected in the job list panel of the window. These details include, for example, Job Type, Quantity, and Shipping Date. You can preview the job, view the files that are attached to the job, and perform various other tasks. For more information on job details, see The Job Details Panel (on page 124).
Changing Job Status Sometimes the job status is changed outside the Web Services system, and you need to reflect this change within the Web Services system. You can do this from within the TRACK JOBS window.
NOTE: The job status in the production process is not changed; only its status within the Web Services system.
Production Management
142 FreeFlow Web Services
To change a job status: 1 Select the job in the TRACK JOBS window, and click Change Status; the CHANGE JOB STATUS window
appears. 2 Select one of the four status options, and click Commit Change. By default, the DO NOT CHANGE THE
JOB STATUS option is selected.
Deleting a Job You can delete jobs from the TRACK JOBS window. For example, if the job was canceled, or the job has been shipped and delivered. Deleted jobs are saved within the Web Services system, and can be displayed.
NOTE: To display deleted jobs: select TASKS -> TRACK JOBS, and on the TRACK JOBS ribbon, click Deleted.
1 Select the job that you want to delete in the TRACK JOBS window, and click Delete job; the DELETE JOBS confirmation message appears.
2 Click Yes to confirm the job deletion.
Viewing and Editing the Job Properties You can view basic job properties, preview the job, and modify some of the job properties from the TRACK JOBS window.
To view and edit job properties: 1 Select the job in the TRACK JOBS window, and click Edit Properties; the JOB PROPERTIES dialog box
appears. 2 Click on PDF Preview to preview the job. 3 You can view basic job properties, and modify properties, as needed. For more information on job
properties, see Viewing and Editing Job Properties (on page 125).
Viewing and Editing the Job Pricing You can view job pricing details, and if necessary, edit the details.
To view and edit job pricing: 1 Select the job in the TRACK JOBS window, and click Job Pricing; the JOB PRICING dialog box appears. 2 View the pricing details of the pricing plan that was defined for the job. If necessary, you can edit the
pricing details, select another pricing plan or create a new plan. For more information on job pricing, see Pricing Process Overview (on page 111).
Viewing and Editing the Job Ticket You can view the job ticket, and if necessary, edit the details.
To view and edit the job ticket: 1 Select the job in the TRACK JOBS window, and click Job Ticket; the JOB TICKET CREATION dialog box
appears. 2 View the job ticket details. If necessary, you can edit the job ticket details. For more information on job
tickets, see Creating a Job Ticket (on page 132).
Viewing and Editing the Order Pricing You can view and edit the pricing of the order to which the job belongs.

Track Jobs
Print Service Provider User Guide 143
To view and edit order pricing: 1 Select the job in the TRACK JOBS window, and click Order Pricing; the ORDER PRICING dialog box
appears. 2 View the order pricing details. If necessary, you can edit the order pricing details. For example, add
items that are part of the order. For more information on order pricing issues, see Pricing (on page 109).
Saving a Job as a Template The SAVE AS TEMPLATE option allows you to save a job as a template, and then use the template when ordering a new job.
To save a job as a template: 1 Select the job in the TRACK JOBS window, and click Save As Template; the SAVE AS TEMPLATE dialog
box appears. 2 Define the template properties. For more information on saving jobs as templates, see Creating a
New Template from an Existing Job (on page 98).
Searching for an Order The SEARCH ORDER option allows you to search for all the jobs that are contained in the same order as the selected job. This information might be useful if, for example, you want to know the status of other jobs in that order.
Select the job in the TRACK JOBS window, and click Search Order. The system creates an automatic filter according to the selected job’s order number and runs the search.The Track Jobs - Job List window is populated with all the jobs in the selected order.

Print Service Provider User Guide 145
10 Managing Site Customization
In This Chapter
Creating Skins ................................................................................... 145 Editing Skin Elements ....................................................................... 148 Accessing the Style Sheet Window .................................................. 149 Uploading Designs ............................................................................ 150 Activating Page Elements ................................................................. 151 Managing the Skin Library ................................................................ 153 Accessing the Skin Library ................................................................ 154 Duplicating Skins ............................................................................... 154
This chapter describes how to create and edit FreeFlow Web Services skins. You can use the Site Customization branding functionality to personalize the general web site layout, in addition to the look and feel of specific items.
Skin Structure
A branding skin comprises several components that define the look and feel of the launch pad, the login page, the site frame containing a top bar and a left bar, and banners for emails and catalogs. You have to define each component separately. In addition, Web Services supports several levels of Print Buyer user privileges. It is possible to use the same site frame for the different user types, or to create a different site frame look and feel for the different privileges.
NOTE: All settings described in this chapter define Site Customization settings at the default level (true for all Print Buyers in your Web Services system). However, you can adjust the settings per account. For more information about defining Site Customization settings at the Account level, refer to Defining Account Branding (on page 51).
Types of Controls
The branding feature identifies buttons and links, Print Buyer logos, and tabs. Clicking a button or a link changes the Web Services page content or opens a new dialog box. A matching control must be assigned to each of the buttons in order to keep the full functionality of the application.
This chapter includes the following sections: • Creating Skins (on page 145) • Editing Skin Elements (on page 148) • Uploading Designs (on page 150) • Activating Page Elements (on page 151) • Managing the Skin Library (on page 153)
Creating Skins You can customize and personalize the general web site layout, in addition to the look and feel of specific items with a skin. You achieve this by uploading designs and images, and adding text to the launch pad and the various frames and banners on the system site.
This section describes the following procedures: • Accessing The Skin Editor (on page 146) • Customizing the Login Page (on page 146) • Customizing the Site Frame (on page 146) • Customizing the Launch Pad (on page 147)

Managing Site Customization
146 FreeFlow Web Services
• Customizing the Email Banner (on page 147) • Customizing the Catalog Banner (on page 148) • Saving and Previewing Views (on page 148)
Accessing The Skin Editor You can customize and edit Web Services skins in the SKIN EDITOR.
To access the Skin Editor: 1 Select STORE ASSETS -> SKINS; the SKIN LIBRARY appears. 2 Select a skin and click Skin Editor; the SKIN EDITOR window appears.
Customizing the Login Page Your Print Buyers use the login page to log in to the Web Services application. You use the Site Customization LOGIN PAGE window to brand a login page. Before customizing the login page, you must have a login page HTML design (*.mht format) with the following prerequisites: • Two text boxes (for the User name and the Password). • An image for the login button.
It is recommended that you have HTML files initially designed by an HTML designer with an understanding of your Web Services application requirements.
To customize the login page: 1 In the SKIN EDITOR, click Login Page; the login page appears with the EDIT tab selected. 2 Click the Upload Login HTML link; a confirmation window appears. 3 Click Yes; the FILE UPLOAD window appears. 4 Browse to the specially designed login page .mht file to upload, and click Next; the design appears in
the login page. For information on uploading designs, refer to Uploading Designs (on page 150). 5 Save and preview the login page. For information about saving and previewing, refer to Saving and
Previewing Views (on page 148). 6 Activate the login page elements. For more information about activating elements, refer to Activating
Page Elements (on page 151).
Customizing the Site Frame You can use the SITE FRAME tab to customize the top and left bars of the application and to define user privileges. The contents of site frame, composed of top and left frames and a main application frame, determine the look and feel of the main application window.
NOTE: For information on defining user privileges, refer to Defining User Privilege Views (on page 153).
You must have an HTML design (*.mht format) to customize the top bar and left bar. • The top bar HTML design must contain a top bar with a table of four cells. • The left bar HTML design must contain a table of seven cells (aligned vertically).
It is possible to have the sub menu of seven cells moved to the top bar, but the main menu cannot be moved to the left.
To customize the Site Frame: 1 In the SKIN EDITOR, click Site Frame; the SITE FRAME window appears, reflecting the Admin view. 2 Click the Upload Top Bar link. 3 Click Yes in the confirmation windows; the TOP BAR: FILE UPLOAD window appears.
Creating Skins
Print Service Provider User Guide 147
4 Complete the File Upload instructions, browse to the target top bar file and click Next; the top bar appears in the SITE FRAME window.
5 Click the Upload Left Bar link. 6 Click Yes in the confirmation windows; the FILE UPLOAD window appears. 7 Complete the LEFT BAR: FILE UPLOAD instructions, browse to the target left bar file and click Next; the
left bar appears in the SITE FRAME window. 8 Save and preview the site frame. For information about saving and previewing, refer to Saving and
Previewing Views (on page 148). 9 Activate elements in the site frame top and left bars. For information about activating the site frame
top and left bars, refer to Activating Page Elements (on page 151).
Customizing the Launch Pad Depending on the system preference settings, the starting point for initiating a job order can be the launch pad. You can use the LAUNCH PAD view to apply your branding to the launch pad. Alternatively, you may prefer to have the Web Services default launch pad appear.
To use the default Web Services Launch Pad: 1 In the SKIN EDITOR, click Launch Pad; the LAUNCH PAD view appears with the EDIT tab selected. 2 Select the Preserve the Default Launch Pad Look check box, located at the base of the LAUNCH
PAD view. 3 Click OK.
To customize the Launch Pad: 1 In the SKIN EDITOR, click Launch Pad; the LAUNCH PAD view appears with the EDIT tab selected. 2 Click the Upload Launch Pad HTML link; the confirmation window appears. 3 Click Yes; the FILE UPLOAD window appears. 4 Browse to the designed launch pad .mht file to upload, and click Next; the design appears in the
launch pad. For information on uploading designs, refer to Uploading Designs (on page 150). 5 Save and preview the launch pad. For more information about saving and previewing, refer to Saving
and Previewing Views (on page 148).
NOTE: You can edit the final design after saving and previewing your launch pad. For more information about design editing, refer to Editing the Final Design (on page 149).
6 Activate the launch pad elements. For more information about activating elements, refer to Activating Page Elements (on page 151).
Customizing the Email Banner You can use the EMAIL BANNER window to customize the banner of email messages generated and sent through the Web Services system. For more information about email messages sent throughout the Web Services system, refer to Defining Email Notification Settings (on page 55).
To customize the Email Banner: 1 In the SKIN EDITOR, click Email Banner; the EMAIL BANNER window appears with the EDIT tab
selected. 2 Click the Upload EMail Banner HTML link; the confirmation window appears. 3 Click Yes; the FILE UPLOAD window appears. 4 Browse to the specially designed Email Banner .mht file to upload and click Next; the design appears
in the EMAIL BANNER window. For information on uploading designs, refer to Uploading Designs (on page 150).

Managing Site Customization
148 FreeFlow Web Services
5 Save and preview the Email Banner. For information about saving and previewing, refer to Saving and Previewing Views (on page 148).
NOTE: You can edit the final design after saving and previewing the email banner. For information about editing the design, refer to Editing the Final Design (on page 149).
6 Activate the EMAIL BANNER window elements. For information about activating elements, refer to Activating Page Elements (on page 151).
Customizing the Catalog Banner You can use the CATALOG BANNER window to customize the banner of HTML catalogs. For information about HTML catalogs in the Web Services system, refer to Setting the Account Job-ordering Windows (on page 50).
To customize the Catalog Banner: 1 In the SKIN EDITOR, click Catalog Banner; the catalog banner page appears with the EDIT tab
selected. 2 Click the Upload Catalog Banner HTML link; the confirmation window appears. 3 Click Yes; the FILE UPLOAD window appears. 4 Browse to the specially designed catalog banner .mht file to upload and click Next; the design
appears in the catalog banner page. For information on uploading designs, refer to Uploading Designs (on page 150).
5 Save and preview the catalog banner. For information about saving and previewing, refer to Saving and Previewing Views (on page 148).
NOTE: You can edit the final design after saving and previewing your catalog banner. For information about editing the final design, refer to Editing the Final Design.
6 Activate the catalog banner elements. For information about activating elements, refer to Activating Page Elements (on page 151).
Saving and Previewing Views The SAVE AND PREVIEW tab displays a preview of the current skin item without grid lines. Toggle between the two views by clicking the tabs located at the base of the SKIN EDITOR.
To save and preview views, click the Save and Preview tab; changes are saved and a preview appears.
NOTE: • Images missing from a preview are indicated by . • Buttons are inactive on the SAVE AND PREVIEW tab.
Editing Skin Elements This section describes editing skin elements, and the following procedures: • Uploading Images (on page 75) • Editing the Final Design (on page 149)
You can edit the following skin elements using the STYLE SHEET window: • Color Palette – Edit the window colors. • Buttons – Edit the standard application button images. • Side Panel - Edit the Panel Title and Background. • Fonts – Edit font type, style, size and color. • Arrows - Edit the Arrow icons. • Wizard Progress - Edit the progress images. • Tabs - Edit the tab images.
The linked image cannot be displayed. The file may have been moved, renamed, or deleted. Verify that the link points to the correct file and location.

Accessing the Style Sheet Window
Print Service Provider User Guide 149
Uploading Images 1 Select the folder to which you want to upload the images. 2 Click Upload Images; the UPLOAD FILE dialog box opens. 3 To upload a single file:
a Click Browse and select the image to upload. b Click Continue; the image is uploaded. c Click Close, to close the upload dialog box; the image is added to the image library.
4 To upload multiple files: a Select the Upload multiple files option. b Click Continue; the FTP Upload dialog box opens. c Click Page and select Open FTP Site in Windows Explorer; the Windows Explorer opens. d Drag and drop the images to be uploaded to the FTP window. e Close the Windows Explorer and the FTP Upload dialog boxes.
Editing the Final Design After skins are uploaded, approved, and activated, you can edit the final design in the SKIN EDITOR.
To reposition objects: 1 In the SKIN EDITOR, click the object to reposition. 2 Drag and drop it to the new location.
To resize objects: 1 In the SKIN EDITOR, click the object to resize. 2 Drag the anchor points to the new location.
To add text: 1 In the SKIN EDITOR, click the area where text is to appear. 2 Type the text.
To edit text: 1 In the SKIN EDITOR, select the text to edit. 2 Edit the text. Text editing tools are located on the toolbar.
NOTE: Save and preview your work by clicking the SAVE AND PREVIEW tab.
Accessing the Style Sheet Window To access the STYLE SHEET window, select a skin in the SKIN LIBRARY and select SKIN EDITOR > STYLE SHEET; the STYLE SHEET window appears.
NOTE: All Privilege levels use the Style Sheet.
To edit a window color: 1 In the STYLE SHEET window, click a color palette element; the COLOR SELECTION dialog box appears. 2 Select a color or type an RGB number; the new color appears in the SELECTED COLOR field.
NOTE: When using the RGB Editor, numbers cannot exceed 255.

Managing Site Customization
150 FreeFlow Web Services
3 Click OK; the new color appears on the COLOR PALETTE sub-panel. 4 Repeat Steps 1 through 3 to edit the color of other elements.
To edit a button: 1 Ensure the button image to be used (other than the existing button images) is uploaded to the Images
folder. For information about uploading images, refer to Uploading Images (on page 75). 2 In the STYLE SHEET window, click a Button element; the IMAGE FOLDER dialog box appears showing
the button name selected in the Name list, and the current button image displayed on the IMAGE pane. 3 Click the new image name and then click Select Image; the new image appears on the BUTTONS
sub-panel.
NOTE: • Text displayed on regular and dark buttons is independent of the background image. • The text is edited from the FONT sub-panel.
To edit a font: 1 In the STYLE SHEET window, click a font element; the FONTS dialog box appears. 2 Click a font type and style, and type a size. 3 Click OK.
To edit font colors: 1 In the STYLE SHEET window, click a font element; the FONTS dialog box appears. 2 Click the Color field; the COLOR SELECTION dialog box appears. 3 Click a color or type an RGB number; the new color appears in the SELECTED COLOR field. 4 Click OK; the new color appears on the COLOR PALETTE sub-panel. 5 Click OK.
NOTE: To preview the changes on the PREVIEW pane, right-click in the STYLE SHEET window and from the shortcut menu, choose Refresh.
Uploading Designs Before uploading a design, you must have a login page HTML design (*.mht format) for each of the pages to be customized.
It is recommended that you have HTML files initially designed by an HTML designer with an understanding of your Web Services application requirements.
Initial application designs first appear as gray background (default) to serve as reference data for what is being replaced, which you can select and temporarily delete. The gray background disappears permanently after you upload an HTML file (*.mht format).
The varying dimensions for uploading Site Customization files are outlined below.
Page Name Width Height
Login Page 1000px 700px
Site Frame Left bar - 200px Top bar - 1000px
Left bar - 500px Top bar - 100px
Launch Pad 1000px 700px
Email Banner 1000px unlimited
Catalog Banner 1000px 100px

Activating Page Elements
Print Service Provider User Guide 151
Converting HTML Pages to .mht Files You must convert the HTML page to a web archive (*.mht) file when uploading designs.
To convert an HTML page to an .mht file: 1 Open the web page in Microsoft Internet Explorer. 2 Select FILE -> SAVE AS; the SAVE AS window appears. 3 In the SAVE AS TYPE dropdown list, select Web Archive, single file (*.mht). 4 Click Save.
Activating Page Elements After you upload an .mht file, the associated page elements, such as links and buttons, remain inactive. In other words, they remain static and provide no functionality until they are ‘activated’, giving them functionality. Therefore, to activate those elements, you assign an action for each item.
Tabs are functionally very similar to buttons. There are tab controls in TRACK JOBS, MANAGE TEMPLATES and MY MANAGE ACCOUNT pages. You use these tabs to control the content of the window.
The main difference in behavior between the tabs and the buttons is that the tabs have two modes - a selected mode and an unselected mode. Activating tabs in the same way that buttons are activated makes skin creation very cumbersome. For this reason tabs are treated differently. A generic table is defined in the HTML page. This table can have 1 column with 4 rows, or 1 row with 4 columns. Having a total of 4 cells provides for all the possible tab controls. You then define the color of the selected and unselected tab and the font and color of the tab caption. From there the Branding feature takes the specifications for generating the various tabs in the various application environments.
Use the ACTIVATION window to activate buttons (links) and fields, such as on the login page, where you have a User and a Password field. Other pages have different items to activate.
This section describes activating page elements, and the following procedures: • Selecting Languages (on page 152) • Specifying First Page After Login (on page 152) • Defining User Privilege Views (on page 153)
To activate page elements: 1 In the SKIN EDITOR, click ; the ACTIVATION window appears. The window is divided into the following
three panes: o Left pane – Lists the activated objects (images or text). o Center pane – Displays the Editor instructions. o Right pane – Lists the required and optional buttons for activation.
NOTE: When you select a left pane list object, the corresponding object in the design is automatically selected, visually linking the listed object and the design object.
2 Select an object in the SKIN EDITOR window and click Add in the ACTIVATION window left pane (or double-click the object); a newly activated object appears in the left pane list.
3 Type the default name. 4 In the center pane, click the Element Type dropdown list, and select the required element type; the
right pane automatically updates to reflect the selection made.
NOTE: The right pane includes two activation lists: ‘Recommended’ and ‘Optional’. After clicking OK or Save and Preview, an alert message appears if you neglected to activate all the recommended list items.
The linked image cannot be displayed. The file may have been moved, renamed, or deleted. Verify that the link points to the correct file and location.
Managing Site Customization
152 FreeFlow Web Services
To activate tabs in the Top and Left Bars: 1 In the ACTIVATION window, in the ELEMENT TYPE dropdown list, select Tab-Main Menu or Tab-Sub
Menu. 2 For Unselected Mode and Selected Mode, define the fonts, text alignment, and background color.
NOTE: If you select the ALWAYS SHOW BACKGROUND option, the top and left bar background design elements, including any inactive buttons and images, remain visible for all users–regardless of their user privilege level–in all views.
3 In the TABS ALIGNMENT list, select a valid tab alignment option and then click OK. See the options in the table below:
Both bars Top bar Left bar
Fit To Width Right Top
Center Left Bottom
Selecting Languages You can define the language selection function, which appears in the login page. Language selection enables your users a selection of languages to view your site in.
NOTE: • Language Selection functionality is optional; if you leave the Language Selection undefined, the
default language remains that of the Print Service Provider. • Verify that language icons exist in the uploaded login page HTML design to enable Language
Selection.
To activate Language Selection buttons: 1 In the SKIN EDITOR, select a predefined language icon.
2 Click ; the ACTIVATION window appears. a Click the Add button, and in the ELEMENT TYPE dropdown list, select Button/Link. b In the ACTIVATED FUNCTION dropdown list, choose Select Language. c In the LANGUAGE dropdown list, select the language you want. d Repeat Steps 1 to 3 for each additional language selection button. e Click OK to confirm the activation and close the ACTIVATION window.
3 Click OK to close the SKIN EDITOR; the Language Selection buttons are activated.
Specifying First Page After Login You can specify the default page that users arrive at after logging in, according to their user privilege level. It is recommended that such default page settings are decided on together with your Print Buyers. You can use the DEFAULT PAGE tool, located on the site frame, to specify the first page after login for each privilege level. The default page can be any one of the Web Services internal pages, or an external page.
To define an alternative Default page: 1 In the SKIN EDITOR, click Default Page under the Site Frame tab, and in the DEFAULT PAGE dialog
box, choose Use External URL or Use Internal Page. o If you choose USE EXTERNAL URL, type the target URL in the field. o If you choose USE INTERNAL PAGE, select the target internal page from the dropdown list.
2 Click OK. 3 Save and preview the page. For information about saving and previewing, refer to Saving and
Previewing Views (on page 148).
The linked image cannot be displayed. The file may have been moved, renamed, or deleted. Verify that the link points to the correct file and location.
The linked image cannot be displayed. The file may have been moved, renamed, or deleted. Verify that the link points to the correct file and location.

Managing the Skin Library
Print Service Provider User Guide 153
Defining User Privilege Views Web Services operators authorized with Administrator user type have complete operational control. The Administrator view is the primary base design upon which a designer uses to create other user views. The branding applied to the ADMINISTRATOR window is automatically applied to the views displayed to the other user types.
For more information about defining system users, refer to Defining Print Service Provider Users (on page 17).
Defining and Editing for the Various User Types You can use the Edit Privilege bar to define the seven different views of the Web Services application. The EDIT PRIVILEGE windows are designed with the same layout, with the exception of different instructions in the instruction pane.
To define views for various user types: 1 In the SKIN EDITOR, click Site Frame and the required EDIT PRIVILEGE tab. 2 Select one of the following option buttons:
o Inherit From Administrator – determines that the site frame is based on the user type design. o Customized for this Privilege Level – determines that the site frame is based on the user type
design and the user has the ability to customize the design.
After the Administrator design is completed, it is advisable to edit the screens according to user abilities (as defined in SYSTEM SETUP -> ADVANCED -> USER TYPES).
Example edit: Remove the button accessing software downloads for the USER screen. You will need to upload the edited .mht file to the customized user privilege skin again.
Managing the Skin Library This section describes managing the SKIN LIBRARY, and the following procedures: • Assigning Skins to Print Buyers (on page 153) • Designating a Default Skin (on page 153)
Use the SITE CUSTOMIZATION LIBRARY to manage your system skins. Designers can create, edit, or delete skins, as well as rename and define the default skin.
Assigning Skins to Print Buyers When you select a skin in the SKIN LIBRARY to be used by one or more Print Buyers, the Print Buyer name, or names of Print Buyers currently assigned to the selected skin (if any) appear in the ASSIGNED TO CUSTOMERS list. You can reassign skins, or remove the skin assignment option for the Print Buyer altogether.
To assign a skin: 1 In the SKINS list, select a skin name and click Assign to Customers; the ASSIGN TO CUSTOMERS
dialog box appears listing all Print Buyers and their respective assigned skins. 2 Select the check boxes corresponding to the respective Print Buyers and click Assign; the assigned
Print Buyers are displayed in the ASSIGNED TO CUSTOMERS list.
Designating a Default Skin The System Standard skin, located in the SKINS list, is automatically set as the default skin upon installation. You can select another skin as the default skin for your Web Services site.

Managing Site Customization
154 FreeFlow Web Services
To make a default display skin; select a skin and click Set as Default.
NOTE: • You cannot have multiple default skins. • The System Standard skin cannot be edited.
Accessing the Skin Library To access the SKINS LIBRARY; select STORE ASSETS > SKINS; the SKIN LIBRARY appears.
To begin creating a skin: 1 In the SKIN LIBRARY, click New Skin and type a unique name in the ENTER NEW NAME field. 2 Click OK; the new skin name appears in the SKINS list.
You can now upload and assign design(s) and images to the skin, thus customizing it to serve as branding for your Site Customization system. For information about how to edit skins and upload designs and images, refer to Creating Skins (on page 145) and Editing Skin Elements (on page 148).
Duplicating Skins You can create multiple skins with the same look, containing different content or images, by using an existing skin. Duplicating skins is a simple, time-saving method of setting up a Multisite system.
To duplicate a skin, select a skin name and click Duplicate Skin; the duplicate skin appears in the SKINS list.
To rename a skin: 1 In the SKINS list, select a skin.
2 Click Rename Skin and type a unique name in the SKIN NAME field. 3 Click OK; the skin is renamed.
To delete a skin: 1 In the SKINS list, select a skin name and click Delete Skin. 2 In the confirmation dialog box, click Yes; the skin is deleted. Print Buyer accounts assigned with the
deleted skin are assigned the default skin.
The linked image cannot be displayed. The file may have been moved, renamed, or deleted. Verify that the link points to the correct file and location.
The linked image cannot be displayed. The file may have been moved, renamed, or deleted. Verify that the link points to the correct file and location.
The linked image cannot be displayed. The file may have been moved, renamed, or deleted. Verify that the link points to the correct file and location.
The linked image cannot be displayed. The file may have been moved, renamed, or deleted. Verify that the link points to the correct file and location.
Print Service Provider User Guide 155
11 Direct Marketing Links
In This Chapter
DirectSmile Image Generator ........................................................... 155 XMPie PersonalEffect ....................................................................... 157
You can use FreeFlow Web Services Direct Marketing Links to enhance your Print Buyers’ business opportunities with the ability to provide specialized services through the use of customized templates. These templates are created and then customized by integrating external application plug-ins. After purchasing a FreeFlow Web Services Direct Marketing Links license, the relative module adapters are provided to enable use of the modules described below.
This chapter contains information about the following Direct Marketing Links plug-ins: • DirectSmile Image Generator (on page 155) – create personalized image layouts and designs,
increase the impact of direct mail. • XMPie PersonalEffect Integration (on page 157) – enables Print Buyers to effectively reach their
customers via print, web, and email, within the framework of dynamic publishing campaigns.
DirectSmile Image Generator You can use DirectSmile Image Generator to create personalized image layouts and benefit from almost unlimited design possibilities. You can increase the impact of direct mail and narrow the distance between your Print Buyers and their customers, using the DirectSmile Image Generator.
This section describes how to use DirectSmile Image Generator within Web Services templates, and contains the following topics: • Creating a Template with a DirectSmile Image (on page 155) • Ordering a Job from a Template with a DirectSmile Image. (on page 157)
NOTE:
• You are required to purchase DirectSmile Image Generator .dset files (DirectSmile Image sets) and add them in the DirectSmile Image application.
• Ensure that all prerequisite software and components are properly installed and configured before beginning template creation. See the Integrations Guide on page 177 for more information.
• Both Print Services Providers and Print Buyers can create Templates only if they have Manage Template privileges.
Creating a Template with a DirectSmile Image After creating a FreeFlow Web Services template, create a template with a DirectSmile Image. 1 Navigate to ACCOUNTS -> STORE SETUP -> TEMPLATES. 2 Click the Create a new Template link; the CHOOSE JOB TYPE dialog box appears. 3 Select a job type and click Select; the GENERAL PROPERTIES window appears. 4 Type a template name in the TEMPLATE NAME field. 5 (Optional) Click the Change Thumbnail link to change the thumbnail image. 6 Type valid template property information in the fields provided.
NOTE: The information you provide in the GENERAL PROPERTIES window is made available for template search filters.
7 Click Save & Continue; the FILE UPLOAD window appears showing the UPLOAD FILE view.

Direct Marketing Links
156 FreeFlow Web Services
8 Browse to the file and click Save & Continue; the PREFLIGHT view appears. 9 To view the FILE REPORT, click the Click here to review these problems link; the template properties
are displayed as well as any preflight problems. Click the What is and Click here links to view preflight problem information. Edit as necessary.
10 Click Save & Continue; the INTENT view appears with the Web Services INTENT LIST. 11 Use the Web Services INTENT LIST controls to add tabs, edit properties, and edit the order of INTENT
LIST elements: Add Tab-– adds tab for the Print Buyer to define intent in separate pages Edit-– accesses the Edit Joblet Property dialog box Move Up-– moves the selected joblet up a position in the list Move Down-– moves the selected joblet down a position in the list Remove-– deletes the selected joblet from the list
12 Select the Visible column check box to specify a tab is made visible. 13 Click Save & Continue; the VARIABLE INFORMATION window appears, showing the DEFINE FIELDS
view.
To create a variable data template: 1 In the VARIABLE INFORMATION window, select VDP (data uploading/editing) in the dropdown list; the
Form Editor button is active. 2 Click the Form Editor button; the FORM EDITOR appears. 3 Click New, and in the NEW FIELD dialog box select Text and then click OK; a TEXT STEP appears in the
FIELD NAME list. Alternatively, you can use the selective upload to define images, or you can upload images in the design template or elsewhere. For example SMS Designer, and have the field pre-defined.
4 Click New again, and in the NEW FIELD dialog box, select Image and click OK; an IMAGE STEP appears in the FIELD NAME list.
5 Click the IMAGE FIELD name and select the Use Image Generator check box; the IMAGE GENERATOR dropdown list and SETTINGS link appear.
To integrate the template with a DirectSmile Image: 1 In the GENERATOR dropdown list, select DirectSmile Image Generator and click the SETTINGS link;
the DIRECTSMILE PARAMETERS dialog box appears. 2 Set the resolution and in the TEMPLATE FILE dropdown list, select a .dset (DirectSmile Image set). 3 In the TEXT DROPDOWN lists, choose how the text is to be applied:
o Embedded – Text is permanent and appears on each template page (hidden from the user). Type text in the TEXT field and click Save.
o Linked – The text is linked in the existing template field (variable for the user). 4 Select the Form Editor field name in the TEXT dropdown list and click Save. 5 Close the LAYOUT PREVIEW and then click the Form Editor field name. 6 Type text into the DEFAULT TEXT field and click OK. (For the Preview only.) 7 Click OK; the PREVIEW THE TEMPLATE window reappears. 8 Click Save & Continue; the SAVE AS TEMPLATE window appears. 9 Type a name, include reference information, and select a filing folder. 10 Click Finish.
The linked image cannot be displayed. The file may have been moved, renamed, or deleted. Verify that the link points to the correct file and location.
XMPie PersonalEffect
Print Service Provider User Guide 157
Ordering a Job from a Template with a DirectSmile Image. 1 You can create print jobs after the DirectSmile Image is integrated with the template. 2 On the Print Buyer side, in the ORDER JOBS window, select the template created in the above
procedure. 3 Click Save & Continue; the ENTER VARIABLE DATA window appears. 4 Type data and click Add to Cart and Checkout; the SHOPPING CART window appears. 5 Complete the Print Buyer workflow process.
XMPie PersonalEffect FreeFlow Web Services XMPie PersonalEffect enables Print Buyers to effectively reach their customers via print, web, and email, within the framework of dynamic publishing campaigns. By integrating XMPie PersonalEffect with Web Services, Print Buyers can access the XMPie PersonalEffect application using the Web Services workflow.
XMPie PersonalEffect with Web Services facilitates the following: • Print Buyers can access, customize, and order VI campaigns directly from Web Services. • Dynamic proofing and the generation of all VI output formats supported in PersonalEffect are
available directly from Web Services in a completely transparent way. • An integrated, online solution that places a Print Service Provider at the center of all relevant media
campaign information.
NOTE: • A Direct Marketing Links license is required to enable XMPie. • An expert level of understanding of the XMPie PersonalEffect accounts, campaigns, and
variable template creation is required to effectively present the templates for order by a Print Buyer.
The following topics describe the procedures involved in importing and using an XMPie PersonalEffect template in to the Web Services system. • Importing an XMPie PersonalEffect Template to the Web Services System (on page 157) • Ordering From a Template (on page 158) • Uploading a Database File (on page 158) • Restrictions and Known Limitations (on page 158)
NOTE: Ensure that all prerequisite software and components are properly installed and configured before beginning template creation. See the Integrations Guide on page 177 for more information.
Importing an XMPie PersonalEffect Template to the Web Services System To import an XMPie PersonalEffect template for use within Web Services: 1 Navigate to ACCOUNTS -> STORE SETUP -> TEMPLATES. 2 Click the Synchronize with External Repository link; the Import Template Wizard opens,
displaying the Choose Document Source window. 3 Select the XMPie option and click Start Import Wizard; the Choose Campaign window appears. 4 In the dropdown lists, select an account and a campaign and click Next; the Choose XMPie
PersonalEffect Document window appears. 5 Select a document (template) and click Next; the Choose Job Type window appears. 6 Select a job type and click Next; the Edit Properties window appears. 7 Define the job's properties and click Next; the Choose Output Device window appears. 8 In the dropdown lists, select an output format and an output device and click Next; the Template

Direct Marketing Links
158 FreeFlow Web Services
Pricing window appears. 9 Select the pricing model, type in template pricing values, select the pricing options, and click Next; the
Template Attributes window appears. 10 Information entered into Template Attributes is used by the Template search engine for establishing
the precise location of the template. Data entered is also sourced by the Template search engine to locate a template. Define the template attributes and click Finish; the XMPie template appears in the Templates list.
XMPie PersonalEffect templates are represented by the icon.
Ordering From a Template After you have uploaded an XMPie PersonalEffect template to Web Services, the template is ready to use for creating new jobs. The workflow follows regular Web Services template procedures.
To order a new job from an XMPie PersonalEffect template: 1 On the Print Buyer side, click ORDER JOBS; the Order Jobs window appears. 2 On the Catalog launch pad, click START ORDER; the Choose a Template window appears. 3 Select the target template and click CONTINUE; the Enter the Variable Data window appears. 4 To complete the job order, click ADD TO CART and CHECKOUT. 5 Proceed with the Web Services workflow. For more information, refer to the FreeFlow Web Services
Print Buyer User Guide.
Uploading a Database File To upload a database file: 1 Click the Add Records link; the Add Variable Data Records window appears. 2 Browse to a target database and click Continue; the Upload Variable Data Database window
appears. 3 Select a field name in each Field Name dropdown list and click Continue; the Variable Data
Express window appears. You can view a PDF preview using the Variable Data Express window. All PDF previews in the XMPie workflow are automatically generated as low resolution images by the XMPie server.
4 Click Add to Cart to send the job to the Shopping Cart, or click Add to Cart and Checkout to complete the workflow.
Restrictions and Known Limitations • The Auto Approve feature is not supported for XMPie Jobs. • The Imposition feature cannot be used with the VDX format. • In Track Jobs, when doing a PDF Preview, a "job in process" message is issued. To see the preview,
you must click "abort process." • Web Services does not impose XMPie jobs. This is done in XMPie. • Web Services does not generate press sheet calculations in the imposition section in the Job Info
panel in the Production queue. • VI templates cannot download the Print Buyer’s database that was uploaded in the order (there is no
import/export database capability). • XMPie VI fields behave like Form Editor VI fields. Uploading a file that is unsupported through the
Form Editor will not work. • When outsourcing an XMPie job, only the job ticket will be attached to the outsource email. • VI Fields that do not apply to XMPie templates are not disabled in the Form Editor. The table below
lists the fields for which the XMPie template definitions you change using Form Editor will apply, as well as fields for which the XMPie template changes that you make will not be applied. Fields that you
The linked image cannot be displayed. The file may have been moved, renamed, or deleted. Verify that the link points to the correct file and location.
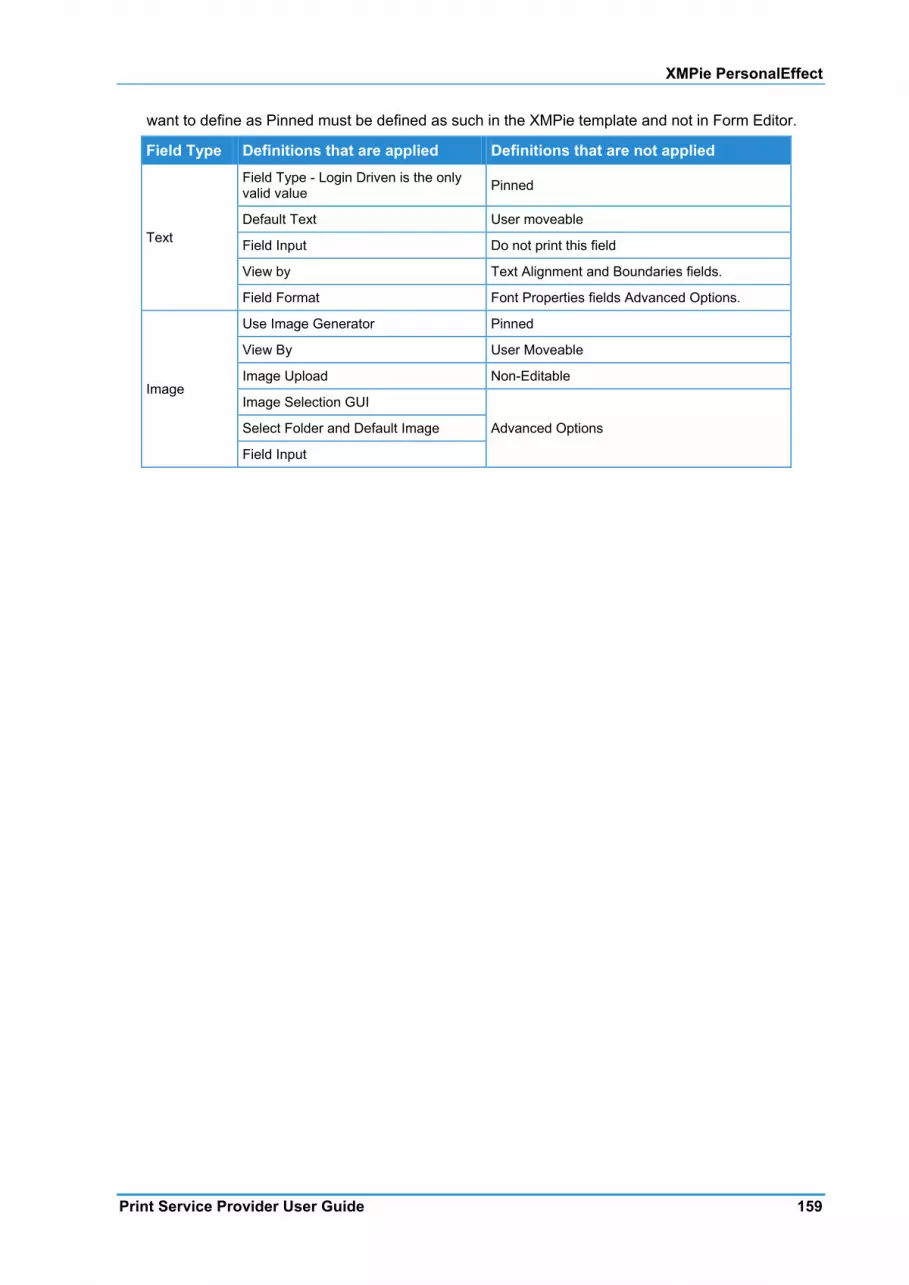
XMPie PersonalEffect
Print Service Provider User Guide 159
want to define as Pinned must be defined as such in the XMPie template and not in Form Editor.
Field Type Definitions that are applied Definitions that are not applied
Text
Field Type - Login Driven is the only valid value Pinned
Default Text User moveable
Field Input Do not print this field
View by Text Alignment and Boundaries fields.
Field Format Font Properties fields Advanced Options.
Image
Use Image Generator Pinned
View By User Moveable
Image Upload Non-Editable
Image Selection GUI
Advanced Options Select Folder and Default Image
Field Input

Direct Marketing Links
160 FreeFlow Web Services
Print Service Provider User Guide 161
12 Excel Pricing
In This Chapter
Settings in Web Services .................................................................. 161 Excel Pricing File Format .................................................................. 162 Excel Programming and Useful Excel Functions .............................. 167
Excel Pricing has been developed for Print Providers who prefer a pricing solution other than that provided by FreeFlow Web Services. The reasons you might prefer an extraneous pricing system are two-fold: • You have your own unique way of calculating the price and are not able to find a satisfactory way in
which to define pricing within the Web Services system • You already have your own tool by which you can define a price list and calculate prices
Excel Pricing enables you to upload an Excel file that contains all pricing parameters and then assign the file to an intended customer.
NOTE: • By working with an Excel file, all calculation methods are possible (i.e. any formula or any
information that will generate the specific price can be employed). • To activate Excel pricing, you must purchase the Data Export module.
Working with an Excel File
To work with Excel Pricing, you must first create an Excel file (see Excel Pricing File Format (on page 162) for more information) and then upload the file to the Print Buyer account. When the Print Buyer clicks on Get Quote, all relevant information related to the job and customer, is exported from Web Services to the Excel file.
The Excel file receives the new information and, according to the formulas that you provided, updates and calculates the price. The price and the output device information are automatically imported back to Web Services, where it is displayed to the Print Buyer.
When working with Excel Pricing, you can price a multitude of additional parameters. A few examples are: B&W and color pages, click charges, job tickets, and paper types.
Settings in Web Services This section describes the interaction between Web Services and the pricing file for a specific customer.
The following issues are covered in this section: • How to assign an Excel pricing file to a Print Buyer • How to download an Excel file that is assigned to a customer
Assigning Excel Pricing to a Print Buyer To assign a pricing file to a Print Buyer, perform the following: 1 Log in to Web Services and go to to ACCOUNTS -> ACCOUNT SETUP -> PREFERENCES. 2 In the PRICING sub panel, select Excel from the ACCOUNT PRICING MODEL dropdown menu; the Excel
File link becomes enabled. 3 Select the Excel file to be assigned to the specific Account.
Excel Pricing
162 FreeFlow Web Services
Importing/Exporting the Excel Pricing File You can upload an unlimited number of Excel files for pricing, however, only one Excel file can be assigned to a customer.
To upload an Excel file: 1 Click on the Excel File link; the Excel File dialog box appears and displays a list of all of the Excel files
that exist within Web Services.
NOTE: Sample Excel Pricing.xls and Sample Excel Pricing with Set.xls are the samples files provided by the system and demonstrate the general format that Excel Pricing sheets should follow. Do not delete these files since they will act as a basis for the Excel Pricing sheets. For more information about the Excel Pricing file format, refer to Excel Pricing File Format (on page 162).
2 Select the files that you want to upload and click Upload Files.
Excel Pricing File Format Web Services provides two Excel sample files: • Sample Excel Pricing.xls • Sample Excel Pricing with Set.xls
NOTE: The Sample Excel Pricing with Set.xls file is only relevant if you have the <iWay_Set> module.
Excel file for pricing has a special format which can not be modified. In this section, a full description of the file format is provided to help you create your own pricing mechanisms using the Excel Pricing model. These descriptions are based on the content in the Sample Excel Pricing.xls file.
Understanding the File Format The Sample Excel Pricing.xls file contains 2 sheets: • Info • Calculation
These sheets cannot be modified, removed, or deleted, and must be present when creating the Excel file. The Calculation sheet contains 4 columns: • Column A - Fields names that are exported from Web Services. • Column B - Values of the field names exported from Web Services. • Column C - Fields names that are imported into Web Services. • Column D - Values of the field names that are imported into Web Services.
You cannot make any modifications in Columns A, B or C. You need to generate values for Column D according to calculations inserted in each cell.
Column A Column A contains field names related to job properties, shipping and print buyer information, which are exported from Web Services.
Column A Fields
Fields Name Explanation
JobID Unique job# that the system generates
JobName Job name as it appears in the Shopping cart
JobStatusID Job status ID as it appears on the Database

Excel Pricing File Format
Print Service Provider User Guide 163
Fields Name Explanation
JobStatusName Job status
CustomerRefCode Reference code that the customer entered
JobTypeID Job type ID
JobTypeName Job type name as defined in the job type library
JobSubtypeID Job sub type ID
JobSubtypeName Job sub type name as defined in the job type library
Copies Number of copies of the job (if it is a VI job the number of copies is for one record)
FlatCount Number of original pages of this job (for one copy) without folding
FlatWidth Job original page width (without folding)
FlatHeight Job original page height (without folding)
FlatSize Job page size (without folding)
FlatOrientation Job page orientation
FlatSides Job sides
PageCount Number of folded counts of this job (for one copy)
PageWidth The job width after folding
PageHeight The job Height after folding
PaperCategory The paper category (on which the job will be printed) as was defined in the stock library
PaperTexture The paper texture (on which the job will be printed) as was defined in the stock library
PaperBrand The paper brand (on which the job will be printed) as was defined in the stock library
PaperColor The paper color (on which the job will be printed) as was defined in the stock library
PaperWeight The paper weight (on which the job will be printed) as was defined in the stock library
OutputDeviceID Printer ID that was assigned automatically by the system
OutputDeviceName Printer name that was assigned automatically by the system
PrintQualityID Print quality ID as defined in the printer
PrintQualityName Print quality name as defined in the printer (cost effective, high quality)
ColorGroup The job color details: process or B/W
BlackColorCount If B/W according to the job properties
ProcessColorCount Number of processes according to the job properties
SpotColorCount Number of spot colors according to the job properties
RequiredDate The delivery date
UrgencyID Urgency ID according to the definition in the system
UrgencyRate Urgency Rate according to the definition in the system
JobTaxRate Tax rate for this job

Excel Pricing
164 FreeFlow Web Services
Fields Name Explanation
PdfFlatCount Number of pages of this job (for one copy) without folding. after converting to PDF
PdfFlatWidth Job original page width (without folding) after converting to PDF
PdfFlatHeight Job original page height (without folding) after converting to PDF
PdfBlackColorCount If B/W after conversion to PDF
PdfProcessColorCount Number of process colors after conversion to PDF
PdfSpotColorCount Number of spot colors after conversion to PDF
PdfBlackAndWhitePageCount Number of pages of the job that are B/W
PdfColorPageCount Number of pages of the job that are process
VardataCount Number of records (VI) for this job
HasForm Is it an Variable Data Form job
CustomerID Customer ID (generated by the system when a customer is created)
CostCenterID Cost Center ID
CustomerName Print Buyer name
CustomerDiscountRate Print Buyer discount rate (as set in preferences)
CustomerTaxRate Print Buyer tax rate (as set in preferences)
StaplingType Stapling type (as defined for this job)
StaplingPosition Stapling position (as defined for this job)
StapleCount Staple count (as defined for this job)
CombBindingType Comb binding type (as defined for this job)
CombBindingPosition Comb binding position (as defined for this job)
CombThickness Comb binding thickness (as defined for this job in Inches)
VardataCount How many recodes are in a VI job
LaminatingTexture Laminating texture
LaminatingSides Laminating sides (one side or two sided)
DrillingPosition Drilling position (as defined for this job)
DrillingRadius Drilling radius (as defined for this job in Inches)
DrillingHoleCount Drilling hole counts (as defined for this job)
CollatingType Collating (if defined for this job)
PerfectBindingType Perfect binding type (as defined for this job)
PerfectBindingPosition Perfect binding position (as defined for this job)
NumberingType Numbering type (as defined for this job)
NumberingPosition Numbering position (as defined for this job)
NumberingSides Numbering sided
HasCustomFinishing Does this job has custom finishing
CustomFinishingName Custom finishing name
CustomFinishingDescription Custom finishing description
FoldCount Number of folding in the job (for 1 copy)
Excel Pricing File Format
Print Service Provider User Guide 165
Fields Name Explanation
ShipToFirstName First name as appears in the shipping address
ShipToLastName Last name as appears in the shipping address
ShipToFullName First name and Last name as appears in the shipping address
ShipToCompany Company name as appears in the shipping address
ShipToDepartment Department name as appears in the shipping address
ShipToStreet Street name as appears in the shipping address
ShipToCity City name as appears in the shipping address
ShipToState State name as appears in the shipping address
ShipToZipCode Zip code as appears in the shipping address
ShipToCountry Country name as appears in the shipping address
ShipToPhone Phone number as appears in the shipping address
ShipToMobile Mobile number as appears in the shipping address
ShipToEmail E-mail address as appears in the shipping address
ShipToAddressNotes Address notes as appears in the shipping address
PricingLevel Customer level is the relevant on Excel
SameJobTypeShoppingCartCopies The total number of copies, from all the jobs based on the same job type, currently in the Shopping Cart.
SameTemplateShoppingCartCopies The total number of copies, from all the jobs based on the same template, currently in the Shopping Cart.
Column B When a Print Buyer clicks on the Get Quote button in the Shopping Cart, the values related to the job are exported to Column B. The following windows in Web Services update the values in Column B: • GET QUOTE - Data concerning the Job properties and customer details will be updated • CHOOSE SHIPPING ADDRESS - Shipping Address information • CHOOSE YOUR SHIPPING OPTIONS - Shipping date and urgency
NOTE:
• Values of measurement - All sizes that are exported to the Excel file are in inches, even if the default language is not English US. You need to convert these values to mm using an Excel formula. For example, to convert Cell B16 from inches to mm use B16*25.4.
• Fields Format -Excel provides an option for setting the cell format whereby the view is changed but not the value. In the Excel that arrived with the system, all cells are set to General. Cell format can be changed by right-clicking on the cell and selecting the format cell option from the menu. For example, Cell B37, which is the required date value with a number, can be changed to a date format (with any date format).
Column C Column C contains field names of the pricing and output device information, which are imported into Web Services.
Column C Fields
Field Names Explanation
Cost Cost for the Print Provider
Price Customer price without tax and discount
Excel Pricing
166 FreeFlow Web Services
Field Names Explanation
AdjustedPrice Customer price + the negative discount
CustomerPrice Customer price + the positive discount
DiscountRate Discount rate
Discount Discount price
UrgencyRate Urgency rate
UrgencyPrice Urgency price
TaxRate Tax rate
Tax Tax price
TotalNoTax The total price without the tax
Total The total price + discount + urgency + taxes
PressSheetSize The Run Size that will be used for printing this Job (not obligatory)
OutputDeviceID The printer that the Job will be print on (not obligatory)
Column D You should insert the values for Column D. These are the values imported back to Web Services after the Print Buyer clicks Get Quote.
NOTE:
• N/A value - A Print Buyer, using the Excel Pricing model, may receive a pricing error (N/A) in place of the price, after clicking on Get Quote. This is an indication that there is an error in the Column D calculation. To resolve this problem, download the Excel file used for this customer and review the formula for values in Column D.
• Fields Format - In Excel, there are options for setting the cell format, which will change the view and not the value. In the file that came with the system, all cells are set to General. An option exists for changing the Excel default cell format by right-clicking on the cell and choosing the format cell option from the menu. For example, Cell D6 is the price that the customer will see in the Shopping Cart. You can set this cell format to be Currency according to your decision (this change will not effect the currency value that was set in Web Services).
• Field Value - Column D, Cells D4-D15 can accept only numbers. If the cells contain text, an error will be generated when a Print Buyer clicks on the Get Quote button.
• Ensure that the Excel file used by the Print Buyer for the price calculation is closed prior to the customer ordering. If the file is open and a Print Buyer requests a quote, instead of the price, a Microsoft Excel message will appear on the server.
You can make other changes in the other columns (except A-D) of the Calculation sheet and you can add new sheets to the file. Linking between two Excel files may cause an error, so any information that exists in a different file can be copied to a new sheet in the file that will be used for the Print Buyer.
Excel Pricing with the Book Assembly Module The file format, which can generate a quote for jobs ordered with the Book Assembly module and for simple jobs, is similar to the file format that was described in the previous section.
This section describes the fields and sheets that were added to the Sample Excel Pricing with Set.xls file: • Additional Fields - In the Calculation sheet, there are 2 new fields which are exported from FreeFlow
Web Services • Binding - This field contains the binding style that was chosen for the Book Assembly Job. • Material - The Material that was chosen for this Book Assembly Job. If there is no material for a Job,
the value of this field will be set to 0 • Additional Sheet - Component sheet was added to the Sample Excel Pricing with Set.xls file. Columns
A-F described the Book Assembly components and are exported from FreeFlow Web Services

Excel Programming and Useful Excel Functions
Print Service Provider User Guide 167
• Column A: Component - describes the component type: Color Pages, B/W, Cover, Tag or any other type that the Print Provider will define
• Column B: Component Type -The type of the component that was defined in Column A • Column C: Page Count - Number of pages for the current component • Column D: Paper Type - Paper Type for the current component • Column E: Finishing - Finishing for the current component • Column F: PDF Colors - Number of PDF color pages that were originally uploaded for the current
component • The numbers of rows that are added depends on the number of components that were defined for a
Book Assembly Job.
To import the updated Excel file with Book Assembly, perform the following: 1 Log in to Web Services and go to to ACCOUNTS -> ACCOUNT SETUP -> PREFERENCES. 2 In the PRICING sub panel, select Excel, including Set jobs from the CUSTOMER PRICING MODEL
dropdown menu; the Excel File link becomes enabled. 3 Select the Excel file to be assigned to the specific customer.
The EXCEL FILE dialog box displays the Last Output of-Sample Excel Pricing With Set.xls file. Last Output of-Sample Excel Pricing With Set.xls contains all the data that was imported and exported by Web Services during the last use. This means that in this file, you can find all the information about the job being ordered by the Print Buyer when the Print Buyer clicked Get Quote.
Excel Programming and Useful Excel Functions This section lists examples of several useful Excel formulas and functions.
IF Function The Excel If function examines whether a certain condition is true or false. If the condition is true, the function will do one thing, if the condition is false, the function will do something else.
Sample IF Syntax Using the IF function, we will select on which printer a job is processed.
If the job is B/W, the printer will be Printer1. If this is a process job, the printer will be Printer2. =IF(Calculation!B33="process", "Printer2","Printer1")
Vlookup Function The Vlookup function searches for a value in the first column of a table array and returns a value in the same row from another column in the table array.
Syntax: VLOOKUP (lookup_value, table_array, col_index_num, range_lookup) • lookup_value - the value to search for in the first column of the table_array. • table_array - two or more columns of data that are sorted in ascending order. • col_index_num - the column number in table_array from which the matching value must be returned.
The first column is 1. • range_lookup - determines if you are looking for an exact match based on lookup_value. Enter
FALSE to find an exact match. Enter TRUE to find an approximate match, which means that if an exact match is not found, then the VLOOKUP function will look for the next largest value that is less than value.
Example
Using the VLOOKUP function, we will define a discount according to number of copies. We set a table of

Excel Pricing
168 FreeFlow Web Services
discounts according number of copies. The first column displays the minimum number of copies required to receive the discount displayed in the second column.
The lookup_value must be in the first (left) column on the table_array which sometimes can have limits and the user will have to change their own database for this limitation. To solve this limitation, use the functions MATCH and INDEX.
MATCH The Match function searches for a value in an array and returns the relative position of that item.
Syntax: MATCH (lookup_value, lookup_array, match_type) • lookup_value - the value to search for in the lookup_array. • lookup_array - a range of cells that contains the lookup_value that you are searching for. • match_type:
o FALSE or 0: exact match. o TRUE or 1: closest value (if the exact value is not found, the function will look for the closest value
smaller than the lookup_value).
INDEX The Index function returns a value or the reference to a value from within a table or range.
Syntax: INDEX (array, row_num, column_num) • array - a range of cells or table. • row_num - the row number in the array to use to return the value. • column_num - the column number in the array to use to return the value.
DGET Function One of the powerful functions which operates on databases is the DGET function. DGET function retrieves from a database a single record that matches a given criteria.
Syntax: DGET (database, field, criteria) • database - the range of cells that you want to apply the criteria against. • field - the column to retrieve. • criteria - table that contains the criteria + column names.
VBA With Excel, there is an option to write code with VBA. Using this option, you can create any function that you would like, especially for complex pricing calculations. It is important to remember that if you are using this functionality in one of the Excel files, there is a need to change the Macro security on Microsoft Excel that is installed on the server.
To change the Macro security, go to MICROSOFT EXCEL -> FILE -> OPTIONS -> TRUST CENTER-> TRUST CENTER SETTINGS -> MACRO SETTINGS and Enable all Macros.
Print Service Provider User Guide 169
13 Book Assembly
In This Chapter
Book Assembly Definitions................................................................ 169 Defining a Book Assembly Job Type ................................................ 170 Defining a Book Assembly Preview .................................................. 172 Producing a Book Assembly Job ...................................................... 175
Book Assembly enables you to determine those parameters necessary for a Print Buyer to create a multicomponent job. Web Services Set jobs are comprised of an optional binding element such as a binder or a spiral, and components such as color pages, black and white pages, tabs, and blank pages.
A Book Assembly job type is identified by a binding style. Therefore the term binding style is used instead of Book Assembly job type.
Book Assembly Definitions Book Assembly is comprised of several different pieces. This section describes the different parts that make up a book.
Binding Styles The binding style identifies the job type. To create a binding style, you need to define basic parameters as the type of binding, the possible page sizes, additional materials, pricing, and available components.
The binding collects the components into one physical entity that can contain covers, pages, inserts, and tabs. The binding element can take the form of binders, saddle stitching, perfect binding, wire binding, thermal binding or any other similar means.
Components Components are the elements comprising a Book Assembly. Web Services comes supplied with four default components. You can modify these components, delete them and add as many other components as required.
The default components are: • Cover - The Cover component is used when the cover has been designed as a separate file
encompassing the front cover, spine and back cover of the Book Assembly. • Tab - The Tab component is used for inserting tabs in a Book Assembly. It is possible to define the
text to be printed on a tab and the text parameters. When the Tab component is used, the application takes into account the number of tabs that can fit along a page side and provides feedback if this number has been exceeded.
• Color Pages - A standard component type which can be one or two-sided. • B/W Pages - A standard component type which can be one or two-sided.
Book Assembly Pricing The price of Book Assembly jobs is calculated as follows:
Total Price of a Book Assembly = Base Price per unit + [Price per Unit + Price Per Materials + Price Per Components * Pages]
Book Assembly
170 FreeFlow Web Services
Defining a Book Assembly Job Type You must first define the available components, their paper, color, finishing and pricing. When the components are ready, you must determine which binding styles are available and which components are available for each binding style.
NOTE: It is possible to continue and update components at any point. However, any change in component properties will affect EVERY Binding Style that includes the changed component.
To define Book Assembly job types, click PRINT SETTINGS -> JOB BUSINESS FLOW -> BOOK ASSEMBLY.
Defining Binding Properties The BINDING STYLES list contains all the binding styles that are available to the Print Buyer. The following default binding styles are available: • Binder • Saddle Stitch • Perfect Bind • Double Wire-O • Thermal Bind
After selecting the binding style, you should navigate through the various tabs and set values for the following properties: • General - define the General Binding Style properties. • Page Size - define the sizes available for each Binding Style. • Material - define the different materials used for the Book Assembly job. • Splitting - define the Splitting properties. • Pricing - define the price for assembling each Book Assembly unit and define quantity discounts.
Setting General Properties You can define Spine type and width for Binding Styles that do not have binding materials (such as saddle-stitching). When the binding style requires binding materials, the spine type and width are defined in the MATERIALS tab. If the spine is set from the MATERIALS tab, the SPINE and WIDTH boxes do not appear in the General view.
Select one of the following options from the SPINE drop down box: • Fixed - define a binding spine that is not affected by the actual thickness of a job. Type 0 in the Width
box to define that there is no spine. • Calculated - used for binding styles in which the binding spine width results from the actual job
thickness. Calculated Spine enables setting the maximum spine width to prevent the Print Buyer from creating a job that cannot be handled. With this setting, the system automatically calculates the spine width according to the total thickness of the files that the Print Buyer adds to the job.
Setting Page Size Properties Select the page size for the Book Assembly job. Available options include: • Fixed Sizes - select the sizes which are appropriate for this binding style. These sizes will be
presented as a selection option to the Print Buyer during ordering. The sizes displayed are based on the paper sizes defined in your system.
• Custom Sizes - when required page sizes do not appear in the FIXED SIZES list, you can create any number of custom sizes.
Defining a Book Assembly Job Type
Print Service Provider User Guide 171
Setting Material Properties Binding styles can involve different materials for operator selection (i.e. ring binders, spiral binders, etc.). Each material can have a different price and a different preview.
When a Print Buyer orders a job and selects a binding style with a list of materials, these materials will be presented to him as selection options. For example: If the Print Buyer selects a binder job type, the next stage will be to select the appropriate binder.
Material Properties enables defining the SPINE type and width. You can also add front cover, back cover and pages spine images that will be superimposed on the PDF preview.
Setting Splitting Properties Select any splitting options for the Binding Style and then click on the Edit Imposition icon next to the component in the SUMMARY pane. All components can be simultaneously configured by clicking on the Edit Imposition icon for ALL. For more information see Editing Job Imposition (on page 126).
NOTE:
• Bleeds can only be configured per Binding Style (click on the Edit Imposition icon for ALL). • When editing the imposition for an individual component, the Bleeds options will be disabled and
show the same parameters configured for All. • If the uploaded file for the Book Assembly has bleeds defined, then the bleeds defined for the
Binder Style will not be used and the bleeds will be taken from the file itself. This is relevant for all the pages in the file no matter how the file is split.
Setting Pricing Properties You can determine the price for each unit of a Book Assembly job, as well as determine the range of discounts for the job.
Defining Component Properties The COMPONENT PROPERTIES pane appears when you select a component, and it includes the following tabs: • General • Paper Selection • Color Channels • Finishing • Pricing
General Properties The General view enables you to determine the following: • Specify whether the component is one- sided or two-sided (also known as simplex and duplex). • Enter an internal note and a note for the print buyer for the specific component.
Paper Selection Properties The PAPER SELECTION tab enables you to define the paper types on which the component can be printed and enables you to set the default paper category names. The Print Buyer can view these options in the PAPER box of the Book Assembly job properties window.
Paper Category PAPER CATEGORY enables you to create name aliases for a specific paper and simplifies the ordering process for the Print Buyer. For each Paper Category, at least one valid Paper must be defined.
Book Assembly
172 FreeFlow Web Services
Paper List The PAPER LIST contains a list of papers that are connected to a specific paper category. The color of the paper items in the list is significant. Black color signifies a paper item that is in stock; gray color signifies that the paper has been temporarily disabled in the stock library; and red color signifies that the paper has been removed from the stock library.
When there is more than one paper in the PAPER LIST, the first item in the list is the default. To set another paper as default, select the target paper and move it up until it is the first one in the list.
Color Channel Properties Color Channels enables you to define whether the component will be printed in process colors or with black ink only.
The COLOR CHANNELS tab contains the following elements: • Process - When selected, the component becomes a Full Color component and when it is assigned to
Book Assembly pages, these pages will be priced and printed as color pages. • Black & White - When selected, the component becomes a Black and White component and when it is
assigned to Book Assembly pages, these pages will be printed with black ink and priced accordingly.
Finishing Properties The FINISHING tab enables you to define whether the component will be laminated.
Pricing Properties The PRICING tab enables you to set up the component pricing, and includes the following:
Price per Page Price per Page enables defining a base price per page, for each page size that is possible for this component. Enter the price only for page sizes that you expect to be using in Book Assembly Jobs.
Pages Quantity Discount Pages Quantity Discount enables define discount levels based on the total number of pages for this component type in a specific Book Assembly job. • Min - Minimum number of pages ('1' by default) • Max - Maximum number of pages ('Infinite' by default) • Discount - Fixed discount, according to the number of printed pages • Add Row - Click to add an empty row to the bottom of the table • Delete Last Row - Click to delete the last row at the bottom of the table
Defining a Book Assembly Preview Book Assembly preview enables the Print Buyer to receive a simulated view of the entire job, with all its various elements. The preview allows the Print Buyer operator to flip through and review the job during the creation process, functioning as a tool for avoiding design flaws and mistakes. For the preview to achieve its full potential, it has to be defined for each binding style and appropriate size.
Material Properties enables providing default settings for A4, A5, Letter, and Ledger page sizes. These settings can be changed according to need. In the default preview settings, the preview size appears larger than the default size in order to display the background.
NOTE:
The system does not require preview information for a specific size in order to provide a preview. If preview information is missing from a size that is available to the Print Buyer, the system will search among the existing sizes with preview information and will choose the size that is closest to the size lacking the preview information. The chosen size is then automatically scaled to the size lacking the preview.

Defining a Book Assembly Preview
Print Service Provider User Guide 173
Preparation Before you can start setting up the preview, you have to define the preview size, and then create appropriate images.
To create a realistic-looking preview, Book Assembly places the supplied background image (A), superimposes onto it the file content as uploaded by the Print Buyer (B), and places on the top an image simulating the appearance of the binding element (C).
Stages of a Book Assembly Preview
A The view's image is placed in the background.
B The uploaded file information is positioned over the background.
C Any binding-related images (such as binder rings or a spiral) is positioned on top.
Optional Spine Optional Spine enables providing the following settings only when the spine/cover and foreground are required in the style: • External Spine Image; which will serve as the background image of the spine • Spine Position (top-left corner) • Spine Width; the size of the spine in the original image
NOTE: The Binding Preview Spine Width is not the size of the spine that has been set for the binding style. Binding Preview Spine Width is a setting that is necessary for placement calculation. The size number must be entered (and should be greater than 0) if a file, under the External Spine Image, exists.
Establish the Preview Size The width of the preview must be double that of the page size plus the width of the margins. If no margins are added, the background will not appear in the preview.
NOTE: When setting height and width of the preview size to the same size as the page size dimensions, the background will not be displayed. This is suitable for graphically depicting binding types such as thermal binding. To view the background as well, the height and width of the preview size should be larger than two pages side by side. This is suitable for depicting binding types such as binder.
Prepare the following background files for the display: • External Front Cover • Internal Front Cover • Pages • Internal Back Cover • External Back Cover
NOTE: All the background files must be the same size.
The linked image cannot be displayed. The file may have been moved, renamed, or deleted. Verify that the link points to the correct file and location.

Book Assembly
174 FreeFlow Web Services
If the binding has a prominent visual feature that can be seen when flipping through a real similar product (such as binder rings) you might wish to create appropriate foreground images for each of the following views: • Internal Front Cover • Pages • Internal Back Cover
Establish the Left and Right Page Position The left page position is defined by the position of its top-right corner relative to the top-left corner of the background image.
The right page position is defined by the position of its top-left corner relative to the top-left corner of the background image.
If these numbers are unknown, they can be found by using Acrobat. In order to locate this point, carry out the following steps:
Left Page 1 Open the image in Acrobat, on the local PC. 2 Click on the Crop Tool (TOOLS -> ADVANCED EDITING -> CROP TOOL) and outline the left page. 3 Double-click on the image; the Crop Pages dialog box appears; the Top-right corner is the composite
of the top and right coordinates.
Right Page 1 Click on the Crop Tool and outline the right page. 2 Double-click on the image; the Crop Pages dialog box appears; the Top-left corner is the composite of
the top and left coordinates.
Setting up a New Preview To set up a new Preview, carry out the following steps: 1 To access the preview definition, select PRINT SETTINGS -> JOB BUSINESS FLOW -> BOOK ASSEMBLY. 2 Select a binding style and then click the Page Size tab.
Add/Edit Preview Link Adjacent to each Page Size is a PDF icon and a Preview link which accesses the Binding Preview window. The system provides the following two Preview link options: • Add Preview (with a gray PDF icon) - A preview does not exist but can be created by entering the
appropriate information into the various Binding Preview data boxes • Edit Preview (with a red PDF icon) - An editable preview already exists and can be edited by entering
the appropriate information into the various Binding Preview data boxes
Click on Add Preview near a selected page size; the Binding Preview dialog box appears.
Setting up a Binding Preview Binding Preview enables defining the background image on which the Book Assembly job created by the Print Buyer will appear, creating a full preview experience.
In addition, you must set the following: • The Preview sizes • Left and Right page positions
If a Spine is defined and there is a cover for the style, you must also set the position and width of the spine.
Producing a Book Assembly Job
Print Service Provider User Guide 175
Producing a Book Assembly Job To produce a Book Assembly job, perform the following: 1 Click TASKS -> PRODUCTION; the PRODUCTION window appears.
Book Assembly jobs waiting in the APPROVAL queue are marked by the Book Assembly icon. 2 Select a job.
The FILES tab displays a list of the files comprising the job. Since the job can contain multiple files and components, its production is often split between several devices.
3 Click Split Files; the SPLIT PDF dialog box appears. 4 Select the splitting options, component types, color channels, or color content of the files and click
OK. 5 Click Approve to send the files to production.

Book Assembly
176 FreeFlow Web Services
Print Service Provider User Guide 177
14 Integrations Guide
In This Chapter
Introduction ....................................................................................... 177 LDAP ................................................................................................. 178 User Management ............................................................................. 180 Data Export ....................................................................................... 187 Freeflow Connectivity ........................................................................ 203 XMPie PersonalEffect ....................................................................... 221 DirectSmile ........................................................................................ 225 Credit Card ........................................................................................ 226
Introduction This guide provides detailed information on the various integration possibilities available with FreeFlow Web Services.
Who Should Use This Guide This integration guide assumes that you are a network administrator or technician, and that you have prior knowledge of the following topics: • Networking concepts and terminology. • Network topologies. • Distributed networks and IP routing.
The guide also assumes that you are familiar with the FreeFlow Web Services capabilities.
Overview The information on integrating with FreeFlow Web Services is organized according to the various products. It is therefore only necessary to go to the section(s) that are relevant to the particular integration with Web Services.
LDAP LDAP (on page 178) gives information to Print Service Providers who want to connect Web Services to an LDAP server and enable user authentication by way of a directory service. The chapter provides instructions for integrating Web Services with an LDAP server enabling automated user synchronization and Single Sign On (SSO).
User Management User Management (on page 180) contains information for Print Service Providers who manage their users in an IT system which is not LDAP/Novel and wish to automatically synchronize users between the systems. The chapter provides instructions for implementing an authentication server, interfacing between Web Services and the IT system used to manage their users authentication and enabling automated user synchronization and Single Sign On (SSO).
Data Export Data Export (on page 187) is an add-on module for FreeFlow Web Services that enables a Print Service Provider to implement data-transfer to the various peripheral systems existing in their organization. The

Integrations Guide
178 FreeFlow Web Services
chapter provides instructions on retrieving the data that Web Services generates when a predefined event occurs.
FreeFlow Connectivity Freeflow Connectivity (on page 203) provides a Print Service Provider with the instructions needed to connect FreeFlow Web Services to external integrations such as FreeFlow output devices, and increase the automation between Web Services and the integrations.
XMPie PersonalEffect XMPie PersonalEffect (on page 221) provides instructions on integrating the software with Web Services, enabling Print Buyers to access, customize, and order XMPie PersonalEffect campaigns directly from within Web Services.
DirectSmile DirectSmile (on page 225) provides instructions on integrating the DirectSmile Image Generator tool with Web Services, providing a variety of additional options for creating variable data and image personalization solutions.
Credit Card Credit Card (on page 226) is an add-on module for FreeFlow Web Services that enables Print Buyers to pay for jobs ordered using an online payment vendor. The chapter provides instructions on integrating Web Services with the Credit Card vendor.
LDAP Overview The FreeFlow Web Services Lightweight Directory Access Protocol (LDAP) Adapter enables user authentication when logging in to the Web Services application by way of a directory service.
The LDAP Integration Guide is designed for Print Service Providers who want to connect Web Services to an LDAP server. Integration of the LDAP system into Web Services is intended for corporate Print Buyer accounts, and supports multiple LDAP directories for different customers.
Integration of the LDAP system into Web Services enables users who are managed in an LDAP directory to work with the Web Services system. The Web Services account is a copy of the domain user account and is updated each time the user logs into Web Services. The user is synchronized with the LDAP user including account status, required user details, and properties.
NOTE: • The Web Services LDAP Adapter is a separately licensed product and must be purchased in
addition to the Direct Marketing Links license. • Microsoft Active Directory and Novell's eDirectory are currently supported by the Web Services
LDAP Adapter.
Prerequisites Use of the FreeFlow Web Services LDAP Adapter requires the following: • Appropriate Directory User Account(s) should be set up and made available. • The Web Services application should be configured to perform LDAP authentication.
LDAP Workflow The following steps describe the LDAP workflow:
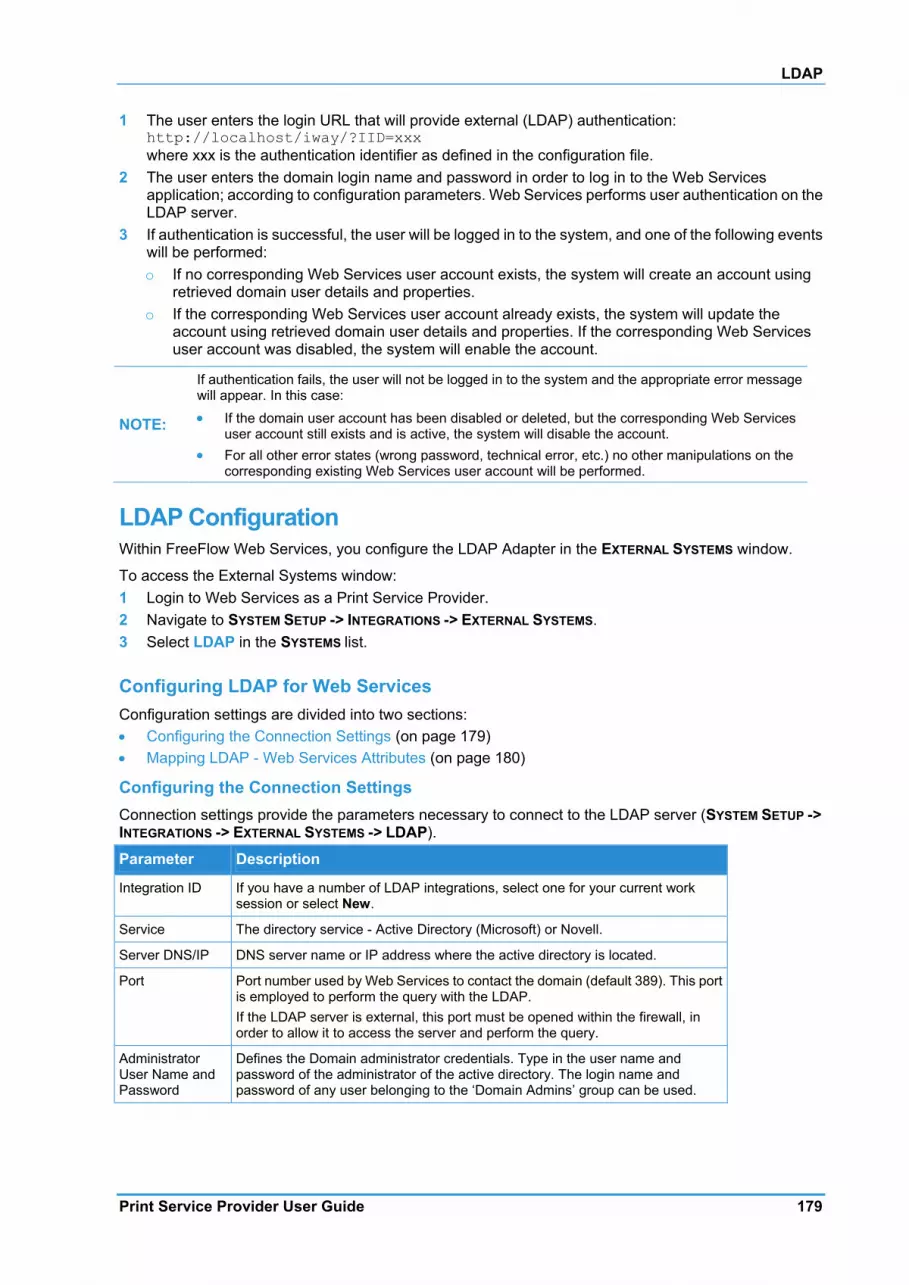
LDAP
Print Service Provider User Guide 179
1 The user enters the login URL that will provide external (LDAP) authentication: http://localhost/iway/?IID=xxx where xxx is the authentication identifier as defined in the configuration file.
2 The user enters the domain login name and password in order to log in to the Web Services application; according to configuration parameters. Web Services performs user authentication on the LDAP server.
3 If authentication is successful, the user will be logged in to the system, and one of the following events will be performed: o If no corresponding Web Services user account exists, the system will create an account using
retrieved domain user details and properties. o If the corresponding Web Services user account already exists, the system will update the
account using retrieved domain user details and properties. If the corresponding Web Services user account was disabled, the system will enable the account.
NOTE:
If authentication fails, the user will not be logged in to the system and the appropriate error message will appear. In this case: • If the domain user account has been disabled or deleted, but the corresponding Web Services
user account still exists and is active, the system will disable the account. • For all other error states (wrong password, technical error, etc.) no other manipulations on the
corresponding existing Web Services user account will be performed.
LDAP Configuration Within FreeFlow Web Services, you configure the LDAP Adapter in the EXTERNAL SYSTEMS window.
To access the External Systems window: 1 Login to Web Services as a Print Service Provider. 2 Navigate to SYSTEM SETUP -> INTEGRATIONS -> EXTERNAL SYSTEMS. 3 Select LDAP in the SYSTEMS list.
Configuring LDAP for Web Services Configuration settings are divided into two sections: • Configuring the Connection Settings (on page 179) • Mapping LDAP - Web Services Attributes (on page 180)
Configuring the Connection Settings Connection settings provide the parameters necessary to connect to the LDAP server (SYSTEM SETUP -> INTEGRATIONS -> EXTERNAL SYSTEMS -> LDAP).
Parameter Description
Integration ID If you have a number of LDAP integrations, select one for your current work session or select New.
Service The directory service - Active Directory (Microsoft) or Novell.
Server DNS/IP DNS server name or IP address where the active directory is located.
Port Port number used by Web Services to contact the domain (default 389). This port is employed to perform the query with the LDAP. If the LDAP server is external, this port must be opened within the firewall, in order to allow it to access the server and perform the query.
Administrator User Name and Password
Defines the Domain administrator credentials. Type in the user name and password of the administrator of the active directory. The login name and password of any user belonging to the ‘Domain Admins’ group can be used.
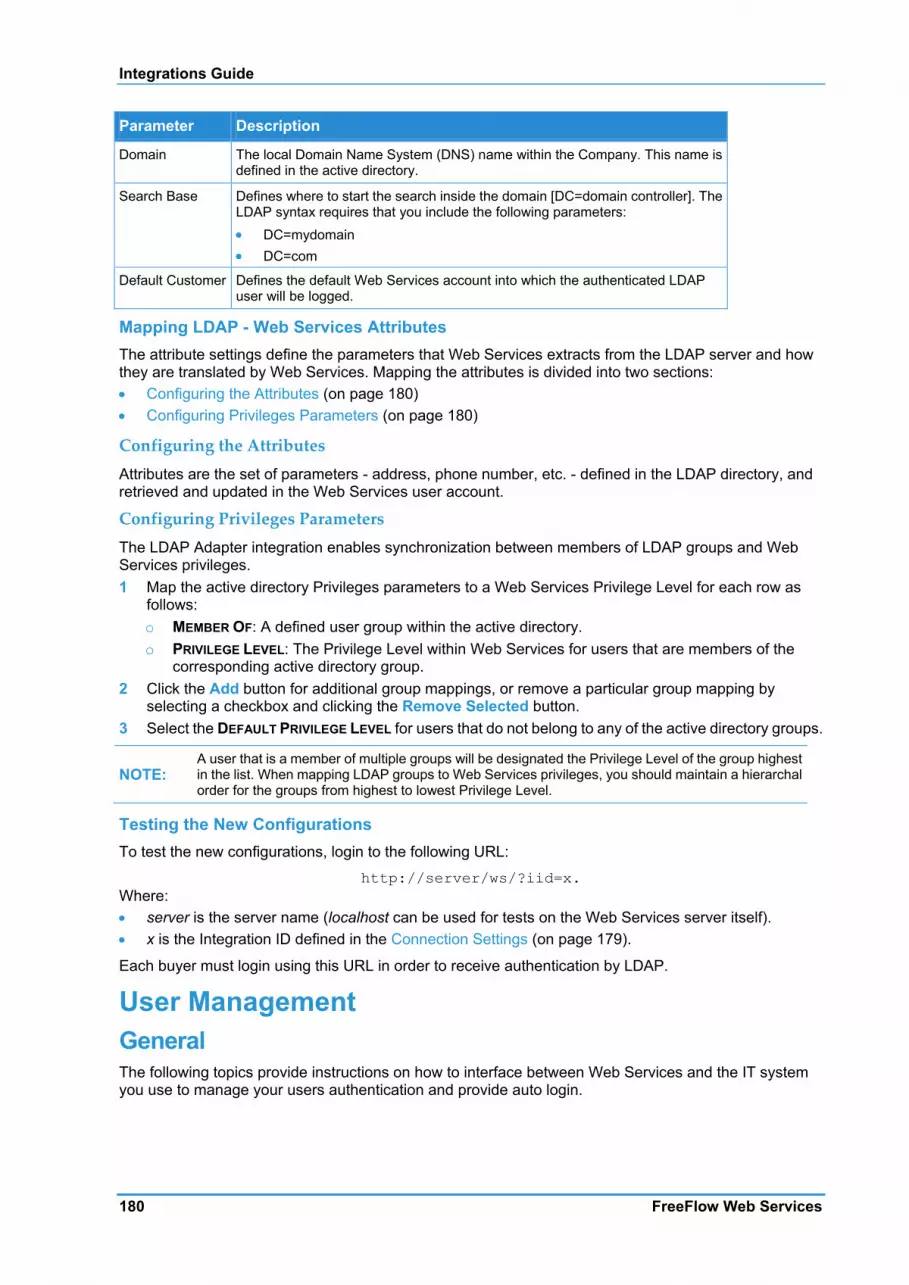
Integrations Guide
180 FreeFlow Web Services
Parameter Description
Domain The local Domain Name System (DNS) name within the Company. This name is defined in the active directory.
Search Base Defines where to start the search inside the domain [DC=domain controller]. The LDAP syntax requires that you include the following parameters: • DC=mydomain • DC=com
Default Customer Defines the default Web Services account into which the authenticated LDAP user will be logged.
Mapping LDAP - Web Services Attributes The attribute settings define the parameters that Web Services extracts from the LDAP server and how they are translated by Web Services. Mapping the attributes is divided into two sections: • Configuring the Attributes (on page 180) • Configuring Privileges Parameters (on page 180)
Configuring the Attributes Attributes are the set of parameters - address, phone number, etc. - defined in the LDAP directory, and retrieved and updated in the Web Services user account.
Configuring Privileges Parameters The LDAP Adapter integration enables synchronization between members of LDAP groups and Web Services privileges. 1 Map the active directory Privileges parameters to a Web Services Privilege Level for each row as
follows: o MEMBER OF: A defined user group within the active directory. o PRIVILEGE LEVEL: The Privilege Level within Web Services for users that are members of the
corresponding active directory group. 2 Click the Add button for additional group mappings, or remove a particular group mapping by
selecting a checkbox and clicking the Remove Selected button. 3 Select the DEFAULT PRIVILEGE LEVEL for users that do not belong to any of the active directory groups.
NOTE: A user that is a member of multiple groups will be designated the Privilege Level of the group highest in the list. When mapping LDAP groups to Web Services privileges, you should maintain a hierarchal order for the groups from highest to lowest Privilege Level.
Testing the New Configurations To test the new configurations, login to the following URL:
http://server/ws/?iid=x. Where: • server is the server name (localhost can be used for tests on the Web Services server itself). • x is the Integration ID defined in the Connection Settings (on page 179).
Each buyer must login using this URL in order to receive authentication by LDAP.
User Management General The following topics provide instructions on how to interface between Web Services and the IT system you use to manage your users authentication and provide auto login.
User Management
Print Service Provider User Guide 181
Overview The User Authentication Interface module of the application enables you to authenticate Print Buyer users through an external system, instead of manually registering the users in the application administration modules.
Prerequisites 1 An Authentication Server - An external system that is capable of receiving http requests and
responding with a standard XML reply. The authentication server queries the external user management system, and generates XML as required by Web Services.
2 Data Export license - Users can work with this integration only after acquiring and enabling the Data Export license.
Integration Flow The following procedure describes the basic workflow involved in the Automatic Login procedure. 1 The User Authentication procedure begins when a login request to the application is made from any
internet or intranet website. To activate the User Authentication workflow, the login request must be made to the following webpage: http://[server]/NewsWay/Interfaces/AutoLogin/algin.asp?IID=[x]&PrintProviderID=[y]&firsturlselection=[page]&localizationsection=[lang] Where:: o server – name of the Web Services server. o x – number of the authentication server configuration node. o y – ID of the print provider to which the account and user belong. In stand-alone installations, the
PrintProviderID = 5. o page – page that will be the first seen by the Print Buyer upon logging into the application. One of
the following "punch-in options" can be chosen: "firstpage" – default view (if blank or missing). "shoppingcart" "approval"
o lang – Language used by the system in the GUI interface after user login. The list of language codes is located in [Application Drive]:\NewEdition\ControlPanel\Localization\_nw_setup.txt, where [Application Drive] is the drive on which the application is installed. Default (if blank or missing) = English (US).
For example: http://localhost/newsway/interfaces/autologin/algin.asp?PrintProviderID=5&IID=2&firsturlselection=shoppingcart&localizationsection=FrenchCA The call can include any POST or GET parameters and the sending method should be predefined in the application configuration files.
2 The application sends the request to a webpage on the server that handles the authentication, forwarding any parameters included in the original request. The webpage URL, to which the request is being forwarded, must be predefined in the application configuration files.
3 The authentication request is replied to via an XML file. The XML file supplies a unique ID to the Print Buyer as well as the specific Print Buyer user, provides additional optional information about the user and/or the Print Buyer (such as contact information), and states the action to be taken. Possible actions are: o Create new user: A new user is created with the given parameters. If needed, a new customer is
created. If a user with the given unique ID already exists, an error occurs. o Update existing user: An existing user and/or customer with the given unique ID are updated with
the given parameters. If the user/customer does not exist, an error occurs. o Create or Update: If a user and/or customer with the given unique ID exists, the ID is updated with
Integrations Guide
182 FreeFlow Web Services
the given parameters; otherwise the user/customer is created and assigned the given parameters.
o Delete User: Delete the user with given unique ID. o Login: Log in - without updating user details. If no action is stated, the user is denied access to the application server. A sample XML reply is provided with the application installation and is located in [Application Drive]:\NewEdition\IPanel\Db\AutoLogin\sample.xml, where [Application Drive] is the drive on which the application is installed. The sample XML shows and explains all the optional parameters that the application accepts.
4 If the XML response is processed with no errors, the application takes the action that was stated in the XML. If the user is allowed to log in, the application redirects the web client that has made the original login request to the application logged‐in Start Page. If the user is denied login, the application displays an error message.
Configuring the User Authentication Definition To begin configuration of the User Authentication definition, do the following: 1 Open [Applciation Drive]: NewEdition\IPanel\PP\5\Integration\ExternalMethods\_nw_setup.xml,
where [Application Drive] is the drive on which Web Services is installed. 2 Go to the parameter ExternalIntegration IID = 2 which represents the "User Authentication" options
and a Change the parameters of authURL to the URL of your authentication server.
e.g.: http://localhost/newsway/test/autologin/xmlresponse.asp b Match the IID parameter to the IID that is passed from the external system into the application.
You can change the IID to any IID that you want, if you are working with a number of Auto Logins for example.
NOTE:
Do not touch the following. They have been deprecated. • UserDetailedSync • SingleSignOn • Parameter Method
Authentication server response structure The parameter tables below list the required elements found in the standard xml which the application interprets when logging in using external authentication. • A sample XML file can be found in:
[Application Drive]\NEWEDITION\IPANEL\DB\AUTOLOGIN\SAMPLE.XML, where [Application Drive] is the drive on which Web Services is installed.
• Missing tags in the xml will cause a crash — you can remove an existing tag in the xml by changing it to a comment (the syntax begins with <!-- and ends with -->). e.g., instead of deleting "<city>New York City</city>" change it to "<!-- city>New York City</city -->")
• "CustomerRefId" and "UserRefId" — id's used by the system that requests the login to identify the user and customer (like UserId, and CustomerId in Web Services). They can never be changed for a user/customer; if new reference id's are sent, a new customer/user is created. The rest of the parameters can be updated by an "update" user action.
• Editing XML file — if you are changing the data in the sample.xml or providing your own xml file, make sure you save it as UTF-8 encoding.
Account management Using the user management module, you can create, update, and delete accounts. This is a very powerful capability and we recommend you use it only once per account. If you need to change account properties with active users, use the application GUI (ACCOUNTS -> ACCOUNT SETUP - Some of the fields are located

User Management
Print Service Provider User Guide 183
in the GENERAL INFO tab and some in the PREFERENCES tab.
NOTE:
• In previous versions of Web Services, accounts were called customers. Therefore, accounts are referred to as customers in some places.
• A new account is created only when needed. • The account is managed based on the external ref ID. IF you want to log into accounts that were
created in the GUI, you need to add the external RefID in the Database customers table. Currently this cannot be done via the GUI.
Required Elements Example Description
customerRefId 1600066 Unique account ID in the external system
customer_name Royal Cargo Account name
street 143 5th Avenue
Account Address Information
city New York City
state New York
zip code 00147
country United States
contact_name John Smith
first_name John
last_name Smith
jobTitle VP Sales
CompanyName Royal Cargo
email [email protected]
phone +1 123 12345678
mobile +1 456 12345678
fax +1 123 87654321
ExtendedAddress
AddressField [1-5] ContactField[1-5] Customized fields
status 1
Account status. Valid values are: 1 = Enabled 2 = Disabled Default (if blank or missing) = Enabled
discount_rate 0 Fixed discount rate (%)
skin Name of the skin used for this customer (applicable only when using branded skins)
tax_rate Tax rate for this customer (%). If blank or missing, the application system default is applicable.
price_visible 1
Whether price information is shown to users of this customer. Valid values are: 0 = no 1 = yes
required_date_visible 1
Whether required date information is shown to users of this customer. Valid values are: 0 = no 1 = yes

Integrations Guide
184 FreeFlow Web Services
Required Elements Example Description
allow_purchase_orders 1
Whether purchase orders are allowed for users of this customer: Valid values are: 0 = no 1 = yes
allow_online_payment 1
Whether Online Payment is allowed for users of this customer: Valid values are: 0 = no 1 = yes
allow_credit_card 1
Whether Credit Card payment is allowed for users of this customer: Valid values are: 0 = no 1 = yes
allow_direct_debit 1
Whether Electronic Direct debit payments allowed for users of this customer: Valid values are: 0 = no 1 = yes Direct debit is relevant only with the "Paymaster" payment method. Turning it on for other online payment methods will cause the system to malfunction.
print_driver_enabled 1
Whether use of Print Driver is enabled for users of this customer: Valid values are: 0 = no 1 = yes
selective_upload_enabled 1
Whether use of Selective Upload is enabled for users of this customer: Valid values are: 0 = no 1 = yes
allow_order_unpriced 0
Whether users of this customer are allowed to order unpriced jobs: Valid values are: 0 = no 1 = yes
allow_order_no_content 1
Whether users of this customer are allowed to order jobs without content: Valid values are: 0 = no 1 = yes
allow_file_attachment 0
Whether users of this customer are allowed to attach files to jobs: Valid values are: 0 = no 1 = yes
default_catalog Account’s default application catalog. The catalog is attached to the customer only if it already exists.
logo_file_name Account’s logo file. The file name is attached to the customer only if the file was already uploaded to the application system.
access_path Name of the access path used for this customer (applicable only when using branded skins.)

User Management
Print Service Provider User Guide 185
External User Management and Synchronization The Web Services User Management module is implemented so that the users are synchronized in a "lazy fashion". A user is created / updated at the time of login. Synchronization always happens before login, so that on login to Web Services the details are up-to-date. However, at any point in time, full synchronization of the two user management systems is not guaranteed.
Required Elements Example Description
userRefId 1600066 Unique User ID in the external system
first_name John
last_name Smith
privilege 10
Web Services privilege. Valid values are: 10 = Administrator 20 = Supervisor 30 = Designer 40 = User 50 = Super User Default (if blank or missing) = User
department Sales If the department does not exist in Web Services, it is created
cost_center_name If a cost center with the cost center code (and or) cost center name exists for this account, the cost center is correlated to the user. Cost center creation is not available. cost_center_code
street 143 5th Avenue
Address information. If the address element and its sub elements are missing, the users address is the customers default address.
city New York City
state New York
zipcode 00147
country United States
jobTitle VP Sales
CompanyName RoyalCargo
email [email protected]
phone +1 123 12345678
mobile +1 456 12345678
fax +1 123 87654321
ExtendedAddress
AddressNotes
AddressField [1-5] ContactField[1-5]
catalog Users default application catalog. The catalog is attached to the user only if it already exists. If blank or missing, customers default catalog is used. If text is none, no catalog is used.
language
ip_filter The IP addresses from which the user is allowed to log in.
user_action CreateOrUpdate
What should the application system do with the information in the xml. Valid values are: • Create = Create a new user with the given parameters. • Update = Update the user parameters, but do not create

Integrations Guide
186 FreeFlow Web Services
Required Elements Example Description one if the user does not exist.
• CreateOrUpdate = Same as update, but create user if it does not exist.
• Delete = Permanently delete the user from Web Services. • Login = Log in without updating the user details. If no value is given, user login is denied.
Multisite Compatibility To support multisite compatibility: 1 Each site must have a different name. This limitation is not enforced by the GUI, since it is only
relevant when using LDAP or auto login. 2 You must add printproviderID=xxx to the url parameters
For example: http://uniquesitename/iway?IID=2&printproviderid=6
Appendix Using the Sample The sample demonstrates SSO user and account creation and can be useful for demos and authentication server development kick-off. Using the sample triggers a sample authentication server.
To use the provided sample: 1 Log into: HTTP://LOCALHOST/NEWSWAY/TEST/AUTOLOGIN/REQUESTLOGIN.ASP? 2 Click Use Get or Use Post to run it. This will call a sample authentication server that will return this
xml file: \NewEdition\IPanel\Db\AutoLogin\sample.xml
Troubleshooting Below is a list of troubleshooting concepts that may help if something does not work. • Is your IIS working in debug mode (server side scripting checkbox)? If yes, then turn it off. The
authentication server request is performed using multi-threading, and debug mode does not support this.
• Is the application server up? • Are you running the sample from the same server as the application? If not, add the machineName
parameter to the url. For example: http://rndprt002/newsway/test/autologin/requestlogin.asp?machineName=rndprt002
• Is your configuration OK? o Did you configure the setup correctly? – is the authentication server URL correct? o Did you write the login URL correctly? IID ? printproviderID ? o Did you add the parameters that Web Services is supposed to forward to the authentication
server? • Is your authentication server OK? • Try simulating a call to your authentication server from the application
o Did you get an XML in a browser? Do you see one in the logger? o Look at the XML – are any mandatory fields missing?

Data Export
Print Service Provider User Guide 187
Q&A Question: What operating system and hardware is required for the authentication server?
Answer: The authentication server is software that queries the Print Buyer user management system and returns an XML file based on an HTTP request. The authentication server can be developed on any independent web server platform.
Question: What change will the Print Service Provider need to make in the system to send the login request to Web Services?
Answer: The Print Service Provider must add a link to the Print Buyer’s web site. This website contains the user credentials (IID, printproviderid, and parameters for identifying the user) which are forwarded to the authentication server.
Data Export Introduction FreeFlow Web Services Data Export is an add-on module for Web Services that implements the concept of the application as an open system which can be easily integrated with, and conveyed to the various peripheral systems existing in an organization (such as Accounting and Mis).
The activation of Data Export is protected by the Print Service Provider’s licensing option. If the licensing option is not set for Data Export, the links will not be activated, even after the Data Export module has been installed. Existing customers, who wish to add the Data Export ability to Web Services, should contact their distributor and request an activation file that will add the Data Export license to their current licensing option.
This module implements data-transfer, whereby data is transferred at the time that a specific event occurs. There are 2 ways to retrieve the data the application generates when an event occurs: • Hot folder Configuration (on page 187) involves listening on the configured folder and retrieving the
XML file from it. • Writing a connector (on page 201) which is plugged in to Web Services’s events system. The
connector is triggered when an event occurs, and receives a dictionary with the same data as exported in the XML.
Hot Folder Configuration In situations where special processing is not needed for the export of information, Web Services provides a Default Receptor (our sample implementation of writing a connector) for each link. These Receptors write all of the information that was sent from the link to an XML file (a standard file format) and saves the file in a designated folder. These files can be accessed later and processed manually, or they can be processed by any software that supports the XML format.
E:\Temp has been set as the default folder for the XML file. However, the Print Service Provider can change this folder by entering any target folder into the Folder Path field box found in the Data Export window (SYSTEM SETUP -> INTEGRATIONS -> DATA EXPORT).
NOTE: Each of the links can be enabled or disabled independently. After installing Data Export on the server, all links are disabled by default. To enable a link, select the associated checkbox.
The naming of the XML files, written by the default Receptors, uses the following convention:
linkName_documentID_uniqueID.xml
Where: • linkName = getPrice, confirmOrder, jobShipped, jobApproved, confirmInvoice, confirmReceipt,
confirmDeposit, or confirmCreditNote. • documentedID = job id, order id, invoice id, receipt id, credit note id, or deposit id

Integrations Guide
188 FreeFlow Web Services
• uniqueID is a random number given to the filename in order to prevent the file being overwritten.
The Existing Links The following links are currently provided with the Data Export module: • Get Quote Link (on page 188) • Job Order Link (on page 188) • Edit Imposition (on page 188) • Job Shipped Link (on page 188) • Confirm Billing Document (on page 188) • Job Approved (on page 188)
Get Quote Link The Get Quote link is activated when clicking the Get Quote button in the application Shopping Cart. Some of the values in the created XML are not yet defined at the time that the XML for the quote is created, and these parameters are given default values. The actual values for these fields are provided during the place-order event.
Job Order Link The Job Order link is activated by clicking on the Place Your Order button in the Place the Order screen.
Edit Imposition The Edit Imposition link is activated when clicking on the Edit Imposition button in the Place the Order screen.
Job Shipped Link The Job Shipped link is activated when approving Jobs for shipping in the Delivery queue by clicking on the Approve Selected Deliveries button.
Confirm Billing Document The Confirm Billing Document link is activated when a billing document is confirmed. This happens by pressing the Confirm button in the Web Services GUI. • The link applies to all billing documents: invoice, receipt, credit note, and deposit. • This link is available only to Web Services Order Center users. • The link is also activated in the case of automatic invoice and receipt creation when working with
online payments.
Job Approved The Job Approved link is activated when clicking on the Approve button in the Production queue.
Exported data description This section describes the data sent in the application links. The data structure in all of them is similar. Below is a description of each of the included node properties.
Order Node The Order node exists in the Job Order xml file.
XML Property Name Type Description / Comments OrderID int Unique number of the order.
IP string IP of the computer placing the order.
InvoiceID int The id of the invoice of this order.

Data Export
Print Service Provider User Guide 189
XML Property Name Type Description / Comments PaymentTransactionID string Credit Card transaction number. Only available for some
Credit Card vendors.
PaymentTerms string Deprecated. No value presented.
IsPaid boolean True if already paid for by Credit Card.
OrderField[1-10] string Customized fields defined in System Setup -> Customized Fields -> Order tab.
AccountManager string Web Services Order Center customized fields defined in System Setup -> Customized Fields -> Account Information tab.
SalesPerson string
AccountField[1-5] string
PrintProviderID int Unique Print Provider number.
PrintProviderName string The current print provider name defined in System Setup -> Contact Details -> Print Provider Name
DisplayCurrency string The currency of the user placing the order..
DisplayCurrencyRate float The rate of the selected currency defined in Print Settings -> Pricing -> Currency Rates.
price double Price of the order before tax.
urgency double Urgency factor for delivery time based on regular, express, or urgent values. This is defined in the Job type or template setting, tax & urgency, and calculated according to the required delivery date in the order checkout process.
tax double Cost of order tax.
total double Order total cost.
OrderDate date Deprecated. Duplicate of OrderDateISO.
OrderDateISO date The date the order was taken.
id int Deprecated. Duplicate of OrderID field.
RequestedDate date Deprecated. Duplicate of RequiredDateISO.
RequiredDateISO date Defined in ordering sequence.
taxRate float Deprecated. Values appears under job nodes.
PaymentMethod String The method of payment.
PaymentMethodCode string Payment method as defined in the ordering flow, for example "PO (Purchase Order)".
POnumber string Purchase order number as defined in the ordering flow.
ExpirationDate Web Services Order Center field.
InternalNote string Defined per job type/template. Can be changed in Tasks-> Production Queue notes.
InternalReferenceCode string Reference code of the job – entered in the order wizard.
RefQuoteID string Web Services Order Center field.
LastFollowUp date Web Services Order Center field.
LostTo string Web Services Order Center field.
LostToPrice float Web Services Order Center field.
Name string Job name.
NextFollowUp date Web Services Order Center field.

Integrations Guide
190 FreeFlow Web Services
XML Property Name Type Description / Comments Numerator string Order counter defined in System Setup -> Numbering
ReceivedAs string Web Services Order Center field.
CustomerID int Account unique identifier. Visible in Accounts -> General Info.
customerTaxPackage float The customer Tax Package as defined per account.
customername string Deprecated. Duplicate of CustomerName field.
customerDiscountRate int Defined in Accounts -> Account Setup -> Preferences -> Pricing
ExternalCustomerID string Defined in auto login module or when exporting accounts. Seen in GUI only when defined, and cannot be edited in the GUI.
CustomerName string Account name.
CustomerNote string Edited by the Print Buyer during job creation -> Job details -> note for print provider.
OrderIP string Deprecated. Duplicate of IP field.
LoginName. DepartmentName, FirstName, LastName , DepartmentID, Email, JobTitle, Phone, Mobile, Fax, CompanyName
string Defined in user management.
UserID int Unique identifier of user. Not available in the GUI.
ExternalUserID string Defined in auto login module or when exporting accounts. Seen in GUI only when defined, and cannot be edited in the GUI.
CSRId int Web Services Order Center field. Unique identifier of the CSR creating the order. Not available in the GUI.
userContactAddress Node The userContactAddress node exists in the Get Quote, Job Order and Job Shipped xml files and contains the details of the order requesting user.
XML Property Name Type Description / Comments AddressID int Unique address identifier.
CustomerID int Unique Account identifier. Visible in Accounts -> General Info.
UserID int Unique user identifier. Not available in the GUI.
ContactTypeID int 1 - customer main contact 2 - user main contact
ContactGroupID int 2 - public group 3 - user group
AddressID1 int Deprecated. Duplicate of AddressID field.
CompanyName, DepartmentName, Street, City, State, ZipCode, Country, AddressNotes, FirstName,LastName, Phone, Mobile, Email, ExtendedAddress, JobTitle,
string Defined in Accounts -> Account Setup -> Users.
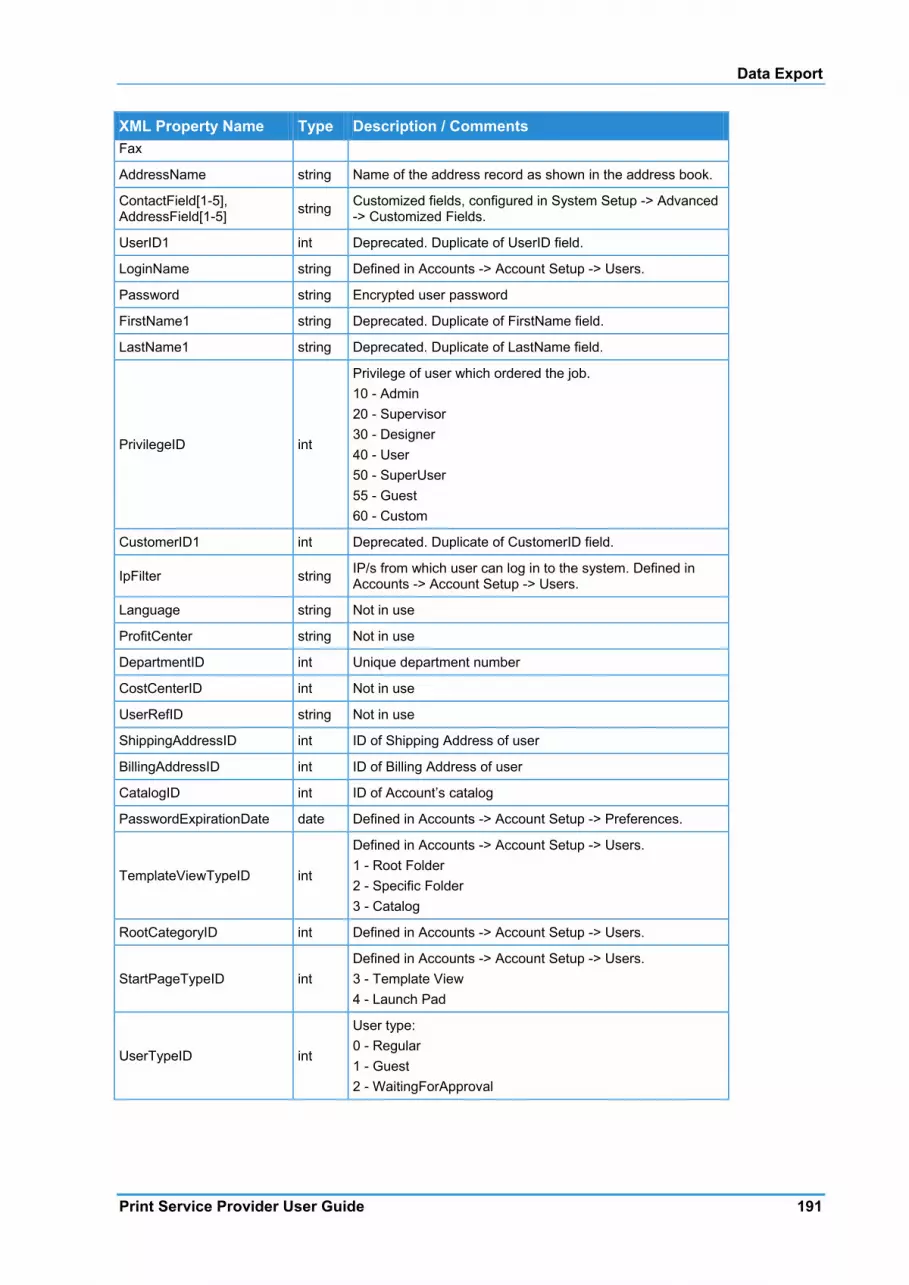
Data Export
Print Service Provider User Guide 191
XML Property Name Type Description / Comments Fax
AddressName string Name of the address record as shown in the address book.
ContactField[1-5], AddressField[1-5] string Customized fields, configured in System Setup -> Advanced
-> Customized Fields.
UserID1 int Deprecated. Duplicate of UserID field.
LoginName string Defined in Accounts -> Account Setup -> Users.
Password string Encrypted user password
FirstName1 string Deprecated. Duplicate of FirstName field.
LastName1 string Deprecated. Duplicate of LastName field.
PrivilegeID int
Privilege of user which ordered the job. 10 - Admin 20 - Supervisor 30 - Designer 40 - User 50 - SuperUser 55 - Guest 60 - Custom
CustomerID1 int Deprecated. Duplicate of CustomerID field.
IpFilter string IP/s from which user can log in to the system. Defined in Accounts -> Account Setup -> Users.
Language string Not in use
ProfitCenter string Not in use
DepartmentID int Unique department number
CostCenterID int Not in use
UserRefID string Not in use
ShippingAddressID int ID of Shipping Address of user
BillingAddressID int ID of Billing Address of user
CatalogID int ID of Account’s catalog
PasswordExpirationDate date Defined in Accounts -> Account Setup -> Preferences.
TemplateViewTypeID int
Defined in Accounts -> Account Setup -> Users. 1 - Root Folder 2 - Specific Folder 3 - Catalog
RootCategoryID int Defined in Accounts -> Account Setup -> Users.
StartPageTypeID int Defined in Accounts -> Account Setup -> Users. 3 - Template View 4 - Launch Pad
UserTypeID int
User type: 0 - Regular 1 - Guest 2 - WaitingForApproval
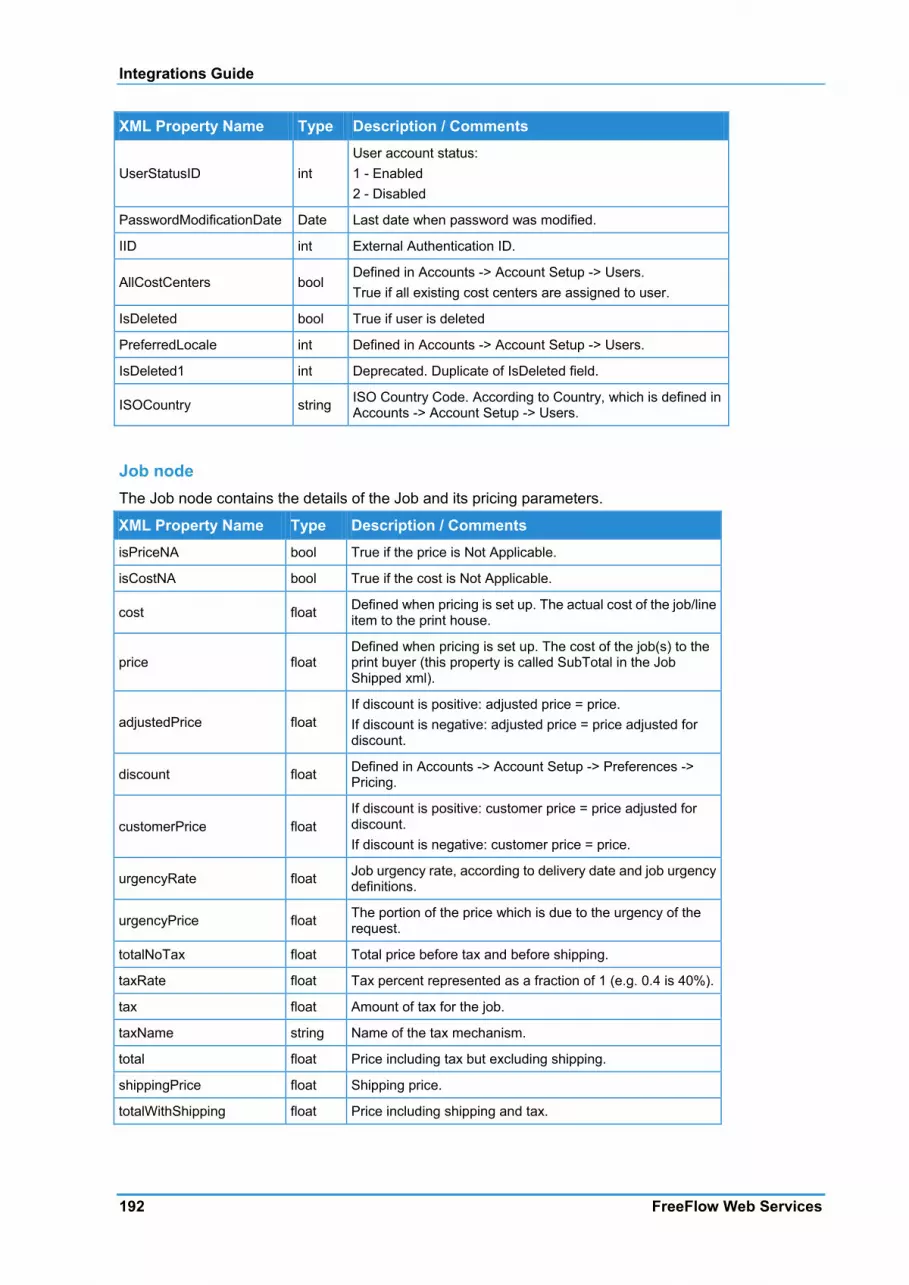
Integrations Guide
192 FreeFlow Web Services
XML Property Name Type Description / Comments
UserStatusID int User account status: 1 - Enabled 2 - Disabled
PasswordModificationDate Date Last date when password was modified.
IID int External Authentication ID.
AllCostCenters bool Defined in Accounts -> Account Setup -> Users. True if all existing cost centers are assigned to user.
IsDeleted bool True if user is deleted
PreferredLocale int Defined in Accounts -> Account Setup -> Users.
IsDeleted1 int Deprecated. Duplicate of IsDeleted field.
ISOCountry string ISO Country Code. According to Country, which is defined in Accounts -> Account Setup -> Users.
Job node The Job node contains the details of the Job and its pricing parameters.
XML Property Name Type Description / Comments isPriceNA bool True if the price is Not Applicable.
isCostNA bool True if the cost is Not Applicable.
cost float Defined when pricing is set up. The actual cost of the job/line item to the print house.
price float Defined when pricing is set up. The cost of the job(s) to the print buyer (this property is called SubTotal in the Job Shipped xml).
adjustedPrice float If discount is positive: adjusted price = price. If discount is negative: adjusted price = price adjusted for discount.
discount float Defined in Accounts -> Account Setup -> Preferences -> Pricing.
customerPrice float If discount is positive: customer price = price adjusted for discount. If discount is negative: customer price = price.
urgencyRate float Job urgency rate, according to delivery date and job urgency definitions.
urgencyPrice float The portion of the price which is due to the urgency of the request.
totalNoTax float Total price before tax and before shipping.
taxRate float Tax percent represented as a fraction of 1 (e.g. 0.4 is 40%).
tax float Amount of tax for the job.
taxName string Name of the tax mechanism.
total float Price including tax but excluding shipping.
shippingPrice float Shipping price.
totalWithShipping float Price including shipping and tax.
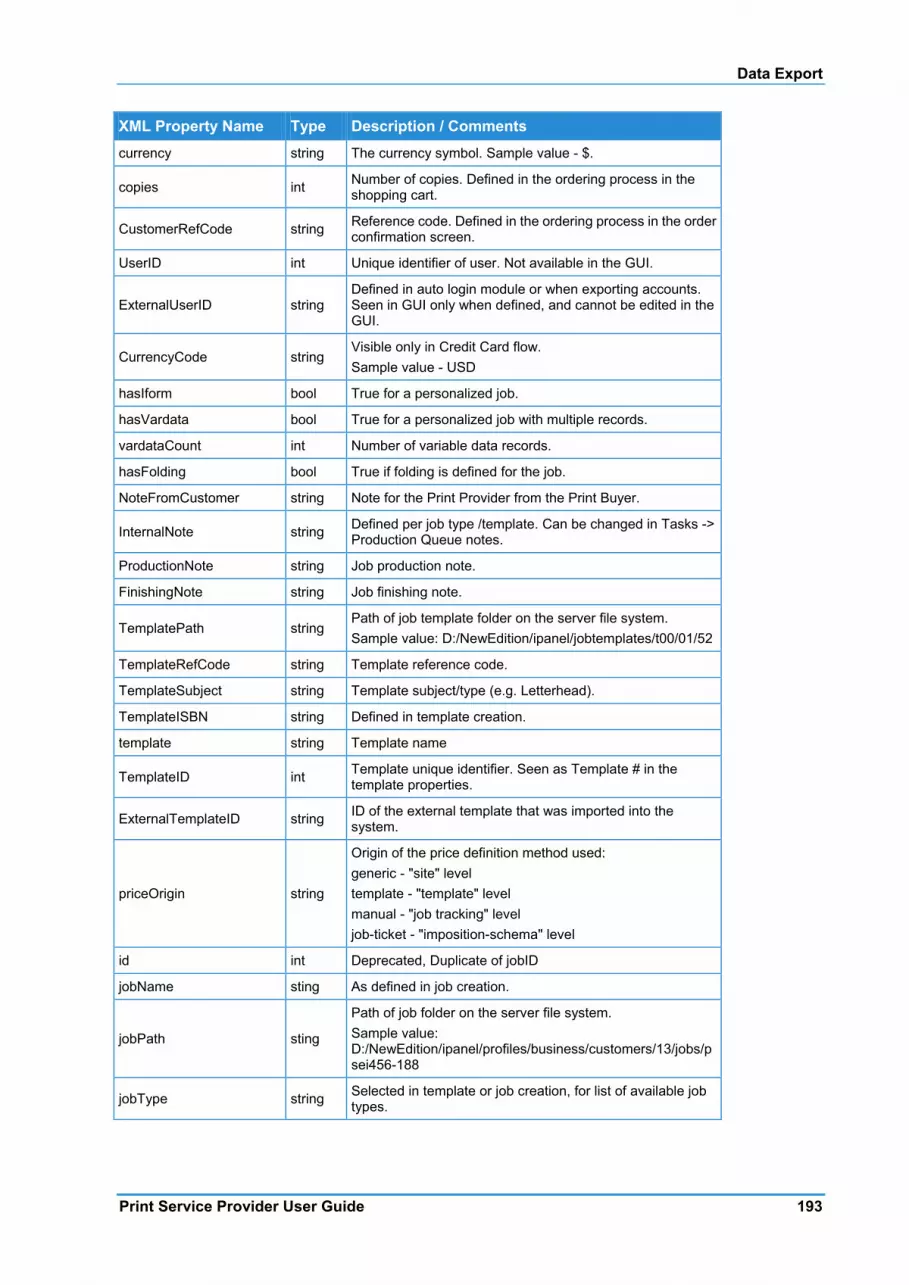
Data Export
Print Service Provider User Guide 193
XML Property Name Type Description / Comments currency string The currency symbol. Sample value - $.
copies int Number of copies. Defined in the ordering process in the shopping cart.
CustomerRefCode string Reference code. Defined in the ordering process in the order confirmation screen.
UserID int Unique identifier of user. Not available in the GUI.
ExternalUserID string Defined in auto login module or when exporting accounts. Seen in GUI only when defined, and cannot be edited in the GUI.
CurrencyCode string Visible only in Credit Card flow. Sample value - USD
hasIform bool True for a personalized job.
hasVardata bool True for a personalized job with multiple records.
vardataCount int Number of variable data records.
hasFolding bool True if folding is defined for the job.
NoteFromCustomer string Note for the Print Provider from the Print Buyer.
InternalNote string Defined per job type /template. Can be changed in Tasks -> Production Queue notes.
ProductionNote string Job production note.
FinishingNote string Job finishing note.
TemplatePath string Path of job template folder on the server file system. Sample value: D:/NewEdition/ipanel/jobtemplates/t00/01/52
TemplateRefCode string Template reference code.
TemplateSubject string Template subject/type (e.g. Letterhead).
TemplateISBN string Defined in template creation.
template string Template name
TemplateID int Template unique identifier. Seen as Template # in the template properties.
ExternalTemplateID string ID of the external template that was imported into the system.
priceOrigin string
Origin of the price definition method used: generic - "site" level template - "template" level manual - "job tracking" level job-ticket - "imposition-schema" level
id int Deprecated, Duplicate of jobID
jobName sting As defined in job creation.
jobPath sting
Path of job folder on the server file system. Sample value: D:/NewEdition/ipanel/profiles/business/customers/13/jobs/psei456-188
jobType string Selected in template or job creation, for list of available job types.
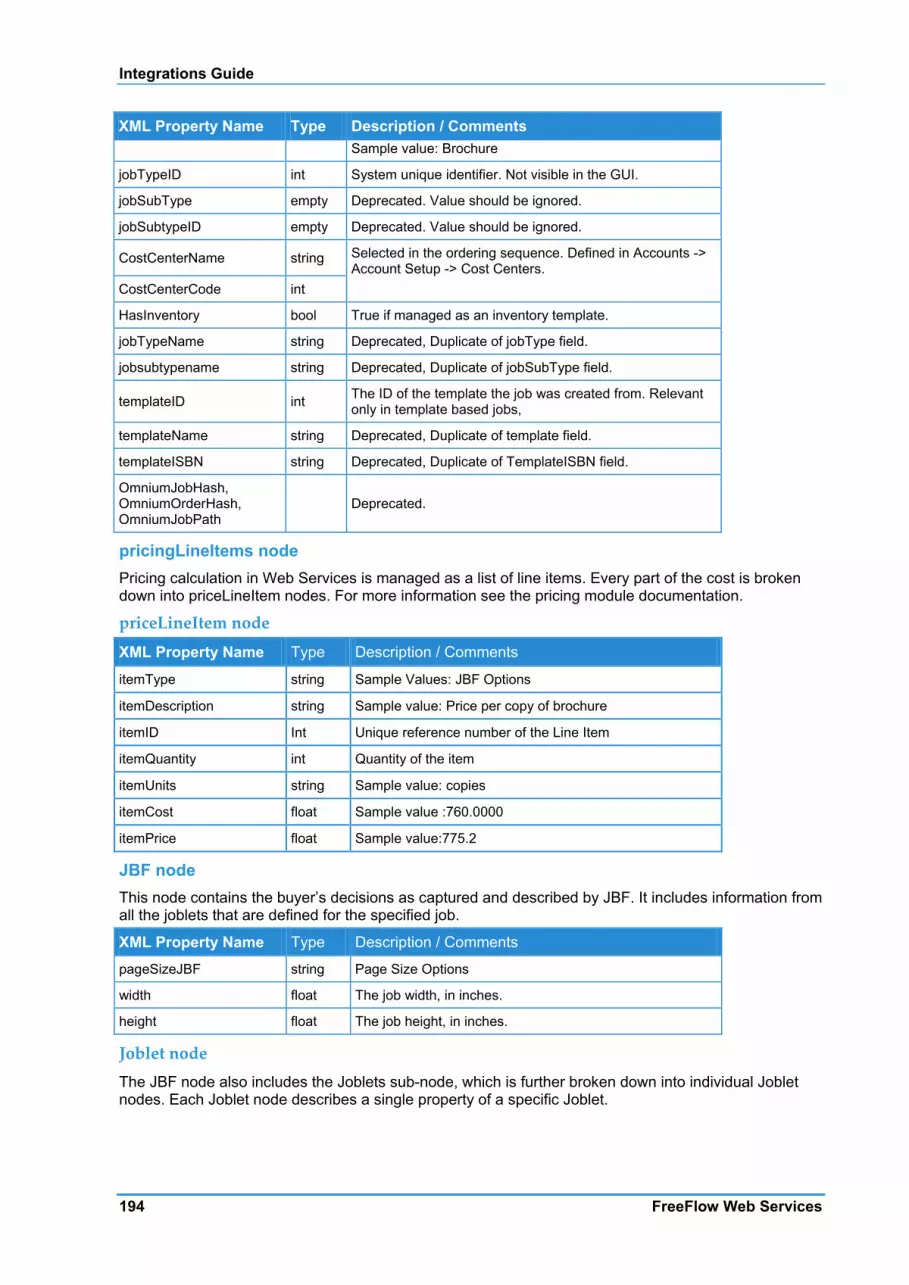
Integrations Guide
194 FreeFlow Web Services
XML Property Name Type Description / Comments Sample value: Brochure
jobTypeID int System unique identifier. Not visible in the GUI.
jobSubType empty Deprecated. Value should be ignored.
jobSubtypeID empty Deprecated. Value should be ignored.
CostCenterName string Selected in the ordering sequence. Defined in Accounts -> Account Setup -> Cost Centers. CostCenterCode int
HasInventory bool True if managed as an inventory template.
jobTypeName string Deprecated, Duplicate of jobType field.
jobsubtypename string Deprecated, Duplicate of jobSubType field.
templateID int The ID of the template the job was created from. Relevant only in template based jobs,
templateName string Deprecated, Duplicate of template field.
templateISBN string Deprecated, Duplicate of TemplateISBN field.
OmniumJobHash, OmniumOrderHash, OmniumJobPath
Deprecated.
pricingLineItems node Pricing calculation in Web Services is managed as a list of line items. Every part of the cost is broken down into priceLineItem nodes. For more information see the pricing module documentation.
priceLineItem node
XML Property Name Type Description / Comments
itemType string Sample Values: JBF Options
itemDescription string Sample value: Price per copy of brochure
itemID Int Unique reference number of the Line Item
itemQuantity int Quantity of the item
itemUnits string Sample value: copies
itemCost float Sample value :760.0000
itemPrice float Sample value:775.2
JBF node This node contains the buyer’s decisions as captured and described by JBF. It includes information from all the joblets that are defined for the specified job.
XML Property Name Type Description / Comments pageSizeJBF string Page Size Options
width float The job width, in inches.
height float The job height, in inches.
Joblet node The JBF node also includes the Joblets sub-node, which is further broken down into individual Joblet nodes. Each Joblet node describes a single property of a specific Joblet.
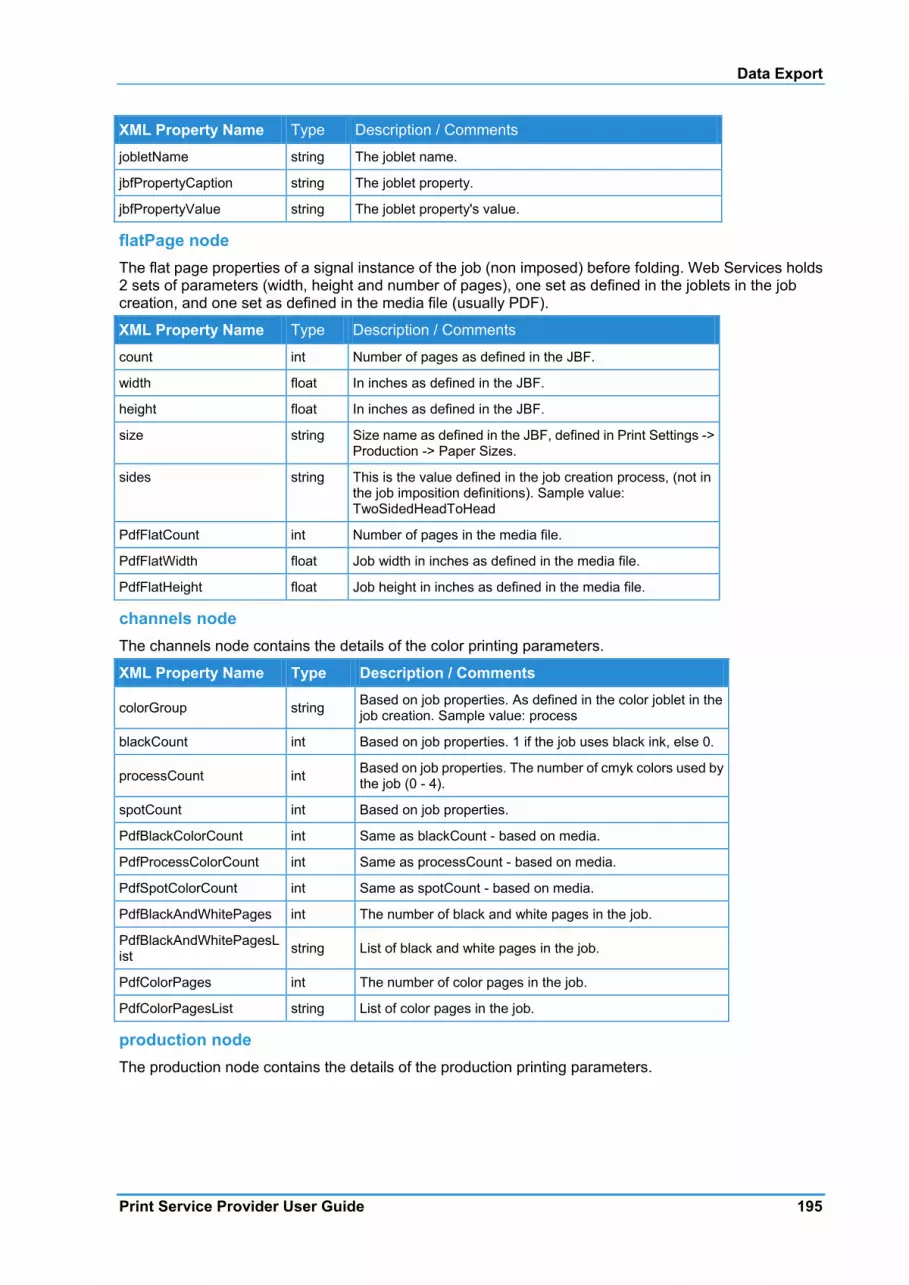
Data Export
Print Service Provider User Guide 195
XML Property Name Type Description / Comments jobletName string The joblet name.
jbfPropertyCaption string The joblet property.
jbfPropertyValue string The joblet property's value.
flatPage node The flat page properties of a signal instance of the job (non imposed) before folding. Web Services holds 2 sets of parameters (width, height and number of pages), one set as defined in the joblets in the job creation, and one set as defined in the media file (usually PDF).
XML Property Name Type Description / Comments count int Number of pages as defined in the JBF.
width float In inches as defined in the JBF.
height float In inches as defined in the JBF.
size string Size name as defined in the JBF, defined in Print Settings -> Production -> Paper Sizes.
sides string This is the value defined in the job creation process, (not in the job imposition definitions). Sample value: TwoSidedHeadToHead
PdfFlatCount int Number of pages in the media file.
PdfFlatWidth float Job width in inches as defined in the media file.
PdfFlatHeight float Job height in inches as defined in the media file.
channels node The channels node contains the details of the color printing parameters.
XML Property Name Type Description / Comments
colorGroup string Based on job properties. As defined in the color joblet in the job creation. Sample value: process
blackCount int Based on job properties. 1 if the job uses black ink, else 0.
processCount int Based on job properties. The number of cmyk colors used by the job (0 - 4).
spotCount int Based on job properties.
PdfBlackColorCount int Same as blackCount - based on media.
PdfProcessColorCount int Same as processCount - based on media.
PdfSpotColorCount int Same as spotCount - based on media.
PdfBlackAndWhitePages int The number of black and white pages in the job.
PdfBlackAndWhitePagesList string List of black and white pages in the job.
PdfColorPages int The number of color pages in the job.
PdfColorPagesList string List of color pages in the job.
production node The production node contains the details of the production printing parameters.
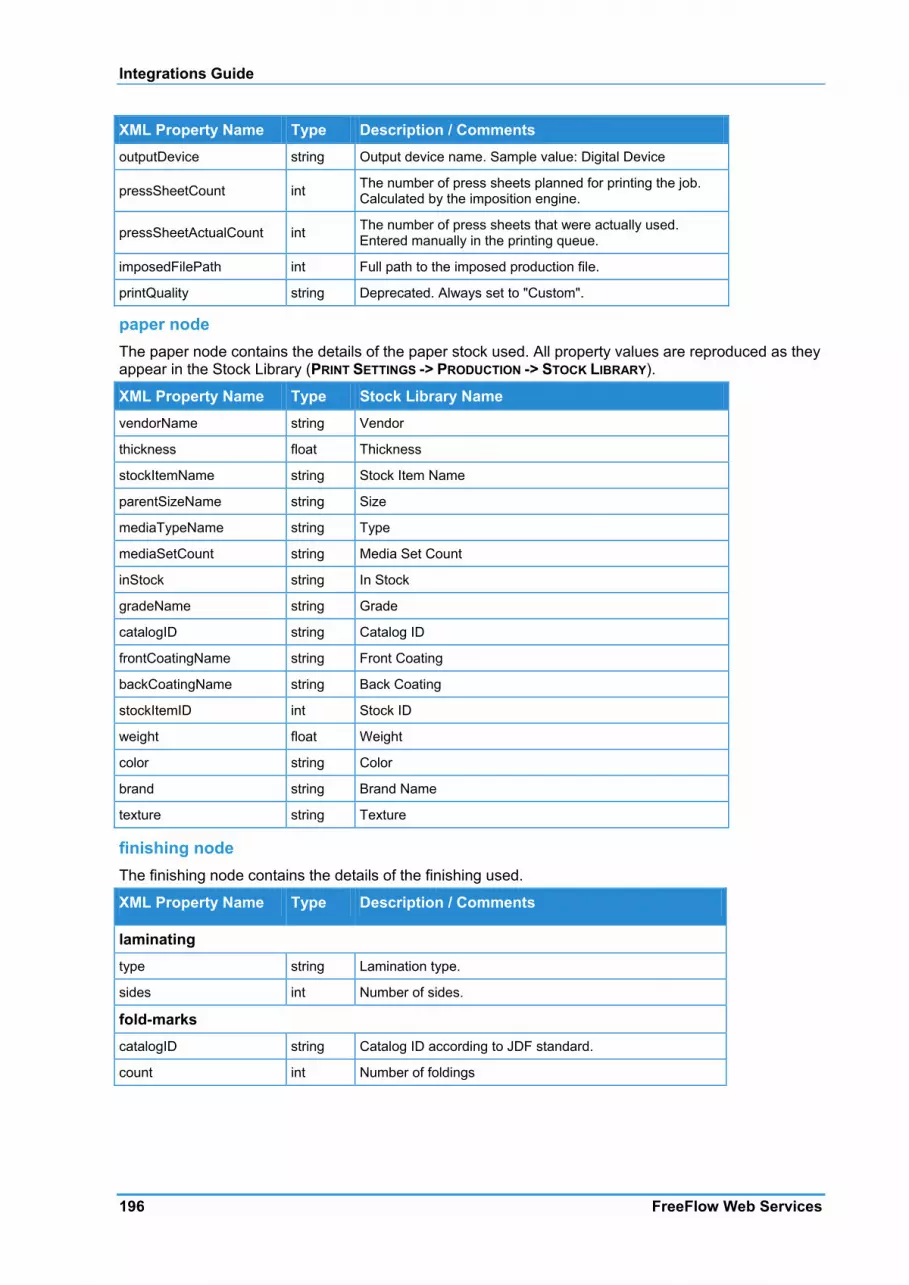
Integrations Guide
196 FreeFlow Web Services
XML Property Name Type Description / Comments outputDevice string Output device name. Sample value: Digital Device
pressSheetCount int The number of press sheets planned for printing the job. Calculated by the imposition engine.
pressSheetActualCount int The number of press sheets that were actually used. Entered manually in the printing queue.
imposedFilePath int Full path to the imposed production file.
printQuality string Deprecated. Always set to "Custom".
paper node The paper node contains the details of the paper stock used. All property values are reproduced as they appear in the Stock Library (PRINT SETTINGS -> PRODUCTION -> STOCK LIBRARY).
XML Property Name Type Stock Library Name vendorName string Vendor
thickness float Thickness
stockItemName string Stock Item Name
parentSizeName string Size
mediaTypeName string Type
mediaSetCount string Media Set Count
inStock string In Stock
gradeName string Grade
catalogID string Catalog ID
frontCoatingName string Front Coating
backCoatingName string Back Coating
stockItemID int Stock ID
weight float Weight
color string Color
brand string Brand Name
texture string Texture
finishing node The finishing node contains the details of the finishing used.
XML Property Name Type Description / Comments
laminating type string Lamination type.
sides int Number of sides.
fold-marks catalogID string Catalog ID according to JDF standard.
count int Number of foldings

Data Export
Print Service Provider User Guide 197
XML Property Name Type Description / Comments
numbering position string Position of number on the page.
Start int Start number.
step int Numbering step.
Start-page int Start page.
Duplex string duplex or single
type string Numbering type.
drilling position string Position of drilling on the page.
count int Number of drills.
radius float Radius of the drills.
shipping node There is a shipping node per delivery in the job order (multiple nodes for the multi delivery option). In the case of a quote, the values are not yet defined since the checkout process has not completed, and default values are provided.
XML Property Name Type Description / Comments DeliveryID int Unique identifier of the delivery. Not available in the GUI.
ProductID int Duplicate of JobID. Deprecated.
AddressID int Unique identifier of the delivery. Not available in the GUI.
Copies int Number of copied in the delivery.
ShippingMethod string As selected in the order checkout process. Sample value: Express Shipping (Same day delivery)
ShippingWeight float The weight of the delivery as calculated by Web Services
ShippingPrice float Shipping price as calculated by the pricing plug-in
RequiredDate Date Delivery Required Date as defined in the checkout process. Sample value: 3/3/2009 9:00:00 PM
CarrierCode string Deprecated
CarrierName string Name of the carrier
TrackingNumber string Entered in the delivery queue. Based on input from the delivery company.
StatusID int ReadyForShipping = 190 Shipping = 200 Received = 300
ShippingMethodID int Unique identifier of the shipping method.
ShippingJobPrice float Deprecated. Duplicate of job price.
ShippingTax float Tax on the shipping price.
AddressID1 string Deprecated. Duplicate of AddressID.
Company Name, Street, ExtendedAddress, City,State, ZipCode,
string Shipping address. As defined in the ordering flow.

Integrations Guide
198 FreeFlow Web Services
XML Property Name Type Description / Comments Country, AddressNotes
FirstName, LastName, JobTitle, CompanyName Phone, Mobile, Fax, Email
string Shipping address, contact Information details. As defined in the ordering flow.
AddressName string Name of the address record as shown in the address book.
ContactField[1-5] string Contact customized fields. Configured in System Setup -> Customized Fields -> Contact Information tab.
AddressField1 string Address customized fields. Configured in System Setup -> Customized Fields -> Address tab.
ShippingMethodID1 Deprecated. Copy of ShippingMethodID.
CarrierID int Unique ID of carrier (as selected in Shipping Method). Not visible in the GUI.
DeliveryMethodName string Name of the delivery method.
MethodDescription string Description of the shipping method, configured in Print Settings -> Shipping -> Shipping Methods and in Accounts-> Account Setup -> General Info -> Shipping Method Groups tab.
Markup float Markup on the shipping cost configured in Print Settings -> Shipping -> Shipping Methods.
HandlingFee float Deprecated
PricingModel string Intent / production/ excel Sample value: Intent Pricing
PricingModelSource string Job type / template. Deprecated Sample value: Price was calculated using Job Type pricing definitions
IsDefault bool Deprecated
ConfigurationGroupID int Deprecated
WeightLineItemID int Deprecated
VolumeLineItemID int Deprecated
WeightVolumeProportions float Deprecated
TaxPackageID int The tax package used for shipping costs.
TaxPackagename string Name of the tax package.
OnlineLineItemID int The delivery line item in the order result matrix.
RequiredDateISO date Requested shipping date
ShippedDateISO date When the job was really shipped.
DeliveryMethodName string Shipping method name
ISOCountry string ISO Country code as defined in User settings.
StatusName string Job status. Sample value: printing
billing node The billing node contains the contact details of the billing address.
orderPriceLineItems node This node describes the order pricing result break down. It includes information for each line item as a
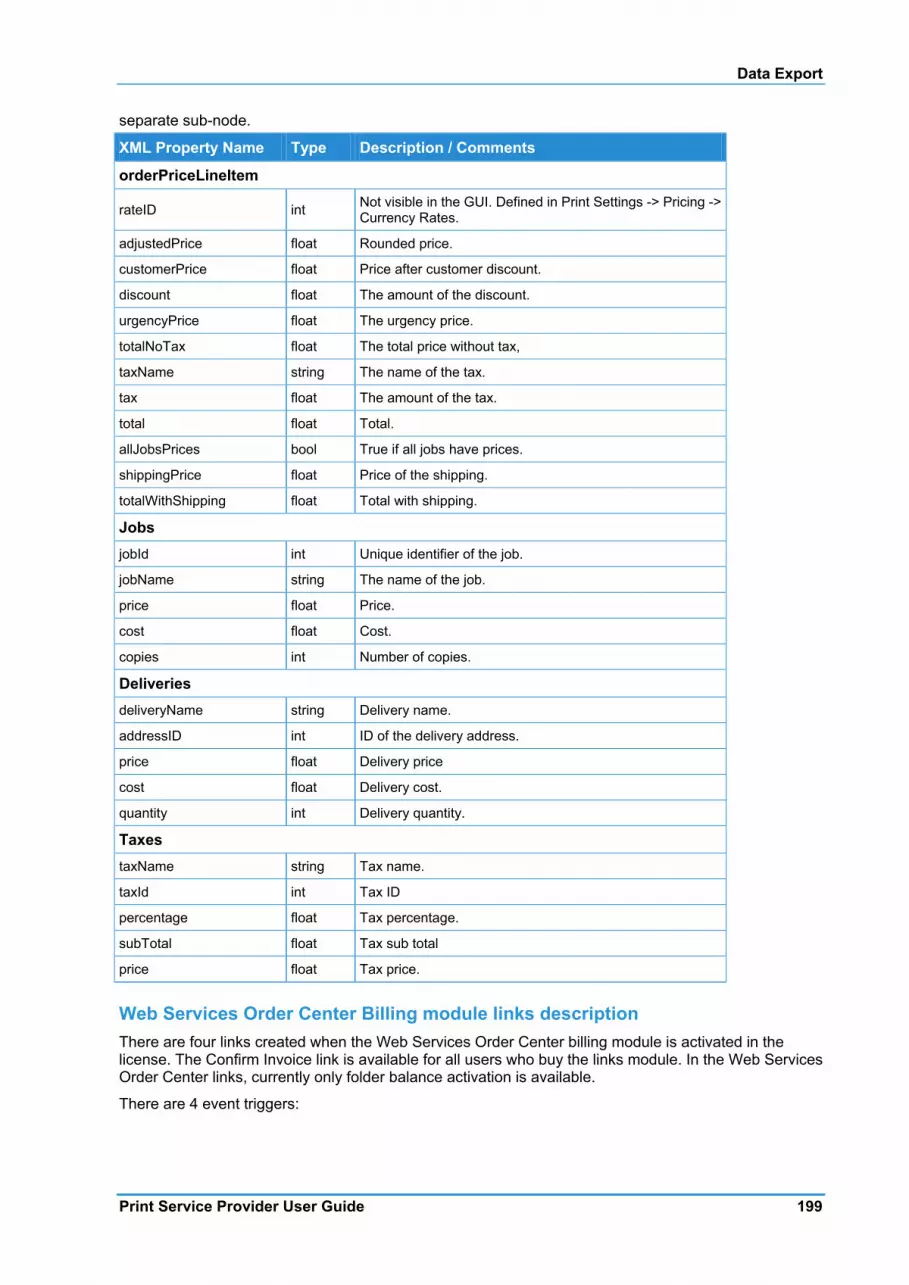
Data Export
Print Service Provider User Guide 199
separate sub-node.
XML Property Name Type Description / Comments
orderPriceLineItem
rateID int Not visible in the GUI. Defined in Print Settings -> Pricing -> Currency Rates.
adjustedPrice float Rounded price.
customerPrice float Price after customer discount.
discount float The amount of the discount.
urgencyPrice float The urgency price.
totalNoTax float The total price without tax,
taxName string The name of the tax.
tax float The amount of the tax.
total float Total.
allJobsPrices bool True if all jobs have prices.
shippingPrice float Price of the shipping.
totalWithShipping float Total with shipping.
Jobs jobId int Unique identifier of the job.
jobName string The name of the job.
price float Price.
cost float Cost.
copies int Number of copies.
Deliveries deliveryName string Delivery name.
addressID int ID of the delivery address.
price float Delivery price
cost float Delivery cost.
quantity int Delivery quantity.
Taxes taxName string Tax name.
taxId int Tax ID
percentage float Tax percentage.
subTotal float Tax sub total
price float Tax price.
Web Services Order Center Billing module links description There are four links created when the Web Services Order Center billing module is activated in the license. The Confirm Invoice link is available for all users who buy the links module. In the Web Services Order Center links, currently only folder balance activation is available.
There are 4 event triggers:
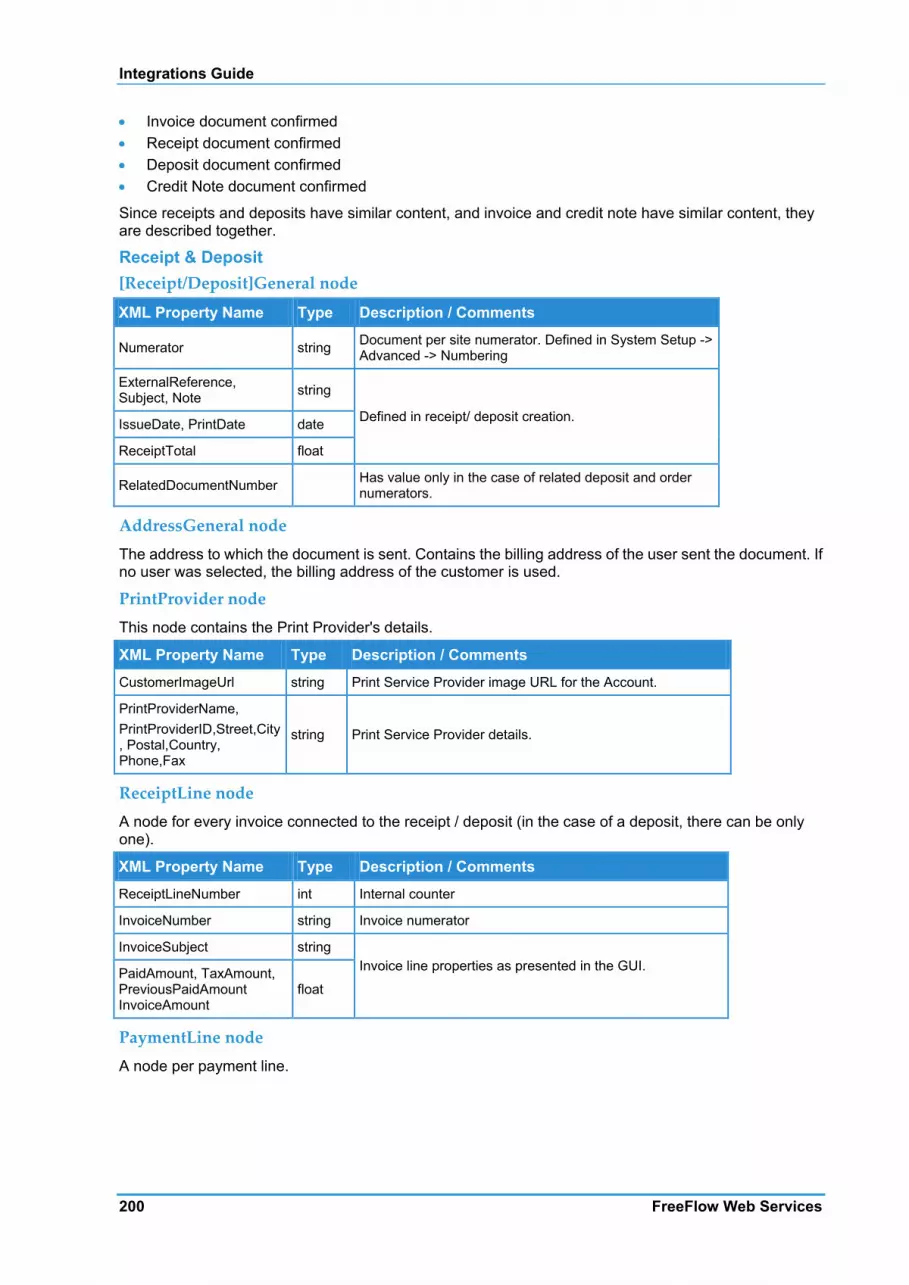
Integrations Guide
200 FreeFlow Web Services
• Invoice document confirmed • Receipt document confirmed • Deposit document confirmed • Credit Note document confirmed
Since receipts and deposits have similar content, and invoice and credit note have similar content, they are described together.
Receipt & Deposit [Receipt/Deposit]General node
XML Property Name Type Description / Comments
Numerator string Document per site numerator. Defined in System Setup -> Advanced -> Numbering
ExternalReference, Subject, Note string
Defined in receipt/ deposit creation. IssueDate, PrintDate date
ReceiptTotal float
RelatedDocumentNumber Has value only in the case of related deposit and order numerators.
AddressGeneral node
The address to which the document is sent. Contains the billing address of the user sent the document. If no user was selected, the billing address of the customer is used.
PrintProvider node This node contains the Print Provider's details.
XML Property Name Type Description / Comments
CustomerImageUrl string Print Service Provider image URL for the Account.
PrintProviderName, PrintProviderID,Street,City, Postal,Country, Phone,Fax
string Print Service Provider details.
ReceiptLine node A node for every invoice connected to the receipt / deposit (in the case of a deposit, there can be only one).
XML Property Name Type Description / Comments
ReceiptLineNumber int Internal counter
InvoiceNumber string Invoice numerator
InvoiceSubject string Invoice line properties as presented in the GUI.
PaidAmount, TaxAmount, PreviousPaidAmount InvoiceAmount
float
PaymentLine node
A node per payment line.

Data Export
Print Service Provider User Guide 201
XML Property Name Type Description / Comments
PaymentTypeName, Amount, Details, Note string Payment line details
Invoice & Credit Note [Invoice/CreditNote]General node
XML Property Name Type Description / Comments
InvoiceNumerator, ExternalReference, RelatedDocumentNumber, Subject, Note, Currency, poNum
string
Values as shown in the invoice creation GUI
IssueDate, ValueDate, PrintDate date
InvoiceTotalExcTax, InvoiceTotalIncTax, InvoiceTotalExcTax, InvoiceDiscountAmmount, ExistingCreditNotesSum, DepositTotal, TaxAmount, InvoiceTotalIncTax, LeftToPay
float
AddressGeneral node The address to which the document is sent. Contains the billing address of the user sent the document. If no user was selected, the billing address of the customer is used.
InvoiceLine node
A node per order connected to the invoice. Does not exist for a Credit Note.
XML Property Name Type Description / Comments
InvoiceLineNumber int
Values as shown in the invoice creation GUI
OrderEnumerator, Description string
OrderTotal, DiscountAmount, TotalAfterDiscount, TotalIncTax, Tax
float
Writing a Connector At the core of Data Export is the INS (The Web Services Nerve System). The INS serves as a mediator between requests for data processing and the implementation of the processing, so that the requesting component and the implementing component are independent of one another.
A Link is a point in the workflow where a specific event initializes the process of assembling a package of data that is related to the event. This package of data is then transferred to a Receptor, which is a software module, designed to receive the package and manipulate the data stored within. Each Link is uniquely defined by the information contained within the package that it sends and by the event that initializes it; however, the Receptor can be any software module written according to the specifications described in Connector Implementation (on page 202). The Receptor must receive the data according to the means dictated by the Link but once the package has been received, the Receptor component is free to process the data as seen fit.

Integrations Guide
202 FreeFlow Web Services
Working with Data Export To be able to integrate with any peripheral system, the INS must be installed on the application server. When this component has been installed, the links are activated and the application begins exporting data using the existing links.
All of the parameters that will be transferred from the application to each Link are predefined. These parameters are then transferred to a Receptor for processing. An Integrator can create Receptors, for specific uses, in which case the logic implemented by the Receptor and the consequences of its action are the Integrator’s responsibility.
INS Components The request for processing is called an INS Event. An INS Event is issued by the application, together with a data package that contains the relevant parameters for that event. For each Event implemented by the INS, there is a corresponding Nerve. A Nerve is a logical container within the INS that maintains the definition of which data is expected to be delivered with the Event and which Receptor is to process that data.
The Receptors are implemented as COM components. They can run on any machine over the network, thus enabling load management.
Nerve For each Event implemented by the INS, there is a corresponding Nerve. A Nerve is a logical container within the INS that coordinates the work for the implementation components, the Receptors. The Nerve maintains the definition of what data is expected to be delivered with the Event, and which Receptor, or Receptors, is to process that data.
It is possible to map more than one Receptor on a single Nerve. In such cases, the Nerve will initialize the Receptors, sequentially, transferring each returned value from one Receptor to the next Receptor.
Receptors Receptors perform the actual work in the INS. They are implemented as COM components and can run on any machine over the network, thus enabling load management. When an INS Event occurs and a Nerve is being implemented, the Receptor defined within the Nerve will be loaded by the INS and unloaded after it finishes carrying out the operations it is designed for. The Receptor will then return a value to the calling Nerve. With each notification, the Receptor will receive a data-set, specific for the Event being implemented at that time. The data is referred to as the Event Context.
Connector Implementation All links export Job-related information. The Event Context (set of data) is transported as a dictionary (Scripting, Dictionary Type). The Event that takes place can be related to more than one Job; however, there will be one Event issued to the INS that will hold the data of all of the Jobs involved. In such cases, the dictionary being transferred will contain sub-dictionaries, where each sub-dictionary corresponds to one Job only.
The Job Order link also transfers order-related information. In this case, there will be two sub-dictionaries, one containing all order information and one containing all Job information.
The structure of the nested dictionaries is coherent with that of the generated XML.
Receptor Implementation Receptors are primarily COM objects and therefore, to implement a Receptor, one must be familiar with COM programming. • The minimal requirement is the implementation of a one-function call. • As INS works on top of MTS, it is preferable (but not compulsory) that Receptors be MTS aware. • For better performance, Receptors should be implemented as Apartment Neutral (Aggregating FTM)
or Apartment Threaded components.
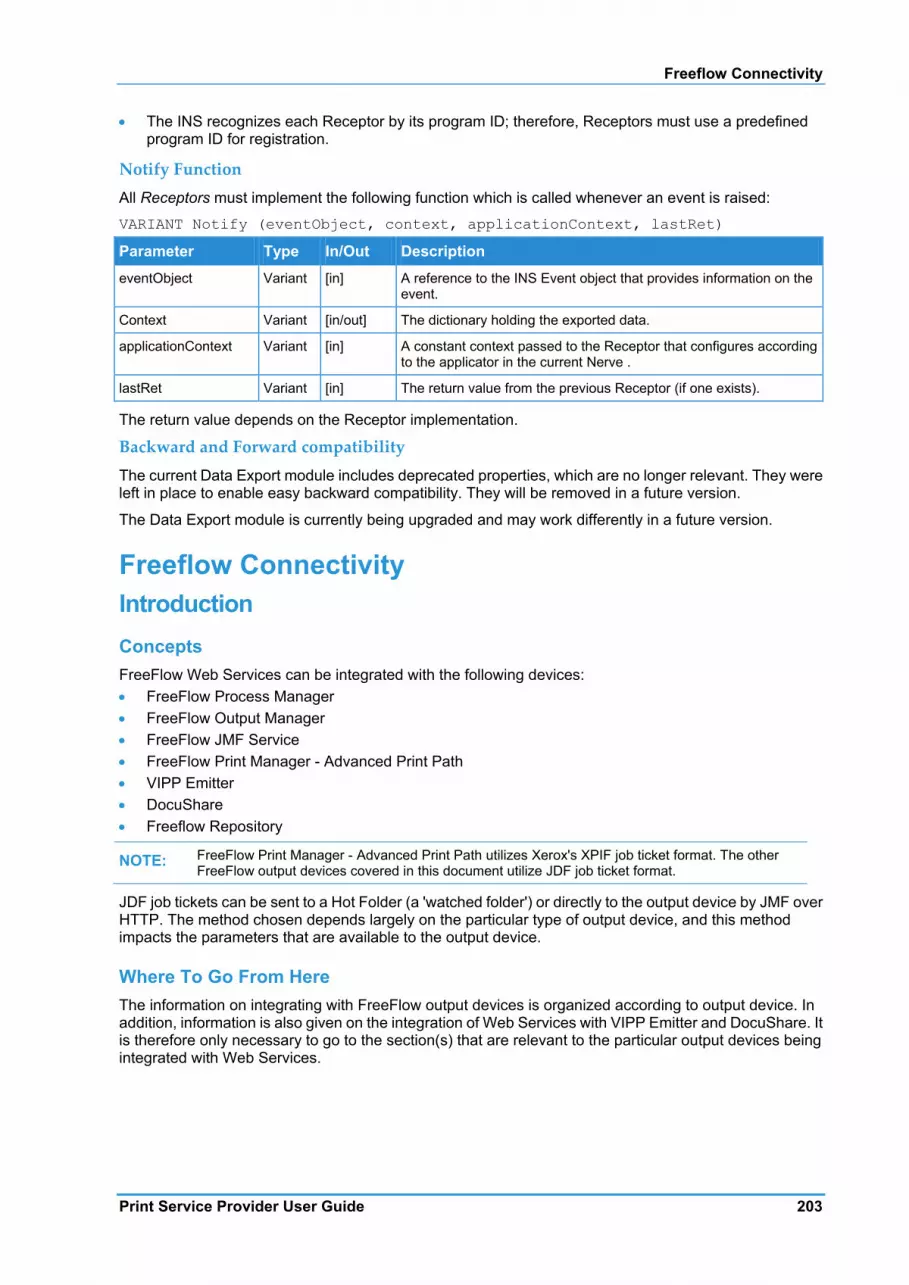
Freeflow Connectivity
Print Service Provider User Guide 203
• The INS recognizes each Receptor by its program ID; therefore, Receptors must use a predefined program ID for registration.
Notify Function All Receptors must implement the following function which is called whenever an event is raised:
VARIANT Notify (eventObject, context, applicationContext, lastRet)
Parameter Type In/Out Description eventObject Variant [in] A reference to the INS Event object that provides information on the
event.
Context Variant [in/out] The dictionary holding the exported data.
applicationContext Variant [in] A constant context passed to the Receptor that configures according to the applicator in the current Nerve .
lastRet Variant [in] The return value from the previous Receptor (if one exists).
The return value depends on the Receptor implementation.
Backward and Forward compatibility
The current Data Export module includes deprecated properties, which are no longer relevant. They were left in place to enable easy backward compatibility. They will be removed in a future version.
The Data Export module is currently being upgraded and may work differently in a future version.
Freeflow Connectivity Introduction Concepts FreeFlow Web Services can be integrated with the following devices: • FreeFlow Process Manager • FreeFlow Output Manager • FreeFlow JMF Service • FreeFlow Print Manager - Advanced Print Path • VIPP Emitter • DocuShare • Freeflow Repository
NOTE: FreeFlow Print Manager - Advanced Print Path utilizes Xerox's XPIF job ticket format. The other FreeFlow output devices covered in this document utilize JDF job ticket format.
JDF job tickets can be sent to a Hot Folder (a 'watched folder') or directly to the output device by JMF over HTTP. The method chosen depends largely on the particular type of output device, and this method impacts the parameters that are available to the output device.
Where To Go From Here The information on integrating with FreeFlow output devices is organized according to output device. In addition, information is also given on the integration of Web Services with VIPP Emitter and DocuShare. It is therefore only necessary to go to the section(s) that are relevant to the particular output devices being integrated with Web Services.

Integrations Guide
204 FreeFlow Web Services
Process Manager Integration FreeFlow Process Manager automates your repetitive prepress activities and increases the overall efficiency of your workflow by creating automated workflows for your jobs. Combined with FreeFlow Web Services , the FreeFlow Process Manager accepts uploaded documents and adds automation for the prepress process.
Web Services supports transferring files over HTTP or by using Hot Folders.
Getting Started Before getting started, you will need to gather some Process Manager client information; the IP address or server name, User Name and Password. You will also be expected to have configured the Process Manager client prior to integrating with Web Services.
Integration To integrate between Web Services and FreeFlow Process Manager:
Set-up: 1 Define the workflows in the FreeFlow Process Manager software. 2 If the workflows in the FreeFlow Process Manager are defined to work with Hot Folders, you must
define the Hot Folders root directory location as shared on the network. 3 Define a dedicated output device in Web Services for the FreeFlow Process Manager.
Job Printing: 4 Printing a job in Web Services: The job is sent with the relevant information and files to the relevant
FreeFlow Process Manager workflow, either over HTTP or by using Hot Folders depending on the definition in the output device and the workflow.
5 The job is processed in the FreeFlow Process Manager depending on the defined workflow.
This guide shows the process for Step 2 and describes Steps 3 and 4. For details on definitions and usage of the FreeFlow Process Manager (Steps 1, 2 and 5), refer to the relevant Xerox User Guides.
Defining the Root Directory of the Hot Folders as Shared To define the root directory of the Hot Folders as shared: 1 Right-click the Root directory where the Hot Folders are located, and select Properties. 2 Click the Sharing tab. 3 Select Share this folder; the Share name appears. 4 Click Permissions and ensure that everyone has Full Control. 5 Click OK; Folder Properties becomes the active window. 6 Click OK.
NOTE: • Ensure that the Permissions are set for Full Control. • All Hot Folder directories must reside on the same drive.
Defining an Output Device for the FreeFlow Process Manager Creating a New Output Device To create a Web Services output device for the FreeFlow Process Manager: 1 In Web Services, select PRINT SETTINGS > PRODUCTION > OUTPUT DEVICES. 2 Click the Add button (below the Output Devices list); the Add Device dialog box appears:
a Type the Device Name. b In Device Group, select Digital.
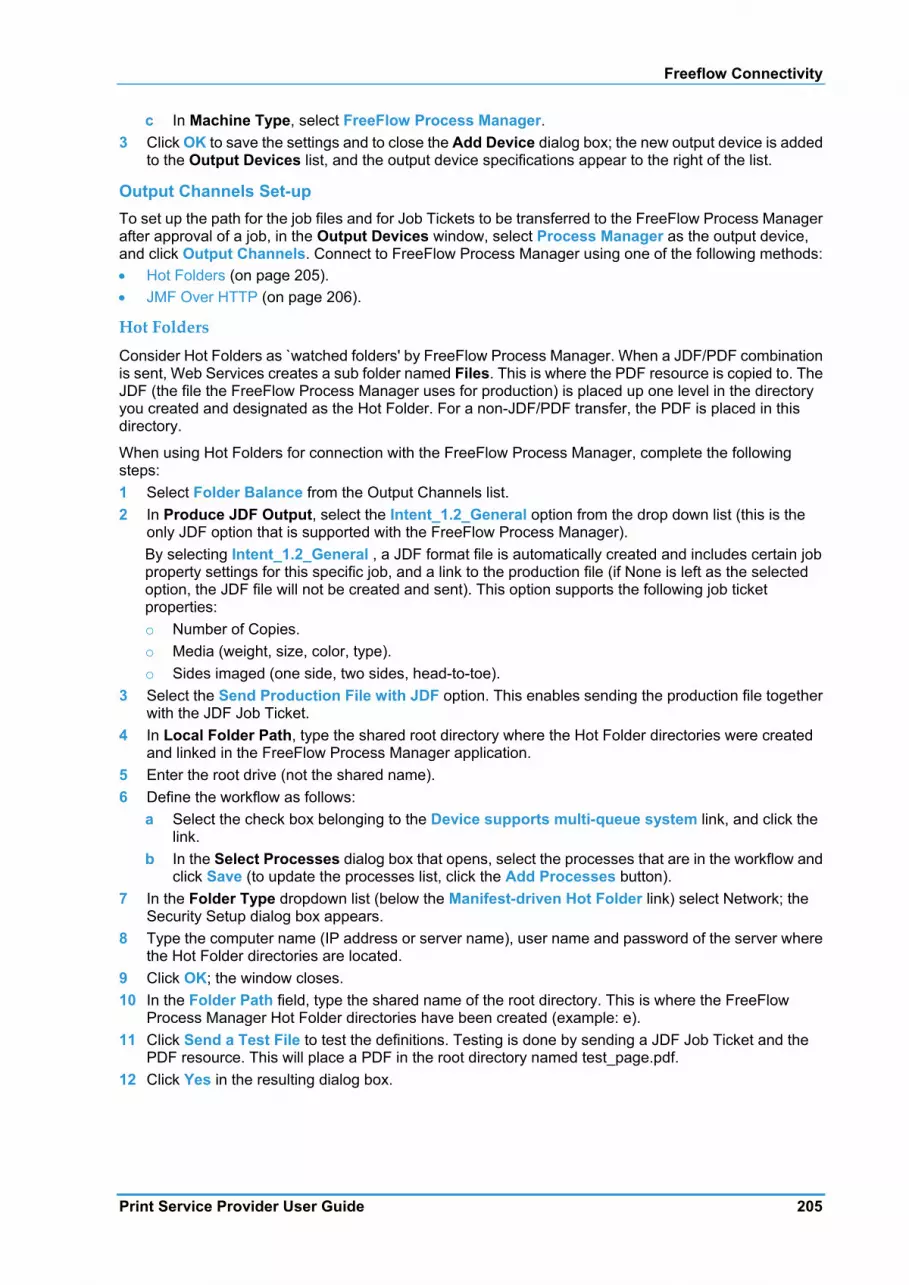
Freeflow Connectivity
Print Service Provider User Guide 205
c In Machine Type, select FreeFlow Process Manager. 3 Click OK to save the settings and to close the Add Device dialog box; the new output device is added
to the Output Devices list, and the output device specifications appear to the right of the list.
Output Channels Set-up To set up the path for the job files and for Job Tickets to be transferred to the FreeFlow Process Manager after approval of a job, in the Output Devices window, select Process Manager as the output device, and click Output Channels. Connect to FreeFlow Process Manager using one of the following methods: • Hot Folders (on page 205). • JMF Over HTTP (on page 206).
Hot Folders Consider Hot Folders as `watched folders' by FreeFlow Process Manager. When a JDF/PDF combination is sent, Web Services creates a sub folder named Files. This is where the PDF resource is copied to. The JDF (the file the FreeFlow Process Manager uses for production) is placed up one level in the directory you created and designated as the Hot Folder. For a non-JDF/PDF transfer, the PDF is placed in this directory.
When using Hot Folders for connection with the FreeFlow Process Manager, complete the following steps: 1 Select Folder Balance from the Output Channels list. 2 In Produce JDF Output, select the Intent_1.2_General option from the drop down list (this is the
only JDF option that is supported with the FreeFlow Process Manager). By selecting Intent_1.2_General , a JDF format file is automatically created and includes certain job property settings for this specific job, and a link to the production file (if None is left as the selected option, the JDF file will not be created and sent). This option supports the following job ticket properties: o Number of Copies. o Media (weight, size, color, type). o Sides imaged (one side, two sides, head-to-toe).
3 Select the Send Production File with JDF option. This enables sending the production file together with the JDF Job Ticket.
4 In Local Folder Path, type the shared root directory where the Hot Folder directories were created and linked in the FreeFlow Process Manager application.
5 Enter the root drive (not the shared name). 6 Define the workflow as follows:
a Select the check box belonging to the Device supports multi-queue system link, and click the link.
b In the Select Processes dialog box that opens, select the processes that are in the workflow and click Save (to update the processes list, click the Add Processes button).
7 In the Folder Type dropdown list (below the Manifest-driven Hot Folder link) select Network; the Security Setup dialog box appears.
8 Type the computer name (IP address or server name), user name and password of the server where the Hot Folder directories are located.
9 Click OK; the window closes. 10 In the Folder Path field, type the shared name of the root directory. This is where the FreeFlow
Process Manager Hot Folder directories have been created (example: e). 11 Click Send a Test File to test the definitions. Testing is done by sending a JDF Job Ticket and the
PDF resource. This will place a PDF in the root directory named test_page.pdf. 12 Click Yes in the resulting dialog box.

Integrations Guide
206 FreeFlow Web Services
JMF Over HTTP When using JMF over HTTP for connection with the FreeFlow Process Manager, complete the following steps: 1 Select JMF over HTTP from the Output Channels list. 2 Select the Device supports multi-queue system check box. 3 In the IP Address field, type the IP address of the server where the FreeFlow Process Manager is
installed. 4 In the Port field, specify 7779 (the default port for the FreeFlow Process Manager server). 5 In the Produce JDF output dropdown list, select Intent_1.2_General. This option supports the
following job ticket properties: o Number of Copies. o Media (weight, size, color, type). o Sides imaged (one side, two sides, head-to-toe).
6 Click OK.
Defining Workflows This definition enables you to create multiple workflows for electronically transferring the job file either to target folders linked to the FreeFlow Process Manager Hot Folders, or over HTTP.
To connect to the workflows previously set up in the FreeFlow Process Manager: 1 In the Output Devices > Output Channels window, click the Device supports multi-queue system
link; the Select Default Workflow dialog box appears. Once this link is clicked, the user sees a No Data to Display message indicating that no workflows are available in Web Services yet. Proceed to the next step to define workflows. o If entering this link at a later stage (after the output device has already been set up), the user sees
a list of workflows already available and registered in Web Services. o The Web Services registered workflows list may not reflect the actual list of workflows currently
defined in the FreeFlow Process Manager. To synchronize Web Services registered workflows and FreeFlow Process Manager workflows, use the Available Workflows option, as defined in the next step.
2 Click the Available Workflows button to synchronize with FreeFlow Process Manager; the workflows previously set up appear in the Enable Workflows window.
3 When using Hot Folders, workflows that appear on the list are workflows that: o Are enabled within the FreeFlow Process Manager o Have at least one item defined in the workflow. o Were associated with a Hot Folder. When using HTTP, workflows that appear on the list are workflows that: o Are enabled within the FreeFlow Process Manager. o Have at least one item defined in the workflow.
4 Select the relevant workflows for this output device and click OK. 5 Select the workflow to serve as default and click OK. 6 Click Save .
Printing a Web Services Job to FreeFlow Process Manager To approve a Web Services based job for printing through FreeFlow Process Manager: 1 Select Tasks and click the Production icon. 2 Select the required job in the Approval Queue. 3 To verify the selected FreeFlow Process Manager workflow, or to select a different workflow for the
job, complete the following steps:
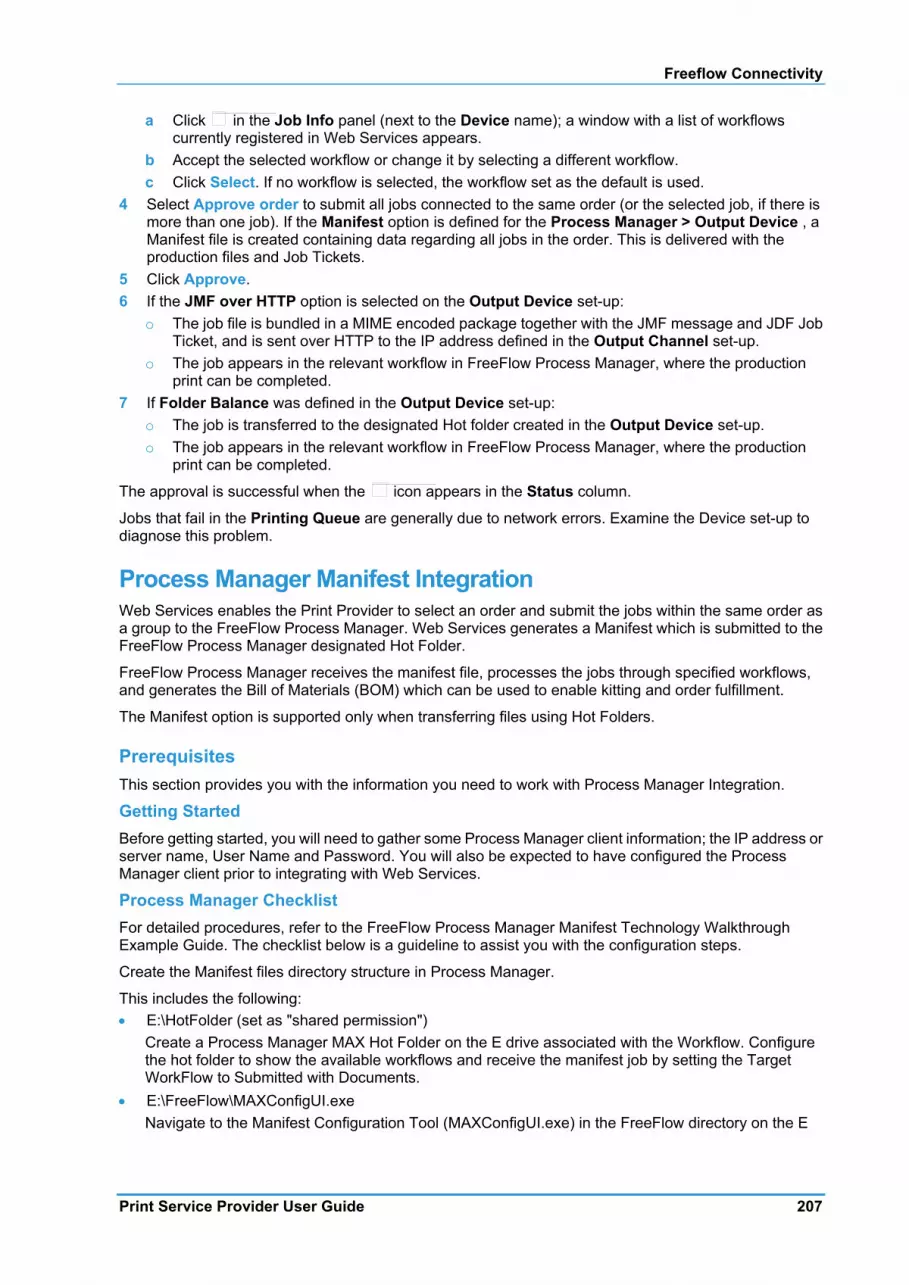
Freeflow Connectivity
Print Service Provider User Guide 207
a Click in the Job Info panel (next to the Device name); a window with a list of workflows currently registered in Web Services appears.
b Accept the selected workflow or change it by selecting a different workflow. c Click Select. If no workflow is selected, the workflow set as the default is used.
4 Select Approve order to submit all jobs connected to the same order (or the selected job, if there is more than one job). If the Manifest option is defined for the Process Manager > Output Device , a Manifest file is created containing data regarding all jobs in the order. This is delivered with the production files and Job Tickets.
5 Click Approve. 6 If the JMF over HTTP option is selected on the Output Device set-up:
o The job file is bundled in a MIME encoded package together with the JMF message and JDF Job Ticket, and is sent over HTTP to the IP address defined in the Output Channel set-up.
o The job appears in the relevant workflow in FreeFlow Process Manager, where the production print can be completed.
7 If Folder Balance was defined in the Output Device set-up: o The job is transferred to the designated Hot folder created in the Output Device set-up. o The job appears in the relevant workflow in FreeFlow Process Manager, where the production
print can be completed.
The approval is successful when the icon appears in the Status column.
Jobs that fail in the Printing Queue are generally due to network errors. Examine the Device set-up to diagnose this problem.
Process Manager Manifest Integration Web Services enables the Print Provider to select an order and submit the jobs within the same order as a group to the FreeFlow Process Manager. Web Services generates a Manifest which is submitted to the FreeFlow Process Manager designated Hot Folder.
FreeFlow Process Manager receives the manifest file, processes the jobs through specified workflows, and generates the Bill of Materials (BOM) which can be used to enable kitting and order fulfillment.
The Manifest option is supported only when transferring files using Hot Folders.
Prerequisites This section provides you with the information you need to work with Process Manager Integration.
Getting Started Before getting started, you will need to gather some Process Manager client information; the IP address or server name, User Name and Password. You will also be expected to have configured the Process Manager client prior to integrating with Web Services.
Process Manager Checklist For detailed procedures, refer to the FreeFlow Process Manager Manifest Technology Walkthrough Example Guide. The checklist below is a guideline to assist you with the configuration steps.
Create the Manifest files directory structure in Process Manager.
This includes the following: • E:\HotFolder (set as "shared permission")
Create a Process Manager MAX Hot Folder on the E drive associated with the Workflow. Configure the hot folder to show the available workflows and receive the manifest job by setting the Target WorkFlow to Submitted with Documents.
• E:\FreeFlow\MAXConfigUI.exe Navigate to the Manifest Configuration Tool (MAXConfigUI.exe) in the FreeFlow directory on the E
The linked image cannot be displayed. The file may have been moved, renamed, or deleted. Verify that the link points to the correct file and location.
The linked image cannot be displayed. The file may have been moved, renamed, or deleted. Verify that the link points to the correct file and location.
Integrations Guide
208 FreeFlow Web Services
drive. Launch it and load the new Web Services Manifest Configuration file (WS manifestconfig.xml) by selecting the Load button, load from a file. The manifest process will use this configured mapping of rows and columns in the generation of the csv file.
Now you can proceed to the FreeFlow Web Services client and learn the steps required for a manifest job.
Integration To integrate between Web Services and FreeFlow Process Manager:
Set-up: 1 Define the workflows in the FreeFlow Process Manager software. 2 If the workflows in the FreeFlow Process Manager are defined to work with Hot Folders, you must
define the Hot Folders root directory location as shared on the network. 3 Define a dedicated output device in Web Services for the FreeFlow Process Manager.
Job Printing: 4 Printing a job in Web Services: The job is sent with the relevant information and files to the relevant
FreeFlow Process Manager workflow, either over HTTP or by using Hot Folders depending on the definition in the output device and the workflow.
5 The job is processed in the FreeFlow Process Manager depending on the defined workflow.
This guide shows the process for Step 2 and describes Steps 3 and 4. For details on definitions and usage of the FreeFlow Process Manager (Steps 1, 2 and 5), refer to the relevant Xerox User Guides.
Defining the Root Directory of the Hot Folders as Shared To define the root directory of the Hot Folders as shared: 1 Right-click the Root directory where the Hot Folders are located, and select Properties. 2 Click the Sharing tab. 3 Select Share this folder; the Share name appears. 4 Click Permissions and ensure that everyone has Full Control. 5 Click OK; Folder Properties becomes the active window. 6 Click OK.
NOTE: • Ensure that the Permissions are set for Full Control. • All Hot Folder directories must reside on the same drive.
Creating an Output Device for the Process Manager Manifest Creating a New Output Device To create a Web Services output device for the FreeFlow Process Manager: 1 In Web Services, select PRINT SETTINGS > PRODUCTION > OUTPUT DEVICES. 2 Click the Add button (below the Output Devices list); the Add Device dialog box appears:
a Type the Device Name. b In Device Group, select Digital. c In Machine Type, select FreeFlow Process Manager.
3 Click OK to save the settings and to close the Add Device dialog box; the new output device is added to the Output Devices list, and the output device specifications appear to the right of the list.
Output Channels Set-up To set up the path for the job files and for Job Tickets to be transferred to the FreeFlow Process Manager after approval of a job, in the Output Devices window, select Process Manager as the output device, and click Output Channels.

Freeflow Connectivity
Print Service Provider User Guide 209
Hot Folders When using Hot Folders for connection with the FreeFlow Process Manager, complete the following steps: 1 Continuing in the Output Devices window, select the newly created output device and click Output
Channels . 2 Select Folder Balance from the Output Channels list. 3 In Produce JDF Output , select the Intent_1.2_General option from the drop down list (this is the
only JDF option that is supported with the FreeFlow Process Manager). By selecting Intent_1.2_General , a JDF format file is automatically created and includes certain job property settings for this specific job, and a link to the production file. (If None is left as the selected option, the JDF file will not be created and sent.) This option supports the following job ticket properties:
• Number of Copies. • Media (weight, size, color, type). • Sides imaged (one side, two sides, head-to-toe). 1 Select the Send Production File with JDF option. This enables sending the production file together
with the JDF Job Ticket. 2 In Local Folder Path , type the shared root directory where the Hot Folder directories were created
and linked in the FreeFlow Process Manager application. Enter the root drive (not the shared name); for example, D:
3 In the Folder Path field, type the shared name of the root directory. This is where the FreeFlow Process Manager Hot Folder directories have been created (example: e).
Connect to a Process 1 In the Folder Type dropdown list (below the Manifest-driven Hot Folder link) select Network; the
Security Setup dialog box appears. 2 Type the computer name (IP address or server name), user name and password of the server where
the Hot Folder directories are located. 3 Click OK; the window closes. 4 Click Manifest-driven Hot Folder; the Manifest-driven Hot Folder window appears. 5 Click Special Hot Folders; the Enable Manifest Hot Folder dialog box appears. 6 Select the relevant Manifest Hot Folder. 7 Click OK. 8 Click Save; the Enable Manifest Hot Folder window closes.
o You must define the designated `Manifest Folder' in the FreeFlow Process Manager before performing this step.
o The Manifest option creates a CSV (Comma Separated Value) file containing data of the jobs in the specific Manifest, sent together with the job files and Job Ticket.
9 Click Send a Test File to test the definitions. Testing is done by sending a JDF Job Ticket and the PDF resource. This will place a PDF in the root directory named test_page.pdf.
10 Click Yes in the resulting dialog box.
Defining Workflows This definition enables you to create multiple workflows for electronically transferring the job file to target folders linked to the FreeFlow Process Manager Hot Folders. Manifest uses the "submitted with Documents" Hot Folder to process the jobs in the Manifest or Order Jacket file (.csv).
To connect to the workflows previously set up in the FreeFlow Process Manager: 1 In the Output Devices > Output Channels window, click the Device supports multi-queue system
link; the Select Default Workflow dialog box appears. Once this link is clicked, the user sees a No Data to Display message indicating that no workflows are available in Web Services yet. Proceed to

Integrations Guide
210 FreeFlow Web Services
the next step to define workflows. o If entering this link at a later stage (after the output device has already been set up), the user sees
a list of workflows already available and registered in Web Services. o The Web Services registered workflows list may not reflect the actual list of workflows currently
defined in the FreeFlow Process Manager. To synchronize Web Services registered workflows and FreeFlow Process Manager workflows, use the Available Workflows option, as defined in the next step.
2 Click the Available Workflows button to synchronize with FreeFlow Process Manager; the workflows previously set up appear in the Enable Workflows window. Workflows that appear on the list are workflows that: o Are enabled within the FreeFlow Process Manager o Have at least one item defined in the workflow. o Were associated with a Hot Folder.
3 Select the relevant workflows for this output device and click OK. 4 Select the workflow to serve as default and click OK. 5 Click Save.
Printing a Web Services Job to FreeFlow Process Manager To approve a Web Services based job for printing through FreeFlow Process Manager: 1 Select Tasks and click the Production icon. 2 Select the required job in the Approval Queue. 3 To verify the selected FreeFlow Process Manager workflow, or to select a different workflow for the
job, complete the following steps: a Click in the Job Info panel (next to the Device name); a window with a list of workflows
currently registered in Web Services appears. b Accept the selected workflow or change it by selecting a different workflow. c Click Select. If no workflow is selected, the workflow set as the default is used.
4 Select Approve order to submit all jobs connected to the same order (or the selected job, if there is more than one job). If the Manifest option is defined for the Process Manager > Output Device , a Manifest file is created containing data regarding all jobs in the order. This is delivered with the production files and Job Tickets.
5 Click Approve. 6 If the JMF over HTTP option is selected on the Output Device set-up:
o The job file is bundled in a MIME encoded package together with the JMF message and JDF Job Ticket, and is sent over HTTP to the IP address defined in the Output Channel set-up.
o The job appears in the relevant workflow in FreeFlow Process Manager, where the production print can be completed.
7 If Folder Balance was defined in the Output Device set-up: o The job is transferred to the designated Hot folder created in the Output Device set-up. o The job appears in the relevant workflow in FreeFlow Process Manager, where the production
print can be completed.
The approval is successful when the icon appears in the Status column.
Jobs that fail in the Printing Queue are generally due to network errors. Examine the Device set-up to diagnose this problem.
Output Manager Integration FreeFlow Output Manager is a server-based output manager designed to provide a single point of job management for network production printing. It addresses the needs of the Publishing and
The linked image cannot be displayed. The file may have been moved, renamed, or deleted. Verify that the link points to the correct file and location.
The linked image cannot be displayed. The file may have been moved, renamed, or deleted. Verify that the link points to the correct file and location.
Freeflow Connectivity
Print Service Provider User Guide 211
Print-On-Demand environments. FreeFlow Output Manager includes load balancing to address capacity and asset utilization requirements, such as job splitting, color splitting and copy splitting capabilities for robust cluster printing. • FreeFlow Output Manager accepts jobs in JDF/JMF format and can support clients that use this
format. • FreeFlow Output Manager accepts documents from FreeFlow Web Services and automatically routes
them to printers based on load, availability and job requirements. This increases printer efficiency and productivity.
• Web Services uses JMF (Job Messaging Format) when transferring files to and from FreeFlow Output Manager. JMF is a standardized XML document that is often used for job submission, Snapshots of job and device status, Dynamic job update and more.
NOTE: In order to print Book Assembly jobs on a FreeFlow Output Manager device, you must define certain Web Services settings appropriately. For more information, refer to the FreeFlow Web Services Print Service Provider User Guide .
Integration The integration between Web Services and FreeFlow Output Manager comprises the following steps:
Set-up 1 Defining available Printers on the FreeFlow Printer Administration. 2 Defining available Queues on the FreeFlow Output Manager software and connecting them to the
available printers in the FreeFlow Printer Administration. 3 Defining a dedicated output device in Web Services for FreeFlow Output Manager.
Job Printing 4 Printing a job in Web Services: The job is sent over HTTP to FreeFlow Output Manager with relevant
information and files. 5 The job is processed in FreeFlow Output Manager and printed.
This guide describes Steps 3 and 4. For details on definitions and usage of the FreeFlow Printer Administration and FreeFlow Output Manager (Steps 1, 2 and 5), refer to the relevant Xerox User Guides.
Defining an Output Device for FreeFlow Output Manager Create a New Output Device To create a Web Services output device for FreeFlow Output Manager: 1 In the Web Services web site, select Print Settings > Production > Output Devices . 2 Click the Add button; the Add Device dialog box appears.
a Type a name in Device Name field. b Select Digital in the Device Group dropdown list. c Select FreeFlow Output Manager in Machine Type dropdown list.
3 Click OK to close the Add Device dialog box; the output device is added to the Output Devices list. The settings for the output device are shown to the right of the list.
Output Channels Set-up To set up the path for the job files and Job Tickets to be transferred to FreeFlow Output Manager after approval (submission) of a job: 1 In the Output Devices window, select the Output Channels tab. 2 Select the JMF over HTTP radio button. 3 Select the Device supports multi-queue system check box. 4 Type the IP address or the server host name where FreeFlow Output Manager is installed, in the IP
Address field.

Integrations Guide
212 FreeFlow Web Services
5 Type 7781 in the Port field. 6 In the Produce JDF Output drop down list, select the Intent_1.2_General option. This option
supports the following job ticket properties: General o Number of Copies. o Media (weight, size, color, type). o Sides imaged (one side, two sides, head-to-toe). Finishing o Folding.
7 Click Save.
Defining Queues
NOTE: The IP Address should be set and saved prior to defining queues.
To connect to the queues previously set-up in FreeFlow Output Manager: 1 In the Output Devices > Output Channels window, click the Device supports multi-queue system
link; the Queue Selection dialog box appears. o If you follow this link at a later stage (after the output device is set up), users see a list of queues
available and registered in Web Services. o The Web Services registered queues list may not reflect the actual list of queues currently defined
in FreeFlow Output Manager. To synchronize Web Services registered and FreeFlow Output Manager defined queues, use the Available Queues option, as defined in the next Step.
2 Click Available Queues for synchronizing with FreeFlow Output Manager; the list of queues currently defined and available in FreeFlow Output Manager appears.
3 Select the relevant queues for this output device by selecting one or more check boxes. 4 Click OK. 5 Select the queue you want to serve as the default and click OK. 6 Click Save.
Printing a Job to FreeFlow Output Manager To approve a Web Services-based job for printing through FreeFlow Output Manager: 1 In the Web Services web site, select Tasks > Production . 2 Select a Production Queue job. 3 Verify that the output device is set to Output Manager (this can be viewed in the Job Info panel on the
right side of the window). If the output device is not Output Manager, click and adjust the Output Device dropdown list.
4 Accept the selected FreeFlow Output Manager queue or select a different queue for the job: a Click in Job Info next to the Device name; a dialog box appears with a list of Output Manager
queues currently registered in Web Services. b Accept the selected queue or change the Queue Selection by selecting a different Queue name. c Click Select. If no target queue has been selected, the queue that is set as default will be used.
5 Click Approve. o The job file is bundled in a MIME encoded package together with the JMF message and JDF Job
Ticket and is sent over HTTP to the IP address defined in the Output Channels set-up. o The job appears in the relevant queue in FreeFlow Output Manager, where it is possible to
complete the production print.
The approval is successful when the icon appears in the Status column.
Jobs that fail in the Printing Queue are generally due to network errors. Examine the Device set-up to
The linked image cannot be displayed. The file may have been moved, renamed, or deleted. Verify that the link points to the correct file and location.
The linked image cannot be displayed. The file may have been moved, renamed, or deleted. Verify that the link points to the correct file and location.

Freeflow Connectivity
Print Service Provider User Guide 213
diagnose this problem.
System Requirements • Web Services Requirements • Integration enabled on the FlexLM license • FreeFlow Output Manager version 6.0 or higher
References • FreeFlow ® Output Manager Install Guide • FreeFlow ® Output Manager User Guide • FreeFlow ® Printer Administration User Guide
JMF Service The FreeFlow JMF Service is considered a Device since it is acting as a proxy for the printer. FreeFlow JMF Service implements the JDF Specification provided over http for nonsecure interactions only. The JMF Service supports JMF clients such as Adobe Acrobat 7 and 8, and FreeFlow Web Services.
A JMF Service job goes directly to the printer with no need for manual intervention. The JDF job ticket is supported in an automated fashion via two way communication using the JMF Standard.
NOTE:
• To print Book Assembly jobs on a FreeFlow JMF Service device, you must define certain Web Services settings appropriately. For more information, refer to the FreeFlow Web Services Print Service Provider User Guide.
• For more information on installing and configuring FreeFlow JMF Service, refer to the FreeFlow JMF Service User Guide.
Defining an Output Device for FreeFlow JMF Service To create a FreeFlow output device for FreeFlow JMF Service: 1 Select Settings > Output Devices. 2 Click Add; the Add Device dialog box appears.
a In the Device Name field, type a name. b In the Device Group dropdown list, select Digital. c In the Machine Type dropdown list, select FreeFlow JMF Service - JMF Service.
3 Click OK.
Output Channels Set-up To set up the path for the job files and Job Tickets to be transferred to the FreeFlow JMF Service after approval of a job: 1 Select the Output Channels tab. 2 Select the JMF over HTTP option button. 3 Select the Device supports multi-queue system check box. 4 In the IP Address field, type the IP address or the server host name where FreeFlow JMF Service is
installed. 5 In the Port field, type 7781 (the FreeFlow JMF Service server's default port - if the port is changed on
the FreeFlow JMF Service server it needs to be defined here respectively). 6 In the Produce JDF Output drop down list, select the Intent_1.2_General option. 7 Click OK.

Integrations Guide
214 FreeFlow Web Services
Printing a FreeFlow Web Services Job to FreeFlow JMF Service To approve a Web Services job for printing through FreeFlow JMF Service: 1 Select Tasks > Production . 2 Select the required job in the Approval Queue. 3 Verify that the output device value is JMF Service (can be viewed on the Job Info panel, right side of
the window). If the output device is not set to JMF Service , click and in the Edit Imposition dialog box, edit the Output Device dropdown list.
4 Accept the selected JMF Service printer or select a different printer for the job: a Click in the Job Info panel. b Change the printer selection by selecting a different printer name. c Click OK.
5 Click Approve.
If the approval is successful the icon appears in the Status column.
Jobs that fail in the Printing Queue are generally due to network errors. Examine the output device set-up to diagnose this problem.
Print Manager – Advanced Print Path FreeFlow Print Manager - Advanced Print Path is a software application used to enter job ticket information for an existing PDL file (ASCII, PS, TIFF, PCL, or PDF) and then to submit the job to an available printer. This allows for printing RDOs via templates or catalog items, or to enhance job settings with options FFWS does not support.
NOTE: Repository templates (templates imported from docushare or share point) can only be sent to Print Manager - Advanced Print Path from the Production Queue. Print Manager - Advanced Print Path is the only option that will be available to edit imposition when selecting a job generated from a repository template.
Creating a Cold Folder Directory for Approved Jobs To create a shared Cold Folder directory: 1 Create a folder on a local or remote computer. 2 Right-click the created folder and select Properties. 3 Click the Sharing tab. 4 Select Share this folder; the share name will appear. 5 Click Permissions and ensure that everyone has Full Control. 6 Click OK; changes are saved and Folder Properties become the active window. 7 Click OK. 8 Open My Network Places on the FreeFlow Web Services server and setup a new network place that
points to the shared folder. Enter a user name and password if prompted (to login to the remote computer) and select the Remember my password option.
NOTE: Another way to map the folder is with Tools > Map Network Drive in Windows Explorer.
Defining an Output Device for FreeFlow Print Manager - Advanced Print Path To create a FreeFlow output device for FreeFlow Print Manager - Advanced Print Path: 1 Select Settings > Output Devices tab. 2 Click Add below the Output Devices list; the Add Device dialog box appears.
o In the Device Name field, type a name. o In the Device Group dropdown list, select Digital.
The linked image cannot be displayed. The file may have been moved, renamed, or deleted. Verify that the link points to the correct file and location.
The linked image cannot be displayed. The file may have been moved, renamed, or deleted. Verify that the link points to the correct file and location.

Freeflow Connectivity
Print Service Provider User Guide 215
o In the Machine Type dropdown list, select FreeFlow Print Manager Service - Advanced Print Path.
3 Click OK.
Output Channels Set-up To set up the path for the job files and Job Tickets to be transferred to the FreeFlow Print Manager - Advanced Print Path after approval of a job: 1 Select the Output Channels tab. 2 Select the Application Launcher option button. 3 Select the Device supports multi-queue system check box. 4 In the Folder Type dropdown list, select Network. 5 In the Application dropdown list, select Xerox FreeFlow Printer (this may be the only available
selection). 6 Type the shared Cold Folder directory name into the Folder Path; this is the folder to which the Job
Ticket and resources are transferred when the job is approved for printing. 7 Click Security; the Security Setup dialog box appears. 8 In the Computer field, type the IP of the remote computer where the Cold Folder directory was
created. 9 Click OK.
Defining Printers To connect to the printers previously set-up in the FreeFlow Printer Administration: 1 Click the Device supports multi-queue system link.
o When clicking this link the user will see a No Data to Display message that indicates that no printers are available in Web Services yet. At least one printer needs to be defined, as explained in the next step.
o When accessing this link at later stage (after the output device is already set-up), the user sees a list of printers available and registered in Web Services.
o The Web Services registered printers list may not reflect the actual list of printers currently defined in the FreeFlow Common Printer Administration. To synchronize Web Services registered and FreeFlow Common Printer Administration defined printers, use the Available Printers option, as defined in the following step.
2 Click Available Printers for synchronizing with FreeFlow Printer Administration; the list of printers currently defined and available in the FreeFlow Printer Administration appears.
3 Select the printers appropriate for this output device and click OK. 4 Select the printer to be the default and click OK. 5 Click Save.
Printing a FreeFlow Repository Job using FreeFlow Print Manager - Advanced Print Path To approve a job that originates from an external repository: 1 Select Tasks > Production. 2 Select the job in the Approval Queue. The job appears with a Manual Impose icon in the Job Info
panel. The icon for the job is also unique. Both of these factors identify this job as a Repository or Catalog-ready job.
3 Verify that the output device value is Print Manager - Advanced Print Path (this can be viewed on the Job Info panel, right side of the window). If the output device is not set to Print Manager - Advanced Print Path , click on Edit Imposition and in the Device and Imposition dialog box, edit the Output Device dropdown list.
4 Accept the selected FreeFlow Print Manager - Advanced Print Path printer or select a different printer
Integrations Guide
216 FreeFlow Web Services
for the job: a Click in the Job Info panel, next to the Device name. b Change the printer selection by selecting a different printer name. c Change the Quantity if required. d Click OK.
5 Click Approve.
If the approval is successful the icon appears in the Status column.
NOTE: The job is submitted directly to the cold folder. A subfolder is created with the job number and it contains 3 files: xpf, xpr and pdf.
Jobs that fail in the Printing Queue are generally due to network errors. To diagnose this problem: • Examine the output device set-up. • Synchronize between the External Repository set-up and the FreeFlow Repository set-up.
VIPP Emitter Integration FreeFlow Web Services VIPP Emitter is a module designed specifically for Xerox digital front ends that have VIPP (Variable Data Intelligent PostScript Printware) already installed and licensed. The purpose of the VIPP Emitter module is to significantly decrease the amount of RIP and server time.
The VIPP Emitter must be activated through a dedicated FlexLM license.
Defining a Web Services VIPP Emitter-enabled Device 1 On the Print Services Provider side, select Print Settings > Production > Output Devices > Output
Channels . 2 Click the VIPP Emitter option button; the Output Devices sub-panel updates with the VIPP Emitter
fields. 3 Select one of the Folder Type dropdown list options:
o Local - Specifies an absolute folder path within the local server. o FTP - Specifies the full ftp path for transferring jobs via the Internet to any remote computer (i.e.
format: ftp://www.print-provider.com). o Network - Specifies the transfer of jobs to any computer within the local network (the network
server directory must be specified as the following: \ ...). 4 Define the Folder Path field; define a full folder path (according to the folder type method chosen). 5 Select one of the Imposition Preferences dropdown list options.
Web Services VIPP Emitter Job in the Production Queue A VIPP Emitter Job located in the Production Approval queue is identified by the icon.
Upon approval, the VIPP Project Container (VPC) is created with the SETPROJECT destination as defined in the VIPP Submission Folder.
NOTE: • This is an XML VIPP format within the Project Container. • The VPC is placed in the destination folder specified in PRINT SETTINGS ->
PRODUCTION -> OUTPUT DEVICES -> OUTPUT CHANNELS -> FOLDER PATH.
Fonts The VIPP Emitter workflow supports all font types supported by Web Services standard workflows, including true type fonts. However, true type fonts must be installed on the DFE's RIP for production; type1 fonts will be embedded in the job.
The linked image cannot be displayed. The file may have been moved, renamed, or deleted. Verify that the link points to the correct file and location.
The linked image cannot be displayed. The file may have been moved, renamed, or deleted. Verify that the link points to the correct file and location.
The linked image cannot be displayed. The file may have been moved, renamed, or deleted. Verify that the link points to the correct file and location.

Freeflow Connectivity
Print Service Provider User Guide 217
Web Services VIPP Emitter Workflow VIPP Emitter Workflow describes the Web Services / VIPP Emitter integrated workflow. A variable data workflow in Web Services provides you with an easy method to create and order highly flexible and very sophisticated jobs, utilizing simple and intuitive browser-based tools. VIPP is a print stream which enables an efficient, printer-rate variable data printing method. The integration between both tools provides owners of Xerox printers who use a VIPP-enabled digital front end and Web Service with the most powerful and flexible production tool on the market.
Print Buyer Side To order a variable data Job using the Web Services / VIPP Emitter integrated workflow: 1 Log in to Web Services. 2 Select Order Jobs and click the Print Documents from Our Catalog button. 3 Click the Start Order button; the Choose a Template window appears. 4 Select a template created for a variable data workflow. 5 Upload a database and complete the instructions to create the job. 6 Proof and complete the job order through confirmation.
Print Service Provider Side After Print Buyer confirmation, the VIPP Emitter job is transferred to the Print Service Provider side and appears in the Production Approval queue (indicated by the VIPP ).
Continue with the following steps: 1 Navigate to PRINT SETTINGS > PRODUCTION > OUTPUT DEVICES > OUTPUT CHANNELS. 2 Set up a VIPP Emitter-enabled output device; specific templates are targeted to this output device. 3 Approve the VIPP Emitter job for production; the server automatically creates a VIPP Variable Project
Container (VPC file).
NOTE:
• Web Services uses the Folder Balance output channel and places the VPC in the designated folder as specified in PRINT SETTINGS -> PRODUCTION -> OUTPUT DEVICES -> OUTPUT CHANNELS -> FOLDER PATH.
• The VPC must be processed on the Digital Front End according to the Xerox VIPP Emitter documentation.
VPC Structure The VPC must be processed on the Digital Front End according to the Xerox VIPP documentation.
Print from DocuShare Integration Xerox DocuShare Enterprise Content Manager offers businesses a flexible, easy-to-deploy, Web-based software application that delivers sophisticated, yet highly personalized content management capabilities to every knowledge worker. The integration between FreeFlow Web Services and Xerox DocuShare comprises the following steps: 1 Configuring the DocuShare server. 2 Defining a connection to Xerox DocuShare in Web Services. 3 Printing a document from DocuShare; Web Services is launched. 4 Following the steps in Web Services to complete the order.
Prerequisites • Xerox DocuShare software (version 5.0 or higher) installed and correctly set up. For more information
on Xerox DocuShare, refer to the relevant Xerox User Guides. • FreeFlow Web Services (version 7.0 or higher)
The linked image cannot be displayed. The file may have been moved, renamed, or deleted. Verify that the link points to the correct file and location.

Integrations Guide
218 FreeFlow Web Services
• The integration must be activated on the FlexLM license.
Configuring the DocuShare Server 1 Browse to: <drive letter>:\Xerox\DocuShare\amber\templates\en . 2 Create a directory called `local' within the en directory. 3 From the en\system directory, copy the FFWS.vdf file into the local directory. 4 Open the FFWS.vdf file (in the local directory) with Notepad, and make the following modifications:
o Find the line: <define id="enable">false</define> Set: define id to: true:
o Find the line: <define id="FFServerURL">http://FF_Print_Server_URL/</define> Replace: FF_Print_Server_URL with the Web Services actual URL.
o Find the line: <define id="FFWSID">ds1</define> Replace: ds1 with the ID that will be configured in web server; by default the ID is DocuShare.
NOTE: To find out the DocuShare ID, it is recommended that you contact your site's DocuShare Administrator. If you cannot access an ID, contact Customer Support.
Defining a Xerox DocuShare Connection In order to connect to Xerox DocuShare, carry out the following steps: 1 Log in to FreeFlow Web Services. 2 Navigate to System Setup > Integration > External Systems. 3 In the Systems pane, select DocuShare. 4 Select the Enable checkbox. 5 Enter the values for the following parameters and click OK:
o DocuShare Server ID o DocuShare Server IP o DocuShare Root o DocuShare Domain o Account Name o Password
Removing a DocuShare Connection To remove a server from the list: 1 Select the server and click Remove. 2 Click OK.
Printing from DocuShare To initiate a print job from DocuShare, perform the following steps: 1 Initiate the print job:
a Log in to one of the configured DocuShare servers. b Select the file that you want to print.

Freeflow Connectivity
Print Service Provider User Guide 219
c Right-click on the file and select FF WS Print. The FreeFlow Web Services web site is launched and the Login window appears.
2 Log into Web Services by typing the Web Services User Name and password, and clicking Login. 3 Choose the Job Type and edit the properties:
a Choose a Job Type specific to the document that is being ordered from DocuShare. b Click Next; the Edit Properties window appears. c Edit the properties and click Next. There is a slightly different workflow if a native application is selected (Microsoft Word, or PowerPoint etc.).
4 Review the job before placing the order: a Review the File Report (document pre-flight). b Click the Click here to review these problems link and fix the problems, or select I want the
Print Provider to resolve these problems check box. c Click Continue; the Preview the Job window appears. d Click Add to Cart and Checkout.
5 Complete the Order (depending on the Printer Profile and Account Preferences, the following steps can vary slightly): a Open the Shopping Cart and click the Get Quote button. b Click Proceed to Checkout. c Complete Choose a Shipping Address and Choose Your Shipping Options. d Click Continue in each successive window. e Select All Billing, Ship to: and Summary Information. f Click Place Your Order. g Review the Order Confirmation. h Click Continue Shopping or Logout.
FreeFlow Repository Integration FreeFlow Web Services can integrate with the following optional repositories, however, only one repository can be enabled, configured and synchronized: • Xerox DocuShare • Microsoft SharePoint • Document Library - As of Web Services 6.0, Document Library is no longer supported. To continue
using templates in Web Services that are based on files from Document Library, the following two steps must be carried out: a Export the data to the Windows file system or to Microsoft SharePoint, using the Document
Library Migration Utility. This utility resides in the "<Install Drive>\FreeFlow" folder as "DLMigration.exe".
b Update the reference of the templates in Web Services to refer to the new location of the data instead of to the Document Library. This is carried out by running an update procedure on the Web Services server from the following URL: http://localhost/newsway/utils/dlimport.asp. In the browser, enter the name of the Exported Data description file and click on the Start Migration button.
Integration The integration between Web Services and any of the repository options comprises the following steps: 1 Defining a connection to the relevant repository in Web Services. 2 Synchronizing Web Services with the Repository to create templates in Web Services. 3 Printing a job based on a Repository template.

Integrations Guide
220 FreeFlow Web Services
Prerequisites • Repository software installed and correctly set up. • The integration must be activated through the FlexLM license. • All templates in the Repository software must be designated as Catalog-ready.
Defining a Connection to a FreeFlow Repository In order to define a connection to a FreeFlow Repository, carry out the following steps: 1 Log in to FreeFlow Web Services. 2 Navigate to SYSTEM SETUP > INTEGRATIONS > EXTERNAL SYSTEMS. 3 Select FreeFlow Repository and in the FreeFlow Repository panel, select the Enable checkbox. 4 In the Server IP: field, enter the IP address or Host Name where the RMS (Repository Management
Software) server is installed. Generally, the RMS server is installed on the same server as Web Services. However, the RMS server needs to be configured to work with repositories installed anywhere on the network (this is carried out through a FreeFlow Administration Tool which is a part of the Web Services installation).
5 In the Port: field, enter 8090. 6 In the Service Address: field, enter /RepositoryService.asmx. 7 Enter the username defined as the Repository software login username. 8 Enter the password defined for the username. 9 Click on OK to save.
Synchronizing Web Services with the Repository To add a template from a FreeFlow Repository into Web Services, carry out the Synchronize with External Repository procedure as described below.
Transferring a Template Selection from a Repository to a Customer Collection To transfer a template selection from a repository to a customer collection, carry out the following steps: 1 Navigate to ACCOUNTS -> STORE SETUP -> TEMPLATES. 2 Select the target customer from the Customers list. 3 Click Synchronize with External Repository; the Choose Document Source window appears. 4 Click the FreeFlow Repository radio button. Update internal cache informs Web Services to
connect to a defined repository, retrieve all available catalog ready items for the time of synchronization and bring them into the internal Web Services cache. Then the synchronization takes place. If the checkbox is not selected, Web Services will use the internal cache that was updated the last time the connection to the repository had been made.
5 Click the Start Import Wizard button.
Choosing the Repository Item(s) To select any displayed repository items, carry out the following steps: 1 Select the checkbox next to each document to be imported. 2 When all of the desired documents have been selected, click Next.
NOTE: The following steps require selecting the Job Type, Properties, and Template attributes. If multiple items are selected, the items will have the same attributes. If the properties are completed in the Repository, the information will populate the Template Attribute step.
Saving Templates To save the imported templates in the selected Customer/Directory, carry out the following steps: 1 Choose a job type and click Next; the Edit Properties window appears.
XMPie PersonalEffect
Print Service Provider User Guide 221
2 Edit any properties to reflect the document properties and click Next; the Template Attributes window appears.
3 Define the appropriate template attributes and in the Create In pane, browse to the target folder for adding the Repository item. The attribute that is defined here can affect the pricing if Job Type Pricing is the Default Pricing model. o Select the Save Full Path Info checkbox to add the Full Path Info to the Template information that
will be available to the Print Buyer. o At anytime during the process, the Back button can be used to return to a previous window and
the Cancel button can be used to cancel the process. 4 Click Finish.
Template Pricing At this stage, the template has been added to the account's template. The icon appearing with the template name has a different look than static, variable and archive icons. If necessary, Template Pricing and Printer Selection can be applied to the template by selecting the Pricing button.
Printing a Job Based on a Repository Template To approve a Xerox Repository-based job in FreeFlow Web Services for printing, carry out the following steps: 1 In Web Services, click on Tasks -> Production; the Production window appears. 2 Select the relevant job in the Approval queue.
o Xerox Repository Items can be printed only through the FreeFlow Print Manager software that is defined in FreeFlow Web Services as an output device carrying the name FreeFlow Print Manager - Advanced Print Path.
o If such an Output Device was defined prior to importing the Repository items into Web Services (Synchronize with external repository action, as detailed above), then these items receive the designated output device automatically. Otherwise, before moving to the next step, it is necessary to change the output device.
3 Click Approve.
XMPie PersonalEffect XMPie PersonalEffect Integration FreeFlow Web Services XMPie PersonalEffect enables Print Buyers to effectively reach their customers via print, web, and email, within the framework of dynamic publishing campaigns. By integrating XMPie PersonalEffect with Web Services, Print Buyers can access the XMPie PersonalEffect application using the Web Services workflow.
XMPie PersonalEffect with Web Services facilitates the following: • Print Buyers can access, customize, and order VI campaigns directly from Web Services. • Dynamic proofing and the generation of all VI output formats supported in PersonalEffect are
available directly from Web Services in a completely transparent way. • An integrated, online solution that places a Print Service Provider at the center of all relevant media
campaign information.
NOTE: • A Direct Marketing Links license is required to enable XMPie. • An expert level of understanding of the XMPie PersonalEffect accounts, campaigns, and
variable template creation is required to effectively present the templates for order by a Print Buyer.
The following topics describe the procedures involved in importing and using an XMPie PersonalEffect template in to the Web Services system.
Integrations Guide
222 FreeFlow Web Services
Installing XMPie PersonalEffect The first step is installing XMPie PersonalEffect. Take note of the following when installing the XMPie PersonalEffect application: • The XMPie PersonalEffect application must be installed in the same domain or workgroup as Web
Services but NOT on the same server as Web Services. • The user that installs the XMPie PersonalEffect application must also exist as a user on the Web
Services server with admin permissions. • Take note of the following XMPie PersonalEffect login information that will be needed for configuring
within Web Services: IP address, Customer Name, User, and Password. • The XMPie PersonalEffect application must include the XMPie API install. Contact XMPie to receive
the relevant API files. To test the API has been successfully installed: a Browse to http://<server IP>/api/GetOutputFormatList.asp b Verify that you receive the following XML. " <?xml version="1.0" encoding="utf-8" ?> - <result> <err>-3</err> <src>GetOutputFormatList</src> <descr>Required Parameter [cn] Missing</descr> </result>"
Web Services and XMPie PersonalEffect Integration Web Services Setup Before configuring Web Services settings, make sure of the following Web Services server requirements: 1 The User account used to install XMPie also exists on the Web Services server and has the following
configuration: o Password never expires. o Member of the following 3 groups: Administrators, IIS_WPG and Users
2 The NewEdition folder on the Web Services server is shared as follows: o The share name must be: iWayDataFiles o The shared folder is configured with full permission to Everyone.
Web Services Configuration To create a link for Account(s) or Campaign(s) between the XMPie PersonalEffect Server and Web Services: 1 Navigate to SYSTEM SETUP -> INTEGRATIONS -> EXTERNAL SYSTEMS. 2 In the SYSTEMS pane, select XMPie PersonalEffect. 3 Select the Enable checkbox. 4 Fill in the XMPie login information:
o XPMie Server Local IP: the local IP address of the XMPie server (or DNS name). o Production Server Local IP: the local IP address of the Web Services server (or DNS name), o Customer: the XMPie customer name. o User: the XMPie user name. o Password: the password to the XMPie user account.
5 Click OK.
XMPie PersonalEffect
Print Service Provider User Guide 223
NOTE: The user name and password must match the user login details of the XMPie user (who creates campaigns and upload cpkg files), not the XMPie administrator (who manages users and preferences, for example).
Configuration Check To verify the configuration settings, click Check Configuration in the Set-up Configuration panel and the Production Server Tests window appears. If you have configured a setting correctly, the status in the Production Server Tests window appears as Passed. However, when a setting has been configured incorrectly, the status appears as Failed and the Production Server Tests window displays a comment message on the failure.
Test Comment
XMPie Api calls Verify that the XMPie server is installed. Verify in the Settings view that the XMPie Server Local IP field is correctly configured.
Validate Login Info Verify that the XMPie server is installed. Verify in the Settings view that the Customer, User, and Password fields are correctly configured.
Copy file to XMPie server
Verify the following: • In the Settings view, the Production Server Local IP field is
correctly configured. • The NewEdition folder on the Production server is shared. • The share name is iWayDataFiles with full permission to Everyone.
Copy file from XMPie server Verify that the XMPie server is installed. Verify in the Settings view that the XMPie Server Local IP field is correctly configured.
To verify XMPie PersonalEffect connectivity with the Web Services server: • On the XMPie PersonalEffect server, click Start and then click Run. • In the Run dialog box, type the value appearing in the XMPie uProduce Server Tests field box. • Click OK.
NOTE: The appearance of Windows Explorer confirms XMPie connectivity.
Importing an XMPie PersonalEffect Template to the Web Services System To import an XMPie PersonalEffect template for use within Web Services: 1 Navigate to ACCOUNTS -> STORE SETUP -> TEMPLATES. 2 Click the Synchronize with External Repository link; the Import Template Wizard opens,
displaying the Choose Document Source window. 3 Select the XMPie option and click Start Import Wizard; the Choose Campaign window appears. 4 In the dropdown lists, select an account and a campaign and click Next; the Choose XMPie
PersonalEffect Document window appears. 5 Select a document (template) and click Next; the Choose Job Type window appears. 6 Select a job type and click Next; the Edit Properties window appears. 7 Define the job's properties and click Next; the Choose Output Device window appears. 8 In the dropdown lists, select an output format and an output device and click Next; the Template
Pricing window appears. 9 Select the pricing model, type in template pricing values, select the pricing options, and click Next; the
Template Attributes window appears. 10 Information entered into Template Attributes is used by the Template search engine for establishing
the precise location of the template. Data entered is also sourced by the Template search engine to locate a template. Define the template attributes and click Finish; the XMPie template appears in the

Integrations Guide
224 FreeFlow Web Services
Templates list.
XMPie PersonalEffect templates are represented by the icon.
Ordering From a Template After you have uploaded an XMPie PersonalEffect template to Web Services, the template is ready to use for creating new jobs. The workflow follows regular Web Services template procedures.
To order a new job from an XMPie PersonalEffect template: 1 On the Print Buyer side, click ORDER JOBS; the Order Jobs window appears. 2 On the Catalog launch pad, click START ORDER; the Choose a Template window appears. 3 Select the target template and click CONTINUE; the Enter the Variable Data window appears. 4 To complete the job order, click ADD TO CART and CHECKOUT. 5 Proceed with the Web Services workflow. For more information, refer to the FreeFlow Web Services
Print Buyer User Guide.
Uploading a Database File To upload a database file: 1 Click the Add Records link; the Add Variable Data Records window appears. 2 Browse to a target database and click Continue; the Upload Variable Data Database window
appears. 3 Select a field name in each Field Name dropdown list and click Continue; the Variable Data
Express window appears. You can view a PDF preview using the Variable Data Express window. All PDF previews in the XMPie workflow are automatically generated as low resolution images by the XMPie server.
4 Click Add to Cart to send the job to the Shopping Cart, or click Add to Cart and Checkout to complete the workflow.
Restrictions and Known Limitations • The Auto Approve feature is not supported for XMPie Jobs. • The Imposition feature cannot be used with the VDX format. • In Track Jobs, when doing a PDF Preview, a "job in process" message is issued. To see the preview,
you must click "abort process." • Web Services does not impose XMPie jobs. This is done in XMPie. • Web Services does not generate press sheet calculations in the imposition section in the Job Info
panel in the Production queue. • VI templates cannot download the Print Buyer’s database that was uploaded in the order (there is no
import/export database capability). • XMPie VI fields behave like Form Editor VI fields. Uploading a file that is unsupported through the
Form Editor will not work. • When outsourcing an XMPie job, only the job ticket will be attached to the outsource email. • VI Fields that do not apply to XMPie templates are not disabled in the Form Editor. The table below
lists the fields for which the XMPie template definitions you change using Form Editor will apply, as well as fields for which the XMPie template changes that you make will not be applied. Fields that you want to define as Pinned must be defined as such in the XMPie template and not in Form Editor.
Field Type Definitions that are applied Definitions that are not applied
Text
Field Type - Login Driven is the only valid value Pinned
Default Text User moveable
Field Input Do not print this field
The linked image cannot be displayed. The file may have been moved, renamed, or deleted. Verify that the link points to the correct file and location.
DirectSmile
Print Service Provider User Guide 225
View by Text Alignment and Boundaries fields.
Field Format Font Properties fields Advanced Options.
Image
Use Image Generator Pinned
View By User Moveable
Image Upload Non-Editable
Image Selection GUI
Advanced Options Select Folder and Default Image
Field Input
DirectSmile Overview DirectSmile software provides customers with a variety of exciting, innovative and attractive options and ideas for creating variable data and image personalization solutions. DirectSmile has several products; the Web Services integration is with the Image Generator tool. Demo the software at:
http://www.greetingcardscafe.com/ http://www.greetingcardscafe.com/
Image Generator Main Features: • Create personalized image layouts • Use unique Fonts • Add special effects such as: light, shadow or motion to any image.
Prerequisites • Web Services Integration License. • DirectSmile dongle and license.
o At least 1000 smiles within the DirectSmile license. • DirectSmile Image Generator version 3.5 installed on the Web Services server.
o Installed on the C drive (default installation path). • DirectSmile running on the Web Services server at all times.
Installation process With the DirectSmile Image Generator already installed on the Web Services server, install the DirectSmile Adapter: 1 Open Windows Explorer and navigate to the Web Services Installation > DirectSmile folder (usually
on D:/). 2 Double-click on the Setup.exe file. 3 Validate that the DirectSmile Image Generator is correctly installed:
a Navigate to HOME -> INFO. CENTER. b In the Grid Extensions pane, verify that DirectSmile is listed.
Enabling DirectSmile To enable DirectSmile within Web Services: 1 Navigate to SYSTEM SETUP -> INTEGRATIONS -> EXTERNAL SYSTEMS.

Integrations Guide
226 FreeFlow Web Services
2 In the SYSTEMS pane, select DirectSmile. 3 Select the Enable checkbox. 4 Select Image Cropping to improve the performance / speed of creating a low resolution preview, in
cases where a Print Buyer uploads a heavy database to a template. Note that this feature must also be enabled on the DirectSmile license ("set scaler": paid feature).
Job Ordering Workflow The ordering flow is similar to any other ordering flow in Web Services. A template with the DirectSmile image behaves the same as any other Variable data template.
Print Buyer Ordering Flow: 1 Select the template. 2 Fill in the personalized data or upload a database. 3 Preview the job. 4 Order it.
Credit Card Introduction The FreeFlow Web Services Credit Card module enables Print Buyers to pay for the Print Service Provider's services through the use of an online payment vendor.
NOTE: The Credit Card feature is only available with the Web Services Credit Card license.
Currently, FreeFlow Web Services supports Credit Cards through the following payment services: • Authorize.Net (www.authorize.net) • PayPal (www.paypal.com) • SaferPay (www.saferpay.com) • DebiTech (www.dibspayment.com) • Moneris (www.moneris.com) • ePDQ (www.barclaycard.co.uk) • Atos (www.atosworldline.com) • ChinaBank (www.chinabank.com.cn)
To work with an online payment vendor not yet supported by Web Services, see Adding Credit Card Vendors to Web Services (on page 229).
Integrating with the Credit Card Vendor Before configuring Web Services, you must have opened an account with one or more of the supported Credit Card vendors. Depending on the way the vendor account is configured, a URL may be needed for posting the transaction response. If a URL is needed when configuring the vendor account, use the URL given in the table below.
Vendor URL needed for vendor account configuration
Authorize.net Response URL: http://[DNS]/newsway/versions/250/site/iway/app/payment/authorizenet/relayresponse.asp
PayPal Path back to server: http://[DNS]/newsway/versions/250/site/iway/app/payment/paypal/status.asp
SaferPay Return URL:

Credit Card
Print Service Provider User Guide 227
Vendor URL needed for vendor account configuration http://[DNS]/newsway/versions/250/site/iway/app/payment/saferpay/status.asp
DebiTech
URL return link in code snippet: <a href=>[ver location=http://[DNS]/newsway/versions/250/site/iway/app/payment/debitech/status.asp?ordernumber=[ver id no]&custom=[ver valueof=custom]&amount=[ver sum]&status=[ver reply]&[ver mac]]</a>
Moneris Approval/Declined URL: http://[DNS]/newsway/versions/250/site/iway/app/payment/moneris/status.asp
ePDQ
Allowed URL: http://[DNS]/newsway/versions/250/site/iway/app/payment/epdq/paymentposting.asp Post URL: http://[DNS]/newsway/versions/250/site/iway/app/payment/epdq/statusdataprocessing.asp
Atos
Approve URL: http://[DNS]/newsway/versions/250/site/iway/app/payment/Atos/statusSuccess.asp Cancel URL: http://[DNS]/newsway/versions/250/site/iway/app/payment/Atos/statusCancel.asp Decline/Error URL: http://[DNS]/newsway/versions/250/site/iway/app/payment/Atos/status.asp
ChinaBank Approval/Declined URL: http://[DNS]/newsway/versions/250/site/iway/app/payment/ChinaBank/status.asp
*Replace [DNS] with the actual Web Services DNS or IP address, as specified in SETTINGS -> SYSTEM -> SERVER ADDRESS (for example: www.Web Services.com).
NOTE: • For more information on configuring the vendor's account, read the documentation provided on
their website or contact the vendor's technical support. • The DemoOnlinePayment option in is a restricted tool intended for training purposes only. It is
not fully certified, and its use may result in unexpected errors.
Authorize.Net To configure Authorize.Net as a Credit Card Vendor, carry out the following steps: 1 Navigate to SYSTEM SETUP -> INTEGRATIONS -> CREDIT CARD. 2 Select Authorize.Net in the list. 3 Click on the Enabled checkbox and edit the Caption if necessary. 4 Fill in the Authorize.Net account information:
a Login ID b Transaction Key
5 To send the user's shipping address to Authorize.Net, enable the Send Shipping Address checkbox.
6 To test payment without processing actual data, enable the Test Mode checkbox. 7 Click on the Save button to apply the new settings.
NOTE: U.S. dollars (USD) are the only supported currency for U.S.-based merchants when Authorize.Net is the selected Payment Service for Credit Card.
PayPal To configure PayPal as a Credit Card Vendor, carry out the following steps: 1 Navigate to SYSTEM SETUP -> INTEGRATIONS -> CREDIT CARD. 2 Select PayPal in the list.

Integrations Guide
228 FreeFlow Web Services
3 Click on the Enabled checkbox and edit the Caption if necessary. 4 Fill in the PayPal account information:
o Merchant ID (e-Mail) 5 To test payment without processing actual data, enable the Test Mode checkbox. 6 Click on the Save button to apply the new settings.
SaferPay To configure SaferPay as a Credit Card Vendor, carry out the following steps: 1 Navigate to SYSTEM SETUP -> INTEGRATIONS -> CREDIT CARD. 2 Select SaferPay in the list. 3 Click on the Enabled checkbox and edit the Caption if necessary. 4 Fill in the SaferPay account information:
o Account ID 5 Click on the Save button to apply the new settings.
DebiTech To configure DebiTech as a Credit Card Vendor, carry out the following steps: 1 Navigate to SYSTEM SETUP -> INTEGRATIONS -> CREDIT CARD. 2 Select DebiTech in the list. 3 Click on the Enabled checkbox and edit the Caption if necessary. 4 Fill in the DebiTech account information:
o Account Name o Method o Page Set o SHA-1 Security Key
5 Click on the Save button to apply the new settings.
Moneris To configure Moneris as a Credit Card Vendor, carry out the following steps: 1 Navigate to SYSTEM SETUP -> INTEGRATIONS -> CREDIT CARD. 2 Select Moneris in the list. 3 Click on the Enabled checkbox and edit the Caption if necessary. 4 Fill in the Moneris account information:
o Store ID o Store Key
5 Click on the Save button to apply the new settings.
ePDQ To configure ePDQ as a Credit Card Vendor, carry out the following steps: 1 Navigate to SYSTEM SETUP -> INTEGRATIONS -> CREDIT CARD. 2 Select ePDQ in the list. 3 Click on the Enabled checkbox and edit the Caption if necessary. 4 Fill in the ePDQ account information:
o Client ID o Passphrase

Credit Card
Print Service Provider User Guide 229
5 Click on the Save button to apply the new settings.
Atos To configure Atos as a Credit Card Vendor, carry out the following steps: 1 Navigate to SYSTEM SETUP -> INTEGRATIONS -> CREDIT CARD. 2 Select Atos in the list. 3 Click on the Enabled checkbox and edit the Caption if necessary. 4 Fill in the Atos account information:
o Client API Installation Path o Merchant Country (2 letter code) o Merchant ID
5 Click on the Save button to apply the new settings.
ChinaBank To configure ChinaBank as a Credit Card Vendor, carry out the following steps: 1 Navigate to SYSTEM SETUP -> INTEGRATIONS -> CREDIT CARD. 2 Select ChinaBank in the list. 3 Click on the Enabled checkbox and edit the Caption if necessary. 4 Fill in the ChinaBank account information:
o Account Number o MD5 key
5 Click on the Save button to apply the new settings.
Enabling Credit Cards for Web Services Accounts The Credit Card feature is set per account, and is disabled by default. To enable one or more Credit Card vendors for a specific account, carry out the following procedure: 1 Navigate to ACCOUNTS -> ACCOUNT SETUP -> PREFERENCES. 2 Select the account. 3 In the PRICING sub pane, enable the relevant Payment Method checkboxes. Only enabled Credit
Card vendors are displayed. 4 Click on the Save button to apply the new setting.
Verifying Print Buyer Workflow via Credit Card To verify that the feature is configured correctly and that the Print Buyer can now pay for an order using a payment vendor, carry out the following steps: 1 Order a job as a Print Buyer, following the order workflow until the CONFIRM ORDER pane appears. 2 In the PAYMENT METHOD sub‐panel, select an online payment option and then click on Place the
Order; the Print Buyer should be automatically transferred to the Credit Card vendor's web page.
Adding Credit Card Vendors to Web Services In order to add new Credit Card vendors to Web Services’s list of available vendors, send an email message to your FreeFlow Web Services representative with the following information: • The name of the Credit Card vendor to add. • The website of the Credit Card vendor. • Test account details for the Credit Card vendor's site or a description of the way in which to create a
Integrations Guide
230 FreeFlow Web Services
test account. • Documentation, in English, outlining the means by which to interact with the Credit Card vendor’s site
or a link to a location where such documentation can be downloaded.
NOTE: Adding Credit Card vendors is a paid service. For more information, contact your FreeFlow Web Services representative.

Print Service Provider User Guide 231
15 Web Services Order Center User Guide
In This Chapter
Introduction ....................................................................................... 231 Configuration ..................................................................................... 232 Sales ................................................................................................. 237 Invoicing and Billing .......................................................................... 249 Managing Your Business and Production ......................................... 259 Production Pricing ............................................................................. 267
Introduction The Web Services Order Center User Guide provides the information and instructions you need to set up and use Web Services Order Center on your site.
Web Services Order Center is an add-on module to FreeFlow Web Services. Whereas FreeFlow Web Services enables receiving and processing orders that enter via the web, Web Services Order Center enables the processing of all off-line communication/business interactions received by a CSR (Customer Service Representative) through such means as the fax, phone, email or from a "walk-in" customer.
Once the Print Service Provider has received a request for a quotation, Web Services Order Center enables the Print Service Provider to create a quote, and then records all the interactions with the customer regarding this quote. After the Print Buyer has accepted the quote, the Print Service Provider can convert this quote into an order. When the order has been completed, the Print Service Provider can close the sales cycle by issuing an invoice and a receipt. The process is automated and efficient. The CSRs can view account and job statuses, handle all tasks, and issue reports on a daily basis. The built-in follow-up mechanism also allows better customer service and helps drive sales.
NOTE: Web Services Order Center is not an accounting system; so for general ledger purposes it is still necessary to enter the data into an accounting system.
In addition to the pricing calculation models provided by FreeFlow Web Services, Web Services Order Center also provides production pricing calculation models. Instead of defining an overall cost for an intent joblet (for example, cutting), production pricing allows a Print Service Provider to define the costs and prices for each part of the production process, such as setup time, labor charges, cutting charges and waste charges (for the cutting process, for example).
Web Services Order Center uses a single database for all quotes, orders, billing documents, and customer contact information.
Overview This guide provides all the necessary information, procedures and steps to effectively use Web Services Order Center and includes the following information: • Configuration (on page 232) • Sales (on page 237) • Invoicing and Billing (on page 249) • Managing Your Business and Production (on page 259) • Production Pricing (on page 267)

Web Services Order Center User Guide
232 FreeFlow Web Services
Configuration This chapter explains how to configure the system: part of the configuration applies to FreeFlow Web Services, and part of the configuration is unique to Web Services Order Center. Before setting up the system, ensure that the Web Services Order Center software license is enabled.
This chapter is divided into the following tasks: 1 Define Accounts (on page 232) 2 Add CSR Users (on page 233) 3 Configure Web Services Order Center Email (on page 233) 4 Configure Web Services Order Center Settings (on page 234)
Define Accounts To set-up new accounts and manage existing ones: 1 Navigate to ACCOUNTS -> ACCOUNT SETUP. 2 Create or update accounts as needed, and define at least one user for each account (ACCOUNTS ->
ACCOUNT SETUP -> USERS). 3 Add Account Manager and Sales Person custom fields to the account's details (ACCOUNTS ->
ACCOUNT SETUP -> GENERAL INFO) by defining these fields and making them visible in SYSTEM SETUP -> ADVANCED -> CUSTOMIZED FIELDS.
For more detailed information on managing accounts, see Account Setup (on page 43) in the Print Service Provider User Guide.
Set up Account Groups The Account Groups feature provides the Print Service Provider with an additional option for managing accounts and categorizing them into different group types for different purposes such as billing, reports and activities. The Print Service Provider also assigns CSRs to an Account Group that only contains the accounts that CSR will handle, thus isolating the CSR from accounts handled by other CSRs and limiting the CSRs ability to modify other account information.
To manage account groups, navigate to SYSTEM SETUP -> ADVANCED -> ACCOUNT GROUPS.
NOTE: • Create an Account Group for each CSR that you plan on adding as a system user. • Accounts can be included in more than one Account Group if necessary.
To add a new account group: 1 Click the New button. 2 Enter a Group Name and Description. 3 Select one or more accounts in the NOT A MEMBER: list box and click the Add arrow. The accounts are
moved to the MEMBER: list box.
NOTE: To select more than one account, press the Ctrl key while selecting an additional account.
4 Click Save.
To delete an account group: 1 Select the Account Group in the list and click the Delete button. 2 Click Yes in the confirmation dialog box that opens.

Configuration
Print Service Provider User Guide 233
To duplicate an existing account group: 1 Select the Account Group in the list and click the Duplicate button. A new group is created with the
same description and group members. 2 Enter a Group Name and update the Description if necessary. 3 Update the group membership if necessary by selecting accounts in one of the list boxes and clicking
the Add or Remove arrow as appropriate. 4 Click Save.
To edit an existing account group: 1 Select the Account Group in the list. 2 Update the Group Name and Description if necessary. 3 Update the group membership if necessary by selecting accounts in one of the list boxes and clicking
the Add or Remove arrow as appropriate. 4 Click Save.
Add CSR Users 1 Navigate to SYSTEM SETUP -> USERS. 2 Create a user account for each CSR:
a Assign each CSR a System Admin, Manager, or Manager Advanced User Type. The Manager Advanced user type is only available with Web Services Order Center. It provides the same privileges as Manager but also allows the user to create and edit credit notes, and cancel receipts. System Admin users can also create and edit credit notes and cancel receipts. but have more extensive privileges.
b Assign each CSR to an Account Group. The CSR will only have privileges to accounts that are members of this Account Group. This field does not display for System Admin user types (who have full access to all accounts).
For more detailed information on managing users and user types, see Managing Print Service Provider Users (on page 17) and Print Service Provider User Privileges (on page 18) in the Print Service Provider User Guide.
Configure Web Services Order Center Email In order for Web Services Order Center to match the email replies from customers to the relevant quotes and orders, Web Services Order Center needs a dedicated email account. Each CSR must also have an email account, and these accounts must be configured so that emails received by the CSR are also forwarded to the Web Services Order Center email account. The procedure to configure Web Services Order Center email involves the following steps: 1 Set up Web Services Order Center Email (on page 233) 2 Configure CSR Email Forwarding (on page 234)
Set up Web Services Order Center Email 1 Create a dedicated Web Services Order Center email account (for example, an account called Web
Services_Email) on the company's exchange server / ISP. For assistance, consult your PC support team / IT.
2 Configure the mail listener file, as follows: a Open WINDOWS EXPLORER, and browse to the IPANEL\DB folder (default installation path:
D:\NewEdition\IPanel\Db). b Open the MAILLISTENER.CONFIG file for editing (for example, using Notepad). c Change the value of the PopServer parameter from NONE to the name of your organization's
POP3 (Incoming email) Server. If necessary, change the Port and useSSL parameters according

Web Services Order Center User Guide
234 FreeFlow Web Services
to your network configuration. d Replace the values of the Username and Password parameters within the relevant data
according to the email account defined for the Web Services Order Center (for example, Web Services_Email).
e Save and close the mailListener.config file. 3 Restart FreeFlow Web Services using the Toolbox.
Configure CSR Email Forwarding Perform the following steps to ensure that the CSR's emails are forwarded to the dedicated Web Services Order Center email account. This is not limited to initial Web Services Order Center email setup; use this procedure whenever adding a new CSR user to FreeFlow Web Services.
NOTE: If more than one CSR is defined in the application, the same dedicated Web Services Order Center email account needs to be used for forwarding emails from all the CSRs.
The following procedure is an example for configuring CSR email forwarding on Microsoft Exchange Server 2007 (the steps for other mail servers will be slightly different): 1 Access the Microsoft Exchange Server 2007 computer. 2 Navigate to START -> ALL PROGRAMS -> MICROSOFT EXCHANGE SERVER 2007 -> EXCHANGE
MANAGEMENT CONSOLE. 3 Expand the RECIPIENT CONFIGURATION node and select MAILBOX. 4 For each CSR, configure the Web Services Order Center email account to also get a copy as follows:
a Select the user (CSR). b Click Properties, and then select the MAIL FLOW SETTINGS tab in the Properties dialog box. c Select DELIVERY OPTIONS and click the Properties button. d In the Delivery Options dialog box that opens, enable the Forward to checkbox and then click on
the Browse button. e In the Select Recipient dialog box that opens, enter the name or email address of the Web
Services Order Center mailbox (e.g. Web Services_Email) and then click OK. The dialog box closes.
f In the Delivery Options dialog box, ensure that both the CSR email account and the Web Services Order Center email account receive the email, by selecting the Deliver message to both forwarding address and mailbox checkbox, and then clicking OK. The dialog box closes.
g In the Properties dialog box, click OK. The dialog box closes. 5 Close the EXCHANGE MANAGEMENT CONSOLE.
To validate that email is set up and working correctly (that the CSRs will be able to use the system to send Quotes/Orders/Billing doc's to a customer), do the following: 1 Create and send a quote (ACCOUNTS -> SALES -> QUOTES) to a non-user email account (e.g. a
personal mail account), and then reply to it. 2 Make sure that the Quote - Unread Message status icon is displayed in the Sales - Quotes window. 3 Under history, view the emails content in the Activity Details.
NOTE: In order for Web Services Order Center to know how to match the email replies to the relevant quotes and orders, the recipients must reply to the email without changing the emails subject.
Configure Web Services Order Center Settings After setting up the Web Services Order Center software, configure the following optional settings: • Define the Banks List (on page 235) • Modify Follow-up and Validity Periods (on page 235) • Modify Documents Attachment Format (on page 235)

Configuration
Print Service Provider User Guide 235
• Set Sales Tips (on page 235) • Customize Document Numbering (on page 236) • Define Invoice Settings (on page 235)
Define the Banks List Define the list of banks from which you accept checks. This list is used to select the name of the bank when a payment is made. 1 Navigate to SYSTEM SETUP -> ADVANCED -> BILLING. 2 Click the Add button under the Banks list. In the empty row that is added to the list, type in the banks
name. 3 To remove a bank, select the bank and click Remove. 4 Click Save.
NOTE: To enable the Bank Check payment option for an account, at least one bank must be defined in the Bank list, otherwise the Billing documents cannot be confirmed.
Define Invoice Settings 1 Navigate to SYSTEM SETUP -> ADVANCED -> BILLING. 2 To enable the automatic creation of invoices and receipts for all the online orders made using online
payment, select the Create an Invoice and Receipt for Web created orders with online payment check box .
3 To issue the invoices to a parent account instead of to the account that generated the order, select the Allow issuing invoice for parent account check box.
4 Click Save.
Modify Follow-up and Validity Periods Set the follow-up and validity time periods for quotes (and orders): 1 Navigate to SYSTEM SETUP -> ADVANCED -> CRM. 2 In the DEFAULT FOLLOW UP field, type the default time period by which follow-up is expected. The
default is 3 days. 3 In the DEFAULT VALID UNTIL field, type the time period after which the quote is no longer considered
valid. The default is 30 days. 4 Click Save.
NOTE: The date for a specific quote can be changed on the General page of the quote details. When the quote is converted to an order, the order dates are reset regardless of what was set in the quote.
Modify Documents Attachment Format It is optional to convert the Word documents into PDF format when quotes/orders/billing documents are sent by email to a customer. The documents will still be displayed to the CSR as Word documents that the CSR can modify, and the conversion to PDF will take place when the CSR sends the documents to the customer. To enable Word document convertion to PDF format, perform the following steps: 1 Navigate to SYSTEM SETUP -> ADVANCED -> CRM. 2 Under the Email attachment format, select Send attached documents as PDF (applies to Quote,
Order and Billing documents) checkbox.
Set Sales Tips This optional feature enables the Print Service Provider to define sales tips that will assist the CSR in the sales process. The sales tip can be an image or a URL, and multiple sales tips can be defined for each
Web Services Order Center User Guide
236 FreeFlow Web Services
Job type or Template to be displayed in a loop.
NOTE: Sales tips are shown for Printable and Not printable Job Types or Templates but not for Book Assembly Templates.
1 Navigate to PRINT SETTINGS -> JOB BUSINESS FLOW -> JOB TYPE LIBRARY. 2 For each job type that you want to define a sales tip:
a Select the job type and click the Edit button. b On the GENERAL PROPERTIES tab click the Add Sales Tip Message button.
3 Select a message from the list (or click the New button to create additional messages) and then click OK.
NOTE: The maximum size of a sales tip image:
• Height: 540px • Width: 400px
Customize Document Numbering All quote, order and billing documents are uniquely numbered. These numbers are used to identify the objects in the system and the documents that are sent to the customers at different stages of the sales process. Each document number has an alphabetic prefix that indicates the document type (for example, QUO for quotes) and different document types are numbered independently of each other. The prefixes and the starting number of each counter can be customized and the same counter can be used for several objects, according to the system limitations.
To customize document numbering: 1 Navigate to SYSTEM SETUP -> ADVANCED -> NUMBERING. 2 Modify the prefixes in each of the prefix fields as required. 3 Change the starting numbers for each of the objects in the STARTING NUMBER fields as required. 4 To separate the prefix and numbering of web-submitted orders, select the Use separate numbering
definitions for online and offline orders check box; the ONLINE ORDER NUMBER prefix and starting number fields are then enabled.
5 To combine the prefix and counter of receipts and deposits, select the Use Receipt numbering definitions for Deposit check box; the DEPOSIT NUMBER prefix and starting number fields are then disabled.
6 To combine the prefix and counter of the invoices and credit notes, select the Use Invoice numbering for Credit Notes check box; the CREDIT NOTES prefix and starting number fields are then disabled.
NOTE: • The numbering of existing quotes, orders and billing documents is not influenced by changes in
numbering. • Numbering prefixes are NOT case sensitive (e.g. INV is the same as inv). Changing only the
case of a prefix and then resetting the numbering could result in errors.
Document Type Default Prefix Other Options
Quotes QUO
Orders OSR
Online orders OSR Use a separate counter, with a default OWB prefix.
Invoices INV
Receipts RCT
Deposits DEP Use the same counter and prefix as receipts.
Credit notes CDT Use the same counter and prefix as invoices.

Sales
Print Service Provider User Guide 237
Sales This chapter describes how to use Web Services Order Center to handle sales, and covers the sales management life cycle from creating a quote through to committing an order.
The sales cycle begins with a customer’s request for a quotation. This request can be received by phone, fax, email or from a "walk-in" customer. Based on the request, a quote is created and then delivered to the customer. When the customer accepts the quote, it can be converted into an official order to be produced and shipped to the customer. After the order is produced, an invoice is sent to the customer and when the customer pays the invoice, a receipt can be issued.
The most common sales cycle would go as follows: 1 Customer requests a quote. 2 Print Service Provider CSR creates a quote and sends it to the customer. 3 Customer approves the quote. 4 Print Service Provider CSR converts a quote into an order. If the order includes ready production files
they are transferred directly to production. If the order does not have ready production files it is sent to artwork.
5 Print Service Provider Designer (artwork) creates the job production files, verifies and corrects supplied customer files, and handles proofing cycles.
6 Print Service Provider Production operators print and finish the jobs. 7 Print Service Provider Dispatch operator packs jobs for delivery, prints delivery labels, and approves
the delivery. 8 Print Service Provider Administrator creates an invoice. 9 Customer pays the invoice. 10 Print Service Provider Administrator issues a receipt.
This chapter contains the following major topics. • Creating a Simple Quote (on page 237) • Performing Additional Edits in the Quote or Order (on page 240)
o Selecting a Quote and Displaying its Product Tab (on page 240) o Adding/Deleting Jobs and Items (on page 240) o Editing Pricing Details (on page 242) o Uploading, Attaching, and Mapping Files (on page 241)
• Progressing from Quotes to Orders (on page 244) o Understanding Quote/Order Statuses and Icons (on page 244) o Moving Through the Stages in the Quote–Order Life Cycle (on page 245) o Handling Follow-up Activities for Quotes and Orders (on page 247) o Viewing Quote and Order History (on page 249)
Creating a Simple Quote Create a quote by performing the following actions in sequence: 1 Create the Quote (on page 237) 2 Define the General Details (on page 238) 3 Add and Define the Products (on page 239) 4 Define the Shipping Information (on page 240)
Create the Quote 1 Navigate to ACCOUNTS -> SALES -> QUOTES. 2 Select the account in the drop-down list.

Web Services Order Center User Guide
238 FreeFlow Web Services
o The left pane displays the list of existing Open quotes for the account (that is, quotes that require attention).
o The right pane displays the details of the selected quote. 3 To filter the list of quotes by Status or the name of the CSR who created the quote, select values for
any combination of the following: o From the STATUS drop-down list, select the status of the quotes. For an explanation of statuses,
see Understanding Quote/Order Statuses and Icons (on page 244). o From the CSR drop-down list, select the name of the CSR.
4 To search for a specific quote or job with a known number, select either Quote # or Job # from the drop-down list, fill in the number and then click Search.
5 Create a new quote (or duplicate an existing quote), as follows: o To create a new quote, click Create New. o To duplicate an existing quote, select the quote and click Duplicate. The quote is added to the quote list. The quote is assigned a unique ID having a default prefix of QUO (for quote) followed by a numeric increment; the status of the quote is set to DRAFT.
NOTE: A quote can also be created by duplicating an existing order in the ACCOUNTS -> SALES -> ORDERS screen.
Quotes and orders have two main statuses – Draft and Committed. As long as a document is in draft mode, it can be changed and edited as required. When the document is finalized and has to be transferred to the customer, it must be committed. The commit action makes the document official; a committed document can no longer be edited.
Define the General Details Fill in or edit the GENERAL details of the quote, as follows: 1 Type an identifying name for the quote Name field. 2 To select a different contact person
a Click the Contact Person link. b In the dialog box that opens, select the contact in the list and click Save.
3 Define the Billing Address; the default is taken from the Contact Person settings. 4 If supplied, type the reference number in the Customer Reference field. 5 In the Received as list, select how the Request For Quote (RFQ) was received. 6 To assign a different CSR to the quote (by default, a new quote is assigned to the user creating the
quote): a Click the Assigned to CSR link. b In the dialog box that opens, select the user and click Save.
7 To assign an account manager to this quote (available only if the Customize Fields feature is enabled): a Click the Account Manager link. b In the dialog box that opens, select the user and click Save.
8 To assign a sales person to this quote (available only if the Customize Fields feature is enabled:) a Click the Sales Person link. b In the dialog box that opens, select the user and click Save.
9 Type your internal reference number, if one exists, in the Internal Reference field. 10 Optionally change the default quote expiration and follow-up dates using the Valid Until and Next
Follow-up calendars. For information on follow-up actions, see Handling Follow-up Activities for Quotes and Orders (on page 247).
11 Optionally add notes as follows: o In the Internal Note text box, add notes that you want to appear on internal Print Service Provider
Sales
Print Service Provider User Guide 239
documents (for example, on the job ticket). o In the Note for Customer text box, add additional information that should appear in the quote that
you send to the customer. 12 Click Save.
NOTE: A number of different quote/order custom fields can be added to quotes and orders. For information on customizing fields, see the System Setup chapter in the Print Service Provider User Guide.
Add and Define the Products
NOTE:
When filling in the details for the job type or template, see the Print Service Provider User Guide for instructions such as: • Adding Joblets and Joblet options to Intents. • Defining Tax Groups and Tax Packages. • Adding Line Items to the Line Item Library. • Defining Shipping.
Add the products (jobs and/or templates) to the PRODUCTS details of the quote, as follows: 1 Click the Add button and select one of the following options:
o Add New Job - to add a job from a job type. o Add Job from Template - to add a job from one of the account’s templates. o Add Non-Printable Job - to add a non-paper job (for example, a mouse pad). The CHOOSE JOB TYPE (or for a template, the CHOOSE TEMPLATE) dialog box opens.
2 Select the job type or template and click Continue. The CREATE A NEW JOB dialog box opens and displays the tabs (JOB DETAILS, INTENT, PRICING, and VARIABLE INFORMATION if needed) that you use to define the job or template. If Sales tips are defined for the Job Type or Template, the CSR will see them while defining the job details and job intent. See Setting Sales Tips (on page 235) for more information.
3 Select the JOB DETAILS tab, fill in the details as in FreeFlow Web Services, and click Continue. Note that this is the only place a Cost center can be assigned to a job.
4 Select the INTENT tab, fill in the details as in FreeFlow Web Services, and click Continue. Note that it is possible to add any joblet or joblet options that were not defined for the job type or template, but defined in the application.
5 If there is a VARIABLE INFORMATION tab, select the tab and fill in the details as in FreeFlow Web Services. Note that VDP or Archive templates will not have a preview from the summary panel (these jobs can be previewed by clicking on the Preview button on the EDIT PROPERTIES -> VARIABLE INFORMATION tab).
6 Select the PRICING tab. o To use the default pricing calculation method defined for the job or template, fill in the quantity in
the Copies field, and click Calculate. If the calculation method is Manual, the results matrix returns a line (Type: MANUAL; Item:
CSR MANUAL PRICE) where you can type in the price manually. Fill in the price. For all calculation methods except Manual, an itemized results matrix indicates the prices.
o To use a different pricing calculation method or perform other pricing changes for the quote, see Editing Pricing Details (on page 242).
7 After filling in the last tab in the CREATE A NEW JOB dialog box, click Finish. The new job appears on the PRODUCTS page.
Repeat this process for each job or template to be added. To add an item from the Items List Library to table, see Adding An Item from the Line Item Library (on page 241).
The details in the Products tab of a quote or order are organized into Tax Group tables: items are displayed in tables organized by the tax group that applies to them.
Web Services Order Center User Guide
240 FreeFlow Web Services
• If all items belong to the same tax group, all items are listed in the same tax group table. • If items belong to different tax groups, a table for each tax group lists the items that belong to that tax
group.
The tables will also contain an urgency surcharge line item and a discount line item (if defined).
NOTE: When multiple quantities are listed for the same job in a quote, Urgency, Shipping and Tax will not be calculated and displayed on the quote's Product tab. However, when the quote is converted to an Order and the desired quantity is selected, these parameters will be displayed under the Order Product tab.
Define the Shipping Information After adding at least one job a link to define the shipping information will be displayed. The CSR needs to manually select the desired delivery date and method. Only after selecting these parameters will the shipping information be displayed in the top panel (delivery date, method and delivery address) and the shipping price will be added to the quote pricing breakdown. • If multiple shipping is defined, only the Multiple shipping string will be displayed and not all the
shipping details. • Web Services Order Center has more flexible delivery date options than in FreeFlow Web Services
alone, and jobs can be selected to be ready from the time the quote is created and with an urgent surcharge added.
• If shipping details are not defined, the default values will be selected when committing this quote.
Performing Additional Actions on the Quote
NOTE: The procedures in this section describe how to modify quotes. You can modify orders the same way by performing these procedures in the Sales - Orders window (ACCOUNTS -> SALES -> ORDERS). The Sales - Orders and Sales - Quotes windows are almost identical.
This section contains the topics: • Selecting A Quote And Displaying Its Product Tab (on page 240) • Adding/Deleting Jobs and Items (on page 240) • Editing Pricing Details (on page 242) • Uploading, Attaching, and Mapping Files (on page 241)
Selecting a Quote and Displaying the Product Tab If the quote is not selected and its product tab is not displayed, you can select the quote and display its Products tab, as follows: 1 Navigate to ACCOUNTS -> SALES -> QUOTES. 2 Select the account from the ACCOUNT list box on the right side of the window. 3 In the list of quotes on the left side of the window, select the quote. If the list of quotes is long, you can
search for a specific quote or job if you know the quote number or job number. The list of displayed quotes can be filtered according to quote status and/or responsible CSR.
4 In the QUOTE DETAILS pane on the right side of the window, select the PRODUCTS tab. (To edit the General details of the quote, select the GENERAL tab, and see Define the General Details (on page 238) for information on editing the field of the GENERAL tab.)
Adding/Deleting Jobs and Items This section includes the following procedures: • Adding Another Job or Template (on page 241) • Duplicating a Job (on page 241) • Deleting a Job (on page 241)

Sales
Print Service Provider User Guide 241
• Adding an Item from the Line Item Library (on page 241)
Adding Another Job or Template Follow the instructions in Add and Define the Products (on page 239).
Duplicating a Job 1 In the PRODUCTS tab, select the job to duplicate. 2 Click the Duplicate button. Another job will be added with a different item number. 3 To edit the duplicated job, select it and click the Properties button.
NOTE: The job's urgency is also duplicated and added to the order.
Deleting a Job 1 In the PRODUCTS tab, select the job to delete. 2 Click the Delete button.
NOTE: If more than 1 quantity was defined for this job then deleting the job will delete all quantities. In order to change the quantity, select the job, click the Pricing button, edit the desired quantity and then click the Finish button.
Adding an Item from the Line Item Library 1 In the PRODUCTS tab, locate the Taxes group to which to add the item. 2 Click the Add Item button connected to that Taxes group. 3 Select the item and click Add.
NOTE: To remove an item, select the item in the tax group and click the Remove Item button.
The price is updated automatically after adding or removing an item.
Uploading, Attaching, and Mapping Files Web Services Order Center provides two mechanisms for uploading and attaching files. Although these mechanisms are very similar, each mechanism is intended for a specific situation, and are described accordingly in this section: • Attaching a File Where Upload is Required (on page 241): If the files were created in-house, or
received by digital media, they must be uploaded and assigned to the appropriate job(s). • Mapping Files from a Reply Email (on page 242): If the customer received a quote by email from the
system, and the customer attached the files to the reply email, they will be automatically uploaded to the quote (the uploading stage is skipped). The files must still be mapped to the appropriate job(s).
Attaching a File Where Upload is Required 1 Do either of the following:
o If you are in the process of creating a quote, in the JOB DETAILS tab of the EDIT PRODUCTS dialog box, click the Attachments link. The ATTACHMENTS dialog box opens.
o If you previously saved the quote, open the Attachments dialog box, as follows: i In the Products tab in the Quote details pane, select the job or template. ii Click the Attachments button. The ATTACHMENTS dialog box opens.
2 In the ATTACHMENTS dialog box, click the Upload Files button. 3 In the UPLOAD FILE dialog box, ensure that the Upload a Single file option is selected, and then click
the Browse button. The CHOOSE FILE TO UPLOAD dialog box opens. 4 Select the file for upload and click Open. The CHOOSE FILE TO UPLOAD dialog box closes. 5 Click Continue. The UPLOAD REPORT appears informing that the file has been uploaded. 6 Click Close. The uploaded file appears in the ATTACHMENTS dialog box.

Web Services Order Center User Guide
242 FreeFlow Web Services
7 If the file requires no prepress work and is ready to print, activate the preflight process by selecting the file and clicking the Mark for Production button. The file is processed and marked as ready for production and the job is automatically sent to the Production queue once the quote is converted to an order and then committed.
NOTE: There is an option to upload multiple files, using Multi-file upload. Note that only one of the files attached to a job can be marked for production. For more information, see the Print Service Provider User Guide for instructions.
Mapping Files from a Reply Email If the customer received a quote by email, and then attached the files to the reply email, they will be automatically uploaded to the quote, but must still be mapped to the correct job.
NOTE: When a customer replies to the email, the subject or content from the sent mail should not be changed, otherwise the application will not be able to correctly identify the email and map it to the correct quote. The customer must reply to the email and add his text to the existing content.
1 Select the quote or order in the SALES-QUOTE or SALES-ORDER screen. 2 Select the FILE MAPPING tab in the Details pane.
The files that were included in the reply are listed in the File Mapping tab together with all files that were manually uploaded and attached to jobs in the quote or order. If the file was submitted by email, an icon appears in the Email column. Double-clicking this icon displays the email message content.
3 Select the file, and then select the job to which it should be assigned in the Job Name dropdown box. 4 If the file requires no prepress work and is ready to print, activate the preflight process by selecting the
file and clicking the Mark for Production button. The file is processed and marked as ready for production; the job is automatically sent to the Production queue once the quote is converted to an order and then committed. The following icons indicate the result of the preflight operation: o — Preflight processing was successful.
o — Preflight processing encountered errors. Double clicking on an icon opens a report on the process.
Editing Pricing Details This section describes how to view, define and modify pricing at the quote or order level.
NOTE: The editing of pricing details is only possible when a quote or order is still in draft mode, and cannot be changed otherwise.
If the PRICING tab in the EDIT PRODUCT dialog box is not displayed, display it as follows: 1 In the Products tab, select the job or template. 2 Click the Pricing button (or click the Properties button and then select the Pricing tab).
The following types of pricing adjustment can be performed. • Generating Prices for Different Quantities (on page 242) • Changing the Pricing Calculation for a Job Type or Template (on page 243) • Requesting a Quote from another Print Provider (on page 243)
NOTE: • Pricing instructions that apply to FreeFlow Web Services are not repeated. For information on
defining pricing in FreeFlow Web Services, see the Print Service Provider User Guide. • This section does not describe how to set up Production Pricing using Web Services Order
Center. For more information, see Production Pricing (on page 267).
Generating Prices for Different Quantities Customers might want to know the prices for different quantities (number of copies) of the same job. Different prices can be generated according to the number of copies as follows: 1 Click the Add button. A new field is added to allow you to specify a number of copies.
The linked image cannot be displayed. The file may have been moved, renamed, or deleted. Verify that the link points to the correct file and location.
The linked image cannot be displayed. The file may have been moved, renamed, or deleted. Verify that the link points to the correct file and location.
Sales
Print Service Provider User Guide 243
2 Fill in the number of copies and then click Calculate. The price is calculated for the newly defined quantity.
3 To use a particular quantity in the total costs calculation, select the appropriate number of copies line and the pricing is calculated accordingly.
4 Click Save, or if done with all pricing changes, click Finish. The Save button is only enabled when editing an existing Quote.
NOTE: When multiple quantities are listed for the same job in a quote, Urgency, Shipping and Tax will not be displayed on the quote's Product tab. However, when the quote is converted to an Order and the desired quantity is selected, these parameters will be displayed under the Order Product tab.
Changing the Pricing Calculation for a Job Type or Template There are several calculation models that can be used to calculate the price of a job. Each job type and template has a default calculation mode. When a quote or order is created, the default calculation model is used, and the criteria used in this model cannot be adjusted.
By following the steps in this procedure, you can either change the calculation model, or use the same model but adjust the calculation criteria. 1 Click the Change Planning and Pricing Setup link. The PLANNING dialog box opens and displays the
PRICING tab (it also contains a Tax and Urgency tab). 2 Select the Use New Settings option, which turns the CALCULATION MODEL field into a drop-down list. 3 Select the new Calculation Model, or select the same calculation model if you want to make changes
to the default calculation model. 4 Depending on your selection, fill in the fields in the PRICING tab of the PLANNING dialog box:
o If you chose one of the Production pricing models as the calculation model, see Define Production Pricing As The Default Calculation Model For A Job Type or Template (on page 277).
o If you chose Manual as the calculation model, another line (Type: MANUAL; Item: CSR MANUAL PRICE) will be added to the result matrix.
5 Click Save. The PLANNING dialog box closes. 6 Select the quantity and click Calculate, to update the TOTAL PRICE according to the new price
settings. If you chose Manual as the calculation model fill in the price manually. 7 Click Save, or if you are done with all pricing changes, click Finish.
Requesting a Quote from another Print Provider Use this feature send a request for quotation to another print provider, if you expect to outsource this job and don’t know the outsourcing cost. 1 Click the Request for Third Party Quote button, The REQUEST FOR QUOTE dialog box is displayed. 2 Select a partner print provider already defined in the system from the Print Provider Name list.
o To add new partner print providers, use the New Print Provider button. o Details of any partner in the list can be changed using the Edit Details button. o Any partner can be removed from the list using the Remove Print Provider button.
3 Click the Job Ticket link in EDIT JOB TICKET section, if editing is required. For information about editing the job ticket, see the section about Production, in the Print Service Provider Guide.
4 Write your comments in the text box, in the Add Comment section. 5 To attach the job PDF to the email that will be sent, select the Add Job PDF to Email Content check
box. 6 Click the Send Email button to send the request for quotation to the selected partner print provider.
NOTE: Once an answer on the request for quote (RFQ) has been received via email or by any other means, the price must be manually entered in the PRICING screen for the job.
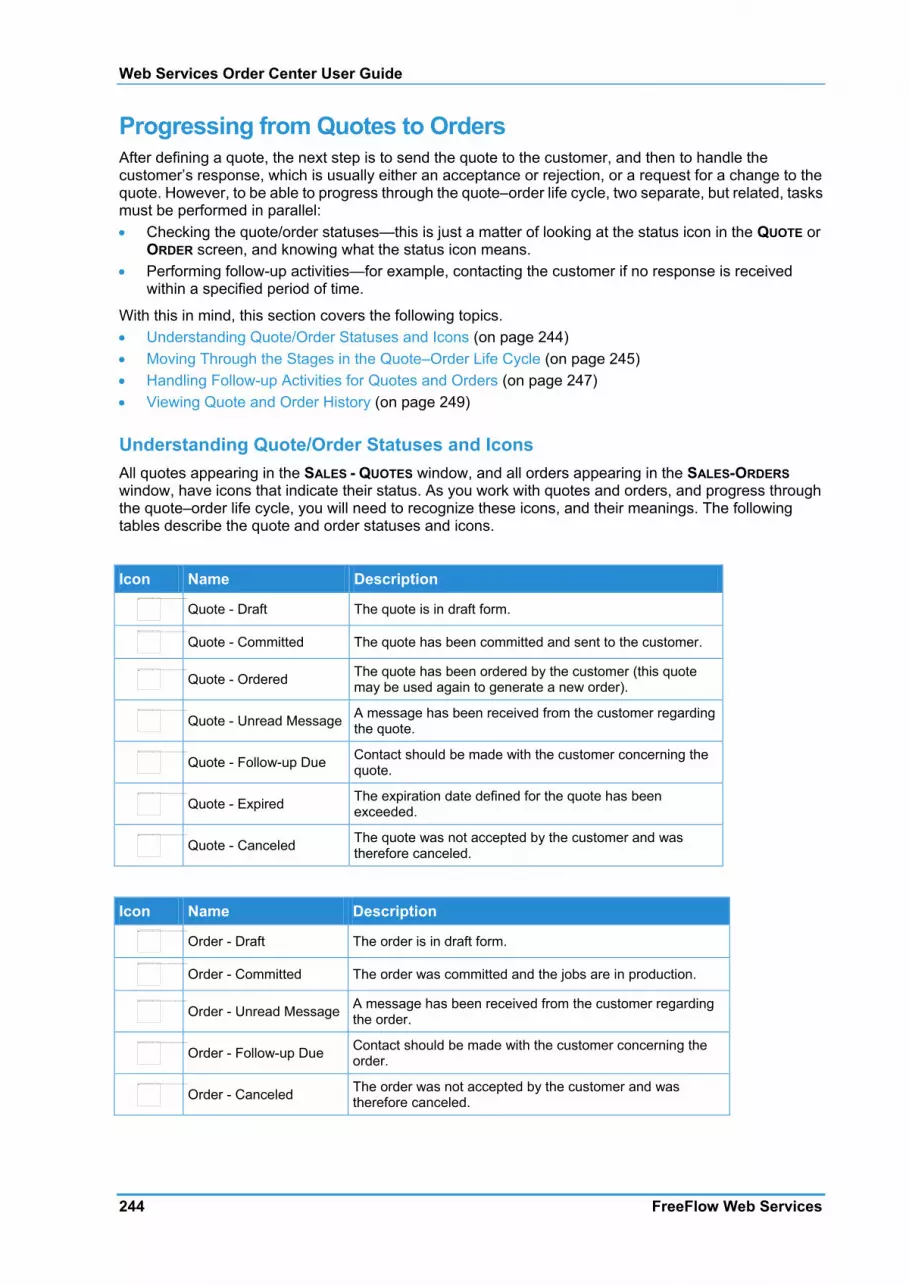
Web Services Order Center User Guide
244 FreeFlow Web Services
Progressing from Quotes to Orders After defining a quote, the next step is to send the quote to the customer, and then to handle the customer’s response, which is usually either an acceptance or rejection, or a request for a change to the quote. However, to be able to progress through the quote–order life cycle, two separate, but related, tasks must be performed in parallel: • Checking the quote/order statuses—this is just a matter of looking at the status icon in the QUOTE or
ORDER screen, and knowing what the status icon means. • Performing follow-up activities—for example, contacting the customer if no response is received
within a specified period of time.
With this in mind, this section covers the following topics. • Understanding Quote/Order Statuses and Icons (on page 244) • Moving Through the Stages in the Quote–Order Life Cycle (on page 245) • Handling Follow-up Activities for Quotes and Orders (on page 247) • Viewing Quote and Order History (on page 249)
Understanding Quote/Order Statuses and Icons All quotes appearing in the SALES - QUOTES window, and all orders appearing in the SALES-ORDERS window, have icons that indicate their status. As you work with quotes and orders, and progress through the quote–order life cycle, you will need to recognize these icons, and their meanings. The following tables describe the quote and order statuses and icons.
Quote Statuses
Icon Name Description
Quote - Draft The quote is in draft form.
Quote - Committed The quote has been committed and sent to the customer.
Quote - Ordered The quote has been ordered by the customer (this quote may be used again to generate a new order).
Quote - Unread Message A message has been received from the customer regarding the quote.
Quote - Follow-up Due Contact should be made with the customer concerning the quote.
Quote - Expired The expiration date defined for the quote has been exceeded.
Quote - Canceled The quote was not accepted by the customer and was therefore canceled.
Order Statuses
Icon Name Description
Order - Draft The order is in draft form.
Order - Committed The order was committed and the jobs are in production.
Order - Unread Message A message has been received from the customer regarding the order.
Order - Follow-up Due Contact should be made with the customer concerning the order.
Order - Canceled The order was not accepted by the customer and was therefore canceled.
The linked image cannot be displayed. The file may have been moved, renamed, or deleted. Verify that the link poin
The linked image cannot be displayed. The file may have been moved, renamed, or deleted. Verify that the link poin
The linked image cannot be displayed. The file may have been moved, renamed, or deleted. Verify that the link poin
The linked image cannot be displayed. The file may have been moved, renamed, or deleted. Verify that the link poin
The linked image cannot be displayed. The file may have been moved, renamed, or deleted. Verify that the link poin
The linked image cannot be displayed. The file may have been moved, renamed, or deleted. Verify that the link poin
The linked image cannot be displayed. The file may have been moved, renamed, or deleted. Verify that the link poin
The linked image cannot be displayed. The file may have been moved, renamed, or deleted. Verify that the link poin
The linked image cannot be displayed. The file may have been moved, renamed, or deleted. Verify that the link poin
The linked image cannot be displayed. The file may have been moved, renamed, or deleted. Verify that the link poin
The linked image cannot be displayed. The file may have been moved, renamed, or deleted. Verify that the link poin
The linked image cannot be displayed. The file may have been moved, renamed, or deleted. Verify that the link poin

Sales
Print Service Provider User Guide 245
NOTE:
• Opening a screen that displays lists of quotes or orders (for example, the QUOTES or ORDERS screen), by default all Open quotes or orders are displayed. These are quotes or orders that require your attention (quotes or orders in the draft or expired mode, or with overdue activities, or with attached unread messages).
• Quote or order expiration, overdue activities, and unread messages are technically not statuses but rather they are flags marking additional information about a quote or order status. The available work steps depend on the actual quote or order status, and not on these flags.
Moving Through the Stages in the Quote–Order Life Cycle This section covers the following topics: • Providing the Quote to the Customer (Committing) (on page 245) • Handling the Customer Response (on page 246)
o Placing the Order (on page 246) o Revising the Quote or Order (on page 247) o Cancelling the Quote or Order (on page 247)
Providing the Quote to the Customer (Committing) A draft quote that is ready to be sent to the customer must first be committed: the quote must be changed from a draft document to an official document. 1 Navigate to ACCOUNTS -> SALES -> QUOTES.
o The left pane displays the list of existing Open quotes for the account (that is, quotes that require attention).
o The right pane displays the details of the selected quote. 2 Select the account in the drop-down list. 3 To filter the list of quotes by Status or the name of the CSR who created the quote, select values for
any combination of the following and then click Search: o From the STATUS drop-down list, select Draft. o From the CSR drop-down list, select the name of the CSR.
4 To search for a specific quote with a known number, select Quote # from the drop-down list, fill in the number and then click Search.
5 Select the quote in the list.
NOTE: For orders that don't require sending a quote to the customer, quickly convert the draft quote to a committed order by clicking on the Convert to Committed Order button. In this case, all the following steps are not relevant.
6 Click the Commit and Send to Customer button. The Quote detail pane is replaced by the COMMIT THE QUOTE AND CONVERT IT INTO AN OFFICIAL QUOTE pane.
7 Optionally, edit the VALID UNTIL and NEXT FOLLOW-UP dates. 8 Select one of the following methods to commit and convert the quote.
o To send the customer the quote as an email: i In the ACTION drop down list, select Commit and Send an Email, and then click Go. The
SEND DOCUMENT preview dialog box opens. You can preview and edit the document. ii To send the document, click Send Email. Depending on the basic settings defined during
Setting up the system, the quote document is either attached to the email as a Word document or converted to a PDF and attached, and sent to the customer and the CSR.
o To print the quote (for example, for a walk-in customer or to fax the quote): i In the ACTION drop down list, select Commit and Print, and then click Go. The PRINT
DOCUMENT preview dialog box opens. You can preview and edit the document. ii To print the document, click OK.
Web Services Order Center User Guide
246 FreeFlow Web Services
o To commit the quote without printing or sending, in the ACTION drop down list, select Commit, and then click Go.
The COMMIT THE QUOTE AND CONVERT IT INTO AN OFFICIAL QUOTE pane is replaced by the details pane for the quote.
NOTE: If the shipping details were not defined for this quote, the application will notify the user and allow him to stop the committing process or continue with the default shipping details.
Handling the Customer Response This section describes how to handle the customer’s response to the quotes. Generally, any of the following actions will be performed, depending on the customer response: • Placing the Order (on page 246) • Revising the Quote or Order (on page 247) • Cancelling the Quote or Order (on page 247)
Placing the Order
After the customer has accepted the quote and decided on the quantities to print for each quoted job, convert the quote to an order. Both committed quotes and draft quotes can be converted to orders.
Convert quotes to a: • Committed Order when all the order details are finalized. • Draft Order when the order information is not complete and finalized (for example, files still need to
be supplied).
NOTE: A quote can be repeatedly converted into an order, potentially generating an unlimited number of orders, each with a unique order number. This is useful for creating repeat orders from the same quote.
1 Navigate to ACCOUNTS -> SALES -> QUOTES. 2 Select the account in the drop-down list. 3 Filter the quotes list to only display committed quotes by selecting Committed in the STATUS
drop-down list. 4 Select the quote. 5 Click one of the following icons:
o Click the Convert icon ( ) to convert the quote to a draft order.
o Click the Convert to Committed Order icon ( ) to convert the quote to a committed order. 6 The CONVERT THE QUOTE INTO AN ORDER screen appears. 7 Adjust the number of copies, if required. 8 Click the Convert button. The Next Follow up and Valid Until dates are reset.
NOTE: If a budget inventory template is used for this quote and there is insufficient budget or customer inventory when converting the quote to an order, the CSR will not be blocked.
The quote is converted to an order and now appears in the following screens: • The quote still appears in the QUOTE screen with its quote ID and it's status is set to Quote-Ordered.
The details pane indicates that the quote has been ordered. • The quote is added as an order to the ORDER screen (ACCOUNTS -> SALES -> ORDERS). The default
prefix for this order is changed to OSR and it is assigned a new numeric increment. The status of the order is set as follows: o If the quote was converted to a draft order, the status of the order is set to Draft. o If the quote was converted to a committed order, the status of the order is set to Committed.
When converting a quote to a committed order, the Next Follow up and Valid Until dates are reset and the attached jobs are automatically sent to the appropriate queue:
The linked image cannot be displayed. The file may have been moved, renamed, or deleted. Verify that the link points to the correct file and location.
The linked image cannot be displayed. The file may have been moved, renamed, or deleted. Verify that the link points to the correct file and location.

Sales
Print Service Provider User Guide 247
• Jobs with attached files that are marked for production are sent to the Production queue. • Jobs without attached files and jobs with attached files that are not marked for production, are sent to
the Artwork queue.
NOTE: Uploaded jobs from the customer where Send file separately was selected will also go to the Artwork queue
Revising the Quote or Order To revise a committed quote that has been sent to a customer (for example, the customer will not accept the quote without certain changes), or make changes to a committed order: 1 Select the quote or order in the QUOTES or ORDERS screen. To simplify selection, do the following:
o To display the list of draft quotes, select Draft in the STATUS drop down list. o To display the list of committed quotes, select Committed in the STATUS drop down list.
2 To revise a committed quote or order, do the following: a Click the Revise button. The REVISE THE QUOTE (or REVISE THE ORDER) screen is displayed. This
screen allows you to add a note explaining why you are revising the quote. b Type a note text in the Quote Internal Note field and click Save. The Quote (or Order) is set back to DRAFT status, and the revision number is updated in the General tab with the relevant revision number.
3 Perform the necessary edits and changes to the quote and job, as described throughout this chapter. 4 After updating or revising the quote or order, commit it. To send a revised quote to the customer, see
Providing the Quote to the Customer (Committing) (on page 245).
NOTE: When revising a committed order, all jobs from this order will be removed from the Print Service Provider queues.
Cancelling the Quote or Order If the customer decides against placing an order, or if the user placed the order but is now canceling it, you can close the quote or order as follows: 1 Navigate to ACCOUNTS -> SALES -> QUOTES to cancel a quote, or navigate to ACCOUNTS -> SALES ->
ORDERS to cancel an order. 2 Select the quote or order. 3 Click Cancel. The CANCEL THE QUOTE (or CANCEL THE ORDER) pane appears. 4 Fill in the following relevant information if available (which might be useful for future decisions):
o Name of the print provider to whom you have lost the business. o Price at which the other print provider won the order.
5 Type any additional relevant information in the Quote Internal Note box. 6 Click Save.
NOTE:
• A quote that has already been converted into an order cannot be canceled. • When an order is canceled, jobs from this order will be removed from the Print Service Provider
queues. • The competitor's name, price and internal note can be viewed in the HISTORY tab of the Quote or
Order screen. For details, see Viewing Quote and Order History (on page 249).
Handling Follow-up Activities for Quotes and Orders Concepts Many, if not most, business transactions cannot be completed in a single action from start to finish. Often, follow-up activities are required. Examples: • If after a predetermined amount of time the customer has still not responded to your quote, you should
check whether to proceed with the order. To remind you to follow-up with the customer, the Activities
Web Services Order Center User Guide
248 FreeFlow Web Services
feature automatically creates a follow-up activity when you provide a quote. • If a designer makes a change in a job’s design, you might need to modify the job’s pricing or
scheduling. The Activities feature automatically alerts you to design changes so that you can check if pricing or scheduling changes are needed.
• If you need to contact or schedule a meeting with a customer, you can use the Activities feature to remind you to make the contact or set up the meeting.
As the above examples illustrate, there are two types of activities: • Automatically generated and scheduled activities.
o Change in order – an activity that is generated when a designer marks a change in job or order in the artwork queue. For more information, see The Artwork Queue (on page 262).
o Follow-up phone call - an activity that is generated when a Follow-up date is defined in a quote or an order. Note: In new quotes, the system automatically assigns a follow-up date. You can change this date, which will affect the activity.
• Manually created (ad-hoc) activities that you create according to need.
Viewing and Handling Quote and Order Activities The steps in this procedure describe how to view and handle quote activities. 1 Navigate to ACCOUNTS -> ACTIVES. 2 Select the Account in the drop-down list. 3 Filter the displayed activities as needed, as follows:
a Specify filtering criteria based on status, date type (Start, Due) and period, and person assigned to the activity.
b Select the activities to include by enabling the relevant check boxes (Account, Quotes and/or Orders).
c Click Search. The filtered list of activities is displayed in the window.
4 Do any of the following in the Activities window: o To create a new activity from scratch, click New. The NEW ACTIVITY dialog box opens. The
activity parameters are set to the default values, where appropriate. o To duplicate an existing activity, select the activity and click Duplicate. The DUPLICATE
ACTIVITY dialog box displays the duplicated details of the activity (these are basically the same details that are displayed for the selected activity record in the Activity window). Note that System activities (like next follow up) can’t be duplicated.
o To edit an existing activity, select the activity and click Edit. The EDIT ACTIVITY dialog box displays the details of the activity (these are basically the same details that are displayed for the selected activity record in the Activity window). Note that only uncompleted activities can be edited.
5 Fill in or modify the details of the activity as needed. Note the following important points and hints: o You can edit the list of available activity types:
i Click Edit List. The ACCOUNT ACTIVITY TYPE dialog box opens. ii Add, edit, or remove the items in the list. iii Click Save. The dialog box is closed and the list updated.
o By adjusting the priority value and then sorting on priority, you can view the most important activities first.
o You can adjust the % COMPLETE values and the due date according to need, to make the information more accurate and valuable.
o You can adjust the status according to subsequent follow-up results: a Click Change Status. b In the Change Status dialog box, select the appropriate status (Active, On Hold, Complete, or
Cancelled).

Invoicing and Billing
Print Service Provider User Guide 249
c Specify a reason (or other relevant information) for making the change. d Click OK.
6 When you are done editing the activity, click OK in the EDIT ACTIVITY dialog box.
Viewing Quote and Order History You can view a list of the stages, to date, in the life cycle of a quote or order. 1 Navigate to ACCOUNTS -> SALES -> QUOTES. The SALES - QUOTES window opens and displays all
Open quotes. For an explanation of statuses, see Understanding Quote/Order Statuses and Icons (on page 244).
NOTE: The steps in this procedure describe how to view the history of a quote. To view the history of an order, perform these steps in the SALES - ORDERS window (ACCOUNTS > SALES > ORDERS). The SALES - ORDERS and SALES - QUOTES windows are almost identical.
2 Select the Account in the drop-down list. 3 If helpful, filter the display. 4 Select the quote in the SALES - QUOTES list. 5 Select the History tab to view the list of the stages in the quote’s life cycle.
To view the details of a particular stage, click the button in the DETAILS column for that stage. The ACTIVITY DETAILS dialog box opens and displays the Activity description. When done viewing the details, click the Close button in the Activity Details dialog box.
NOTE: Any action in the Quote or Order History tab is written in the same language the user was logged in with while performing this action.
Invoicing and Billing The Billing module of Web Services Order Center enables you to generate and manage the billing documents. This module provides: • Separate screens, under ACCOUNTS -> BILLING, for generating and handling invoices, receipts, credit
notes, and deposits, at the account level. • The BILLING MANAGER screen (TASKS -> BILLING) that provides a single entry point for monitoring and
intervening in billing issues for any account. This screen and its usage is described in Managing Your Business And Production (on page 259).
This chapter provides instructions for performing the following tasks: • Handling Deposits (on page 249) • Handling Invoices (on page 252) • Handling Credit Notes (on page 254) • Handling Receipts (on page 257)
Handling Deposits A deposit is a partial payment for an order, made by the customer in advance before commencing work on a job, and is therefore linked to a specific order. Because it is possible to make several advance payments, multiple deposits can be linked to a single order.
Deposits for an account are handled in the Deposits screen. The screen contains two panes: • The left pane lists the deposits for the account. By default, only the draft deposits are listed and the list
is sorted by issue date, in ascending order. The list can also be sorted by each of the data types by clicking the corresponding column header.
• The right pane lists information about the selected deposit. It contains two tabs: o General tab—lists general information such as contact person and billing address. o Details tab—displays key details specific to the particular deposit. This includes order number,
The linked image cannot be displayed. The file may have been moved, renamed, or deleted. Verify that the link points to the correct file and location.

Web Services Order Center User Guide
250 FreeFlow Web Services
total order amount, and the existing confirmed deposit amount.
This section contains the following procedures: • Opening the Deposits screen and Displaying Deposits (on page 250) • Creating or Editing a Deposit (on page 250) • Confirming a Draft Deposit (on page 251) • Canceling a Deposit (on page 251) • Printing a Deposit (on page 251)
Opening the Deposits screen and Displaying Deposits 1 Open the Deposit screen as follows:
a Navigate to ACCOUNTS -> BILLING -> DEPOSITS. b Select the account in the dropdown list.
2 To filter the list by any combination of status, name of CSR who created the deposit, issue dates, or value dates, select values for any combination of the following and then click Search: o From the STATUS drop-down list, select the status of the deposits. o From the CREATED BY drop-down list, select the name of the CSR. o From the DATE drop-down list, select the type of date (issue date, value date) by which you want
to filter the list. o From the SELECT DATE drop-down list, select a predefined date range, or supply a date range for
the search in the From and To fields (manually or using the calendar). 3 To search for a specific deposit with a known number, fill in the DEPOSIT # and click Search. 4 To clear the search results and display the entire list of deposits, click Reset.
Creating or Editing a Deposit You can create new deposits and edit draft deposits for committed orders only. A deposit cannot be edited if the order is already a part of a draft or confirmed invoice. 1 In the DEPOSIT screen, do either of the following:
o To create a new deposit, click Create New under the list of deposits. The NEW DEPOSIT dialog box opens.
o To edit an existing draft deposit, select the deposit and click Edit under the deposit details pane. The EDIT DEPOSIT dialog box opens. You cannot edit a confirmed deposit; if a confirmed deposit is incorrect, you can cancel it, and then define a new, correct deposit.
2 In the GENERAL tab of the NEW DEPOSIT (or EDIT DEPOSIT) dialog box, enter information in the editable fields. a Change the default account billing address and contact person information, if required, by clicking
on the Billing Address link. A dialog box appears allowing the selection of a different user of the account.
b Fill in any extra information: Internal Note for internal use only. Customer's Note that will appear on the deposit printout to the customer.
3 Select the Details tab. 4 For a new deposit (or to correct the order), click Select Order. The SELECT ORDERS dialog box
appears. a Find and select the order. Only committed orders that have not been invoiced will be displayed
(clicking an order number link will open a dialog box with the order details for viewing only, and changes should not be made from this screen).
b Click OK. The dialog box closes and the order information appears in the INSERT DEPOSIT dialog box. The total will be updated with the selected order's amount and any previous deposit amount
Invoicing and Billing
Print Service Provider User Guide 251
(if any - else 0). 5 To add or edit payments:
a Click Add Payment, or select the payment and click Edit Payment. The PAYMENTS dialog box opens.
b Select the form of payment. The dialog box contents change for each method of payment. c Fill in the details and amounts, as required. If the payment type is Credit Card or Debit Card, and
payment is being made in more than one installment, use the Installment button to open a dialog box where you can enter the required information.
d Click OK. The dialog box closes and the payment is added to the list.
NOTE: The payment screens have no interface to online payment gateways.
6 Type the total payments amount in the Total Amount text box. Payment must be greater than 0 and less than or equal to the order total minus all previous deposits (if any). o If required, edit the selected payment line information using the Edit Payment button. o If required, remove the selected payment(s) from the table using the Delete Payment button.
7 Save the deposit as follows: o To save as a draft deposit, click OK. o To save as a confirmed deposit, click Confirm.
Confirming a Draft Deposit 1 Select the draft deposit. 2 Click the Confirm button. 3 In the confirmation prompt warning that the deposit will not be editable, click Yes. The message dialog
box is closed and the status of the deposit is changed to CONFIRMED.
NOTE: Confirmed deposits cannot be edited. If you find a mistake in a confirmed deposit, cancel the deposit and create a new deposit in its place.
Canceling a Deposit 1 Select the deposit. 2 Click the Cancel Deposit button. 3 In the confirmation prompt, click Yes. 4 In the dialog box that opens requesting the reason for the cancelation, enter the information in the
Reason field and click OK.
NOTE: A deposit for an invoiced order cannot be canceled.
Printing a Deposit 1 Select the deposit. 2 Click the Print button. The Send Document dialog box opens. 3 Click the link to open the deposit for editing / printing or click the Send Email button.
NOTE: • The email will be sent to the email Billing address displayed on the General Tab. • The deposit will either be attached as a Microsoft Word doc or as a PDF file - as defined in the
CRM settings (SYSTEM SETUP -> ADVANCED -> CRM).
Web Services Order Center User Guide
252 FreeFlow Web Services
Handling Invoices An invoice is a request for payment for orders produced within the system. Invoices for an account are handled in the Invoices screen. The screen contains two panes: • The left pane lists the invoices for the account. By default, only the draft invoices are listed and the list
is sorted by issue date, in ascending order. The list can also be sorted by each of the data types by clicking the corresponding column header.
• The right pane lists information about the selected invoice. It contains two tabs: o General tab—lists general information such as contact person and billing address. o Details tab—displays key details specific to the particular invoice.
The key details specific to the invoice are displayed in the Details tab. The Details tab includes the following: • A list of the orders to be paid—order lines are links. Clicking an order number link opens a dialog box
with the order details. Note that the order window is for viewing only, and changes should not be made from this screen.
• Any manually added lines (components that are not linked to an order but have a value that will influence the invoice total). The manual lines do not have an order number.
• A price breakdown that also includes: o TOTAL CREDIT NOTES amount line—if credit notes exist for the invoice, the Total Credit Notes
amount becomes an active link. Clicking the link opens the CREDIT NOTES window in a dialog box, for viewing credit note information for this invoice.
o TOTAL DEPOSITS amount line—if a deposit exists for the connected order, the Total Deposits amount becomes an active link. Clicking the link opens the DEPOSITS window in a dialog box, for viewing deposit information for the order(s) in this invoice.
This section contains the following procedures: • Opening the Invoices Screen and Displaying Invoices (on page 253) • Creating or Editing an Invoice (on page 253) • Confirming a Draft Invoice (on page 254) • Canceling an Invoice (on page 254) • Issuing a Credit Note (on page 254) • Printing an Invoice (on page 254)
Opening the Invoices Screen and Displaying Invoices 1 Open the Invoice screen as follows:
a Navigate to ACCOUNTS -> BILLING -> INVOICES. b Select the account in the dropdown list.
2 To filter the list by any combination of status, name of CSR who created the invoice, issue dates, or value dates, select values for any combination of the following and then click Search: o From the STATUS drop-down list, select the status of the invoices. o From the CREATED BY drop-down list, select the name of the CSR. o From the DATE drop-down list, select the type of date (issue date, value date) by which you want
to filter the list. o From the SELECT DATE drop-down list, select a predefined date range, or supply a date range for
the search in the From and To fields (manually or using the calendar). 3 To search for a specific invoice with a known number, fill in the INVOICE # and click Search. 4 To clear the search results and display the entire list of invoices, click Reset.
Invoicing and Billing
Print Service Provider User Guide 253
Creating or Editing an Invoice 1 In the INVOICE screen, do either of the following:
o To create a new invoice, click Create New under the list of invoices. The NEW INVOICE dialog box opens.
o To edit an existing draft invoice, select the invoice and click Edit under the invoice details pane. The EDIT INVOICE dialog box opens. You cannot edit a confirmed invoice; if a confirmed invoice is incorrect, you can cancel it, and then define a new, correct invoice.
2 In the GENERAL tab of the NEW INVOICE (or EDIT INVOICE) dialog box, enter information in the editable fields. a Change the default account billing address and contact person information, if required, by clicking
on the Billing Address link. A dialog box appears allowing the selection of a different user of the account.
b Fill in any extra information: Internal Note for internal use only. Customer's Note that will appear on the invoice printout to the customer.
3 Select the Details tab. 4 Add order(s) to the invoice as follows:
a Click the Select Orders button. The SELECT ORDERS dialog box appears, listing all the committed (online and offline) orders that have not been invoiced for the account. The list does not include any orders that are already connected to a draft invoice.
b If necessary, filter the orders using the search feature. The listed orders display the following information: Order number, description, creation date, total, total deposits for the order, amount left to pay on the order, shipped status of the order and whether the order was placed online or by a CSR (clicking an order number link will open a dialog box with the order details for viewing only, and changes should not be made from this screen).
c Select the check boxes next to the orders to be included in the invoice and click OK. The SELECT ORDERS dialog box closes, and the selected orders appear in the NEW INVOICE dialog box. The invoice total is also recalculated.
5 If required, add a new price component to the total amount of the selected invoice draft (e.g. an item or service such as art design that cannot be ordered through Web Services but needs to be charged for): a Click the Add Manual Line button. b Enter the information in the editable fields of the SET MANUAL LINE dialog box. This can include a
description, amount excluding tax, discount amount or percentage, and tax amount. c Click OK. The new line appears in the NEW INVOICE dialog box, and the invoice total is
recalculated. 6 To remove orders or manual lines from the invoice draft, select the item and click the Remove button.
Then click Yes to confirm. The selected line is removed from the invoice, and the invoice total is recalculated.
7 To set a discount for a component in the invoice draft: a Select the line in the invoice component list and click the Set Discount button. An appropriate
dialog box opens allowing the user to enter the discount for the selected line. b Type the discount description. c Enter the discount value or percentage. d Click OK. The dialog box is closed, the corresponding data in the selected line is changed, and
the invoice total is recalculated. 8 To set a discount for the entire invoice, enter a percentage in the DISCOUNT text box 9 To manage the credit notes for this invoice, click the TOTAL CREDIT NOTES link to open the CREDIT
NOTES screen. The link is only available if at least one credit note exists for one of the orders to be invoiced. For more information on creating and editing credit notes, see Handling Credit Notes (on page 254).

Web Services Order Center User Guide
254 FreeFlow Web Services
10 To manage the deposits for this invoice, click the TOTAL DEPOSITS link to open the DEPOSITS screen. The link is only available if at least one deposit exists for one of the orders to be invoiced. For more information on creating and editing deposits, see Handling Deposits (on page 249).
11 To save the invoice as a draft, click OK; to save the invoice as a confirmed invoice, click Confirm.
Confirming a Draft Invoice 1 Select the draft invoice. 2 Click the Confirm button. 3 In the confirmation prompt warning that the invoice will not be editable, click Yes. The message dialog
box is closed and the status of the invoice is changed to CONFIRMED.
NOTE: Confirmed invoices cannot be edited. If you find a mistake in a confirmed invoice, cancel the invoice and create a new invoice in its place.
Canceling an Invoice Only invoices in Draft or Confirmed status can be canceled. For invoices in any other status the Cancel Invoice button is disabled. 1 Select the invoice. 2 Click the Cancel Invoice button. 3 In the confirmation prompt, click Yes. 4 In the dialog box that opens requesting the reason for the cancelation, enter the information in the
Reason field and click OK.
NOTE:
• Canceling an invoice also cancels all the credit notes issued for that invoice. • If the canceled invoice was a confirmed invoice, a new credit note is created with
an amount equal to the amount of the canceled invoice, and it is linked to the canceled invoice. This is done for balancing the books.
Issuing a Credit Note Credit Notes are linked to specific invoices. You can only issue a Credit Note for an invoice with a CONFIRMED or PARTIALLY PAID status. See Handling Credit Notes (on page 254) for more information. 1 Select the invoice. 2 Click the Issue Credit Note button. The NEW CREDIT NOTE dialog box opens. 3 Fill in the necessary information. The number of the selected invoice is displayed in the Issued for
Invoice # field of the DETAILS page. 4 Click OK to save the draft credit note for the selected invoice; or click Confirm to save the draft and
convert it to a confirmed credit note.
Printing an Invoice 1 Select the invoice. 2 Click the Print button. The Send Document dialog box opens. 3 Click the link to open the invoice for editing / printing or click the Send Email button.
NOTE: • The email will be sent to the email Billing address displayed on the General Tab. • The invoice will either be attached as a Microsoft Word doc or as a PDF file - as defined in the
CRM settings (SYSTEM SETUP -> ADVANCED -> CRM).
Handling Credit Notes A credit note is a billing document issued to a customer in order to record the reduction of an invoice

Invoicing and Billing
Print Service Provider User Guide 255
because of a discount, product return or cancelation. • Credit notes are linked to an invoice, influencing the invoice balance to be paid. The invoice is linked
to a receipt. The credit note amounts are displayed in the receipt. • Multiple credit notes can exist for an invoice. When creating a receipt for an invoice with a linked credit
note, the total amount to pay will be: Total to Pay = Invoice Total - Credit Notes
Credit Notes for an account are handled in the Credit Notes screen. The screen contains two panes: • The left pane lists the credit notes for the account. By default, only the draft credit notes are listed and
the list is sorted by issue date, in ascending order. The list can also be sorted by each of the data types by clicking the corresponding column header.
• The right pane lists information about the selected credit note. It contains two tabs: o General tab—lists general information such as contact person and billing address. o Details tab—displays key details specific to the particular credit note. The credit note details
contain information on the connected invoice, the credit note amount and tax.
This section contains the following procedures: • Opening the Credit Notes Screen and Displaying Credit Notes (on page 255) • Creating or Editing a Credit Note (on page 255) • Confirming a Draft Credit Note (on page 256) • Canceling a Credit Note (on page 256) • Printing a Credit Note (on page 256)
Opening the Credit Notes Screen and Displaying Credit Notes 1 Open the Credit Note screen as follows:
a Navigate to ACCOUNTS -> BILLING -> CREDIT NOTES. b Select the account in the dropdown list.
2 To filter the list by any combination of status, name of CSR who created the credit note, issue dates, or value dates, select values for any combination of the following and then click Search: o From the STATUS drop-down list, select the status of the credit notes. o From the CREATED BY drop-down list, select the name of the CSR. o From the DATE drop-down list, select the type of date (issue date, value date) by which you want
to filter the list. o From the SELECT DATE drop-down list, select a predefined date range, or supply a date range for
the search in the From and To fields (manually or using the calendar). 3 To search for a specific credit note with a known number, fill in the CREDIT NOTE # and click Search. 4 To clear the search results and display the entire list of credit notes, click Reset.
Creating or Editing a Credit Note Only users with System Administrator or Manager Advanced user type privileges can create or edit credit notes, and only draft credit notes that are connected to a confirmed but not yet paid invoice can be edited. 1 In the CREDIT NOTE screen, do either of the following:
o To create a new credit note, click Create New under the list of credit notes. The NEW CREDIT NOTE dialog box opens.
o To edit an existing draft credit note, select the credit note and click Edit under the credit note details pane. The EDIT CREDIT NOTE dialog box opens. You cannot edit a confirmed credit note; if a confirmed credit note is incorrect, you can cancel it, and then define a new, correct credit note.
2 In the GENERAL tab of the NEW CREDIT NOTE (or EDIT CREDIT NOTE) dialog box, enter information in the editable fields. a Change the default account billing address and contact person information, if required, by clicking

Web Services Order Center User Guide
256 FreeFlow Web Services
on the Billing Address link. A dialog box appears allowing the selection of a different user of the account.
b Fill in any extra information: Internal Note for internal use only. Customer's Note that will appear on the credit note printout to the customer.
3 Select the Details tab. 4 Click the Select Invoice button. The SELECT INVOICE dialog box opens.
a Select the invoice. Only invoices with the following status will be displayed: Confirmed, Partially Paid or invoices with a Draft credit note.
b Click OK. The dialog box closes; the invoice number appears in the credit note details. 5 Enter an amount for the credit note and set the tax. The amount must be more than zero and less than
or equal to the amount left to pay on the invoice. 6 Save the credit note as follows:
o To save as a draft credit note, click OK. o To save as a confirmed credit note, click Confirm.
Confirming a Draft Credit Note Only authorized users (users with System Administrator or Manager Advanced user type) can confirm a draft credit note. 1 Select the draft credit note. 2 Click the Confirm button. 3 In the confirmation prompt warning that the credit note will not be editable, click Yes. The message
dialog box is closed and the status of the credit note is changed to CONFIRMED.
NOTE: Confirmed credit notes cannot be edited. If you find a mistake in a confirmed credit note, cancel the credit note and create a new credit note in its place.
Once the credit note is confirmed, the Left to Pay total for the invoice is updated.
Canceling a Credit Note Only authorized users (users with System Administrator or Manager Advanced user type) can cancel a credit note. 1 Select the credit note. 2 Click the Cancel Credit Note button. 3 In the confirmation prompt, click Yes. 4 In the dialog box that opens requesting the reason for the cancelation, enter the information in the
Reason field and click OK.
NOTE: • Credit notes that are connected to an invoice that was paid cannot be canceled. • If the canceled credit note was a confirmed credit, a new credit note is created with a negative
amount equal to the amount of the canceled credit note. This is done for balancing the books.
Printing a Credit Note 1 Select the credit note. 2 Click the Print button. The Send Document dialog box opens. 3 Click the link to open the credit note for editing / printing or click the Send Email button.
NOTE: • The email will be sent to the email Billing address displayed on the General Tab. • The credit note will either be attached as a Microsoft Word doc or as a PDF file - as defined in the
CRM settings (SYSTEM SETUP -> ADVANCED -> CRM).

Invoicing and Billing
Print Service Provider User Guide 257
Handling Receipts Receipts are issued in response to payments made. Receipts for an account are handled in the Receipts screen. The screen contains two panes: • The left pane lists the receipts for the account. By default, only the draft receipts are listed and the list
is sorted by issue date, in ascending order. The list can also be sorted by each of the data types by clicking the corresponding column header.
• The right pane lists information about the selected receipt. It contains two tabs: o General tab—lists general information such as contact person and billing address. o Details tab—displays key details specific to the particular receipt.
The key details specific to the receipt are displayed in the Details tab. This tab displays: • Invoices included in the receipt—these are links and clicking the invoice number link opens a dialog
box with the invoice details - for display only. • Confirmed credit note total for an invoice—this amount is shown in the Invoices table. • Total amount of the receipt. • Total credit notes. • Amount and type of each payment. • Total payments.
Receipts: • can be issued for one or multiple invoices. • can be issued for a payment covering the full balance of the invoices or a partial payment. • can contain one or multiple payments with different payment forms. • can be paid using various payment methods. In case of credit card, it can be divided into several
installments.
Examples
The following examples present the most simple receipt scenario and a complex one. • Simple Receipt—A receipt is issued for one invoice; one payment is made for the full amount. • Multiple invoices and multiple payments receipt—A receipt is issued for two invoices; two payments
are made, in cash and with a credit card; the payments are for a partial amount. When payments are made for a partial amount and there is more than one invoice, you can decide how to divide the payment between the invoices. In this example, the first invoice was accredited full payment, and the left-over payment was accredited to the second invoice.
This section contains the following procedures: • Opening the Receipts Screen and Displaying Receipts (on page 257) • Creating or Editing a Receipt (on page 258) • Confirming a Draft Receipt (on page 259) • Canceling a Receipt (on page 259) • Viewing the Details of an Invoice in the Receipt (on page 259) • Printing a Receipt (on page 259)
Opening the Receipts Screen and Displaying Receipts 1 Open the Receipt screen as follows:
a Navigate to ACCOUNTS -> BILLING -> RECEIPTS. b Select the account in the dropdown list.
2 To filter the list by any combination of status, name of CSR who created the receipt, issue dates, or value dates, select values for any combination of the following and then click Search: o From the STATUS drop-down list, select the status of the receipts.
Web Services Order Center User Guide
258 FreeFlow Web Services
o From the CREATED BY drop-down list, select the name of the CSR. o From the DATE drop-down list, select the type of date (issue date, value date) by which you want
to filter the list. o From the SELECT DATE drop-down list, select a predefined date range, or supply a date range for
the search in the From and To fields (manually or using the calendar). 3 To search for a specific receipt with a known number, fill in the RECEIPT # and click Search. 4 To clear the search results and display the entire list of receipts, click Reset.
Creating or Editing a Receipt 1 In the RECEIPT screen, do either of the following:
o To create a new receipt, click Create New under the list of receipts. The NEW RECEIPT dialog box opens.
o To edit an existing draft receipt, select the receipt and click Edit under the receipt details pane. The EDIT RECEIPT dialog box opens. You cannot edit a confirmed receipt; if a confirmed receipt is incorrect, you can cancel it, and then define a new, correct receipt.
2 In the GENERAL tab of the NEW RECEIPT (or EDIT RECEIPT) dialog box, enter information in the editable fields. a Change the default account billing address and contact person information, if required, by clicking
on the Billing Address link. A dialog box appears allowing the selection of a different user of the account.
b Fill in any extra information: Internal Note for internal use only. Customer's Note that will appear on the receipt printout to the customer.
3 Select the Details tab. 4 Add an invoice to the receipt as follows:
a Click the Select Invoices button. The SELECT INVOICES dialog box appears. Only confirmed invoices that have not been fully paid are displayed.
b If necessary, filter the invoices using the search feature. c Select the check boxes next to the invoice(s) to be included and click OK. The SELECT INVOICES
dialog box closes. The invoices now appear in the INSERT RECEIPT dialog box and also include the following information: o LEFT TO PAY shows the current amount left for payment on the invoice - this is the invoice amount
less credit notes, deposits and previous receipts (if any). o PAID AMOUNT by default contains the same amount as LEFT TO PAY. If the payment amount is less
than this amount (see below) then this field must be manually updated to the paid amount. 5 To remove an invoice, select it and click Remove line. 6 To add or edit payments:
a Click Add Payment, or select the payment and click Edit Payment. The PAYMENTS dialog box opens.
b Select the form of payment. The dialog box contents change for each method of payment. c Fill in the details and amounts, as required. If the payment type is Credit Card or Debit Card, and
payment is being made in more than one installment, use the Installment button to open a dialog box for entering the required information.
d Click OK. The dialog box closes and the payment is added to the list.
NOTE: The payment screens have no interface to online payment gateways.
7 If the payment amount does not cover the full amount left to pay on the invoice(s), type the paid amount per invoice in the Paid Amount text box.
8 (Optional) Enter a positive or negative Rounding Value to generate a Rounded Total.

Managing Your Business and Production
Print Service Provider User Guide 259
9 To save as a draft receipt, click OK. The dialog box closes. The status of all the invoices included in the draft receipt and of all the credit notes linked to the draft receipt is changed to LINKED TO DRAFT RECEIPT.
Confirming a Draft Receipt 1 Select the draft receipt. 2 Click the Confirm button. 3 In the confirmation prompt warning that the receipt will not be editable, click Yes. The message dialog
box is closed and the status of the receipt is changed to CONFIRMED.
NOTE: Confirmed receipts cannot be edited. If you find a mistake in a confirmed receipt, cancel the receipt and create a new receipt in its place.
The statuses of all the invoices included in the receipt are changed to PAID or PARTIALLY PAID, depending on the amount paid.
Canceling a Receipt Only authorized users (users with the System Administrator or Manager Advanced user type) can cancel a receipt: 1 Select the receipt. 2 Click the Cancel Receipt button. 3 In the confirmation prompt, click Yes. 4 In the dialog box that opens requesting the reason for the cancelation, enter the information in the
Reason field and click OK.
The statuses of all the invoices included in the receipt, will be updated as follows: • If the invoice does not have another receipt it will be changed to Confirmed status. • If there is another confirmed receipt for this invoice it will be changed to Partially Paid status.
Viewing the Details of an Invoice in the Receipt 1 Select the receipt. 2 Select the Details tab. 3 Click the Invoice link. A dialog box displays the Invoice details.
Printing a Receipt 1 Select the receipt. 2 Click the Print button. The Send Document dialog box opens. 3 Click the link to open the receipt for editing / printing or click the Send Email button.
NOTE: • The email will be sent to the email Billing address displayed on the General Tab. • The receipt will either be attached as a Microsoft Word doc or as a PDF file - as defined in the
CRM settings (SYSTEM SETUP -> ADVANCED -> CRM).
Managing Your Business and Production This chapter describes various tasks performed using Web Services Order Center. Many of these tasks utilize the functionality described in the earlier chapters of this guide, but Web Services Order Center also provides several more screens to help simplify a number of these management tasks. Some these screens are queue screens accessed from the TASK option in the main menu, where Web Services Order Center offers a number of improvements in the Business-to-Production flow, including the following: • Jobs are automatically sent to the Production queue after the order has been committed.

Web Services Order Center User Guide
260 FreeFlow Web Services
• When a Job needs to be revised (following user confirmation of the request to revise), the Job is withdrawn from the Production or Delivery queues (if already located there).
• Jobs can now be approved for production without an attached file. • Users can now select the target file that is to be printed from among existing files.
This chapter covers the following topics: • The Dashboard (on page 260) for viewing account data at a glance — generally performed by the
CSR. • The Commercial Queue (on page 261) for monitoring open quotes and orders — generally performed
by the CSR. • The Artwork Queue (on page 262) for handling jobs that are not ready for production — generally
performed by the designer. • The Activities Screen (on page 266) for managing an account’s activities — generally performed by
the CSR. • The Billing Manager (on page 266) for managing the billing process — generally performed by
administrative personnel.
The Dashboard The Dashboard is best used as an entry point to managing accounts and viewing all the relevant account business data at a glance. Reviewing account data on a frequent basis can make it much easier to keep the customer satisfied.
Print Service Provider users must have Manager, Manager Advanced or Administrator privileges to have access to the Dashboard screen.
There are several important reasons for reviewing account business data: • To ensure that everything is fine with an account. For example:
o To ensure that orders and jobs are handled quickly. o To determine if any follow-up activities are required, and ensure that they get performed. o To identify any outstanding issues or problems, and ensure that they do not "fall between the
cracks." • To help in pre-sales preparation. For example, before providing a quote to a customer, it might be
useful to check the customer’s account history. Checking the history might help you decide: o how fast you should respond to the request for quotation. o what kind of payment terms and price to quote.
To review account data in the Dashboard 1 Navigate to ACCOUNTS -> DASHBOARD. The Dashboard screen contains the following panes:
o Account list pane —from which you select the account to whose data you want to view. o Account Business Details pane—displays details and links to other details, for the account you
selected. 2 To filter the account list or search for an account, do the following"
a In the SEARCH FOR ACCOUNTS text box, enter an account name (partial or complete). b In the GROUP list, select which groups to search. c Click Search; the relevant name(s) appear(s) in the list. (You can click Reset to restore the complete list of accounts.)
3 Select the account. The details of the account are displayed in the Account Business Details pane. This pane contains the following sections that provide key information about the account at a glance: o INFORMATION AND ACTIONS—this section contains:
Totals for commonly requested data, and links to access the windows where that data is
Managing Your Business and Production
Print Service Provider User Guide 261
normally displayed. For example, the Quote Drafts link displays the number of Quote Drafts (for the account), and provides direct access to those quote drafts in the QUOTES screen (as if you selected ACCOUNTS -> SALES -> QUOTES and then selected Drafts as the TYPE filter).
Buttons to perform common actions (create new quotes and add new activities). Summary and pie chart indicating the Web orders and Offline orders for the month.
o STATISTICS—displays (for the account) the number of quotes and orders and their total prices, for a time period you select (month, quarter, year), and compares these figures to quotes and orders for the same time period last year.
o CONTACT PERSON—displays the contact details of the contact in the Print Buyer’s organization. o NOTES—allows you to enter, save, and view at a glance, important notes regarding the account.
4 For shortcut access to a type of item that requires intervention in the appropriate screen (for example, to access Quote Drafts in the QUOTES screen), click the appropriate link in the INFORMATION AND ACTION section.
The following table lists the shortcut links, the screens that those links open, and the lists displayed in the opened screens.
Shortcut Links in the Dashboard
Link Screen Opened List displayed
Quote Drafts Sales- Quotes Filtered list of draft quotes
Overdue Activities Activities Filtered list of overdue activities
Expired Quotes Sales - Quotes Filtered list of expired quotes
Unread Messages Commercial queue Unread messages on quotes from the selected account
Jobs in Production Production queue All the jobs in the Production queue
Not Billed Orders Sales - Orders Filtered list of committed orders
Invoice Drafts Billing - Invoices Filtered list of draft invoices
1 To perform one of the following actions for the account, click the appropriate button: o To create a new quote, click Create New Quote. (Alternatively, you can perform this action in the
Quotes screen). For instruction on filling in quote details, see Creating a Simple Quote (on page 237).
o To add a new activity, click Add New Activity. (Alternatively, you can perform this action in the Activities screen). For instructions on filling in activity details, see The Activities Screen (on page 266).
2 To view quote and order statistics for a particular time period, select the time period in the drop down list in the STATISTICS section.
3 To add a note concerning the account, type the note in the NOTES text box and click Save.
The Commercial Queue Although you can view and handle quotes in the SALES - QUOTES window, and orders in the SALES - ORDERS window, the Commercial Queue provides a single location for handling quotes and orders for all accounts. The COMMERCIAL window provides: • Access to all the quotes and orders in the system. • The ability to perform tasks on quotes and orders. • Access to overdue account level activities.
As with the SALES - QUOTE and SALES - ORDER screens, the Commercial Queue contains two panes. The left pane lists the open quotes and orders, and the right pane displays the details of the selected quote or order.

Web Services Order Center User Guide
262 FreeFlow Web Services
• the Commercial window allows you to filter and specify selection criteria for listed quotes and orders • the details pane displays the same information and allows you to perform the same actions.
To Handle Open Quotes and Orders in the Commercial window 1 Navigate to TASKS -> COMMERCIAL.
By default, the Commercial Queue displays all quotes and orders having one of the various Open statuses, as well as overdue account level activities. Open statuses include the FOLLOW-UP, EXPIRED, DRAFTS, and UNREAD MESSAGES statuses.
2 (Optional) Filter the displayed items as follows: o Specify a Status in the dropdown box. o Specify the responsible CSR in the dropdown box. o Search for a specific quote/order/job number by selecting the item type, filling in the number and
then clicking on the Search button. 3 Select the quote or order to be handled. All relevant details and parameters are displayed in the
adjacent details pane. 4 Handle the quote or order as you would in the SALES - QUOTE window or the SALES - ORDER window.
(The functionality of these pages is the same as in the QUOTES and ORDERS in the SALES window, depending on the quote/order status. For details regarding the functionality of these windows, see Section 3 Handling Sales.)
The Artwork Queue Concepts Jobs that are not ready for production arrive in the ARTWORK queue. This generally occurs in the following cases. • A job in a committed order has no production file. • A Print Buyer orders a job online without uploading a print file.
Use the ARTWORK queue screen to manage the jobs that require some work before they can be sent to production. These jobs can generally be made ready for production in one of the following ways. • At the request of the Print Buyer, the Print Service Provider can create or design the production file
and then get it approved by the Print Buyer. • The Print Buyer can supply the production file (as might normally be done before the order has been
committed).
The ARTWORK window contains two panes: • List – includes all the jobs that require handling before they can be sent to production. • Job details – displays the detailed information for the selected job and a tool bar with options for
handling the job.
List pane
Jobs in the Artwork list are sorted according to the sequence of job arrival, with new jobs added to the bottom of the list. The following information appears for every job in the queue: job thumbnail (the thumbnail will be empty if there is no production file), job number and name, number of ordered copies, shipping date, account name, order change status, and soft proof status.
Functional icons and buttons of the ARTWORK queue allow you to search for any job in the artwork phase, to upload and download print files, to send a job to production when the artwork is ready, to send a job to a soft proof, and, in case a job was printed externally, to move the job from the ARTWORK queue directly to DELIVERY, skipping the production.
Job details pane
When a job is selected in the list, the job information appears in the right pane: • Job alerts – initially displays the No Production File icon while the job has no file attached. After a file

Managing Your Business and Production
Print Service Provider User Guide 263
has been added, additional alerts may be displayed regarding preflight problems, font problems, etc. For more information about alerts, see the chapter discussing Production, in the Print Service Provider User Guide.
• Details of the selected job. • Details for the order that contains the selected job: order number (linked to the order), number of jobs
in order, account name, price, order date and shipping date.
NOTE: The Order # link is for viewing the order's information only; no editing of the order should be applied at this stage. To edit the order, navigate to ACCOUNTS -> SALES -> ORDERS.
Tasks Handled in the Artwork Queue You can perform the following tasks in the Artwork queue: • Managing Production Files (on page 263) • Managing Follow-up Activities for Order And Job Changes (on page 265) • Moving Jobs from the Artwork Queue to Other Queues (on page 266)
Managing Production Files This section contains covers the following topics: • Handling File Attachments (on page 263) • Sending And Confirming Soft Proofs (on page 264)
Handling File Attachments You can upload, download and attach files to a job, and view, modify or replace the files that are attached to a job. The files can be copied to any other location or placed in any folder, using standard Windows Explorer procedures.
In some cases, a designer might want to download files to a local computer to do the design work, and then upload the files back to the system when the design work is done.
The steps in this procedure describe how use the ATTACHMENTS dialog box to upload, download, and attach files, and how to mark files for production. The Mark for Production functionality performs a preflight, creates a preview and thumbnail, and when you close the dialog box, updates the thumbnail in the list.
In the ATTACHMENTS dialog box, a file’s status is indicated with the following icon: — the file is ready for production
To handle file attachments 1 Navigate to TASKS -> ARTWORK. The ARTWORK window is displayed. You can filter the display. 2 Select the job.
3 In the details pane, click the Attachments icon ( ). The ATTACHMENTS dialog box opens and displays currently uploaded files.
4 To upload additional files to the list of files: a Click the Upload Files button. The UPLOAD FILE dialog box opens. b Ensure Upload a Single file is selected, and click Browse. The CHOOSE FILE dialog box opens.
NOTE: There is an option to upload multiple files, using Multi-file upload. See the Print Service Provider Guide for instructions.
c Select the file for upload and click Open. d Click Continue. The UPLOAD REPORT appears informing that the file has been uploaded. e Click Close. The uploaded file appears in the ATTACHMENTS dialog box. f Repeat this step for each file to be added.
5 To download files (for example, to your local computer):
The linked image cannot be displayed. The file may have been moved, renamed, or deleted. Verify that the link points to the correct file and location.
The linked image cannot be displayed. The file may have been moved, renamed, or deleted. Verify that the link points to the correct file and location.
Web Services Order Center User Guide
264 FreeFlow Web Services
a Select the file(s).
b Click the Download icon ( ).The DOWNLOAD FILE dialog box opens and displays one or two file download links.
NOTE: • When downloading one file, the dialog box will contain two links: for the single file and a zip file
containing the file to be downloaded. • When downloading several files, the dialog box will only contain a link to a zip file containing all
the files to be downloaded.
c Click the link. The FILE DOWNLOAD dialog box opens. d Save the file to the desired location as you would any file in the web browser. e Close the DOWNLOAD FILE dialog box.
6 To delete a file, select the file and click the Delete icon ( ). This can be useful, for example, if the Print Buyer rejects a proof that you uploaded and sent as a soft proof for approval.
7 To activate the preflight process on a file, select the file and click Mark for Production. The preflight is performed, a preview and thumbnail created, the dialog box is closed and the thumbnail is updated in the list. A Marked for Production icon ( ) appears by the file.
8 When done, click Close.
Sending and Confirming Soft Proofs If your design team is designing or creating the production file, you will need to send a soft proof to the Print Buyer for approval. When you send soft proof, a flag is added to the job in the Artwork queue.
When the Print Buyer approves the soft proof, you must update the job in the Artwork queue to indicate the approval. These update actions are recorded in the order history.
In many cases, the status icons that is used to indicate that an activity was performed matches the icon of the button that was used to perform the action (for example, the icon indicating that a soft proof was sent is identical to the button used for sending a soft proof).
To send a soft proof: 1 Navigate to TASKS -> ARTWORK. The ARTWORK window is displayed. 2 Select the job to send as a soft proof.
3 Click the Send Soft Proof icon ( ). The SEND SOFT PROOF dialog box opens. The dialog box displays the list of files already attached to the job (if any).
4 In the dialog box, specify who will receive the soft proof. You can select a different user, or select the Other Mail Address check box and fill in an email address.
5 Fill in a Subject and Message for the email. The default Subject and Message does not include any information about the Job ID or Order ID; in case this information is needed, add it manually.
6 To upload additional files to be sent, click the Upload Additional Files button. The Attachments dialog box opens. Attach the files as described in Handling File Attachments (on page 263).
7 Select the check boxes of the files for soft proofing. 8 Click OK. An email with the soft proofs is sent and a message confirming that the email was sent
appears.
9 Click OK to close the confirmation message. The icon appears in the list, indicating that a soft proof has been sent.
To indicate that the Print Buyer approved the soft proof, do the following: 1 Navigate to TASKS -> ARTWORK. The ARTWORK window is displayed. 2 Select the job that has been approved by the Print Buyer.
3 Click the Confirm Soft Proof icon ( ). The CONFIRM SOFT PROOF dialog box opens.
The linked image cannot be displayed. The file may have been moved, renamed, or deleted. Verify that the link points to the correct file and location.
The linked image cannot be displayed. The file may have been moved, renamed, or deleted. Verify that the link points to the correct file and location.
The linked image cannot be displayed. The file may have been moved, renamed, or deleted. Verify that the link points to the correct file and location.
The linked image cannot be displayed. The file may have been moved, renamed, or deleted. Verify that the link points to the correct file and location.
The linked image cannot be displayed. The file may have been moved, renamed, or deleted. Verify that the link points to the correct file and location.
The linked image cannot be displayed. The file may have been moved, renamed, or deleted. Verify that the link points to the correct file and location.
Managing Your Business and Production
Print Service Provider User Guide 265
4 If necessary, change the name of the Confirmed By user. Click the name of the user and then select a different user from the Select Contact Person dialog box, or select the Other User Name check box and fill in the name of the person.
5 Set the Confirmation Date. 6 Add a Note if necessary.
7 Click OK. The Confirmed icon ( ) appears in the list, indicating that the change was confirmed.
Managing Follow-up Activities for Order and Job Changes Certain changes that the designer performs might require follow-up activities. For example, the designer might change a job in a way that can affect the job’s pricing or production time. In such a case the designer
manually indicates the required follow-up, using the Define Change in Order/Job Activity ( ) button. This results in the following: • The order appears in the COMMERCIAL queue with an Overdue Activity status and icon. This indicates
that the CSR should handle the job. • The appropriate activity is added to the order details. • An activity flag is added to the job in the ORDER CHANGE STATUS column (second column from the
right) in the Artwork queue.
When the CSR marks the activity as completed, the flag in the Artwork queue is changed to confirmed. Optionally, the CSR can notify the designer that the change is approved, and the designer can confirm the change from the artwork queue.
To define a change in the job 1 Navigate to TASKS -> ARTWORK. The ARTWORK window is displayed. 2 Select the job requiring a change. All relevant details and parameters are displayed in the adjacent
details pane.
3 In the job details pane, click the Define Change in Order/Job Activity icon ( ). The DEFINE CHANGE IN ORDER/JOB ACTIVITY dialog box opens. In the dialog box, the default activity type is Change in Order.
4 Change the activity properties as required.
5 Click OK. The icon appears in the list, indicating that the job status was changed to WAITING FOR CHANGE APPROVAL.
An activity is added to the order and the order appears in the commercial queue as an order with overdue activities.
To approve a change in the job: 1 Navigate to TASKS -> ARTWORK. The ARTWORK window is displayed. 2 Select the job that is waiting for change approval.
3 Click the Confirm Change in Activity icon ( ). The CONFIRM CHANGE IN ACTIVITY dialog box opens.
4 If necessary, change the name of the Confirmed By user. Click the name of the user and then select a different user from the Select Contact Person dialog box, or select the Other User Name check box and fill in the name of the person.
5 Set the Confirmation Date. 6 Add a Note if necessary.
7 Click OK. The Confirmed icon ( ) appears in the list, indicating that the change was confirmed.
The linked image cannot be displayed. The file may have been moved, renamed, or deleted. Verify that the link points to the correct file and location.
The linked image cannot be displayed. The file may have been moved, renamed, or deleted. Verify that the link points to the correct file and location.
The linked image cannot be displayed. The file may have been moved, renamed, or deleted. Verify that the link points to the correct file and location.
The linked image cannot be displayed. The file may have been moved, renamed, or deleted. Verify that the link points to the correct file and location.
The linked image cannot be displayed. The file may have been moved, renamed, or deleted. Verify that the link points to the correct file and location.
The linked image cannot be displayed. The file may have been moved, renamed, or deleted. Verify that the link points to the correct file and location.

Web Services Order Center User Guide
266 FreeFlow Web Services
Moving Jobs from the Artwork Queue to Other Queues To approve a job in the Artwork queue for production
The APPROVE functionality is used by all the system queues as the standard way to move a job to the next processing step (queue). In the case of the ARTWORK queue, it means moving the job to the PRODUCTION queue. 1 Navigate to TASKS -> ARTWORK. The ARTWORK window is displayed. 2 Select the job. 3 Click the Approve button. The job is moved to the PRODUCTION queue.
To move a job from the Artwork queue to the Delivery queue without any processing
Use this option to move a job without any processing to the DELIVERY queue, skipping the standard step of production. 1 Navigate to TASKS -> ARTWORK. The ARTWORK window is displayed. 2 Select the job. 3 Click the Move To... button. The CHANGE JOB STATUS dialog box opens. 4 Select the Delivery queue. 5 Click OK. The dialog box closes and the job is moved to the selected queue.
The Activities Screen Generally, follow-up activities that are relevant to a feature are performed from the screen that is relevant to that feature (for example, performing follow-up activities on quotes in the Quote screen). The Activities screen provides a single entry point from which to view and handle activities for an account, and is the same screen as the Activities screen that is opened directly from the Quote or Order screen, except that it allows for a greater choice in selecting the combination of activities to be displayed. 1 Navigate to ACCOUNTS -> ACTIVITIES. 2 Select the account from the ACCOUNT dropdown box on the right side of the screen. 3 Filter the displayed activities as follows:
a Specify filtering criteria based on status, date type (Start, Due) and period, and person assigned to the activity.
b In the ACTIVITIES RELATED TO: check boxes, select the activities to include (Account, Quotes and/or Orders).
c Slick Search. The filtered list of activities is displayed in the screen.
4 Perform activities as you would if you opened the screen from the QUOTE screen or the ORDER screen. For more information see Handling Follow-up Activities for Quotes and Orders (on page 247).
The Billing Manager The BILLING MANAGER screen provides a single entry point from which to view and access accounting documents for all accounts, and perform different billing related actions on the documents. 1 Navigate to TASKS -> BILLING MANAGER. The Billing Manager screen contains two panes:
o the left pane displays the Accounts List. o the right pane, called the ACCOUNTS DOCUMENTS pane, displays the list of documents for the
selected account. The account list displays the following information for each account: o ID – the automatically generated account identification number. o ACCOUNT – the name of the account. o RECEIVABLES – total amount in un-invoiced orders, and the number of un-invoiced orders in

Production Pricing
Print Service Provider User Guide 267
brackets. o SHIPPED – total amount in shipped jobs that were not invoiced yet, and the number of these jobs in
brackets. o UN-PAID INVOICES – total amount in un-paid invoices and the number of un-paid invoices in
brackets. 2 Filter the list of displayed billing documents as needed, as follows:
a To filter on billing document status and or group name, select the status in the Show drop-down list, and/or select the group name in the Groups drop-down list.
b Optionally, specify an account name (or prefix). c Click Search.
3 To perform any of the following actions on documents, click the appropriate button in the Accounts Documents pane. o Generate new invoices. o Generate new receipts. o Issue deposits. o Issue credit notes. o View billing documents. o Edit billing documents in draft mode. o Cancel billing documents. o Confirm draft documents. o Print billing documents.
For more information about performing related tasks after clicking a button, see the relevant section in Invoicing and Billing (on page 249).
Production Pricing To use production pricing for jobs and templates, you must first define production pricing settings. To do this, you should understand certain basic pricing concepts.
This chapter contains the following major topics: • Pricing Concepts (on page 267) • Setting Up Production Pricing (on page 270)
Pricing Concepts FreeFlow Web Services provides several pricing calculation models for defining pricing settings, and these are described in the Print Service Provider Guide. Web Services Order Center provides several additional pricing calculation models, based on production pricing, described in this section.
You determine which calculation models to use for defining pricing for a job type or template. Then, when you request a quote for a print job, the application returns price quotations depending on the selected/defined model.
This section covers the following concepts: • Regular FreeFlow Web Services Pricing Mechanism (on page 267) • Hierarchy FreeFlow Web Services Uses To Calculate The Price Of A Job (on page 268) • Expanded Pricing Capabilities Provided By Web Services Order Center (on page 269) • Choosing between Intent Pricing and Production Pricing (on page 270)
Regular FreeFlow Web Services Pricing Mechanism The regular FreeFlow Web Services pricing mechanism uses the following flow:
Web Services Order Center User Guide
268 FreeFlow Web Services
1 When defining the System Setup, you define the following sets of Pricing parameters: o Business parameters—this set of parameters include currency and how to round off amounts
(SYSTEM SETUP -> BASIC -> REGION AND LANGUAGE). o Tax Packages—this set of parameters includes various taxing packages that can be added to the
price of the job. o Line Items Library—this set of parameters consists of individual items that you generally define
elsewhere (for example, stock paper items, shipping items). Not all the items in this library need to contain cost or pricing information, but many of the items do contain this information (for example, prices for specific paper types, prices for shipping, etc.). You can add additional items to this library directly, without defining them elsewhere.
2 When you define a job type, you define the job intent joblets that are included in the job. Then, when you define the job pricing settings, you define the following: o Calculation model to be used in determining the job’s pricing. This is the default pricing model and
can be one of the following models: Intent—this model allows you to define pricing based on the job intent definition. You can
define base costs and prices for the job and particular intent options included. Though you can have in mind the time, labor, waste, and other costs, when you define the cost and price of an intent joblet, there are no fields that allow you to actually specify these amounts. Therefore, the job price is fixed according to the intent price regardless of the actual time, labor, waste, and so on, that the job requires.
Manual—this model allows the CSR to define the price manually while the job has not been ordered yet (in shopping cart, saved job, etc.).
Excel pricing—this model allows the CSR to define pricing at the account level using an Excel file.
o If you select Intent Pricing, the following sections allow you to define the Intent Pricing for the job: Planner—this section of the Pricing tab allows you to specify output devices and related
parameters according the quantities being printed. Job Type Options—When you select Intent Pricing, this section allows you to define both
basic pricing for the job, and pricing for all of the intent options that might be selected by the Print Buyer.
o If you select Manual Pricing, the Planner section allows the CSR to define pricing at the time the job is ordered.
3 When you define a template, the template inherits the characteristics of the job type, including the Calculation Model. In the Pricing tab of the Settings, you can accept the default Calculation Model of the parent (that is, the job type), or you can choose to use new settings. If you choose to use new settings, you can change the Calculation model (that is, make a different model the default model) and/or modify the pricing settings.
4 If different pricing plans are possible (for example, the job can be printed on different output devices, and pricing will be different depending on the device chosen), you can see the plans in Track jobs.
Hierarchy FreeFlow Web Services Uses to Calculate the Price of a Job When FreeFlow Web Services calculates the price of a job request, the pricing mechanism has a hierarchy that contains the following 4 levels. It begins with the most specific pricing, and if that level is not found, it moves to the next level: 1 Manual override for a pre-ordered job. This is where the Print Service Provider has overridden the
default pricing model and manually selected the pricing model to use for the job (including setting the prices manually).
2 Price setting per template (Intent). 3 Account pricing (Excel). 4 Price setting per job type.
Production Pricing
Print Service Provider User Guide 269
Expanded Pricing Capabilities Provided by Web Services Order Center In addition to the pricing calculation models available from FreeFlow Web Services, Web Services Order Center allows for the use of various forms of Production Pricing to determine the costs and prices. Instead of defining an overall cost for an intent joblet (such as cutting), production pricing allows you to define the costs and prices for each part of the production process (such as setup time and labor charges, cutting charges, waste charges for the cutting process, etc.).
In general, production pricing is determined by a combination of stock pricing, output device pricing and process estimator pricing. 1 When defining System Setup:
a Enable production pricing. (PRINT SETTINGS -> PRICING -> BUSINESS). b Define Process Estimators. FreeFlow Web Services uses a pre-supplied set of Process
Estimators to define the costs and prices of each production process (such as cutting, drilling, wide format printing). Costs and prices can factor in such things as number of times the process is performed, setup labor, run labor, and materials.
2 When defining Job Types and Templates in the wizard: a In the Intent panel, you select joblets for the processes (such as drilling, laminating, etc.) that can
be applied to the job. (Many process joblets correspond to the process estimators that you defined earlier.) In addition, you can select any generic joblets that you have defined.
b In the Pricing tab of the Settings panel, you select the Calculation model as you would in FreeFlow Web Services. However, Web Services Order Center provides you with several production pricing Calculation Models. Production pricing calculation models apply the pricing breakdowns you defined in the process estimators to the process joblets used by the job (which you selected in the Intent panel). Web Services Order Center provides the following production pricing calculation modules: Production Pricing—regular production pricing. Printing pricing is based on press sheet
counts, and total pricing is calculated based on the following formula: Stock library + output devices + process estimators (cutting + folding + drilling + laminating + numbering).
Wide Format Production—production pricing for wide format printing such as posters and banners. Printing pricing is and is based on print area, and total pricing is calculated using the following formula: Stock library + output devices + process estimators (cutting + folding + drilling + laminating + numbering + wide format printing).
Production with Generic Joblets— production pricing where the job also uses generic joblets (such as joblets for design work, artwork, or other special inputs). Printing pricing is based on press sheet counts, and total pricing is calculated using the following formula: Stock library + output devices + process estimators (cutting + folding + drilling + laminating + numbering) + generic joblets. (Although generic joblets are technically intent pricing items, they are used for production pricing as well.)
The hierarchy (on page 268) used to calculate the price of a job remains unchanged with production pricing, however the Pricing result matrix will be displayed differently. In the result matrix: o All intents used for this job and priced at the intent level will be displayed under JBF Options. o All selected intent options will be displayed with the cost as set in the Estimators but with a Price of
0 since the intent pricing module is enabled for this job. o For each option that was not calculated with Production pricing there is an option to add the
production pricing by clicking on the Restore default Price icon - this will add the selected item price to the total.
3 When you create quotes or orders, you can use the default calculation model to determine pricing or you can choose a different calculation model for the quote or the order.
4 If different output devices are used, each providing different pricing plans, Web Services Order Center selects the lowest price; if several plans have the same lowest price, Web Services Order Center selects the most cost effective. The plans can be viewed while creating the quote and are limited to a maximum of 7 plans.

Web Services Order Center User Guide
270 FreeFlow Web Services
Choosing between Intent Pricing and Production Pricing Intent pricing and production pricing provide different approaches according to situation and need. • Intent pricing—this calculation model allows you to define pricing for job type and template intents,
according to the number of copies, the total pages or the actual printed press-sheets. It is useful when you know how much you want to charge—for example, you know what the market charges for a particular intent—even if you do not know your actual costs or do not want to manage them through FreeFlow Web Services. You define intent pricing individually for each job type and template intent. You can specify costs if you know them, but these are for your information, and they are not central to the price calculation.
• Production pricing—this calculation model is useful when you know the cost of various production processes and materials. You define the costs of these processes and materials, and the percentage you want to mark up those costs to determine the price. Production process pricing (for example, the cost of cutting, drilling or lamination) is defined at the system level, not the job level. You define, for each job type or template, whether production pricing will be available for that job type or template. Production pricing can also include generic joblet pricing (for example, to set the design or packaging costs and markups). Though technically intent pricing, they will be added to production pricing calculations. When production pricing is enabled, the job price calculation uses the same mechanism for Print Buyers and for CSRs who prepare quotations for offline orders. Several pricing plans (up to seven) can be presented to the CSR, who can then choose the best plan (generally according to price).
Setting Up Production Pricing You set up Production Pricing by performing the following high-level steps: • Enable Production Pricing (on page 270) • Define Output Device Pricing Parameters (on page 270) • Define Stock pricing (on page 272) • Define Process Estimator parameters (on page 272)
Once you have implemented Production Pricing, you can define Production Pricing as the calculation model for job types and templates, by performing the following procedure: • Define Production Pricing As The Default Calculation Model For A Job Type or Template (on page
277)
Enable Production Pricing To enable production pricing: 1 Navigate to PRINT SETTINGS -> PRICING -> BUSINESS. 2 Select the Enable pricing based on production pricing check box. 3 Click the Save button.
Define Output Device Pricing Parameters Define output device pricing parameters as follows (for each output device): 1 Navigate to PRINT SETTINGS -> PRODUCTION -> OUTPUT DEVICES. 2 Select the output device to configure in the OUTPUT DEVICES window. 3 Select the PRESS SETUP tab.
o In the SETUP TIME field, define the minutes needed for the initial output device setup. o In the PASS SETUP TIME field, define the minutes needed for setting up one pass through the
device. o For offset devices, define the minutes needed to set up each print head per pass in the PRINT

Production Pricing
Print Service Provider User Guide 271
HEAD SETUP TIME box. Click Save.
4 Select the SPEED AND WASTE tab. Configure the definitions depending on the output device type. o For digital devices or copiers:
In the PAPER WEIGHT fields, define the minimum and maximum weights (in grams per square meter) that are wasted by the device during a run.
In the SPEED BY PAPER SIZE fields, define the number of run sheets that the device can run per hour, depending on the paper size.
Click Add to add more runs to the job and define the additional values. In the PRODUCTION FACTORS area, define the Process Color, Spot Color, and Duplex Mode
speed factors. o For offset devices:
In the FIXED WASTE field, define the number of run sheets that are wasted during a run. In the RUN LENGTH field, define the number of copies that can be run. In the SPEED field, define the number of sheets that can be run per hour. In the WASTE field, define the approximate percentage of run sheet waste (derived from output
device adjustments, run sheet examination, or other waste factors). Click Add for additional job runs; define the parameters in the resulting fields. In the PRODUCTION FACTORS area, define speed and waste factors in the PROCESS COLOR,
SPOT COLOR, and PAPER WEIGHT fields. (Optional) Click Add for additional weights to be added to the job; define the parameters in the
resulting fields. Click Save.
5 Select the LABOR CHARGE tab Define labor and mark-up charges used to calculate the production cost of a job, depending on the device type. o To define a digital labor charge:
Define the Mark-up percentage. For both Setup-Time and Run-Time: Define the Labor Cost per hour. Define the Min Labor time in minutes.
o To define an offset labor charge: Define the Mark-up percentage. Define the Plate Fee. For both the Setup time and the Run time: Define the Labor Cost per hour. Define the Min Labor time in minutes. Define the Process Wash-up Cost. Define the Spot Wash-up Cost.
Click Save. 6 Select the CLICK CHARGE tab.
You can use external devices for digital print jobs, and calculate the cost per click in the production costs, as follows: o Define the Mark-up percentage. o Define the Color page ‘click’ costs. o Define the Black and White page ‘click’ costs.

Web Services Order Center User Guide
272 FreeFlow Web Services
Click Save.
NOTE: Click Charges are calculated based on the planned number of press sheets and do not include the clicks on any waste in the calculation.
Define Stock pricing Navigate to PRINT SETTINGS -> PRODUCTION -> STOCK LIBRARY. For each stock item for which you are defining pricing, do the following: 1 Select the stock item and click Edit. 2 Define the cost and the price at the bottom of the screen, per number of copies. These costs and
prices can only be defined if Production Pricing is enabled. 3 To add another line, click New Range and define the cost and price for that range. 4 Click OK.
NOTE: Make sure that the other parameters on the page contain real values as they are also used in the production pricing calculation. For example, without setting the Thickness of the stock item, the cutting process estimator will not be calculated correctly.
Define Process Estimator Parameters You define process estimators one at a time by displaying the Process Estimators window (PRINT SETTINGS -> PRICING -> PROCESS ESTIMATORS), selecting the process, and filling in the appropriate estimator values. You can define estimators for the following processes: • Cutting—cutting the printed sheets/copies at the end of the print process. In the case that press
sheets are made from the Parent sheet paper, the cutting costs and price will be calculated as well. • Folding—folding the printed material for a brochure, calendar, etc. It is assumed that only one fold
type is defined for a job and folding is calculated per press sheet. • Drilling—drilling holes in the printed sheets. • Laminating—laminating the printed sheets. • Numbering—adding serial numbers to the printed sheets. • Wide-Format Printing—printing large format jobs such as posters, advertisements for building, etc.
NOTE: You can only define process estimators if production pricing is enabled. For instructions on enabling production pricing, see Enable Production Pricing (on page 270).
Cutting Process Estimators 1 Navigate to PRINT SETTINGS -> PRICING -> PROCESS ESTIMATORS. 2 In the PLUG INS area of the PROCESS ESTIMATORS window, select Cutting. 3 At the top of the CUTTING area, select whether the pricing should be calculated by the labor involved in
the cuts (Use Price by Labor Time) or by the number of cuts (Use Price by Cuts). The tabs and fields that can be edited depend on the value you select.
4 If you selected USE PRICE BY LABOR TIME, fill in the fields as follows: a In the GENERAL tab, fill in the Maximum Stack Height. b In the SETUP TIME tab, define the following:
i In the JOB PREPARATION field, specify the number of minutes it takes to prepare the job on the cutting device.
ii In the CUT CONFIGURATION field, specify the number of minutes it takes to configure the cutting device per cut.
iii In the CUTTING SETUP LABOR PRICE area, define the fixed and variable cutting setup labor costs per unit of time, per number of copies in a range, and do either of the following:
Fill in the fixed and variable cutting setup labor prices based on your own calculations. Have the system calculate the fixed and variable cutting setup labor prices as a percentage of
markup over the costs by selecting User Markup, and in the % field that is displayed, type the

Production Pricing
Print Service Provider User Guide 273
markup percentage. c In the RUN TIME tab, define the following:
i In the STACK RELOADING field, specify the number of minutes it takes to reload the stack of the printed job on the cutting device.
ii In the CUT RUN TIME field, specify the number of minutes it takes to cut the loaded job. iii In the CUTTING RUN LABOR PRICE area, define the fixed and variable runtime cutting labor
costs per unit of time, per number of copies in a range, and do either of the following: Fill in the fixed and variable cutting run labor prices based on your own calculations. Have the system calculate the fixed and variable cutting run labor prices as a percentage of
markup over the costs by selecting User Markup, and in the % field that is displayed, type the markup percentage.
5 If you selected USE PRICE BY CUTS, fill in the fields as follows: a In the GENERAL tab, fill in the MAXIMUM STACK HEIGHT in inches b In the PER CUT tab, in the CUTTING PRICE area, define the fixed and variable cutting costs per
number of cuts, per number of copies in a range, and do either of the following: Fill in the fixed and variable cut prices based on your own calculations. Have the system calculate the fixed and variable cut prices as a percentage of markup over
the costs by selecting User Markup, and in the % field that is displayed, type the markup percentage.
6 Click Save.
Folding Process Estimators 1 Navigate to PRINT SETTINGS -> PRICING -> PROCESS ESTIMATORS. 2 In the PLUG INS area of the PROCESS ESTIMATORS window, select Folding. 3 In the SETUP TIME tab, define the following:
a In the JOB PREPARATION field, specify the number of minutes it takes to setup the job on the folding device.
b In the FOLD CONFIGURATION field, specify the number of minutes it takes to setup the folding parameters.
c In the SETUP TEST RUN field, specify the number of minutes it takes to run a trial process. d In the SETUP WASTE field, specify the number of press sheets that are wasted during setup and
test run. e In the FOLDING SETUP LABOR COST area, define the fixed and variable folding set-up labor costs
per unit of time, per number of copies in a range, and do either of the following: Fill in the fixed and variable folding setup labor prices based on your own calculations. Have the system calculate the fixed and variable folding setup labor prices as a percentage of
markup over the costs by selecting User Markup, and in the % field that is displayed, type the markup percentage.
4 In the RUN TIME tab, define the following: a In the MACHINE SPEED field, specify the number of press sheets the machine can fold per hour. b In the RUN WASTE FACTOR field, specify the percentage of waste during the trial run process. c In the FOLDING RUN LABOR COST area, define the fixed and variable folding run labor costs per unit
of time, per number of copies in a range, and do either of the following: Fill in the fixed and variable folding run labor prices based on your own calculations. Have the system calculate the fixed and variable folding run labor prices as a percentage of
markup over the costs by selecting User Markup, and in the % field that is displayed, type the markup percentage.
5 Click Save.

Web Services Order Center User Guide
274 FreeFlow Web Services
Drilling Process Estimators 1 Navigate to PRINT SETTINGS -> PRICING -> PROCESS ESTIMATORS. 2 In the PLUG INS area of the PROCESS ESTIMATORS window, select Drilling. 3 At the top of the DRILLING area select whether the pricing should be calculated by the labor involved in
the drilling (Use Price by Labor Time) or by the number of holes (Use Price by Holes). The tabs and fields that can be edited depend on the value you select.
4 If you selected USE PRICE BY LABOR TIME, fill in the fields as follows: a In the GENERAL tab, fill in the maximum stack height, and the maximum number of holes the
machine can drill b In the SETUP TIME tab, define the following:
i In the JOB PREPARATION field, specify the number of minutes it takes to prepare the job on the drilling device.
ii In the DRILLS CONFIGURATION field, specify the number of minutes it takes to configure the drilling device per drill.
iii In the SETUP TEST RUN field, specify the number of minutes it takes to run a trial process. iv In the SETUP WASTE field, specify the number of press sheets that are wasted during setup
and test run. v In the DRILLING SETUP LABOR PRICE area, define the fixed and variable drilling setup labor
costs per unit of time, per number of copies in a range, and do either of the following: Fill in the fixed and variable drilling setup labor prices based on your own calculations. Have the system calculate the fixed and variable drilling setup labor prices as a percentage of
markup over the costs by selecting User Markup, and in the % field that is displayed, type the markup percentage.
c In the RUN TIME tab, define the following: i In the HOLE RUN TIME field, specify the number of minutes it takes to drill the loaded job. ii In the DRILLING RUN LABOR PRICE area, define the fixed and variable drilling run labor costs
per unit of time, per number of copies in a range, and do either of the following: Fill in the fixed and variable drilling run labor prices based on your own calculations. Have the system calculate the fixed and variable drilling run labor prices as a percentage of
markup over the costs by selecting User Markup, and in the % field that is displayed, type the markup percentage.
5 If you selected USE PRICE BY HOLES, fill in the fields as follows: a In the GENERAL tab, fill in the maximum stack height, and the maximum number of holes the
machine can drill. b In the BY HOLES tab, in the DRILLING PRICE area, define the fixed and variable drilling costs per
number of holes, per number of copies in a range, and do either of the following: Fill in the fixed and variable drill prices based on your own calculations. Have the system calculate the fixed and variable drill prices as a percentage of markup over
the costs by selecting User Markup, and in the % field that is displayed, type the markup percentage.
6 Click Save.
Laminating Process Estimators 1 Navigate to PRINT SETTINGS -> PRICING -> PROCESS ESTIMATORS. 2 In the PLUG INS area of the PROCESS ESTIMATORS window, select Laminating. 3 In the SETUP TIME tab, define the following:
a In the JOB PREPARATION field, specify the number of minutes it takes to setup the job on the laminating device.
b In the SETUP TEST RUN field, specify the number of minutes it takes to run a trial process. c In the SETUP WASTE field, specify the number of press sheets that are wasted during setup and
Production Pricing
Print Service Provider User Guide 275
test run. d In the LAMINATING SETUP LABOR COST area, define the fixed and variable laminating setup labor
costs per unit of time, per number of copies in a range, and do either of the following: Fill in the fixed and variable laminating setup labor prices based on your own calculations. Have the system calculate the fixed and variable laminating setup labor prices as a
percentage of markup over the costs by selecting User Markup, and in the % field that is displayed, type the markup percentage.
4 In the RUN TIME tab, define the following: a In the MACHINE SPEED field, specify the number of meters the machine can laminate per hour
(when laminating on one side). b In the TWO SIDES SLOW DOWN field, specify the percentage of time that the Machine Speed value
decreases if the lamination is performed on two sides. c In the RUN WASTE field, specify the number of press sheets that are wasted during the run. d In the LAMINATING RUN LABOR COST area, define the fixed and variable laminating run labor costs
per unit of time, per number of copies in a range, and do either of the following: Fill in the fixed and variable laminating run labor prices based on your own calculations. Have the system calculate the fixed and variable laminating run labor prices as a percentage
of markup over the costs by selecting User Markup, and in the % field that is displayed, type the markup percentage.
5 In the MATERIALS tab, in the LAMINATING MATERIAL COST area, define the fixed and variable costs of laminating material per unit of size, per number of copies in a range, and do either of the following: o Fill in the fixed and variable laminating material prices based on your own calculations. o Have the system calculate the fixed and variable laminating material prices as a percentage of
markup over the costs by selecting User Markup, and in the % field that is displayed, type the markup percentage.
6 Click Save.
Numbering Process Estimators 1 Navigate to PRINT SETTINGS -> PRICING -> PROCESS ESTIMATORS. 2 In the PLUG INS area of the PROCESS ESTIMATORS window, select Numbering. 3 At the top of the NUMBERING area select whether the pricing should be calculated by the labor involved
in the numbering (Use Price by Labor Time) or per number (Use Price by Numbering). The tabs and fields that can be edited depend on the value you select.
4 If you selected USE PRICE BY LABOR TIME, fill in the fields as follows: a In the SETUP TIME tab, define the following:
i In the JOB PREPARATION field, specify the number of minutes it takes to setup the job on the numbering device.
ii In the SETUP TEST RUN field, specify the number of minutes it takes to run a trial process. iii In the SETUP WASTE field, specify the number of press sheets wasted during the trial run
process. iv In the NUMBERING SETUP LABOR PRICE area, define the fixed and variable numbering setup
labor costs per units of time, per number of copies in a range, and do either of the following: Fill in the fixed and variable numbering setup labor prices based on your own calculations. Have the system calculate the fixed and variable numbering setup labor prices as a
percentage of markup over the costs by selecting User Markup, and in the % field that is displayed, type the markup percentage.
b In the RUN TIME tab, define the following: i In the MACHINE SPEED field, specify the number of press sheets the machine can number per
hour. ii In the RUN WASTE FACTOR field, specify the percentage of waste during the trial run process.

Web Services Order Center User Guide
276 FreeFlow Web Services
iii In the NUMBERING RUN LABOR PRICE area, define the fixed and variable numbering run labor costs per units of time, per number of copies in a range, and do either of the following:
Fill in the fixed and variable numbering run labor prices based on your own calculations. Have the system calculate the fixed and variable run labor numbering prices as a percentage
of markup over the costs by selecting User Markup, and in the % field that is displayed, type the markup percentage.
5 If you selected USE PRICE BY NUMBERING, in the PER NUMBERING tab, in the NUMBERING PRICE area, define the fixed and variable numbering costs per number of units, per number of copies in a range, and do either of the following: o Fill in the fixed and variable numbering prices based on your own calculations. o Have the system calculate the fixed and variable numbering prices as a percentage of markup
over the costs by selecting User Markup, and in the % field that is displayed, type the markup percentage.
6 Click Save.
Wide-Format Printing Process Estimators 1 Navigate to PRINT SETTINGS -> PRICING -> PROCESS ESTIMATORS. 2 In the PLUG INS area of the PROCESS ESTIMATORS window, select Wide-Format Printing. 3 In the SETUP TIME tab, define the following:
a In the JOB PREPARATION field, specify the number of minutes it takes to setup the job on the wide-format printing device.
b In the SETUP WASTE field, specify the amount of paper that is wasted during setup. c In the WIDE FORMAT PRINTING SETUP LABOR area, define the fixed and variable wide format
printing setup labor costs per units of time, per number of copies in a range, and do either of the following:. Fill in the fixed and variable wide format printing setup labor prices based on your own
calculations. Have the system calculate the fixed and variable wide format printing setup labor prices as a
percentage of markup over the costs by selecting User Markup, and in the % field that is displayed, type the markup percentage.
4 In the RUN TIME tab, define the following: a In the MACHINE SPEED field, specify the area that the machine can print per hour. b In the WIDE FORMAT PRINTING RUN COST area, define the fixed and variable wide format printing
run labor costs per units of time, per number of copies in a range, and do either of the following:. Fill in the fixed and variable wide format printing run labor prices based on your own
calculations. Have the system calculate the fixed and variable wide format printing run labor prices as a
percentage of markup over the costs by selecting User Markup, and in the % field that is displayed, type the markup percentage.
5 In the PRINTING tab, in the WIDE PRINTING COST area, define the wide printing run labor cost and price per number of copies in a range. a In the WIDE FORMAT PRINTING RUN COST area, define the fixed and variable wide format printing
costs per units of area, per number of copies in a range, and do either of the following: Fill in the fixed and variable wide format printing prices per units of area based on your own
calculations. Have the system calculate the fixed and variable wide format printing prices per units of area
as a percentage of markup over the costs by selecting User Markup, and in the % field that is displayed, type the markup percentage.
6 Click Save.
Production Pricing
Print Service Provider User Guide 277
Define Production Pricing as the Default Calculation Model If Production Pricing is enabled, to make Production Pricing the default Calculation Model for a job type or template, do the following: 1 Display the PRICING tab for the selected job type or template in the SETTINGS panel of the Definition
wizard. 2 In the CALCULATION MODEL field, select one of the type of production pricing calculation model:
o Production Pricing.—select this model if the job type or template does not need generic joblets or wide format printing. Print pricing will largely be determined by number of press sheets.
o Wide Format Production—select this model if the job pricing should be largely calculated based on size of the printing area (such as posters/banners).
o Production with Generic Joblets—select this model if the production is calculated according to production pricing (cost) but there is a need to use additional pricing elements (such as Design, packaging, etc.) which were added to the system using Generic Joblets.
NOTE: Selecting one of the above values disables Intent pricing for this job type, and pricing calculations will be based on the production pricing parameters.
3 If you are editing a template, and are choosing a different calculation model than is used by its job type, select the Use New Settings radio button, and select the calculation model.
4 Fill in the details of the Pricing tab as you would in FreeFlow Web Services (for details, see the Print Service Provider Guide): o If you chose Production Pricing or Wide Format Production, only the PLANNER section of the
Pricing tab is displayed; stock and process estimator prices are taken depending on the definition of the production job.
o If you chose Production with Generic Joblets, both the PLANNER section and the JBF OPTIONS section are displayed; the JBF OPTIONS section displays the base product and generic joblets.

Print Service Provider User Guide 279
Index
[ [Invoice/CreditNote]General node ............ 201 [Receipt/Deposit]General node ................. 200
A Accessing The Skin Editor ................ 145, 146 Accessing the Skin Library ........................ 154 Accessing the Style Sheet Window .......... 149 Accessing Web Services .............................. 3 Accessing Web Services locally ................... 3 Account Groups .................................... 17, 24 Account management ............................... 183 Account Setup ..................................... 43, 232 Account Setup Overview ............................. 43 Activating Page Elements .................. 145, 146, 147, 148, 151 Add and Define the Products ....237, 239, 241 Add CSR Users ................................. 232, 233 Add/Edit Preview Link ............................... 174 Adding a Database to the Library ............... 76 Adding a Joblet Option ................................ 80 Adding an Archive to a Template ................ 96 Adding an Item from the Line Item Library ............................................... 240, 241 Adding Another Job or Template .............. 241 Adding Credit Card Vendors to Web Services ............................................ 227, 230 Adding General Information to a Job Type ............................................................ 84 Adding General Information to a Template ..................................................... 92 Adding Joblets ............................................ 85 Adding Messages ....................................... 69 Adding Output Devices ............................... 30 Adding Products to a Superstore .......... 62, 64 Adding Tabs ................................................ 86 Adding Templates to an HTML Catalog .................................................................... 70 Adding/Deleting Jobs and Items237, 240, 241 AddressGeneral node ....................... 200, 201 Adjusting the File Report Parameters ......... 88 Adjusting the Job Details Parameters ......... 88 Adjusting the Preview Parameters .............. 88 Advanced .................................................... 19 Advanced Options ..................................... 104 Advanced Properties Example .................. 104 Appendix ................................................... 186 Applying a Layout Theme to a Superstore ............................................. 62, 65 Applying a Pre-defined Layout Theme to a Superstore ........................................... 66
Approving a Job for Printing ..... 124, 133, 135 Approving Jobs for Delivery ..................... 138 Area-dependent Taxes ............................. 113 Arrange Fields .......................................... 106 Assigning Excel Pricing to a Print Buyer ........................................................ 161 Assigning Skins to Print Buyers ............... 153 Atos .......................................................... 229 Attaching a File Where Upload is Required ................................................... 241 Attaching Files to the Job ................. 124, 126 Authentication server response structure ................................................... 182 Authorize.Net ........................................... 228
B Backward and Forward compatibility ....... 203 Basic ........................................................... 11 Billing .......................................................... 25 billing node ............................................... 199 Binding ................................................. 78, 81 Binding Styles .......................................... 169 Book Assembly ............................ 83, 92, 169 Book Assembly Definitions....................... 169 Book Assembly Pricing ............................ 169
C Calculation Model ..................................... 109 Calendar Options ................................. 11, 13 Canceling a Credit Note ................... 255, 256 Canceling a Deposit ......................... 250, 251 Canceling a Receipt ......................... 258, 259 Canceling an Invoice ........................ 252, 254 Cancelling the Quote or Order . 245, 246, 247 Catalog Overview ................................. 51, 59 Changing a Joblet Description ................... 79 Changing Job Status ................................ 141 Changing the Image Display Mode ............ 74 Changing the Pricing Calculation for a Job Type or Template ...................... 242, 243 Changing the Sequence of Fields ............ 106 Changing the Sequence of Intent Steps .......................................................... 86 Changing the Sequence of Joblet Options ....................................................... 80 Changing the Status of a Job ... 124, 133, 135 channels node .......................................... 195 Checking a Database ................................. 76 Checking and Modifying Job Pricing 119, 122 Checking and Modifying Order Pricing .............................................. 119, 120 ChinaBank ................................................ 230 Choosing between Intent Pricing and Production Pricing ............................ 268, 270 Choosing the Number of Pages ................. 85 Choosing the Options in Additional Joblets ........................................................ 86
Index
280 FreeFlow Web Services
Choosing the Page Sizes ............................ 85 Choosing the Printing Sides and Colors .......................................................... 85 Choosing the Repository Item(s) .............. 221 Collating ................................................ 78, 82 Color Channel Properties .......................... 172 Color Mismatch ........................................... 94 Colors .................................................... 78, 82 Column A .................................................. 162 Column B .................................................. 165 Column C .................................................. 165 Column D .................................................. 166 Components .............................................. 169 Concepts .......................... 109, 203, 248, 262 Configuration ..................................... 231, 232 Configuration Check ................................. 223 Configure CSR Email Forwarding ..... 233, 234 Configure Web Services Order Center Email ................................................. 232, 233 Configure Web Services Order Center Settings ............................................. 232, 234 Configuring LDAP for Web Services ......... 179 Configuring Privileges Parameters ........... 180 Configuring the Attributes ......................... 180 Configuring the Connection Settings 179, 180 Configuring the DocuShare Server ........... 218 Configuring the User Authentication Definition ................................................... 182 Confirm Billing Document ......................... 188 Confirming a Draft Credit Note.......... 255, 256 Confirming a Draft Deposit ................ 250, 251 Confirming a Draft Invoice ................ 252, 254 Confirming a Draft Receipt ................ 258, 259 Connect to a Process ................................ 209 Connections .......................................... 11, 12 Connector Implementation ........................ 202 Contact Details ............................................ 11 Content ........................................................ 92 Controlling the Image Selection GUI ........ 104 Controlling the Image Upload Policy ......... 104 Conventions Used in Web Services ............. 4 Converting HTML Pages to .mht Files ...... 151 Copying a Category .................................... 63 Copying a Template .................................... 96 Create a New Output Device .................... 211 Create the Quote .............................. 237, 238 Creating a Cold Folder Directory for Approved Jobs .......................................... 214 Creating a Copy of One or More Images in Another Folder ............................ 75 Creating a Delivery Package .................... 137 Creating a dependent Tax ........113, 114, 115 Creating a Job Ticket ................124, 132, 142 Creating a Multiple-tax Package ............... 114 Creating a New Account ................. 43, 44, 46 Creating a New Folder ................................ 74 Creating a New Joblet ................................. 79
Creating a New Line Item................. 119, 121 Creating a New Output Device ........ 205, 208 Creating a New Template .............. 92, 96, 99 Creating a New Template from an Existing Job ........................................ 98, 143 Creating a Simple Job Type ....................... 84 Creating a Simple Quote .................. 237, 261 Creating a Simple Tax ...................... 113, 114 Creating a Single-tax Package ................ 113 Creating a Superstore .......................... 62, 63 Creating a Template with a DirectSmile Image .................................... 155 Creating an HTML Catalog .................. 69, 70 Creating an Output Device for the Process Manager Manifest ...................... 208 Creating and Managing HTML Catalogs ............................................... 59, 69 Creating and Managing Superstore Catalogs ............................................... 59, 62 Creating and Populating Cross Sales ........ 73 Creating or Editing a Credit Note ..... 255, 256 Creating or Editing a Deposit ................... 250 Creating or Editing a Receipt ................... 258 Creating or Editing an Invoice .......... 252, 253 Creating Skins .................................. 145, 154 Creating Variable Data Templates . 77, 94, 99 Credit Card ....................................... 178, 227 Credit Card Integration ............................... 25 CRM ........................................................... 19 Customize Document Numbering .... 235, 236 Customized Fields ................................ 23, 56 Customizing Order Fields at the Account Level ................................. 24, 46, 56 Customizing the Catalog Banner ..... 146, 148 Customizing the Email Banner ......... 146, 147 Customizing the Launch Pad ........... 145, 147 Customizing the Login Page ............ 145, 146 Customizing the Site Frame ............. 145, 146 Cutting Process Estimators ...................... 272
D Data Export ...................................... 178, 187 DebiTech .................................................. 229 Decision Component ................................ 110 Define Accounts ....................................... 232 Define Invoice Settings ............................ 235 Define Output Device Pricing Parameters ....................................... 270, 271 Define Process Estimator Parameters270, 272 Define Production Pricing as the Default Calculation Model ........ 243, 270, 277 Define Stock pricing ......................... 270, 272 Define Tax Settings .................................... 90 Define the Banks List ....................... 234, 235 Define the General Details ....... 237, 238, 240 Define the Shipping Information ....... 237, 240 Defining a Book Assembly Job Type ....... 170
Production Pricing
Print Service Provider User Guide 281
Defining a Book Assembly Preview .......... 172 Defining a Catalog’s Properties ............ 71, 72 Defining a Connection to a FreeFlow Repository ................................................. 220 Defining a Suffix ........................................ 105 Defining a Web Services VIPP Emitter-enabled Device ............................. 216 Defining a Xerox DocuShare Connection ................................................ 218 Defining Account Branding ........... 47, 51, 145 Defining Account Utilities ............................ 47 Defining Advanced Group Centering ........ 105 Defining Advanced Style Selection ........... 106 Defining an Output Device for FreeFlow JMF Service .............................. 213 Defining an Output Device for FreeFlow Output Manager ........................ 211 Defining an Output Device for FreeFlow Print Manager - Advanced Print Path .................................................. 215 Defining an Output Device for the FreeFlow Process Manager ...................... 205 Defining and Editing for the Various User Types ................................................ 153 Defining and Saving Job Search Information ........................................ 140, 141 Defining Binding Properties ...................... 170 Defining Carriers ................................... 39, 51 Defining Click Charges ............................... 36 Defining Component Properties ................ 171 Defining Composite Fields ........................ 102 Defining Data Export ................................... 26 Defining Drop-down Menu Fields ............. 101 Defining Email Notification Settings46, 55, 147 Defining Field Format ................................ 101 Defining General Settings for a New Account ....................................................... 44 Defining Input Restrictions on Fields 100, 103 Defining Job Search Criteria ..................... 140 Defining Labor Charges .............................. 36 Defining Non-Editable Fields ............ 100, 103 Defining Non-Printable Fields ........... 100, 103 Defining Output Device Channels ............... 31 Defining Pinned Fields ...................... 101, 104 Defining Position Links .............................. 105 Defining Press Setup Parameters for Pricing Calculation ...................................... 35 Defining Pricing Settings .............5, 47, 49, 72 Defining Print Imposition .... 32, 125, 126, 128 Defining Printers ....................................... 215 Defining Production Parameters ................. 29 Defining Queues ....................................... 212 Defining Self Registration Details ......... 47, 48 Defining Shipping ........................................ 39 Defining Shipping Method Groups .............. 41 Defining Shipping Methods .........39, 111, 122
Defining Superstore Content Using the Add Products Option ............................ 64, 73 Defining Superstore Content Using the Add Queries Option .............................. 64, 73 Defining the Account Checkout Process ................................................ 44, 45 Defining the Account Cost Centers 46, 53, 55 Defining the Cross Sale Area ..................... 68 Defining the Items Area .............................. 67 Defining the Navigation Pane .................... 68 Defining the Ordering Sequence ................ 95 Defining the Root Directory of the Hot Folders as Shared ............................ 204, 208 Defining the Settings .................................. 95 Defining the Target Audience of a Field ......................................................... 101, 104 Defining Third-party Imposition Jobs ......... 34 Defining User Groups Settings ............ 46, 53 Defining User Moveable Fields ........ 100, 103 Defining User Privilege Views .. 146, 151, 153 Defining Users for a New Account . 44, 45, 52 Defining Variable Data Field Properties ................................................... 99 Defining Workflows .......................... 206, 210 Deleting a Catalog ...................................... 70 Deleting a Category ................................... 63 Deleting a Cross Sale ................................ 73 Deleting a Database ................................... 76 Deleting a Folder ........................................ 74 Deleting a Job .......................... 141, 142, 241 Deleting a Job Type ................................... 83 Deleting a Joblet ........................................ 79 Deleting a Joblet Option ............................. 80 Deleting a Tax .......................................... 115 Deleting a Tax Package ........................... 114 Deleting a Template ................................... 96 Deleting One or More Images .................... 75 Delivery Queue ................................ 123, 135 Delivery Queue Overview ........................ 135 Designating a Default Skin ....................... 153 DGET Function ........................................ 168 Direct Marketing Links .............................. 155 DirectSmile ....................................... 178, 225 DirectSmile Image Generator .................. 155 Disabling a Job Type .................................. 83 Disabling a Joblet ....................................... 79 Disabling a Joblet Option ........................... 80 Displaying and Hiding Queue Columns ............................................................. 5, 132 Document Duplication Job Type .............. 117 Downloading Files ........................................ 6 Downloading One or More Images ............ 75 Drilling .................................................. 78, 82 Drilling Process Estimators ...................... 274 Duplicating a Cross Sale ............................ 73 Duplicating a Job ...................................... 241 Duplicating a Job Type ............................... 83

Index
282 FreeFlow Web Services
Duplicating a Tax ...................................... 115 Duplicating a Tax Package ....................... 114 Duplicating Skins ...................................... 154
E Edit Imposition .......................................... 188 Editing a Job Type ...................................... 84 Editing a Joblet ........................................... 79 Editing a Tax ............................................. 115 Editing a Template ...................................... 96 Editing Calculated Job Line Items ............ 122 Editing Delivery Line Items ....................... 122 Editing Discount Line Items .............. 121, 122 Editing JBF Option, Design and Custom Line Items ............................ 120, 121 Editing Job Imposition ...............124, 126, 171 Editing Line Items ..................................... 121 Editing Pricing Details ...... 237, 239, 240, 242 Editing Skin Elements ...............145, 148, 154 Editing Tax Line Items .............................. 122 Editing the Final Design ..... 51, 147, 148, 149 Editing Urgency Line Items ....................... 122 Email ........................................................... 20 Enable Production Pricing .........270, 271, 272 Enabling a Joblet Option ............................. 80 Enabling a Template for Inventory ........ 92, 98 Enabling Credit Cards for Web Services Accounts .................................... 230 Enabling DirectSmile ................................. 226 Enabling the Image Editor ......................... 104 ePDQ ........................................................ 229 Establish the Left and Right Page Position ..................................................... 174 Establish the Preview Size ........................ 173 Estimation Model ...................................... 110 Excel Calculation Model (Optional) ........... 110 Excel Pricing ..................................... 110, 161 Excel Pricing File Format .................. 161, 162 Excel Pricing with the Book Assembly Module ...................................................... 166 Excel Programming and Useful Excel Functions ................................................... 167 Expanded Pricing Capabilities Provided by Web Services Order Center ............................................... 268, 269 Exported data description ......................... 189 Exporting an HTML Catalog .................. 69, 72 External User Management and Synchronization ........................................ 185
F File Report ............................................. 87, 92 File Upload ........................................ 6, 11, 12 finishing node ............................................ 197 Finishing Properties .................................. 172 flatPage node ............................................ 195 Folding .................................................. 78, 81
Folding Process Estimators ..................... 273 Fonts .................................................. 21, 217 Freeflow Connectivity ....................... 178, 203 FreeFlow Connectivity .............................. 178 FreeFlow Repository Integration .............. 219 FreeFlow Web Services ............................... 1 Frequently Used Terminology ...................... 4
G Ganging Jobs for Production ........................ 124, 130, 133, 135 General............................................... 11, 181 General Overview ...................................... 77 General Properties ................................... 171 General Tab ............................................... 30 Generating and Editing Job Tickets ............. 9 Generating Prices for Different Quantities ......................................... 242, 243 Get Quote Link ......................................... 188 Getting Started ................................. 204, 207
H Handling Credit Notes .............. 249, 254, 255 Handling Deposits .................... 249, 250, 254 Handling Empty Fields ............................. 106 Handling File Attachments ............... 263, 265 Handling Follow-up Activities for Quotes and Orders ... 237, 239, 244, 248, 267 Handling Identical Input Fields ................. 106 Handling Invoices ............................. 249, 252 Handling Receipts ............................ 249, 257 Handling the Customer Response ... 245, 246 Hierarchy FreeFlow Web Services Uses to Calculate the Price of a Job ........................... 268, 269, 270 Home Page Customization .................. 14, 51 Home Page Images ............................. 14, 17 Home Page Text .................................. 14, 16 Hot Folder Configuration .......................... 187 Hot Folders ....................................... 205, 209 How Many Job Types to Create? ............... 83 HTML Catalogs .......................................... 62 HTML or Word Documents ........................ 26
I IF Function ............................................... 167 Image Fields ............................................. 103 Importing an XMPie PersonalEffect Template to the Web Services System ............................................. 157, 224 Importing and Exporting Database Files ........................................................ 6, 54 Importing and Exporting Stock ................... 37 Importing/Exporting the Excel Pricing File ............................................................ 162 Imposition Schemes ................................. 128 INDEX ...................................................... 168
Production Pricing
Print Service Provider User Guide 283
INS Components ....................................... 202 Installation process ................................... 226 Installing XMPie PersonalEffect ................ 222 Integrating Web Services with Other Systems ...................................................... 27 Integrating with the Credit Card Vendor ....................................................... 227 Integration ........................ 204, 208, 211, 220 Integration Flow ........................................ 181 Integrations ................................................. 25 Integrations Guide ..................................... 177 Intent ..................................................... 84, 92 Intent Calculation Model ........................... 110 Intent Pricing Examples ............................ 117 Introduction .. 1, 109, 177, 187, 203, 227, 231 Invoice & Credit Note ................................ 201 InvoiceLine node ....................................... 201 Invoicing and Billing ..................231, 249, 267 Issuing a Credit Note ........................ 252, 254 Item Background ......................................... 61 Items Layout and Details ............................ 62
J JBF node ................................................... 195 JMF Over HTTP ................................ 205, 206 JMF Service .............................................. 213 Job Approved ............................................ 188 Job Business Flow ................. 59, 76, 77, 111 Job Details .................................................. 87 Job Expiration ............................................. 23 Job node ................................................... 192 Job Order Link .......................................... 188 Job Ordering Workflow ............................. 226 Job Pricing ........................................ 111, 112 Job Pricing Setup ...................................... 111 Job Shipped Link ...................................... 188 Job Type Groups .................................. 78, 91 Job Types .............................................. 77, 82 Joblet node................................................ 195 Joblet Types ................................................ 80 Joblets ................................................... 77, 78
L Laminating Process Estimators ................ 275 Lamination ............................................. 78, 80 Layout Maker Overview .................... 124, 130 LDAP ................................................. 177, 178 LDAP Configuration .................................. 179 LDAP Workflow ......................................... 179 Left Page ................................................... 174 Line Item ................................................... 110 Line Item Library .......................109, 111, 120 List Structure ............................................... 61 Localized Credit Card Display Name .. 7, 8, 26 Localized Customized Fields .............. 7, 8, 57 Localized Ordering Sequence............. 7, 8, 87 Logging Out of Web Services ....................... 4
Low Resolution Images .............................. 94
M Making Intent Steps Invisible ..................... 86 Managing Account Access ......................... 46 Managing Accounts ........................ 43, 44, 46 Managing Attachments .................. 6, 17, 126 Managing Cross Sales ............................... 73 Managing Delivery in the Batch Order Panel ................................................ 136, 139 Managing Folders ...................................... 74 Managing Follow-up Activities for Order and Job Changes ................... 263, 265 Managing HTML Catalogs ................... 69, 70 Managing Images ....................................... 74 Managing Inventory Information ................ 98 Managing Job Types .................................. 83 Managing Joblets ....................................... 79 Managing Jobs in the Production Queue ....................................... 123, 124, 139 Managing Layouts ...................................... 66 Managing Notifications and Alerts ................................ 123, 124, 125, 132 Managing Output Devices .................. 30, 111 Managing Print Service Provider Users .......................................... 17, 153, 233 Managing Production Files....................... 263 Managing Queues ................................ 4, 136 Managing Site Customization .................. 145 Managing Superstores ......................... 62, 63 Managing Taxes ....................................... 114 Managing Templates .................................. 95 Managing the Access Rights of a Template .................................................... 97 Managing the Account Departments ................................... 46, 53, 54 Managing the Cross Sales Library . 59, 68, 73 Managing the Database Library ........... 59, 76 Managing the Image Library ................ 59, 74 Managing the Jobs for Delivery Panel ........................................ 135, 136, 138 Managing the Line Item Library ............... 121 Managing the Production Queue Job List ................................. 123, 124 Managing the Shipped Deliveries Panel ........................................................ 138 Managing the Skin Library ............... 145, 153 Managing the Stock Library ....................... 37 Managing the Tax Packages ................... 113 Managing the Workflow Policy of a Template .............................................. 71, 97 Managing Tracked Jobs ........... 139, 140, 141 Managing Users ............................. 45, 46, 52 Managing Your Business and Production ................................ 231, 249, 260 Manual Calculation Model ........................ 110 Manual Impose ......................................... 128

Index
284 FreeFlow Web Services
Manually Pricing a Job .............................. 119 Mapping Files from a Reply Email .... 241, 242 Mapping LDAP - Web Services Attributes ........................................... 179, 180 MATCH ..................................................... 168 Maximum Password Age ...................... 11, 13 Modify Documents Attachment Format .......................................................... 234, 235 Modify Follow-up and Validity Periods .............................................. 234, 235 Modifying Account Preferences .......... 46, 111 Moneris ..................................................... 229 Moving a Category ...................................... 63 Moving a Template ..................................... 96 Moving Jobs from the Artwork Queue to Other Queues ............................... 263, 266 Moving One or More Images Between Folders ........................................................ 74 Moving Through the Stages in the Quote–Order Life Cycle ............237, 244, 245 Multiple Language Support ........................... 7 Multiple Tax Calculation ............................ 113 Multisite Compatibility ............................... 186
N Navigating Web Services .............................. 4 Nerve ......................................................... 202 Non-embedded Fonts ................................. 94 Notify Function .......................................... 203 Number of Pages .................................. 78, 81 Number of Pages Mismatch ........................ 94 Numbering ....................................... 19, 79, 82 Numbering Process Estimators ................ 275
O Opening the Credit Notes Screen and Displaying Credit Notes ............................ 255 Opening the Deposits screen and Displaying Deposits .................................. 250 Opening the Invoices Screen and Displaying Invoices ................................... 252 Opening the Receipts Screen and Displaying Receipts .................................. 258 Optional Spine .......................................... 173 Order Node ............................................... 189 Order Pricing ..................................... 111, 112 Order Pricing Setup .................................. 111 Order Tax Hierarchy ................................. 112 Ordering a Job from a Template with a DirectSmile Image. ............................ 155, 157 Ordering From a Template ........157, 158, 224 Ordering Quantity ........................................ 89 Ordering Sequence ............................... 86, 95 orderPriceLineItems node ......................... 199 Outgoing Emails Localized per User ........ 7, 8 Output Channels Set-up ....................... 205, 209, 212, 213, 215
Output Devices ........................................... 30 Output Manager Integration ..................... 211 Outsourcing Jobs to a Partner Print Service Provider ............................... 124, 133 Overview .................. 177, 178, 181, 225, 231
P Page Size ............................................. 78, 82 Pages Quantity Discount .......................... 172 Panel Layout .............................................. 60 Paper .................................................... 78, 81 Paper Category ........................................ 171 Paper List ................................................. 172 paper node ............................................... 196 Paper Selection Properties ...................... 171 Partner Print Service Provider Workflow................................................... 134 PaymentLine node ................................... 201 PayPal ...................................................... 228 PDF Preview ............................ 11, 13, 47, 48 Performing Additional Actions on the Quote ................................................ 237, 240 Placing the Order ............................. 245, 246 Planner Component ................................. 110 Postcards Job Type ................................. 117 Preparation ............................................... 173 Prerequisites .... 178, 181, 207, 218, 220, 226 Preview....................................................... 87 Previewing the Superstore or Category ................................................................... 69 Price Management ........... 109, 111, 112, 119 Price per Page ......................................... 172 priceLineItem node ................................... 194 Pricing .......................... 89, 90, 109, 133, 143 Pricing Concepts .............................. 267, 268 Pricing Overview ...................................... 109 Pricing Process Overview .......... 50, 111, 142 Pricing Properties ..................................... 172 pricingLineItems node .............................. 194 Print Buyer Side ....................................... 217 Print Buyer User Privileges .................. 21, 22 Print from DocuShare Integration ............ 218 Print Manager – Advanced Print Path ...... 214 Print Service Provider Side ...................... 217 Print Service Provider User Privileges ...................................... 17, 18, 233 Print Service Provider Workflow .............. 134 Print Settings ........................................ 29, 90 Print Time Settings ..................................... 90 Printing a Credit Note ....................... 255, 257 Printing a Deposit ............................. 250, 252 Printing a FreeFlow Repository Job using FreeFlow Print Manager - Advanced Print Path ................................ 216 Printing a FreeFlow Web Services Job to FreeFlow JMF Service ......................... 214
Production Pricing
Print Service Provider User Guide 285
Printing a Job Based on a Repository Template ................................................... 221 Printing a Job to FreeFlow Output Manager .................................................... 212 Printing a Receipt .............................. 258, 260 Printing a Web Services Job to FreeFlow Process Manager .............. 207, 210 Printing an Invoice ............................ 252, 255 Printing Book Assembly Jobs on More Than One Output Device .................. 124, 131 Printing from DocuShare ........................... 219 Printing Jobs Using the Layout Maker ...... 131 PrintProvider node .................................... 200 Process Manager Checklist ...................... 207 Process Manager Integration .................... 204 Process Manager Manifest Integration ..... 207 Producing a Book Assembly Job .............. 175 Producing Jobs ................................. 123, 133 Production Management ........................... 123 production node ........................................ 196 Production Plan ......................................... 110 Production Pricing .....................231, 242, 267 Production Queue Overview ..................... 123 Progressing from Quotes to Orders .. 237, 244 Providing the Quote to the Customer (Committing)...................................... 245, 247
Q Q&A ........................................................... 187 Quote before Upload Scenario ................... 87
R Receipt & Deposit ..................................... 200 ReceiptLine node ...................................... 200 Receptor Implementation .......................... 203 Receptors .................................................. 202 References ................................................ 213 Region and Languages ............................... 13 Regular FreeFlow Web Services Pricing Mechanism .................................... 268 Remote Support .................................... 11, 12 Removing a DocuShare Connection ........ 219 Removing a Product from a Cross Sale .................................................................... 73 Removing a Tax from a Package ............. 115 Removing Intent Steps ................................ 86 Removing Items from the Content List ....... 65 Removing Output Devices .......................... 32 Renaming a Catalog ................................... 70 Renaming a Category ................................. 63 Renaming a Folder ..................................... 74 Renaming a Job Type ................................. 83 Renaming a Joblet ...................................... 79 Renaming a Template ................................. 95 Renaming an Image .................................... 75 Repositioning Jobs ........................................ 5
Requesting a Quote from another Print Provider ............................................ 242, 243 Restrictions and Known Limitations ................................ 157, 158, 225 Result Line Item ....................................... 111 Result Line Items ..................................... 121 Result Matrix ............................................ 110 Revising the Quote or Order .... 245, 246, 247 RGB Images ............................................... 94 Right Page ............................................... 174
S SaferPay .................................................. 228 Sales ................................................ 231, 237 Sample IF Syntax ..................................... 167 Saving a Job as a Template ............ 141, 143 Saving and Previewing Views ................................ 146, 147, 148, 152 Saving Templates .................................... 221 Searching for a Line Item ......................... 121 Searching for an Order ..................... 141, 143 Searching for Jobs ................................... 139 Searching the Stock Library ....................... 37 Select Variable Data Fields ........................ 99 Selecting a Job Type ................................ 116 Selecting a Quote and Displaying the Product Tab ...................................... 237, 240 Selecting a Template ............................... 116 Selecting Languages ........................ 151, 152 Selecting Shipping Method Groups for the Account .................................... 41, 46, 51 Selecting the Printing Stock ....................... 85 Selecting Variable Image Fields ................ 99 Selecting Variable Text Fields ................... 99 Sending a Template as MailToPrint ........... 97 Sending an HTML Catalog by Email .... 69, 72 Sending and Confirming Soft Proofs 263, 264 Separating a Single Job into Multiple Packages ................................................. 137 Server Address .................................... 11, 12 Set Sales Tips .................................. 235, 239 Set up Account Groups ............................ 232 Set up Web Services Order Center Email ........................................................ 233 Setting a Default Tax Package ................ 114 Setting General Properties ....................... 170 Setting HTML Catalog Template Parameters ................................................. 70 Setting Image Resolution Warning ............ 29 Setting Material Properties ....................... 171 Setting Page Size Properties ................... 170 Setting Paper Sizes .................................... 38 Setting Pricing Properties......................... 171 Setting Size Difference ............................... 29 Setting Speed and Waste .......................... 35 Setting Splitting Properties ....................... 171
Index
286 FreeFlow Web Services
Setting the Account Job-ordering Windows ................................. 47, 50, 53, 148 Setting up a Binding Preview .................... 174 Setting up a New Preview ......................... 174 Setting Up Production Pricing ........... 267, 270 Settings ....................................................... 89 Settings in Web Services .......................... 161 Setting-up Intent Pricing ............................ 116 Setting-up Manual Pricing ......................... 119 Setup .........................................109, 111, 112 Set-up Job Type Pricing ............................ 115 Setup Line Items ....................................... 120 Set-up Tax Packages .......................... 90, 112 shipping node ............................................ 197 Size Mismatch ............................................. 93 Sorting Jobs .................................................. 5 Specifying First Page After Login ..... 151, 152 Specifying the Intent ................................... 93 Splitting Fields into Several Tabs ............. 107 Status Icons .................................................. 3 Store Setup ................................................. 59 Superstore Catalogs ................................... 60 Superstore Look and Feel ........................... 60 Synchronizing Web Services with the Repository ................................................. 220 System Requirements ............................... 213 System Setup .............................................. 11
T Tasks Handled in the Artwork Queue ....... 263 Tax Package ................................. 40, 41, 111 Template Creation ...................................... 92 Template Pricing ....................................... 221 Template Structure ..................................... 92 Template Types .......................................... 91 Templates ............................................. 77, 91 Terms and Conditions ................................. 14 Testing the New Configurations ................ 180 Text Fields ................................................. 100 The Activities Screen ................260, 261, 266 The Artwork Queue ...................248, 260, 262 The Billing Manager .......................... 260, 267 The Commercial Queue .................... 260, 262 The Contact Us Link ............................. 14, 16 The Customize Link .............................. 14, 15 The Dashboard ......................................... 260 The Existing Links ..................................... 188 The FAQ Link ........................................ 14, 15 The Help Link ........................................ 14, 16 The Job Details Panel ....................... 124, 141 The Logout Link .................................... 14, 15 The Print Service Provider Guide ................. 1 Time Zone ................................................... 13 Track Jobs ......................................... 123, 139 Transferring a Template Selection from a Repository to a Customer Collection .................................................. 220
Troubleshooting ....................................... 186 Types of Line Items .................................. 120
U Understanding Quote/Order Statuses and Icons .......................... 237, 238, 244, 249 Understanding the File Format ................ 162 Updating a Database ................................. 76 Upload File ................................................. 93 Uploading a Database File ....... 157, 158, 224 Uploading Designs ... 145, 146, 147, 148, 150 Uploading Files .............. 6, 49, 126, 127, 128 Uploading Images........ 64, 66, 67, 69, 75, 148, 149, 150 Uploading, Attaching, and Mapping Files .......................................... 237, 240, 241 User Management ............................ 177, 181 User Types ........................................... 21, 45 userContactAddress Node ....................... 190 Users .......................................................... 17 Using the Accounts Pane ........................... 43 Using the Edit Layout Theme Wizard ........ 66 Using the File Report ................................. 93 Using the Sample ..................................... 186 Using Web Services Features ..................... 5
V Variable Information ............................. 93, 94 VBA .......................................................... 168 Verifying Print Buyer Workflow via Credit Card ............................................... 230 Viewing and Editing Job Properties . 125, 142 Viewing and Editing the Job Pricing . 141, 142 Viewing and Editing the Job Properties ......................... 124, 133, 141, 142 Viewing and Editing the Job Ticket .. 141, 142 Viewing and Editing the Order Pricing .............................................. 141, 142 Viewing and Handling Quote and Order Activities ......................................... 248 Viewing and Modifying a Job’s Trim and Bleed Parameters ..................... 124, 126 Viewing Carrier Tracking Status .............. 138 Viewing Job Details .................................. 141 Viewing Quote and Order History .............................. 237, 244, 247, 249 Viewing the Details of an Invoice in the Receipt ............................................. 258, 259 VIPP Emitter Integration ........................... 216 Vlookup Function ..................................... 167 VPC Structure .......................................... 217
W Web Services and XMPie PersonalEffect Integration ........................ 222 Web Services Configuration .................... 223
Production Pricing
Print Service Provider User Guide 287
Web Services Order Center Billing module links description ............................ 200 Web Services Order Center User Guide ......................................................... 231 Web Services Setup ................................. 222 Web Services User Overview ....................... 3 Web Services VIPP Emitter Job in the Production Queue ..................................... 217 Web Services VIPP Emitter Workflow ...... 217 Where To Go From Here .......................... 204 Who Should Use This Guide ..................... 177 Wide-Format Printing Process Estimators ................................................. 276 Working with Data Export ......................... 202 Writing a Connector .......................... 187, 202
X XMPie PersonalEffect ...... 155, 157, 178, 222 XMPie PersonalEffect Integration ............. 222


