Embed Size (px)
Citation preview
HT1-2194-000-V.1.0 PRINTED IN CHINA XXXXXXXX
ii Preface
CopyrightCopyright © 2002 by Canon, Inc. All rights reserved. No part of this publication may bereproduced, transmitted, transcribed, stored in a retrieval system, or translated into anylanguage or computer language in any form or by any means, electronic, mechanical,magnetic, optical, chemical, manual, or otherwise, without the prior written permissionof Canon, Inc.
TrademarksCanon is a registered trademark, and UHQ is a trademark of Canon Inc.
All other product and brand names are registered trademarks, trademarks or servicemarks of their respective owners.
As an ENERGY STAR® Partner, Canon has determined that theFAX-L290/L240 meets the ENERGY STAR® guidelines for energyefficiency.
This equipment conforms with the essential requirements of EC Directive 1999/5/EC.We declare that this product conforms with the EMC requirementsof EC Directive 1999/5/EC at nominal mains input 230V, 50Hzalthough the rated input of the product is 200V–240V, 50/60Hz.If you move to another EU country and are experiencing troubleplease call the Canon Help Desk.
(For Europe Only)
IMPORTANT!• If you have purchased the FAX-L290 model, be sure to read
Appendix E before reading the rest of this guide.• Appendix C describes important information exclusively
for specified countries. If you find your country name inAppendix C, be sure to read it.
• H12251 (FAX-L240)• H12250 (FAX-L290)
Model Name
Preface iii
Super G3 is a phrase used to describe the new generation of faxunits that use ITU-T V.34 standard 33.6 Kbps* modems. Super G3High Speed Fax units allow transmission time of approximately threeseconds* per page which results in reduced telephone line charges.
*Approximately three seconds per page document transmission time based on Canon FAX StandardChart No. 1 (Standard Mode) at 33.6 Kbps modem speed. The Public Switched Telephone Network(PSTN) currently supports 28.8 Kbps modem speeds or lower, depending on telephone line conditions.
Laser Safety InformationLaser radiation could be hazardous to the human body. For this reason, laser radiationemitted inside this unit is hermetically sealed within the protective housing and externalcover. No radiation can leak from the machine in the normal operation of the product bythe user.
This fax is classified as a Class 1 Laser Product under EN 60825-1: 1994.
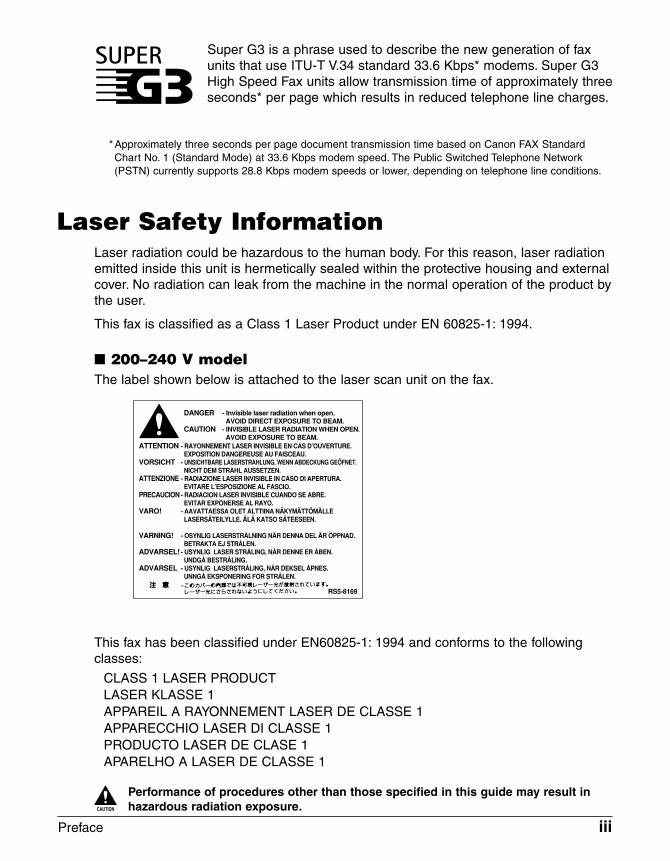
� 200–240 V modelThe label shown below is attached to the laser scan unit on the fax.
This fax has been classified under EN60825-1: 1994 and conforms to the followingclasses:
CLASS 1 LASER PRODUCTLASER KLASSE 1APPAREIL A RAYONNEMENT LASER DE CLASSE 1APPARECCHIO LASER DI CLASSE 1PRODUCTO LASER DE CLASE 1APARELHO A LASER DE CLASSE 1
c Performance of procedures other than those specified in this guide may result inhazardous radiation exposure.
iv Preface
ContentsChapter 1: IntroductionType Conventions Used in This Guide...................................................................1-2Customer Support .................................................................................................1-3Important Safety Instructions.................................................................................1-4
Chapter 2: Setting UpUnpacking the FAX ................................................................................................2-2
Removing Shipping Materials............................................................................2-4Assembling the FAX ..............................................................................................2-5Making Connections ..............................................................................................2-6
Connecting the Telephone Line Cord and External Devices .............................2-6Connecting the Power Cord...............................................................................2-8
Setting the Language and Country........................................................................2-9Main Components of the FAX..............................................................................2-11
Operation Panel ...............................................................................................2-12Special Function Buttons.............................................................................2-12
Installing the Toner Cartridge...............................................................................2-13Loading Paper......................................................................................................2-16Testing the FAX....................................................................................................2-18
Chapter 3: Registering InformationGuidelines for Entering Numbers, Letters, and Symbols.......................................3-2
Correcting a Mistake..........................................................................................3-4Registering Sender Information.............................................................................3-5
What is Sender Information? .............................................................................3-5Entering the Date and Time...............................................................................3-6Registering Your FAX Number and Name .........................................................3-6
Setting the Telephone Line Type............................................................................3-8Dialling Through a Switchboard.............................................................................3-9
Registering the R Button ...................................................................................3-9Setting the Summer Time ....................................................................................3-11
Chapter 4: Document HandlingDocument Requirements .......................................................................................4-2
Scanned Area of a Document ...........................................................................4-2Loading Documents...............................................................................................4-3
Adding Pages to the Document in the ADF ......................................................4-4
Preface v
Chapter 5: Paper HandlingPaper Requirements ..............................................................................................5-2
Printable Area ....................................................................................................5-3Selecting Paper for Your FAX.................................................................................5-3Loading Paper........................................................................................................5-3Selecting Face-Up or Face-Down Paper Delivery .................................................5-4Changing the Paper Size Setting...........................................................................5-7Adjusting the Toner Saver Setting..........................................................................5-9
Chapter 6: Speed DiallingWhat is Speed Dialling? ........................................................................................6-2
Speed Dialling Methods.....................................................................................6-2Registering One-Touch Speed Dialling..................................................................6-3Registering Coded Speed Dialling.........................................................................6-8Registering Group Dialling...................................................................................6-13Using Speed Dialling ...........................................................................................6-16
Sending a Document With Speed Dialling ......................................................6-16Making a Telephone Call With Speed Dialling.................................................6-17
Printing Speed Dialling Lists................................................................................6-18
Chapter 7: Sending FaxesPreparing to Send a Fax........................................................................................7-2
Documents You Can Fax ...................................................................................7-2Setting the Scanning Resolution .......................................................................7-2Setting the Scanning Contrast...........................................................................7-3Dialling Methods ................................................................................................7-4
Sending Methods...................................................................................................7-5Memory Sending ...............................................................................................7-5Manual Sending Via the Handset ......................................................................7-6
Cancelling Sending................................................................................................7-8Redialling When the Line is Busy ..........................................................................7-9
Manual Redialling ..............................................................................................7-9Cancelling Manual Redialling ........................................................................7-9
Automatic Redialling ..........................................................................................7-9What is Automatic Redialling?.......................................................................7-9Cancelling Automatic Redialling ....................................................................7-9Setting the Options for Automatic Redialling...............................................7-10
Sending the Same Document to Several Fax Numbers (Sequential Broadcasting) ...............................................................................7-12
Delayed Sending..................................................................................................7-14Scanning a Document into Memory for Delayed Sending...............................7-14Printing a Document Set for Delayed Sending................................................7-16Deleting a Document Set for Delayed Sending ...............................................7-17
vi Preface
Chapter 8: Receiving FaxesReceiving Methods ................................................................................................8-2
Receiving Faxes Automatically: FAX ONLY MODE ...........................................8-3Setting FAX ONLY MODE..............................................................................8-3
Receiving Both Faxes and Telephone Calls Automatically: Fax/Tel Mode ........8-5Setting Fax/Tel Mode .....................................................................................8-5Setting the Options for Fax/Tel Mode ............................................................8-6
Receiving Faxes Manually: MANUAL MODE ....................................................8-8Setting MANUAL MODE................................................................................8-8Receiving a Fax Manually .............................................................................8-8
Receiving With an Answering Machine: ANS.MACHINE MODE.....................8-10Setting ANS.MACHINE MODE....................................................................8-10Using the FAX With an Answering Machine................................................8-10
Receiving While Performing Other Tasks ............................................................8-11Receiving Faxes in Memory When a Problem Occurs ........................................8-11Cancelling Receiving ...........................................................................................8-11
Chapter 9: Special FeaturesSpecial Dialling ......................................................................................................9-2
Entering Pauses in a Fax/Telephone Number ...................................................9-2Switching Temporarily to Tone Dialling ..............................................................9-3Confirming a Dial Tone ......................................................................................9-4Dialling Through a Switchboard.........................................................................9-4
Documents Stored in Memory ...............................................................................9-5Printing a List of Documents Stored in Memory................................................9-5Printing a Document Stored in Memory ............................................................9-6Sending a Document Stored in Memory ...........................................................9-7Deleting a Document Stored in Memory ...........................................................9-9
Polling ..................................................................................................................9-10What is Polling? ...............................................................................................9-10Polling Receiving .............................................................................................9-10
Polling Another Fax Machine.......................................................................9-10Cancelling Polling Receiving .......................................................................9-12
Polling Sending ................................................................................................9-12Setting Up the Polling Box...........................................................................9-12Scanning a Document into the Polling Box .................................................9-15Changing or Deleting the Polling Box Settings............................................9-15
Restricting Use of Your FAX.................................................................................9-17Enabling Restriction of Your FAX .....................................................................9-17Cancelling Restriction of Your FAX ..................................................................9-18
Restricting Reception...........................................................................................9-20
Preface vii
Chapter 10: CopyingDocuments You Can Copy ...................................................................................10-2Making Copies .....................................................................................................10-2Making a Quick Single Copy................................................................................10-3
Chapter 11: Reports and ListsSummary of Reports and Lists ............................................................................11-2ACTIVITY REPORT.............................................................................................11-3TX (Transmission) REPORT................................................................................11-4
MULTI TX/RX (Transaction) REPORT .............................................................11-5RX (Reception) REPORT ....................................................................................11-5
Chapter 12: MaintenancePeriodic Cleaning.................................................................................................12-2
Cleaning the FAX’s Exterior.............................................................................12-2Cleaning the FAX’s Interior ..............................................................................12-3Cleaning the Scanner Components.................................................................12-5
Replacing the Toner Cartridge.............................................................................12-7
Chapter 13: TroubleshootingClearing Jams......................................................................................................13-2
Jams in the ADF ..............................................................................................13-2Paper Jams......................................................................................................13-3
Jams in the Paper Delivery Slots ................................................................13-3Jams Inside the Unit ....................................................................................13-3
LCD Messages ....................................................................................................13-8Paper Feeding Problems ...................................................................................13-13Faxing Problems ................................................................................................13-13
Sending Problems .........................................................................................13-13Receiving Problems.......................................................................................13-15
Copying Problems..............................................................................................13-17Telephone Problems ..........................................................................................13-18Printing Problems ..............................................................................................13-18General Problems..............................................................................................13-20If You Cannot Solve a Problem ..........................................................................13-21If a Power Cut Occurs........................................................................................13-22
viii Preface
Chapter 14: Summary of SettingsUnderstanding the Menu System ........................................................................14-2
Printing a List to Check the Current Settings ..................................................14-2Accessing the Menus ......................................................................................14-3
USER SETTINGS Menu ......................................................................................14-4REPORT SETTINGS Menu .................................................................................14-5TX (Transmission) SETTINGS Menu...................................................................14-6RX (Reception) SETTINGS Menu .......................................................................14-7PRINTER SETTINGS Menu ................................................................................14-8POLLING BOX Menu...........................................................................................14-9SYSTEM SETTINGS Menu ...............................................................................14-10
Appendix A: SpecificationsGeneral Specifications ..........................................................................................A-2Facsimile................................................................................................................A-2Copier ....................................................................................................................A-3Telephone ..............................................................................................................A-3Printer ....................................................................................................................A-3
Appendix B: Default Settings for Each CountryDefault Settings for Each Country.........................................................................B-2
UK, GERMANY, FRANCE, IRELAND ...............................................................B-2AUSTRALIA, HONG KONG, NEW ZEALAND, MALAYSIA, SINGAPORE .......B-4
Appendix C: Country-specific FeaturesUnited Kingdom.....................................................................................................C-2
Connecting External Device..............................................................................C-2Ringer Equivalence Number (R.E.N.) ...............................................................C-2
Germany................................................................................................................C-3Applicable Standards ........................................................................................C-3Connecting the Telephone Line Cord................................................................C-3Connecting a Telephone ...................................................................................C-3Connecting an Answering Machine ..................................................................C-4Customer Support.............................................................................................C-4
Australia ................................................................................................................C-5For Your Safety ..................................................................................................C-5Telstra FaxStream Duet..................................................................................C-5
Setting the FAX for Network Switch..............................................................C-6Network Switch System Operation ...............................................................C-6
New Zealand .........................................................................................................C-7Caution..............................................................................................................C-7Telecom FaxAbility ............................................................................................C-7
Setting the FAX for Network Switch..............................................................C-8Network Switch System Operation ...............................................................C-8
Preface ix
Appendix D: OptionsOptional Handset ..................................................................................................D-2
Package Contents .............................................................................................D-2Attaching the Handset to Your FAX...................................................................D-3Maintaining Your Handset .................................................................................D-4
Appendix E: FAX-L290 InstructionsIntroduction............................................................................................................E-2Differences Between the FAX-L290 and FAX-L240 ..............................................E-2Using Your Documentation ....................................................................................E-2Unpacking the FAX-L290 ......................................................................................E-2Connecting the FAX-L290 to Your PC ...................................................................E-3Print Media Requirements.....................................................................................E-4
Printable Area....................................................................................................E-4Selecting Print Media ............................................................................................E-5Loading Envelopes ................................................................................................E-6Loading Transparencies ........................................................................................E-7
Index .....................................................................................................................I-1

x Preface
Chapter 1 Introduction 1-1
Intr
od
uct
ion
Chapter 1
Introduction
Type Conventions Used in This Guide ...................................................1-2
Customer Support ....................................................................................1-3
Important Safety Instructions .................................................................1-4
1-2 Introduction Chapter 1
Type Conventions Used in This GuidePlease read the list below of symbols, terms, and abbreviations used in this guide.
c Cautions tell you how to avoid actions that could injure you or damage your FAX. Inorder to use your unit safely, always observe these cautions.
nNotes provide advice on using your FAX more effectively, describe operating restrictions,and tell you how to avoid minor difficulties. Reading these is recommended to make themost of your unit and its functions.
(1 p. n-nn) A number preceded by an arrow and enclosed in parenthesisreferences a page number (p.) or page numbers (pp.) thatcontain more information on the topic of the previous sentence.
default A setting that remains in effect unless you change it.
document or fax The original sheet(s) of paper you send or receive with your FAX.
menu A list of settings from which you select an item to set up orchange. A menu has a title which appears in the LCD.
TX/RX NO. Transaction number. When you send or receive a document, yourFAX automatically assigns the document a unique transactionnumber. A transaction number is a four-digit number that will helpyou keep track of documents you send and receive.
TX Denotes Sending.
RX Denotes Receiving.
Ex: Example of a message or setting displayed in the LCD.
ADF Automatic Document Feeder. The device on your FAX thatautomatically feeds a document into the unit for faxing andcopying.
LCD Liquid Crystal Display. The display on the operation panel thatdisplays messages and settings.
ECM Error Correction Mode. The ability of your FAX to reduce systemand line errors when sending to or receiving from a fax machinewith ECM capability.
G3 Group 3. A system that uses encoding schemes to transmitimage data while reducing the amount of data that needs to betransmitted, thus reducing transmission time.
ITU-TS International Telecommunications Union-TelecommunicationsSector. A committee created to set international standards fortelecommunications.
Certain countries See Appendixes B and C to specify the countries.
Chapter 1 Introduction 1-3
Intr
od
uct
ion
In addition, this guide uses distinctive typefaces to identify buttons and information inthe LCD:
• The buttons you press appear in this typeface: Stop.
• Information in the LCD appears in this typeface: USER SETTINGS.
Customer SupportYour FAX is designed with the latest technology to provide trouble-free operation. If youencounter a problem with the unit’s operation, try to solve it by using the information inChapter 13. If you cannot solve the problem or if you think your FAX needs servicing,contact your local authorised Canon dealer or the Canon help line.
1-4 Introduction Chapter 1
Important Safety InstructionsRead these safety instructions thoroughly before using your FAX.
c Except as specifically described in this guide, do not attempt to service the FAXyourself. Never attempt to disassemble the unit: opening and removing its interiorcovers will expose you to dangerous voltages and other risks. For all service,contact your local authorised Canon dealer or the Canon help line.
� Handling and Maintenance• Follow all warnings and instructions marked on the FAX.
• Do not subject the FAX to strong physical shocks or vibrations.
• Always unplug the FAX before moving or cleaning it.
• To avoid paper jams, never unplug the power cord, open the front cover, or add orremove paper in the multi-purpose tray while printing.
• When transporting the FAX, be sure to remove the toner cartridge from the unit. Placethe toner cartridge in its original protective bag or wrap it in a thick cloth to preventexposure to light.
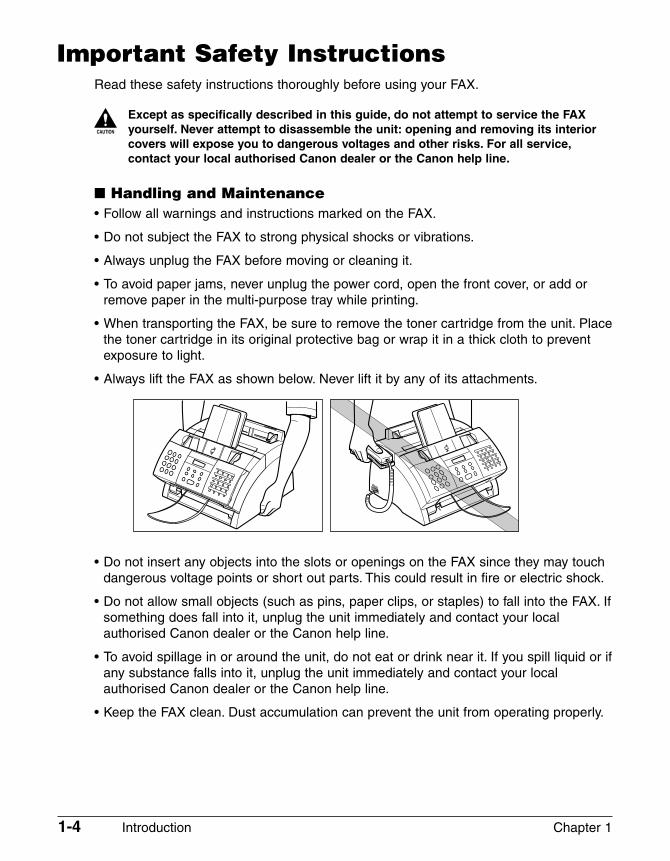
• Always lift the FAX as shown below. Never lift it by any of its attachments.
• Do not insert any objects into the slots or openings on the FAX since they may touchdangerous voltage points or short out parts. This could result in fire or electric shock.
• Do not allow small objects (such as pins, paper clips, or staples) to fall into the FAX. Ifsomething does fall into it, unplug the unit immediately and contact your localauthorised Canon dealer or the Canon help line.
• To avoid spillage in or around the unit, do not eat or drink near it. If you spill liquid or ifany substance falls into it, unplug the unit immediately and contact your localauthorised Canon dealer or the Canon help line.
• Keep the FAX clean. Dust accumulation can prevent the unit from operating properly.
Chapter 1 Introduction 1-5
Intr
od
uct
ion
• Unplug the FAX from the wall outlet and contact your local authorised Canon dealeror the Canon help line in any of the following cases:
– When the power cord or plug is damaged or frayed.
– If liquid has spilled into the unit.
– If the unit has been exposed to rain or water.
– If the unit does not operate normally when you have followed the instructions in thisguide. Adjust only those controls that are covered by the instructions in this guide.Improper adjustment of other controls may result in damage and may requireextensive work by a qualified technician to restore the product to normal operation.
– If the unit has been dropped or the cabinet has been damaged.
– If the unit exhibits a distinct change in performance, indicating a need for servicing.
� Location• Place the FAX on a flat, stable, vibration-free surface that is strong enough to support
its weight (approx. 10 kg).
• Place the FAX in a cool, dry, clean, well ventilated place.
– Make sure the area is free from dust.
– Make sure the location is not affected by extreme temperature changes, and alwaysstays between 10° and 32.5°C.
– Make sure the area’s relative humidity is always between 20% and 80%.
• Keep the FAX away from direct sunlight as this can damage it. If you have to place itnear a window, install heavy curtains or blinds.
• Do not use the FAX near water. Make sure that no wet or humid objects come intocontact with the unit.
• Do not use or store the FAX outdoors.
• Do not install the FAX near devices that contain magnets or generate magnetic fields,such as speakers.
• If possible, place the FAX near an existing telephone line outlet for easy connection ofthe telephone line cord, and to avoid the expense of installing a new outlet.
• Place the FAX near a standard 200–240 V AC (50–60 Hz) power outlet.
• To ensure reliable operation of the FAX and to protect it from overheating (which cancause it to operate abnormally and create a fire risk), do not block the exhaust vent.Never block or cover any openings on the unit by placing it on a bed, sofa, rug, orother similar surface. Do not place the unit in a cupboard or built-in installation, ornear a radiator or other heat source unless proper ventilation is provided. Leaveapproximately 10 cm space around all sides of the unit. For the dimensions of theFAX, see p. A-2.
1-6 Introduction Chapter 1
• Do not stack boxes or furniture around the power outlet. Keep the area free so youcan reach the outlet quickly. If you notice anything unusual (smoke, strange odours,noises) around the FAX, unplug the unit immediately. Contact your local authorisedCanon dealer or the Canon help line.
• Do not allow anything to rest on the power cord, and do not place the unit where thecord will be walked on. Make sure the cord is not knotted or kinked.
� Power Supply• During electrical storms, disconnect the power cord from the power outlet. (Please
note that any documents stored in the FAX’s memory will be deleted when you unplugthe unit.)
• Whenever you unplug the FAX, wait at least five seconds before you plug it in again.
• Do not plug the FAX into an uninterruptible power supply (UPS).
c This product emits low level magnetic flux.If you use a cardiac pacemaker and feel abnormalities, please move away from thisproduct and consult your doctor.
Chapter 2 Setting Up 2-1
Set
tin
g U
p
Chapter 2
Setting Up
Unpacking the FAX ...................................................................................2-2
Removing Shipping Materials.................................................................2-4
Assembling the FAX .................................................................................2-5
Making Connections ................................................................................2-6
Connecting the Telephone Line Cord and External Devices..................2-6
Connecting the Power Cord ...................................................................2-8
Setting the Language and Country.........................................................2-9
Main Components of the FAX ...............................................................2-11
Operation Panel....................................................................................2-12
Special Function Buttons..................................................................2-12
Installing the Toner Cartridge................................................................2-13
Loading Paper.........................................................................................2-16
Testing the FAX.......................................................................................2-18
2-2 Setting Up Chapter 2
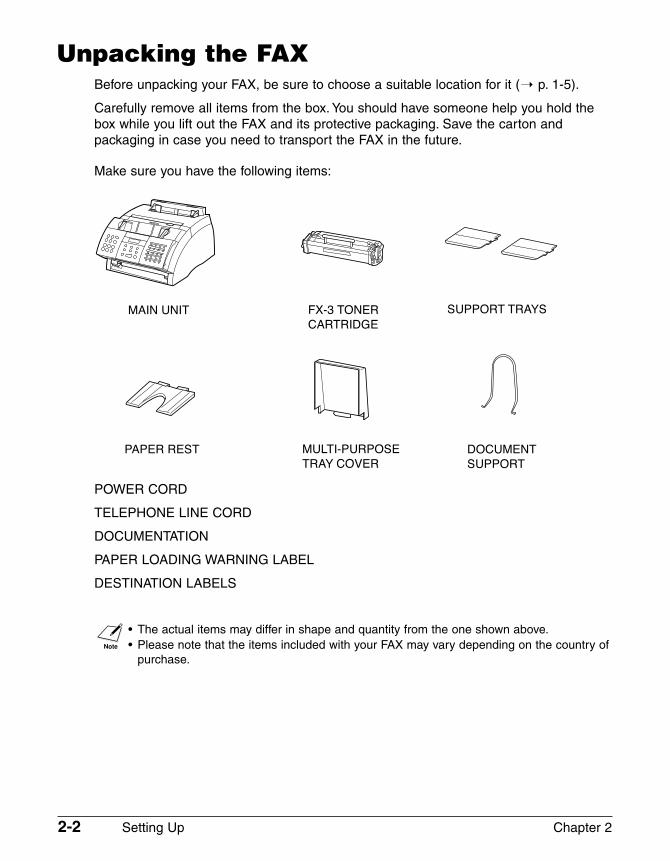
Unpacking the FAXBefore unpacking your FAX, be sure to choose a suitable location for it (1 p. 1-5).
Carefully remove all items from the box. You should have someone help you hold thebox while you lift out the FAX and its protective packaging. Save the carton andpackaging in case you need to transport the FAX in the future.
Make sure you have the following items:
POWER CORD
TELEPHONE LINE CORD
DOCUMENTATION
PAPER LOADING WARNING LABEL
DESTINATION LABELS
n • The actual items may differ in shape and quantity from the one shown above.• Please note that the items included with your FAX may vary depending on the country of
purchase.
MAIN UNIT FX-3 TONER �
CARTRIDGE
SUPPORT TRAYS
MULTI-PURPOSE �
TRAY COVER
DOCUMENT�
SUPPORT
PAPER REST
Chapter 2 Setting Up 2-3
Set
tin
g U
p
If any items are damaged or missing, notify your local authorised Canon dealer or theCanon help line immediately.
n • Important! Save your sales receipt for proof of purchase in case your unit requireswarranty service.
• If you have purchased the optional handset, see Appendix D for the items included.
2-4 Setting Up Chapter 2
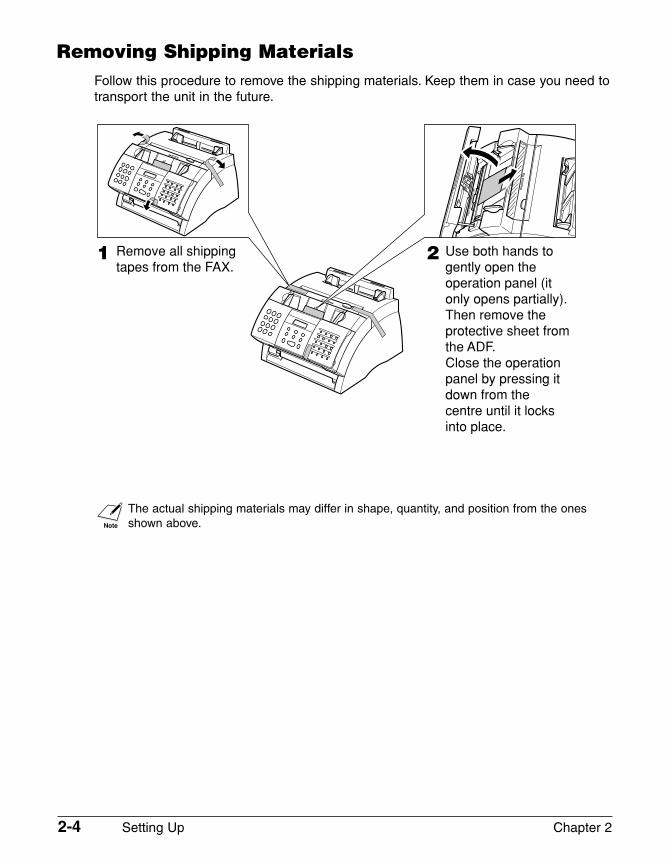
Removing Shipping MaterialsFollow this procedure to remove the shipping materials. Keep them in case you need totransport the unit in the future.
n The actual shipping materials may differ in shape, quantity, and position from the onesshown above.
1 Remove all shipping tapes from the FAX.
2 Use both hands to gently open the operation panel (it only opens partially). Then remove the protective sheet from the ADF.Close the operation panel by pressing it down from thecentre until it locks into place.
Chapter 2 Setting Up 2-5
Set
tin
g U
p
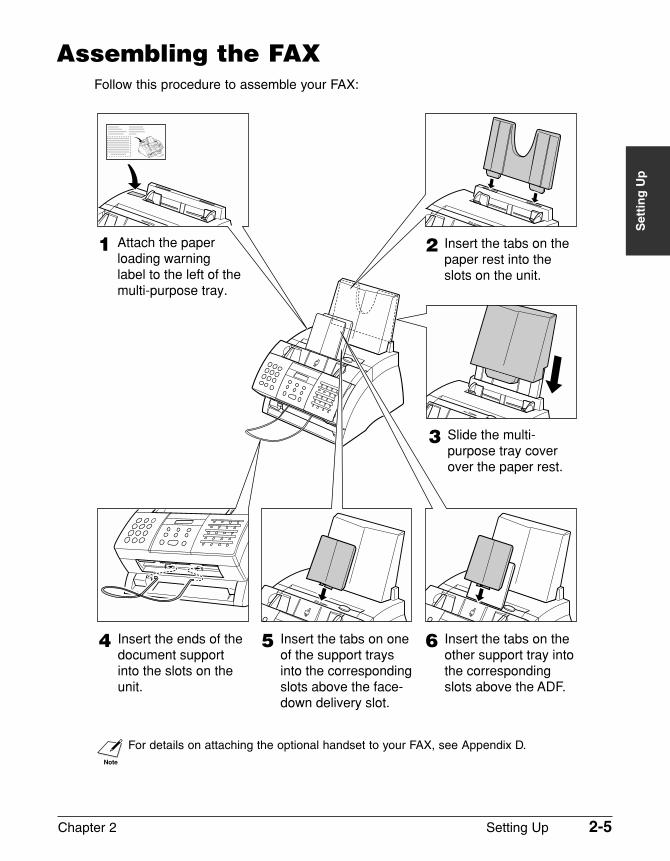
Assembling the FAXFollow this procedure to assemble your FAX:
n For details on attaching the optional handset to your FAX, see Appendix D.
1 Attach the paper loading warning label to the left of the multi-purpose tray.
2 Insert the tabs on the paper rest into the slots on the unit.
3 Slide the multi-purpose tray cover over the paper rest.
4 Insert the ends of the document support into the slots on the unit.
5 Insert the tabs on one of the support trays into the corresponding slots above the face-down delivery slot.
6 Insert the tabs on the other support tray into the corresponding slots above the ADF.
2-6 Setting Up Chapter 2
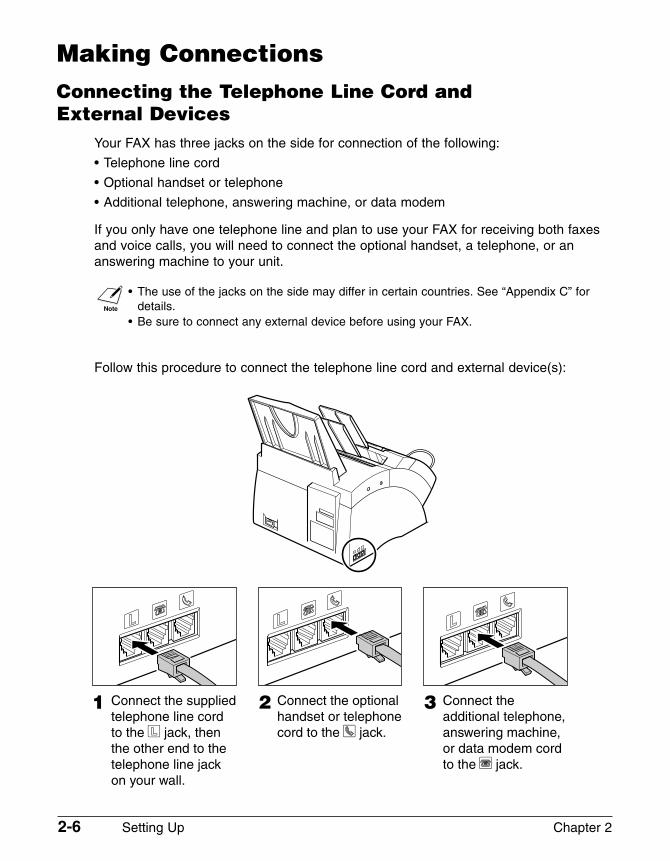
Making ConnectionsConnecting the Telephone Line Cord and External Devices
Your FAX has three jacks on the side for connection of the following:
• Telephone line cord
• Optional handset or telephone
• Additional telephone, answering machine, or data modem
If you only have one telephone line and plan to use your FAX for receiving both faxesand voice calls, you will need to connect the optional handset, a telephone, or ananswering machine to your unit.
n • The use of the jacks on the side may differ in certain countries. See “Appendix C” fordetails.
• Be sure to connect any external device before using your FAX.
Follow this procedure to connect the telephone line cord and external device(s):
1 Connect the supplied telephone line cord to the L jack, then the other end to the telephone line jack on your wall.
2 Connect the optional handset or telephone cord to the h jack.
3 Connect the additional telephone, answering machine, or data modem cord to the t jack.
Chapter 2 Setting Up 2-7
Set
tin
g U
p
n • Canon cannot guarantee that all answering machines will be compatible with your unit,due to varying specifications.
• If you have connected an external device to your FAX, be sure to set the correct receivemode (1 Chapter 8).
• To connect an additional telephone as well as an answering machine, connect theadditional telephone to the answering machine, and then the answering machine to yourFAX.
• If you connect a data modem to your FAX and you use it extensively, or others accessyour PC frequently through the data modem, you may want a dedicated telephone linefor your data modem.
2-8 Setting Up Chapter 2
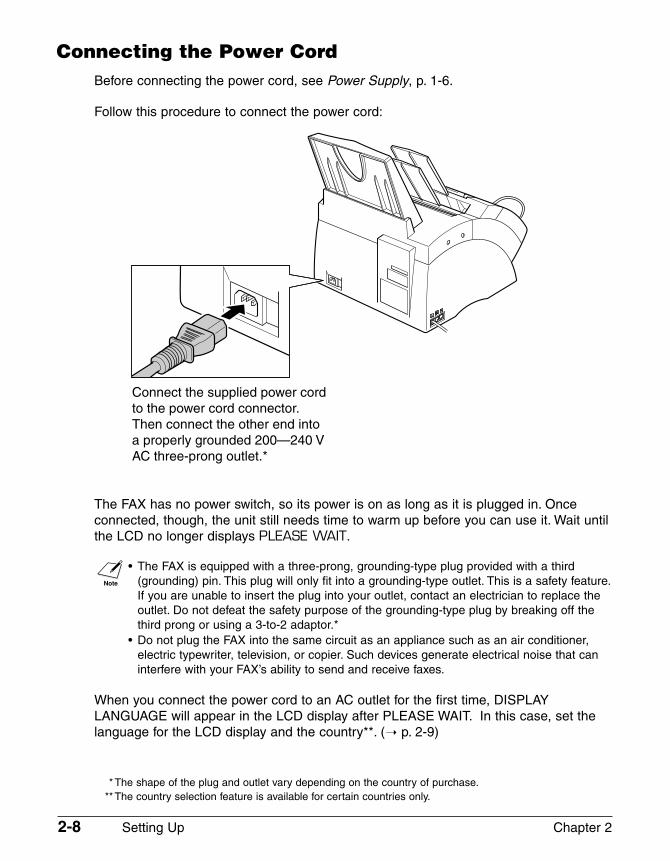
Connecting the Power CordBefore connecting the power cord, see Power Supply, p. 1-6.
Follow this procedure to connect the power cord:
The FAX has no power switch, so its power is on as long as it is plugged in. Onceconnected, though, the unit still needs time to warm up before you can use it. Wait untilthe LCD no longer displays PLEASE WAIT.
n • The FAX is equipped with a three-prong, grounding-type plug provided with a third(grounding) pin. This plug will only fit into a grounding-type outlet. This is a safety feature.If you are unable to insert the plug into your outlet, contact an electrician to replace theoutlet. Do not defeat the safety purpose of the grounding-type plug by breaking off thethird prong or using a 3-to-2 adaptor.*
• Do not plug the FAX into the same circuit as an appliance such as an air conditioner,electric typewriter, television, or copier. Such devices generate electrical noise that caninterfere with your FAX’s ability to send and receive faxes.
When you connect the power cord to an AC outlet for the first time, DISPLAYLANGUAGE will appear in the LCD display after PLEASE WAIT. In this case, set thelanguage for the LCD display and the country**. (1 p. 2-9)
Connect the supplied power cord to the power cord connector. Then connect the other end into a properly grounded 200—240 V AC three-prong outlet.*
* The shape of the plug and outlet vary depending on the country of purchase.** The country selection feature is available for certain countries only.
Chapter 2 Setting Up 2-9
Set
tin
g U
p
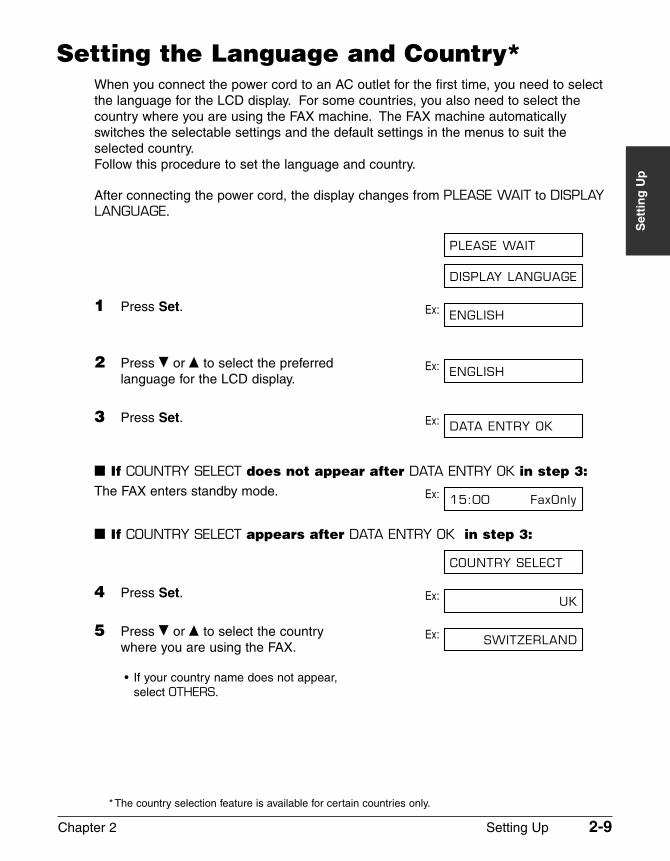
Setting the Language and Country*When you connect the power cord to an AC outlet for the first time, you need to selectthe language for the LCD display. For some countries, you also need to select thecountry where you are using the FAX machine. The FAX machine automaticallyswitches the selectable settings and the default settings in the menus to suit theselected country.Follow this procedure to set the language and country.
After connecting the power cord, the display changes from PLEASE WAIT to DISPLAYLANGUAGE.
1 Press Set. Ex:
2 Press ∂ or ¨ to select the preferred Ex: language for the LCD display.
3 Press Set. Ex:
� If COUNTRY SELECT does not appear after DATA ENTRY OK in step 3:The FAX enters standby mode. Ex:
� If COUNTRY SELECT appears after DATA ENTRY OK in step 3:
4 Press Set. Ex:
5 Press ∂ or ¨ to select the country Ex: where you are using the FAX.
• If your country name does not appear,select OTHERS.
SWITZERLAND
UK
COUNTRY SELECT
15:00 FaxOnly
DATA ENTRY OK
ENGLISH
ENGLISH
DISPLAY LANGUAGE
PLEASE WAIT
* The country selection feature is available for certain countries only.
2-10 Setting Up Chapter 2
6 Press Set.The FAX enters standby mode.
Ex:
Once you have selected the language and country, these setting menus will not appearnext time you connect the power cord.
n • To check the settings made by the country selection, you can print the USER’S DATALIST (1 p. 14-2).
• You can change the language or country setting using the SYSTEM SETTINGS menu (1 p.14-10).
15:00 FaxOnly
PUT IN CARTRIDGE
DATA ENTRY OK
Chapter 2 Setting Up 2-11
Set
tin
g U
p
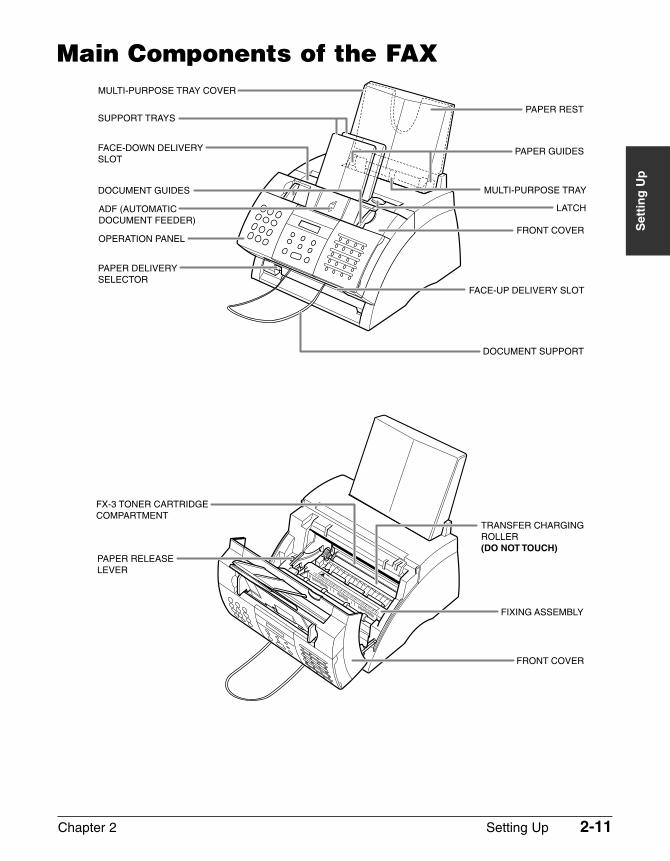
Main Components of the FAX
SUPPORT TRAYS
MULTI-PURPOSE TRAY COVER
ADF (AUTOMATIC DOCUMENT FEEDER)
DOCUMENT GUIDES
OPERATION PANEL
PAPER DELIVERY SELECTOR
DOCUMENT SUPPORT
FACE-UP DELIVERY SLOT
FRONT COVER
FACE-DOWN DELIVERY SLOT
LATCH
PAPER GUIDES
MULTI-PURPOSE TRAY
PAPER REST
FX-3 TONER CARTRIDGE COMPARTMENT
TRANSFER CHARGING ROLLER (DO NOT TOUCH)
PAPER RELEASE LEVER
FIXING ASSEMBLY
FRONT COVER
2-12 Setting Up Chapter 2
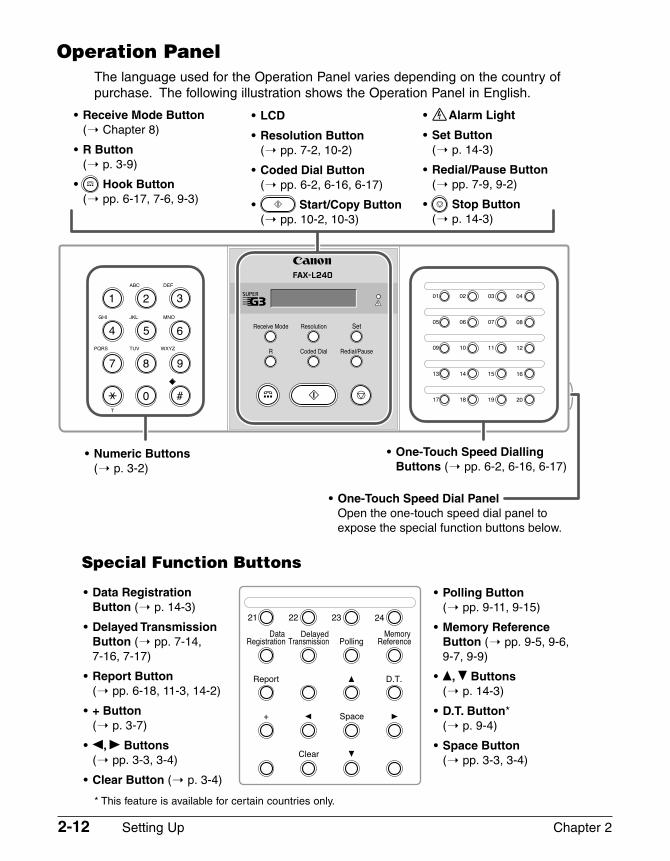
Operation PanelThe language used for the Operation Panel varies depending on the country ofpurchase. The following illustration shows the Operation Panel in English.
GHI JKL MNO
ABC DEF
TUV WXYZPQRSCoded DialR
Receive Mode
Redial/Pause
Resolution Set
01 02 03 04
05 06 07 08
09 10 11 12
13 14 15 16
17 18 19 20
1
0 #
7 8 9
4 5 6
2 3
21 22 23 24
Registration TransmissionData Delayed
ReferenceMemory
Polling
Report D.T.
+ Space
Clear
T
• Numeric Buttons (1 p. 3-2)
• One-Touch Speed Dialling Buttons (1 pp. 6-2, 6-16, 6-17)
• Receive Mode Button(1 Chapter 8)
• R Button(1 p. 3-9)
• Hook Button(1 pp. 6-17, 7-6, 9-3)
• LCD
• Resolution Button (1 pp. 7-2, 10-2)
• Coded Dial Button (1 pp. 6-2, 6-16, 6-17)
• Start/Copy Button(1 pp. 10-2, 10-3)
• Alarm Light
• Set Button(1 p. 14-3)
• Redial/Pause Button (1 pp. 7-9, 9-2)
• Stop Button(1 p. 14-3)
• One-Touch Speed Dial Panel Open the one-touch speed dial panel to
expose the special function buttons below.
• Data Registration Button (1 p. 14-3)
• Delayed Transmission Button (1 pp. 7-14, �
7-16, 7-17)
• Report Button (1 pp. 6-18, 11-3, 14-2)
• + Button (1 p. 3-7)
• ¬, ® Buttons(1 pp. 3-3, 3-4)
• Clear Button (1 p. 3-4)
• Polling Button(1 pp. 9-11, 9-15)
• Memory Reference Button (1 pp. 9-5, 9-6,
9-7, 9-9)
• ¨, ∂ Buttons(1 p. 14-3)
• D.T. Button*(1 p. 9-4)
• Space Button(1 pp. 3-3, 3-4)
Special Function Buttons
* This feature is available for certain countries only.

Chapter 2 Setting Up 2-13
Set
tin
g U
p
Installing the Toner CartridgeThis section describes how to install the toner cartridge in the FAX for the very firsttime. If you are replacing a used toner cartridge, see p. 12-7.
Before installing the toner cartridge, be sure to read the following:
• Use only FX-3 toner cartridges in your FAX.
• Keep the toner cartridge away from computer screens, disk drives, and floppy disks.The magnet inside the toner cartridge may harm these items.
• Do not store the toner cartridge in direct sunlight.
• Avoid locations subject to high temperature, high humidity, or rapid changes intemperature. Store the toner cartridge between 0° and 35°C.
• Do not expose the toner cartridge to direct sunlight or bright light for longer than fiveminutes.
• Store the toner cartridge in its protective bag. Do not open the bag until you are readyto install the toner cartridge in the unit.
• Save the toner cartridge’s protective bag in case you need to repack and transport thetoner cartridge at a later date.
• Do not store the toner cartridge in a salty atmosphere or where there are corrosivegases such as from aerosol sprays.
• Do not remove the toner cartridge from the FAX unnecessarily.
• Do not open the drum protective shutter on the toner cartridge.Print quality may deteriorate if the drum surface is exposed tolight or is damaged.
• Hold the toner cartridge as shown so that your hand is nottouching the drum protective shutter.
• Never touch the drum protective shutter. When holding thetoner cartridge, avoid touching the drum protective shutterwith your hands.
• Do not stand the toner cartridge on end, and do not turn itupside down. If toner becomes caked in the toner cartridge, it may prove impossible to free it even by shaking the tonercartridge.
c Do not place the toner cartridge in fire. Toner powder is flammable.
2-14 Setting Up Chapter 2
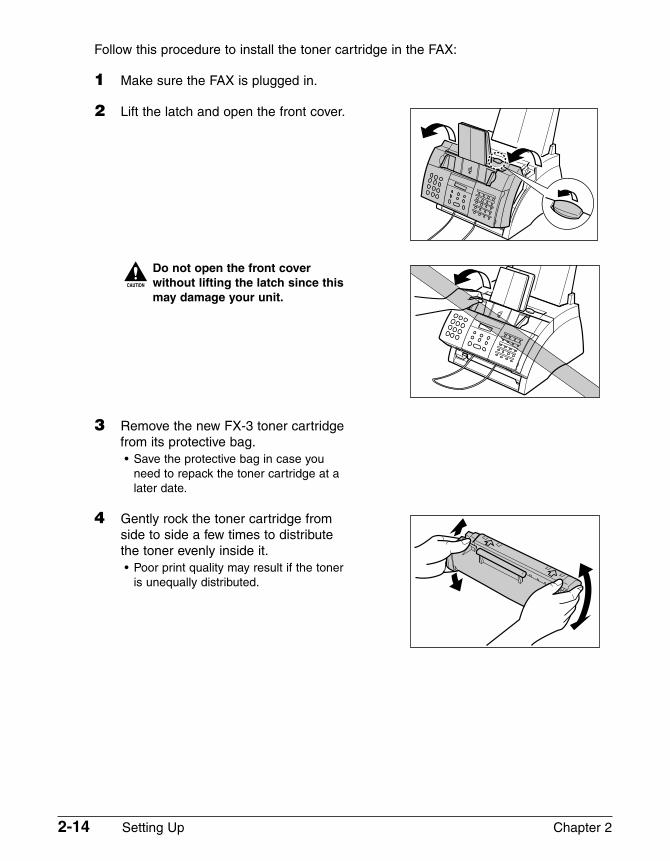
Follow this procedure to install the toner cartridge in the FAX:
1 Make sure the FAX is plugged in.
2 Lift the latch and open the front cover.
c Do not open the front cover without lifting the latch since thismay damage your unit.
3 Remove the new FX-3 toner cartridgefrom its protective bag.• Save the protective bag in case you
need to repack the toner cartridge at alater date.
4 Gently rock the toner cartridge from side to side a few times to distributethe toner evenly inside it.• Poor print quality may result if the toner
is unequally distributed.
Chapter 2 Setting Up 2-15
Set
tin
g U
p
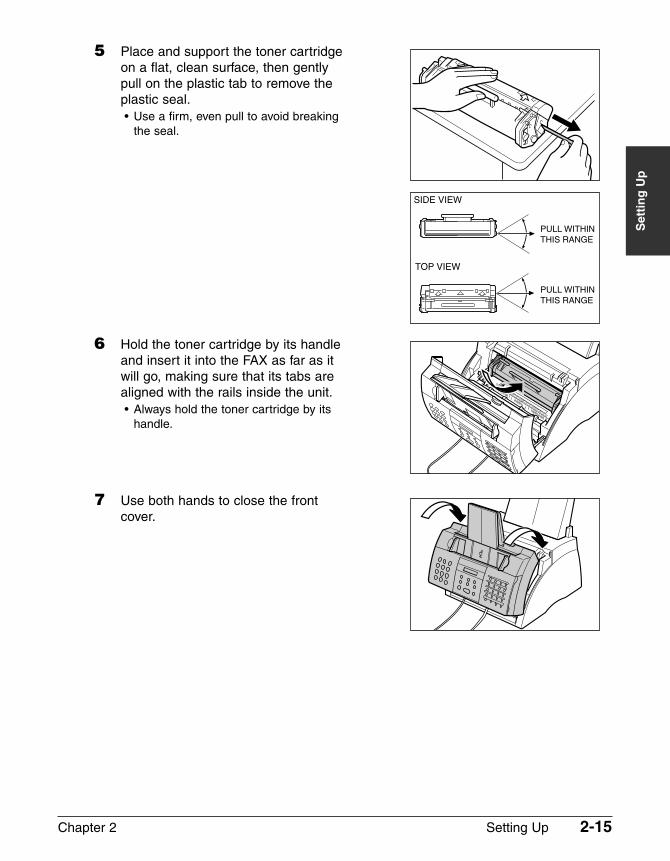
5 Place and support the toner cartridge on a flat, clean surface, then gentlypull on the plastic tab to remove theplastic seal.• Use a firm, even pull to avoid breaking
the seal.
6 Hold the toner cartridge by its handle and insert it into the FAX as far as itwill go, making sure that its tabs arealigned with the rails inside the unit.• Always hold the toner cartridge by its
handle.
7 Use both hands to close the front cover.
TOP VIEW
SIDE VIEW
PULL WITHINTHIS RANGE
PULL WITHINTHIS RANGE
2-16 Setting Up Chapter 2
Loading PaperThis section explains how to load plain paper in the multi-purpose tray.
For complete details on paper requirements and selecting paper for your FAX, seeChapter 5.
Before loading paper, be sure to read the following:
c The laser printing process uses high temperatures to fuse toner to the paper. Usepaper that will not melt, vaporise, discolour, or emit dangerous fumes attemperatures near 170°C. For example, do not use vellum paper in a laser printer.Make sure any letterhead or coloured paper you use can withstand hightemperatures.
• Your FAX supports regular copier paper, cotton bond paper, and typical letterheadpaper. It does not require special paper. Use cut-sheet paper only, not paper thatcomes on a roll.
• Be sure to load paper of the correct size, weight, and quantity recommended for yourFAX (1 Chapter 5).
• The multi-purpose tray is factory-set for loading A4-size paper, but you can changethis setting to other paper sizes (1 p. 5-7).
• You can choose whether paper is delivered through the face-up or face-down deliveryslot (1 p. 5-4). Choose according to the task you are performing.
• The face-down delivery slot can hold up to approximately 50 sheets of paper. Toprevent paper jams, remove paper from this slot before the count reaches 50.
• Do not load paper while the FAX is printing.
• Do not leave paper stacked in the multi-purpose tray for long periods of time since itmay bend or curl and cause problems.
• Certain environmental conditions, such as extreme temperatures or humidity, cancause some paper to misfeed in the multi-purpose tray. If you have trouble, feed onesheet at a time.
• Take care not to drop any foreign objects into the multi-purpose tray.
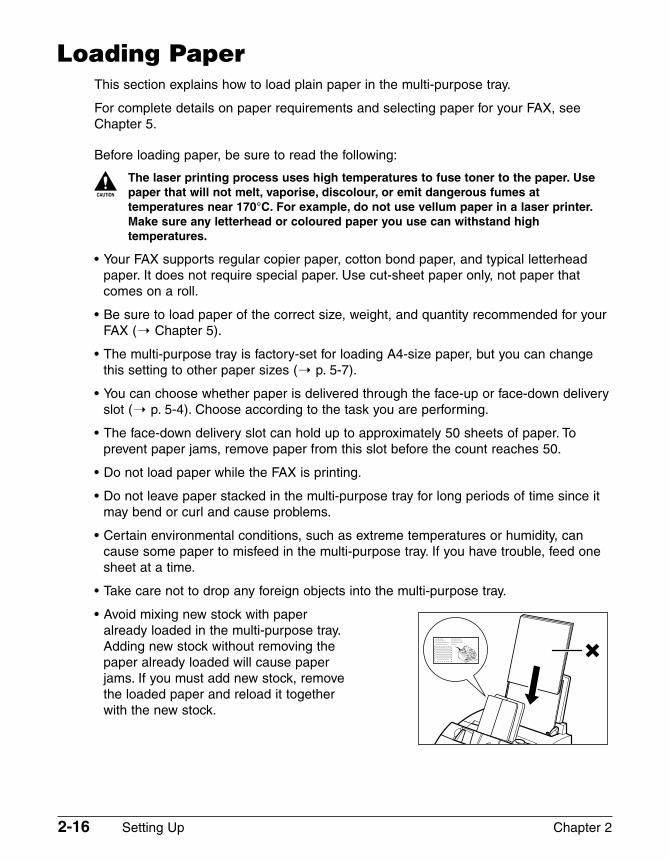
• Avoid mixing new stock with paper already loaded in the multi-purpose tray.Adding new stock without removing thepaper already loaded will cause paperjams. If you must add new stock, removethe loaded paper and reload it togetherwith the new stock.
Chapter 2 Setting Up 2-17
Set
tin
g U
p
Follow this procedure to load a stack (maximum 10 mm stack height) of A4-size plainpaper in the multi-purpose tray:
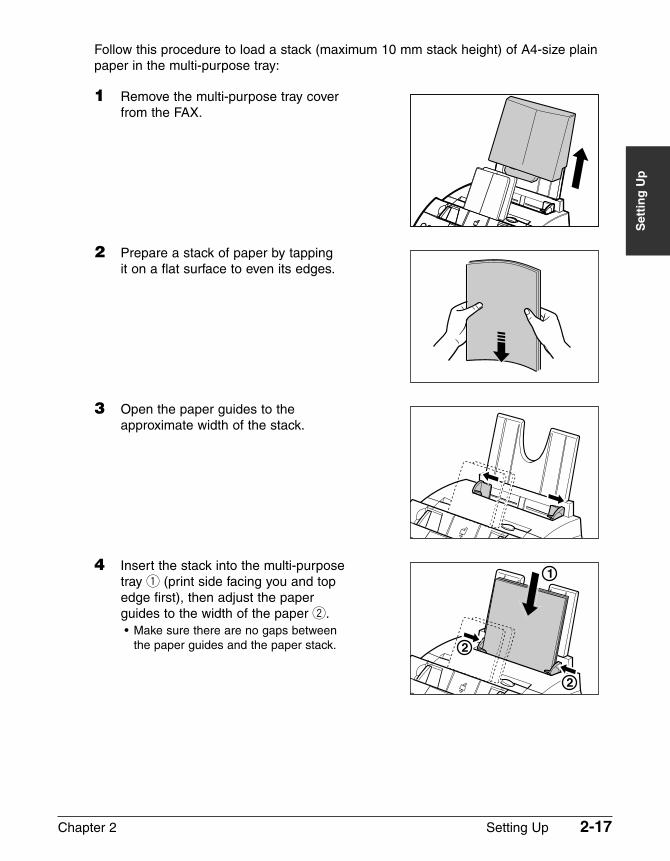
1 Remove the multi-purpose tray coverfrom the FAX.
2 Prepare a stack of paper by tapping it on a flat surface to even its edges.
3 Open the paper guides to the approximate width of the stack.
4 Insert the stack into the multi-purposetray q (print side facing you and topedge first), then adjust the paperguides to the width of the paper w.• Make sure there are no gaps between
the paper guides and the paper stack.
1
2
2
2-18 Setting Up Chapter 2
5 Replace the multi-purpose tray cover.• Be sure to replace this cover to prevent
dust accumulating inside the unit.
6 Adjust the paper delivery selector ifnecessary (1 p. 5-4).
Your FAX is now ready to print.
Testing the FAXOnce you have assembled the FAX, installed the toner cartridge, and loaded paper, youcan make sure the FAX is printing properly by making several copies of a document (1p. 10-2).
If you have problems printing, see Chapter 13.
Chapter 3 Registering Information 3-1
Reg
iste
rin
gIn
form
atio
n
Chapter 3
Registering Information
Guidelines for Entering Numbers, Letters, and Symbols.....................3-2
Correcting a Mistake...............................................................................3-4
Registering Sender Information..............................................................3-5
What is Sender Information?..................................................................3-5
Entering the Date and Time ...................................................................3-6
Registering Your FAX Number and Name ..............................................3-6
Setting the Telephone Line Type .............................................................3-8
Dialling Through a Switchboard..............................................................3-9
Registering the R Button ........................................................................3-9
Setting the Summer Time ......................................................................3-11
3-2 Registering Information Chapter 3
Guidelines for Entering Numbers, Letters,and Symbols
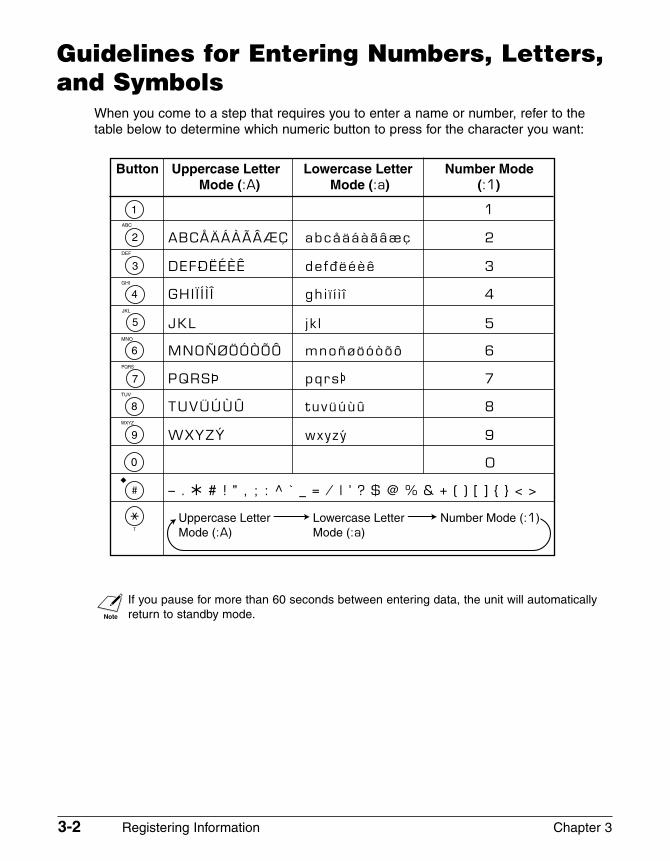
When you come to a step that requires you to enter a name or number, refer to thetable below to determine which numeric button to press for the character you want:
n If you pause for more than 60 seconds between entering data, the unit will automaticallyreturn to standby mode.
Chapter 3 Registering Information 3-3
Reg
iste
rin
gIn
form
atio
n
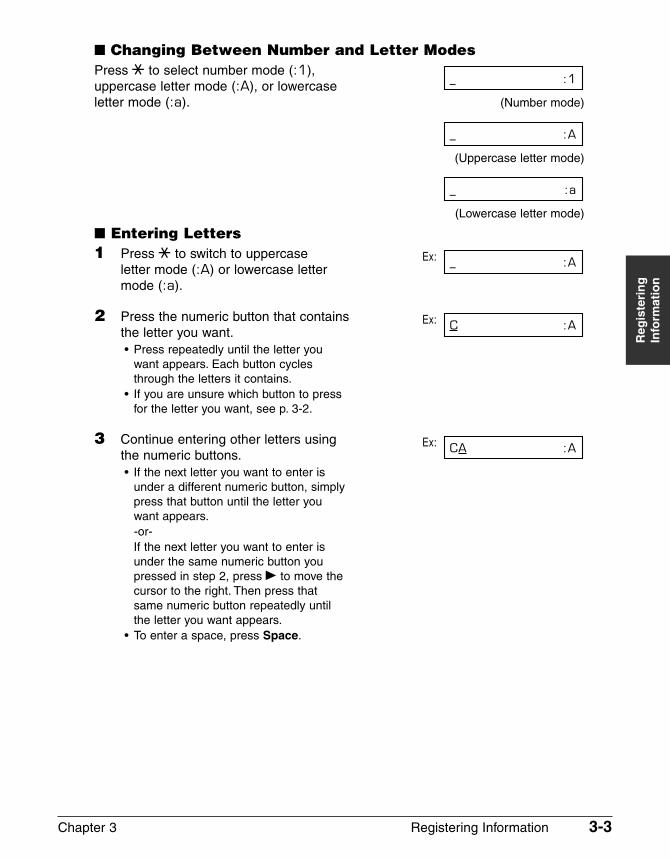
� Changing Between Number and Letter ModesPress T to select number mode (:1), uppercase letter mode (:A), or lowercase letter mode (:a). (Number mode)
(Uppercase letter mode)
(Lowercase letter mode)
� Entering Letters1 Press T to switch to uppercase Ex:
letter mode (:A) or lowercase lettermode (:a).
2 Press the numeric button that contains Ex:the letter you want.• Press repeatedly until the letter you
want appears. Each button cyclesthrough the letters it contains.
• If you are unsure which button to pressfor the letter you want, see p. 3-2.
3 Continue entering other letters using Ex:the numeric buttons.• If the next letter you want to enter is
under a different numeric button, simplypress that button until the letter youwant appears.-or-If the next letter you want to enter isunder the same numeric button youpressed in step 2, press ® to move thecursor to the right. Then press thatsame numeric button repeatedly untilthe letter you want appears.
• To enter a space, press Space.
CA :A
C :A
_ :A
_ :a
_ :A
_ :1
3-4 Registering Information Chapter 3
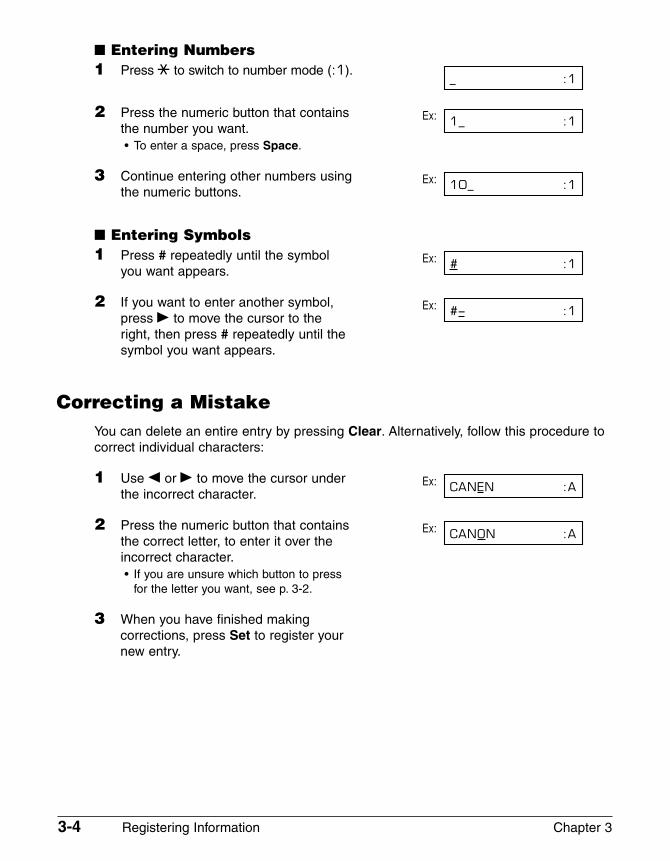
� Entering Numbers1 Press T to switch to number mode (:1).
2 Press the numeric button that contains Ex:the number you want.• To enter a space, press Space.
3 Continue entering other numbers using Ex:the numeric buttons.
� Entering Symbols1 Press # repeatedly until the symbol Ex:
you want appears.
2 If you want to enter another symbol, Ex:press ® to move the cursor to theright, then press # repeatedly until thesymbol you want appears.
Correcting a MistakeYou can delete an entire entry by pressing Clear. Alternatively, follow this procedure tocorrect individual characters:
1 Use ¬ or ® to move the cursor under Ex:the incorrect character.
2 Press the numeric button that contains Ex:the correct letter, to enter it over theincorrect character.• If you are unsure which button to press
for the letter you want, see p. 3-2.
3 When you have finished makingcorrections, press Set to register yournew entry.
CANON :A
CANEN :A
#– :1
# :1
10_ :1
1_ :1
_ :1
Chapter 3 Registering Information 3-5
Reg
iste
rin
gIn
form
atio
n
Registering Sender InformationWhat is Sender Information?
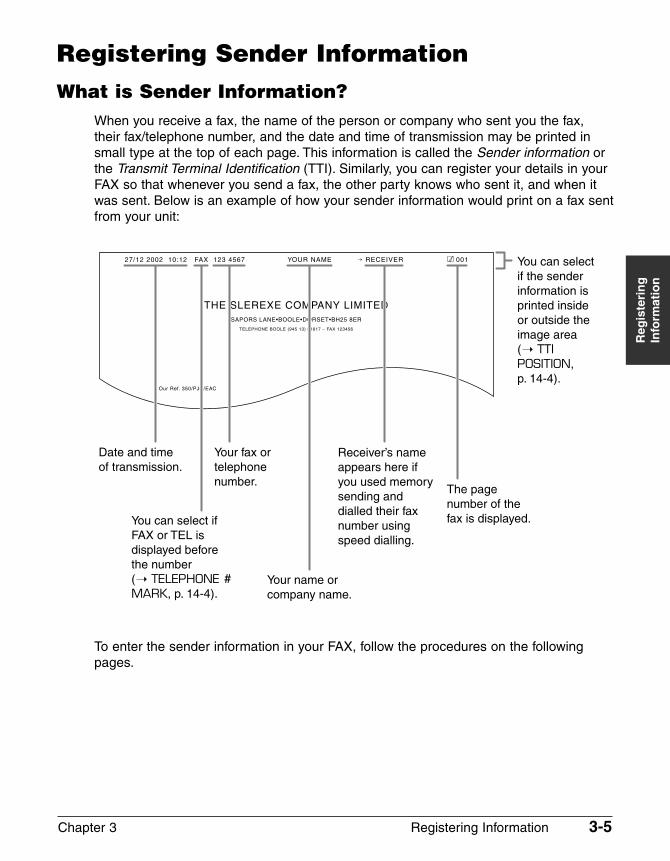
When you receive a fax, the name of the person or company who sent you the fax,their fax/telephone number, and the date and time of transmission may be printed insmall type at the top of each page. This information is called the Sender information orthe Transmit Terminal Identification (TTI). Similarly, you can register your details in yourFAX so that whenever you send a fax, the other party knows who sent it, and when itwas sent. Below is an example of how your sender information would print on a fax sentfrom your unit:
To enter the sender information in your FAX, follow the procedures on the followingpages.
3-6 Registering Information Chapter 3
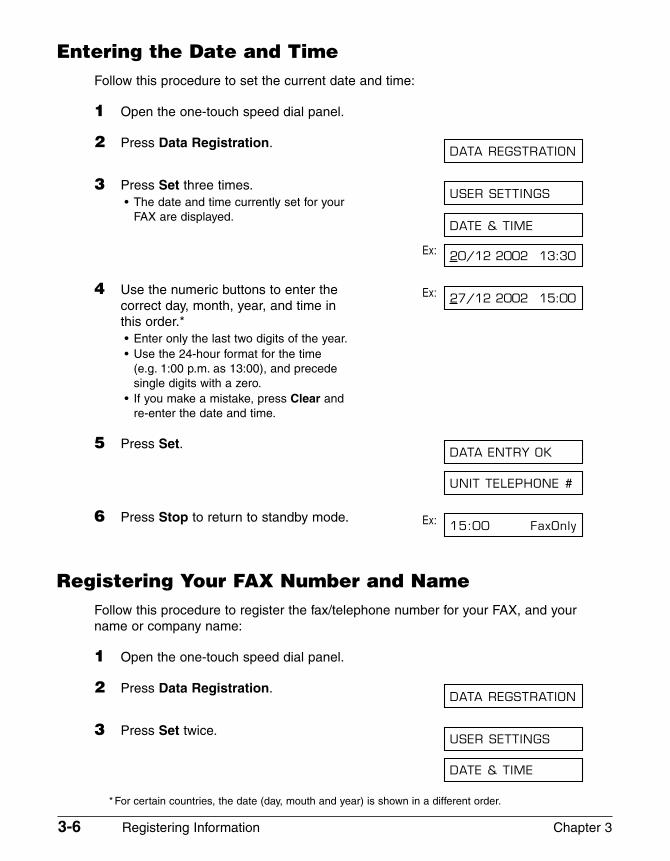
Entering the Date and TimeFollow this procedure to set the current date and time:
1 Open the one-touch speed dial panel.
2 Press Data Registration.
3 Press Set three times.• The date and time currently set for your
FAX are displayed.
Ex:
4 Use the numeric buttons to enter the Ex:correct day, month, year, and time inthis order.*• Enter only the last two digits of the year.• Use the 24-hour format for the time
(e.g. 1:00 p.m. as 13:00), and precedesingle digits with a zero.
• If you make a mistake, press Clear andre-enter the date and time.
5 Press Set.
6 Press Stop to return to standby mode. Ex:
Registering Your FAX Number and NameFollow this procedure to register the fax/telephone number for your FAX, and yourname or company name:
1 Open the one-touch speed dial panel.
2 Press Data Registration.
3 Press Set twice.
DATE & TIME
USER SETTINGS
DATA REGSTRATION
15:00 FaxOnly
UNIT TELEPHONE #
DATA ENTRY OK
27/12 2002 15:00
20/12 2002 13:30
DATE & TIME
USER SETTINGS
DATA REGSTRATION
* For certain countries, the date (day, mouth and year) is shown in a different order.
Chapter 3 Registering Information 3-7
Reg
iste
rin
gIn
form
atio
n
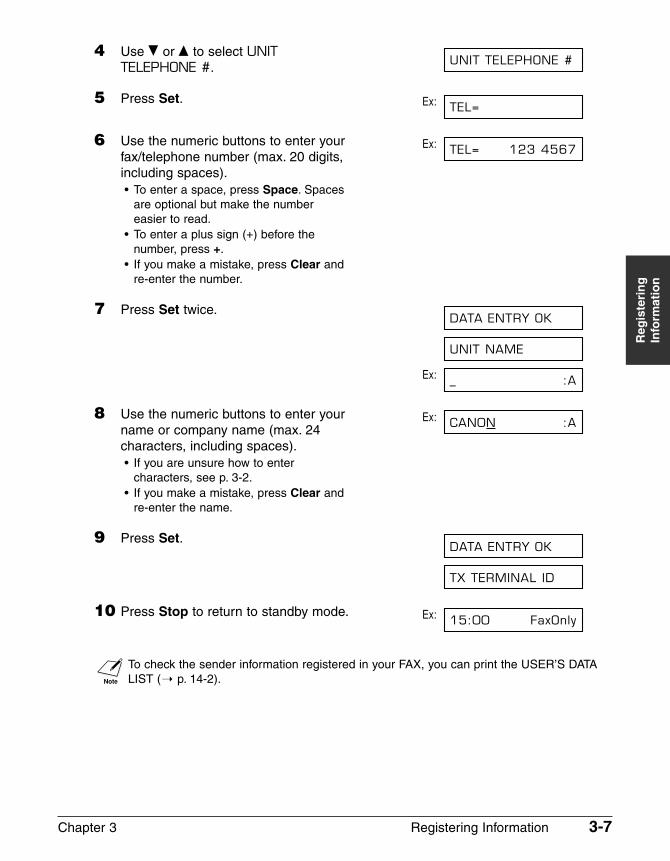
4 Use ∂ or ¨ to select UNITTELEPHONE #.
5 Press Set. Ex:
6 Use the numeric buttons to enter your Ex:fax/telephone number (max. 20 digits,including spaces).• To enter a space, press Space. Spaces
are optional but make the numbereasier to read.
• To enter a plus sign (+) before thenumber, press +.
• If you make a mistake, press Clear andre-enter the number.
7 Press Set twice.
Ex:
8 Use the numeric buttons to enter your Ex:name or company name (max. 24characters, including spaces).• If you are unsure how to enter
characters, see p. 3-2.• If you make a mistake, press Clear and
re-enter the name.
9 Press Set.
10 Press Stop to return to standby mode. Ex:
n To check the sender information registered in your FAX, you can print the USER’S DATALIST (1 p. 14-2).
15:00 FaxOnly
TX TERMINAL ID
DATA ENTRY OK
CAN0N :A
_ :A
UNIT NAME
DATA ENTRY OK
TEL= 123 4567
TEL=
UNIT TELEPHONE #
3-8 Registering Information Chapter 3
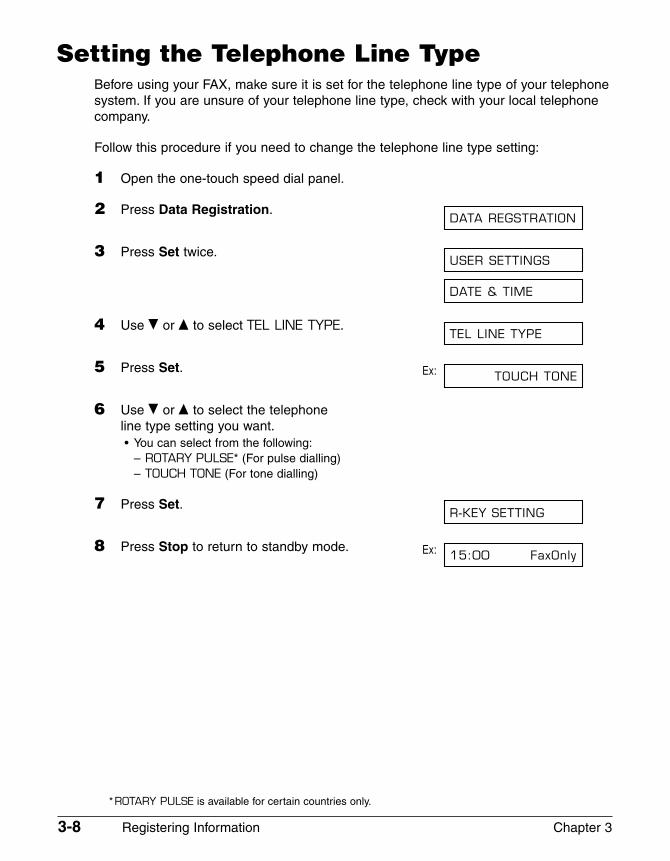
Setting the Telephone Line TypeBefore using your FAX, make sure it is set for the telephone line type of your telephonesystem. If you are unsure of your telephone line type, check with your local telephonecompany.
Follow this procedure if you need to change the telephone line type setting:
1 Open the one-touch speed dial panel.
2 Press Data Registration.
3 Press Set twice.
4 Use ∂ or ¨ to select TEL LINE TYPE.
5 Press Set. Ex:
6 Use ∂ or ¨ to select the telephone line type setting you want.• You can select from the following:
– ROTARY PULSE* (For pulse dialling)– TOUCH TONE (For tone dialling)
7 Press Set.
8 Press Stop to return to standby mode. Ex: 15:00 FaxOnly
R-KEY SETTING
TOUCH TONE
TEL LINE TYPE
DATE & TIME
USER SETTINGS
DATA REGSTRATION
*ROTARY PULSE is available for certain countries only.
Chapter 3 Registering Information 3-9
Reg
iste
rin
gIn
form
atio
n
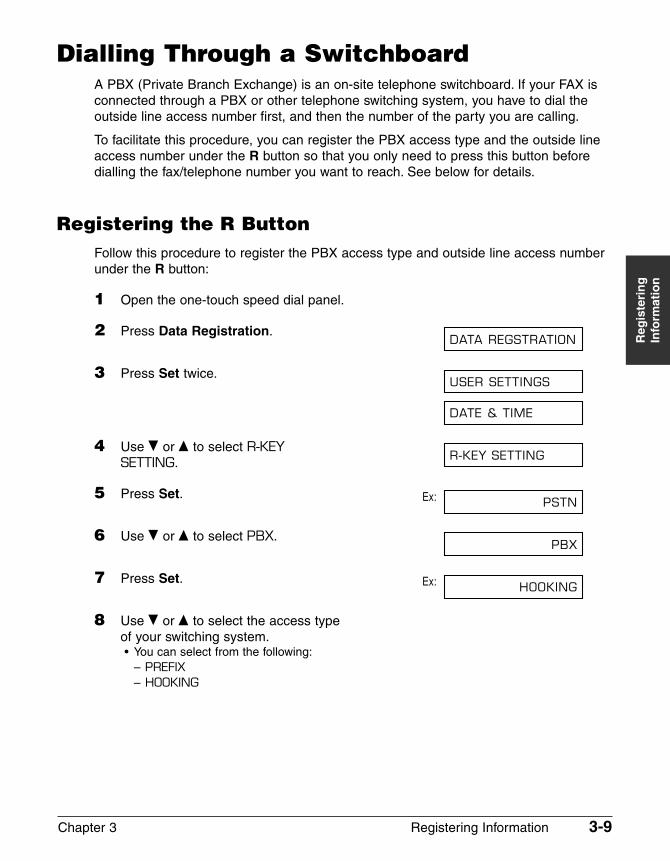
Dialling Through a SwitchboardA PBX (Private Branch Exchange) is an on-site telephone switchboard. If your FAX isconnected through a PBX or other telephone switching system, you have to dial theoutside line access number first, and then the number of the party you are calling.
To facilitate this procedure, you can register the PBX access type and the outside lineaccess number under the R button so that you only need to press this button beforedialling the fax/telephone number you want to reach. See below for details.
Registering the R ButtonFollow this procedure to register the PBX access type and outside line access numberunder the R button:
1 Open the one-touch speed dial panel.
2 Press Data Registration.
3 Press Set twice.
4 Use ∂ or ¨ to select R-KEY SETTING.
5 Press Set. Ex:
6 Use ∂ or ¨ to select PBX.
7 Press Set. Ex:
8 Use ∂ or ¨ to select the access typeof your switching system.• You can select from the following:
– PREFIX– HOOKING
HOOKING
PBX
PSTN
R-KEY SETTING
DATE & TIME
USER SETTINGS
DATA REGSTRATION
3-10 Registering Information Chapter 3
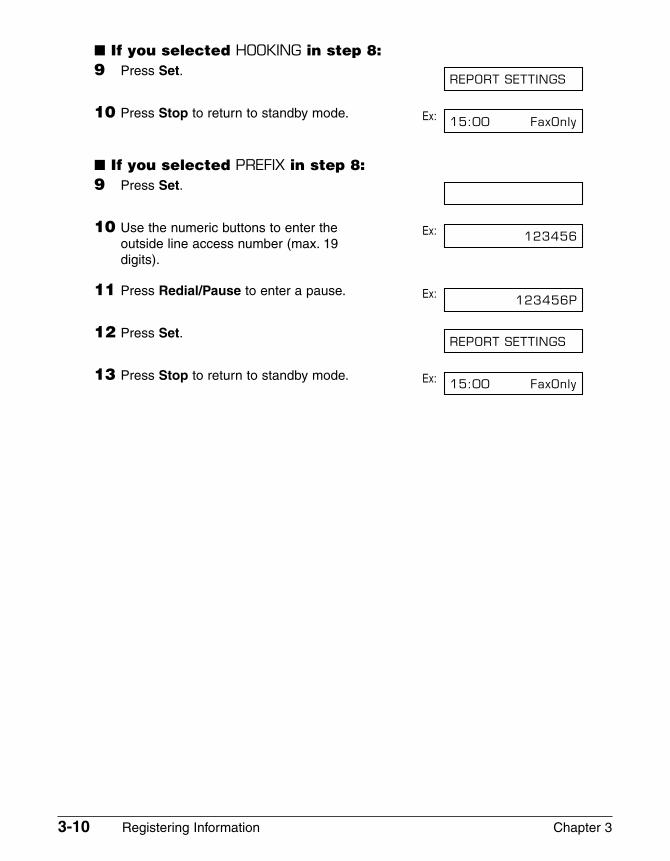
� If you selected HOOKING in step 8:9 Press Set.
10 Press Stop to return to standby mode. Ex:
� If you selected PREFIX in step 8:9 Press Set.
10 Use the numeric buttons to enter the Ex:outside line access number (max. 19digits).
11 Press Redial/Pause to enter a pause. Ex:
12 Press Set.
13 Press Stop to return to standby mode. Ex: 15:00 FaxOnly
REPORT SETTINGS
123456P
123456
15:00 FaxOnly
REPORT SETTINGS
Chapter 3 Registering Information 3-11
Reg
iste
rin
gIn
form
atio
n
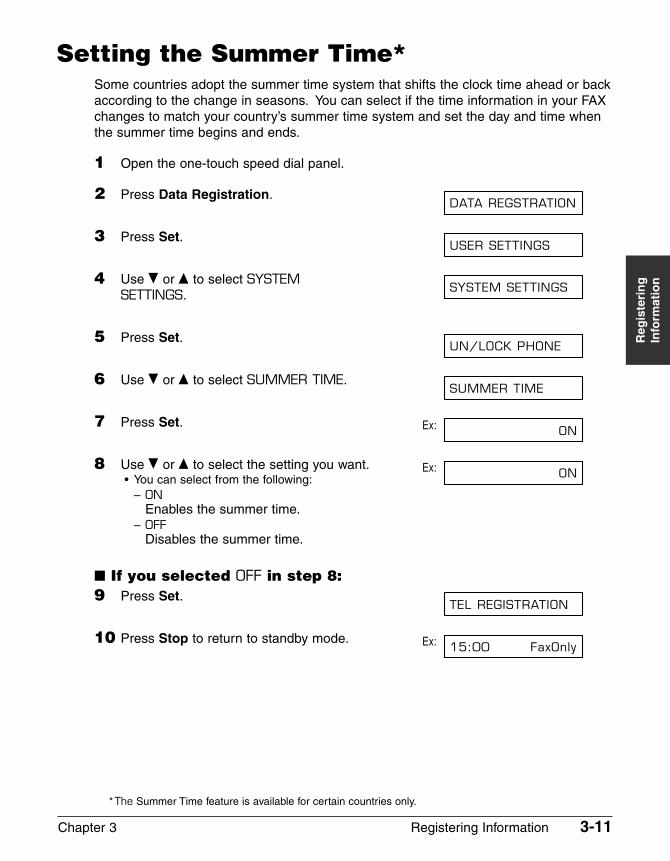
Setting the Summer Time*Some countries adopt the summer time system that shifts the clock time ahead or backaccording to the change in seasons. You can select if the time information in your FAXchanges to match your country’s summer time system and set the day and time whenthe summer time begins and ends.
1 Open the one-touch speed dial panel.
2 Press Data Registration.
3 Press Set.
4 Use ∂ or ¨ to select SYSTEM SETTINGS.
5 Press Set.
6 Use ∂ or ¨ to select SUMMER TIME.
7 Press Set. Ex:
8 Use ∂ or ¨ to select the setting you want. Ex:• You can select from the following:
– ONEnables the summer time.
– OFFDisables the summer time.
� If you selected OFF in step 8:9 Press Set.
10 Press Stop to return to standby mode. Ex: 15:00 FaxOnly
TEL REGISTRATION
ON
ON
SUMMER TIME
UN/LOCK PHONE
SYSTEM SETTINGS
USER SETTINGS
DATA REGSTRATION
*The Summer Time feature is available for certain countries only.
3-12 Registering Information Chapter 3
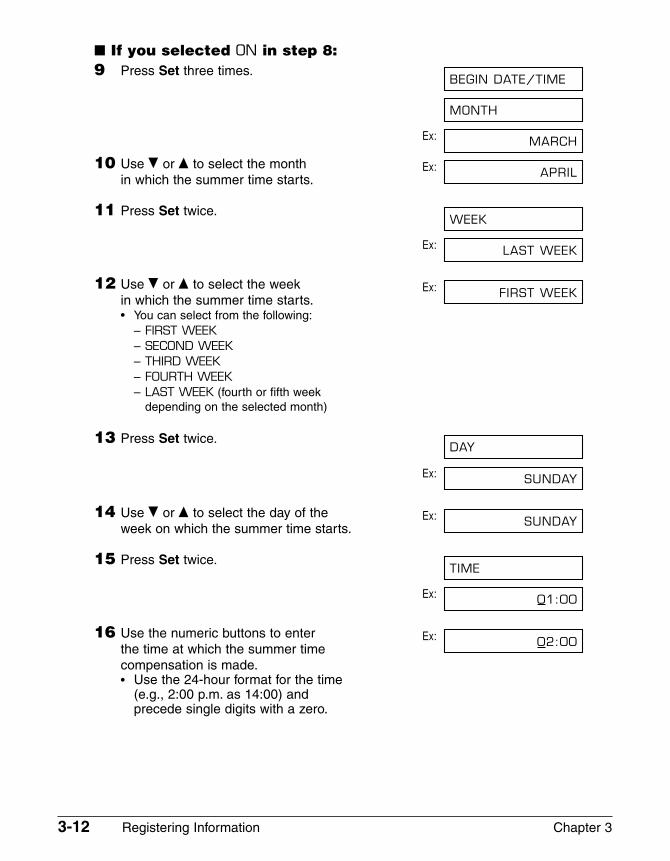
� If you selected ON in step 8:9 Press Set three times.
Ex:
10 Use ∂ or ¨ to select the month Ex:in which the summer time starts.
11 Press Set twice.
Ex:
12 Use ∂ or ¨ to select the week Ex:in which the summer time starts.• You can select from the following:
– FIRST WEEK– SECOND WEEK– THIRD WEEK– FOURTH WEEK– LAST WEEK (fourth or fifth week
depending on the selected month)
13 Press Set twice.
Ex:
14 Use ∂ or ¨ to select the day of the Ex:week on which the summer time starts.
15 Press Set twice.
Ex:
16 Use the numeric buttons to enter Ex:the time at which the summer time compensation is made.• Use the 24-hour format for the time
(e.g., 2:00 p.m. as 14:00) and precede single digits with a zero.
02:00
01:00
TIME
SUNDAY
SUNDAY
DAY
FIRST WEEK
LAST WEEK
WEEK
APRIL
MARCH
MONTH
BEGIN DATE/TIME
Chapter 3 Registering Information 3-13
Reg
iste
rin
gIn
form
atio
n
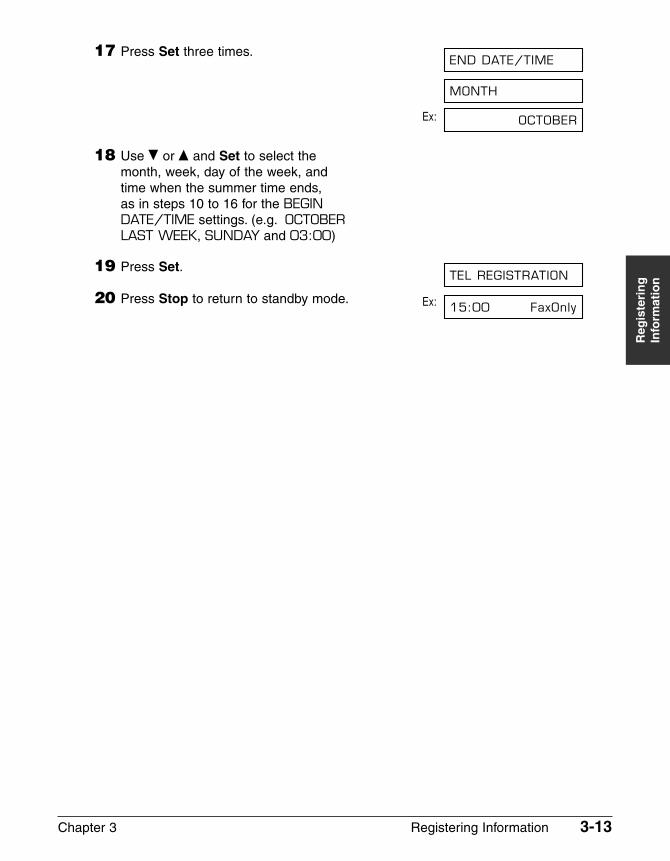
17 Press Set three times.
Ex:
18 Use ∂ or ¨ and Set to select the month, week, day of the week, and time when the summer time ends, as in steps 10 to 16 for the BEGIN DATE/TIME settings. (e.g. OCTOBER LAST WEEK, SUNDAY and 03:00)
19 Press Set.
20 Press Stop to return to standby mode. Ex: 15:00 FaxOnly
TEL REGISTRATION
OCTOBER
MONTH
END DATE/TIME

3-14 Registering Information Chapter 3
Chapter 4 Document Handling 4-1
Do
cum
ent
Han
dlin
g
Chapter 4
Document Handling
Document Requirements .........................................................................4-2
Scanned Area of a Document ................................................................4-2
Loading Documents .................................................................................4-3
Adding Pages to the Document in the ADF ...........................................4-4
4-2 Document Handling Chapter 4
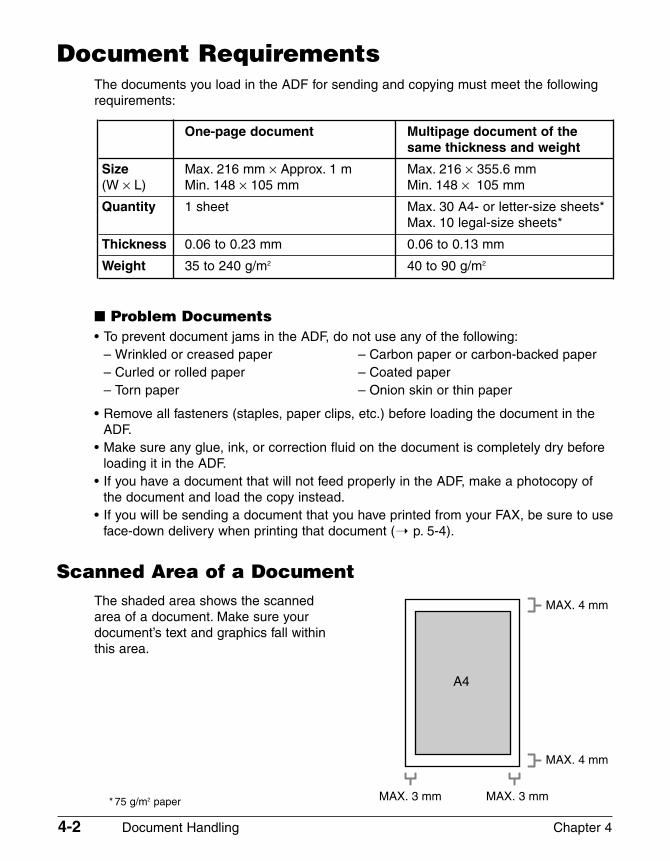
Document RequirementsThe documents you load in the ADF for sending and copying must meet the followingrequirements:
One-page document Multipage document of the same thickness and weight
Size Max. 216 mm × Approx. 1 m Max. 216 × 355.6 mm(W × L) Min. 148 × 105 mm Min. 148 × 105 mm
Quantity 1 sheet Max. 30 A4- or letter-size sheets*Max. 10 legal-size sheets*
Thickness 0.06 to 0.23 mm 0.06 to 0.13 mm
Weight 35 to 240 g/m2 40 to 90 g/m2
� Problem Documents• To prevent document jams in the ADF, do not use any of the following:
– Wrinkled or creased paper – Carbon paper or carbon-backed paper– Curled or rolled paper – Coated paper– Torn paper – Onion skin or thin paper
• Remove all fasteners (staples, paper clips, etc.) before loading the document in theADF.
• Make sure any glue, ink, or correction fluid on the document is completely dry beforeloading it in the ADF.
• If you have a document that will not feed properly in the ADF, make a photocopy ofthe document and load the copy instead.
• If you will be sending a document that you have printed from your FAX, be sure to useface-down delivery when printing that document (1 p. 5-4).
Scanned Area of a DocumentThe shaded area shows the scannedarea of a document. Make sure yourdocument’s text and graphics fall withinthis area.
MAX. 4 mm
MAX. 4 mm
MAX. 3 mmMAX. 3 mm
A4
* 75 g/m2 paper
Chapter 4 Document Handling 4-3
Do
cum
ent
Han
dlin
g
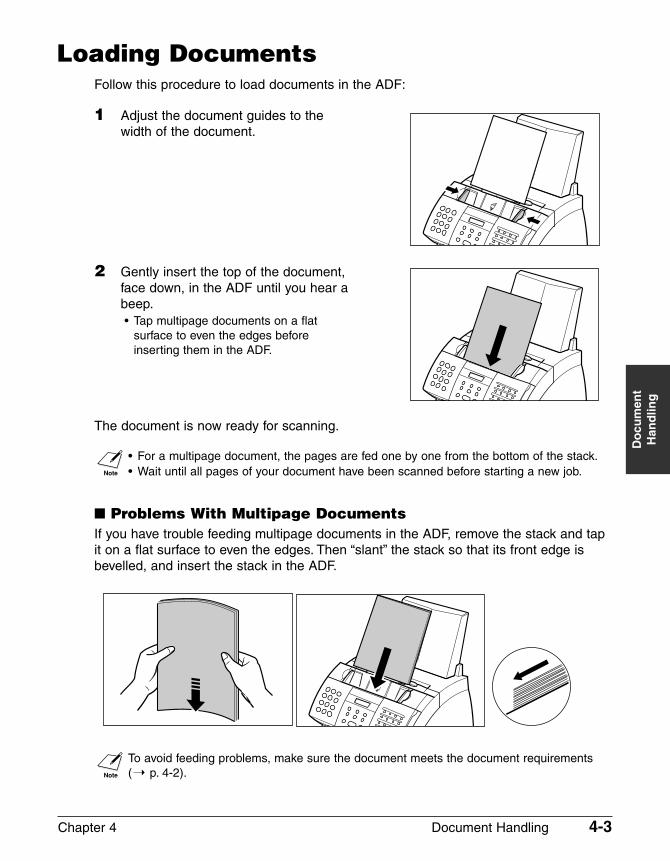
Loading DocumentsFollow this procedure to load documents in the ADF:
1 Adjust the document guides to the width of the document.
2 Gently insert the top of the document, face down, in the ADF until you hear abeep.• Tap multipage documents on a flat
surface to even the edges beforeinserting them in the ADF.
The document is now ready for scanning.
n • For a multipage document, the pages are fed one by one from the bottom of the stack.• Wait until all pages of your document have been scanned before starting a new job.
� Problems With Multipage DocumentsIf you have trouble feeding multipage documents in the ADF, remove the stack and tapit on a flat surface to even the edges. Then “slant” the stack so that its front edge isbevelled, and insert the stack in the ADF.
n To avoid feeding problems, make sure the document meets the document requirements(1 p. 4-2).
4-4 Document Handling Chapter 4
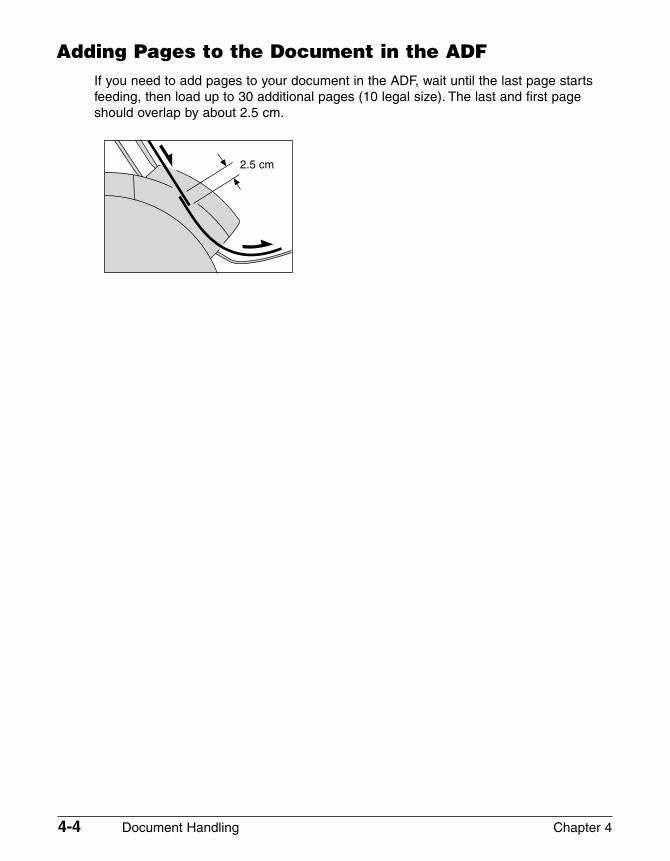
Adding Pages to the Document in the ADFIf you need to add pages to your document in the ADF, wait until the last page startsfeeding, then load up to 30 additional pages (10 legal size). The last and first pageshould overlap by about 2.5 cm.
2.5 cm
Chapter 5 Paper Handling 5-1
Pap
er H
and
ling
Chapter 5
Paper Handling
Paper Requirements.................................................................................5-2
Printable Area.........................................................................................5-3
Selecting Paper for Your FAX ..................................................................5-3
Loading Paper...........................................................................................5-3
Selecting Face-Up or Face-Down Paper Delivery .................................5-4
Changing the Paper Size Setting ............................................................5-7
Adjusting the Toner Saver Setting ..........................................................5-9
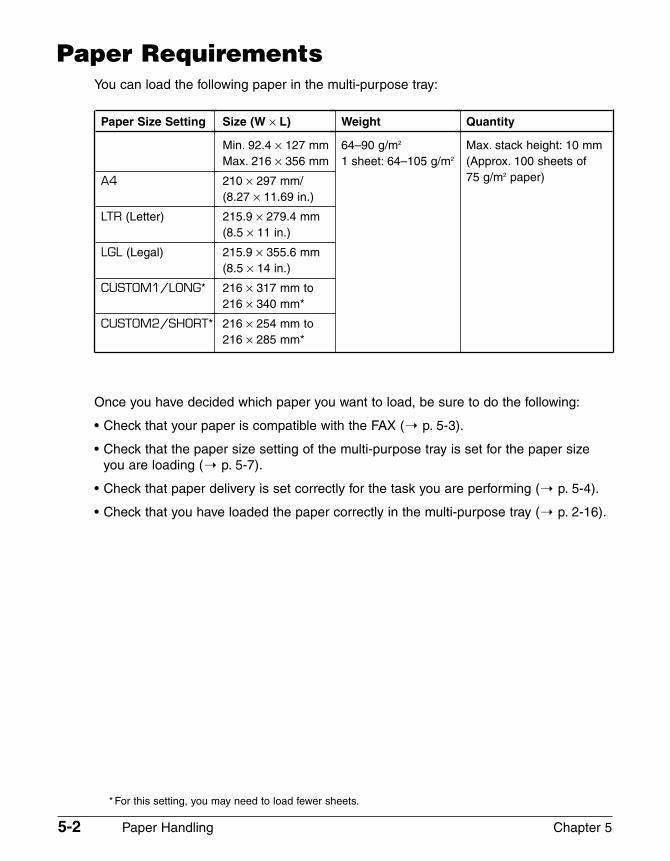
Paper RequirementsYou can load the following paper in the multi-purpose tray:
Once you have decided which paper you want to load, be sure to do the following:
• Check that your paper is compatible with the FAX (1 p. 5-3).
• Check that the paper size setting of the multi-purpose tray is set for the paper sizeyou are loading (1 p. 5-7).
• Check that paper delivery is set correctly for the task you are performing (1 p. 5-4).
• Check that you have loaded the paper correctly in the multi-purpose tray (1 p. 2-16).
5-2 Paper Handling Chapter 5
Size (W × L)
Min. 92.4 × 127 mmMax. 216 × 356 mm
210 × 297 mm/(8.27 × 11.69 in.)
215.9 × 279.4 mm(8.5 × 11 in.)
215.9 × 355.6 mm(8.5 × 14 in.)
216 × 317 mm to216 × 340 mm*
216 × 254 mm to216 × 285 mm*
Weight
64–90 g/m2
1 sheet: 64–105 g/m2
Quantity
Max. stack height: 10 mm (Approx. 100 sheets of 75 g/m2 paper)
Paper Size Setting
A4
LTR (Letter)
LGL (Legal)
CUSTOM1/LONG*
CUSTOM2/SHORT*
* For this setting, you may need to load fewer sheets.
Chapter 5 Paper Handling 5-3
Pap
er H
and
ling
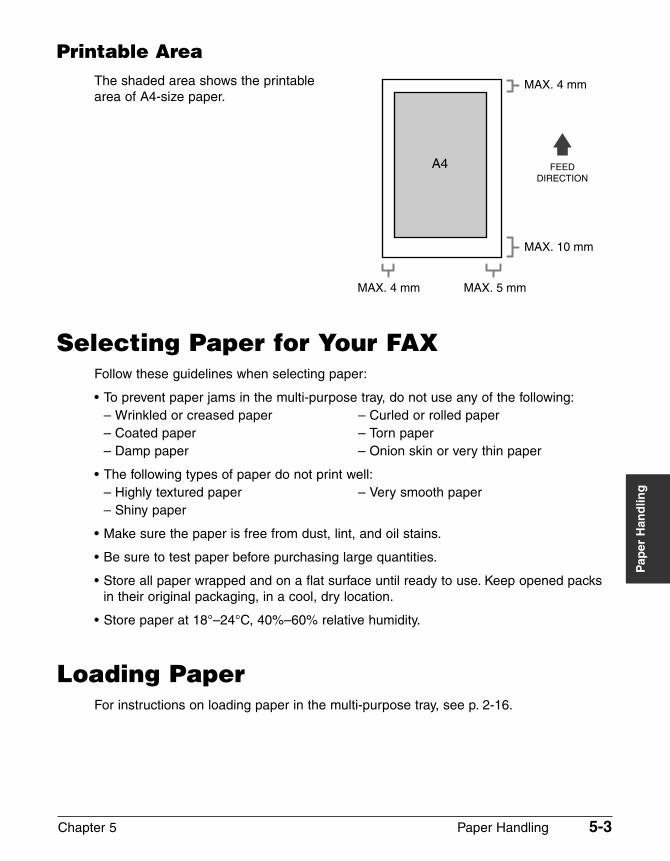
Printable AreaThe shaded area shows the printable area of A4-size paper.
Selecting Paper for Your FAXFollow these guidelines when selecting paper:
• To prevent paper jams in the multi-purpose tray, do not use any of the following:– Wrinkled or creased paper – Curled or rolled paper– Coated paper – Torn paper– Damp paper – Onion skin or very thin paper
• The following types of paper do not print well:– Highly textured paper – Very smooth paper– Shiny paper
• Make sure the paper is free from dust, lint, and oil stains.
• Be sure to test paper before purchasing large quantities.
• Store all paper wrapped and on a flat surface until ready to use. Keep opened packsin their original packaging, in a cool, dry location.
• Store paper at 18°–24°C, 40%–60% relative humidity.
Loading PaperFor instructions on loading paper in the multi-purpose tray, see p. 2-16.
MAX. 4 mm
MAX. 10 mm
MAX. 5 mmMAX. 4 mm
A4 FEED DIRECTION
5-4 Paper Handling Chapter 5
Selecting Face-Up or Face-Down PaperDelivery
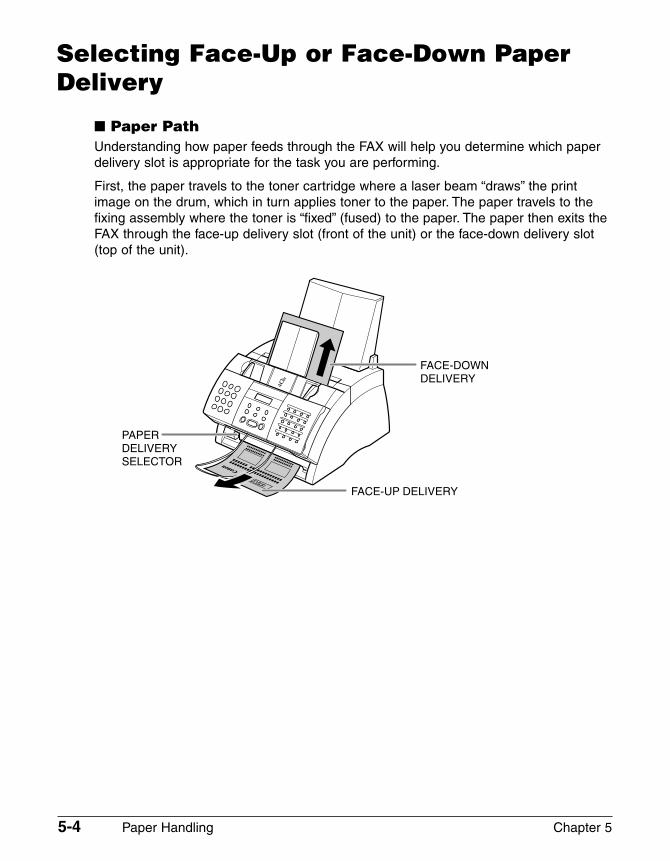
� Paper PathUnderstanding how paper feeds through the FAX will help you determine which paperdelivery slot is appropriate for the task you are performing.
First, the paper travels to the toner cartridge where a laser beam “draws” the printimage on the drum, which in turn applies toner to the paper. The paper travels to thefixing assembly where the toner is “fixed” (fused) to the paper. The paper then exits theFAX through the face-up delivery slot (front of the unit) or the face-down delivery slot(top of the unit).
FACE-DOWN DELIVERY
FACE-UP DELIVERY
PAPER DELIVERY SELECTOR
Chapter 5 Paper Handling 5-5
Pap
er H
and
ling
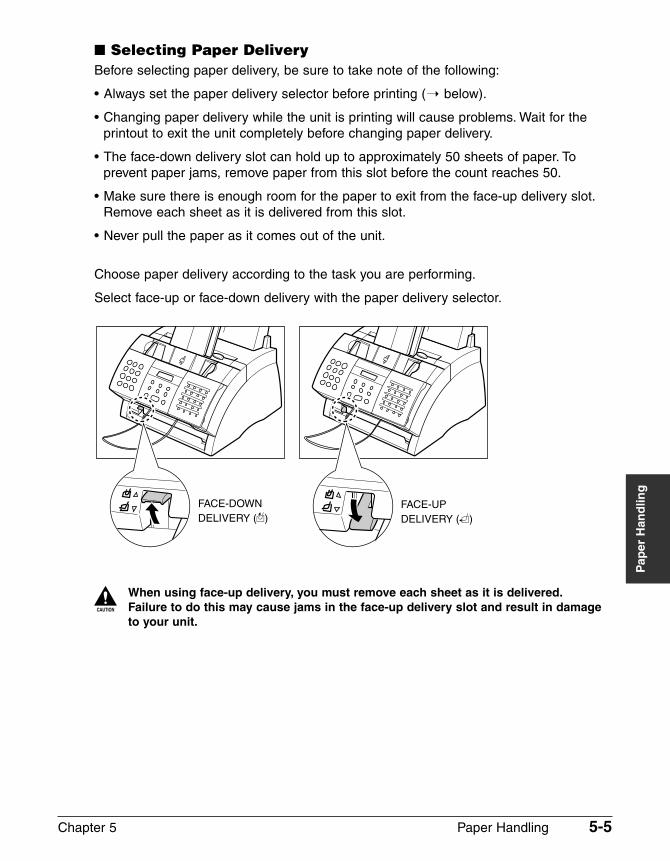
� Selecting Paper DeliveryBefore selecting paper delivery, be sure to take note of the following:
• Always set the paper delivery selector before printing (1 below).
• Changing paper delivery while the unit is printing will cause problems. Wait for theprintout to exit the unit completely before changing paper delivery.
• The face-down delivery slot can hold up to approximately 50 sheets of paper. Toprevent paper jams, remove paper from this slot before the count reaches 50.
• Make sure there is enough room for the paper to exit from the face-up delivery slot.Remove each sheet as it is delivered from this slot.
• Never pull the paper as it comes out of the unit.
Choose paper delivery according to the task you are performing.
Select face-up or face-down delivery with the paper delivery selector.
c When using face-up delivery, you must remove each sheet as it is delivered.Failure to do this may cause jams in the face-up delivery slot and result in damageto your unit.
FACE-DOWN DELIVERY (D)
FACE-UPDELIVERY (U)
5-6 Paper Handling Chapter 5
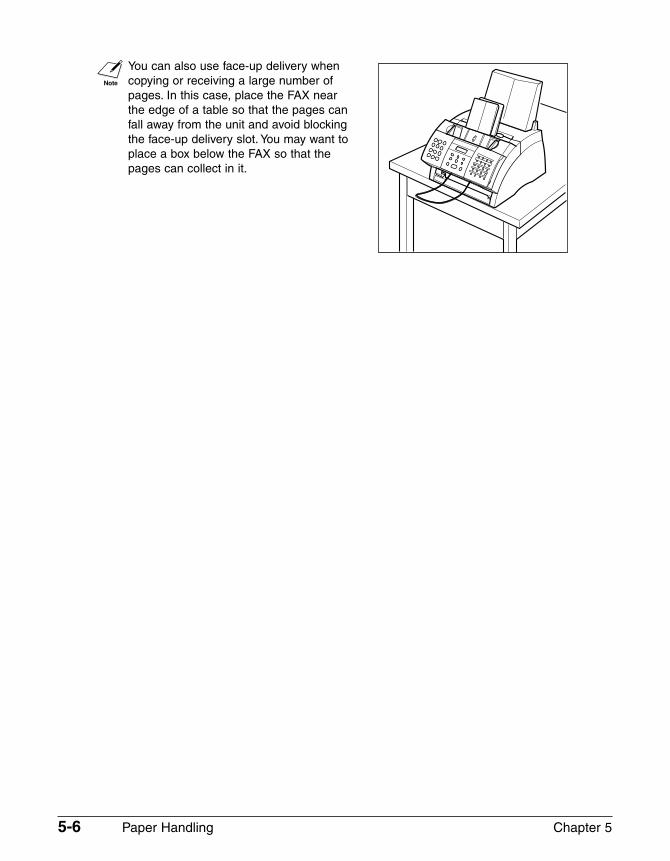
nYou can also use face-up delivery when copying or receiving a large number ofpages. In this case, place the FAX nearthe edge of a table so that the pages canfall away from the unit and avoid blockingthe face-up delivery slot. You may want toplace a box below the FAX so that thepages can collect in it.
Chapter 5 Paper Handling 5-7
Pap
er H
and
ling
Changing the Paper Size SettingThe multi-purpose tray is factory-set for loading A4-size paper. If you want to load adifferent paper size (1 p. 5-2), follow this procedure to change the paper size setting:
1 Open the one-touch speed dial panel.
2 Press Data Registration.
3 Press Set.
4 Use ∂ or ¨ to select PRINTERSETTINGS.
5 Press Set.
6 Use ∂ or ¨ to select PAPER SIZE.
7 Press Set. Ex:
8 Use ∂ or ¨ to select the paper sizeyou want for the multi-purpose tray.• You can select from the following:
– A4 (Default)– LTR– LGL– CUSTOM
• For details on the paper sizes above,see p. 5-2.
� If you selected A4, LTR, or LGL in step 8:9 Press Set.
10 Press Stop to return to standby mode. Ex:
� If you selected CUSTOM in step 8:9 Press Set. Ex: CUSTOM1/LONG
15:00 FaxOnly
ECONOMY PRT
A4
PAPER SIZE
RX REDUCTION
PRINTER SETTINGS
USER SETTINGS
DATA REGSTRATION
5-8 Paper Handling Chapter 5
10 Use ∂ or ¨ to select the custompaper size setting.• You can select from the following:
– CUSTOM1/LONG (Default)– CUSTOM2/SHORT
• For details on the paper sizes above, see p. 5-2.
11 Press Set.
12 Press Stop to return to standby mode. Ex: 15:00 FaxOnly
ECONOMY PRT
Chapter 5 Paper Handling 5-9
Pap
er H
and
ling
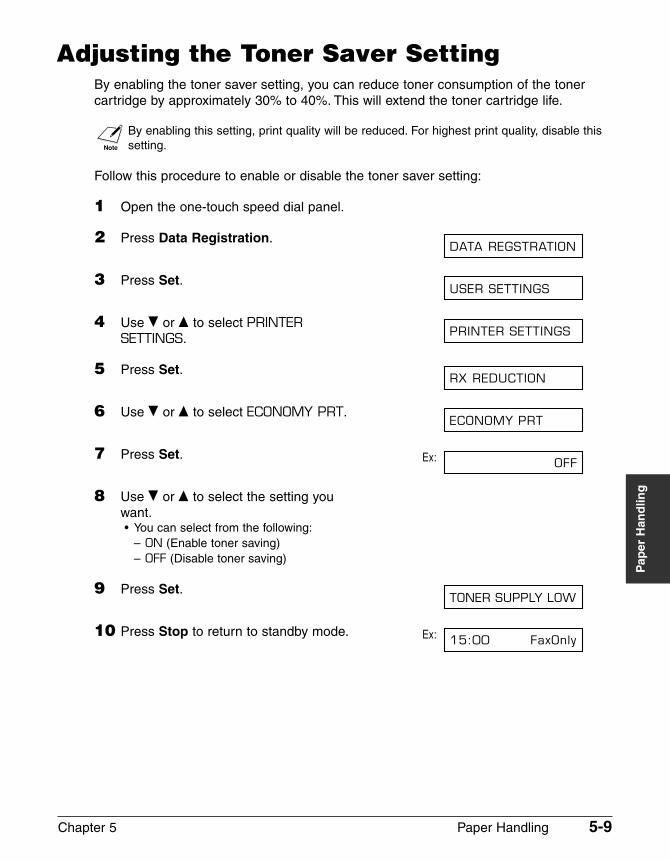
Adjusting the Toner Saver SettingBy enabling the toner saver setting, you can reduce toner consumption of the tonercartridge by approximately 30% to 40%. This will extend the toner cartridge life.
nBy enabling this setting, print quality will be reduced. For highest print quality, disable thissetting.
Follow this procedure to enable or disable the toner saver setting:
1 Open the one-touch speed dial panel.
2 Press Data Registration.
3 Press Set.
4 Use ∂ or ¨ to select PRINTERSETTINGS.
5 Press Set.
6 Use ∂ or ¨ to select ECONOMY PRT.
7 Press Set. Ex:
8 Use ∂ or ¨ to select the setting youwant.• You can select from the following:
– ON (Enable toner saving)– OFF (Disable toner saving)
9 Press Set.
10 Press Stop to return to standby mode. Ex: 15:00 FaxOnly
TONER SUPPLY LOW
OFF
ECONOMY PRT
RX REDUCTION
PRINTER SETTINGS
USER SETTINGS
DATA REGSTRATION

5-10 Paper Handling Chapter 5
Chapter 6 Speed Dialling 6-1
Sp
eed
Dia
llin
g
Chapter 6
Speed Dialling
What is Speed Dialling?...........................................................................6-2
Speed Dialling Methods .........................................................................6-2
Registering One-Touch Speed Dialling ..................................................6-3
Registering Coded Speed Dialling..........................................................6-8
Registering Group Dialling ....................................................................6-13
Using Speed Dialling..............................................................................6-16
Sending a Document With Speed Dialling ...........................................6-16
Making a Telephone Call With Speed Dialling......................................6-17
Printing Speed Dialling Lists.................................................................6-18
6-2 Speed Dialling Chapter 6
What is Speed Dialling?Instead of having to dial a fax or telephone number using regular dialling (i.e. with thenumeric buttons), you can simplify the dialling procedure by registering thefax/telephone number for speed dialling. This will reduce the number of buttons youneed to press to dial the fax/telephone number, making it convenient for frequentlydialled numbers.
Speed Dialling also allows you to register several fax numbers under one speed diallingbutton or code so that you can send a document to all those fax numbers in oneoperation.
See below for details on the different speed dialling methods.
Speed Dialling MethodsYour FAX offers the following speed dialling methods:
� One-Touch Speed Dialling (2 p. 6-3)Register a fax/telephone number under a one-touch speed dialling button so that youonly have to press one button to dial that fax/telephone number.
There are 24 one-touch speed dialling buttons available for you to registerfax/telephone numbers.
� Coded Speed Dialling (2 p. 6-8)Register a fax/telephone number under a coded speed dialling code so that you onlyhave to press Coded Dial and enter the registered two-digit code (using the numericbuttons) to dial that fax/telephone number.
There are 100 codes available for you to register fax/telephone numbers.
� Group Dialling (2 p. 6-13)“Group” up to 123 fax numbers together, so you can send to those fax numbers in onequick operation. A group is registered under a one-touch speed dialling button or acoded speed dialling code.

Chapter 6 Speed Dialling 6-3
Sp
eed
Dia
llin
g
Registering One-Touch Speed DiallingBy registering a fax/telephone number under a one-touch speed dialling button, you cansimplify dialling of that number to the press of a single button.
When you register one-touch speed dialling, you will:
– assign one of the 24 one-touch speed dialling buttons for the fax/telephone numberyou want to register.
– register the fax/telephone number under that one-touch speed dialling button.
– register a name for the one-touch speed dialling button. This name appears in speeddialling lists, in reports, and at the top of the recipient’s fax if you use memory sending (1 p. 7-5).
– set the transmission type for the fax number you have registered. You can set asubaddress and/or password if the other party’s fax machine requires these settings.
Follow this procedure to register one-touch speed dialling:
1 Open the one-touch speed dial panel.
2 Press Data Registration.
3 Use ∂ or ¨ to select TELREGISTRATION.
4 Press Set twice.
Ex:
5 Use ∂ or ¨ to select the one-touch Ex:speed dialling button (01 to 24)under which you want to register thefax/telephone number.• If a one-touch speed dialling button has
already been registered, the numberregistered under that button appears.
• If a group is already registered under aone-touch speed dialling button, GROUPDIAL appears.
6 Press Set twice.
Ex: TEL=_
TELEPHONE NUMBER
04=
01=
1-TOUCH SPD DIAL
TEL REGISTRATION
DATA REGSTRATION
6-4 Speed Dialling Chapter 6
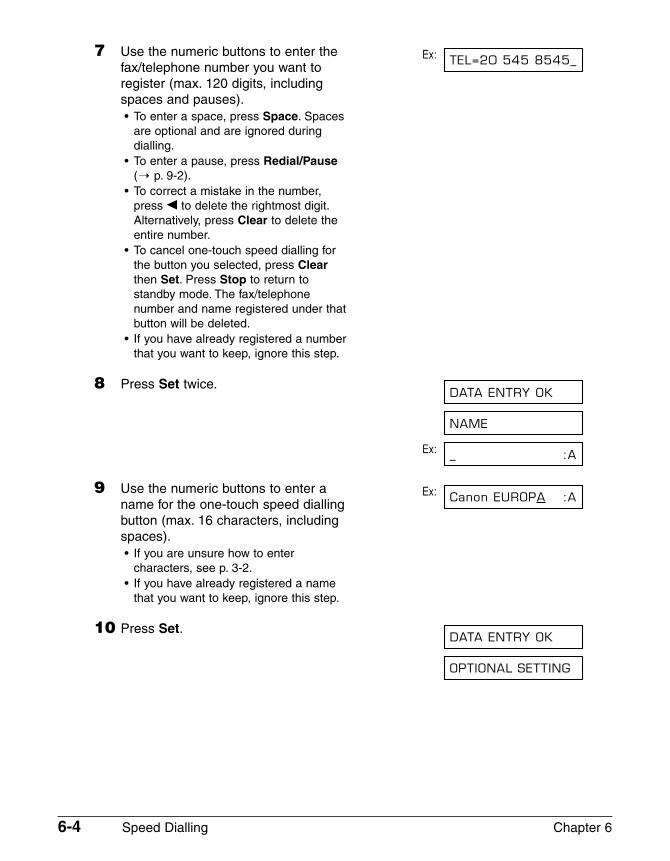
7 Use the numeric buttons to enter the Ex:fax/telephone number you want toregister (max. 120 digits, includingspaces and pauses).• To enter a space, press Space. Spaces
are optional and are ignored duringdialling.
• To enter a pause, press Redial/Pause(1 p. 9-2).
• To correct a mistake in the number,press ¬ to delete the rightmost digit.Alternatively, press Clear to delete theentire number.
• To cancel one-touch speed dialling forthe button you selected, press Clearthen Set. Press Stop to return tostandby mode. The fax/telephonenumber and name registered under thatbutton will be deleted.
• If you have already registered a numberthat you want to keep, ignore this step.
8 Press Set twice.
Ex:
9 Use the numeric buttons to enter a Ex:name for the one-touch speed diallingbutton (max. 16 characters, includingspaces).• If you are unsure how to enter
characters, see p. 3-2.• If you have already registered a name
that you want to keep, ignore this step.
10 Press Set.
OPTIONAL SETTING
DATA ENTRY OK
Canon EUROPA :A
_ :A
NAME
DATA ENTRY OK
TEL=20 545 8545_
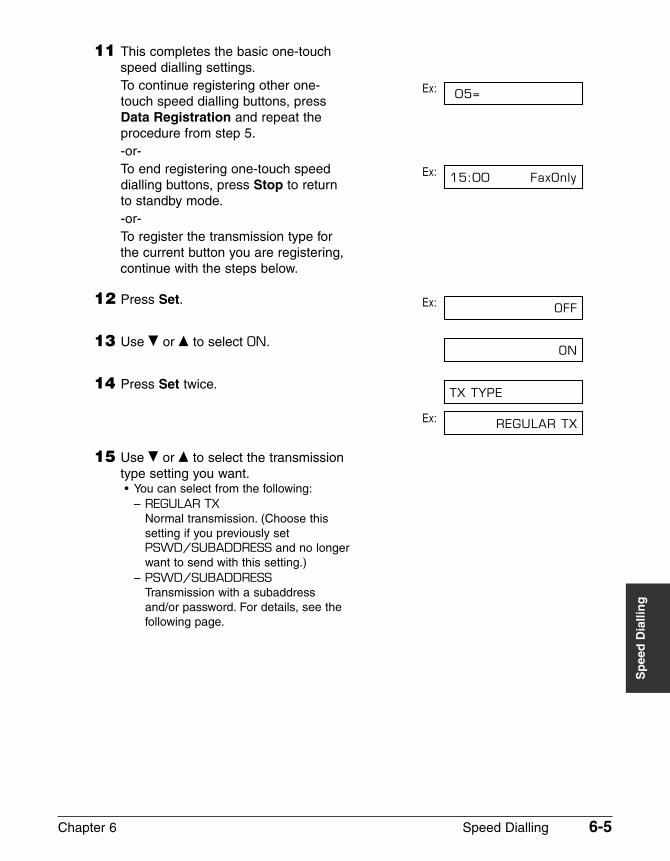
Chapter 6 Speed Dialling 6-5
Sp
eed
Dia
llin
g
11 This completes the basic one-touchspeed dialling settings.To continue registering other one- Ex:touch speed dialling buttons, pressData Registration and repeat theprocedure from step 5.-or-To end registering one-touch speed Ex:dialling buttons, press Stop to returnto standby mode.-or-To register the transmission type forthe current button you are registering,continue with the steps below.
12 Press Set. Ex:
13 Use ∂ or ¨ to select ON.
14 Press Set twice.
Ex:
15 Use ∂ or ¨ to select the transmissiontype setting you want.• You can select from the following:
– REGULAR TXNormal transmission. (Choose thissetting if you previously setPSWD/SUBADDRESS and no longerwant to send with this setting.)
– PSWD/SUBADDRESSTransmission with a subaddressand/or password. For details, see thefollowing page.
REGULAR TX
TX TYPE
ON
OFF
15:00 FaxOnly
05=
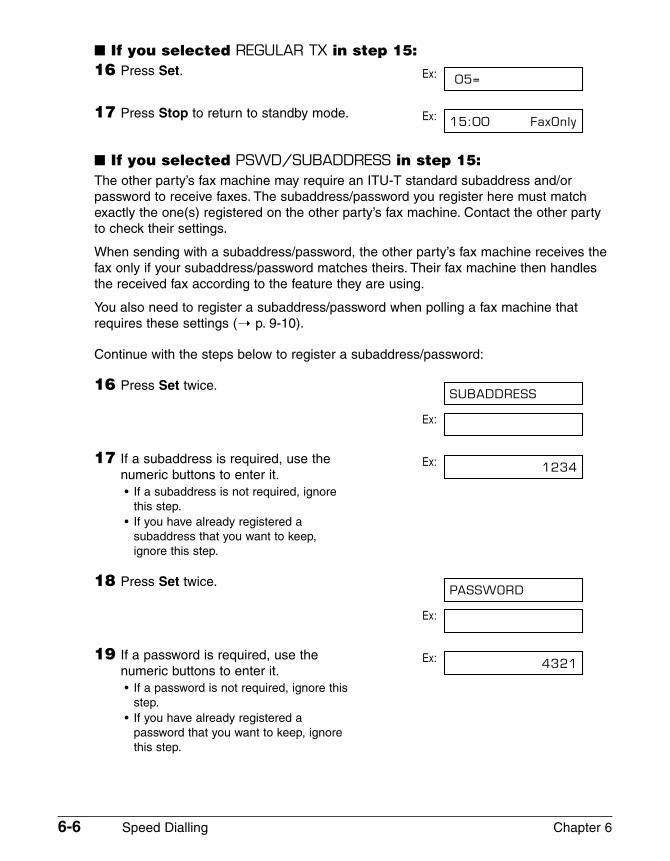
6-6 Speed Dialling Chapter 6
� If you selected REGULAR TX in step 15:16 Press Set. Ex:
17 Press Stop to return to standby mode. Ex:
� If you selected PSWD/SUBADDRESS in step 15:The other party’s fax machine may require an ITU-T standard subaddress and/orpassword to receive faxes. The subaddress/password you register here must matchexactly the one(s) registered on the other party’s fax machine. Contact the other partyto check their settings.
When sending with a subaddress/password, the other party’s fax machine receives thefax only if your subaddress/password matches theirs. Their fax machine then handlesthe received fax according to the feature they are using.
You also need to register a subaddress/password when polling a fax machine thatrequires these settings (1 p. 9-10).
Continue with the steps below to register a subaddress/password:
16 Press Set twice.
Ex:
17 If a subaddress is required, use the Ex:numeric buttons to enter it.• If a subaddress is not required, ignore
this step.• If you have already registered a
subaddress that you want to keep,ignore this step.
18 Press Set twice.
Ex:
19 If a password is required, use the Ex:numeric buttons to enter it.• If a password is not required, ignore this
step.• If you have already registered a
password that you want to keep, ignorethis step.
4321
PASSWORD
1234
SUBADDRESS
15:00 FaxOnly
05=
Chapter 6 Speed Dialling 6-7
Sp
eed
Dia
llin
g
20 Press Set. Ex:
21 To continue registering other one-touch speed dialling buttons, repeatthe procedure from step 5.-or-Press Stop to return to standby mode. Ex:
n • Use the destination labels provided with your FAX to label the one-touch speed diallingbuttons. Stick the labels above each corresponding button.
• To check your entries, you can print a list of all the numbers and names registered forone-touch speed dialling (1 p. 6-18).
15:00 FaxOnly
05=
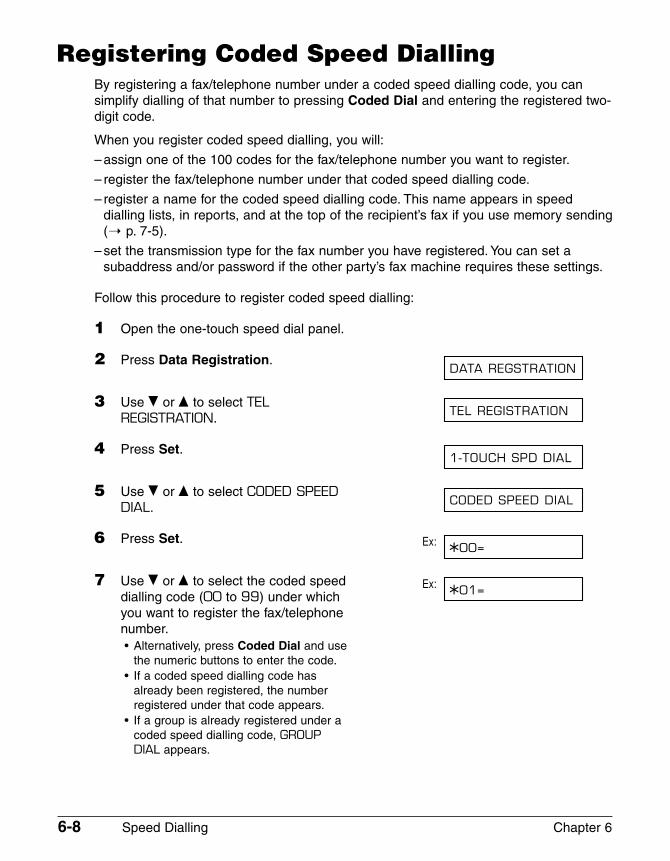
6-8 Speed Dialling Chapter 6
Registering Coded Speed DiallingBy registering a fax/telephone number under a coded speed dialling code, you cansimplify dialling of that number to pressing Coded Dial and entering the registered two-digit code.
When you register coded speed dialling, you will:
– assign one of the 100 codes for the fax/telephone number you want to register.
– register the fax/telephone number under that coded speed dialling code.
– register a name for the coded speed dialling code. This name appears in speeddialling lists, in reports, and at the top of the recipient’s fax if you use memory sending (1 p. 7-5).
– set the transmission type for the fax number you have registered. You can set asubaddress and/or password if the other party’s fax machine requires these settings.
Follow this procedure to register coded speed dialling:
1 Open the one-touch speed dial panel.
2 Press Data Registration.
3 Use ∂ or ¨ to select TELREGISTRATION.
4 Press Set.
5 Use ∂ or ¨ to select CODED SPEED DIAL.
6 Press Set. Ex:
7 Use ∂ or ¨ to select the coded speed Ex:dialling code (00 to 99) under whichyou want to register the fax/telephonenumber.• Alternatively, press Coded Dial and use
the numeric buttons to enter the code.• If a coded speed dialling code has
already been registered, the numberregistered under that code appears.
• If a group is already registered under acoded speed dialling code, GROUPDIAL appears.
A01=
A00=
CODED SPEED DIAL
1-TOUCH SPD DIAL
TEL REGISTRATION
DATA REGSTRATION
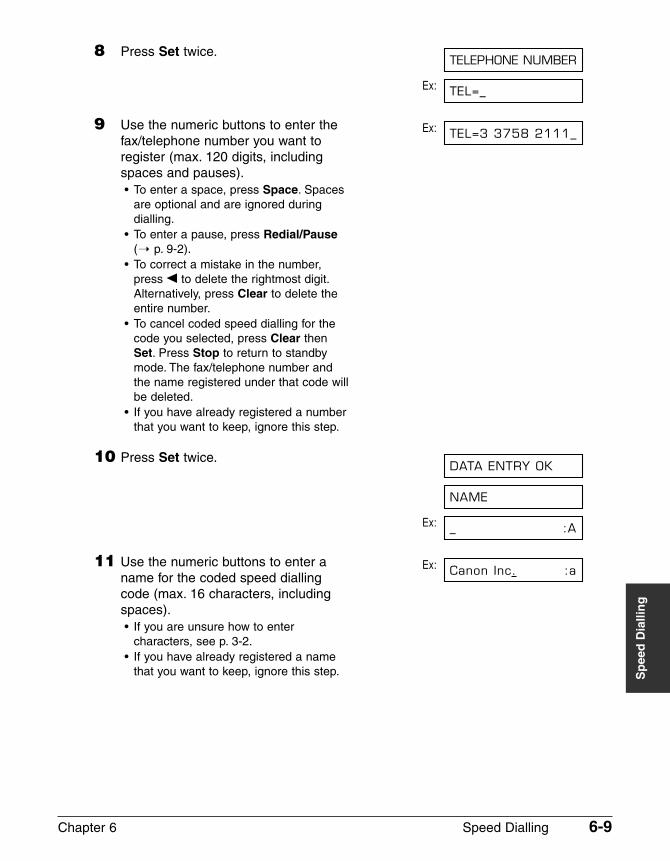
Chapter 6 Speed Dialling 6-9
Sp
eed
Dia
llin
g
8 Press Set twice.
Ex:
9 Use the numeric buttons to enter the Ex:fax/telephone number you want toregister (max. 120 digits, includingspaces and pauses).• To enter a space, press Space. Spaces
are optional and are ignored duringdialling.
• To enter a pause, press Redial/Pause(1 p. 9-2).
• To correct a mistake in the number,press ¬ to delete the rightmost digit.Alternatively, press Clear to delete theentire number.
• To cancel coded speed dialling for thecode you selected, press Clear thenSet. Press Stop to return to standbymode. The fax/telephone number andthe name registered under that code willbe deleted.
• If you have already registered a numberthat you want to keep, ignore this step.
10 Press Set twice.
Ex:
11 Use the numeric buttons to enter a Ex:name for the coded speed diallingcode (max. 16 characters, includingspaces).• If you are unsure how to enter
characters, see p. 3-2.• If you have already registered a name
that you want to keep, ignore this step.
Canon Inc. :a
_ :A
NAME
DATA ENTRY OK
TEL=3 3758 2111_
TEL=_
TELEPHONE NUMBER
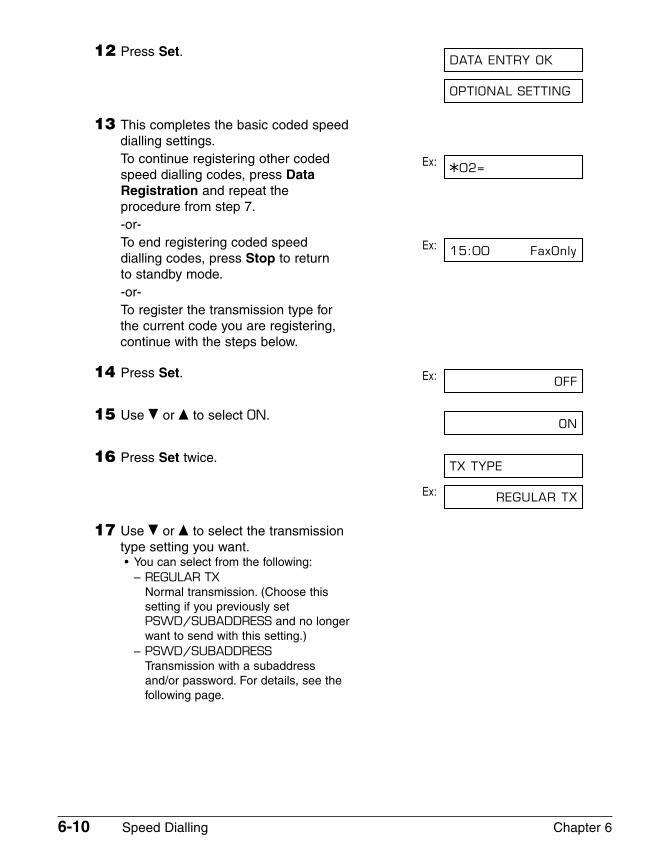
6-10 Speed Dialling Chapter 6
12 Press Set.
13 This completes the basic coded speeddialling settings.To continue registering other coded Ex:speed dialling codes, press DataRegistration and repeat theprocedure from step 7.-or-To end registering coded speed Ex:dialling codes, press Stop to return to standby mode.-or-To register the transmission type forthe current code you are registering,continue with the steps below.
14 Press Set. Ex:
15 Use ∂ or ¨ to select ON.
16 Press Set twice.
Ex:
17 Use ∂ or ¨ to select the transmissiontype setting you want.• You can select from the following:
– REGULAR TXNormal transmission. (Choose thissetting if you previously setPSWD/SUBADDRESS and no longerwant to send with this setting.)
– PSWD/SUBADDRESSTransmission with a subaddressand/or password. For details, see thefollowing page.
REGULAR TX
TX TYPE
ON
OFF
15:00 FaxOnly
A02=
OPTIONAL SETTING
DATA ENTRY OK
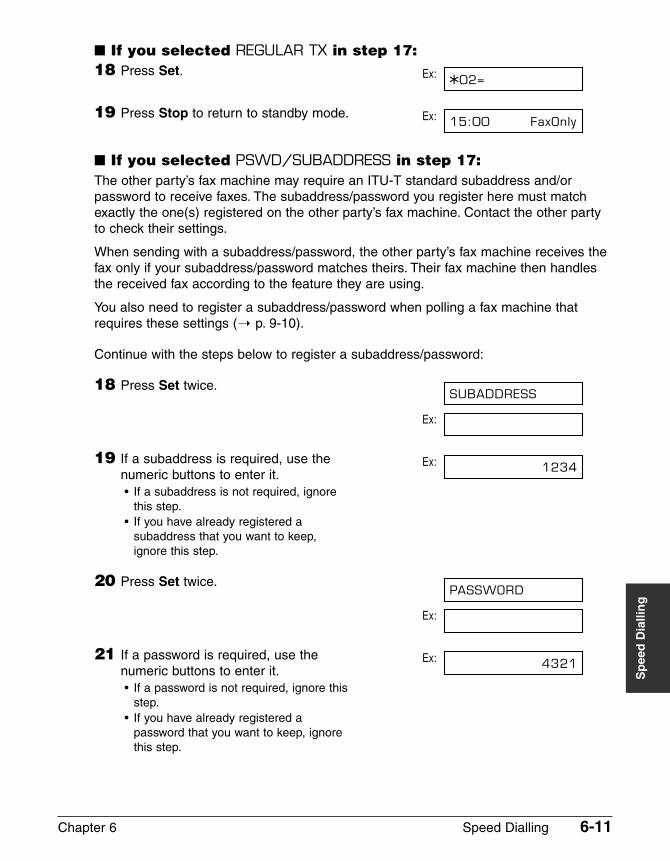
Chapter 6 Speed Dialling 6-11
Sp
eed
Dia
llin
g
� If you selected REGULAR TX in step 17:18 Press Set. Ex:
19 Press Stop to return to standby mode. Ex:
� If you selected PSWD/SUBADDRESS in step 17:The other party’s fax machine may require an ITU-T standard subaddress and/orpassword to receive faxes. The subaddress/password you register here must matchexactly the one(s) registered on the other party’s fax machine. Contact the other partyto check their settings.
When sending with a subaddress/password, the other party’s fax machine receives thefax only if your subaddress/password matches theirs. Their fax machine then handlesthe received fax according to the feature they are using.
You also need to register a subaddress/password when polling a fax machine thatrequires these settings (1 p. 9-10).
Continue with the steps below to register a subaddress/password:
18 Press Set twice.
Ex:
19 If a subaddress is required, use the Ex:numeric buttons to enter it.• If a subaddress is not required, ignore
this step.• If you have already registered a
subaddress that you want to keep,ignore this step.
20 Press Set twice.
Ex:
21 If a password is required, use the Ex:numeric buttons to enter it.• If a password is not required, ignore this
step.• If you have already registered a
password that you want to keep, ignorethis step.
4321
PASSWORD
1234
SUBADDRESS
15:00 FaxOnly
A02=
6-12 Speed Dialling Chapter 6
22 Press Set. Ex:
23 To continue registering other codedspeed dialling codes, repeat theprocedure from step 7.-or-Press Stop to return to standby mode. Ex:
n To check your entries, you can print a list of all the numbers and names registered forcoded speed dialling (1 p. 6-18). You may want to keep this list near your FAX to refer to itwhen dialling.
15:00 FaxOnly
A02=
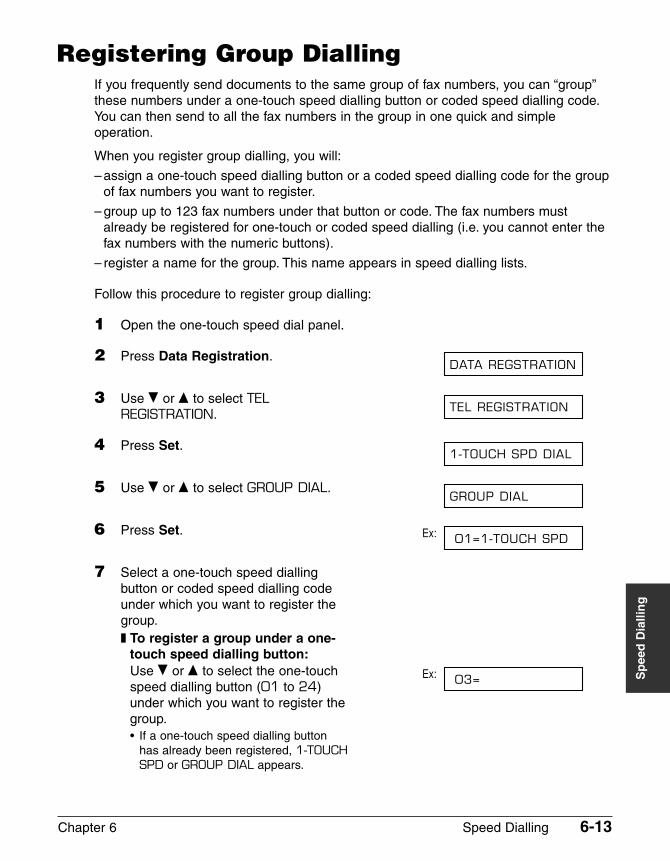
Chapter 6 Speed Dialling 6-13
Sp
eed
Dia
llin
g
Registering Group DiallingIf you frequently send documents to the same group of fax numbers, you can “group”these numbers under a one-touch speed dialling button or coded speed dialling code.You can then send to all the fax numbers in the group in one quick and simpleoperation.
When you register group dialling, you will:
– assign a one-touch speed dialling button or a coded speed dialling code for the groupof fax numbers you want to register.
– group up to 123 fax numbers under that button or code. The fax numbers mustalready be registered for one-touch or coded speed dialling (i.e. you cannot enter thefax numbers with the numeric buttons).
– register a name for the group. This name appears in speed dialling lists.
Follow this procedure to register group dialling:
1 Open the one-touch speed dial panel.
2 Press Data Registration.
3 Use ∂ or ¨ to select TELREGISTRATION.
4 Press Set.
5 Use ∂ or ¨ to select GROUP DIAL.
6 Press Set. Ex:
7 Select a one-touch speed dialling button or coded speed dialling codeunder which you want to register thegroup.❚ To register a group under a one-
touch speed dialling button:Use ∂ or ¨ to select the one-touch Ex:speed dialling button (01 to 24)under which you want to register thegroup.• If a one-touch speed dialling button
has already been registered, 1-TOUCHSPD or GROUP DIAL appears.
03=
01=1-TOUCH SPD
GROUP DIAL
1-TOUCH SPD DIAL
TEL REGISTRATION
DATA REGSTRATION
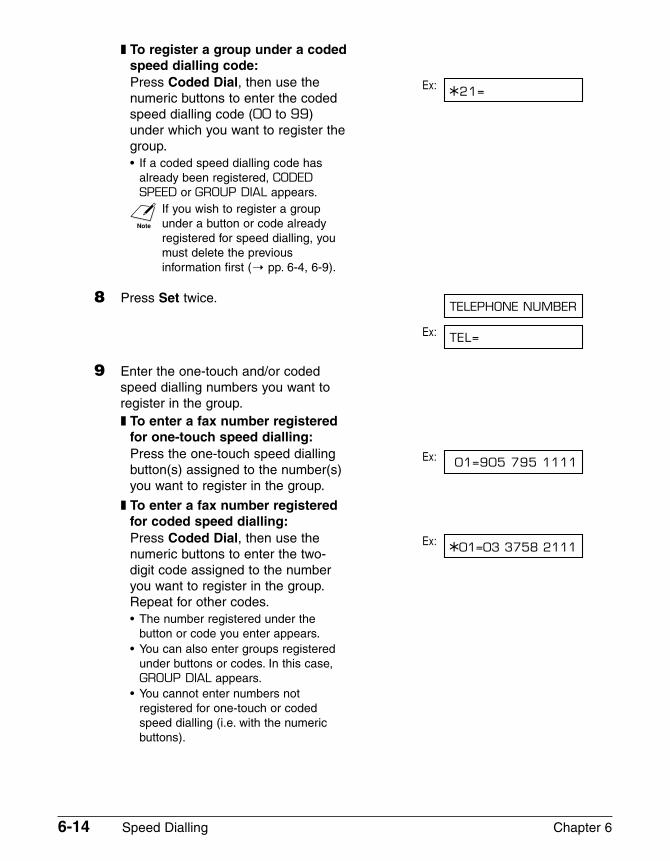
6-14 Speed Dialling Chapter 6
❚ To register a group under a codedspeed dialling code:Press Coded Dial, then use the Ex:numeric buttons to enter the codedspeed dialling code (00 to 99)under which you want to register thegroup.• If a coded speed dialling code has
already been registered, CODEDSPEED or GROUP DIAL appears.
n If you wish to register a groupunder a button or code alreadyregistered for speed dialling, youmust delete the previousinformation first (1 pp. 6-4, 6-9).
8 Press Set twice.
Ex:
9 Enter the one-touch and/or codedspeed dialling numbers you want toregister in the group.❚ To enter a fax number registered
for one-touch speed dialling:Press the one-touch speed dialling Ex:button(s) assigned to the number(s)you want to register in the group.
❚ To enter a fax number registeredfor coded speed dialling:Press Coded Dial, then use the Ex:numeric buttons to enter the two-digit code assigned to the numberyou want to register in the group.Repeat for other codes.• The number registered under the
button or code you enter appears.• You can also enter groups registered
under buttons or codes. In this case,GROUP DIAL appears.
• You cannot enter numbers notregistered for one-touch or codedspeed dialling (i.e. with the numericbuttons).
A01=03 3758 2111
01=905 795 1111
TEL=
TELEPHONE NUMBER
A21=
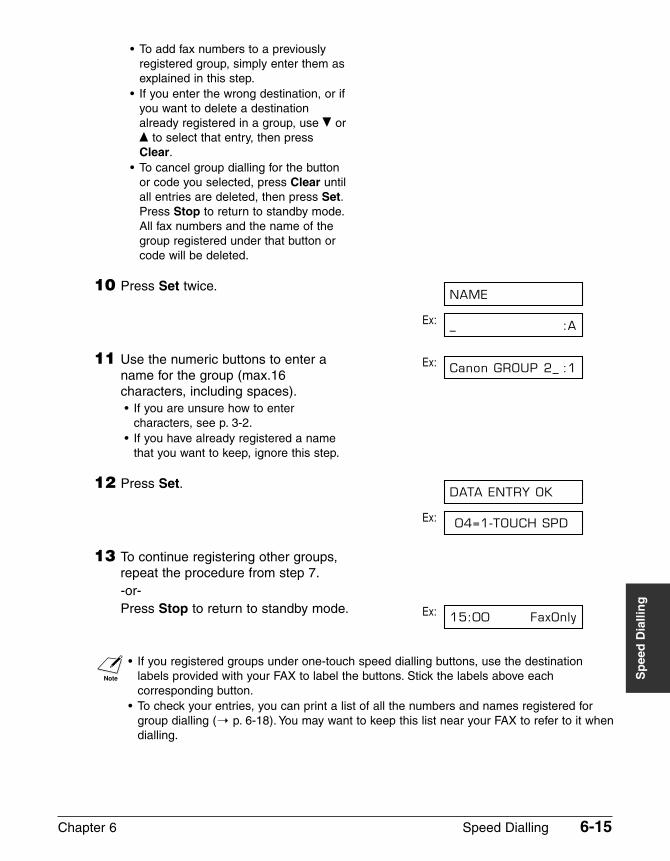
Chapter 6 Speed Dialling 6-15
Sp
eed
Dia
llin
g
• To add fax numbers to a previouslyregistered group, simply enter them asexplained in this step.
• If you enter the wrong destination, or ifyou want to delete a destinationalready registered in a group, use ∂ or¨ to select that entry, then pressClear.
• To cancel group dialling for the buttonor code you selected, press Clear untilall entries are deleted, then press Set.Press Stop to return to standby mode.All fax numbers and the name of thegroup registered under that button orcode will be deleted.
10 Press Set twice.
Ex:
11 Use the numeric buttons to enter a Ex:name for the group (max.16characters, including spaces).• If you are unsure how to enter
characters, see p. 3-2.• If you have already registered a name
that you want to keep, ignore this step.
12 Press Set.
Ex:
13 To continue registering other groups,repeat the procedure from step 7.-or-Press Stop to return to standby mode. Ex:
n • If you registered groups under one-touch speed dialling buttons, use the destinationlabels provided with your FAX to label the buttons. Stick the labels above eachcorresponding button.
• To check your entries, you can print a list of all the numbers and names registered forgroup dialling (1 p. 6-18). You may want to keep this list near your FAX to refer to it whendialling.
15:00 FaxOnly
04=1-TOUCH SPD
DATA ENTRY OK
Canon GROUP 2_ :1
_ :A
NAME
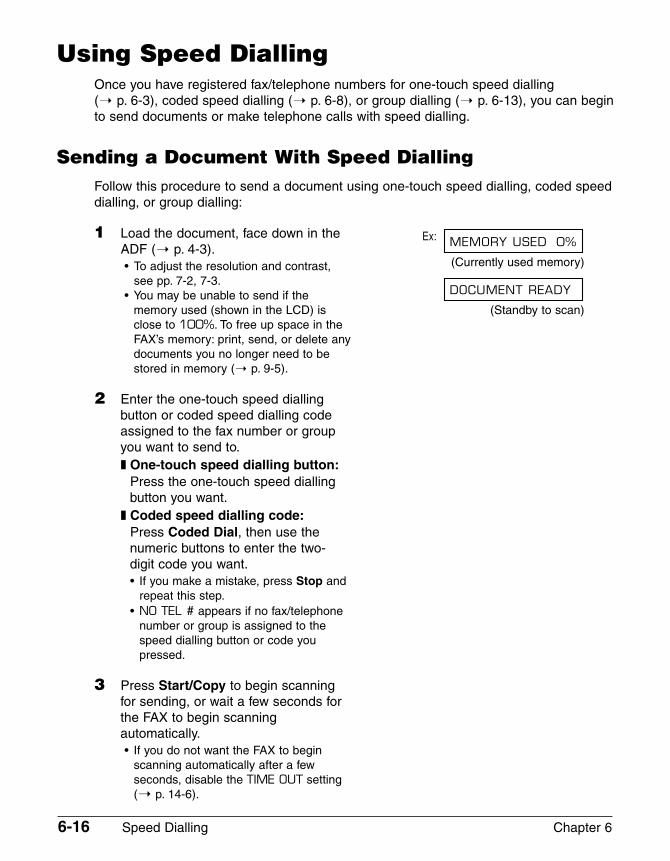
6-16 Speed Dialling Chapter 6
Using Speed DiallingOnce you have registered fax/telephone numbers for one-touch speed dialling (1 p. 6-3), coded speed dialling (1 p. 6-8), or group dialling (1 p. 6-13), you can beginto send documents or make telephone calls with speed dialling.
Sending a Document With Speed DiallingFollow this procedure to send a document using one-touch speed dialling, coded speeddialling, or group dialling:
1 Load the document, face down in the Ex:ADF (1 p. 4-3).• To adjust the resolution and contrast, (Currently used memory)
see pp. 7-2, 7-3.• You may be unable to send if the
memory used (shown in the LCD) is (Standby to scan)close to 100%. To free up space in the FAX’s memory: print, send, or delete any documents you no longer need to be stored in memory (1 p. 9-5).
2 Enter the one-touch speed diallingbutton or coded speed dialling codeassigned to the fax number or groupyou want to send to.❚ One-touch speed dialling button:
Press the one-touch speed diallingbutton you want.
❚ Coded speed dialling code:Press Coded Dial, then use thenumeric buttons to enter the two-digit code you want.• If you make a mistake, press Stop and
repeat this step.• NO TEL # appears if no fax/telephone
number or group is assigned to thespeed dialling button or code youpressed.
3 Press Start/Copy to begin scanningfor sending, or wait a few seconds forthe FAX to begin scanningautomatically.• If you do not want the FAX to begin
scanning automatically after a fewseconds, disable the TIME OUT setting(1 p. 14-6).
DOCUMENT READY
MEMORY USED 0%
Chapter 6 Speed Dialling 6-17
Sp
eed
Dia
llin
g
Making a Telephone Call With Speed DiallingFollow this procedure to dial a telephone number registered for one-touch or codedspeed dialling on your FAX:
1 Make sure you have connected theoptional handset or a telephone to theFAX (1 p. 2-6).
2 Press Hook.• You can also lift the handset instead of
pressing Hook.
3 Enter the one-touch speed diallingbutton or coded speed dialling codeassigned to the telephone number youwant to dial.❚ One-touch speed dialling button:
Press the one-touch speed diallingbutton you want.
❚ Coded speed dialling code:Press Coded Dial, then use thenumeric buttons to enter the two-digit code you want.• If you make a mistake, press Hook or
hang up the handset and start againfrom step 2.
• NO TEL # appears if no fax/telephonenumber is assigned to the speeddialling button or code you pressed.
• NOT AVAILABLE appears if youentered a speed dialling button or codeassigned to a group of fax numbers.
4 When you hear the other party answerthe call, pick up the handset to starttalking.
5 When you are finished, simply hangup.
TEL=
6-18 Speed Dialling Chapter 6
Printing Speed Dialling ListsTo check the fax/telephone numbers and names registered for speed dialling, you canprint the speed dialling lists. You may want to keep these lists near your FAX to refer tothem when dialling.
Follow this procedure to print speed dialling lists:
1 Open the one-touch speed dial panel.
2 Press Report.
3 Use ∂ or ¨ to select SPEED DIALLIST.
4 Press Set.
5 Use ∂ or ¨ to select the list you wantto print.• You can select from the following:
– 1-TOUCH LIST– CODED DIAL LIST– 1-TOUCH (DETAIL)– CODED (DETAIL)– GROUP DIAL LIST
� If you selected GROUP DIAL LIST in step 5:6 Press Set.
• The FAX prints the list.
� If you selected a list other than GROUP DIAL LIST in step 5:6 Press Set.
7 Select in what order you want the liststo be printed.Press T to print the list with thedestination names (CONNECTION IDon the reports) in alphabetical order(sorted).-or-Press # to print the list in code orbutton order (unsorted).• The FAX prints the list.
Samples of the lists are shown on the following pages.
YES=(A) NO=(#)
SORTED OUTPUT
1-TOUCH LIST
SPEED DIAL LIST
ACTIVITY REPORT
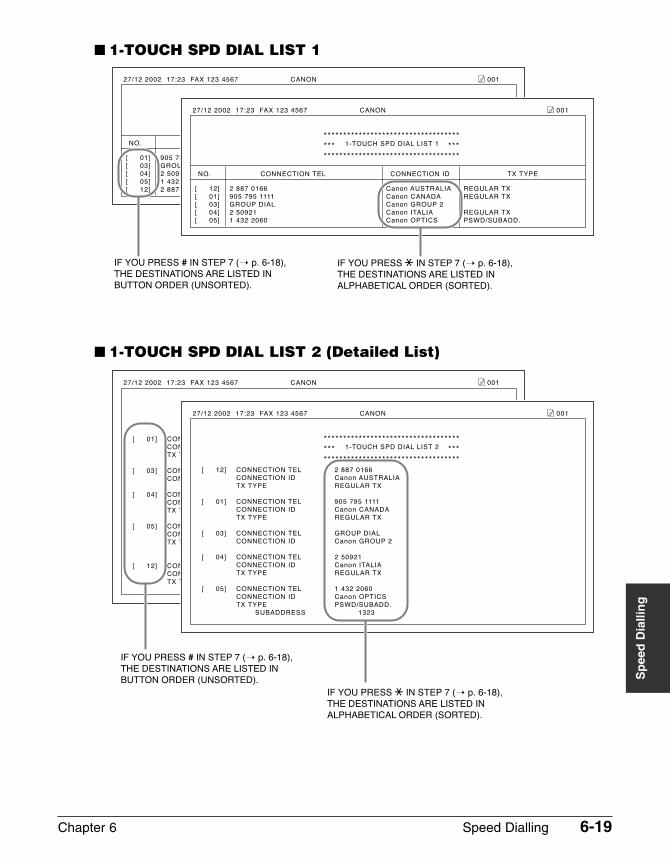
Chapter 6 Speed Dialling 6-19
Sp
eed
Dia
llin
g
� 1-TOUCH SPD DIAL LIST 1
� 1-TOUCH SPD DIAL LIST 2 (Detailed List)
***********************************
***********************************
*** ***1-TOUCH SPD DIAL LIST 2
[ 01] CONNECTION TEL 905 795 1111�
CONNECTION ID Canon CANADA�
TX TYPE REGULAR TX
[ 03] CONNECTION TEL GROUP DIAL�
CONNECTION ID GROUP 2
[ 04] CONNECTION TEL 2 50921�
CONNECTION ID Canon ITALIA�
TX TYPE REGULAR TX
[ 05] CONNECTION TEL 1 432 2060�
CONNECTION ID Canon OPTICS�
TX TYPE PSWD/SUBADD.
SUBADDRESS 1323
[ 12] CONNECTION TEL 2 887 0166�
CONNECTION ID Canon AUSTRALIA�
TX TYPE REGULAR TX
27/12 2002 17:23 FAX 123 4567 CANON 001
***********************************
***********************************
*** ***1-TOUCH SPD DIAL LIST 2
[ 12] CONNECTION TEL 2 887 0166�
CONNECTION ID Canon AUSTRALIA�
TX TYPE REGULAR TX
[ 01] CONNECTION TEL 905 795 1111�
CONNECTION ID Canon CANADA�
TX TYPE REGULAR TX
[ 03] CONNECTION TEL GROUP DIAL�
CONNECTION ID Canon GROUP 2
[ 04] CONNECTION TEL 2 50921�
CONNECTION ID Canon ITALIA�
TX TYPE REGULAR TX
[ 05] CONNECTION TEL 1 432 2060�
CONNECTION ID Canon OPTICS�
TX TYPE PSWD/SUBADD.
SUBADDRESS 1323
27/12 2002 17:23 FAX 123 4567 CANON 001
IF YOU PRESS T IN STEP 7 (1 p. 6-18),
THE DESTINATIONS ARE LISTED IN
ALPHABETICAL ORDER (SORTED).
IF YOU PRESS # IN STEP 7 (1 p. 6-18),
THE DESTINATIONS ARE LISTED IN
BUTTON ORDER (UNSORTED).
***********************************
***********************************
*** ***1-TOUCH SPD DIAL LIST 1
NO. CONNECTION TEL CONNECTION ID TX TYPE
[ 01] 905 795 1111 Canon CANADA REGULAR TX
[ 03] GROUP DIAL GROUP 2
[ 04] 2 50921 Canon ITALIA REGULAR TX
[ 05] 1 432 2060 Canon OPTICS PSWD/SUBADD.
[ 12] 2 887 0166 Canon AUSTRALIA REGULAR TX
27/12 2002 17:23 FAX 123 4567 CANON 001
***********************************
***********************************
*** ***1-TOUCH SPD DIAL LIST 1
NO. CONNECTION TEL CONNECTION ID TX TYPE
[ 12] 2 887 0166 Canon AUSTRALIA REGULAR TX
[ 01] 905 795 1111 Canon CANADA REGULAR TX
[ 03] GROUP DIAL Canon GROUP 2
[ 04] 2 50921 Canon ITALIA REGULAR TX
[ 05] 1 432 2060 Canon OPTICS PSWD/SUBADD.
27/12 2002 17:23 FAX 123 4567 CANON 001
IF YOU PRESS T IN STEP 7 (1 p. 6-18),
THE DESTINATIONS ARE LISTED IN
ALPHABETICAL ORDER (SORTED).
IF YOU PRESS # IN STEP 7 (1 p. 6-18),
THE DESTINATIONS ARE LISTED IN
BUTTON ORDER (UNSORTED).
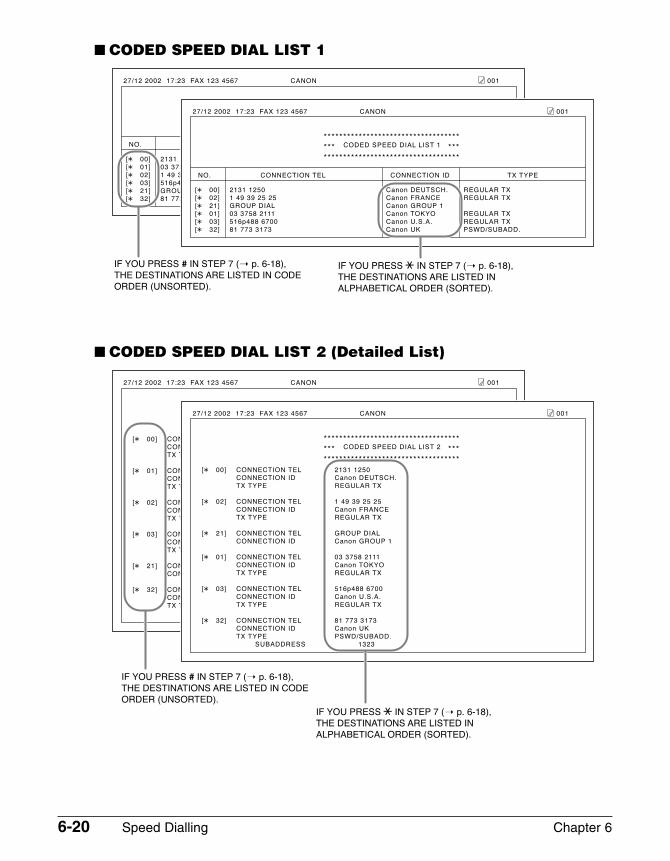
6-20 Speed Dialling Chapter 6
� CODED SPEED DIAL LIST 1
� CODED SPEED DIAL LIST 2 (Detailed List)
[A 00] CONNECTION TEL 2131 1250�
CONNECTION ID Canon DEUTSCH.�
TX TYPE REGULAR TX
[A 01] CONNECTION TEL 03 3758 2111�
CONNECTION ID Canon TOKYO�
TX TYPE REGULAR TX
[A 02] CONNECTION TEL 1 49 39 25 25�
CONNECTION ID Canon FRANCE�
TX TYPE REGULAR TX
[A 03] CONNECTION TEL 516p488 6700�
CONNECTION ID Canon U.S.A.�
TX TYPE REGULAR TX
[A 21] CONNECTION TEL GROUP DIAL�
CONNECTION ID Canon GROUP 1
[A 32] CONNECTION TEL 81 773 3173�
CONNECTION ID Canon UK�
TX TYPE PSWD/SUBADD.
SUBADDRESS 1323
27/12 2002 17:23 FAX 123 4567 CANON 001
***********************************
***********************************
*** ***CODED SPEED DIAL LIST 2
[A 00] CONNECTION TEL 2131 1250�
CONNECTION ID Canon DEUTSCH.�
TX TYPE REGULAR TX
[A 02] CONNECTION TEL 1 49 39 25 25�
CONNECTION ID Canon FRANCE�
TX TYPE REGULAR TX
[A 21] CONNECTION TEL GROUP DIAL�
CONNECTION ID Canon GROUP 1
[A 01] CONNECTION TEL 03 3758 2111�
CONNECTION ID Canon TOKYO�
TX TYPE REGULAR TX
[A 03] CONNECTION TEL 516p488 6700�
CONNECTION ID Canon U.S.A.�
TX TYPE REGULAR TX
[A 32] CONNECTION TEL 81 773 3173�
CONNECTION ID Canon UK�
TX TYPE PSWD/SUBADD.
SUBADDRESS 1323
27/12 2002 17:23 FAX 123 4567 CANON 001
***********************************
***********************************
*** ***CODED SPEED DIAL LIST 2
IF YOU PRESS T IN STEP 7 (1 p. 6-18),
THE DESTINATIONS ARE LISTED IN
ALPHABETICAL ORDER (SORTED).
IF YOU PRESS # IN STEP 7 (1 p. 6-18),
THE DESTINATIONS ARE LISTED IN CODE
ORDER (UNSORTED).
***********************************
***********************************
*** ***CODED SPEED DIAL LIST 1
NO. CONNECTION TEL CONNECTION ID TX TYPE
[A 00] 2131 1250 Canon DEUTSCH. REGULAR TX
[A 01] 03 3758 2111 Canon TOKYO REGULAR TX
[A 02] 1 49 39 25 25 Canon FRANCE REGULAR TX
[A 03] 516p488 6700 Canon U.S.A. REGULAR TX
[A 21] GROUP DIAL Canon GROUP 1
[A 32] 81 773 3173 Canon UK PSWD/SUBADD.
27/12 2002 17:23 FAX 123 4567 CANON 001
***********************************
***********************************
*** ***CODED SPEED DIAL LIST 1
NO. CONNECTION TEL CONNECTION ID TX TYPE
[A 00] 2131 1250 Canon DEUTSCH. REGULAR TX
[A 02] 1 49 39 25 25 Canon FRANCE REGULAR TX
[A 21] GROUP DIAL Canon GROUP 1
[A 01] 03 3758 2111 Canon TOKYO REGULAR TX
[A 03] 516p488 6700 Canon U.S.A. REGULAR TX
[A 32] 81 773 3173 Canon UK PSWD/SUBADD.
27/12 2002 17:23 FAX 123 4567 CANON 001
IF YOU PRESS T IN STEP 7 (1 p. 6-18),
THE DESTINATIONS ARE LISTED IN
ALPHABETICAL ORDER (SORTED).
IF YOU PRESS # IN STEP 7 (1 p. 6-18),
THE DESTINATIONS ARE LISTED IN CODE
ORDER (UNSORTED).

Chapter 6 Speed Dialling 6-21
Sp
eed
Dia
llin
g
� GROUP DIAL LIST

6-22 Speed Dialling Chapter 6
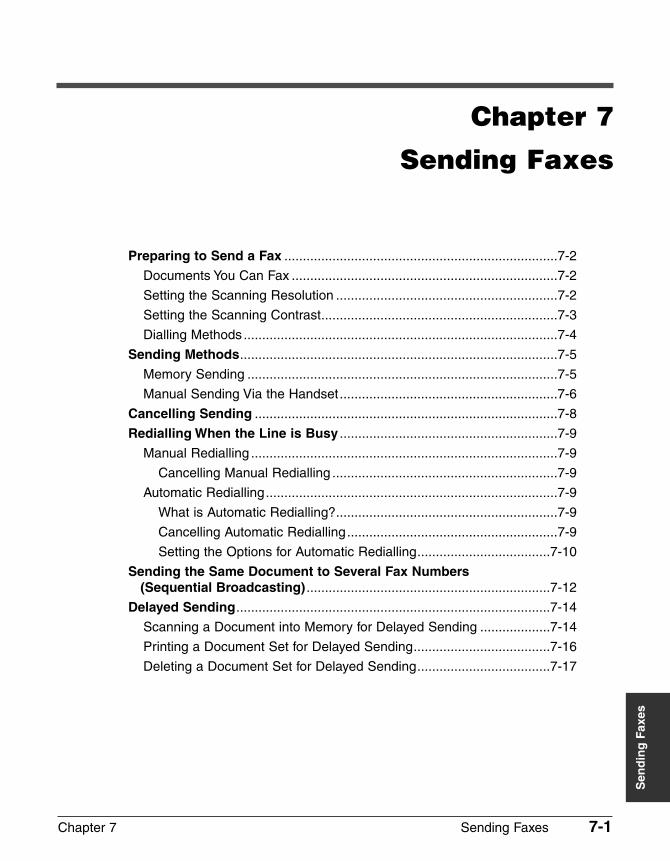
Chapter 7 Sending Faxes 7-1
Sen
din
g F
axes
Chapter 7
Sending Faxes
Preparing to Send a Fax ..........................................................................7-2
Documents You Can Fax ........................................................................7-2
Setting the Scanning Resolution ............................................................7-2
Setting the Scanning Contrast................................................................7-3
Dialling Methods .....................................................................................7-4
Sending Methods......................................................................................7-5
Memory Sending ....................................................................................7-5
Manual Sending Via the Handset...........................................................7-6
Cancelling Sending ..................................................................................7-8
Redialling When the Line is Busy ...........................................................7-9
Manual Redialling ...................................................................................7-9
Cancelling Manual Redialling .............................................................7-9
Automatic Redialling...............................................................................7-9
What is Automatic Redialling?............................................................7-9
Cancelling Automatic Redialling.........................................................7-9
Setting the Options for Automatic Redialling....................................7-10
Sending the Same Document to Several Fax Numbers(Sequential Broadcasting) ..................................................................7-12
Delayed Sending.....................................................................................7-14
Scanning a Document into Memory for Delayed Sending ...................7-14
Printing a Document Set for Delayed Sending.....................................7-16
Deleting a Document Set for Delayed Sending....................................7-17
7-2 Sending Faxes Chapter 7
Preparing to Send a FaxDocuments You Can Fax
For information on the types of documents you can fax, their requirements, and detailson loading documents, see Chapter 4.
Setting the Scanning ResolutionYou can set the scanning resolution of documents you send. The higher the resolutionthe higher the output quality at the other end, but the slower the transmission speed.Adjust the scanning resolution according to the type of document you are sending.
If you are sending a document that requires some pages to be scanned at a differentresolution from the others, you can change the resolution setting while the document isbeing scanned. However, please note that the new setting will only be effective from thenext page scanned.
Follow this procedure to set the scanning resolution:
1 Press Resolution to select the resolution Ex:setting you want.• You can select from the following:
– FAX STANDARDSuitable for most text-only documents.
– FAX FINESuitable for fine-print documents.
– FAX PHOTOSuitable for documents that containimages such as photos. With thissetting, areas of the document thatcontain photos are automaticallyscanned with 64 levels of grey, ratherthan just in black & white.
– SUPER FINESuitable for documents that containfine print and images. This setting isfour times the resolution of the FAXSTANDARD setting.
2 Continue with the operation you areperforming.• If you do not proceed with any other
operation, the LCD returns to standbymode after about 10 seconds.
FAX PHOTO
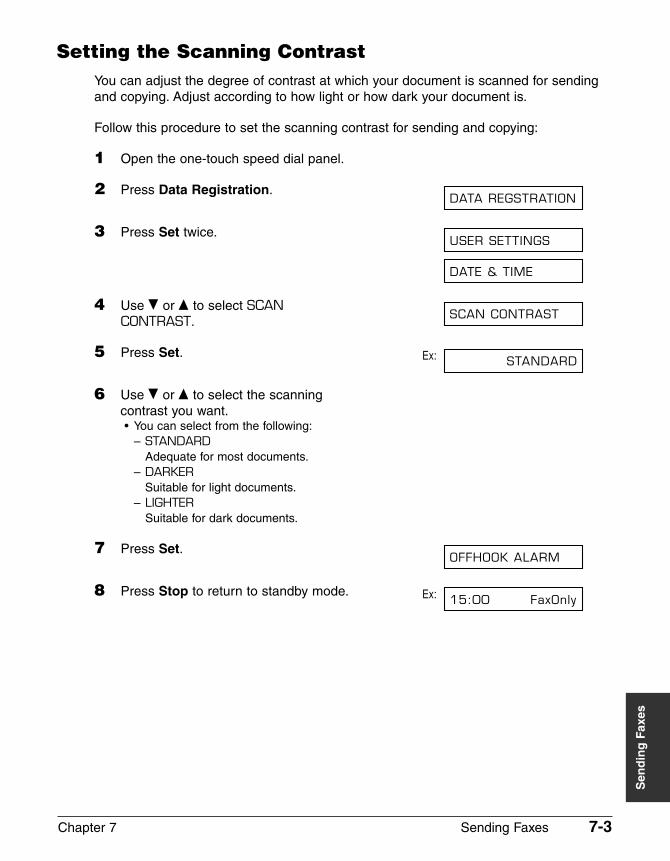
Chapter 7 Sending Faxes 7-3
Sen
din
g F
axes
Setting the Scanning ContrastYou can adjust the degree of contrast at which your document is scanned for sendingand copying. Adjust according to how light or how dark your document is.
Follow this procedure to set the scanning contrast for sending and copying:
1 Open the one-touch speed dial panel.
2 Press Data Registration.
3 Press Set twice.
4 Use ∂ or ¨ to select SCANCONTRAST.
5 Press Set. Ex:
6 Use ∂ or ¨ to select the scanningcontrast you want.• You can select from the following:
– STANDARDAdequate for most documents.
– DARKERSuitable for light documents.
– LIGHTERSuitable for dark documents.
7 Press Set.
8 Press Stop to return to standby mode. Ex: 15:00 FaxOnly
OFFHOOK ALARM
STANDARD
SCAN CONTRAST
DATE & TIME
USER SETTINGS
DATA REGSTRATION
7-4 Sending Faxes Chapter 7
Dialling MethodsThere are several ways of dialling the fax number(s) you want to send to. They are asfollows:
• Regular DiallingDial a fax number by using the numeric buttons, similar to dialling a telephonenumber.
• One-Touch Speed DiallingDial a fax number by pressing the one-touch speed dialling button (01 to 24) assignedto the fax number. For details on registering and using one-touch speed dialling, see pp. 6-3, 6-16.
• Coded Speed DiallingDial a fax number by pressing Coded Dial and entering the two-digit code (00 to 99)assigned to the fax number. For details on registering and using coded speed dialling,see pp. 6-8, 6-16.
• Group DiallingSend a document to a predefined group of fax numbers registered for speed dialling.For details on registering groups and using group dialling, see pp. 6-13, 6-16.

Chapter 7 Sending Faxes 7-5
Sen
din
g F
axes
Sending MethodsThis section explains the two main sending methods: Memory sending and Manualsending via the handset.
Memory SendingMemory sending is a quick and easy way to send a document. As the FAX scans thefirst page of a multipage document into its memory, it begins calling the other party andtransmitting the information even as the remaining pages are being scanned.
Since the FAX is multitasking, you can even scan a document into memory whileperforming other tasks.
The FAX has enough memory to store up to approximately 256 pages* (fewer if thedocument contains many graphics or particularly dense text).
Follow this procedure to send a document using memory sending:
1 Load the document, face down in the Ex:ADF (1 p. 4-3).• To adjust the resolution and contrast, (Currently used memory)
see pp. 7-2, 7-3.• You may be unable to send if the
memory used (shown in the LCD) is (Standby to scan)close to 100%. Use manual sending via the handset instead (1 p. 7-6).
2 Dial the other party’s fax number. Ex:• For dialling methods, see p. 7-4.• If you enter the wrong number, press
Stop, then enter the correct number.• If you are connected to a PBX and need
to first dial an outside line accessnumber (“9”, for example), add a pauseafter that number by pressingRedial/Pause (1 p. 9-2).
TEL= 9p7654321
DOCUMENT READY
MEMORY USED 0%
* Based on Canon FAX Standard Chart No. 1, standard mode.
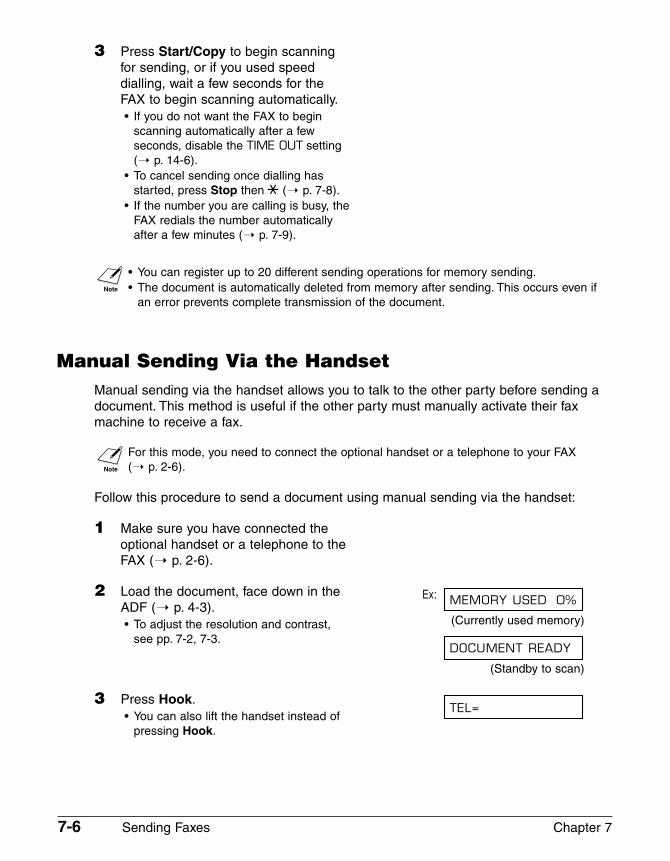
7-6 Sending Faxes Chapter 7
3 Press Start/Copy to begin scanningfor sending, or if you used speeddialling, wait a few seconds for theFAX to begin scanning automatically.• If you do not want the FAX to begin
scanning automatically after a fewseconds, disable the TIME OUT setting(1 p. 14-6).
• To cancel sending once dialling hasstarted, press Stop then T (1 p. 7-8).
• If the number you are calling is busy, theFAX redials the number automaticallyafter a few minutes (1 p. 7-9).
n • You can register up to 20 different sending operations for memory sending.• The document is automatically deleted from memory after sending. This occurs even if
an error prevents complete transmission of the document.
Manual Sending Via the HandsetManual sending via the handset allows you to talk to the other party before sending adocument. This method is useful if the other party must manually activate their faxmachine to receive a fax.
n For this mode, you need to connect the optional handset or a telephone to your FAX (1 p. 2-6).
Follow this procedure to send a document using manual sending via the handset:
1 Make sure you have connected theoptional handset or a telephone to theFAX (1 p. 2-6).
2 Load the document, face down in the Ex:ADF (1 p. 4-3).• To adjust the resolution and contrast, (Currently used memory)
see pp. 7-2, 7-3.
(Standby to scan)
3 Press Hook.• You can also lift the handset instead of
pressing Hook.
TEL=
DOCUMENT READY
MEMORY USED 0%
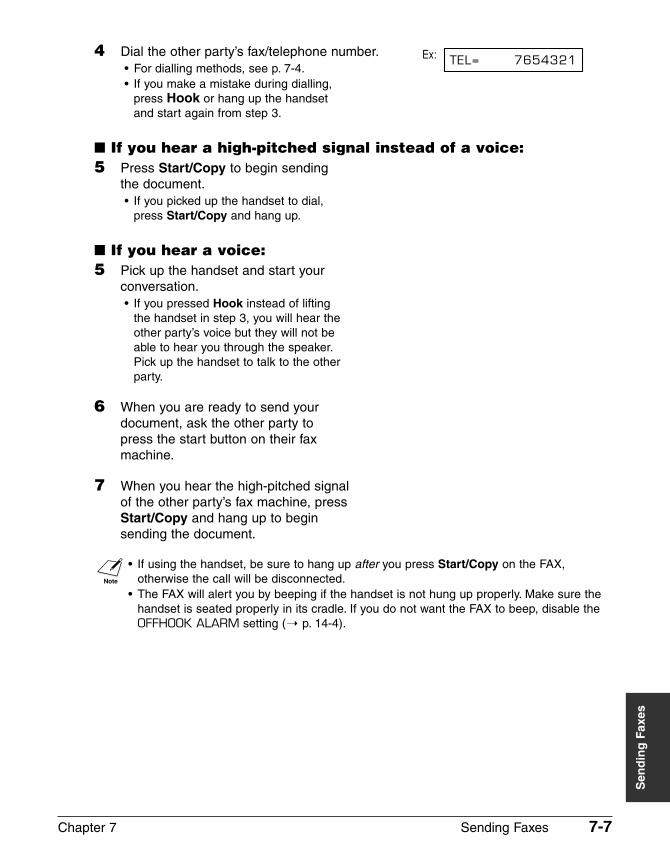
Chapter 7 Sending Faxes 7-7
Sen
din
g F
axes
4 Dial the other party’s fax/telephone number. Ex:• For dialling methods, see p. 7-4.• If you make a mistake during dialling,
press Hook or hang up the handsetand start again from step 3.
� If you hear a high-pitched signal instead of a voice:5 Press Start/Copy to begin sending
the document.• If you picked up the handset to dial,
press Start/Copy and hang up.
� If you hear a voice:5 Pick up the handset and start your
conversation.• If you pressed Hook instead of lifting
the handset in step 3, you will hear theother party’s voice but they will not beable to hear you through the speaker.Pick up the handset to talk to the otherparty.
6 When you are ready to send yourdocument, ask the other party topress the start button on their faxmachine.
7 When you hear the high-pitched signalof the other party’s fax machine, pressStart/Copy and hang up to beginsending the document.
n • If using the handset, be sure to hang up after you press Start/Copy on the FAX,otherwise the call will be disconnected.
• The FAX will alert you by beeping if the handset is not hung up properly. Make sure thehandset is seated properly in its cradle. If you do not want the FAX to beep, disable theOFFHOOK ALARM setting (1 p. 14-4).
TEL= 7654321
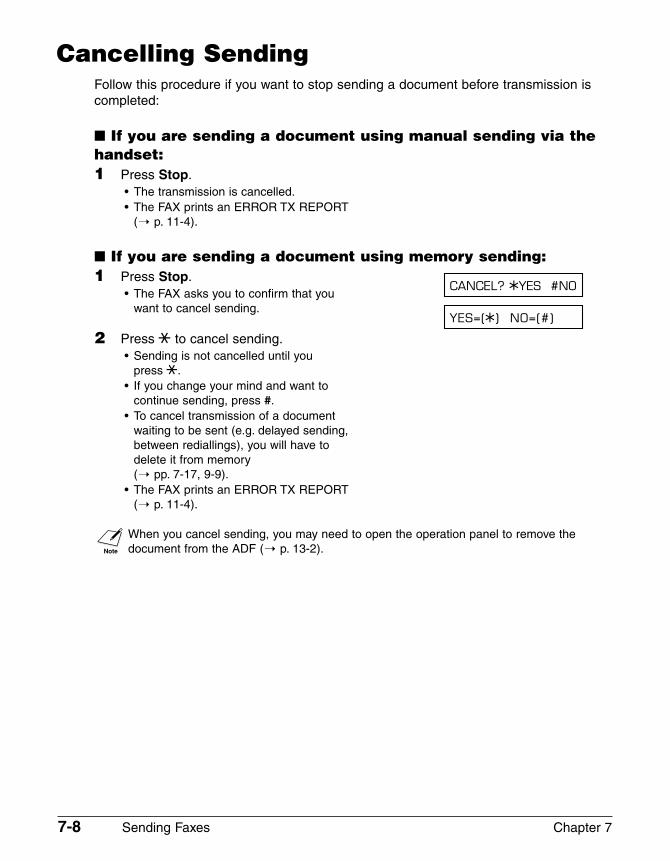
7-8 Sending Faxes Chapter 7
Cancelling SendingFollow this procedure if you want to stop sending a document before transmission iscompleted:
� If you are sending a document using manual sending via thehandset:1 Press Stop.
• The transmission is cancelled.• The FAX prints an ERROR TX REPORT
(1 p. 11-4).
� If you are sending a document using memory sending:1 Press Stop.
• The FAX asks you to confirm that you want to cancel sending.
2 Press T to cancel sending.• Sending is not cancelled until you
press T.• If you change your mind and want to
continue sending, press #.• To cancel transmission of a document
waiting to be sent (e.g. delayed sending,between rediallings), you will have todelete it from memory (1 pp. 7-17, 9-9).
• The FAX prints an ERROR TX REPORT(1 p. 11-4).
nWhen you cancel sending, you may need to open the operation panel to remove thedocument from the ADF (1 p. 13-2).
YES=(A) NO=(#)
CANCEL? AYES #NO
Chapter 7 Sending Faxes 7-9
Sen
din
g F
axes
Redialling When the Line is BusyThere are two methods of redialling: Manual redialling and Automatic redialling. Thissection explains these two methods.
Manual RediallingPress Redial/Pause to dial the last number you dialled with the numeric buttons. (Thisstarts redialling regardless of whether automatic redialling is enabled.)
Cancelling Manual RediallingTo cancel manual redialling, press Stop.
Automatic Redialling
What is Automatic Redialling?When you are sending a document using memory sending (1 p. 7-5) and the otherparty’s line is busy, the FAX waits the specified time interval and then redials thenumber automatically. This is called Automatic redialling.
You will know that the FAX is waiting to redial when AUTO REDIAL and the transactionnumber (TX/RX NO.) are displayed in the LCD.
The automatic redialling options allow you to customise the number of times the FAXredials, as well as the time interval between redials. You can also disable automaticredialling if you prefer the FAX not to do so.
If all automatic redialling attempts are unsuccessful, the FAX cancels the transmissionand prints an ERROR TX REPORT to notify you that the transmission was notcompleted (1 p. 11-4).
Cancelling Automatic RediallingAutomatic redialling cannot be cancelled with the Stop button while the FAX is waitingto redial. You can either wait until the FAX begins redialling and then follow theprocedure below, or if you want to cancel while the FAX is waiting to redial, you willhave to delete the document from memory (1 p. 9-9).
Follow this procedure to cancel automatic redialling when the FAX begins redialling:
1 Wait until the FAX begins redialling.DIALING
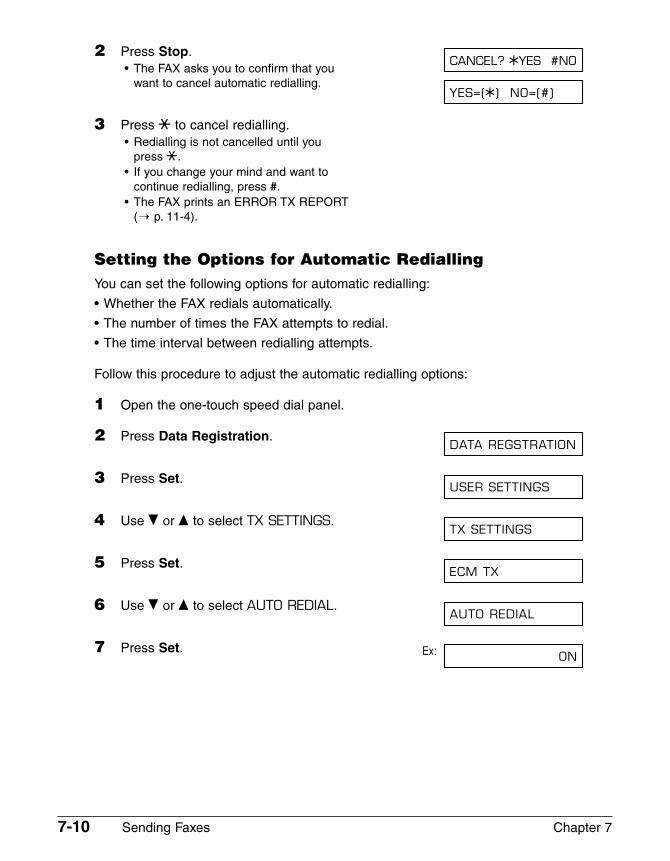
7-10 Sending Faxes Chapter 7
2 Press Stop.• The FAX asks you to confirm that you
want to cancel automatic redialling.
3 Press T to cancel redialling.• Redialling is not cancelled until you
press T.• If you change your mind and want to
continue redialling, press #.• The FAX prints an ERROR TX REPORT
(1 p. 11-4).
Setting the Options for Automatic RediallingYou can set the following options for automatic redialling:
• Whether the FAX redials automatically.
• The number of times the FAX attempts to redial.
• The time interval between redialling attempts.
Follow this procedure to adjust the automatic redialling options:
1 Open the one-touch speed dial panel.
2 Press Data Registration.
3 Press Set.
4 Use ∂ or ¨ to select TX SETTINGS.
5 Press Set.
6 Use ∂ or ¨ to select AUTO REDIAL.
7 Press Set. Ex: ON
AUTO REDIAL
ECM TX
TX SETTINGS
USER SETTINGS
DATA REGSTRATION
YES=(A) NO=(#)
CANCEL? AYES #NO
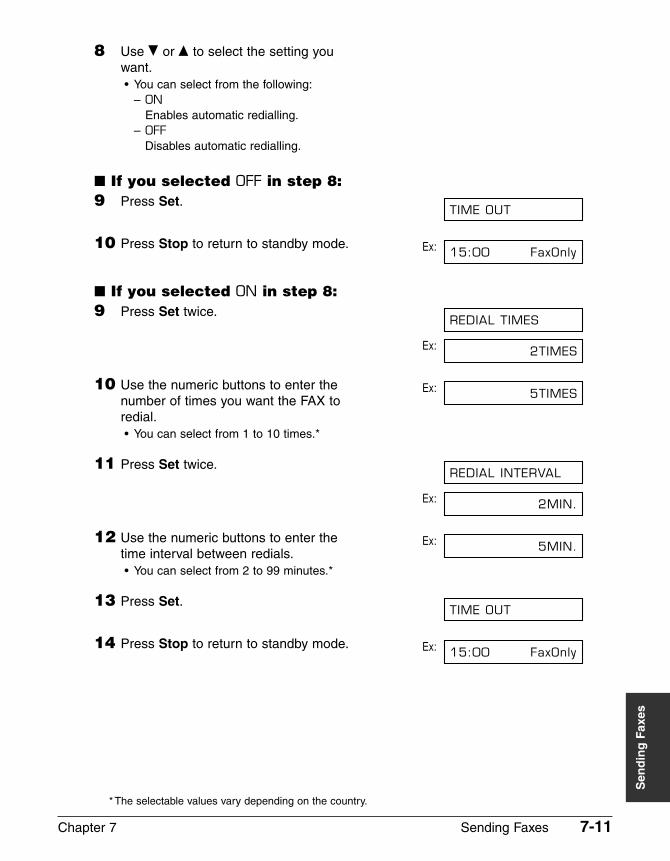
Chapter 7 Sending Faxes 7-11
Sen
din
g F
axes
8 Use ∂ or ¨ to select the setting you want.• You can select from the following:
– ONEnables automatic redialling.
– OFFDisables automatic redialling.
� If you selected OFF in step 8:9 Press Set.
10 Press Stop to return to standby mode. Ex:
� If you selected ON in step 8:9 Press Set twice.
Ex:
10 Use the numeric buttons to enter the Ex:number of times you want the FAX to redial.• You can select from 1 to 10 times.*
11 Press Set twice.
Ex:
12 Use the numeric buttons to enter the Ex:time interval between redials.• You can select from 2 to 99 minutes.*
13 Press Set.
14 Press Stop to return to standby mode. Ex: 15:00 FaxOnly
TIME OUT
5MIN.
2MIN.
REDIAL INTERVAL
5TIMES
2TIMES
REDIAL TIMES
15:00 FaxOnly
TIME OUT
* The selectable values vary depending on the country.
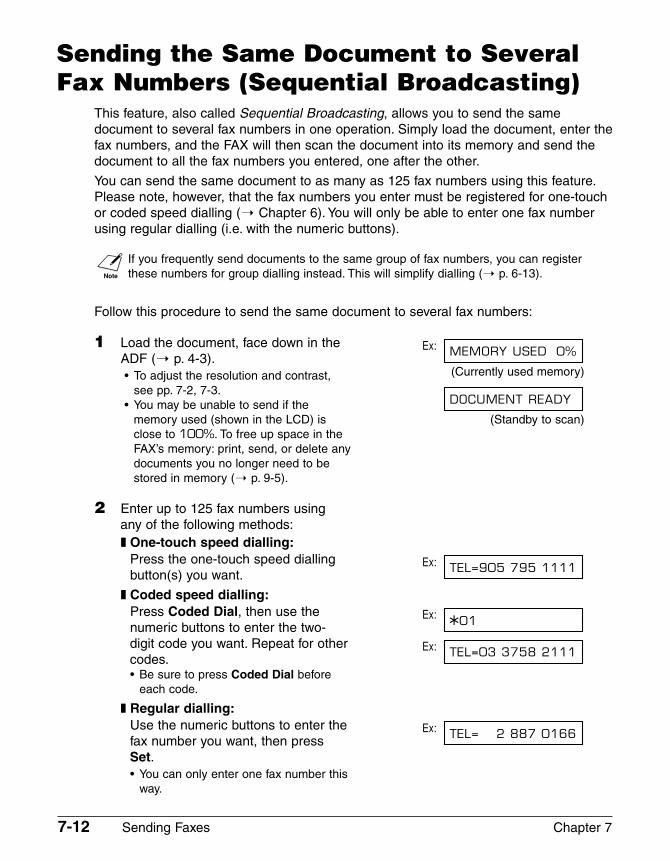
7-12 Sending Faxes Chapter 7
Sending the Same Document to SeveralFax Numbers (Sequential Broadcasting)
This feature, also called Sequential Broadcasting, allows you to send the samedocument to several fax numbers in one operation. Simply load the document, enter thefax numbers, and the FAX will then scan the document into its memory and send thedocument to all the fax numbers you entered, one after the other.
You can send the same document to as many as 125 fax numbers using this feature.Please note, however, that the fax numbers you enter must be registered for one-touchor coded speed dialling (1 Chapter 6). You will only be able to enter one fax numberusing regular dialling (i.e. with the numeric buttons).
n If you frequently send documents to the same group of fax numbers, you can registerthese numbers for group dialling instead. This will simplify dialling (1 p. 6-13).
Follow this procedure to send the same document to several fax numbers:
1 Load the document, face down in the Ex:ADF (1 p. 4-3).• To adjust the resolution and contrast, (Currently used memory)
see pp. 7-2, 7-3.• You may be unable to send if the
memory used (shown in the LCD) is (Standby to scan)close to 100%. To free up space in the FAX’s memory: print, send, or delete any documents you no longer need to be stored in memory (1 p. 9-5).
2 Enter up to 125 fax numbers using any of the following methods:❚ One-touch speed dialling:
Press the one-touch speed dialling Ex:button(s) you want.
❚ Coded speed dialling:Press Coded Dial, then use the Ex:numeric buttons to enter the two-digit code you want. Repeat for other Ex:codes.• Be sure to press Coded Dial before
each code.
❚ Regular dialling:Use the numeric buttons to enter the Ex:fax number you want, then pressSet.• You can only enter one fax number this
way.
TEL= 2 887 0166
TEL=03 3758 2111
A01
TEL=905 795 1111
DOCUMENT READY
MEMORY USED 0%
Chapter 7 Sending Faxes 7-13
Sen
din
g F
axes
n • You can enter the fax numbers in any order.
• If you enter a wrong destination,press Clear, then enter thecorrect destination.
• You must enter the seconddestination within five seconds ofentering the first one. Allsubsequent destinations must beentered within 10 seconds. If youwait longer than these times, theFAX automatically beginsscanning the document forsending. If you do not want theFAX to begin scanningautomatically after a fewseconds, disable the TIME OUTsetting (1 p. 14-6).
• To review the destinationsentered, use ∂ or ¨ to scrollthrough the numbers.
3 Press Start/Copy to begin scanningfor sending, or wait a few seconds forthe FAX to begin scanningautomatically.• The FAX will first send the document to
the one-touch speed diallingdestinations, then the coded speeddialling destinations, and finally to thedestination dialled using regular dialling.
• If you do not want the FAX to beginscanning automatically after a fewseconds, disable the TIME OUT setting(1 p. 14-6).
• To cancel sending once dialling hasstarted, press Stop then T. Sending toall destinations you specified in step 2will be cancelled. (You cannot cancelonly one destination.)
n • If a number is busy, the FAX will continue sending to the other destinations and thenautomatically redial the number that was busy.
• If the FAX’s memory becomes full while scanning your document, MEMORY FULL willappear in the LCD. If this happens, remove the remainder of the document from the ADF(you may need to open the operation panel to do so), then divide the document intoseveral sections and send each section separately.

7-14 Sending Faxes Chapter 7
Delayed SendingYour FAX allows you to scan a document into its memory and send it automatically toas many as 125 fax numbers at a preset time within the next 24 hours. This is calledDelayed sending or Timer sending. By using this feature, you can take advantage oflower long distance rates at night, for example.
n To use delayed sending correctly, make sure the correct time is set on your FAX (1 p. 3-6).
Scanning a Document into Memory for DelayedSending
Follow this procedure to scan a document into the FAX’s memory for delayed sending:
1 Load the document, face down in the Ex:ADF (1 p. 4-3).• To adjust the resolution and contrast, (Currently used memory)
see pp. 7-2, 7-3.• You may be unable to scan if the
memory used (shown in the LCD) is (Standby to scan)close to 100%. To free up space in the FAX’s memory: print, send, or delete any documents you no longer need to be stored in memory (1 p. 9-5).
2 Open the one-touch speed dial panel.
3 Press Delayed Transmission.
4 Press Set. Ex:
5 Use the numeric buttons to enter the Ex:time at which you want to send thedocument.• Use the 24-hour format for the time
(e.g. 11:30 p.m. as 23:30), and precedesingle digits with a zero.
6 Press Set.
TEL=
SELECT LOCATIONS
SET TIME 22:30
SET TIME 15:00
REGISTER
DOCUMENT READY
MEMORY USED 0%
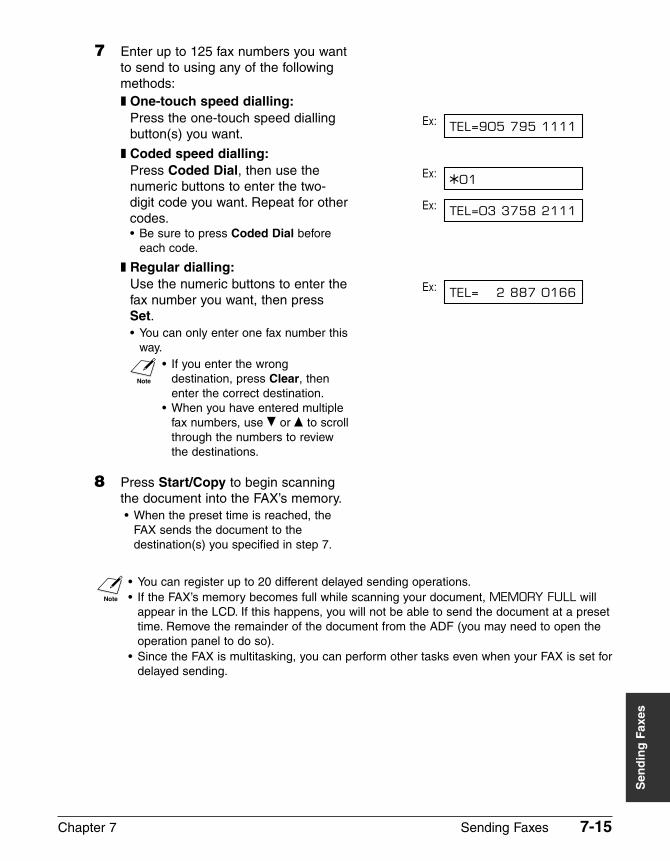
Chapter 7 Sending Faxes 7-15
Sen
din
g F
axes
7 Enter up to 125 fax numbers you wantto send to using any of the followingmethods:❚ One-touch speed dialling:
Press the one-touch speed dialling Ex:button(s) you want.
❚ Coded speed dialling:Press Coded Dial, then use the Ex:numeric buttons to enter the two-digit code you want. Repeat for other Ex:codes.• Be sure to press Coded Dial before
each code.
❚ Regular dialling:Use the numeric buttons to enter the Ex:fax number you want, then pressSet.• You can only enter one fax number this
way.
n • If you enter the wrongdestination, press Clear, thenenter the correct destination.
• When you have entered multiplefax numbers, use ∂ or ¨ to scrollthrough the numbers to reviewthe destinations.
8 Press Start/Copy to begin scanningthe document into the FAX’s memory.• When the preset time is reached, the
FAX sends the document to thedestination(s) you specified in step 7.
n • You can register up to 20 different delayed sending operations.• If the FAX’s memory becomes full while scanning your document, MEMORY FULL will
appear in the LCD. If this happens, you will not be able to send the document at a presettime. Remove the remainder of the document from the ADF (you may need to open theoperation panel to do so).
• Since the FAX is multitasking, you can perform other tasks even when your FAX is set fordelayed sending.
TEL= 2 887 0166
TEL=03 3758 2111
A01
TEL=905 795 1111
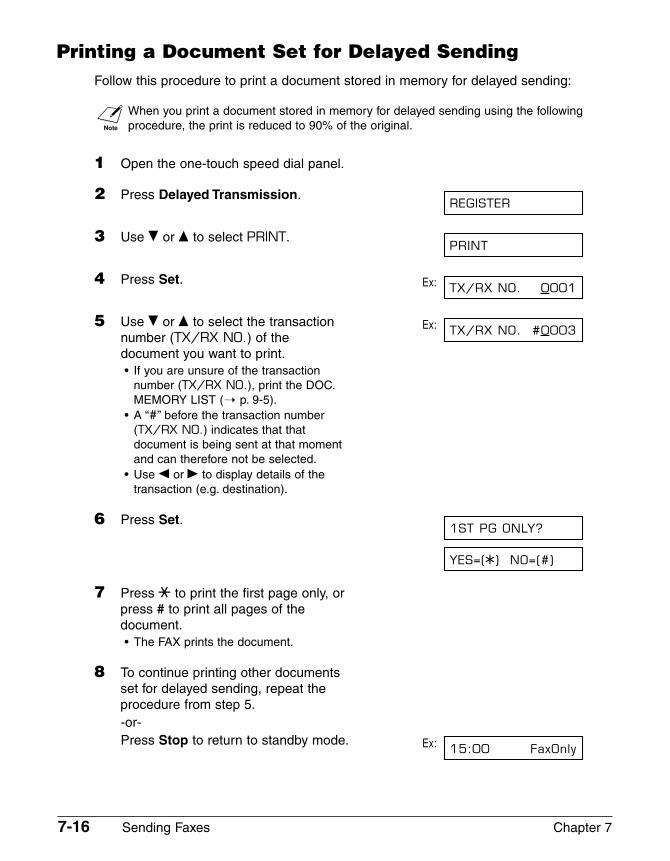
7-16 Sending Faxes Chapter 7
Printing a Document Set for Delayed SendingFollow this procedure to print a document stored in memory for delayed sending:
nWhen you print a document stored in memory for delayed sending using the followingprocedure, the print is reduced to 90% of the original.
1 Open the one-touch speed dial panel.
2 Press Delayed Transmission.
3 Use ∂ or ¨ to select PRINT.
4 Press Set. Ex:
5 Use ∂ or ¨ to select the transaction Ex:number (TX/RX NO.) of thedocument you want to print.• If you are unsure of the transaction
number (TX/RX NO.), print the DOC.MEMORY LIST (1 p. 9-5).
• A “#” before the transaction number(TX/RX NO.) indicates that thatdocument is being sent at that momentand can therefore not be selected.
• Use ¬ or ® to display details of thetransaction (e.g. destination).
6 Press Set.
7 Press T to print the first page only, orpress # to print all pages of thedocument.• The FAX prints the document.
8 To continue printing other documentsset for delayed sending, repeat theprocedure from step 5.-or-Press Stop to return to standby mode. Ex: 15:00 FaxOnly
YES=(A) NO=(#)
1ST PG ONLY?
TX/RX NO. #0003
TX/RX NO. 0001
REGISTER
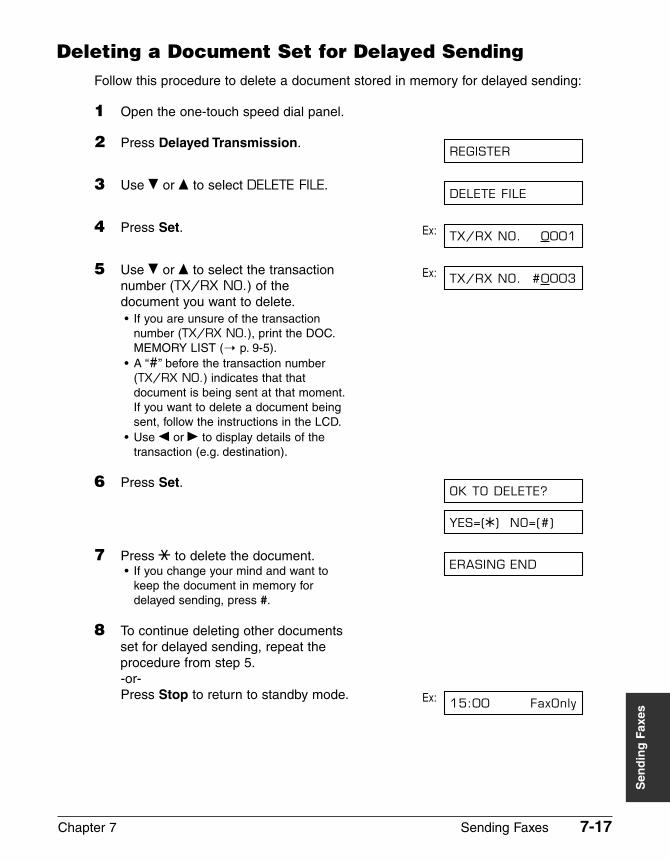
Chapter 7 Sending Faxes 7-17
Sen
din
g F
axes
Deleting a Document Set for Delayed SendingFollow this procedure to delete a document stored in memory for delayed sending:
1 Open the one-touch speed dial panel.
2 Press Delayed Transmission.
3 Use ∂ or ¨ to select DELETE FILE.
4 Press Set. Ex:
5 Use ∂ or ¨ to select the transaction Ex:number (TX/RX NO.) of thedocument you want to delete.• If you are unsure of the transaction
number (TX/RX NO.), print the DOC.MEMORY LIST (1 p. 9-5).
• A “#” before the transaction number(TX/RX NO.) indicates that thatdocument is being sent at that moment.If you want to delete a document beingsent, follow the instructions in the LCD.
• Use ¬ or ® to display details of thetransaction (e.g. destination).
6 Press Set.
7 Press T to delete the document.• If you change your mind and want to
keep the document in memory fordelayed sending, press #.
8 To continue deleting other documentsset for delayed sending, repeat theprocedure from step 5.-or-Press Stop to return to standby mode. Ex: 15:00 FaxOnly
ERASING END
YES=(A) NO=(#)
OK TO DELETE?
TX/RX NO. #0003
TX/RX NO. 0001
DELETE FILE
REGISTER

7-18 Sending Faxes Chapter 7
Chapter 8 Receiving Faxes 8-1
Rec
eivi
ng
Fax
es
Chapter 8
Receiving Faxes
Receiving Methods ...................................................................................8-2
Receiving Faxes Automatically: FAX ONLY MODE ................................8-3
Setting FAX ONLY MODE ..................................................................8-3
Receiving Both Faxes and Telephone Calls Automatically:Fax/Tel Mode........................................................................................8-5
Setting Fax/Tel Mode..........................................................................8-5
Setting the Options for Fax/Tel Mode .................................................8-6
Receiving Faxes Manually: MANUAL MODE .........................................8-8
Setting MANUAL MODE.....................................................................8-8
Receiving a Fax Manually ..................................................................8-8
Receiving With an Answering Machine: ANS.MACHINE MODE..........8-10
Setting ANS.MACHINE MODE.........................................................8-10
Using the FAX With an Answering Machine.....................................8-10
Receiving While Performing Other Tasks .............................................8-11
Receiving Faxes in Memory When a Problem Occurs........................8-11
Cancelling Receiving .............................................................................8-11
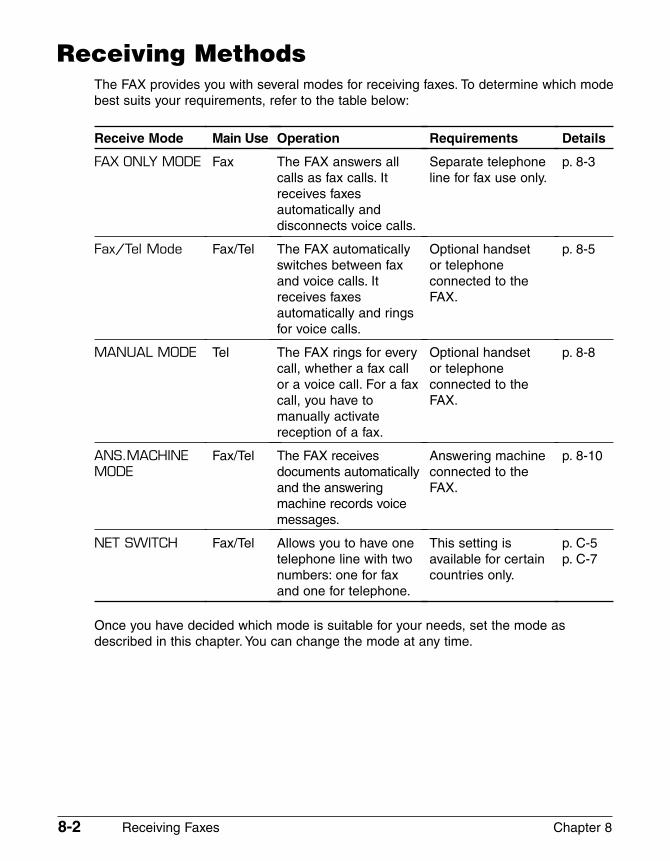
8-2 Receiving Faxes Chapter 8
Receiving MethodsThe FAX provides you with several modes for receiving faxes. To determine which modebest suits your requirements, refer to the table below:
Once you have decided which mode is suitable for your needs, set the mode asdescribed in this chapter. You can change the mode at any time.
Receive Mode
FAX ONLY MODE
Fax/Tel Mode
MANUAL MODE
ANS.MACHINEMODE
NET SWITCH
Main Use
Fax
Fax/Tel
Tel
Fax/Tel
Fax/Tel
Operation
The FAX answers allcalls as fax calls. Itreceives faxesautomatically anddisconnects voice calls.
The FAX automaticallyswitches between faxand voice calls. Itreceives faxesautomatically and ringsfor voice calls.
The FAX rings for everycall, whether a fax callor a voice call. For a faxcall, you have tomanually activatereception of a fax.
The FAX receivesdocuments automaticallyand the answeringmachine records voicemessages.
Allows you to have onetelephone line with twonumbers: one for faxand one for telephone.
Requirements
Separate telephoneline for fax use only.
Optional handset or telephoneconnected to theFAX.
Optional handset or telephoneconnected to theFAX.
Answering machineconnected to theFAX.
This setting isavailable for certaincountries only.
Details
p. 8-3
p. 8-5
p. 8-8
p. 8-10
p. C-5p. C-7
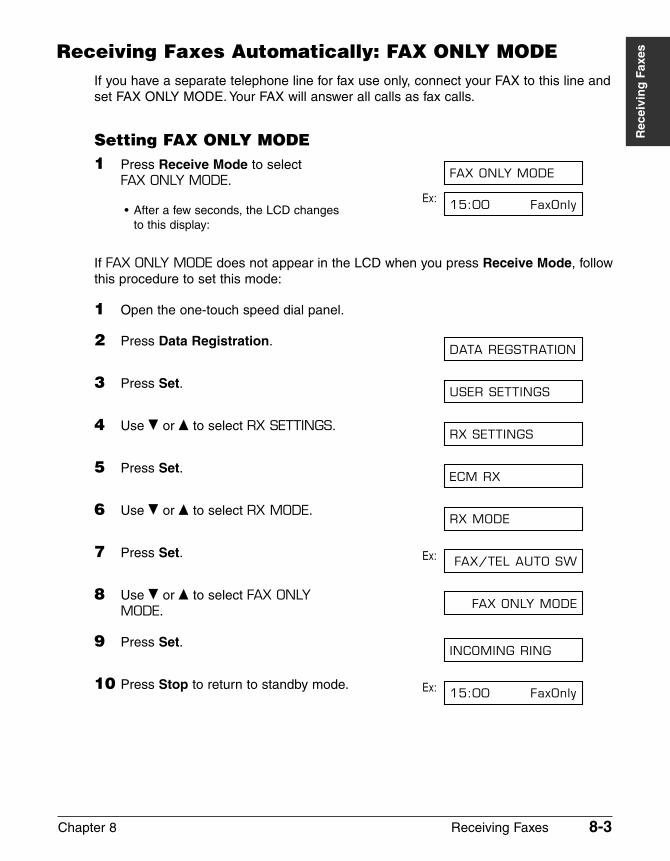
Chapter 8 Receiving Faxes 8-3
Rec
eivi
ng
Fax
esReceiving Faxes Automatically: FAX ONLY MODEIf you have a separate telephone line for fax use only, connect your FAX to this line andset FAX ONLY MODE. Your FAX will answer all calls as fax calls.
Setting FAX ONLY MODE1 Press Receive Mode to select
FAX ONLY MODE.Ex:
• After a few seconds, the LCD changes to this display:
If FAX ONLY MODE does not appear in the LCD when you press Receive Mode, followthis procedure to set this mode:
1 Open the one-touch speed dial panel.
2 Press Data Registration.
3 Press Set.
4 Use ∂ or ¨ to select RX SETTINGS.
5 Press Set.
6 Use ∂ or ¨ to select RX MODE.
7 Press Set. Ex:
8 Use ∂ or ¨ to select FAX ONLYMODE.
9 Press Set.
10 Press Stop to return to standby mode. Ex: 15:00 FaxOnly
INCOMING RING
FAX ONLY MODE
FAX/TEL AUTO SW
RX MODE
ECM RX
RX SETTINGS
USER SETTINGS
DATA REGSTRATION
15:00 FaxOnly
FAX ONLY MODE
8-4 Receiving Faxes Chapter 8
11 Confirm that FaxOnly is displayed in Ex:the LCD.• If FaxOnly is not displayed, press
Receive Mode to select FAX ONLYMODE. After a few seconds, the LCDreturns to standby mode.
The FAX treats all incoming calls as fax calls. It receives faxes automatically anddisconnects any voice calls.
n The FAX does not ring when it receives a fax call. If you want to be alerted when a fax callis received, connect the optional handset or a telephone to the FAX, and enable theINCOMING RING setting (1 p. 14-7). You can also select the number of rings before theFAX answers (1 RING COUNT, p. 14-7).
15:00 FaxOnly
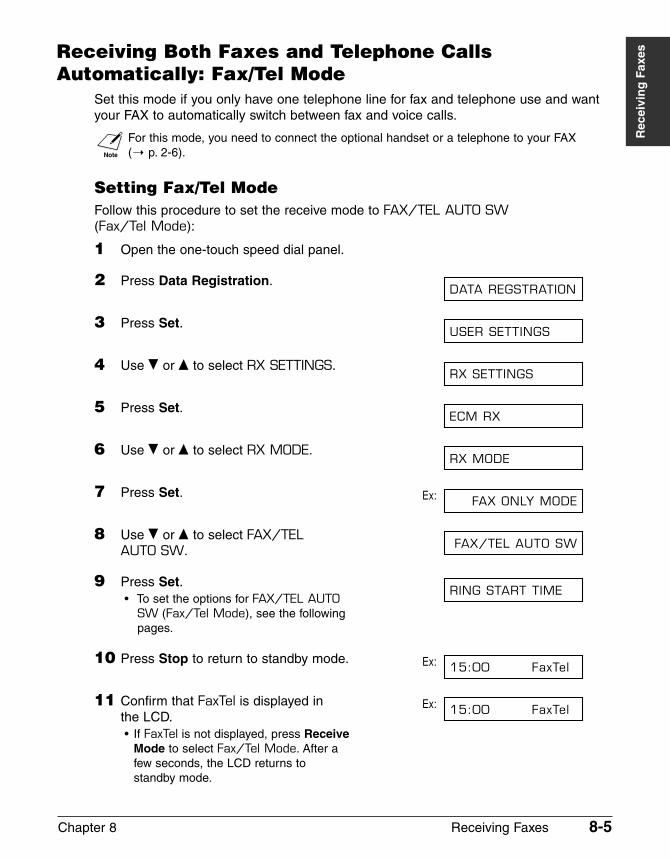
Chapter 8 Receiving Faxes 8-5
Rec
eivi
ng
Fax
esReceiving Both Faxes and Telephone CallsAutomatically: Fax/Tel Mode
Set this mode if you only have one telephone line for fax and telephone use and wantyour FAX to automatically switch between fax and voice calls.
n For this mode, you need to connect the optional handset or a telephone to your FAX (1 p. 2-6).
Setting Fax/Tel ModeFollow this procedure to set the receive mode to FAX/TEL AUTO SW(Fax/Tel Mode):
1 Open the one-touch speed dial panel.
2 Press Data Registration.
3 Press Set.
4 Use ∂ or ¨ to select RX SETTINGS.
5 Press Set.
6 Use ∂ or ¨ to select RX MODE.
7 Press Set. Ex:
8 Use ∂ or ¨ to select FAX/TELAUTO SW.
9 Press Set.• To set the options for FAX/TEL AUTO
SW (Fax/Tel Mode), see the followingpages.
10 Press Stop to return to standby mode. Ex:
11 Confirm that FaxTel is displayed in Ex:the LCD.• If FaxTel is not displayed, press Receive
Mode to select Fax/Tel Mode. After afew seconds, the LCD returns tostandby mode.
15:00 FaxTel
15:00 FaxTel
RING START TIME
FAX/TEL AUTO SW
FAX ONLY MODE
RX MODE
ECM RX
RX SETTINGS
USER SETTINGS
DATA REGSTRATION
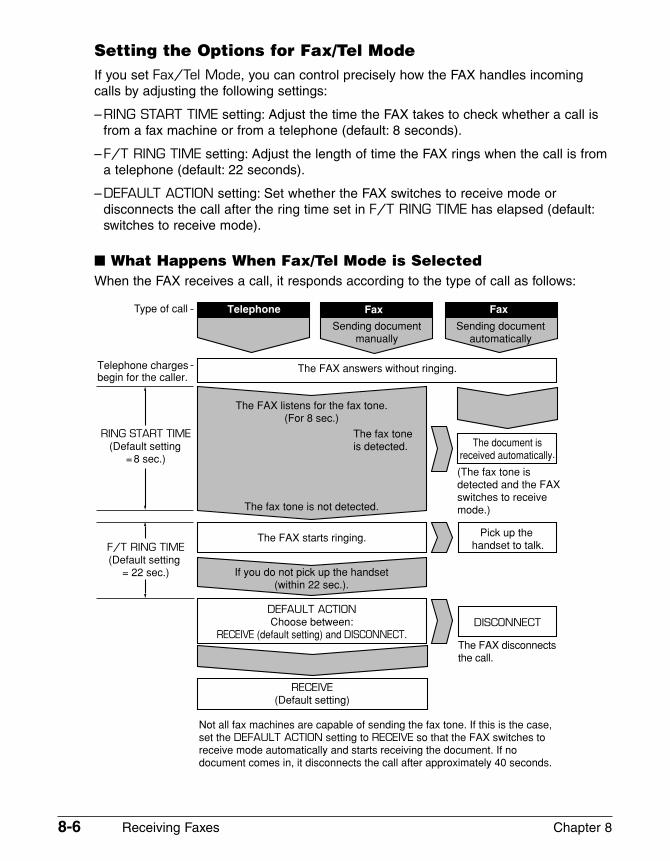
8-6 Receiving Faxes Chapter 8
Setting the Options for Fax/Tel ModeIf you set Fax/Tel Mode, you can control precisely how the FAX handles incomingcalls by adjusting the following settings:
–RING START TIME setting: Adjust the time the FAX takes to check whether a call isfrom a fax machine or from a telephone (default: 8 seconds).
–F/T RING TIME setting: Adjust the length of time the FAX rings when the call is froma telephone (default: 22 seconds).
–DEFAULT ACTION setting: Set whether the FAX switches to receive mode ordisconnects the call after the ring time set in F/T RING TIME has elapsed (default:switches to receive mode).
� What Happens When Fax/Tel Mode is SelectedWhen the FAX receives a call, it responds according to the type of call as follows:
Telephone Fax Fax
Sending document manually
Sending document automatically
The FAX answers without ringing.
The FAX listens for the fax tone.(For 8 sec.)
The fax tone is detected.
The fax tone is not detected.
The document is received automatically.
The FAX starts ringing. Pick up the handset to talk.
If you do not pick up the handset(within 22 sec.).
DEFAULT ACTIONChoose between:
RECEIVE (default setting) and DISCONNECT.DISCONNECT
RECEIVE(Default setting)
(The fax tone is detected and the FAX switches to receive mode.)
The FAX disconnects the call.
Not all fax machines are capable of sending the fax tone. If this is the case, set the DEFAULT ACTION setting to RECEIVE so that the FAX switches to receive mode automatically and starts receiving the document. If no document comes in, it disconnects the call after approximately 40 seconds.
F/T RING TIME(Default setting
= 22 sec.)
Type of call
Telephone charges begin for the caller.
RING START TIME(Default setting
= 8 sec.)
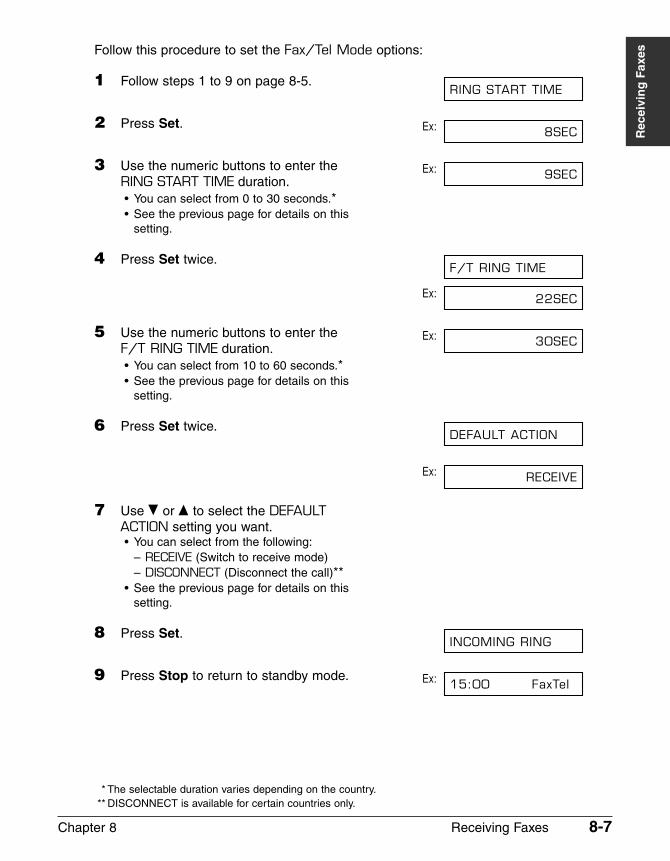
Chapter 8 Receiving Faxes 8-7
Rec
eivi
ng
Fax
esFollow this procedure to set the Fax/Tel Mode options:
1 Follow steps 1 to 9 on page 8-5.
2 Press Set. Ex:
3 Use the numeric buttons to enter the Ex:RING START TIME duration.• You can select from 0 to 30 seconds.*• See the previous page for details on this
setting.
4 Press Set twice.
Ex:
5 Use the numeric buttons to enter the Ex:F/T RING TIME duration.• You can select from 10 to 60 seconds.*• See the previous page for details on this
setting.
6 Press Set twice.
Ex:
7 Use ∂ or ¨ to select the DEFAULTACTION setting you want.• You can select from the following:
– RECEIVE (Switch to receive mode)– DISCONNECT (Disconnect the call)**
• See the previous page for details on thissetting.
8 Press Set.
9 Press Stop to return to standby mode. Ex: 15:00 FaxTel
INCOMING RING
RECEIVE
DEFAULT ACTION
30SEC
22SEC
F/T RING TIME
9SEC
8SEC
RING START TIME
* The selectable duration varies depending on the country.** DISCONNECT is available for certain countries only.
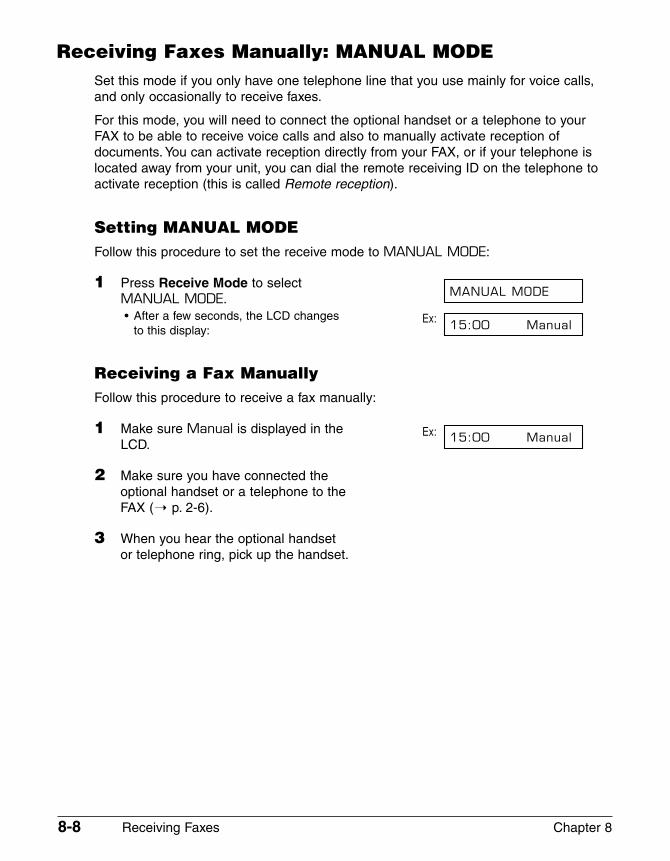
8-8 Receiving Faxes Chapter 8
Receiving Faxes Manually: MANUAL MODESet this mode if you only have one telephone line that you use mainly for voice calls,and only occasionally to receive faxes.
For this mode, you will need to connect the optional handset or a telephone to yourFAX to be able to receive voice calls and also to manually activate reception ofdocuments. You can activate reception directly from your FAX, or if your telephone islocated away from your unit, you can dial the remote receiving ID on the telephone toactivate reception (this is called Remote reception).
Setting MANUAL MODEFollow this procedure to set the receive mode to MANUAL MODE:
1 Press Receive Mode to select MANUAL MODE.• After a few seconds, the LCD changes Ex:
to this display:
Receiving a Fax ManuallyFollow this procedure to receive a fax manually:
1 Make sure Manual is displayed in the Ex:LCD.
2 Make sure you have connected theoptional handset or a telephone to theFAX (1 p. 2-6).
3 When you hear the optional handsetor telephone ring, pick up the handset.
15:00 Manual
15:00 Manual
MANUAL MODE
Chapter 8 Receiving Faxes 8-9
Rec
eivi
ng
Fax
es� If you hear a beep tone or silence:4 Someone is trying to send you a fax.
Press Start/Copy on your FAX andhang up to begin receiving thedocument.• If you are using the telephone and it is
located away from your unit, dial 25 (thedefault remote receiving ID) on yourtelephone and hang up.
� If you hear a voice:4 Start your conversation. If the caller
wants to send a fax after talking toyou, ask them to press the start buttonon their fax machine.
5 When you hear a beep, pressStart/Copy on your FAX and hang upto begin receiving the document.• If you are using the telephone and it is
located away from your unit, dial 25 (thedefault remote receiving ID) on yourtelephone and hang up.
n • If using the handset, be sure to hang up after you press Start/Copy on the FAX,otherwise the call will be disconnected.
• The FAX will alert you by beeping if the handset is not hung up properly. Make sure thehandset is seated properly in its cradle. If you do not want the FAX to beep, disable theOFFHOOK ALARM setting (1 p. 14-4).
• If you cannot activate reception from the telephone, check that the REMOTE RX setting isenabled (1 p. 14-7).
• You can change the remote receiving ID (1 REMOTE RX ID, p. 14-7), or disable remotereceiving (1 REMOTE RX, p. 14-7).
• If you have an answering machine connected to your FAX that can carry out remote-control operations (controlling your answering machine from a remote telephone), thesecurity code for this function may be the same as the remote receiving ID of your FAX. Ifthis is the case, make sure you change the FAX’s remote receiving ID to make it distinctfrom the answering machine’s security code (1 REMOTE RX ID, p. 14-7).
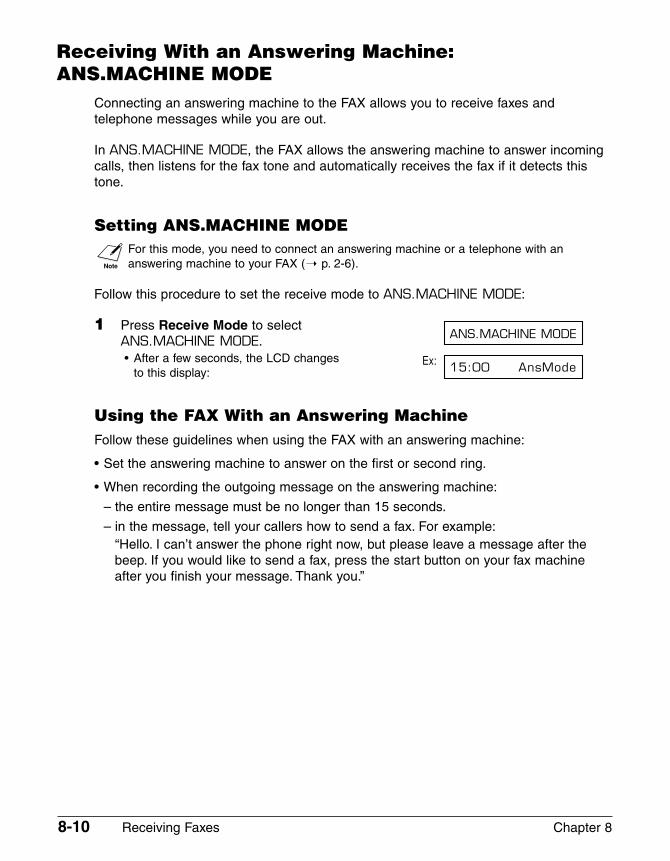
8-10 Receiving Faxes Chapter 8
Receiving With an Answering Machine: ANS.MACHINE MODE
Connecting an answering machine to the FAX allows you to receive faxes andtelephone messages while you are out.
In ANS.MACHINE MODE, the FAX allows the answering machine to answer incomingcalls, then listens for the fax tone and automatically receives the fax if it detects thistone.
Setting ANS.MACHINE MODE
n For this mode, you need to connect an answering machine or a telephone with ananswering machine to your FAX (1 p. 2-6).
Follow this procedure to set the receive mode to ANS.MACHINE MODE:
1 Press Receive Mode to selectANS.MACHINE MODE.• After a few seconds, the LCD changes Ex:
to this display:
Using the FAX With an Answering MachineFollow these guidelines when using the FAX with an answering machine:
• Set the answering machine to answer on the first or second ring.
• When recording the outgoing message on the answering machine:
– the entire message must be no longer than 15 seconds.
– in the message, tell your callers how to send a fax. For example:“Hello. I can’t answer the phone right now, but please leave a message after thebeep. If you would like to send a fax, press the start button on your fax machineafter you finish your message. Thank you.”
15:00 AnsMode
ANS.MACHINE MODE
Chapter 8 Receiving Faxes 8-11
Rec
eivi
ng
Fax
esReceiving While Performing Other TasksThe FAX is a multitasking device so it can receive faxes and voice calls while you areperforming other tasks.
If the FAX cannot print a received fax because it is performing another task thatprevents it from doing so, it will receive the fax in memory. Then, as soon as itcompletes the other task, the FAX automatically prints the received fax from memory.
Receiving Faxes in Memory When aProblem Occurs
If the FAX encounters a problem when it is receiving a fax, it automatically stores theunprinted pages of the fax in memory. It then displays REC’D IN MEMORY as well asone or more messages in the LCD. For an explanation of the message(s) and detailson the action to take, see p. 13-8.
n • The FAX’s memory can store up to approximately 256 pages.*• You can set the unit so that it does not store faxes in memory if a problem occurs during
reception (1 MEMORY RX, p. 14-7).• Once the problem is solved and the unit prints the received fax, it will delete the fax from
memory.• If the unit’s memory becomes full while receiving a fax in memory, you will not be able to
receive the remaining pages. Contact the other party and ask them to resend theremainder of the fax.
Cancelling ReceivingFollow this procedure if you want to stop receiving a fax before reception is completed:
1 Press Stop.• The FAX asks you to confirm that you
want to cancel receiving.
2 Press T to cancel receiving.• Receiving is not cancelled until you
press T. Ex:• If you change your mind and want to
continue receiving, press #.
TX/RX NO. 5003
TX/RX CANCELLED
YES=(A) NO=(#)
CANCEL? AYES #NO
* Based on Canon FAX Standard Chart No. 1, standard mode.

8-12 Receiving Faxes Chapter 8
Chapter 9 Special Features 9-1
Sp
ecia
l Fea
ture
s
Chapter 9
Special Features
Special Dialling .........................................................................................9-2
Entering Pauses in a Fax/Telephone Number........................................9-2
Switching Temporarily to Tone Dialling ...................................................9-3
Confirming a Dial Tone ...........................................................................9-4
Dialling Through a Switchboard..............................................................9-4
Documents Stored in Memory ................................................................9-5
Printing a List of Documents Stored in Memory ....................................9-5
Printing a Document Stored in Memory .................................................9-6
Sending a Document Stored in Memory ................................................9-7
Deleting a Document Stored in Memory ................................................9-9
Polling ......................................................................................................9-10
What is Polling?....................................................................................9-10
Polling Receiving ..................................................................................9-10
Polling Another Fax Machine............................................................9-10
Cancelling Polling Receiving ............................................................9-12
Polling Sending.....................................................................................9-12
Setting Up the Polling Box................................................................9-12
Scanning a Document into the Polling Box ......................................9-15
Changing or Deleting the Polling Box Settings ................................9-15
Restricting Use of Your FAX ..................................................................9-17
Enabling Restriction of Your FAX..........................................................9-17
Cancelling Restriction of Your FAX.......................................................9-18
Restricting Reception ............................................................................9-20
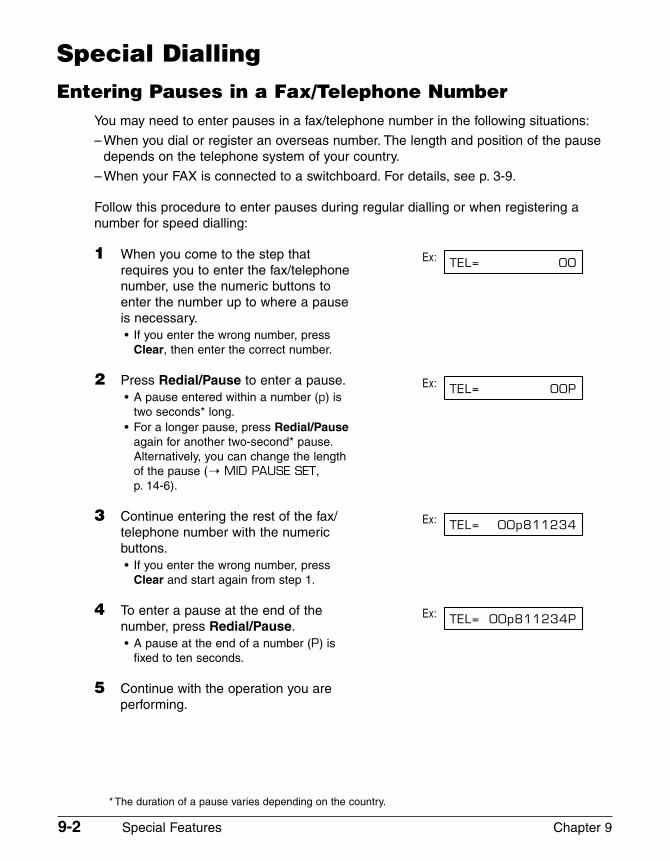
9-2 Special Features Chapter 9
Special DiallingEntering Pauses in a Fax/Telephone Number
You may need to enter pauses in a fax/telephone number in the following situations:
– When you dial or register an overseas number. The length and position of the pausedepends on the telephone system of your country.
– When your FAX is connected to a switchboard. For details, see p. 3-9.
Follow this procedure to enter pauses during regular dialling or when registering anumber for speed dialling:
1 When you come to the step that Ex:requires you to enter the fax/telephonenumber, use the numeric buttons toenter the number up to where a pauseis necessary.• If you enter the wrong number, press
Clear, then enter the correct number.
2 Press Redial/Pause to enter a pause. Ex:• A pause entered within a number (p) is
two seconds* long.• For a longer pause, press Redial/Pause
again for another two-second* pause.Alternatively, you can change the lengthof the pause (1 MID PAUSE SET, p. 14-6).
3 Continue entering the rest of the fax/ Ex:telephone number with the numericbuttons.• If you enter the wrong number, press
Clear and start again from step 1.
4 To enter a pause at the end of the Ex:number, press Redial/Pause.• A pause at the end of a number (P) is
fixed to ten seconds.
5 Continue with the operation you areperforming.
TEL= 00p811234P
TEL= 00p811234
TEL= 00P
TEL= 00
* The duration of a pause varies depending on the country.
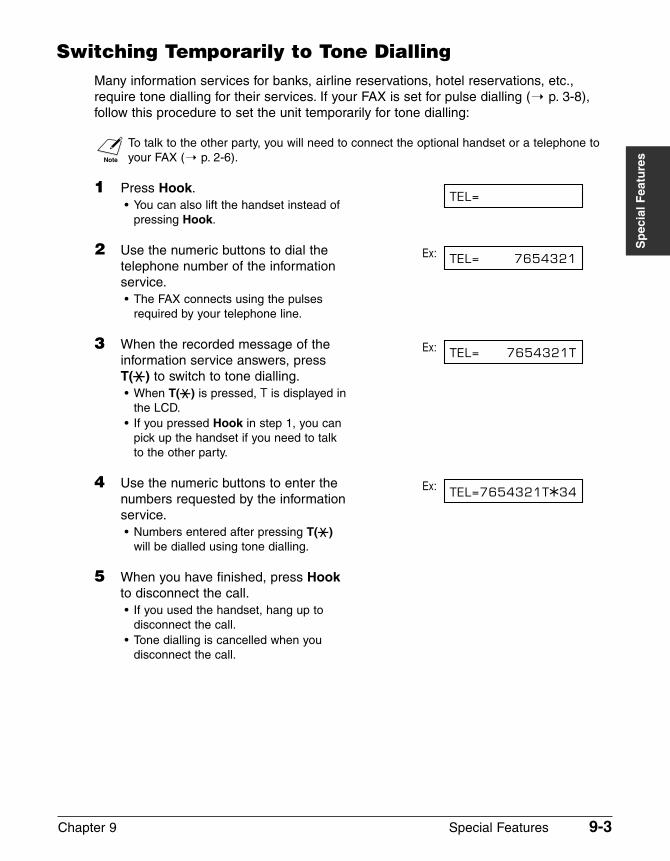
Chapter 9 Special Features 9-3
Sp
ecia
l Fea
ture
s
Switching Temporarily to Tone DiallingMany information services for banks, airline reservations, hotel reservations, etc.,require tone dialling for their services. If your FAX is set for pulse dialling (1 p. 3-8),follow this procedure to set the unit temporarily for tone dialling:
n To talk to the other party, you will need to connect the optional handset or a telephone toyour FAX (1 p. 2-6).
1 Press Hook.• You can also lift the handset instead of
pressing Hook.
2 Use the numeric buttons to dial the Ex:telephone number of the informationservice.• The FAX connects using the pulses
required by your telephone line.
3 When the recorded message of the Ex:information service answers, pressT(T) to switch to tone dialling.• When T(T) is pressed, T is displayed in
the LCD.• If you pressed Hook in step 1, you can
pick up the handset if you need to talkto the other party.
4 Use the numeric buttons to enter the Ex:numbers requested by the informationservice.• Numbers entered after pressing T(T)
will be dialled using tone dialling.
5 When you have finished, press Hookto disconnect the call.• If you used the handset, hang up to
disconnect the call.• Tone dialling is cancelled when you
disconnect the call.
TEL=7654321TA34
TEL= 7654321T
TEL= 7654321
TEL=

9-4 Special Features Chapter 9
Confirming a Dial Tone*This feature allows you to set your FAX to listen for and detect a dial tone in the middleof a fax/telephone number before dialling the rest of the number. This is called Dial tonedetection.
Follow this procedure for dial tone detection during regular dialling or when registeringa number for speed dialling:
1 When you come to the step that Ex:requires you to enter the fax/telephonenumber, use the numeric buttons toenter the number up to where dialtone detection is required.
2 Open the one-touch speed dial Ex:panel and press D.T. for dial tonedetection.• A small dot indicates where the FAX will
wait for the dial tone.
3 Continue entering the rest of the fax/ Ex:telephone number with the numericbuttons.• If you enter the wrong number, press
Clear and start again from step 1.
4 Continue with the operation you areperforming.
Dialling Through a SwitchboardFor details on dialling through a switchboard, see p. 3-9.
TEL= 345•1234
TEL= 345•
TEL= 345
*This feature is available for certain countries only.
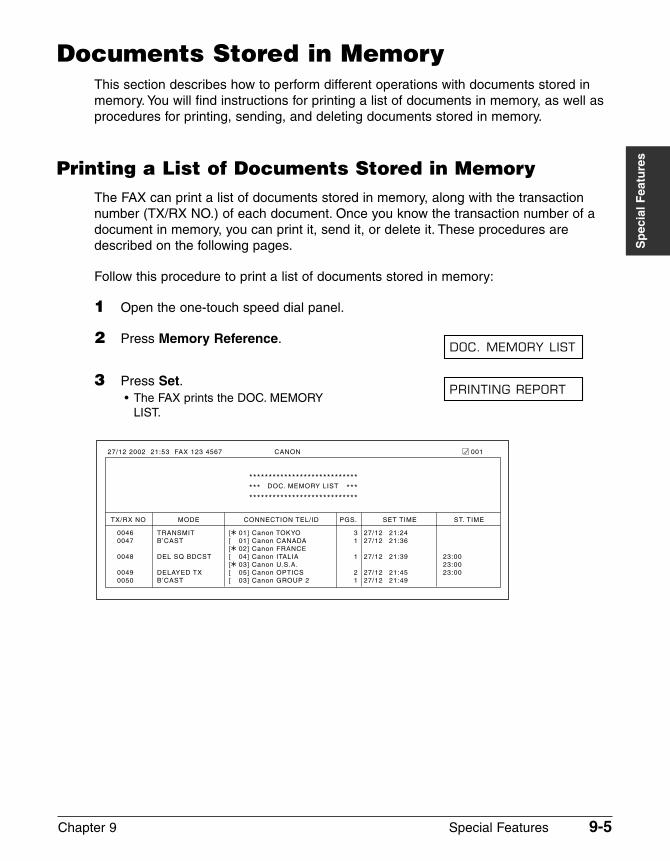
Chapter 9 Special Features 9-5
Sp
ecia
l Fea
ture
s
Documents Stored in MemoryThis section describes how to perform different operations with documents stored inmemory. You will find instructions for printing a list of documents in memory, as well asprocedures for printing, sending, and deleting documents stored in memory.
Printing a List of Documents Stored in MemoryThe FAX can print a list of documents stored in memory, along with the transactionnumber (TX/RX NO.) of each document. Once you know the transaction number of adocument in memory, you can print it, send it, or delete it. These procedures aredescribed on the following pages.
Follow this procedure to print a list of documents stored in memory:
1 Open the one-touch speed dial panel.
2 Press Memory Reference.
3 Press Set.• The FAX prints the DOC. MEMORY
LIST.
PRINTING REPORT
DOC. MEMORY LIST
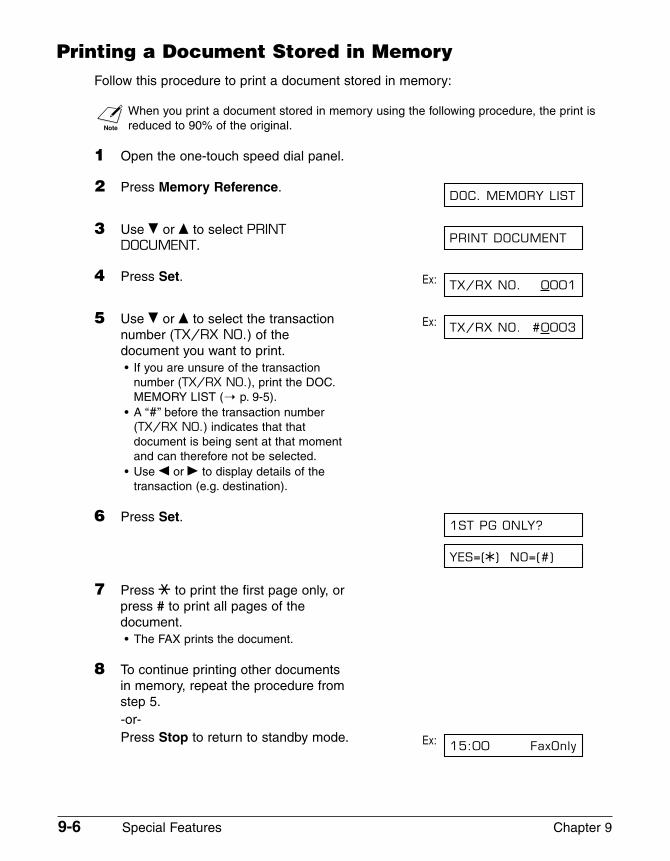
9-6 Special Features Chapter 9
Printing a Document Stored in MemoryFollow this procedure to print a document stored in memory:
nWhen you print a document stored in memory using the following procedure, the print isreduced to 90% of the original.
1 Open the one-touch speed dial panel.
2 Press Memory Reference.
3 Use ∂ or ¨ to select PRINTDOCUMENT.
4 Press Set. Ex:
5 Use ∂ or ¨ to select the transaction Ex:number (TX/RX NO.) of thedocument you want to print.• If you are unsure of the transaction
number (TX/RX NO.), print the DOC.MEMORY LIST (1 p. 9-5).
• A “#” before the transaction number(TX/RX NO.) indicates that thatdocument is being sent at that momentand can therefore not be selected.
• Use ¬ or ® to display details of thetransaction (e.g. destination).
6 Press Set.
7 Press T to print the first page only, orpress # to print all pages of thedocument.• The FAX prints the document.
8 To continue printing other documentsin memory, repeat the procedure fromstep 5.-or-Press Stop to return to standby mode. Ex: 15:00 FaxOnly
YES=(A) NO=(#)
1ST PG ONLY?
TX/RX NO. #0003
TX/RX NO. 0001
PRINT DOCUMENT
DOC. MEMORY LIST
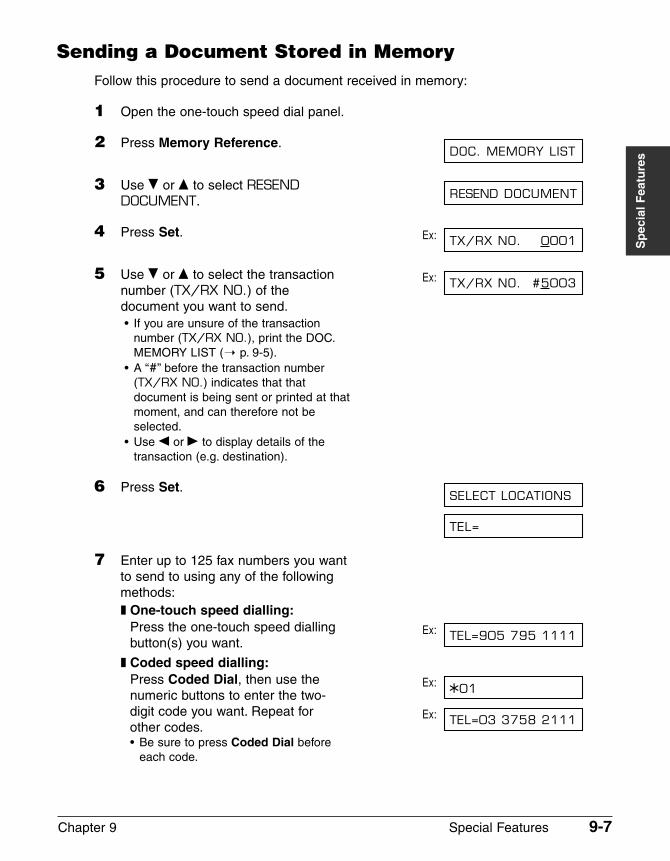
Chapter 9 Special Features 9-7
Sp
ecia
l Fea
ture
s
Sending a Document Stored in MemoryFollow this procedure to send a document received in memory:
1 Open the one-touch speed dial panel.
2 Press Memory Reference.
3 Use ∂ or ¨ to select RESENDDOCUMENT.
4 Press Set. Ex:
5 Use ∂ or ¨ to select the transaction Ex:number (TX/RX NO.) of thedocument you want to send.• If you are unsure of the transaction
number (TX/RX NO.), print the DOC.MEMORY LIST (1 p. 9-5).
• A “#” before the transaction number(TX/RX NO.) indicates that thatdocument is being sent or printed at thatmoment, and can therefore not beselected.
• Use ¬ or ® to display details of thetransaction (e.g. destination).
6 Press Set.
7 Enter up to 125 fax numbers you wantto send to using any of the followingmethods:❚ One-touch speed dialling:
Press the one-touch speed dialling Ex:button(s) you want.
❚ Coded speed dialling:Press Coded Dial, then use the Ex:numeric buttons to enter the two-digit code you want. Repeat for Ex:other codes.• Be sure to press Coded Dial before
each code.
TEL=03 3758 2111
A01
TEL=905 795 1111
TEL=
SELECT LOCATIONS
TX/RX NO. #5003
TX/RX NO. 0001
RESEND DOCUMENT
DOC. MEMORY LIST
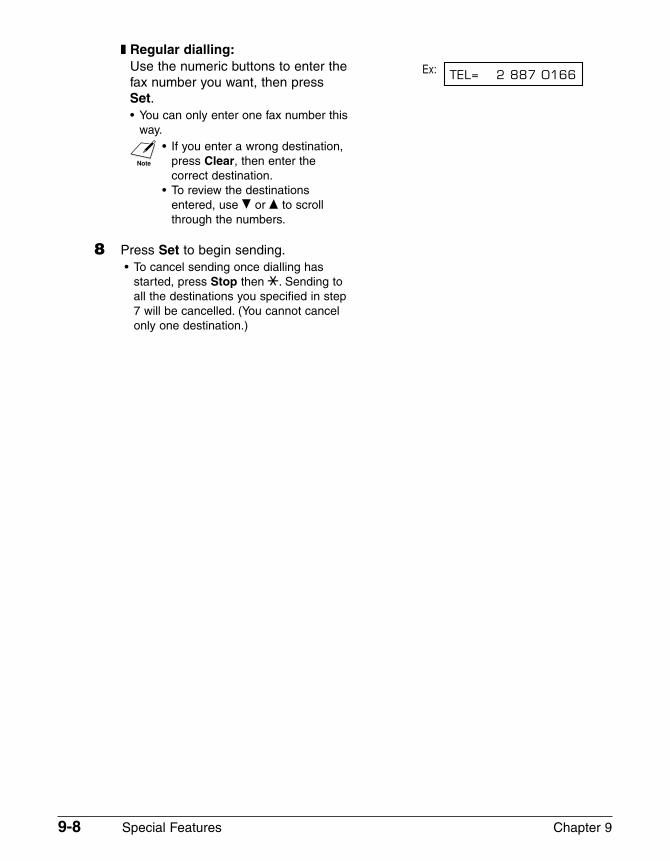
9-8 Special Features Chapter 9
❚ Regular dialling:Use the numeric buttons to enter the Ex:fax number you want, then pressSet.• You can only enter one fax number this
way.
n • If you enter a wrong destination,press Clear, then enter thecorrect destination.
• To review the destinationsentered, use ∂ or ¨ to scrollthrough the numbers.
8 Press Set to begin sending.• To cancel sending once dialling has
started, press Stop then T. Sending toall the destinations you specified in step7 will be cancelled. (You cannot cancelonly one destination.)
TEL= 2 887 0166
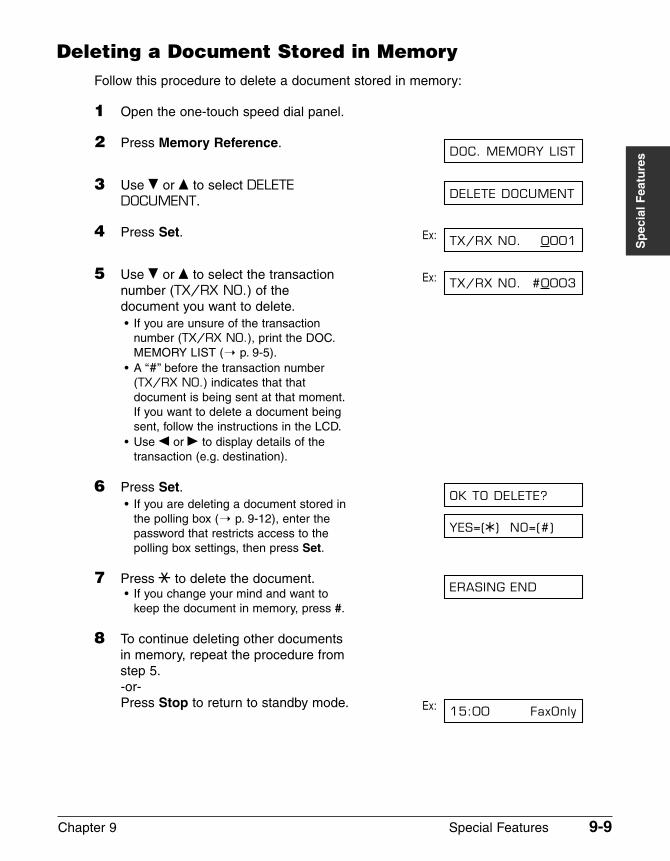
Chapter 9 Special Features 9-9
Sp
ecia
l Fea
ture
s
Deleting a Document Stored in MemoryFollow this procedure to delete a document stored in memory:
1 Open the one-touch speed dial panel.
2 Press Memory Reference.
3 Use ∂ or ¨ to select DELETEDOCUMENT.
4 Press Set. Ex:
5 Use ∂ or ¨ to select the transaction Ex:number (TX/RX NO.) of thedocument you want to delete.• If you are unsure of the transaction
number (TX/RX NO.), print the DOC.MEMORY LIST (1 p. 9-5).
• A “#” before the transaction number(TX/RX NO.) indicates that thatdocument is being sent at that moment.If you want to delete a document beingsent, follow the instructions in the LCD.
• Use ¬ or ® to display details of thetransaction (e.g. destination).
6 Press Set.• If you are deleting a document stored in
the polling box (1 p. 9-12), enter the password that restricts access to the polling box settings, then press Set.
7 Press T to delete the document.• If you change your mind and want to
keep the document in memory, press #.
8 To continue deleting other documentsin memory, repeat the procedure fromstep 5.-or-Press Stop to return to standby mode. Ex: 15:00 FaxOnly
ERASING END
YES=(A) NO=(#)
OK TO DELETE?
TX/RX NO. #0003
TX/RX NO. 0001
DELETE DOCUMENT
DOC. MEMORY LIST
9-10 Special Features Chapter 9
PollingWhat is Polling?
In normal faxing, a fax machine sends a document to another fax machine. With polling,a fax machine calls another fax machine and requests that a document be sent to it; inother words, it “polls” that fax machine.
Your FAX has the capability of functioning in both roles; it can poll another fax machineto retrieve a document from it (polling receiving), or it can hold a document in its pollingbox so that other fax machines can poll your FAX and retrieve your document (pollingsending).
Polling ReceivingIn polling receiving, your FAX calls another fax machine and requests it sends thedocument it is holding.
You may find polling receiving convenient in the following situations:
– When you want to retrieve a document from an establishment, such as bank orinformation service.
– When you want to retrieve a document from another fax machine at yourconvenience.
– When you want to bear the transmission cost of receiving a document.
Polling Another Fax MachineBefore polling another fax machine, be sure to read the following:
• The FAX can only poll fax machines that support polling.
• The document you want to retrieve must be ready to be polled on the other party’s faxmachine. If necessary, call the other party to check.
• Call the other party and check if you require a subaddress and/or password to retrievethe document from their fax machine. If you do, take note of them and register themtogether with the fax number for speed dialling (1 Chapter 6). You can only poll with asubaddress/password by using speed dialling. If you do not require asubaddress/password, you can retrieve the document without having to enter thesenumbers.
• If the other party is using a Canon fax machine and their unit does not supportsubaddress/password transactions, ask them to set the polling ID on their fax machineto 255 or 11111111 binary.
• You can poll several fax machines in one operation. Each polling operation canretrieve documents from as many as 125 fax numbers.
• The subaddress/password must be an ITU-T standard subaddress/password.
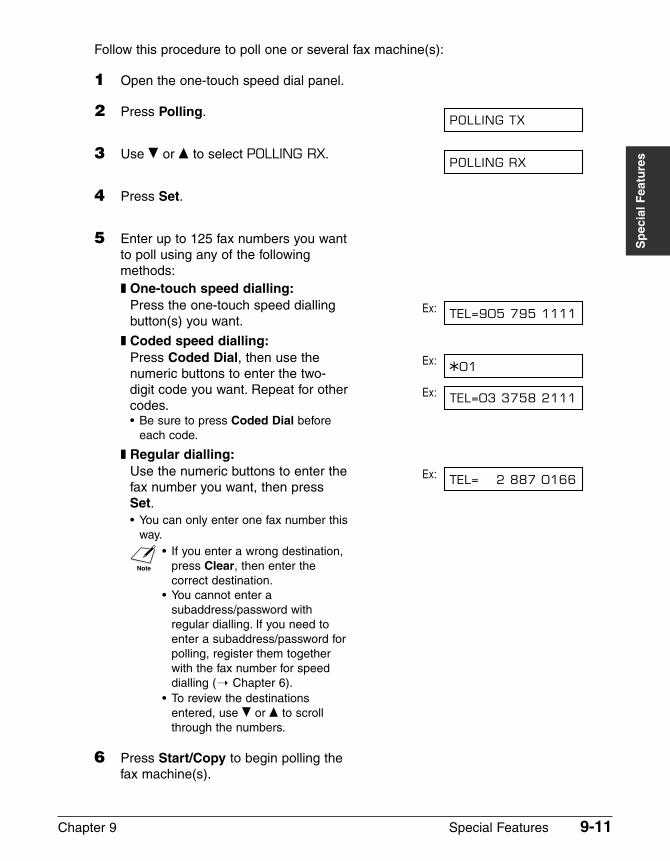
Chapter 9 Special Features 9-11
Sp
ecia
l Fea
ture
s
Follow this procedure to poll one or several fax machine(s):
1 Open the one-touch speed dial panel.
2 Press Polling.
3 Use ∂ or ¨ to select POLLING RX.
4 Press Set.
5 Enter up to 125 fax numbers you wantto poll using any of the following methods:❚ One-touch speed dialling:
Press the one-touch speed dialling Ex:button(s) you want.
❚ Coded speed dialling:Press Coded Dial, then use the Ex:numeric buttons to enter the two-digit code you want. Repeat for other Ex:codes.• Be sure to press Coded Dial before
each code.
❚ Regular dialling:Use the numeric buttons to enter the Ex:fax number you want, then pressSet.• You can only enter one fax number this
way.
n • If you enter a wrong destination,press Clear, then enter thecorrect destination.
• You cannot enter asubaddress/password withregular dialling. If you need toenter a subaddress/password forpolling, register them togetherwith the fax number for speeddialling (1 Chapter 6).
• To review the destinationsentered, use ∂ or ¨ to scrollthrough the numbers.
6 Press Start/Copy to begin polling thefax machine(s).
TEL= 2 887 0166
TEL=03 3758 2111
A01
TEL=905 795 1111
POLLING RX
POLLING TX
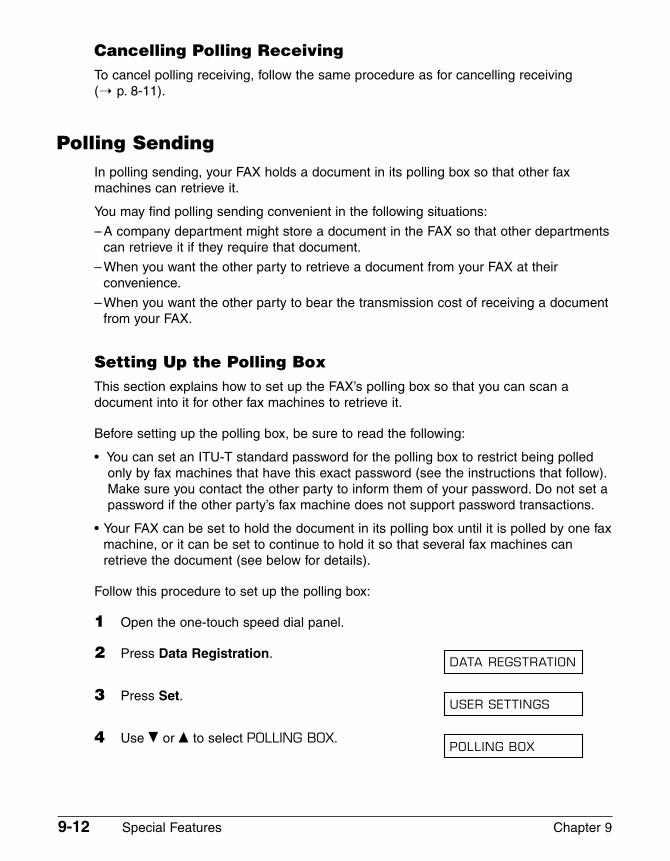
9-12 Special Features Chapter 9
Cancelling Polling ReceivingTo cancel polling receiving, follow the same procedure as for cancelling receiving (1 p. 8-11).
Polling SendingIn polling sending, your FAX holds a document in its polling box so that other faxmachines can retrieve it.
You may find polling sending convenient in the following situations:
– A company department might store a document in the FAX so that other departmentscan retrieve it if they require that document.
– When you want the other party to retrieve a document from your FAX at theirconvenience.
– When you want the other party to bear the transmission cost of receiving a documentfrom your FAX.
Setting Up the Polling BoxThis section explains how to set up the FAX’s polling box so that you can scan adocument into it for other fax machines to retrieve it.
Before setting up the polling box, be sure to read the following:
• You can set an ITU-T standard password for the polling box to restrict being polledonly by fax machines that have this exact password (see the instructions that follow).Make sure you contact the other party to inform them of your password. Do not set apassword if the other party’s fax machine does not support password transactions.
• Your FAX can be set to hold the document in its polling box until it is polled by one faxmachine, or it can be set to continue to hold it so that several fax machines canretrieve the document (see below for details).
Follow this procedure to set up the polling box:
1 Open the one-touch speed dial panel.
2 Press Data Registration.
3 Press Set.
4 Use ∂ or ¨ to select POLLING BOX.POLLING BOX
USER SETTINGS
DATA REGSTRATION
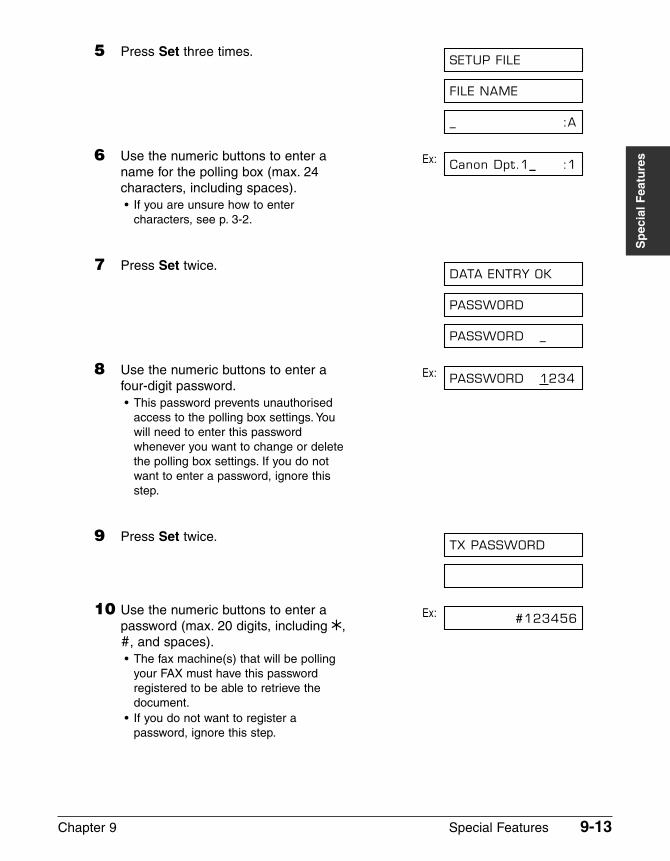
Chapter 9 Special Features 9-13
Sp
ecia
l Fea
ture
s
5 Press Set three times.
6 Use the numeric buttons to enter a Ex:name for the polling box (max. 24characters, including spaces).• If you are unsure how to enter
characters, see p. 3-2.
7 Press Set twice.
8 Use the numeric buttons to enter a Ex:four-digit password.• This password prevents unauthorised
access to the polling box settings. Youwill need to enter this passwordwhenever you want to change or deletethe polling box settings. If you do notwant to enter a password, ignore thisstep.
9 Press Set twice.
10 Use the numeric buttons to enter a Ex:password (max. 20 digits, including A,#, and spaces).• The fax machine(s) that will be polling
your FAX must have this passwordregistered to be able to retrieve thedocument.
• If you do not want to register apassword, ignore this step.
#123456
TX PASSWORD
PASSWORD 1234
PASSWORD _
PASSWORD
DATA ENTRY OK
Canon Dpt.1_ :1
_ :A
FILE NAME
SETUP FILE
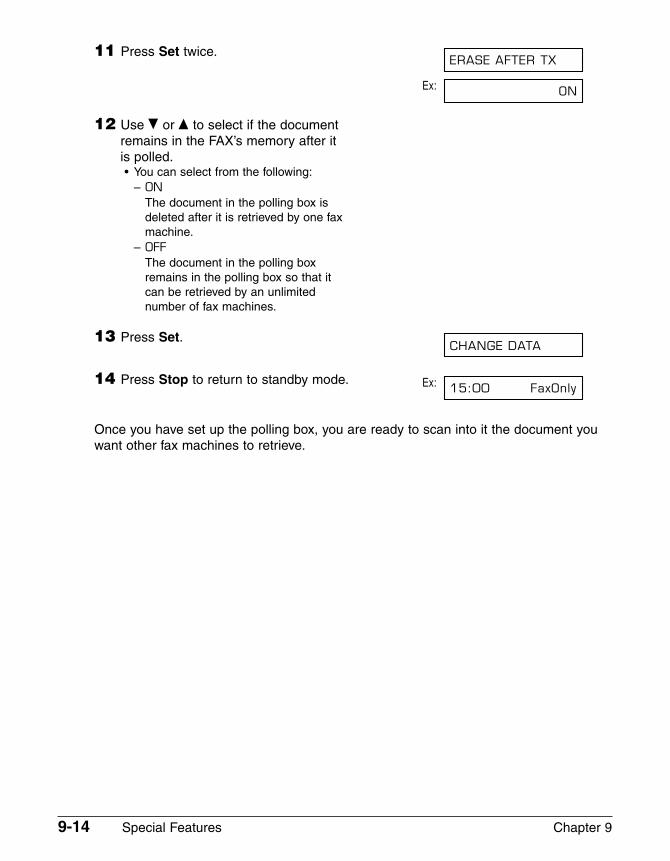
9-14 Special Features Chapter 9
11 Press Set twice.
Ex:
12 Use ∂ or ¨ to select if the documentremains in the FAX’s memory after itis polled.• You can select from the following:
– ONThe document in the polling box isdeleted after it is retrieved by one faxmachine.
– OFFThe document in the polling boxremains in the polling box so that itcan be retrieved by an unlimitednumber of fax machines.
13 Press Set.
14 Press Stop to return to standby mode. Ex:
Once you have set up the polling box, you are ready to scan into it the document youwant other fax machines to retrieve.
15:00 FaxOnly
CHANGE DATA
ON
ERASE AFTER TX
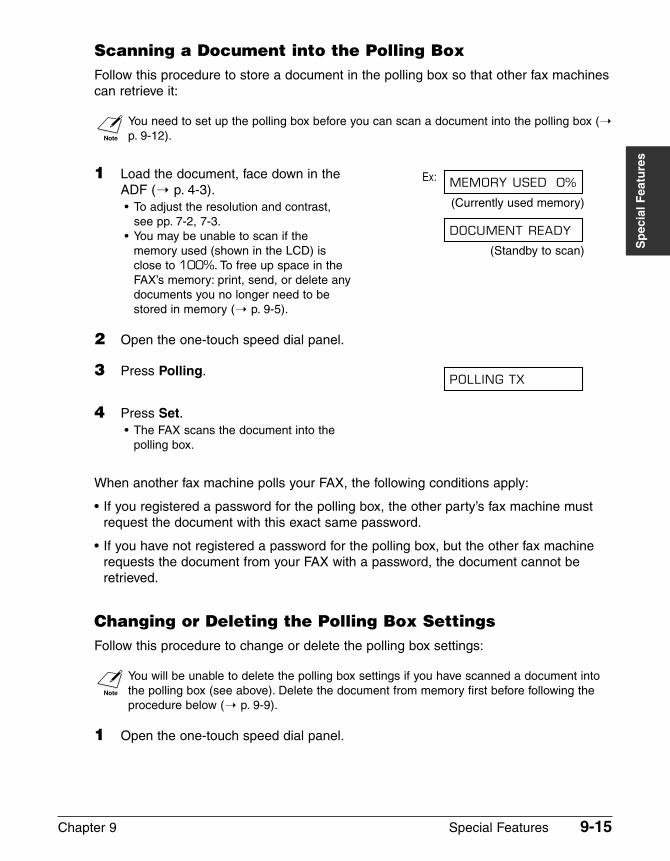
Chapter 9 Special Features 9-15
Sp
ecia
l Fea
ture
s
Scanning a Document into the Polling BoxFollow this procedure to store a document in the polling box so that other fax machinescan retrieve it:
nYou need to set up the polling box before you can scan a document into the polling box (1p. 9-12).
1 Load the document, face down in the Ex:ADF (1 p. 4-3).• To adjust the resolution and contrast, (Currently used memory)
see pp. 7-2, 7-3.• You may be unable to scan if the
memory used (shown in the LCD) is (Standby to scan)close to 100%. To free up space in the FAX’s memory: print, send, or delete any documents you no longer need to be stored in memory (1 p. 9-5).
2 Open the one-touch speed dial panel.
3 Press Polling.
4 Press Set.• The FAX scans the document into the
polling box.
When another fax machine polls your FAX, the following conditions apply:
• If you registered a password for the polling box, the other party’s fax machine mustrequest the document with this exact same password.
• If you have not registered a password for the polling box, but the other fax machinerequests the document from your FAX with a password, the document cannot beretrieved.
Changing or Deleting the Polling Box SettingsFollow this procedure to change or delete the polling box settings:
nYou will be unable to delete the polling box settings if you have scanned a document intothe polling box (see above). Delete the document from memory first before following theprocedure below (1 p. 9-9).
1 Open the one-touch speed dial panel.
POLLING TX
DOCUMENT READY
MEMORY USED 0%
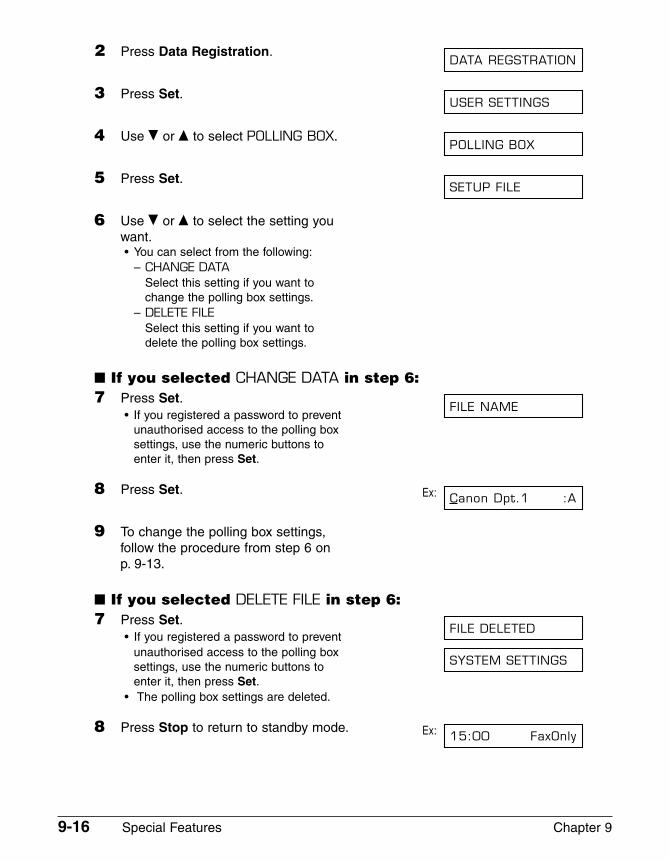
9-16 Special Features Chapter 9
2 Press Data Registration.
3 Press Set.
4 Use ∂ or ¨ to select POLLING BOX.
5 Press Set.
6 Use ∂ or ¨ to select the setting youwant.• You can select from the following:
– CHANGE DATASelect this setting if you want tochange the polling box settings.
– DELETE FILESelect this setting if you want todelete the polling box settings.
� If you selected CHANGE DATA in step 6:7 Press Set.
• If you registered a password to preventunauthorised access to the polling boxsettings, use the numeric buttons toenter it, then press Set.
8 Press Set. Ex:
9 To change the polling box settings,follow the procedure from step 6 on p. 9-13.
� If you selected DELETE FILE in step 6:7 Press Set.
• If you registered a password to prevent unauthorised access to the polling box settings, use the numeric buttons to enter it, then press Set.
• The polling box settings are deleted.
8 Press Stop to return to standby mode. Ex: 15:00 FaxOnly
SYSTEM SETTINGS
FILE DELETED
Canon Dpt.1 :A
FILE NAME
SETUP FILE
POLLING BOX
USER SETTINGS
DATA REGSTRATION

Chapter 9 Special Features 9-17
Sp
ecia
l Fea
ture
s
Restricting Use of Your FAXBy enabling this feature, you can prevent unauthorised use of your FAX to make callsand send faxes.
Enabling Restriction of Your FAXFollow this procedure to enable restriction of your FAX:
1 Open the one-touch speed dial panel.
2 Press Data Registration.
3 Press Set.
4 Use ∂ or ¨ to select SYSTEMSETTINGS.
5 Press Set three times.
Ex:
6 Use ∂ or ¨ to select ON.
7 Press Set twice.
Ex:
8 Use the numeric buttons to enter a Ex:four-digit password.• This password prevents unauthorised
access to the LOCK PHONE settingthat enables or disables restriction ofyour FAX. If you do not want to enter apassword, ignore this step.
9 Press Set.RX RESTRICTION
PASSWORD 1234
PASSWORD _
PASSWORD
ON
OFF
LOCK PHONE
UN/LOCK PHONE
SYSTEM SETTINGS
USER SETTINGS
DATA REGSTRATION
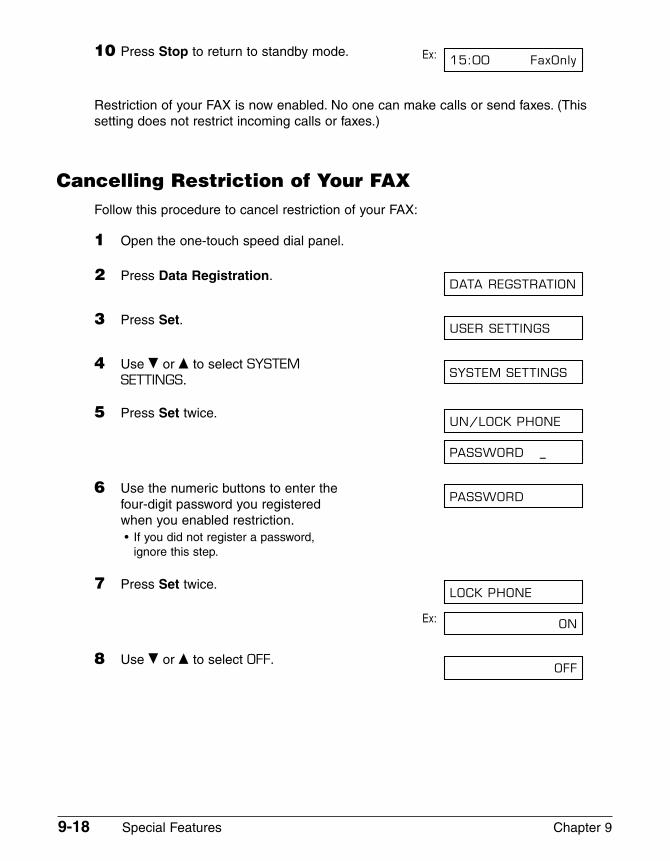
9-18 Special Features Chapter 9
10 Press Stop to return to standby mode. Ex:
Restriction of your FAX is now enabled. No one can make calls or send faxes. (Thissetting does not restrict incoming calls or faxes.)
Cancelling Restriction of Your FAXFollow this procedure to cancel restriction of your FAX:
1 Open the one-touch speed dial panel.
2 Press Data Registration.
3 Press Set.
4 Use ∂ or ¨ to select SYSTEMSETTINGS.
5 Press Set twice.
6 Use the numeric buttons to enter the four-digit password you registeredwhen you enabled restriction.• If you did not register a password,
ignore this step.
7 Press Set twice.
Ex:
8 Use ∂ or ¨ to select OFF.OFF
ON
LOCK PHONE
PASSWORD
PASSWORD _
UN/LOCK PHONE
SYSTEM SETTINGS
USER SETTINGS
DATA REGSTRATION
15:00 FaxOnly
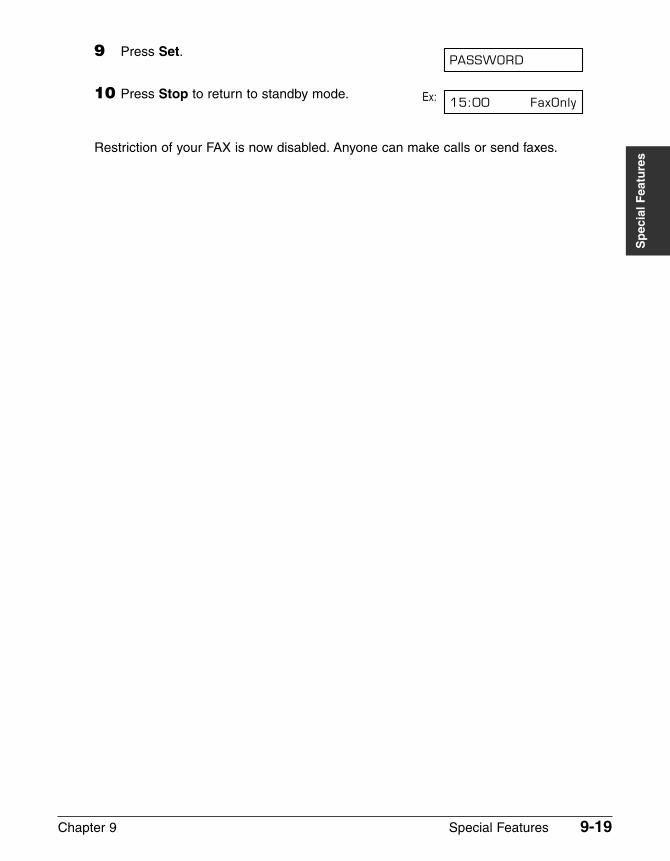
Chapter 9 Special Features 9-19
Sp
ecia
l Fea
ture
s
9 Press Set.
10 Press Stop to return to standby mode. Ex:
Restriction of your FAX is now disabled. Anyone can make calls or send faxes.
15:00 FaxOnly
PASSWORD
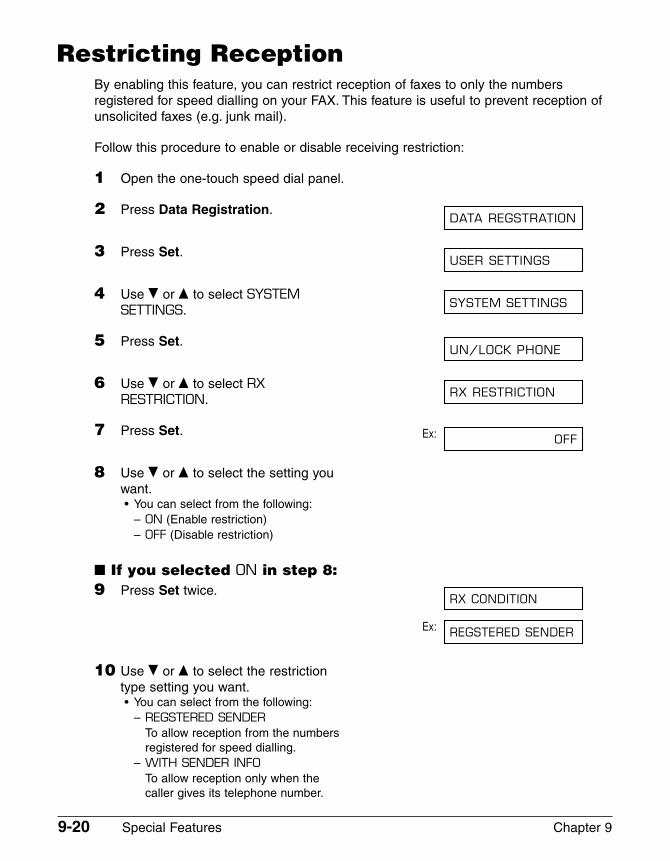
9-20 Special Features Chapter 9
Restricting ReceptionBy enabling this feature, you can restrict reception of faxes to only the numbersregistered for speed dialling on your FAX. This feature is useful to prevent reception ofunsolicited faxes (e.g. junk mail).
Follow this procedure to enable or disable receiving restriction:
1 Open the one-touch speed dial panel.
2 Press Data Registration.
3 Press Set.
4 Use ∂ or ¨ to select SYSTEMSETTINGS.
5 Press Set.
6 Use ∂ or ¨ to select RX RESTRICTION.
7 Press Set. Ex:
8 Use ∂ or ¨ to select the setting youwant.• You can select from the following:
– ON (Enable restriction)– OFF (Disable restriction)
� If you selected ON in step 8:9 Press Set twice.
Ex:
10 Use ∂ or ¨ to select the restrictiontype setting you want.• You can select from the following:
– REGSTERED SENDERTo allow reception from the numbers registered for speed dialling.
– WITH SENDER INFOTo allow reception only when the caller gives its telephone number.
REGSTERED SENDER
RX CONDITION
OFF
RX RESTRICTION
UN/LOCK PHONE
SYSTEM SETTINGS
USER SETTINGS
DATA REGSTRATION
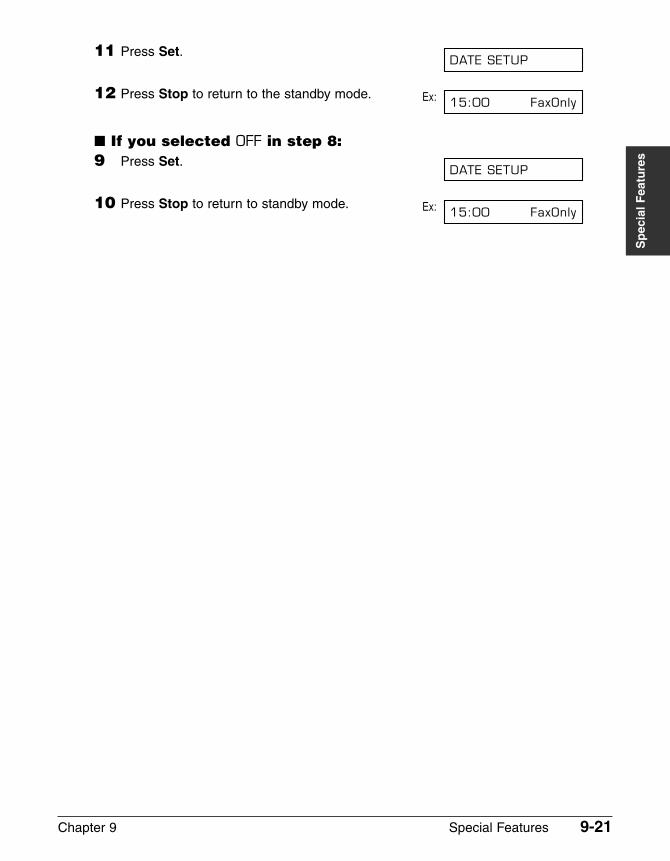
Chapter 9 Special Features 9-21
Sp
ecia
l Fea
ture
s
11 Press Set.
12 Press Stop to return to the standby mode. Ex:
� If you selected OFF in step 8:9 Press Set.
10 Press Stop to return to standby mode. Ex: 15:00 FaxOnly
DATE SETUP
15:00 FaxOnly
DATE SETUP

9-22 Special Features Chapter 9
Chapter 10 Copying 10-1
Co
pyi
ng
Chapter 10
Copying
Documents You Can Copy .....................................................................10-2
Making Copies ........................................................................................10-2
Making a Quick Single Copy .................................................................10-3
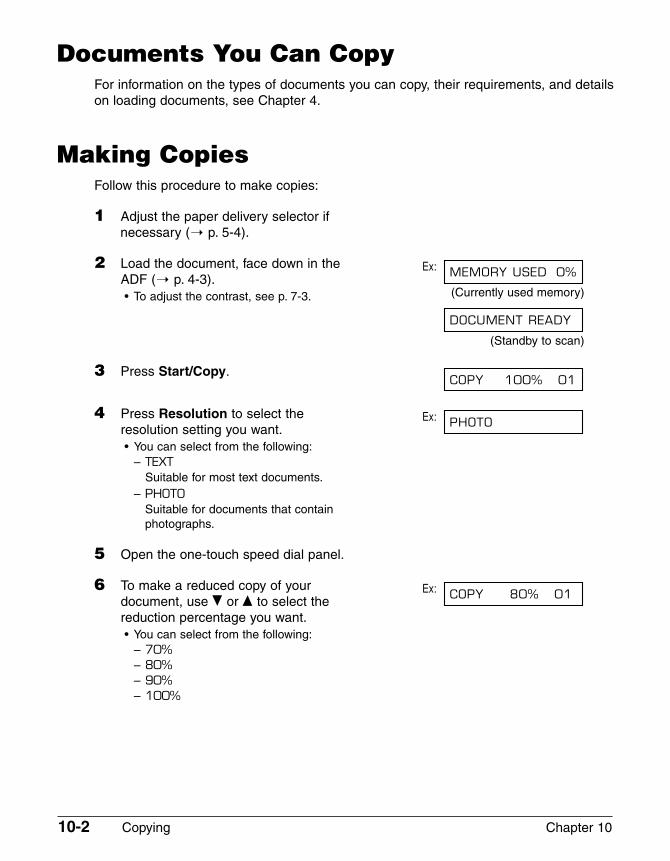
10-2 Copying Chapter 10
Documents You Can CopyFor information on the types of documents you can copy, their requirements, and detailson loading documents, see Chapter 4.
Making CopiesFollow this procedure to make copies:
1 Adjust the paper delivery selector ifnecessary (1 p. 5-4).
2 Load the document, face down in the Ex:ADF (1 p. 4-3).• To adjust the contrast, see p. 7-3. (Currently used memory)
(Standby to scan)
3 Press Start/Copy.
4 Press Resolution to select the Ex:resolution setting you want.• You can select from the following:
– TEXTSuitable for most text documents.
– PHOTOSuitable for documents that containphotographs.
5 Open the one-touch speed dial panel.
6 To make a reduced copy of your Ex:document, use ∂ or ¨ to select thereduction percentage you want.• You can select from the following:
– 70%– 80%– 90%– 100%
COPY 80% 01
PHOTO
COPY 100% 01
DOCUMENT READY
MEMORY USED 0%
Chapter 10 Copying 10-3
Co
pyi
ng
7 If you want to make multiple copies, Ex:use the numeric buttons to enter thenumber of copies.• You can make up to 99 copies.
n The FAX copies at 400 × 300 dpifor single copies, and at 200 × 300dpi for multiple copies. For bestquality output, make one copy at atime.
8 Press Start/Copy to begin copying.• To cancel copying, press Stop. You may
then need to open the operation panelto remove the document from the ADF(1 p. 13-2).
n You will be unable to make multiple copies if MEMORY FULL appears in the LCD. Print,send, or delete any documents stored in memory to free up space in the FAX’s memory(1 p. 9-5), then start again. Also, if you are copying multiple pages with many graphics,separate the pages into smaller stacks or make the desired number of copies one at atime as needed.
Making a Quick Single CopyFollow this procedure if you want to make a quick single copy of a document withoutadjusting the resolution, contrast, or size:
1 Load the document, face down in the Ex:ADF (1 p. 4-3).
(Currently used memory)
(Standby to scan)
2 Press Start/Copy twice to begin copying.• To cancel copying, press Stop. You
may then need to open the operation panel to remove the document from the ADF (1 p. 13-2).
COPYING
COPY 100% 01
DOCUMENT READY
MEMORY USED 0%
COPYING
COPY 80% 05

10-4 Copying Chapter 10
Chapter 11 Reports and Lists 11-1
Rep
ort
s an
d L
ists
Chapter 11
Reports and Lists
Summary of Reports and Lists .............................................................11-2
ACTIVITY REPORT .................................................................................11-3
TX (Transmission) REPORT ..................................................................11-4
MULTI TX/RX (Transaction) REPORT..................................................11-5
RX (Reception) REPORT........................................................................11-5
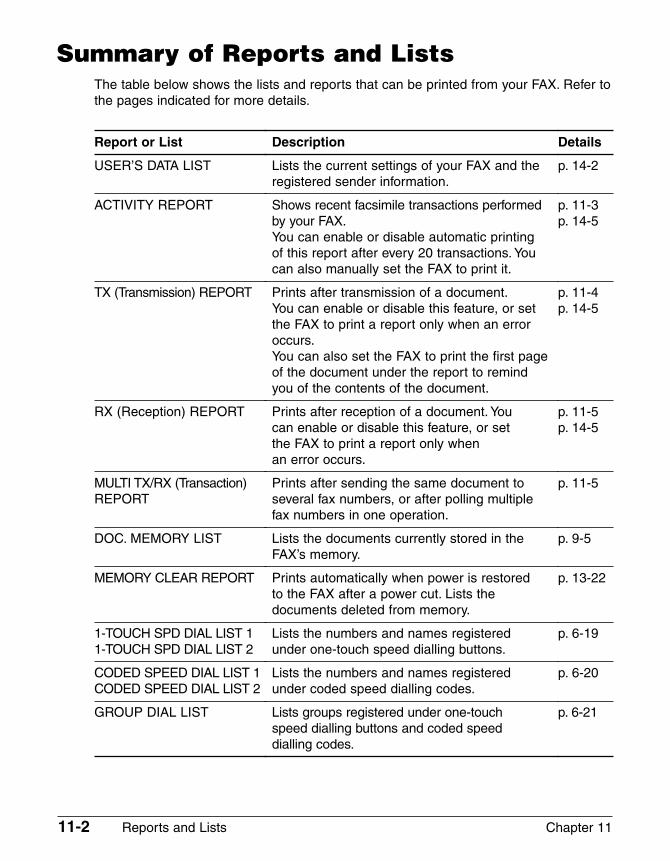
11-2 Reports and Lists Chapter 11
Summary of Reports and ListsThe table below shows the lists and reports that can be printed from your FAX. Refer tothe pages indicated for more details.
Report or List
USER’S DATA LIST
ACTIVITY REPORT
TX (Transmission) REPORT
RX (Reception) REPORT
MULTI TX/RX (Transaction)REPORT
DOC. MEMORY LIST
MEMORY CLEAR REPORT
1-TOUCH SPD DIAL LIST 11-TOUCH SPD DIAL LIST 2
CODED SPEED DIAL LIST 1CODED SPEED DIAL LIST 2
GROUP DIAL LIST
Description
Lists the current settings of your FAX and theregistered sender information.
Shows recent facsimile transactions performedby your FAX.You can enable or disable automatic printing of this report after every 20 transactions. Youcan also manually set the FAX to print it.
Prints after transmission of a document.You can enable or disable this feature, or setthe FAX to print a report only when an erroroccurs.You can also set the FAX to print the first pageof the document under the report to remindyou of the contents of the document.
Prints after reception of a document. You can enable or disable this feature, or set the FAX to print a report only when an error occurs.
Prints after sending the same document toseveral fax numbers, or after polling multiplefax numbers in one operation.
Lists the documents currently stored in theFAX’s memory.
Prints automatically when power is restored to the FAX after a power cut. Lists thedocuments deleted from memory.
Lists the numbers and names registered under one-touch speed dialling buttons.
Lists the numbers and names registered under coded speed dialling codes.
Lists groups registered under one-touch speed dialling buttons and coded speed dialling codes.
Details
p. 14-2
p. 11-3p. 14-5
p. 11-4p. 14-5
p. 11-5p. 14-5
p. 11-5
p. 9-5
p. 13-22
p. 6-19
p. 6-20
p. 6-21
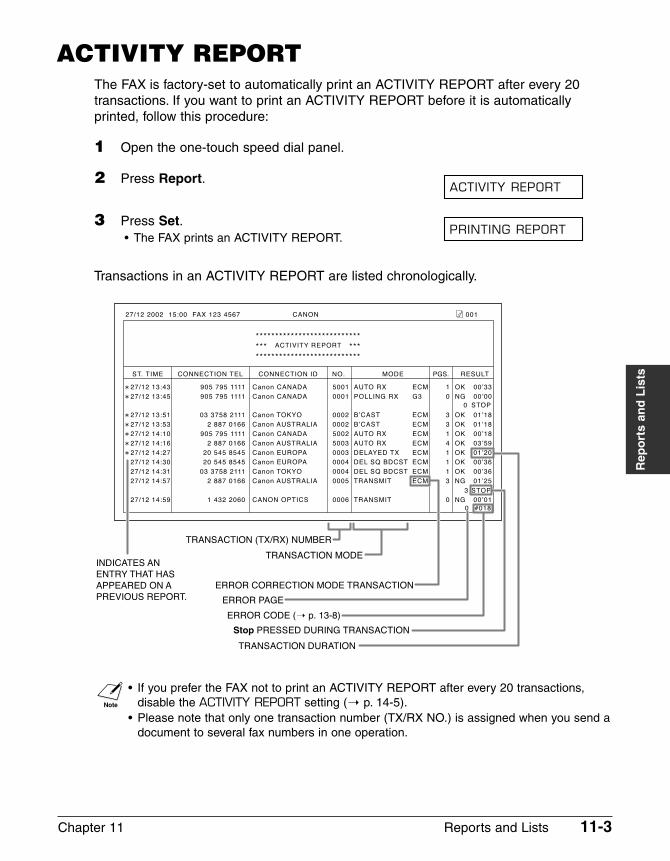
Chapter 11 Reports and Lists 11-3
Rep
ort
s an
d L
ists
ACTIVITY REPORTThe FAX is factory-set to automatically print an ACTIVITY REPORT after every 20transactions. If you want to print an ACTIVITY REPORT before it is automaticallyprinted, follow this procedure:
1 Open the one-touch speed dial panel.
2 Press Report.
3 Press Set.• The FAX prints an ACTIVITY REPORT.
Transactions in an ACTIVITY REPORT are listed chronologically.
n • If you prefer the FAX not to print an ACTIVITY REPORT after every 20 transactions,disable the ACTIVITY REPORT setting (1 p. 14-5).
• Please note that only one transaction number (TX/RX NO.) is assigned when you send adocument to several fax numbers in one operation.
A 27/12 13:43 905 795 1111 Canon CANADA 5001 AUTO RX ECM 1 OK 00Õ33
A 27/12 13:45 905 795 1111 Canon CANADA 0001 POLLING RX G3 0 NG 00Õ00
A 27/12 13:51 03 3758 2111 Canon TOKYO 0002 BÕCAST ECM 3 OK 01Õ18
A 27/12 13:53 2 887 0166 Canon AUSTRALIA 0002 BÕCAST ECM 3 OK 01Õ18
A 27/12 14:10 905 795 1111 Canon CANADA 5002 AUTO RX ECM 1 OK 00Õ18
A 27/12 14:16 2 887 0166 Canon AUSTRALIA 5003 AUTO RX ECM 4 OK 03Õ59
A 27/12 14:27 20 545 8545 Canon EUROPA 0003 DELAYED TX ECM 1 OK 01Õ20
27/12 14:30 20 545 8545 Canon EUROPA 0004 DEL SQ BDCST ECM 1 OK 00Õ36
27/12 14:31 03 3758 2111 Canon TOKYO 0004 DEL SQ BDCST ECM 1 OK 00Õ36
27/12 14:57 2 887 0166 Canon AUSTRALIA 0005 TRANSMIT ECM 3 NG 01Õ25
27/12 14:59 1 432 2060 CANON OPTICS 0006 TRANSMIT 0 NG 00Õ01
***************************
***************************
*** ***ACTIVITY REPORT
ST. TIME CONNECTION TEL CONNECTION ID NO. MODE PGS. RESULT
27/12 2002 15:00 FAX 123 4567 CANON 001
3 STOP
0 STOP
0 #018
TRANSACTION (TX/RX) NUMBER
TRANSACTION MODEINDICATES AN �
ENTRY THAT HAS
APPEARED ON A
PREVIOUS REPORT. ERROR PAGE
ERROR CODE (1 p. 13-8)
Stop PRESSED DURING TRANSACTION
TRANSACTION DURATION
ERROR CORRECTION MODE TRANSACTION
PRINTING REPORT
ACTIVITY REPORT
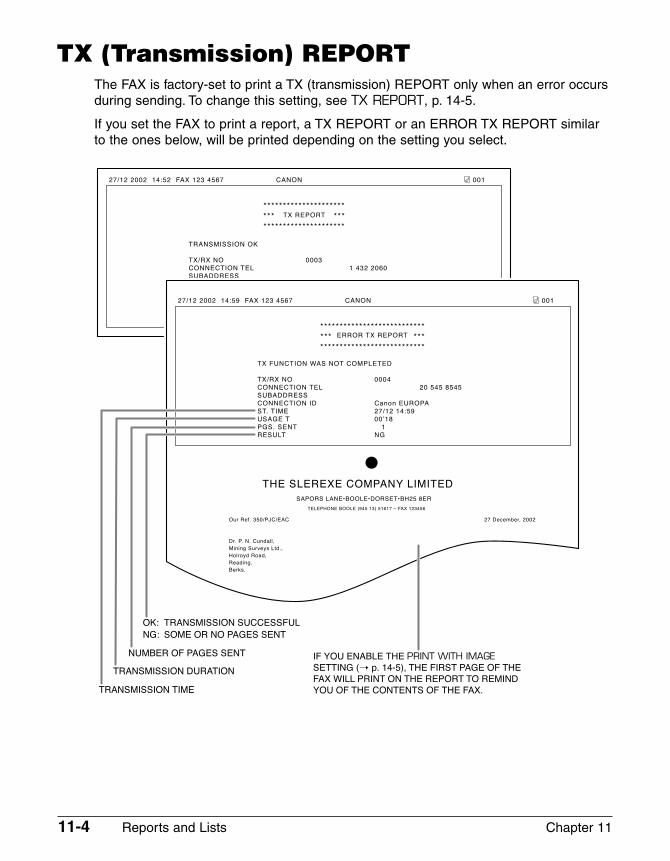
11-4 Reports and Lists Chapter 11
TX (Transmission) REPORTThe FAX is factory-set to print a TX (transmission) REPORT only when an error occursduring sending. To change this setting, see TX REPORT, p. 14-5.
If you set the FAX to print a report, a TX REPORT or an ERROR TX REPORT similarto the ones below, will be printed depending on the setting you select.
TRANSMISSION OK
TX/RX NO 0003
CONNECTION TEL 1 432 2060
SUBADDRESS
CONNECTION ID Canon OPTICS
ST. TIME 27/12 14:52
USAGE T 00Õ34
PGS. SENT 1
RESULT OK
27/12 2002 14:52 FAX 123 4567 CANON 001
*********************
*********************
*** ***TX REPORT
TX FUNCTION WAS NOT COMPLETED
TX/RX NO 0004
CONNECTION TEL 20 545 8545
SUBADDRESS
CONNECTION ID Canon EUROPA
ST. TIME 27/12 14:59
USAGE T 00Õ18
PGS. SENT 1
RESULT NG
THE SLEREXE COMPANY LIMITED
SAPORS LANE¥BOOLE¥DORSET¥BH25 8ER
TELEPHONE BOOLE (945 13) 51617 Ð FAX 123456
Our Ref. 350/PJC/EAC 27 December, 2002
Dr. P. N. Cundall,
Mining Surveys Ltd.,
Holroyd Road,
Reading,
Berks.
27/12 2002 14:59 FAX 123 4567 CANON 001
***************************
***************************
*** ***ERROR TX REPORT
IF YOU ENABLE THE PRINT WITH IMAGESETTING (1 p. 14-5), THE FIRST PAGE OF THE
FAX WILL PRINT ON THE REPORT TO REMIND
YOU OF THE CONTENTS OF THE FAX.
OK: TRANSMISSION SUCCESSFUL
NG: SOME OR NO PAGES SENT
NUMBER OF PAGES SENT
TRANSMISSION DURATION
TRANSMISSION TIME

Chapter 11 Reports and Lists 11-5
Rep
ort
s an
d L
ists
MULTI TX/RX (Transaction) REPORTA MULTI TX/RX (transaction) REPORT similar to the one below, is printed when yousend the same document to several fax numbers, or when you poll multiple faxnumbers in one operation.
RX (Reception) REPORTThe FAX is factory-set not to print an RX (reception) REPORT even if an error occursduring reception. To change this setting, see RX REPORT, p. 14-5.
If you set the FAX to print a report, an RX REPORT similar to the one below, will beprinted.
*********************
*********************
*** ***RX REPORT
RECEPTION OK
TX/RX NO 5004
CONNECTION TEL 905 795 1111
SUBADDRESS
CONNECTION ID Canon CANADA
ST. TIME 27/12 14:59
USAGE T 01Õ59
PGS. 4
RESULT OK
27/12 2002 15:02 FAX 123 4567 CANON 001
OK: RECEPTION SUCCESSFUL
NG: SOME OR NO PAGES RECEIVED
NUMBER OF PAGES RECEIVED
RECEPTION DURATION
RECEPTION TIME

11-6 Reports and Lists Chapter 11
Chapter 12 Maintenance 12-1
Mai
nte
nan
ce
Chapter 12
Maintenance
Periodic Cleaning ...................................................................................12-2
Cleaning the FAX’s Exterior..................................................................12-2
Cleaning the FAX’s Interior...................................................................12-3
Cleaning the Scanner Components .....................................................12-5
Replacing the Toner Cartridge ..............................................................12-7
12-2 Maintenance Chapter 12
Periodic CleaningThis section describes the necessary cleaning procedures for your FAX. Please notethe following before cleaning your unit:
• Be sure to disconnect the power cord before cleaning the FAX. Since documents inmemory are erased when the power is disconnected, print or send any documentsstored in memory before disconnecting the power cord (1 p. 9-5).
• Do not use tissue paper, paper towels, or similar materials for cleaning; they can stickto the components or generate static charges.
c Never use volatile liquids such as thinners, benzene, acetone, or any other chemicalcleaner to clean the interior of the FAX; these can damage the unit’s components.
Cleaning the FAX’s ExteriorFollow this procedure to clean the FAX’s outer casing:
1 Disconnect the power cord from theFAX.
2 Wipe the FAX’s exterior with a clean,soft, lint-free cloth moistened withwater or diluted dishwashing detergentsolution.
3 When you are finished, reconnect thepower cord.
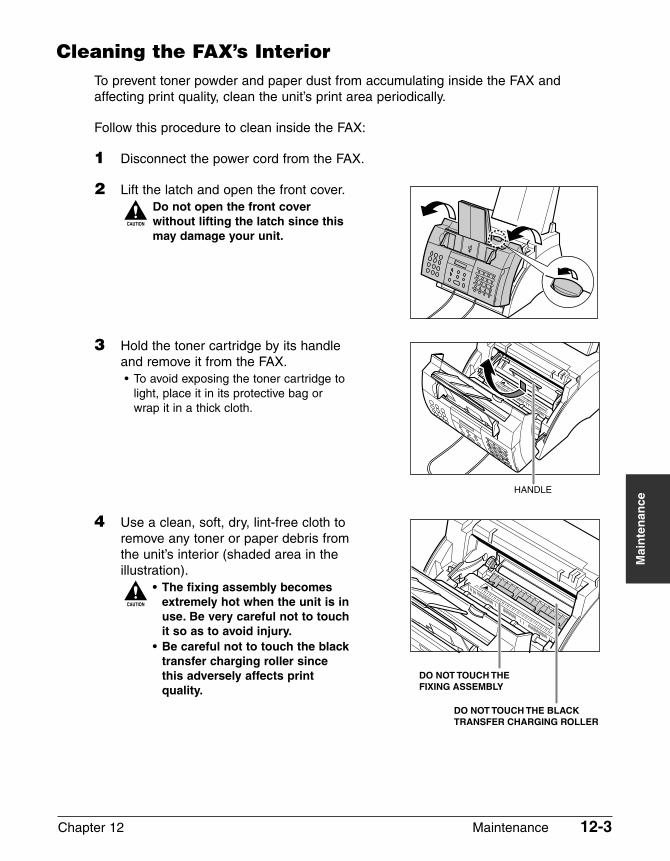
Chapter 12 Maintenance 12-3
Mai
nte
nan
ce
Cleaning the FAX’s InteriorTo prevent toner powder and paper dust from accumulating inside the FAX andaffecting print quality, clean the unit’s print area periodically.
Follow this procedure to clean inside the FAX:
1 Disconnect the power cord from the FAX.
2 Lift the latch and open the front cover.
c Do not open the front coverwithout lifting the latch since thismay damage your unit.
3 Hold the toner cartridge by its handleand remove it from the FAX.• To avoid exposing the toner cartridge to
light, place it in its protective bag orwrap it in a thick cloth.
4 Use a clean, soft, dry, lint-free cloth to remove any toner or paper debris fromthe unit’s interior (shaded area in theillustration).
c • The fixing assembly becomesextremely hot when the unit is inuse. Be very careful not to touchit so as to avoid injury.
• Be careful not to touch the blacktransfer charging roller sincethis adversely affects printquality.
DO NOT TOUCH THE BLACK TRANSFER CHARGING ROLLER
DO NOT TOUCH THE FIXING ASSEMBLY
HANDLE
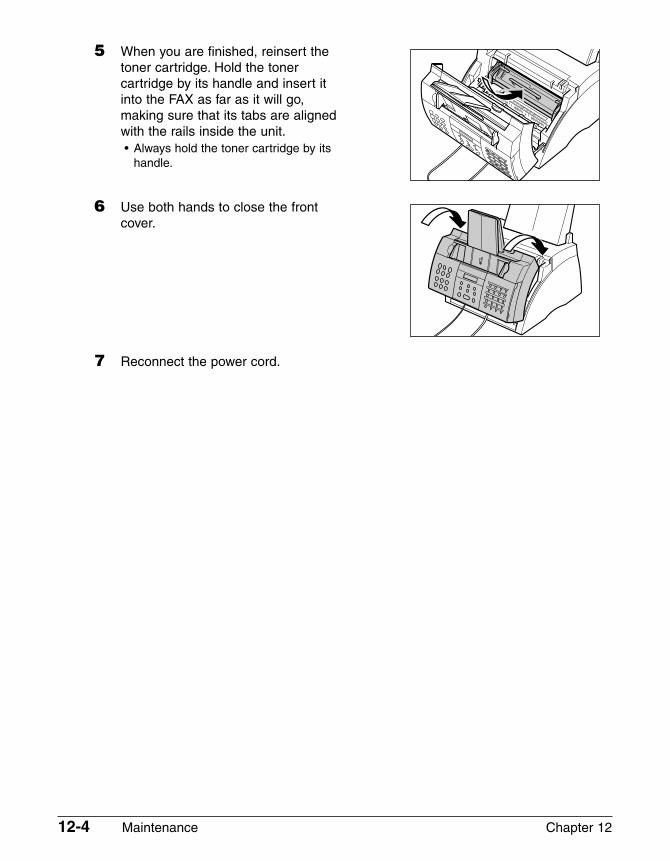
12-4 Maintenance Chapter 12
5 When you are finished, reinsert the toner cartridge. Hold the tonercartridge by its handle and insert itinto the FAX as far as it will go,making sure that its tabs are alignedwith the rails inside the unit.• Always hold the toner cartridge by its
handle.
6 Use both hands to close the front cover.
7 Reconnect the power cord.
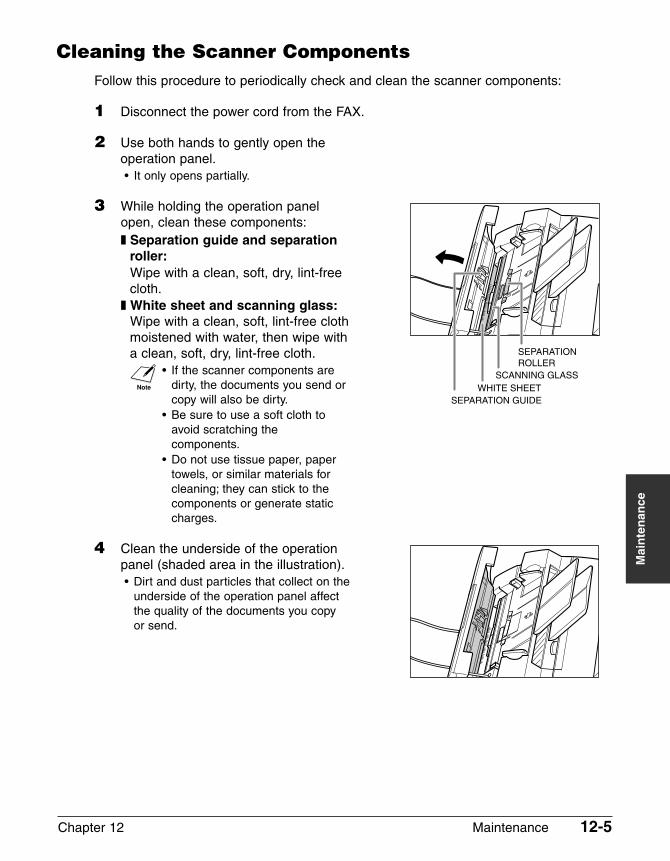
Chapter 12 Maintenance 12-5
Mai
nte
nan
ce
Cleaning the Scanner ComponentsFollow this procedure to periodically check and clean the scanner components:
1 Disconnect the power cord from the FAX.
2 Use both hands to gently open theoperation panel.• It only opens partially.
3 While holding the operation panelopen, clean these components:❚ Separation guide and separation
roller:Wipe with a clean, soft, dry, lint-freecloth.
❚ White sheet and scanning glass:Wipe with a clean, soft, lint-free clothmoistened with water, then wipe witha clean, soft, dry, lint-free cloth.
n • If the scanner components aredirty, the documents you send orcopy will also be dirty.
• Be sure to use a soft cloth toavoid scratching thecomponents.
• Do not use tissue paper, papertowels, or similar materials forcleaning; they can stick to thecomponents or generate staticcharges.
4 Clean the underside of the operationpanel (shaded area in the illustration).• Dirt and dust particles that collect on the
underside of the operation panel affectthe quality of the documents you copyor send.
SCANNING GLASSWHITE SHEET
SEPARATION GUIDE
SEPARATION ROLLER
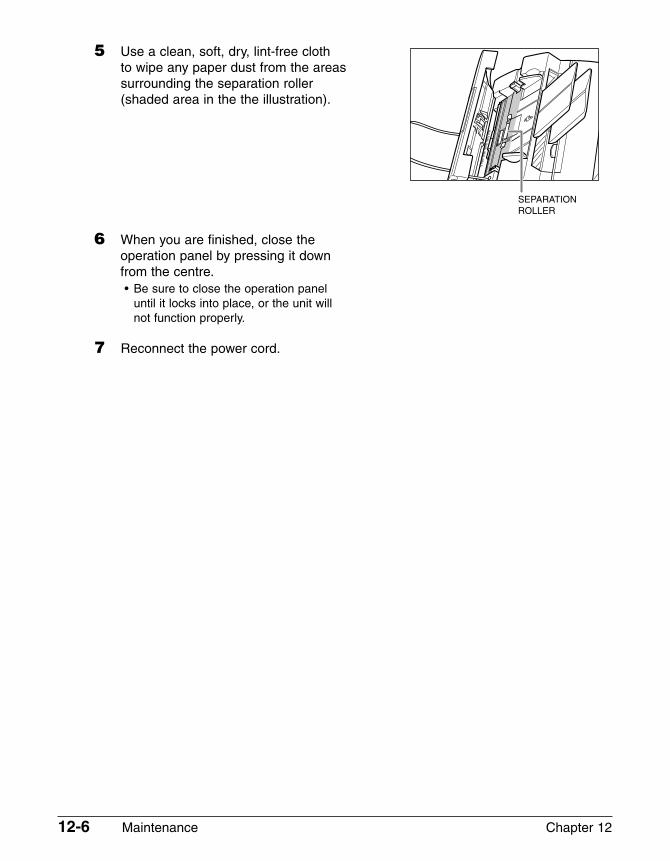
12-6 Maintenance Chapter 12
5 Use a clean, soft, dry, lint-free clothto wipe any paper dust from the areassurrounding the separation roller(shaded area in the the illustration).
6 When you are finished, close theoperation panel by pressing it downfrom the centre.• Be sure to close the operation panel
until it locks into place, or the unit willnot function properly.
7 Reconnect the power cord.
SEPARATION ROLLER
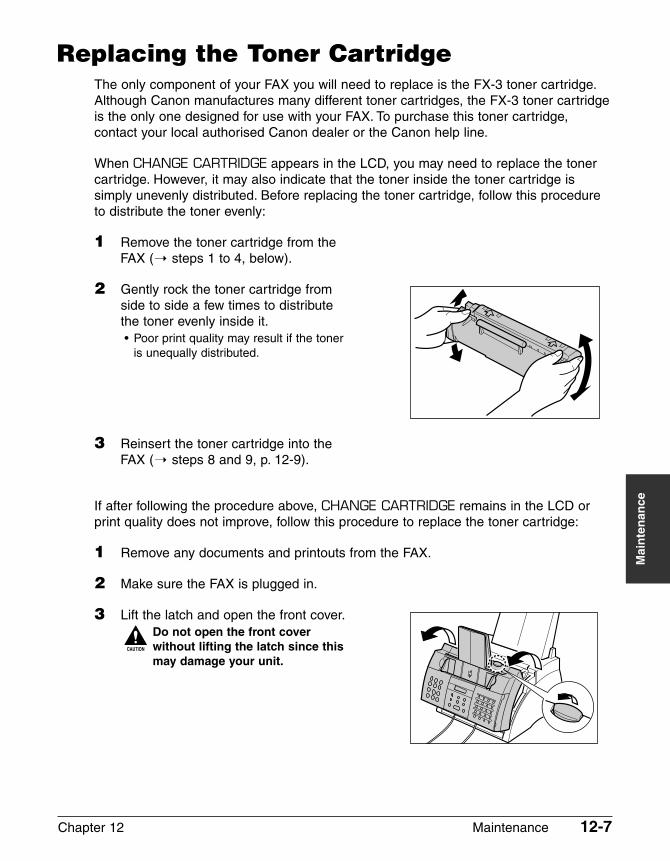
Chapter 12 Maintenance 12-7
Mai
nte
nan
ce
Replacing the Toner CartridgeThe only component of your FAX you will need to replace is the FX-3 toner cartridge.Although Canon manufactures many different toner cartridges, the FX-3 toner cartridgeis the only one designed for use with your FAX. To purchase this toner cartridge,contact your local authorised Canon dealer or the Canon help line.
When CHANGE CARTRIDGE appears in the LCD, you may need to replace the tonercartridge. However, it may also indicate that the toner inside the toner cartridge issimply unevenly distributed. Before replacing the toner cartridge, follow this procedureto distribute the toner evenly:
1 Remove the toner cartridge from theFAX (1 steps 1 to 4, below).
2 Gently rock the toner cartridge from side to side a few times to distributethe toner evenly inside it.• Poor print quality may result if the toner
is unequally distributed.
3 Reinsert the toner cartridge into theFAX (1 steps 8 and 9, p. 12-9).
If after following the procedure above, CHANGE CARTRIDGE remains in the LCD orprint quality does not improve, follow this procedure to replace the toner cartridge:
1 Remove any documents and printouts from the FAX.
2 Make sure the FAX is plugged in.
3 Lift the latch and open the front cover.
c Do not open the front coverwithout lifting the latch since thismay damage your unit.

12-8 Maintenance Chapter 12
4 Hold the toner cartridge by its handleand remove it from the FAX.• Discard the old toner cartridge
immediately according to the local lawsand regulations for disposal ofconsumables. To recycle your usedtoner cartridge, simply follow theinstructions included with your new FX-3 toner cartridge.
5 Remove the new FX-3 toner cartridgefrom its protective bag.• Save the protective bag in case you
need to repack the toner cartridge at alater date.
6 Gently rock the toner cartridge from side to side a few times to distributethe toner evenly inside it.• Poor print quality may result if the toner
is unequally distributed.
7 Place and support the toner cartridge on a flat, clean surface, then gentlypull on the plastic tab to remove theplastic seal.• Use a firm, even pull to avoid breaking
the seal.
TOP VIEW
SIDE VIEW
PULL WITHINTHIS RANGE
PULL WITHINTHIS RANGE
HANDLE
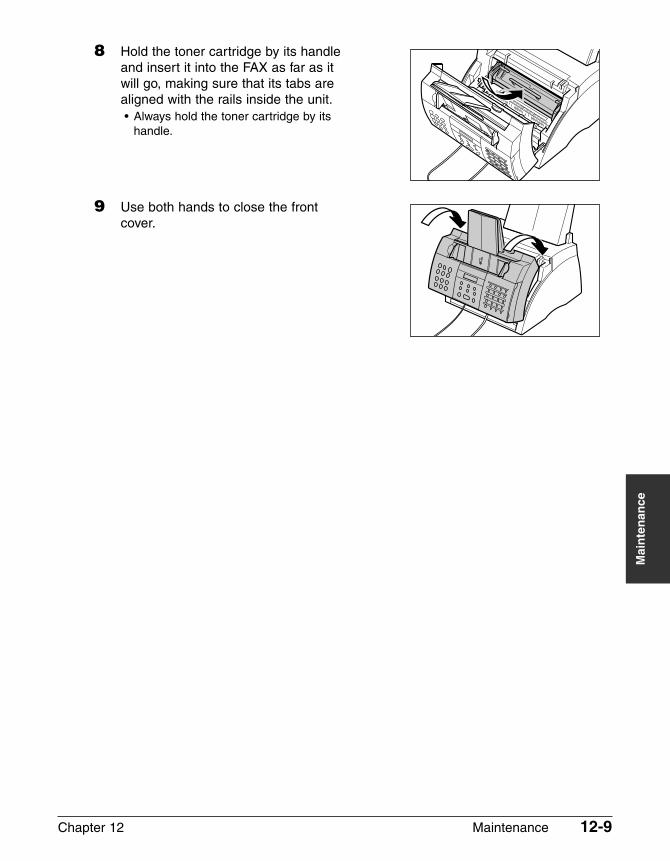
Chapter 12 Maintenance 12-9
Mai
nte
nan
ce
8 Hold the toner cartridge by its handle and insert it into the FAX as far as itwill go, making sure that its tabs arealigned with the rails inside the unit.• Always hold the toner cartridge by its
handle.
9 Use both hands to close the front cover.

12-10 Maintenance Chapter 12
Chapter 13 Troubleshooting 13-1
Tro
ub
lesh
oo
tin
g
Chapter 13
Troubleshooting
Clearing Jams .........................................................................................13-2
Jams in the ADF...................................................................................13-2
Paper Jams...........................................................................................13-3
Jams in the Paper Delivery Slots .....................................................13-3
Jams Inside the Unit.........................................................................13-3
LCD Messages ........................................................................................13-8
Paper Feeding Problems......................................................................13-13
Faxing Problems...................................................................................13-13
Sending Problems ..............................................................................13-13
Receiving Problems............................................................................13-15
Copying Problems ................................................................................13-17
Telephone Problems.............................................................................13-18
Printing Problems.................................................................................13-18
General Problems .................................................................................13-20
If You Cannot Solve a Problem............................................................13-21
If a Power Cut Occurs ..........................................................................13-22
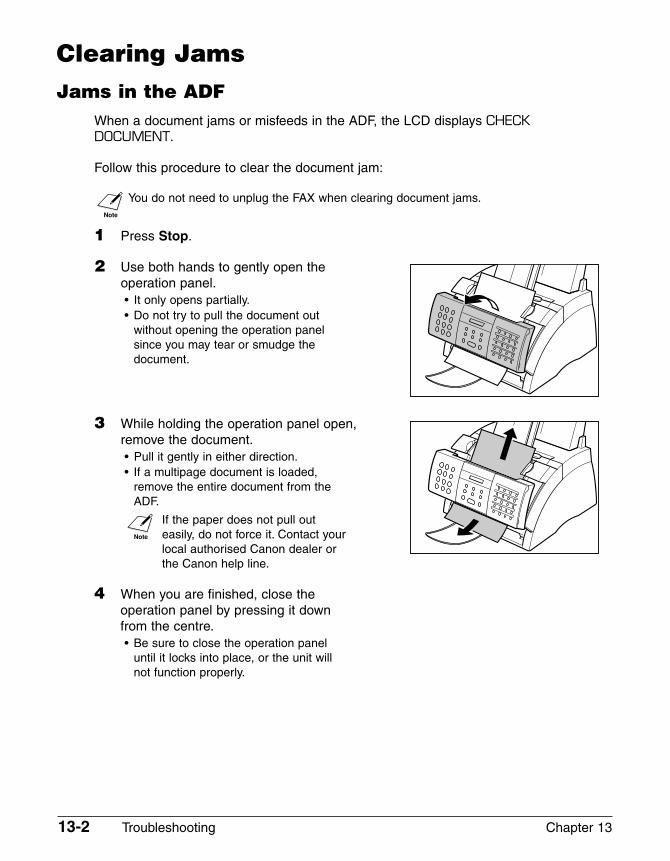
13-2 Troubleshooting Chapter 13
Clearing JamsJams in the ADF
When a document jams or misfeeds in the ADF, the LCD displays CHECKDOCUMENT.
Follow this procedure to clear the document jam:
n You do not need to unplug the FAX when clearing document jams.
1 Press Stop.
2 Use both hands to gently open theoperation panel.• It only opens partially.• Do not try to pull the document out
without opening the operation panelsince you may tear or smudge thedocument.
3 While holding the operation panel open,remove the document.• Pull it gently in either direction.• If a multipage document is loaded,
remove the entire document from theADF.
n If the paper does not pull outeasily, do not force it. Contact yourlocal authorised Canon dealer orthe Canon help line.
4 When you are finished, close theoperation panel by pressing it downfrom the centre.• Be sure to close the operation panel
until it locks into place, or the unit willnot function properly.
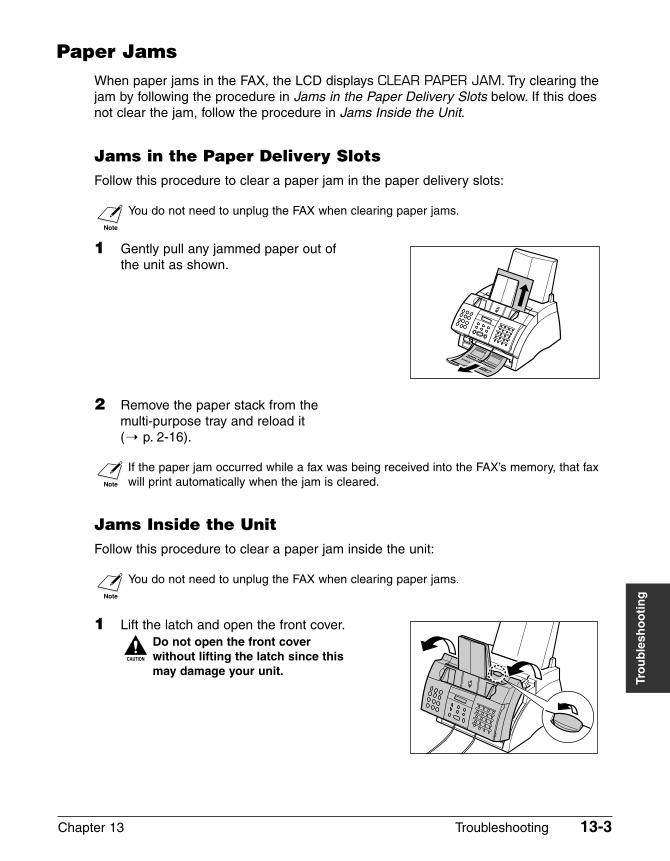
Chapter 13 Troubleshooting 13-3
Tro
ub
lesh
oo
tin
g
Paper JamsWhen paper jams in the FAX, the LCD displays CLEAR PAPER JAM. Try clearing thejam by following the procedure in Jams in the Paper Delivery Slots below. If this doesnot clear the jam, follow the procedure in Jams Inside the Unit.
Jams in the Paper Delivery SlotsFollow this procedure to clear a paper jam in the paper delivery slots:
n You do not need to unplug the FAX when clearing paper jams.
1 Gently pull any jammed paper out ofthe unit as shown.
2 Remove the paper stack from themulti-purpose tray and reload it (1 p. 2-16).
n If the paper jam occurred while a fax was being received into the FAX’s memory, that faxwill print automatically when the jam is cleared.
Jams Inside the UnitFollow this procedure to clear a paper jam inside the unit:
n You do not need to unplug the FAX when clearing paper jams.
1 Lift the latch and open the front cover.
c Do not open the front coverwithout lifting the latch since thismay damage your unit.
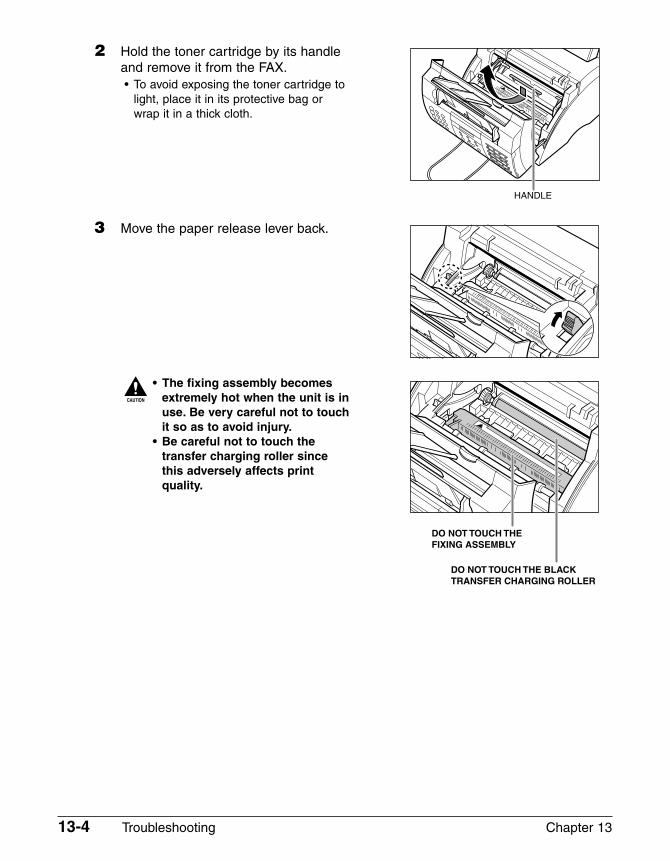
13-4 Troubleshooting Chapter 13
2 Hold the toner cartridge by its handleand remove it from the FAX.• To avoid exposing the toner cartridge to
light, place it in its protective bag orwrap it in a thick cloth.
3 Move the paper release lever back.
c • The fixing assembly becomesextremely hot when the unit is inuse. Be very careful not to touchit so as to avoid injury.
• Be careful not to touch thetransfer charging roller sincethis adversely affects printquality.
DO NOT TOUCH THE FIXING ASSEMBLY
DO NOT TOUCH THE BLACK TRANSFER CHARGING ROLLER
HANDLE
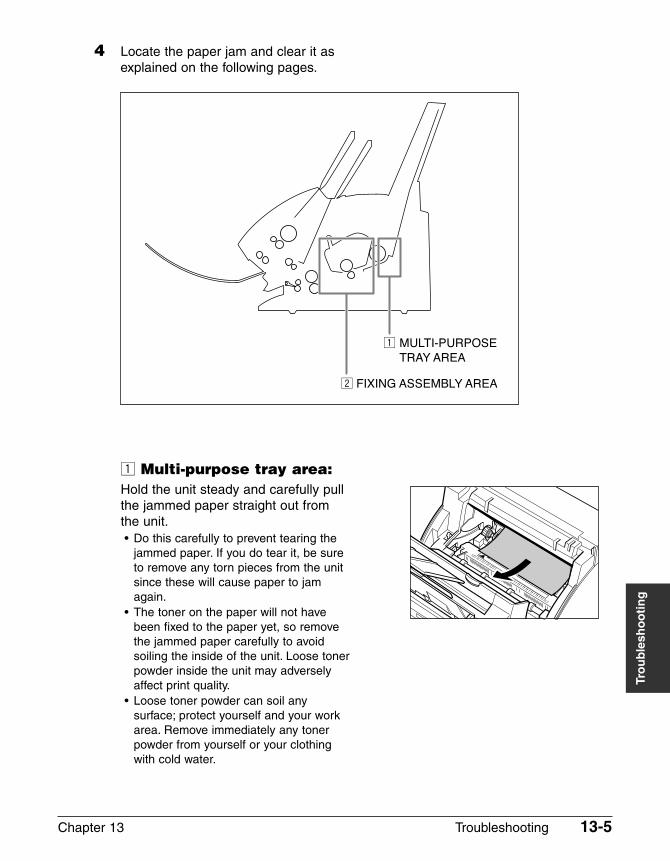
Chapter 13 Troubleshooting 13-5
Tro
ub
lesh
oo
tin
g
4 Locate the paper jam and clear it asexplained on the following pages.
z Multi-purpose tray area:Hold the unit steady and carefully pullthe jammed paper straight out fromthe unit.• Do this carefully to prevent tearing the
jammed paper. If you do tear it, be sureto remove any torn pieces from the unitsince these will cause paper to jamagain.
• The toner on the paper will not havebeen fixed to the paper yet, so removethe jammed paper carefully to avoidsoiling the inside of the unit. Loose tonerpowder inside the unit may adverselyaffect print quality.
• Loose toner powder can soil anysurface; protect yourself and your workarea. Remove immediately any tonerpowder from yourself or your clothingwith cold water.
z MULTI-PURPOSE�
TRAY AREA
x FIXING ASSEMBLY AREA
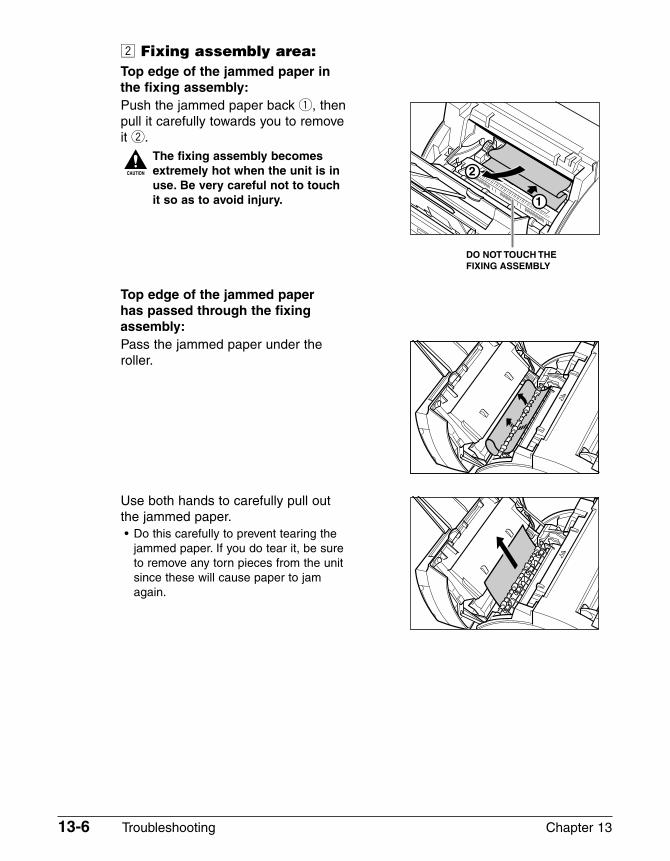
13-6 Troubleshooting Chapter 13
x Fixing assembly area:Top edge of the jammed paper inthe fixing assembly:Push the jammed paper back q, then pull it carefully towards you to removeit w.
c The fixing assembly becomesextremely hot when the unit is inuse. Be very careful not to touchit so as to avoid injury.
Top edge of the jammed paper has passed through the fixingassembly:Pass the jammed paper under the roller.
Use both hands to carefully pull out the jammed paper.• Do this carefully to prevent tearing the
jammed paper. If you do tear it, be sureto remove any torn pieces from the unitsince these will cause paper to jamagain.
2
1
DO NOT TOUCH THE FIXING ASSEMBLY
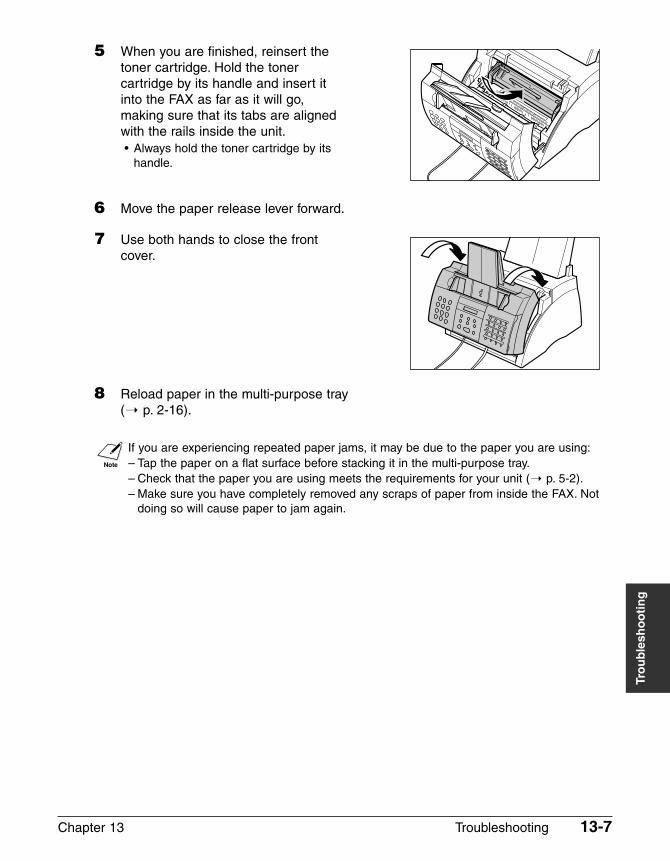
Chapter 13 Troubleshooting 13-7
Tro
ub
lesh
oo
tin
g
5 When you are finished, reinsert the toner cartridge. Hold the tonercartridge by its handle and insert itinto the FAX as far as it will go,making sure that its tabs are alignedwith the rails inside the unit.• Always hold the toner cartridge by its
handle.
6 Move the paper release lever forward.
7 Use both hands to close the front cover.
8 Reload paper in the multi-purpose tray(1 p. 2-16).
n If you are experiencing repeated paper jams, it may be due to the paper you are using:– Tap the paper on a flat surface before stacking it in the multi-purpose tray.– Check that the paper you are using meets the requirements for your unit (1 p. 5-2).– Make sure you have completely removed any scraps of paper from inside the FAX. Not
doing so will cause paper to jam again.
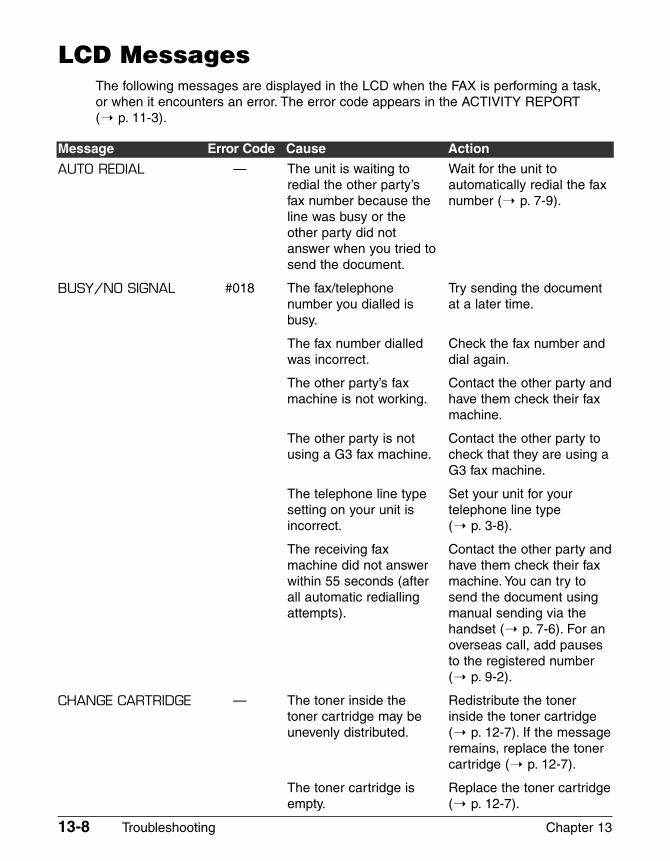
13-8 Troubleshooting Chapter 13
AUTO REDIAL
BUSY/NO SIGNAL
CHANGE CARTRIDGE
—
#018
—
The unit is waiting toredial the other party’sfax number because theline was busy or theother party did notanswer when you tried tosend the document.
The fax/telephonenumber you dialled isbusy.
The fax number dialledwas incorrect.
The other party’s faxmachine is not working.
The other party is notusing a G3 fax machine.
The telephone line typesetting on your unit isincorrect.
The receiving faxmachine did not answerwithin 55 seconds (afterall automatic rediallingattempts).
The toner inside thetoner cartridge may beunevenly distributed.
The toner cartridge isempty.
Wait for the unit toautomatically redial the faxnumber (1 p. 7-9).
Try sending the documentat a later time.
Check the fax number anddial again.
Contact the other party andhave them check their faxmachine.
Contact the other party tocheck that they are using aG3 fax machine.
Set your unit for yourtelephone line type (1 p. 3-8).
Contact the other party andhave them check their faxmachine. You can try tosend the document usingmanual sending via thehandset (1 p. 7-6). For anoverseas call, add pausesto the registered number(1 p. 9-2).
Redistribute the tonerinside the toner cartridge(1 p. 12-7). If the messageremains, replace the tonercartridge (1 p. 12-7).
Replace the toner cartridge(1 p. 12-7).
Message Error Code Cause Action
LCD MessagesThe following messages are displayed in the LCD when the FAX is performing a task,or when it encounters an error. The error code appears in the ACTIVITY REPORT (1 p. 11-3).
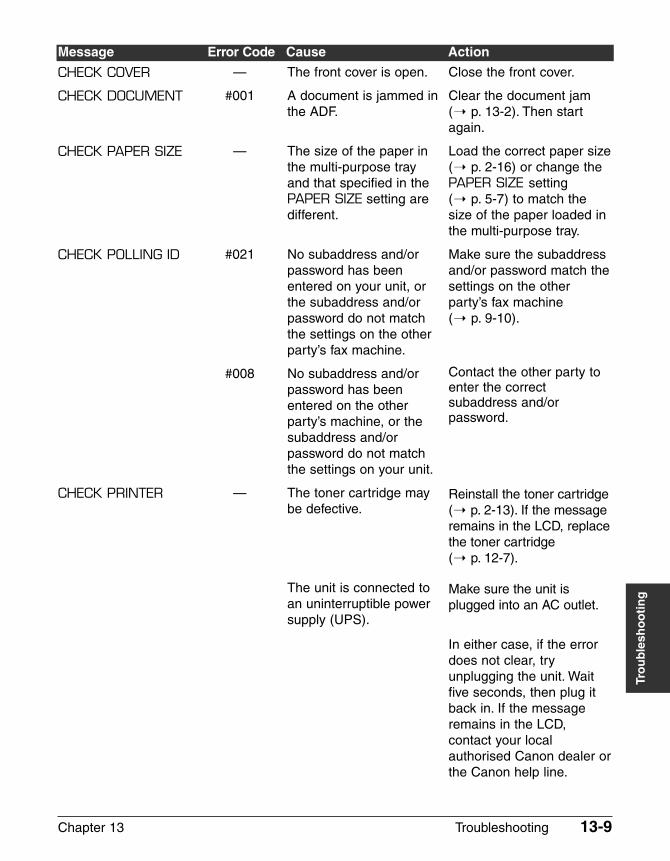
Chapter 13 Troubleshooting 13-9
Tro
ub
lesh
oo
tin
g
CHECK COVER
CHECK DOCUMENT
CHECK PAPER SIZE
CHECK POLLING ID
CHECK PRINTER
—
#001
—
#021
#008
—
The front cover is open.
A document is jammed inthe ADF.
The size of the paper inthe multi-purpose trayand that specified in thePAPER SIZE setting aredifferent.
No subaddress and/orpassword has beenentered on your unit, orthe subaddress and/orpassword do not matchthe settings on the otherparty’s fax machine.
No subaddress and/orpassword has beenentered on the otherparty’s machine, or thesubaddress and/orpassword do not matchthe settings on your unit.
The toner cartridge may be defective.
The unit is connected toan uninterruptible powersupply (UPS).
Close the front cover.
Clear the document jam(1 p. 13-2). Then startagain.
Load the correct paper size(1 p. 2-16) or change thePAPER SIZE setting (1 p. 5-7) to match thesize of the paper loaded inthe multi-purpose tray.
Make sure the subaddressand/or password match thesettings on the otherparty’s fax machine (1 p. 9-10).
Contact the other party toenter the correctsubaddress and/orpassword.
Reinstall the toner cartridge(1 p. 2-13). If the messageremains in the LCD, replacethe toner cartridge (1 p. 12-7).
Make sure the unit isplugged into an AC outlet.
In either case, if the errordoes not clear, tryunplugging the unit. Waitfive seconds, then plug itback in. If the messageremains in the LCD,contact your localauthorised Canon dealer orthe Canon help line.
Message Error Code Cause Action
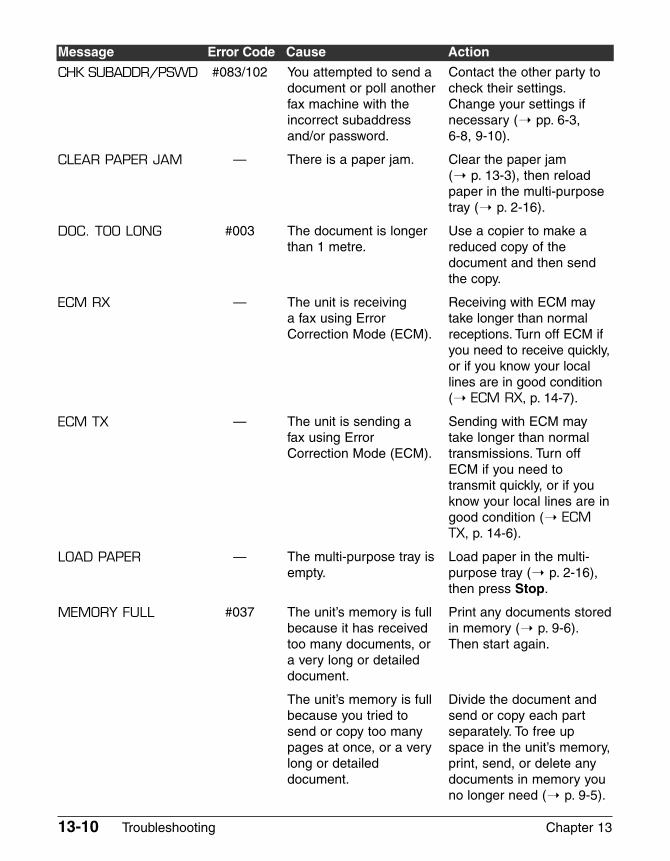
13-10 Troubleshooting Chapter 13
CHK SUBADDR/PSWD
CLEAR PAPER JAM
DOC. TOO LONG
ECM RX
ECM TX
LOAD PAPER
MEMORY FULL
#083/102
—
#003
—
—
—
#037
You attempted to send adocument or poll anotherfax machine with theincorrect subaddressand/or password.
There is a paper jam.
The document is longerthan 1 metre.
The unit is receiving a fax using ErrorCorrection Mode (ECM).
The unit is sending a fax using ErrorCorrection Mode (ECM).
The multi-purpose tray isempty.
The unit’s memory is fullbecause it has receivedtoo many documents, ora very long or detaileddocument.
The unit’s memory is fullbecause you tried tosend or copy too manypages at once, or a verylong or detaileddocument.
Contact the other party tocheck their settings.Change your settings ifnecessary (1 pp. 6-3, 6-8, 9-10).
Clear the paper jam (1 p. 13-3), then reloadpaper in the multi-purposetray (1 p. 2-16).
Use a copier to make areduced copy of thedocument and then sendthe copy.
Receiving with ECM maytake longer than normalreceptions. Turn off ECM ifyou need to receive quickly,or if you know your locallines are in good condition(1 ECM RX, p. 14-7).
Sending with ECM maytake longer than normaltransmissions. Turn offECM if you need totransmit quickly, or if youknow your local lines are ingood condition (1 ECMTX, p. 14-6).
Load paper in the multi-purpose tray (1 p. 2-16),then press Stop.
Print any documents storedin memory (1 p. 9-6).Then start again.
Divide the document andsend or copy each partseparately. To free upspace in the unit’s memory,print, send, or delete anydocuments in memory youno longer need (1 p. 9-5).
Message Error Code Cause Action
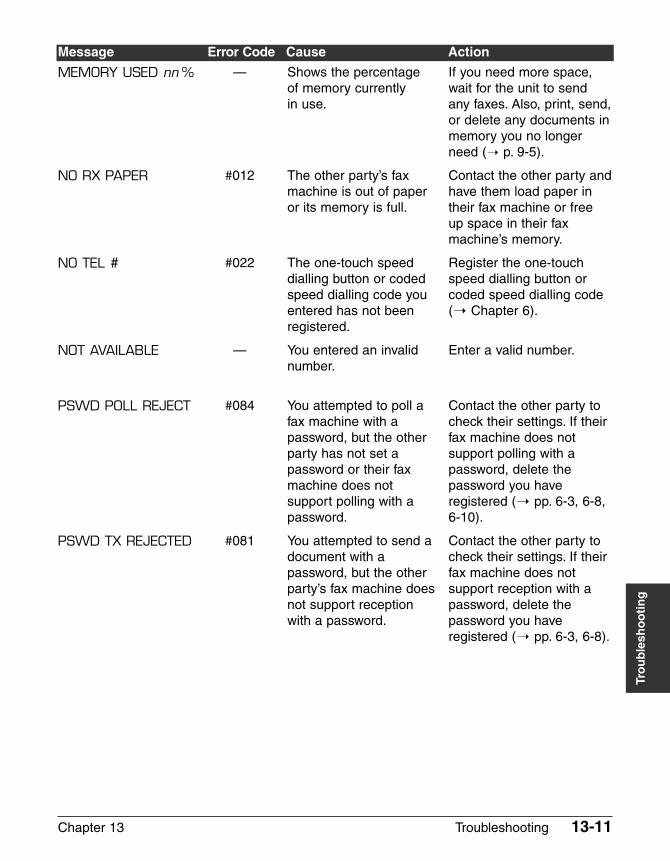
Chapter 13 Troubleshooting 13-11
Tro
ub
lesh
oo
tin
g
MEMORY USED nn %
NO RX PAPER
NO TEL #
NOT AVAILABLE
PSWD POLL REJECT
PSWD TX REJECTED
—
#012
#022
—
#084
#081
Shows the percentage of memory currently in use.
The other party’s faxmachine is out of paperor its memory is full.
The one-touch speeddialling button or codedspeed dialling code youentered has not beenregistered.
You entered an invalidnumber.
You attempted to poll afax machine with apassword, but the otherparty has not set apassword or their faxmachine does notsupport polling with apassword.
You attempted to send adocument with apassword, but the otherparty’s fax machine doesnot support receptionwith a password.
If you need more space,wait for the unit to sendany faxes. Also, print, send,or delete any documents inmemory you no longerneed (1 p. 9-5).
Contact the other party andhave them load paper intheir fax machine or freeup space in their faxmachine’s memory.
Register the one-touchspeed dialling button orcoded speed dialling code(1 Chapter 6).
Enter a valid number.
Contact the other party tocheck their settings. If theirfax machine does notsupport polling with apassword, delete thepassword you haveregistered (1 pp. 6-3, 6-8,6-10).
Contact the other party tocheck their settings. If theirfax machine does notsupport reception with apassword, delete thepassword you haveregistered (1 pp. 6-3, 6-8).
Message Error Code Cause Action
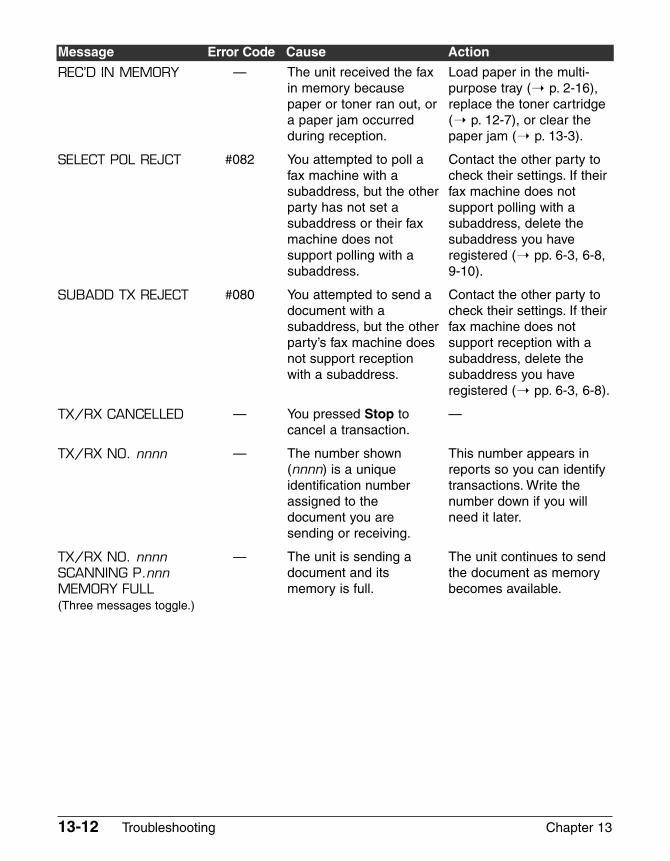
13-12 Troubleshooting Chapter 13
REC’D IN MEMORY
SELECT POL REJCT
SUBADD TX REJECT
TX/RX CANCELLED
TX/RX NO. nnnn
TX/RX NO. nnnnSCANNING P.nnnMEMORY FULL(Three messages toggle.)
—
#082
#080
—
—
—
The unit received the faxin memory becausepaper or toner ran out, ora paper jam occurredduring reception.
You attempted to poll afax machine with asubaddress, but the otherparty has not set asubaddress or their faxmachine does notsupport polling with asubaddress.
You attempted to send adocument with asubaddress, but the otherparty’s fax machine doesnot support receptionwith a subaddress.
You pressed Stop tocancel a transaction.
The number shown(nnnn) is a uniqueidentification numberassigned to thedocument you aresending or receiving.
The unit is sending adocument and itsmemory is full.
Load paper in the multi-purpose tray (1 p. 2-16),replace the toner cartridge(1 p. 12-7), or clear thepaper jam (1 p. 13-3).
Contact the other party tocheck their settings. If theirfax machine does notsupport polling with asubaddress, delete thesubaddress you haveregistered (1 pp. 6-3, 6-8,9-10).
Contact the other party tocheck their settings. If theirfax machine does notsupport reception with asubaddress, delete thesubaddress you haveregistered (1 pp. 6-3, 6-8).
—
This number appears inreports so you can identifytransactions. Write thenumber down if you willneed it later.
The unit continues to sendthe document as memorybecomes available.
Message Error Code Cause Action
Chapter 13 Troubleshooting 13-13
Tro
ub
lesh
oo
tin
g
Paper Feeding Problems
� Paper does not feed properly.The multi-purpose tray may contain too many sheets.• Make sure you load the correct quantity (1 p. 5-2).
The paper may not be loaded correctly.• Make sure the paper stack is loaded correctly in the multi-purpose tray (1 p. 2-16).
� Multiple sheets feed together into the FAX.The paper may not be loaded correctly.• Make sure the paper stack is loaded correctly in the multi-purpose tray (1 p. 2-16).
The multi-purpose tray may contain too many sheets.• Make sure you load the correct quantity (1 p. 5-2).
Different types of paper may be loaded in the multi-purpose tray.• Load only one type of paper.
• Make sure you load paper that meets the requirements for the FAX (1 p. 5-2).
• Let the paper run out before refilling the multi-purpose tray. Avoid mixing new stockwith paper already loaded.
� Repeated paper jams occur.The paper you are using may be causing the jams.• Make sure you load paper that meets the requirements for the FAX (1 p. 5-2).
Faxing ProblemsSending Problems
� Cannot send a fax.The FAX may not be set for the correct telephone line type.• Make sure the FAX is set for the correct telephone line type (1 p. 3-8).
The document may not be loaded correctly.• Make sure the document is loaded correctly in the ADF (1 p. 4-3).
• Make sure the operation panel is closed.
The one-touch speed dialling button or coded speed dialling code you enteredmay not be registered correctly.• Check that the speed dialling settings are registered correctly (1 Chapter 6).
13-14 Troubleshooting Chapter 13
You dialled or have been provided with an incorrect number.• Dial the number again, or check that you have the correct number.
The other party’s fax machine may be out of paper.• Contact the other party and ask them to make sure paper is loaded in their fax
machine.
There may be other documents being sent from memory.• Allow time for those documents to finish sending.
An error may have occurred during sending.• Print an ACTIVITY REPORT and check for an error code (1 p. 11-3).
The telephone line may not be working properly.• Make sure there is a dial tone when you press Hook or when you lift the handset of
any external device connected to the FAX. If there is no dial tone, contact your localtelephone company.
The receiving fax machine may not be a G3 fax machine.• Make sure the receiving fax machine is compatible with your FAX (which is a G3 fax
machine).
The subaddress and/or password are incorrect.• If you registered a subaddress/password under a speed dialling button or code, make
sure they match the other party’s settings.
� Faxes sent from the FAX are spotted or dirty.The receiving fax machine may not be working properly.• Check the FAX by making a copy (1 p. 10-2). If the copy is clear, the problem may be
in the receiving fax machine. If the copy is spotted or dirty, clean the scannercomponents (1 p. 12-5).
The document may not be loaded correctly.• Make sure the document is loaded correctly in the ADF (1 p. 4-3).
� Cannot send using Error Correction Mode (ECM).The other party’s fax machine may not support ECM.• If this is the case, the document is sent without ECM.
ECM may be disabled.• Make sure ECM on your FAX is enabled (1 ECM TX, p. 14-6).
• Contact the other party to check if ECM on their fax machine is enabled.
Chapter 13 Troubleshooting 13-15
Tro
ub
lesh
oo
tin
g
� Errors occur frequently while sending.The telephone lines may be in poor condition, or you may have a bad connection.• Lower the transmission speed (1 TX START SPEED, p. 14-10).
n If none of these solutions solve the problem, unplug the FAX and wait for at least fiveseconds. Then plug it back in and try sending again. If you still cannot send, contact yourlocal authorised Canon dealer or the Canon help line.
Receiving Problems
� Cannot receive a fax automatically.The FAX may not be set to receive automatically.• For the FAX to receive faxes automatically, the receive mode must be set to FAX
ONLY MODE, Fax/Tel Mode, ANS.MACHINE MODE, or NET SWITCH* (1 Chapter 8 or Appendix C). If you have set ANS.MACHINE MODE, confirm that ananswering machine is connected to the FAX and that it is turned on with an outgoingmessage properly recorded (1 p. 8-10).
The FAX may have a document stored in memory, leaving little or no memoryavailable.• Print, send, or delete any documents stored in memory (1 p. 9-5).
An error may have occurred during reception.• Check the LCD for an error message (1 p. 13-8).
• Print an ACTIVITY REPORT and check for an error code (1 p. 11-3).
The multi-purpose tray may be empty.• Make sure paper is loaded in the multi-purpose tray (1 p. 2-16).
The telephone line cord may not be connected properly.• Make sure it is connected properly (1 p. 2-6).
� No automatic switching between telephone and fax calls.The FAX may not be set to switch automatically between telephone and fax calls.• For the FAX to switch automatically, the receive mode must be set to Fax/Tel Mode,ANS.MACHINE MODE, or NET SWITCH* (1 Chapter 8 or Appendix C). If you haveset ANS.MACHINE MODE, confirm that an answering machine is connected to theFAX and that it is turned on with an outgoing message properly recorded (1 p. 8-10).
The FAX may have a document stored in memory, leaving little or no memoryavailable.• Print, send, or delete any documents stored in memory (1 p. 9-5).
*NET SWITCH is available for certain countries only.
13-16 Troubleshooting Chapter 13
An error may have occurred during reception.• Check the LCD for an error message (1 p. 13-8).
• Print an ACTIVITY REPORT and check for an error code (1 p. 11-3).
The multi-purpose tray may be empty.• Make sure paper is loaded in the multi-purpose tray (1 p. 2-16).
The other party’s fax machine may not send the CNG signal that tells your FAXthat the incoming call is a fax call.• Some fax machines cannot send this signal. In such cases, you will have to receive
the fax manually (1 p. 8-8).
� Cannot receive a document manually.You may have disconnected the call by pressing Start/Copy or dialling the remotereceiving ID after hanging up.• Always press Start/Copy or dial the remote receiving ID before hanging up.
Otherwise you will disconnect the call (1 p. 8-8).
� Print quality is poor.You may not be using the correct paper type.• Make sure you load paper that meets the requirements for the FAX (1 p. 5-2).
The other party’s fax machine may not be functioning properly.• The sending fax machine usually determines the fax’s quality. Contact the other party
and have them check that the scanning components of their fax machine are clean.
Error Correction Mode (ECM) may be disabled.• Make sure ECM is on (1 ECM RX, p. 14-7).
� Faxes do not print.The toner cartridge may not be installed properly.• Make sure the toner cartridge is installed properly (1 p. 2-13).
The toner cartridge may need to be replaced.• Replace the toner cartridge (1 p. 12-7).
� Received faxes print blotched or unevenly.The telephone lines may be in poor condition, or you may have a bad connection.• Error Correction Mode (ECM) sending/receiving should eliminate such problems.
However, if the telephone lines are in poor condition, you may have to try again.
The other party’s fax machine may not be functioning properly.• The sending fax machine usually determines the fax’s quality. Contact the other party
and have them check that the scanning components of their fax machine are clean.
Chapter 13 Troubleshooting 13-17
Tro
ub
lesh
oo
tin
g
Toner may be low or unevenly distributed.• Redistribute the toner inside the toner cartridge (1 p. 12-7). If the problem persists,
replace the toner cartridge (1 p. 12-7).
� Cannot receive using Error Correction Mode (ECM).The other party’s fax machine may not support ECM.• If this is the case, the document is received without ECM.
ECM may be disabled.• Make sure ECM on your FAX is enabled (1 ECM RX, p. 14-7).
• Contact the other party to check if ECM on their fax machine is enabled.
� Errors occur frequently while receiving.The telephone lines may be in poor condition, or you may have a bad connection.• Lower the reception speed (1 RX START SPEED, p. 14-10).
The other party’s fax machine may not be functioning properly.• Contact the other party and have them check that their fax machine is functioning
properly.
Copying Problems
� Cannot make copies.The document may not be loaded correctly.• Make sure the document is loaded correctly in the ADF (1 p. 4-3).
• Make sure the operation panel is closed.
The document may not meet the requirements for the FAX.• Make sure you load documents that meet the requirements for the FAX (1 p. 4-2).
� MEMORY FULL appears in the LCD when making multiplecopies.
The FAX’s memory is full.• Print, send, or delete any documents stored in memory (1 p. 9-5) to free up space in
the FAX’s memory, then start again.
The document you are copying may have too many graphics.• If multiple pages are being copied, separate the pages into smaller stacks. If not,
make the desired number of copies one at a time as needed.
n For additional troubleshooting, see Printing Problems, p. 13-18.
13-18 Troubleshooting Chapter 13
Telephone Problems
� Cannot dial.The telephone line cord may not be connected properly.• Make sure it is connected properly (1 p. 2-6).
The power cord may not be plugged in securely.• Check that the power cord is plugged securely into the FAX and into the wall outlet
(1 p. 2-8). If the unit is plugged into a power strip, make sure the power strip isplugged in and turned on.
The FAX may not be set for the correct telephone line type.• Make sure the FAX is set for the correct telephone line type (1 p. 3-8).
� Optional handset or telephone disconnects while you aretalking.
The power cord may not be plugged in securely.• Check that the power cord is plugged securely into the FAX and into the wall outlet
(1 p. 2-8). If the unit is plugged into a power strip, make sure the power strip isplugged in and turned on.
The optional handset or telephone cord may be defective.• Check the cord by substituting with another cord.
Printing Problems
� Alarm light is lit and the FAX beeps while printing.The FAX may have a paper jam.• Clear the paper jam (1 p. 13-3).
• If the FAX has no paper jam, unplug the unit and wait five seconds, then plug it backin. If the Alarm light remains lit, contact your local authorised Canon dealer or theCanon help line.
� Nothing prints.The power cord may not be plugged in securely.• Check that the power cord is plugged securely into the FAX and into the wall outlet
(1 p. 2-8). If the unit is plugged into a power strip, make sure the power strip isplugged in and turned on.
Chapter 13 Troubleshooting 13-19
Tro
ub
lesh
oo
tin
g
You may not have removed the plastic seal from the toner cartridge.• Make sure you install the toner cartridge properly (1 p. 2-13).
The toner cartridge may need to be replaced.• Replace the toner cartridge (1 p. 12-7).
� Printout does not match paper size.The paper may not be loaded correctly.• Make sure the paper stack is loaded correctly in the multi-purpose tray (1 p. 2-16).
� Printout is skewed.The paper may not be loaded correctly.• Make sure the paper stack is loaded correctly in the multi-purpose tray (1 p. 2-16).• Make sure the paper delivery slots are clear.
� Paper jams occur.You may not be using the correct paper delivery slot.• Select the correct paper delivery slot (1 p. 5-4).
� Printout is not clear.You may not be using the correct paper type.• Make sure you load paper that meets the requirements for the FAX (1 p. 5-2).
You may be printing on the wrong side of the paper.• Some papers have a “right” side for printing. If the print quality is not as clear as you
would like it to be, try turning the paper over and printing on the other side.
� Printout has vertical white streaks.Toner may be low or unevenly distributed.• Redistribute the toner inside the toner cartridge (1 p. 12-7). If the problem persists,
replace the toner cartridge (1 p. 12-7).
13-20 Troubleshooting Chapter 13
General Problems
� FAX has no power.The power cord may not be plugged in securely.• Check that the power cord is plugged securely into the FAX and into the wall outlet
(1 p. 2-8). If the unit is plugged into a power strip, make sure the power strip isplugged in and turned on.
The power cord may not be supplying power.• Check the power cord by substituting with another, or by using a voltmeter to test it for
continuity.
� Nothing appears in the LCD.The power cord may not be plugged in securely.• Check that the power cord is plugged securely into the FAX and into the wall outlet
(1 p. 2-8). If the unit is plugged into a power strip, make sure the power strip isplugged in and turned on. If the LCD remains blank, unplug the unit and wait fiveseconds, then plug it back in. If the LCD still remains blank, contact your localauthorised Canon dealer or the Canon help line.
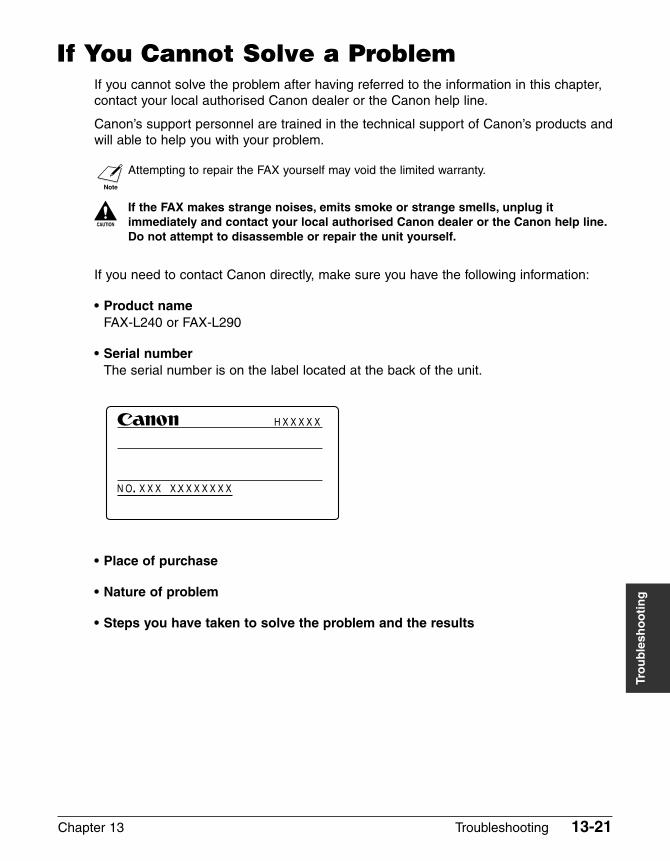
Chapter 13 Troubleshooting 13-21
Tro
ub
lesh
oo
tin
g
If You Cannot Solve a ProblemIf you cannot solve the problem after having referred to the information in this chapter,contact your local authorised Canon dealer or the Canon help line.
Canon’s support personnel are trained in the technical support of Canon’s products andwill able to help you with your problem.
nAttempting to repair the FAX yourself may void the limited warranty.
c If the FAX makes strange noises, emits smoke or strange smells, unplug itimmediately and contact your local authorised Canon dealer or the Canon help line.Do not attempt to disassemble or repair the unit yourself.
If you need to contact Canon directly, make sure you have the following information:
• Product nameFAX-L240 or FAX-L290
• Serial numberThe serial number is on the label located at the back of the unit.
• Place of purchase
• Nature of problem
• Steps you have taken to solve the problem and the results
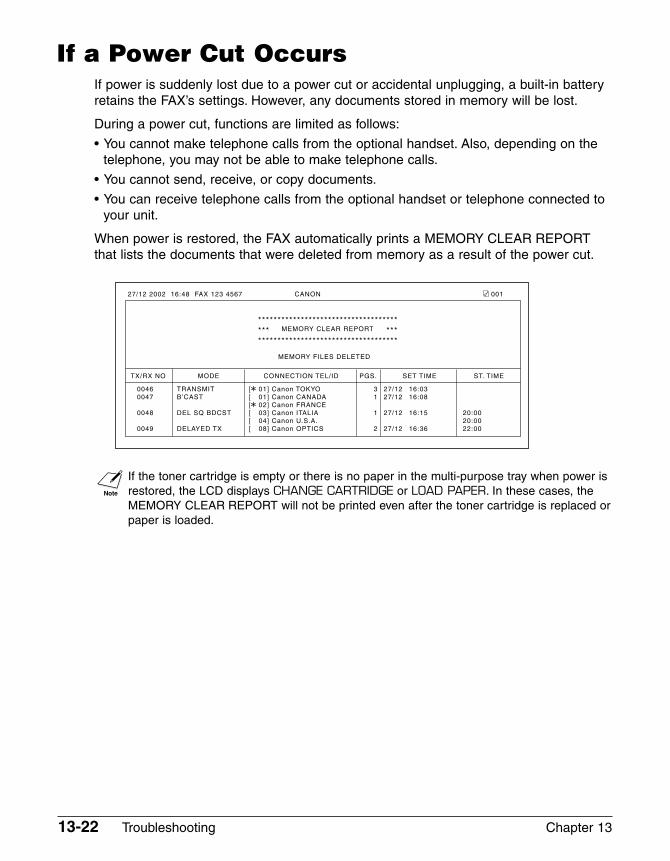
13-22 Troubleshooting Chapter 13
If a Power Cut OccursIf power is suddenly lost due to a power cut or accidental unplugging, a built-in batteryretains the FAX’s settings. However, any documents stored in memory will be lost.
During a power cut, functions are limited as follows:
• You cannot make telephone calls from the optional handset. Also, depending on thetelephone, you may not be able to make telephone calls.
• You cannot send, receive, or copy documents.
• You can receive telephone calls from the optional handset or telephone connected toyour unit.
When power is restored, the FAX automatically prints a MEMORY CLEAR REPORTthat lists the documents that were deleted from memory as a result of the power cut.
n If the toner cartridge is empty or there is no paper in the multi-purpose tray when power isrestored, the LCD displays CHANGE CARTRIDGE or LOAD PAPER. In these cases, theMEMORY CLEAR REPORT will not be printed even after the toner cartridge is replaced orpaper is loaded.
Chapter 14 Summary of Settings 14-1
Su
mm
ary
of
Set
tin
gs
Chapter 14
Summary of Settings
Understanding the Menu System..........................................................14-2
Printing a List to Check the Current Settings .......................................14-2
Accessing the Menus ...........................................................................14-3
USER SETTINGS Menu ..........................................................................14-4
REPORT SETTINGS Menu .....................................................................14-5
TX (Transmission) SETTINGS Menu .....................................................14-6
RX (Reception) SETTINGS Menu ..........................................................14-7
PRINTER SETTINGS Menu.....................................................................14-8
POLLING BOX Menu...............................................................................14-9
SYSTEM SETTINGS Menu....................................................................14-10
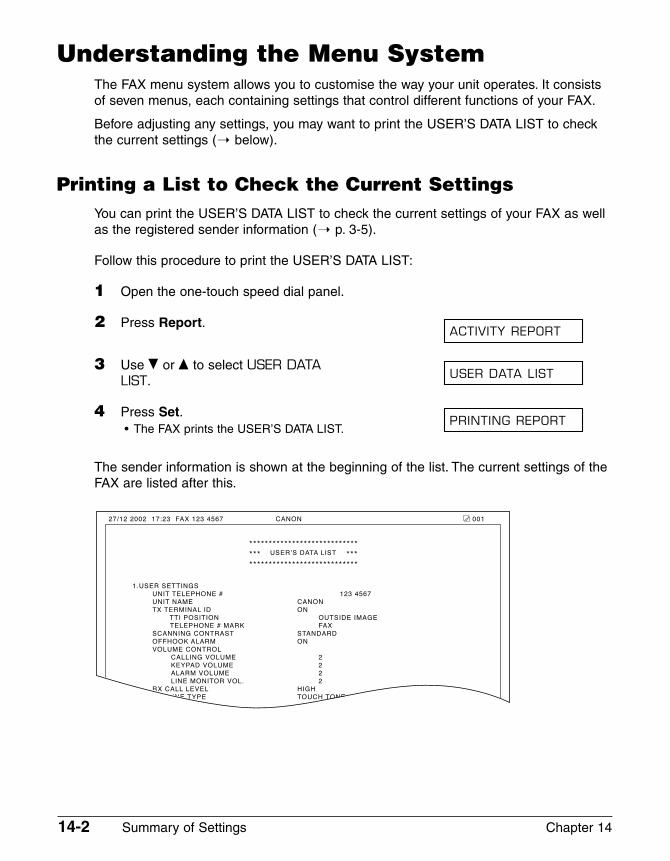
14-2 Summary of Settings Chapter 14
Understanding the Menu SystemThe FAX menu system allows you to customise the way your unit operates. It consistsof seven menus, each containing settings that control different functions of your FAX.
Before adjusting any settings, you may want to print the USER’S DATA LIST to checkthe current settings (1 below).
Printing a List to Check the Current SettingsYou can print the USER’S DATA LIST to check the current settings of your FAX as wellas the registered sender information (1 p. 3-5).
Follow this procedure to print the USER’S DATA LIST:
1 Open the one-touch speed dial panel.
2 Press Report.
3 Use ∂ or ¨ to select USER DATALIST.
4 Press Set.• The FAX prints the USER’S DATA LIST.
The sender information is shown at the beginning of the list. The current settings of theFAX are listed after this.
****************************
****************************
*** ***USERÕS DATA LIST
1.USER SETTINGS
UNIT TELEPHONE # 123 4567
UNIT NAME CANON
TX TERMINAL ID ON
TTI POSITION OUTSIDE IMAGE
TELEPHONE # MARK FAX
SCANNING CONTRAST STANDARD
OFFHOOK ALARM ON
VOLUME CONTROL
CALLING VOLUME 2
KEYPAD VOLUME 2
ALARM VOLUME 2
LINE MONITOR VOL. 2
RX CALL LEVEL HIGH
TEL LINE TYPE TOUCH TONE
27/12 2002 17:23 FAX 123 4567 CANON 001
PRINTING REPORT
USER DATA LIST
ACTIVITY REPORT
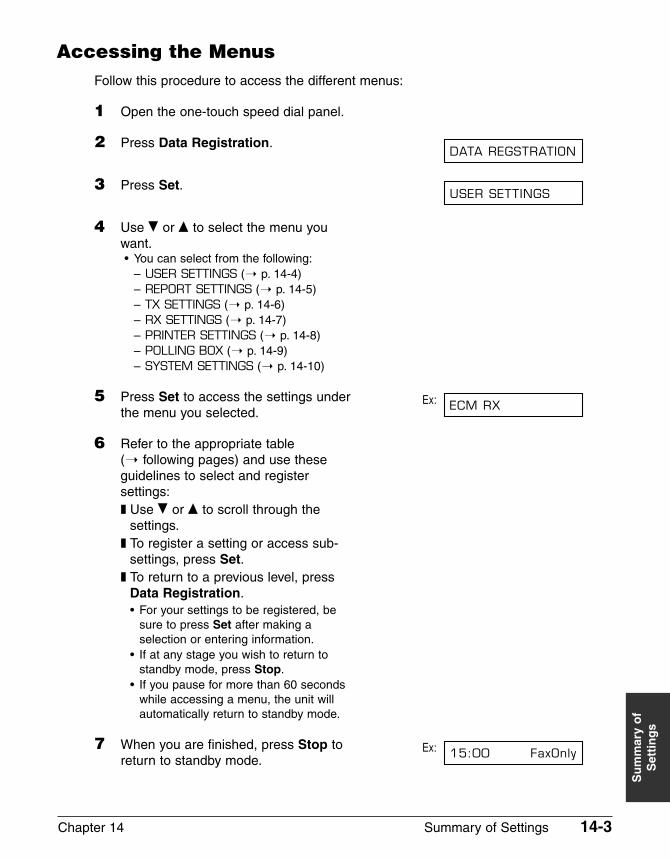
Chapter 14 Summary of Settings 14-3
Su
mm
ary
of
Set
tin
gs
Accessing the MenusFollow this procedure to access the different menus:
1 Open the one-touch speed dial panel.
2 Press Data Registration.
3 Press Set.
4 Use ∂ or ¨ to select the menu youwant.• You can select from the following:
– USER SETTINGS (1 p. 14-4)– REPORT SETTINGS (1 p. 14-5)– TX SETTINGS (1 p. 14-6)– RX SETTINGS (1 p. 14-7)– PRINTER SETTINGS (1 p. 14-8)– POLLING BOX (1 p. 14-9)– SYSTEM SETTINGS (1 p. 14-10)
5 Press Set to access the settings under Ex:the menu you selected.
6 Refer to the appropriate table (1 following pages) and use theseguidelines to select and registersettings:❚ Use ∂ or ¨ to scroll through the
settings.❚ To register a setting or access sub-
settings, press Set.❚ To return to a previous level, press
Data Registration.• For your settings to be registered, be
sure to press Set after making aselection or entering information.
• If at any stage you wish to return tostandby mode, press Stop.
• If you pause for more than 60 secondswhile accessing a menu, the unit willautomatically return to standby mode.
7 When you are finished, press Stop to Ex:return to standby mode. 15:00 FaxOnly
ECM RX
USER SETTINGS
DATA REGSTRATION

14-4 Summary of Settings Chapter 14
DATE & TIME
UNIT TELEPHONE #
UNIT NAME
TX TERMINAL ID
TTI POSITION
TELEPHONE #MARK
SCAN CONTRAST
OFFHOOK ALARM
VOLUME CONTROL
CALLING VOLUME
KEYPAD VOLUME
ALARM VOLUME
LINE MONITOR VOL
RX CALL LEVEL
TEL LINE TYPE
R-KEY SETTING
Sets the current date and time (1 p. 3-6).
Enters the fax/telephone number you want to appear at the top of each fax page you send (1 p. 3-6).
Enters the name or company name you want to appearat the top of each fax page you send (1 p. 3-6).
Enables/disables printing of the sender information (1 p. 3-5).
Selects whether the sender information is positionedinside or outside the image area (1 p. 3-5).
Selects the prefix for the unit number (1 p. 3-5).
Selects the scanning contrast (1 p. 7-3).
Enables/disables the off hook alarm that alerts you that the handset is not seated properly in its cradle.
Sets the volume of the FAX sounds.
Selects the ring volume when the FAX detects a voicecall.
Selects the keypad touch beep volume.
Selects the error alarm volume.
Selects the line monitor volume (sound during dialling).
Selects the ring type for incoming calls.
Selects the telephone line type setting for your FAX (1 p. 3-8).
Enables dialling through a switchboard.If you select PBX, you can select additional sub-settings(1 p. 3-9).
–
–
–
ONOFF
OUTSIDE IMAGEINSIDE IMAGE
FAXTEL
STANDARDDARKERLIGHTER
ONOFF
–
1/2/3
0 (off)/1/2/3
0 (off)/1/2/3
0 (off)/1/2/3
HIGHSTANDARD
TOUCH TONEROTARY PULSE
PSTNPBX
USER SETTINGS MenuFor details on accessing the settings below, see p. 14-3.
The selectable settings and the default settings vary depending on the country where youhave purchased the FAX. The values shown here are average values.For the default settings for your FAX, see Appendix B.
Setting Description Sub-Settings
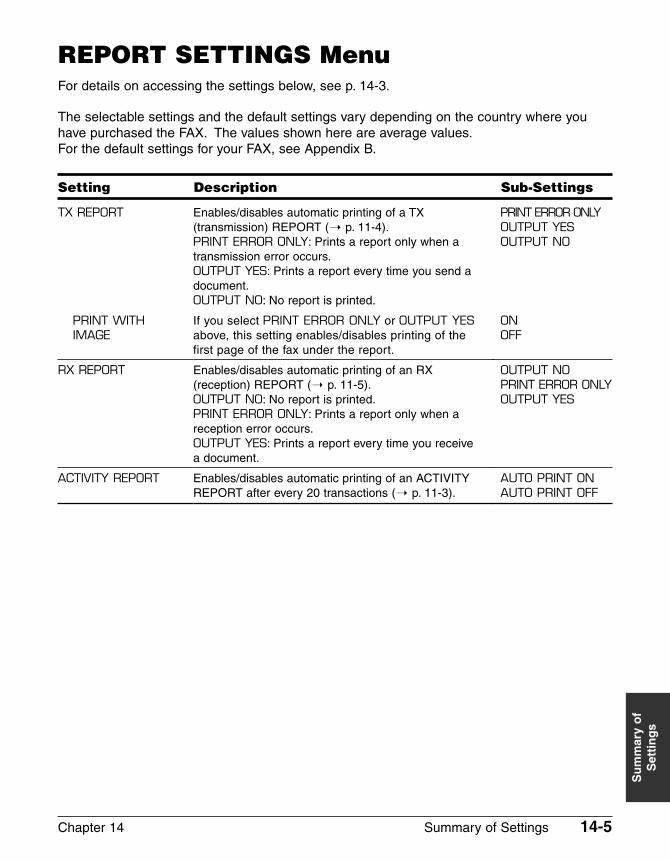
Chapter 14 Summary of Settings 14-5
Su
mm
ary
of
Set
tin
gs
TX REPORT
PRINT WITH IMAGE
RX REPORT
ACTIVITY REPORT
Enables/disables automatic printing of a TX(transmission) REPORT (1 p. 11-4).PRINT ERROR ONLY: Prints a report only when atransmission error occurs.OUTPUT YES: Prints a report every time you send adocument.OUTPUT NO: No report is printed.
If you select PRINT ERROR ONLY or OUTPUT YESabove, this setting enables/disables printing of the first page of the fax under the report.
Enables/disables automatic printing of an RX(reception) REPORT (1 p. 11-5).OUTPUT NO: No report is printed.PRINT ERROR ONLY: Prints a report only when areception error occurs.OUTPUT YES: Prints a report every time you receive a document.
Enables/disables automatic printing of an ACTIVITYREPORT after every 20 transactions (1 p. 11-3).
PRINT ERROR ONLYOUTPUT YESOUTPUT NO
ONOFF
OUTPUT NOPRINT ERROR ONLYOUTPUT YES
AUTO PRINT ONAUTO PRINT OFF
REPORT SETTINGS MenuFor details on accessing the settings below, see p. 14-3.
The selectable settings and the default settings vary depending on the country where youhave purchased the FAX. The values shown here are average values.For the default settings for your FAX, see Appendix B.
Setting Description Sub-Settings
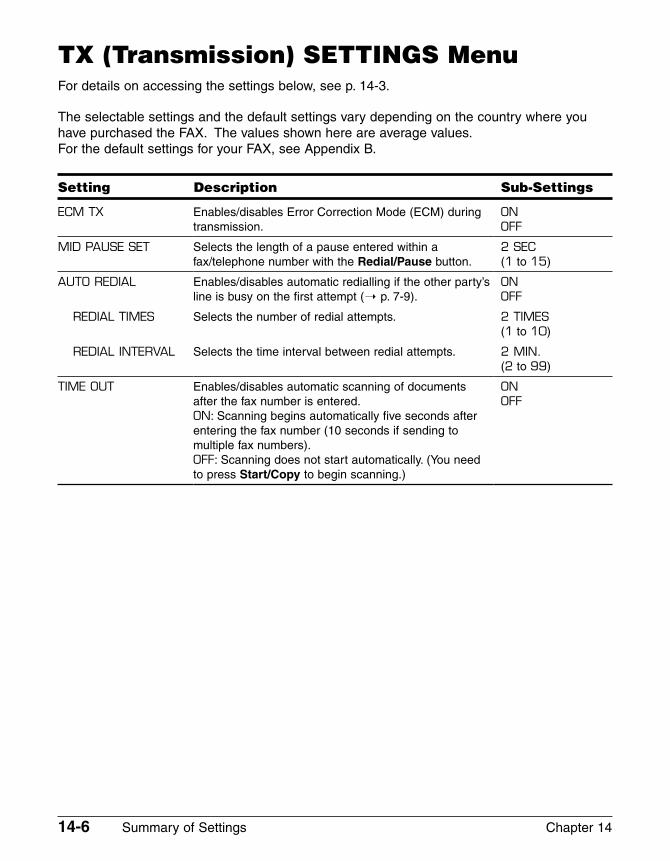
14-6 Summary of Settings Chapter 14
ECM TX
MID PAUSE SET
AUTO REDIAL
REDIAL TIMES
REDIAL INTERVAL
TIME OUT
Enables/disables Error Correction Mode (ECM) duringtransmission.
Selects the length of a pause entered within afax/telephone number with the Redial/Pause button.
Enables/disables automatic redialling if the other party’sline is busy on the first attempt (1 p. 7-9).
Selects the number of redial attempts.
Selects the time interval between redial attempts.
Enables/disables automatic scanning of documentsafter the fax number is entered.ON: Scanning begins automatically five seconds afterentering the fax number (10 seconds if sending tomultiple fax numbers).OFF: Scanning does not start automatically. (You needto press Start/Copy to begin scanning.)
ONOFF
2 SEC (1 to 15)
ONOFF
2 TIMES (1 to 10)
2 MIN. (2 to 99)
ONOFF
TX (Transmission) SETTINGS MenuFor details on accessing the settings below, see p. 14-3.
The selectable settings and the default settings vary depending on the country where youhave purchased the FAX. The values shown here are average values.For the default settings for your FAX, see Appendix B.
Setting Description Sub-Settings
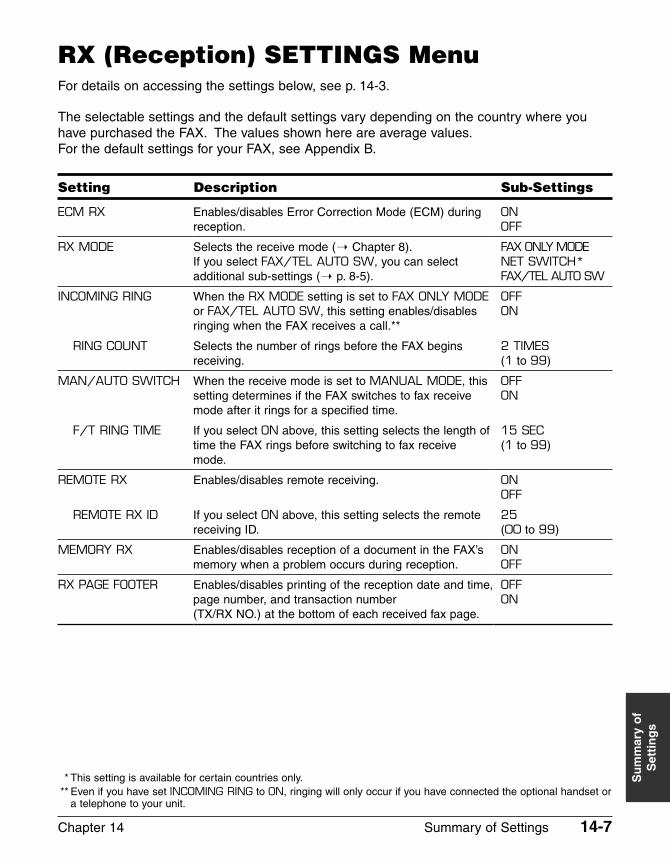
Chapter 14 Summary of Settings 14-7
Su
mm
ary
of
Set
tin
gs
ECM RX
RX MODE
INCOMING RING
RING COUNT
MAN/AUTO SWITCH
F/T RING TIME
REMOTE RX
REMOTE RX ID
MEMORY RX
RX PAGE FOOTER
Enables/disables Error Correction Mode (ECM) duringreception.
Selects the receive mode (1 Chapter 8).If you select FAX/TEL AUTO SW, you can selectadditional sub-settings (1 p. 8-5).
When the RX MODE setting is set to FAX ONLY MODEor FAX/TEL AUTO SW, this setting enables/disablesringing when the FAX receives a call.**
Selects the number of rings before the FAX beginsreceiving.
When the receive mode is set to MANUAL MODE, thissetting determines if the FAX switches to fax receivemode after it rings for a specified time.
If you select ON above, this setting selects the length oftime the FAX rings before switching to fax receivemode.
Enables/disables remote receiving.
If you select ON above, this setting selects the remotereceiving ID.
Enables/disables reception of a document in the FAX’smemory when a problem occurs during reception.
Enables/disables printing of the reception date and time,page number, and transaction number (TX/RX NO.) at the bottom of each received fax page.
ONOFF
FAX ONLY MODENET SWITCH*FAX/TEL AUTO SW
OFFON
2 TIMES(1 to 99)
OFFON
15 SEC (1 to 99)
ONOFF
25 (00 to 99)
ONOFF
OFFON
* This setting is available for certain countries only.** Even if you have set INCOMING RING to ON, ringing will only occur if you have connected the optional handset or
a telephone to your unit.
RX (Reception) SETTINGS MenuFor details on accessing the settings below, see p. 14-3.
The selectable settings and the default settings vary depending on the country where youhave purchased the FAX. The values shown here are average values.For the default settings for your FAX, see Appendix B.
Setting Description Sub-Settings

14-8 Summary of Settings Chapter 14
RX REDUCTION
PAPER SIZE
ECONOMY PRT
TONER SUPPLY LOW
Enables/disables reduction of faxes to fit on the paperloaded in the multi-purpose tray.
If you select ON, you can select the direction of thereduction.
Selects the size of the paper loaded in the multi-purpose tray (1 p. 5-7).
If you select CUSTOM, you can select additional sub-settings (1 p. 5-7).
Enables/disables economy printing (1 p. 5-9).
Selects whether the FAX continues printing when toner level is low (CHANGE CARTRIDGE displayed inthe LCD).RX TO MEMORY: Stops printing and received faxes arestored in memory.KEEP PRINTING: Continues printing even when tonerlevel is low. Select this setting when you do not have anew toner cartridge available and need to print anyfaxes received in memory.
ONOFF
VERTICAL ONLYHORIZ & VERTICAL
A4LTRLGLCUSTOM
OFFON
RX TO MEMORYKEEP PRINTING
PRINTER SETTINGS MenuFor details on accessing the settings below, see p. 14-3.
The selectable settings and the default settings vary depending on the country where youhave purchased the FAX. The values shown here are average values.For the default settings for your FAX, see Appendix B.
Setting Description Sub-Settings
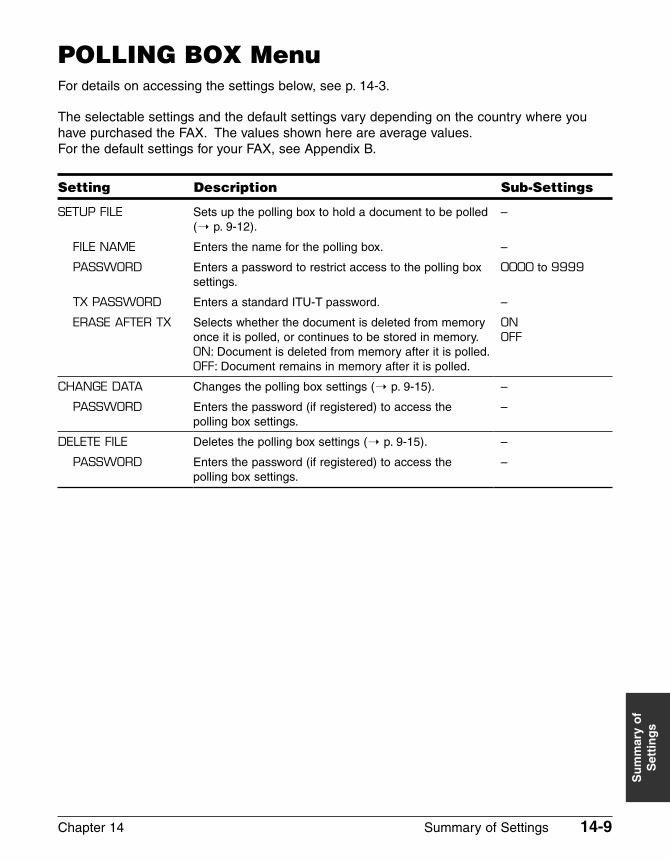
Chapter 14 Summary of Settings 14-9
Su
mm
ary
of
Set
tin
gs
SETUP FILE
FILE NAME
PASSWORD
TX PASSWORD
ERASE AFTER TX
CHANGE DATA
PASSWORD
DELETE FILE
PASSWORD
Sets up the polling box to hold a document to be polled(1 p. 9-12).
Enters the name for the polling box.
Enters a password to restrict access to the polling boxsettings.
Enters a standard ITU-T password.
Selects whether the document is deleted from memoryonce it is polled, or continues to be stored in memory.ON: Document is deleted from memory after it is polled.OFF: Document remains in memory after it is polled.
Changes the polling box settings (1 p. 9-15).
Enters the password (if registered) to access the polling box settings.
Deletes the polling box settings (1 p. 9-15).
Enters the password (if registered) to access the polling box settings.
–
–
0000 to 9999
–
ONOFF
–
–
–
–
POLLING BOX MenuFor details on accessing the settings below, see p. 14-3.
The selectable settings and the default settings vary depending on the country where youhave purchased the FAX. The values shown here are average values.For the default settings for your FAX, see Appendix B.
Setting Description Sub-Settings
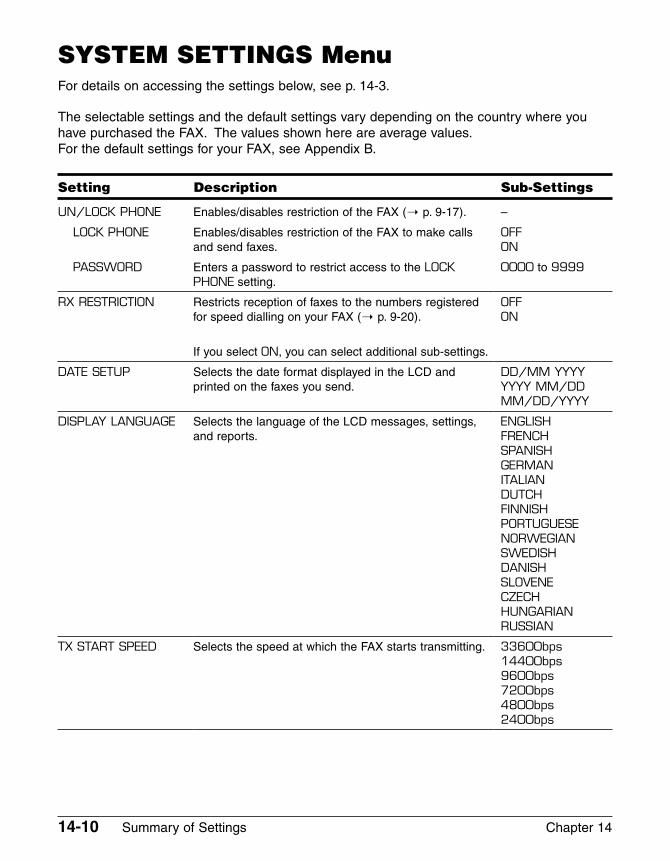
14-10 Summary of Settings Chapter 14
UN/LOCK PHONE
LOCK PHONE
PASSWORD
RX RESTRICTION
DATE SETUP
DISPLAY LANGUAGE
TX START SPEED
Enables/disables restriction of the FAX (1 p. 9-17).
Enables/disables restriction of the FAX to make callsand send faxes.
Enters a password to restrict access to the LOCKPHONE setting.
Restricts reception of faxes to the numbers registeredfor speed dialling on your FAX (1 p. 9-20).
If you select ON, you can select additional sub-settings.
Selects the date format displayed in the LCD andprinted on the faxes you send.
Selects the language of the LCD messages, settings,and reports.
Selects the speed at which the FAX starts transmitting.
–
OFFON
0000 to 9999
OFFON
DD/MM YYYYYYYY MM/DDMM/DD/YYYY
ENGLISHFRENCHSPANISHGERMANITALIANDUTCHFINNISHPORTUGUESENORWEGIANSWEDISHDANISHSLOVENECZECHHUNGARIANRUSSIAN
33600bps14400bps9600bps7200bps4800bps2400bps
SYSTEM SETTINGS MenuFor details on accessing the settings below, see p. 14-3.
The selectable settings and the default settings vary depending on the country where youhave purchased the FAX. The values shown here are average values.For the default settings for your FAX, see Appendix B.
Setting Description Sub-Settings
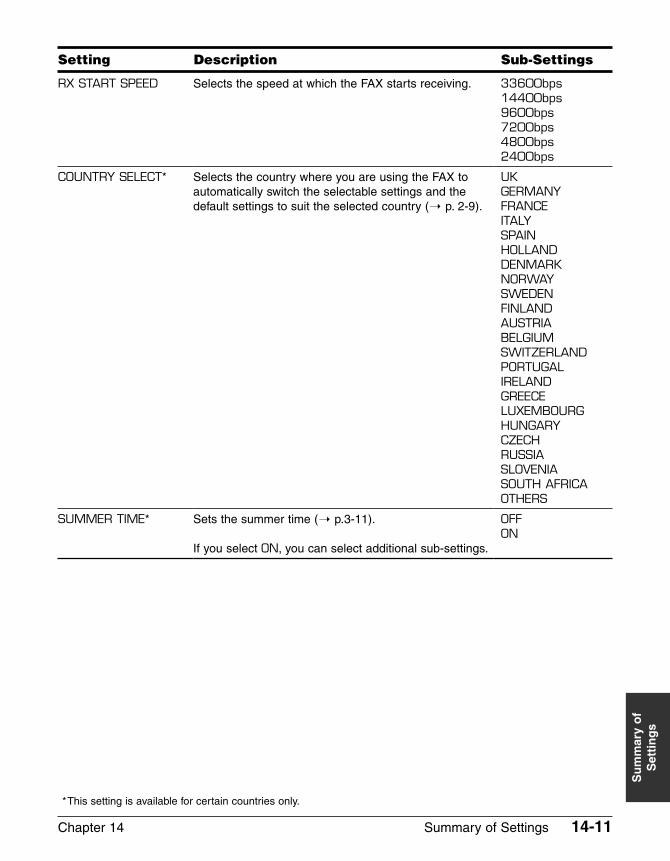
Chapter 14 Summary of Settings 14-11
Su
mm
ary
of
Set
tin
gs
Setting Description Sub-Settings
RX START SPEED
COUNTRY SELECT*
SUMMER TIME*
Selects the speed at which the FAX starts receiving.
Selects the country where you are using the FAX toautomatically switch the selectable settings and thedefault settings to suit the selected country (1 p. 2-9).
Sets the summer time (1 p.3-11).
If you select ON, you can select additional sub-settings.
33600bps14400bps9600bps7200bps4800bps2400bps
UKGERMANYFRANCEITALYSPAINHOLLANDDENMARKNORWAYSWEDENFINLANDAUSTRIABELGIUMSWITZERLANDPORTUGALIRELANDGREECELUXEMBOURGHUNGARYCZECHRUSSIASLOVENIASOUTH AFRICAOTHERS
OFFON
*This setting is available for certain countries only.

14-12 Summary of Settings Chapter 14

Appendix A Specifications A-1
Sp
ecif
icat
ion
s
Appendix A
Specifications
General Specifications ............................................................................A-2
Facsimile ...................................................................................................A-2
Copier ........................................................................................................A-3
Telephone..................................................................................................A-3
Printer........................................................................................................A-3
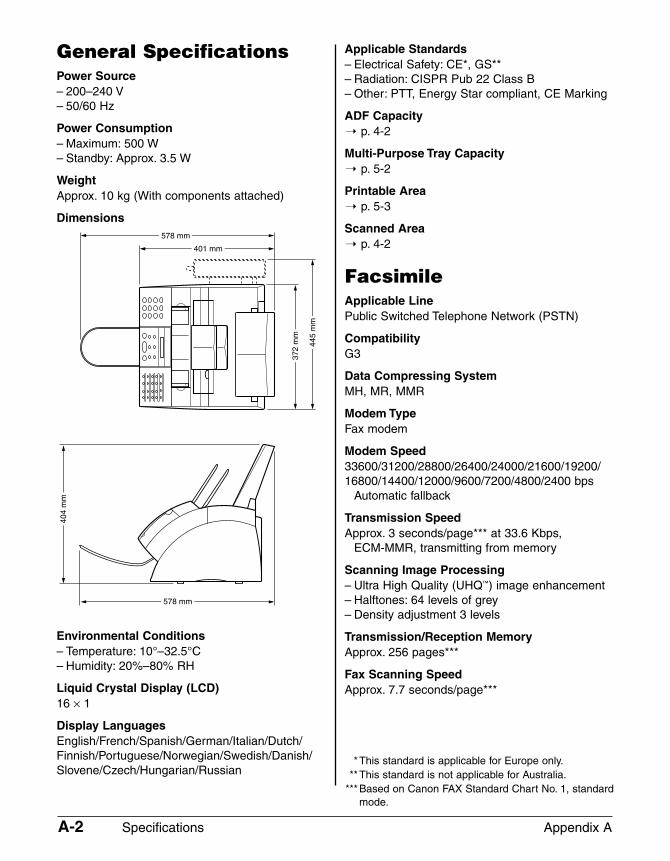
A-2 Specifications Appendix A
General SpecificationsPower Source– 200–240 V– 50/60 Hz
Power Consumption– Maximum: 500 W– Standby: Approx. 3.5 W
WeightApprox. 10 kg (With components attached)
Dimensions
Environmental Conditions– Temperature: 10°–32.5°C– Humidity: 20%–80% RH
Liquid Crystal Display (LCD)16 × 1
Display LanguagesEnglish/French/Spanish/German/Italian/Dutch/Finnish/Portuguese/Norwegian/Swedish/Danish/Slovene/Czech/Hungarian/Russian
401 mm
372
mm
445
mm
578 mm
578 mm
404
mm
Applicable Standards– Electrical Safety: CE*, GS**– Radiation: CISPR Pub 22 Class B– Other: PTT, Energy Star compliant, CE Marking
ADF Capacity1 p. 4-2
Multi-Purpose Tray Capacity1 p. 5-2
Printable Area1 p. 5-3
Scanned Area1 p. 4-2
FacsimileApplicable LinePublic Switched Telephone Network (PSTN)
CompatibilityG3
Data Compressing SystemMH, MR, MMR
Modem TypeFax modem
Modem Speed33600/31200/28800/26400/24000/21600/19200/16800/14400/12000/9600/7200/4800/2400 bps
Automatic fallback
Transmission SpeedApprox. 3 seconds/page*** at 33.6 Kbps,
ECM-MMR, transmitting from memory
Scanning Image Processing– Ultra High Quality (UHQ™) image enhancement– Halftones: 64 levels of grey– Density adjustment 3 levels
Transmission/Reception MemoryApprox. 256 pages***
Fax Scanning SpeedApprox. 7.7 seconds/page***
*This standard is applicable for Europe only.**This standard is not applicable for Australia.
***Based on Canon FAX Standard Chart No. 1, standardmode.
Appendix A Specifications A-3
Sp
ecif
icat
ion
sFax Resolution– FAX STANDARD: 8 pels/mm × 3.85 lines/mm– FAX FINE: 8 pels/mm × 7.7 lines/mm– FAX PHOTO: 8 pels/mm × 7.7 lines/mm with
halftones– SUPER FINE: 8 pels/mm × 15.4 lines/mm
Dialling– Automatic dialling
One-touch speed dialling (24 destinations)Coded speed dialling (100 destinations)Group dialling (Max. 123 destinations)
– Regular dialling (with numeric buttons)– Automatic redialling – Manual redialling– Pause button– Redial button– D.T. button*
Networking– Sequential broadcasting (Max. 125 destinations)– Automatic reception– Automatic Fax/Tel switchover– Delayed transmission (Max. 125 destinations)– Polling transmission– Polling reception– Remote reception by telephone (Default ID: 25)– Non-ring reception– ECM deactivation– Network switch*– ACTIVITY REPORT (after every 20 transactions)– Non-delivery report– TTI (Transmit Terminal Identification)
CopierScanning Resolution– Direct Copy: 400 × 300 dpi– Memory Copy: 200 × 300 dpi
Printing Resolution600 × 600 dpi
Reduction70%, 80%, 90%
Copy SpeedApprox. 6 pages/minute
No. of CopiesMax. 99 copies
TelephoneConnection– Optional handset/telephone*– Additional telephone/answering machine (CNG
detecting signal)/data modem
PrinterPrinting MethodLaser beam printing
Paper HandlingAutomatic feed
Paper Size and Weight1 p. 5-2
Recommended Paper1 p. 5-3
Print Speed**Approx. 6 pages/minute
Print WidthMax. 206 mm
Resolution600 × 600 dpi
Printing CartridgeFX-3 toner cartridge
Toner SaverApprox. 30% to 40% reduction in toner
consumption
*This feature is available for certain countries only.**Based on Canon FAX Standard Chart No. 1, standard
mode.

A-4 Specifications Appendix A

Appendix B Default Settings for Each Country B-1
Def
ault
Set
tin
gs
for
Eac
h C
ou
ntr
y
Appendix B
Default Settings for Each Country
Default Settings for Each Country .........................................................B-2
UK, GERMANY, FRANCE, IRELAND....................................................B-2
AUSTRALIA, HONG KONG, NEW ZEALAND, MALAYSIA, SINGAPORE .......................................................................................B-4
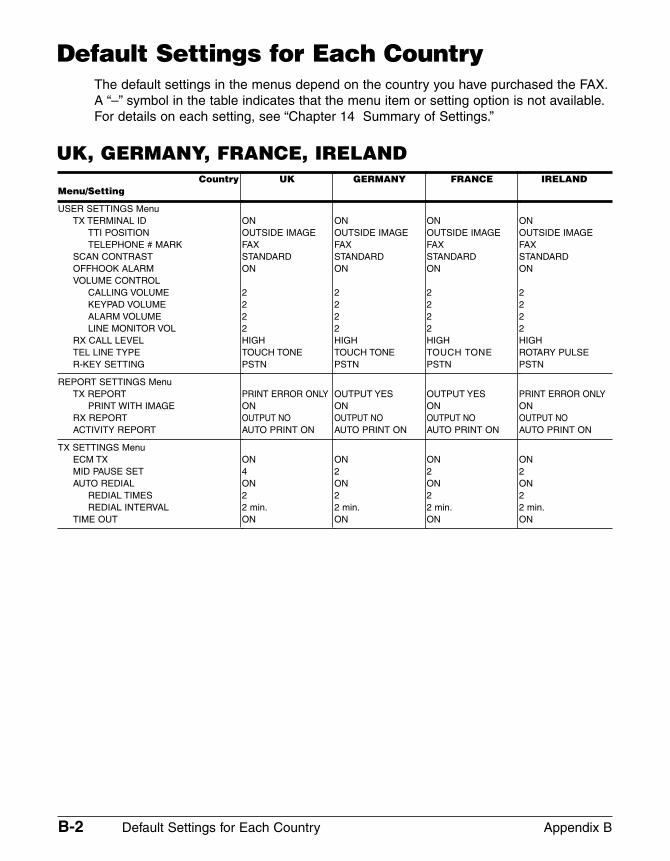
B-2 Default Settings for Each Country Appendix B
Default Settings for Each CountryThe default settings in the menus depend on the country you have purchased the FAX.A “–” symbol in the table indicates that the menu item or setting option is not available.For details on each setting, see “Chapter 14 Summary of Settings.”
UK, GERMANY, FRANCE, IRELANDCountry
Menu/Setting
USER SETTINGS MenuTX TERMINAL ID
TTI POSITIONTELEPHONE # MARK
SCAN CONTRASTOFFHOOK ALARMVOLUME CONTROL
CALLING VOLUMEKEYPAD VOLUMEALARM VOLUMELINE MONITOR VOL
RX CALL LEVELTEL LINE TYPER-KEY SETTING
REPORT SETTINGS MenuTX REPORT
PRINT WITH IMAGERX REPORTACTIVITY REPORT
TX SETTINGS MenuECM TXMID PAUSE SETAUTO REDIAL
REDIAL TIMESREDIAL INTERVAL
TIME OUT
UK
ONOUTSIDE IMAGEFAXSTANDARDON
2222HIGHTOUCH TONEPSTN
PRINT ERROR ONLYONOUTPUT NOAUTO PRINT ON
ON4ON22 min.ON
GERMANY
ONOUTSIDE IMAGEFAXSTANDARDON
2222HIGHTOUCH TONEPSTN
OUTPUT YESONOUTPUT NOAUTO PRINT ON
ON2ON22 min.ON
FRANCE
ONOUTSIDE IMAGEFAXSTANDARDON
2222HIGHTOUCH TONEPSTN
OUTPUT YESONOUTPUT NOAUTO PRINT ON
ON2ON22 min.ON
IRELAND
ONOUTSIDE IMAGEFAXSTANDARDON
2222HIGHROTARY PULSEPSTN
PRINT ERROR ONLYONOUTPUT NOAUTO PRINT ON
ON2ON22 min.ON
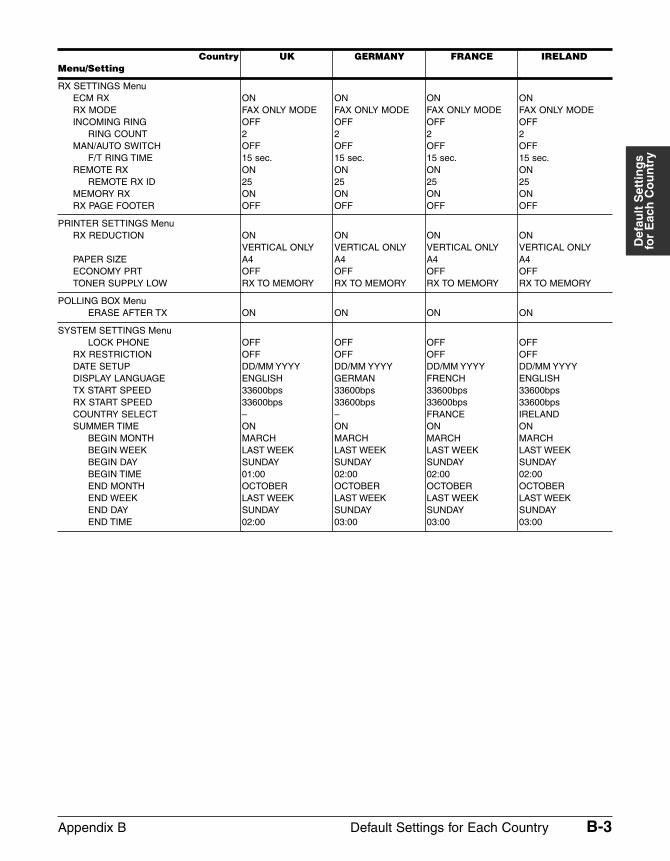
Appendix B Default Settings for Each Country B-3
Def
ault
Set
tin
gs
for
Eac
h C
ou
ntr
y
CountryMenu/Setting
RX SETTINGS MenuECM RXRX MODEINCOMING RING
RING COUNTMAN/AUTO SWITCH
F/T RING TIMEREMOTE RX
REMOTE RX IDMEMORY RXRX PAGE FOOTER
PRINTER SETTINGS MenuRX REDUCTION
PAPER SIZEECONOMY PRTTONER SUPPLY LOW
POLLING BOX MenuERASE AFTER TX
SYSTEM SETTINGS MenuLOCK PHONE
RX RESTRICTIONDATE SETUPDISPLAY LANGUAGETX START SPEEDRX START SPEEDCOUNTRY SELECTSUMMER TIME
BEGIN MONTHBEGIN WEEKBEGIN DAYBEGIN TIMEEND MONTHEND WEEKEND DAYEND TIME
UK
ONFAX ONLY MODEOFF2OFF15 sec.ON25ONOFF
ONVERTICAL ONLYA4OFFRX TO MEMORY
ON
OFFOFFDD/MM YYYYENGLISH33600bps33600bps–ONMARCHLAST WEEKSUNDAY01:00OCTOBERLAST WEEKSUNDAY02:00
GERMANY
ONFAX ONLY MODEOFF2OFF15 sec.ON25ONOFF
ONVERTICAL ONLYA4OFFRX TO MEMORY
ON
OFFOFFDD/MM YYYYGERMAN33600bps33600bps–ONMARCHLAST WEEKSUNDAY02:00OCTOBERLAST WEEKSUNDAY03:00
FRANCE
ONFAX ONLY MODEOFF2OFF15 sec.ON25ONOFF
ONVERTICAL ONLYA4OFFRX TO MEMORY
ON
OFFOFFDD/MM YYYYFRENCH33600bps33600bpsFRANCEONMARCHLAST WEEKSUNDAY02:00OCTOBERLAST WEEKSUNDAY03:00
IRELAND
ONFAX ONLY MODEOFF2OFF15 sec.ON25ONOFF
ONVERTICAL ONLYA4OFFRX TO MEMORY
ON
OFFOFFDD/MM YYYYENGLISH33600bps33600bpsIRELANDONMARCHLAST WEEKSUNDAY02:00OCTOBERLAST WEEKSUNDAY03:00
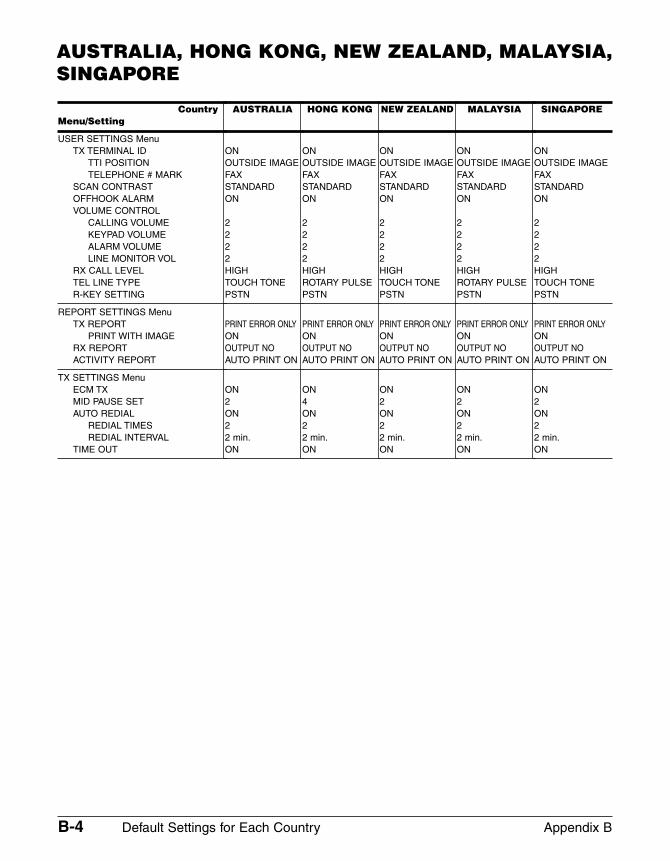
B-4 Default Settings for Each Country Appendix B
CountryMenu/Setting
USER SETTINGS MenuTX TERMINAL ID
TTI POSITIONTELEPHONE # MARK
SCAN CONTRASTOFFHOOK ALARMVOLUME CONTROL
CALLING VOLUMEKEYPAD VOLUMEALARM VOLUMELINE MONITOR VOL
RX CALL LEVELTEL LINE TYPER-KEY SETTING
REPORT SETTINGS MenuTX REPORT
PRINT WITH IMAGERX REPORTACTIVITY REPORT
TX SETTINGS MenuECM TXMID PAUSE SETAUTO REDIAL
REDIAL TIMESREDIAL INTERVAL
TIME OUT
AUSTRALIA
ONOUTSIDE IMAGEFAXSTANDARDON
2222HIGHTOUCH TONEPSTN
PRINT ERROR ONLYONOUTPUT NOAUTO PRINT ON
ON2ON22 min.ON
HONG KONG
ONOUTSIDE IMAGEFAXSTANDARDON
2222HIGHROTARY PULSEPSTN
PRINT ERROR ONLYONOUTPUT NOAUTO PRINT ON
ON4ON22 min.ON
NEW ZEALAND
ONOUTSIDE IMAGEFAXSTANDARDON
2222HIGHTOUCH TONEPSTN
PRINT ERROR ONLYONOUTPUT NOAUTO PRINT ON
ON2ON22 min.ON
MALAYSIA
ONOUTSIDE IMAGEFAXSTANDARDON
2222HIGHROTARY PULSEPSTN
PRINT ERROR ONLYONOUTPUT NOAUTO PRINT ON
ON2ON22 min.ON
SINGAPORE
ONOUTSIDE IMAGEFAXSTANDARDON
2222HIGHTOUCH TONEPSTN
PRINT ERROR ONLYONOUTPUT NOAUTO PRINT ON
ON2ON22 min.ON
AUSTRALIA, HONG KONG, NEW ZEALAND, MALAYSIA,SINGAPORE
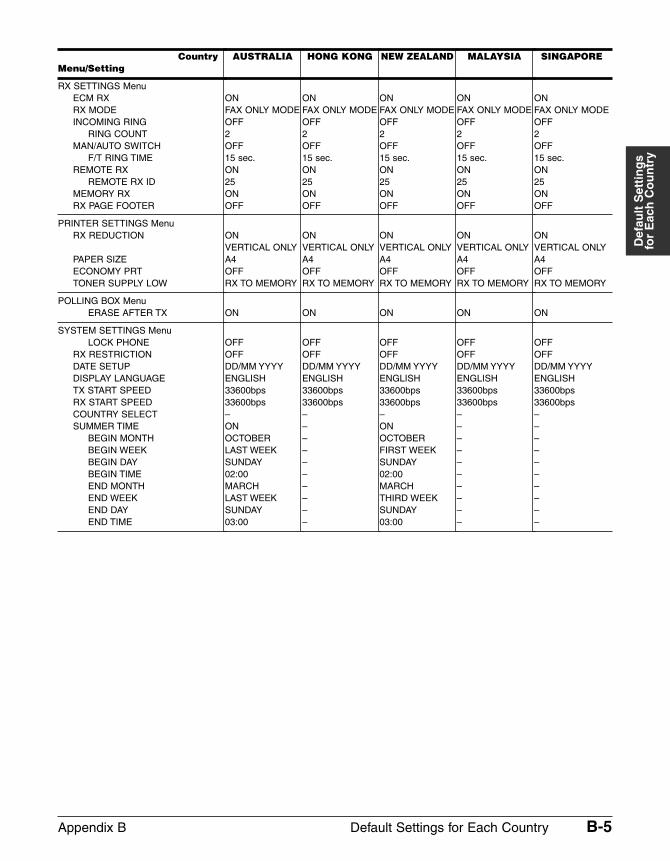
Appendix B Default Settings for Each Country B-5
Def
ault
Set
tin
gs
for
Eac
h C
ou
ntr
y
CountryMenu/Setting
RX SETTINGS MenuECM RXRX MODEINCOMING RING
RING COUNTMAN/AUTO SWITCH
F/T RING TIMEREMOTE RX
REMOTE RX IDMEMORY RXRX PAGE FOOTER
PRINTER SETTINGS MenuRX REDUCTION
PAPER SIZEECONOMY PRTTONER SUPPLY LOW
POLLING BOX MenuERASE AFTER TX
SYSTEM SETTINGS MenuLOCK PHONE
RX RESTRICTIONDATE SETUPDISPLAY LANGUAGETX START SPEEDRX START SPEEDCOUNTRY SELECTSUMMER TIME
BEGIN MONTHBEGIN WEEKBEGIN DAYBEGIN TIMEEND MONTHEND WEEKEND DAYEND TIME
AUSTRALIA
ONFAX ONLY MODEOFF2OFF15 sec.ON25ONOFF
ONVERTICAL ONLYA4OFFRX TO MEMORY
ON
OFFOFFDD/MM YYYYENGLISH33600bps33600bps–ONOCTOBERLAST WEEKSUNDAY02:00MARCHLAST WEEKSUNDAY03:00
HONG KONG
ONFAX ONLY MODEOFF2OFF15 sec.ON25ONOFF
ONVERTICAL ONLYA4OFFRX TO MEMORY
ON
OFFOFFDD/MM YYYYENGLISH33600bps33600bps––––––––––
NEW ZEALAND
ONFAX ONLY MODEOFF2OFF15 sec.ON25ONOFF
ONVERTICAL ONLYA4OFFRX TO MEMORY
ON
OFFOFFDD/MM YYYYENGLISH33600bps33600bps–ONOCTOBERFIRST WEEKSUNDAY02:00MARCHTHIRD WEEKSUNDAY03:00
MALAYSIA
ONFAX ONLY MODEOFF2OFF15 sec.ON25ONOFF
ONVERTICAL ONLYA4OFFRX TO MEMORY
ON
OFFOFFDD/MM YYYYENGLISH33600bps33600bps––––––––––
SINGAPORE
ONFAX ONLY MODEOFF2OFF15 sec.ON25ONOFF
ONVERTICAL ONLYA4OFFRX TO MEMORY
ON
OFFOFFDD/MM YYYYENGLISH33600bps33600bps––––––––––

B-6 Default Settings for Each Country Appendix B
Appendix C Country-specific Features C-1
Co
un
try-
spec
ific
Fea
ture
s
Appendix C
Country-specific Features
United Kingdom .......................................................................................C-2
Connecting External Device ..................................................................C-2
Ringer Equivalence Number (R.E.N.)....................................................C-2
Germany....................................................................................................C-3
Applicable Standards .............................................................................C-3
Connecting the Telephone Line Cord ....................................................C-3
Connecting a Telephone ........................................................................C-3
Connecting an Answering Machine .......................................................C-4
Customer Support..................................................................................C-4
Australia ....................................................................................................C-5
For Your Safety.......................................................................................C-5
Telstra FaxStreamTM Duet.......................................................................C-5
Setting the FAX for Network Switch...................................................C-6
Network Switch System Operation ....................................................C-6
New Zealand .............................................................................................C-7
Caution...................................................................................................C-7
Telecom FaxAbility .................................................................................C-7
Setting the FAX for Network Switch...................................................C-8
Network Switch System Operation ....................................................C-8
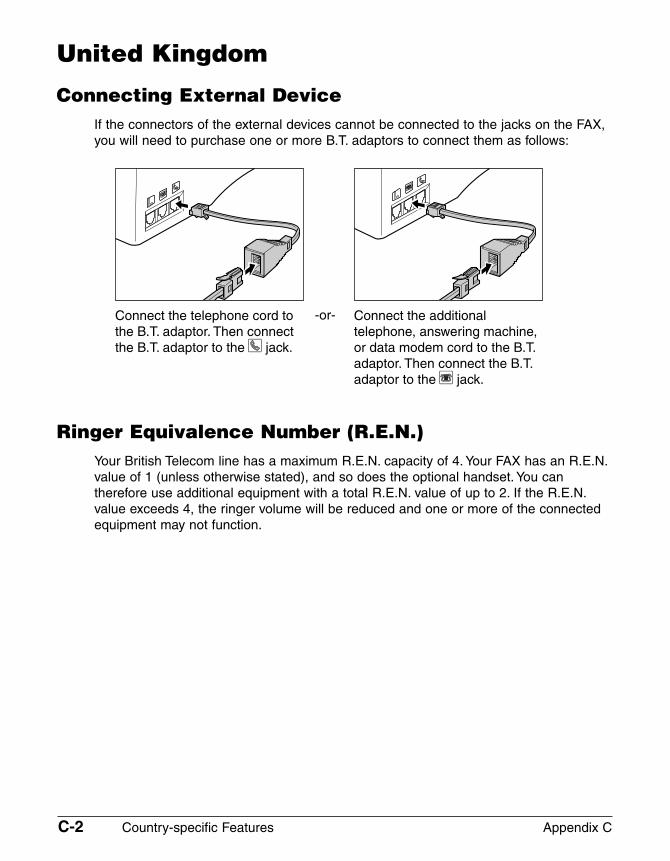
C-2 Country-specific Features Appendix C
United Kingdom
Connecting External DeviceIf the connectors of the external devices cannot be connected to the jacks on the FAX,you will need to purchase one or more B.T. adaptors to connect them as follows:
Ringer Equivalence Number (R.E.N.)Your British Telecom line has a maximum R.E.N. capacity of 4. Your FAX has an R.E.N.value of 1 (unless otherwise stated), and so does the optional handset. You cantherefore use additional equipment with a total R.E.N. value of up to 2. If the R.E.N.value exceeds 4, the ringer volume will be reduced and one or more of the connectedequipment may not function.
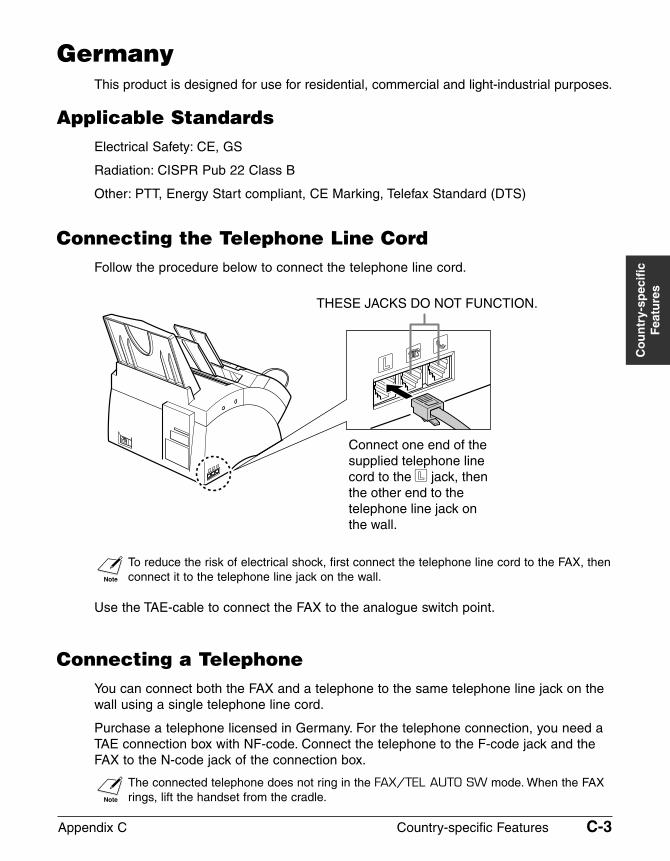
Appendix C Country-specific Features C-3
Co
un
try-
spec
ific
Fea
ture
s
GermanyThis product is designed for use for residential, commercial and light-industrial purposes.
Applicable StandardsElectrical Safety: CE, GS
Radiation: CISPR Pub 22 Class B
Other: PTT, Energy Start compliant, CE Marking, Telefax Standard (DTS)
Connecting the Telephone Line CordFollow the procedure below to connect the telephone line cord.
n To reduce the risk of electrical shock, first connect the telephone line cord to the FAX, thenconnect it to the telephone line jack on the wall.
Use the TAE-cable to connect the FAX to the analogue switch point.
Connecting a TelephoneYou can connect both the FAX and a telephone to the same telephone line jack on thewall using a single telephone line cord.
Purchase a telephone licensed in Germany. For the telephone connection, you need aTAE connection box with NF-code. Connect the telephone to the F-code jack and theFAX to the N-code jack of the connection box.
n The connected telephone does not ring in the FAX/TEL AUTO SW mode. When the FAXrings, lift the handset from the cradle.
THESE JACKS DO NOT FUNCTION.
Connect one end of the supplied telephone line cord to the L jack, then the other end to the telephone line jack on the wall.
C-4 Country-specific Features Appendix C
Connecting an Answering MachineBy connecting an answering machine to the same telephone line jack on the wall as theFAX, you can not only receive documents from another fax, but also receive voice calls.
• If you use an answering machine which does not correspond to DIN44015,compatibility problems may occur with your FAX.
• Purchase an answering machine licensed in Germany.
• To connect an answering machine with a telephone integrated, you need a TAEconnection box with NF-code. Connect the answering machine to the F-code jack andthe FAX to the N-code jack of the connection box.
• To connect an answering machine without a telephone integrated, use a connectionbox with NFN-code.
n • Canon cannot guarantee that all answering machines will be compatible with your FAX,due to varying specifications.
• If you have connected an external device to your FAX, be sure to set the correct receivemode (1 Chapter 8).
• If you want to connect your FAX through a PBX, read the information on p. 3-9.
Customer SupportIf you cannot solve the problem or if you think your FAX needs servicing, contact to thefollowing phone numbers or URLs.
Canon Hotline 0180-5006022http://www.canon.de
Appendix C Country-specific Features C-5
Co
un
try-
spec
ific
Fea
ture
s
Australia
For Your Safety To ensure safe operation the three-pin plug supplied must be inserted only into astandard three-pin power point which is effectively earthed through the normalhousehold wiring.
Extension cords used with the equipment must be three-core and be correctly wired toprovide connection to earth. Wrongly wired extension cords are a major cause offatalities.
The power point shall be located near the equipment and shall be easily accessible.
The fact that the equipment operates satisfactorily does not imply that the power pointis earthed and the installation is completely safe. For your safety, if in any doubt aboutthe effective earthing of the power point, consult a qualified electrician.
Telstra FaxStream™ DuetIn Australia, Telstra offers the FaxStream™ Duet capability. This service allows you toassign two numbers to your line: one for fax and one for telephone. When the faxnumber is called, the network sends a specific ring tone which your unit recognises andautomatically handles as a fax call. If the telephone number is called, a different ringtone is sent out from the network so that the call is handled as a voice call. This meansthat there is no switching delay at the caller’s end.
• Triple ring (short-short-short) for fax receiving.Three short rings, at regular intervals.
• Any ring except triple ring (depending on your switchboard) for telephoneconversation.
Contact Telstra for connection information.

C-6 Country-specific Features Appendix C
Setting the FAX for Network SwitchFollow this procedure to set the receive mode to NET SWITCH:
1 Open the one-touch speed dial panel.
2 Press Data Registration.
3 Press Set.
4 Use ∂ or ¨ to select RX SETTINGS.
5 Press Set.
6 Use ∂ or ¨ to select RX MODE.
7 Press Set. Ex:
8 Use ∂ or ¨ to select NET SWITCH.
9 Press Set.
10 Press Stop to return to standby mode. Ex:
nWhen the RX MODE setting is set to NET SWITCH, no other receive mode can beselected with the Receive Mode button.
Network Switch System OperationThe procedure for using the network switch system is almost the same as when usingthe FAX over a normal telephone line. When you receive calls, however, the unit willrespond slightly differently as described below:
When you hear the telephone call ring pattern:Pick up the handset and talk normally. If you hear a slow beep, it means the call is froma fax machine trying to send a fax. Press Start/Copy to receive the fax. If you do notpick up the handset, the unit continues to ring until the other party hangs up. If ananswering machine is connected, it takes over the call.
When you hear the fax call ring pattern (triple ring):After the unit rings, it receives the document automatically.
15:00 NET SW.
INCOMING RING
NET SWITCH
FAX ONLY MODE
RX MODE
ECM RX
RX SETTINGS
USER SETTINGS
DATA REGSTRATION
Appendix C Country-specific Features C-7
Co
un
try-
spec
ific
Fea
ture
s
New Zealand
Caution1. This equipment may not necessarily provide for the effective hand-over of a call to or
from a telephone connected to the same line.
2. The operation of this equipment on the same line as telephone or other equipmentwith audible warning devices or automatic ring detectors will give rise to bell tinkle ornoise and may cause false tripping of the ring detector. Should such problems occur,the user is not to contact Telecom faults service.
3. Should this equipment become physically damaged, disconnect immediately fromthe Telecom connection and power source and contact your nearest service agent.
4. To relocate this equipment please.
1) Disconnect the equipment from the Telecom connection.
2) Disconnect the equipment from the power source.
3) Reconnect the equipment to the power source.
4) Reconnect the equipment to the Telecom connection.
5. If the supply cord of this equipment is damaged, it must be replaced by the specialcord (Parts No.: HH2-1910).
6. Not all standard telephones will respond to incoming ringing when connected to theextension socket.
7. This device may be subject to bell tinkle, or mistakenly enter receive mode whencalls are made from another device on the same line. If this occurs, the problemshould not be referred to the Telecom Faults service.
8. Please note when you connect an extension phone to this device, if you use anextension phone which has features such as “last number redial”, redial memorynumbers may be lost.
Telecom FaxAbilityIn New Zealand, Telecom N.Z. offers the FaxAbility capability. This service allows you toassign two numbers to your line: one for fax and one for telephone. When the faxnumber is called, the network sends a specific ring tone which your unit recognises andautomatically handles as a fax call. If the telephone number is called, a different ringtone is sent out from the network so that the call is handled as a voice call. This meansthat there is no switching delay at the caller’s end.
Contact Telecom for connection information.
C-8 Country-specific Features Appendix C
Setting the FAX for Network SwitchFollow this procedure to set the receive mode to NET SWITCH:
1 Open the one-touch speed dial panel.
2 Press Data Registration.
3 Press Set.
4 Use ∂ or ¨ to select RX SETTINGS.
5 Press Set.
6 Use ∂ or ¨ to select RX MODE.
7 Press Set. Ex:
8 Use ∂ or ¨ to select NET SWITCH.
9 Press Set.
10 Press Stop to return to standby mode. Ex:
nWhen the RX MODE setting is set to NET SWITCH, no other receive mode can beselected with the Receive Mode button.
Network Switch System OperationThe procedure for using the network switch system is almost the same as when usingthe FAX over a normal telephone line. When you receive calls, however, the unit willrespond slightly differently as described below:
When you hear the telephone call ring pattern:Pick up the handset and talk normally. If you hear a slow beep, it means the call is froma fax machine trying to send a fax. Press Start/Copy to receive the fax. If you do notpick up the handset, the unit continues to ring until the other party hangs up. If ananswering machine is connected, it takes over the call.
When you hear the fax call ring pattern:After the unit rings, it receives the document automatically.
15:00 NET SW.
INCOMING RING
NET SWITCH
FAX ONLY MODE
RX MODE
ECM RX
RX SETTINGS
USER SETTINGS
DATA REGSTRATION
Appendix D Options D-1
Op
tio
ns
Appendix D
Options
Optional Handset .....................................................................................D-2
Package Contents..................................................................................D-2
Attaching the Handset to Your FAX........................................................D-3
Maintaining Your Handset ......................................................................D-4

D-2 Options Appendix D
Optional Handset*An optional handset is available in certain countries for connection to your FAX. Contactyour local authorised Canon dealer for more information on purchasing this option.
nPlease note that the shape of your handset may differ from the one shown in this section.However, both handsets have exactly the same functions and performance.
Package ContentsMake sure your handset package includes the following items:
If any items are damaged or missing, notify your local authorised Canon dealer or theCanon help line immediately.
HANDSET
HANDSET CRADLE
SCREWS WITH PLUGS (2)
SCREWS(Not used with your FAX.)
RINGER VOLUME SWITCHUse a pen or other pointed object to select the ring volume of the handset (HI, LO, or OFF).
*The optional handset is available for certain countries only.
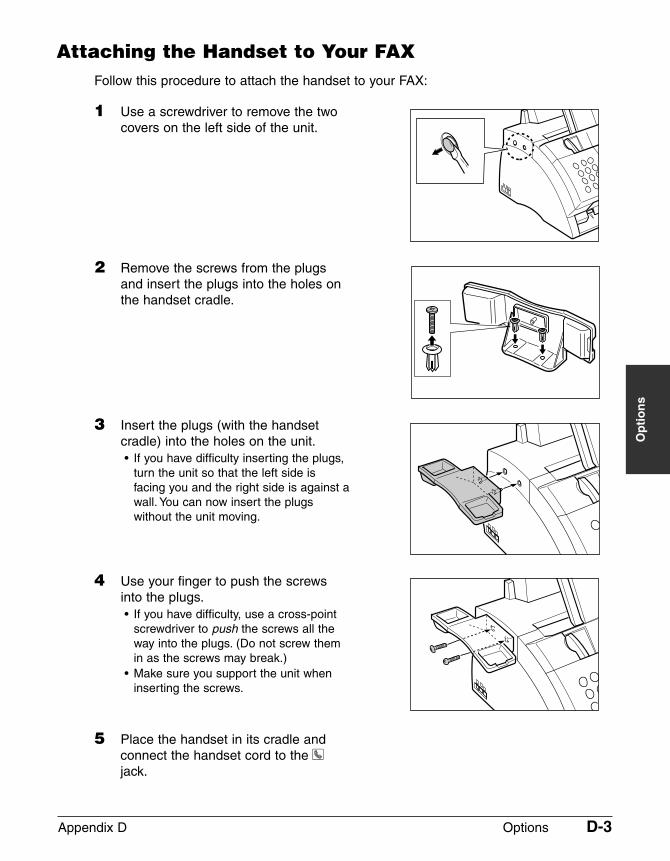
Appendix D Options D-3
Op
tio
ns
Attaching the Handset to Your FAXFollow this procedure to attach the handset to your FAX:
1 Use a screwdriver to remove the two covers on the left side of the unit.
2 Remove the screws from the plugs and insert the plugs into the holes onthe handset cradle.
3 Insert the plugs (with the handset cradle) into the holes on the unit.• If you have difficulty inserting the plugs,
turn the unit so that the left side isfacing you and the right side is against awall. You can now insert the plugswithout the unit moving.
4 Use your finger to push the screws into the plugs.• If you have difficulty, use a cross-point
screwdriver to push the screws all theway into the plugs. (Do not screw themin as the screws may break.)
• Make sure you support the unit wheninserting the screws.
5 Place the handset in its cradle andconnect the handset cord to the hjack.
D-4 Options Appendix D
Maintaining Your HandsetTo maintain your handset in top working condition, be sure to follow these guidelines:
• Do not leave your handset exposed to direct sunlight.
• Do not install your handset in hot or humid conditions.
• Do not spray aerosol polishes on your handset since they may enter the holes on yourhandset and cause damage.
• Use a damp cloth to clean your handset.
Appendix E FAX-L290 Instructions E-1
FAX
-L29
0In
stru
ctio
ns
Appendix E
FAX-L290 Instructions
Introduction ..............................................................................................E-2
Differences Between the FAX-L290 and FAX-L240 ...............................E-2
Using Your Documentation......................................................................E-2
Unpacking the FAX-L290 .........................................................................E-2
Connecting the FAX-L290 to Your PC.....................................................E-3
Print Media Requirements.......................................................................E-4
Printable Area ........................................................................................E-4
Selecting Print Media...............................................................................E-5
Loading Envelopes ..................................................................................E-6
Loading Transparencies ..........................................................................E-7
E-2 FAX-L290 Instructions Appendix E
IntroductionThis Appendix provides information relevant only to purchasers of the FAX-L290 model.Please be sure to read this section before reading the rest of this guide.
Differences Between the FAX-L290 andFAX-L240
In addition to the FAX-L240 features, the FAX-L290 also has the following features:
• Connectability to your PC for printing
• Increased memory for storing up to 448 fax pages*
• Support of a wider range of print media
Using Your DocumentationYour FAX-L290 includes the following documentation:
• This guide: Provides detailed information on how to set up, operate, maintain, andtroubleshoot your FAX.
• Printer Driver Guide: This guide, included in the CD-ROM, describes how to useyour FAX to print from within your PC’s Windows® environment.
Unpacking the FAX-L290Unpack your FAX as described on page 2-2. The items included are exactly the sameas for the FAX-L240, except that your unit also includes the software necessary forconnecting it to your PC.
Check that you have all items. If any are damaged or missing, notify your localauthorised Canon dealer or the Canon help line immediately.
n In addition to the items shipped with your FAX, you will need to purchase a printer cable toconnect your FAX to a PC (1 p. E-3).
* Based on Canon FAX Standard Chart No. 1, standard mode.
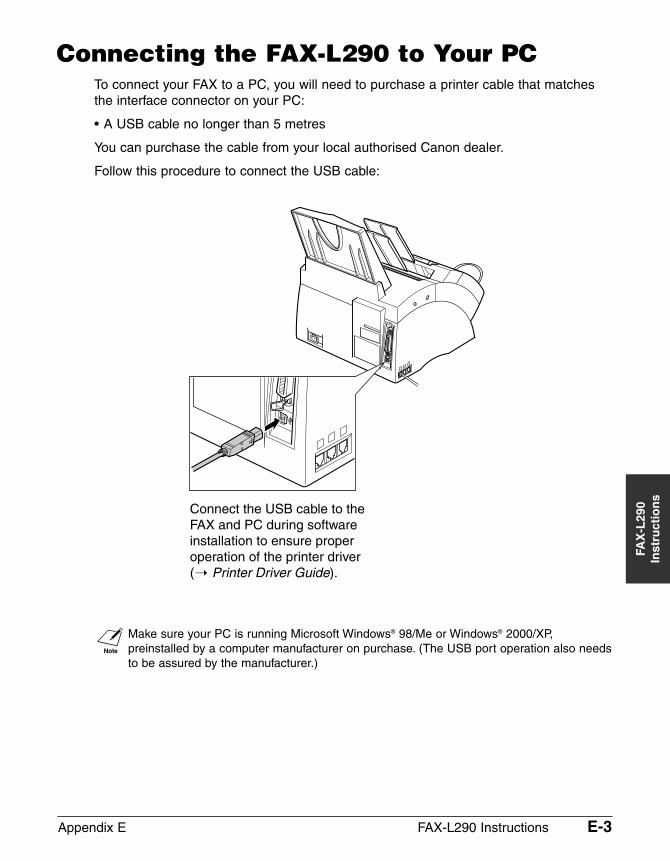
Appendix E FAX-L290 Instructions E-3
FAX
-L29
0In
stru
ctio
ns
Connecting the FAX-L290 to Your PCTo connect your FAX to a PC, you will need to purchase a printer cable that matchesthe interface connector on your PC:
• A USB cable no longer than 5 metres
You can purchase the cable from your local authorised Canon dealer.
Follow this procedure to connect the USB cable:
nMake sure your PC is running Microsoft Windows® 98/Me or Windows® 2000/XP,preinstalled by a computer manufacturer on purchase. (The USB port operation also needsto be assured by the manufacturer.)
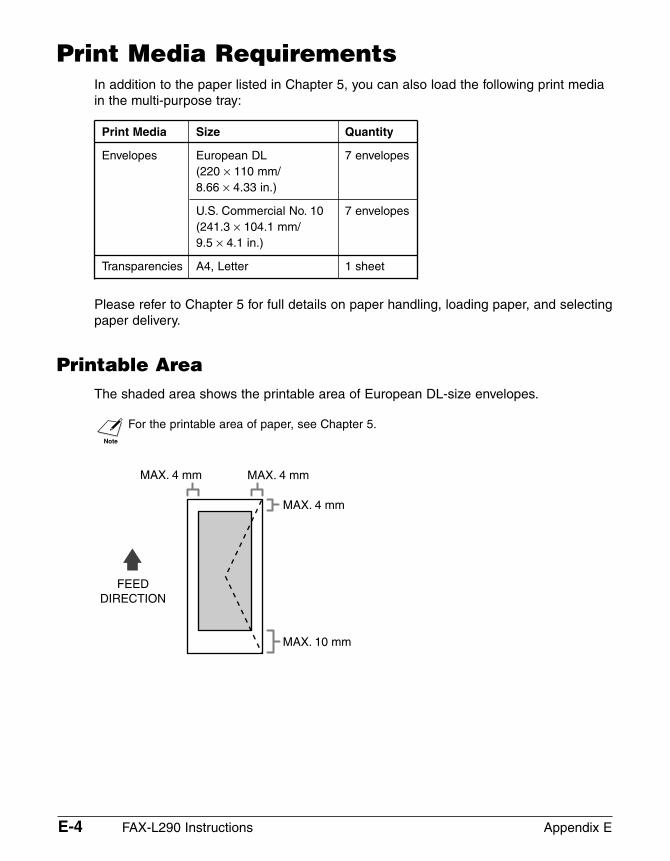
E-4 FAX-L290 Instructions Appendix E
Print Media RequirementsIn addition to the paper listed in Chapter 5, you can also load the following print mediain the multi-purpose tray:
Print Media Size Quantity
Envelopes European DL 7 envelopes(220 × 110 mm/8.66 × 4.33 in.)
U.S. Commercial No. 10 7 envelopes(241.3 × 104.1 mm/9.5 × 4.1 in.)
Transparencies A4, Letter 1 sheet
Please refer to Chapter 5 for full details on paper handling, loading paper, and selectingpaper delivery.
Printable AreaThe shaded area shows the printable area of European DL-size envelopes.
n For the printable area of paper, see Chapter 5.
MAX. 10 mm
MAX. 4 mm
MAX. 4 mmMAX. 4 mm
FEED DIRECTION

Appendix E FAX-L290 Instructions E-5
FAX
-L29
0In
stru
ctio
ns
Selecting Print MediaFollow these guidelines when selecting envelopes and transparencies:
n For paper guidelines, see Chapter 5.
� Envelopes• Use standard envelopes with diagonal seams and flaps.
• To prevent jams in the multi-purpose tray, do not use the following:– Envelopes with windows, holes, perforations, cutouts, and double flaps– Envelopes made with special coated paper or deeply embossed paper– Envelopes with peel-off sealing strips– Envelopes with letters enclosed
• You may be able to load other size envelopes than those listed on the previous page.However, Canon cannot guarantee consistent performance on these.
nWhen printing on envelopes, be sure to use face-up delivery (1 p. 5-4).
� Transparencies• Use only special laser printer transparencies.
n • When printing on transparencies, be sure to use face-up delivery (1 p. 5-4).• To prevent the transparency from curling, remove it as soon as it exits the FAX and place
it on a flat surface to cool.
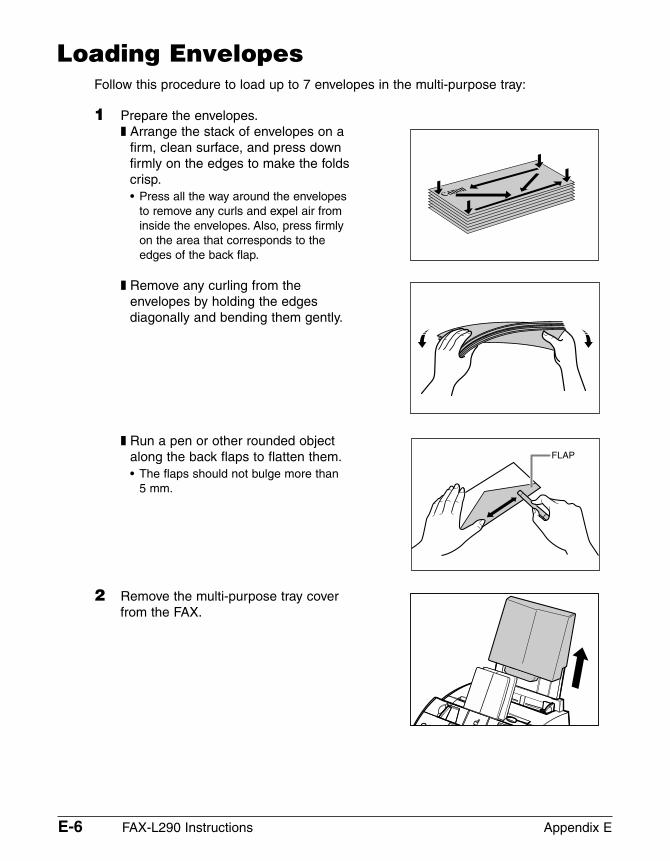
E-6 FAX-L290 Instructions Appendix E
Loading EnvelopesFollow this procedure to load up to 7 envelopes in the multi-purpose tray:
1 Prepare the envelopes.❚ Arrange the stack of envelopes on a
firm, clean surface, and press downfirmly on the edges to make the foldscrisp.• Press all the way around the envelopes
to remove any curls and expel air frominside the envelopes. Also, press firmlyon the area that corresponds to theedges of the back flap.
❚ Remove any curling from the envelopes by holding the edgesdiagonally and bending them gently.
❚ Run a pen or other rounded object along the back flaps to flatten them.• The flaps should not bulge more than
5 mm.
2 Remove the multi-purpose tray coverfrom the FAX.
FLAP
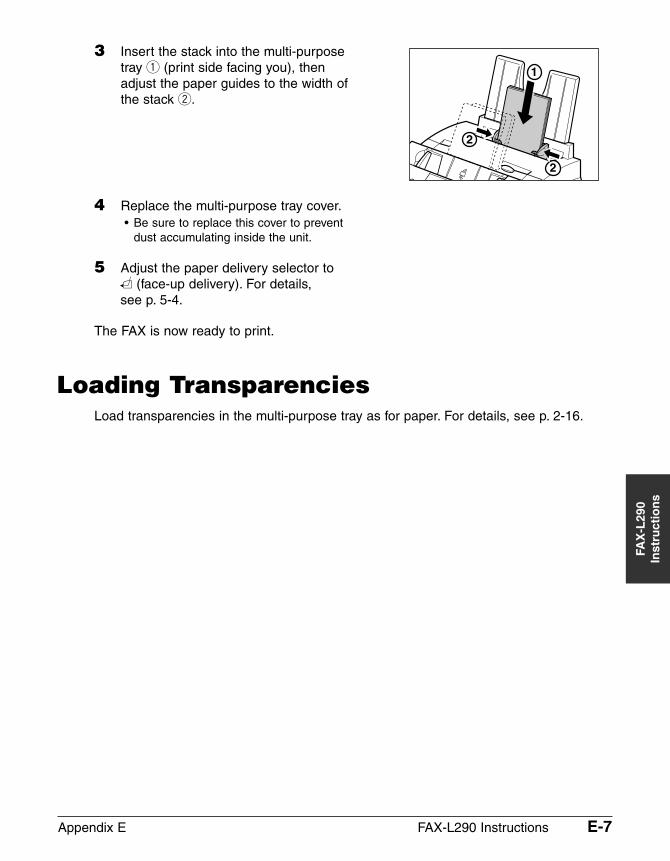
Appendix E FAX-L290 Instructions E-7
FAX
-L29
0In
stru
ctio
ns
3 Insert the stack into the multi-purposetray q (print side facing you), thenadjust the paper guides to the width ofthe stack w.
4 Replace the multi-purpose tray cover.• Be sure to replace this cover to prevent
dust accumulating inside the unit.
5 Adjust the paper delivery selector to U (face-up delivery). For details, see p. 5-4.
The FAX is now ready to print.
Loading TransparenciesLoad transparencies in the multi-purpose tray as for paper. For details, see p. 2-16.
2
2
1

E-8 FAX-L290 Instructions Appendix E
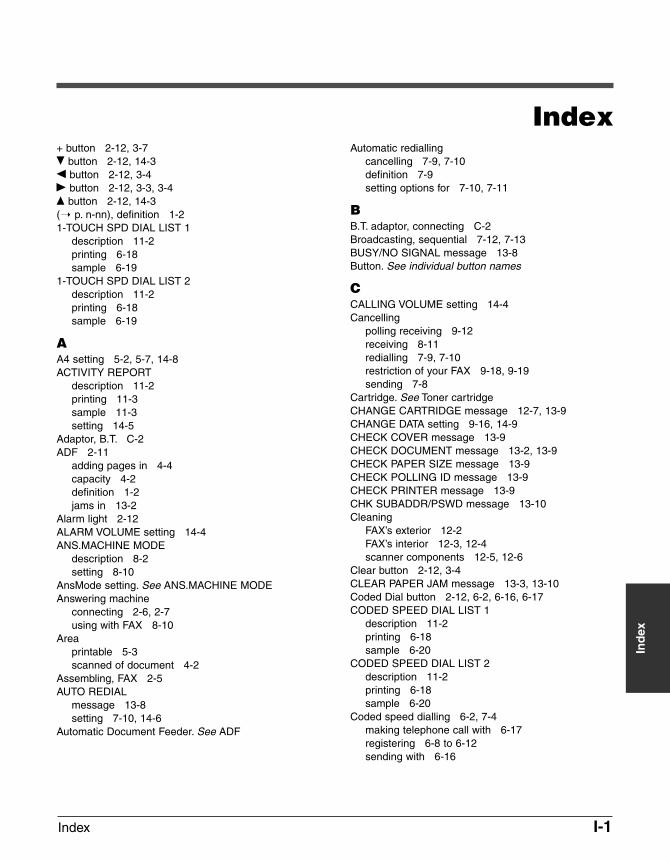
Index I-1
Ind
ex
Index+ button 2-12, 3-7∂ button 2-12, 14-3¬ button 2-12, 3-4® button 2-12, 3-3, 3-4¨ button 2-12, 14-3(1 p. n-nn), definition 1-21-TOUCH SPD DIAL LIST 1
description 11-2printing 6-18sample 6-19
1-TOUCH SPD DIAL LIST 2description 11-2printing 6-18sample 6-19
AA4 setting 5-2, 5-7, 14-8ACTIVITY REPORT
description 11-2printing 11-3sample 11-3setting 14-5
Adaptor, B.T. C-2ADF 2-11
adding pages in 4-4capacity 4-2definition 1-2jams in 13-2
Alarm light 2-12ALARM VOLUME setting 14-4ANS.MACHINE MODE
description 8-2setting 8-10
AnsMode setting. See ANS.MACHINE MODEAnswering machine
connecting 2-6, 2-7using with FAX 8-10
Areaprintable 5-3scanned of document 4-2
Assembling, FAX 2-5AUTO REDIAL
message 13-8setting 7-10, 14-6
Automatic Document Feeder. See ADF
Automatic rediallingcancelling 7-9, 7-10definition 7-9setting options for 7-10, 7-11
BB.T. adaptor, connecting C-2Broadcasting, sequential 7-12, 7-13BUSY/NO SIGNAL message 13-8Button. See individual button names
CCALLING VOLUME setting 14-4Cancelling
polling receiving 9-12receiving 8-11redialling 7-9, 7-10restriction of your FAX 9-18, 9-19sending 7-8
Cartridge. See Toner cartridgeCHANGE CARTRIDGE message 12-7, 13-9CHANGE DATA setting 9-16, 14-9CHECK COVER message 13-9CHECK DOCUMENT message 13-2, 13-9CHECK PAPER SIZE message 13-9CHECK POLLING ID message 13-9CHECK PRINTER message 13-9CHK SUBADDR/PSWD message 13-10Cleaning
FAX’s exterior 12-2FAX’s interior 12-3, 12-4scanner components 12-5, 12-6
Clear button 2-12, 3-4CLEAR PAPER JAM message 13-3, 13-10Coded Dial button 2-12, 6-2, 6-16, 6-17CODED SPEED DIAL LIST 1
description 11-2printing 6-18sample 6-20
CODED SPEED DIAL LIST 2description 11-2printing 6-18sample 6-20
Coded speed dialling 6-2, 7-4making telephone call with 6-17registering 6-8 to 6-12sending with 6-16
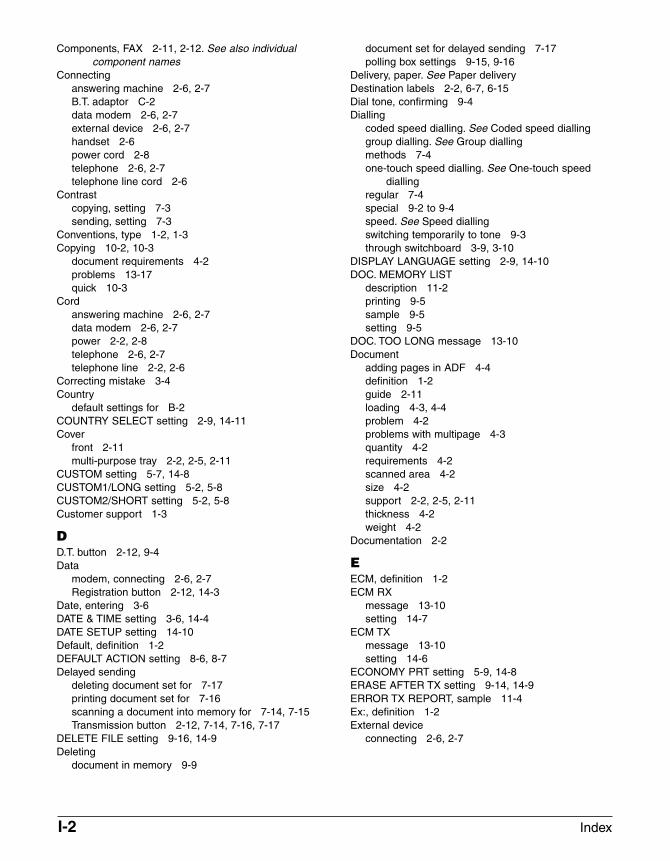
I-2 Index
Components, FAX 2-11, 2-12. See also individualcomponent names
Connectinganswering machine 2-6, 2-7B.T. adaptor C-2data modem 2-6, 2-7external device 2-6, 2-7handset 2-6power cord 2-8telephone 2-6, 2-7telephone line cord 2-6
Contrastcopying, setting 7-3sending, setting 7-3
Conventions, type 1-2, 1-3Copying 10-2, 10-3
document requirements 4-2problems 13-17quick 10-3
Cordanswering machine 2-6, 2-7data modem 2-6, 2-7power 2-2, 2-8telephone 2-6, 2-7telephone line 2-2, 2-6
Correcting mistake 3-4Country
default settings for B-2COUNTRY SELECT setting 2-9, 14-11Cover
front 2-11multi-purpose tray 2-2, 2-5, 2-11
CUSTOM setting 5-7, 14-8CUSTOM1/LONG setting 5-2, 5-8CUSTOM2/SHORT setting 5-2, 5-8Customer support 1-3
DD.T. button 2-12, 9-4Data
modem, connecting 2-6, 2-7Registration button 2-12, 14-3
Date, entering 3-6DATE & TIME setting 3-6, 14-4DATE SETUP setting 14-10Default, definition 1-2DEFAULT ACTION setting 8-6, 8-7Delayed sending
deleting document set for 7-17printing document set for 7-16scanning a document into memory for 7-14, 7-15Transmission button 2-12, 7-14, 7-16, 7-17
DELETE FILE setting 9-16, 14-9Deleting
document in memory 9-9
document set for delayed sending 7-17polling box settings 9-15, 9-16
Delivery, paper. See Paper deliveryDestination labels 2-2, 6-7, 6-15Dial tone, confirming 9-4Dialling
coded speed dialling. See Coded speed diallinggroup dialling. See Group diallingmethods 7-4one-touch speed dialling. See One-touch speed
diallingregular 7-4special 9-2 to 9-4speed. See Speed diallingswitching temporarily to tone 9-3through switchboard 3-9, 3-10
DISPLAY LANGUAGE setting 2-9, 14-10DOC. MEMORY LIST
description 11-2printing 9-5sample 9-5setting 9-5
DOC. TOO LONG message 13-10Document
adding pages in ADF 4-4definition 1-2guide 2-11loading 4-3, 4-4problem 4-2problems with multipage 4-3quantity 4-2requirements 4-2scanned area 4-2size 4-2support 2-2, 2-5, 2-11thickness 4-2weight 4-2
Documentation 2-2
EECM, definition 1-2ECM RX
message 13-10setting 14-7
ECM TXmessage 13-10setting 14-6
ECONOMY PRT setting 5-9, 14-8ERASE AFTER TX setting 9-14, 14-9ERROR TX REPORT, sample 11-4Ex:, definition 1-2External device
connecting 2-6, 2-7
Index I-3
Ind
ex
FF/T RING TIME setting 8-6, 8-7, 14-7Face-down delivery 5-4, 5-5
slot 2-11, 5-4Face-up delivery 5-4, 5-5, 5-6
slot 2-11, 5-4Fax, definition 1-2FAX 2-2
assembling 2-5cleaning 12-2 to 12-6clearing jams 13-2 to 13-7components 2-11, 2-12. See also individual
component namesconnecting 2-6 to 2-8name, registering 3-6, 3-7number, registering 3-6, 3-7restricting use 9-17 to 9-19testing 2-18unpacking 2-2 to 2-4
FAX ONLY MODEdescription 8-2setting 8-3, 8-4, 14-7
FAX/TEL AUTO SW setting 8-5, 14-7Fax/Tel Mode
description 8-2setting 8-5setting options for 8-6, 8-7
FaxAbility. See Telecom FaxAbilityFaxOnly setting. See FAX ONLY MODEFaxStream™ Duet. See Telstra FaxStream™ DuetFaxTel setting. See Fax/Tel ModeFILE NAME setting 9-13, 14-9Fixing assembly 2-11Front cover 2-11FX-3. See Toner cartridge
GG3, definition 1-2GROUP DIAL LIST
description 11-2printing 6-18sample 6-21
Group dialling 6-2, 7-4registering 6-13 to 6-15sending with 6-16
Guidedocument 2-11paper 2-11
HHandling, safety instructions 1-4, 1-5Handset
connecting 2-6sending manually via 7-6, 7-7
Hook Button 2-12, 6-17, 7-6, 9-3HOOKING setting 3-9, 3-10HORIZ & VERTICAL setting 14-8
IINCOMING RING setting 14-7INSIDE IMAGE setting 14-4Installing, toner cartridge 2-13 to 2-15ITU-TS, definition 1-2
JJack 2-6, 2-7Jams
clearing 13-2 to 13-7in ADF 13-2in paper delivery slots 13-3inside unit 13-3 to 13-7paper 13-3 to 13-7
KKEEP PRINTING setting 14-8KEYPAD VOLUME setting 14-4
LLabel
destination 2-2, 6-7, 6-15paper loading warning 2-2, 2-5
Latch 2-11LCD 2-12
definition 1-2messages 13-8 to 13-12. See also individual
message namesLetter mode
lowercase 3-2, 3-3uppercase 3-2, 3-3
Letters, entering 3-2, 3-3Lever, paper release 2-11, 13-4LGL setting 5-2, 5-7, 14-8Light, Alarm 2-12LINE MONITOR VOL setting 14-4Lists. See also individual list names
summary 11-2LOAD PAPER message 13-10Loading
document 4-3, 4-4paper 2-16 to 2-18
Location, safety instructions 1-5, 1-6LOCK PHONE setting 9-17, 9-18, 14-10Lowercase letter mode 3-2, 3-3LTR setting 5-2, 5-7, 14-8
MMaintenance, safety instructions 1-4, 1-5MAN/AUTO SWITCH setting 14-7
I-4 Index
MANUAL MODEdescription 8-2setting 8-8, 8-9
Manual redialling 7-9cancelling 7-9
Manual sending via the handset 7-6, 7-7cancelling 7-8
Manual setting. See MANUAL MODEMemory
deleting document in 9-9documents in 9-5 to 9-9printing document in 9-6printing list of documents in 9-5receiving when problem occurs 8-11Reference button 2-12, 9-5, 9-6, 9-7, 9-9scanning a document for delayed sending into
7-14, 7-15sending. See Memory sendingsending document in 9-7, 9-8
MEMORY CLEAR REPORT 13-22description 11-2sample 13-22
MEMORY FULL message 13-10MEMORY RX setting 14-7Memory sending 7-5, 7-6
cancelling 7-8MEMORY USED nn% message 13-11Menu. See also individual menu names
accessing 14-3definition 1-2system, understanding 14-2, 14-3
Messages. See LCD messagesMID PAUSE SET setting 14-6Mistake, correcting 3-4MULTI TX/RX (Transaction) REPORT 11-5
description 11-2sample 11-5
MULTI TX/RX REPORT. See MULTI TX/RX(Transaction) REPORT
Multi-purpose tray 2-11capacity 5-2cover 2-2, 2-5, 2-11
NNET SW setting. See NET SWITCH settingNET SWITCH
description 8-2setting 14-7, C-5, C-6, C-7, C-8
NO RX PAPER message 13-11NO TEL # message 13-11NOT AVAILABLE message 13-11Number
entering 3-2, 3-3, 3-4mode 3-2, 3-3, 3-4
Numeric buttons 2-12, 3-2
OOFFHOOK ALARM setting 14-4One-touch speed dial panel 2-12One-touch speed dialling 6-2, 7-4
buttons 2-12, 6-2, 6-16, 6-17making telephone call with 6-17registering 6-3 to 6-7sending with 6-16
Operation panel 2-11, 2-12Optional handset. See HandsetOUTPUT NO setting 14-5OUTPUT YES setting 14-5OUTSIDE IMAGE setting 14-4
PPanel, one-touch speed dial 2-12Paper
delivery. See Paper deliveryfeeding problems 13-13guide 2-11jams 13-3 to 13-7loading 2-16 to 2-18loading warning label 2-2, 2-5path 5-4printable area 5-3quantity 5-2release lever 2-11, 13-4requirements 5-2, 5-3rest 2-2, 2-5, 2-11selecting 5-3size setting 5-2, 5-7, 5-8weight 5-2
Paper deliveryface-down 5-4, 5-5face-up 5-4, 5-5, 5-6selecting 5-4 to 5-6selector 2-11, 5-5slot, jams in 13-3
PAPER SIZE setting 5-7, 14-8Password
for polling box, setting 9-12 to 9-14for polling receiving 9-10registering for coded speed dialling 6-8 to 6-12registering for one-touch speed dialling 6-3 to 6-7
PASSWORD setting 9-13, 9-17, 9-18, 14-9, 14-10Pause, entering 9-2PBX
definition 3-9setting 3-9, 14-4
Pollinganother fax machine 9-10, 9-11box. See Polling boxbutton 2-12, 9-11, 9-15
Index I-5
Ind
ex
definition 9-10receiving. See Polling receivingsending. See Polling sending
Polling boxchanging settings 9-15, 9-16deleting settings 9-15, 9-16scanning document into 9-15setting up 9-12 to 9-14
POLLING BOX menu 14-3, 14-9setting 9-12, 9-16
Polling receivingcancelling 9-12polling another fax machine 9-10, 9-11
Polling sendingchanging polling box settings 9-15, 9-16deleting polling box settings 9-15, 9-16scanning document into polling box 9-15setting up polling box 9-12 to 9-14
Powercord 2-2, 2-8cut 13-22supply, safety instructions 1-6switch 2-8
PREFIX setting 3-9, 3-10PRINT ERROR ONLY setting 14-5PRINT WITH IMAGE setting 14-5PRINTER SETTINGS menu 14-3, 14-8Printing
area 5-3document in memory 9-6document set for delayed sending 7-16lists. See individual list namesproblems 13-18, 13-19reports. See individual report names
Problemscannot solve 13-21copying 13-17document 4-2general 13-20multipage document 4-3paper feeding 13-13printing 13-18, 13-19receiving 13-15 to 13-17receiving into memory when 8-11sending 13-13 to 13-15telephone 13-18
PSTN setting 3-9, 14-4PSWD POLL REJECT message 13-11PSWD TX REJECTED message 13-11Pulse dialling
setting for 3-8switching temporarily to tone dialling 9-3
QQuantity
document 4-2paper 5-2
RR button 2-12
registering 3-9, 3-10REC’D IN MEMORY message 8-11, 13-12Receive Mode button 2-12Receiving. See also individual receive modes
cancelling 8-11in memory when problem occurs 8-11methods 8-2polling. See Polling receivingproblems 13-15 to 13-17remote, definition 8-8restricting 9-20while performing other tasks 8-11
Reception report. See RX (Reception) REPORTREDIAL INTERVAL setting 7-11, 14-6REDIAL TIMES setting 7-11, 14-6Redial/Pause button 2-12, 7-9, 9-2Redialling 7-9 to 7-11Remote reception, definition 8-8REMOTE RX ID setting 14-7REMOTE RX setting 14-7Replacing
toner cartridge 12-7 to 12-9Report button 2-12, 6-18, 11-3, 14-2REPORT SETTINGS menu 14-3, 14-5Reports. See also individual report names
summary 11-2Resolution
button 2-12, 7-2, 10-2copying, setting 10-2sending, setting 7-2
Rest, paper 2-2, 2-5, 2-11Restricting
reception 9-20use of FAX 9-17 to 9-19
RING COUNT setting 14-7RING START TIME setting 8-6, 8-7R-KEY SETTING 3-9, 14-4Roller, transfer charging 2-11ROTARY PULSE setting 3-8, 14-4RX, definition 1-2RX (Reception) REPORT 11-5
description 11-2sample 11-5
RX (Reception) SETTINGS menu 14-3, 14-7RX CALL LEVEL setting 14-4RX MODE setting 8-3, 8-5, 14-7, C-6RX PAGE FOOTER setting 14-7RX REDUCTION setting 14-8
I-6 Index
RX REPORT. See also RX (Reception) REPORTsetting 14-5
RX RESTRICTION setting 9-20, 14-10RX SETTINGS menu. See RX (Reception) SETTINGS
menuRX START SPEED setting 14-10RX TO MEMORY setting 14-8
SSafety instructions 1-4 to 1-6Saving, toner consumption 5-9SCAN CONTRAST setting 7-3, 14-4Scanner components, cleaning 12-5, 12-6Scanning
contrast, copying 7-3contrast, sending 7-3document area 4-2document for delayed sending into memory 7-14,
7-15resolution, copying 10-2resolution, sending 7-2
SELECT POL REJCT message 13-12Selector, paper delivery 2-11, 5-5Sender information
definition 3-5registering 3-5 to 3-7sample 3-5
Sendingat preset time. See Delayed sendingcancelling 7-8delayed. See Delayed sendingdocument in memory 9-7, 9-8document requirements 4-2manual via the handset 7-6, 7-7memory 7-5, 7-6methods 7-5 to 7-7polling. See Polling sendingproblems 13-13 to 13-15same document to several fax numbers 7-12, 7-13timer. See Delayed sendingwith coded speed dialling 6-16with group dialling 6-16with one-touch speed dialling 6-16with speed dialling 6-16
Sequential broadcasting 7-12, 7-13Serial number, FAX 13-21Set button 2-12, 14-3Settings. See also individual setting names
printing list of 14-2SETUP FILE setting 9-13, 14-9Shipping materials, removing 2-4Size
document 4-2paper 5-2, 5-7, 5-8
Space button 2-12, 3-3, 3-4
Special function buttons 2-12. See also individualbutton names
Speed dialling. See also individual speed diallingmethods
definition 6-2lists. See Speed dialling listsmaking telephone call with 6-17methods 6-2sending document with 6-16using 6-16, 6-17
Speed dialling lists. See also individual list namesprinting 6-18 to 6-21samples 6-19 to 6-21
Start/Copy button 2-12, 10-2, 10-3Stop button 2-12, 14-3SUBADD TX REJECT message 13-12Subaddress
for polling receiving 9-10registering for coded speed dialling 6-8 to 6-12registering for one-touch speed dialling 6-3 to 6-7
SUMMER TIME setting 3-11, 14-11Support
customer 1-3document 2-2, 2-5, 2-11tray 2-2, 2-5, 2-11
Switchboard, dialling through 3-9, 3-10Symbols, entering 3-2, 3-4SYSTEM SETTINGS menu 14-3, 14-10
TTEL LINE TYPE setting 3-8, 14-4Telecom FaxAbility 8-2, C-7Telephone
connecting 2-6, 2-7making call with speed dialling 6-17problems 13-18
TELEPHONE # MARK setting 14-4Telephone line
cord 2-2, 2-6type, setting 3-8
Telstra FaxStream™ Duet 8-2, C-5Testing FAX 2-18Thickness, document 4-2Time
entering 3-6sending at preset. See Delayed sending
TIME OUT setting 14-6Timer sending. See Delayed sendingTone dialling
setting for 3-8switching temporarily to 9-3
T(T) button 9-3

Index I-7
Ind
ex
Toner cartridge 2-2compartment 2-11installing 2-13 to 2-15replacing 12-7 to 12-9
Toner saver setting 5-9TONER SUPPLY LOW setting 14-8TOUCH TONE setting 3-8, 14-4Transfer charging roller 2-11Transmission report. See TX (Transmission) REPORTTray
multi-purpose 2-11multi-purpose, cover 2-2, 2-5, 2-11support 2-2, 2-5, 2-11
TTI POSITION setting 14-4TX, definition 1-2TX (Transmission) REPORT 11-4
description 11-2sample 11-4
TX (Transmission) SETTINGS menu 14-3, 14-6TX PASSWORD setting 9-13, 14-9TX REPORT. See also TX (Transmission) REPORT
setting 14-5TX SETTINGS menu. See TX (Transmission)
SETTINGS menuTX START SPEED setting 14-10TX TERMINAL ID setting 14-4TX/RX CANCELLED message 13-12TX/RX NO., definition 1-2TX/RX NO. nnnn message 13-12TX/RX NO. nnnn, SCANNING P.nnn, MEMORY FULL
message 13-12Type conventions 1-2, 1-3
UUN/LOCK PHONE setting 9-17, 9-18, 14-10UNIT NAME setting 3-7, 14-4UNIT TELEPHONE # setting 3-7, 14-4Unpacking FAX 2-2 to 2-4Uppercase letter mode 3-2, 3-3USER SETTINGS menu 14-3, 14-4USER’S DATA LIST
description 11-2printing 14-2sample 14-2
User’s Guide, type conventions 1-2, 1-3
VVERTICAL ONLY setting 14-8Volume
ALARM VOLUME setting 14-4CALLING VOLUME setting 14-4KEYPAD VOLUME setting 14-4LINE MONITOR VOL setting 14-4VOLUME CONTROL setting 14-4
VOLUME CONTROL setting 14-4
WWeight
document 4-2paper 5-2unit 1-5

I-8 Index

HT1-2194-000-V.1.0 PRINTED IN CHINA XXXXXXXX


![It's Complicated: Romancing the [male] modernist canon](https://img.dokumen.tips/doc/110x75/633c9b7f1a13014aae0411a8/its-complicated-romancing-the-male-modernist-canon.jpg)


