Embed Size (px)
Citation preview

Drawing with the Pen tool
To draw precise paths as straight lines or smooth, flowing curves, use the Pen tool. When you draw
with the Pen tool, click to create points on straight line segments and drag to create points on curved
line segments. Adjust straight and curved line segments by adjusting points on the line.
The following video tutorial demonstrates how to use Pen tool in Animate:
Pen tool drawing states
The Pen tool provides feedback about its current drawing state by displaying different pointers. The
various drawing states are indicated by the following pointers:
Initial Anchor Point pointer
The first pointer you see when you select the Pen tool. Indicates that the next mouse click on the Stage
will create an initial anchor point, which is the beginning of a new path (all new paths begin with an
initial anchor point). Any existing drawing paths are terminated.
Sequential Anchor Point pointer
Indicates that the next mouse click will create an anchor point with a line connecting it to the previous
anchor point. This pointer is displayed during the creation of all user-defined anchor points except the
initial anchor point of a path.
Add Anchor Point pointer
Indicates that the next mouse click will add an anchor point to an existing path. To add an anchor
point, the path must be selected, and the Pen tool must not be over an existing anchor point. The
existing path is redrawn based on the additional anchor point. Only one anchor point can be added at a
time.
Delete Anchor Point pointer
Indicates that the next mouse click on an existing path will remove an anchor point. To remove an
anchor point, the path must be selected with the Selection tool, and the pointer must be over an
existing anchor point. The existing path is redrawn based on the removal of the anchor point. Only one
anchor point can be removed at a time.
Continue Path pointer
Extends a new path from an existing anchor point. For this pointer to be activated, the mouse must be
over an existing anchor point on a path. This pointer is only available when you are not currently
drawing a path. The anchor point does not have to be one of the terminal anchor points of a path; any
anchor point can be the location of a continued path.
Close Path pointer
Closes the path you’re drawing on the starting point of the path. You can only close a path that you are
currently drawing, and the existing anchor point must be the starting anchor point of the same path.
The resulting path does not have any specified fill color settings applied to the enclosed shape; apply
fill color separately.
Join Paths pointer
Similar to the Close Path Tool except that the mouse must not be over the initial anchor point of the
same path. The pointer must be over either of the terminal points of a unique path. The segment may
or may not be selected.
note: Joining paths may or may not result in a closed shape.
Retract Bezier Handle pointer
Appears when the mouse is over an anchor point whose Bezier handles are displayed. Clicking the
mouse retracts the Bezier handles and causes the curved path across the anchor point to revert to
straight segments.
Convert Anchor Point pointer
Converts a corner point without direction lines to a corner point with independent direction lines. To
enable the Convert Anchor Point pointer, use the Shift + C modifier keys to toggle the Pen tool.
For a video tutorial about the Pen tool, see www.adobe.com/go/vid0120.
Draw straight lines with the Pen tool
The simplest path you can draw with the Pen tool is a straight line, made by clicking the Pen tool to
create two anchor points. Continue to click to create a path made of straight line segments connected
by corner points.
1. Select the Pen tool .
2. Position the Pen tool where the straight segment is to begin, and click to define the first anchor
point. If direction lines appear, you accidentally dragged the Pen tool; choose Edit > Undo and
click again.
Note:
The first segment you draw is not visible until you click a second anchor point (unless you’ve
specified Show Pen Preview in the Drawing category of the Preferences dialog box).
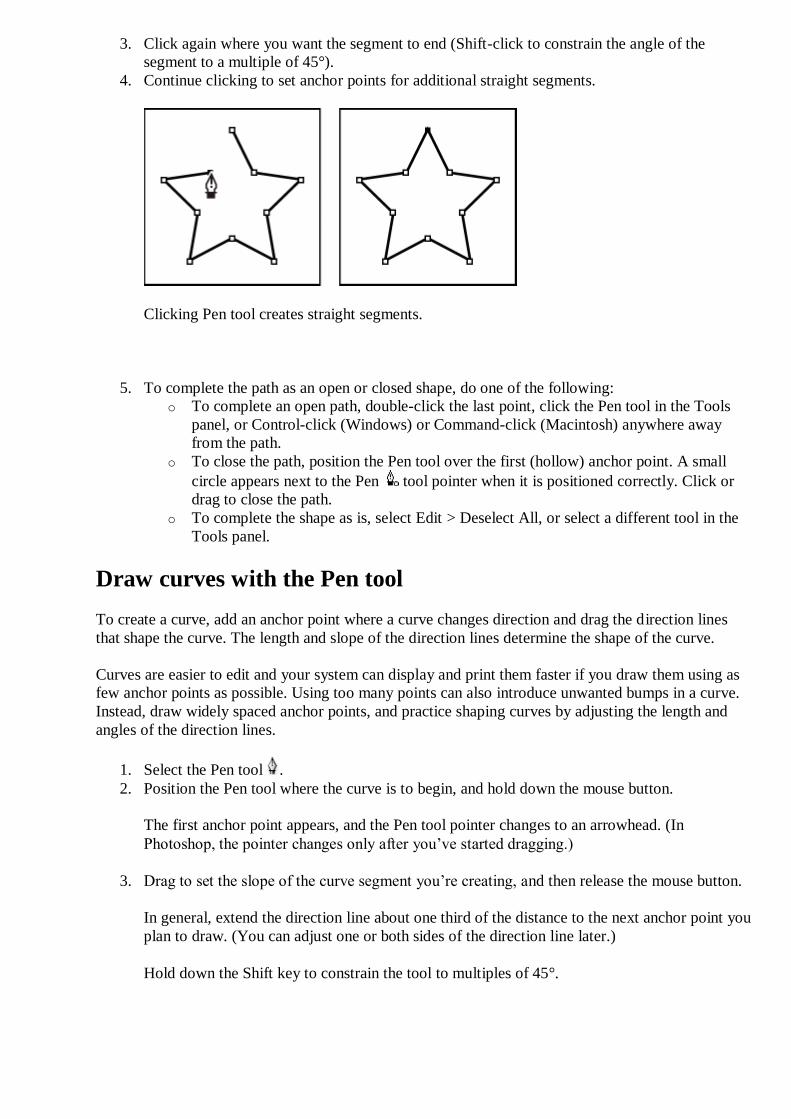
3. Click again where you want the segment to end (Shift-click to constrain the angle of the
segment to a multiple of 45°).
4. Continue clicking to set anchor points for additional straight segments.
Clicking Pen tool creates straight segments.
5. To complete the path as an open or closed shape, do one of the following:
o To complete an open path, double-click the last point, click the Pen tool in the Tools
panel, or Control-click (Windows) or Command-click (Macintosh) anywhere away
from the path.
o To close the path, position the Pen tool over the first (hollow) anchor point. A small
circle appears next to the Pen tool pointer when it is positioned correctly. Click or
drag to close the path.
o To complete the shape as is, select Edit > Deselect All, or select a different tool in the
Tools panel.
Draw curves with the Pen tool
To create a curve, add an anchor point where a curve changes direction and drag the direction lines
that shape the curve. The length and slope of the direction lines determine the shape of the curve.
Curves are easier to edit and your system can display and print them faster if you draw them using as
few anchor points as possible. Using too many points can also introduce unwanted bumps in a curve.
Instead, draw widely spaced anchor points, and practice shaping curves by adjusting the length and
angles of the direction lines.
1. Select the Pen tool .
2. Position the Pen tool where the curve is to begin, and hold down the mouse button.
The first anchor point appears, and the Pen tool pointer changes to an arrowhead. (In
Photoshop, the pointer changes only after you’ve started dragging.)
3. Drag to set the slope of the curve segment you’re creating, and then release the mouse button.
In general, extend the direction line about one third of the distance to the next anchor point you
plan to draw. (You can adjust one or both sides of the direction line later.)
Hold down the Shift key to constrain the tool to multiples of 45°.

Drawing the first point in a curve
A. Positioning Pen tool B. Starting to drag (mouse button pressed) C. Dragging to extend direction lines.
4. Position the Pen tool where the curve segment is to end, and do one of the following:
o To create a C-shaped curve, drag in a direction opposite to the previous direction line
and release the mouse button.
Drawing the second point in a curve
o To create an S-shaped curve, drag in the same direction as the previous direction line
and release the mouse button.
Drawing an S curve
5. To create a series of smooth curves, continue dragging the Pen tool from different locations.
Place anchor points at the beginning and end of each curve, not at the tip of the curve.
Note:
To break out the direction lines of an anchor point, Alt-drag (Windows) or Option-drag
(Macintosh) direction lines.
6. To complete the path, do one of the following:
o To close the path, position the Pen tool over the first (hollow) anchor point. A small
circle appears next to the Pen tool pointer when it is positioned correctly. Click or
drag to close the path.
o To leave the path open, Ctrl-click (Windows) or Command-click (Macintosh) anywhere
away from all objects, select a different tool, or choose Edit > Deselect All.
Add or delete anchor points
Adding anchor points can give you more control over a path or it can extend an open path. However,
it’s a good idea not to add more points than necessary. A path with fewer points is easier to edit,
display, and print. To reduce the complexity of a path, delete unnecessary points.
The toolbox contains three tools for adding or deleting points: the Pen tool , the Add Anchor Point
tool , and the Delete Anchor Point tool .
By default, the Pen tool changes to the Add Anchor Point tool as you position it over a selected path,
or to the Delete Anchor Point tool as you position it over an anchor point.
Note:
Don’t use the Delete, Backspace, and Clear keys or the Edit > Cut or Edit > Clear commands to delete
anchor points; these keys and commands delete the point and the line segments that connect to that
point.
1. Select the path to modify.
2. Click and hold the mouse button on the Pen tool , then select the Pen tool , Add Anchor
Point tool , or the Delete Anchor Point tool .
3. To add an anchor point, position the pointer over a path segment, and click. To delete an
anchor point, position the pointer over an anchor point, and click.
Adjust anchor points on paths
When you draw a curve with the Pen tool, you create smooth points—anchor points on a continuous,
curved path. When you draw a straight line segment or a straight line connected to a curved segment,
you create corner points—anchor points on a straight path or at the juncture of a straight and a curved
path.
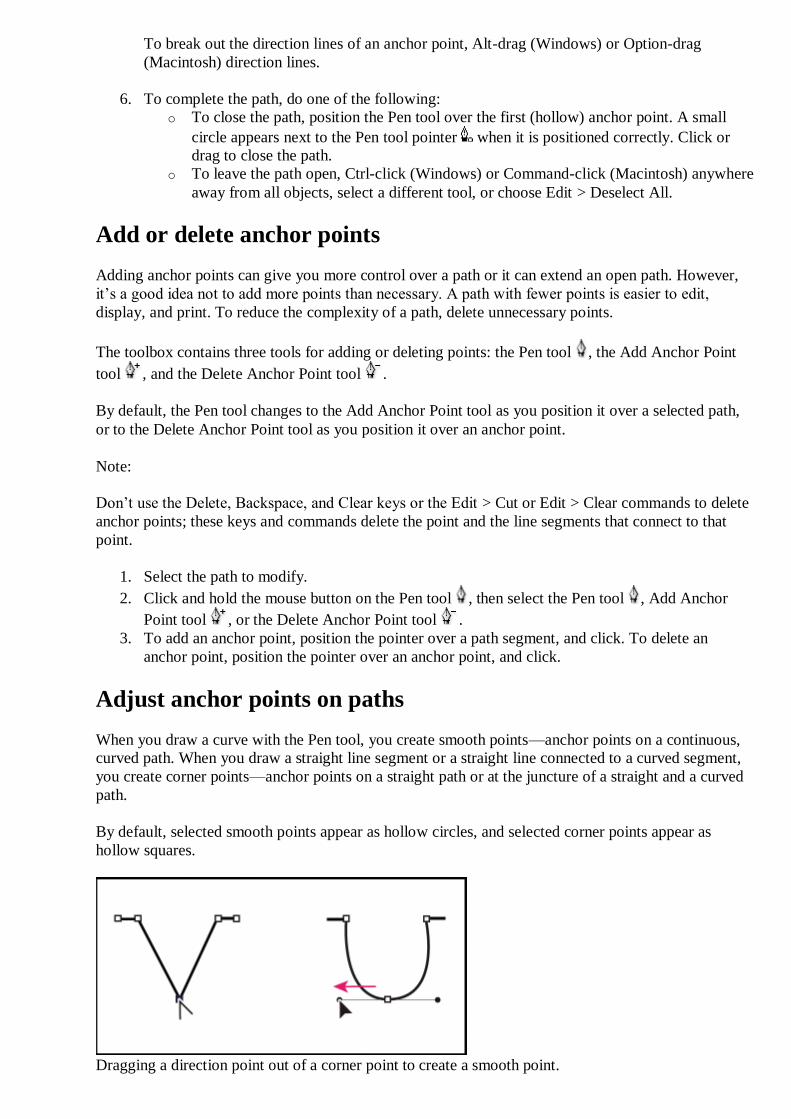
By default, selected smooth points appear as hollow circles, and selected corner points appear as
hollow squares.
Dragging a direction point out of a corner point to create a smooth point.

Move or add anchor points
To move an anchor point, drag the point with the Subselection tool .
To nudge an anchor point or points, select the point or points with the Subselection tool and
use the arrow keys to move the point or points. Shift-click to select multiple points.
To add an anchor point, click a line segment with the Pen tool. A plus (+) sign appears next to
the Pen tool if an anchor point can be added to the selected line segment. If the line segment
is not yet selected, click it with the Pen tool to select it, and then add an anchor point.
Delete anchor points
Deleting unneeded anchor points on a curved path optimizes the curve and reduces the resulting SWF
file size.
To delete a corner point, click the point once with the Pen tool. A minus (-) sign appears next
to the Pen tool if an anchor point can be deleted from the selected line segment. If the line
segment is not yet selected, click it with the Pen tool to select it, and then delete the anchor
point.
To delete a smooth point, click the point once with the Pen tool. A minus (-) sign appears next
to the Pen tool if an anchor point can be deleted from the selected line segment. If the line
segment is not yet selected, click it with the Pen tool to select it, and then delete the corner
point. (Click once to convert the point to a corner point, and once more to delete the point.)
Convert segments between straight and curved
To convert segments in a line from straight segments to curve segments, convert corner points to
smooth points. You can also do the reverse.
To convert a corner point to a smooth point, use the Subselection tool to select the point, then
Alt-drag (Windows) or Option-drag (Macintosh) the point to place the tangent handles.
To convert a smooth point to a corner point, click the point with the Pen tool. The carat ^
marker next to the pointer indicates when it is over the smooth point.
Adjust segments
To change the angle or length of the segment or adjust curved segments to change the slope or
direction of the curve, adjust straight segments.
When you move a tangent handle on a smooth point, the curves on both sides of the point adjust.
When you move a tangent handle on a corner point, only the curve on the same side of the point as the
tangent handle adjusts.
To adjust a straight segment, select the Subselection tool , and select a straight segment. Use
the Subselection tool to drag an anchor point on the segment to a new position.
To adjust a curve segment, select the Subselection tool and drag the segment.
note: When you click the path, Animate shows the anchor points. Adjusting a segment with the
Subselection tool can add points to the path.
To adjust points or tangent handles on a curve, select the Subselection tool, and select an
anchor point on a curved segment.
To adjust the shape of the curve on either side of the anchor point, drag the anchor point, or
drag the tangent handle. To constrain the curve to multiples of 45º, Shift-drag. To drag tangent
handles individually, Alt-drag (Windows) or Option-drag (Macintosh).
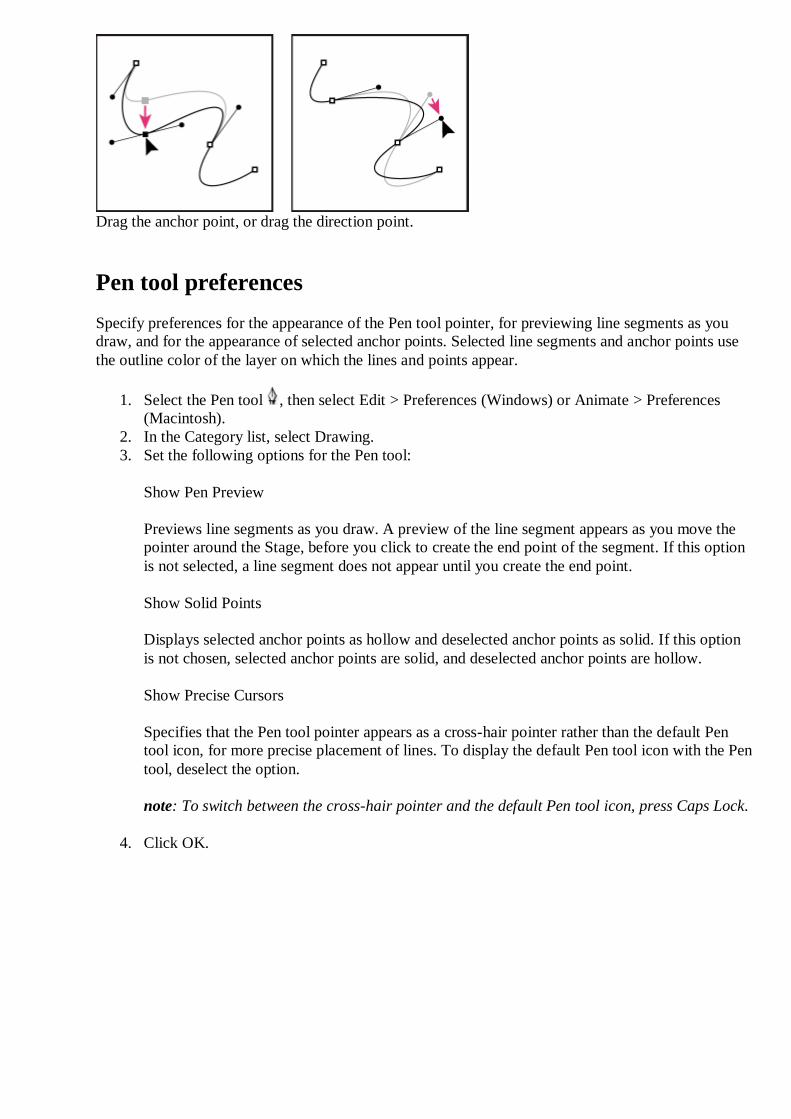
Drag the anchor point, or drag the direction point.
Pen tool preferences
Specify preferences for the appearance of the Pen tool pointer, for previewing line segments as you
draw, and for the appearance of selected anchor points. Selected line segments and anchor points use
the outline color of the layer on which the lines and points appear.
1. Select the Pen tool , then select Edit > Preferences (Windows) or Animate > Preferences
(Macintosh).
2. In the Category list, select Drawing.
3. Set the following options for the Pen tool:
Show Pen Preview
Previews line segments as you draw. A preview of the line segment appears as you move the
pointer around the Stage, before you click to create the end point of the segment. If this option
is not selected, a line segment does not appear until you create the end point.
Show Solid Points
Displays selected anchor points as hollow and deselected anchor points as solid. If this option
is not chosen, selected anchor points are solid, and deselected anchor points are hollow.
Show Precise Cursors
Specifies that the Pen tool pointer appears as a cross-hair pointer rather than the default Pen
tool icon, for more precise placement of lines. To display the default Pen tool icon with the Pen
tool, deselect the option.
note: To switch between the cross-hair pointer and the default Pen tool icon, press Caps Lock.
4. Click OK.

Converting Shape Types(interaction between shapes )
Flash offers a variety of shape types: fills, strokes, merge-shapes, drawing-objects,
primitives, and text. It’s possible to convert some types of shapes into others. For
example, you can convert strokes to fills; you can convert merge-shapes to drawing-
objects and vice versa; you can convert primitive-shapes to merge-shapes and
drawing-objects; and you can convert text, a special type of fill, to a regular
drawing-object fill (for TLF text) or merge-shape fill (for Classic text). You cannot,
however, convert merge-shapes or drawing-objects to primitive-shapes.
To convert a stroke to a fill:
1. Select a stroke on the Stage.
2. Choose Modify > Shape > Convert Lines to Fills .
To transform strokes into fills, choose Modify > Shape > Convert Lines
to Fills.
Flash converts the stroke to a fill shape that looks exactly like the stroke. You
can now edit the path of the “stroke’s” outline as though you were working
with a fill created with the brush tool .
You can convert a stroke, such as this line drawn with the pencil tool
(top), to a fill. The fill’s outline then has its own editable path (middle and
bottom).
To convert a merge-shape or a primitive to a drawing-object:
1. Select a single merge-shape or primitive-shape on the Stage.
2. Choose Modify > Combine Objects > Union.
Flash converts the selected shape to a drawing-object; it remains selected .
Choose Modify > Combine Objects > Union to convert the shape
selected on the Stage into a drawing-object.
TIP
The Modify > Combine Shapes commands (Union, Intersect, Punch, and Crop)
work on multiple, selected drawing-objects and primitives; the last three
commands work on overlapping drawing-objects or primitives. In effect, these
commands convert the drawing-objects or primitives to merge-shapes (so that
they interact) and then convert the resulting shape(s) back into a drawing-
object. Note that primitives lose their status as primitives once you combine
them. You’ll learn more about combining shapes in Chapter 5.
To convert a drawing-object or a primitive to a merge-shape:
1. Select a drawing-object or primitive-shape on the Stage.
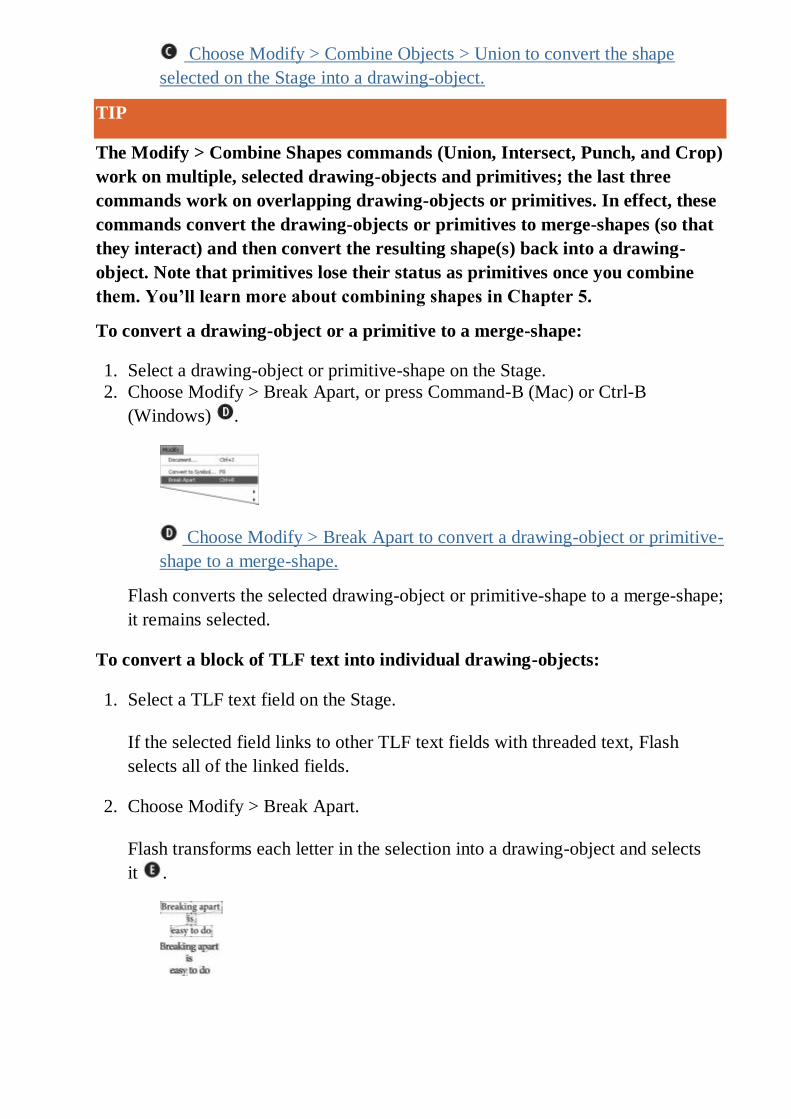
2. Choose Modify > Break Apart, or press Command-B (Mac) or Ctrl-B
(Windows) .
Choose Modify > Break Apart to convert a drawing-object or primitive-
shape to a merge-shape.
Flash converts the selected drawing-object or primitive-shape to a merge-shape;
it remains selected.
To convert a block of TLF text into individual drawing-objects:
1. Select a TLF text field on the Stage.
If the selected field links to other TLF text fields with threaded text, Flash
selects all of the linked fields.
2. Choose Modify > Break Apart.
Flash transforms each letter in the selection into a drawing-object and selects
it .
With TLF text fields selected (top), choosing Modify > Break Apart
transforms each letter into a separate drawing object (bottom).
TIP
Converting TLF text to drawing-objects can be useful if you have a small
amount of text that you can’t (or don’t want to) supply to every end user, but
you need to ensure the text looks exactly the same in the finished product as it
did during the authoring phase.
TIP
You don’t actually have to select a TLF text field; just position the text tool’s I-
beam cursor anywhere within the text field. When you choose Modify > Break
Apart, Flash converts all the text in that text field, and any fields linked to it, to
drawing-objects.
Breaking Down Classic Text
The conversion process for Classic text works a bit differently than the process for
TLF text. It takes two steps to transform Classic Text to simple graphic shapes.
Classic-text characters convert to merge-shapes, while TLF-text characters convert
to drawing-objects.
First, select the Classic text field on the Stage. Choose Modify > Break Apart. Flash
places each letter in its own Classic text field and selects them all. Each Classic text
field is just wide enough to hold one letter. Each letter is fully editable on its own,
although the set of letters is no longer linked. Now, to transform those single-letter
text fields into merge-shapes, with the text fields selected, choose Modify > Break
Apart again. This second Break Apart command transforms the editable letters into
raw shapes on the Stage . You can edit them as you would any other fill, but you
can no longer change their text attributes with the text tool or Text (Tool) Property
inspector.
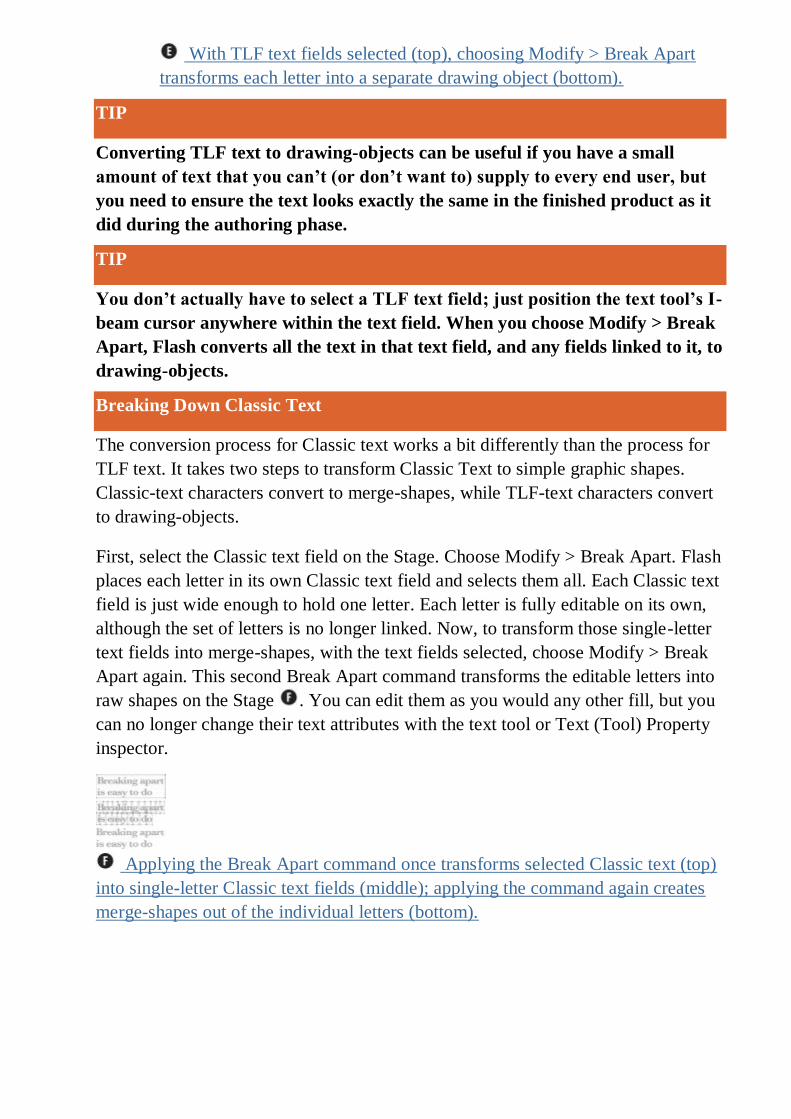
Applying the Break Apart command once transforms selected Classic text (top)
into single-letter Classic text fields (middle); applying the command again creates
merge-shapes out of the individual letters (bottom).
Working With Object Drawing
Previously in Flash, all shapes in the same layer on the Stage could change other overlapping shapes,
known as Merge Drawing. In Flash, you can create shapes directly on the Stage that do not affect other
overlapping shapes, known as Object Drawing. By default, Flash uses Merge Drawing. To draw shapes
using Object Drawing, you use the Object Drawing button on the Tools panel. When you select a shape
created using Object Drawing, Flash selects the shape with a rectangular bounding box, which you can use
with the Pointer tool to move the shape on the Stage. You can use General preferences to set selection
options for contact-sensitivity when selecting shapes created using Object Drawing.
Enable and Use Object Drawing
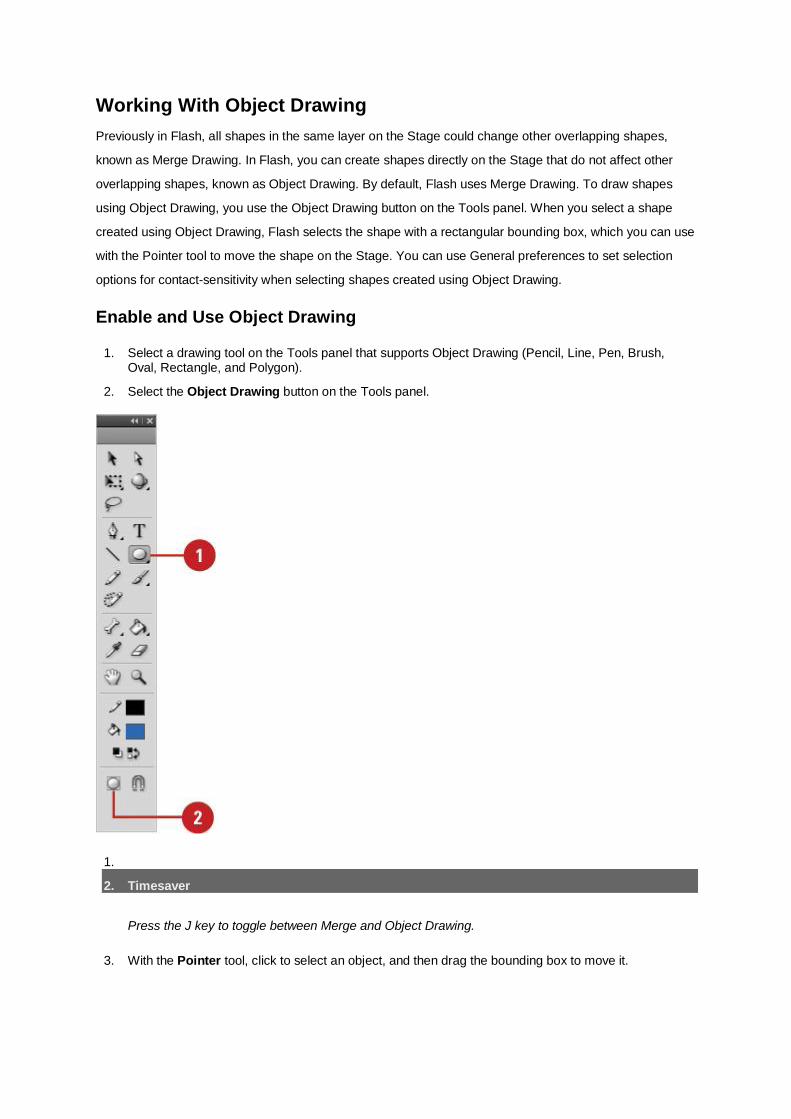
1. Select a drawing tool on the Tools panel that supports Object Drawing (Pencil, Line, Pen, Brush, Oval, Rectangle, and Polygon).
2. Select the Object Drawing button on the Tools panel.
1.
2. Timesaver
Press the J key to toggle between Merge and Object Drawing.
3. With the Pointer tool, click to select an object, and then drag the bounding box to move it.

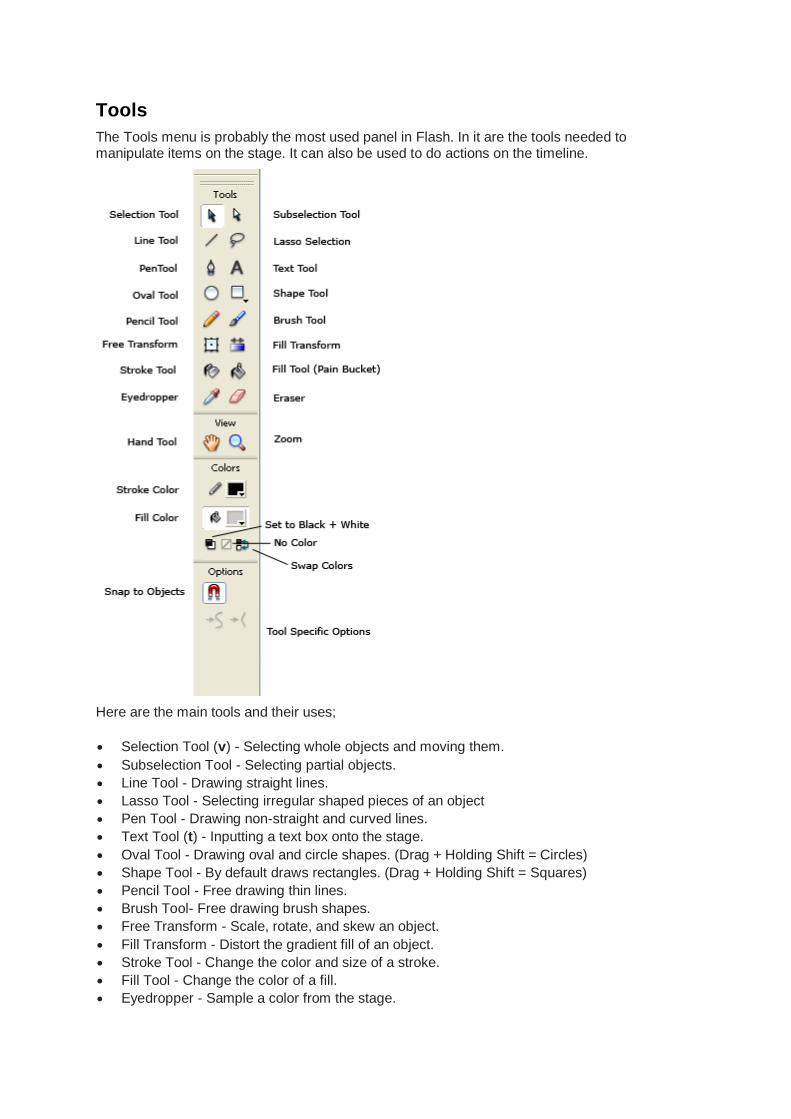
Tools
The Tools menu is probably the most used panel in Flash. In it are the tools needed to manipulate items on the stage. It can also be used to do actions on the timeline.
Here are the main tools and their uses;
Selection Tool (v) - Selecting whole objects and moving them.
Subselection Tool - Selecting partial objects.
Line Tool - Drawing straight lines.
Lasso Tool - Selecting irregular shaped pieces of an object
Pen Tool - Drawing non-straight and curved lines.
Text Tool (t) - Inputting a text box onto the stage.
Oval Tool - Drawing oval and circle shapes. (Drag + Holding Shift = Circles)
Shape Tool - By default draws rectangles. (Drag + Holding Shift = Squares)
Pencil Tool - Free drawing thin lines.
Brush Tool- Free drawing brush shapes.
Free Transform - Scale, rotate, and skew an object.
Fill Transform - Distort the gradient fill of an object.
Stroke Tool - Change the color and size of a stroke.
Fill Tool - Change the color of a fill.
Eyedropper - Sample a color from the stage.

Eraser - Use a brush to erase parts of an object.
Hand Tool - Used to drag the stage around to see not visible parts of it.
Zoom - Zoom in or out.
Properties Panel[edit]
The properties panel is used to modify the characteristics of pre-existing objects on stage.
Other Panels
Flash layers
Introduction Layers help you deal with more complex Flash projects. Working with layers has several advantages:
You can draw and edit objects in one layer without affecting objects in another layer.
You can lock layers (to protect their embedded objects from unwanted editing)
You can hide layers, make them visible (i.e. you can see their objects in the workspace), or you can display just the outlines of their objects.
The layers tool is part of the Timeline panel.
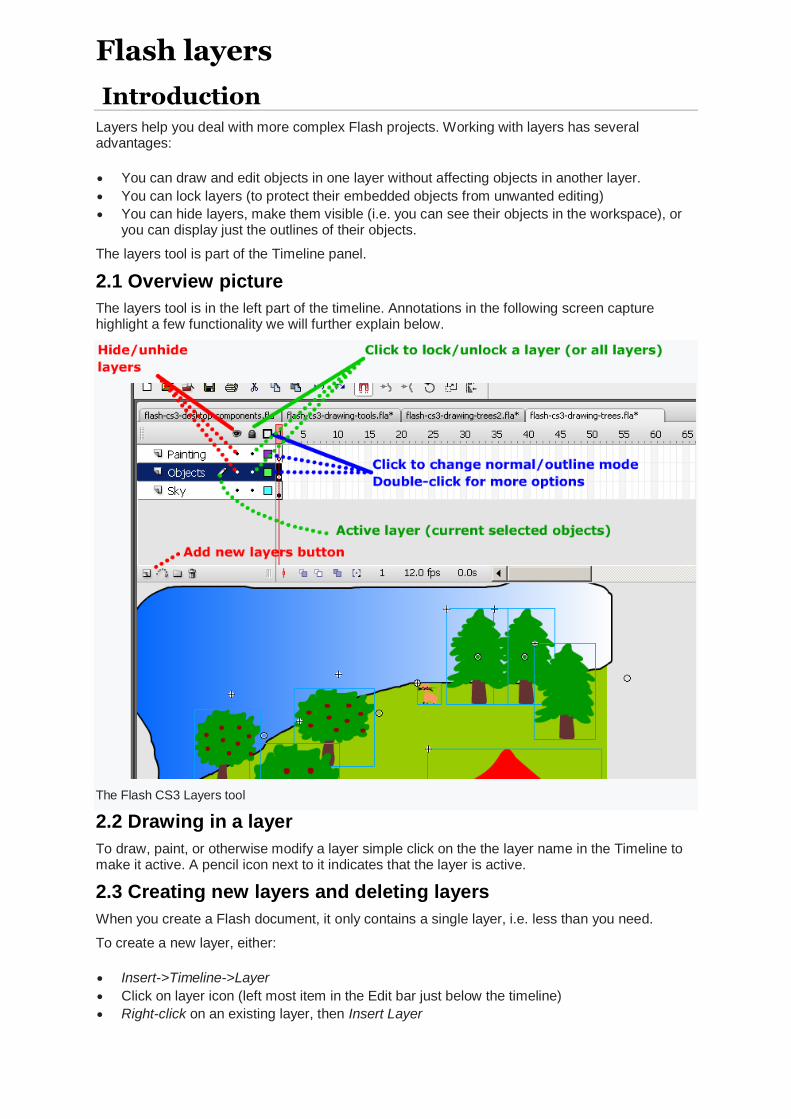
2.1 Overview picture
The layers tool is in the left part of the timeline. Annotations in the following screen capture highlight a few functionality we will further explain below.
The Flash CS3 Layers tool
2.2 Drawing in a layer
To draw, paint, or otherwise modify a layer simple click on the the layer name in the Timeline to make it active. A pencil icon next to it indicates that the layer is active.
2.3 Creating new layers and deleting layers
When you create a Flash document, it only contains a single layer, i.e. less than you need.
To create a new layer, either:
Insert->Timeline->Layer
Click on layer icon (left most item in the Edit bar just below the timeline)
Right-click on an existing layer, then Insert Layer
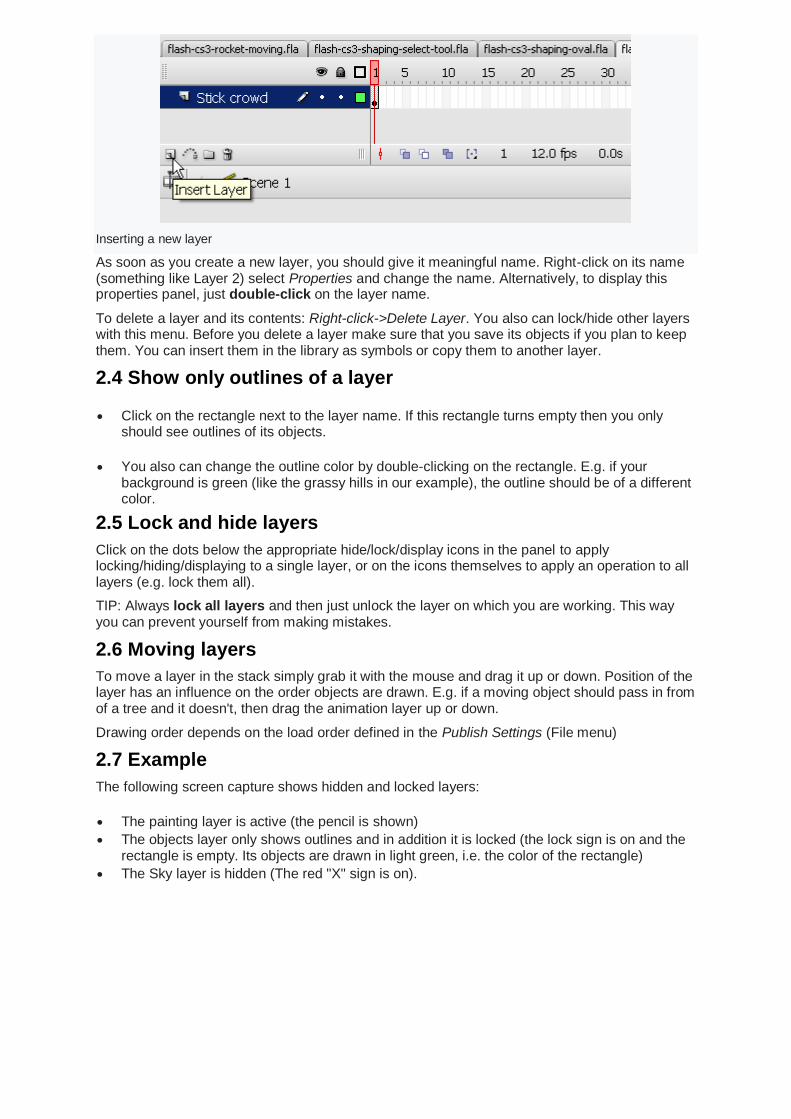
Inserting a new layer
As soon as you create a new layer, you should give it meaningful name. Right-click on its name (something like Layer 2) select Properties and change the name. Alternatively, to display this properties panel, just double-click on the layer name.
To delete a layer and its contents: Right-click->Delete Layer. You also can lock/hide other layers with this menu. Before you delete a layer make sure that you save its objects if you plan to keep them. You can insert them in the library as symbols or copy them to another layer.
2.4 Show only outlines of a layer
Click on the rectangle next to the layer name. If this rectangle turns empty then you only should see outlines of its objects.
You also can change the outline color by double-clicking on the rectangle. E.g. if your background is green (like the grassy hills in our example), the outline should be of a different color.
2.5 Lock and hide layers
Click on the dots below the appropriate hide/lock/display icons in the panel to apply locking/hiding/displaying to a single layer, or on the icons themselves to apply an operation to all layers (e.g. lock them all).
TIP: Always lock all layers and then just unlock the layer on which you are working. This way you can prevent yourself from making mistakes.
2.6 Moving layers
To move a layer in the stack simply grab it with the mouse and drag it up or down. Position of the layer has an influence on the order objects are drawn. E.g. if a moving object should pass in from of a tree and it doesn't, then drag the animation layer up or down.
Drawing order depends on the load order defined in the Publish Settings (File menu)
2.7 Example
The following screen capture shows hidden and locked layers:
The painting layer is active (the pencil is shown)
The objects layer only shows outlines and in addition it is locked (the lock sign is on and the rectangle is empty. Its objects are drawn in light green, i.e. the color of the rectangle)
The Sky layer is hidden (The red "X" sign is on).
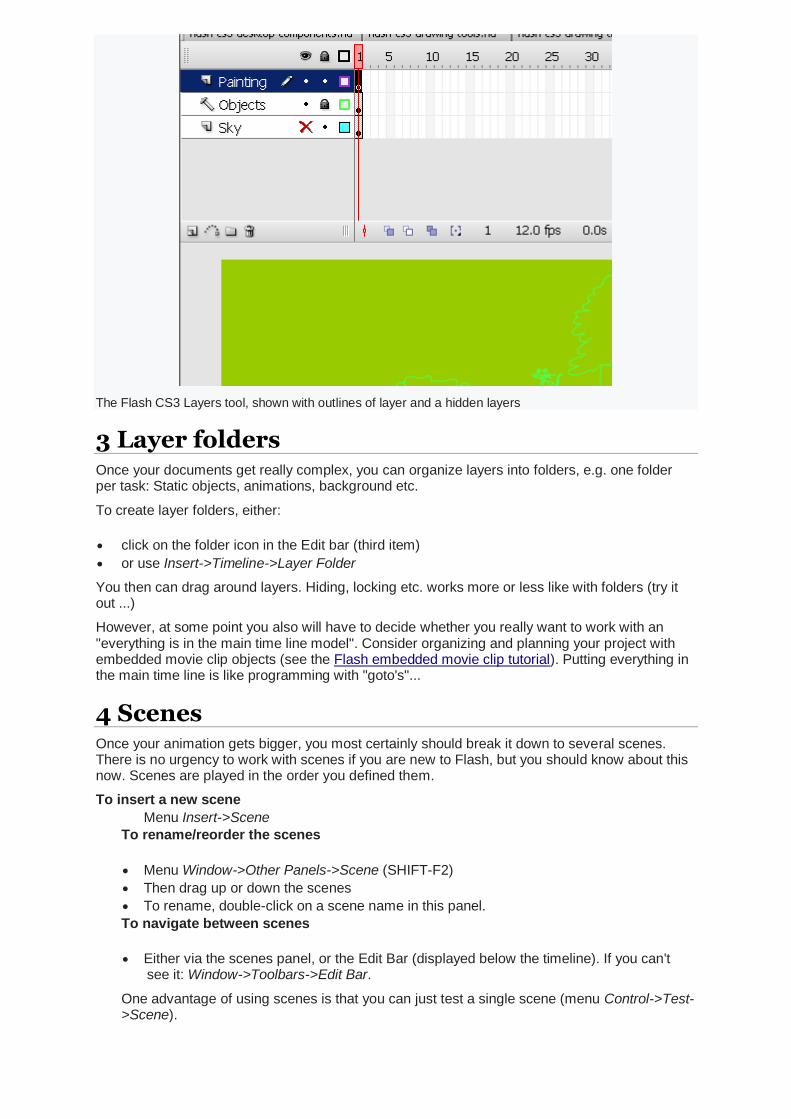
The Flash CS3 Layers tool, shown with outlines of layer and a hidden layers
3 Layer folders Once your documents get really complex, you can organize layers into folders, e.g. one folder per task: Static objects, animations, background etc.
To create layer folders, either:
click on the folder icon in the Edit bar (third item)
or use Insert->Timeline->Layer Folder
You then can drag around layers. Hiding, locking etc. works more or less like with folders (try it out ...)
However, at some point you also will have to decide whether you really want to work with an "everything is in the main time line model". Consider organizing and planning your project with embedded movie clip objects (see the Flash embedded movie clip tutorial). Putting everything in the main time line is like programming with "goto's"...
4 Scenes Once your animation gets bigger, you most certainly should break it down to several scenes. There is no urgency to work with scenes if you are new to Flash, but you should know about this now. Scenes are played in the order you defined them.
To insert a new scene
Menu Insert->Scene
To rename/reorder the scenes
Menu Window->Other Panels->Scene (SHIFT-F2)
Then drag up or down the scenes
To rename, double-click on a scene name in this panel.
To navigate between scenes
Either via the scenes panel, or the Edit Bar (displayed below the timeline). If you can't see it: Window->Toolbars->Edit Bar.
One advantage of using scenes is that you can just test a single scene (menu Control->Test->Scene).

Group objects
To manipulate elements as a single object, group them. For example, after creating a drawing,
you might group the elements of the drawing so that you can easily select and move the
drawing as a whole.
When you select a group, the Property inspector displays the x and y coordinates of the group
and its pixel dimensions.
You can edit groups without ungrouping them. You can also select an individual object in a
group for editing without ungrouping the objects.
1. Select the objects to group. You can select shapes, other groups, symbols, text, and so on.
To group objects, select Modify > Group, or press Control+G (Windows) or Command+G
(Macintosh).
To ungroup objects, select Modify > Ungroup, or press Control+Shift+G (Windows) or
Command+Shift+G (Macintosh).
Edit a group or an object within a group
1. Select the group, and then select Edit > Edit Selected, or double-click the group with the
Selection tool.
Everything on the page that is not part of the group is dimmed, indicating that elements
outside the group are inaccessible.
2. Edit any element within the group.
3. Select Edit > Edit All, or double-click a blank spot on the Stage with the Selection tool.
Animate restores the group to its status as a single entity, and you can work with other
elements on the Stage.
Break apart groups and objects
To separate groups, instances, and bitmaps into ungrouped, editable elements, you break
them apart, which significantly reduces the file size of imported graphics.
Although you can select Edit > Undo immediately after breaking apart a group or object,
breaking apart is not entirely reversible. It affects objects as follows:
Severs a symbol instance’s link to its master symbol
Discards all but the current frame in an animated symbol

Converts a bitmap to a fill
Places each character into a separate text block when applied to text blocks
Converts characters to outlines when applied to a single text character.
Do not confuse the Break Apart command with the Ungroup command. The Ungroup
command separates grouped objects, returning grouped elements to the state they were in
before grouping. It does not break apart bitmaps, instances, or type, or convert type to
outlines.
1. Select the group, bitmap, or symbol to break apart.
2. Select Modify > Break Apart. Note:
Breaking apart animated symbols, or groups in an interpolated animation is not recommended and might
have unpredictable results. Breaking apart complex symbols and large blocks of text can take a long time.
You might need to increase the application’s memory allocation to properly break apart complex objects.
Using the Free Transform Tool
There are a number of ways to change the scale or size of graphics in Flash. The Free Transform tool on
Tools panel allows you to interactively scale and rotate any selected object or shape on the Stage. Nearly
every object in Flash can be transformed with these two functions of the Free Transform tool including
groups, symbols, text, bitmaps, and editable shapes. The Free Transform tool allows you to select an
object on the Stage and then interactively change its size or rotate it freely. Both options are available at
once depending on where you place your mouse on the bounding box that appears.
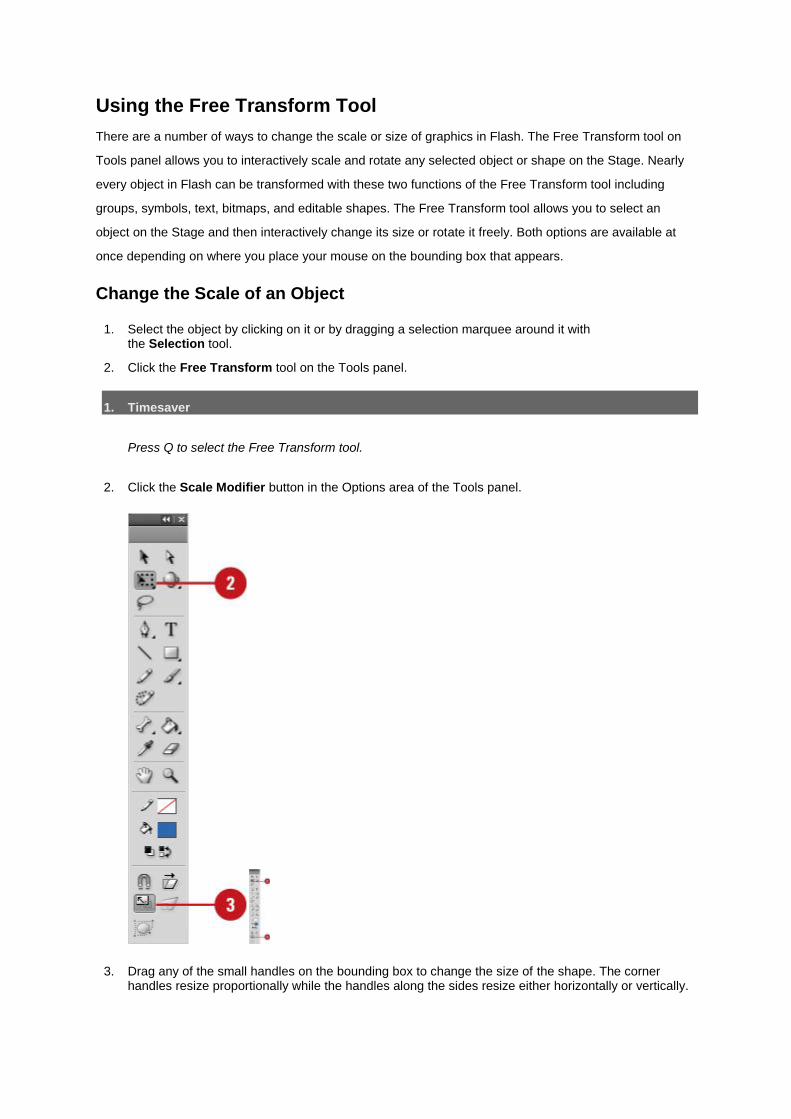
Change the Scale of an Object
1. Select the object by clicking on it or by dragging a selection marquee around it with the Selection tool.
2. Click the Free Transform tool on the Tools panel.
1. Timesaver
Press Q to select the Free Transform tool.
2. Click the Scale Modifier button in the Options area of the Tools panel.
3. Drag any of the small handles on the bounding box to change the size of the shape. The corner handles resize proportionally while the handles along the sides resize either horizontally or vertically.
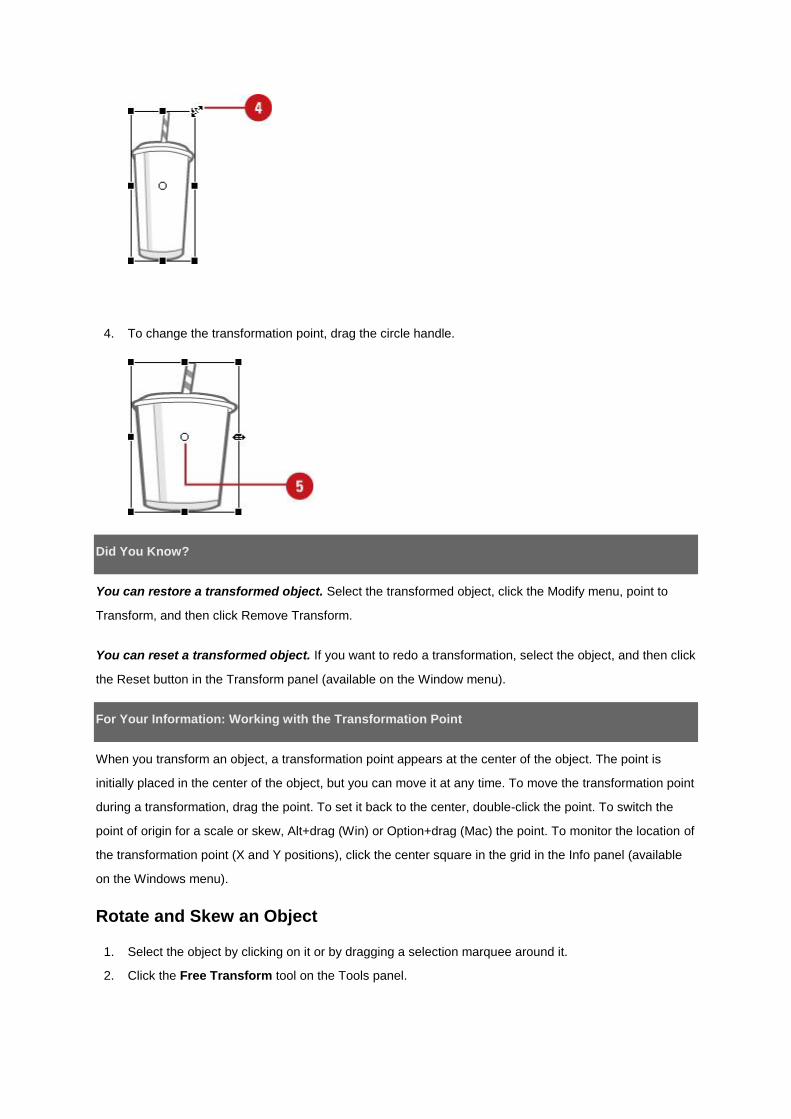
4. To change the transformation point, drag the circle handle.
Did You Know?
You can restore a transformed object. Select the transformed object, click the Modify menu, point to
Transform, and then click Remove Transform.
You can reset a transformed object. If you want to redo a transformation, select the object, and then click
the Reset button in the Transform panel (available on the Window menu).
For Your Information: Working with the Transformation Point
When you transform an object, a transformation point appears at the center of the object. The point is
initially placed in the center of the object, but you can move it at any time. To move the transformation point
during a transformation, drag the point. To set it back to the center, double-click the point. To switch the
point of origin for a scale or skew, Alt+drag (Win) or Option+drag (Mac) the point. To monitor the location of
the transformation point (X and Y positions), click the center square in the grid in the Info panel (available
on the Windows menu).
Rotate and Skew an Object
1. Select the object by clicking on it or by dragging a selection marquee around it.
2. Click the Free Transform tool on the Tools panel.
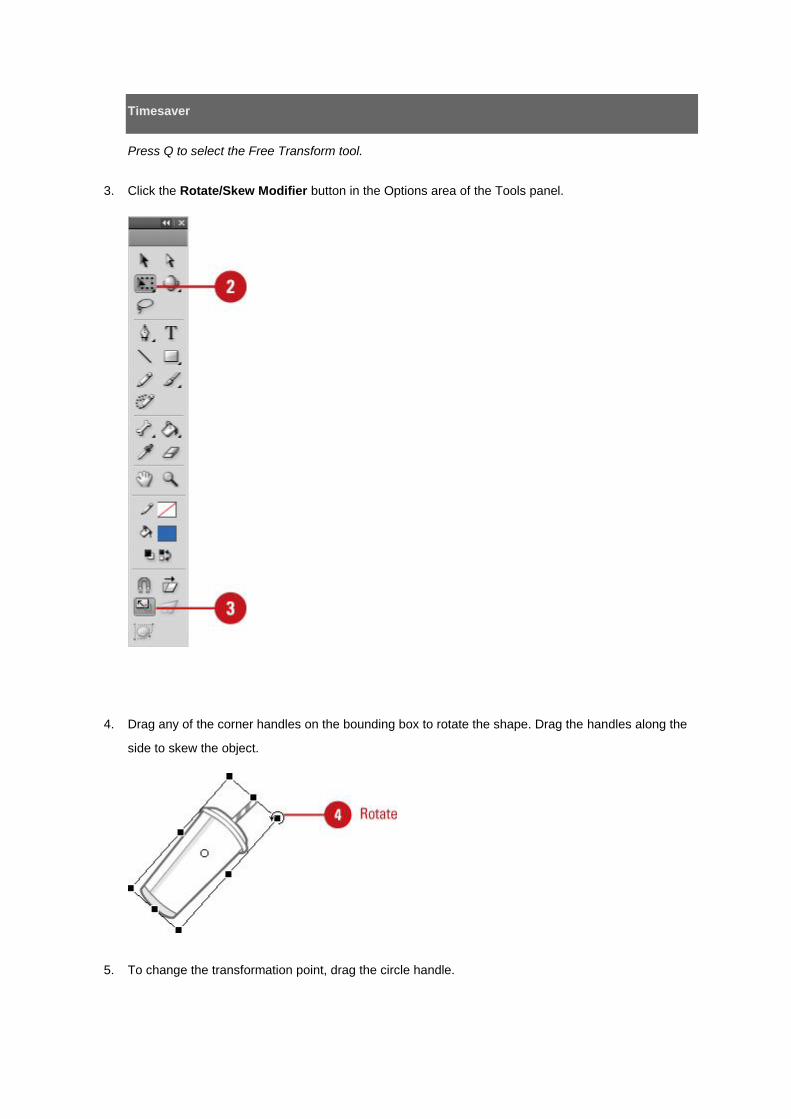
Timesaver
Press Q to select the Free Transform tool.
3. Click the Rotate/Skew Modifier button in the Options area of the Tools panel.
4. Drag any of the corner handles on the bounding box to rotate the shape. Drag the handles along the
side to skew the object.
5. To change the transformation point, drag the circle handle.
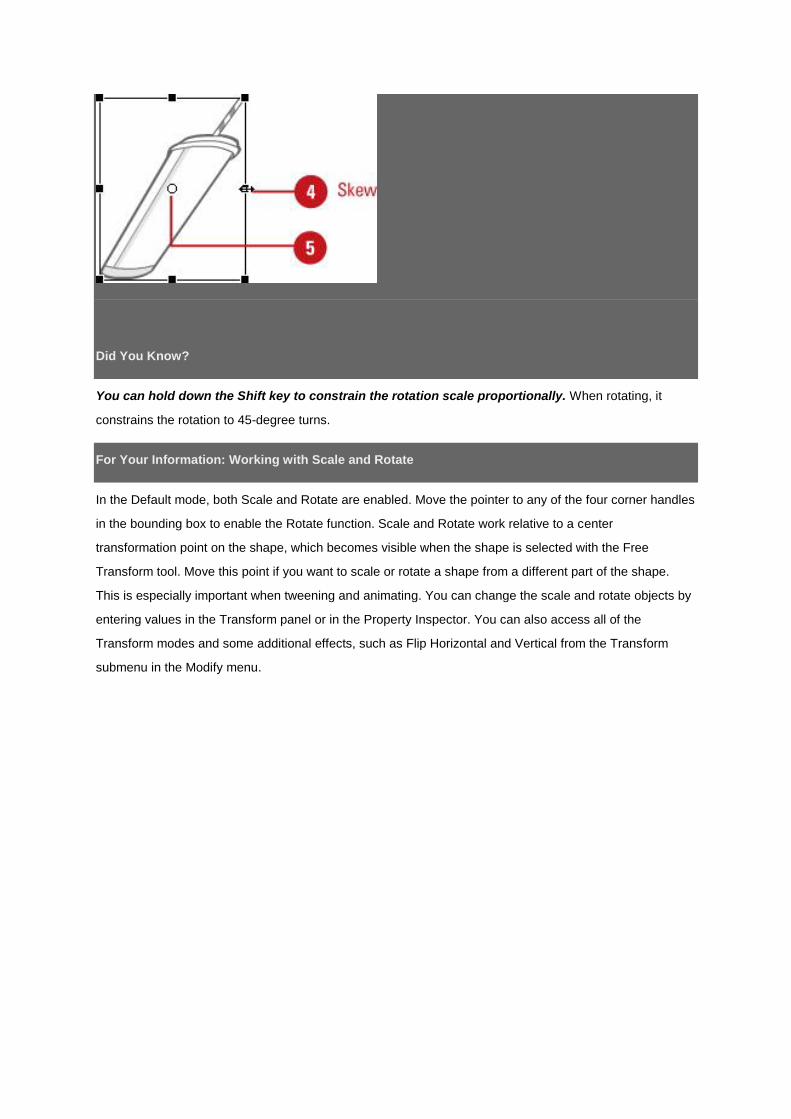
Did You Know?
You can hold down the Shift key to constrain the rotation scale proportionally. When rotating, it
constrains the rotation to 45-degree turns.
For Your Information: Working with Scale and Rotate
In the Default mode, both Scale and Rotate are enabled. Move the pointer to any of the four corner handles
in the bounding box to enable the Rotate function. Scale and Rotate work relative to a center
transformation point on the shape, which becomes visible when the shape is selected with the Free
Transform tool. Move this point if you want to scale or rotate a shape from a different part of the shape.
This is especially important when tweening and animating. You can change the scale and rotate objects by
entering values in the Transform panel or in the Property Inspector. You can also access all of the
Transform modes and some additional effects, such as Flip Horizontal and Vertical from the Transform
submenu in the Modify menu.
3/12/2020 Action Script 3.0
https://www.sfu.ca/~tutor/techbytes/Flash/fl2.html 1/6
MORE TUTORIALSPhotoshopFlashFinalCutProDreamweaverAudacityAfter Effects
Action Script 3.0Introduction
Aside from making animation, Flash is also well-known for creating interactive applications. Action Script 3.0 in
Flash allows you to create all kinds of fully interactive applications such as dynamic websites and computer
games. Also, AS3.0 is an object-oriented programming language; if you are familiar with AS3.0, it will help you to
learn other object-oriented language such as Javascript.
In this sort lesson, our goal is to provide you with some basic understanding of some crucial concepts and the
syntax; so once you can find ready-made AS3.0 online and modify it to suit your own purpose.
Unfortunately, if you had previous experience in AS2.0, the chances are that it will not help you learning AS3.0 as
much and it might even slow you down. The reason is that in AS3.0, all the coding methods are standardized,
therefore it becomes less visualized. It would be easier for programmer, but it become harder for designer since
you do not immediately see you have done with your code.
Graphic VS Movie Clip
If we want to use AS3.0 to interact with your symbols/objects, we need to set the type of your symbol to Movie
Clip; the fundamental difference between Graphic and Movie Clip Symbols is that graphic symbol animates with
timeline whereas Movie Clip symbol animates independent of timeline.
Here is a flash movie shows you the difference between Graphic and Movie Clips; you can click on STOP to stop
the timeline from playing as well click on PLAY to resume the playback on the timeline.
Instances and Naming Convention
As I mentioned before, in order to access a stage element, we need to give it an instance name; you might find we
already give it a name when we convert it to a movie clip. However, that name cannot be referenced by AS3.0 at
all. So under the properties inspector (keep the onstage movie clip selected), you can type in a name.
Once you gave a name to a Movie Clip symbol, it become a unique instance; by calling the instance name in
AS3.0, we can add all kinds of functions and events to it.
Action Script 3.0 Is CASE SENSITIVE!
One thing you need to pay attention to is that do not start any instance name with a capital letter; the main reason
is that there are many keywords in AS3.0 starting with capital letter. An instance name starting with capital letter
FLASH LESSONS
LESSON ONE
Introduction to Flash
Flash Animation
Pan, Zoom, Fade
LESSON TWO
Action Script 3.0
DOWNLOADS
flash_lesson1.zip
flash_lesson2.zip
flash_panzoomfade.zip
flash_lesson_photo_tween.zip
RESOURCE LINKS
CartoonSmart.Com
ActionScript.Org
Flash Kit
Yugop.com
CLICK HERE TO SUBMIT
SITE MAPDOWNLOAD GUIDECONTACT
3/12/2020 Action Script 3.0
https://www.sfu.ca/~tutor/techbytes/Flash/fl2.html 2/6
would confuse Flash and cost all types of strange errors.
For the purpose of organization and debugging, especially when you work with a team, if your code is written with
random variable names, it will be a big headache when you or your colleagues try to revisit/fix your code.
The major advantages of conforming to a certain set of naming convention are:
1. To reduce the effort needed to understand your code
2. To help formalize expectations and promote consistency within a development team
3. To enhance clarity in cases of potential ambiguity
4. To enhance the aesthetic and professional appearance of work product (wikipedia)
The typical naming convention in AS3.0 is usually like this:
If you have a stage element which will function as an interactive button, you should start with btn/button
(usually, you do not start an instance with capital letter) then goes the name you have for your button.For
example, a round shape button should be named "btnCircle"; if you have more than one same kind of buttons on
stage, you should add a number after the name like "btnCircle1" or "btnCircle2"
If you have a movie clip element, you should start with mc/m. For example, a movie clip contains an animation of
jumping bunny we could name it "mcBunny" or "mcJumpBunny"
If you have multiple scenes, then elements on different scenes should be able to be identified from the name. For
example, a movie clip contains a ball in scene 1 could be named "mcBall_Scene1"
Last but not least, an instance name cannot contain special characters such as exclamation point, question mark,
etc.
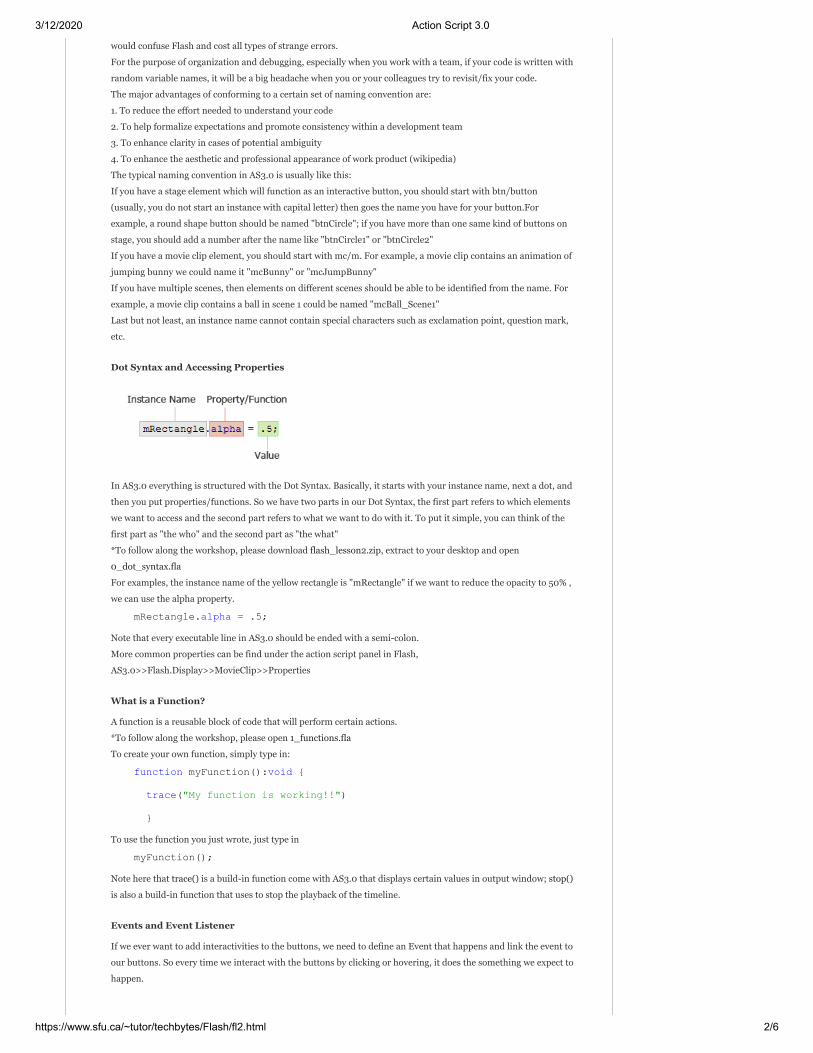
Dot Syntax and Accessing Properties
In AS3.0 everything is structured with the Dot Syntax. Basically, it starts with your instance name, next a dot, and
then you put properties/functions. So we have two parts in our Dot Syntax, the first part refers to which elements
we want to access and the second part refers to what we want to do with it. To put it simple, you can think of the
first part as "the who" and the second part as "the what"
*To follow along the workshop, please download flash_lesson2.zip, extract to your desktop and open
0_dot_syntax.fla
For examples, the instance name of the yellow rectangle is "mRectangle" if we want to reduce the opacity to 50% ,
we can use the alpha property.
mRectangle.alpha = .5;
Note that every executable line in AS3.0 should be ended with a semi-colon.
More common properties can be find under the action script panel in Flash,
AS3.0>>Flash.Display>>MovieClip>>Properties
What is a Function?
A function is a reusable block of code that will perform certain actions.
*To follow along the workshop, please open 1_functions.fla
To create your own function, simply type in:
function myFunction():void { trace("My function is working!!") }
To use the function you just wrote, just type in
myFunction();
Note here that trace() is a build-in function come with AS3.0 that displays certain values in output window; stop()
is also a build-in function that uses to stop the playback of the timeline.
Events and Event Listener
If we ever want to add interactivities to the buttons, we need to define an Event that happens and link the event to
our buttons. So every time we interact with the buttons by clicking or hovering, it does the something we expect to
happen.
3/12/2020 Action Script 3.0
https://www.sfu.ca/~tutor/techbytes/Flash/fl2.html 3/6
For example, if we want to create button that directs us to a website when we click on it, we need to create an
event that direct us to a website, then we create a button, then we add the event to the button.
*To follow along the workshop, please open 2_URLRequest.fla
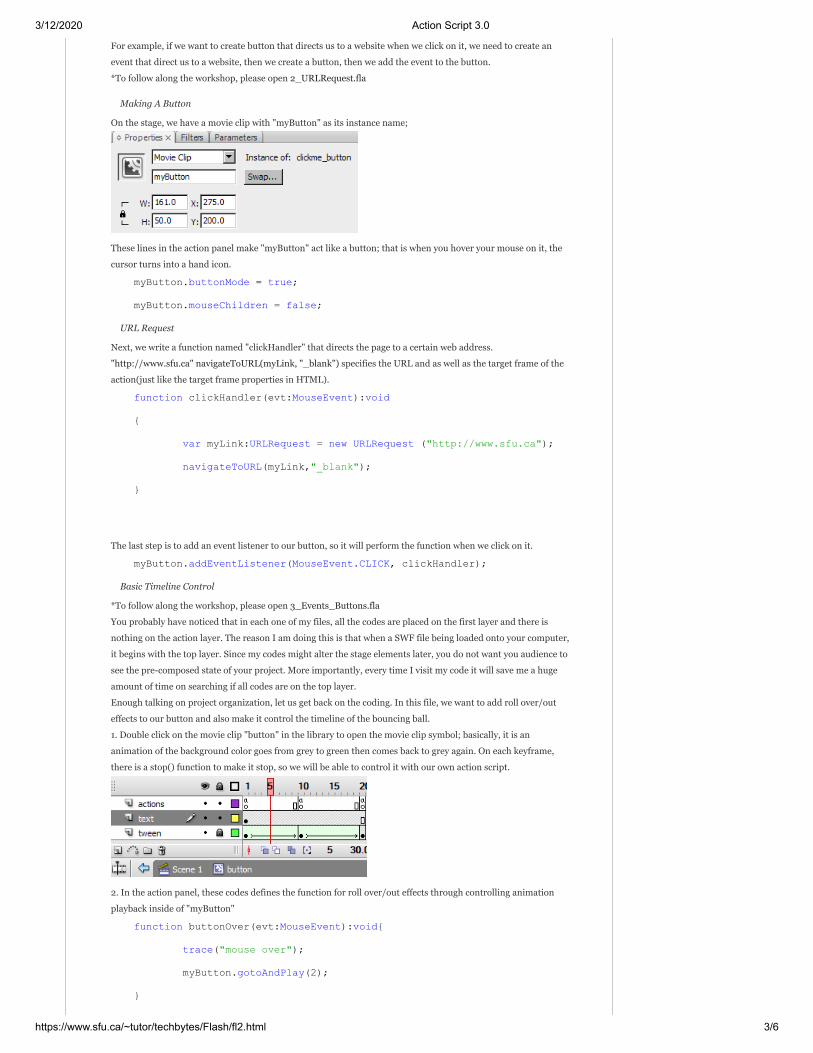
Making A Button
On the stage, we have a movie clip with "myButton" as its instance name;
These lines in the action panel make "myButton" act like a button; that is when you hover your mouse on it, the
cursor turns into a hand icon.
myButton.buttonMode = true; myButton.mouseChildren = false;
URL Request
Next, we write a function named "clickHandler" that directs the page to a certain web address.
"http://www.sfu.ca" navigateToURL(myLink, "_blank") specifies the URL and as well as the target frame of the
action(just like the target frame properties in HTML).
function clickHandler(evt:MouseEvent):void { var myLink:URLRequest = new URLRequest ("http://www.sfu.ca"); navigateToURL(myLink,"_blank"); }
The last step is to add an event listener to our button, so it will perform the function when we click on it.
myButton.addEventListener(MouseEvent.CLICK, clickHandler);
Basic Timeline Control
*To follow along the workshop, please open 3_Events_Buttons.fla
You probably have noticed that in each one of my files, all the codes are placed on the first layer and there is
nothing on the action layer. The reason I am doing this is that when a SWF file being loaded onto your computer,
it begins with the top layer. Since my codes might alter the stage elements later, you do not want you audience to
see the pre-composed state of your project. More importantly, every time I visit my code it will save me a huge
amount of time on searching if all codes are on the top layer.
Enough talking on project organization, let us get back on the coding. In this file, we want to add roll over/out
effects to our button and also make it control the timeline of the bouncing ball.
1. Double click on the movie clip "button" in the library to open the movie clip symbol; basically, it is an
animation of the background color goes from grey to green then comes back to grey again. On each keyframe,
there is a stop() function to make it stop, so we will be able to control it with our own action script.
2. In the action panel, these codes defines the function for roll over/out effects through controlling animation
playback inside of "myButton"
function buttonOver(evt:MouseEvent):void{ trace("mouse over"); myButton.gotoAndPlay(2); }

3/12/2020 Action Script 3.0
https://www.sfu.ca/~tutor/techbytes/Flash/fl2.html 4/6
function buttonOut(evt:MouseEvent):void{ trace("mouse out"); myButton.gotoAndPlay(13); }
3. Next, let us add the roll over/out effects to "myButton" using event listener;
myButton.addEventListener(MouseEvent.ROLL_OVER,buttonOver); myButton.addEventListener(MouseEvent.ROLL_OUT,buttonOut);
4. Then we need to have a function that controls the timeline in the "mcBouncing" movie clip, so when we click on
the button the animation will play. Also, we need to put a stop in the bouncing animation.
function buttonClick(evt:MouseEvent):void{ trace("click!"); mcBouncing.gotoAndPlay(2); }
5. Finally, link the timeline control function to "myButton".
myButton.addEventListener(MouseEvent.CLICK,buttonClick);
Exercise: Complete the Flash Gallery
In the final part of this workshop, you are going to use the knowledge you have learned on AS3.0 and complete
the flash gallery.
*To follow along the workshop, please open 4_BuildingYourOwnFlashSite.fla
Two fully function buttons has been created, you will need to turn the static texts "IMAGE3", "IMAGE4" and
"IMAGE5" into interactive buttons. Also, you need to customize the roll over/out effects of those buttons, then
add the image loader function to the buttons and make them load different images.
Before you start it, here is a brief explanation
1. Creating buttons
btnImage1.buttonMode = true; btnImage1.mouseChildren = false;
btnImage2.buttonMode = true; btnImage2.mouseChildren = false; // Making buttons function like a button
function btnOver(evt:Event):void { evt.target.gotoAndPlay(2); }
function btnOut(evt:Event):void { evt.target.gotoAndPlay(13); }
3/12/2020 Action Script 3.0
https://www.sfu.ca/~tutor/techbytes/Flash/fl2.html 5/6
// Defining the events for rollover/rollout effects
Notes that evt.target will automatically deprive the instance name and place it in the function
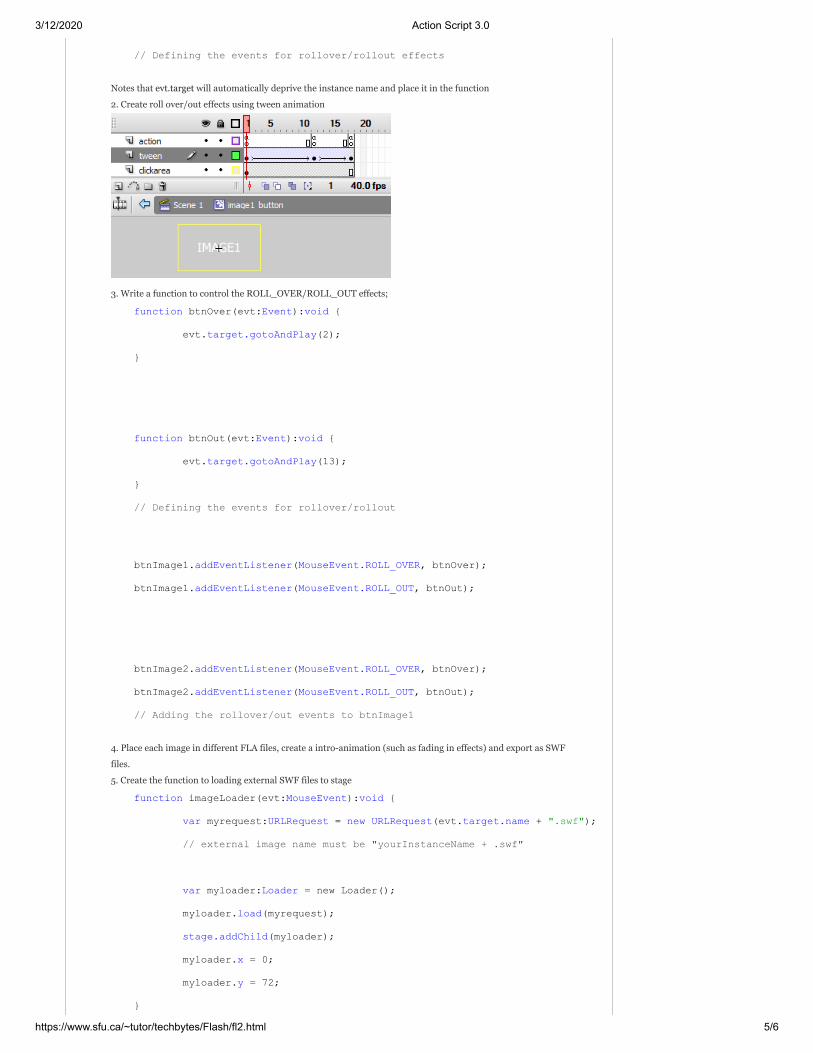
2. Create roll over/out effects using tween animation
3. Write a function to control the ROLL_OVER/ROLL_OUT effects;
function btnOver(evt:Event):void { evt.target.gotoAndPlay(2); }
function btnOut(evt:Event):void { evt.target.gotoAndPlay(13); } // Defining the events for rollover/rollout
btnImage1.addEventListener(MouseEvent.ROLL_OVER, btnOver); btnImage1.addEventListener(MouseEvent.ROLL_OUT, btnOut);
btnImage2.addEventListener(MouseEvent.ROLL_OVER, btnOver); btnImage2.addEventListener(MouseEvent.ROLL_OUT, btnOut); // Adding the rollover/out events to btnImage1
4. Place each image in different FLA files, create a intro-animation (such as fading in effects) and export as SWF
files.
5. Create the function to loading external SWF files to stage
function imageLoader(evt:MouseEvent):void { var myrequest:URLRequest = new URLRequest(evt.target.name + ".swf"); // external image name must be "yourInstanceName + .swf" var myloader:Loader = new Loader(); myloader.load(myrequest); stage.addChild(myloader); myloader.x = 0; myloader.y = 72; }

3/12/2020 Action Script 3.0
https://www.sfu.ca/~tutor/techbytes/Flash/fl2.html 6/6
COPYRIGHT 2008 SFU ALLRIGHTS RESERVED
6. Add the loading Function to MouseClick Event
btnImage1.addEventListener(MouseEvent.CLICK, imageLoader); btnImage2.addEventListener(MouseEvent.CLICK, imageLoader);
Back to top
3/12/2020 ActionScript 3.0 overview | Adobe Developer Connection
https://www.adobe.com/devnet/actionscript/articles/actionscript3_overview.html 1/6
ActionScript 3.0 overview
by Gary Grossman
Gary Grossman
by Emmy Huang
emmy houng
Created27 June 2006
ActionScript 3.0 is a powerful, object-oriented programming language that
signifies an important step in the evolution of the capabilities of the Flash
Player runtime. The motivation driving ActionScript 3.0 is to create a language
ideally suited for rapidly building rich Internet applications, which have
become an essential part of the web experience.
Earlier versions of ActionScript offered the power and flexibility required for
creating truly engaging online experiences. ActionScript 3.0 now further
advances the language, providing superb performance and ease of
development to facilitate highly complex applications, large datasets, and
object-oriented, reusable code bases. With ActionScript 3.0, developers can
achieve excellent productivity and performance with content and applications
that target Flash Player.
ActionScript 3.0 is based on ECMAScript, the international standardized
programming language for scripting. ActionScript 3.0 is compliant with the
ECMAScript Language Specification, Third Edition (ECMA-262). It also contains
functionality based on ongoing work on ECMAScript Edition 4, occurring
within the ECMA standards body.
ActionScript is executed by the ActionScript Virtual Machine (AVM) built into
the Flash Player. AVM1, the virtual machine used to execute legacy ActionScript
code, powers Flash Player today and makes possible a wide range of
interactive media and rich Internet applications.
However, developers have started to push AVM1 to its limits; their project
requirements now demand a major breakthrough. ActionScript 3.0 introduces
a new highly optimized ActionScript Virtual Machine, AVM2, which
dramatically exceeds the performance possible with AVM1. As a result,
ActionScript 3.0 code executes up to 10 times faster than legacy ActionScript
code.
The new AVM2 virtual machine is available in Flash Player 9, and will be the
primary virtual machine for ActionScript execution going forward. The older
AVM1 will continue to be supported by Flash Player for backwards
compatibility with existing and legacy content.
There are numerous products that generate content and applications targeted
at the Flash Player runtime. Often these products incorporate support for
ActionScript to add interactivity and behavior to their output. In the Adobe
product family, professional designers and developers might use ActionScript
within several tools and servers—such as Flash, Flex, and Flash Media Server
—to create content and applications for Flash Player. The Flex product family,
including the new Eclipse-based Flex Builder 2 IDE, will be the first product line
to access the new capabilities of ActionScript 3.0.
ACTIONSCRIPT 3.0 OVERVIEW
›
☰ Sign In

3/12/2020 ActionScript 3.0 overview | Adobe Developer Connection
https://www.adobe.com/devnet/actionscript/articles/actionscript3_overview.html 2/6
Goals of ActionScript 3.0
We wanted ActionScript 3.0 to deliver an improved, consistent programming
model; compliance with industry standards; and performance an order of
magnitude greater than what we delivered in the past. Although ActionScript
3.0 represents a new programming model for the runtime, it is one that will be
familiar to developers with a basic knowledge of object-oriented
programming.
ActionScript 3.0 is designed to address the following goals:
Safety: The language supports type safety so developers can writeunambiguous, easily maintainable code.Simplicity: The language is intuitive enough for developers to be able toread and write programs without constantly consulting a reference manual.Performance: The language enables developers to write complexprograms that perform efficiently and responsively.Compatibility: The language provides a short backward and forwardcompatibility path and a significant overlap with industry standards.ActionScript 3.0 is a dialect of ECMAScript which formalizes the features ofActionScript 2.0, adds the capabilities of ECMAScript for XML (E4X), andunifies the language into a coherent whole.
Features of ActionScript 3.0
ActionScript 3.0 consists of two parts: the core language and the Flash Player
API. The core language defines the basic building blocks of the programming
language, such as statements, expressions, conditions, loops, and types. The
Flash Player API is made up of classes that represent and provide access to
Flash Player–specific functionality
ActionScript 3.0 contains a host of powerful new features that can greatly
speed the development process. Regular expression support enables a variety
of powerful operations on text. ECMAScript for XML (E4X) transforms XML into
a native data type, dramatically simplifying XML processing. The new Display
List API makes working with visual objects far more straightforward and
consistent. The standardized DOM event model cements the way those
objects talk and respond to each other at runtime. These are only a few of the
many new capabilities of ActionScript 3.0.
Language features
ActionScript 3.0 brings the core language aspects of ActionScript 2.0 into
compliance with the ECMAScript standard and introduces some areas of new
or enhanced functionality. All of these features are discussed in comprehensive
detail in the ActionScript 3.0 Language Reference, available in beta version on
Adobe Labs.
Following is a high-level summary of the developer benefits and usage of
some of the new features.
Runtime exceptions
In ActionScript 2.0, many runtime errors would fail in a graceful but silent
fashion. This ensured that Flash Player would not display some inexplicable
dialog box, which JavaScript did in early web browsers. On the other hand, this
ACTIONSCRIPT 3.0 OVERVIEW
›
☰ Sign In

3/12/2020 ActionScript 3.0 overview | Adobe Developer Connection
https://www.adobe.com/devnet/actionscript/articles/actionscript3_overview.html 3/6
lack of error reporting made it more challenging to debug ActionScript
programs.
ActionScript 3.0 introduces a variety of runtime exceptions for common error
conditions, improving the debugging experience and enabling applications that
handle errors robustly. Runtime errors can provide stack traces annotated with
source file and line number information, helping to pinpoint errors quickly.
Runtime types
In ActionScript 2.0, type annotations were primarily an aid for developers; at
runtime, all values were dynamically typed.
In ActionScript 3.0, type information is preserved at runtime and utilized for a
number of purposes. Flash Player performs runtime type checking , improving
the system's type safety. Type information is also used to represent variables in
native machine representations, improving performance and reducing
memory usage.
Sealed classes
ActionScript 3.0 introduces the concept of a sealed class. A sealed class
possesses only the fixed set of properties and methods that were defined at
compile-time; additional properties and methods cannot be added. This
makes stricter compile-time checking possible, resulting in more robust
programs. It also improves memory usage by not requiring an internal hash
table for each object instance. Dynamic classes are also possible using the
dynamic keyword.
Method closures
Event handling is simplified in ActionScript 3.0 thanks to method closures,
which provide built-in event delegation. In ActionScript 2.0, a closure would not
remember what object instance it was extracted from, leading to unexpected
behavior when the closure was invoked. The mx.utils.Delegate class was a
popular workaround; to use it, you would write code as follows:
myButton.addEventListener("click", Delegate.create(this, someMethod)); Delegate.create(th
This class is no longer needed because in ActionScript 3.0, a method closure
will be generated when someMethod is referenced. The method closure will
automatically remember its original object instance. Now, one can simply
write:
myButton.addEventListener("click", someMethod);
ECMAScript for XML (E4X)
ActionScript 3.0 features a full implementation of ECMAScript for XML (E4X),
recently standardized as ECMA-357. E4X offers a natural, fluent set of language
constructs for manipulating XML. Unlike traditional XML parsing APIs, E4X
makes XML feel like a native data type of the language. E4X streamlines the
development of applications that manipulate XML by drastically reducing the
amount of code needed.
Read more about the E4X specification (PDF, 1.8 MB)
ACTIONSCRIPT 3.0 OVERVIEW
›
☰ Sign In
3/12/2020 ActionScript 3.0 overview | Adobe Developer Connection
https://www.adobe.com/devnet/actionscript/articles/actionscript3_overview.html 4/6
Regular expressions
ActionScript3.0 includes native support for regular expressions so you can
quickly search for and manipulate strings. ActionScript 3.0 implements the
regular expressions defined in the ECMAScript Language Specification(ECMA-
262).
Namespaces
Namespaces are an innovative new mechanism for controlling visibility of
declarations. Similar to the traditional access specifiers used to control visibility
of declarations (public, private, protected), namespaces are essentially custom
access specifiers, which can have names of your choosing. The Flex
framework, for example, uses anmx_internal namespace for its internal data.
Namespaces are outfitted with a Universal Resource Identifier (URI) to avoid
collisions, and are also used to represent XML namespaces when working with
E4X.
New primitive types
ActionScript 2.0 had a single numeric type, Number, a double-precision floating
point number. One welcome addition to ActionScript 3.0 is the new int type—
a 32-bit signed integer that lets ActionScript code take advantage of the fast
integer math capabilities of the CPU. The int type is great for loop counters and
almost anywhere a decimal point isn't needed. Another new type is uint , an
unsigned 32-bit integer type similar to int.
Flash Player API features
The Flash Player API is a set of classes and functions that expose the
capabilities of Flash Player to the ActionScript language. This functionality is
the bridge between the ActionScript core language and the rest of the
platform. It is the source of much of the power available to Flash applications
and is a very important complement to the core language. Although there isn't
space here to cover the APIs in detail, here is a short list of some of the new
and interesting functionality available to developers:
DOM3 event model
The event model provides a standard way of generating and handling event
messages so that objects within applications can interact and communicate,
maintaining state and responding to change. Patterned after the W3C DOM3
Events specification, this model provides a clearer and more efficient
mechanism than the event systems available in previous versions of
ActionScript. The Flex application framework uses the same event model as
the Flash Player API, so the event system is unified across the platform from
top to bottom.
Display List API
The Display List API consists of a revamped set of classes for working with the
visual primitives in Flash.
The new Sprite class is a lightweight building block, similar to MovieClip but
more appropriate as a base class for UI components. The new Shape class
represents raw vector shapes. These classes can be instantiated naturally with
the new operator and can be dynamically re-parented at any time.
ACTIONSCRIPT 3.0 OVERVIEW
›
☰ Sign In
3/12/2020 ActionScript 3.0 overview | Adobe Developer Connection
https://www.adobe.com/devnet/actionscript/articles/actionscript3_overview.html 5/6
There is no longer any need to assign depth numbers to display list objects.
Depth management is now automatic and built into Flash Player. New
methods are provided for specifying and managing the z-order of objects
Where to go from here
This ActionScript 3.0 overview outlines only a few of the exciting APIs and
language features you'll discover as you learn more about ActionScript3.0.
Programming ActionScript 3.0 on LiveDocs (or as PDF) is a good place to start
for information on how to implement programming concepts in ActionScript,
and the ActionScript 3.0 Language Reference will be the definitive source for
complete information about the core language and the Flash Player API. Also, if
you're already familiar with ActionScript 1.0 or 2.0, check out Tips for Learning
ActionScript 3.0.
The Flash Player team is thrilled to be able to deliver a preview of the language,
its new capabilities, and improved performance to the community through
Adobe Labs. You will be able to explore ActionScript3.0 to see where we are
taking the language through Flex Builder 2, the Flex framework, Flex Data
Services 2, and Flash Player 9. We hope you are as excited as we are about the
future of the platform, and look forward to the feedback you will provide us
through Adobe Labs.
More Like This
Six reasons to use ActionScript 3.0
Creating a preloader in Flash
Introduction to event handling in ActionScript 3.0
ActionScript 3 Design Patterns excerpt: Factory method and MVC
Essential ActionScript 3 excerpt: Display and interactivity
ActionScript 3 Cookbook excerpts: From custom classes to the rendering
model
Flash iOS Apps Cookbook excerpt: ActionScript optimization
Introduction to Robotlegs – Part 2: Models
ActionScript 3.0 from the ground up
Colin Moock ActionScript 3 videos
› Adobe Developer Connection › ActionScript Technology Center › ActionScript 3.0 overview
Products
Blogs & Community
Support
Adobe
Adobe Acrobat Reader DC Adobe Flash Player Adobe AIR
ACTIONSCRIPT 3.0 OVERVIEW
›
☰ Sign In

3/12/2020 ActionScript 3.0 overview | Adobe Developer Connection
https://www.adobe.com/devnet/actionscript/articles/actionscript3_overview.html 6/6
Change region
Copyright © 2020 Adobe. All rights reserved./
/ / / /
∨
Privacy Terms of Use Cookies Do not sell my personal information AdChoices
ACTIONSCRIPT 3.0 OVERVIEW
›
3/12/2020 Adobe Flash Professional CS5 * Set parameters and properties
https://help.adobe.com/en_US/as3/components/WS5b3ccc516d4fbf351e63e3d118a9c65b32-7fee.html 1/2
View Help PDF ( 3.6M B)
Adobe Flash Professional CS5
Home / Using ActionScript 3.0 Components / Working with Components
Set parameters and properties
Set component properties in ActionScript
Each component has parameters that you can set to change its appearance and behavior. A parameter is aproperty of the component’s class and appears in the Property inspector and the Component inspector. Themost commonly used properties appear as authoring parameters; others you must set with ActionScript. Allparameters that can be set during authoring can also be set with ActionScript. Setting a parameter withActionScript overrides any value set during authoring.
Most ActionScript 3.0 User Interface components inherit properties and methods from the UIComponent classas well as from a base class. For example, the Button and CheckBox classes inherit properties from both theUIComponent class and the BaseButton class. A component’s inherited properties, as well as its own classproperties, are available for you to access. For example, the ProgressBar component inherits theProgressBar.enabled property from UIComponent but also has its own ProgressBar.percentComplete property.You can access both of these properties to interact with an instance of the ProgressBar component. For moreinformation on a component’s properties, see its class entry in the ActionScript 3.0 Reference for the AdobeFlash Platform .
You can set parameters for a component instance using either the Property inspector or the Componentinspector.
Enter an instance name for a component in the Property inspector:
1. Select Window > Properties > Properties.
2. Select an instance of a component on the Stage.
3. Enter a name for the component instance in the box that says <Instance Name>, located beneath thedrop-down list that says Movie Clip. Or click the Parameters tab and enter the name in the box below theword Component . Enter values for any parameters that you want to set.
It’s a good idea to add a suffix to the instance name to indicate what kind of component it is; this makesit easier to read your ActionScript code. For example, the instance name licenseSb identifies that acomponent is a scroll bar that scrolls a license agreement in the licenseTa text area.
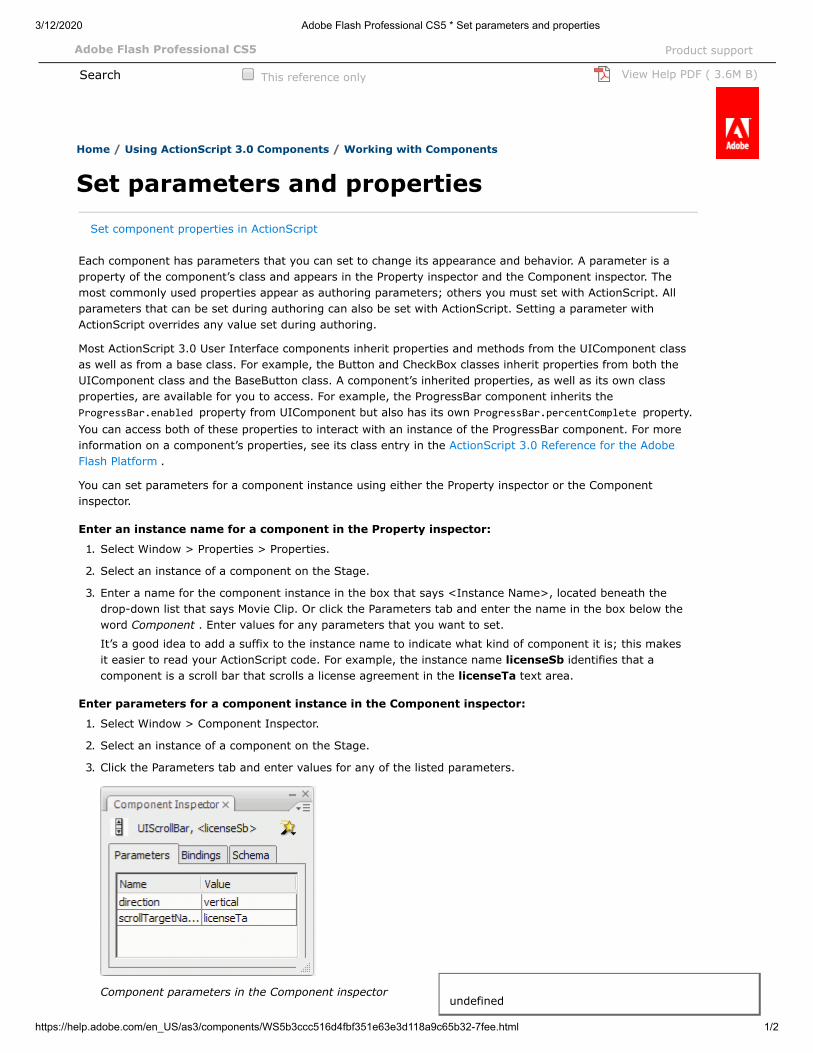
Enter parameters for a component instance in the Component inspector:
1. Select Window > Component Inspector.
2. Select an instance of a component on the Stage.
3. Click the Parameters tab and enter values for any of the listed parameters.
Component parameters in the Component inspector
This reference onlySearch
Product support
undefined
3/12/2020 Adobe Flash Professional CS5 * Set parameters and properties
https://help.adobe.com/en_US/as3/components/WS5b3ccc516d4fbf351e63e3d118a9c65b32-7fee.html 2/2
Set component properties in ActionScriptIn ActionScript, you use a dot (.) operator (dot syntax) to access properties or methods that belong to anobject or instance on the Stage. A dot syntax expression begins with the name of the instance, followed by adot, and it ends with the element you want to specify. For example, the following ActionScript code sets thewidth property of the CheckBox instance aCh to make it 50 pixels wide:
aCh.width = 50;
The following if statement checks to see if the user has selected the check box:
if (aCh.selected == true) { displayImg(redCar); }
Twitter™ and Facebook posts are not covered under the terms of Creative Commons.
Home / Using ActionScript 3.0 Components / Working with Components
Legal Notices | Online Privacy Policy
// Ethnio survey code removed
undefined
3/12/2020 Basic Animation Methods in Flash
gcctech.org/cmm/cmm21g/flash/flash_basic_animation_methods.htm 1/2
Basic Methods of Animating in Flash
1. Frame-by-Frame animation
This is the most basic form of animation. You manually change the contents of each individual keyframe. Thismethod is ideal for complex animations that need very subtle changes such as small facial expressions.
Frame-by-frame animation is very time consuming and tedious to draw the art work for each frame, and itcontributes to a large file size.
When using the frame-by-frame technique most animators will want to make use the the Onion Skinningfeatures. There are two options Onion Skin and Onion Skin Outlines.Onion Skin will show grayed-out art work over multiple frames. Onion Skin Outlines will show coloured artwork over multiple frames. The number of frames visible can be controlled by the Modify Onion Markers menu.
2. Tweening animation
Tweening is one of the most powerful features of flash animation. It allows the animator to quickly createtransitions between images. You only need to establish the starting point and the ending point, Flash willgenerate the in-beTweens. Tweening can be used to render changes in shape, position, rotation, colour,transparency, size and skew.
Tweening also minimizes the filesize, Flash only saves the start image, end image and the values needed to makethe change.
Flash has two types of tweens:
Shape tween - useful for morphing basic shapes eg. turn a star into a circle
Motion Tween - move an image from one place to another as well as rotate, change colour, transparency, sizeand skew images.Flash has the feature of Motion tween along a path, this lets the animator draw a path for the motion tween tofollow.
3. Timeline Effects
New to Flash MX 2004 is Timeline Effects. These are pre built scripts that you can control what happens. Thereare three categories of Timeline effects (check Insert > Timeline Effects menu)
Assistants- gives you a more streamlined way to complete tasks-Copy to Grid: create multiple symbol instances and render them in rows or columns-Distributed Duplicate: create multiple symbol instances, with changes in alpha or colour
Effects - modify the graphic content of the original item-Blur: similar to a soften fill edges-Drop shadow: adds a 'shadow' effect with settings for colour, alpha, and offset

3/12/2020 Basic Animation Methods in Flash
gcctech.org/cmm/cmm21g/flash/flash_basic_animation_methods.htm 2/2
-Expand: Animator can choose the direction and amount an item will stretch and squash and distort.-Explode: Self explanatory, animator chooses size, direction, distance and speed the pieces fly
Transform/Transition: Some effects similar to the motion tween, but quicker to use-Transform: change an items position, scale, rotation, colour, and alpha -Transition: Fade/Wipe and item in or out
Basic Methods of Animating in Flash
1. Frame-by-Frame animation
This is the most basic form of animation. You manually change the contents of each
individual keyframe. This method is ideal for complex animations that need very
subtle changes such as small facial expressions.
Frame-by-frame animation is very time consuming and tedious to draw the art work
for each frame, and it contributes to a large file size.
When using the frame-by-frame technique most animators will want to make use the
the Onion Skinning features. There are two options Onion Skin and Onion Skin
Outlines.
Onion Skin will show grayed-out art work over multiple frames. Onion Skin
Outlines will show coloured art work over multiple frames. The number of frames
visible can be controlled by the Modify Onion Markers menu.
2. Tweening animation
Tweening is one of the most powerful features of flash animation. It allows the
animator to quickly create transitions between images. You only need to establish the
starting point and the ending point, Flash will generate the in-beTweens. Tweening
can be used to render changes in shape, position, rotation, colour, transparency, size
and skew.
Tweening also minimizes the filesize, Flash only saves the start image, end image and
the values needed to make the change.
Flash has two types of tweens:
Shape tween - useful for morphing basic shapes eg. turn a star into a circle
Motion Tween - move an image from one place to another as well as rotate, change
colour, transparency, size and skew images.
Flash has the feature of Motion tween along a path, this lets the animator draw a path
for the motion tween to follow.
3. Timeline Effects
New to Flash MX 2004 is Timeline Effects. These are pre built scripts that you can
control what happens. There are three categories of Timeline effects (check Insert >
Timeline Effects menu)
Assistants- gives you a more streamlined way to complete tasks
-Copy to Grid: create multiple symbol instances and render them in rows or columns
-Distributed Duplicate: create multiple symbol instances, with changes in alpha or
colour
Effects - modify the graphic content of the original item
-Blur: similar to a soften fill edges
-Drop shadow: adds a 'shadow' effect with settings for colour, alpha, and offset
-Expand: Animator can choose the direction and amount an item will stretch and
squash and distort.
-Explode: Self explanatory, animator chooses size, direction, distance and speed the
pieces fly
Transform/Transition: Some effects similar to the motion tween, but quicker to use
-Transform: change an items position, scale, rotation, colour, and alpha
-Transition: Fade/Wipe and item in or out

Basics of movie clips
Flash Player 9 and later, Adobe AIR 1.0 and later
Movie clips are a key element for people who create animated content with the Flash
authoring tool and want to control that content with ActionScript. Whenever you
create a movie clip symbol in Flash, Flash adds the symbol to the library of that
Flash document. By default, this symbol becomes an instance of the MovieClip
class , and as such has the properties and methods of the MovieClip class.
When an instance of a movie clip symbol is placed on the Stage, the movie clip
automatically progresses through its timeline (if it has more than one frame) unless
its playback is altered using ActionScript. It is this timeline that distinguishes the
MovieClip class, allowing you to create animation through motion or shape tweens
through the Flash authoring tool. By contrast, with a display object that is an instance
of the Sprite class, you can create animation only by programmatically changing the
object’s values.
In previous versions of ActionScript, the MovieClip class was the base class of all
instances on the Stage. In ActionScript 3.0, a movie clip is only one of many display
objects that can appear on the screen. If a timeline is not necessary for the function
of a display object, using the Shape class or Sprite class in lieu of the MovieClip
class may improve rendering performance. For more information on choosing the
appropriate display object for a task, see Choosing a DisplayObject subclass .
Important concepts and terms
The following reference list contains important terms related to movie clips:
AVM1 SWF
A SWF file created using ActionScript 1.0 or ActionScript 2.0, usually
targeting Flash Player 8 or earlier.
AVM2 SWF
A SWF file created using ActionScript 3.0 for Adobe Flash Player 9 or later or
Adobe AIR.
External SWF
A SWF file that is created separately from the project SWF file and is intended
to be loaded into the project SWF file and played back within that SWF file.
Frame
The smallest division of time on the timeline. As with a motion picture
filmstrip, each frame is like a snapshot of the animation in time, and when
frames are played quickly in sequence, the effect of animation is created.
Timeline
The metaphorical representation of the series of frames that make up a movie
clip’s animation sequence. The timeline of a MovieClip object is equivalent to
the timeline in the Flash authoring tool.
Playhead
A marker identifying the location (frame) in the timeline that is being
displayed at a given moment.

Flash Video 101: How to Customize the FLV Playback Component
It's easy to customize the playback appearance and controls of Flash video to match the
design or functionality of any project. James Gonzalez demonstrates how to customize the
FLVPlayback component by using Flash's built-in custom UI components. He also
explains how to create entirely new skins by modifying these components with Flash's
graphic editing tools.
A previous article in this series, Controlling Flash Video with the FLVPlayback
Component, reviewed how to control Flash Video with the FLVPlayback component. This
article extends the review by covering how to customize this playback component to
achieve the look or functionality needed to match the design of your projects.
You have the following choices for customizing the FLVPlayback component:
Select a pre-designed skin.
Skin FLVPlayback custom UI components individually.
Create a new skin. You can also use FLVPlayback properties to modify the behavior
of a skin.
NOTE
You must upload your skin SWF file to the web server along with your application
SWF file for the skin to work with your FLVPlayback component.
This article covers how to customize the FLVPlayback component by using the
built-in custom UI components or by creating entirely new skins by modifying these
components themselves with Flash’s graphics tools.
For a comprehensive overview of customizing components, including terminology
and the basic concepts of working with styles, skins, and themes, see the
"Customizing Components" section of Flash Help.
NOTE
If you are familiar with customizing other Flash components, do not use these
methods here, as they will not work with the FLVPlayback component. To
customize the FLVPlayback component use only the techniques I cover in this
article.
Selecting a Predesigned Skin
Select a predesigned skin for the FLVPlayback component by clicking the value
cell for the skin parameter in the Component inspector (see Figure 1).
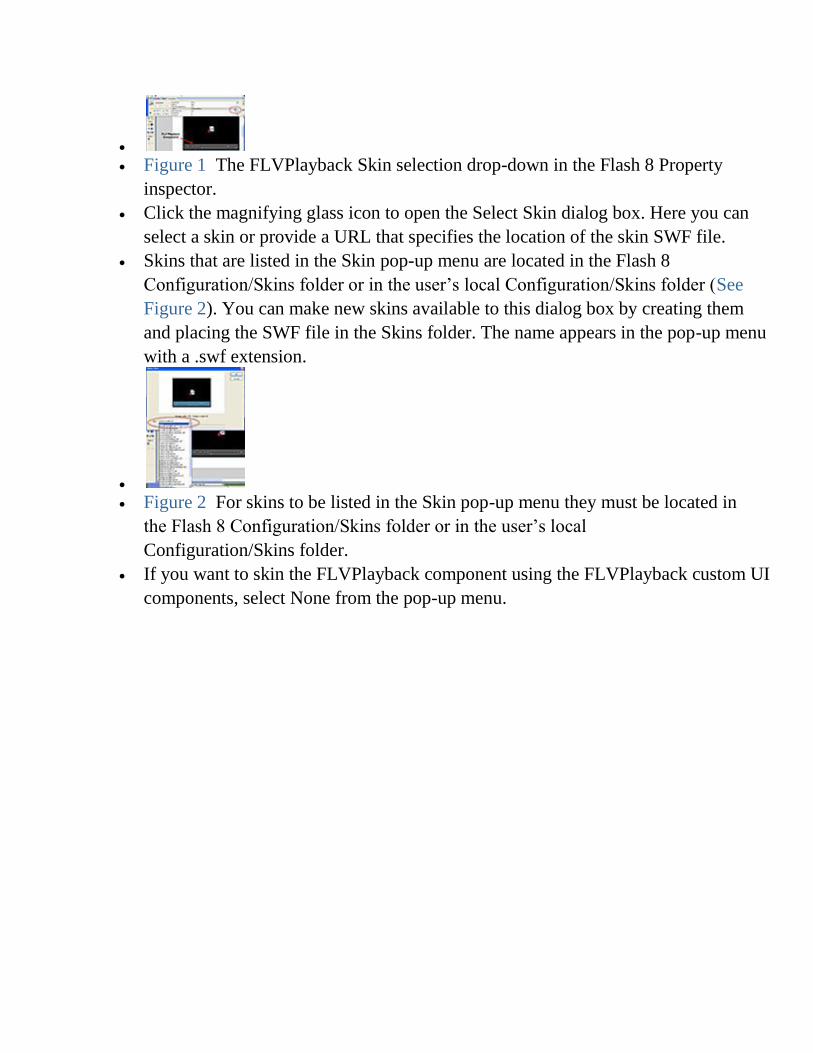
Figure 1 The FLVPlayback Skin selection drop-down in the Flash 8 Property
inspector.
Click the magnifying glass icon to open the Select Skin dialog box. Here you can
select a skin or provide a URL that specifies the location of the skin SWF file.
Skins that are listed in the Skin pop-up menu are located in the Flash 8
Configuration/Skins folder or in the user’s local Configuration/Skins folder (See
Figure 2). You can make new skins available to this dialog box by creating them
and placing the SWF file in the Skins folder. The name appears in the pop-up menu
with a .swf extension.
Figure 2 For skins to be listed in the Skin pop-up menu they must be located in
the Flash 8 Configuration/Skins folder or in the user’s local
Configuration/Skins folder.
If you want to skin the FLVPlayback component using the FLVPlayback custom UI
components, select None from the pop-up menu.
Configuring the FLVPlayback Component
Configuring the FLVPlayback component involves three steps:
1. With the component selected, open the Property inspector (Windows > Properties) and enter an
instance name.
2. Select the Parameters tab in the Property inspector or open the Component inspector (Windows >
Components).
3. Enter values for parameters or use default settings (See Figure 6).
Figure 6 FLVPlayback component parameters in the Property inspector
For each FLVPlayback component instance, you can set the following parameters in the Property
inspector or Component inspector:
NOTE
In most cases and for most deployments, it is not necessary to alter the settings in the FLVPlayback
component, unless you want to change the appearance of a video skin. Flash will usually do a good job
with this when the video clip is imported.
autoPlay: This is a Boolean value that determines how to play the FLV. If true, the FLV plays
immediately when it is loaded. If false, it loads the first frame and pauses. The default value is true.
autoRewind: This is a Boolean value that determines whether the FLV is automatically rewound. If
true, the Video component automatically rewinds the FLV to the beginning when the playhead
reaches the end or when the user clicks the stop button. If false, the Video component does not
automatically rewind the FLV. The default value is true.
autoSize: A Boolean value that, if true, resizes the component at runtime to use the source FLV
dimensions. The default value is false.
NOTE
The encoded frame size of the FLV is not the same as the default dimensions of the FLVPlayback
component.
bufferTime: This sets the number of seconds to buffer before beginning playback. The default value
is 0.
contentPath: This is a string that specifies the URL to an FLV or to an XML file that describes how
to play the FLV. Double-click the Value cell for this parameter to activate the Content Path dialog
box. The default is an empty string. If you do not specify a value for the contentPath parameter,
nothing happens when Flash executes the FLVPlayback instance. For more information, see
"Specifying the Contentpath Parameter" in Flash Help.
isLive: This is a Boolean value that, if true, specifies that the FLV is streaming live from FCS. The
default value is false.
cuePoints: This is a string that specifies the cue points for the FLV. Cue points enable you to
synchronize specific points in the FLV with Flash animation, graphics, or text. The default value is
an empty string.
maintainAspectRatio: A Boolean value that, if true, resizes the video player within the
FLVPlayback component to retain the source FLV aspect ratio; the source FLV will still be scaled
and the FLVPlayback component itself will not be resized. The autoSize parameter takes precedence
over this parameter. The default value is true.
skin: A parameter that opens the Select Skin dialog box and enables you to choose a skin for the
component (See Figure 7). The default skin is ClearOverPlaySeekMute.swf. If you choose None, the
FLVPlayback instance will not have control elements that allow the user to play, stop, or rewind the
FLV; or take other actions that the controls make possible. If the autoPlay parameter is set to true,
the FLV plays automatically. For more information, see "Selecting a Predesigned skin
in FLVPlayback Component (Flash Professional Only)" in the Flash Help section labeled
"Components Language Reference."
Figure 7 The Select Skin dialog box for choosing a skin for the FLVPlayback component
totalTime: The total number of seconds in the source FLV file. The default value is 0. If you use
progressive download, Flash can use this value for a variety of tasks as long as it is set to a value
greater than zero. Otherwise, Flash tries to take the time from metadata.
NOTE
If you’re using FCS or FVSS, this value is ignored; the total time of the FLV is taken from the
server.
volume: A number from 0 to 100 that represents the percentage of maximum volume at which to set
the volume control interface.
Providing an easy-to-use yet full-featured set of playback controls is an important element of any video
implementation. Although Flash provides several options for video playback control, your best option is
probably to use the new FLVPlayback component. Not only is the FLVPlayback component the most
full-featured and easiest option to implement, it is also the most customizable.
The next article of this series explores this customization capability in more detail with a review of the
various methods available for customizing the FLVPlayback component.
3/12/2020 Distributing Graphics to Layers | Creating Graphics in Adobe Flash CS3 Professional | InformIT
https://www.informit.com/articles/article.aspx?p=729513&seqNum=33 1/2
Home > Ar�cles > Graphics & Web Design > Dreamweaver & Flash
By Andy Anderson, Steve Johnson, Perspec�on Inc.
May 11, 2007
This chapter is from the book
Adobe Flash CS3 Professional On Demand
Learn More Buy
Crea�ng Graphics in Adobe Flash CS3 Professional
Distribu�ng Graphics to LayersIf you have several objects on a single layer, and need to move them onto separate layers, you can useCut and Paste in place for each object or you can save �me by using the Distribute to Layers command.The Distribute to Layers commands puts each object (shapes, groups, and symbols) in a selec�on on aseparate layer; any unselected objects remain on their original layer. This command comes in handywhen you want to create a mo�on tweening anima�on, which requires objects to be on individuallayers.
Place Selected Objects on Separate Layers
Create or open a document with several objects on a single layer.
Select all the objects on a single layer you want to distribute to separate layers.
📄 Contents ⎙ Print + Share This < Back Page 33 of 34 Next >
Click the Edit menu, and then click Select All or press +A (Mac) or Ctrl+A (Win).
Timesaver
Related Resources
Adobe Animate Classroom ina Book (2020 release)By Russell Chun
Book $47.99
Adobe Animate CC Classroomin a Book (2019 Release)By Russell Chun
eBook (Watermarked) $38.39
Adobe Animate CC Classroomin a Book (2019 Release)By Russell Chun
Book $47.99
See All Related Store Items
books, eBooks, and digital learning
Pearson
PRODUCT SUPPORT ANNOUNCEMENT Some videos and Web Edi�ons may be returning errors on launch. Learn more.
Store Ar�cles
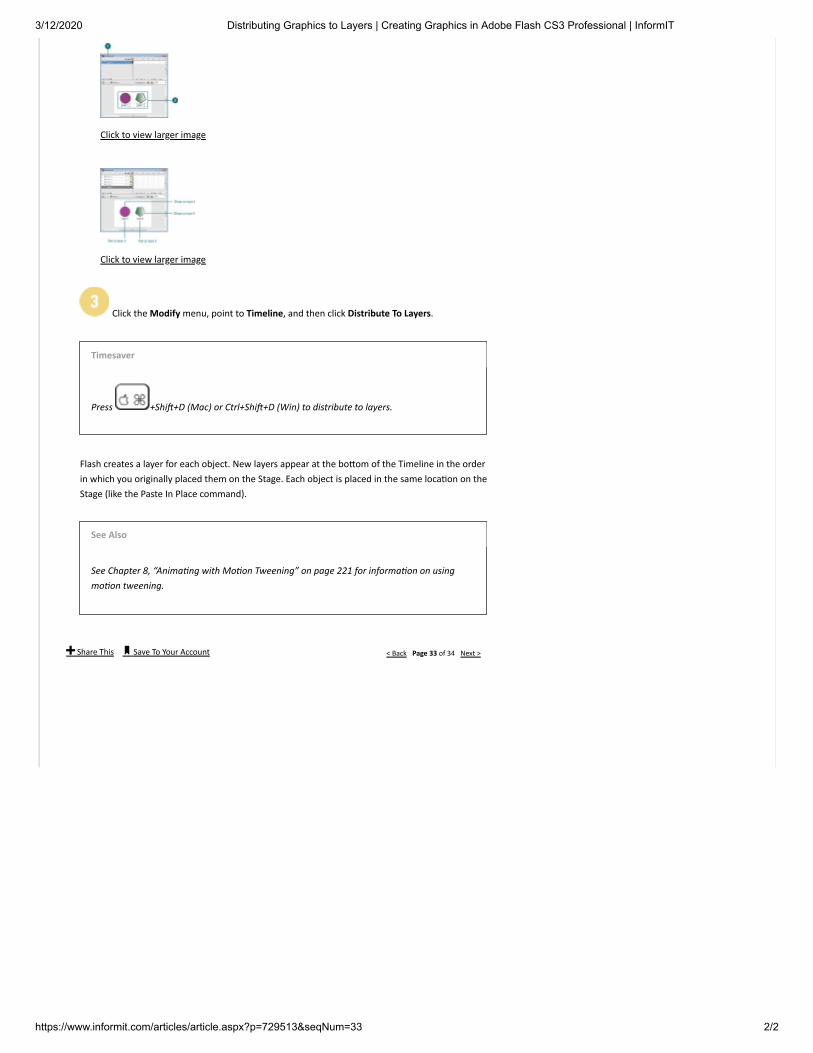
3/12/2020 Distributing Graphics to Layers | Creating Graphics in Adobe Flash CS3 Professional | InformIT
https://www.informit.com/articles/article.aspx?p=729513&seqNum=33 2/2
Click to view larger image
Click to view larger image
Click the Modify menu, point to Timeline, and then click Distribute To Layers.
Flash creates a layer for each object. New layers appear at the bo�om of the Timeline in the orderin which you originally placed them on the Stage. Each object is placed in the same loca�on on theStage (like the Paste In Place command).
Press +Shi�+D (Mac) or Ctrl+Shi�+D (Win) to distribute to layers.
Timesaver
See Chapter 8, “Anima�ng with Mo�on Tweening” on page 221 for informa�on on usingmo�on tweening.
See Also
< Back Page 33 of 34 Next >+ Share This 🔖 Save To Your Account
Requirements
Prerequisite knowledge
You should have a basic knowledge of the Flash Professional user interface and a basic
knowledge of working with FLA files. Certain features, such as H.264 codec support,
are available only in Flash Player 9.0.115 and later.
User level
Beginning
Before you can add on-demand (prerecorded) web video to your web page, you must
acquire the video and encode it, which involves converting it to a format compatible
with Adobe Flash Player (FLV or MPEG-4).
This section of the Video Learning Guide for Flash provides information on how to
encode on-demand video, including background information about how web video is
encoded and how to get best results when capturing video. We assume that you already
have some video in a format other than FLV or a compatible version of MPEG-4. Many
leading video editing tools allow you to capture video directly from your digital video
camera. For some tips on capturing video, see the later section, "Capturing good video."
Robert Reinhardt's bitrate calculator helps you determine the optimal bitrate at which to
encode your videos. See the FLV bitrate calculator links at the top of this page.
Note: To capture and publish live video, use Flash Player and Adobe Flash Media
Server. For more information, see the Flash Media Server Developer Center. For
higher-quality live video, you can also use Flash Media Live Encoder.)
Encoding FLV and F4V video files
Flash Professional CS5 provides several video-encoding solutions that let you encode
your video clips into the FLV or F4V format.
Video Import Wizard
The Video Import Wizard lets you encode video clips into the FLV format when you
import them. However, the Video Import wizard has limitations in that you can only
encode one video clip at a time, and the process of encoding can be both time- and
computing-intensive.
For users who work extensively with video-based content, Flash Professional CS5
includes Adobe Media Encoder and the QuickTime Exporter.
Adobe Media Encoder
The Adobe Media Encoder lets you batch process video clips, allowing you to encode
several clips at a time without having to interrupt your workflow. In addition to
selecting encoding options for video and audio content, Adobe Media Encoder also lets
you embed cue points into video clips you encode, and edit the video using crop-and-
trim controls.
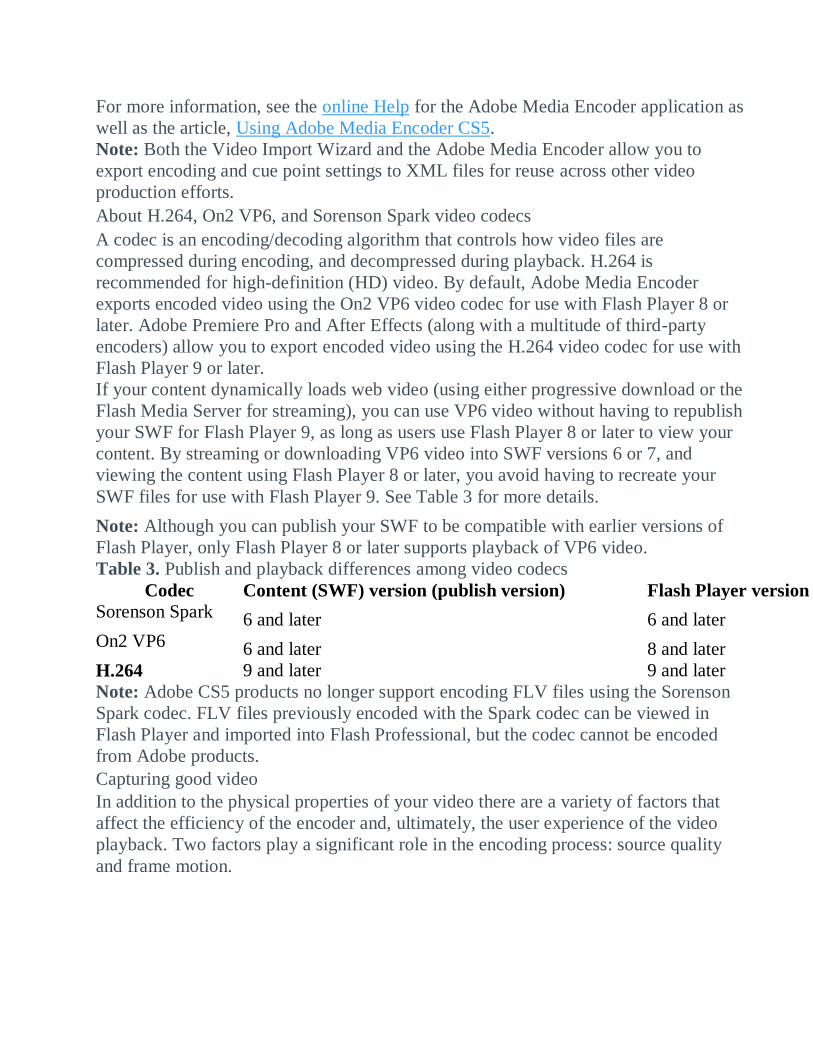
For more information, see the online Help for the Adobe Media Encoder application as
well as the article, Using Adobe Media Encoder CS5.
Note: Both the Video Import Wizard and the Adobe Media Encoder allow you to
export encoding and cue point settings to XML files for reuse across other video
production efforts.
About H.264, On2 VP6, and Sorenson Spark video codecs
A codec is an encoding/decoding algorithm that controls how video files are
compressed during encoding, and decompressed during playback. H.264 is
recommended for high-definition (HD) video. By default, Adobe Media Encoder
exports encoded video using the On2 VP6 video codec for use with Flash Player 8 or
later. Adobe Premiere Pro and After Effects (along with a multitude of third-party
encoders) allow you to export encoded video using the H.264 video codec for use with
Flash Player 9 or later.
If your content dynamically loads web video (using either progressive download or the
Flash Media Server for streaming), you can use VP6 video without having to republish
your SWF for Flash Player 9, as long as users use Flash Player 8 or later to view your
content. By streaming or downloading VP6 video into SWF versions 6 or 7, and
viewing the content using Flash Player 8 or later, you avoid having to recreate your
SWF files for use with Flash Player 9. See Table 3 for more details.
Note: Although you can publish your SWF to be compatible with earlier versions of
Flash Player, only Flash Player 8 or later supports playback of VP6 video.
Table 3. Publish and playback differences among video codecs
Codec Content (SWF) version (publish version) Flash Player version equired for playback)
Sorenson Spark 6 and later 6 and later
On2 VP6 6 and later 8 and later
H.264 9 and later 9 and later
Note: Adobe CS5 products no longer support encoding FLV files using the Sorenson
Spark codec. FLV files previously encoded with the Spark codec can be viewed in
Flash Player and imported into Flash Professional, but the codec cannot be encoded
from Adobe products.
Capturing good video
In addition to the physical properties of your video there are a variety of factors that
affect the efficiency of the encoder and, ultimately, the user experience of the video
playback. Two factors play a significant role in the encoding process: source quality
and frame motion.
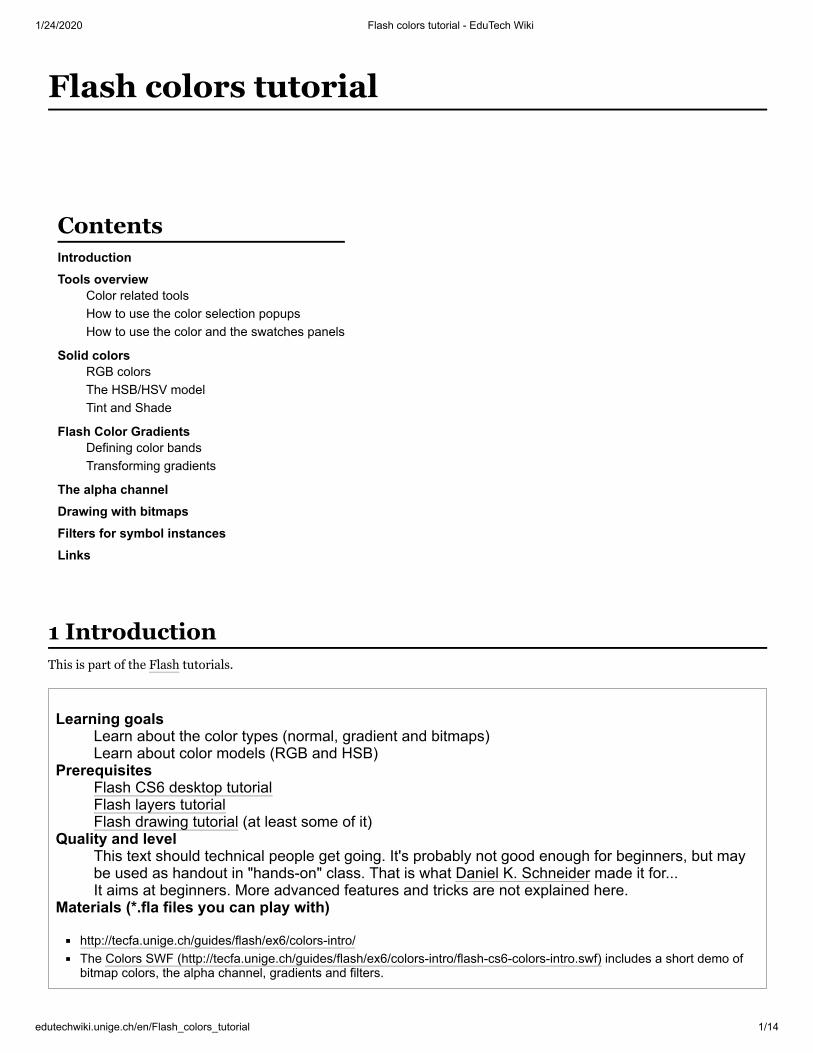
1/24/2020 Flash colors tutorial - EduTech Wiki
edutechwiki.unige.ch/en/Flash_colors_tutorial 1/14
Flash colors tutorial
IntroductionTools overview
Color related toolsHow to use the color selection popupsHow to use the color and the swatches panels
Solid colorsRGB colorsThe HSB/HSV modelTint and Shade
Flash Color GradientsDefining color bandsTransforming gradients
The alpha channelDrawing with bitmapsFilters for symbol instancesLinks
This is part of the Flash tutorials.
Learning goalsLearn about the color types (normal, gradient and bitmaps)Learn about color models (RGB and HSB)
PrerequisitesFlash CS6 desktop tutorialFlash layers tutorialFlash drawing tutorial (at least some of it)
Quality and levelThis text should technical people get going. It's probably not good enough for beginners, but maybe used as handout in "hands-on" class. That is what Daniel K. Schneider made it for...It aims at beginners. More advanced features and tricks are not explained here.
Materials (*.fla files you can play with)
http://tecfa.unige.ch/guides/flash/ex6/colors-intro/The Colors SWF (http://tecfa.unige.ch/guides/flash/ex6/colors-intro/flash-cs6-colors-intro.swf) includes a short demo ofbitmap colors, the alpha channel, gradients and filters.
Contents
1 Introduction
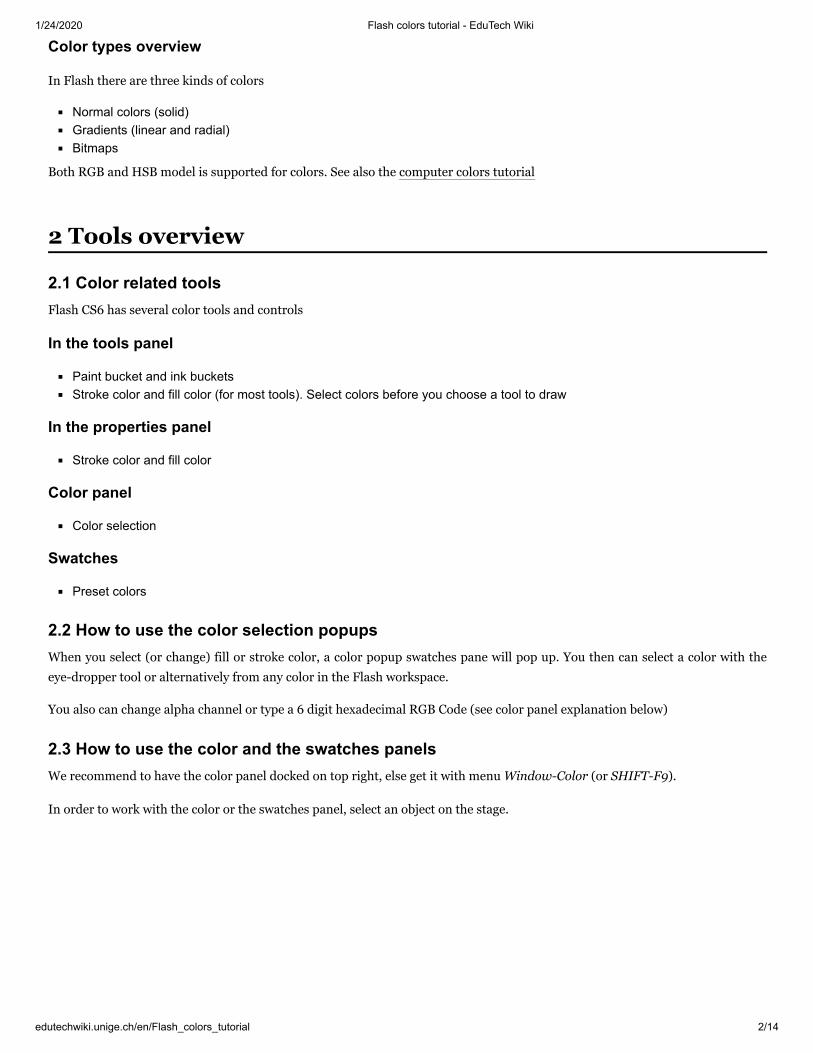
1/24/2020 Flash colors tutorial - EduTech Wiki
edutechwiki.unige.ch/en/Flash_colors_tutorial 2/14
Color types overview
In Flash there are three kinds of colors
Normal colors (solid)Gradients (linear and radial)Bitmaps
Both RGB and HSB model is supported for colors. See also the computer colors tutorial
Flash CS6 has several color tools and controls
In the tools panel
Paint bucket and ink bucketsStroke color and fill color (for most tools). Select colors before you choose a tool to draw
In the properties panel
Stroke color and fill color
Color panel
Color selection
Swatches
Preset colors
When you select (or change) fill or stroke color, a color popup swatches pane will pop up. You then can select a color with the
eye-dropper tool or alternatively from any color in the Flash workspace.
You also can change alpha channel or type a 6 digit hexadecimal RGB Code (see color panel explanation below)
We recommend to have the color panel docked on top right, else get it with menu Window-Color (or SHIFT-F9).
In order to work with the color or the swatches panel, select an object on the stage.
2 Tools overview
2.1 Color related tools
2.2 How to use the color selection popups
2.3 How to use the color and the swatches panels
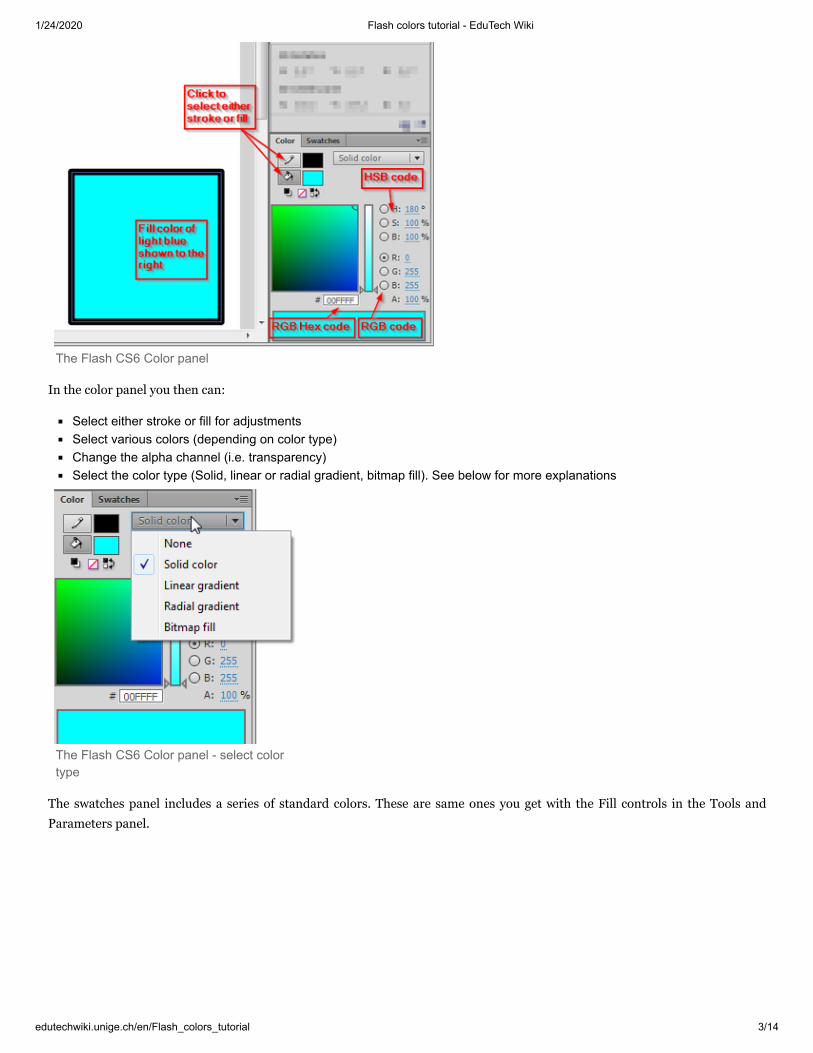
1/24/2020 Flash colors tutorial - EduTech Wiki
edutechwiki.unige.ch/en/Flash_colors_tutorial 3/14
The Flash CS6 Color panel
In the color panel you then can:
Select either stroke or fill for adjustmentsSelect various colors (depending on color type)Change the alpha channel (i.e. transparency)Select the color type (Solid, linear or radial gradient, bitmap fill). See below for more explanations
The Flash CS6 Color panel - select colortype
The swatches panel includes a series of standard colors. These are same ones you get with the Fill controls in the Tools and
Parameters panel.
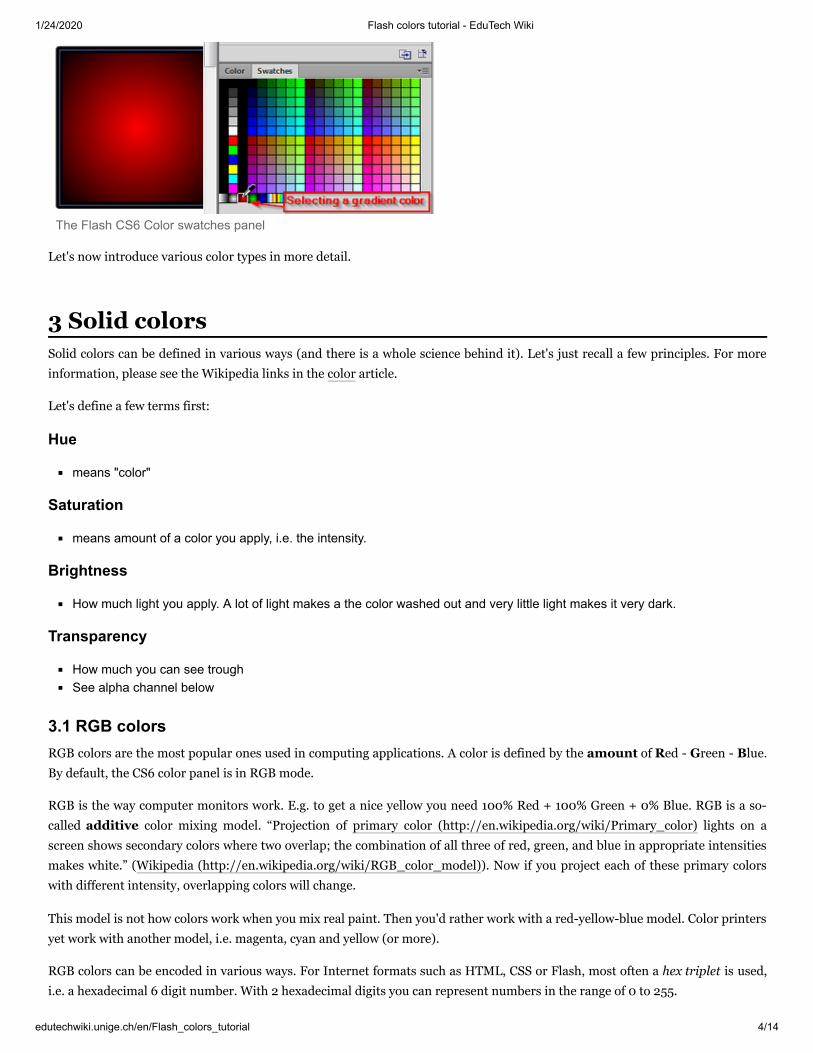
1/24/2020 Flash colors tutorial - EduTech Wiki
edutechwiki.unige.ch/en/Flash_colors_tutorial 4/14
The Flash CS6 Color swatches panel
Let's now introduce various color types in more detail.
Solid colors can be defined in various ways (and there is a whole science behind it). Let's just recall a few principles. For more
information, please see the Wikipedia links in the color article.
Let's define a few terms first:
Hue
means "color"
Saturation
means amount of a color you apply, i.e. the intensity.
Brightness
How much light you apply. A lot of light makes a the color washed out and very little light makes it very dark.
Transparency
How much you can see troughSee alpha channel below
RGB colors are the most popular ones used in computing applications. A color is defined by the amount of Red - Green - Blue.
By default, the CS6 color panel is in RGB mode.
RGB is the way computer monitors work. E.g. to get a nice yellow you need 100% Red + 100% Green + 0% Blue. RGB is a so-
called additive color mixing model. “Projection of primary color (http://en.wikipedia.org/wiki/Primary_color) lights on a
screen shows secondary colors where two overlap; the combination of all three of red, green, and blue in appropriate intensities
makes white.” (Wikipedia (http://en.wikipedia.org/wiki/RGB_color_model)). Now if you project each of these primary colors
with different intensity, overlapping colors will change.
This model is not how colors work when you mix real paint. Then you'd rather work with a red-yellow-blue model. Color printers
yet work with another model, i.e. magenta, cyan and yellow (or more).
RGB colors can be encoded in various ways. For Internet formats such as HTML, CSS or Flash, most often a hex triplet is used,
i.e. a hexadecimal 6 digit number. With 2 hexadecimal digits you can represent numbers in the range of 0 to 255.
3 Solid colors
3.1 RGB colors
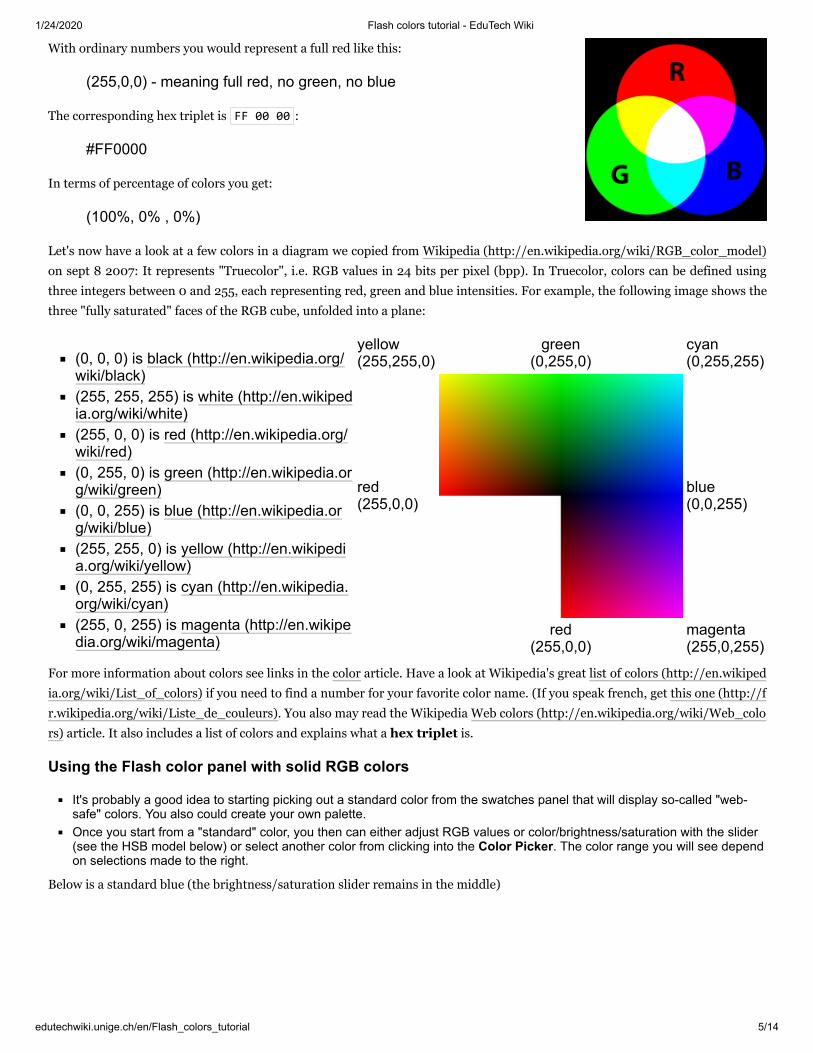
1/24/2020 Flash colors tutorial - EduTech Wiki
edutechwiki.unige.ch/en/Flash_colors_tutorial 5/14
With ordinary numbers you would represent a full red like this:
(255,0,0) - meaning full red, no green, no blue
The corresponding hex triplet is FF 00 00 :
#FF0000
In terms of percentage of colors you get:
(100%, 0% , 0%)
Let's now have a look at a few colors in a diagram we copied from Wikipedia (http://en.wikipedia.org/wiki/RGB_color_model)
on sept 8 2007: It represents "Truecolor", i.e. RGB values in 24 bits per pixel (bpp). In Truecolor, colors can be defined using
three integers between 0 and 255, each representing red, green and blue intensities. For example, the following image shows the
three "fully saturated" faces of the RGB cube, unfolded into a plane:
(0, 0, 0) is black (http://en.wikipedia.org/wiki/black)(255, 255, 255) is white (http://en.wikipedia.org/wiki/white)(255, 0, 0) is red (http://en.wikipedia.org/wiki/red)(0, 255, 0) is green (http://en.wikipedia.org/wiki/green)(0, 0, 255) is blue (http://en.wikipedia.org/wiki/blue)(255, 255, 0) is yellow (http://en.wikipedia.org/wiki/yellow)(0, 255, 255) is cyan (http://en.wikipedia.org/wiki/cyan)(255, 0, 255) is magenta (http://en.wikipedia.org/wiki/magenta)
yellow(255,255,0)
green(0,255,0)
cyan(0,255,255)
red(255,0,0)
blue(0,0,255)
red(255,0,0)
magenta(255,0,255)
For more information about colors see links in the color article. Have a look at Wikipedia's great list of colors (http://en.wikiped
ia.org/wiki/List_of_colors) if you need to find a number for your favorite color name. (If you speak french, get this one (http://f
r.wikipedia.org/wiki/Liste_de_couleurs). You also may read the Wikipedia Web colors (http://en.wikipedia.org/wiki/Web_colo
rs) article. It also includes a list of colors and explains what a hex triplet is.
Using the Flash color panel with solid RGB colors
It's probably a good idea to starting picking out a standard color from the swatches panel that will display so-called "web-safe" colors. You also could create your own palette.Once you start from a "standard" color, you then can either adjust RGB values or color/brightness/saturation with the slider(see the HSB model below) or select another color from clicking into the Color Picker. The color range you will see dependon selections made to the right.
Below is a standard blue (the brightness/saturation slider remains in the middle)
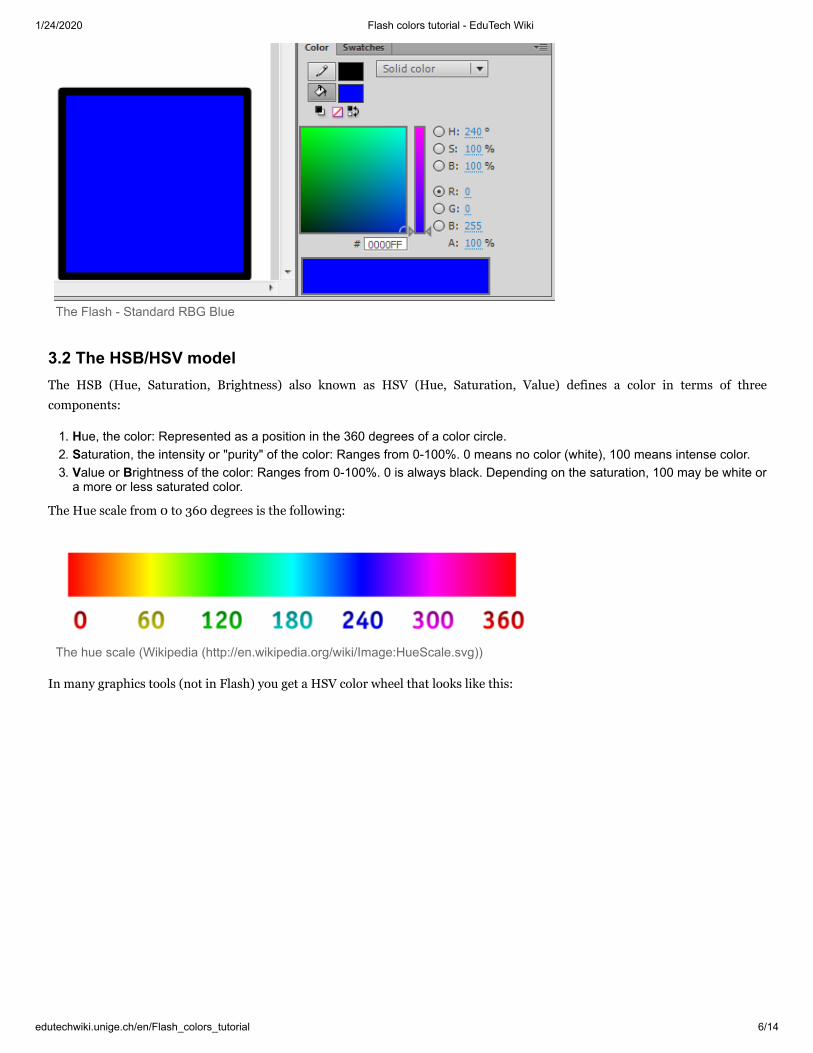
1/24/2020 Flash colors tutorial - EduTech Wiki
edutechwiki.unige.ch/en/Flash_colors_tutorial 6/14
The Flash - Standard RBG Blue
The HSB (Hue, Saturation, Brightness) also known as HSV (Hue, Saturation, Value) defines a color in terms of three
components:
1. Hue, the color: Represented as a position in the 360 degrees of a color circle.2. Saturation, the intensity or "purity" of the color: Ranges from 0-100%. 0 means no color (white), 100 means intense color.3. Value or Brightness of the color: Ranges from 0-100%. 0 is always black. Depending on the saturation, 100 may be white or
a more or less saturated color.
The Hue scale from 0 to 360 degrees is the following:
The hue scale (Wikipedia (http://en.wikipedia.org/wiki/Image:HueScale.svg))
In many graphics tools (not in Flash) you get a HSV color wheel that looks like this:
3.2 The HSB/HSV model
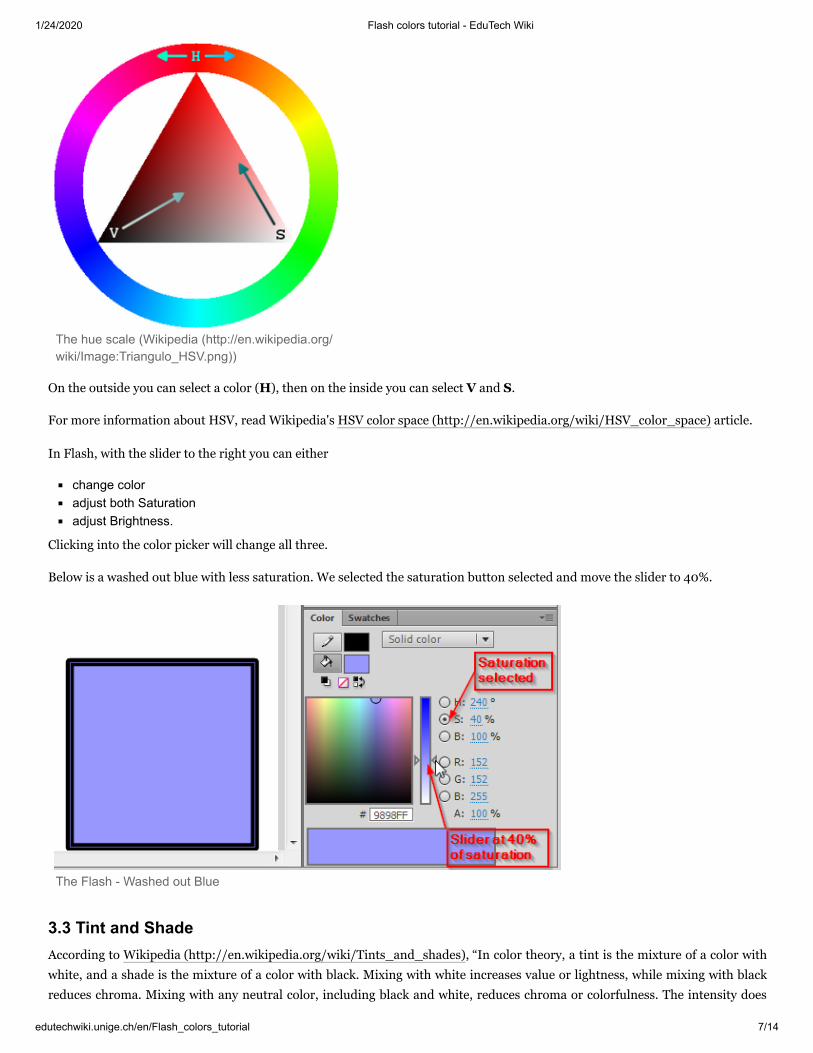
1/24/2020 Flash colors tutorial - EduTech Wiki
edutechwiki.unige.ch/en/Flash_colors_tutorial 7/14
The hue scale (Wikipedia (http://en.wikipedia.org/wiki/Image:Triangulo_HSV.png))
On the outside you can select a color (H), then on the inside you can select V and S.
For more information about HSV, read Wikipedia's HSV color space (http://en.wikipedia.org/wiki/HSV_color_space) article.
In Flash, with the slider to the right you can either
change coloradjust both Saturationadjust Brightness.
Clicking into the color picker will change all three.
Below is a washed out blue with less saturation. We selected the saturation button selected and move the slider to 40%.
The Flash - Washed out Blue
According to Wikipedia (http://en.wikipedia.org/wiki/Tints_and_shades), “In color theory, a tint is the mixture of a color with
white, and a shade is the mixture of a color with black. Mixing with white increases value or lightness, while mixing with black
reduces chroma. Mixing with any neutral color, including black and white, reduces chroma or colorfulness. The intensity does
3.3 Tint and Shade
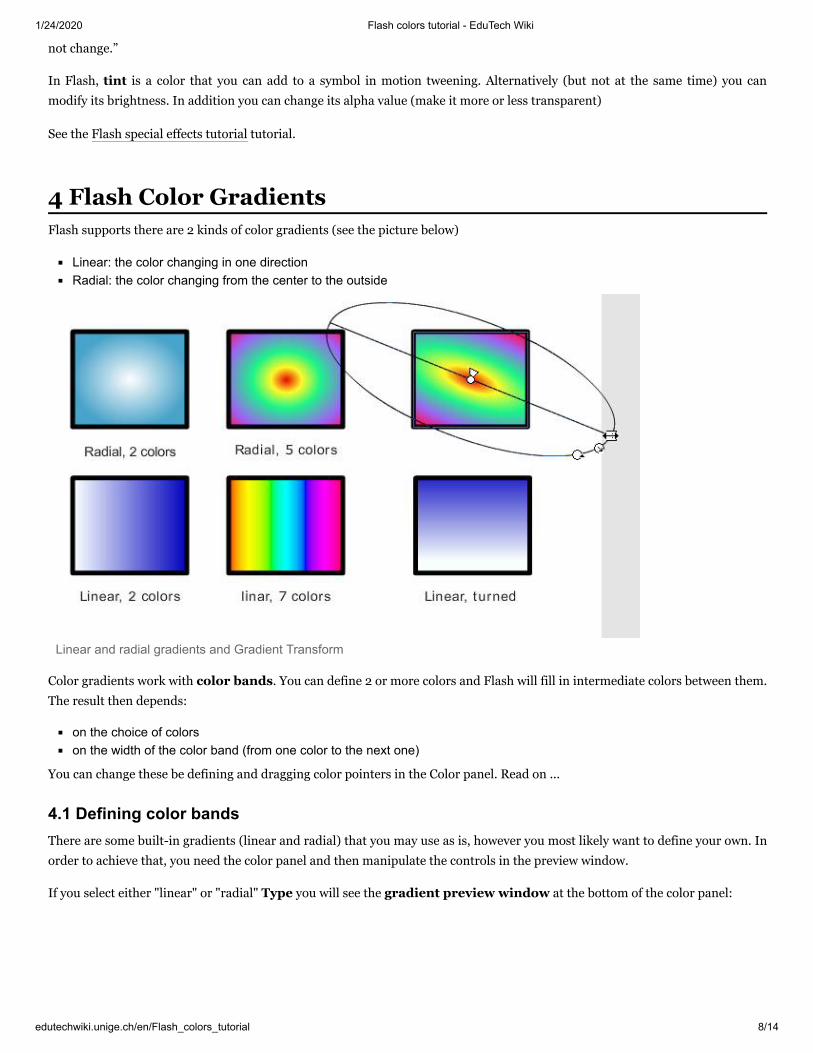
1/24/2020 Flash colors tutorial - EduTech Wiki
edutechwiki.unige.ch/en/Flash_colors_tutorial 8/14
not change.”
In Flash, tint is a color that you can add to a symbol in motion tweening. Alternatively (but not at the same time) you can
modify its brightness. In addition you can change its alpha value (make it more or less transparent)
See the Flash special effects tutorial tutorial.
Flash supports there are 2 kinds of color gradients (see the picture below)
Linear: the color changing in one directionRadial: the color changing from the center to the outside
Linear and radial gradients and Gradient Transform
Color gradients work with color bands. You can define 2 or more colors and Flash will fill in intermediate colors between them.
The result then depends:
on the choice of colorson the width of the color band (from one color to the next one)
You can change these be defining and dragging color pointers in the Color panel. Read on ...
There are some built-in gradients (linear and radial) that you may use as is, however you most likely want to define your own. In
order to achieve that, you need the color panel and then manipulate the controls in the preview window.
If you select either "linear" or "radial" Type you will see the gradient preview window at the bottom of the color panel:
4 Flash Color Gradients
4.1 Defining color bands
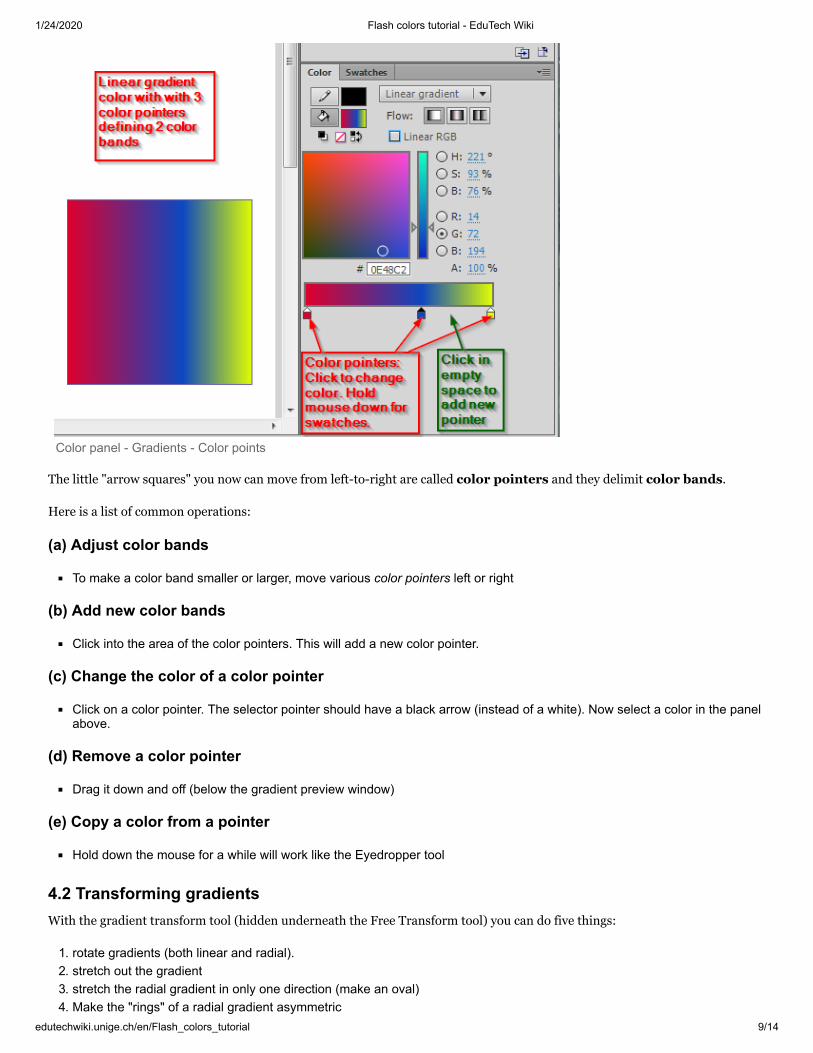
1/24/2020 Flash colors tutorial - EduTech Wiki
edutechwiki.unige.ch/en/Flash_colors_tutorial 9/14
Color panel - Gradients - Color points
The little "arrow squares" you now can move from left-to-right are called color pointers and they delimit color bands.
Here is a list of common operations:
(a) Adjust color bands
To make a color band smaller or larger, move various color pointers left or right
(b) Add new color bands
Click into the area of the color pointers. This will add a new color pointer.
(c) Change the color of a color pointer
Click on a color pointer. The selector pointer should have a black arrow (instead of a white). Now select a color in the panelabove.
(d) Remove a color pointer
Drag it down and off (below the gradient preview window)
(e) Copy a color from a pointer
Hold down the mouse for a while will work like the Eyedropper tool
With the gradient transform tool (hidden underneath the Free Transform tool) you can do five things:
1. rotate gradients (both linear and radial).2. stretch out the gradient3. stretch the radial gradient in only one direction (make an oval)4. Make the "rings" of a radial gradient asymmetric
4.2 Transforming gradients

1/24/2020 Flash colors tutorial - EduTech Wiki
edutechwiki.unige.ch/en/Flash_colors_tutorial 10/14
5. Move the center of the gradient color
Procedure
Select the tool (hold down the mouse over the Free Transform tool in the tools panel) and select the Gradient TransformTool ( )After selecting an object you will see five handles with which you can: stretch in one direction, resize, turn, make the ringsellipsoid, and finally move the whole gradient. See the screen capture below, which shows the handles for a radial gradienttransform:
Radial Gradient Transform controls
Stretching or rotating a linear gradient works in a similar way:
Linear gradient transform controls -turning
In computer graphics, alpha compositing is the process of combining an image with a background to create the appearance of
partial transparency (Wikipedia (http://en.wikipedia.org/wiki/Alpha_channel))
In more simple terms, you can set the alpha to some percentage:
5 The alpha channel
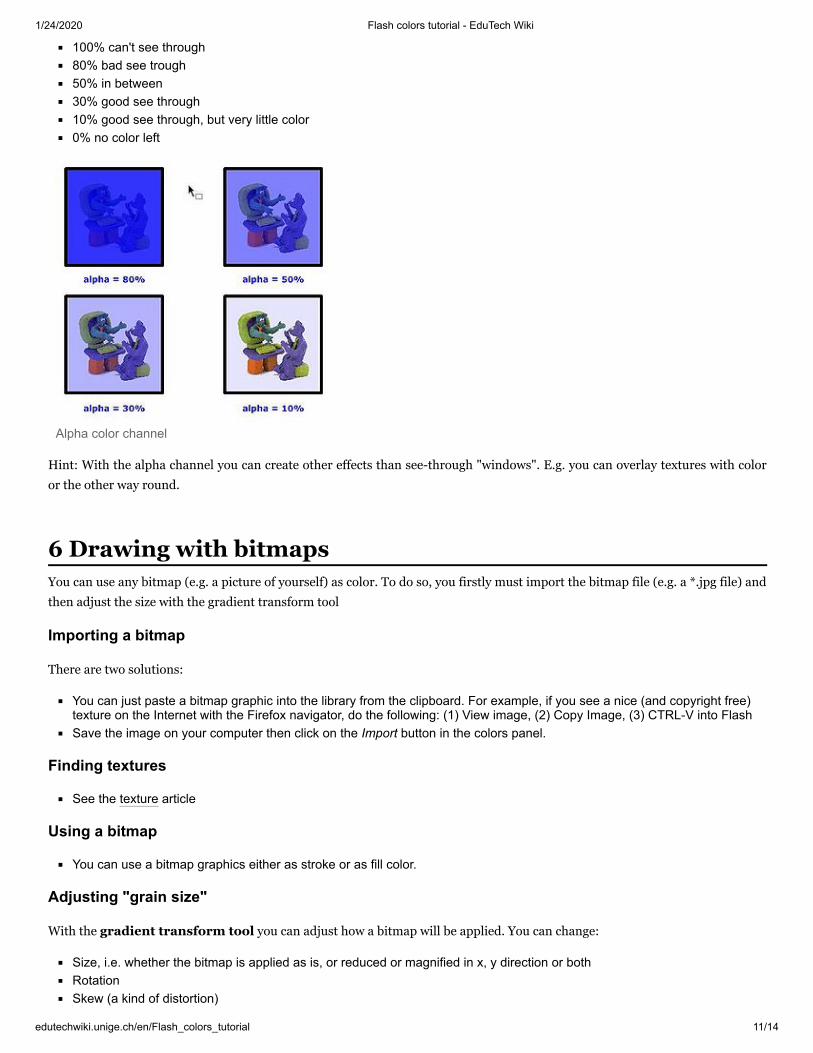
1/24/2020 Flash colors tutorial - EduTech Wiki
edutechwiki.unige.ch/en/Flash_colors_tutorial 11/14
100% can't see through80% bad see trough50% in between30% good see through10% good see through, but very little color0% no color left
Alpha color channel
Hint: With the alpha channel you can create other effects than see-through "windows". E.g. you can overlay textures with color
or the other way round.
You can use any bitmap (e.g. a picture of yourself) as color. To do so, you firstly must import the bitmap file (e.g. a *.jpg file) and
then adjust the size with the gradient transform tool
Importing a bitmap
There are two solutions:
You can just paste a bitmap graphic into the library from the clipboard. For example, if you see a nice (and copyright free)texture on the Internet with the Firefox navigator, do the following: (1) View image, (2) Copy Image, (3) CTRL-V into FlashSave the image on your computer then click on the Import button in the colors panel.
Finding textures
See the texture article
Using a bitmap
You can use a bitmap graphics either as stroke or as fill color.
Adjusting "grain size"
With the gradient transform tool you can adjust how a bitmap will be applied. You can change:
Size, i.e. whether the bitmap is applied as is, or reduced or magnified in x, y direction or bothRotationSkew (a kind of distortion)
6 Drawing with bitmaps
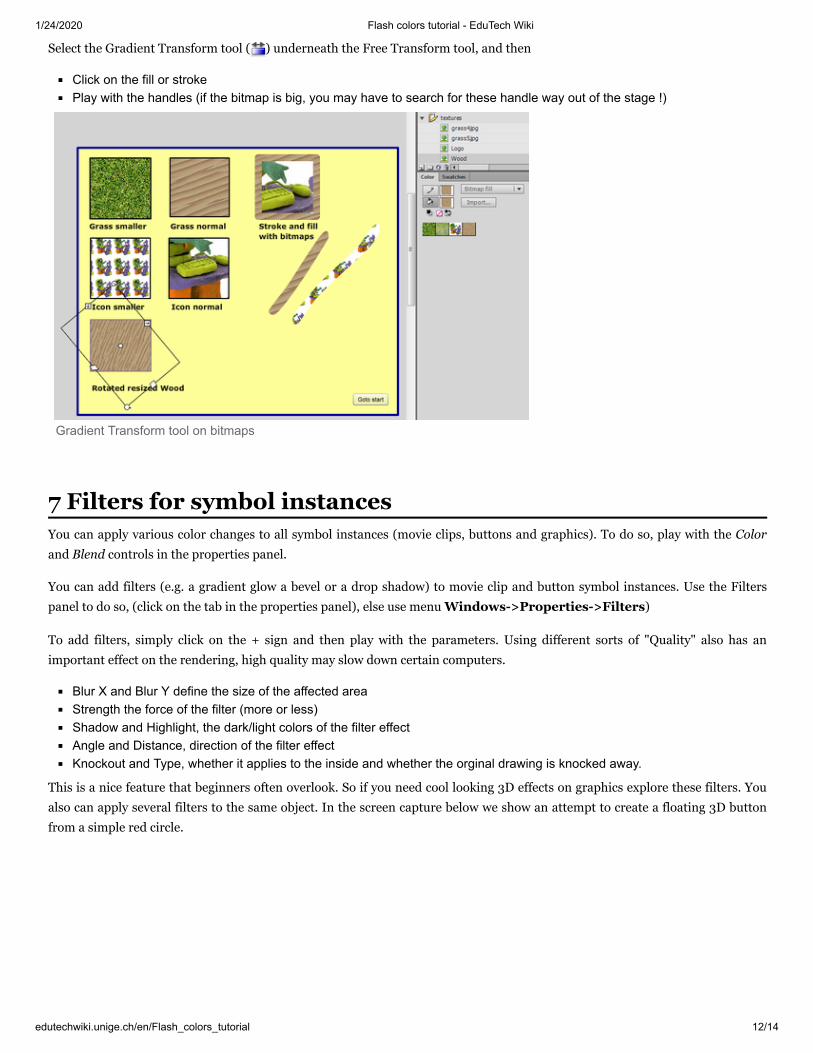
1/24/2020 Flash colors tutorial - EduTech Wiki
edutechwiki.unige.ch/en/Flash_colors_tutorial 12/14
Select the Gradient Transform tool ( ) underneath the Free Transform tool, and then
Click on the fill or strokePlay with the handles (if the bitmap is big, you may have to search for these handle way out of the stage !)
Gradient Transform tool on bitmaps
You can apply various color changes to all symbol instances (movie clips, buttons and graphics). To do so, play with the Colorand Blend controls in the properties panel.
You can add filters (e.g. a gradient glow a bevel or a drop shadow) to movie clip and button symbol instances. Use the Filters
panel to do so, (click on the tab in the properties panel), else use menu Windows->Properties->Filters)
To add filters, simply click on the + sign and then play with the parameters. Using different sorts of "Quality" also has an
important effect on the rendering, high quality may slow down certain computers.
Blur X and Blur Y define the size of the affected areaStrength the force of the filter (more or less)Shadow and Highlight, the dark/light colors of the filter effectAngle and Distance, direction of the filter effectKnockout and Type, whether it applies to the inside and whether the orginal drawing is knocked away.
This is a nice feature that beginners often overlook. So if you need cool looking 3D effects on graphics explore these filters. You
also can apply several filters to the same object. In the screen capture below we show an attempt to create a floating 3D button
from a simple red circle.
7 Filters for symbol instances
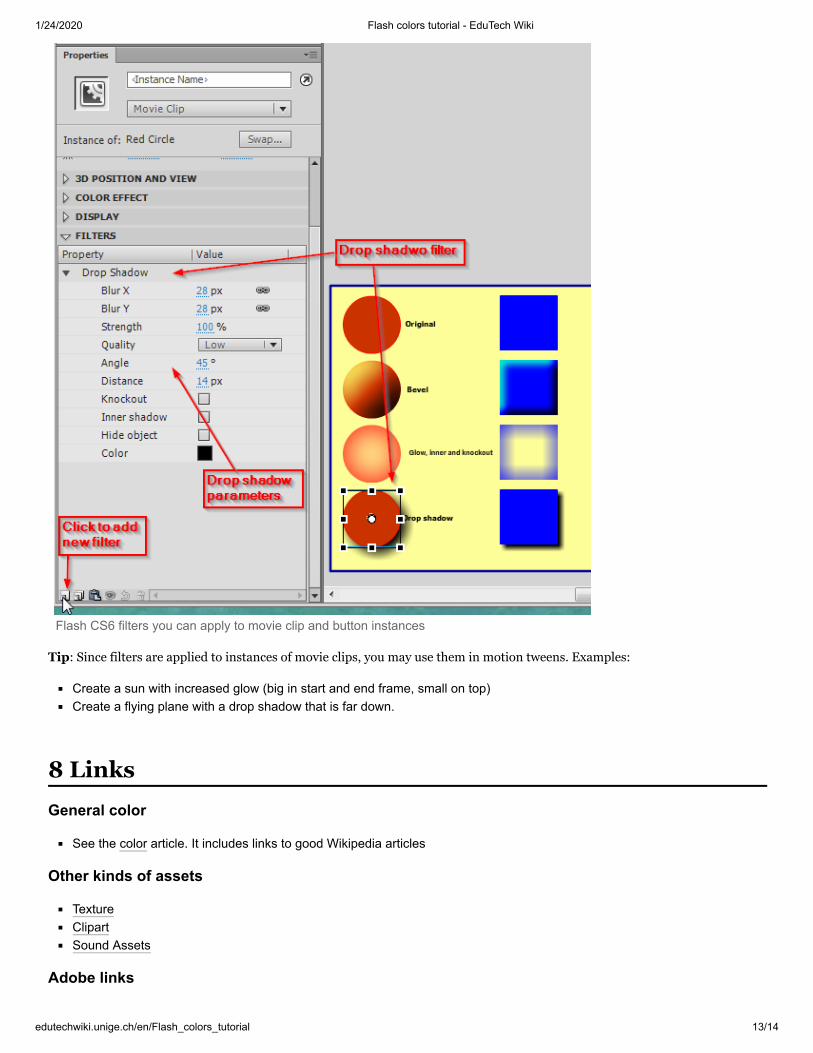
1/24/2020 Flash colors tutorial - EduTech Wiki
edutechwiki.unige.ch/en/Flash_colors_tutorial 13/14
Flash CS6 filters you can apply to movie clip and button instances
Tip: Since filters are applied to instances of movie clips, you may use them in motion tweens. Examples:
Create a sun with increased glow (big in start and end frame, small on top)Create a flying plane with a drop shadow that is far down.
General color
See the color article. It includes links to good Wikipedia articles
Other kinds of assets
TextureClipartSound Assets
Adobe links
8 Links

1/24/2020 Flash colors tutorial - EduTech Wiki
edutechwiki.unige.ch/en/Flash_colors_tutorial 14/14
Flash Professional / Color (http://help.adobe.com/en_US/flash/cs/using/WS18B74DFC-C9B7-47c1-8B25-B4F196059B7C.html)Flash Professional Help / Strokes, fills, and gradients (http://helpx.adobe.com/content/help/en/flash/using/strokes-fills-gradients.html)
Retrieved from "http://edutechwiki.unige.ch/mediawiki/index.php?title=Flash_colors_tutorial&oldid=59924"
Page last modified 19:18, 22 August 2016.
By default, content is protected by a CC BY-NC-SA Licence.
Controlling external video playback with ActionScript
Playing external FLV or F4V files dynamically
An alternative to importing video into the Animate authoring environment is to use either the
FLVPlayback component or ActionScript to dynamically play external FLV or F4V files in Flash
Player. You can also use the FLVPlayback component and ActionScript together.
You can play FLV or F4V files posted as HTTP downloads or as local media files. To play back an
external FLV or F4V file, post an FLV or F4V file to a URL (either an HTTP site or a local folder) and
add either the FLVPlayback component or ActionScript code to the Animate document to access the file
and control playback during runtime.
Using external FLV or F4V files provides the following capabilities that are not available when using
imported video:
You can use longer video clips without slowing down playback. External FLV or F4V files are played
using cached memory, which means that large files are stored in small pieces and accessed dynamically;
they do not require as much memory as embedded video files.
An external FLV or F4V file can have a different frame rate from the Animate document in which it
plays. For example, you can set the Animate document frame rate to 30 fps and the video frame rate to
21 fps, which gives you greater control in ensuring smooth video playback.
With external FLV or F4V files, Animate document playback does not have to be interrupted while the
video file is loading. Imported video files can sometimes interrupt document playback to perform
certain functions (for example, to access a CD-ROM drive). FLV or F4V files can perform functions
independently of the Animate document, and so do not interrupt playback.
Captioning video content is easier with external FLV or F4V files because you can use callback
functions to access metadata for the video.
Behaviors used in video playback
Video behaviors provide one way to control video playback. Behaviors are prewritten ActionScript
scripts that you add to a triggering object to control another object. Behaviors add the power, control,
and flexibility of ActionScript coding to your document without having to create the ActionScript code.
Video behaviors play, stop, pause, rewind, fast-forward, show, and hide a video clip.
To control a video clip with a behavior, use the Behaviors panel to apply the behavior to a triggering
object, such as a movie clip. Specify the event that triggers the behavior (such as releasing the movie
clip), select a target object (the video that is affected by the behavior), and when necessary, select
settings for the behavior, such as the number of frames to rewind.
Note:
The triggering object must be a movie clip. You cannot attach video playback behaviors to button
symbols or button components.
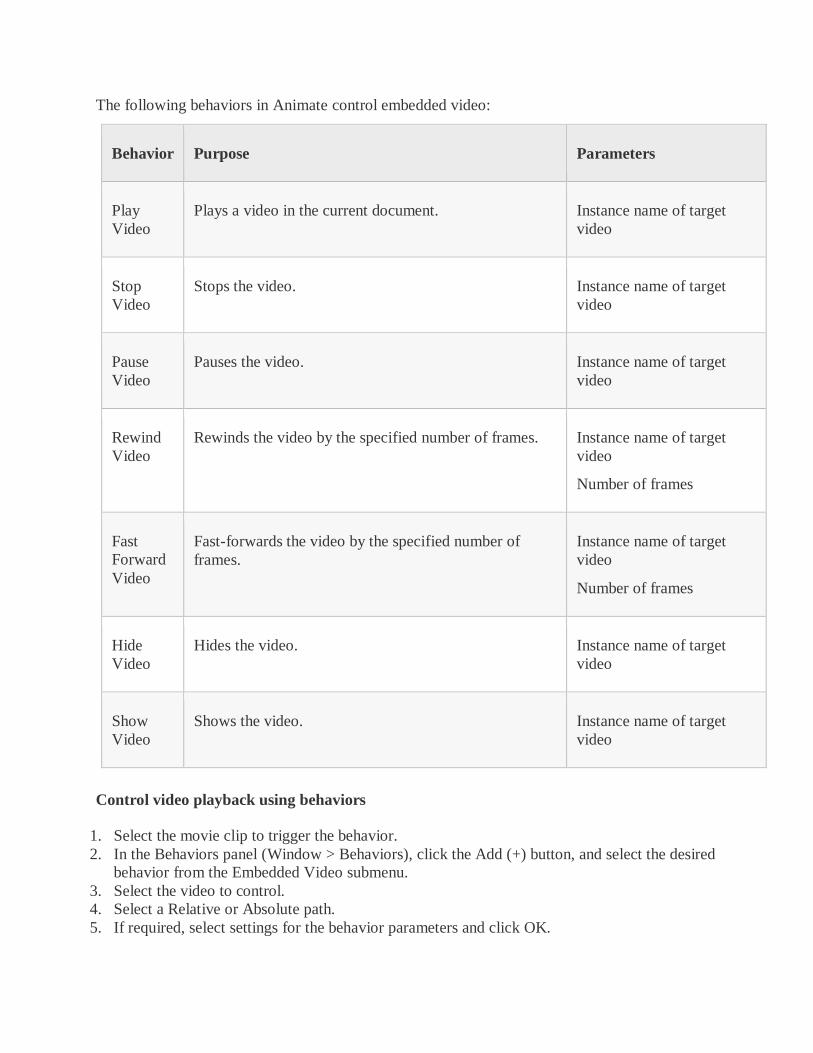
The following behaviors in Animate control embedded video:
Behavior Purpose Parameters
Play
Video
Plays a video in the current document. Instance name of target
video
Stop
Video
Stops the video. Instance name of target
video
Pause
Video
Pauses the video. Instance name of target
video
Rewind
Video
Rewinds the video by the specified number of frames. Instance name of target
video
Number of frames
Fast
Forward
Video
Fast-forwards the video by the specified number of
frames.
Instance name of target
video
Number of frames
Hide
Video
Hides the video. Instance name of target
video
Show
Video
Shows the video. Instance name of target
video
Control video playback using behaviors
1. Select the movie clip to trigger the behavior.
2. In the Behaviors panel (Window > Behaviors), click the Add (+) button, and select the desired
behavior from the Embedded Video submenu.
3. Select the video to control.
4. Select a Relative or Absolute path.
5. If required, select settings for the behavior parameters and click OK.
6. In the Behaviors panel under Event, click On Release (the default event) and select a mouse event.
To use the On Release event, leave the option unchanged.
The FLVPlayback component
The FLVPlayback component lets you include a video player in your Animate application to play
progressively downloaded video (FLV or F4V) files over HTTP, or play streaming FLV files from
Adobe Media Server (AMS) or a Flash Video Streaming Service (FVSS).
The FLVPlayback component does the following:
Provides a set of prefabricated skins to customize playback controls and the look and feel of the user
interface.
Lets advanced users create their own custom skins.
Provides cue points to synchronize your video with the animation, text, and graphics in your
Animate application.
Provides live preview of customizations.
Maintains a reasonably sized SWF file for easy download.
The FLVPlayback component is the display area in which you view video. The FLVPlayback
component includes the FLV Custom UI controls, a set of control buttons that play, stop, pause, and
control playback the video.
Configure the FLVPlayback component
1. With the FLVPlayback component selected on the stage, open the Property inspector (Window >
Properties) and enter an instance name.
2. Select Parameters in the Property inspector or open the Component inspector (Window >
Components).
3. Enter values for parameters or use default settings.
For each FLVPlayback component instance you can set the following parameters in the Property
inspector or in the Component inspector:
Note:
In most instances, it is not necessary to alter the settings in the FLVPlayback component unless you
want to change the appearance of a video skin. The Video Import wizard sufficiently configures the
parameters for most deployments.
autoPlay
Boolean value that determines how to play the FLV or F4V. If true, the video plays immediately when
it is loaded. If false, loads the first frame and pauses. The default value is true.
autoRewind
Boolean value that determines whether the video is automatically rewound. If true, the FLVPlayback
component automatically rewinds the video to the beginning when the playhead reaches the end or
when the user clicks the stop button. If false, the component does not automatically rewind the video.
The default value is true.
autoSize Boolean value that, if true, resizes the component at runtime to use the source video dimensions. The
default value is false.
note: The encoded frame size of the video is not the same as the default dimensions of the FLVPlayback
component.
bufferTime
Number of seconds to buffer before beginning playback. The default value is 0.
contentPath (AS2 files) String that specifies the URL to an FLV, F4V, or to an XML file that describes how to play the video.
Double-click the Value cell for this parameter to activate the Content Path dialog box. The default is an
empty string. If you do not specify a value for the contentPath parameter, nothing happens when
Animate executes the FLVPlayback instance.
source (AS3 files) String that specifies the URL to an FLV, F4V, or to an XML file that describes how to play the video.
Double-click the Value cell for this parameter to activate the Content Path dialog box. The default is an
empty string. If you do not specify a value for the contentPath parameter, nothing happens when
Animate executes the FLVPlayback instance.
isLive Boolean value that, if true, specifies that the video is streaming live from FMS. The default value
is false.
cuePoints
A string that specifies the cue points for the video. Cue points allow you to synchronize specific points
in the video with Animate animation, graphics, or text. The default value is an empty string.
maintainAspectRatio
A Boolean value that, if true, resizes the video player in the FLVPlayback component to retain the
source video aspect ratio; the source video is still scaled and the FLVPlayback component itself is not
resized. The autoSize parameter takes precedence over this parameter. The default value is true.
skin A parameter that opens the Select Skin dialog box and allows you to choose a skin for the component.
The default value is None. If you choose None, the FLVPlayback instance does not have control
elements that allow the user to play, stop, or rewind the video, or take other actions that the controls
make possible. If the autoPlay parameter is set to true, the video plays automatically. For more
information, see “Customizing the FLVPlayback component” in Using ActionScript 3.0
Components or ActionScript 2.0 Components Language Reference.
totalTime
Total number of seconds in the source video. The default value is 0. If you use progressive download,
Animate uses this number if it is set to a value greater than zero (0). Otherwise, Animate tries to take the
time from metadata.
note: If you’re using FMS or FVSS, this value is ignored; the total time of the video is taken from the
server.
volume A number from 0 to 100 that represents the percentage of maximum volume at which to set the volume.
Specify the contentPath or source parameter
If you imported a local video clip into Animate for use with progressively downloaded or streaming
video content, update the contentPath (AS2 FLA files) or source (AS3 FLA files) parameter of the
FLVPlayback component before uploading your content to a web server or Adobe Media Server.
The contentPath or source parameter specifies the name and location of the video file on the server,
and implies the playback method (for example, progressively downloading using HTTP, or streaming
from Adobe Media Server using RTMP).
1. With the FLVPlayback component selected on the Stage, open the Property inspector (Window >
Properties) and select Parameters in the Property inspector, or open the Component inspector
(Window > Component Inspector).
2. Enter values for parameters, or use the default settings as appropriate. For
the contentPath or source parameter, do the following: a) Double-click the Value cell for
the contentPath or source parameter to activate the Content Path dialog box. b) Enter the URL or
local path to the FLV or F4V file, or the XML file (for Adobe Media Server or FVSS) that describes
how to play the video.
If you do not know the location of the video or XML file, click the folder icon to navigate to the correct
location. When browsing for an video file, if it is at or below the location of the target SWF file,
Animate automatically makes the path relative to that location so that it is ready for serving from a web
server. Otherwise, it is an absolute Windows or Macintosh file path.
If you specify an HTTP URL, the video file is a progressive download FLV or F4V file. If you specify a
URL that is a Real-Time Messaging Protocol (RTMP) URL, the video streams from a Adobe Media
Server (AMS). A URL to an XML file could also be a streaming video file from AMS or from FVSS.
Note:
When you click OK on the Content Path dialog box, Animate updates the value of
the cuePoints parameter, too, because you might have changed the contentPath parameter so that
the cuePoints parameter no longer applies to the current content path. As a result, you lose any disabled
cue points, although not ActionScript cue points. For this reason, you may want to disable non-
ActionScript cue points through ActionScript, rather than through the Cue Points dialog box.
When you specify the contentPath or source parameter, Animate attempts to verify that the video you
specified is compatible with Flash Player. If you see a warning dialog box, try re-encoding the video to
FLV or F4V format with Adobe Media Encoder.
You can also specify the location of an XML file that describes how to play multiple video streams for
multiple bandwidths. The XML file uses Synchronized Multimedia Integration Language (SMIL) to
describe the video files. For a description of the XML SMIL file, see “Using a SMIL file” in
the ActionScript 2.0 Components Language Reference.
Media components (Flash Player 6 and 7)
Note:
The media components were introduced in Macromedia Flash MX Professional 2004 and are intended
for use with Flash Player 6 or 7. If you are developing video content to use with Flash Player 8, instead
use the FLVPlayback component introduced in Version 8. The FLVPlayback component provides
improved functionality, giving you more control over video playback in the Animate environment.
The media component suite consists of three components: MediaDisplay, MediaController, and
MediaPlayback. With the MediaDisplay component, to add media to your Animate documents, drag the
component to the Stage and configure it in the Component inspector. In addition to setting the
parameters in the Component inspector, you can add cue points to trigger other actions. The
MediaDisplay component has no visual representation during playback; only the video clip is visible.
The MediaController component provides user interface controls that let the user interact with
streaming media. The Controller features Play, Pause, and Rewind to Start buttons and a volume
control. It also includes playbars that show how much of the media has loaded and how much has
played. A playhead slider can be dragged forward and backward on the playbar to navigate quickly to
different parts of the video. Using behaviors or ActionScript, you can easily link this component to the
MediaDisplay component to show streaming video and provide user control.
The MediaPlayback component provides the easiest and quickest way to add video and a controller to
your Animate documents. The MediaPlayback component combines the MediaDisplay and
MediaController components into a single, integrated component. The MediaDisplay and
MediaController component instances are automatically linked to each other for playback control.
To configure parameters for playback, size, and layout for all three components, use the Component
inspector or the Parameters tab in the Property inspector. All the media components work equally well
with mp3 audio content.
For more information on the media components, “Media components,” in the ActionScript 2.0
Components Language Reference.
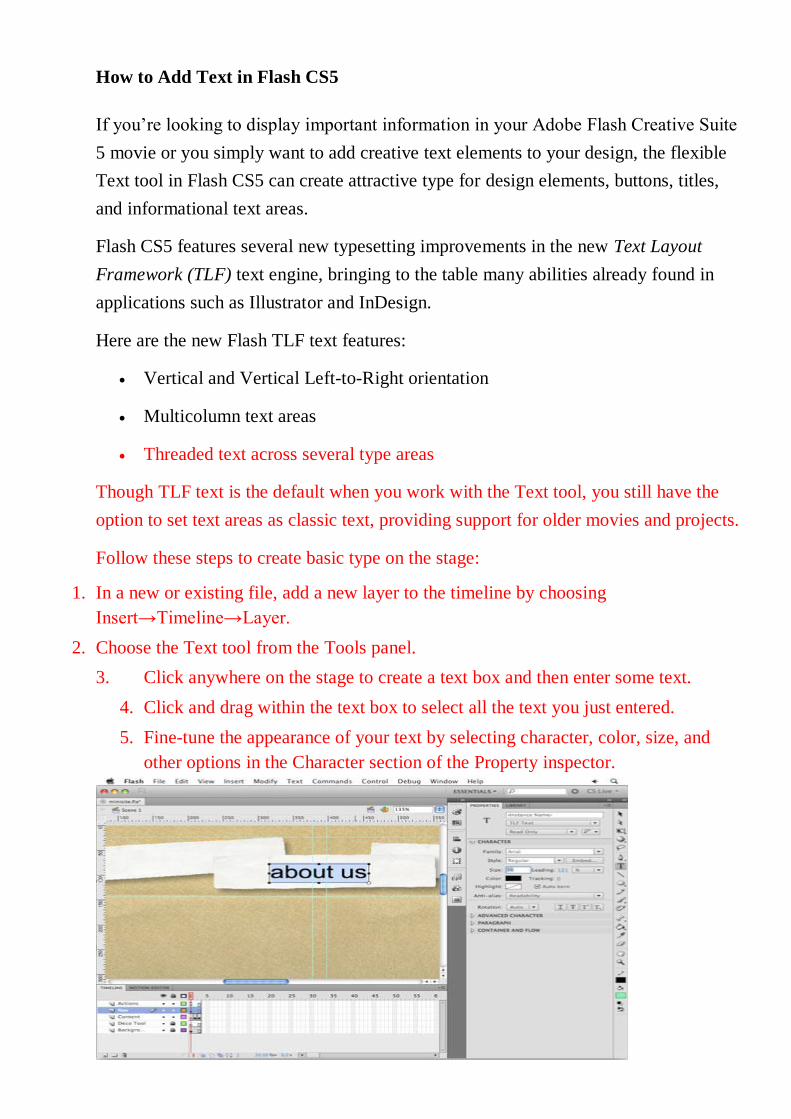
How to Add Text in Flash CS5
If you’re looking to display important information in your Adobe Flash Creative Suite
5 movie or you simply want to add creative text elements to your design, the flexible
Text tool in Flash CS5 can create attractive type for design elements, buttons, titles,
and informational text areas.
Flash CS5 features several new typesetting improvements in the new Text Layout
Framework (TLF) text engine, bringing to the table many abilities already found in
applications such as Illustrator and InDesign.
Here are the new Flash TLF text features:
Vertical and Vertical Left-to-Right orientation
Multicolumn text areas
Threaded text across several type areas
Though TLF text is the default when you work with the Text tool, you still have the
option to set text areas as classic text, providing support for older movies and projects.
Follow these steps to create basic type on the stage:
1. In a new or existing file, add a new layer to the timeline by choosing
Insert→Timeline→Layer.
2. Choose the Text tool from the Tools panel.
3. Click anywhere on the stage to create a text box and then enter some text.
4. Click and drag within the text box to select all the text you just entered.
5. Fine-tune the appearance of your text by selecting character, color, size, and
other options in the Character section of the Property inspector.
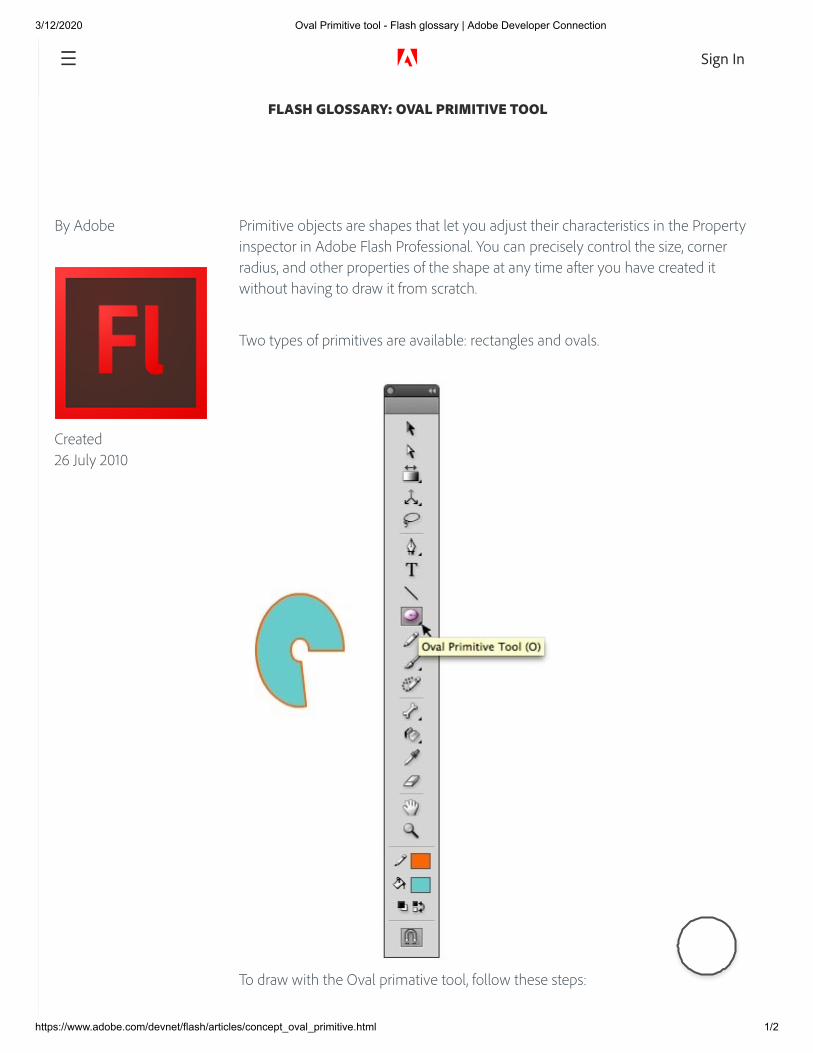
3/12/2020 Oval Primitive tool - Flash glossary | Adobe Developer Connection
https://www.adobe.com/devnet/flash/articles/concept_oval_primitive.html 1/2
By Adobe
Created
26 July 2010
Primitive objects are shapes that let you adjust their characteristics in the Property
inspector in Adobe Flash Professional. You can precisely control the size, corner
radius, and other properties of the shape at any time after you have created it
without having to draw it from scratch.
Two types of primitives are available: rectangles and ovals.
To draw with the Oval primative tool, follow these steps:
FLASH GLOSSARY: OVAL PRIMITIVE TOOL
☰ Sign In

3/12/2020 Oval Primitive tool - Flash glossary | Adobe Developer Connection
https://www.adobe.com/devnet/flash/articles/concept_oval_primitive.html 2/2
1. Select the Oval Primitive Tool from the Tools panel.
2. Draw an object on the Stage.
Note: When either of the Primitive Object drawing tools is selected, the Property
inspector retains the values of the last primitive object that you edited. For example,
if you modify an oval's properties and then draw a new oval shape on Stage, you'll
draw a second oval with the same properties.
To learn more about working with the Oval Primitive tool, see the section
titled Drawing modes and graphic objects in the Flash documentation.
Change region
Copyright © 2020 Adobe. All rights reserved./
/ / / /
Products
Blogs & Community
Support
Adobe
Adobe Acrobat Reader DC Adobe Flash Player Adobe AIR
∨
Privacy Terms of Use Cookies Do not sell my personal information AdChoices
FLASH GLOSSARY: OVAL PRIMITIVE TOOL
☰ Sign In
3/12/2020 The Art of Animation. Nonlinear animation | WebReference
webreference.com/dlab/9904/nonlinear.html 1/5
www.developer.com
HomeLanguages
ASPCSSDHTMLHTMLJavaScriptPerlPHPRSSXHTMLXML
General3D ModelingDesignDesign LabGraphicsHTML ToolsInternetJavaScript ToolsMultimediaProgrammingPromotionReviewsSearch Engine ResourcesVideoWeb Servers
ReferenceColor CodesHTML CharactersHTML TagsJavaScript CoreReference SectionSite ServicesXML
Newsletter
Search SiteGo
Login | Register
Enter your Email Address
Close
Home / Dmitry's Design Lab / 9904
3/12/2020 The Art of Animation. Nonlinear animation | WebReference
webreference.com/dlab/9904/nonlinear.html 2/5
The Art of Animation. Nonlinear animation
Nonlinear animation
here are a number of useful tips to avoid monotony in motion.Perhaps the most generic piece of advice that can be given in thisregard is: eliminate linearity. Although a static straight line has acertain aesthetic appeal due to its geometric perfection, a monotone
linear motion is much less likely to work satisfactorily - in most cases, it'ssimply boring. However, being nonlinear in motion does not necessarilymean pushing your objects along a Bezier curve (although this might be agood idea in some cases, too). See what other options exist:
Accelerate or decelerate all instances of motion. Constant speedadds a mechanic feeling to any movement. Imagine that everyelement in your composition has a certain mass, and therefore cannotstart or stop moving too abruptly. When you need some object tomove and then stop, or to stay for some time and then start moving,gradual decelerating or accelerating is a must; but even for the caseswhere an object just keeps moving without stopping (for example,until it gets out of sight), adding some second derivative (which is themathematical equivalent for the physical concept of acceleration) willmake its movement more natural and engaging.
Use curvilinear motion paths instead of linear ones where possible,even if the curve is a simple circle. When moving an object along alinear path, rotating it at some degree during the shift will help toenliven it. Using rotation in combination with acceleration ordeceleration will make a motion much more organic.
Adding a third dimension to your motion may compensate for its toolinear character. By this I do not mean real 3D, only a simple trick ofenlarging or reducing an object dynamically thus giving it animpression of "emerging" or "sinking" relative to the plane of thescreen. Again, this technique can be used in combination with linearmotion, accelerating/decelerating and rotation.
Color and texture effects can, to some extent, mask the linearity of amotion. Combined with a gradual darkening/lightening, transparencyvariation, or a moving highlight such as that of Fig. 2, even anabsolutely monotonous progression may turn into an interestingexperience.
Similarly, about any transformation of an object, such as shapemorphing or tweening, forces us to watch it with much closerattention, even if the object is immobile or involved in a simple linearmotion. Transformations are something computers can do amazinglywell, and creative opportunities are enormous.
3/12/2020 The Art of Animation. Nonlinear animation | WebReference
webreference.com/dlab/9904/nonlinear.html 3/5
With linear motions, try, at the very least, to make them as short aspossible; avoid frustrating the viewer by pushing an object too far in atoo monotonous manner. For short bits of motion, it is much moredifficult for the eye to notice their linearity.
Furthermore, use a number of short linear movements of differentobjects instead of a single object's complex motion path. With avector format such as Flash, you can use multiple instances of thesame object moving simultaneously in different points and directionsto create an impressive "swarming" effect with minimum bandwidth.Generally, always attempt to compress your movie's timespan bypartially overlapping consecutive animation stages so that the entireclip looks more dynamic and the possible deficiencies of each singleobject's behavior are less noticeable.
Nonlinearity in animation is not as geometrically simple a concept as itsounds. For example, the animation shown on Fig. 3, b has a good deal ofnonlinearity about it, too - although it does not use any rotation oracceleration. Note that this short movie consists of three obviously distinctstages, with two of them dominated by exploding and imploding circles,and the third intermediate stage featuring a left-to-right motion theme. Asthere are no clear boundaries between these stages, we feel that the entiremovie's character changes at least twice during the cycle - and it is thischange that contributes a nonlinearity component to the motion, making itinteresting enough to watch from beginning to end.
In mathematical terms, nonlinearity means that the derivatives of thesecond, third, and higher orders for some variable - be it an object's size,spatial coordinate, character of motion or any other aspect - are non-zero.To find an analog for this animation concept, consider this fact from thescience of acoustics. A sound containing only a first order sinusoid, withoutany overtones (harmonics), is very sharp, shallow, mechanistic. To get arich, lively sound of an interesting timbre, you should add some higherorder components to it. Analogously, to make a motion interesting, youshould expand its linear base by some nonlinear components of gradualunfolding, growth, or inflexion.
Created: Apr. 14, 1999Revised: Apr. 14, 1999
URL: http://www.webreference.com/dlab/9904/nonlinear.html
Justtechjobs.comFind a programming school near you
Zip Code:
Subject: Computer Prog. - Software Dev.
Degree: - Select All Degrees -

3/12/2020 The Art of Animation. Nonlinear animation | WebReference
webreference.com/dlab/9904/nonlinear.html 4/5
Online Campus Both
Submit
WebReference

3/12/2020 The Art of Animation. Nonlinear animation | WebReference
webreference.com/dlab/9904/nonlinear.html 5/5
Tip ArchiveAboutSitemapContactSubscribe
Topics
Web AuthoringThe Internet and the WebMultimediaWeb ProgrammingWebsite Promotion and MarketingContributors
Terms Of ServiceLicensing and PermissionsPrivacy PolicyAdvertisingNewsletters
Copyright © 2017 QuinStreet Inc. All Rights Reserved.
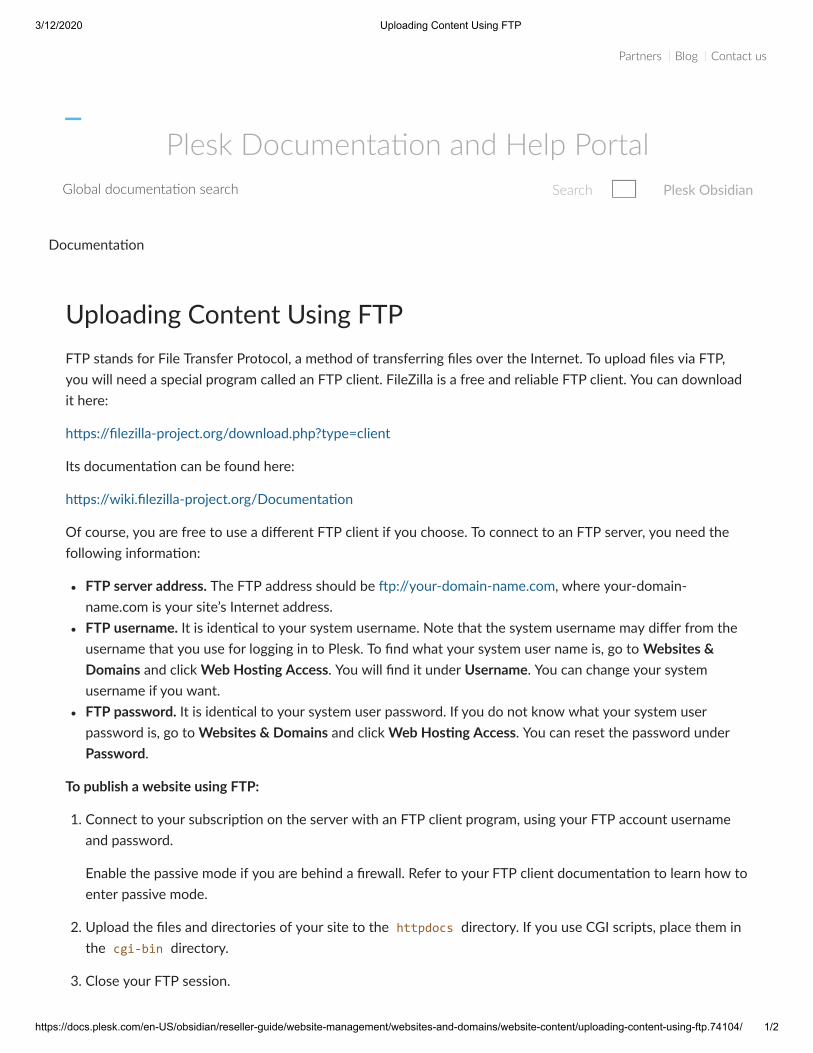
3/12/2020 Uploading Content Using FTP
https://docs.plesk.com/en-US/obsidian/reseller-guide/website-management/websites-and-domains/website-content/uploading-content-using-ftp.74104/ 1/2
Partners Blog Contact us
Plesk Documenta�on and Help Portal
Documenta�on
Uploading Content Using FTPFTP stands for File Transfer Protocol, a method of transferring files over the Internet. To upload files via FTP,you will need a special program called an FTP client. FileZilla is a free and reliable FTP client. You can downloadit here:
h�ps://filezilla-project.org/download.php?type=client
Its documenta�on can be found here:
h�ps://wiki.filezilla-project.org/Documenta�on
Of course, you are free to use a different FTP client if you choose. To connect to an FTP server, you need thefollowing informa�on:
FTP server address. The FTP address should be �p://your-domain-name.com, where your-domain-name.com is your site’s Internet address.FTP username. It is iden�cal to your system username. Note that the system username may differ from theusername that you use for logging in to Plesk. To find what your system user name is, go to Websites &Domains and click Web Hos�ng Access. You will find it under Username. You can change your systemusername if you want.FTP password. It is iden�cal to your system user password. If you do not know what your system userpassword is, go to Websites & Domains and click Web Hos�ng Access. You can reset the password underPassword.
To publish a website using FTP:
1. Connect to your subscrip�on on the server with an FTP client program, using your FTP account usernameand password.
Enable the passive mode if you are behind a firewall. Refer to your FTP client documenta�on to learn how toenter passive mode.
2. Upload the files and directories of your site to the httpdocs directory. If you use CGI scripts, place them inthe cgi-bin directory.
3. Close your FTP session.
Global documenta�on search Search Plesk Obsidian

3/12/2020 Uploading Content Using FTP
https://docs.plesk.com/en-US/obsidian/reseller-guide/website-management/websites-and-domains/website-content/uploading-content-using-ftp.74104/ 2/2
You can also set up addi�onal FTP accounts if you need to collaborate on website content with other users. Formore informa�on, see the sec�on Adding FTP Accounts.
Was this page helpful?
Yes No
IndustryPartners
COMPANYAbout PleskOur BrandEULATerms of UseLegalPrivacy PolicyImpressum
PRODUCTPricingExtensions
KNOWLEDGE BASEDocumenta�onHelp CenterMigrate to PleskContact UsPlesk Lifecycle Policy
PROGRAMSAffiliate ProgramContent ProgramPartner Program
COMMUNITYBlogForumsPlesk University
© 2019 Plesk International GmbH. Al l r ights reserved. Plesk and the Plesk logo are trademarks of Plesk InternationalGmbH.
The timeline graphically orders Flash content across two dimensions: time and depth.
Time: The sequence of frames is arranged horizontally, from left to right, as they
appear in time. Thus, if your movie is set to 20 frames per second, frame 40 occurs
at the 2-second point of your animation.
Depth: The timeline layers enable you to separate content on discrete layers. These
layers are arranged vertically, from bottom to top. They also enable you to separate
content from actions, comments, labels, and sounds. Any items placed on layers
above will block out any items in layers beneath them, without otherwise affecting
each other. In the editing environment, you can set layer visibility (the eye icon),
editability (the lock icon), and the display mode regular or just outlines (the square
icon). Note, however, that these settings do not affect the final movie: All layer
content, regardless of visibility or outline settings, is included in the final movie.
At this point, it’s worth noting that Flash 5 occasioned several changes to the way the
timeline works. These changes were designed to make frame spans more easily
recognized and manipulated. (A frame span is the group of frames ranging from one
keyframe to, but not including, the next.)
Because the frames between two keyframes do not add any new information to the
movie, they really depend on the keyframes preceding them. Thus, in a logical sense,
it’s reasonable to be able to select them as a singular entity (the keyframe and all of
the frames that depend on it), rather than individually. This group selection also makes
moving frame spans easier clicking a frame span turns the cursor into a hand and
enables dragging.
The many features, options, and controls of the timeline shown below. As shown
below, the principal parts of the timeline are:
Title Bar: This identifies the timeline if the timeline is not docked near the top of
the screen.
Active Layer Toggle: This is more of an icon, really. To make a layer active,
either click the layer’s name, or select a frame or group of frames. Then the pencil
icon appears, indicating that the layer is now active that’s in addition to this more
obvious clue: The Layer Bar of the active layer is black, whereas inactive Layer
Bars are gray. Only one layer can be active at a time.
Show/Hide Layer Toggle: This is a true toggle. Click the dot beneath the eye icon
to hide the contents of this layer from view on the stage. When the layer is hidden,
a red X appears over the dot. To return the layer to visibility, click the X.
Lock/Unlock Layer Toggle: This toggle locks or unlocks the layer to either
prevent (or enable) further editing. As with Show/Hide, when the layer is locked, a
red X appears over the dot.
Because animation is the art of making things happen with pictures that change
over time, the timeline might be considered the backbone of Flash. The timeline
uses layers and frames to organize and control a movie’s contents.
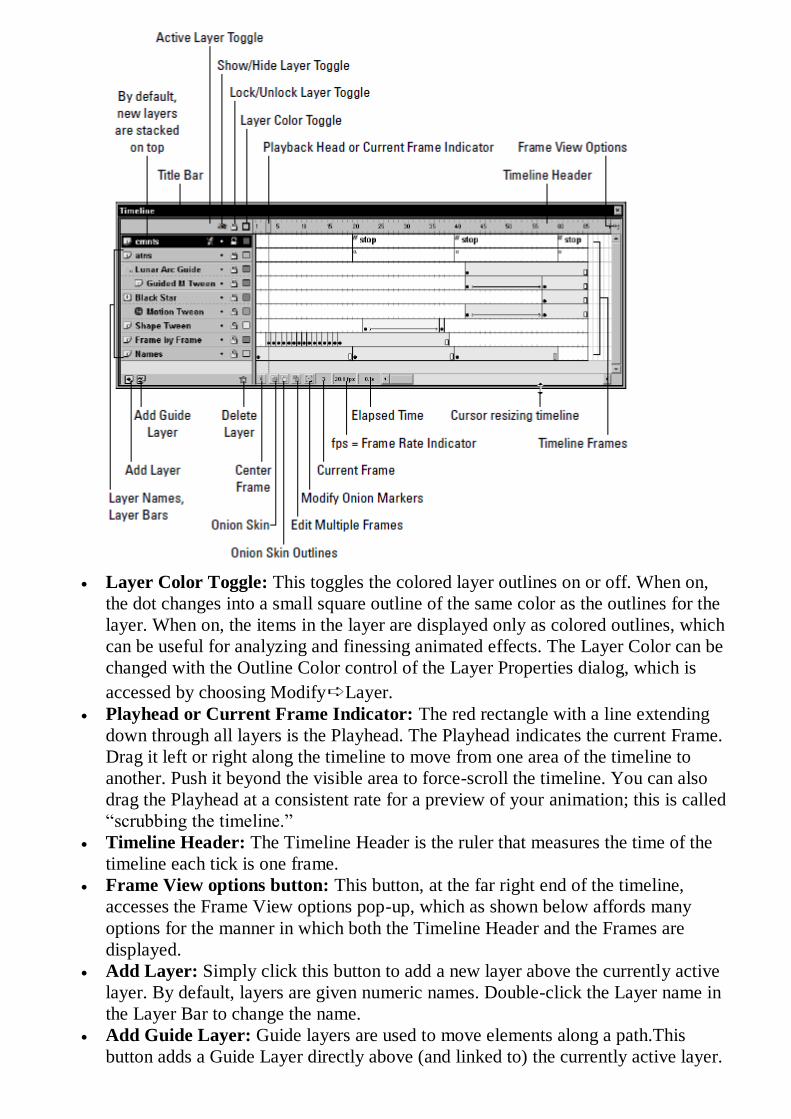
Layer Color Toggle: This toggles the colored layer outlines on or off. When on,
the dot changes into a small square outline of the same color as the outlines for the
layer. When on, the items in the layer are displayed only as colored outlines, which
can be useful for analyzing and finessing animated effects. The Layer Color can be
changed with the Outline Color control of the Layer Properties dialog, which is
accessed by choosing Modify➪Layer.
Playhead or Current Frame Indicator: The red rectangle with a line extending
down through all layers is the Playhead. The Playhead indicates the current Frame.
Drag it left or right along the timeline to move from one area of the timeline to
another. Push it beyond the visible area to force-scroll the timeline. You can also
drag the Playhead at a consistent rate for a preview of your animation; this is called
“scrubbing the timeline.”
Timeline Header: The Timeline Header is the ruler that measures the time of the
timeline each tick is one frame.
Frame View options button: This button, at the far right end of the timeline,
accesses the Frame View options pop-up, which as shown below affords many
options for the manner in which both the Timeline Header and the Frames are
displayed.
Add Layer: Simply click this button to add a new layer above the currently active
layer. By default, layers are given numeric names. Double-click the Layer name in
the Layer Bar to change the name.
Add Guide Layer: Guide layers are used to move elements along a path.This
button adds a Guide Layer directly above (and linked to) the currently active layer.
Delete Layer: This button deletes the currently active layer, regardless of whether
it is locked. Of course, the final layer cannot be deleted.
Center Frame: Click this button to shift the timeline so that the current frame is
centered in the visible area of the timeline.
Onion Skin: The Onion Skin feature enables you to see several frames of
animation simultaneously.
Onion Skin Outlines: This enables you to see the outlines of several frames of
animation simultaneously.
Edit Multiple Frames: Normally, onion skinning only permits you to edit the
current frame. Click this button to make each frame between the Onion Skin
Markers editable.
Modify Onion Markers: Click this button to evoke the Modify Onion Markers
pop-up, as shown in Figure below. In addition to manual adjustments, the -options
are used to control the behavior and range of onion skinning.
Current Frame: This indicates the number of the current frame. It’s most useful
when working with small frame sizes, which, as shown in Figure below, can be
specified from the Frame View options.
Frame Rate Indicator: This indicates the Frame Rate of the movie, measured in
fps, or frames per second. Although the program default is 12 fps, usually 20 fps is
a good starting point. The Frame Rate is specified in the Movie Properties dialog,
which is accessed by choosing Modify➪Movie (Ctrl/ Command+M). You can also
double-click the Frame Rate Indicator to invoke the Movie Properties dialog.
Elapsed Time: This indicates the total movie time, measured in fps, which would
elapse from frame 1 to the current frame provided that the movie is played back at
the specified speed.


