Embed Size (px)
Citation preview

Delores Collins
CONNECTED INSIGHTS www.ConnectedInsights.org
DITTO ADMINISTRATOR MANUAL

DITTO Administrator Manual 1
Introduction Welcome to the Digital Inclusion Technological Training Outcomes (DITTO) Administrator Manual! This manual is designed for the Administrator level. We hope that you find this manual an easy to use reference for all aspects of DITTO. If you have any feedback or suggestions about this manual, please email us at [email protected]. Getting Started To begin, log on to DITTO at www.ci-ditto.org. Please note the web address ends in .org, not .com. For best results, use either Google Chrome or Mozilla Firefox. Enter your username and password and then click the ‘Login’ button or simply press the ‘enter’ key.
After logging in, you will be taken to Connected Insights welcome screen. You can access all of DITTO’s main functions from the DITTO Toolbar located at the top of the screen. Note that you will be automatically logged out of DITTO after a period of inactivity. If that occurs, simply log back in.
The DITTO Login Screen.

DITTO Administrator Manual 2
The DITTO Toolbar
The DITTO Toolbar is located at the top of every screen. You can access all available functions from this toolbar by clicking on the name of the function and selecting from the dropdown list. Be cautious of using the DITTO Toolbar when creating or editing records – most records must
be saved before navigating away from their page. When you are finished working in DITTO, you should select ‘Logout’ from the DITTO Toolbar. The Welcome Message DITTO displays a welcome message after logging in. This message can be customized by the administrator.
The DITTO Toolbar is located at the top of the screen.

DITTO Administrator Manual 3
To change the welcome message, click on ‘Manage Team’ in the DITTO Toolbar and select ‘Manage News’ from the drop-down menu. This will display the Manage Message screen.
To add a new Welcome Message, click on the ‘New’ button. This will take you to the ‘Create New Entry’ screen. Enter a message title in the ‘Title’ box. Enter the text of the message in the ‘Detail’ box. Enter the date in the ‘Date’ box (it defaults to today’s date). Once you have entered all information, click the ‘Create’ button to save the entry. If you close this window without clicking on the ‘Create’ button, this entry will not be saved.
You can change the Welcome Message at this screen.

DITTO Administrator Manual 4
Edit or Delete a Welcome Message You can edit an existing Welcome Message by clicking on the desired record (a selected record will be highlighted in blue) and then clicking on the ‘Edit’ button located at the top-left of the screen. Clicking the ‘Edit’ button takes you to the Edit Entry screen. Here you can edit a Welcome Message. Make sure to click on the ‘Update’ button to save this record.
To delete a Welcome Message, click on the desired record and then click the ‘Delete’ button. Manage Participants’ To add a new participant to the DITTO system, click on ‘Manage Participants’ in the DITTO Toolbar and select ‘add a participant’ from the drop-down menu.
You will be taken to the ‘Add Participant’ screen. Enter the required information in each field. Press the ‘tab’ key to advance to the next field. Be sure to record the participant’s contact preferences in the appropriate field. If your organization is collecting census tract information, you can look up that information at https://geocoding.geo.census.gov/geocoder/.

DITTO Administrator Manual 5
Once you have entered contact and background information, you must ‘save’ the record. If you close your browser window or tab, use the browser ‘back’ or ‘reload’ button, or otherwise leave this page without saving, any entered information will be lost. In this case, you will have to start over. There are three different ‘Save’ buttons located at the bottom of the screen:
‘Save and Back’ saves all information entered into this record and will then return you back to the Participant List screen.
‘Save’ will save all information entered into this record and then allow you to continue to edit this record. If you add or change any information after saving, you will need to save again.
‘Save and Add New’ saves all information entered into this record and then will create a new, blank participant record. This allows you to efficiently enter numerous new participants.
Participant List The Participant List screen displays a list of all participants. You can sort the list of participants by clicking on the arrows next to the desired sorting criteria. By default, the list displays 15 entries at a time. Navigate between the pages by using the ‘next’ or ‘previous’ buttons located at the
Enter Participant Contact & Background information.

DITTO Administrator Manual 6
bottom right of the page. You can also search for a particular participant by using the Search Box above the list of names.
Exporting & Printing the Participant List DITTO has the capability to export the participant list for use in a variety of external programs. To begin, click on the ‘Export’ button on the Participants List screen. DITTO will present you with three options:
‘Copy’ copies all Participant records to the clipboard. You can then paste this data directly into any number of external programs including Microsoft Word or other word processing programs. You can then use any of the external programs features with the data, including printing the data.
‘Excel’ will export all Participant records into a Microsoft Excel file. You can save this file to your computer. The file will be named ‘Connected Insights.xlsx’. You can then open
The Participant List screen displays all participants.

DITTO Administrator Manual 7
the file in Microsoft Excel and use any of Excel’s features with the data, including printing the file.
‘CSV’ will export all Participant records into a comma-separated values file. You can save this file to your computer. The file will be named ‘Connected Insights.csv’. You can then open the file in many spreadsheet programs and use any of their features with this data, including printing the file.
You can limit what data is exported by using the Search box. Managing Instructors – The Instructors Screen Instructors are the individuals who teach the classes. To add a new instructor to the DITTO system, edit an existing instructor’s record, delete an existing instructor’s record, or export a list of all instructors, click on ‘Manage Team’ in the DITTO Toolbar and select ‘Manage Instructors’ from the drop-down menu. You will be taken to the ‘Instructors’ screen. The Instructors screen displays a list of all instructors. You can sort the list of instructors by clicking on the arrows next to the desired sorting criteria. By default, the list displays 15 entries at a time. Navigate between the pages by using the ‘next’ or ‘previous’ buttons located at the bottom right of the page. You can also search for a particular instructor by using the search box.
The Instructors Screen. Manage instructors at this screen.

DITTO Administrator Manual 8
Clicking on the green ‘plus’ sign next to a record expands that record to show additional information. Clicking on the red ‘minus’ sign will collapse an expanded record. Adding a New Instructor To add a new instructor to the system, click on the ‘New’ button. Clicking on the ‘New’ button takes you to the Create New Entry screen. This screen allows you to add all information about a new instructor. Enter all required information, pressing the ‘tab’ key to advance to the next field. You must create a username and password for this instructor. Be sure that the instructor records their username and password. Be aware that passwords are case-sensitive. As part of this process you can set the instructor’s contact preferences. Once you have entered all required information, click on the ‘Create’ button at the bottom of the screen. If you leave this page without clicking ‘Create’, no information will be recorded and you will have to create the record again.
Enter all the required information, including a new username and password. Click ‘Create’ to save the record.

DITTO Administrator Manual 9
Editing an Existing Instructor You can edit an existing instructor record by clicking on the desired record (a selected record will be highlighted in blue) and then clicking on the ‘Edit’ button located at the top-left of the screen. Clicking the ‘Edit’ button takes you to the Edit Entry screen. This screen allows you to make any necessary changes to an instructor’s record. You can change the instructor’s password on this screen, this is useful if the volunteer has forgotten their password. Note that you cannot change an instructor’s username. Once you are finished making changes to the record, you must click the ‘Update’ button at the bottom of the record to save. If you leave this page without clicking ‘Update’, any edits will be lost.
Exporting & Printing Instructor Records DITTO has the capability to export the instructor list for use in a variety of external programs. To begin, click on the ‘Export’ button on the Instructors screen. DITTO will present you with three options:
‘Copy’ copies all Instructor records to the clipboard. You can then paste this data directly into any number of external programs including Microsoft Word or other word processing programs. You can then use any of the external programs features with the data, including printing the data.
‘Excel’ will export the information into a Microsoft Excel file. You can save this file to your computer. The file will be named ‘Connected Insights.xlsx’. You can then open the file in Microsoft Excel and use any of Excel’s features with the data, including printing the file.

DITTO Administrator Manual 10
‘CSV’ will export the information into a comma-separated values file. You can save this file to your computer. The file will be named ‘Connected Insights.csv’. You can then open the file in many spreadsheet programs and use any of their features with this data, including printing the file.
Managing Supervisors – The Supervisor Screen Supervisors are responsible for an individual location(s). All aspects of Supervisors are managed at the Supervisors screen. To access this screen, click on ‘Manage Team’ from the DITTO Toolbar and selected ‘Manage Supervisors from the drop-down menu. This screen displays a list of all supervisors currently in the system. You can sort the list of supervisors by clicking on the arrows next to the desired sorting criteria. By default, the list displays 15 entries at a time. Navigate between the pages by using the ‘next’ or ‘previous’ buttons located at the bottom right of the page. You can also search for a particular supervisor by using the Search Box above the list of names. Clicking on the green ‘plus’ sign next to a record expands that record to show additional information. Clicking on the red ‘minus’ sign will collapse an expanded record.
Manage supervisors from this screen.
DITTO Administrator Manual 11
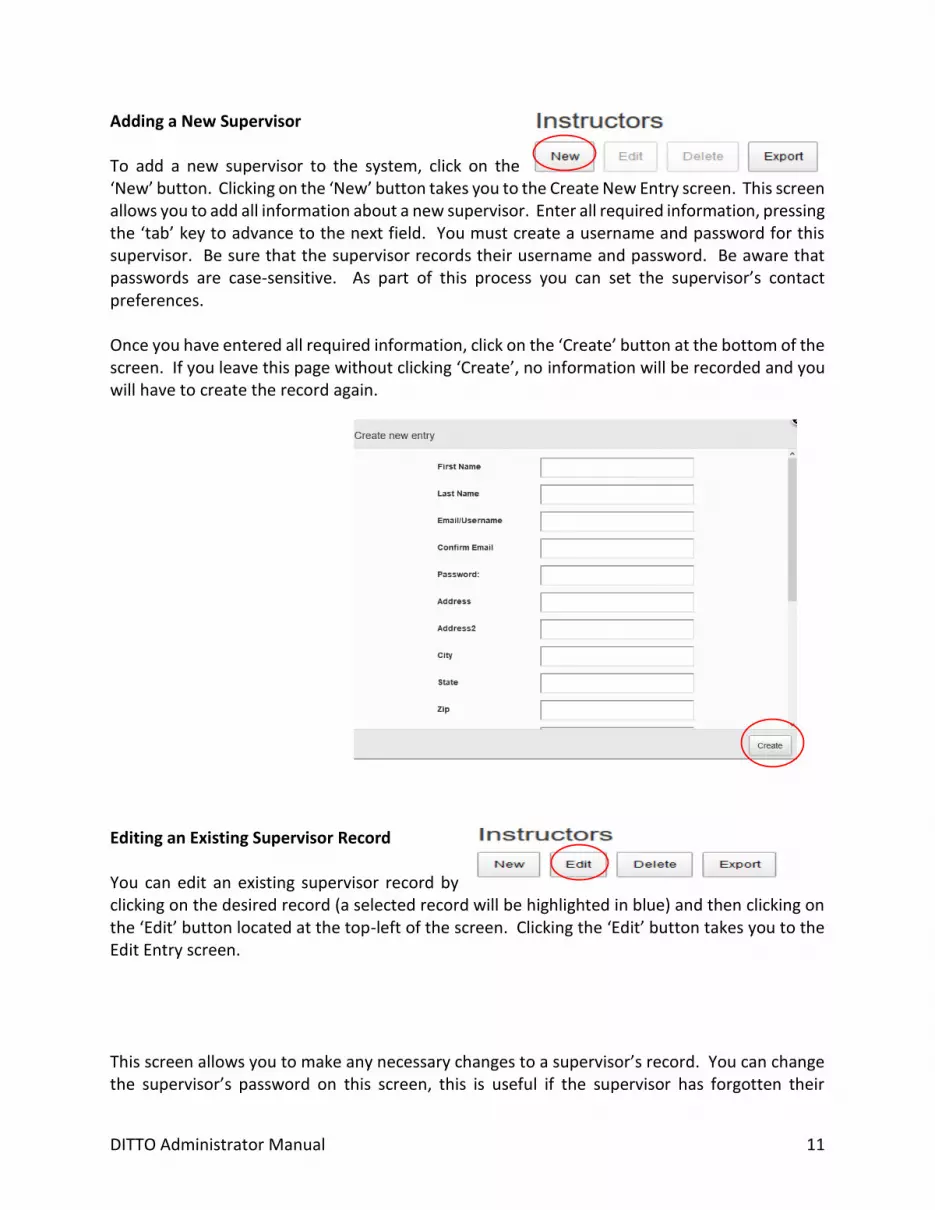
Adding a New Supervisor To add a new supervisor to the system, click on the ‘New’ button. Clicking on the ‘New’ button takes you to the Create New Entry screen. This screen allows you to add all information about a new supervisor. Enter all required information, pressing the ‘tab’ key to advance to the next field. You must create a username and password for this supervisor. Be sure that the supervisor records their username and password. Be aware that passwords are case-sensitive. As part of this process you can set the supervisor’s contact preferences. Once you have entered all required information, click on the ‘Create’ button at the bottom of the screen. If you leave this page without clicking ‘Create’, no information will be recorded and you will have to create the record again. Editing an Existing Supervisor Record You can edit an existing supervisor record by clicking on the desired record (a selected record will be highlighted in blue) and then clicking on the ‘Edit’ button located at the top-left of the screen. Clicking the ‘Edit’ button takes you to the Edit Entry screen. This screen allows you to make any necessary changes to a supervisor’s record. You can change the supervisor’s password on this screen, this is useful if the supervisor has forgotten their

DITTO Administrator Manual 12
password. Note that you cannot change a supervisor’s username. Once you are finished making changes to the record, you must click the ‘Update’ button at the bottom of the record to save. If you leave this page without clicking ‘Update’, any edits will be lost. You can delete a supervisor record by clicking on the desired record (a selected record will be highlighted in blue) and then clicking on the ‘Delete’ button. Exporting & Printing the Supervisor List DITTO has the capability to export the Supervisor list for use in a variety of external programs. To begin, click on the ‘Export’ button on the Supervisors List screen (access this screen by clicking on ‘Manage Program from the DITTO Toolbar and selecting ‘Manage Supervisors’). DITTO will present you with three options:
‘Copy’ copies all Supervisor records to the clipboard. You can then paste this data directly into any number of external programs including Microsoft Word or other word processing programs. You can then use any of the external programs features with the data, including printing the data.
‘Excel’ will export all Supervisor records into a Microsoft Excel file. You can save this file to your computer. The file will be named ‘Connected Insights.xlsx’. You can then open the file in Microsoft Excel and use any of Excel’s features with the data, including printing the file.
‘CSV’ will export all Supervisor records into a comma-separated values file. You can save this file to your computer. The file will be named ‘Connected Insights.csv’ You can then open the file in many spreadsheet programs and use any of their features with this data, including printing the file.

DITTO Administrator Manual 13
Courses & Classes - Terminology A course is the complete set of curricula for a particular subject. For example, you might have a course entitled “Computer Basics” or “Introduction to Microsoft Word”. A class is a specific offering of that course taught by an instructor over a number of sessions. A session is a single, scheduled meeting of that class. Adding a New Course To add a new course, click on ‘Manage Program’ in the DITTO Toolbar and select ‘Manage Courses’ from the drop-down menu. This will take you to the Courses screen.
To add a new course, click on the ‘New’ button. This will open the Create New Entry screen. Enter all required information, including a Course Description, then click the ‘Create’ button. If you close this window without clicking the ‘Create’ button, this record will not be saved.
The Courses Screen allows you to view all courses, add new courses, edit existing courses, and trt course information.

DITTO Administrator Manual 14
Viewing Courses You can view all available courses by clicking ‘Manage Program’ from the DITTO Toolbar and selecting ‘Manage Courses’ from the drop-down menu. You can search for a specific course by using the Search box. Results will begin appearing as soon as you have entered a few characters into the Search box. Clicking on the ‘Manage Classes’ link will take you to the Classes screen for that particular course. Editing an Existing Course You can edit an existing course from the Courses screen. Click on ‘Manage Program’ in the DITTO Toolbar and select ‘Manage Courses’ from the drop-down menu. To edit an existing course, select the desired course (the selected course will be highlighted in blue) and click on the ‘Edit’ button. You can also click on the pencil icon next to the desired course. This will open the Edit Entry window. Make any changes needed and click the ‘Update’ button to save the record. If you close this window without clicking ‘Update’ any changes will not be saved.
Exporting & Printing the Course List DITTO has the capability to export the Course list for use in a variety of external programs. To begin, click on the ‘Export’ button on the Courses List screen (access this screen by clicking on ‘Manage Program from the DITTO Toolbar and selecting ‘Manage Courses’). DITTO will present you with three options:
‘Copy’ copies all Course records to the clipboard. You can then paste this data directly into any number of external programs including Microsoft Word or other word processing programs. You can then use any of the external programs features with the data, including printing the data.
‘Excel’ will export all Course records into a Microsoft Excel file. You can save this file to your computer. The file will be named ‘Connected Insights.xlsx’. You can then open the

DITTO Administrator Manual 15
file in Microsoft Excel and use any of Excel’s features with the data, including printing the file.
‘CSV’ will export all Course records into a comma-separated values file. You can save this file to your computer. The file will be named ‘Connected Insights.csv’ You can then open the file in many spreadsheet programs and use any of their features with this data, including printing the file.
Adding & Managing Locations Locations are the physical sites where classes will be held. All aspects of locations are managed from the Location Screen. To access the Locations screen, click on ‘Manage Program’ from the DITTO Toolbar and select ‘Manage’ Locations from the drop-down menu. This screen displays a list of all available locations. To add a new location, click on the ‘New’ button. This will open the Create New Entry screen.
Enter all required information and select a supervisor for this location. Once you have entered all information, click on the ‘Create’ button to save this record.

DITTO Administrator Manual 16
Editing an Existing Location You can edit an existing location from the Locations screen. Click on ‘Manage Program’ in the DITTO Toolbar and select ‘Manage Locations’ from the drop-down menu. To edit an existing location, select the desired location (the selected location will be highlighted in blue) and click on the ‘Edit’ button. You can also click on the pencil icon next to the desired location. This will open the Edit Entry window. Make any changes needed and click the ‘Update’ button to save the record. If you close this window without clicking ‘Update’ any changes will not be saved. Exporting & Printing the Locations List DITTO has the capability to export the Locations list for use in a variety of external programs. To begin, click on the ‘Export’ button on the Locations screen (access this screen by clicking on ‘Manage Program from the DITTO Toolbar and selecting ‘Manage Locations’). DITTO will present you with three options:
‘Copy’ copies all location records to the clipboard. You can then paste this data directly into any number of external programs including Microsoft Word or other word processing programs. You can then use any of the external programs features with the data, including printing the data.
‘Excel’ will export all location records into a Microsoft Excel file. You can save this file to your computer. The file will be named ‘Connected Insights.xlsx’. You can then open the file in Microsoft Excel and use any of Excel’s features with the data, including printing the file.
‘CSV’ will export all location records into a comma-separated values file. You can save this file to your computer. The file will be named ‘Connected Insights.csv’ You can then open the file in many spreadsheet programs and use any of their features with this data, including printing the file.

DITTO Administrator Manual 17
Creating a New Class To create a new class, click on ‘Manage Program’ from the DITTO Toolbar and select ‘Manage Classes’ from the drop-down menu. This takes you to the Classes screen. Click on the ‘New’ button. This will take you to the Class Detail screen. The Class Detail screen allows you set up the details of a new class. To create a new class:
Select the desired course from the Course drop-down menu.
Select the desired instructor from the Instructor drop-down menu.
Select the desired location from the Location drop-down menu.
Add any desired notes into the text box.
Note that all elements of the class must exist prior to creating a class – for example, only previously entered instructors & locations will appear in the drop-down menu. Once you have entered all information, you must click the green ‘Save’ button. If you leave this page without saving, all entered information will be lost and you will have to recreate this class. Clicking on the ‘Back to List’ button will return you to the Class List screen without saving. After clicking ‘Save’, you will be returned to the Class Detail screen. Now you must create a new session(s) for this class.
To create a new class, click on the ‘New’ button.
Create the new class by selecting the apropriate choices from the drop-

DITTO Administrator Manual 18
Creating New Sessions for a Class To create new sessions for a class, click on ‘Manage Program’ in the DITTO Toolbar and select ‘Manage Classes’ from the drop-down menu. Click on the ‘Sessions’ link for the desired class. You can also create new sessions from the Class Detail page (this is the page that is displayed immediately after creating a new class).

DITTO Administrator Manual 19
To create a new single session of a class, click on the ‘New’ button. This will take you to the Create New Entry screen: You can add time and date information by clicking on the arrows or by manually entering the information. Once you are finished adding the information, you must click ‘Create’ to save this record. If you close this window without clicking ‘Create’ the record will not be saved. Adding new sessions in this method is useful if the class is only meeting once or twice. For a class that meets over a number of sessions (over the course of a semester, for instance) it may be more useful to set up recurring sessions.
To create recurring sessions for a class, click on the ‘Recurring’ button. This will take you to the Recurring Sessions screen. The Recurring Sessions screen allows you to set up repeating sessions of a class. To create a recurring session:
Set the start and end times of the class by clicking on the drop-down arrows and selecting the desired times. The length of the class will display in the Duration box.
Select the recurrence pattern – weekly or monthly - by clicking on the appropriate radio button.
If the class is to meet weekly, select the pattern (every week, every two weeks, etc.) and days. For instance, to set a class that meets every week on Monday and Wednesday, set the class to repeat every 1 week, and click the checkboxes next to Monday and Wednesday.
If the class is to meet on a monthly schedule, select the desired pattern. For example, you can set a class to meet on the 10th every two months. Or you could set a class to meet the first Wednesday of every month.
Set the desired starting and ending dates in the Calendar section. You can specify a number of sessions or a specific ending date.
The Sessions screen. Use this screen to manage sessions for a particular class.
Add time and date information on this screen. Be sure to click the ‘Create’ button to save this record.

DITTO Administrator Manual 20
After you have set the pattern, the schedule will appear in the ‘Output’ section. Confirm the schedule is correct and click ‘Save’ at the bottom of the screen.
You must click the ‘Save’ button at the bottom of the screen before you leave this page. If you leave this page without clicking ‘Save’, no information will be recorded and you will have to create this record again. After you click ‘Save’, you will be returned to the Class Detail screen.
Editing or Deleting Sessions You can edit or delete sessions for a class from the Class Detail screen. Access this screen by selecting ‘Manage Program’ in the DITTO Toolbar and clicking ‘Manage Classes’ from the drop-down menu. Click on the ‘Sessions’ link for the appropriate class.
The Recurring Sessions screen. Set your desired options and don’t forget to click ‘Save’ at the bottom of the screen.

DITTO Administrator Manual 21
To edit an existing session, select the desired session (the selected session will be highlighted in blue) and click on the ‘Edit’ button. You can also click on the pencil icon next to the desired session.
This will open the Edit Entry window. Make any changes needed and click the ‘Update’ button to save the record. If you close this window without clicking ‘Update’ any changes will not be saved. To delete an existing session, select the desired session(s) (the selected session will be highlighted in blue) and click on the ‘Delete button. DITTO will display a confirmation warning. If you wish to delete these selections, press the ‘Delete’ button. If you close the confirmation window without clicking on ‘Delete’ the session will not be deleted.
You can edit or delete sessions from this screen. The selected record will be highlighted in blue.

DITTO Administrator Manual 22
Exporting & Printing the Session List You can export the Sessions list from the Sessions screen. Access this screen by selecting ‘Manage Program’ in the DITTO Toolbar and clicking ‘Manage Classes’ from the drop-down menu. Click on the ‘Sessions’ link for the appropriate class.
DITTO has the capability to export the sessions list for use in a variety of external programs. To begin, click on the ‘Export’ button on the Sessions screen. DITTO will present you with three options:
‘Copy’ copies all Session records to the clipboard. You can then paste this data directly into any number of external programs including Microsoft Word or other word processing programs. You can then use any of the external program’s features with the data, including printing the data.
‘Excel’ will export all Session records into a Microsoft Excel file. You can save this file to your computer. The file will be named ‘Connected Insights.xlsx’. You can then open the file in Microsoft Excel and use any of Excel’s features with the data, including printing the file.
‘CSV’ will export all Session records into a comma-separated values file. You can save this file to your computer. The file will be named ‘Connected Insights.csv’. You can then open the file in many spreadsheet programs and use any of their features with this data, including printing the file.

DITTO Administrator Manual 23
Taking Attendance Take attendance from the Classes screen. Access this screen by selecting ‘Manage Program’ in the DITTO Toolbar and clicking ‘Manage Classes’ from the drop-down menu. Click on the ‘Sessions’ link for the appropriate class.
To take attendance, click on the ‘Attendance’ link for the appropriate date. Clicking on the ‘attendance’ link will take you to the ‘Take Attendance’ screen.
A list of all enrolled students will be displayed. To take attendance, simply click on the appropriate radio button next to each student’s name. You must click the ‘Save’ button before leaving this page.
Use this screen to record attendance for each class. Make sure to click ‘Save’ before you leave the page!

DITTO Administrator Manual 24
Recording Students Who Have Completed a Course You can record participants who have completed a course by clicking on the green ‘Complete Class’ button on the Class Detail Screen.
Clicking on the ‘Complete Class’ button takes you to the Completion Status screen for that course. Click on the appropriate radio button to record a participant’s status for that course. You must click the ‘Save’ button before leaving this page. If you leave this page without clicking ‘Save’, any entered information will not be recorded. After you click ‘Save’, you will be returned to the Class Detail screen.

DITTO Administrator Manual 25
Managing Participants The Class Detail screen displays all current enrollees for this class. You can use the search box to search for the name of a current enrollee. To manage participants of a class, click on the ‘Enroll’ button on the Class Detail screen, or click on the ‘Enroll’ link from the Classes screen
Scroll down on the Class Detail screen to find the ‘Enroll’ button.
The Completion Status Screen

DITTO Administrator Manual 26
The Enroll Screen – Adding or Removing Enrollee To add a participant to this class, click on the ‘Enroll’ button next to their name. To remove a currently enrolled participant, click on the ‘Remove’ button next to their name. Any changes you make will be saved automatically. Click on the green ‘Back’ button to return to the Class Detail screen. Note that before a participant can be enrolled in a class, they must already exist in the system. See the “Adding Participants” section of this manual for instructions on adding a new participant to the system.
Clicking on the ‘Enroll’ button will take you to the Enroll Screen. This screen displays a list of all available participants on the left side of the screen and a list of enrolled participants on the right side of the screen. You can search either set of participants by using the appropriate Search Box located above each list. You can change the sorting method of either list by clicking on the arrow next to the desired sorting criteria.
A list of all available enrollees is on the left side of the screen. Currently enrolled participants are listed on the right side.

DITTO Administrator Manual 27
Managing Volunteers To add a new volunteer to the DITTO system, edit an existing volunteer’s record, delete an existing volunteer’s record, or export a list of all volunteers, click on ‘Manage Team’ in the DITTO Toolbar and select ‘Manage Volunteers’ from the drop-down menu. You will be taken to the ‘Volunteers’ screen.
The Volunteers Screen This screen displays a list of all volunteers currently in the system. You can sort the list of volunteers by clicking on the arrows next to the desired sorting criteria. By default, the list displays 15 entries at a time. Navigate between the pages by using the ‘next’ or ‘previous’ buttons located at the bottom right of the page. You can also search for a particular volunteer by using the Search Box above the list of names. Clicking on the green ‘plus’ sign next to a record expands that record to show additional information. Clicking on the red ‘minus’ sign will collapse an expanded record.
The Volunteers Screen – To add a new volunteer, click on ‘New’.
DITTO Administrator Manual 28
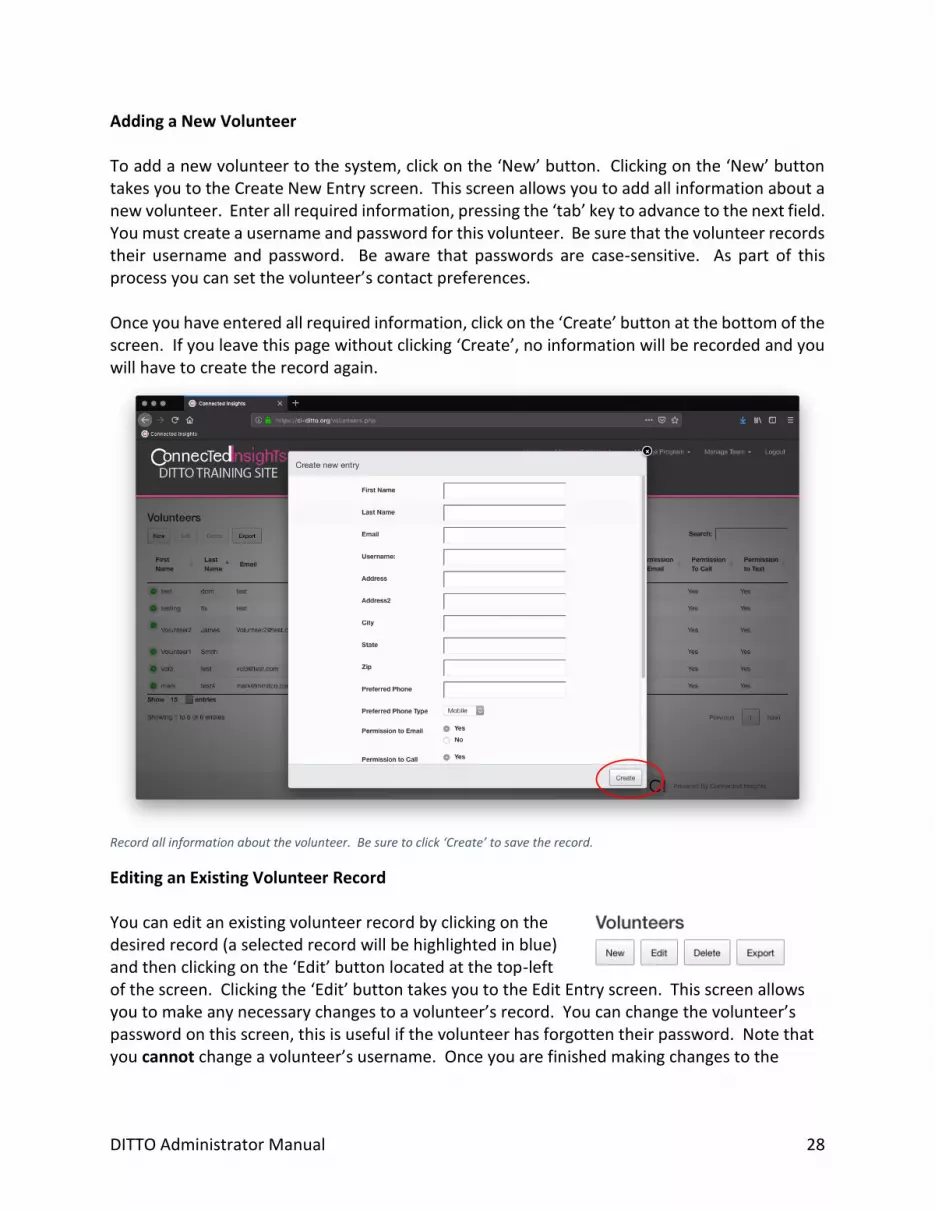
Adding a New Volunteer To add a new volunteer to the system, click on the ‘New’ button. Clicking on the ‘New’ button takes you to the Create New Entry screen. This screen allows you to add all information about a new volunteer. Enter all required information, pressing the ‘tab’ key to advance to the next field. You must create a username and password for this volunteer. Be sure that the volunteer records their username and password. Be aware that passwords are case-sensitive. As part of this process you can set the volunteer’s contact preferences. Once you have entered all required information, click on the ‘Create’ button at the bottom of the screen. If you leave this page without clicking ‘Create’, no information will be recorded and you will have to create the record again.
Record all information about the volunteer. Be sure to click ‘Create’ to save the record.
Editing an Existing Volunteer Record You can edit an existing volunteer record by clicking on the desired record (a selected record will be highlighted in blue) and then clicking on the ‘Edit’ button located at the top-left of the screen. Clicking the ‘Edit’ button takes you to the Edit Entry screen. This screen allows you to make any necessary changes to a volunteer’s record. You can change the volunteer’s password on this screen, this is useful if the volunteer has forgotten their password. Note that you cannot change a volunteer’s username. Once you are finished making changes to the

DITTO Administrator Manual 29
record, you must click the ‘Update’ button at the bottom of the record to save. If you leave this page without clicking ‘Update’, any edits will be lost.
Exporting & Printing the Volunteer List DITTO has the capability to export the volunteer list for use in a variety of external programs. To begin, click on the ‘Export’ button on the Volunteers screen. DITTO will present you with three options:
‘Copy’ copies all Volunteer records to the clipboard. You can then paste this data directly into any number of external programs including Microsoft Word or other word processing programs. You can then use any of the external program’s features with the data, including printing the data.
The Edit Entry screen. Once you have completed editing the record, you must click the ‘Update’ button.

DITTO Administrator Manual 30
‘Excel’ will export the information into a Microsoft Excel file. You can save this file to your computer. The file will be named ‘Connected Insights.xlsx’. You can then open the file in Microsoft Excel and use any of Excel’s features with the data, including printing the file.
‘CSV’ will export the information into a comma-separated values file. You can save this file to your computer. The file will be named ‘Connected Insights.csv’. You can then open the file in many spreadsheet programs and use any of their features with this data, including printing the file.
Managing Class Volunteers The Volunteers section of the Class Detail screen displays a list of volunteers associated with this class. You can use the Search Box to search for the name of a volunteer associated with this class. To manage class volunteers, click on the ‘Add Volunteers’ button on the Class Detail screen, or click on the ‘Add Volunteers’ link from the Classes screen.
Scroll down on the Class Detail screen to find the ‘Add Volunteers’ button.
Adding or Removing Volunteers to a Class Clicking on the ‘Add Volunteers’ button will take you to the Add Volunteers Screen. This screen displays a list of all available volunteers on the left side of the screen and a list of added volunteers on the right side of the screen. You can search either set of volunteers by using the

DITTO Administrator Manual 31
appropriate Search Box located above each list. You can change the sorting method of either list by clicking on the arrow next to the desired sorting criteria. To add a volunteer to this class, click on the ‘Add’ button next to their name. To remove a current volunteer, click on the ‘Remove’ button next to their name. Any changes you make will be saved automatically. Click on the green ‘Back’ button to return to the Class Detail screen. Note that before a volunteer can be added to a class, they must already exist in the system. See the “Adding Volunteers” section of this manual for instructions on adding a new volunteer to the system.
The Add a Volunteer screen displays a list of all available volunteers on the left, and a list of added volunteers on the right.


